Blog by Paresh Deshpande
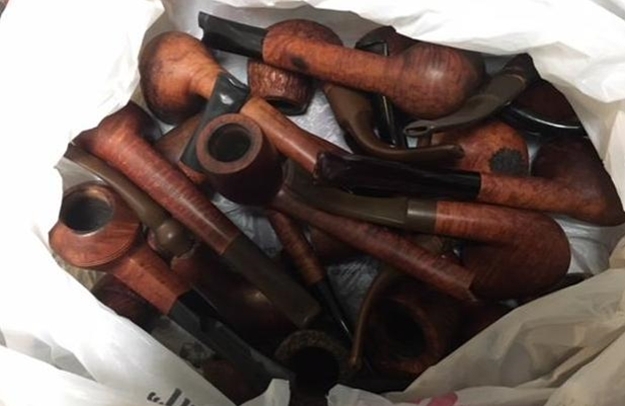
Steve, my friend and mentor, had sent me a pipe lot of 15 pipes for restoration. These assorted pipes were sent to me with an intent that these would provide me with an opportunity to further hone my skills and gain experience in tackling varied issues that one may come across during restoration. Each of these pipes has its own set of issues to address and I look forward to work on each one of this pipe lot. Here is the picture of the pipes as I received it, less the one marked with a cross in red which is a Dunhill Root and restored by Steve for my personal collection. I had worked on a no name straight billiard (marked number 1) from this lot and it turned out to be a beautiful pipe. The next pipe from this lot that I selected to work on is an Oom Paul and is marked with a yellow arrow and numeral 2.
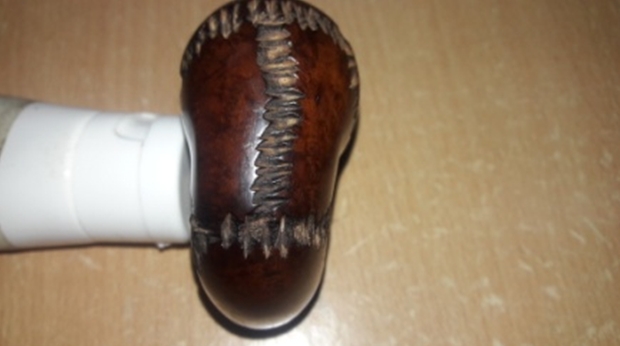
 This pipe has a nice heft to it and the classic Oom Paul shape lends itself to be clenched comfortably while having your hands free. The stummel is combination of islands of smooth surface formed due to stitches-like rustications crisscrossing the length and breadth of the stummel. It is stamped on the left side of the shank as “Oom Paul” in block capital, increasing in letter size towards the shank end. On the bottom of the shank and very close to the shank end it is stamped as “Israel” in sentence case. There is no stamping on the vulcanite full bent stem.
 This is the first pipe that I am working on coming from Israel and so to learn more about it, I visited pipedia.org. I searched the link for Israel in Pipe Brands/ Makers and found that Israel has only one pipe factory, The Shalom Pipe factory. Thus it is highly probable that this pipe too came from this factory. No other information was available on the internet that I could research. It does appear to be an ol’ timer though.
INITIAL VISUAL INSPECTION
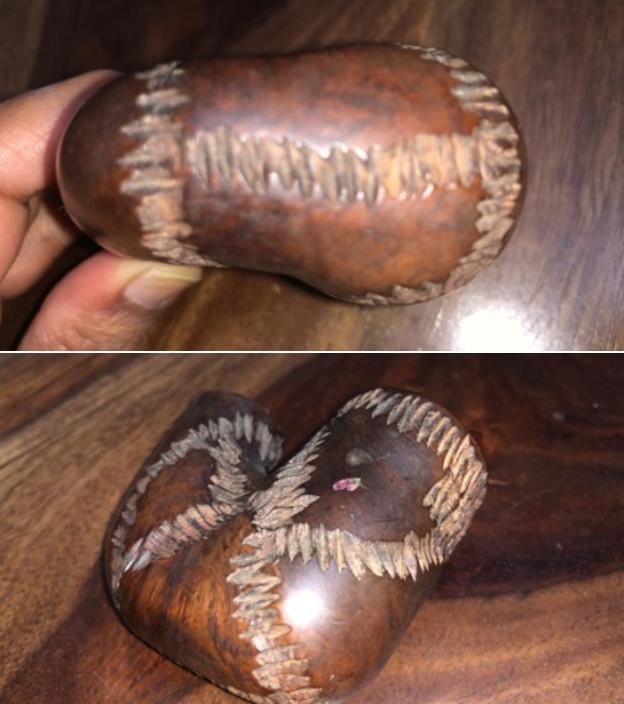
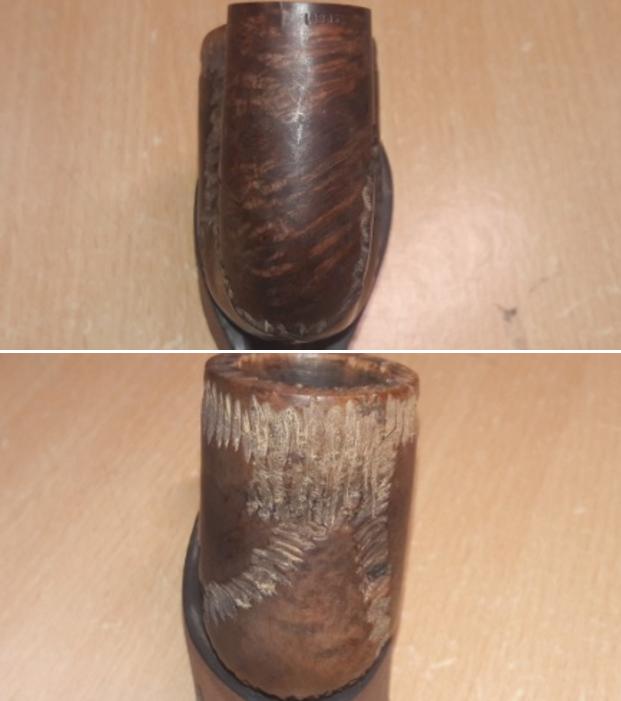
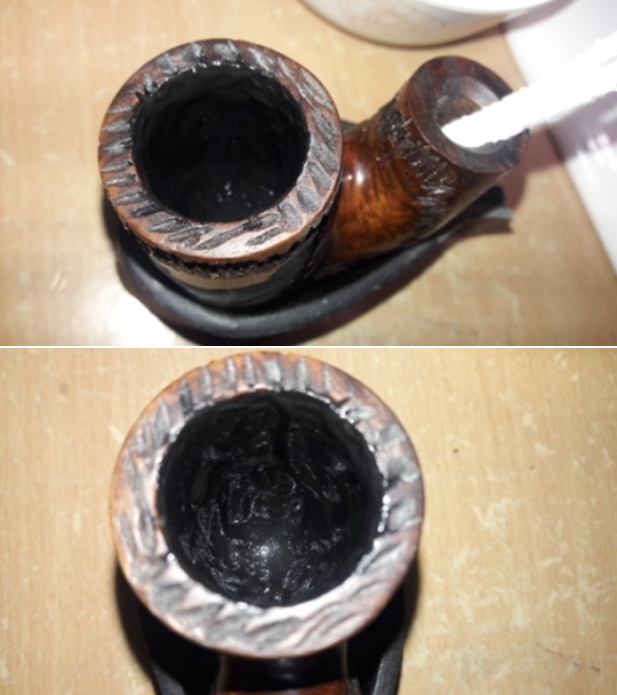
There is a thick layer of cake in the huge chamber pointing to the fact that this was the previous owner’s favorite pipe. The stitch-like rustications on the rim top surface are filled with dust and dirt and yes, surprisingly without overflowing lava accumulation. The inner and outer rim edges are in decent shape. The condition of the inner walls of the chamber can be only ascertained once the cake has been taken down to bare briar. Thankfully, the chamber has very mild odor which should be eliminated once the chamber and shank internals have been cleaned. The stummel is covered in dirt and grime that gives it a dull and tired appearance. The large smooth paneled surface on the right side of the stummel is considerably darker in appearance as compared to the right side. However, the entire stummel has a solid feel to it. The stitch-like rustications that crisscross the entire stummel are filled with dust and dirt and appear lighter than the smooth surfaces. There are patches of dried oils and grime which has attracted a lot of dust. Through all this dirt and grime, beautiful Bird’s eye and cross grains peek out from the smooth surface. Once the stummel is cleaned and polished, these grains will pop out in all their refined glory. All in all as it stands now, this is one dull and tired looking stummel that requires a lot of TLC!!

 The mortise has a sump at the bottom that is similar to the Peterson’s System pipes, with the opening for the draught hole well above this sump. The mortise and the sump are clogged with oils and tars. This will need to be thoroughly cleaned.
 The stem, to put it mildly, is a mess!! Apart from being heavily oxidized, it has deep bite marks on both upper and lower stem surface. Heavy tooth chatter is seen all over the bite zone on both sides of the stem surface. The button has been badly chewed with deep tooth indentations on both sides of the stem. The aluminum stinger is surrounded by a thick layer of accumulated dried oils and tars and could not be dislodged from the tenon end. The tenon end and slot shows heavy accumulation of gunk, making air flow very laborious. All these issues need to be addressed.
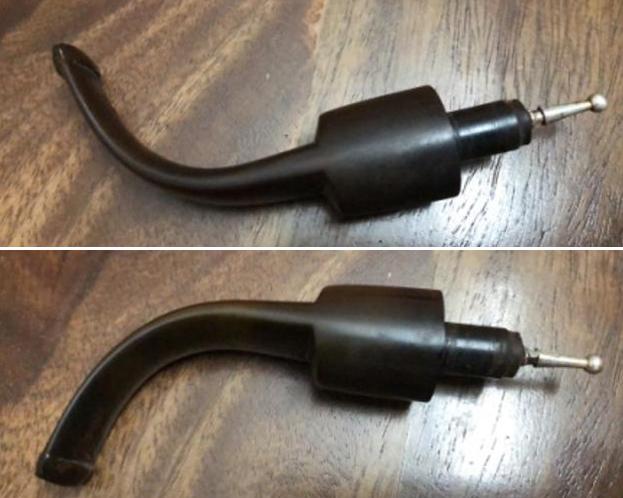
 INITIAL CLEANING BY ABHA……….
Ever since we had an on-the-job learning on initial cleaning and restoration when Jeff and Steve visited us, Abha is enjoying her part of work in restoring pipes (read that as initial cleaning) and is getting better and faster in her chosen field. She reamed out the complete cake and further smoothed out the chamber walls with a folded piece of 220 grit sand paper. She scrubbed out the dried oils, tars and gunk from the mortise with a fabricated dental spatula and further cleaned out the internals of the shank with pipe cleaners and alcohol and cotton buds. She followed the internal cleaning of the shank with external cleaning of the stummel using Murphy’s Oil soap and hard bristled tooth brush and dried it with paper napkins and cotton cloth.
Next she lightly heated the stinger, carefully pulled it out with nose pliers and cleaned out the internals of the stem air way and immersed it in “Before and After Deoxidizer” solution along with the stem of other pipes in line for restoration. Once the stem had soaked overnight, she cleaned the stem under running warm water and scrubbed the raised oxidation from the stem surface using Scotch Brite pad. She further removed the oxidation by scrubbing the stem with 0000 grade steel wool and applied a little olive oil to rehydrate the stem.
ONCE THE PIPE IS ON MY WORK TABLE……
The cleaned up pipes presents a very clear picture of what needs to be done to restore this pipe to a pristine and smokable condition. I really cannot thank Abha, my wife, enough for all the help and support that she extends me in my pursuance of this hobby. A clean pipe also helps in clearly identifying the work that would be required to restore a pipe. The pictures shows the condition of the pipe when it reached me after being cleaned.
 The stummel is nice and clean with the stitch-like rustications now appearing considerably lighter than the rest of the stummel surface. With the dirt and dust that covered the surface cleaned out, the smooth surfaces on the stummel presents an array of beautiful cross and Bird’s eye grains. The smooth surface on right side of the stummel is considerably darker (circled in red) than the left and will need to be examined closely. However, the stummel is solid to the touch, thereby ruling out a total burn out. I am sanguine that after a nice polish with micromesh pads followed by further wax polish, the stummel would look beautiful and stately.
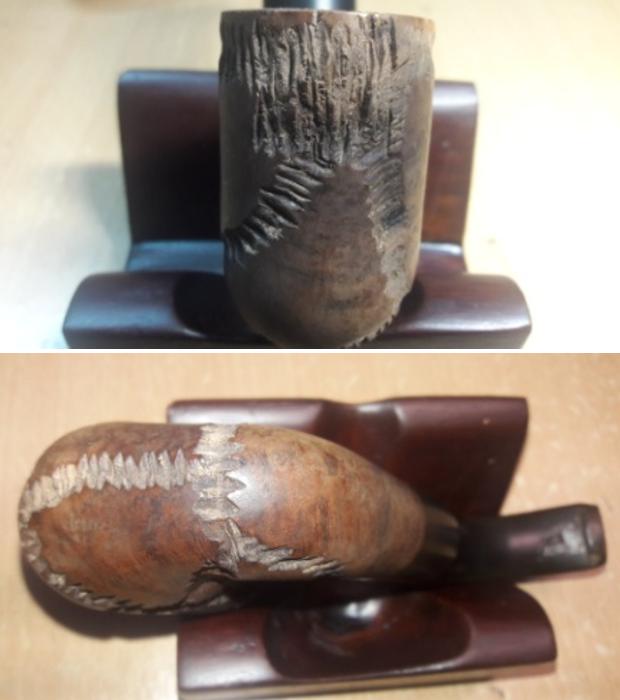
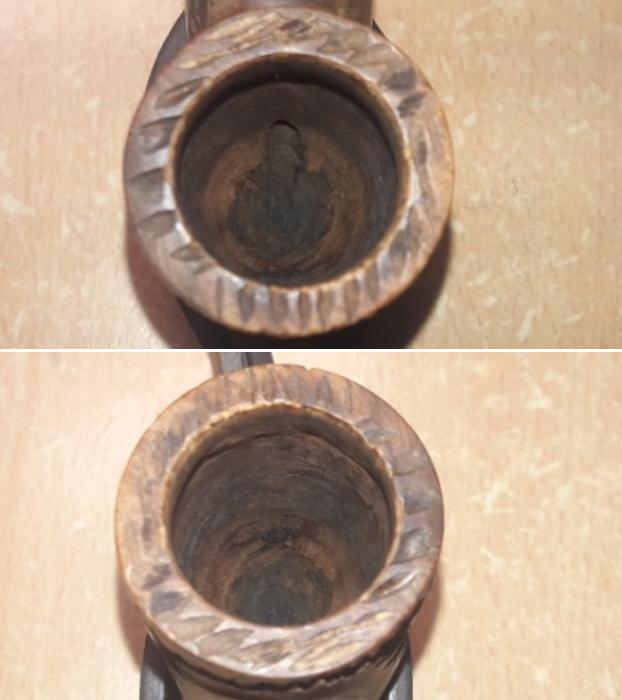
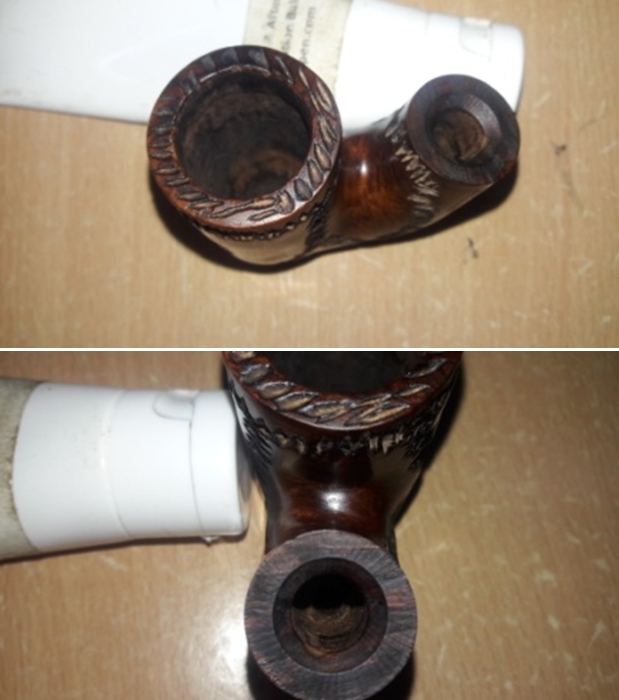
 The large deep chamber is nice clean and odorless with minor heat fissures all around the walls. These fissures on the right side (marked in red circle) are likely to be more severe as the outer surface is considerably darkened than the left side of the stummel. I need to explore these heat fissures further to determine the extent of the depth of these fissures. However, I am certain that these are not an all out burn through, but mostly like the beginnings of one. The mortise and sump is spotlessly clean, thanks to a stupendous job done by Abha.
 As spelled out in my initial appreciation, prima facie it is the stem that has suffered the most damage at the hands of the previous owner. I say prima facie since at this stage, I am not sure about the hidden gremlins in the form of heat fissures which necessitates detailed exploration. The bite zone is peppered with tooth chatter and deep tooth indentations on both sides of the stem. The buttons on both the sides are badly deformed with deep bite marks and signs of presence of deep seated oxidation. I would need to sharpen the edges of the buttons also. I intend to first raise these indentations to the surface by heating and sanding followed by filling it with a mix of activated charcoal and superglue. By sanding to even out the stem fill and remove the deeper oxidation followed by micromesh polishing cycle should add a nice shine to the stem. The aluminum stinger, tenon and slot are nice and clean.
 THE PROCESS
Firstly, I heat the surface of the stem with the flame of a lighter to raise the tooth indentations to the surface and follow it up with a sanding with a folded piece of 220 grit sand paper. This helped to even out the raised surface, address the tooth chatter and also remove the deep seated oxidation to some extent. I wiped the stem with a cotton swab and alcohol to remove the raised oxidation and the resulting sanding dust. However, the tooth indentations are still prominent. A bite through on the top stem surface is reveled which extends in to the stem airway. I need to address this issue. After this abrasive sanding and alcohol wipe, the stem appears dried out and so I apply a small quantity of Extra Virgin Olive oil to hydrate it.
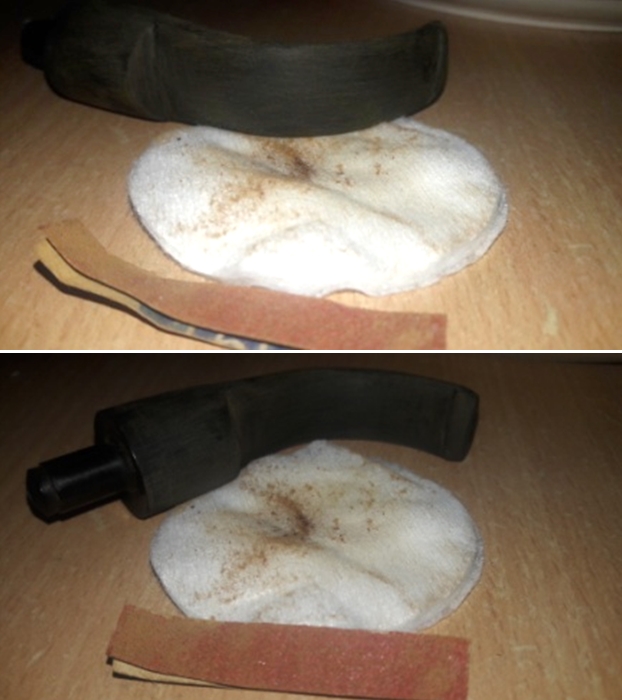 To address the deep tooth marks in the bite zone, button surface and the bite through on the top stem surface, I decided to use a mix of activated charcoal and CA superglue and apply it over the damaged areas. But before that, I insert a regular pipe cleaner smeared in petroleum jelly in to the stem air way. This prevents the mix from seeping in to the air way and blocking it when hardened. I apply a generous coat of the above mix over the damaged surface, including the buttons on either sides of the stem and set it aside overnight to cure.
 Next, while the stem fills are curing, I sand the entire stummel surface with a piece of 220 grit sand paper. I also work the inner rim edge with the sandpaper to even out the rim edge. This sanding helps in addressing all the minor dents, if any, from the surface while providing a smooth surface for the next stage which is polishing cycle using complete set of micromesh pads. I was especially very careful while sanding the side and bottom of the shank around the stampings, as it is very easy to miss out the stamp and one swipe of the sand paper is enough to ruin/ damage the stampings and it is the stampings on any pipe that I always strive to preserve.
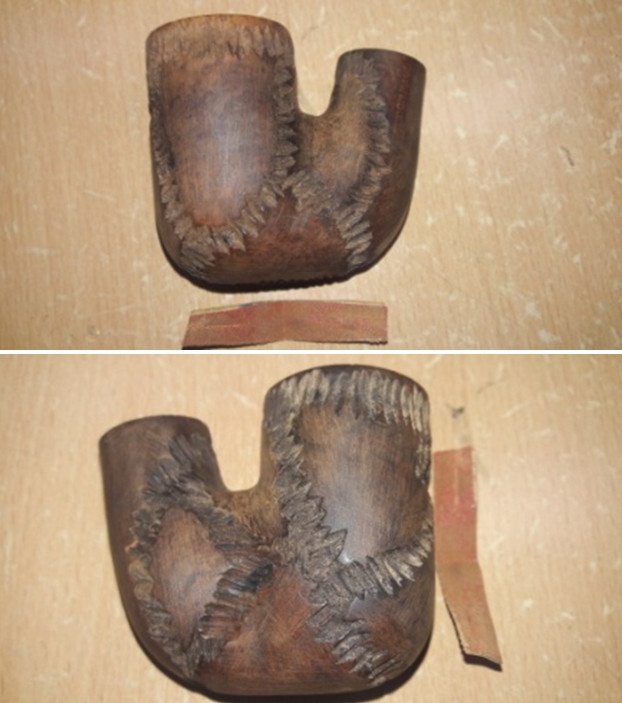
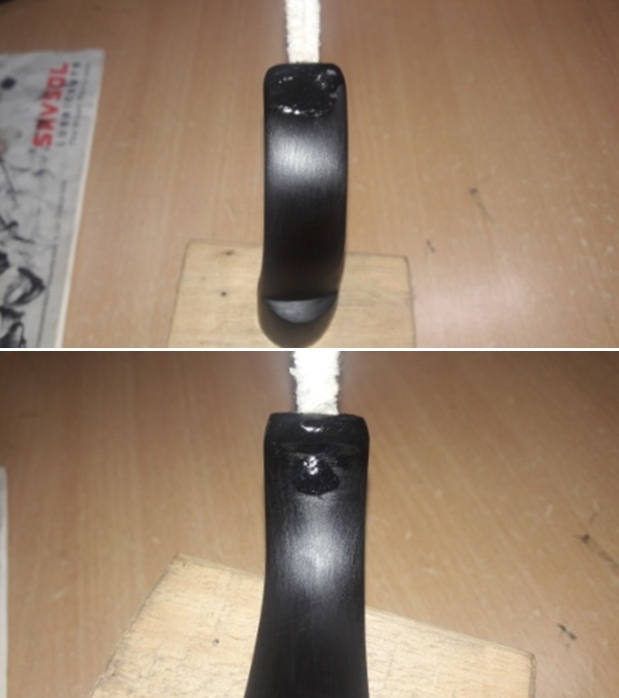
 The next afternoon, I work the stem as the fills had hardened nicely. With a flat head needle file, I sand these fills to achieve a rough match. I further fine tuned the match by sanding the filled area with a folded piece of 220 grit sand paper pinched between my thumb and forefinger. I followed it up by sanding the entire stem surface using 400, 600 and 800 grit sand papers. This serves to remove the deep seated oxidation and also reduces the sanding marks of the more abrasive sand papers. I also sharpened the button edges with a flat head needle file and the sand papers. I wiped the stem with a cotton swab and alcohol to remove all the oxidation and sanding dust from the surface. I applied a little Extra Virgin Olive oil over the stem and set it aside to be absorbed by the vulcanite.
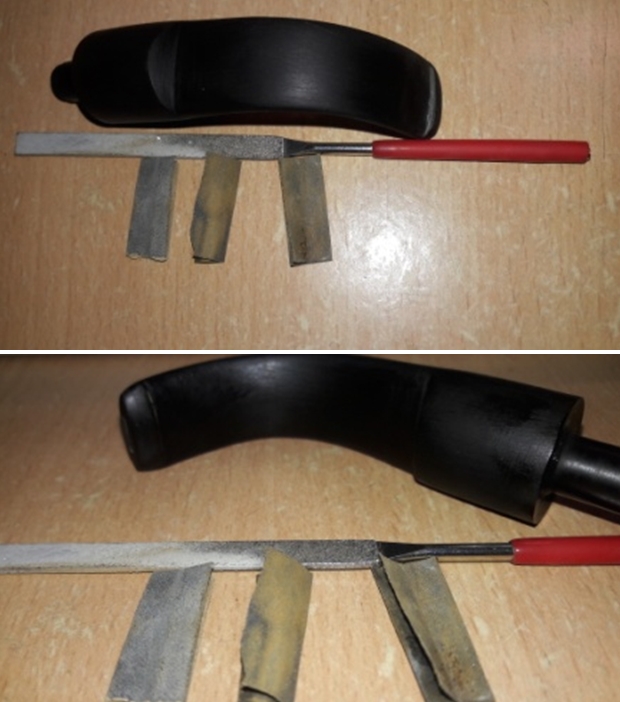 I followed up the sanding regime with micromesh polishing to bring a shine on the stem surface. Since my hand held rotary tool is out for repairs, I could not continue with my experimentation on use of Red Tripoli and White Diamond during the polishing regime. I wet sand the stem with 1500 to 12000 girt micromesh pads. I rub a small quantity of olive oil in to the stem surface to hydrate it and set it aside. The stem looks nice and shinning black.
 Now that the stem repairs are nearly complete save for final polish with Blue diamond and wax, I could now move ahead with polishing the stummel. To remove the sanding marks and bring a deeper shine, I polished the stummel with micromesh pads, wet sanding with 1500 to 12000 pads. I wiped the surface with a soft cloth at the end of the micromesh cycle. The stummel looks amazing with a deep dark maroon coloration and shine with beautiful grains popping over the stummel surface. The only aspect that stood out like a sore thumb was the light brown surfaces within the stitch-like rustications and the sand dust of micromesh pad has not helped, rather worsened the look. I carefully wipe the rustications with a moistened q-tip.
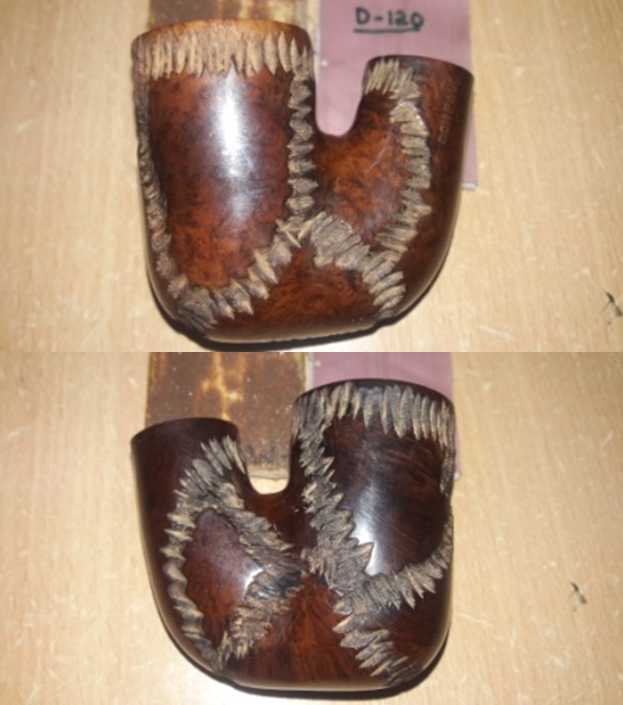

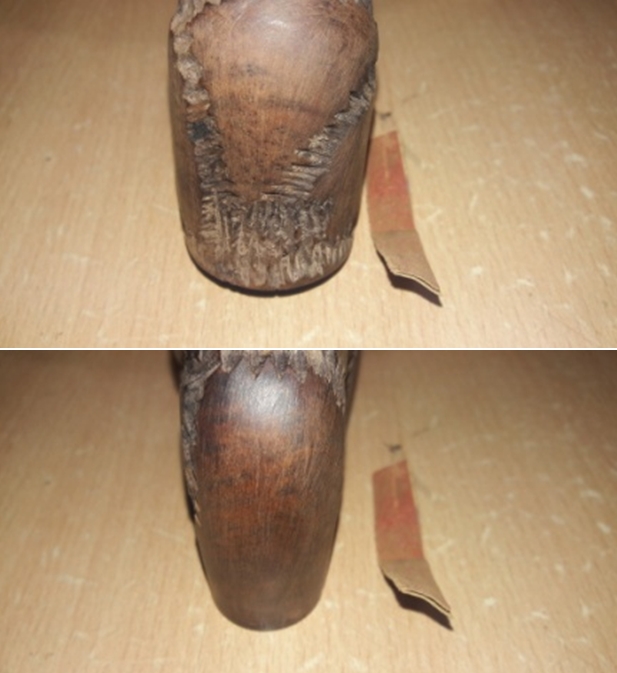
 Next, I rub a small quantity of “Before and After Restoration Balm” in to the briar with my finger tips and let it rest for a few minutes. I was diligent while applying the balm in to the stitch-like rustication as this may darken the inside of the rustications. The balm almost immediately works its magic and the briar now has a nice vibrant appearance with the beautiful darkened grain patterns on full display. I further buff it with a horse hair shoe brush. However, my attempt at darkening the insides of the rustications was met with limited success and a few sore spots still stand out.

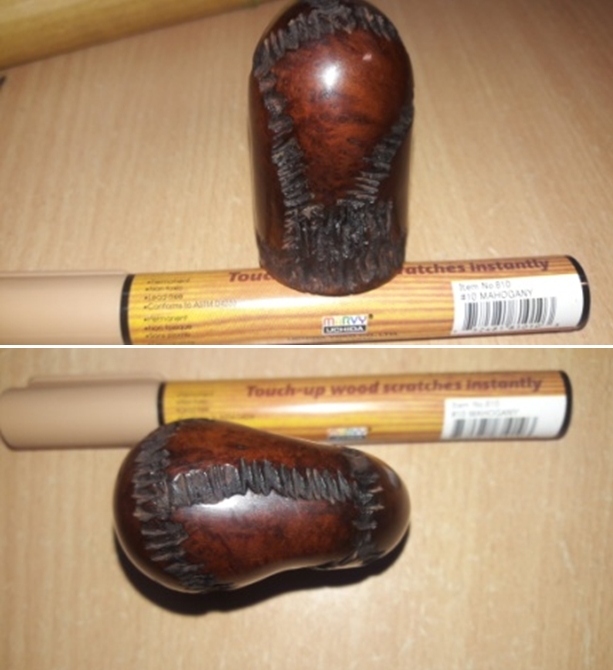
 I decided to darken the insides of the stitch-like rustications by using a mahogany stain pen. I diligently ran the stain pen through each and every stitch-like rustication. It was a painstaking work but I am very happy with the results.
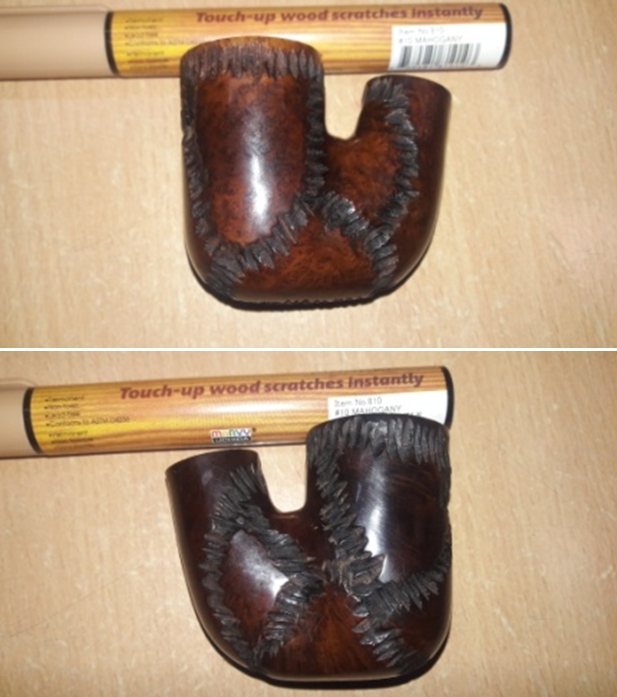
 Now, on to the home stretch!! I very excited to see the result of the final polishing cycle with Blue Diamond and carnauba wax.
To apply the finishing touches, I mount a cotton cloth buffing wheel on to my hand held rotary tool and apply a coat of Blue Diamond to the stummel and the stem to polish out the minor scratches. With a cotton buffing wheel that I use for carnauba wax, I apply a coat of carnauba wax and continue to work on it till the complete coat of wax had been polished out. I mount a clean cotton cloth buffing wheel and give the entire pipe a once over buff. I finished the restoration by giving the entire pipe a rigorous hand buffing using a microfiber cloth to raise the shine further. The finished pipe looks fantastic, the beauty of which is accentuated by its classic shape, size and feel in the mouth. This pipe is all set for a new home and will definitely provide the new owner pipe man/ lady hours of blissful smoke.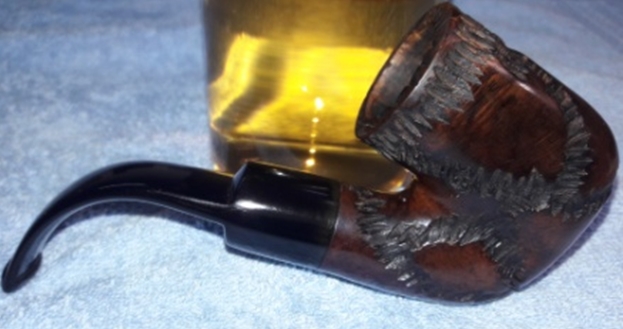


 P.S. At this point, I always share pictures of the completed pipe with Abha, my wife just so she can appreciate the end results of all her hard work put in during her initial cleaning. She loved the natural deep dark brown coloration taken by the stummel. However, she reminded me that I had not addressed the issue of heat fissures in the walls of the chamber which she had brought to my notice.
Hell!!! How did I miss out on this vital functional aspect of a pipe, but miss out, I did!! Thus, I set about addressing this issue.
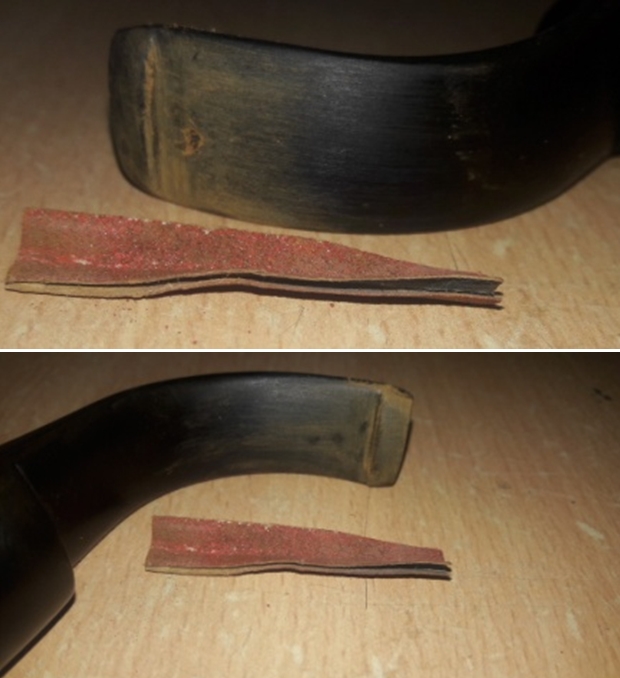
First and foremost, I took some real close ups of the heat fissures on the right side of the walls. I could definitely see dried and burnt briar in these fissures even though they appeared insignificant. But the darkened stummel surface on the right side pointed to otherwise.  To further determine the extent of depth and width of these heat fissures, with a sharp dental probe I scraped out the dead and burnt briar from within these fissures. As anticipated, these fissures were not very deep but deep enough to lead to a burn out sooner than later. Furthermore, my probing the left side fissures also revealed deeper than appearing fissures. This important functional aspect needs to be addressed.
 I decided to use a coat of JB Weld first followed by a bowl coat of activated charcoal and yogurt. The coat of JB Weld would protect the briar from coming in to direct contact with the burning tobacco while the charcoal and yogurt would insulate the JB Weld from direct contact with the lit tobacco while accelerating the formation of cake which subsequently adds a further protective layer. This was essential for furthering the briar life while providing a lifetime of contentment to the new pipe man/ lady. Now, JB Weld comes in two parts – the ‘Steel’ and the ‘Hardener’ in separate tubes. As per the directions both are to be mixed in 1:1 ratio and that one has about 4 minutes before the mixture sets. Before applying the mixture, I insert a petroleum jelly coated pipe cleaner through draught hole to prevent the draught from being smeared with the mix and blocking it when the mix is hardened. I mix JB Weld at 50/50 (eyeballing the quantities, of course) on an index card, mix it well, and apply it as evenly as possible over the complete chamber wall with a sliver of a bamboo frond – it was a bit messy, but mission accomplished successfully. I set the stummel aside and let it cure overnight.
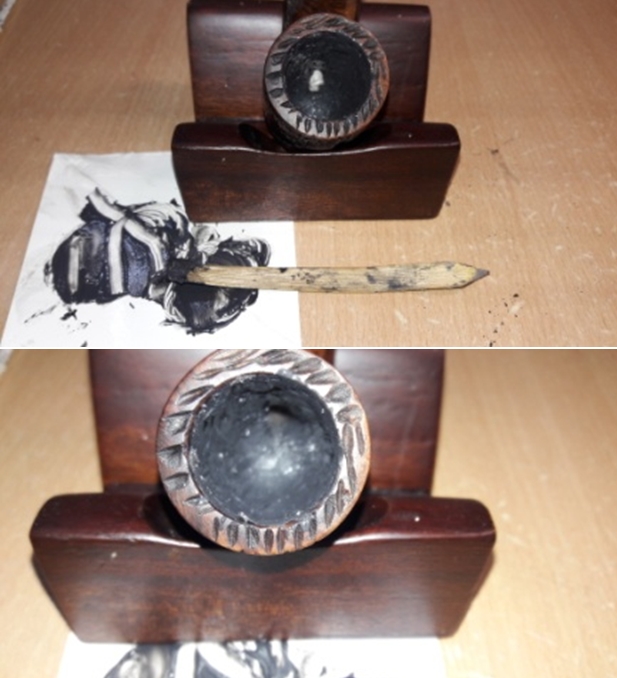 The next afternoon, the mix had hardened and I realized how unevenly the mix was applied!! I did not want the layer of the mix to be too thick, but only as a thin layer. I mounted a 180 grit sanding drum on to my hand held rotary tool and carefully sand down the hardened mix to an acceptable thickness. To be honest, I do not know of any scientific method to determine the thickness and neither do I know of any instrument that would help me in doing so, it was just by touch and feel. Once satisfied, I cleaned the chamber of all the sanding dust and readied it for the next coat of activated charcoal and yogurt.
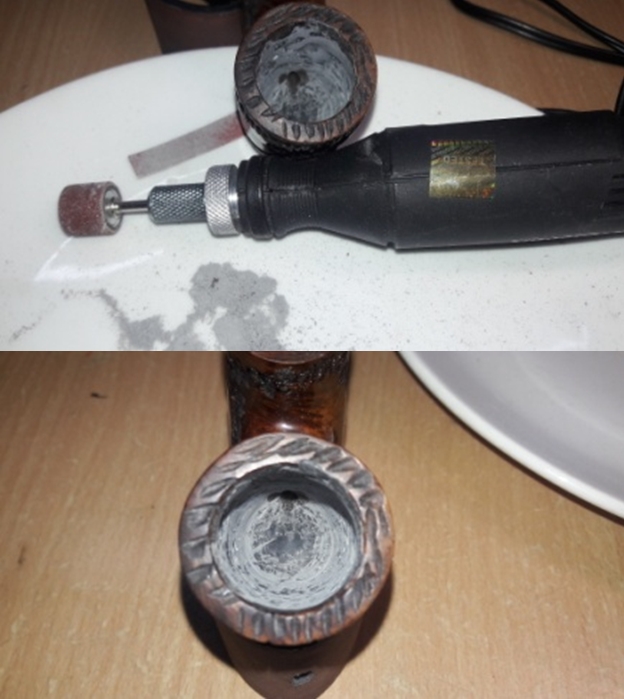 Next, I mixed activated charcoal and yogurt to a thick consistency, neither too runny that it would run down the surface nor too thick that it would not spread out evenly. Again, this was all by feel!! Once I was satisfied with the consistency, I applied it evenly over the layer of JB Weld mixture and set it aside to dry out naturally.
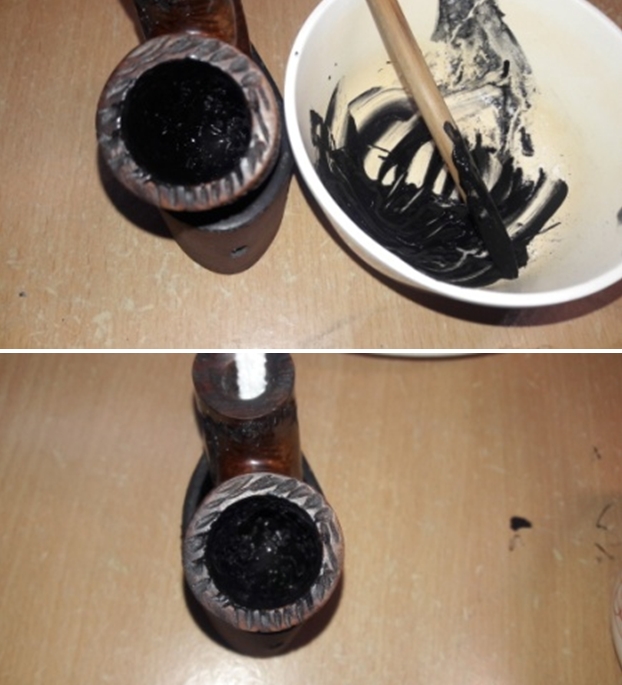
 Once the bowl coat had dried out and hardened, I cleaned the rim top off all the dust and charcoal yogurt mix with a q-tip. I wiped the stummel with a clean soft cotton cloth and rubbed a small quantity of balm to enliven the briar and hand buffed the stummel with a microfiber cloth to deepen the shine.
The pipe is now truly ready for a long hiatus with a new piper, providing years of service in future. I cannot thank Abha enough for reminding me to address this most important functional aspect.
Thank you all for reading through this longish write up and for the valuable time you have invested in doing so. If any reader is interested in enjoying this pipe as his/ her rotation pipe, feel free to let us know.