Tag Archives: restaining

Restoring a Beautiful Danish Freehand


Blog by Kenneth Lieblich

From time to time, I come across a pipe that seems to embody everything one wants a pipe to be: aesthetically pleasing, well proportioned, skilfully carved, forcefully present. This is one of those pipes. It is a Granhill Select Freehand. The grain on this pipe is absolutely beautiful. There is precious little information on the Granhill name. Yonks ago, Steve did a blog post on a Granhill pipe and it contained all the available information at the time. The maker was either a carver named Michael Kabik or a tobacconist named Lonnie Fay. Now, Fay may well have produced pipes under this name, but I think we can say with certainty that this pipe is by Kabik, based on the similarity of design and logo. I will reproduce here some of what is written is Pipedia:

Michael Victor Kabik or Michael J. Kabik, now retired artisan and pipe repairman, was born in Annapolis, Maryland in 1950. As a student he was fascinated by science, but finally turned to the arts. In the early 1970s he started working as an artisan and designer for Hollyday Pipes Ltd., and when the company closed he set up in his own right.

Kabik writes as follows:

…In the 1960s, I had helped Jay build Jay’s Smoke Shop and was his first employee. Since that time, he had set up one of the very first freehand pipe-making operations in the U.S. along with his partner, Chuck Holiday, called CHP-X Pipes. The staff consisted of four full-timers actually making the pipes and perhaps another four in sales and office work. Chuck, who did the actual design and carving, had long since had serious disagreements with Jay and split. Chuck’s replacement from the staff was quitting, and Jay was in a bind. Jay offered me the job, and I gladly accepted. The fellow quitting was supposed to train me for two months but left after two weeks, leaving me with an awesome responsibility. I felt as though the future employment of all these people depended on me as the designer and cutter…and it did.

 …Sadly, CHP-X closed its doors two years after my arrival, due primarily to distribution, sales force problems, and other issues to which I was not privy…In love with a medium that satisfied my creative impulses while, pretty much, paying the bills, I bought up the essential equipment and produced pipes on my own. I did this from a farm house my wife and I rented in Phoenix, Maryland. I produced pipes under the name KANE, Gran Hill and others I can’t remember as well as a private label line for a store in, I believe, South Dakota.

 …In 1973, I was approached by Mel Baker, the owner of a chain in Virginia Beach called Tobak Ltd. Mel was interested in producing a freehand pipe line and was alerted to my product by Al Saxon, one of his managers and a former CHP-X employee. Mel wanted to relocate me to Virginia Beach, give me carte blanche, and recreate the CHP-X studio with, of course, a new name for the product. I’m sure my answer came very quickly.

 …We decided on the name Sven-Lar. Why? Well, when I bought out CHP-X, I also got a small drawer full of metal stamps that were created for private-label work. The Sven-Lar name was conceived but never realized. Aside from having the stamp already made, there were other reasons we chose Sven-Lar. First, we were making a line of pipes in the Danish freehand tradition and also, sadly, we knew the difficulty American pipe makers had breaking the foreign market mystique barrier. The latter certainly played a big part in the demise of CHP-X.

You can read the entire Pipedia article on Kabik here. Just to close the loop on this, I also found Kabik on Facebook. I haven’t contacted him yet, but I may to see if we can get some more historical information. Here is a relatively recent photo of him:

The markings on the pipe are as follows. On the shank, there is a large letter Z [over] Danmark [over] Granhill [over] Select. Mysteries abound! I don’t know what the “Z” refers to, I don’t know why he uses the Danish spelling of Denmark rather than the English (given that he’s American), I don’t know if Granhill is the same as Gran-Hill, etc., and, finally, I don’t know where “Select” ranks in the pantheon of Kabik pipes. Frustrating.

Let’s have a closer look at the pipe itself. It really is an attractive piece. Overall, it is in good condition – no major issues to resolve. Just a few minor ones – particularly on the stem. It had some significant tooth marks in the button and, as the photo shows, debris clogging the bore. I started with the BIC lighter and “painted” the stem with its flame, in the hopes of raising some of the dents in the vulcanite. Although they did not disappear altogether, they were substantially improved and I was pleased with the results.I wiped down the stem with some Murphy’s on some cotton rounds. Then, I cleaned out the insides of the stem with pipe cleaners and lemon-infused isopropyl alcohol. Once that was done, the stem went for an overnight soak in the Before & After Hard Rubber Deoxidizer. After soaking, I cleaned off the de-oxidizing fluid with alcohol, pipe cleaners, et cetera. The oxidation had migrated to the surface and I used SoftScrub to work it off. I built up the tooth damage on the stem with black cyanoacrylate adhesive and let it fully cure. I used my miniature files to take down the majority of the dried glue. I then used all nine Micromesh pads (1,500 through 12,000 grit) to bring out the lovely black lustre on the stem. I also used Obsidian Pipe Stem Oil in between each pad scrubbing. I used the PipNet Reamer (and some sandpaper taped to a wooden dowel) to take the bowl down to bare briar, as I wanted to ensure there were no hidden flaws in the walls of the bowl. Fortunately, there were none. I then proceeded to clean out the insides of the shank with Q-tips, pipe cleaners, and isopropyl alcohol. It took a fair amount of cotton to get this thing clean!A de-ghosting session seemed like a good idea. This de-ghosting consisted of thrusting cotton balls in the bowl and the shank, and saturating them with 99% isopropyl alcohol. I let the stummel sit overnight. This caused the oils, tars and smells to leech out into the cotton. Finally, a relatively clean and fresh-smelling bowl emerged. I then moved on to cleaning the outside of the stummel with Murphy’s Oil Soap and some cotton pads. I also scrubbed the plateau with a toothbrush. What a difference that made! I then cleaned the insides with some Castile soap and tube brushes. After this, I used all nine Micromesh pads (1,500 through 12,000 grit) to smooth out everything in the briar. Then a light application of Before & After Restoration Balm brought out the best in the stummel’s grain. The grain on this pipe is pretty fantastic! Off to the bench polisher to put the final touches on this pipe. A dose of White Diamond and a few coats of carnauba wax were just what this pipe needed. The lovely shine made the wood look absolutely beautiful.

All done! This Granhill Select Freehand looks fantastic and is ready to be enjoyed again by the next owner. I am pleased to announce that this pipe is for sale! If you are interested in acquiring it for your collection, please have a look in the “American” section of the store here on Steve’s website. You can also email me directly at kenneth@knightsofthepipe.com. The approximate dimensions of the pipe are as follows: length 6 in. (155 mm); height 2½ in. (64 mm); bowl diameter 1⅞ in. (47 mm); chamber diameter 1 in. (24 mm). The weight of the pipe is 1¾ oz. (52 g). I hope you enjoyed reading the story of this pipe’s restoration as much as I did restoring it. If you are interested in more of my work, please follow me here on Steve’s website or send me an email. Thank you very much for reading and, as always, I welcome and encourage your comments.

Restoring a Damaged Tan Peterson’s Meer in a Shape 302


Blog by Steve Laug

The next pipe on the work table is a tan coloured Peterson’s style meerschaum pipe. We purchased it from a seller in Spring Branch, Texas, USA on 02/29/2024. It is a classic Peterson’s 302 shaped bowl and probably made like all their meerschaum by Laxey Pipes Ltd, on the Isle of Man. It has a tan rusticated bowl that really gives depth to the pipe. The bowl is dirty with grime in the meerschaum. There is a cake in the bowl and a lava overflow in the rustication on the rim top and edges. It looks like the rim top and first 1/8 inch of the rim top have a dark flume coat. The only stamping on the pipe is on the nickel ferrule and it reads K&P over Peterson. The ferrule has some oxidation and is dull but otherwise undamaged. The stem is oxidized, calcified and has tooth chatter and marks on both sides ahead of the P-lip button. Jeff took photos of the pipe before he started his cleanup. Jeff took photos of the rim top and stem to show the general condition of the pipe. The bowl is moderately caked and the rim top and edges have lava overflowing on to them. The stem is oxidized, calcified and has tooth chatter and tooth marks on the top and underside near the button. Jeff took photos of the bowl sides and heel to show the condition of the rusticated finish around this bowl. It is a nice looking pipe. He took photos of the nickel ferrule to show the stamping around it. You can see that it reads as noted above. I took some time to remind myself of the provenance of these Peterson’s Dublin Meerschaum pipes. I am pretty sure the pipe was made by the Laxey Pipe Ltd. on the Isle of Man for Peterson’s in Ireland (https://pipedia.org/wiki/Laxey_Pipes_Ltd). I quote from the Pipedia article in full:

Laxey Pipe Ltd. resided in a historical 19th century four-storey Man stone building at The Quay, Old Laxey, Isle of Man, which thankfully has been preserved. The company specialized in the production of Meerschaum Pipes using the Meerschaum mined by the Tanganyika Meerschaum Corporation in the Amboseli basin in Tanganyika (since 1964 part of the United Republic of Tanzania). Please note: you may often find names like “Manx Pipes Ltd.”, “Man Pipe Co.” and others more, but there is no indication of another Isle of Man pipe producer other than Laxey Pipe Ltd. at any time!

Laxey Pipe Ltd. marketed own brands like “Manxpipe”, “Manxman”, “Manxland” e.c. Names like “John Bull”, “White Knight” (unwaxed), “Domino” (black, or lined) indicated some shapes / colours of Laxey’s own series. The stems either showed the astronomical sign for “male” or “man” (circle + arrow), or the crest of the Isle of Man, the 3-legged X in a circle. Manxpipes and Laxey’s other brands were available through pipe retailers in general, but also were sold (mainly) to tourists through their own shop in Laxey.

Furthermore Laxey Pipe Ltd. manufactured the meer bowls for Peterson, Barling, Nørding and others from the later 1960’s until 2001. Man Pipe e.g. was a brand distributed by Comoy’s. The bowls usually showed no nomenclature indicating the orderer. “Genuine Block Meerschaum” was engraved frequently. Often, just the stems were different, while bowls were the same.

Supply of meer from East Africa run out (Kenya / Tanzania exhausted, Somalia inaccessible), and thus the last Laxey meers were supplied to trade in May, 2001. Laxey Pipe Ltd. tried to survive continuing with briar pipes – mainly in the Danish style -, but to no success. It closed down business in July, 2002.

I know that the pipe was made on the Isle of Man by Laxey Pipe Ltd. out of African Meerschaum. It was made for export for Peterson’s of Dublin. The flumed top on the bowl and the rustication around the bowl and shank make me think that it is a 1970s era pipe. That was as much as I could figure out.

Jeff had done a great job cleaning up the pipe as usual. He reamed the pipe with a PipNet reamer and cut back the cake back to the bare meerschaum. He cleaned up the walls with a Savinelli Fitsall Pipe Knife. He scrubbed the interior of the bowl and shank with pipe cleaners, cotton swabs and alcohol to remove the tars and oils. He scrubbed the exterior of the pipe with Murphy’s Oil Soap and a tooth brush to remove the grime from the finish. He worked on the rim top lava and darkening with the soap and tooth brush. He cleaned up the tarnish on the nickel ferrule. He scrubbed the inside of the stem with alcohol and pipe cleaners. He scrubbed the exterior with Soft Scrub and then soaked it in Briarville’s Pipe Stem Deoxidizer. He washed it off with warm water to remove the Deoxidizer. The pipe looked very good when it arrived. I took some close up photos of the rim top and also of the stem surface. I wanted to show how well it had cleaned up. The rim top and edges were in rough condition. The back rim top and edge were thin and the front left top and edge were damaged. It looked like the rim top had been rusticated like the bowl at one point but it was not clear due to the damage on the top and inner edges. The stem showed some light tooth marks and chatter on the surface near the button.I took a photo of the stamping on the ferrule. You can see that once the tarnish was removed it is stamped as noted above. It is clear and readable. I also removed the stem from the shank and took a photo to show the proportions of the pipe.This pipe needed a bit more work than the previous Peterson’s meer. The rim top had a lot of damage and was burned and chipped on the front inner edge of the  bowlw. The back of the bowl rim top and edge were very thin and also had damage. I cleaned up the inner edge of the bowl with a folded piece of 220 grit sandpaper. While I was able to remove the damage on the inner edge the bowl top and out edge on the front were damaged and there was a dip in the front outer edge. To deal with this issue I gently topped the bowl on a topping board with 220 grit sandpaper. Once finished I used a Dremel and dental burr to rusticate the rim top to match the finish around the bowl sides. I restained the finished rim top and edges with a walnut and a black stain pen. The original bowl had a dark stain on the rim top and on the first 1/8 inch of the bowl side.I polished the nickel ferrule with a jeweller’s cloth to shine and slow down the process of oxidation. The ferrule really looks good. I rubbed the meerschaum down with Clapham’s Beeswax/Carnauba mix. I worked it into the surface of the meerschaum with my fingertips and a shoebrush to protect it. I let the wax sit for 15 minutes and then buffed with a cotton cloth to raise the shine. The pipe is looking quite good. I set the bowl aside and turned to work on the stem. I sanded out the chatter and tooth marks with 320-3500 grit sanding pads. I wiped it down after each pad with an Obsidian Oil impregnated cloth. It really began to take on a shine.I polished the stem with micromesh sanding pads – wet sanding with 1500-12000 grit sanding pads. I wiped it down after each sanding pad with Obsidian Oil. I polished it with Before & After Pipe Stem Polish – both Fine and Extra Fine. As usual at this point in the restoration process I am excited to be on the homestretch. I put the bowl and stem of this Peterson’s Meerschaum back together. I polished the bowl and stem with Blue Diamond to polish out the scratches in the meerschaum and the vulcanite. I gave the bowl multiple coats of Clapham’s Wax and the stem multiple coats of carnauba wax. I buffed the pipe with a clean buffing pad to raise the shine. I hand buffed it with a microfiber cloth to deepen the shine. The pipe polished up pretty nicely. The meerschaum has a rich glow with the wax and polish. The shiny black vulcanite stem is a beautiful contrast to the rich developing patina of the tan bowl and the polished ferrule. It really is a stunning pipe whose shape and finish make it stand out. The thick/chubby shank makes it a very comfortable pipe to hold in the hand. The finished pipe is shown in the photos below. The dimensions are Length: 5 inches, Height: 1 ½ inches, Outside diameter of the bowl: 1 ¼ inches, Chamber diameter: 7/8 of an inch. The weight of the pipe is 54 grams/1.90 ounces. It is a beautiful pipe and one that will be on the Irish Pipe Makers Section of the rebornpipes store. If you are interested in adding it to your collection let me know. Thanks for walking through the restoration with me as I worked over this pipe.

Restoring a Peterson’s Meerschaum in a Shape 302


Blog by Steve Laug

The next pipe on the work table is a white Peterson’s style meerschaum pipe. We purchased it from an estate sale at Idaho Falls, Idaho, USA on 09/16/23. It is a classic Peterson’s 302 shaped bowl and probably made like all their meerschaum by Laxey Pipes Ltd, on the Isle of Man. It has a slight patina making it almost golden with a black flume around the bowl and rim top. It is a rusticated bowl. The bowl is dirty for sure with grime in the meerschaum. There is a cake in the bowl and a lava overflow in the rustication on the rim top and edges. The only stamping on the pipe is on the nickel ferrule and it reads K&P over Peterson. The ferrule has some oxidation and is dull but otherwise undamaged. The stem is lightly oxidized and has tooth chatter and marks on both sides ahead of the P-lip button. Jeff took photos of the pipe before he started his cleanup. Jeff took photos of the rim top and stem to show the general condition of the pipe. The bowl is moderately caked and the rim top and edges have lava overflowing on to them. The stem is oxidized and has tooth chatter and tooth marks on the top and underside near the button. Jeff took photos of the bowl sides and heel to show the condition of the rusticated finish around this bowl. It is a nice looking pipe. He took photos of the nickel ferrule to show the stamping around it. You can see that it reads as noted above.I took some time to remind myself of the provenance of these Peterson’s Dublin Meerschaum pipes. I am pretty sure the pipe was made by the Laxey Pipe Ltd. on the Isle of Man for Peterson’s in Ireland (https://pipedia.org/wiki/Laxey_Pipes_Ltd). I quote from the Pipedia article in full:

Laxey Pipe Ltd. resided in a historical 19th century four-storey Man stone building at The Quay, Old Laxey, Isle of Man, which thankfully has been preserved. The company specialized in the production of Meerschaum Pipes using the Meerschaum mined by the Tanganyika Meerschaum Corporation in the Amboseli basin in Tanganyika (since 1964 part of the United Republic of Tanzania). Please note: you may often find names like “Manx Pipes Ltd.”, “Man Pipe Co.” and others more, but there is no indication of another Isle of Man pipe producer other than Laxey Pipe Ltd. at any time!

Laxey Pipe Ltd. marketed own brands like “Manxpipe”, “Manxman”, “Manxland” e.c. Names like “John Bull”, “White Knight” (unwaxed), “Domino” (black, or lined) indicated some shapes / colours of Laxey’s own series. The stems either showed the astronomical sign for “male” or “man” (circle + arrow), or the crest of the Isle of Man, the 3-legged X in a circle. Manxpipes and Laxey’s other brands were available through pipe retailers in general, but also were sold (mainly) to tourists through their own shop in Laxey.

Furthermore Laxey Pipe Ltd. manufactured the meer bowls for Peterson, Barling, Nørding and others from the later 1960’s until 2001. Man Pipe e.g. was a brand distributed by Comoy’s. The bowls usually showed no nomenclature indicating the orderer. “Genuine Block Meerschaum” was engraved frequently. Often, just the stems were different, while bowls were the same.

Supply of meer from East Africa run out (Kenya / Tanzania exhausted, Somalia inaccessible), and thus the last Laxey meers were supplied to trade in May, 2001. Laxey Pipe Ltd. tried to survive continuing with briar pipes – mainly in the Danish style -, but to no success. It closed down business in July, 2002.

I know that the pipe was made on the Isle of Man by Laxey Pipe Ltd. out of African Meerschaum. It was made for export for Peterson’s of Dublin. The flumed top on the bowl and the rustication around the bowl and shank make me think that it is a 1970s era pipe. That was as much as I could figure out.

Jeff had done a great job cleaning up the pipe as usual. He reamed the pipe with a PipNet reamer and cut back the cake back to the bare meerschaum. He cleaned up the walls with a Savinelli Fitsall Pipe Knife. He scrubbed the interior of the bowl and shank with pipe cleaners, cotton swabs and alcohol to remove the tars and oils. He scrubbed the exterior of the pipe with Murphy’s Oil Soap and a tooth brush to remove the grime from the finish. He worked on the rim top lava and darkening with the soap and tooth brush. He cleaned up the tarnish on the nickel ferrule. He scrubbed the inside of the stem with alcohol and pipe cleaners. He scrubbed the exterior with Soft Scrub and then soaked it in Before & After Pipe Stem Deoxidizer. He washed it off with warm water to remove the Deoxidizer. The pipe looked very good when it arrived. I took some close up photos of the rim top and also of the stem surface. I wanted to show how well it had cleaned up. The rim top and edges looked very good. There was still some debris in the rustication on the rim top that would need to be removed. The stem showed some light tooth marks and chatter on the surface near the button.I took a photo of the stamping on the ferrule. You can see that once the tarnish was removed it is stamped as noted above. It is clear and readable. I also removed the stem from the shank and took a photo to show the proportions of the pipe.I cleaned up the debris in the rim top with a brass bristle wire brush and was able to remove it all. I touched up the rim top and edges with a black Sharpie Pen. Once it was finished it looked very good.I polished the nickel ferrule with a jeweller’s cloth to shine and slow down the process of oxidation. The ferrule really looks good. I rubbed the meerschaum down with Clapham’s Beeswax/Carnauba mix. I worked it into the surface of the meerschaum with my fingertips and a shoebrush to protect it. I let the the wax sit for 15 minutes and then buffed with a cotton cloth to raise the shine. I set the bowl aside and turned to work on the stem. I sanded out the chatter and tooth marks with 320-3500 grit sanding pads. I wiped it down after each pad with an Obsidian Oil impregnated cloth. It really began to take on a shine.I polished the stem with micromesh sanding pads – wet sanding with 1500-12000 grit sanding pads. I wiped it down after each sanding pad with Obsidian Oil. I polished it with Before & After Pipe Stem Polish – both Fine and Extra Fine. As usual at this point in the restoration process I am excited to be on the homestretch. I put the bowl and stem of this Peterson’s Meerschaum back together. I polished the bowl and stem with Blue Diamond to polish out the scratches in the meerschaum and the vulcanite. I gave the bowl multiple coats of Clapham’s Wax and the stem multiple coats of carnauba wax. I buffed the pipe with a clean buffing pad to raise the shine. I hand buffed it with a microfiber cloth to deepen the shine. The pipe polished up pretty nicely. The meerschaum has a rich glow with the wax and polish. The shiny black vulcanite stem is a beautiful contrast to the rich developing patina of the bowl and the polished ferrule. It really is a stunning pipe whose shape and finish make it stand out. The thick/chubby shank makes it a very comfortable pipe to hold in the hand. The finished pipe is shown in the photos below. The dimensions are Length: 5 inches, Height: 1 ½ inches, Outside diameter of the bowl: 1 ¼ inches, Chamber diameter: 7/8 of an inch. The weight of the pipe is 51 grams/1.80 ounces. It is a beautiful pipe and one that will be on the Irish Pipe Makers Section of the rebornpipes store. If you are interested in adding it to your collection let me know. Thanks for walking through the restoration with me as I worked over this pipe.

Restoring an old timer 1912 BBB Own Make Silver Band England Billiard


Blog by Steve Laug

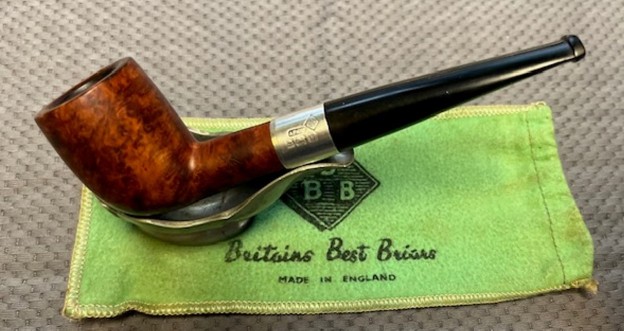
The next pipe that I am working on came from an estate sale in Oregon City, Oregon, USA we purchased on 03/21/24. It was very dirty and was a reddish, brown coloured pipe when it started. The smooth finish around the bowl was dirty and had hand oils ground into the grooves. The bowl had a thick cake a spotty coat of lava on the rim edge and top of the bowl. The outer edge and top of the bowl were battered and damaged with chips and nicks deep in the briar. It was a mess. The stem was oxidized, very dirty and had light tooth marks on both sides ahead of the button. The pipe was stamped on the left side of the shank with the BBB logo in a diamond and underneath and to the side of the point it read Own Make. On the underside of the shank it was stamped England and had been double stamped. The Sterling Silver band on the shank was oxidized but was also stamped with the BBB in a diamond logo and to the left of it was stamped AF&Co in a rectangular stamp [over] three hallmarks – an Anchor, a Rampant Lion and the letter “n”. All were in shield style cartouches. The Anchor is the mark for Birmingham, the Lion is the mark for .925 Silver and the “n” is the date stamp. Jeff took photos of the pipe so I could have a sense of what it looked like before he started his work on it. Jeff took photos of the bowl and rim top to show the condition of the bowl. The rim top is dirty with lava and deep nicks in the surface of the rim. There is a thick cake in the bowl. The silver band on the shank is oxidized and stamped as noted above. The stem is oxidized and is very dirty from the shank to the button. There are light tooth marks and chatter on the stem on both sides ahead of the button. He took photos of the sides and the heel of the bowl to show the condition of the finish and the grain around the pipe. It has some great grain showing through the grime. He took photos of the stamping on the sides of the shank and on the silver band on the shank. It reads as noted above. It is faint in spots but is still very readable. The Sterling Silver band on the shank was oxidized but was also stamped as noted above. The BBB in a diamond logo identifies the pipe brand of this pipe. The AF&Co in a rectangular stamp to the left of the BBB logo identifies the silversmith as Adolf Frankau and Company who was the owner of the BBB brand. Underneath that stamp there were three hallmarks – an Anchor, a Rampant Lion and the letter “n”. All were in shield style cartouches. The Anchor is the mark for the city of Birmingham where the silver was assayed. The Lion is the mark for the quality of silver used – in this case .925 Silver. The letter “n” is the date stamp. I turned to a link on a British Hallmark site to look for the date code. I found a listing for Birmingham silver dates (https://www.925-1000.com/dlc_birmingham.html). I did a screen capture of the chart and have included it below. The letter “n” is in the same shape cartouche as the section I have marked in the picture below. That identifies the pipe as having been made in 1912.Now it was my turn to work on the pipe. Jeff had done an amazing cleanup of the pipe. He reamed the cake with a PipNet reamer and cleaned up that with a Savinelli Fitsall Pipe Knife. He scrubbed the internals of the bowl and stem with alcohol, cotton swabs and pipe cleaners. He scrubbed the externals with undiluted Murphy’s Oil Soap and rinsed the bowl off with running water. He soaked the stem in Briarville’s Pipe stem Deoxidizer and once it had soaked, rinsed it off with warm water to remove the residual solution. He dried it off and rubbed it down to remove any oxidation that was still on the stem. The pipe looked very good when I received it. I took a photo of the rim top to show the condition. You can see the clean bowl. The bowl is in excellent condition and is clean. The rim top and the inner edge showed damage with nicks and scratches on the top and roughness to both the inner and outer edges. The stem came out looking clean. There were some light tooth marks and chatter on both sides ahead of the button. I took photos of the stamping on the shank. It is faint but still very readable. There was also a very faint stamp on the stem but I am still not certain it is the correct stem because of the fit and shape of the stem. I removed the stem from the shank and took a photo of the pipe parts to show what I was working with. I began my work on the pipe by addressing the issues with the rim top and the rim edges both inner and outer. I used a folded piece of 220 grit sandpaper to smooth out the inner edge and work to bring it back to round.The rim looked much better at this point thought there was still damage at the front of the inner edge of the bowl. I used a piece of 220 grit sandpaper and a wooden ball to give the inner edge and rim top a slight bevel. It looked much better.I built up the large chip in the outer edge of the bowl at the front with clear CA glue and briar dust. I put a spot of glue on the area and dipped the bowl into the briar dust. It stuck to the glue and came of the rest of the bowl. Once it dried I sanded it smooth with a 320 grit sanding pad to smooth out the repair on the top and the front of the bowl. It looked very good. I used a Cherry stain pen to touch up the repaired areas of the bowl. I stained the rim top with the same pen at the same time. It looked much better.I sanded the briar with 320-3500 grit sanding pads to smooth out the nicks and scratches in the bowl sides, rim and heel of the bowl. I wiped it down after each sanding pad with a damp cloth to remove the sanding dust and debris. The pipe had cleaned up so well that I turned to polish the briar with micromesh sanding pads. I dry sanded it with 1500-12000 grit sanding pads and wiped the bowl down after each pad with a damp cloth. By the final pads the briar really had a shine. I rubbed the briar down with Before & After Restoration Balm. I worked it into the briar with my fingertips. The product works to clean, enliven and preserve the briar. I let it sit for 10 minutes then I buffed it with a cotton cloth to deepen the shine. The briar really comes alive with the balm. Next, I moved on to further smooth out the surface of the vulcanite. I sanded it with 320-3500 grit sanding pads to further clean up the scratches and file marks on the surface of the stem.I polished the vulcanite with micromesh sanding pads – 1500-12000 grit pads. I wiped it down with Obsidian Oil after each sanding pad. I used Before & After Pipe Polish – both Fine and Extra Fine to further polish the stem. It really took on a shine and I knew that once it was buffed it would look amazing. I put the stem back on the 1912 BBB Own Make Billiard with a Vulcanite Stem and took it to the buffer. I worked it over with Blue Diamond to polish out the remaining small scratches. I gave the bowl and the stem several coats of carnauba wax and buffed the pipe with a clean buffing pad to raise the shine. I hand buffed it with a microfiber cloth to deepen the shine. The pipe polished up really well and the rim top looked good. I was happy with the look of the finished pipe. The photos below show what the pipe looks like after the restoration. The 1912 BBB Own Make Billiard is a beautiful and unique take on a classic shape. The polished, hard rubber taper stem looks really good with the browns of the briar. The dimensions of the pipe are Length: 5 ½ inches, Height: 1 ¾ inches, Outside diameter of the bowl: 1 ¼ inches, Chamber diameter: ¾ of an inch. The weight of the pipe is 1.45 ounces/41 grams. This is another old time BBB pipe that I will be adding to my BBB Collection. I love these old time English Pipes by BBB as they are a real pleasure to smoke. Thanks for walking through the restoration with me.

Cleaning up a Wayward Republic Era K&P Peterson’s System Standard 314


Blog by Steve Laug

Sometimes there is benefit to being a pipe rescue location. Although I am not sure my wife and daughters would agree with that. But I have to say it does keep this old guy busy rejuvenating old pipes and giving them life. If you were to come into my basement office/workshop (but mind you few do) I think you would be surprised by two things – the number of books on the shelves and the number of pipes in the storage bins behind my desk! There are a lot of pipes that still need attention. Most have been reamed and cleaned so that part is finished. But many still need a lot of attention to make them smokable again. Ah well, enough of that. This post is about a pipe I received in the mail today. Several weeks ago I received an email from a friend, Dave in Nova Scotia regarding a pipe he had that he thought I might enjoy having. I have included a portion of his email as it sets the stage for this interesting old Peterson’s System Standard 314.

Hi Steve,

Dave in Nova Scotia. Hope you’re enjoying the spring!

If you’re interested and want to send postage for a Canada Post small box, I’ll send you this Peterson system standard, 314.

Was my brother-in-law’s. He bought it Ireland many years ago. Needs some TLC. 

Yours is the home for wayward pipes!

So, I knew that the pipe was a Peterson’s System Standard 314 that had originally belonged to his brother-in-law who had purchased it directly from Peterson’s in Ireland. He included two photos of the Peterson for me to have a look at. I have included them below. The pipe was in desperate need of a restoration that is for sure. But I have truly worked on pipes in worse condition than this one. The box arrived on Friday this past week and I unpacked it to examine it carefully. The pipe was very dirty and tired looking. The finish was dirty and the nickel ferrule on the shank end was very corroded in spots on the left and underside and covered in thick grime. There were some dark spots on the left and right side toward the bottom of the bowl. The rim top had a thick lava coat that flowed up from the thick cake in the bowl. It was stamped on the left side vertically under the ferrule and read Peterson’s with the forked leg on the P [arched over] System [over] Standard. On the right side of the shank the stamping is horizontal and reads Made in the Republic of Ireland [in three lines] with the 314 shape number underneath that. The nickel ferrule was stamped under the grime and read K&P over Peterson’s. The stem is covered in a thick build up of dirt and oils. There is some oxidation on the stem surface and surprisingly there are no tooth marks. I took photos of the pipe before I started my work on it. I took photos of the bowl and rim top to show the condition of the bowl. You can also see the condition of the nickel ferrule with all of the corrosion and grime completely removing the shine of the nickel ferrule. The stem is dirty around the insert in the ferrule. It is lightly oxidized and is very dirty on the stem and the button. There are light tooth marks and chatter on the stem service on both sides ahead of the p-lip.I took photos of the stamping on the shank sides. It is faint but still very readable as noted above. I removed the stem from the shank and took a photo of the pipe parts to show what I was working with. You can also see the dark spot on the right side of the bowl ahead of the stamping. I started my working on the pipe by addressing the corrosion and oxidation on the nickel ferrule. I sanded it with 320 grit sanding pads to remove the corrosion. I was utterly surprised that the nickel ferrule cleaned up and had a rich shine to it. I reamed the bowl with a PipNet pipe reamer and took the cake back to bare briar. I cleaned up the reaming with Savinelli Fitsall Pipe Knife to remove remnants of cake. I sanded the walls of the bowl with 220 grit sandpaper wrapped around a piece of dowel. I scrubbed the externals bowl and shank with Murphy’s Oil Soap and a tooth brush. I rinsed it off with warm water to remove the grime and debris from the scrubbing. I scrubbed out the internals with alcohol, cotton swabs and pipe cleaners to remove the grime in the shank and sump of the Pete. I also scrubbed the airway on the inside of the stem at the same time. The pipe was very dirty but it cleaned up well.I cleaned off the remaining darkening on the rim top with a folded piece of 220 grit sandpaper. It cleaned up very well and looked good. There was no damage to the inner or outer rim edges.I worked over the briar bowl sides and rim top with 320-3500 grit sanding pads. I sanded down the dark spots on the surface and was able to remove the damage. Thankfully they were not burn marks. I wiped the bowl down after each sanding pad with a damp cloth to remove the dust and sanding debris left behind. The pipe had cleaned up so well that I turned to polish the briar with micromesh sanding pads. I dry sanded it with 1500-12000 grit sanding pads and wiped the bowl down after each pad with a damp cloth. By the final pads the briar really had a shine. I rubbed the briar down with Before & After Restoration Balm. I worked it into the briar with my fingertips. The product works to clean, enliven and preserve the briar. I let it sit for 10 minutes then I buffed it with a cotton cloth to deepen the shine. The briar really comes alive with the balm. I set aside the bowl and turned my attention to the stem. To help remove the oxidation I scrubbed the stem with Soft Scrub Cleanser and cotton pads. It took some elbow work but the stem definitely looked better and the sulphur smell of the oxidation is gone!I sanded the surface with 320-3500 grit sanding pads to further clean up the spots of oxidation on the surface of the stem. I wiped it down with a soft damp cloth following each sanding pad to remove the sanding debris.I polished the vulcanite with micromesh sanding pads – 1500-12000 grit pads. I wiped it down with Obsidian Oil after each sanding pad. I used Before & After Pipe Polish – both Fine and Extra Fine to further polish the stem. It really took on a shine and I knew that once it was buffed it would look amazing. This Republic Era Peterson’s System Standard 314 Bent Billiard with a vulcanite stem is a great looking pipe now that it has been restored. The beautiful grain around the bowl sides stands out very well with the contrast of the polished nickel ferrule. The polished finish is stunning. I put the stem back on the bowl and carefully buffed the pipe with Blue Diamond on the buffing wheel. I gave the bowl and the stem multiple coats of carnauba wax on the buffing wheel. I followed that by buffing the entire pipe with a clean buffing pad. I hand buffed the pipe with a microfiber cloth to deepen the shine. The finished Peterson’s System Standard 314 fits nicely in the hand and feels great. Give the finished pipe a look in the photos below. The dimensions of the pipe are Length: 5 inches, Height: 1 ¾ inches, Outside diameter of the bowl: 1 1/8 inches, Chamber diameter: ¾ of an inch. The weight of the pipe is 45grams/1.59oz. This one has been reserved for first refusal. If you are interested in being in the queue for this pipe send me a message or an email. Thanks for reading this blog and my reflections on the pipe while I worked on it. There are many more to come!

Pipe Gods Smiled and I Got Not One But Three Les Wood Pipes…Restoring the Last of the Three Les Wood Pipes; a Smooth Bent Bulldog “Reo”


Blog by Paresh Deshpande

With this write up, I have reached a personal statistical milestone of 200th contribution on rebornpipes.com, a journey that I was encouraged to embark upon, helped and supported at each hurdle by my Guru, mentor and now a dear friend, Steve and without whom I would have remained alienated from this fantastic world of pipe repairs, restorations and pipe collection.

So, thank you Steve for making this platform available to me for learning and enjoying myself! And now, back to the pipe on my work table!

I had purchased three Les Wood pipes from a gentleman and had restored two of the three pipes and have added it to my personal collection. Given below is the link to the first write up posted on Reborn pipes and is a recommended read to know how I came to be in possession of this lot and brief research on husband wife duo of Leslie Wood and Dolly and the pipes they make.

https://rebornpipes.com/2022/08/05/pipe-gods-smiled-and-i-got-not-one-but-three-les-wood-pipes-restoring-a-les-wood-poker/

Below is the link to the second Les Wood pipe that I have refurbished and added to my personal collection. I would request you to read through the write up as the stampings are totally at a variance from those seen on the Les Wood Poker pipe.

https://rebornpipes.com/2023/07/15/pipe-gods-smiled-and-i-got-not-one-but-three-les-wood-pipes-restoring-second-of-the-three-les-wood-pipes-a-bark-silver-spigot/

The third pipe from this lot of Les Wood pipe is a large smooth bent pipe in classic English bulldog shape in dark brown and red color. The pipe oozes very high quality briar and a well cut handmade vulcanite stem, all in the hallmark of a Les Wood pipe! The pipe is stamped on the lower panel of the square shank with three stars one below the other on the far left side. It is followed by “FERNDOWN” in an arch over “REO”, all in block capital letters. These stampings are followed by “HAND MADE IN” over “ENGLAND” over “LES WOOD” towards the sterling silver shank end band. The Sterling silver band bears the stamp “L & JS” in a rectangular cartouche over “.925”. The vulcanite saddle stem is stamped on the left side of the saddle as “LJS”. In addition to the information that I have assimilated while working on the two Les Wood pipes above, I would like to reproduce the following snippet of information from pipedia.org

To many pipe smokers, Les Wood’s pipes embody the revival of great English pipe making initiated by Ashton in the early 1980s. The high-grade Italian and Spanish plateau he prefers is oil-cured in the tradition of both Dunhill and Ashton. The pipes are renowned for their pleasant, slightly nutty flavor and remarkable smoking characteristics. They feature impeccable craftsmanship extending to very good stem/bit work, though many pipes are often a bit heavier. The hallmark of his work, of course, is the excellent silver work. Almost all of his pipes feature rings or ferules for spigot stems. Grading is by finish: “Bark” (ca. 90%, rusticated, dark brown and black), “Antique Bark” (tan rusticated), “Reo” (brown and red, smooth), “Root” (orange, smooth), and “Tudor Root” (orange and brown smooth) and by size (one to four stars). He also designates straight grains with SG.

Due to the vagaries of international trademark law, he sold his earlier pipes as ” L.&J.S Briars”, “Ellwood”, “Les Wood” or “L. Wood”. Until recently, an average of 1500 – 2000 pipes a year were sold as “Ferndown” — named for the mansion he lives in — in the UK and US, but as “L. Wood” pipes in Germany.

Thus, from the above, the pipe currently on my work table is an early Les Wood pipe made in US/ UK and is one of 10% smooth pipe made in that year.

Initial Visual Inspection
The pipe is heavy! That’s the first thing that I noticed, heavier than even the Poker that I had restored earlier. The finish is dark and dull with dust and grime ground in to the surface. There is some darkening of the rim top surface, more noticeably towards the back of the rim in 6 ‘O’ clock direction. The rim edges are sans any damage. There is a thick layer of cake inside the chamber with a wad of unburnt tobacco at the heel of the chamber. The hand cut, high quality vulcanite stem is deeply oxidized with some very light bite marks in the bite zone. The mortise has some serious accumulation of old oils and tars that needs to be cleaned. There are serious ghost smells emanating from the chamber and the mortise. Overall, with some TLC, this pipe should regain its former glory when it first left Ferndown Mansion. Detailed Visual Inspection
The chamber has a thin layer of cake with some unburnt residual tobacco at the heel of the bowl. However, if my experiences of working on two previous Ferndown from this same estate are anything to go by, then I think the cake layer is thick, but evenly maintained. The chamber smells a rather strong fragrant hinting at being used to smoke English blend or an aromatic. The rim top surface is clean, smooth and even and so are the rim edges. I do not envisage any issues related to heat lines/ fissures along the chamber walls. The stummel surface is covered in a layer of dust and grime giving the surface a dull and lackluster appearance. From underneath this grime, a mix of bird’s eye swirls and cross grains can be seen that waits to be brought to the fore. The twin rings separating the cap of the stummel from rest of the bowl is without any nicks/ chips/ dents or dings. The mortise shows presence of some oils and tars, but should be easily cleaned. The Sterling Silver band is deeply oxidized and tarnished at places. Once cleaned and polished, this band will add a nice classy bling to the appearance of the pipe. The beautiful vulcanite stem is hand cut and oozes very high quality of material use and also craftsmanship of highest quality. The stem is oxidized with very minor tooth chatter and bite marks seen in the bite zone on both the upper and lower surfaces of the stem. These tooth chatter and tooth indentation should be easily addressed by heating the affected areas to raise the vulcanite and thereafter sanding it down to match the rest of the stem surface. The tenon end and the horizontal slot end show very minor traces of accumulation of dried gunk and grime.The Restoration Process
I started the refurbishing of this Les Wood by working the stem first. Since there were other stems that were ready to be put into the stem deoxidizer solution, I decided to clean the internals of this stem first so that it could be put in the solution with other stems. I cleaned the stem airway with a thin shank brush and anti-oil soap. I used a sharp dental tool to clean the horizontal slot and further cleaned the internals with regular and bristled pipe cleaners dipped in alcohol.The stem was immersed in the Deoxidizer solution, a product that has been developed by Mark Hoover. This solution helps raise the stem oxidation to the surface thus helping in easy removal and subsequently imparting a nice shine to the stem after polishing cycle. The pipe is indicated with a red arrow. The stem is allowed to soak into this solution overnight.The pipe next to the one indicated in the picture above, is also a Ferndown which is the next pipe in line. This one is a NOS un-smoked pipe that too came from the same gentleman’s collection as these three Les Wood pipes and was the last one that he intended to pass on to his family members. However, for reasons best known to the gent, he voluntarily offered the pipe to me at the price which I had first quoted for the very first Les Wood from his collection. I could sense a feeling of sadness in his communication and I made him a payment without further queries. The pipe made its way to me as I worked on the REO.

Now it was time for me to work on the stummel. I did this by first reaming the chamber with size 3 and 4 PipNet reamer heads. I further scraped the chamber walls with my fabricated knife to remove the remaining carbon deposits where the reamer head could not reach. Once the cake was reamed back to the bare briar, I used a piece of 220 grit sand paper to remove all the traces of remaining cake and also to smoothen out the inner walls of the chamber surface. Finally, to remove the residual carbon dust, I wiped the chamber with a cotton pad wetted with 99.9% pure isopropyl alcohol. The huge pile of carbon dust that was reamed out is an indication enough to the amount of carbon that had accumulated in the chamber while the smaller heap is that of the un-burnt tobacco from the chamber. The chamber walls are solid without any heat lines or fissures. I further cleaned the mortise by scrapping out the dried gunk with a dental tool. I ran a few pipe cleaners dipped in alcohol to moisten the dried gunk and assist in its removal. I shall further continue the internal cleaning of the chamber and mortise with cotton and alcohol soak.I continued the cleaning of the chamber and shank internals with a salt and alcohol bath. I use cotton balls which is an at par substitute to Kosher salt as I have realized over the years. I draw out a wick from the cotton and along with a folded regular pipe cleaner; insert it in to the mortise and through the draught hole in to the chamber. Thereafter, I packed the chamber with cotton balls to about quarter of an inch below the inner rim edge and soaked the cotton balls with isopropyl alcohol up to the brim. About half an hour later, the level of alcohol had gone down, having being absorbed by the cotton. I topped it up once again and set it aside overnight. By next morning, the cotton and alcohol had drawn out all the remaining oils and tars from the chamber and mortise, fulfilling its intended task. I removed the cotton balls and ran pipe cleaners through the mortise to clean out all the loosened tars and gunk and further cleaned it with alcohol and q-tips. With the internal cleaning now completed, I undertook the cleaning of the external surface. I wiped the surface with Murphy’s oil soap on a cotton pad and further cleaned it with a wet cotton swab to remove all the soap from the surface and wiped it dry with paper towels and cotton cloth. The usual process that I follow while cleaning the external surface is to scrub the stummel with oil soap and rinse under running warm water. However, in this case, I was keen to preserve the stain and finish to max extent possible and hence the slight modification to the process. I further dried the surface with a heat gun to ensure that there is no moisture in the surface. My exuberance to see the shine and gloss that this pipe is capable of, thanks to the processes employed by Les Wood’s wife; I decided to continue with the stummel refurbishment. I dry sand the surface with 1500 to 12000 grit micromesh pads, wiping frequently with a dry soft cotton cloth to check the progress made. Once the micromesh polish cycle was completed, I massaged a small quantity of ‘Before and After Restoration Balm’ in to briar surface and set it aside for few minutes. Once the briar was rejuvenated, I hand buffed the stummel with a microfiber cloth to a deep and luxurious shine. It was here that I noticed that all the cleaning of the stummel had left the finish over the rim surface a bit splotchy and light. Using a dark brown wood stain pen, I stained the rim top surface and set it aside for the stain to set.Now that the internal and external cleaning of the stummel was nearly done and also the stem had now been soaking for more than 24 hours, I removed the stem from the solution. I first scrubbed the stem surface with a Scotch Brite pad, always being mindful of the stem logo on the left side. I followed this scrubbing with a nice cleaning of the surface using a 0000 grade steel wool. I rinsed the stem under running water to rid the stem of the thick deoxidizer solution. I ran a couple of pipe cleaners to remove any residual deoxidizer solution from the airway.To address the minor tooth chatter on either surface, I heated the bite zone with the flame of a soft flame lighter. The heat from the lighter expands the vulcanite and fills up the tooth chatter. The results are not always perfect, but in this instance, the results are very satisfactory.I followed it up by wet sanding the entire stem surface using320, 400, 600, 800, 1000, 1500 and finally with a piece of 2000 grit sand paper. This progressive sanding with higher grit sandpapers serves to reduce the sanding marks of the more abrasive sand papers. I also sharpened the button edges while sanding. I wiped the stem with a moist cotton swab to remove all the oxidation and sanding dust from the surface. I applied a little Extra Virgin Olive oil over the stem and set it aside to be absorbed by the vulcanite.With a jeweller’s cloth, I polished the sterling silver band at the shank end to a nice shine.On the way to complete the project, I polished the stem and stummel surface with White Diamond. Next, I replaced the buffing wheel on the rotary tool with the one that has been earmarked for Blue diamond compound and polished the entire pipe. I like the way the pipe is polishing up at this stage. With a cotton buffing wheel that I use for carnauba wax, I applied a coat of carnauba wax and continued to work on it till the complete coat of wax had been polished out. I mounted a clean cotton cloth buffing wheel and gave the entire pipe a once over buff. I finished the restoration by giving the entire pipe a rigorous hand buffing using a microfiber cloth to raise the shine further. The finished pipe looks beautiful and is ready to be added to my personal collection of pipes. P.S.: The finished pipe has a fantastic glass like shine which has been a hallmark finish from Dolly and the pipe looks very beautiful. This entire project has been very close to my heart for a reason and shall find a place of pride in my Les Wood collection.

I wish to thank readers of rebornpipes.com who have spared their valuable time in reading through this work. I look forward to your comments and suggestions for improvements. I wish to make a mention of one follower of Reborn Pipes who had been regularly in touch. However, since last month there has been no communication. If you are reading this blog my friend, a simple message of your well-being will be highly appreciated. Cheers…

Cleaning up one of my restorations from many years ago


Blog by Steve Laug

I have always liked the GBD 9438 shaped pipe and this one was one of the first that I picked up many years ago when I first started working on pipes. I found it at an antique shop. It was in the early days when I picked up most every pipe I found. I believe that like others I found in the early days this pipe cost me about $6CDN. Just remembering that reminds me how much things have changed over the years. It became a favourite shape of mine and over the years I have purchased many more 9438 pipes made by GBD for their main and their seconds lines such as Irwin and Dr. Plumb. I have added them to my collection. Here is a link to a blog I did on my collection back in 2013 (https://rebornpipes.com/2013/12/12/my-gbd-9438-saddle-stems-and-tapered-stem-rhodesians/). I have 12 – some were in rough shape and others not so bad. I have been sorting through my pipe collection and thinning out pipes that I am willing to part with. I have sold many already and others are currently on the store. For the most part these pipes have been early restorations and all need a bit of work to bring them up to my current standard. I have set aside three 9438 pipes that I decided to rework. The first of them is stamped on the left side Dr. Plumb [over] London Made. On the right side it is stamped London England [over] 943810. While it was very workable and I had actually smoked it quite a bit over the years I knew that original restoration on it was less rigorous than my current standards. So, before I listed it for sale I wanted to work it over again. I took photos of the pipe to give a sense of the beauty and the work that needed to be done. I took photos of the pipe’s bowl and rim top to show the moderate cake in the bowl and some damage to the inner edge of the bowl. There was also burn damage on the rim top and darkening on the rear and front right top of the bowl. I also took photos to capture the condition of the stem. You can see in the first photo below the dark dot on the top of the saddle. It was originally a Dr. Plumb style logo but over time it had darkened. Fortunately, I am not a biter or stem chewer so there were no deep tooth marks on the top and underside of the stem. There was some oxidation on the vulcanite stem and some chatter around the button.I took photos of the stamping on each side of the shank. It is readable and clear as noted above.I took the stem off the shank and took a photo of the look of the pipe. It really is a beauty.I decided to address the damage to the rim top and inner edge of the bowl. To deal with the burned inner edge of the rim and the rim top damage I lightly topped it on a piece of 220 grit sandpaper. I used a piece of 220 grit sandpaper on a wooden ball to give the rim top a light bevel. It took a bit of work to smooth out the damage and lightly bevel the inner edge of the bowl. I used a Cherry stain pen to restain the rim top and begin the process of blending it in. I reamed the bowl with a Savinelli Fitsall Pipe Knife to take out the cake. I removed ti back to bare briar. I sanded the bowl walls with a piece of 220 grit sandpaper wrapped around a dowel to smooth out the walls. It looked very good. No burn damage or checking on the bowl walls.I scrubbed out the shank and the stem with pipe cleaners, cotton swabs and alcohol to remove the tars and oils. The shank was dirty though the stem airway was not too bad. It cleaned up well. I sanded the bowl and rim top to clean up the damage and repairs to the edge and start the polishing of the bowl. I used 320-3500 grit sanding pads. I wiped the bowl down with a damp cloth after each pad. It really began to take on a shine. I polished the briar with micromesh sanding pads – dry sanding with 1500-12000 grit pads. I wiped it down after each sanding pad with a damp cloth to remove the sanding debris on the surface. I rubbed the bowl down with Before & After Restoration Balm. I worked it into the surface of the briar with my fingertips to clean, enliven and protect it. I let the balm sit for a little while and then buffed with a cotton cloth and shoe brush to raise the shine. I set the bowl aside and turned to address the stem. It was in good condition other than the light tooth chatter so I polished the vulcanite with micromesh sanding pads – 1500-12000 grit pads. I wiped it down with Obsidian Oil after each sanding pad. I used Before & After Pipe Polish – both Fine and Extra Fine to further polish the stem. I gave it a final coat of Obsidian Oil and set it aside to dry. This Dr. Plumb London Made 943810 Bent Rhodesian cleaned up much better this second time around and looks very good. The Before & After Restoration Balm brought the colours and grain out in the smooth finish on the pipe. It works well with the polished vulcanite saddle stem. I put the stem back on the bowl and carefully buffed the pipe with Blue Diamond on the buffing wheel using a light touch on the briar. I gave the bowl and the stem multiple coats of carnauba wax on the buffing wheel. I followed that by buffing the entire pipe with a clean buffing pad. I hand buffed the pipe with a microfiber cloth to deepen the shine. The finished Dr. Plumb London Made Rhodesian 943810 fits nicely in the hand and I think it will feel great as it heats up with a good tobacco. Give the finished pipe a look in the photos below. The dimensions of the pipe are Length: 5 ½ inches, Height: 1 ½ inches, Outside diameter of the bowl: 1 ¼ inches, Chamber diameter: ¾ of an inch. The weight of the pipe is 1.76 ounces/50 grams. I will be adding this one to the British Pipemakers Section of the rebornpipes store shortly. If you want to add it to your collection let me know. Thanks for reading this blog and my reflections on the pipe while I worked on it.

New Life for a 1961 Dunhill Shell Briar 252 Billiard 4S


Blog by Steve Laug

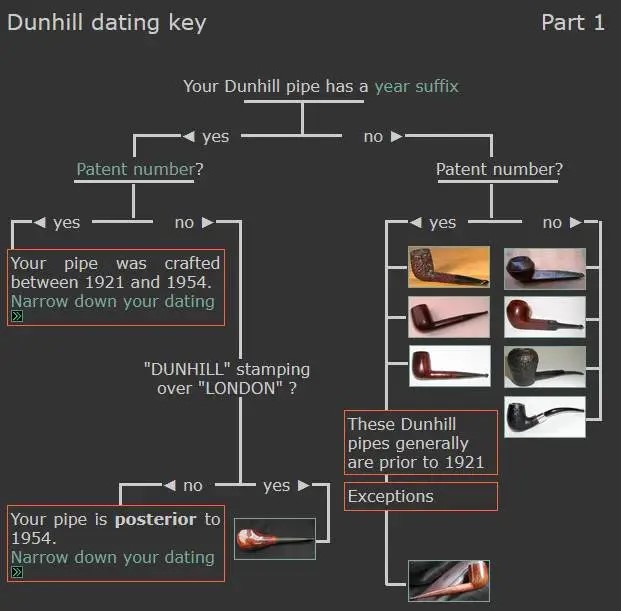
The next pipe on the table is a sandblast Dunhill Billiard. It had a taper, vulcanite stem with a white spot. We purchased it from a seller in Copenhagen, Denmark 02/02/2024. The pipe is stamped on the heel of the bowl and on the underside of the shank. On the heel of the bowl it is stamped with the shape number 252. That is followed with stamping on the shank Dunhill [over] Shell Briar. That is followed by Made in [over] England1. There is a 4 in a circle and an S which speak of the size of the pipe being a Group 4 and the finish S a Shell Briar. The rim has a thick lava coat filling in the sandblast. It is from the overflowing cake in the bowl. It is hard to assess the condition of the inner edge of the rim due to the cake and lava overflow. There were oils and grime ground into the bowl sides gives the finish a flat look. There is a deep sandblast showing through the grime. The vulcanite stem is oxidized, calcified, and dirty with grime and grit on the surface. There were scratches and some deep tooth marks on both the top and underside of the stem just ahead of the button. Jeff took photos of the pipe before he started his clean up work. I have included them below. He took photos of the pipe’s bowl and rim top to show the cake in the bowl and the lava coat overflowing onto the top. It is another dirty pipe. He also took photos to capture the tooth marks on the top and underside of the stem near the button. He took photos of the sides and heel of the bowl to show the rugged sandblast around the bowl and the amount of grime ground into the surface of the briar. He took photos of the stamping on the underside of the shank. It is faint in spots but still readable as noted above. I wanted to unpack the Dunhill stamping on the shank and work to understand each element of the stamp. I generally use the Pipephil site to gather as much initial information as possible (http://pipephil.eu/logos/en/dunhill/shell-briar1.html). The stamping is interpreted as follows: The number 252 is the shape number for a taper stem Billiard. The Shell Briar stamp refers to the finish. The superscript 1 following the D of England would give the date the pipe. The 4S is the size of the pipe and the finish. The photo below is of the stamping on a Don shape but the stamping is similar on this one.Pipephil also has some helpful dating keys on the site that are basically flow charts that you can walk through to date your pipe (http://pipephil.eu/logos/en/dunhill/cledat-en1.html). I turned to Part 1 of the Dating Key and followed the chart. This pipe has a superscript 30 following the D in England. There was no patent number so that took me to the section on the chart below (column one) which instructed me that the pipe could be dated as being made “posterior to 1954”. I followed the link under “Your pipe is posterior to 1954. Narrow down your dating”. That took me to Page 2 of the dating key (http://pipephil.eu/logos/en/dunhill/cledat-en1a.html). The second column (suffix 1…4) or (11…39) led me to the section with a 1 after the D in England. There was a directive for dating the pipe spelled out as follows: 1960 + suffix 1 which gives the pipe a date of 1961.I then turned to Pipedia’s section on Dunhill Shell Briar to get a bit of background on the Dunhill finishes (https://pipedia.org/wiki/Dunhill#Root_Briar). I quote:

Shell

A deep craggy sandblast with a black stain finish (usually made using Algerian briar) – the color of the stain used has varied over the years. Although there is some doubt as to them being the first to sandblast pipes, Dunhill’s Shell pipes, and the sandblasting techniques developed to create them are considered one of Dunhill’s greatest and most lasting contributions to the art of pipe making.

The documented history of Dunhill’s inception of the Shell is largely limited to patent applications — there are no catalog pages or advertisements promoting blasted pipes at the time. The preliminary work on the English patent (No. 1484/17) was submitted on October 13, 1917. The patent submission was completed half a year later, on April 12, 1918, followed by the granting of the English patent on October 14, 1918. This was less than a month before the end of The Great War on November 11th.

In 1986 Dunhill released a line of premium Shell finish pipes – “RING GRAIN”. These are high-quality straight grain pipes which are sandblasted. Initially only Ring Grain, but now in two different finishes. In 1995 the “Shilling” was introduced with Cumberland finish – it is an extremely rare series. These pipes exhibit a deeper blast characteristic of that of the 1930’s – mid-1960’s (and the limited ‘deep blast’ pipes of the early 1980s) and show a fine graining pattern. These are considered the best new Dunhills by many enthusiasts today and are very rare. The finish is sometimes described as tasting like vanilla at first, with the taste becoming more normal or good as the pipe breaks in.

I turned to work on the pipe itself. Jeff had done an amazing cleanup of the pipe. He reamed the light cake with a PipNet reamer and cleaned up that with a Savinelli Fitsall Pipe Knife. He scrubbed the internals of the bowl and stem with alcohol, cotton swabs,pipe cleaners and shank brushes. He scrubbed the externals with undiluted Murphy’s Oil Soap and rinsed the bowl off with running water. He soaked the stem in Briarville’s Pipe stem Deoxidizer and once it had soaked rinsed it off with warm water to remove the residual solution. He dried it off and rubbed it down to remove any oxidation that was still on the stem. The pipe looked very good when I received it. I took a photo of the rim top to show the condition. It looks pretty good with the tars and oils removed from the rim top. The inner edge of the bowl was slightly damaged and out of round. The bowl itself was very clean. The stem came out looking quite good with deep tooth marks and chatter on both sides ahead of the button. I took a photo of the underside of the shank to show the stamping. The photo shows the stamping and is actually more readable in person. I removed the stem from the shank and took a photo of the pipe parts to show what I was working with. It is a nice looking pipe.I sanded the inside of the rim top with a folded piece of 220 grit sandpaper to smooth out the damage to the edge. I stained the sanded edge with a Walnut stain pen to blend it into the surrounding briar surface. It looked much better. I rubbed the briar down with Before & After Restoration Balm. I worked it into the surface with my fingertips and a horsehair shoe brush to work it into the nooks and crannies of the sandblast finish. The product works to clean, enliven and preserve the briar. I let it sit for 10 minutes then I buffed it with a cotton cloth to deepen the shine. The pipe really comes alive with the balm. I set the bowl aside and turned to address the stem issues. I “painted” the surface of the stem with the flame of a Bic lighter. I was able to lift the marks on the stem top leaving light marks but the ones on the bottom side were much deeper and the flame lifted them slightly but they still remained. I filled in the marks that remained with clear CA glue. Once the repair cured I flattened the repair with a small file. It looked much better. I cleaned up the repairs with a folded piece of 220 grit sandpaper. I was able to flatten them and blend them in very well with the surface of the vulcanite. I sanded it with 320-3500 grit sanding pads. I wiped it down after each sanding pad with a damp cloth. By the final 3500 grit sanding pad the rim top had a shine.I polished the vulcanite with micromesh sanding pads – 1500-12000 grit pads. I wiped it down with Obsidian Oil after each sanding pad. I used Before & After Pipe Polish – both Fine and Extra Fine to further polish the stem. This 1961 Dunhill Shell Briar 252 Billiard Vulcanite taper stem has a beautiful, unique Dunhill Sandblast finish that is very deep and craggy. The Shell Briar mixed brown finish highlights some great grain around the bowl and shank. It has a unique sandblast that Dunhill specialized in making. The polished vulcanite taper stem adds to the mix. I put the stem back on the bowl and buffed the pipe with Blue Diamond on the buffing wheel being careful to not buff the stamping. I gave the bowl multiple coats of Conservator’s Wax and the stem multiple coats of carnauba wax on the buffing wheel and followed that by buffing it with a clean buffing pad. I hand buffed the pipe with a microfiber cloth to deepen the shine. The finished Dunhill Shell Briar 252 Billiard is quite nice and feels great in the hand. Give the finished pipe a look in the photos below. The dimensions of the pipe are Length: 5 ½ inches, Height: 1 ¾ inches, Outside diameter of the bowl: 1 ¼ inches, Chamber diameter: ¾ of an inch. The weight of the pipe is 1.23 ounces/.35 grams. Thanks for walking through the restoration with me as I worked over another beautiful pipe. This one will be going on the rebornpipes store in the English Pipe Makers Section. Thanks for your time.

Restoring a Nicely Grained Churchill 999 Imported Briar Pot


Blog by Steve Laug

Last week I received a text from Robert about restoring three pipes his brother had found in Eastern New York. There were two Kaywoodies and a Churchill. The Kaywoodies included a small apple stamped Campus and an octagonal pipe stamped Kaywoodie Standard. The Churchill was a 999 Pot shaped pipe. He sent along two photos of the pipes. You can see the condition of the three pipes. They are dirty and worn. The last pipe in the photo, the Campus has what appears to be a broken shank and a potential repair. It looks to be poorly done. Robert said that he was fairly certain that the stem was glued onto the shank with the repair. On Saturday he brought the pipes by for me to look at. I now had three more pipes to clean up and repair. The Churchill 999 Pot and the Kaywoodie Standard Oxagonal 44 Apple were dirty but were in good repair. I had finished the little KW Campus repair and the pipe looked good (https://rebornpipes.com/2024/04/21/repairing-and-restoring-a-kaywoodie-campus-apple/). I also cleaned up the second Kaywoodie, the Octagonal Apple and it looked good. Here is the link to that blog (https://rebornpipes.com/2024/04/22/restoring-a-kaywoodie-standard-octagonal-44-apple/). There was a moderate cake in the bowl with tobacco debris. There was a coat of lava on the rim top that was quite thick and the inner edge showed some damage. The outer edge looked very good. The finish was dirty but otherwise showed some nice grain underneath. The stamping on the pipe is very simple. On the left side of the shank it is stamped Churchill’s arched over 999 with Imported Briar underneath. The stem was very oxidized and there was light tooth chatter on both sides ahead of the button. The stem was also plugged with tars and debris in the slot and airway was narrowed down.

I have worked on several Churchill pipes over the years and have done research on the brand when I worked on them. Here is a link to one of them that I had worked on. Here is the link to the blog (https://rebornpipes.com/2013/09/08/churchills-bent-pot/). I am including that information below.I am fairly certain that the pipe came from Churchill’s Tobacco Shop in Norwich, England. I found the following information on the Pipes and Logos website http://pipephil.eu/logos/en/logo-c4.html On the site there is a small paragraph which I have copied as follows: “Churchill’s Tobacco shop is situated in St Andrew’s Street at the corner of Bridewell Alley in Norwich, England. The shop was next to a church and at the bottom of two hills, and that’s how it became “Churchill’s”. Former manager: John Elvin (retired on May, 31 2008). Current owner (2008): Keith Garrard.” I have included these pictures from that website as they show the stamping on both the shank and stem that is identical to the pipe that I have just refurbished.According to the Churchill’s website it is the last remaining specialist tobacconist in Norwich, originally standing at 32 St Andrews Street for over 23 years. http://www.churchillsofnorwich.com/index.php?_a=viewDoc&docId=1 The site also notifies the shop’s clients that Keith Garrard, who had a wealth of knowledge and was an avid pipe and cigar smoker himself, passed away on 23rd March 2012. His wife Coral continues to maintain the business in his honour.

I took photos of the pipe when I brought it to the worktable. I wanted to show the general condition of the pipe before I started my work on it. You can see the cake in the bowl and the lava on the rim top. The rim top appears to be good under the lava. The stem is dirty and heavily oxidized as noted and light tooth marks are on the top and underside ahead of the button. I took some close up photos of the rim top and the stem surface. I wanted to show the condition of both more closely. The rim top and the inner and outer edges of the bowl heavily cake in lava and you can see the marks on the inner bowl edge. I also took close up photos of the stem to show the oxidation and the light tooth marks on the stem surface. I took a photo of the stamping on the left side of the shank and it is clear and readable. It is stamped as noted above. I removed the stem for the shank and took a photo of the bowl and stem to give a picture of what it looked like. Now it is time to clean up the pipe. I reamed the bowl with a PipNet pipe reamer and the second cutting head. It cleaned up most of the cake. I used a Savinelli Fitsall Pipe Knife and cleaned up the remaining cake leaving bare briar. I sanded the bowl walls with 220 grip sandpaper wrapped around a piece of dowel. I smoothed out the bowl walls and they looked very good. There was no heat damage or checking on the walls. I scrubbed the exterior of the bowl and shank with a tooth brush and undiluted Murphy’s Oil Soap. It works exceptionally well to remove unwanted oils from the briar and also the grime on the rim and the bowl sides. I rinsed it in warm water while scrubbing with the tooth brush. The pipe looks very good at this point. The rim top is clean enough to know the condition it is in and what I need to do to deal with it. There are scratches and nicks on the rim top and they are very visible now that the lava has been removed. I scrubbed out the shank and the stem with pipe cleaners, cotton swabs and alcohol.
I gently topped the bowl to remove the damage on the rim top and to minimize it on the rear edge where the most damage was. I used a topping board and 220 grit sandpaper.There was some damage and wear on the front outer edge of the bowl. Built it up with CA glue and briar dust to fill in the damage. I smoothed out the damage with 220 grit sandpaper and reshaped it to follow the flow of the bowl. I sanded it further with 320 grit sandpaper to smooth out the repair. It really started to look very good.I touched up the stain on the rim top and on the front of the bowl with a Walnut stain pen. It is a little streaky at this point. It will work better when I finish the sanding and polishing of the rim and bowl.I sanded the bowl and rim top to clean up the damage and repairs to the edge and start the polishing of the bowl. I used 320-3500 grit sanding pads. I wiped the bowl down with a damp cloth after each pad. It really began to take on a shine. I polished the briar with micromesh sanding pads – dry sanding with 1500-12000 grit pads. I wiped it down after each sanding pad with a damp cloth to remove the sanding debris on the surface. I rubbed the bowl down with Before & After Restoration Balm. I worked it into the surface of the briar with my fingertips to clean, enliven and protect it. I let the balm sit for a little while and then buffed with a cotton cloth and shoe brush to raise the shine. I set the bowl aside and turned to address the stem issues. I scrubbed the stem oxidation with Soft Scrub and cotton pads. I was able to remove the majority of the oxidation. Then, I sanded it with a folded piece of 220 grit sandpaper. It looked much better at this point. To remove the remnants of oxidation from the vulcanite I sanded it with 320-3500 grit sanding pads. I wiped it down after each sanding pad with a damp cloth. By the final 3500 grit sanding pad the rim top had a shine.The stem was in good condition so I polished the vulcanite with micromesh sanding pads – 1500-12000 grit pads. I wiped it down with Obsidian Oil after each sanding pad. I used Before & After Pipe Polish – both Fine and Extra Fine to further polish the stem. I gave it a final coat of Obsidian Oil and set it aside to dry. This Churchill 999 Imported Briar Pot cleaned up really well and looks very good. The Before & After Restoration Balm brought the colours and grain out in the smooth finish on the pipe. It works well with the polished vulcanite taper stem. I put the stem back on the bowl and carefully buffed the pipe with Blue Diamond on the buffing wheel using a light touch on the briar. I gave the bowl and the stem multiple coats of carnauba wax on the buffing wheel. I followed that by buffing the entire pipe with a clean buffing pad. I hand buffed the pipe with a microfiber cloth to deepen the shine. The finished Churchill 999 Pot fits nicely in the hand and I think it will feel great as it heats up with a good tobacco. Give the finished pipe a look in the photos below. The dimensions of the pipe are Length: 5 ¼ inches, Height: 1 ½ inches, Outside diameter of the bowl: 1 ¼ inches, Chamber diameter: 7/8 of an inch. The weight of the pipe is 1.13 ounces/32 grams. I know Robert is going to enjoy this last pipe of the three once I return them to him. Thanks for reading this blog and my reflections on the pipe while I worked on it.

Restoring a Kaywoodie Standard Octagonal 44 Apple


Blog by Steve Laug

Last week I received a text from Robert about restoring three pipes his brother had found in Eastern New York. There were two Kaywoodies and a Churchill. The Kaywoodies included a small apple stamped Campus and an octagonal pipe stamped Kaywoodie Standard. The Churchill 999 Pot shaped pipe. He sent along two photos of the pipes. You can see the condition of the three pipes. They are dirty and worn. The last pipe in the photo, the Campus has what appears to be a broken shank and a potential repair. It looks to be poorly done. Robert said that he was fairly certain that the stem was glued onto the shank with the repair. On Saturday he brought the pipes by for me to look at. I now had three more pipes to clean up and repair. The Churchill 999 Pot and the Kaywoodie Standard Oxagonal 44 Apple were dirty but were in good repair. I had finished the little KW Campus repair and the pipe looked good (https://rebornpipes.com/2024/04/21/repairing-and-restoring-a-kaywoodie-campus-apple/). I looked second Kaywoodie, the Octagonal Apple over carefully and this is what I saw. There was a thick cake in the bowl with tobacco debris. There was a coat of lava on the rim top that was quite thick but the inner edge looked very good. The outer edge had some damage on the back side above the shank bowl union. The finish was dirty but otherwise showed some nice grain underneath. The stem was dirty with light tooth chatter on both sides ahead of the button.

Dal had worked on a Kaywoodie Standard, but shape 33 and done a fair bit of research on the pipe (https://rebornpipes.com/2020/03/23/new-life-for-a-kaywoodie-standard-apple-for-a-special-pipe-woman/). I have included the link above if you would like to read it. I have copied the pertinent portion on the 2 digit shape numbers and dating of the pipe below.

The next picture in this set shows the Kaywoodie shape number ‘33’ on the right flank of the shank which points to the designation of a ‘Large Apple’ from the US production of Kaywoodie pipes (LINK).  According to this discussion on Tapatalk.com, the 2-digit system, employed from 1927 to 1972 when the system was changed to a 3-digit system, was when pipe production (for Kaywoodie, Yello-Bole and Medico) was moved to the Medico factory in Richmond Hill Queens NY as plans for new plant were in process.  The 3-digit numbers was used during this period for all Kaywoodie and Medico pipes, from 1972 to 1980.  The same article indicated that the 2-digit numbers were only for Kaywoodies produced in the US – that Kaywoodie of London (Cadogan) had their own three-digit system.  Putting all the information together, this Kaywoodie Apple is most likely a 1960s vintage.  According to the Kaywoodie Discussion at MyFreeForum the ‘Standard’ line of Kaywoodie started in the 1950s, but with the 2 digit shape number and the 3 hole stinger, the evidence points to the 1960s dating.

I included a portion of the shape number chart from Pipedia and the link to the chart as well (https://pipedia.org/wiki/Kaywoodie_Shape_Numbers). I did a screen capture of the section with the shape 44 number. It is interesting in that the shape was available for only a few years – 1965 to 1970. That helps narrow down the date on the pipe I am working on. It also identifies it as an Octagon Apple.I also have included a portion of a chart with the pipe line names and the approximate date of manufacture below (https://pipedia.org/images/3/3d/Kaywoodie_Pipe_Names.pdf). It identifies the date of the Standard line production between 1950 and the present.I learned that the line was introduced in 1950 and the specific shape I had in hand was made between 1965 and 1970. The tenon/stinger was a typical Drinkless type and was threaded to screw into the fitment in the shank. From that I knew that I was working on an older pipe.

I took photos of the pipe when I brought it to the worktable. I wanted to show the general condition of the pipe before I started my work on it. You can see the cake in the bowl and the lava on the rim top. The damage on the back edge of the rim top is also visible. The stem is dirty and lightly oxidized as noted and light tooth marks are on the top and underside ahead of the button. I took some close up photos of the rim top and the stem surface. I wanted to show the condition of both more closely. The rim top and the inner and outer edges of the bowl heavily cake in lava and you can see the marks on the back outer edge. I also took close up photos of the stem to show the general dullness of the stem and the light tooth marks on the stem surface. I took a photo of the stamping on the left side of the shank and it is clear and readable. It is stamped as noted above. The right side has the shape number but it is almost filled in with dirt. It is still readable but I could not capture it in a photo. I removed the stem for the shank and took a photo of the bowl and stem to give a picture of what it looked like.Now it is time to clean up the pipe. I reamed the bowl with a PipNet pipe reamer and the second cutting head. It cleaned up most of the cake. I used a Savinelli Fitsall Pipe Knife and cleaned up the remaining cake leaving bare briar. I sanded the bowl walls with 220 grip sandpaper wrapped around a piece of dowel. I smoothed out the bowl walls and they looked very good. There was no heat damage or checking on the walls. I scrubbed out the shank and the stem with pipe cleaners, cotton swabs and alcohol. I cleaned up the stinger with pipe cleaners, cotton pads and alcohol.I scrubbed the exterior of the bowl and shank with a tooth brush and undiluted Murphy’s Oil Soap. It works exceptionally well to remove unwanted oils from the briar and also the grime on the rim and the bowl sides. I rinsed it in warm water while scrubbing with the tooth brush. The pipe looks very good at this point. The rim top is clean enough to know the condition it is in and what I need to do to deal with it. I gently topped the bowl to remove the damage on the rim top and to minimize it on the rear edge where the most damage was. I used a topping board and 220 grit sandpaper.I repaired the outer edge of the rim at the back with clear CA glue and briar dust. I sanded it smooth with a folded piece of 220 grit sandpaper to start blending the repair into the rest of the briar. It was smooth to touch and did not stand out as a dark repair.I sanded the bowl and rim top to clean up the damage and repairs to the edge using 320-3500 grit sanding pads. I wiped the bowl down with a damp cloth after each pad. It really began to take on a shine. I polished the briar with micromesh sanding pads – dry sanding with 1500-12000 grit pads. I wiped it down after each sanding pad with a damp cloth to remove the sanding debris on the surface. I rubbed the bowl down with Before & After Restoration Balm. I worked it into the surface of the briar with my fingertips to clean, enliven and protect it. I let the balm sit for a little while and then buffed with a cotton cloth and shoe brush to raise the shine. I set the bowl aside and turned to address the stem issues. I “painted” the stem surface with the flame of a lighter. I filled in the deep tooth marks with black CA glue. Once it cured I sanded it flat to the stem surface with a folded piece of 220 grit sandpaper. It looked much better at this point. To blend the repairs into the surface of the vulcanite I sanded it with 320-3500 grit sanding pads. I wiped it down after each sanding pad with a damp cloth. By the final 3500 grit sanding pad the rim top had a shine. The stem was in good condition so I polished the vulcanite with micromesh sanding pads – 1500-12000 grit pads. I wiped it down with Obsidian Oil after each sanding pad. I used Before & After Pipe Polish – both Fine and Extra Fine to further polish the stem. I gave it a final coat of Obsidian Oil and set it aside to dry. This Kaywoodie Standard Imported Briar 44 Octagonal Apple cleaned up really well and looks very good. The Before & After Restoration Balm brought the colours and grain out in the smooth finish on the pipe. It works well with the polished oval vulcanite taper stem. I put the stem back on the bowl and carefully buffed the pipe with Blue Diamond on the buffing wheel. I gave the bowl and the stem multiple coats of carnauba wax on the buffing wheel. I followed that by buffing the entire pipe with a clean buffing pad. I hand buffed the pipe with a microfiber cloth to deepen the shine. The finished Kaywoodie Standard 44 Octagonal Apple fits nicely in the hand and I think it will feel great as it heats up with a good tobacco. Give the finished pipe a look in the photos below. The dimensions of the pipe are Length: 5 ½ inches, Height: 1 ½ inches, Outside diameter of the bowl: 1 ¼ inches, Chamber diameter: ¾ of an inch. The weight of the pipe is 1.34 ounces/38 grams. I know Robert is going to enjoy this second pipe of the three once I return it to him with the other pipes he dropped off. Thanks for reading this blog and my reflections on the pipe while I worked on it.