Monthly Archives: September 2015

y how things change: Reflections on Pipe Smoking while visiting Budapest


Blog by Steve Laug

I have just returned from being in Berlin and in Budapest. I spent just over a week in Budapest and had a great time there. While I was there I was able to sit in a variety of sidewalk cafes and café terraces and enjoy dinner, a pipe and a drink in all of them with no issues. It was a delight to either end a meal with a pipe or sit and sip a new brew while enjoying a bowl.Budapest1 
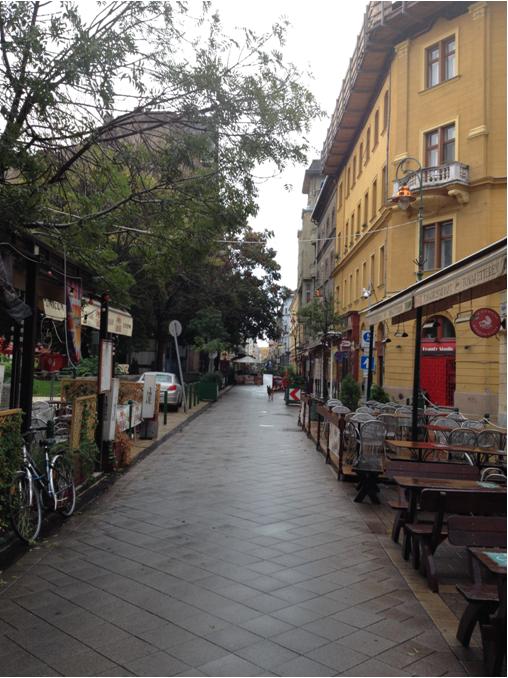
While I was there met other pipe smokers and found them friendly and helpful. I visited two of the pipe shops I have written about before on the blog – Gallwitz and the Pipetorium. When I visited here 5 years ago these both were amazing pipes shops in their own right. They were very different but they both are connected with good memories of that first trip. However this time when I visited them they had undergone significant change. These changes brought to mind some questions for me on the health of pipesmoking in Budapest.Budapest2 
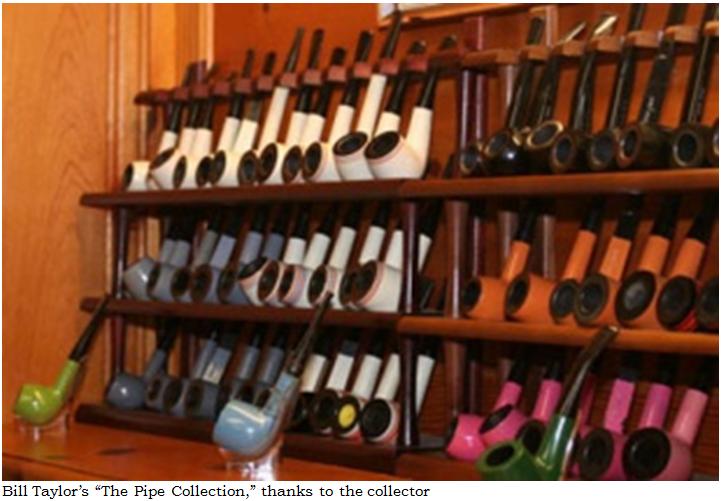
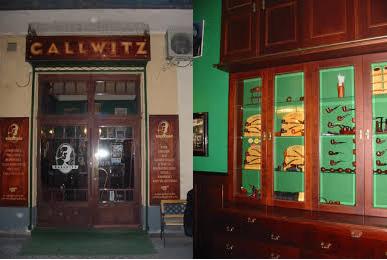
The Gallwitz shop looked the same on the outside but once I opened the door and went in it was obvious that things were not the same. The shop was reduced to almost half of its original size. I was quite shocked when I walked in the front door to see how small it had become. When I was there previously the shop was the quintessential European pipe shop. The walls were lined with cabinets and display drawers. The back of the shop had a low counter and a pipe craftsman sat in residence there. He was not only the shop keeper but a pipe maker in his own right. He “reigned” in this shop with dignity and an age beyond his years. The photos below show what the shop used to look like. I hope that these will give you a picture of what I had in my memories of the previous visit. It was a veritable treasure trove of pipe history in Budapest and a must stop for all who love the pipe and all things pipe.Budapest3 
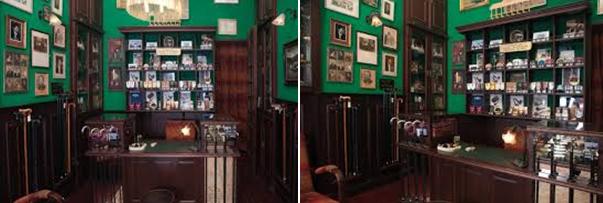
This time the many pipes both estate and new had been reduced. The drawers of pipes were less and they contained fewer examples and brands. The back wall which had earlier been filled with a variety of tinned and pouch tobacco was missing. The shop looked like it had been emptied of its aged dignity. The pipe maker was gone from the low counter. Instead it appeared that the owner (a man more my own age) was now present. I could see that things were not doing well. In speaking with him I found out that the government was making it almost impossible for him to make a living with his shop. He said that they took away tobacco sales and nationalized them. His shop could no longer sell tobacco. He seriously wondered how long he could survive. Listening to him and looking at his shop I too wonder if it will be here next time I come to Budapest.

To illustrate how much things have changed there on the Vaci Utca I want to point out some of the differences that five years have made. This street is the tourist hub of the city. It contains high end shops and restaurants as well as the assorted tourist shops. There were many small tobacco shops here when I came five years ago. For instance just across the street and around the corner from Gallwitz there used to be a Davidoff shop. It was no longer there. In its place was government tobacco shop with cigarettes, drinks and candy with a limited selection of cigarillos, a small assortment of Cuban cigars, maybe 8 different pouched tobaccos and roll your own tobaccos and cigarette papers. The ambience of the elegant Davidoff shop was gone as were its humidors and shop clerks. Many of the other shops were either gone or changed to the innocuous government tobacco shops with little tie to the past that had been there before. I wonder about the state of the historic shops in Budapest and am pretty sure they will be gone when I return again to this beautiful city.

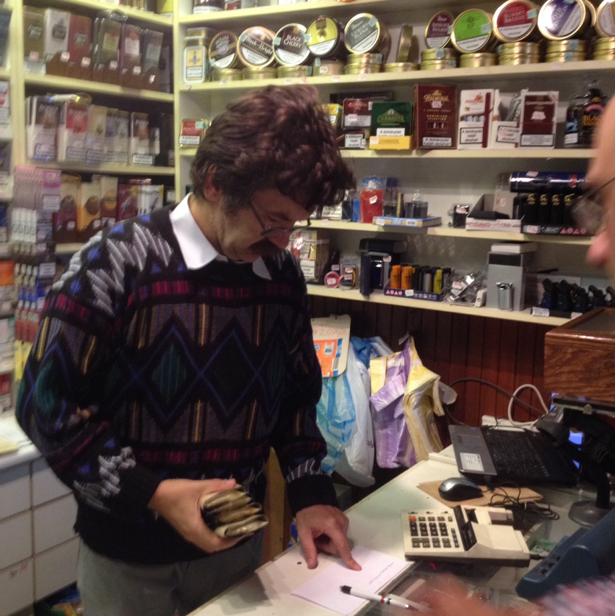
A few days later after work, one of my Hungarian colleagues, who is also a pipe smoker took me to visit the Pipetorium. This shop was a sweet memory to me of my last visit to Budapest. I was hoping that the unique little shop with its hobbit like shop keeper had not changed. The following three photos are pictures of what the shop looked like the last time I visited Budapest.Pipetorium1 Pipetorium2 Pipetorium3
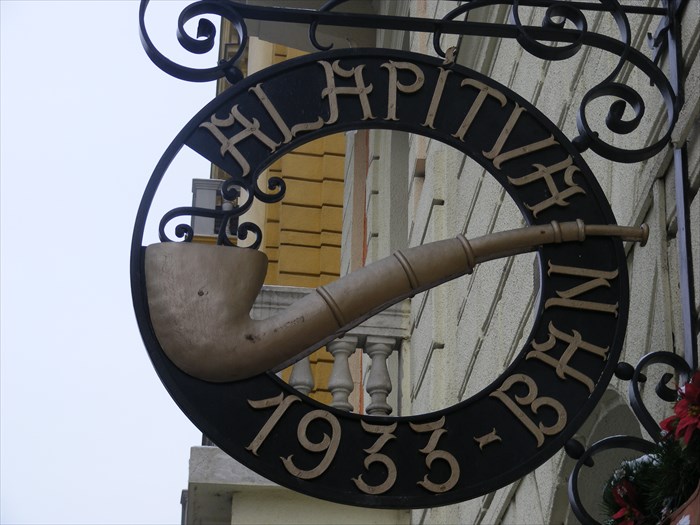
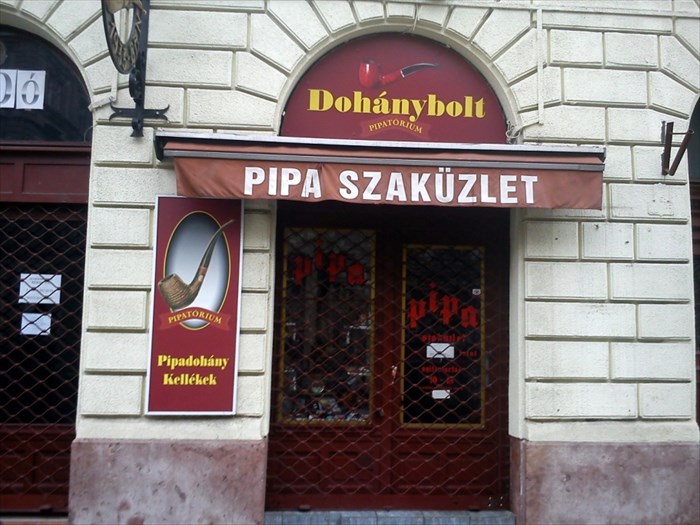
When we came to the location of the shop I was surprised. I would easily have walked right by without knowing that I had missed it. The unique classic pipe sign was gone and in its place was the circular government tobacco shop sign. The display windows were painted over as was the glass door. Pipetorium6
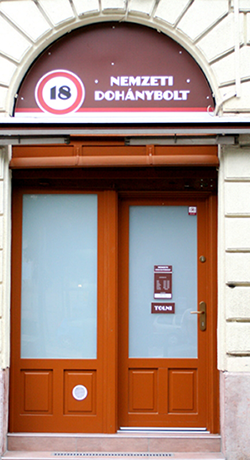
My friend and I pushed open the door and I was expecting the worst. Would the shop be but a memory of my last visit, like the Gallwitz shop? I was not sure. The painted windows and door had darkened the inside but thankfully it remained much the same. The hobbitlike owner who I had met previously still sat behind his counter. The difference this time is that I had a Hungarian with me so we could actually visit. The previous time we had managed with few words. This time we visited and talked about the state of his shop. He told me that he was saddened by the changes that had been forced upon him by the government regulations. He said that he was still surviving. I purchased some pipe cleaners that he manufactured and some tobaccos to pass on to friends before leaving the shop. I looked around at the displays of pipes and tobaccos and wondered if this shop would be here the next time I came to Budapest. Time would tell.Pipetorium1

Pipetorium2 On the last day in Budapest I took a walk further down the Vaci Utca looking for some gifts for my daughters and hoping to see one last tobacco shop that had been there on my previous visit. It was called the Cigar Tower and was a tall round building that stood on a corner street just off the Vaci. When I had been there in the past it had display windows that advertised the pipes, cigars and tobaccos that filled the shop. There was a lovely cigar/smoking lounge on the upper floors. It was an interesting place to visit before but had none of the quaint ambience of the old pipe shop. It was more of a cigar shop that sold a few pipes – but at least it had that. When we walked by I looked at the windows and saw that the same government regulations had attached themselves to this shop. The windows and doors were painted over and the obnoxious government signs now cover them. The display windows are dark. The inside also was darker and the selection had deteriorated much as the other shops. There were fewer pipes and a smaller selection of tobaccos than before. Even the cigar selection had been reduced. It had changed from a unique shop to ugly one. I did not even bother checking out the lounge on the upper floors. The windows had also been painted over and looked dark. I had no desire to lose the memory I had of sitting and enjoying a pipe and a drink there. These were indeed sad times for tobacconists and lovers of the old pipe shops in Hungary. Things had changed and I was left wondering if they would survive the change. Would even this shop remain the next time I was in Budapest.Pipetorium3 
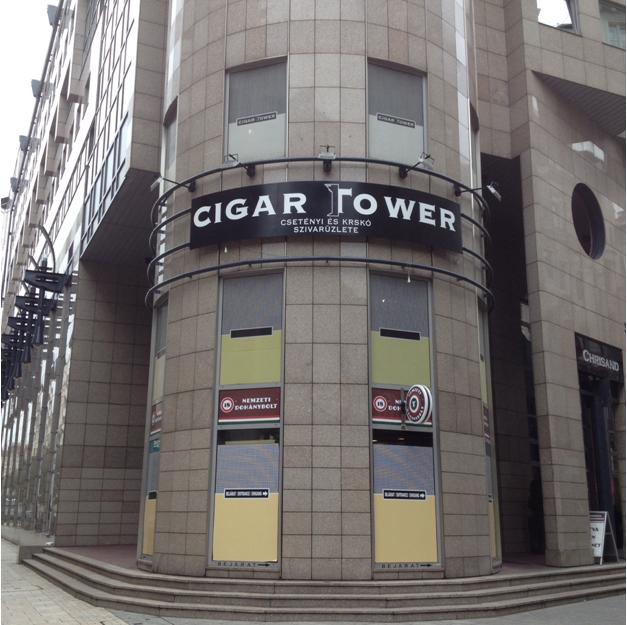
After visiting these old memories and feeling the very real loss of what used to be I sat and smoked a bowl and had a pint at one of the sidewalk cafes near my hotel. It is such a contrast to experience this time in Budapest. While there is distinctly a freedom to smoke a pipe that is very much alive here there is also the sad reality that the pipe shops have declined under oppressive regulations. Things look good at first glance as you sit in a café enjoying your pipe but once you make the rounds to the shops and speak to the shopkeepers and owners you see that things are not as good as they appear. Will there be any pipe shops in Budapest next time I come? I have no idea really. But I am hoping in the years ahead that there will be new shops who figure out how to survive the regulations and thrive as unique glimpses into the past. I am also hoping that the government does not follow the path that the Canadian government has and ban smoking from the sidewalks and cafes. This would truly be sad and a real loss of personal freedom.

I am home in Vancouver now and missing the sidewalk cafes and the pleasure of a pint and a pipe in the quaint ambience that is found in those spaces in Budapest. I am left wondering if they will be there the next time I am in Budapest or whether they too will be lost to the back reaches of my memory.

Repairing a Broken Shank on an LHS Park Lane DeLuxe — Lovat 12


Blog by Steve Laug

I came home from a two-week work trip to Berlin and Budapest to find a package from Troy Wilburn waiting for me. It contained a beautiful little LHS Park Lane De Luxe Lovat shape 12 that we had been speaking about before the trip. I am a sucker for LHS pipes and really like the Park Lane series as they have a quiet elegance about them. The shank on this one had broken near the bowl. Fortunately it was a clean break and not splintered or chipped. The repair on these has become pretty straight forward for me. I have learned a few tricks in joining the parts of a broken shank together from the Frankenpipes that I have crafted. That was their purpose and their schooling has paid off on quite a few of these shank repairs for me. The Park Lane had a Bakelite stem (at least I think it is Bakelite as it feels and acts different from Cumberland). The next two photos show the snapped shank.LHS1

LHS2 Just as I suspected I had a piece of brass tubing that was the perfect size and fit for the repair. I used a file to cut grooves into the tube and to roughen the surface for the glue to have something to hold onto when I glued it in the shank.LHS3

LHS4 I cleaned out the airway on both sides of the broken shank to remove debris and to give a good clean surface for the glue to bond with. To check the size and the fit of the tube in the two parts of the shank I inserted it in the bowl end of the break and then twisted the shank end onto it. The fit was perfect and once glued the repair should be solid.LHS5 I mixed some epoxy and applied it to the metal tube being careful to not get any inside of the airway. I inserted it into the bowl side of the break. I left slightly over half of the tube extending so that when I put the shank piece in place there would be enough of the metal tube to strengthen the repair on that end.LHS6

LHS7 When the epoxy set and the tube was solidly in place I painted some more of the epoxy on the opposite end of the tube and a little on the briar surface of each side of the break. I have learned not to overdo the glue on the briar as it is a pain to remove from the wood when it dries. I twisted the shank piece in place, lined it up and pressed it in place against the bowl side. I held it firmly until the quick set epoxy set and that portion of the repair was finished.LHS8

LHS9

LHS10

LHS11 I pushed some fine briar dust into the small space that remained around the surface of the crack and then filled it with clear super glue. I applied it with the point of a dental pick so as not to get too much glue on the briar.LHS12

LHS13

LHS14

LHS15 I sanded the repaired area carefully with a folded piece of worn 220 grit sandpaper to remove the excess glue and briar dust from the patch. Then I sanded with a fine grit sanding sponge to remove the scratches. I used a medium brown coloured stain pen to touch up the sanded area around the patch. I cleaned out the shank with a pipe cleaner to make sure that there was no glue in the tube.LHS16

LHS17

LHS18

LHS19 The stem was slightly under clocked. I heated the stinger with a lighter until the glue in the stem softened and then carefully screwed it into the shank while holding the shank. I was able to align it perfectly with the shank.LHS20 With that completed, the repairs to the pipe were finished. The stem was in the right position. The cracked shank repaired and strengthened with an inner tube. All that remained was to clean up the surface of the pipe and give it a coat of stain to blend in the sanded areas around the repairs. I also needed to do some work on the stem with micromesh to raise the shine and polish the Bakelite. (I rarely use the buffer on these older LHS stems as I do not want to risk it. I would rather polish them by hand than damage them.)LHS21

LHS22 I wiped the bowl and shank down with alcohol on a cotton pad to remove the grit and grime on the surface of the bowl and to remove the remaining finish.LHS23

LHS24 I cleaned off the tars on the stinger with 0000 steel wool. I wet sanded the stem with 1500-2400 grit micromesh sanding pads and then rubbed it down with Obsidian Oil. I continued to dry sand the stem with 3200-4000 grit pads and then gave it another coat of oil. I finished with the final three grits of micromesh – 6000-12000 – and gave it a final coat of Obsidian Oil. Once the oil dried I gave the stem some coats of Paragon Wax and hand buffed it with a microfibre cloth.LHS25

LHS26

LHS27 I gave the bowl a rubdown with some olive oil and then buffed it out. I touched up the light areas of the stain on the repaired shank with a dark stain pen and then rubbed a little more oil onto the shank. I buffed the pipe with Blue Diamond and then gave it several coats of carnauba wax. I buffed it with a clean flannel buff and then hand buffed it with the microfibre cloth. The finished pipe is shown below. I am hoping to put it in the mail later today or tomorrow to get it back to Troy.LHS28

LHS29 There was some light damage to the rim surface. I decided to leave it alone as it was not enough to top the bowl. It gives character to this old pipe.

LHS30

LHS31

A Quick Refurb of a BBB 2 Star Billiard


I love BBB pipes. They are great smokers and generally great pieces of briar.

I found this BBB 2 Star Billiard at a local antiques and collectibles sale. It was in rather good shape other than a very tarry rim with a few visible dents. The stampings were crisp – the BBB 2 Star logo on the left shank, with “London Made” over “385” on the right shank. The original stem was intact, along with its own BBB logo stamping. The stem had a small bit of oxidation, mainly around the button.

20150915_19043420150915_19044120150915_19055920150915_19065220150915_19080420150915_19081020150915_190837

I decided that the stummel was clean enough to bypass my usual isopropyl alcohol soak; instead, I used alcohol-dipped cotton pads to wipe down the exterior of the briar. This cleaned things up nicely and removed the old finish in the process.

20150915_193433

I reamed the thin cake from the bowl and then cleaned the airway and mortise with alcohol and pipe cleaners. As you can see, it didn’t take a lot of…

View original post 315 more words

A No-Account, Son-of-a-Gun, Sorry Excuse for a Bent Billiard


Guest Blog by Robert M. Boughton
Member, North American Society of Pipe Collectors
http://www.naspc.org
http://www.roadrunnerpipes.com
http://about.me/boughtonrobert
Photos © the Author

“Pipes are like dogs: the smokin‘ man’s best friend. Why, you can cuss at ’em, shout out loud about the state of the world to ’em, carry on all you like ’til yer blue in the face an‘ sore in the jaw about how great the whole place would be if only you was in charge, heck, even put ’em out of mind and ignore ’em altogether…for a while. In fact, a perfectly good, loyal pipe, same as an old coonhound, will even put up with a might mess of outright scandalous behavior an‘ never even consider turnin‘ on you – say, like as if the dog was to chomp off yer ignorant head or the pipe up an‘ went to dumpin‘ hot, burnin‘ ash in yer lap all on its own…But Heaven help the man that treats either his pipe or dog like garbage to be thrown in the dumpster or a bug to be stomped on. He’ll end up with a companion called Cujo if it doesn’t find a better master in time to escape. The pipe or the dog, that is.”
― The Author, in “Musings of a Mind Bored Silly by a Roommate with ADHD Who Just Doesn’t Know the Meaning of Silence Is Bliss,” today

INTRODUCTION
My friend, Phil, he’s a heck of a nice guy. He’s a real big fella – six-three, 280 pounds or right there in the ballpark – and one of the smartest dudes you could ever meet. Now by smart I’m not implicating he’s got some big old stuffy nansy-pansy degree from any of your fancy-schmancy Poison Ivy Universities, with a capital U, back east somewheres, or anyplace else, for all that matters. What would he need with some piece of paper, outside of hangin it one of his walls? Now that’s the day I’d like to see! And if he was the type to frame up a piece of paper all marked with gibberish scrawling like the tests I used to get back from my teachers when I was just a young buck, where do you suppose he’d hang it? I’ll tell you, I will! Right in the throne room, direct across from where he’d be sitting to ponder what the heck good it does him, and other earth-shaking notions and such.

No, boy! Phil’s smarts are part on account of he was born that way, with a genius IQ is my guess, and the other part from all the books and fancy magazines he reads. Plus old Phil, why, he never watches regular TV; doesn’t even own one, not counting this huge thin flat monster that rightly belongs on a wall like I’ve seen at some of the old-timey stores you can still find at the mall, only he connects it to his computer with nary a cord somehow, and that’s how he likes it. Hooks it up to his little old lap computer right through the air with what he calls Wi-Fi and something else that goes by Blue Teeth or Blue Fairy or whatever. Anyhow, whatever kind of magic it is he does to make all this confounded tech-nol-o-gy happen that bring all of his gadgets, not just the TV monster but his walk-around pocket phone and even this genuine Made in China nineteen-hundred and seventies-era Ghetto Blaster he has, work together – well, it’s something else, and how! Why, it’s like he’s at Carnegie Hall in New York City, or at least that’s what I hear tell. Personally, I went to the Grand Ole Opry in Nashville once when I was a kid, and that was good enough for me.

Now, to get to the meat and potatoes of this little fireside story, my friend Phil, he’s a good man, and he’s also one heck of a carpenter. When it comes to woodwork, why, there aint a thing he doesn’t know about all the woods ever grown, and how to build a custom home, with balloon walls and the works, from the ground up – and up and up – and pretty much all by himself. He’s as comfortable with his tools, from his cat’s paw and level to a pettibone, as he is with his own big mitts. And when it comes to the strength and soundness of the whole enchilada, Phil just pretends to listen to all the back-seat drivers, even if it’s the new owner! And you can bet all the money in your sock old Phil won’t take any guff from some pissant, oil-palmed CCI snagger with his eyes out for left-over parts to pilfer more than finding any real faults with the job. Yessir, Phil knows his stuff, from cripples to “A” Braces, trimmers, bearing walls and joists. But…

Ain’t there always a but? Well, Phil’s but is that for all he knows about wood and carpentry, he doesn’t have a bull pucket of a clue about restoring tobacco pipes, even if it’s a fair shake he could whip one up that would be right-on engineering-wise and even show his own, one-of-a-kind style. He’s even told me a few of his ideas, and they sound pretty clever and original. Only, as far as using a wood that wouldn’t give him rashes or boils or even the Big C, and staining the shapely wonder with something other than a nice, thick, shiny, Chinese-style lacquer that would leave the wood Code Red as far as breathing goes, he’s, well, clueless. And then there’s all the taking care not to forget to tuck it away all safe and sound instead of setting it on his work table with all of his sandpapers and rasps and drill bits and other implements of construction that are, what you might say, not Kosher to keep around a frail work of art, plus dropping it and all around banging the thing every chance he gets.

To put it nice, Phil is pretty dang bullheaded when it comes to thinking he can do, make or fix anything, and what’s more, that he’s better than the experts that are here to do it right. And he wouldn’t budge when I suggested he must have had something to do with the billiard’s condition when I got a gander of it. He held to the story that he had nothing to do with it; never touched it, he said, other than smoking it. So I’m sure you all can use whatever cents you had to rub together when you were born and come up with a notion of how dramatic it was for him to – well, ask ain’t the right word – oh, snap! He intimidated that he could use “some advice” on how to fix this no-name, no country but probably Italian bent billiard. Okay, okay, I’m a nice guy, too, and I knew what he was driving at, so when he said it was one of the first pipes I gave him and I said I made it myself, I didn’t want to be rude, but I almost couldn’t help it. One thing is, I’ve never made a pipe in my life nor said I did, even if I have plans to soon; I even bought a nice square block of walnut with grain that’s the bomb and is big enough for two pipes. I figure I’ll go vertical with both of them, seeing as how once I cut it in half I’ll be all-in one way or the other. Anyways, to get back to what I was saying, the other thing is, I did finish a few pre-formed pipes I got my hands on and even made them look pretty smart, if I say so myself, but this here bent billiard wasn’t one of them, no way, no how.

So Phil, he hands the thing to me, and from the second he picks it up from the Blitzkrieg debris that his apartment was full of that day, I saw it was totally FUBAR. I mean, it looked like it was all that could be dug from the rubble of some poor Englishman’s former place of commode during the Battle of Britain after a buzz bomb attack where one of those nasty suckers stopped its buzzing and fell out of the night sky right through his roof before it went off. Okay, so maybe I’m exaggerating, but you get the picture. I’ll tell you, the real shocker to me was that Phil had somehow let this happen when he took real good care of all the other pipes I remembered giving him, including a su-weet, smooth Peterson Aran B11 Bent Brandy I fixed up from my collection and gave to him on his birthday or something after he’d developed a real taste for pipe tobacco. I threw in a sleeve, and he’s kept it the same as the day I gave it to him.Phil1 Back to the sad billiard, while I’m turning it in my hands, forced to admire the almost total stripping of the wax I told myself had to be there when and if I actually gave him the once proud pipe, not to mention the unbelievable uniformity of scratches all over it that – I kid you not – looked to me to be the work of a man with a careful if twisted plan, Phil even uses that word, plan, just as I’m thinking it! I would have jumped if the awfulness of the billiard’s deformities hadn’t already made me numb all over, like. Here’s my favorite angle.Phil2 Phil’s going on how he has some plans for it, like re-staining it some special, unknown color and yada-yada-yada, but he’s real quiet like he never gets unless he’s embarrassed and wants to ask a favor, which he doesn’t ever quite get around to doing. Well, I wasn’t born yesterday, and I just keep it in hand until I’m set to leave, and then I ask him all casual, “Hey, Phil, mind if I hold onto this to look it over some more?” And of course he just has to put on like he doesn’t want to, when that was the plan all along, but in the end I walked out the door with the mysterious, thrashed pipe still in my hand.

RESTORATIONPhil3

Phil4

Phil5

Phil6

Phil7

Phil8

Phil9

Phil10 I really like three of the things you’ll notice in the first of those photographs: the peculiar piece of cork used for some reason I won’t go into, the chamber chock-full of some leaf and the little improvised piece of paper on the tenon to make it fit right like it did when he got it (whoever gave it to him in the first place).

First off I scooped out all the stuff in the chamber and peeled away the sticky paper on the tenon. Without the paper, here’s a good general idea of how it looked.Phil11 Now I don’t know about you, but I couldn’t abide with that ghostly remnant of stain, so I set to stripping all of it down to the bone and soaking the bit in an OxiClean bath.Phil12 I took the wood out of the Everclear after a couple of hours and saw it still need some help removing the old stain. I used 500-grit paper and made the bowl and shank a little better.Phil13

Phil14

Phil15

Phil16

Phil17 And back to the stem for a minute. For a number of reasons, it clearly didn’t fit the shank, and so the motive behind the cover-up with paper. The OxiClean didn’t do much other than get rid of a whole lot of dirt and other mess inside and out, but this is a better view of the tenon and how someone had undercut it at the bottom and generally made a mess of the whole try at making it fit right in the shank. I suppose Phil had nothing to do with that, too.Phil18

Phil19 Other than replacing the whole stem, a plan I wasn’t keen on seeing as how it was going to be for free, I figured I could mend it another way. I sanded it all over with 200-grit paper before putting the 400 to it and micro-meshing as far as I could go, from 1500-12000. With that a done deal, I put a liberal amount of Black Super Glue on the tenon, most of it on the undercut part, to make it all even again.Phil20 Meanwhile, back to the bowl and shank. The stripping ferreted out more cover-up: the front of the pipe, no big surprise considering it wasn’t proud enough of the results to put a name to it or even the country it came from, had a nice little weed-like patch of holes that needed wood putty.Phil21

Phil22 Since I had some time on my hands while the putty and Black Super Glue finished drying, I smoked my own pipe for a spell. Actually it was one heck of a long spell. But it came to an end, like everything else in this life.

I smoothed the putty real gentle with the old 12000 micromesh and used a brown indelible marker, then an orange one, to make it look a little more natural. Then I put just a thin coat of regular Super Glue over that. I had to get out of my place anyway, so while it dried I did some errands. Heck, yeah, even I have errands to run.

What with the swamp cooler on full-blast, by the time I got home again the Super Glue was good and hard and ready for a smoothing of its own. This time I needed something a little rougher and settled on 3200 micromesh with a respectful light touch. And I’ll be darned if it didn’t just do the trick! The rest of the wood I went the whole nine yards micro-meshing.

One of the ideas Phil had for doing it himself was to use a “different” color. After thinking on it a while, I came up with a mix of Lincoln Marine Cordovan and Fiebing’s brown boot stains – don’t ask me what was going through my head because I don’t remember. Anyways, it worked nice enough, so I flamed it and let it sit to cool before using the 3200 again to clear off the char.Phil23

Phil24

Phil25

Phil26

Phil27

Phil28 Alright, now, hold your water! I know it! The front view here shows a need for more attention, which you’ll just have to trust me when I say I gave it because I forgot to snap a shot after. Also I sanded down the shank opening so the stem would meet it better.Phil29 Again, I know it’s not perfect, but this was for free and besides, Phil was starting to breathe down my neck to get it back. Finally I just buffed it up on the wheels with a few waxes.Phil30

Phil31

Phil32

Phil33

Phil34

Phil35 CONCLUSION
Phil is happy with the job I did – and the replacement cork that fit.

Restoring an LHS Certified Purex #24


Blog by Dave Gossett
Dave1 This pipe was a pretty straight forward cleanup. It was in overall decent shape. It had some light rim char and the stem was out of alignment. Steve had recently posted an LHS repair with this very problem so it came in handy. I followed his process and sanded the aluminum shank cap gently on a flat sanding board until the stem was in proper position. I can’t imagine they left the factory out of alignment, so I don’t know how they end up like that.Dave2

Dave3 Next I sanded the rim with 1000 grit until I reached fresh briar, and went over the rest of the stummel with 2000 grit to remove the nicks and scratches, then began working my way up the grit ladder until it was smooth.

A quick wipe down with alcohol was applied before adding Fiebings dark brown. I left it to cure for 24 hours. For a nice contrast stain, I lightly mist the briar with alcohol and use a very worn piece of 2000 grit. This removes the dark stain from the soft wood and makes the grain more prominent. After the pipe has been wiped down with a damp cloth to remove the excess stain, it was left to dry and then lightly sanded with micro mesh one last time.Dave4

Dave5

Dave6

Dave7

Dave8

What the Heck is Brylon?? – A Yello Bole Standard Panel Billiard


These nearly indestructible pipe smoke hot at times but I have had friends who rant them through the dishwaher to clean them with no harm done.

Down near the bottom of my box of estate pipes to refurb was this Yello Bole Standard Brylon octagonal billiard. I had noticed the unique shape of the bowl when the auction lot arrived, but I figured I had better do some research before playing with this pipe too much.

According to Pipedia, Brylon was invented in 1966 by the S.M. Frank & Co Ltd as a cheap alternative to briar. Brylon consists of a resin material mixed with “wood flour” (aka sawdust). It’s heavier than briar, and can reputedly heat up considerably if smoked too quickly, but is practically immune to scratches, dents and other damage common to briar pipes.

This Yello Bole Brylon pipe came out of the refurb box in relatively good shape, a testament perhaps to the impervious qualities of its synthetic makeup. The pipe was dirty on the outside, of course, and had an uneven…

View original post 565 more words

A New Vision for a Butz-Choquin Galion 1661 Sitter


A wonderful example of risk/reward in pipe restoration displayed on this one.

This is a story about potential and a bit of risk-taking to fulfil it. When I pulled this pipe from the refurb box, I immediately felt that it wasn’t quite living up to its potential, not necessarily as a functional pipe, but rather as an “objet d’art”. Pipes, in my mind, fall into that rare category of things that serve a simple function but can also be beautiful works of art in their own right. This large Butz-Choquin sitter was several points off course in that respect. It’s shape seemed heavy and ponderous, and to top it off, it had been “customized” by a previous owner who carved a linear design around the bowl, and signed it with a large “SK” on the bottom. He was presumably proud of his handiwork, but it did not ring any aesthetic or artistic bells for me.

Apart from the custom carvings, the pipe was…

View original post 890 more words

Repairing a hole in the stem of Dr. Grabow 36


Blog by J.D. Dohrer

I am glad to be able to post this first blog by JD Dohrer. He has done a masterful job in repairing this stem. I am hoping he continues to submit blogs to rebornpipes and we can continue to enjoy and learn from his work.– Steve

This is a Dr. Grabow Starfire wire carved large billiard #36. DG Starfires are one of my favorite lines/styles of pipes. I am quite keen on the models that have the metal shank extension. I snagged this one off of ebay for 10 dollars, delivered. I bought it specifically for the hole in the stem. I had been wanting to try my hand at a stem rebuild, especially after seeing the results that Steve and some others here on Reborn had completed.

The following pics are how I received it in the mail. It was actually in quite good condition. The stummel was in nice shape, with just some minor chips on the rim and the typical grime in the wire carving. The stamping was still nice, sharp and deep. The cleaner was even still in the tenon. The stem was in rather good condition even considering the hole that was chewed through the button. The hole was on the underside of the button. Which gave me hope, that if I mucked this up terribly, it would be on the less than visible side of the pipe.JD1

JD2

JD3

JD4 The first thing I did was give the stem a good soaking in ISO 91% alcohol. I then cleaned the interior of the stem with pipe cleaners. Amazingly it only took a couple of pipe cleaners to get rid of the gunk in the stem. I then did some filing around the hole and inside the button. I also cleaned up the edges of the hole and expanded its size a bit.JD5 I let the stem soak in oxyclean for a few minutes. I then scrubbed the stem with a scotch brite pad and oxyclean. I wet sanded the stem from 400, 600, 800 and 1500 and got rid of all the oxidation. I took care of some other minor tooth chatter also at this time. I then finished with a good scrubbing and a magic eraser. I then re-cleaned the stem and hole area with 91% and scuffed up the hole.JD6

JD7 At this point I made a cardboard backer that I wrapped in scotch tape. I made sure it was a nice and tight fit. As a precaution I also inserted a pipe cleaner in the airway just to cover my butt.JD8 Next I opened up a 250mg capsule of activated charcoal. I crushed up the AC as finely as I could, using a medicine measuring cup and a small wax carving spoon type tool. Next I poured a small puddle of black CA glue on a piece of scrap and mixed in some AC. I got it to a pretty thick consistency that didnt drip off my mini trowel tool. I applied in 3 quick layers. The last layer was pretty messy as it was starting to set up but, I got it smoothed out and set it off to the side to dry. The total amount of AC used was probably less than 100 mg. You can see the glue puddle next to the dime. The puddle is smeared around a bit, as this was when I was done applying the glue.JD9 Here is dried glue after 16 hours.JD10 I filed down the area and then did the same steps again with the wet sanding. The filings were very fine and powdery and the glue sanded very nicely.JD11 Now it was onto the easy part. I cleaned/reamed the chamber with a small round blade pocket knife and some 100 grit sandpaper wrapped lengthwise over a Sharpie pen. The caking was very light and I took it down just enough to leave the walls blackened.JD12 Now it was time for the draft hole and mortise/shank extension. I figured since the stem was such a breeze, this should be just as easy. I was dead wrong. I used ISO 91%, quite a few pipe cleaners, qtips, shank brush and a small bladed wax carving tool. It was definitely the worse job to do on this pipe. I cleaned the threads and exterior of the shank extension with 0000 steel wool.JD13 I then moved onto the cleaning of the exterior of the stummel itself. I used oxyclean and a scotchbrite pad to scrub the exterior. I removed a lot of grime and some of the dye on the higher points of the wire carving.JD14 I smoothed out and blended some of the smaller chips in the rim and redyed the stummel. I used 2 parts Fiebings Oxblood and 1 part Fiebings Cordovan. I gave it a couple of good quick coats of dye. I let dry for a few minutes and wiped off any excess.JD15 With all the heavy lifting done, it was time for the buffing and waxing. I used tripoli, white diamond and carnauba on the stem. I hit the shank extension with a bit of white diamond. I used a couple coats of Halcyon 2 on the stummel. I then finished up by buffing with a microfiber cloth. Below is the finished product with as good of a close up as I could get with my iphone.JD16

JD17

JD18

JD19

JD20 I am pretty dang pleased with myself on how this pipe came out looking. When I started working on pipes, I always made sure that the pipe I was bidding on had a stem that was in good shape. But, after this project, I will seek those pipes out that need some stem work. In fact, I have 3 pipes on their way that need some intense TLC and stem work. I again thank Steve and all the rest on here and DGCF for their postings, tips and ideas. Truly appreciated.

I fired ‘er up last night and ran a bowl of Carter Hall, Chatham Manor and a burley/cavendish blend through it. It smokes just as well as my other Starfires. Its a keeper and it will join with my other 6 Grabow Starfires.

Thanks in advance for checking it out. My picture taking skills are a bit lacking and my iphone does not take the best close up pics. W

Now I’ve Seen Everything


Guest Blog by Robert M. Boughton
Member, North American Society of Pipe Collectors
http://www.naspc.org
http://www.roadrunnerpipes.com
http://about.me/boughtonrobert

“What will they think of next?”
― From “What Will They Think of Next?” Canadian science TV series (1976-1979), with Joseph Campanella and guest hosts

INTRODUCTION
On tonight’s episode, we’ll look at some of the most unusual smoking pipes ever conceived by innovative inventors whose lives have been committed to making the world the place we now know it to be! First from Langley, Virginia in the United States, a pipe that was, for many years during the Cold War, classified “Top Secret” by the intelligence community there; then to the United Kingdom for a glance at a pipe even children can enjoy, however illicitly; next to another U.K. company, originally headquartered in the U.S., known best for its metal pipes that have sold 44,000,000 and counting, but which also holds the distinction of having introduced this “unbreakable” pipe; back to the U.S., in San Marcos, Texas, for a pipe you can literally stick almost anywhere you find yourself…and more!

CUT TO COMMERCIAL BREAK

OUR PROGRAM CONTINUES

For those James Bond fans who think his gadgets are cool enough to die for, created by the ingenious Q in his ever-clever if not always quite perfected lab full of spy toys for Her Majesty’s secret agents with a 00-series license to kill clearance, we offer this glimpse of real-life tradecraft brought to you by the brilliant though perhaps somewhat sociopathic inventors at the Central Intelligence Agency: the meerschaum small billiard pipe, c. 1950s, complete with a screw-in tenon that can be removed for the open shank to act as a gun barrel. Capable of firing a single .22-caliber bullet by simply pressing the tiny ventilation-like system “trigger” on the underside of the shank, this is one tobacco pipe that would indeed be deadly to use.Rob1 Although this petite, gorgeous beauty of a meerschaum, very similar to the women in Bond thrillers, was capable of being enjoyed in the usual sense of the term (with a nice bowl of tobacco), in this case the word smoked takes on a more sinister meaning. Note the somewhat creepy, lightly used condition of the bit just below the lip, indicating the pipe’s actual use at least once by an actual non-official cover (NOC), or deep-cover and fully-deniable, CIA agent.

Now, onto our next amazing variation from the norm in the world of tobacco pipes: the Puff Pop Lollipop Pipe! That’s right – Lollipop Pipe! Distributed by everyonedoesit.com, these unique candy pipes are fashioned with clear, hollow, plastic combination shanks/bits leading into the same old lollipops enjoyed by generations of children – except that one side of the round ball of candy is hollowed out to add real pipe tobacco, and the other is flat.Rob2 Although there is a clear drawback here – the pipe shapes are limited to the one shown above – they are designed as sitters. The Puff Pop Pipes, cutting-edge versions of the old-fashioned candy on a stick, create an “original, cool, easily usable, tasty smoking accessory.” And that leaves out the obvious, disposable. Conceived by the “think tank that is Pitara, who are all about dual purpose,” they are available to order only online at a site that requires anyone who wishes to enter to certify he is 18 or older. That certainly ensures that potential underage smokers will be weeded out. The real draw of this great new pipe variety is that the tobacco taste and aroma are sweetened and flavored and “come in a number of different mind crackling flavors and colors, for all to enjoy.” Now, there’s a great idea!

Now onto a pipe – “The Pipe” – invented by Super Temp in 1963 with sales beginning in 1965, during the height of the Hippie movement, by Tar Gard. Not until 1971 did The Pipe become part of Falcon family, the renowned inventor of the metal pipe. Constructed of virtually unbreakable materials that led Falcon to drop this line quietly in 1972, due to the very nature of The Pipe’s unconventional construction, their manufacture passed to yet another pipe interest. Responsibility for making The Pipe moved for the last time to RJ Reynolds in 1973, the final year of its short period of manufacture but seemingly permanent existence. They remain available to collectors to this day, perhaps due to their all but indestructible nature.Rob3 At last we come to the last but not least of this evening’s scientific wonders: Grabber Pipes! Available in two great traditional shapes and made of the usual briar, with one major difference, these pipes are modernized with the insertion of magnets to allow pipe enjoyers on-the go, or those who don’t have a pipe rack, to set the finished Grabber on almost anything metallic!Rob4

Rob5 And that concludes tonight’s episode. Thank you for joining us, and look forward to the next account of scientific breakthroughs.

CONCLUSION
What can I add other than…now I’ve seen everything! Anyone with an account of any tobacco pipe odder than these, please, do tell.

SOURCES
For those of you who are interested, here are the websites to visit for more information.

http://www.popularmechanics.com/culture/movies/g985/23-most-memorable-james-bond-gadgets/?slide=1 23 Most Memorable Bond Gadgets – Popular Mechanics
http://www.ebaumsworld.com/pictures/view/81348090/ CIA pipe-gun
https://www.cia.gov/news-information/featured-story-archive/2007-featured-story-archive/cia-museum.html CIA Museum
http://www.everyonedoesit.com/online_headshop/puff-pops-lollipop-pipes.cfm# Puff Pop – Lollipop Pipes
http://www.pipetobacco.com/grabber.html Magnet pipes
http://www.thepipe.info/info/anatomy.html Anatomy of The Pipe
http://www.thepipe.info/history/index.html#Timeline The Pipe Timeline