Tag Archives: Oxidation

Restoring a Beautiful Danish Freehand


Blog by Kenneth Lieblich

From time to time, I come across a pipe that seems to embody everything one wants a pipe to be: aesthetically pleasing, well proportioned, skilfully carved, forcefully present. This is one of those pipes. It is a Granhill Select Freehand. The grain on this pipe is absolutely beautiful. There is precious little information on the Granhill name. Yonks ago, Steve did a blog post on a Granhill pipe and it contained all the available information at the time. The maker was either a carver named Michael Kabik or a tobacconist named Lonnie Fay. Now, Fay may well have produced pipes under this name, but I think we can say with certainty that this pipe is by Kabik, based on the similarity of design and logo. I will reproduce here some of what is written is Pipedia:

Michael Victor Kabik or Michael J. Kabik, now retired artisan and pipe repairman, was born in Annapolis, Maryland in 1950. As a student he was fascinated by science, but finally turned to the arts. In the early 1970s he started working as an artisan and designer for Hollyday Pipes Ltd., and when the company closed he set up in his own right.

Kabik writes as follows:

…In the 1960s, I had helped Jay build Jay’s Smoke Shop and was his first employee. Since that time, he had set up one of the very first freehand pipe-making operations in the U.S. along with his partner, Chuck Holiday, called CHP-X Pipes. The staff consisted of four full-timers actually making the pipes and perhaps another four in sales and office work. Chuck, who did the actual design and carving, had long since had serious disagreements with Jay and split. Chuck’s replacement from the staff was quitting, and Jay was in a bind. Jay offered me the job, and I gladly accepted. The fellow quitting was supposed to train me for two months but left after two weeks, leaving me with an awesome responsibility. I felt as though the future employment of all these people depended on me as the designer and cutter…and it did.

 …Sadly, CHP-X closed its doors two years after my arrival, due primarily to distribution, sales force problems, and other issues to which I was not privy…In love with a medium that satisfied my creative impulses while, pretty much, paying the bills, I bought up the essential equipment and produced pipes on my own. I did this from a farm house my wife and I rented in Phoenix, Maryland. I produced pipes under the name KANE, Gran Hill and others I can’t remember as well as a private label line for a store in, I believe, South Dakota.

 …In 1973, I was approached by Mel Baker, the owner of a chain in Virginia Beach called Tobak Ltd. Mel was interested in producing a freehand pipe line and was alerted to my product by Al Saxon, one of his managers and a former CHP-X employee. Mel wanted to relocate me to Virginia Beach, give me carte blanche, and recreate the CHP-X studio with, of course, a new name for the product. I’m sure my answer came very quickly.

 …We decided on the name Sven-Lar. Why? Well, when I bought out CHP-X, I also got a small drawer full of metal stamps that were created for private-label work. The Sven-Lar name was conceived but never realized. Aside from having the stamp already made, there were other reasons we chose Sven-Lar. First, we were making a line of pipes in the Danish freehand tradition and also, sadly, we knew the difficulty American pipe makers had breaking the foreign market mystique barrier. The latter certainly played a big part in the demise of CHP-X.

You can read the entire Pipedia article on Kabik here. Just to close the loop on this, I also found Kabik on Facebook. I haven’t contacted him yet, but I may to see if we can get some more historical information. Here is a relatively recent photo of him:

The markings on the pipe are as follows. On the shank, there is a large letter Z [over] Danmark [over] Granhill [over] Select. Mysteries abound! I don’t know what the “Z” refers to, I don’t know why he uses the Danish spelling of Denmark rather than the English (given that he’s American), I don’t know if Granhill is the same as Gran-Hill, etc., and, finally, I don’t know where “Select” ranks in the pantheon of Kabik pipes. Frustrating.

Let’s have a closer look at the pipe itself. It really is an attractive piece. Overall, it is in good condition – no major issues to resolve. Just a few minor ones – particularly on the stem. It had some significant tooth marks in the button and, as the photo shows, debris clogging the bore. I started with the BIC lighter and “painted” the stem with its flame, in the hopes of raising some of the dents in the vulcanite. Although they did not disappear altogether, they were substantially improved and I was pleased with the results.I wiped down the stem with some Murphy’s on some cotton rounds. Then, I cleaned out the insides of the stem with pipe cleaners and lemon-infused isopropyl alcohol. Once that was done, the stem went for an overnight soak in the Before & After Hard Rubber Deoxidizer. After soaking, I cleaned off the de-oxidizing fluid with alcohol, pipe cleaners, et cetera. The oxidation had migrated to the surface and I used SoftScrub to work it off. I built up the tooth damage on the stem with black cyanoacrylate adhesive and let it fully cure. I used my miniature files to take down the majority of the dried glue. I then used all nine Micromesh pads (1,500 through 12,000 grit) to bring out the lovely black lustre on the stem. I also used Obsidian Pipe Stem Oil in between each pad scrubbing. I used the PipNet Reamer (and some sandpaper taped to a wooden dowel) to take the bowl down to bare briar, as I wanted to ensure there were no hidden flaws in the walls of the bowl. Fortunately, there were none. I then proceeded to clean out the insides of the shank with Q-tips, pipe cleaners, and isopropyl alcohol. It took a fair amount of cotton to get this thing clean!A de-ghosting session seemed like a good idea. This de-ghosting consisted of thrusting cotton balls in the bowl and the shank, and saturating them with 99% isopropyl alcohol. I let the stummel sit overnight. This caused the oils, tars and smells to leech out into the cotton. Finally, a relatively clean and fresh-smelling bowl emerged. I then moved on to cleaning the outside of the stummel with Murphy’s Oil Soap and some cotton pads. I also scrubbed the plateau with a toothbrush. What a difference that made! I then cleaned the insides with some Castile soap and tube brushes. After this, I used all nine Micromesh pads (1,500 through 12,000 grit) to smooth out everything in the briar. Then a light application of Before & After Restoration Balm brought out the best in the stummel’s grain. The grain on this pipe is pretty fantastic! Off to the bench polisher to put the final touches on this pipe. A dose of White Diamond and a few coats of carnauba wax were just what this pipe needed. The lovely shine made the wood look absolutely beautiful.

All done! This Granhill Select Freehand looks fantastic and is ready to be enjoyed again by the next owner. I am pleased to announce that this pipe is for sale! If you are interested in acquiring it for your collection, please have a look in the “American” section of the store here on Steve’s website. You can also email me directly at kenneth@knightsofthepipe.com. The approximate dimensions of the pipe are as follows: length 6 in. (155 mm); height 2½ in. (64 mm); bowl diameter 1⅞ in. (47 mm); chamber diameter 1 in. (24 mm). The weight of the pipe is 1¾ oz. (52 g). I hope you enjoyed reading the story of this pipe’s restoration as much as I did restoring it. If you are interested in more of my work, please follow me here on Steve’s website or send me an email. Thank you very much for reading and, as always, I welcome and encourage your comments.

Restoring a Republic Era Peterson’s System Standard 302 Apple


Blog by Steve Laug

The next pipe I have chosen is another smooth finished Peterson’s System – this time a System Standard shape 302. It came to us from our source in Copenhagen, Denmark on 01/29/24. It had fishtail stem rather than a P-lip stem. The finish was smooth with some nice grain around the sides and shank. It was stamped on the left side of the shank and read Peterson’s [arched over] System [over] Standard. On the right side of the shank it was stamped Made in the Republic of Ireland (three lines) over the shape number 302. It was dirty with grime ground into the finish around the bowl and shank. There was a moderate cake in the bowl and some light lava spots on the rim top. The nickel ferrule was in good shape but had some scratches that would need to be polished. It is stamped as well and reads K & P [over] Peterson on the left. The vulcanite fishtail stem was unstamped and there was some oxidation, calcification and light chatter near the button that would polish out. Jeff took photos of the pipe before he started my work. He took photos of the rim top and stem to show the general condition of the pipe. The bowl is moderately caked and the rim top and edges have a spotty lava overflow. The stem looks good but it has light tooth marks on the top and underside near the button. He took photos of the sides and heel of the bowl to show the grain that was very visible around the bowl and shank. He took photos of the stamping on the shank sides and the ferrule. It read as noted above and was clear and readable. I am including the information from Pipedia’s article on Peterson pipes. It is a great read in terms of the history of the brand (https://pipedia.org/wiki/Peterson). I have included a bit of the pertinent history here.

1950 – 1989 The Republic Era – From 1950 to the present time, the stamp for this era is “Made in the Republic of Ireland” in a block format generally in three lines but two lines have been used with or without Republic being abbreviated.

During the 1950’s and 60’s the Kapp & Peterson company was still in the ownership of the Kapp family. However 1964 saw the retiral of the company Managing Director Frederick Henry(Harry) Kapp.

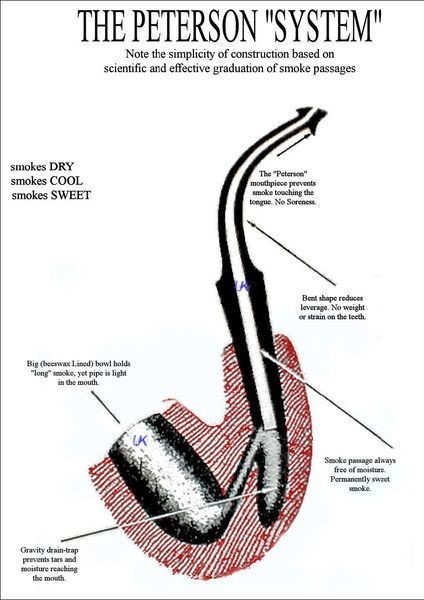
Pipedia also included a section of information on the System pipes including a diagram of the sytems look (https://pipedia.org/wiki/Peterson#Republic_Era_Pipes). I quote a section of the article in part and include a link to another article on Pipedia on the System pipe.

The Peterson System pipes are the standard bearers of the Peterson pipe family, famous for the excellent smoking pleasure they provide. Often imitated but never equalled, the Peterson System smokes dry, cool and sweet, thanks to the scientific effectiveness of the original design. The heart of the System is the unique graduated bore in the mouthpiece. This makes the suction applied by the smoker 15 times weaker by the time it reaches the tobacco chamber. The result is that all the moisture flows into the reservoir and, thus cannot reach the smoker’s mouth. The Peterson Lip further enhances the effectiveness of the graduated bore by directing the flow of smoke upwards and away from the tongue. This achieves a uniquely even distribution of smoke and virtually eliminates any chance of tonguebite or bitterness. Furthermore, the shape is contoured so that the tongue rests comfortably in the depression under the opening. Each “PLip” mouthpiece is made from Vulcanite. For the Peterson System pipes to work properly, the stem/tenon has to have an extension, the tip of which will pass by the draft hole from the bowl and into the sump. Upon the smoker drawing in smoke, this extension then directs the smoke down and around the sump to dispense a lot of the moisture before the smoke enters the extension and stem. On the System Standards and other less expensive systems, this extension with be made of Vulcanite turned integrally with the stem. On the more expensive System pipes this extension will be made of metal which screws into the Vulcanite stem. This extension on the earlier pipes will be of brass and the newer pipes will be of aluminium. Most smokers not knowing this function of the metal extension, assumes that it is a condenser/stinger and will remove it as they do with the metal condensers of Kaywoodie, etc. Should you have a System pipe with this metal extension, do not remove it for it will make the System function properly and give you a dryer smoke (https://pipedia.org/wiki/A_closer_look_at_the_famous_Peterson_Standard_System_Pipe).

With that information in hand I knew what I was dealing with in terms of the stamping and the age of this pipe. I knew from the information that the pipe was made during the Late Republic Era between 1950 and the present day. Personally I think this is probably a 60s-70s pipe. Now it was time to work on the pipe.

Jeff had cleaned up the pipe with his usual thoroughness. He reamed the pipe with a PipNet Pipe Reamer and cleaned up the remnants with a Savinelli Fitsall Pipe Knife.  He scrubbed the bowl with undiluted Murphy’s Oil Soap with a tooth brush. He rinsed it under running warm water to remove the soap and grime. He cleaned out the inside of the shank and the airway in the stem with alcohol, cotton swabs and pipe cleaners. He soaked the stem in Before & After Deoxidizer and rinsed it off with warm water. Somewhere along the way as it sat here it picked up some stickiness on the top of the stem that looks a lot like what is left behind by a gummed label. I took photos of the pipe 3 years later when I finally got around to working on it. As you can see it is another beautiful looking pipe. I took photos of the rim top and bowl as well as the stem to give a sense of the condition of both. The rim top and the inner edge had some darkening and burn damage on the inner edge on the back of the bowl. The stem was clean but had light tooth marks and chatter on the top and underside ahead of the button.I took photos of the stamping on the sides of the shank. They are clear and readable as noted above. I took the stem out of the shank and took a photo of the overall look of the pipe. It is another beauty. There are a few small dings from the journey of the pipe that will remain as a part of its story. I started my work on the pipe by working on the damage to the top and inner edge of the rim with a folded piece of 220 grit sandpaper. I was able to remove the darkening on the top completely but I also took care of the burn damage on the inner edge to give it a slight bevel. It looks much better. I worked the top and edge over with a 320 grit sanding sponge and wiped it down with a damp cloth. It looked much better. I polished the briar with micromesh sanding pads – wet sanding with 1500-12000 grit pads. I wiped the bowl down after each pad with a damp cloth. I rubbed the bowl down with Before & After Restoration Balm. I worked it into the surface of the bowl sides and shank with my fingertips. The product works to clean, enliven and protect the briar. I let the balm sit for a little while and then buffed with a cotton cloth to raise the shine. I polished the nickel ferrule with a jeweller’s cloth to protect and polish the metal. It really adds a sparkle to the metal ferrule. I set the bowl aside and turned to work on the stem. I polished the stem with micromesh sanding pads – 1500-12000 grit pads. I wiped it down with Obsidian Oil after each sanding pad. I used Before & After Pipe Polish – both Fine and Extra Fine to further polish the stem. I gave it a final coat of Obsidian Oil and set it aside to dry. This Republic Era Peterson’s System Standard 302 Bent Apple with a vulcanite, fish tail,  saddle stem is a great looking pipe now that it has been restored. The beautiful grain that shines through the polished finish is stunning. I put the stem back on the bowl and carefully buffed the pipe with Blue Diamond on the buffing wheel. I gave the bowl and the stem multiple coats of carnauba wax on the buffing wheel and followed that by buffing the entire pipe with a clean buffing pad. I hand buffed the pipe with a microfiber cloth to deepen the shine. The finished Peterson’s System Standard 302 fits nicely in the hand and feels great. Give the finished pipe a look in the photos below. The dimensions of the pipe are Length: 5 ½ inches, Height: 1 ½ inches, Outside diameter of the bowl: 1 ¼ inches, Chamber diameter: ¾ of an inch. The weight of the pipe is 69 grams/2.43 ounces. This pipe has been spoken for so it will soon be heading out with a couple of others that have been set aside for their new trustee. Thanks for reading this blog and my reflections on the pipe while I worked on it. There are many more to come!

Peterson’s Emerald Republic Era 03


Blog by Steve Laug

The next pipe on the work table is a lovely Peterson’s style briar pipe. We purchased it from a seller in Spring Branch, Texas, USA on 02/29/2024. It is a classic Peterson’s 03 shaped bowl. It has a smooth, rich brown stained bowl that really highlights the grain in the briar. The bowl is dirty with grime in the finish. There is a moderate cake in the bowl and a light lava overflow on the rim top and edges. The stamping on the pipe is clear and readable and on the left side it reads Peterson’s [over] Emerald. On the right side it reads Made in the Republic of Ireland (three lines) [followed by] the shape number 03. There is an interesting light green shank band sandwiched between two brass bands that adds distinguishing Emerald line touch to the pipe. The stem had a P logo stamped on the left side of the taper. It is oxidized, calcified and has tooth chatter and marks on both sides ahead of the P-lip button. Jeff took photos of the pipe before he started his cleanup. Jeff took photos of the rim top and stem to show the general condition of the pipe. The bowl is moderately caked and the rim top and edges have a light coat of lava overflowing on to them. The stem is oxidized, calcified and has tooth chatter and tooth marks on the top and underside near the button. Jeff took photos of the bowl sides and heel to show the condition of the finish around this bowl. It has some great grain. He took photos of the stamping on the shank sides. You can see that it is clear and reads as noted above. The P logo is also clear on the left side of the stem.I am including the information from Pipedia’s article on Peterson pipes. It is a great read in terms of the history of the brand (https://pipedia.org/wiki/Peterson). I have included a bit of the pertinent history here.

1950 – 1989 The Republic Era – From 1950 to the present time, the stamp for this era is “Made in the Republic of Ireland” in a block format generally in three lines but two lines have been used with or without Republic being abbreviated.

During the 1950’s and 60’s the Kapp & Peterson Company was still in the ownership of the Kapp family. However 1964 saw the retiral of the company Managing Director Frederick Henry (Harry) Kapp.

I knew that I was dealing with a Republic Era pipe made between 1950 and the present.

I turned to The Peterson Pipe book by Mark Irwin and Gary Malmberg for more information. On page 299 there was a summary of the Emerald Pipe. I quote

Emerald (1987-) Moderate-priced line in Bordeaux and black rustic finish with a shank band of green acrylic between brass rings, P-lip mouthpiece; smooth walnut version added in ’91. Fishtail mouthpiece added in ’97. Identical line and finishes named Jade from early eighties until ’87.

This information narrowed down the date even further. The smooth walnut finish was added in 1991 so this one came out after 1991 and has a P-lip style mouth piece. Now it was time to work on the pipe.

Jeff had done a great job cleaning up the pipe as usual. He reamed the pipe with a PipNet reamer and cut back the cake back to the bare briar. He cleaned up the walls with a Savinelli Fitsall Pipe Knife. He scrubbed the interior of the bowl and shank with pipe cleaners, shank brushes, cotton swabs and alcohol to remove the tars and oils. He scrubbed the exterior of the pipe with Murphy’s Oil Soap and a tooth brush to remove the grime from the finish. He worked on the rim top lava and darkening with the soap and tooth brush. He scrubbed the inside of the stem with alcohol and pipe cleaners. He scrubbed the exterior with Soft Scrub and then soaked it in Briarville’s Pipe Stem Deoxidizer. He washed it off with warm water to remove the Deoxidizer. The pipe looked very good when it arrived. I took close up photos of the rim top and the stem surface. I wanted to show how well it had cleaned up. The rim top looked very good. The bevelled inner edge was in excellent condition. I took photos of the stem to show the light chatter and tooth marks on the surface ahead of the button.I took photos of the stamping on the sides of the shank. You can see that it is stamped as noted above. It is clear and readable. I took the pipe apart and took a photo of the pipe. It is a good looking pipe and has some great grain around the bowl and shank. I polished the briar with micromesh sanding pads – dry sanding with 1500-12000 grit pads and wiping the bowl down after each sanding pad. The grain really began to shine through. It is a beautiful pipe. I worked some Before & After Restoration Balm into the surface of the briar with my fingertips to clean, enliven and protect the briar. I let the balm sit for 15 minutes and then buffed with a cotton cloth to raise the shine. The photos show the bowl at this point in the restoration process. I set the bowl aside and worked on the stem. I touched up the gold P stamp on the left side of the stem with some Rub’n Buff Antique Gold. I pressed it into the stamp with a tooth pick and wiped it off with a soft cotton pad.I sanded out the light tooth marks and chatter in the surface and the button edges with 320-3500 grit sanding pads. I wiped it down after each pad with a cloth impregnated with Obsidian Oil to preserve and remove debris. I polished the stem with micromesh sanding pads – wet sanding with 1500-12000 grit sanding pads. I wiped it down after each sanding pad with Obsidian Oil. I polished it with Before & After Pipe Stem Polish – both Fine and Extra Fine. I am excited to finish this Republic Era Peterson’s Emerald 03 Bent Apple.  I put the pipe back together and buffed it with Blue Diamond on the buffing wheel. I gave the bowl and the stem multiple coats of carnauba wax. I buffed the pipe with a clean buffing pad to raise the shine and hand buffed it with a microfibre cloth to deepen the shine. It is fun to see what the polished bowl looks like with the polished triple brass and emerald acrylic band and the black vulcanite stem. It is a real beauty. This Classic Peterson’s Emerald 03 feels great in my hand. It is light and well balanced. Have a look at it with the photos below. The dimensions are Length: 5 inches, Height: 1 ½ inches, Outside diameter of the bowl: 1 ¼ inches, Chamber diameter: ¾ of an inch. The weight of the pipe is 53 grams/1.83 ounces. It is a beautiful pipe and one that will be on the Irish Pipe Makers Section of the rebornpipes store soon. If you are interested in adding it to your collection let me know. Thanks for walking through the restoration with me as I worked over this pipe. Thanks to each of you who are reading this blog.

Restoring Five Pipes at Once


Blog by Kenneth Lieblich

One of my customers very kindly sent me five pipes to clean up for him. I had the pleasure of working on some beauties and I thought I would share the results with all of you. I was sent two Jobeys and three Peterson Sherlock Holmes pipes. On this occasion, I did something different than I usually do: I restored all five at once, rather than one at a time. The results on the pipes were as good as usual, but the results on your author’s sanity were perhaps less good. This blog is more of a show-and-tell than my usual restoration stories. Onward ho!

Let’s examine the five pipes. First is a Jobey Band E79 partially rusticated bullmoose with a variegated, acrylic, fishtail, saddle stem. Second is a Jobey Hand-Rubbed 680 smooth bent egg with a black, vulcanite, fishtail, saddle stem. Third is a Peterson’s Sherlock Holmes Professor large bent billiard with a sterling silver band and a black, vulcanite, P-lip, tapered stem. Dated 1998. Fourth is a Peterson Sherlock Holmes Hansom large (and very tall) bent bulldog with a sterling silver band and a black, vulcanite, P-lip, tapered stem. Dated 1997. And fifth is a Peterson Sherlock Holmes (without a specific name) large bent Rhodesian with a sterling silver band and a black, vulcanite, P-lip, tapered stem. Dated 1987. I cleaned the outside of all of the stems with Murphy’s and the insides with pipe cleaners and Q-tips dipped in isopropyl alcohol. The vulcanite stems were tossed into the oxidation removal fluid for a good soak. I later cleaned off the oxidation and went to fill in the tooth dents with black cyanoacrylate adhesive. I worked off the high points with my needle files and sanded them all with Micromesh pads and Obsidian Oil. On to the stummels. I reamed out all the bowls and removed all of that old cake. Some bowls had lava on the rim, so I carefully removed that without damaging anything further. I also cleaned the outside of the stummels with Murphy’s. These stummels had been quite well maintained over the years, so there wasn’t much difficulty in cleaning out the gunk inside – with one exception. The Jobey bent egg had a hidden trap of debris inside that had evidently never been noticed. As the photos show, there was some dreadful goo to remove from there! I set all five pipes up for a de-ghosting session and, since I was doing them all at once, an egg carton made an excellent holder for multiple pipes at once.Again, four of the five stummels were in great condition and didn’t really need much work to the outside briar. The exception was that same Jobey egg – it had a couple of significant blemishes which I repaired with briar dust and cyanoacrylate adhesive. After this, all of the stummels were sanded down with Micromesh pads and then left to sit with a coat of Before and After Balm. It sort of moisturizes the wood and gives it a lovely gloss. I took the pipes to my bench buffer and spiffed them all up with some White Diamond and carnauba wax. My last stem was to polish the sterling silver ands with my jewellery cloth. And voilà! These beauties are already on their way back to their owner. I trust that he will enjoy their new and improved status. I hope you enjoyed reading this quick write-up of this lovely bunch of pipes. If you are interested in my work, please follow me here on Steve’s website or email me directly at kenneth@knightsofthepipe.com. Thank you very much for reading and, as always, I welcome and encourage your comments.

Restoring a Damaged Tan Peterson’s Meer in a Shape 302


Blog by Steve Laug

The next pipe on the work table is a tan coloured Peterson’s style meerschaum pipe. We purchased it from a seller in Spring Branch, Texas, USA on 02/29/2024. It is a classic Peterson’s 302 shaped bowl and probably made like all their meerschaum by Laxey Pipes Ltd, on the Isle of Man. It has a tan rusticated bowl that really gives depth to the pipe. The bowl is dirty with grime in the meerschaum. There is a cake in the bowl and a lava overflow in the rustication on the rim top and edges. It looks like the rim top and first 1/8 inch of the rim top have a dark flume coat. The only stamping on the pipe is on the nickel ferrule and it reads K&P over Peterson. The ferrule has some oxidation and is dull but otherwise undamaged. The stem is oxidized, calcified and has tooth chatter and marks on both sides ahead of the P-lip button. Jeff took photos of the pipe before he started his cleanup. Jeff took photos of the rim top and stem to show the general condition of the pipe. The bowl is moderately caked and the rim top and edges have lava overflowing on to them. The stem is oxidized, calcified and has tooth chatter and tooth marks on the top and underside near the button. Jeff took photos of the bowl sides and heel to show the condition of the rusticated finish around this bowl. It is a nice looking pipe. He took photos of the nickel ferrule to show the stamping around it. You can see that it reads as noted above. I took some time to remind myself of the provenance of these Peterson’s Dublin Meerschaum pipes. I am pretty sure the pipe was made by the Laxey Pipe Ltd. on the Isle of Man for Peterson’s in Ireland (https://pipedia.org/wiki/Laxey_Pipes_Ltd). I quote from the Pipedia article in full:

Laxey Pipe Ltd. resided in a historical 19th century four-storey Man stone building at The Quay, Old Laxey, Isle of Man, which thankfully has been preserved. The company specialized in the production of Meerschaum Pipes using the Meerschaum mined by the Tanganyika Meerschaum Corporation in the Amboseli basin in Tanganyika (since 1964 part of the United Republic of Tanzania). Please note: you may often find names like “Manx Pipes Ltd.”, “Man Pipe Co.” and others more, but there is no indication of another Isle of Man pipe producer other than Laxey Pipe Ltd. at any time!

Laxey Pipe Ltd. marketed own brands like “Manxpipe”, “Manxman”, “Manxland” e.c. Names like “John Bull”, “White Knight” (unwaxed), “Domino” (black, or lined) indicated some shapes / colours of Laxey’s own series. The stems either showed the astronomical sign for “male” or “man” (circle + arrow), or the crest of the Isle of Man, the 3-legged X in a circle. Manxpipes and Laxey’s other brands were available through pipe retailers in general, but also were sold (mainly) to tourists through their own shop in Laxey.

Furthermore Laxey Pipe Ltd. manufactured the meer bowls for Peterson, Barling, Nørding and others from the later 1960’s until 2001. Man Pipe e.g. was a brand distributed by Comoy’s. The bowls usually showed no nomenclature indicating the orderer. “Genuine Block Meerschaum” was engraved frequently. Often, just the stems were different, while bowls were the same.

Supply of meer from East Africa run out (Kenya / Tanzania exhausted, Somalia inaccessible), and thus the last Laxey meers were supplied to trade in May, 2001. Laxey Pipe Ltd. tried to survive continuing with briar pipes – mainly in the Danish style -, but to no success. It closed down business in July, 2002.

I know that the pipe was made on the Isle of Man by Laxey Pipe Ltd. out of African Meerschaum. It was made for export for Peterson’s of Dublin. The flumed top on the bowl and the rustication around the bowl and shank make me think that it is a 1970s era pipe. That was as much as I could figure out.

Jeff had done a great job cleaning up the pipe as usual. He reamed the pipe with a PipNet reamer and cut back the cake back to the bare meerschaum. He cleaned up the walls with a Savinelli Fitsall Pipe Knife. He scrubbed the interior of the bowl and shank with pipe cleaners, cotton swabs and alcohol to remove the tars and oils. He scrubbed the exterior of the pipe with Murphy’s Oil Soap and a tooth brush to remove the grime from the finish. He worked on the rim top lava and darkening with the soap and tooth brush. He cleaned up the tarnish on the nickel ferrule. He scrubbed the inside of the stem with alcohol and pipe cleaners. He scrubbed the exterior with Soft Scrub and then soaked it in Briarville’s Pipe Stem Deoxidizer. He washed it off with warm water to remove the Deoxidizer. The pipe looked very good when it arrived. I took some close up photos of the rim top and also of the stem surface. I wanted to show how well it had cleaned up. The rim top and edges were in rough condition. The back rim top and edge were thin and the front left top and edge were damaged. It looked like the rim top had been rusticated like the bowl at one point but it was not clear due to the damage on the top and inner edges. The stem showed some light tooth marks and chatter on the surface near the button.I took a photo of the stamping on the ferrule. You can see that once the tarnish was removed it is stamped as noted above. It is clear and readable. I also removed the stem from the shank and took a photo to show the proportions of the pipe.This pipe needed a bit more work than the previous Peterson’s meer. The rim top had a lot of damage and was burned and chipped on the front inner edge of the  bowlw. The back of the bowl rim top and edge were very thin and also had damage. I cleaned up the inner edge of the bowl with a folded piece of 220 grit sandpaper. While I was able to remove the damage on the inner edge the bowl top and out edge on the front were damaged and there was a dip in the front outer edge. To deal with this issue I gently topped the bowl on a topping board with 220 grit sandpaper. Once finished I used a Dremel and dental burr to rusticate the rim top to match the finish around the bowl sides. I restained the finished rim top and edges with a walnut and a black stain pen. The original bowl had a dark stain on the rim top and on the first 1/8 inch of the bowl side.I polished the nickel ferrule with a jeweller’s cloth to shine and slow down the process of oxidation. The ferrule really looks good. I rubbed the meerschaum down with Clapham’s Beeswax/Carnauba mix. I worked it into the surface of the meerschaum with my fingertips and a shoebrush to protect it. I let the wax sit for 15 minutes and then buffed with a cotton cloth to raise the shine. The pipe is looking quite good. I set the bowl aside and turned to work on the stem. I sanded out the chatter and tooth marks with 320-3500 grit sanding pads. I wiped it down after each pad with an Obsidian Oil impregnated cloth. It really began to take on a shine.I polished the stem with micromesh sanding pads – wet sanding with 1500-12000 grit sanding pads. I wiped it down after each sanding pad with Obsidian Oil. I polished it with Before & After Pipe Stem Polish – both Fine and Extra Fine. As usual at this point in the restoration process I am excited to be on the homestretch. I put the bowl and stem of this Peterson’s Meerschaum back together. I polished the bowl and stem with Blue Diamond to polish out the scratches in the meerschaum and the vulcanite. I gave the bowl multiple coats of Clapham’s Wax and the stem multiple coats of carnauba wax. I buffed the pipe with a clean buffing pad to raise the shine. I hand buffed it with a microfiber cloth to deepen the shine. The pipe polished up pretty nicely. The meerschaum has a rich glow with the wax and polish. The shiny black vulcanite stem is a beautiful contrast to the rich developing patina of the tan bowl and the polished ferrule. It really is a stunning pipe whose shape and finish make it stand out. The thick/chubby shank makes it a very comfortable pipe to hold in the hand. The finished pipe is shown in the photos below. The dimensions are Length: 5 inches, Height: 1 ½ inches, Outside diameter of the bowl: 1 ¼ inches, Chamber diameter: 7/8 of an inch. The weight of the pipe is 54 grams/1.90 ounces. It is a beautiful pipe and one that will be on the Irish Pipe Makers Section of the rebornpipes store. If you are interested in adding it to your collection let me know. Thanks for walking through the restoration with me as I worked over this pipe.

Restoring a Peterson’s Meerschaum in a Shape 302


Blog by Steve Laug

The next pipe on the work table is a white Peterson’s style meerschaum pipe. We purchased it from an estate sale at Idaho Falls, Idaho, USA on 09/16/23. It is a classic Peterson’s 302 shaped bowl and probably made like all their meerschaum by Laxey Pipes Ltd, on the Isle of Man. It has a slight patina making it almost golden with a black flume around the bowl and rim top. It is a rusticated bowl. The bowl is dirty for sure with grime in the meerschaum. There is a cake in the bowl and a lava overflow in the rustication on the rim top and edges. The only stamping on the pipe is on the nickel ferrule and it reads K&P over Peterson. The ferrule has some oxidation and is dull but otherwise undamaged. The stem is lightly oxidized and has tooth chatter and marks on both sides ahead of the P-lip button. Jeff took photos of the pipe before he started his cleanup. Jeff took photos of the rim top and stem to show the general condition of the pipe. The bowl is moderately caked and the rim top and edges have lava overflowing on to them. The stem is oxidized and has tooth chatter and tooth marks on the top and underside near the button. Jeff took photos of the bowl sides and heel to show the condition of the rusticated finish around this bowl. It is a nice looking pipe. He took photos of the nickel ferrule to show the stamping around it. You can see that it reads as noted above.I took some time to remind myself of the provenance of these Peterson’s Dublin Meerschaum pipes. I am pretty sure the pipe was made by the Laxey Pipe Ltd. on the Isle of Man for Peterson’s in Ireland (https://pipedia.org/wiki/Laxey_Pipes_Ltd). I quote from the Pipedia article in full:

Laxey Pipe Ltd. resided in a historical 19th century four-storey Man stone building at The Quay, Old Laxey, Isle of Man, which thankfully has been preserved. The company specialized in the production of Meerschaum Pipes using the Meerschaum mined by the Tanganyika Meerschaum Corporation in the Amboseli basin in Tanganyika (since 1964 part of the United Republic of Tanzania). Please note: you may often find names like “Manx Pipes Ltd.”, “Man Pipe Co.” and others more, but there is no indication of another Isle of Man pipe producer other than Laxey Pipe Ltd. at any time!

Laxey Pipe Ltd. marketed own brands like “Manxpipe”, “Manxman”, “Manxland” e.c. Names like “John Bull”, “White Knight” (unwaxed), “Domino” (black, or lined) indicated some shapes / colours of Laxey’s own series. The stems either showed the astronomical sign for “male” or “man” (circle + arrow), or the crest of the Isle of Man, the 3-legged X in a circle. Manxpipes and Laxey’s other brands were available through pipe retailers in general, but also were sold (mainly) to tourists through their own shop in Laxey.

Furthermore Laxey Pipe Ltd. manufactured the meer bowls for Peterson, Barling, Nørding and others from the later 1960’s until 2001. Man Pipe e.g. was a brand distributed by Comoy’s. The bowls usually showed no nomenclature indicating the orderer. “Genuine Block Meerschaum” was engraved frequently. Often, just the stems were different, while bowls were the same.

Supply of meer from East Africa run out (Kenya / Tanzania exhausted, Somalia inaccessible), and thus the last Laxey meers were supplied to trade in May, 2001. Laxey Pipe Ltd. tried to survive continuing with briar pipes – mainly in the Danish style -, but to no success. It closed down business in July, 2002.

I know that the pipe was made on the Isle of Man by Laxey Pipe Ltd. out of African Meerschaum. It was made for export for Peterson’s of Dublin. The flumed top on the bowl and the rustication around the bowl and shank make me think that it is a 1970s era pipe. That was as much as I could figure out.

Jeff had done a great job cleaning up the pipe as usual. He reamed the pipe with a PipNet reamer and cut back the cake back to the bare meerschaum. He cleaned up the walls with a Savinelli Fitsall Pipe Knife. He scrubbed the interior of the bowl and shank with pipe cleaners, cotton swabs and alcohol to remove the tars and oils. He scrubbed the exterior of the pipe with Murphy’s Oil Soap and a tooth brush to remove the grime from the finish. He worked on the rim top lava and darkening with the soap and tooth brush. He cleaned up the tarnish on the nickel ferrule. He scrubbed the inside of the stem with alcohol and pipe cleaners. He scrubbed the exterior with Soft Scrub and then soaked it in Before & After Pipe Stem Deoxidizer. He washed it off with warm water to remove the Deoxidizer. The pipe looked very good when it arrived. I took some close up photos of the rim top and also of the stem surface. I wanted to show how well it had cleaned up. The rim top and edges looked very good. There was still some debris in the rustication on the rim top that would need to be removed. The stem showed some light tooth marks and chatter on the surface near the button.I took a photo of the stamping on the ferrule. You can see that once the tarnish was removed it is stamped as noted above. It is clear and readable. I also removed the stem from the shank and took a photo to show the proportions of the pipe.I cleaned up the debris in the rim top with a brass bristle wire brush and was able to remove it all. I touched up the rim top and edges with a black Sharpie Pen. Once it was finished it looked very good.I polished the nickel ferrule with a jeweller’s cloth to shine and slow down the process of oxidation. The ferrule really looks good. I rubbed the meerschaum down with Clapham’s Beeswax/Carnauba mix. I worked it into the surface of the meerschaum with my fingertips and a shoebrush to protect it. I let the the wax sit for 15 minutes and then buffed with a cotton cloth to raise the shine. I set the bowl aside and turned to work on the stem. I sanded out the chatter and tooth marks with 320-3500 grit sanding pads. I wiped it down after each pad with an Obsidian Oil impregnated cloth. It really began to take on a shine.I polished the stem with micromesh sanding pads – wet sanding with 1500-12000 grit sanding pads. I wiped it down after each sanding pad with Obsidian Oil. I polished it with Before & After Pipe Stem Polish – both Fine and Extra Fine. As usual at this point in the restoration process I am excited to be on the homestretch. I put the bowl and stem of this Peterson’s Meerschaum back together. I polished the bowl and stem with Blue Diamond to polish out the scratches in the meerschaum and the vulcanite. I gave the bowl multiple coats of Clapham’s Wax and the stem multiple coats of carnauba wax. I buffed the pipe with a clean buffing pad to raise the shine. I hand buffed it with a microfiber cloth to deepen the shine. The pipe polished up pretty nicely. The meerschaum has a rich glow with the wax and polish. The shiny black vulcanite stem is a beautiful contrast to the rich developing patina of the bowl and the polished ferrule. It really is a stunning pipe whose shape and finish make it stand out. The thick/chubby shank makes it a very comfortable pipe to hold in the hand. The finished pipe is shown in the photos below. The dimensions are Length: 5 inches, Height: 1 ½ inches, Outside diameter of the bowl: 1 ¼ inches, Chamber diameter: 7/8 of an inch. The weight of the pipe is 51 grams/1.80 ounces. It is a beautiful pipe and one that will be on the Irish Pipe Makers Section of the rebornpipes store. If you are interested in adding it to your collection let me know. Thanks for walking through the restoration with me as I worked over this pipe.

Restoring the third of the Antique Collectible Finds – a Jeantet Fait Main 9 Bent Freehand Apple


Blog by Steve Laug

Last weekend on April 27 Kenneth and I went to an antique and collectible sale at an arena in New Westminster, BC, Canada. I wrote about the adventure and posted it in a previous blog last weekend (https://rebornpipes.com/2024/04/28/you-have-to-join-kenneth-and-me-on-a-great-morning-pipe-hunt/). On the hunt I picked up four pipes that I have listed below:

  1. Jeantet Fait Main Bent Freehand Dublin 4 with a diamond shank
  2. Jeantet Fait Main Bent Apple 9 with a uniquely shaped shank and stem
  3. Republic Era Peterson’s System Pipe 1307 Bowl sans stem
  4. Brigham Made in Canada 625 Squat Straight Bulldog

I have included photos of the foursome below. They are in the order of the list above. I chose to work on the second pipe in the above photos. It is shown in the photos below and is stamped Jeantet [over] Fait Main (Hand Made) on the left topside of the shank. On the right side of the shank it is stamped with the number 9 (shape number perhaps) [over] Made in France. There is a Jeantet logo J in a silver oval on the left topside of the diamond stem. It is kind of a Freehand Bent Apple with a unique panelled shank. The pipe has some great grain around the bowl sides and shank. The rim top is bevelled inward and slightly oval. The bowl had a moderate cake on the walls and some lava on the rim top or edges of the bowl. The briar is dry and lifeless with some grime and grit ground into the briar. The stem was oxidized and had light toothmarks on the top and underside ahead of the button. The photos below show what I saw when I examined the pipe. I took photos of the bowl and rim top to show the condition of the bowl. The rim top has some heavy lava around the back half. There was some darkening around the inner edge of the bowl and there is a moderate cake in the bowl. The stem is lightly oxidized and is very dirty from the shank to the button. There are light tooth marks and chatter on the stem on both sides ahead of the button.I took photos of the stamping on the topsides of the shank. It reads as noted above. It is faint in spots but is still very readable. I took the stem off and took a photo of the parts to give a sense of the size of the bowl. Before I started my work on this pipe I turned to Pipephil’s site to see what I could learn about Jeantet pipes (http://pipephil.eu/logos/en/logo-jeantet.html). There was nothing specific about Hand Made line though was a brief summary of the history. I quote from the top bar below:

The company joined the Cuty-Fort Entreprises group (Chacom, Ropp, Vuillard, Jean Lacroix…) in 1992. In 2010 it dropped out and the brand isn’t part of the group any more. The label is owned by the Jeantet family (Dominique Jeantet) again. The pipe production is discontinued. Dominique Jeantet retired in 2000. See also: Antidote, Duke of Kent, Grand Duke, Hermes, Sir Bruce, Sir Duke

I turned to Pipedia to get a more detailed history of the brand (https://pipedia.org/wiki/Jeantet). There as a short history there that I have reproduced below.

The firm of the Jeantet family in Saint-Claude is first mentioned as early as 1775. By 1807 the Jeantets operated a turnery producing in particular wooden shanks for porcelain pipes and wild cherry wood pipes. The firm was named Jeantet-David in 1816, and in 1837 the enterprise was transformed into a corporation as collective name for numerous workshops scattered all over the city.

The manufacturing of briar pipes and began in 1858. 51 persons were employed by 1890. Desirous to concentrate the workers at a single site, the corporation began to construct a factory edifying integrated buildings about 1891 at Rue de Bonneville 12 – 14. This took several years. In 1898 Maurice Jeantet restructured the business. He is also presumed to enlarge Jeantet factory purchasing a workshop adjoining southerly. It belonged to the family Genoud, who were specialized in rough shaping of stummels and polishing finished pipes. (In these times it was a most common procedure to carry goods from here to there and back again often for certain steps of the production executed by dependant family based subcontractors. Manpower was cheap.)

Jeantet was transformed to a corporation with limited liability in 1938. By that time a branch workshop was operated in Montréal-la-Cluse (Ain), where mainly the less expensive pipes were finished. 107 employees – 26 of them working from their homes – were counted in Saint-Claude in 1948 and 18 in the Ain facility.

The Saint-Claude factory was considerably modernized by ca. 1950 installing (e.g.) freight elevators. In 1952 the southern workshop was elevated. 80 workers were employed in 1958. The factory covered an area of 2831 m²; 1447 m² of the surface were buildings.

The climax of the pipe production was reached around 1969, when thirty to thirty five thousand dozens of pipes were made by 72 workers (1969). But then the production continuously dwindled to only six or seven thousand dozens in 1987 and only 22 workers were still there. Even though, around 1979 a very modern steam powered facility for drying the briar had been installed in the factory’s roofed yard.

Yves Grenard, formerly Jeantet’s chief designer and a great cousin of Pierre Comoy, had taken over the management of Chapuis-Comoy in 1971. Now, to preserve the brand, the Jeantet family went into negotiations with him, and resulting from that Jeantet was merged in the Cuty Fort Group (est. 1987 and headed by Chacom) in 1988 along with the pipe brands of John Lacroix and Emile Vuillard. Chacom closed the Jeantet plant, and the City of Saint-Claude purchased it in 1989. After alternative plans failed, the buildings were devoted to wrecking. The southerly workshop was wrecked before 1992.

Today Jeantet pipes were produced as a sub-brand by Chapuis-Comoy who’s mainstay is Chacom of course.

I reamed the bowl with a PipNet pipe reamer and then cleaned up the reaming with a Savinelli Fitsall Pipe Knife. I sanded the bowl sides with 220 grit sandpaper wrapped around a piece of dowel. The bowl walls showed no heat damage or checking. I used a folded piece of 220 grit sandpaper to clean up the top of the rim and the inner edge to make it look better.I scrubbed the externals bowl and shank with Murphy’s Oil Soap and a tooth brush. I rinsed it off with warm water to remove the grime and debris from the scrubbing. I scrubbed the internals of the airway and mortise in the shank and the airway in the stem with pipe cleaners, cotton swabs and alcohol until the airways were clean and the pipe smelled fresh. I took a photo of the shank end to give a sense of the shape of the stem and shank. The top half of the stem and shank are three panels. The bottom half of the shank is half of an oval. Together they form a unique shape.I sanded the surface of the briar with 320-3500 grit sanding pads. It took on a real shine on the briar as I worked through the pads. I wiped it down after each sanding pad with a damp cloth to remove the sanding dust and debris left behind. The pipe had cleaned up so well that I turned to polish the briar with micromesh sanding pads. I dry sanded it with 1500-12000 grit sanding pads and wiped the bowl down after each pad with a damp cloth. By the final pads the briar really had a shine. I rubbed the briar down with Before & After Restoration Balm. I worked it into the briar with my fingertips. The product works to clean, enliven and preserve the briar. I let it sit for 10 minutes then I buffed it with a cotton cloth to deepen the shine. The briar really came alive with the balm. I set aside the bowl and turned my attention to the stem. To help remove the oxidation I scrubbed the stem with Soft Scrub Cleanser and cotton pads. It took some elbow work but the stem definitely looked better and the sulphur smell of the oxidation is gone!I sanded the surface with 320-3500 grit sanding pads to further clean up the spots of oxidation on the surface of the stem. I wiped it down with a soft damp cloth following each sanding pad to remove the sanding debris.I polished the vulcanite with micromesh sanding pads – 1500-12000 grit pads. I wiped it down with Obsidian Oil after each sanding pad. I used Before & After Pipe Polish – both Fine and Extra Fine to further polish the stem. It really took on a shine and I knew that once it was buffed it would look amazing. This Jeantet Fait Main Freehand Bent Apple 9 with a vulcanite stem is a great looking pipe now that it has been restored. The beautiful grain around the bowl sides stands out very well with the contrast of the polished vulcanite stem. I carefully buffed the pipe with Blue Diamond on the buffing wheel. I gave the bowl and the stem multiple coats of carnauba wax on the buffing wheel. I followed that by buffing the entire pipe with a clean buffing pad. I hand buffed the pipe with a microfiber cloth to deepen the shine. The finished Jeantet Fait Main Freehand fits nicely in the hand and feels great. Give the finished pipe a look in the photos below. The dimensions of the pipe are Length: 5 ½ inches, Height: 1 ½ inches, Outside diameter of the bowl: 1 ½ inches, Chamber diameter: ¾ of an inch. The weight of the pipe is 52 grams/1.83 ounces. I will be adding this one to the French Pipe Makers Section of the rebornpipes store. If you are interested in adding it to your collection send me a message or an email. Thanks for reading this blog and my reflections on the pipe while I worked on it. There are many more to come!

Restoring the second Antique Collectible Find – a GT&Co Peterson’s System Standard 1307


Blog by Steve Laug

Last weekend on April 27 Kenneth and I went to an antique and collectible sale at an arena in New Westminster, BC, Canada. I wrote about the adventure and posted it in a previous blog last weekend (https://rebornpipes.com/2024/04/28/you-have-to-join-kenneth-and-me-on-a-great-morning-pipe-hunt/). On the hunt I picked up four pipes that I have listed below:

  1. Jeantet Fait Main Bent Freehand Dublin 4 with a diamond shank
  2. Jeantet Fait Main Bent Apple 9 with a uniquely shaped shank and stem
  3. Republic Era Peterson’s System Pipe 1307 Bowl sans stem
  4. Brigham Made in Canada 625 Squat Straight Bulldog

I have included photos of the foursome below. They are in the order of the list above. I chose to work on the third pipe in the above photos. It is shown in the photos below and is Peterson’s with a forked tail [over] System [over] Standard on the left side of the shank. On the right side of the shank it is stamped Made in the Republic of Ireland (in three lines) [over] 1307 the shape number. There is a very clean nickel ferrule that is stamped on the left side and reads K&P over Makers Marks which makes it pre-circa 1963.The three symbols are a Shamrock, a Wolfhound and a Tower without a door. That is followed by the stamping Peterson’s. The pipe has some great grain around the bowl sides and shank. The rim top is flat and the edges look good. The bowl had a moderate cake on the walls and a light lava coat on the rim top and edges of the bowl. The briar has some grime and grit ground into the briar. There was no stem so I would need to fit a new one on the bowl. The photos below show what I saw when I examined the pipe. I took photos of the stamping on the undersides of the shank. It reads as noted above. It is faint in spots but is still very readable. I took the stem off and took a photo of the parts to give a sense of the size of the bowl.I have included the information on the shape number on this pipe that I picked up on researching the other pipes. It is a Peterson’s System Standard pipe with a 1307 shape number. The 307 is identical in shape, size and marking. I started my hunt for information by turning to a Peterson Catalogue that I have on rebornpipes and looked up the System Standard pipes (https://rebornpipes.com/tag/peterson-hallmark-chart/). I have put a red box around the 307 shown in the catalogue page shown below. That should give a clear picture of the size and shape of the pipe. But there was nothing to give me any information on what number 1 meant in the shape number 1307 that I am working on. Since this is stamped with the same “1” as previous Peterson pipes that I have worked on I turned to the blog and had a look. I am including the information on the unique numbering. Mark pointed me in the direction that I needed. I quote the pertinent part of his email. The underlined portion was the clue I was looking for on this pipe. I have already cleaned up several of Bob’s pipes that were sold through GT&C (Genin, Trudeau and Company, Montreal, Quebec).

The index at the back of the book is pretty good, and points you to all the GT&C goodies, but 155 has a photo from the catalog with your 1307, while 318 and 323 explain the rationale for the “1” prefix. In a nutshell, just drop the “1” and you’ve got the shape. My theory is that GT&C added this to aid them in warranty work, so they’d know the pipe was bought on Canadian soil.

I turned then to a previous blog I had written on a Kapruf 54 that had an odd shape number stamp and referred to the Canadian numbering system used by GT&C. Here it the link to that blog (https://rebornpipes.com/2019/08/09/back-to-bob-kerrs-estate-another-canadian-import-petersons-kapruf-a-54/). In the blog I included a link to a blog I did on the GT&C Catalogue that came to me in some paperwork the family gave me. I have included the cover of the catalogue and the page on the system pipes showing the 1312 shape. I have put a red box around the shape for ease of reference (https://rebornpipes.com/2016/09/13/petersons-pipes-brochure-from-genin-trudeau-co-montreal-quebec/). Be sure to check out the rest of the document on the link.

The GT&C Catalogue combined with the earlier Peterson Pipe Catalogue page make the link definitive. I am also including the information from Pipedia’s article on Peterson pipes. It is a great read in terms of the history of the brand (https://pipedia.org/wiki/Peterson). I have included a bit of the pertinent history here.

1950 – 1989 The Republic Era – From 1950 to the present time, the stamp for this era is “Made in the Republic of Ireland” in a block format generally in three lines but two lines have been used with or without Republic being abbreviated.

During the 1950’s and 60’s the Kapp & Peterson company was still in the ownership of the Kapp family. However 1964 saw the retiral of the company Managing Director Frederick Henry(Harry) Kapp.

Pipedia also included a section of information on the System pipes including a diagram of the sytems look (https://pipedia.org/wiki/Peterson#Republic_Era_Pipes). I quote a section of the article in part and include a link to another article on Pipedia on the System pipe.

The Peterson System pipes are the standard bearers of the Peterson pipe family, famous for the excellent smoking pleasure they provide. Often imitated but never equaled, the Peterson System smokes dry, cool and sweet, thanks to the scientific effectiveness of the original design. The heart of the System is the unique graduated bore in the mouthpiece. This makes the suction applied by the smoker 15 times weaker by the time it reaches the tobacco chamber. The result is that all the moisture flows into the reservoir and, thus cannot reach the smoker’s mouth. The Peterson Lip further enhances the effectiveness of the graduated bore by directing the flow of smoke upwards and away from the tongue. This achieves a uniquely even distribution of smoke and virtually eliminates any chance of tonguebite or bitterness. Furthermore, the shape is contoured so that the tongue rests comfortably in the depression under the opening. Each “PLip” mouthpiece is made from Vulcanite. For the Peterson System pipes to work properly, the stem/tenon has to have an extension, the tip of which will pass by the draft hole from the bowl and into the sump. Upon the smoker drawing in smoke, this extension then directs the smoke down and around the sump to dispense a lot of the moisture before the smoke enters the extension and stem. On the System Standards and other less expensive systems, this extension with be made of Vulcanite turned integrally with the stem. On the more expensive System pipes this extension will be made of metal which screws into the Vulcanite stem. This extension on the earlier pipes will be of brass and the newer pipes will be of aluminium. Most smokers not knowing this function of the metal extension, assumes that it is a condenser/stinger and will remove it as they do with the metal condensers of Kaywoodie, etc. Should you have a System pipe with this metal extension, do not remove it for it will make the System function properly and give you a dryer smoke (https://pipedia.org/wiki/A_closer_look_at_the_famous_Peterson_Standard_System_Pipe).

With that information in hand I knew what I was dealing with in terms of the stamping and the age of this pipe. I knew from the information that the pipe was made during the Republic Era between 1950 and 1989. I also knew that the pipe was brought into Canada by the Canadian Importer, Genin, Trudeau & Co. in Montreal, Quebec. Noting above that the catalogue postal code puts it in the late 60s early 70s which also fits the story. Now it was time to work on the pipe.

I cleaned up the thin cake in the bowl with a Savinelli Fitsall Pipe Knife and sanded the bowl with a piece of 220 grit sandpaper wrapped around a piece of dowel. I used a folded piece of 220 grit sandpaper to clean up the top of the rim and the inner edge to make it look better.I scrubbed the exterior of the bowl and shank with undiluted Murphy’s Oil Soap and a tooth brush to remove the grime. I rinsed it off with warm running water and dried it off with a soft cloth. I cleaned the mortise and the airway in the shank with alcohol, cotton swabs and pipe cleaners. They were dirty but the pipe is clean now.   I sanded the surface of the briar with 320-3500 grit sanding pads. It took on a real shine on the briar. I wiped it down after each sanding pad with a damp cloth to remove the sanding dust and debris left behind. I polished the bowl and rim top with micromesh sanding pads – wet sanding with 1500-12000 grit pads. I wiped the rim down after each sanding pad to remove the dust and debris from the sanding. The rim top was looking very good after the final polishing pad.  I rubbed the bowl and shank down with Before & After Restoration Balm. I worked it into the surface of the briar with my fingertips to clean, enliven and protect it. I let the balm sit for a little while and then buffed with a cotton cloth to raise the shine. I set the bowl aside and turned my attention to fitting a new stem. I chose a new stem for the pipe from my lot of new stem blanks. It is a Peterson’s Made Replacement stem so it should fit well once the work is done.I used a flat rasp to sand out the casting marks on the sides and ends of the stems. I followed that up with a folded piece of 220 sandpaper. I flattened out the casting marks and the sanded them smooth and blended them into the surface. I also sanded out the casting marks on the end of the stem and around the P-lip button. It looked much better at this point. I took a photo of the pipe bowl and the new stem. I still needed to do a lot more work on it to smooth out the scratches and file marks. It is going to look very good.I reshaped the shank end with 220 grit sandpaper to get a snug fit in the ferrule. It took time but as I shaped the angles the stem fit very well deep enough in the shank. I heated it with a lighter to soften the vulcanite and bent it to fit the angles of the bowl. I fit it in the shank and took photos of the pipe put back together. It looks good. I sanded the stem with 320-3500 grit sanding pads. I wiped it down after each sanding pad with a damp cloth to remove the debris left behind. It is beginning to look much better.I polished the stem with micromesh sanding pads – wet sanding it with 1500-12000 grit pads. I wiped the stem down after each sanding pad with a cotton pad to remove the sanding debris. I finished polishing the stem with Before & After Pipe Stem Polish – both fine and extra fine. I finished by wiping it down with Obsidian Oil and buffing it to a shine. It feels good to be finishing the restoration of this Made for Canada GT&Co Republic Era Peterson’s System Standard 1307. I look forward to the final look when it is put back together, polished and waxed. I put the bowl and stem back together. I polished them with Blue Diamond to polish out the scratches in the briar and the vulcanite. I gave the bowl and the stem multiple coats of carnauba wax. I buffed the pipe with a clean buffing pad to raise the shine. I hand buffed it with a microfiber cloth to deepen the shine. The pipe polished up pretty nicely. The grain is quite stunning and really pops with the wax and polish. The newly fit shiny black vulcanite stem is a beautiful contrast to the browns of the bowl and thick shank. This Peterson’s System Standard 1307 Bent Billiard is a beauty. The polished nickel Ferrule works as a contrast between the stem and the briar and binds it all together. It really is a quite stunning piece of briar whose shape follows the flow of the briar. The pipe is comfortable pipe to hold in the hand. The finished pipe is shown in the photos below. The dimensions of the pipe are Length: 6 ½ inches, Height: 2 inches, Outside diameter of the bowl: 1 ¼ inches, Chamber diameter: ¾ of an inch. The weight of the pipe is 68 grams/2.40 ounces. I will be adding the pipe to the rebornpipe store in the Irish Pipe Makers Section. If you are interested in adding it to your collection let me know. Thanks for reading this blog and my reflections on the pipe while I worked on it. This was an interesting estate to bring back to life.

Restoring an old timer 1912 BBB Own Make Silver Band England Billiard


Blog by Steve Laug

The next pipe that I am working on came from an estate sale in Oregon City, Oregon, USA we purchased on 03/21/24. It was very dirty and was a reddish, brown coloured pipe when it started. The smooth finish around the bowl was dirty and had hand oils ground into the grooves. The bowl had a thick cake a spotty coat of lava on the rim edge and top of the bowl. The outer edge and top of the bowl were battered and damaged with chips and nicks deep in the briar. It was a mess. The stem was oxidized, very dirty and had light tooth marks on both sides ahead of the button. The pipe was stamped on the left side of the shank with the BBB logo in a diamond and underneath and to the side of the point it read Own Make. On the underside of the shank it was stamped England and had been double stamped. The Sterling Silver band on the shank was oxidized but was also stamped with the BBB in a diamond logo and to the left of it was stamped AF&Co in a rectangular stamp [over] three hallmarks – an Anchor, a Rampant Lion and the letter “n”. All were in shield style cartouches. The Anchor is the mark for Birmingham, the Lion is the mark for .925 Silver and the “n” is the date stamp. Jeff took photos of the pipe so I could have a sense of what it looked like before he started his work on it. Jeff took photos of the bowl and rim top to show the condition of the bowl. The rim top is dirty with lava and deep nicks in the surface of the rim. There is a thick cake in the bowl. The silver band on the shank is oxidized and stamped as noted above. The stem is oxidized and is very dirty from the shank to the button. There are light tooth marks and chatter on the stem on both sides ahead of the button. He took photos of the sides and the heel of the bowl to show the condition of the finish and the grain around the pipe. It has some great grain showing through the grime. He took photos of the stamping on the sides of the shank and on the silver band on the shank. It reads as noted above. It is faint in spots but is still very readable. The Sterling Silver band on the shank was oxidized but was also stamped as noted above. The BBB in a diamond logo identifies the pipe brand of this pipe. The AF&Co in a rectangular stamp to the left of the BBB logo identifies the silversmith as Adolf Frankau and Company who was the owner of the BBB brand. Underneath that stamp there were three hallmarks – an Anchor, a Rampant Lion and the letter “n”. All were in shield style cartouches. The Anchor is the mark for the city of Birmingham where the silver was assayed. The Lion is the mark for the quality of silver used – in this case .925 Silver. The letter “n” is the date stamp. I turned to a link on a British Hallmark site to look for the date code. I found a listing for Birmingham silver dates (https://www.925-1000.com/dlc_birmingham.html). I did a screen capture of the chart and have included it below. The letter “n” is in the same shape cartouche as the section I have marked in the picture below. That identifies the pipe as having been made in 1912.Now it was my turn to work on the pipe. Jeff had done an amazing cleanup of the pipe. He reamed the cake with a PipNet reamer and cleaned up that with a Savinelli Fitsall Pipe Knife. He scrubbed the internals of the bowl and stem with alcohol, cotton swabs and pipe cleaners. He scrubbed the externals with undiluted Murphy’s Oil Soap and rinsed the bowl off with running water. He soaked the stem in Briarville’s Pipe stem Deoxidizer and once it had soaked, rinsed it off with warm water to remove the residual solution. He dried it off and rubbed it down to remove any oxidation that was still on the stem. The pipe looked very good when I received it. I took a photo of the rim top to show the condition. You can see the clean bowl. The bowl is in excellent condition and is clean. The rim top and the inner edge showed damage with nicks and scratches on the top and roughness to both the inner and outer edges. The stem came out looking clean. There were some light tooth marks and chatter on both sides ahead of the button. I took photos of the stamping on the shank. It is faint but still very readable. There was also a very faint stamp on the stem but I am still not certain it is the correct stem because of the fit and shape of the stem. I removed the stem from the shank and took a photo of the pipe parts to show what I was working with. I began my work on the pipe by addressing the issues with the rim top and the rim edges both inner and outer. I used a folded piece of 220 grit sandpaper to smooth out the inner edge and work to bring it back to round.The rim looked much better at this point thought there was still damage at the front of the inner edge of the bowl. I used a piece of 220 grit sandpaper and a wooden ball to give the inner edge and rim top a slight bevel. It looked much better.I built up the large chip in the outer edge of the bowl at the front with clear CA glue and briar dust. I put a spot of glue on the area and dipped the bowl into the briar dust. It stuck to the glue and came of the rest of the bowl. Once it dried I sanded it smooth with a 320 grit sanding pad to smooth out the repair on the top and the front of the bowl. It looked very good. I used a Cherry stain pen to touch up the repaired areas of the bowl. I stained the rim top with the same pen at the same time. It looked much better.I sanded the briar with 320-3500 grit sanding pads to smooth out the nicks and scratches in the bowl sides, rim and heel of the bowl. I wiped it down after each sanding pad with a damp cloth to remove the sanding dust and debris. The pipe had cleaned up so well that I turned to polish the briar with micromesh sanding pads. I dry sanded it with 1500-12000 grit sanding pads and wiped the bowl down after each pad with a damp cloth. By the final pads the briar really had a shine. I rubbed the briar down with Before & After Restoration Balm. I worked it into the briar with my fingertips. The product works to clean, enliven and preserve the briar. I let it sit for 10 minutes then I buffed it with a cotton cloth to deepen the shine. The briar really comes alive with the balm. Next, I moved on to further smooth out the surface of the vulcanite. I sanded it with 320-3500 grit sanding pads to further clean up the scratches and file marks on the surface of the stem.I polished the vulcanite with micromesh sanding pads – 1500-12000 grit pads. I wiped it down with Obsidian Oil after each sanding pad. I used Before & After Pipe Polish – both Fine and Extra Fine to further polish the stem. It really took on a shine and I knew that once it was buffed it would look amazing. I put the stem back on the 1912 BBB Own Make Billiard with a Vulcanite Stem and took it to the buffer. I worked it over with Blue Diamond to polish out the remaining small scratches. I gave the bowl and the stem several coats of carnauba wax and buffed the pipe with a clean buffing pad to raise the shine. I hand buffed it with a microfiber cloth to deepen the shine. The pipe polished up really well and the rim top looked good. I was happy with the look of the finished pipe. The photos below show what the pipe looks like after the restoration. The 1912 BBB Own Make Billiard is a beautiful and unique take on a classic shape. The polished, hard rubber taper stem looks really good with the browns of the briar. The dimensions of the pipe are Length: 5 ½ inches, Height: 1 ¾ inches, Outside diameter of the bowl: 1 ¼ inches, Chamber diameter: ¾ of an inch. The weight of the pipe is 1.45 ounces/41 grams. This is another old time BBB pipe that I will be adding to my BBB Collection. I love these old time English Pipes by BBB as they are a real pleasure to smoke. Thanks for walking through the restoration with me.

Restoring the first of the Antique Collectible Finds – a Jeantet Fait Main Bent Freehand Dublin


Blog by Steve Laug

Last weekend on April 27 Kenneth and I went to an antique and collectible sale at an arena in New Westminster, BC, Canada. I wrote about the adventure and posted it in a previous blog last weekend (https://rebornpipes.com/2024/04/28/you-have-to-join-kenneth-and-me-on-a-great-morning-pipe-hunt/). On the hunt I picked up four pipes that I have listed below:

  1. Jeantet Fait Main Bent Freehand Dublin 4 with a diamond shank
  2. Jeantet Fait Main Bent Apple 9 with a uniquely shaped shank and stem
  3. Republic Era Peterson’s System Pipe 1307 Bowl sans stem
  4. Brigham Made in Canada 625 Squat Straight Bulldog

I have included photos of the foursome below. They are in the order of the list above. I chose to work on the first pipe in the above photos. It is shown in the photos below and is stamped Jeantet [over] Fait Main (Hand Made) on the left underside of the shank. On the right underside of the shank it is stamped with the number 4 (shape number perhaps) and with Made in France along the shank/stem junction. There is a Jeantet logo J in a silver oval on the left topside of the diamond stem. It is kind of a Freehand Bent Dublin with a Diamond shank. The pipe has some great grain around the bowl sides and shank. The rim top is flat and slightly oval. The bowl had a moderate cake on the walls and thankfully no lava on the rim top or edges of the bowl. The briar is dry and lifeless with some grime and grit ground into the briar. The stem was oxidized and had light toothmarks on the top and underside ahead of the button. The photos below show what I saw when I examined the pipe.  I took photos of the bowl and rim top to show the condition of the bowl. The rim top is clean with no lava and there is a moderate cake in the bowl. The stem is lightly oxidized and is very dirty from the shank to the button. There are light tooth marks and chatter on the stem on both sides ahead of the button.I took photos of the stamping on the undersides of the shank. It reads as noted above. It is faint in spots but is still very readable. I took the stem off and took a photo of the parts to give a sense of the size of the bowl. I turned to Pipephil’s site to see what I could learn about Jeantet pipes (http://pipephil.eu/logos/en/logo-jeantet.html). There was nothing specific about that line though was a brief summary of the history. I quote from the top bar below:

The company joined the Cuty-Fort Entreprises group (Chacom, Ropp, Vuillard, Jean Lacroix…) in 1992. In 2010 it dropped out and the brand isn’t part of the group any more. The label is owned by the Jeantet family (Dominique Jeantet) again. The pipe production is discontinued. Dominique Jeantet retired in 2000. See also: Antidote, Duke of Kent, Grand Duke, Hermes, Sir Bruce, Sir Duke

I turned to Pipedia to get a more detailed history of the brand (https://pipedia.org/wiki/Jeantet). There as a short history there that I have reproduced below.

The firm of the Jeantet family in Saint-Claude is first mentioned as early as 1775. By 1807 the Jeantets operated a turnery producing in particular wooden shanks for porcelain pipes and wild cherry wood pipes. The firm was named Jeantet-David in 1816, and in 1837 the enterprise was transformed into a corporation as collective name for numerous workshops scattered all over the city.

The manufacturing of briar pipes and began in 1858. 51 persons were employed by 1890. Desirous to concentrate the workers at a single site, the corporation began to construct a factory edifying integrated buildings about 1891 at Rue de Bonneville 12 – 14. This took several years. In 1898 Maurice Jeantet restructured the business. He is also presumed to enlarge Jeantet factory purchasing a workshop adjoining southerly. It belonged to the family Genoud, who were specialized in rough shaping of stummels and polishing finished pipes. (In these times it was a most common procedure to carry goods from here to there and back again often for certain steps of the production executed by dependant family based subcontractors. Manpower was cheap.)

Jeantet was transformed to a corporation with limited liability in 1938. By that time a branch workshop was operated in Montréal-la-Cluse (Ain), where mainly the less expensive pipes were finished. 107 employees – 26 of them working from their homes – were counted in Saint-Claude in 1948 and 18 in the Ain facility.

The Saint-Claude factory was considerably modernized by ca. 1950 installing (e.g.) freight elevators. In 1952 the southern workshop was elevated. 80 workers were employed in 1958. The factory covered an area of 2831 m²; 1447 m² of the surface were buildings.

The climax of the pipe production was reached around 1969, when thirty to thirty five thousand dozens of pipes were made by 72 workers (1969). But then the production continuously dwindled to only six or seven thousand dozens in 1987 and only 22 workers were still there. Even though, around 1979 a very modern steam powered facility for drying the briar had been installed in the factory’s roofed yard.

Yves Grenard, formerly Jeantet’s chief designer and a great cousin of Pierre Comoy, had taken over the management of Chapuis-Comoy in 1971. Now, to preserve the brand, the Jeantet family went into negotiations with him, and resulting from that Jeantet was merged in the Cuty Fort Group (est. 1987 and headed by Chacom) in 1988 along with the pipe brands of John Lacroix and Emile Vuillard. Chacom closed the Jeantet plant, and the City of Saint-Claude purchased it in 1989. After alternative plans failed, the buildings were devoted to wrecking. The southerly workshop was wrecked before 1992.

Today Jeantet pipes were produced as a sub-brand by Chapuis-Comoy who’s mainstay is Chacom of course.

I reamed the bowl with a PipNet pipe reamer and then cleaned up the reaming with a Savinelli Fitsall Pipe Knife. I sanded the bowl sides with 220 grit sandpaper wrapped around a piece of dowel. The bowl walls showed no heat damage or checking. I scrubbed the internals of the airway and mortise in the shank and the airway in the stem with pipe cleaners, cotton swabs and alcohol until the airways were clean and the pipe smelled fresh. I scrubbed the externals bowl and shank with Murphy’s Oil Soap and a tooth brush. I rinsed it off with warm water to remove the grime and debris from the scrubbing. The pipe had cleaned up so well that I turned to polish the briar with micromesh sanding pads. I dry sanded it with 1500-12000 grit sanding pads and wiped the bowl down after each pad with a damp cloth. By the final pads the briar really had a shine. I rubbed the briar down with Before & After Restoration Balm. I worked it into the briar with my fingertips. The product works to clean, enliven and preserve the briar. I let it sit for 10 minutes then I buffed it with a cotton cloth to deepen the shine. The briar really comes alive with the balm. I set aside the bowl and turned my attention to the stem. To help remove the oxidation I scrubbed the stem with Soft Scrub Cleanser and cotton pads. It took some elbow work but the stem definitely looked better and the sulphur smell of the oxidation is gone!I sanded the surface with 320-3500 grit sanding pads to further clean up the spots of oxidation on the surface of the stem. I wiped it down with a soft damp cloth following each sanding pad to remove the sanding debris.I polished the vulcanite with micromesh sanding pads – 1500-12000 grit pads. I wiped it down with Obsidian Oil after each sanding pad. I used Before & After Pipe Polish – both Fine and Extra Fine to further polish the stem. It really took on a shine and I knew that once it was buffed it would look amazing. This Jeantet Fait Main Freehand Bent Dublin 4 with a vulcanite stem is a great looking pipe now that it has been restored. The beautiful grain around the bowl sides stands out very well with the contrast of the polished vulcanite stem. I carefully buffed the pipe with Blue Diamond on the buffing wheel. I gave the bowl and the stem multiple coats of carnauba wax on the buffing wheel. I followed that by buffing the entire pipe with a clean buffing pad. I hand buffed the pipe with a microfiber cloth to deepen the shine. The finished Jeantet Fait Main Freehand fits nicely in the hand and feels great. Give the finished pipe a look in the photos below. The dimensions of the pipe are Length: 5 ¾ inches, Height: 2 inches, Outside diameter of the bowl: 1 ¾ inches, Chamber diameter: ¾ of an inch. The weight of the pipe is 61grams/2.15 ounces. I will be adding this one to the French Pipe Makers Section of the rebornpipes store. If you are interested in adding it to your collection send me a message or an email. Thanks for reading this blog and my reflections on the pipe while I worked on it. There are many more to come!