Blog by Steve Laug
Last weekend on April 27 Kenneth and I went to an antique and collectible sale at an arena in New Westminster, BC, Canada. I wrote about the adventure and posted it in a previous blog last weekend (https://rebornpipes.com/2024/04/28/you-have-to-join-kenneth-and-me-on-a-great-morning-pipe-hunt/). On the hunt I picked up four pipes that I have listed below:
- Jeantet Fait Main Bent Freehand Dublin 4 with a diamond shank
- Jeantet Fait Main Bent Apple 9 with a uniquely shaped shank and stem
- Republic Era Peterson’s System Pipe 1307 Bowl sans stem
- Brigham Made in Canada 625 Squat Straight Bulldog
I have included photos of the foursome below. They are in the order of the list above. 

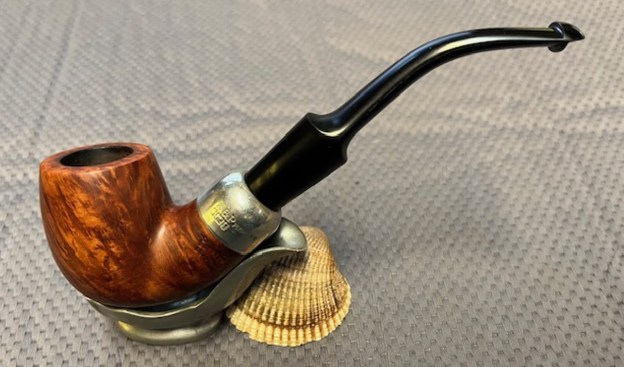
 I chose to work on the second pipe in the above photos. It is shown in the photos below and is stamped Jeantet [over] Fait Main (Hand Made) on the left topside of the shank. On the right side of the shank it is stamped with the number 9 (shape number perhaps) [over] Made in France. There is a Jeantet logo J in a silver oval on the left topside of the diamond stem. It is kind of a Freehand Bent Apple with a unique panelled shank. The pipe has some great grain around the bowl sides and shank. The rim top is bevelled inward and slightly oval. The bowl had a moderate cake on the walls and some lava on the rim top or edges of the bowl. The briar is dry and lifeless with some grime and grit ground into the briar. The stem was oxidized and had light toothmarks on the top and underside ahead of the button. The photos below show what I saw when I examined the pipe.
 I took photos of the bowl and rim top to show the condition of the bowl. The rim top has some heavy lava around the back half. There was some darkening around the inner edge of the bowl and there is a moderate cake in the bowl. The stem is lightly oxidized and is very dirty from the shank to the button. There are light tooth marks and chatter on the stem on both sides ahead of the button.
 I took photos of the stamping on the topsides of the shank. It reads as noted above. It is faint in spots but is still very readable. I took the stem off and took a photo of the parts to give a sense of the size of the bowl.
 Before I started my work on this pipe I turned to Pipephil’s site to see what I could learn about Jeantet pipes (http://pipephil.eu/logos/en/logo-jeantet.html). There was nothing specific about Hand Made line though was a brief summary of the history. I quote from the top bar below:
The company joined the Cuty-Fort Entreprises group (Chacom, Ropp, Vuillard, Jean Lacroix…) in 1992. In 2010 it dropped out and the brand isn’t part of the group any more. The label is owned by the Jeantet family (Dominique Jeantet) again. The pipe production is discontinued. Dominique Jeantet retired in 2000. See also: Antidote, Duke of Kent, Grand Duke, Hermes, Sir Bruce, Sir Duke
I turned to Pipedia to get a more detailed history of the brand (https://pipedia.org/wiki/Jeantet). There as a short history there that I have reproduced below.
The firm of the Jeantet family in Saint-Claude is first mentioned as early as 1775. By 1807 the Jeantets operated a turnery producing in particular wooden shanks for porcelain pipes and wild cherry wood pipes. The firm was named Jeantet-David in 1816, and in 1837 the enterprise was transformed into a corporation as collective name for numerous workshops scattered all over the city.
The manufacturing of briar pipes and began in 1858. 51 persons were employed by 1890. Desirous to concentrate the workers at a single site, the corporation began to construct a factory edifying integrated buildings about 1891 at Rue de Bonneville 12 – 14. This took several years. In 1898 Maurice Jeantet restructured the business. He is also presumed to enlarge Jeantet factory purchasing a workshop adjoining southerly. It belonged to the family Genoud, who were specialized in rough shaping of stummels and polishing finished pipes. (In these times it was a most common procedure to carry goods from here to there and back again often for certain steps of the production executed by dependant family based subcontractors. Manpower was cheap.)
Jeantet was transformed to a corporation with limited liability in 1938. By that time a branch workshop was operated in Montréal-la-Cluse (Ain), where mainly the less expensive pipes were finished. 107 employees – 26 of them working from their homes – were counted in Saint-Claude in 1948 and 18 in the Ain facility.
The Saint-Claude factory was considerably modernized by ca. 1950 installing (e.g.) freight elevators. In 1952 the southern workshop was elevated. 80 workers were employed in 1958. The factory covered an area of 2831 m²; 1447 m² of the surface were buildings.
The climax of the pipe production was reached around 1969, when thirty to thirty five thousand dozens of pipes were made by 72 workers (1969). But then the production continuously dwindled to only six or seven thousand dozens in 1987 and only 22 workers were still there. Even though, around 1979 a very modern steam powered facility for drying the briar had been installed in the factory’s roofed yard.
Yves Grenard, formerly Jeantet’s chief designer and a great cousin of Pierre Comoy, had taken over the management of Chapuis-Comoy in 1971. Now, to preserve the brand, the Jeantet family went into negotiations with him, and resulting from that Jeantet was merged in the Cuty Fort Group (est. 1987 and headed by Chacom) in 1988 along with the pipe brands of John Lacroix and Emile Vuillard. Chacom closed the Jeantet plant, and the City of Saint-Claude purchased it in 1989. After alternative plans failed, the buildings were devoted to wrecking. The southerly workshop was wrecked before 1992.
Today Jeantet pipes were produced as a sub-brand by Chapuis-Comoy who’s mainstay is Chacom of course.
I reamed the bowl with a PipNet pipe reamer and then cleaned up the reaming with a Savinelli Fitsall Pipe Knife. I sanded the bowl sides with 220 grit sandpaper wrapped around a piece of dowel. The bowl walls showed no heat damage or checking.
 I used a folded piece of 220 grit sandpaper to clean up the top of the rim and the inner edge to make it look better.
 I scrubbed the externals bowl and shank with Murphy’s Oil Soap and a tooth brush. I rinsed it off with warm water to remove the grime and debris from the scrubbing.
 I scrubbed the internals of the airway and mortise in the shank and the airway in the stem with pipe cleaners, cotton swabs and alcohol until the airways were clean and the pipe smelled fresh.
  I took a photo of the shank end to give a sense of the shape of the stem and shank. The top half of the stem and shank are three panels. The bottom half of the shank is half of an oval. Together they form a unique shape.
 I sanded the surface of the briar with 320-3500 grit sanding pads. It took on a real shine on the briar as I worked through the pads. I wiped it down after each sanding pad with a damp cloth to remove the sanding dust and debris left behind.
 The pipe had cleaned up so well that I turned to polish the briar with micromesh sanding pads. I dry sanded it with 1500-12000 grit sanding pads and wiped the bowl down after each pad with a damp cloth. By the final pads the briar really had a shine.


 I rubbed the briar down with Before & After Restoration Balm. I worked it into the briar with my fingertips. The product works to clean, enliven and preserve the briar. I let it sit for 10 minutes then I buffed it with a cotton cloth to deepen the shine. The briar really came alive with the balm.

 I set aside the bowl and turned my attention to the stem. To help remove the oxidation I scrubbed the stem with Soft Scrub Cleanser and cotton pads. It took some elbow work but the stem definitely looked better and the sulphur smell of the oxidation is gone!
 I sanded the surface with 320-3500 grit sanding pads to further clean up the spots of oxidation on the surface of the stem. I wiped it down with a soft damp cloth following each sanding pad to remove the sanding debris.
 I polished the vulcanite with micromesh sanding pads – 1500-12000 grit pads. I wiped it down with Obsidian Oil after each sanding pad. I used Before & After Pipe Polish – both Fine and Extra Fine to further polish the stem. It really took on a shine and I knew that once it was buffed it would look amazing.
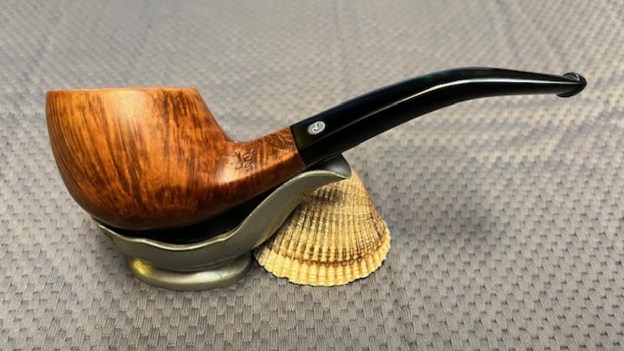
 This Jeantet Fait Main Freehand Bent Apple 9 with a vulcanite stem is a great looking pipe now that it has been restored. The beautiful grain around the bowl sides stands out very well with the contrast of the polished vulcanite stem. I carefully buffed the pipe with Blue Diamond on the buffing wheel. I gave the bowl and the stem multiple coats of carnauba wax on the buffing wheel. I followed that by buffing the entire pipe with a clean buffing pad. I hand buffed the pipe with a microfiber cloth to deepen the shine. The finished Jeantet Fait Main Freehand fits nicely in the hand and feels great. Give the finished pipe a look in the photos below. The dimensions of the pipe are Length: 5 ½ inches, Height: 1 ½ inches, Outside diameter of the bowl: 1 ½ inches, Chamber diameter: ¾ of an inch. The weight of the pipe is 52 grams/1.83 ounces. I will be adding this one to the French Pipe Makers Section of the rebornpipes store. If you are interested in adding it to your collection send me a message or an email. Thanks for reading this blog and my reflections on the pipe while I worked on it. There are many more to come!