Monthly Archives: June 2022

New Life for a Hard Smoked Older Bewlay Popular 127 Billiard


Blog by Steve Laug

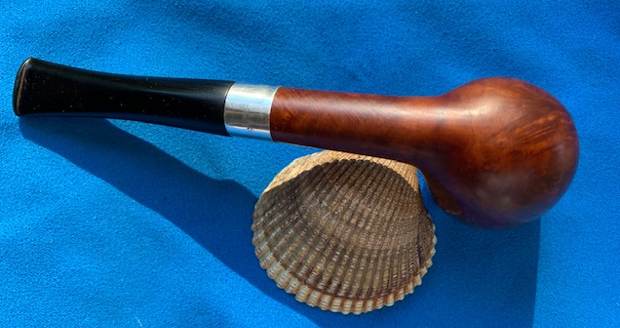
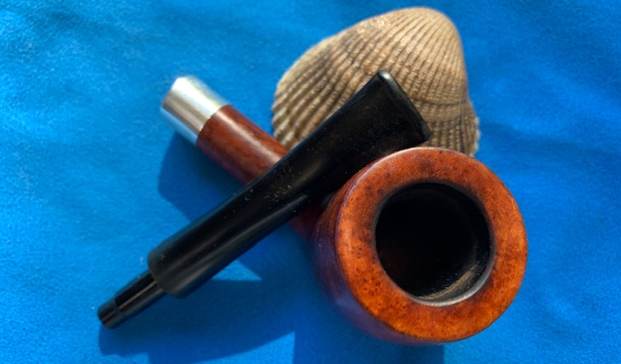
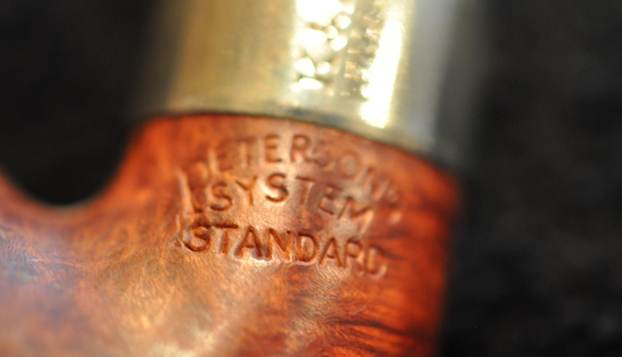
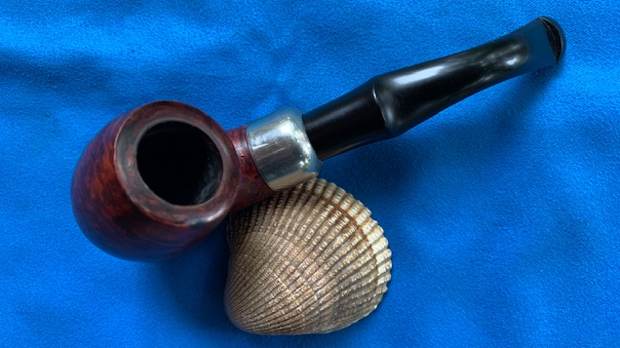
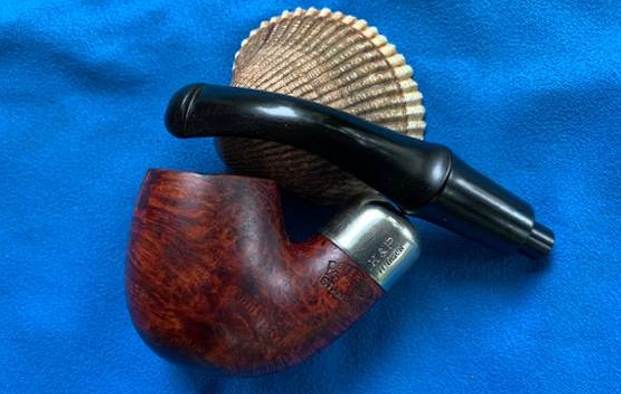
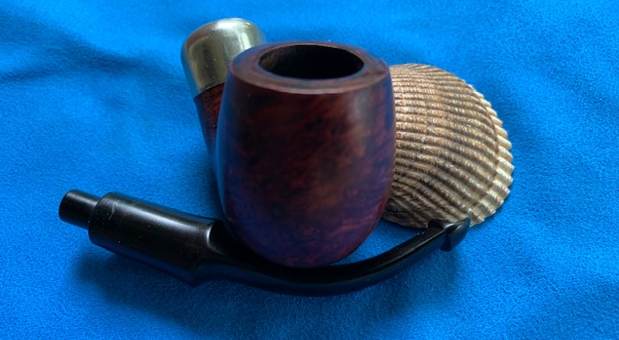
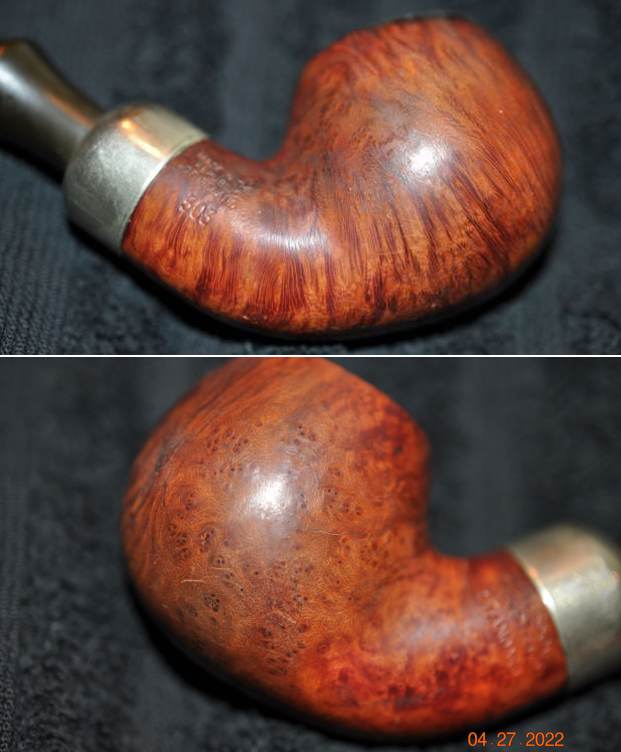
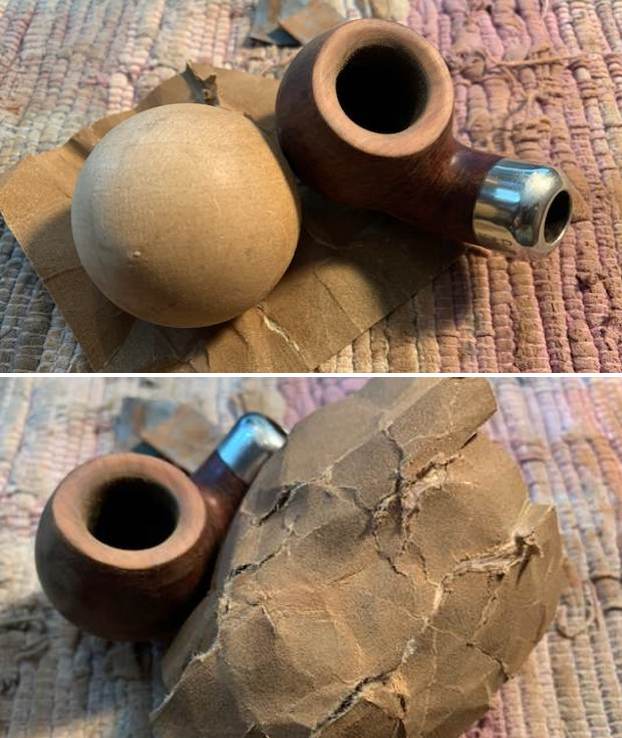
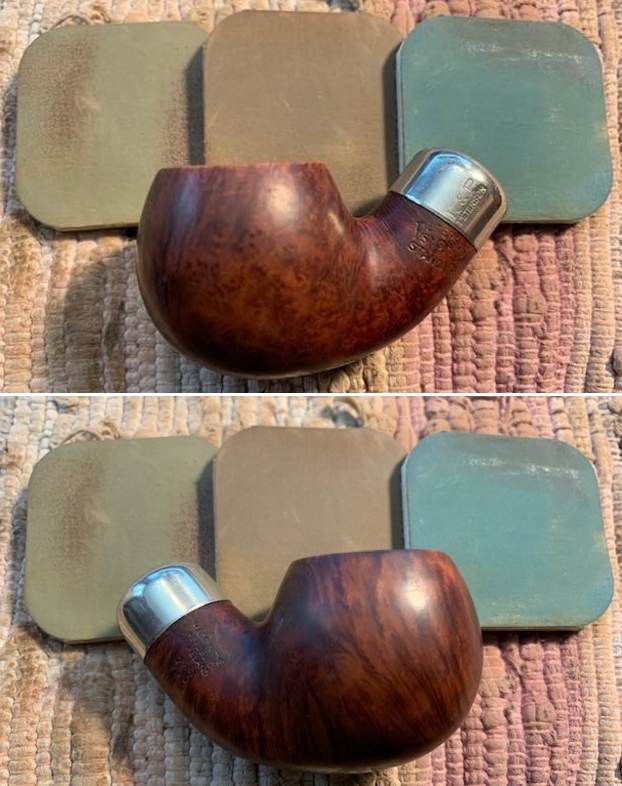
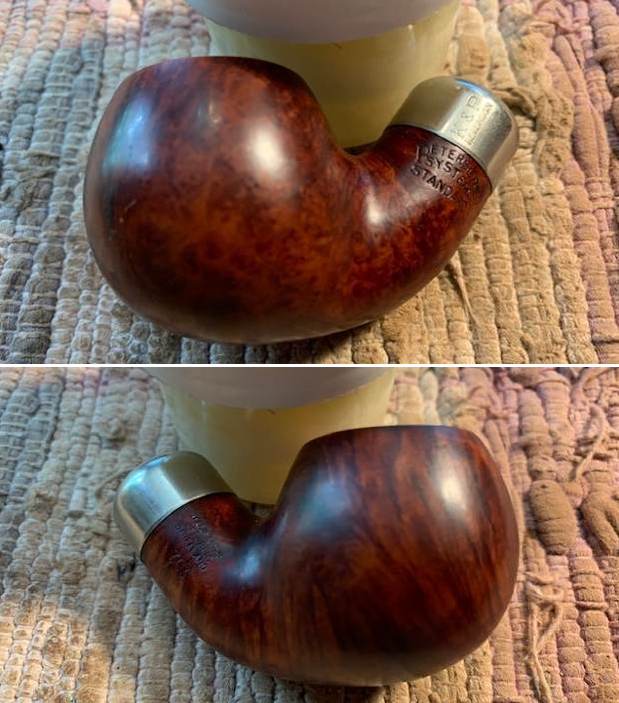
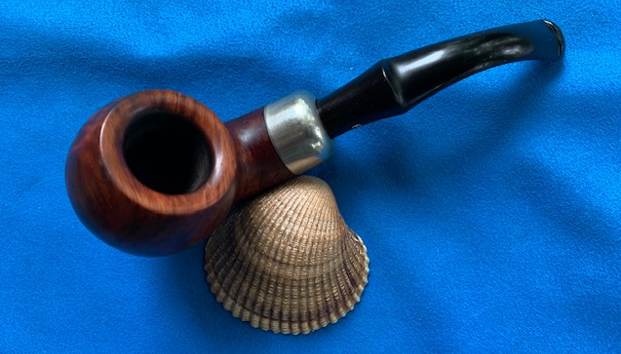
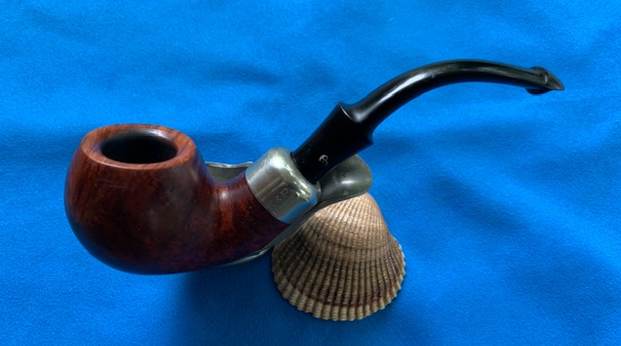
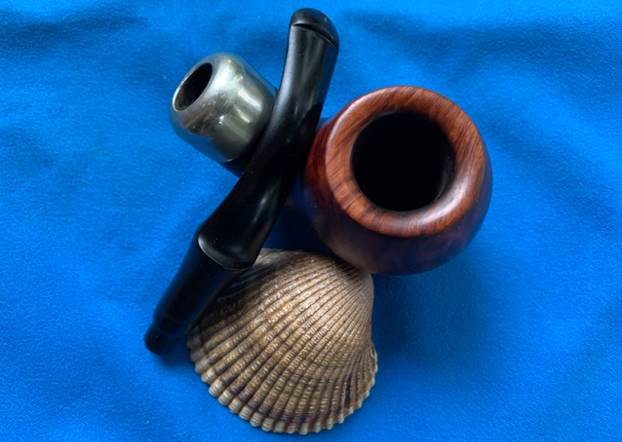
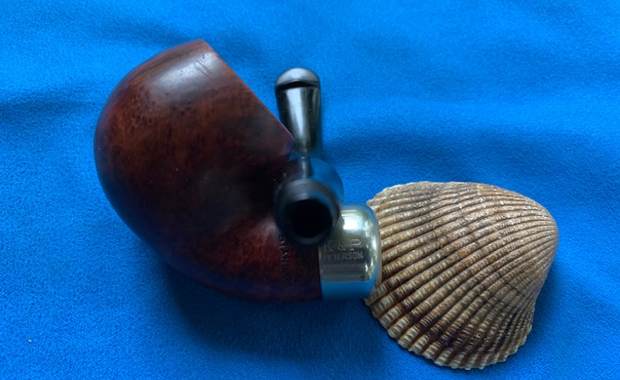
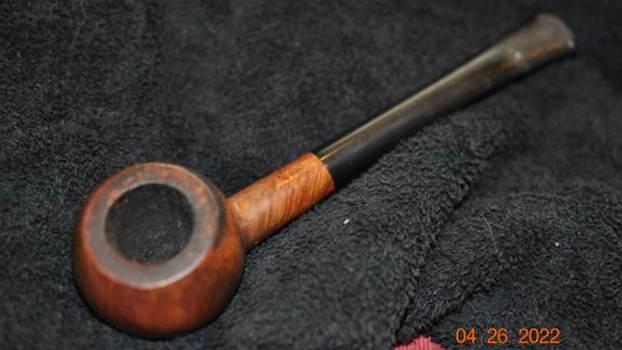
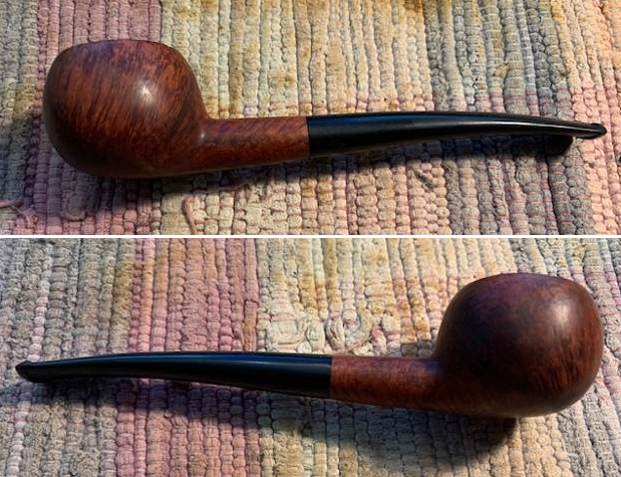
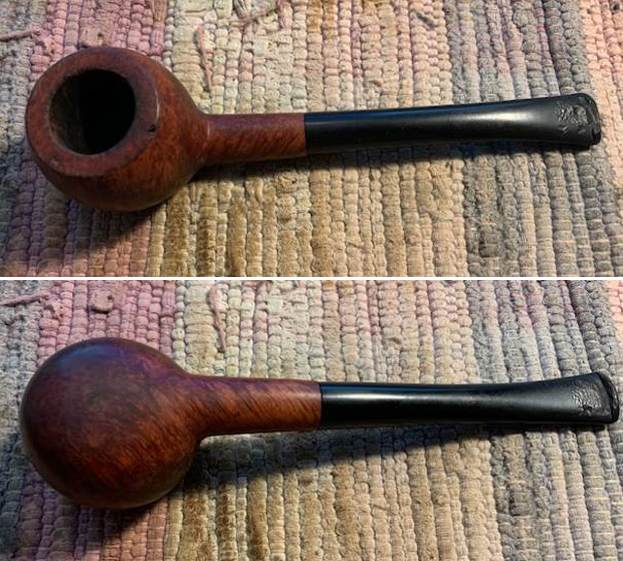
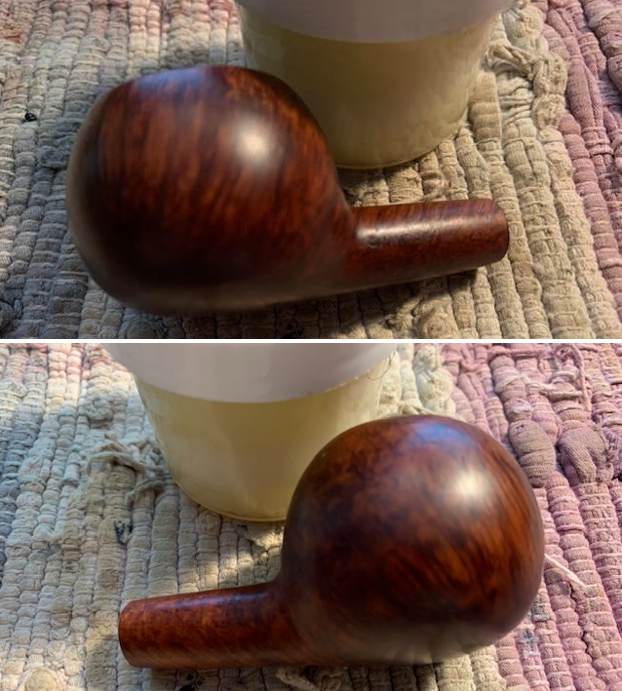
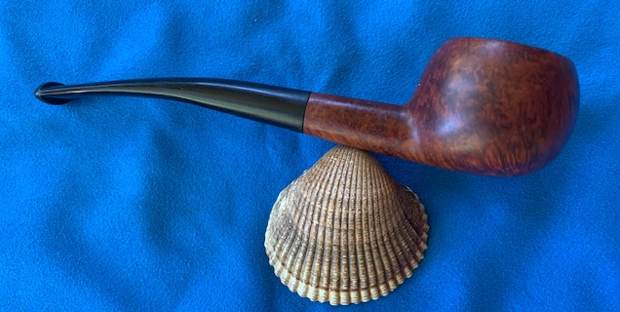
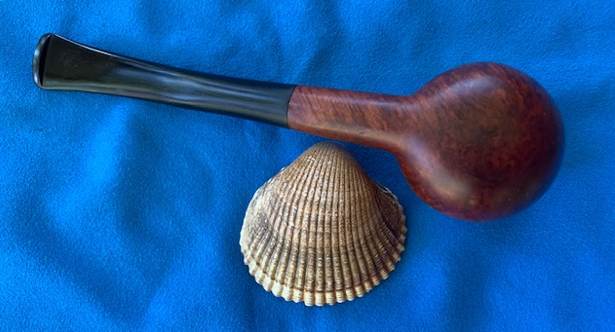
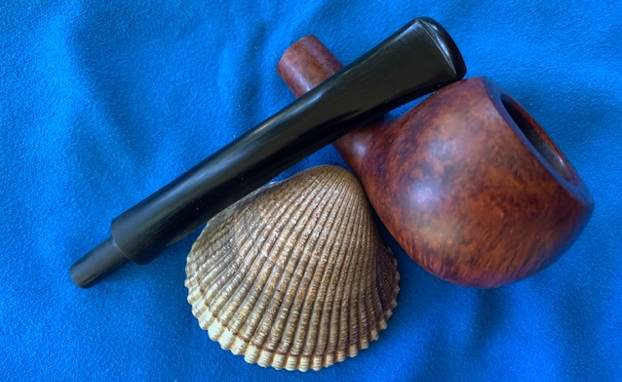
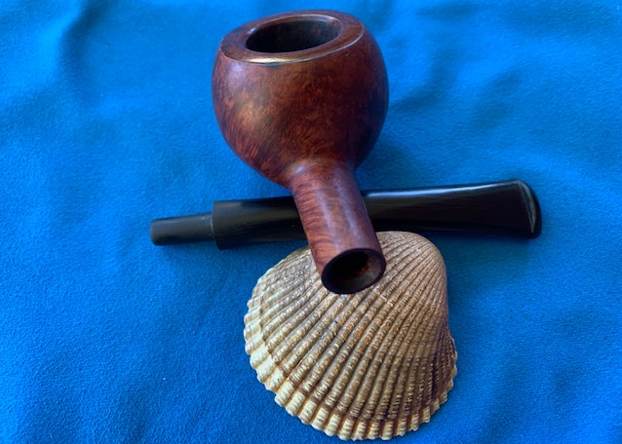
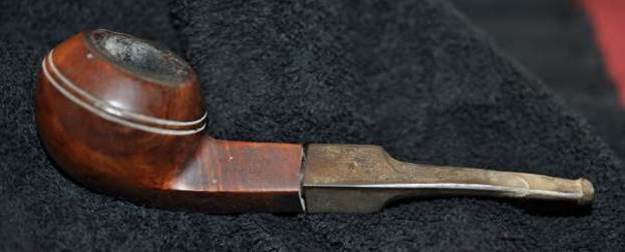
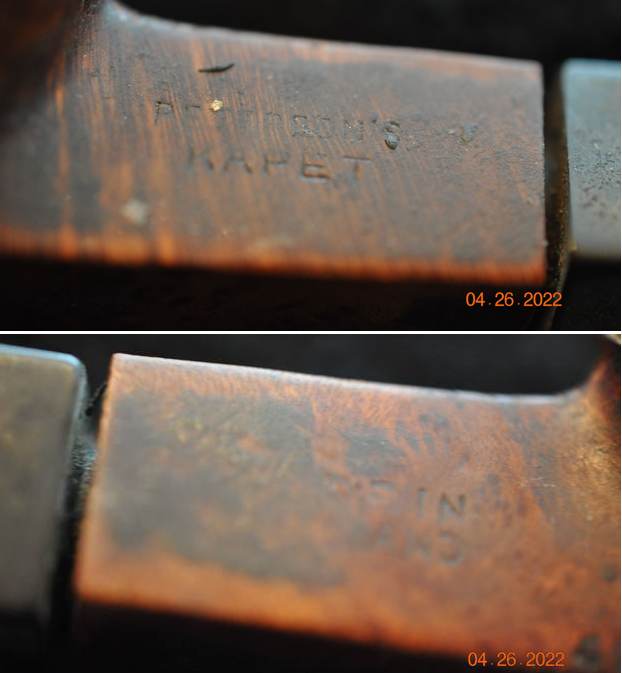
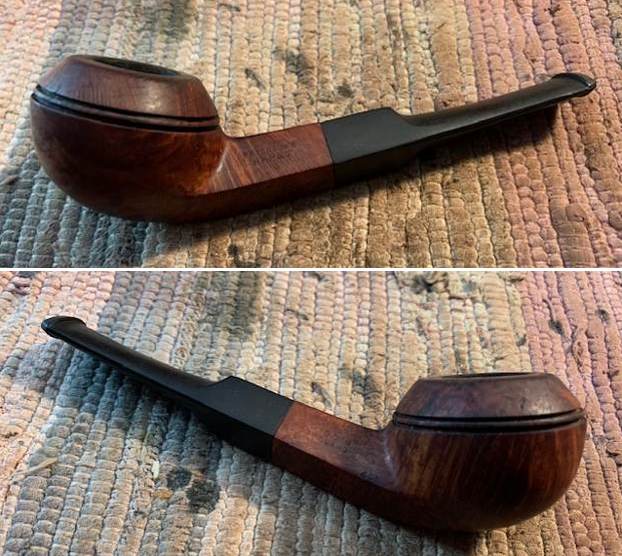
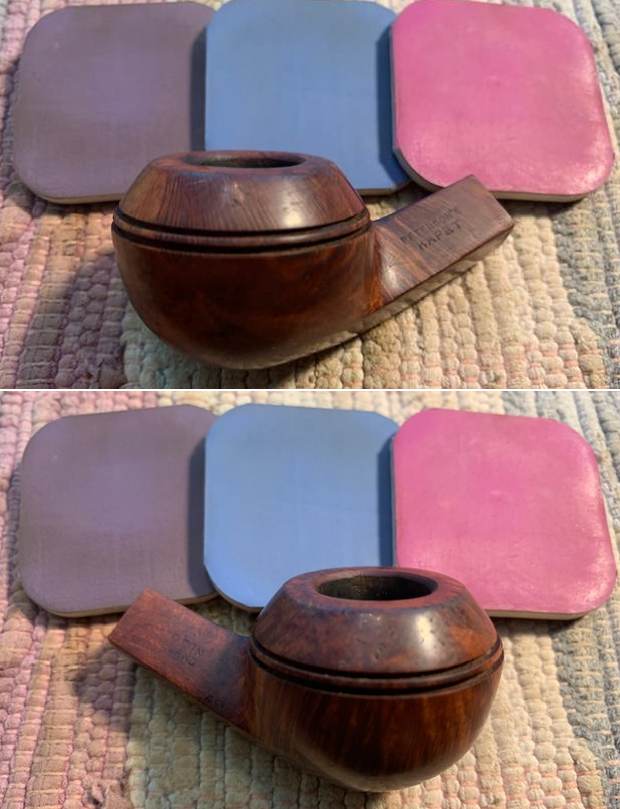
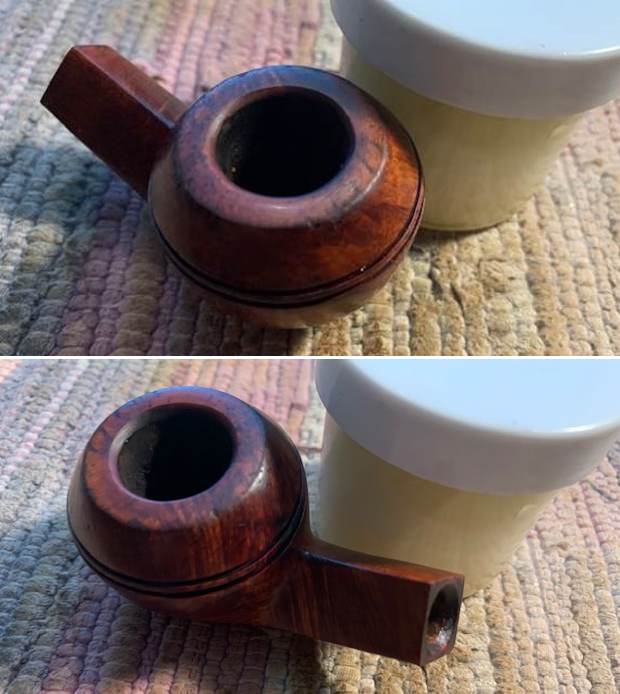
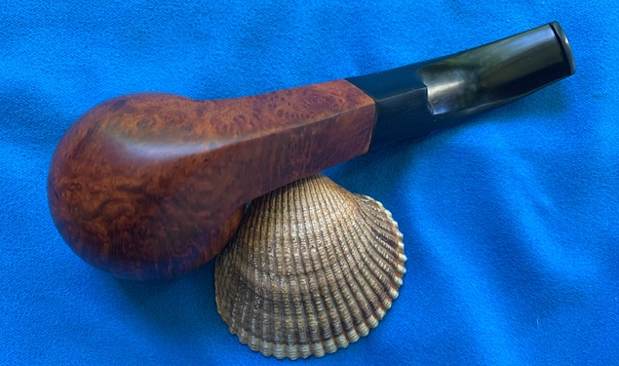
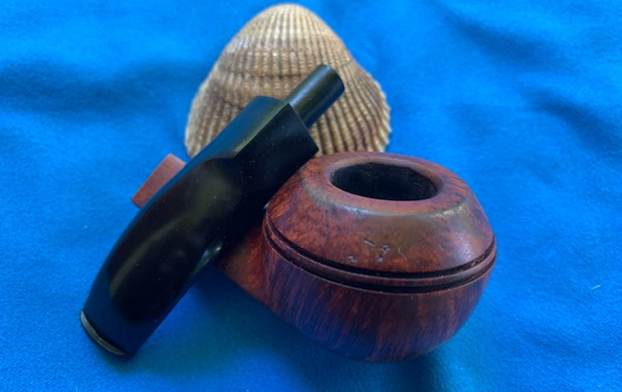
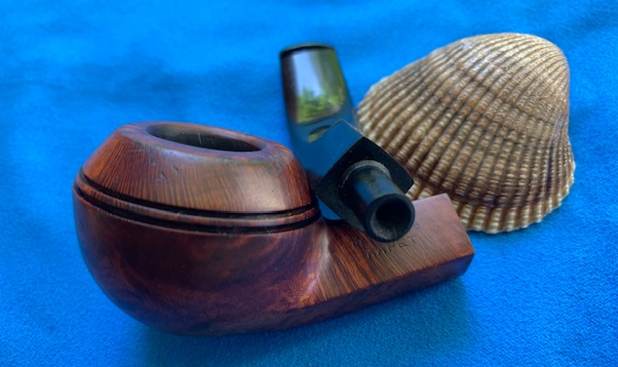
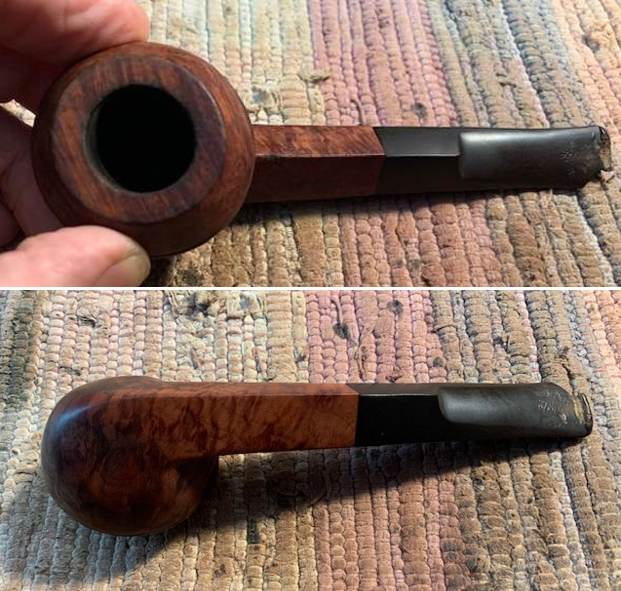
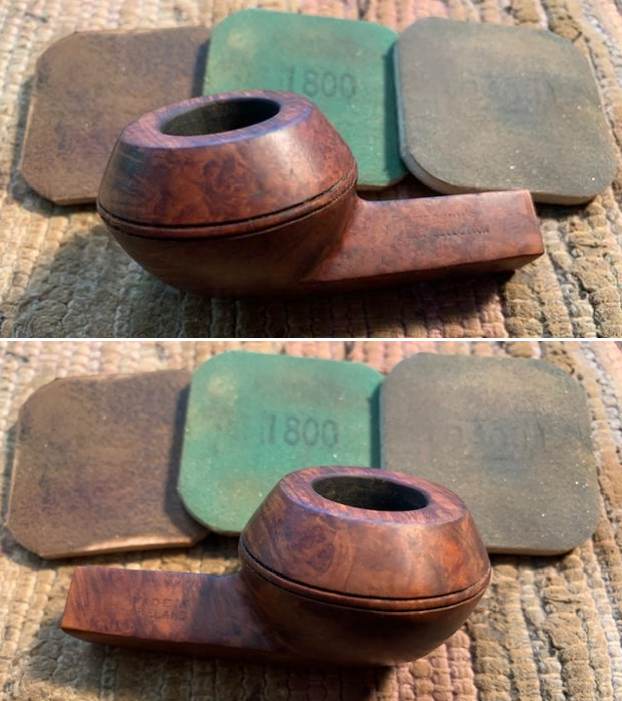
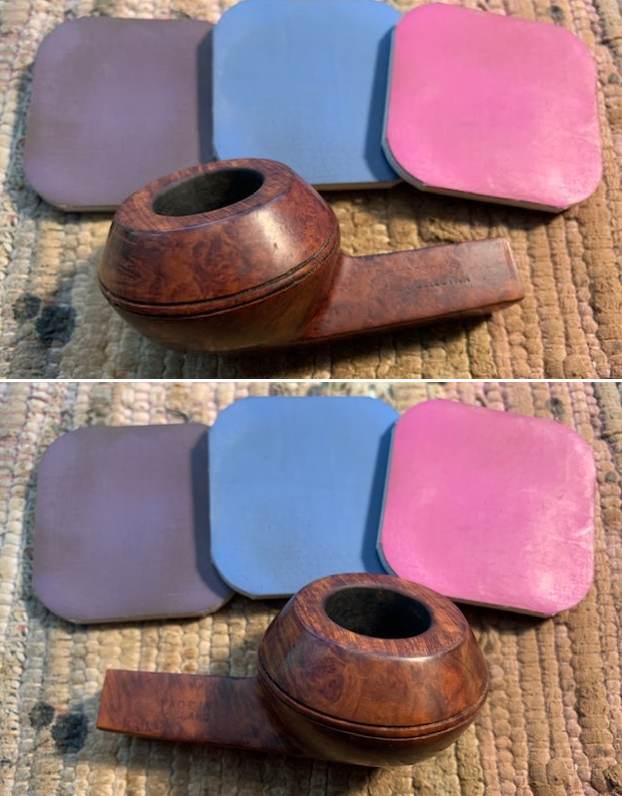
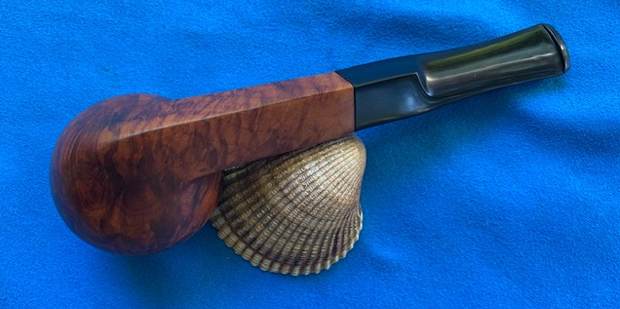
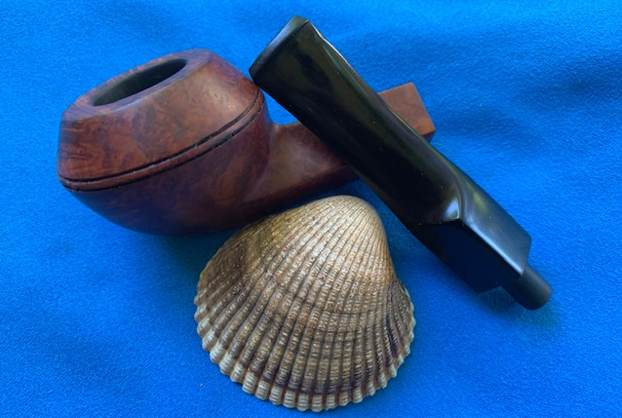
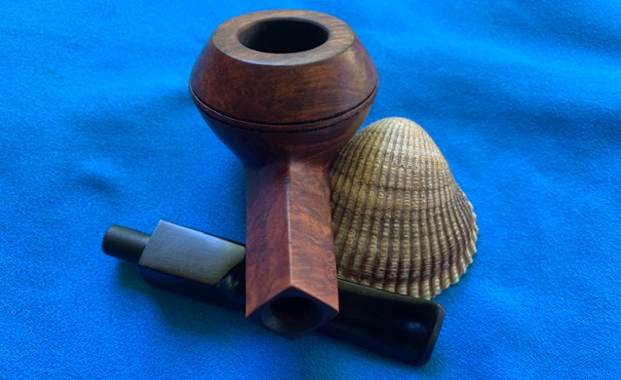
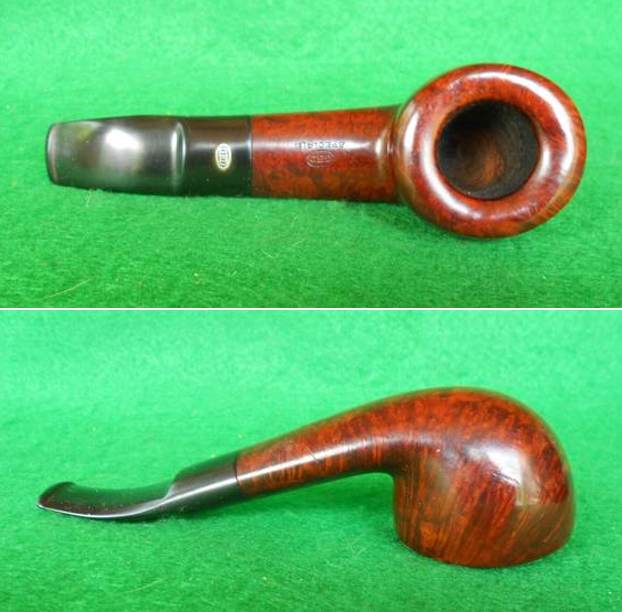
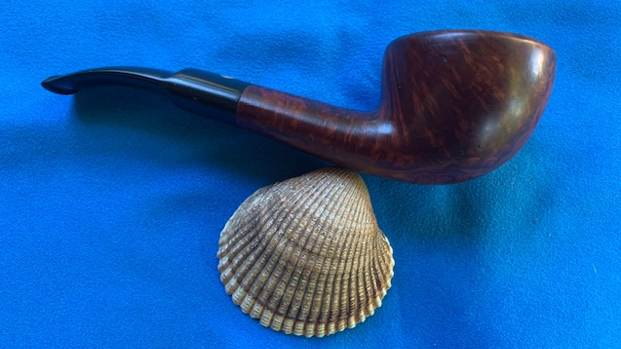
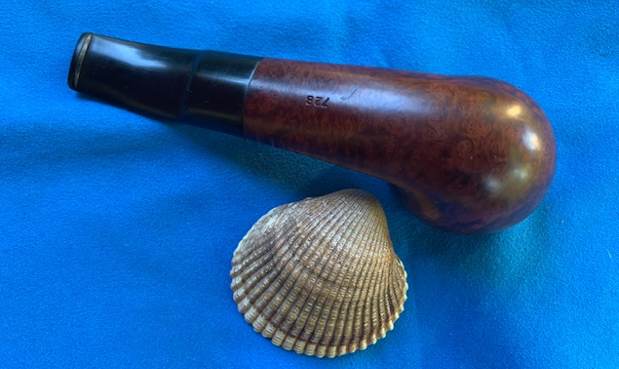
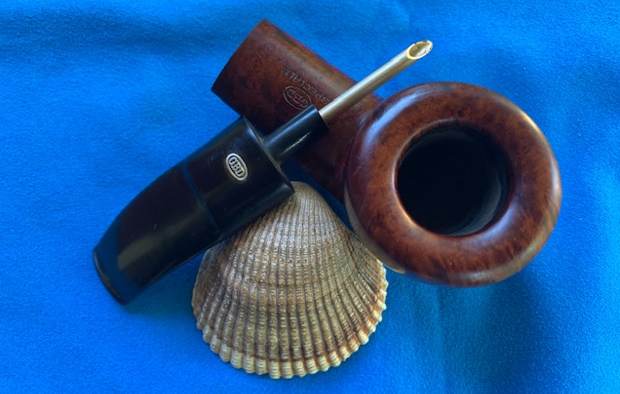
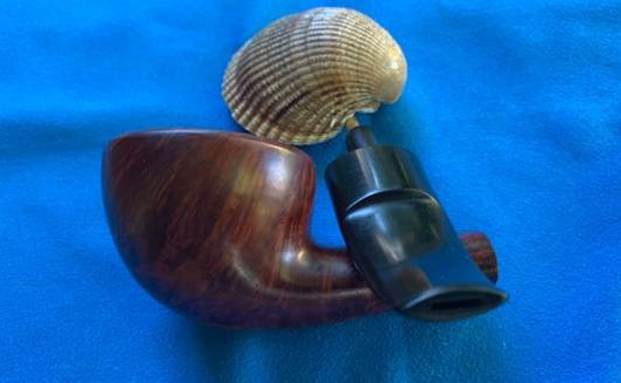
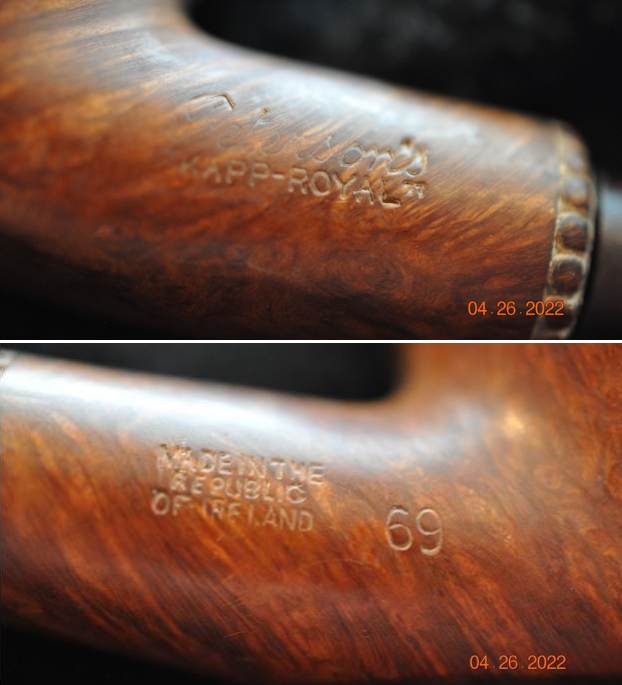
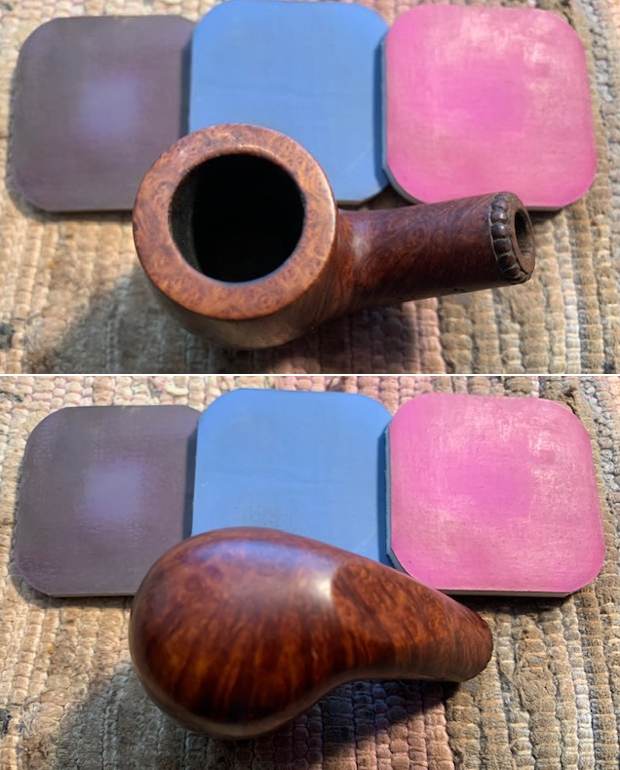
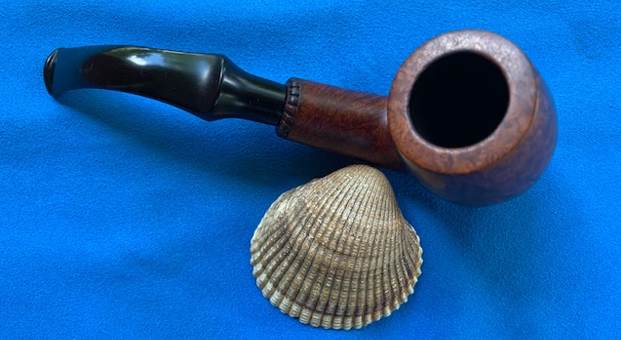
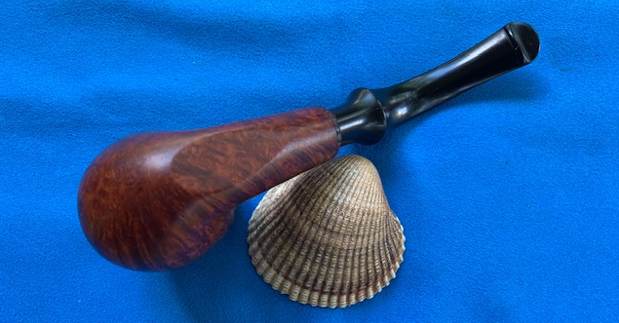
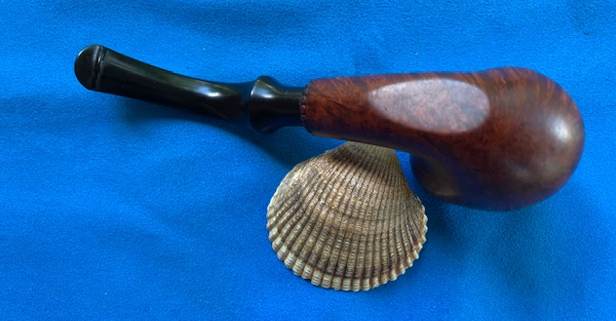
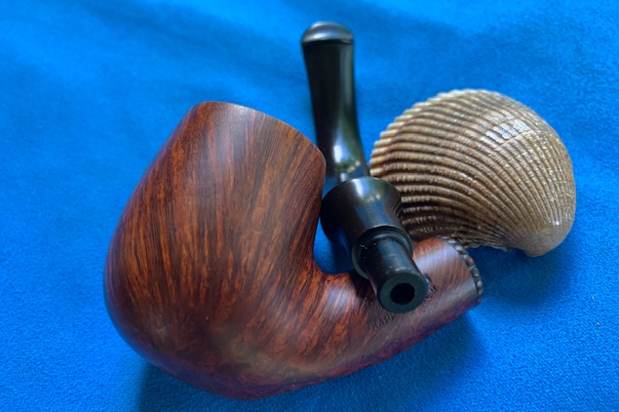
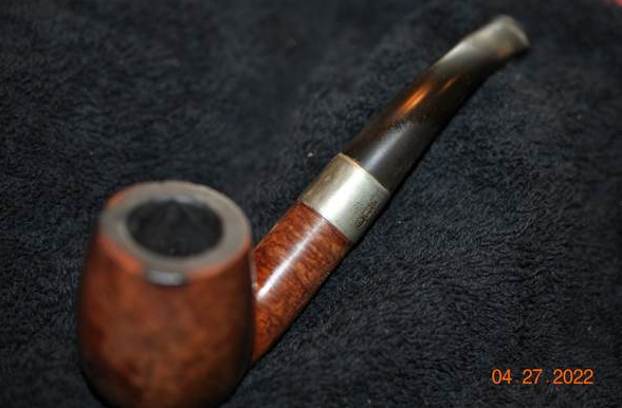
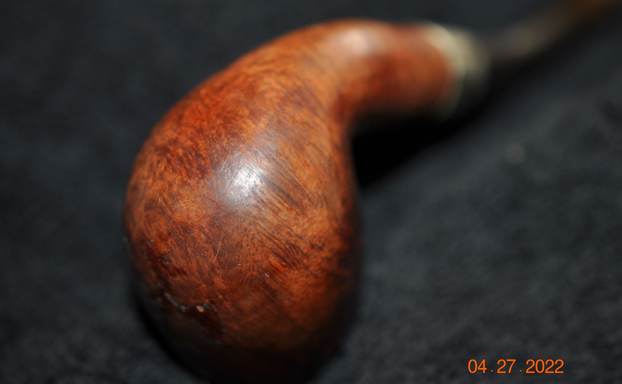
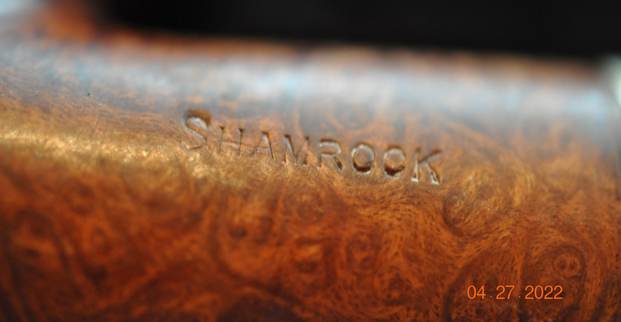
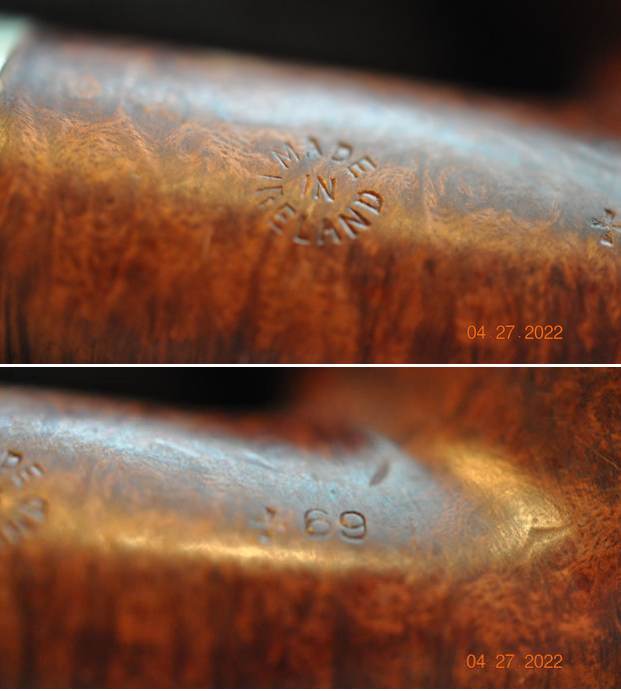
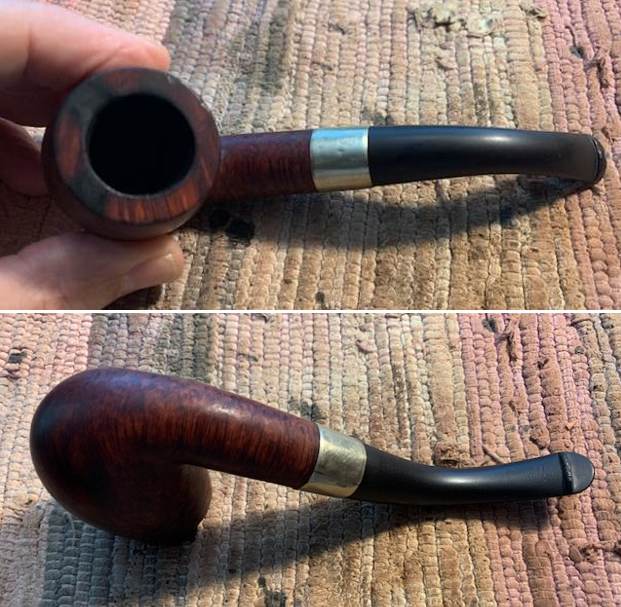
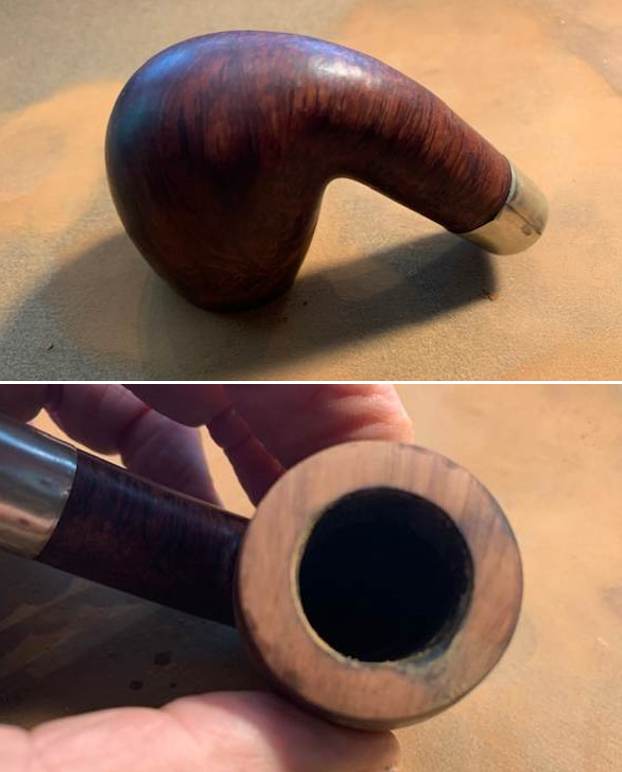
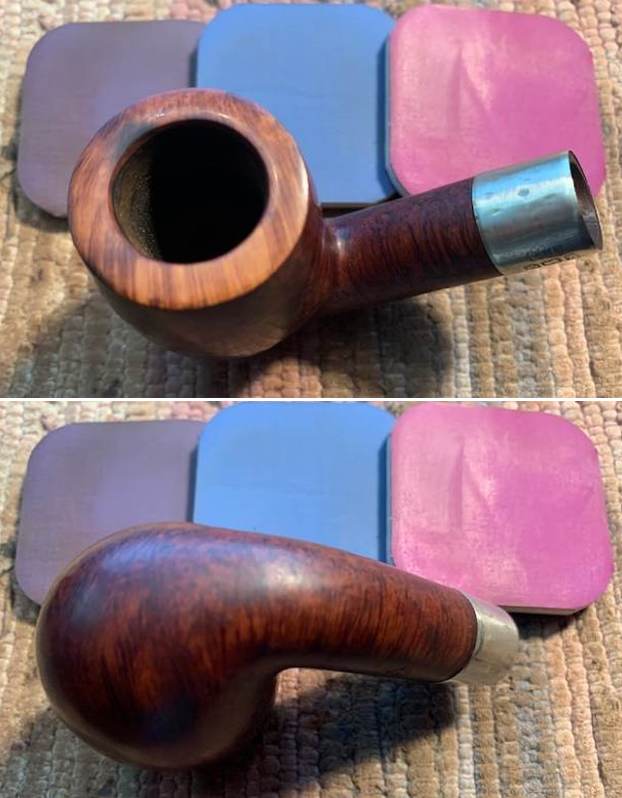
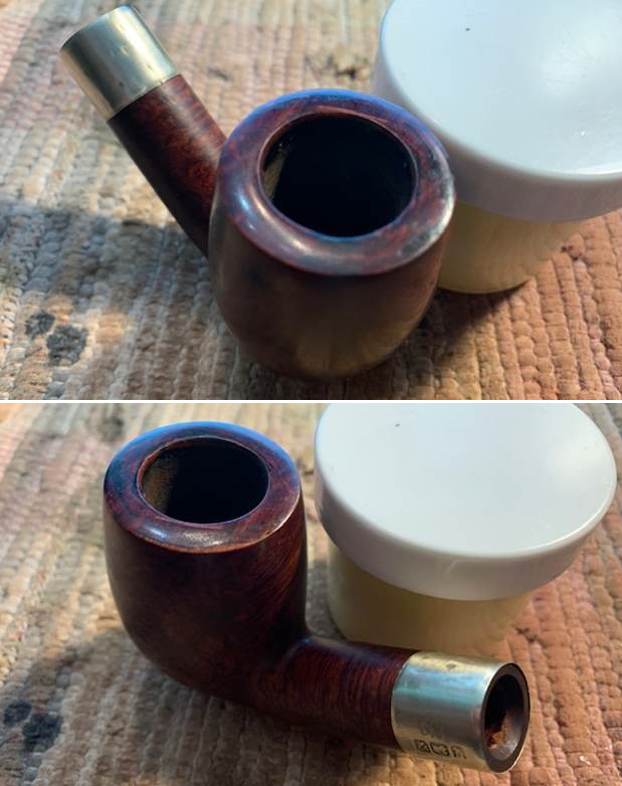
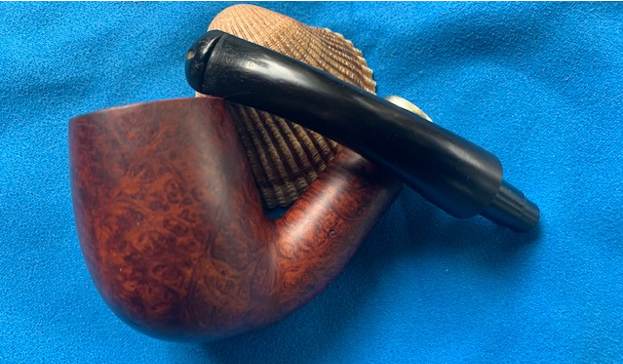
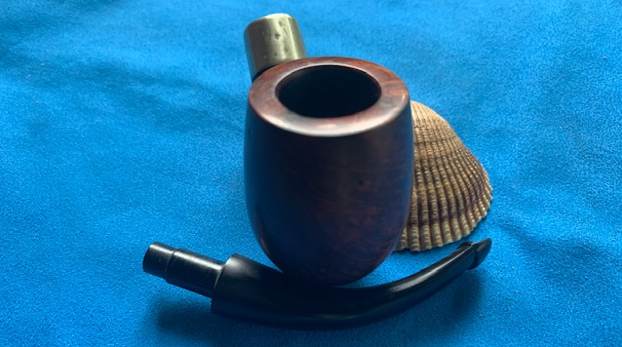
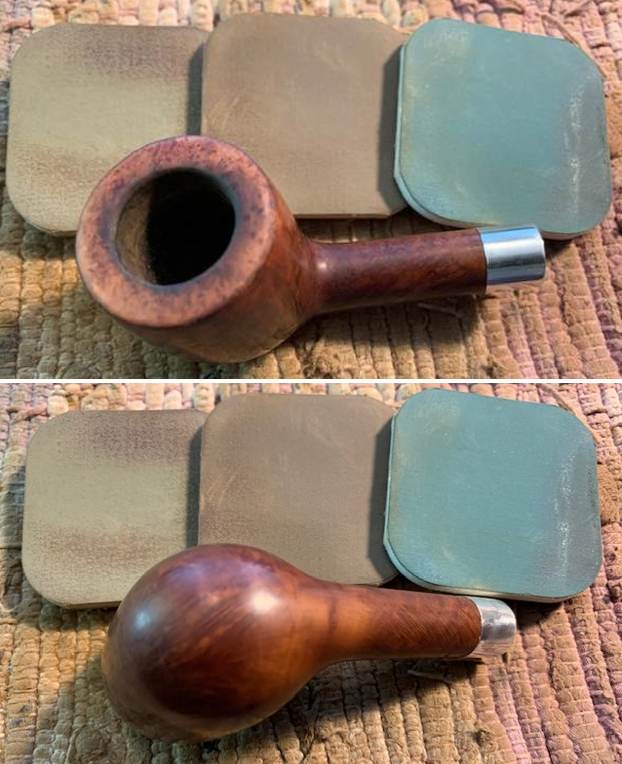
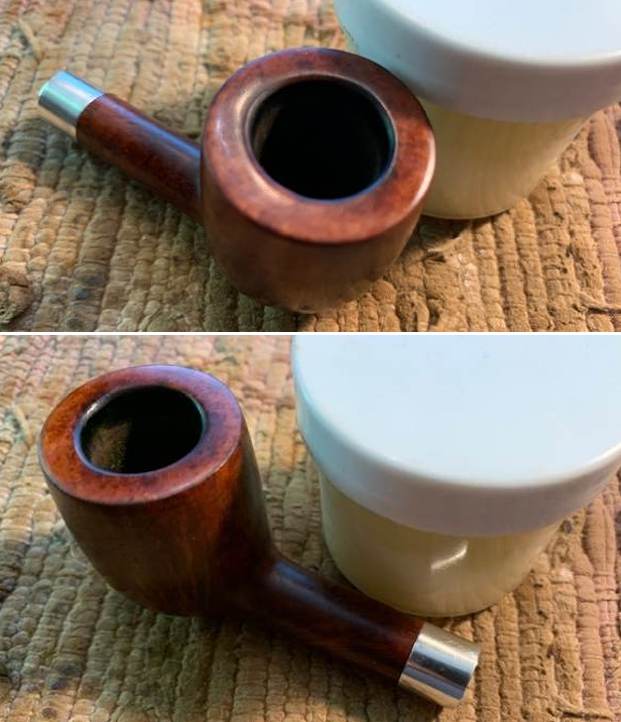
The next pipe on the work table was dropped off by a local pipe shop that I do repair and restoration work for. It is an older pipe that the shop wanted me to do a full restoration on and properly fit the stem. It is stamped on the left side of the shank and reads Bewlay in script [over] Popular. On the right side it was stamped London Made and lower on the shank it read 127 (shape number) [over] 0. The shank had an oxidized silver band (stamped on the underside Sterling Silver) on the shank and under examination with a bright light it was a repair for a cracked shank. The poor pipe was another one that had obviously been someone’s favourite and must have been a grand smoker. The finish appears to have some nice grain around the bowl and shank that even stands out with the grime on the finish. The bowl is heavily caked with a thick lava overflow on the rim top. The inner edge looked good under the grime but a clean up would tell the full story. The stem is quite oxidized, calcified and had a lot of tooth chatter on the top and underside near the button. The diameter of the stem is larger than the diameter of the shank. I would need to reduce it for a proper fit. The pipe showed a lot of promise but it was a mess. I took photos of it before starting my work on it. 
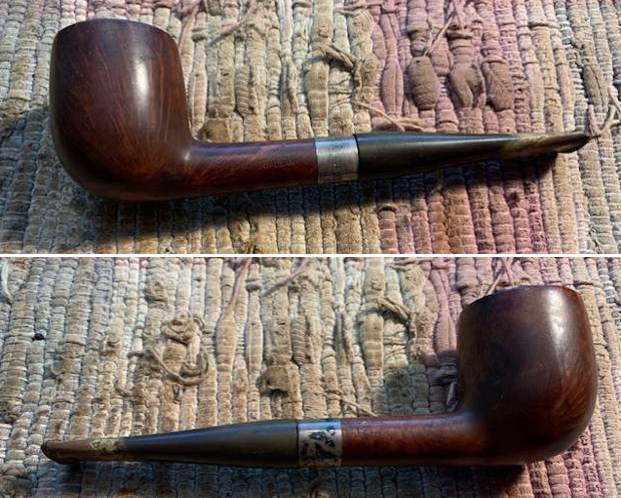
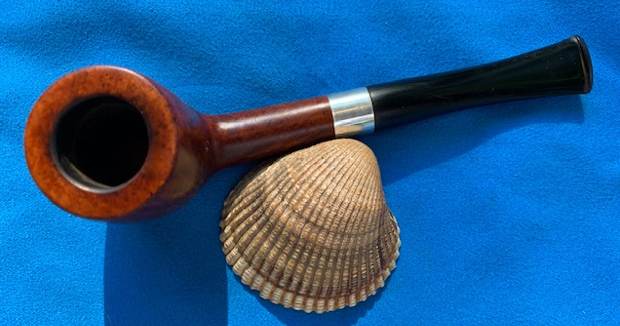
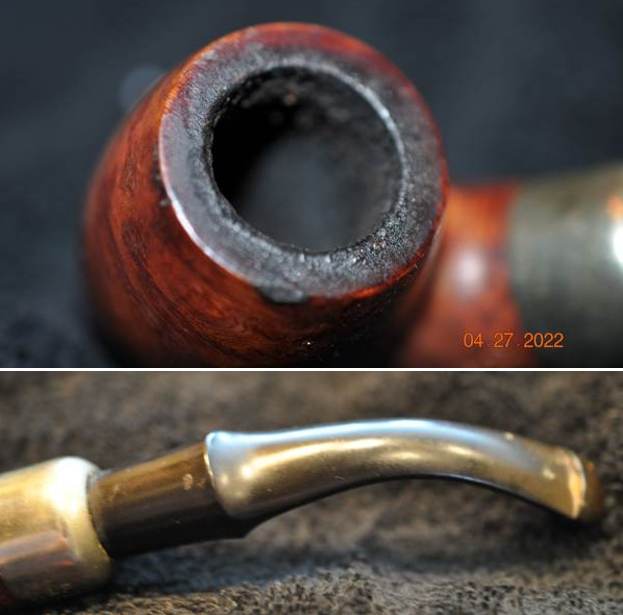
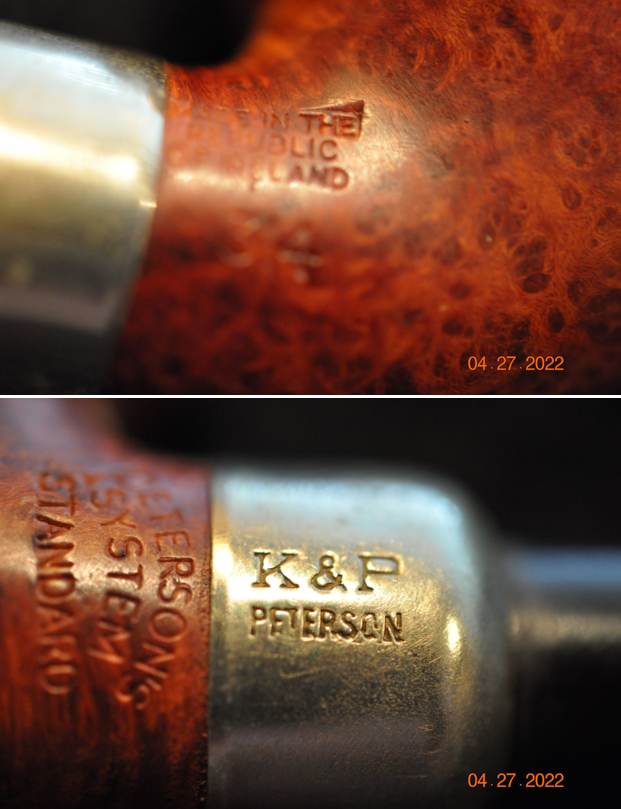
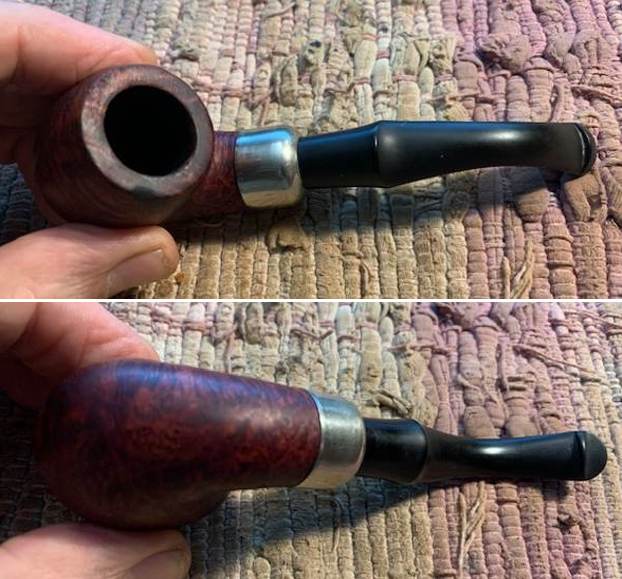
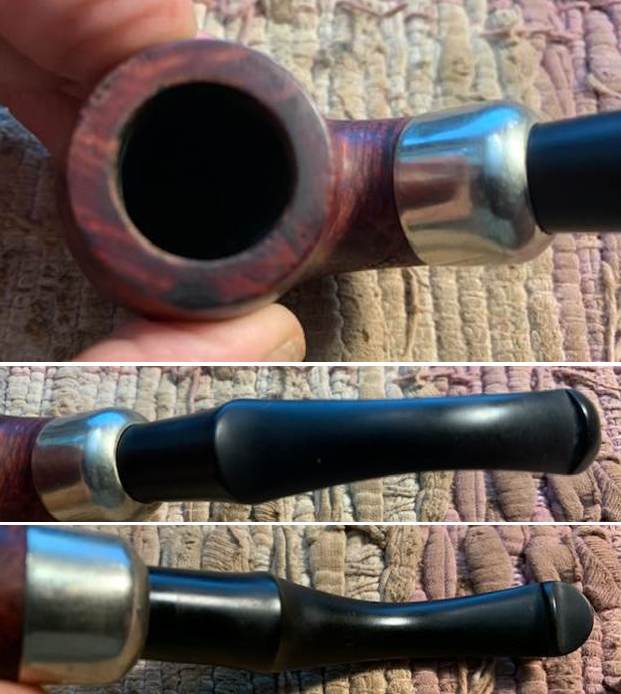
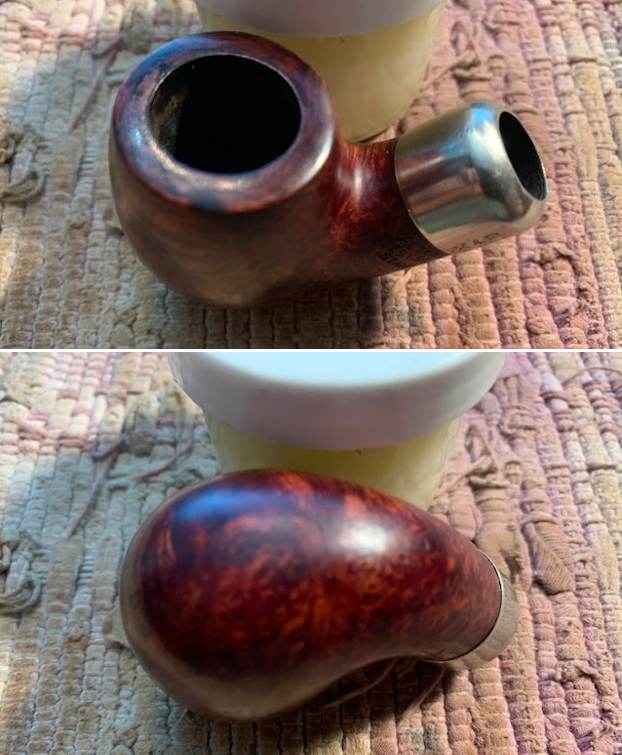
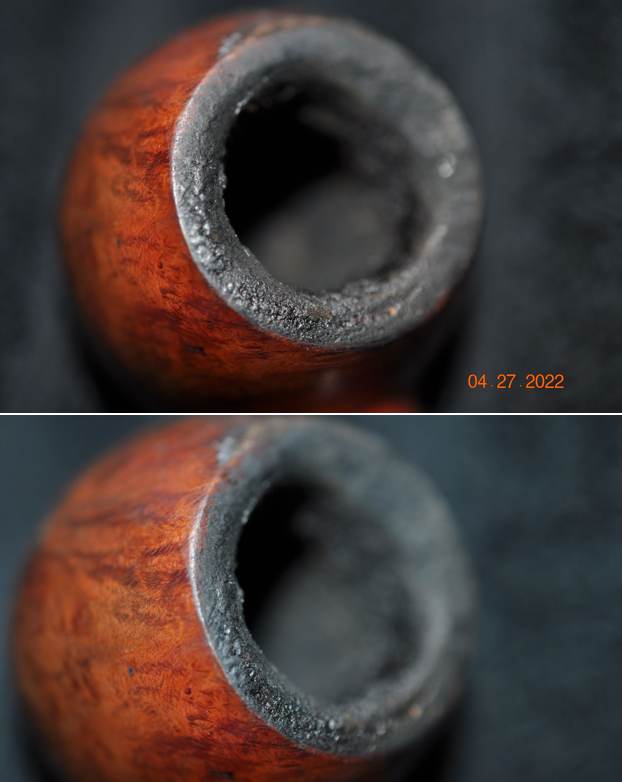
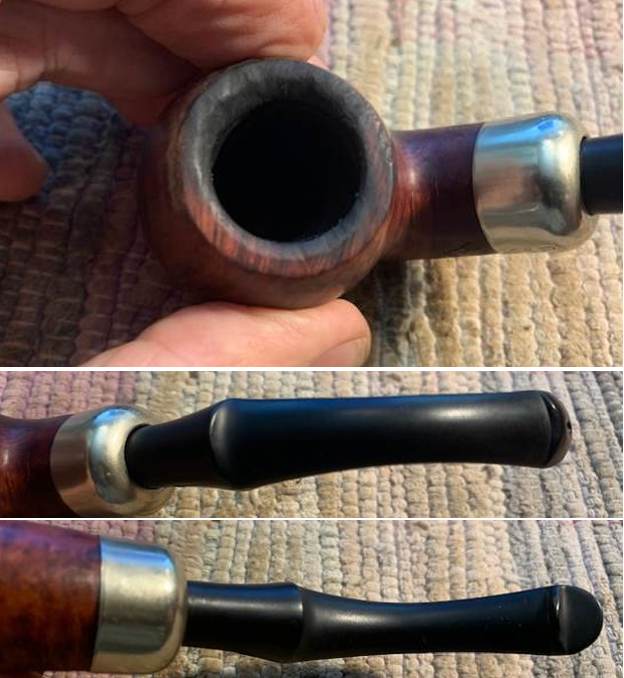
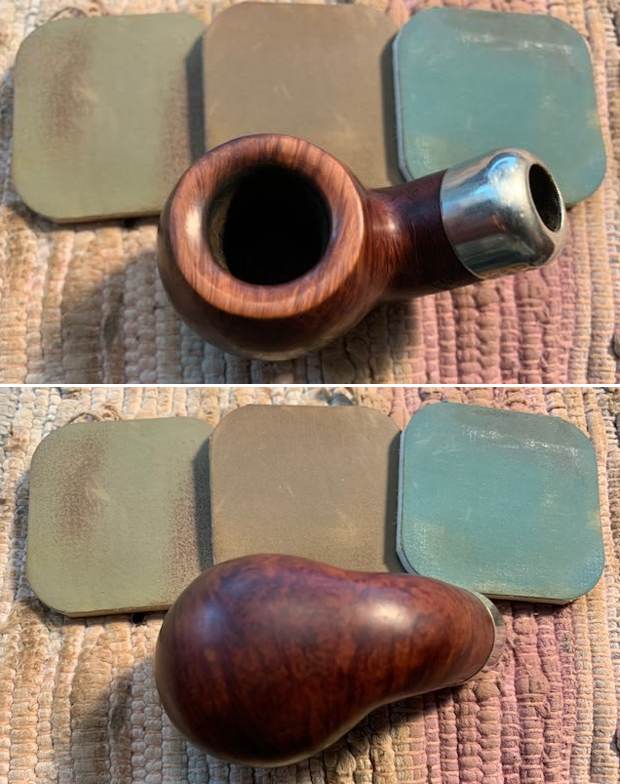
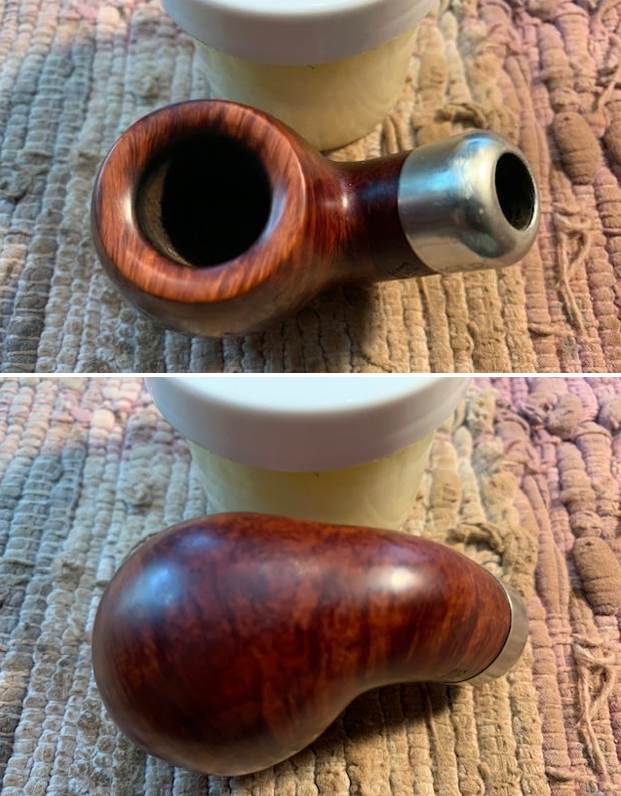
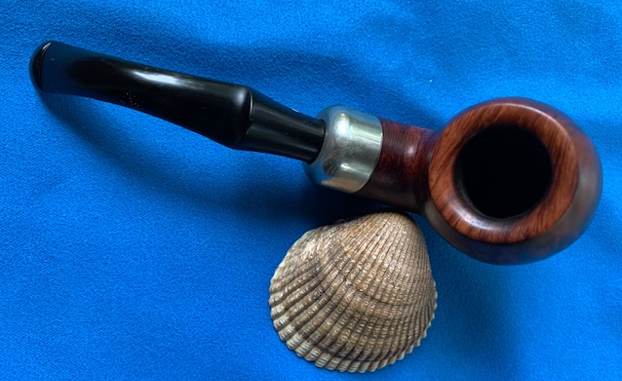
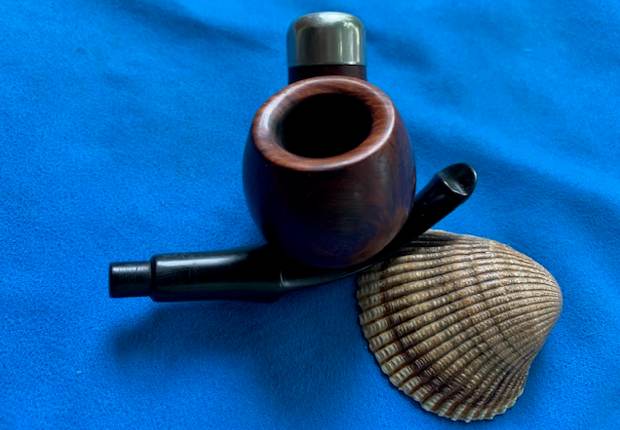
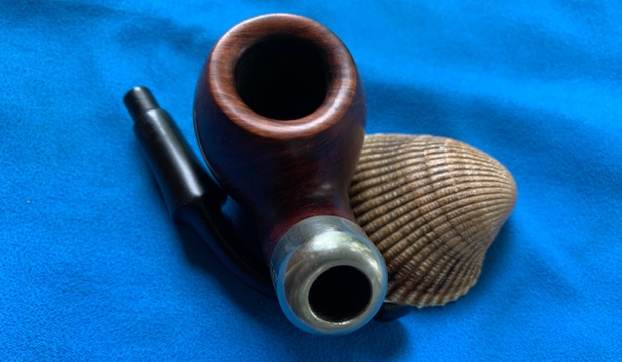
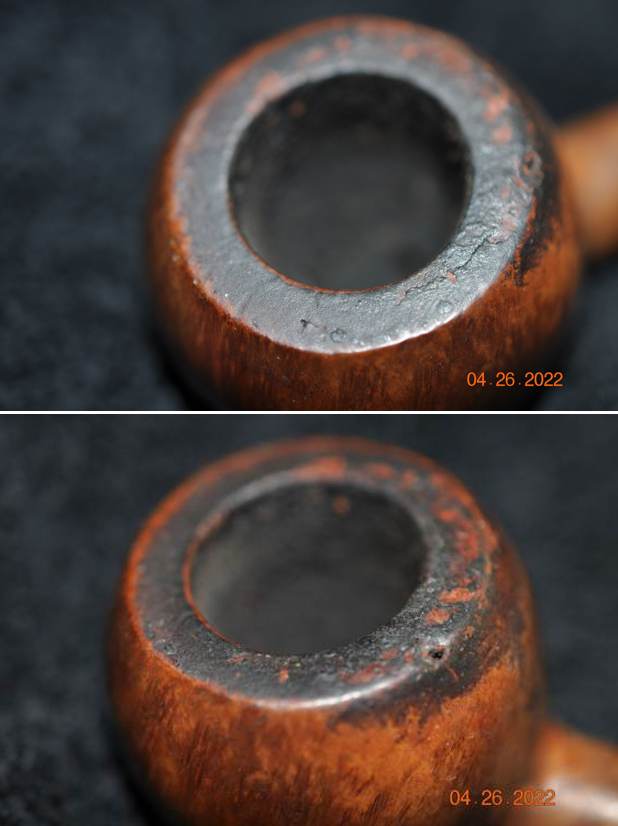
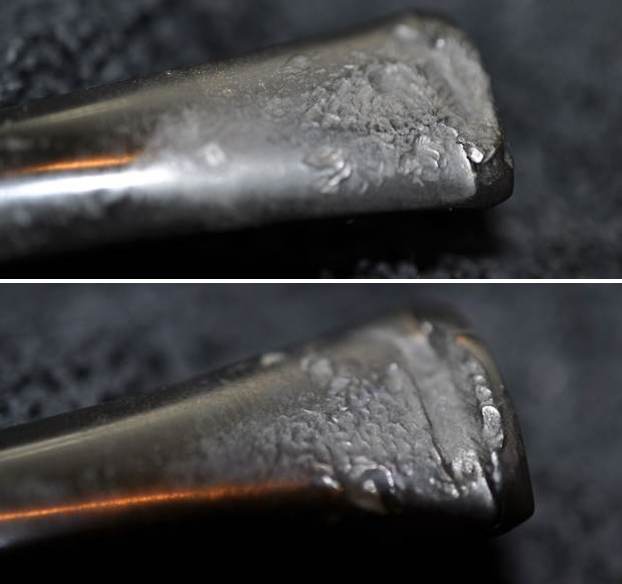
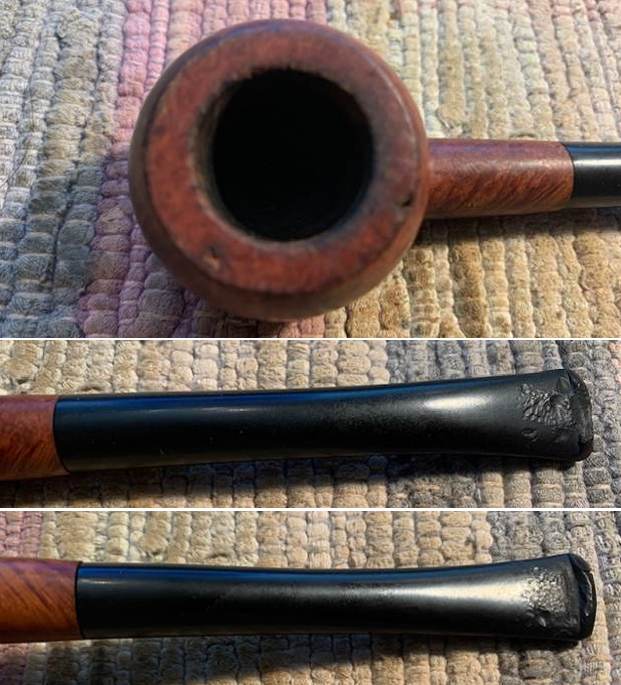
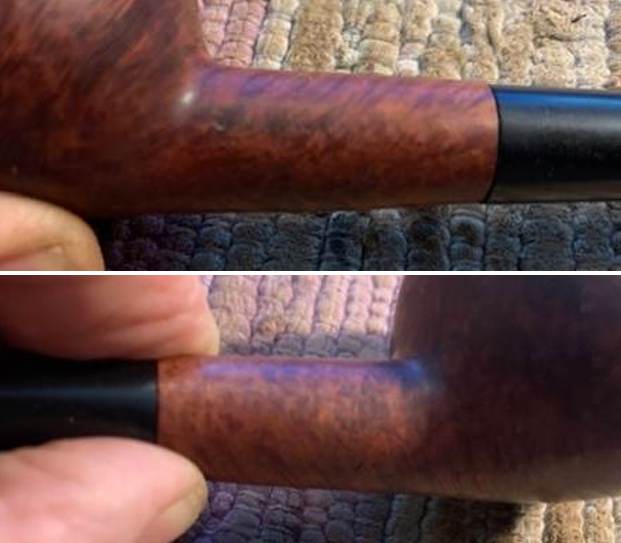
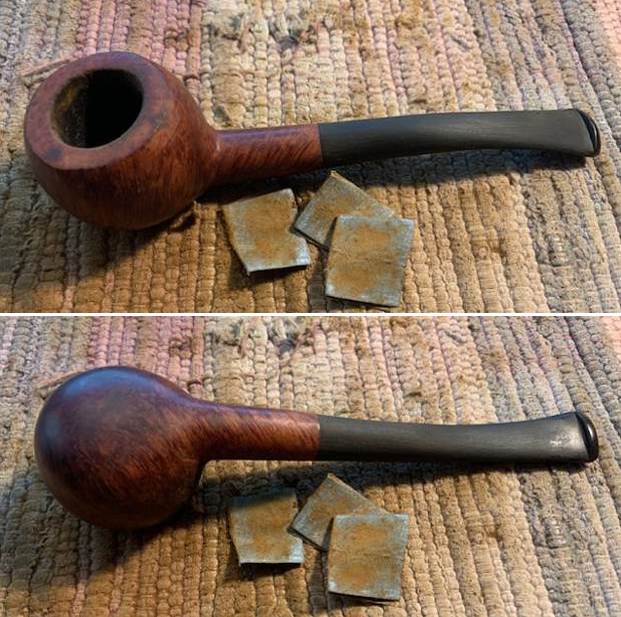
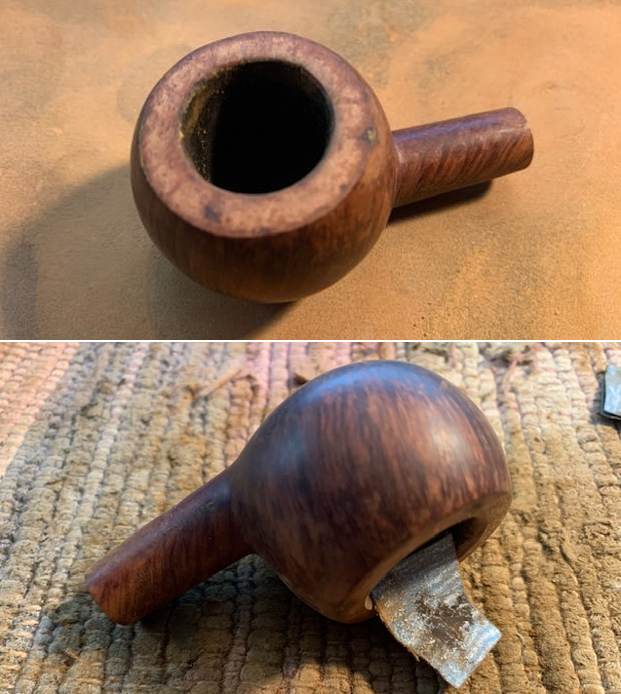
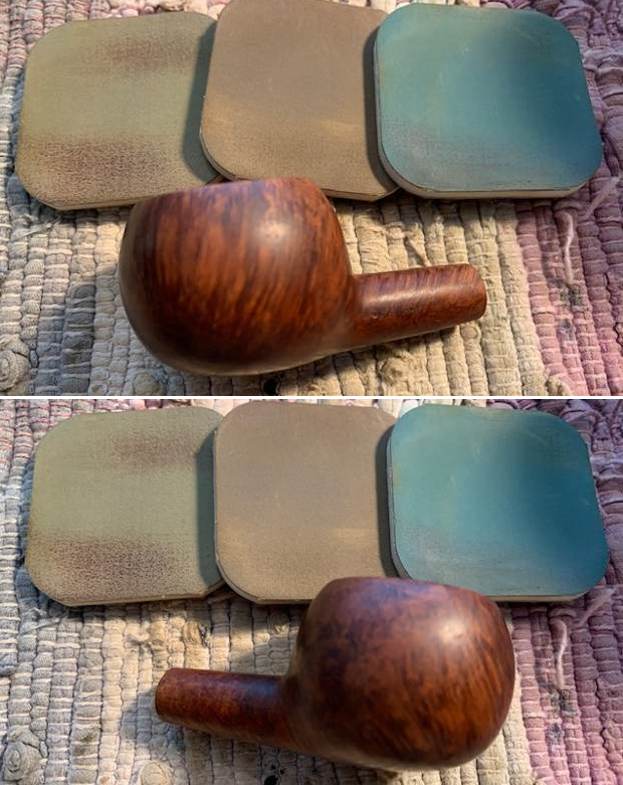
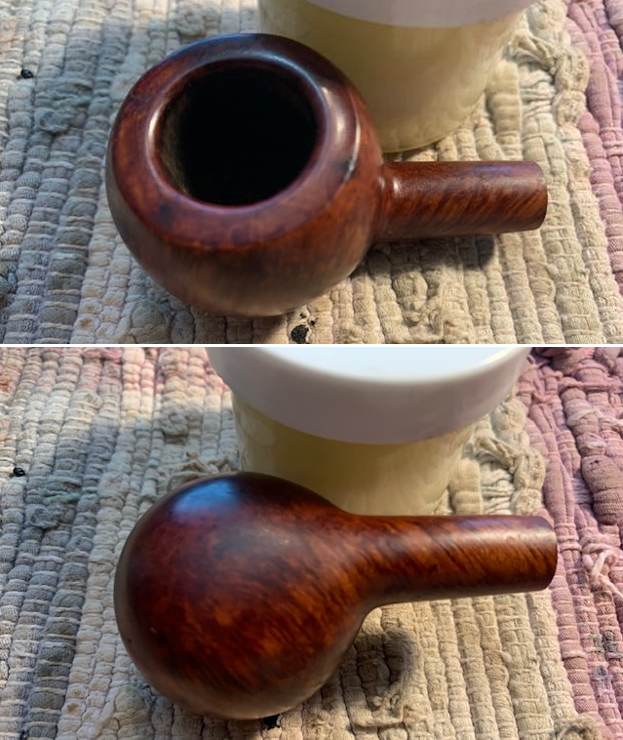
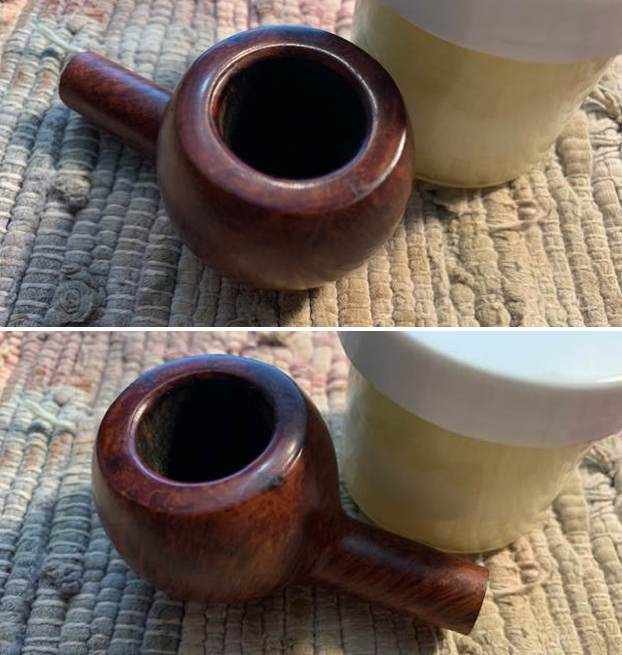
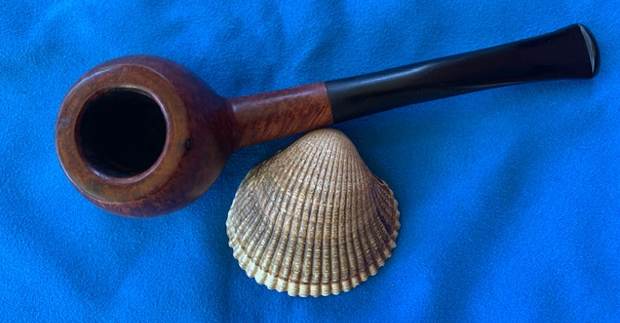
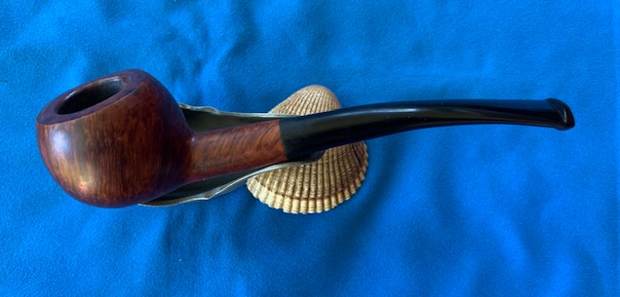
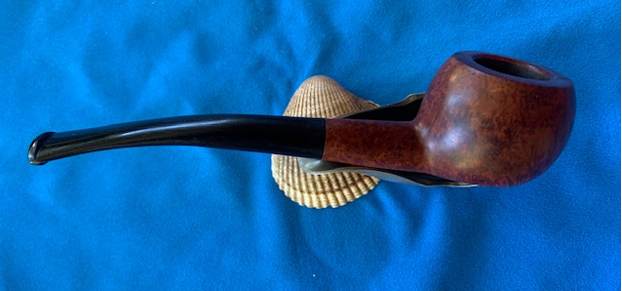
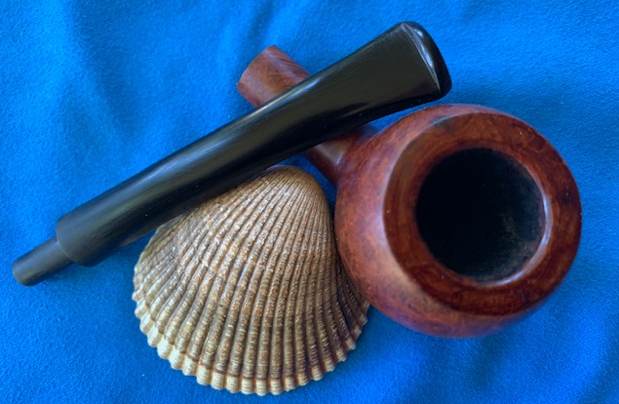
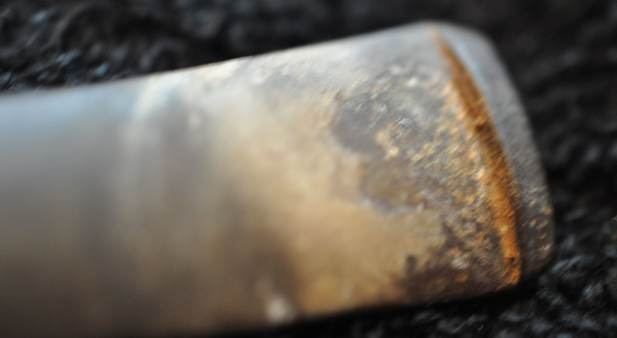
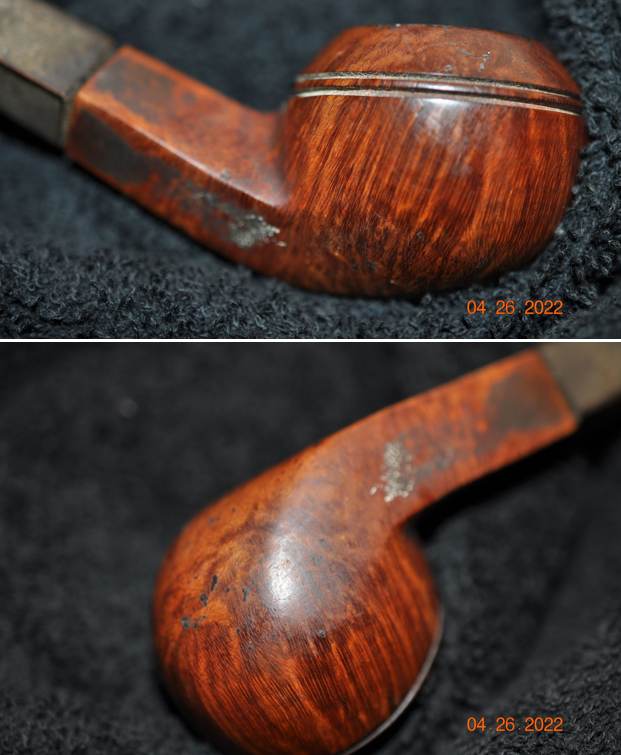
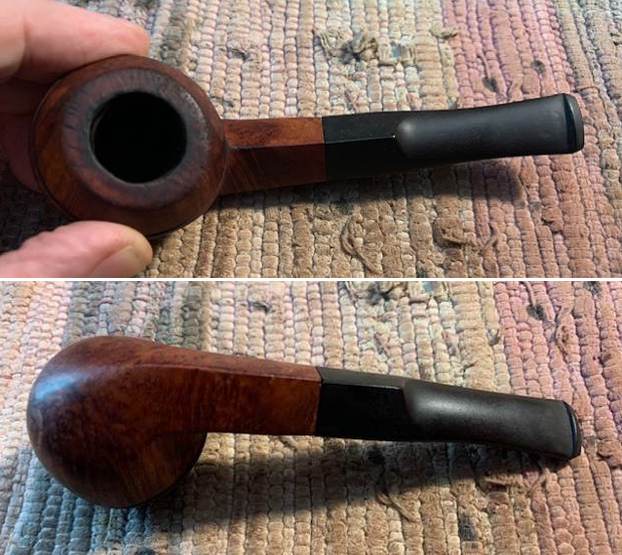
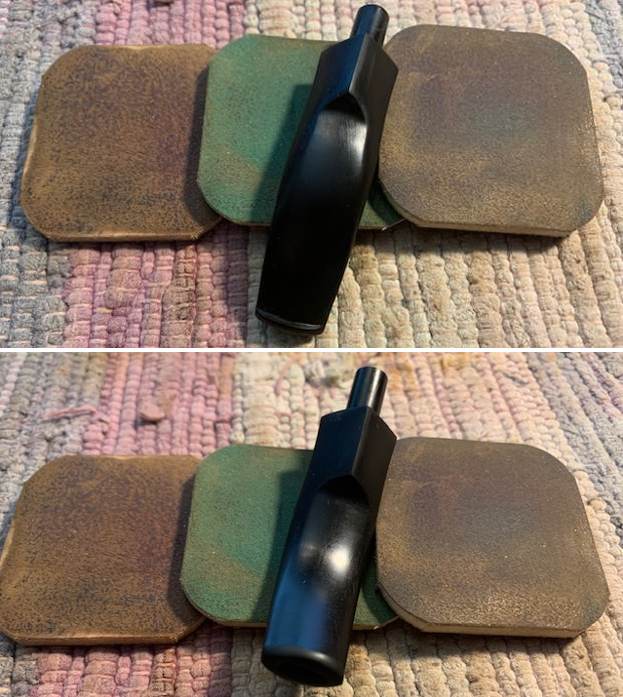
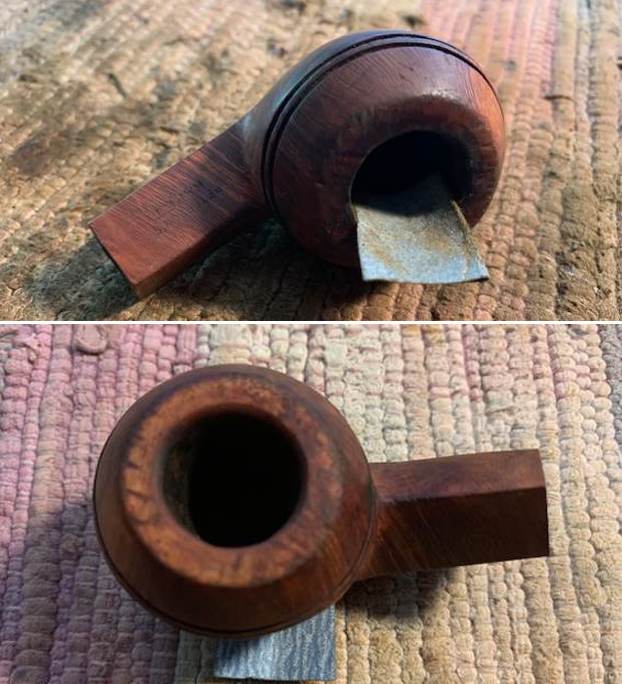
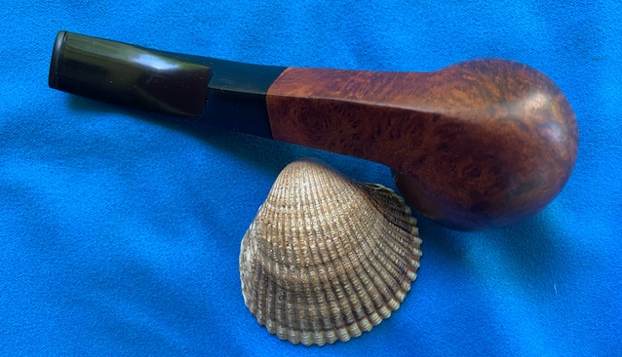
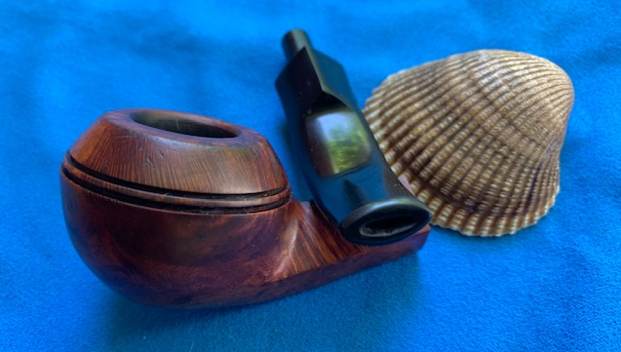
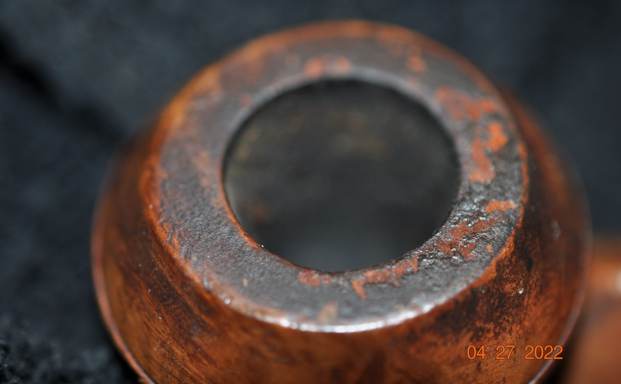
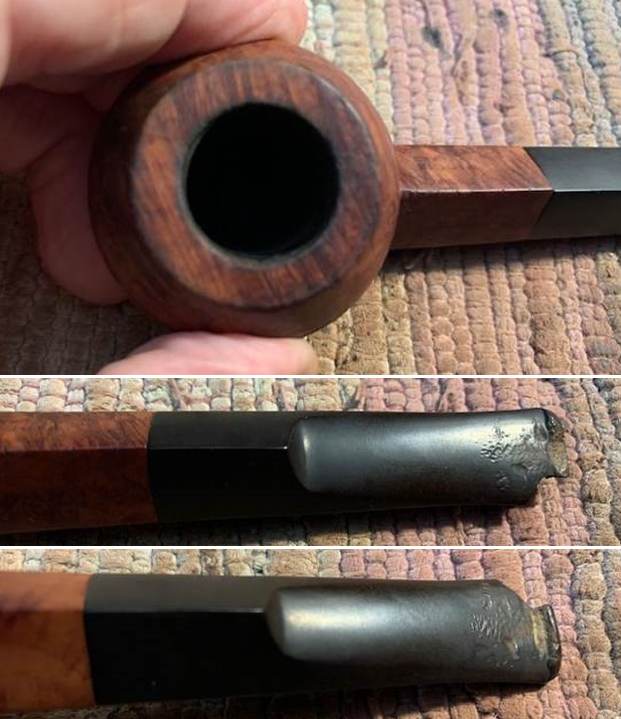
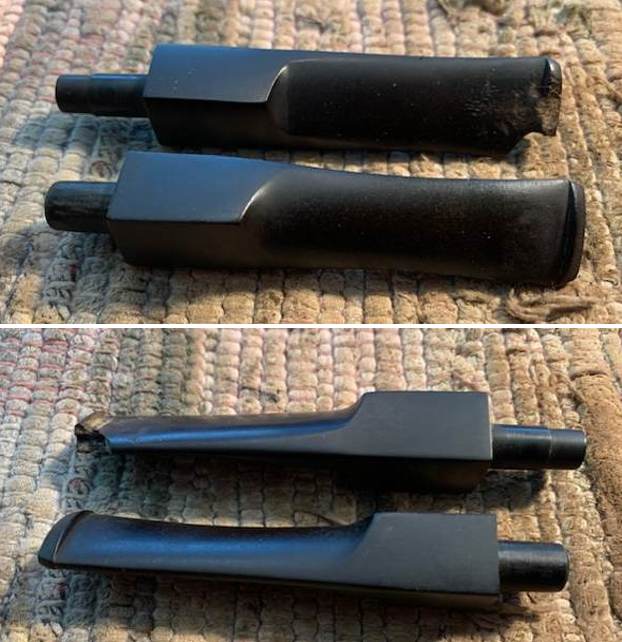
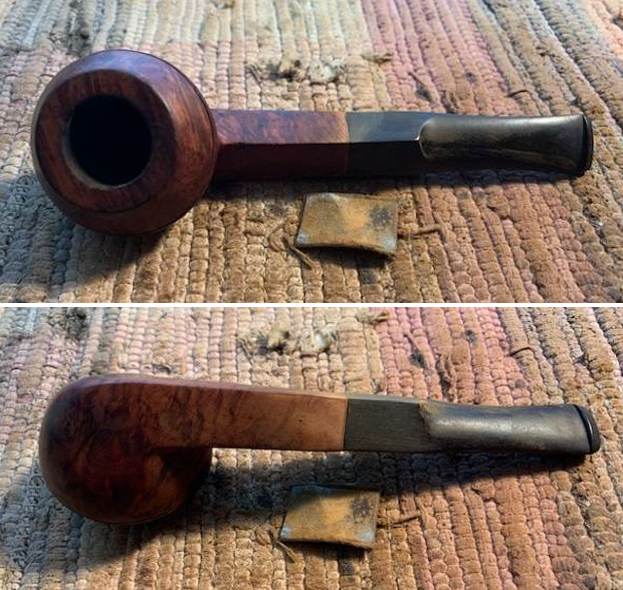
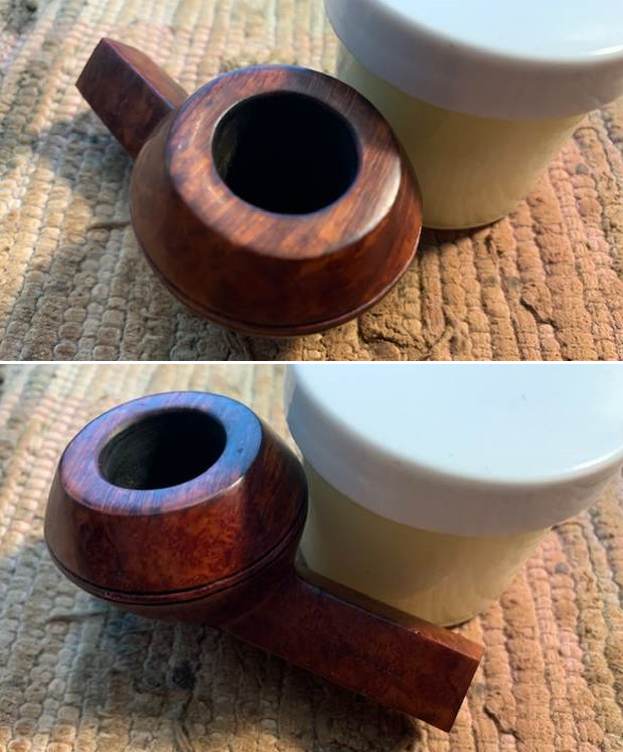
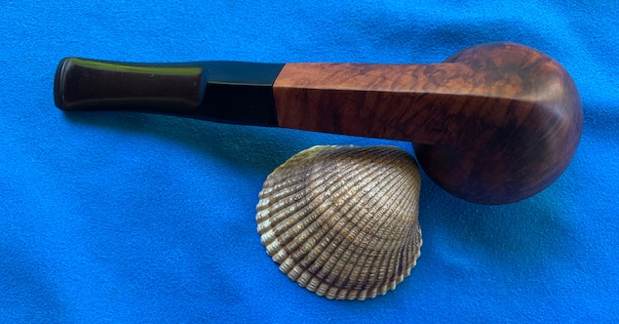
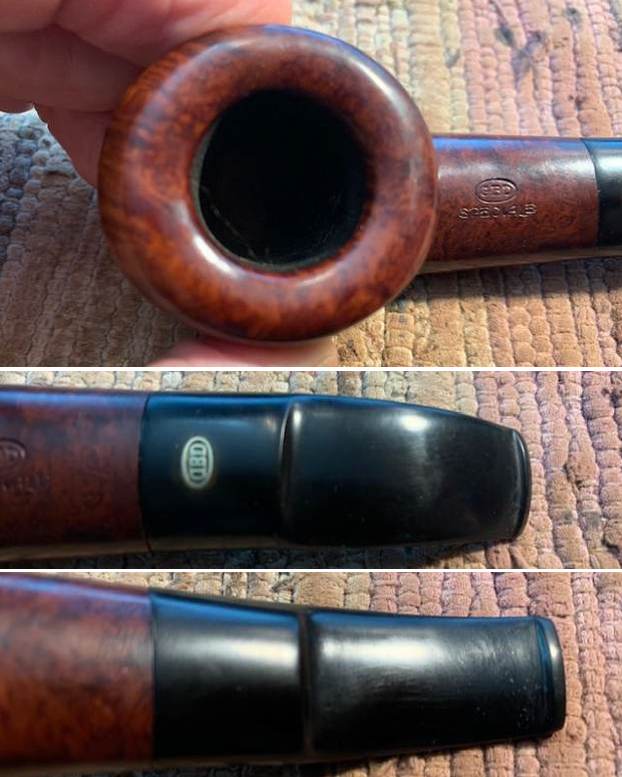
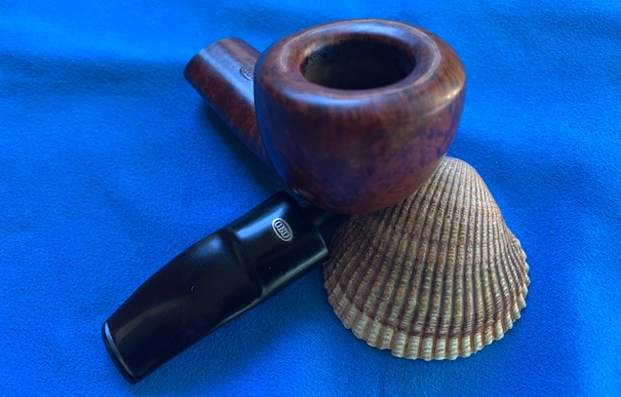
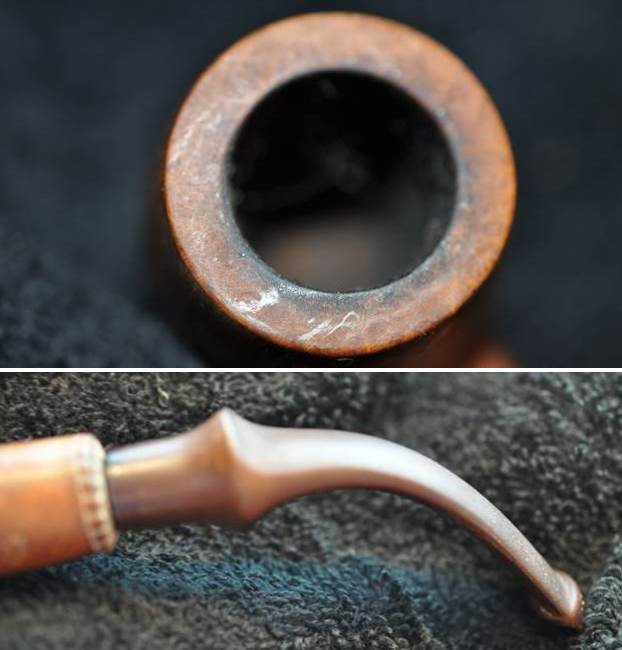
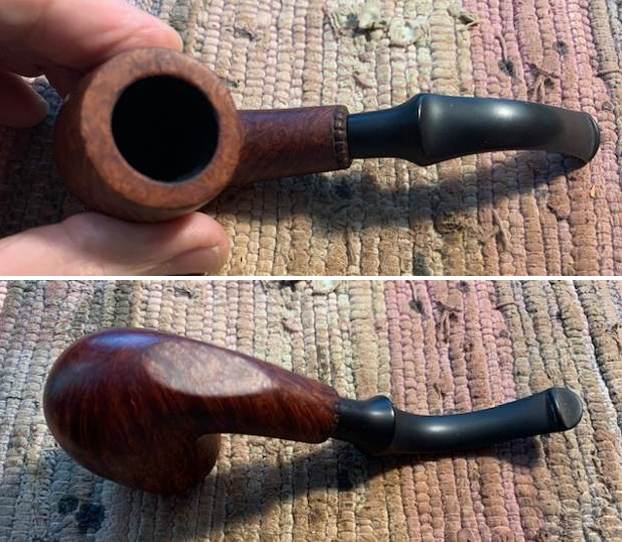
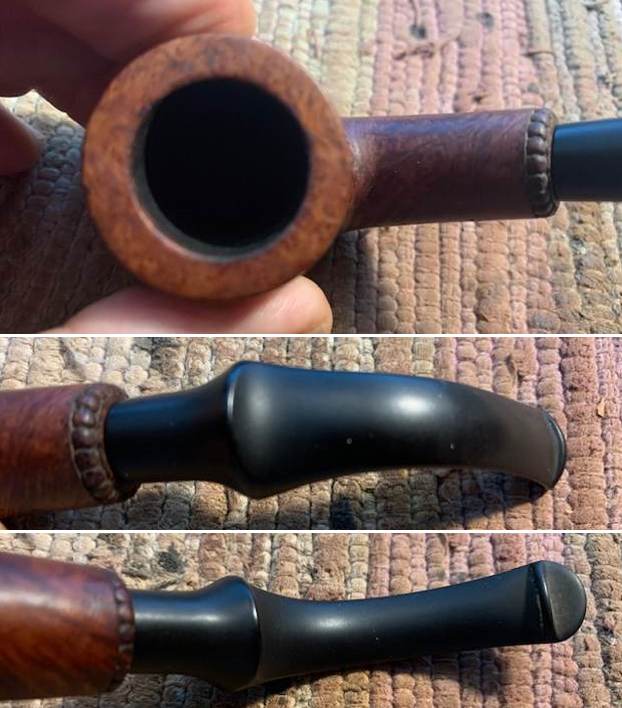
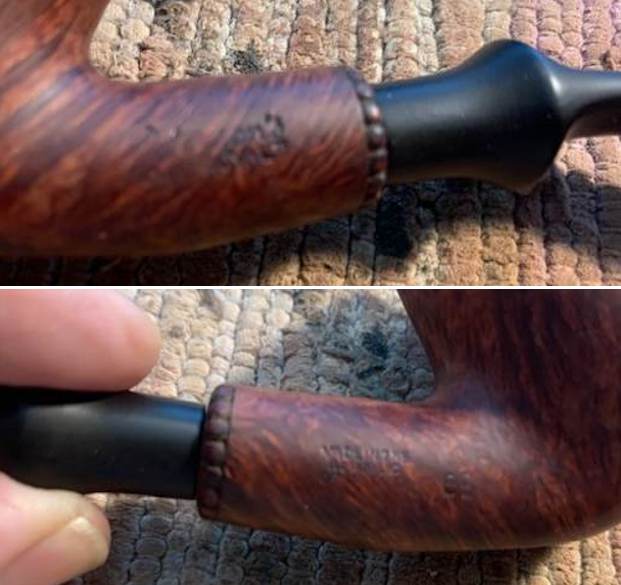
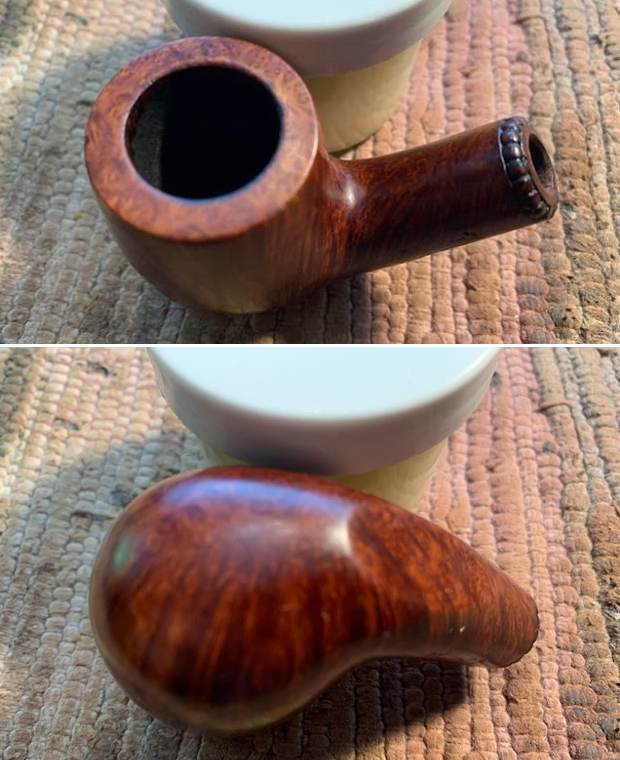
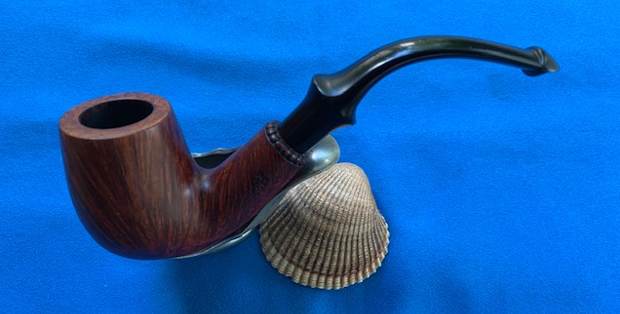
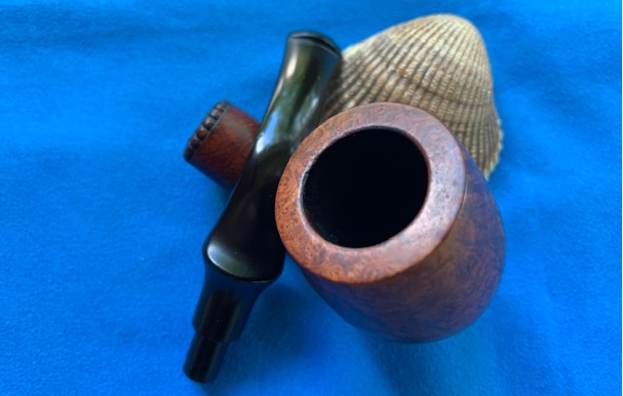
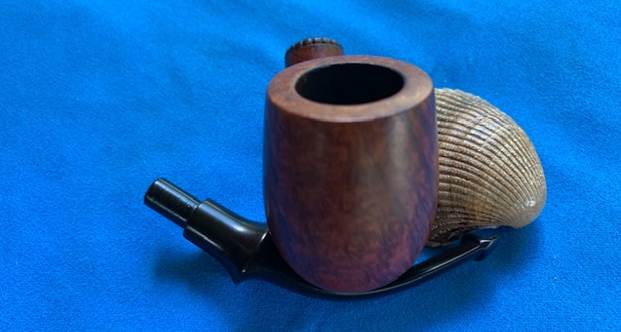
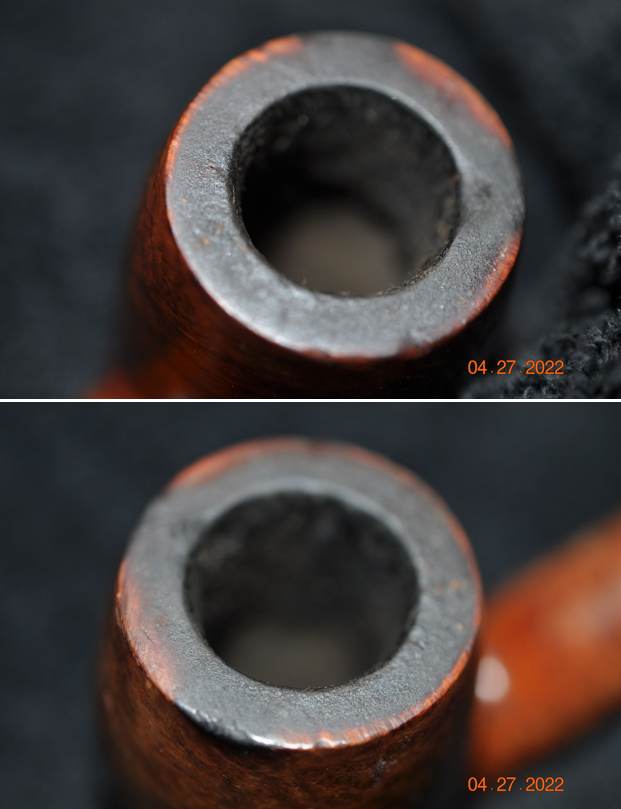
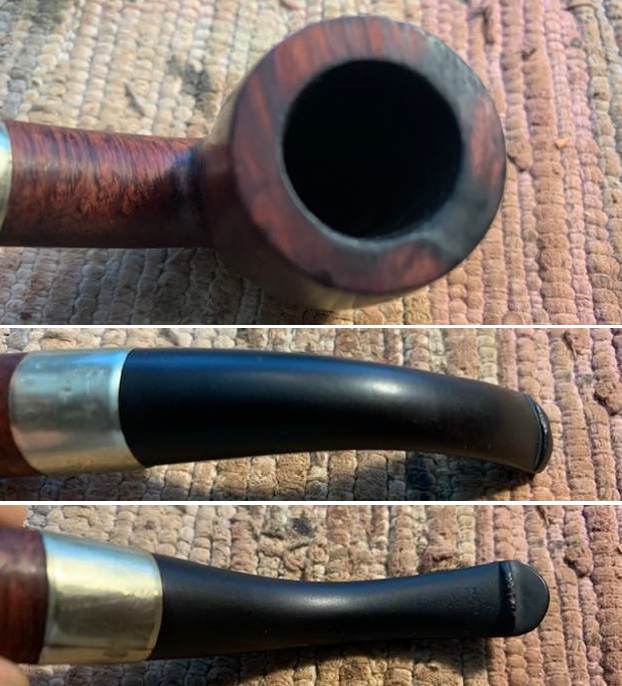
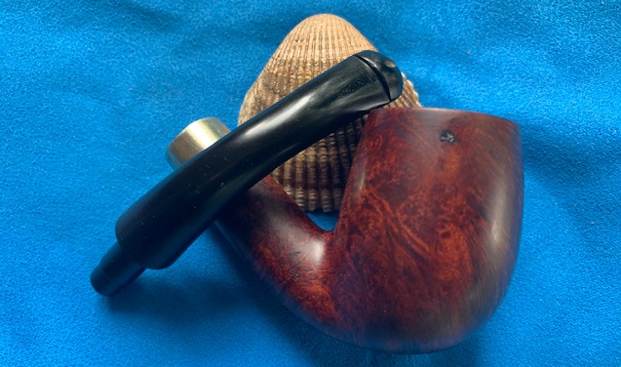
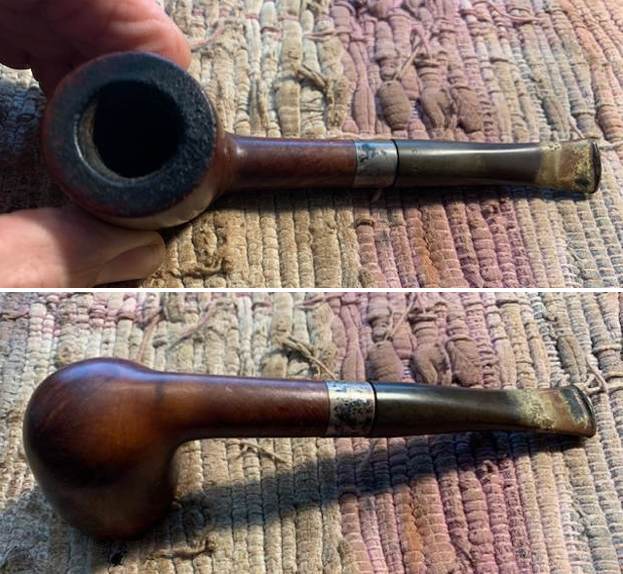
I took photos of the rim top and bowl as well as the stem surfaces to show the condition of the well smoked pipe. You can see the thick cake in the bowl and the heavy lava on the inner edge and rim. The stem was oxidized, calcified and had tooth chatter on both sides ahead of the button.
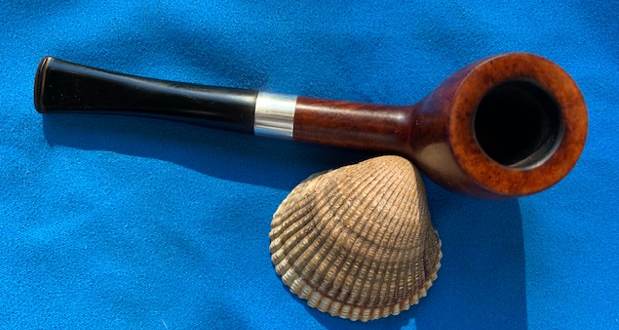
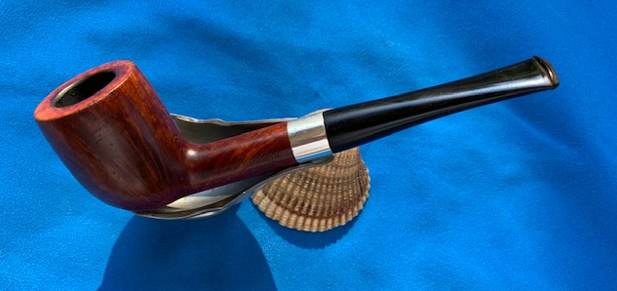
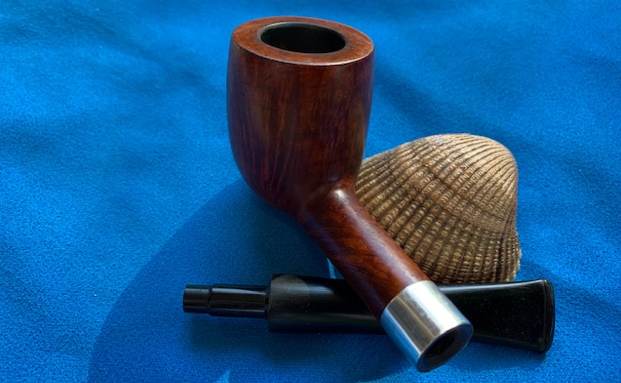
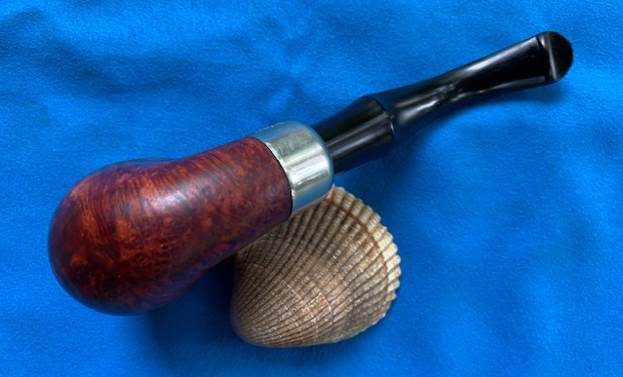
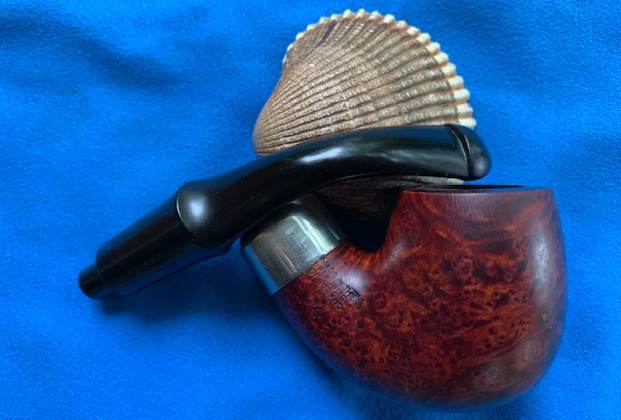
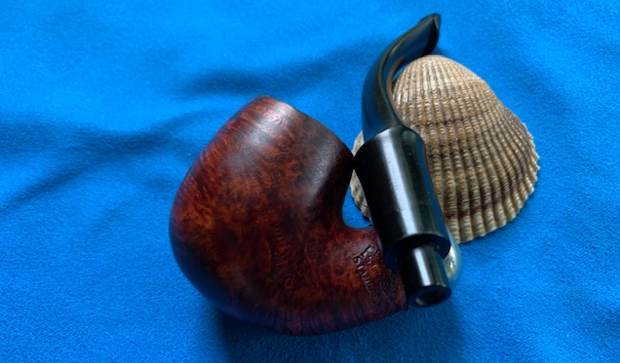
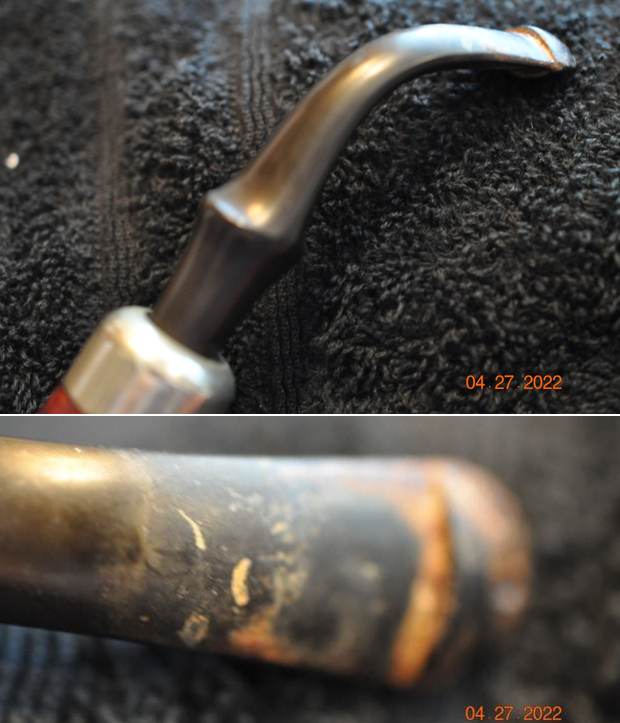
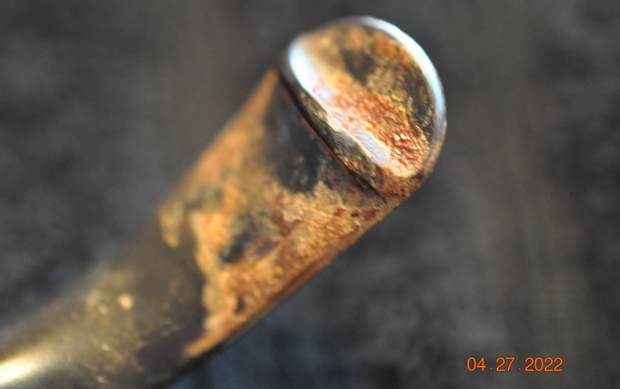
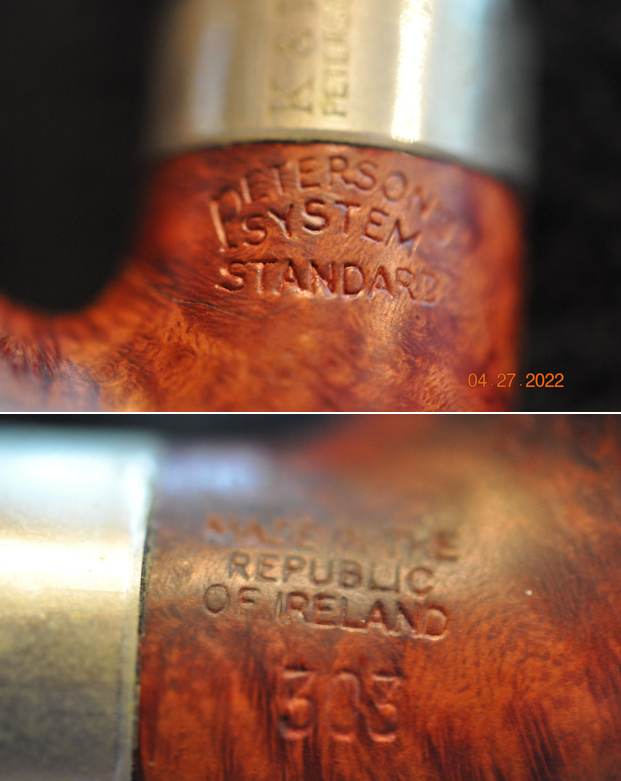
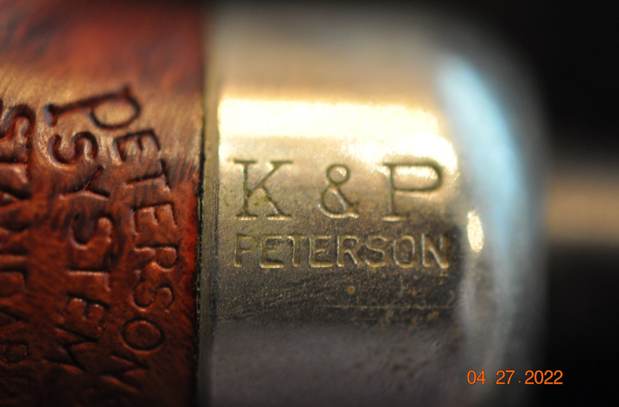
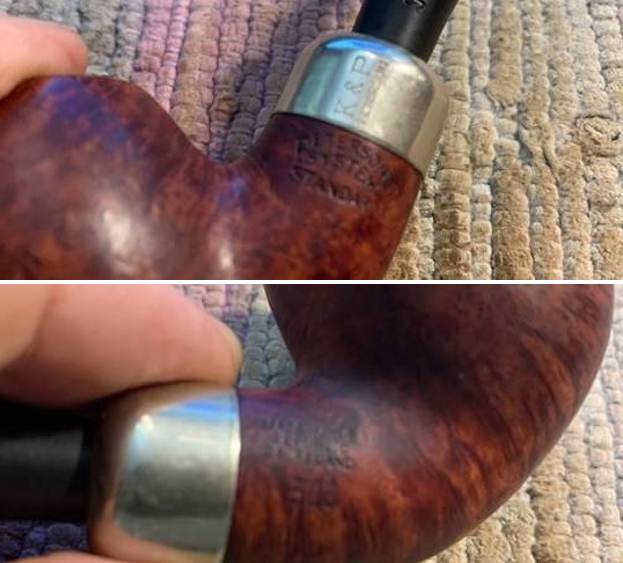
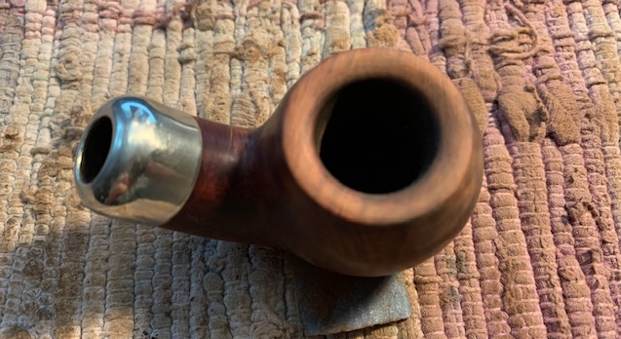
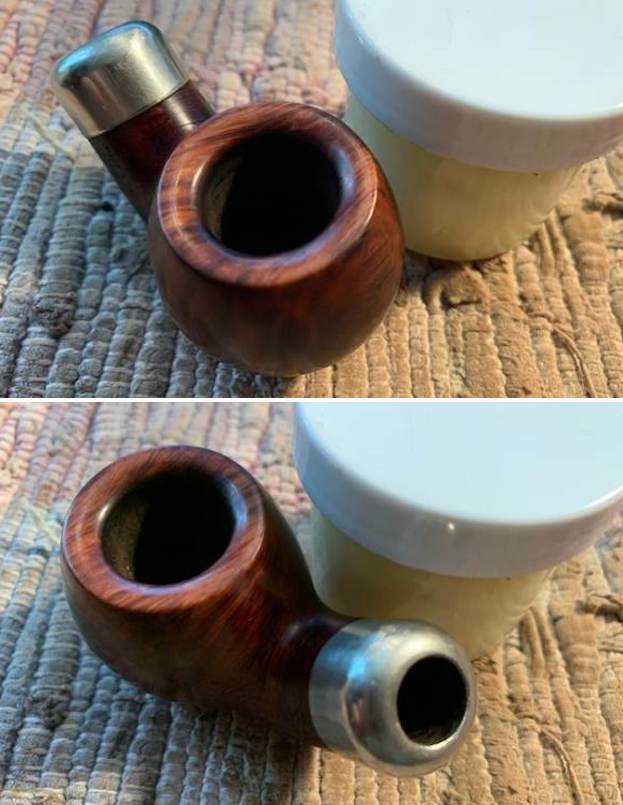
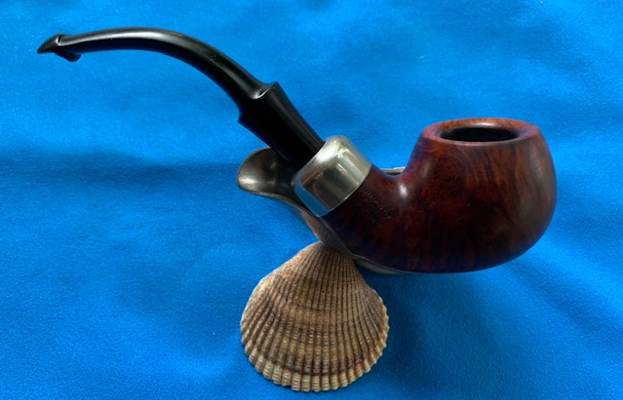
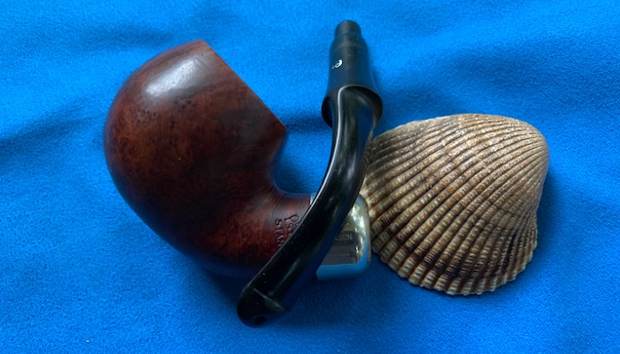
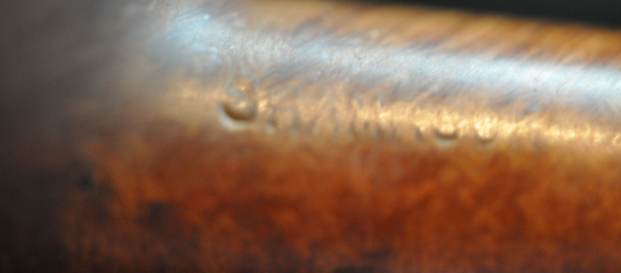
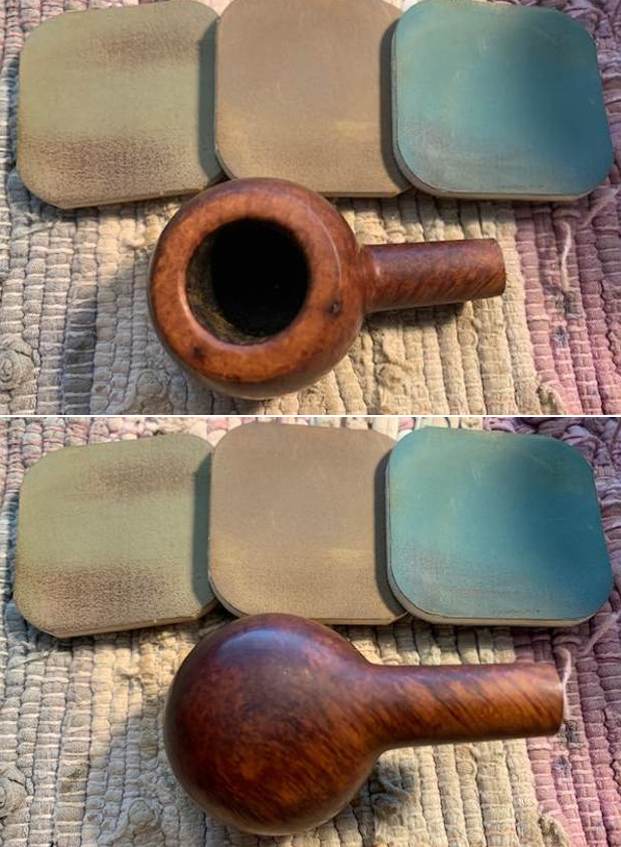
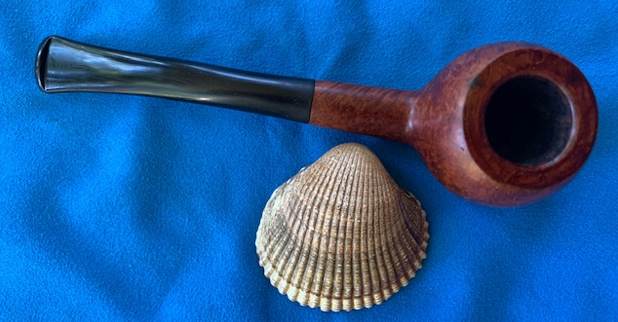
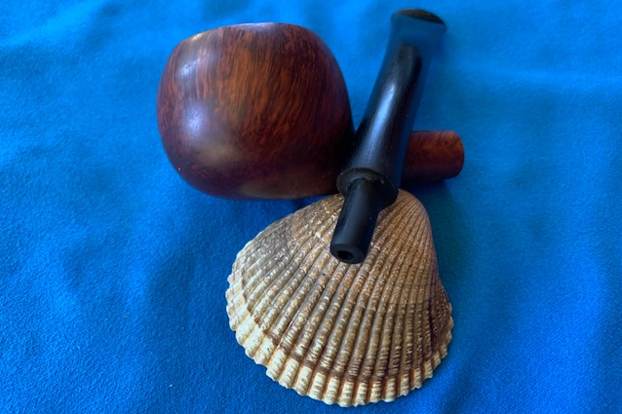
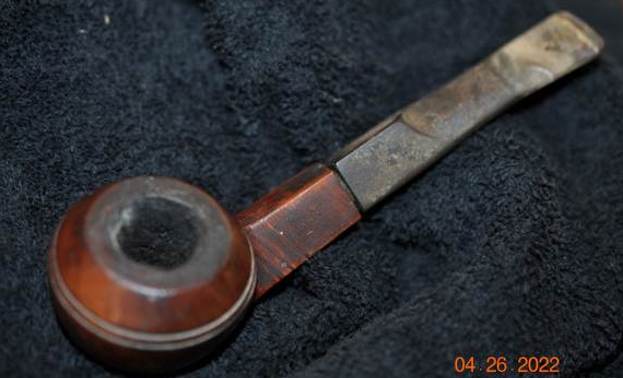
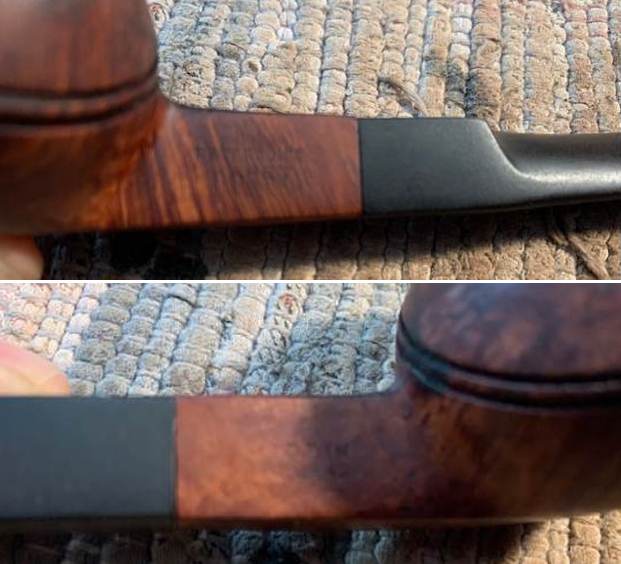
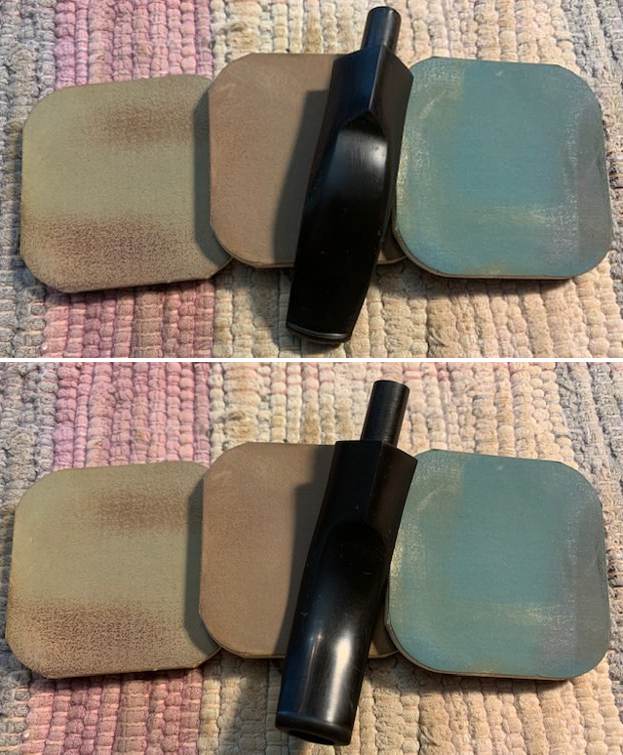
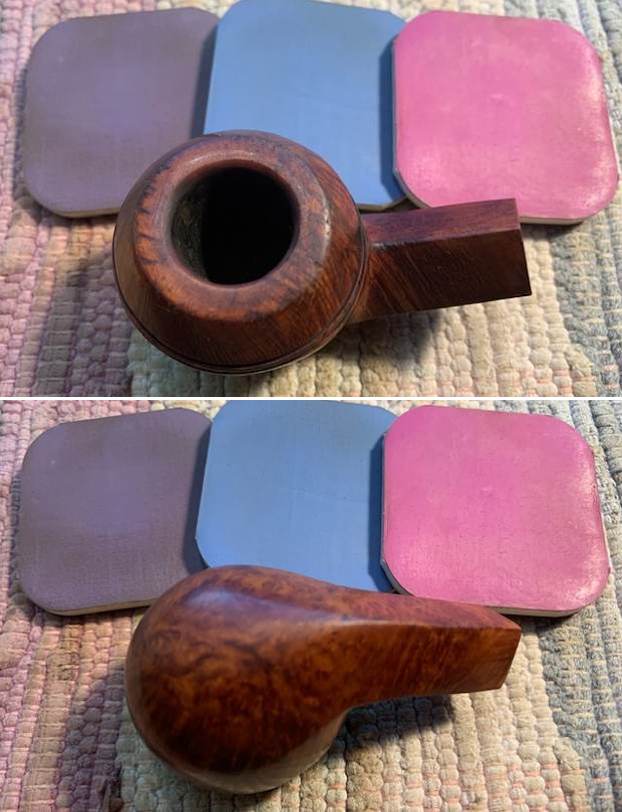
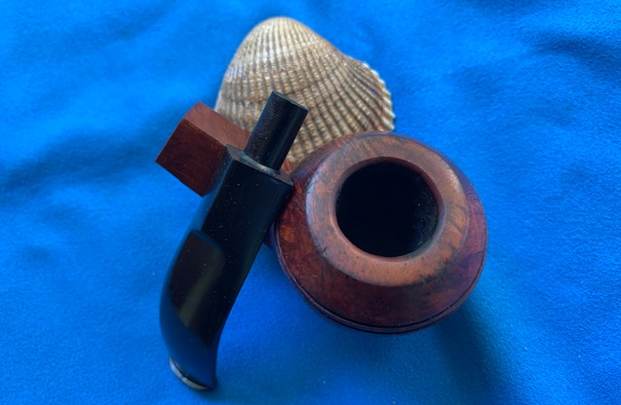
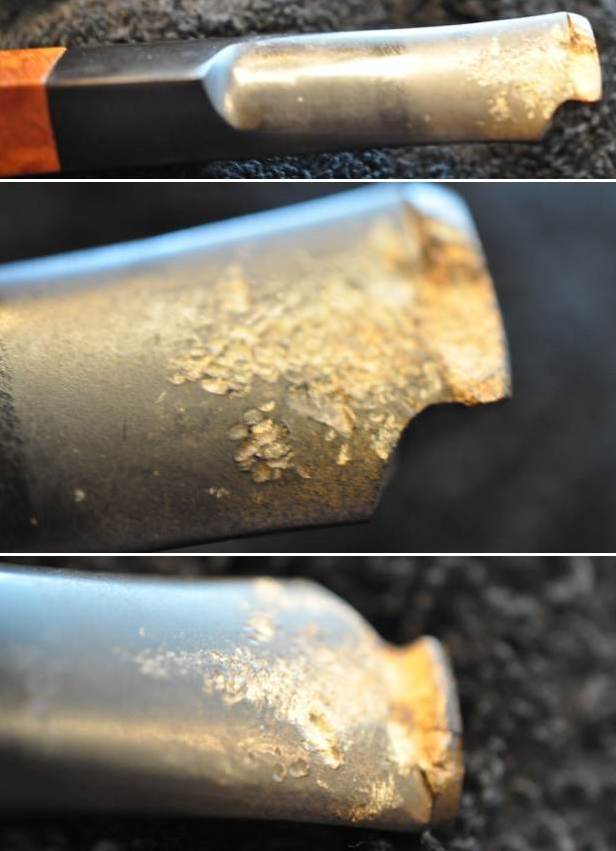
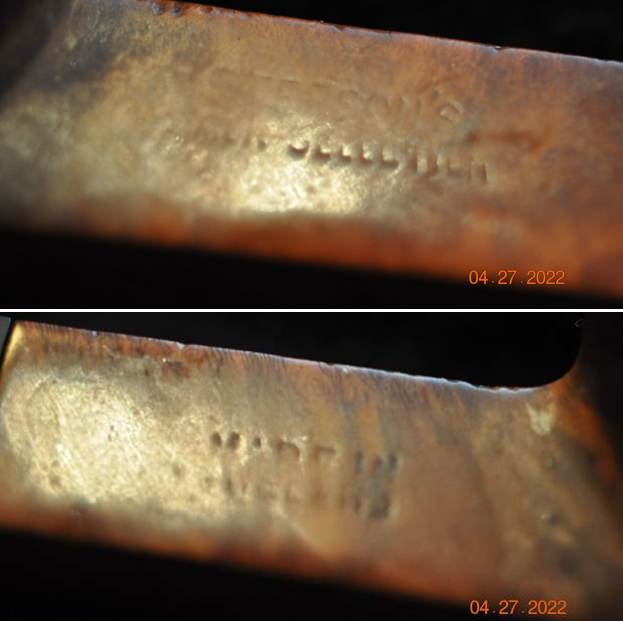
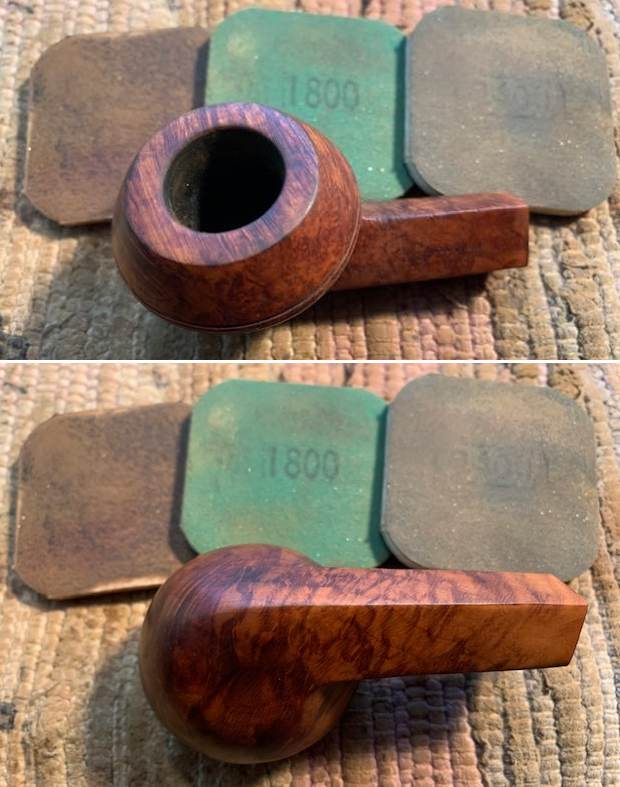
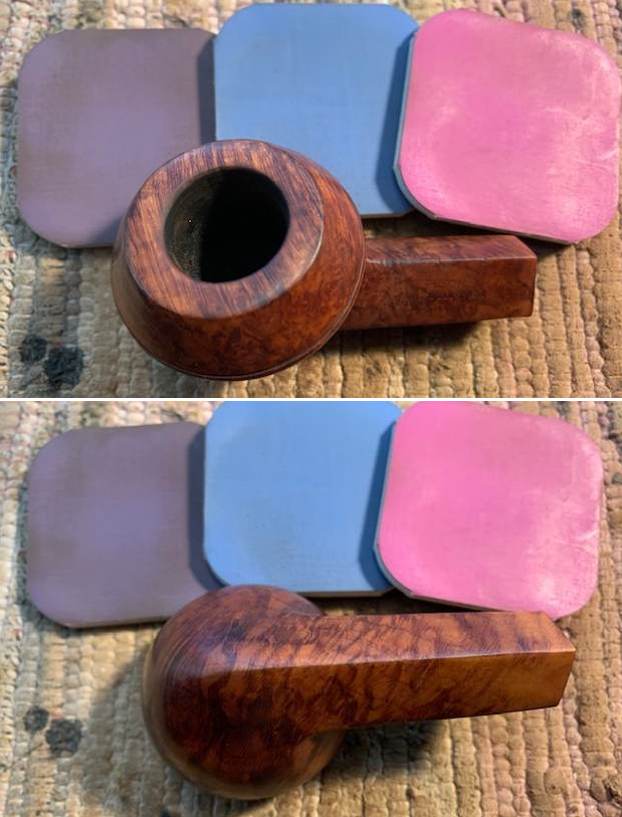
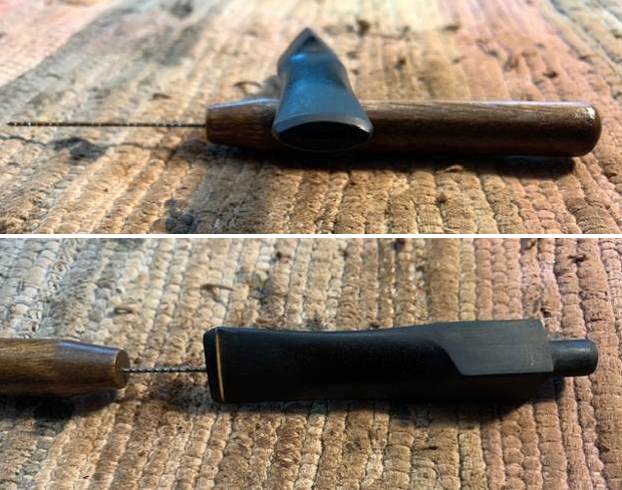
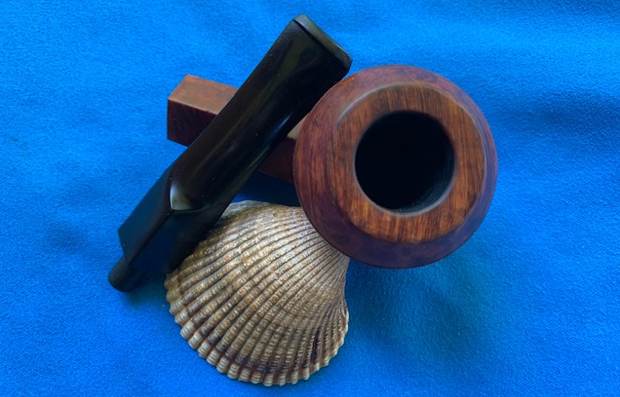
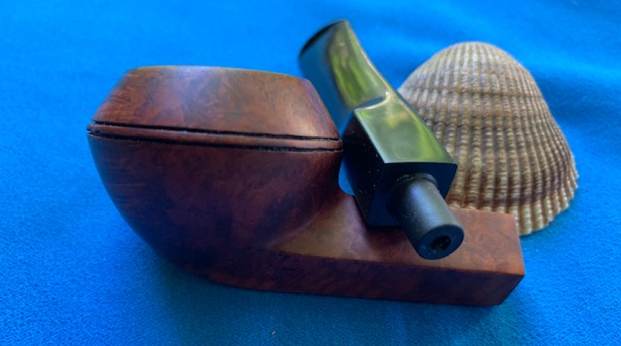
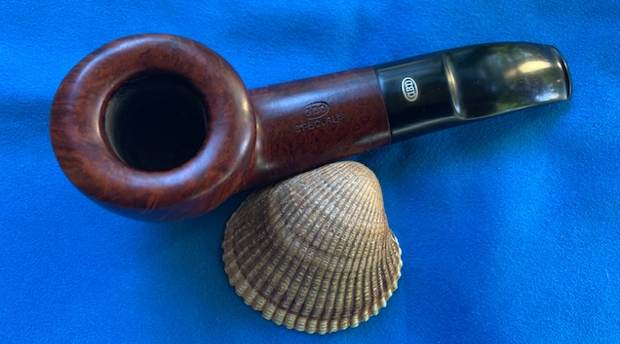
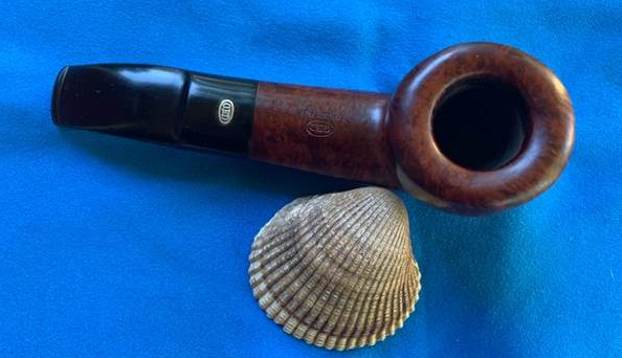
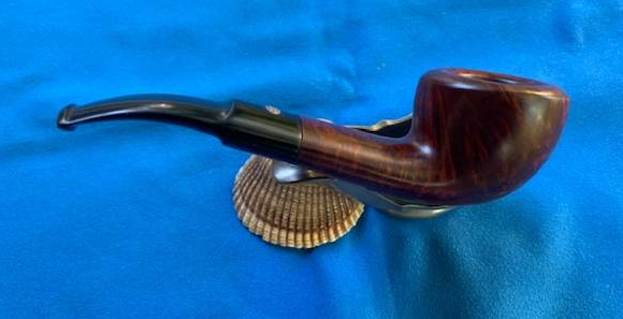
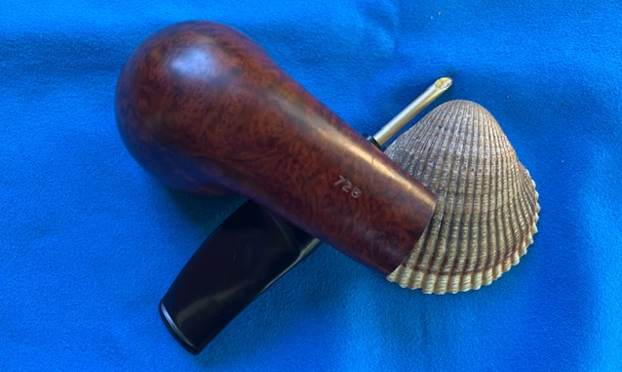
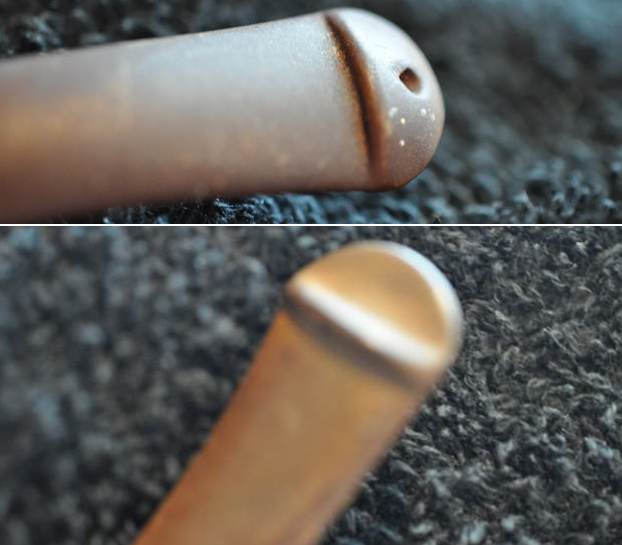
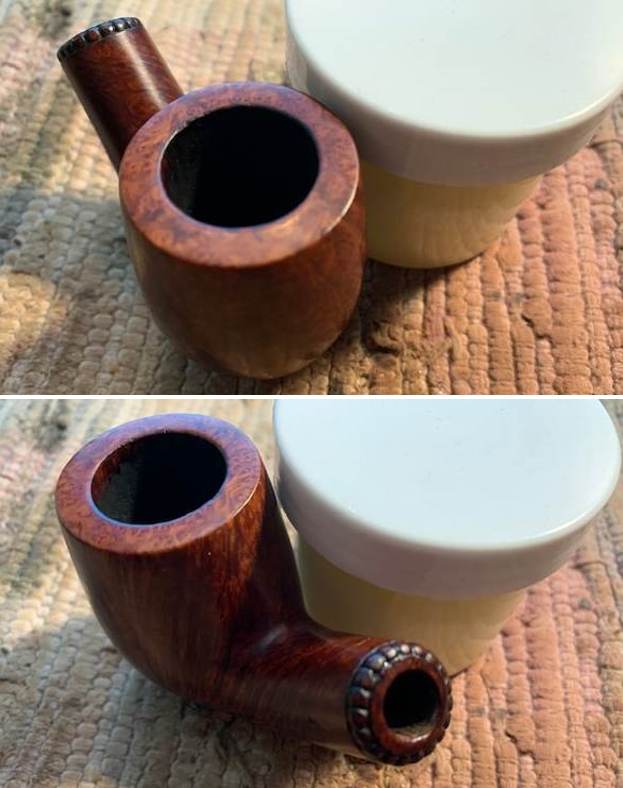
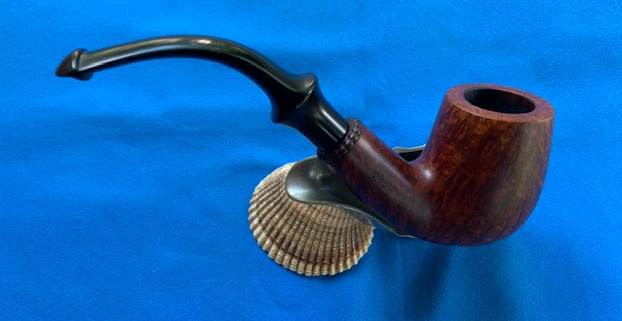
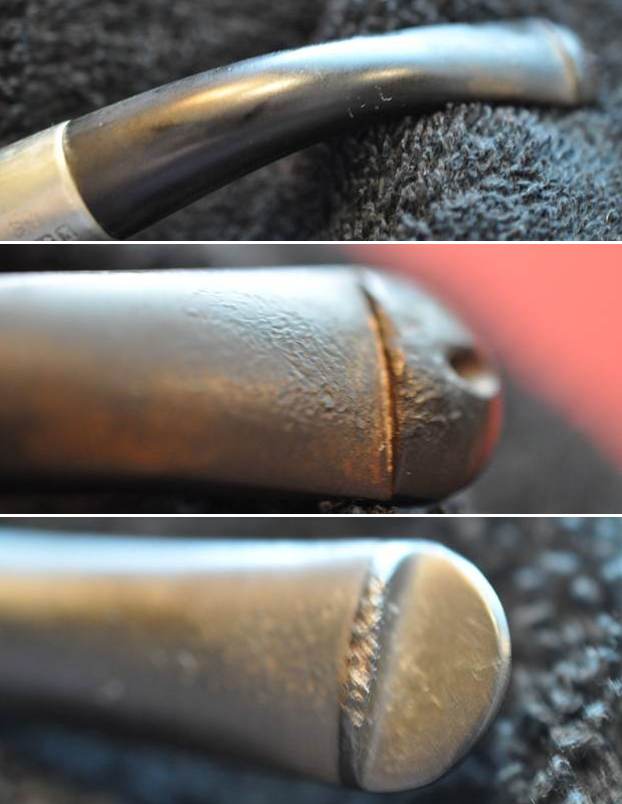
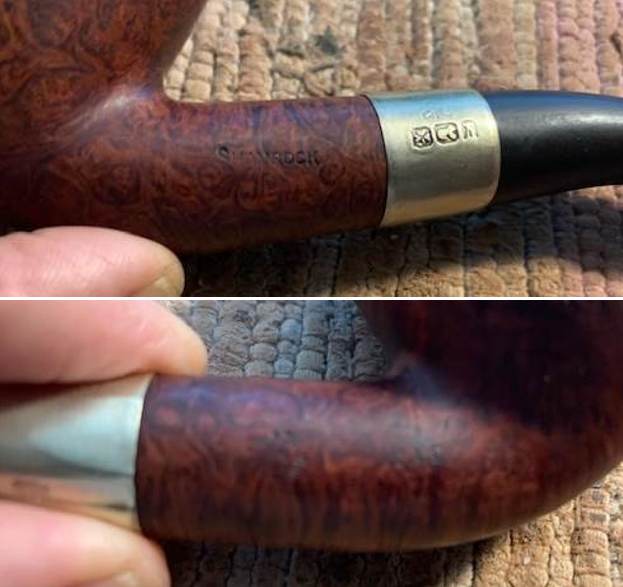
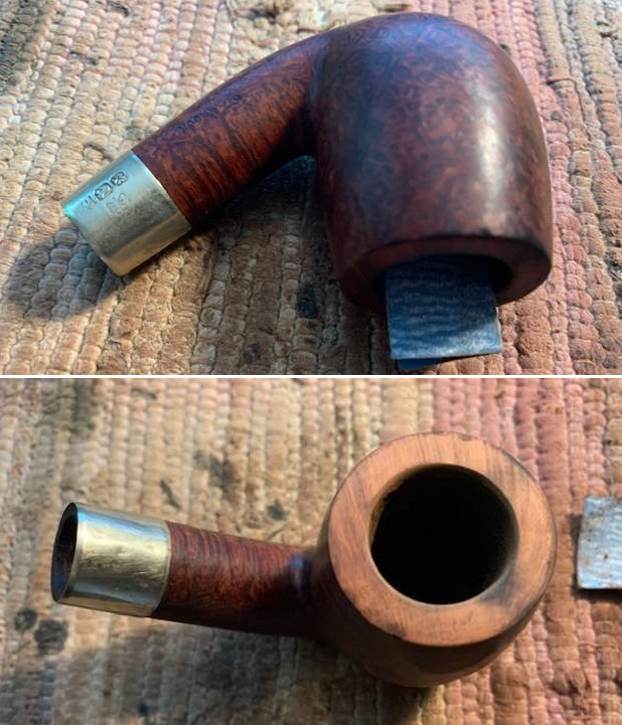
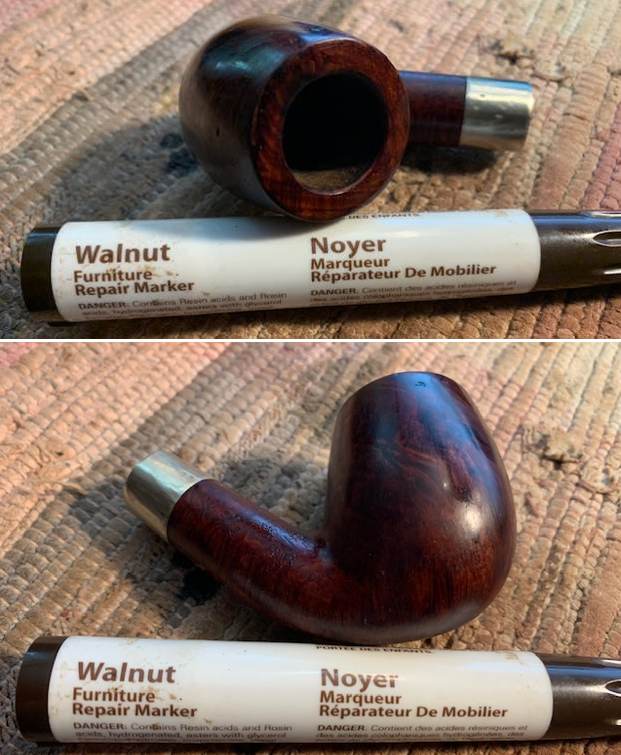
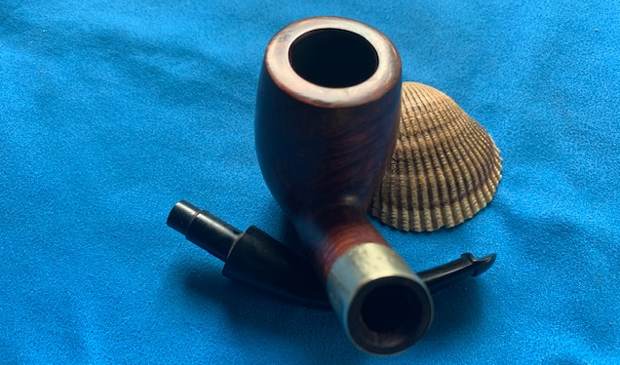
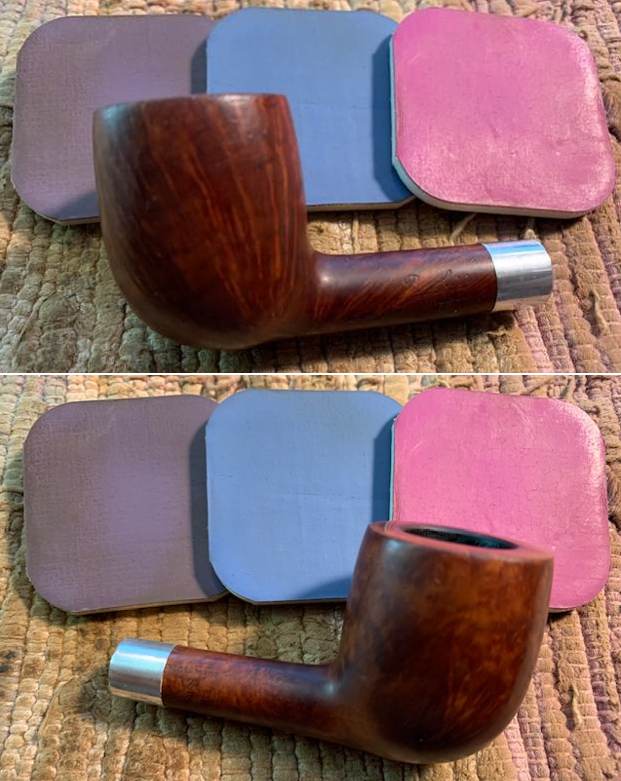
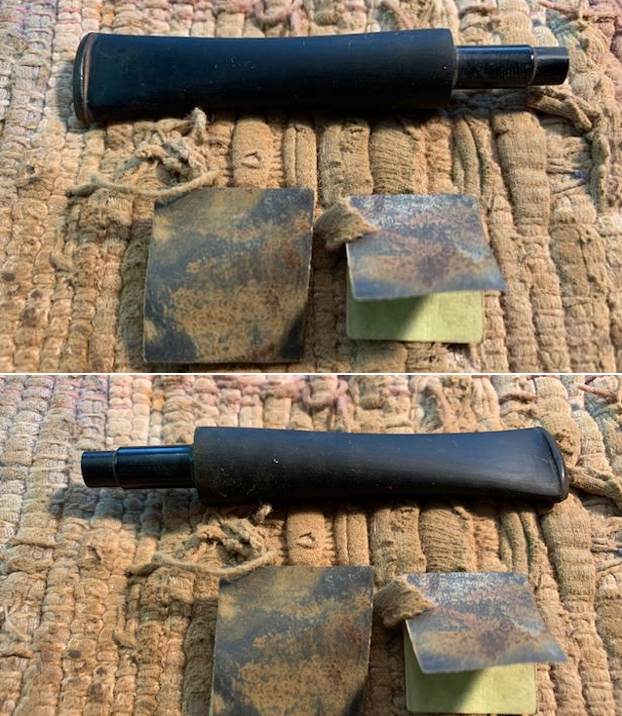
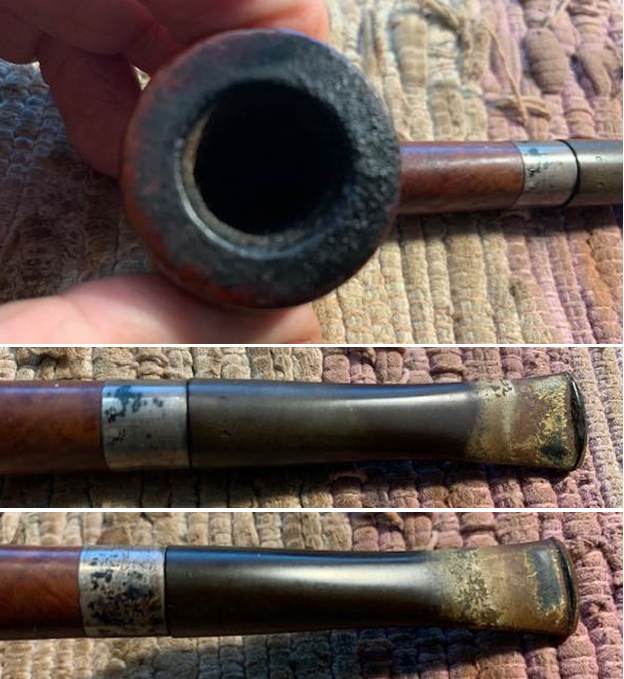
I tried to capture the stamping on the sides of the shank. It is faint in spots but is readable as noted above. You can also see the diameter variation in the stem and the shank in the photos. I am pretty certain that somewhere along the way the original stem broke and cracked the shank. The pipe was banded and a new stem put on the pipe. Whoever did the work did not adjust the fit of the stem.
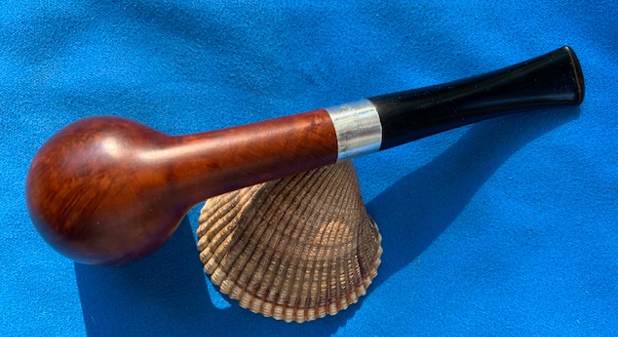
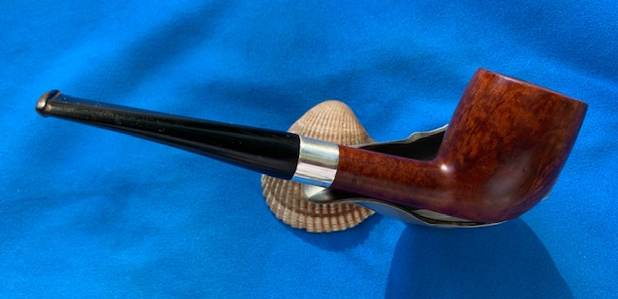
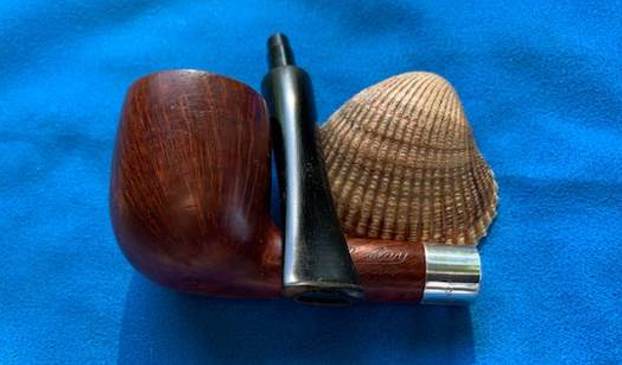
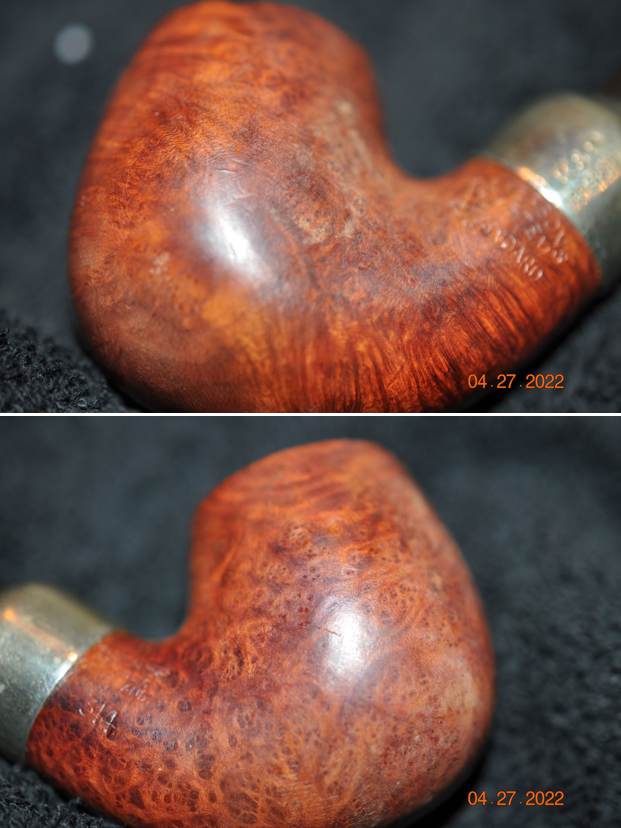
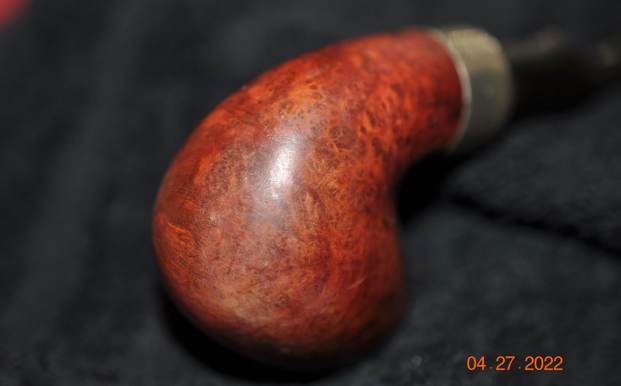
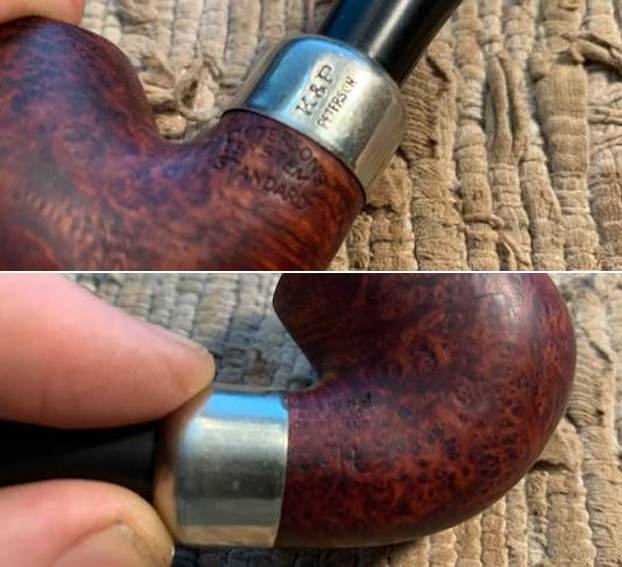
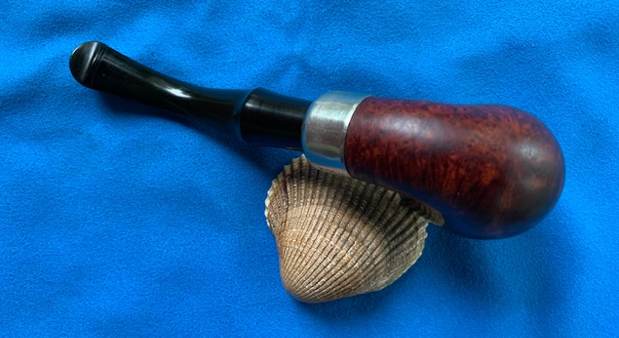
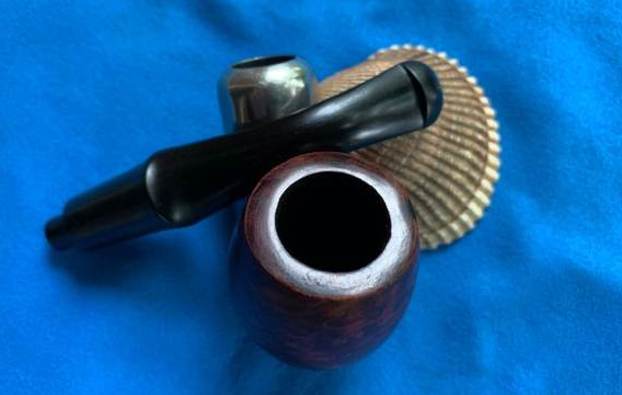
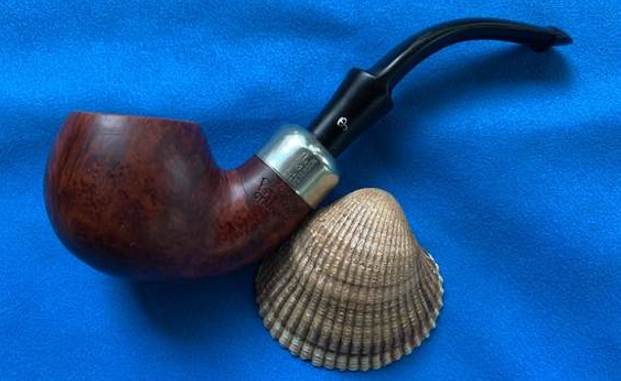
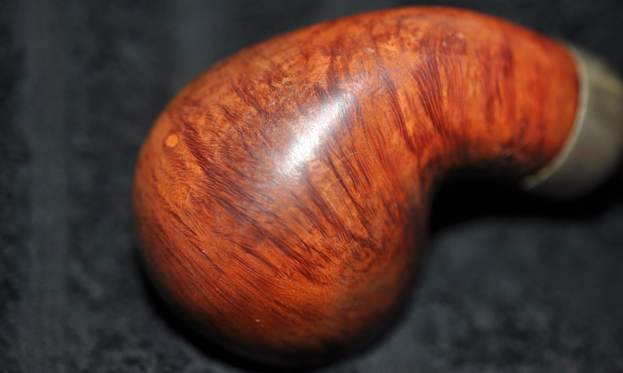
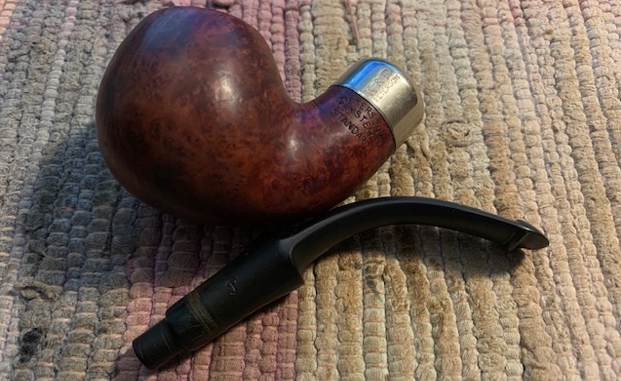
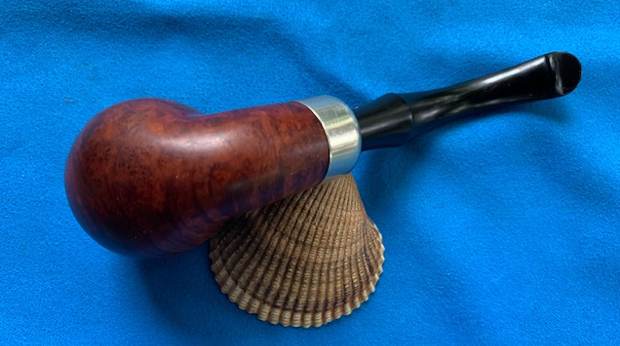
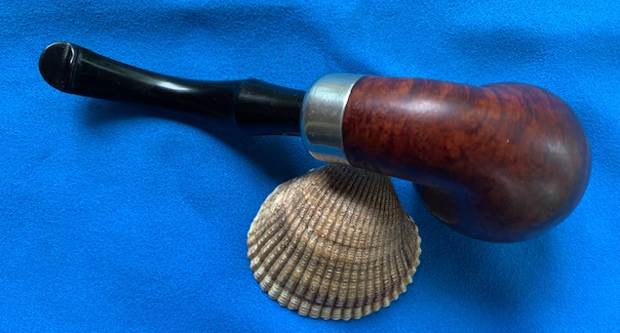
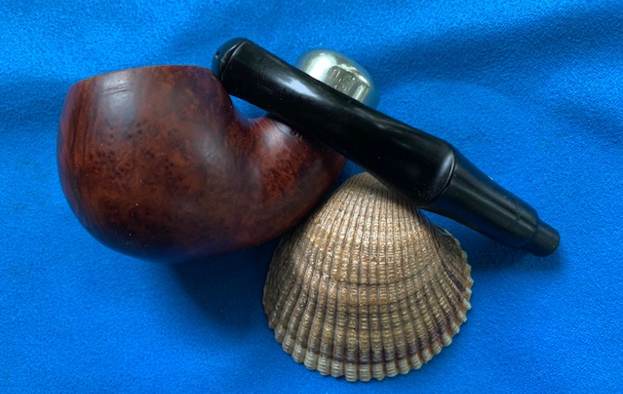
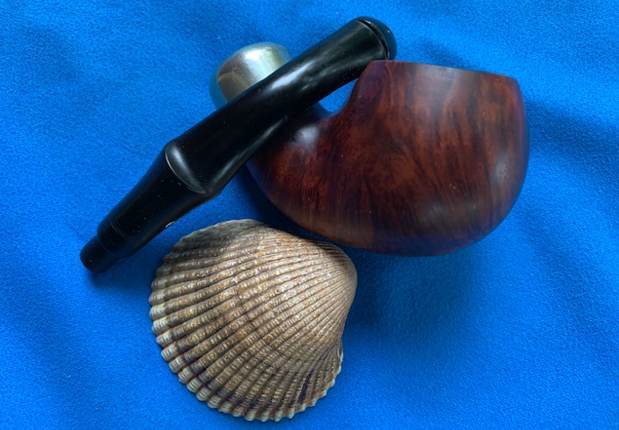
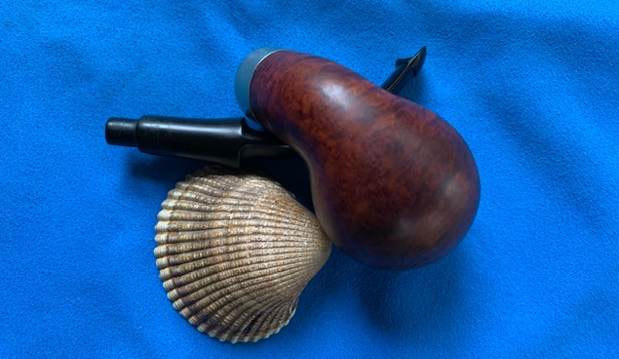
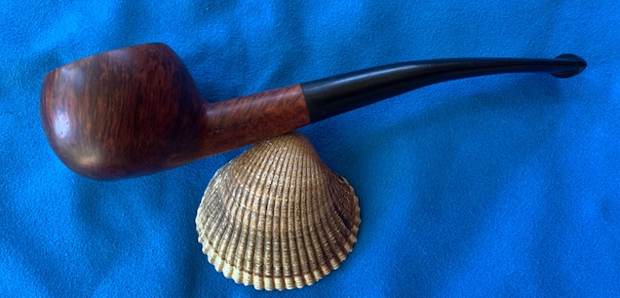
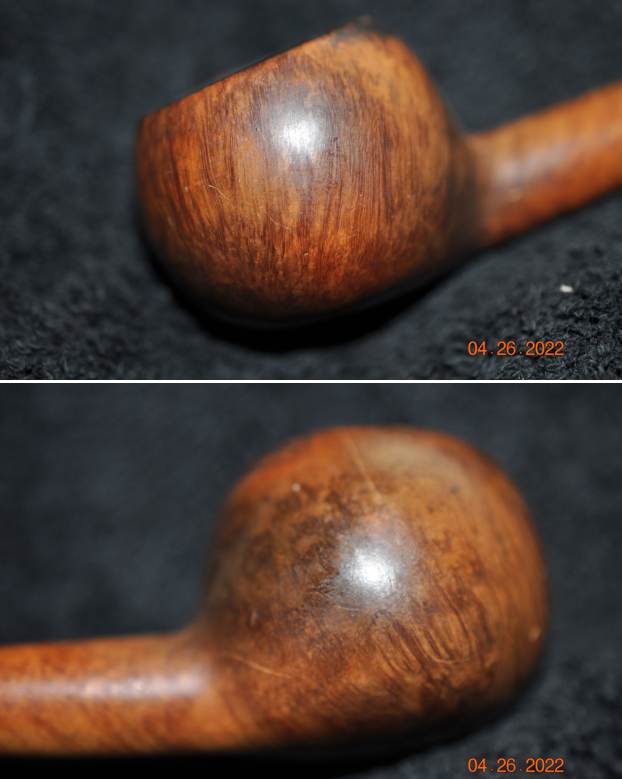
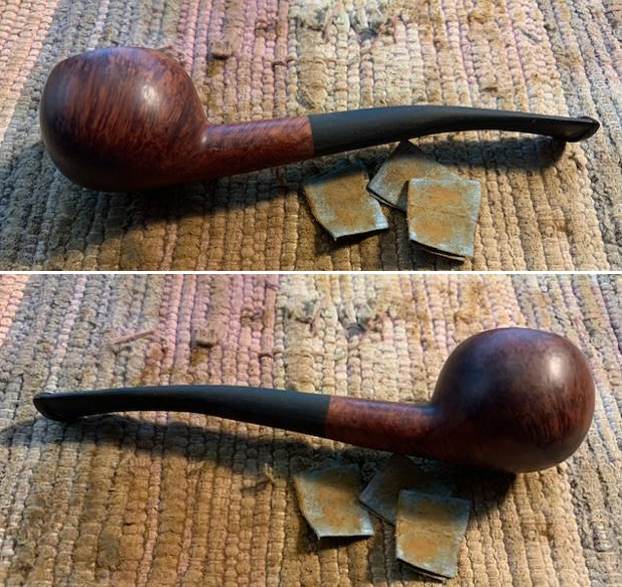
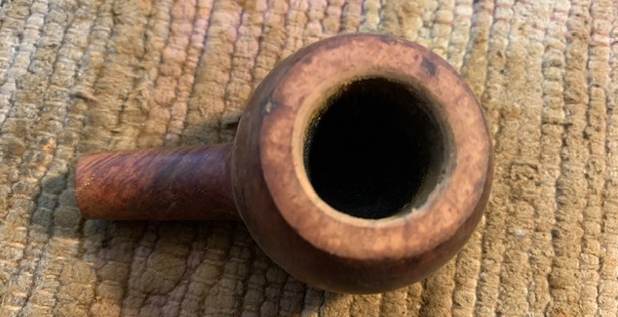
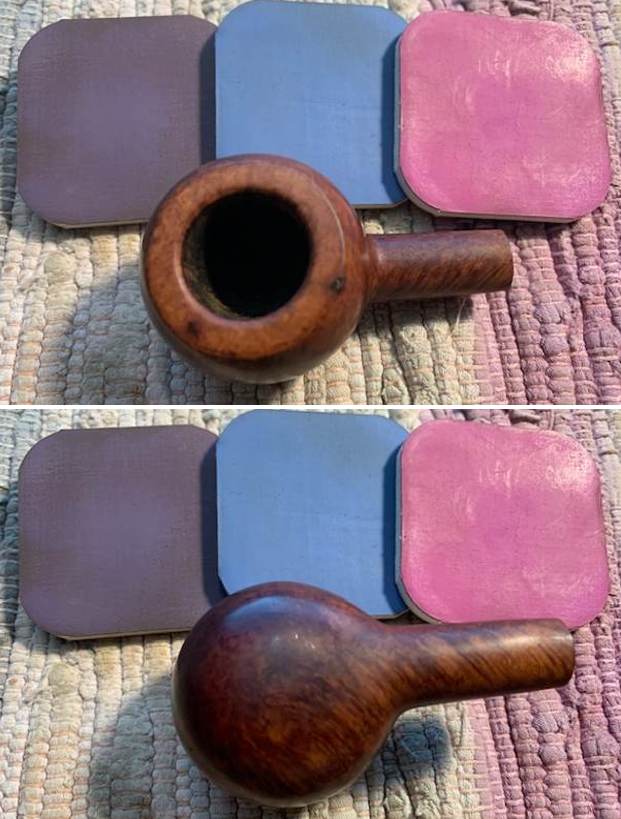
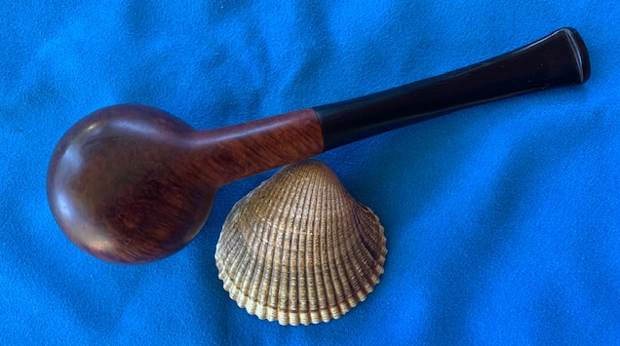
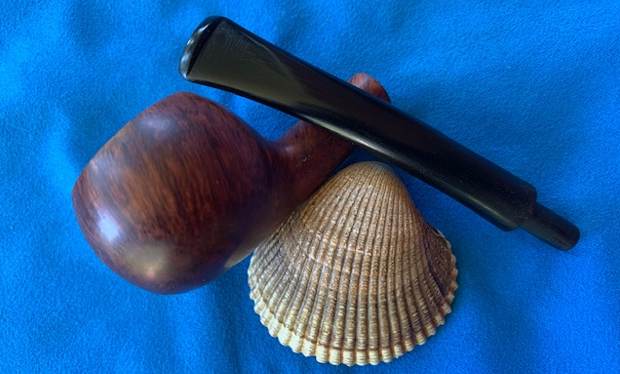
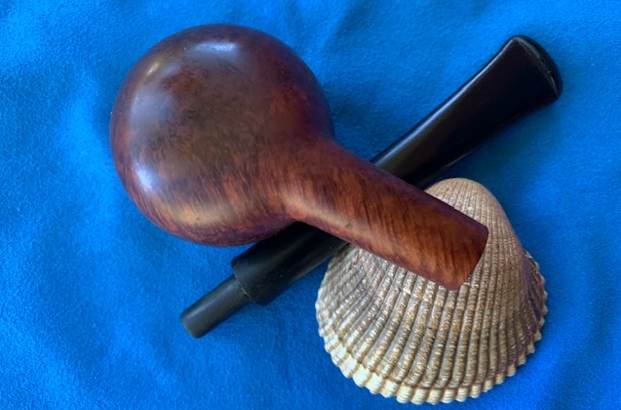
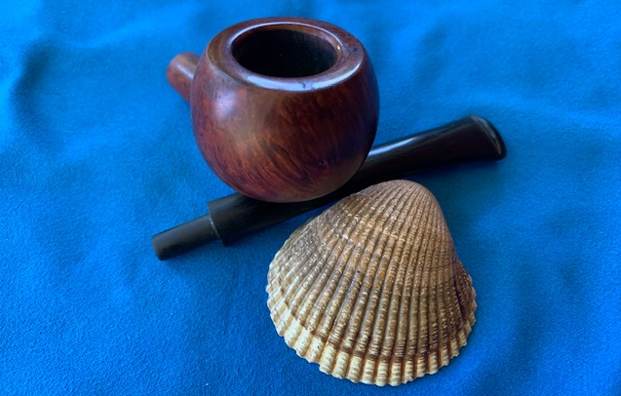
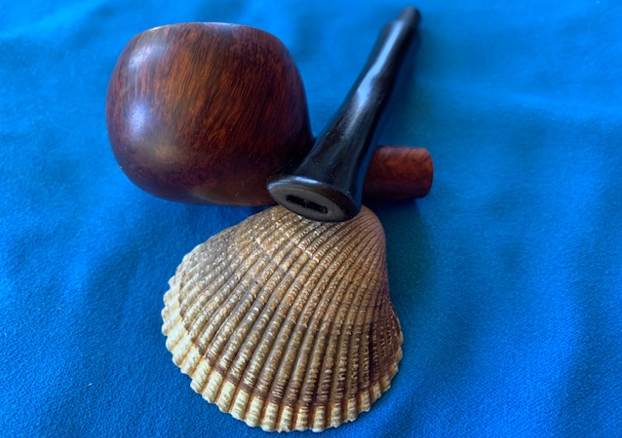
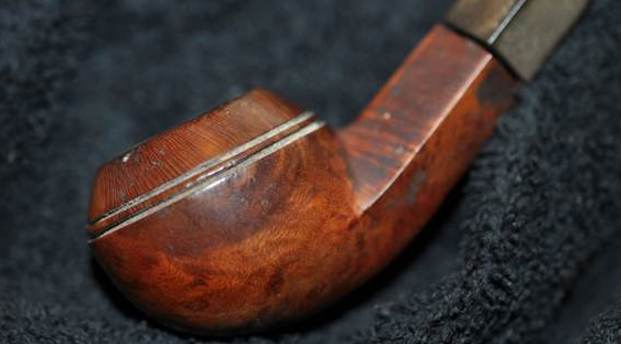
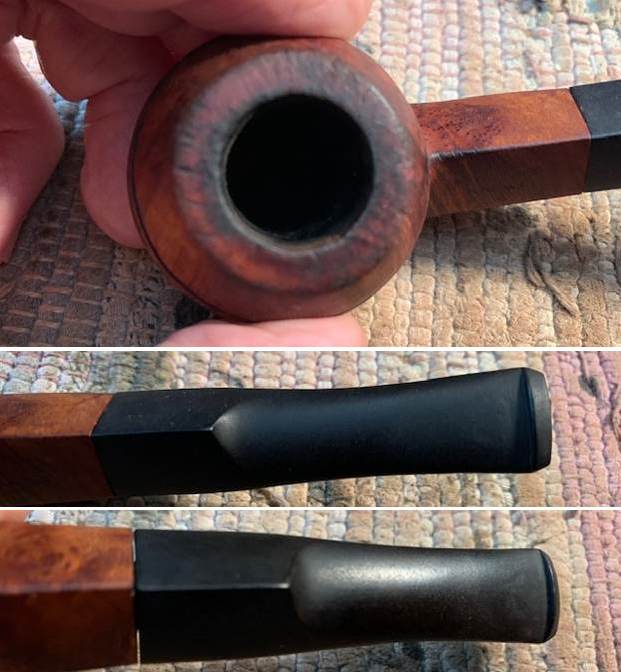
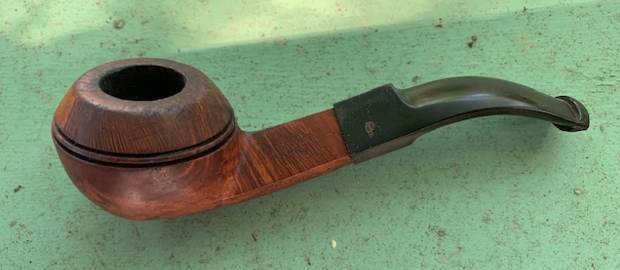
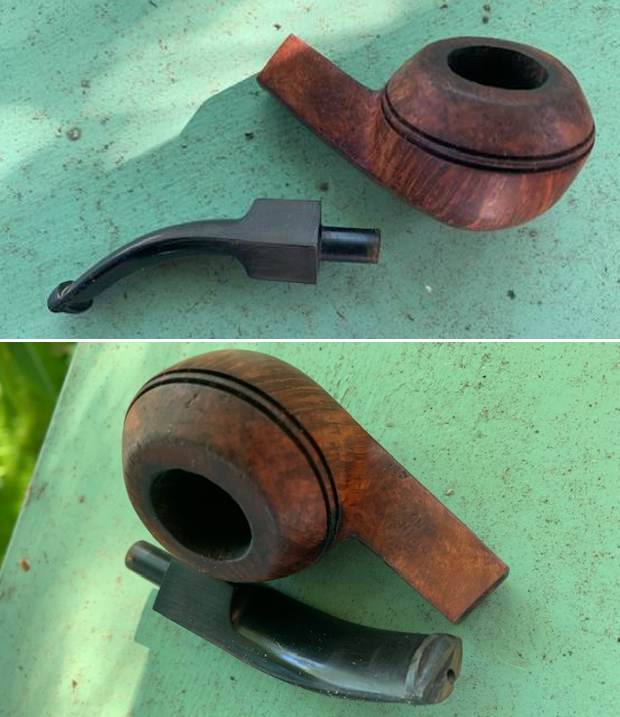
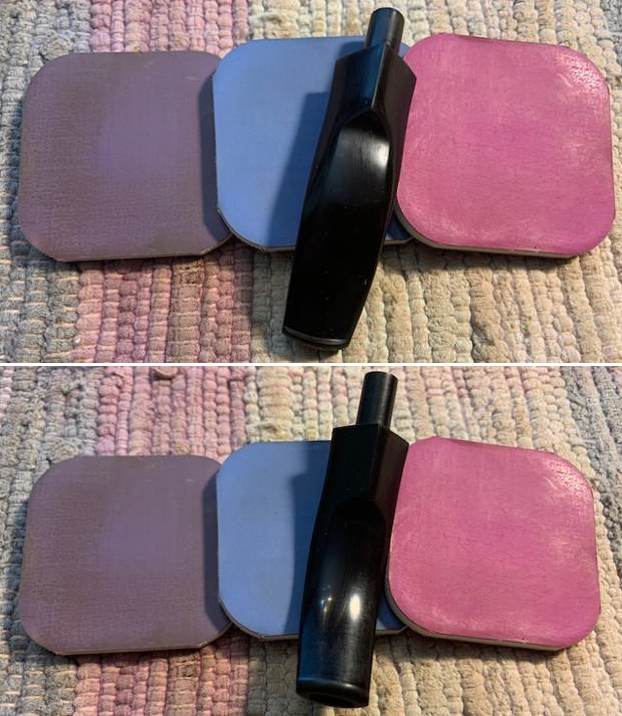
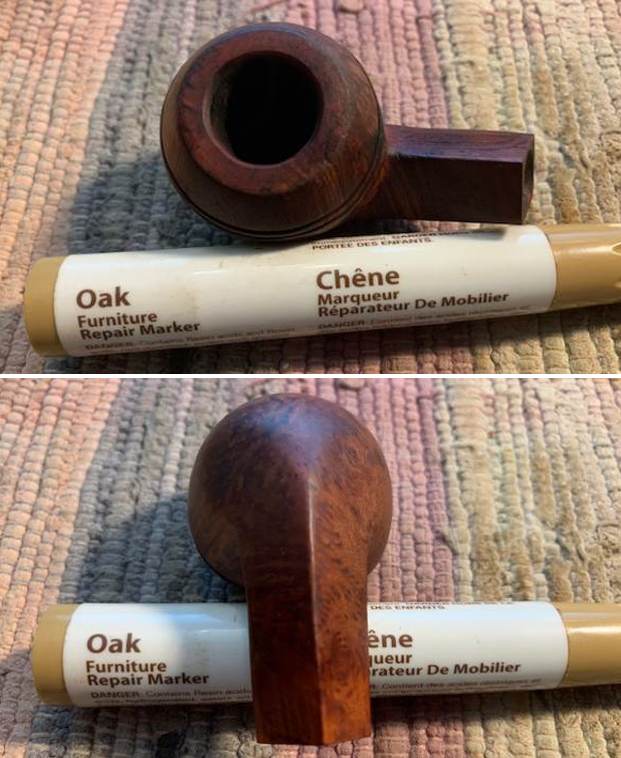
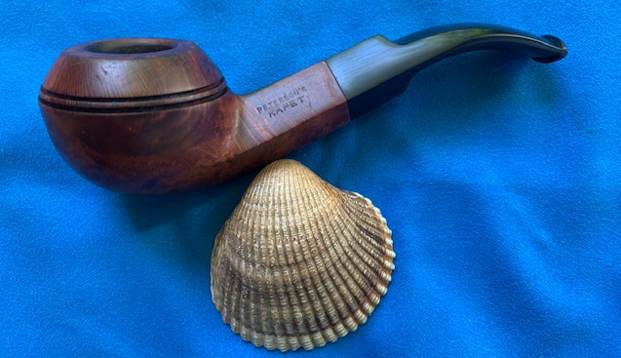
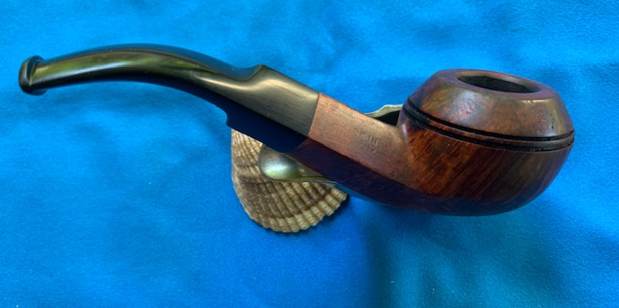
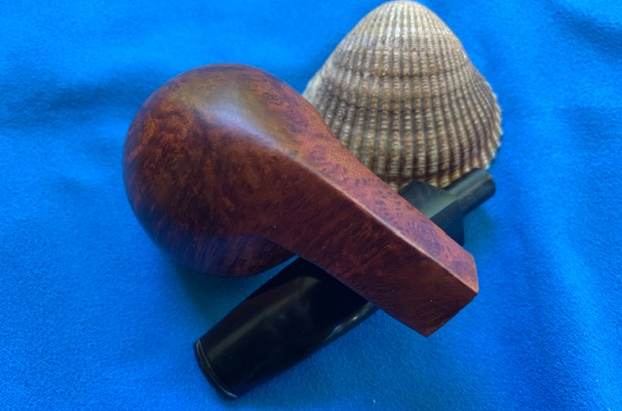
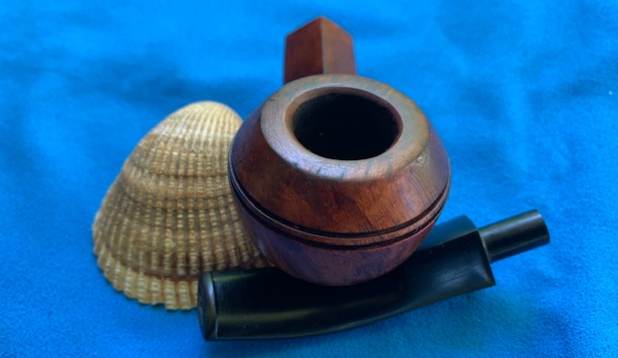
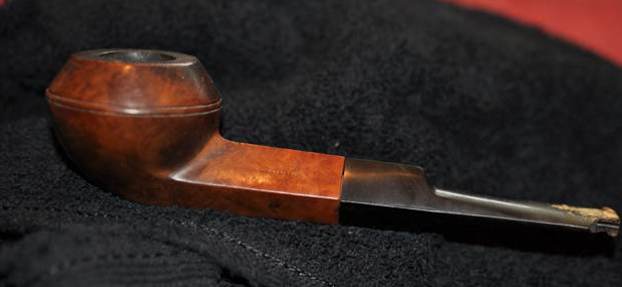
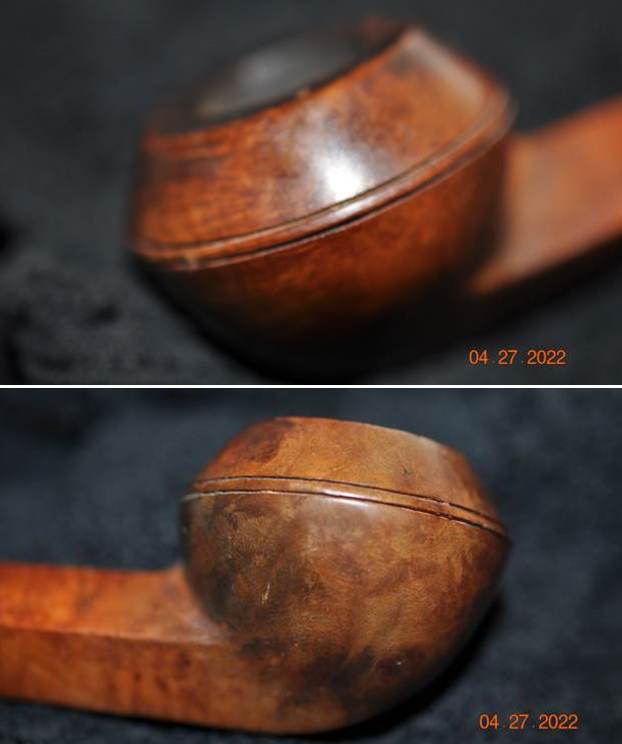
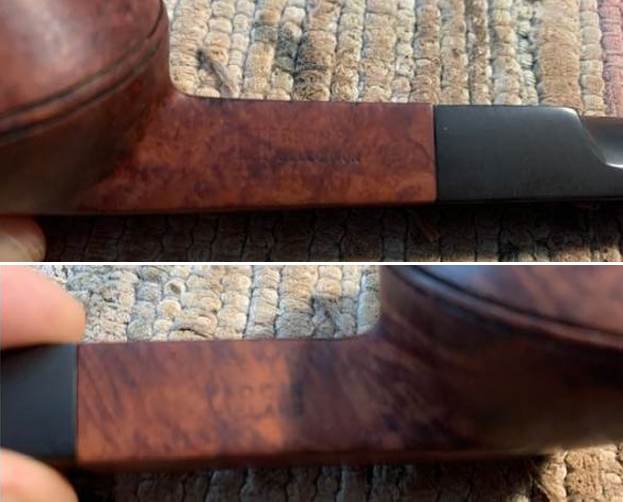
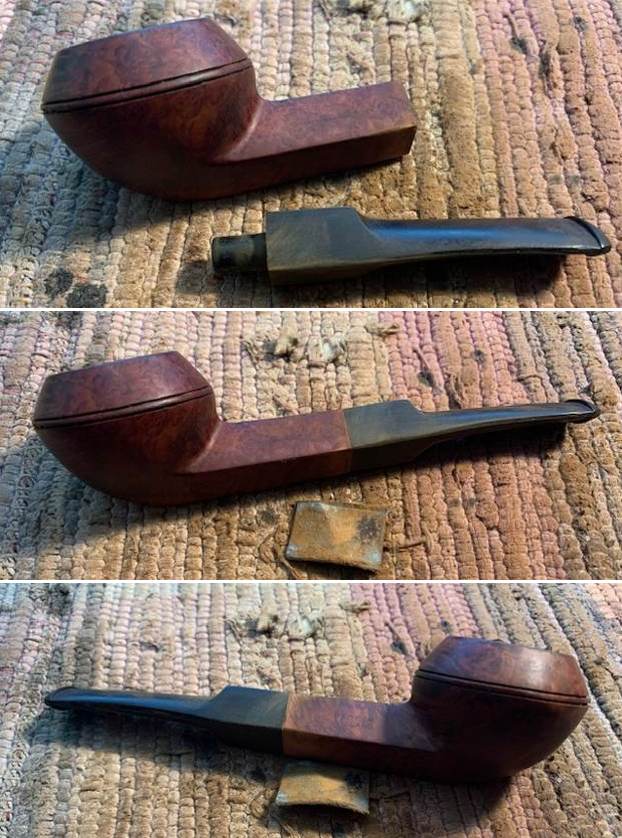
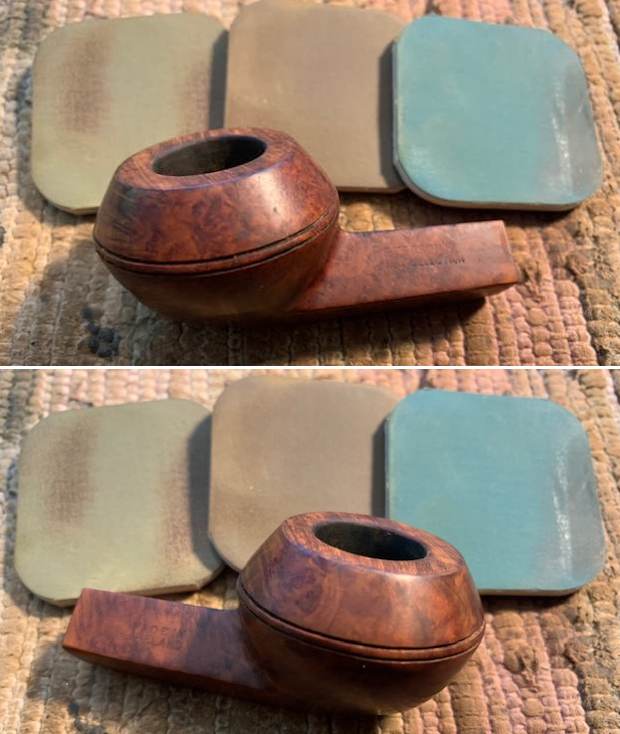
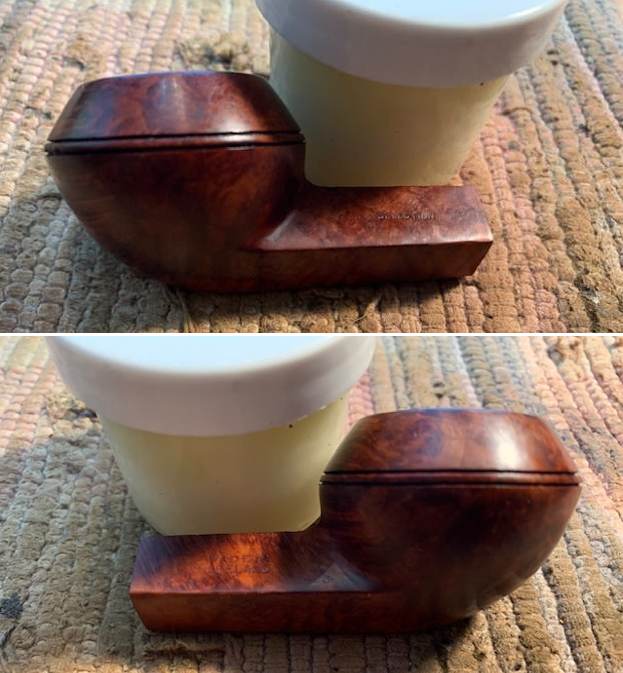
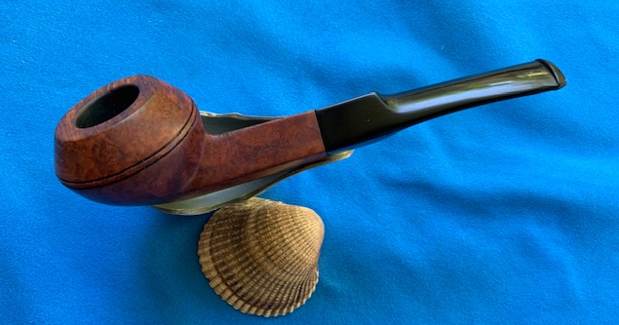
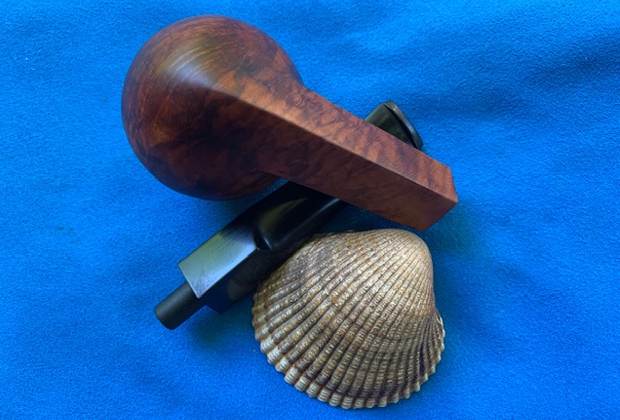
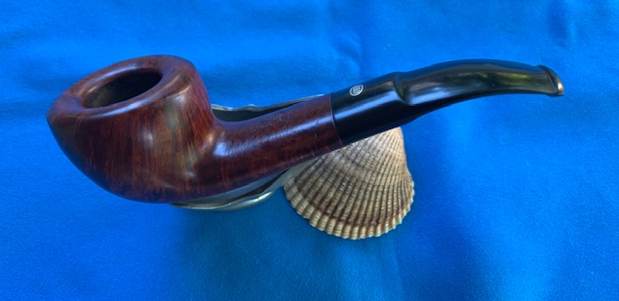
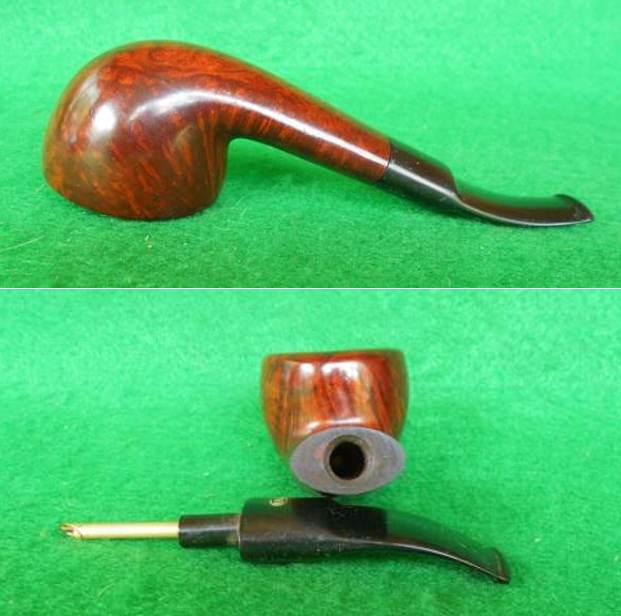
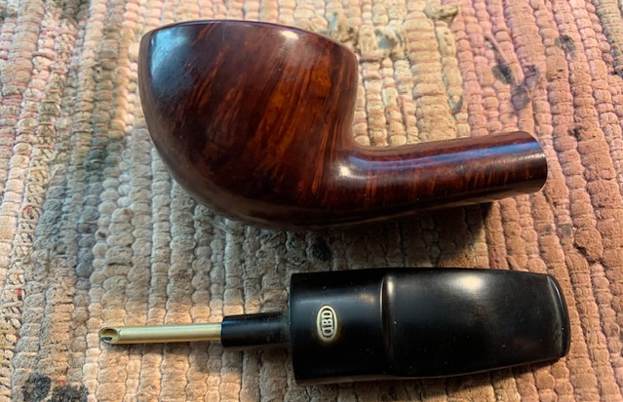
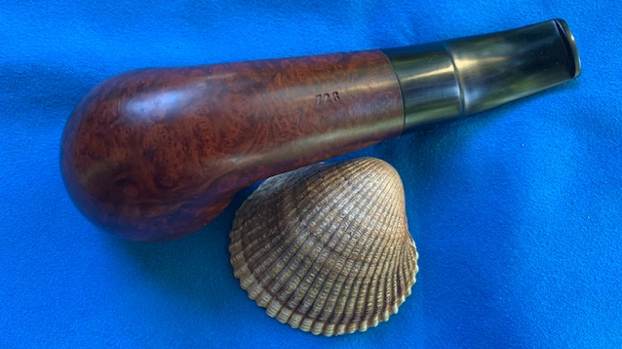
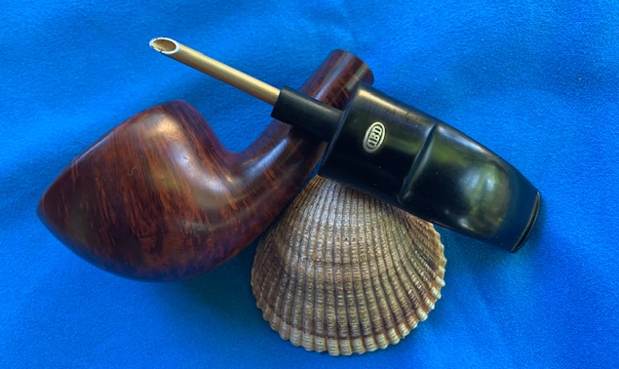
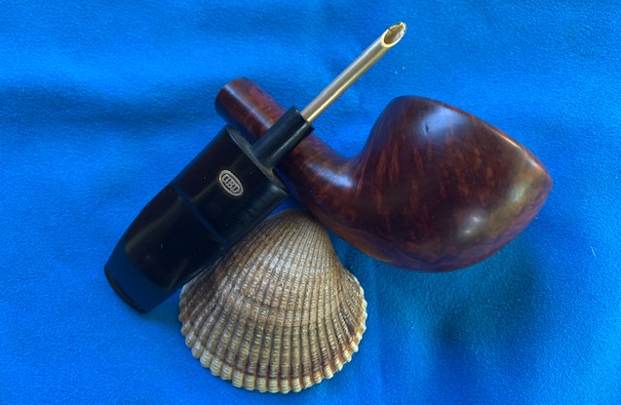
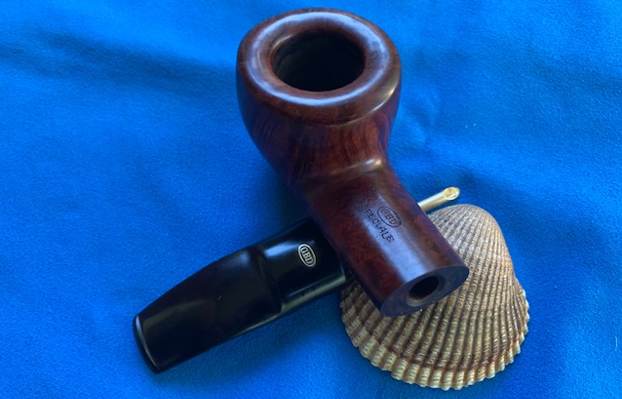
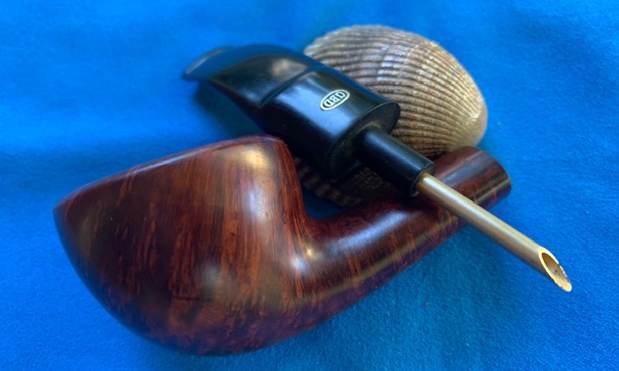
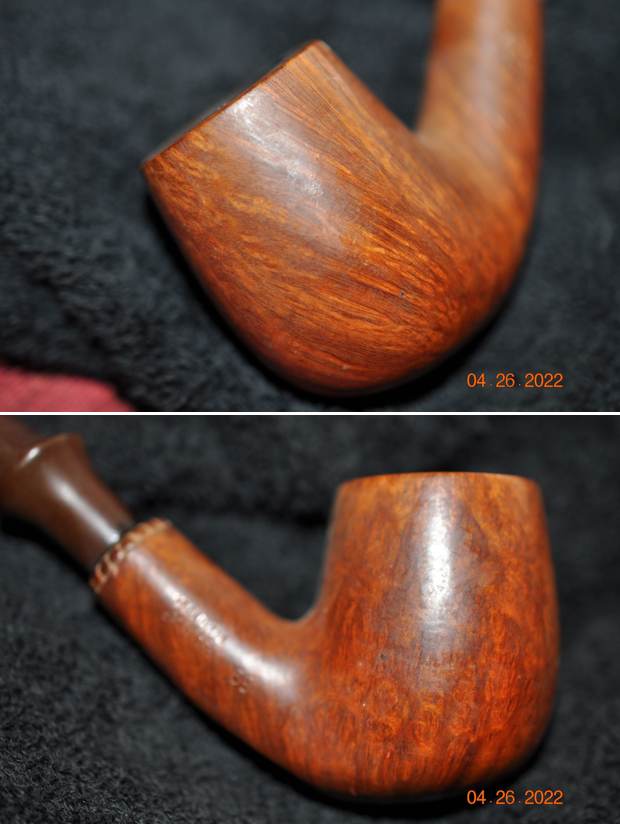
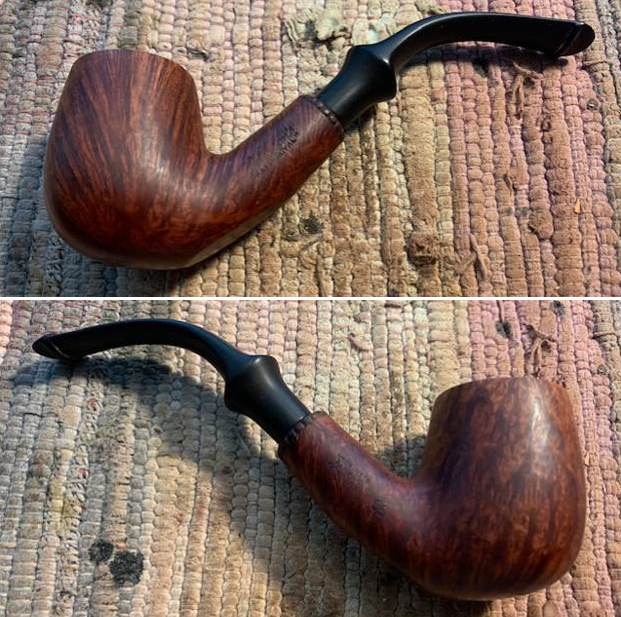
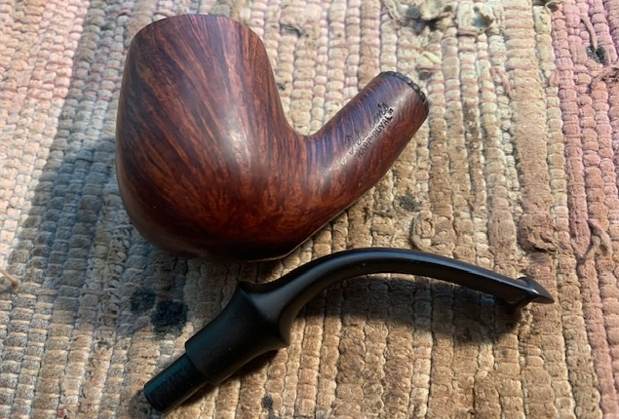
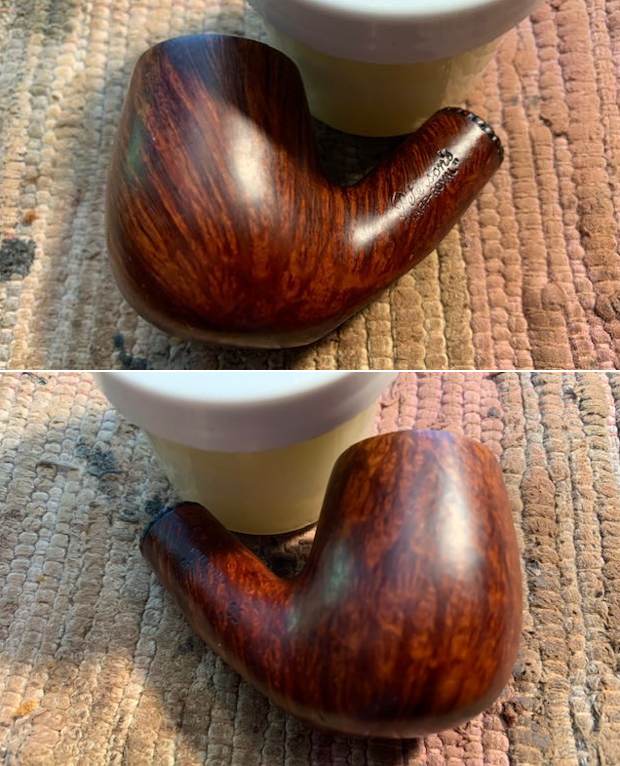
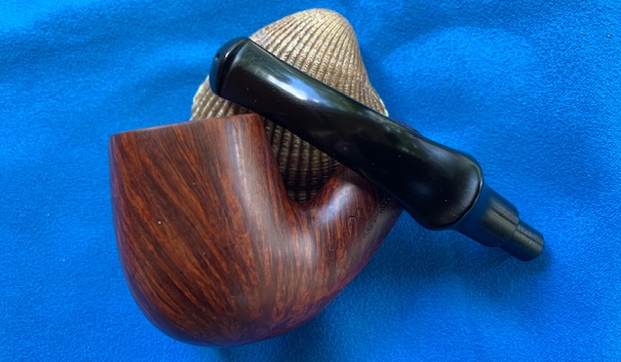
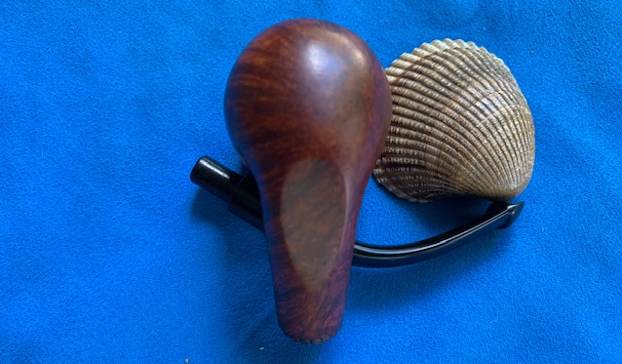
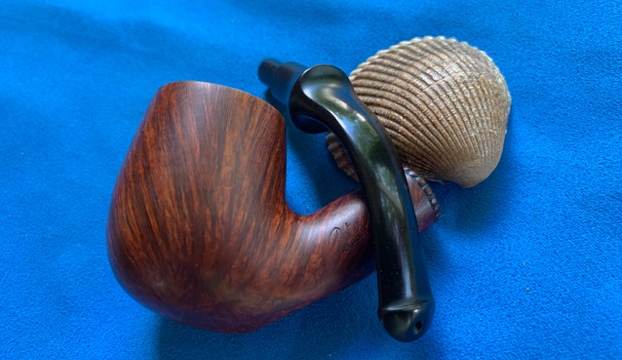
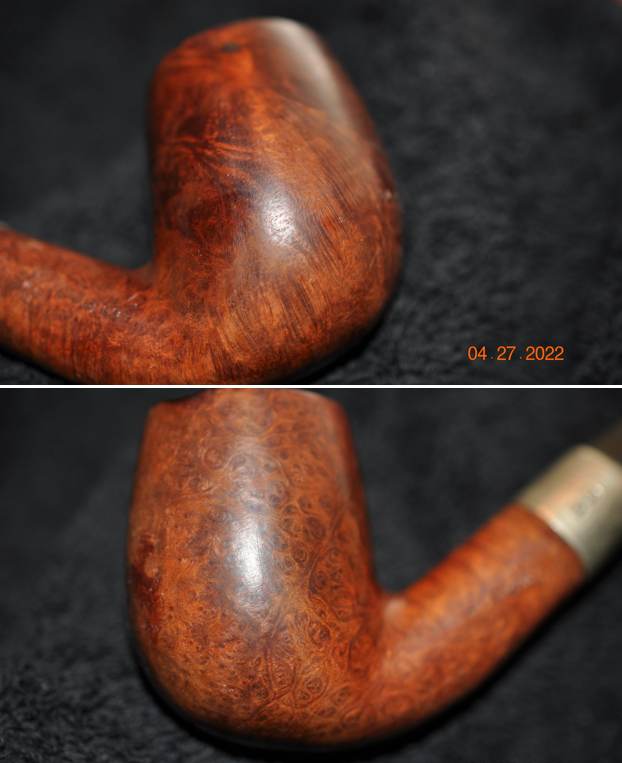
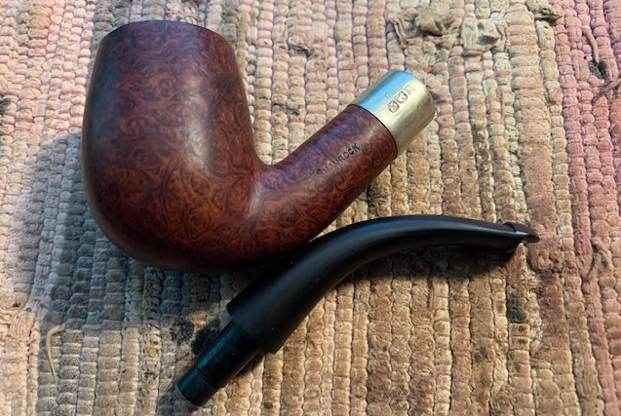
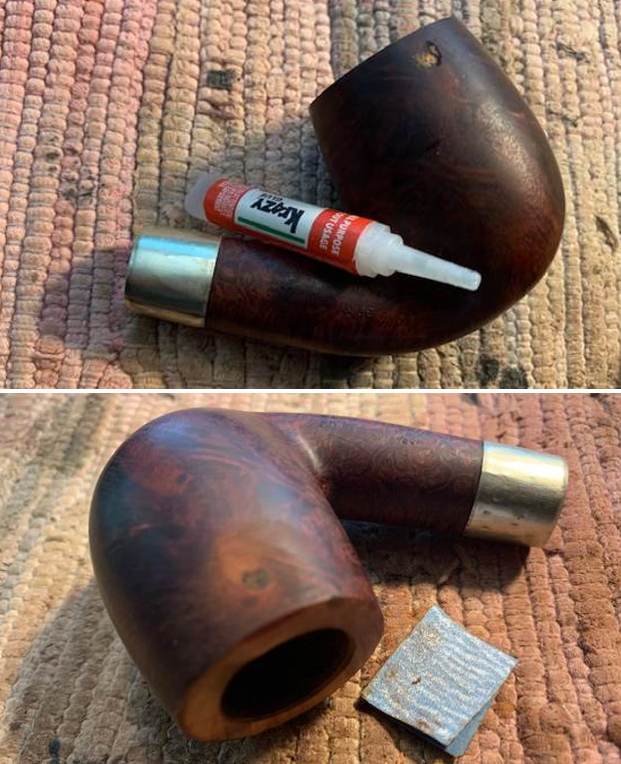
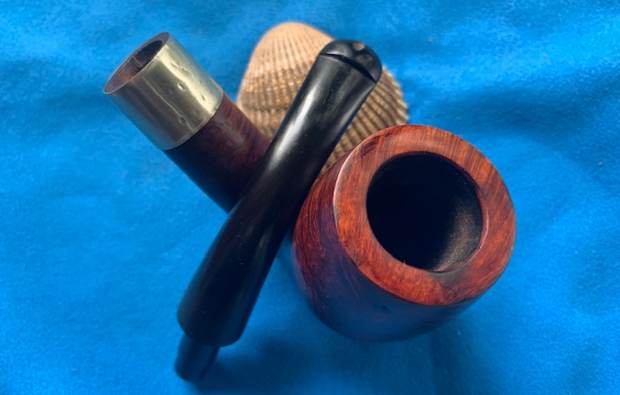
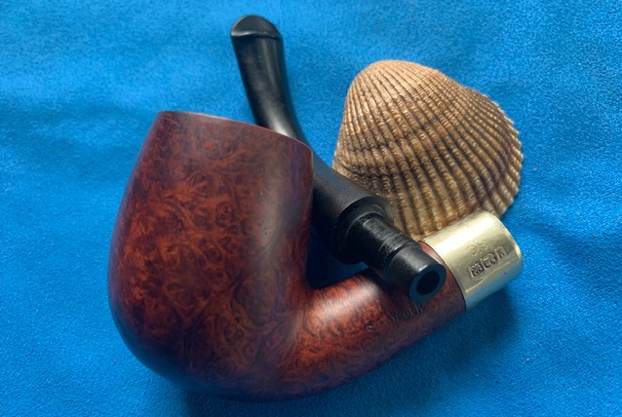
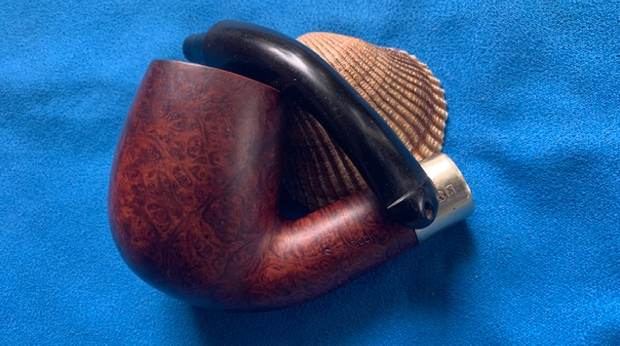
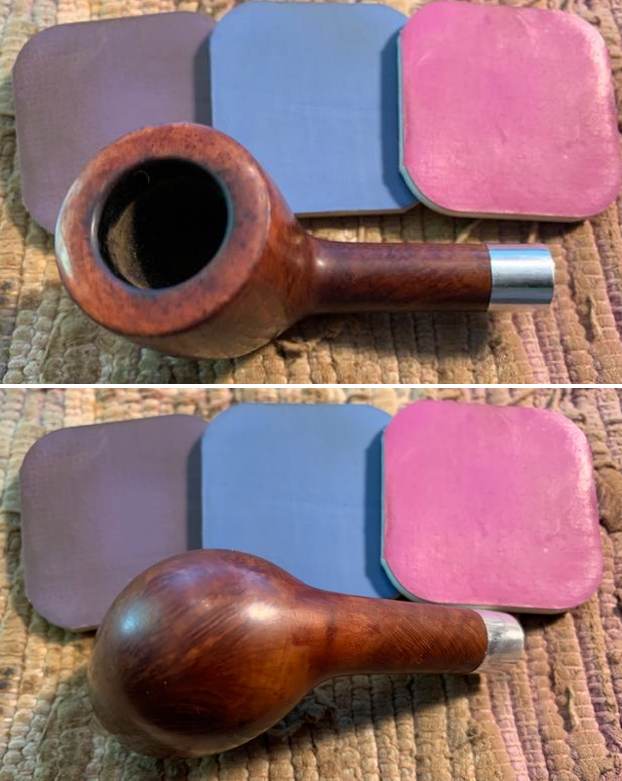
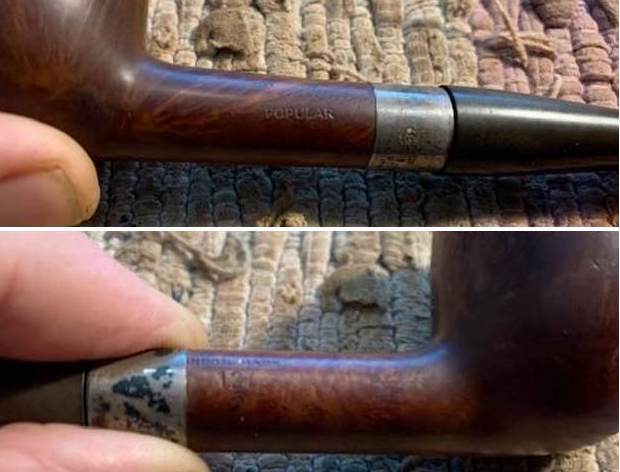
I removed the stem from the shank and took a photo to give a sense of the beauty of the pipe. Look at the grain on the left side of the bowl.
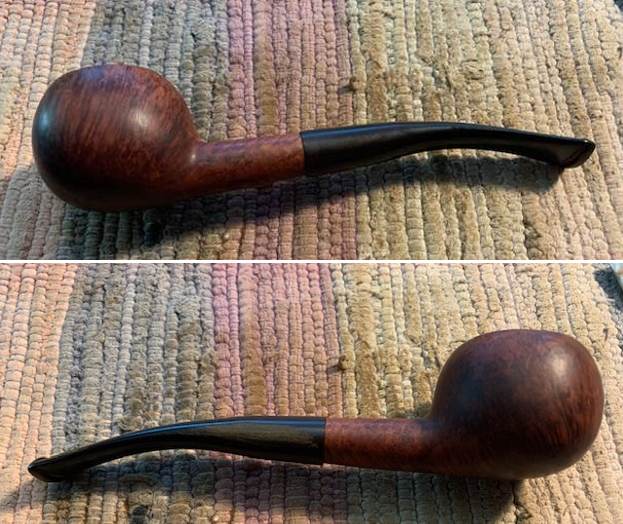
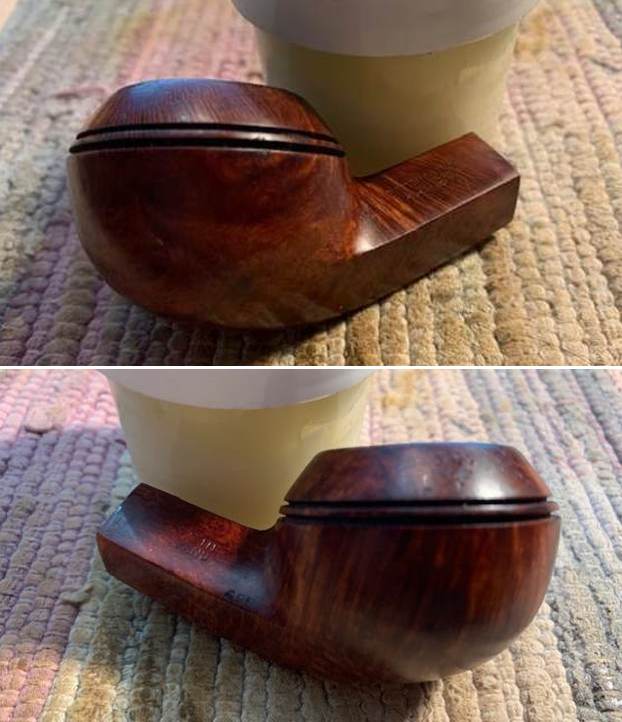
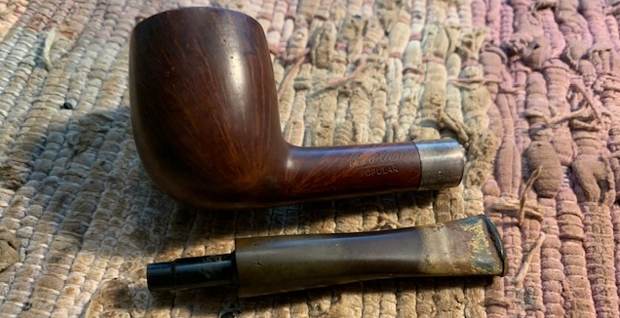
I have worked quite a few Bewlay pipes over the years but wanted a reminder of the background of the brand. I turned first to Pipephil’s site (http://pipephil.eu/logos/en/logo-b4.html).  I got a quick summary there. I have included a screen capture below. The second pipe in the photograph below is stamped similarly to the one I have. It is also a Bewlay Popular. The shape number is different but that stamp also looks like this one. I have also included the information that was in the sidebar below photos below.
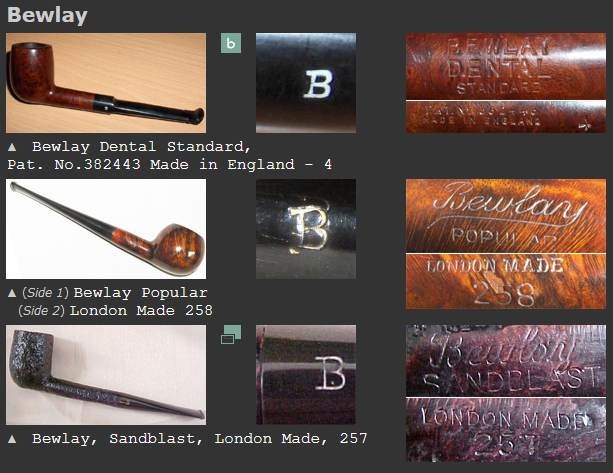
Brand distributed by Bewlay & Co (chain of pipe stores) until the 50s, taken over by Imperial Tobacco & Co.

I turned to Pipedia next and include a screen shot of a photo there and a short history of the brand and who made pipes for them (https://pipedia.org/wiki/Bewlay).
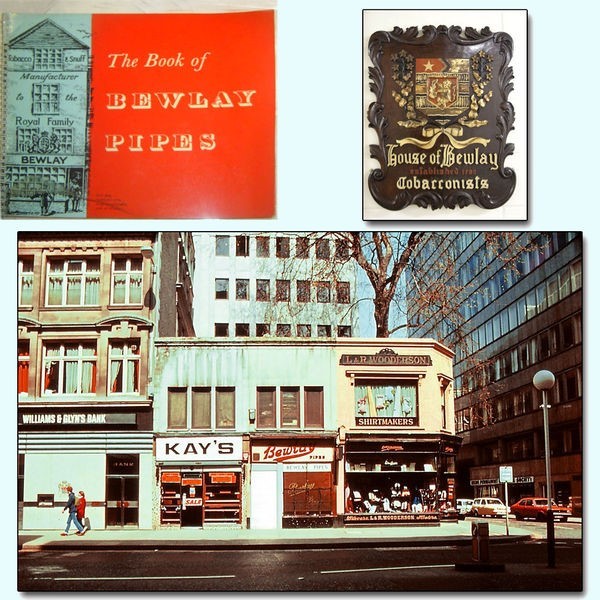
The English brand of Bewlay & Co. Ltd. (formerly Salmon & Gluckstein Ltd.), was in business from the early 20th century until the 1950s. The brand ended up being sold and taken over by Imperial Tobacco Co.. The shop chain closed in the 1980s but there seems to be one shop still in business on Carr Lane in the city of Hull.

Bewlay pipes were made by prestigious firms. Notably Barling, Charatan, Loewe & Co., Sasieni, Huybrecht, and Orlik. So understandably, the English considered a Bewlay pipe a quality pipe.

The information highlighted in red above is very interesting. Key English pipe making firms made pipes for Bewlay. I did a bit of searching for the shape number 127 under those company’s but did not find anything conclusive.

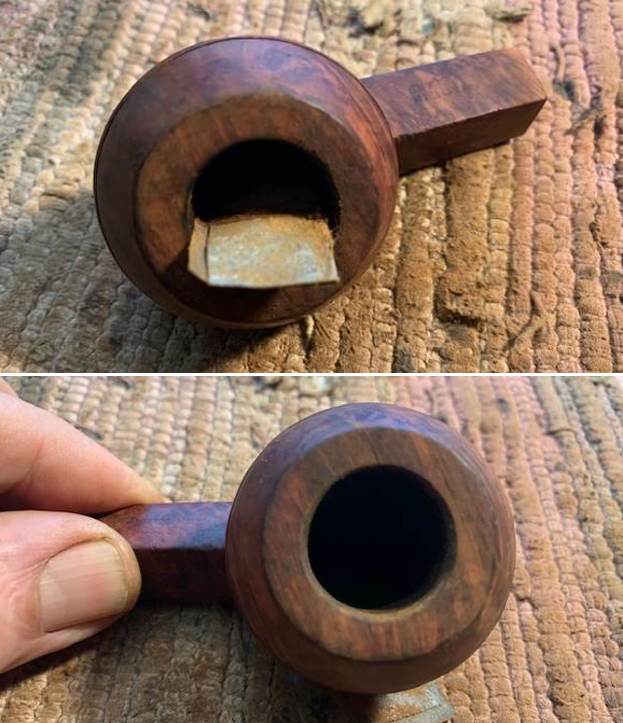
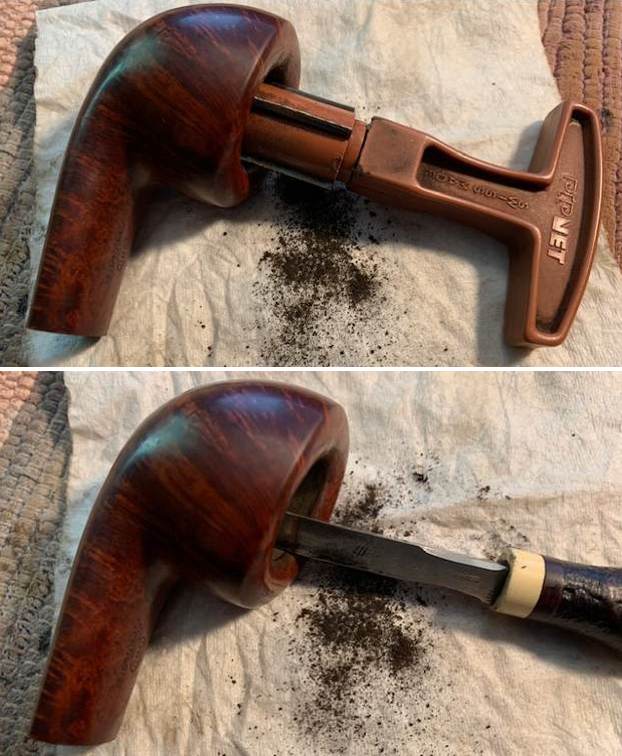
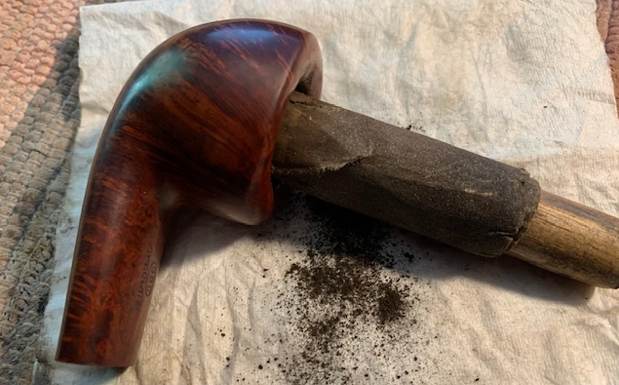
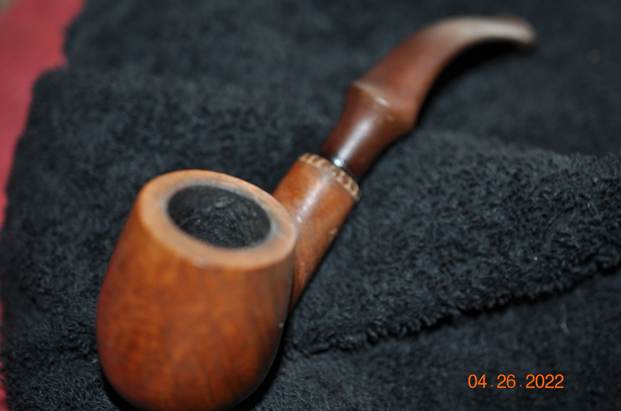
I started my work on the pipe by doing the cleanup work. I reamed the bowl with a PipNet Pipe Reamer and cleaned up the remnants with a Savinelli Fitsall Pipe Knife. I took the cake back to bare briar and sanded the walls with a piece of 220 grit sandpaper wrapped around a piece of dowel. I checked the walls of the bowl for damage. It looked very good. 
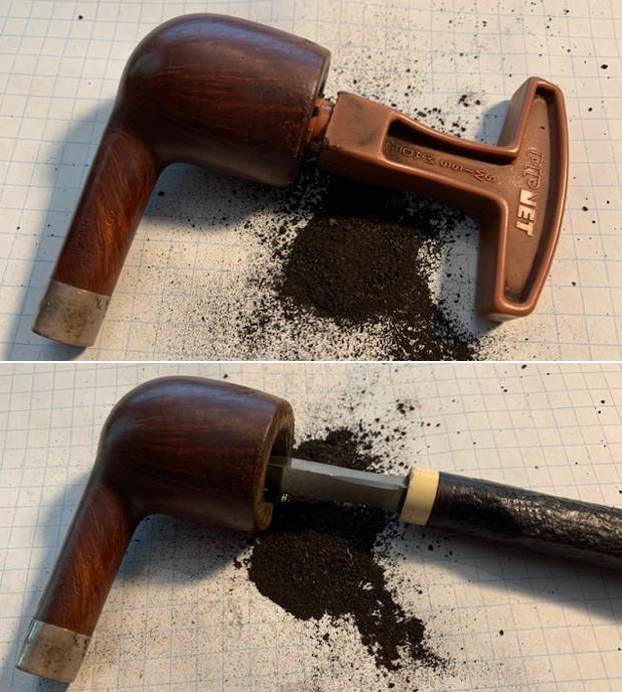
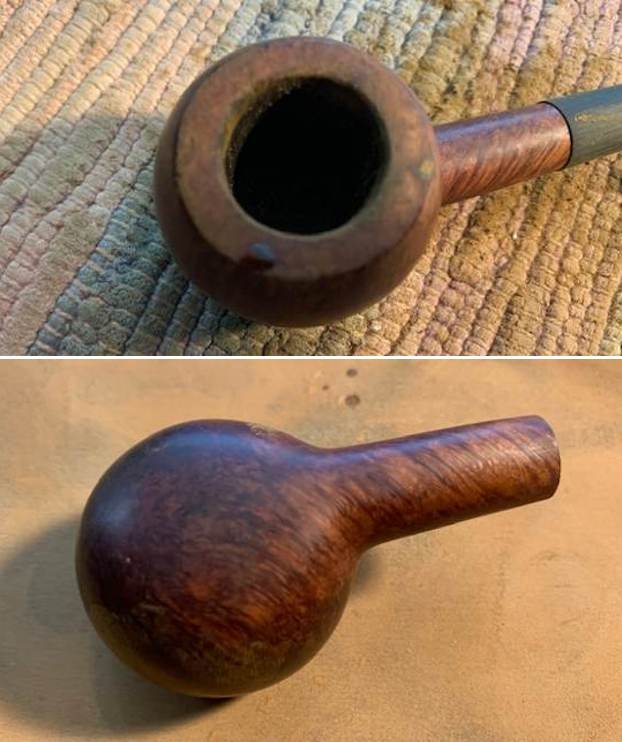
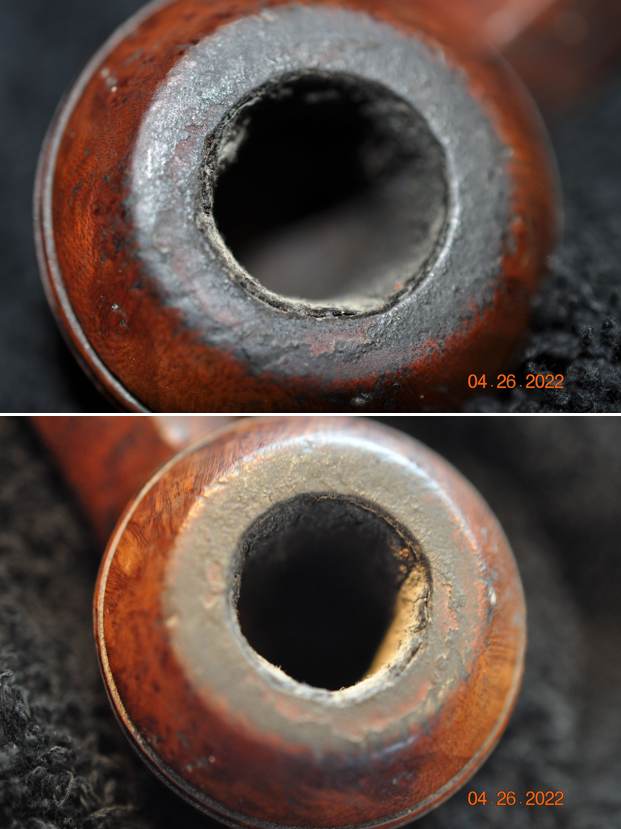
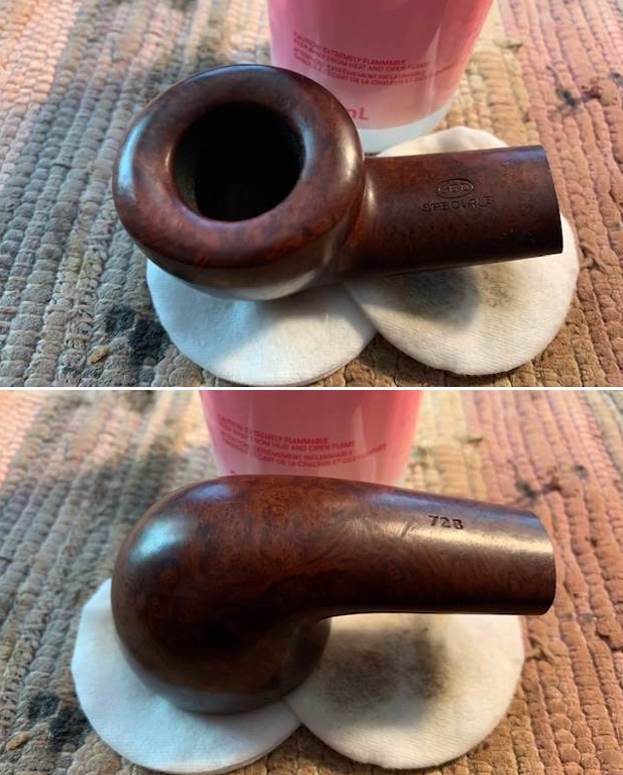
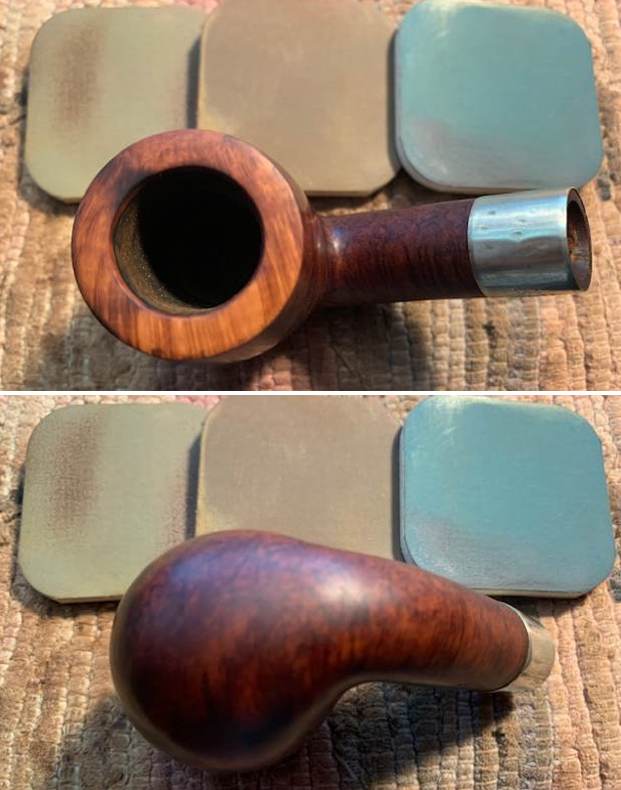
I scrubbed the exterior of the bowl with Murphy’s Oil Soap and a tooth brush to remove the grime on the bowl and rim and was able to remove much of the lava and dirt. The inner edge of the bowl looked good and the rim top had some darkening but otherwise was in good shape. 
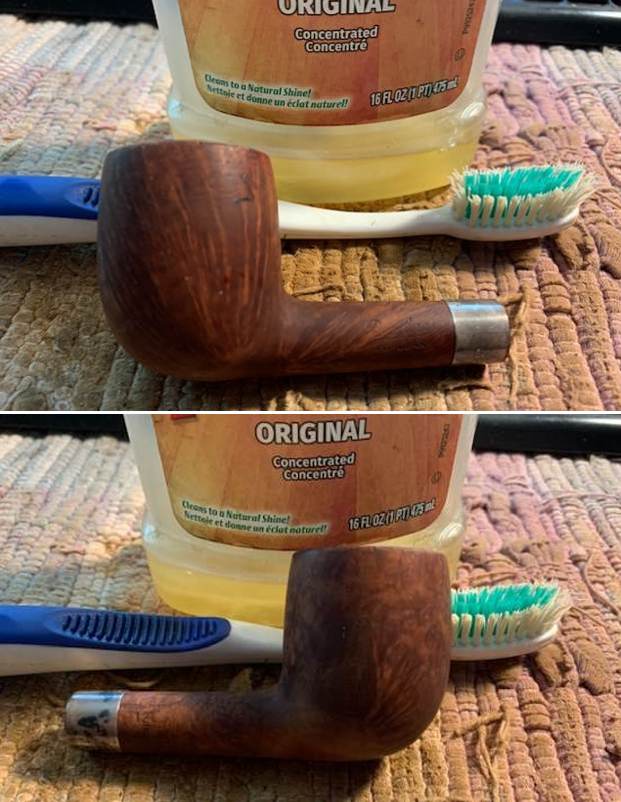
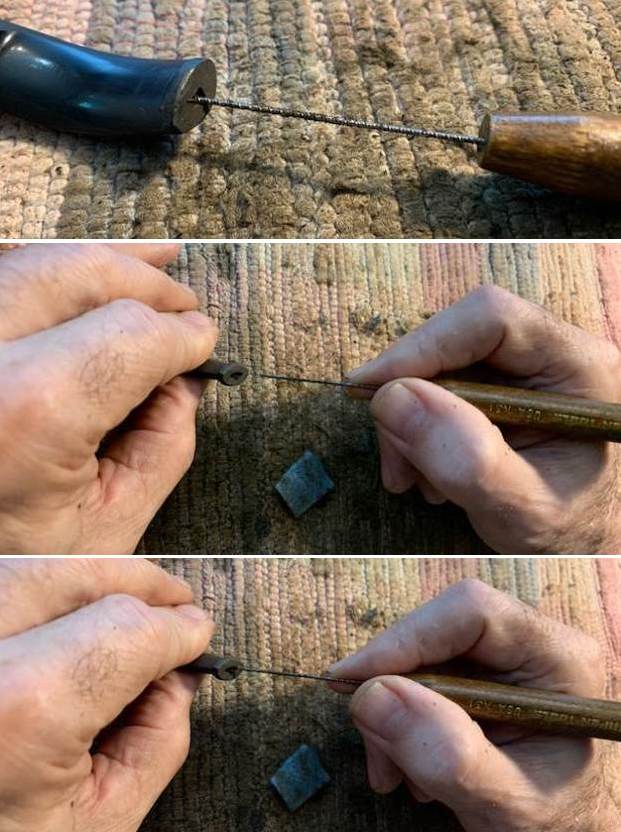
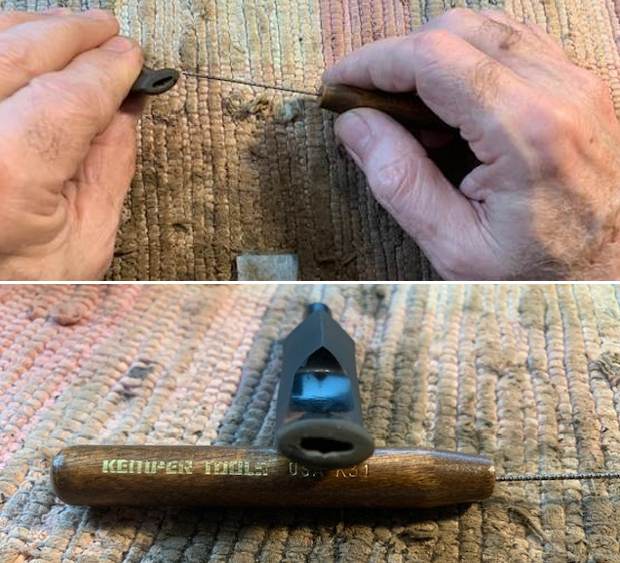
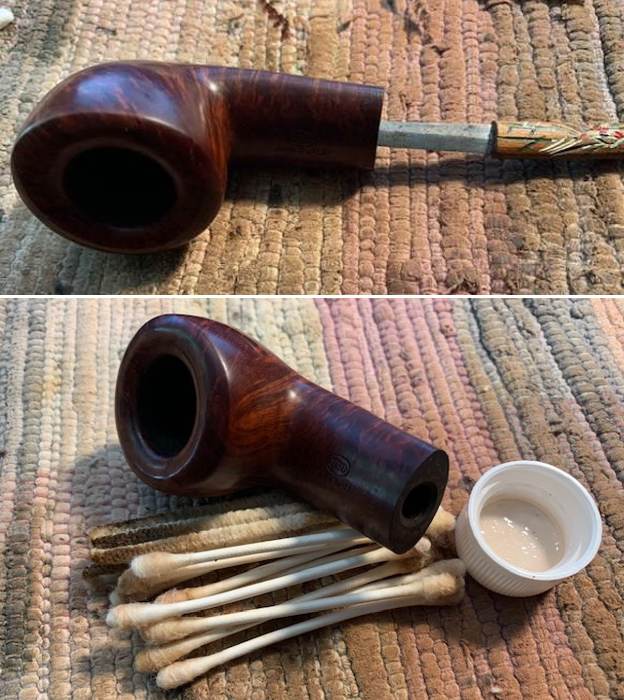
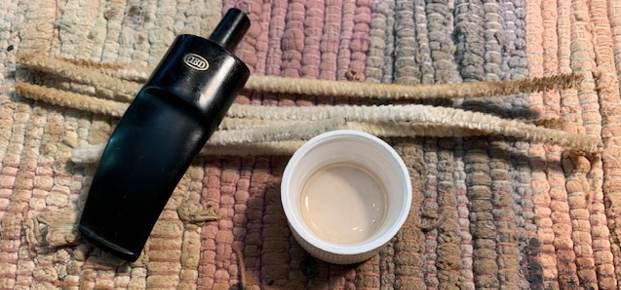
I cleaned out the interior of the bowl and shank with pipe cleaners, cotton swabs and alcohol until they came out clean. I cleaned out the airway with alcohol, cotton swabs and pipe cleaners.
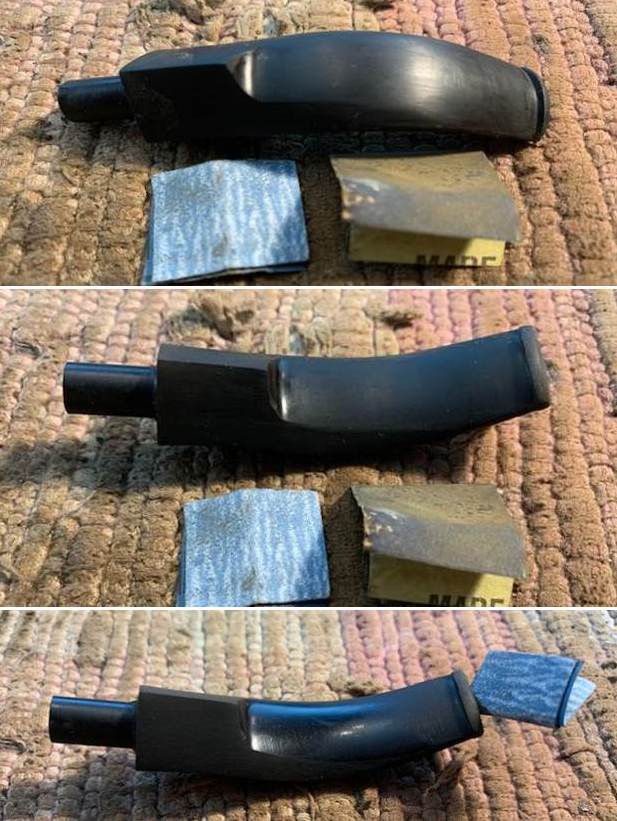
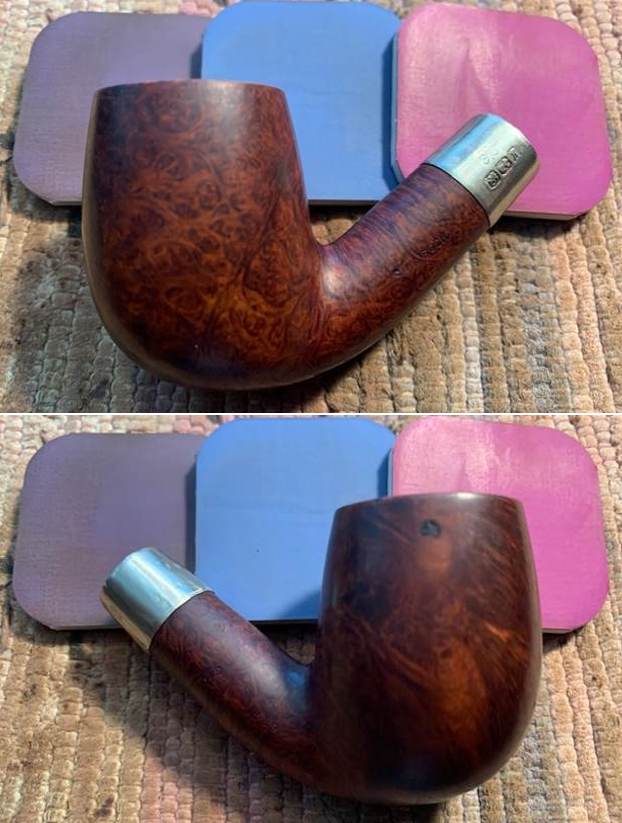
I used a folded piece of 220 grit sandpaper to smooth the rim top and remove the darkening in and damage. I went over the inner edge of the rim to smooth out any roughness. Once I was finished I liked the way it looked.
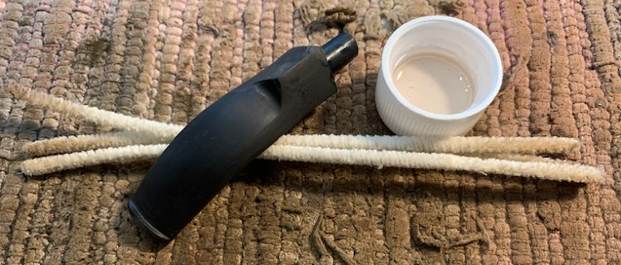
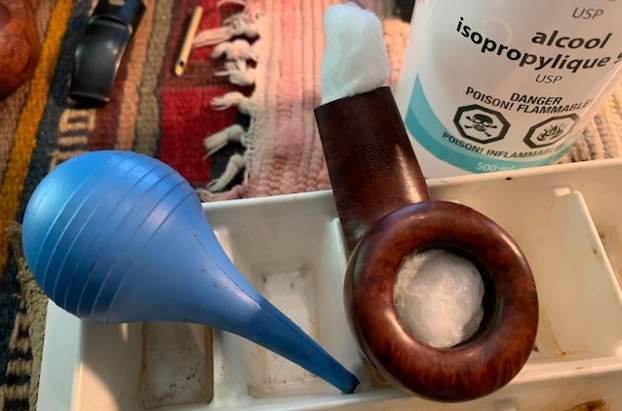
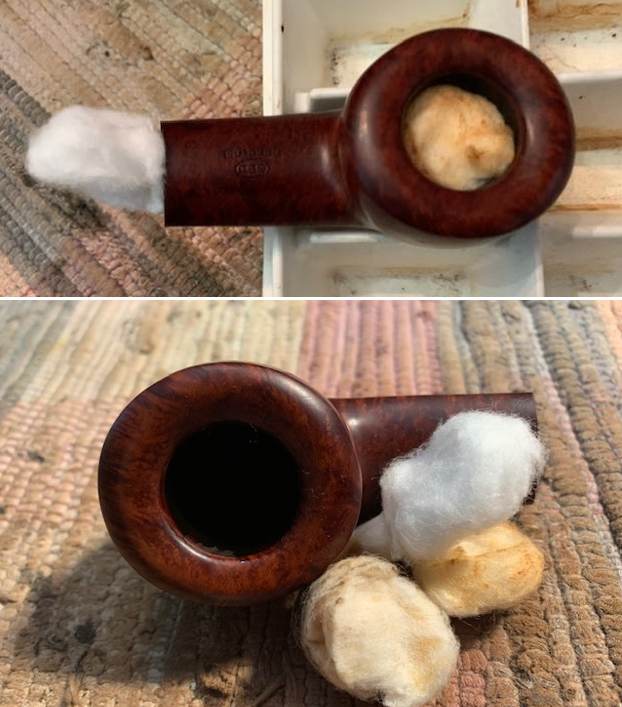
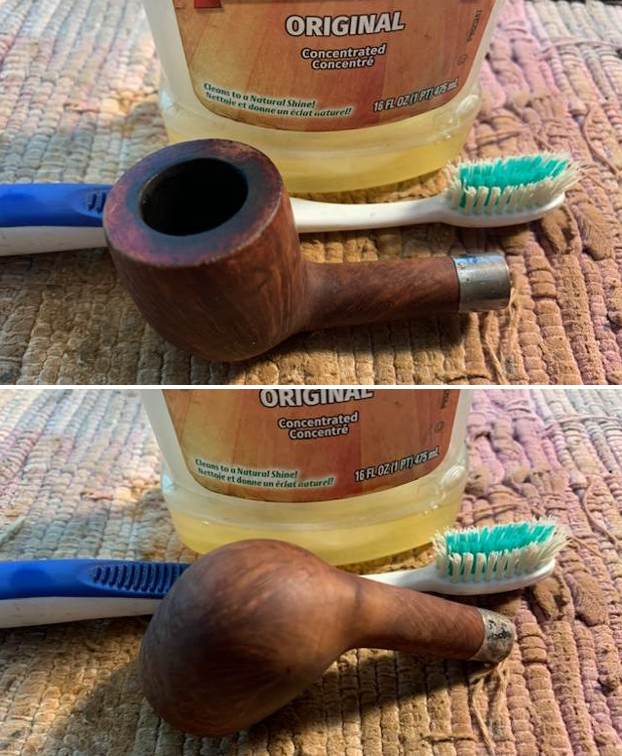
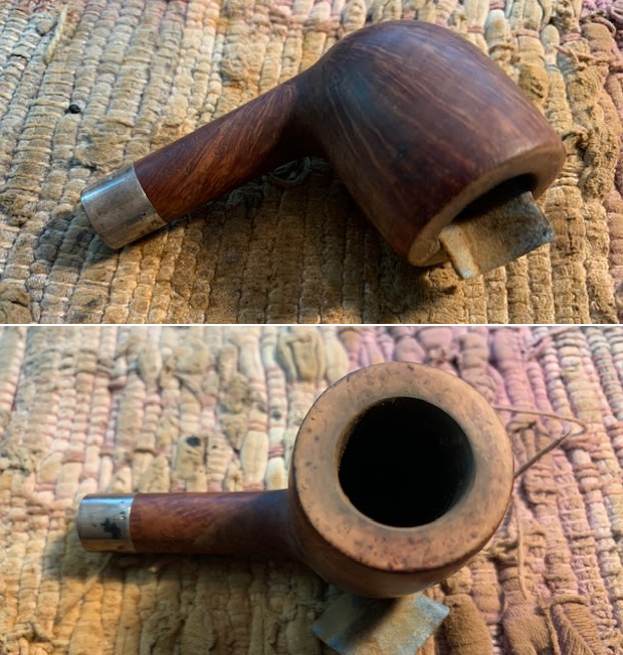
I decided to deghost the bowl and stuffed with cotton bolls and twisted a paper towel into the shank end. I used an ear syringe to fill the bowl with 99% isopropyl alcohol to wick out the oils in the bowl and shank walls. I let it sit for 5 hours and worked on the stem and took my wife to lunch. When we came back the cotton had turned amber coloured. I pulled it out and cleaned out the shank once more. The pipe smelled significantly better.
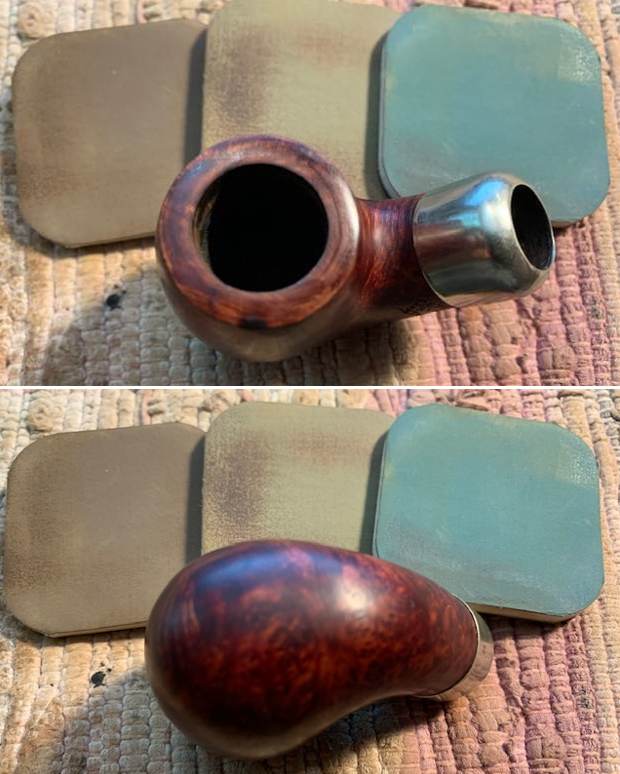
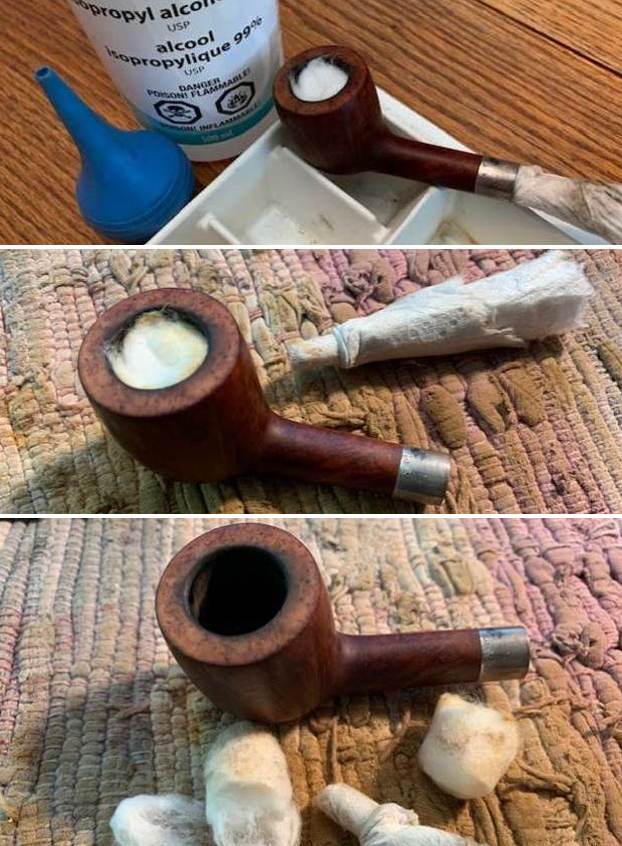
I polished the Sterling Silver band with some silver polish to remove the tarnish and protect it from further tarnish. With it polished the Sterling Silver stamp is visible and readable on the underside.
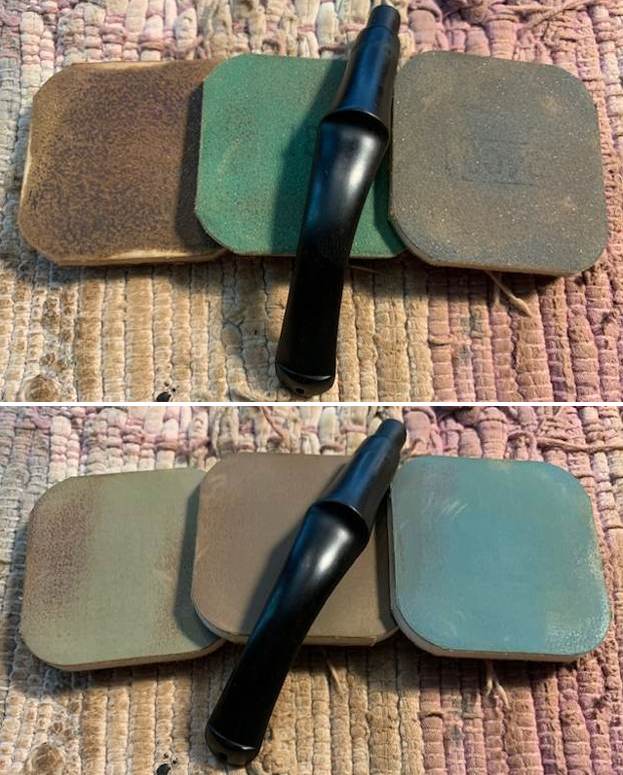
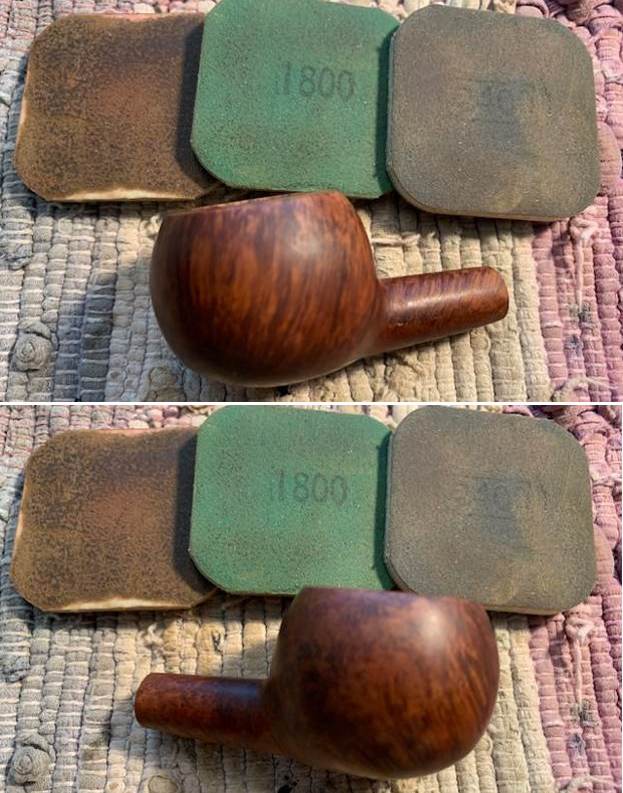
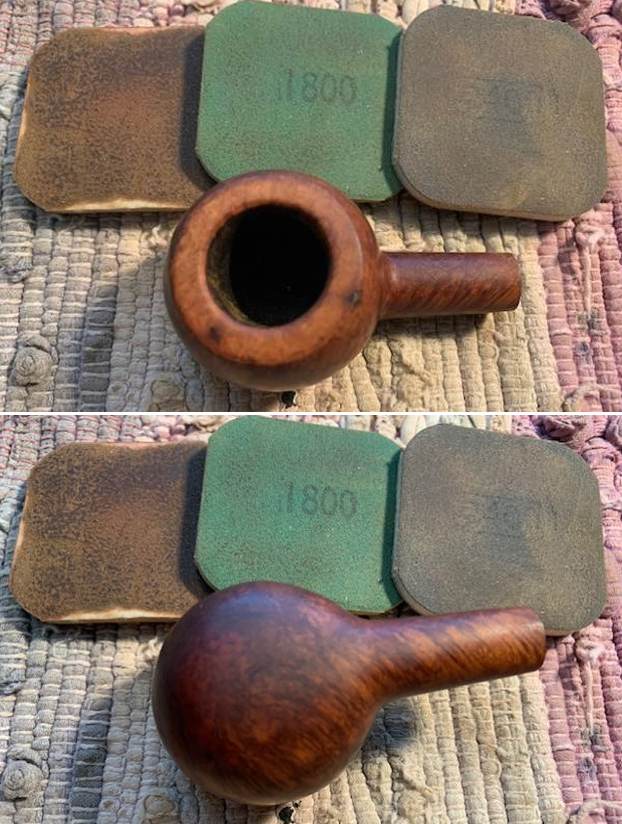
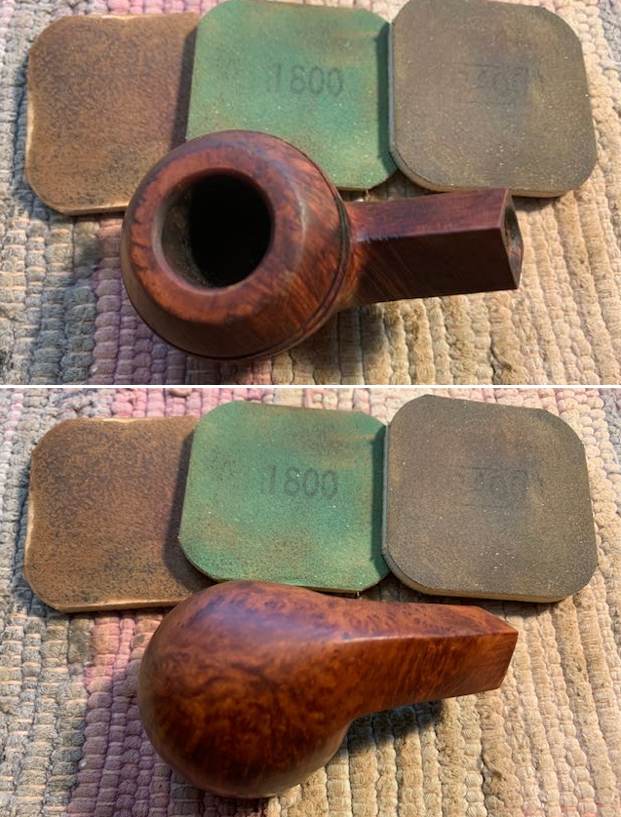
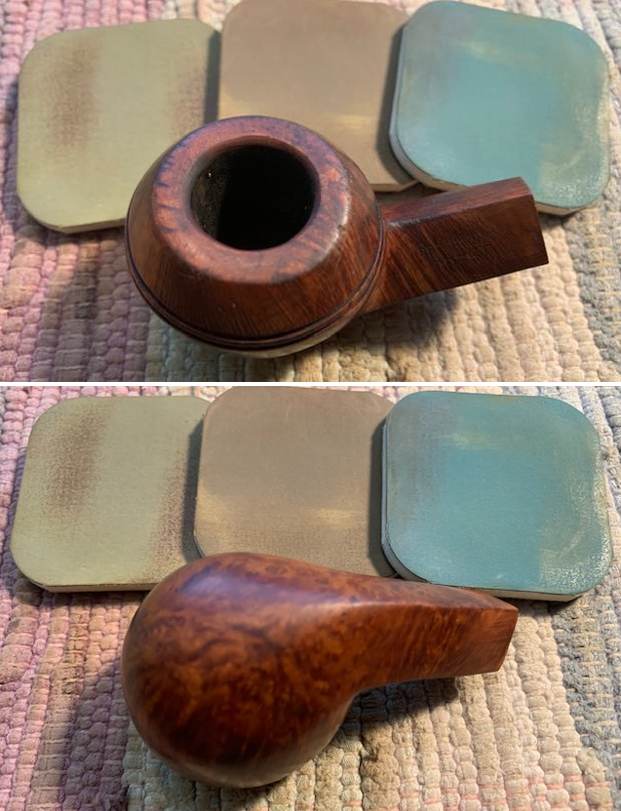
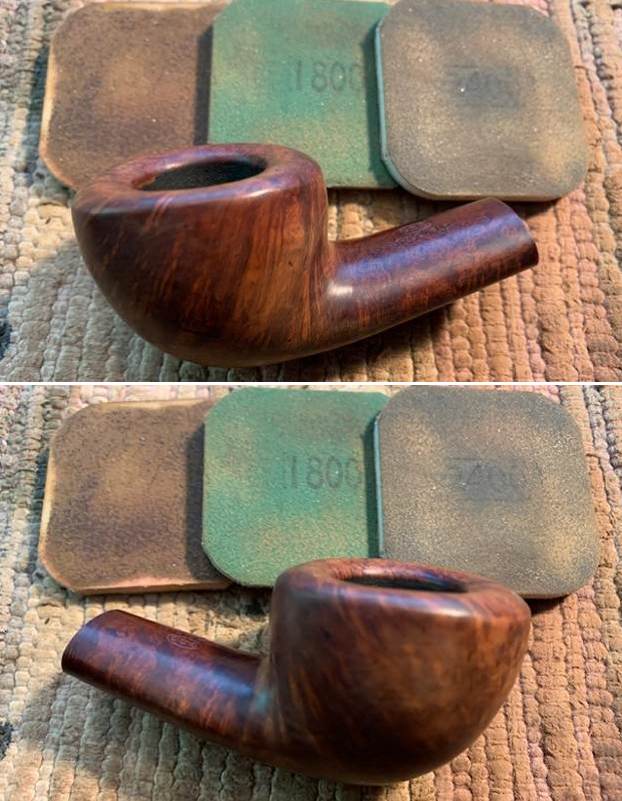
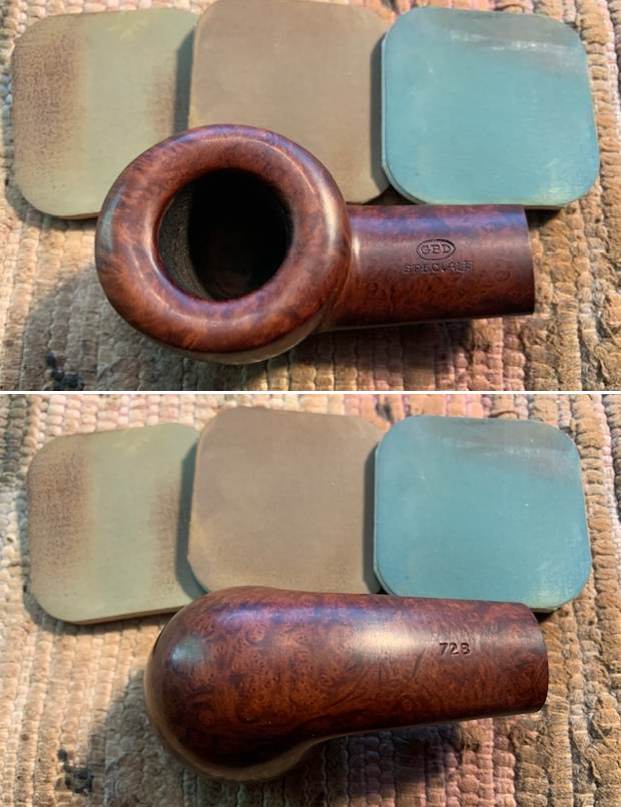
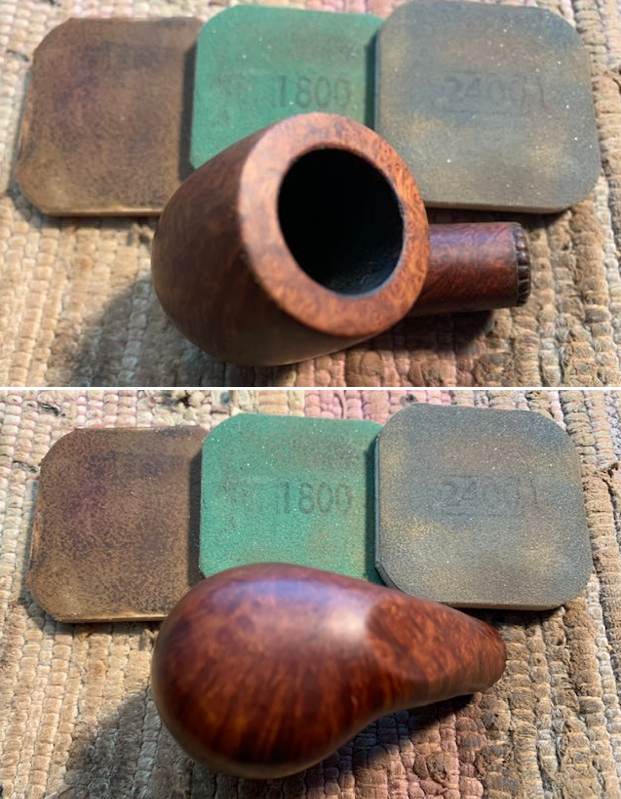
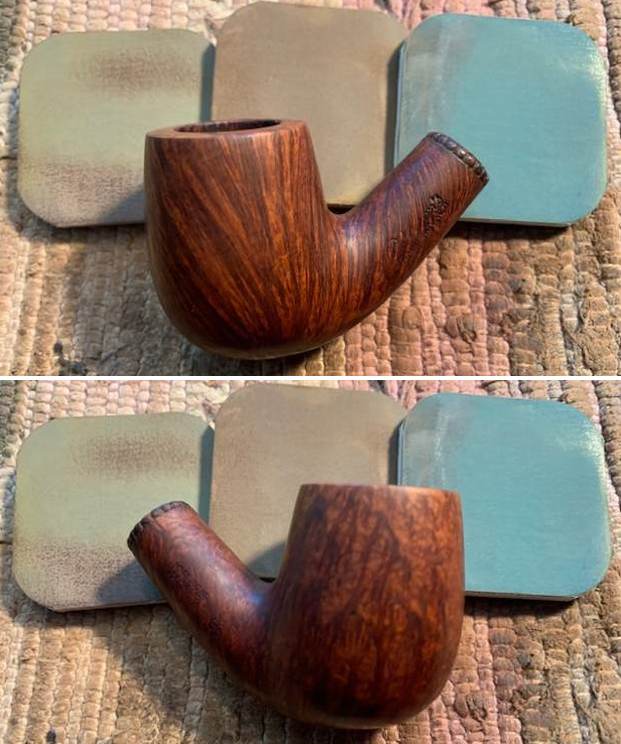
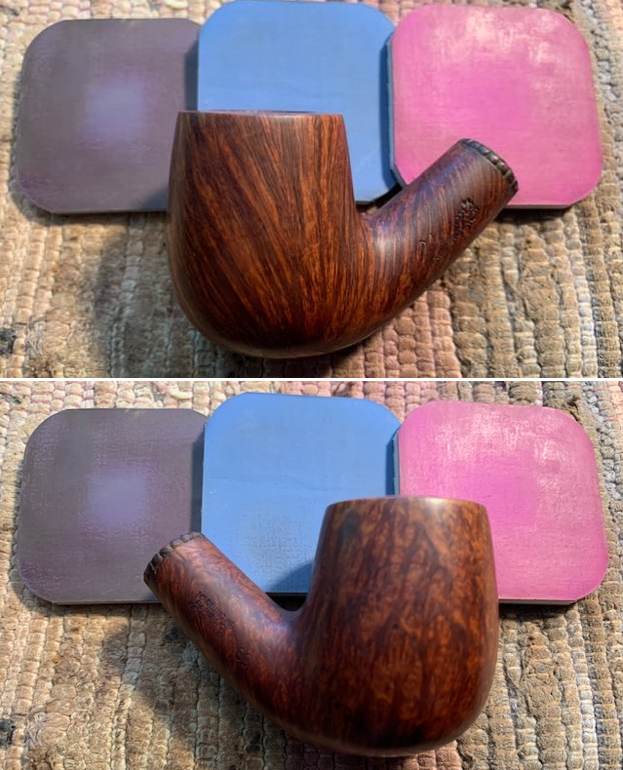
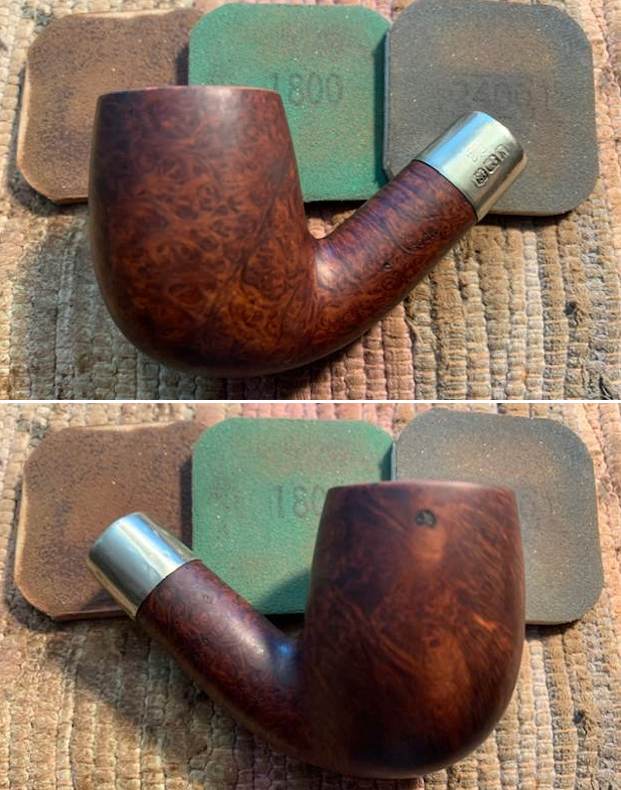
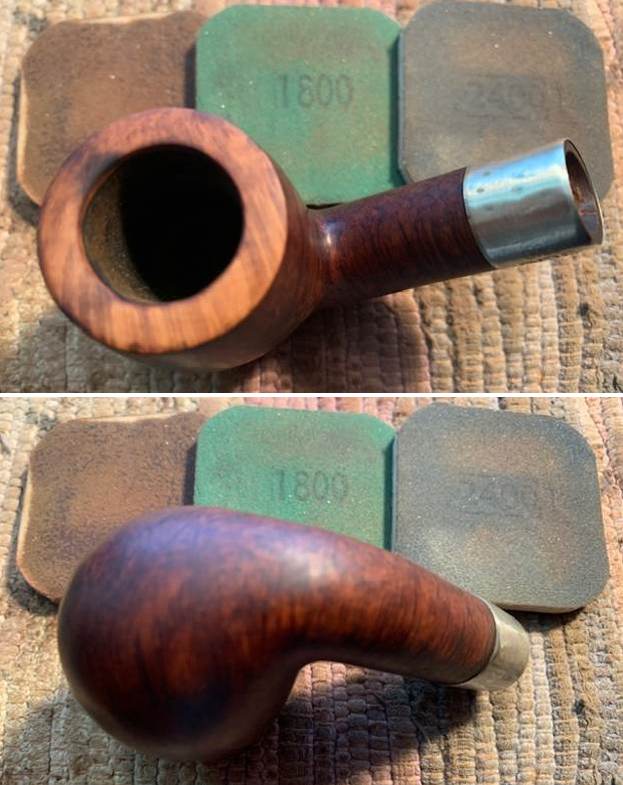
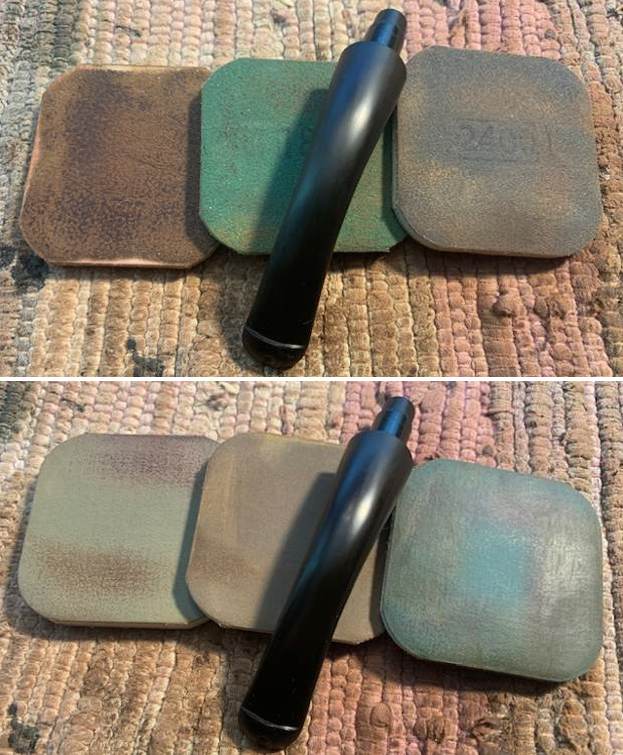
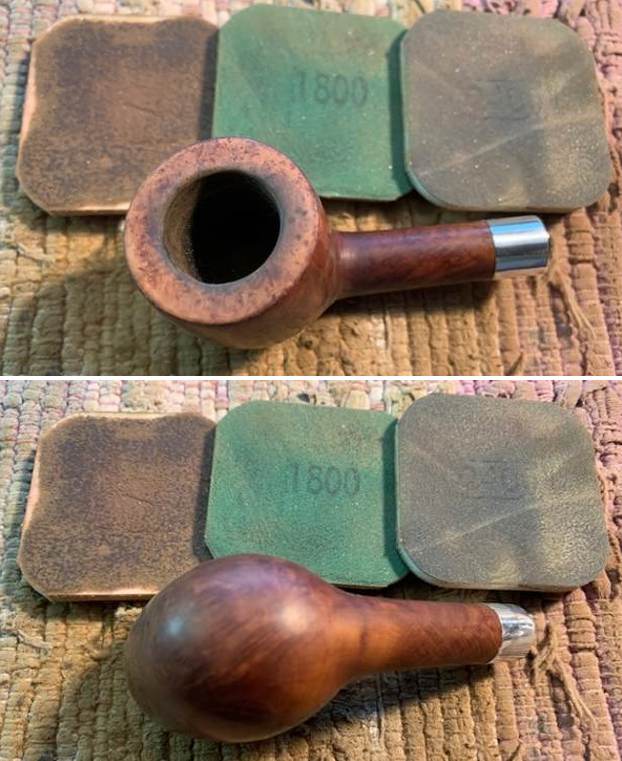
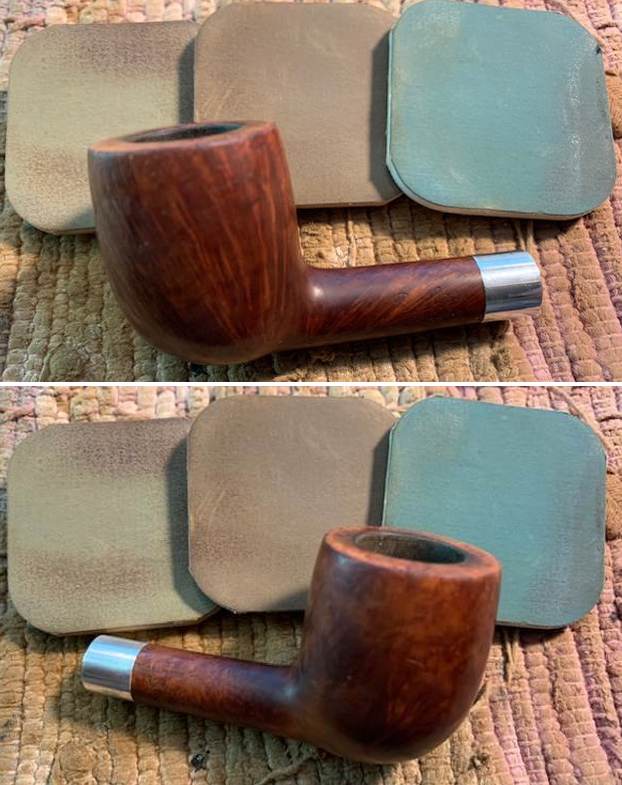
I polished the briar with micromesh sanding pads – dry sanding with 1500-12000 grit pads. I worked over the inner and outer edge of the rim as well. After each pad I wiped the bowl down with a damp cloth to remove the sanding debris. It really took on a shine by the last three sanding pads.  
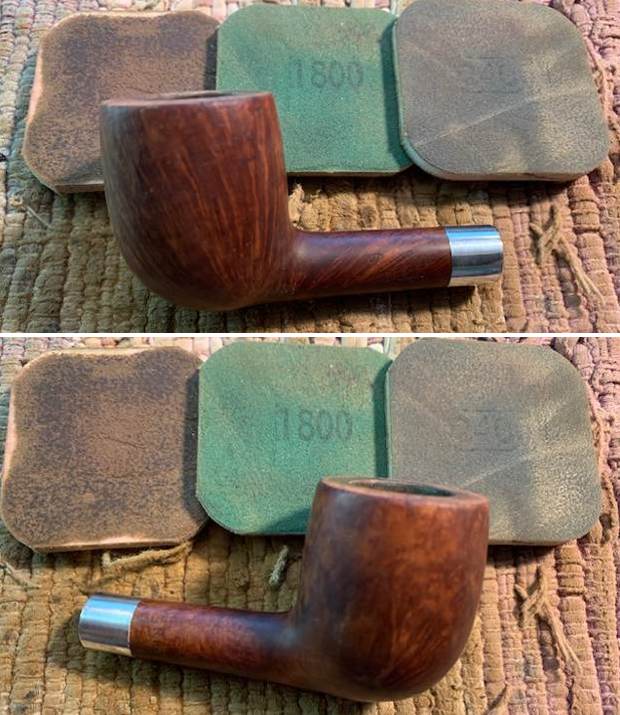
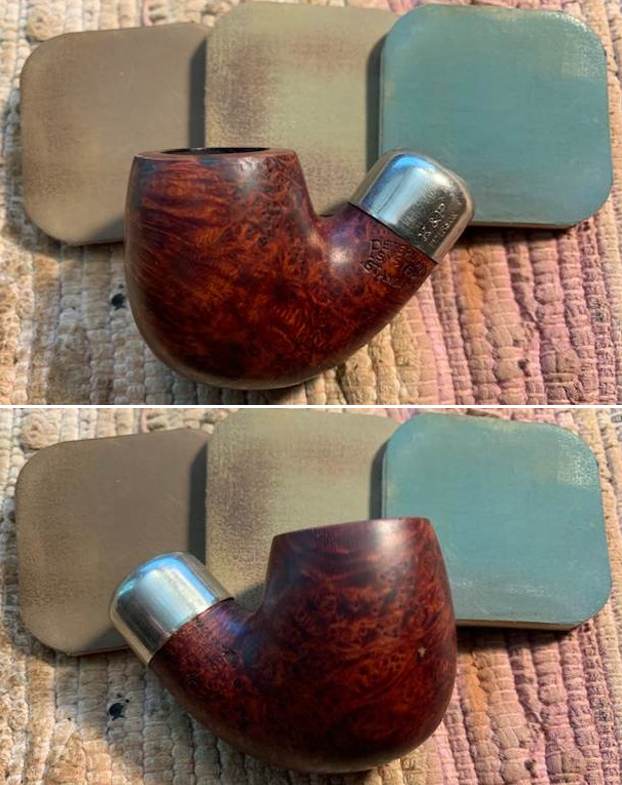
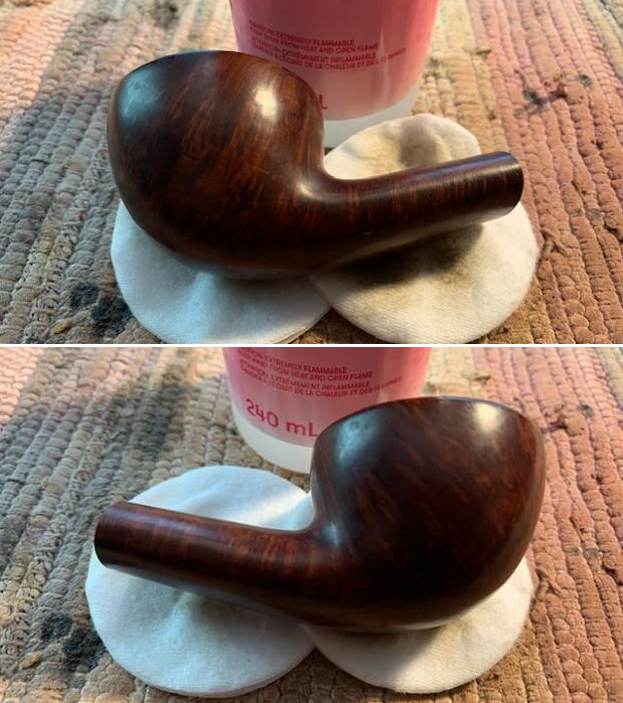
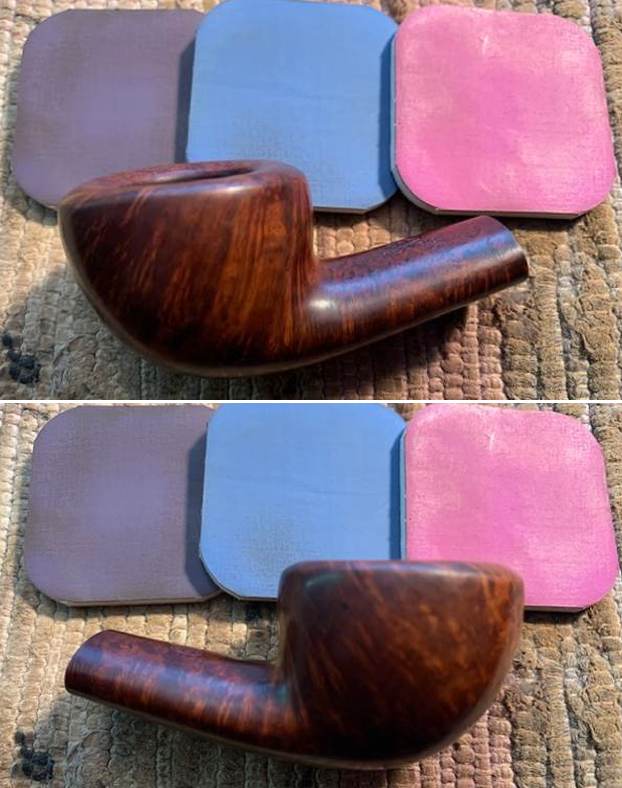
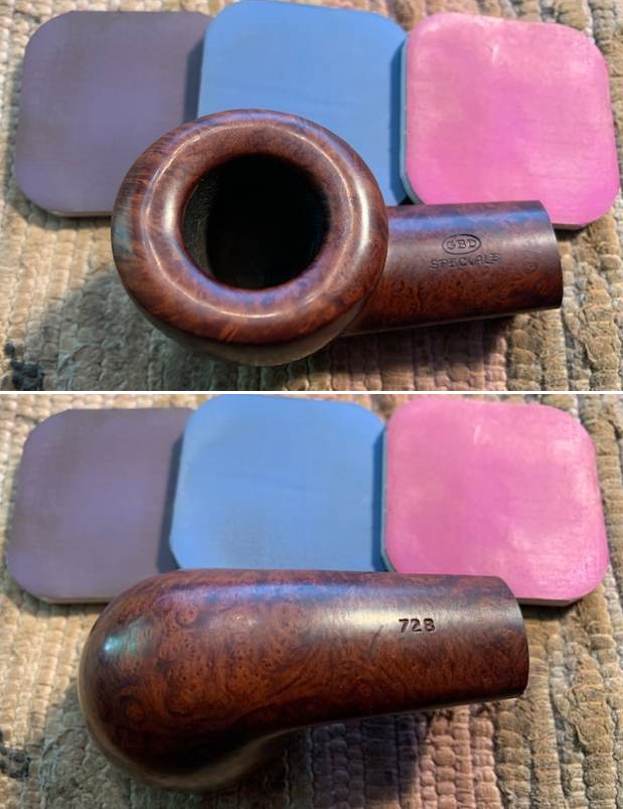
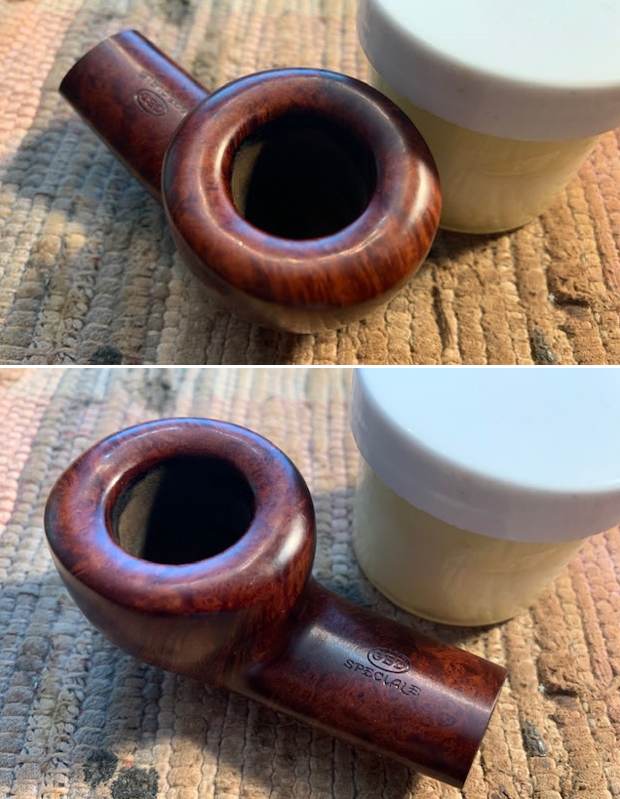
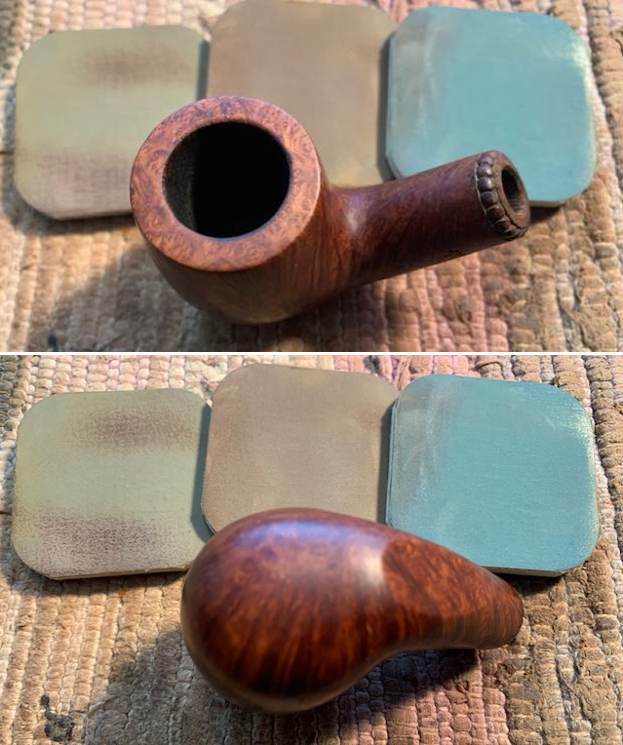
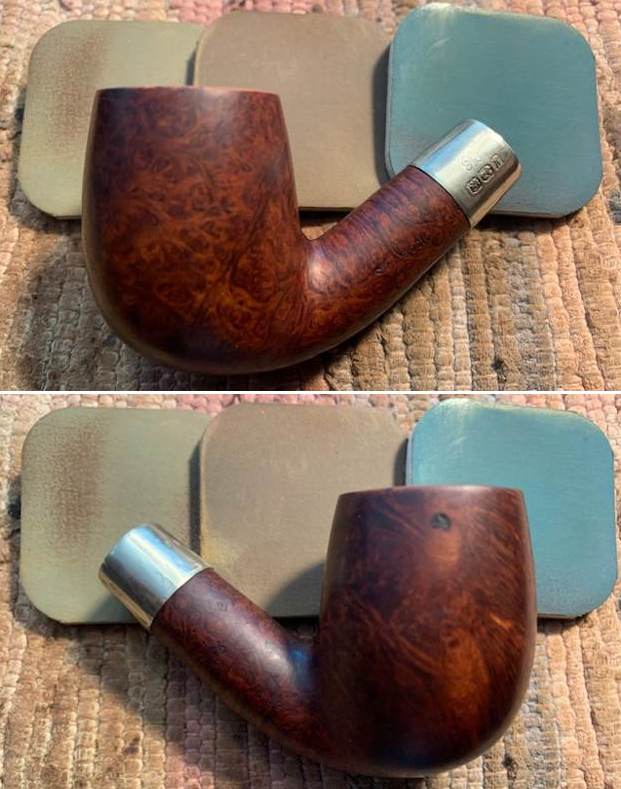
I rubbed the bowl down with Before & After Restoration Balm. I worked it into the surface of the briar with my fingertips where it works to clean, restore and preserve the briar. I let it do its magic for 15 minutes then buffed it off with a cotton cloth. The pipe looks incredibly good at this point in the process. 
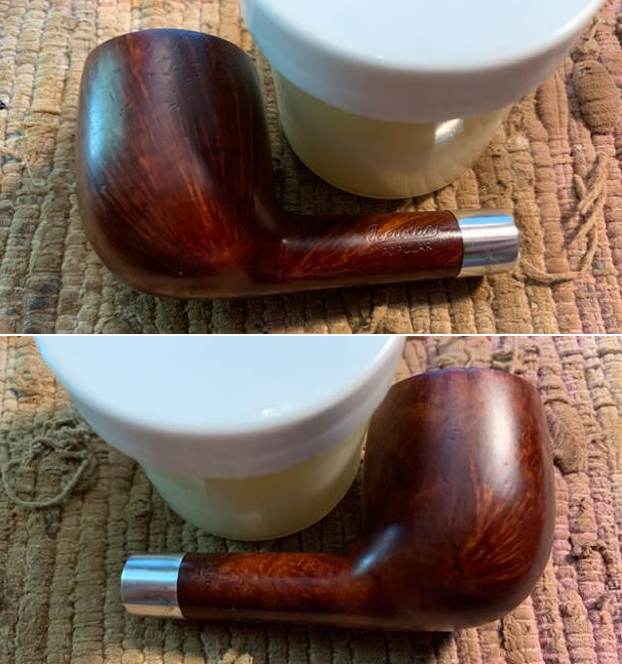
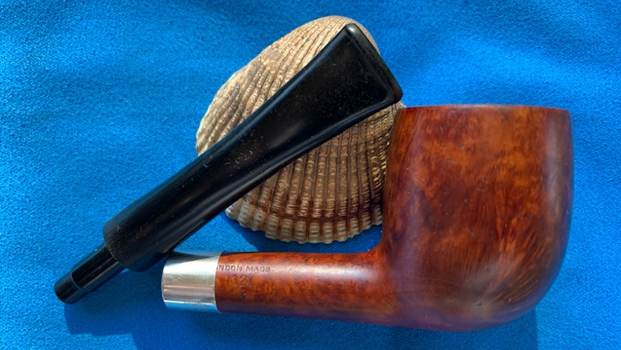
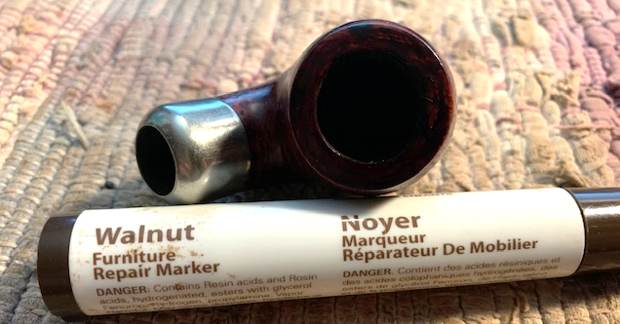
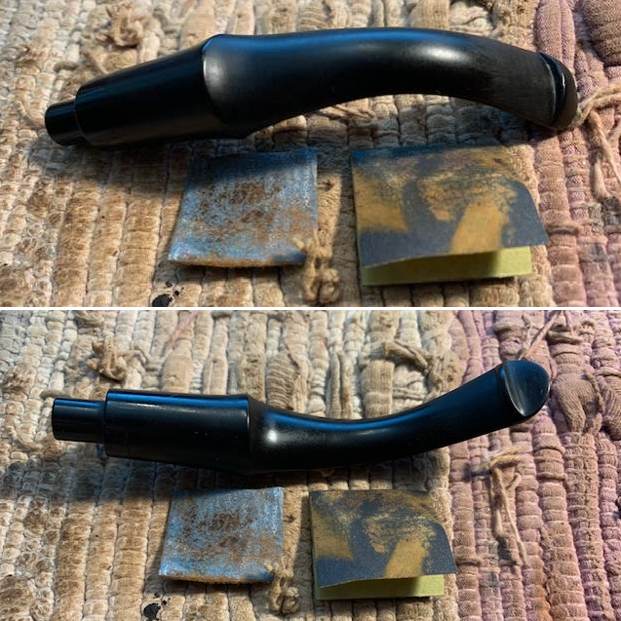
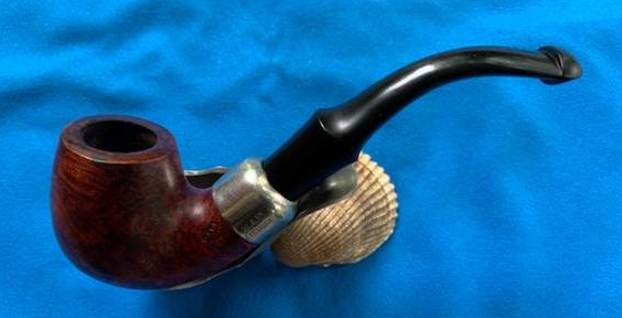
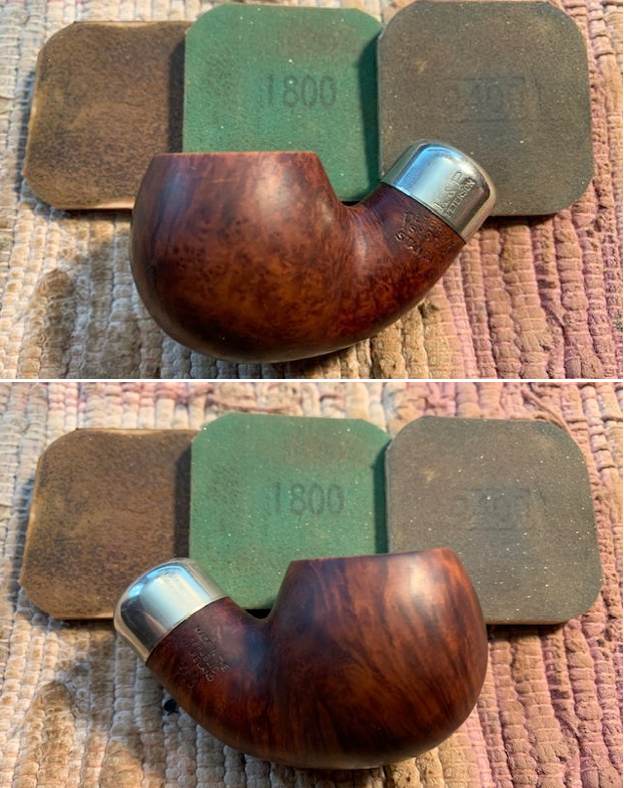
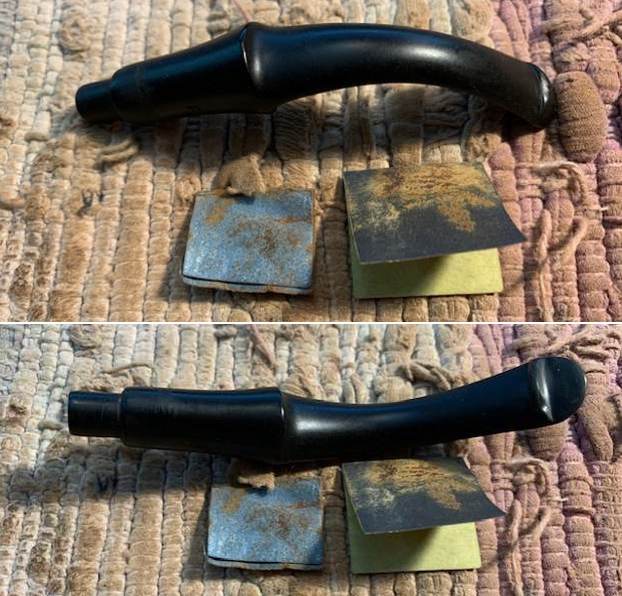
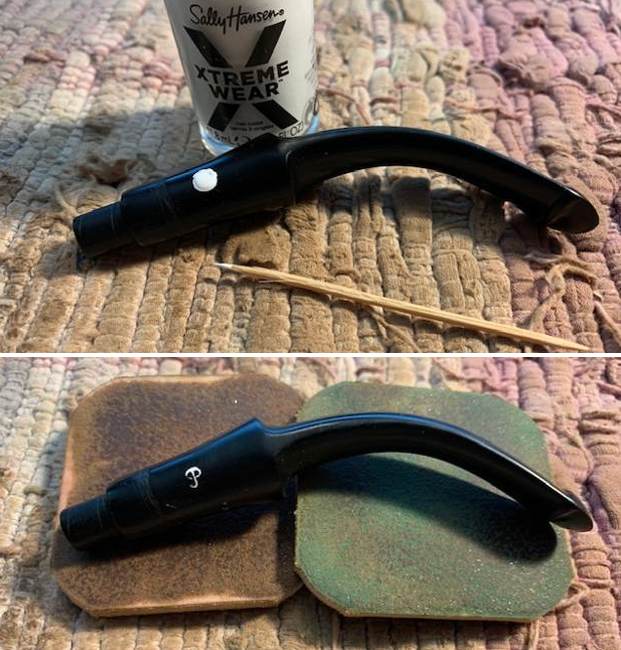
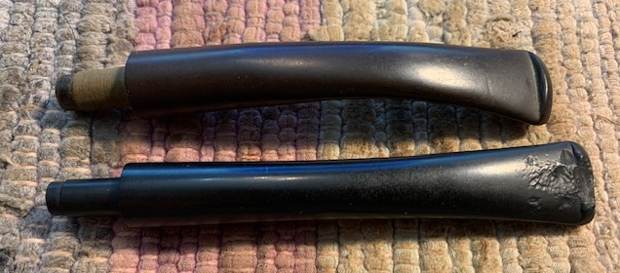
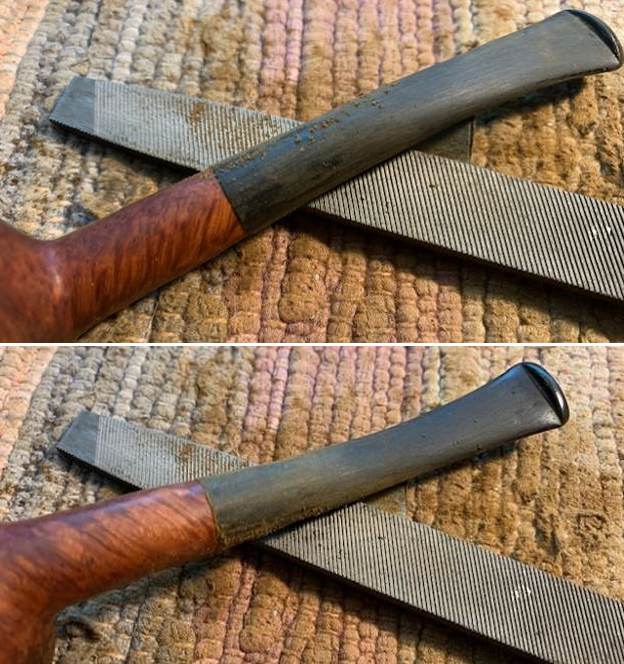
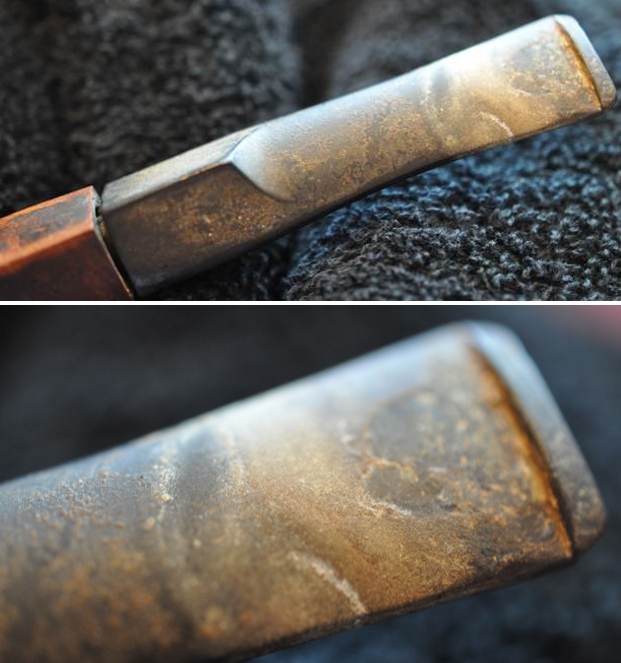
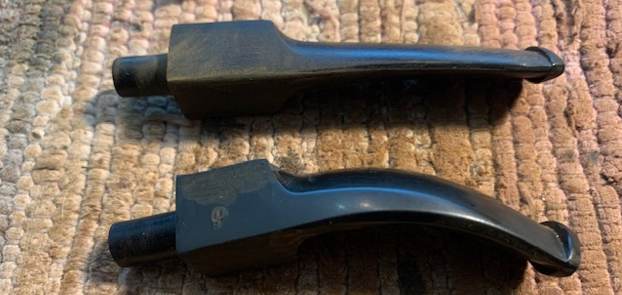
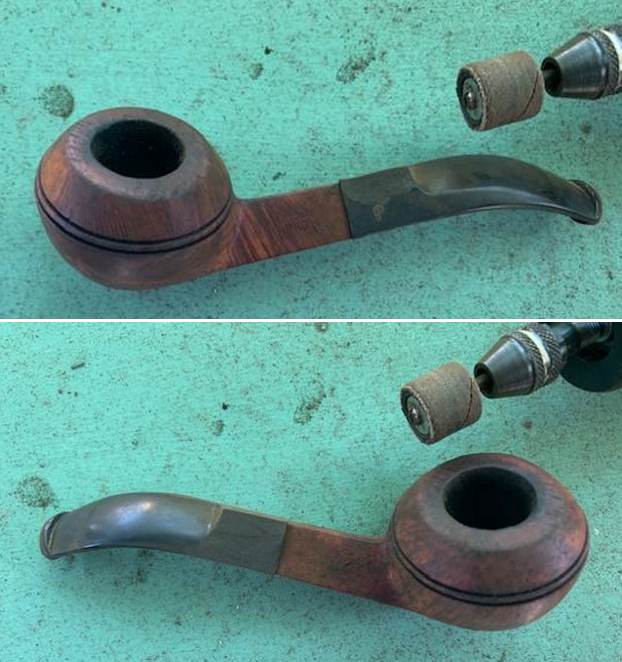
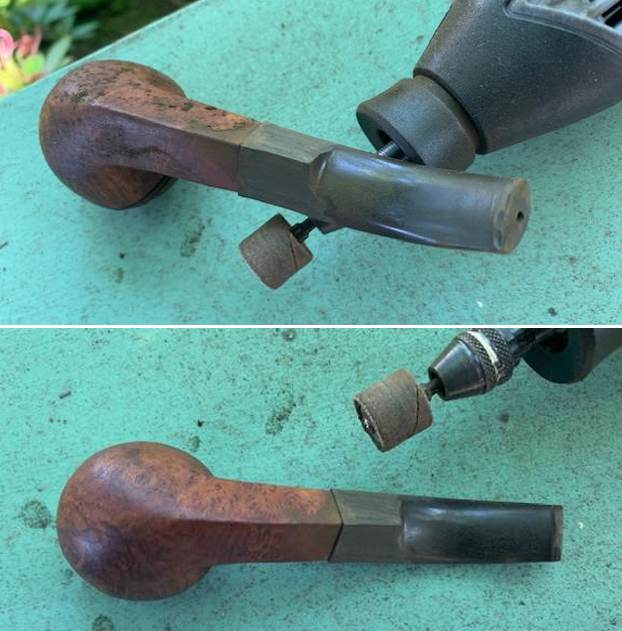
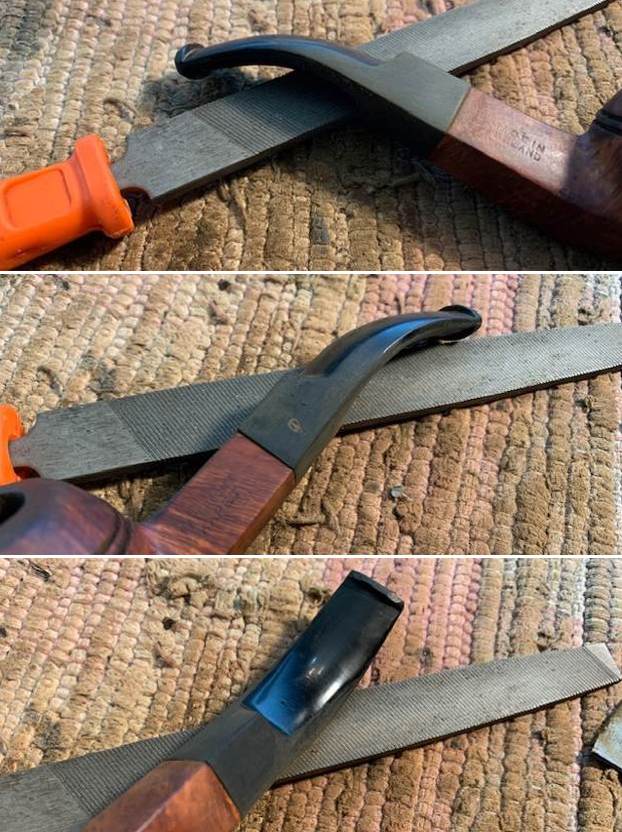
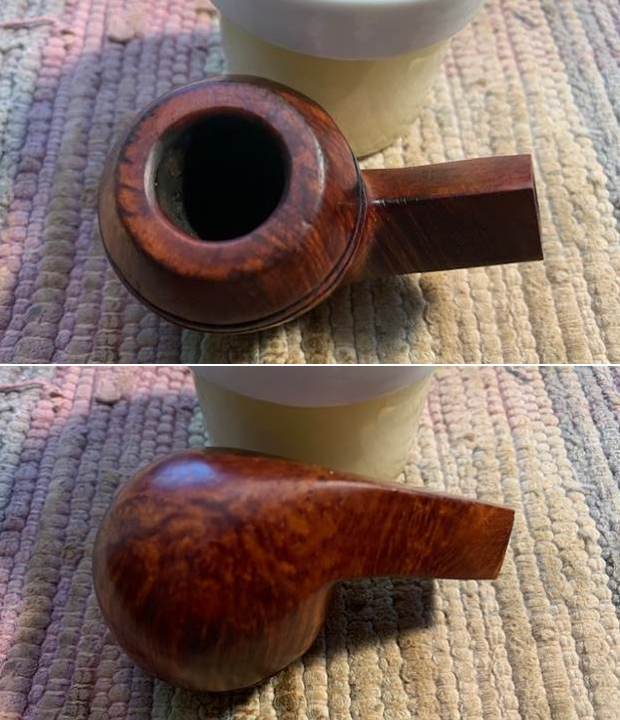
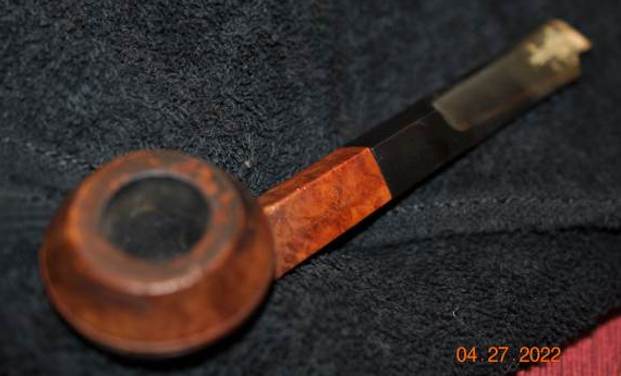
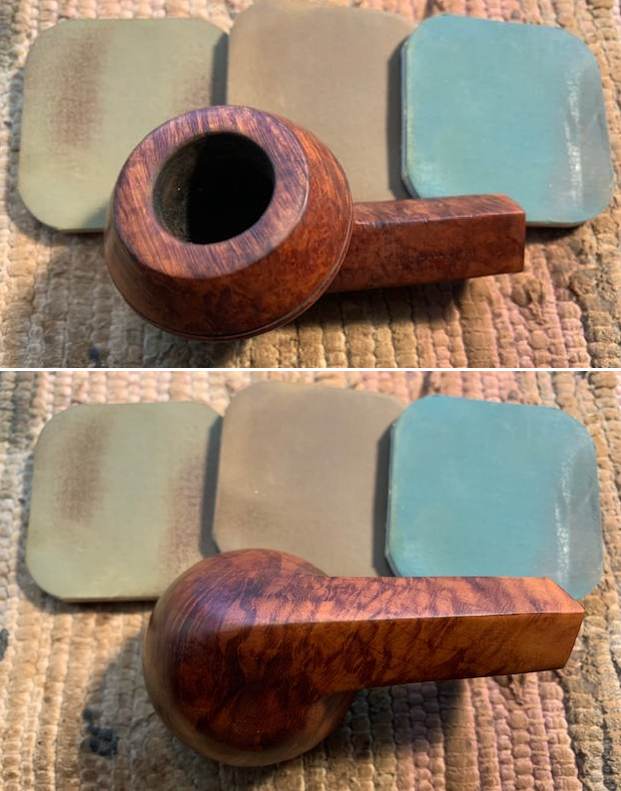
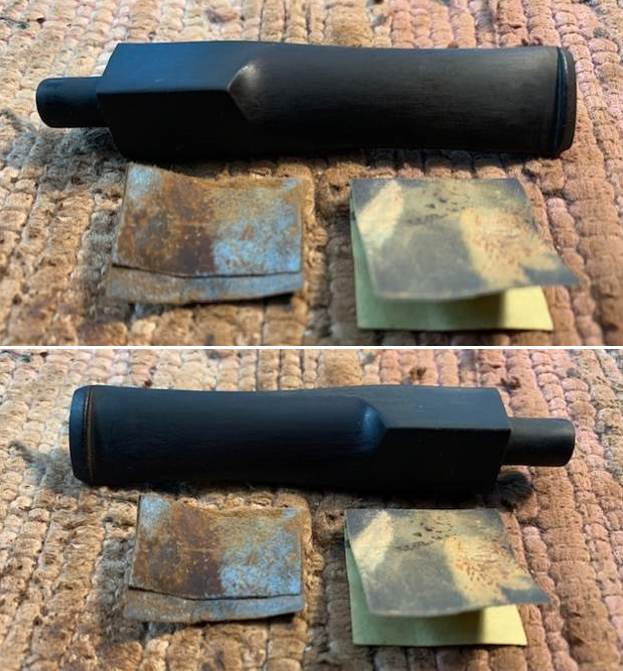
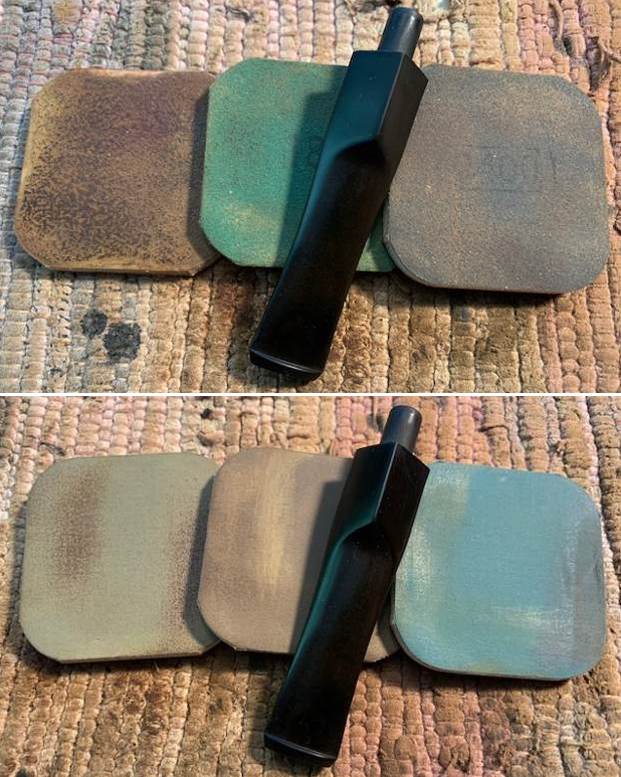
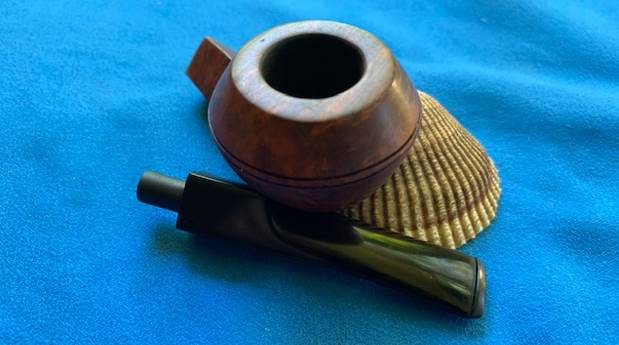
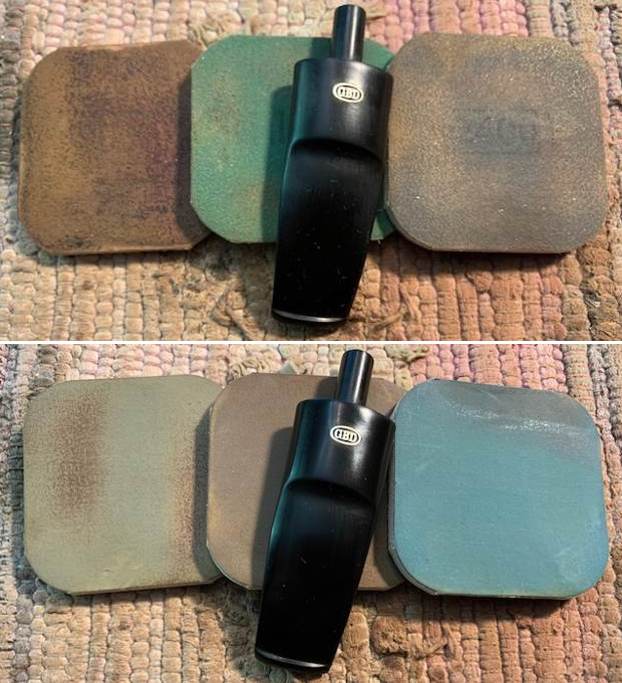
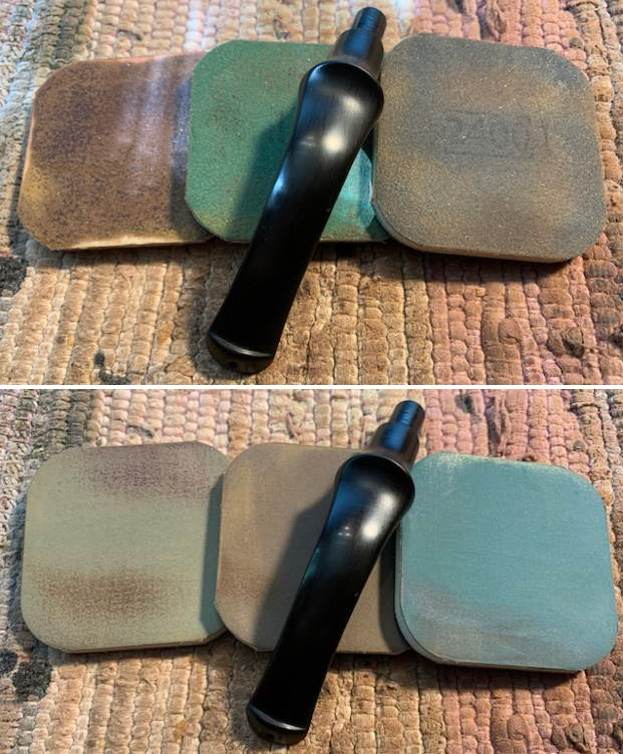
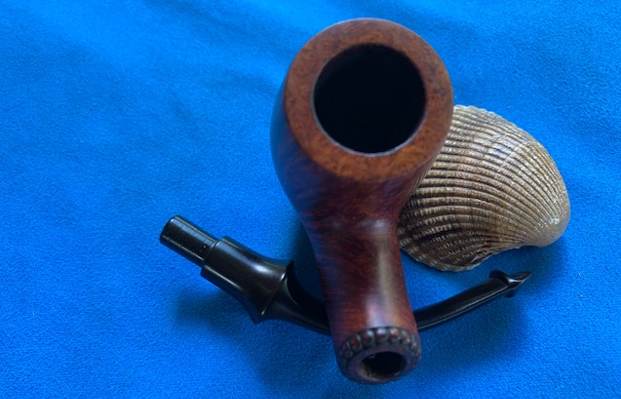
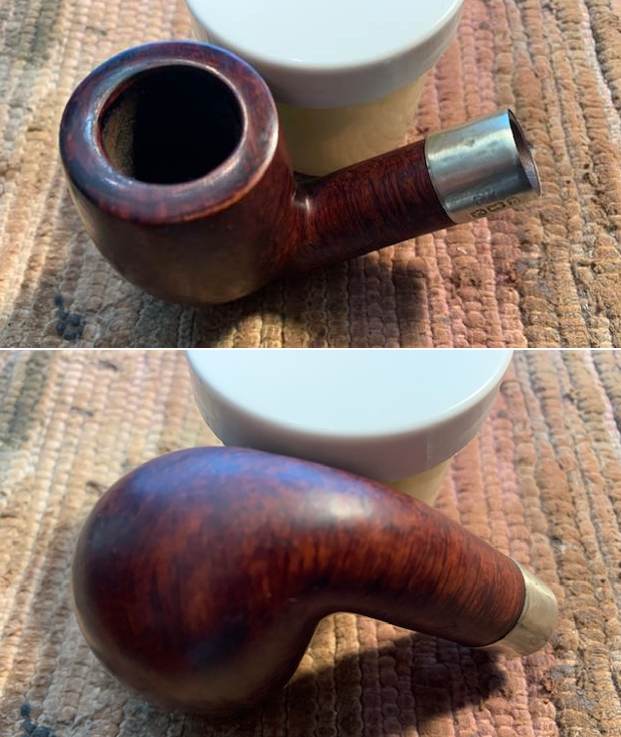
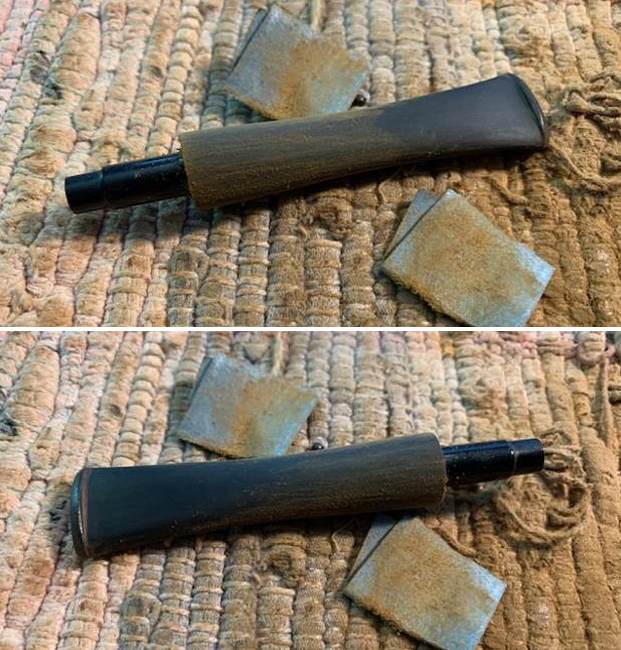
I set the bowl aside and turned my attention to the stem. I used 220 grit sandpaper to reduce the diameter of the stem to match that of the shank. It took a lot of sanding to get there. I also sanded the oxidation, calcification and chatter at the same time. I started polishing the stem with 400 grit wet dry sandpaper. It is starting to look very good. (The first two photos show the size of the stem diameter in comparison with the shank.) 
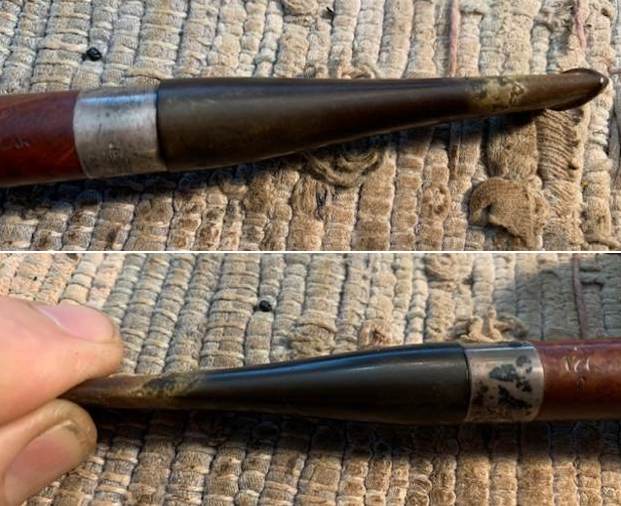
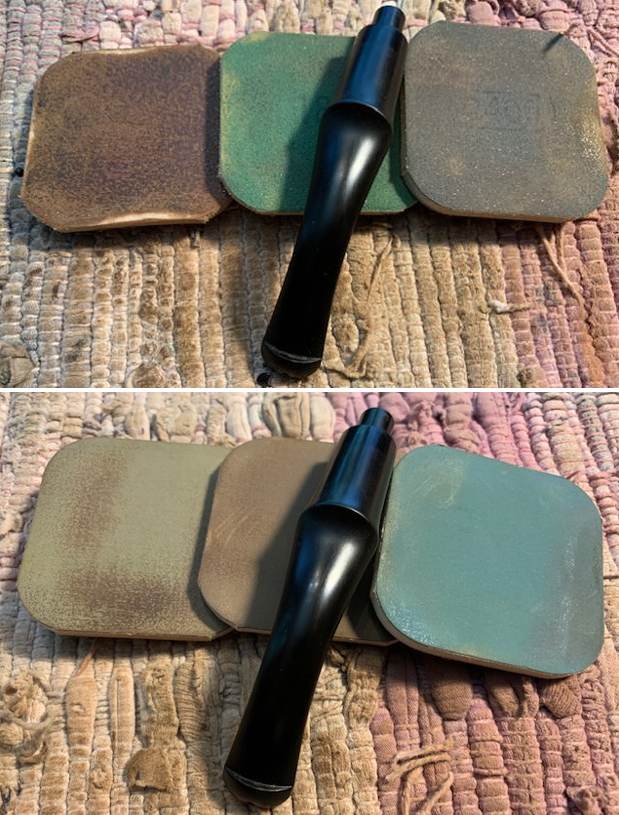
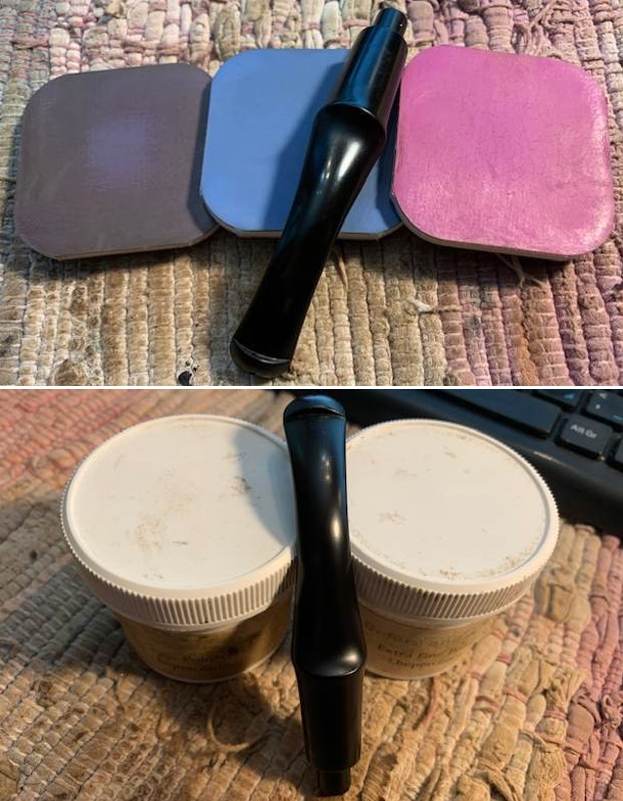
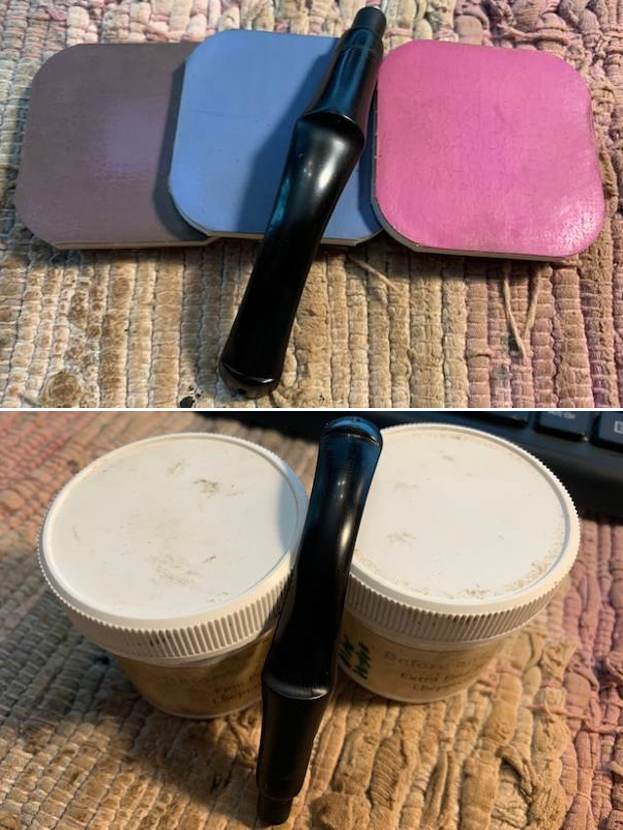
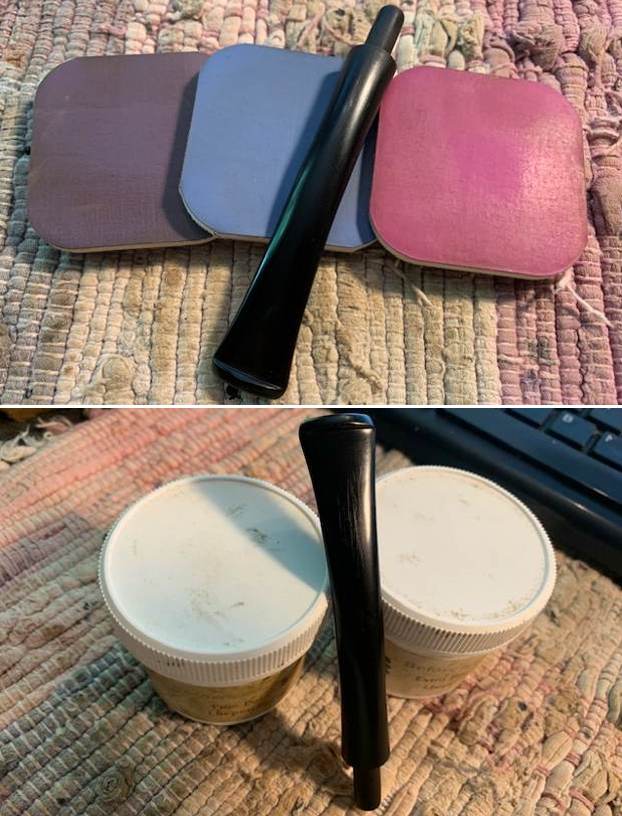
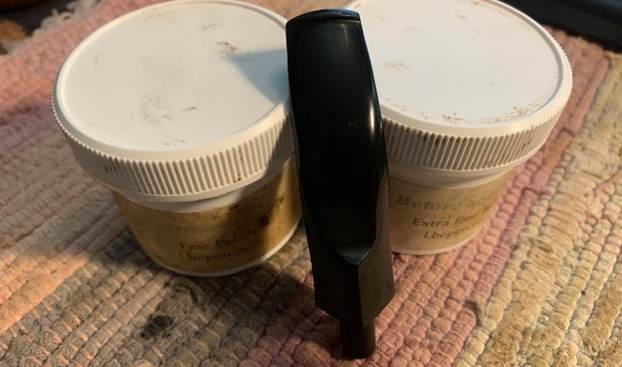
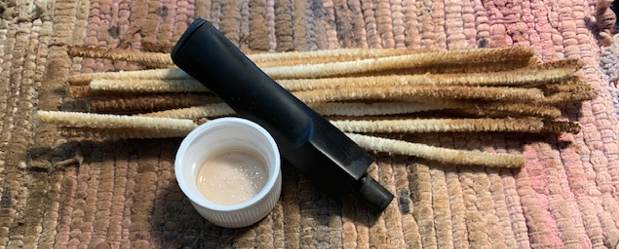
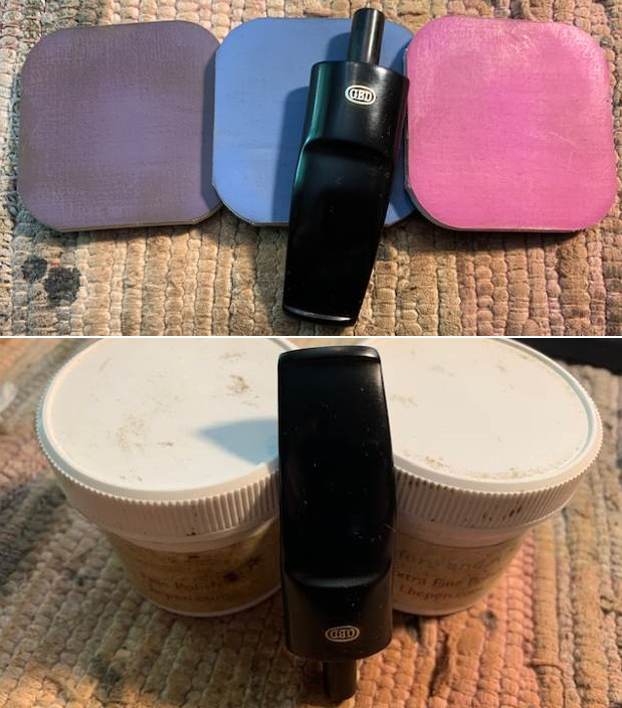
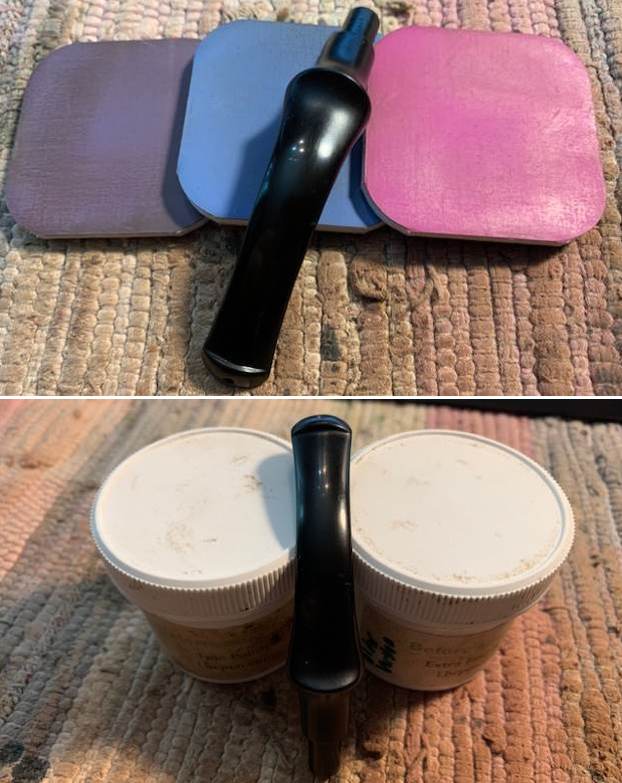
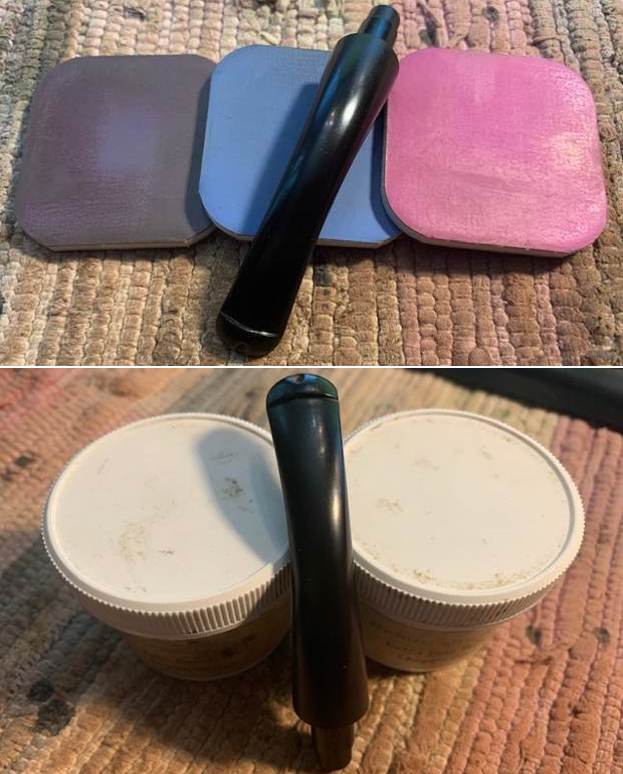
I continued to polish the stem with micromesh sanding pads – dry sanding with 1500-12000 grit sanding pads. I wiped it down after each sanding pad with Obsidian Oil. I polished it further with Before & After Stem Polish – both Fine and Extra Fine. I gave it a final coat of Obsidian Oil and set it aside to cure. 
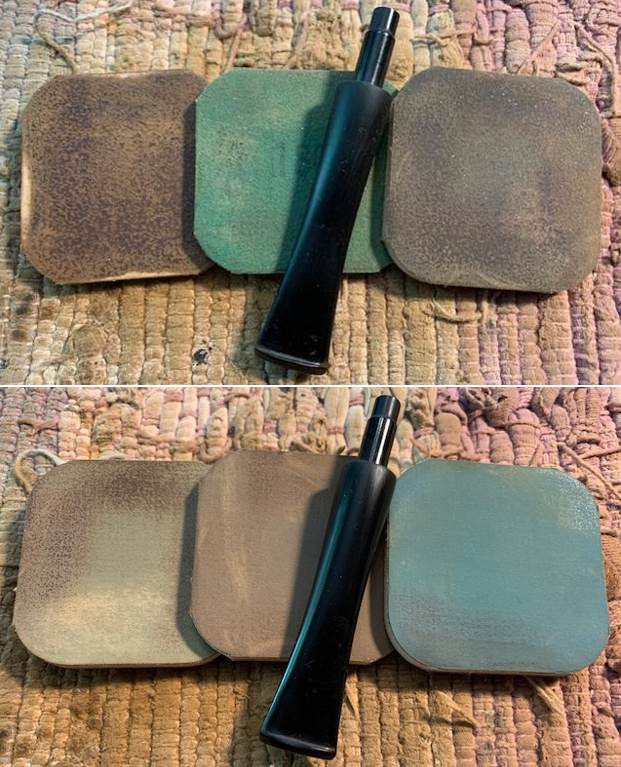
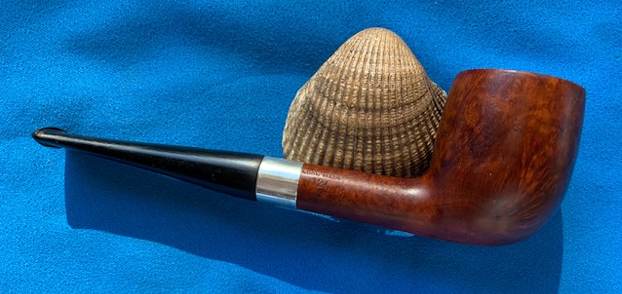
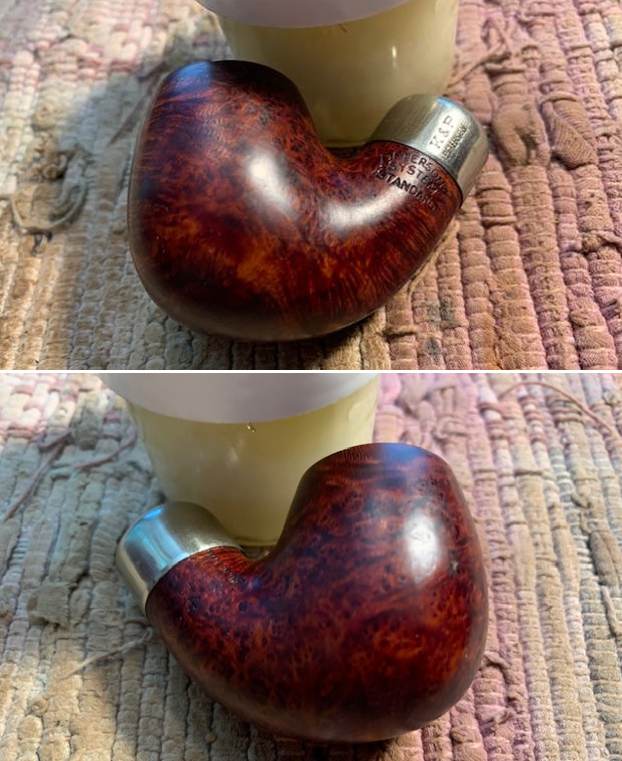
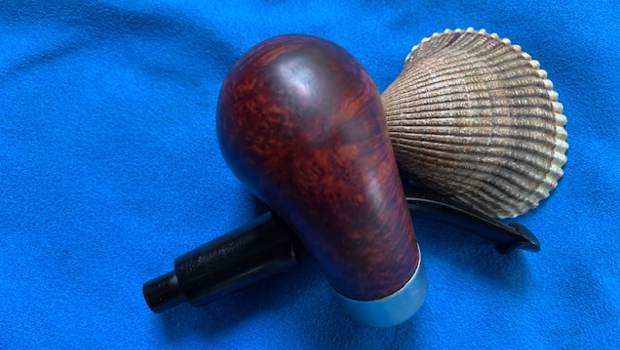
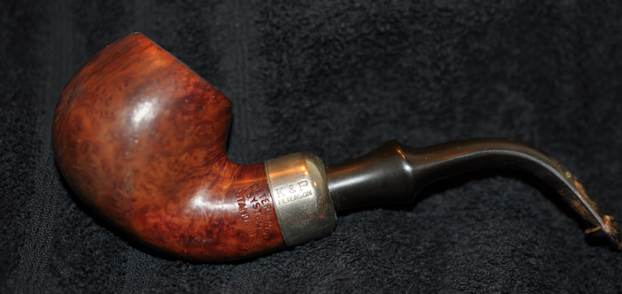
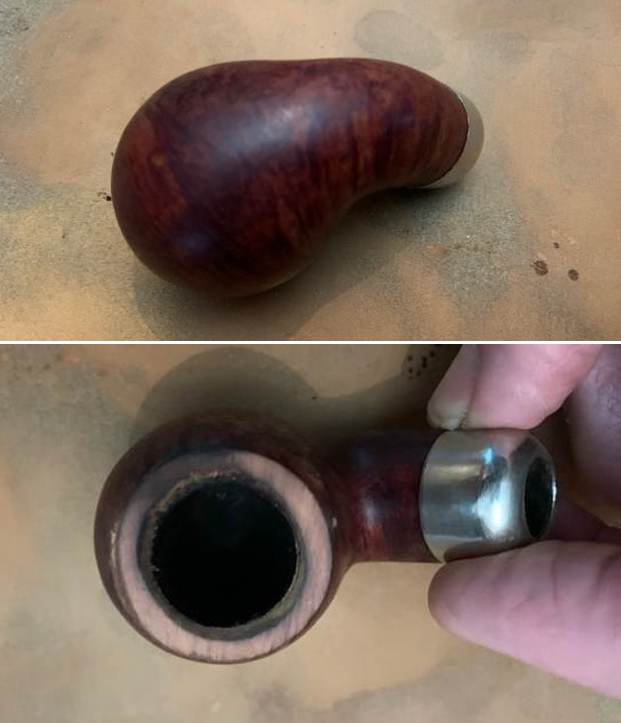
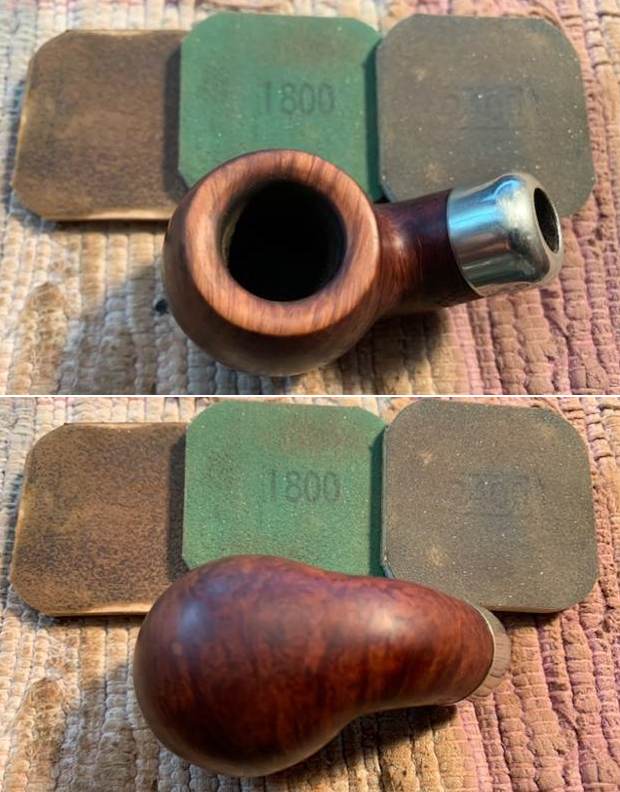
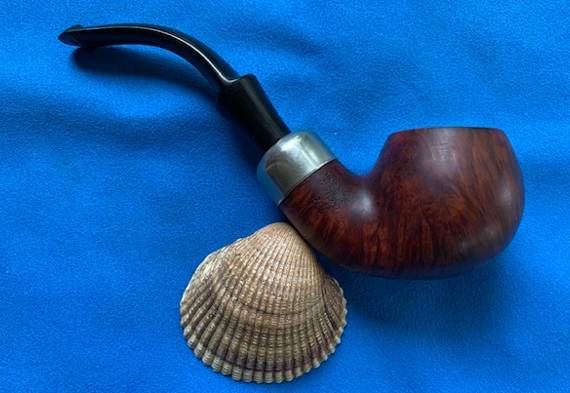
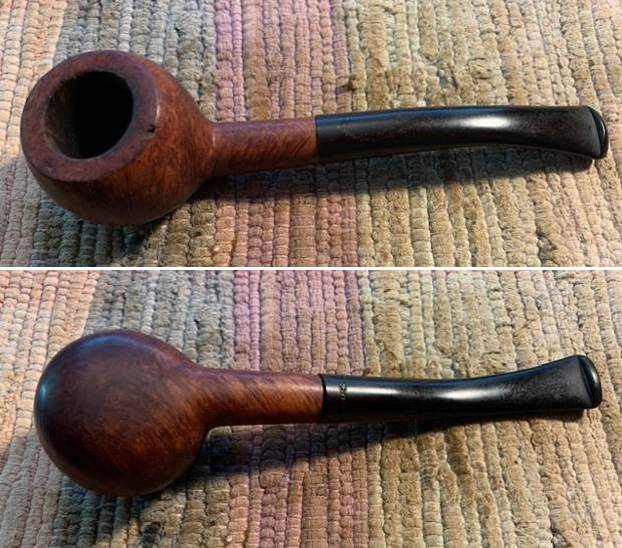
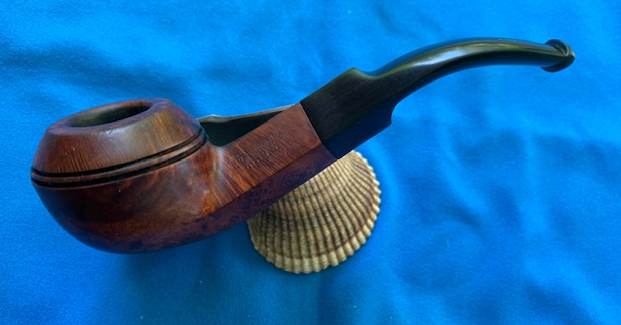
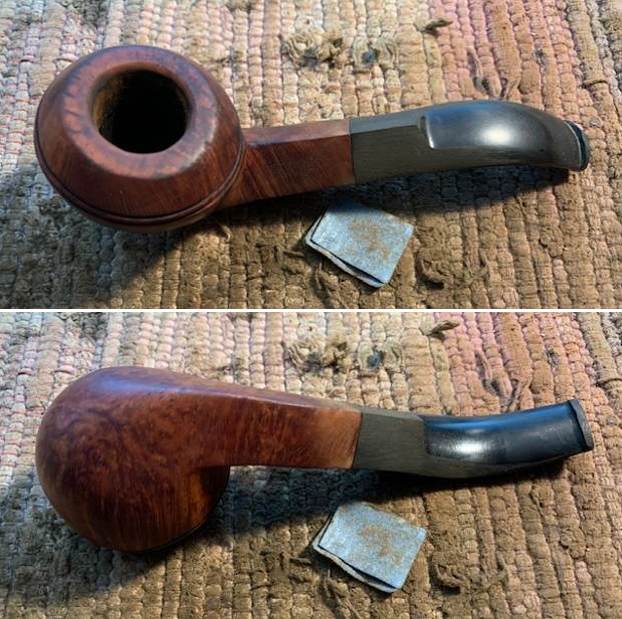
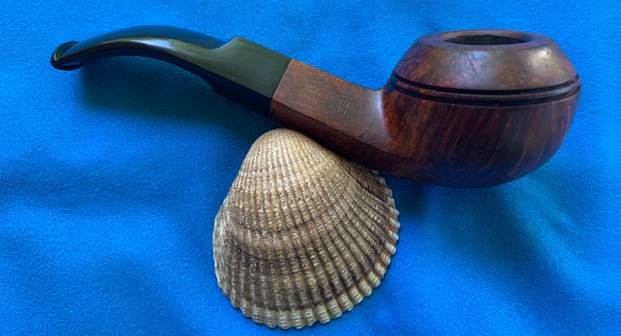
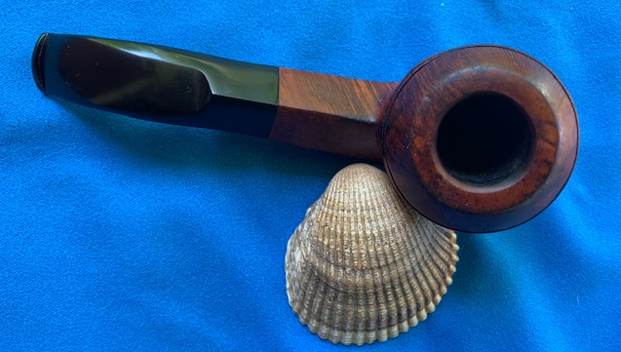
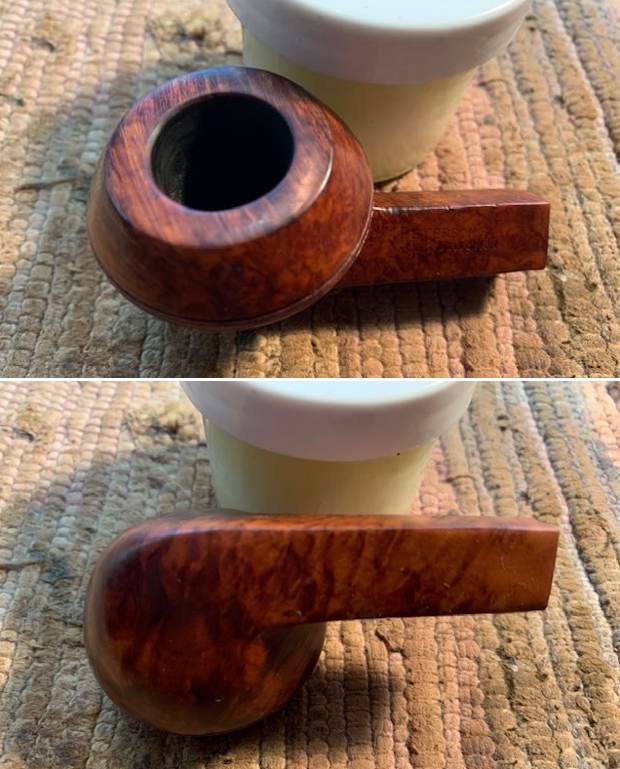
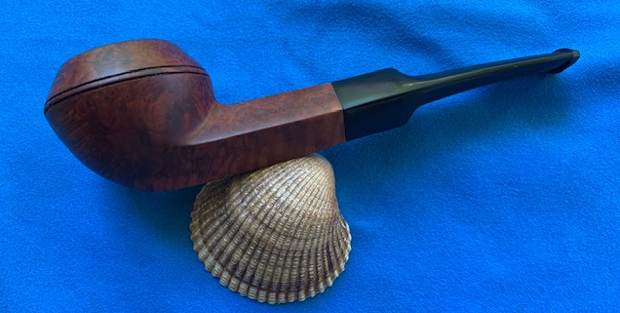
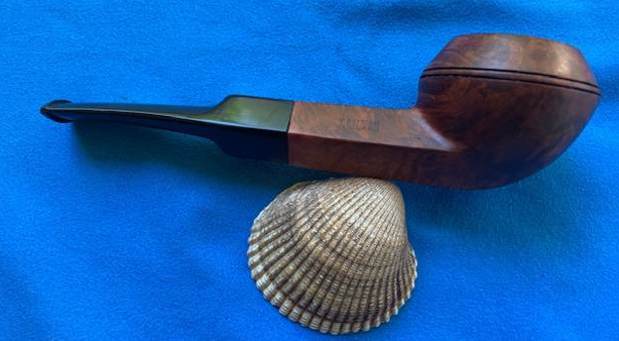
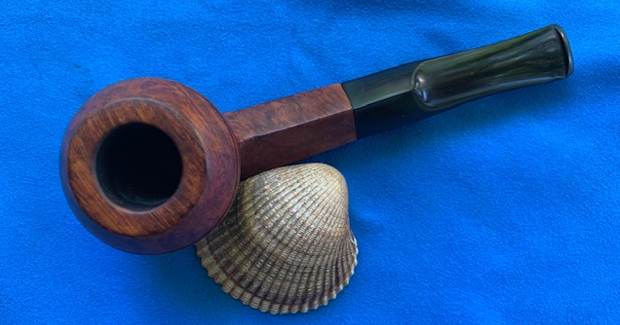
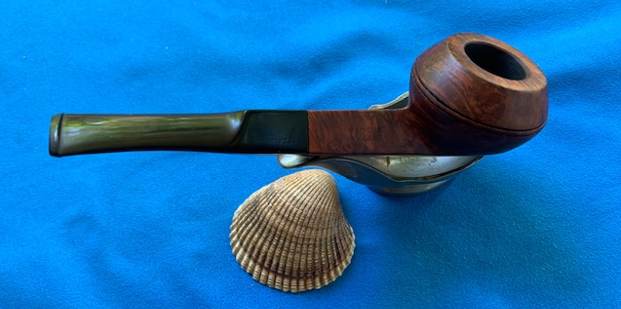
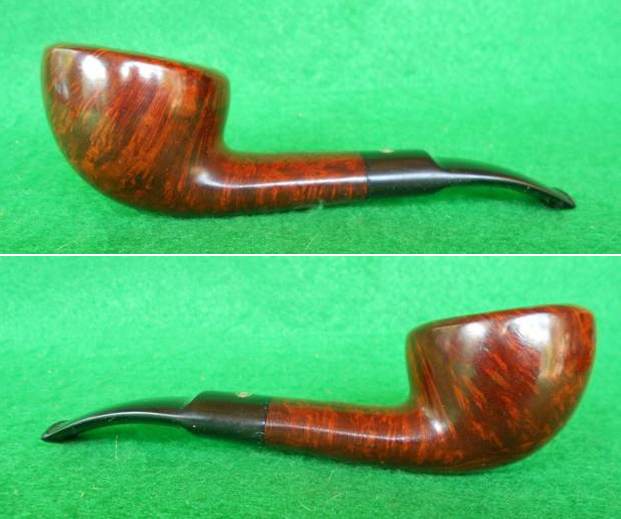
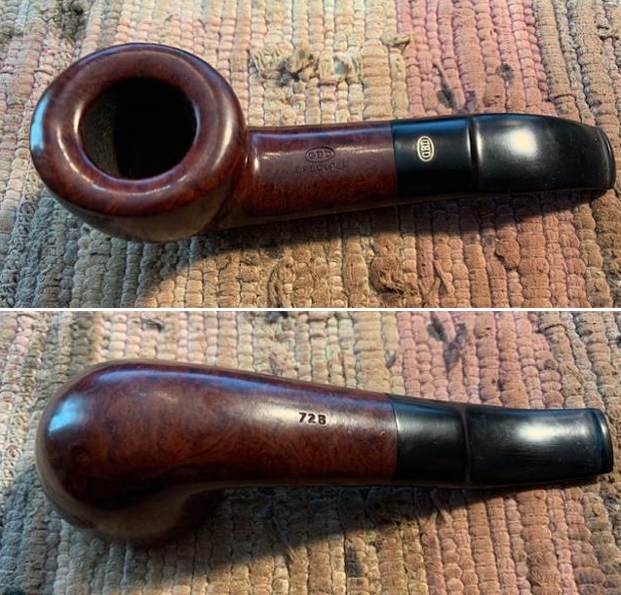
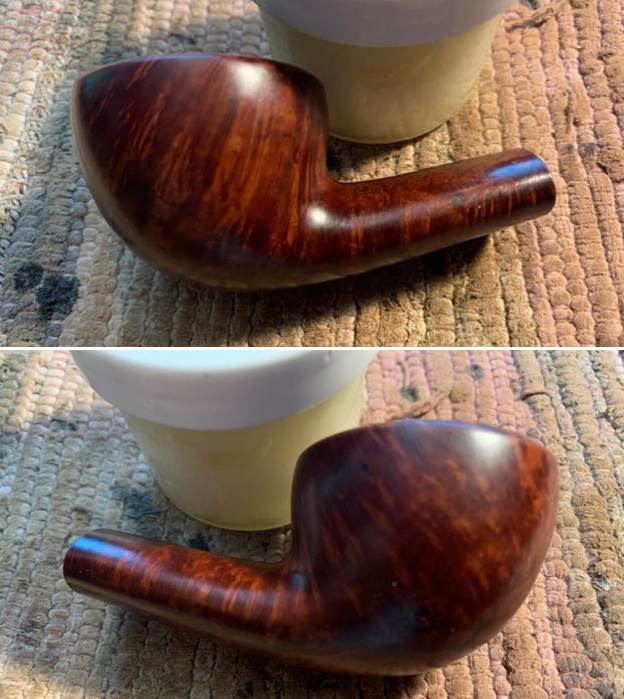
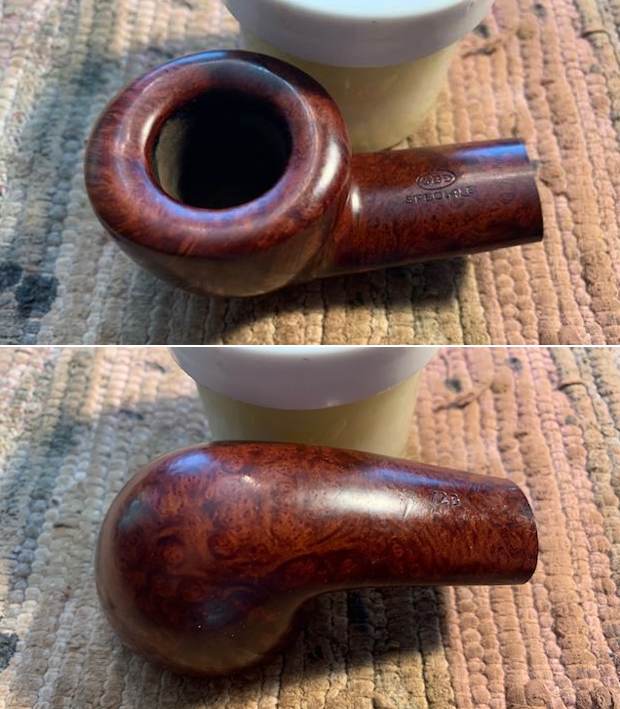
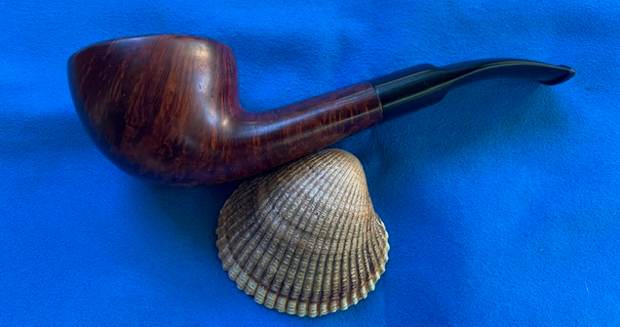
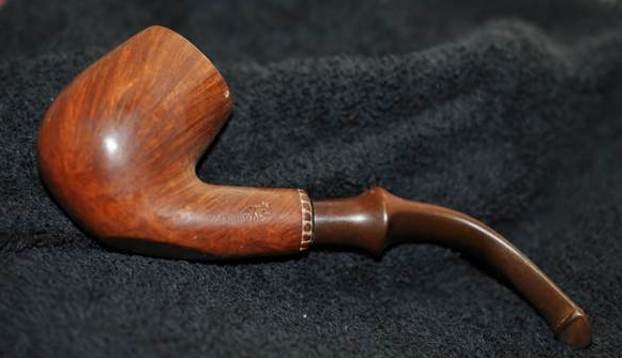
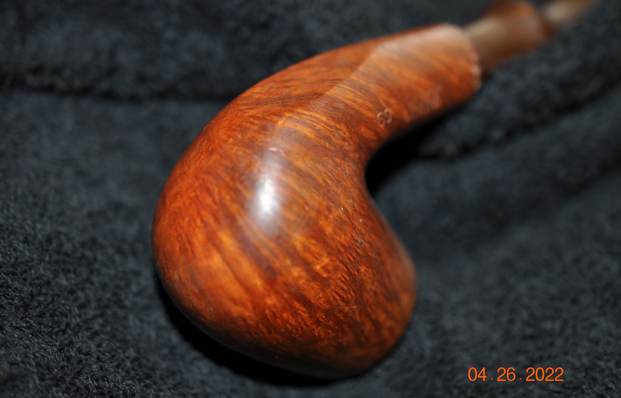
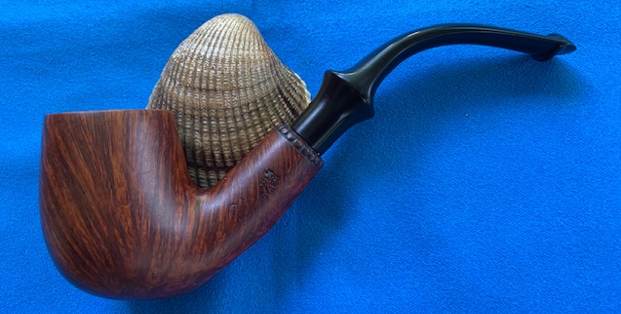
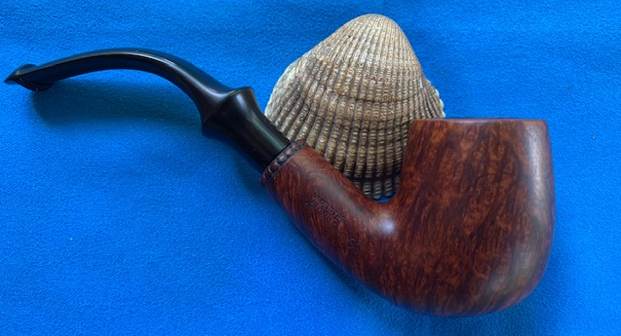
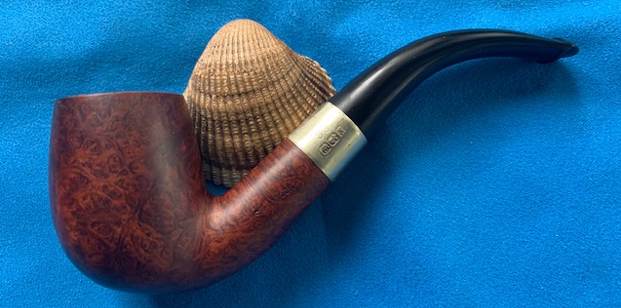
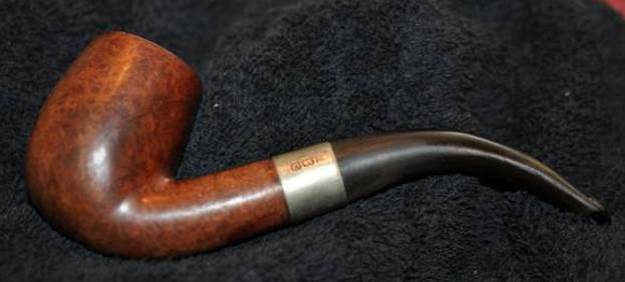
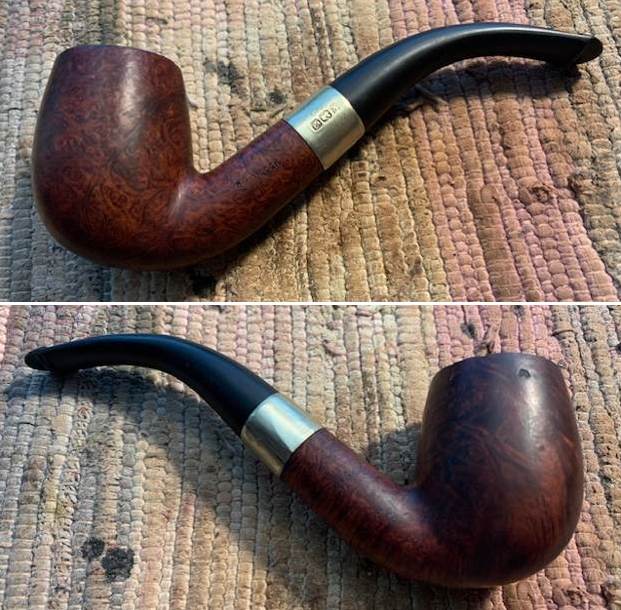
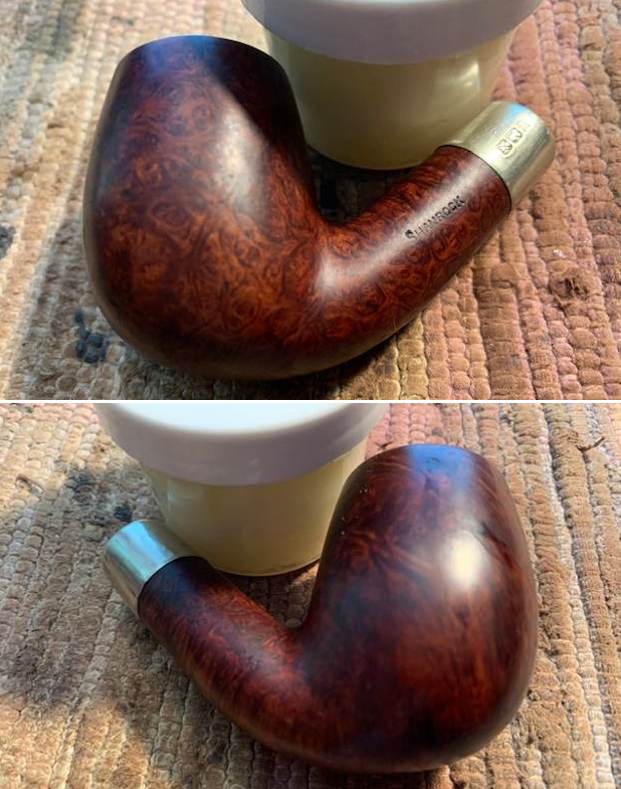
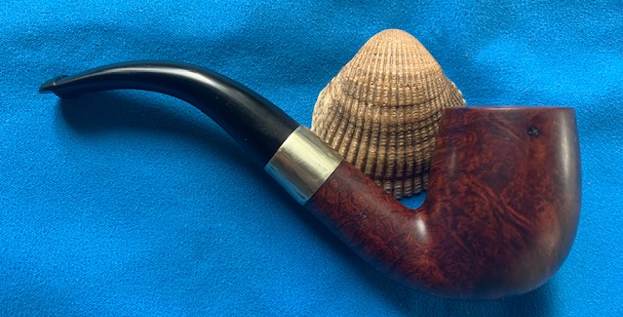
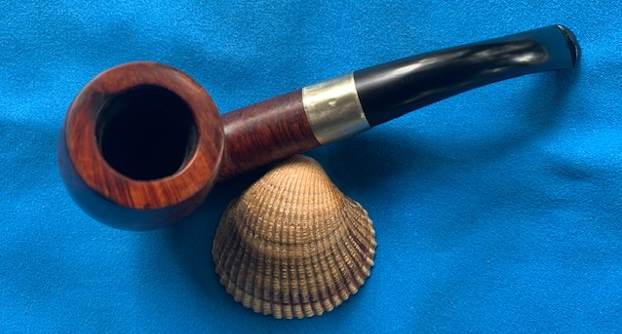
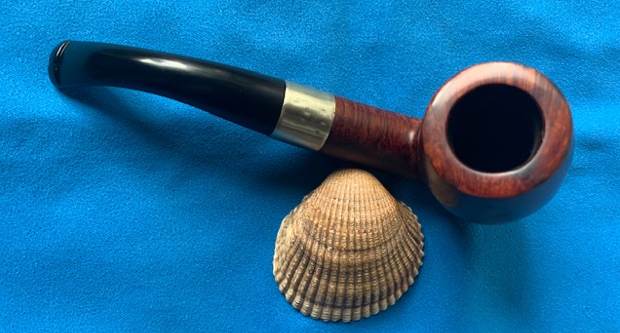
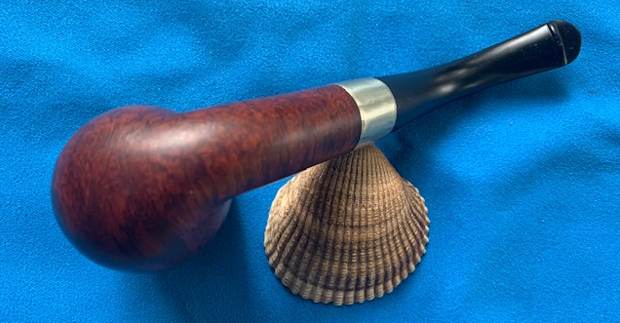
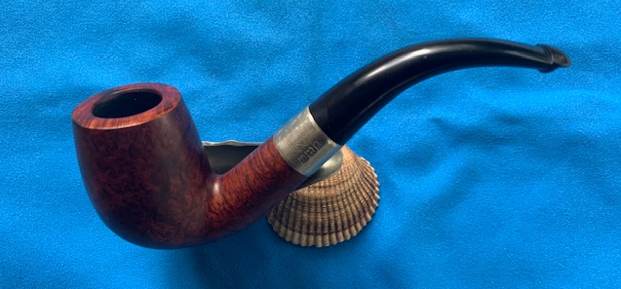
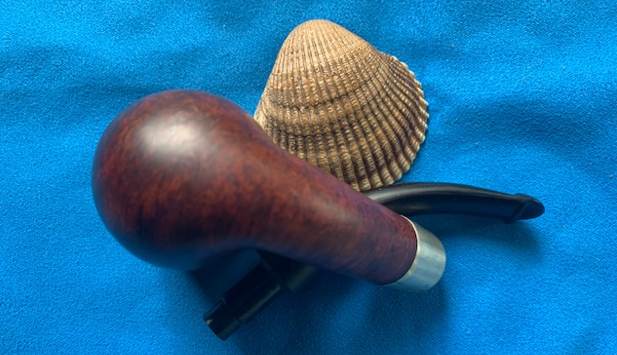
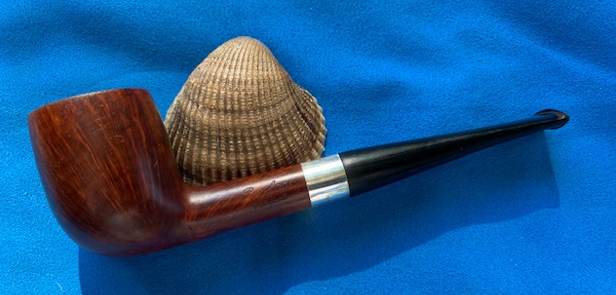
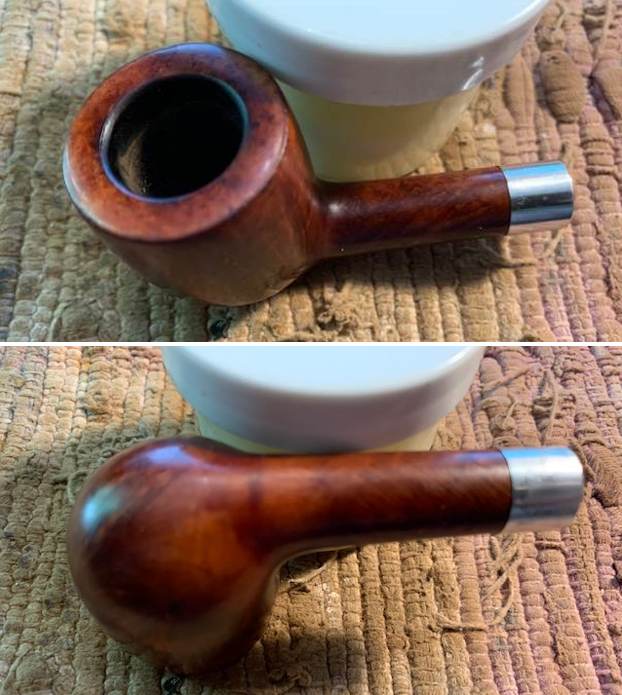
I am excited to finish this Bewlay Popular 127 Billiard. Who made this pipe for Bewlay? My guess, and it is just that, is that the pipe was made by Loewe & Co. Whoever made it the pipe is a beauty. I put the pipe back together and buffed it with Blue Diamond on the buffing wheel. I gave the bowl and the stem multiple coats of carnauba wax. I hand buffed the pipe with a clean buffing pad to raise the shine. It is fun to see what the polished bowl looks like with beautiful straight grain all around it and the birdseye on the rim top. The polished grain on the pipe looks great with the black vulcanite stem. This smooth Bewlay Popular Billiard is great looking and the pipe feels great in my hand. It is light and well balanced. Have a look at it with the photos below. The dimensions are Length: 5 ½ inches, Height: 1 ½ inches, Outside diameter of the bowl: 1 ¼ inch, Chamber diameter: ¾ of an inch. The weight of the pipe is 35 grams/1.23 ounces. It turned out to be a beautiful pipe. Once I finish the second pipe the pipe shop brought for repair I will be giving them a call for pickup. I hope that the owner will get great enjoyment from the pipes. Remember we are the next in a long line of pipe men and women who will carry on the trust of our pipes until we pass them on to the next trustee. Thanks for your time reading this blog.

New Life for a Tired Republic Era Peterson’s System Standard 314


Blog by Steve Laug

We picked this older Peterson’s System Standard purchased from a seller on 11/17/21 in San Marcos, Texas, USA. It was stamped on the left side of the shank and read Peterson’s [over] System [over] Standard. On the right side it is stamped and reads Made in the Republic of Ireland (three lines) with the shape number 314 underneath. The pipe was another tired old workhorse with lots of grime ground into the finish and a thick cake in the bowl. There was a heavy lava over flow on the rim top and some burn damage on the left front and side of the top and edges. The nickel ferrule was tired by undamaged. The sump and mortise were black with tars and oils. The stem was lightly oxidized and a lot of heavy calcification build up on the P-lip button and underside. There were some tooth marks and chatter on both sides just ahead of the button. Jeff took these photos before he did his clean up work to give an idea of the condition of the pipe. Jeff captured the thick cake in the bowl and the lava overflow onto the rim top in his photo below. There really was no way of knowing what the edges looked like under the thick cake and lava. You can also see the lava flowing down the sides of the bowl in the photos. The burn marks on the left side are also visible in the photo. The stem surface appears to have a lot of tooth chatter and marks but perhaps the calcification and grime on the bowl protected it a bit. There is also some oxidation. He took photos of the sides and the heel of the bowl to show the interesting grain patterns in the briar. It was quite beautiful. He took photos of the stamping on the sides of the shank and on the ferrule and stem. It is readable but faint in places. The stamping on the nickel ferrule is very clear and readable. I remembered that Paresh had restored a Peterson’s System Standard (his was a 314) earlier this year and as usual had done good work on the research. I turned to his blog and read through his work on the pipe (https://rebornpipes.com/2021/07/24/helping-a-fellow-piper-with-his-dream-pipea-petersons-system-pipe/). I quote below from the section on his blog regarding the dating of the pipe.

While dating a Peterson’s pipe, I always fall back to my under mentioned favorite site; http://thepetersonpipeproject.blogspot.com/2007/07/dating-peterons-pipes.html

I quote from the above site.

Stamping of Bowl:

During the years of Kapp and Peterson’s business operations, the country of Ireland has undergone several name changes and K&P’s stamping on their pipes reflects these changes. Knowing these changes, a Peterson pipe can be roughly dated and placed in “eras.”

  • The Republic Era is from 1949 until the present. The Republic of Ireland was formed on 17 April 1949. From 1949 to present the stamp for this era is “Made in the Republic of Ireland” in a block format generally in three lines but two lines have been used with or without Republic being abbreviated.

With that information at hand I turned to work on the pipe itself. Jeff had thoroughly cleaned up the pipe. He reamed the pipe with a PipNet Pipe Reamer and cleaned up the remnants with a Savinelli Fitsall Pipe Knife.  He scrubbed the bowl with undiluted Murphy’s Oil Soap with a tooth brush. He rinsed it under running warm water to remove the soap and grime. He cleaned out the inside of the shank and the airway in the stem with alcohol, cotton swabs and pipe cleaners. He scrubbed the exterior of the stem with Soft Scrub to remove as much of the oxidation as possible. He soaked the stem in Before & After Deoxidizer and rinsed it off with warm water. I took photos of the pipe before I started my work on it. (You can see the burn damage on the left edge mid bowl.) I took photos of the rim top and bowl as well as the stem to give a sense of the condition of both. The rim top had some scratching on the top and damage to the outer edge and rim top on the side. The stem cleaned up well and the tooth marks on the top and underside ahead of the button are light and should clean up easily.I took photos of the stamping on the shank sides. The are clear and readable as noted above. There is some faintness on parts of the stamping but it is still readable.I took the stem out of the shank and took a photo of the overall look of the pipe. I decided to start my work on the pipe by addressing the damage on the outer left edge of the bowl and the rim top.  I lightly topped the bowl with 220 grit sandpaper on a topping board. I wiped the top and edges down with a damp cloth and the rim top damage and burn marks on the outer edges were gone.I polished the top with 400 grit wet dry sandpaper to prepare it for staining. I stained the rim top and edges with a Walnut stain pen. I let it dry and repeated it until the stain matched.I polished the briar with micromesh sanding pads – dry sanding with 1500-12000 grit pads. I wiped the bowl down after each pad with a damp cloth. I rubbed the bowl down with Before & After Restoration Balm. I worked it into the surface of the bowl sides and shank with my fingertips. The product works to clean, enliven and protect the briar. I let the balm sit for a little while and then buffed with a cotton cloth to raise the shine. I sanded the tooth marks and chatter smooth with a folded piece of 220 grit sandpaper to begin blending them into the stem surface. I started the polishing with some 400 grit wet dry sandpaper.I set the bowl aside and turned to work on the stem. I polished the stem with micromesh sanding pads – 1500-12000 grit pads. I wiped it down with Obsidian Oil after each sanding pad. I used Before & After Pipe Polish – both Fine and Extra Fine to further polish the stem. This Republic Era Peterson’s System Standard 314 Bent Billiard with a vulcanite stem is a great looking pipe now that it has been restored. The beautiful grain that shines through the polished finish is stunning. As the pipe is smoked the patina should darken and look even better. I put the stem back on the bowl and carefully buffed the pipe with Blue Diamond on the buffing wheel. I gave the bowl and the stem multiple coats of carnauba wax on the buffing wheel and followed that by buffing the entire pipe with a clean buffing pad. I hand buffed the pipe with a microfiber cloth to deepen the shine. The finished Peterson’s System Standard 314 fits nicely in the hand and feels great. Give the finished pipe a look in the photos below. The dimensions of the pipe are Length: 5 ½ inches, Height: 1 ¾ inches, Outside diameter of the bowl: 1 inch, Chamber diameter: ¾ of an inch. The weight of the pipe is 41 grams/1.41 ounces. I will soon be adding it to the rebornpipe store in the Irish Pipe Makers Section. If you are interested in this pipe send me a message or an email. Thanks for reading this blog and my reflections on the pipe while I worked on it. There are many more to come!

New Life for a Worn and Tired Republic Era Peterson’s System Standard 303


Blog by Steve Laug

We picked this older Peterson’s System Standard on a Facebook auction on 02/02/22 from Cottage Grove, Minnesota, USA. It was stamped on the left side of the shank and read Peterson’s [over] System [over] Standard. On the right side it is stamped and reads Made in the Republic of Ireland (three lines) with the shape number 303 underneath. The pipe was a tired old workhorse with lots of grime ground into the finish and a thick cake in the bowl. There was a heavy lava over flow on the rim top and some serious burn damage on the right front of the top and edges from repeated burning with a flame lighter. The nickel ferrule was tired but undamaged and stamped K&P [over] Peterson. The sump and mortise were black with tars and oils. The stem was a mess with oxidation and a lot of heavy calcification build up on the P-lip button and underside. There were some light tooth marks and chatter on both sides just ahead of the button. Jeff took these photos before he did his clean up work to give an idea of the condition of the pipe. Jeff captured the thick cake in the bowl and the heavy lava overflow onto the rim top in his photos. It looks like there is some damage to the inner edge on the right front of the bowl. There really was no way of knowing for sure what the edges looked like under the thick cake. You can also see the lava flowing down the sides of the bowl in the photos. The stem surface appears to have a lot of tooth chatter and marks but perhaps the calcification and grime on the bowl protected it a bit. There is also some oxidation.He took photos of the sides and the heel of the bowl to show the interesting grain patterns in the briar. It was quite beautiful. He took photos of the stamping on the sides of the shank and on the ferrule and stem. It is readable but faint in places. I remembered that Paresh had restored a Peterson’s System Standard (his was a 314) earlier this year and as usual had done good work on the research. I turned to his blog and read through his work on the pipe (https://rebornpipes.com/2021/07/24/helping-a-fellow-piper-with-his-dream-pipea-petersons-system-pipe/). I quote below from the section on his blog regarding the dating of the pipe.

While dating a Peterson’s pipe, I always fall back to my under mentioned favorite site; http://thepetersonpipeproject.blogspot.com/2007/07/dating-peterons-pipes.html

I quote from the above site.

Stamping of Bowl:

During the years of Kapp and Peterson’s business operations, the country of Ireland has undergone several name changes and K&P’s stamping on their pipes reflects these changes. Knowing these changes, a Peterson pipe can be roughly dated and placed in “eras.”

  • The Republic Era is from 1949 until the present. The Republic of Ireland was formed on 17 April 1949. From 1949 to present the stamp for this era is “Made in the Republic of Ireland” in a block format generally in three lines but two lines have been used with or without Republic being abbreviated.

With that information at hand I turned to work on the pipe itself. Jeff had thoroughly cleaned up the pipe. He reamed the pipe with a PipNet Pipe Reamer and cleaned up the remnants with a Savinelli Fitsall Pipe Knife.  He scrubbed the bowl with undiluted Murphy’s Oil Soap with a tooth brush. He rinsed it under running warm water to remove the soap and grime. He cleaned out the inside of the shank and the airway in the stem with alcohol, cotton swabs and pipe cleaners. He scrubbed the exterior of the stem with Soft Scrubb to remove as much of the oxidation as possible. He soaked the stem in Before & After Deoxidizer and rinsed it off with warm water. I took photos of the pipe before I started my work on it. (You can see the burn damage on the right top edge of the bowl.) I took photos of the rim top and bowl as well as the stem to give a sense of the condition of both. The rim top had some scratching on the top and damage to the inner edge and rim top on the right front as I had guessed when I saw the photos before the cleanup. The stem cleaned up well and the tooth marks on the top and underside ahead of the button are light and should clean up easily.I took photos of the stamping on the shank sides. The are clear and readable as noted above. There is some faintness on parts of the stamping but it is still readable.I took the stem out of the shank and took a photo of the overall look of the pipe. I decided to start my work on the pipe by addressing the damage on the inside edge of the bowl and the rim top.  I topped the bowl with 220 grit sandpaper on a topping board. I then used a wooden ball and 220 grit sandpaper to give the inner edge a slight bevel to remove the burn damage on the right front. I wiped the top and edges down with a damp cloth and the rim top damage and burn marks on the outer edges were gone. I polished the briar with micromesh sanding pads – dry sanding with 1500-12000 grit pads. I wiped the bowl down after each pad with a damp cloth. I did not need to restain the rim top and edge because with polishing the match is very good. I rubbed the bowl down with Before & After Restoration Balm. I worked it into the surface of the bowl sides and shank with my fingertips. The product works to clean, enliven and protect the briar. I let the balm sit for a little while and then buffed with a cotton cloth to raise the shine. I sanded the repairs smooth with a folded piece of 220 grit sandpaper to begin blending them into the stem surface. I started the polishing with some 400 grit wet dry sandpaper.I set the bowl aside and turned to work on the stem. I polished the stem with micromesh sanding pads – 1500-12000 grit pads. I wiped it down with Obsidian Oil after each sanding pad. I used Before & After Pipe Polish – both Fine and Extra Fine to further polish the stem. I touched up the “P” logo on the stem with white acrylic fingernail polish. I worked it into the tails on the “P” with a tooth pick and scraped off the excess with my fingernail. I used a worn piece of 1500 and 1800 grit micromesh to polish off the excess, then buffed it with a soft cloth. This Republic Era Peterson’s System Standard 303 Bent Apple with a vulcanite stem is a great looking pipe now that it has been restored. The beautiful grain that shines through the polished finish is stunning. As the pipe is smoked the patina should darken and look even better. I put the stem back on the bowl and carefully buffed the pipe with Blue Diamond on the buffing wheel. I gave the bowl and the stem multiple coats of carnauba wax on the buffing wheel and followed that by buffing the entire pipe with a clean buffing pad. I hand buffed the pipe with a microfiber cloth to deepen the shine. The finished Peterson’s System Standard 303 Apple fits nicely in the hand and feels great. Give the finished pipe a look in the photos below. The dimensions of the pipe are Length: 5 ½ inches, Height: 1 ½ inches, Outside diameter of the bowl: 1 ¼ inches, Chamber diameter: ¾ of an inch. The weight of the pipe is 49 grams/1.73 ounces. I will soon be adding it to the rebornpipe store in the Irish Pipe Makers Section. If you are interested in this pipe send me a message or an email. Thanks for reading this blog and my reflections on the pipe while I worked on it. There are many more to come!

Restoring and Restemming a Made in Ireland Shamrock 106 Prince


Blog by Steve Laug

The next pipe was a mess and one that obviously had been “ridden hard and put away wet”. The finish and condition was abysmal. It was definitely a stranger to any cleaning! This one is a smooth Prince that has a rich coloured finish around the bowl sides and shank under the grit and grime of years. This pipe was purchased from an antique mall on 08/27/21 in Bozeman, Montana, USA. The finish is almost bland looking it is so dirty it was hard to know what to expect once it was cleaned. It was stamped on the  left side of the shank and read SHAMROCK. It was stamped to the right of the shank and reads MADE IN IRELAND (in a circle) with the shape number 106 lower and next to the bowl. It was filthy when Jeff brought it to the table. There was a thick cake in the bowl and lava on the rim top and the inner edge of the bowl. There were nicks in the outer edge all the way around. The replacement stem was chewed and damaged on the top and underside on and near the button. It did not appear to be vulcanite. Jeff took photos of the pipe before his cleanup work. Jeff took photos of the rim top and stem to show the general condition of the pipe. The bowl is heavily caked so it is hard to know the condition of the edges under the lava overflow. The stem was a replacement and had been heavily gnawed. The way the bit marks are on the surface of the stem makes me think that it is not vulcanite. The pipe is a real mess and I would probably have to restem the bowl. Jeff took photos of the bowl sides and heel to show the grain that was around this bowl. You can see the sandpits and nicks in the briar in the photos below. Even so, it is a nice looking pipe. He took a photo of the left side of the shank to show the stamping. The stamping is faint but readable in the photo below and is as noted above. He did not take a photo of the circular stamp Made In Ireland and the shape number on the right side of the shank. I will try to capture that later in the blog.I am including the link to the Pipedia’s article on Peterson pipes. It is a great read in terms of the history of the brand (https://pipedia.org/wiki/Peterson).

I turned to “The Peterson Pipe” by Mark Irwin and Gary Malmberg to get some background on the Peterson’s Shamrock Pipe. On page 312 it had the following information.

Shamrock (c1941-2009) Originally stamped SHAMROCK with no brand name, an inexpensive line first described in George Yale (New York) mail order booklet in 1941, imported by Rogers Import. The line was actively promoted beginning in ’45, aggressively promoted in US by Rogers from early ‘50s when they registered the Shamrock logo with US Patent Office, claiming propriety since ’38. Over the years offered with P-lip or fishtail mouthpiece, with or without nickel band, with or without Shamrock logo on the band, with or without S stamped in white or later in gold on mouthpiece. Appearing in 2008 as unstained smooth and rustic, fishtail mouthpiece with gold impressed P on the stem. COMS of MADE IN over IRELAND (C1945-1965), MADE IN IRELAND forming a circle (c1945-1965), “A PETERSON’S PRODUCT” over MADE IN IRELAND (c1945-1965), MADE IN THE over REPUBLIC over OF IRELAND9c1948-1998). Model is always difficult or impossible to date.

Judging from the description above, the pipe I am working on is stamped with the stamp noted in red above. Made in Ireland in a circle which narrows the date to between approximately 1945-1965. It is just stamped SHAMROCK with no brand name and no stamping on the stem.

I was utterly surprised when I took this pipe out of the box and compared it to the before photos. Jeff had done a great job cleaning up the pipe as usual. He reamed the pipe with a PipNet reamer and cut back the cake back to the bare briar. He cleaned up the walls with a Savinelli Fitsall Pipe Knife. Surprisingly the walls looked unscathed from the heavy cake. He scrubbed the interior of the bowl and shank with pipe cleaners, cotton swabs and alcohol to remove the tars and oils. He scrubbed the exterior of the pipe with Murphy’s Oil Soap and a tooth brush to remove the grime from the finish. He worked on the rim top lava and darkening with the soap and tooth brush. He scrubbed the inside of the stem with alcohol and pipe cleaners. He scrubbed the exterior of the stem with Soft Scrub and then soaked it in Briarville’s Deoxidizer. He washed it off with warm water to remove the Deoxidizer. When I examined the stem I knew it would need to be replaced. The pipe looked far better when it arrived. The cleaned up rim top revealed very damaged inner and outer edges and the top. There were nicks in the surface of the rim and the edges. I took some close up photos of the rim top and edges to show how well it had cleaned up and the damage to the edges around the bowl. I also took close up photos of the stem to show the tooth marks on the surface near and on the button itself. The stem would be replaced. You can see the deep tooth marks and damage to the button edges on both sides. The diameter of the stem is smaller than that of the shank as can be seen in the photos.I took photos of the stamping on the sides of the shank. It is faint but still readable. It reads as noted above.I removed the stem and took a photo of the pipe to have a look at the parts and overall look.I removed the stem from the shank and went through my stems to find one that matched the length and shape of the previous stem. I was pleased to see that it was slightly larger in diameter than the previous one. The tenon was almost the same size as the other one. It was bent more than the previous one but once straightened out it was only 1/8 of an inch shorter. I thought it would look very good.I used a small folded piece of 220 grit sandpaper to reduce the tenon enough that it would fit the mortise on the bowl. It did not take too much work and it fit perfectly. The diameter of the stem was slightly larger than the shank and would need some work to fit it properly. I took photos of the pipe with its new stem. I needed to reduce the diameter of the stem and also straighten it a bit to fit correctly. I used a flat file to take off as much of the excess as I could without damaging the briar ahead of it.I cleaned up the fit of the stem to the shank with folded 220 grit sandpaper. I worked over the flow of the stem into the shank to make the transition smooth. It was looking very good. I also heated the stem with the flame of a lighter to soften the vulcanite and straighten it. I repaired the damaged spots on the rim top with briar dust and clear superglue. Once it cured I topped the bowl on a topping board with 220 grit sandpaper. I used a folded piece of 220 grit sandpaper to clean up the inside edge of the bowl and smooth out the damage. I gave it a slight bevel to minimize the damage. I polished the briar with micromesh sanding pads – dry sanding with 1500-12000 grit sanding pads. I wiped the bowl down with a damp cloth after each sanding pad. I restained the rim top with a Walnut and a Maple stain pen to match it to the surrounding bowl colour. It looked pretty good. It will blend well once the pipe is polished and buffed. I worked some Before & After Restoration Balm into the surface of the briar with my fingertips to clean, enliven and protect the briar. I let the balm sit for 15 minutes and then buffed with a cotton cloth to raise the shine. The photos show the bowl at this point in the restoration process. I set the bowl aside and polished the stem with micromesh sanding pads – wet sanding with 1500-12000 grit sanding pads. I wiped it down after each sanding pad with Obsidian Oil. I polished it with Before & After Pipe Stem Polish – both Fine and Extra Fine. I am excited to finish this Older Made in Ireland Shamrock 106 Prince. I put the pipe back together and buffed it with Blue Diamond on the buffing wheel. I gave the bowl and the stem multiple coats of carnauba wax. I hand buffed the pipe with a clean buffing pad to raise the shine. It is fun to see what the polished bowl looks like with beautiful mixed grain all around it, looks great with the new black vulcanite stem. This smooth Classic Shamrock 106 Prince is great looking and the pipe feels great in my hand. It is light and well balanced. Have a look at it with the photos below. The dimensions are Length: 6 inches, Height: 1 ¼ inches, Outside diameter of the bowl: 1 ¼ inches, Chamber diameter: ¾ of an inch. The weight of the pipe is 36 grams/1.27 ounces. It turned out to be a beautiful pipe. I will be putting on the rebornpipes store in the Irish Pipe Makers Section. Thanks for your time and as Paresh says each time – Stay Safe.

Restoring and Restemming a Made in Ireland Peterson’s Kapet 595 Bent Rhodesian


Blog by Steve Laug

The next pipe was a mess and one that obviously had been “ridden hard and put away wet”. The finish and condition was abysmal. It was definitely a stranger to any cleaning! This one is a smooth Bent Rhodesian that has a rich coloured finish around the bowl sides and shank under the grit and grime of years. This pipe was purchased off Facebook Marketplace on 05/22/21 from Fruitland, Idaho, USA. The finish is almost bland looking it is so dirty it was hard to know what to expect once it was cleaned. It was stamped on the  left side of the shank and read Peterson’s [over] Kapet. It was stamped to the right of the shank and reads MADE IN IRELAND with the shape number 595 next to the bowl. It was filthy when Jeff brought it to the table. There was a thick cake in the bowl and lava on the back of the rim top and the inner edge of the bowl. The outer edge looked good. The vulcanite stem did not fit well and was straight rather than bent. It was oxidized and dirty. There was also tooth marks and chatter on the top and underside on the rest of the stem. Jeff took photos of the pipe before his cleanup work. Jeff took photos of the rim top and stem to show the general condition of the pipe. The bowl is heavily caked and there was a heavy lava overflow on the rim top and the inner edge. The stem is oxidized, calcified and grimy. It was a mess and it was not the correct stem. I would need to replace it. Jeff took photos of the bowl sides and heel to show the grain that was around this bowl. The grain is quite beautiful around the sides of the bowl and shank. It is a nice looking pipe.   He took photos of the sides of the shank to show the stamping. The stamping is faint but still is readable in the photos below and is as noted above. I am including the link to the Pipedia’s article on Peterson pipes. It is a great read in terms of the history of the brand (https://pipedia.org/wiki/Peterson). There was a short note toward the bottom of the page about the series. It is definitely referring to the newer line that came out later. I quote:

I turned to Pipedia (https://pipedia.org/wiki/Peterson) to first pin down a date that the pipe was made. I knew that the Made in Ireland stamp would give me that. I quote:

As usual when trying to get accurate facts in regard to Peterson history, something will jump up and get in the way. They are missing many of their records. The following is the best that we can do for a guide to the myriad markings during the period 1922 – 1949. Prior to 1920 it was rare for a country of origin to be stamped on the pipe, just Peterson’s Dublin on the band. After 1921/22, if it is stamped “MADE IN IRELAND” and the “Made in” is stacked over “Ireland” or “MADE IN EIRE” or several other forms, it was made between 1922 and 1938. A considerable number of Peterson pipes were stamped “Irish Free State”. From about 1930 to 1949, most of the pipes (those which were stamped) were stamped “Made in Ireland”.” If the stamp reads “MADE IN IRELAND” in a circle, the pipe was made between 1939 and 1948. These are all “Pre-Republic” pipes. I can tell you that the mark “Irish Free State” was adopted in 1922; and replaced by “Eire” in 1937 and then by “Republic of Ireland” in 1949.

That gave me a date for the pipe – it was made between 1922 and 1938 as can be proved by the Made in Ireland stamp on the right side of the shank.

I turned to “The Peterson Pipe” by Mark Irwin and Gary Malmberg to get some background on the Peterson’s Kapet Line. On page 305 it had the following information.

Kapet (1925-87) Line first described in 1925 brochure and featured in occasional catalogs through 1987. Early specimens will be stamped IRISH over FREE STATE. Described in 1937 catalog as available in dark plum or natural finish. Featured an aluminum “inner tube” or stinger until 1945.  Mid-century specimens may be stamped Made In over Ireland. Specimens from 1970 on may have mounts with hallmarks.

Judging from the Made in Ireland stamp, the pipe I am working on is probably made between 1922-38. Those dates work also for the Kapet information above. The stem is missing the original P-lip stem and the P emblem on the stem side as well as the inner tube.

To help clarify the stamping on the shank my daughter did some digging and found a shape chart on Mark Irwin’s site that had the 595 shape and it did indeed have a saddle stem (https://petersonpipenotes.wordpress.com/?fbclid=IwAR2VQVQbIXKn90Y9DK56WQVIknkz7UVkfbivxdAjdNqslt9297JIUMvpyjc). The chart identified the 595 as a Medium Rhodesian with a fish tail stem so I was excited to see that the stem I had would be correct! I was utterly surprised when I took this pipe out of the box and compared it to the before photos. Jeff had done a great job cleaning up the pipe as usual. He reamed the pipe with a PipNet reamer and cut back the cake back to the bare briar. He cleaned up the walls with a Savinelli Fitsall Pipe Knife. Surprisingly the walls looked unscathed from the heavy cake. He scrubbed the interior of the bowl and shank with pipe cleaners, cotton swabs and alcohol to remove the tars and oils. He scrubbed the exterior of the pipe with Murphy’s Oil Soap and a tooth brush to remove the grime from the finish. He worked on the rim top lava and darkening with the soap and tooth brush. There was some scratching, dents and wear on the top and the inner edge of the rim. He scrubbed the inside of the stem with alcohol and pipe cleaners. He scrubbed the exterior of the stem with Soft Scrub and then soaked it in Briarville’s Deoxidizer. He washed it off with warm water to remove the Deoxidizer. He sent the stem along so that I could use it to fit another stem. I took photos of the pipe when it arrived. The cleaned up rim top looked clean but there were dents and marks on the top and some damage and burn marks on the inner edge of the bowl. I took some close up photos of the rim top and edges to show how well it had cleaned up. I also took close up photos of the stem to show the condition on both sides.I took photos of the stamping on the sides of the shank. It is faint but reads as noted above. I removed the stem and went through my stems and found one that matched the shank well. I would need to reduce the sides of the diamond saddle and then I would work the stem to fit correctly. The stem had originally been a P-lip style but someone along the way had cut it off. I would need to clean up that work and reshape it to be a fish tail stem like the one in the chart above. There was a faint P on the left side of the saddle that would probably disappear with the shaping.I put the stem in the shank and took a photo of the bowl with the stem first to have a look at the pipe with this stem. It looked very good and I think with the adjustments it was going to look like the original.I took photos of the stem to show the shape of the bent and also the modification that had been done to remove the P-lip and convert it to what was an attempt at a fish tail. The work on it was a bit of a hack job so it was a mess. I would need to do some reshaping and opening of the button. I started my work on this pipe by fitting the new stem to the shank. I had to reduce the sides of the diamond saddle with my Dremel and sanding drum. As with all diamond shank pipes, the sides were not equal in measurement so I had to shave off some of the vulcanite on each side to get a proper fit to the shank. I also used it on the button end to flatten it out and give it some initial shape. There is more work to do but it is getting there. I used a flat file to get the fit close to a smooth fit. Care had to be taken not to damage the briar. I then worked on it with a folded piece of 220 sandpaper. I wanted the transition between the shank and stem to be smooth. I converted the single hole in the button end to a slot using a hole saw (a pottery trimming saw). I worked on it to shape it as an oval. Once that was done I shaped the button to remove some of the thickness and give it a comfortable shape. I sanded the stem with 220 grit sandpaper and started the polishing it with 400 grit wet dry sandpaper. I sanded the inside of the slot with 220 and 400 grit sandpaper to smooth out the airway in the button.I cleaned the inside of the stem with alcohol and pipe cleaners. The stem was very dirty so it took a bit of work to get the oils and tars out of it. Once it was cleaned it smelled very good.I polished the stem with micromesh sanding pads – wet sanding with 1500-12000 grit sanding pads. I wiped it down after each sanding pad with Obsidian Oil. I polished it with Before & After Pipe Stem Polish – both Fine and Extra Fine. With the stem finished, I removed it and turned my attention to the bowl. I know some of you would have kept working on the stem but I needed a change of pace so I went to the bowl for awhile to address this darkening on the rim top and edges. I used a folded piece of 220 grit sandpaper to smooth out the inner edge and work on the darkening on the top.I used an oak stain pen to touch up the sanded areas on the rim top and edges as well as the shank end. The pen was a good match to the rest of the briar around the bowl and shank. It would blend in very well once it was buffed and waxed.I polished the briar and worked to blend in the sanded areas on the rim top and shank end with the surrounding briar with micromesh sanding pads. I dry sanded with 1500-12000 grit pads. I wiped the briar down after each pad with a damp cloth to remove the dust and assess progress. I worked some Before & After Restoration Balm into the surface of the briar with my fingertips to clean, enliven and protect the briar. I worked it into the twin rings around the cap with a shoe brush. I let the balm sit for 15 minutes and then buffed with a cotton cloth to raise the shine. The photos show the bowl at this point in the restoration process.  I am excited to finish this beautifully grained, restemmed Peterson’s Kapet 595 Bent Rhodesian. I put the pipe back together and buffed it with Blue Diamond on the buffing wheel. I gave the bowl and the stem multiple coats of carnauba wax. I hand buffed the pipe with a clean buffing pad to raise the shine. It is fun to see what the polished bowl looks like with beautiful mixed grain all around it. The Bent Rhodesian looks great with the new replacement black vulcanite stem. This smooth Classic Peterson’s Kapet Bent Rhodesian is great looking and the pipe feels great in my hand. It is light and well balanced. Have a look at it with the photos below. The dimensions are Length: 5 inches, Height: 1 ½ inches, Outside diameter of the bowl: 1 ¼ inches, Chamber diameter: ¾ of an inch. The weight of the pipe is 40 grams/1.41 ounces. It turned out to be a beautiful pipe. I will be putting on the rebornpipes store in the Irish Pipe Makers Section. Thanks for your time and as Paresh says each time – Stay Safe.

Restoring and Restemming a Made in Ireland Peterson’s Premier Selection 493 Bulldog


Blog by Steve Laug

The next pipe was a mess and one that obviously had been “ridden hard and put away wet”. The finish and condition was abysmal. It was definitely a stranger to any cleaning! This one is a smooth Bent Billiard that has a rich coloured finish around the bowl sides and shank under the grit and grime of years. This pipe was purchased from an antique mall on 08/27/21 in Bozeman, Montana, USA. The finish is almost bland looking it is so dirty it was hard to know what to expect once it was cleaned. It was stamped on the  left side of the shank and read Peterson’s [over] Premier Selection. It was stamped to the right of the shank and reads MADE IN IRELAND with the shape number 493 next to the bowl. It was filthy when Jeff brought it to the table. There was a thick cake in the bowl and lava on the back of the rim top and the inner edge of the bowl. The outer edge looked good. The replacement Biteproof stem was oxidized and had a chunk missing from the left side of the stem at the button. There was also tooth marks and chatter on the top and underside on the rest of the stem. Jeff took photos of the pipe before his cleanup work. Jeff took photos of the rim top and stem to show the general condition of the pipe. The bowl is heavily caked and there was a heavy lava overflow on the rim top and the inner edge. The stem is broken, oxidized, calcified and grimy. It was a mess. Jeff took photos of the bowl sides and heel to show the grain that was around this bowl. The grain is quite beautiful around the sides of the bowl and shank. It is a nice looking pipe. He took photos of the sides of the shank to show the stamping. The stamping is readable in the photos below and is as noted above.    I am including the link to the Pipedia’s article on Peterson pipes. It is a great read in terms of the history of the brand (https://pipedia.org/wiki/Peterson). There was a short note toward the bottom of the page about the series. It is definitely referring to the newer line that came out later. I quote:

I turned to Pipedia (https://pipedia.org/wiki/Peterson) to first pin down a date that the pipe was made. I knew that the Made in Ireland stamp would give me that. I quote:

As usual when trying to get accurate facts in regard to Peterson history, something will jump up and get in the way. They are missing many of their records. The following is the best that we can do for a guide to the myriad markings during the period 1922 – 1949. Prior to 1920 it was rare for a country of origin to be stamped on the pipe, just Peterson’s Dublin on the band. After 1921/22, if it is stamped “MADE IN IRELAND” and the “Made in” is stacked over “Ireland” or “MADE IN EIRE” or several other forms, it was made between 1922 and 1938. A considerable number of Peterson pipes were stamped “Irish Free State”. From about 1930 to 1949, most of the pipes (those which were stamped) were stamped “Made in Ireland”.” If the stamp reads “MADE IN IRELAND” in a circle, the pipe was made between 1939 and 1948. These are all “pre-Republic” pipes. I can tell you that the mark “Irish Free State” was adopted in 1922;and replaced by “Eire” in 1937 and then by “Republic of Ireland” in 1949.

That gave me a date for the pipe – it was made between 1922 and 1938 as can be proved by the Made in Ireland stamp on the right side of the shank.

I turned to “The Peterson Pipe” by Mark Irwin and Gary Malmberg to get some background on the Peterson’s Kapp-Royal Pipe. On page 310 it had the following information.

Premier on the shank (c. 1953- c. 1981) A high grade line of Classic Range shapes for the US market introduced by Rogers Imports in their 1953 catalog. Offered in smooth or sandblast finish, a P-lip mouthpiece with an aluminum P. The first occurrence of this logo in the ephemera. The Tan Bark Premier appeared in the ’69 Iwan Ries catalog. COM of Made in over Ireland, a PREMIER stamp also appears over SELECTION and will be distinguished by an inset brass P on the mouthpiece. See system for SYSTEM over PREMIER stamp.

Judging from the Made in Ireland stamp, the pipe I am working on is probably made between 1922-38. The contrary piece of the puzzle is that the second red highlight above dates it to between 1953 and 1981. It is missing the original P-lip stem and the P emblem on the stem side. So once more we enter the realm of Peterson’s mysteries. Anyone have any ideas on this one.

I was utterly surprised when I took this pipe out of the box and compared it to the before photos. Jeff had done a great job cleaning up the pipe as usual. He reamed the pipe with a PipNet reamer and cut back the cake back to the bare briar. He cleaned up the walls with a Savinelli Fitsall Pipe Knife. Surprisingly the walls looked unscathed from the heavy cake. He scrubbed the interior of the bowl and shank with pipe cleaners, cotton swabs and alcohol to remove the tars and oils. He scrubbed the exterior of the pipe with Murphy’s Oil Soap and a tooth brush to remove the grime from the finish. He worked on the rim top lava and darkening with the soap and tooth brush. Since the stem was ruined he did not clean it. He sent the ruined stem along so that I could use it to fit another stem. I took photos of the pipe when it arrived. The cleaned up rim top looked very good around the edges and the top. I took some close up photos of the rim top and edges to show how well it had cleaned up. I also took close up photos of the stem to show the damage on the left side of the stem near the button.I took photos of the stamping on the sides of the shank. It reads as noted above. I removed the stem and went through my stems and found one that matched the broken one very well. I would need to reduce the diameter of the tenon and then I would work the stem to fit correctly.I started my work on this pipe by fitting the new stem to the shank. I had to reduce the tenon with 220 grit sandpaper to fit the shank. As with all diamond shank pipes, the sides were not equal in measurement so I had to shave off some of the vulcanite or some of the briar to get a proper fit to the shank. I did the work with some 220 grit sandpaper until the transition was smooth all the way around the shank and stem. There is more work to do but it is getting there. With the stem fit I removed it and turned my attention to the bowl. I know some of you would have kept working on the stem but I needed a change of pace so I went to the bowl for awhile to address this darkening on the rim top and edges. I used a folded piece of 220 grit sandpaper to smooth out the inner edge and work on the darkening on the top.I polished the briar and worked to blend in the sanded areas on the rim top and shank end with the surrounding briar with micromesh sanding pads. I dry sanded with 1500-12000 grit pads. I wiped the briar down after each pad with a damp cloth to remove the dust and assess progress. I worked some Before & After Restoration Balm into the surface of the briar with my fingertips to clean, enliven and protect the briar. I worked it into the twin rings around the cap with a shoe brush. I let the balm sit for 15 minutes and then buffed with a cotton cloth to raise the shine. The photos show the bowl at this point in the restoration process. I set the bowl aside and turned my attention back to the stem. Started by opening up the slot in the button with a small saw. Once I had it the way I wanted I turned to the rest of the stem. I worked on the shaping and smoothing out the sanding marks with 220 grit sandpaper and starting polishing it with 400 grit wet dry sandpaper. I cleaned the inside of the stem with alcohol and pipe cleaners. The stem was very dirty so it took a bit of work to get the oils and tars out of it. Once it was cleaned it smelled very good. I polished the stem with micromesh sanding pads – wet sanding with 1500-12000 grit sanding pads. I wiped it down after each sanding pad with Obsidian Oil. I polished it with Before & After Pipe Stem Polish – both Fine and Extra Fine. I am excited to finish this beautifully grained, restemmed Peterson’s Premier Selection 493 Straight Bulldog. I put the pipe back together and buffed it with Blue Diamond on the buffing wheel. I gave the bowl and the stem multiple coats of carnauba wax. I hand buffed the pipe with a clean buffing pad to raise the shine. It is fun to see what the polished bowl looks like with beautiful mixed grain all around it. The Bulldog looks great with the new replacement black vulcanite stem. This smooth Classic Peterson’s Premier Selection Bulldog is great looking and the pipe feels great in my hand. It is light and well balanced. Have a look at it with the photos below. The dimensions are Length: 5 ¾ inches, Height: 1 ½ inches, Outside diameter of the bowl: 1 ¾ inches, Chamber diameter: ¾ of an inch. The weight of the pipe is 38 grams/1.34 ounces. It turned out to be a beautiful pipe. I will be putting on the rebornpipes store in the Irish Pipe Makers Section. Thanks for your time and as Paresh says each time – Stay Safe.

Restoring a GBD Speciale 728


Blog by Steve Laug

I have worked on several pipes for a fellow in Israel over the past few months and he is great to work with. He has great taste in pipes and the ones he has purchased from me have also been beautiful. Periodically I receive an email from him about another pipe he was interested in purchasing EBay. This next one was one that caught my attention. He sent me the link and wanted my opinion on it. It was a nice GBD with a brass rondel on the stem top. It is stamped with the GBD oval over Speciale on the top of the shank and on the underside it has the shape number 728. GBD called this one a Rhodesian according to their shape charts but I would not call it that. To me it is more of Dublin/Scoop and has some great looking grain around the bowl sides, rim and shank. The pipe appeared to be in decent condition and lightly smoked. Not too many days after that he wrote me to say he had won it and he had it shipped to me rather than to him in Israel. We chatted back and forth about it via email and I would let him know when I received it. Here are the pictures that the EBay seller included with the advertising. I always like to be able to set the pipe I am working on in its historical setting so I turn to Pipedia (https://pipedia.org/wiki/GBD) and read through the brand history. Toward the middle of the article I found what I was looking for. I quote below:

The Paris factory moved to Saint-Claude in 1952. Since 1981 the majority of GBD pipes come from the English factory.

The premium lines of GBD offered very good values, and are considered amongst the most affordable high end pipe of the 1960’s and earlier and a rival in quality, design, and price to Dunhill. Smokers’ Haven was the main retail supplier for GBD’s in the US until the early 1980’s.

GBD produced consistently well made pipes, almost entirely of Algerian or Grecian briar. In the late 1960’s to late 1970’s, they introduced the “Collector” and “Unique” lines, made primarily by Horry Jamieson, who had carved for Barling for many years, and was skilled in freehand design. Older GBD pieces are excellent smokers and unique in design. They did an excellent executions of classic pipe shapes, as well as some beautiful freehands in the “Unique” line. [2]

The following list comprises the better grades in descending order:

Pedigree, Pedigree I, Pedigree II, Straight Grain, Prodigy, Bronze Velvet, Virgin, Varichrome, Prestige, Jubilee, New Era, Prehistoric, International, Universe, Speciale Standard, Ebony, Tapestry, New Standard, Granitan, Sauvage, Sierra, Penthouse, Legacy, Concorde.

The pipe I am working on was stamped Speciale and though it does not say it was made in France I think it was like the other Speciale pipes I have worked on. Thus I knew that it was made either in Paris before 1952 or in St. Claude after that date and before 1981 when production moved to England. I also new that I was dealing with one of the better grade pipes with the Speciale Standard stamp.

I then followed the links included to a listing of the shapes and numbers on the GBD pipes (https://pipedia.org/wiki/GBD_Shapes/Numbers). The pipe I was working on was labeled by GBD as a 728 which is a Rhodesian/Poker according to the chart. It has an oval shank though and I am not sure I would classify it as either of those shapes.

The pipe arrived this week in a Bubble Mailer from the seller in Italy. To me it is a questionable way to ship pipes as they can be easily damaged. I was concerned when I opened the mailer to examine the pipe inside. Fortunately the seller had separated the stem and bowl and wrapped each in thick bubble wrap which certainly helped. I examined the pipe carefully to assess both the condition of the pipe and what I needed to do with it. There was a light cake in the bowl and no lava on the rim top or edges. There light scratches on the rim top and on the sides of the bowl. The pipe was stamped on the on the top and underside of the shank as noted above. The finish was surprisingly clean and shiny with some great grain showing through. As I looked over the finish it appeared to me that bowl had been varnished to give it that shininess. I personally don’t like that kind of coating as I feel that it gets in the way of the briar breathing and often bubbles when the pipe is heated. The stem had the inlaid brass oval rondel on the top of the saddle portion. The vulcanite stem was fairly clean and there was light tooth marks and chatter on the top and underside. I took some photos of the pipe before I started my work on it. I have included them below. The cleaned up rim top looked very good around the edges and the top. I took some close up photos of the rim top and edges to show how it looked when it arrived. There were a few dents and scratches in the crowned top. The inner and outer edges looked good. I also took close up photos of the stem to show the light tooth marks on the surface near and on the button itself.I took photos of the stamping on the top and underside of the shank. It reads as noted above.I removed the stem and took a photo of the pipe to have a look at the parts and overall look. You can also see the inner tube in the tenon. It is removable and I will take it out and clean it up in the process.To remove the varnish coat from the briar I wiped it down with cotton pads soaked in acetone. It worked very well and took off the varnish but did no remove the stain finish. It was clean and the grain stood out more clearly. Once the bowl was polished and waxed I think that the rain would sing. I polished the briar with micromesh sanding pads – dry sanding with 1500-12000 grit sanding pads. I wiped the bowl down with a damp cloth after each sanding pad. With the outside polished I decided to clean the insides of the pipe and shank next. I reamed the bowl with the third cutting head of a PipeNet pipe reamer to take the thin cake off the walls of the pipe. I cleaned up the reaming with a Savinelli Fitsall Pipe Knife. I polished the walls of the bowl with 220 grit sandpaper wrapped around a piece of dowel.  I scraped the inside of the shank with a small pen knife to remove the tars and oils that had built up on the walls of the pipe. I scrubbed the shank with pipe cleaners, cotton swabs and isopropyl alcohol and worked on it until the shank was clean. I cleaned out the slot in the button and the airway in the stem with pipe cleaners and alcohol. It was quite dirty but with the scrubbing it was very clean. I decided to de-ghost the bowl with alcohol and cotton pads. I stuffed the bowl with cotton pads and twisted one up to insert in the shank. Once those were in place I used an ear syringe to fill the bowl with isopropyl alcohol. I set the bowl in an old ice cube tray to hold the bowl upright. I set it aside until the morning. At that time the cotton was very dirty with tars and oils both on the twisted cotton in the shank and the bolls stuffed in the bowl. I cleaned out the shank and mortise with alcohol to remove any debris. The pipe smelled much better. I worked some Before & After Restoration Balm into the surface of the briar with my fingertips to clean, enliven and protect the briar. I let the balm sit for 15 minutes and then buffed with a cotton cloth to raise the shine. The photos show the bowl at this point in the restoration process. I set the bowl aside and turned my attention to the stem. I polished the scratches and tooth chatter out of the stem with micromesh sanding pads – wet sanding with 1500-12000 grit sanding pads. I wiped it down after each sanding pad with Obsidian Oil. I polished it with Before & After Pipe Stem Polish – both Fine and Extra Fine. I am excited to finish this beautifully grained GBD Speciale 721 with a saddle stem. I put the pipe back together and buffed it with Blue Diamond on the buffing wheel. I gave the bowl and the stem multiple coats of carnauba wax. I hand buffed the pipe with a clean buffing pad to raise the shine. It is fun to see what the polished bowl looks like with beautiful mixed grain all around it. The polished bowl looks great with the black vulcanite stem. The removal of the varnish will enable the briar to breathe. This smooth Classic GBD Speciale 721 is great looking and the pipe feels great in my hand. It is light and well balanced. Have a look at it with the photos below. The dimensions are Length: 5 ½ inches, Height: 1 ½ inches, Outside diameter of the bowl: 1 ½ inches, Chamber diameter: 7/8 of an inch. The weight of the pipe is 47 grams/1.62 ounces. It turned out to be a beautiful pipe. I will be sending it off to the fellow in Israel shortly and I look forward to hearing what he thinks of it once he receives it. Remember that we are only trustees of our pipes and long after we are gone the pipes will go onto the next person who takes on the trust. Thanks for your time and as Paresh says each time – Stay Safe.

Restoring a Republic Era Peterson’s “Kapp-Royal” 69 Bent Billiard


Blog by Steve Laug

The next pipe was a mess and one that obviously had been “ridden hard and put away wet”. The finish and condition was abysmal. It was definitely a stranger to any cleaning! This one is a smooth Bent Billiard that has a rich coloured finish around the bowl sides and shank under the grit and grime of years. The shank end did not have a ferrule but had a carved finish on the end. This pipe was purchased on 06/17/21 from a fellow in Brazil, Indiana, USA. The finish is almost bland looking it is so dirty it was hard to know what to expect once it was cleaned. It was stamped on the  left side of the shank and read Peterson’s [over] “Kapp-Royal”. It was stamped to the right of the shank and reads MADE IN THE REPUBLIC OF IRELAND (three lines) with the shape number 69 next to the bowl. The underside of the shank was flattened like it is in a Dunmore pipe. It enables the pipe to be a sitter. It was filthy when Jeff brought it to the table. There was a thick cake in the bowl and lava on the back of the rim top and the inner edge of the bowl. The outer edge looked good. The stem was oxidized and had light tooth marks and chatter on the top and underside on and near the button. Jeff took photos of the pipe before his cleanup work. Jeff took photos of the rim top and stem to show the general condition of the pipe. The bowl is heavily caked and there was lava overflow on the back of the rim top and the inner edge. The stem is oxidized, calcified and grimy. It has some tooth marks on the top and underside near and on the surface of the button itself. Jeff took photos of the bowl sides and heel to show the grain that was around this bowl. The grain is quite beautiful around the sides of the bowl and shank. It is a nice looking pipe. He took photos of the sides of the shank to show the stamping. The stamping is readable in the photos below and is as noted above. I am including the link to the Pipedia’s article on Peterson pipes. It is a great read in terms of the history of the brand (https://pipedia.org/wiki/Peterson). There was a short note toward the bottom of the page about the series. It is definitely referring to the newer line that came out later. I quote:

Kapp Royal Series: The Kapp Royal series is a relatively new one, but has a well establish history in Europe. They are a handsome colourful series with a good quality natural stain briar and bright orange Lucite stems and occasionally Cumberland.

I turned to “The Peterson Pipe” by Mark Irwin and Gary Malmberg to get some background on the Peterson’s Kapp-Royal Pipe. On page 306 it had the following information.

Kapp-Royal (1969, 1976-79, c1988, 2004) First appearance  as a line introduced 1969. In 1976-79 Iwan Ries catalog offering identical with non-System Dunmore line. Second appearance in the late eighties as a high-grade Italian market line with briar band inset into the mouthpiece. From c.2004, Italian line available in US as high grade, orange finish, sterling band, amber-colored acrylic fishtail stem or sometimes vulcanite, embedded aluminum P.

Judging from the description above, the pipe I am working on is probably made between 1976-79. It fits the description above in red that says it is “identical with non-System Dunmore line”. The Made in the Republic of Ireland stamp on the right side of the stamp puts it in the Republic Era 1950-1989.

I was utterly surprised when I took this pipe out of the box and compared it to the before photos. Jeff had done a great job cleaning up the pipe as usual. He reamed the pipe with a PipNet reamer and cut back the cake back to the bare briar. He cleaned up the walls with a Savinelli Fitsall Pipe Knife. Surprisingly the walls looked unscathed from the heavy cake. He scrubbed the interior of the bowl and shank with pipe cleaners, cotton swabs and alcohol to remove the tars and oils. He scrubbed the exterior of the pipe with Murphy’s Oil Soap and a tooth brush to remove the grime from the finish. He worked on the rim top lava and darkening with the soap and tooth brush. He scrubbed the inside of the stem with alcohol and pipe cleaners. He scrubbed the exterior of the stem with Soft Scrub and then soaked it in Briarville’s Deoxidizer. He washed it off with warm water to remove the Deoxidizer. The pipe looked far better when it arrived. The cleaned up rim top looked very good around the edges and the top. I took some close up photos of the rim top and edges to show how well it had cleaned up. I also took close up photos of the stem to show the light tooth marks on the surface near and on the button itself.I took photos of the stamping on the sides of the shank. It reads as noted above.I removed the stem and took a photo of the pipe to have a look at the parts and overall look.I started my work on this pipe polishing the briar with micromesh sanding pads – dry sanding with 1500-12000 grit sanding pads. I wiped the bowl down with a damp cloth after each sanding pad. I worked some Before & After Restoration Balm into the surface of the briar with my fingertips to clean, enliven and protect the briar. I let the balm sit for 15 minutes and then buffed with a cotton cloth to raise the shine. The photos show the bowl at this point in the restoration process. I set the bowl aside and worked on the stem. I scrubbed it down with Soft Scrub to deal with the remaining oxidation on the vulcanite. It took a bit of scrubbing but I was able to remove it.I polished the stem with micromesh sanding pads – wet sanding with 1500-12000 grit sanding pads. I wiped it down after each sanding pad with Obsidian Oil. I polished it with Before & After Pipe Stem Polish – both Fine and Extra Fine. I am excited to finish this beautifully grained Peterson’s Kapp-Royal 69 Bent Billiard. I put the pipe back together and buffed it with Blue Diamond on the buffing wheel. I gave the bowl and the stem multiple coats of carnauba wax. I hand buffed the pipe with a clean buffing pad to raise the shine. It is fun to see what the polished bowl looks like with beautiful mixed grain all around it. The polished nickel band is losing some of the plating but it still looks great with the black vulcanite stem. This smooth Classic Peterson’s Kapp-Royal Bent Billiard is great looking and the pipe feels great in my hand. It is light and well balanced. Have a look at it with the photos below. The dimensions are Length: 5 ½ inches, Height: 1 ¾ inches, Outside diameter of the bowl: 1 ¼ inches, Chamber diameter: ¾ of an inch. The weight of the pipe is 43 grams/1.52 ounces. It turned out to be a beautiful pipe. I will be putting on the rebornpipes store in the Irish Pipe Makers Section. Thanks for your time and as Paresh says each time – Stay Safe.

Restoring a Made in Ireland Shamrock +69 Bent Billiard


Blog by Steve Laug

The next pipe was a mess and one that obviously had been “ridden hard and put away wet”. The finish and condition was abysmal. It was definitely a stranger to any cleaning! This one is a smooth Bent Billiard that has a rich coloured finish and great grain around the bowl sides and shank under the grit and grime of years. This pipe was purchased on 06/05/21 from a fellow in Brazil, Indiana, USA. The finish is almost bland looking it is so dirty it was hard to know what to expect once it was cleaned. It was stamped on the  left side of the shank and read SHAMROCK. It was stamped to the right of the shank and reads MADE IN IRELAND (in a circle) with the shape number +69 next to the bowl. It was filthy when Jeff brought it to the table. There was a thick cake in the bowl and lava on the rim top and the inner edge of the bowl. There were nicks in the outer edge all the way around. There were burn marks on the outer edge on the right and left front of the bowl. The stem was oxidized and had light tooth marks and chatter on the top and underside on and near the button. Jeff took photos of the pipe before his cleanup work. Jeff took photos of the rim top and stem to show the general condition of the pipe. The bowl is heavily caked so it is hard to know the condition of the edges under the lava overflow. The burn marks are also visible on the outer edge of the bowl. The stem is oxidized, calcified and grimy. It has some tooth marks on the top and underside near and on the surface of the button itself. Jeff took photos of the bowl sides and heel to show the grain that was around this bowl. You can see the sandpits and nicks in the briar in the photos below. Even so, it is a nice looking pipe. He took photos of the sides of the shank to show the stamping. The stamping is readable in the photos below and is as noted above. I am including the link to the Pipedia’s article on Peterson pipes. It is a great read in terms of the history of the brand (https://pipedia.org/wiki/Peterson).

I turned to “The Peterson Pipe” by Mark Irwin and Gary Malmberg to get some background on the Peterson’s Shamrock Pipe. On page 312 it had the following information.

Shamrock (c1941-2009) Originally stamped SHAMROCK with no brand name, an inexpensive line first described in George Yale (New York) mail order booklet in 1941, imported by Rogers Import. The line was actively promoted beginning in ’45, aggressively promoted in US by Rogers from early ‘50s when they registered the Shamrock logo with US Patent Office, claiming propriety since ’38. Over the years offered with P-lip or fishtail mouthpiece, with or without nickel band, with or without shamrock logo on the band, with or without S stamped in white or later in gold on mouthpiece. Appearing in 2008 as unstained smooth and rustic, fishtail mouthpiece with gold impressed P on the stem. COMS of MADE IN over IRELAND (C1945-1965), MADE IN IRELAND forming a circle (c1945-1965), “A PETERSON’S PRODUCT” over MADE IN IRELAND (c1945-1965), MADE IN THE over REPUBLIC over OF IRELAND9c1948-1998). Model is always difficult or impossible to date.

Judging from the description above, the pipe I am working on is stamped with the stamp noted in red above. Made in Ireland in a circle which narrows the date to between approximately 1945-1965. It is just stamped SHAMROCK with no brand name and no stamping on the stem.

On page 302 there was a listing on the nickel mounted markings such as those used on the band on the shank of this pipe. I quote:

Nickel-Mount Markings. Often called faux hallmarks or faux marks by Peterson collectors, this set of three little images of a shamrock, an Irish wolfhound and a round tower appear within rectangular shapes as decorations on nickel mountings. Very early nickel mounts (1891-c. 1920) had no such decorations, only the same stamps used on sterling but without the hallmarks. As a stamp, the set of decorations began to appear at the beginning of the Irish Free State era, sometimes alone but often under K&P and over block lettered PETERSON over DUBLIN, although the  three emblems appeared on K&P’s Irish Carving Shamrocks pipes since 1896. The stamp was used until about 1963, when hand soldered nickel bands and ferrules were replaced by pressed ferrules and premade bands…The shamrock is the emblem of Ireland; the Irish wolfhound has long been used for both hunting and protection, and is an emblem of strength; the round tower a symbol of Ireland’s early religious power. These decorations were stamped at the factory on non-sterling mounts only, and the assay office has nothing to do with them…

I was utterly surprised when I took this pipe out of the box and compared it to the before photos. Jeff had done a great job cleaning up the pipe as usual. He reamed the pipe with a PipNet reamer and cut back the cake back to the bare briar. He cleaned up the walls with a Savinelli Fitsall Pipe Knife. Surprisingly the walls looked unscathed from the heavy cake. He scrubbed the interior of the bowl and shank with pipe cleaners, cotton swabs and alcohol to remove the tars and oils. He scrubbed the exterior of the pipe with Murphy’s Oil Soap and a tooth brush to remove the grime from the finish. He worked on the rim top lava and darkening with the soap and tooth brush. He scrubbed the inside of the stem with alcohol and pipe cleaners. He scrubbed the exterior of the stem with Soft Scrub and then soaked it in Briarville’s Deoxidizer. He washed it off with warm water to remove the Deoxidizer. The pipe looked far better when it arrived. The cleaned up rim top revealed very damaged inner and outer edges and the top. It was both burned and nicked from being knocked out on a hard surface. I took some close up photos of the rim top and edges to show how well it had cleaned up and the damage to the edges around the bowl. I also took close up photos of the stem to show the tooth marks on the surface near and on the button itself.I took photos of the stamping on the sides of the shank. It reads as noted above.I removed the stem and took a photo of the pipe to have a look at the parts and overall look. I started my work on this pipe by topping the bowl and reworking the damage to the inner edge. I topped the bowl on a piece of 220 grit sandpaper on a topping board. Once I had it smooth I used a folded piece of 220 grit sandpaper to give the inner edge of the bowl a slight bevel to accommodate the burned areas and blend them into the surrounding briar. There was a large flaw in the briar near the rim top on the right side of the bowl. I filled it in with clear super glue and briar dust. Once the repair cured I sanded it smooth with 220 grit sandpaper to blend it into the surrounding briar.I polished the briar with micromesh sanding pads – dry sanding with 1500-12000 grit sanding pads. I wiped the bowl down with a damp cloth after each sanding pad. I restained the rim top with a Walnut stain pen to match it to the surrounding bowl colour. It looked pretty good. I also touched up the repaired flaw on the right side of the bowl toward the top. They will both blend well once the pipe is polished and buffed.I worked some Before & After Restoration Balm into the surface of the briar with my fingertips to clean, enliven and protect the briar. I let the balm sit for 15 minutes and then buffed with a cotton cloth to raise the shine. The photos show the bowl at this point in the restoration process. I set the bowl aside and polished the stem with micromesh sanding pads – wet sanding with 1500-12000 grit sanding pads. I wiped it down after each sanding pad with Obsidian Oil. I polished it with Before & After Pipe Stem Polish – both Fine and Extra Fine. I am excited to finish this Nickel Banded Older Made in Ireland Shamrock 69+ Bent Billiard. I put the pipe back together and buffed it with Blue Diamond on the buffing wheel. I gave the bowl and the stem multiple coats of carnauba wax. I hand buffed the pipe with a clean buffing pad to raise the shine. It is fun to see what the polished bowl looks like with beautiful mixed grain all around it. The polished nickel band is losing some of the plating but it still looks great with the black vulcanite stem. This smooth Classic Shamrock 69+ Bent Billiard is great looking and the pipe feels great in my hand. It is light and well balanced. Have a look at it with the photos below. The dimensions are Length: 5 ¾ inches, Height: 2 inches, Outside diameter of the bowl: 1 ¼ inches, Chamber diameter: ¾ of an inch. The weight of the pipe is 59 grams/2.08  oz. It turned out to be a beautiful pipe. I will be putting on the rebornpipes store in the Irish Pipe Makers Section. Thanks for your time and as Paresh says each time – Stay Safe.