Blog by Paresh Deshpande
This pipe had attracted my attention way back in 2017 when I first saw it on eBay and finally made it to me with a very small price tag, shipping included!! Subsequently as I started working on my inherited pipes under Steve’s guidance, the Barling’s, Dunhills, Peterson’s, Ben Wades, Nordings, Stanwells, Danish FH et al took center stage and the Melby got buried deeper and deeper down in the box. During his visit to India in May this year, Steve, Abha and I went through two of the three big cartons of pipes that I had inherited including a few pipes that I had purchased on eBay in earlier years. The aim of this exercise was to sort out pipes that could be sold and those that are to be added to personal collection. The Melby figured in the list of pipes “TO BE SOLD”!!
Well, after lying in wait for more than two years, the Melby has finally found its way on to my work table now.
This is a beautiful Acorn shaped pipe with a very subtle and delicate upturned bend to an equally delicate and thin shank. The stummel narrows down towards the foot from a nice broad and wide rim top. The pipe ends with a thin fancy vulcanite stem that has a slight bend at the slot end that carries forward the overall delicate profile of the pipe as a whole. The second aspect that struck me was how light the pipe was!!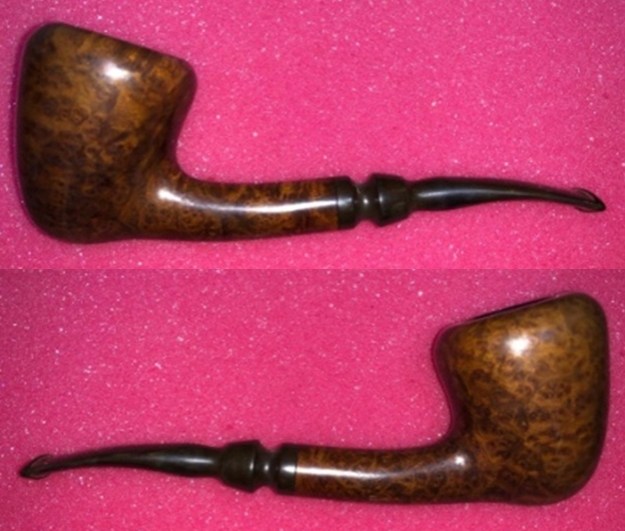 The pipe is stamped vertically towards the shank end bottom as “MELBY” over “MADE IN” over “DENMARK”. There is no other stamping on the stummel. The stem is also devoid of any stampings.
 The top notch quality of the briar, beautiful shape and overall high quality of finish and design screamed that this pipe had to be work of some really gifted artisan. To know more about this pipe, I visited pipedia.org. Sure enough, there was a mention of this brand under Danish pipes, but sadly nothing more than a mere mention. In my quest to unravel this mysterious brand, I surf the internet and the only reference that I could find out was on an aptly named site “VERY KEEN ON PIPES”. Here is the link to this interesting site; https://vkpipes.com/
Within this site I searched for Melby and here is what I learned; https://vkpipes.com/pipeline/melby/
An extraordinary Danish work! As every proper Danish pipe it’s made of a good briar, shows nice grain and has skillfully designed freehand shape. But the most of all we’re absolutely amazed with its sense of equilibrium – the pipe can surely balance just on its heel (back side of its bottom). Some signs (such as kind of briar) hint it might be a Karl Erik pipe but we don’t have a 100% proof so far.
With this information, I move ahead with my initial visual inspection.
INITIAL VISUAL INSPECTION
The pipe came to us in a very well smoked state, but, I have to admit that it was well taken care of by the previous owner. An even layer of heavy cake build up is observed in the chamber with overflow of lava on the rim top surface, notably at the back. Otherwise, the rim top surface and both inner and outer rim edges are in fairly good condition with slight darkening and unevenness to the inner rim edge. It is pretty strong sweet smelling pipe, I say!! I am not sure if by mere cleaning of the chamber and shank internals that these smells will be eliminated.
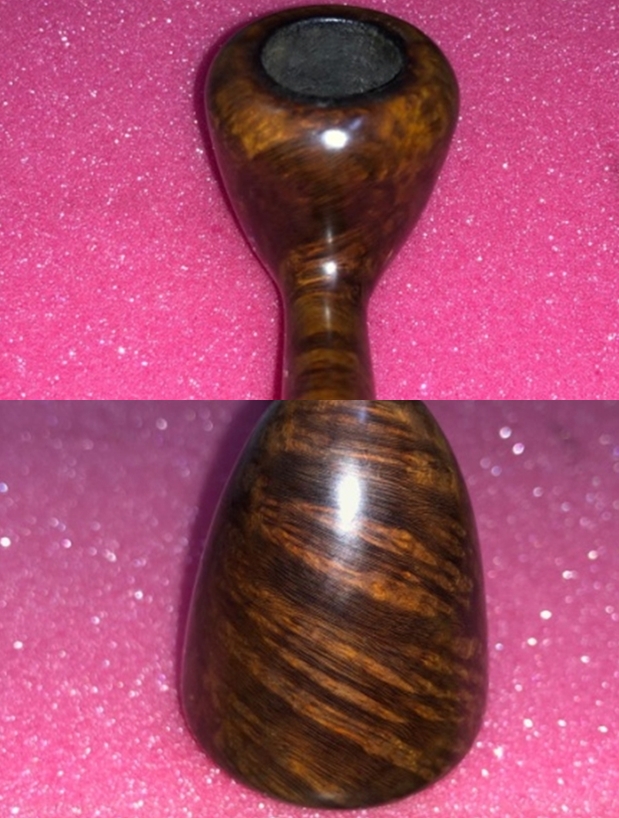
 The smooth stummel surface has beautiful Bird’s eye grain patterns on either sides of the stummel with beautiful densely packed cross grains on the front, back and the shank. The stummel surface has a dirty yellowish orange like stain to the briar that has darkened and dulled out due to accumulation of grime. Once it has been cleaned up, the grains should pop out after a nice polish. The mortise with shank internals is clogged and shows heavy accumulation of oils and tars. The chamber emanates a very strong sweet odor from previous usage. The draught hole is right at the bottom center and should be a great smoker!! The light weight and perfect shape make it a beautiful pipe to clench while you read your favorite book or while tending to your garden!! Reclaiming this piece of briar should be a fun project.
 The delicate fancy vulcanite stem is deeply oxidized, especially in the nooks and crannies. There are a few deep tooth indentations on either surface of the stem in the bite zone and over the upper button edge. The button edges would need to be sharpened and made crisp. The tenon and the slot show heavy accumulation of dried oils and gunk and the airflow through the stem is laborious.
 INITIAL CLEANING BY ABHA…
The initial cleaning on this pipe was done by Abha, my wife (she has cleaned up around 40-50 pipes and these have now reached me for further restoration). She reamed out the complete cake and further smoothed out the chamber walls with a folded piece of 220 grit sand paper. She scrubbed out the dried oils, tars and gunk from the mortise with a fabricated dental spatula and further cleaned out the internals of the shank with pipe cleaners and alcohol and cotton buds. She followed the internal cleaning of the shank with external cleaning of the stummel using Murphy’s Oil soap and hard bristled tooth brush and dried it with paper napkins and cotton cloth.
Next she cleaned out the internals of the stem air way and immersed it in “Before and After Deoxidizer” solution along with the stem of other pipes in line for restoration. Once the stem had soaked overnight, she cleaned the stem under running warm water and scrubbed the raised oxidation from the stem surface using Scotch Brite pad. She further removed the oxidation by scrubbing the stem with 0000 grade steel wool and applied a little olive oil to rehydrate the stem.
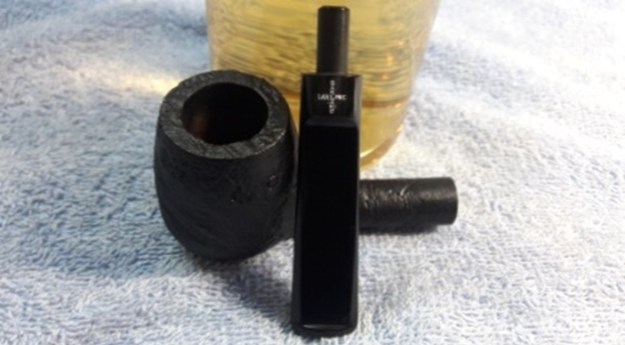
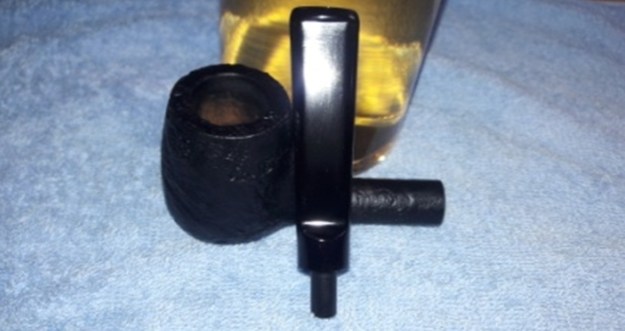
ONCE THE PIPE IS ON MY WORK TABLE…
The cleaned up pipes presents a very clear picture of what needs to be done to restore this pipe to a pristine and smokable condition. I really cannot thank Abha, my wife, enough for all the help and support that she extends me in my pursuance of this hobby. A clean pipe also helps in clearly identifying the work that would be required to restore a pipe. The pictures shows the condition of the pipe when it reached me after being cleaned.

 The chamber stills has the strong old odor and would need further intrusive methods to address this issue. The walls are solid without any signs of damage. The inward curving wide rim top surface has a flat smooth ring towards the chamber. The flat inner rim edge is slightly darkened towards the front and left of the stummel and would need to be addressed. The rounded outer rim surface is in perfect condition but shows signs of overzealous cleaning by Abha to remove the overflow of lava from the right and extending to the back side of the rim top. I am amazed at the cavernous size of the chamber.
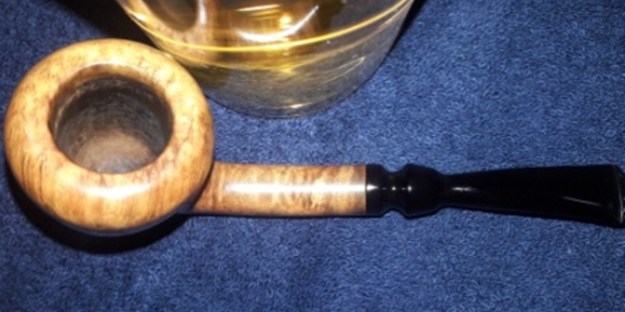
 The stummel surface is sans any fills or flaws. A nice polish and the beautiful grains will pop out and will be on display in all their glory. The stummel has lost its old stain and further sanding followed with micromesh pad polishing will further bring out the natural finish of the bowl. Whether to stain it to accentuate the grains or to let it be, I shall decide once the micromesh cycle is complete. I think as the pipe is smoked, over a period of time, the briar will take on some nice dark coloration and patina. I am really looking forward to see the stummel after polish. The mortise and shank internals are also nice and clean now. The seating of the stem tenon in to the mortise is snug and flush with the shank end.

 The oxidation on the vulcanite stem has been removed, thanks to all the efforts put in by Abha. The slot and stem internals are all clean and fresh. The deeper tooth indentations on the upper and lower surface and on the upper button edge are now clearly visible. I intend to first raise these indentations to the surface by heating and sanding followed, if necessary, by filling it with a mix of activated charcoal and superglue. A bit of sanding to remove the deeper oxidation followed by micromesh polishing cycle should add a nice shine to the stem.
  THE PROCESS
Firstly, I heat the surface of the stem with the flame of a lighter to raise the tooth indentations to the surface and follow it up with a sanding with a piece of folded 220 grit sand paper. This helps to even out the raised surface, address minor tooth chatter and also remove the deep seated oxidation. I wiped the stem with a cotton swab and alcohol to remove the raised oxidation and the resulting sanding dust. The tooth indentations, though greatly reduced, are still prominent. I need to address this issue.

 I mix a small quantity of activated charcoal and CA superglue and spot apply it over the visible bite marks. I set the stem aside for the fill to cure overnight. If I had black CA superglue, that is what I would have used in this instance.
  Next, I start by sanding the entire stummel surface, including the rim top, with a piece of 220 grit sand paper. I also work the inner rim edge with the sandpaper to remove the darkened briar and even out the rim edge. This sanding helps in addressing all the minor dents, if any, from the surface while providing a smooth surface for the next stage which is polishing cycle using complete set of micromesh pads. I was especially very careful while sanding the bottom of the shank around the stampings, as it is very easy to miss out the stamp and one swipe of the sand paper is enough to ruin/ damage the stampings.

 Before I move to the next stage of polishing the stummel, I decided to address the issue of strong odor in the chamber. To eliminate the ghost smells from the pipe, I decided to treat it with salt and alcohol. I do not use Kosher salt as it is not readily available here and if available, it’s very expensive. I use cotton balls which is an at par substitute as I have realized over the last year or so. I draw out a wick from the cotton and along with a folded regular pipe cleaner; insert it in to the mortise and through the draught hole in the chamber. Thereafter, I pack the chamber with cotton balls to about quarter of an inch below the rim inner edge. I soak the cotton balls with isopropyl alcohol up to the brim. About half an hour later, the level of alcohol has gone down, having being absorbed by the cotton. I top it up once again and set it aside overnight. By next afternoon, the cotton and alcohol has drawn out all the remaining oils and tars from the chamber and mortise and the cotton and alcohol had fulfilled its intended task. I removed the cotton balls and ran pipe cleaners through the mortise to clean out all the loosened tars and gunk. The chamber now smells clean and fresh. I set the stummel to dry out naturally.
 While the chamber was soaking in the salt and alcohol bath, I worked the stem. The stem fills had cured and with a flat head needle file, I sand these fills to achieve a rough match. I further fine tuned the match by sanding the filled area with a folded piece of 220 grit sand paper pinched between my thumb and forefinger. I followed it up by sanding the entire stem surface using 400, 600, 800 grit sand papers and finally with a piece of 0000 grade steel wool. This serves to remove the deep seated oxidation and also reduces the sanding marks of the more abrasive sand papers. I also sharpened the button edges while sanding. I wiped the stem with a cotton swab and alcohol to remove all the oxidation and sanding dust from the surface. I applied a little Extra Virgin Olive oil over the stem and set it aside to be absorbed by the vulcanite.
  I followed up the sanding regime with micromesh polishing to bring a shine on the stem surface. Since my hand held rotary tool is out for repairs, I could not continue with my experimentation on use of Red Tripoli and White Diamond during the polishing regime. I wet sand the stem with 1500 to 12000 girt micromesh pads. I rub a small quantity of olive oil in to the stem surface to hydrate it and set it aside. The stem looks nice and shinning black.
 The stummel had dried out completely and I could now move ahead with polishing the stummel. To remove the sanding marks and bring a deeper shine, I polished the stummel with micromesh pads, wet sanding with 1500 to 12000 pads. I wiped the surface with a soft cloth at the end of the micromesh cycle. The stummel looks amazing with a deep shine and beautiful grains popping over the stummel surface. I shared pictures of the stummel at this stage in restoration with Abha for her opinion as to whether stain it in dark brown or otherwise. Prompt came the response to let it be. She really liked the patterns of grain and the look of the pipe. Also as the pipe is smoked, it will turn dark and develop a nice patina. So, natural finish to the stummel it is!!

 Next, I rub a small quantity of “Before and After Restoration Balm” in to the briar with my finger tips and let it rest for a few minutes. The balm almost immediately works its magic and the briar now has a nice vibrant appearance with the beautiful darkened grain patterns on full display. I further buff it with a horse hair shoe brush. Unfortunately I just missed out on taking pictures of the stummel at this point in restoration process. But it looks beautiful, I say!!
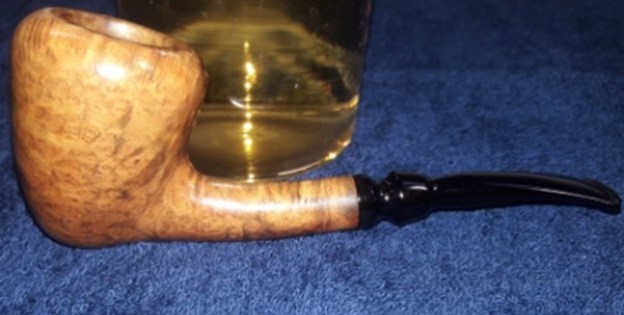
By the weekend, my rotary tool stabilizer came back after repairs and I could finally move ahead with finishing the pipe. To apply the finishing touches, I mount a cotton cloth buffing wheel on to my hand held rotary tool and apply a coat of Blue Diamond to the stummel and the stem to polish out the minor scratches. With a cotton buffing wheel that I use for carnauba wax, I apply a coat of carnauba wax and continue to work on it till the complete coat of wax had been polished out. I mount a clean cotton cloth buffing wheel and give the entire pipe a once over buff. I finished the restoration by giving the entire pipe a rigorous hand buffing using a microfiber cloth to raise the shine further. This is truly a beautifully crafted pipe with gorgeous grains all around and the feather weight coupled with a large bowl will surely provide a long and leisurely smoke allowing ample time to admire the construction and grains on this pipe.


 P.S. This pipe was earmarked not for addition to my personal collection but for sale. However, the beautiful grains, the exquisite carving and very light weight coupled with a large chamber for a long and peaceful smoke has me enticed to an extent that I have decided to add it to my rotation. Such is the beauty of this pipe. Now all that remains is to load this bowl with my favorite G.L. Pease Virginia blend and puff contentedly for some time!!
Thanks to all readers of Reborn pipes who have spared a moment of their invaluable time in reading through this write up and as is always, your suggestions and advice are always welcome as this would not only help me but also help the new pursuers of this art.