Blog by Paresh Deshpande
I had finished refurbishing a Barling Brandy bowl in a smooth finish and it has found a new piper to carry forward the legacy. The next pipe that I decided to work on is a lovely Brandy bowl shaped Barling pipe in a sandblast finish which was purchased together with the smooth finish that I have mentioned above. The pipe boasts of shallow blasts on the stummel with beautiful patterns. The pipe is stamped on the surface at the bottom of the shank as “B.BARLINGS & SONS” in block capitals over “MADE IN DENMARK” over shape code numeral “4899”. The top of the saddle stem has the trademark BARLING in a cross stem logo. The stampings are all deep and crisp.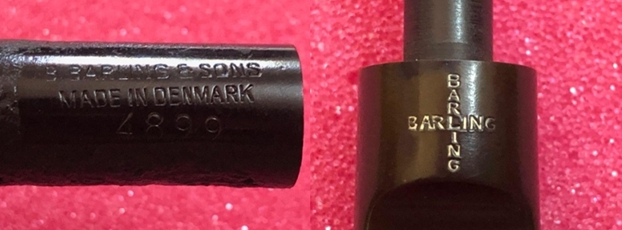 Having just recently worked on a Barling pipe that bore the COM stamp of Denmark, I was aware of the provenance of this pipe. I reproduce the relevant part of the information gleaned from pipedia.org.
In the late 1970’s production of Barling pipes was shifted to Denmark where Eric Nording manufactured Barling pipes for Imperial. There may have been other factories, but as of this writing, none has been identified. Nording stated that he made approximately 100.000 pipes for Imperial.
Despite these attempts to diversify the line, Barling lost its market. These pipes just weren’t equivalent to the family era pipes.
Finally, Imperial decided to close down the Barling operations entirely by 1980.
Thus from the above, it is safely concluded that the pipe currently on my work table is from the period between late 1970’s to 1980 and given the quality of sandblast, most likely manufactured by other factories in Denmark!!
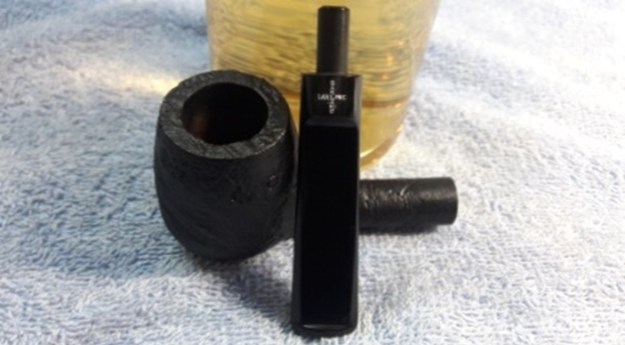
INITIAL VISUAL INSPECTION
The pipe came to us in a very nice condition having being smoked maybe only a few times. It was lightly smoked and with a thin layer of cake build up in the chamber. The rim top is covered in a minimal overflow of lava with inner and outer rim edges in pristine condition. The chamber has minimum odor and should be addressed once the chamber and shank internals are cleaned up. A simple scrub with a brass bristled brush should suffice to clean the rim top surface. The sandblasted stummel surface has a shallow sandblast with beautiful patterns of mix of Bird’s eye, cross grains and nice swirls to the sides, front and bottom of the bowl respectively. The front of the stummel has a deep pit, likely caused during the sandblasting process where the soft briar was chipped off by the sand particles. The stummel surface is stained black and has a dark lacquer coat that has dulled a bit. The mortise is relatively clean with an easy draw. Running a few pipe cleaners dipped in alcohol should clean up the shank internals.

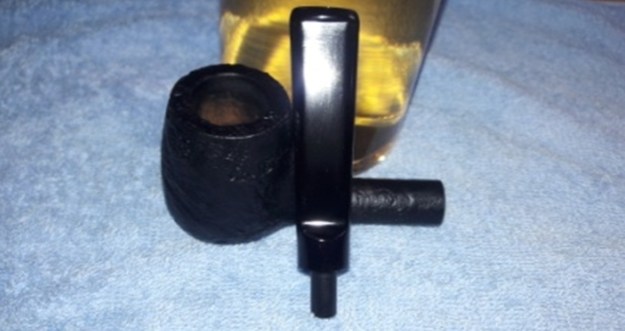
 The straight vulcanite saddle stem gradually flares out towards the slot end and is deeply oxidized. Thankfully the stem surface is free of any bite marks or tooth chatter on either surface in the bite zone. The insides of the slot and tenon have very little signs of accumulated gunk. The crossed Barling logo on the saddle top of the stem is crisp and deep.
 INITIAL CLEANING BY ABHA…
The initial cleaning on this pipe was done by Abha, my wife (she has cleaned up around 40-50 pipes and these have now reached me for further restoration). She reamed out the complete cake and further smoothed out the chamber walls with a folded piece of 220 grit sand paper. She further cleaned out the internals of the shank with pipe cleaners and alcohol and cotton buds. She followed the internal cleaning of the shank with external cleaning of the stummel using Murphy’s Oil soap and hard bristled tooth brush and dried it with paper napkins and cotton cloth.
Next she cleaned out the internals of the stem air way and immersed it in “Before and After Deoxidizer” solution along with the stem of other pipes in line for restoration. Once the stem had soaked overnight, she cleaned the stem under running warm water and scrubbed the raised oxidation from the stem surface using Scotch Brite pad. She further removed the oxidation by scrubbing the stem with 0000 grade steel wool and applied a little olive oil to rehydrate the stem.
ONCE THE PIPE IS ON MY WORK TABLE…
I cannot thank my wife, Abha, enough for all the help and support that she extends me in my pursuance of this hobby. With the initial pipe cleaning at her hands, allows me to move at a nice click with my restoration and repair work on the pipes.
The chamber is odorless and the walls are solid without any signs of damage. The sandblasted rim top surface is intact with an equally undamaged inner and outer rim edge. The chamber and rim top has been nicely cleaned up by Abha. With a draught hole right at the bottom and dead center, this should be a fantastic smoker!!
 Even though most of the lacquer coat was removed when the stummel was cleaned up by Abha, I could still see remnants of the peeling lacquer coat over some parts of the stummel and the stain has been washed away at a two places. I shall have to remove this coat and thereafter decide on my further course of action. The mortise and shank internals are clean and fresh. This should turn out to be an easy project requiring just a rub down with restoration balm followed by wax polish to bring life back in to the stummel.

 The oxidation on the vulcanite stem has been greatly reduced thanks to all the efforts put in by Abha. A bit of sanding to remove the deeper oxidation followed by micromesh polishing cycle should add a nice shine to the stem. The stem internals are nice and clean with a free airflow. I would need to refresh the stem logo to make it pop out on the shining black stem once done.
 THE PROCESS
The first thing I addressed was the lacquer coating that remained on the stummel surface. I wiped the stummel surface with cotton swabs and alcohol. However, the coating persisted. Next I decided to use a stronger solvent. With cotton swabs and acetone, I cleaned the stummel surface. I was able to remove the lacquer coating completely from the surface.

 Next, I rub a small quantity of “Before and After Restoration Balm” in to the briar with my finger tips and let it rest for a few minutes. The balm almost immediately works its magic and the briar now has a nice vibrant appearance. However, I noticed that my finger tips had blackened with stain which was coming off. I thought that I would let it rest and dry out and thereafter check again.

 A couple of hours later, I wiped the stummel with a soft cotton cloth and to my chagrin, I noticed that the cloth had blackened at the spots which had come in contact with the stummel surface and the stain had come off from the surface too. I decided to heat the stummel surface with a heat gun and reset the stain. Should this trick fail, I had made up my mind to go the “full Monty” way. I would completely remove the old stain and apply a fresh coat of stain and the works!! And this was supposed to be a simple restoration!!
 I heat the stummel surface with my heat gun and set it aside to cool down naturally. Half an hour later, the stummel had cooled and I reapplied the “Before and After Restoration Balm”. This time there were no blackened finger tips. What a relief this revelation was!!
 Now that the stummel was nearly complete, I turned my attention to the stem refurbishing. With a folded piece of a 220 grit sand paper, I sand down the stem surface. I followed it up by sanding it with 400, 600, 800 grit sand papers and finally with a piece of 0000 grade steel wool. This serves to remove the deep seated oxidation and also reduces the sanding marks of the more abrasive sand papers. I wiped the stem with a cotton swab and alcohol to remove all the oxidation and sanding dust from the surface. I applied a little Extra Virgin Olive oil over the stem and set it aside to be absorbed by the vulcanite.
 I followed up the sanding regime with micromesh polishing to bring a shine on the stem surface. I wet sand the stem with 1500 to 12000 girt micromesh pads. This time around I could not continue with my experimentation that I had spelled out in my previous posts, as due to voltage fluctuations, my hand held rotary tool stabilizer had a burn out and had to be sent for repairs. I rub a small quantity of olive oil in to the stem surface to hydrate it and set it aside.
 The stem looks nice and shinning black, however, the stem logo is yet to be refreshed and highlighted. With a white fine tipped correction pen, I filled the crossed Barling stamping and once it had dried a bit, with a toothpick, I scrapped off excess of the correction ink. The stamping is now completely refreshed and sits proudly on the top of the saddle.
 With three pipes on the home stretch and a week long wait later, my rotary tool came back from repairs. I was held up just for this piece of equipment!! To apply the finishing touches, I mount a cotton cloth buffing wheel on to my hand held rotary tool and apply a coat of Blue Diamond to the stummel and the stem to polish out the minor scratches. With a cotton buffing wheel that I use for carnauba wax, I apply a coat of carnauba wax and continue to work on it till the complete coat of wax had been polished out. I mount a clean cotton cloth buffing wheel and give the entire pipe a once over buff. I finished the restoration by giving the entire pipe a rigorous hand buffing using a microfiber cloth to raise the shine further. The finished pipe looks beautiful and is waiting for a new home!!