Blog by Steve Laug
Those who have been following the blog know that I really like old BBB pipes and have a pretty nice collection of different shapes. I love working on them as the briar is very good and the vulcanite is quite nice as well. You also know that I am not currently adding any work to the queue that is not local so that I can catch up on the large estate from Bob Kerr that I have been working on. But sometimes it is hard to say no. When the brand I like and a pipe I like come along together it is a hard one to decline. So long story short, not too long ago I received the following email with photos of the damaged stem attached:
Dear Steve,
Greetings from Wisconsin! Thank you for the good work you do, and for bringing new life to so many fallen pipes.
I bought a BBB Own Make Liverpool (shape # 607) despite its severely damaged stem. I love the shape and weight of it, and if its stem were restored this would probably be my favorite pipe.
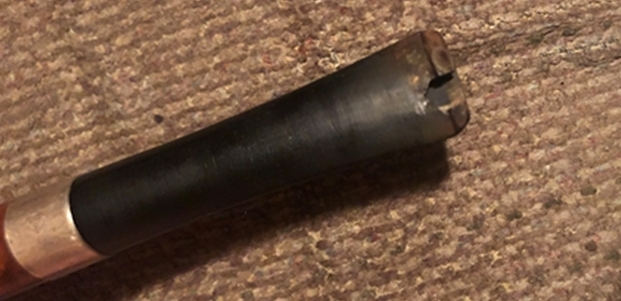
The damage to the stem (please see attached photographs) is bad enough that the pipe is unsmokable: a piece of the vulcanite about one-fifth the size of a dime is missing altogether. In addition, the stem has been very roughly sanded, which left it marked with a kind of rude crosshatching.
I’m writing to ask whether you yourself would be open to doing a repair job, or could recommend someone who could.
Many thanks and congratulations again on the good work you do.
Stephen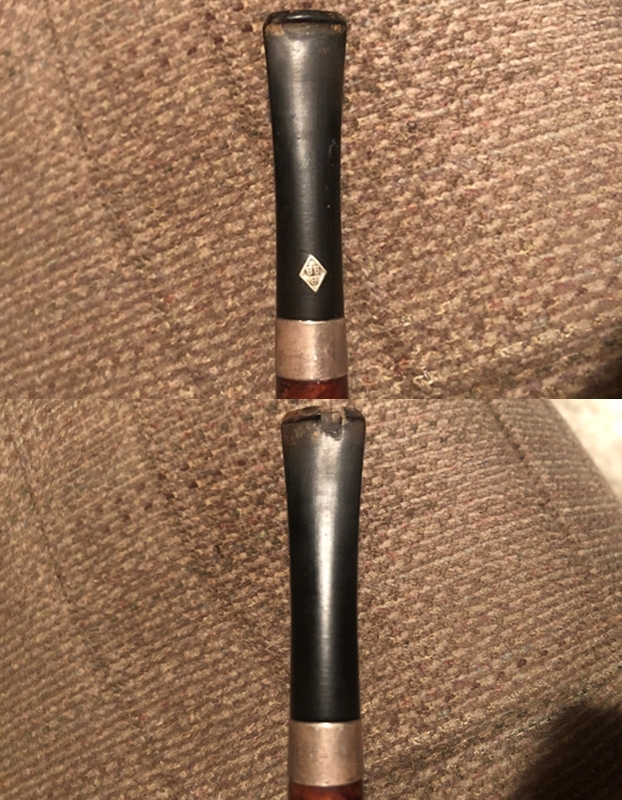
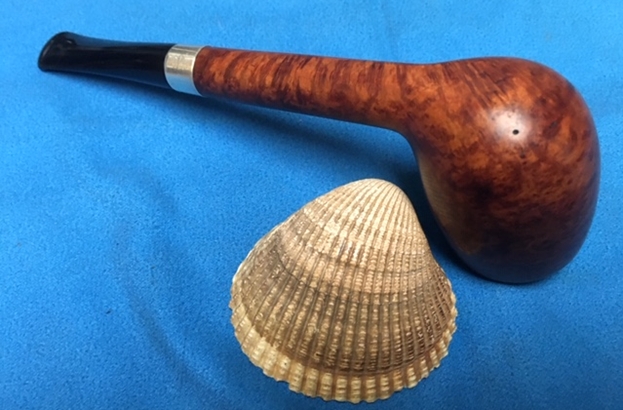
 Looking at the photos he sent I had to take his word for it that it was a Liverpool shaped pipe. The round shank and the short tapered stem pointed to that. The metal BBB logo on the stem top, the fact that it was a BBB Own Make and the challenge of restoring a BBB all made it impossible for me to decline! After I said yes and the deal was struck for the repair and restoration I thought I should have had him send it to Paresh who loves working on this kind of stem rebuild. But I just shook my head and waited for it to arrive.
When it arrived I took time to assess the damage. The stem was just as Stephen described it so I quote his description here: The damage to the stem (please see attached photographs) is bad enough that the pipe is unsmokable: a piece of the vulcanite about one-fifth the size of a dime is missing altogether. In addition, the stem has been very roughly sanded, which left it marked with a kind of rude crosshatching. On top of that it was dirty and smelled bad. The bowl was another story. There were some dark stains on the heel of the bowl and on the right side of the shank that at first glance looked like burn marks but on examination seemed to be a dark, sticky substance on the surface of the briar. The rim top was darkened and there was some lava overflow on the top. There was a burn mark on the front of the bowl on the bevel but it did not appear too deep. There was also a burn mark on the out edge of the rim at the front. The bowl had a thin cake in it and the pipe smelled old and musty. My first thoughts on the band were that it was a repair band, but when I removed the stem there were no cracks in the shank. I examined the band with a lens and bright light and on the underside it bears the BBB Diamond and the stamping “Sterling Silver”. It is original! The pipe was a mess but it showed some promise and bespoke of a lot of work! I took photos of the pipe when I received it.
 I took a close up photo of the rim top and the stem to give a better picture of the issues that I needed to deal with in the restoration. You can see the damage on the front beveled edge and top of the rim as well as the darkening and nicks in the surface toward the back of the bowl. There was definitely damage that would need to be addressed (possibly a light topping). What was interesting to me is that the cake did not go all the way to the bottom of the bowl. The bowl bottom was still raw unsmoked briar… that too was promising. The stem was another story. The topside had a lot of sanding scratches and hash marks all around the brass BBB Diamond. The button was very thin on the top side both in terms of width and height. The chip out of the underside of the button went quite a ways into the stem material so that the rebuilt button would need to be a little thicker than the original but it was fixable in my estimation.
  I took photos of the stamping on the shank. I took a photo of the left side and you can see the BBB Diamond with Own Make flanking it on each side. I cleaned off the black grime on the right side before I took the photo of the stamping there. It read Made In London over England followed by the shape number – 607. You can see the nice birdseye grain on the shank sides. It is going to be a beautiful pipe once it is cleaned and restored.
 I took the stem off the pipe and was a bit surprised by the aluminum inner tube in the tenon. It extended the length of the shank and the pointed end extended into the bottom of the bowl. I just could not see it due to the cake and grime in the pipe.
 I decided to start my clean up on the bowl to see if I could remove the black marks on the heel and the shank side. I scrubbed the bowl down with Mark Hoover’s Before & After Briar Cleaner. I rubbed it into the surface of the briar, and as Mark wrote me it lifted the grime and dirt out of the briar. It removed the majority of the dark spots on the shank and heel. I would need to do a little more work on those areas but it looked very good. I rinsed the cleaner off the bowl with warm running water and dried it with a soft cloth. The photos below show the cleaned briar…. Look at the grain on that pipe!
 With the externals clean it was time to clean the internals. I cleaned out the thin cake in the bowl with a Savinelli Fitsall Pipe Knife and promptly forgot to take the photos. I cleaned out the mortise and the airway in the shank and stem with alcohol, pipe cleaners, and cotton swabs. For the way the pipe smelled the shank was amazingly clean. I am not used to that when an inner tube is used as usually the tars build up around the outside… This time the tube actually worked very well.
 While the rim top definitely looked better there was still some burn damage to the outer edge of the front rim and nicks in the back edge. I lightly topped the bowl with 220 grit sandpaper on a topping board. I was able to remove the damage for the most part without removing too much of the rim top.
 I did the initial polishing of the briar with micromesh sanding pads – wet sanding with 1500-2400 grit pads. I wiped the briar down after each pad with a damp cloth. I worked on the dark spots that had been on the heel and on the right side of the shank while being careful to not damage the stamping that was underneath the marks. I also polished the rim top and the inner bevel in preparation for staining.
 I smoothed out the bevel on the inner edge of the rim and was happy with the look. I used an Oak stain pen to stain the rim to match the rest of the pipe. The match is very good and it did a great job of blending in the damage to the bevel.
  Once I had finished the stain I continued to polish the bowl and rim top with micromesh sanding pads – wet sanding with 3200-12000 grit pads. I wiped the bowl down after each pad with a damp cloth to remove the sanding dust.


 I rubbed the bowl down with Before & After Restoration Balm. I worked it into the surface of the briar with my fingertips to clean, enliven and protect it. I let the balm sit for a little while and then buffed with a cotton cloth to raise the shine. I continue to use Mark Hoover’s Balm on every pipe I have been working on. The grain on the Own Make is quite stunning and it just pops now with the cleanup! It is a beauty.

 I polished the Sterling Silver Band with Hagerty’s Silver Polish to remove the tarnish and bring the shine back. It is a beautiful band. The BBB Diamond logo and Sterling Silver is on the underside of the shank.
 With the cleaning and restoration of the bowl finished for now I set it aside and turned my attention to the stem. The stem was the real challenge on this old timer. I was hoping to be able to rebuild the button and stem on the underside and widen the button on the topside to help protect the repair. I mixed up a batch of black super glue and activated charcoal powder to make putty. I inserted a folded card covered with packing tape to keep the glue from filling in the airway in the slot. I used a dental spatula to fill in the chipped area. I also filled in the area on the topside to build up the button. This kind of repair is really ugly at this point in the process. There is nothing pretty or redeeming about the way it looks.
 I let the stem repair cure overnight and in the morning used a needle file and a rasp to smooth out the repair and shape the edge of the button on both sides of the stem. The first photo shows the repaired and rebuilt button on the underside. The second one is the widened and beefed up topside of the button. Lots of work to go still but it is starting to show some promise.
  I sanded the repairs and the reshaped button with 220 grit sand paper and 400 grit wet dry sand paper to smooth out the ridges and high spots and give definition to the shape.
  I have one more tin of Denicare Mouthpiece Polish left from a few that I have picked up over the years. It is a coarse red pasted that serves to help remove oxidation. I polished the stem with that to further smooth out the surface of the vulcanite (and to be honest – to use it up).
  I polished the stem with micromesh sanding pads – wet sanding with 1500-12000 grit pads. I wiped the stem down after each sanding pad with Obsidian Oil. I polished it with Before & After Pipe Stem Polish – both Fine and Extra Fine. Once I had finished the polishing I gave it final coat of oil and set it aside to dry.


 When this pipe arrived I truly dreaded rebuilding the stem. I know how to do the process. That is never the problem but it is very labour intensive and time consuming. However, yesterday afternoon I felt like doing something a bit different in the restoration process. I pulled this pipe out of the box and finished the repair yesterday. Today I shaped and polished it. With every pipe I work on, I look forward to when it all comes back together, polished and waxed. I put the bowl and stem back together. I polished the bowl and stem with Blue Diamond to polish out the scratches in the briar and the vulcanite. I gave the bowl multiple coats of Conservator’s Wax and the stem multiple coats of carnauba wax. I buffed the pipe with a clean buffing pad to raise the shine. I hand buffed it with a microfiber cloth to deepen the shine. The pipe polished up pretty nicely. The sandblast finish looked really good with the polished black vulcanite. This BBB Own Make 607 Liverpool was another fun pipe to work on. It really has a look that I have come to expect from BBB pipes. It is really eye catching. The combination of various brown stains really makes the pipe look attractive. It is another comfortable pipe to hold in the hand. The finished pipe is shown in the photos below. The dimensions of the pipe are Length: 5 ¾ inches, Height: 1 7/8 inches, Outside diameter of the bowl: 1 ¼ inches, Chamber diameter: ¾ of an inch. I look forward to mailing it back to Stephen and seeing what he thinks of the finished pipe. I have sent him progress reports but that is not the same as holding it in your hand. Thanks for reading this blog and my reflections on the pipe while I worked on it. This is an interesting estate to bring back to life.