Blog by Steve Laug
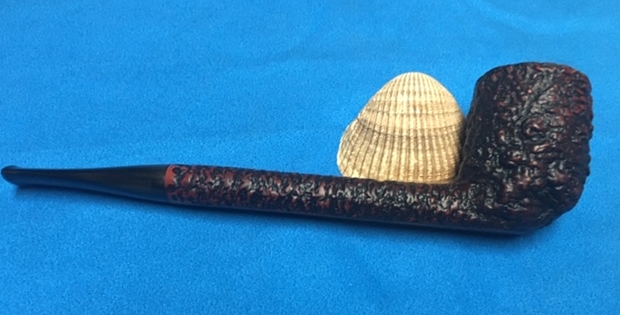
Along with the recent Kaywoodie Original (https://rebornpipes.com/2019/01/25/new-life-for-a-kaywoodie-original-imported-briar-freehand-stack/) and the Royal Danish 984R Canadian (https://rebornpipes.com/2019/01/26/an-easy-restore-a-royal-danish-984r-canadian/) that I worked on, my brother Jeff sent me an interesting Jobey Canadian. The pipe has a Sea Rock style finish. The underside of the shank is stamped Jobey over Florentine in script followed by EXTRA and finally by PATENT PENDING. That helps to date this to the time after the patent was filed in 1970. Like the other pipes that came from this Idaho auction the pipe was in good condition – dirty but really not too bad. The finish was very dirty with grime worked into the grooves and valleys of the rustication. The bowl had a thick cake that flowed over the rim top leaving a thick coat of lava. It was hard to know what the inner and outer edges of the bowl looked like until the pipe was reamed and cleaned. The stem looked good but had deep tooth marks on both sides of the stem. Jeff took these pictures of the pipe to show its condition before he started his cleanup work. 
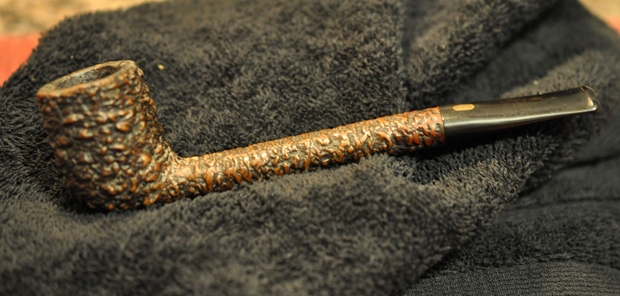 Jeff took a close up of the bowl and rim. The bowl thick cake and the photos show the lava overflow onto the rim top. It was thick and had filled in the crevices and valleys of the rustication.
 On the underside of the shank the stamping was very clear and readable. It is stamped in a smooth panel that runs from the heel of the bowl to end of the shank. It is evidently an early Jobey that is stamped Patent Pending. I am sure that the Patent refers to the Jobey Link in the shank.
 He took photos of the stem to show the oxidation on the stem. The first photo shows the faint/light Royal Danish Crown on the top side of the taper near the shank. The second and third photo show the oxidation and the otherwise pristine stem surface.
 On the topside of the tapered stem there is a brass Jobey insert that is pressed into the vulcanite. It was readable but dirty.
 Jeff followed his usual regimen of cleaning an estate pipe. He had reamed the bowl with a PipNet pipe reamer and followed up with a Savinelli Fitsall pipe knife to remove the cake. He scrubbed out the mortise and the airway in the shank and the stem with alcohol, cotton swabs and pipe cleaners. He scrubbed the exterior of the bowl, rim, shank and stem with a tooth brush and Murphy’s Oil Soap to remove the oils and tars on the bowl, rim and shank. He rinsed it under running water and dried it off with a soft cloth. It looked a lot better but the rim was still dirty. The stem had deep tooth marks on both sides from the button forward. I took photos of the pipe to show its condition before I started my work on it.
 I took close up photos of the rim top that shows the clean bowl and the remaining hard coat of lava in the grooves at the front right side of the rim top. The stem was clean and Jeff had used Before & After Deoxidizer to soak and remove much of the oxidation. He rinsed out the inside of the stem and rinsed off the exterior as well. It is hard to see the rippling tooth marks in the photos but they are on both sides of the stem.
 I removed the stem from the shank to show the Jobey Link that screwed into the shank and the smooth end that the stem sat on.
 I used a brass bristle wire brush to clean up the rim top of the bowl and loosen the remaining debris and dust in the grooves in the rustication toward the front of the bowl.
 I rubbed the bowl down with Before & After Restoration Balm into the coral rusticated finish of the bowl and the shank to deep clean the briar. I worked it into the smooth portions the sides and the bottom of the bowl. The product works to clean, enliven and protect the briar. I hand rubbed it with my fingers and wiped it off with a soft cloth. I buffed the bowl with a horsehair shoe brush to polish it. The briar really began to have a rich shine. I took some photos of the bowl at this point to mark the progress in the restoration.

 I sanded the stem down with a folded piece of 220 grit sandpaper to smooth out the tooth marks and waves in the surface of both sides. I used a piece of 400 grit wet dry sandpaper to polish out the scratches in the stem.
 I polished the stem with micromesh sanding pads – wet sanding it with 1500-2400 grit pads and dry sanding it with 3200-12000 grit pads. I wiped the stem down after each pad with a damp cloth to remove the sanding dust. I used the Before & After Pipe Polish to remove the small minute scratches left in the vulcanite. I finished by wiping the stem down with a final coat of Obsidian Oil and set it aside to dry.
 I polished the stem with Blue Diamond to polish out the remaining small scratches and gave it several coats of carnauba. I polished the bowl and shank with Conservator’s Wax and buffed it with a shoe brush. I buffed the pipe with a clean buffing pad to raise the shine. I hand buffed it with a microfiber cloth to deepen the shine. The pipe polished up pretty nicely. The finished pipe is shown in the photos below. The dimensions are Length: 6 3/4 inches, Height: 1 3/4 inches, Outside diameter of the bowl: 1 1/4 inches, Chamber diameter: ¾ of an inch. I will be adding it to the rebornpipes store shortly. If you are interested in adding it to your collection email me at slaug@uniserve.com or send me a message on Facebook. Thanks for walking through the restoration with me as I worked over this rusticated Patent Pending Jobey made Canadian.