Daily Archives: January 19, 2019

New Life for another B.P. Jum War Club


Blog by Steve Laug

I was sorting through another one of the boxes of pipes that my brother Jeff sent me and found another B.P. Jum pipe. In a previous blog (https://rebornpipes.com/2018/06/02/breathing-new-life-into-a-b-p-jum-war-club/) I had restored one that was very similar. I had called it a war club because of the size and heft of the pipe. This B.P. Jum was also a large, hefty carved pipe. It too had the shape and a carved finish that was similar to the Custombilt pipes such as the ones that I have worked on lately. It is the same size as the previous Jum that I had worked on – 5 ½ inches long, 1 ½ inches tall, outside wall diameter 2 inches and the chamber diameter 1 inch. The shank diameter is 7/8 inches. The stem is 2 ¼ inches long. The briar was very dirty with grit and grime in the depths of the carvings. The rim top had a thick coat of lava and tars in the carving of the rim. There was a thick cake built up on the walls of the bowl. Interestingly this pipe did not have any visible fills that I have come to expect on the B.P. Jum line. The stem was oxidized and dirty and there were no tooth marks or chatter on either side of the stem. The internals of the both the airway in the stem and shank and the mortise were very dirty with tars and oils. Jeff took photos of the pipe before he started his cleanup work on it. Jeff took a photo of the rim top and inside of the bowl to show the condition. You can see the thick cake in the bowl and the heavy lava overflowing over the surface of the rim top. He also took a photo the underside of the bowl and shank. I have included it here as well.There was a smooth portion of briar on the underside of the shank that was stamped BP JUM over IMPORTED BRIAR. You can see that the pipe has some interesting grain even on the shank.He took photos of the stem to show the oxidation and calcification on the stem. Surprisingly there were no tooth marks or chatter on the surface.When I worked on the previous B.P. Jum I did some research to try to find out information on the brand. There was a lot of conjecture as to whether the brand was made by Tracy Mincer of Custombilt fame. There is no definitive proof other than the common shapes, sizes and look of the pipes. Bill Unger, of Custombilt fame and author of a history of the brand, mentions BP Jum but cannot definitively connect the two. So the maker remains a mystery that is still unsolved. Do any of you reading this have information on the brand? Send me a message or an email if you can help. Thanks ahead of time.

Jeff had reamed the bowl with a PipNet pipe reamer and followed up with a Savinelli Fitsall pipe knife to remove the cake. He scrubbed out the mortise and the airway in the shank and the stem with alcohol, cotton swabs and pipe cleaners. He scrubbed the exterior of the bowl, rim, shank and stem with a tooth brush and Murphy’s Oil Soap to remove the oils and tars on the bowl, rim and shank. He rinsed it under running water. He dried it off with a soft cloth. The lava mess on the rim was thoroughly removed without harming the finish underneath it. Without the grime the finish looked good. The inner edge of the bowl showed some burn damage and was out of round. The stem was actually in pretty good condition and would only need to be polished. I took photos of the pipe to show its condition before I started my work on it. 
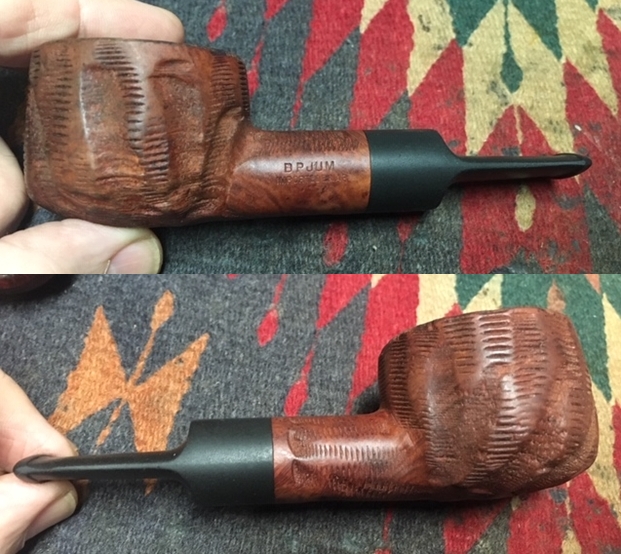
I took close up photos of the rim top that shows the clean bowl and the burn damage around the inner edge of the bowl. The stem was clean and Jeff had used Before & After Deoxidizer to soak and remove much of the oxidation. He rinsed out the inside of the stem and rinsed off the exterior as well. The photos of the stem show how good the stem actually looked after this treatment.The BP JUM stamp is very clean and readable. You can see from the photo that there are no visible fills in the shank or the portion of the bowl showing. The rest of the bowl is clean in the same way – no fills in the briar. That is a first for the B.P. Jum pipes that I have worked on.There was a small nick in the edge of the rim that I filled in with clear super glue. Once the glue dried I scraped away the excess with a pen knife and then used a brass bristle wire brush to clean up the grooves in the rim.I used a folded piece of 220 grit sandpaper to smooth out the burn damage and nicks in the inner edge of the rim. I gave the inner edge a slight bevel to mask the damage.I rubbed the bowl down with Before & After Restoration Balm to deep clean the briar and particularly the sanded areas. The product works to clean, enliven and protect the briar. I hand rubbed it with my fingers and wiped it off with a soft cloth. I buffed the bowl with a horsehair shoe brush to polish it. The briar really began to have a rich shine. I took some photos of the bowl at this point to mark the progress in the restoration. I waxed the cleaned and polished bowl with Conservator’s Wax and worked it into the rusticated finish. I buffed it with a shoe brush and a soft cloth. The bowl is finished other than the final buffing that I will do once the stem is finished. I set the bowl aside and turned my attention to the stem. Since the stem was in such good condition and there was no oxidation or tooth marks I could immediately turn polishing it with micromesh sanding pads. I wet sanded it with 1500-2400 grit pads and dry sanded it with 3200-12000 grit pads. I wiped the stem down after each pad with a damp cloth to remove the sanding dust. I used the Before & After Pipe Polish to remove the small minute scratches left in the vulcanite. I finished by wiping the stem down with a final coat of Obsidian Oil and set it aside to dry. 
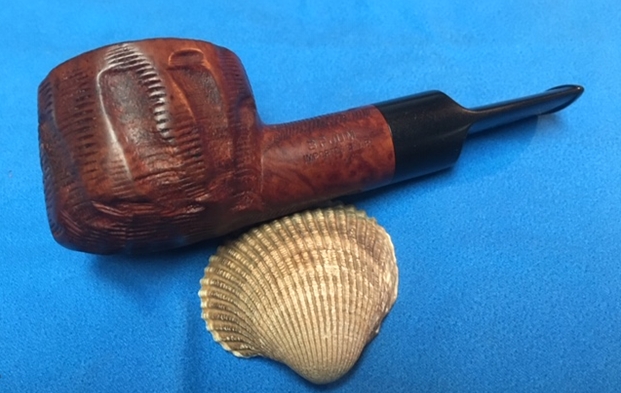
I polished the stem and bowl with Blue Diamond to polish out the remaining small scratches. I gave the bowl multiple coats of Conservator’s Wax and the stem several coats of carnauba wax and buffed the pipe with a clean buffing pad to raise the shine. I hand buffed it with a microfiber cloth to deepen the shine. The pipe polished up pretty nicely. The finished pipe is shown in the photos below. It is an interesting looking pipe that may have been carved by Tracy Mincer. It certainly bears a lot of resemblance to Custombilt/Custom-Bilt pipes. The dimensions are Length: 5 ½ inches, Height: 1 1/2 inches, Outside diameter of the bowl: 2 inches, Chamber diameter: 1 inch. I will be adding it to the rebornpipes store shortly. If you are interested in adding it to your collection email me at slaug@uniserve.com or send me a message on Facebook. Thanks for walking through the restoration with me as I worked over this B.P. Jum.

On the table – a Clipper High Class Briar Bent Churchwarden


Blog by Steve Laug

Over the past several years my brother Jeff has picked up some very interesting Churchwarden pipes. They have varied from classic shapes to Freehands. They have been anywhere from 7 to 10 inches long and have had straight, ¼, ½ and almost full bent stems. Each box he sends has at least one of these pipes – at least it seems so. In one of the recent boxes there was a beautiful little half bent Churchwarden. I have been keeping an eye out for one that I thought Paresh would like and this seemed like it was the one. When I showed it Paresh during one of our Whatsapp calls he fell in love with it and I added it to his box.

When Jeff received the pipe it was in pretty decent condition – dirty but really not too bad. The finish was dusty and dirty with grime worked into the lovely grain of the briar. The bowl had a moderate cake in it but the rim top was free of lava. The inner edge of the bowl was in great condition other than what appeared to be a small burned area toward to the front. That would not be clear until it was reamed. The rim top had some nicks and scratches as did the outer edge of the bowl. The left side of the shank was stamped Clipper over High Class Briar over IBERPIPSA. On the right side of the shank it had a square box with a pipe and puff of smoke as a logo. The underside at the stem/shank union it had the shape number 512. The stem did not seat in the shank due to the buildup of tars and oils. At the shank the stem had two vertical dots on the topside. The stem had some deep tooth marks on both sides at the button. It was oxidized but in decent condition. Jeff took these pictures of the pipe to show its condition before he started his cleanup work. He took close up photos of the rim top and the side and bottom of the bowl to show the condition of the briar and the bowl. You can see the cake in the bowl and the slight burn mark toward the front of the inner edge of the rim. You can also see the small nicks around the outer edge of the bowl. The finish is pretty but quite dirty. He took a photo of the stamping on the left, right and underside of the shank as well as the two vertical dots on the stem. The photos of the stem show the tooth chatter and marks on both sides of the stem near the button and the wear on the button itself.I did some research on the brand and found many different pipes that bore this stamping. They also seemed to have the name Swensson stamped on the shank as well. This link shows the same stamping with the addition of the Swensson name (https://en.todocoleccion.net/collectable-smoking-pipes/pipa-swensson-iberpipsa-car07~x111057347). Here is a second link that shows the box that the brand came in as well as a leaflet (https://en.todocoleccion.net/collectable-smoking-pipes/pipa-clipper-5740-iberpipsa~x33567017). I have included that photo for the information that it includes. There were other references to the brand with lots of photos of pipes in a variety of classic shapes. However there was nothing on either Pipedia or Pipephil that I could find. All of the examples of pipes bearing this brand that I saw were well made and showed beautiful grain.Armed with little bit of information that I could find it was time to start working on this pipe. Jeff had cleaned the pipe with his usual thoroughness – reaming the bowl with a PipNet pipe reamer and cleaning up the remnants with a Savinelli Fitsall Pipe Knife. He scrubbed the internals of the bowl, shank and stem with alcohol, cotton swabs and pipe cleaners. He scrubbed the exterior with Murphy’s Oil Soap to clean off the dust and grime on the finish. The rim top looked very good other than the small burned inner edge at the front of the bowl. The inside of the bowl itself looked great. The pipe had some beautiful grain all around the bowl and the cut of the briar maximized that. The stem was in great condition other than the oxidation and tooth marks on both sides near the button. I took photos of the pipe before I started working on it. I took some close up photos of the rim top, bowl and stem to show what they looked like after Jeff’s cleanup. The two different photos show the damage at the front inner edge of the rim from different angles. The stem was in good shape other than the tooth marks and chatter on both sides near the button.I took some photos of the stampings around the shank to give a picture of what they looked like after the cleanup. I worked on the damage to the front of  inner edge first. I used a folded piece of 220 grit sandpaper to smooth out the burned area and bevel the inner edge slightly to minimize the damage there. I polished the rim edges – both inner and outer with micromesh sanding pads – wet sanding with 1500-2400 and dry sanding with 3200-12000 grit pads. I worked on the nicked edges on the outside of the bowl to smooth them out. I polished the entire bowl avoiding the stamping with the pads. I wiped it down with a damp cloth after each sanding pad. You can see the progress in the photos below.  I worked some Before & After Restoration Balm into the smooth finish of the bowl and the rim top. I worked it into the surface of the briar with my fingertips to clean, enliven and protect the wood. Once the bowl was covered with the balm I let it sit for about 20 minutes and buffed it off with a soft cotton cloth and then polished it with a microfiber cloth. I took photos of the pipe at this point in the process to show what the bowl looked like at this point. I set the bowl aside and turned my attention to the stem. I decided to address the oxidation and the tooth marks on both sides of the stem ahead of the button. I sanded the tooth marks and chatter with 220 grit sandpaper and was able to remove them all. I sanded the stem surface with the 220 grit sandpaper and removed the majority of the oxidation. I polished the stem with Denicare Mouthpiece Polish to take out the oxidation at the button edge and on the end of the mouthpiece. I also worked hard to scrub it from the surface of the stem at the tenon end.I polished the stem, button and blade with micromesh sanding pads – wet sanding with 1500-2400 grit pads and dry sanding with 3200-12000 grit pads. I wiped the stem down after each sanding pad with Obsidian Oil. I polished it with Before & After Pipe Stem Polish – both Fine and Extra Fine. Once I had finished the polishing I gave it a final coat of oil and set it aside to dry. I put the bowl and stem back together. I buffed the bowl and stem with Blue Diamond to polish the briar and the vulcanite. I gave the bowl and the stem multiple coats of carnauba wax. I buffed the pipe with a clean buffing pad to raise the shine. I hand buffed it with a microfiber cloth to deepen the shine. The pipe polished up pretty nicely. The pipe turned out very well and shows the grain shining through. The contrast of the various grains – birdseye, flame and straight swirling around the bowl and shank looked good with the polished, long black vulcanite. This Churchwarden will soon be joining the other pipes I have boxed up for Paresh. The finished pipe is shown in the photos below. The dimensions of the pipe are Length: 10 inches, Height: 1 3/4 inches, Outside diameter of the bowl: 1 1/4 inches, Chamber diameter: 3/4 of an inch. I am looking forward to hearing what Paresh thinks of the pipe now. Thanks for reading this blog and my reflections on the pipe while I worked on it. Addendum: I posted on Facebook Tobacco Pipe Restorers Group and asked questions about the brand. I received this response from Sam Vior, a member there:      Iberpipsa: Iberica de Pipas, SA it was founded late 1980’s and made several lines: Swenson, Everest, Clipper, Brio, Coral, Commodore. In Spain.

That led me to a page on Pipedia (https://pipedia.org/wiki/Iberica_de_Pipas). I quote from that article in full.

“Founded in 1919, Iberica de Pipas is a company dedicated to the manufacture of pipes and gift items in wood. More than eighty years of presence in the market guarantee our products. Our accumulated experience has strengthened and allowed us to both continue making improvements and maintain the professional standards which our name inspires throughout the years.

In our effort to maintain client satisfaction, we offer an increased variety of quality products ranging from smoking to gift and home articles at an excellent price-quality relationship. Thanks to our professional standards and transparency, we can also manufacture any personally designed specialty items that our clients so desire. Contact us, we are eager to discuss how we can fulfil your needs.”

Brands (afak):

New Life for an old Custombilt Apple


Blog by Steve Laug

I have always been intrigued by Tracy Mincer and his Custom-Bilt pipes and even his Custombilt pipes like this one. There is something about the rugged carving and appearance of the pipes that gets my attention. I have a few of them in my collection and always enjoy the tactile nature of the pipe when it is being smoked. This old apple has the Custombilt stamp and I had reacquainted myself with the eras of the various spellings of the brand so that I can place it along with the previous billiard within the Rich Era. The pipe was in pretty decent condition when Jeff received it – dirty but really not too bad. The finish was dusty and dirty in the worm trail carvings. The bowl had a thick cake in it that flowed over the rim top into the rustication. The inner edge of the bowl appeared have some damage toward to the front but that would not be clear until it was reamed. The rim top had some deep scratches and gouges toward the right front. The stem had some deep tooth marks on both sides at the button but otherwise was in decent condition. The smooth part of the shank stamped Custombilt in script on the left side. On a smooth panel on the heel of the bowl it is stamped Imported Briar. Jeff took these pictures of the pipe to show its condition before he started his cleanup work. He took close up photos of the rim top and the side and bottom of the bowl to show the condition of the briar and the bowl. You can see the cake in the bowl and the lava overflowing onto the top of the rim. The worm trail rustication is quite dusty and dirty. He took a photo of the stamping on the left shank side and the heel of the bowl.The photos of the stem show the tooth chatter and marks on both sides of the stem near the button and the wear on the button itself.I did the research on the brand when I worked on the previous Custombilt that I restored earlier today (https://rebornpipes.com/2019/01/18/bringing-an-old-custombilt-billiard-to-back-to-life/). I have included much of that here for you to read. It comes from a great article on Pipedia that helps understand the brand and give a sense of what the various stamping looks like on the pipes (https://pipedia.org/wiki/Custom-Bilt). I cite from that article to give a feel for the brand:

In 1946, the name was changed to Custombilt after Mincer began an association with Eugene J. Rich, Inc. There were some big changes in advertising and distribution. The slogan “AS INDIVIDUAL AS A THUMBPRINT” began at this time as well.

In 1953, Leonard Rodgers bought the company and emphasized tobacco pouches and butane lighters. (However, it appears Mincer was working on his new pipe, the Doodler.) In 1968, Rodgers sold the Company to Consolidated Cigars. In the early 1970s, Wally Frank Co. bought the Custombilt trademark and began to produce their version of the pipe in 1974 or 1975. Hollco Rohr owned the Weber pipe factory, located in New Jersey, and produced the Custombilt pipes there. In 1987, the pipes were made out of the Butz-Choquin factory (France) and then Mexico until the late 1990s. Currently, the Custombilt name is owned by Tobacalera of Spain.

Along with the information above I found that the stamping that is on this pipe is identical to that identified in the article as Stamp Number Five. I have included that graphic because of the information that it included. It brings some of the issues in identifying the maker and the time period of the brand. In my mind the pipe I have in hand is very much like the Rich era pipes that I have seen and the note below says that. Interestingly the author also says he has seen the same stamping on the Wally Frank era pipes. It is a fascinating piece of history and a beautifully made old pipe.Armed with that information I turned to working on the pipe. Jeff had cleaned the pipe with his usual thoroughness – reaming the bowl with a PipNet pipe reamer and cleaning up the remnants with a Savinelli Fitsall Pipe Knife. He scrubbed the internals of the bowl, shank and stem with alcohol, cotton swabs and pipe cleaners. He scrubbed the exterior with Murphy’s Oil Soap to clean off the dust and grime on the finish. The rim top looked very good under the thick lava coat. I love the way the grain of the briar shows through the rustication. There were just a few nicks and scratches to deal with. The inside of the bowl itself looked great. The stem was in great condition other than the tooth marks on both sides near the button. I took photos of the pipe before I started working on it. I took some close up photos of the rim top, bowl and stem to show what they looked like after Jeff’s cleanup. The rim top has some darkening around the top and the edges. There is also some nicks and scratches on the surface ant the edges. Some are quite deep looking. The stem was in good shape other than the tooth marks and chatter on both sides near the button.  I took some photos of the stamping which seemed far more visible after Jeff’s cleanup than before.I worked on the  rim top and inner edge damage first. I gently topped the bowl to remove the deep cuts and gouges and smooth out the damage. I used a folded piece of 220 grit sandpaper to  further clean up the inner edge and leave it smooth. I polished the sanded rim top with micromesh sanding pads – wet sanding with 1500-2400 and dry sanding with 3200-12000 grit pads. I wiped it down with a damp cloth after each sanding pad. You can see the progress in the photos below. I stained the rim with three different stain pens – Cherry, Walnut and Mahogany. It still needed to be blended in a bit but the match of colour is perfect. I buffed it on the buffing wheel with Blue Diamond polish. The second photo shows the polished rim top. The match is good.Since the briar was in such good condition I started with rejuvenating the wood. I worked some Before & After Restoration Balm into the rustication and worm trails on the bowl and the rim top. I worked it into the surface of the briar with my fingertips to clean, enliven and protect the wood. Once the bowl was covered with the balm I let it sit for about 20 minutes and buffed it off with a soft cotton cloth and then polished it with a microfiber cloth. I took photos of the pipe at this point in the process to show what the bowl looked like at this point. I set the bowl aside and turned my attention to the stem. I decided to address the deep tooth marks on both sides of the stem ahead of the button. I filled in the tooth marks on the both sides of the stem with a clear super glue (Jeff had already cleaned the stem very well so it was not an issue). I set the stem aside to let the repairs cure.Once the repair had cured I used a flat blade needle file to sharpen the edge of the button on both sides of the stem. I also used it to flatten out the repairs. I worked on the remaining repaired areas with 220 grit sandpaper to blend them into the surface of the stem. I polished the stem with Denicare Mouthpiece Polish to take out the oxidation at the button edge and on the end of the mouthpiece. I also worked hard to scrub it from the surface of the stem at the tenon end.I polished repaired areas on the stem, button and blade with micromesh sanding pads – wet sanding with 1500-2400 grit pads and dry sanding with 3200-12000 grit pads. I wiped the stem down after each sanding pad with Obsidian Oil. I polished it with Before & After Pipe Stem Polish – both Fine and Extra Fine. Once I had finished the polishing I gave it a final coat of oil and set it aside to dry. I put the bowl and stem back together. I buffed the bowl and stem with Blue Diamond to polish out any light scratches that remained in the briar and the vulcanite. I gave the bowl and the stem multiple coats of carnauba wax. I buffed the pipe with a clean buffing pad to raise the shine. I hand buffed it with a microfiber cloth to deepen the shine. The pipe polished up pretty nicely. The worm trail rusticated finish on this Rich era Custombilt and the smooth portion around the cap on the rim and shank turned out very nice and shows the grain shining through. It has the kind of rustic beauty that draws collectors to them after all of these years. The contrast of the worm trails with the grain swirling through them looked good with the polished black vulcanite. This Custombilt Apple will soon be joining the other pipes I have on the rebornpipes store. The finished pipe is shown in the photos below. The dimensions of the pipe are Length: 5 1/2 inches, Height: 1 7/8 inches, Outside diameter of the bowl: 1 ½ inches, Chamber diameter: 7/8 of an inch. If you are interested in adding it to your collection let me know. Thanks for reading this blog and my reflections on the pipe while I worked on it.