Tag Archives: restaining a bowl and rim

Reconstructing a Broken Stem on Dunhill Bruyere # 51671


Blog by Paresh Deshpande

I had just finished the first of the 30 pipes from my Mumbai Bonanza find, a Stefano “EXCLUSIVE”; here is the link to the write up; https://rebornpipes.com/2019/03/11/mumbai-bonanza-stefano-exclusive-restorationa-month-long-project/

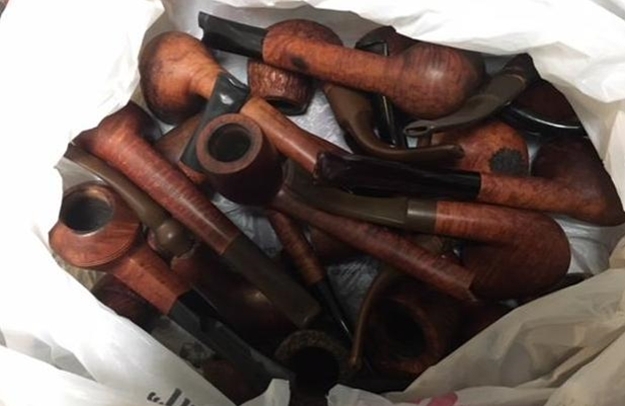
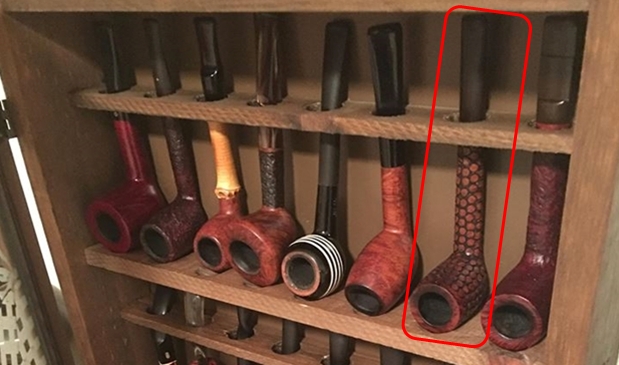
How did I land up with this lot makes for an interesting read and one which I have written about in the above restoration. Here are pictures of the pipes that I received in this lot. 
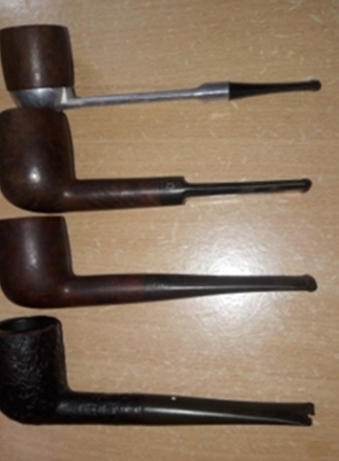
This lot contains some very nice collectible pipes, a few well known brand pipes and some mediocre pipe brands. Overall, with seven Dunhills, a Preben Holm #1, a couple of Made in England Pete System pipes, Charatan’s and other assorted pipes, I would say that I had hit a huge jack pot!!! Hence, I like to call this find as “Mumbai Bonanza”.

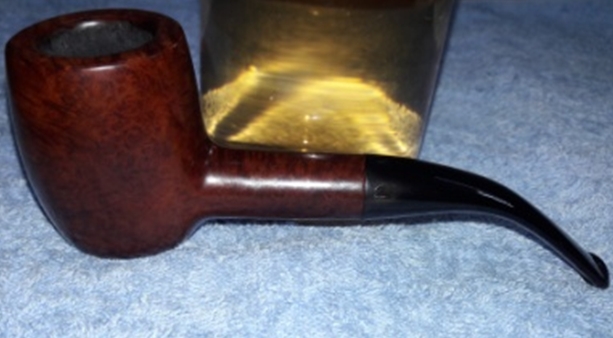
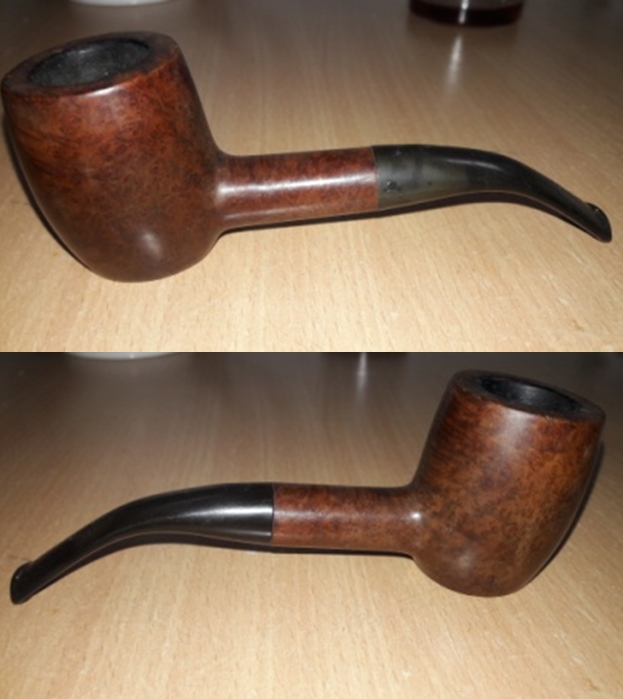
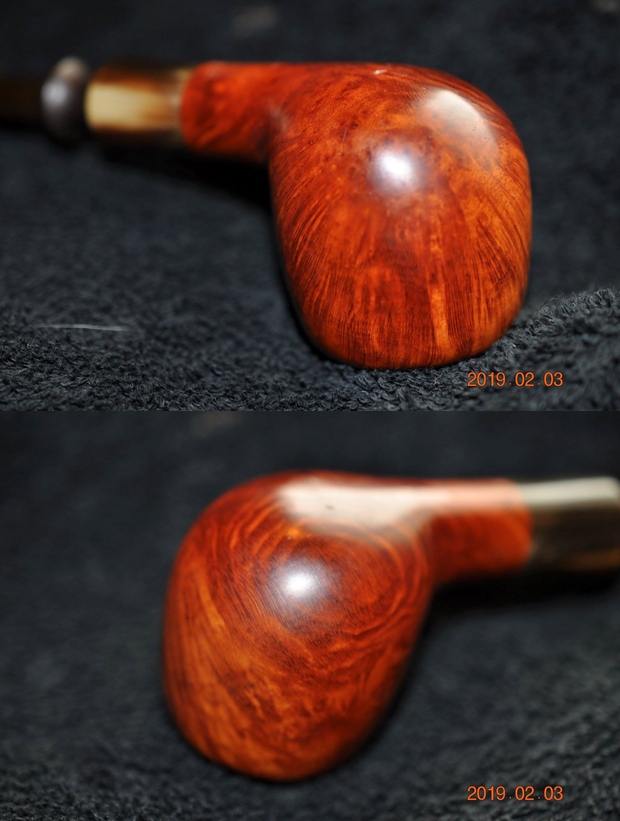
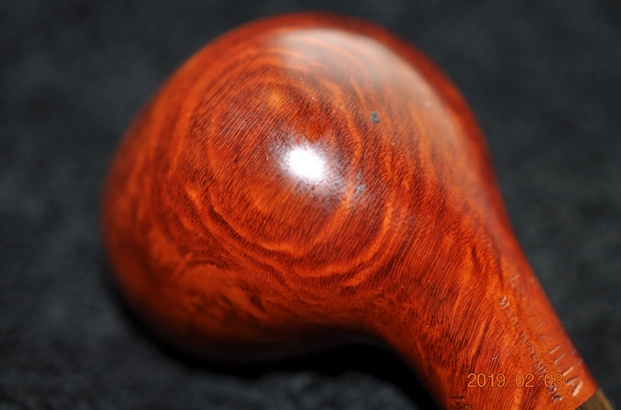
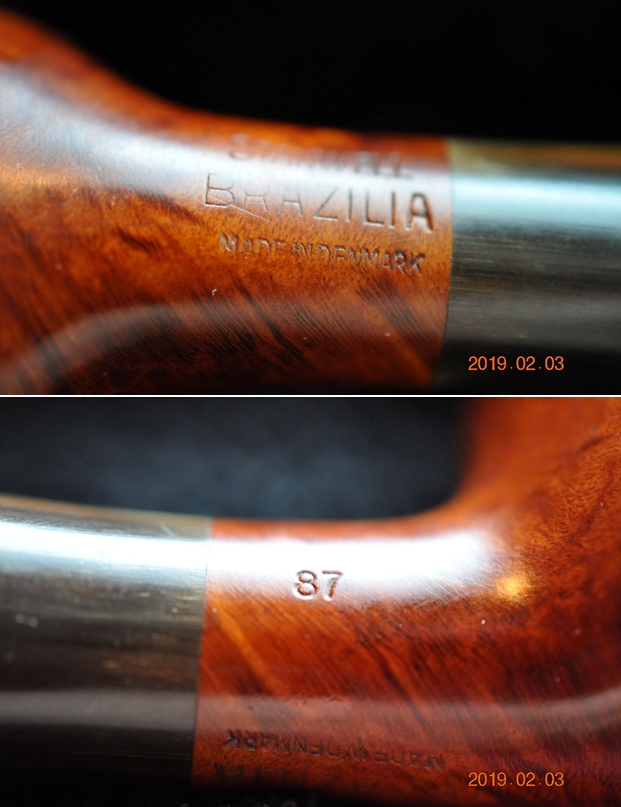
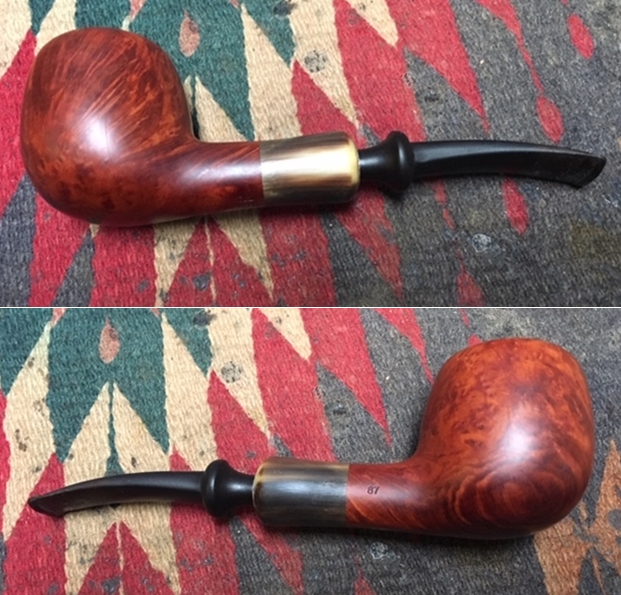
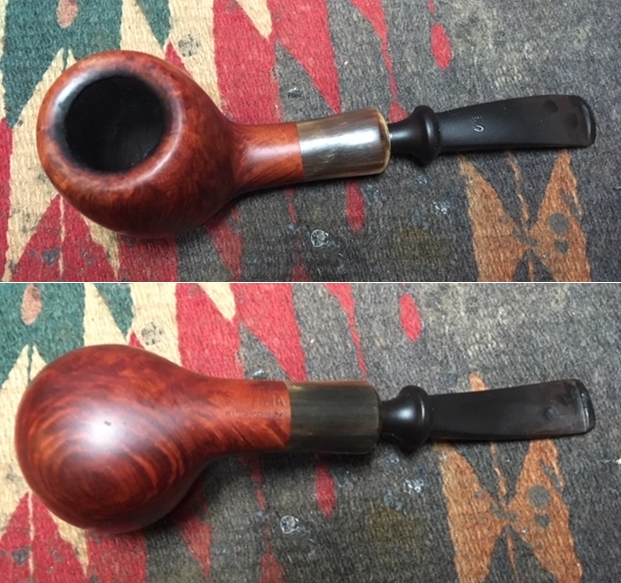
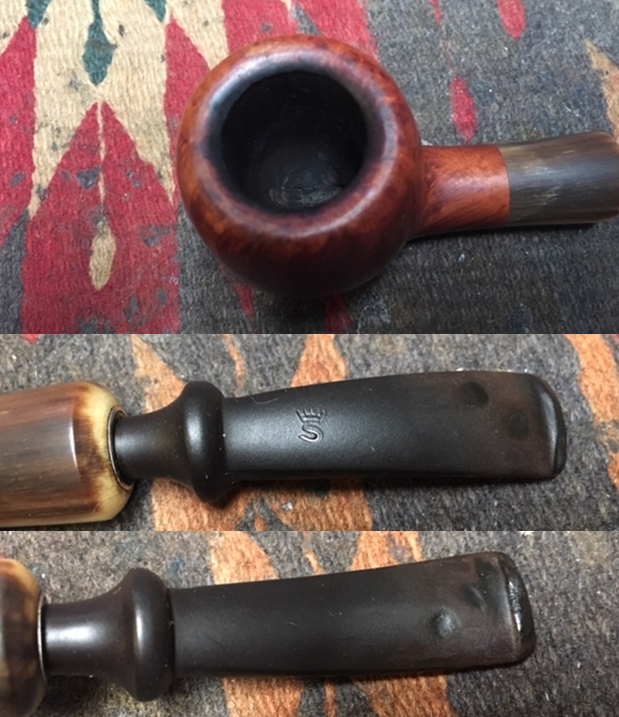
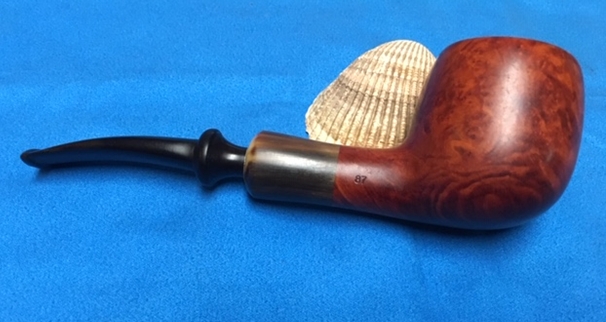
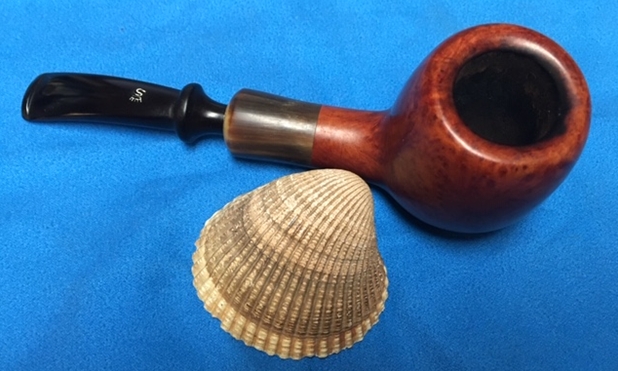
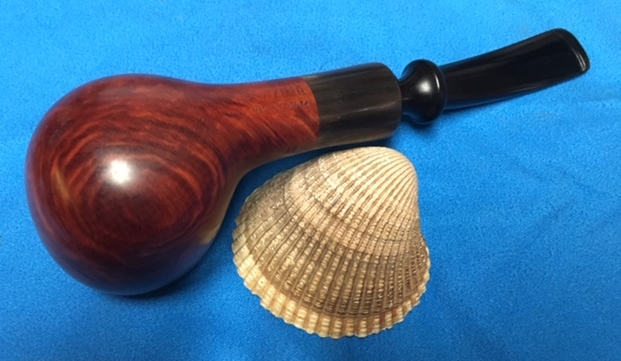
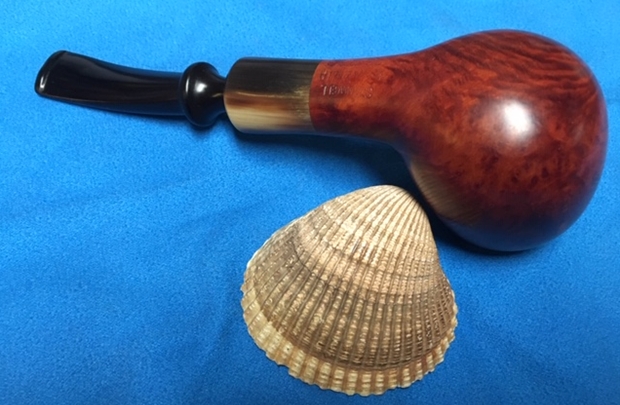
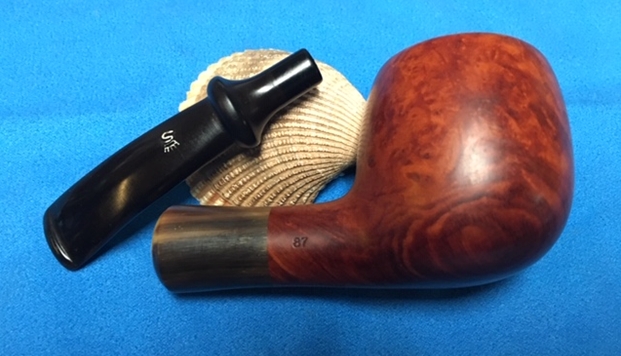
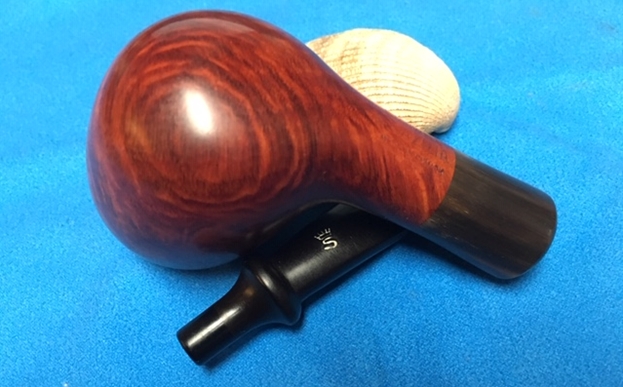
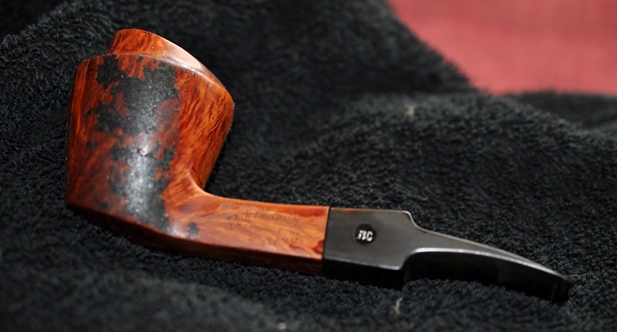
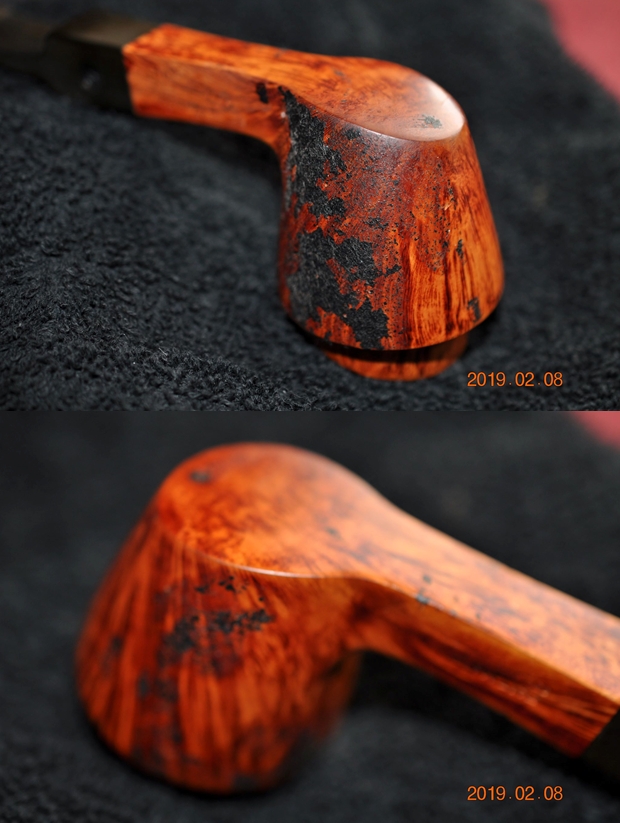
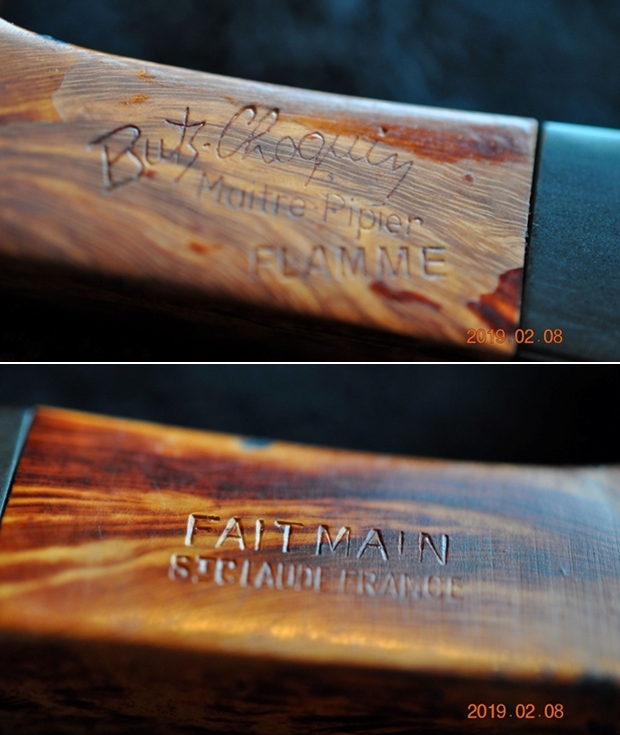
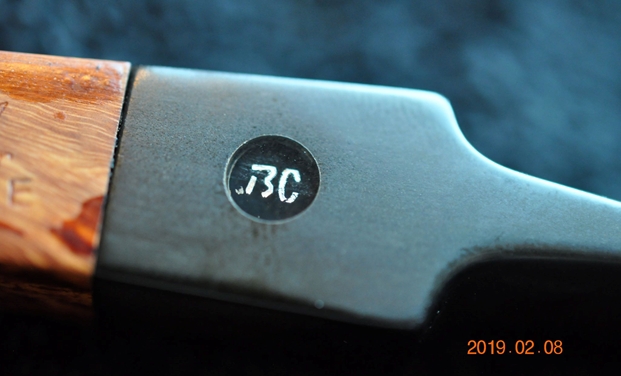
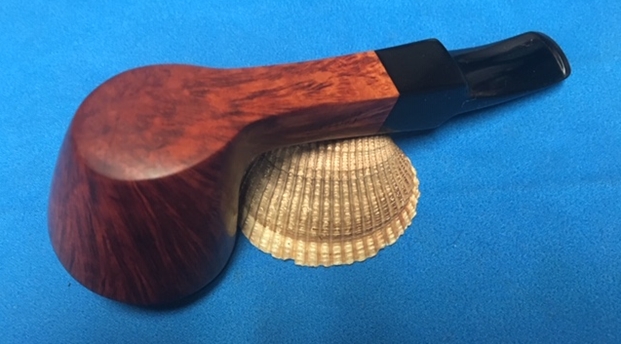
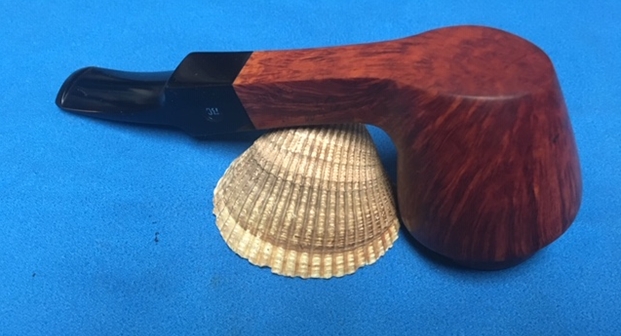
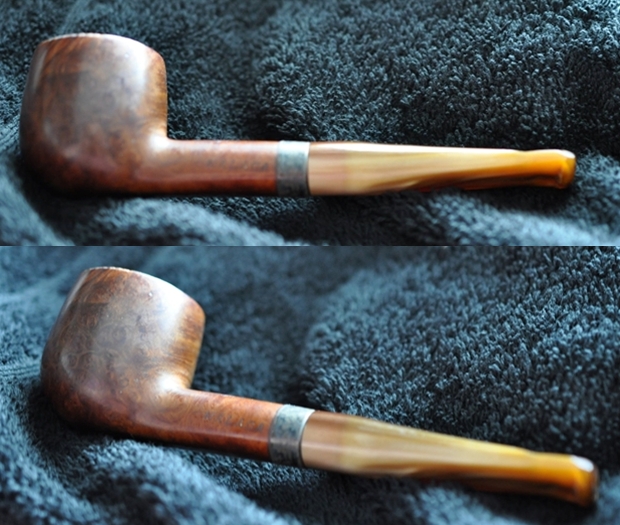
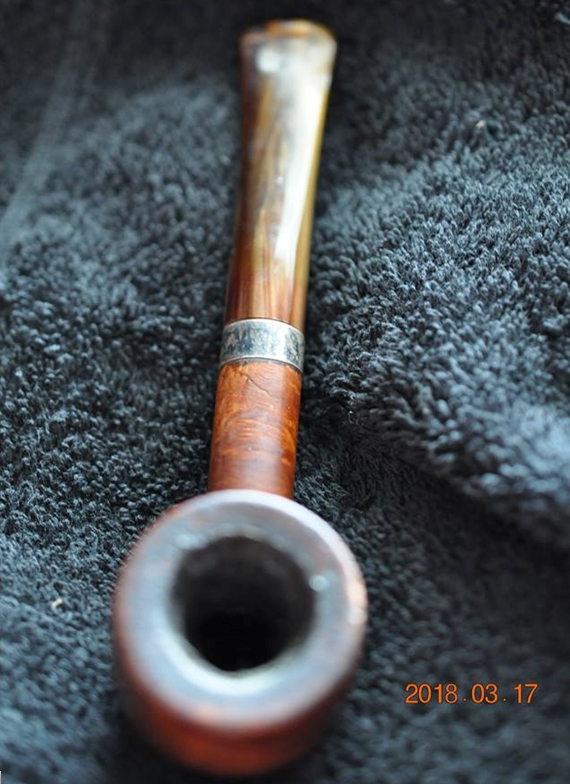
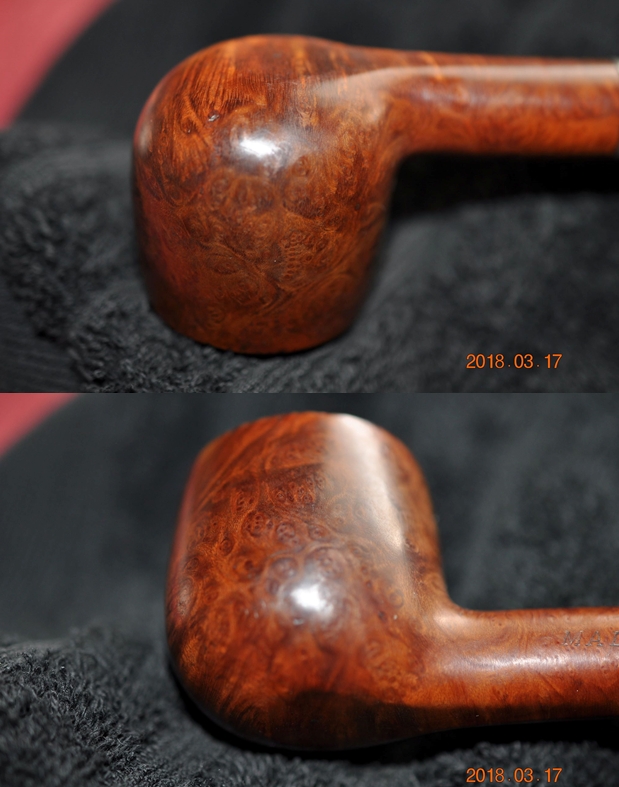
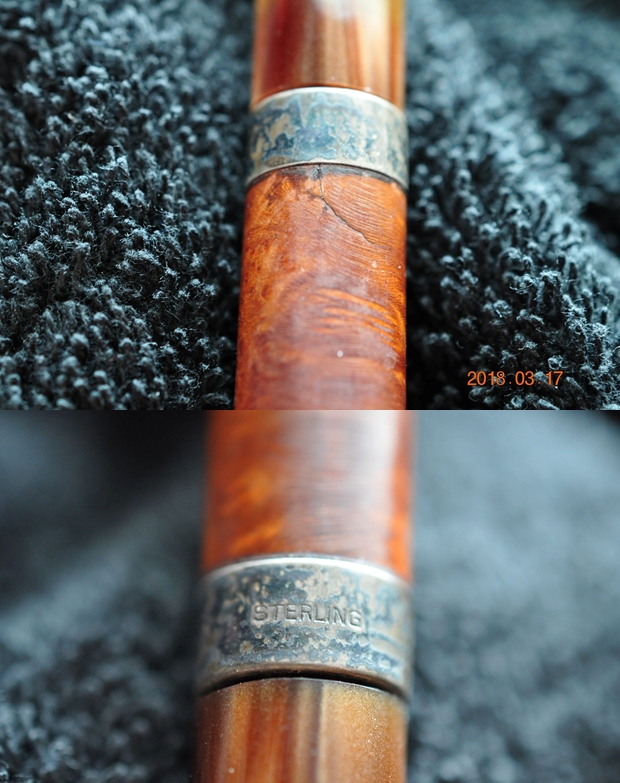
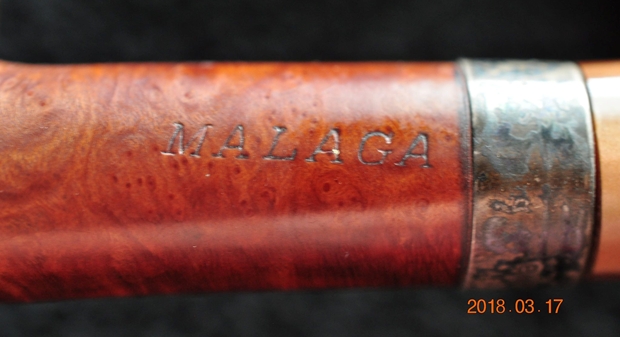
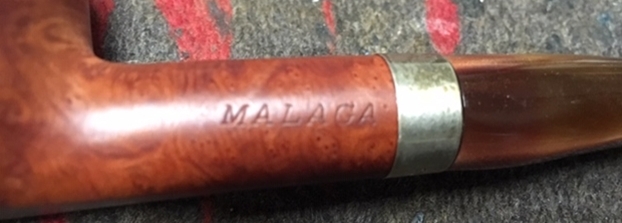
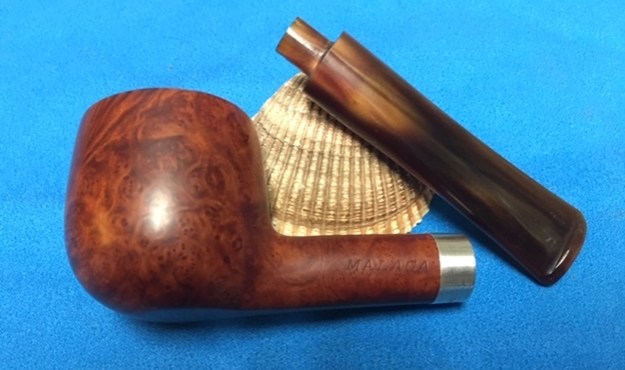
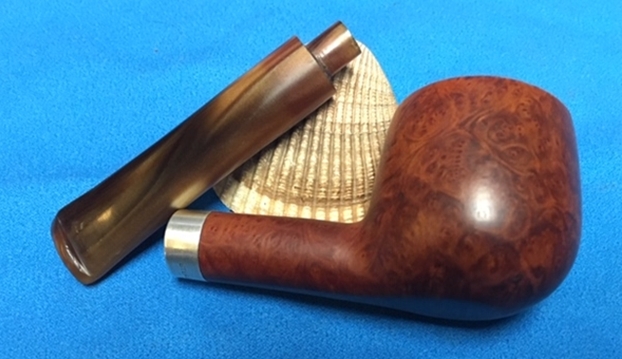
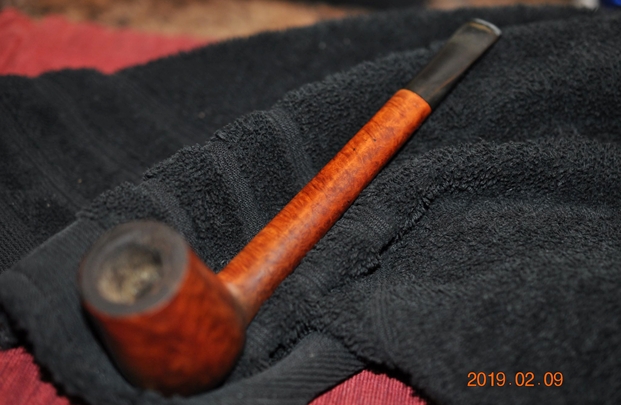
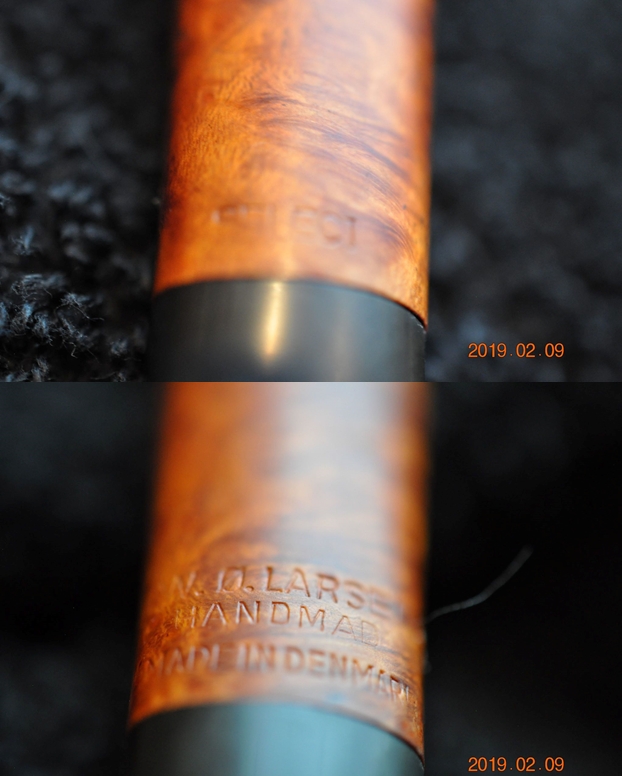
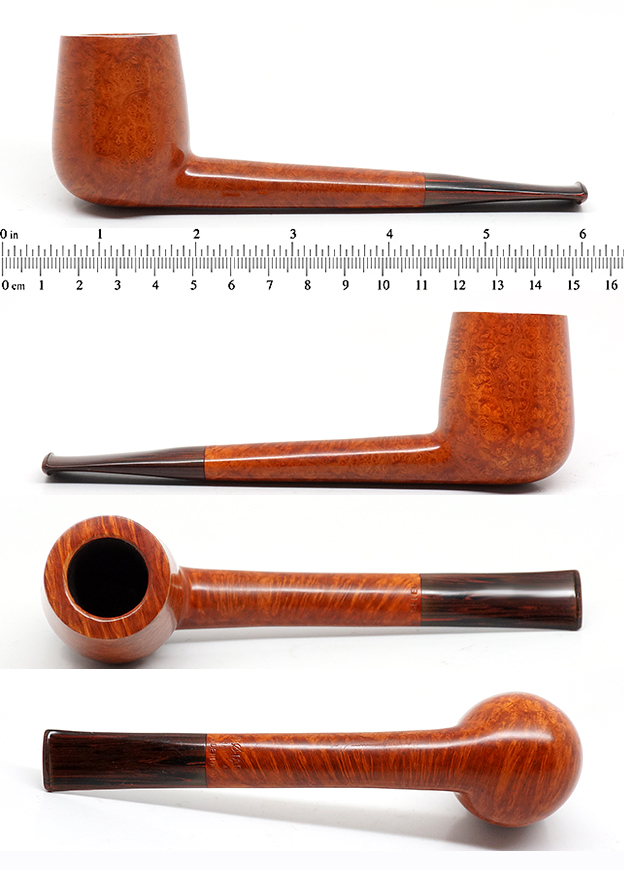
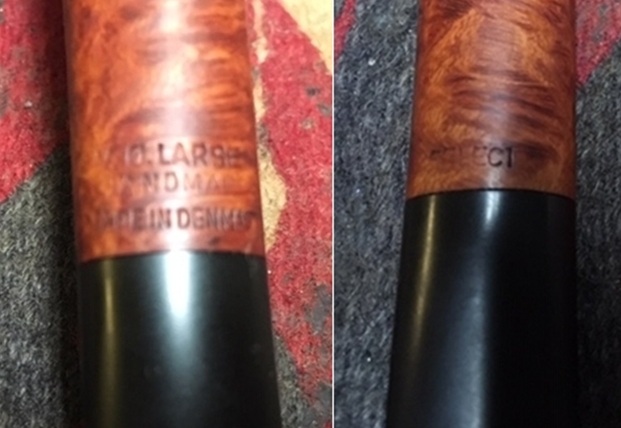
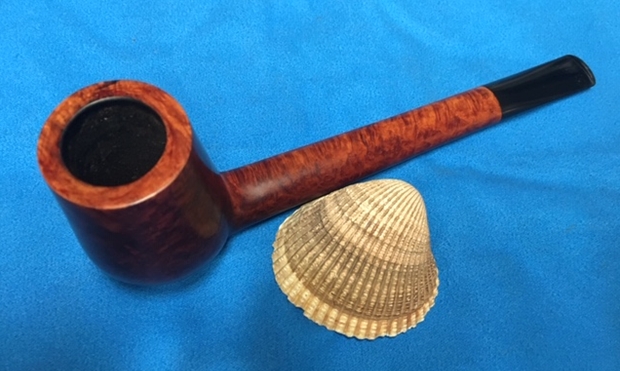
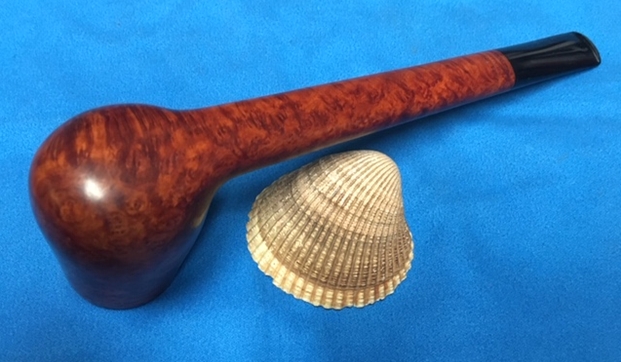
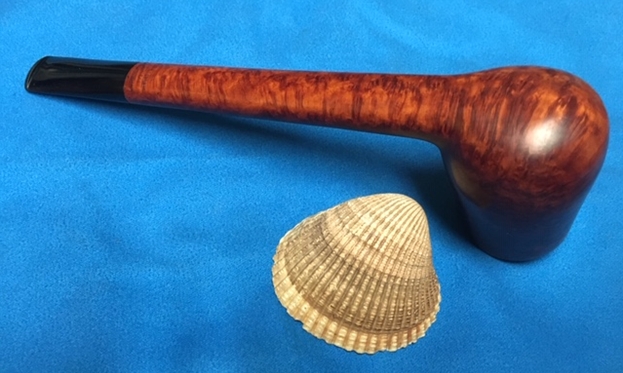
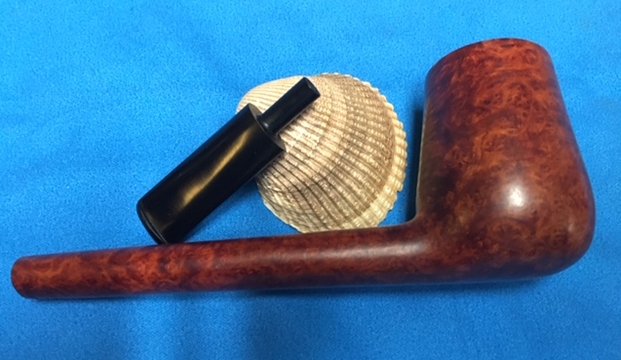
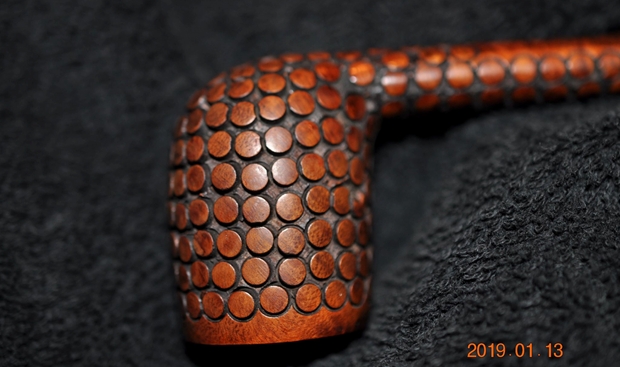
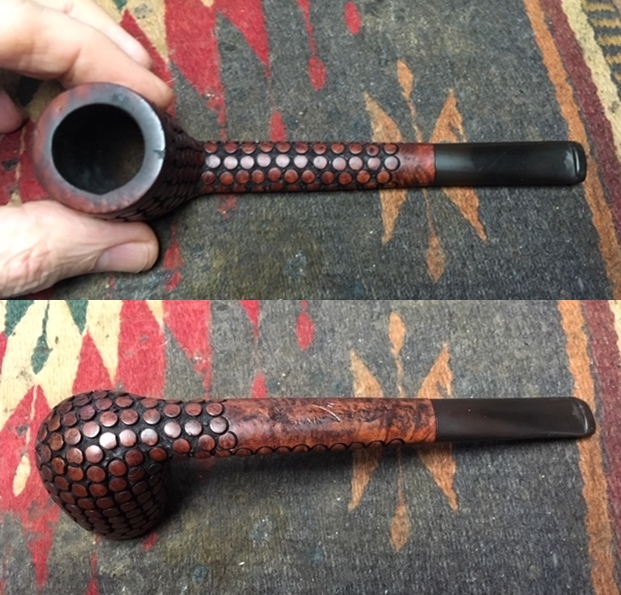
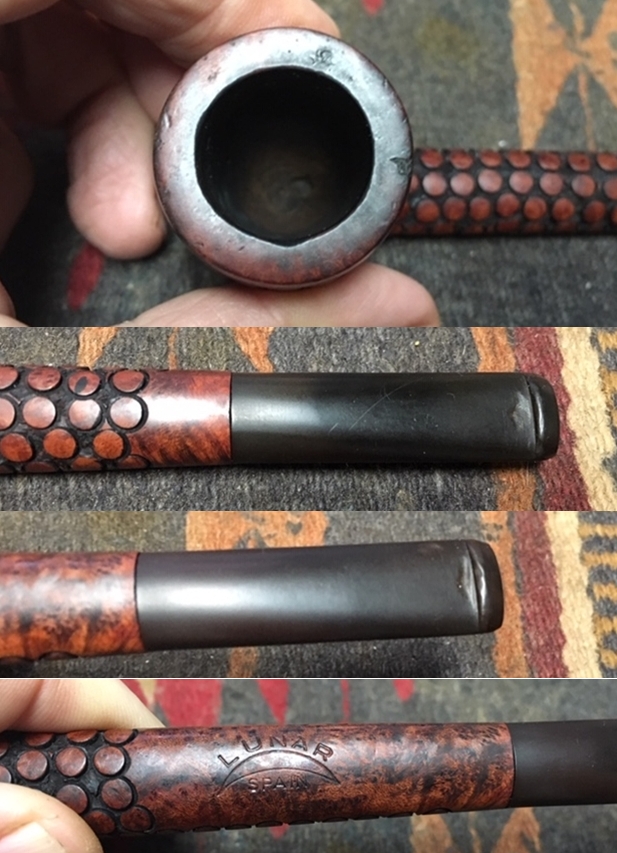
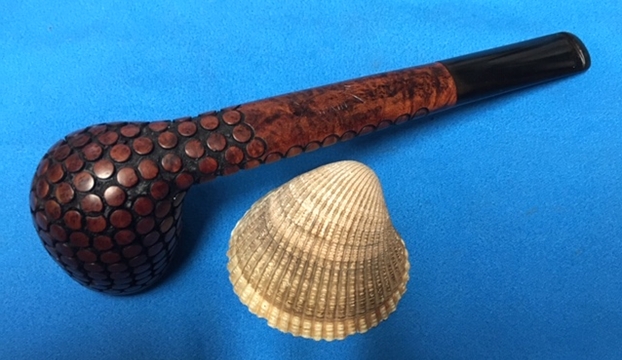
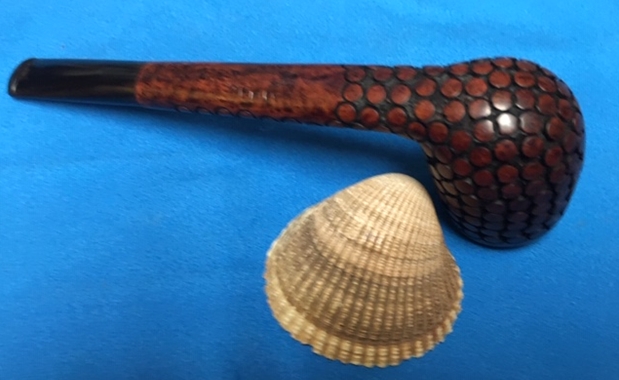
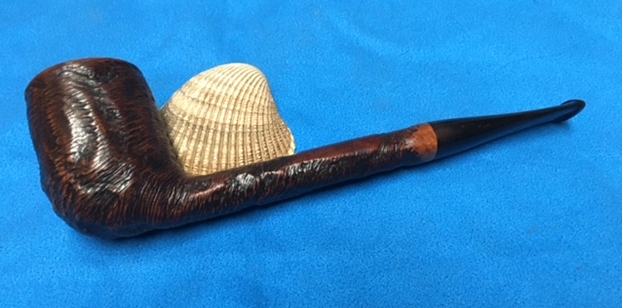
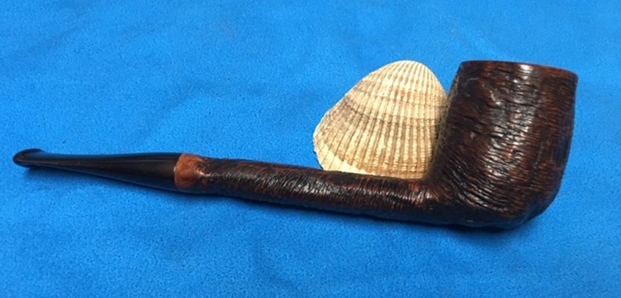
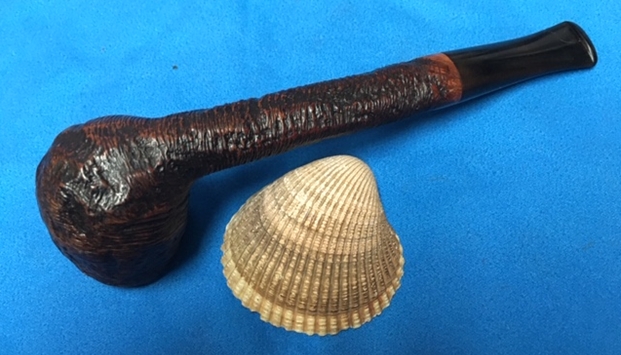
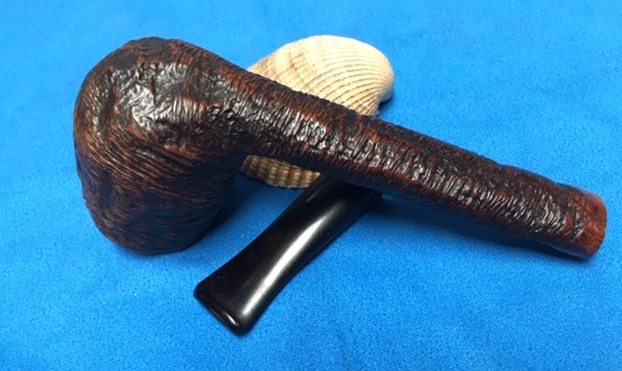
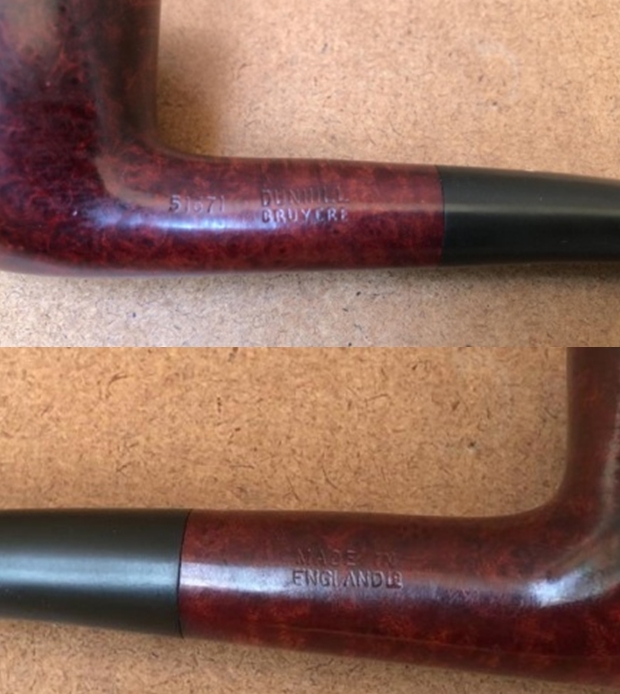
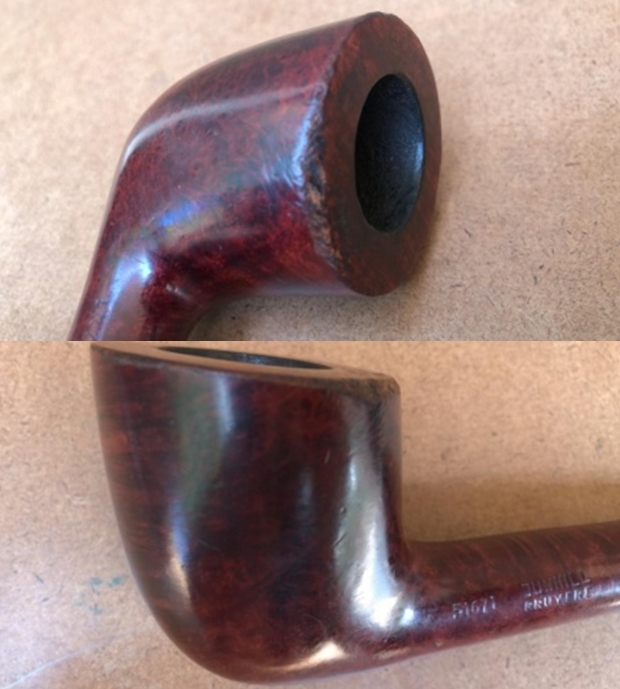
The pipe that I decided to work on is from this find and is marked in a red circle in the picture below. The stummel surface boasts of some beautiful bird’s eye grain on either side of the stummel while densely packed cross grain adorns the front and back of the stummel and also the shank top and bottom surface. It is stamped with “# 51671” towards the bowl and followed by “DUNHILL” over “BRUYERE” on the left side of the shank while the right side bears the COM stamp “MADE IN” over “ENGLAND” followed by underlined numeral “19”. Dunhill White Dot adorns the top of the vulcanite stem. The stampings on either side is deep, crisp and clear. 
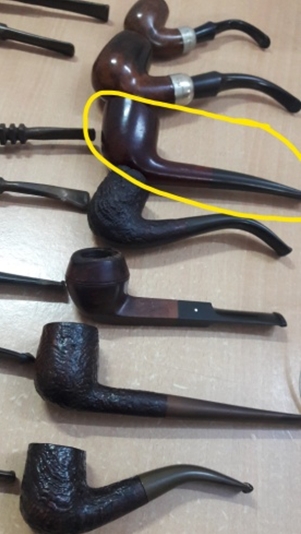
The dating of this pipe is very straight forward and dates to 1979 (1960+19). However, deciphering the shape code, 51671, proved to be a challenge. The first digit 5 identifies this pipe as being Group size 5, second numeral, 1, identifies the style of mouthpiece as being tapered and this is where the ease ends and led to a lot of confusion with the next two digits. Though the shape appears as Zulu, it is not so since the shank is rounded. The profile of the pipe points towards it being a Horn shaped, but the shape code supports neither a Zulu nor a Horn!!! Well, another mystery which is likely to remain unresolved!!

With this information, I proceed ahead with the restoration of this handsome pipe, my first ever DUNHILL!

INITIAL VISUAL INSPECTION
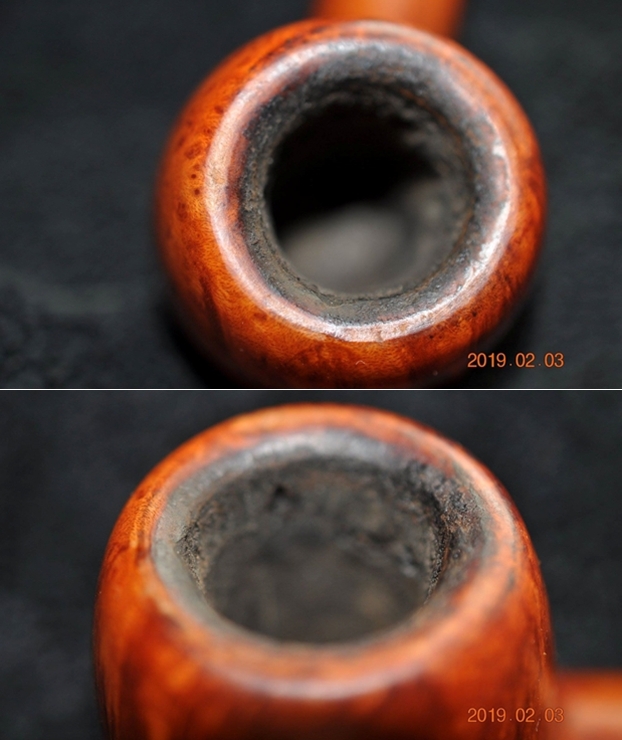
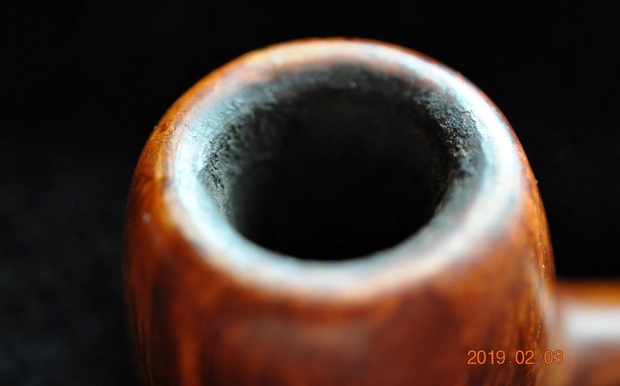
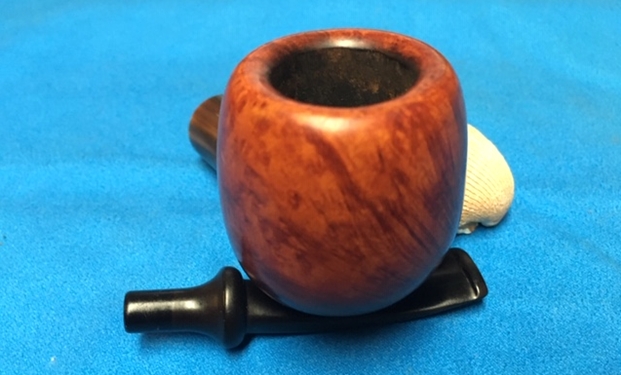
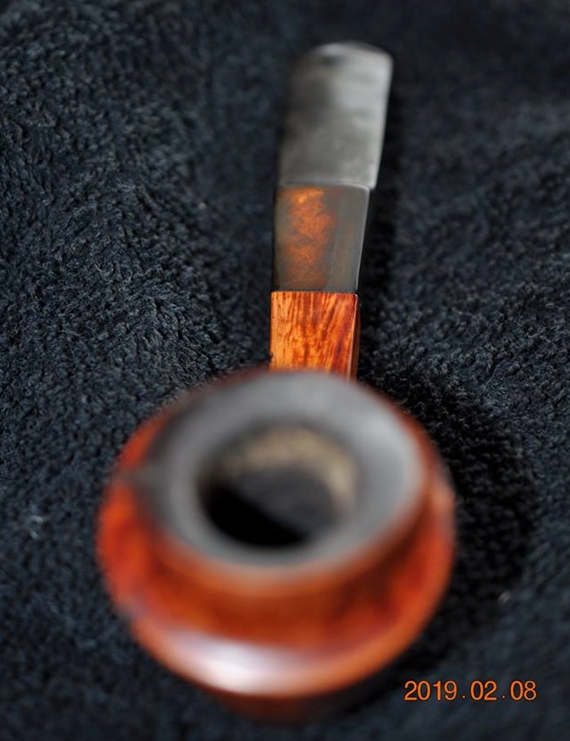
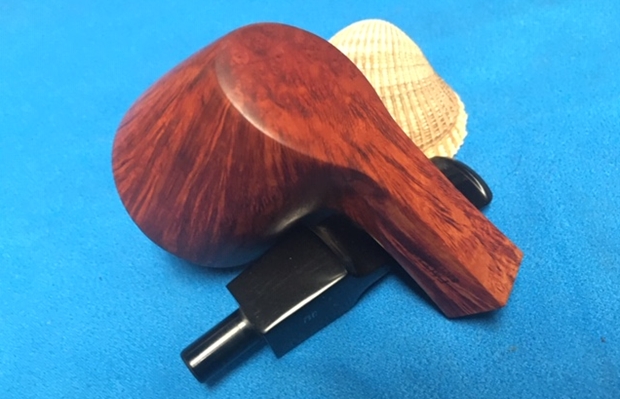
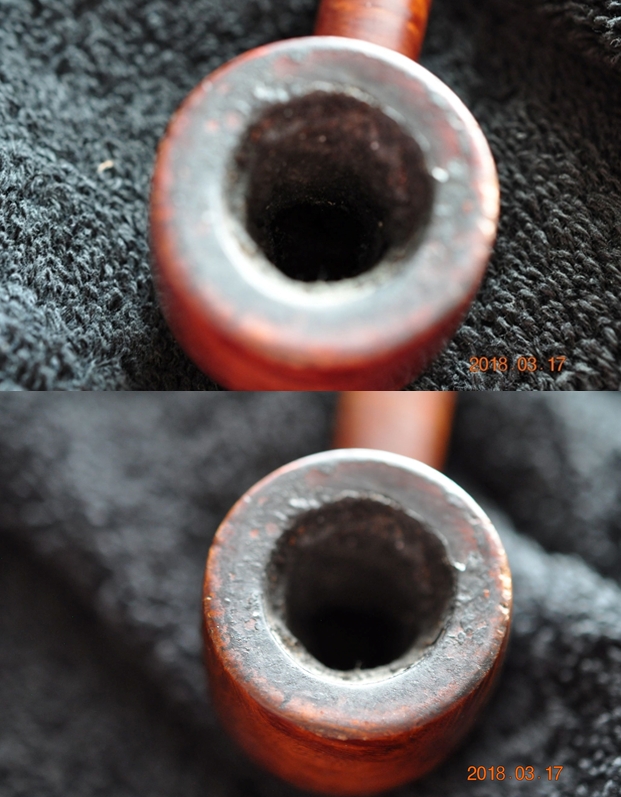
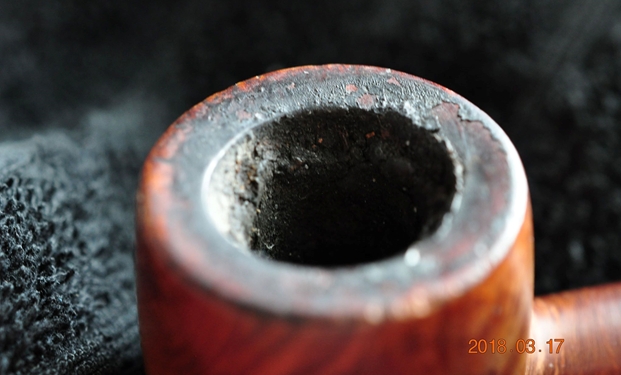
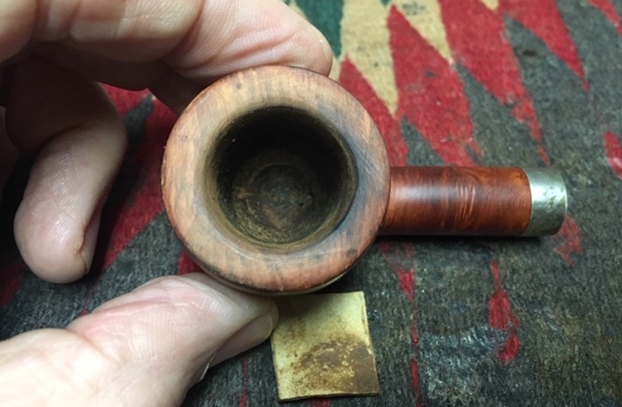
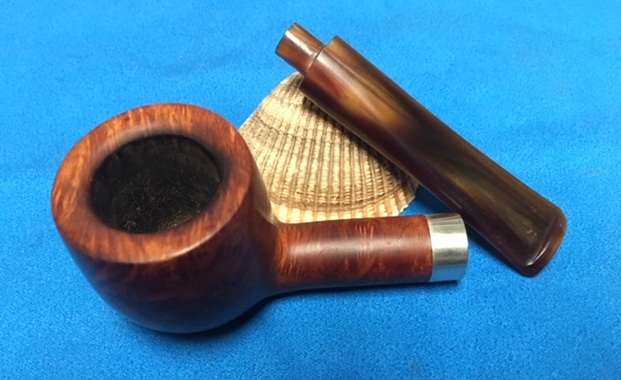
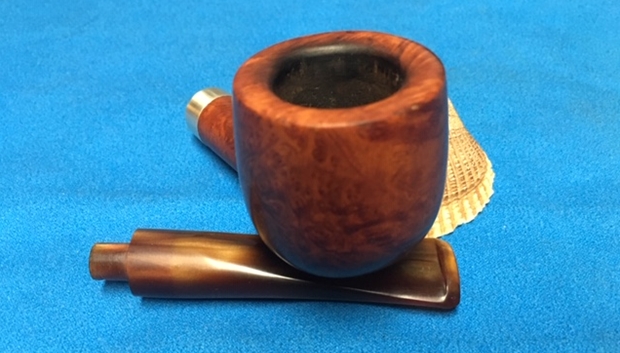
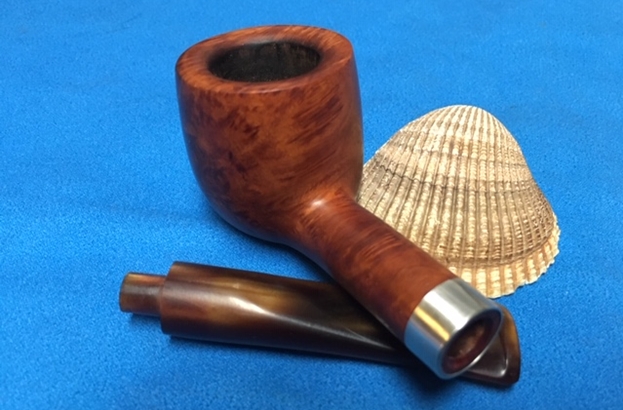
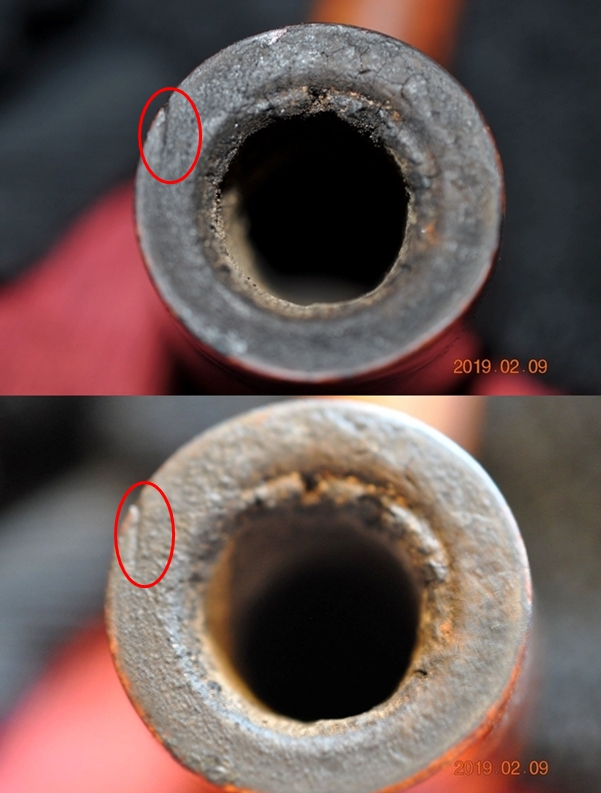
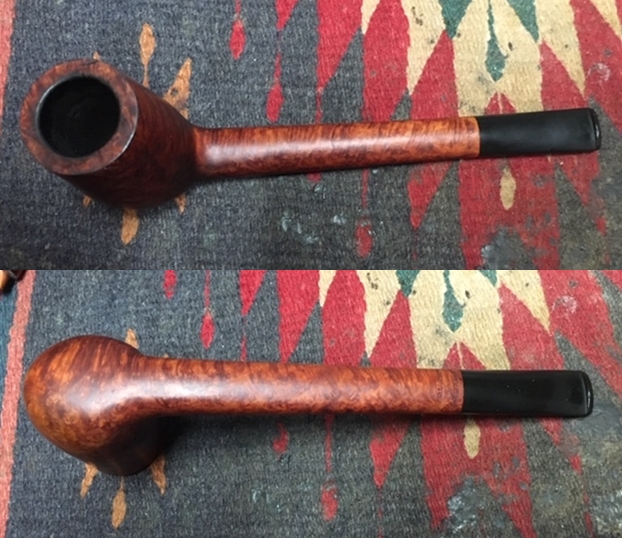
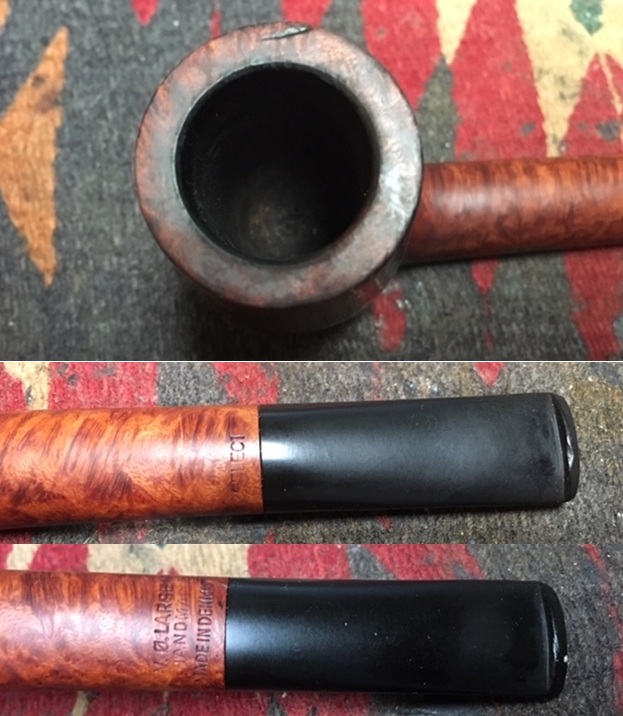
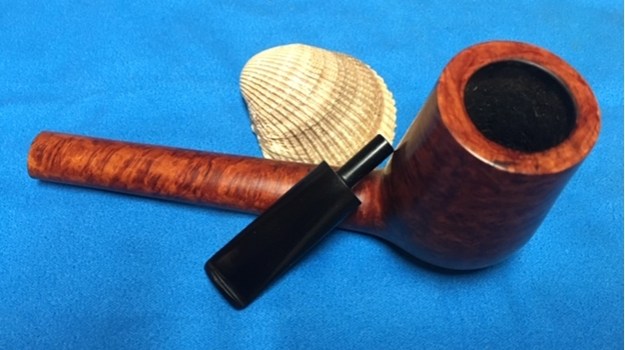
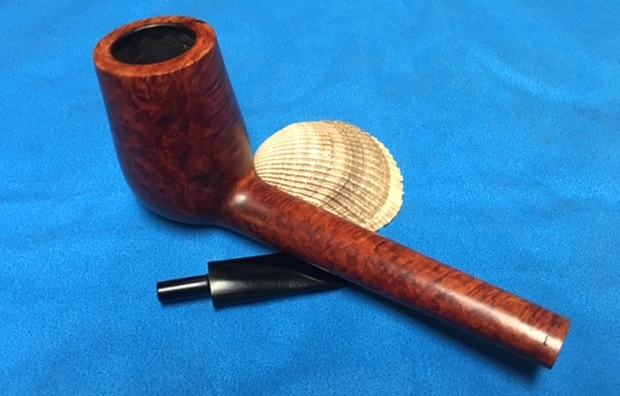
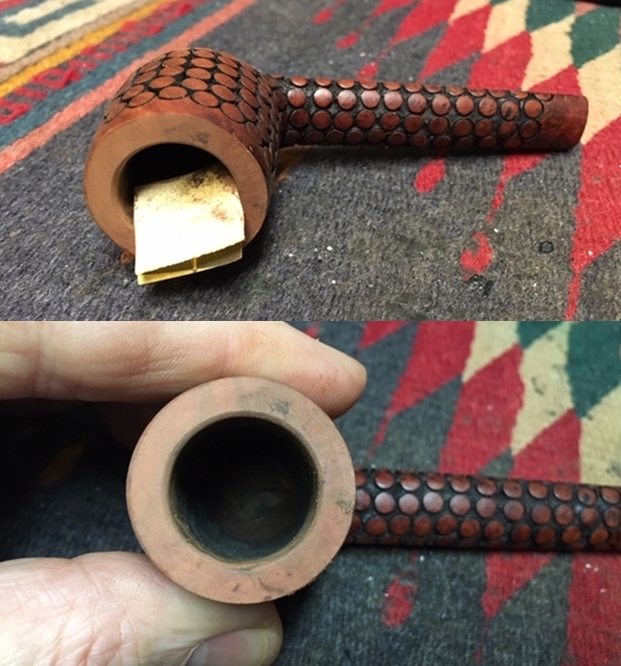
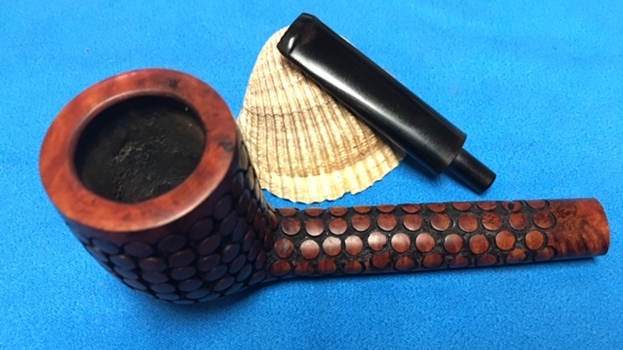
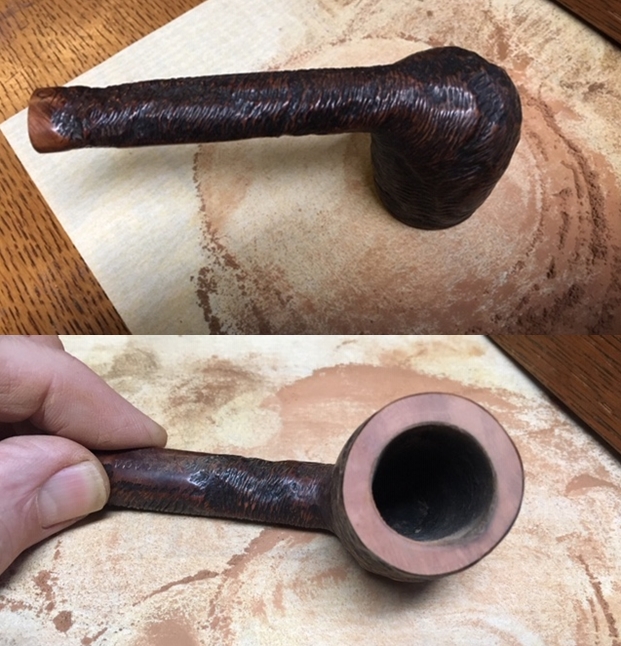
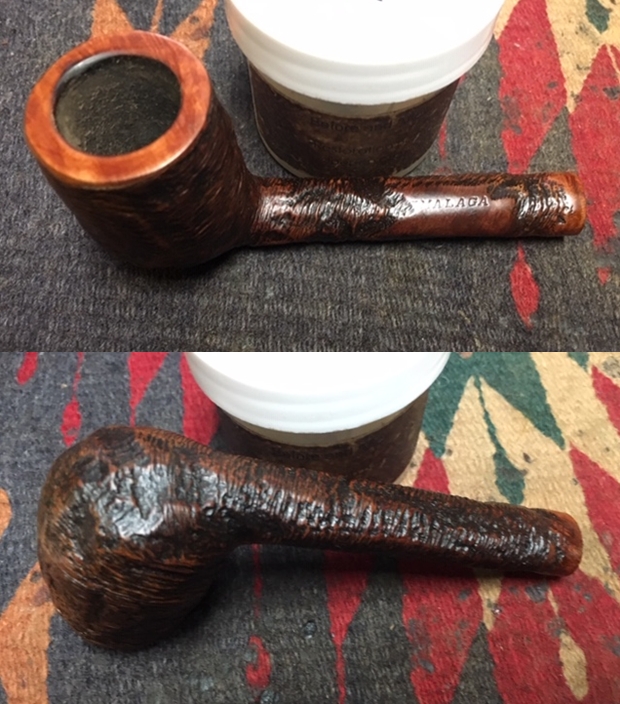
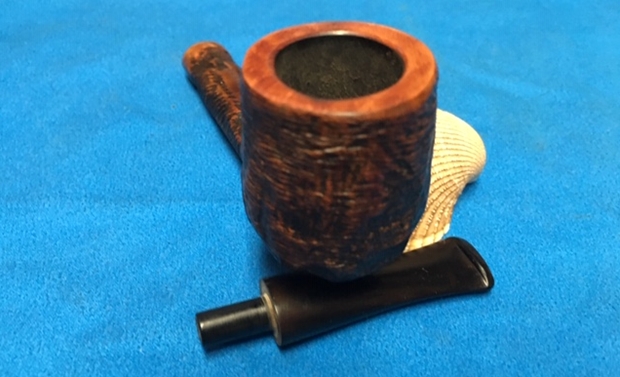
The chamber is clean with a thin layer of cake which indicates that the pipe has been kept clean by its previous Steward. From what I can see, the chamber walls appear to be without any damage. The chamber is odorless. The inner rim edge show minor unevenness which should be easy to address. It is the outer rim edge that shows significant damage on the left side in 7 o’clock and 11 o’clock directions. This must have been caused due to hammering of the edge against a hard surface to remove dottle!! The rim top surface has a number of dents due to the same reason. The mortise is clean and so is the shank airway. 
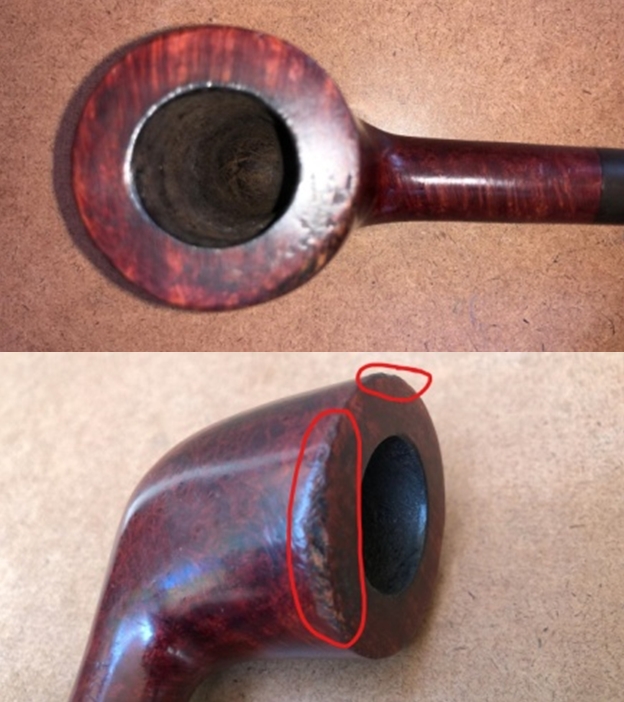
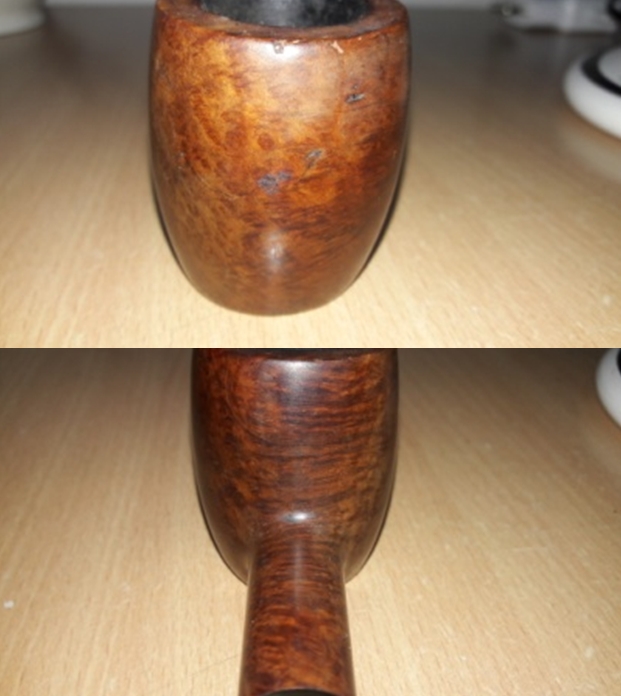
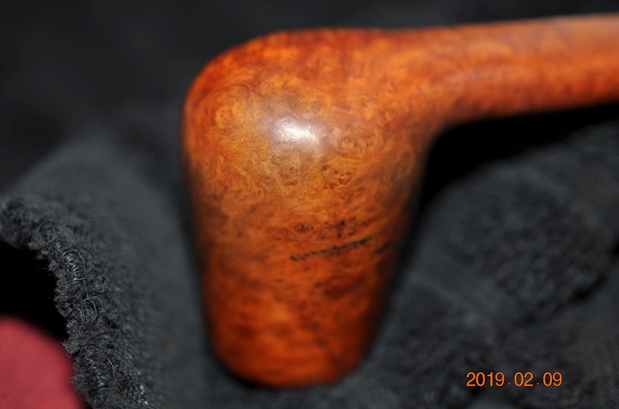
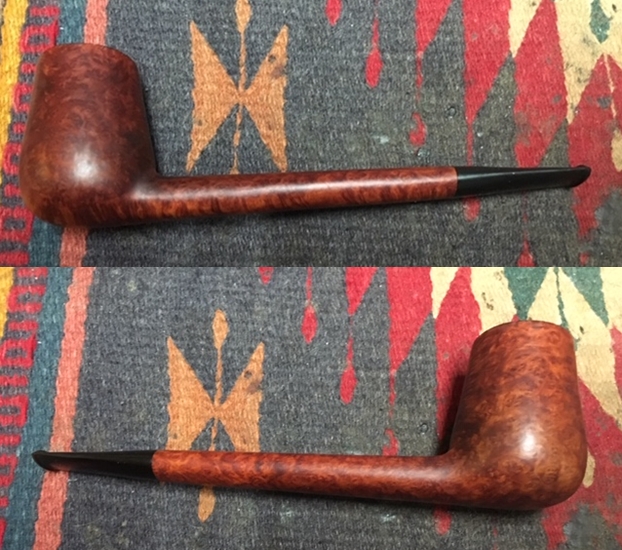
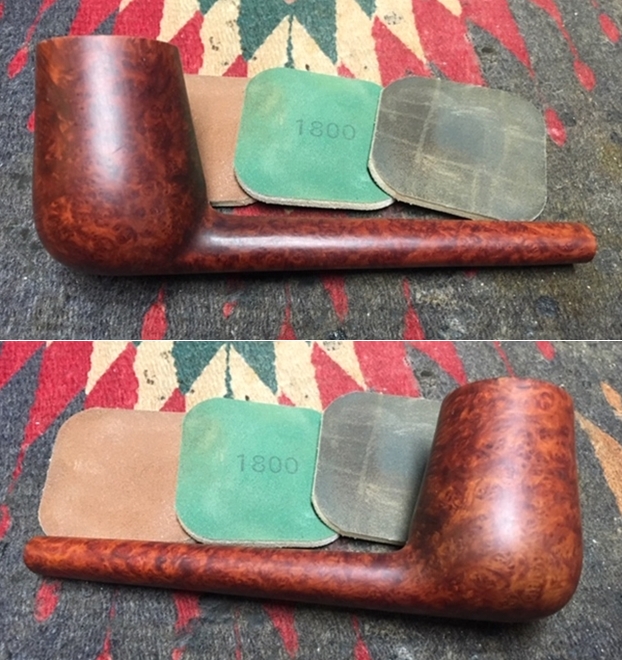
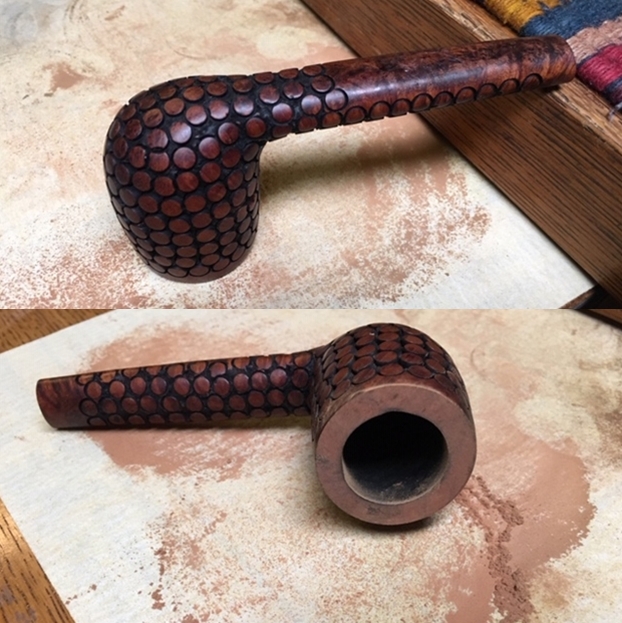
The stummel surface is peppered with numerous dents and dings and scratches. Being a Dunhill, any issue of fills is never to be expected and hold true for this pipe too. These dents and ding are probably caused due to uncared for storage by the previous Steward and further contributed to by the trash collector who had sold the pipes to me. The stummel is covered in dirt and grime and is surprisingly slightly stick to the touch. The briar looks lifeless and dull which is nothing serious to address. 
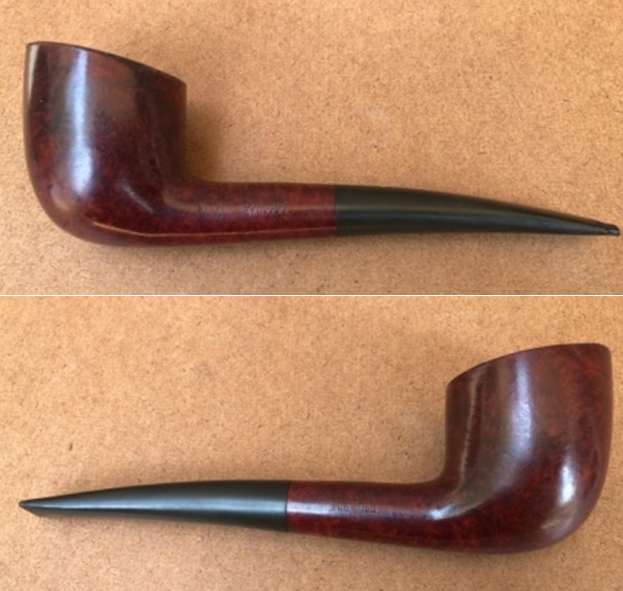
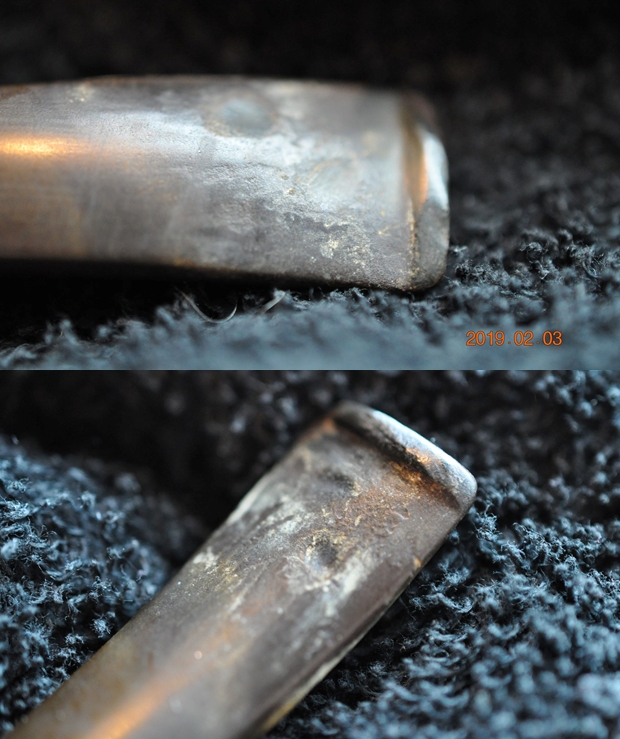
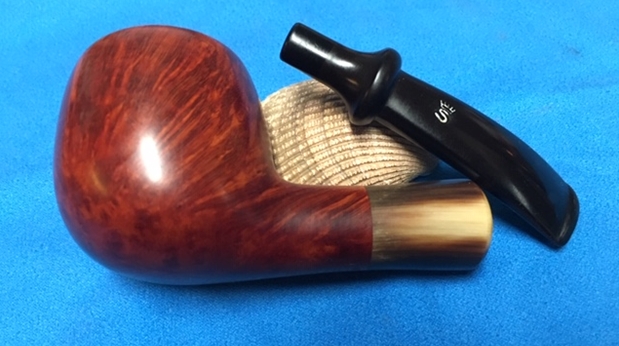
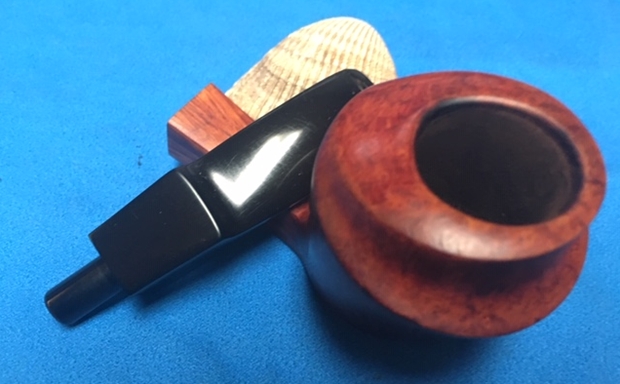
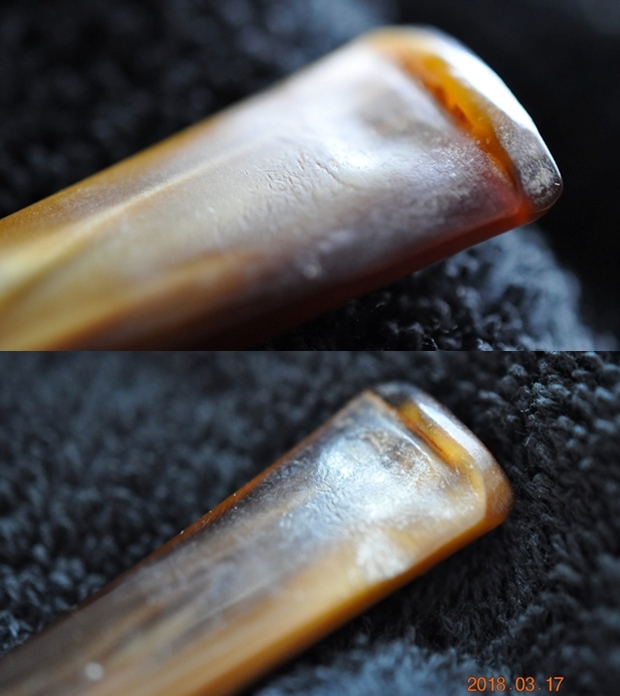
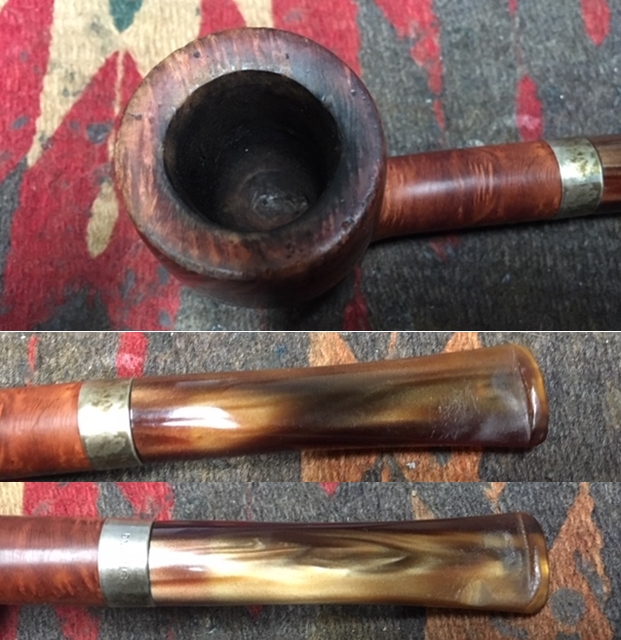
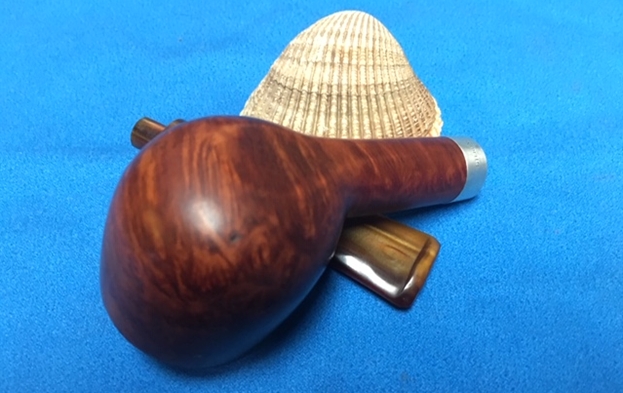
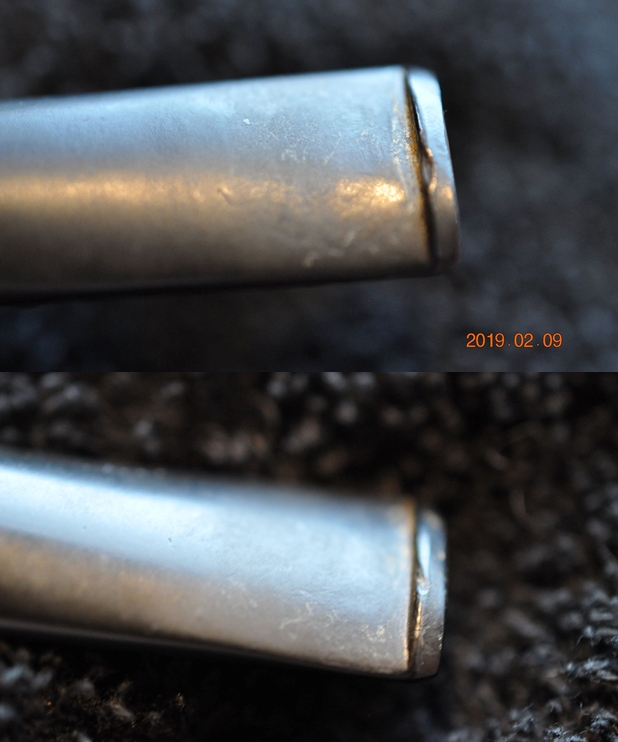
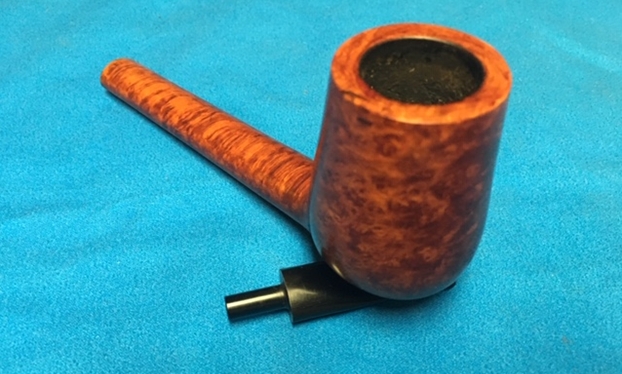
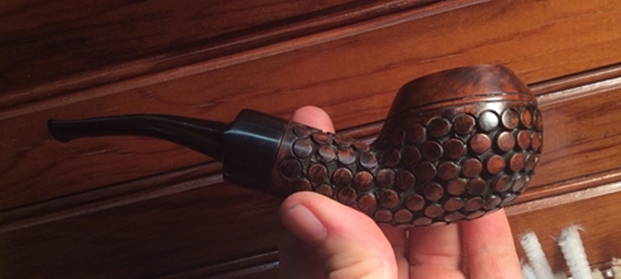
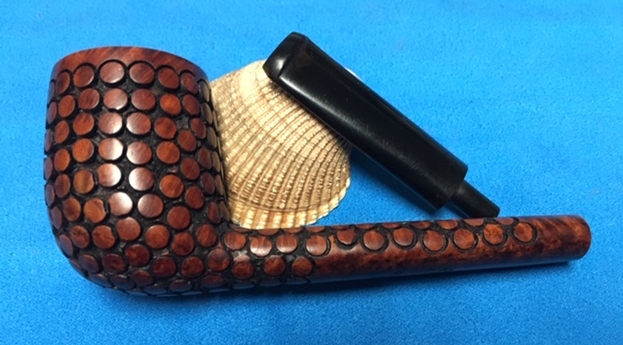
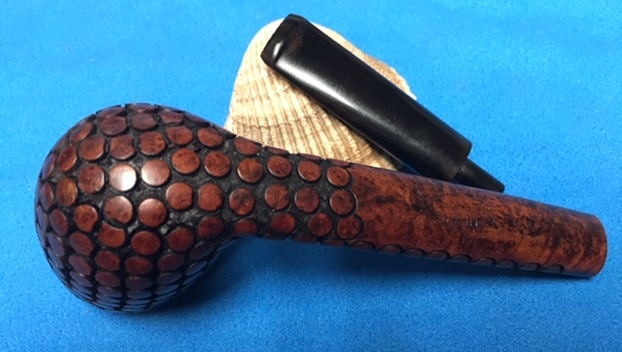
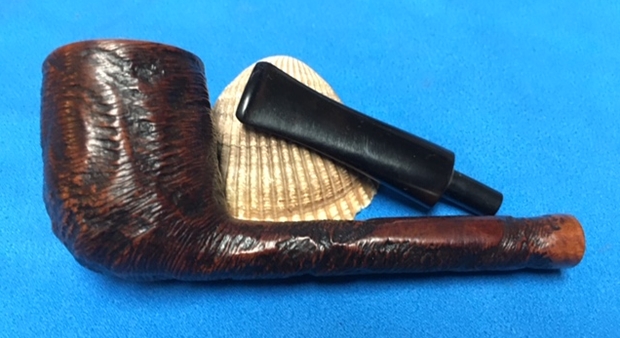
The vulcanite stem shows significant damage to the button end, in fact, there is no button at all!! The stem end is missing, well, about half an inch of vulcanite. Heavy and slightly deep scratches can be seen extending upwards from the broken button side. The stem surface is very thin at the place where it has been chewed off by the previous owner. I intend to reconstruct/ rebuild this portion of the stem, including the slot, while maintaining the stem and general profile of the pipe. This will require major repairs. The quality of vulcanite is good. In this project, repairs to the damaged outer edge and stem rebuild will be a major challenge, the stem more so, as maintaining the tapered profile of the stem will need to be adhered to for overall appeal of this piece of briar. Having just finished the tedious restoration of the Stefano, I am aware of the challenges this restoration will be presenting enroute.

THE PROCESS
Since the stem has significant damage, and from my experience of stem repairs (Stefano nightmare!) this will be the most time consuming and laborious part of this restoration, I start this project by tackling the stem first. I was faced with two options in my approach to this stem repair; first was to recreate a new button around the broken part and maintain the existing stem profile with a straight slot and the second option was to cut away the damaged button and reconstruct an entirely new button with a straight horizontal slot, sacrificing the overall length of the pipe. I decided to take the former approach. This decision was partly dictated by the fact that I do not have a rotary cutting blade to cut the damaged button end and partly to my innate desire to maintain the originality of the pipe. It’s a Dunhill after all!!

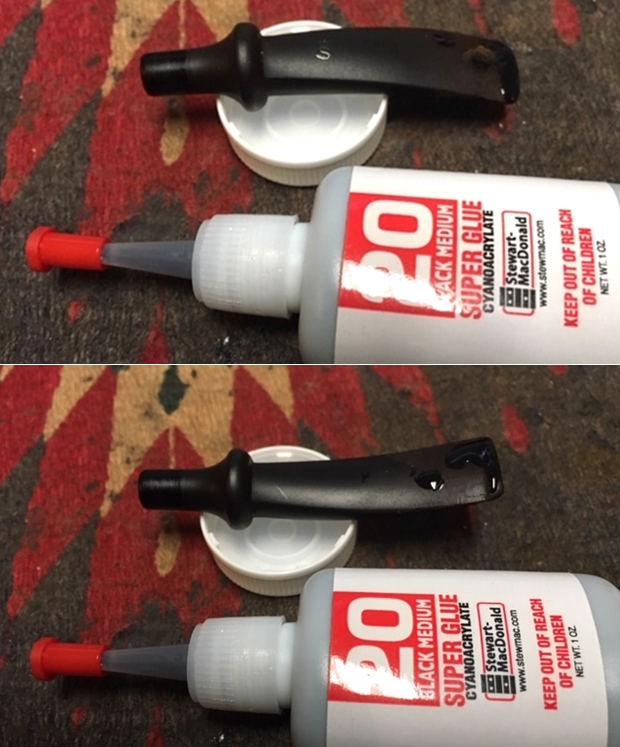
Now that I was clear about the path to be followed, I sand the stem end with a folded piece of 220 grit sand paper to erase the scratches and provide a smooth surface for the intended fill. I cleaned out the internals of the stem with hard bristled and regular pipe cleaners dipped in isopropyl alcohol. Once I was satisfied with the internal cleaning, I wiped the stem surface, particularly the damaged button end, with a cotton pad and alcohol to remove any traces of dirt and grime. To begin the stem repairs, I smeared a folded pipe cleaner with petroleum jelly and inserted it in to the stem airway. I prepared a mix of CA superglue and activated charcoal and generously applied it over and extending beyond the broken surface and set it aside for curing over night. To be honest, I have not researched and measured the exact length that I had to reconstruct, but eyeballed the length using the longer left side of the stem (where a very tiny raised portion of the button is still visible) as a guiding length. Before moving ahead, I would like to mention here that I had applied this mix in layers, over the week, to achieve sufficient thickness which would help during the filing and sanding while shaping the button and achieving the correct stem profile. 
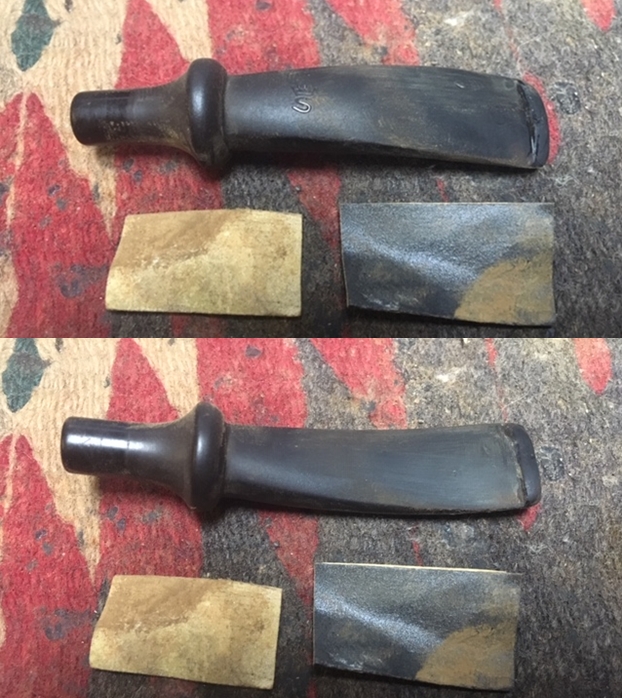
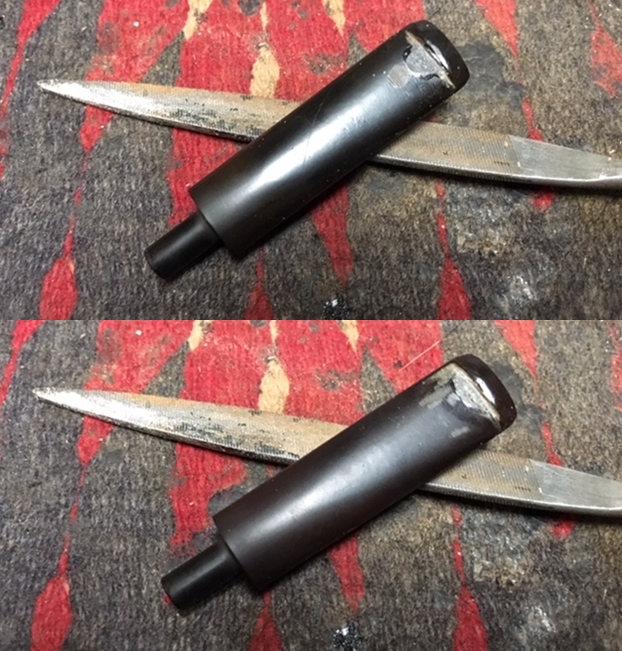
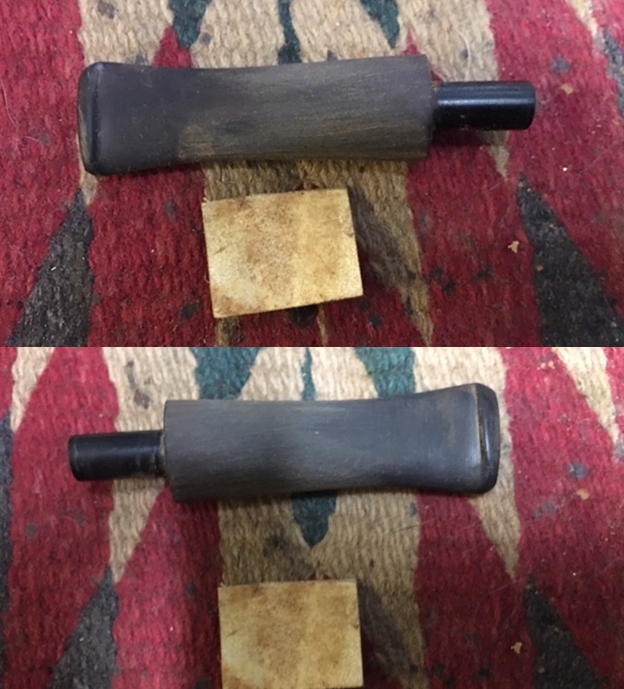
Once I was satisfied that the fill had cured nicely, I moved ahead and began the process of filing and shaping the button end with a flat head needle file. And then this happened… 
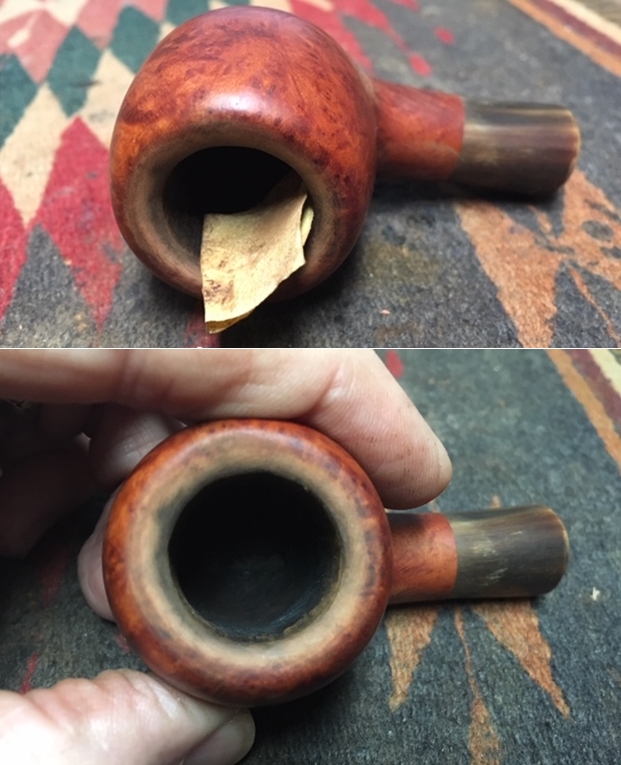
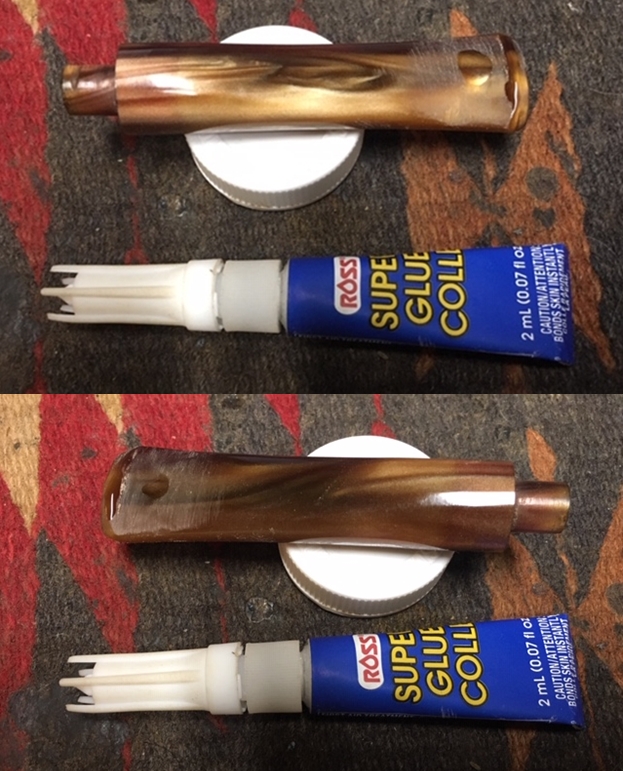
As you can see in the following pictures, not everything was lost. There remained a portion of the fill which was intact. Not one to give up and having the experience of the Stefano behind me, I persisted with the reconstruction. I made a fresh mix of activated charcoal and CA superglue, this time around increasing the amount of superglue, and reapplied it over the broken button end after inserting a petroleum jelly smeared a folded pipe cleaner. I continued with the layering technique of building up the fill.
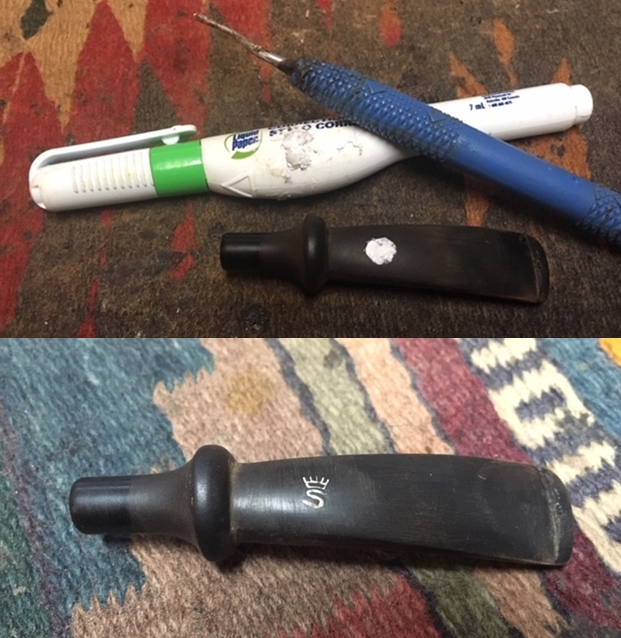
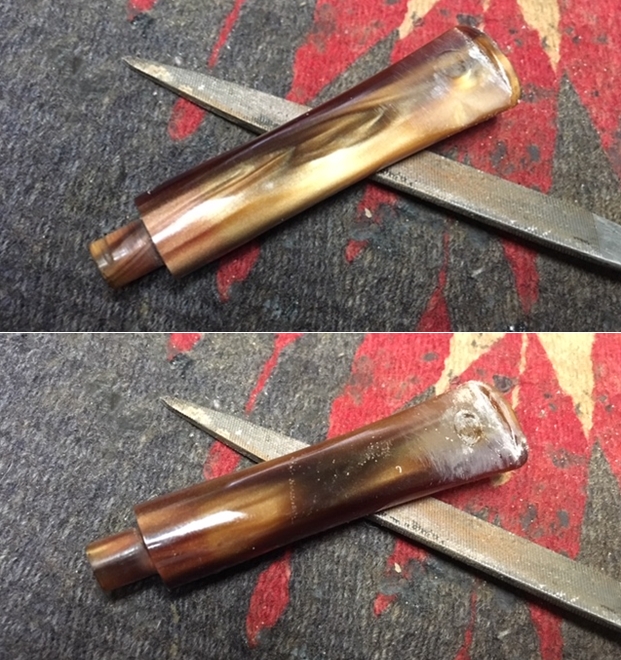
The next set of pictures show the progress of the stem rebuild using the layering technique. Slowly but surely, I am getting there!
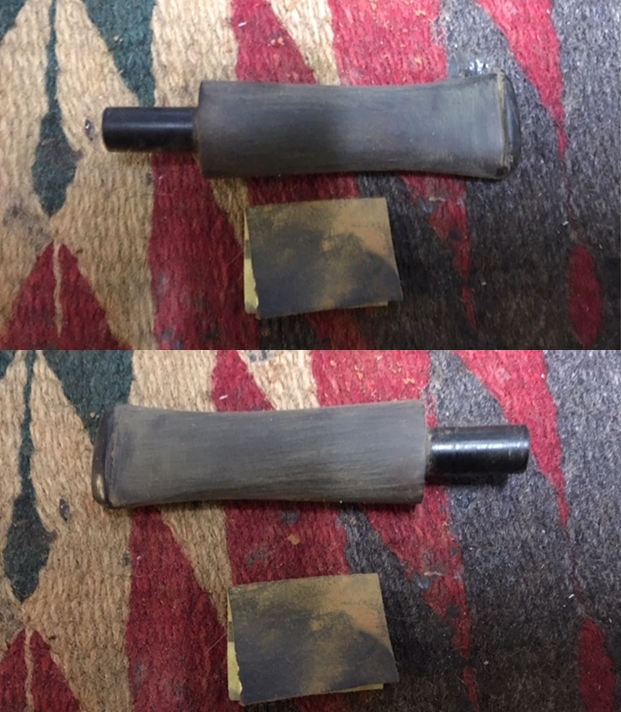
Once I had achieved the desired thickness and having let the fill cure for a few days, I proceed with shaping the button using flat head needle files. I am quite pleased with the way things are progressing at this point in restoration. However, fingers remain crossed and mentally remained prepared for disaster to strike anytime. At this stage, I am pretty satisfied with the profile of the stem, the thickness of the button and, in general, the overall progress on the stem rebuild. Also glad that there have been no further setbacks!!!! With this I proceed to shape the horizontal slot for the button. It is a long drawn process and a tedious one at that!! The inside of the slot needed to be smoothed out while maintaining the thickness of the button edge on either side. I build up the insides of the slot by layering it with superglue, letting it cure, sanding and then applying a fresh layer. I must have repeated this process for good about a week plus!!!! The external surface of the slot was also developed the same way and this helped in maintaining the thickness of the button edge.
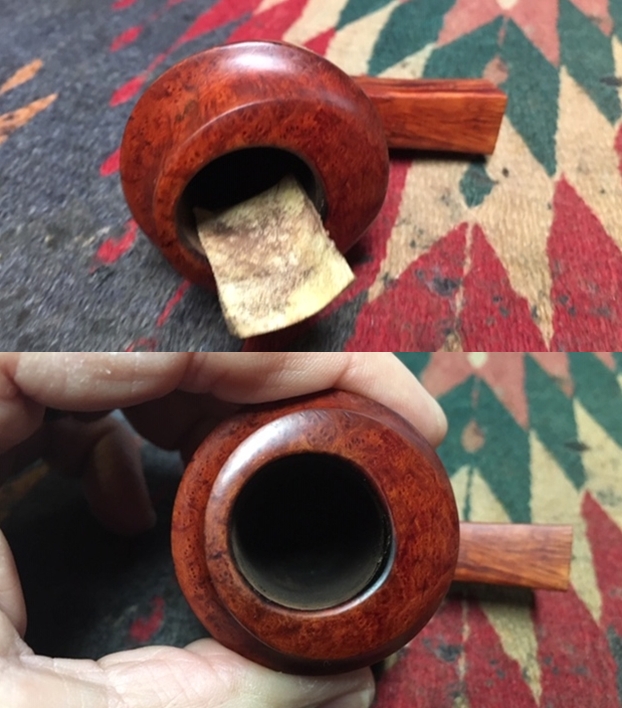
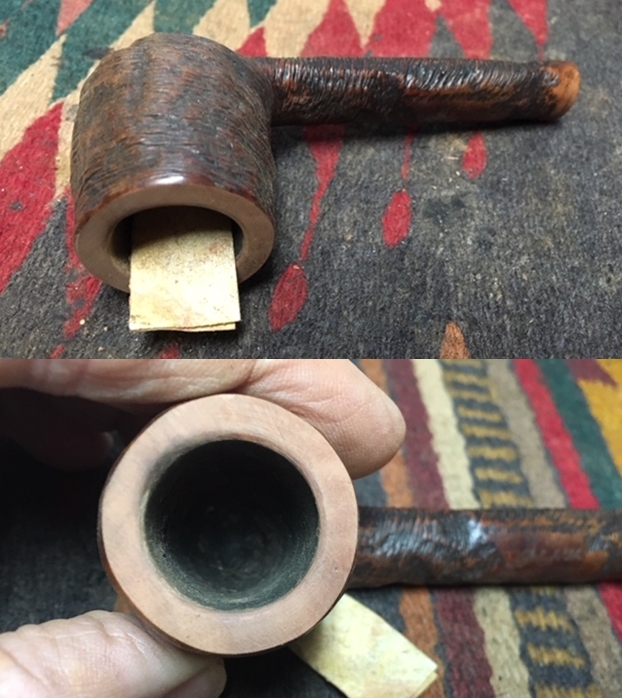
While the stem repair was progressing at its own pace, I moved ahead to deal with the stummel repairs. Given the size of the chamber, I reamed the chamber with size 4 head of a PipNet reamer. The cake was thicker at the bottom and used the size 2 head to remove the cake. I used my fabricated knife and scraped out all the remaining cake. The amount of cake reamed out of the chamber really surprised me as I was expecting minimum cake. I further used one folded piece of 180 grit sand paper to sand out the last traces of remaining cake and expose the walls of the chamber to ascertain that there are no cracks/ heat fissures. I wiped the chamber with a cotton pad dipped in isopropyl alcohol to remove the carbon dust left behind by all the reaming and sanding process. The walls of the chamber were solid with no damage. This was followed by cleaning the mortise by scraping away at the dried gunk with my fabricated spatula and followed it up with further cleaning using cue tips, pipe cleaners and shank brush dipped in isopropyl alcohol. This eliminated all traces of old smells from previous usage. 
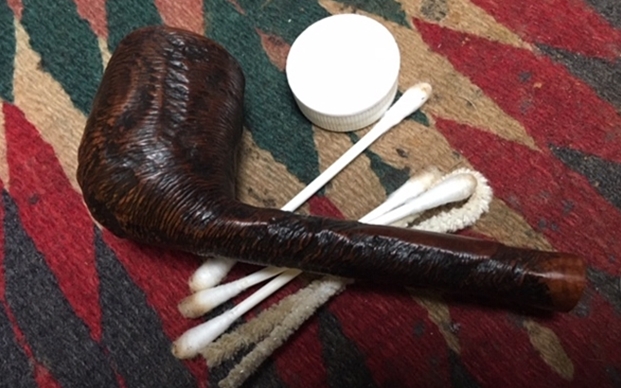
Continuing with the cleaning regime, using a hard bristled tooth brush dipped in undiluted Murphy’s oil soap, I very deliberately scrubbed the surface of the stummel and the rim top. The original reddish dye was also washed away to some extent. The stummel and rim top was dried using paper napkins and soft cotton cloth. I set the stummel aside to dry out naturally. 
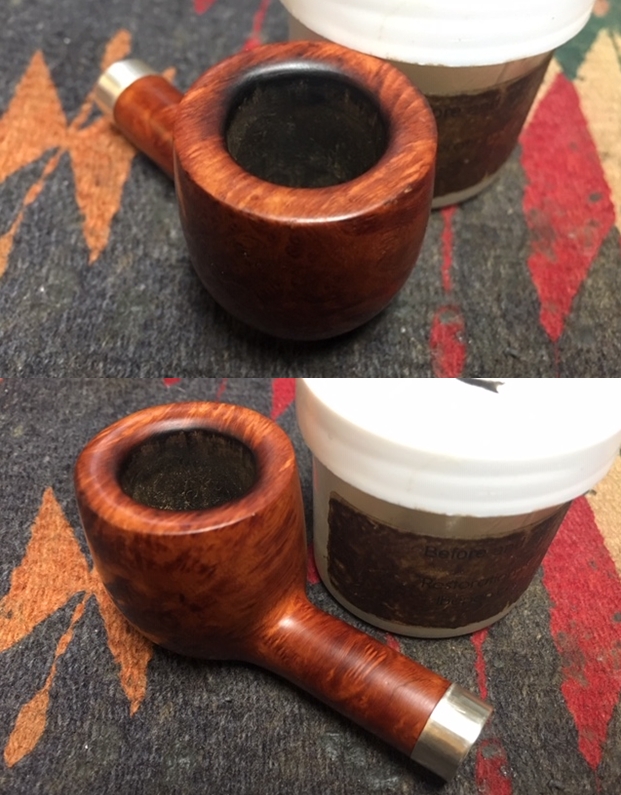
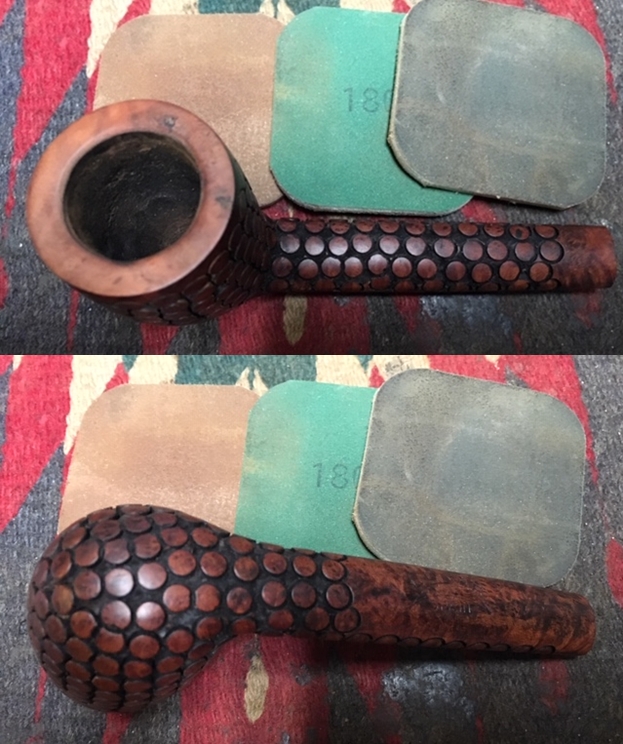
The damages to the outer rim edge, uneven inner rim edge and stummel dents and dings are now clearly visible in the above pictures after the cleaning.

Next, I decided to address the dents and dings on the stummel surface and the damage on the rim outer edge by steaming them out. I heated my fabricated knife over the flame of a candle, placed a wet Turkish hand towel over the damaged areas and steamed out the dents by placing the heated knife over the towel. Though some dents were still observed, these were greatly reduced when compared to before steaming. The steaming method had raised to the surface all the major dents and dings. However, the outer edge of the rim still remained unaffected. The steaming method having failed to address the issue of the damaged outer rim edge, I decided to use a more aggressive method of topping the rim top. Personally, I prefer to avoid topping as I do not appreciate loosing even one mm of briar estate, but in this instance, I was left with no recourse but to top the rim. I topped the rim on a 220 grit sand paper, checking frequently the progress being made. The damage to the outer rim was so extensive that the even after what felt like ages of topping, the damage was still apparent. Finally, I just did not feel like topping any further and hence decided on another course of action. I would rebuild the outer edge with briar dust and superglue. Having decided on this course of action, I lightly top it on 600 grit sand paper to reduce the sanding marks left behind by the 220. The only benefit derived from this topping was that the inner rim is now perfect and I collected some briar dust!

I tried mixing briar dust with superglue, but to no avail. The moment the two came in contact with each other, the mix hardened. So I resorted to the layering method again, first I layered superglue over the damaged surface followed by sprinkling of briar dust and one final layer of superglue. I set the stummel aside to cure. The only problem with this method is the high probability of presence of air pockets.The next evening, the repairs to the edge had completely cured and I move ahead by filing and rough shaping with a flat head needle file. I further fine tune the blending by sanding it down with 220, 320, 600 and 800 grit sand papers. Here is how the repaired area appears at this stage. I am very pleased with the way this repair progressed.
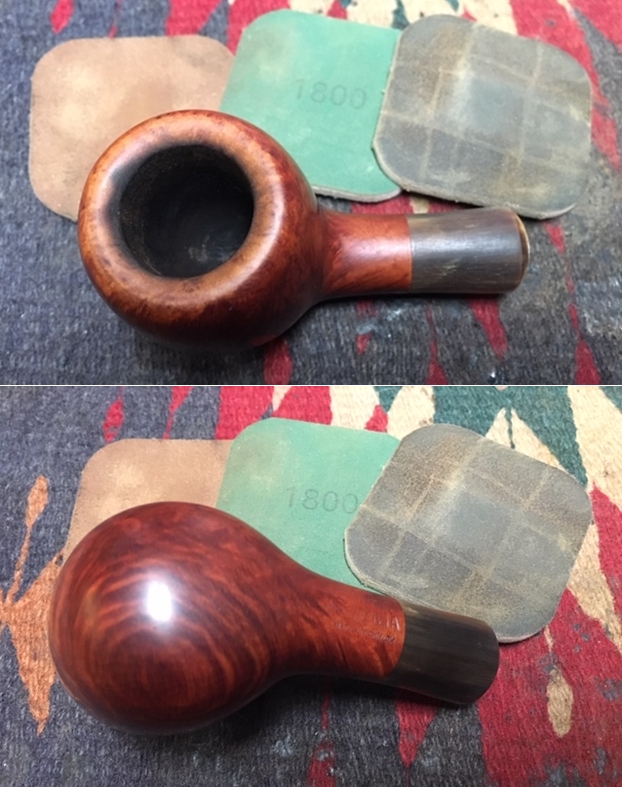
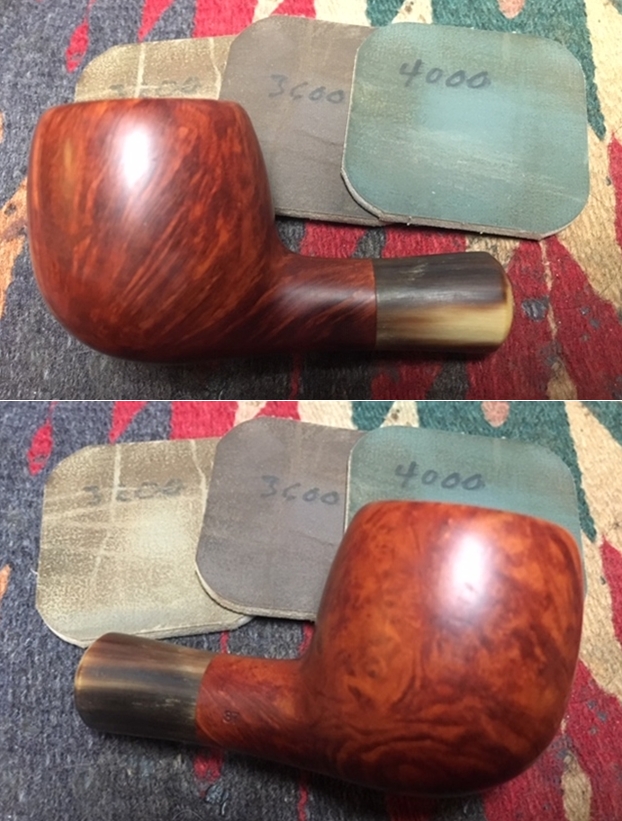
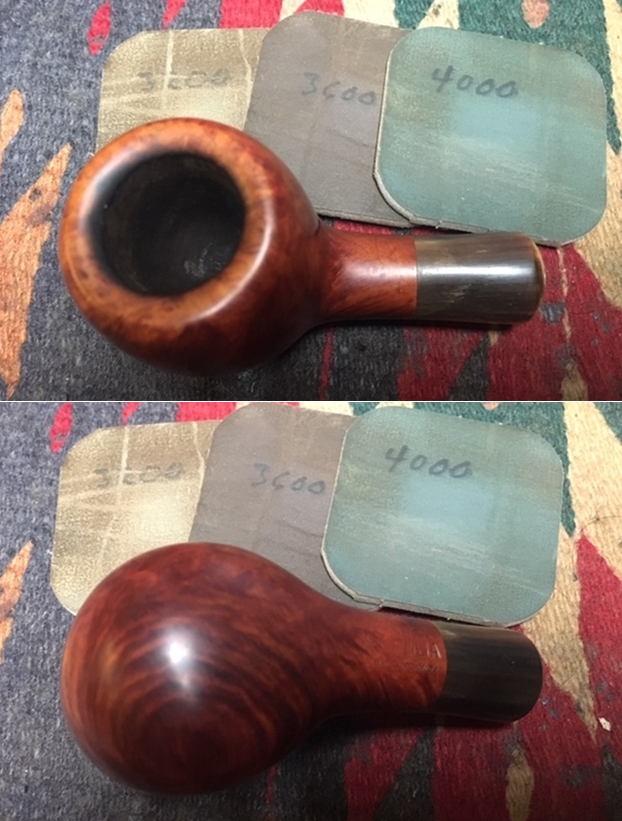
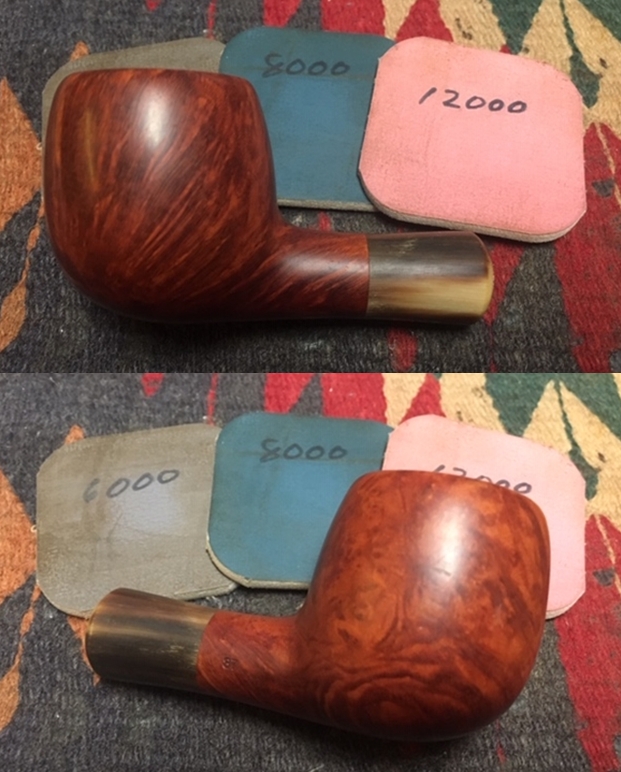
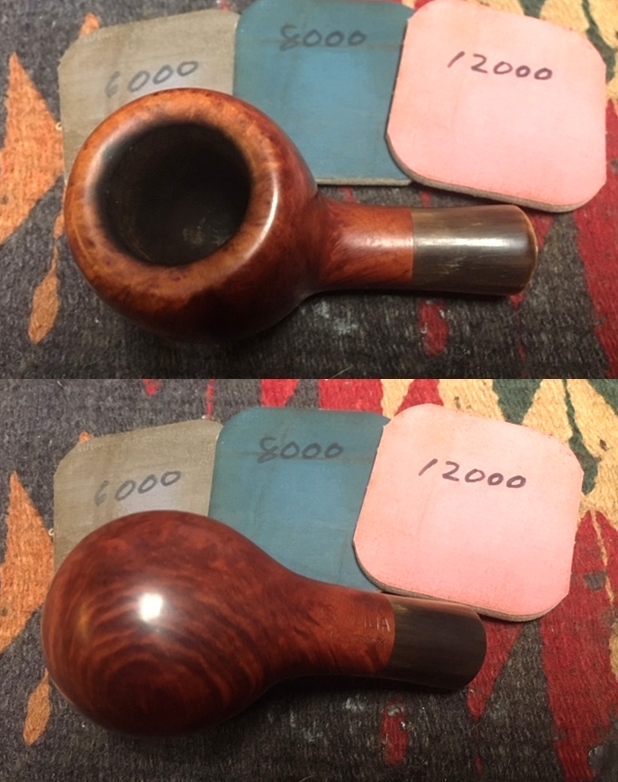
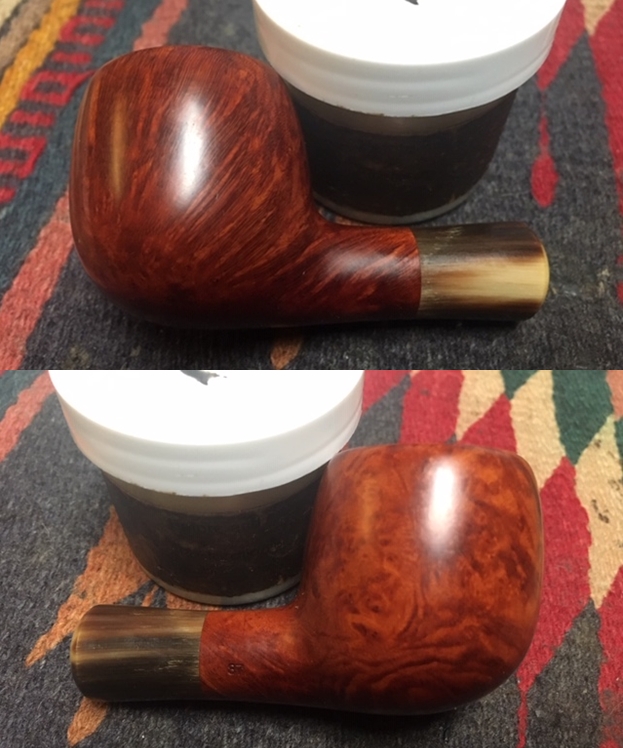
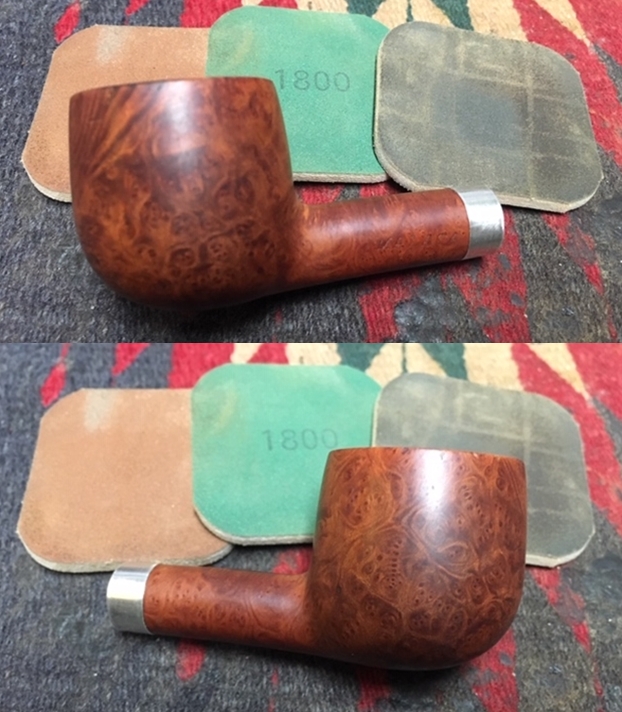
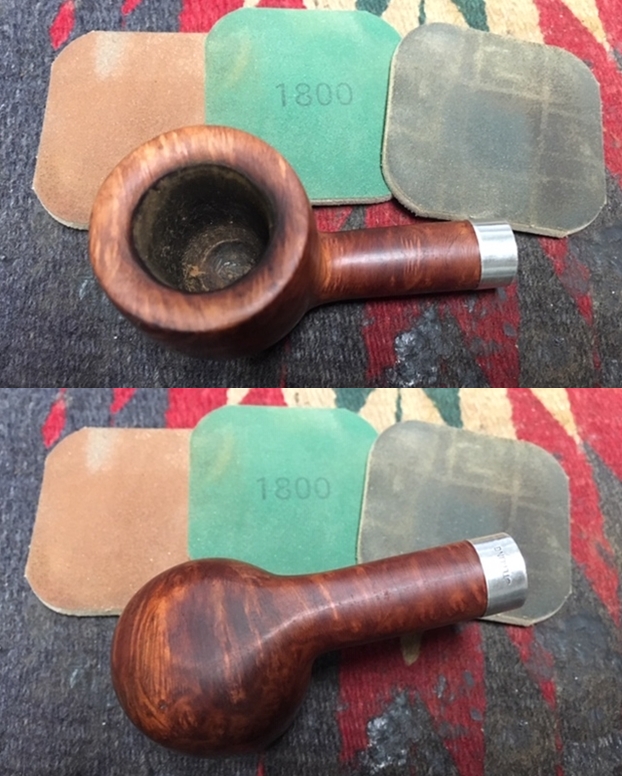
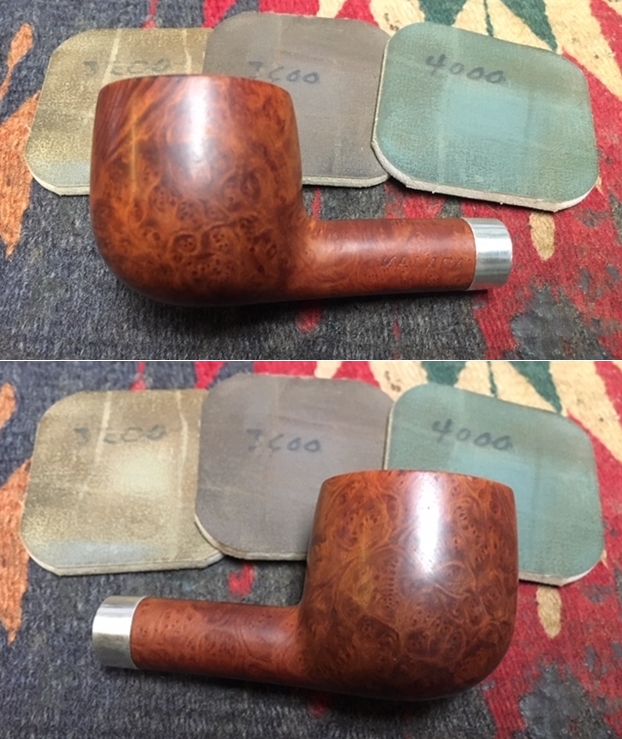
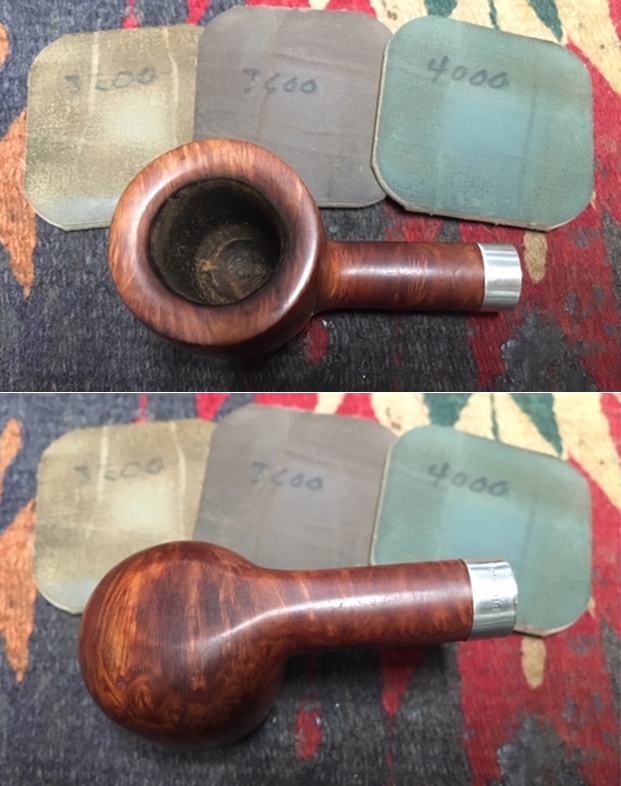
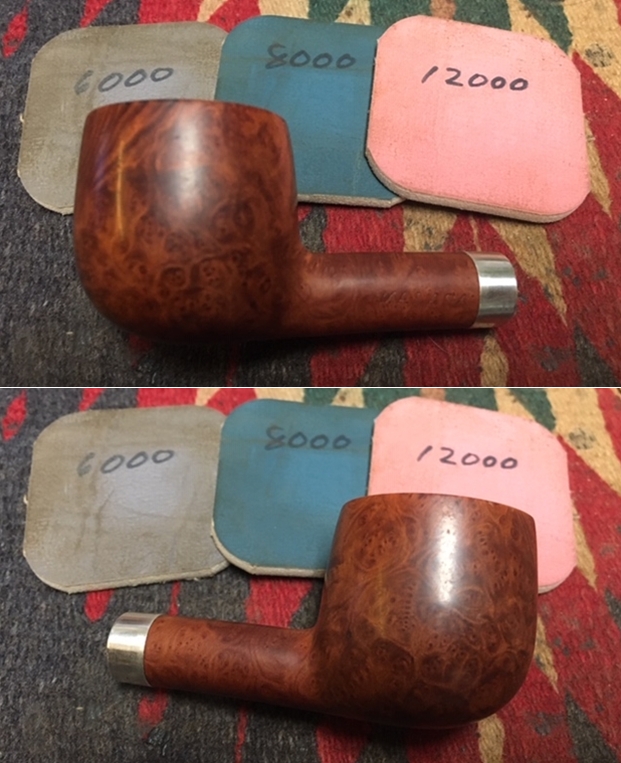
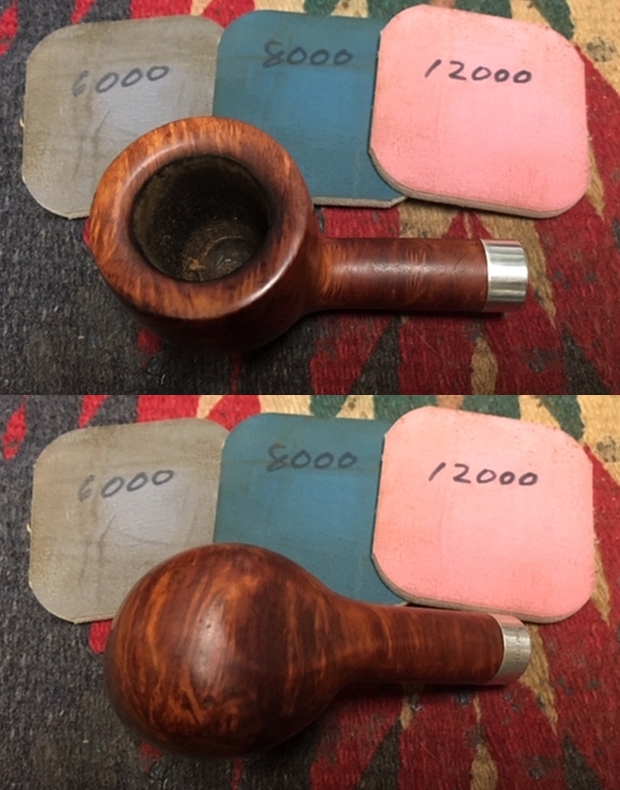
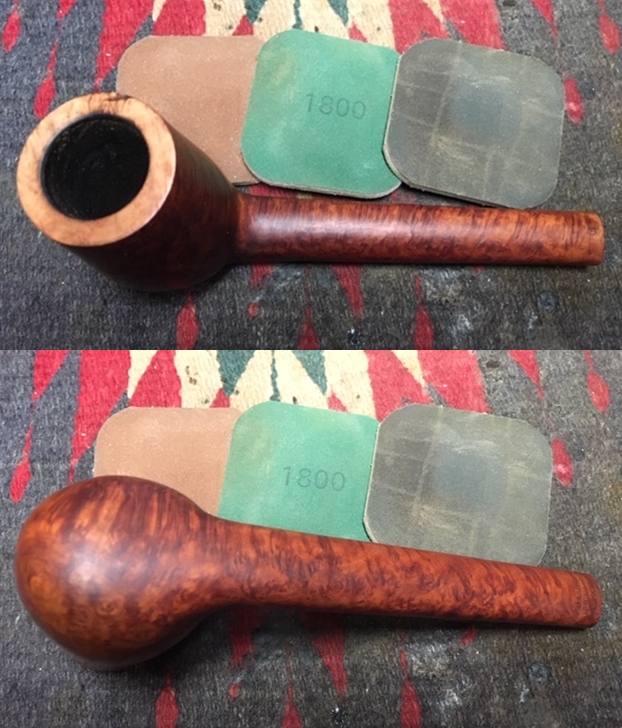
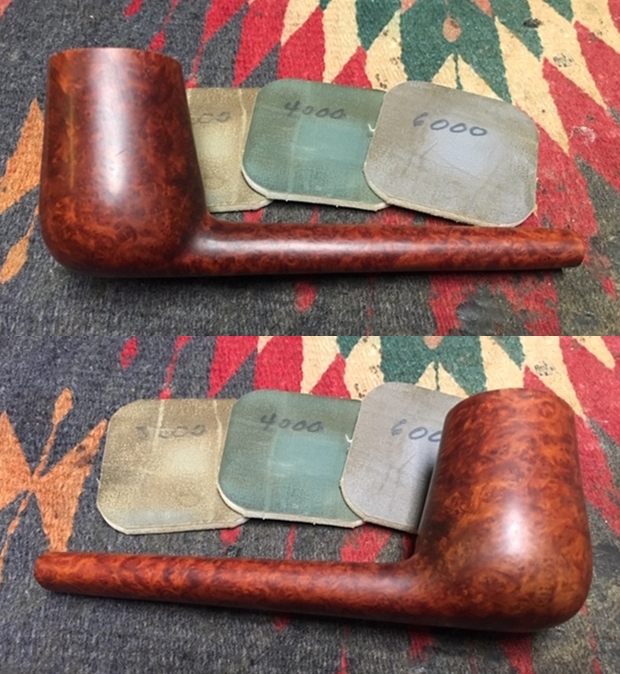
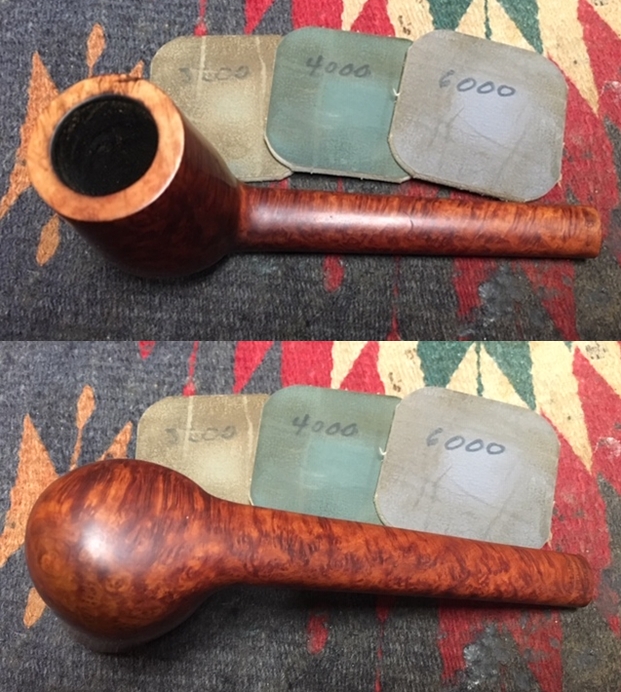
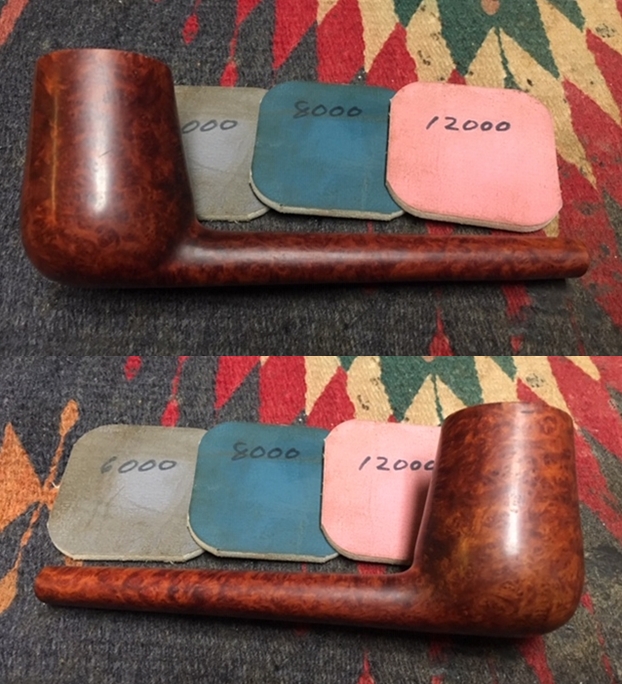
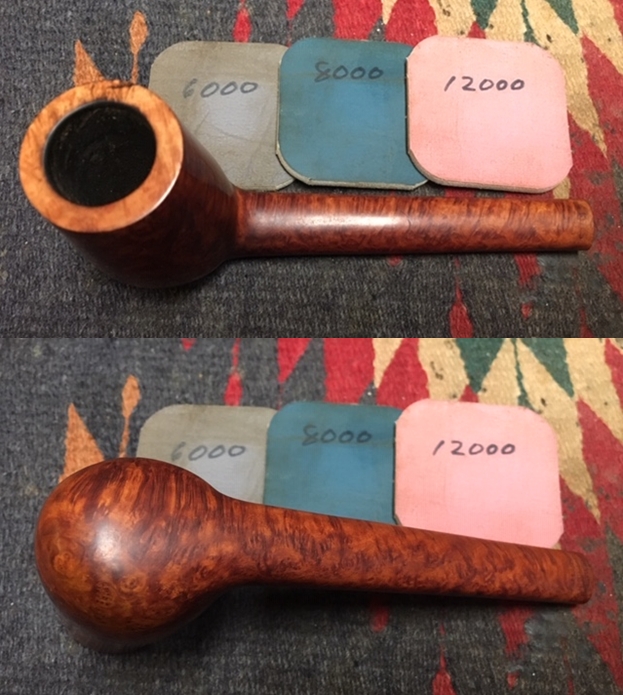
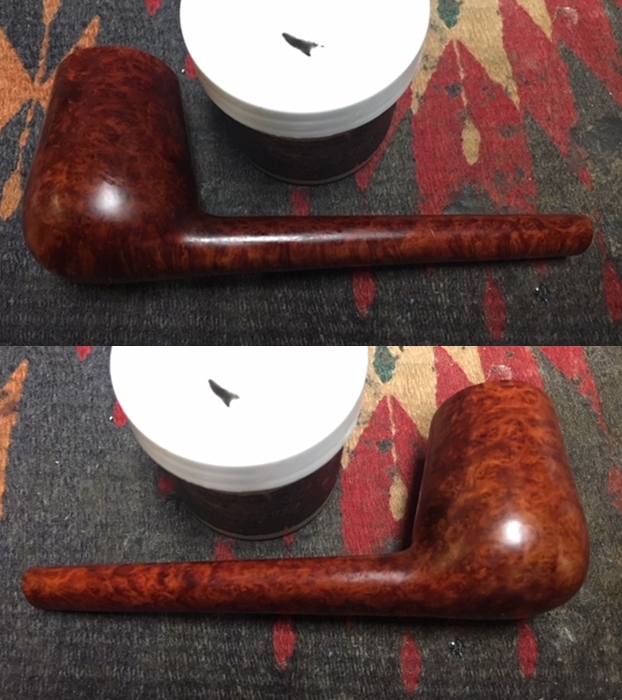
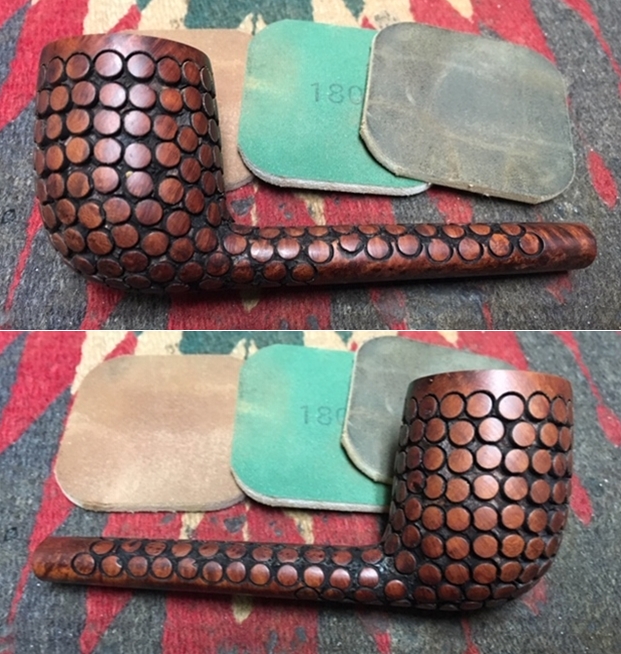
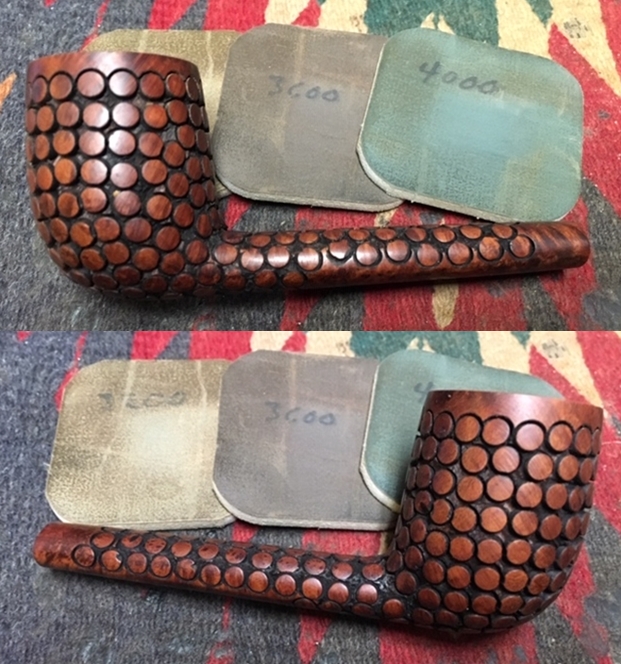
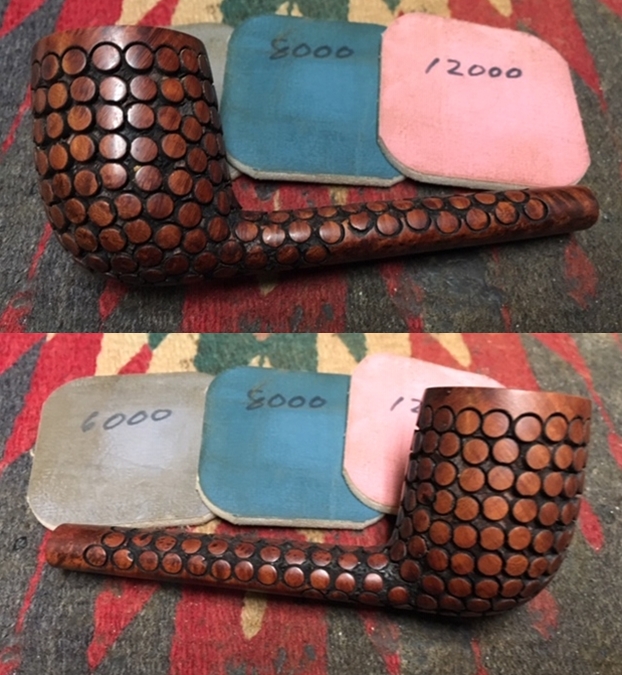
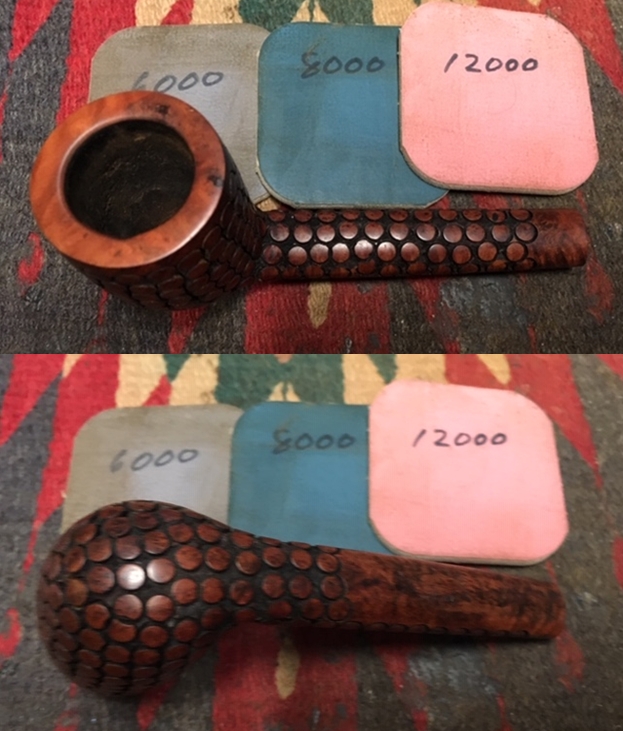
Steaming out the dents and dings from the stummel surface had necessitated that the surface of the stummel be evened out by sanding. I sand the entire stummel using 220, 400, 600 and 800 grit sand papers. The little dents and dings that remained on the stummel and outer rim edge were also evened out under this sanding process. This was followed by polishing with micromesh pads. I wet sand the stummel with 1500 to 2400 grit pads and follow it up by dry sanding with 3200 to 12000 grit pads. I wiped the surface with a moist cotton cloth after every wet pad to check the progress. The repaired rim edge now appears shiny and glossy. This has got me a bit worried as it stands out from the rest of the stummel surface. I fervently pray that this is masked after I have stained it. 
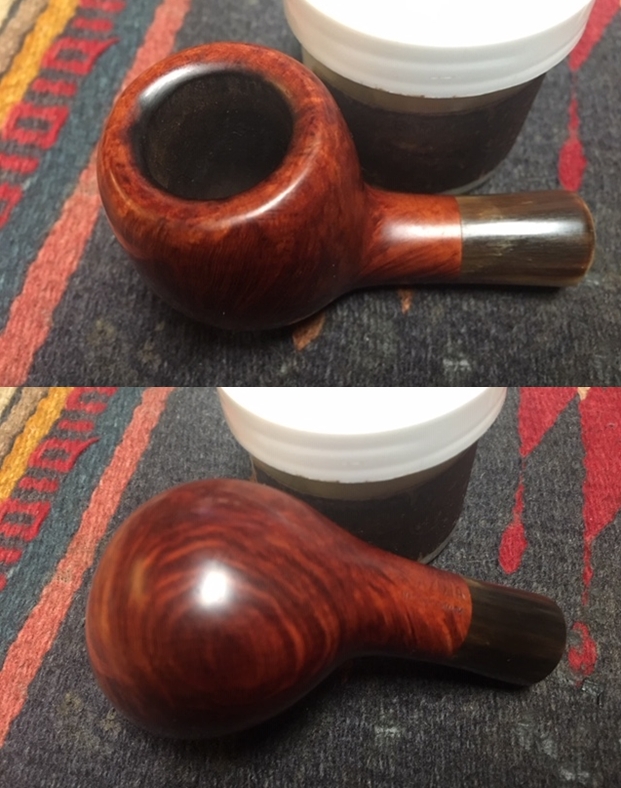
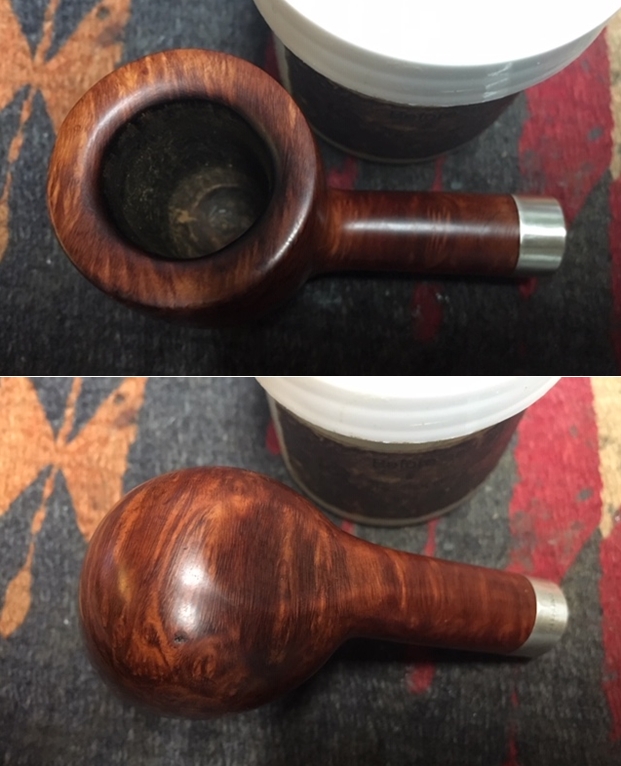
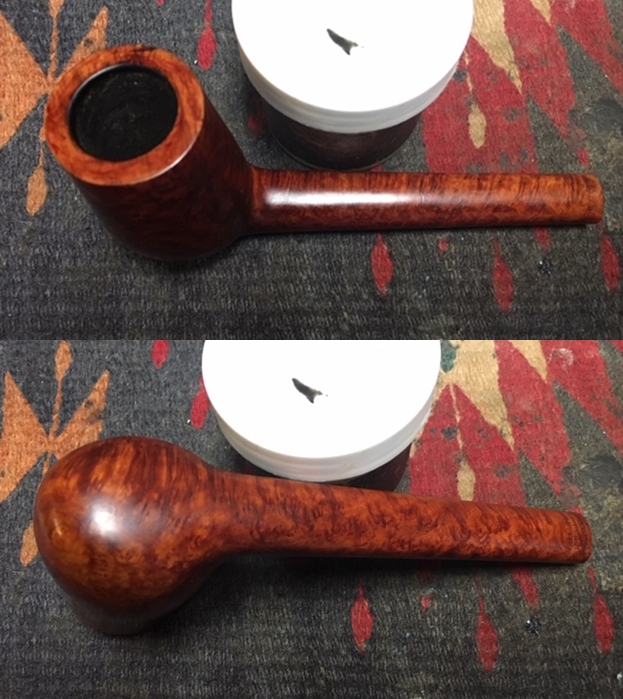
I rub a small quantity of “Before and After Restoration Balm” in to the briar with my finger tips and let it rest for a few minutes. The balm almost immediately works its magic and the briar now has a nice vibrant appearance. I further buff it with a horse hair shoe brush. I had hoped that the balm would work its magic on the filled area and help in blending it a bit, but that did not happen. 
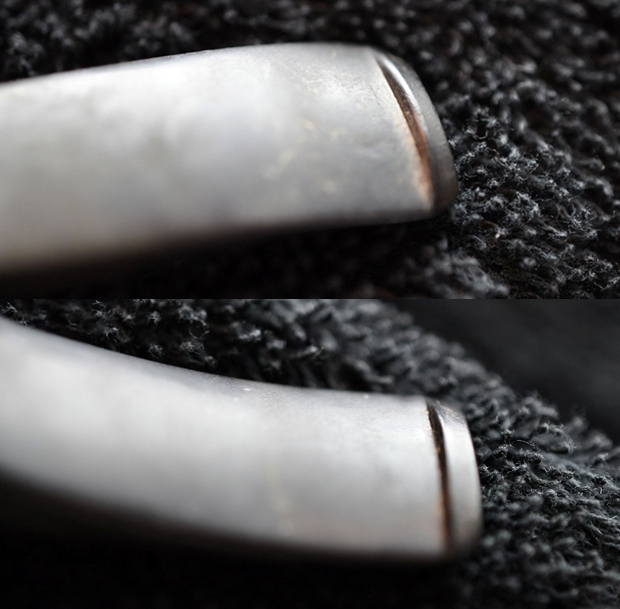
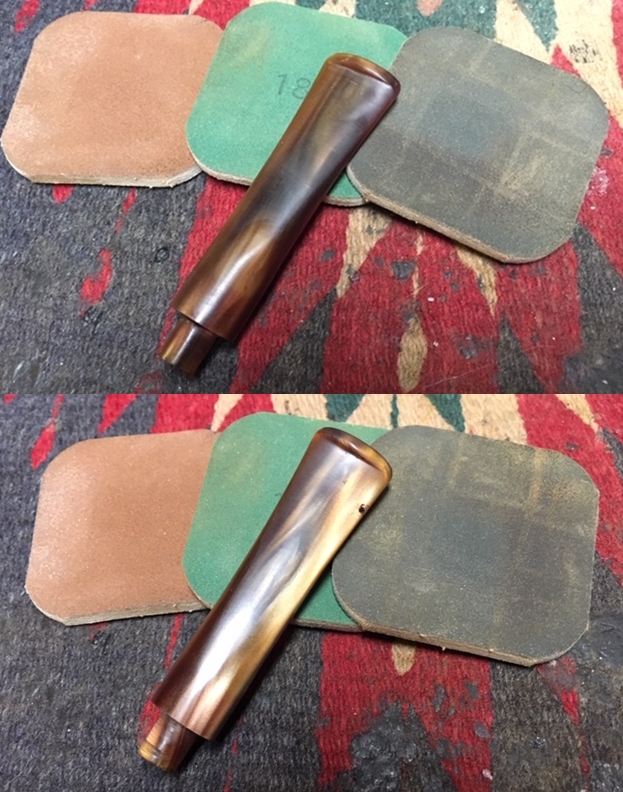
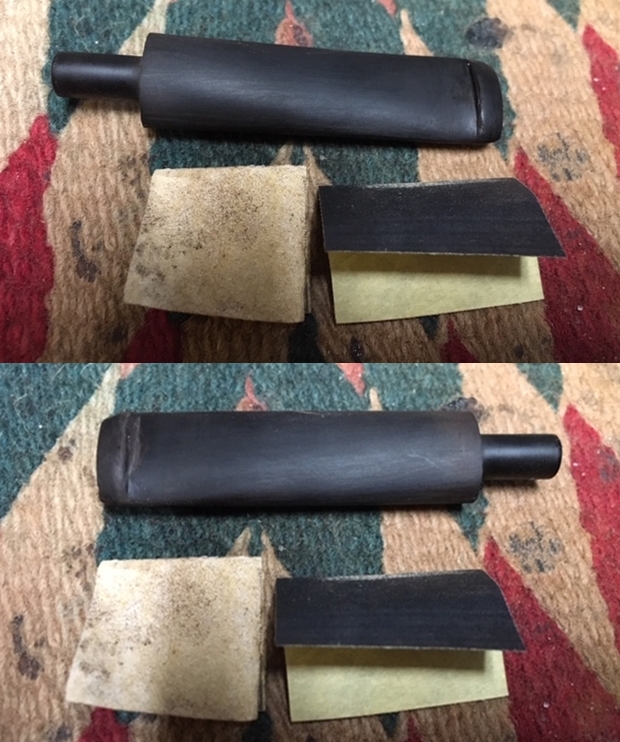
I had simultaneously been working on the stem reconstruction by building up the slot and button using the layering technique. Though tedious, I have reached a satisfactory stage from where I can fine tune the slot and button edges. What followed were hours of tedious, back breaking and nerve wracking process of sanding and shaping of the slot and the button. Though the slot is not a perfect horizontal straight opening, rather a slight oval, I have managed to match the profile and dimensions of the original stem and the pipe is definitely smokable. Here are pictures of the progress.
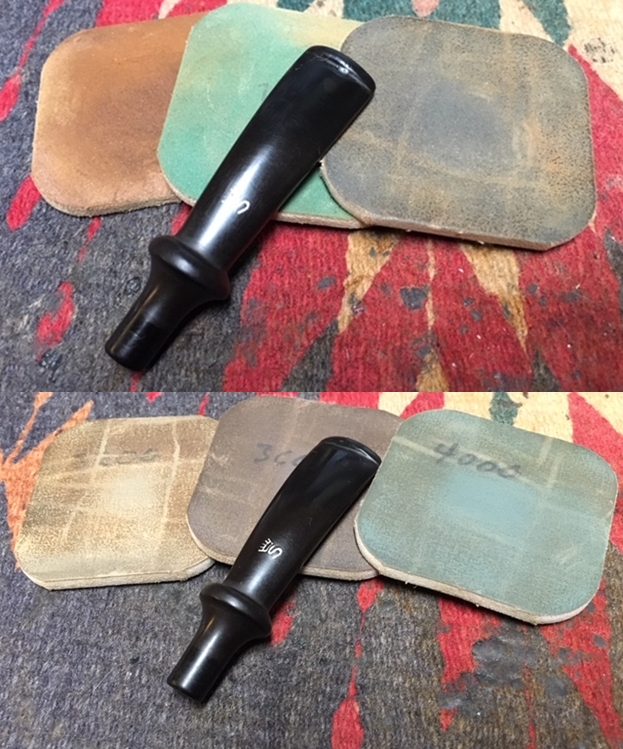
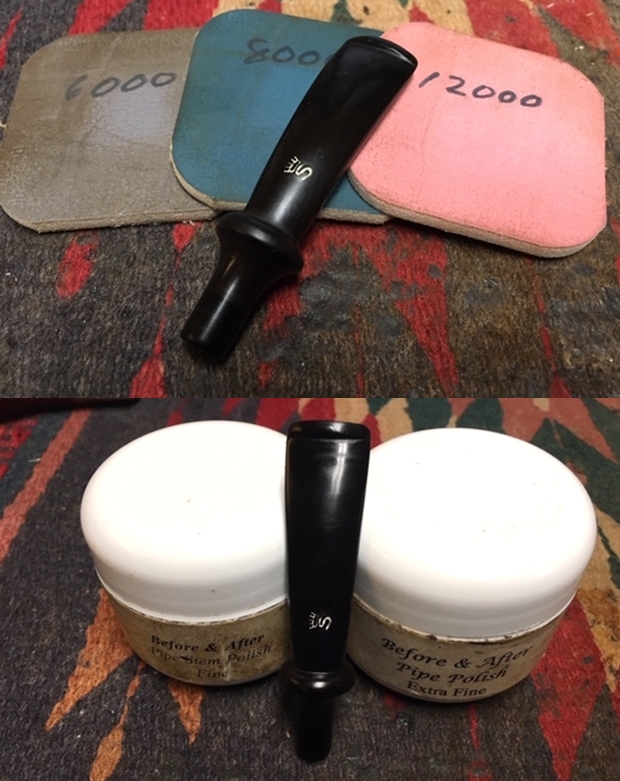
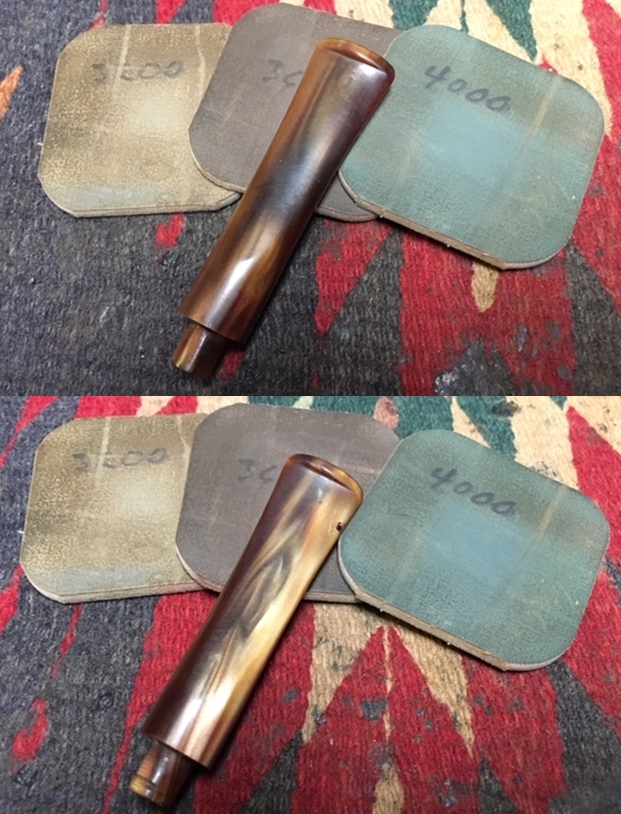
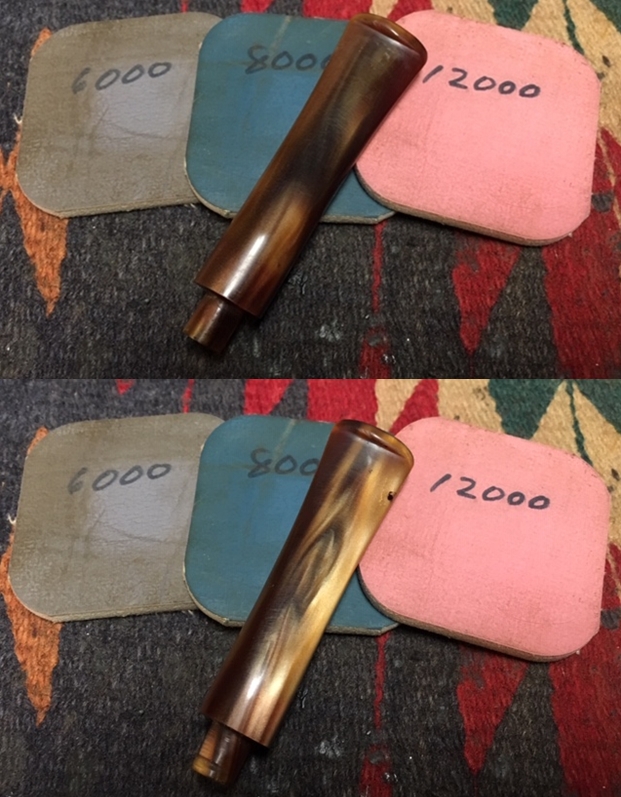
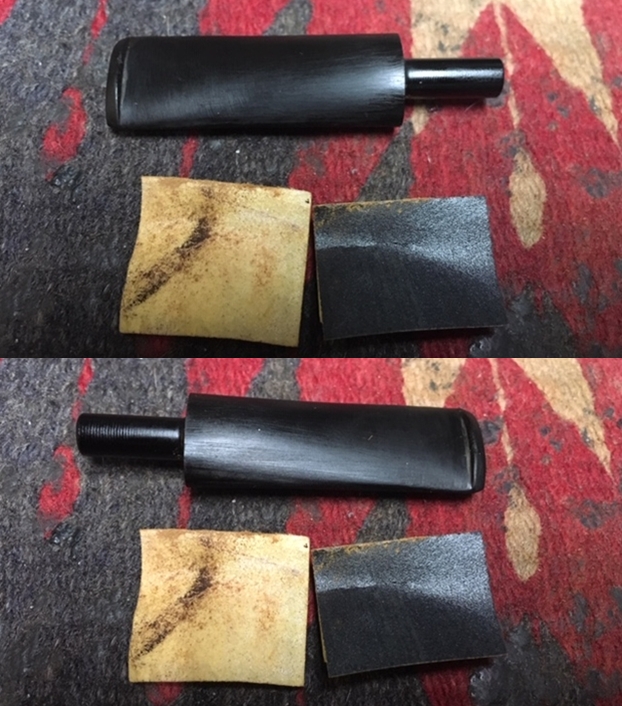
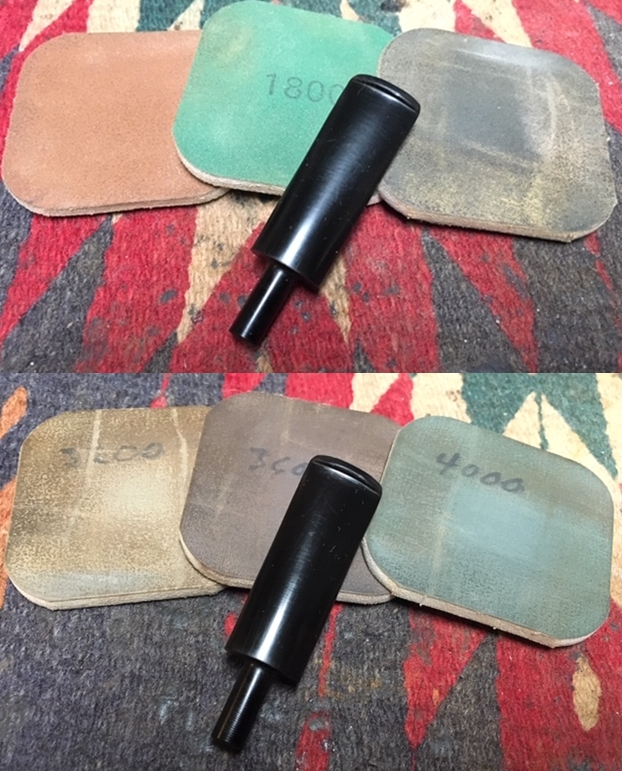
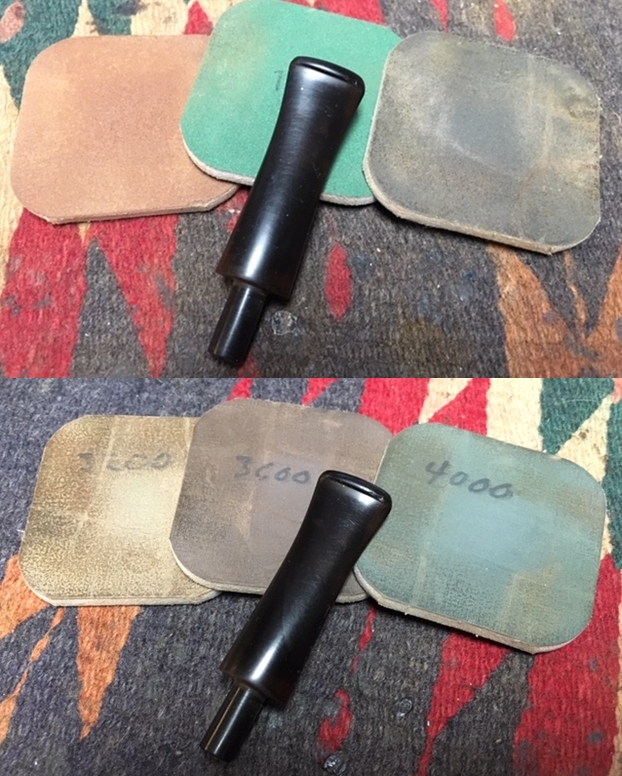
For a better blending, I further sanded the entire stem with 220 followed by 400, 600 and 800 grit sand paper. This helps to reduce the sanding marks left behind by the more abrasive 220 grit paper. To bring a deep shine to the vulcanite stem, I went through the complete set of micromesh pads, wet sanding with 1500 to 2400 grit pads and dry sanding with 3200 to 12000 grit pads. I wiped the stem with alcohol after each pad and rubbed it down with Extra Virgin Olive oil to rehydrate the vulcanite. The repairs have blended in very well and the stem now looks a shiny black and beautiful. The internals of the stem was cleaned out using alcohol and pipe cleaners. The finished stem is shown below. 
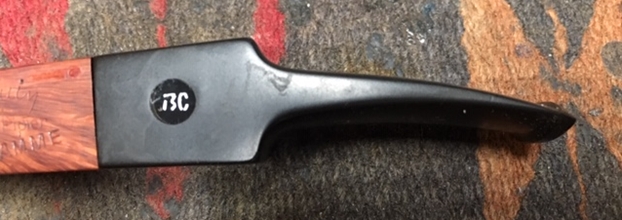
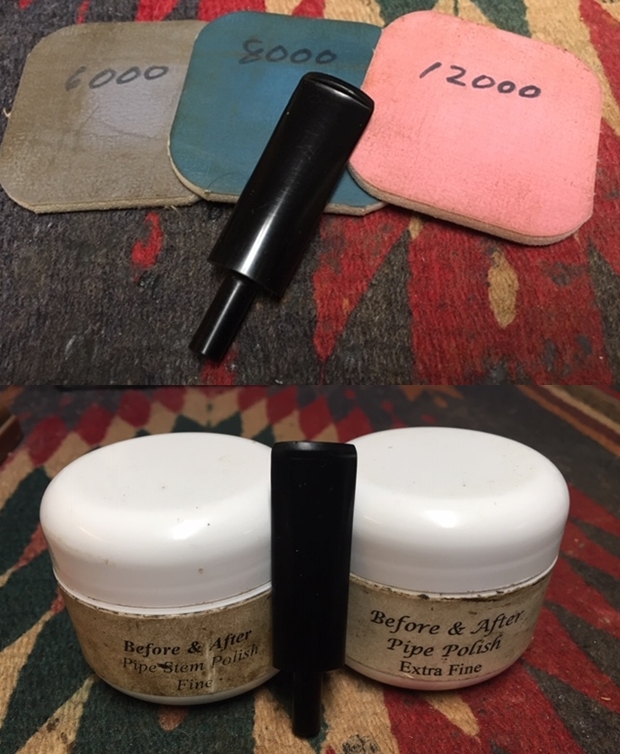
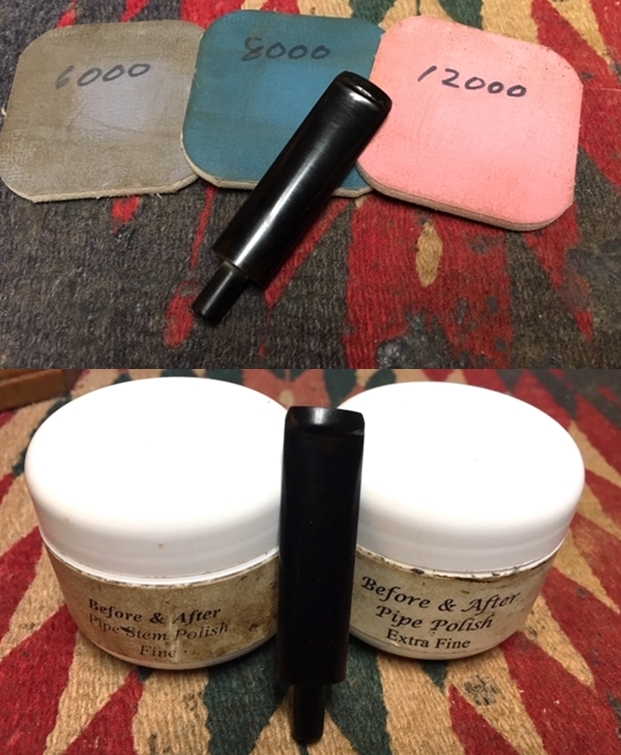
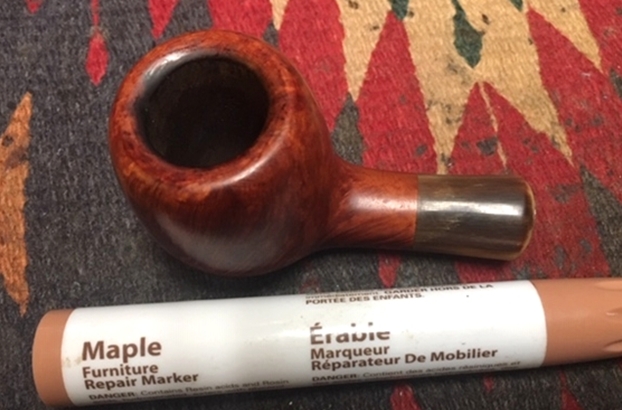
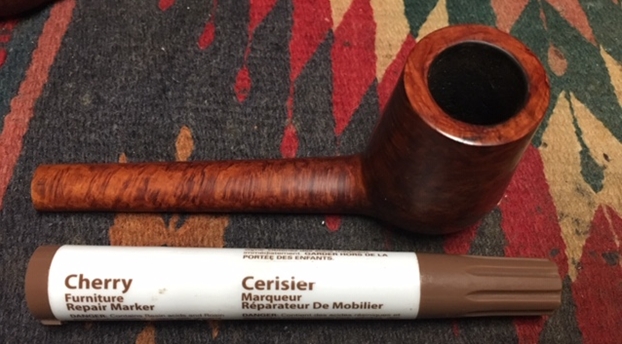
I kept the stem aside to let the stem absorb the oil and turn my attention towards the stummel. I decided to stain the stummel in cherry red stain which was the original stain true to the Bruyere line of Dunhill pipes. I use the powder variety of stain and mix it with 99% isopropyl alcohol. I heated the stummel surface with a heat gun and applied the stain with a folded pipe cleaner. As I paint the stummel with stain over sections at a time, I burn the dye using a Bic lighter that combusts the alcohol in the aniline dye and sets the dye pigmentation in the wood.  After fully saturating the stummel and covering the whole surface, including the rim top, I set the stummel aside to rest for several hours. 
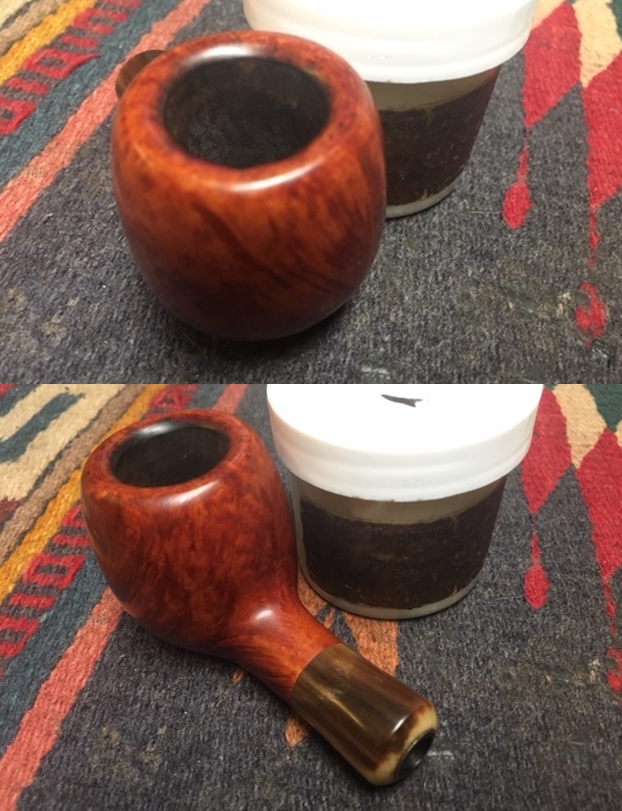
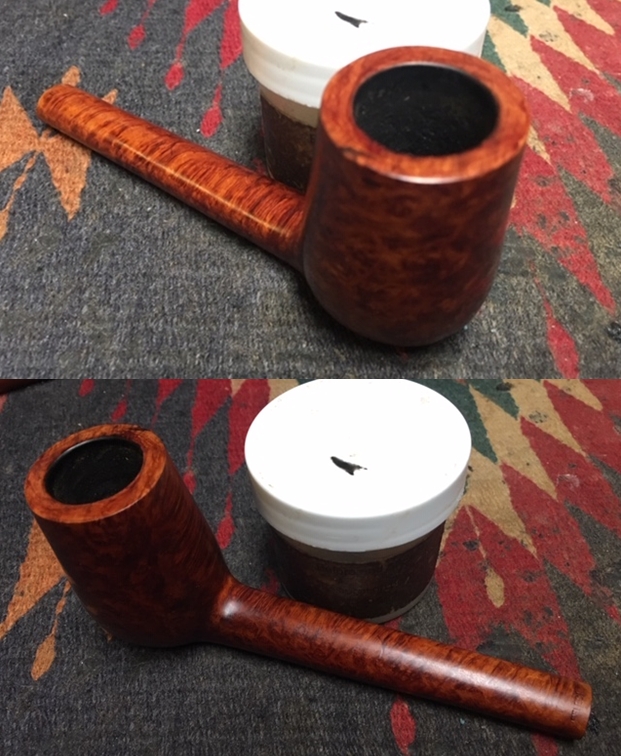
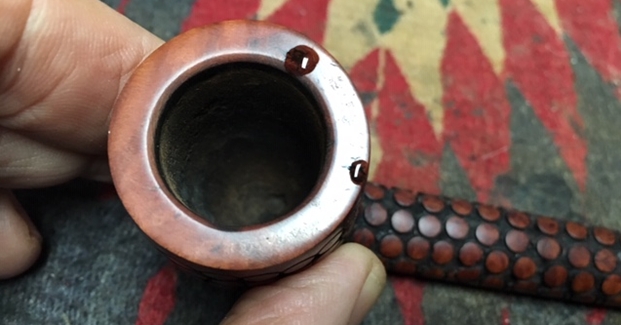
By next evening, the stain had set nicely. I mount a cotton cloth buffing wheel (because I do not have felt cloth buffing wheels!!) on the Dremel and set the speed at about 40% of full RPM and apply red compound to the stummel. This does help in revealing the grains gradually; however, my fears had come true. The repairs to the outer edge of the rim did not absorb the stain and is encircled in yellow. 
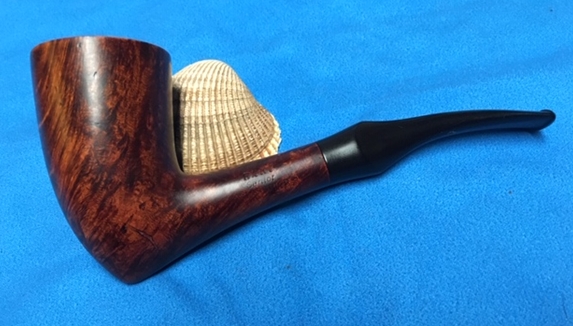
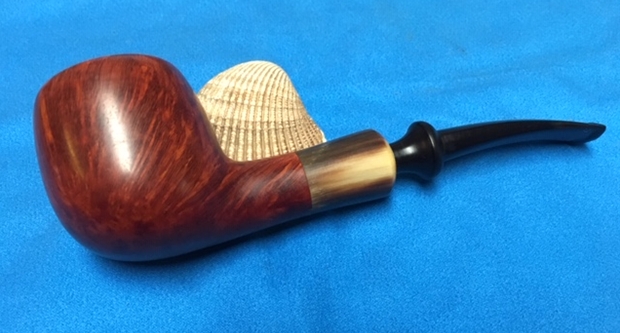
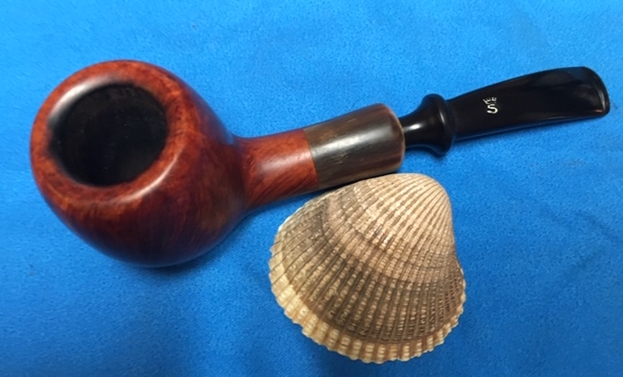
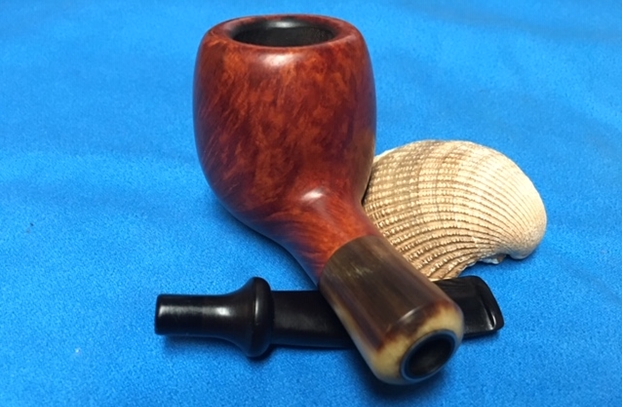
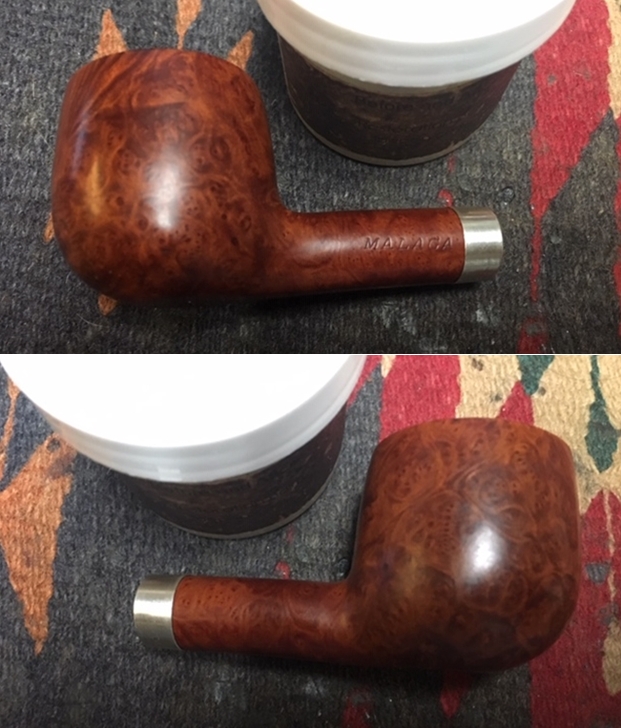
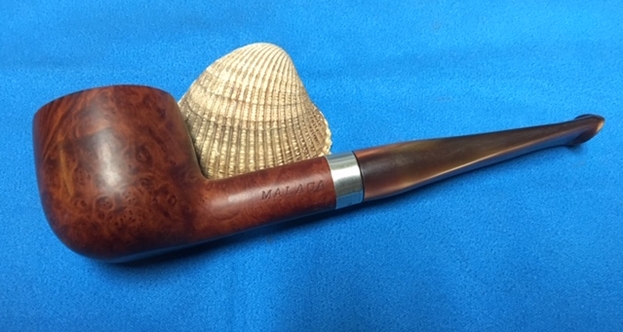
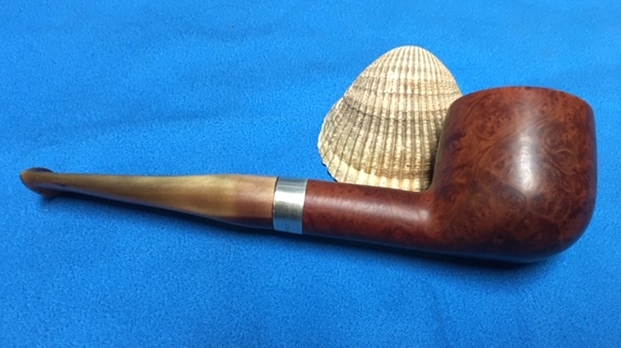
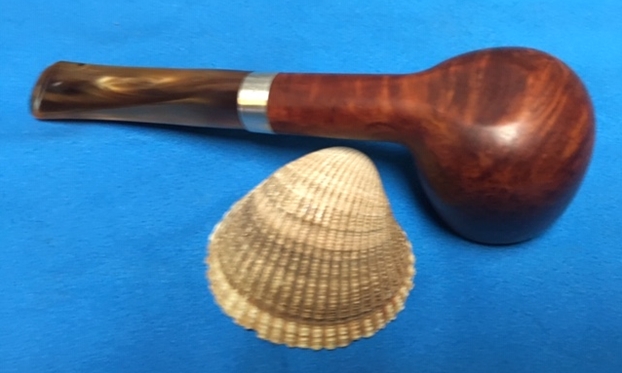
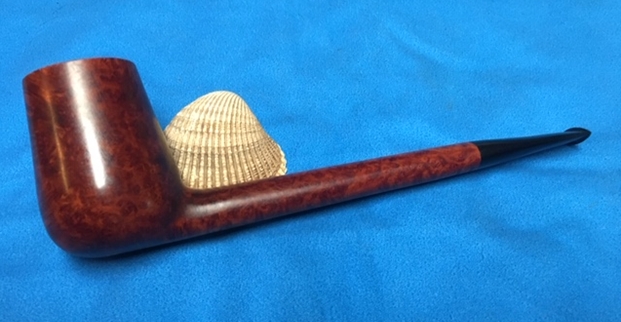
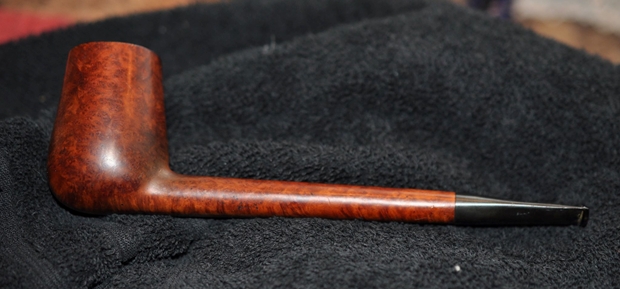
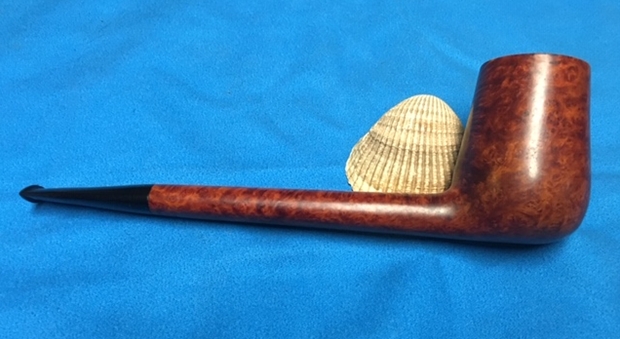
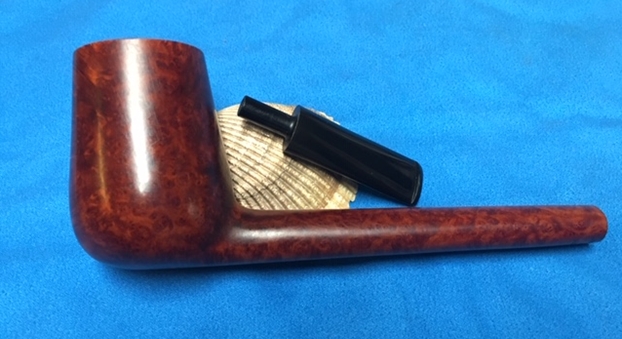
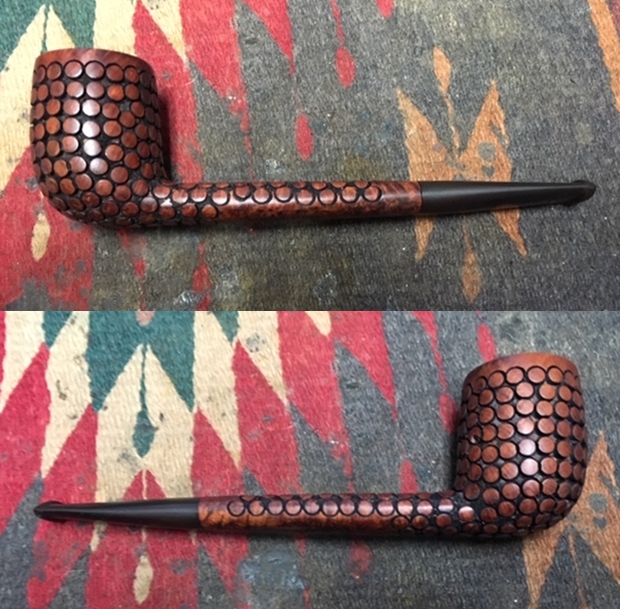
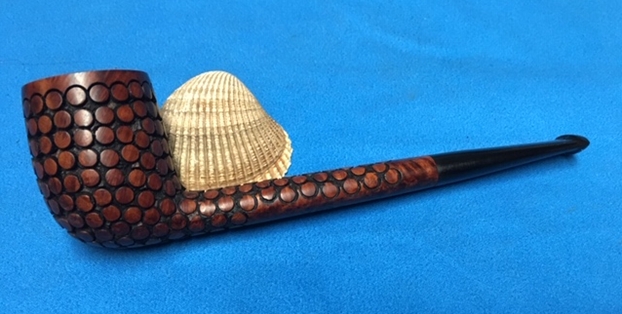
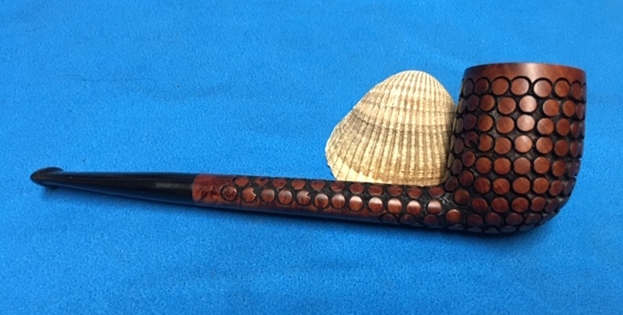
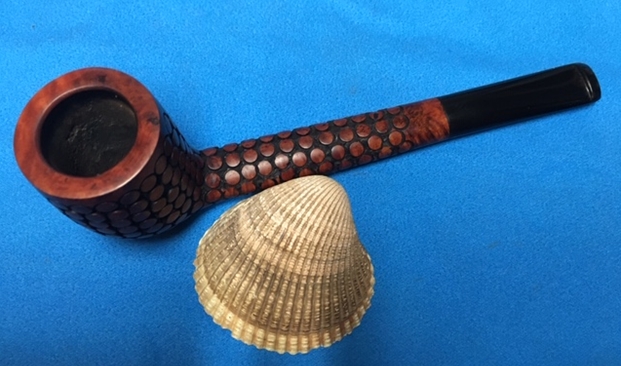
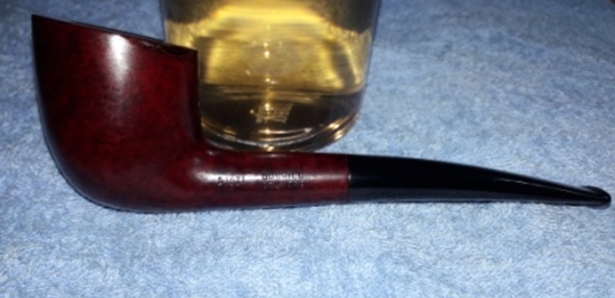
To finish, I re-attach the stem with the stummel. I mounted a cotton cloth buffing wheel to the Dremel (actually it is not the brand machine, but a local machine which is similar).  I set the speed at about half of the full power and applied White Diamond compound to the entire pipe. I wiped/ buffed the pipe with a soft cotton cloth to clear it of any leftover compound dust. I then mounted another cotton cloth wheel on to the polishing machine and applied several coats of carnauba wax. I finished the restoration by giving the entire pipe a rigorous hand buffing using a microfiber cloth to raise the shine further. The completed pipe looks lovely, fresh and vibrant; the photographs in this case, do not do justice to the appearance of this beautiful pipe, my first Dunhill. I cannot thank enough my friends Mr. Dal Stanton, Mr. Sam Vior, Mr. Victor Naddeo and Mr. Steve for helping me to research and complete this mysteriously stamped Dunhill pipe. PS: The readers would have observed the fact that the rim repair could not blend completely in spite of my best of efforts and still I have highlighted the flaw while the general tendency is to hide it. True, there are reasons for me highlighting the flaws; firstly, if I cannot hide it from myself, than why attempt to pretend it’s not there and secondly, the highlighting will encourage you to have a closer look at the flaw and maybe you could have an explanation for it in the first place and share it with me. This will help me in avoiding these mistakes in my future restorations. Third and most important reason is that a newbie somewhere who is not so fortunate like me to have friends and mentor that I have will also benefit from my mistakes.


Restoring a Unique “House of Lords” Sitter


Blog by Paresh Deshpande

I am pretty angry and frustrated at myself!!!!! That’s a very strong and confusing sentiment against oneself, I admit. But that’s the truth. Let me explain.

I spent nearly two weeks working on three pipes; a Dunhill Bruyere, a Tim West Freehand and a Stefano Exclusive. These three had their lip end of the stem either chewed off for about an inch and a half or a through and through hole!!! It could be considered as a major stem repair project. I successfully rebuild the stem end, including the button, lip edges and the slot. Though, I was unable to shape the slot as perfectly as I would have liked on the Dunhill, the repair was perfect on the Tim West and the Stefano. I felt elated and supremely confident about my capabilities. The blending of the repairs appeared spot on and I blazed through the remaining restoration, clicking pictures of the progress without giving them a second look. When, at the end, I went through the pictures while doing the write up, to my horror, the repaired stem and stummel stared back at me with all their imperfections on display in form of scratches, brownish spots of oxidation and fillings showing through the stain!! This was embarrassing for me and I shared these images with Mr. Steve. In his characteristic method of pointing out my short comings, I shall quote his reply to me, “Takes lots of work… I am having a little trouble with that lately…. Trying to rush it. Pipe looks good”, unquote!! Readers of rebornpipes and those who know him would be smiling while reading this part. Well, to cut the banter short, I shall rework all these short comings later as I want to start on a fresh pipe!!

The pipe on my work table, from my inherited collection, is one large barrel shaped full bent (this aspect needs to be confirmed and will be cleared as we progress further) sitter with beautiful and very tightly packed birds’ eye grain on either side of the bowl and shank, extending over to more than half of the front of the stummel. Equally tightly packed cross grain are seen on the front left and back of the bowl and also on the upper and bottom surface of the shank. It is stamped on the left side of the shank as “HOUSE OF LORDS” over “MADE IN ENGLAND” in block capital letters. The right side of the shank bears the numeral “275”, probably the shape code, towards the bowl shank junction. The vulcanite saddle stem bears the Crown logo stamped on the left of the round stem. The stem logo and the shape code are slightly worn off. I have included a picture of the stem logo from pipephil.eu to show how it appears on this stem.To know more about the brand, the lines offered by the maker and attempt to date this pipe, I visited pipedia.org, which has wealth of information on almost all pipes. The only information available here was that this brand was by Samuel Gordon in the early 20th century and thereafter became a Sasieni second. My next go to site is pipephil.eu where the stampings and stem logos on a pipe are used for brand information and to date a pipe. Here is the link for information on the pipe currently on my work table:-

www.pipephil.eu/logos/en/logo-h3.html#houseoflords

This site also pointed to the same information gleaned from pipedia.org. Here is what was found on pipephil.eu.

Brand from Samuel Gordon. Maybe a Sasieni second (J.M. Lopes, op. cit.)

I further followed the link to “Gordon” and learned that Samuel Gordon had founded the brand “GORDON” in 1910-20 eras. This is the link for Gordon brand of pipes; www.pipephil.eu/logos/en/logo-g4.html#gordon

From the above information, it is assumed that this piece is from the early 20th century period. Wow!!!! This is really an old pipe. The pipe brands and its vintage, those that are in my grandfather’s collection, never cease to amaze me and there are some really collectible pipes that I have inherited.

INITIAL VISUAL INSPECTION

The chamber shows a nice even build up of a cake which makes it difficult to comment on the condition of the inner walls of the chamber. However, the general appearance of the stummel makes me believe that there will not be any major issues with the chamber walls. The rim top is clean with no overflow of lava and this is a big surprise coming from my inherited collection!! The chamber is out of round with the inner rim edges showing charring at 3 o’clock and 9 o’clock direction. It appears that this charred area of the inner edge was tried to get rid off in an amateurish way. The outer rim is also damaged and has a few chips and dents to the front, probably caused due to hitting the bowl against a hard surface to remove the dottle!! All in all, I would say that this was one of the few well cared for pipes from his collection!!The surface of the stummel is covered in dirt and grime accumulated over a period of time. The stummel surface is peppered with numerous dents and dings, more so towards the front of the bowl, probably caused due to careless and uncared for storage for the last 40-45 years and equal number of years of previous usage!!!! It will be a big decision whether to address these dents and dings by abrasive sanding method and loose the patina which has developed on the surface, or let them be. Well, I shall cross the bridge when I reach it. The mortise appears to be either clogged or has some obstruction as air flow through it is hard and laborious. The vulcanite stem is heavily oxidized. Some light tooth chatter is seen on both surfaces of the stem towards the lip. This issue should not be a major headache to address. The lip edge on both sides is crisp but lightly damaged. The quality of vulcanite is good.The thing that struck me odd was the bend on the stem. It was bent way too much than the normal. When I shared the pictures of this pipe with Mr. Steve, he too found the angle of the bend too rakish and very odd, to the extent that he felt it might not even be correct for the pipe. However, the stem logo confirmed otherwise. So, I am confronted with the controversial prospect between “PRESERVATION” and “RESTORATION”!! While I do not have as clear a mandate as Mr. Steve had, managing this conflict, for me, is more challenging. To me, this inheritance is a family heirloom and in this particular instance, I would rather maintain this profile instead of straightening it. Mr. Steve gave me a second perspective that the stem was bent during storage due to intense heat which is prevalent in India and may not be original as my grandfather had smoked!! Well, this could be true. The inner conflict continued while I proceed to clean and spruce up the pipe to its pristine condition (or at least make a sincere attempt at it)

THE PROCESS
I reamed the chamber with my fabricated knife and scraped out all the cake. With a folded piece of 180 grit sandpaper, I further sand out the last traces of remaining cake and expose the walls of the chamber. There are some very minor and insignificant webs of line on the chamber walls that can be seen to the front and above the drought hole. I wiped the chamber with a cotton pad dipped in isopropyl alcohol to remove the carbon dust left behind by all the reaming and sanding process. I gently scraped the rim top surface with a sharp knife to remove the lava overflow. Using the same knife, I gently scrapped out the charred briar from the inner rim edge till I reached solid wood. The following pictures show the inner rim edge after the removal of the charred wood from the 3 o’clock and 9 o’clock direction. Also seen is the earlier amateurish attempt at addressing the issue of out of round bowl. I shall address this issue by creating a bevel to inner edge. This was followed by cleaning the mortise with cue tips, pipe cleaners and shank brush dipped in isopropyl alcohol. With my fabricated spatula shaped knife, I scrapped out the dried oils and tars from the mortise. My, there were chunks of gunk in there and can be seen in the following pictures!! Finally after some diligent cleaning, the mortise is clean and this further completely eliminated traces of old smells from previous usage.The internals of the stummel is now clean and fresh. Now, it was the turn of the stummel to get cleaned up. Using a hard bristled tooth brush dipped in undiluted Murphy’s oil soap, I very deliberately scrubbed the surface of the stummel. I cleaned the rim too. The stummel and rim top was dried using paper napkins and soft cotton cloth. I am not very happy the way the rim top appears at this stage with all the charring and uneven inner and outer rim edges. This needs to be addressed. I set the stummel aside to dry out naturally. After cleaning the rim top with Murphy’s oil soap, the inner edge damage was even more evident, and begged to be addressed before I proceed any further. I topped the rim on a 220 followed by 320 and 600 grit sand paper, checking frequently till I was satisfied that the charred surface was greatly reduced. The inner edge is still uneven, though much better than before topping. With a folded piece of 180 grit sand paper pinched between my thumb and fore finger, I created a bevel on the inner edge. This addressed the issue of uneven and out of round inner edge. A couple of dents and chips are also seen to the outer rim edge and one (circled in red) in the newly created inner edge bevel. There were a few slightly deeper chips on the stummel surface. I gouged out the old and dried wood from these dents from the front of the stummel, inner rim edge and the heel and spot filled it with a mix of CA superglue and briar dust (believe you me gentlemen, making and thereafter applying this mix to fill the pits is not as easy as it appears!!!!!! The moment superglue comes into contact with the briar dust; it hardens even before you can blink. Maybe there is an issue with the glue that is available to me here, coupled with the prevailing climatic conditions or maybe one Mr. Dal Stanton could help!!). I always over fill the holes so that when I sand them down they are smooth and I can feather in the fills with the rest of the briar. I set the stummel aside to cure overnight. I had applied this mix of superglue and briar dust to the inner rim edge as it would not be coming in direct contact with heat from the burning tobacco leading to health issues. While the stummel was drying, I worked the stem. I covered the stampings on the stem with whitener using a whitener pen. I flamed the stem surface of the stem with a Bic lighter to raise the tooth indentations and scratches on the stem. The heat from the flame of Bic lighter causes the vulcanite to expand and regain its natural shape, reducing the marks. Using a needle file, I sharpened the lip edges. For a better blending, I further sanded the entire stem with 220 followed by 600, 400 and 800 grit sand paper. This helps to reduce the sanding marks left behind by the more abrasive 220 grit paper. To bring a deep shine to the vulcanite stem, I went through the complete set of micromesh pads, wet sanding with 1500 to 2400 grit pads and dry sanding with 3200 to 12000 grit pads. I wiped the stem with alcohol after each pad and rubbed it down with Extra Virgin Olive oil. The internals of the stem was cleaned out using alcohol and pipe cleaners. The finished stem is shown below. By the time I had worked on the stem, the fills on the stummel surface had completely cured. I sanded the fills using a flat head needle file and checked to see if I had missed any spots. I wanted the entire surface smooth to the touch. I sanded the spots down and blended them into the bowl surface using a folded 220 grit sand paper. I followed this step by sanding the entire stummel with a 220 grit sand paper followed by 600 and 800 grit sand papers. Once that was done I wiped the bowl down with a cotton cloth dampened with Isopropyl alcohol to remove any remaining dust. I wet sand the stummel with 1500 to 2400 grit pads and follow it up by dry sanding with 3200 to 12000 grit pads. Once I was through with the micromesh pad sanding, the fills showed in complete contrast with the rest of the stummel, as can be seen in the pictures below. I hope they will blend in better once I apply the balm and buff the stummel. I rub a small quantity of “Before and After Restoration Balm” in to briar and let it rest for a few minutes. The balm almost immediately works its magic and the briar now has a nice vibrant appearance. I further buff it with a horse hair shoe brush. The stummel, at this point in restoration, looks beautiful save for the fills which can still be seen in all their awfulness. To address this, I have the option to stain the stummel with a dark brown stain or I let it be as a being part of its journey thus far!! Thus, another conflict has been added to the existing one regarding the stem. I shall think about it once I reach that point in restoration. Before I proceed to final stage of polishing and applying carnauba wax coats, I want to address the superficial and insignificantly thin lines in the chamber as a precautionary measure. I mix activated charcoal and yogurt to the consistency of a thick porridge, not runny while being pliable. Inserting a folded pipe cleaner into the mortise till it peeps out of the draught hole, I apply an even coat of this mixture to the inner walls of the chamber with a modified bamboo frond and set it aside to dry out overnight. The next evening, the coat has completely dried out and is hard. Using a piece of folded 220 grit sand paper, I lightly run it over the coating to a smooth finish. I had a long look at the dark fills against the rest of the stummel and did not like it. I made a decision to stain the stummel in dark walnut stain. I use the powder variety of stain and mix it with 99% isopropyl alcohol. I heated the stummel surface with a heat gun and applied the stain with a folded pipe cleaner. As I paint the stummel with stain over sections at a time, I burn the dye using a Bic lighter that combusts the alcohol in the aniline dye and sets the dye pigmentation in the wood.  After fully saturating the stummel and covering the whole surface, I set the stummel aside to rest for several hours. Once the stain had set, I mount a cotton cloth buffing wheel on the Dremel and set the speed at about 40% full strength and apply red compound to the stummel. This does help in revealing the grains gradually while masking the darker fills. To finish, I re-attach the stem with the stummel. I mounted a cotton cloth buffing wheel to a locally manufactured machine which is similar Dremel.  I set the speed at about half of the full power and applied White Diamond compound to the entire pipe. I wiped/ buffed the pipe with a soft cotton cloth to clear it of any leftover compound dust. I then mounted another cotton cloth wheel on to the polishing machine and applied several coats of carnauba wax. I finished the restoration by giving the entire pipe a rigorous hand buffing using a microfiber cloth to raise the shine further.

The completed pipe looks lovely, fresh and vibrant; the photographs in this case, do not do justice to the appearance of this beautiful large barrel-shaped pipe. Thank you for having the patience to reach this far while reading the write up. And as usual, I request all those readers to please leave a comment as it will help me to improve further and hone my skills. PS: After the pipe restoration was completed, nearly 15 days later my guide and mentor, Mr. Steve casually asked me if I had decided to straighten the stem. This set me thinking that here is a gentleman who is still thinking about the bent stem and that he is still doing so as he is convinced that a straight stem would look nicer on the pipe and would be original to the pipe. This convinced me to re-straighten the stem to its original. I place a fluffy pipe cleaner through the airway to prevent it from collapsing due to heating and with a heat gun; I heat the stem till it is pliable and straighten out the stem just by eyeballing the shape till satisfied. Here are a few pictures after the stem was straightened. Yes, there are a few minor issues which is a direct result of the process like the alignment of the shank end with the tenon end and slight dullness in the shiny stem etc, but they will be addressed subsequently. The overall appearance of the pipe is much better and the shank flow into the stem is more fluid and even. Thanks Mr. Steve!!


Life for a Beat up Bari Senior Old Briar Pick Axe


Blog by Steve Laug

The next pipe in the queue came from a pipe that Jeff purchased from an antique shop in Brookings, Oregon. He stopped by there on a trip last fall and picked up a few pipes. He picked up quite a few of his pipes and they included this interesting, Kriswill like Bari Senior. It is stamped on the left side of the shank and read Bari over Senior over Old Briar. On the right side it said Made in Denmark over the shape number 503. It is a pick axe shaped pipe with a deep pointed bowl and a narrow shank. The entire pipe had some beautiful mixed grain around the bowl but it was covered with deep cut marks on both sides and the front of the bowl. The rim top was covered with lava and darkening. The pipe was filthy but the grain underneath was rich and the finish looked like it would clean up well. The stem is vulcanite and has a pinched side on both left and right just past the saddle. The stem is oxidized and had tooth marks and chatter on both sides at the button edge. The photos below tell the story and give a glimpse of the pipe before clean up. Jeff took photos of the bowl and rim from various angles to capture the condition of the pipe before he started his cleanup work. There was a thick coat of lava on the rim and the cake in the bowl. It appeared that the beveled inner edges were in good condition. The outer edges actually appeared to be in excellent condition.He also took a series of photos of the sides of the bowl and shank to show the beautiful grain on the pipe but also the serious damage to the bowl – large gouges in the briar all around the bowl sides and front. The number of the gouges was a nightmare. Jeff took photos of the stamping on the left side of the shank. It reads as noted above. The first stamp BARI is legible. The second line that reads Senior and the third that reads Old Briar are both less legible.The next two photos show the stem surface. They show the tooth marks and chatter on both sides near the button. The stem is oxidized and has a thick build up around the button end. The pinched stem is a beautiful and sleek addition to the pipe.Once again, Jeff did his usual thorough clean up job on the pipe so that  when it arrived here in Vancouver it looked really good. Jeff reamed the bowl with a PipNet pipe reamer and followed up with a Savinelli Fitsall pipe knife to remove the cake. He scrubbed out the mortise and the airway in the shank and the stem with alcohol, cotton swabs and pipe cleaners. He scrubbed the exterior of the bowl, rim, shank and stem with a tooth brush and Murphy’s Oil Soap to remove the oils and tars on the rim and the grime on the finish of the bowl of the pipe. He rinsed it off under running water. He dried it off with a soft cloth. He was able to remove all of the lava build up on the beveled rim top of the pipe. The rim top looked pretty good though there were scratches in the flat top and a little darkening on the inner bevel toward the front of the bowl. The grain was beautiful but there were a lot of deep gouges in the briar around the sides of the bowl. He soaked the stem in Before & After Deoxidizer and was able to remove the oxidation. The pipe looked very good.I took photos of the pipe to show its condition before I started my work. I took a close up photo of the bowl and rim to capture the condition of the pipe before I started my restoration of the pipe. The rim top was clean but had some nicks on the flat surface and some darkening on the inside edge of the rim at the back of the bowl. The stem was quite clean with some light tooth marks and chatter on the top and underside near the button.I took some close up photos of the sides and front of the bowl to show the deep gouges in the briar. They were cuts rather than dents so steaming would not repair them. This would take some sanding and then strategic filling and staining to blend them into the briar. Time would tell if I could achieve what I wanted to do with this one. I started my restoration of the pipe by dealing with this damage. I sanded the damage areas on the bowl sides and front with a folded piece of 220 grit sandpaper. I worked on the areas until the lighter damaged areas were removed and the deeper ones were less visible.I filled in the deeper gouges with clear super glue. You can see the repairs are almost like pock marks around the bowl. They also highlight the extent of the damage on the sides of the bowl were when I started.When the repairs had cured I sanded them smooth with folded 220 grit sandpaper until they blended in to the surrounding briar. As I sanded I also found more damage on the front of the bowl and filled it in and sanded it smooth. I wiped the bowl down with alcohol on a cotton pad to remove the sanding dust. I wanted to remove it in preparation for restaining the bowl.I topped the bowl on a topping board with 220 grit sandpaper to remove the damage on the rim top and edges of the bowl. It did not take too much sanding to remove the damaged areas and leave the top ready for the next step.I sanded the bowl and rim with a medium and a fine grade sanding sponge to remove the sanding marks from the briar on the bowl and rim top. It was the first step in polishing the briar to ready it for staining. I continued to polish the briar with micromesh sanding pads – wet sanding with 1500-2400 grit pads and dry sanding with 3200-12000 grit pads. I  wiped the briar down after each pad with an alcohol dampened cotton pad. I decided to stain the pipe with contrasting stains – a dark brown undercoat and a cherry top coat. My thinking was that this would minimize the visual overload of repairs. I stained the bowl with the dark brown aniline stain and flamed it to set the stain in the grain of the briar. I repeated the process until the coverage was even and then set it aside for the afternoon. My thinking was that the dark stain would highlight the grain and also hide some of the repairs to the briar bowl.I wiped down the excess stain on the bowl with a cotton pad and isopropyl alcohol. I wanted to make the stain a bit more transparent and prepare it for buffing. I buffed the pipe with Red Tripoli on the buffing wheel to remove the excess dark stain. After buffing the bowl the Tripoli the grain was darker and the contrast between the light and the dark on the grain was quite stunning. I wiped the bowl down with alcohol and then rubbed some Before & After Restoration Balm into briar to enliven and preserve it. I buffed it with a soft cloth to raise the shine at this point. Once I had buffed off the balm I gave it a top coat of Danish Oil Cherry stain. I applied it with a soft cotton pad and let it sit for about 30 minutes before buffing it off with a cloth. Here is what it looked like as it dried. With the second coat of stain finished, I worked some Before & After Restoration Balm into the surface of the briar with my fingertips to clean, enliven and protect it. I let the balm sit for a little while and then buffed with a cotton cloth to raise the shine. The following photos show the bowl at this point in the restoration process. The bowl and the rim top look really good and the darkening is lessened. The finish looks very good with the combined rich brown and cherry stain on the bowl and rim. The stem was in good enough condition that I was able to polish out the tooth chatter and marks by wet sanding it with 1500-2400 grit micromesh sanding pads. I then dry sanded it with 3200-12000 grit pads. I wiped the stem down with a damp cloth after each pad. I further polished it with Before & After Pipe Polish – both Fine and Extra Fine. I wiped it down with a coat of Obsidian Oil and set it aside to dry. There was a spot of metal embedded in the vulcanite of the stem on the top left side ahead of the button. I have marked it with a red circle to highlight it for you as you look at the photo. It does not disappear as the stem is polish but seems to go quite deep in the rubber of the stem. Since I had finished both the bowl and stem I put them together and polished them both with Blue Diamond polish on the buffing wheel. I gave the bowl multiple and the stem multiple coats of carnauba wax. I buffed the pipe with a clean buffing pad to raise the shine. I hand buffed it with a microfiber cloth to deepen the shine. The pipe polished up pretty nicely. The grain around the sides of the bowl really began to stand out with contrast as I buff the bowl. The rich dark brown undercoat and cherry top coat finish on the briar works well with polished black vulcanite stem. Bari made some beautiful pipes and this is certainly one of them. The darker stain does the job hiding the repairs to the gouges and makes the grain really show through. This pipe is a great feeling pipe in the hand and I am sure that it will be an amazing smoker. Have a look at it with the photos below. The dimensions are Length: 5 1/2 inches, Height: 2 1/2 inches, Outside diameter of the bowl: 1 1/2 inches, Chamber diameter: 3/4 of an inch. I will be putting this beauty on the rebornpipes store shortly and it can be added to your collection. Thanks for walking through the restoration with me on this Bari Senior Old Briar 503 Pick Axe.

Fresh Life for  a Stanwell Brazilia 87 Apple


Blog by Steve Laug

The next pipe in the queue came from a group of pipes Jeff and I purchased from a fellow in Pennsylvania who was selling out his collection as he no longer smoked a pipe. We picked up quite a few of his pipes and they included this beautiful Stanwell Made in Denmark Brazilia with a horn shank extension. It is a round apple shaped pipe with a round rim top curving from the sides into the bowl. The entire pipe had some beautiful mixed grain around the bowl. The rim top was covered with a thick tar and lava coat. The pipe was filthy but the grain underneath was rich and the finish looked like it would clean up well. The pipe is stamped on the underside of the shank and reads Stanwell over Brazilia over Made in Denmark. On the right side of the shank it is stamped with the shape number 87. The stem is vulcanite and has the Stanwell Crown S on the top side. The stem is dirty and had deep tooth marks and chatter on both sides of the stem at the button edge. The photos below tell the story and give a glimpse of the pipe before clean up.Jeff took photos of the bowl and rim from various angles to capture the condition of the pipe before he started his cleanup work. There was a thick coat of lava on the rim and the cake in the bowl. It appeared that the beveled inner edges were in good condition. The outer edges actually appeared to be in excellent condition. He also took a series of photos of the sides of the bowl and shank to show the straight grain around the bowl. It is very dirty but the grain is visible in the photo. Jeff took photos of the stamping on the underside and the right of the shank. It reads as noted above and is clear and legible. The horn shank extension is quite stunning and should shine up nicely. The next two photos show the stem surface. They show the deep tooth marks on both sides near the button. The stem is oxidized and has a thick build up around the button end.Jeff did his usual thorough clean up job on the pipe so that  when it arrived here in Vancouver it looked really good. Jeff reamed the bowl with a PipNet pipe reamer and followed up with a Savinelli Fitsall pipe knife to remove the cake. He scrubbed out the mortise and the airway in the shank and the stem with alcohol, cotton swabs and pipe cleaners. He scrubbed the exterior of the bowl, rim, shank and stem with a tooth brush and Murphy’s Oil Soap to remove the oils and tars on the rim and the grime on the finish of the bowl of the pipe. He rinsed it off under running water. He dried it off with a soft cloth. He was able to remove all of the lava build up on the beveled rim top of the pipe. The rim top looked really good with a little darkening on the inner bevel toward the front of the bowl. The mixed grain stood out on the clean pipe. He soaked the stem in Before & After Deoxidizer and was able to remove the oxidation. The pipe looked very good.I took photos of the pipe to show its condition before I started my work. I took a close up photo of the bowl and rim to capture the condition of the pipe before he started my restoration of the pipe. The rim top was clean but had some darkening on the inside edge of the rim at the front of the bowl. It was solid so it was not charred. The horn shank extension looked dry and lifeless but otherwise in good condition. The stem was quite clean with some deep tooth marks on the top and underside near the button.I started the process of the restoration by working on the bowl. I worked over the inner bevel of the rim with 220 grit sandpaper to address the darkening and light damage.I polished the briar with 2400-12000 grit micromesh sanding pads – wet sanding with 1500-2400 grit pads and dry sanding with 3200-4000 grit pads. I wiped the bowl down with a damp cloth after each pad. I found that with each successive grit of micromesh the grain on the bowl and shank sides stood out more and gave a shine to the pipe. The sanded rim top was beginning to blend in quite well. I stained the top of the bowl to match the rest of the bowl. I used a Maple stain pen and set it aside to dry.As is my pattern on these restorations, I worked some Before & After Restoration Balm into the surface of the briar with my fingertips to clean, enliven and protect it. I let the balm sit for a little while and then buffed with a cotton cloth to raise the shine. The following photos show the bowl at this point in the restoration process. The bowl and the rim top look really good and the darkening is lessened. The finish looks very good with the rich brown stain on the bowl and rim. The horn has come alive once again and the striations of colour are rich. I am very happy with the results. With the bowl finished I set it aside and turned my attention to the stem. I filled in the deep tooth marks with black super glue and rebuilt the damage on the button. I set the stem aside to let the repairs cure overnight.In the morning when the repairs had cured I used a needle file to cut the sharp edge of the button and to flatten out the repairs. I sanded the stem surface with 220 grit sandpaper to smooth out tooth chatter and light tooth marks. I polished the surface of the whole stem with 400 grit wet dry sandpaper.I touched up the Stanwell Crown S with a white touch up pen. I used a dental pick to push it into the grooves and polished the excess off with a coarse cotton cloth. I did it early in the polishing to make sure I did not polish off any of the deep grooves of the stamp.I continued to polish the stem with micromesh sanding pads – wet sanding it with 1500-2400 grit pads and dry sanding it with 3200-12000 grit pads. I wiped the stem down with a damp cloth after each pad. I further polished it with Before & After Pipe Polish – both Fine and Extra Fine. I wiped it down with a coat of Obsidian Oil and set it aside to dry. Since I had finished both the bowl and stem I put them together and polished them both with Blue Diamond polish on the buffing wheel. I gave the bowl multiple and the stem multiple coats of carnauba wax. I buffed the pipe with a clean buffing pad to raise the shine. I hand buffed it with a microfiber cloth to deepen the shine. The pipe polished up pretty nicely. The mixed grain really began to stand out with contrast as I buff the bowl. The rich medium brown finish on the briar works well with the polished horn shank extension and the black vulcanite stem. Stanwell has a knack for making pipes that not only look good but also feel great in the hand. Have a look at it with the photos below. The dimensions are Length: 5 1/2 inches, Height: 1 7/8 inches, Outside diameter of the bowl: 1 1/2 inches, Chamber diameter: 3/4 of an inch. I will be putting this beauty on the rebornpipes store shortly and it can be added to your collection. Thanks for walking through the restoration with me on this beautiful Stanwell Brazilia 87 Apple.

Underneath the grime was a Beautiful Butz Choquin Maitre Pipier Flamme


Blog by Steve Laug

The next pipe in the queue came from a group of pipes Jeff and I purchased from a fellow in Florida who was selling out his collection as he no longer smoked a pipe. The pipe is a beautiful Butz Choquin Maitre Pipier Flamme pipe. It is a flat bottom sitter with a square shank and a very uniquely shaped bowl. The entire pipe had some beautiful flame grain around the bowl and birdseye grain on bottom and top of the shank. The rim top was covered with a thick tar and lava coat that even went down the sides of the bowl. The pipe was filthy. But underneath I could see that the carver had done an amazing job utilizing the block of briar to maximize the grain. The pipe is stamped on the left side of the shank and reads Butz Choquin over Maitre Pipier over Flame. On the right side of the shank it is stamped Fait Main over St. Claude France. The stem is vulcanite and has the inset BC circle on the left side of the saddle. It is a uniquely fit saddle stem.

Jeff took some photos of the pipe when he received them to show the general condition of the pipe before he started his cleanup work. The pipes from this collection were all very dirty and well used. The finish was covered with a thick coat of grime and tars. There was a thick cake in the bowl and lots of lava overflowing onto the rim top. It was hard to know if the edges of the bowl were damaged or not because of the cake and lava. The stem is dirty but it was in remarkably good condition under the grime. There were light tooth marks and chatter on both sides of the stem at the button edge. The photos below tell the story and give a glimpse of the pipe before clean up. Jeff took a photo of the bowl and rim to capture the condition of the pipe before he started his cleanup work. There was a thick coat of lava on the rim and the cake in the bowl. It shows the mess this pipe was in when we received it. The thick lava overflow on the rim top made it hard to know what the inner edges of the bowl looked like. It looked like there maybe some damage on the back inner edge toward the left side making the bowl out of round. The outer edges actually appeared to be in excellent condition.He also took a series of photos of the sides of the bowl and shank to show the straight grain around the bowl. The finish has a lot of grime and thick layers of tars on the surface. It is very dirty but the grain is visible in the photo. Jeff took photos of the stamping on the left and right sides of the shank. It reads as noted above and is clear and legible. The left side of the saddle stem has the typical inlaid BC in acrylic. The next two photos show the stem surface. They show the tooth chatter on both sides near the button. The stem is dirty and is lightly oxidized. I have worked on another Maitre Pipier not too long ago and wrote up a blog on it. It was a nice looking Calabash (https://rebornpipes.com/2019/02/14/a-butz-choquin-maitre-pipier-hand-made-calabash/). On that blog I included some overall information on the brand and I will repeat it here to set the stage.

Butz Choquin was a brand that I was familiar with having worked on quite a few of them over the years. I decided to check on a few sites to refresh the memory of the brand. I turned first to Pipephil and as usual the site gives a great summary (http://www.pipephil.eu/logos/en/logo-butzchoquin.html). I quote:

The origin of the brand reaches back to 1858 when Jean-Baptiste Choquin in collaboration with his son-in-law Gustave Butz created their first pipe in Metz (France). Since 1951 Butz-Choquin Site officiel Butz Choquin, pipes de Saint-Claude jura. BC pipe de bruyere luxe is a brand of the Berrod-Regad group (Saint-Claude, France).

I also found the line of Fait Main Maitre Pipier pipes listed. The pipe I am working on is stamped the same way as the one in the screen capture below. The shape is different but the rest is the same. The capture has a small paragraph on the line that reads as follows: Pipes of the “Maitre Pipier” séries were crafted by Paul Lanier until he retired and after him by Alain Albuisson. I turned then to Pipedia to see what I could find out there (https://pipedia.org/wiki/Butz-Choquin). I quote the article in its entirety as it gives a clear history.

The pipe, from Metz to Saint-Claude. Jean-Baptiste Choquin of Metz started out as a tobacconist. This enterprise was prosperous; he had several employees. Among those, there was a certain Gustave Butz who was its first workman and who became his son-in-law by marrying Choquin’s daughter Marie in 1858.

In 1858 Jean-Baptiste Choquin created, in collaboration with Gustave Butz, the Choquin pipe. This bent pipe with a flat-bottomed bowl was finished with an albatross-bone mouthpiece, fixed with silver rings.

In 1858, still in Metz, Gustave Butz built an establishment for the manufacture of the Choquin pipe which took the name of . In 1951, the Berrod-Regad company bought the trademark, continuing manufacture until 2002. Departing from Metz, the workshop was relocated to Saint-Claude, then also called “the world capital of the briar pipe,” under the Berrod-Regad group. The Berrod-Regad group would go on to completely rebuild the network of representatives until finally entering the export market in 1960 and has since won several prizes, as well as the Gold Cup of French good taste.

In a few years, the brand’s collection increased from ten to seventy series. 135 years after it was founded, the pipe is still well-known not only in France but throughout the world. In 2002, the Berrod family, wishing to preserve manufacture of pipes in Saint-Claude, handed over the company to Fabien Guichon, a native of the area, who will continue to develop the brand during the 21st century.

Jeff did an amazing clean up job on the pipe. When it arrived here in Vancouver it did not look at all like the same pipe we purchased. It is a beauty. Jeff reamed the bowl with a PipNet pipe reamer and followed up with a Savinelli Fitsall pipe knife to remove the cake. He scrubbed out the mortise and the airway in the shank and the stem with alcohol, cotton swabs and pipe cleaners. He scrubbed the exterior of the bowl, rim, shank and stem with a tooth brush and Murphy’s Oil Soap to remove the oils and tars on the rim and the grime on the finish of the bowl of the pipe. He rinsed it off under running water. He dried it off with a soft cloth. There was still some shiny varnish spots on the shank and bowl so he wiped it down with acetone to remove the remnants of the old finish. He was able to remove all of the lava build up on the rim top of the pipe. The rim top looked really good with no damage to the edges of the bowl or the top. The flame grain stood out on the clean pipe. He soaked the stem in Before & After Deoxidizer and was able to remove the oxidation. The pipe looked very good. I took photos of the pipe to show its condition before I started my work. I took a close up photo of the bowl and rim to capture the condition of the pipe before he started my restoration of the pipe. The rim top was clean but had some darkening on the surface at the back of the bowl. There was also some burn damage to the inner edge of the rim confirming my suspicions about it being out of round. The stem was quite clean with some light tooth marks on the top and underside near the button.I started the process of the restoration by working on the bowl. I polished the briar with 2400-12000 grit micromesh sanding pads – wet sanding with 1500-2400 grit pads and dry sanding with 3200-4000 grit pads. I wiped the rim top down with a damp cloth after each pad. I found that with each successive grit of micromesh the grain on the bowl and shank sides stood out more and gave a shine to the pipe. I liked what I saw when I looked at it. I stained the top of the bowl to match the rest of the bowl. I used a Maple stain pen and set it aside to dry.I used a folded piece of 220 grit sandpaper to smooth out the damage to the inner edge of the rim. I worked on it to remove the burn damage and to try to bring the bowl back into round.I worked some Before & After Restoration Balm into the surface of the briar and the plateau with my fingertips to clean, enliven and protect it. I let the balm sit for a little while and then buffed with a cotton cloth to raise the shine. I buffed the rim top with a shoe brush to make sure that the nooks and crannies had the conditioner deep in them. The following photos show the bowl at this point in the restoration process. The bowl and the rim top look really good and the darkening is gone. The finish looks very good with the rich oil finish on the bowl and rim. I am very happy with the results. With the bowl finished I set it aside and turned my attention to the stem. I sanded the stem surface with 220 grit sandpaper to smooth out tooth chatter and light tooth marks. I polished the surface of the whole stem with 400 grit wet dry sandpaper.I continued to polish the stem with micromesh sanding pads – wet sanding it with 1500-2400 grit pads and dry sanding it with 3200-12000 grit pads. I wiped the stem down with a damp cloth after each pad. I further polished it with Before & After Pipe Polish – both Fine and Extra Fine. I wiped it down with a coat of Obsidian Oil and set it aside to dry. Now with both parts of the pipe finished, I polished stem with Blue Diamond polish on the buffing wheel. I gave the bowl multiple and the stem multiple coats of carnauba wax. I buffed the pipe with a clean buffing pad to raise the shine. I hand buffed it with a microfiber cloth to deepen the shine. The pipe polished up pretty nicely. The grain came alive with the buffing. The rich medium brown finish on the briar works well with the polished, square, black vulcanite stem. The finished pipe is a beauty and feels great in the hand. Have a look at it with the photos below. The dimensions are Length: 5 1/2 inches, Height: 2 inches, Outside diameter of the bowl: 1 7/8 inches, Chamber diameter: 3/4 of an inch. This one will be going on the rebornpipes store shortly and can be added to your collection. Thanks for walking through the restoration with me on this Hand Made Butz Choquin Maitre Pipier Flamme pipe.

A Silver Banded Malaga Pot from Kathy’s Dad’s Pipes


Blog by Steve Laug

After getting the Malaga Catalogue from Kathy I was motivated to tackle another pipe from George Koch’s estate. It is Malaga pipes Pot with a Sterling Silver repair band. It has a variegated brown, gold and copper Lucite Stem. It has a beveled rim top tipping inward toward the bowl and combined with the silver and the stem it is quite a stunning pipe. It spoke to me as I went through the bag of Malaga pipes that I still have to work on. The Pot shaped pipe was just one of the many Malaga pipes that came to my brother and me in several shipments of pipes from George’s daughter Kathy. When Jeff got each box the pipes were well wrapped and packed. Jeff unwrapped them and took the following photo to give an idea of the volume of the pipes that we purchased. The next Malaga came in mixed in a box of pipes much like the one below.In each of the previous blogs that I have written on the restoration of George’s pipes I have told his story. If you have followed the restorations you will have read the information and the background piece that Kathy did on her father. Here is a link to one of the previous blogs on his Malaga pipes where I included her tribute in full (https://rebornpipes.com/2019/01/26/back-to-kathys-dads-pipes-restoring-a-%c2%bc-bent-malaga-author/). You can also read the bio on her Dad, George Koch. It is an interesting read and one that shows just how far our pipe collecting passion can go when we find a brand of pipes that we enjoy. I am going to only include the portion on the Malagas at this point. If you wish to read the rest follow the link above.

Kathy writes…We lived in Livonia, and that’s where his love for Malaga pipes began. After a few years he returned to Allis Chalmers and we moved back to Springfield. I remember that when we went back to Michigan to visit friends, Dad had to go to the Malaga store and acquire a few new pipes. Many a year I wrote to Malaga and they picked out a pipe for me to purchase that I could give Dad for a Christmas or birthday present. He was always pleased. His favorites were the straight stemmed medium sized bowl pipes, but he liked them all. 

He had some other pipes, but the Malagas were his favorites. I remember him smoking them sitting in his easy chair after work, with feet up on the ledge by the fire burning in the fireplace.  Growing up it was my job to clean them and he liked the inner bowl and stem coated with Watkins vanilla, leaving a little of that liquid in the bowl to soak in when I put them back on the rack…I’m very happy they are being restored by you and your brother and hope they find homes who enjoy them as much as Dad did. Thank-you for your care and interest. — Kathy, the oldest daughter

The Malaga Pot with a silver band and variegated brown/gold acrylic stem is next on the table. The carver did a great job of shaping the pipe to follow the grain on the briar. There is a Sterling Silver band on the shank end that is a repair band that I can only assume George picked up at the Malaga Pipe Shop as they did most or all of his repairs. The bowl top is smooth and beveled inward. The rim top has some damage on the top and inner edge as well as nicks and chips on the outer edge. The bowl had a very thick cake and an overflow of lava onto the thin rim top. The sides of the bowl and shank are very dirty with grime and oils from prolonged use. The stamping on the left side of the diamond shank read MALAGA. The brown/gold swirled acrylic stem had tooth dents and chatter on the top and the underside of the stem. Jeff took these photos before he started the cleanup work on the pipe. Jeff took three close up photos of the bowl and rim with different lighting to capture the condition of the pipe before he started his cleanup work. The rim top had some lava overflow and some darkening. There appeared to be some rim damage on the inner edge at the rear of the bowl. The third photo shows some of the damage to the outer edge of the bowl. You can see the wear on the rim top, the cake and cobwebs in the bowl. The pipe is dirty. He also took photos of the sides and bottom of the bowl and shank to show the beautiful cross and birdseye grain around the bowl. The photos show the general condition of the bowl and wear on the finish. It is very dirty but this is another beautiful pipe.The next two photos show the Sterling Silver Band and the repair that had been made to a cracked shank. The crack was on the top side of the shank and the pipe had been well repaired.Jeff took a photo to capture the stamping on the left side of the shank. The photo shows stamping MALAGA. The stamping does not have the quotation marks that I have seen on some pipes.The next two photos show the stem surface. There are tooth marks and chatter on both sides near the button. There is also some wear on the sharp edge of the button.I am also including the link to a blog that I wrote that gives some of the history of the Malaga brand and the Malaga Pipe Shop in Royal Oak, Michigan in the USA. I have written an earlier blog to give a little history of the Malaga Brand and the pipemaker, George Khoubesser. Here is the link – https://rebornpipes.com/tag/malaga-pipes/.That blog also includes links to a catalogue and the history of the pipemaker George Khoubesser. Follow the link to get a feel for the brand and the pipemaker.

Jeff reamed the bowl with a PipNet pipe reamer and followed up with a Savinelli Fitsall pipe knife to remove the cake. He scrubbed out the mortise and the airway in the shank and the stem with alcohol, cotton swabs and pipe cleaners. He scrubbed the exterior of the bowl, rim, shank and stem with a tooth brush and Murphy’s Oil Soap to remove the oils and tars on the rim and the grime on the finish of the bowl. He rinsed it under running water. He dried it off with a soft cloth. He was able to remove the lava build up on the rim top and you could see the damage to the flat surface of the rim and the inner edge on the back side and on the outer edge toward the front of the bowl. I took photos of the pipe to show its condition before I started my work on it. I took close up photos of the bowl and rim top as well as the stem. You can see the condition of the rim top and bowl in the first photo. Jeff was able to remove all of the tar and oils but you can now see the damaged areas on the surface clearly. There are damaged spots all around the top surface and on the front and the backside of the inner edge of the bowl. The silver band on the shank is badly oxidized. The acrylic/Lucite stem had tooth chatter and some tooth marks on the top and underside of the stem near and on the button surface.I took a photo of the stamping on the shank to show how good the condition is. The stamp is deep and legible on the left side.I decided to address the damage to the rim top first. I hand topped the beveled rim top with a folded piece of 220 grit sandpaper the damage to the flat surface of the rim top and also to try to minimize the damage to the inner edge of the rim. I worked over the inner edge of the rim with a folded piece of 220 grit sandpaper to smooth out the damage. I gave it a slight bevel to hide the burn damage on the inner edge of the rim. The photos tell the story. The damage to the rim top is gone and the inner edge looks far better with the light bevel. The damage to the front edge looks much better than when I began.I polished the rim top and the exterior of the bowl with micromesh sanding pads – wet sanding with 1500-2400 grit pads and dry sanding with 3200-12000 grit pads. I wiped the bowl down after each sanding pad to remove the dust. The damage on the rim is pretty much invisible after polishing and the rim top really looked good. I worked some Before & After Restoration Balm into the rusticated and the smooth surface of the briar with my fingertips to clean, enliven and protect it. It took some time to really get it into the grooves and valleys of the rustication but I was able to work it in. I let the balm sit for a little while and then buffed with a cotton cloth to raise the shine. The following photos show the bowl at this point in the restoration process. The reworked rim top looks really good and matches the colour of the rest of the pipe. I am very happy with the results. I set the bowl aside and worked on the stem. There were some tooth marks on the top and underside at the button that needed to be addressed. I also needed to do some work on the surface of the button on both sides. I filled the damaged areas in and build up the surface with clear super glue and set the stem aside until the repairs cured.Once the repair had cured I used a needle file to smooth out the repairs and begin to blend them into the surface of the stem.I sanded both sides smooth with 220 grit sandpaper and 400 grit sandpaper to blend the tooth chatter and the repair into the surface of the stem. As I sanded and reshaped the button and stem surface the repaired areas and the tooth chatter disappeared.I polished the acrylic stem with micromesh sanding pads – wet sanding with 1500-2400 grit sanding pads and dry sanding it with 3200-12000 grit sanding pads. I wiped it down after each sanding pad with a damp cloth. This is a beautiful Malaga pipe and the Sterling Silver band gives it a nice touch of class. It is one of the only banded pipes that I have worked from George’s collection. The beveled rim top and the cut of the briar works well to highlight the cross and birdseye grain. I polished Lucite stem and the bowl with Blue Diamond polish on the buffing wheel. I polished the silver band with silver polish to remove all of the remaining oxidation. I gave the bowl multipole coats of and the stem multiple coats of carnauba wax. I buffed the pipe with a clean buffing pad to raise the shine. I hand buffed it with a microfiber cloth to deepen the shine. The pipe polished up pretty nicely. The cross and birdseye grain took on life with the buffing. The rich oil cured colour works well with the silver band on the shank end and the polished variegated brown/gold Lucite stem. The finished pipe has a rich look that is quite catching. Have a look at it with the photos below. The shape, finish and flow of the pipe and stem are very well done. The dimensions are Length: 5 1/2 inches, Height: 1 1/2 inches, Outside diameter of the bowl: 1 1/2  inches, Chamber diameter: 3/4 of an inch. I will be putting this newly finished Malaga pipe on the rebornpipes store shortly if you are interested in adding it to your collection and carrying on the trust. Thanks for walking through the restoration with me as I worked over another one of Kathy’s Dad’s Pipes.

Rebuilding a Rim and Chamber for an Aldo Velani Trio Rusticated Volcano


Blog by Dal Stanton

This Rusticated Volcano came to my worktable in what I call the St. Louis Lot of 26 that my son, Josiah, found in an antique shop before last Christmas. He was impressed by the quality of pipes in the Lot and emailed me in Bulgaria with a proposition of going in together for the Lot of 26.  His part in the purchase would be his Christmas present to me – that I would choose a pipe for my own from the Lot.  My part of the purchase would be to restore the pipes to benefit the Daughters of Bulgaria.  It was a proposal hard to refuse and some weeks later I unwrapped the St. Louis Lot of 26 in Denver where our family had gathered for Christmas.  I chose as my gift from Josiah an unbelievable find: a Churchwarden – EP Champion Made in France.  After my restoration of the EPC Majestic, I know that this pipe also has a very auspicious nomenclature dating back to pre-WW2 from the now defunct Paris based A Pandevant & Roy Co. which has now been included in Pipedia as a new entry based on my research during that restoration – Woohoo!  To see my first Pipedia entry, see this LINK!  This picture, after opening the Lot of 26, just happens to have both subjects on the top – the Aldo Velani Trio Rusticated Volcano and my historic EP Churchwarden.Now, back in Bulgaria, on the 10th floor of our formerly Communist apartment complex block, each pipe in the Lot of 26 has been sorted and populated on the website in the ‘For “Pipe Dreamers” Only!’ collection.  Stephen saw the Aldo Velani when I posted a picture on Facebook of the Lot of 26 earlier.  The former steward of this estate liked the Aldo Velani Trio set.  In the Lot, in addition to the Rusticated Volcano came three others from the Aldo Velani Trio set.  The common characteristics of the set is the bright Oxblood hue, the double-ringed gold banding and an assortment of acrylic stems.  The set is obviously meant to appeal to an upscaled expectation.Stephen was drawn to the deeply Rusticated Volcano and after communicating back and forth, he decided to commission it.  Here are more pictures taking a closer look at the Aldo Velani Rusticated Volcano.The rusticated version of the set of Aldo Velani Trio is cast somewhat darker than the smooth briar brothers.  The chamber shows moderate build up of cake and some lava flow over the rim.  This guy was well used by his former steward.The darker ruby red – burgundy acrylic stem shows heavy tooth chatter and chewing on the bit and button.  The lower bit has a deeper bite compression that needs addressing.The amazing ‘fire’ of the acrylic stem presents in a spectrum of ruby red to burgundy and is eye catching and when the entire pipe is cleaned up, will probably steal the show.The gold band I’m assuming is nickel plated as there are no markings showing a gold metal content.  The double-bumped band is attractive and adds a touch of class as it joins the acrylic stem and rusticated stummel.  The band will shine up nicely.The nomenclature on the left shank side is cursive script, ‘Aldo Velani’ [over] ‘TRIO’ with the shape number ‘53’ set to the left side of the smooth shank panel.  Barely visible in the picture below is the stamping ‘Italy’ next to the band and the very bottom. The Aldo Velani stem stamp is interesting and takes a closer look to figure out.  I found in Pipedia’s Aldo Velani article, an example and details of the stamping on an original Aldo Velani box, courtesy of Doug Valitchka.  The stamp depicts a pipe as the front leg of the ‘A’ for Aldo and the back leg of the ‘A’ forms the front riser of the ‘V’ of Velani. The article cited from Pipedia provides helpful information understanding the provenance of the Aldo Velani name:

Most Aldo Velani pipes are made in Livorno, Italy, for the USA market by Cesare Barontini. They were previously imported by Lane Limited. Lane spokesman Frank Blews once described Velani’s stylish, intrinsically Italian designs as “Billiards with more ball, bulldogs with more jaw.” The name “Aldo Velani” is actually fictional.

Another Barontini 2nd is named “Cesare”.

I learn two interesting things from this information.  First, Aldo Velani is a faux name that does not describe an Italian pipe house but a specific pipe line.  Secondly, the Aldo Velani is made by the Casare Barontini name based in Livorno, Italy.   Further information is available cross referencing to Casare Barontini in Pipedia:

In 1890 Turildo Barontini opened a factory for the production of briar. In 1925 his son Bruno began to produce the first pipes. Cesare Barontini, son of Bruno, started direction of the factory in 1955, and still runs it together with his daughters Barbara and Silvia.

Sub-brands & Seconds: Aldo Velani. Cesare, L’artigiana, Stuart, Cortina

Pipephil’s site has several examples of the Aldo Velani line depicted which tend to be very stylish and nice-looking pipes which confirms the Pipedia assertion that Casare Brontini produced the Aldo Velani lines primarily for export.  It is evident that there was not a consistency in the stem stamping or name style for Aldo Velani as different examples are given.  Here are the stem stamping variations provided by Pipephil:With a better understanding of the Aldo Velani Trio Rusticated Volcano before me, I begin his recommissioning by cleaning him up!  I start by disassembling the parts – I find that the gold band easily is removed which will allow cleaning of each element to be easier.I then take the stummel and ream the chamber using the Pipnet reaming kit.  I use the 2 smaller blade heads then switch to the Savinelli Fitsall tool.  It doesn’t take long digging in the chamber and clearing away the cake that I realize there are problems.  I remove the carbon cake and then sand the chamber wall with 240 grade paper wrapped around a Sharpie Pen to further clean and allow me to see the chamber wall with more clarity.  I wipe the chamber with a cotton pad wetted with isopropyl 95% to aid me in my assessment. The first thing I note was strange was what looks like a ‘stoop’ at the lower back side of the chamber that gives the appearance of the draft hole entering the chamber floor more ‘forward’ than usual.  What becomes more evident as I clear away the thick cake is that the back side of the chamber had fallen away revealing excessively burned briar.  I see carbon fissures reaching into the chamber wall which I continue to remove by scraping with the Savinelli Fitsall Tool knowing that I need to find solid, healthier briar underneath the carbon cake.  After sanding and cleaning, I take these pictures skewed toward an opened aperture to reveal the darker chamber confines with a pipe cleaner giving reference to the draft hole entry.  I was able to find solid briar and now a cleaned surface with only 2 heat fissures that I see but the burning toward the aft of the bowl has reduced the diameter of the briar thickness significantly compared to the forward chamber wall thickness.  The following pictures show what I’m seeing and it’s not good. This final assessment picture below shows evidence of the wall thinning only in reference to the rim’s condition.  The rim is dangerously thin.With much to think about now regarding how to proceed with the chamber damage, I proceed with the normal cleaning regimen which is needful and gives time to think!  Using undiluted Murphy’s Oil soap on a cotton pad and with a bristled tooth brush, I clean the attractive rusticated surface.  I also use a brass wire brush and a little help from my thumb’s fingernail to clean the remaining lava off the labored, bemangled rim.  The cleaning does well and reveals the smooth briar rim motif of the original design of the Aldo Velani.  The smooth briar rim would have popped in contrast to the rustication.  I like it, but unfortunately, much of the original rim is now smoke history. To the internals – I use pipe cleaners and cotton buds wetted with isopropyl 95% to do the job.  With the condition of the chamber lack of care and maintenance, it’s not surprising that the internals are grungy.  I also use a dental spatula to scrape the mortise wall as well as long shank brushes to clean the airway.  In time, the pipe cleaners and buds start surfacing less soiled and I move to the next phase of cleaning the internals.I continue the internal cleaning with a kosher salt and alcohol soak.  I stretch and twist a cotton ball to serve as a mortise wick and then insert it down the mortise into the airway with the help of a straight stiff wire.  I then fill the bowl with kosher salt which, unlike iodized salt, does not leave a ghosted aftertaste.  After putting the stummel in an egg crate to provide some stability, I fill the bowl with isopropyl 95% until it surfaces over the salt.  After a while, the alcohol is absorbed into the salt and cotton wick and I add some more alcohol to top it off and put the stummel aside to soak for several hours. With the kosher salt doing its thing, I turn now to the stem.  The first thing to do is clean the internals using a pipe cleaner and isopropyl 95%.  The pipe cleaners discover not too much resistance.  I then wipe down the acrylic stem external surface to clean it from the grunge so I can examine the surface closely.The stem is in good shape with only expected scratches and scrapes from normal wear.  The bit is a different story with a compressed button and tooth chatter on the upper side and a deep compression on the lower bit with button damage and chatter.  Starting with the upper bit challenges, I sand using 240 grit paper on the bit and button.  I’m thinking that sanding alone might address the damage on this side.  I also use a flat needle file to help shape and freshen the button.  As I had hoped, sanding and filing alone erases the compressions and chatter.The lower bit is a different approach.  I realize from the outset that sanding alone will not address the damage – the compressions on the bit and button are too deep.  Because of this, I apply a patch of thick CA glue to the areas and then use an accelerator too quicken the curing time.  I start with CA glue because I want the footprints of the compressions to be larger so that the CA has more to attach to. I then address the cured CA patch first by filing with a flat needle file and then by sanding with 240 grade paper.  I reshape the button with the file as I work on filing the patch mounds down to the acrylic surface.  Then, switching to 240, I bring the patches down flush with the acrylic surface.  The ruby red and burgundy hues should shine through the transparent CA glue after sanded and polished.Sometimes an air pocket is uncovered in the sanding and filing like in the picture below.  To remedy this, I add another drop of CA glue to fill this. I finish this phase of the repair using the flat needle file and 240 grit paper. To erase the scratches of the 240 grit paper I follow by wet sanding with 600 grade paper and the I apply a 0000 grade of steel wool.Then, the micromesh process using 9 pads from 1500 to 12000.  First, I wet sand with pads 1500 to 2400 and then follow by dry sanding with pads 3200 to 4000 and 6000 to 12000.  I’m not sure it revitalizes the acrylic material, but as I do with vulcanite stems, I apply obsidian oil to the stem after each set of 3 pads.  My – the fire in this acrylic stem is beautiful.  The problem is that it’s difficult to capture with my iPhone 6s camera! Next, I shine up the gold nickel plated double-ringed band – shank cap.  I first wash it with warm water and dish soap using a bristled tooth brush to get into the center crease.  After I dry the band, I then apply Tarn-X with a cotton pad and after scrubbing it well, rinse with cool tap water and dry it.  It looks great.  Later, I will buff it up more with the Dremel. It has been several hours since starting the kosher salt and alcohol soak.  The salt and cotton wick have soiled somewhat, not as much as I thought it would, but perhaps my initial cleaning had accomplished more than I thought!  After I toss the expended salt in the waste, clean the chamber with a paper towel, I also use broad bristled shank brushes to clean the residue salt left behind.  I blow through the mortise to loosen and remove salt crystal remaining in the airway.  Finally, to make sure the cleaning has done the job, I expend a few more pipe cleaners and cotton buds with alcohol and discover that the internals are clean.  Moving on!I’ve had some time to think about the issues with the burning damage to the chamber.  The good news is that there are no burn throughs, but the briar on the back side of the chamber is thin. The rim on the backside is also thinner in comparison to the front side of the rim which is evident in the first picture.  In the second picture I’ve tried to show how the inner chamber has bowed out because of the loss of briar through burning.  During the reaming and removal of all the charred wood, left behind is a bowed cavity where it should be relatively straight-vertical.  The third picture shows the remaining fissure that crawls up the left side of the chamber and impacts the rim. I’ve looked very closely and thankfully, the fissure crack is isolated where it is.  There are no skulking cracks over the rim into the rusticated surface. To give this pipe a longer life, I will employ two different approaches that hopefully will build the rim up and fill the bowl cavity out to increase the mass on the rear chamber wall.  To do this I’ll use JB Kwik Weld to build a new chamber lining and to fill the fissure on the left side of the bowl.  JB Weld will be the main strategy in the chamber itself because of its heat resistant capabilities.  This is the lower chamber strategy.  Before starting this, I will first build out the rim thickness using a mixture of thick CA glue and briar dust to form a putty that will cure and provide the upper scaffolding for a rear rim rebuild. I’ll form this first around the back side of the rim and as I form the rim mold with the putty, I’ll intentionally fashion an ‘under-ridge’ with the briar dust putty.  This ‘under-ridge’ will form the raised boarder that the JB Kwik Weld will butt against when it is applied afterwards.  I hope this plan will work!

The first thing I do is wipe the bowl and rim with alcohol and a cotton pad to clean the surface.  Then I mix a batch of briar dust and thick CA glue on an index card.  When it’s about the viscosity of molasses so it will hold together and not run, I trowel it to the rim with a curved dental spatula shaping the rim form.  As I’m working, I see that the putty isn’t firming up on the rim as I hoped and so I use an accelerator to help quickly set the putty in place and cure.  I apply three separate batches of putty to build up the rim which are shown in the pictures.  The first phase looks good.  The pictures show the progress. Next, I mix equal parts of the two components of JB Kwik Weld, the steel and hardener.  After the two elements meet, there is about 4 minutes of relative pliability to apply the Weld in place.  After four to five minutes the Weld begins to harden.  I use a spatula to trowel the Weld into the chamber – trying to avoid the rim, but that wasn’t easy to do.  As I apply the Weld into the chamber, I spread it on the back wall and fill the fissure.  As it hardens, I tamp it down and shape.  After applying and shaping, I set the stummel up so that the back of the bowl is down allowing gravity to help.  I turn out the lights and call it a day. The next day I’m anxious to start to work on shaping the rim after the JB Kwik Weld and briar dust putty have thoroughly cured.  My main work horse to begin with is the Dremel mounted with a round grinding stone and a half-rounded needle file.  The grinding stone is the perfect size at 5/8 inches in diameter to fit into the narrowed Volcano summit and yet, large enough to provide a larger and less abrupt grinding footprint.  As I begin to grind the internal lip of the rim patch, I remove the excess briar dust putty patch material.  I go slowly and patiently eyeballing the roundness of the rim.  I decide to employ a caliper to measure the original intact part of the rim to help me measure the removal process.  I would rather leave more and work down slowly sanding with paper than to be greedy with the Dremel grinder and take off too much.After a time, a take a picture to mark the progress removing and rounding. When I’m close to being satisfied with the removal and rounding with the Dremel grinding stone, I use both a flat and half rounded needle files to begin removal of the excess patch material on the rim top.  The entire rim bevels inwardly and slanting toward the chamber and I patiently and gently file in that direction. After filing, I transition to 240 grade paper to continue to shape and to blend the rim patch with the resident briar.  I do a dance back and forth between sanding and filing and eyeballing the angle of the rim slant – seeking as much uniformity as possible!I’m satisfied with where I am at this juncture.  The inner rim looks round and the rim rebuild is holding together very well.  The area is still rough, and I’ll continue to work on that later, but now I turn my attention from the rim rebuild and restoration to the chamber. I wet a cotton pad with alcohol and wipe out the chamber so that I can assess where the chamber repair is with the JB Kwik Weld.  With the shank oriented downwardly, I take a few pictures after replacing the pipe cleaner through the draft hole.  The pictures are difficult to see what I can feel with my finger as I examine the contours of the hardened JB Weld.  The cavity created by the burn damage has been filled partially and reinforced well.  I no longer have any concerns about the thinness of the briar on the back of the bowl.  I don’t believe I can fill the entire cavity with JB Weld and will not try.  But I still can feel an abrupt ridge underneath the rim repair.  This I need to fill to provide a smoother transition from the rim repair to the chamber repair. Orienting the picture now to the left side of the chamber, the JB Weld has filled the fissure very nicely.  I’ll sand the excess off later. After dealing with the fissure proper, I’ll address the upper part of the fissure crack that reaches to the rim.For the second strategic application of JB Kwik Weld, I cover the rim and upper bowl with masking tape to protect from accidental drips of the Weld.  After mixing the two parts of the JB Weld, again I use a dental spatula to apply the epoxy to specific areas underneath the rim rebuild to provide the foundation for a smooth, seamless transition between the two reconstruction areas.  As before, to be careful, I place a pipe cleaner through the draft hole even though there is no plan for Weld to be applied in that area.  After troweling enough JB Weld to the area targeted, I patiently and carefully continuously tamp the area to massage the epoxy into the best positioning.   As the 4-minute window passes, the epoxy is thickening allowing me the final opportunity to shape and smooth the epoxy before it sets.A few hours later, I begin the dance of sanding and utilizing the round grinding stone mounted onto the Dremel.  The sanding paper I use is a coarse 120 grit and I wrap it around the end of the flat needle file to give me some reach and leverage as I apply pressure during the sanding.  The goal is to remove all excess JB Kwik Weld only leaving that which provides necessary filling to the burned-out area and to the heat fissure.  These pictures show the dance, but the reality is this phase is a mess with dust flying all over!  Living and working in our 10th floor flat of a formerly Communist bloc apartment complex in the winter provides much opportunity for me to thank my wife for her patience and helping to take a few of the pictures below! After I’m satisfied with the heavy duty grinding and sanding, I switch to a sanding drum mounted to the Dremel.  It serves to fine tune the sanding and makes my job easier.I finish with the rim/chamber rebuild.  After cleaning the chamber blowing and wiping with a cotton pad wetted with isopropyl 95%, I’m pleased with the outcome.  The pictures show remaining epoxy in the areas of need.  The first picture shows well the fissure that is now secured with epoxy.  The lighter epoxy is visible but to the touch, there is nothing there.The next pictures show the transition between the two repair projects.  The briar dust rim rebuild transitions to the chamber burn repair.  The JB Weld contours to the chamber wall building out the large burned area that threatened the aft chamber wall, but thankfully never burned through.  The aesthetics are still nothing to get excited about but I’m hopeful through the sanding and polishing process the rim rebuild will blend well with the surrounding briar.  Later, I will apply a coating of pipe mud to the chamber to encourage the growth of a new, healthy protective cake. I move on now to fine tuning the rim.  I use 240 grit paper to clean up scratches left over from the restoration project and then I apply 600 grade paper to smooth. With all the sanding, filing and grinding of epoxy and briar, I do a quick clean up of the stummel by taking it to the sink and running tap water over it and scrub it with the bristled tooth brush.  I also wipe the chamber and the rim with a cotton pad wetted with isopropyl 95% and run a pipe cleaner through the airway also wetted with alcohol to make sure all is clean.Next, before progressing further with the sanding of the rim, I color the rim to hide and blend the repairs.  I use straight Fiebing’s Oxblood with a cotton bud to apply several coats of the dye to the rim.  I also touch up the rusticated areas on the peak of the Volcano bowl that had lightened because of all the construction and cleaning going on. I’m hopeful that the dye will also be absorbed by the rim patch area which is speckled now after the sanding.  After applying the dye several times, I give the rim a light wipe of a cotton pad wetted with alcohol simply to blend and gather excess dye. Next, I move directly to applying micromesh pads to the rim and to the smooth briar panel on the left shank flank.  I begin by wet sanding with pads 1500 to 2400 and I realize immediately that I had made a mistake in the order of things.  As soon as I began wet sanding the Oxblood dye that I had just applied was, for the most part, now running down the drain.  I realize that I should have completed the micromesh regimen and then applied dye to the rim.  Not able to change anything at this point, I continue after wet sanding with the first set of three, to dry sand using the remaining pads, 3200 to 12000.  The pictures show the results – the rim looks great regarding the sanding and polishing but the coloring of the rim is lost for the most part.  I also discover as I micromeshed the smooth panel that the color was coming off as well….  I’m encouraged by the fact that we learn as much from what not to do as doing something well.  The pictures show the results. Circumstances create the environment for decisions and decisions shaped by past successes and failures is the definition of wisdom.  What is the wise course of action!? Previously, I planned to keep the original finish as it was and move to the polishing phase.  Now, I decide to apply Fiebing’s Oxblood Leather Dye to the entire stummel and not just as a touch up.  At this point there are too many ‘touch up’ points and it is better simply to refresh the entire bowl with dye.  I assemble all the components of my tabletop dying station and then wipe the stummel down with alcohol to clean the surface.  Using a hot air gun, I heat the stummel to open the briar to be more receptive to the dye pigmentation.After heated, I then apply the Oxblood dye to the stummel using a folded pipe cleaner holding on the cork which is inserted into the shank as a handle.  As I paint the stummel with dye over sections at a time, I ‘fire’ the dye using a lit candle that combusts the alcohol in the aniline dye and sets the dye pigmentation in the wood.  After fully saturating the stummel and covering the whole surface, I set the stummel aside to rest for several hours.Several hours later I’m ready to ‘unwrap’ the fired crust on the surface of the rusticated stummel.Since I’m working with a rusticated stummel, I don’t use a felt buffing wheel as is my approach with smooth briars.  I mount a cotton cloth buffing wheel on the Dremel and set the speed at about 40% full strength, I apply Tripoli compound to the stummel.I’m always fascinated by the way the grain emerges during the unwrapping process with the Tripoli.  The picture below shows the ‘front line’ of the buffing process and the richness of the rusticated surface being revealed.  Yes, surgical gloves!  In this way I keep stain of my hands which keeps my wife happier!With my wife’s help, the next few pictures show my customary ‘Dremel posture’ – my lap top station working on a chopping board.  I keep the overhead lamp close and I’m able to see the movement of the compounds and waxes I apply during the use of the Dremel.Working on rusticated and blasted surfaces are rough on the cotton cloth buffing wheels and I’ll be tossing this one when I’m finished!  I buy buffing wheels in bulk.  The smaller buffing wheel allows me to rotate the orientation of the stummel to follow the rusticated valleys and ridges – I keep moving and it takes a good bit of time to work through the rustication.  Patience reveals good results most of the time!After completing the Tripoli regimen, I wipe the bowl with a cotton pad wetted with alcohol.  I do this not really to lighten the aniline stain but to blend the Oxblood dye and to wipe off excess dye.With a rusticated surface as distinct and deep as this Aldo Velani Trio, I use a 1500 grade micromesh pad and lightly ‘brush sand’ the surface of the stummel.  What this does is sand the tips of many of the rustication ridges and lightens them.  This creates more contrast in the rustication that I first saw many restoration ago, restoring a rusticated fully bent Billiard, Lorenzo Rialto.  The ‘speckled’ effect creates a mesmerizing rusticated surface – I like it.  The picture shows these results.Next, I mount another cotton cloth buffing wheel to the Dremel, maintaining the same speed and I apply Blue Diamond compound to the stummel surface.  I decide not to reunite the stem at this point to apply the Blue Diamond in order to use a different buffing wheel with the acrylic stem.One of the reasons for letting the newly dyed and fired stummel to ‘rest’ for several hours before working on it is that it helps the dye to set and less of it comes off later on the steward’s hands.  This does happen especially the first few times a pipe is put in service and the bowl heats up for the first time.  I’m concerned that the rusticated surface will hold more unseasoned dye surface and to mitigate against Oxblood dye coming off on the hands, I heat the stummel with the hot air gun and with the bowl heated, I wipe it heartily with a few cotton pads to capture the unseasoned dye.  I hope this helps!Before turning to the stem, I have two additional projects to complete before the final phase of applying wax.  I need to remount the gold band/shank cap and polish it.  Also, I need to apply a mixture of sour cream (or natural yogurt) and activated charcoal to the chamber to aid the formation of a cake to serve to buffer the newly repaired chamber wall from the fire.  Starting first with the band, I apply a small drop of thick CA glue inside the cap and then attach it to the end of the shank.  I use a thicker variety so that it doesn’t run and get on something that it shouldn’t!Next, I mount a cotton cloth buffing wheel on the Dremel that is dedicated to the application of White Diamond compound on nickel.  You don’t mix buffing wheels!  I label each wheel for what compound or wax is used and on what surface – metals and wood are different! I also am careful while buffing the band to stay on the metal and not bleed over onto the briar.  The black residue that comes off the metal can darken and stain briar – careful!  Wow!  I thought the cap was shiny before, but now it beams!Next, applying the natural yogurt and charcoal mixture to the chamber walls to provide a buffer between the briar and the burning tobacco helps as a ‘starter’ to develop a protective cake.  I’ve learned that I have used too much yogurt in the past and toss a lot in the waste.  This time, I use much less.I mix the charcoal in until it thickens.  I’ve learned to mix a little more charcoal than I think is necessary so that it is firmer.  The test I’ve used to know when I’ve mixed enough charcoal into the soup is when I can scoop some of the mixture on a flat dental spatula and it doesn’t run off.  That lets me know that it will stay where I put it on the chamber wall and not be overcome by gravity pulling it down to the floor of the chamber.When the mixture seems good, and after I put a pipe cleaner through the draft hole, so it stays clear, I dollop the black mixture using a dental spatula and paint the chamber walls up to the rim.  I got the mixture right.  After covering the chamber walls fully, I take a picture – it’s not easy to see, but it looks good and will serve the needed purpose.  A word to the new steward of the Aldo Velani Trio, when you put the pipe into service do not scrape the chamber to clean it!  Gently stirring the ash loosens it allowing it to dump easily.  Then, use a folded over pipe cleaner and ‘rub’ the chamber wall which cleans adequately.  You want to allow enough time for a cake to develop. With the stummel waiting for the yogurt/charcoal mixture to dry, I now turn to the stem.  I mount another cotton cloth wheel on the Dremel, maintain speed at 40% full power and apply Blue Diamond to the beautiful fiery acrylic stem.  After this, I mount another cotton cloth wheel, maintain the same speed and apply White Diamond compound. After completed, I wipe and buff the stem with a felt cloth to remove the compound dust.Next, I want to spice up this classy stem by refreshing the Aldo Velani stamp on the side of the stem. It is unique with the A and V in cursive script, but to me the clincher is the pipe forming the left leg of the A.  It’s just cool.  With all the gold in the band, I think gold would be a good color to bring out this noteworthy stem stamping given that I don’t have a picture of the original intent but what I see looking closely at the stamp, it may have been gold but I’m not positive.  I use Rub’nBuff European Gold to apply the color.  As the name says, I apply it over the stamp with a cotton bud and then wipe it of with a cotton pad.  I need to rub it well to clean up the excess but what is in the stamping stays in the stamp.  It looks great! Now the home stretch.  The charcoal/yogurt mixture has set up and time to apply carnauba wax. I unite stem and stummel and mount another cotton cloth buffing wheel on the Dremel, increase the speed to about 50% full power.  I increase the RPMs to increase the heat in applying the wax – more heat causes the wax to liquefy more as it’s working into the briar which makes application of the wax to the rougher rusticated surface more likely not gunk up. When applying wax to the stem, I back the speed off to 40% full power.  After completing the application of wax, I give the pipe a hearty hand buffing to raise the shine even more.

Oh my.  This Barontini Aldo Velani Trio Rusticated Volcano is a classy pipe – I would call it a ‘dinner pipe’.  It requires a more upscale dress code!  This pipe required a lot of work – a repaired stem bit and button, a rim rebuild and a restoration of the damaged chamber.  What a difference!  The rustication is distinctive, and the Volcano shape is enhanced by the craggy rise of the bowl tightening into the summit of the smooth briar rim contrast.  Transitioning to the stem the band adds to the class and the acrylic stem is simply on fire – it’s alive and the Oxblood hue of the briar is… did I say ‘classy’ already?  This Aldo Velani Trio was commissioned by Stephen and he has the first opportunity to claim him from The Pipe Steward Store.  This pipe benefits the Daughters of Bulgaria – women and girls who have been trafficked and sexually exploited. Thanks for joining me!


Breathing Life Into a W.O. Larsen Handmade Select Canadian/Brandy


Blog by Steve Laug

The next pipe in the queue is from a fellow in Florida who picks up some pipes for Jeff and me. It was one of several that he found and sent to us. It is a well-made W.O. Larsen Select, Brandy shaped Canadian. The entire pipe had some beautiful cross grain on the front and rear of the bowl and the top and underside of the shank. It had some great birdseye grain on both sides of the bowl and shank. The bowl has a Brandy snifter shaped bowl and a long, oval shank that defines the Canadian shape. The pipe has a rich medium brown finish that really makes the grain on the pipe stand out. The carver at Larsen did a great job utilizing the block of briar to maximize the grain. The pipe is stamped on the underside of the shank. It reads W.O. Larsen over Handmade over Made in Denmark. On the topside of the shank it is stamped SELECT. The stamping is horizontal on the end of the shank on both sides next to the stem/shank junction. The stem is short, tapered vulcanite and has no marking or stamping on it. This is a beautiful example of the work coming from W.O. Larsen.

Jeff took some photos of the pipe when he received them to show the general condition of the pipe before he started his cleanup work. The pipe was very dirty and well used. There was a thick cake in the bowl and a thick coat of lava overflowing onto the rim top. It was hard to know if the edges of the bowl were damaged or not because of the cake and lava. The exterior of the briar was dirty with grease and oils from being held. The vulcanite stem is dirty and had deep tooth marks on both sides of the stem at the button edge and some wear on the button edge itself. The photos below tell the story and give a glimpse of this beauty. Jeff took photos of the bowl and rim to capture the condition of the pipe before he started his cleanup work. There was a thick coat of lava on the rim and the cake in the bowl. It shows the mess this pipe was in when we received it. The thick lava overflow on the rim top made it hard to know what the inner edges of the bowl looked like. The outer edge appeared to have deep gouge on the right side of the rim top. I have circled it in red to identify the issue. There is also a general accumulation of grease and grime ground into the finish on the rest of the bowl and shank. He also took a photo of the right and underside of the bowl and shank to show the interesting grain around the bowl and shank. The finish is very dirty but the grain is visible in the photos.Jeff took photos of the stamping on the top and underside of the shank. It reads as noted above and is clear and legible. The next two photos show the stem surface. They show the tooth marks and chatter on both sides near the button. There are also some marks on the sharp edge of the button. The stem is dirty and is covered in scratches.I wanted to refresh my memory about the pipes coming out of Ole Larsen’s Copenhagen tobacco shop. I knew that many famous Danish Carvers started their careers carving for the shop. I turned first to the pipephil wesite to get and over view of the brand. Here is the link (http://www.pipephil.eu/logos/en/logo-l2.html). I did a screen capture of the section on the site showing a summary of the brand and the typical stamping. I then turned to Pipedia to do a bit more reading about the brand and the various lines making it up. Here is the link (https://pipedia.org/wiki/W.%C3%98._Larsen). The link took me to some pages on the finepipes.com website. Here is the link to the summary of the history of the brand. I quote it in full. I have marked the pertinent section with bold font to mark out the section on the SELECT series (https://www.finepipes.com/pipes/danish/w-o-larsen?sort=20a&page=2&zenid=562ff4b9d62f4f612d0f6ee60cab1224).

W.O. Larsen was one of the most famous tobacco shops in Copenhagen, with a beautiful store located on Copenhagen’s famous “Walking Street.” During the flowering of the Danish pipe in the ’60’s, they first began retailing pipes by such carvers as Sixten Ivarsson, Sven Knudsen, Poul Rasmussen, and Brakner. Urged on by his store manager Sven Bang, the owner, Ole Larsen, decided to begin making pipes in the basement of the shop. He first hired Sven Knudsen as the pipe maker, who soon passed the job to his protégé Hans “Former” Nielsen. Larsen’s fortunes rose along with the rest of the Danish pipe business, and Former was soon managing a group of carvers in the old Larsen cigar factory. Among these were Teddy Knudsen, Tonni Nielsen, Jess Chonowitch, Peter Hedegaard and others, who were responsible for the Select and Straight Grain series before they branched out on their own. After Former left to start Bentley pipes in Switzerland, his duties were taken over by Soren Refbjerg Rasmussen, while the straight grains were made by Teddy’s student Benni Jorgenson. As Ole’s health began to fail, the reins were taken over by his son Nils. Nils became convinced that the way for Larsen to prosper was by entering the low-end market, and acquired the Georg Jensen pipe factory to make an array of less expensive pipes. This turned out to be a fatal error, and Larsen was recently sold to Stanwell, who continue to produce so-called “Larsen” pipes in their huge factory. Thus ended an important part of Danish pipe history.

Also included on the finepipes site was a pipe that was very similar to the one on my worktable. It was similarly shaped and was called a Canadian/Brandy. The most important difference is the Cumberland stem on the one in the photo below. Here is the link to the pipe (https://www.finepipes.com/index.php?main_page=product_info&cPath=5_61&products_id=10289&zenid=562ff4b9d62f4f612d0f6ee60cab1224).From the above information I knew that the pipe came from the 1960s and was carved by some of the Danish greats who were responsible for the SELECT and STRAIGHT GRAIN series. Names like Teddy Knudsen, Tonni Nielsen, Jess Chonowitch, Peter Hedegaard and others are some of those associated with the series pipe that I am working on. In many ways it is a high grade pipe made by a great maker but a pipe that I may never know the actual carver who crafted it in WO Larsen’s studio.

Armed with that information I turned to the pipe on my table. Jeff had reamed the bowl with a PipNet pipe reamer and followed up with a Savinelli Fitsall pipe knife to remove the cake. He scrubbed out the mortise and the airway in the shank and the stem with alcohol, cotton swabs and pipe cleaners. He scrubbed the exterior of the bowl, rim, shank and stem with a tooth brush and Murphy’s Oil Soap to remove the oils and tars on the rim and the grime on the finish of the bowl. He rinsed it under running water. He dried it off with a soft cloth. He was able to remove the lava build up on the rim top and you could see the overall condition of the bowl top and edges of the rim. He scrubbed the stem with soap to remove the grime on the surface. I took photos of the pipe to show its condition before I started work on it. I took a close up photo of the rim top to show the darkening on the top and the deep gouge on the right side of the outer edge of the rim top. Jeff had done an amazing job cleaning off the lava buildup. The outer edge of the rim has some deep nicks on the front of the bowl. The inner edge of the bowl had some darkening and some wear on the left side. The vulcanite stem photos show the tooth marks and the wear on the button surface on both sides. I also decided to take photos of the stamping on both the top and underside of the shank to show its condition. I decided to start my work on the pipe by addressing the darkening and damage to the rim top and edges. I topped the bowl on a topping board with 220 grit sandpaper to remove the damage and minimize the outer and inner edge damage. I was able to remove much of the damage. To address the gouge in the rim top on the right side I filled it in with clear super glue and continued the topping until it was smooth. I cleaned up the inner edge with a folded piece of 220 grit sandpaper to minimize the damage to the edge.I polished the bowl sides and rim top with micromesh sanding pads. I wet sanded with 1500-2400 grit pads and dry sanded with 3200-12000 grit pads. I wiped the bowl and rim down with a damp cloth after each pad. As I polished it the sanded rim top began to shine and blend in with the rest of the briar. When I finished polishing the rim top I stained it with a Cherry stain pen to match the colour of the rest of the bowl. Once the stain had dried. I worked some Before & After Restoration Balm into the surface of the briar with my fingertips to clean, enliven and protect it. I let the balm sit for a little while and then buffed with a cotton cloth to raise the shine. The following photos show the bowl at this point in the restoration process. The bowl and the rim top look really good. The pipe looks very good with the rich finish on the bowl and rim. I am very happy with the results. I used a folded piece of 220 grit sandpaper to smooth out the damage to the stem and reshape the button. Once the surface was smooth I sanded out the scratch marks and started the polishing of the stem with a folded piece of 400 grit sandpaper. I wiped the stem down with Obsidian Oil and took the following photos.I polished the stem with micromesh sanding pads – wet sanding it with 1500-2400 grit pads and dry sanding it with 3200-12000 grit pads. I wiped the stem down with a damp cloth after each pad. I polished it with Before & After Pipe Stem Polish – Fine and Extra Fine. I wiped it down with a coat of Obsidian Oil and set it aside to dry. I put the stem back on the bowl and polished them both with Blue Diamond polish on the buffing wheel. I gave the bowl and stem multiple coats of carnauba wax. I buffed the pipe with a clean buffing pad to raise the shine. I hand buffed it with a microfiber cloth to deepen the shine. The pipe polished up pretty nicely. The grain on the natural brown briar that had darkened over time came alive with the buffing. The finish worked well with the polished black vulcanite stem. Have a look at it in the photos below. The dimensions are Length: 7 inches, Height: 2 1/4 inches, Outside diameter of the bowl: 1 3/8 inches, Chamber diameter: 3/4 of an inch. This beauty will soon be on the rebornpipes store. It would make a beautiful addition to somebody’s pipe rack. Thanks for walking through the restoration of this Danish take on the Canadian/Brandy shape from the 60s with me as it was a fun pipe to work on.

This is a new brand to me – LUNAR Spain Canadian


Blog by Steve Laug

The next pipe in the queue is yet another interesting pipe from the Michigan lot – a really nice Canadian with rustication pattern like nothing I have ever seen before. The entire pipe – bowl, rim and shank is covered in small circles or dots with the area between the dots lightly rusticated and stained darker than the dots. The rim top, band around the rim and a band on the shank end are the only non-carved portions of the Canadian.  It is another totally unique pipe and different from any of the other pipes in the collection. It is not a large pipe – probably a Group 4 sized bowl. The rim top is flat and smooth with some darkening and damage to the finish. The pipe has a contrasting black and medium brown stain coat that highlights and accentuates the unusual finish. The underside of the shank is smooth for the majority of the shank. It is stamped LUNAR arched over a crescent moon shape under the arched moon is stamped SPAIN. Obviously the pipe is made in Spain and I will need to do a bit of work to find out about the brand. The stem is vulcanite and has no marking or stamping on it. This is another nice looking piece much like the rest of those in this 21 pipe Michigan pipe lot. The LUNAR Canadian I am working on is shown on the first shelf of the rack pictured below. It is the second pipe on the right and I put a red box around it to make it easy to identify.Jeff took some photos of the pipe when he received them to show the general condition of the pipe before he started his cleanup work. Like the rest of the pipes from the Michigan collection this pipe was dirty and well used. There was a thick cake in the bowl and lava overflowing onto the rim top. It was hard to know if the edges of the bowl were damaged or not because of the cake and lava. The carved dots or circles on the entire pipe made it very interesting. The vulcanite stem is lightly oxidized and has some calcification at the button. There are deep tooth marks on both sides of the stem at the button edge and some wear on the button edge itself. There are also scratches in the vulcanite where it looks like someone scraped off some of the calcification. The photos below tell the story and give a glimpse of another beautiful Canadian. Jeff took a close up photo of the bowl and rim to capture the condition of the pipe before he started his cleanup work. There was a thick hard cake in the bowl which made me think it was a favourite pipe. The rim top had some thick lava overflow and some darkening. The thick lava on the rim top made it hard to know what the inner and outer edges of the bowl looked like. There is also a general accumulation of dust in the finish on the rest of the bowl and shank.He also took photo of the right side of the bowl and shank to show the interesting circular carving on the finish. The finish is very dirty but the grain is visible in each of the circles. The rustication pattern between the circles give it a fascinating look. This is another beautiful pipe.Jeff took a photo to capture the stamping on the underside of the shank. The photo shows stamping as noted above. The stamping on this pipe is clear and readable.The next two photos show the stem surface. They show the tooth marks and chatter on both sides near the button. There are also some marks on the sharp edge of the button. The stem is dirty, oxidized and has a yellow cast to it. I looked in all of my usual sources for information on the brand. There was nothing on Pipedia or on Pipephil. The brand was unknown and this point all I knew was the stamping on the pipe – it was made in Spain. It was also not listed in Who Made That Pipe. It was also not listed in Lopes book on pipes. I then did a general Google search for Lunar Smoking Pipes Spain. The search turned up lots of useless information but it came up with one helpful discussion on the brand on the Pipesmagazine forum (http://pipesmagazine.com/forums/topic/luna-spain-very-unique-pipe). The fellow posting there put up the following photo and asked for information about the brand and company that made it. There was not a lot of helpful information there but several posters gave suggestions about how they thought the finish was achieved. One fellow also said that LUNAR could be translated as Mole or Polka Dot. That led to look at some other sites for information.I did a search on Google Translator Spanish-English and put in the English word Lunar. It gave me the following information (https://www.google.com/search?client=firefox-b-d&q=translate+from+spanish+to+english).

That was all the information that I could find online or in my reference books that usually give me information. I knew nothing about the brand but found that the name could mean mole, spot, or even polka dot. Kind of a fitting translation given the pattern on the bowl and shank.

Jeff reamed the bowl with a PipNet pipe reamer and followed up with a Savinelli Fitsall pipe knife to remove the cake. He scrubbed out the mortise and the airway in the shank and the stem with alcohol, cotton swabs and pipe cleaners. He scrubbed the exterior of the bowl, rim, shank and stem with a tooth brush and Murphy’s Oil Soap to remove the oils and tars on the rim and the grime on the finish of the bowl. He rinsed it under running water. He dried it off with a soft cloth. He was able to remove the lava build up on the rim top and you could see the great condition of the bowl top and edges of the rim. He soaked the stem in Before & After Deoxidizer to remove the oxidation. I took photos of the pipe to show its condition before I started my work on it. I took a close up photo of the rim top to show the darkening on the surface of the rim toward the back of the bowl that was normal with use. The front part of the rim top looked a little lighter in colour but there were also deep sandpits and nicks on the entire top. The inner edge showed some burn damage and also some cuts and nicks from a knife that was used to ream the bowl sometime in its life time. The outer edge of the rim looks really good. The stem photos show the tooth marks and the wear on the button surface on both sides. The final close up photos shows the LUNAR stamping on the underside of the shank (as noted above).I decided to start with the rim top and see what I could do with the damage to the top surface and the burn marks on the inner edge of the bowl. I topped the bowl on a topping board with 220 grit sandpaper to remove the damage to the rim surface and minimize the burn damage to the inner edge of the bowl. I also wanted to work toward bringing the bowl back into round. After topping I used a folded piece of sandpaper to give the inner edge a slight bevel to hide the damage. I polished the smooth portion of the bowl and the rim top with micromesh sanding pads. I wet sanded with 1500-2400 grit pads and dry sanded with 3200-12000 grit pads. I wiped the bowl and rim down with a damp cloth after each pad. When I had finished polishing the rim with the 4000 grit pad the small flaws on the top needed to be addressed. It was almost as if during the sanding process some of the fill material was dislodged leaving pits. I stopped and filled in the pits with clear super glue and then worked my way back through the micromesh until I finished with 6000-12000 grit pads. I used a Maple stain pen to match the rim top to the colour of the rest of the pipe. I applied the stain and let it sit for a little while to cure before buffing the bowl with a soft cotton cloth.I worked some Before & After Restoration Balm into the surface of the briar with my fingertips to clean, enliven and protect it. I used a horsehair shoe brush to work it into the nooks and crannies around each circular spot. It was hard to get it into the grooves and the shoe brush did the trick. I let the balm sit for a little while and then buffed with a cotton cloth to raise the shine. The following photos show the bowl at this point in the restoration process. The bowl and the rim top look really good and the darkening is gone. The finish looks very good with the rich oil finish on the bowl and rim. I am very happy with the results. With the bowl finished I set it aside and turned my attention to the stem. I cleaned out the tooth marks on both sides of the stem with a cotton swab and alcohol. I filled in the tooth marks with clear super glue. Once the repairs had cured I used a needle file to flatten out the repaired areas. I filed it until the patches were smooth with the surface of the stem. I used a folded piece of 240 grit sandpaper to blend the repairs into the surface of the stem. Once the surface was smooth I sanded out the scratch marks and started the polishing of the stem with a folded piece of 400 grit sandpaper. I wiped the stem down with Obsidian Oil and took the following photos.I polished the stem with micromesh sanding pads – wet sanding it with 1500-2400 grit pads and dry sanding it with 3200-12000 grit pads. I wiped the stem down with a damp cloth after each pad. I further polished it with Before & After Pipe Polish – both Fine and Extra Fine. I wiped it down with a coat of Obsidian Oil and set it aside to dry. I put the stem back on the bowl so I could polish it without rounding the edges as the shank union. I polished stem with Blue Diamond polish on the buffing wheel. I gave the bowl multiple coats of Conservator’s Wax and the stem multiple coats of carnauba wax. I buffed the pipe with a clean buffing pad to raise the shine. I hand buffed it with a microfiber cloth to deepen the shine. The pipe polished up pretty nicely. The contrasting circular carved Polka Dots and the grooves between them gave an interesting texture to the bowl and shank. It truly came alive with the buffing. The rich brown stain on the high surfaces and the black stain in the crevices worked very well with the polished black vulcanite stem. The finished pipe is a beauty and feels great in the hand. Have a look at it with the photos below. The dimensions are Length: 6 inches, Height: 1 7/8 inches, Outside diameter of the bowl: 1 1/4 inches, Chamber diameter: 3/4 of an inch. This beauty has already been claimed; just the details have to be worked out with the buyers. Thanks for walking through the restoration of this beautiful Canadian with me it was a pleasure to work on.

Breathing new life into a Malaga Carved Canadian


Blog by Steve Laug

I am working through a lot of the queue of pipes that are sitting in my repair bin this weekend. Next on the table is another Malaga from Alex that he dropped off for a restoration. It is what Malaga would have called one of their carved finishes. It is a Canadian with a double rusticated finish. The underfinish is almost Custombilt like in the deep worm trail grooves on the bowl and shank. The top finish is a wire rustication that covers the bowl sides and shank over the top of the previous finish. The rim top and a band on the shank end are smooth and stained with a contrasting lighter stain. It is an interestingly piece with a very unique finish that has grown on me as I worked on it.

The pipe had been reamed and cleaned according to the seller. The bowl and shank were pretty clean bowl. The rim top had some damage on the top surface and a deeper burn mark on the right front inner edge. The pipe is stamped on the topside of the shank horizontally and reads MALAGA. The finish on the pipe is very in good condition with a lot of grime and dust in the finish. The stem was very deeply oxidized and polished over the oxidation. There were waves and marks on the surface of both sides at the button and tooth damage on the button itself. The photos give a pretty clear picture of the shape of the pipe and its general condition when I received it. I took a close up photo of the bowl and rim to capture the condition of the pipe before he started my restoration of the pipe. The rim top was clean but had some darkening and chipping on the surface at the back of the bowl. The right front inner edge and bowl top had some burn damage that was quite extensive. The stem itself was an interesting mess. It had been shinned and polished but there was still some very deep oxidation that is visible – with the shine is a cloudy red colour. There are also tooth marks on the button surface of the topside (shown in the second photo) as well as some general waviness to the stem just ahead of the button that spoke of some one trying to buff out the tooth marks. Also note the stamped C on the shank underside in the third photo. I believe this refers to the fact that the pipe has the Malaga Carved finish.I took a photo to capture the stamping on the topside of the shank. The photo shows stamping as noted above. The stamping on this pipe is clear and readable. Once again it does not include the quotation marks that show up on various Malaga pipes.For those of you who are unfamiliar with the brand, I am also including the link to a blog that I wrote that gives some of the history of the Malaga brand and the Malaga Pipe Shop in Royal Oak, Michigan in the USA. Here is the link – https://rebornpipes.com/tag/malaga-pipes/. That blog also includes links to a catalogue and the history of the pipemaker George Khoubesser. If you are interested to learn more then I invite you to follow the link to get a feel for the brand and the pipemaker.

Since the bowl had been reamed and the pipe appeared to be clean I left the cleanup work until after I had reworked the shank and stem. I started my work on the pipe by working on the rim top and inner edge of the bowl. I started by topping the bowl on a topping board with 220 grit sandpaper. I wanted to remove as much of the damage to the rim top as possible and minimize the burn damage on the front edge of the bowl. What limited the topping was the smooth band around the top of the bowl. Even though it was thin I could safely remove some of the damage without compromising the band. Once I had it topped I used a folded piece of 220 grit sandpaper to give the inner edge a slight bevel to further hide the burn damage. I polished the freshly sanded briar with 2400-12000 grit micromesh sanding pads – wet sanding with 1500-2400 grit pads and dry sanding with 3200-12000 grit pads. I wiped the rim top down with a damp cloth after each pad. I found that with each successive grit of micromesh the grain stood out more and gave a shine to the pipe. I liked what I saw when I looked at it. While it was a close match to the smooth band on the shank and around the rim top it would need to be stained to give a more perfect match. I used an Oak Stain pen to touch up the rim top and the light spots on the band around the shank end. I worked some Before & After Restoration Balm into the surface of the briar with my fingertips to clean, enliven and protect it. I let the balm sit for a little while and then buffed with a cotton cloth to raise the shine. The following photos show the bowl at this point in the restoration process. The bowl and the rim top look really good and the darkening is gone. The finish looks very good with the rich oil finish on the bowl and rim. I am very happy with the results. I cleaned out the airway in the shank and wiped out the bowl to make sure there was no debris left behind. The pipe had been well cleaned on the inside by the seller. Because of that most of what I got was the sanding debris that had drifted in the bowl and shank when I had topped the rim. With the bowl finished I set it aside and turned my attention to the stem. I sanded the stem surface with 220 grit sandpaper to smooth out the waves, remove the oxidation and smooth out the tooth marks on the surface of the button. The oxidation and waviness of the stem surface was hardest to deal with in order to not accentuate the waves instead of removing them. I sanded with long strokes on the surface to blend in the high and low spots. I am happy with the stem surface once that was done. I started the polishing of the surface with 400 grit wet dry sandpaper. I cleaned out the debris from the airway and slot in the stem after the sanding was completed. I used alcohol and pipe cleaners.I polished the stem with micromesh sanding pads – wet sanding it with 1500-2400 grit pads and dry sanding it with 3200-12000 grit pads. I wiped the stem down with a damp cloth after each pad. I further polished it with Before & After Pipe Polish – both Fine and Extra Fine. I wiped it down with a coat of Obsidian Oil and set it aside to dry. Now with both parts of the pipe finished, I polished stem with Blue Diamond polish on the buffing wheel. I gave the bowl multiple coats of Conservator’s Wax and the stem multiple coats of carnauba wax. I buffed the pipe with a clean buffing pad to raise the shine. I hand buffed it with a microfiber cloth to deepen the shine. The pipe polished up pretty nicely. The grain under the double rustication came alive with the buffing. The rich oil finish on the briar works well with the new, polished black vulcanite stem. The finished pipe is a beauty and feels great in the hand. Have a look at it with the photos below. The dimensions are Length: 6 inches, Height: 1 3/4 inches, Outside diameter of the bowl: 1 1/4 inches, Chamber diameter: 3/4 of an inch. This one will be going back to Alex with the rest of his pipes that I am working on. Thanks for walking through the restoration and restemming with me on this uniquely carved Malaga Canadian.