Tag Archives: restaining a bowl and rim

Rebuilding a Button to Recommission an Aristocrat London Made – Made in England 1077


Blog by Dal Stanton

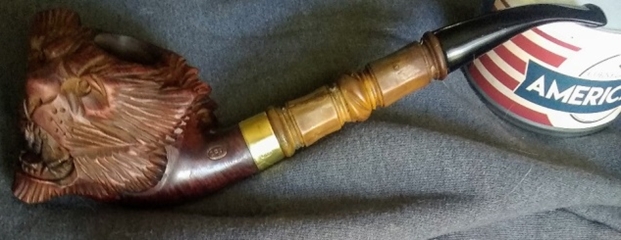
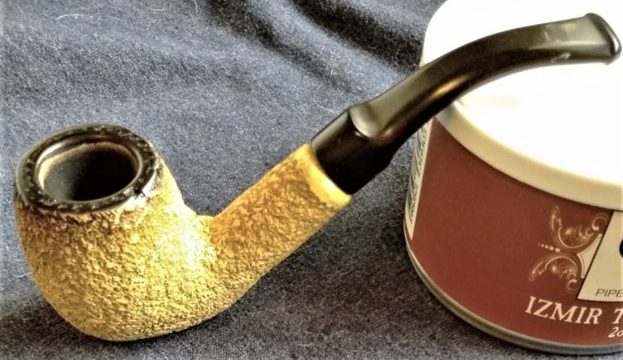
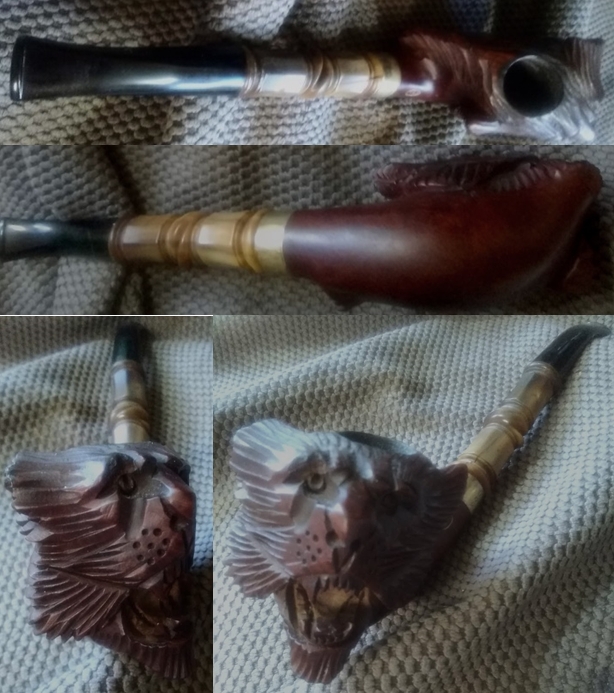
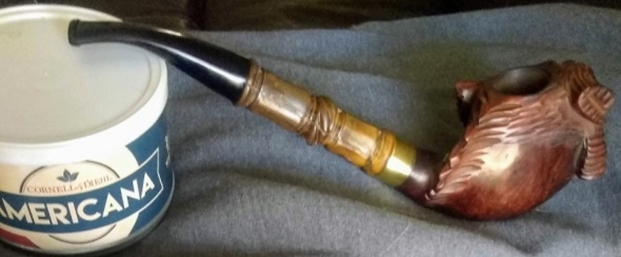
I acquired this very stately looking Aristocrat trolling through offerings on eBay.  I liked it immediately because of its large rusticated bowl and the nice half bent Billiard presence.  It needed some work which was good for me – a broken off button and deep oxidation – factors that would discourage many from taking a second look.  When the auction ended, the price was a good one and I had the highest bid.  Another great pipe to restore to benefit the Daughters of Bulgaria – our work here in Bulgaria helping women and girls who have been trafficked and sexually exploited.  I was in the US when I landed this hefty rusticated Billiard and it was in the suitcase in the Lufthansa cargo hold on its way back to Bulgaria with me.As with all the pipes available in the For “Pipe Dreamers” Only! collection, I take additional pictures for stewards looking to commission a pipe.  When Andrew reached out to me, he indicated interest in the Aristocrat but also in the Bearded Sailor Carved pipe I had then.  He had served in the Navy for 17 years and the old sailor caught his attention.  Unfortunately, the Carved Bearded Sailor was already commissioned for another pipe man.  I appreciate the service that Andrew has given in serving his country, and I mentioned to him that my son had also served as a submariner in the Navy, on the USS Boise. I appreciated his reply when I asked him for patience waiting for the Aristocrat to reach the work table.  Here’s what he wrote:

Dal, 

As the Grandson of a hobbyist wildlife painter I fully understand the time required to do something like this.  I would love this pipe and would like to commission too this pipe.  Thank you for keeping me in mind about the bearded sailor and thank your son for his service.

Andrew 

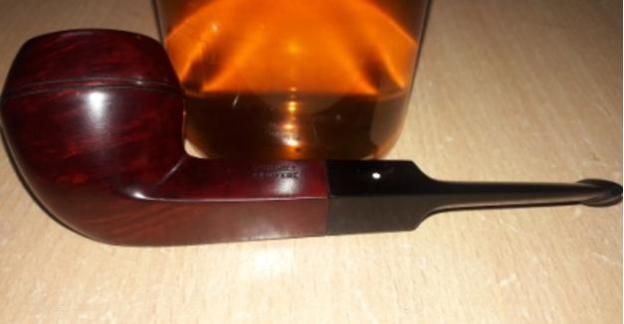
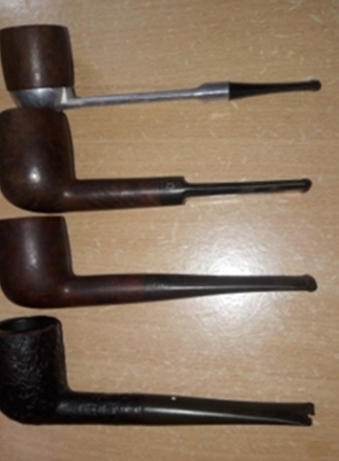
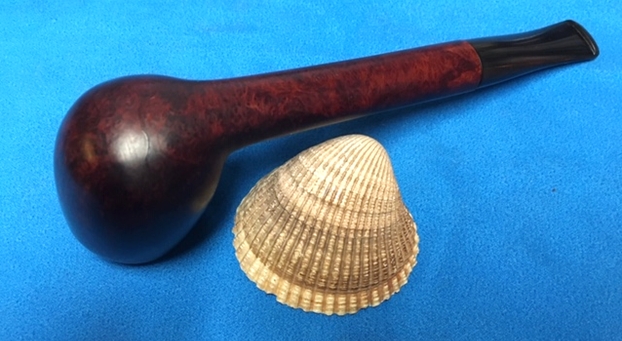
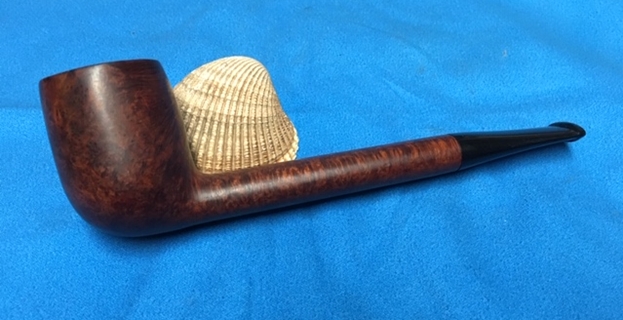
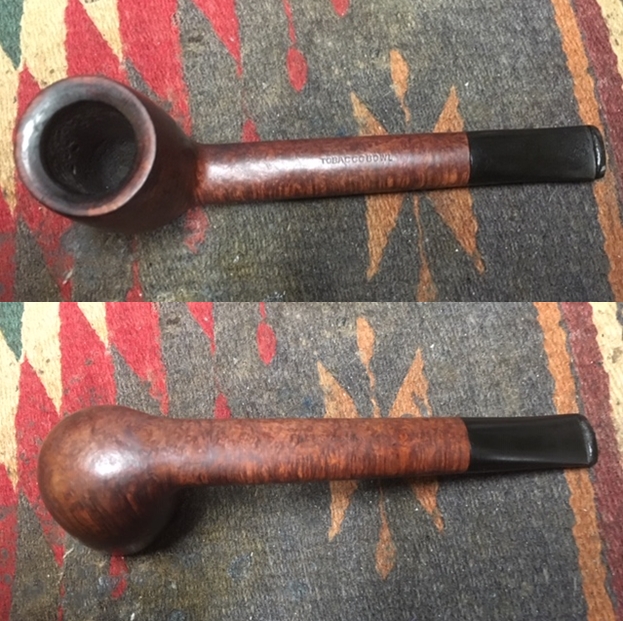
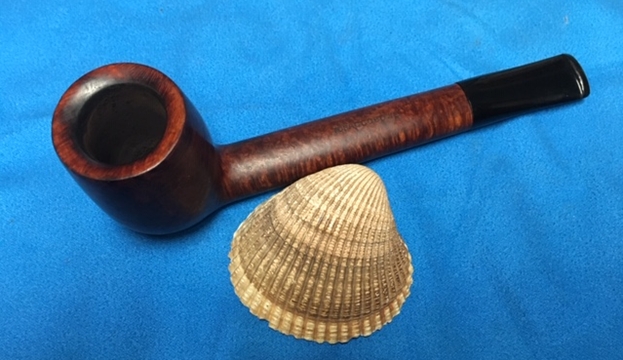
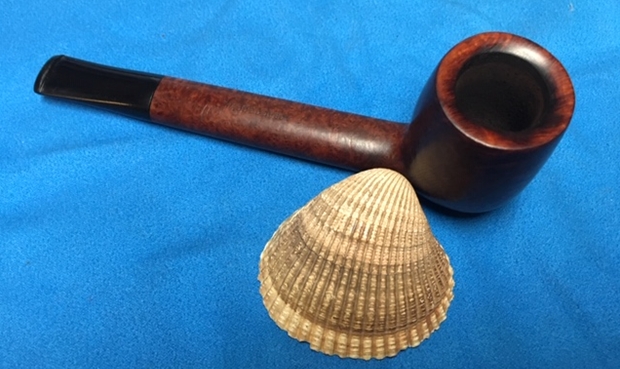
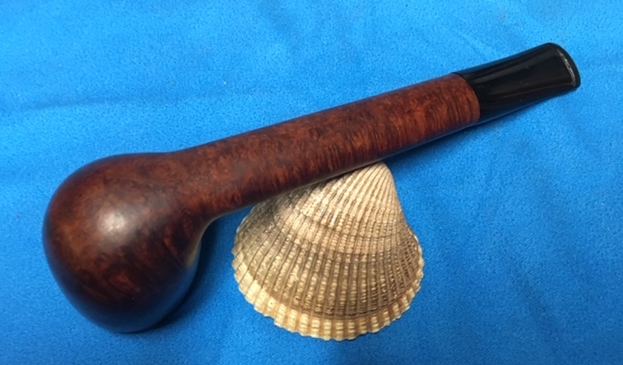
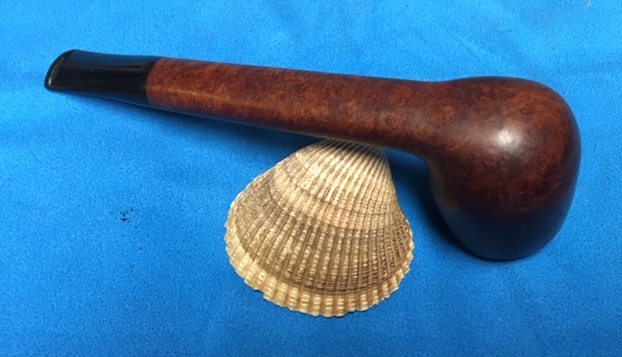
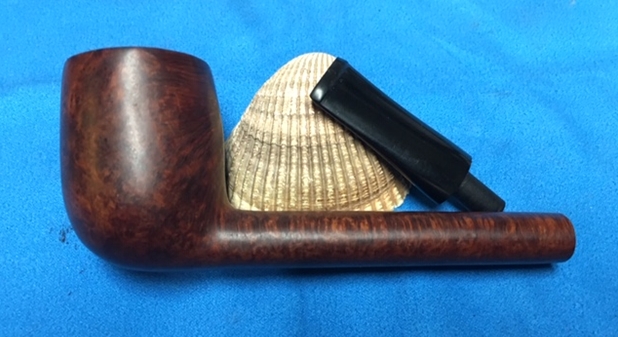
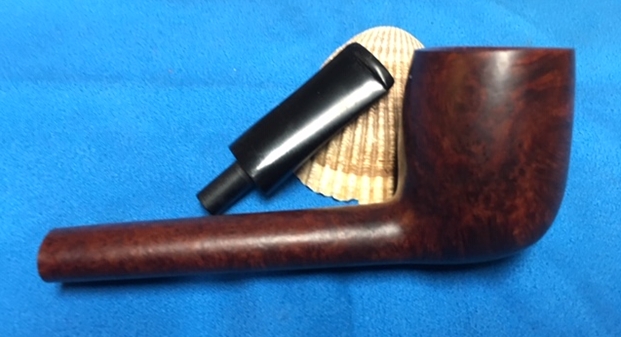
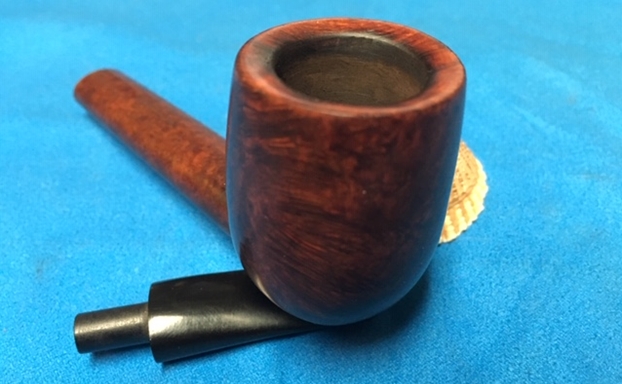
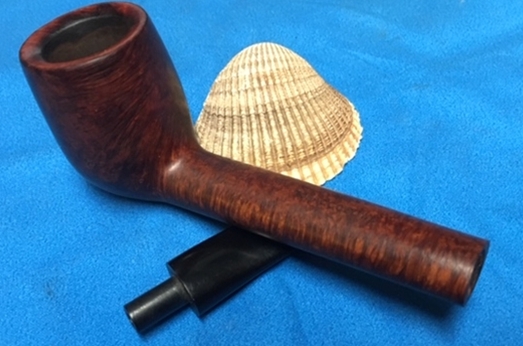
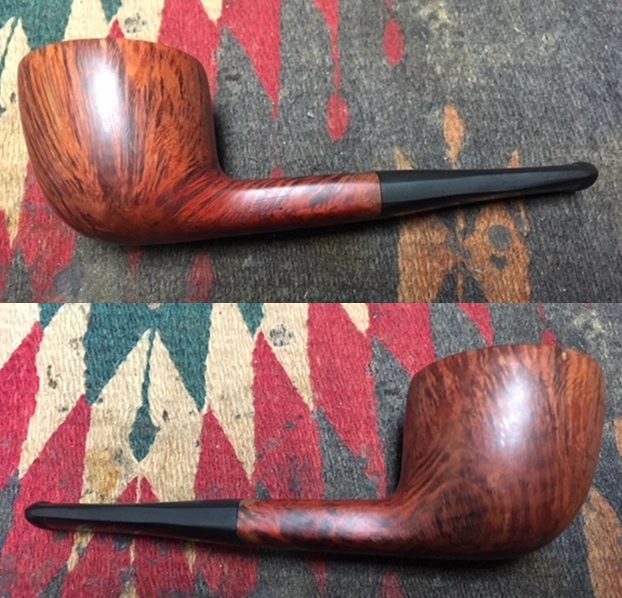
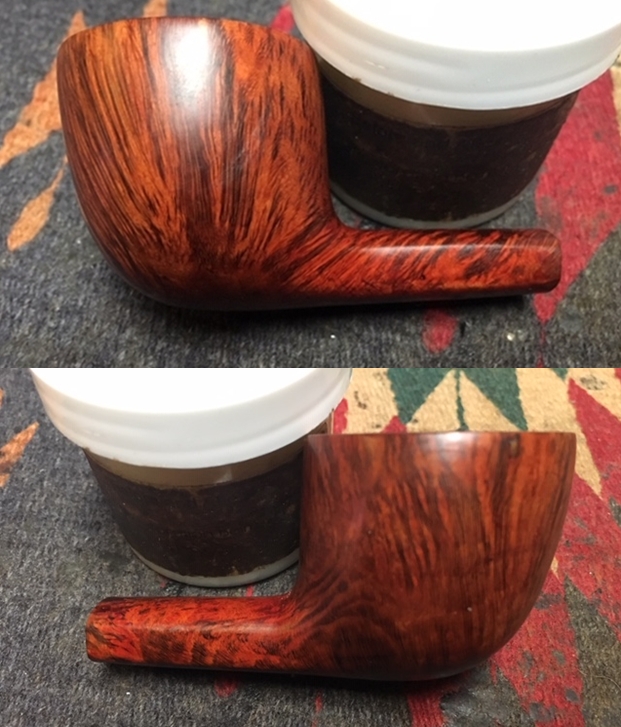
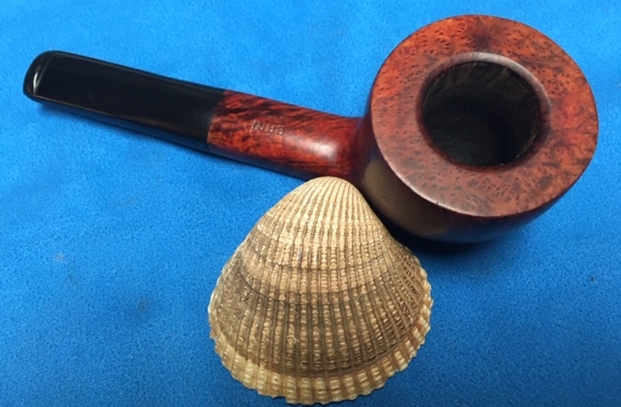
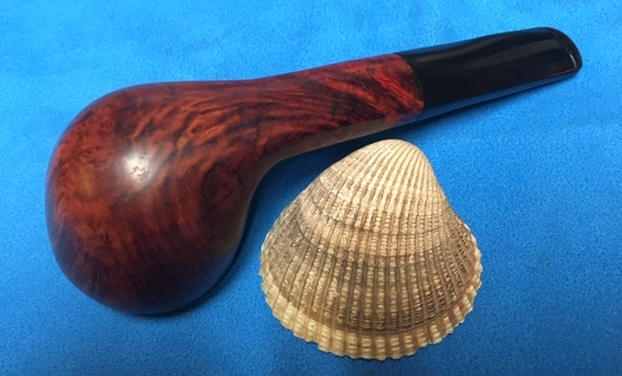
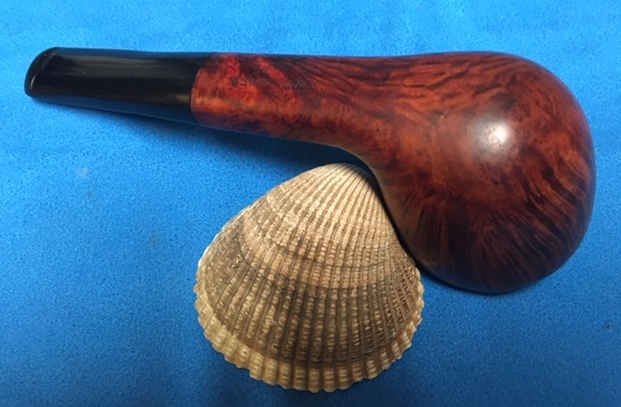
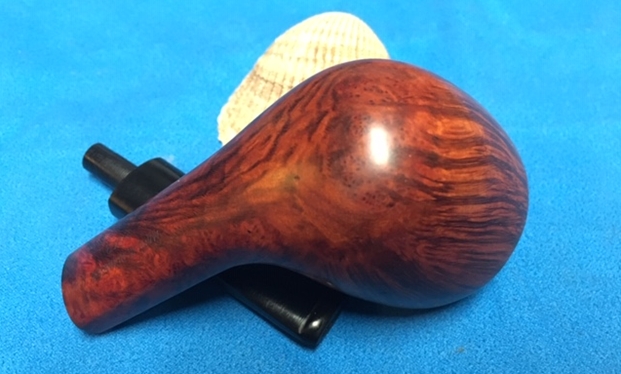
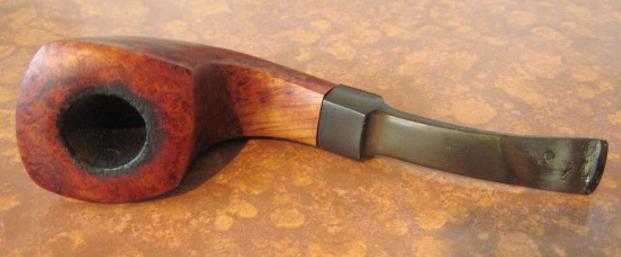
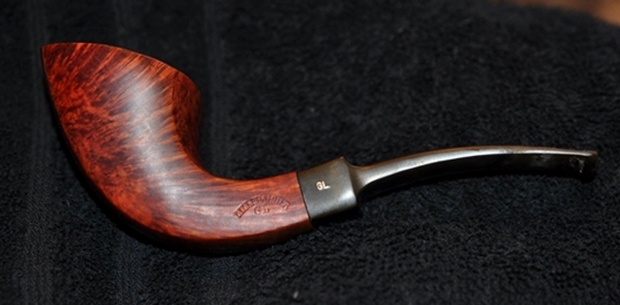
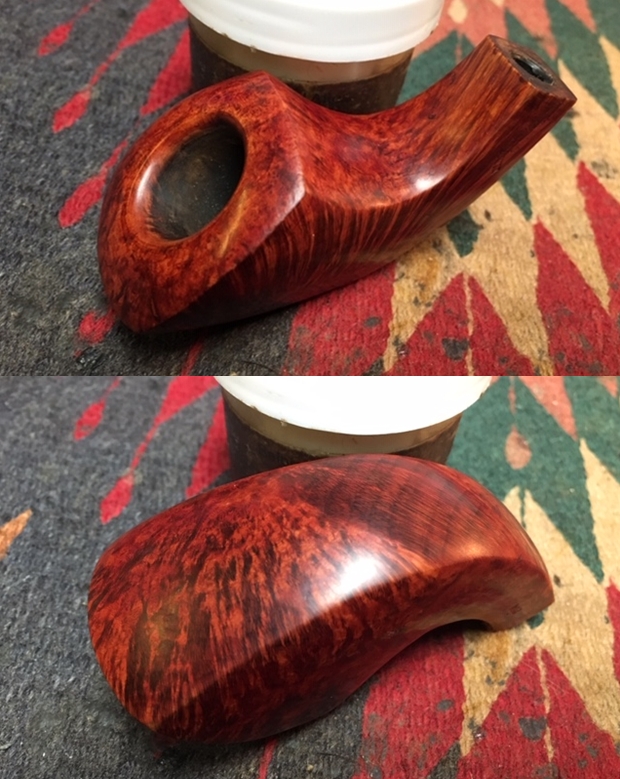
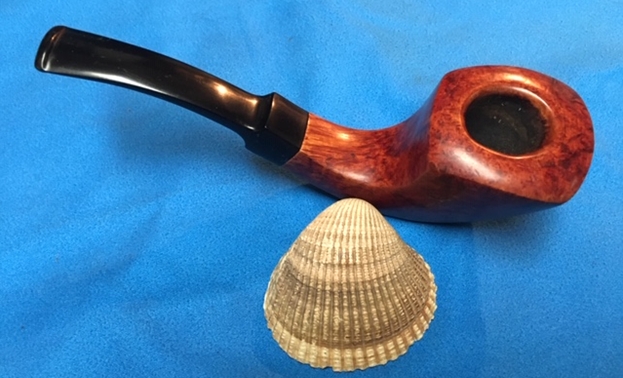
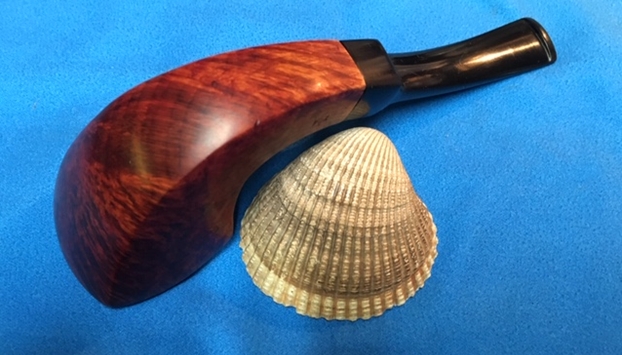
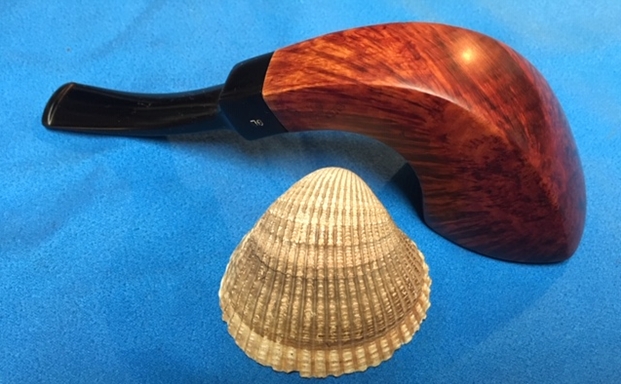
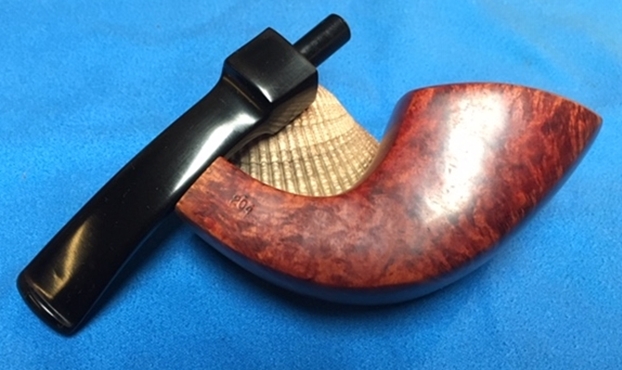
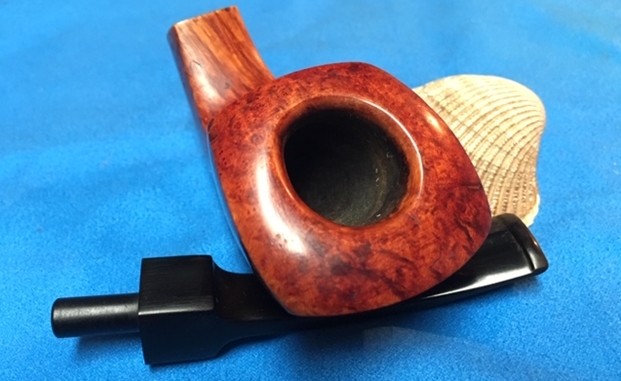
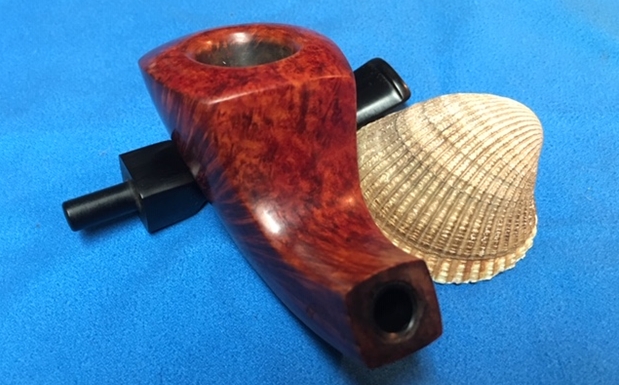
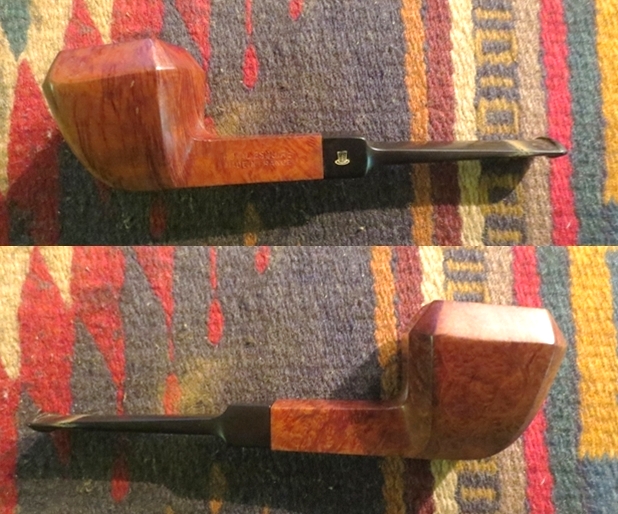
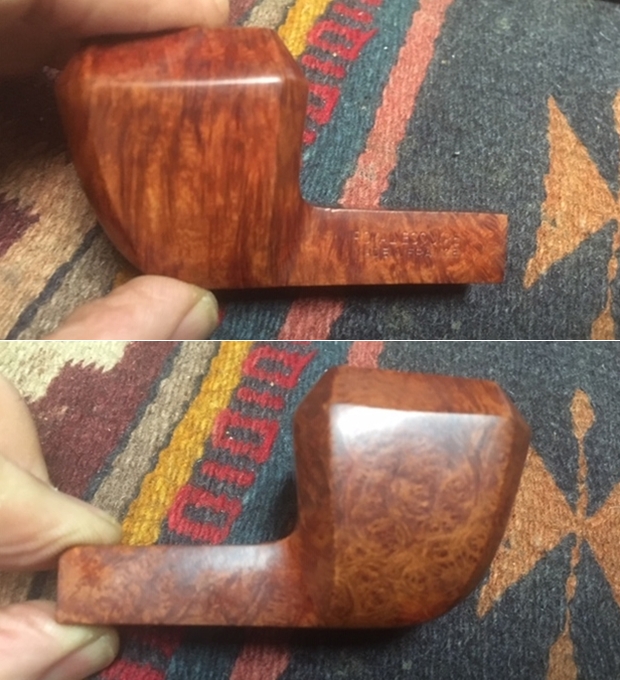
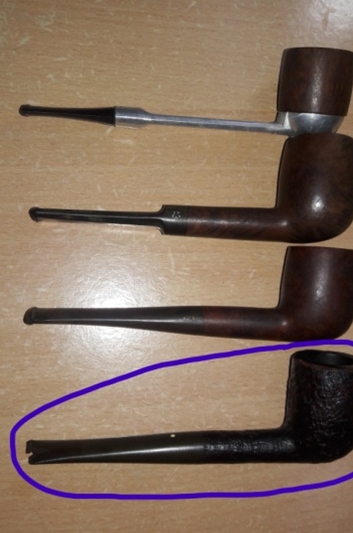
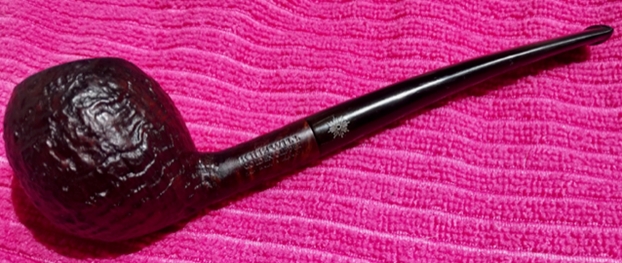
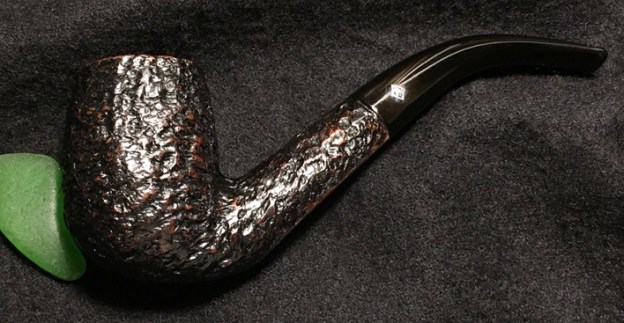
Here are some of the pictures Andrew saw of the Aristocrat London Made that I used from the original seller: 
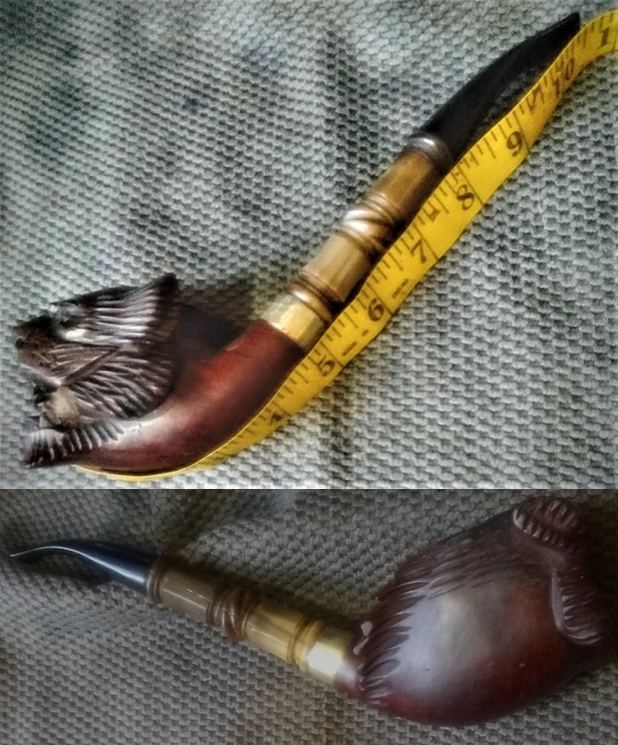
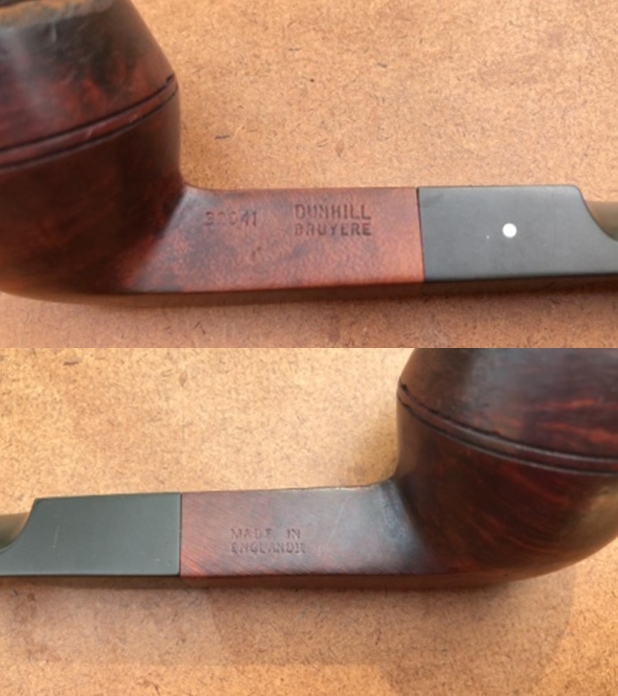
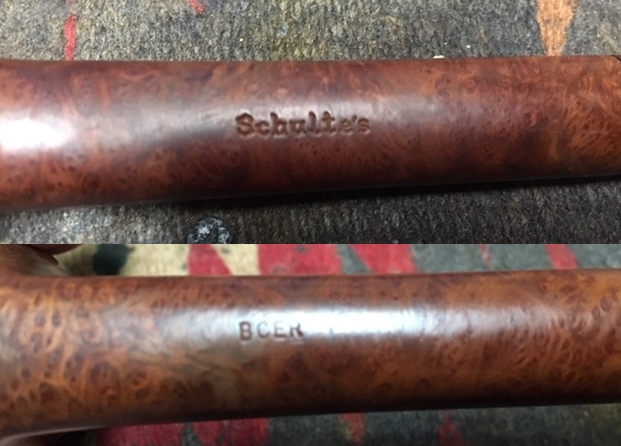
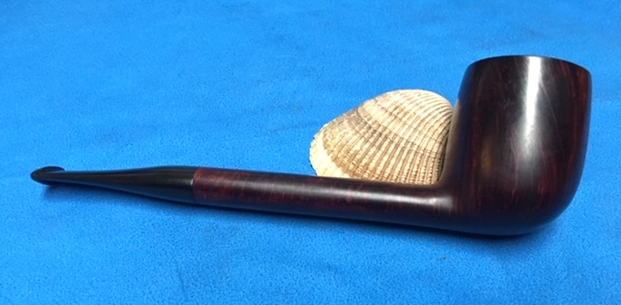
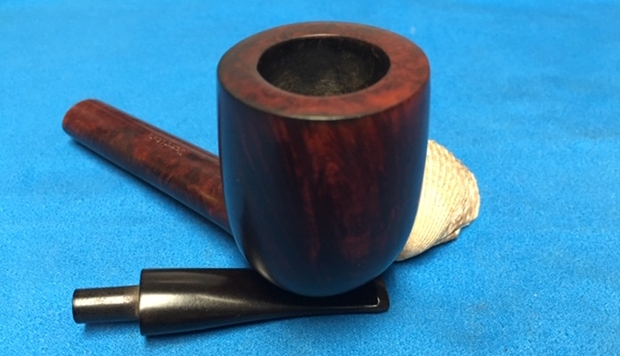
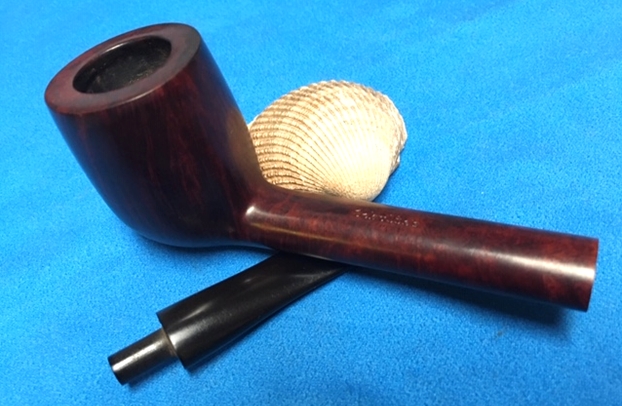
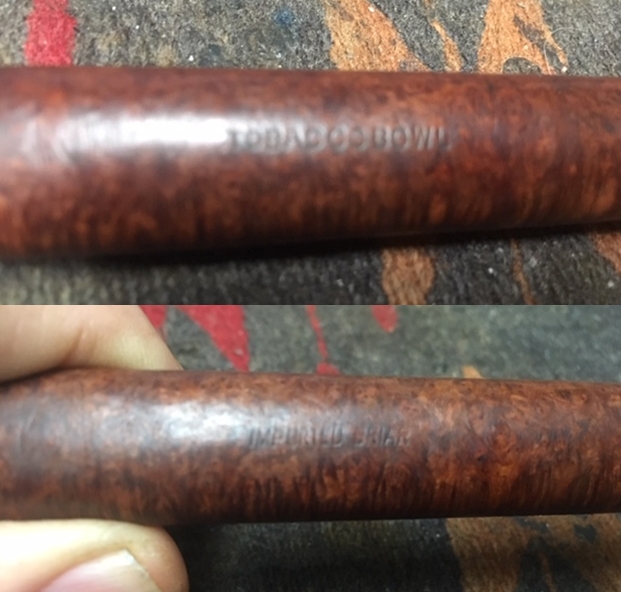
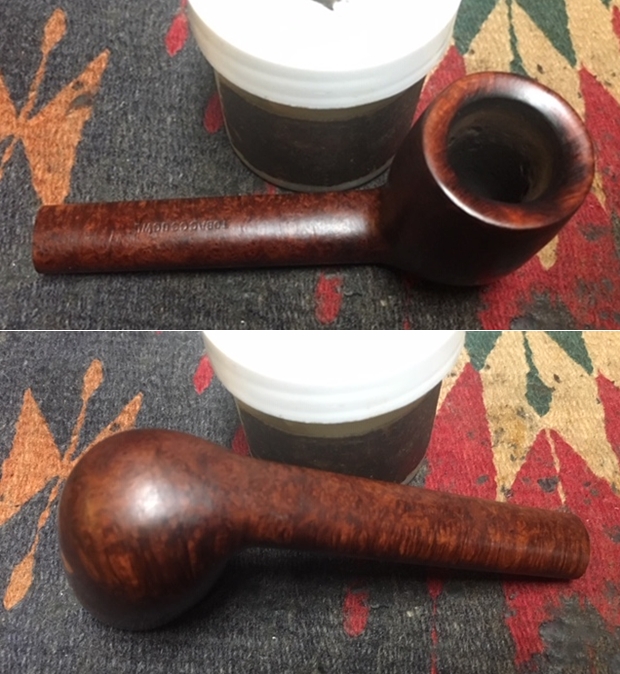
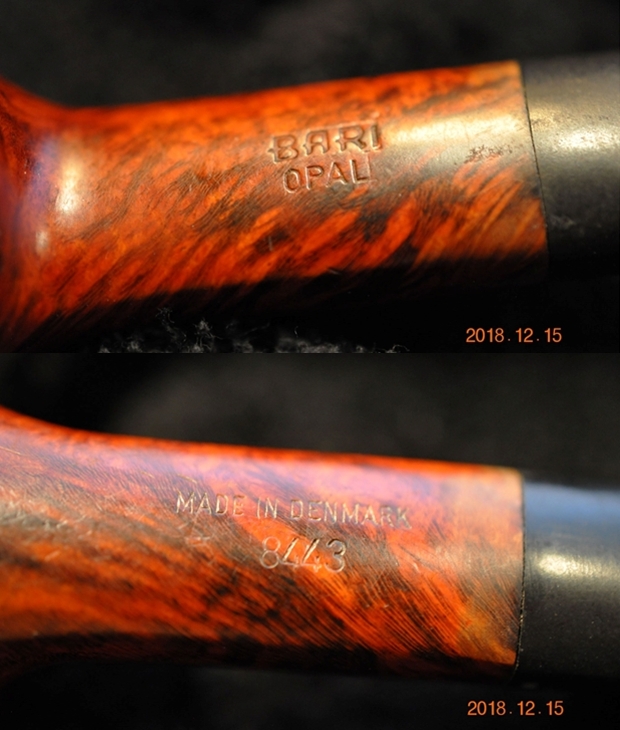
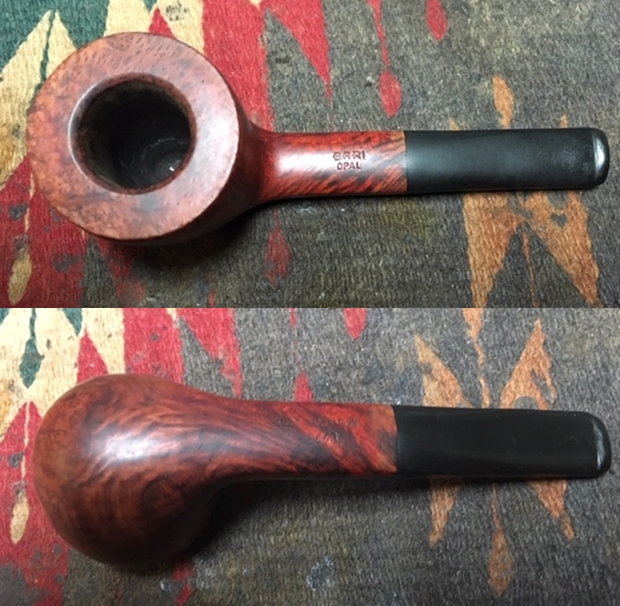
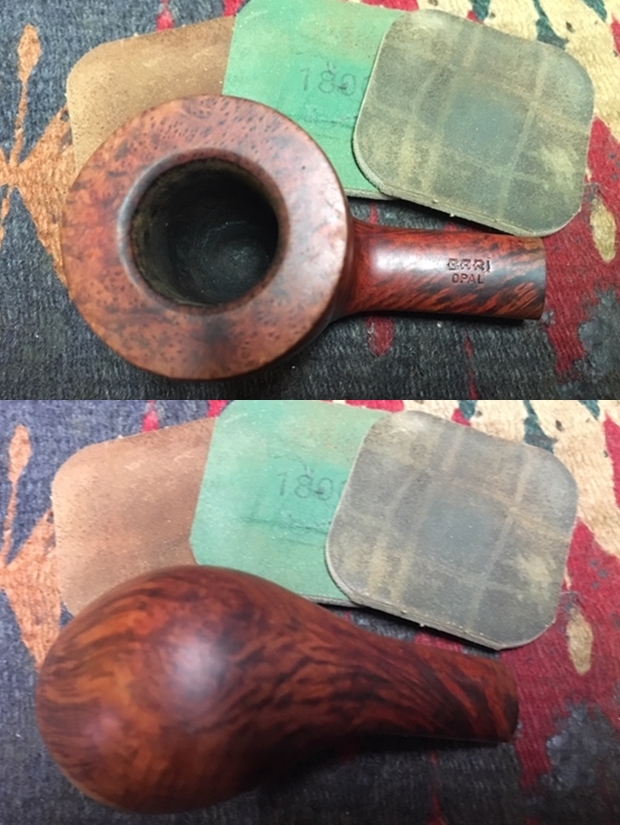
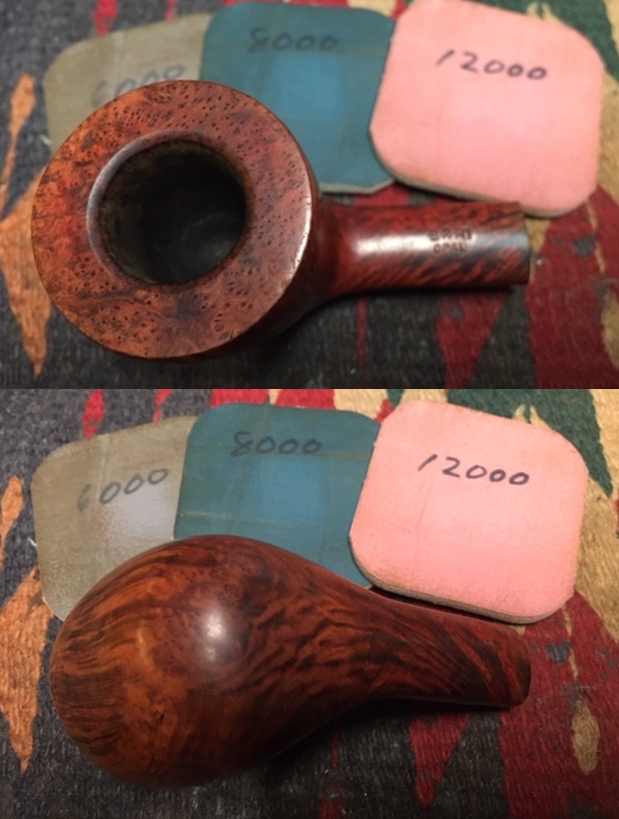
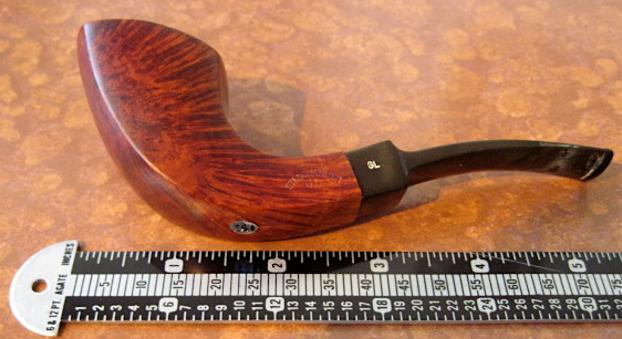
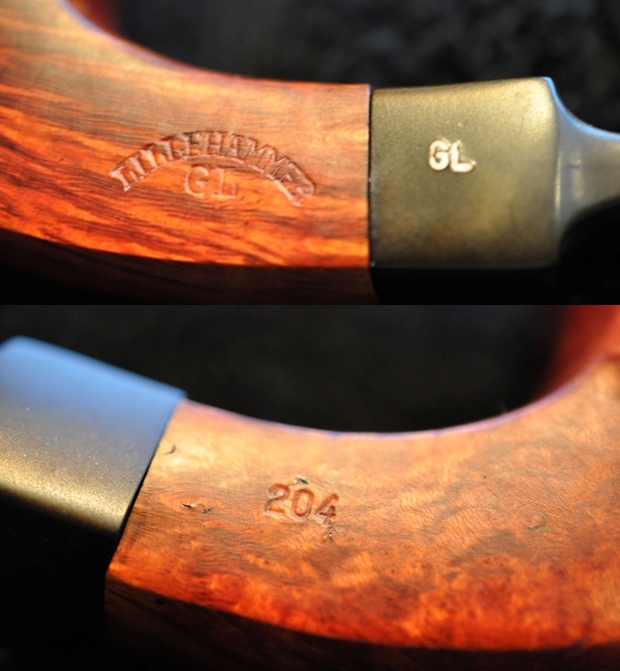
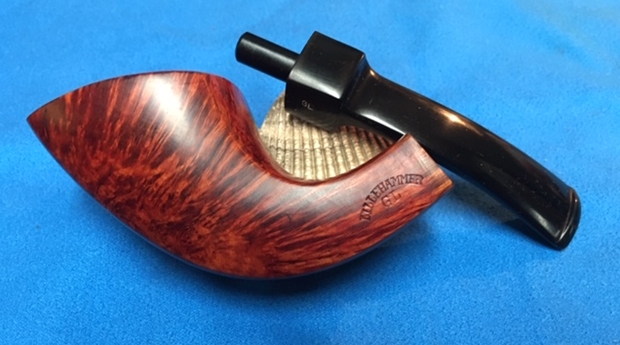
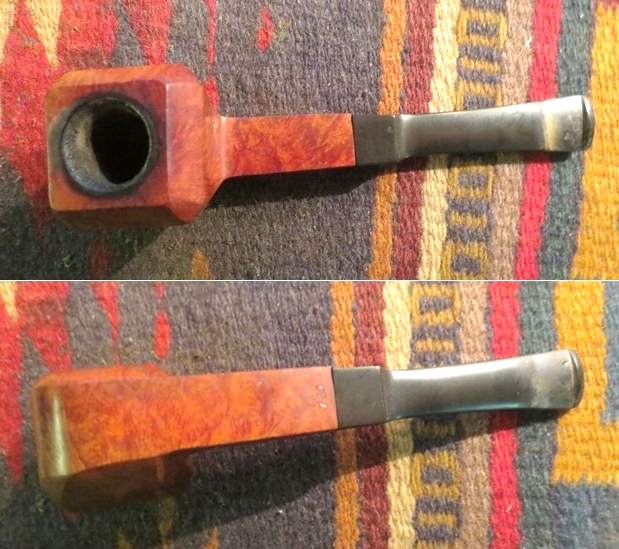
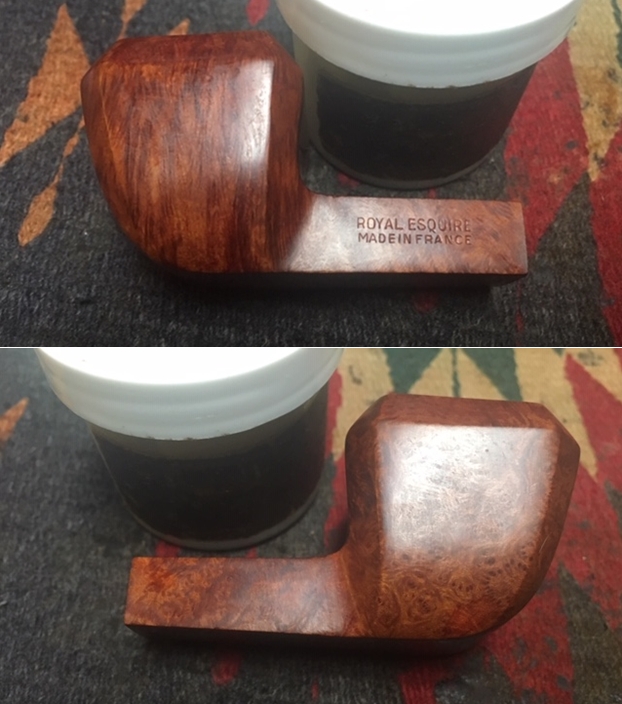
The pipe has a large presence and I take out my ruler and take the measurements: Length: 5 15/16 inches, Height: 2 inches, Rim width: 1 1/4 inches, Chamber width: 3/4 inches, Chamber depth: 1 13/16 inches.  The nomenclature stamped on the lower shank smooth panel is thin. I take additional pictures of this from my worktable.  What is stamped is cursive ‘Aristocrat’ [over] LONDON MADE [over] MADE IN ENGLAND.  To the left of the nomenclature is a shape number: 1077 which undoubtedly points to the half-bent Billiard designation.The stem stamping is an ‘A’ set in a diamond frame.In search of the origins of the Aristocrat, I first look in my autographed copy of Herb Wilczak & Tom Colwell’s, “Who Made That Pipe?” dated 3/3/97.  Tom Colwell’s gifting of this book to “Bruce” is in April of 2001, concluding with his signature.  There were several listings for ‘Aristocrat’ but only two fell within the correct UK parameters:

John Redman/Kapp & Peterson – ENGL
Comoy’s / Harmon Bros. LTD – ENGL

Pipedia’s information narrowed the field by isolating the plain ‘A’ logo:

Pipedia’s entry for the John Redman Co. does not include much information.  I researched this company before as being the probable English manufacturer of pipes stamped with Boston’s Tobacconist Shop, L.J. Peretti name (see: A Christmas Gift in need of a stem splice – L J 
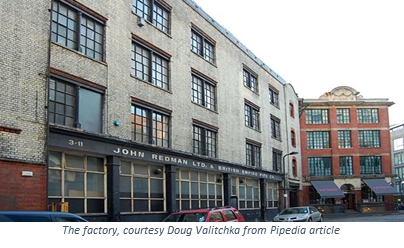
Peretti Squared Shank Billiard).  This restoration started a fun hobby of collecting L.J. Peretti pipes and selling many too!  Here is the information.

John Redman Ltd. and British Empire Pipe Co.

Other lines include Aristocrat, Buckingham, Buckingham Palace, Canberra, Captain Fortune, Dr John, Golden Square, Redonian, Richmond (not Sasieni), Twin Bore.

Former factory located at 3-11 Westland Place, Hackney, London N1 7LP

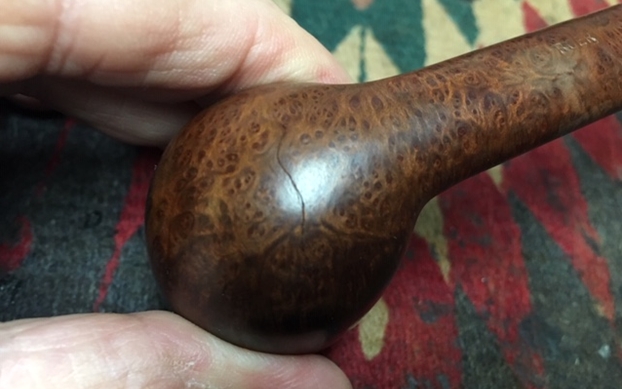
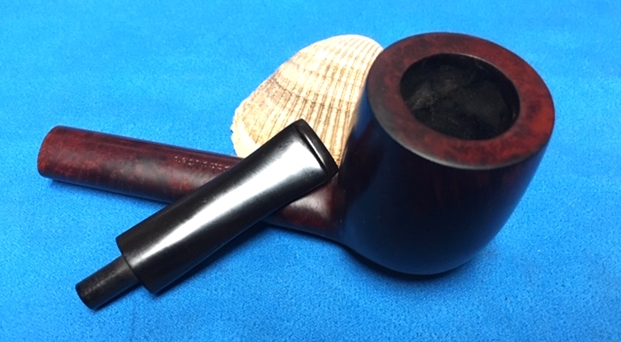
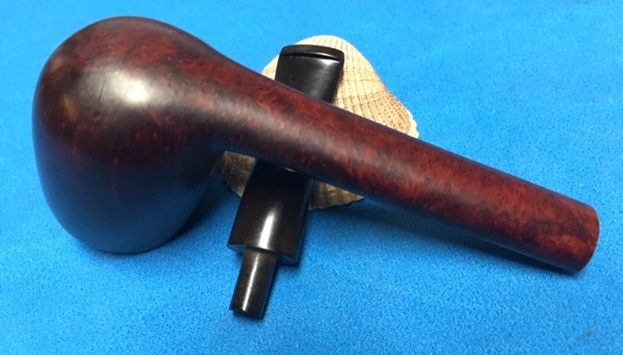
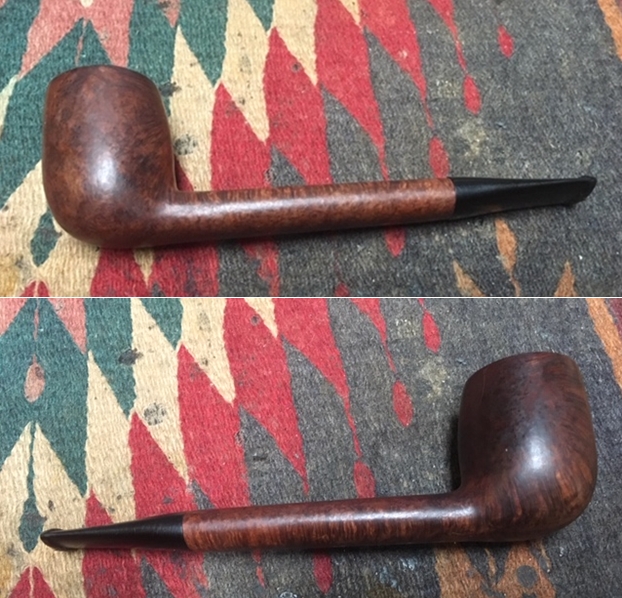
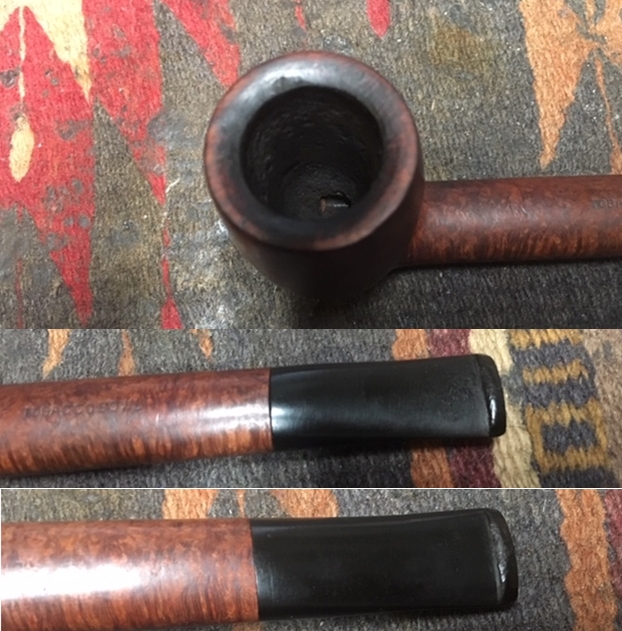
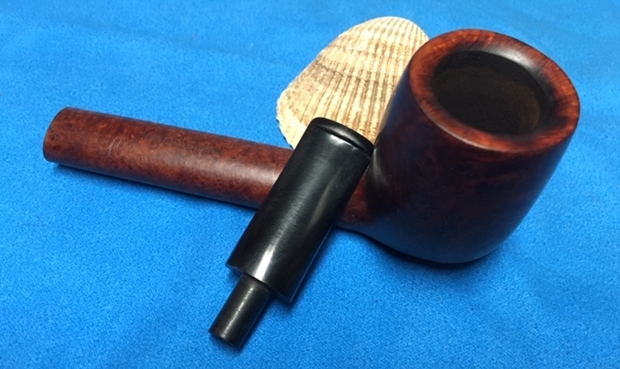
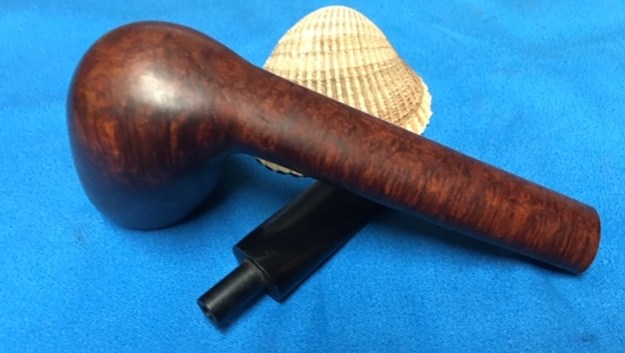
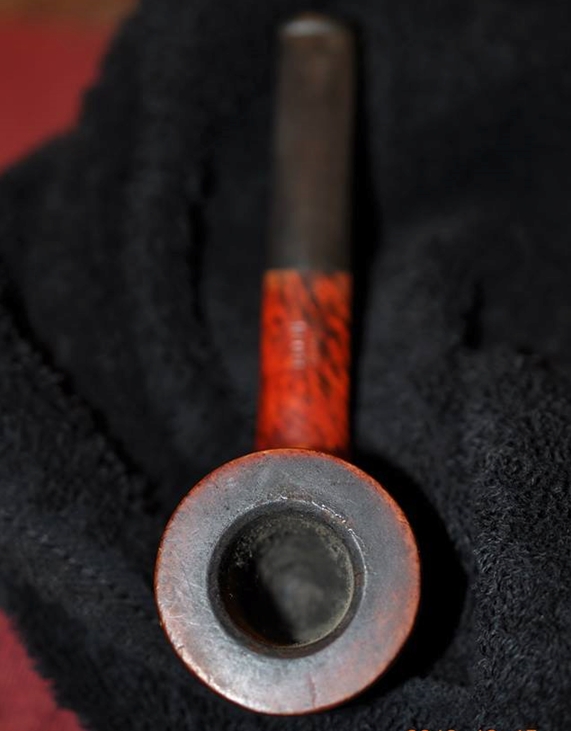
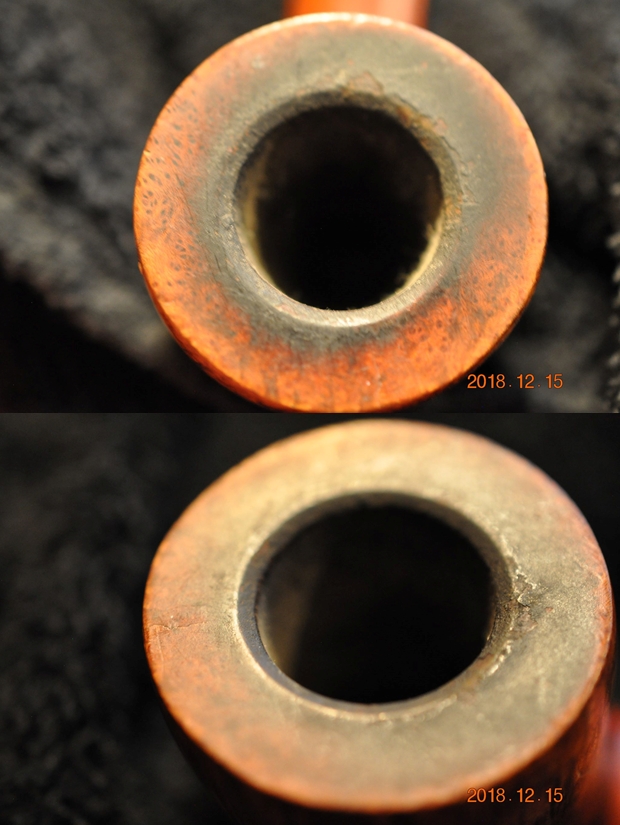
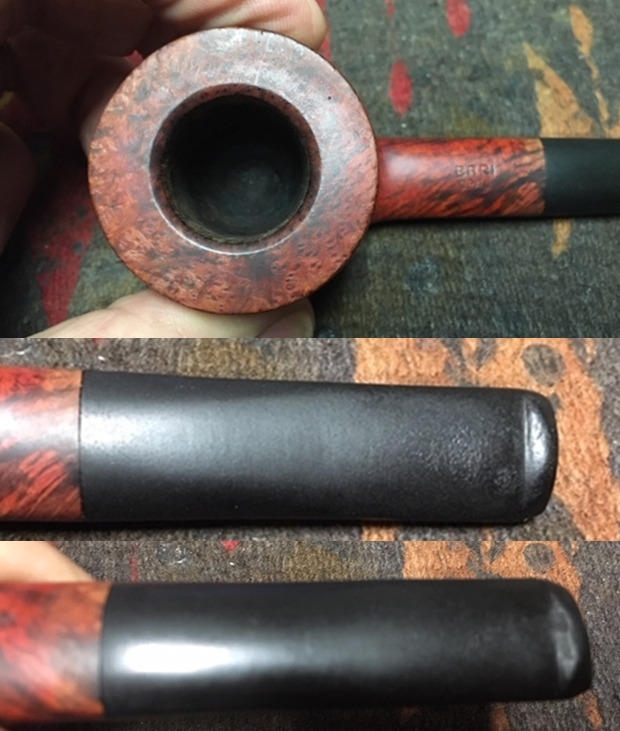
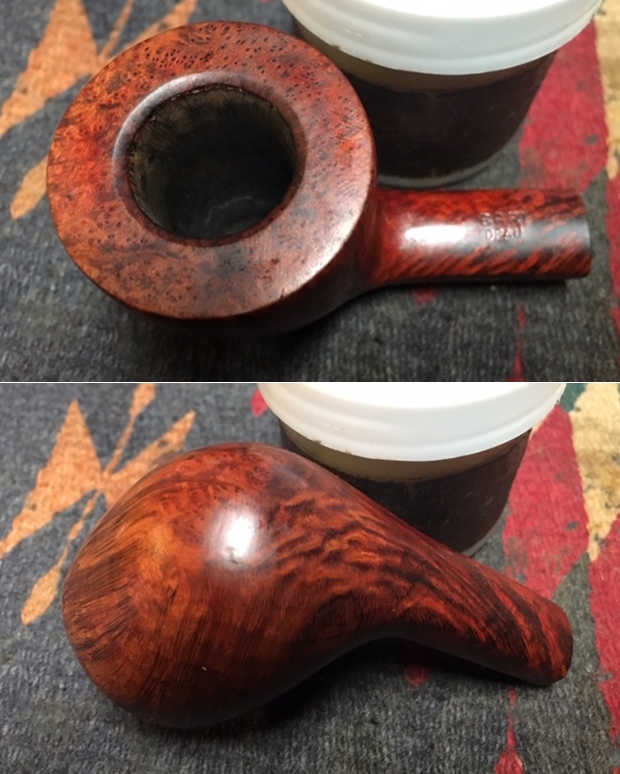
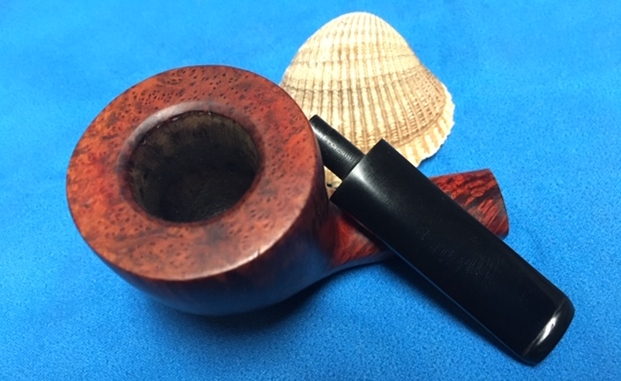
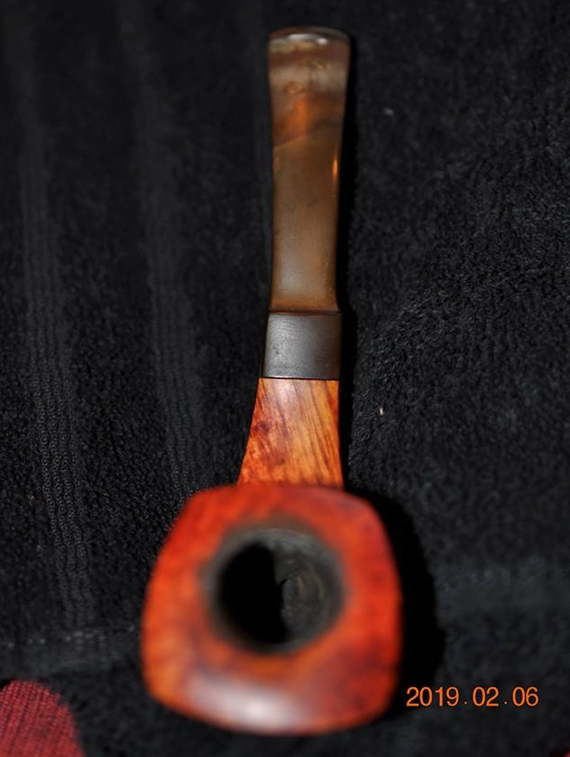
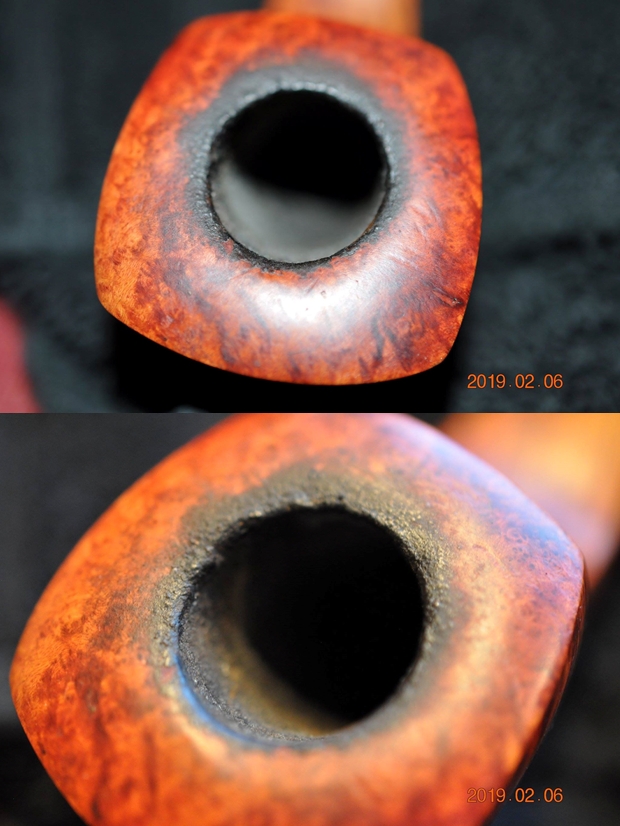
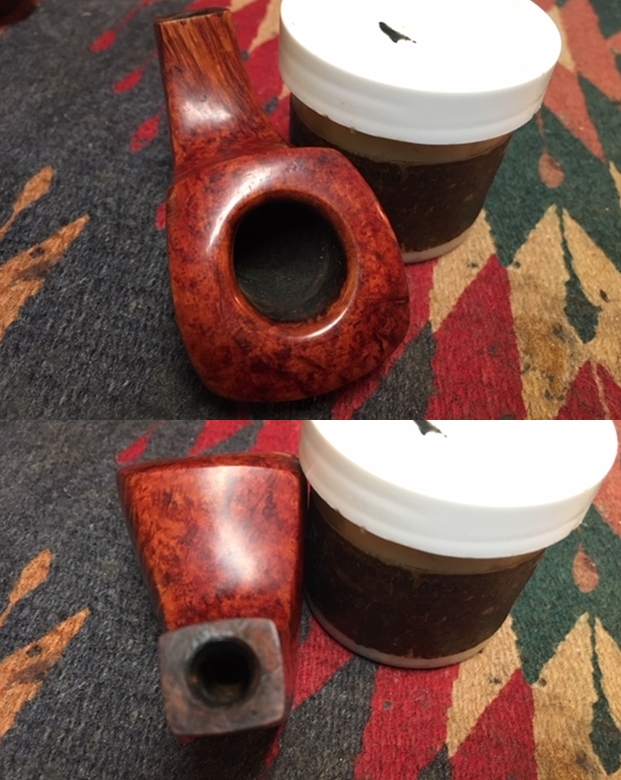
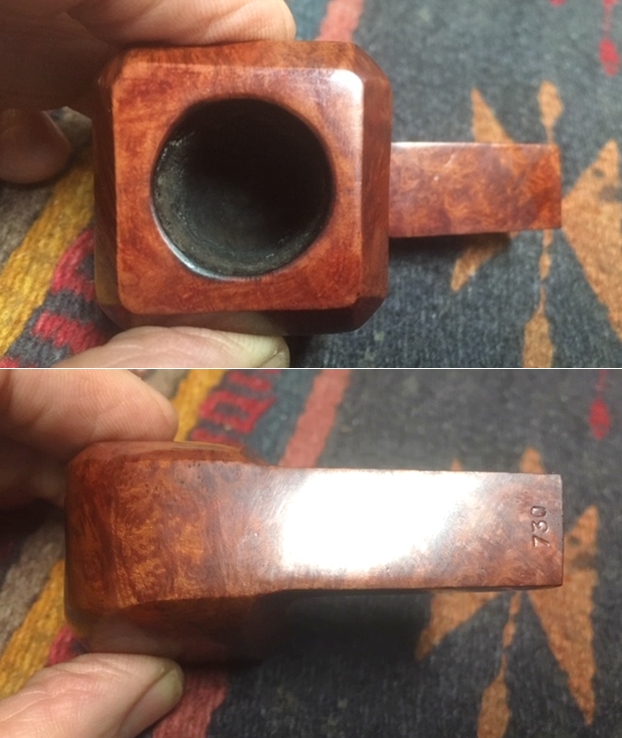
Pipephil’s entry solidified the John Redman Ltd. And British Empire Pipe Co., with the Aristocrat and the ‘A’ stem stamping.The dating of the Aristocrat on my table is difficult to determine, but it has an older feel to it and is set in a very traditional dark English style hue.  Looking at the pipe itself, there is a moderate amount of carbon cake buildup in the chamber which I will remove to examine the condition of the chamber walls.  The rusticated stummel is very attractive – the deep, distinct etching is nice, but there is grime and build up on the rim as well as in the stummel’s nooks and crannies.  The smooth briar panel holding the nomenclature on the shank’s underside is worn and the nomenclature is thin. There is a large scratch scarring the panel.  The panel’s scratches and nicks will be a challenge to clean without further eroding the stampings.  The stem has deep oxidation and the lower button has cracked off.  This will need to be rebuilt.  These pictures show some of these specific issues.I begin the restoration of this John Redman Aristocrat London Made, half-bent Billiard by cleaning the airway of the stem with a pipe cleaner wetting with isopropyl 95%.  I add the deeply oxidized stem to a soak of Before & After Deoxidizer along with other stems and pipes in the queue. 
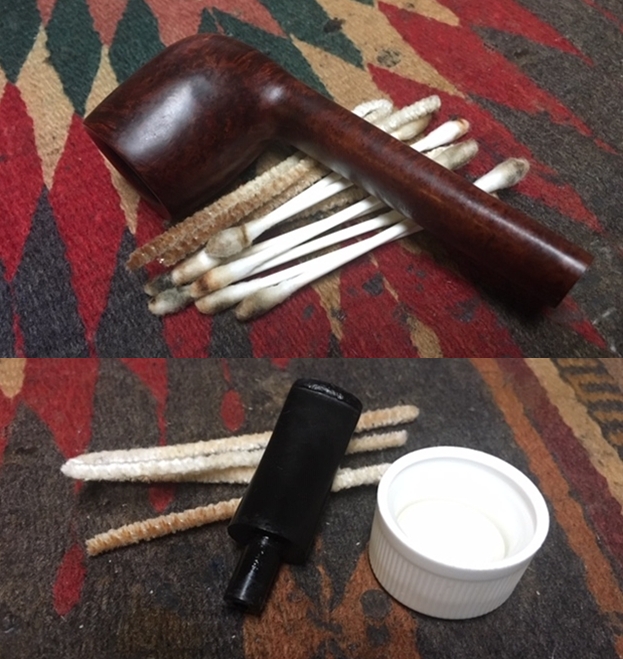
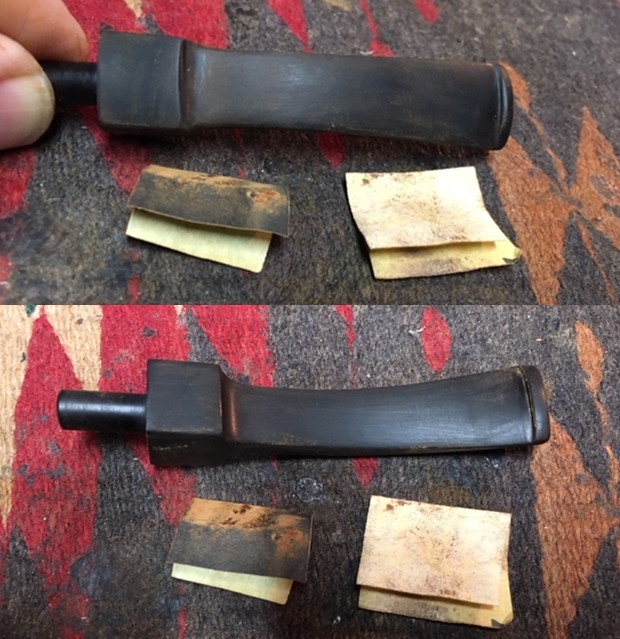
After soaking for several hours, I fish out the Aristocrat’s stem and again clean the airway with a pipe cleaner wetted with isopropyl 95% to clean the excess Deoxidizer. I use a cotton pad to wipe off the raised oxidation and the Deoxidizer has done a good job, but I still detect oxidation in the vulcanite.To begin revitalizing the stem, I apply paraffin oil, a mineral oil, and put it aside to dry.Next, I begin the process of cleaning the stummel. I start with reaming the chamber using the smallest blade head of the Pipnet Reaming Kit and moving to the larger blades. I put paper towel down to expedite the cleanup.  I use 2 of the 4 blades available then transition to scraping the chamber further using the Savinelli Fitsall tool and follow with sanding the chamber using 240 grade paper wrapped around a Sharpie Pen for reach and leverage.  After cleaning the chamber with a cotton pad wetted with alcohol, I examine the chamber and it looks great.  I see no evidences of burning damage with fissures or cracking. 
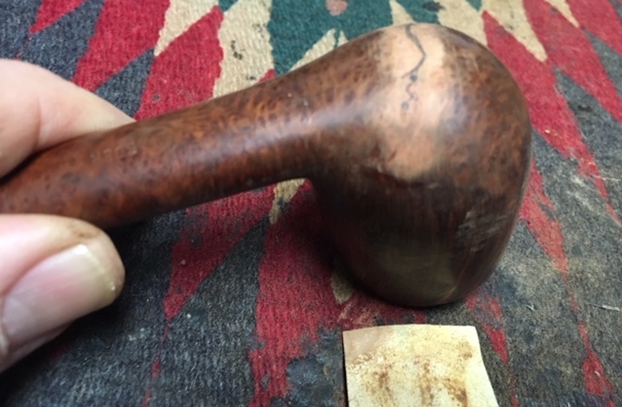
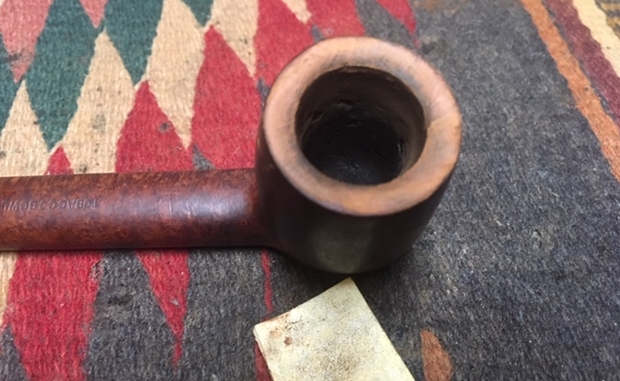
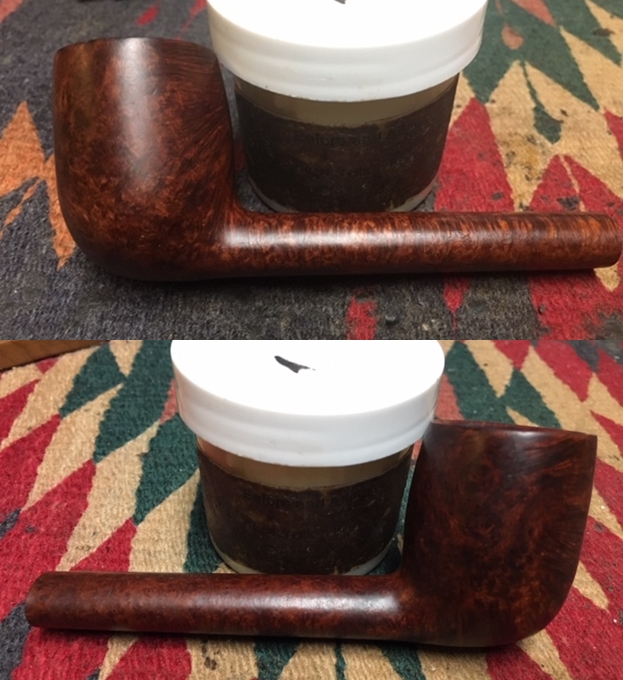
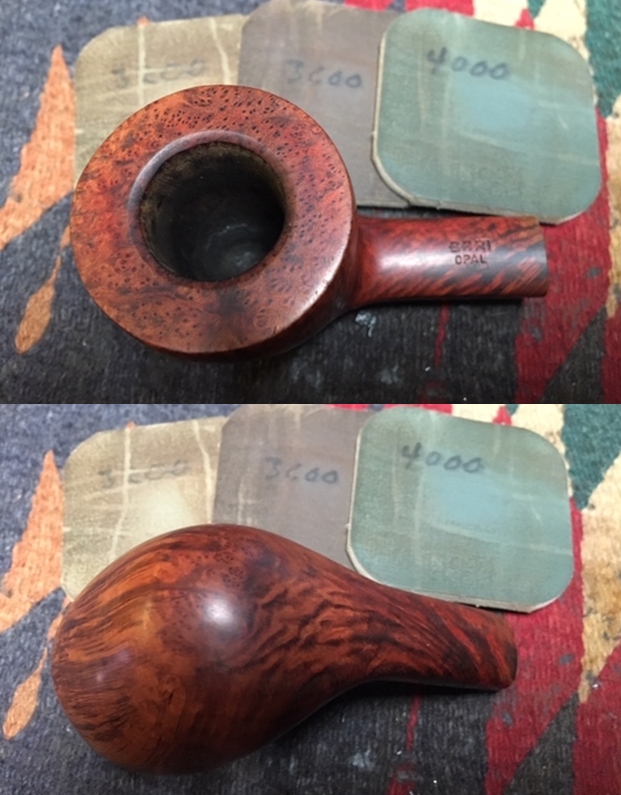
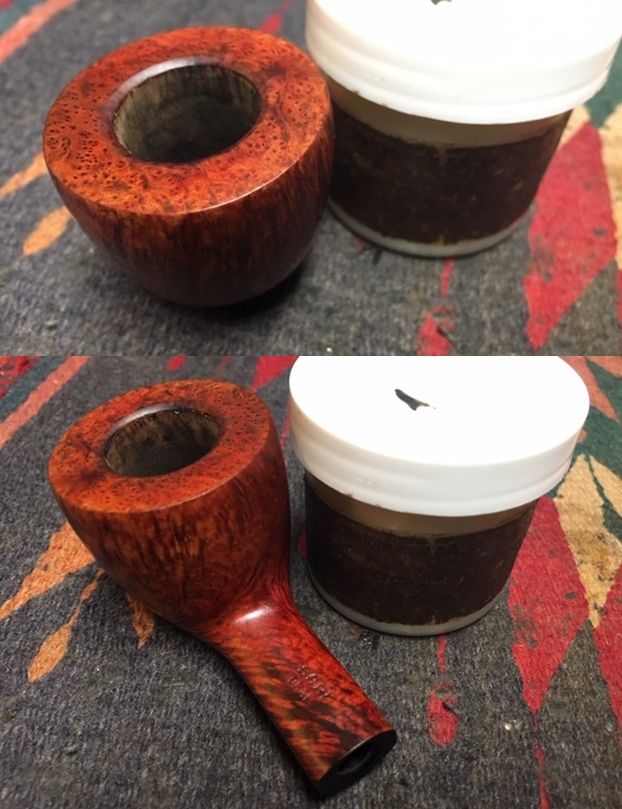
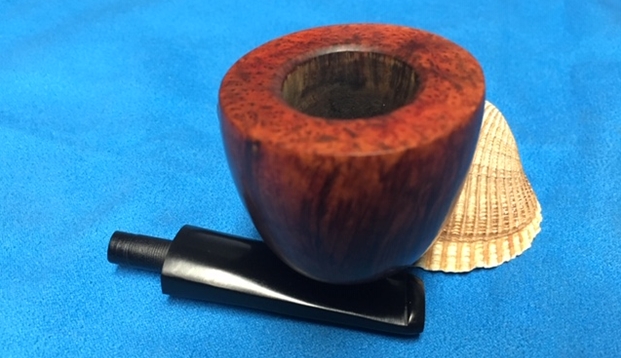
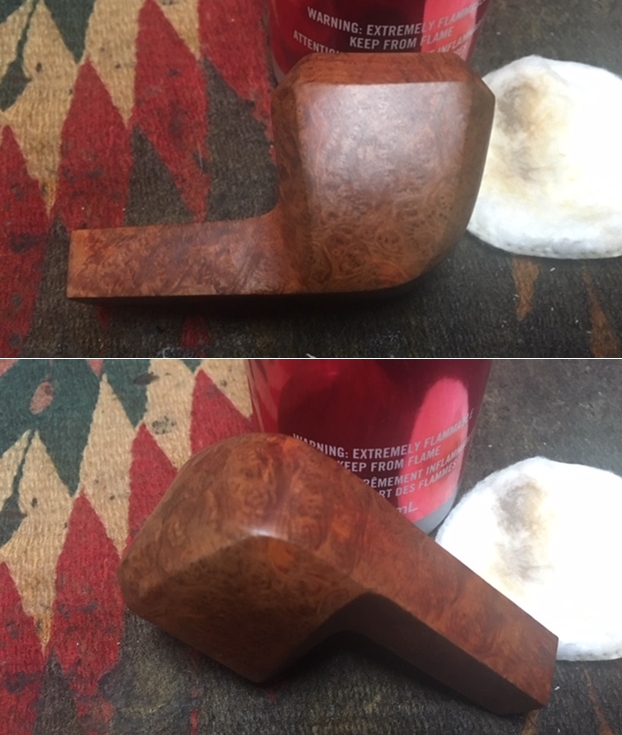
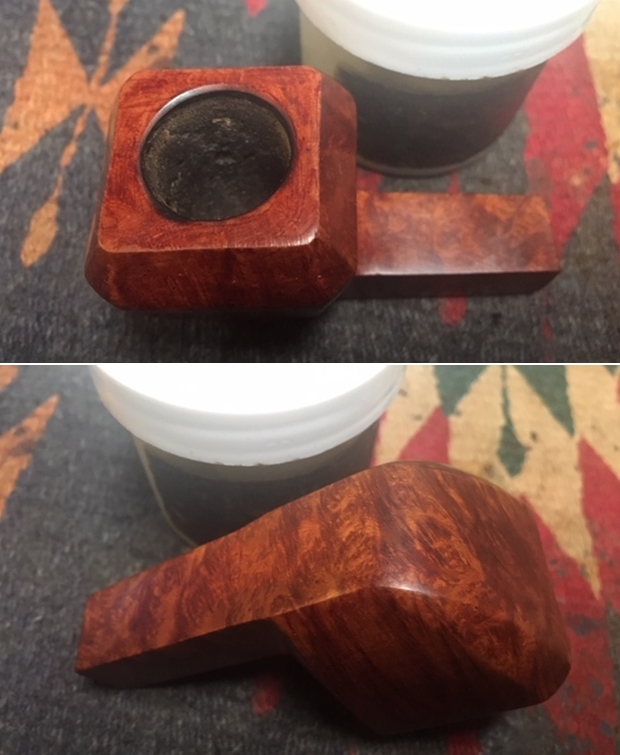
Next, using undiluted Murphy’s Oil Soap on a cotton pad I start the cleaning of the external rusticated surface.  I also employ a bristled tooth brush to work into the ridges of the rustication.  A brass wire brush which is gentle on the briar, also helps with the rim cleaning.  Finally, I take the stummel to the sink and rinse it with cool tap water.  The cleaning did a good job.  I take some pictures to show the surface and the question begins in my mind regarding the base color of the stummel.  Bare briar is peeking through, but the base looks black to me. 
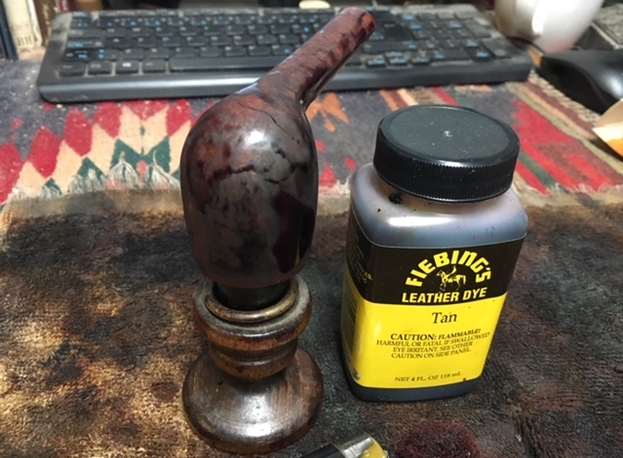
Wanting to get a head start on my thinking for later stages, I pull out 3 very dark or black dyes to compare.  I have two Italian brands that are labeled ‘Dark Night’ and ‘Wenghe’ – both of which are so dark brown that they appear black to me.  The third dye is Fiebing’s Black Leather Dye – it is black.  I test each of these to see what they do and which may be the dye I use later to freshen the stummel if I indeed do decide to stain it. Thinking….
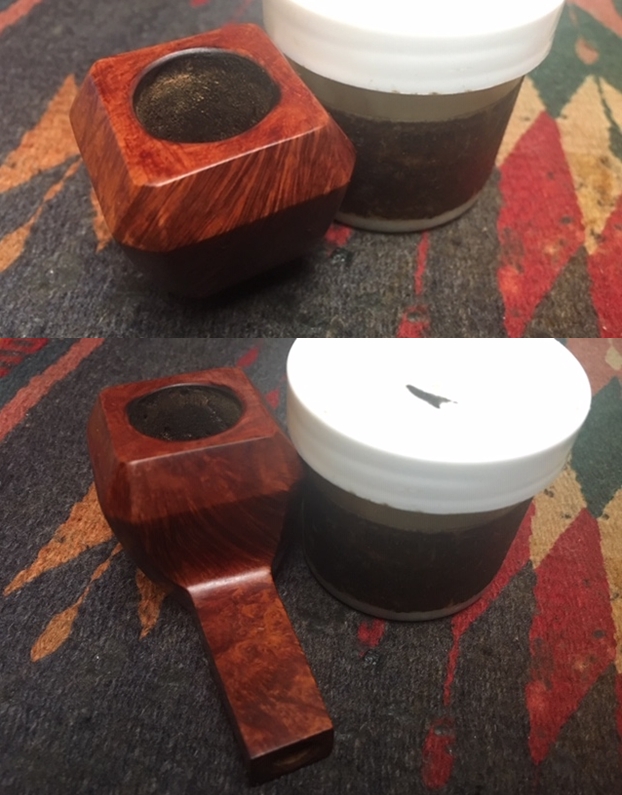
Moving to the internal stummel cleaning, I use pipe cleaners and cotton buds dipped in isopropyl 95%. I quickly transition to scraping the mortise walls with a narrow dental spatula to excavate what tars and oils would come out manually.  I also use different sizes of shank brushes wetted with isopropyl 95% to clean.  As the picture below shows, this was not a short-lived encounter.  I also use a drill bit to hand turn down the airway to draw out more tar build-up.  After some time, the buds begin to lighten but not enough to declare the job done. 
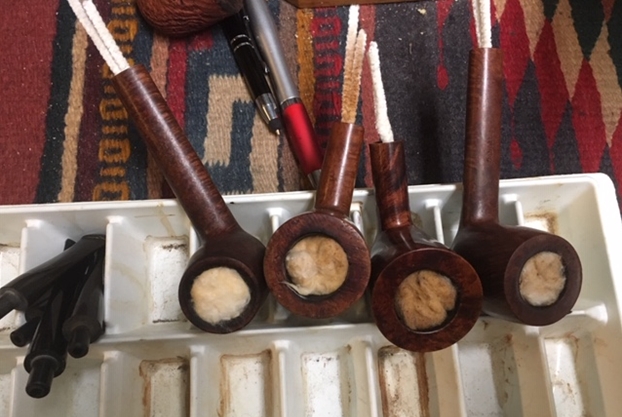
To continue cleaning the internals passively, I use a kosher salt and alcohol soak.  I do this to further clean as well as to freshen the internal briar for the new steward.  I first pull and twist a cotton ball to form a wick which I stuff down the mortise and airway with the aid of a stiff wire.  This will act to draw out the tars and oils as the isopropyl 95% does its thing. After putting the stummel in an egg crate to stabilize things, I fill the bowl with kosher salt.  Unlike iodized salt, kosher salt doesn’t leave an aftertaste.  Next, I fill the bowl with isopropyl 95% until it surfaces over the salt.  As the alcohol absorbs into the chamber and mortise, the level of alcohol goes down.  After a few minutes I top off the isopropyl 95% and put the stummel aside to soak. 
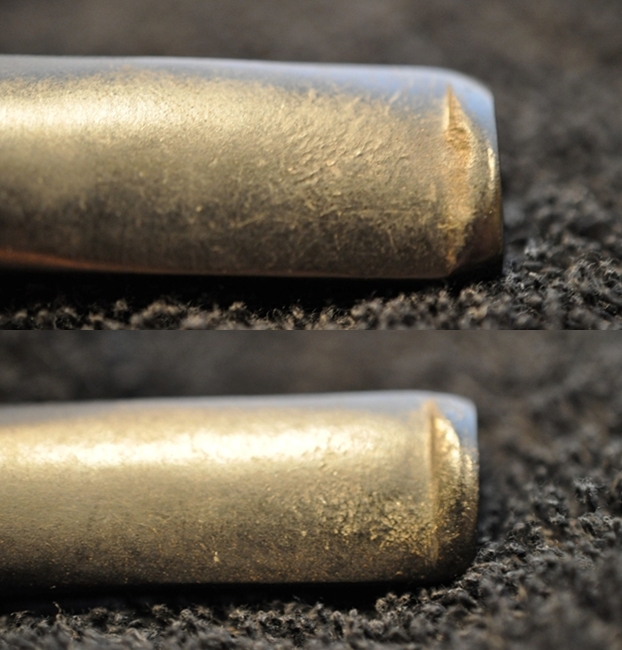
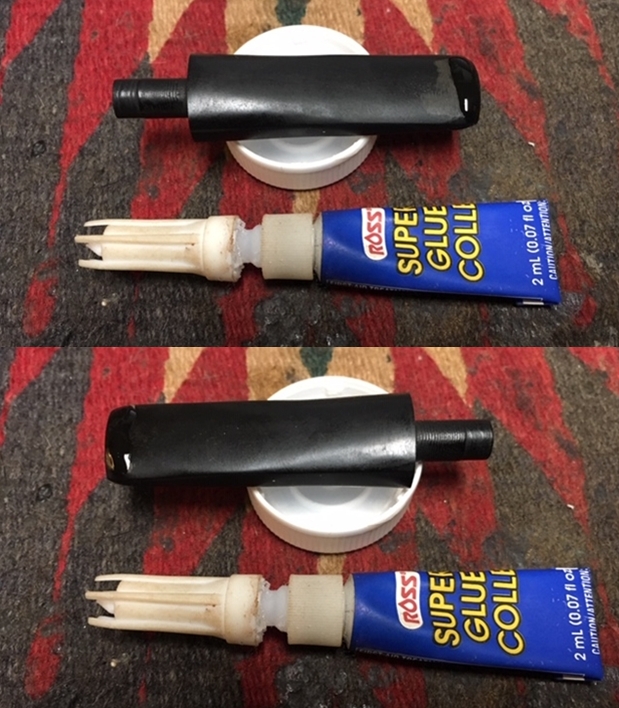
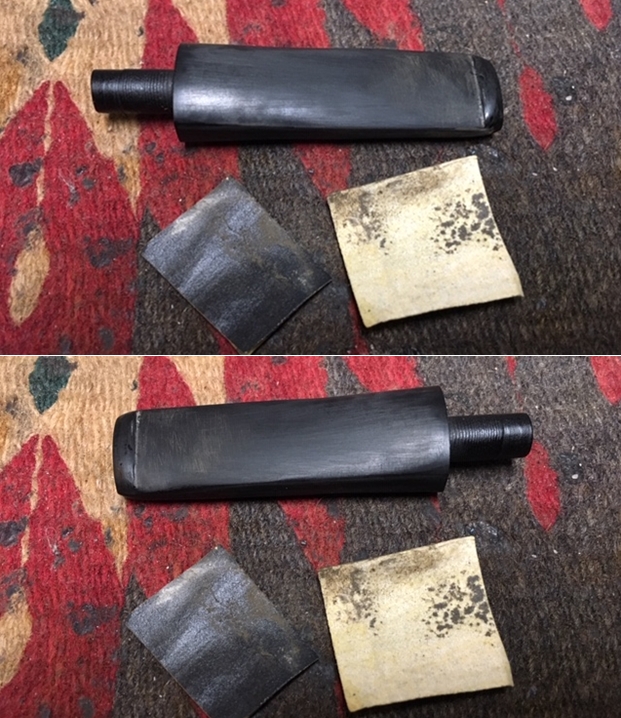
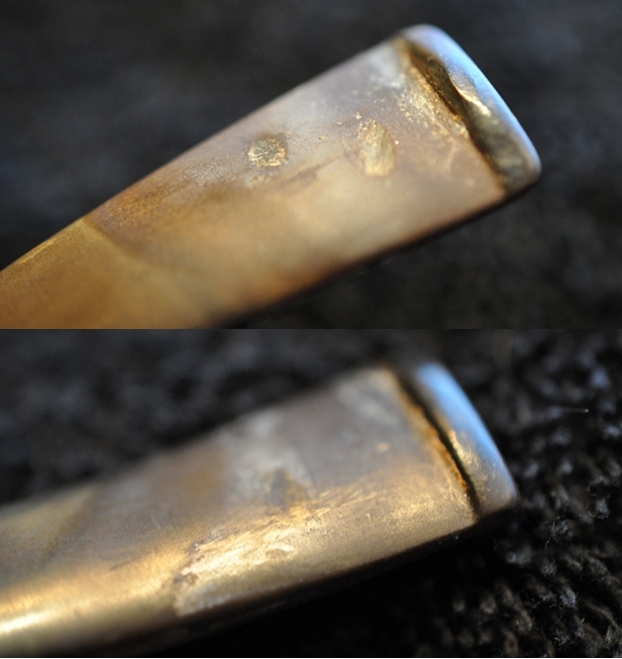
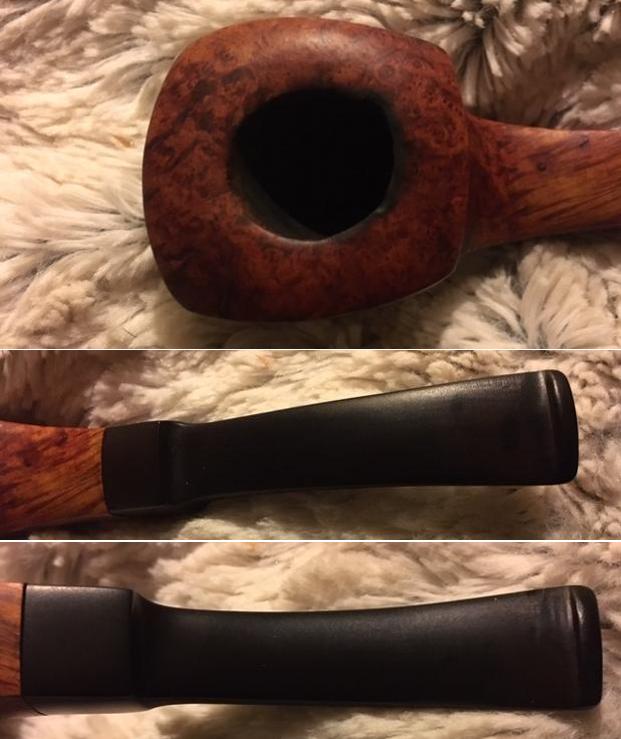
Turning now to the stem, I take some pictures and take a closer look.  The Before & After Oxidizer did well, but there are still build up places on the surface showing where the oxidation was.  The button on the topside is worn down and underneath the button has broken off. Before starting on the rebuild of the button, I use 240 grade sanding paper and sand the stem.  I want to first address the overall condition of the stem surface then the button. While sanding, I’m careful to protect the diamond A stamp of the Aristocrat as well as to avoid shouldering the shank facing. 
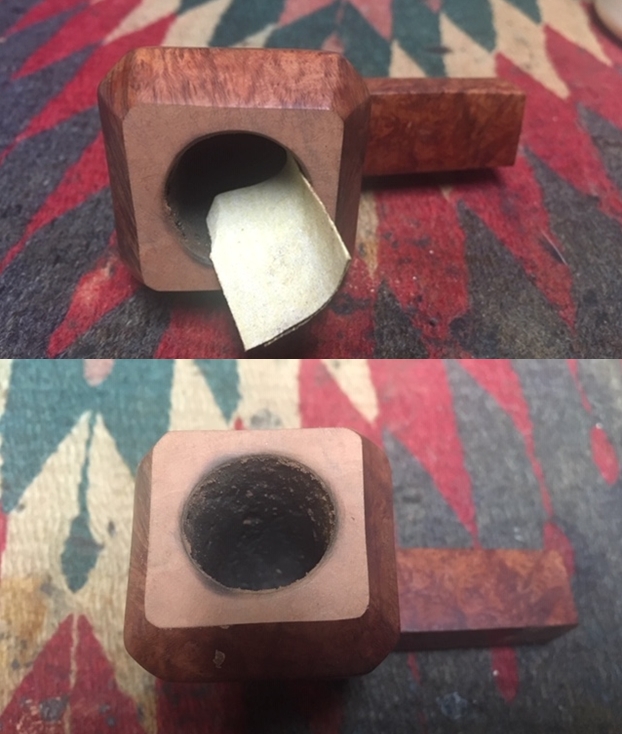
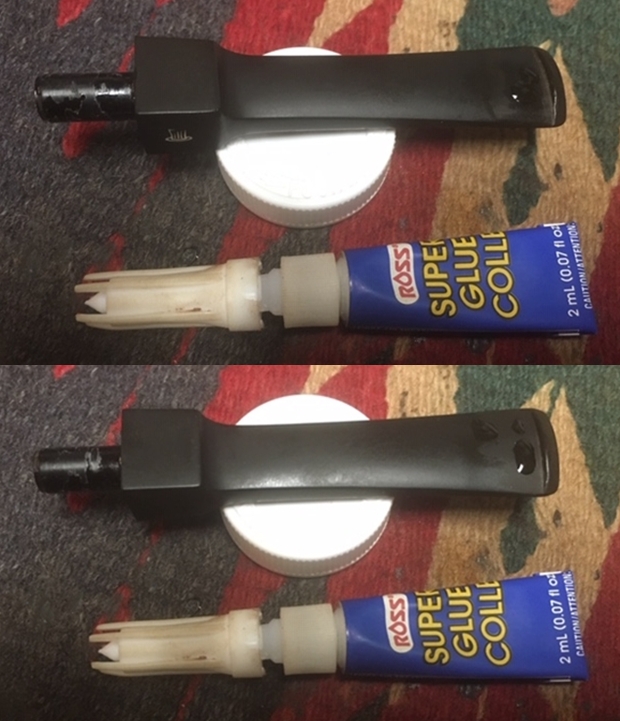
To rebuild the button, I begin by cutting a folded over triangle from index card stock which is a bit stiffer.  I leave the end of the triangle open and create a sleeve.  I put smooth scotch tape over the end of the triangle sleeve to hold the sleeve together and to keep the wedge from sticking to the CA glue and activated charcoal mixture.  After the triangle wedge is fashioned, I insert it into the slot airway as far as it will go to fill the gap and then I push other triangle pieces of index card into the sleeve to fill it out and to hold it in place firmer.I then mix the charcoal putty.  I use extra thick CA glue and mix it with activated charcoal by gradually pulling charcoal into a small puddle of CA glue and mixing with a toothpick.  I add charcoal until it reaches the viscosity of molasses and then apply it to the button.The first application is a little too runny, so I add a bit more charcoal to the mixture and apply more.I have a good coverage over the entire area which will allow me to file and shape the new button.  After the charcoal putty sets, I work the wedge loose and it comes out easily.  I put the stem aside to allow the putty to cure thoroughly.Well, after a few days longer than planned because of dealing with an unforeseen flu bug hitting many here in Sofia, the kosher salt and alcohol soak has done some major work.  The salt and wick are soiled in a big way indicating that the tars and oils were drawn more from the internals. I toss the salt in the waste and clean the chamber with paper towel as well as blowing through the mortise to rid the stummel of salt crystals.I follow again with more cotton buds and pipe cleaners dipped in isopropyl 95% to clean up the left-over residue.  The salt soak made a dent.  After some more effort, I declare the internals clean and move on.The stem button rebuild is next.  The charcoal putty is fully cured after the days of the flu bug and I start working on it using a flat needle file. I start working on the end filing toward the slot to form the end of the stem. 
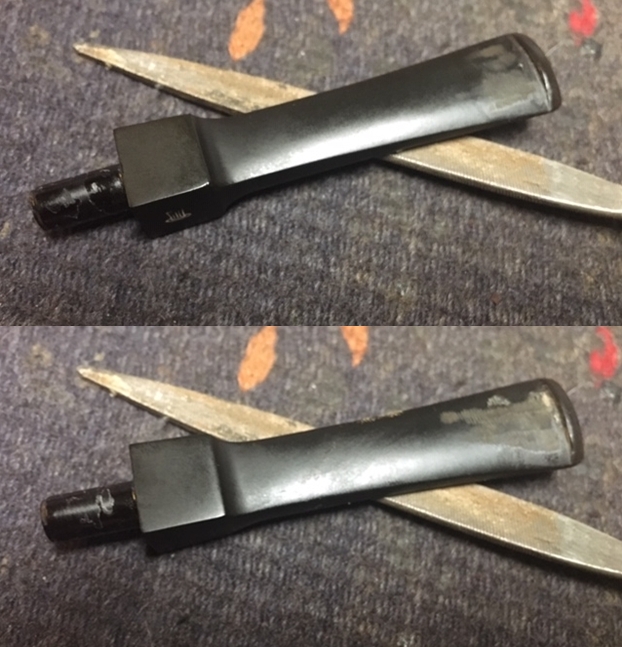
After the button face is flush, I then file downwardly to form the depth of the button lip.When I arrive at about the right depth for the button lip, I then file from the stem side to sharpen and shape the new button.I also use the round pointed needle file to smooth the slot – forgot to picture that file!I also freshen the topside button lip with the flat needle file.The filing process is complete.  The bottom rebuild looks great – it shaped up well.  The next pictures show the completion of the filing on the upper bit and button face. As is often the case, air pockets are trapped in the charcoal putty and are revealed during the sanding process. To remedy this, using a toothpick, I run a small drop of regular CA glue on the toothpick and use it to paint the entire lip with the glue.  I also run a line to seal the edges of the button – both the stem side and on the button face.  Taking a picture of black with a light background doesn’t show a lot of detail often!I use an accelerator to quicken the curing process and follow by lightly sanding the button with 240 grade paper.  The CA glue filled the pits well.
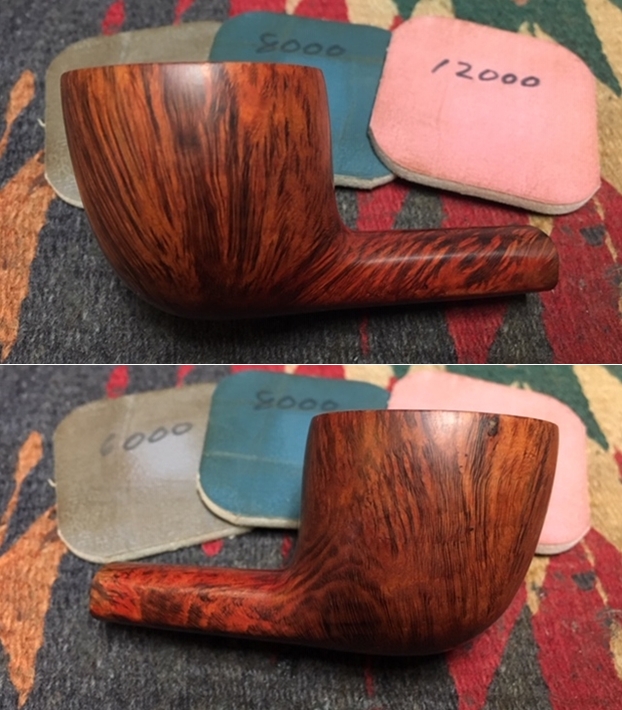
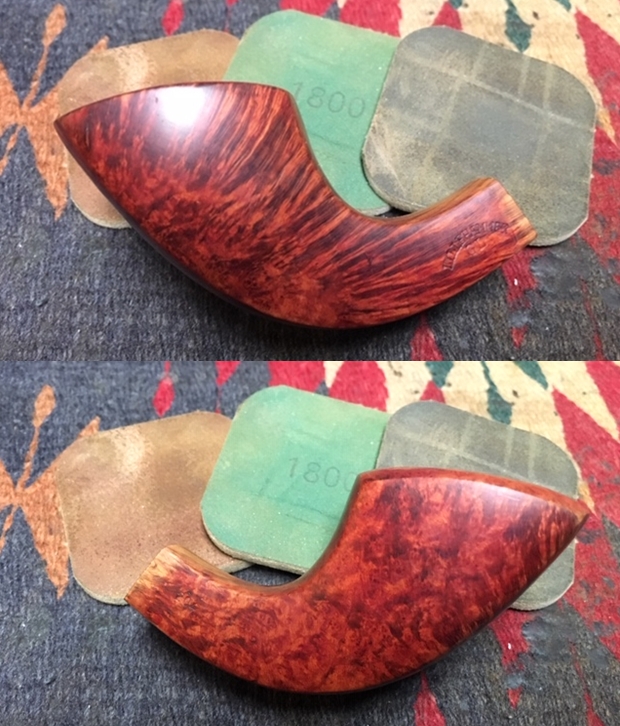
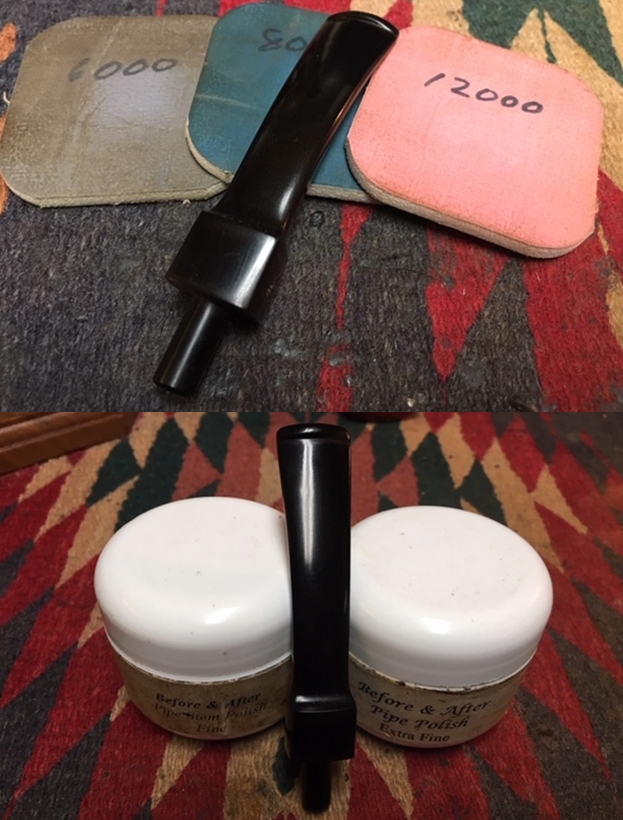
I take the stem to the sink and wet sand the entire stem with 600 grade paper.  I’m careful to avoid sanding the Aristocrat ‘A’ stem stamp.  After using 600 paper, I then apply 0000 grade steel wool to the entire stem.
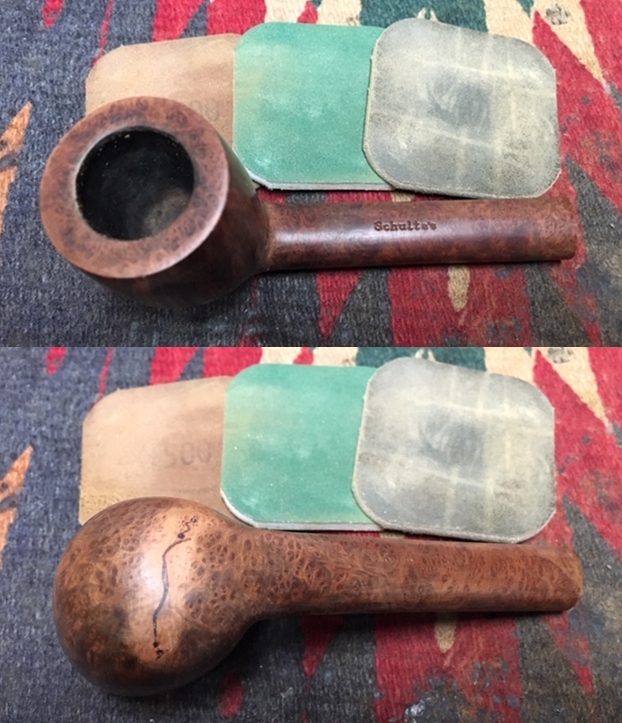
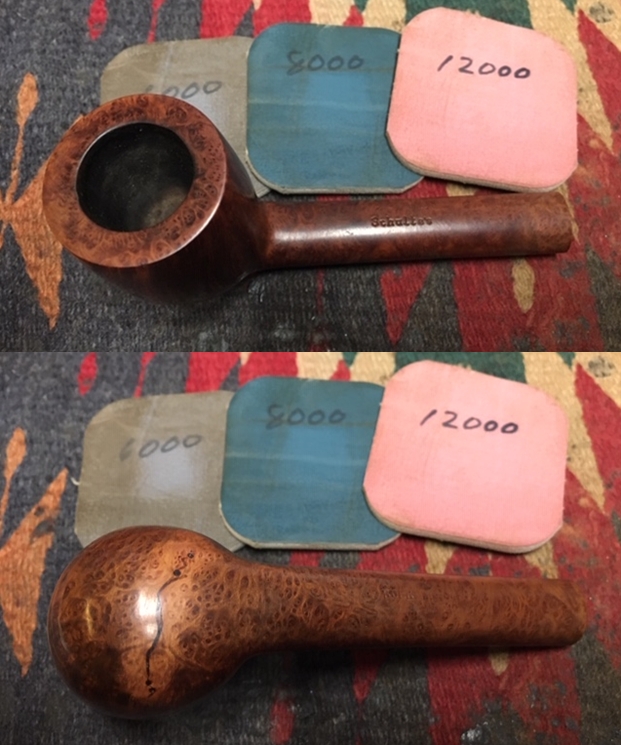
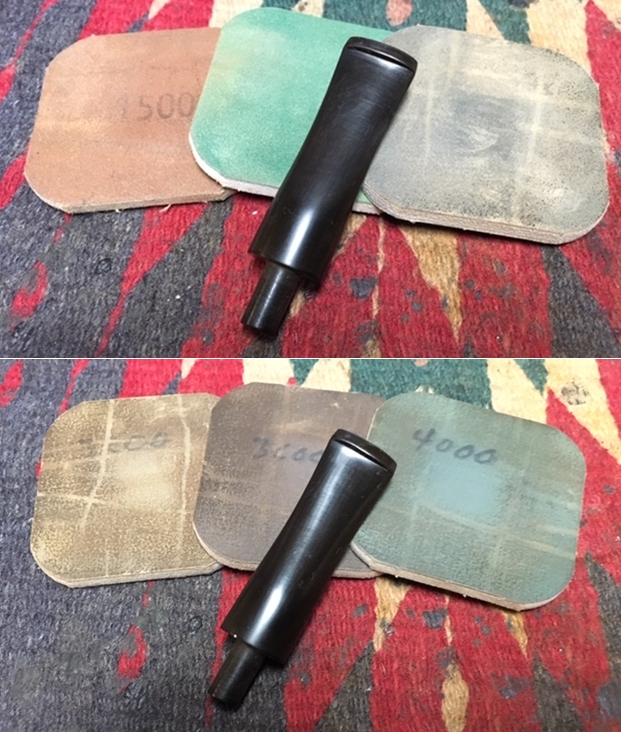
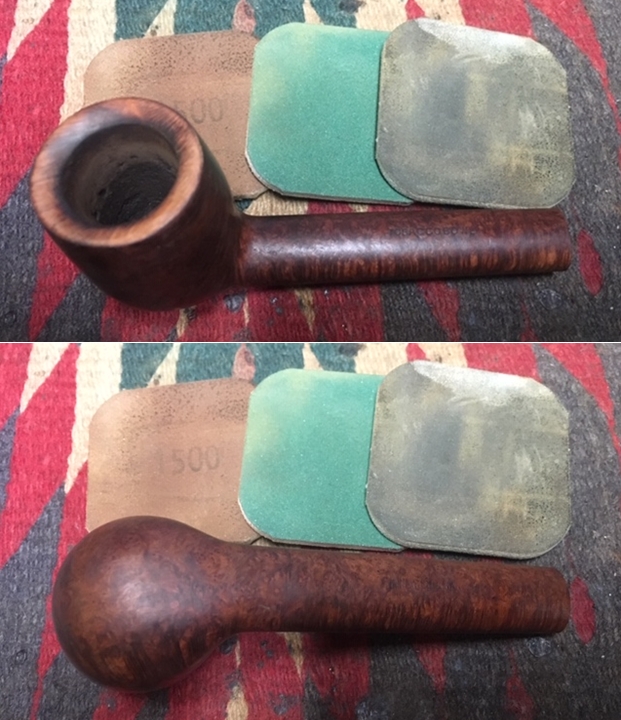
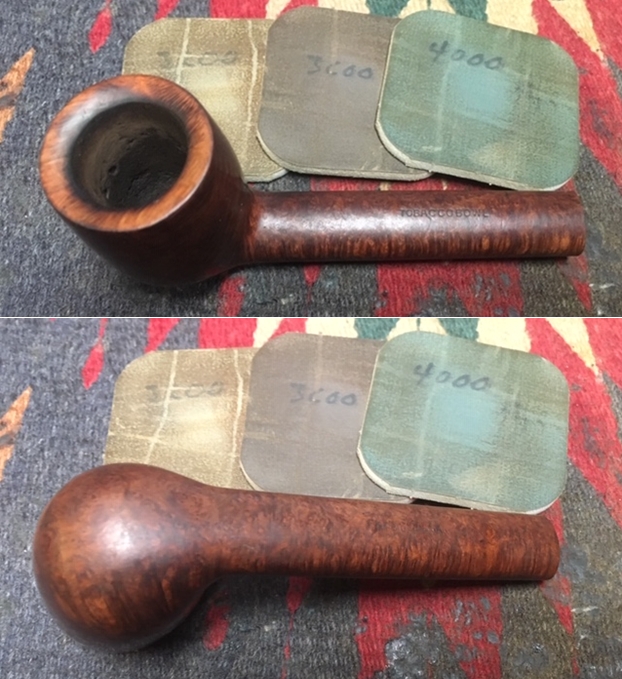
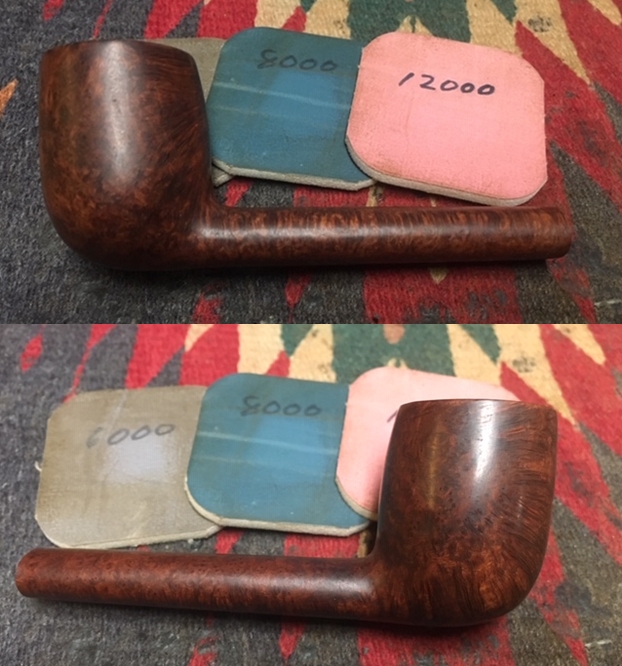
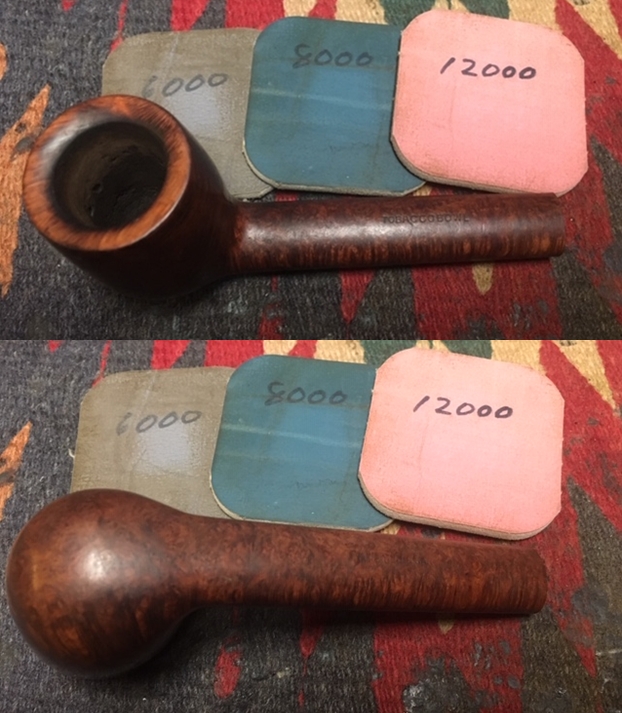
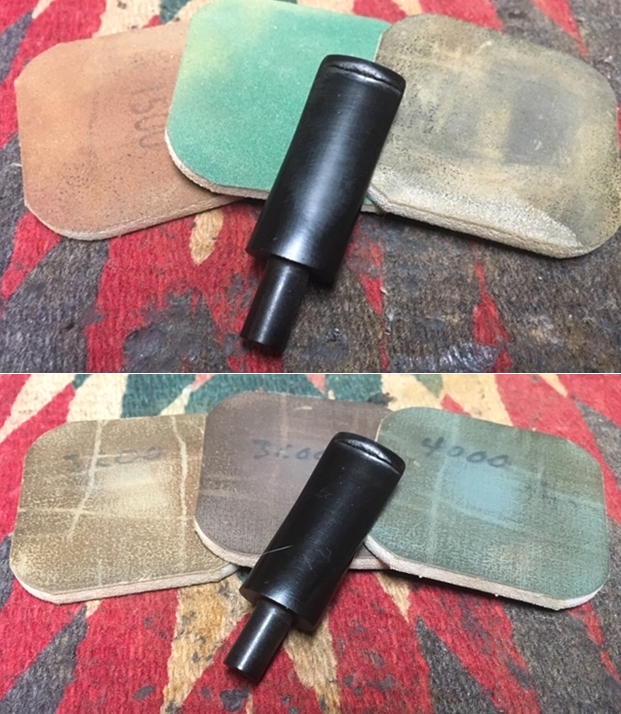
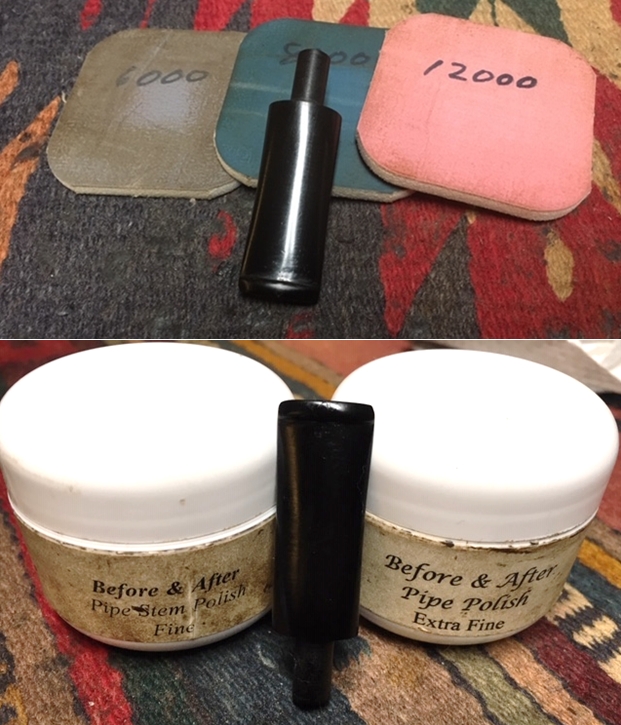
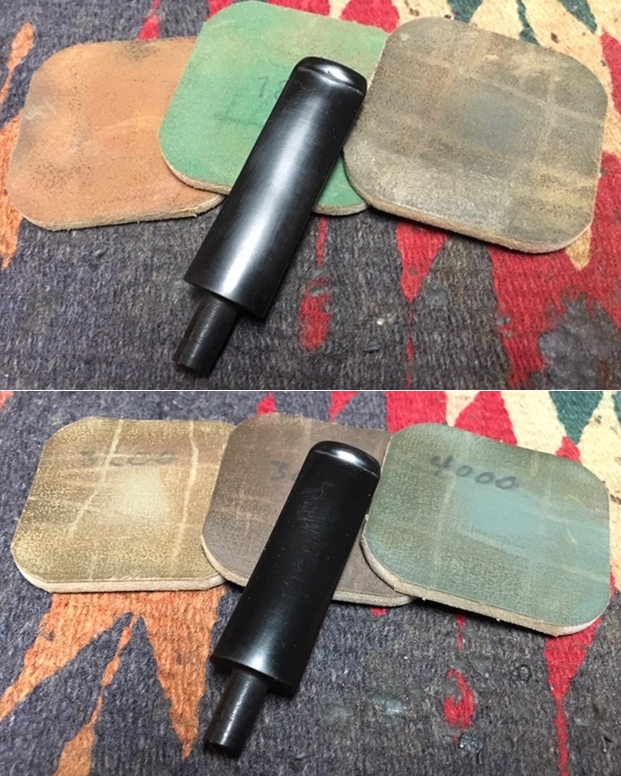
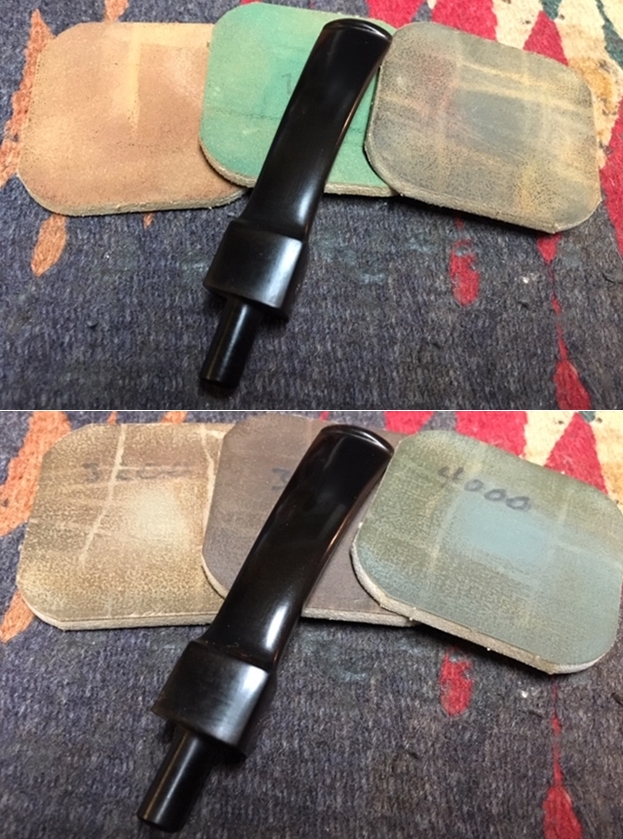
I move directly to applying the full regimen of 9 micromesh pads to the Aristocrat stem.  I start by wet sanding using pads 1500 to 2400 followed by dry sanding with pads 3200 to 4000 and 6000 to 12000.  Between each set of 3 pads, I apply a coat of Obsidian Oil to condition the stem.  I like that newly polished pop that comes from the vulcanite after the micromesh process! 
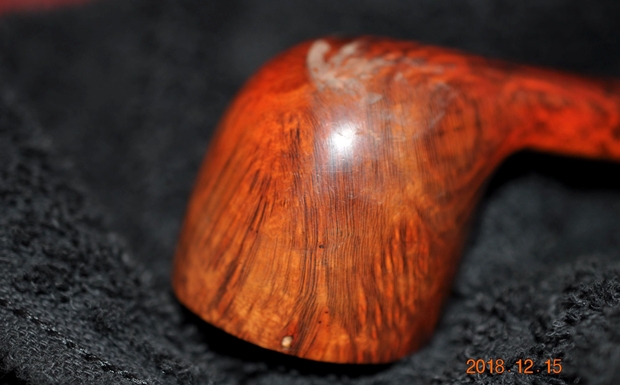
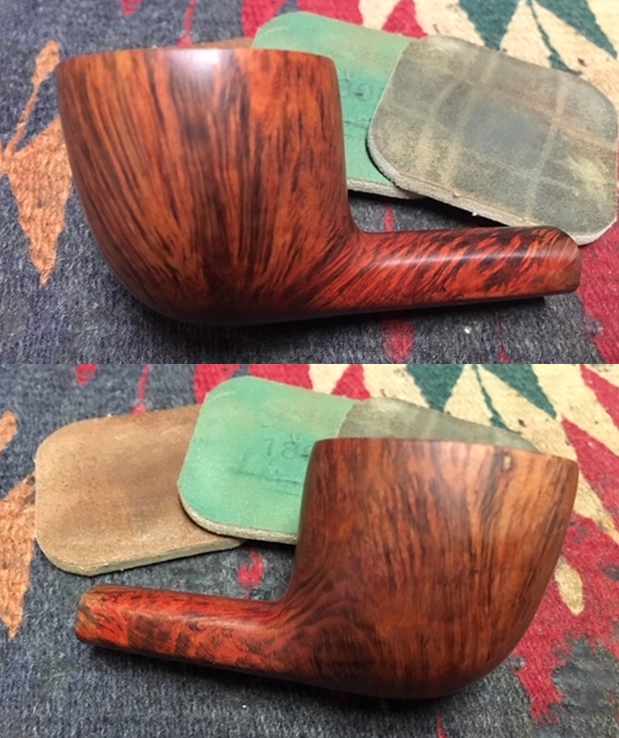
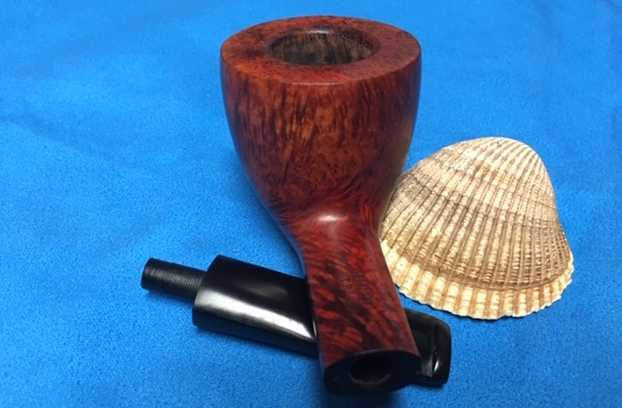
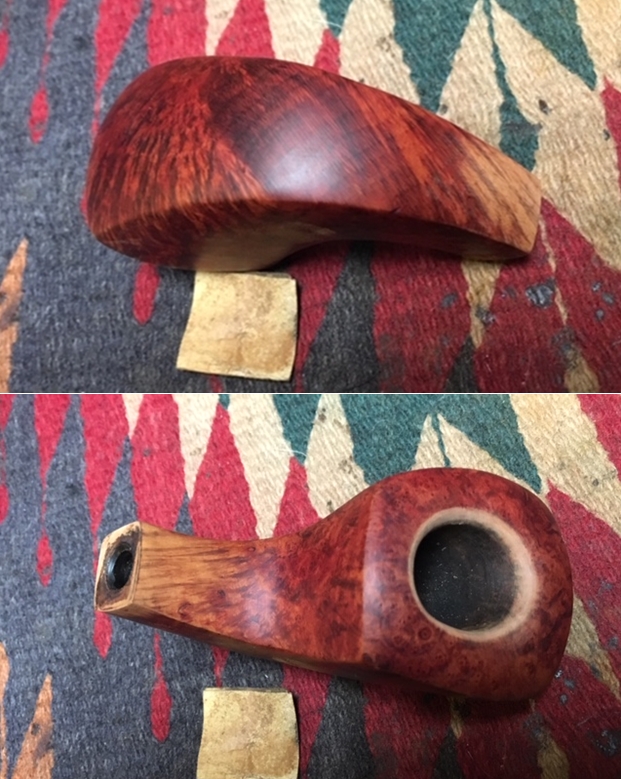
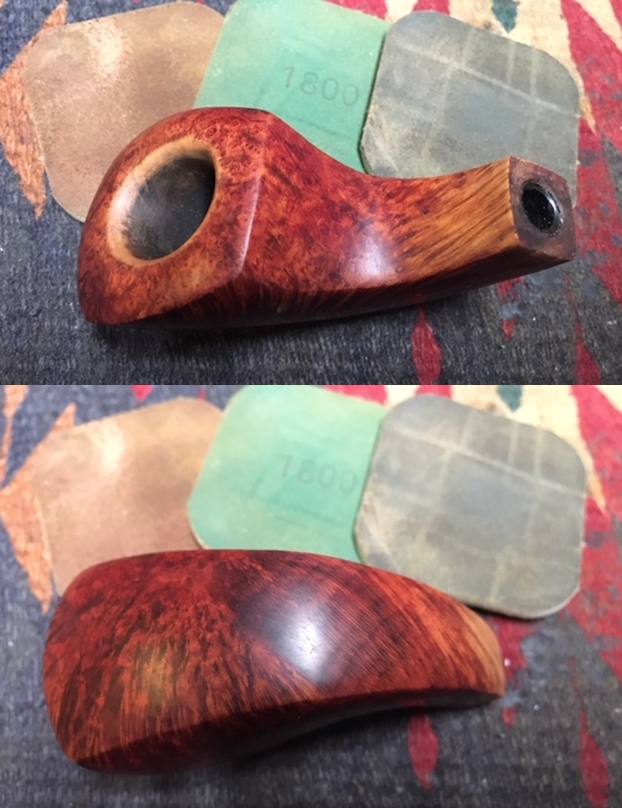
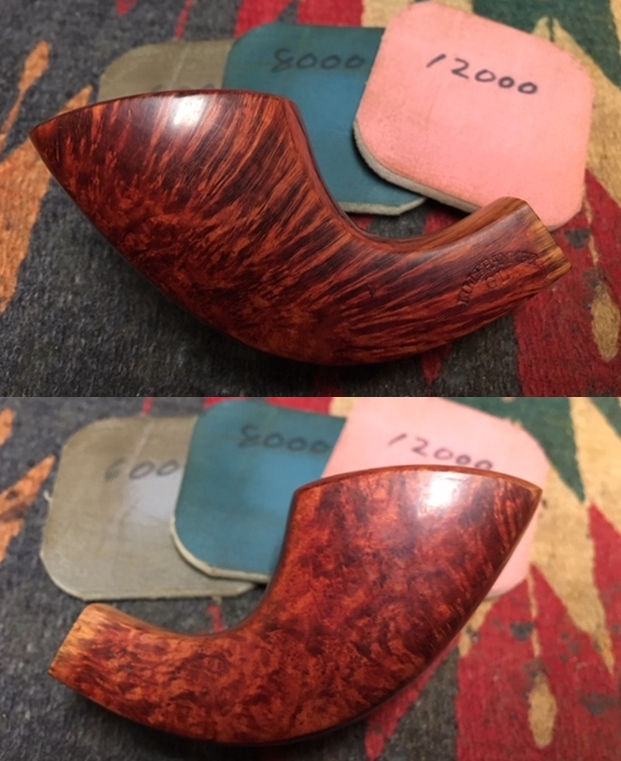
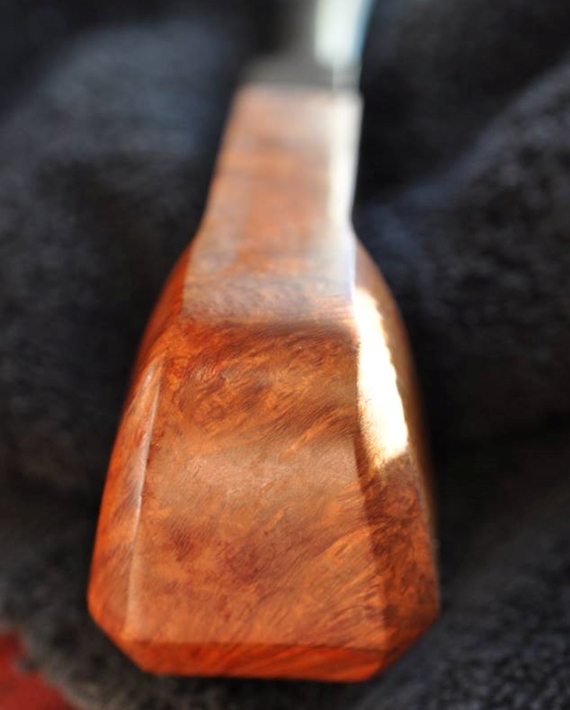
With the stem waiting in the wings, I take a close look at the stummel.  The rustication is deep and expressive and the stummel itself is large.  The briar block this stummel is hewn from must have been dense, because the stummel itself has some weight to it.  I like the dark hue of the rustication and my head debate is whether to freshen the entire bowl by staining it or to keep what is present and touch it up, primarily on the rim?  I’m drawn to the flecked bare briar that is present in the current condition – it gives the stummel and classic rustic look – not too polished, but a pipe that has seen some life.  The rim has raw briar showing and needs touching up. 
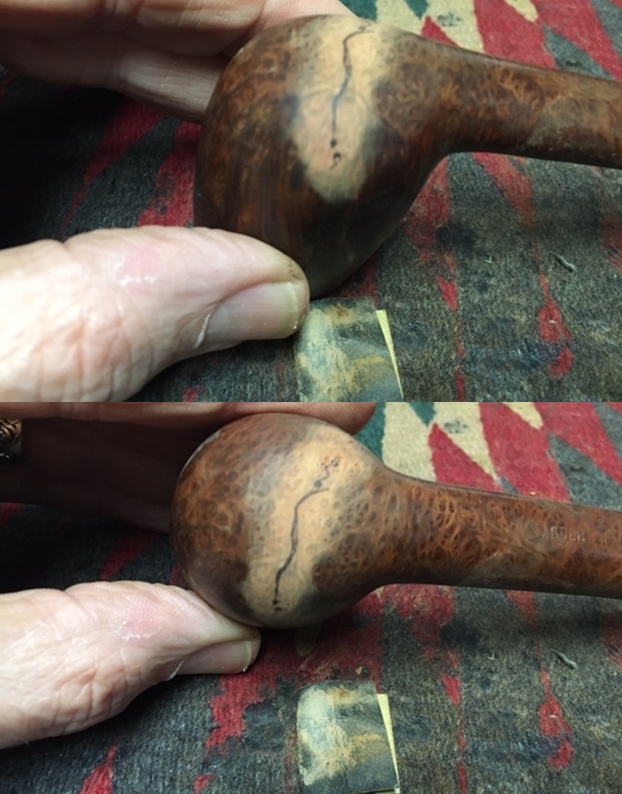
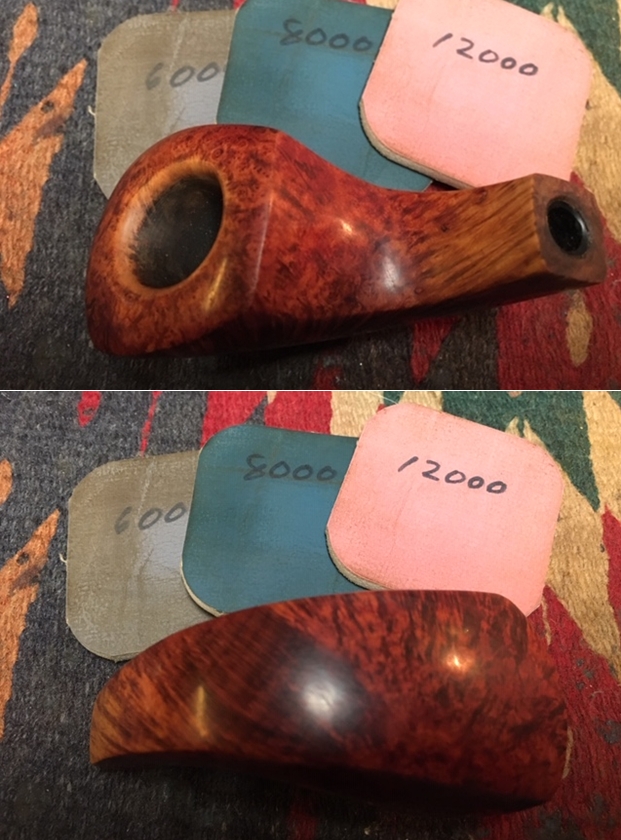
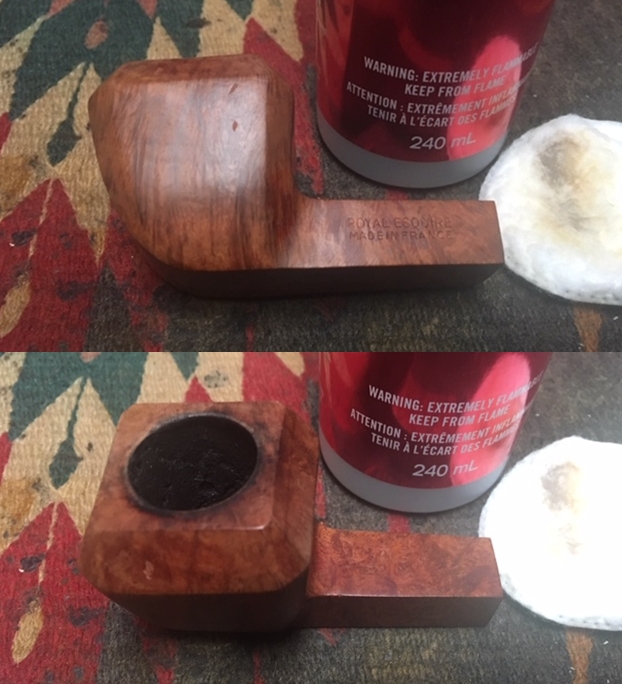
The other question has to do with the smooth briar underplate holding the nomenclature.  The stamping is already ghosting and thin – I don’t want to contribute to this loss of his history!  There is a scratch to the right of the lettering that I can sand without trouble.  But as I look at the smooth briar plate, the dark stain that is now covering the smooth briar does not look good.
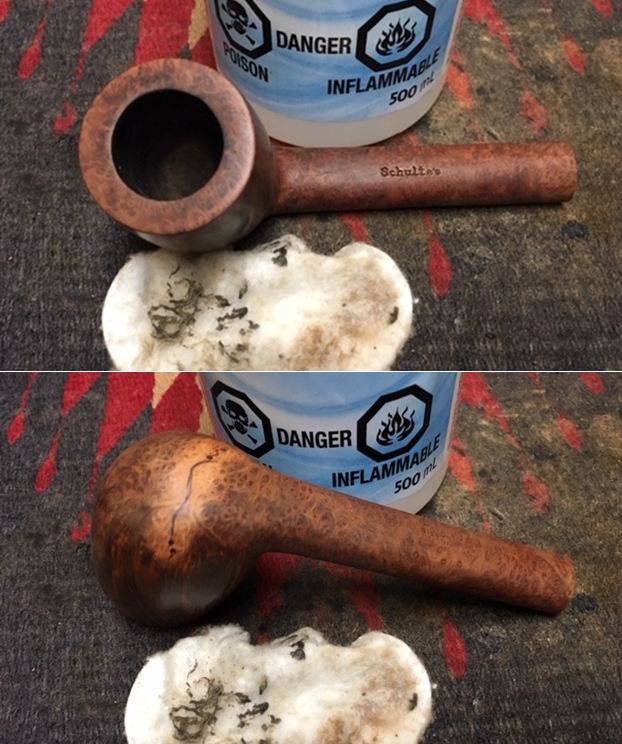
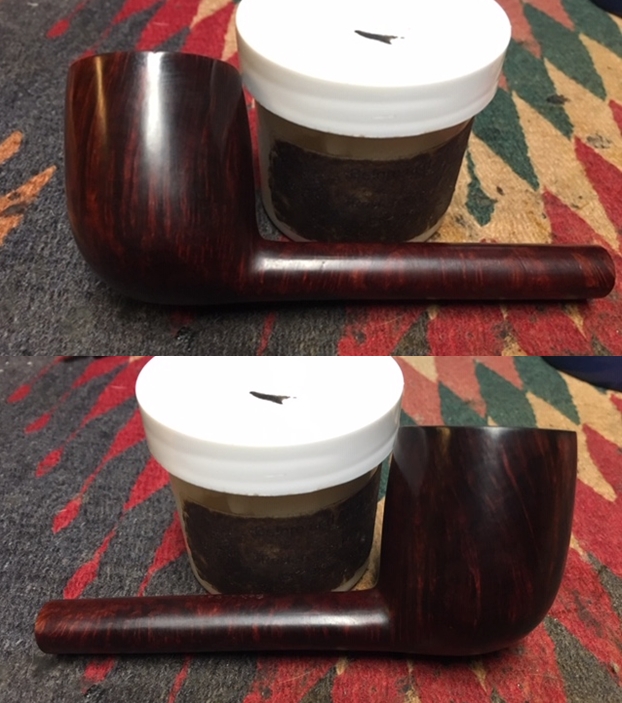
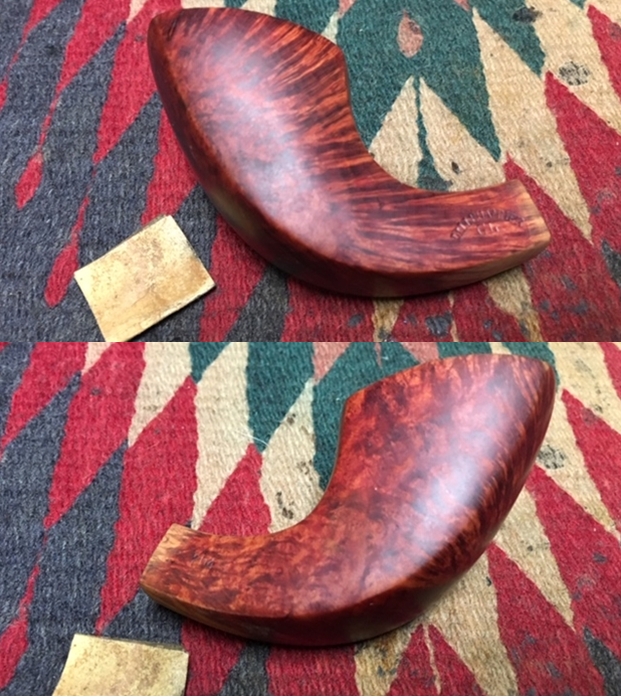
With the decision made to go with the current hue and touch up, I start on the smooth briar nomenclature plate first on the underside of the shank.  I want to create a more distinct and classy looking nomenclature plate by removing the finish from the smooth briar.  This will create a classy looking contrast between the dark rusticated surface and the smooth briar.  I first use a cotton pad wetted with alcohol which had little effect.  I then switch to using acetone.  I wetted several cotton pads and scrubbed the smooth briar.  This had some effect, but still nothing spectacular showing a loosening of the dark finish on this area.The breakthrough came when I thought of trying Mr. Clean Magic Eraser. To my great surprise, it works.  The finish was removed in large measure leaving behind and interesting patch of smooth briar.  Yet, as I look closely at the nomenclature, I’m afraid it appears as though the Magic Eraser sponge exerted more abrasiveness than I thought would be the case.  The lettering has deteriorated further – the profanity that flashed through my mind did not surface!  Ugh – we make plans, but often they are not what happens.  I allow the briar to dry before doing more on the underside panel.
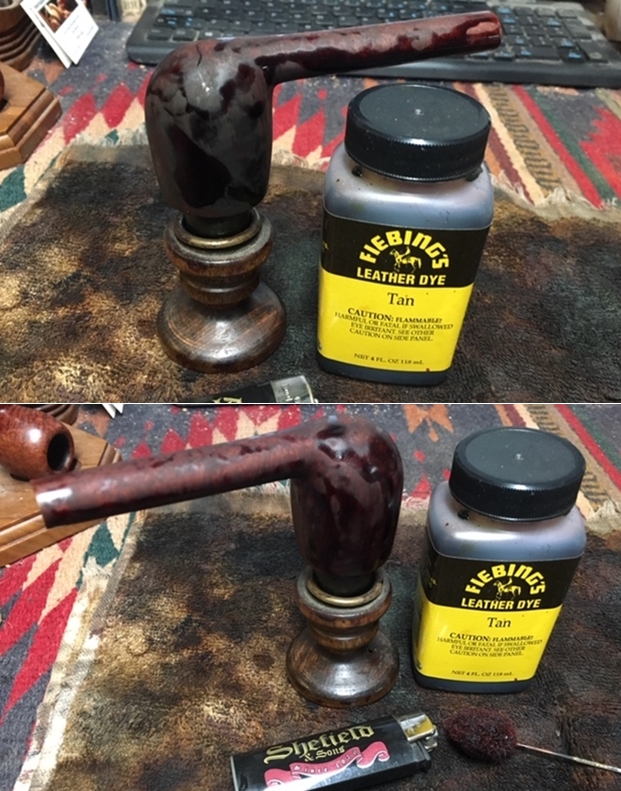
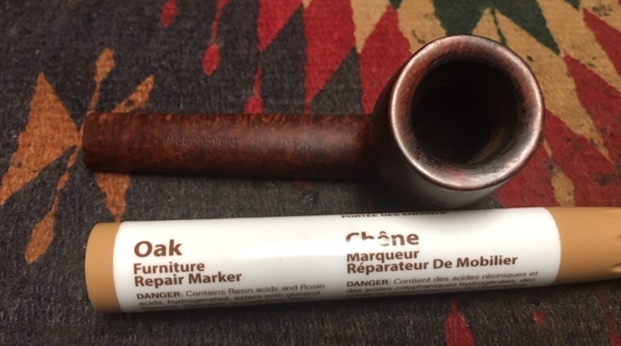
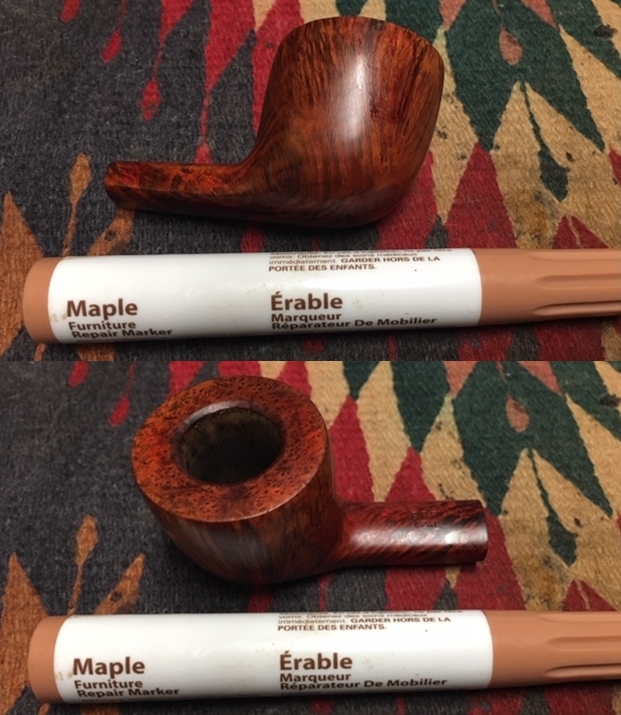
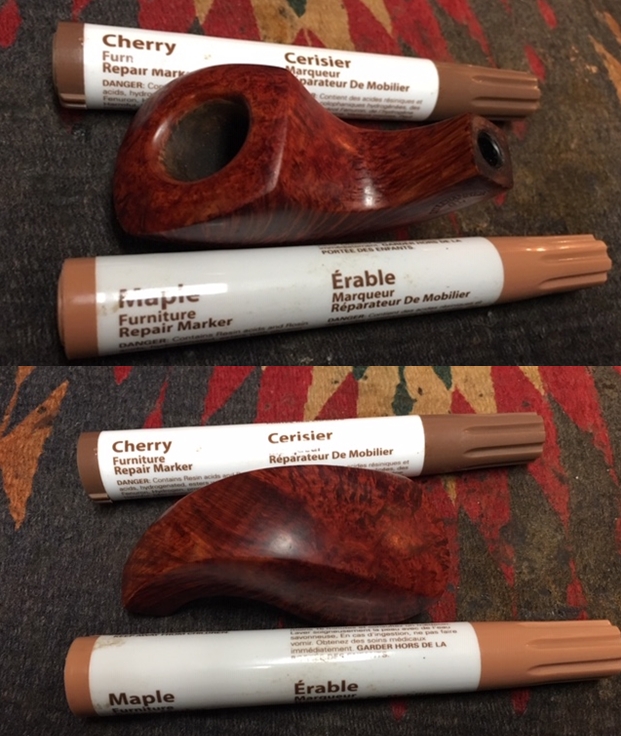
Next, to touch up the rim, I use a Dark Walnut dye stick, which I chose after testing several colors on a cotton pad.  I apply the dye stick over the rim and in the crevices.  It looks great, blending well with the rest of the stummel. 
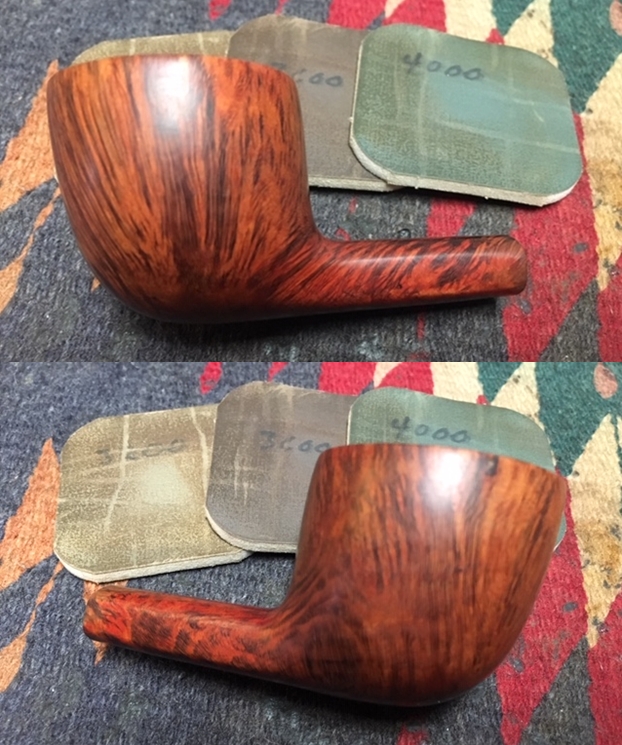
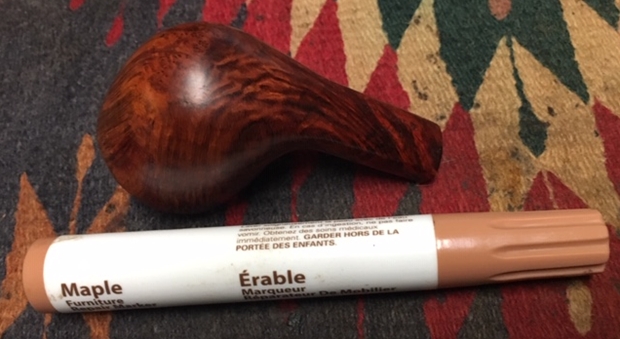
To roughen the rim up a bit, to blend it more with the weathered, rustic stummel, I use a 1500 grade micromesh pad and lightly sand the ridges of the rusticated rim.  This lightens the tips and helps blending.
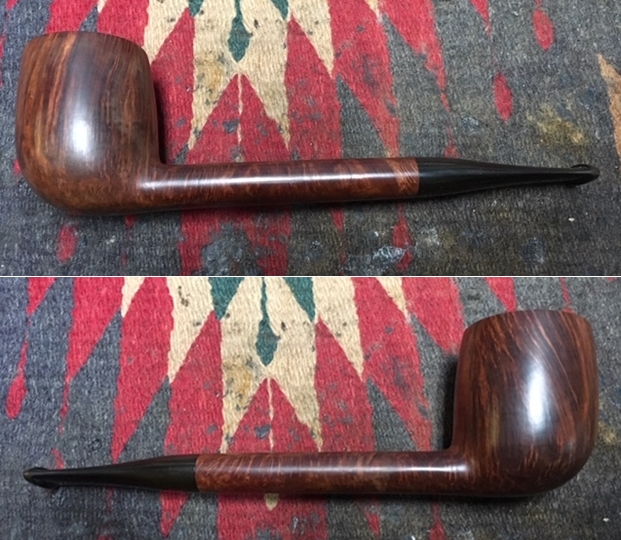
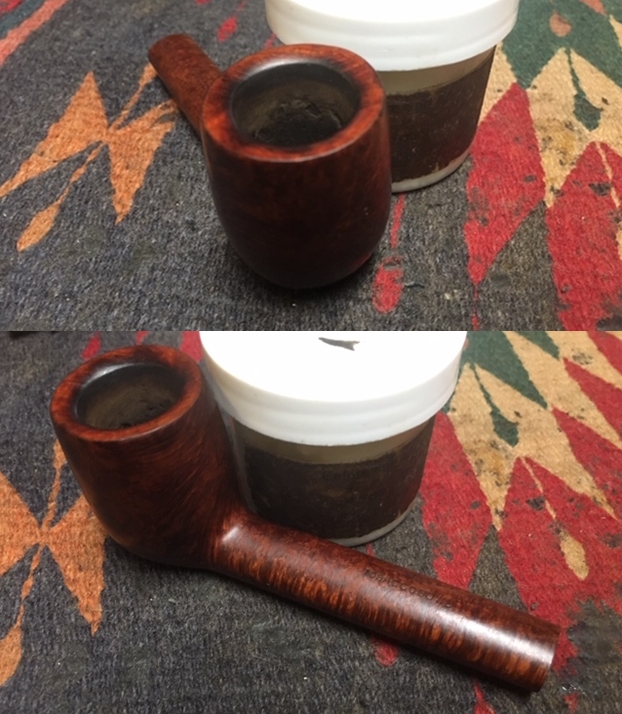
To get a bird’s eye view of the project, I rejoin the Aristocrat London Made stem and stummel.  It’s looking good.With a closer look at the junction there is a gap between the shank and the stem facings.  I examine the mortise and there is no ridge that would be creating the obstruction.  With no obvious obstruction, I use 240 grade sanding paper simply to taper the end of the tenon more guessing that the mortise narrows, and this will afford a little more room for the tenon.  After sanding, I try again, and it seats well now. I now mount a cotton cloth buffing wheel to the Dremel, set the speed at about 40% full power and apply Blue Diamond compound to the stem and stummel.  With my wife’s help, she takes a picture of the process in motion.  When completed, I give the pipe a good wipe down with a felt cloth to clean it of compound dust. 
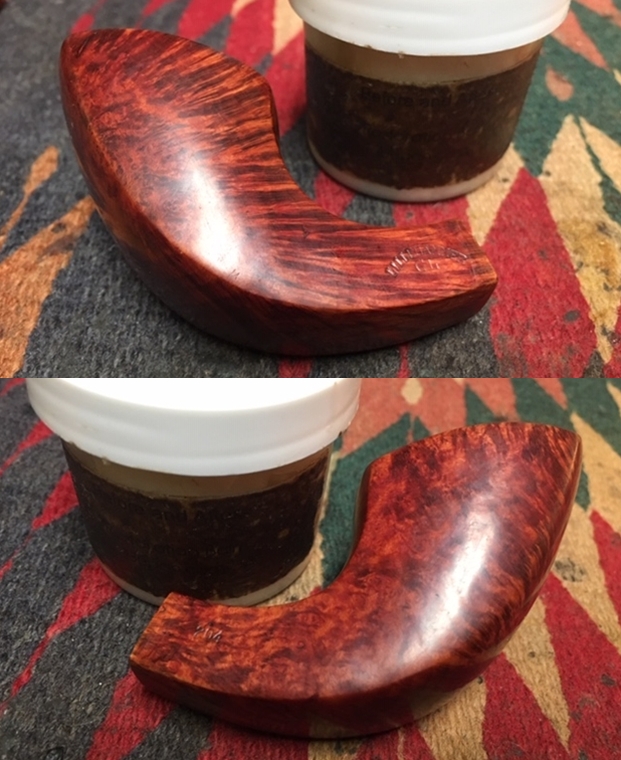
Before applying wax to the stem and stummel, two mini-projects are first needed.  I could have done this earlier, but now is ok too!  Using Before & After Restoration Balm, I apply some to my fingers and then rub it into the smooth briar area on the underside of the shank.  I also apply the Balm to the shank alone.  Later, after it absorbs for a few minutes, I wipe off the excess and buff up the smooth briar and the shank.  I like the results so well, even on the rusticated shank surface, I decide to then apply B&A Restoration Balm to the entire stummel.  After about 15 minutes, I again wipe off the excess then buff the surface up, making sure all the Balm has been absorbed into the briar surface. While the Balm is absorbing, I refresh the diamond encased ‘A’ Aristocrat stem stamp.  Using white acrylic paint, I apply some paint over the stamp and then blot it with a cotton pad to draw off the excess paint.  After it dries, I gently scrape the excess paint leaving the paint filling the stamping lines.  I like it! 
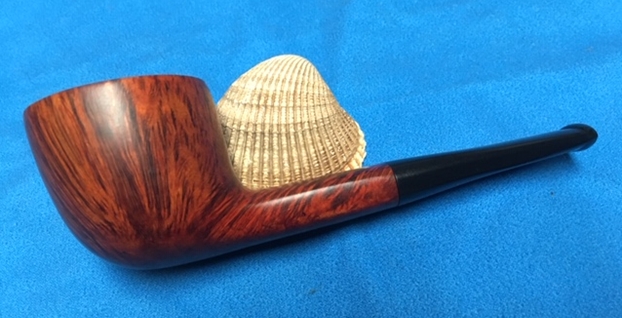
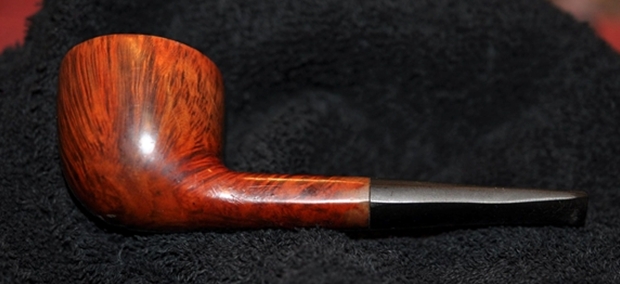
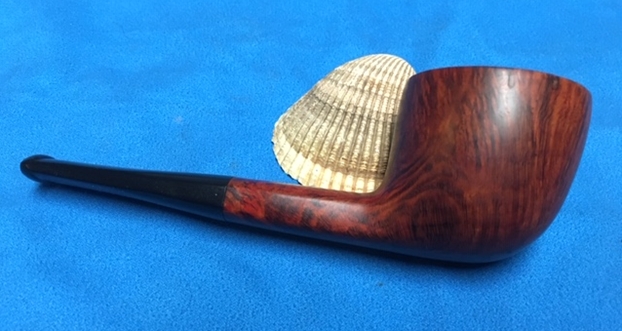
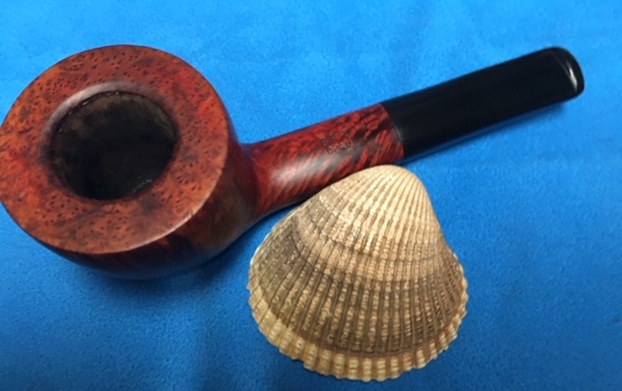
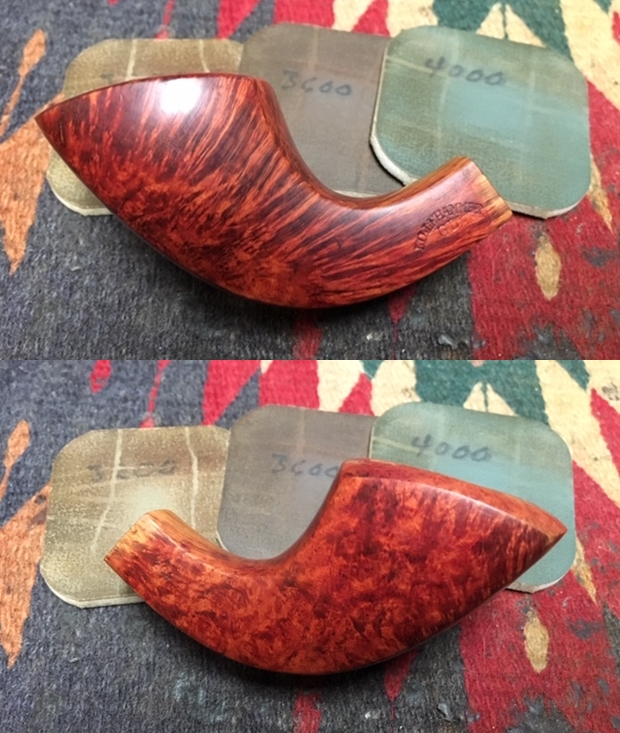
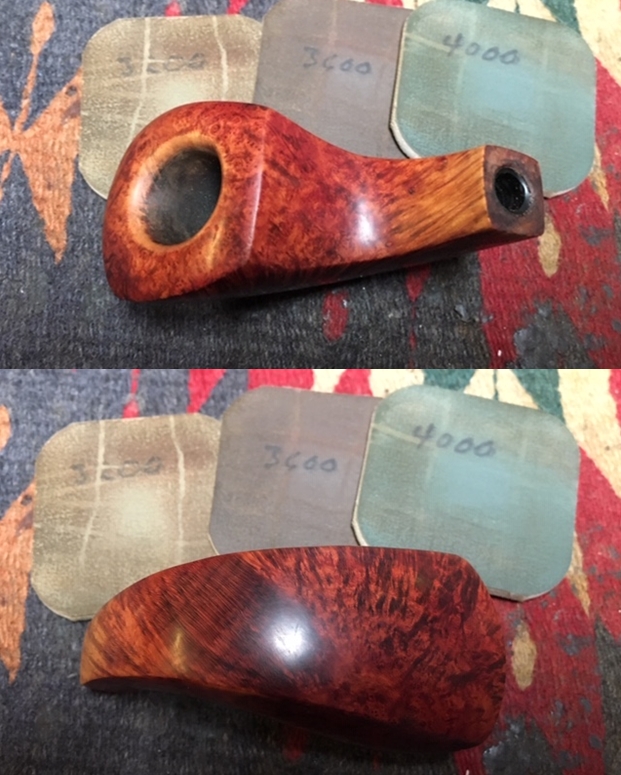
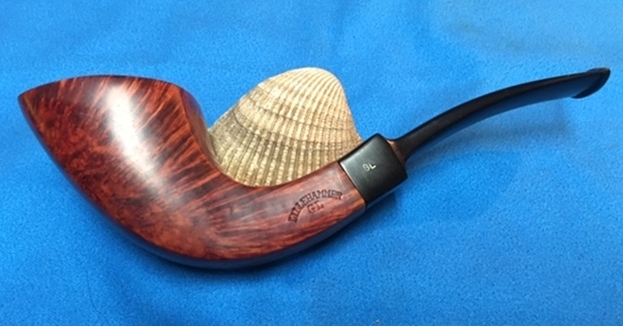
I reunite the stem and stummel and mount another cotton cloth buffing wheel onto the Dremel.  Because I’m applying wax to a rougher rusticated surface, I increase the speed of the Dremel to about 60% full power to increase the RPMs and therefore the heat helping to dissolve the wax.  I apply a few coats of carnauba wax to the stummel. Moving to the stem, I decrease the speed to 40% of full power and apply carnauba.   After finishing with the wax, I use and microfiber cloth and give the pipe a rigorous hand buffing to raise the shine.

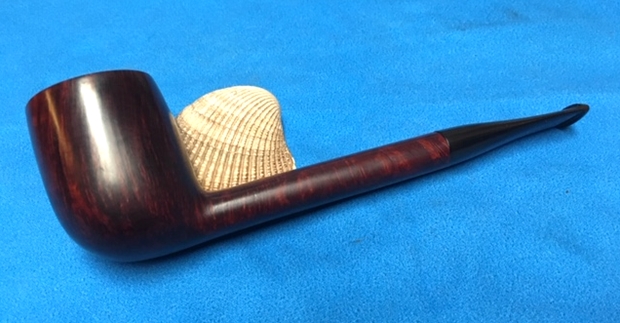
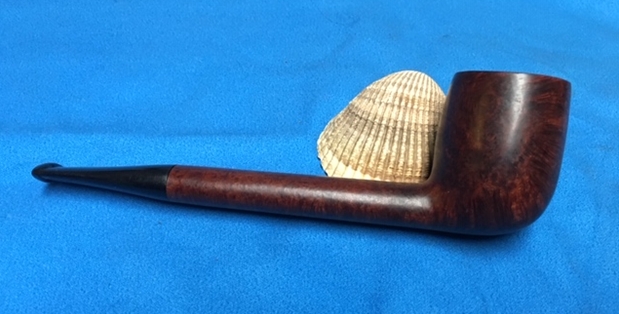
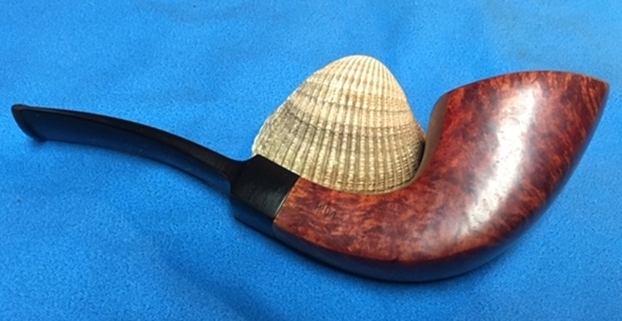
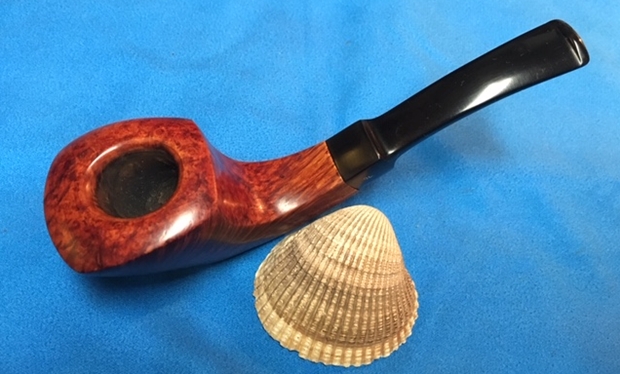
I am very pleased how this hefty pipe turned out.  The deep, distinct rusticated surface looks great on this nice looking, classic half bent Billiard.  The half bend works very well with the overall feel of the bowl resting in the palm.  My only disappointment is the further eroding of the nomenclature in order to reveal the grain of the smooth briar panel.  Even so, the pipe is a keeper.  The major technical hurdle of rebuilding the button came out beautifully and reveals no evidence of its former state.  Andrew could see how nice this Aristocrat London Made could be and he commissioned him from the For “Pipe Dreamers” Only! collection and will have the first opportunity to acquire it from The Pipe Steward Store.  The restoration of this pipe benefits the Daughters of Bulgaria – women and girls who have been trafficked and sexually exploited.  Thanks for joining me!

Light in April


Blog by Robert M. Boughton
Copyright © Reborn Pipes and the Author except as cited
https://www.roadrunnerpipes2k.com/
https://www.facebook.com/roadrunnerpipes/

“The past is never dead.  It’s not even past”
— William Faulkner, Requiem for a Nun, 1951

As another loose and humble homage – some of which have been received well, others less so – I offer this tribute to the great American author and Southerner William Faulkner (1897-1962).  Perhaps as an inducement to those who may at least entertain the notion of reading on from beginning to end, I also tender a reward: one fine African meerschaum bent billiard of unknown make to the first person who identifies the names of a few of Faulkner’s magnificent literary works contained within this story blog as simple text.  Anyone willing to take the challenge, if such it may be called, need only reply at the end with the titles uncovered.MONDAY, APRIL 15
Perched on a whitewashed planter flecked with dirt and displaying dead flowers, the man smoked a pipe that was carved when his great-grandfather was young, thinking about the never-ending drudge of life but knowing he was not awake enough to keep the idea going.  The camouflaged cinderblock showpiece for the all but disintegrated yarrow, yellow marigold and other forgotten floral detritus, almost as common to the area as weeds and sagebrush and the five local seasons – spring, summer, fall, winter and wind – was prominent between the fractured cement driveway and stylish stone garden that had a proprietary name few locals knew other than perhaps a few grizzled flyboy retirees who flocked to this high desert town to spend their final years and paychecks. Still, the house he rented would always be the mansion to his way of thinking.

He heard the first of many coffee pots, percolating on the stove, that would goad him through the spring day, telling himself out loud how each of them would make him a little more sociable as the warm April sunlight he regarded as somehow less special that the light in August came and went in the course of the day.  The gurgle and flush of the old thing made him crankier, thinking the piñon nuts mixed with the dark ground beans would never taste as good as he thought he remembered before the whole enchilada started breaking bad.  He said, “I hope a cupful will give me a minimum of contentment.”

His parents gave him a name, but he liked to be called Bert, which was a half-baked sort of diminishment of his official designation inscribed on a certificate somewhere, but he was alright with that, thinking, names don’t amount to a hill of pinto beans, and since this one was given to me I can toss it in the river if I want..

Having gotten along in years to the condition where he remembered being a boy like it was yesterday but was hogtied to dredge up a word he wanted or where he saw someone the day before, Bert would tell himself he was no hoary, broken-down wraith of the sad, amusing sort of flags in the dust he saw ambling down bedraggled, pot-holed, sage brush-strewn roads in the hamlet where he lived.  Feeling shackled to call the place home by the antiquated convention of the vague class known as society, all Bert could think was, “That’s Tamalewood, huh.”  The town was no sanctuary to him, if it ever was.  The problem was recollecting the particulars of the fancies that flashed inside his mercurial stream of consciousness that was not as sharp as Hatch chile like it used to be.  He was long since at peace in that respect.

When he was a boy he grabbed hold of the early-onset codger in him as though it were something dear he might lose, knowing in later life he was not as old as most of that breed of character, thinking maybe I’m a curmudgeon but hoping better and pushing the notion out of his head as he would flick mosquitoes from his arm with the nail of a calloused finger.

Trying to piece together how he came to be in frequent contact with a fellow pipe restorer by the name of Benjamin Loveless of Tennessee, Bert’s first thought was how the name evoked a character from some might-have-been Dickens novel – an attorney maybe, or someone else with a good education anyway.  Then, jarring back to reality, he recalled the first encounter was an email from this Loveless in early February, asking for information on Colossus Pipe Factory pipes.  Little more than a week later, he sent a photograph of a rare peculiar wooden pipe in the style named after those who kept watch over churches in years long past, with the head of a tiger cocked to the left.  Seized by a powerful lust from that first gander at the fine old smoker, even if it was a bit what he called froufrou, he had but two words for his chance of ever affording whatever Loveless wanted for it, “Eeee!” followed by “Oraley!” and resented the tease.  If he really wanted to burn that bridge he would have told Loveless to bounce.

Bert knew a thing or two about CPF pipes and wanted that one in the worst way, and being a codger if not a curmudgeon he never counted on Loveless’ proffered hospitable and charitable ways.  In fact he still did not altogether trust the hope sparked inside his chest by the offer Loveless made him.   One way or another, the two men cut a deal on trust that Bert would come through with a reasonable monthly installment until the debt was paid.  The whole while, Bert thought it sounded too good to be true, like ordering from the Sears & Roebuck catalog, based on no more than his pledge.  In all truthfulness, they both knew the end price fixed upon was a good deal higher than anything the regular market would support, but that’s the nature of the pipe hunger beast.for you.  Bert had heard tell of four others he could have bought for the price of the one, if he had the cash on hand that is, but to his eyes they were all Walgreens quality by comparison.  Bert knew, Some day as I lay dying, God willing not before I’ve had time to enjoy it, I’ll never forget the favor Loveless cut me!  The amazing pipe arrived by express mail two days later and was in Bert’s own disbelieving hands.

PRESERVATION
Bert heard tell later from a source of unassailable integrity that Briarville Pipe Repair LLC, thinking of its motto, “Pipe Repair as Close as Your Mailbox” ™, replaced the horn extension with a shiny black bit fixed in place.  Having assisted Briarville in finding the answer to an intriguing old pipe question before, he decided to telephone the business and determine what if any work the excellent operation indeed performed.  The restorer was relieved he did so, as the answers the owner sent back prove why fact-checking is imperative for all types of writing, whether investigative journalism or much simpler pipe restoration blogging.   Indeed, Bert had more than the one questions wanting answers.

    1. Did Briarville provide a replacement extension and bit, and if so, what model was used to choose the very appropriate look? Briarville did not replace anything but instead repaired a single crack in the extension.
    2. What materials formed the extension and bit? Knowing the query might sound somewhat daft given the obvious horn appearance of the extension, he had never worked with the alternative accessory and wanted to be sure it was what it appeared to be.  Also, the bit looked to be something he thought was not invented until after 1915 when CPF closed shop.  The answer was that the extension in fact was horn as it seemed and Bert’s original source suspected, and the bit was Vulcanite as he had guessed.  And so, researching the date Vulcanite was patented, he found US3633A by Charles Goodyear dated June 6, 1844, shown below.  That was excellent news, suggesting the two combined parts were original.
    3. From what type of wood was the stummel carved? The reply to that was briar, but with all due respect to Briarville, Bert had serious doubts about that for several reasons: the extreme darkness of the wood that lightened very little after an extensive soak in alcohol, the somewhat tiger-like grain, and the unique taste of the wood that melded quite well with the tobacco.  Some of the photos that follow will demonstrate Bert’s point, but in the end he emailed photos to his artisan pipe maker friend Don Gillmore in hope of settling the issue.  Don is known for his use of alternative woods such as walnut, maple and pecan, and still others more exotic including bog wood (a.k.a. morta, ebony wood, black wood and abonos wood), and trusted if anyone he know could identify the genus, it was he   From the darkness of the wood, Bert suggested cherry.  Don shot that down, noting the grain and lack of iridescence were not present.  He noted “the color is within the range of walnut,” but as it turned out he was only going by Bert’s conviction it wasn’t briar.  When Bert responded that it was heavy and dense, Don’s final conclusion was “probably briar.”  And so Bert saw no choice but to join the consensus, however contrary the necessity.
    4. What time frame would the pipe’s manufacture date be? The guess was early 20th century. That may very well be the case, Bert knew, and there was no way to pinpoint it, but in this case stuck to his guns and argued his pipe’s creation to be in the late 1800s, with cause having nothing to do with a desire to make it older than it was.  Since 2013, when Bert first heard of CPF, he was confident to a point just short of calling himself an expert that he had researched the brand and its pipes – wood and meerschaum – as thoroughly as anyone.  He never before set eyes on any ornate wooden CPF like the tiger’s head.  More to the point, when Kaufman Brothers & Bondy bought CPF in 1883, the shift from ornate to more traditional models began and continued until the company’s end, and by the time 1900 was rung in by turn-of-the-century revelers, ornate wood pipes were all but phased out.  Nevertheless, when it comes to arguing the potential difference in age from 119 to 136 years, Bert said again out loud he was not going to quibble.  He hated that species of know-it-all more than anything.  His “newest” pipe was an antique with more than enough years to spare, whatever its date of creation.

To give a better perspective of the actual size of the CPF shown in Loveless’ beautiful photo that isn’t apparrent below (even with the lovely Peterson dwarfed by it), the length was 10 1/2”, the bowl height 2” and the chamber diameter a unique ⅞” x 2”.  Bert chose unique because of the peculiar straight evenness of the depth, which accommodated far more tobacco than his favorite Ben Wade by Preben Holm Danish freehand that sported a 1” x 2” tapered chamber.  The second photo shows the same tobacco needed to fill both the CPF and the PH, left to right.  Despite the trick of the angle, both lids were identical in size, but the left held about five good pinches, and the right three. The tiger’s head needed no cleaning and was unblemished by any apparent damage to the horn extension.  Bert, of course, following his nature, tried it out and enjoyed it so much he made it the only pipe he smoked for a couple of days.  Then, to his horror, he observed the sudden appearance of two cracks in the horn that could only be described as honking.  To make it clear right off, he was not blaming anyone for the weirdness of the manifestation.  He suspected it was due to the extreme age of the horn and long disuse, and may very well require ongoing attention. For the edification of those whose personal values (which are formed by family, social and peer forces as by clay with all of the potential for works of art or bricks or quagmires of mud and possess the same qualities of steady hardening into solids that can nevertheless be shattered) deny them the sublime enjoyment of reading the dry legalese of patents, the second paragraph describes Goodyear’s idea of “combining sulphur and white lead with the india rubber” and heating in such a way that the result is both heat- and cold-resistant, thereby making Vulcanite less apt to soften and crack, although Vulcanite is never mentioned by name.

Illustrated next is the rest of the phenomenal pipe when Bert decided to fix the cracks and re-do the stain, only to satisfy his own quirky druthers. The only real CPF expert Bert knew told him the hallmarks on the brass-coated nickel band were meaningless for dating or other helpful purposes, but they looked impressive.

Commencing his journey to salvation, Bert gave the stummel, extension and bit a quick wipe with a paper towel and purified water, then reamed and sanded the chamber with 220- and 320-grit papers and pre-cleaned the inner shank and air hole with cleaners dipped in Everclear he would have found refreshing for his own consumption in earlier years. He then bathed the extension/bit in an OxiClean solution as though it were a hot natural spring water cure ordered by a physician and got the retort out of the way with his newer laboratory grade kit, which, fueled with Isopropyl alcohol, makes an impressive and mighty flame that should be respected but does boil the Everclear through the rounded Pyrex tube with great speed and efficiency.Concluding there was no time like the present to tackle the only repair needed, Bert confronted the crack with the determination of David against Goliath but an approach that required two applications of Super Glue rather than a sling and stones, the initial one clamping the cracks shut long enough to dry afterward and the other just filling in remaining gaps again before sanding and buffing smooth. In his work of fine-tuning, Bert did not record the multiple buffing steps.  As for the stummel, he had set his mind on as much of a two tone as he could achieve to give the stunning, intricate carving of the tiger’s head a more lifelike color and leave the smooth area darker but still showing a hint of the grain.  After a long Everclear soak, he let it dry and used super fine “0000” steel wool to lighten the color. The remainder of the trek was a blur, and again he failed in his usual obsessive observance of details.  The almost final steps were micro meshing from 1500-12000 and staining the smooth area with Lincoln Brown Leather Dye and the carved part with something a little different: Fiebing’s British Tan.So close to the end and almost delirious, Bert went over the top in obsessiveness making the regal, proud, all-but-lifelike head light enough to suit his exacting taste, using steel wool again and even light sanding with a double-sided 220-320-grit pad.  In almost all cases of waxing carved surfaces of pipes, Bert employed a white, hand-applied concoction, but not this time.  He buffed the carved part on the electric wheel with carnauba alone and the smooth with red Tripoli and carnauba.  In a moment of blinding revelation, the sound and the fury of the experience came together in an epiphany that left him dazed. AFTERWORD
Bert remained one of the unvanquished, believing that so long as the past is remembered and preserved, it never goes away.

SOURCES
https://briarville.com/
https://patents.google.com/patent/US3633?oq=3633a
http://www.teltinc.com/
https://www.etsy.com/shop/DonWarrenPipes
https://rebornpipes.com/2013/04/14/some-reflection-on-the-historical-background-on-cpf-pipes/
https://rebornpipes.com/2019/02/22/reflecting-on-a-few-of-my-cpf-pipes-colossus-pipe-factory-pipes/

Refurbishing a Battered Dunhill Bruyere #32041


Blog by Paresh Deshpande

I had just finished restoring three pipes from my inheritance; a WDC Stratford, The Doodler and a Barling # 2639. Save for the WDC, these were easy projects and it helped that Abha, my wife, had done all the initial cleaning. I finished these pipes in real quick time.

Now I turned my attention once again to the pipes from my “Mumbai Bonanza”. I have restored three pipes; two Dunhill and a Stefano Exclusive from this lot of 30 and each one has been, well, to put it mildly a royal pain where you wouldn’t like it!!  How did I land up with this lot makes for an interesting read and about one which I have written in the restoration of the Stefano Exclusive (https://rebornpipes.com/2019/03/11/mumbai-bonanza-stefano-exclusive-restorationa-month-long-project/).

Here are pictures of the pipes that I received in this lot. This lot contains some very nice collectible pipes, a few well known brand pipes and some mediocre pipe brands. Overall, with seven Dunhills, a Preben Holm #1, a couple of “Made in England” Pete System pipes, Charatan’s and other assorted pipes, I would say that I had hit a huge jack pot!!! Hence, I like to call this find as “Mumbai Bonanza”.

The pipe that I decided to work on is from this find and is marked in a red circle in the picture below. It’s the third Dunhill from this lot, a Bruyere in a classic bulldog shape. The stummel surface boasts of some beautiful densely packed cross grain on the stummel, cap and also the shank top, bottom and side surfaces. It is stamped with “# 32041” towards the bowl and followed by “DUNHILL” over “BRUYERE” on the left side of the shank while the right side bears the COM stamp “MADE IN” over “ENGLAND” followed by underlined numeral “18”. Dunhill White Dot adorns the top of the vulcanite stem. The stampings on either side is deep, crisp and clear.The dating of this pipe is very straight forward and dates to 1978 (1960+18). Deciphering the shape code, “32041” is equally straight forward with the first digit 3 identifying this pipe as being Group size 3, second numeral, 2, identifies the style of mouthpiece as being a saddle stem and the digits 04 indicates Bulldog shape. With this information, I proceed ahead with the restoration of this handsome pipe.

INITIAL VISUAL INSPECTION
The chamber is clean with a thin layer of cake which indicates that the pipe has been kept clean by its previous Steward; however, the reaming has been done unevenly. From what I can see, the chamber walls appear to be without any damage. The chamber is odorless. It is the rim top, including the outer and inner rim edge that shows significant damage on the left side in 11 o’clock and 7 o’clock directions. This must have been caused due to hammering of the edge against a hard surface to remove dottle!! There is not even a millimeter of surface on the rim top surface which does not show signs of severe damage. All in all, it appears like this pipe’s rim top was used by the previous Steward as a hammer while giving vent to his/ her anger, and if this is true by any stretch of imagination, HE/ SHE SHOULD ENROLL FOR ANGER MANAGEMENT TREATMENT!! Darkening of the outer rim edge is also seen all along the left half of the rim top, most significantly in 11 o’clock and 7 o’clock directions. I just hope that it does not go deep in to the briar!!  Being a Dunhill, any issue of fills is never to be expected and hold true for this pipe too. However, there are a number of scratches and dents that can be seen on the stummel surface. These dents and ding are probably caused due to uncared for storage by the previous Steward and further contributed to by the trash collector who had sold the pipes to me. The stummel is covered in dirt and grime. The briar looks lifeless and dull which is nothing serious to address.I am very pleased with the condition of the stem. The diamond saddle type vulcanite stem shows minor damage to the button end and the lip edges. Light scratches can be seen extending upwards from the button end towards the saddle. The quality of vulcanite is good. These issues should be an easy fix. The mortise is clogged and will have to be cleaned. In this project, repairs to the damaged outer edge and rim top surface will be a major challenge. While restoring the Dunhill Bruyere # 51671 (https://rebornpipes.com/2019/03/13/reconstructing-a-broken-stem-on-dunhill-bruyere-51671/), I had faced difficulties in blending the repairs to the outer rim edges and these could be seen even after I had stained the stummel. Similar set of difficulties are envisaged on this pipe too!!!! I have learned my lesson and will follow the advice and suggestion received from readers of rebornpipes.com.

THE PROCESS
Since the stummel has significant damage, I start this project by tackling the stummel repairs first. I reamed the chamber with size 2 head of a PipNet reamer. The cake was thicker at the bottom and using my fabricated knife, I scraped out all the remaining cake. I further used one folded piece of 180 grit sand paper to sand out the last traces of remaining cake and expose the walls of the chamber to ascertain that there are no cracks/ heat fissures. I wiped the chamber with a cotton pad dipped in isopropyl alcohol to remove the carbon dust left behind by all the reaming and sanding process. The walls of the chamber were solid with just very fine superficial web of lines seen on one side. This was followed by cleaning the mortise by scraping away at the dried gunk with my fabricated spatula and followed it up with further cleaning using cue tips, pipe cleaners and shank brush dipped in isopropyl alcohol. With the thin sharp edge of my fabricated spatula, I cleaned in between the edges of the cap ring separating the cap from the rest of the stummel. Continuing with the cleaning regime, using a hard bristled tooth brush dipped in undiluted Murphy’s oil soap, I very deliberately scrubbed the surface of the stummel and the rim top. The original reddish dye was also washed away to some extent. The dirt and grime on the stummel surface was so stubborn that I had to resort to using a scotch-brite pad to get rid of it. While scrubbing the stummel, I paid special attention to areas where significant darkening was seen just below the rim outer edge. Thankfully, the burn marks were superficial and cleaned out nicely. However, a dark spot was revealed just below the cap ring and is marked in a red circle. The damages to the outer rim edge, uneven inner rim edge and stummel dents and dings are now clearly visible in the above pictures after the cleaning. I had a close, hard look at the darkened spot seen and marked in red. The briar on and around the spot was hard and solid with no deep heat fissures on the corresponding inner surface of the chamber. This ruled out the possibility of a burn out!!!! Phew, what a relief this was!!!! This external darkening, most probably, appears to have been caused when the pipe was placed in an ash tray alongside a smoldering cigarette butt, just a hypothesis!!! This will be addressed (hopefully!) when I sand the stummel surface to get rid of all the scratches and dents.

With the stummel now dried out, I got around to address the rim top and outer rim damage. The extent of the dip or trough caused due to banging the rim edge against a hard surface was deep and would necessitate heavy topping off of the rim surface, and I for one, absolutely wish to avoid any loss of briar!!!!! So, I decided to try out something different. I planned on first filling up the deep troughs on the rim edge using briar dust and superglue to roughly match the rim surface and some more and then topping it to achieve a smooth surface. Theoretically, this sounded logical.

I resorted to the layering method again; first I layered superglue over the damaged surfaces on the front and back outer rim edges, followed by sprinkling of briar dust, another layer of superglue followed by a final layer of briar dust. This final layer of briar dust reduces the probability of air pockets. In the last picture, you can see that the layering has been done to the level of the rim surface so that it sits evenly on a flat surface without showing any gaps. I set the stummel aside to cure. While the stummel fill was being set aside to cure, I tackled the stem repairs by first flaming the surface with a Bic lighter flame to raise the bite marks to the surface. This was followed by sanding the stem surface with a folded piece of 220 grit sand paper. This step has a twofold purpose; firstly, it helps to roughly blend the raised bite marks with the rest of the stem surface and brings to fore the spots which require filling and secondly, it helps to rid the oxidation from the stem surface which helps subsequently in better finish after polishing. I cleaned out the surface with a cotton pad dipped in alcohol to remove all the dirt and grime. Once the surface was clean, the lip edges and the bite marks were filled with a superglue and activated charcoal mix and set aside to cure overnight. The fill repair to the outer rim edges had cured by this time and with a flat head needle file, I roughly sand the fills to match the surrounding surface. Using a folded piece of a 220 grit sand paper, I further blended the outer filled edges with the rest of the edge and created a slight bevel to mask the uneven inner rim edges. The rim top surface was topped on a piece of 220 grit sand paper to further blend and even out the rim top, checking frequently the progress being made. Personally, I prefer to avoid topping as I do not appreciate loosing even one mm of briar estate, but in this instance, I was left with no recourse but to top the rim. I lightly top it on 600 grit sand paper to reduce the sanding marks left behind by the 220. However, a few air pockets revealed themselves (marked in red-orange circle) at this stage which necessitated reapplication of briar dust and super glue. Sorry, missed out taking pictures of this stage!! While the second fill to the rim outer edge was curing, I turned my attention to work on the cured stem fills. Using a flat head needle file, I roughly matched the fills with the rest of the stem surface. For a better blending, I further sanded the entire stem with 220 followed by 400, 600 and 800 grit sand paper. This helps to reduce the sanding marks left behind by the more abrasive 220 grit paper. To bring a deep shine to the vulcanite stem, I went through the complete set of micromesh pads, wet sanding with 1500 to 2400 grit pads and dry sanding with 3200 to 12000 grit pads. I wiped the stem with alcohol after each pad and rubbed it down with Extra Virgin Olive oil to rehydrate the vulcanite. The repairs have blended in very well and the stem now looks a shiny black and beautiful. The internals of the stem was cleaned out using alcohol and pipe cleaners. The finished stem is shown below. The next evening, the repairs to the edge had completely cured and I move ahead by filing and rough shaping with a flat head needle file. I further fine tune the blending by sanding it down with 220, 320, 600 and 800 grit sand papers. Here is how the repaired area appears at this stage. I am very pleased with the way this repair progressed. I sand the entire stummel using 220, 400, 600 and 800 grit sand papers. The little dents and dings that remained on the stummel and outer rim edge were also evened out under this sanding process. This was followed by polishing with micromesh pads. I wet sand the stummel with 1500 to 2400 grit pads and follow it up by dry sanding with 3200 to 12000 grit pads. I wiped the surface with a moist cotton cloth after every wet pad to check the progress. The repaired rim edge appears, in picture, as though it is patchy with air pockets. However, that is not the case. The fill is smooth and solid and should get masked after I have stained it. I rub a small quantity of “Before and After Restoration Balm” in to the briar with my finger tips and let it rest for a few minutes. The balm almost immediately works its magic and the briar now has a nice vibrant appearance. I further buff it with a horse hair shoe brush. I had hoped that the balm would work its magic on the filled area and help in blending it a bit, and that did happen!! I am very pleased with the way these repairs have turned out. And now on to staining and polishing… After Mr. Steve had uploaded my write up on the Dunhill Bruyere Horn shaped pipe (https://rebornpipes.com/2019/03/13/reconstructing-a-broken-stem-on-dunhill-bruyere-51671/), the feedback and responses were very educative and I had decided to incorporate these suggestions while working this project. Mr. Roland Borchers brought out that the original color of Bruyere was achieved by first staining with Dark Brown stain followed by Cherry red stain. Mr. Steve also concurred and then there was no turning back!! I stained the stummel in DB stain first. I use the powder variety of stain and mix it with 99% isopropyl alcohol. I heated the stummel surface with a heat gun and applied the stain with a folded pipe cleaner. As I paint the stummel with stain over sections at a time, I burn the dye using a Bic lighter that combusts the alcohol in the aniline dye and sets the dye pigmentation in the wood.  After fully saturating the stummel and covering the whole surface, including the rim top, I set the stummel aside to rest for several hours. By next evening, the stain had set nicely. I mount a cotton cloth buffing wheel (because I do not have felt cloth buffing wheels!!) on the Dremel and set the speed at about 40% of full RPM and apply white compound to the stummel. This does help in revealing the grains gradually. This time around, the repaired area had blended very nicely in to the rest of the stummel surface. Here is another lesson that I have learned; it is advisable to use white compound after staining and not red Tripoli as I used to, for the reason that the red Tripoli compound is more abrasive and does not make sense to use after polishing by 12000 grit micromesh pad!! I followed this polish by re-staining the stummel with Cherry red stain. I set it aside to let the briar pores absorb the stain pigments. To finish, I re-attach the stem with the stummel. I mounted a cotton cloth buffing wheel to my local machine which is similar to a Dremel, set the speed at about half of the full power and applied White Diamond compound to the entire pipe. I wiped/ buffed the pipe with a soft cotton cloth to clear it of any leftover compound dust. I then mounted another cotton cloth wheel on to the polishing machine and applied several coats of carnauba wax. I finished the restoration by giving the entire pipe a rigorous hand buffing using a microfiber cloth to raise the shine further. The completed pipe looks lovely, fresh and vibrant; the photographs in this case, do not do justice to the appearance of this beautiful pipe. I cannot thank enough my friends and gentlemen who painstakingly identified my mistakes and suggested remedial measures after reading the write up for helping me to hone my skills while gaining experience.

Getting Rid of a Foul Smell in a fourth pipe – a Schulte’s Canadian


Blog by Steve Laug

This is the last of the foursome of pipes that I have from a box of some 25 pipes that I am working through for a friend here in Vancouver. This last of the four came to me in a sour, stinky condition. With this one I am finishing the last of them. Alex had smoked them once or twice each and found that as he smoked them each became fouler. From my experience this happens when a pipe has not been thoroughly cleaned in the process of restoration. Sometimes even if it has been cleaned, the first few smokes draw out a foul taste and in this case an odor that made me put the four pipes in a zip lock bad to keep the odor contained. They really stunk! On Sunday evening I decided to give the foursome a cotton ball and alcohol treatment to draw out the oils and tars in the briar. I pushed cotton balls into the bowl and a folded pipe cleaner in the shank and used an ear syringe to fill the bowl with isopropyl alcohol. I set the pipes aside to let the alcohol do its work overnight. I know many of you use kosher salt and alcohol and that certainly is your choice. For me however the cotton balls work just as effectively in providing a medium for the foul juices drawn out of a pipe to be deposited. They are also easier to clean up and they do not leave residual salts in the briar. In the morning I took a photo of the finished work. You can see the effectiveness of the treatment.I took the cotton out of the bowls of the pipes and wiped the bowl down with pipe cleaners and cotton swabs to dry them out. The last pipe I decided to work on is the beautifully grained Canadian, the first pipe on the right in the photo above. It is stamped on the topside of the shank SCHULTE’S and on the underside of the shank it is stamped BCER. I know something about Howard Schulte who is a pipe repairman in Florida but could not remember much about the brand. It was another pipe that the seller said was clean but after several smokes Alex deemed it unsmokable. It was now up to me to figure out what was going on.

I examined the pipe when I took out the cotton balls and alcohol and I learned a few things about it that would need to be addressed. The rim top and inner and outer edges of the rim were in excellent condition and would not require a lot of work. The finish was spotty but the pipe had some beautiful grain. The biggest issue was that there was a crack on the heel of the bowl where it looked like the pipe had been dropped. Fortunately it did not go all the way into the interior of the bowl so it would be a pretty straightforward repair. The bowl was the cleanest of the lot with a very light cake inside that could easily be reamed out. The stem was lightly oxidized near the stem/shank junction but it was clean and was free of tooth marks or chatter. I wondered what the airway was like but that is an easy clean up. I took some photos of the pipe at this point. I took a close up photo of the bowl and rim to capture the condition of the rim top and light cake in the bowl. The rim top was in excellent condition and free of damage to the inner and outer edges. The cotton ball alcohol treatment had rid the pipe of the rank smell. The stem was in excellent condition with light oxidation near the shank end. At least it did not have tooth chatter or marks.I took a photo to capture the stamping on the top and underside of the shank. The first photo shows Schulte’s on the topside of the shank. The second photo shows the stamping on the underside and reads BCER. It is clear and readable.The pipe has some amazing grain! BUT…. Here is the real issue after the stench of the bowl and shank.There was a crack running across the heel of the bowl. It looked a lot worse than it actually was fortunately. This kind of crack generally comes when a bowl is dropped. In this case it did not go deep in the briar. Upon examination with a light there was no sign of it in the interior of the bowl. I probed the crack with a sharp pick and it did not go too deep in the briar.I needed to refresh my memory about brand so I turned to Pipephil’s site and did not find anything. On Pipedia I was more successful. The article had a series of comments from former customers that gave a sense of the shop and the pipes (https://pipedia.org/wiki/). I quote in part from that article.

Max Schulte – the name is sometimes misspelled “Shulte” – operated a pipe & tobacco shop in Newark and later in Maplewood, NJ. A customer remembers:

“My first pipes and tobaccos came from Max’s shop in Maplewood (I think it was on Bloomfield Avenue near Hy’s Cheesecake) back around 1965. The smell on entering either of these stores was sublime. I remember him well standing at the polishing wheel just off the counter, wearing a long workman’s apron, working on one of his characteristic classic shapes. The wall behind his tobacco counter was filled with rubber clips holding these as well as Savinellis, Sasienis, and Stanwells. I think he was actually on the front edge of the Danish trend. Max could polish a pipe in five minutes & have it come out looking new. He also blended an Oriental/Balkan blend (I think) called “Maritza” that was the finest of its kind (that I ever encountered) in those days. Max was always willing to share his extensive knowledge of pipes and tobaccos with any customer, even a young know-nothing like me, and seemed genuinely glad of the company. BTW, the going price for a half-pound of Maritza in those days was about seven dollars. It was worth every single cent.”

Now that the stink was gone once again I did not even think of cleaning the shank and airway I just immediately went to the most irritating part of this pipe – crack on the heel of the bowl. I used a microdrill to drill small pin holes at the end of each of the cracks. I did the drilling under a bright light so I could see the extent of the damage and make sure put a small hole at the end of each line of the crack. The large crack had a small crack branching of each end. I put a pin hole at the end of the main crack and one on the end of each small branching crack. I used a sharp point to trace the crack and give me some surface to fill with the repair of briar dust and super glue. The first photo shows the groove I carved. I filled in the groove and crack (along with the pin holes) with super glue then used a dental spatula to put briar dust on top of the glue and press it into the groove.Once the repair cured I sanded it smooth with a folded piece of 220 grit sandpaper to blend it into the surface of the surround briar. The photos below show the repaired scar on the heel. I sanded it further with 400 grit wet dry sandpaper to polish out the scratches. I polished the repaired heel and the rest of the bowl with micromesh sanding pads – wet sanding with 1500-2400 grit pads and dry sanding with 3200-12000 grit pads. I used the wet sanding on the first three pads to give me the traction to remove the scratches in the briar and the dry sanding to polish the briar. I wiped the bowl down after each pad with a damp cloth. It was beginning to look really good. The scar on the bottom of the bowl was very obvious so I would probably need to stain the bowl to blend it into the finish but the polishing would make that clear for me. The finish was looking pretty good but I knew that I would need to do more to blend the repair into the rest of the bowl. In preparation for staining the bowl I decided to wipe it down with isopropyl alcohol to remove the uneven finish. This way when I put a stain coat on at least the undercoat will be even. I looked through my Feibing’s stains to find one that would help to hide the repair but also let the grain shine through. I have found that the tan stain brings out the reds in the briar and once polished allow the grain to shine through. I stained it with the tan stain, flamed it and repeated the process until the coverage was even. I set the pipe aside for the night to let the stain cure. In the morning I wiped it down with alcohol on cotton pads to remove the heavy top coat and begin the process of unveiling the grain. I was also anxious to see how the repair scar looked on the heel of the bowl. I was pleased with how it blended in. It was not invisible but it did not stick out either. I buffed the bowl on the wheel with Blue Diamond to polish the new stain and get a feel for what the grain and the scar would look like. I was pretty happy with the results. I took it back to the worktable and worked some Before & After Restoration Balm into the bowl and shank with my fingertips to clean, enliven and protect it. I let the balm sit for a little while and then buffed with a cotton cloth to raise the shine. The following photos show the bowl at this point in the restoration process. Once again it was at this point that I realized that I had not reamed the bowl or done any cleaning of the internals after the cotton ball and alcohol treatment. I had been so intent on cleaning up the damaged rim that I totally skipped my normal pattern of work. So I went back to ream the bowl with a Savinelli Fitsall Pipe Knife. I was surprised at how clean it was. There was no carbon on the walls and what I had seen as a light cake was not. I turned then to clean out the internals. I cleaned out the airway in the shank and stem with cotton swabs, pipe cleaners and isopropyl alcohol. I cleaned out the mortise in the shank with cotton swabs and alcohol until the mortise walls were clean and looked bare. The pipe smelled clean and fresh.The stem on this Schulte’s was flawless. There were no tooth marks and no chatter. There was some oxidation near where the stem sat against the shank. I polished it with micromesh sanding pads – wet sanding with 1500-2400 grit pads and dry sanding with 3200-12000 grit pads. I wiped it down with Obsidian Oil after each pad. I polished it further with Before & After Pipe Stem Polish – both Fine and Extra Fine. I gave it one more final coat of Obsidian Oil to protect and deepen the shine. I put the stem back on the bowl and polished the pipe with Blue Diamond polish on the buffing wheel. I gave the bowl and the stem multiple coats of carnauba wax. I buffed the pipe with a clean buffing pad to raise the shine. I hand buffed it with a microfiber cloth to deepen the shine. The pipe polished up pretty nicely. The grain came alive with the buffing. The rich brown finish on the briar works well with the polished black vulcanite stem. The finished pipe is a beauty and feels great in the hand. Have a look at it with the photos below. The dimensions are Length: 6 inches, Height: 2 inches, Outside diameter of the bowl: 1 3/8 inches, Chamber diameter: 3/4 of an inch. This one will be going back to Alex to join the other three foul pipes that I had given back to him. Thanks for walking through the restoration on this now great looking Schulte’s Canadian. The repaired crack on the heel came out well and is blended into the darker colour of the pipe. It is really a beauty. I think Alex will enjoy it and he should get a better smoke from it now as that is ultimately what is most important to me. Aesthetics is important but if it does not smoke well it fails for me.

Getting Rid of a Foul Smell in a Tobaccobowl Canadian


Blog by Steve Laug

I have a box of some 25 pipes that I am working through for a friend here in Vancouver. The next batch I am working on came to me in a sour, stinky condition. Alex had smoked them and found that as he smoked them each one became fouler. From my experience this happens when a pipe has not been thoroughly cleaned in the process of restoration. Sometimes even if it has the first few smokes draw out a foul taste and in this case an odor that made me put the four pipes in a zip lock bad to keep the odor contained. They really stunk! On Sunday evening I decided to give the foursome a cotton ball and alcohol treatment to draw out the oils and tars in the briar. I pushed cotton balls into the bowl and a folded pipe cleaner in the shank and used an ear syringe to fill the bowl with isopropyl alcohol. I set the pipes aside to let the alcohol do its work overnight. I know many of you use kosher salt and alcohol and that certainly is your choice. For me however the cotton balls work just as effectively in providing a medium for the foul juices drawn out of a pipe to be deposited. They are also easier to clean up and they do not leave residual salts in the briar. In the morning I took a photo of the finished work. You can see the effectiveness of the treatment.I took the cotton out of the bowls of the pipes and wiped the bowl down with pipe cleaners and cotton swabs to dry them out. The first pipe I decided to work on is the Canadian on the far right of the photo above. It is stamped on the top of the shank TOBACCOBOWL which I am assuming is a pipe shop. The underside of the shank is stamped Imported Briar which tells me that the pipe is American made. There are no identifying shape numbers of other stamps on the pipe so that is the extent of my information. Alex had picked it up eBay and was drawn to the grain and the shape which were very nice. It was purported to be clean by the seller but after his first smoke Alex deemed it unsmokable. It was now up to me to figure out what was going on. I examined the pipe when I took out the cotton balls and alcohol and I learned a few things about it that would need to be addressed. The outside of the bowl was oily and dirty – a thin film of oils was all over the bowl surface and had darkened the rim and the right side of the bowl. The rim top had some burn damage and some lava on the inward beveled top. It was messy. The stem, though it was said to be clean, had a lot of junk in the slot at the button. The airway entered the bowl toward the right side rather than the center and the shank was black with tars and oils. The bowl had a light cake that was oily to touch and would need to be reamed out. I took some photos of the pipe at this point. I took a close up photo of the bowl and rim to capture the damage to the rim top and light and the lava on the right side. The bowl had a malformed cake that needed to be cut back. It needed some more work to clean it up but at least the cotton ball alcohol treatment had rid the pipe of the rank smell. The stem itself was an interesting mess. It had been shinned and polished but there was still some light tooth marks and chatter on the top and underside just ahead of the button. I took a photo to capture the stamping on the top and underside of the shank. The first photo shows TOBACCOBOWL stamping as noted above. The photo is slightly out of focus but it was hard to capture the stamping. On the underside it reads Imported Briar. The stamping on this pipe is readable. I started my work on the pipe by dealing with the damage to the beveled rim top. Because of the bevel I could not use a topping board so I had to work on the damage with a folded piece of 220 grit sandpaper to remove the damage and smooth out the rim top. I had to be careful not to damage the rim top and make it uneven but I wanted to get it back to bare briar so I could polish it and restain it.I polished the rim top that I had sanded and the rest of the bowl with micromesh sanding pads. I wet sanded with 1500-2400 grit pads and dry sanded it with 3200-12000 grit pads. I wiped the rim and bowl down after each pad with a damp cloth to remove the grime and sanding dust. Each successive grit of micromesh removed more of the darkening and started bringing the grain to the surface. The rim top looked considerably better but it was slightly lighter in colour than the rest of the briar so I stained it with an Oak coloured stain pen to match the colour of the bowl and shank.Once the stain was dry I worked some Before & After Restoration Balm into the rim top and the rest of the bowl and shank with my fingertips to clean, enliven and protect it. I let the balm sit for a little while and then buffed with a cotton cloth to raise the shine. The following photos show the bowl at this point in the restoration process. The bowl and the rim top look really good and the darkening is gone. The finish looks very good with the rich oil finish on the bowl and rim. I am very happy with the results. With the externals cleaned and well on the way to being finished I turned my attention to the internals. I reamed the bowl with a PipNet reamer to get rid of the cake and cleaned up the reaming with a Savinelli Fitsall Pipe Knife. I sanded the inside of the bowl with a piece of dowel wrapped with 220 grit sandpaper to remove all remnants of the cake. When I was finished the bowl walls were smooth and clean. I cleaned out the airway in the shank and stem with cotton swabs, pipe cleaners and isopropyl alcohol. I cleaned out the mortise in the shank with cotton swabs and alcohol until the mortise walls were clean and looked bare. At this point in the process the stink was gone.With the bowl finished I set it aside and turned my attention to the stem. I polished the stem with micromesh sanding pads – wet sanding it with 1500-2400 grit pads and dry sanding it with 3200-12000 grit pads. I wiped the stem down with a damp cloth after each pad. The micromesh pads took care of the light tooth chatter and light tooth marks. I further polished it with Before & After Pipe Polish – both Fine and Extra Fine. I wiped it down with a coat of Obsidian Oil and set it aside to dry. Now with both parts of the pipe finished, I polished the bowl and the stem with Blue Diamond polish on the buffing wheel. I gave the bowl and the stem multiple coats of carnauba wax. I buffed the pipe with a clean buffing pad to raise the shine. I hand buffed it with a microfiber cloth to deepen the shine. The pipe polished up pretty nicely. The grain came alive with the buffing. The rich brown finish on the briar works well with the polished black vulcanite stem. The finished pipe is a beauty and feels great in the hand. Have a look at it with the photos below. The dimensions are Length: 5 3/4 inches, Height: 1 ¾ inches, Outside diameter of the bowl: 1 1/4 inches, Chamber diameter: 3/4 of an inch. This one will be going back to Alex with the rest of his pipes that I am working on. Thanks for walking through the restoration on this interesting TOBACCOBOWL Canadian.


Renewing a Classic Bari Shape – A Bari Opal 8443


Blog by Steve Laug

The next pipe on the table is from one of the unsung pipe makers that I really enjoy working on. It is a Bari pot shaped pipe with a rectangular shank and tapered vulcanite stem. This has some stunning straight and flame grain around the bowl and shank with birdseye on the top of the bowl and the heel. It showed a lot of promise even in its filthy condition. The rim top was quite wide and had a slight bevel on the inside rim edge. The pipe is stamped on the topside of the shank Bari over Opal and on the underside Made in Denmark over the shape number 8443. Lately we have been picking up some really dirty pipes and this pipe was no exception. It was very dirty with a thick cake in the bowl and a layer of lava overflowing on to the rim top. It was thick enough to have some wrinkles in the surface that looked almost like cracks. It was hard to know what the inner edge of the rim looked like because of the lava and cake. From the photos it appeared that the inner edge was in good condition. Other than being dirty the finish also appeared to look very good. The stem was lightly oxidized and the button surface on both sides was worn down from tooth damage. There was chatter on both sides of the stem. Jeff took some photos of the pipe before he started working on it. He took photos of the rim top to show the thick cake in the bowl and the overflow of lava. The cake is thick and hard and the lava overflow is a thicker toward the back of the beveled rim. The bowl and the rim are a real mess. This must have been a great smoking pipe.He took a photo of the right side and heel of the bowl to show some of the grain and the condition of the pipe. There is one small fill at the top of the bowl that will need to be dealt with but otherwise it is a pretty pipe.Jeff took photos of the stamping on the top and underside of the shank to capture the clarity of it even under the grime. It is clear and legible.The vulcanite stem was worn at the button with the sharp edge of the button worn down with tooth marks. The stem also had a lot of chatter both sides and some oxidation.Jeff had already cleaned up the pipe before sending it to me. He had reamed the bowl with a PipNet pipe reamer and cleaned it up with a Savinelli Fitsall Pipe Knife. He scrubbed the exterior with Murphy’s Oil Soap and a tooth brush to clean off the grime off the finish and the heavy overflow of lava on the rim top. He cleaned up the internals of the shank, mortise and stem with pipe cleaners, cotton swabs and alcohol to remove all of the oils and tars in the pipe. When it arrived here in Vancouver it was a clean pipe and I knew what I had to work with. I took photos of it before I started my part of the restoration. I took photos of the rim top and the stem to show their condition. Jeff was able to clean up the thick cake and lava overflow that was shown in the rim and bowl in the earlier photos. He was also able to get rid of the grime and grit in the surface of the briar. The rim top looked a lot better than when he started. There was still some pitting and darkening on the surface of the inward bevel but it should clean up very well.I decided to work on the scratches in the surface of the briar first. I polished the surface with micromesh sanding pads – wet sanding with 1500-2400 grit pads and dry sanding with 3200-12000 grit pads. I wiped the rim down with a damp cloth after each pad. I was able to polish out the scratches without damaging the finish on the bowl or the rim. The finish looked very good once I was done polishing it. On the right side of the bowl there was a fill that stuck out. I touched it up with a black Sharpie pen and buffed it by hand. I used a Maple stain pen to touch up the area around the fill and the lighter areas on the shank end. The finish on the rest of the bowl was in excellent condition. After I was finished with the stain pens and polishing the restained areas I rubbed the bowl and shank down with Before & After Restoration Balm to deep clean the finish on the bowl and shank. The product works to clean, enliven and protect the briar. After it sat for a little while I wiped it off and buffed it with a soft cloth. The briar really began to have a rich shine. I took some photos of the bowl at this point to mark the progress in the restoration. It is a beautiful bowl. I set the bowl aside and worked on the stem at this point in the  process. The stem may well be a replacement one but it is hard to know for certain. It is well made and fits perfectly to the shank. I decided to start by repairing the deep tooth marks on the button and the stem. I filled them in and built up the surface of the button with clear super glue and set the stem aside while I went to lunch.I used a needle file to cut a sharp edge on the button on both sides of the stem. I worked it until there was a definite sharp edge. I sanded the button and the stem with 220 grit sandpaper and 400 grit sandpaper to remove the scratches. I polished the stem with micromesh sanding pads – wet sanding with 1500-2400 grit pads and dry sanding with 3200-12000 grit pads. I wiped the stem down after each pad with Obsidian Oil to remove the sanding dust. I polished Before & After Pipe Stem Polish – both Fine and Extra Fine. I gave it a final hand buff with some Obsidian Oil and laid it aside to dry. I put the stem back on the pipe and the pipe to the buffer. I worked it over with Blue Diamond to polish out the remaining small scratches in the briar and the vulcanite. I gave the bowl and the stem several coats of carnauba wax and buffed the pipe with a clean buffing pad to raise the shine. I hand buffed it with a microfiber cloth to deepen the shine. I love the way that the buffer brings a shine to the pipe. I was happy with the look of the finished pipe. The photos below show what the pipe looks like after the restoration. I have worked on quite a few Bari’s over the years and I am always pleased with the way the shape and the grain work together.  The shape and the look is uniquely Bari and are very elegant. The polished black vulcanite stem looks really good with the contrasting browns of the briar. The dimensions of the pipe are Length: 5 inches, Height: 1 3/4 inches, Outside diameter of the bowl: 1 3/4 inches, Chamber diameter: 7/8 of an inch. This pipe will soon be added to the rebornpipes online store. If you are interested in adding it to your collection let me know. This one should be a great smoker. Thanks for walking through the restoration with me on another beauty!

Rejuvenating a Norwegian Made Lillehammer 204 Horn


Blog by Steve Laug

It was time to turn back to a couple of pipes that Jeff and I purchased recently. We bought some pipes from a guy in Pennsylvania. The next pipe on my worktable comes from that collection. This one is a panel shape horn with a square shank and a saddle stem. The rim topped is crowned and the shape follows the grain of the block of briar very well. It is stamped on the left side of the shank Lillehammer arched over GL and on the right side it has the shape number 204 stamped just ahead of the stem/shank union. The stem has a GL stamped on the left side of the saddle. The pipe was very dirty with a thick cake in the bowl and some lava overflowing on to the rim top. It was hard to know what the inner edge of the rim looked like because of the lava and cake. From the photos there seemed to be some damage to the inner edge at the back of the bowl but I could not be sure. Other than being dirty the finish appeared to be in good condition. The stem was lightly oxidized and had come calcification where a pipe Softee bit had been. There was some light tooth chatter and tooth marks on both sides of the stem at the button. I have included two photos that the seller sent to me to give an idea of what Jeff and I saw when we were deciding to purchase the pipe. We had the pipe lot shipped to Jeff in the US so he could do the cleanup on them for me. He took photos of the pipe before he started working on it so I could see what he was dealing with. I am including those now. He took photos of the rim top to show the thick cake in the bowl and the overflow of lava. The cake is thick and hard and the lava overflow is a thick band around the bowl. The bowl is a real mess. This must have been a great smoking pipe.The next photos show the side and bottom of the bowl to give a clear picture of the beauty of the birdseye, cross and flame grain around the bowl of the pipe. Under the grime there is some great grain peeking through.Jeff took photos of the stamping to capture the clarity of it even under the grime. The brand and the shape number are very readable. The stem looked dirty and oxidized with the calcification left behind by a pipe Softee bit. The bite marks and tooth chatter on the stem was light and should not take too much work to remedy. The oxidation was another issue that would need to be addressed.Before I started my work on the pipe I wanted to learn more about the Lillehammer brand so I turned to the first two sites that I always check to gather information on a brand. The first site I turned to this time was the Pipedia site (https://pipedia.org/wiki/Lillehammer). There I was able to learn the backstory and history of the brand. I quote in full from that article and include pictures of the two principals.

In the 1830’s a young Norwegian wood-carver named Gudbrand Larsen saw some pipes made from meershcaum. He though they were beautiful and wanted to make pipes like that, but he could not obtain the material. So he decided to go where it was to be found.

Gudbrand Larsen (1815-1902)

Larsen went to Eskisehir, Turkey, to learn all about meerschaum. But the most beautiful pipes in those days were not made there but in France, so he continued his journey to Marseielle, where he found work in one of the most famous factories at the time. In 1844 he returned to Norway and started a small factory for meerschaum pipes in the town of Lillehammer. The pipes garnered a good reputation from the first.

Gudbrand’s son, August, followed in his father’s footsteps and joined him in the business. However, father and son did not get along very well, so Junior–as August usually was called–did like his father once had, he traveled to learn more about pipe-making.

Martin August “Junior” Larsen (1855-1915)

Junior understood that briar, not meerschaum, was the material of the future, so during his journey he studied the subject carefully, first in England and then in France.

In Paris Junior earned a position with a pipemaker of good repute and became highly respected in his work. However, Gudbrand was getting old and considering retirement, so he asked his son to come home and take over the family business, an offer Junior willingly accepted. As a businessman Junior was even more successful than his father, and during his period of leadership the business prospered.

In 1902 Gudbrand Larsen died at almost 90 years of age. Then Junior passed away a dozen years later, in 1914. His death was followed by some unstable years for the factory because it lacked competent management. And World War I had just started on the continent, which made it difficult to obtain raw material.

In 1916 the factory was bought be a company that appointed new management, and a long, stable period of successful expansion had begun. That period was to last for almost half a century. The main part of the production was briar pipes, but they also continued to make some meerschaums.

Problems at the factory began again at the end of the 1960s, when sales slowed dramatically. The main reason was the “fancy pipes” had become very popular, and Larsen’s of Lillehammer had nothing to offer there. Something had to be done and two steps were taken. In the middle of the 1970s the Danish company Kriswill was bought, and in that way they obtained access to that company’s more modern shapes. A new designer was also employed, but these efforts were not sufficient, and in the 1979 the factory closed.

I turned to the my usual second information site – Pipephil’s (http://pipephil.eu/logos/en/logo-l4.html) and most of the information was confirmed. There was one startling difference that I have highlighted above in the Pipedia information and below in the Pipephil information with bold, italic and underlined text with the main point in red text.

While Lillehammer’s sales went from bad to worse in the 1960’s, Kriswill purchased the brand and used to manage the Norwegian plant a short period.

Now there was a mystery that needed checking. On the Pipedia site it said that in the mid 70’s the Lillehammer Company bought out Kriswill to access the modern shapes. Pipephil reverses that and says that the purchase went the other way around – Kriswill bought out Lillehammer and managed the shop for a short period which putting the two articles together was from the mid 1970s until the plant closed in 1979.

I did some searching on the web to see if I could clarify the above anomaly. The first link I found was to the Pipe Club of Sweden site. There was a great article on the pipe maker Bård Hansen who followed the tradition of the Lillehammer Factory and was trained by a retired engineer from the Lillehammer Factory thus tying him to the brand. In that article there is confirmation for the Pipedia information above (http://www.svenskapipklubben.se/en/pipemakers/bard-hansen/). I quote in part the article there by Jan Andersson. (Once again I have highlighted the pertinent information in the text below using bold, italic and underlined text and marking the main point highlighted in red.

In a Swedish tobacco shop, even in small places in the province, there were usually a fair number of pipes in the 50s and 60s with stems from aluminum. But even for the more traditional pipesmoker, who wanted a pipe from wood and ebonite, there was a lot to choose from. Ratos was the dominant brand, but for those who were willing to spend a little extra, there were usually at least a few more exclusive pipes – pipes in green or blue-checked boxes. Those pipes came from Norway, from G.L. Larsens pipe factory in Lillehammer.

Photo is from the Pipephil Website.

Lillehammer pipes were found in two qualities, Bastia was a little cheaper and Lillehammer GL was for the truly discerning pipesmoker. Later I have learned that there were also more expensive and finer qualities, even one called Best Make, but those luxury pipes were never found in the shops in the small town where I lived. Lillehammer pipes were easily recognizable, they usually were rather slim and with a long stem, which was the fashion at the time. So while a true English gentleman smoked a Dunhill with the white dot on the stem, Norwegian or Swedish pipesmokers preferred an elegant Lillehammer.

We will not go into detail about the interesting story of Lillehammer, but unfortunately we can see that from the beginning of the 70s, it rapidly went downhill for the factory. They bought the Danish company Kriswill but that was not a success, nor was the new series of shapes created by the pipemaker Thorbjørn Rygh. So G.L. Larsen’s pipe factory in Lillehammer had to close, deeply missed by many of us. This feeling persists to this day, which is particularly evident in the great interest in the Lillehammer pipes at auctions and collector’s markets.

The article goes on to make the tie with Bard Hansen. I quote in part to show the ongoing life of a brand and its machinery and to help establish a date for the pipe that I am working on.

Until last spring, I thought that Norwegian manufacture of smoking pipes was just a memory, but fortunately I was wrong. In Bergen there is a man called Bård Hansen, who carries the tradition on.

It all began six years ago when Bård met Hans Tandberg, a retired engineer who had been working as a pipemaker in Larsen’s pipe factory. He had built a workshop with machines from his old workplace and as he had no heirs, he wanted to sell it all to someone who could carry on the traditions. Bård was interested to learn, so he bought the machines and a large stock of briar from the old Lillehammer factory and, not least, he was trained in the art of making pipes by Hans Tandberg.

Bård keeps the old traditions from the Lillehammer factory alive. He prefers the classical, clean lines and two things are important to him: balance and rhythm.

Mainly Bård makes small and medium-sized pipes. The pipes are stamped Tabago. The stems are from ebonite, except on some pipes, where the shaft is from briar.  Those who wish can get their name or any other engraving on a silver ring.

Gathering the data together from my research I have learned that the pipe I have on my worktable is from the period between the mid 70’s to the closing of the factory in 1979. I am also quite certain that came from the time when Kriswill was purchased with the hope of breathing new life into the old Lillehammer Factory. The purchase was made with the thought that through their innovative and modern shapes the Kriswill company would offer new markets for the Lillehammer brand. The GL stamping on this one makes it one of the higher end pipes from the factory.

Armed with that information I turned to address the pipe itself. Jeff cleaned up the pipe for me. He reamed the bowl with a PipNet pipe reamer and cleaned it up with a Savinelli Fitsall Pipe Knife. He scrubbed the exterior with Murphy’s Oil Soap and a tooth brush to clean off the grime off the finish and the heavy overflow of lava on the rim top. He cleaned up the internals of the shank, mortise and stem with pipe cleaners, cotton swabs and alcohol to remove all of the oils and tars in the pipe. He soaked the stem in Before & After Deoxidizer and was able to remove much of the oxidation. When it arrived here in Vancouver it was a clean pipe and I knew what I had to work with. I took photos of it before I started my part of the restoration. I took photos of the rim top and the stem to show their condition. Jeff was able to clean up the incredibly thick cake and lava overflow that was shown in the rim and bowl photos above. He was also able to get rid of the grime and grit in the surface of the briar. There was some general rim darkening and a burned and damaged area on the backside of the bowl that made the bowl out of round. The inner edge of the bowl was rough to the touch and a bit jagged because of the burn. The rest of the rim top and edges looked very good. The variation in the size of the shank and stem are also visible in the photos below. You can see the step down transition. However what you cannot see in the photos is the “lip” at that transition on the briar portion. The stem was much cleaner and there was light tooth chatter on both sides near the button.I took a photo of the left side of the shank to show the stamping on the pipe. It read as noted above – Lillehammer GL. You can also see that a portion of the white paint in the GL stamp on the left side of the saddle stem is missing.I decided to address the bowl first. I worked on both the rim damage and on the flow of the shank to the stem. There was a lip on the briar at the shank/stem transition that needed to be dealt with to make it smooth to touch. I worked on the inner edge of the rim first using a folded piece of 220 grit sandpaper smooth out the damage, bevel the inner edge and bring the bowl back as close as possible to round.I then turned to the shank to smooth out the transition to the stem. I sanded the shank with 220 grit sandpaper to match the stem. I carefully avoided sanding the stamping so as not to damage it but to still minimize the lip on the briar at the joint. I  sanded the top and underside with 220 grit sandpaper to smooth that out as well. I polished the briar with micromesh sanding pads – wet sanding with 1500-2400 grit pads and dry sanding with 3200-12000 grit pads. I wiped the bowl down after each pad with a damp cloth. I used a Maple and a Cherry Stain pen to blend the sanded areas with the rest of the bowl and shank. The combination of the two stain pens were a good match. I rubbed the bowl and shank down with Before & After Restoration Balm to deep clean the finish on the bowl and shank. It also helps to blend the newly stained areas in to the surrounding briar. The product works to clean, enliven and protect the briar. I worked it in with my fingers to get it into the briar. After it sat for a little while I wiped it off and buffed it with a soft cloth. The briar really began to have a rich shine. I took some photos of the bowl at this point to mark the progress in the restoration. It is a beautiful bowl. I set the bowl aside and worked on the stem at this point in the  process. I sanded tooth chatter and the remaining oxidation on the stem with folded pieces of 220 to remove the marks and the light brown colouration on the stem surface. I sanded them with 400 grit sandpaper until the marks were gone and the oxidation was gone.I polished the stem with micromesh sanding pads – wet sanding with 1500-2400 grit pads and dry sanding with 3200-12000 grit pads. I wiped the stem down after each pad with a damp cloth to remove the sanding dust. I used the Before & After Pipe Polish to remove the small minute scratches left in the vulcanite even after the micromesh regimen. I finished by wiping the stem down with a final coat of Obsidian Oil and set it aside to dry. I put the stem back on the pipe and the pipe to the buffer. I worked it over with Blue Diamond to polish out the remaining small scratches. I gave the bowl and the stem several coats of carnauba wax and buffed the pipe with a clean buffing pad to raise the shine. I hand buffed it with a microfiber cloth to deepen the shine. The pipe polished up really well and even the newly beveled rim top looked good. I was happy with the results of the reworking of the rim. The finished pipe is shown in the photos below. The unique horn shape definitely reminds me of the Kriswill pipes that I have restored though none of them were paneled horns. It is my first Lillehammer pipe and I have to say it is quite stunning. The polished black vulcanite stem looks really good with the browns of the briar. The dimensions of the pipe are Length: 6 inches, Height: 2 inches, Outside diameter of the bowl: 1 ½ inches, Chamber diameter: 3/4 of an inch. This is another pipe that I will be putting it on the rebornpipes online store shortly, if you are interested in adding it to your collection. The “detective” work on the brand was an added bonus for me as I worked on this beauty. Thanks for walking through the restoration with me on this beauty!

Breathing Life into a Paneled Royal Esquire 730 Dublin


Blog by Steve Laug

The next pipe on my worktable is yet another pipe from a local pipe shop. It is another of the pipes that came from the estate of an older gentleman whose wife returned his pipes to the shop for restoration and resale. This one is a smooth finished Paneled Dublin. It is stamped on a left side of the shank Royal Esquire over Made in France with the shape number 730 next to the shank/stem junction on the underside of the shank. On the left side of the saddle stem is the is a stamped top hat logo. The pipe was very dirty with a thick cake in the bowl and some lava overflowing on to the rim top. It was hard to know what the inner edge of the rim looked like because of the lava and cake. There were some nicks on the left side of the bowl and the cap that would need to be dealt with. The stem was lightly oxidized and had come calcification where a pipe Softee bit had been. There was some tooth chatter and tooth marks on both sides of the stem at the button. I included this pipe in the batch that I sent off to my brother for cleaning. I know I have said this before but I will have to say it again. I can’t say enough how much I appreciate his willingness to clean and ream the pipes for me. It allows me to move through the repairs much more quickly. When he received the pipe he took a series of photos of it to show its condition.He took a photo of the rim top to show the thick cake in the bowl and the overflow of lava on the rim top.He took photos of the sides and bottom of the bowl to give a clear picture of the beauty of the grain on this smooth finished old pipe. Under the grime there is some great grain peeking through. Jeff took photos of the stamping to capture the clarity of it even under the grime. The brand and the shape number are very readable. He also included a photo of the Top Hat logo on the stem. The stem looked dirty and oxidized with the calcification left behind by a pipe Softee bit. The edges of the button had bite marks and there was some tooth damage to the surface of the stem next to the button on both sides.I have worked on one other Royal Esquire pipe previously from this same collection. It was a poker with a lot of fills in the shank and bowl. It was a mess and once finished turned out very well. Here is the link to that blog: https://rebornpipes.com/2018/03/25/breathing-new-life-into-a-royal-esquire-french-made-poker/. On the previous pipe I had done a lot of searching and hunting to find out about the maker and found nothing on Pipedia or on PipePhil’s site. It remains a mystery to me. Are any of you familiar with the brand? Let us know.

Jeff cleaned up the pipe for me. He reamed the bowl with a PipNet pipe reamer and cleaned it up with a Savinelli Fitsall Pipe Knife. He scrubbed the exterior with Murphy’s Oil Soap and a tooth brush to clean off the grime in the sandblast finish and the heavy overflow of lava on the smooth rim top. He cleaned up the internals of the shank, mortise and stem with pipe cleaners, cotton swabs and alcohol to remove all of the oils and tars in the pipe. When it came back to Vancouver it a cleaner and better looking pipe. I took photos of it before I started the restoration. I took photos of the rim top and the stem to show their condition. Jeff was able to clean up the grime and darkening on the rim top. The inner edge of the bowl had some damage on the front left and right. There was some general rim darkening and the rim top was damaged from tapping it out on hard surfaces. The stem had light tooth chatter and some deeper tooth marks on both sides near the button.I was able to get a very clear picture of the stamping on the left and underside of the shank and the Top Hat logo on the saddle stem.I decided to address the issues with the bowl and rim top first. I wiped the bowl down with acetone on a cotton pad to remove the shiny spots of the lacquer coat that remained on the shank. The acetone also cleaned off any remaining debris on the briar. You can see the deep nicks and gouges on the left side of the bowl in the photos below. I  topped the bowl on a topping board with 220 grit sandpaper to clean up the rim top damage and to minimize the burn damage on the edge of the bowl. I used a folded piece of 220 grit sandpaper to smooth out the inner edge and give it a slight bevel to remove more of the burn marks and damage. I repaired the gouges and nicks in the left side of the bowl and cap with clear super glue and briar dust. Once the repairs cured I sanded them smooth with a folded piece of 220 grit sandpaper. I polished the rim top and the bowl and shank with micromesh sanding pads – wet sanding with 1500-2400 grit pads and dry sanding with 3200-12000 grit pads. I wiped the bowl down after each pad with a damp cloth. The photos tell the story. I used a Maple coloured stain pen to blend the newly sanded areas on the side of the bowl and the rim top into the rest of the bowl.I rubbed the bowl and shank down with Before & After Restoration Balm to deep clean the finish on the bowl and shank. The product works to clean, enliven and protect the briar. I worked it in with my fingers to get it into the finish. After it sat for a little while I wiped it off with a soft cloth. I buffed the bowl with a horsehair shoe brush to polish it. The briar really began to have a rich shine. I took some photos of the bowl at this point to mark the progress in the restoration. I buffed the bowl with Blue Diamond polish on the buffing wheel to even out the look of the stain on the bowl sides and rim top. The pipe is looking really good at this point. It is even better in person than the photos show. I set the bowl aside and worked on the stem. I repaired the tooth marks with clear super glue. I set the stem aside to let the repairs cure. Once the glue cured I cleaned up the edge of the button and flattened out the repaired areas with a needle file. I sanded the repaired areas with folded pieces of 220 to remove the scratches and file marks on the stem surface. I sanded them with 400 grit sandpaper until the repairs were blended into surface of the stem.I polished the stem with micromesh sanding pads – wet sanding with 1500-2400 grit pads and dry sanding with 3200-12000 grit pads. I wiped the stem down after each pad with a damp cloth to remove the sanding dust. I used the Before & After Pipe Polish to remove the small minute scratches left in the vulcanite. I finished by wiping the stem down with a final coat of Obsidian Oil and set it aside to dry. I put the stem back on the pipe and worked it the pipe over with Blue Diamond to polish out the remaining small scratches. I gave the bowl and the stem several coats of carnauba wax and buffed the pipe with a clean buffing pad to raise the shine. I hand buffed it with a microfiber cloth to deepen the shine. The pipe polished up really well with the repairs disappearing into the new finish. The finished pipe is shown in the photos below. There is something about the pipe that reminds me of some of the Edwards pipes that I have repaired and restored over the years. The paneled Dublin and cap polished really well. The polished black vulcanite looks really good with the browns of the briar. The dimensions of the pipe are Length: 5 3/4 inches, Height: 1 3/4 inches, Outside diameter of the bowl: 1 1/2 inches, Chamber diameter: 3/4 of an inch. This is another pipe that I will be putting it on the rebornpipes online store shortly, if you are interested in adding it to your collection. Thanks for walking through the restoration with me as I worked over this interesting smooth finished paneled Dublin with a square shank. It was a fun one to work on.


Reconstructing a Broken Stem on a 1964 Dunhill Shell 253 f/t


Blog by Paresh Despande

I had just finished a second of the 30 pipes from my Mumbai Bonanza find, a 1979 DUNHILL BRUYERE 51671; here is the link to the write up; https://rebornpipes.com/2019/03/13/reconstructing-a-broken-stem-on-dunhill-bruyere-51671/

I was fortunate enough to have heeded to the advice of my dear friend and mentor, Mr. Steve, and struck a deal with a trash collector from Mumbai. He did not know what he was selling and I did not know what I was buying as we reside in different cities!! The argument that Mr. Steve presented was that if not anything, I shall at least have some spares and this was logical. I struck a deal and here are pictures of the pipes that I received in this lot. This lot contains some very nice collectible pipes, a few well known brand pipes and some mediocre pipe brands. Overall, with seven Dunhills, a Preben Holm #1, a couple of Made in England Pete System pipes, Charatan’s, Custom-Bilt, Stanwell and other assorted pipes, I would say that I had hit a huge jack pot!! Hence, I like to call this find as “Mumbai Bonanza”.

The pipe that I decided to work on next from this find is another Dunhill, a 1964 Shell Briar billiard, and is marked in an indigo circle in the picture below. It is stamped on the heel and the underside of the shank with the shape number 253 over a star followed by F/T followed by DUNHILL over Shell Briar over the COM stamp Made in England 4 which dates it as being made in 1964. This is followed by Group size number 4 in a circle and letter S for Shell. Dunhill White Dot adorns the top of the vulcanite stem. The stampings are deep, crisp and clear. I tried to search on pipedia.org for the significance of the star on the heel. However, the information available did not match with the stampings on the pipe on my worktable. I approached members in my group on FB. Their learned response indicated that Dunhill stamped their replacement stummel with a star at the bottom of the heel. They also assured me that these replacement bowls are intrinsically original with same quality as the original and that this does not affect the value of this pipe.

With assurance, I move ahead with the restoration of this beautiful medium sized and sandblasted Dunhill billiard.

INITIAL VISUAL INSPECTION
The chamber is clean with a thin layer of cake which indicates that the pipe has been kept clean by its previous Steward. From what I can see, the chamber walls appear to be without any damage. The chamber is odorless. There is an overflow of lava on the rim top surface. The inner rim edge show minor unevenness which should be easy to address. It is the outer rim edge that shows significant damage in the form of dents, dings and scratches, all along the circumference. This must have been caused due to hammering of the edge against a hard surface to remove dottle!!!!! This being a Dunhill Shell, it will be a challenge for me to fix these dents. The mortise is clean and so is the shank airway. The condition of this pipe is very similar to the earlier Dunhill Bruyere that I have restored and makes me wonder if these could have come from the collection of the same Steward. The stummel boasts of some beautiful sandblast patterns, a mix of straight and cross grain all around. It is dirty with grime and tar filling in much of the craggy finish. The briar looks lifeless and dull which is nothing serious to address. The round shank of the Billiard flows into a long tapered stem which has a flare, like a fish tail, at the button end and hence the stamp F/T. The vulcanite stem shows significant damage to the button end, in fact, there is no button at all, similar to the Dunhill Bruyere that was restored earlier!!!!! This convinces me that there is a high probability that these have been previously enjoyed by the same Steward. The stem end is missing, well, about an inch of vulcanite. This pipe would have been his favorite and he had continued to enjoy bowls of his favorite tobacco long after the button end had been chewed off. This is evident from the significant tooth chatter on both the surfaces of the stem. I intend to reconstruct/ rebuild this portion of the stem, including the slot, while maintaining the stem and general profile of the pipe. This will require major repairs. The quality of vulcanite is good. The condenser tube inside the stem however will have to be cleaned and sanitized. In this project, repairs to the damaged outer edge and stem rebuild will be a major challenge, the stem more so, as achieving the fish tailed profile of the stem will need to be adhered to for overall aesthetic appeal of this piece of briar. Having just finished the tedious restoration of the Dunhill Bruyere, I am aware of the challenges this restoration will present en-route.

THE PROCESS
Since the stem has significant damage, and from my experience of stem repairs this will be time consuming and laborious part, I start this project by tackling the stem first. I had decided to rebuild the entire stem including the button and the slot, while giving the button end a slight flare which is the trademark of a fish tail stem. This decision was partly dictated by the fact that I do not have a rotary cutting blade to cut the damaged button end and partly to my innate desire to maintain the originality of the pipe. It’s a Dunhill after all!!

Now that I was clear about the path to be followed, I first flame both the surfaces of the stem with a Bic lighter. The heat from the flame raises the vulcanite to the surface and takes care of the tooth chatter that was seen earlier. I sand the stem end with a folded piece of 220 grit sand paper to erase the scratches and provide a smooth surface for the intended fill. I cleaned out the internals of the stem with hard bristled and regular pipe cleaners dipped in isopropyl alcohol. Once I was satisfied with the internal cleaning, I wiped the stem surface, particularly the damaged button end, with a cotton pad and alcohol to remove any traces of dirt and grime. To begin the stem repairs, I smeared a folded pipe cleaner with petroleum jelly and inserted it in to the stem airway. I prepared a mix of CA superglue and activated charcoal and generously applied it over and extending beyond the broken surface and set it aside for curing over night. I have not researched and measured the exact length that I had to reconstruct, but eyeballed the length using the longer right side of the stem where a portion of the button was still intact. Before moving ahead, I would like to mention here that I had applied this mix in layers, over the week, to achieve sufficient thickness which would help during the filing and sanding while shaping the button and achieving the correct stem profile. While the stem repair was set aside to cure, I moved ahead to deal with the stummel repairs. There was practically no cake in the chamber and so I directly used a folded piece of 180 grit sand paper to sand out the traces of cake and expose the walls of the chamber to ascertain that there are no cracks/ heat fissures. I wiped the chamber with a cotton pad dipped in isopropyl alcohol to remove the carbon dust left behind by all the reaming and sanding process. The walls of the chamber were solid with no damage. This was followed by cleaning the mortise by scraping away at the dried gunk with my fabricated spatula and followed it up with further cleaning using cue tips, pipe cleaners and shank brush dipped in isopropyl alcohol. This eliminated all traces of old smells from previous usage.Continuing with the cleaning regimen, using a soft brass wired brush I gently scraped away the thick lava coat in the blast of the rim. With a hard bristled tooth brush and dipped in undiluted Murphy’s oil soap, I very deliberately scrubbed the sandblast finish on the stummel and the rim top. The stummel and rim top was dried using paper napkins and soft cotton cloth and set it aside to dry out naturally. The stummel looks fresh and clean. The damages to the outer rim edge are now clearly visible in the above pictures after the cleaning. At this point in the restoration, I was faced with the dilemma of whether or not should I top the bowl to address the rim damage. The issue was recreating the sandblast on the rim top after topping. I put this question to my friends from pipe restoration community on FB. Mr. Steve and Mr. Mark Domingues suggested that I stain the damaged areas with a stain pen and if this does not work, topping is the only recourse available. I went ahead with the suggestion and stained the damaged rim edges and rim top using Mahogany color stain pen. After it had dried completely, I again stained it with dark brown stain pen to darken it further. I set it aside for several hours before working on it any further. Here is how the rim appeared at this stage. Next, I rub a small quantity of “Before and After Restoration Balm” in to the briar with my finger tips and let it rest for a few minutes. The balm almost immediately works its magic and the briar now has a nice vibrant appearance with the beautiful contrasting hues colors that are unique to this sandblast pipe, on full display. I further buff it with a horse hair shoe brush. I had hoped that the balm would work its magic on the filled area and help in blending it a bit, and in this instance, the blend was perfect. The damaged surface has blended to an extent that it appears like a sandblasted surface. Sometimes in life, the most difficult issues have the simplest solutions!! I set the stummel aside and turned my attention to the stem repair. The fill had cured nicely and I moved ahead and began the process of filing and shaping the button end with a flat head needle file. This time around it was more  challenging as I had set for my self the aim of creating a fish tail shape (or rather as close a match to fish tail as possible), a straight thin slot and a concave shape to the button end as seen on original stems. Learning from past mistakes, I marked a straight line for the slot orientation and using only the tip of the pointed needle file, I carved out the slot. I followed it up by sanding with folded pieces of 180 grit sand papers to laboriously shape and widen the slot, always taking care to maintain a straight line. Once I was satisfied with the profile of the slot, I went ahead and shaped the button by first achieving a rough shape with a flat head needle file and there after fine tuning it by sanding it down with a 220 grit sand paper. Unfortunately, being so engrossed in this process made me forget to take pictures of the progess of these stages.

For a better blending, I further sand the entire stem with 220 followed by 400, 600 and 800 grit sand paper. This helps to reduce the sanding marks left behind by the more abrasive 220 grit paper. To bring a deep shine to the vulcanite stem, I went through the complete set of micromesh pads, wet sanding with 1500 to 2400 grit pads and dry sanding with 3200 to 12000 grit pads. I wiped the stem with alcohol after each pad and rubbed it down with Extra Virgin Olive oil to rehydrate the vulcanite. The repairs have blended in very well and the stem now looks shiny black and beautiful. The internals of the stem was once again cleaned out using alcohol and pipe cleaners to clear the airway of all the debris resulting due to the sanding. The finished stem is shown below. To finish, I re-attach the stem with the stummel. I mounted a cotton cloth buffing wheel to my local machine which is similar to the Dremel.  I set the speed at about half of the full power and applied White Diamond compound to the entire pipe. I wiped/ buffed the pipe with a soft cotton cloth to clear it of any leftover compound dust. I then mounted another cotton cloth wheel on to the polishing machine and applied several coats of carnauba wax. I finished the restoration by giving the entire pipe a rigorous hand buffing using a microfiber cloth to raise the shine further. The completed pipe looks lovely, fresh and vibrant. I cannot thank enough my friends Mr. Dal Stanton, Mr. Sam Vior, Mr. Victor Naddeo and Mr. Steve for helping me to research and complete this lovely 1964 made Dunhill Shell billiard.


Repairing a Broken Shank on a Sandblast Kriswill Golden Clipper 1803 Apple


Blog by Lee Neville

Over the past few months I have been in correspondence with Lee via email. He picked up a couple of pipes for me at a local antique shop in Edmonton, Alberta, Canada and sent them to me. We have fired emails back and forth on restoration questions and issues. He also included Charles Lemon of Dad’s Pipes in the conversations and we had a great time. Earlier this week he sent Charles and me an email about a restoration of a pipe that he did using the internal tube to repair a broken shank. He did a great job on the restoration and the description of the work so I asked him if I could post it on rebornpipes. He was glad to have me do so. Thanks Lee for your work and write up welcome to rebornpipes as a contributor! – Steve

Thought I would share my latest pipe rehabilitation effort of a Kriswill Golden Clipper – Model 1803.  This is the sandblast variant of the 03 shape. It showed up in the Winnipeg EBay lot I purchased and was in two pieces – stem (still attached to its snapped off shank) and the bowl itself.  I tried to remove the stem from the snapped off shank – without luck –  stuck tight. The bowl and shank had broken crookedly transversely across the shank – the break measured between 4mm and 8mm from the bowl body. I’m thinking it occurred when someone tried to pry and twist the stem out of the shank while holding on to the bowl.  The tars holding the stem fast held while the shank and bowl parted ways. In all, a stark example why one cannot use the bowl for leverage when trying to removing a reluctant stem from a shank.  Cue Yosemite Sam screaming “Whoa Mule! Whoooooahhh!!!”.There is also a crusty / gummy residue on the broken bowl and shank surfaces indicating a previous failed glue repair. I’m excited and eager to try my hand at a hidden brass tubing reinforcement glued up inside the shank & bowl as part of this repair.

Bowl Rehab
The bowl was packed full of foul smelling crust. The bowl edge is quite ragged – burned and charred in one area, a bit of a gouge just below the rim in another, damage/wear from dottle banging etc. around the periphery. As I could get to the bottom of the bowl from the exterior of the bowl,  I gently used a dental pick to pry manky tars, oils and burgey from the smoke channel. No doubt this build-up led to the welded-on stem and the situation at hand.

I scraped the carbon out of the bowl with a flexible knife blade, then removed the rest of the crust with some twists with a dowel covered with 220 grit sandpaper to work back to briar. I then used 320 / 400 grits over the dowel to finish the bowl interior to smooth. Luckily, there are no cracks, burnouts in this bowl.

I filled the gouge below rim edge at the 11 o’clock position with CA glue and briar dust to build this rim area up – this minimized the following topping effort. I didn’t want to significantly alter the geometry of the bowl.  Minimal is the key word here. Re-topping was followed by polishing the rim up to 4000 grit with micro mesh pads. I re-stained the rim with a stain marker to bring it back into line with the existing stain value.

I finished up the bowl exterior by scrubbing it gently with cotton pads moistened with water, then repeated with pads wetted with alcohol. Looking good.

Re-attaching the shank to the bowl
I soaked the stuck-together shank and stem in isopropyl alcohol overnight.  They easily pulled apart between the jaws of two pairs of padded pliers. Solvents 1 – Evil 0! The shank remnant stunk with old badness. I hit it with brushes and q-tips and was able to clean it out in 15 minutes of vigorous action.  I’ve cleaned dirty shotguns stem to stern quicker than this 25mm length of broken briar shank!

I used a dental pick to remove most of the remnants of dried glue from the shank and the bowl so they’d fit as closely possible when re-glued.  I then used the CA + spray accelerator product from Inoteca to glue the bowl to the shank. Applying a very thin layer of medium viscosity CA glue to both surfaces, I pressed them together, then hit the assembly with the spray accelerator.  Instant activation and hold. I left this overnight to cure, then the following evening removed the squeeze out from the joint with needle files.  This was followed with filling gaps in the glue line with briar dust and CA glue, needle filing and light sanding.

I applied random dabs of stain marker pen (dark oak and mahogany) to colour match the briar dust/CA fills around the glue line, then I blended these re-stained areas into the stummel with a q-tip moistened with alcohol.

Now for the hidden brass tubing reinforcement.  I bought a length of 5/32″ OD brass tube from a local hobby shop as its ID would be close to the stock diameter of the draught hole post repair. I measured approximately 14mm of briar body between the opening of the draught hole in the bowl bottom to the edge of the broken shank still attached to the bowl.  This meant I could use 20mm of tubing to span the break between the bowl body through the shank to the bottom of the stem mortise. The tube reinforcement will span the break area 10mm each way.

I cut a 20mm length of tubing and roughed up its external surface with needle files to provide additional physical bonding for the epoxy.  Inserting the bowl into my small Dremel bench vise with shank pointing to the sky, I drilled out the shank using a 11/64” bit to the desired depth. This 11/64” hole will allow room for the epoxy to fix the reinforcing length of tubing to the shank wall.

I gently flared one end of the brass tubing using a center punch. This flared end will drop and seat against the stem end of the 11/64” hole drilled in the shank.  I then mixed up a bit of JBWeld, generously smeared the exterior of the tubing with it, then threaded a vaselined pipe cleaner through the tube/glue mess.  The pipe cleaner functions as a guide for the tube to slide into the shank and will prevent epoxy from sealing the draught hole at the end of the tubing through to its opening at the bottom of the bowl.

I pressed everything home with a length of Q-tip stick and was gratified to feel the tubing seat its flared end at the top of the 11/64” hole drilled through the shank mortise.  I pulled the pipe cleaner through the tubing from the bowl end – ensuring any epoxy squeeze-out was cleared from the bottom of the bowl. I used Q-tips to remove any epoxy squeeze-out in the stem tenon area of the shank and left the epoxy to set overnight.

The picture below shows the flared end of the hidden tubing snugly glued below the bottom of the shank mortise in the stummel.Cleaning up the stem
The stem was horribly packed full – poking and prodding with brushes, pipe cleaners and picks, I worked both ends of the stem until it was clear. Then it went into an oxyclean bath to lift the oxidation.  Luckily, the Kriswill stamp was in good shape.  The next day, I removed the lifted oxidation with soft toothbrushes, 400 grit wet n’ dry and then moved quickly through the micro mesh pads through to 12000 grit, it came up bright and shiny.

Finishing the pipe
I slathered on a thick coating of Howards Feed and Wax (beeswax, carnauba and citrus oils) and rubbed it into the stummel to feed the thirsty briar. Gently buffed with a microfibre cloth.  I also treated the bowl to a coating of maple syrup + activated charcoal. I dabbed a bit of Testors white enamel into the stamping on the stem, then wiped the excess away – the Kriswill stamp is now very noticeable.

The stem married up to the stummel with little fuss – It looks good.  It’s a lovely pipe – a small rusticated apple with a delicate shank and stem. It’s a feather-light lovely example of Danish pipe making from the late 1960’s – early 1970s. I’m really looking forward to sparking it up.Again, thank you both (Charles Lemon of Dad’s Pipes Blog and Steve Laug of rebornpipes blog) for your exhaustive documentation around this procedure – I would have been in quite the pickle without your guidance. (I wish you both the very best in your adventures.)

Photos of the finished restoration are shown below. I am happy with the finished pipe and enjoying the fruit of my work.

The pipe dimensions are as follows:
Kriswill Golden Clipper – Model 1803
Bowl Height: 40mm
Bowl opening: 22mm
Max depth of bowl: 35mm
Max Bowl diameter: 38mm
Length of stummel: 65.28 mm
Diameter of shank: 11mm
Length of stem: 89 mm
Over all length of pipe: 155mm

Top View – showing the topping and stain blend.  I did radius the inside of bowl ever so slightly to bring it back into round.Right side of bowl – Detail. Bottom of bowl – showing rustication.Pipe in profile (the near side or right side) – love the proportions of this pipe – gee whiz they made them graceful back in the day!Pipe in profile (the far side or left side).