Tag Archives: removing tooth marks

A Beautifully Grained Jobey Designer Cauldron Lay Under Thick Varnish


Blog by Steve Laug

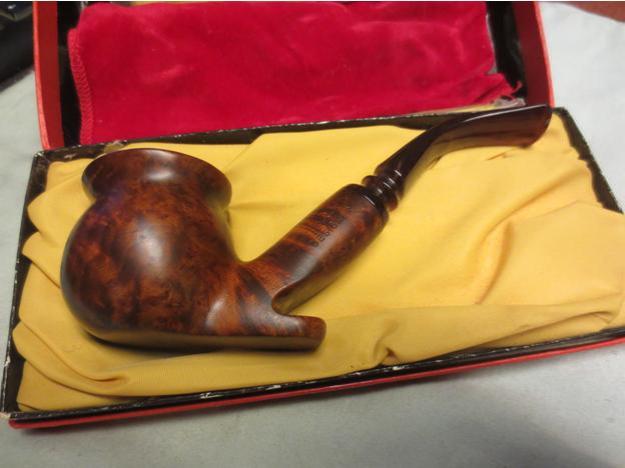
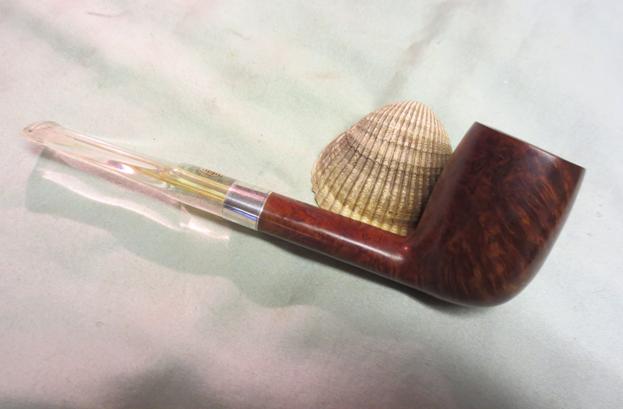
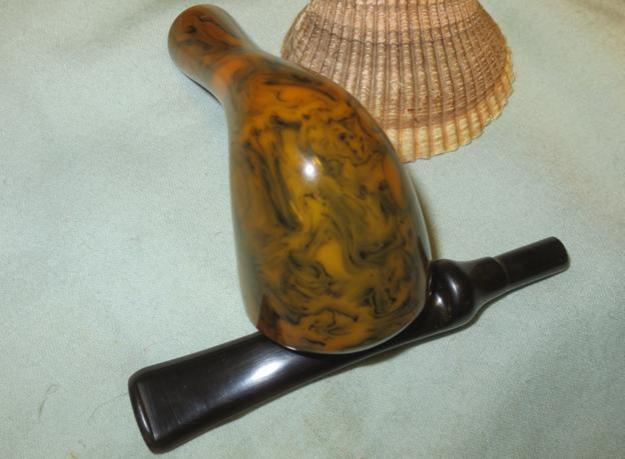
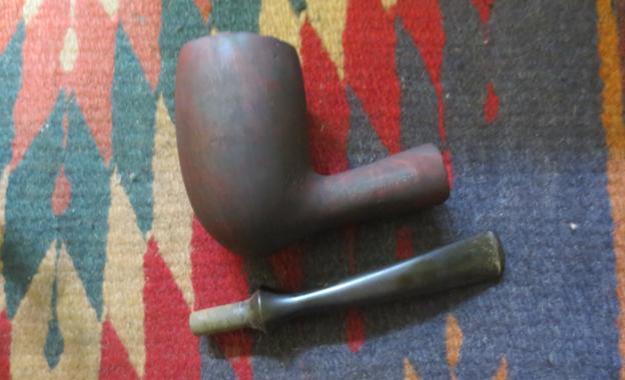
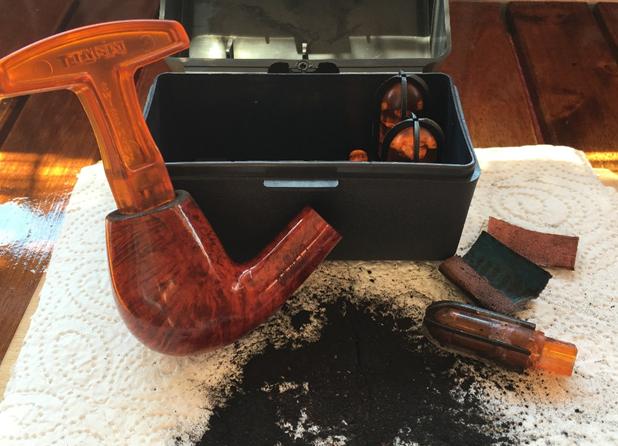
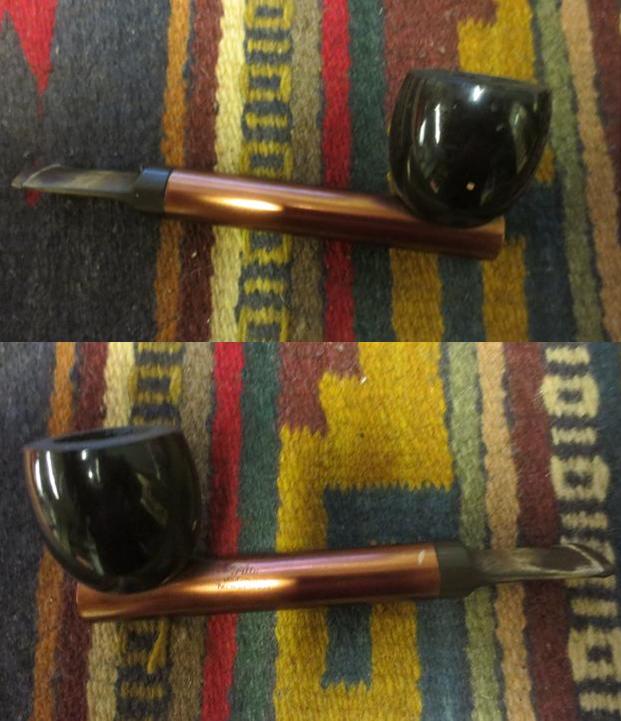
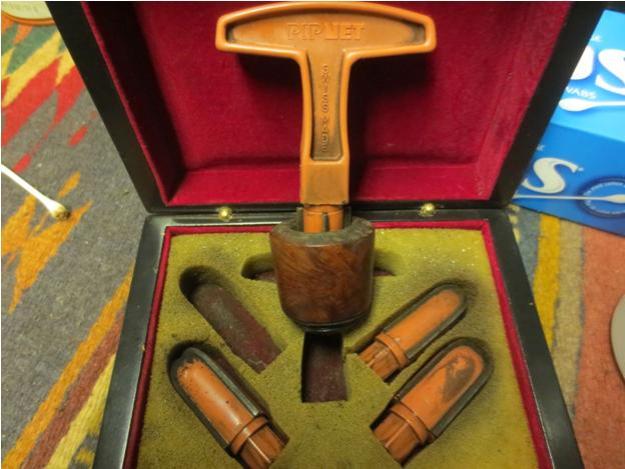
When I was visiting in Idaho my brother Jeff pulled out this Jobey box and handed it to me to look at. I had no idea what to expect once I opened the box. I have cleaned up a lot of Jobey pipes over the years and have really liked the rusticated Jobey Stromboli pipes with their colourful stems and deep rough surfaces. I have seen others that were pretty but nothing spectacular. I turned the box over in my hands to see if there were any hints on the outside what was hidden under the lid but there was nothing – just the classic red box with the Jobey Pipe logo on the lid.Jo1
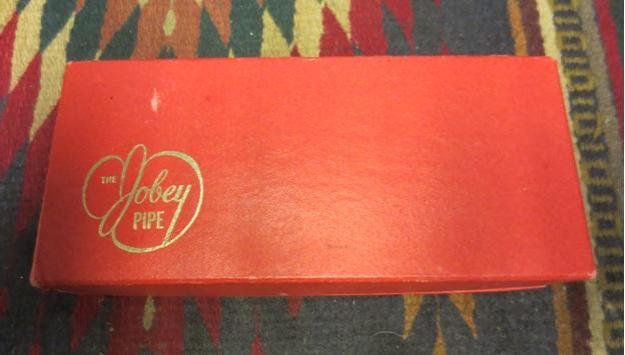
I opened the box to have a look and was surprised. What was inside was actually a really nice looking pipe at first glance. It was stamped on the left side of the shank Jobey over DESIGNER and on the right side of the shank D80 over HANDMADE. The stem was Lucite with a variety of brown tones that ran at an angle across the stem. The finish looked funny to me in that for a handmade pipe it was rough textured. I expected it to be silky smooth but it was rough to the touch and there were brush marks all over the surface. It looked to me like someone had brushed on a thick coat of varnish to give the pipe a perma-shine. The box also had the red pipe sleeve and a Jobey Polishing Cloth in the lid.Jo2Inside the polishing cloth package there was also a cloth for treating the stem. Both were Jobey specialty products. The Jobey sock is slightly worn.Jo3
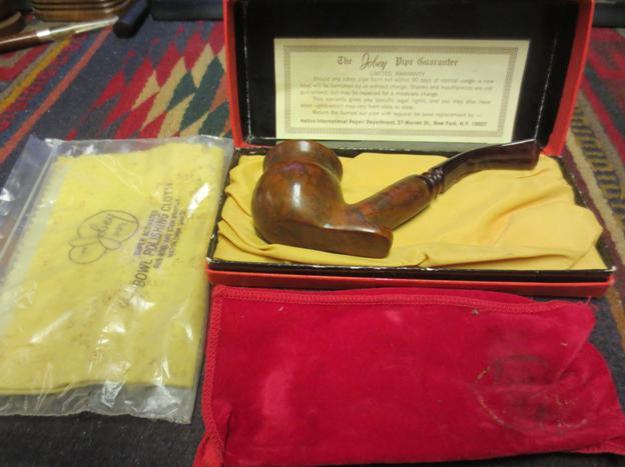
I took the leaflet out of the top of the box to have a look and it was a fun read. It reads: “The Jobey Pipe Guarantee, Limited Warranty. Should any Jobey pipe burn out within 90 days of normal usage, a new bowl will be furnished by us without charge. Shanks and mouthpieces are not guaranteed, but may be repaired for a moderate charge. This warranty gives you specific legal rights and you may also have other rights which may vary from state to state. Return the burned out bowl with a request for bowl replacement to: – Hollco International Repair Department, 37 Warren St., New York, NY 10007.”

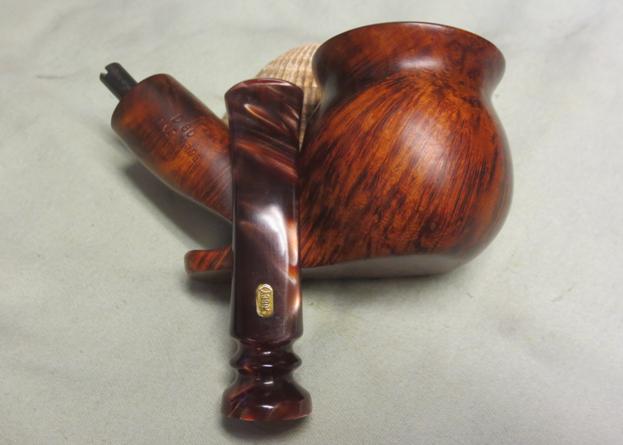
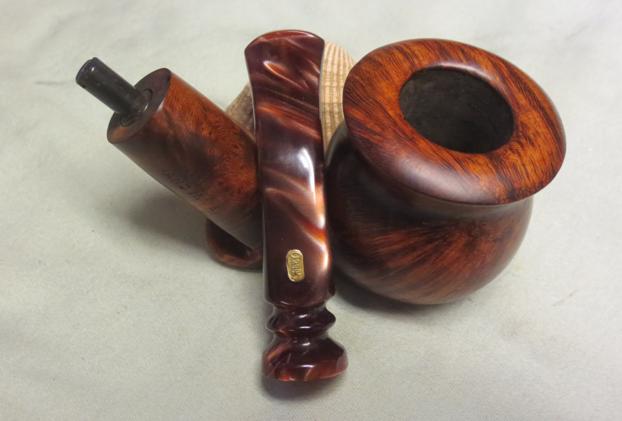
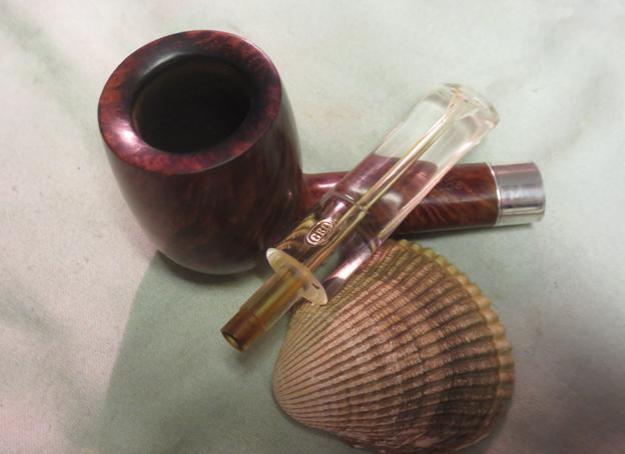
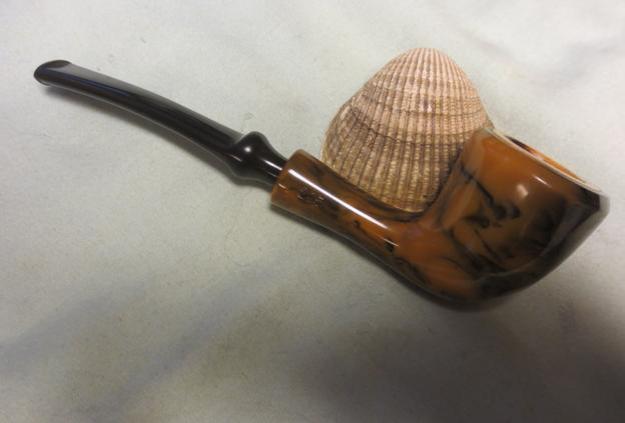
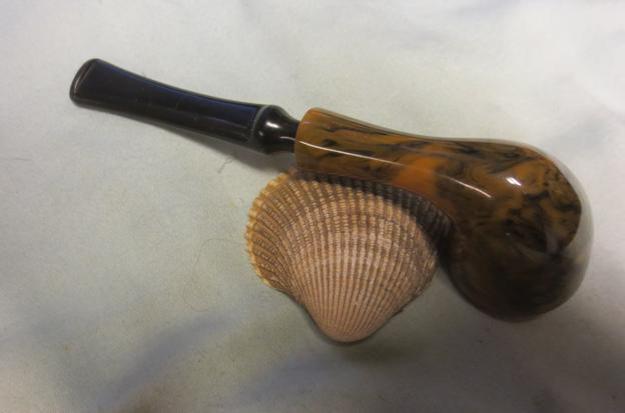
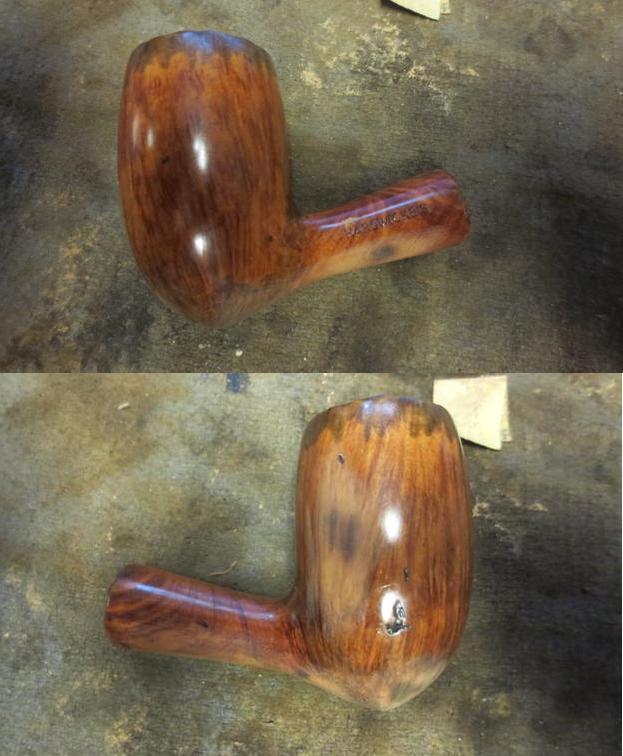
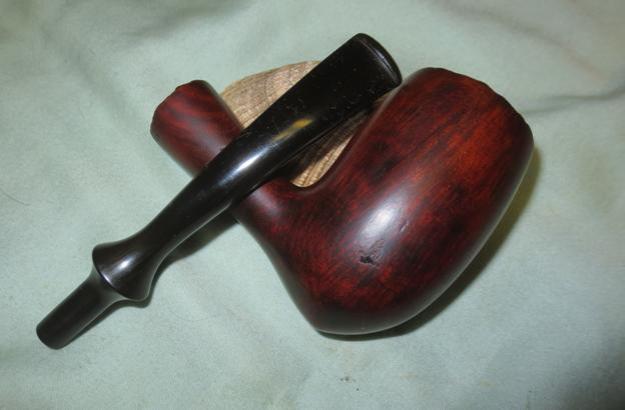
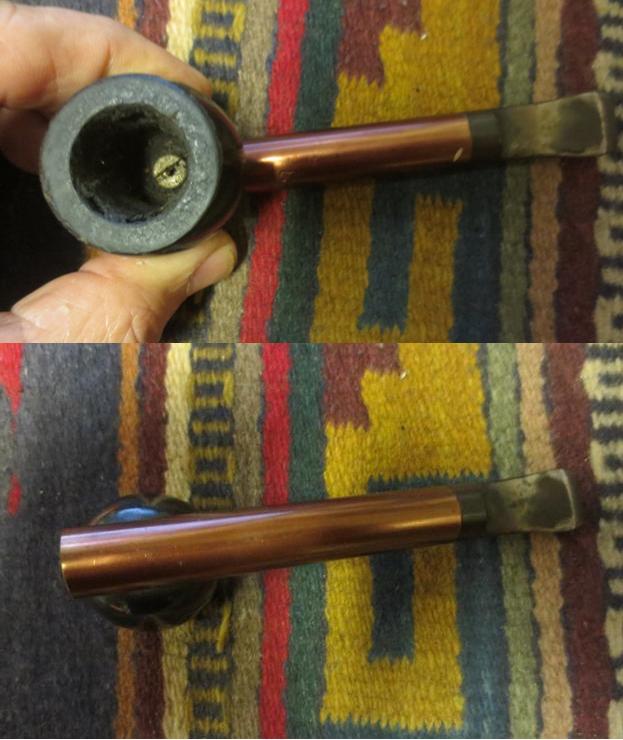
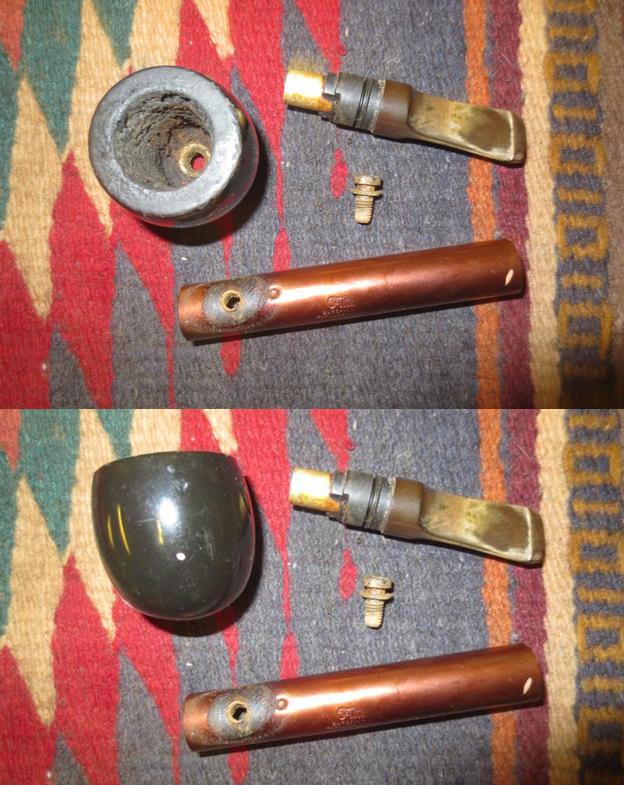
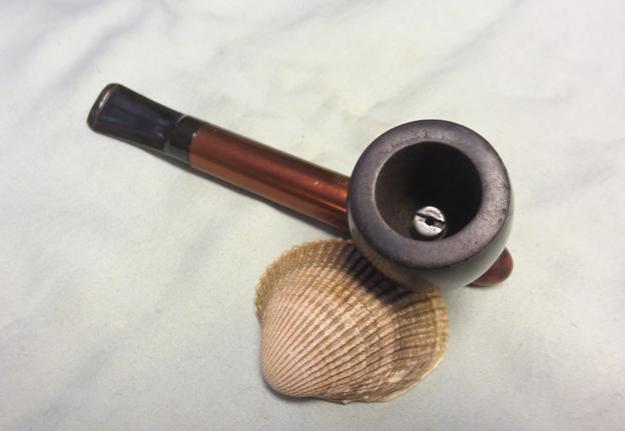
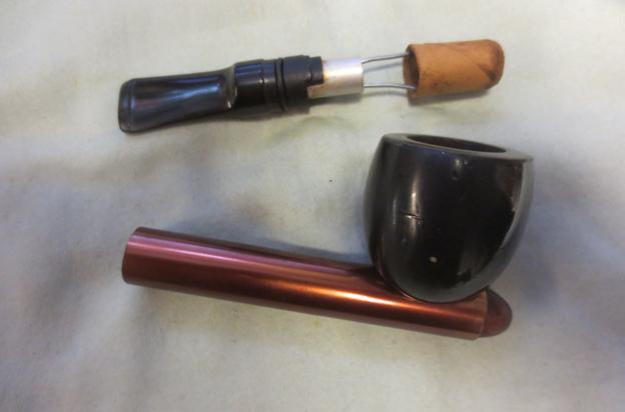
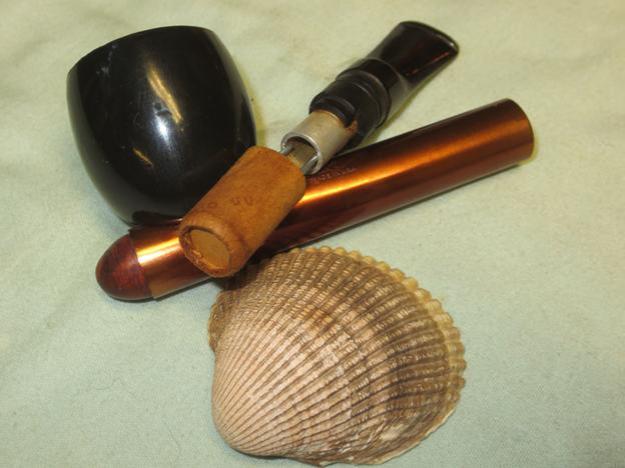
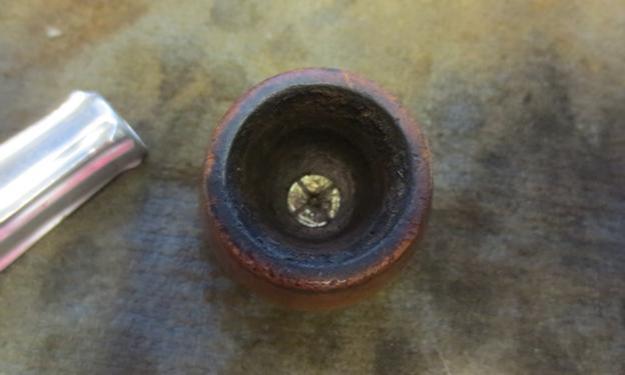
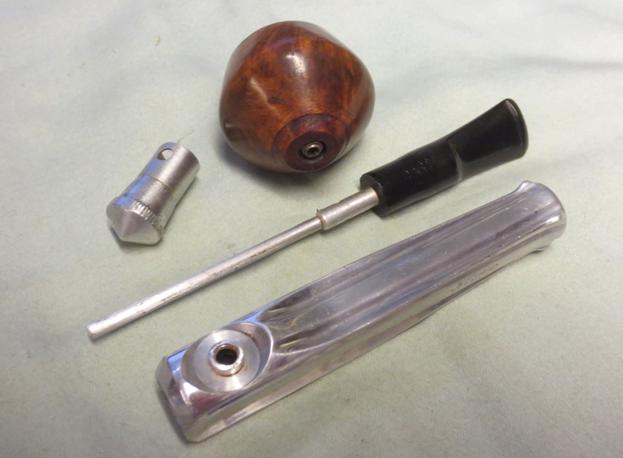
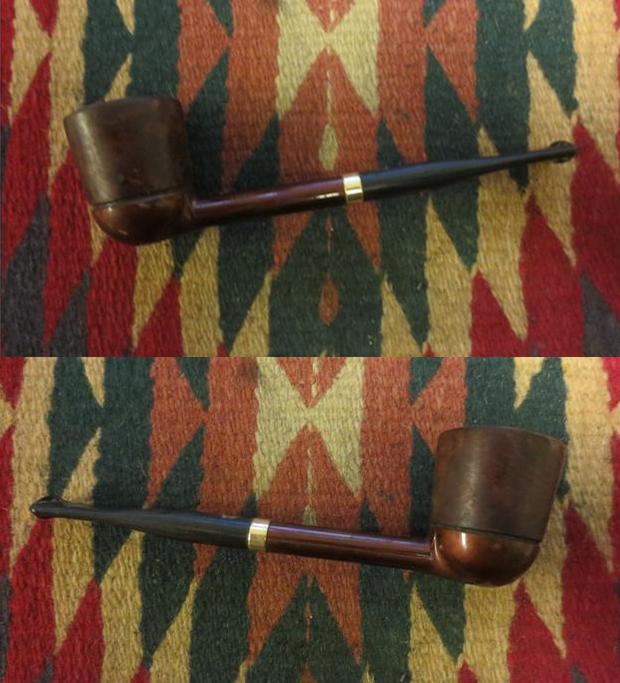
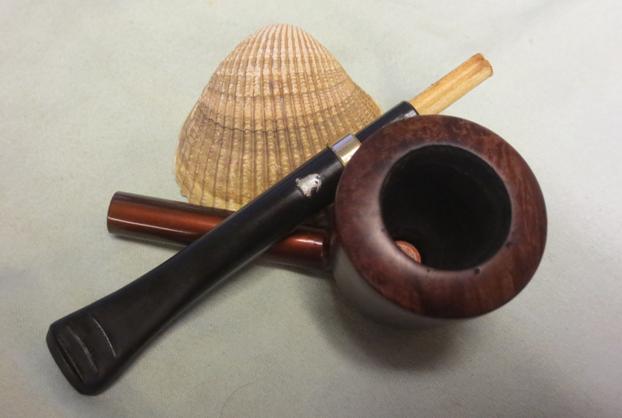
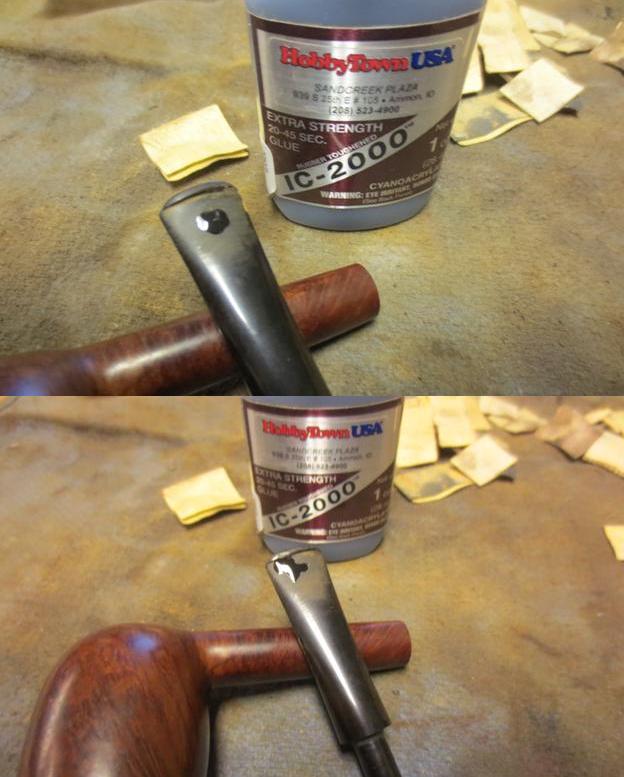
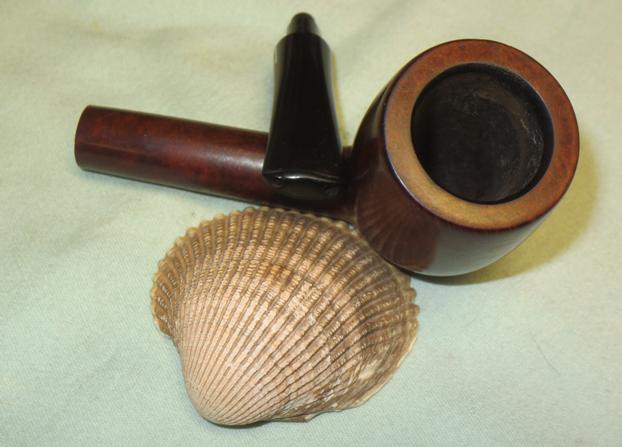
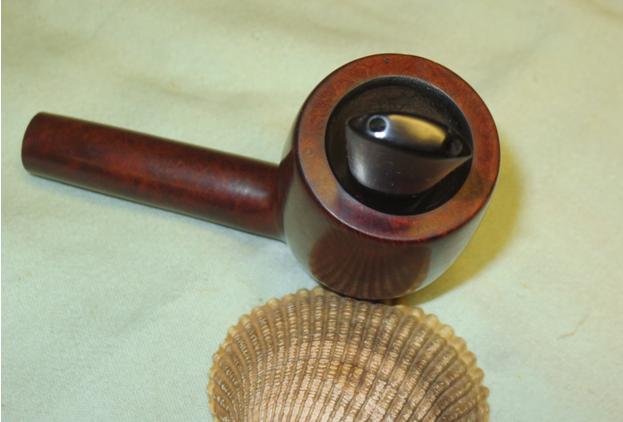
The other side reads: “This Pipe has the “Jobey Link” U.S. Pat.No. 3537462. The unique “Jobey Link” is the first big breakthrough in high quality pipe mounting. There is no metal. Easy to repair – just ask your dealer for an economical replacement “Jobey Link” it keeps your pipe permanently mounted without loosening up. The “Jobey Link” is precision threaded into the briar, but is still adjustable within the stem so that it always lines up straight. If the “Jobey Link” becomes difficult to unscrew use a coin in the convenient unscrewing slot (X). The “Jobey Link” comes in 4 sizes, small, medium short, medium long and large.”Jo4
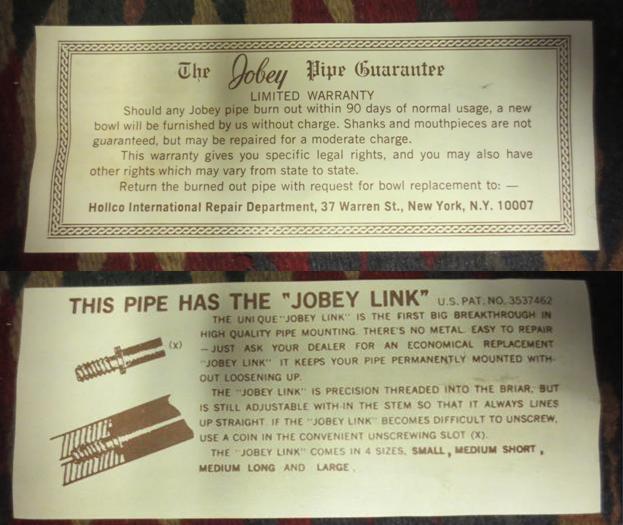
I took some photos of the pipe to show how the varnish coat had muddied the finish and hid the grain as well as hopefully captured some of the brush strokes. Under the varnish on the rim on the back inner edge of the bowl there was also some tar that had been painted over.Jo5 Jo6
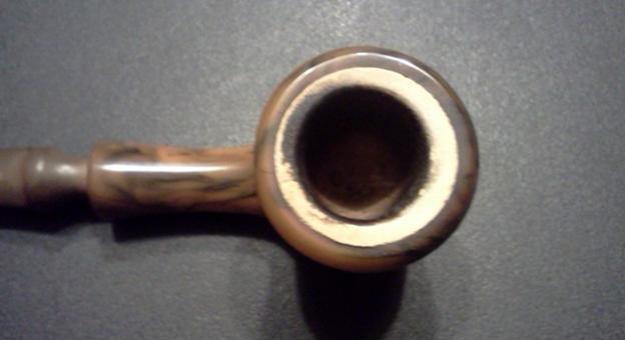
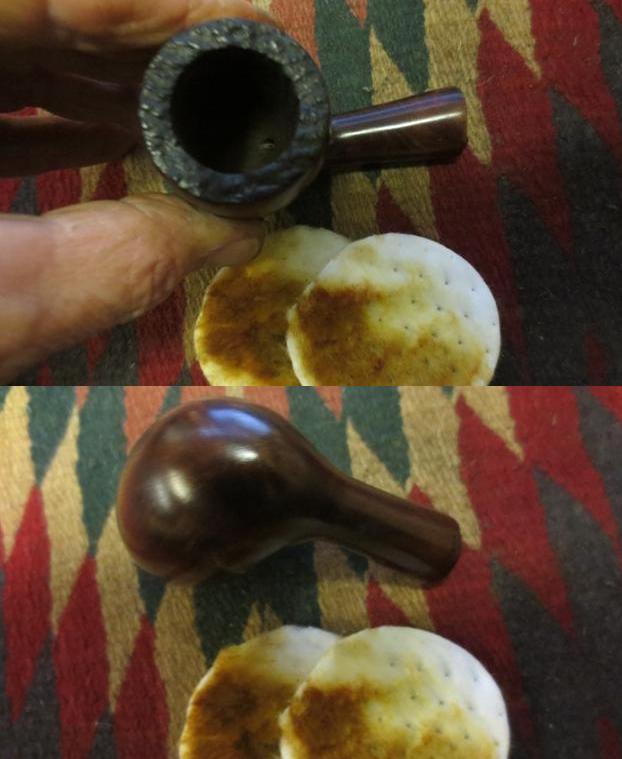
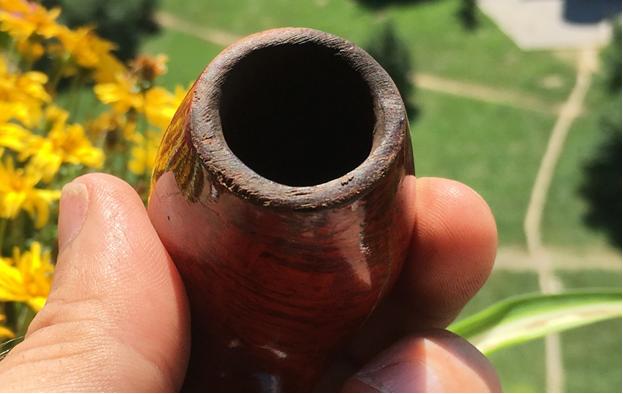
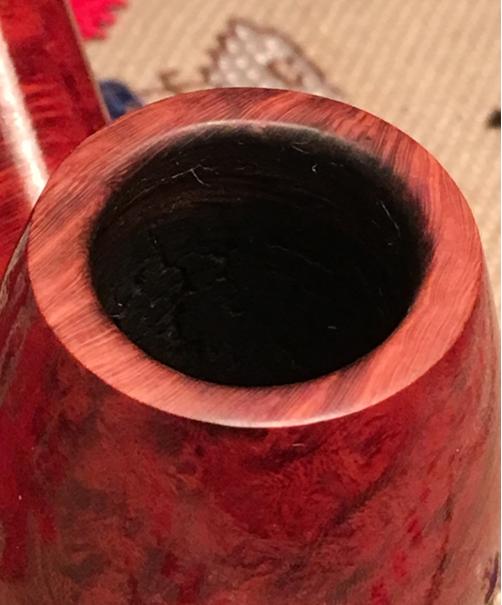
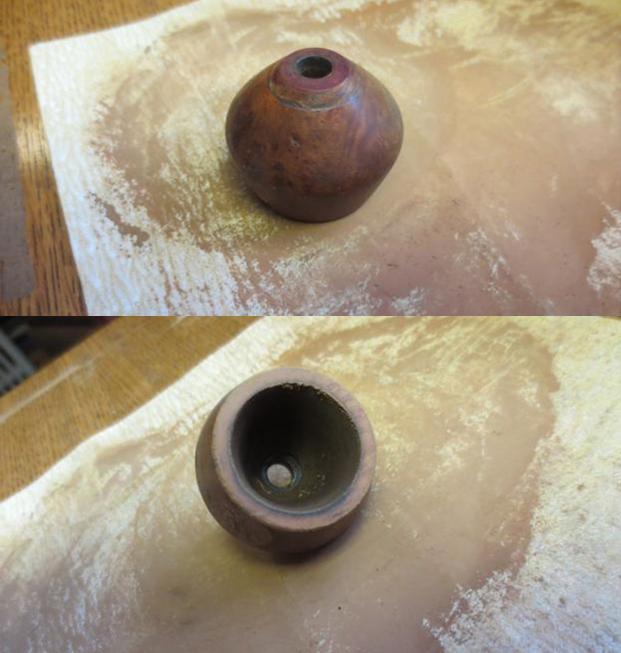
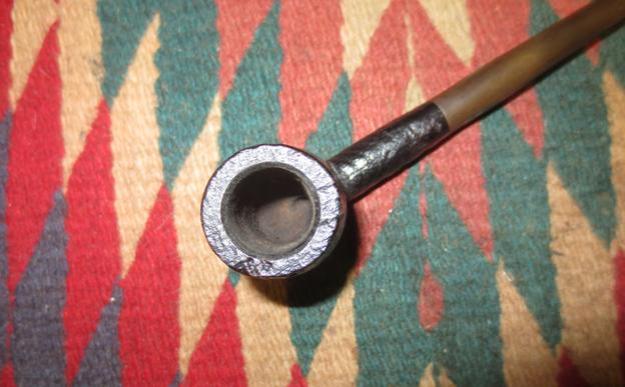
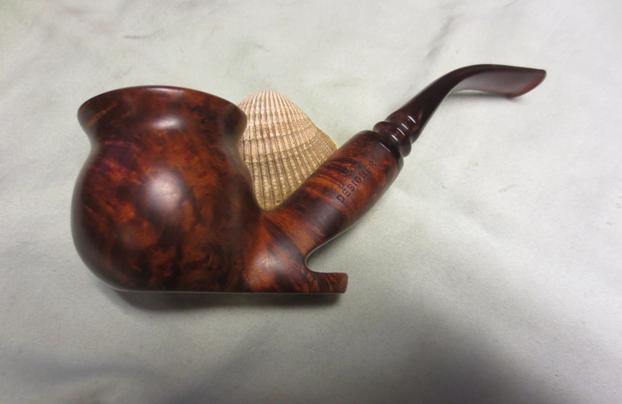
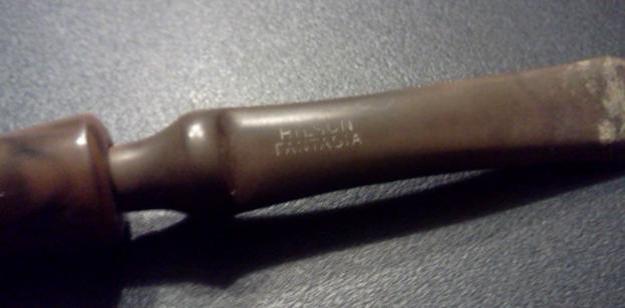
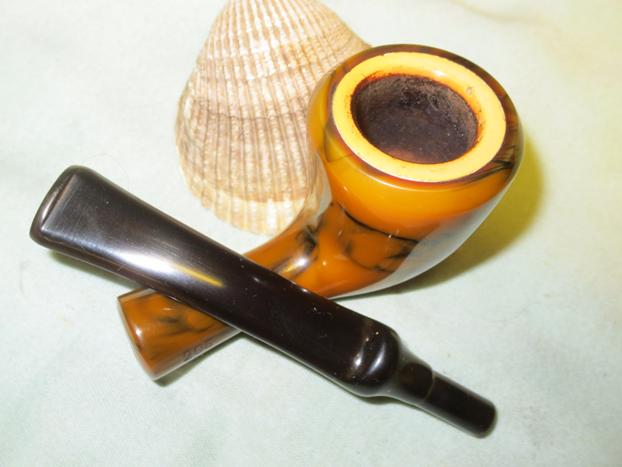
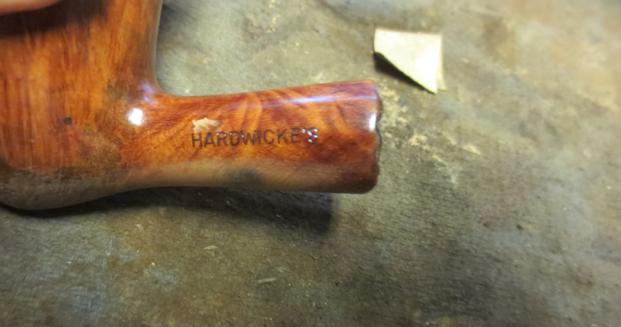
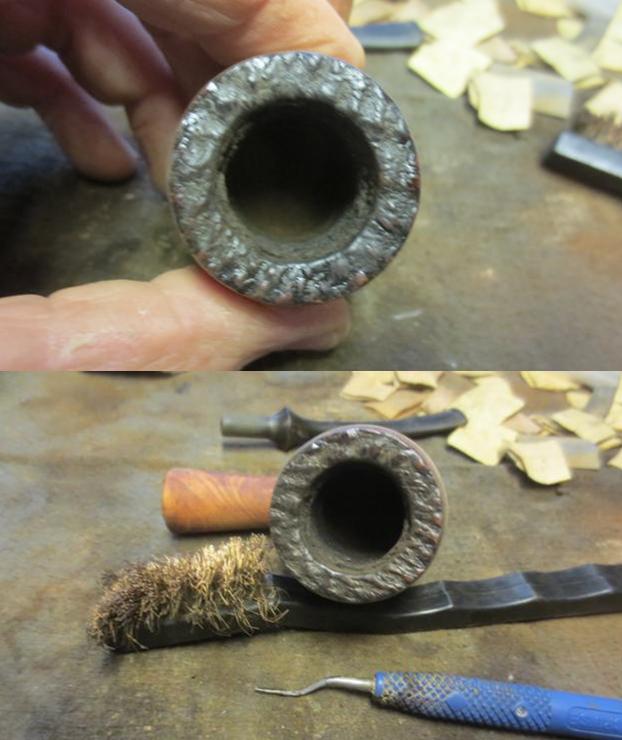
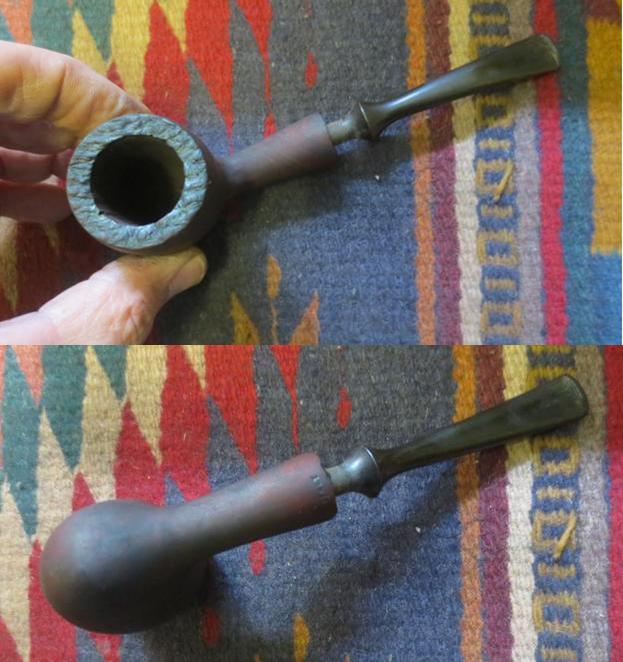
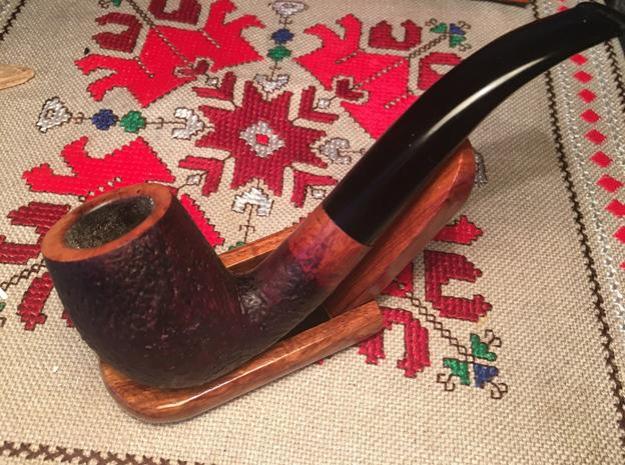
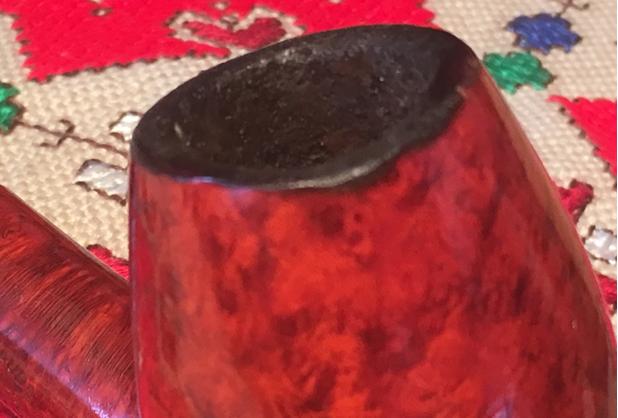
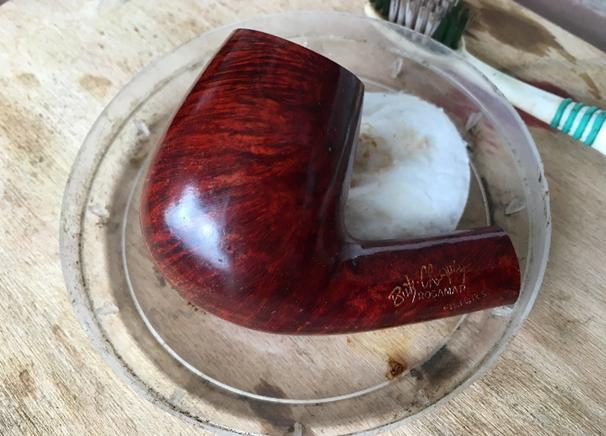
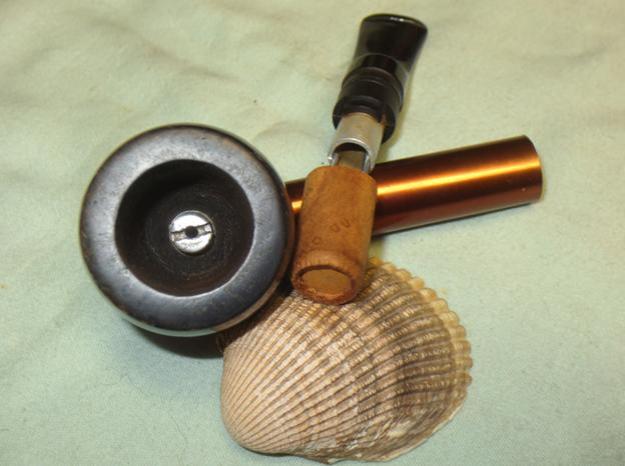
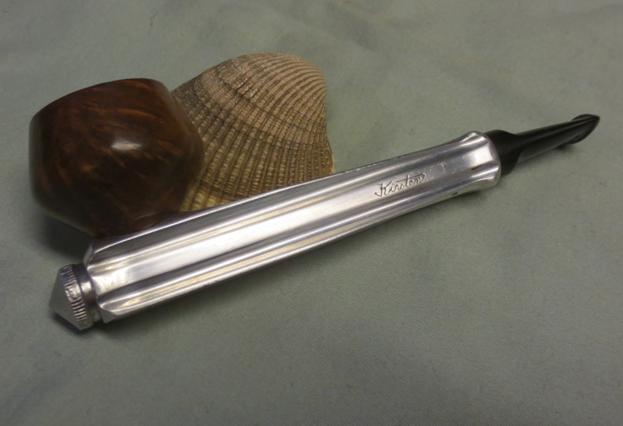
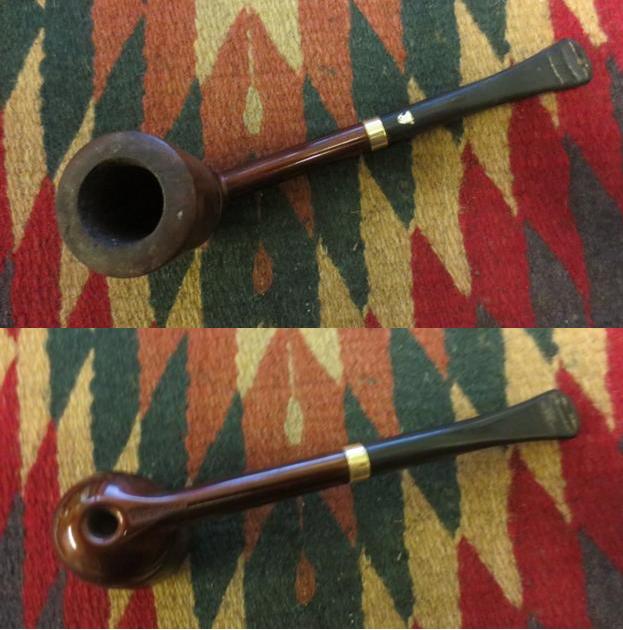
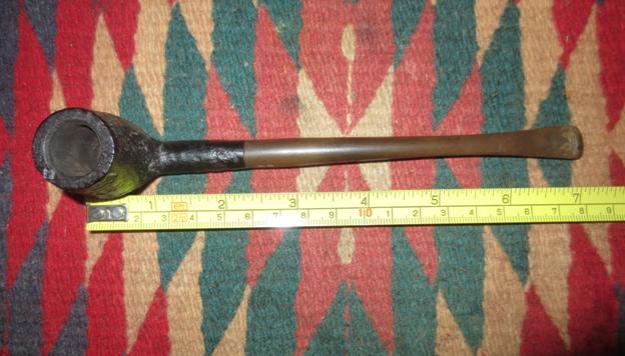
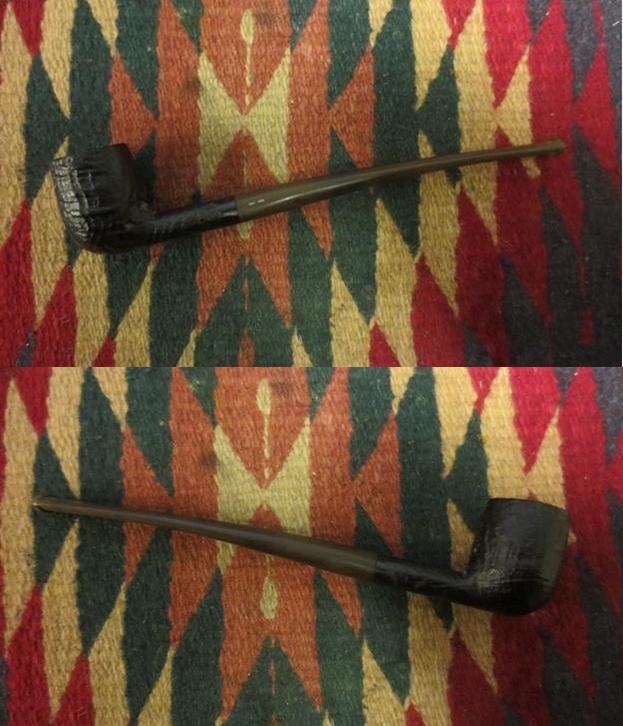
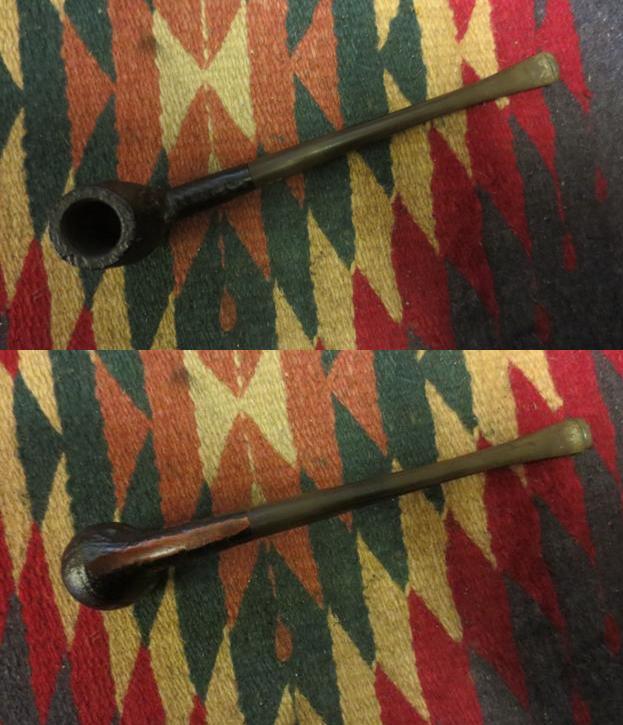
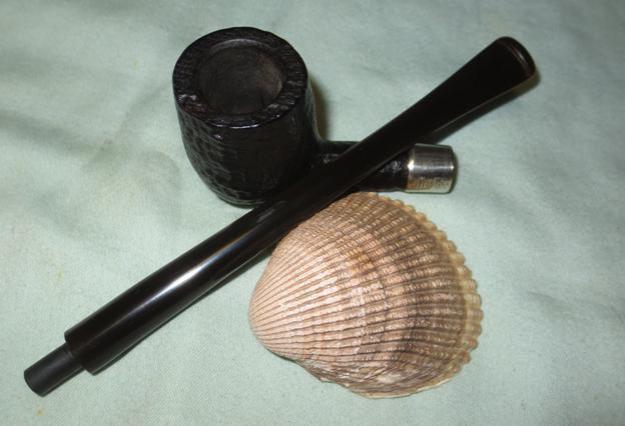
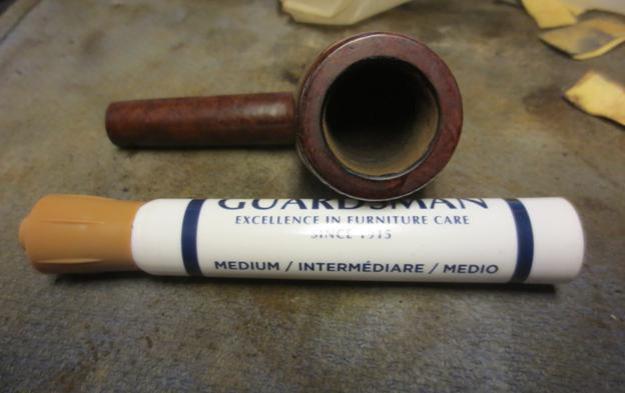
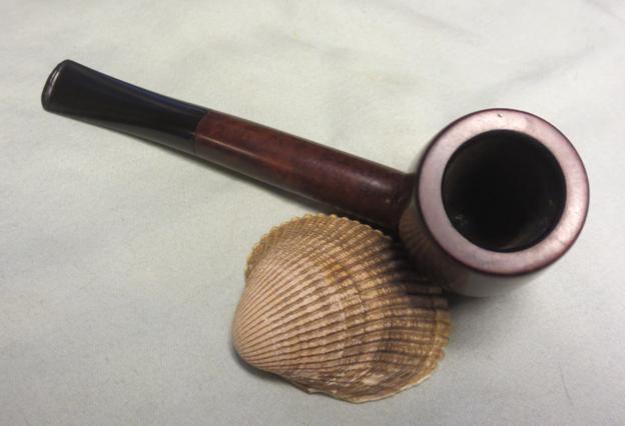
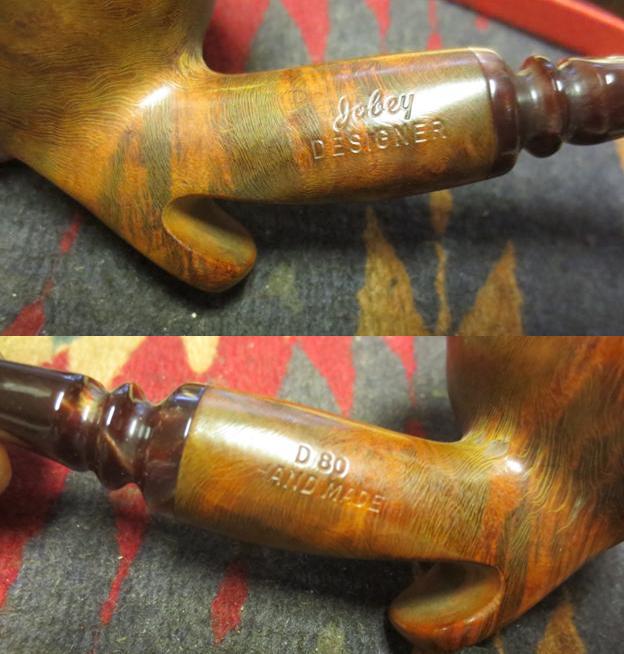
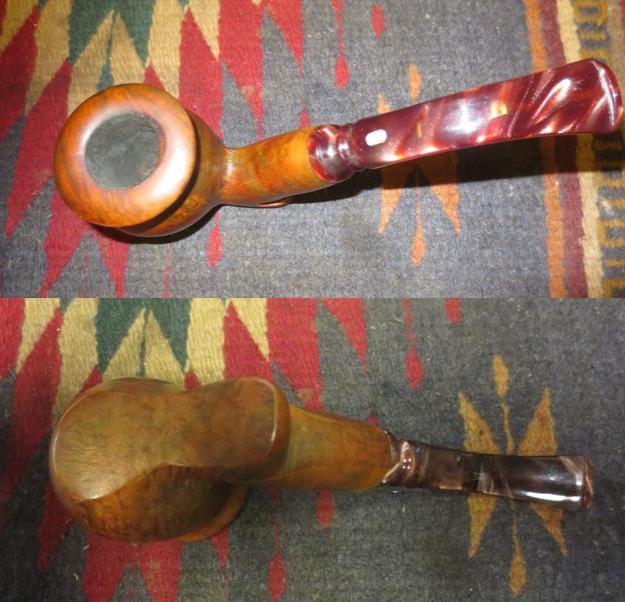
I took some close-up photos of the rim and the stamping on the shank. In those photos you can clearly see the tar on the rim, the clear stamping on the shank and the brush strokes of the varnish on the pipe.Jo7 Jo8
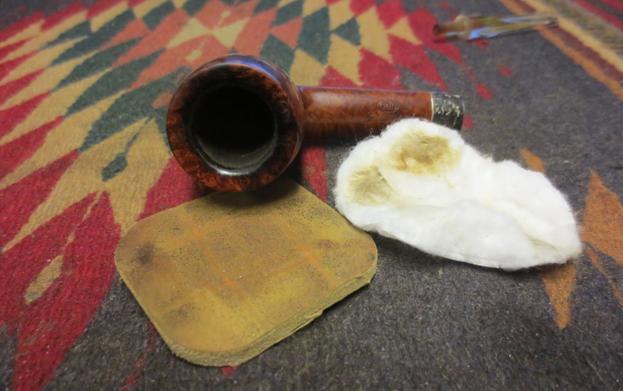
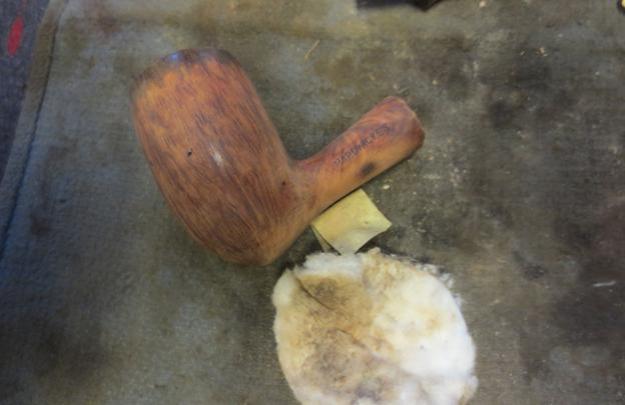
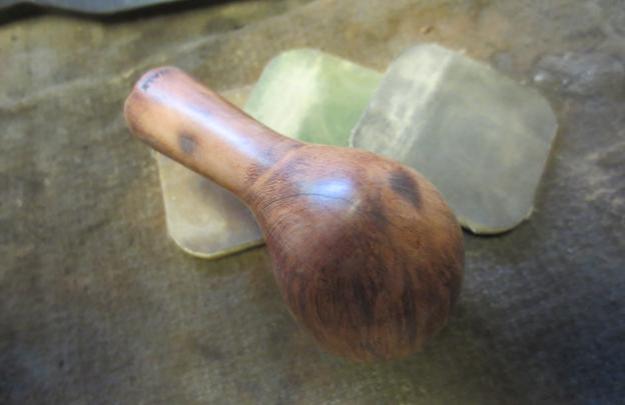
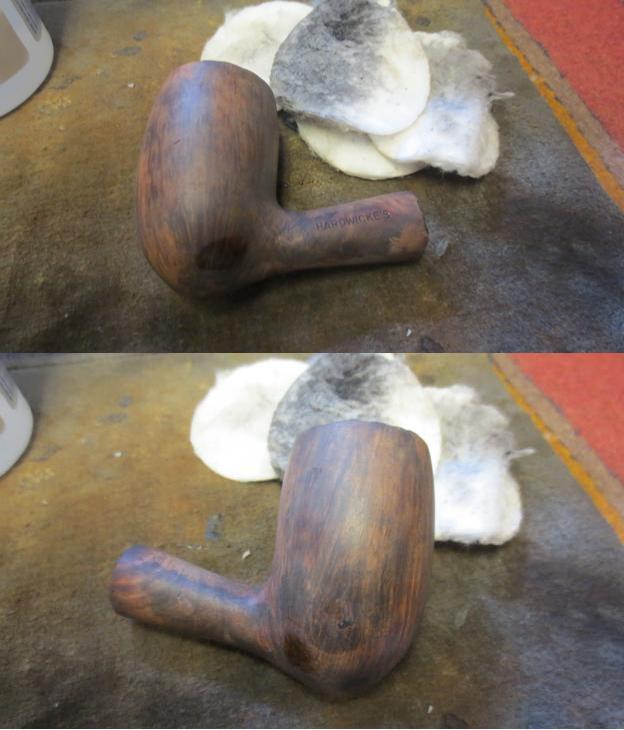
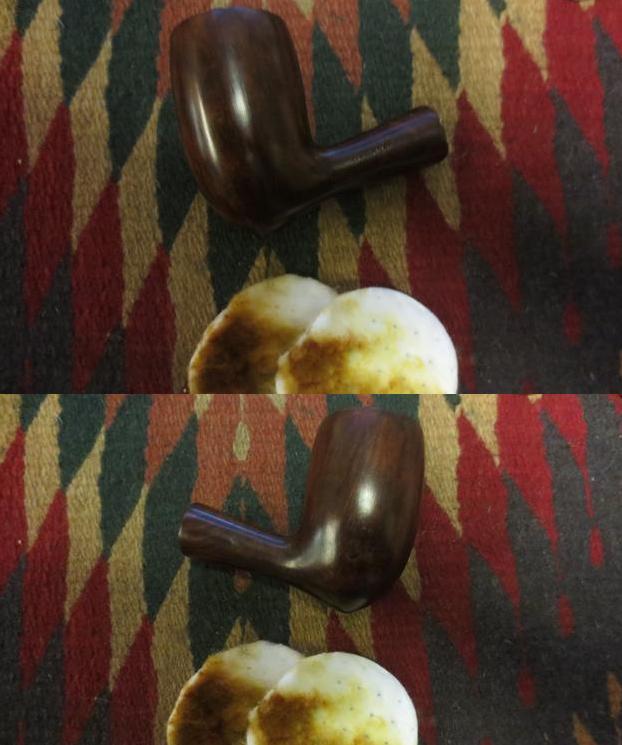
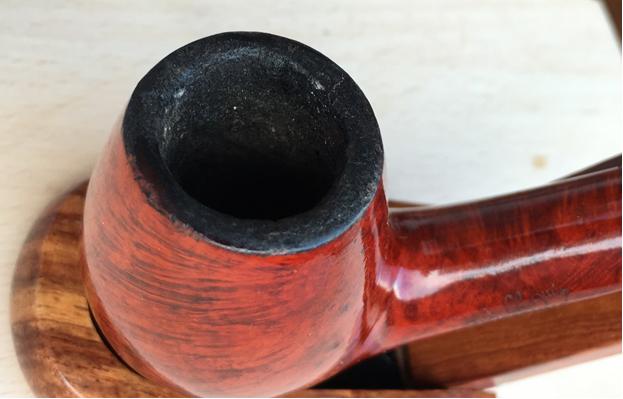
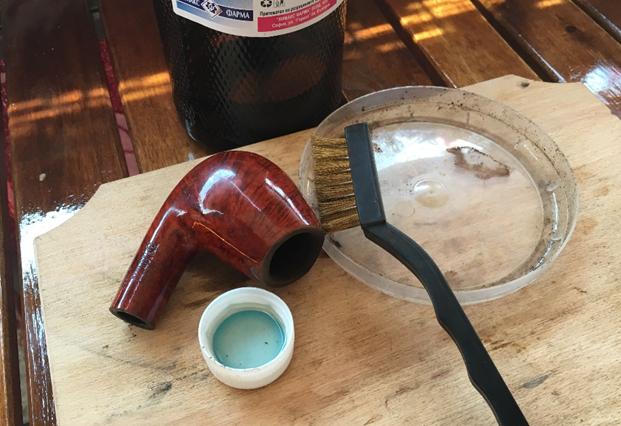
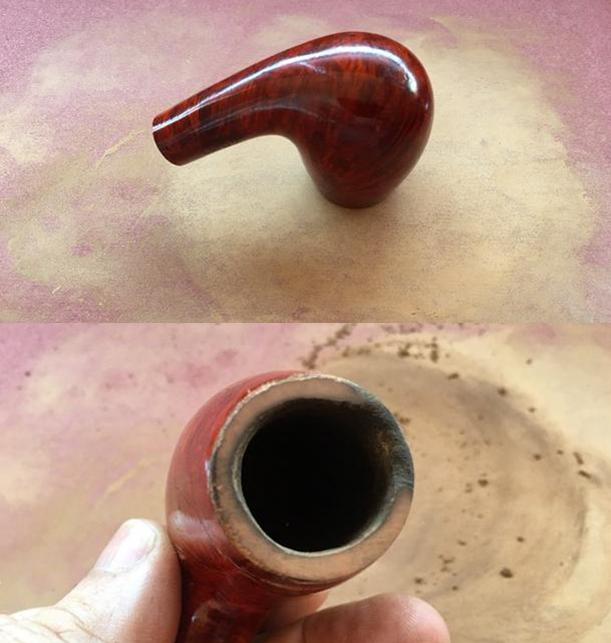
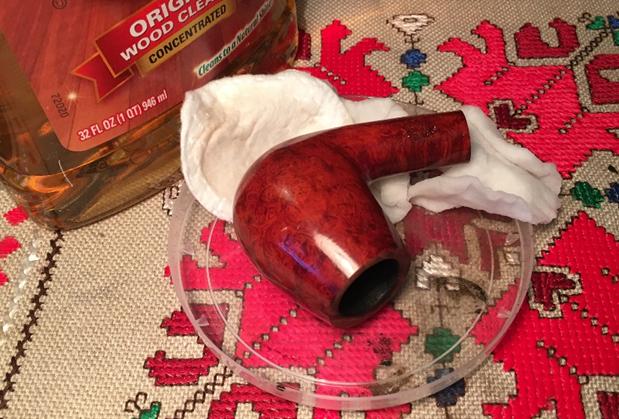
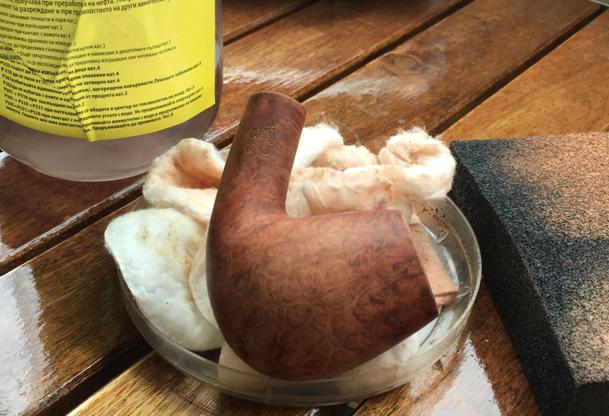
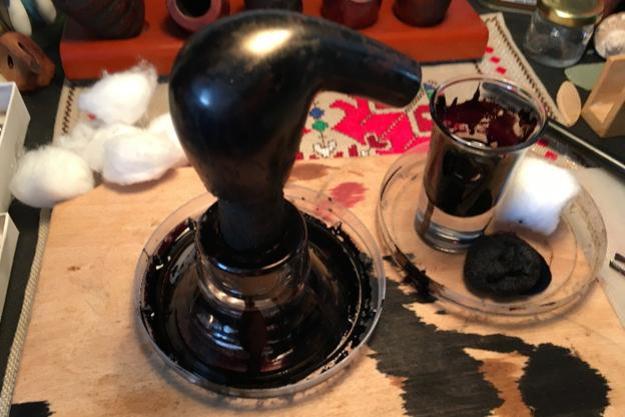
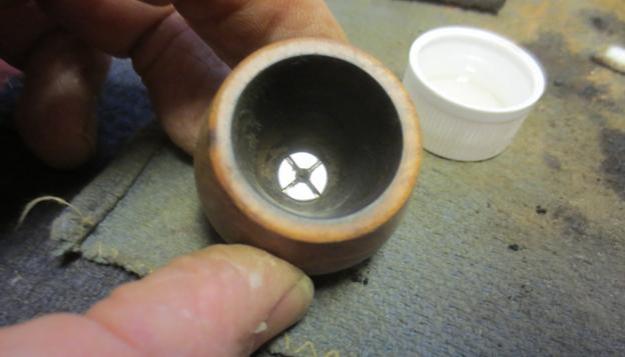
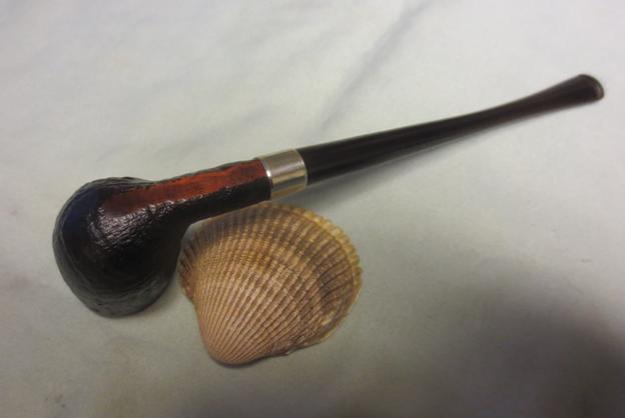
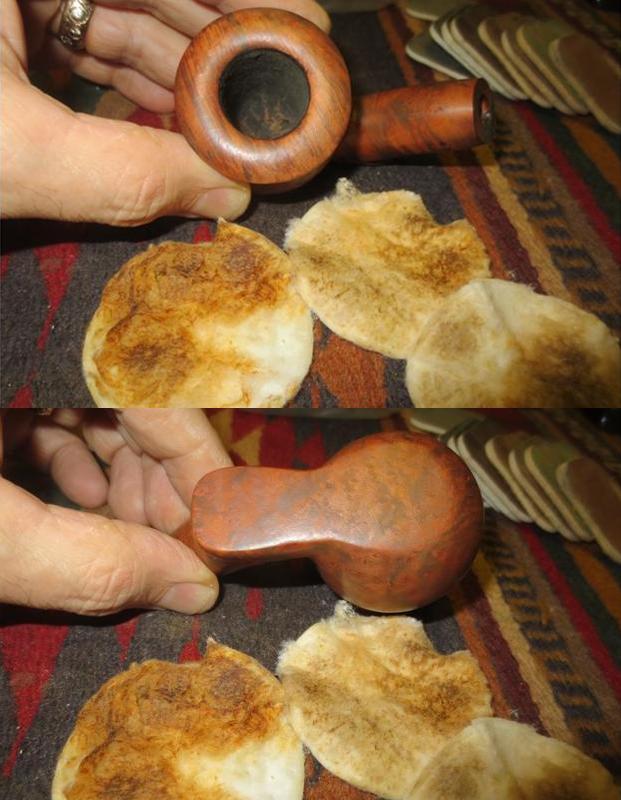
I was hopeful that the shiny coat on the bowl was not urethane but merely varnish. The muddiness of the finish and the way it felt in the hand made me hopeful. I scrubbed the bowl with acetone on cotton pads and was amazed at how easily it came off. I was really happy that I was not dealing with a plastic coat. I scrubbed it repeatedly until the grain clearly showed.Jo9 Jo10
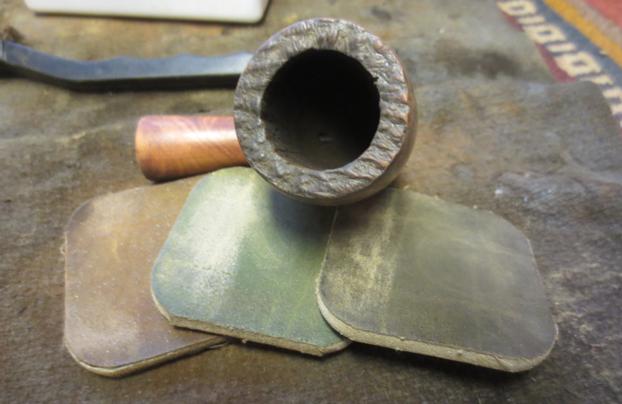
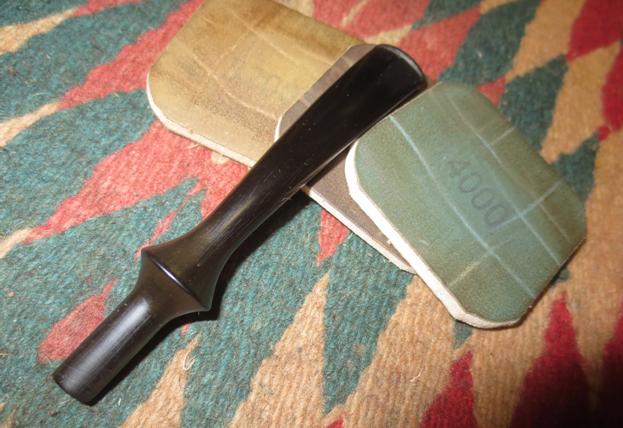
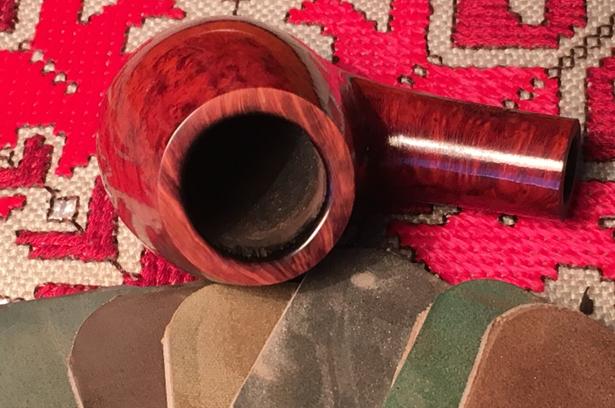
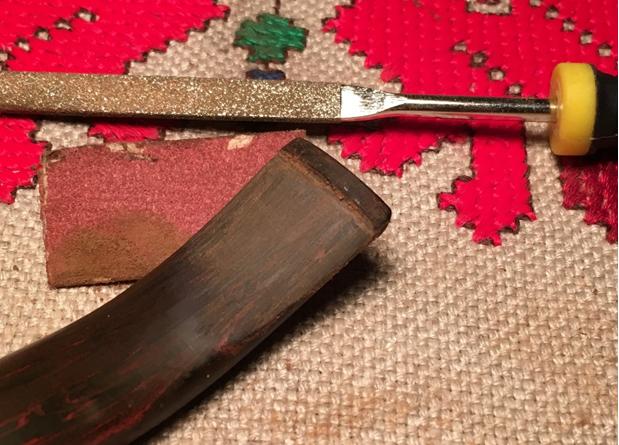
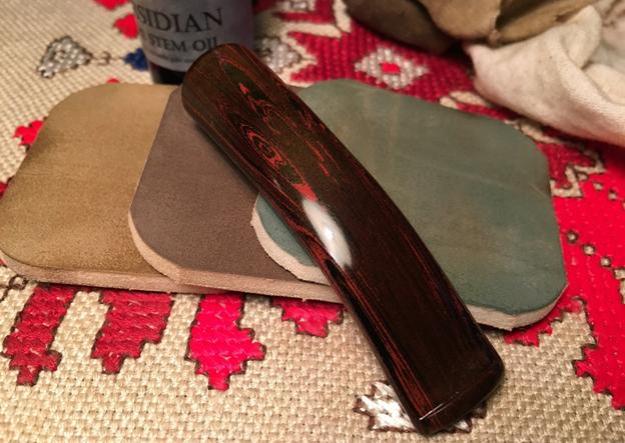
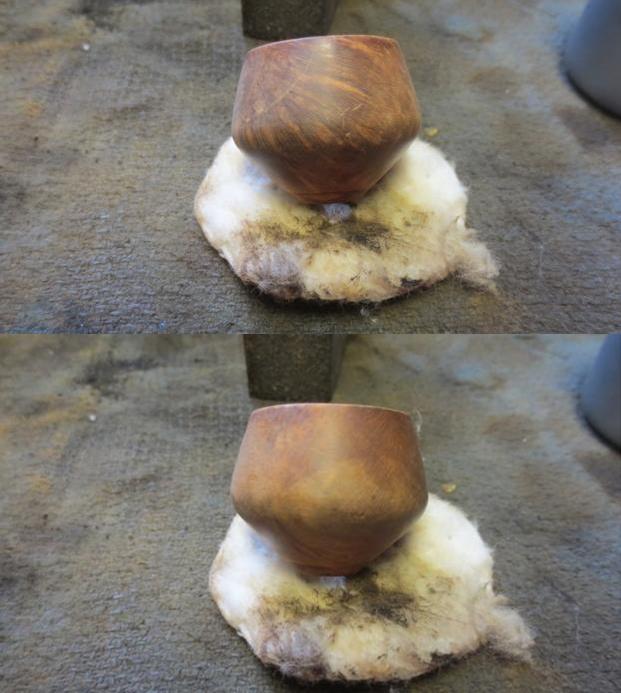
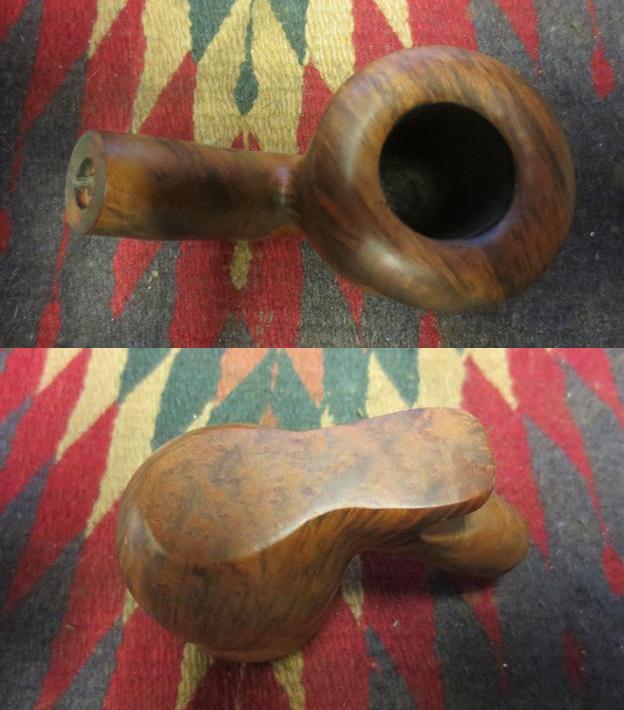
The bowl was still rough under the varnish so I wet sanded it with 1500-2400 grit micromesh sanding pads.Jo11 Jo12 Jo13
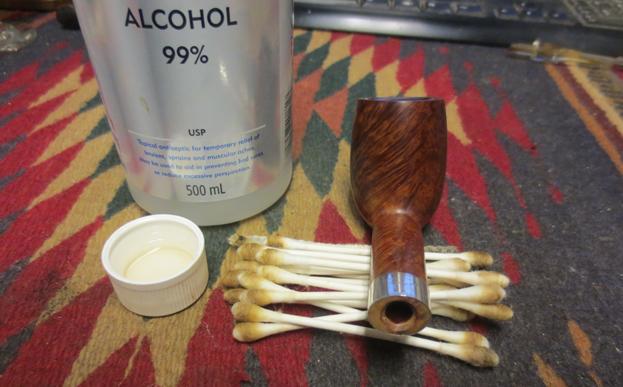
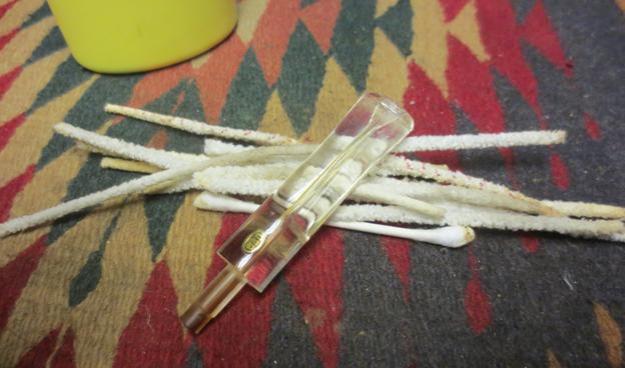
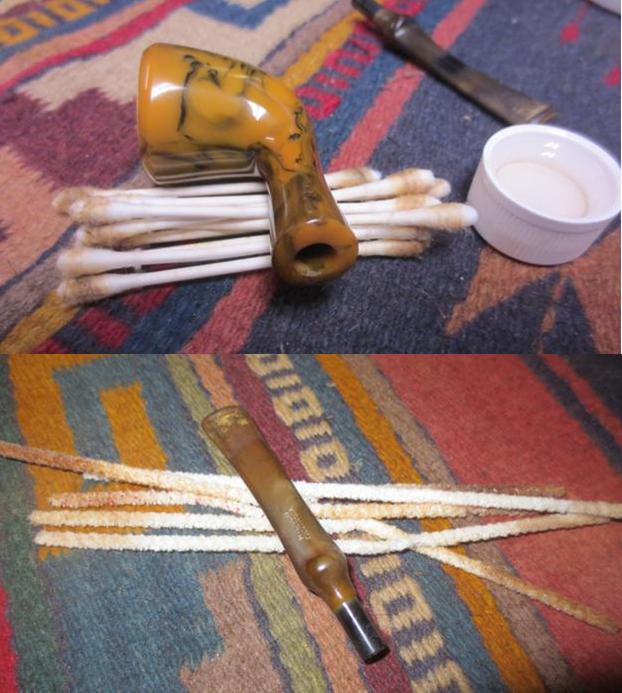
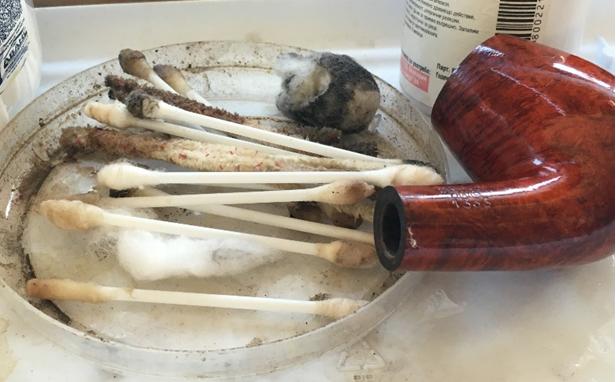
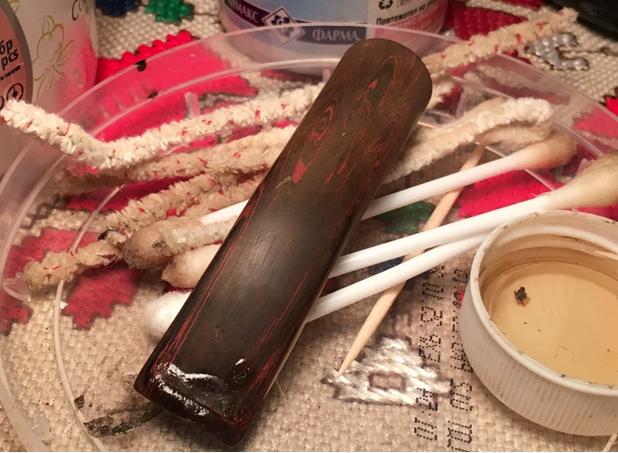
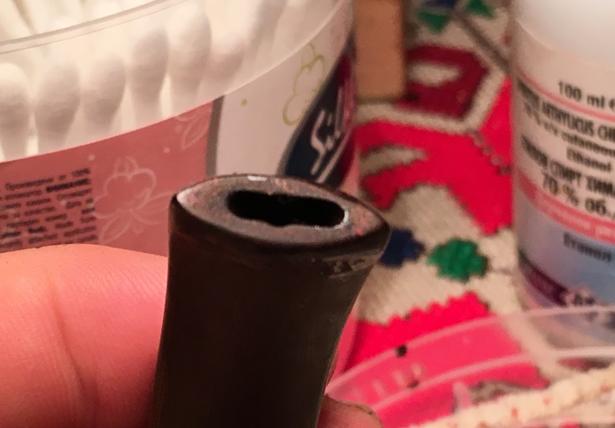
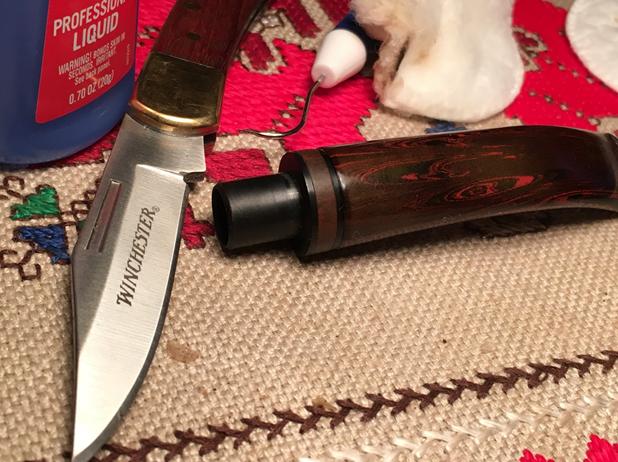
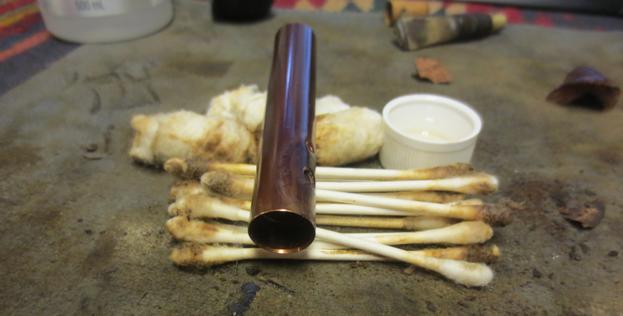
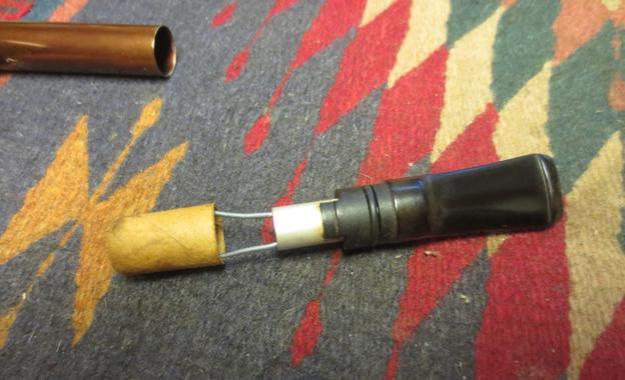
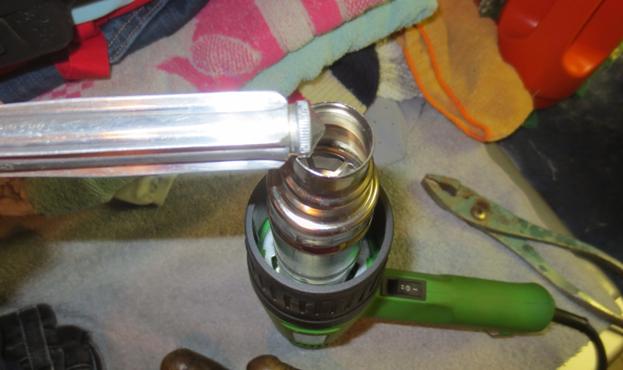
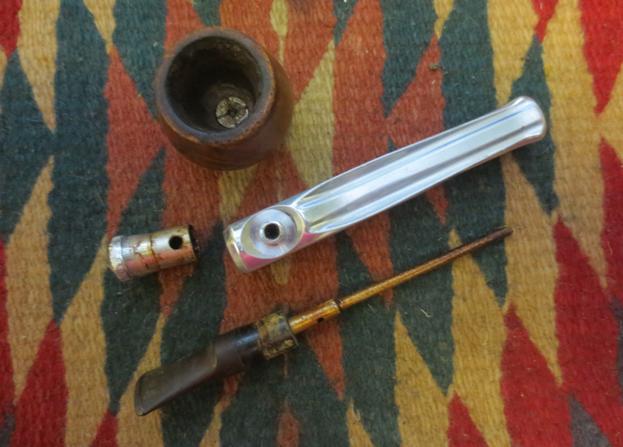
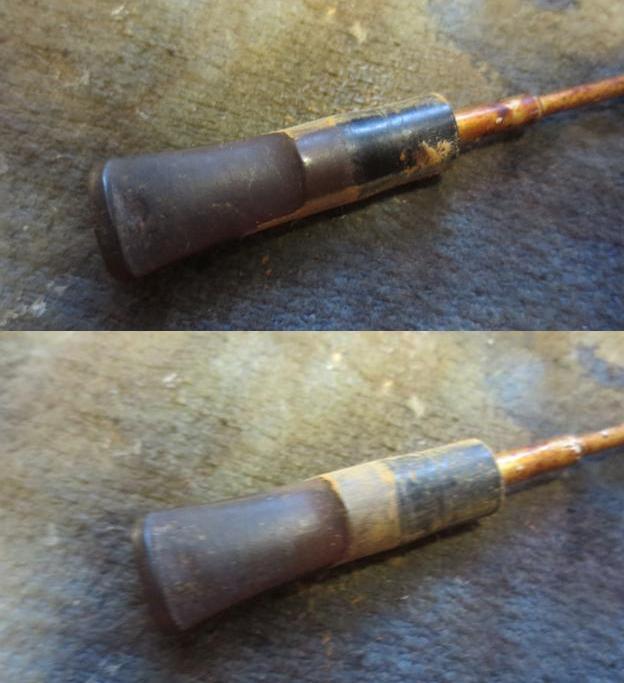
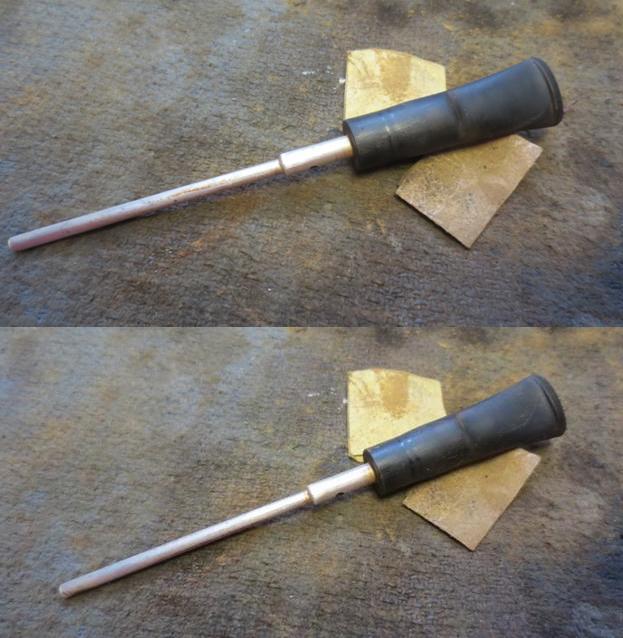
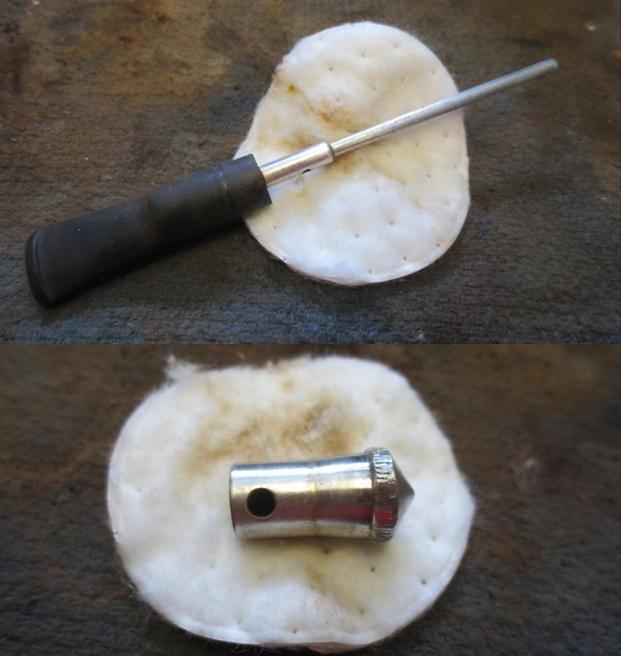
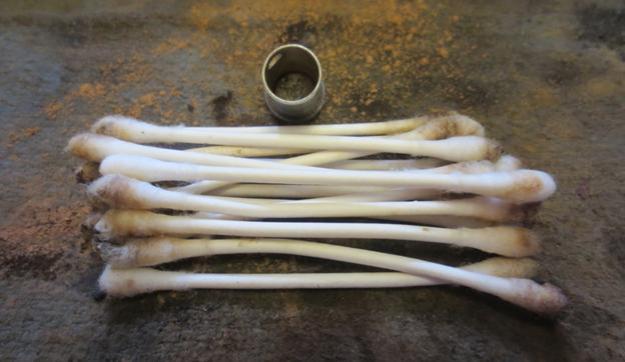
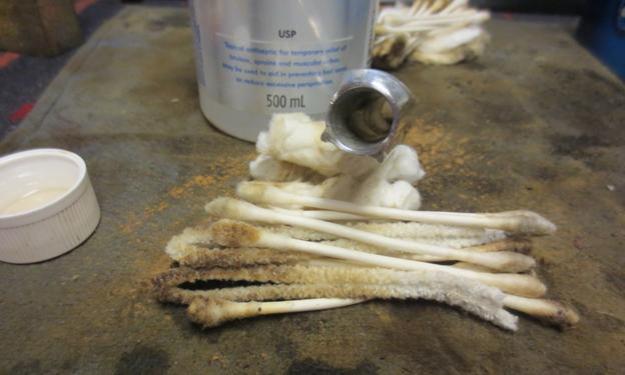
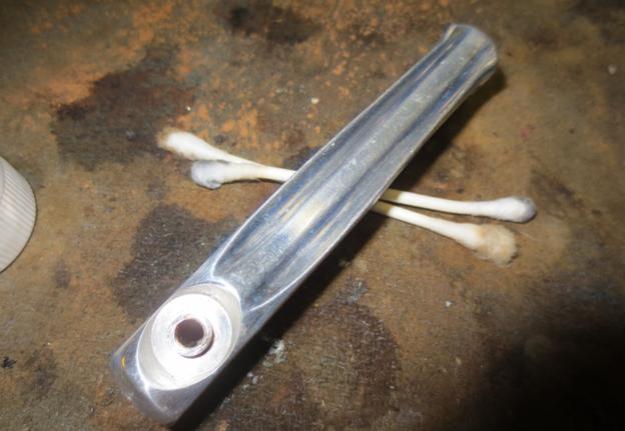
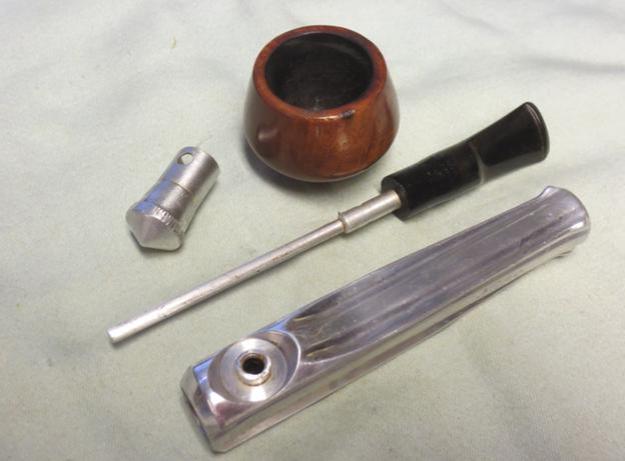
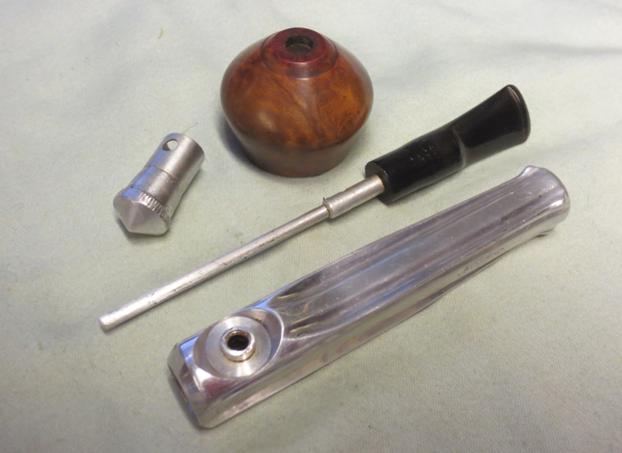
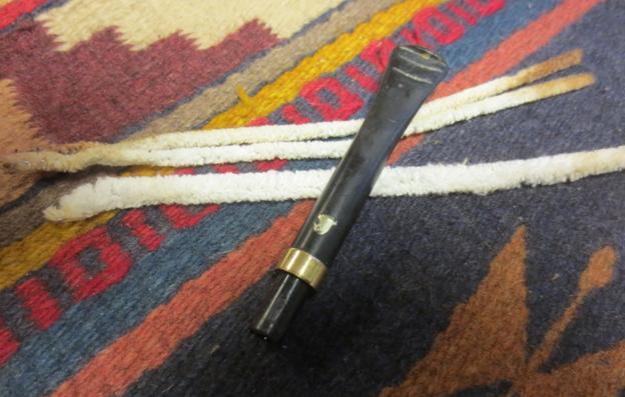
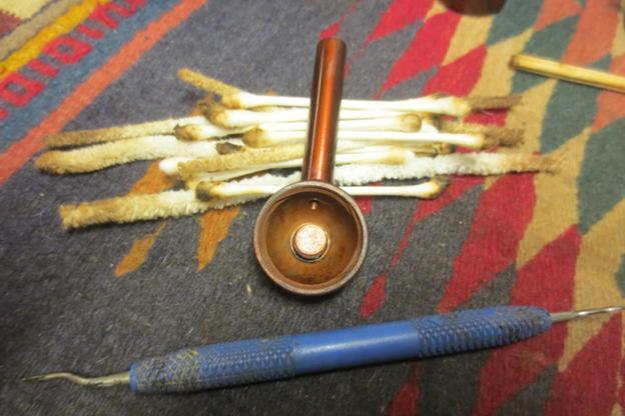
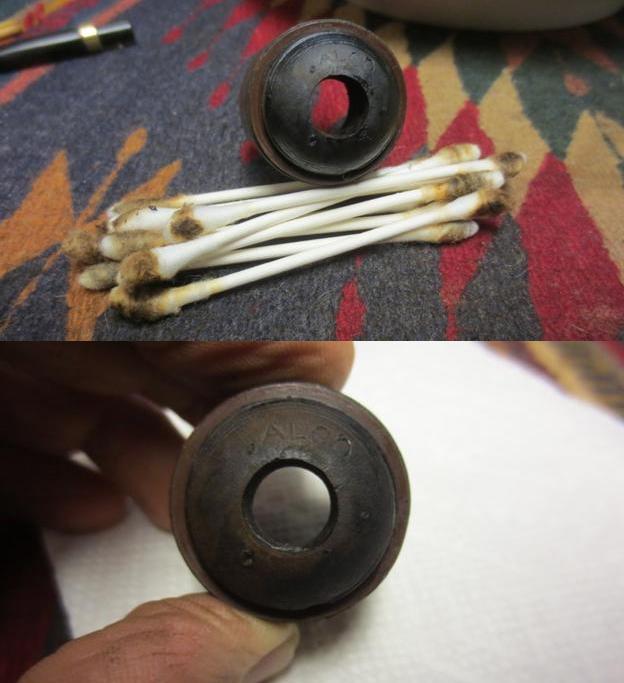
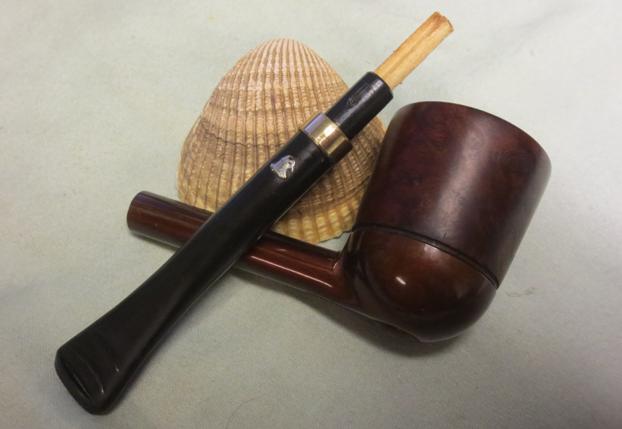
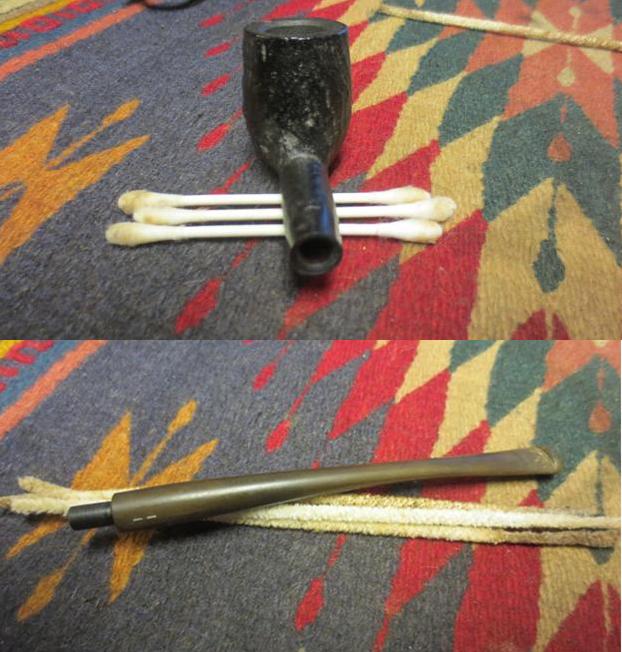
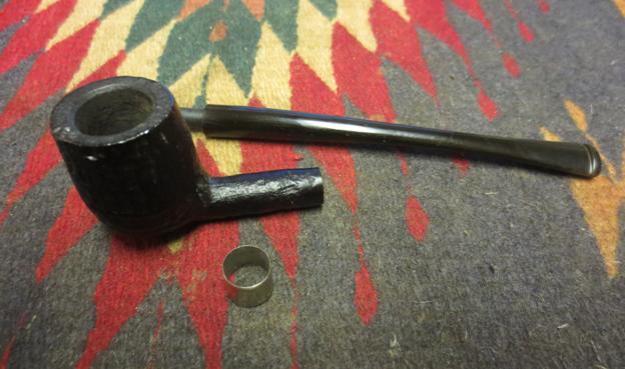
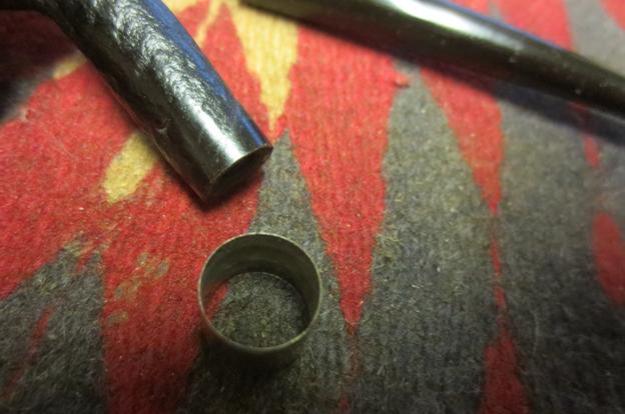
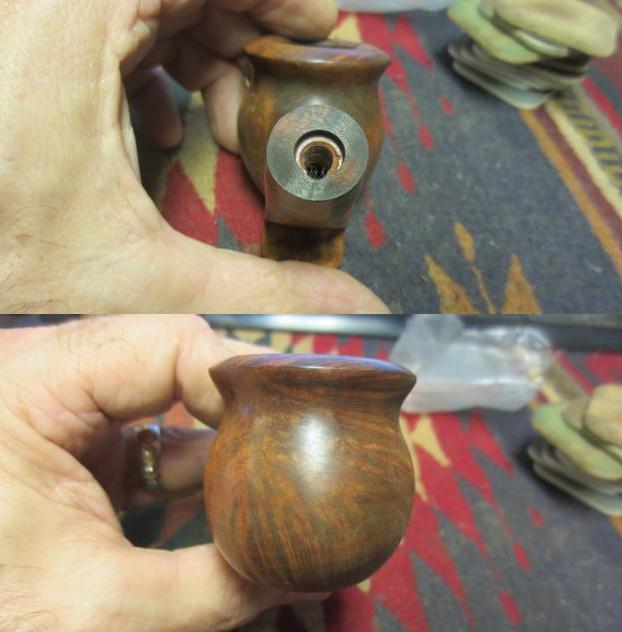
I scrubbed the internals of the mortise and airway in the shank to clean out any build up in the threads and airway. I used cotton swabs and alcohol and found that it was really quite clean. I remove the Jobey Link from the end of the stem and cleaned out the airway in the link and the stem with cotton swabs, pipe cleaners and alcohol.Jo14
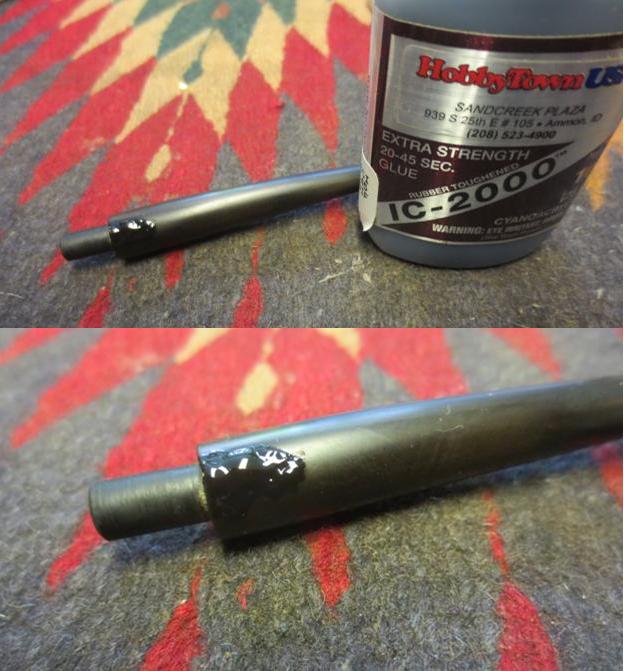
I threaded the Jobey Link into the end of the shank and set it then pushed the stem in place on the other end of the link.Jo15
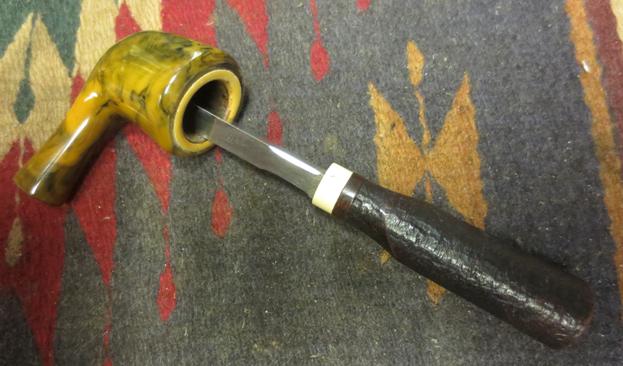
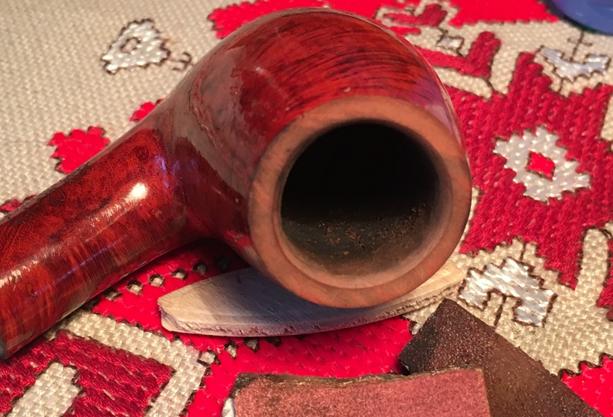
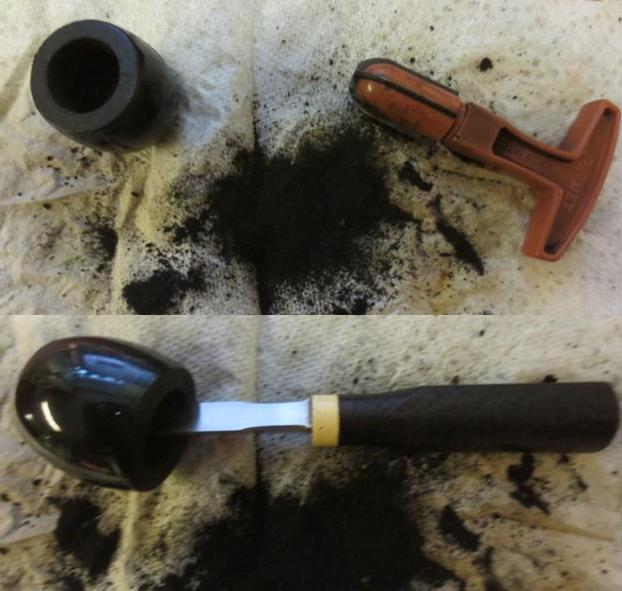
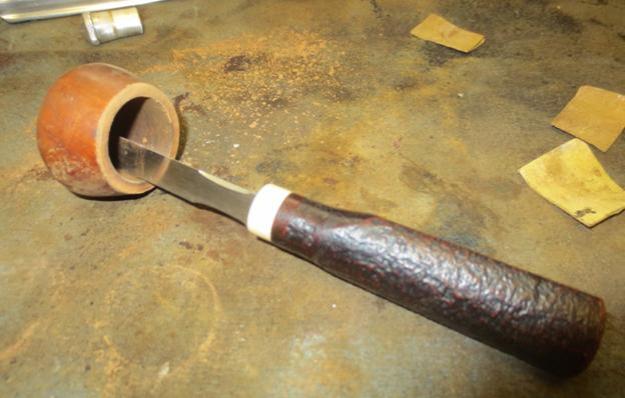
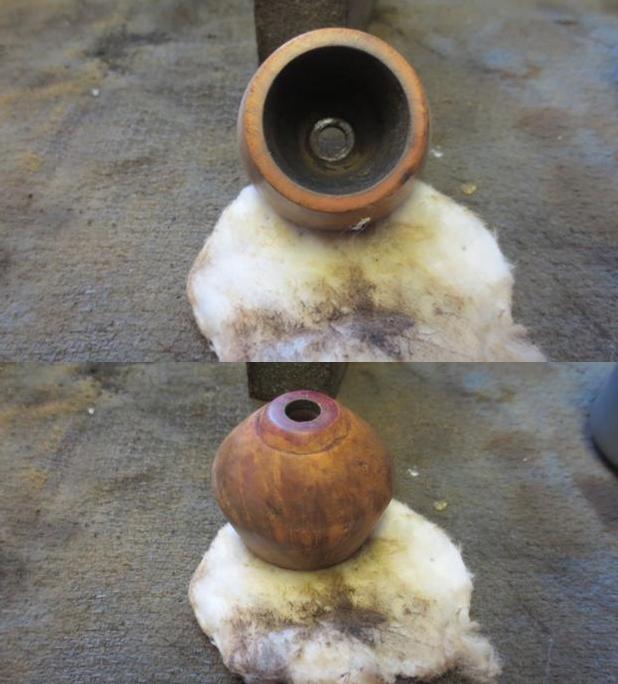
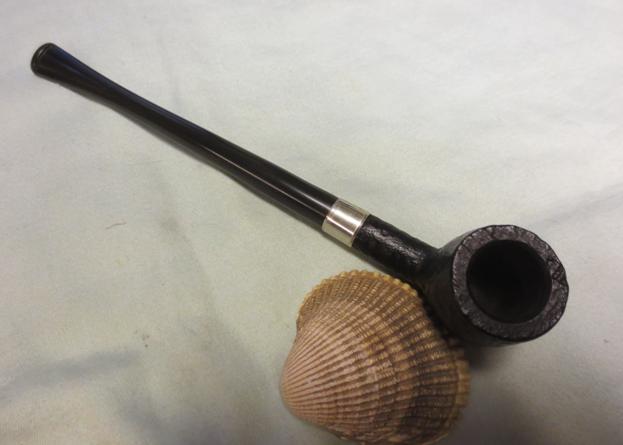
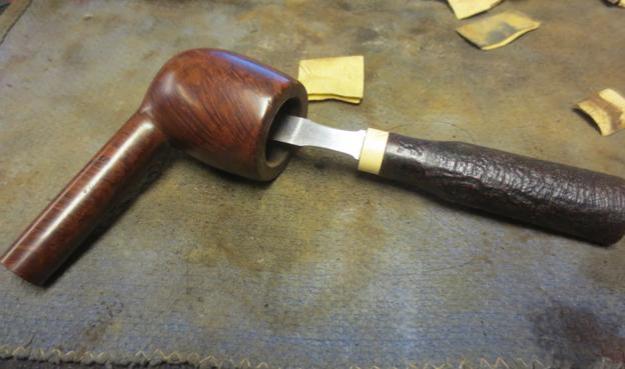
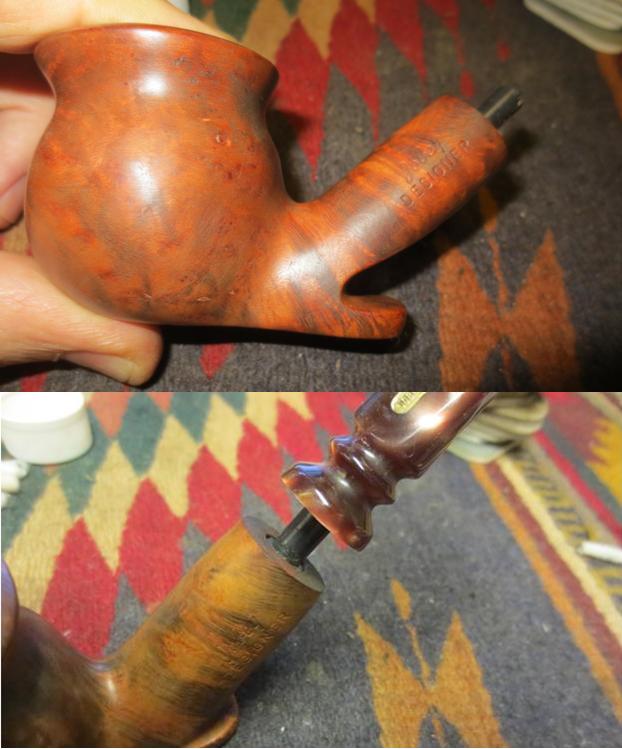
I reamed the bowl back to bare briar with the Savinelli Pipe Knife.Jo16
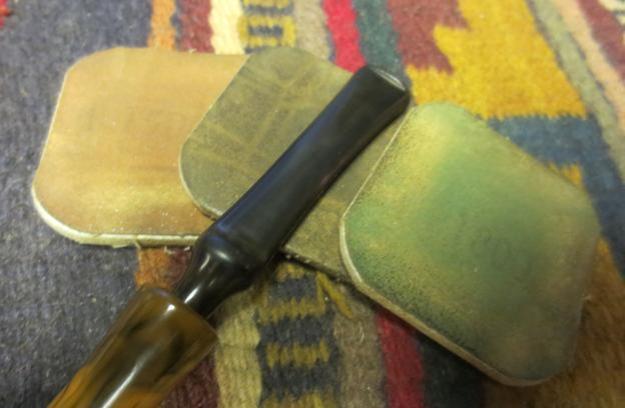
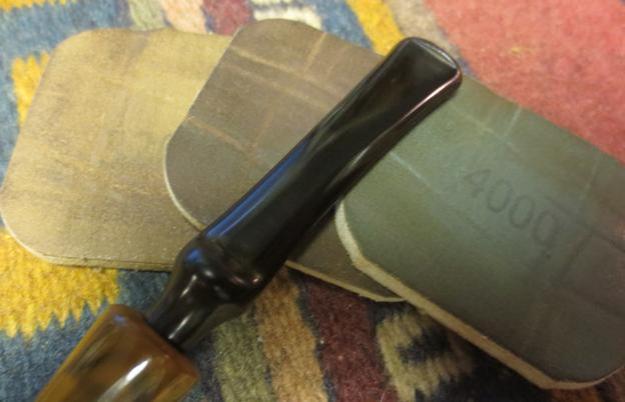
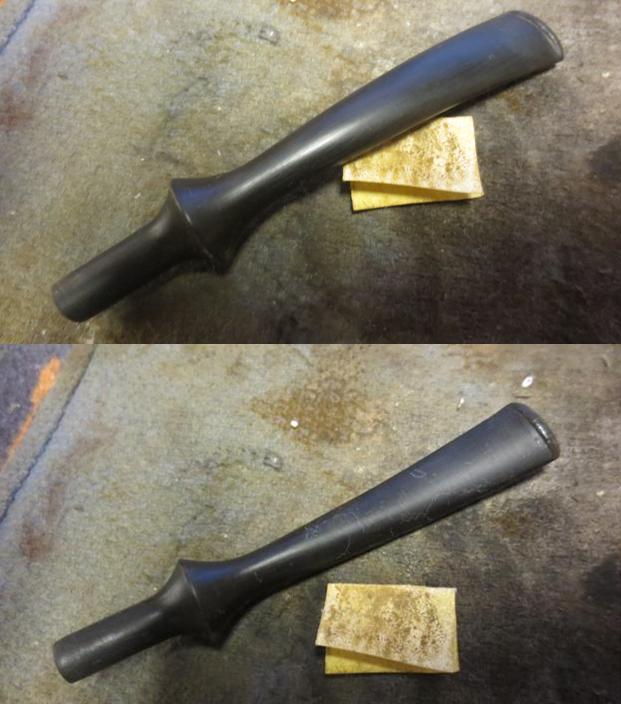
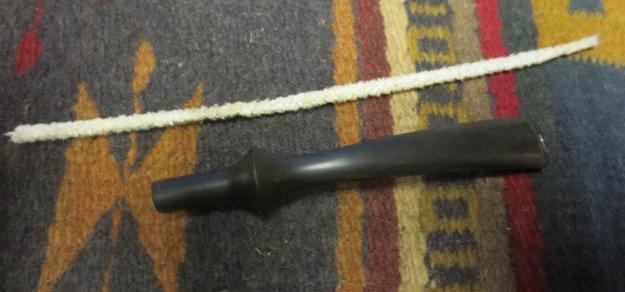
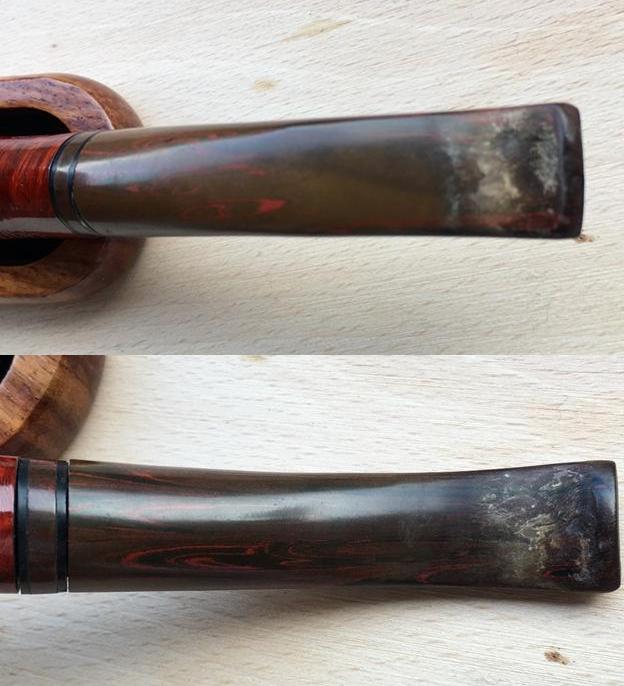
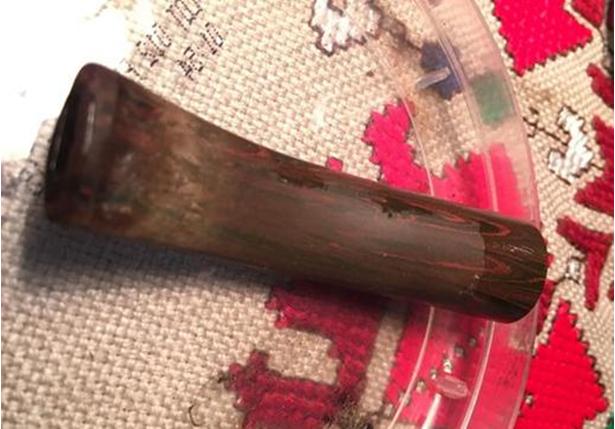
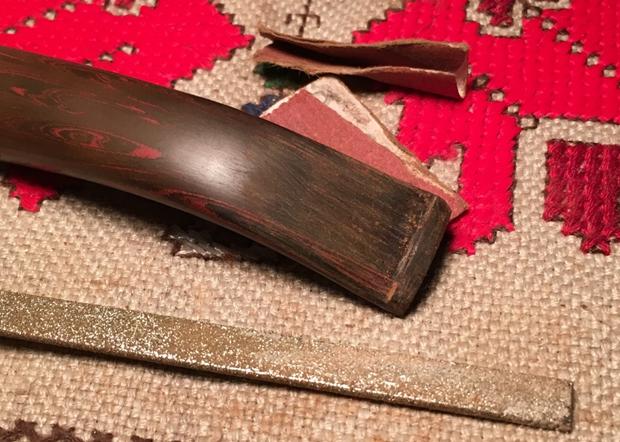
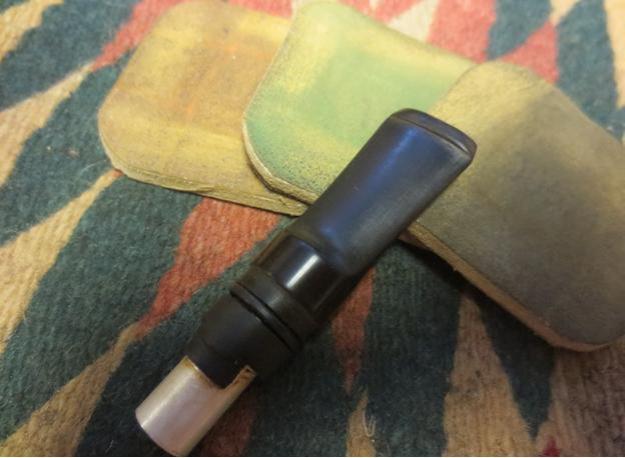
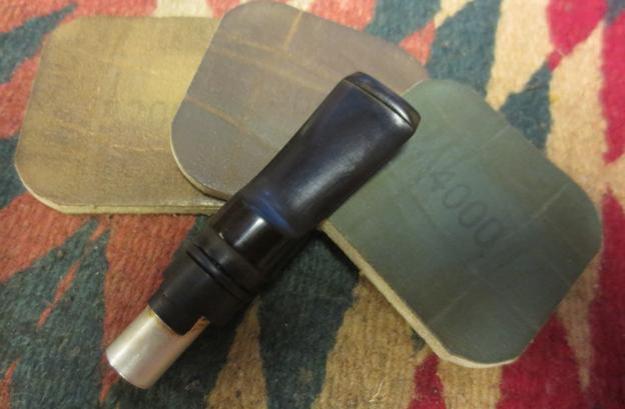
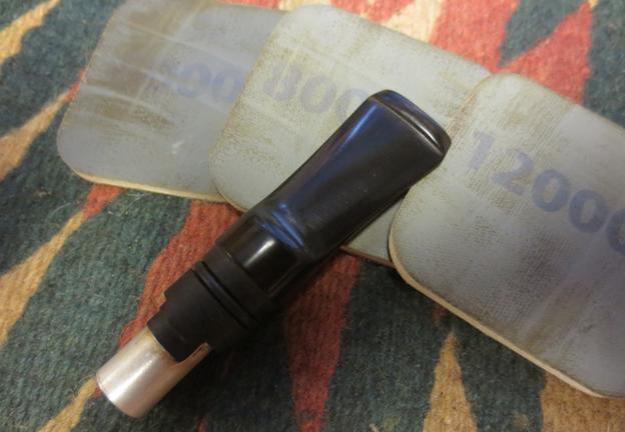
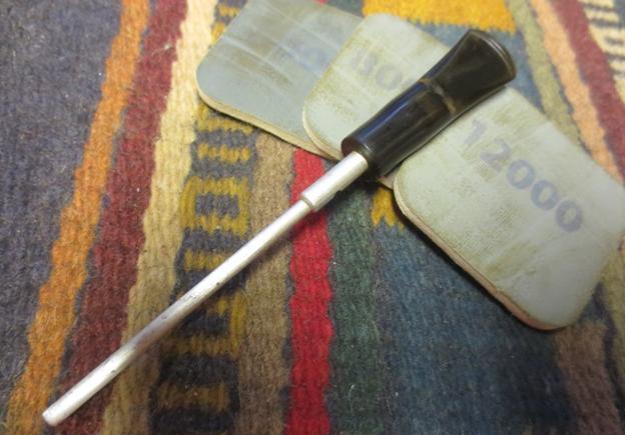
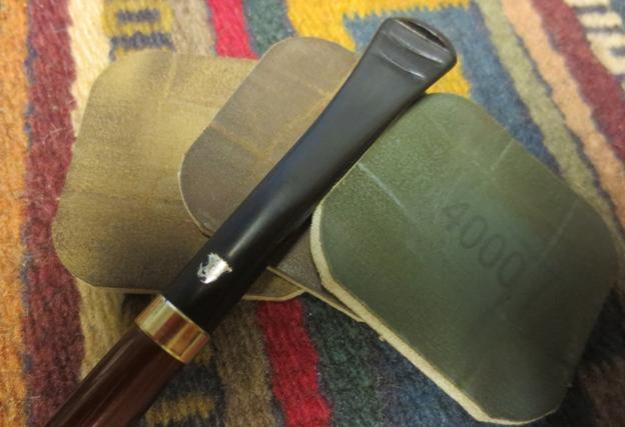
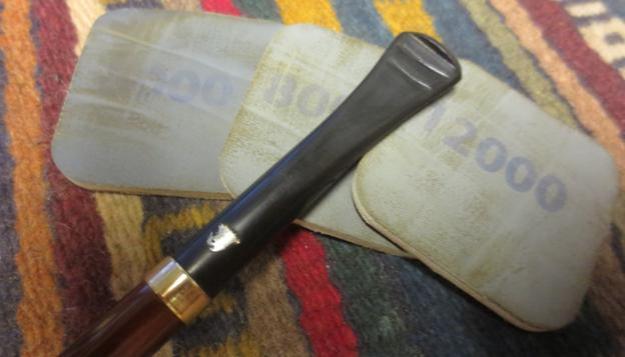
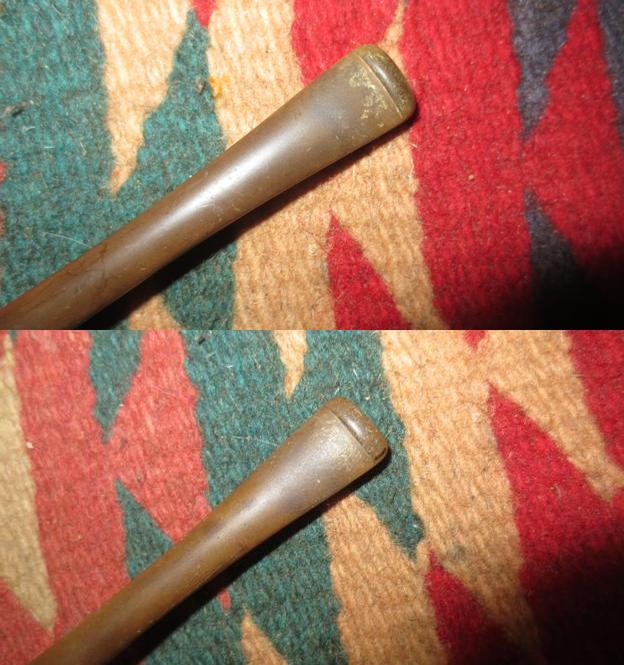
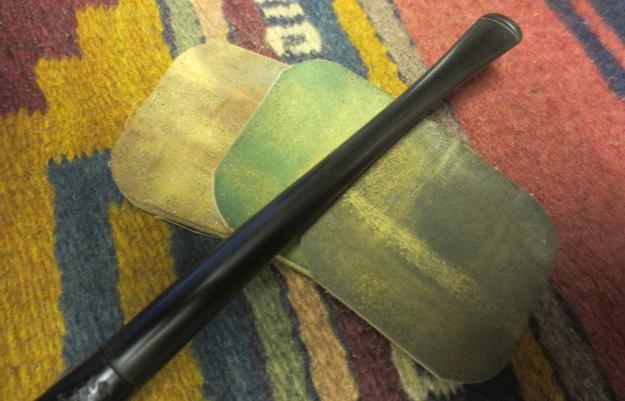
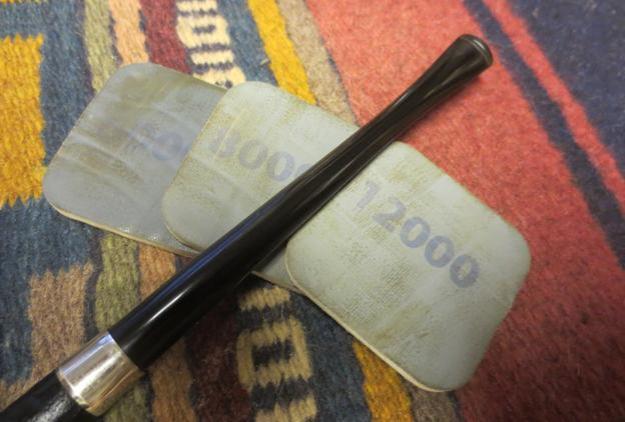
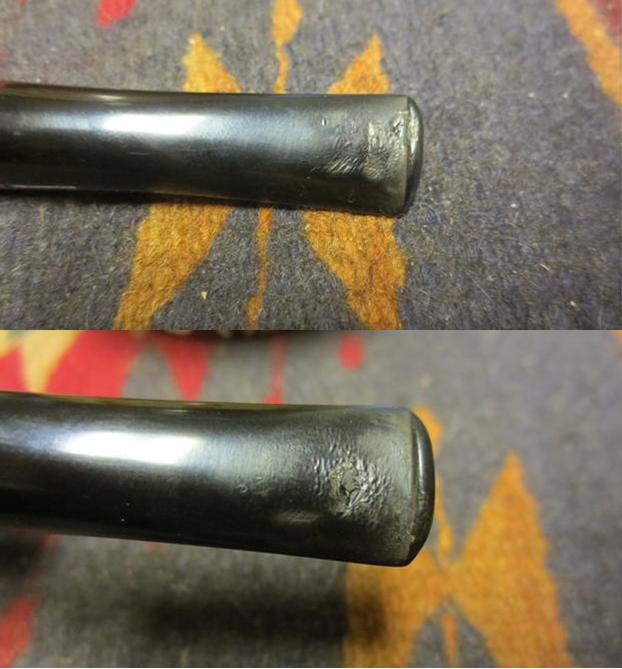
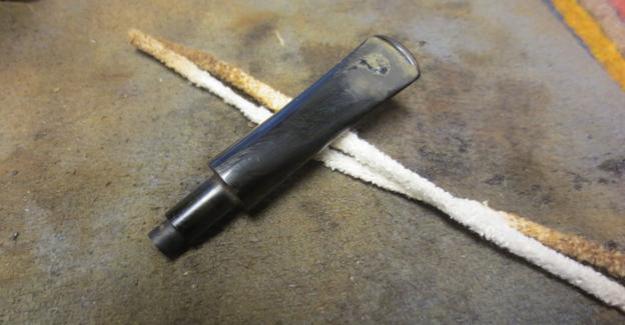
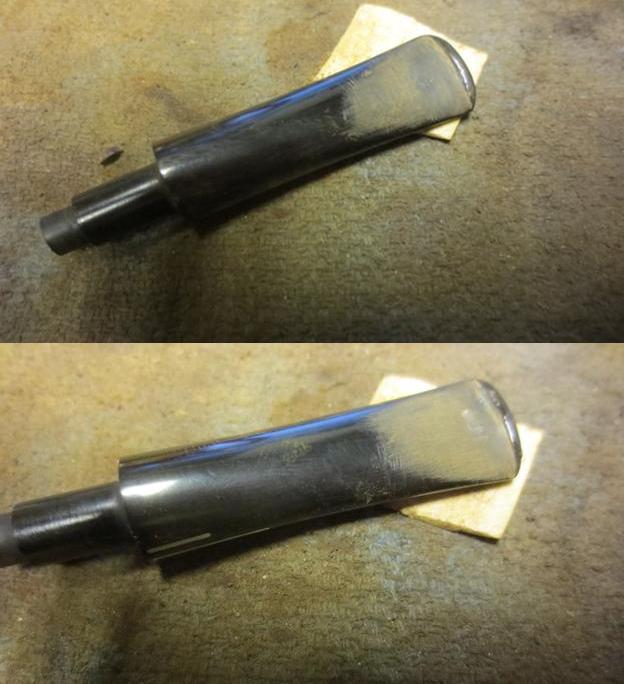
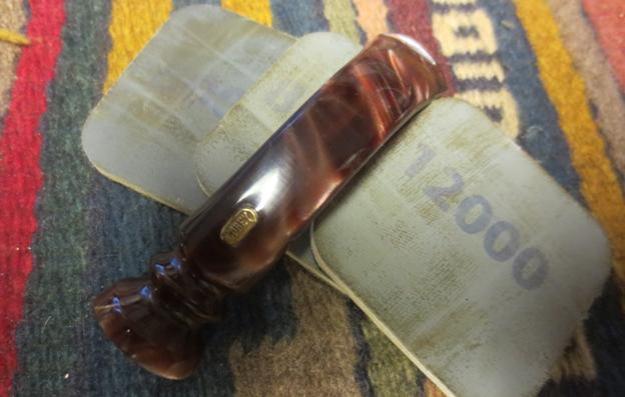
I wet sanded the Lucite stem with 1500-2400 grit micromesh sanding pads and wiped it down with a cotton pad. I sanded 3200-4000 and wiped it down again. I finished sanding it with 6000-12000 grit pads to finish polishing it.Jo17 Jo18 Jo19
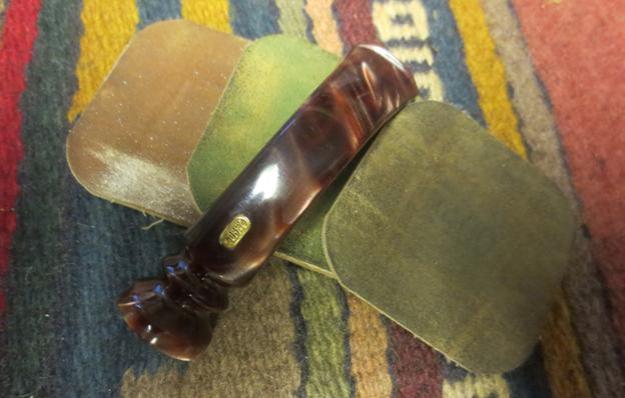
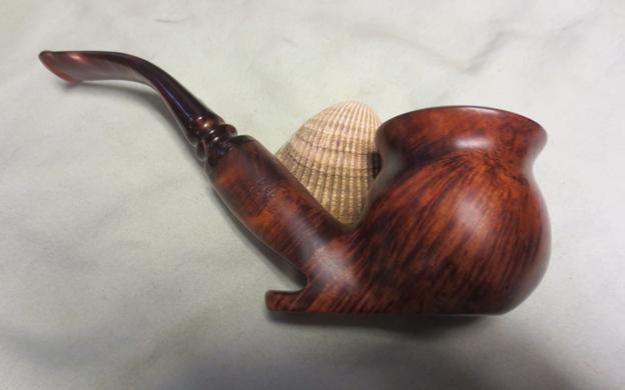
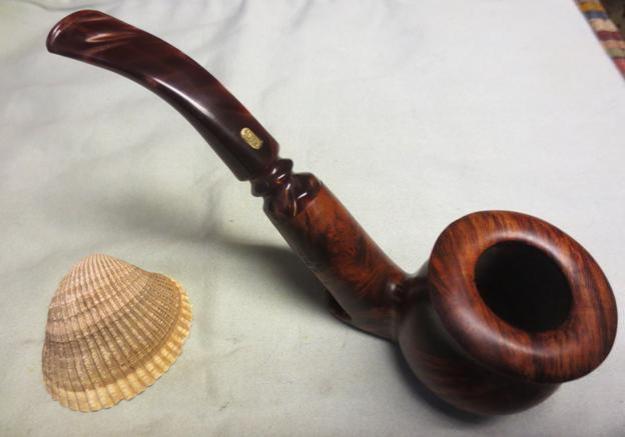
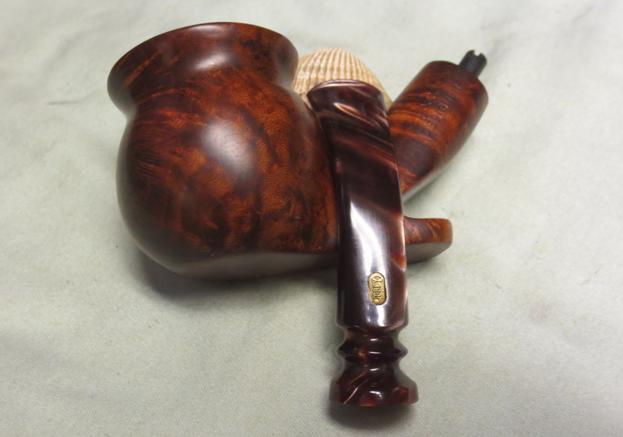
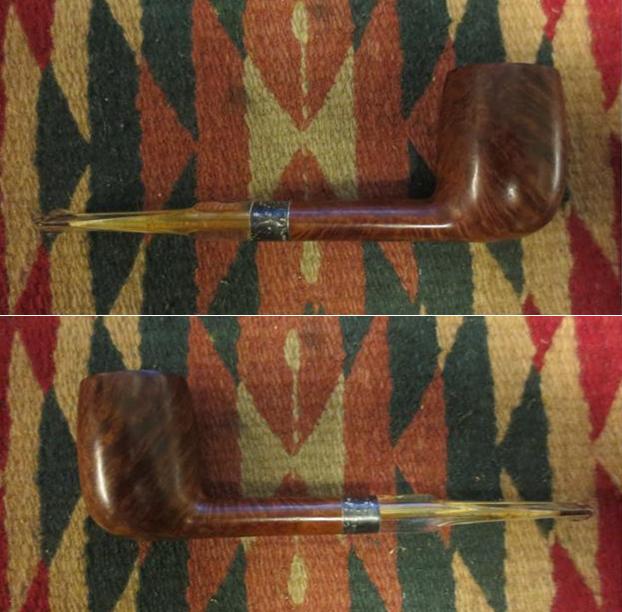
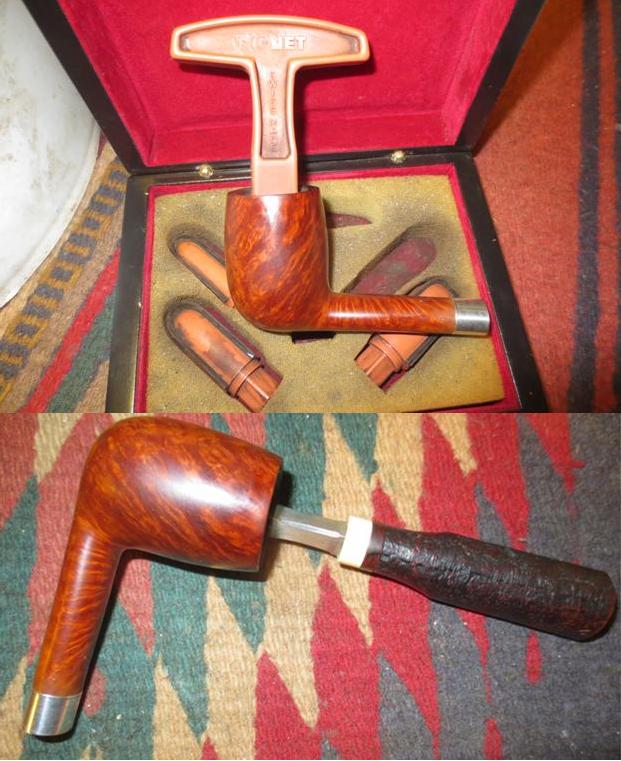
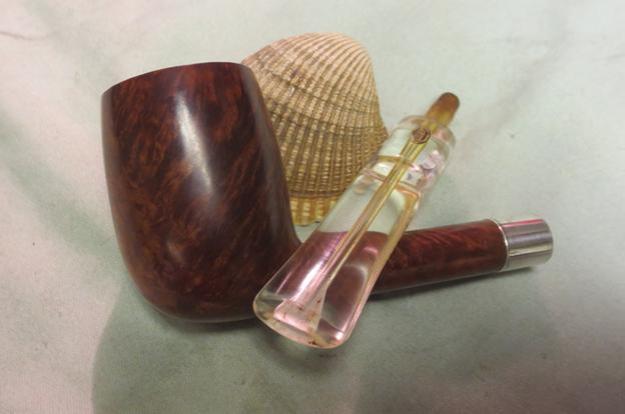
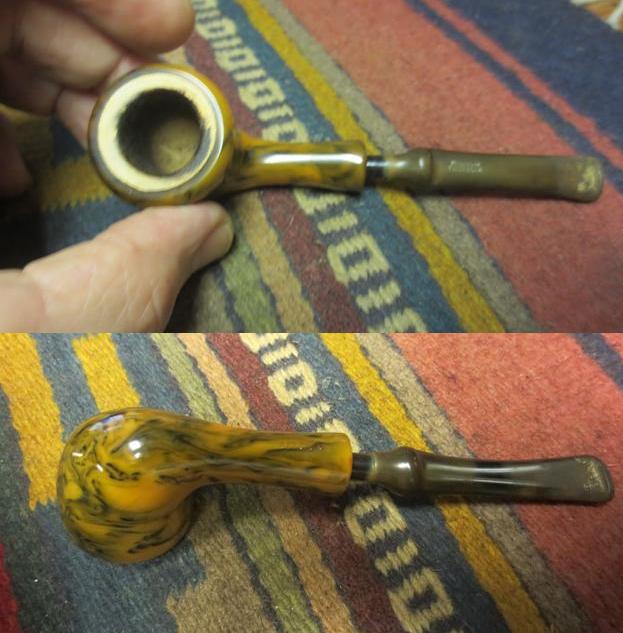
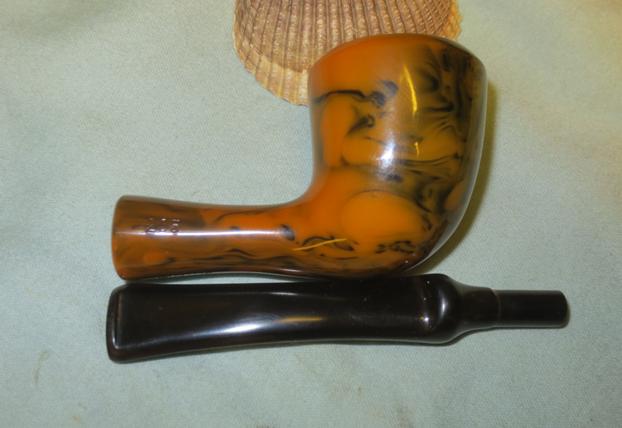
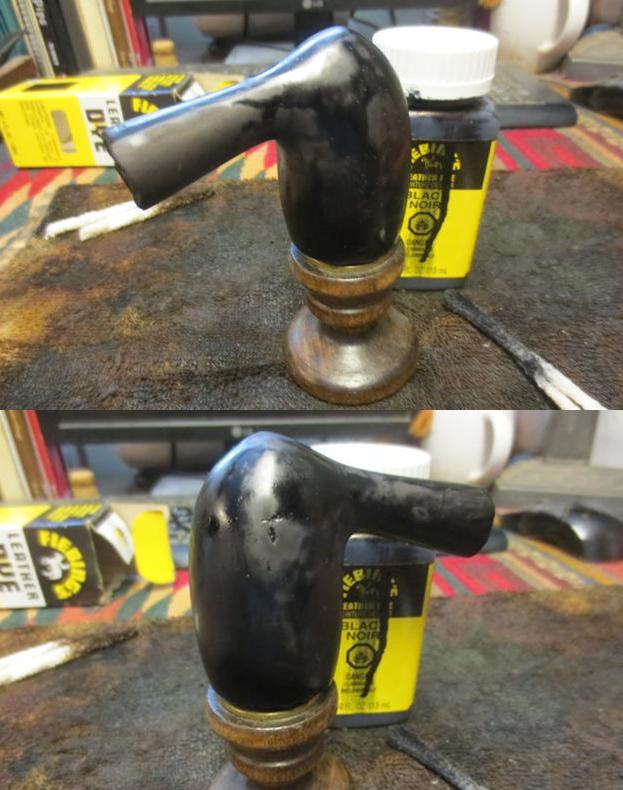
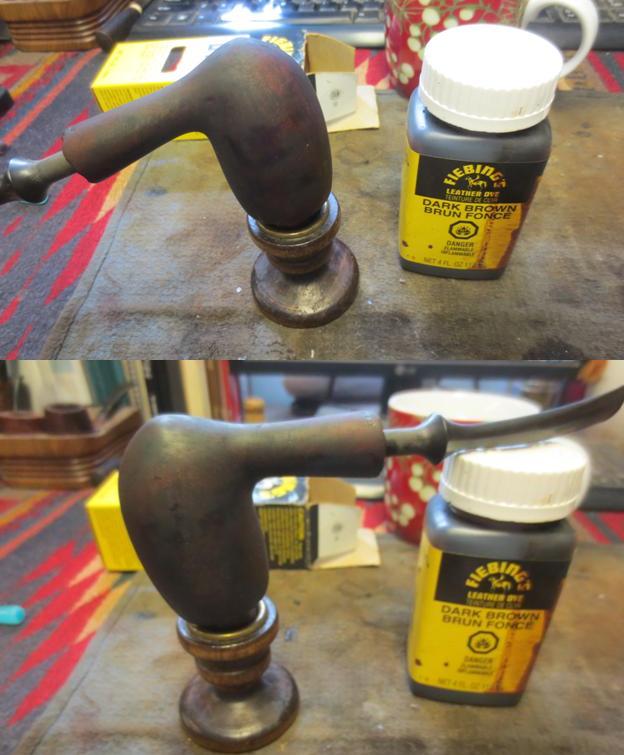
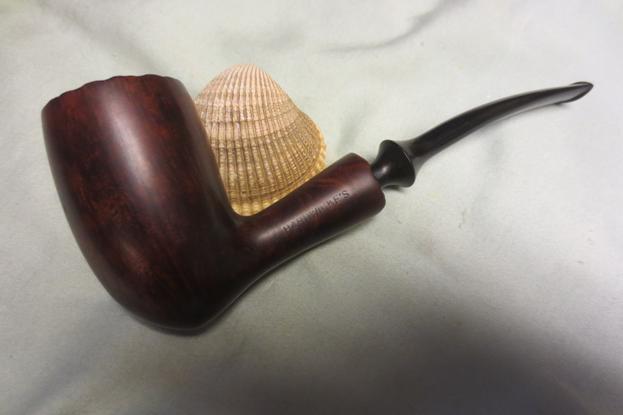
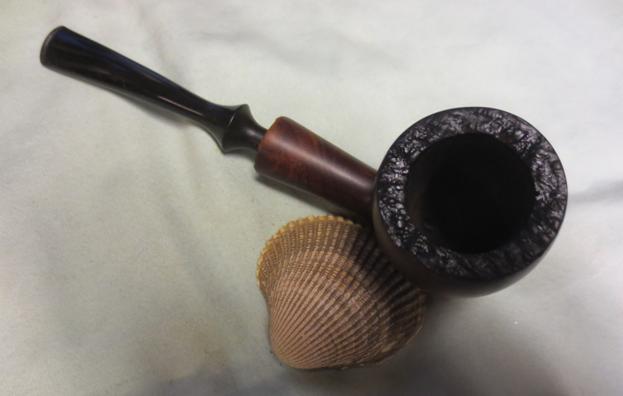
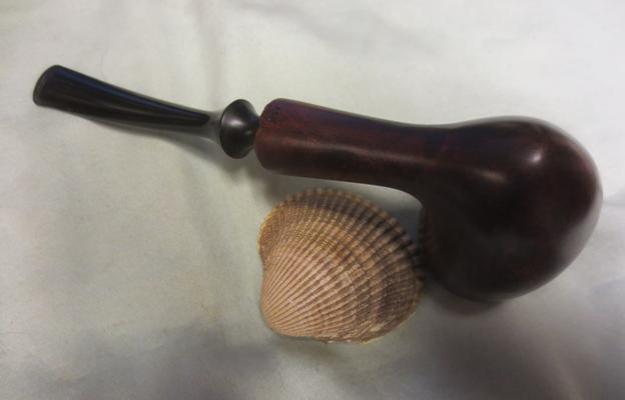
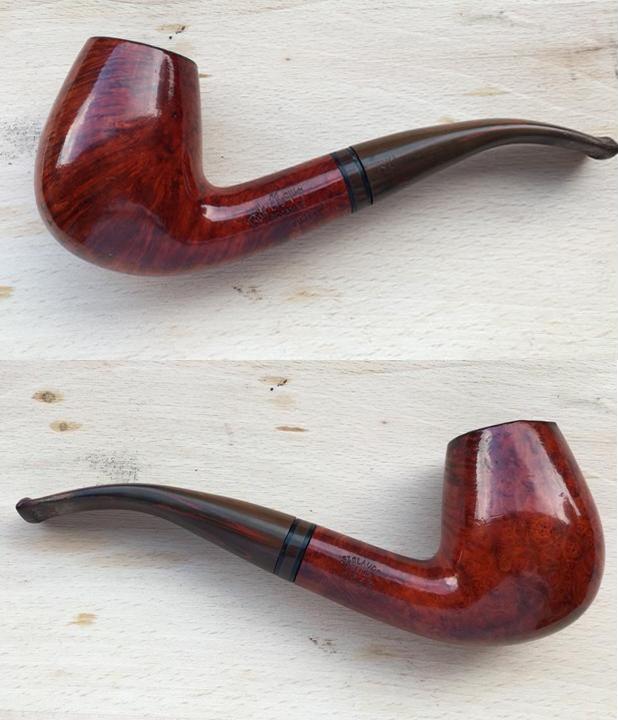
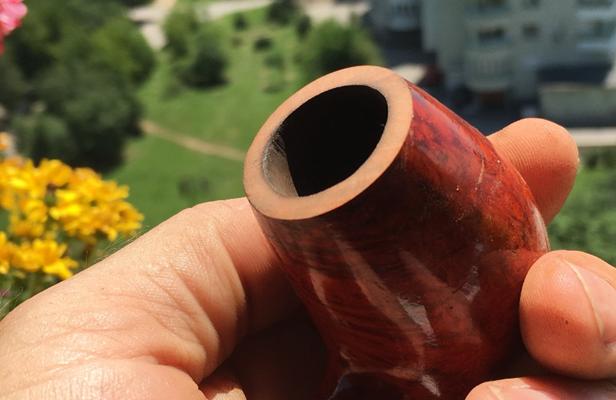
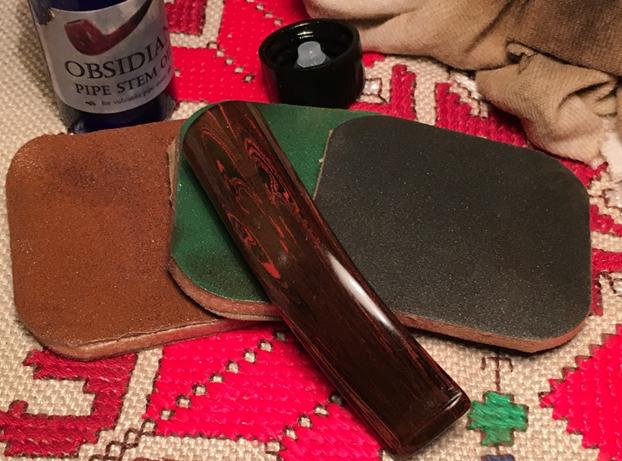
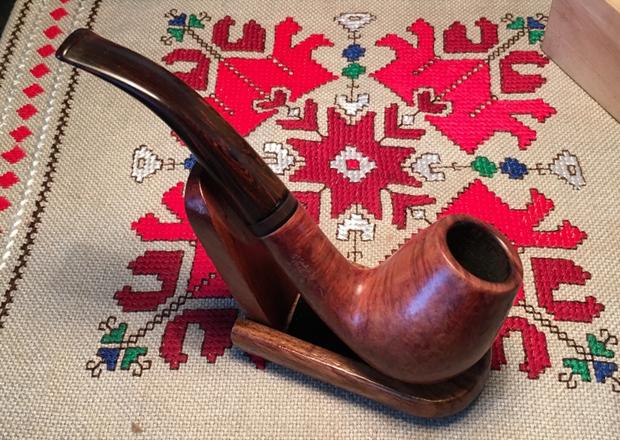
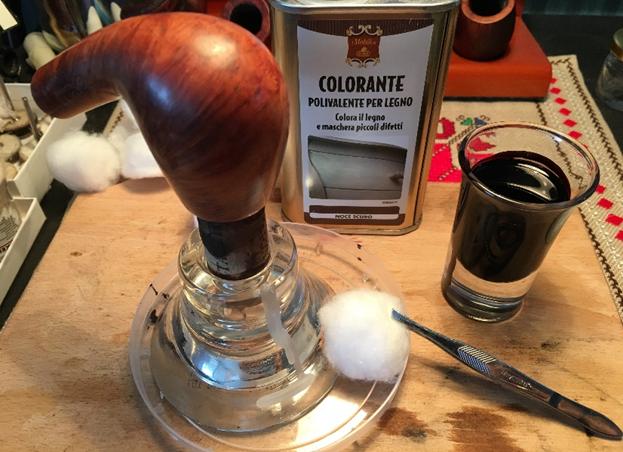
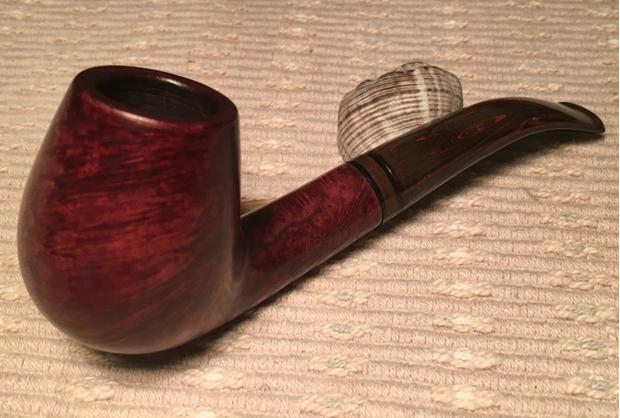
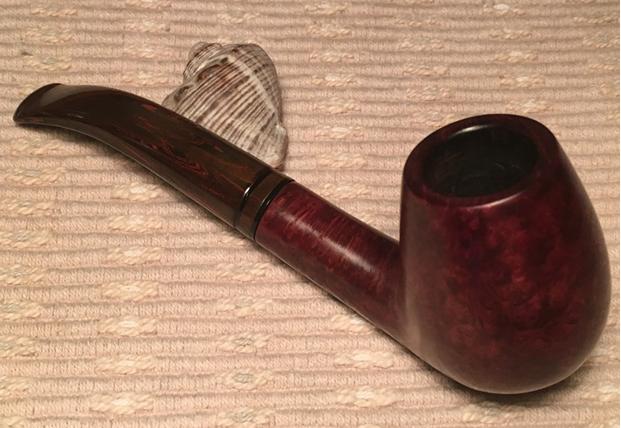
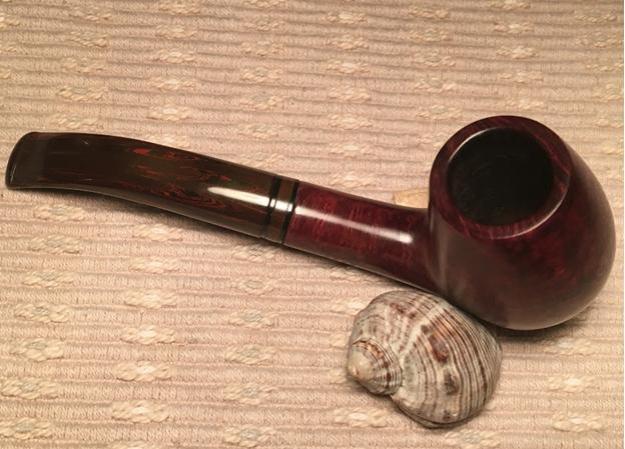
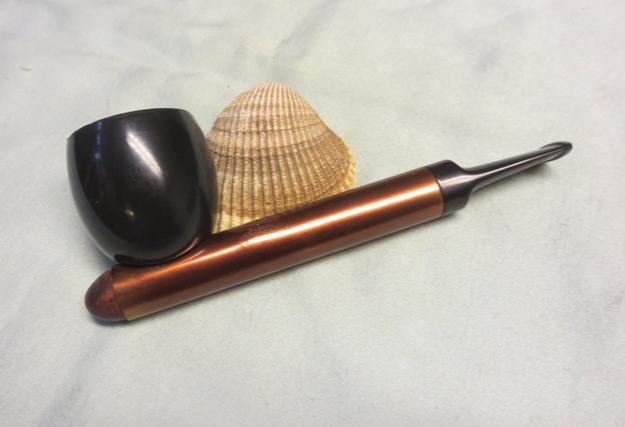
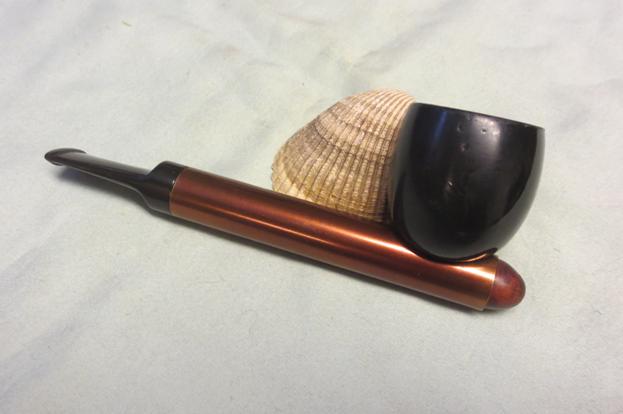
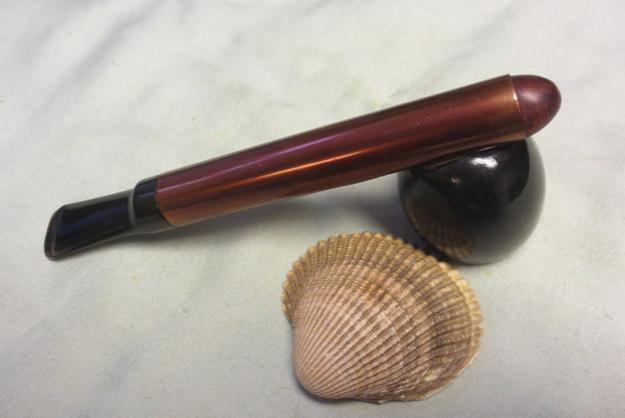
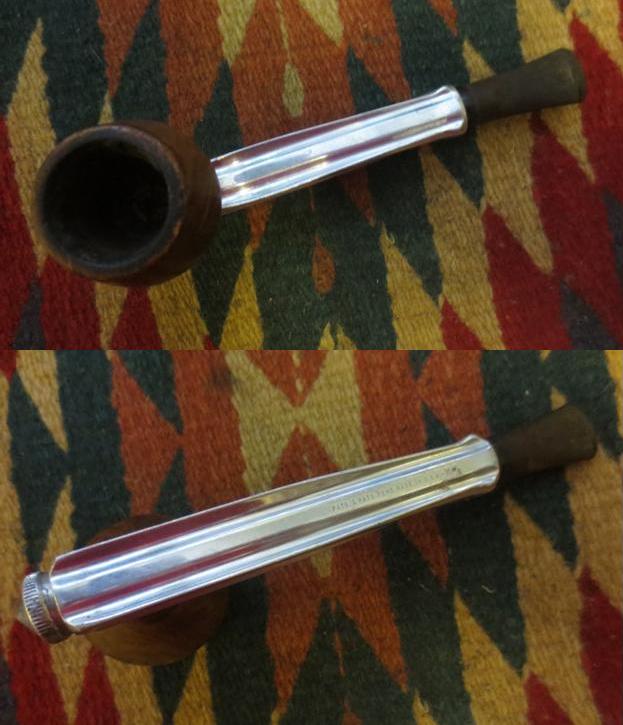
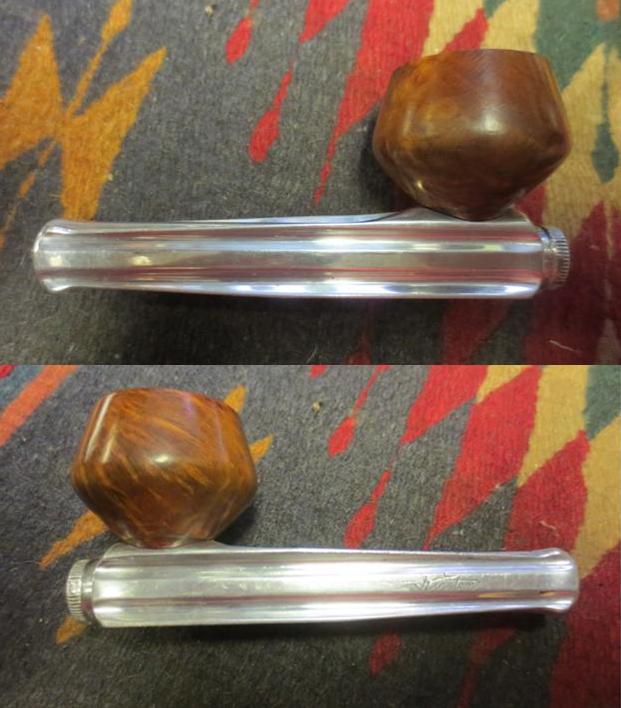
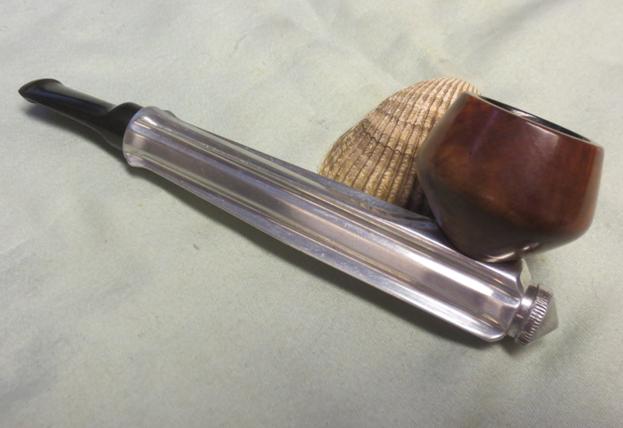
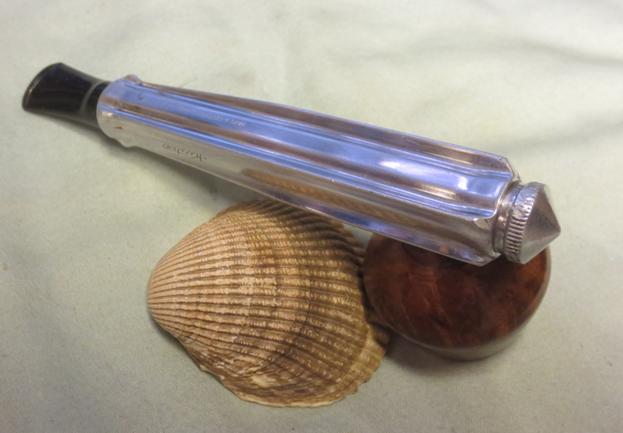
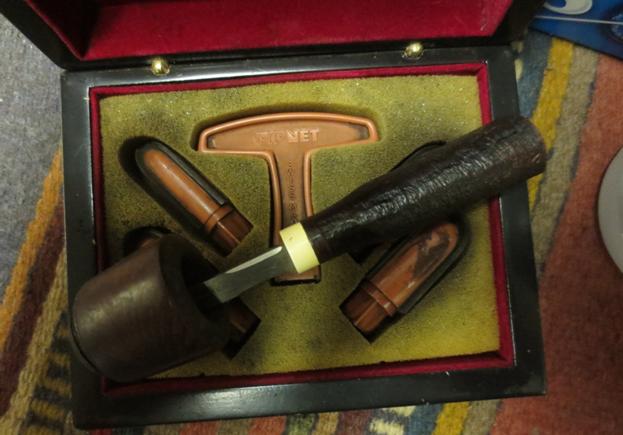
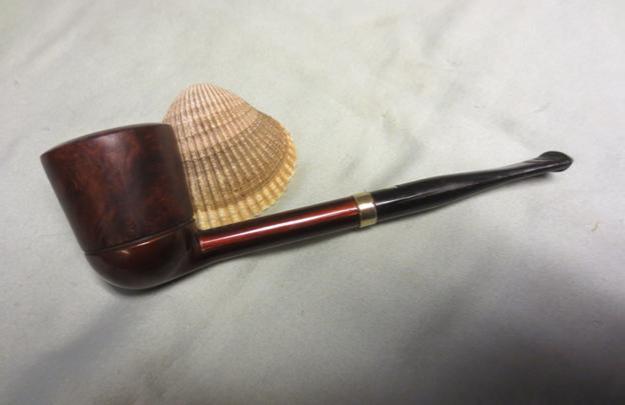
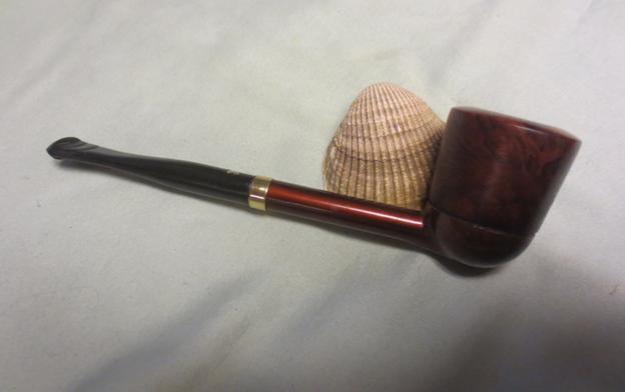
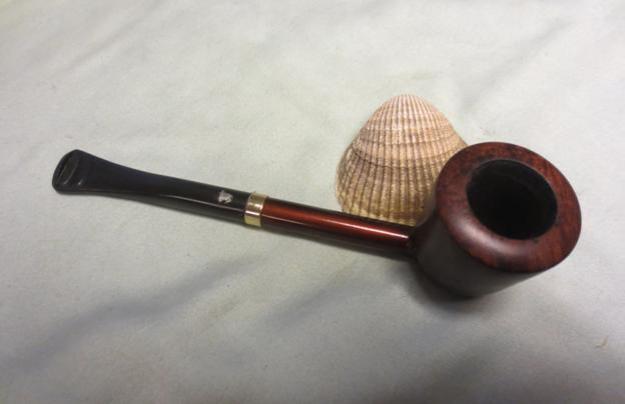
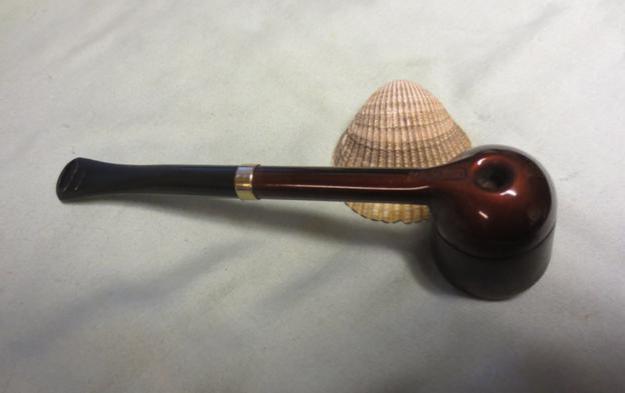
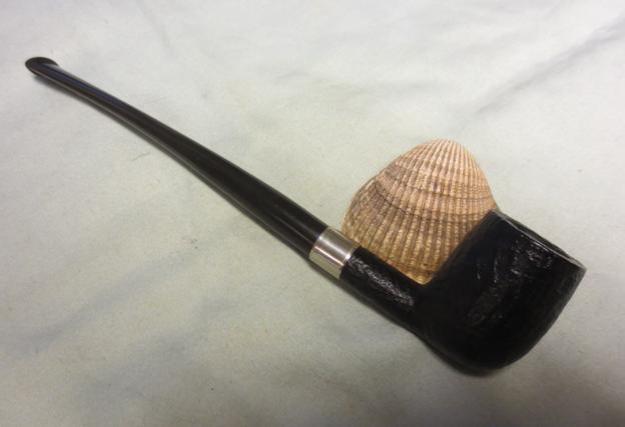
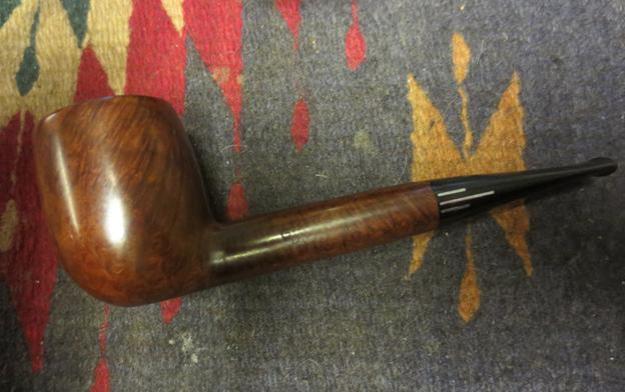
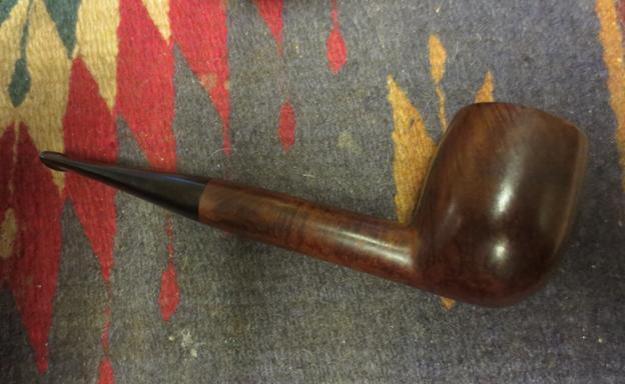
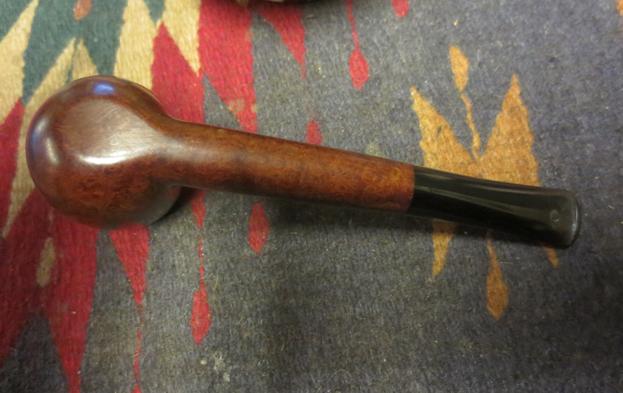
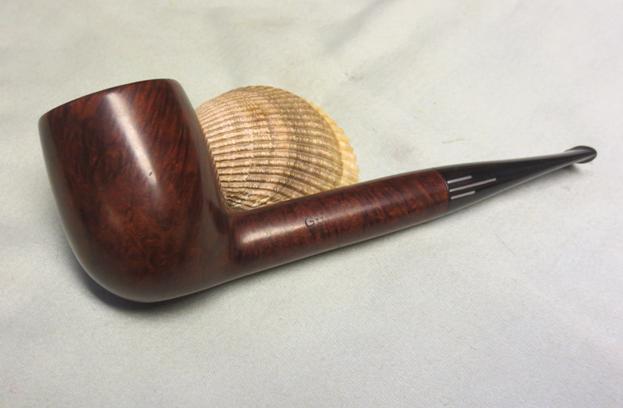
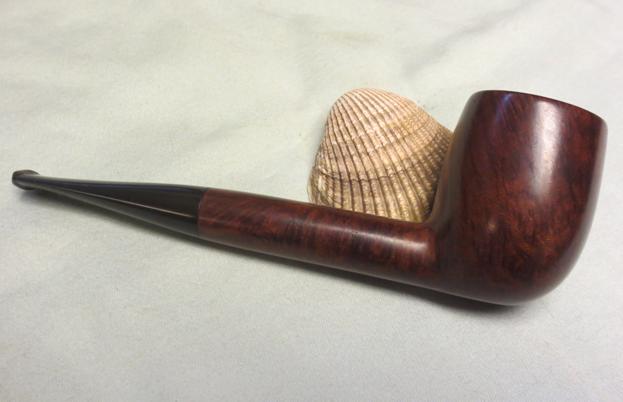
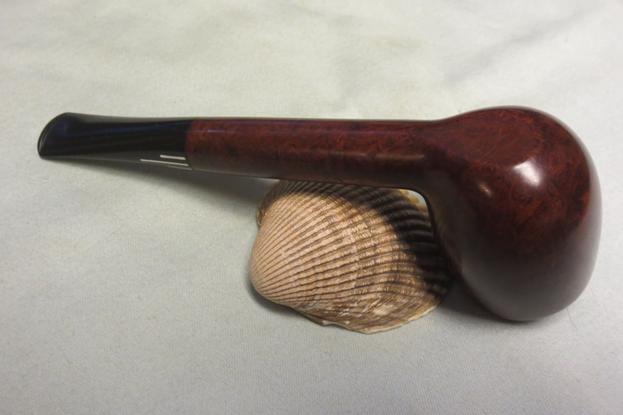
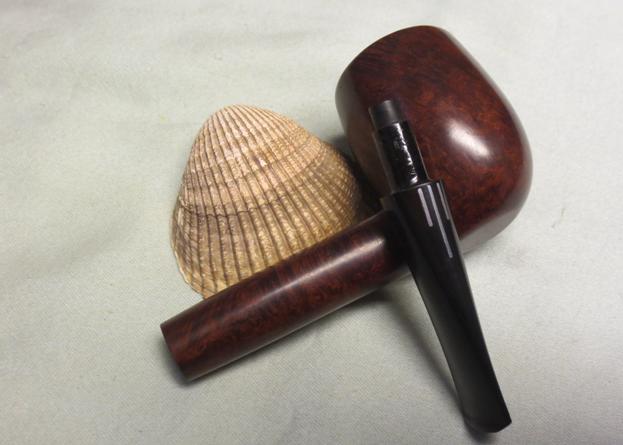
I gave the bowl a light coat of olive oil and then buffed it and the stem with Blue Diamond. I gave the bowl and stem multiple coats of carnauba wax and buffed it with a clean buffing pad. I hand buffed it with a microfibre cloth to deepen the shine. The finished pipe is shown in the photos below. Personally I have never seen a Jobey quite like this one. The carver who did the work captured the lay of the grain extremely well with it flowing up the shank. The new oil and wax finish really went well with the brown striated Lucite stem. Thanks for looking.Jo20 Jo21 Jo22 Jo23 Jo24 Jo25 Jo26 Jo27

A Stellar Find – A GBD Prestige 1451 Oval Shank Billiard


Blog by Steve Laug

I was looking through the box of pipes I brought home from my brother’s when I visited recently and came across a beautiful example of a GBD Prestige pipe. It is stamped GBD in the oval and Prestige below that on the top of the shank. It sports an oxidized silver band stamped Sterling in an arch across the top. It has some stunning grain and is an oval shank. On the bottom side of the shank it is stamped 1451 which according to the GBD shape charts is an oval shank Canadian. This one however does not look like a Canadian to me. It is a nice looking billiard. The stem is clear Perspex and was in decent shape. It has the brass GBD roundel on top of the stem.gbd1 GBD2I took some close-up photos of the pipe. The first shows the stamping on top of the shank. It is very legible and sharp. The second shows the build up on the rim and the cake in the bowl. The inner and outer edges of the rim are sharp and show no damage.gbd3The Perspex stem is actually surprisingly clean. Often the airway and slot on these older stems is stained a deep brown from the tobacco smoke and it is a bear to get out. This one however had minimal staining and most of that is in the slot on the end of the button and on the tenon itself. There was also some light tooth chatter on the top and bottom of the stem at the button.GBD4I was hoping that the build up on the rim could be scrubbed off so that is where I started. I used cotton pads and saliva and was able to remove most of the tars and lava. I used 1500-2400 grit micromesh sanding pads to clean it up further. Other than some slight darkening of the beveled rim it came out clean.GBD5I polished the silver band with some silver polish and a jeweler’s polishing cloth and was able to remove all of the tarnish without scratching or damaging the band.GBD6I reamed the bowl with a PipNet reamer. It was slightly bigger than the second cutting head so I used the Savinelli Pipe Knife to remove the remainder of the cake. I finished by sanding the inside of the bowl with 220 grit sandpaper.GBD7I scrubbed out the airway and mortise in the shank with alcohol, cotton swabs and pipe cleaners until all of the tars and oils were gone. Fortunately this pipe was well cared for and it did not take too many cleaners before they came out clean.GBD8The stem was another story. Never use alcohol on Perspex stems as it causes them to craze and crack. I scrubbed out the airway and slot with pipe cleaners dipped in Soft Scrub cleanser until the airway was once again clear. The slot took a little more work. When the pipe was made the slot work was rough and sloppy so the dark stains filled in grooves and scratches internally that no amount of scrubbing would remove. I used a round, oval and a flat oval needle file to clean up the roughness of the slot and remove the stains from those spots. I rinsed the inside of the stem with cool water to remove the scrubbing compound. The stem came out reasonably well in my opinion. There were a few brown stains that I was not able to remove but they are minimal. They will show up in the final photos of the pipe.GBD9I wet sanded the tooth chatter on the top and bottom sides of the stem at the button using 1500-2400 micromesh sanding pads. I sanded with those until the tooth chatter was gone. I was fortunate that none of the tooth marks were very deep. I dry sanded with 3200-12000 grit pads and finished by wiping the stem down with a damp cotton pad to remove the dust.GBD10 GBD11 GBD12I buffed the bowl and stem with Blue Diamond on the wheel and was amazed at how the grain popped and the stem began to shine. I gave the bowl and stem multiple coats of carnauba wax and buffed them with a clean buffing pad. I finished by hand buffing the pipe with a microfibre cloth. The finished pipe is shown in the photos below. While there are some small brown stains in the button area it is clean. I think you will agree that it is a stunning example of a GBD Prestige. The grain and the stem work really well together and the factory installed silver band sets off the pipe with a touch of class. Thanks for looking.GBD13 GBD14 GBD15 GBD16 GBD17 GBD18 GBD19 GBD20


Is it really a plastic smoking pipe? What is a Hilson Fantasia?


Blog by Steve Laug

The next pipe on the table is a Hilson Fantasia. It is a butterscotch coloured bowl and shank with swirls of black that are scattered throughout the pipe. When I saw the pictures in the eBay seller’s listing I was not sure it was worth the effort. Over the years I have seen some beautiful swirled patterns in bright yellows, puce and lime greens, reds and oranges that were quite stunning. This one fell short of those previously seen pipes in terms of colour (at least in the photos). The following photos are from the seller’s ad.Fan1The resin external bowl was in excellent shape with no cuts, marks or dents in the surface. The meerschaum insert was barely smoked. The rim had some darkening and overflow on the back edge but it was not too bad. The rest of the rim looked rough but would easily polish up and look good. The bottom half of the bowl was not darkened by tobacco burning and looked almost pristine. The fact that Hilson used block meerschaum and not pressed meerschaum for their bowls makes the quality of the lining far better and I have rarely seen a Hilson meerschaum lining cracked or broken. The stem was quite heavily oxidized and the tenon would not fit in the shank due to some residue in the mortise. The stamping “Hilson Fantasia” on the stem was a decal and it was almost worn off. With the heavy oxidation I would have to sacrifice that faint stamping to get the stem back to black. There was some light tooth chatter on the top and underside of the stem near the button. The slot in the button was very small and tight. That made it hard to push a pipe cleaner through the stem from the button end.Fan2 Fan3When I received the pipe from my brother I was pleasantly surprised at the colours. It was significantly brighter than the photos. The swirls of black against the amber colour looked much more appealing than I would have guessed. The bowl was stamped on the underside of the shank with the word BELGIUM and on the right side of the shank with the shape number 205.Fan4Fan5 From my research on the web I found that the Hilson Fantasia, made in Belgium originally came out as a meerschaum lined pipe with an outer bowl made of a new material that they called pipenite. In 1962 it came out in what they called ivory white and in a colour they called tortoise. In 1963 they seemed to have added the option of a black pipenite bowl. From what I can find out about the material they call pipenite, it was a specially designed polyester resin. It was light weight and fairly indestructible. The block meerschaum insert was something that Hilson turned into a specialty. (I have restored some beautiful briar pipe with the Double Ecume or meerschaum liners as well.) These colourful resin pipes look like a product of the 60’s and in my research on Chris’ Pipe pages, http://pipepages.com/hilson.htm I found them in catalogues from that era. The swirled materials of the bowl gave the pipe a 60’s psychedelic look. I have included a catalogue page from a 1962 Wally Frank Catalogue that was on the pipepages site. The write up on the Hilson Fantasia is entertaining to read in terms of the sales pitch that is delivered.Fan7 I have written about some of the history of the brand on a previous blog on Hilson Double Ecume pipes. If you are interested in reading about the history of the brand click on the following link: https://wordpress.com/post/rebornpipes.com/40547. In addition the following link on the Estervals Pipe House website gives a good summary of the history of the brand for those of you who want to read more: http://www.tecon-gmbh.de/info_pages.php?pages_id=70.

I took some close up photos of the rim to show the white bowl bottom and the tars and darkening on the top of the rim. The inner edge of the bowl is rough to touch as is the surface of the rim. I also took a photo of the front and the back of the bowl to show the swirls in amber base colour. There is something stunning about this pipe.Fan8 Fan9 Fan10The next two photos show the tooth chatter and the oxidation on the stem – top and bottom as well as the faded and worn decal that reads Hilson Fantasia.Fan11I scrubbed the surface of the rim with saliva on a cotton pad and then used the 1500-2400 grit micromesh sanding pads to smooth out the surface and the inner edge of the rim.Fan12I carefully scraped the meerschaum lining of the bowl with a Savinelli Pipe Knife to remove the slight cake build up on the inside of the bowl.Fan13I scrubbed out the mortise and airway to the bowl with pipe cleaners, cotton swabs and alcohol to remove the tars and oils. I used pipe cleaners and alcohol to clean out the airway in the stem as well.Fan14I sanded the stem to remove the oxidation on the surface. It took quite a bit of sanding to get through the oxidation on the surface. Once I had it removed I scrubbed it with soft scrub cleanser to clean off the remnant. I wet sanded the stem with 1500-2400 grit micromesh sanding pads and gave it a coat of Obsidian Oil. I dry sanded it with 3200-4000 grit pads, gave it another coat of oil and then finished sanding it with 6000-12000 grit pads. I gave it a final coat of Obsidian Oil and set it aside to dry.Fan15 Fan16 Fan17I buffed the meerschaum rim lightly with Blue Diamond on the wheel and the stem as well. I gave the stem and the rim several coats of carnauba wax and buffed it with a clean buffing pad to give it a shine. I hand buffed it with a microfibre cloth to deepen the shine on the stem and the rim. The finished pipe is shown in the photos below. I am quite taken by the overall look of the pipe once it has been cleaned up. There is more to it than meets the eye. The light weight the swirls in the amber like resin and the patina on the rim give it a touch of class. This one will also probably be on the store for sale in the days ahead. If you are interested send me a message or leave a comment.Fan18 Fan19 Fan20 Fan21 Fan22 Fan23 Fan24 Fan25 Fan26

Restemming and Restoring a Hardwicke’s Freehand


Blog by Steve Laug

One of the pipe bowls that came to me in the box of pipes from my brother was a tall nicely grained freehand that was stamped on the shank Hardwicke’s and Italy on the underside of the shank next to the shank stem junction. H1I had never heard of the brand before and it was not listed on Pipedia or on the Pipephil website. The more I looked in my usual sources such as Who Made that Pipe the more stymied I was about the brand. It was an interesting shaped bowl. The bowl had some dark marks on the shank, the bowl bottom and on the right side at the point and up the side midway. There was a thick coat of urethane over the entire bowl and the faux plateau. The rustication on the rim matched that of the end of the shank and had been done with tools. There was a thick coat of tars and oils under the urethane on the rim. The bowl itself had a thick cake in it that filled it from top to bottom. The first quarter inch down from the top of the rim had a darker stain that ran down the walls. (I almost forgot to take photos of the bowl before I had sanded all of the urethane off the surface. I stopped and caught these. On the lower part of the bowl on the right side there was a spot of real plateau.H2 H3I went through my box of stems and had a stem that would work really well with this pipe. It would need to have the tenon end reduced so that it would sit in the mortise.H4I decided to Google Hardwicke’s Cigar and Pen to see if the pipe could have been a shop pipe. It was made in Italy but the Hardwicke’s stamping pointed elsewhere. I found that there was a group of shops in Indianapolis, Indiana. The main shop was located at 743 Broad Ripple Ave, Indianapolis.H5One reviewer of the shop had this to say about the shop: “This small cigar shop is located just south of the circle, so in the heart of downtown. They carry a pretty impressive stock of cigars and the pricing is relatively reasonable considering their location. The staff is incredibly knowledgeable and willing to help you find something in your price range. They do have a lot of cigars at the $5 price point so don’t be put off by the fact there are also a lot of $15+ cigars.”

“They also have their own brand, which is rolled with several different tobaccos and in several sizes, these should not be overlooked, especially if you don’t want to spend a lot on your smoke.”

“They also offer pens, pipes, pipe tobacco and the usual array of cutters and lighters you’d expect from a cigar shop. I’ve only purchased cigars here so cannot comment the rest of their offerings, although their selection of pipes does seem good to me.”

Further digging found an article in the Indy Star newspaper about the Downtown shop closing. The article also says that the Broad Ripple Store remains open. I have included the link to the article as well the article in full. http://www.indystar.com/story/money/2016/01/20/smoke-free-downtown-landmark-hardwickes-exits/78800744/

Hardwicke’s Pipe & Tobacco, a long-time Indianapolis fixture, seems to have shuttered its Downtown store.

The inventory was being removed last week, and a store clerk said closure was imminent. The store now stands empty, void entirely of the fine cigars, cigarettes and pipes the retailer sold for five decades.

Hardwicke’s Broad Ripple store, which predates the Downtown shop, remains open. Staffers answering the phone there declined to comment on the fate of the Downtown location, which had occupied a storefront at 18 N. Meridian St., just off Monument Circle, since 1977.

The demise of Hardwicke’s Downtown comes amid a flurry of change for Indianapolis’ old-time businesses.

Last month Kincaid’s, the high-end meat market at 56th and Illinois streets that had been in the same family since its founding nearly a century ago, was sold. Virginia Jarvis Coiffures, a beauty shop for many of Indianapolis’ leading women since 1965, closed its doors Saturday. G. Thrapp Jewelers, in the Butler-Tarkington neighborhood, closed Sunday after 33 years.

Contact IndyStar reporter Will Higgins at (317) 444-6043. Follow him on Twitter @WillRHiggins.
So now I knew that the pipe I had was indeed a shop pipe made for Hardwicke’s Tobacco Shop of Indianapolis. Now it was time to work on it and restore and restem it. I sanded the bowl with 220 grit sandpaper to remove the urethane finish that covered the grime and the burn marks. I sanded the burn marks and tried to reduce the damage to the briar. The more I worked on them the more I am convinced that they were not burn marks but rather dark stains that happened when the bowl was laid in something that left a stain mark. I remember when my mom made pickles when I was a lad and the jars of vinegar left dark rings in the oak table top. These looked identical to the ones I remember as a boy. I sanded and was able to remove several of them. I wiped the bowl down with acetone to clean off the stain and the dust.H6The rim was thickly caked. I worked on it with a brass bristle wire brush and a dental pick to remove the build up on the rim. You can see from the second photo the rustication pattern in the faux plateau on the rim. It is identical to the one that is cut on the end of the shank.H7I reamed the bowl with a PipNet reamer and took the cake back to bare wood. I cleaned up the edges and the bottom of the bowl with the Savinelli Pipe Knife.H9I sanded the bowl with a medium and fine grit sanding sponge and then with 1500-2400 grit micromesh sanding pads to remove the scratching in the surface left behind by the 220 grit sandpaper. I remove the darkening around the top of the rim so the surface of the briar was the same over the entire bowl.H10 H11The bottom of the bowl shows a scratch in the surface that looks like it is a hairline crack. Looking at it with a magnifier I am pretty sure it is a scratch and not a crack.H12To deal with the darkened spots on the shank and the bowl bottom as well as the scratch I decided to use a contrast stain. I stained the bowl with a black aniline stain and flamed it. I repeated the process until the coverage was even.H13I wiped down the black stain with alcohol on cotton pads to remove the stain in the body of the briar and leave it in the grain.H14I washed it down with an alcohol damp pad and gave it a top coat of brown stain. I flamed it and applied it until the coverage was even. Then I set it aside to dry.H15I used the Dremel and sanding drum to reduce the diameter of the tenon. I cleaned it up with a piece of 220 grit sandpaper. I put the stem in the shank and took some photos of the look of the pipe at this point in the process.H16 H17 H18I sanded the stem with 220 grit sandpaper to remove the tooth chatter on the top and bottom sides of the stem at the button.H19I cleaned out the airway with a pipe cleaner and alcohol. It was not dirty at all which surprised me.H20I wiped down the bowl with alcohol on cotton pads and then buffed the bowl with Blue Diamond on the buffing wheel.H21 H22I wet sanded the stem with 1500-2400 grit micromesh sanding pads and rubbed it down with Obsidian Oil. I dry sanded with 3200-4000 grit pads, gave it another coat of oil and finished sanding it with 6000-12000 grit pads. I gave it a final coat of Obsidian Oil and set it aside to dry.H23 H24 H25I buffed the bowl and stem with Blue Diamond on the buffing wheel. It removed a little more of the brown stain and made it a bit more translucent. I gave the stem and bowl several coats of carnauba wax and buffed it with a clean buffing pad to raise the shine. The new stem looks like it belongs with the pipe and the curve of the bowl and the new stain look great in my opinion. The grain on the pipe is very nice. The black and brown stain combination hides the dark mars on the shank and the bowl. They are still present but blend in nicely. Thanks for looking.H26 H27 H28 H29 H30 H31 H32

Sofia Hole in the Wall #3: A Butz-Choquin Rocamar with a Cumberland stem


Blog by Dal Stanton

This is my third restoration from what I called the ‘Bag of 4’ that Steve and I saw at the ‘Hole in the Wall’ antique store during his visit to Sofia, Bulgaria.  Thanks again for indulging my ‘newbie’ offerings. My favorite of the bunch was a Savinelli Tortuga (https://rebornpipes.com/2016/06/18/sofia-hole-in-the-wall-find-savinelli-tortuga/).  The second, which I didn’t write up, was a beautiful Danske Club Vario, which I discovered on Pipedia is a Stanwell second.  Behind the Tortuga, the Vario was a close second. It is now next to my Tortuga in regular rotation – a great addition to my growing collection. Take a look at a few pictures of the finished Danish Danske Club Vario. I’m drawn to the blended smooth and sandblasted briar finishes on this pipe:Dal1 Dal2The markings I found on pipe #3 on the left side is Butz-Choquin over Rocamar with a ‘Filter 9’ diagonal imprint.  On the right side, St. Claude, France 1333, which I assume is the BC shape or series number.  The Cumberland stem has the BC imprinted marking.  From Pipedia I discovered a bit of the early history of the name from Pipedia:

“Jean-Baptiste Choquin of Metz started out as a tobacconist. This enterprise was prosperous; he had several employees. Among those, there was a certain Gustave Butz who was its first workman and who became his son-in-law by marrying Choquin’s daughter Marie in 1858.  In 1858 Jean-Baptiste Choquin created, in collaboration with Gustave Butz, the Choquin pipe. This bent pipe with a flat-bottomed bowl was finished with an albatross-bone mouthpiece, fixed with silver rings.  In 1858, still in Metz, Gustave Butz built an establishment for the manufacture of the Choquin pipe which took the name of -. In 1951, the Berrod-Regad company bought the trademark, continuing manufacture until 2002. Departing from Metz, the workshop was relocated to Saint-Claude, then also called ‘the world capital of the briar pipe,’ under the Berrod-Regad group.”

I could find nothing specific about the series name Rocamar so I decided to send an email to Butz-Choquin using their info contact from their current website which is under construction (http://www.butzchoquin.com/).  We’ll see where that goes.

The BC Rocamar has an attractive fiery grain and the bent billiard chimney is tall and elegant to me – perhaps tending toward an egg shaped bowl.  What I’m drawn to also is the bent Cumberland stem – my first to work on.  Not quite knowing what kind of stem it was I did a bit of research and discovered pipesmokersforum.com a thread discussing this stem:

“Cumberland proper is a vulcanite rod made up from red and black rods, melted and swirled together for the brown/red marble effect. It is very soft, and oxydizes fairly quickly if the protective wax coating is scraped off. There is a harder version in ebonite, which has a higher sulfur content if I understand these things correctly, but the color combos are not quite as subdued as the vulcanite version. It’s a bit more “brick” colored.”  Another comment I read was that if one found a Cumberland stem it was most likely hand cut – to me that is cool.  Helpful information.  Here are pictures of the BC Rocamar when it arrived home from the Hole in the Wall:Dal3 Dal4 Dal5 Dal6 Dal7The briar is in great shape and will need basic clean-up.  The rim shows a burn scar about 2 o’clock and lava build up.  As the comments about Cumberland stems and oxidation stated, this one had its share.  The bit has significant teeth chatter and some significant divots that will need repair.  Yet, I see the potential of the color swirl of the Cumberland being a very nice augmentation to the fiery briar stummel.  The filter casing had dislodged from the stem and that will need to be reattached.  I decide to drop the stem in an Oxyclean bath to start working on the oxidation while I turn my attention to the bowl – whoops, that is after I retrieved the stem from underneath the bed – I forgot it was on my lap when I stood to head for the Oxyclean!  I took a close-up of the rim and bowl before I go to work.  I moved from the bedroom work table to the 10th floor balcony mobile work station with Pipnet reaming kit in hand.  I want to minimize pipe soot being released into the bedroom atmosphere resulting in a happier wife.  I use only the two smallest blades from the reaming kit to take the cake down to the wood.  I finish the fire chamber by rubbing it with 120 then 240 grit sanding paper to smooth and clean the chamber walls even more.  Turning to the rim, I clean it with isopropyl 95% and a brass brush which will not scratch the surface of the bowl. I want to see the rim wood clearly before I top the bowl to repair the burn scar and reveal the briar.  With the sunshine helping I can see the rim (and holding tightly not to lose it over the edge!).  I note that the rim circumference is small as the sloping shape of the bowl culminates. Dal8 Dal9 Dal10 Dal11I move to top the bowl but with a view to take off as little as possible to preserve the dimensions of the slender egg-peeked chimney of the bowl.  With the stem soaking in the Oxyclean bath I’m not able to reattach it to the stummel to help make sure I’m maintaining a true perpendicular top and not leaning into the softer burned area.  Before rotating the bowl to top it, I let it free stand and gently rotated the pitch of the bowl so that I could ‘feel’ the low spot where the rim was burned.  By doing this I was able to acclimate to the ‘healthy’ flat part of the rim during the sanding rotation.  It worked well!  I took a picture after only a few rotations on the topping board.  It revealed that I wasn’t fudging into the low spot as it was not yet impacted by the sanding but the other ¾ of the rim was.  I’m careful to keep eyeballing the progress.  I use 240 grit paper on a chop board as my topping table. Moving in a circular, even motion I remove only what is needed.  Satisfied with the topping, I made a small bevel on the inside of the rim using 120 and 240 grit paper.  I did this to take out a bit of inner rim damage and a small bevel is always nice and gives a classy touch. I followed this by using micromesh (1500-12000) on the rim to remove all scratches.  The pictures tell the story.Dal12 Dal13 Dal14 Dal15I decided to wait on staining the rim using a stain-stick and move to the cleaning of the internal and external of the bowl.  The reason I did this was I was able to differentiate the actual unstained color of the briar by looking at the newly repaired rim and compare it to the bowl color.  The rim briar leaned brown whereas the bowl, to the reds.  With cleaning with Murphy’s Soap of the external bowl, I expect there to be a slight change in the color of the bowl briar.  At that point I would go to work again on the color of the rim aiming for the best match.  I decided at this point to move to cleaning the internals of the stummel with Q-tips and pipe cleaners dipped in isopropyl 95%.  I found the internals to be amazingly free of muck and it was not long before Q-tips and pipe cleaners were coming out clean.  Turning to the external cleaning, I used Murphy’s Soap undiluted with cotton pads to remove the wax and grime on the bowl.  The bowl itself is in great shape – no significant scratches or fills.Dal16 Dal17At this point, I came to a road block which necessitated a quick email to ‘Master Obi-wan Steve’ for his input.  After the Murphy’s Soap cleaning I was expecting/hoping the high gloss finish on the bowl to have been dulled – getting to a more natural grain look not competing so much with the bared rim – at least this is what was in my mind.  My hesitations were not wanting to be too aggressive with the bowl finish and mess up the patina that is under the gloss….  With the time difference between Sofia and Vancouver, I put the stummel aside and turn to the much anticipated work on the Cumberland stem – what to me is the unique part of this BC stummel/stem ensemble.  After I extract the stem from the Oxyclean bath, I take some pictures to chronicle the progress.  After an initial buff with 000 steel wool to remove the surfaced oxidation, I take a closer look at the significant teeth divots on the bit and decide to apply super glue to the top and bottom to be able to redefine the button and cover the chatter damage. I want the superglue patches in place before beginning the sanding of the stem.Dal18 Dal19 Dal20 Dal21With the superglue curing, Steve’s reply came about my bowl conundrum and it is now decision time. He suspects that I’m dealing with a urethane finish much like he just dealt with in a Jobey restore (https://rebornpipes.com/2016/06/29/i-thought-this-one-would-be-easy-boy-was-i-wrong/) that was a bear to remove. The options before me are to either come up with a high gloss finish for the rim seeking to match up with the bowl or to aggressively remove the plastic, gloss finish and rescue the beautiful briar beneath.  The close-up picture below revealing the bare briar in rim repair sealed my decision – I put the bowl in an overnight alcohol bath hopefully to soften the glossy finish to be revisited tomorrow.  The time had come to watch some European football – Portugal and Poland – on my widescreen HDTV in my favorite recliner.Dal22The next day, with Poland and Portugal playing to a 1-1 tie the night before, I was anxious to see if the alcohol bath made a dent on the glossy finish.  Upon inspection (picture 1) it was still pretty shiny so I took a light grit sanding sponge to loosen the finish.  I was careful to lightly work around the nomenclature.  This did the trick.  The alcohol bath undoubtedly softened things up.  After the sponge sanding, I followed with rubbing the bowl with acetone with cotton pads to draw the stain out of the grain.  I finished with wiping down the stummel with isopropyl 95% to make sure all was cleaned and no grit left behind.Dal23 Dal24 Dal25I feel like I’m on a roll and I’m anxious to see the grain of this piece of briar unveiled.  I use micromesh pads from 1500 to 2400, 3200 to 4000, and 6000 to 12000.  The pictures below show the progress.  I have to be honest, this is perhaps my favorite part of the restoration process – each set of micromesh pads brings out more of the grain revealing the profoundly unique ‘fingerprint’ of each piece of briar we handle.  I euphemistically think of micromesh pads as ‘magicmesh’ pads – they bring the wood to life.  In my opinion, the grain that I’m now enjoying is much more satisfying than looking through the plastic shiny sheen of the original Butz-Choquin design.Dal26 Dal27 Dal28I decide to put the bowl aside and focus now on completing the Cumberland stem clean up and restoration.  I want to have an idea of the colors of the finished stem before I decide on the best finish for the stummel.  I like working on a clean stem so I first clean the airway using pipe cleaners and Q-tips dipped in isopropyl 95%.  During the cleaning, I saw something that I had missed before.  The button airway opening has a divot – I’ll need to add that to the list.  The superglue applications on the bit and button have had plenty of time to dry.  I use 240 grit sanding paper and needle files to work on the bit and button repair.  The bit repair looks good so I move to micromesh and the homestretch.  I wet sand using 1500-2400 and then apply Obsidian oil to the stem.  At this point, I inspect the repair work on the bit to make sure there are no scratches that I’ve missed before proceeding.  I’ve learned that often scratches are covered by the rough vulcanite.  With the Obsidian oil on the stem I dry-sand using micromesh pads 3200-4000 and apply more Obsidian oil.  I do the same with the last set of three – 6000-12000 and give a good coat of oil and put it aside to dry.  The pictures show the progress rejuvenating the Cumberland stem.  I like what I’m seeing.Dal29 Dal30 Dal31 Dal32 Dal33 Dal34 Dal35I had one undone job – re-attach the filter casing to the stem.  My assumption is that it was initially glued and after inspecting the inside of the stem, I detected residue that I assume was the glue previously used.  I clean the old gunk off the housing and the inside of the stem with alcohol and cotton pad and reattach the housing with superglue.  To get the job done I used my Winchester pocket knife and a dental pick to dig out the old glue.  With the filter housing reattached, the stem is complete.  I really like the rich color of the Cumberland stem.Dal36 Dal37After allowing the filter housing glue to dry I want to see the lay of the land, I rejoin the Cumberland stem to the stummel (picture #1 below).  I decide to stain the bowl with a new stain I found at the German owned ‘Mr. Prakteker’ –  like Home Depot in the US.  Finding alcohol-based stains in Bulgaria has been a challenge so I’ve been mixing my own batches up to this point. The brand is Italian and the cost was a bit more – I’m hoping that translates into better quality. When I opened the tin, a whiff of the stain revealed alcohol.  With the help of Google Translate, the flavor of the stain is Dark Nut.  The Bulgarian stick-on information tag said Dark Walnut.  My thinking is to aim for a darker stummel to blend with the darker hues of the stem.  If this succeeds, then I’m hoping the reds of the Cumberland stem ‘pop’ more instead of competing with the stummel.  We’ll see!   I can use alcohol-dipped cotton pads to lighten the stain after application if I choose.   After setting the stummel up on the cork/candle stand I apply the stain undiluted with a cotton swab to see how it goes.  I liberally allow stain to move over the inverted stummel – making sure of coverage over the inverted rim.  After a good covering I use a lighter to fire the stain which is a quick-combustion of the alcohol leaving the stain to set well into the grain.  The Italian stain ‘fired’ as hoped!  I repeated the procedure and then used the alcohol dipped pads to clean off the burn layer of the stain revealing how the grain received the stain – it’s never the same!  I take a picture to do a quick compare of stummel and stem.  After comparing I’m thinking that I like the dark hue but it needs some reds so I decide to add a layer of Cheren stain – red which I will mix with alcohol as it is a water based stain.  In my mind I’m thinking of the ‘Ox Blood’ depth that Steve uses – which is not found in Bulgaria!  I think the addition of the red stain does the trick (last picture) though it’s difficult to see the difference comparing the last two pictures.Dal38 Dal39 Dal40 Dal41 Dal42Next, I apply several layers of carnauba wax to the stummel and stem with Dremel and cotton wheels.  I’m careful to keep the Dremel wheel moving in rotation over the wood and use the lowest speed so not to overheat the wood. The buffing brings out the grain and the luster of the Cumberland stem.  I continue the buffing with a clean cotton wheel over the entire stummel and stem surface.  I finished with a thorough vigorous buffing with microfiber cloth to bring out the grain depth while watching Germany and Italy’s World Cup match.  The recommissioning of this Butz-Choquin Rocamar was more of a project than I was expecting.  I prefer the finish now before me to the shiny finish I started with.  I like the new color scheme for the bowl and Cumberland stem – I believe it works well.  The reds in the Cumberland stem match the grain amazingly well and the grain swirl in the rim has the appearance of continuing in the stem – a neat effect.  I’m very pleased with the color blends.  Another project done with new things learned to draw upon for the next candidate brought back to life!  Thanks for joining me!Dal43 Dal44 Dal45 Dal46 Dal47 Dal48 Dal49 Dal50

Bringing a FILTO SYSTEM Pipe Back to Life


Blog by Steve Laug

I have had this pipe sitting in a parts box for a while now. It was missing a few parts – notably the end plug. It had a copper coloured barrel and a black vulcanite mouthpiece that was oxidized. There were no tooth marks on the stem. The bowl was painted with a dark brown paint and had a shine. The rim was dirty with lava from the overflow of the bowl. The bowl had a thin, uneven cake on the walls. There was a screw in the bottom of the bowl that was similar to Kirsten screws. It had a hole in the centre that allowed the air to be pulled from the bowl into the barrel. It was stuck in the bottom under the cake that held it in place. The inside of the barrel on the end that was missing the end plug was thickly caked with tars and oils. There appeared to be something in the barrel part way down that closed off the barrel. The side of the barrel is stamped FILTO over Burgaw, NC over PAT. MADE IN USA.Filto1Filto2

I took the pipe apart so that I could look at the pieces. The next photos show the barrel, bowl, stem and screw. The screw is interesting in that it had a collar that kept it lifted above the bottom of the bowl. There seemed to be a build-up of something on the top of the barrel where the bowl sat.Filto3

I did a bit of hunting on the web to see if I could figure out what was missing in the barrel. I knew that the end cap was missing and that it was a pressure fit. I also wanted to know what the card board piece was that seemed to be in the middle of the barrel. When I took the above photo I had not removed it from inside the barrel as I did not know what it was and did not want to damage it. I checked the Smoking Metal Website which is my first stop when seeking information on metal pipes. The site not only had the pipe listed but a variety of photos of the internals and of the models that were available. I have included the link and the short text that was included on the site.  http://www.smokingmetal.co.uk/pipe.php?page=213

“Made by Filto Pipes Inc. of Burgaw, North Carolina, inventor Robert L. Smith, US Patent #33170468 23rd Feb. 1965. The stem, sealing ring and filter holder design mentioned in design by Aristocob. The bowl and stem are in a great variety of colours, all interchangeable.The spring clip in the bit assists in holding the filter in place. There are two version of the stem one with a spun front end and more common with a plastic push fit end cap.”

The photo below shows the parts that are enumerated in the above quote. There are two different barrel designs shown as well. The top one seems to show that the end is rounded and closed like a cigar cap. The red pipe below shows a plastic ridged endcap. The close up of the two bowls at the bottom show both ends. It is obvious that the one I had was like the pipe on the left side. Filto4

The photo below shows many different models of the same pipe. There are obviously two different styles of stems – a saddle stem like the one I have and a tapered stem.Filto5

Now I understood the shape of the end cap and also what the cardboard in the barrel was. I took a photo of the stamping on the barrel. It is clear and easy to read.Filto6

I reamed the bowl with the PipNet reamer and took the cake back to bare briar. I cleaned up the reaming with the Savinelli Pipe Knife.Filto7

I pushed the cardboard out of the barrel and it was marked FILTO filter. The cardboard was a filter that allowed the air to flow around the edges and caught the tars and oils on the end of the filter. This one was unused.Filto8

I cleaned out the inside of the barrel by pushing rolled cotton pads soaked in alcohol through the shank. I also used cotton swabs and alcohol to further clean out the barrel. I scraped the cardboard gasket from the top of the barrel where the bowl sat using the dental spatula. I cleaned the outside of the barrel with alcohol and cotton pads.Filto9

I cleaned out the inside of the tenon on the mouthpiece insert with cotton swabs and alcohol. I ran alcohol soaked pipe cleaners through the mouth piece and tenon to clean out the tars and oils.Filto10

I decided to make and end cap or plug out of briar. I had a piece of briar that was next to the bowl. I had cut it off a while back to use for other purposes. Since it was drilled with an airway I needed to also make a round plug for the airway in the centre of the briar piece. I rounded out the shank piece and the small chip with a Dremel and sanding drum to make the end cap/plug. I round the chip until it fit perfectly into the drilled airway on the briar. I pushed it into the airway and glued it in place with super glue. I used the Dremel and sanding drum to smooth out the end that would go inside the barrel and the end that would stick out.Filto11

I used the Dremel and sanding drum to shape the end of the plug to be shaped like a cone. It continued to shape it until it would pressure fit into the end of the barrel.Filto12

I shaped it like a cone and rounded the end. I cut a small band around the diameter of the end that would sit in the barrel. There was a step down inside that the cap sat against. I pressed it into place and continue to shape it with 180 and 220 grit sandpaper.Filto13

Once I had it shaped correctly I stained it dark brown with a stain pen and buffed it until it shone. I sanded it with 3200-4000 grit micromesh to give it some polish and thin down the opacity of the stain.Filto14

Looking at the spring clip that held the filter in place in the shank I made one that was similarly shaped out of a paper clip. I bent it to fit into the cardboard filter and to sit in the metal tenon of the stem.Filto15

I sanded the stem with 220 grit sandpaper to remove the calcification that was built up on the mouth piece at the button. There was some light oxidation on the saddle portion as well. I wet sanded it with 1500-2400 grit micromesh sanding pads and gave it a coat of Obsidian Oil. I dry sanded it with 3200-4000 grit sanding pads and gave it another coat of oil. I finished sanding it with 6000-12000 grit pads and gave it a final coat of Obsidian Oil.Filto16Filto17Filto18

I buffed the stem with Blue Diamond on the wheel and gave it several coats of carnauba wax. I buffed it with a clean buffing pad to raise the shine and hand buffed it with a microfibre cloth. I put the bent paperclip in the filter and in the end of the tenon.Filto19

I lightly polished the bowl and barrel on the buffer using Blue Diamond. I gave both a coat of carnauba wax and buffed it with a clean pad to polish it. The bowl had a few dents and dings that I left as I found them because of the painted finish. I hand buffed the pipe with a microfibre cloth to deepen the shine. The finished pipe is shown in the photos below. The first four photos show the finished pipe as a whole. The last three show it in pieces.Filto20Filto21Filto22Filto23Filto24Filto25Filto26


Restoring a Kirsten Generation 1 Medium Straight Pipe


Blog by Steve Laug

My brother continues to look for Kirsten estate pipes. He picked up this Kirsten because it looked like an old-timer. When I received it I could see that he was right about it being an older one. All the signs were there. The bowl was threaded directly on the barrel of the pipe and bottom cap that is on new models was not present. When the stem was removed there were no O rings on the end of the insert. The valve cap was stuck in the end of the shank and it could not be turned. The rim had a lava overflow on it and there was a heavy cake in the bowl. The screw mount in the bottom of the bowl was caked over to the point that it was stuck in the bowl. The metal barrel was oxidized and pitted. It had no shine left but looked like a well-worn pipe. The stem was oxidized and a dirty brown colour. There were tooth marks next to the button on the top and the bottom sides of the stem. The rod that ran through the barrel was dirty and coated with tars and oils that had hardened.K1 K2The left side of the barrel is stamped Kirsten in script. The underside is stamped Pats. & Pats.  Pend. USA M. The stamping along with the absence of O rings, the bowl screwed directly on top of the barrel pointed to a Generation 1 Kirsten which dated it between the years 1936-1958. In a previous blog I spelled out the features of each generation of Kirsten pipes that were released. https://rebornpipes.com/2012/11/03/kirsten-generation-1-1-5-2-3/ I quote the following from there: The wooden bowl on this generation connects directly to the metal barrel and there is no metal cup spacer. It is a pretty flush fit that goes flat against the barrel. On the underside of the metal barrel it is stamped with one or more of the following “Pat. Appl. For” (1936-38) and “Pats. & Pats. Pending” (1938-1958) over “Made in USA” – S” (or applicable size – S, M, L). There are no O-rings on the bit or metal shank insert. The M stamp on the pipe identifies it as a Medium sized pipe.

So I armed with that information I knew that the pipe I had, came from the time period of 1936-1958 and the lack of O rings on the mouthpiece and I assumed on the valve once I was able to remove confirmed that. I was ready to get to work on the pipe. I heated the valve insert with a heat gun to loosen the tars that held the cap in place. It did not take too long and I was able to insert a screw driver in the barrel and tap on the valve.K3The next photo shows the pipe taken apart. The condition of all of the parts is clear – dirty but functional. The knurled edges on the valve were damaged by previous attempts by someone else to remove the valve with pliers. In the photo above there are pliers present but I did not use them on the end cap.K4The screw in the bottom of the bowl was held in place by the cake in the bowl. The photo also shows the condition of the bowl and the rim. The other close-up photos show the stem and the tooth marks on both sides near the button.K5 K6I sanded the stem with 180 and 220 grit sandpaper to remove the oxidation and the tooth marks. I was able to blend the tooth damage into the flow of the stem because fortunately they were not deep.K7I lightly topped the bowl on the topping board to remove the damage to the rim and the build-up.K8I reamed the bowl with the Savinelli Pipe Knife and took the cake back to bare briar. I sanded the inside of the bowl with a piece of sandpaper to clean out the remaining cake.K9I scrubbed the exterior of the bowl with cotton pads and acetone to remove the grime and the remaining finish.K10 K11I scrubbed the rod on the stem unit with acetone to remove the tars and oils. I did the same with the exterior of the valve.K12I cleaned out the tarry build-up in the valve/end cap with cotton swabs and alcohol.K13I cleaned out the barrel with cotton swabs and rolled cotton pads and alcohol pushed through the opening with a screw driver. I also pushed a rolled piece of 0000 steel wool through the barrel to polish the inside. I used pipe cleaners to clean out the threads in the opening on the top of the barrel.K14I cleaned up the screw and the airway through the screw with a dental pick, pipe cleaners and alcohol. I cleaned the threads on the screw with cotton swabs and alcohol.K15I polished the aluminum barrel with Meguiar’s Scratch X2.0 and cotton swabs.K16I restained the bowl with a dark brown stain pen. K17I put the bowl on the barrel buffed them with Blue Diamond on the wheel to polish the stain and even out the coat on the bowl as well as polish the aluminum. The next photos show the bowl and barrel at this point in the process.K18 K19I cleaned out the airway in the stem with pipe cleaners and alcohol and then worked on the stem with micromesh sanding pads. I wet sanded with 1500-2400 grit pads and gave it a coat of Obsidian Oil. I dry sanded with 3200-4000 grit pads and gave it another coat of oil. I finished sanding with 6000-12000 grit pads and gave it a final coat of Obsidian Oil. I set the stem aside to dry.K20 K21 K22I gave the pipe and stem multiple coats of carnauba wax and buffed the barrel, bowl and stem with a clean buffing pad to raise the shine. I hand buffed it with a microfibre cloth to add depth to the shine. The photos below show the finished pipe. This one will also go on the store soon. If you are interested in it let me know. Thanks for looking.K23 K24 K25 K26 K27 K28 K29


Finally a simple clean up – an Alco Universal Gold Pipe


Blog by Steve Laug

The Alco pipes were made by Falcon in England. This particular version of the Alco was made to hold an in line triple air groove filter. All Alco bowls are interchangeable with any other Alco, but NOT with Falcon. The Alco I was given is an Alco Universal Gold pipe. The pipe was in decent shape with the finish on the bowl in good shape but dirty. The rim had an abundance of lava overflow that came from a thickly caked bowl. There was tobacco debris stuck to the bottom of the bowl. The copper coloured base was dirty but did not show damage. The gold band was attached to the stem and showed some oxidation. The stem itself had a lot of tooth chatter on both the top and bottom sides near the button. What complicated that a little was that the stem was a dental bit and had two scored marks on each side. The airway in the stem was tight and the slot was narrow. The stem had a gold Falcon on the top side. The stamping on the underside of the base read ALCO UNIVERSAL.Alco1 Alco2The pipe came apart easily. I twisted the bowl off the base and found that there was a plastic spacer between the bowl and the base. The bowl had been stamped ALCO on the underside and it was dirty. The base had a lot of tars and oils that had hardened around the centre post. The stem also had the above mentioned “Triple Air Groove Filter”. Surprisingly the filter was pretty new looking.Alco3I cleaned out the airway in the stem with pipe cleaners, cotton swabs and alcohol. It was not as dirty as I expected. It made me wonder if the previous owner had not cleaned it a bit before he put in the new filter.Alco4The base was another story. It looked as if it had not been cleaned for a long time. I loosened the hardened oils and tar with a dental pick. I cleaned up the loosened debris with cotton swabs and alcohol and was able to remove the hardened tars and oils that had accumulated in the base over the years. I used cotton swabs, pipe cleaners and alcohol to clean out the inside of the mortise and airway in the shank.Alco5Reaming the bowl was a challenge as the cake was hard and dense. Starting with the smallest cutting head on the PipNet reamer and moving through the first three heads I reamed the cake back to bare briar. I cleaned up the bowl and airway at the bottom using the Savinelli Pipe Knife. Thinking about it as I write I probably should have tried out the Falcon Pipe Reamer that I picked up not too long ago. I forgot I had it so it will have to be used next time.Alco6 Alco7I scrubbed the base of the bowl and airway with cotton swabs and alcohol to remove the accumulated oils and tars on the bottom. You can see the ALCO stamping on the briar at the top of the picture.Alco8I worked on the rim with a cotton pad and saliva to remove the build-up there. It just took a bit of elbow grease to remove it and the undamaged rim came out of the grime. I wiped down the bowl with alcohol on the cotton pad and cleaned the dirt off the surface of the bowl and touched up the rim.Alco9I wet sanded the rim and bowl with 1500-2400 grit micromesh sanding pads and wiped it down again. I finished by sanding it with 3200-4000 grit pads to raise the shine. I put the bowl back on the base for the photo below.Alco10I have always found plastic stems harder to polish than rubber ones. The dental bit was a challenge to clean out all of the tooth marks in the grooves. I sanded the stem with 220 grit sandpaper to smooth out the chatter and then used 2000-6000 grit wet dry sandpaper to begin polishing it. I wet sanded it with 1500-2400 grit micromesh sanding pads and gave it a coat of Obsidian Oil. I dry sanded it with 3200-4000 pads, gave it another coat of oil and finished sanding it with 6000-12000 grit pads. I gave it a final coat of Obsidian Oil and let it dry.Alco11 Alco12 Alco13I have found that buffing plastic stems is more trouble than it is worth as the heat of the buffing pads can easily melt the stem and create a mess. I hand polished the stem with Meguiar’s Scratch X2.0 with cotton pads to bring up the shine. I buffed the bowl with Blue Diamond and gave it several coats of carnauba wax. I buffed the bowl with a clean buffing pad. I gave the stem several coats of Conservator’s Wax and hand buffed it and the bowl with a microfibre cloth. The finished pipe is shown in the photos below.Alco14 Alco15 Alco16 Alco17 Alco18 Alco19 Alco20


Restoring a Semi-Churchwarden Pipe


Blog by Steve Laug

When I picked up the lot of pipes from my brother Jeff there was a small churchwarden, just seven inches in length among the assorted pipes. It was a dark sandblasted bowl with an undertone of dark brown and an overstain of medium brown. The bowl was in excellent shape and the rim was very clean. It was stamped on the underside of the shank with the words SEMI over CHURCHWARDEN over Italy. The shank was thinner on the top than on the bottom side. As I examined it I could see a small hairline crack on the right top side of the shank. The finish was perfect with no tars or build up on the rim and no cake in the bowl. The stem was oxidized to an ugly brown and the one side that looked like it had a ‘–‘ logo on the left side. The problem was that the side of the stem had been flattened in that area and if it was a logo it made the stem out of round. There was some tooth chatter on the top and the bottom of the stem at the button but there were not any deep tooth marks that I had to deal with. The way the pipe was made with the flat bottom made it a sitter.CW1I took some photos of the pipe when I brought it to the work table. These give a pretty clear picture of the condition of the pipe when I started cleaning it up. The shank needed to be repaired and the stem cleaned up and made round on the flat side.CW2 CW3I took a close-up photo of the rim to show the state of the inner and the outer edge of bowl. The sandblast finish was clean and the blast on the rim was well done. I also took some photos of both sides of the stem at the button to show the tooth chatter and the lack of deep dents or tooth marks. The fourth photo shows the stamping on the smooth bottom of the shank.CW4 CW5 CW6I cleaned out the inside of the mortise and the airway to the bowl and in the stem with pipe cleaners, cotton swabs and alcohol.CW7I sanded the stem with 220 grit sandpaper to remove the surface oxidation and begin the process of cleaning it off.CW8I cleaned the flat surface on the left side of the stem and then began to build up the smooth area to bring the stem back to round. I sprayed it with an accelerator and then gave it a second coat of glue.CW9I put the stem in the shank and sanded it with 220 grit sandpaper to smooth out and blend in the patch to the rest of the stem. I worked on it with the sandpaper until the surface was smooth to touch and blended well with the rest of the vulcanite.CW10Once it was smooth and round I wet sanded it with 1500-2400 grit micromesh sanding pads and wiped it down with Obsidian Oil. I dry sanded it with 3200-4000 grit pads and gave it another coat of oil. CW11 CW12I went through my assortment of bands to find one that was the correct diameter for the cracked shank. I measured it and then found the correct one. I heated it with a lighter and then pressed it into place on the shank of the pipe.CW13 CW14 CW15I took a close-up photo of the shank end to show the crack at the top of the photo under my finger. I have circled cracked area in red.CW16I finished sanding the stem with 6000-12000 grit micromesh pads and gave it a final coat of Obsidian Oil. I set it aside to dry.CW17I polished the band with a jeweler’s polishing cloth and then buffed the pipe and stem with Blue Diamond on the buffer. I gave the bowl and stem several coats of carnauba wax and buffed it with a clean buffing pad to raise the shine. I hand buffed it with a microfibre cloth to deepen the shine. The finished pipe is shown in the photos below. Thanks for looking. This one will show up on the rebornpipes store soon. Send me a pm or a message if you are interested in owning it.CW18 CW19 CW20 CW21 CW22 CW23 CW24

Restoring a Comoy’s The Guildhall Twin Bore Long Shank


Blog by Steve Laug

The next pipe I brought to my table to work on was stamped on the left side of the shank The Guildhall over London Made and on the right side Twin Bore over Made in England. The stamping was readable with a light and a magnifier but it was faint. It was a nicely shaped long shank billiard or some would call it a Lumberman. I have worked on many Comoy’s The Guildhall pipes but never have seen one stamped like this. The stem indeed is a twin bore. It was in decent shape but it did not bear testimony to the point of the twin bore “bite proof” stem. It had a lot of tooth marks and chatter on the top and the bottom side of the stem. The tooth marks were quite deep but did not enter the airway in the stem. So I guess in that way the stem was “bite through proof”. The finish was quite nice. The pipe was in good shape with just some grime on the surface of the briar. The rim had been topped and restained sometime in its history as the stain is quite a bit lighter than the rest of the pipe. The outer and inner edges of the rim were darker than the surface of the rim. The bowl had been reamed but the cake was left uneven on the walls of the bowl.Guild1 Guild2 Guild3 Guild4I took a close-up photo of the rim to show the previous topping and the darkening of the inner and out edges. You can see that it had been touched up and the rim edges not cleaned up. I also took some close-up photos of the damage to the stem in terms of tooth marks and chatter.Guild5 Guild6I sanded the top and bottom sides of the stem to remove the tooth chatter on the surface and to clean up the area around the deeper tooth marks. I wiped the areas down with alcohol and then used black super glue to fill in the deep marks.Guild7While the stem repairs were drying I reamed the bowl with the Savinelli Pipe Knife. I took the cake back to bare briar.Guild8I used a folded piece of 220 grit sandpaper to clean up the bevel on the inner edge of the bowl. I worked slowly to make sure that the bevel maintained the roundness of the bowl. Once I had it finished I stained the rim and inner edge with a medium brown stain pen to match the colour with the rest of the pipe.Guild9I used a dental spatula to scrape out the inside of the mortise as there was a ridge of tar and oil part way down the shank. I scraped out the grime and then scrubbed the inside of the mortise and the airway in the shank with pipe cleaners, cotton swabs and alcohol until it was clean.Guild10By the time I worked on the twin bore stem the repairs were dry. I lightly sanded them and then cleaned out the twin bore airways.Guild11I sanded the repairs on the stem with 220 grit sandpaper until the surface of the repairs was blended into the surface of the stem.Guild12I wet sanded the stem with 1500-2400 grit micromesh sanding pads. I rubbed down the stem with Obsidian Oil. I dry sanded it with 3200-4000 grit pads and gave it another coat of oil. I sanded it with the last set of three micromesh sanding pads – 6000-12000 grit pads. I gave it a final coat of Obsidian Oil and set it aside to dry.Guild13 Guild14 Guild15I buffed the pipe with Blue Diamond and worked over the scratches that still showed up on the top surface of the stem. It did not take much to remove them and get a deep shine on the stem. I buffed the bowl as well, being careful around the stampings on the shank of the pipe. I gave the bowl and stem multiple coats of carnauba wax and buffed it with a clean buffing pad to raise the shine on the briar and vulcanite. The finished pipe is shown in the photos below. It shines and has depth to the finish. The stamping is faint but is my only example of a Twin Bore Comoy’s The Guildhall Pipe. It is a beauty in my opinion. Thanks for looking.Guild16 Guild17 Guild18 Guild19 Guild20 Guild21 Guild22