Tag Archives: removing oxidation

Kaywoodie Fine Line


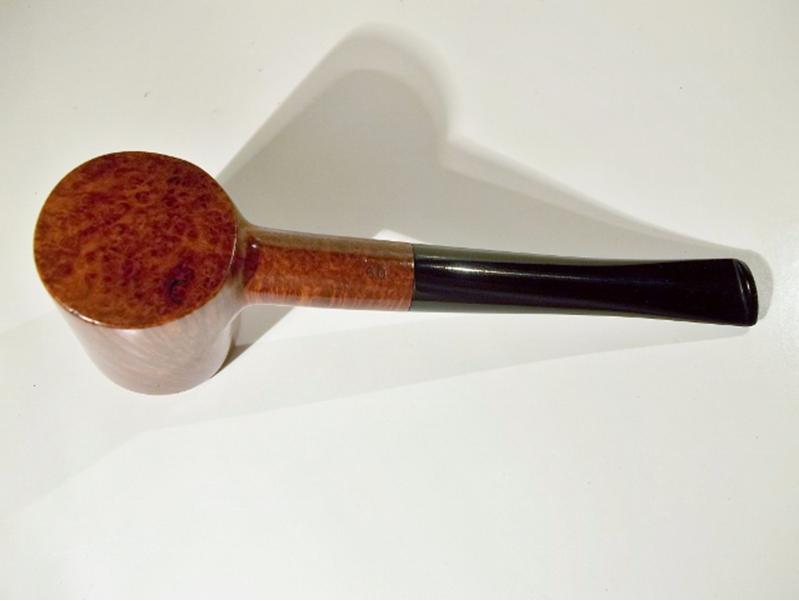
Blog by Aaron Henson

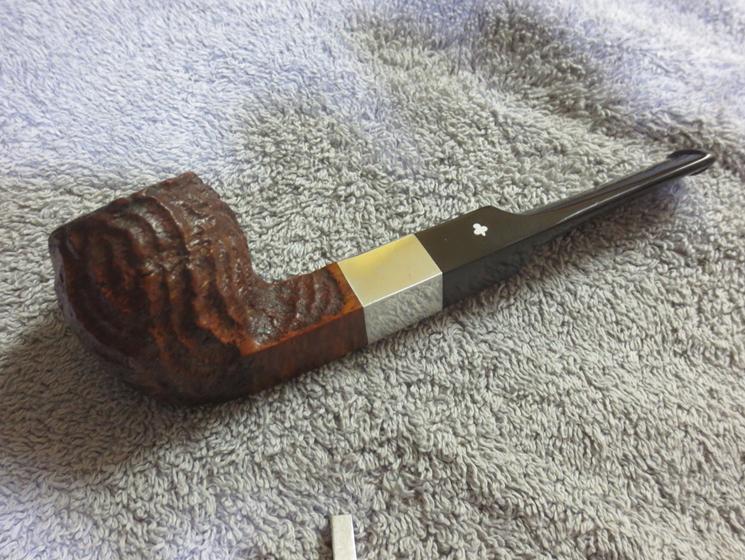
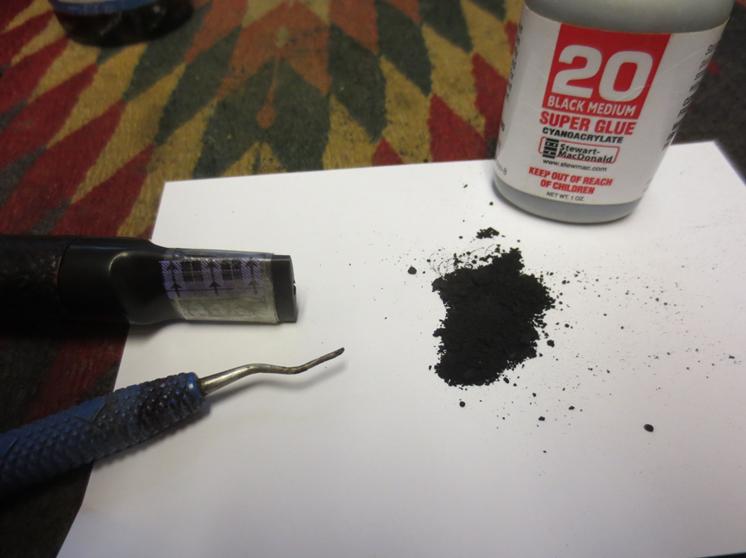
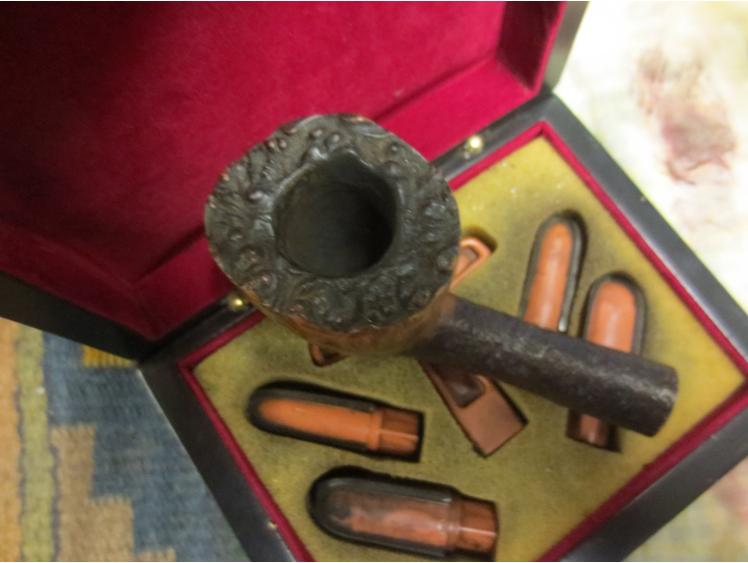
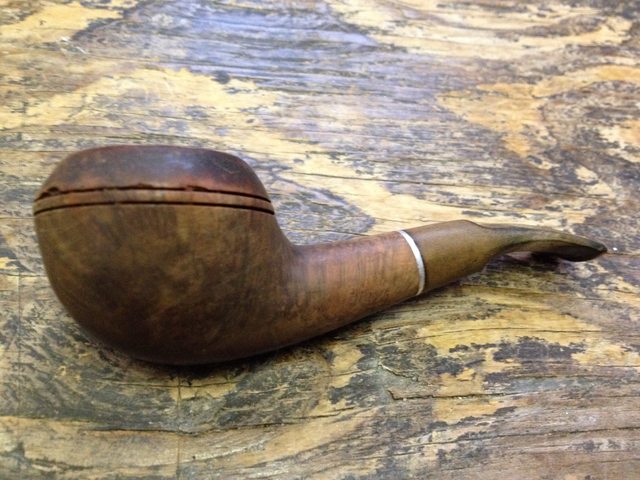
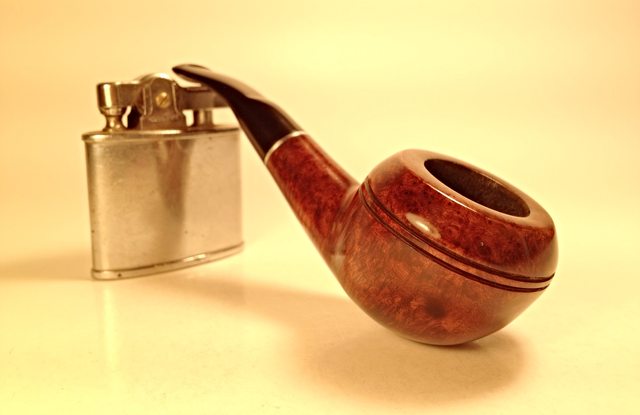
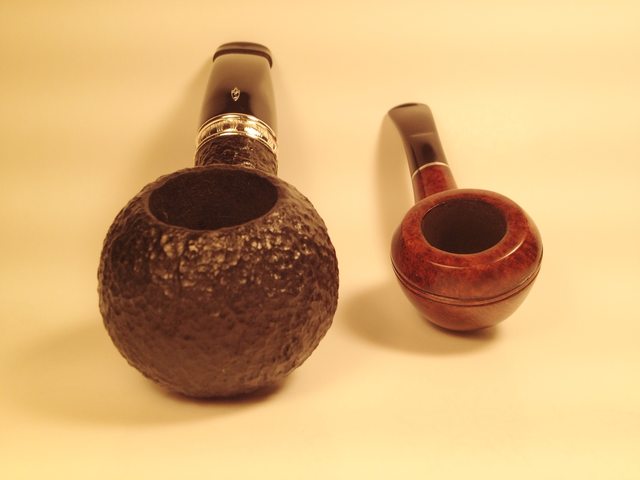
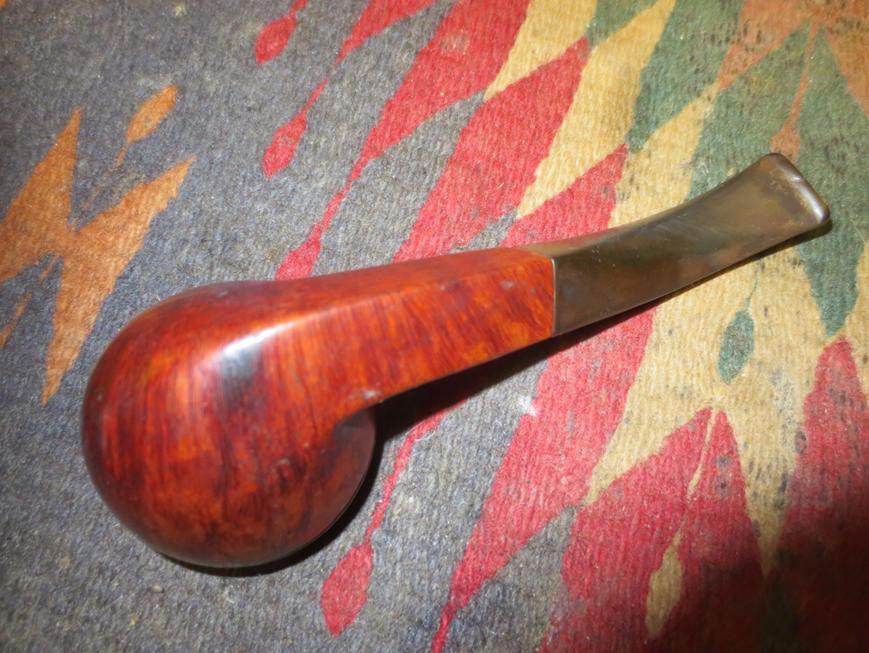
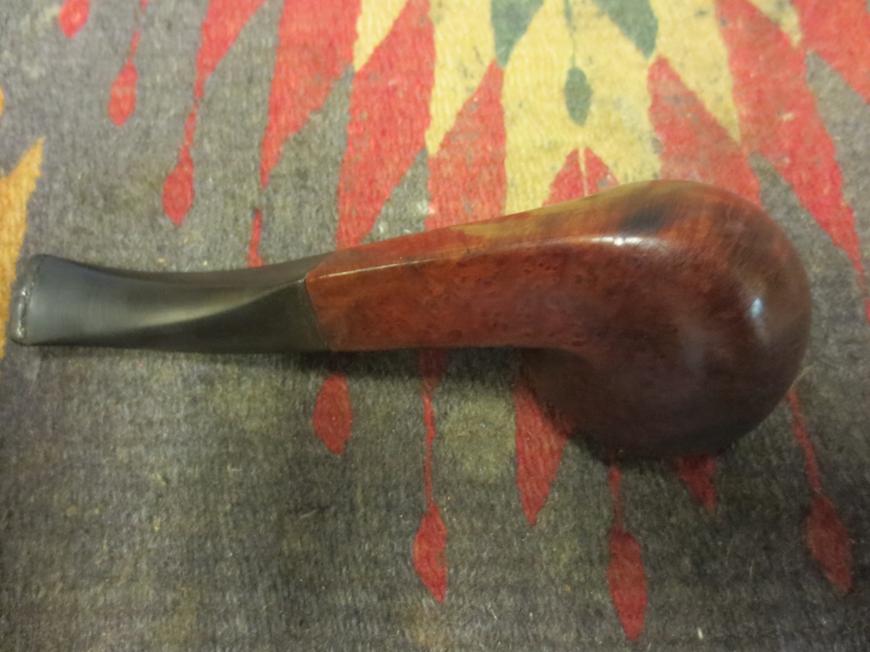
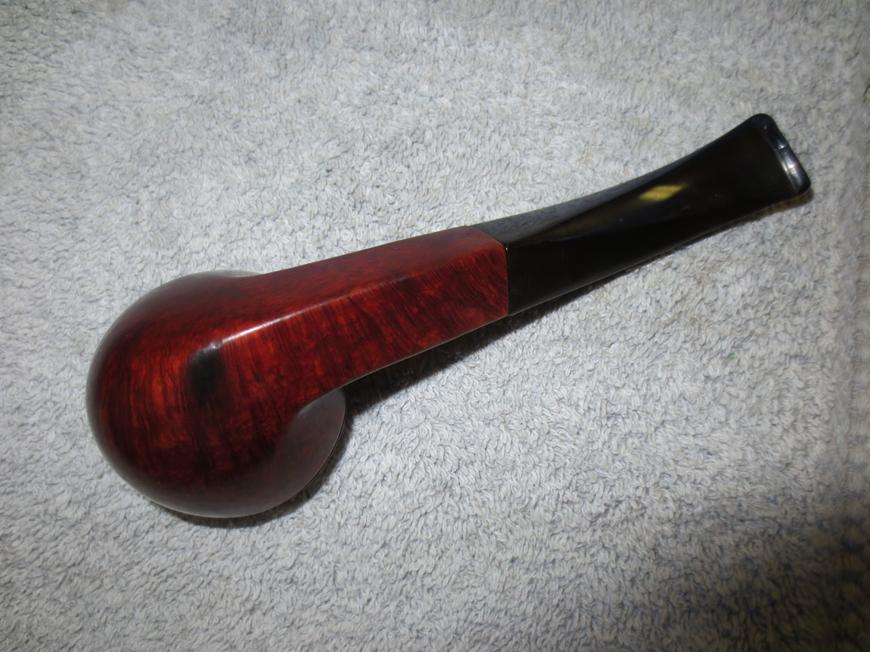
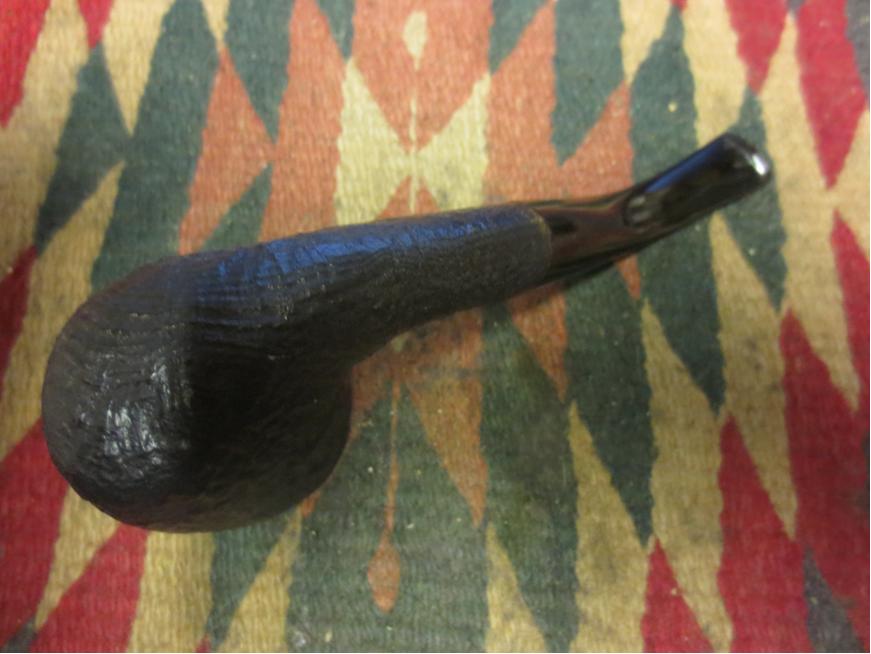
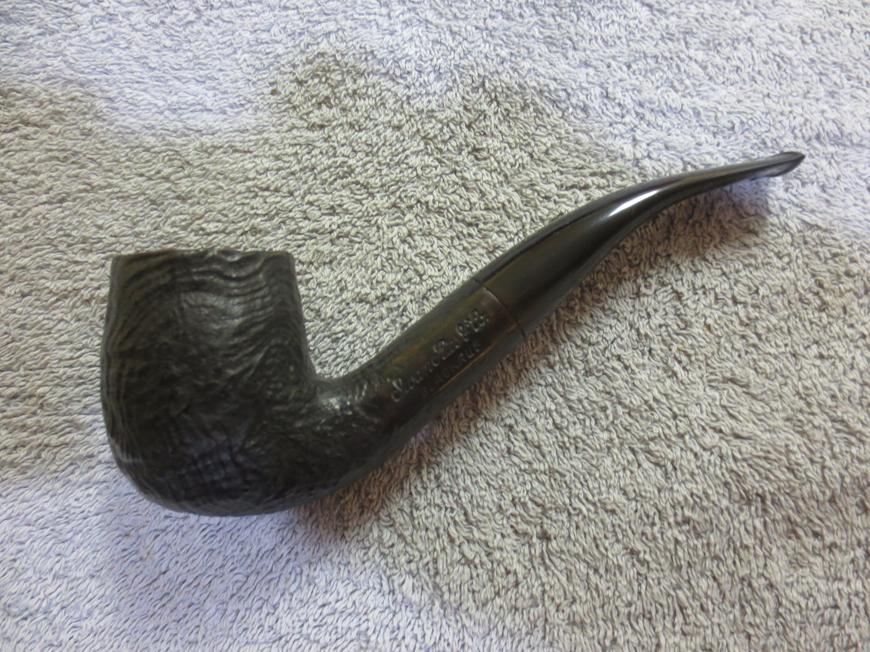
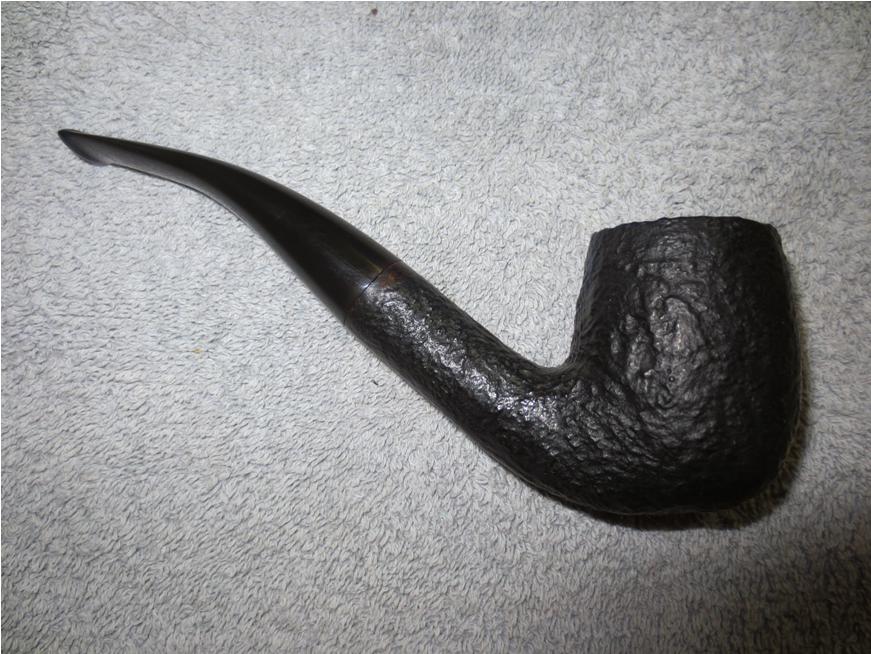
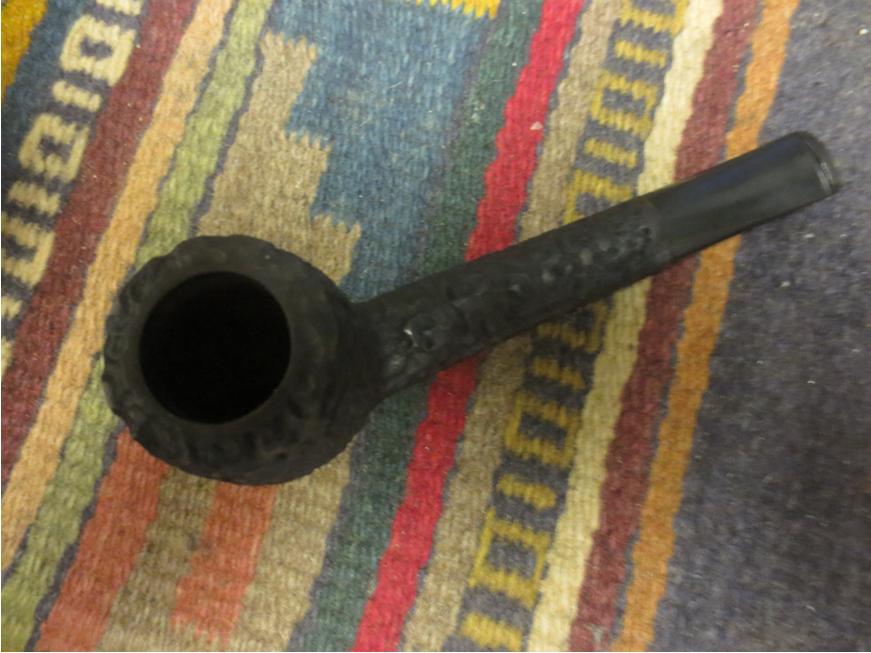
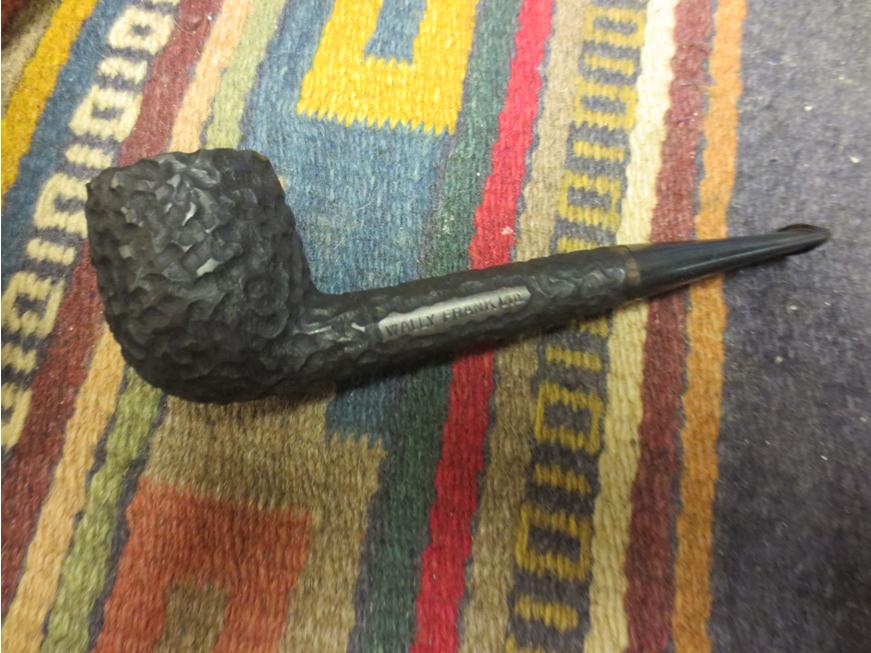
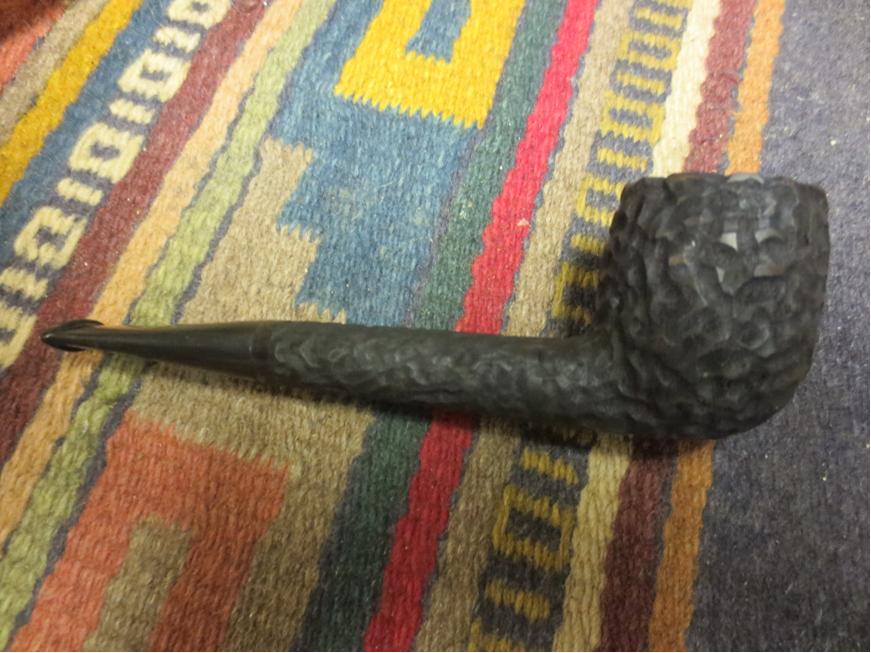
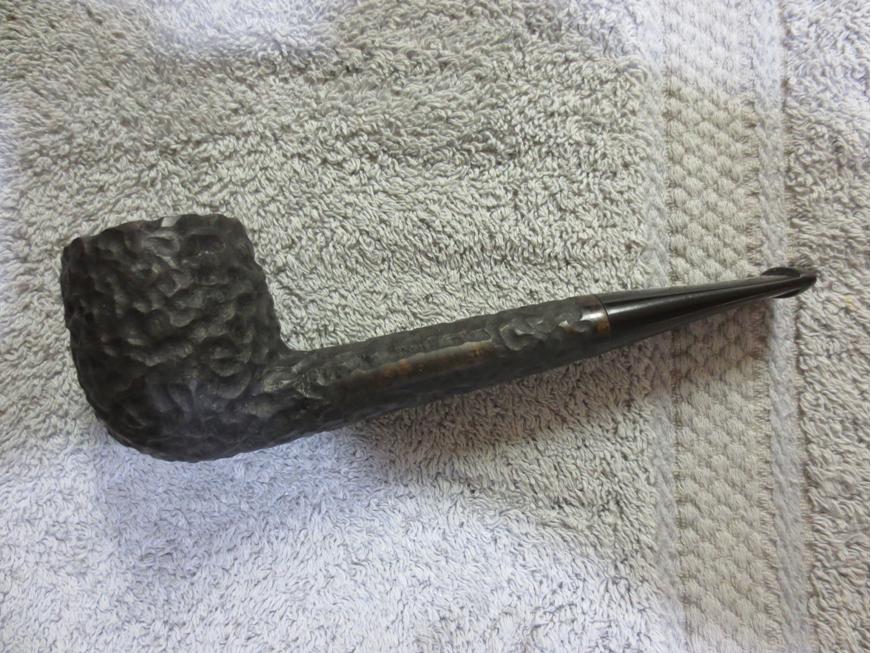
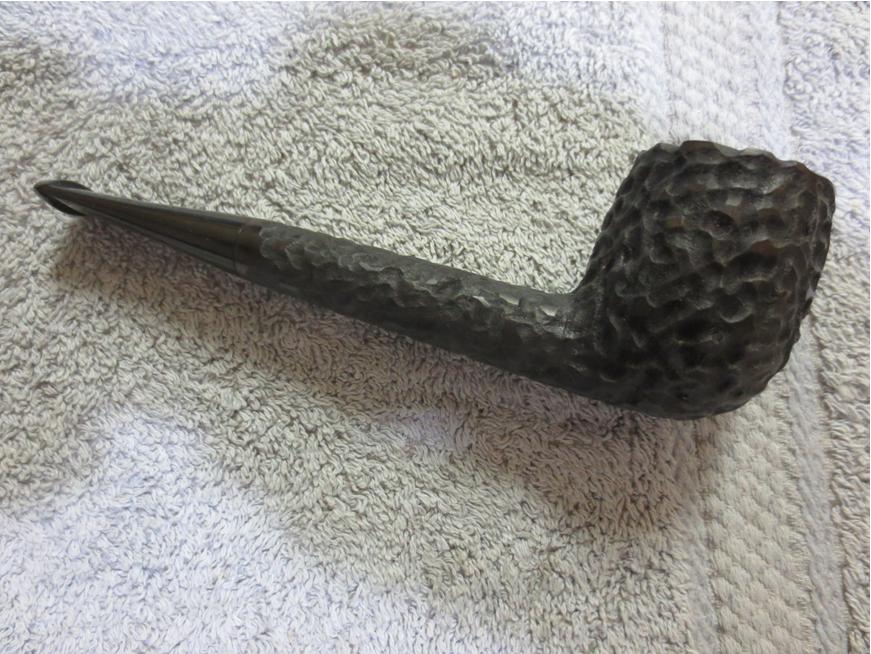
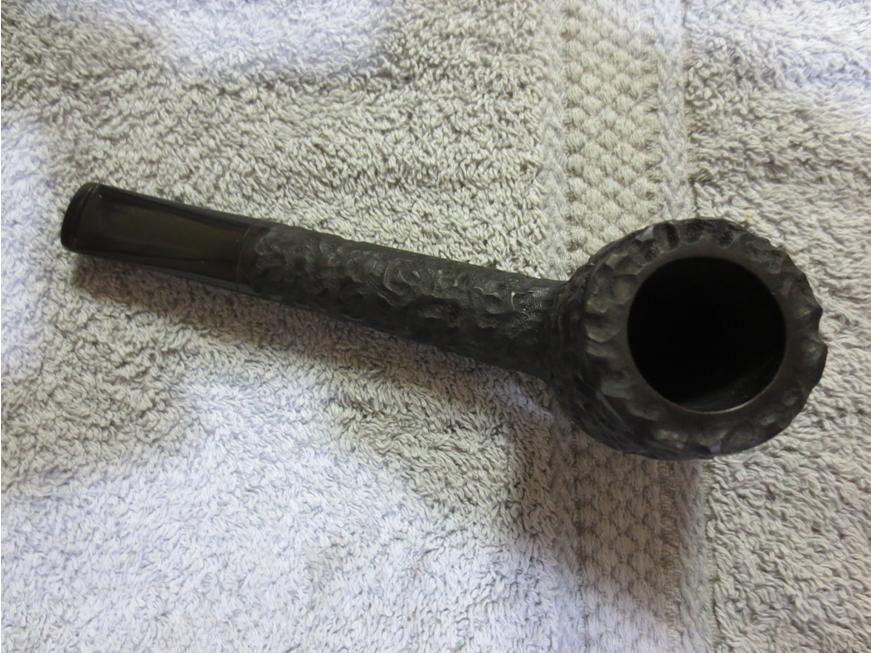
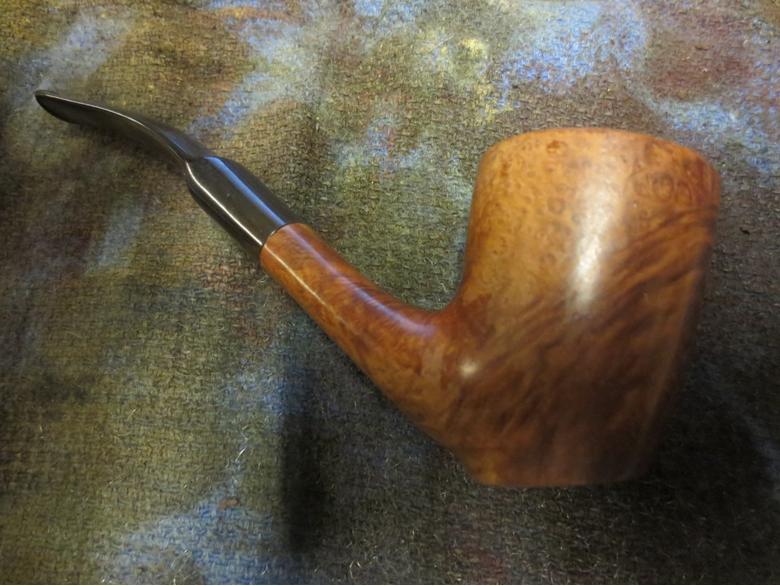
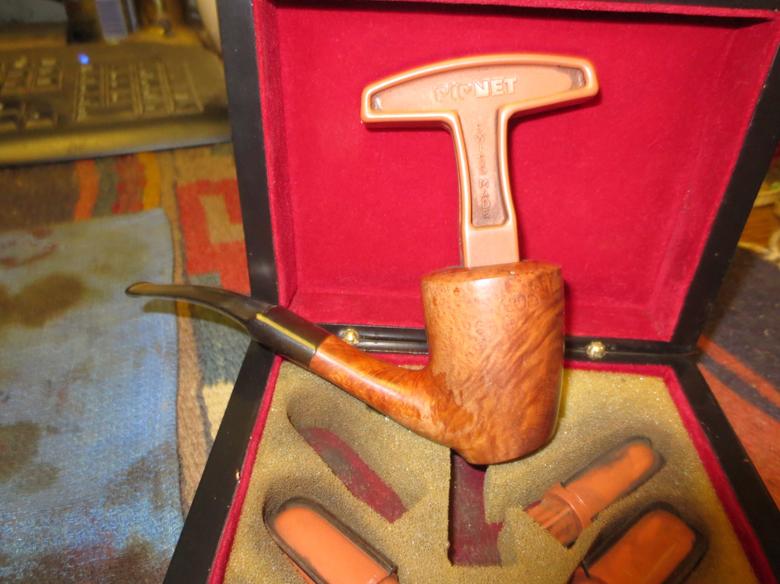
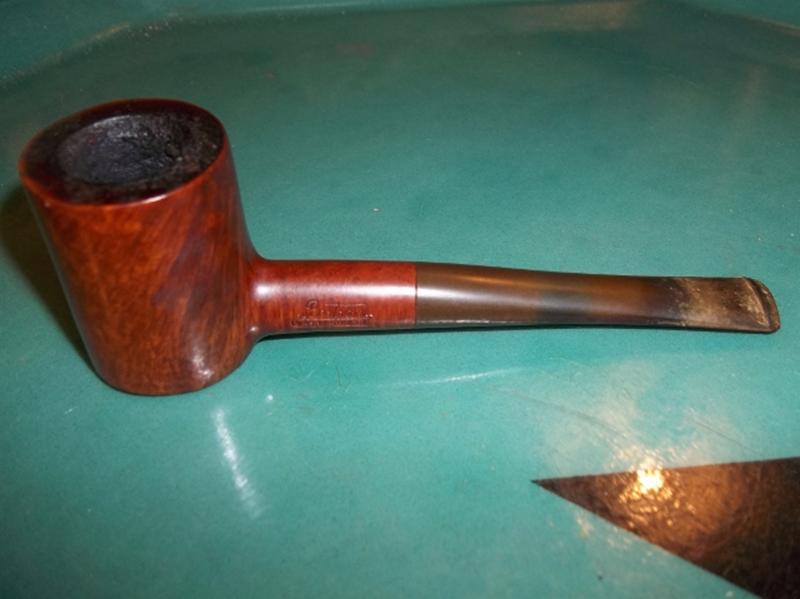
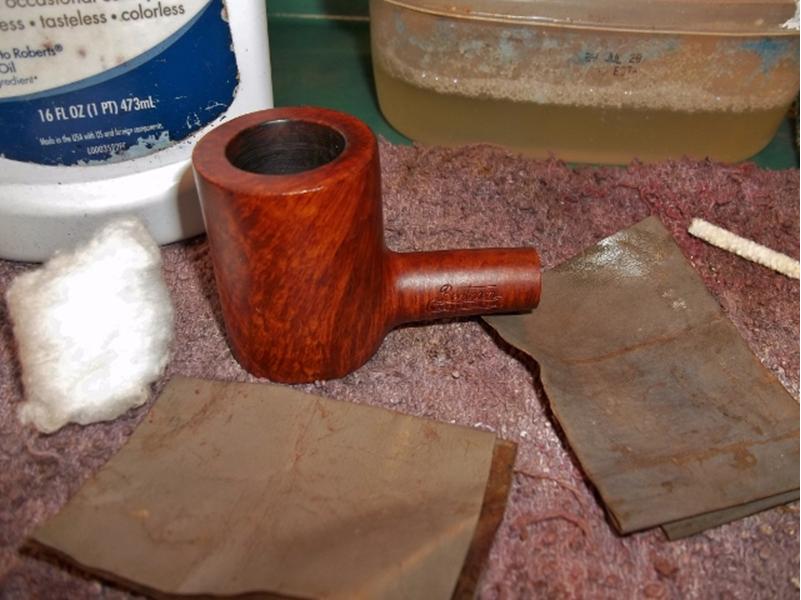
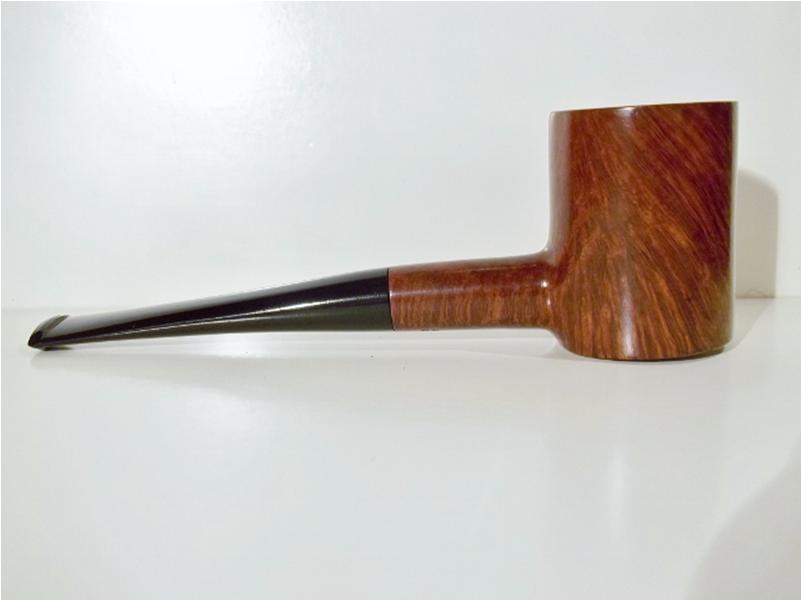
I was in the neighborhood of our second-hand stores a couple of months back so I thought I would stop into one that typically has estate pipes. While browsing the shelves I found three Kaywoodie pipes together in an old coffee cup. None of them were particularly eye-catching: a straight bulldog, a medium pot and this large apple – Fine Line carved. I didn’t have any Kaywoodie pipes in my collection and priced as they were ($11 for the three), I could not pass them up. Besides, I needed some more restoration practice.

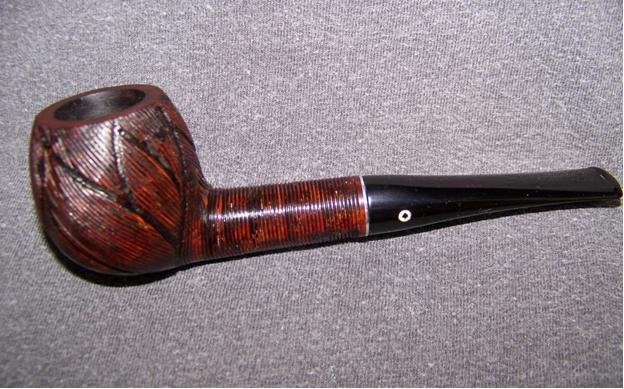
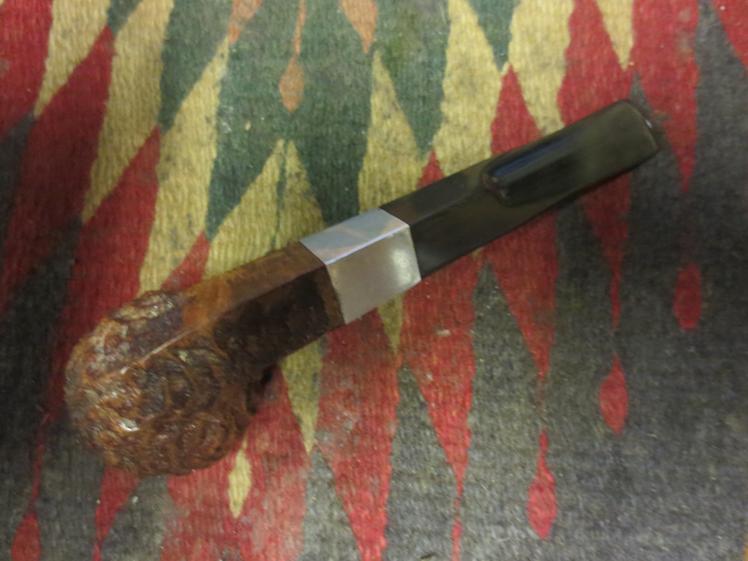
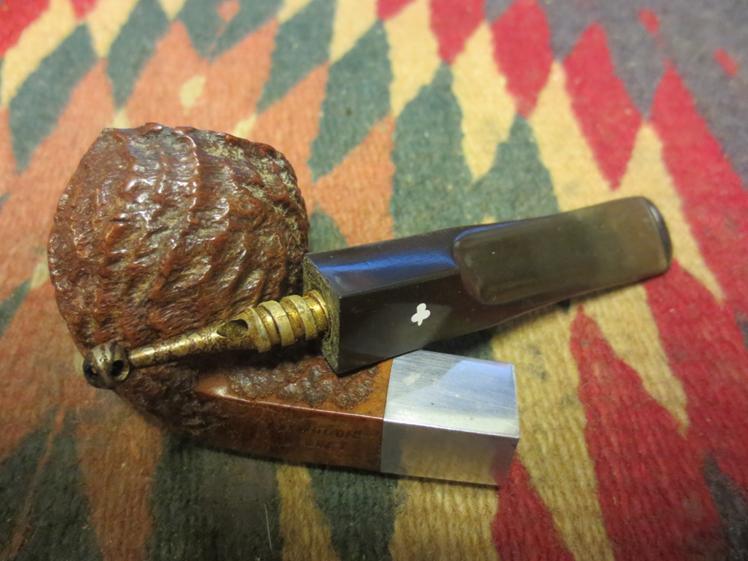
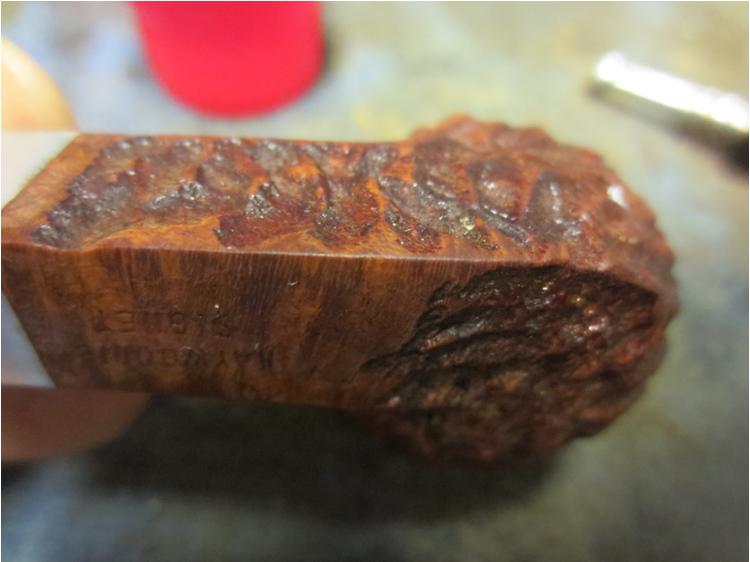
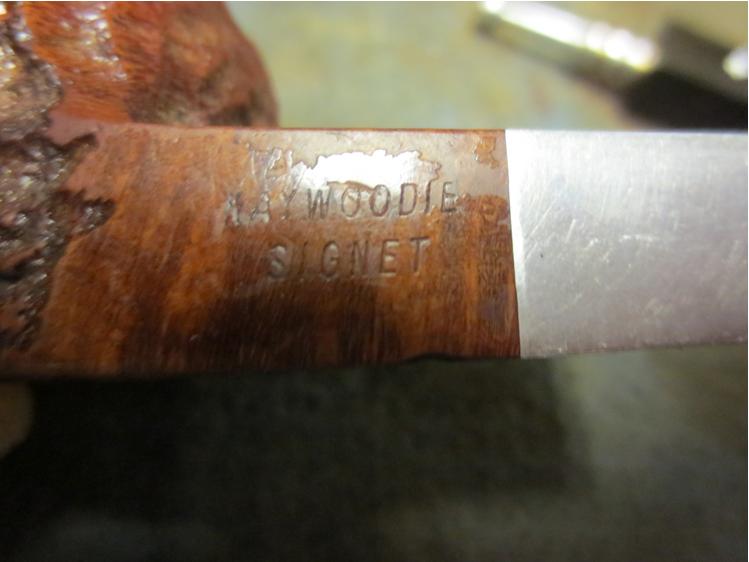
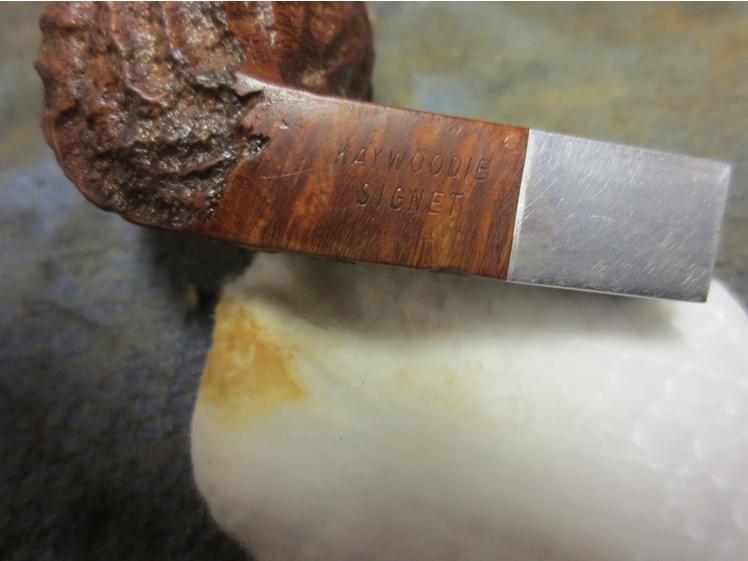
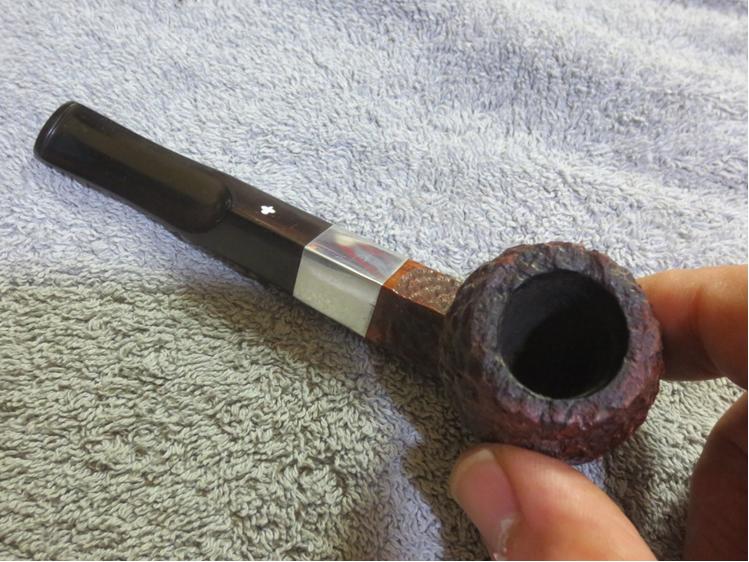
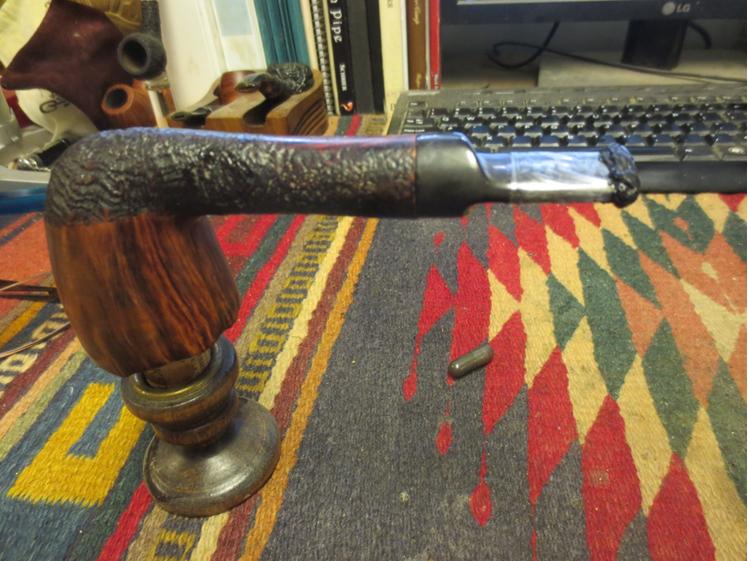
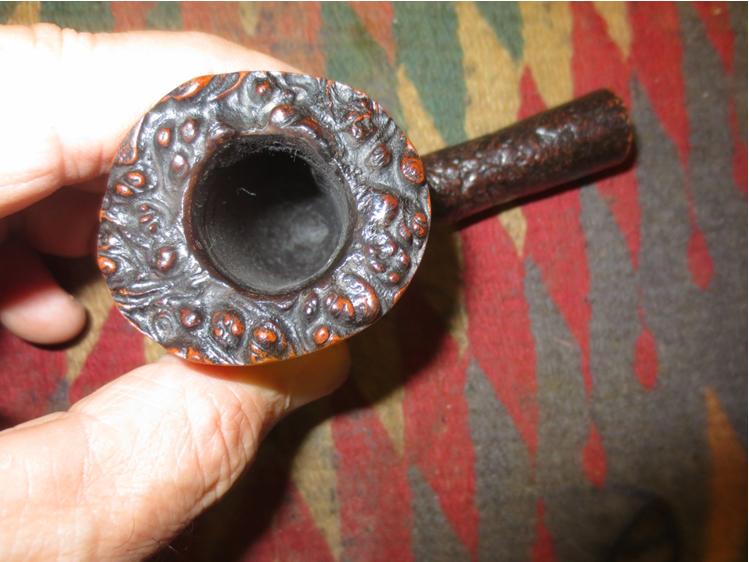
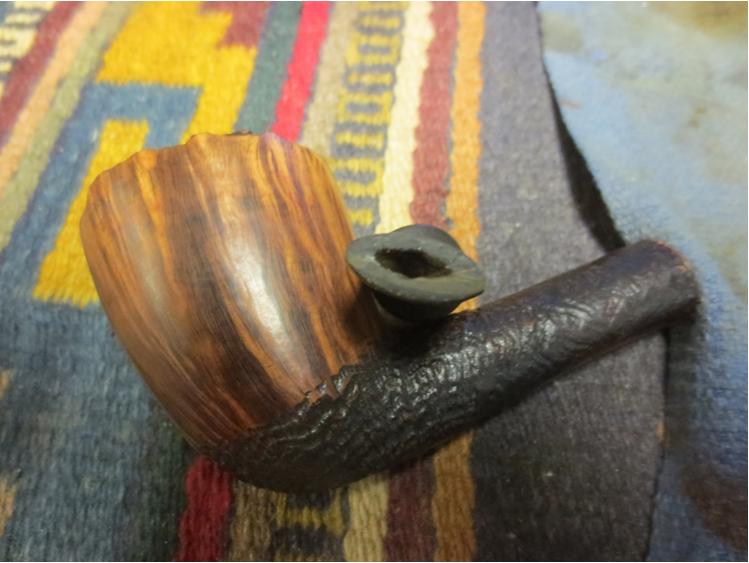
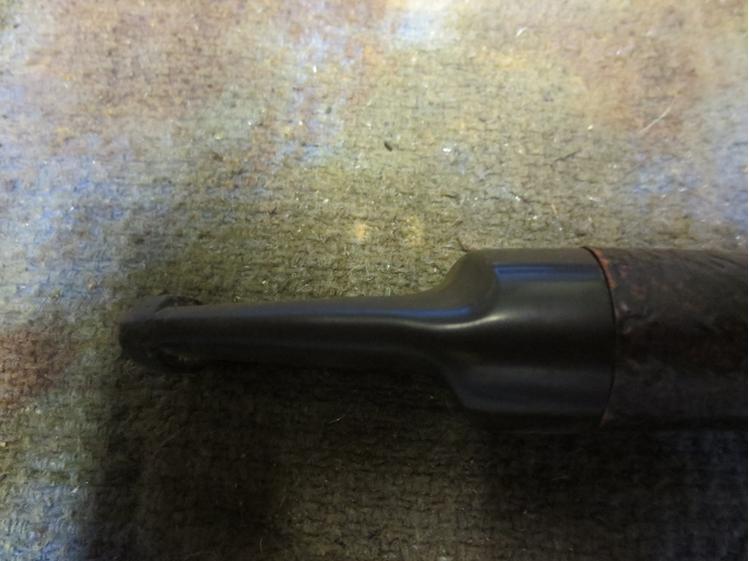
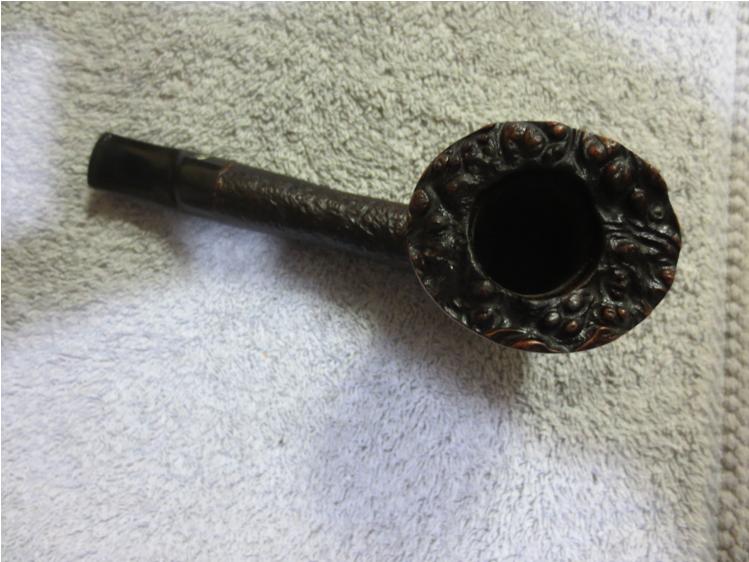
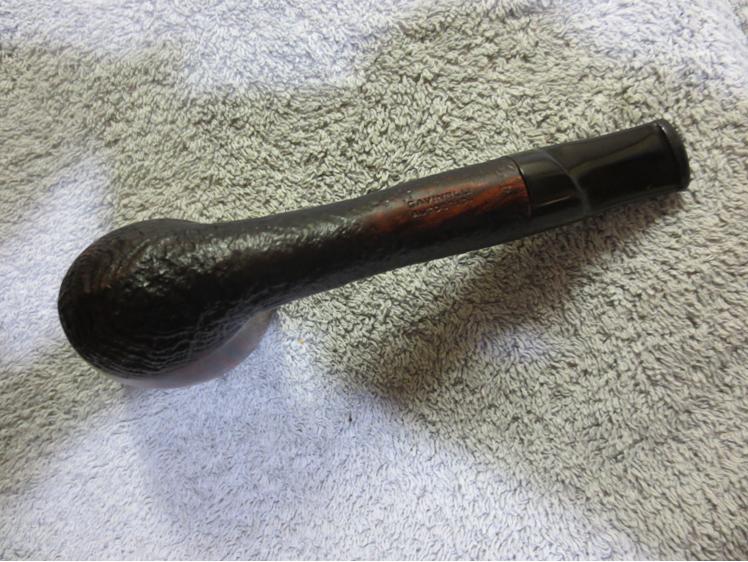
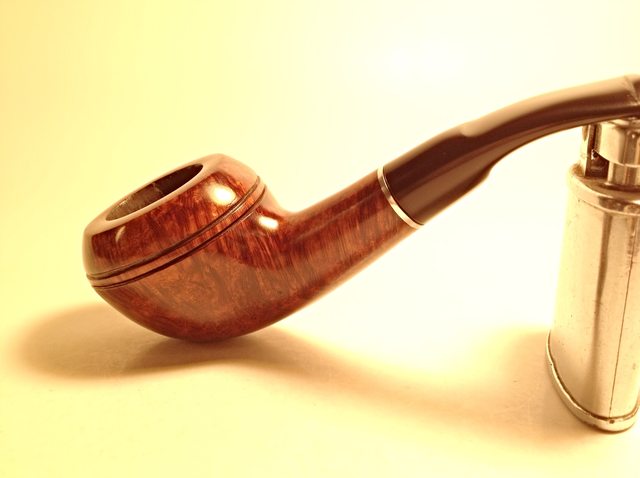
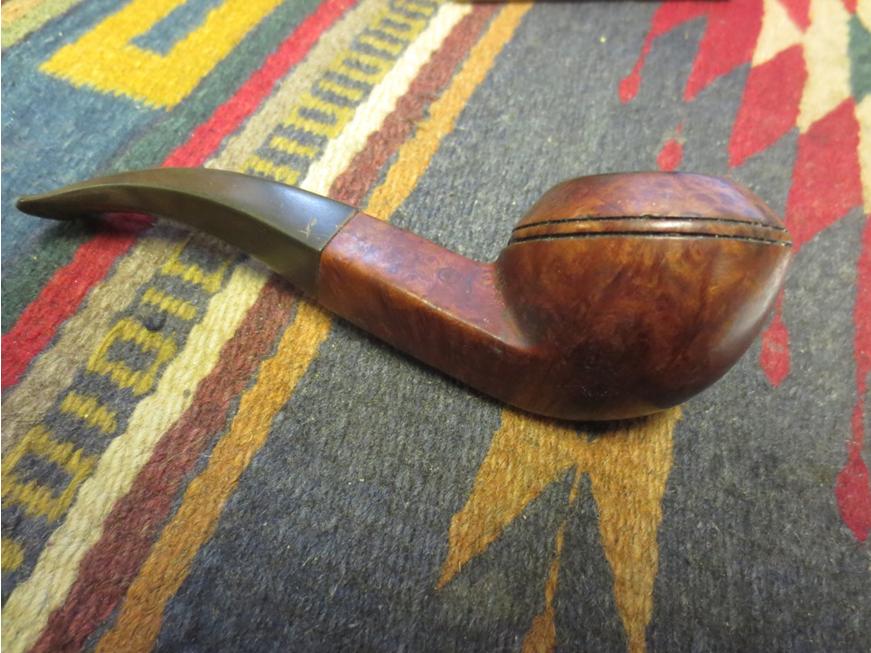
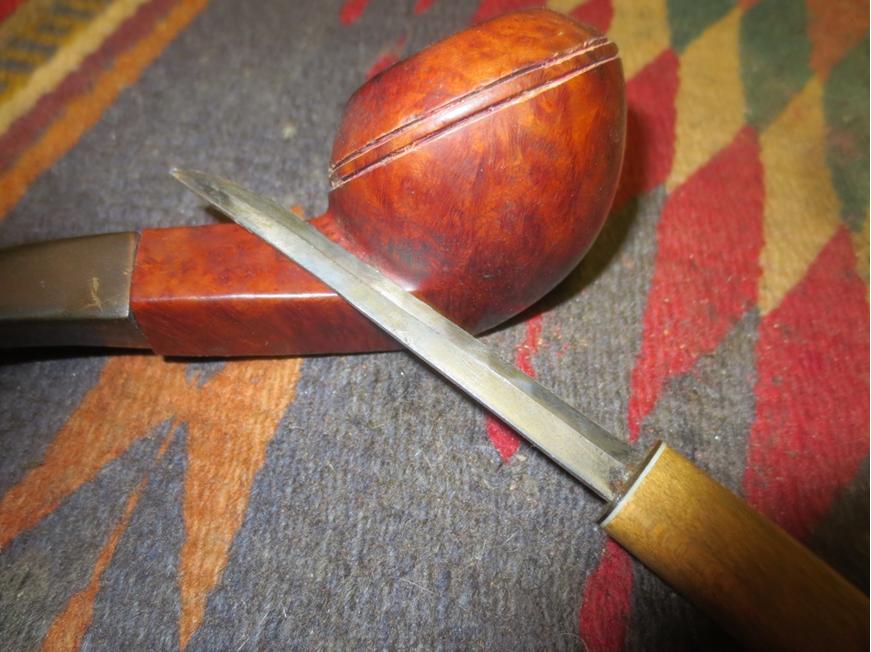
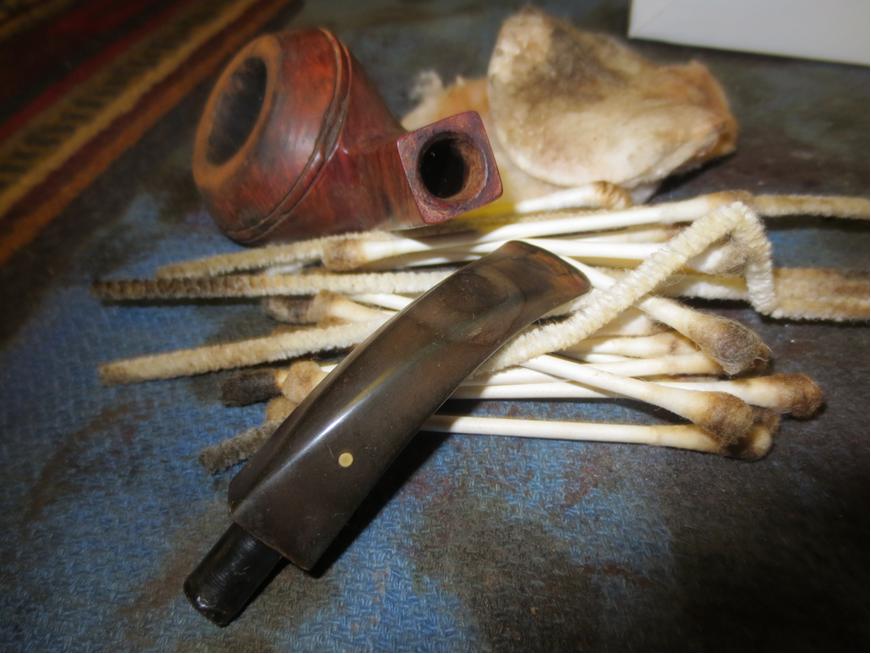
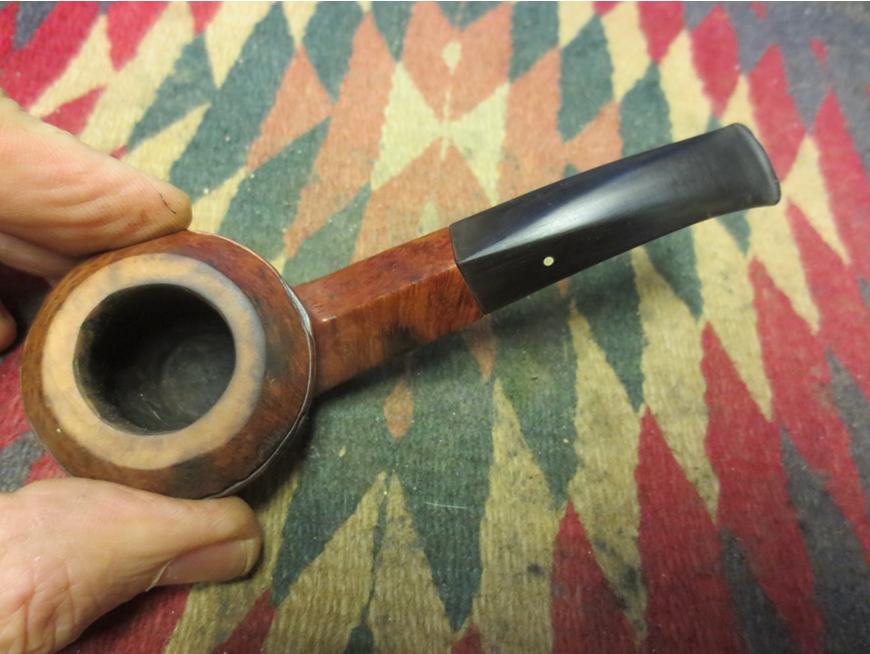
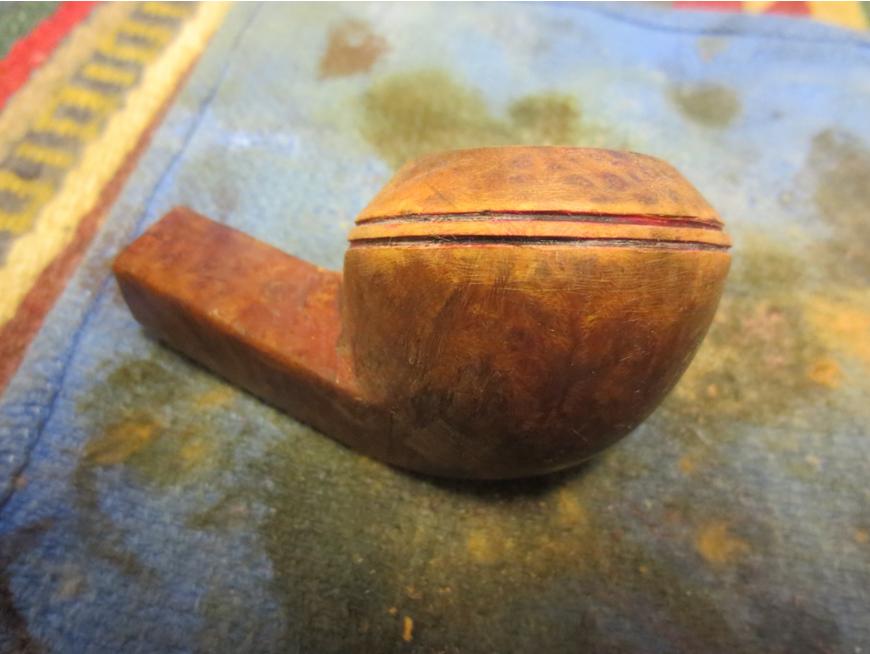
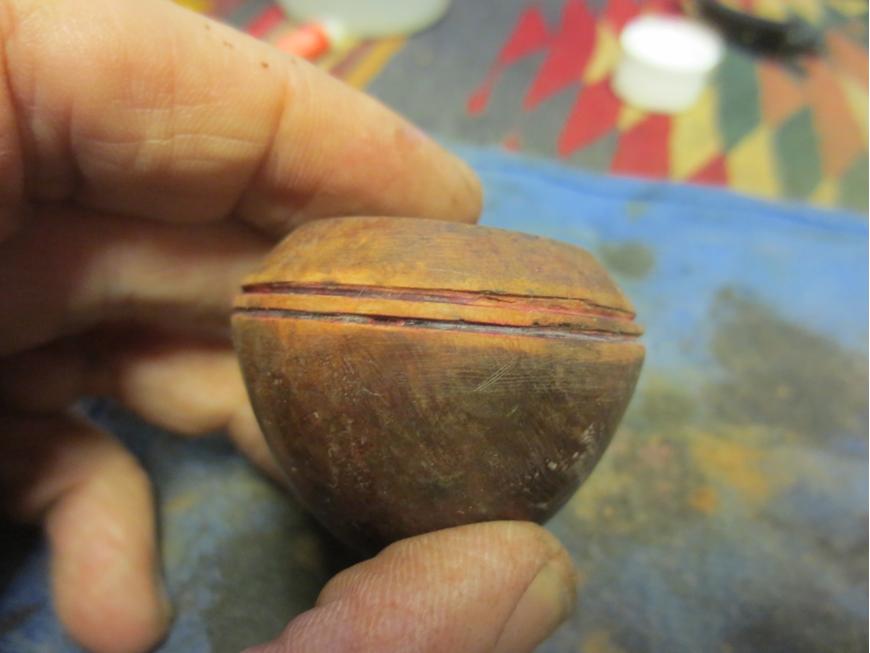
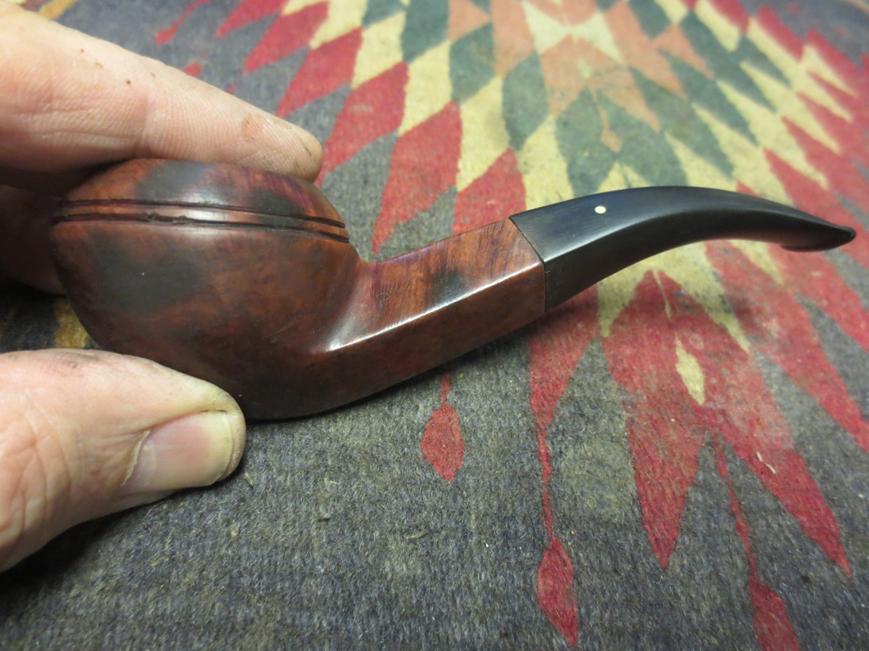
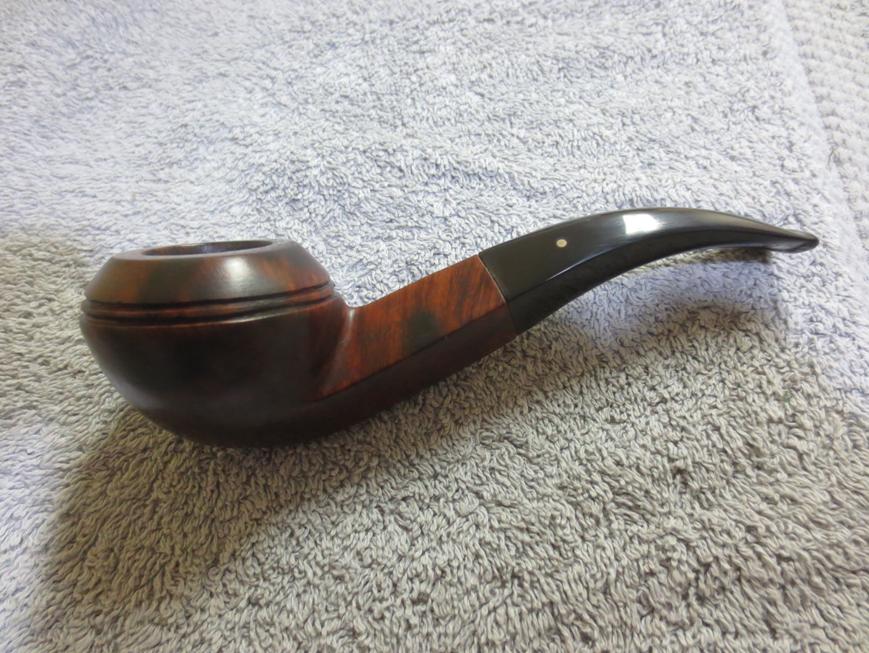
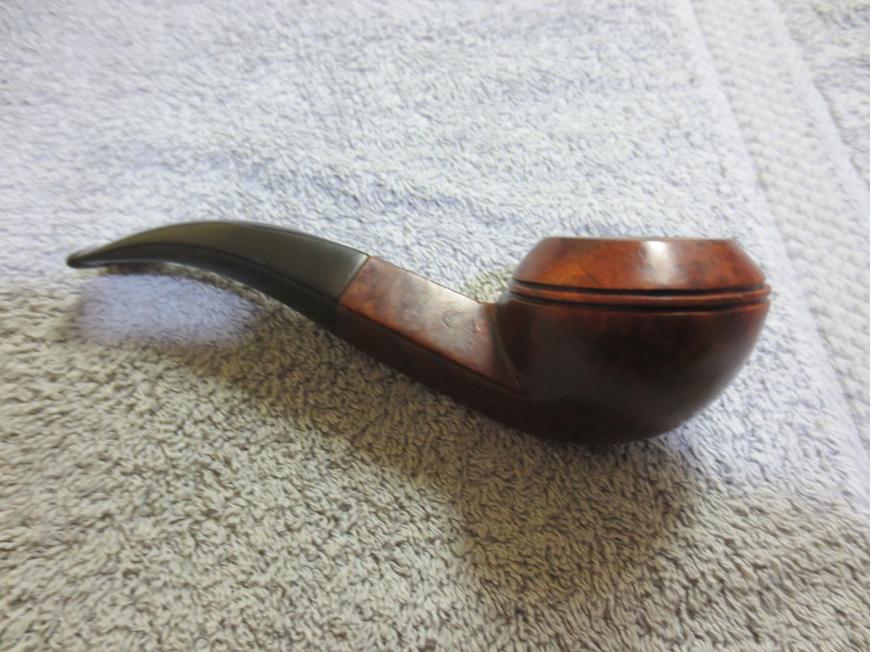
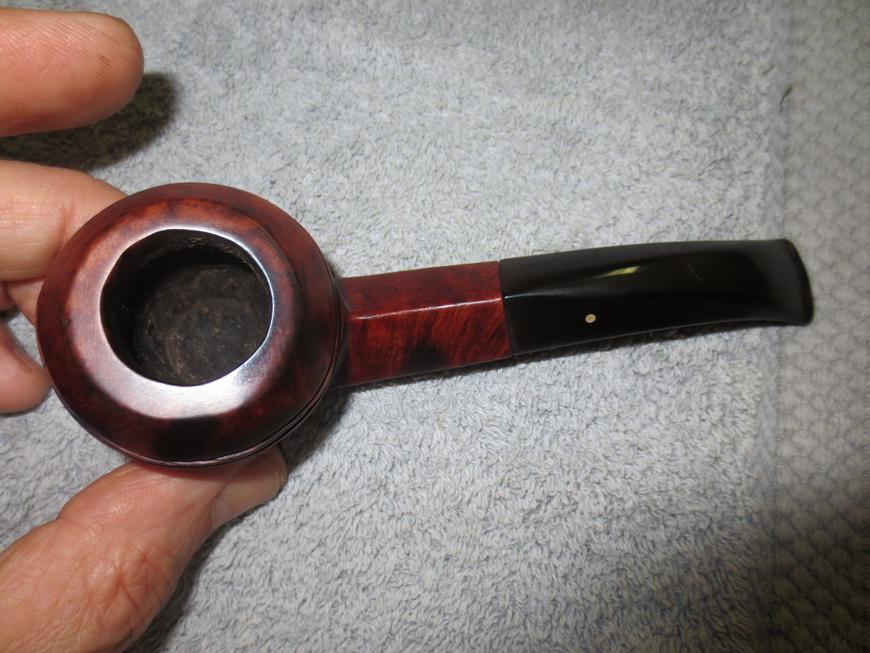
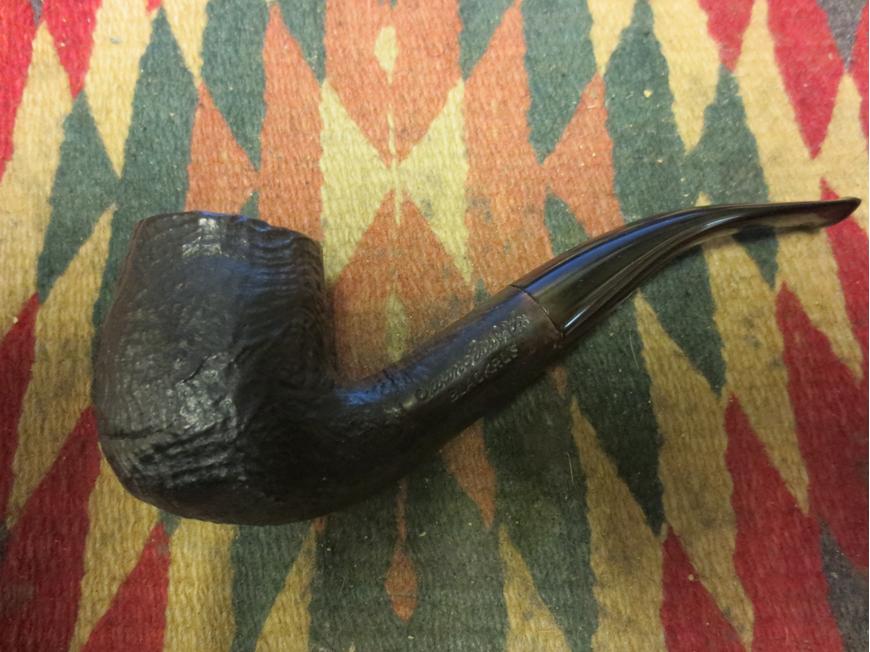
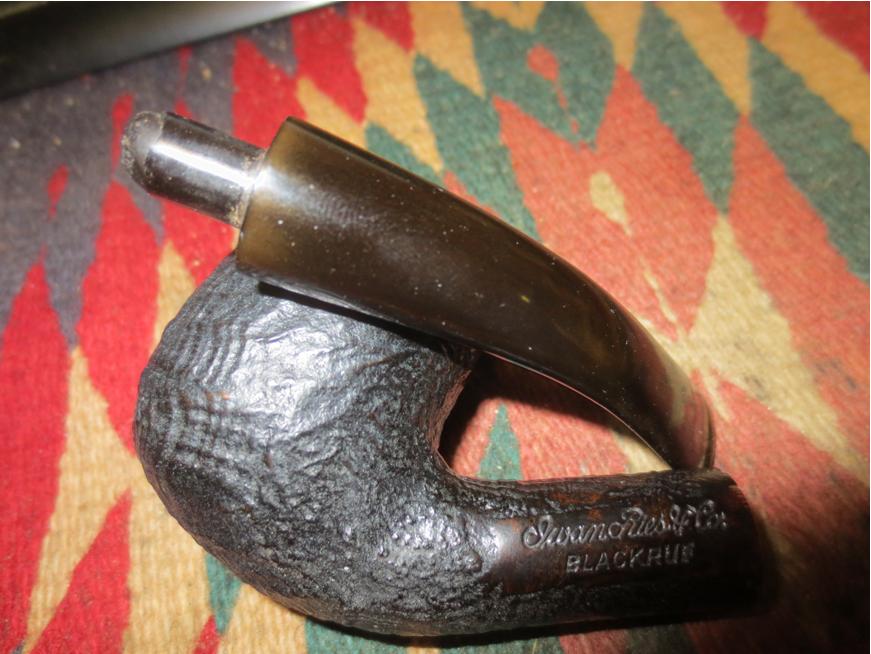
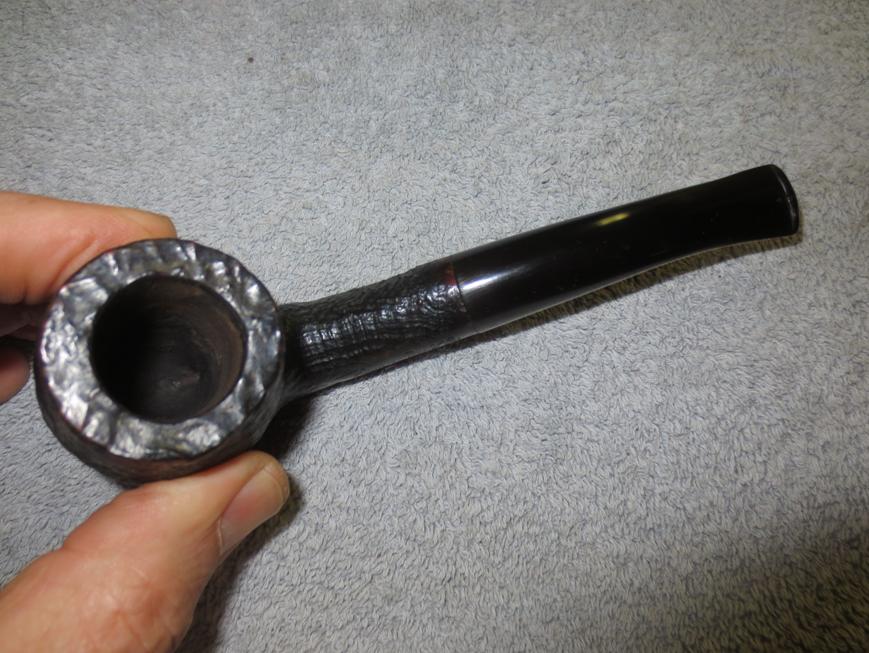
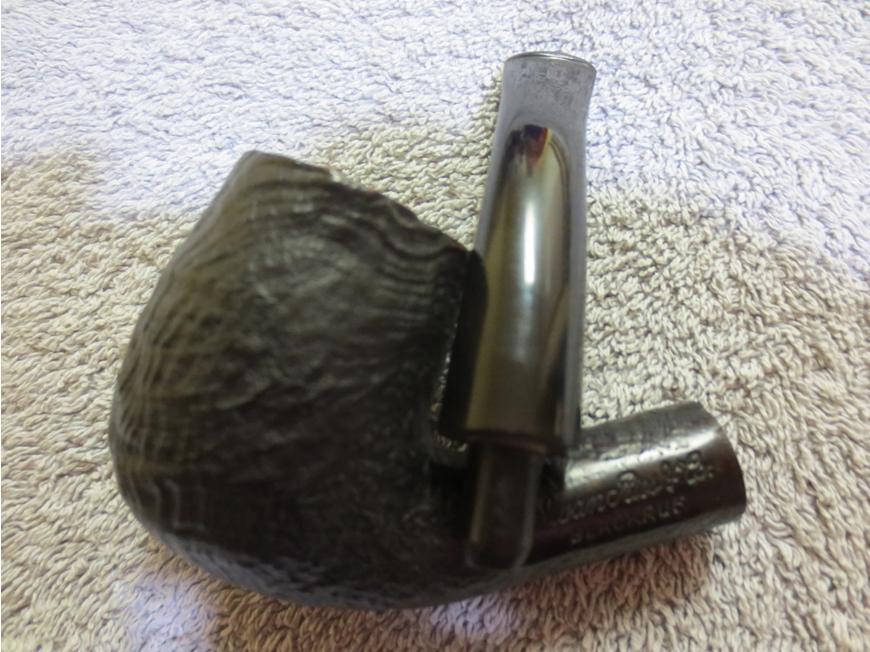
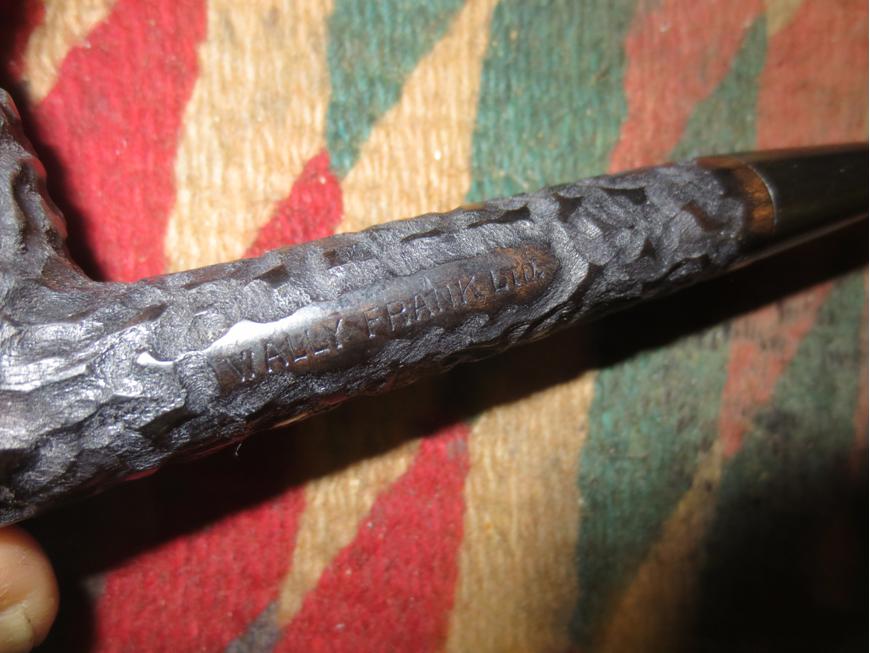
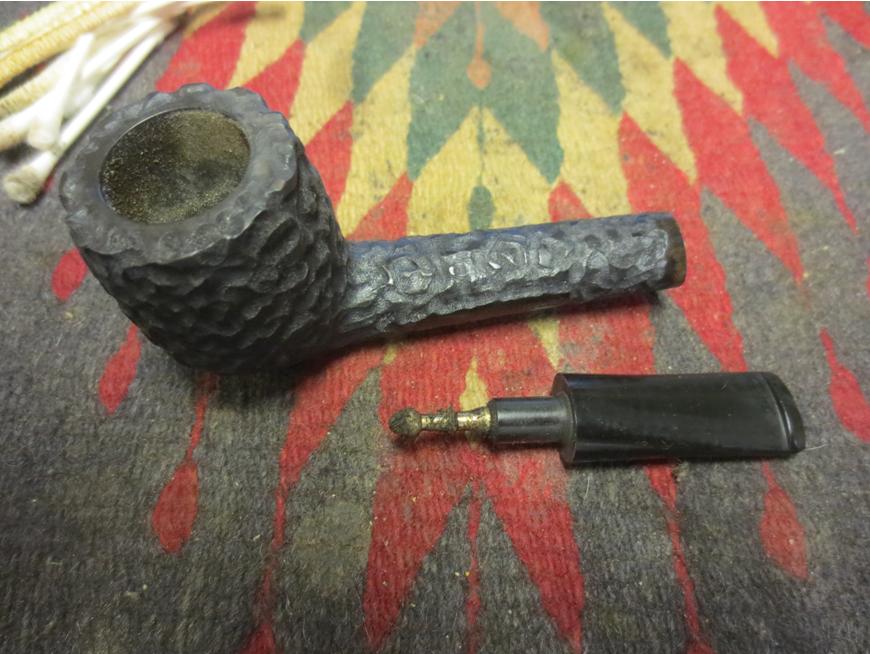
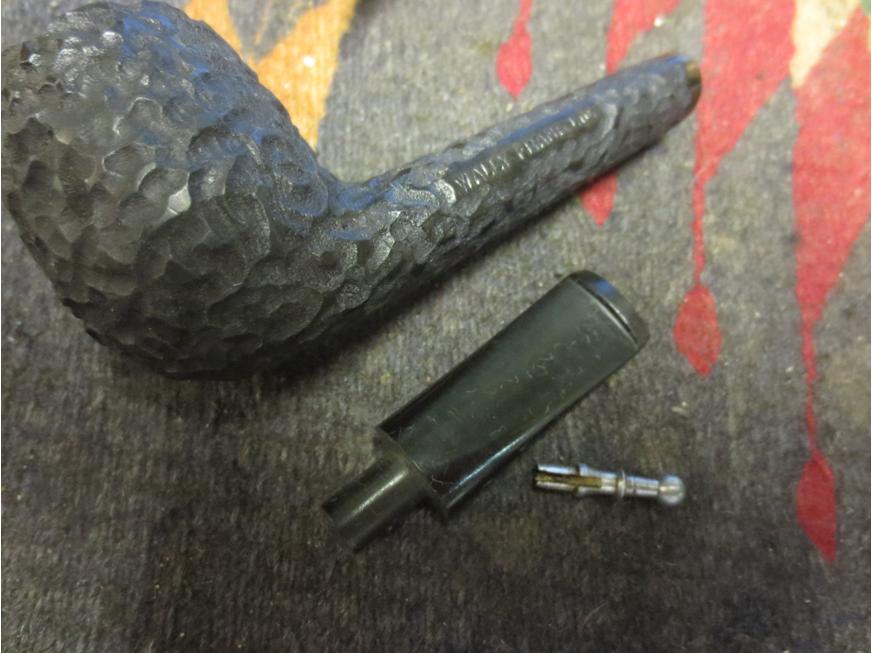
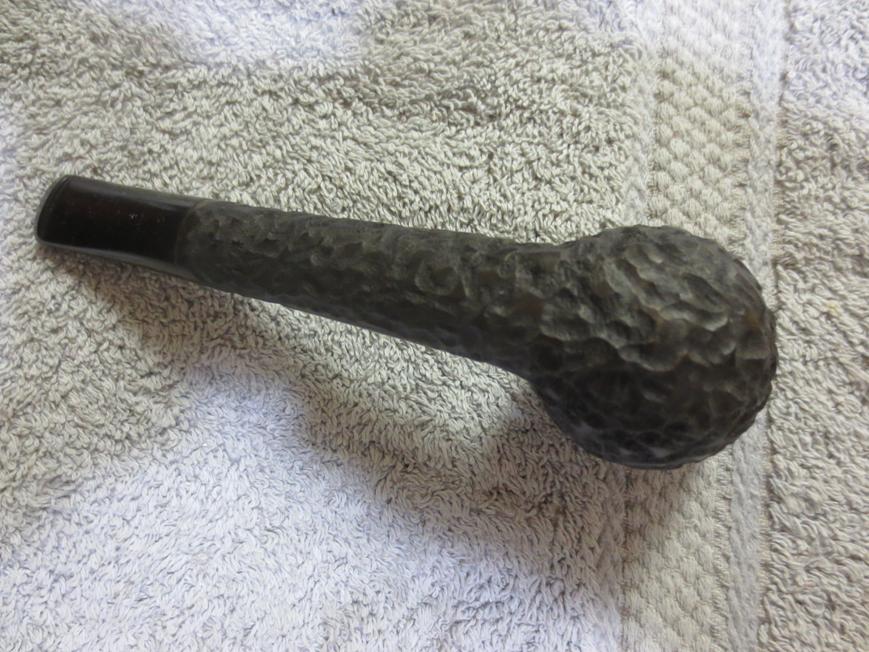
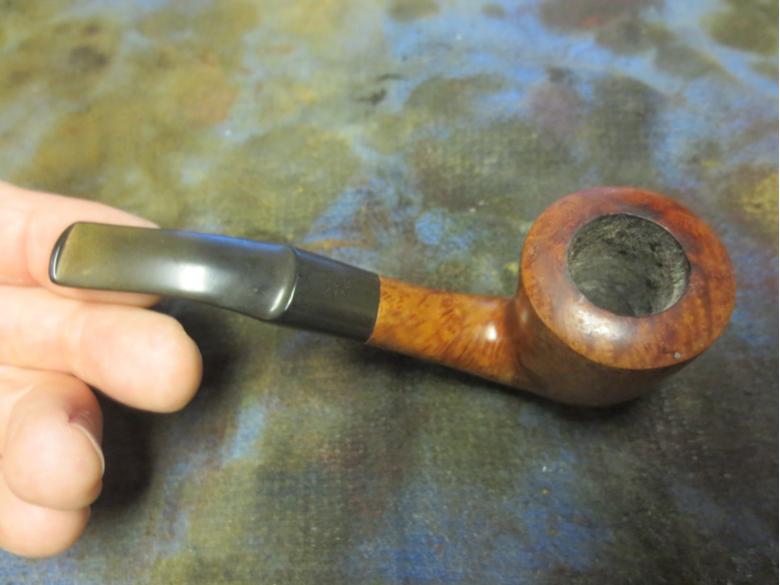
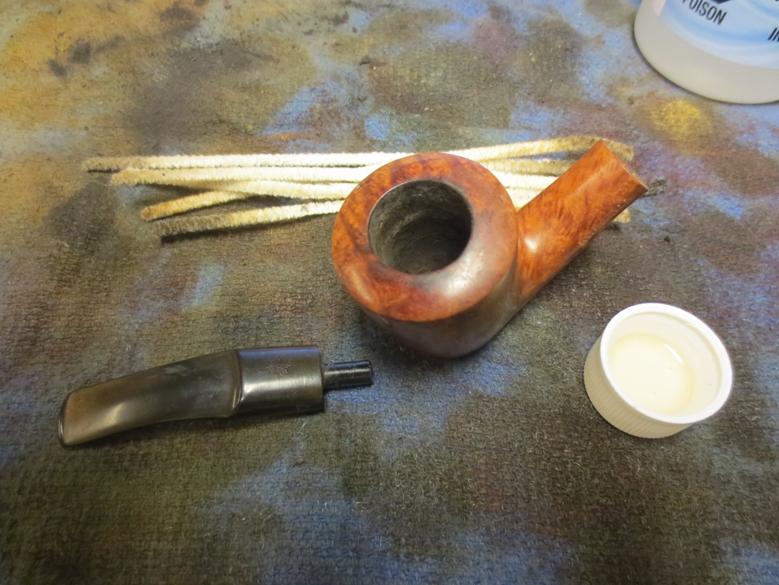
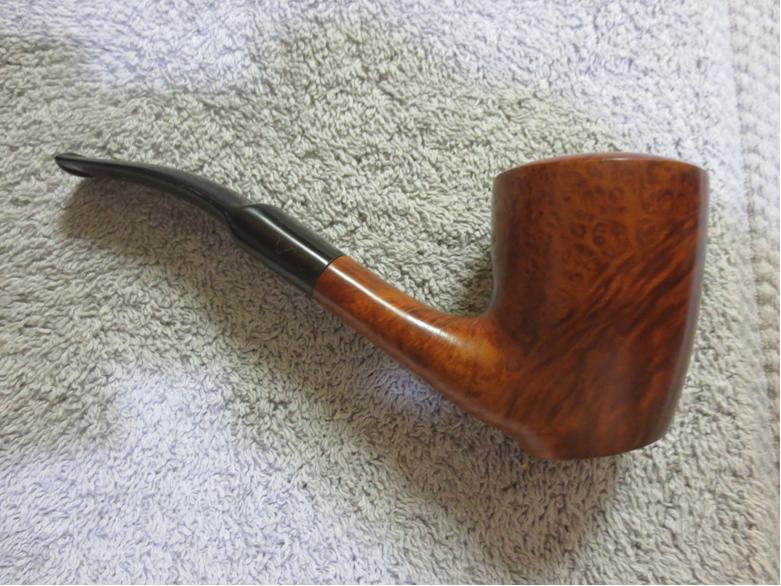
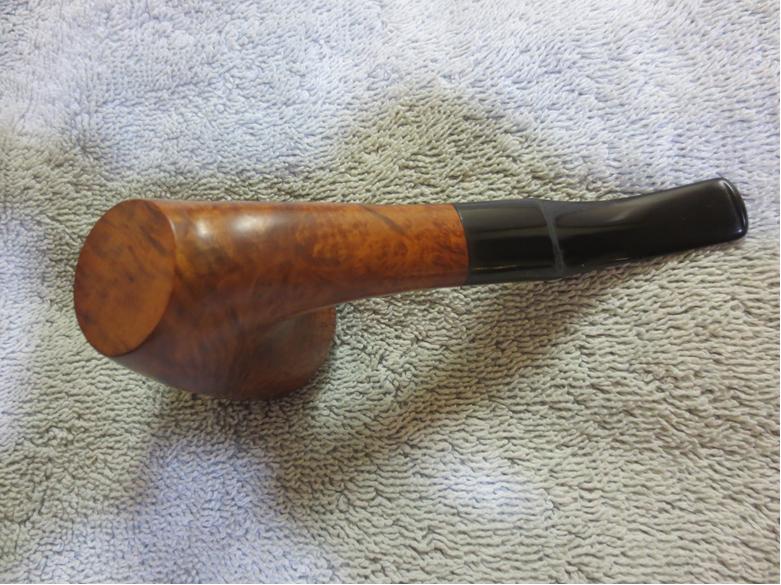
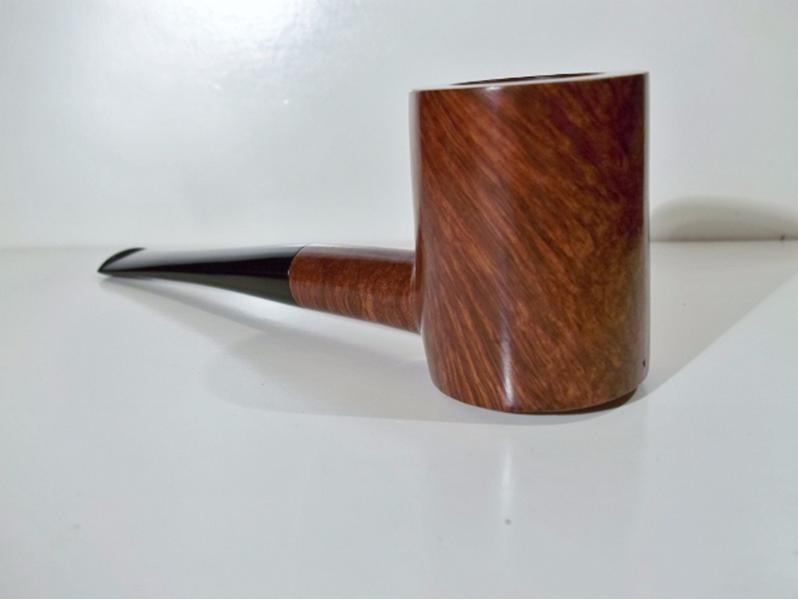
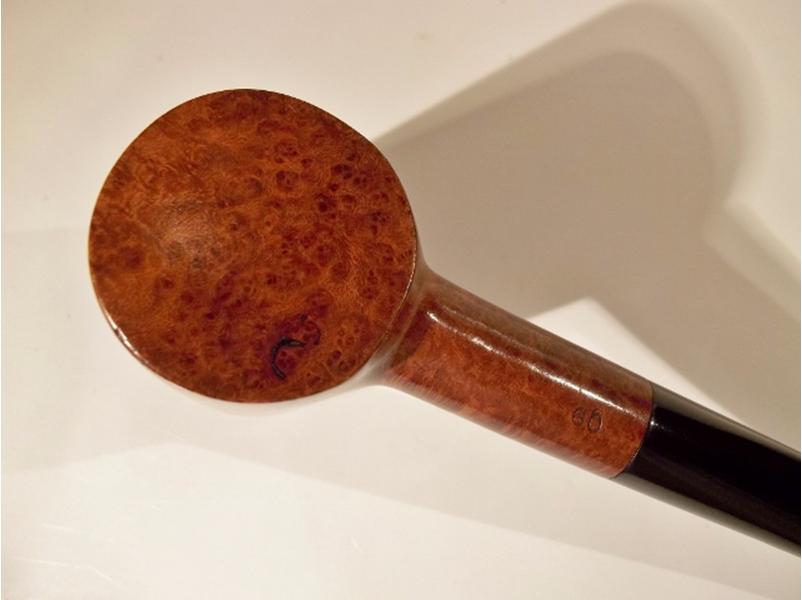
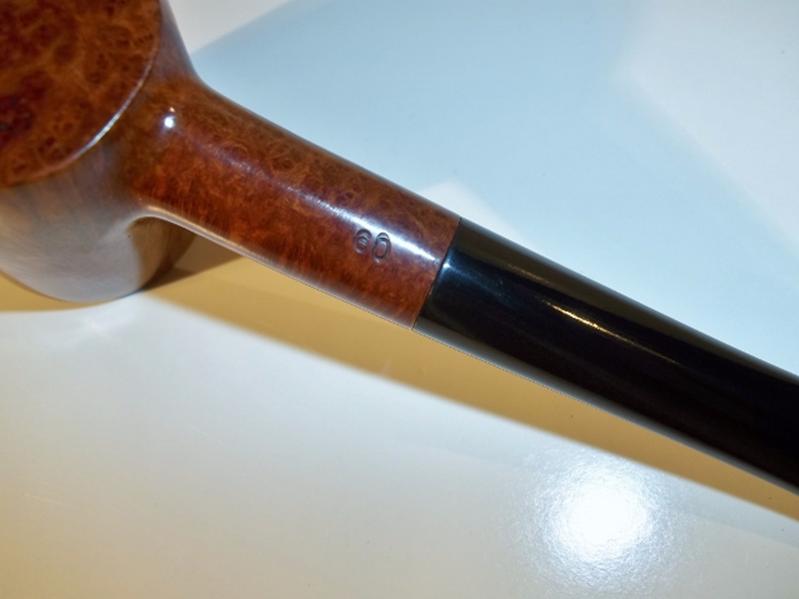
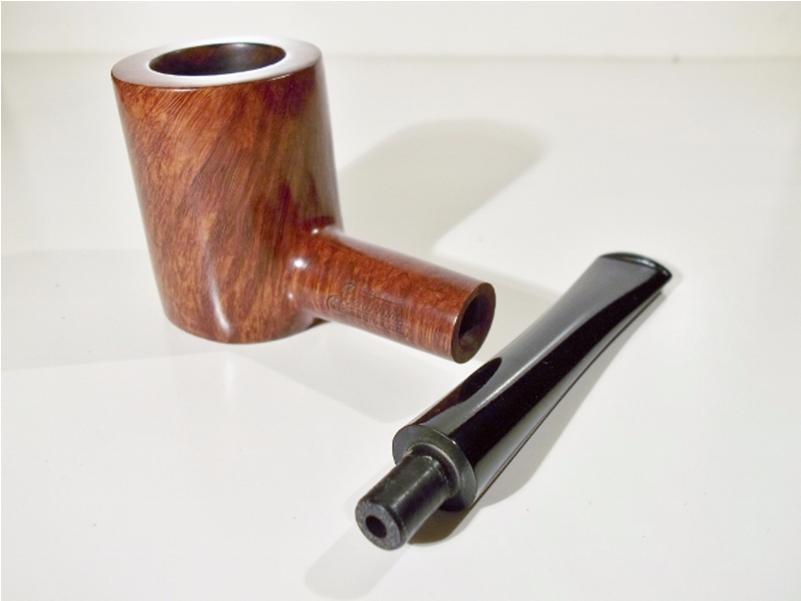
The first of the three that I took on was the Fine Line. It reminded me of the Dr. Grabow Wire Carved pipes I had seen, just not as rustic – if you like that sort of thing.Aaron1 
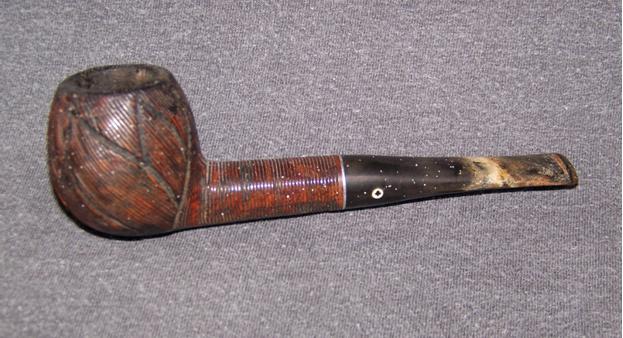
The flat bottom of the shank was stamped with: “Kaywoodie” over “Fine Line ®” and the left hand side of the stem had the black clover in a white dot.Aaron2 
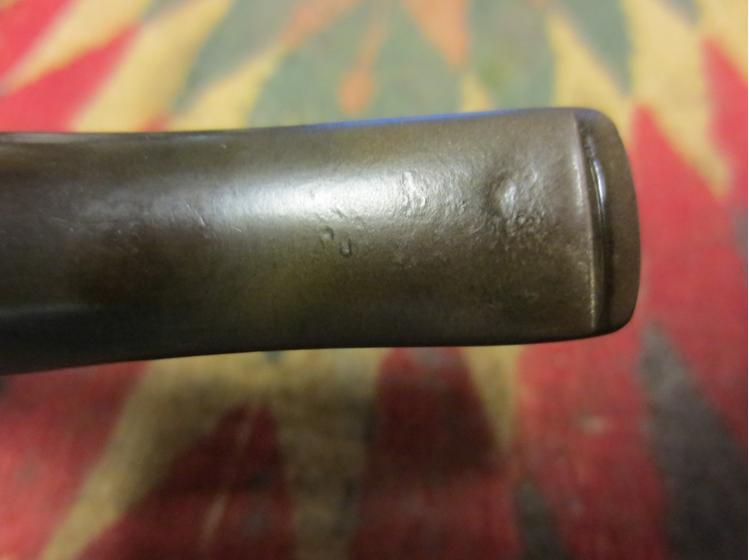
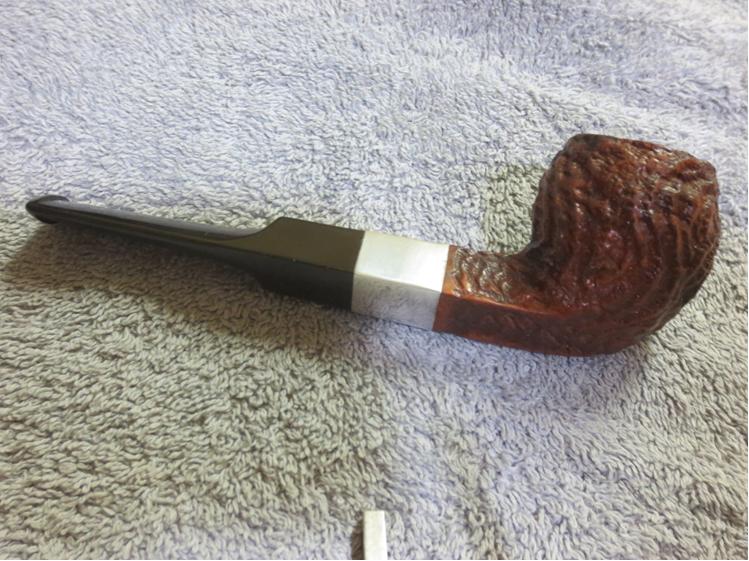
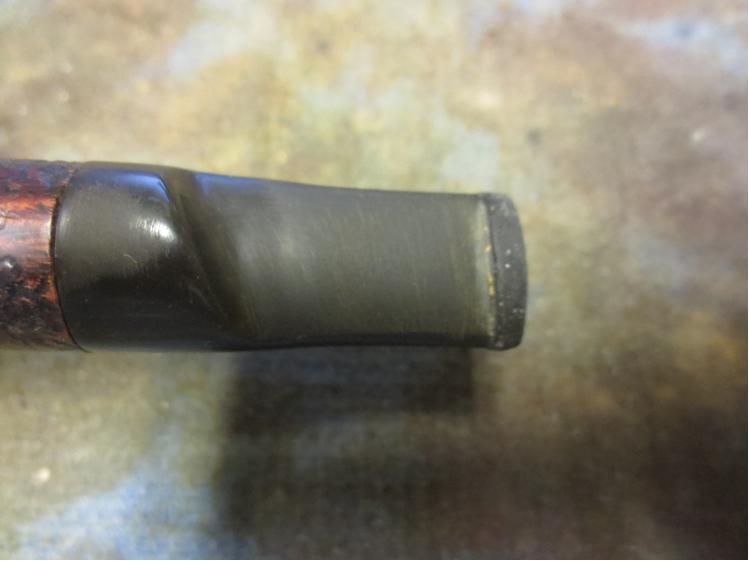
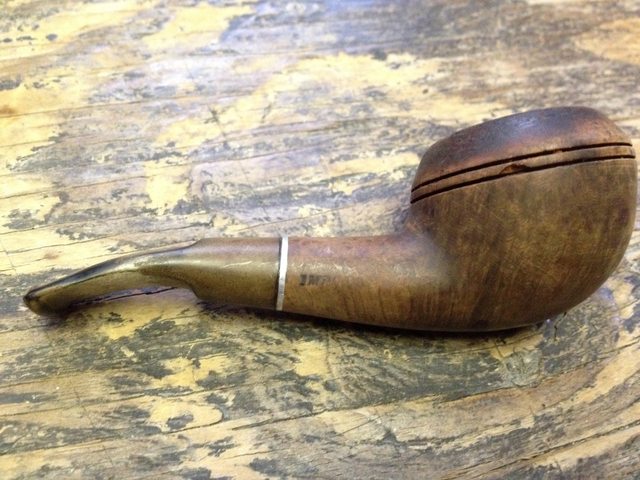
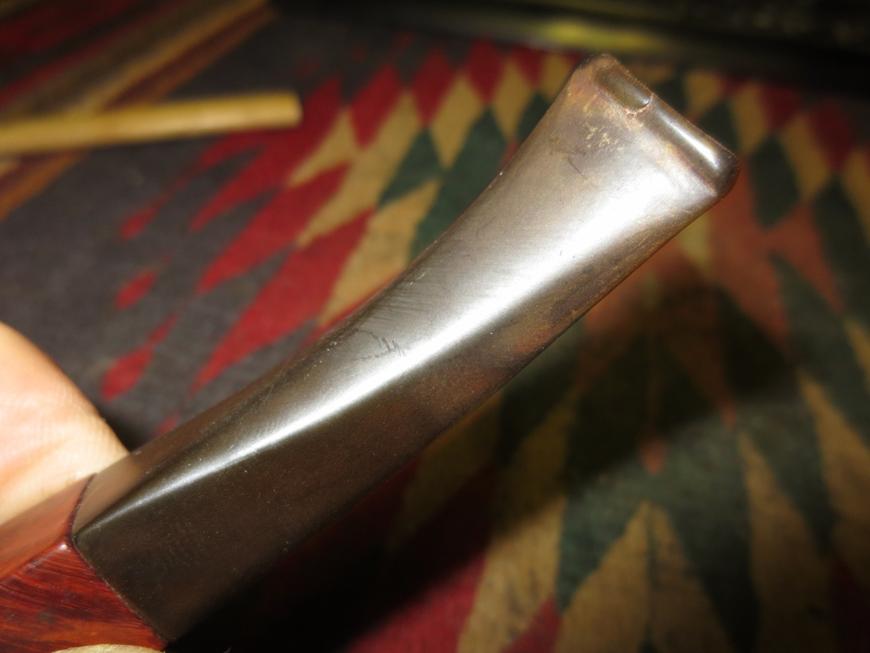
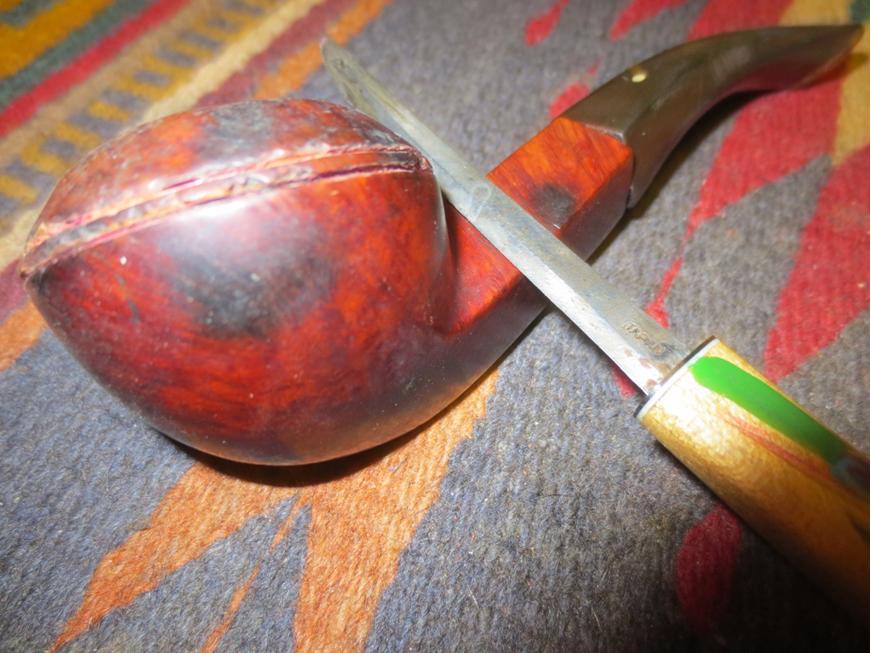
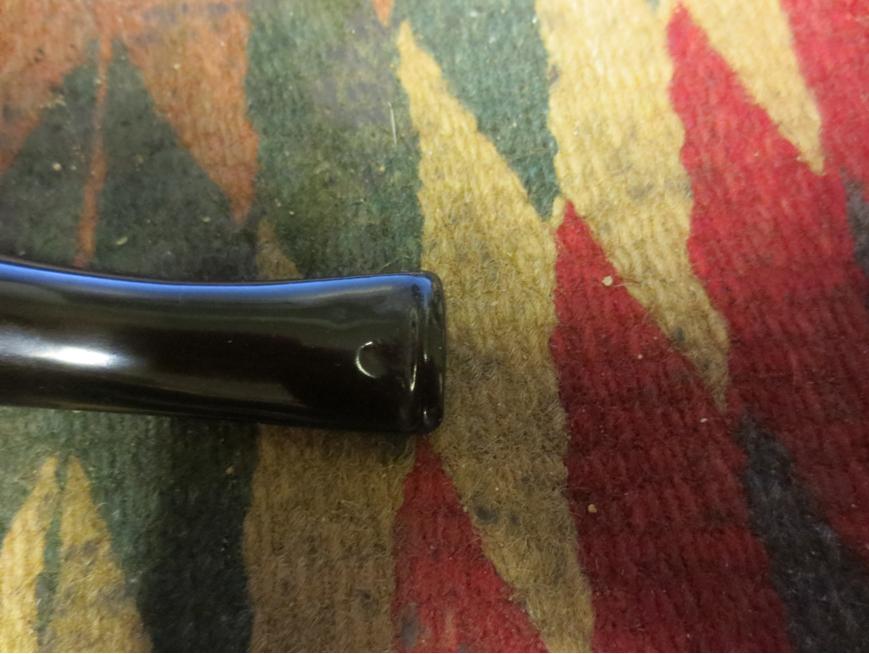
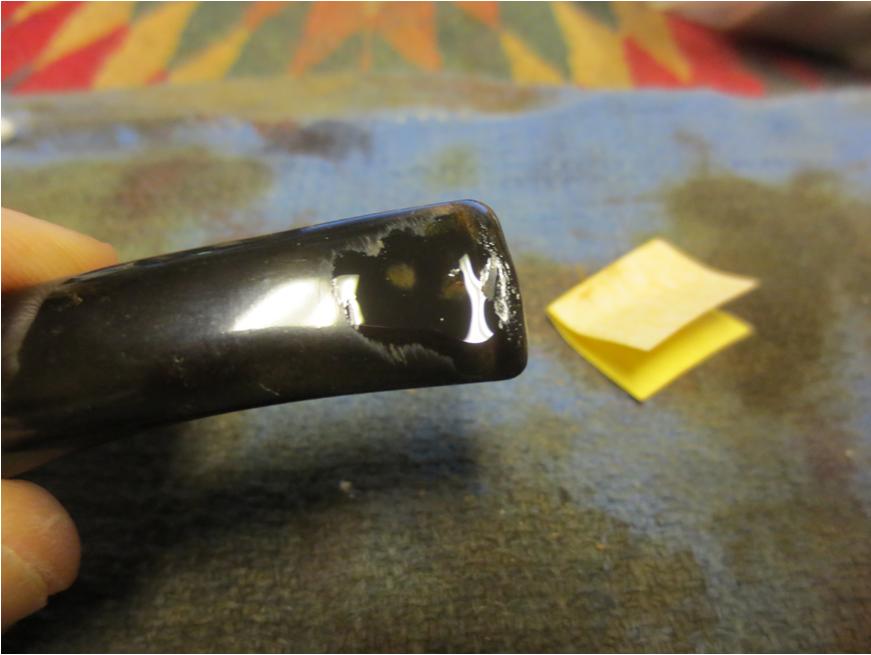
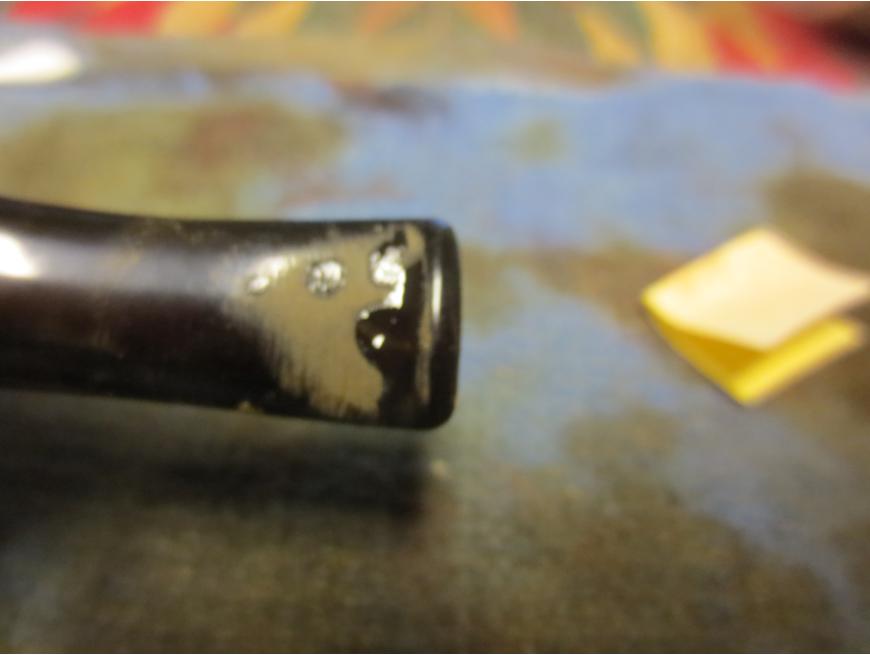
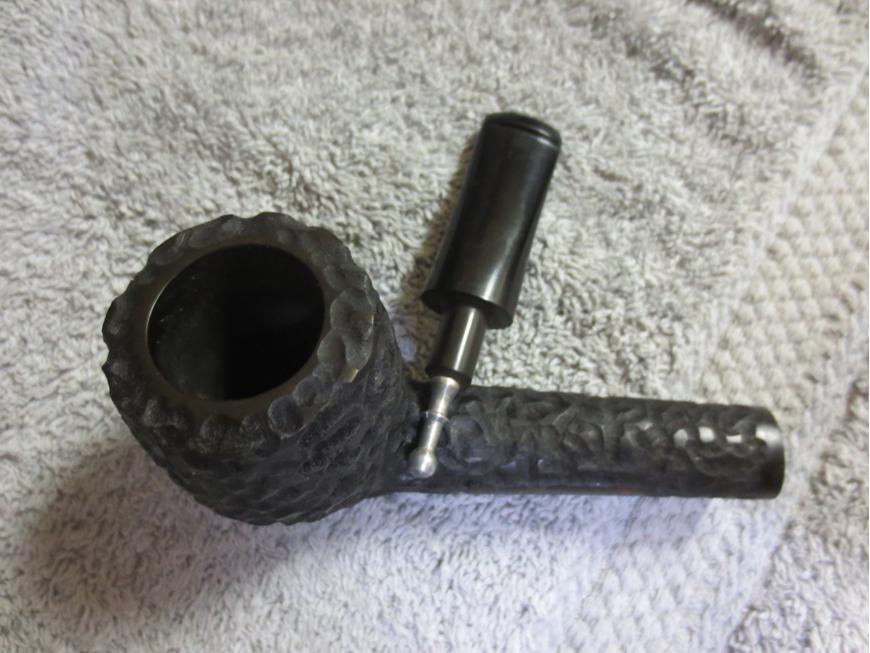
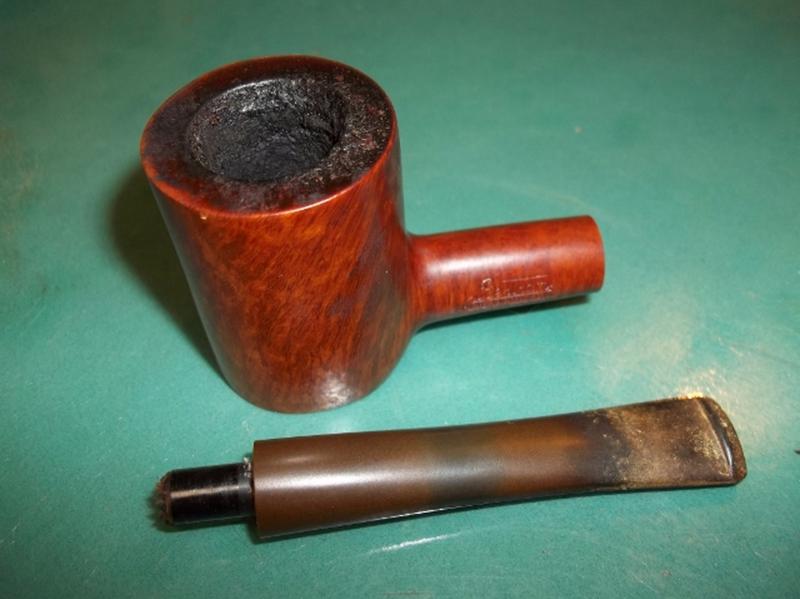
The stem was in great shape. There was some mild oxidation, a little build up of crud and just a minor amount of chatter around the button. The stinger was also in good shape with the expected build up of tars. The stem was over clocked by about 10 degrees and after a little research I came to understand that this is a common problem with Kaywoodie pipes. Fortunately, it is an easy problem to correct.Aaron3 
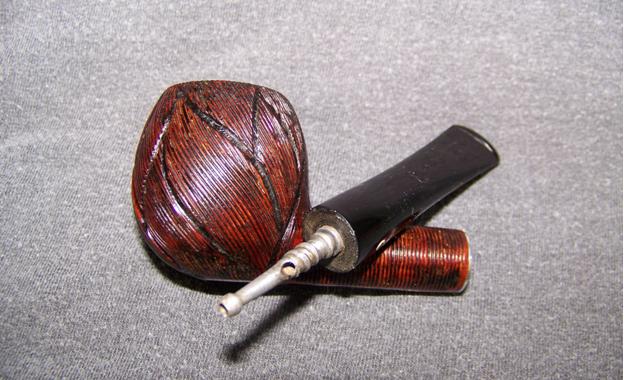
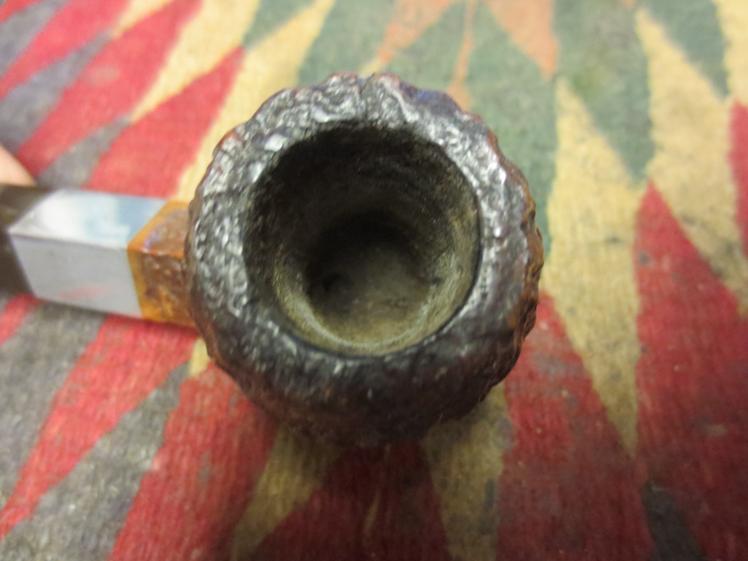
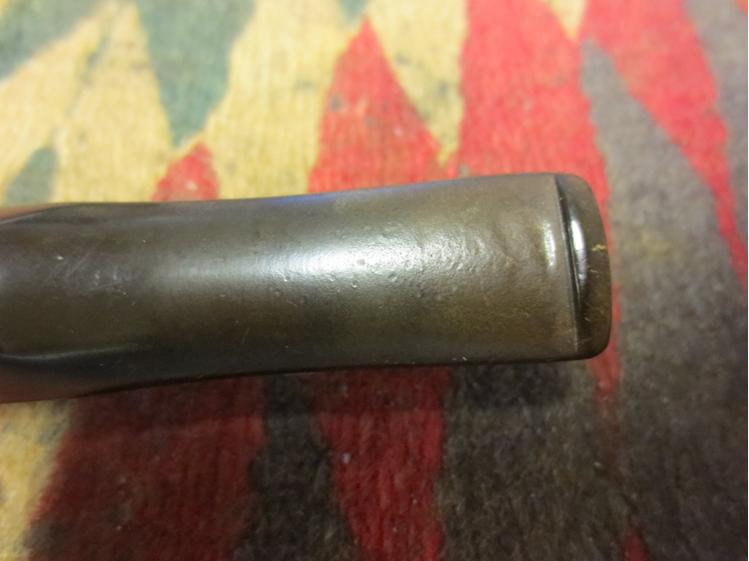
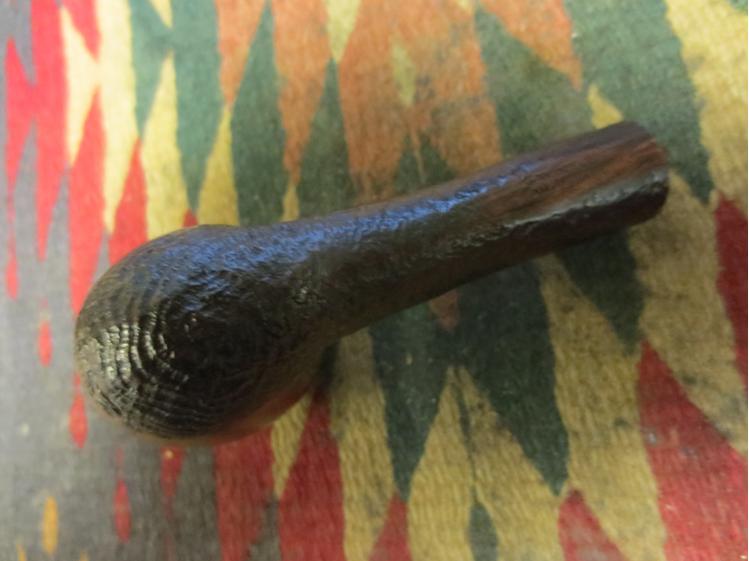
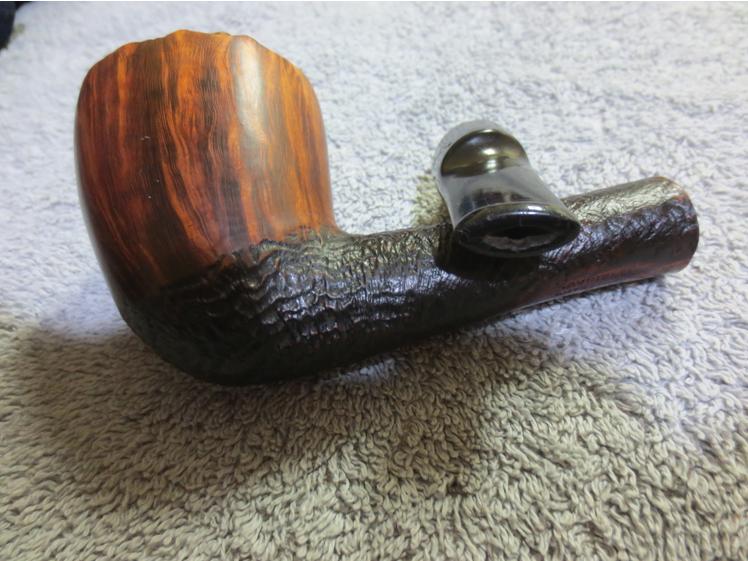
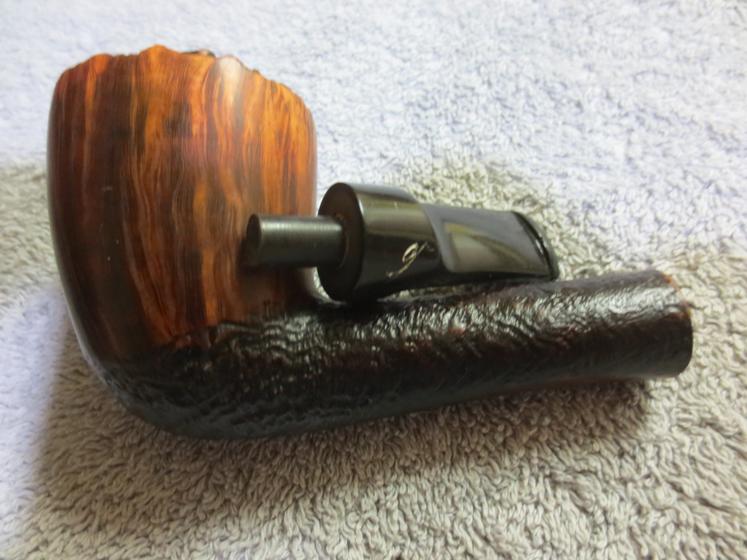
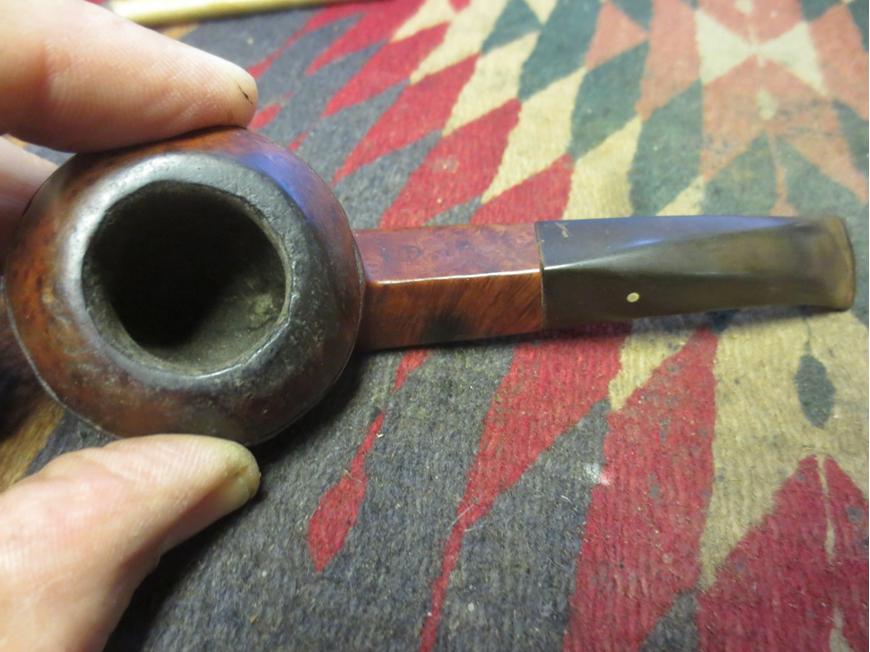
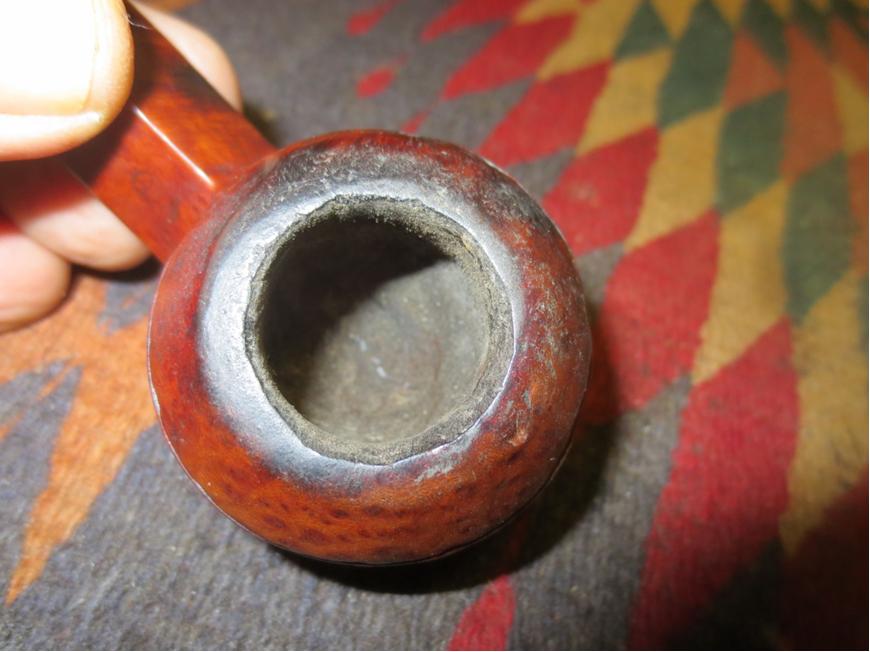
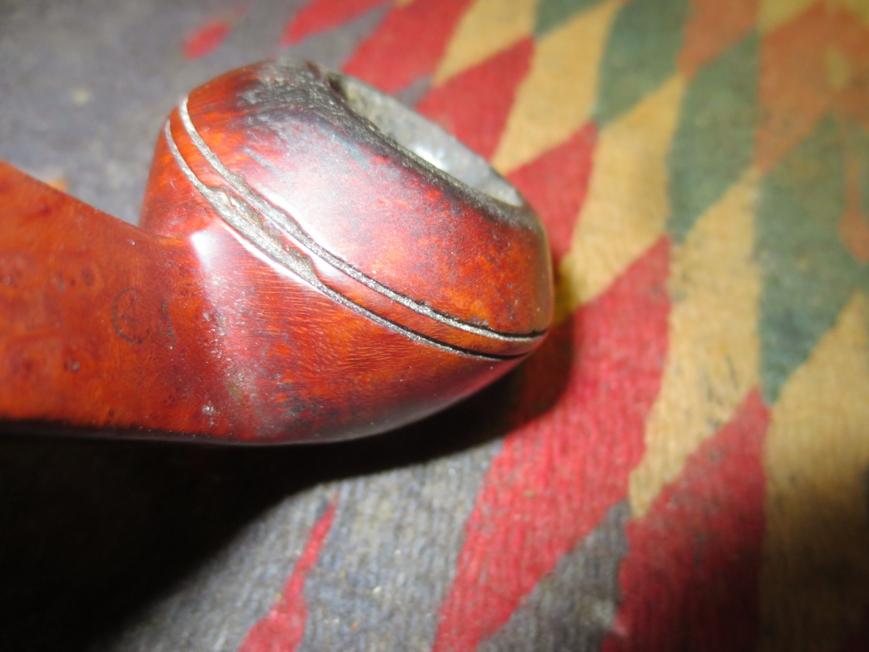
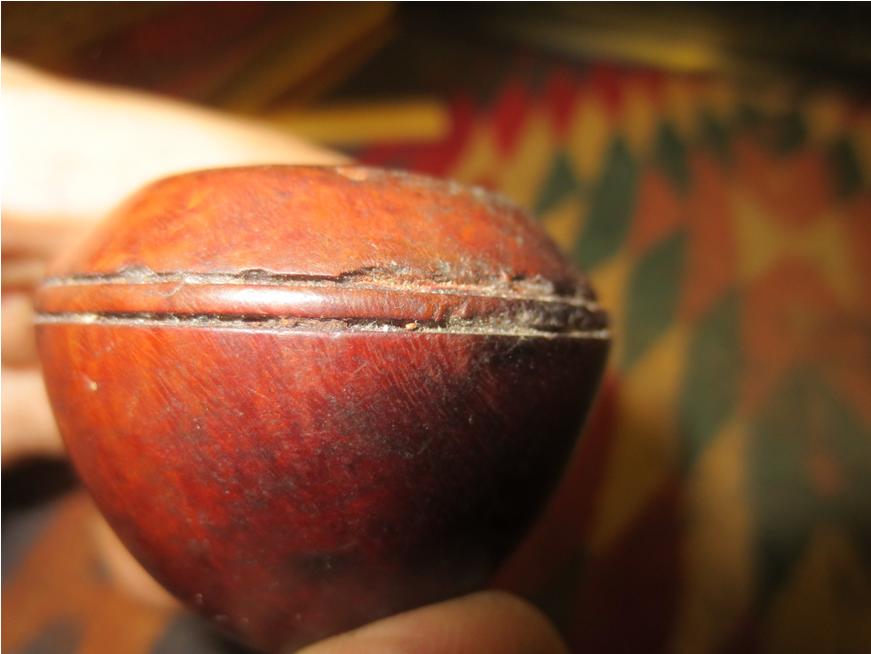
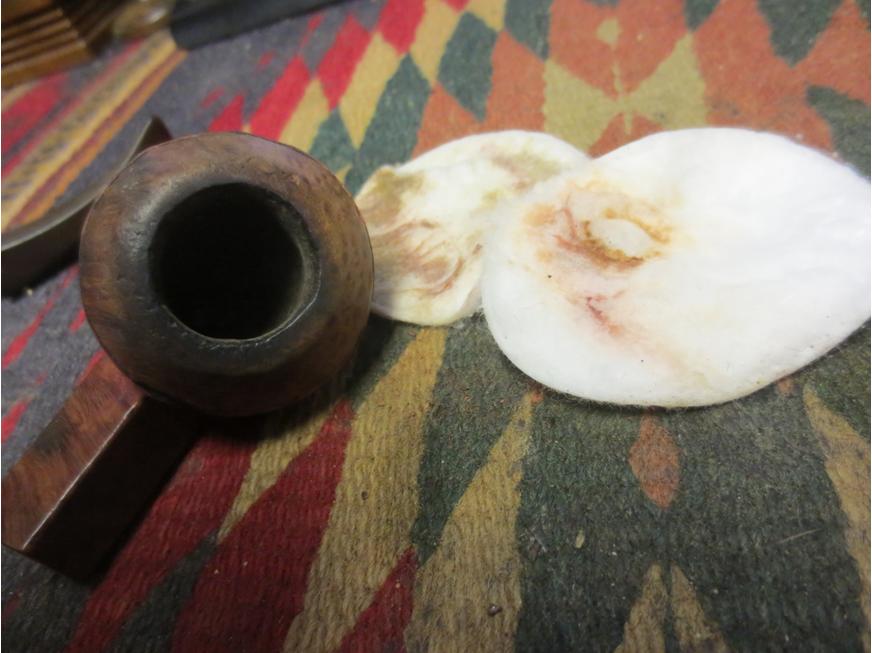
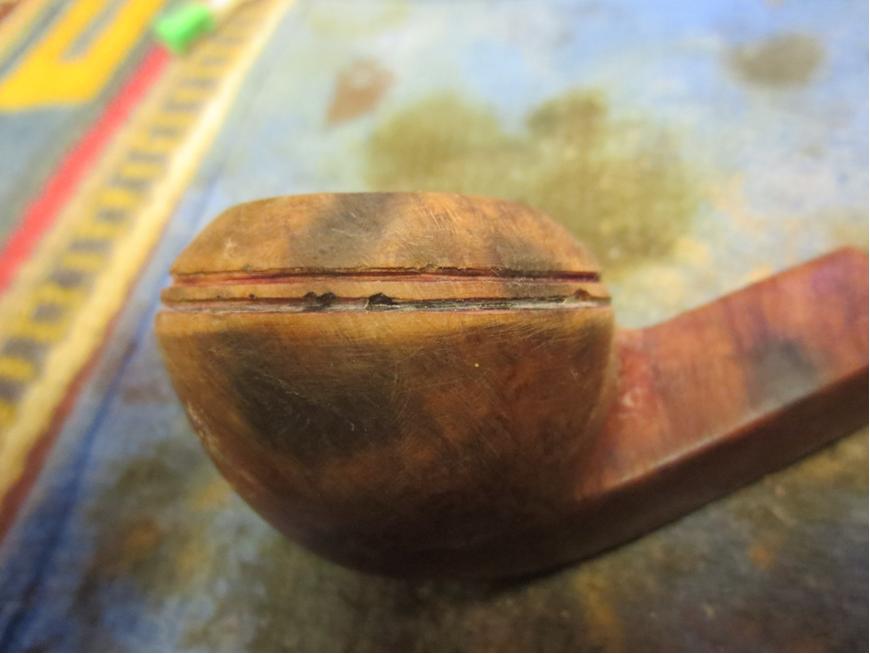
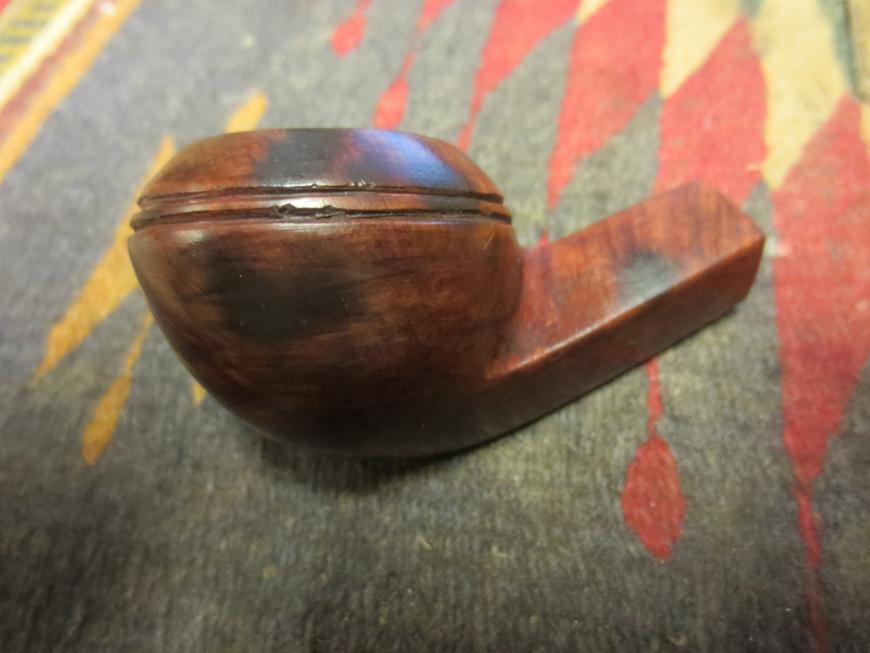
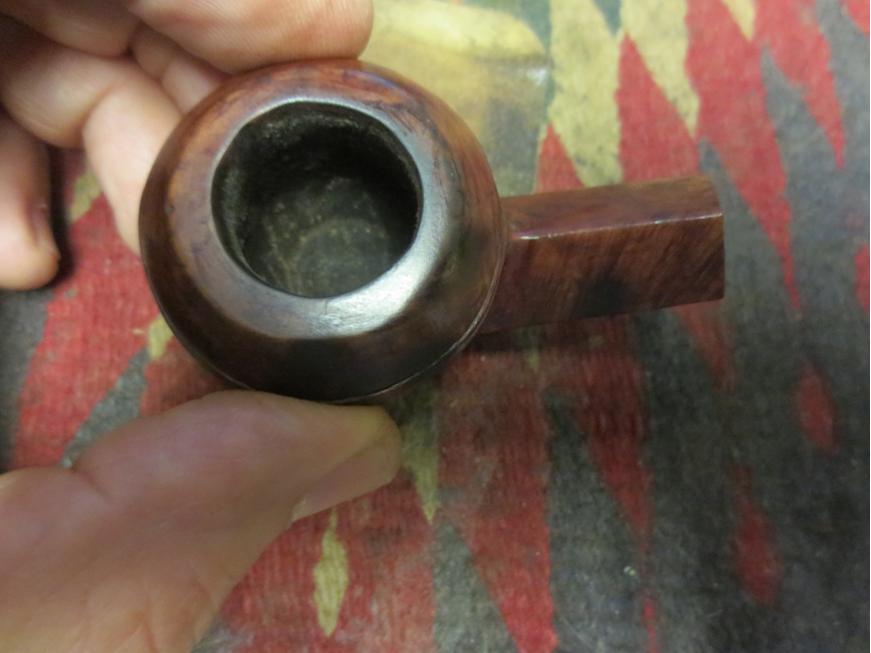
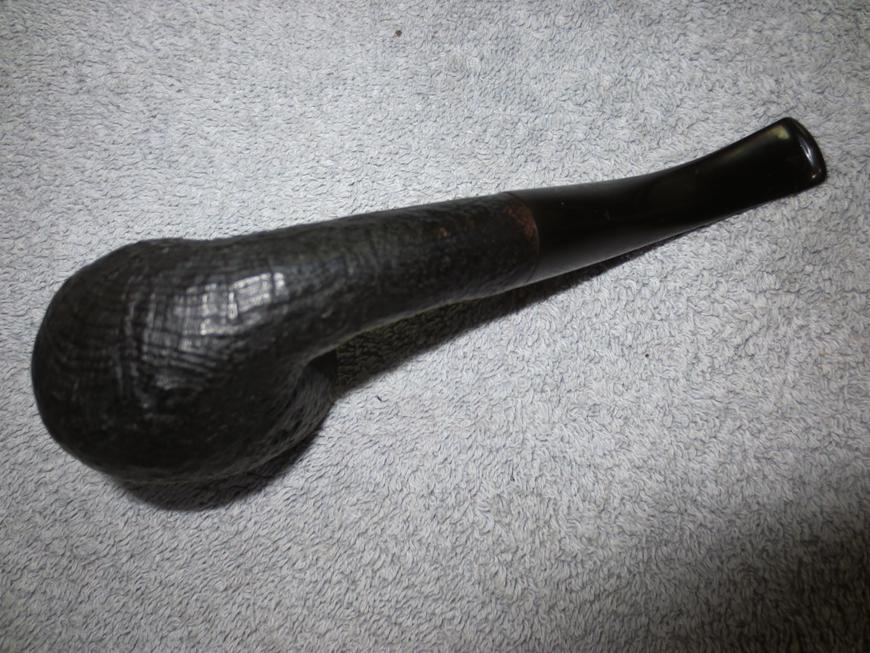
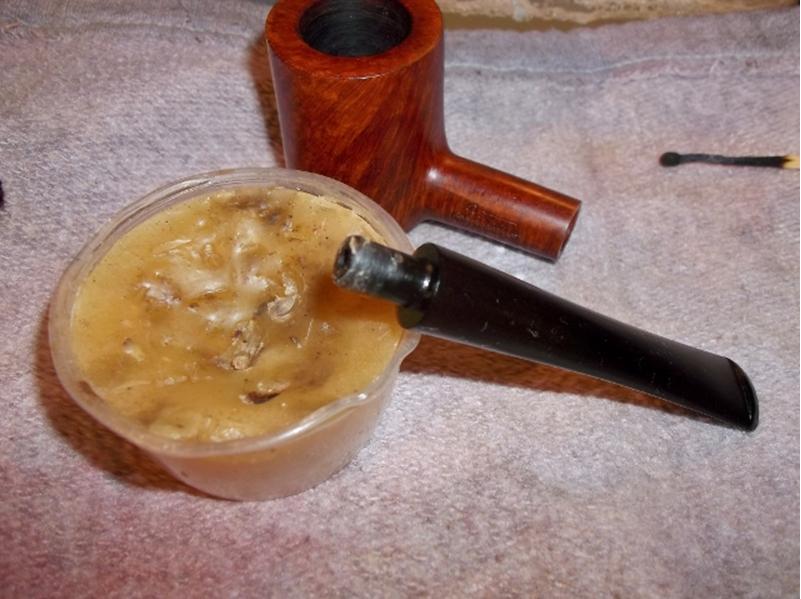
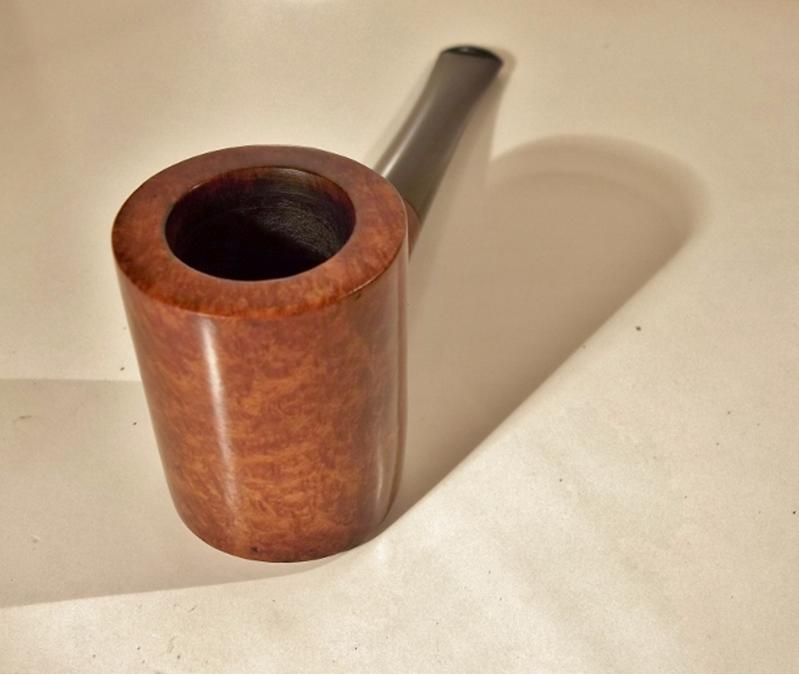
It looked like someone had been rolling out paint on a wall or ceiling near the pipe because there were small droplets of white paint all over the stem and stummel (perhaps they were smoking while painting?). The stummel was dirty but there was no damage that I could see. A thick cake lined the bowl and the lines in the rim where full of char and other gunk, but otherwise it too was in good condition.Aaron4 
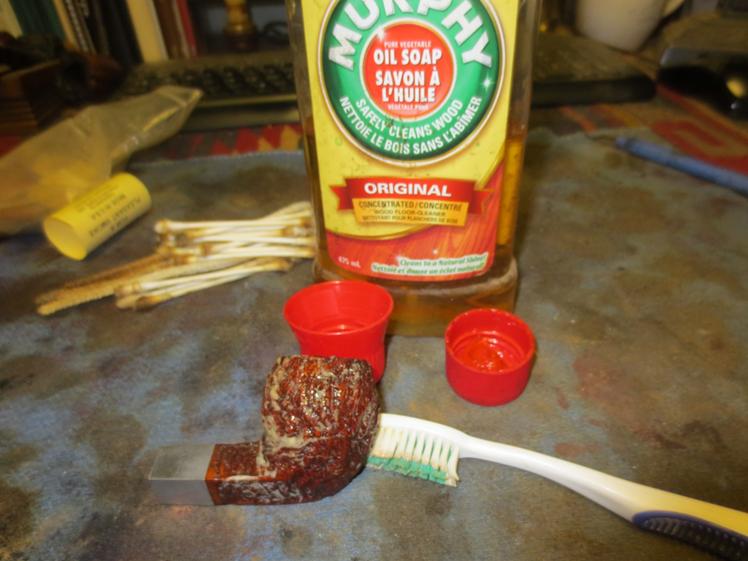
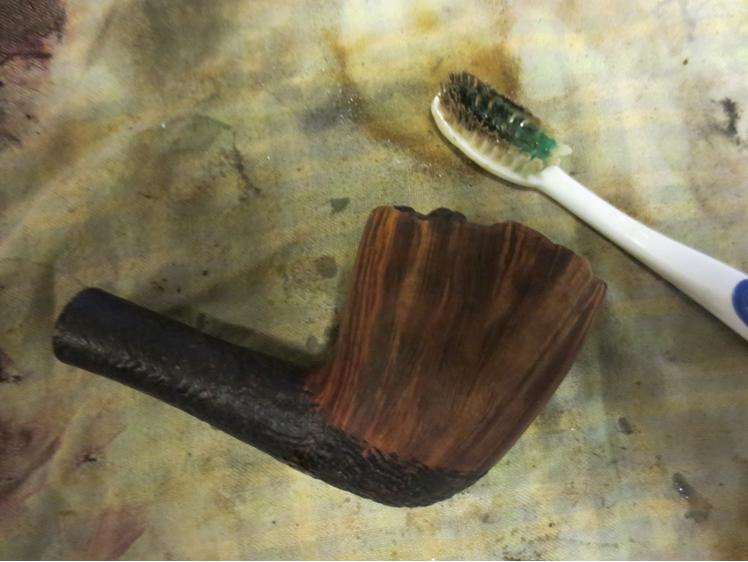
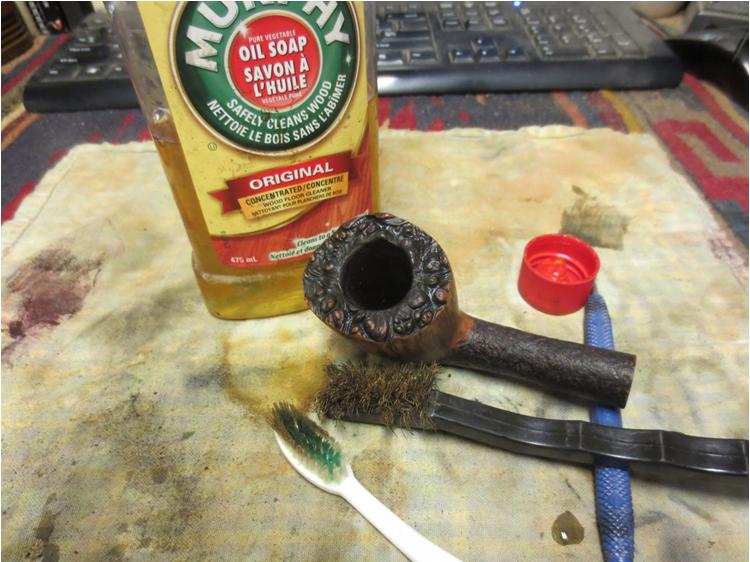
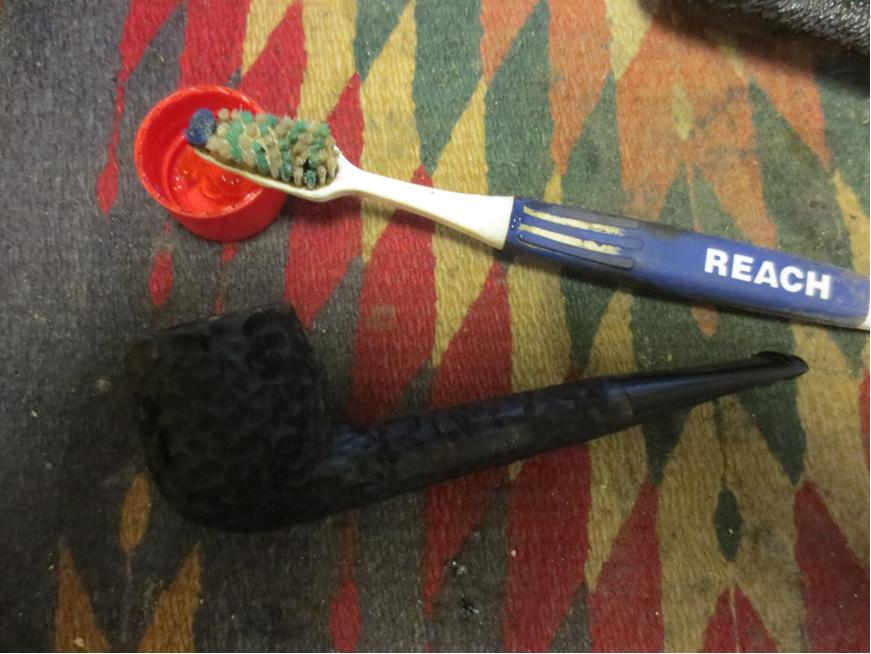
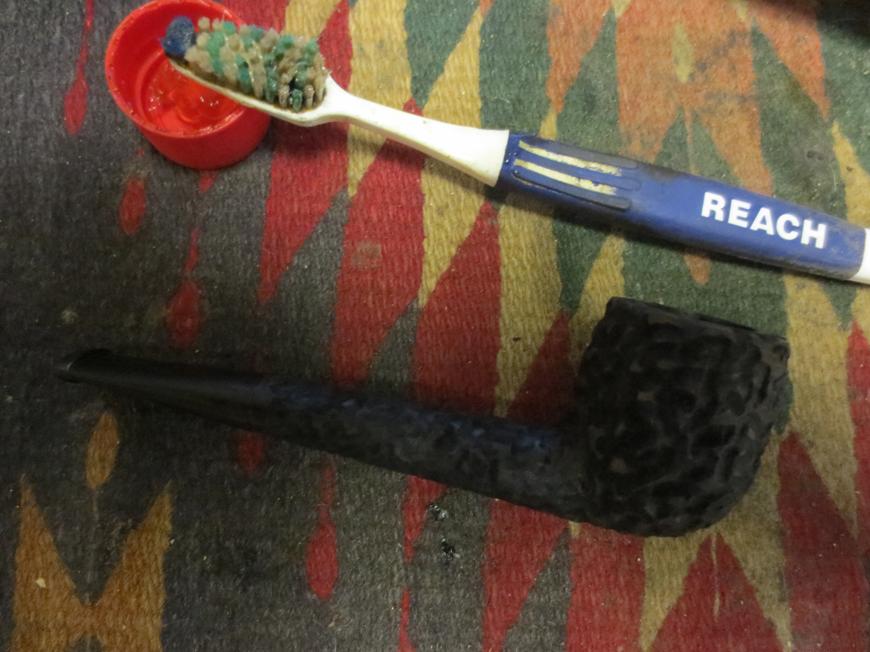
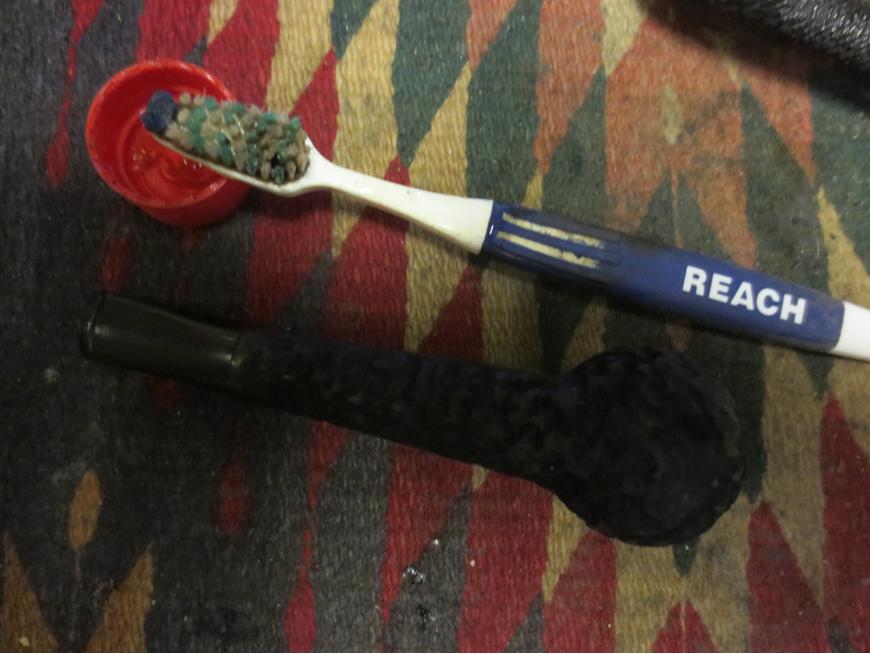
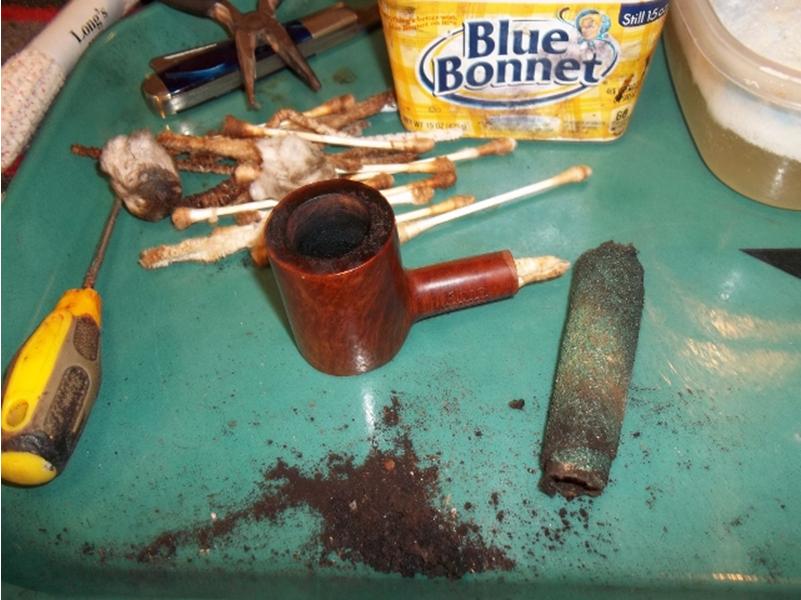
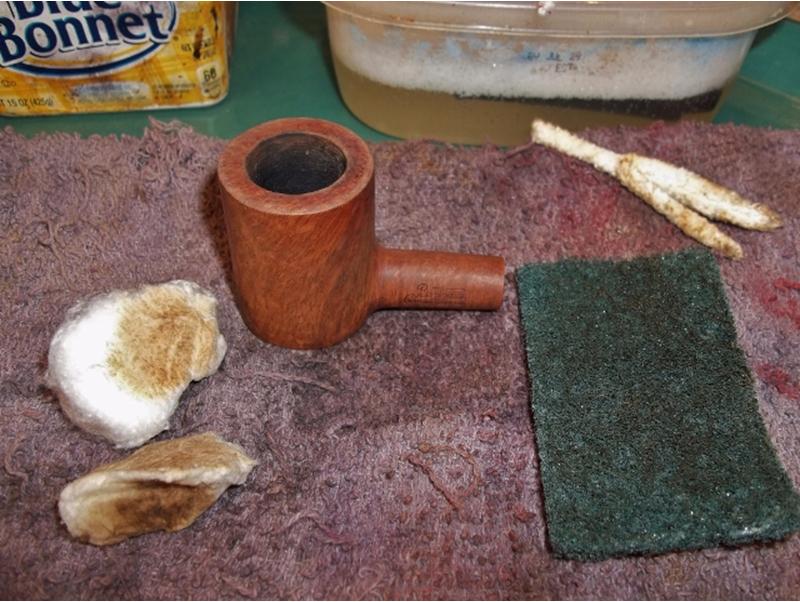
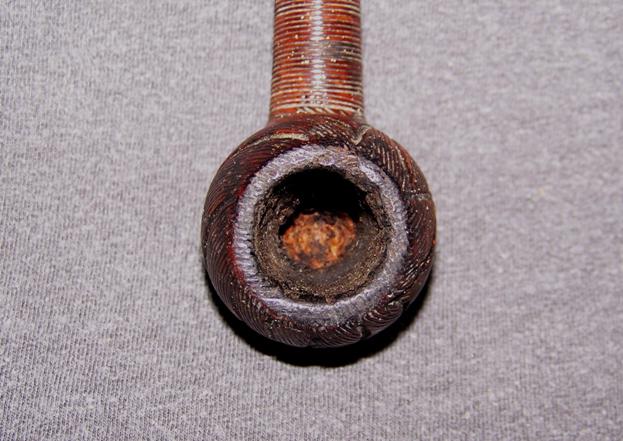
I began by soaking the stem in an alcohol bath to loosen the tars inside and to help lift the crud and paint from the surface. While the stem soaked, I went to work on the stummel with Murphy’s Wood Soap and a soft bristled tooth brush. The dirt and grime came off easily as did most of the paint droplets. I had to employ a soft wood tooth pick to remove more stubborn droplets that were caught in the grooves of the carving.

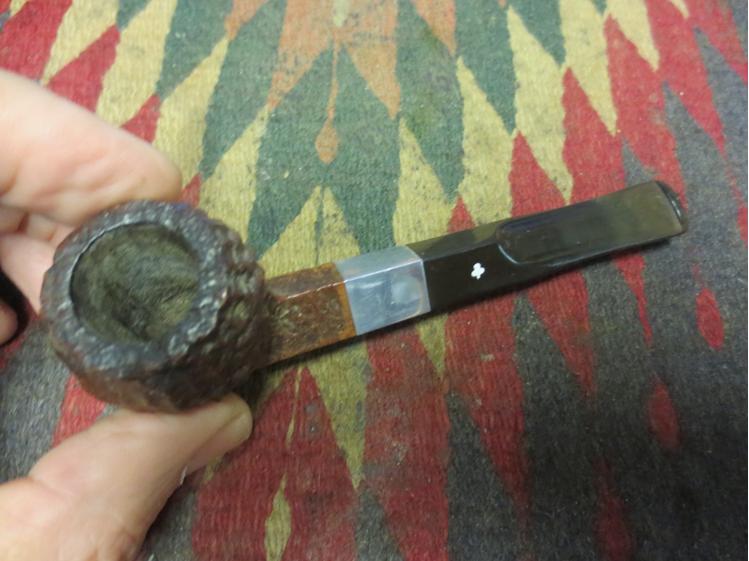
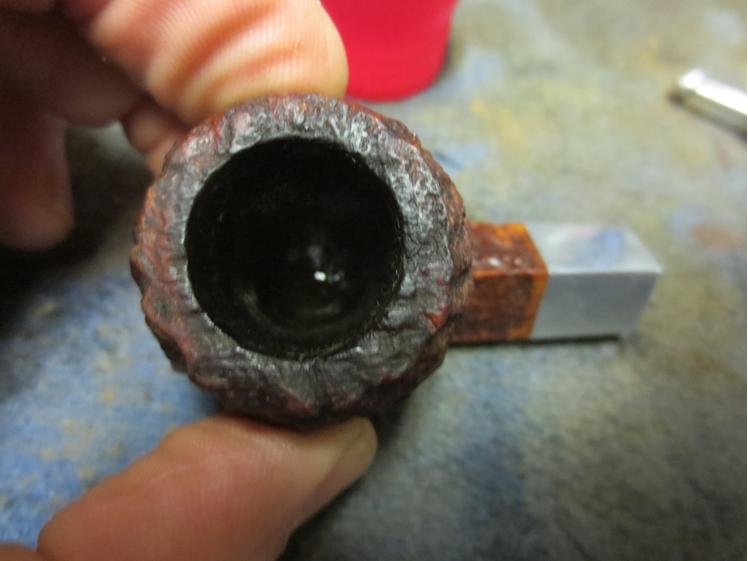
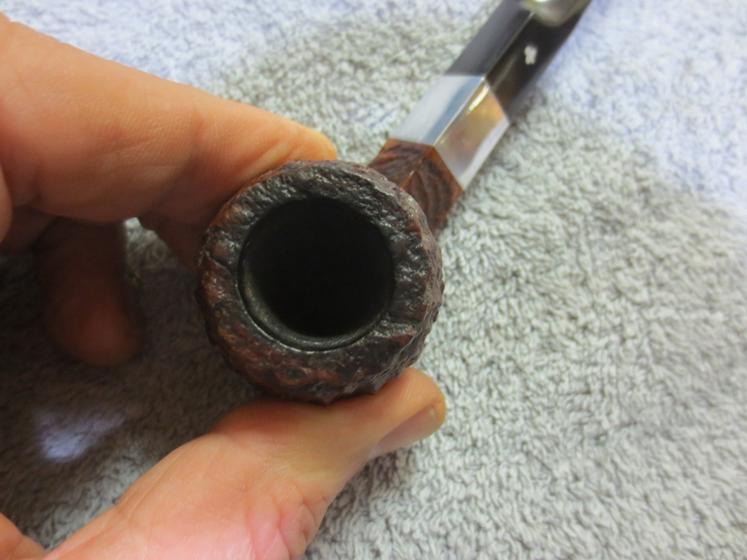
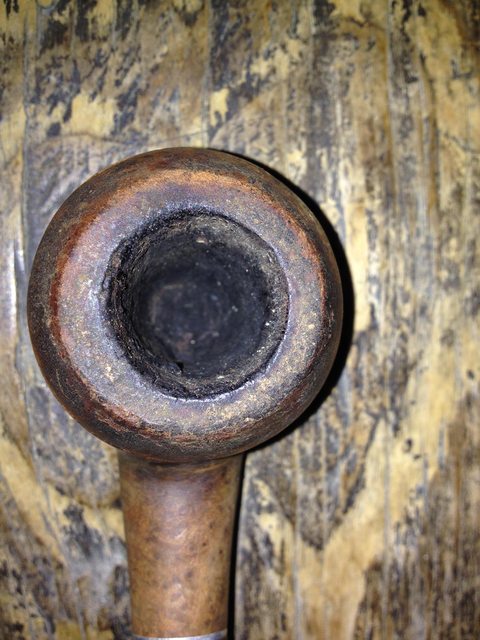
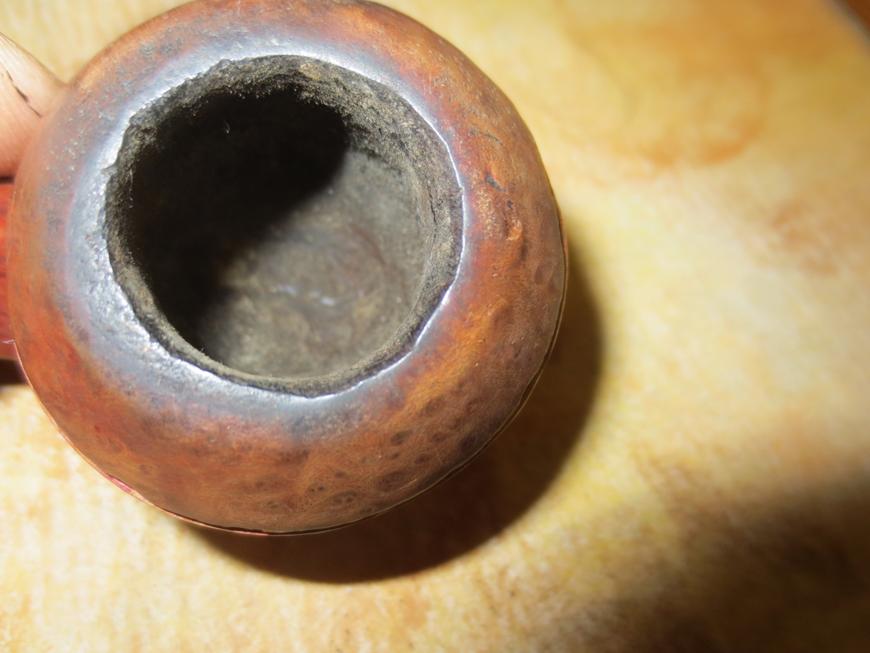
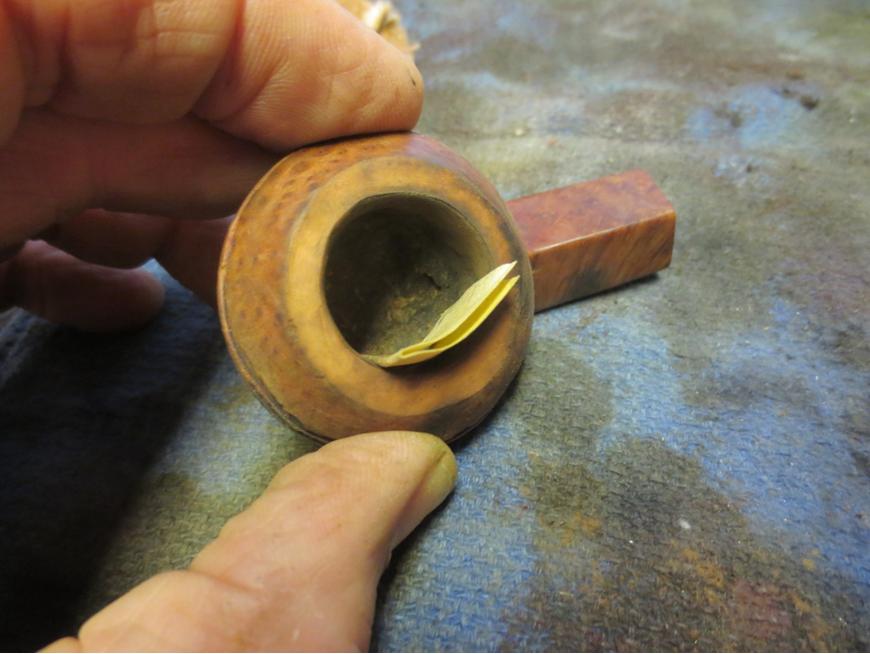
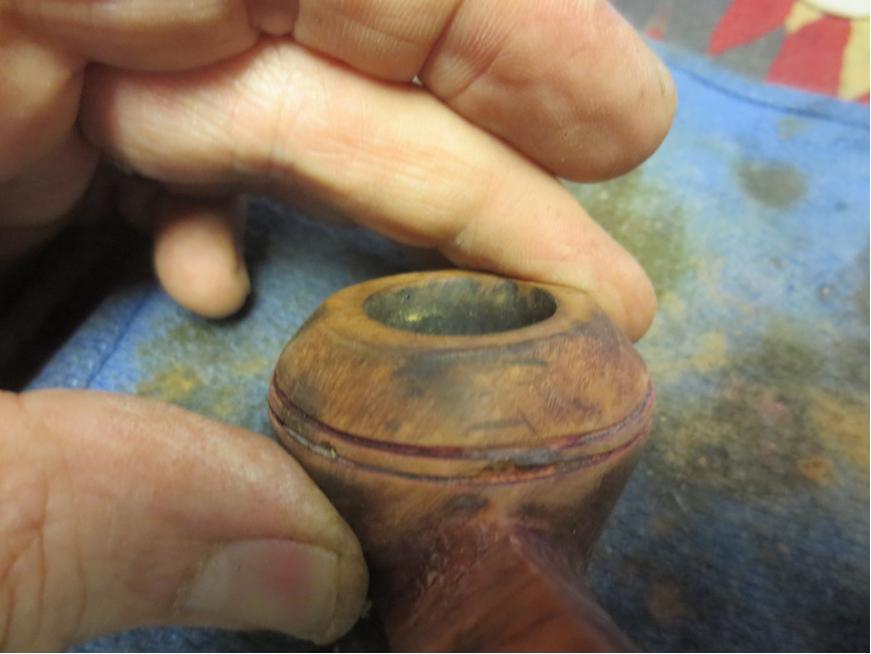
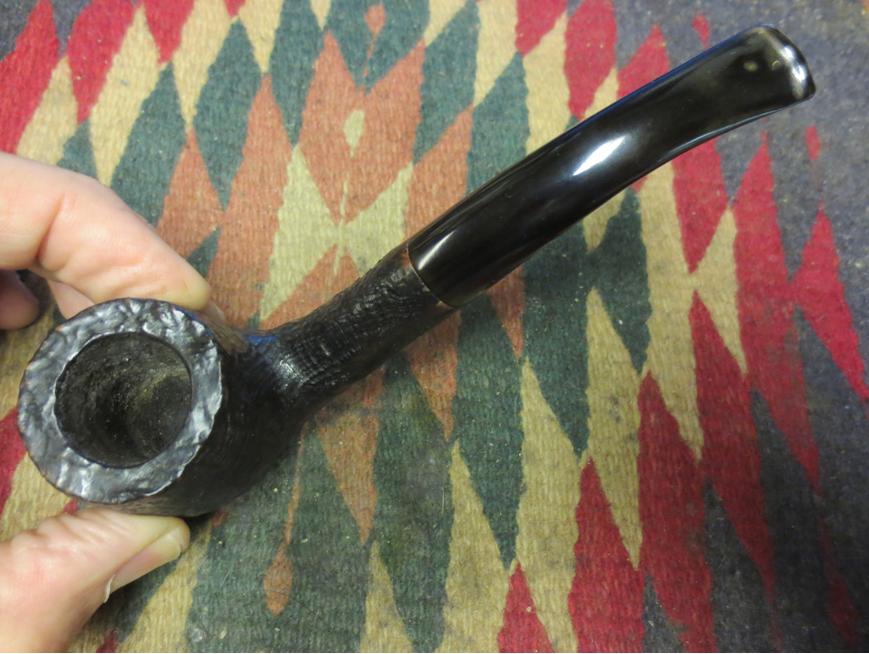
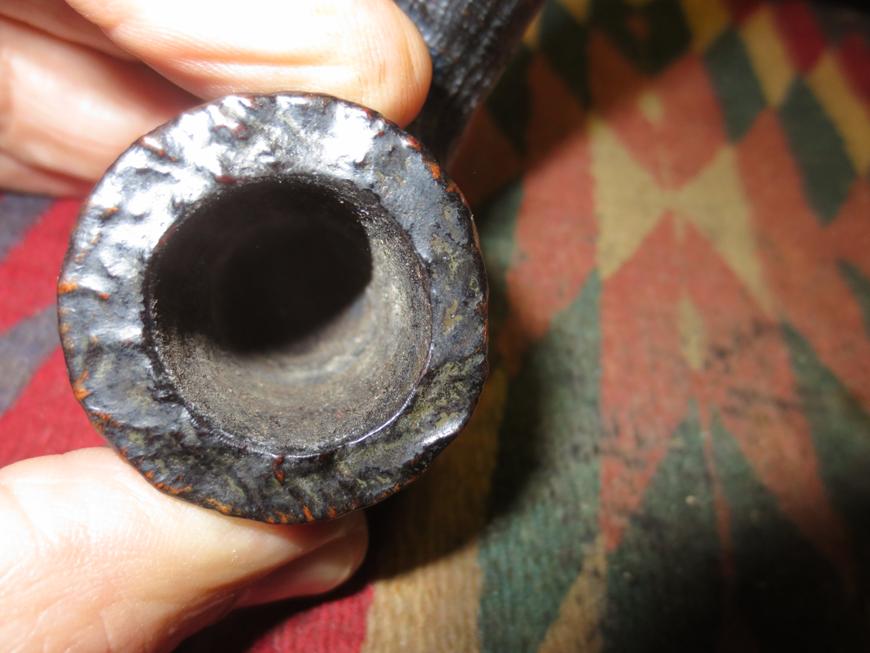
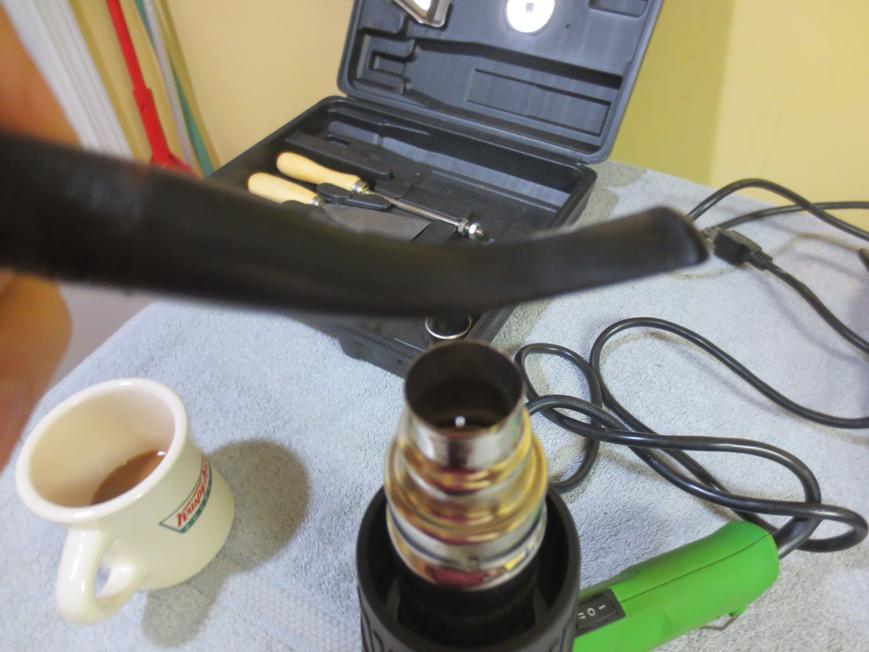
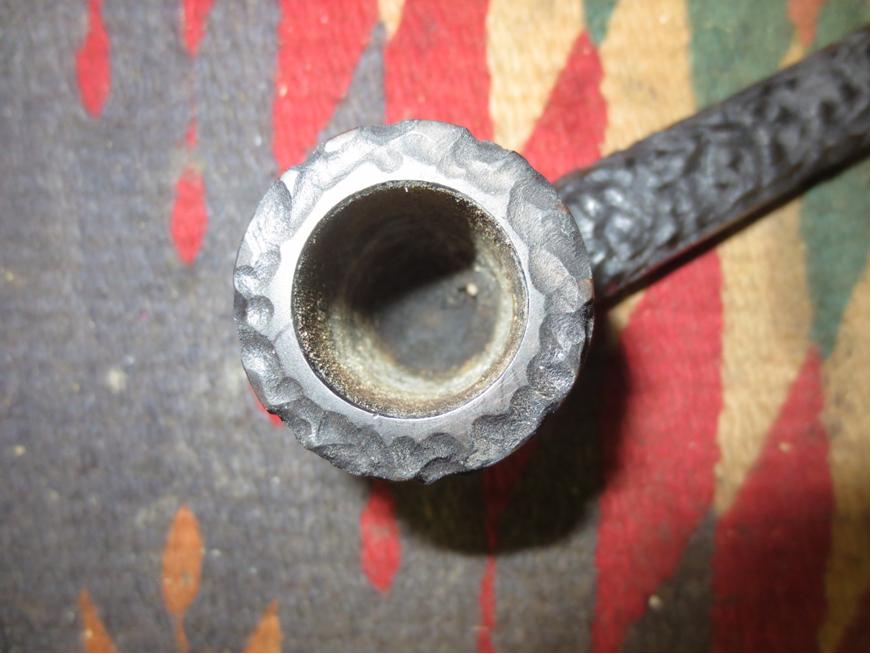
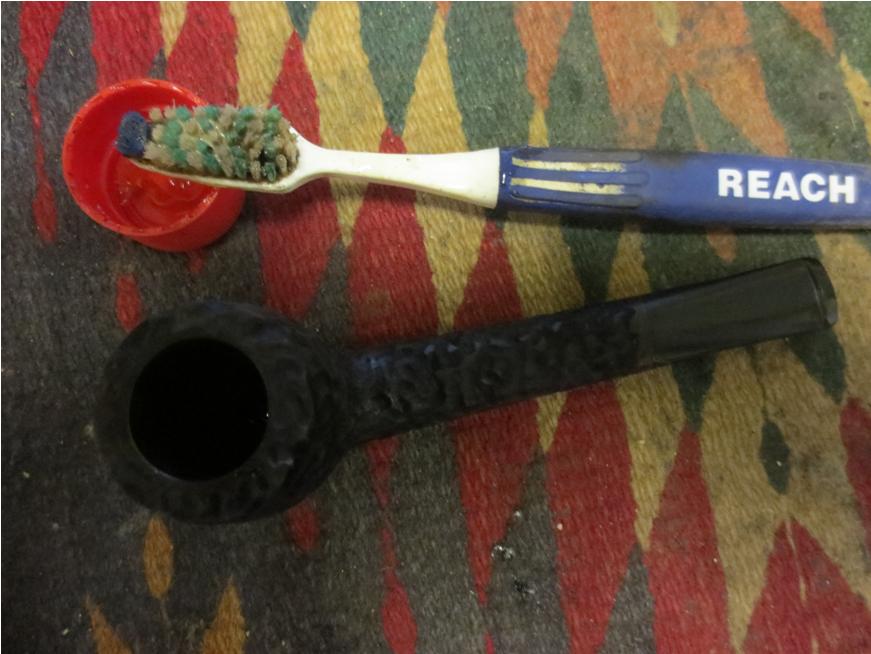
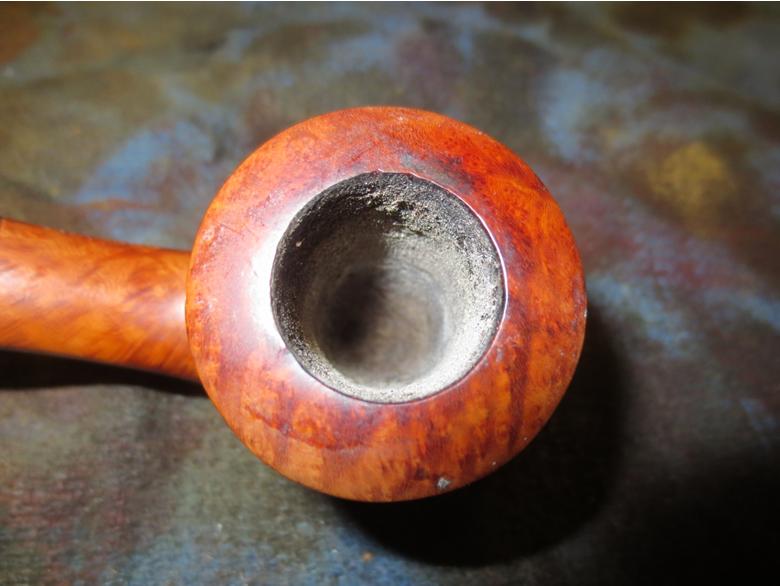
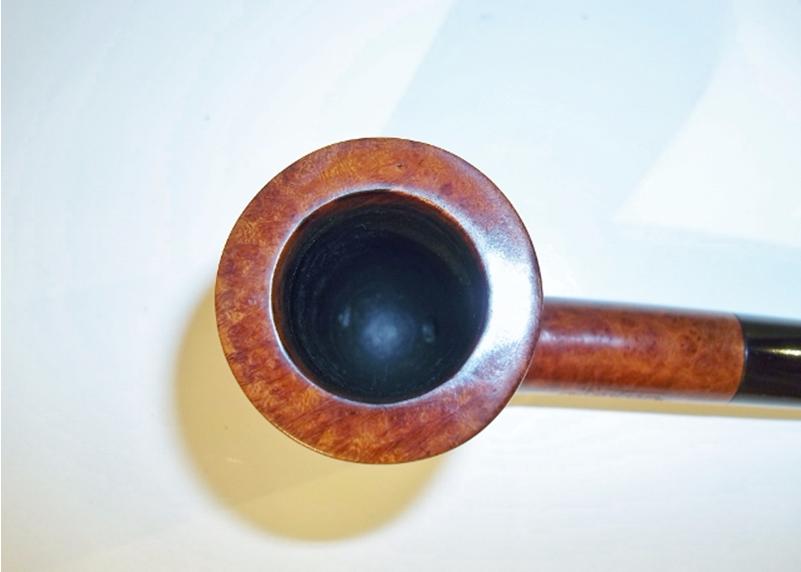
After rinsing the stummel with fresh water – being careful to keep the water out of the bowl and shank – I started reaming out the bowl. Not having a reamer, I use a ½” dowel with a rounded tip wrapped in 40 grit sand paper. This method has worked reasonable well for me on several pipes, even with thick caking.Aaron5

Aaron6 
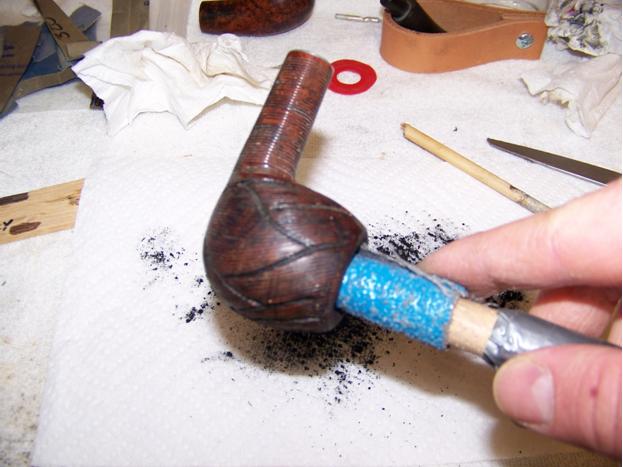
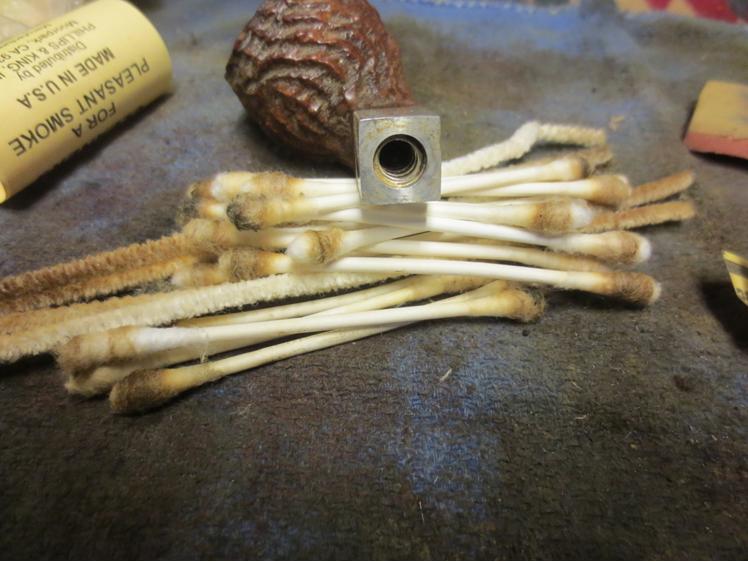
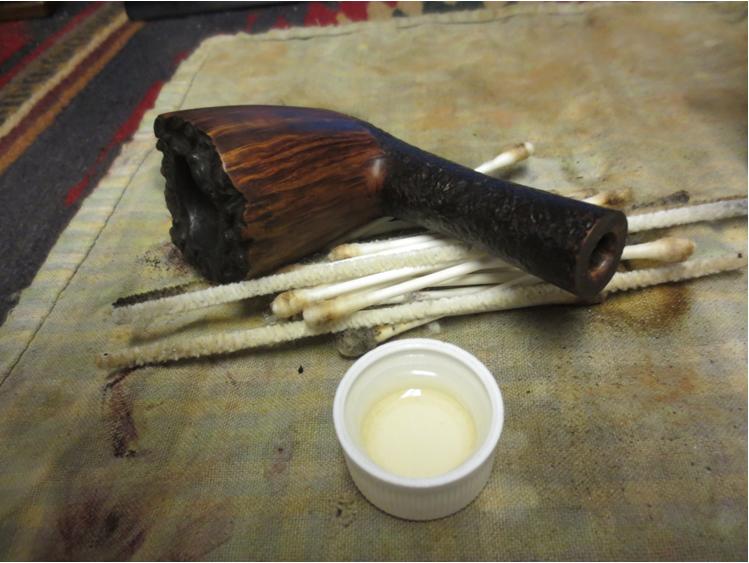
Next, I cleaned the inside of the shank with cotton swaps and isopropyl alcohol. This was a laborious process. The metal sleeve that receives the stinger prevents good access to the inside of the shank. I wanted to preserve as much of the original stain as I could so I choose not to soak the whole stummel in an alcohol bath. So, in an effort to loosen the tar build up, I dripped alcohol into the shank between bouts of swabbing. Eventually the swabs started coming out clean.

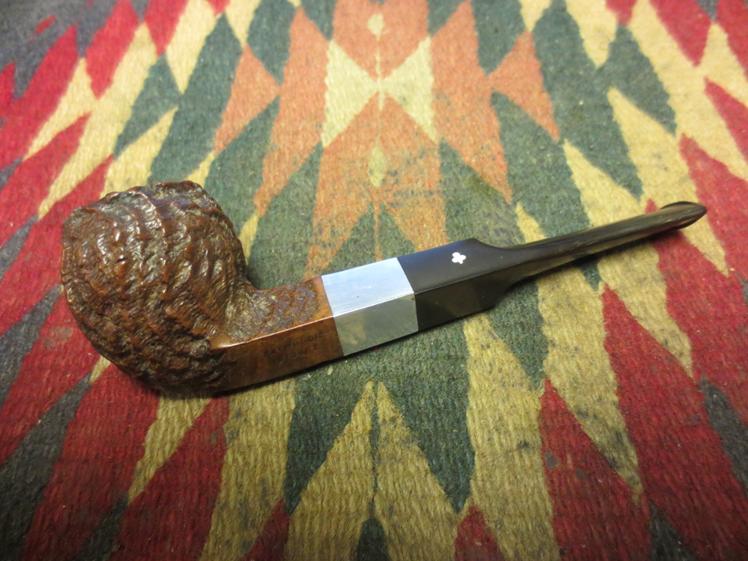
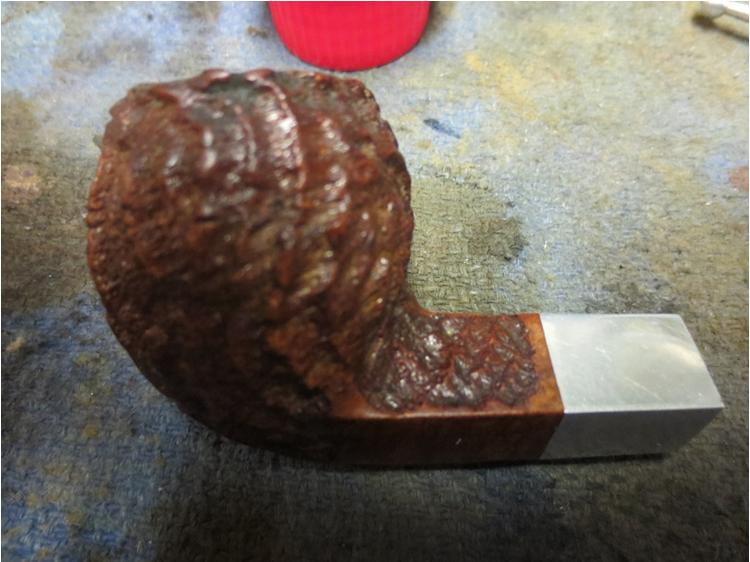
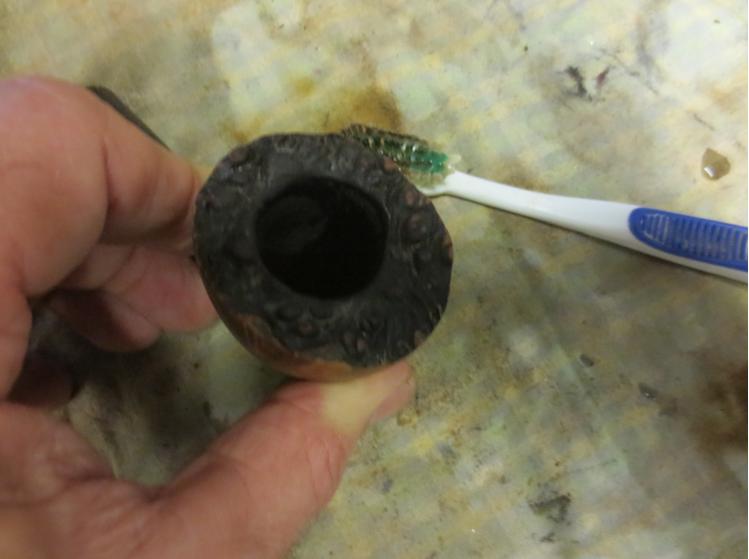
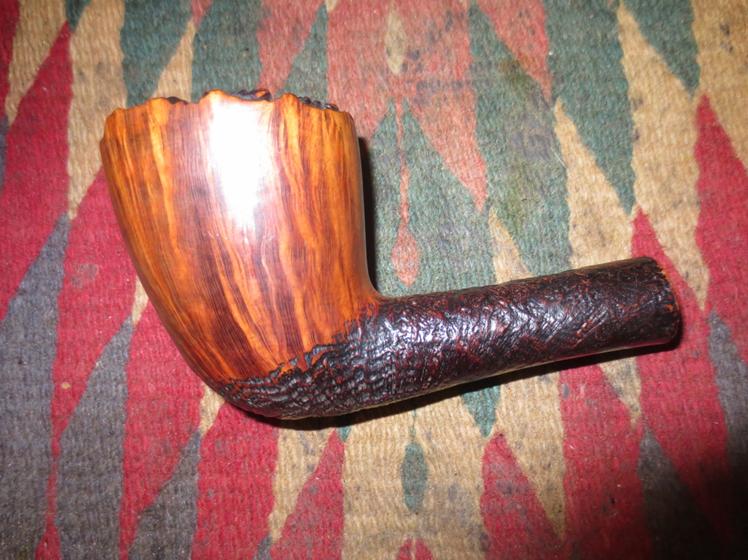
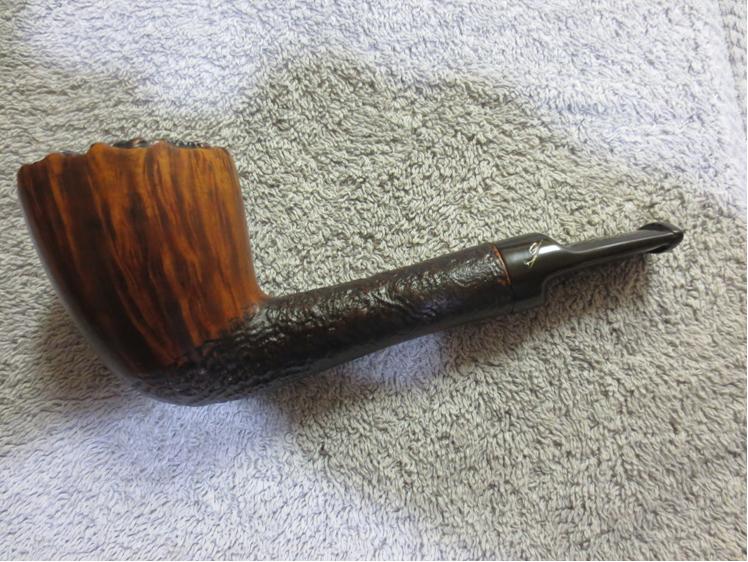
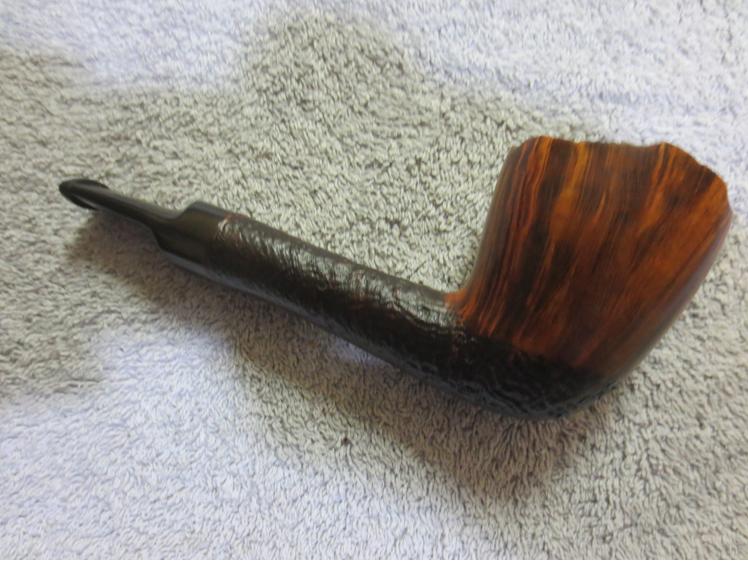
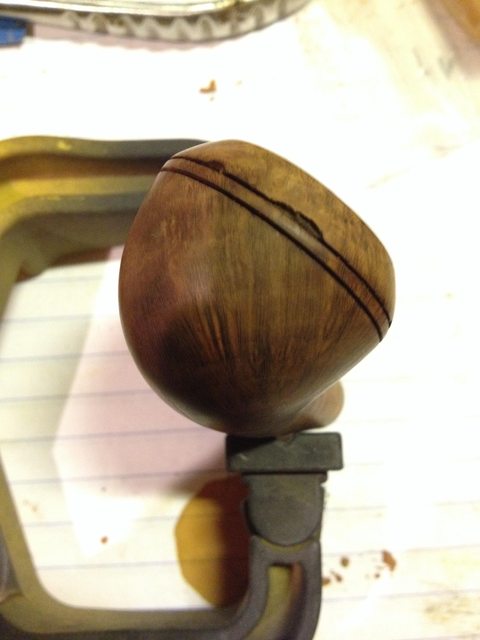
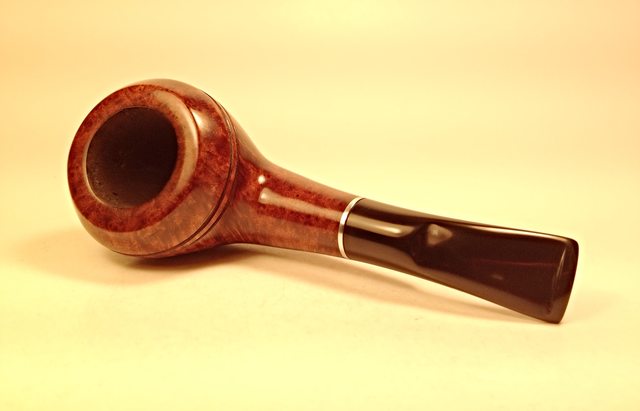
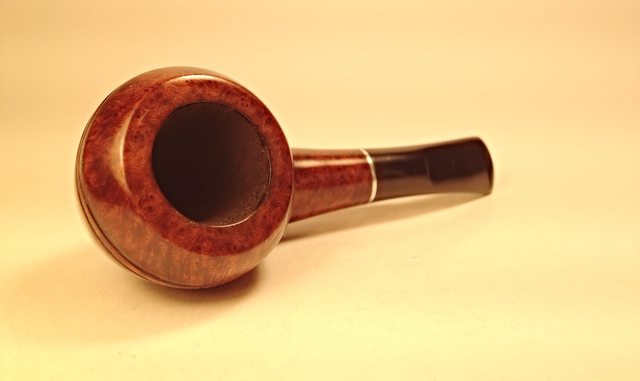
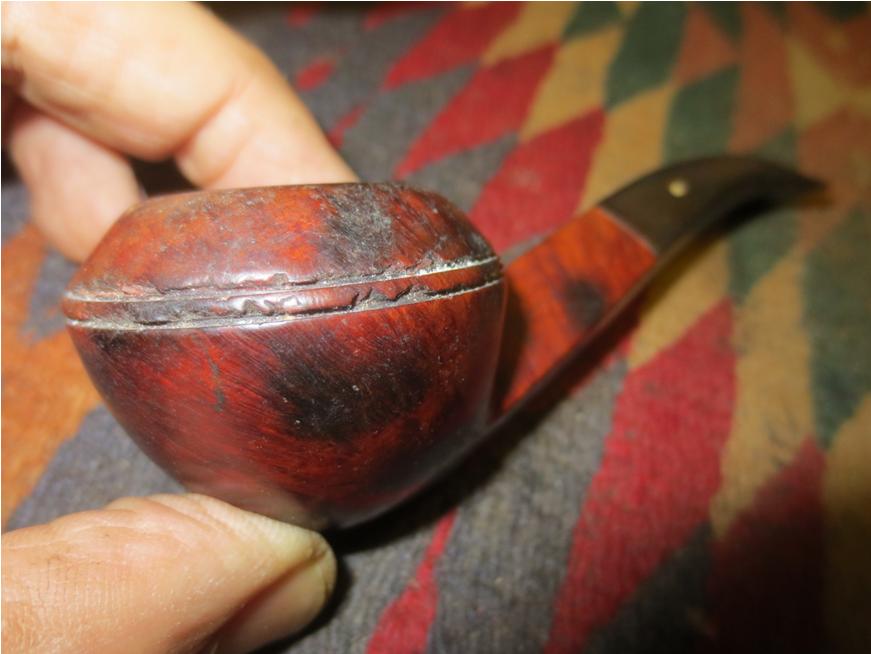
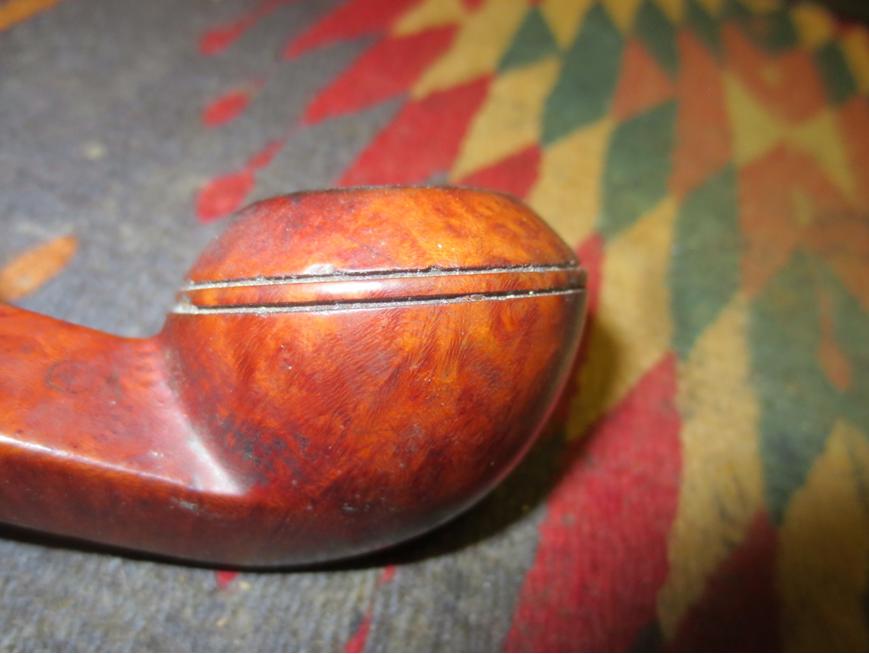
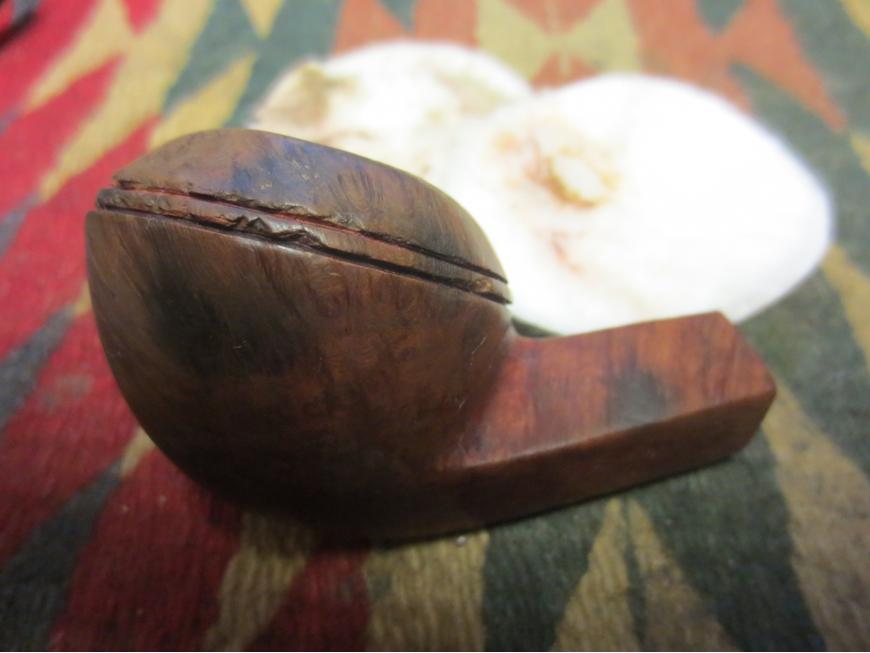
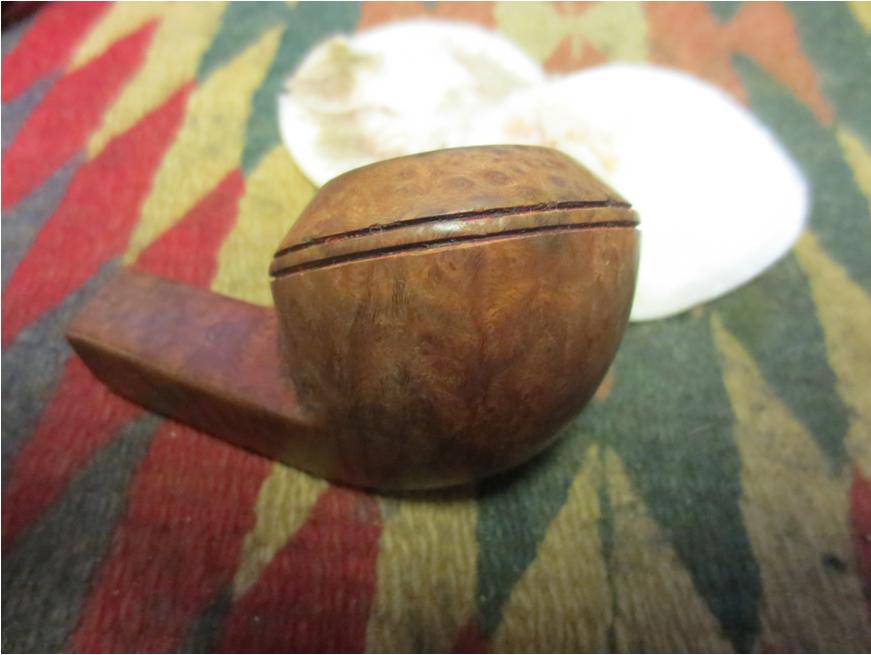
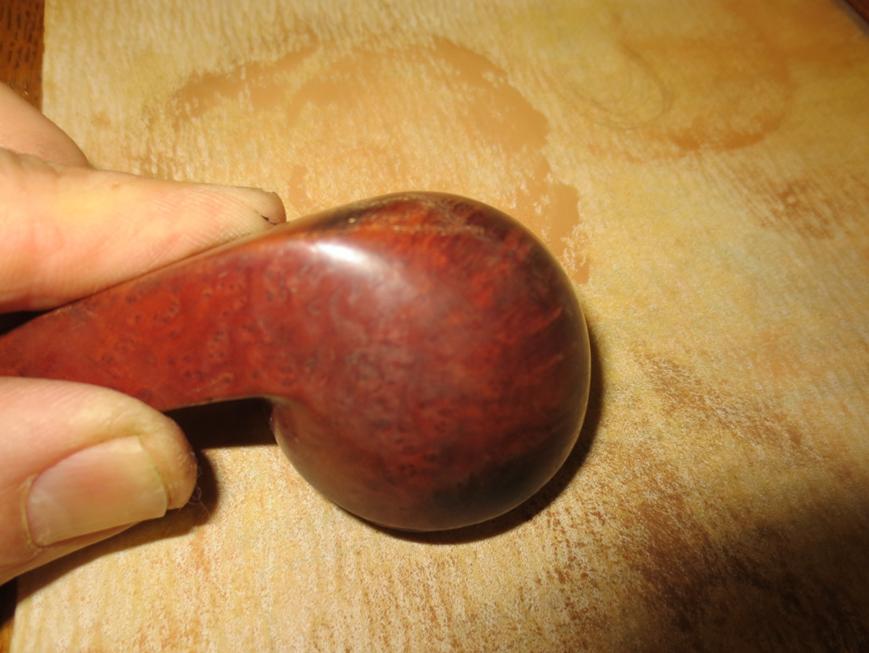
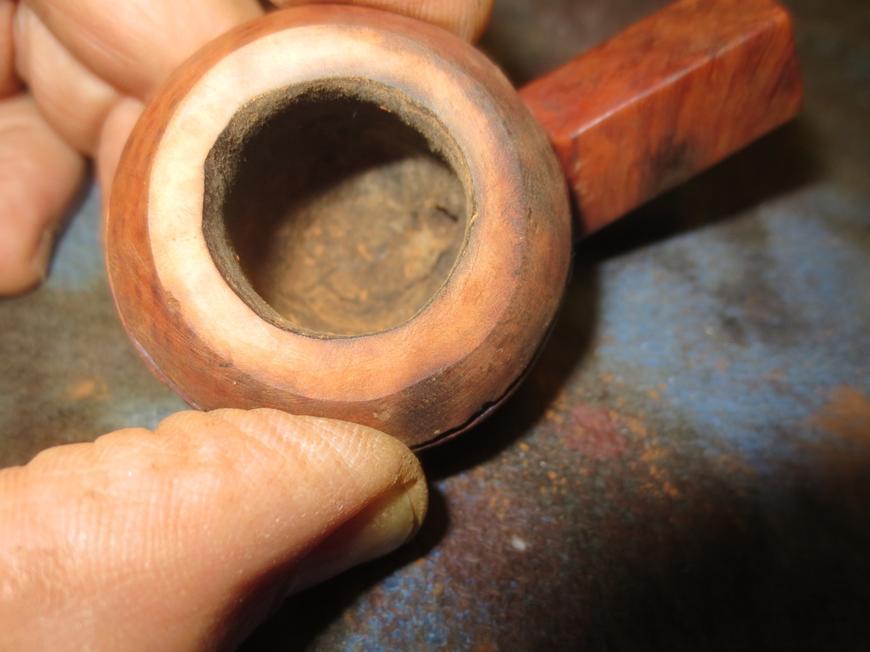
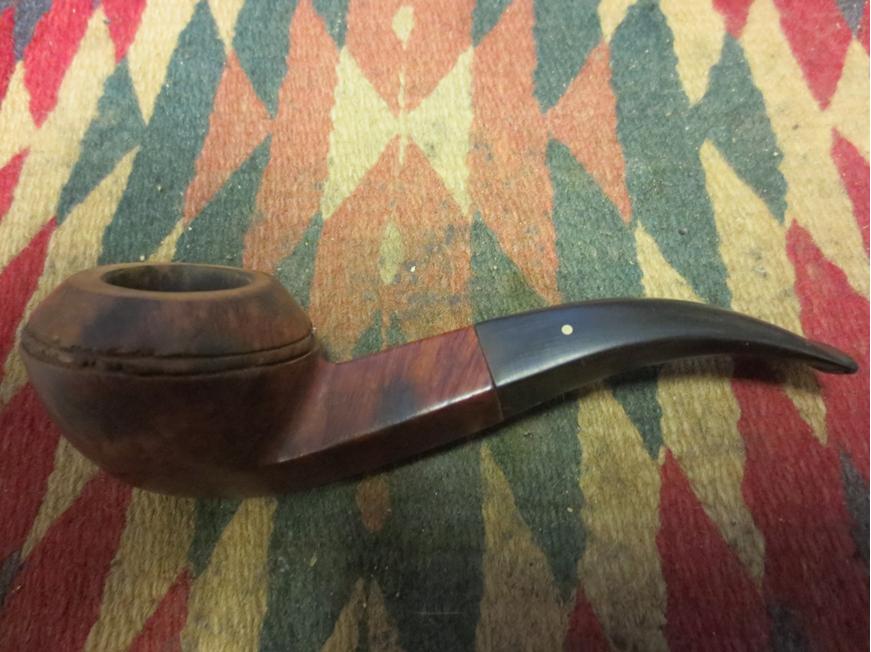
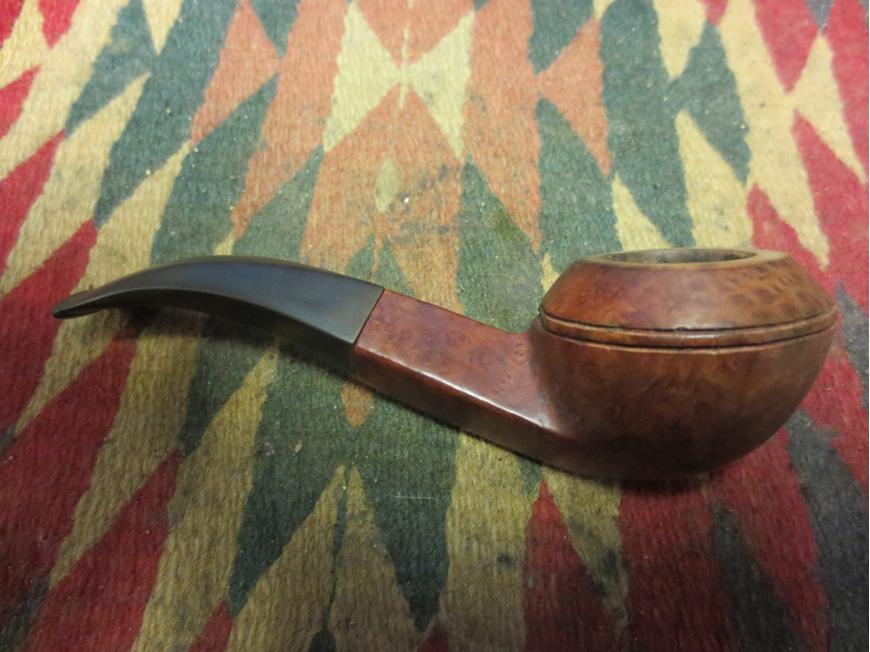
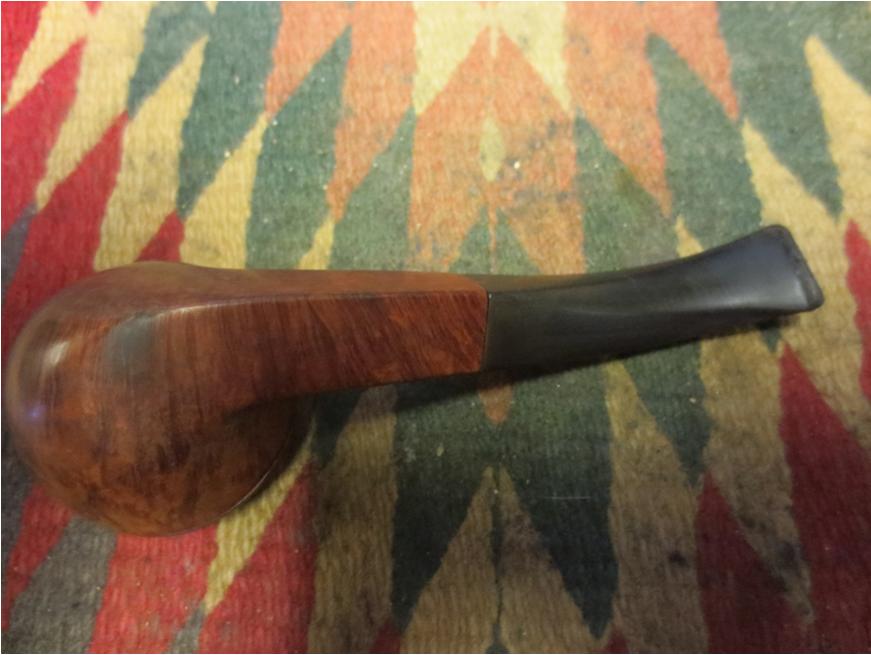
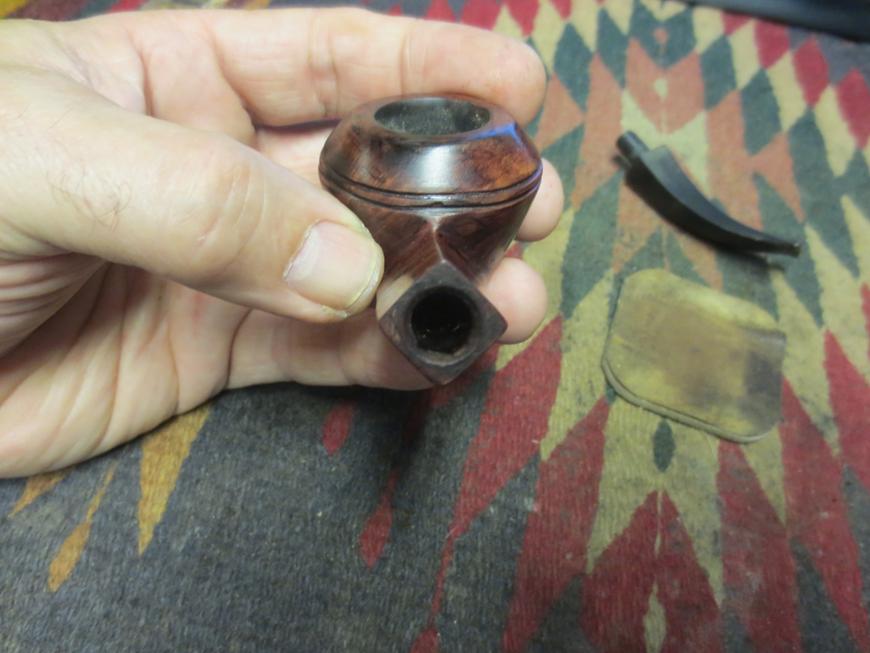
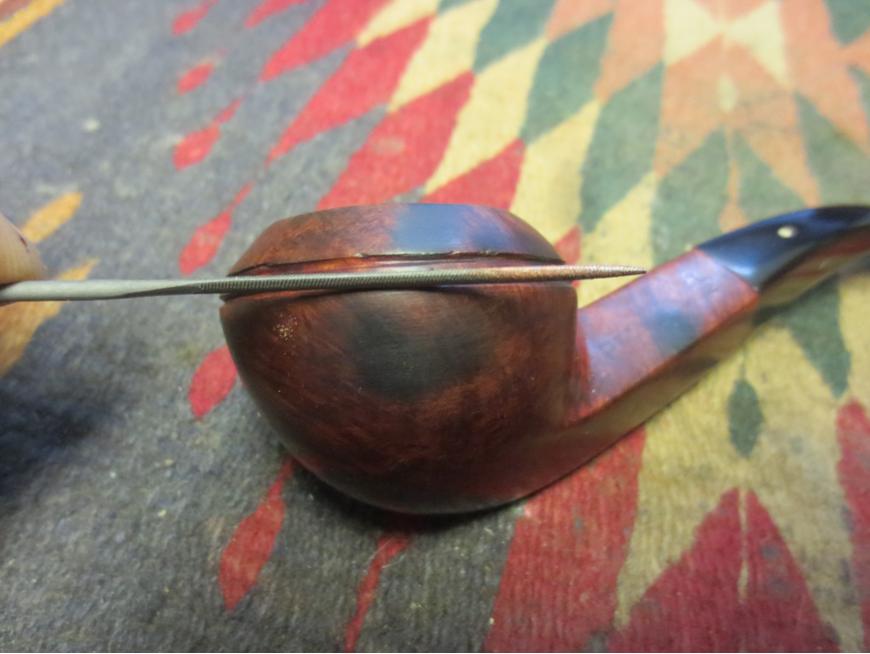
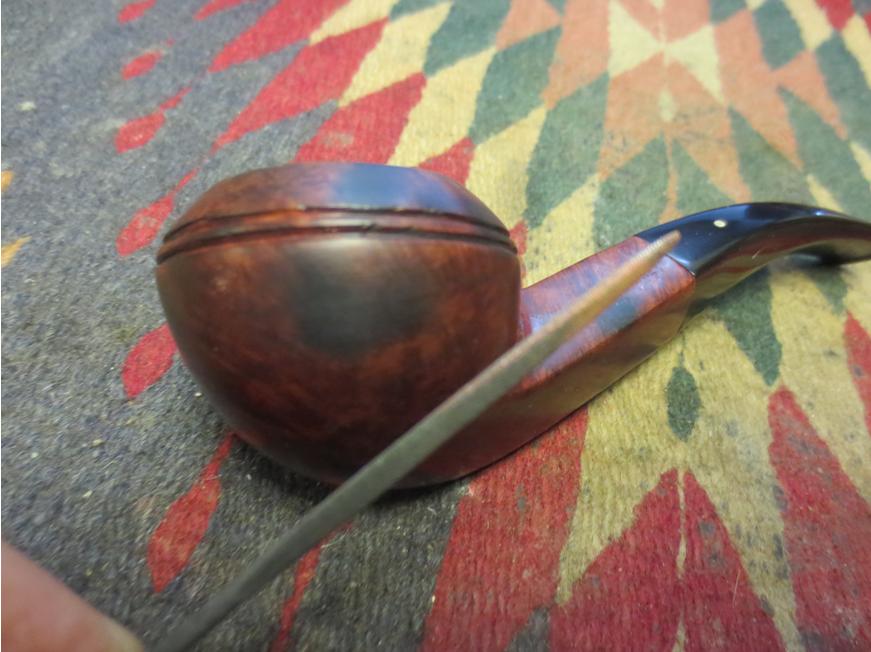
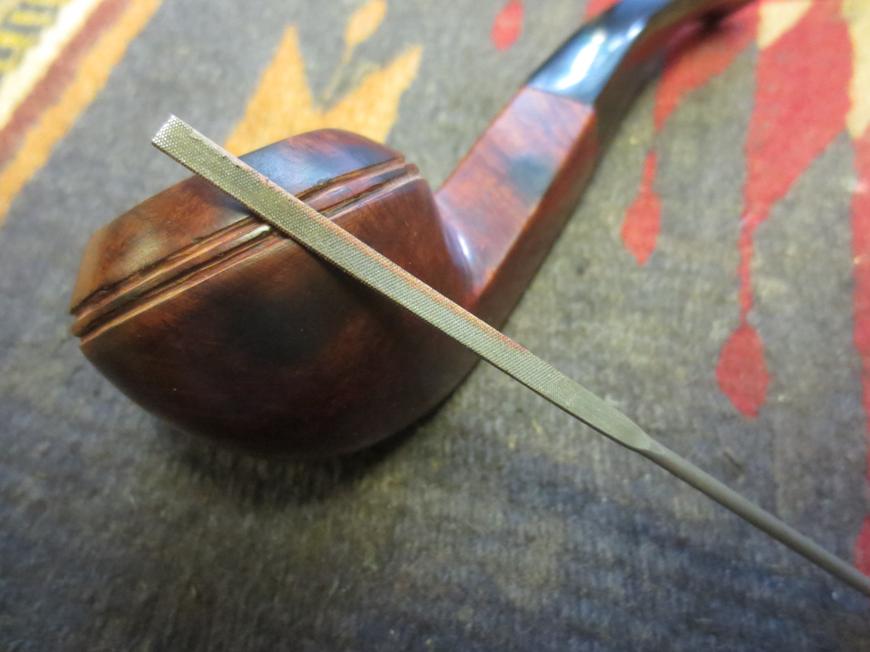
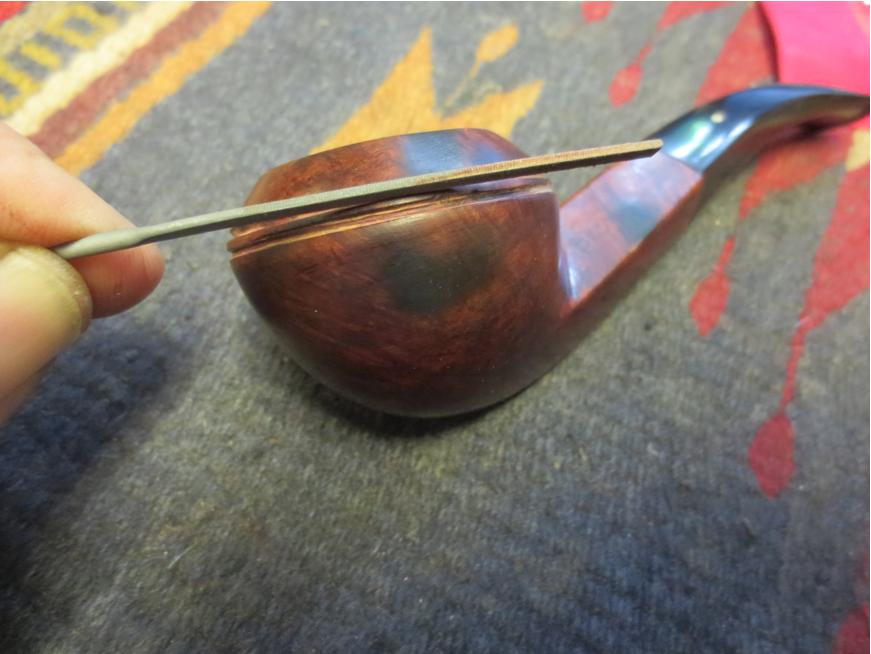
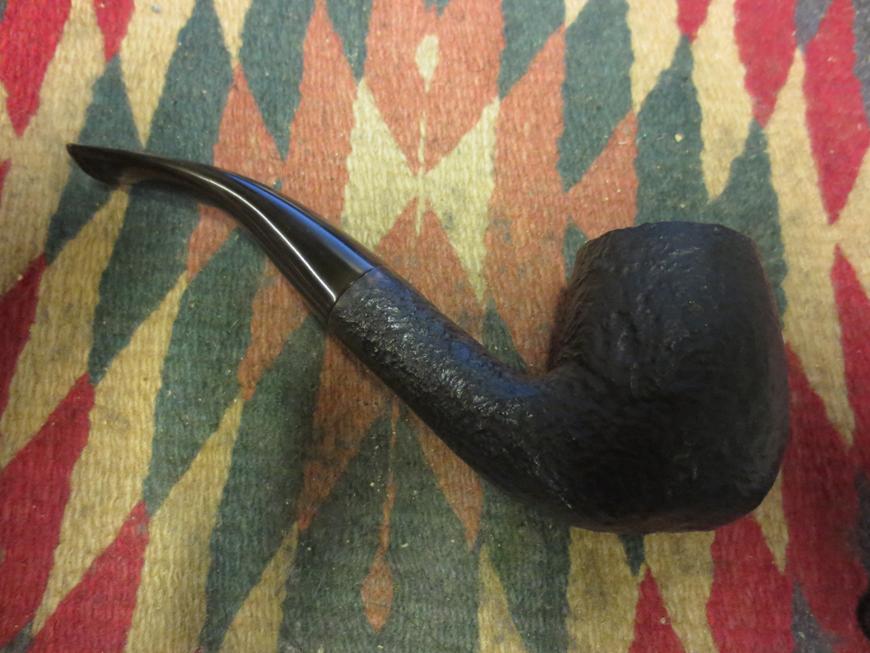
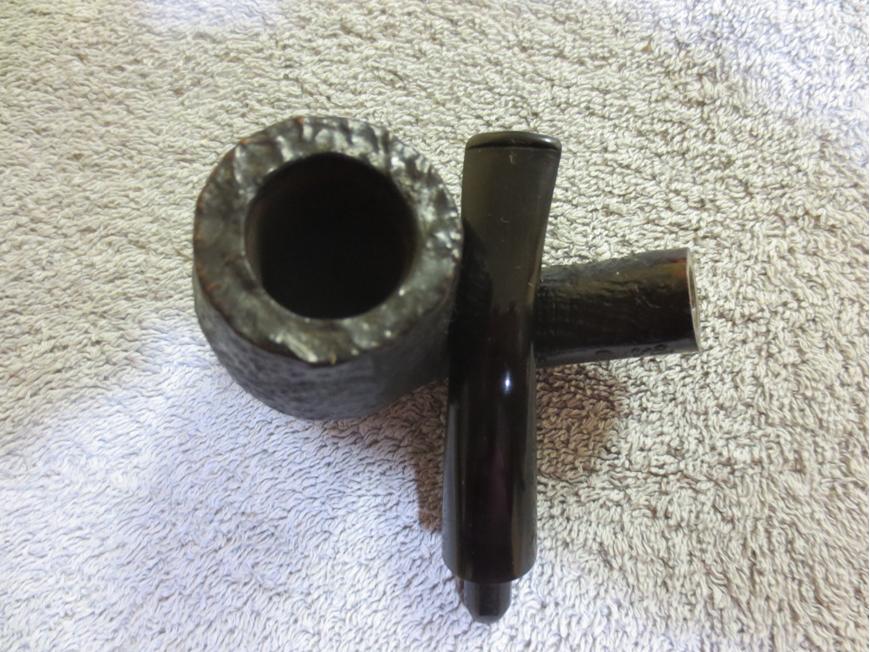
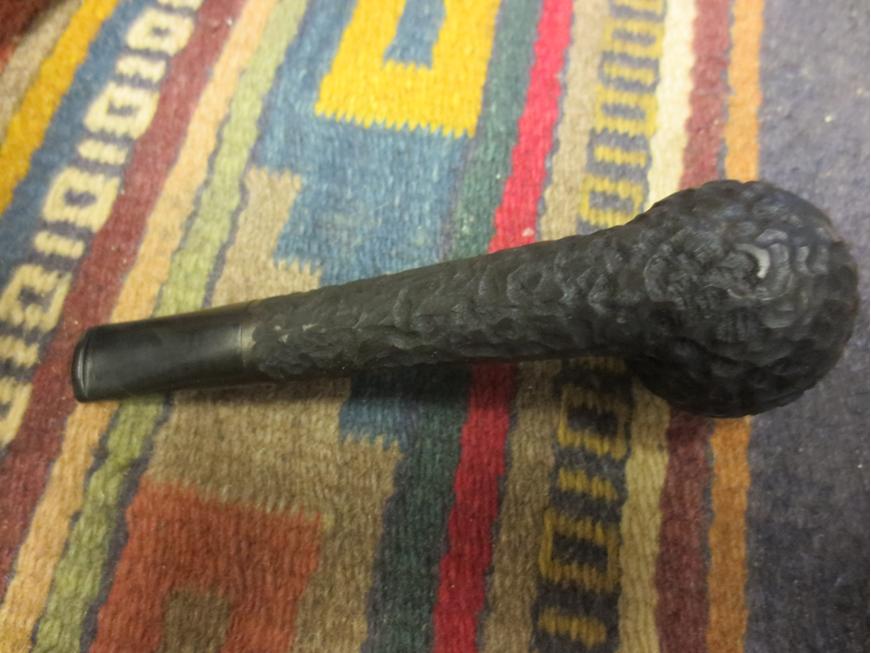
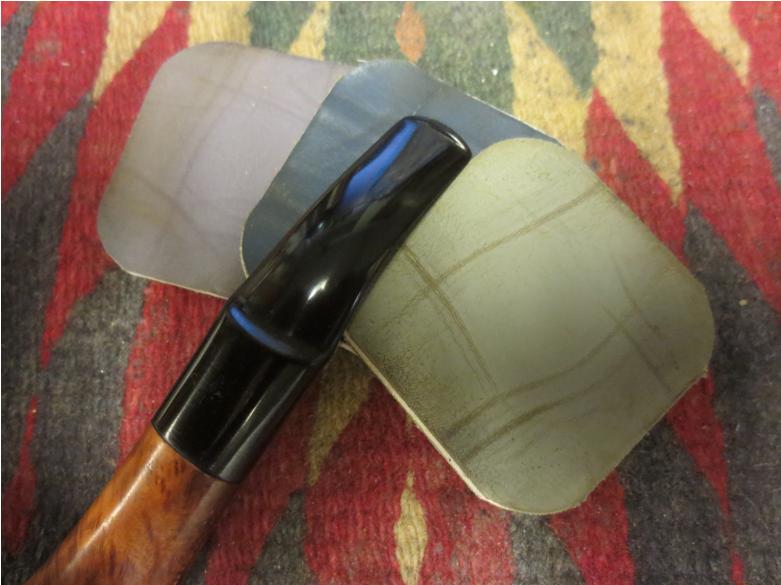
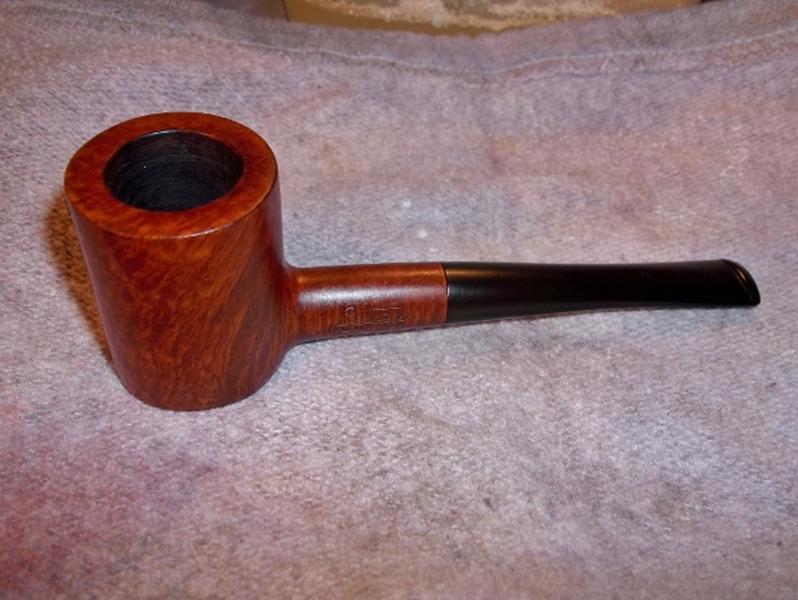
The char around the rim of the bowl was not cleaning up well. I had hoped that I could keep the carved lines on the rim but I made the decision to top the bowl and finish the pipe with a smooth clean rim. I freshened up the stain with a coat of light brown Feibing’s leather stain and flamed the stain to set the color.

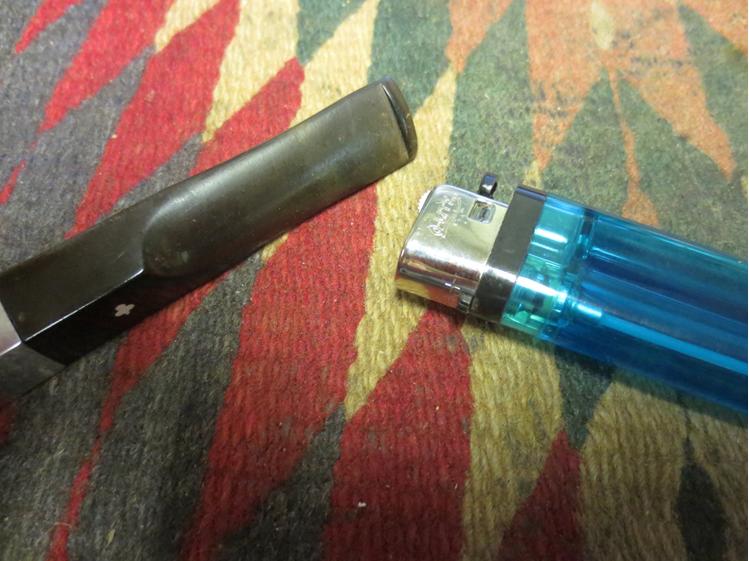
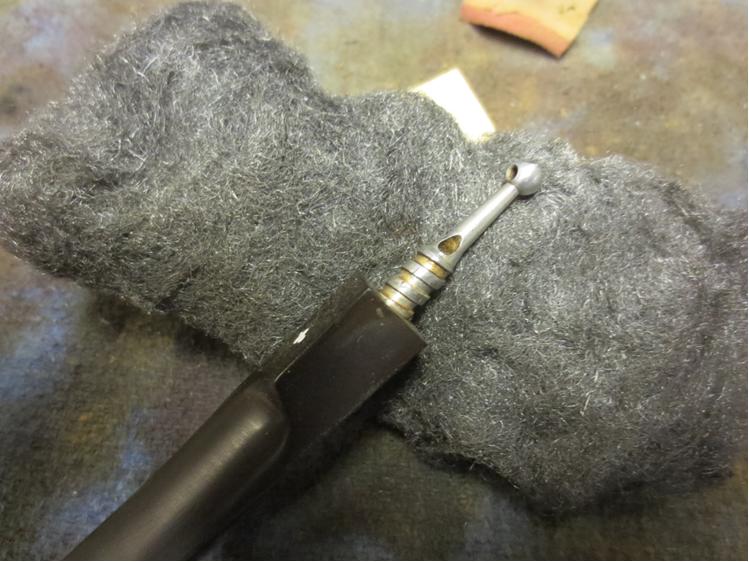
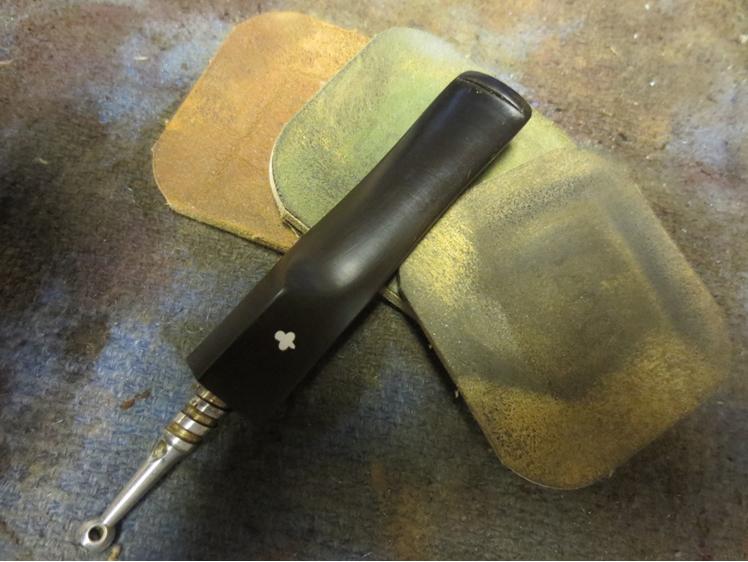
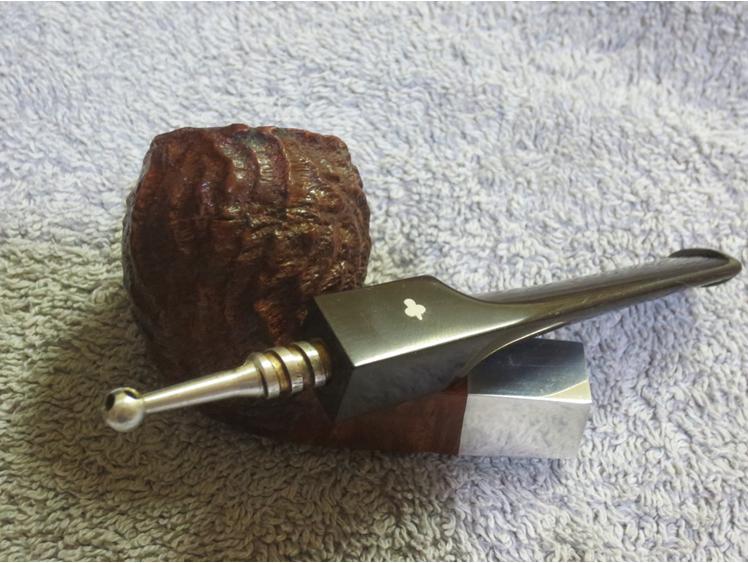
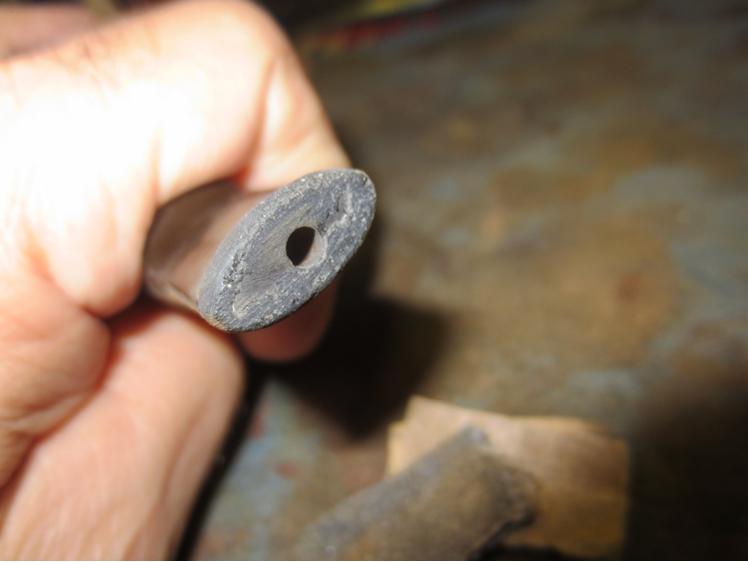
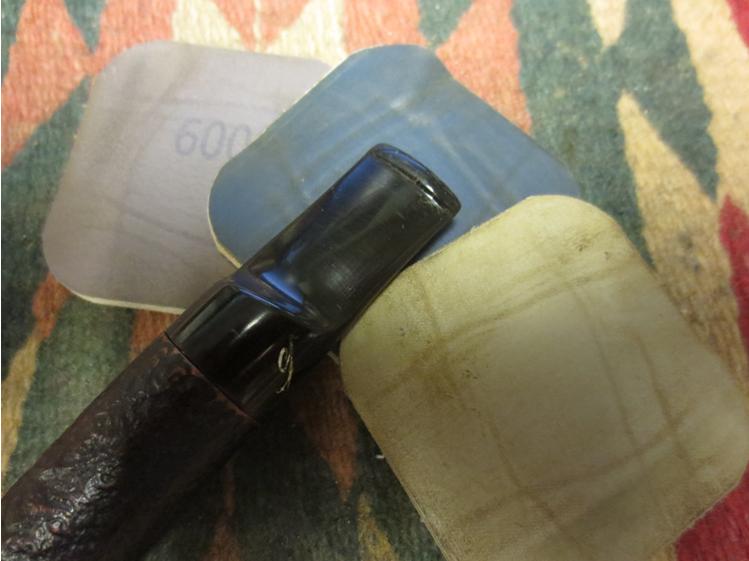
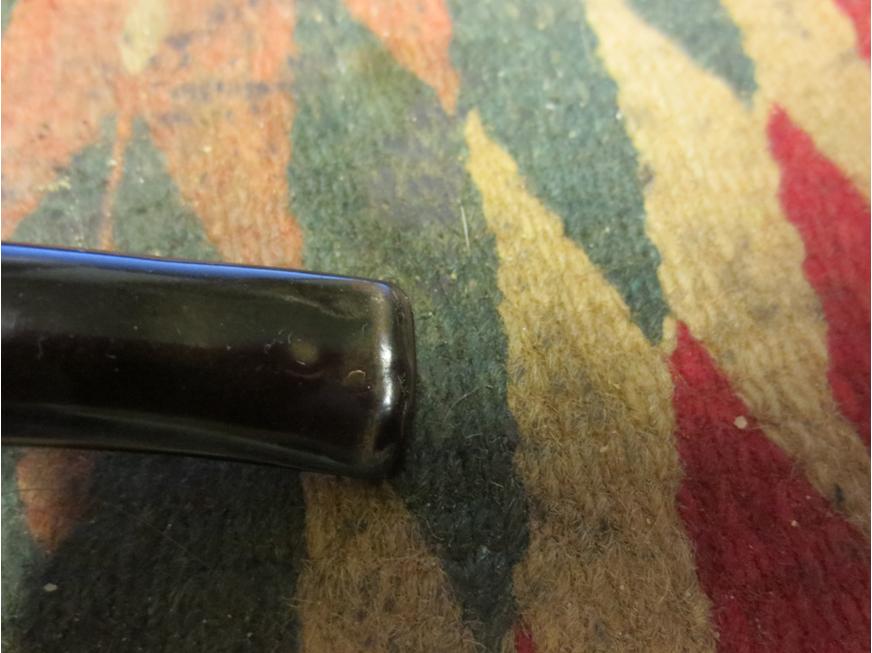
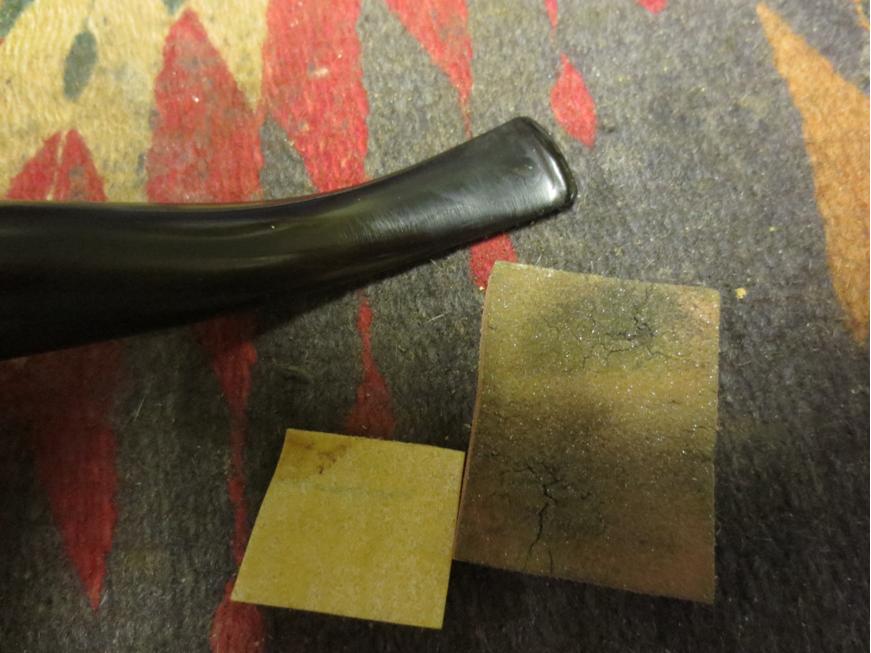
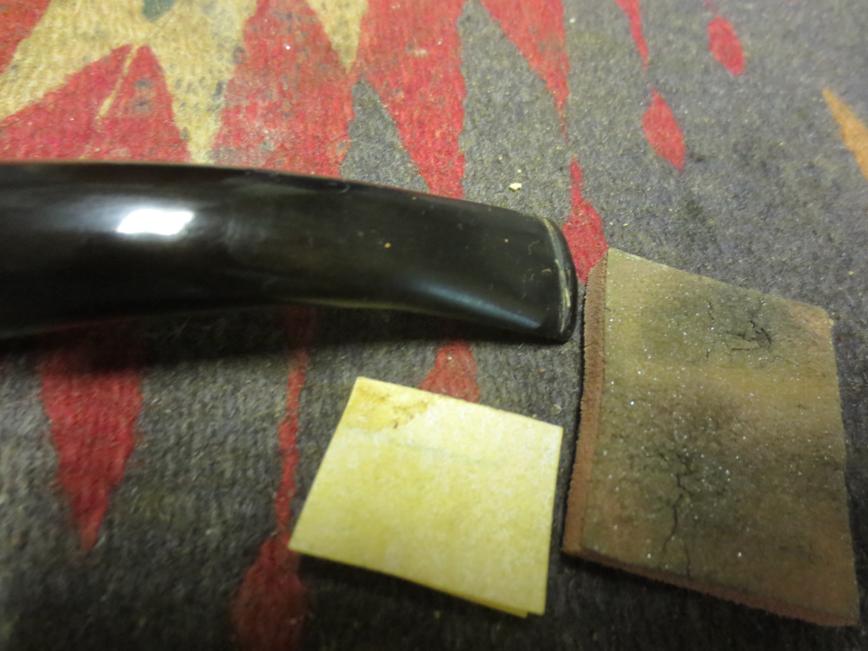
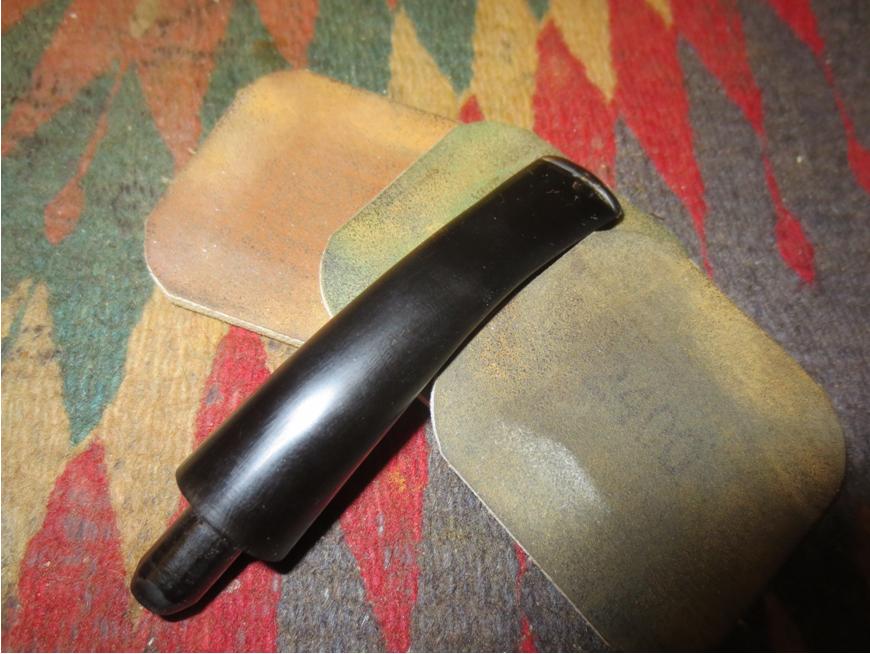
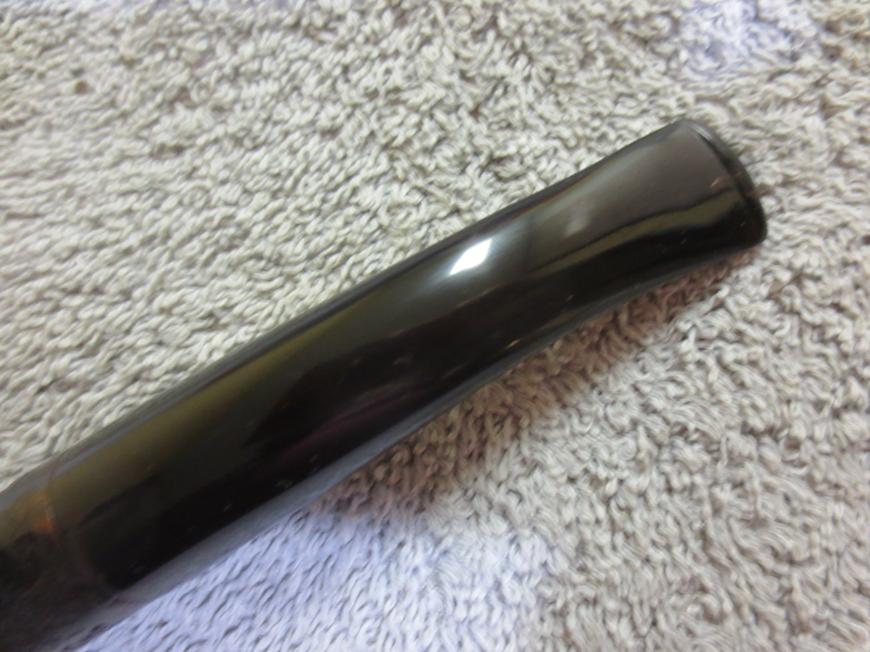
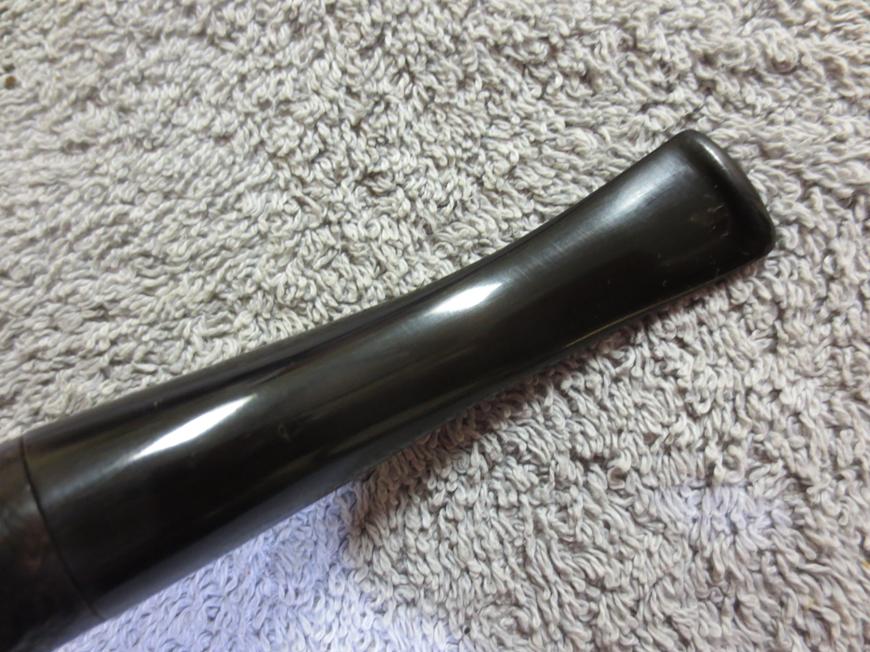
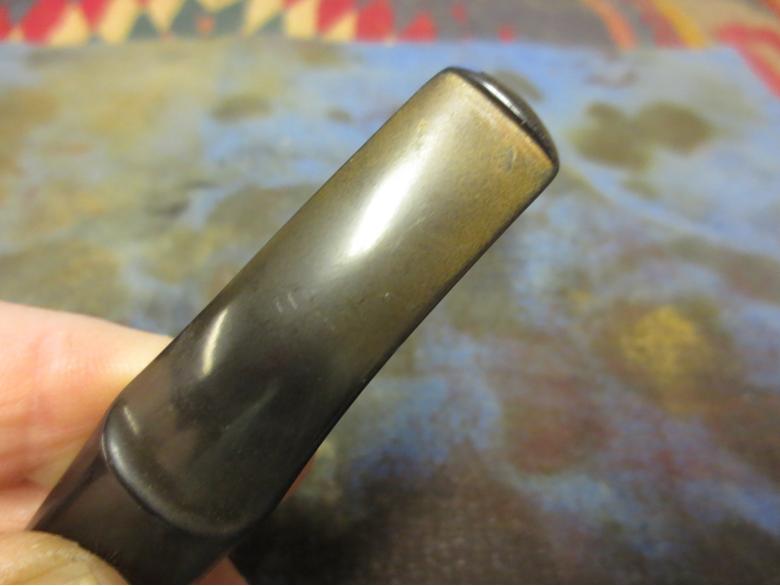
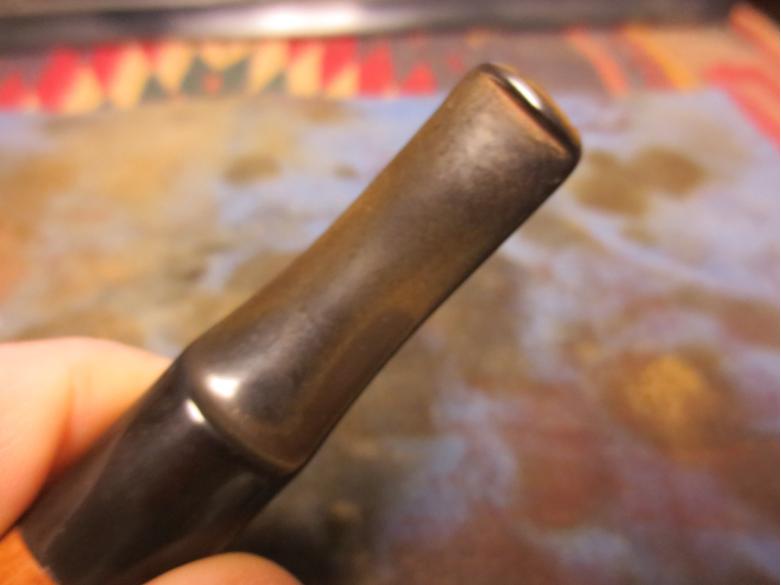
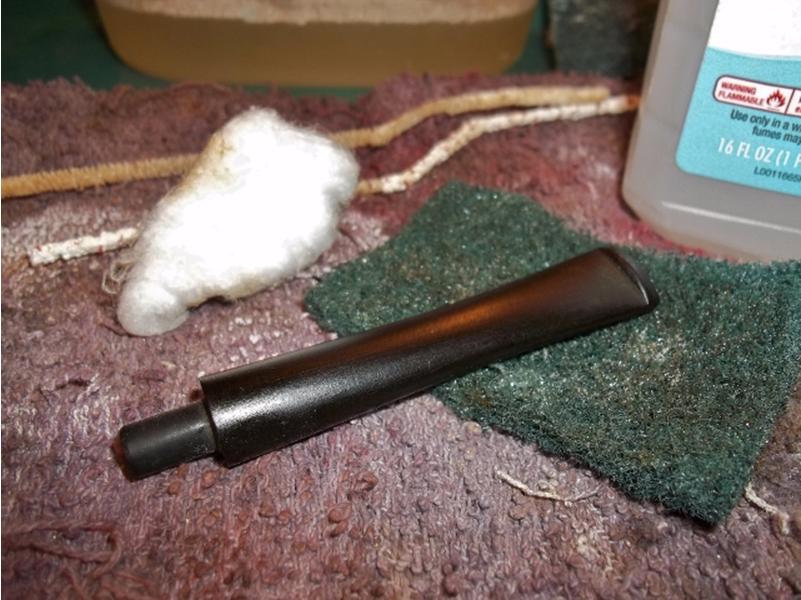
Returning to the stem, I found that the alcohol bath succeed in loosening the tars inside and few passes with pipe cleaners got it clean. I was able to pass a cleaner from the hole in the stinger and out through the button without and troubles. I lightly hit the outside of the stem with 220 grit sand paper to remove the remaining foreign material and then cleaned the stinger with 0000 steel wool. I addressed the minor tooth marks by lightly flaming them with a lighter to raise the vulcanite then finished them off with the 220 grit paper.

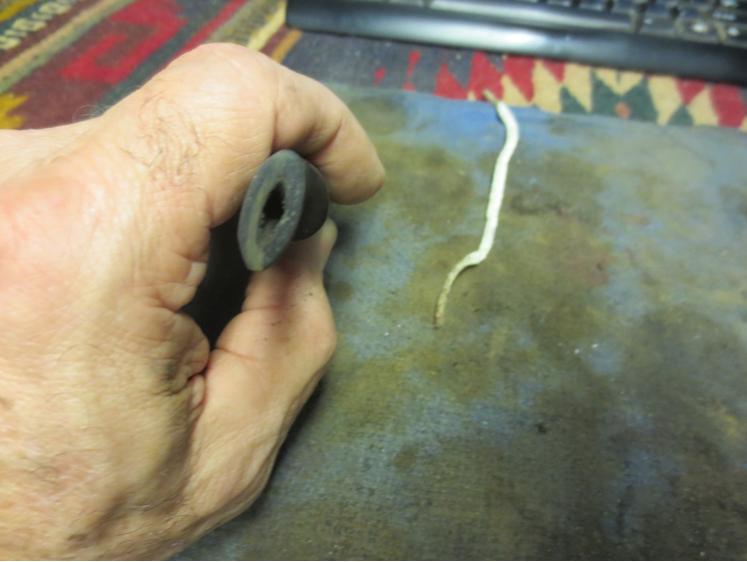
Everything was going quite smoothly up to this point. Little did I know that I was about to get a refresher course in chemistry. Wanting to clean up the oxidation I dropped the stem into a bath of 50/50 bleach and water. Fortunately, I had cause to check on the stem in about 30 minutes and I realized my error. Chlorine (Cl) and aluminum (Al) react to form aluminum chloride (AlCl3). I found a large growth of aluminum chloride crystals on the stinger.

I wish I had had the forethought to document the mistake with a picture or two. But in truth, I was so caught up in cleaning the bleach off the stem and removing the crystals that photos were very far from my mind. All in all there was no real harm done. The aluminum chloride cleaned up easily but left the stinger rough to the touch and it needed to be polished again. Heating up the stinger with a butane lighter melted any of the aluminum chloride that built up inside and it drained out of the stinger holes.

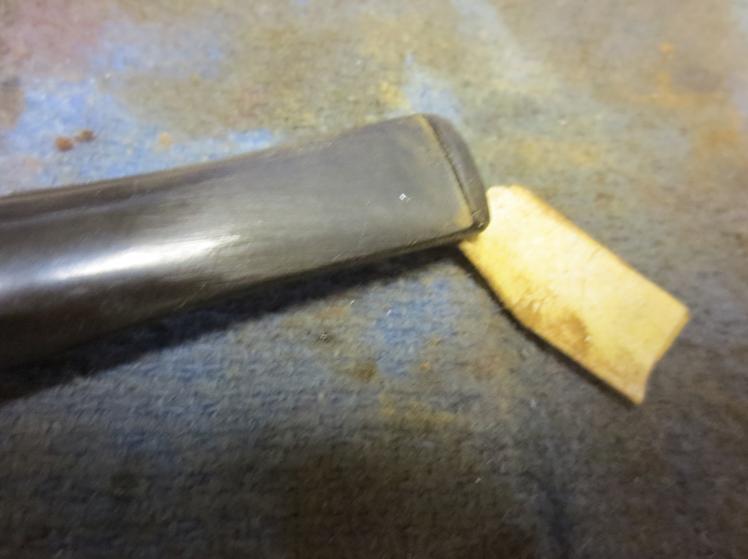
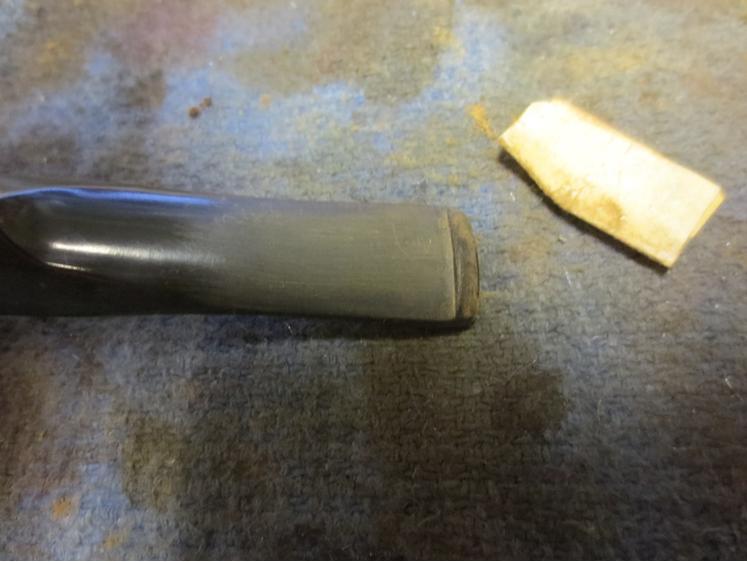
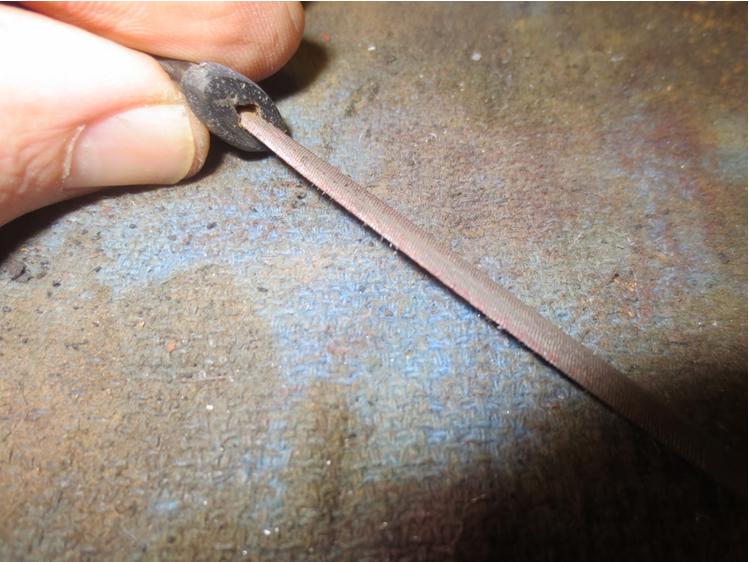
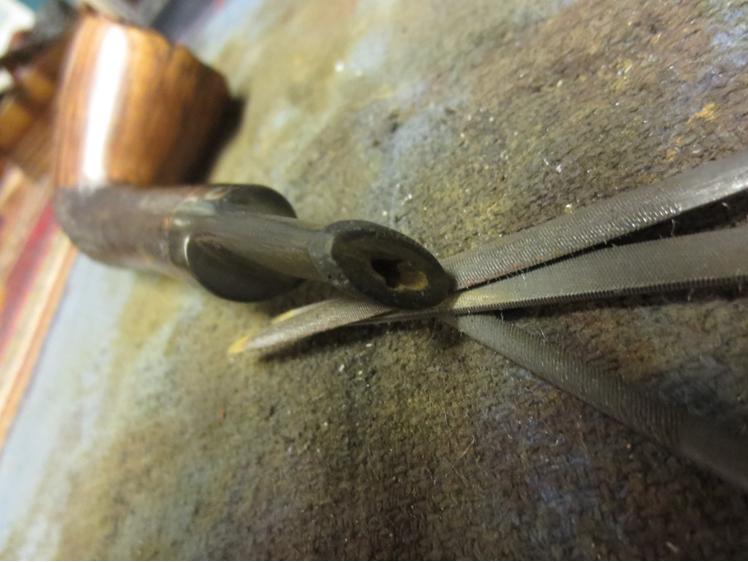
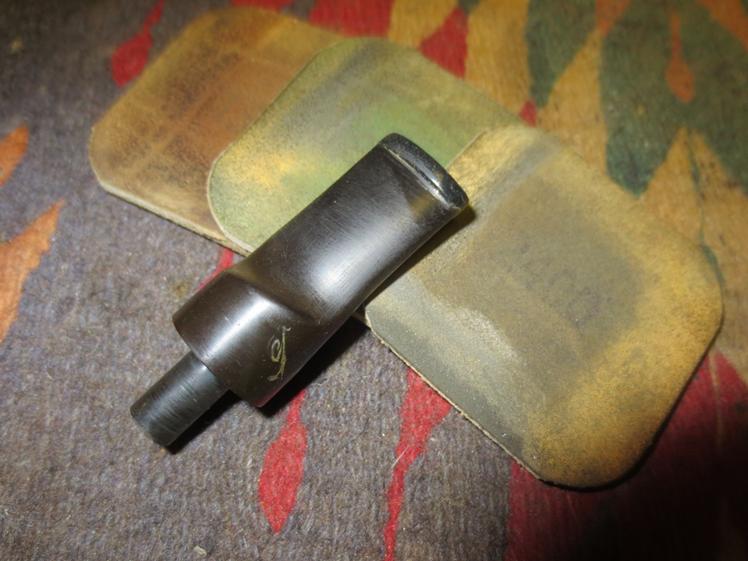
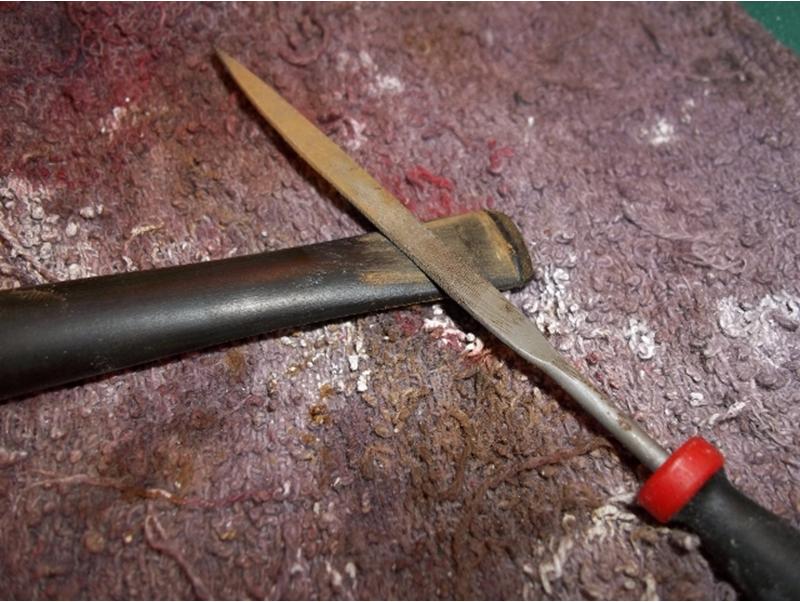
While I had the butane lighter out heating up the stinger, I thought I would take care of the over clocked stem. I wrapped the stem with some cloth tape and made a couple of reference marks to indicate which direction and how much to twist the stinger. I waited until the heat loosened the glue between the stinger and stem and then twisted the stinger with a pair of soft jawed pliers to align it with the stummel.Aaron7 
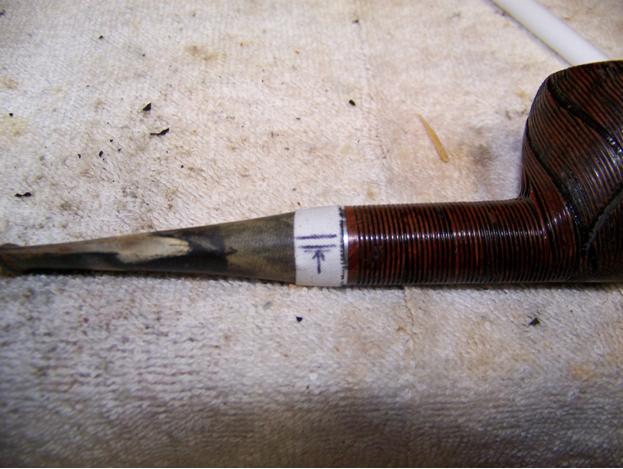
Before I finished the stem and polished everything I thought I would run the pipe through the alcohol retort. I was not confident that I had thoroughly cleaned the inside of the shank and after the aluminum chloride incident, I thought that some hot alcohol vapor though the stinger would hurt. I use 95% isopropyl alcohol for my initial cleaning and soaking but I prefer using Everclear for final rinsing and retort. In my limited experience it seems that the Everclear leaves fewer ghosts in the finished pipe.

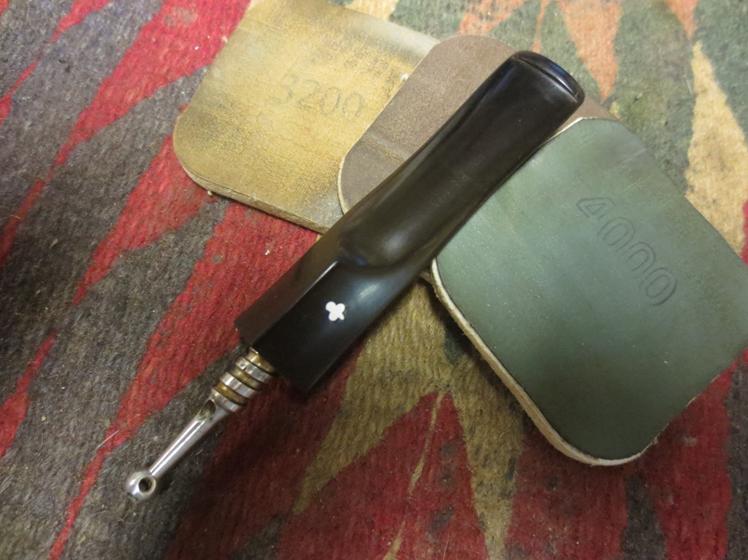
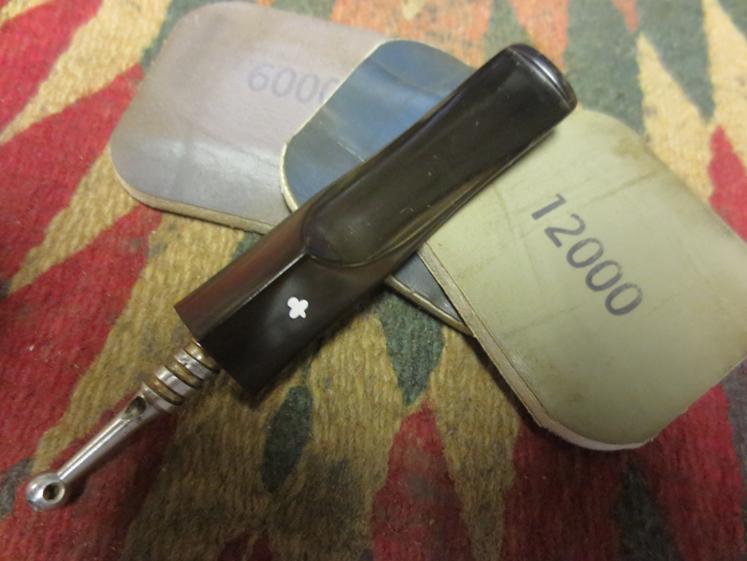
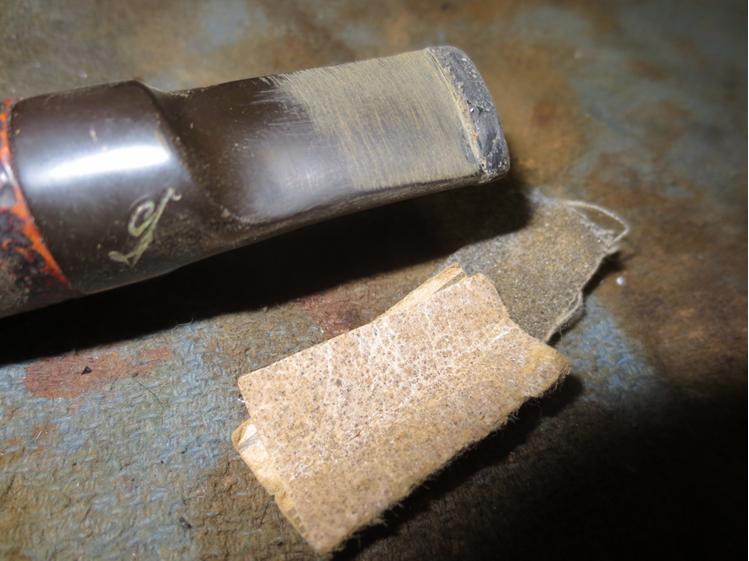
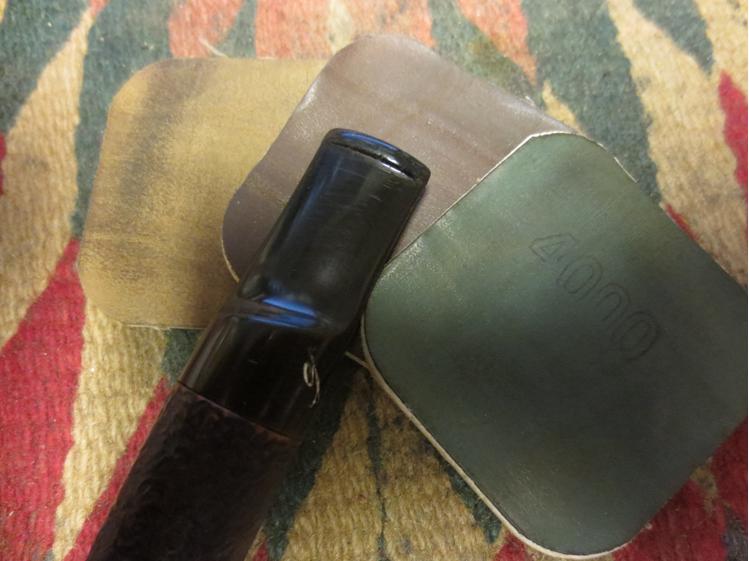
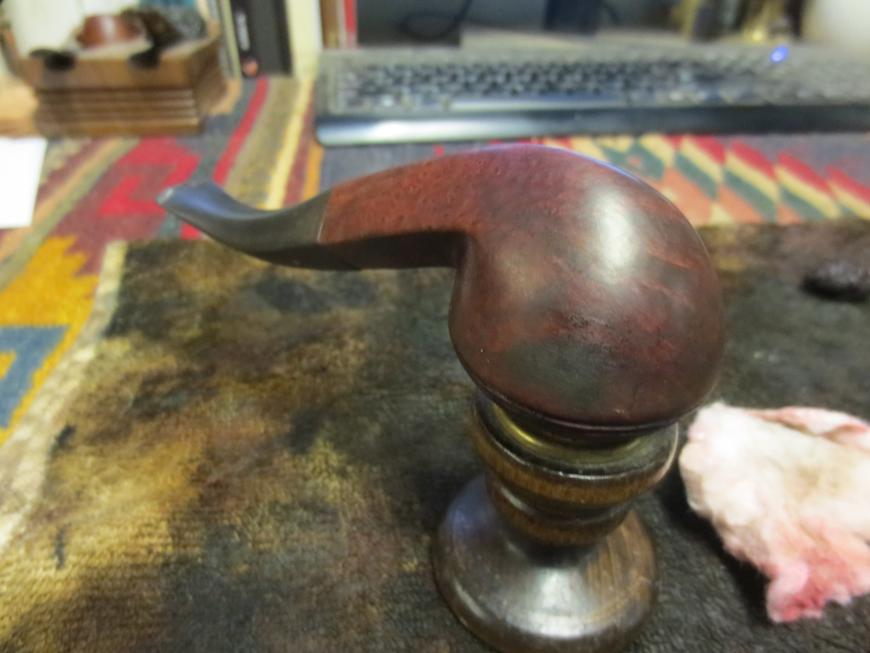
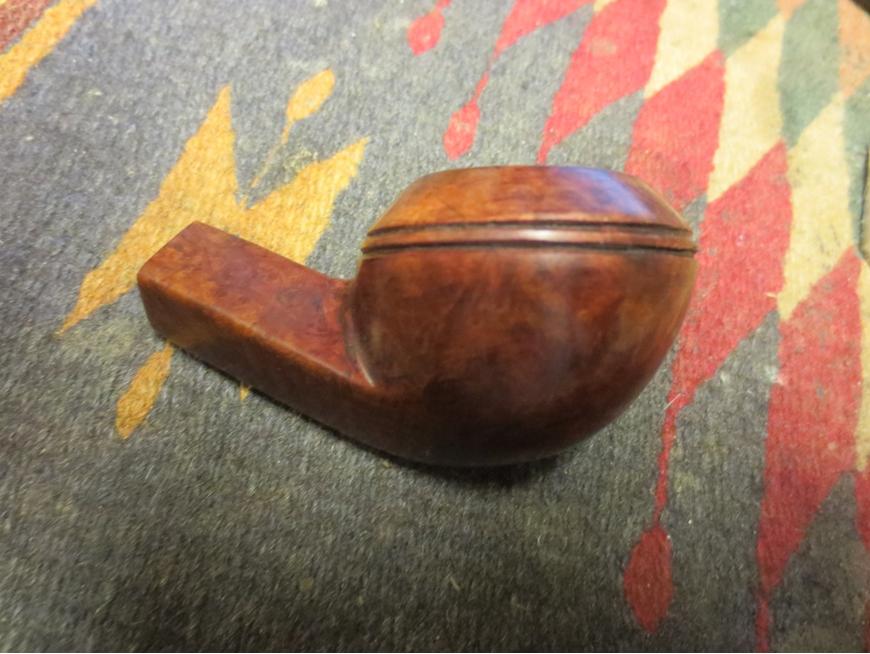
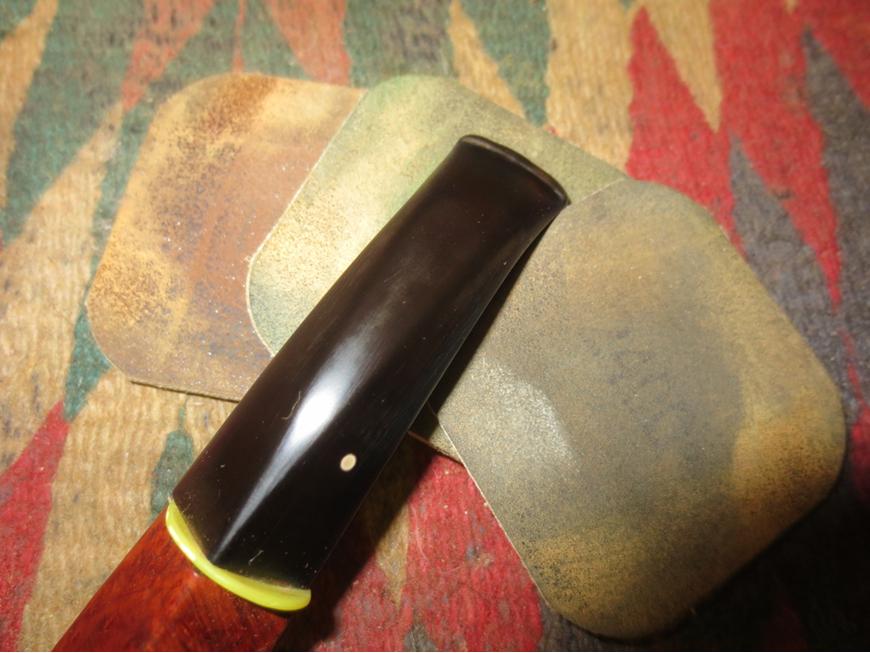
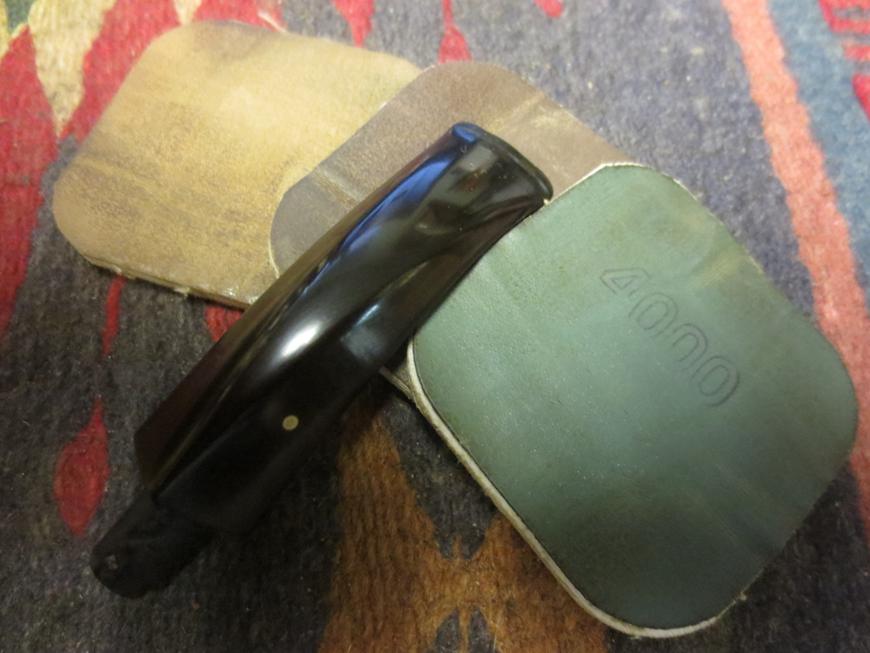
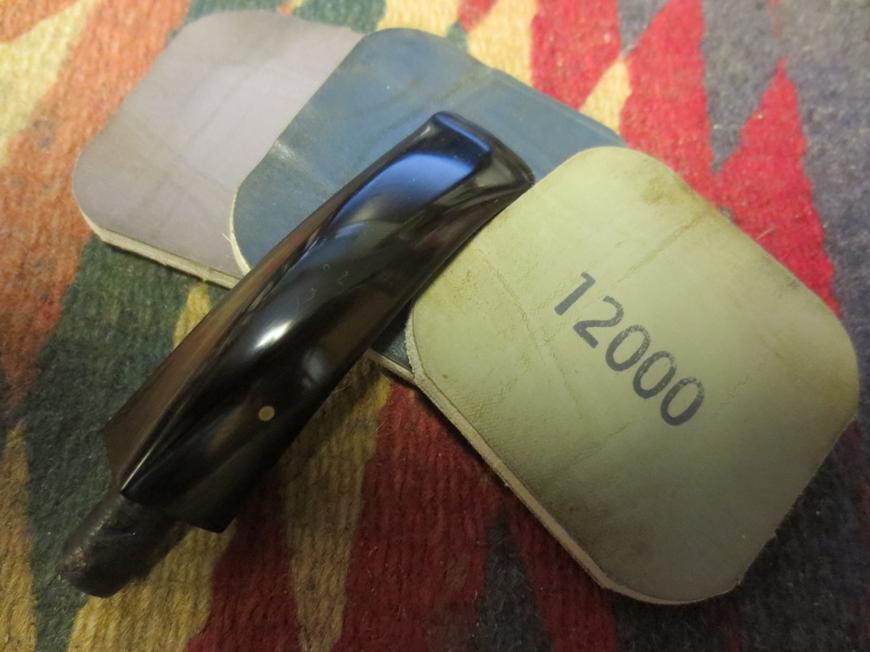
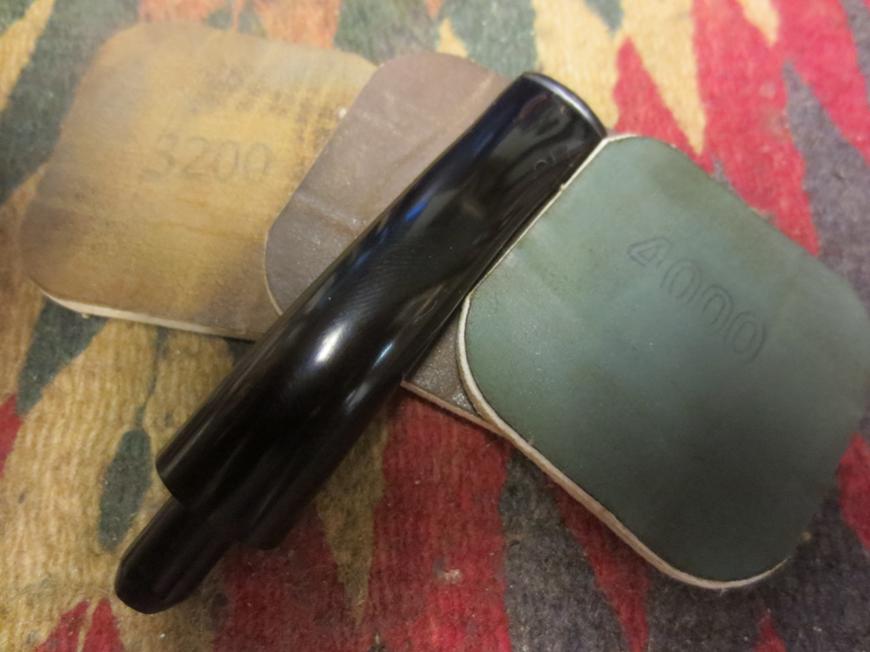
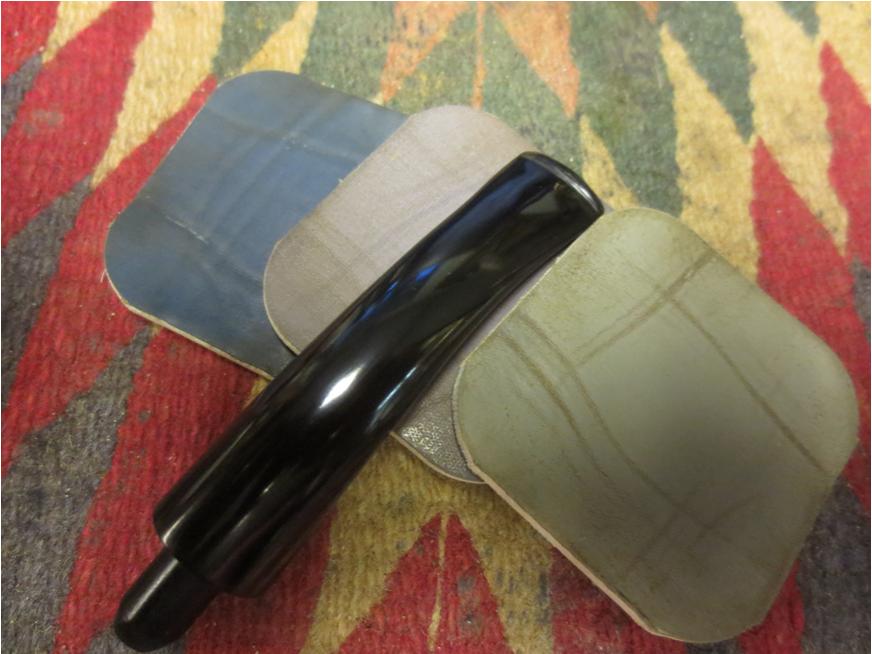
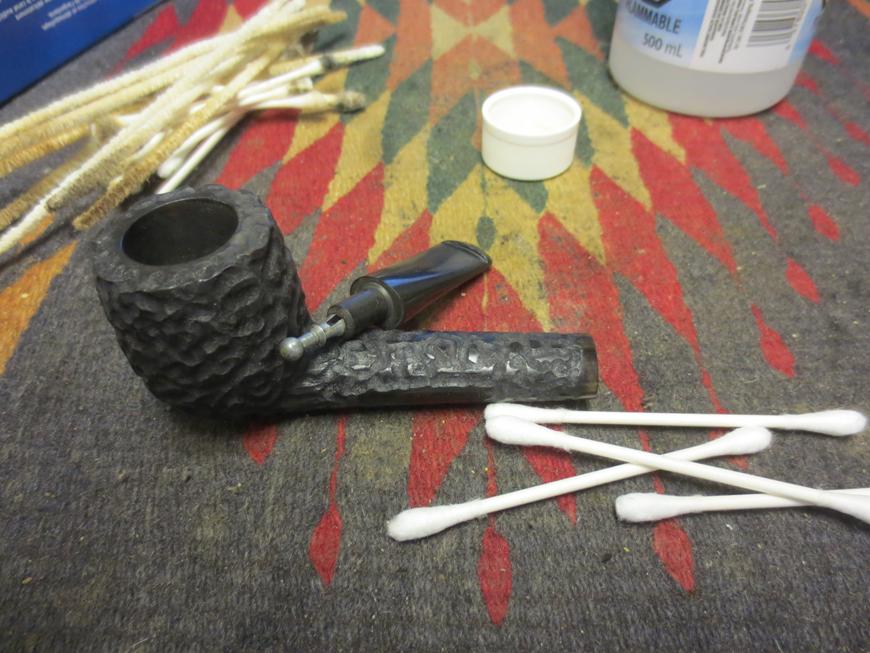
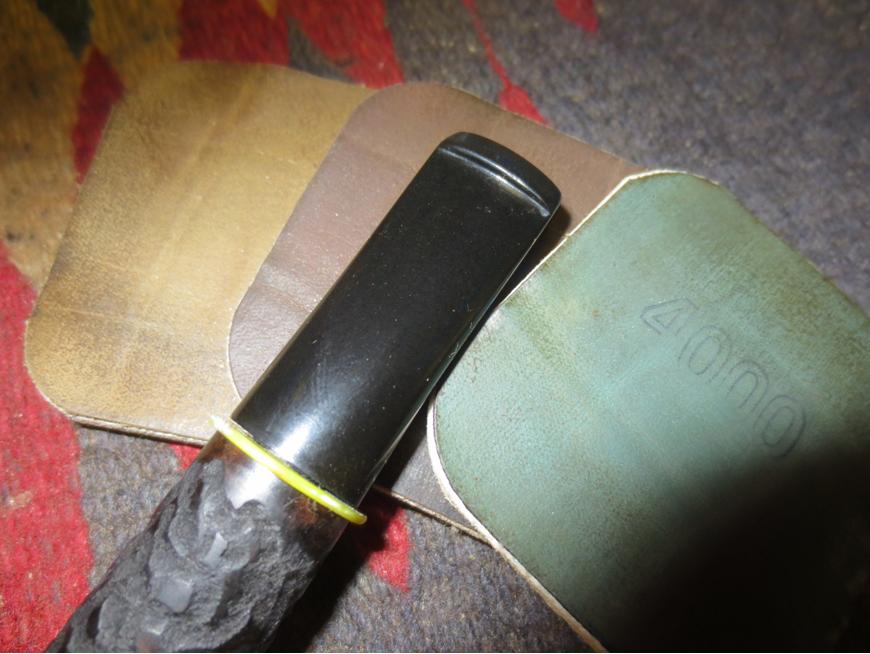
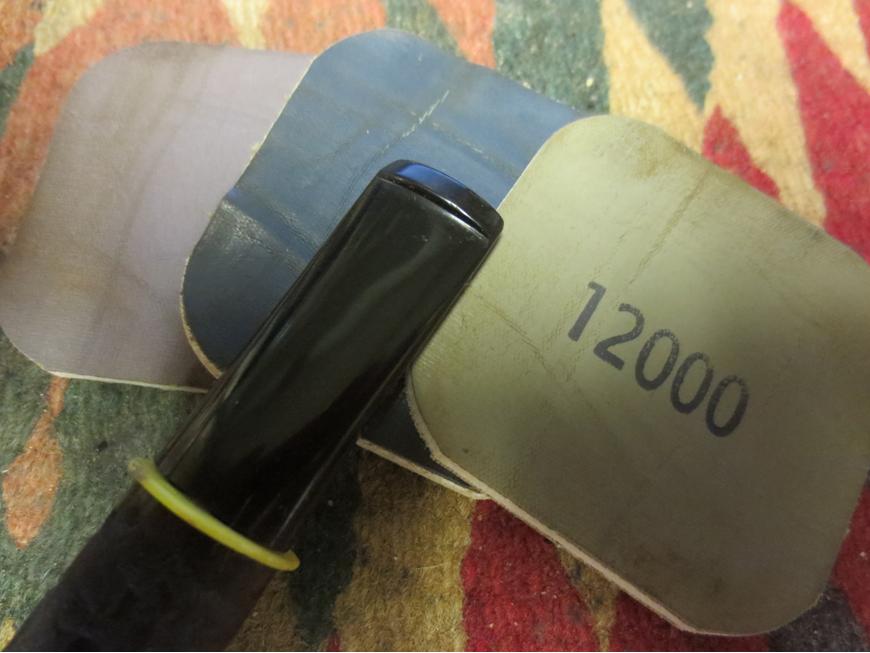
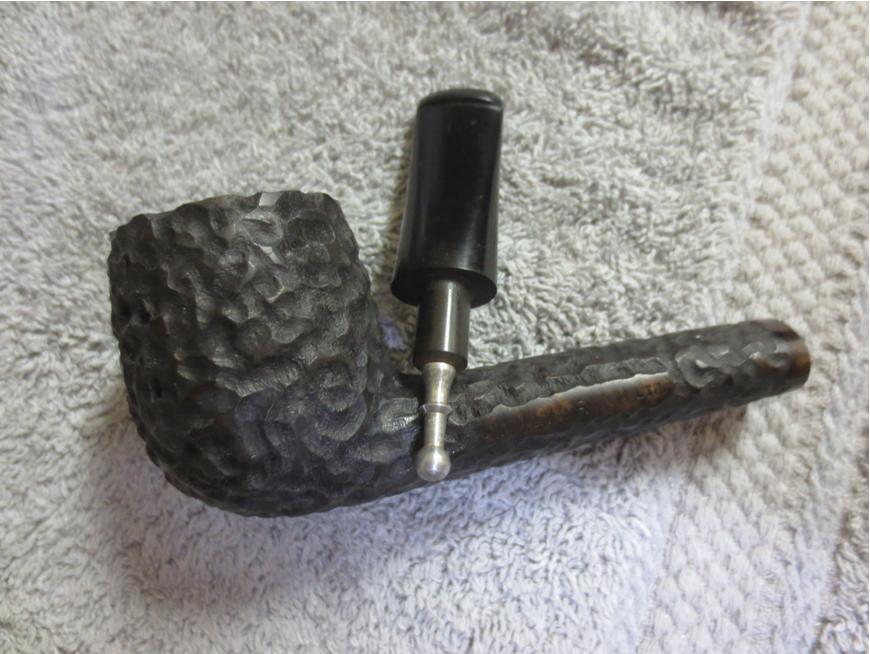
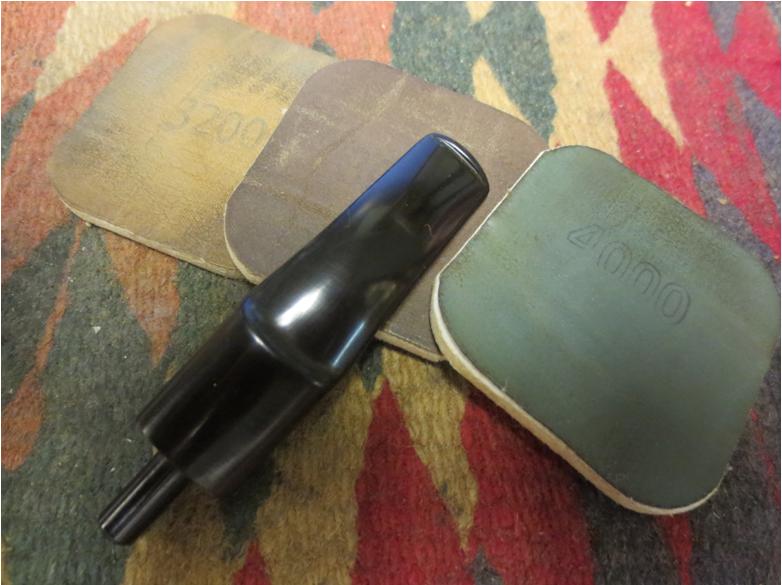
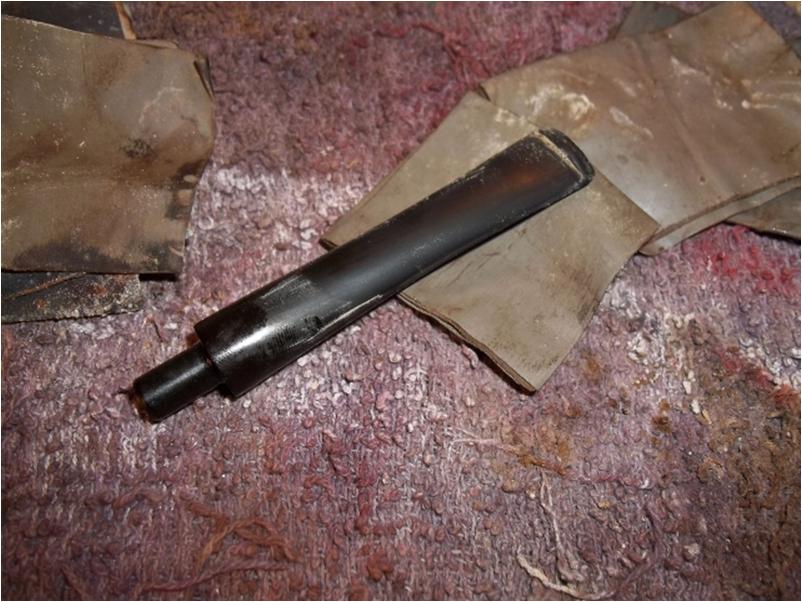
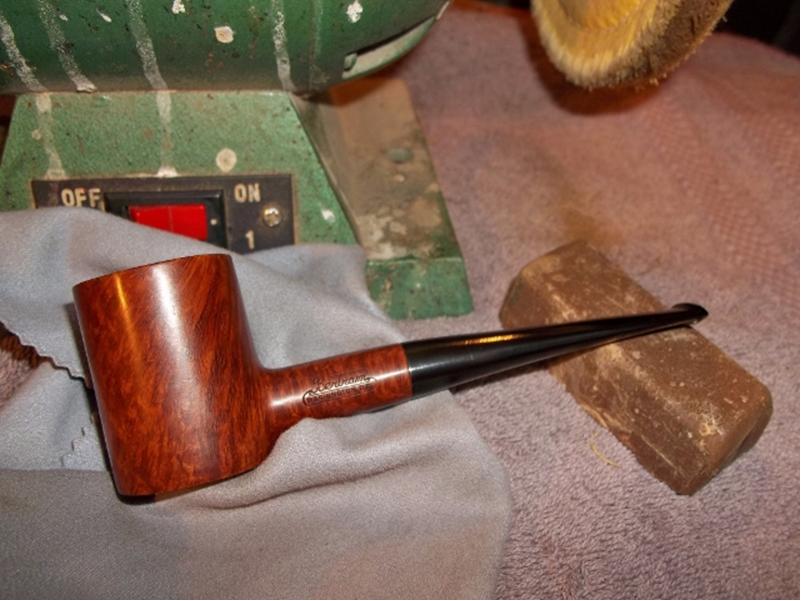
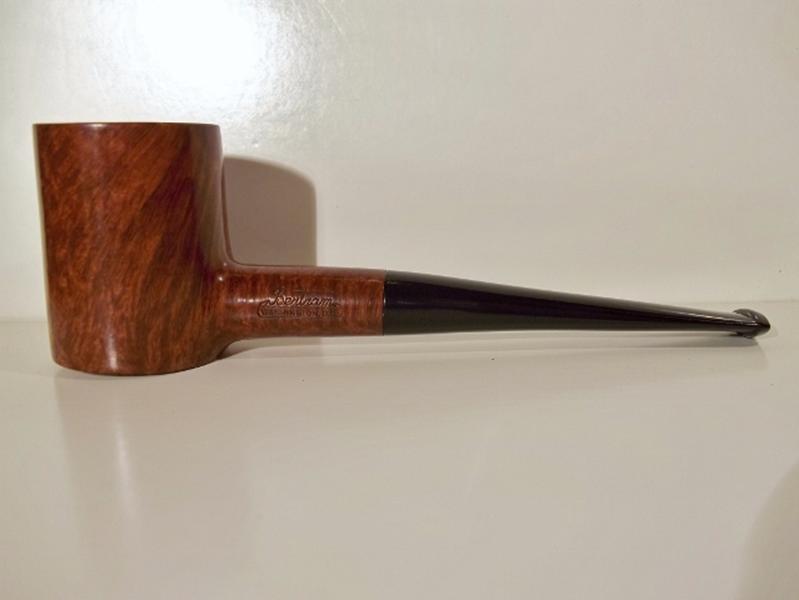
The remainder of the restoration was uneventful. I followed the typically stem polishing practices, wet sanding the stem with 400-4000 grit paper, stopping every few sets of paper to lightly coated the stem with mineral oil. I dry polished with 6000 and 12000 grit paper then took the pipe to the buffing wheel, applying red diamond compound, working the buffer with the carved lines of the pipe. I finished with 3 coats of carnauba wax buffing between each coat. I had to take a tooth pick to some of the wax that built up in the lines but the final product was a vast improvement from where I had started.Aaron8

Aaron9

Aaron10

Aaron11

NEPAL PROJECT PIPE SALE 13 – Breathing New Life into a Kaywoodie Signet Bulldog


Blog by Steve Laug

This is the thirteenth pipe from the box of pipes that I was gifted by a good friend of mine with the instructed purpose of cleaning them up and selling them with all of the proceeds going to the aid of earthquake victims in Nepal. Once again all funds raised will all go to the SA Foundation, and organization that has worked in Nepal for over 15 years helping provide recovery, housing and job training for women who are victims of sexual exploitation and trafficking. The ongoing earthquakes (over 300) that continue to shake Nepal have left much in ruins. The SA Foundation Project there was able to find new housing for the women and help with staff as well. Every dollar raised from the sale of these pipes will go to the work in Nepal.

It is a Kaywoodie Signet Bulldog. I did a bit of digging on the web and found out from the Kaywoodie forum that the KW Signet line was made from 1956 to 1972. It is stamped very clearly on the underside of the left side of the diamond shank, Kaywoodie over Signet. There are no other stampings on the pipe. The finish appears to have been rusticated and possibly blasted in a swirling pattern up and around the bowl. The grooves in the briar are deep and the red brown stain gives the swirls a sense of movement as the pipe is rotated in the hands. It almost undulates as it is turned over and the varieties of browns lend themselves to the illusion of movement. That makes it an interesting finish. The exterior of the bowl is a well shaped bulldog sans a bead around the top of the bowl. The bowl was the cleanest of the lot of pipes donated. It did not need reaming but merely a light wipe of a pipe cleaner in the bowl. The finish was dirty but in decent shape.KW1

KW2

KW3

KW4 The rim had some darkening but was not damaged on either the outer or inner edge. It would only need to be scrubbed to clean up the darkening.KW5 The shank and airway were dirty. As I have often found in a metal mortise pipe, there was a lot of tar and oil built up in the threads of the mortise and behind it in the shank. The aluminum was oxidized and scratched. The stem was a screw mount with a classic KW four hole stinger apparatus and metal tenon. The stinger was not removable but part of the metal tenon. It was dirty and covered in oils.KW6 The stem was oxidized and had tooth marks on the top and underside near the button. Most of the oxidation was on both ends of the stem.KW7

KW8 I used a lighter to heat the bite marks on the stem and raise them to the surface. I paint the surface with the flame, never letting it sit too long in one place. This lifted the bite marks and they would be easily removed with a light sanding. An added benefit to using the lighter is that it also burns off the surface oxidation. The photo below shows the top side of the stem after I “painted” it with the lighter. The bite marks had disappeared the oxidation was less prominent.KW9 I sanded the stem with 220 grit sandpaper to remove the remaining tooth chatter and light tooth marks.KW10

KW11 I scrubbed the stinger and tenon apparatus with 0000 steel wool to remove the buildup of tar and oil that had hardened there.KW12 I cleaned out the airway in the stem and shank as well as the threaded mortise with cotton swabs, pipe cleaners, and alcohol to remove all of the residual oils. I finished by scrubbing the threads on the stinger with a tooth brush to remove the last of the oils. I also scrubbed the end of the shank cap.KW13 I scrubbed the briar with a tooth brush and Murphy’s Oil Soap and then rinsed it under running water to remove the soap. I dried it off with a cotton towel and took some photos of the cleaned finish.KW14

KW15

KW16

KW17

KW18 The smooth area on the underside of the left side of the shank where the stamping was had some peeling varnish or clear coat on it.KW19 I wiped down the shank with acetone on a cotton pad to remove the peeling finish on that portion of the shank. IT came off quite easily which leads me think it was a varnish rather than a lacquer or plastic coat.KW20 With the bowl cleaned and finished it was time to work on the stem. I sanded it with a medium and a fine grit sanding sponge to remove the oxidation and scratches. I sanded it with micromesh sanding pads – wet sanding with 1500-2400 grit pads and dry sanding with 3200-12,000 grit pads. I rubbed down the stem with Obsidian Oil between each set of three pads and then a final time after the sanding with the 12,000 grit pad.KW21

KW22

KW23 When the oil had dried I buffed the pipe with Blue Diamond – lightly pressing the bowl into the buffing wheel and normally buffing the stem. I then gave the bowl a light coat of carnauba and the stem multiple coats of carnauba wax. I finished by buffing the pipe with a soft flannel buff to raise the shine. The finished pipe is shown in the photos below.KW24

KW25

KW26

KW27

KW28

KW29 This Kaywoodie Signet Bulldog a small pipe, roughly a Group 2/3 in Dunhill terms. The pattern of rustication and possibly sandblasting as well give it an interesting to look at and the feel of it in the hand will make it quite tactile when heated up and smoked. The stain is a combination of medium and lighter browns that gives it a subtle look of movement when it is held and turned in the hand. It should make someone a great addition. If you are interested in this pipe email me with an offer at slaug@uniserve.com and we can discuss it. The entirety of the sale price will go to the Nepal project. I will pay the postage so that does not get taken off the proceeds. If you are interested in reading about the SA Foundation you can look at their website at http://www.safoundation.com.

Thanks for looking.

Building a New Button on the Cut off Stem of a Savinelli Autograph 4


Blog by Steve Laug

I decided to tackle another button rebuild. A friend brought over a cut off Savinelli Autograph long shank plateau Dublin that he had picked up. The shank was stamped Savinelli Autograph 4 on the underside and there was a signature stamp on the stem.Auto1 I have no idea how the stem got cut off but my guess would be that someone removed the damaged part of the stem and button and then saw how close to the surface the airway was and decided to abort the mission of cutting a new button on the stem. I have been working with developing my mixture of medium viscosity black cyanoacrylate glue and charcoal powder to rebuild/craft new buttons. I have used it on quite a few repairs of my own and on a few for friends. It definitely dries harder than the glue by itself and seems to be very strong once it has cured. I thought this pipe would be a good candidate for that process.Auto2 I wrapped the end of the stem with a band of cellophane tape to make a straight edge to work against for the glue and charcoal powder mixture. It works to keep a semi-straight edge but I find it is more of a guide than anything else. It gives me an edge to work with when I build up the layers of patch material.Auto3

Auto4 I mixed a batch of glue and charcoal powder on a card that I use for that purpose. That way when I have finished the mix and repair I can fold the card and throw it away without getting the glue all over the place.Auto5 I stirred the powder and glue together with a dental pick until I had a thick paste mixture that was still workable.Auto6 I applied it to the end of the cut off stem with the dental pick and shaped it roughly to match the kind of button shape I was aiming for when finished.Auto7

Auto8 I put the pipe on a cork and candle stick holder that I use for drying bowls when I stain them or stems when I have done this kind of repair and set it aside to cure for two days. This kind of patch is a long haul project. It is not a quick repair. If you start reshaping the button too soon the repair breaks off in chunks that are still soft underneath the surface. So, having learned that I left it alone and did other work while the days passed.Auto9 After two days of curing the repair was solid all the way through. I would still need to be careful as the longer it cured the harder it would become. I used emery cloth and 180 grit sandpaper to shape the button into an oval and to face the end of the button. You can see in the photo below how much more material there was to work with now in terms of shaping the airway and the slot in the button thanks to the build-up of material.Auto10

Auto11 I worked over the edge of the button with the sand paper as well to clean up the sharp edge next to the blade of the stem. I moved on to sand with 220 grit sandpaper and also with a medium and a fine grit sanding sponge to further define the new button and to clean up the scratches.Auto12 After the initial shaping and sanding I put the stem to the side to cure longer and addressed the bowl and shank. I reamed the bowl with a PipNet reamer and took the cake back to a very thin layer.Auto13

Auto14 I cleaned the interior of the airway and mortise with pipe cleaners, cotton swabs and isopropyl alcohol until they were clean.Auto15 I scrubbed the bowl and the plateau rim with a tooth brush and Murphy’s Oil Soap to clean off the grime and dirt in the plateau and the sandblast shank.Auto16

Auto17 I scrubbed the plateau with a brass tire brush to dig out the built up tars and oils that had clogged the crevices in the finish there.Auto18 I put my thumb in the bowl and carefully rinsed off the soap with cool running water. I dried the bowl with a cotton rag and took the next series of photos to show what the bowl looked like clean.Auto19

Auto20

Auto21

Auto22 The next day I decided to work on the slot in the button and open it up with a flare to create a Y shape. I used needle files to work on the airway. The next series of photos show the files and the progress of opening the airway.Auto23

Auto24

Auto25 With the airway/slot roughed in it was time to continue shaping the button and the face of the slot. I sanded it with 220 grit sandpaper to refined the shape and to smooth out the end of the stem.Auto26

Auto27

Auto28 I used a folded piece of sandpaper to smooth out the interior of the slot and further shape it. The photo below shows the state of the slot and the shape of the button.Auto29 With the shaping completed it was time to work on fine sanding of the stem and new button. The charcoal bits in the mixture are hard and coarse and need to be refined with fine sanding. I worked over the stem and button with micromesh sanding pads, wet sanding with 1500-2400 grit pads to remove the majority of the coarseness. It is only this first step in the process of polishing the stem but it is amazing to see the transformation as I work through the various grits of micromesh. I rubbed the stem down with Obsidian Oil when I had finished with the 2400 grit pad. I will still need to refine the inner edge of the button with files but the overall shape of the stem and button are clearly visible.Auto30

Auto31 I wet sanded the stem with the 2400 grit micromesh until I had minimized the scratches and polished the button. I then rubbed it down with another coat of Obsidian Oil and then sanded it with 3200-4000 grit micromesh pads. I gave it another coat of oil and then sanded it with 6000-12,000 grit pads. I gave it a final coat of oil and let it dry.Auto32

Auto33 I buffed the stem and the bowl with Blue Diamond and then lightly buffed the blast with the same. I gave it multiple coats of carnauba wax and buffed it with a clean flannel buffing pad to raise the shine. The finished pipe is shown below. The new button looks like it belongs. The shape of the slot is open and it accepts a pipe cleaner with ease. It should provide years of service to the pipeman who is holding it in trust. He should enjoy smoking it with much more ease. Thanks for having a look!Auto34

Auto35

Auto36

Auto37

Auto38

Auto39

Bead repair on a baby Rhodesian


Blog by Dave Gossett

It is a pleasure to introduce you all to Dave Gossett’s work. Pat Russell, another contributor here sent me links to Dave’s work on Pipes Magazine forum and Dave sent me links to his own YouTube channel showing the beautiful work that he does. With no further ado here are Dave’s own words:

I received this pipe from a friend that acquired it in an estate lot. The only stampings on the pipe read imp, which I assume once read imported briar. This pipe had seen better days but it still drew my attention. Maybe it was the novelty of its size.Dave1

Dave2

Dave3

Dave4 I started out by repairing the bowl chamber which had been badly reamed over the years. After removing the cake I sanded the bowl chamber smooth using 400 grit wrapped around a small sharpie marker.

Next I proceeded to rebuild the bead line.dave5 I covered a small piece of cardboard in clear tape and wedged it in the groove under the damaged areas to keep the channel clear. Medium viscosity cyanoacrylate glue and fine ground briar dust will fill the missing voids. The glue will not stick to the clear tape and the wedge is easily removed after the repair has set up. I put a few small drops of glue in place and sprinkled the dust on top, then used the flat edge of a knife pressed it flat against the pipe. I repeated this several times around the circumference of the bead line.Dave6 After I had all the missing briar filled in I proceeded with the sanding . I started with 800 grit to smooth out all the excess glue, and then worked my way up to 2000 grit on the rest of the pipe.

Fiebings Dark brown leather dye is the base stain mix with a drop of oxblood. Once the stain dried, I went over it again with 2000 grit to give the grain a nice contrast, followed by a couple coats of pure carnauba wax on the buffing wheel.Dave7

Dave8

Dave9

Dave10 Here it is sitting with a Savinelli 320 for size reference.Dave11 Next to a Bic lighter truly shows how small this Rhodesian really is.Dave12

Here is link to his YouTube channel. As he says: No worries. No blathering,YABO’s, or reviews, just pipes…. https://www.youtube.com/channel/UC_IKfDgcIgpOfsIYoodS_Hg

Bringing a Dunhill Bruyere Bent Rhodesian 08 Back From the Brink


Blog by Steve Laug

This Dunhill Bruyere was part of the gift lot for sale for Nepal. It was in very rough shape and one that would never be fit enough to grace a collection. The Dunhill stamping is only visible under bright light with a lens. The stamping on the left side of the shank is Dunhill over Bruyere. On the right side it is stamped with 4 in a circle and an A. The rest of the stamping is very faint and reads Made in London England (At least that is what it looks like). The shape number 08 is gone except for the 0. The finish was gone. The double ring around the bowl was virtually ruined and the bowl itself was in very rough shape. The rim was beat up and out of round. There were burn marks on the rim, the left side and bottom of the bowl and on the left side of the shank. To me it looks like the pipe was laid in an ashtray and the cigarette burned the bowl. It was in very rough shape. The stem was badly oxidized and upon examination there was a small split in the button on the underside and the stem was thin and the edges of the button were rounded down.Dunhill1

Dunhill2

Dunhill3

Dunhill4 I took some close up photos of the bowl to give a better picture of what I had to work with on this one. You can see from the photos the issues that I pointed out above. The ring was badly damaged and rough. The bowl was out of round and the rim was damaged. The finish was spotty and grimy.Dunhill5

Dunhill6

Dunhill7

Dunhill8

Dunhill9 I have one newer Bruyere in my rack so I kind of knew the colour this pipe should have been and it was not even close any more. I did a bit of searching on the web to see if I could find a finish chart and also one that would confirm the shape number that I was “speculating” on. I have included the next two charts for the information that I gleaned from them. The Bruyere was more dark/reddish coloured than this one was and the faint number was indeed 08 which was called a Bent Rhodesian.dunhill_pipe_finishes

dunhill_shape_size_chart The next two photos show the stem in some closeup photos. I wanted to show the oxidation and the split in the button on the bottom side of the stem. The fit in the shank was also worn. The tenon was sloppy fitting and could be wobbled side to side and up and down.Dunhill10

Dunhill11 I put off working on this one for a long time, choosing rather to work on pipes that I had some sense of what the finished product would look like. I had no idea if I could restore this one to any semblance of its original state let alone bringing back to “BEST QUALITY” which the Dunhill catalogue above said that Bruyere pipes stamped with the large “A” were supposed to be. This one was a challenge and I really drug my feet and postponed the test as long as possible. After looking at the photos above I hope that I have communicated the state of the pipe I was going to deal with. I have made no mention at all of the state of the inside of the shank and the stem. It was a mess as well – a thick black crud covered the inside of the airway in the stem and the shank and the mortise was almost clogged with the almost petrified tars of years of neglect.

So, yesterday I decided was the day to tackle this pipe. I had mowed the yard and done my weekend chores and needed some down time to relax. I suppose many of you would not call this relaxing but I still am under the illusion that it is restful…. Shhh don’t change my illusion please. I began with cleaning out the rings around the bowl. They were rough but they were also clogged with all kinds of debris. I used a sharp, thin blade pen knife that I have and use for this kind of thing. It works wonders and within a short time I had cleaned out the grime and the original red stain was showing in the bottom of the grooves.Dunhill12

Dunhill13 I scrubbed the bowl with cotton pads and acetone to remove the grime and the damaged finish. I also wanted to see the extent of the burn marks on the bowl, rim and shank. I wanted to see if they went deeper than the surface. Knowing that would help me decided what to do to address them.Dunhill14

Dunhill15

Dunhill16 With the grime cleaned off the rim I could see what I had to work with. The bowl was in rough shape. It was out of round but the inner edges did not have any char or burn. The rim had lots of dents and dings from someone using it as a hammer.Dunhill17 I decided to top the bowl to flatten out the rim and clean up as much of the damage as possible. I would then have to work on sanding the inner edge of the rim to smooth it out. I used the topping board with 220 grit sandpaper.Dunhill18

Dunhill19 With the rim flattened out once more and the outer edge more evenly set on the bowl top it was time to address the inner edge of the rim. I used a folded piece of 220 grit sandpaper to clean up the edge. I was able to greatly improve the “roundness” of the inner edge. While it was not perfect it was far better than when I started.Dunhill20 I cleaned out the shank and the airways with alcohol, cotton swabs and pipe cleaners. I scrubbed and scoured and scraped the airways clean of the “fossilized” tars until the pipe cleaners and cotton swabs came back white. Since I was probably going to smoke this one myself I decided to not use the retort at this point. If it smoked rough I could always set up the retort and let it do its magic.Dunhill21 I sanded the stem with 220 grit sandpaper, repaired the small split in the button on the bottom side and then sanded the stem with a medium and a fine grit sanding sponge. I rubbed it down with some Obsidian Oil and put the pipe back together. I took a few photos of the cleaned up look. If you are getting the idea that I was postponing working on the double ring and the heavy damage there you are correct in your assumption. I was not sure I would be able to work any redemption on that area of the bowl. Time would tell.Dunhill22

Dunhill23

Dunhill24

Dunhill25 I could not postpone dealing with the ring damage any longer if I was going to finish the pipe. I had read with interest Mark Domingues write up on restoring the rings on the Peterson 80 that he posted here recently. I spent time looking at how he rebuilt the centre briar ring between the two lines. I was ready to start. I cut a piece of note card the width of the back of the bowl and decided to address that damage first. I pressed briar dust into the damaged area of the ring and tamped it in with dental pick. When it was full I put some drops of clear super glue onto the briar dust. I did the same all around the bowl until I had a real mess on my hands. I was careful not to put the glue or dust on the places where the rings were in good shape. I would use these as guides to recut the lines later.Dunhill26

Dunhill27

Dunhill28 I used a flat, thin blade knife edge needle file to recut the grooves in the bowl. It took a lot of work to slowly and carefully recut them but it worked as the photos below show.Dunhill29

Dunhill30

Dunhill31

Dunhill32 After the initial cutting of the grooves with the needle file I continued to use it to smooth out the grooves and the edges on the top and bottom. They took a lot of work to smooth things out. I also folded 220 grit sandpaper and ran it through the grooves on the bowl. Once they were smooth and cleaner looking than before it was time to clean off the bowl and then restain it with the first coat of stain. I wiped the bowl down with alcohol on cotton pads to remove the excess briar dust and any remaining glue. I sanded the burn marks on the bowl and rim with a medium and a fine grit sanding sponge to minimize them. I sanded them again with 1500-2400 grit micromesh pads to smooth out the scratches. I then gave it a coat of oxblood aniline stain, flamed it and set it aside to dry.Dunhill33

Dunhill34 The burn marks still showed with this first coat of stain and it was a little too red to my liking. I buffed it with White Diamond and then brought it back to the table to do some more work. I took some photos of the pipe after the buffing. I find that a couple pics help me focus on what needs some more work. In this case I could see that a little dark brown stain would work to tone down the red and also blend the dark spots in a bit more.Dunhill35

Dunhill36

Dunhill37

Dunhill38 I used a dark brown stain pen to give it a top coat of stain. In the photos it looks streaky but I don’t worry too much about that as a buff once it is dry will take care of that.Dunhill39 I buffed the bowl with White Diamond and a light touch. It is looking better. The rings on the left side are better but are still a little rough. The rest of the way around the bowl they are looking really good. The dark brown stain did a better job of blending in the dark spots and toning down the red. I liked the colour and it seemed to match the chart photos of the Bruyere that I had found.Dunhill40

Dunhill41

Dunhill42

Dunhill43

Dunhill44 At this point it was time for a break. I put the stem on the bowl and loaded a bowl of Boswell’s North Woods and went to church with my daughters. I smoked a bowl as I walked with them and loaded another bowl on the way home. I sat on the porch and fired up a third bowl filled with Malthouse Reserve 12. This pipe really sang with English tobaccos. Even if it was still a bit ugly it smoked well!

When I finally went back to the shop I worked on polishing the stem. I put the plastic spacer/washer between the shank and the stem and worked on it with micromesh sanding pads. I wet sanded with 1500-2400 grit pads and then rubbed the stem down with Obsidian Oil. I dry sanded with 3200-4000 grit pads and rubbed it down again with the oil. I dry sanded with 6000-12,000 grit pads and then gave it a final coat of Obsidian Oil. I set it aside to dry.Dunhill45

Dunhill46

Dunhill47 The stem was looking really good. There was a rich glow to the vulcanite. These older Dunhill pipe stems really shine like glass when they are polished. I set the stem aside and did a bit more work on the bowl. I used a very small oval needle file to work on the rings on the left side and front of the bowl. I wanted to clean up the edges and sharpen the overall look of the rings.Dunhill48

Dunhill49 I followed the oval file with a flat rectangular blade needle file and cleaned up the edges of the rings some more. When I had finished with the flat file the rings looked far better than they were when I started.Dunhill50

Dunhill51 I gave the bowl another coat of stain with the dark brown stain pen and then buffed the bowl and stem with Blue Diamond Plastic polish. I gave them both multiple coats of carnauba wax. Then I buffed the pipe with a clean flannel buff and polished it. The finished pipe is shown below. I think this one will stay with me as the nomenclature is almost illegible and the dark marks all over the bowl still show. The pipe smokes well so it will be a work horse pipe for me. It was well worth the time to clean up and I learned much in the process of reworking the rings.Dunhill52

Dunhill53

Dunhill54

Dunhill55 Thanks for looking.

NEPAL PROJECT PIPE SALE 12 – Restoring an Iwan Ries Blackruf Bent Billiard


Blog by Steve Laug

This is the twelfth pipe from the box of pipes that I was gifted by a good friend of mine with the instructed purpose of cleaning them up and selling them with all of the proceeds going to the aid of earthquake victims in Nepal. Once again all funds raised will all go to the SA Foundation, and organization that has worked in Nepal for over 15 years helping provide recovery, housing and job training for women who are victims of sexual exploitation and trafficking. The ongoing earthquakes (over 300) that continue to shake Nepal have left much in ruins. The SA Foundation Project there was able to find new housing for the women and help with staff as well. Every dollar raised from the sale of these pipes will go to the work in Nepal.

This one is Iwan Ries & Co. Blackruf, or sandblast billiard. It is stamped very clearly on the left side of the shank, Iwan Ries & Co. over Blackruf. There are no other stampings on the pipe. The finish is in the best shape of all of the pipes in this lot that I have worked on. The sandblast is not deep and the finish is a mix of blasted birdseye and swirls. That makes it an interesting blast. The exterior of the bowl is not round as the blast removed a lot of the wood near the top left edge of the pipe. It is still nice and thick but is out of round. The bowl needed a light reaming and the shank and airway were dirty. The rim was very clean and the inner edge is sharp and undamaged. The stem was oxidized and had tooth marks on the top and underside near the button. Most of the oxidation was on both ends of the stem. The stem was also slightly twisted from the bend back to that it did not sit correctly. The button on the top side was quite thin and worn down and the sharp edges on both the top and bottom had been smoothed out. The tenon was unique to me in that it was rounded at the end. Once it was cleaned up and repaired this would be a beautiful looking pipe.Black1

Black2

Black3

Black4 I took some close-up pictures of the rim and the stem to show how they looked when I brought them to the work table.Black5

Black6

Black7 The next photo shows the rounded end of the tenon, the oxidation on the stem and also the dusty buildup on the bowl in the grooves of the sandblast.Black8 I reamed the bowl back to a thin cake with a PipNet reamer. There was a lot of tobacco debris in the bowl, stuck to the sides that needed to be removed and the cake was uneven so I wanted to even it out and make it easier to rebuild the new cake.Black9

Black10 I scrubbed out the mortise and the airway to the bowl with pipe cleaners, cotton swabs and alcohol. It took quite a bit of scrubbing to get them clean and to remove the “crud” (technical term) that had collected there over the years. I used a thin, sharp knife to scrape out the thick ridge of “gunk” (another technical term) in the mortise.Black11 I cleaned out the stem with pipe cleaners and alcohol and also sanded the surface of the dents with 220 grit sandpaper and then wiped it down with alcohol to prepare it for the repairs. I filled the deep dents/tooth marks with clear superglue and let them dry (one side at a time). On the top side I also built up the button edge to give it some additional thickness.Black12

Black13 Once the glue had dried I used a needle file to redefine the sharp edge of the button against the surface of the stem. I sanded the patches with 220 grit sandpaper until they were even with the surface of the stem so that they blended in better.Black14 I sanded the repairs with a medium and a fine grit sanding sponge to reduce the scratches on the surface.Black15

Black16 I wanted to rebend the stem to take out the twist in the end. I set up a heat gun and heated the stem so that it would go back to its original shape. That is one of the things I love about vulcanite – is that it seems to have “memory” and returns to the shape it was before bending or twisting. It took some time to heat and straighten it out.Black17 A secondary benefit of heating the stem is that it smooths out all of the scratches and gives the stem a mat look. I rebent it over an old rolling pin to get a straight bend. I held it in the bend while I cooled it with running water.Black18 I polished it micromesh sanding pads – wet sanding with 1500-2400 grit pads and rubbing it down with Obsidian Oil when I finished this first set. I dry sanded with 3200-4000 grit pads and rubbed it down with oil again when I finished that set. Finally I dry sanded it with 6000-12,000 grit pads and gave it a final coat of Obsidian Oil and set it aside to dry.Black19

Black20

Black21 I buffed it with Blue Diamond Plastic Polish on the wheel to give a deep shine and to remove any final scratches.Black22

Black23 I buffed the bowl lightly with Blue Diamond and the stem once again before giving them both a coat of carnauba wax. I gave the bowl a light coat so as not to fill in the grooves and repeated several more coats on the stem. The finished pipe is shown below. It is ready for the next pipeman who will enjoy smoking this beauty.Black24

Black25

Black26

Black27

Black28

Black29 This Iwan Ries Blackruf bent billiard is quite a large pipe, basically a Group 4/5 in Dunhill terms. The shallow mixed grain blast makes it interesting to look at and the feel of it in the hand will make it quite tactile when heated up and smoked. The stain is a combination of dark browns and black that gives it a multidimensional look. It should make someone a great addition. If you are interested in this pipe email me with an offer at slaug@uniserve.com and we can discuss it. The entirety of the sale price will go to the Nepal project. I will pay the postage so that does not get taken off the proceeds. If you are interested in reading about the SA Foundation you can look at their website at http://www.safoundation.com.

Thanks for looking.

NEPAL PROJECT PIPE SALE 9 – A Simple Restoration on a Wally Frank Rusticated Canadian


Blog by Steve Laug

This is the ninth pipe from the box of pipes that I was gifted by a good friend of mine with the instructed purpose of cleaning them up and selling them with all of the proceeds going to the aid of earthquake victims in Nepal. Once again all funds raised will all go to the SA Foundation, and organization that has worked in Nepal for over 15 years helping provide recovery, housing and job training for women who are victims of sexual exploitation and trafficking. The ongoing earthquakes (over 300) that continue to shake Nepal have left much in ruins. The SA Foundation Project there was able to find new housing for the women and help with staff as well. Every dollar raised from the sale of these pipes will go to the work in Nepal.

This one is a Wally Frank Rusticated Canadian. It is stamped very clearly on the left side of the shank, Wally Frank Ltd. There are no other stampings on the pipe. It was in decent shape though dirty. The finish was in very good shape under the grime and the rustication is interesting and will look great after a cleanup. The bowl needed a light reaming and the shank and airway were dirty. The rim was dirty but still very sharp and crisp. The stem was oxidized and was rough to the touch. Everything else about the pipe looked really good.Wally1

Wally2

Wally3

Wally4

Wally5

Wally6 The externals of the pipe were sharp but dusty and had a build-up of grime in the grooves of the rustication. When I pulled the stem I was a bit surprised to see the stinger apparatus that was pressure fit in the tenon. It was thick with tars and oils.Wally7 I twisted the stinger out of the tenon with a pair of pliers with the jaws wrapped in tape to protect the metal when I clamped down on it to remove it from the stem. I cleaned it with alcohol and 0000 steel wool to remove the tars.Wally8 I was surprised how clean the shank was when I used pipe cleaners, cotton swabs and alcohol to scrub it. The stem was the dirtiest part after the stinger was removed. I ran pipe cleaners through the airway and removed all the oils and tars that had accumulated behind the stinger.Wally9 I scrubbed the exterior with Murphy’s Oil Soap and a tooth brush to remove the dust from the grooves in the rusticated finish. Once it was scrubbed I put a thumb over the bowl and rinsed it off with cool water and then dried it off with a towel.Wally10

Wally11

Wally12

Wally13 The next four photos show the pipe after the scrubbing and drying. The finish is in great shape and will only need to be waxed and buffed.Wally14

Wally15

Wally16

Wally17 I put a plastic washer on the tenon between the shank and the stem so that I could sand it without damaging the shoulders of the shank or stem. I sanded the stem with 220 grit sandpaper to remove the small tooth marks on the top of the stem next to the button and also to remove the oxidation. I then sanded it with a medium and a fine grit sanding sponge to minimize the scratches left behind by the sandpaper. I polished the stem with micromesh sanding pads – wet sanding with 1500-2400 grit pads and then rubbing it down with Obsidian Oil. I dry sanded with 3200-4000 grit pads and repeated the rub down with oil. I finished with 6000-12,000 grit pads and gave the stem a final coat of Obsidian Oil. I set it aside to dry.Wally18

Wally19

Wally20 I buffed the stem and pipe with Blue Diamond Plastic Polish and then with a light buff of carnauba wax to protect it. I finished by buffing it with a clean flannel buff. I hand buffed the bowl with a shoe brush to make sure there was no residual wax in the rustication grooves. The finished pipe is shown below. It is ready for its new home.Wally21

Wally22

Wally23

Wally24

Wally25

Wally26 This Wally Frank Canadian is a very light weight pipe and the rustication and stain – a combination of browns and black gives it a distinctive look. It should make someone a great addition. If you are interested in this pipe email me with an offer at slaug@uniserve.com and we can discuss it. The entirety of the sale price will go to the Nepal project. I will pay the postage so that does not get taken off the proceeds. If you are interested in reading about the SA Foundation you can look at their website at http://www.safoundation.com.

Thanks for looking.

NEPAL PROJECT PIPE SALE 8 – Restoring a Kriswill Chief 32


Blog by Steve Laug

This is the eighth pipe from the box of pipes that I was gifted by a good friend of mine with the instructed purpose of cleaning them up and selling them with all of the proceeds going to the aid of earthquake victims in Nepal. Once again all funds raised will all go to the SA Foundation, and organization that has worked in Nepal for over 15 years helping provide recovery, housing and job training for women who are victims of sexual exploitation and trafficking. The ongoing earthquakes (over 300) that continue to shake Nepal have left much in ruins. The SA Foundation Project there was able to find new housing for the women and help with staff as well. Every dollar raised from the sale of these pipes will go to the work in Nepal.

This one is a Kriswill Chief, shape number 32. It is stamped on the left side of the shank, Kriswill over Chief over Handmade in Denmark. On the underside of the shank next to the stem it is stamped 32. It is an oval shank sitter. It is kind of a combination of shapes – a bent poker, and canted Dublin with a flat bottom, and a rounded rim billiard. All of these shapes combine to make a unique and interesting pipe. It was in decent shape though dirty. The finish was in very good shape under the grime and the briar should really stand out once it was cleaned and buffed. The bowl needed a light reaming and the shank and airway were dirty. The stem was oxidized and looking closely I could see faint stamping of the Kriswill snowflake. I was not sure I could bring it back as it was very faint in the vulcanite.Kriswell1

Kriswell2

Kriswell3

Kriswell4 The rim had some small dings on the inner edge on the left side of the bowl and there were some light tars on the top of the rim. The close-up photo below shows the surface of the rim and the cake in the bowl.Kriswell5 The stem was oxidized and quite brown but it appeared to be mostly on the surface of the stem. When I wiped it down lightly after these photos most of it came off easily.Kriswell6

Kriswell7 I reamed the bowl with a PipNet reamer and took the cake back to a very thin coat against the walls of the bowl.Kriswell8

Kriswell9 I cleaned the bowl, airway, mortise and stem airway with alcohol, cotton swabs and pipe cleaners and it did not take a lot of work to clean them.Kriswell10 I lightly sanded the stem with a medium and a fine grit sanding sponge and then moved on to work on it with the micromesh sanding pads. I wet sanded with 1500-2400 grit pads and rubbed the stem down with Obsidian Oil before moving on to dry sand with 3200-4000 grit pads. I rubbed it down with oil a second time and then dry sanded with 6000-12,000 grit pads.Kriswell11

Kriswell12

Kriswell13 When I had finished with the micromesh I gave it a final coat of Obsidian Oil and when it dried took it to the buffer and buffed the entire pipe with Blue Diamond Plastic polish on the wheel and then gave the stem and bowl multiple coats of carnauba wax to protect and shine. I finished by buffing it with a clean flannel buff to raise the shine. The finished pipe is shown below and is ready for the pipeman who accepts the offer to purchase it and support the women of Nepal.Kriswell14

Kriswell15

Kriswell16

Kriswell17

Kriswell18

Kriswell19 This Kriswell Chief is a beautiful pipe and the unique combination of shapes gives it a distinctive look. As I said above, it should make someone a great addition. If you are interested in this pipe email me with an offer at slaug@uniserve.com and we can discuss it. The entirety of the sale price will go to the Nepal project. I will pay the postage so that does not get taken off the proceeds. If you are interested in reading about the SA Foundation you can look at their website at http://www.safoundation.com.

Thanks for looking.

An Easy Restoration of a Bertram Grade 60 217 Poker


Blog by Troy Wilburn

I have been looking for a nice upper grade (Grade 50 or above) Bertram Poker for a while. I had almost purchased a couple of lower grades and one 50 grade but they were all either to expensive or pretty beat up, so I kept holding out for the right one. When this nice example of a 60 grade came across my path for a modest price I knew my patience had paid off.

This makes my 2nd Bertram pipe. The other being a straight Cutty and it is an excellent smoker. They are some of my highest end estate pipes. I very much like the quality of them and the long interesting history they have.

If you don’t know much about them I recommend doing a little research on them. Bertram pipes were based out of Washington DC. They were popular among famous politicians and celebrities of the time. They made many products for them from FDR’s cigarette holders to Joseph Stalin’s favorite pipe. They were considered some of the best America had to offer till they finally closed their doors in the 70s. They graded their pipes by 10s, the higher the grade the better. Above 60s are uncommon and 80-90s are quite rare. I’ve never heard of or seen a 100 grade. Here is a link with some brief history of Bertram pipes on Pipedia.

I found this image of from a page of a Bertram pipe booklet that shows the poker shape number of 217.
http://pipedia.org/wiki/Bertram Bertram1 This is what the pipe looked like when I received it. Other than being dirty it’s in excellent shape. It’s hard to put a date on it but it’s at least from the 70s and maybe as far back as 40s or more. Bertram started in 1927.Bertram2

Bertram3

Bertram4

Bertram5 I started by cleaning out the bowl and shank. The cake came out very easily and the cleaning was not that difficult.Bertram6 I then cleaned and stripped off old wax and rim residue with Oxy Clean, warm water, cotton balls and a Scotch Brite pad on the rim.Bertram7 I then wet sanded the bowl with mineral oil and 1200 to 2500 grit sandpaper.Bertram8 After soaking the stem for a couple of hours in Oxy Clean and warm water I scrubbed off all the surface oxidation with a Scotch Brite pad.Bertram9 I had a couple of small tooth marks to file out.Bertram10 Then I wet sanded the stem with 400-2500 grit paper.Bertram11 The stem was fitting rather tight so I applied some bee’s wax to the tenon.Bertram12 The bowl and stem back together with a mineral oil applied and wiped off for a quick inspection before buffing.Bertram13 I gave it a quick buff with some brown Tripoli before applying some white Tripoli then many coats of carnauba wax.Bertram14 After applying wax and finished pipe.Bertram15

Bertram16

Bertram17

Bertram18

Bertram19

Bertram20

Bertram21 There was one small flaw in the briar. I decided to leave it as is.Bertram22 Very nice stampings on pipe.Bertram23

Bertram24

Bertram25

Bertram26 All in all it was a very simple refurbish due to its condition. I’m very happy with the way it turned out and have intentions of adding at least one more Bertram to my collection. Hopefully a large straight billiard.

NEPAL PROJECT PIPE SALE 7 –Restoring a Kirsten K – Companion Generation 2


Blog by Steve Laug

This is the seventh pipe from the box of pipes that I was gifted by a good friend of mine with the instructed purpose of cleaning them up and selling them with all of the proceeds going to the aid of earthquake victims in Nepal. Once again all funds raised will all go to the SA Foundation, and organization that has worked in Nepal for over 15 years helping provide recovery, housing and job training for women who are victims of sexual exploitation and trafficking. The ongoing earthquakes (over 300) that continue to shake Nepal have left much in ruins. The SA Foundation Project there was able to find new housing for the women and help with staff as well. Every dollar raised from the sale of these pipes will go to the work in Nepal.

It is a Kirsten metal pipe with a briar Dublin bowl. It is stamped on the left side of the shank, Kirsten in a cursive script. On the underside it is stamped Made in U.S.A. – K. These pipes were made for a long period of time in the Seattle, Washington area of the US. They came in four generations or iterations – Generation 1, 1.5, 2 and 3. The stamping on this one, the absence of a metal cap to hold the bowl, and the presence of the rubber O rings on the metal valve and on the stem insert, point to it being a Generation 1.5 pipe or a transitional one.

Documentation that I quote on an earlier blog from Dave Whitney shows the following information on the Generation 1.5 – transitional period – mid to late 50’s. This was an experimental stage. Kirsten realized that the bit and insert were prone to seizure as the condensate dried. This model always has O-rings on the metal insert, and later models can have O-rings on both. Same markings, as I remember it. There is no metal cup spacer under the bowl. This generation has O rings either on the valve or mouthpiece but no O rings on the other end. This transitional period is stamped “Pat. Pending” and “Pats. & Pats. Pending” some with “Made in U.S.A. It seems like the company was using surplus parts to combine into this series of pipes. This particular pipe is stamped K after the U.S.A. thus making it a Companion.

When I brought this one to the work table the stem was frozen in the shank and the valve on the end was also frozen. The bowl could not be turned off by hand as my other Kirsten’s can. The bowl had a layer of cake and the screw in the bottom of the bowl was also caked and dirty. The rim was dirty and the metal was barrel was dull and soiled. The stem was not only stuck but it also had tooth marks on the top and underside of the stem near the button. There was also some discoloration and sticky buildup on the stem.K1

K2

K3

K4 I cleaned out the slot on the screw in the bottom of the bowl and was able to remove it with a flat blade screwdriver. The valve at the end of the barrel also came out when I used a pair of pliers that I had taped the end on so that it would not damage the aluminum of the valve. It was very tight and the tobacco oils acted like dried varnish on the rubber gasket and the aluminum almost welding it to the barrel. By carefully working it back and forth I was finally able to remove it.K5 The stem would not budge so I dropped the barrel stem down in my alcohol bath and let it soak overnight. I dropped the bowl into the bath at the same time to soften the cake in it and also make the cleanup of the rim and bowl easier.K6 I filled a small cap with alcohol and put the valve and the screw into the small bath overnight as well. I figured a good soak would make the clean up process much simpler.K7 In the morning I was able to remove the stem and rod apparatus from the barrel with ease. It was caked with the same kind of varnish from the tars and oils of the tobacco.K8 I took a photograph down the barrel to show what the inside looked like once the stem was removed.k9 I took the bowl out of the bath as well and laid out the parts of the pipe side by side for the photos before I cleaned them up.k10 Using a piece of 0000 steel wool I scrubbed the rod and the bowl down to clean up the grime and buildup. I also scrubbed the screw and the valve as well with the steel wool. It did not take much effort to remove that from the metal or the briar. The photo below shows the cleaned up parts.k11 I scrubbed out the barrel with cotton swabs and alcohol as far as I could reach. I pushed it through the threaded connector for the bowl as well to remove all of the oils and tar.k12 I took the next photo of the barrel to show the inside and how much cleaner it was. I still needed to clean it more so I twisted some tissue into a cord and turned it into the barrel until it came out the other end. I move it back and forth to scrub out the inside of the barrel. Once it was out the inside of the barrel shone.k13

k14 I reamed the bowl using a sharp pen knife paying particular attention to the seat at the bottom of the bowl which held the screw flat against the bowl bottom. I cut the cake back to a very thin coat along the walls. I then used some Vaseline on the threads of the screw and put it through the bottom of the bowl and used the screw driver to turn it into the barrel. I still needed to polish the grooves on the barrel and the valve but the pipe was beginning to look very good.k15

k16 I sanded the tooth marks on the stem with 220 grit sandpaper to remove as much of them as I could without thinning the surface of the stem or leaving behind a groove. I was able to remove both marks on the top and bottom of the stem.k17

k18 I used micromesh sanding pads to polish the stem and bring back the shine. I wet sanded with 1500-2400 grit pads and then rubbed the stem down with Obsidian Oil and then dry sanded with 3200-4000 grit pads and gave it another coat of oil. Finally I sanded with the 6000-12,000 grit pads and then gave it a final coat of oil and let it dry.k19

k20

k21 I buffed the stem with Blue Diamond Plastic Polish on the wheel and brought out a deep shine. I then gave the stem multiple coats of carnauba wax and buffed it with a clean, soft flannel buffing pad to raise the shine.k22

k23 I buffed the barrel lightly with the Blue Diamond and also buffed the bowl. I gave the bowl and barrel several coats of carnauba wax and then lightly buffed it with a clean flannel buffing pad to raise the shine. The finished pipe is shown in the photos below. It is ready for someone who has been looking for one of these to pick it up and add it to their rack and help out the women of Nepal at the same time.k24

k25

k26

k27

k28 This older Kirsten Companion K is a great looking pipe and the Dublin bowl gives it a distinctive look. As I said above, it should make someone a great addition. If you are interested in this pipe email me with an offer at slaug@uniserve.com and we can discuss it. The entirety of the sale price will go to the Nepal project. I will pay the postage so that does not get taken off the proceeds. If you are interested in reading about the SA Foundation you can look at their website at http://www.safoundation.com.

Thanks for looking.