Tag Archives: removing oxidation

Bringing a FILTO SYSTEM Pipe Back to Life


Blog by Steve Laug

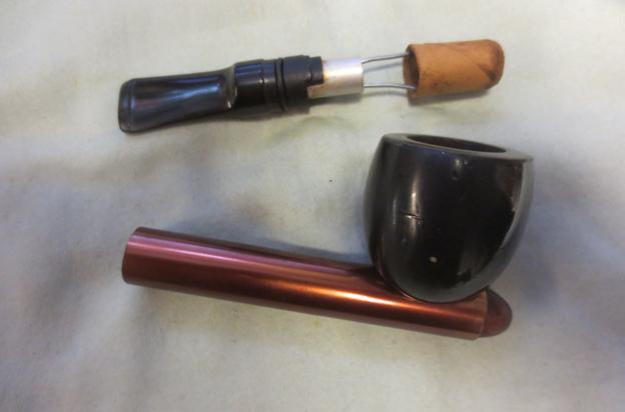
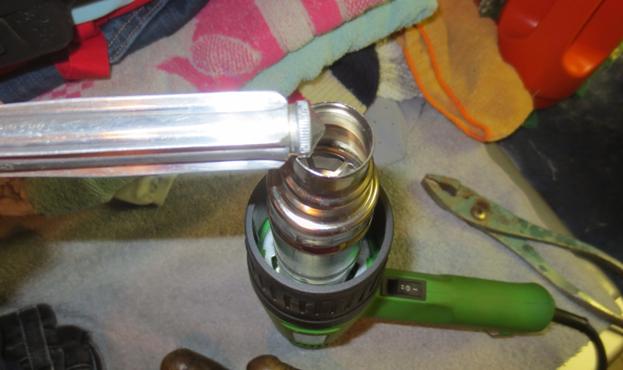
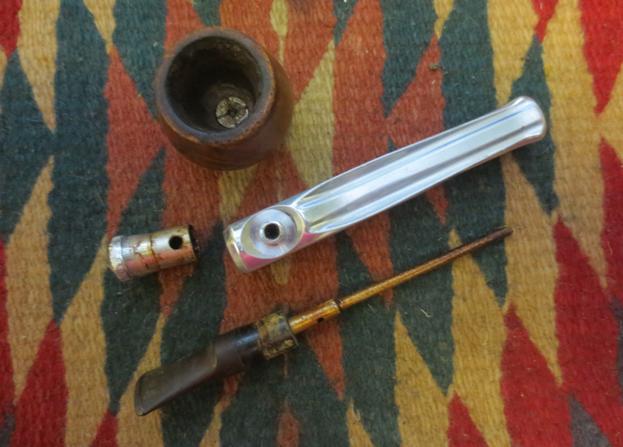
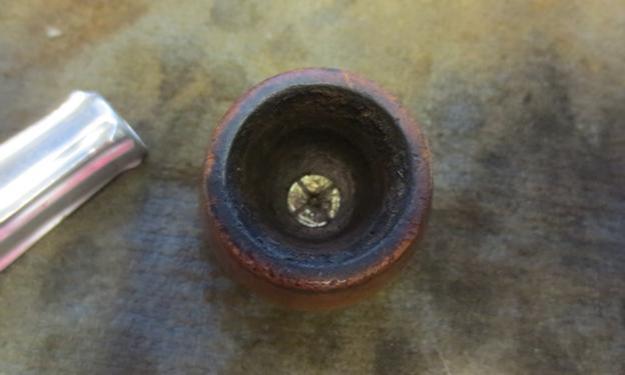
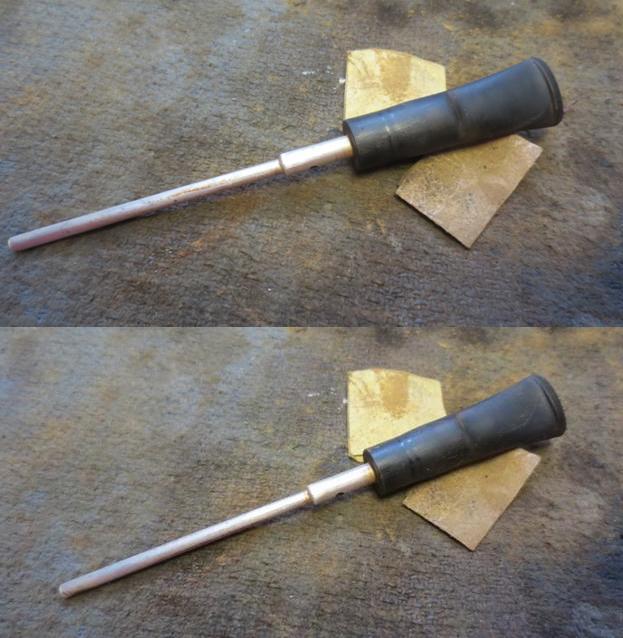
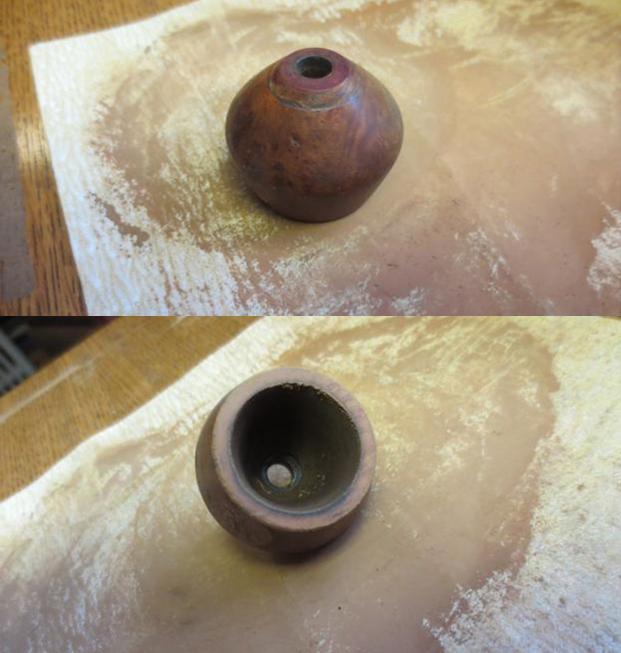
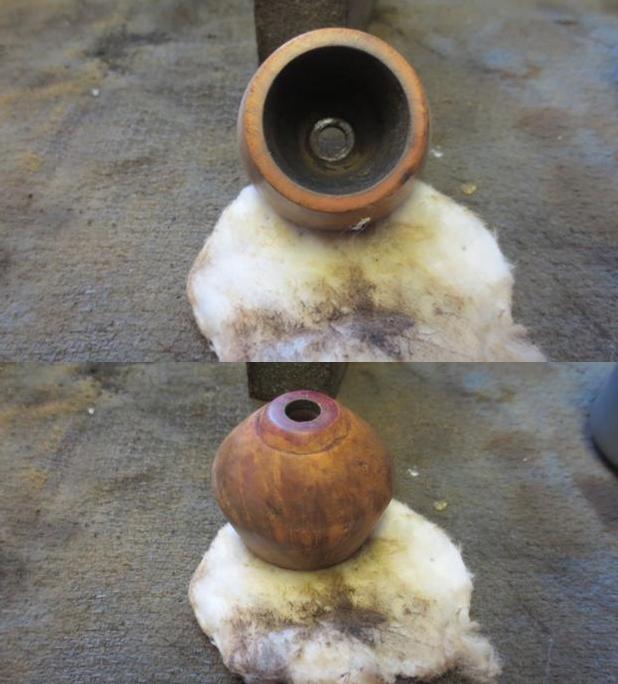
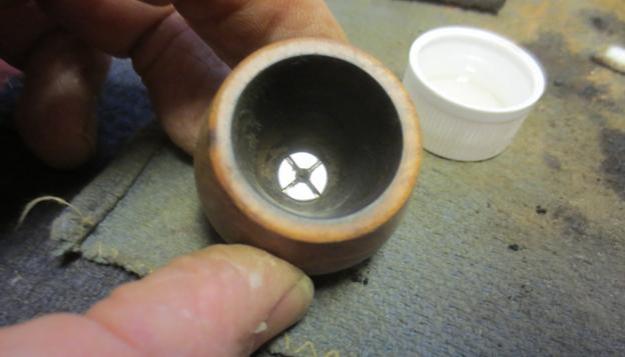
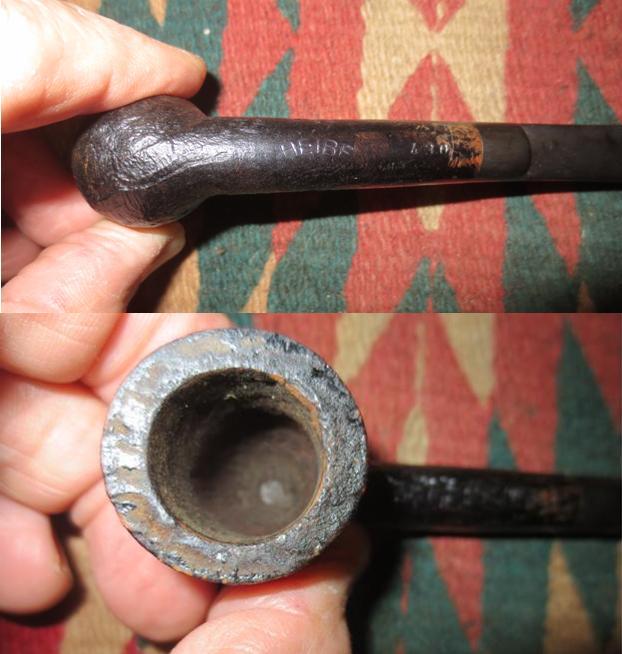
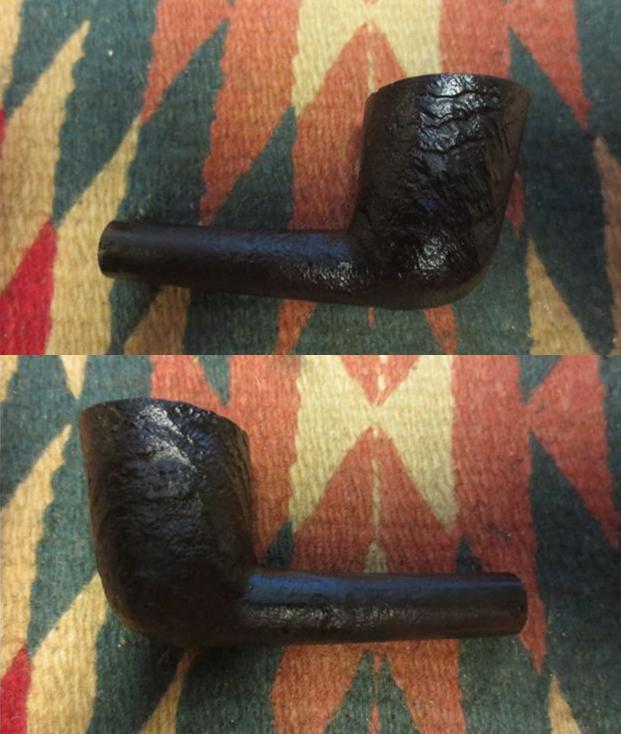
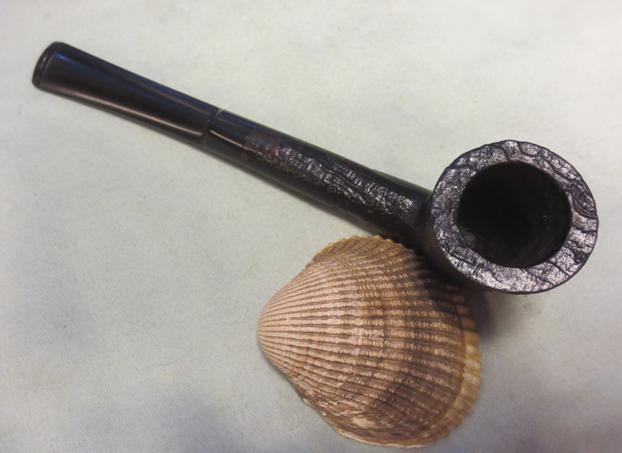
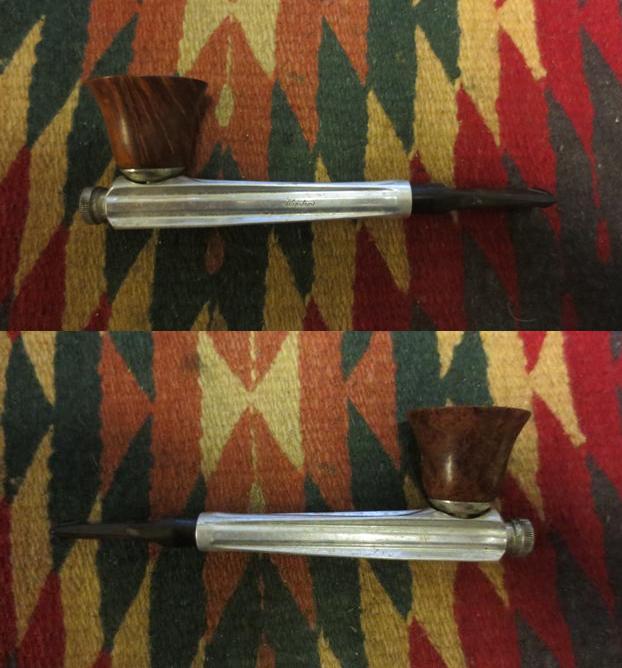
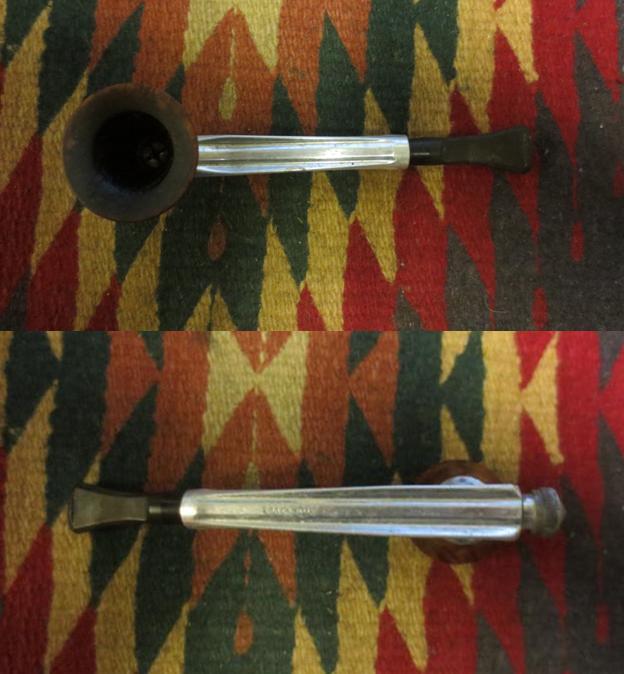
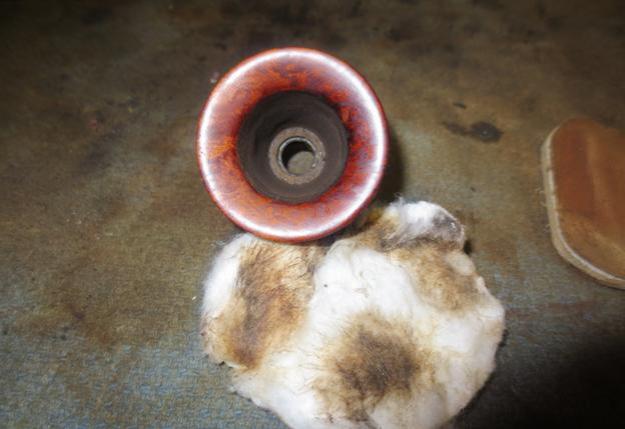
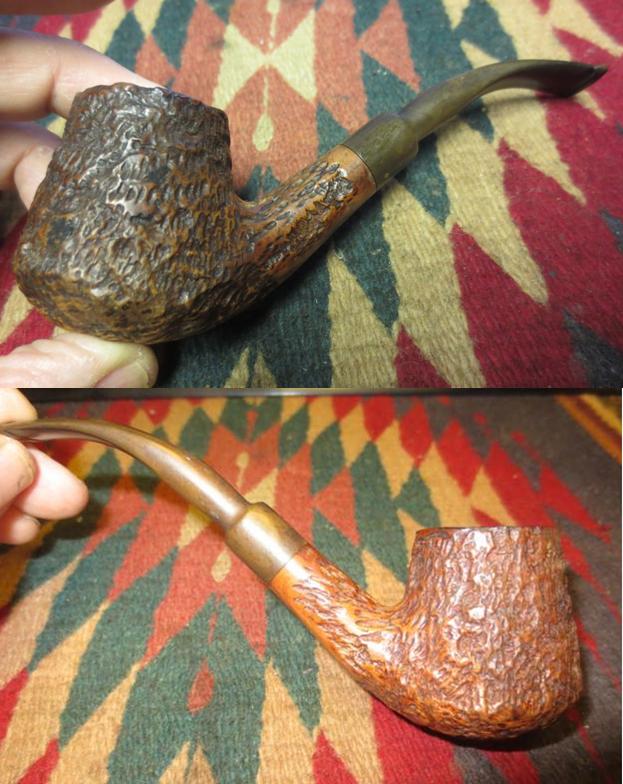
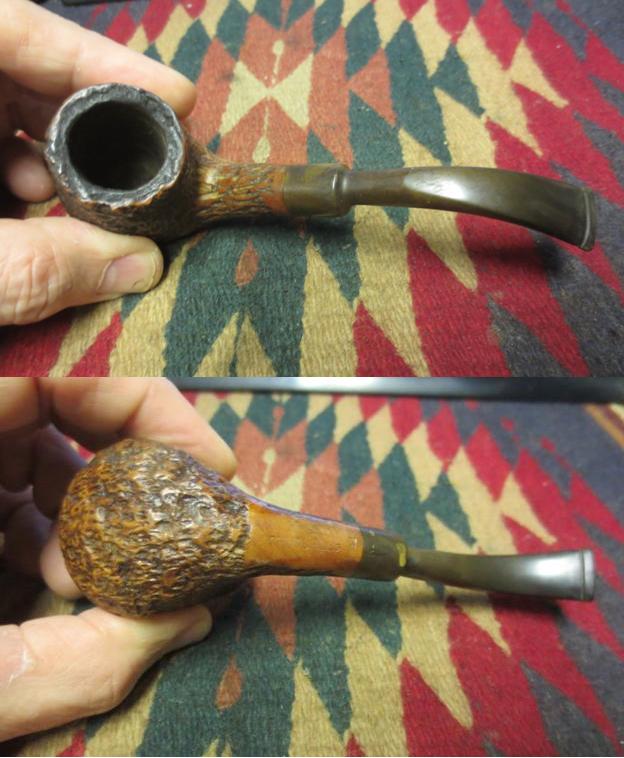
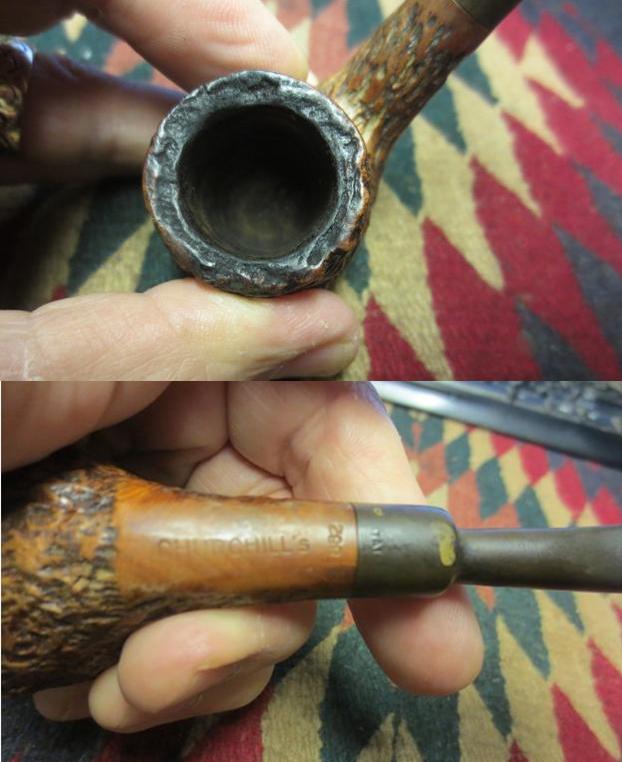
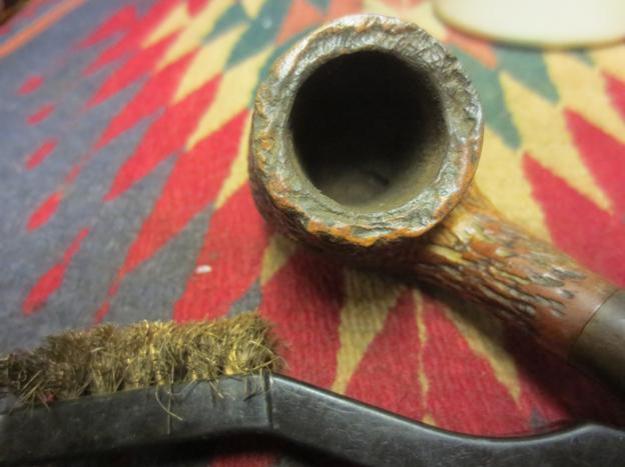
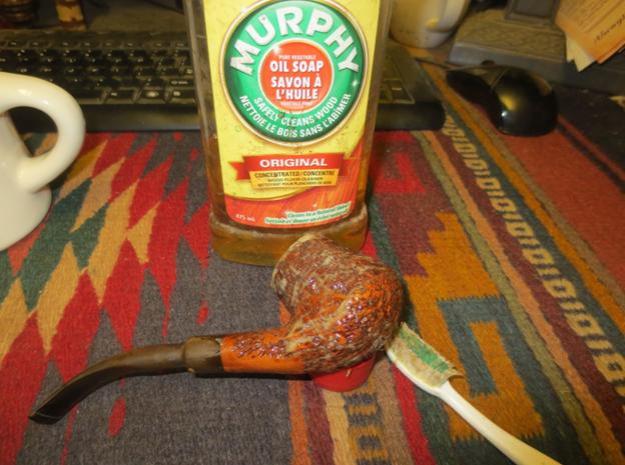
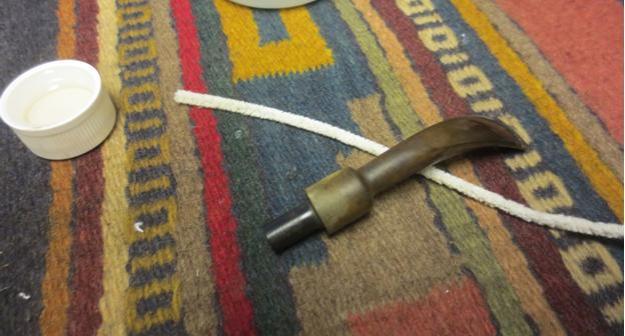
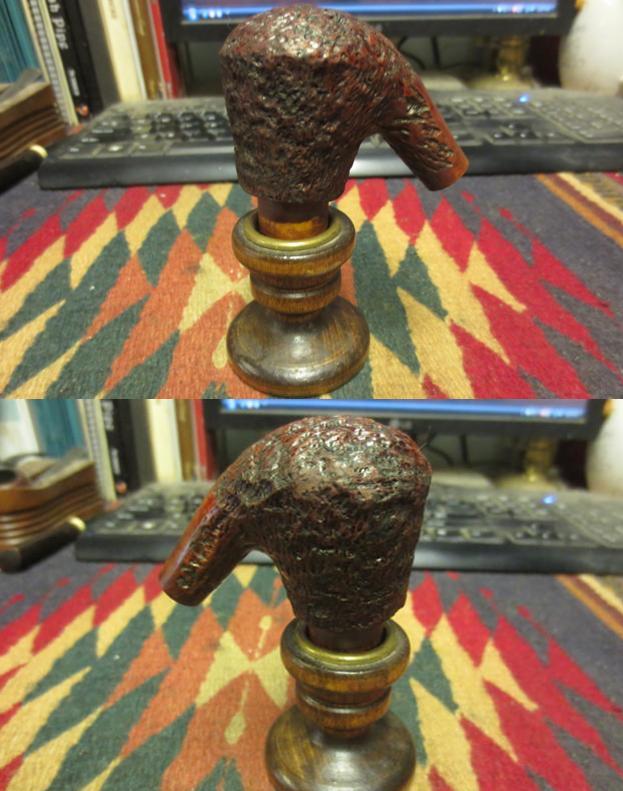
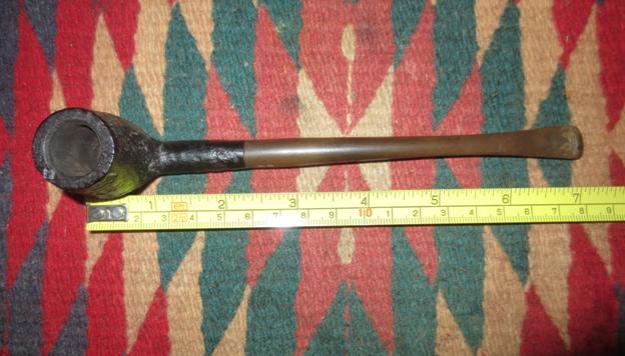
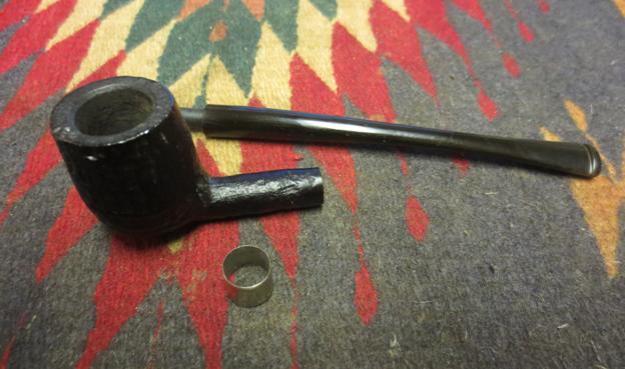
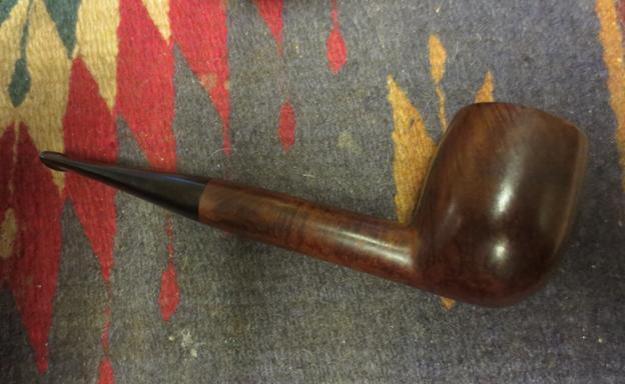
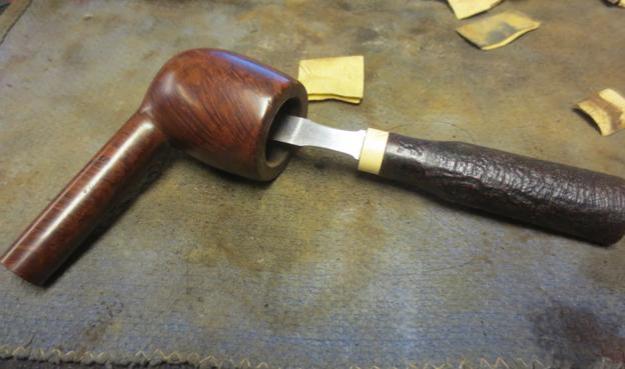
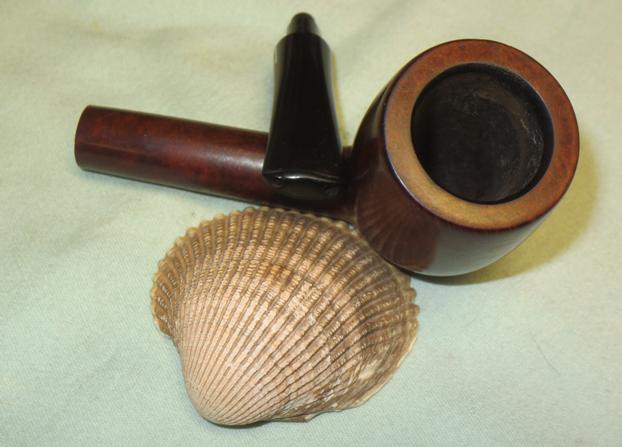
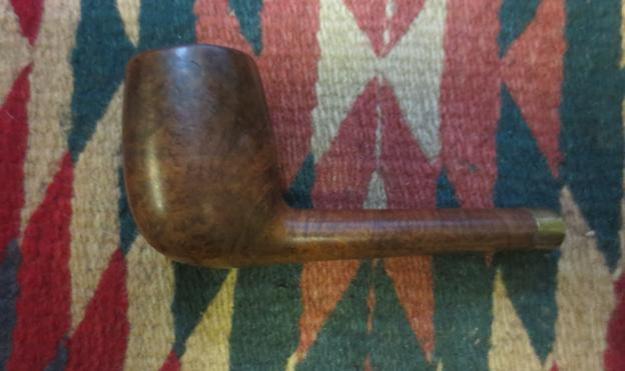
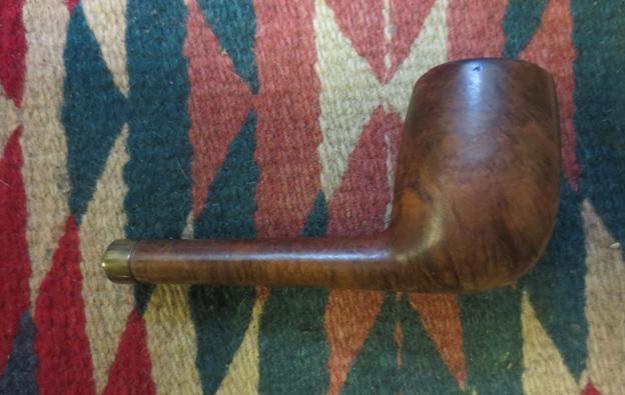
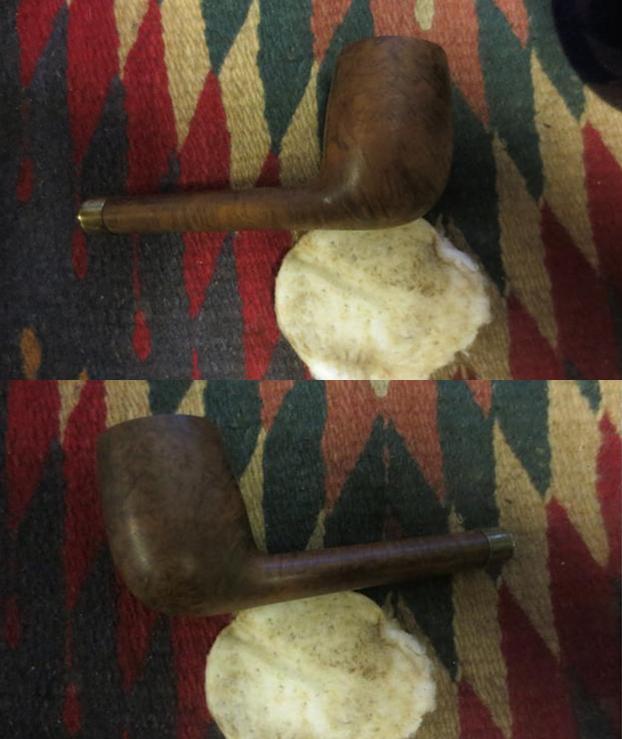
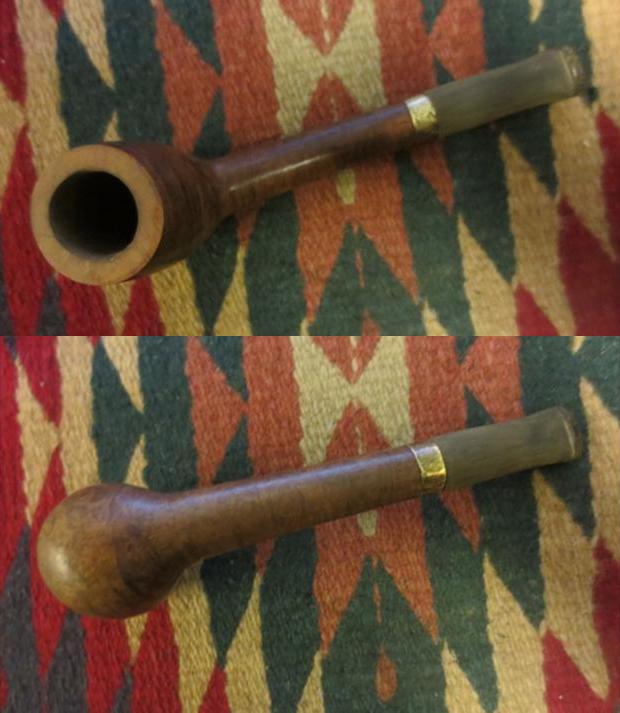
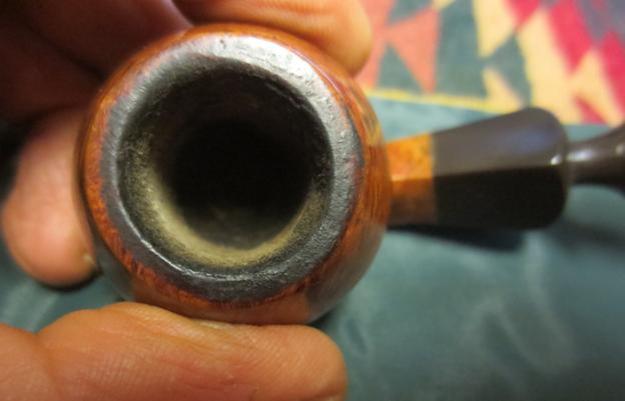
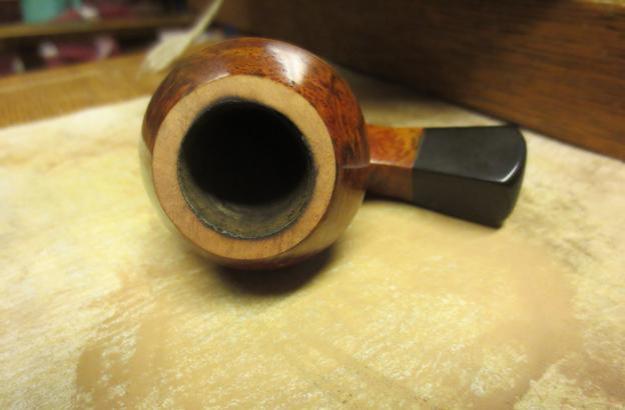
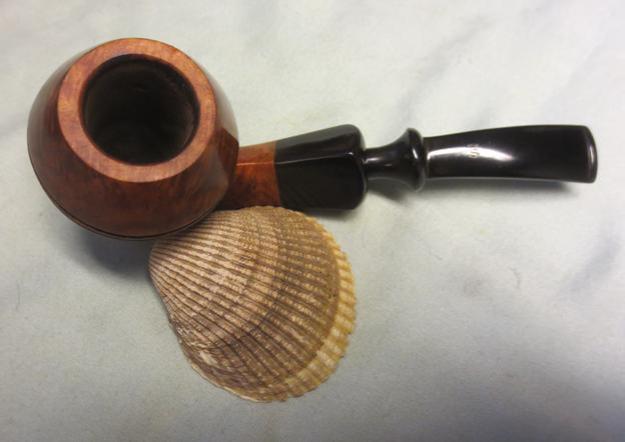
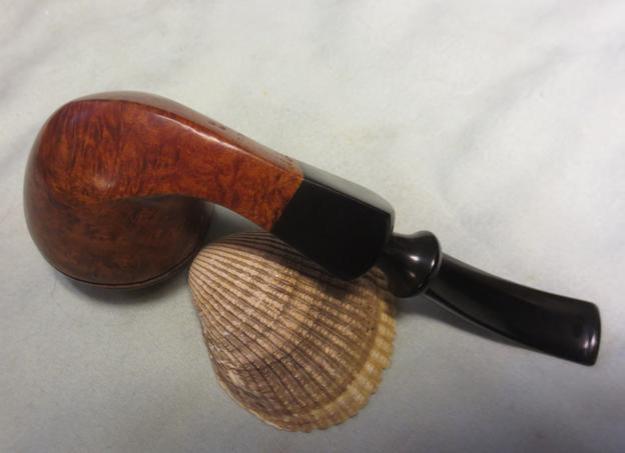
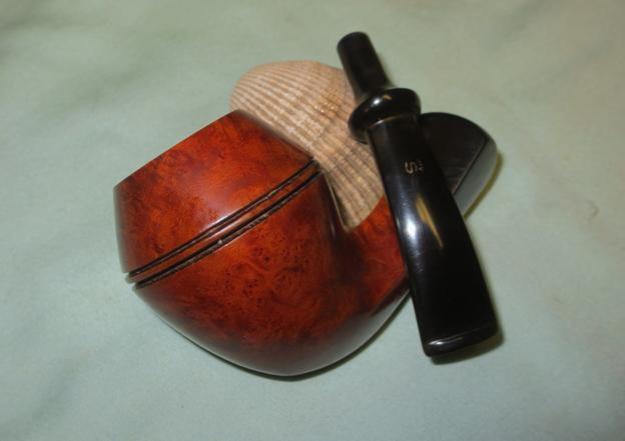
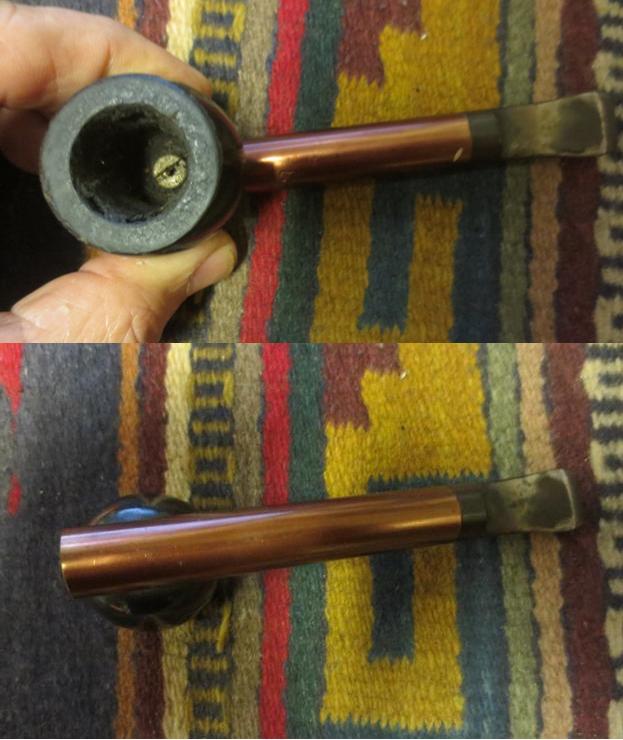
I have had this pipe sitting in a parts box for a while now. It was missing a few parts – notably the end plug. It had a copper coloured barrel and a black vulcanite mouthpiece that was oxidized. There were no tooth marks on the stem. The bowl was painted with a dark brown paint and had a shine. The rim was dirty with lava from the overflow of the bowl. The bowl had a thin, uneven cake on the walls. There was a screw in the bottom of the bowl that was similar to Kirsten screws. It had a hole in the centre that allowed the air to be pulled from the bowl into the barrel. It was stuck in the bottom under the cake that held it in place. The inside of the barrel on the end that was missing the end plug was thickly caked with tars and oils. There appeared to be something in the barrel part way down that closed off the barrel. The side of the barrel is stamped FILTO over Burgaw, NC over PAT. MADE IN USA.Filto1Filto2

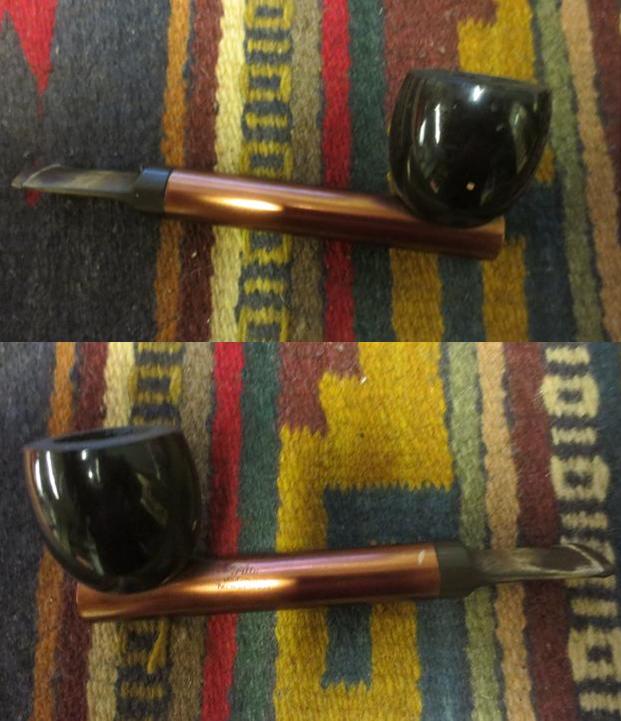
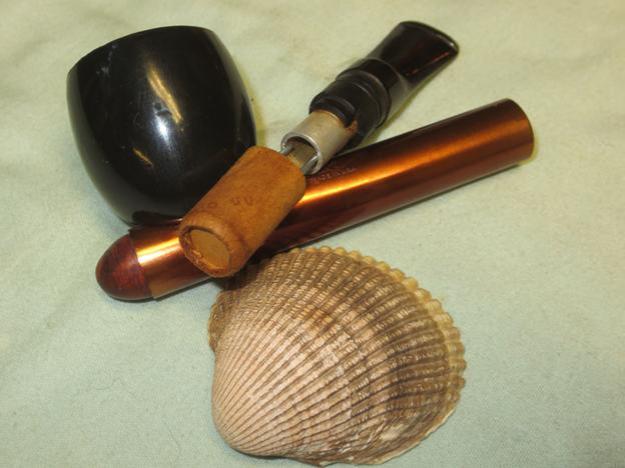
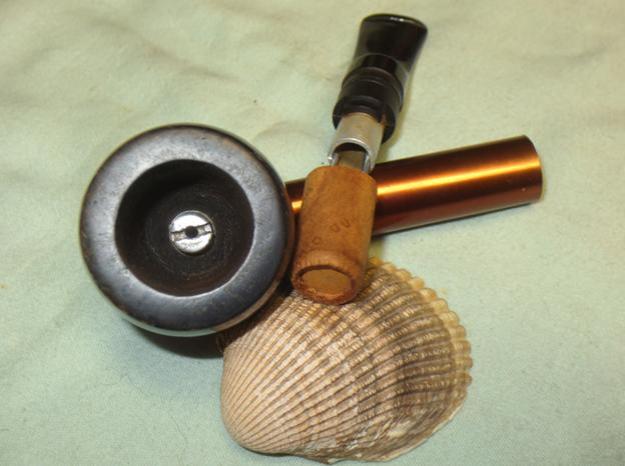
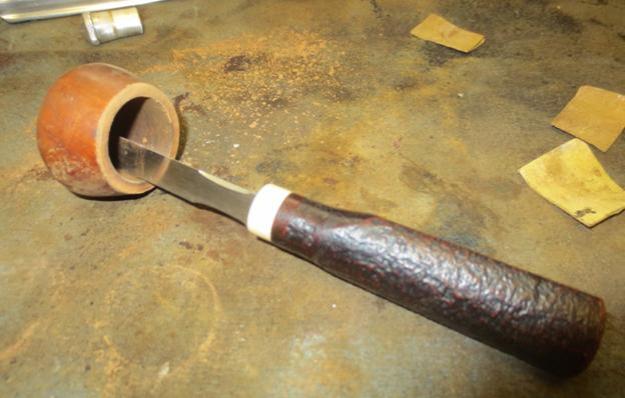
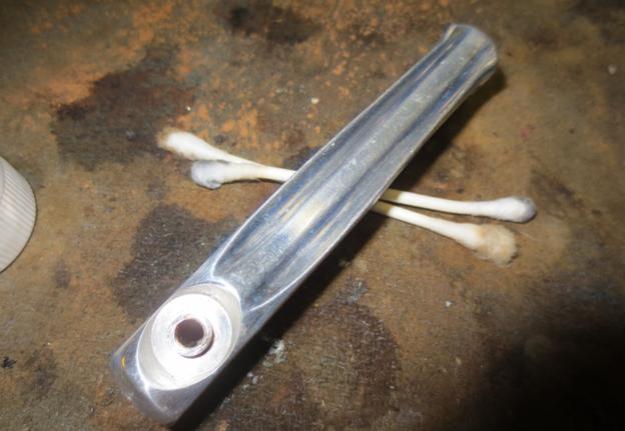
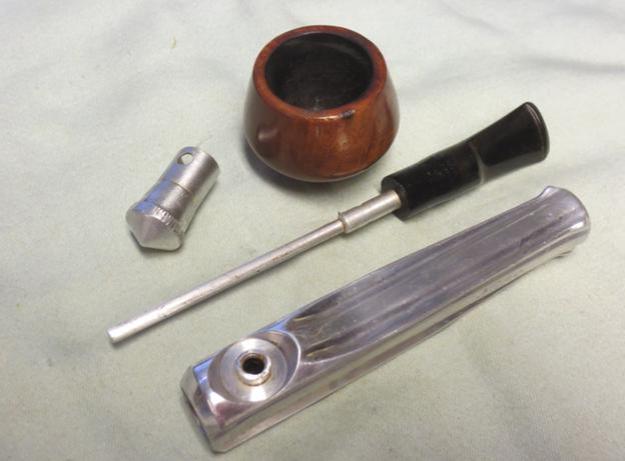
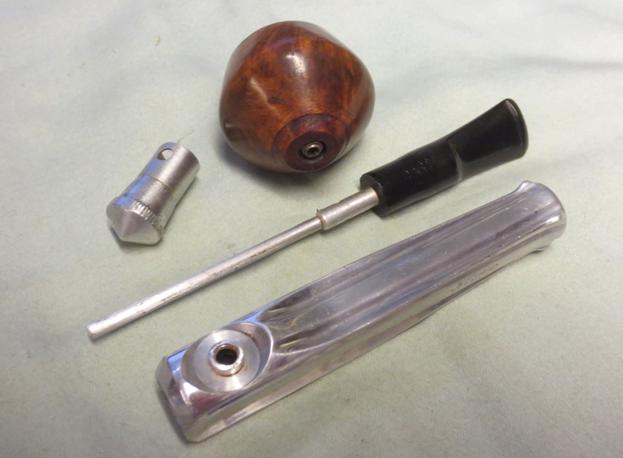
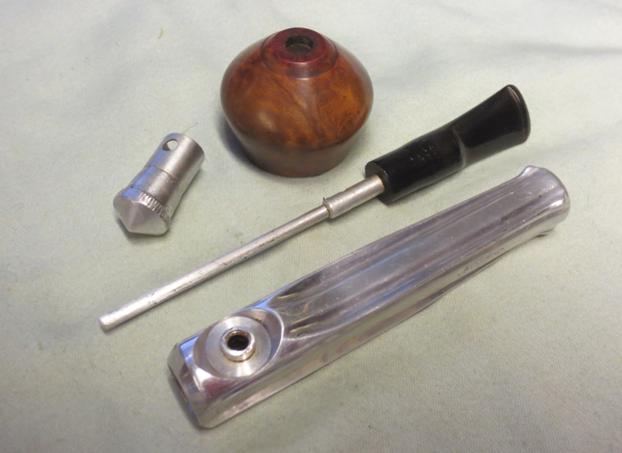
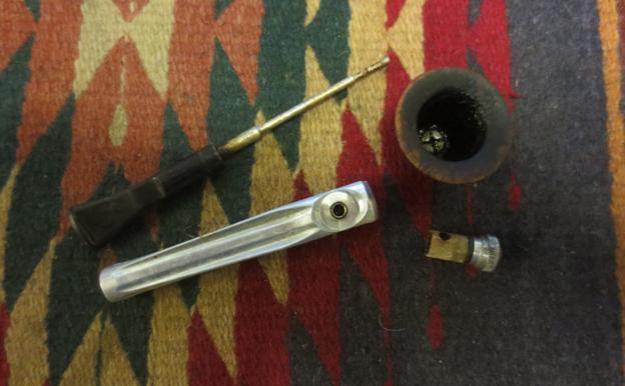
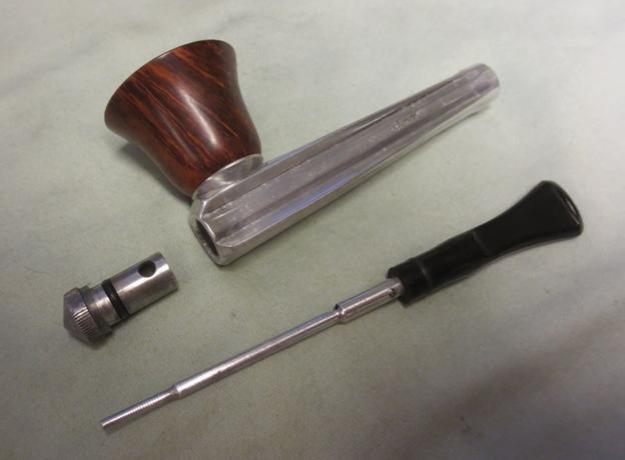
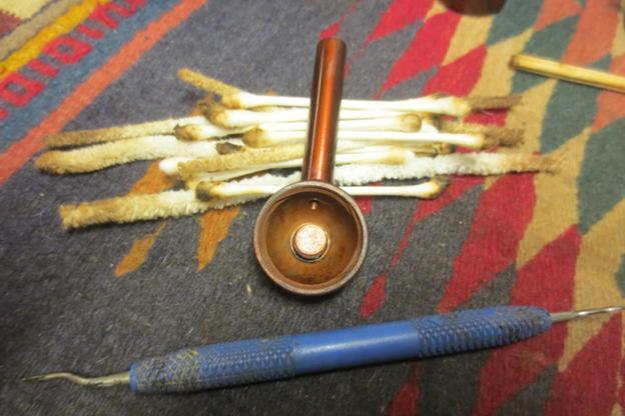
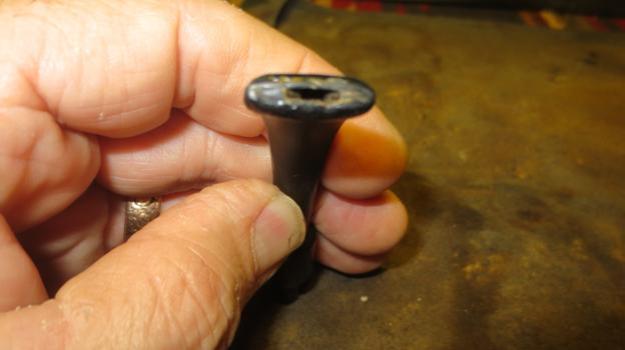
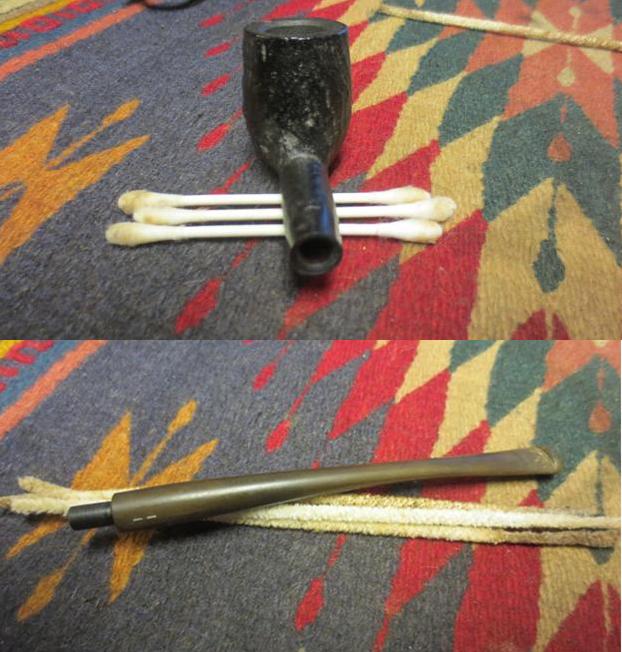
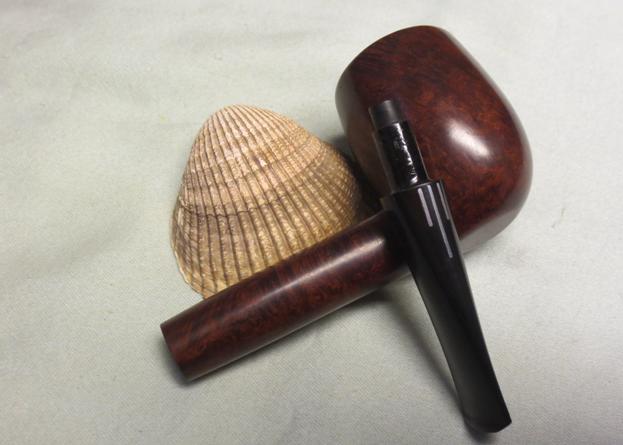
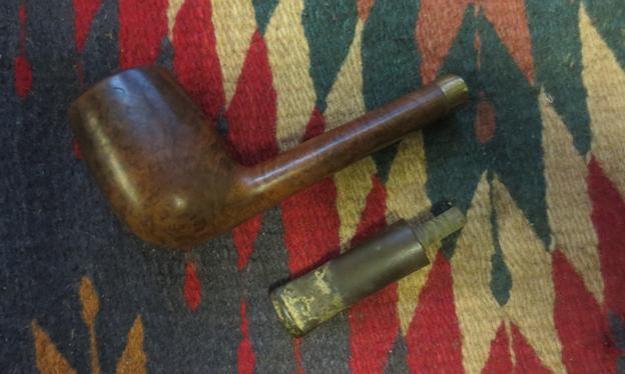
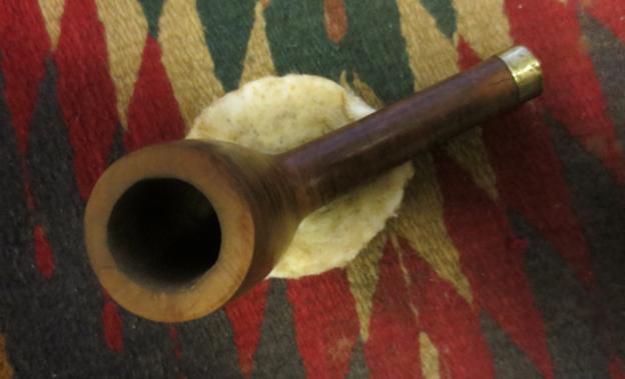
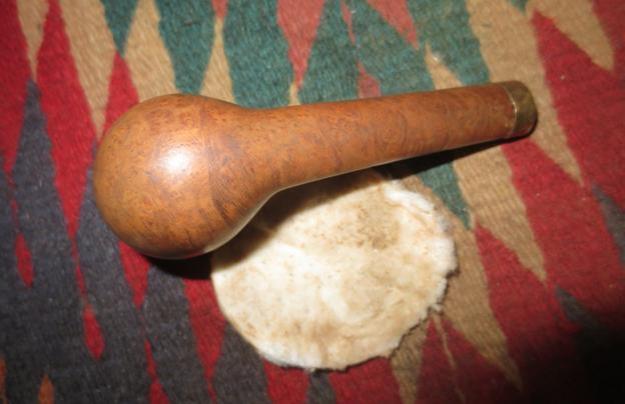
I took the pipe apart so that I could look at the pieces. The next photos show the barrel, bowl, stem and screw. The screw is interesting in that it had a collar that kept it lifted above the bottom of the bowl. There seemed to be a build-up of something on the top of the barrel where the bowl sat.Filto3

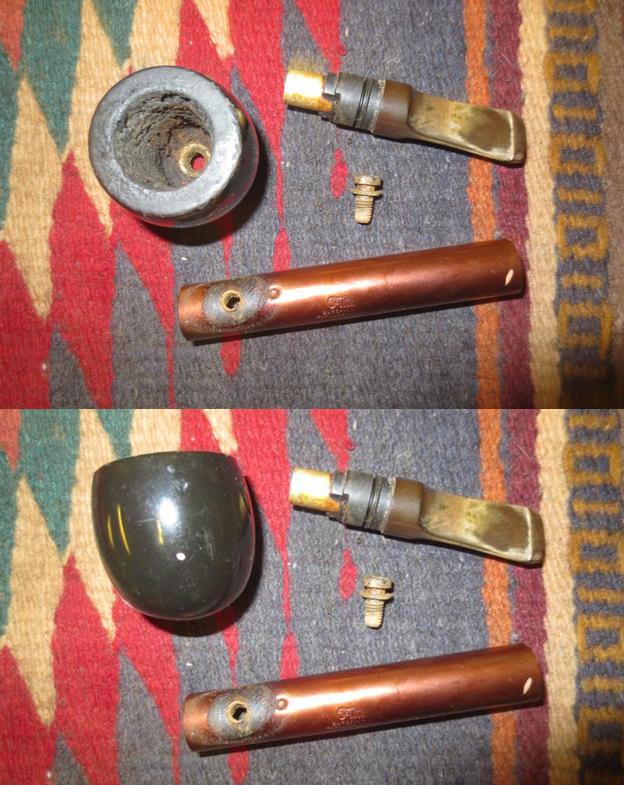
I did a bit of hunting on the web to see if I could figure out what was missing in the barrel. I knew that the end cap was missing and that it was a pressure fit. I also wanted to know what the card board piece was that seemed to be in the middle of the barrel. When I took the above photo I had not removed it from inside the barrel as I did not know what it was and did not want to damage it. I checked the Smoking Metal Website which is my first stop when seeking information on metal pipes. The site not only had the pipe listed but a variety of photos of the internals and of the models that were available. I have included the link and the short text that was included on the site.  http://www.smokingmetal.co.uk/pipe.php?page=213

“Made by Filto Pipes Inc. of Burgaw, North Carolina, inventor Robert L. Smith, US Patent #33170468 23rd Feb. 1965. The stem, sealing ring and filter holder design mentioned in design by Aristocob. The bowl and stem are in a great variety of colours, all interchangeable.The spring clip in the bit assists in holding the filter in place. There are two version of the stem one with a spun front end and more common with a plastic push fit end cap.”

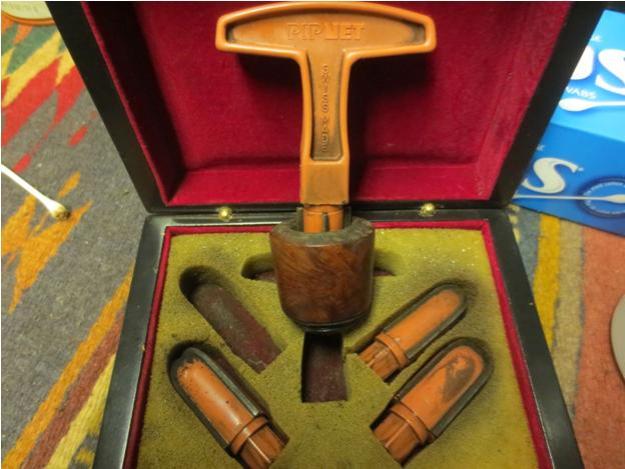
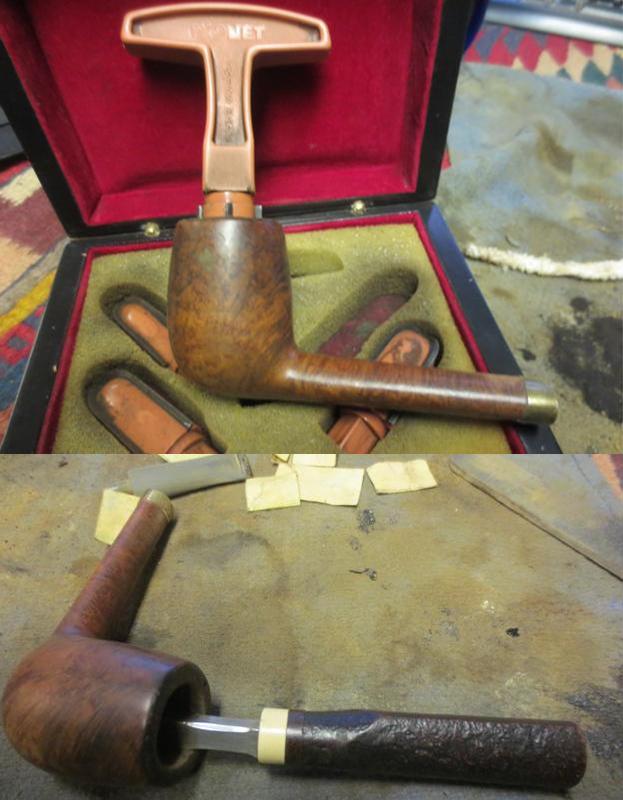
The photo below shows the parts that are enumerated in the above quote. There are two different barrel designs shown as well. The top one seems to show that the end is rounded and closed like a cigar cap. The red pipe below shows a plastic ridged endcap. The close up of the two bowls at the bottom show both ends. It is obvious that the one I had was like the pipe on the left side. Filto4

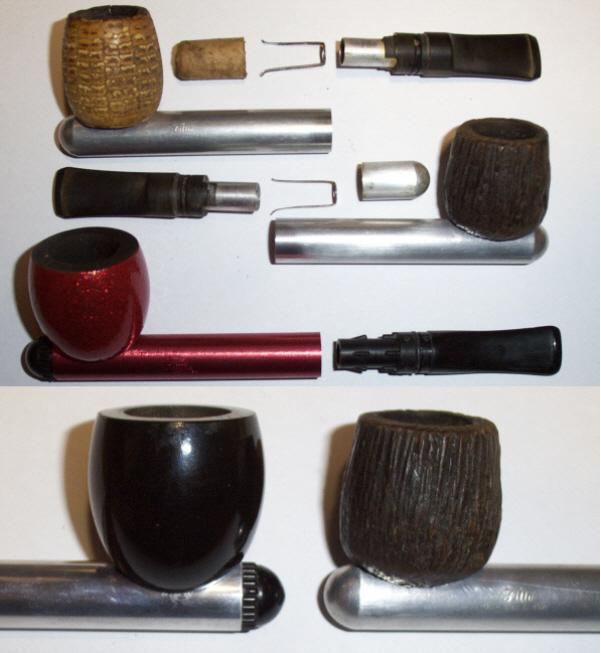
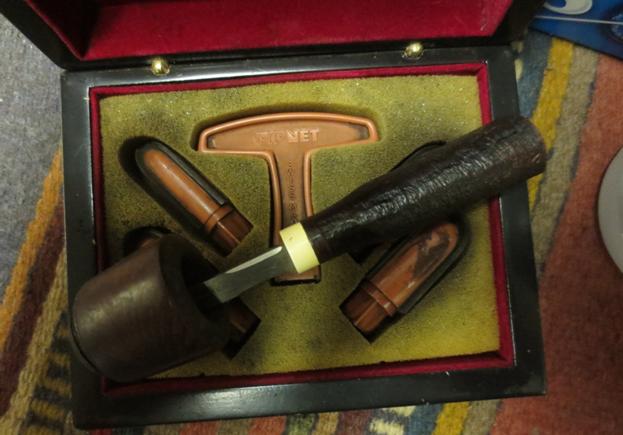
The photo below shows many different models of the same pipe. There are obviously two different styles of stems – a saddle stem like the one I have and a tapered stem.Filto5

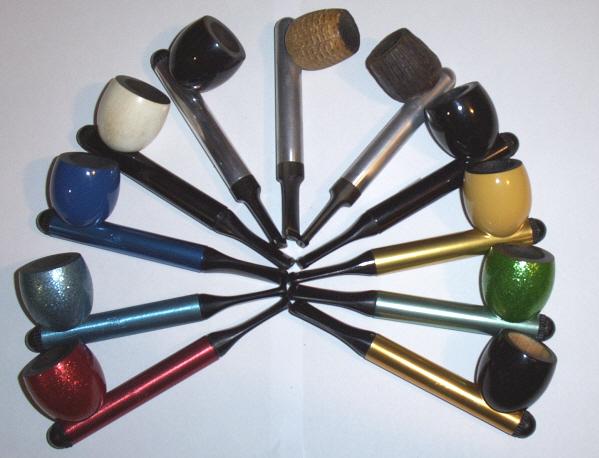
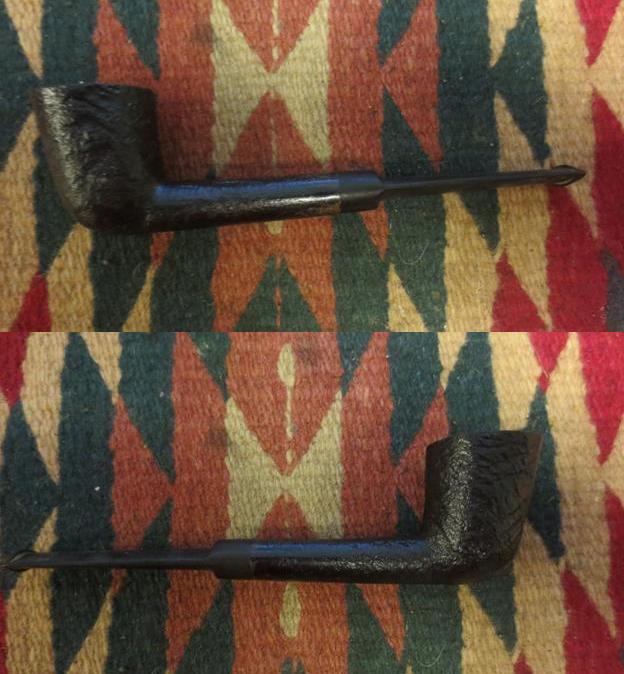
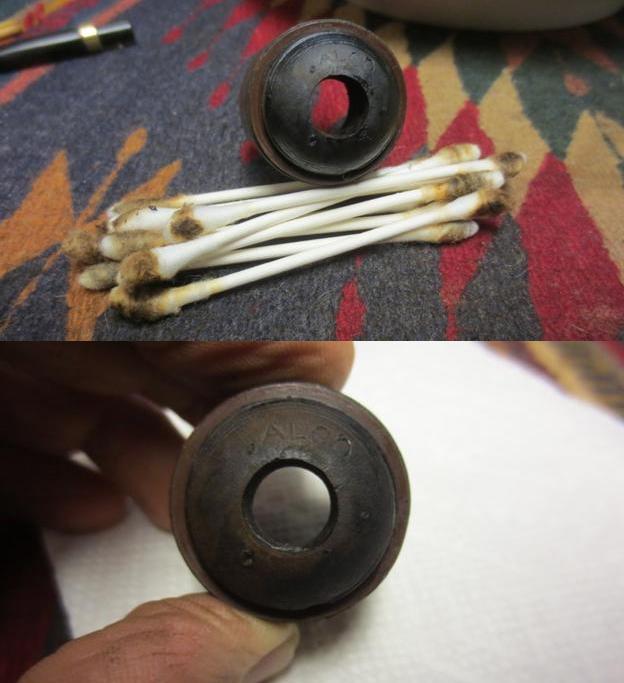
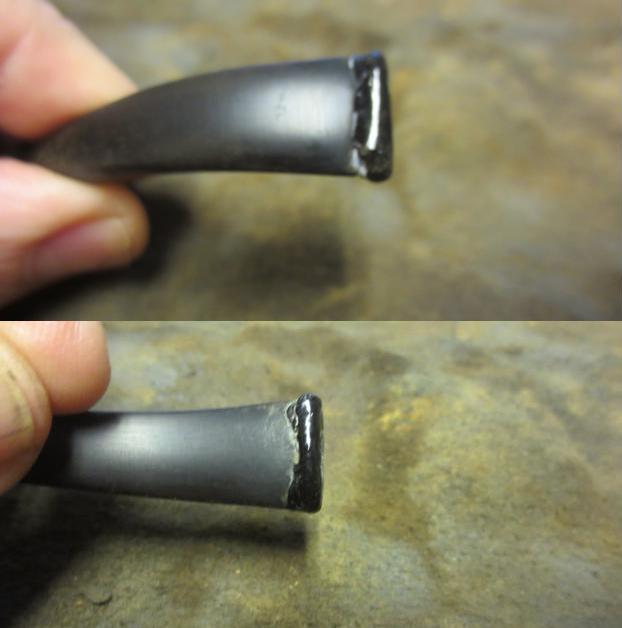
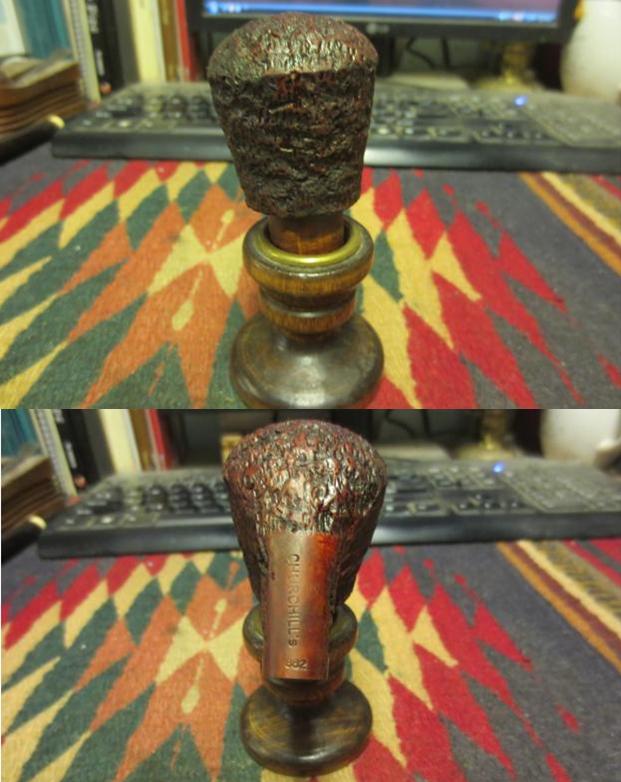
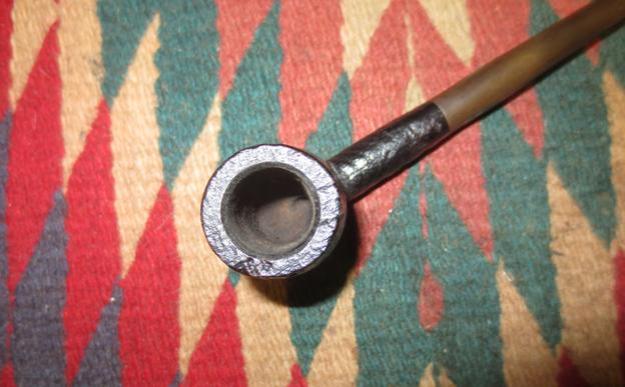
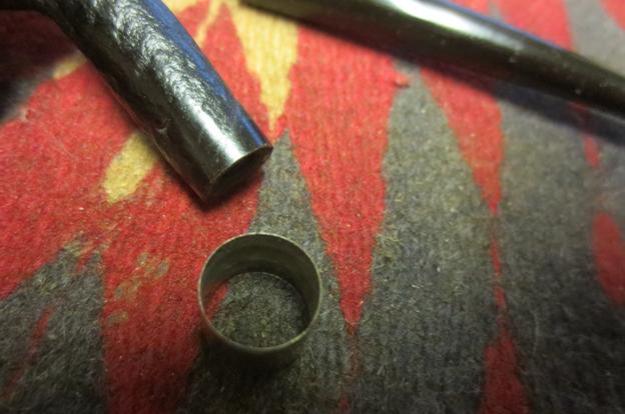
Now I understood the shape of the end cap and also what the cardboard in the barrel was. I took a photo of the stamping on the barrel. It is clear and easy to read.Filto6

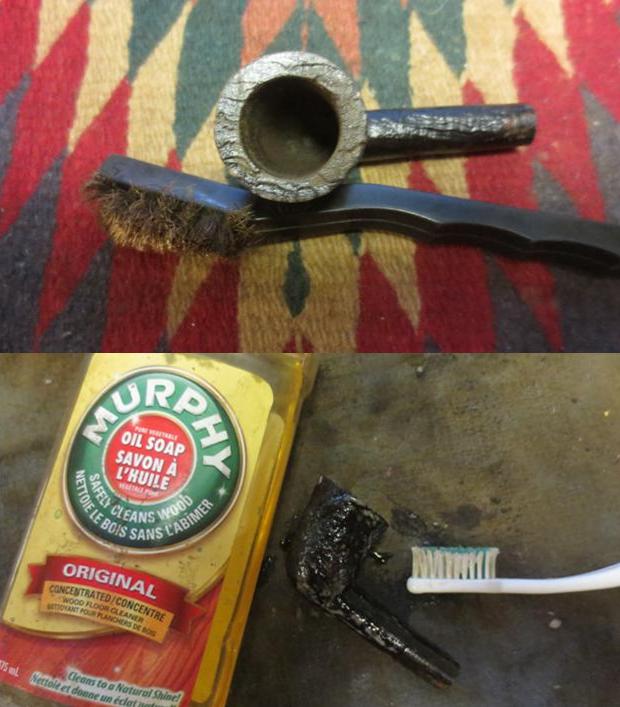
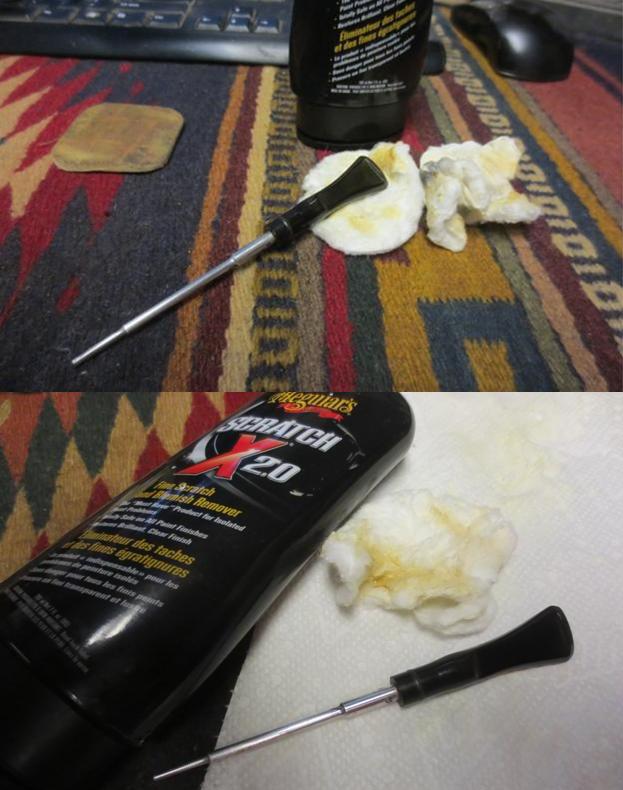
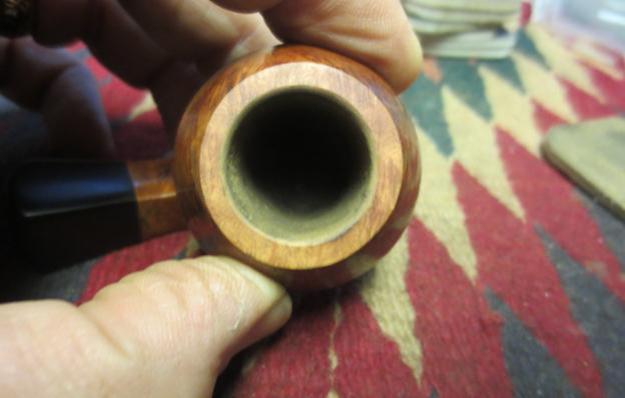
I reamed the bowl with the PipNet reamer and took the cake back to bare briar. I cleaned up the reaming with the Savinelli Pipe Knife.Filto7

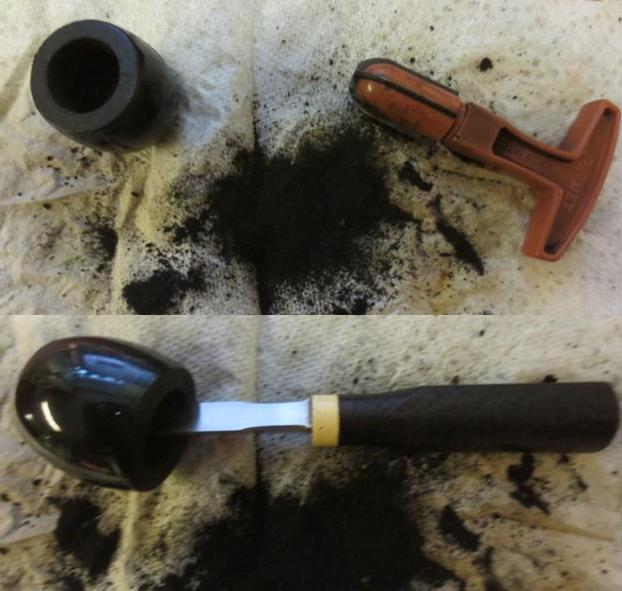
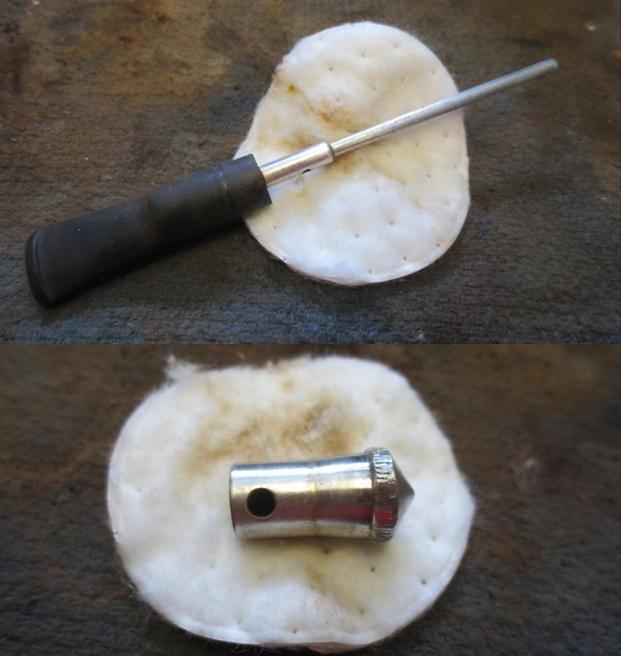
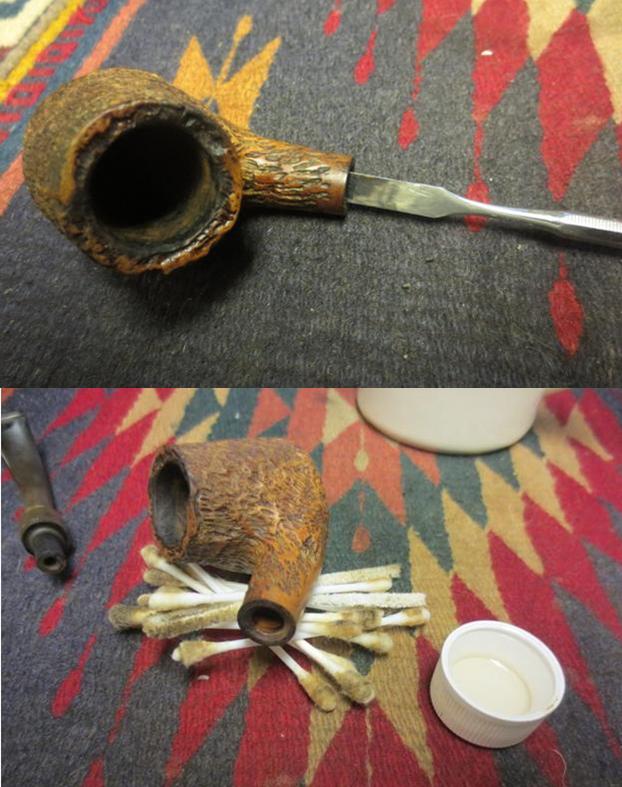
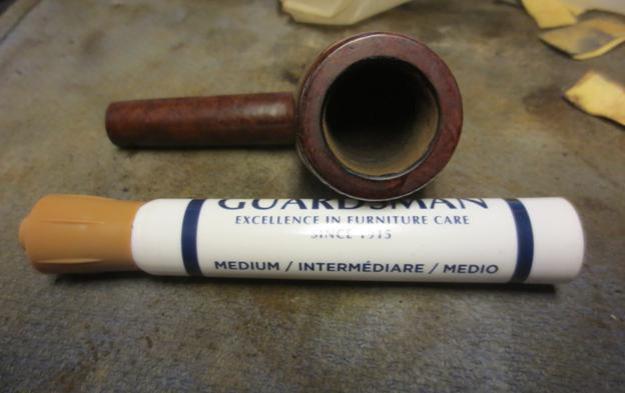
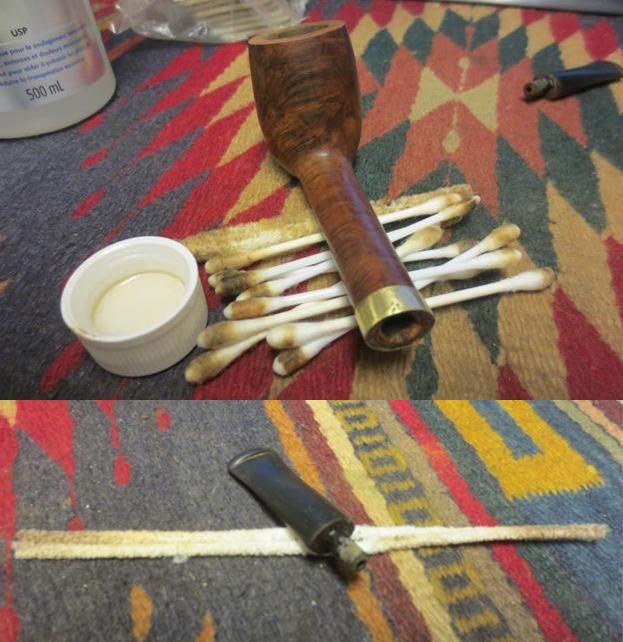
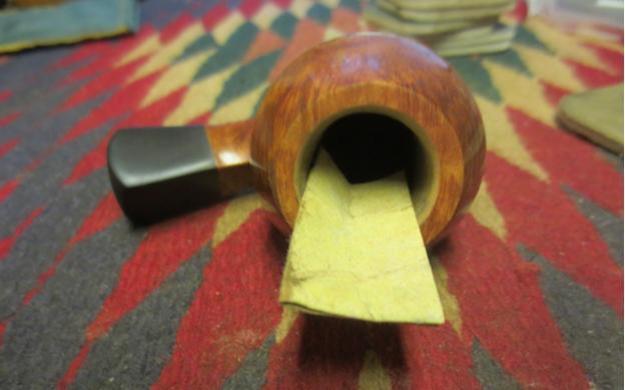
I pushed the cardboard out of the barrel and it was marked FILTO filter. The cardboard was a filter that allowed the air to flow around the edges and caught the tars and oils on the end of the filter. This one was unused.Filto8

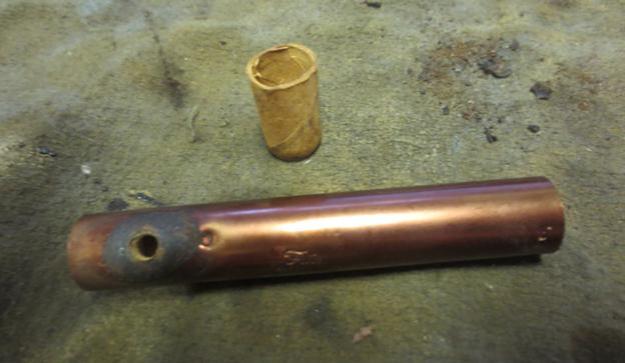
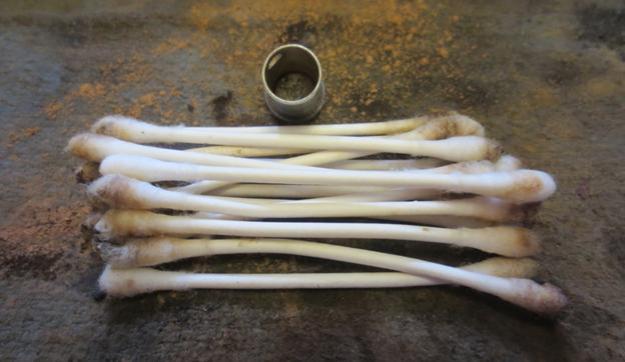
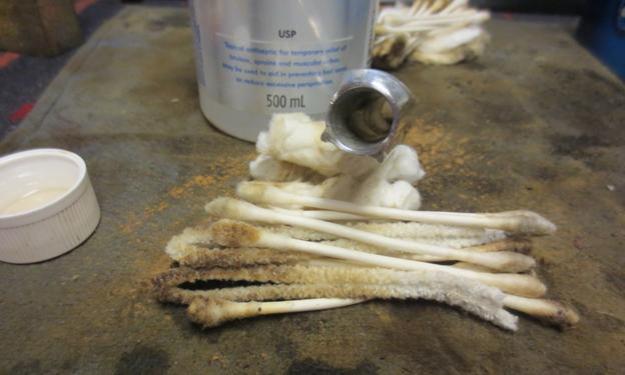
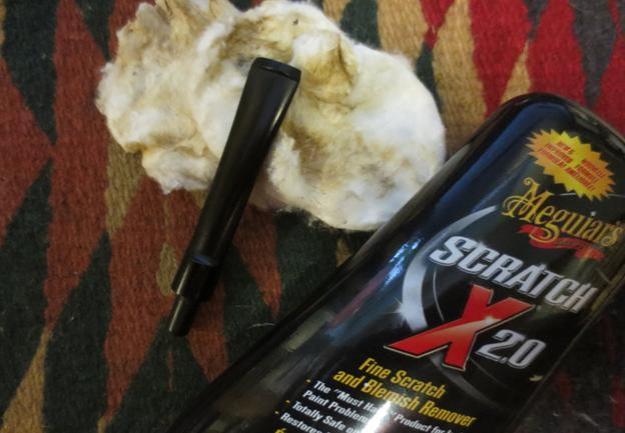
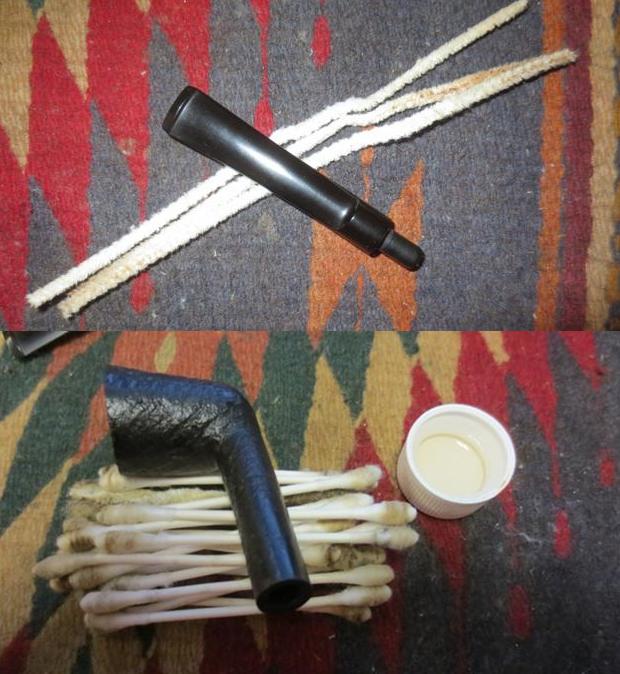
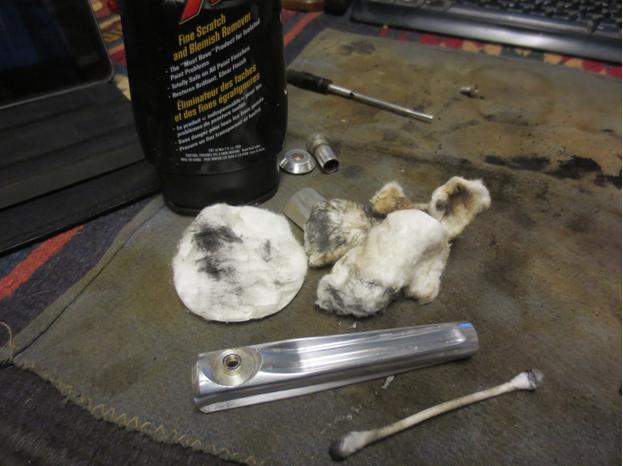
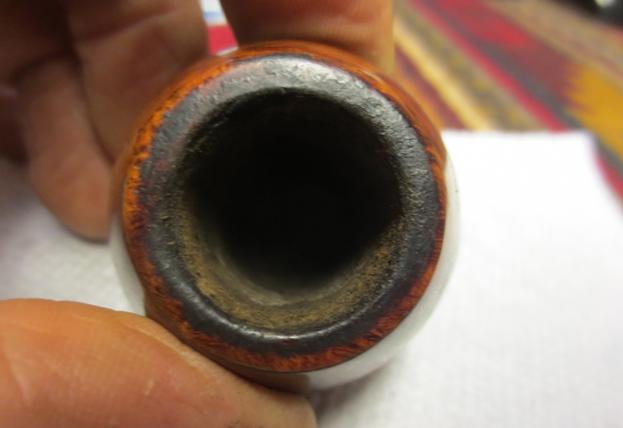
I cleaned out the inside of the barrel by pushing rolled cotton pads soaked in alcohol through the shank. I also used cotton swabs and alcohol to further clean out the barrel. I scraped the cardboard gasket from the top of the barrel where the bowl sat using the dental spatula. I cleaned the outside of the barrel with alcohol and cotton pads.Filto9

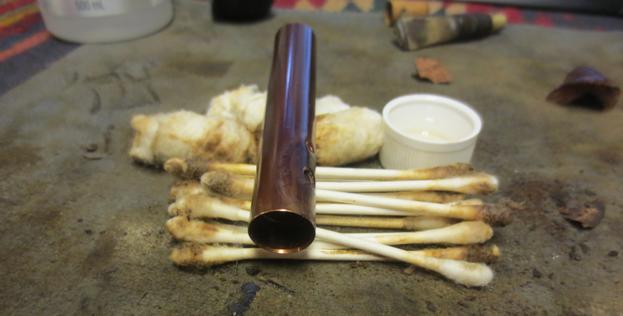
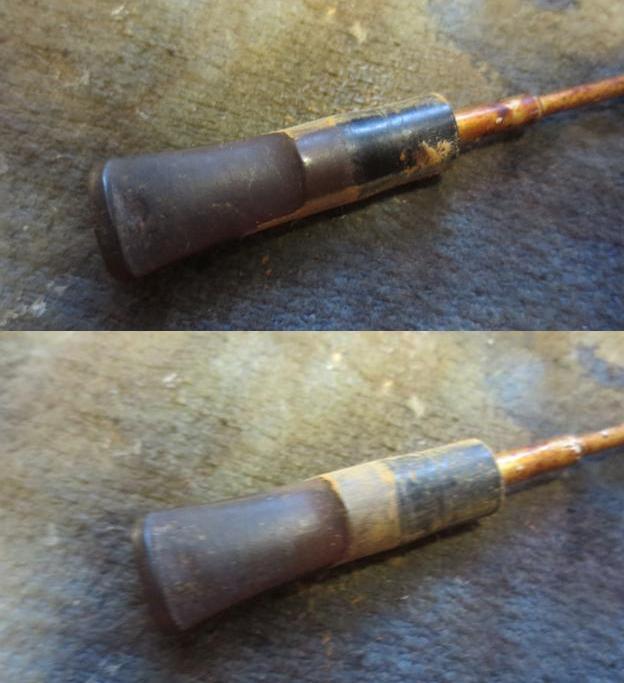
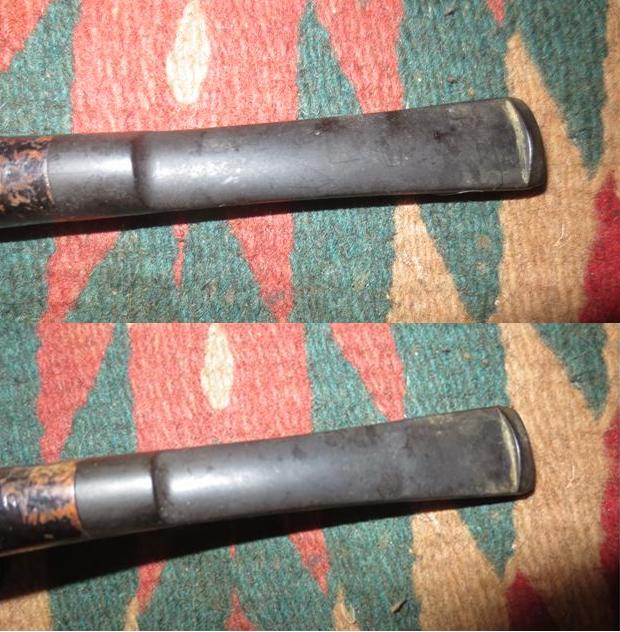
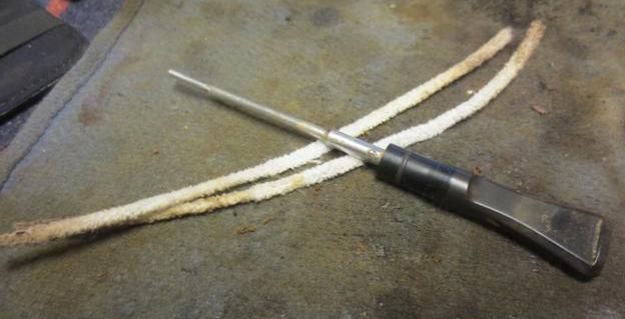
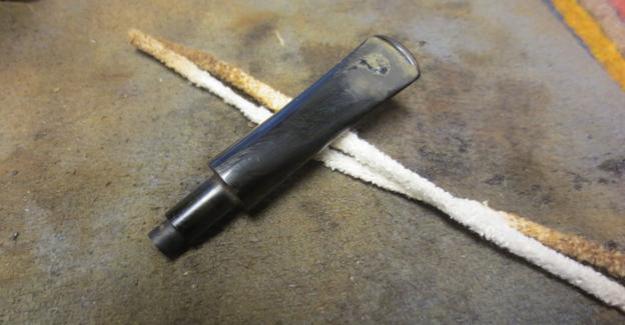
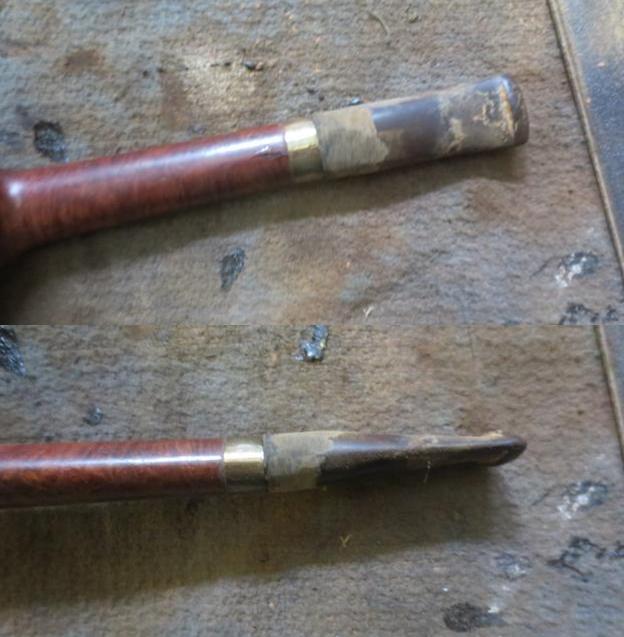
I cleaned out the inside of the tenon on the mouthpiece insert with cotton swabs and alcohol. I ran alcohol soaked pipe cleaners through the mouth piece and tenon to clean out the tars and oils.Filto10

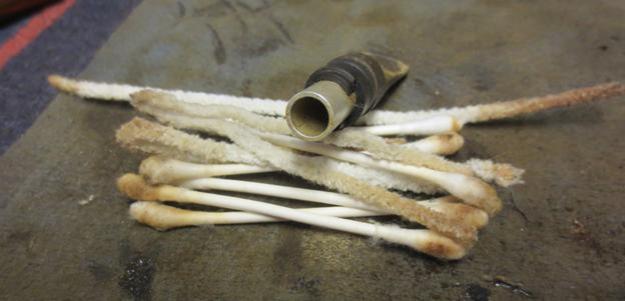
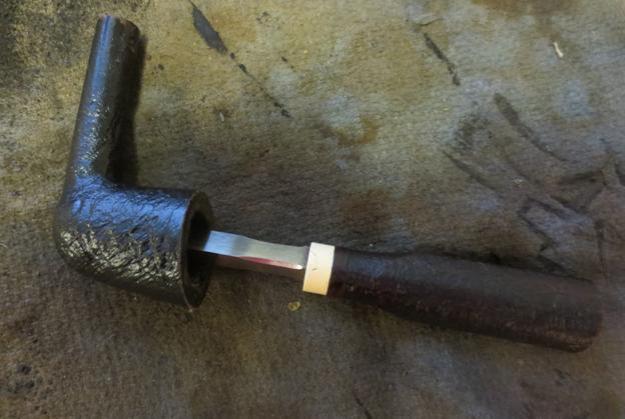
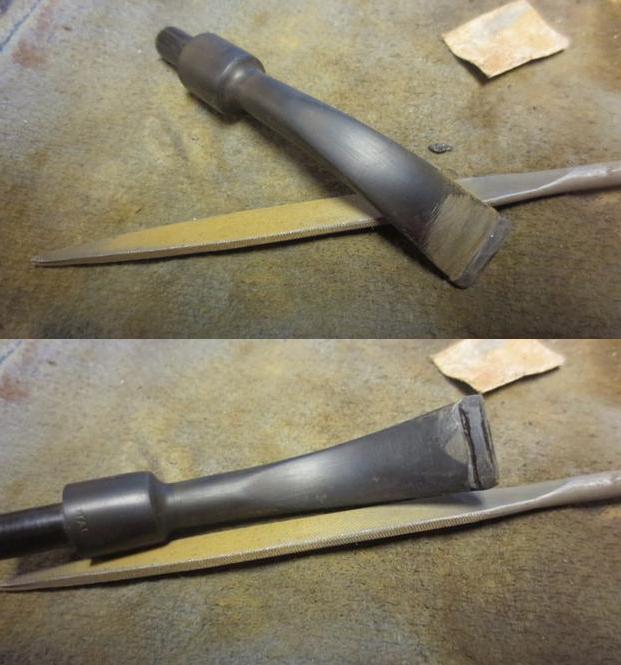
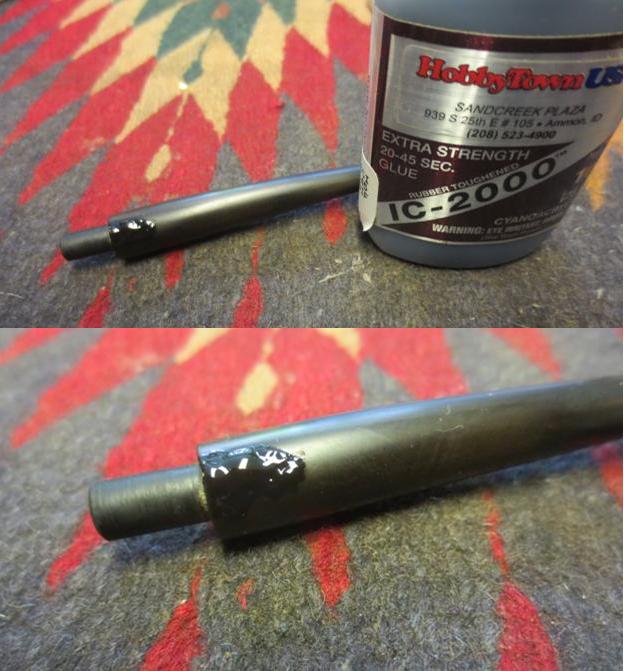
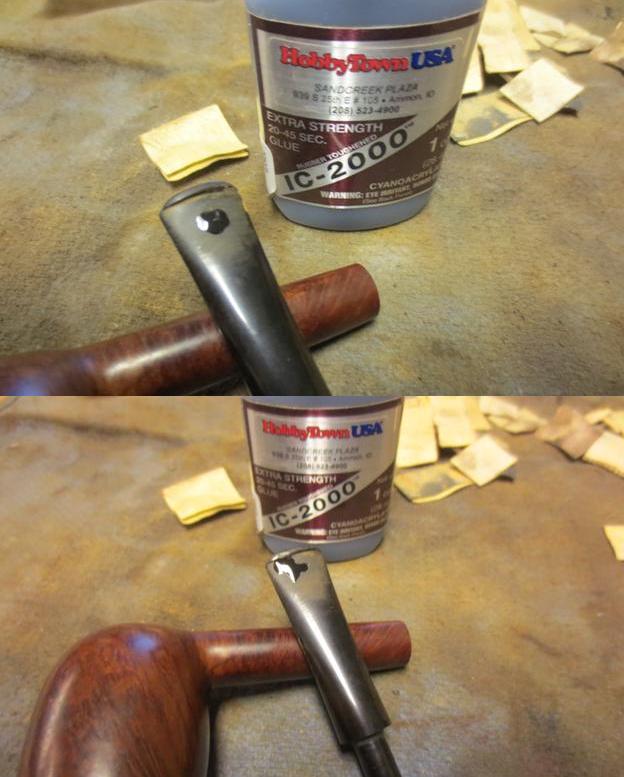
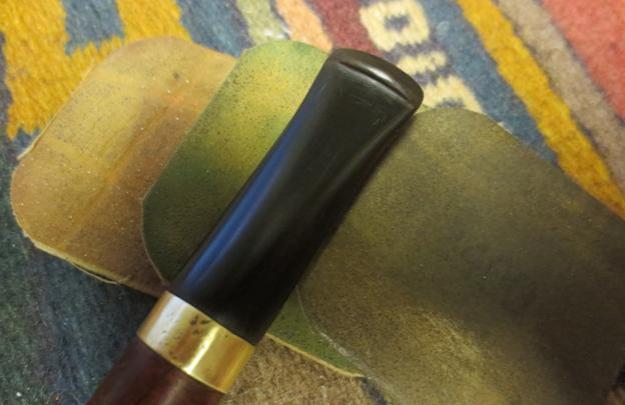
I decided to make and end cap or plug out of briar. I had a piece of briar that was next to the bowl. I had cut it off a while back to use for other purposes. Since it was drilled with an airway I needed to also make a round plug for the airway in the centre of the briar piece. I rounded out the shank piece and the small chip with a Dremel and sanding drum to make the end cap/plug. I round the chip until it fit perfectly into the drilled airway on the briar. I pushed it into the airway and glued it in place with super glue. I used the Dremel and sanding drum to smooth out the end that would go inside the barrel and the end that would stick out.Filto11

I used the Dremel and sanding drum to shape the end of the plug to be shaped like a cone. It continued to shape it until it would pressure fit into the end of the barrel.Filto12

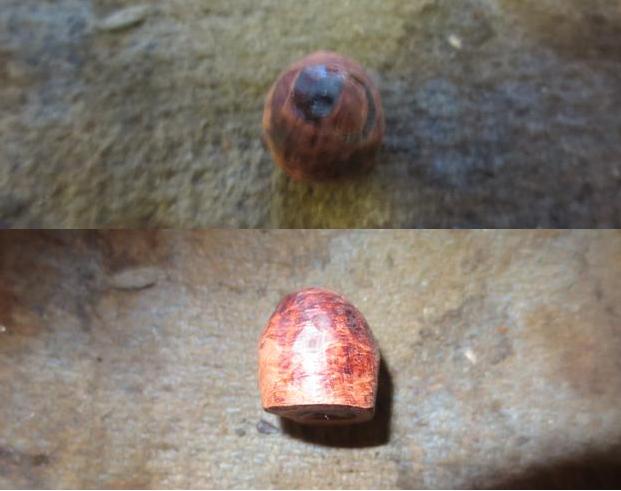
I shaped it like a cone and rounded the end. I cut a small band around the diameter of the end that would sit in the barrel. There was a step down inside that the cap sat against. I pressed it into place and continue to shape it with 180 and 220 grit sandpaper.Filto13

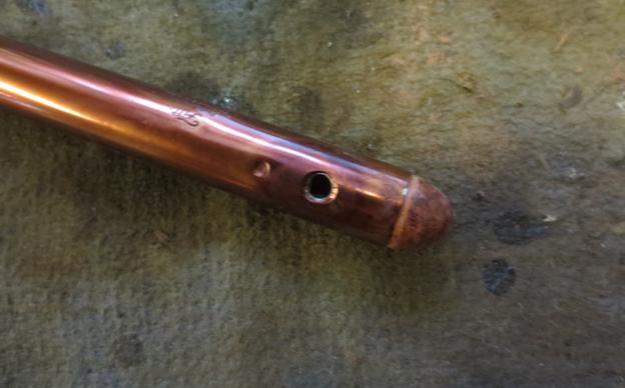
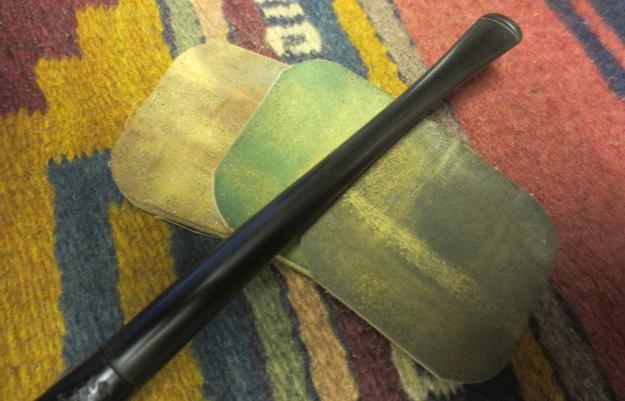
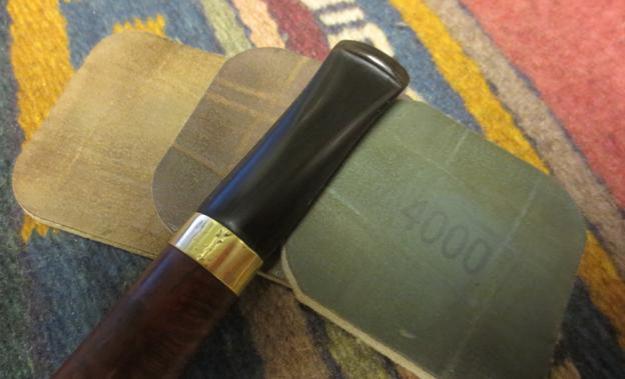
Once I had it shaped correctly I stained it dark brown with a stain pen and buffed it until it shone. I sanded it with 3200-4000 grit micromesh to give it some polish and thin down the opacity of the stain.Filto14

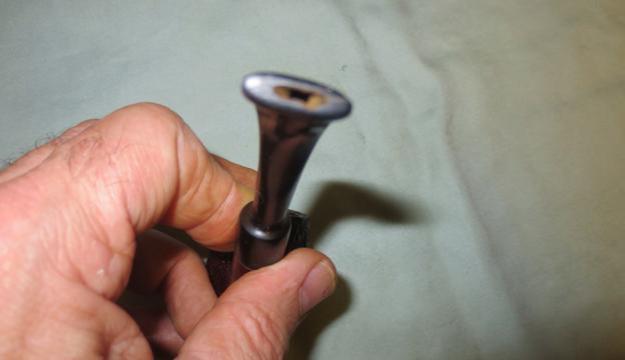
Looking at the spring clip that held the filter in place in the shank I made one that was similarly shaped out of a paper clip. I bent it to fit into the cardboard filter and to sit in the metal tenon of the stem.Filto15

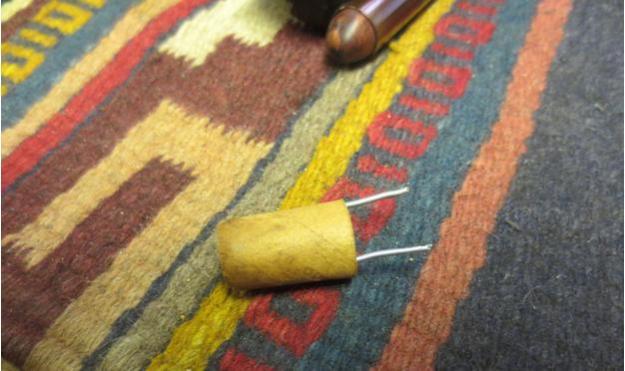
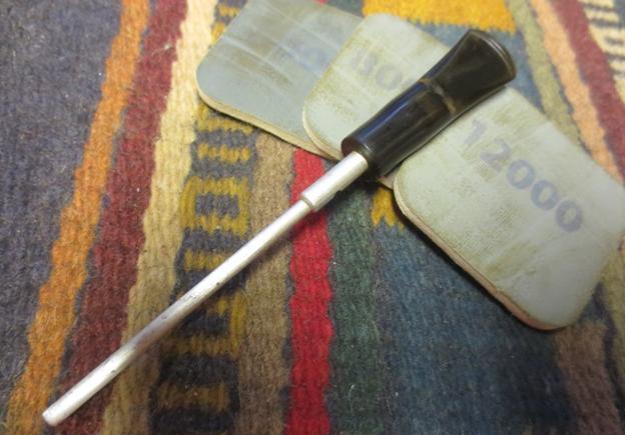
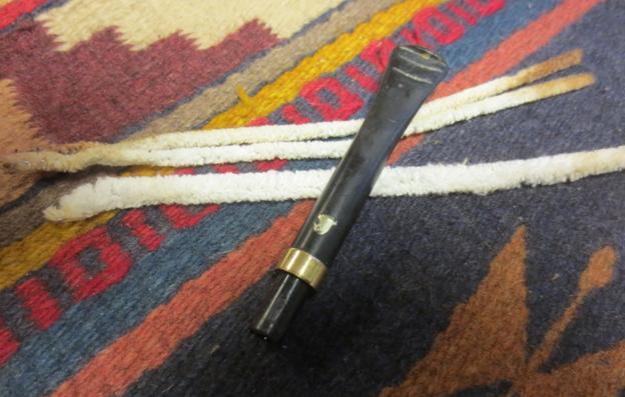
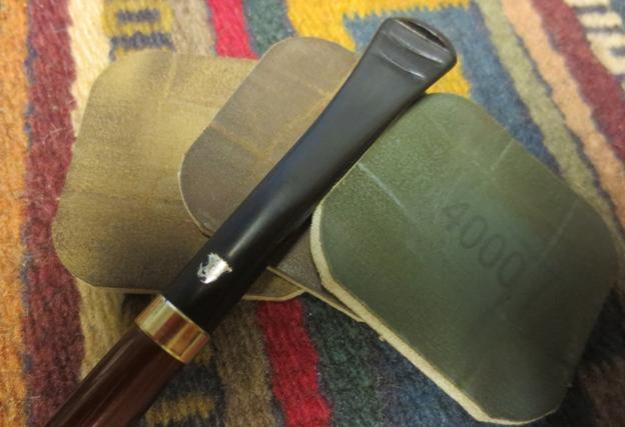
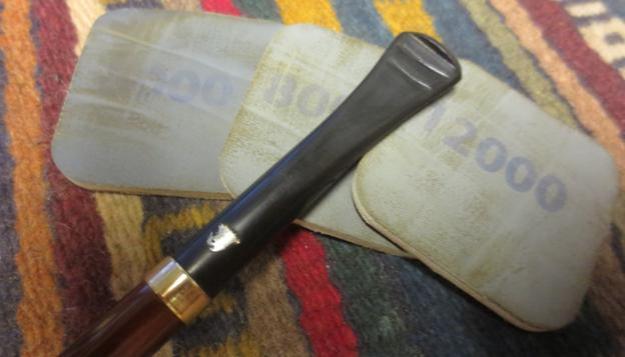
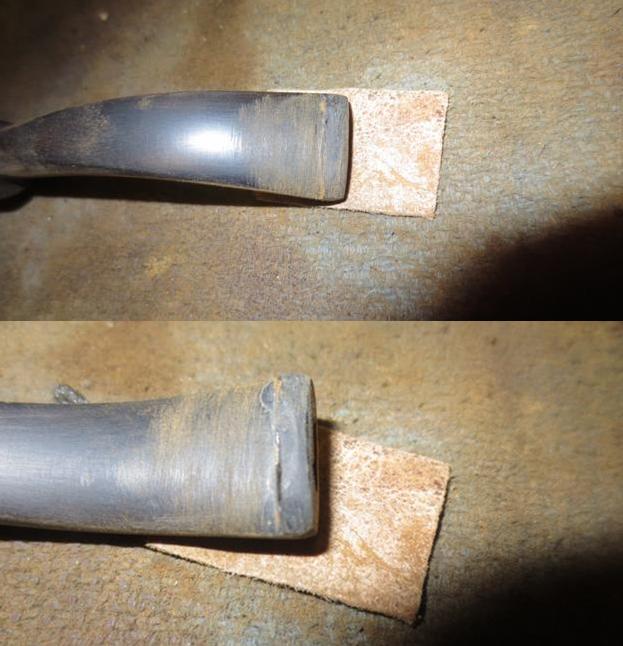
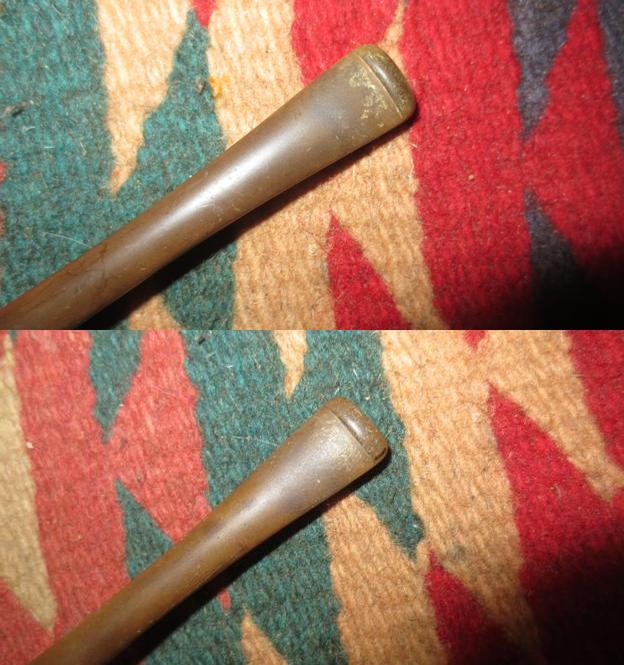
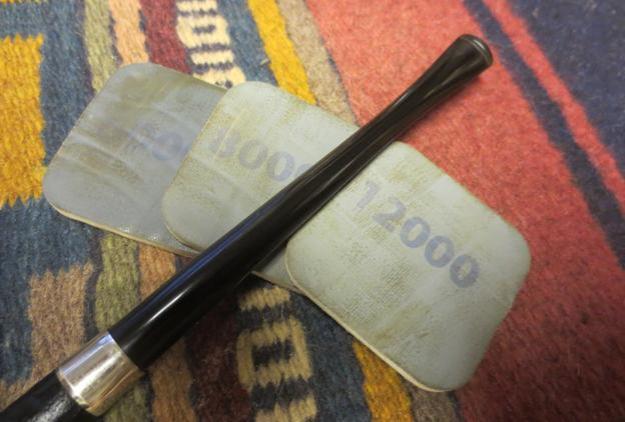
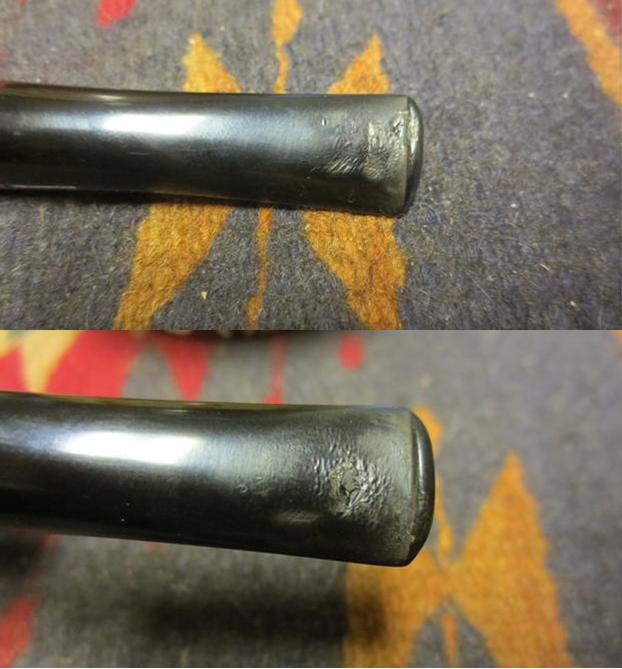
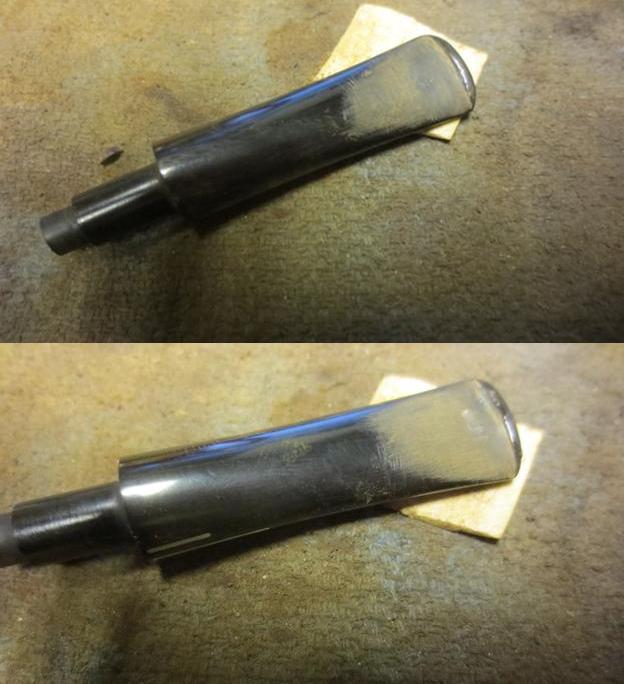
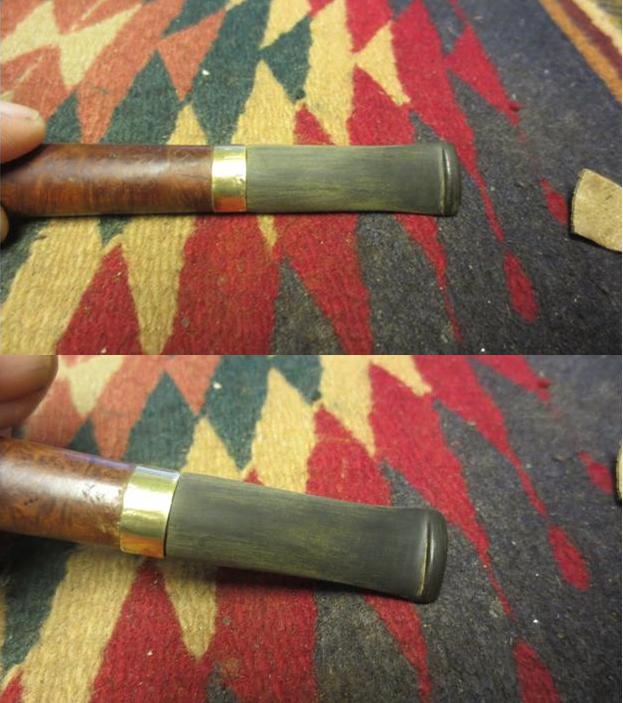
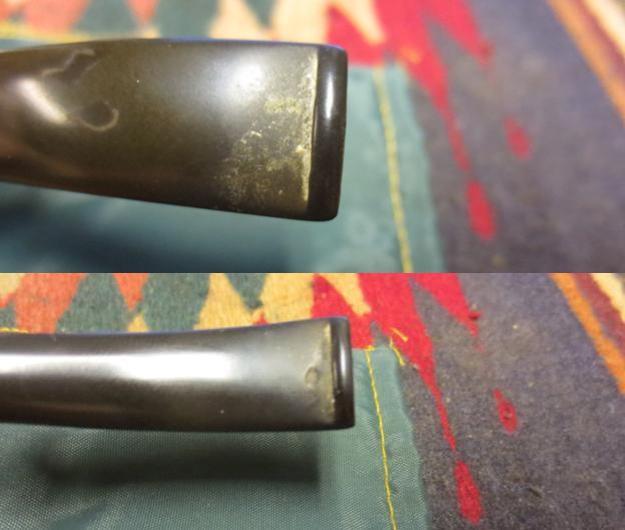
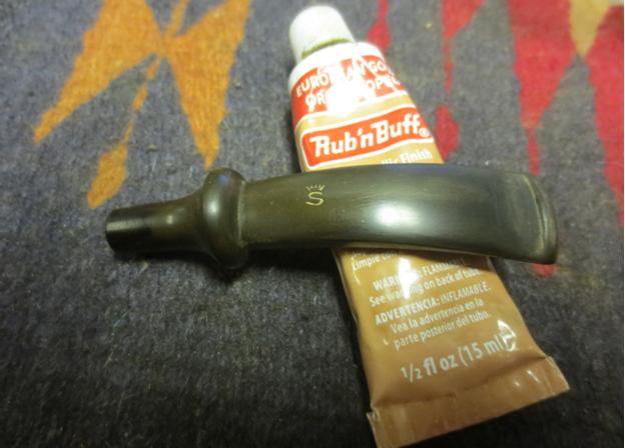
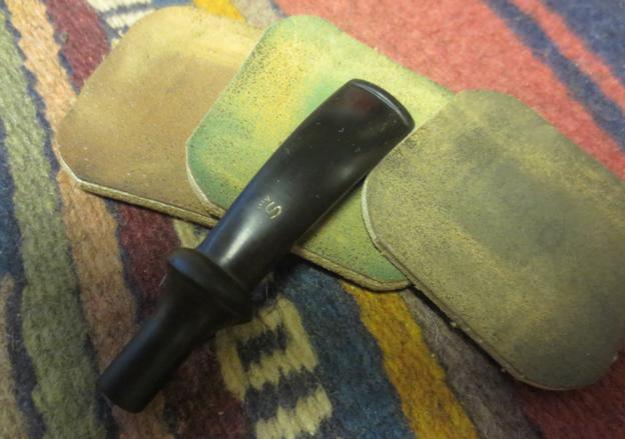
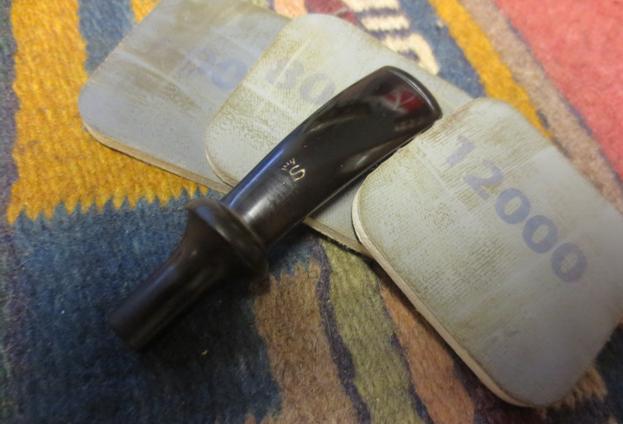
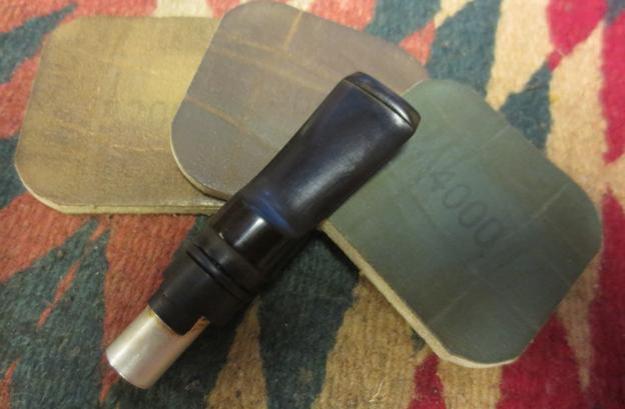
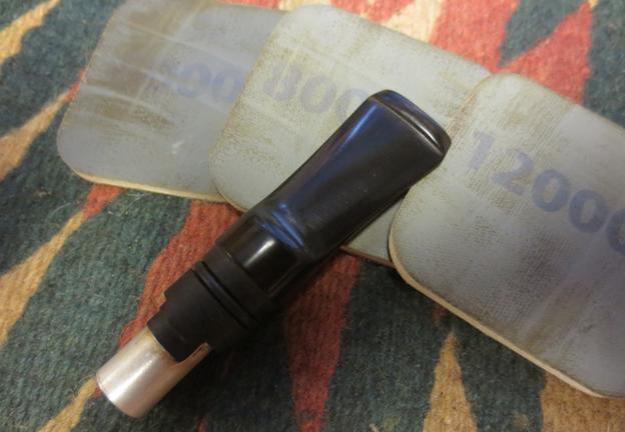
I sanded the stem with 220 grit sandpaper to remove the calcification that was built up on the mouth piece at the button. There was some light oxidation on the saddle portion as well. I wet sanded it with 1500-2400 grit micromesh sanding pads and gave it a coat of Obsidian Oil. I dry sanded it with 3200-4000 grit sanding pads and gave it another coat of oil. I finished sanding it with 6000-12000 grit pads and gave it a final coat of Obsidian Oil.Filto16Filto17Filto18

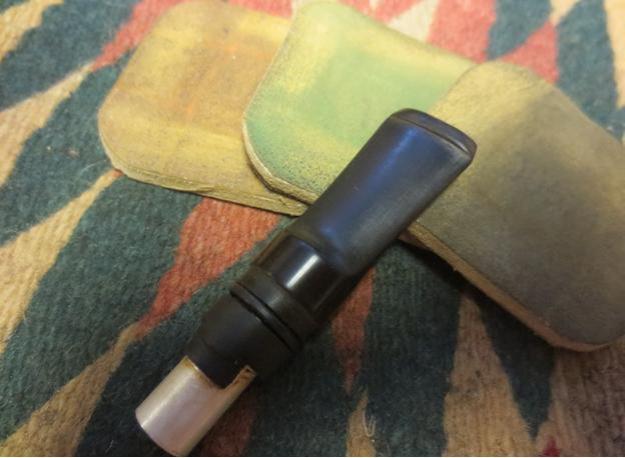
I buffed the stem with Blue Diamond on the wheel and gave it several coats of carnauba wax. I buffed it with a clean buffing pad to raise the shine and hand buffed it with a microfibre cloth. I put the bent paperclip in the filter and in the end of the tenon.Filto19

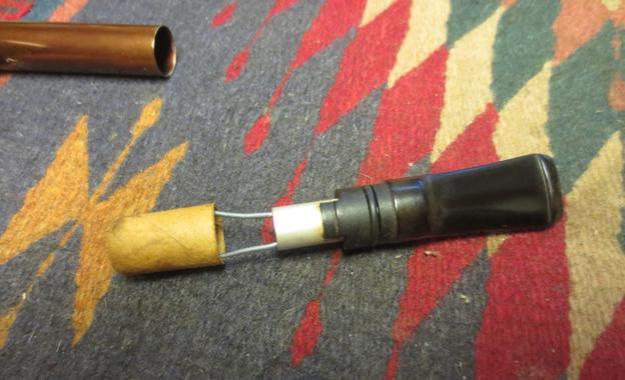
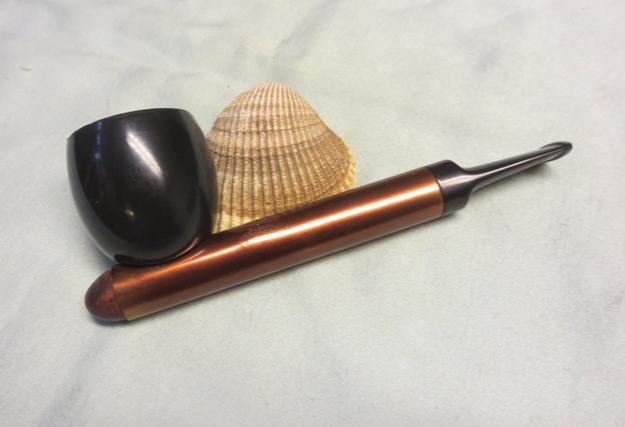
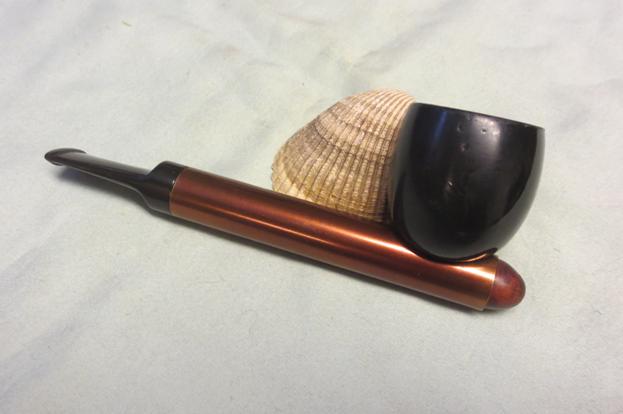
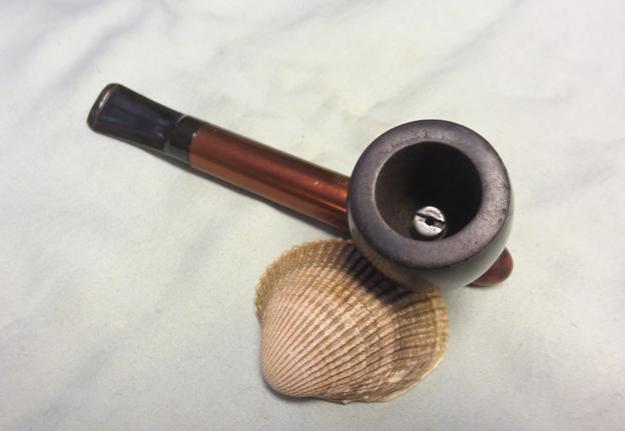
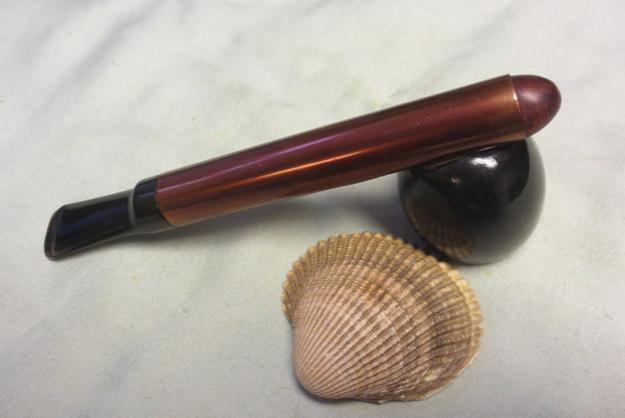
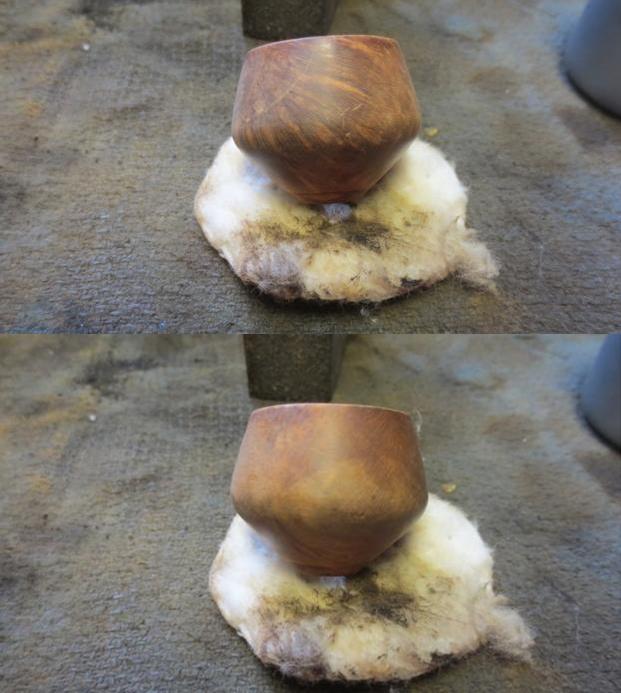
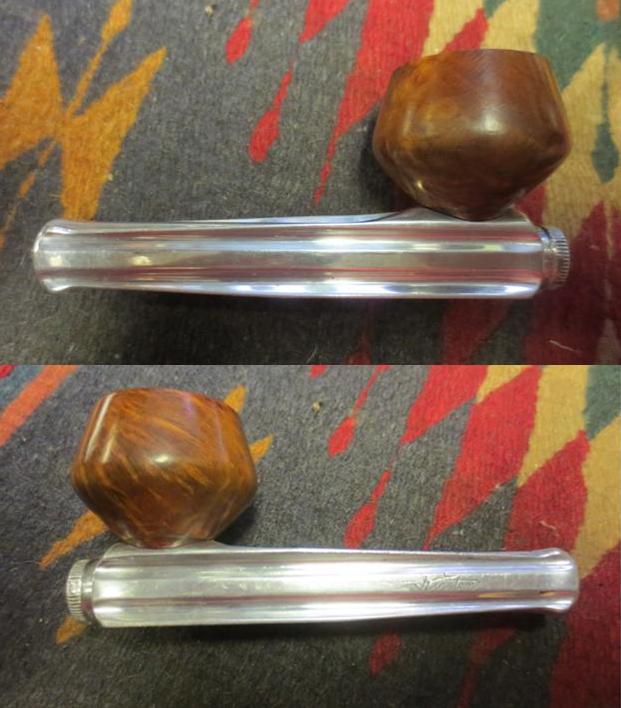
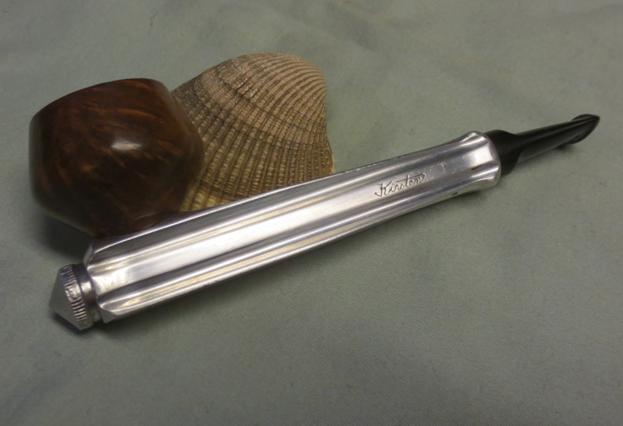
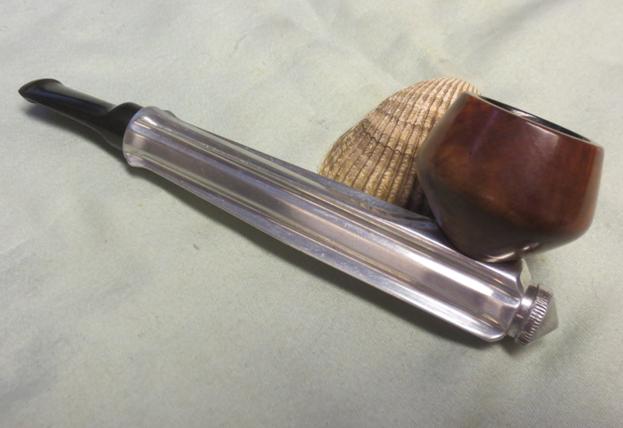
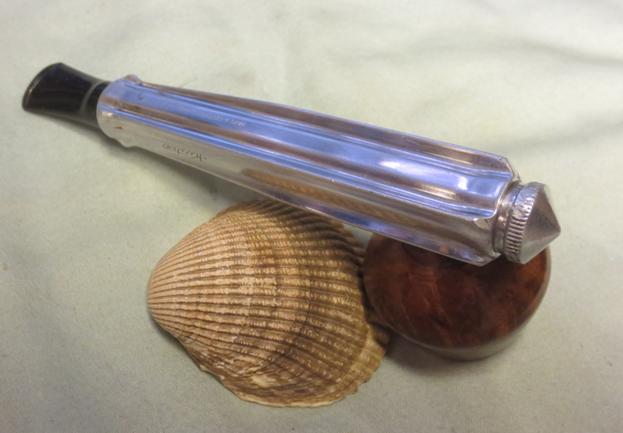
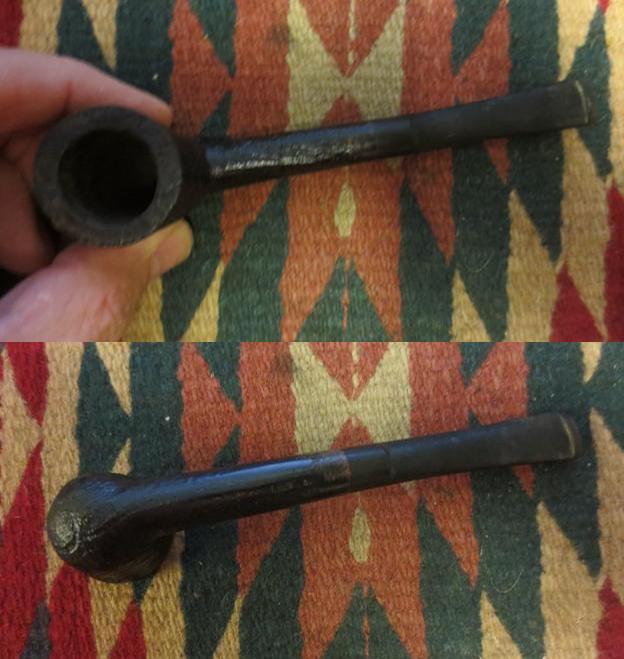
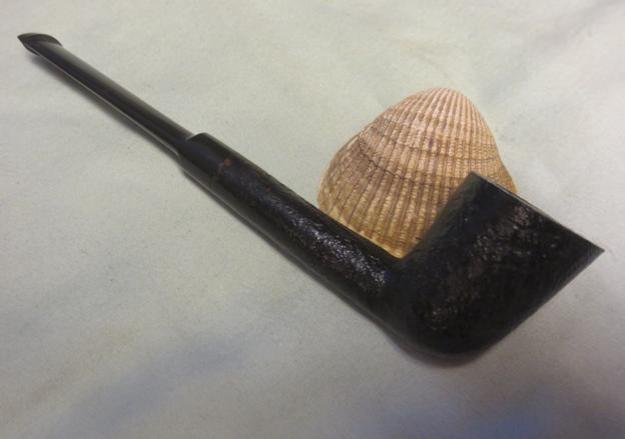
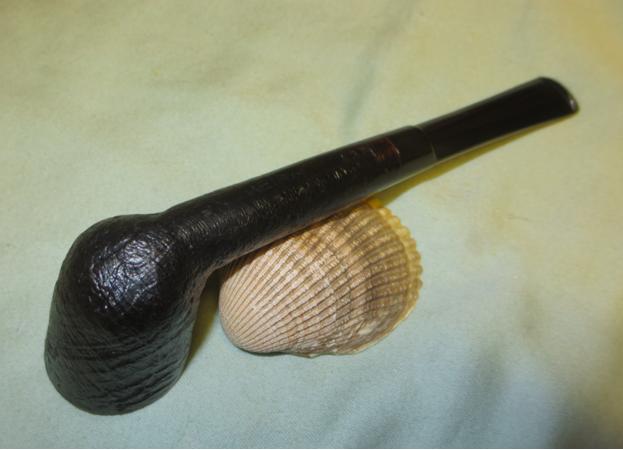
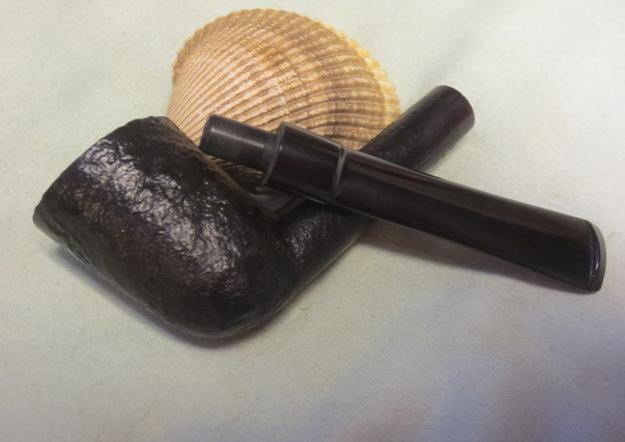
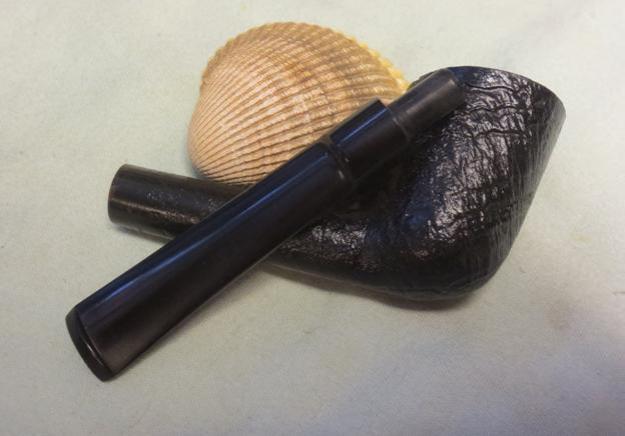
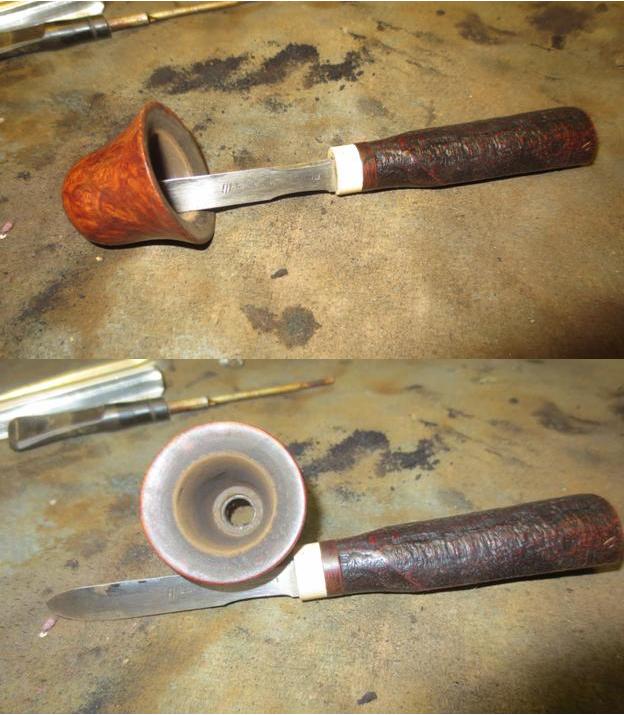
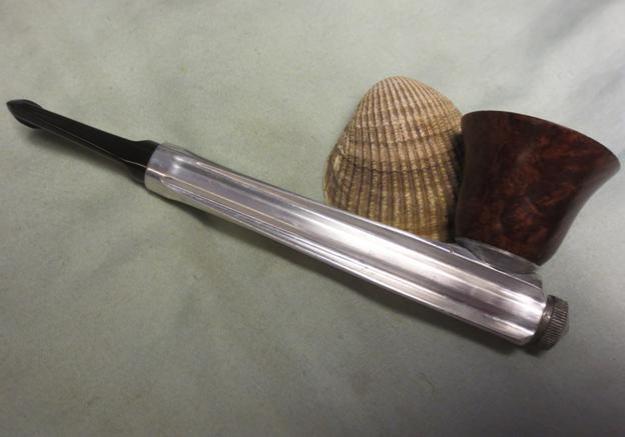
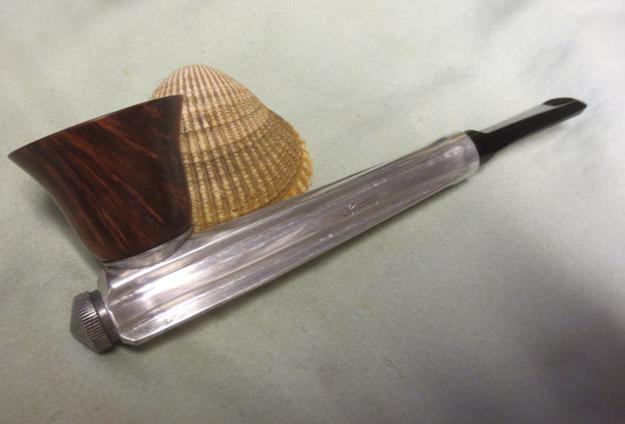
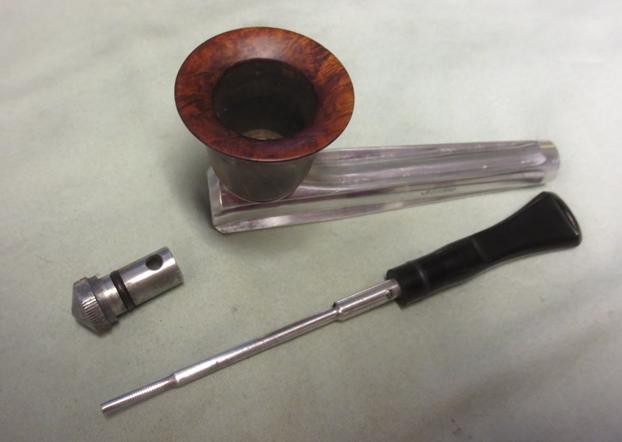
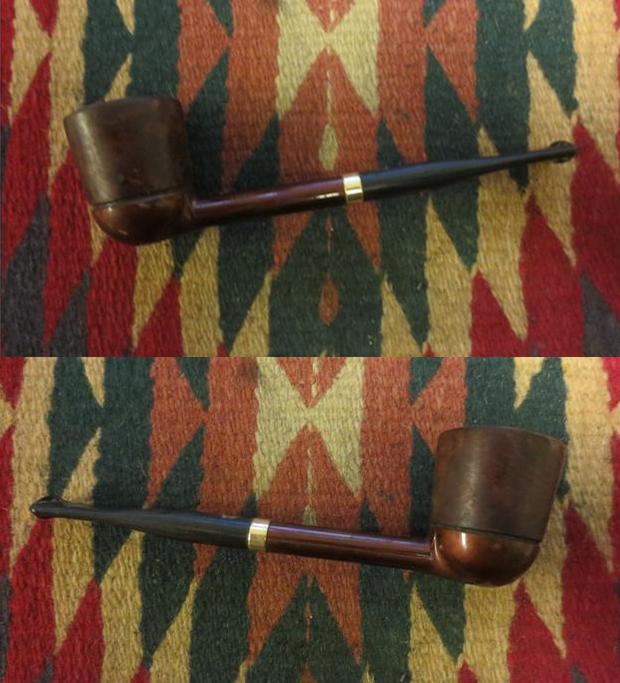
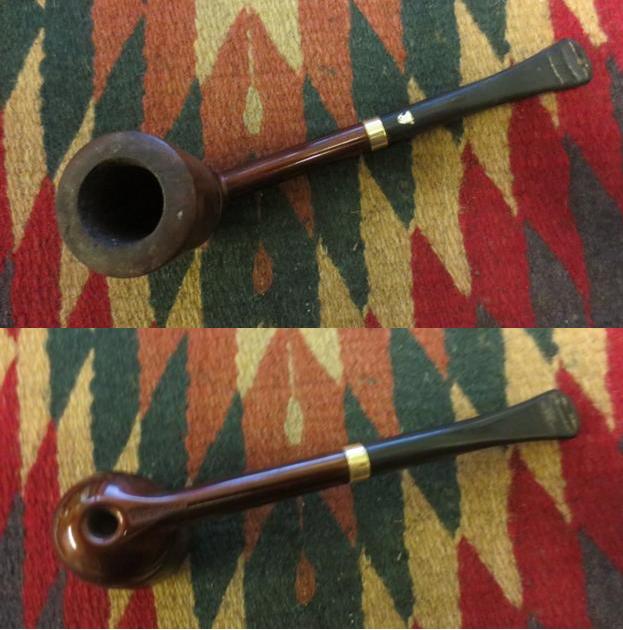
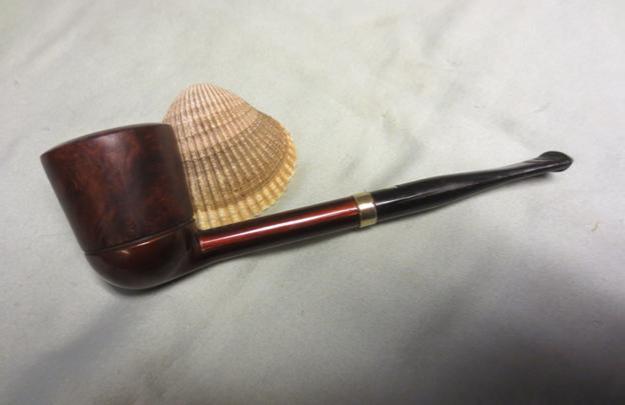
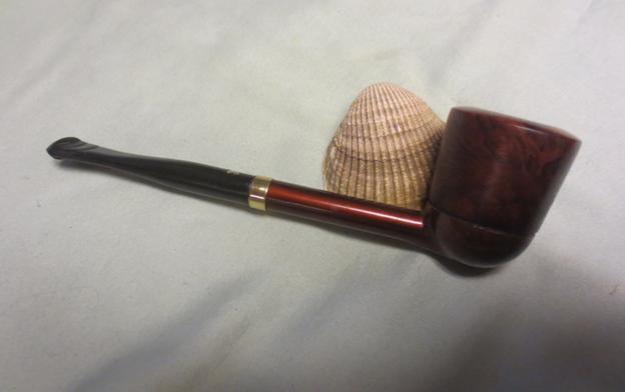
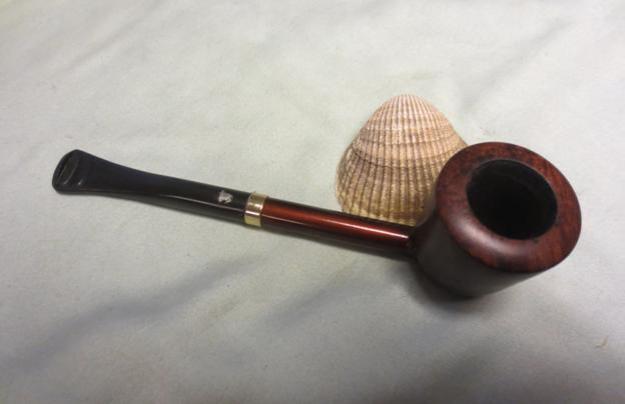
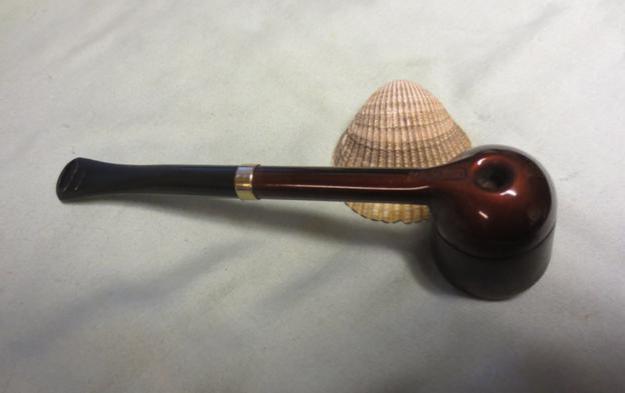
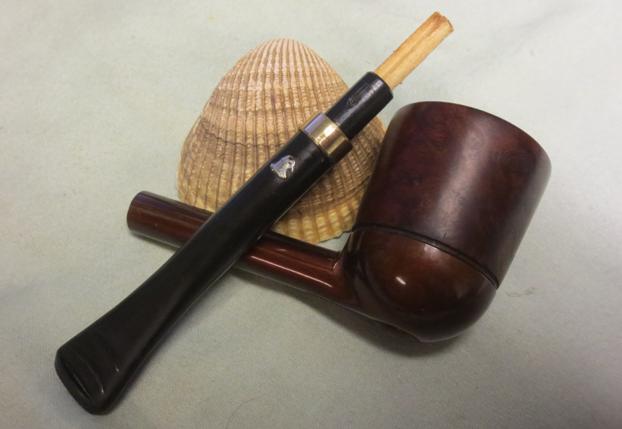
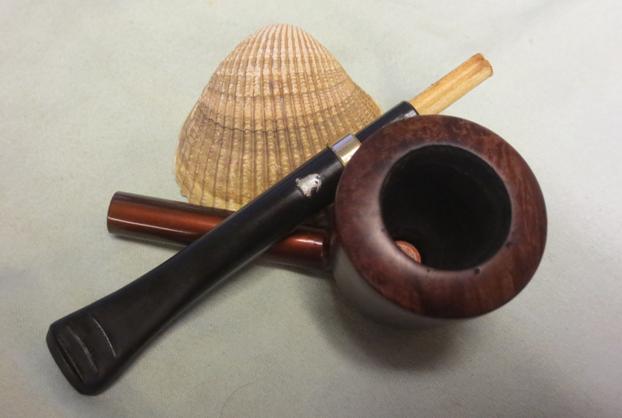
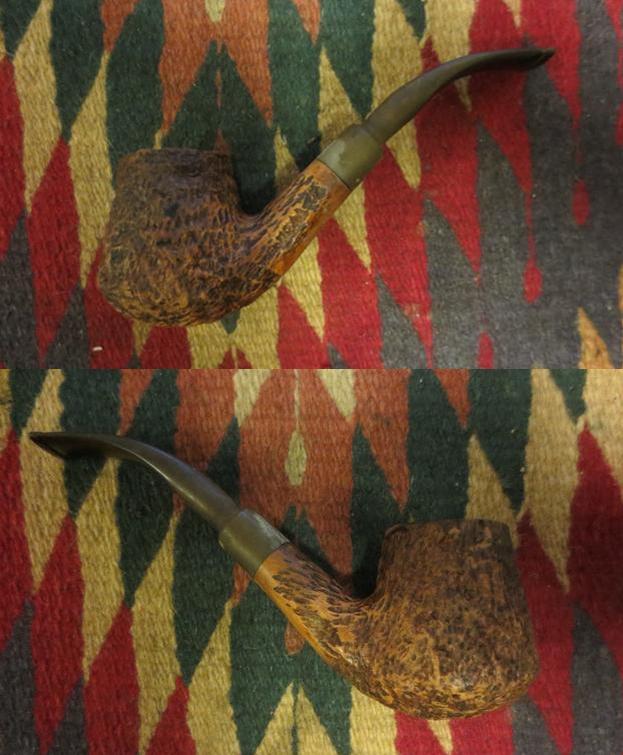
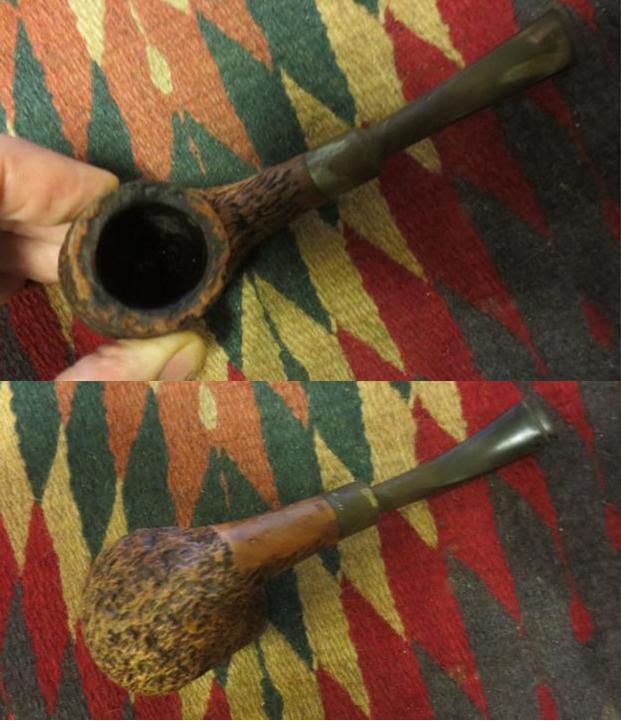
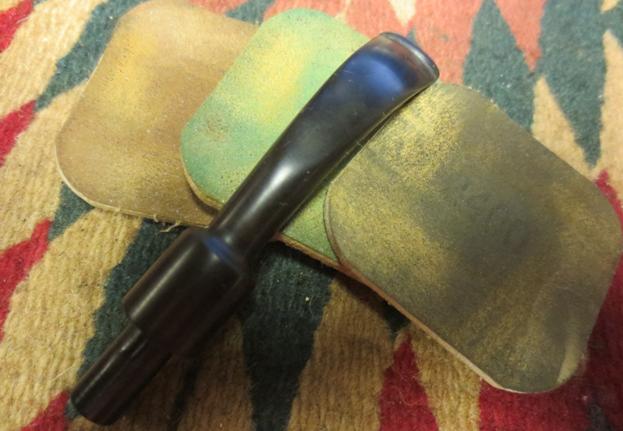
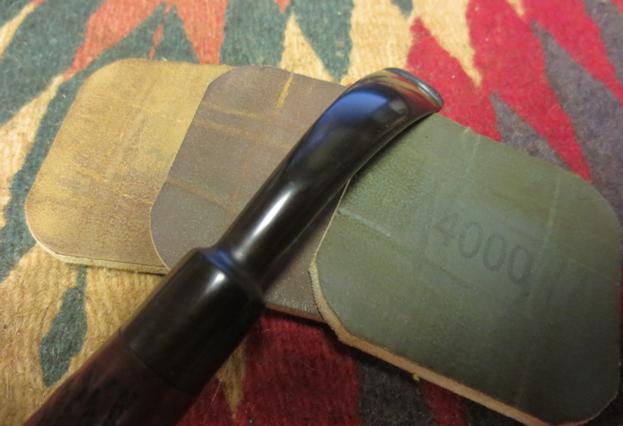
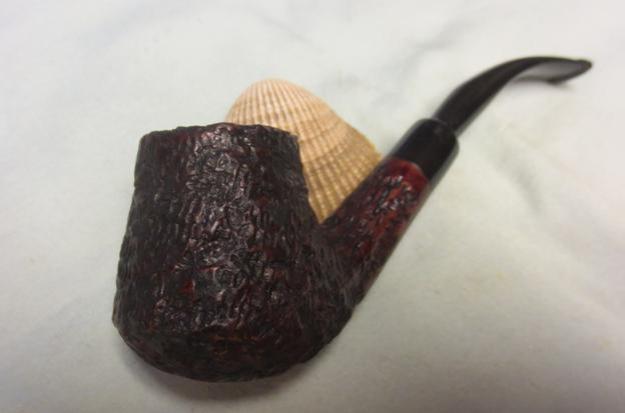
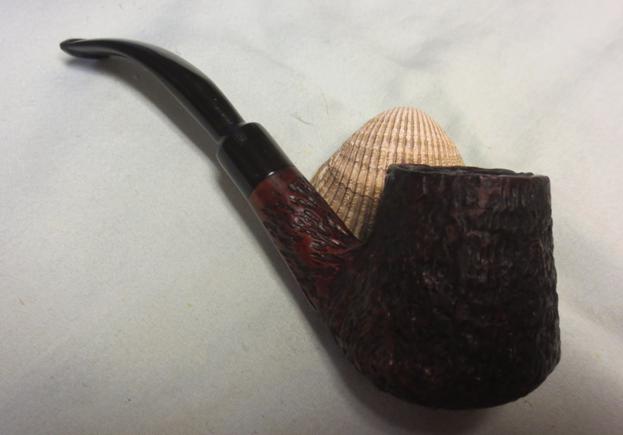
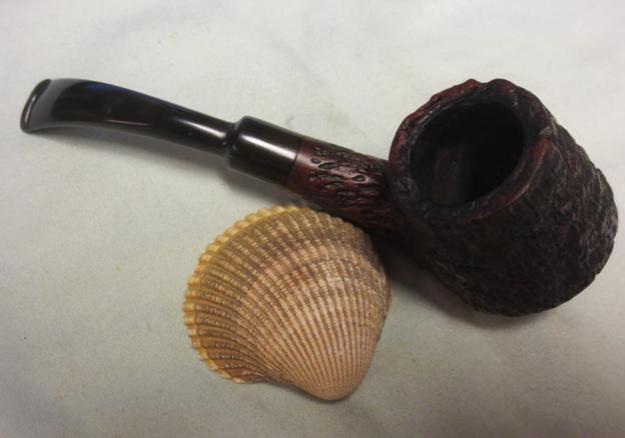
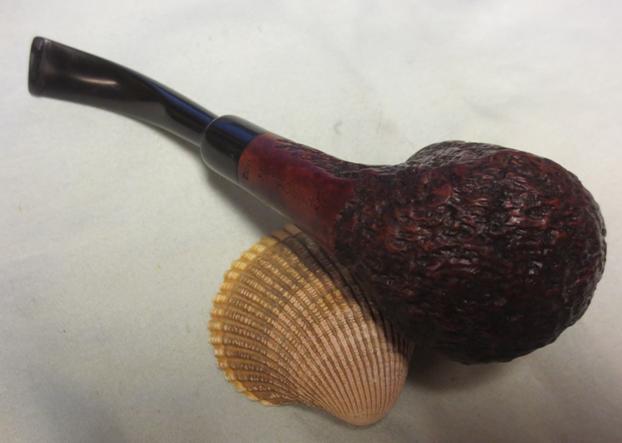
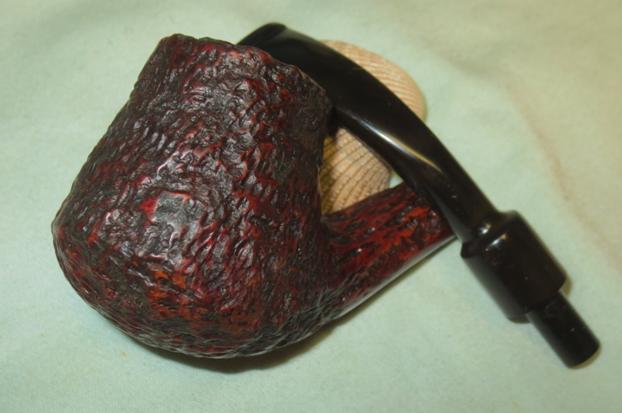
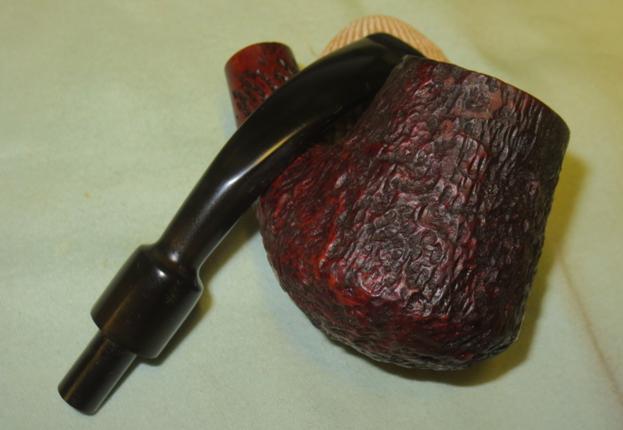
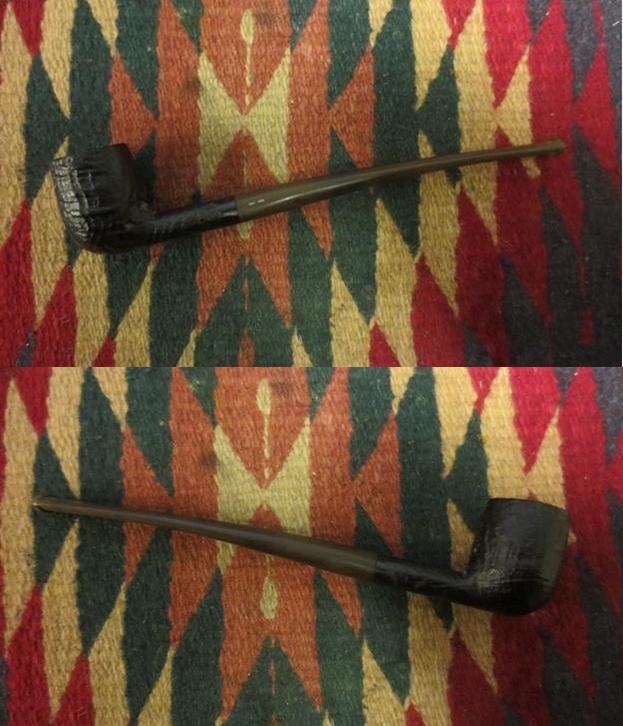
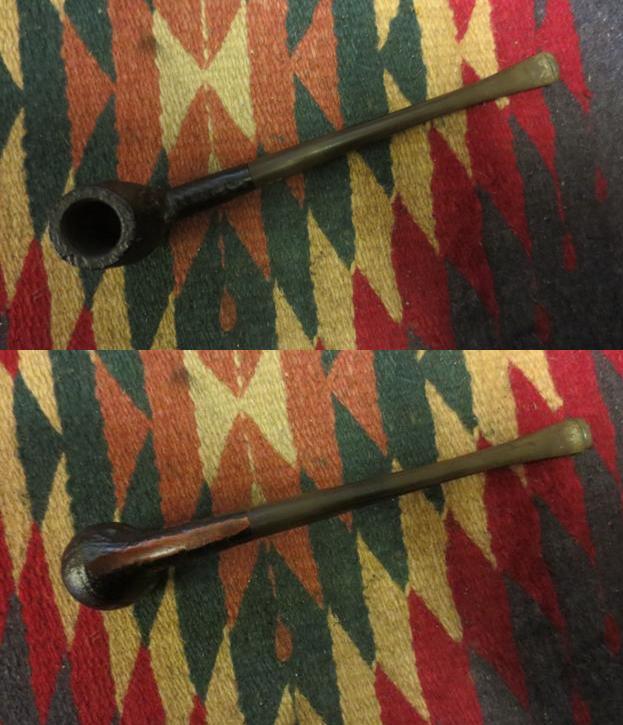
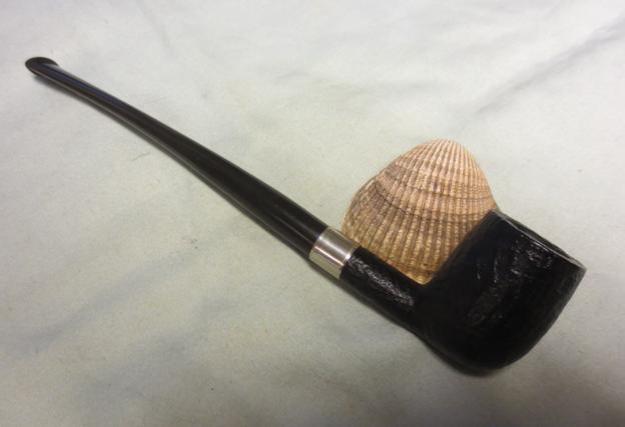
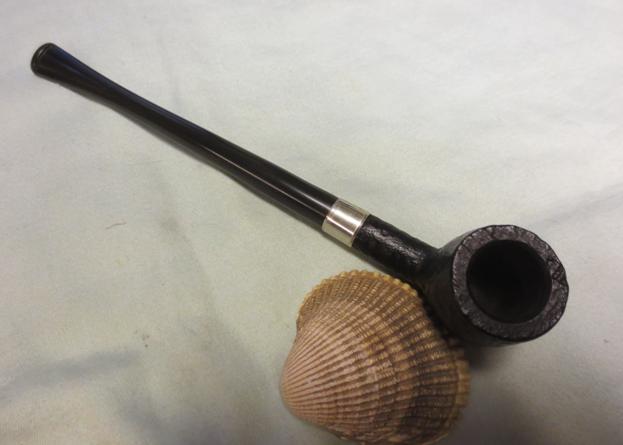
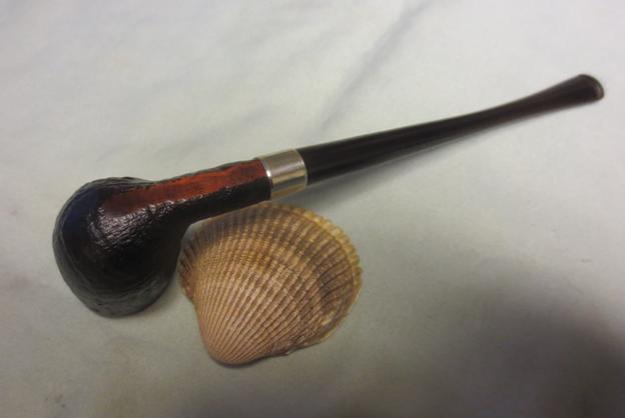
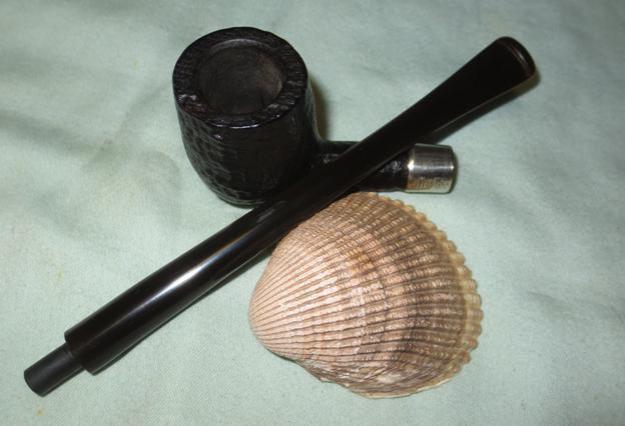
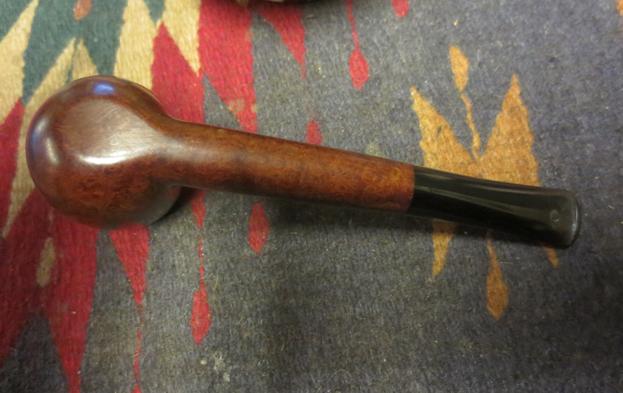
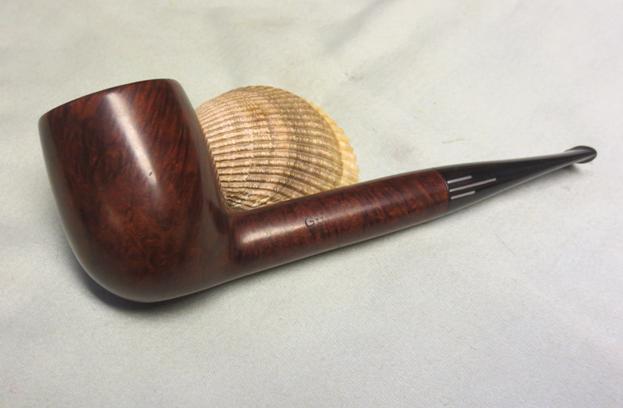
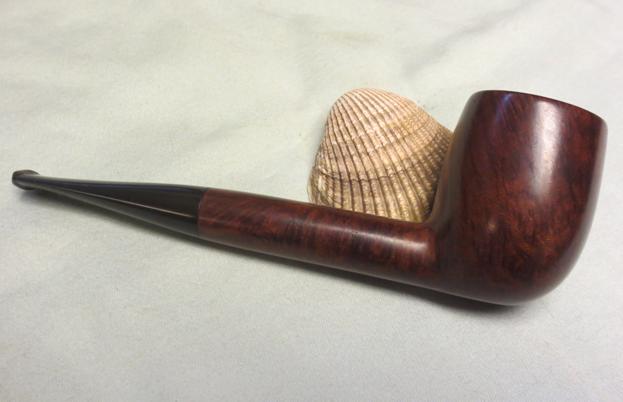
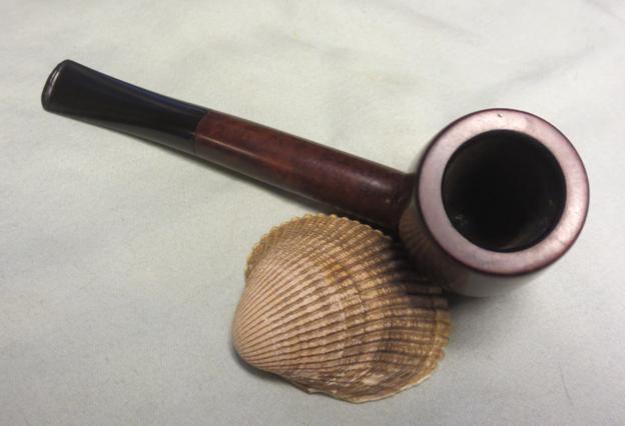
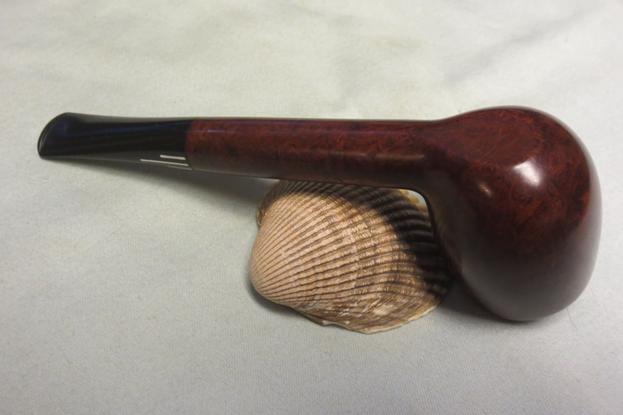
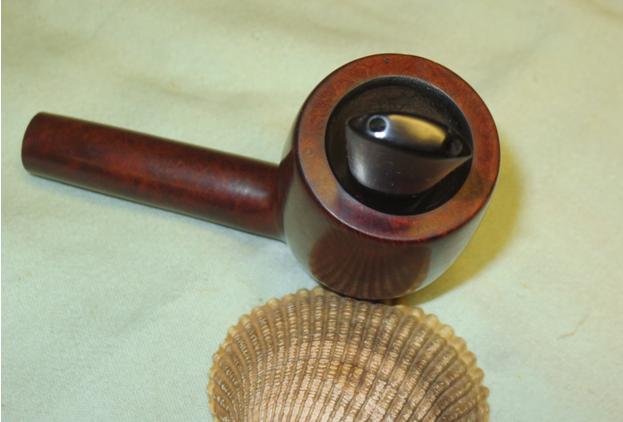
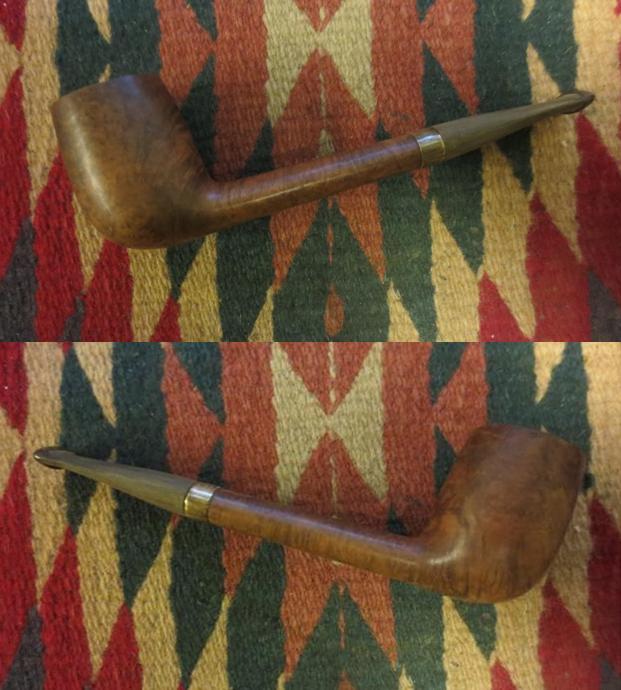
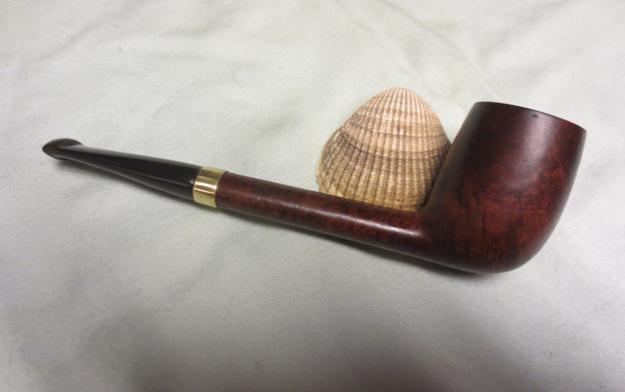
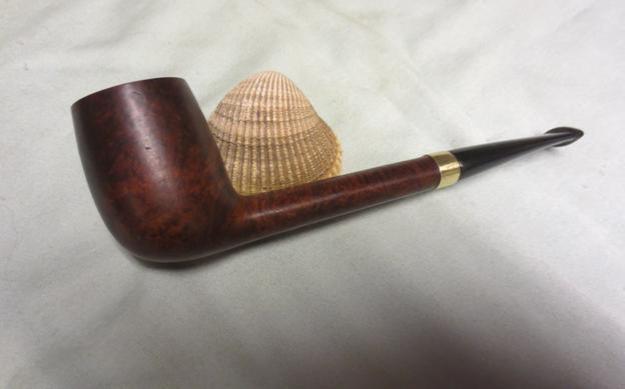
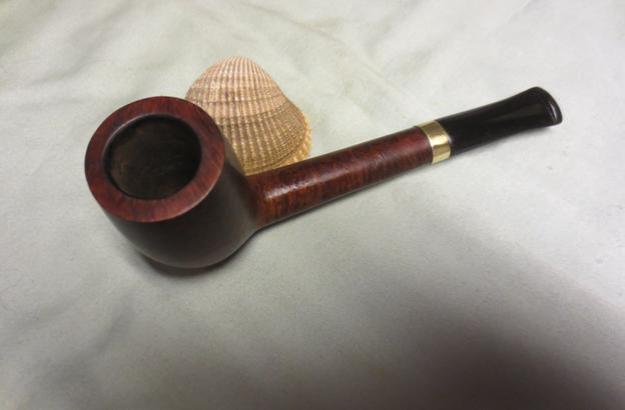
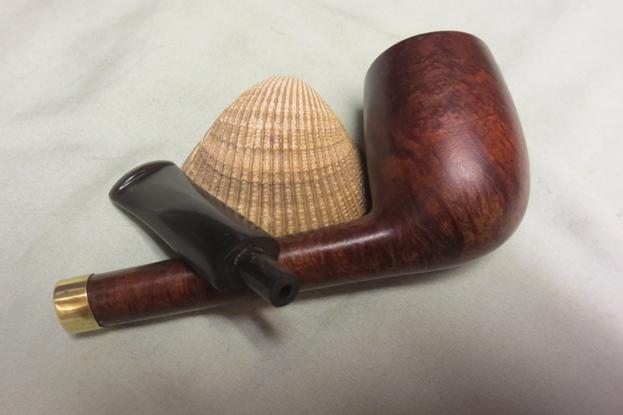
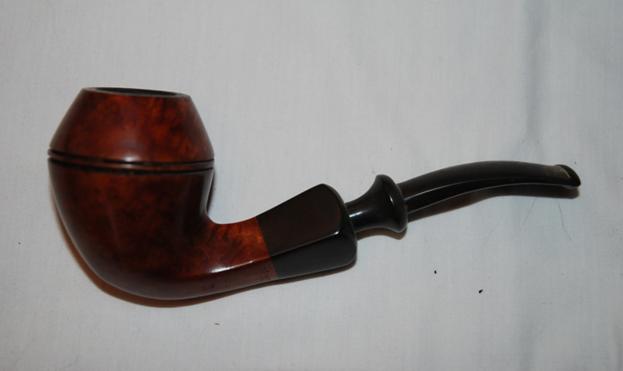
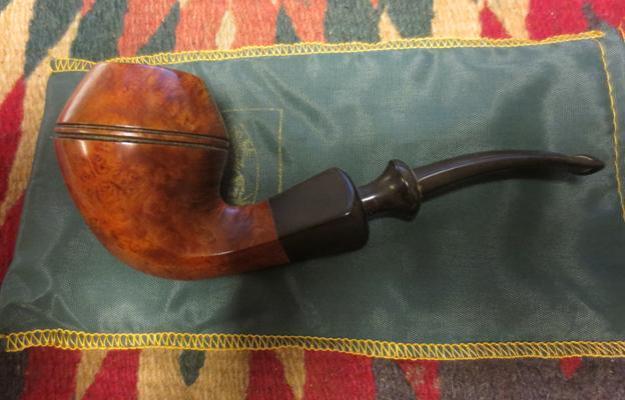
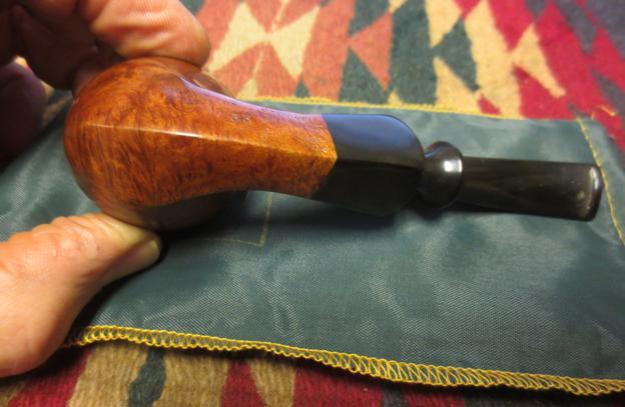
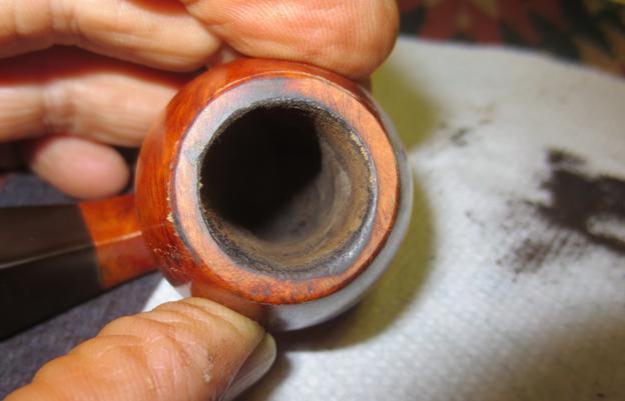
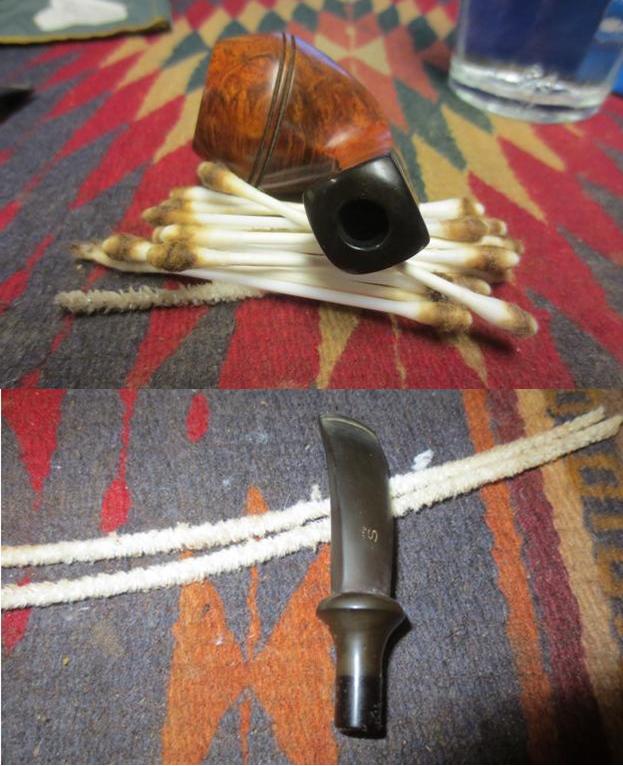
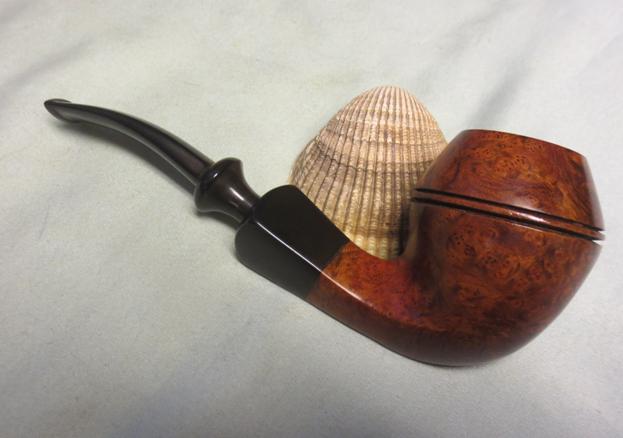
I lightly polished the bowl and barrel on the buffer using Blue Diamond. I gave both a coat of carnauba wax and buffed it with a clean pad to polish it. The bowl had a few dents and dings that I left as I found them because of the painted finish. I hand buffed the pipe with a microfibre cloth to deepen the shine. The finished pipe is shown in the photos below. The first four photos show the finished pipe as a whole. The last three show it in pieces.Filto20Filto21Filto22Filto23Filto24Filto25Filto26


Restoring a Kirsten Generation 1 Medium Straight Pipe


Blog by Steve Laug

My brother continues to look for Kirsten estate pipes. He picked up this Kirsten because it looked like an old-timer. When I received it I could see that he was right about it being an older one. All the signs were there. The bowl was threaded directly on the barrel of the pipe and bottom cap that is on new models was not present. When the stem was removed there were no O rings on the end of the insert. The valve cap was stuck in the end of the shank and it could not be turned. The rim had a lava overflow on it and there was a heavy cake in the bowl. The screw mount in the bottom of the bowl was caked over to the point that it was stuck in the bowl. The metal barrel was oxidized and pitted. It had no shine left but looked like a well-worn pipe. The stem was oxidized and a dirty brown colour. There were tooth marks next to the button on the top and the bottom sides of the stem. The rod that ran through the barrel was dirty and coated with tars and oils that had hardened.K1 K2The left side of the barrel is stamped Kirsten in script. The underside is stamped Pats. & Pats.  Pend. USA M. The stamping along with the absence of O rings, the bowl screwed directly on top of the barrel pointed to a Generation 1 Kirsten which dated it between the years 1936-1958. In a previous blog I spelled out the features of each generation of Kirsten pipes that were released. https://rebornpipes.com/2012/11/03/kirsten-generation-1-1-5-2-3/ I quote the following from there: The wooden bowl on this generation connects directly to the metal barrel and there is no metal cup spacer. It is a pretty flush fit that goes flat against the barrel. On the underside of the metal barrel it is stamped with one or more of the following “Pat. Appl. For” (1936-38) and “Pats. & Pats. Pending” (1938-1958) over “Made in USA” – S” (or applicable size – S, M, L). There are no O-rings on the bit or metal shank insert. The M stamp on the pipe identifies it as a Medium sized pipe.

So I armed with that information I knew that the pipe I had, came from the time period of 1936-1958 and the lack of O rings on the mouthpiece and I assumed on the valve once I was able to remove confirmed that. I was ready to get to work on the pipe. I heated the valve insert with a heat gun to loosen the tars that held the cap in place. It did not take too long and I was able to insert a screw driver in the barrel and tap on the valve.K3The next photo shows the pipe taken apart. The condition of all of the parts is clear – dirty but functional. The knurled edges on the valve were damaged by previous attempts by someone else to remove the valve with pliers. In the photo above there are pliers present but I did not use them on the end cap.K4The screw in the bottom of the bowl was held in place by the cake in the bowl. The photo also shows the condition of the bowl and the rim. The other close-up photos show the stem and the tooth marks on both sides near the button.K5 K6I sanded the stem with 180 and 220 grit sandpaper to remove the oxidation and the tooth marks. I was able to blend the tooth damage into the flow of the stem because fortunately they were not deep.K7I lightly topped the bowl on the topping board to remove the damage to the rim and the build-up.K8I reamed the bowl with the Savinelli Pipe Knife and took the cake back to bare briar. I sanded the inside of the bowl with a piece of sandpaper to clean out the remaining cake.K9I scrubbed the exterior of the bowl with cotton pads and acetone to remove the grime and the remaining finish.K10 K11I scrubbed the rod on the stem unit with acetone to remove the tars and oils. I did the same with the exterior of the valve.K12I cleaned out the tarry build-up in the valve/end cap with cotton swabs and alcohol.K13I cleaned out the barrel with cotton swabs and rolled cotton pads and alcohol pushed through the opening with a screw driver. I also pushed a rolled piece of 0000 steel wool through the barrel to polish the inside. I used pipe cleaners to clean out the threads in the opening on the top of the barrel.K14I cleaned up the screw and the airway through the screw with a dental pick, pipe cleaners and alcohol. I cleaned the threads on the screw with cotton swabs and alcohol.K15I polished the aluminum barrel with Meguiar’s Scratch X2.0 and cotton swabs.K16I restained the bowl with a dark brown stain pen. K17I put the bowl on the barrel buffed them with Blue Diamond on the wheel to polish the stain and even out the coat on the bowl as well as polish the aluminum. The next photos show the bowl and barrel at this point in the process.K18 K19I cleaned out the airway in the stem with pipe cleaners and alcohol and then worked on the stem with micromesh sanding pads. I wet sanded with 1500-2400 grit pads and gave it a coat of Obsidian Oil. I dry sanded with 3200-4000 grit pads and gave it another coat of oil. I finished sanding with 6000-12000 grit pads and gave it a final coat of Obsidian Oil. I set the stem aside to dry.K20 K21 K22I gave the pipe and stem multiple coats of carnauba wax and buffed the barrel, bowl and stem with a clean buffing pad to raise the shine. I hand buffed it with a microfibre cloth to add depth to the shine. The photos below show the finished pipe. This one will also go on the store soon. If you are interested in it let me know. Thanks for looking.K23 K24 K25 K26 K27 K28 K29


Cleaning up the last of the Sofia, Bulgaria Finds – a Heibe Dublin 430


Blog by Steve Laug

This is the last of the pipes I picked up on my trip to Europe and the pipe hunt with Dal in the market in Sofia. It is a nice sandblast Dublin stamped with an arced Heibe next to the shape number 430. There is no other stamping on the pipe so dating it is a bit difficult. I looked up what information I could find on the brand and found on Pipedia a short description of the brand. I quote it here in full with the reference at the end. “Heibe pipes are made by the company of the same name, owned in turn by Erich Heikaus, KG, in Bergneustadt, Germany. The trademark for the Heibe name was first filed on March 9, 1966 and registered on January 14, 1967. The sole trademarked line name of Heibe is the Heibe Goldpoint, which was applied for in 1970 and granted on May 31, 1972. Pipes have been seen stamped both “Germany” and “West Germany”, showing that the Heibe Company continued to make pipes after 1990, but these pipes appear to no longer be in production.  https://pipedia.org/wiki/Heibe

The pipe was in decent shape though the bowl and shank were dull and dirty. The stem was made of quality vulcanite that was not badly oxidized. It had no tooth chatter and other than dirt on the stem it was clean. The rim had some tars and oils over flowing from the bowl but it was not heavy. The cake was thin and uneven. There was a lot of dust in the grooves of the blast that gave the finish a dull appearance. There were some worn spots on the shank near the stem and also on the outer edges and top of the rim that would need to be touched up with stain. But other than that the pipe was in decent shape.Heibe1 Heibe2I took some close-up photos of the stamping, the bowl and rim and the stem to show the state of the pipe when I started cleaning it. You can see the shape number and brand in the first photo as well as the wear on the finish at the stem. In the second photo you can see the tars and grime on the rim and the thin cake in the bowl. The last two photos show the stem top and bottom sides. You can see the quality vulcanite had not oxidized too much.Heibe3 Heibe4I scrubbed the rim with a brass bristle wire brush to clean out the grooves and remove the build-up. It did not take too much scrubbing to get it clean. I scrubbed the rim with Murphy’s Oil Soap to remove the dust and grime in the sandblasted finish. I rinsed it under running water to remove the soap.Heibe5I scraped out the cake in the bowl with the Savinelli Pipe Knife. I took it back to bare briar.Heibe6I touched up the worn areas of the finish on the shank and the rim with a dark brown stain pen and then hand buffed the bowl with a shoe brush. The photos below show what the bowl looked like at this point in the process.Heibe7 Heibe8I hand buffed the bowl and shank with a shoe brush to get a feel for the look of the restained portion of the pipe. The new stain blended in very well with the older stain.Heibe9I gave the bowl several coats of Conservator’s Wax and then buffed it once again with the shoe brush. The polished bowl is shown in the photos below.Heibe10 Heibe11I decided to work on the stem with the cream cleanser and the Meguiar’s Scratch X2.0 once again. Since there were no tooth marks in the stem it would be just a matter of polishing the vulcanite. I scrubbed it with cream cleanser and cotton pads until I had removed the majority of the grime. I scrubbed it with the Meguiar’s to finish polishing it.Heibe12 Heibe13The two polishing compounds removed the grime. I cleaned out the airway with pipe cleaners and alcohol and the stem was finished. I scrubbed the mortise and the airway into the bowl with pipe cleaners, cotton swabs and alcohol and cleaned it out as well.Heibe14I buffed the cleaned pipe with Blue Diamond on the buffing wheel to polish the stem and lightly polish the bowl. I gave the stem several coats of carnauba and the bowl a very light coat of carnauba and then buffed the pipe with a clean buffing pad to raise the shine. I finished buffing it by hand with a microfibre cloth to give it a deeper shine. The look of the finished pipe is shown in the photos below. It has a nice blast and clean sharp lines to it. If anyone is interested in this one let me know it will go on the store very soon. Thanks for looking.Heibe15 Heibe16 Heibe17 Heibe18 Heibe19 Heibe20 Heibe21

Breathing new life into a Kirsten S with a Unique Bell Bowl


Blog by Steve Laug

My brother picked up this Kirsten because he really liked the look of the bowl. I have never seen a Kirsten bowl this shape so I don’t know if it is an aftermarket bowl or one of Kirsten’s own. In the long run it does not matter because not only is the shape attractive but the briar is stunning. The rim has a slight bevel inward and the curve into the metal base cap looks great and feels great in the hand. The bowl had a heavy cake and the screw mount in the bottom of the bowl was caked over to the point that it was stuck in the bowl. The metal barrel was oxidized and pitted. It had no shine left but looked like a well-worn pipe. The stem was oxidized but there were no tooth marks or chatter on the stem. The rod that ran through the barrel was dirty and coated with tars and oils that had harden. The adjustable valve on the end of the barrel was stuck and could not be turn or adjusted. It was actually stuck closed so there was no airflow through the barrel.Kirsten1 Kirsten2I put the pipe in an alcohol bath to let it soak for a day while I was at work. When I came home in the evening I was able to take it apart. The alcohol had softened the tars and the stem came out easily and I was able to use a screw driver and a light tap on the handle to knock out the stuck valve. The bowl came off the barrel but the screw was still stuck in the bottom of the bowl. When I had it apart I realized I was dealing with a Generation 2 Kirsten. It was made between 1958-1985. I quote from a previous blog on the site with the information that leads me to the conclusion that I was dealing with a Generation 2. “Markings on underside of metal shank “Made in USA XL” (or app. size) and “Pat. & Pats. Pending”. The presence of O rings on both the valve and the mouthpiece and the metal cup spacer under bowl are the biggest thing that separates the Generation 1 from the Generation 2 pipes. These O rings help provide a tighter seal when the stem and apparatus are inserted into the radiator stem. Instead of “O” rings, the machining of the Generation 1 pipes was so precise the fit was exact.”  https://rebornpipes.com/2012/11/03/kirsten-generation-1-1-5-2-3/ The blog also identifies the S stamp on the bottom of the shank as the Sportsman Model from that era.

So I knew that the pipe I had, came from the time period of 1958-1985 and that the O rings on both the valve and the mouthpiece confirmed that. The S stamp also fits the pipe squarely within that date range. Armed with that information I began to work on refurbishing the Kirsten.Kirsten3I reamed the bowl with the Savinelli Pipe Knife and was able to clean out the cake enough that I could use a flat blade screwdriver to loosen the screw from the bottom of the bowl. Once the screw was removed I cleaned out the bowl with sandpaper to take the cake back to bare briar.Kirsten4I scrubbed the rim with a cotton pad and saliva and was able to remove the majority of the tars and oils. I used micromesh sanding pads to further clean up the rim top. The briar was beautiful once the grime was removed. I wiped down the outside of the bowl and rim with alcohol and the finish was in very decent shape.Kirsten5I scrubbed the oxidized finish with Meguiar’s Scratch X2.0 and cotton pads and cotton swabs and was able to remove the worn and oxidized build up on the surface. Underneath the oxidation was a shiny metal finish. It would not take too much scrubbing to remove all of the damage.Kirsten6I soaked some cotton pads in alcohol and pushed them through the barrel and also scrubbed the inside of the barrel with cotton swabs and alcohol to remove the tars and oils there. I cleaned out the inside of the valve and the outside of the insert end. Kirsten7I cleaned out the airway in the stem with alcohol and pipe cleaners. I sanded the metal rod with micromesh sanding pads to remove the build up and tars on the metal surface. I scrubbed it with alcohol to clean it and polished it with the Meguiar’s.Kirsten8With the internals cleaned, the bowl reamed and cleaned, the barrel polished and cleaned it was time to polish the stem. I scrubbed it with Soft Scrub cleanser to remove the oxidation. Once I broke through it I used the Meguiar’s Scratch X2.0 to further polish the stem. I decided to try to see if I could successfully use Charles’ method of cleaning oxidation with the Meguiar’s.Kirsten9 Kirsten10I was pretty amazed with the results. The finish glowed and the polish actually removed all of the oxidation. It just took repeated scrubbings and polishing until finally no more oxidation came off with the polish. I buffed the pipe with Blue Diamond on the wheel to polish the briar, barrel and the stem. I gave the pipe multiple coats of carnauba wax and buffed it with a clean buffing pad to polish it. I hand buffed it with a microfibre cloth to deepen the shine. The finished pipe looks like new and it just glows with warmth and a shine that must have originally graced the pipe. It is a beautiful Kirsten and should grace someone’s pipe rack for years to come. The finished pipe is shown in the photos below. If you are interested in this pipe let me know. Thanks for looking. Kirsten11 Kirsten12 Kirsten13 Kirsten14 Kirsten15 Kirsten16 Kirsten17

Finally a simple clean up – an Alco Universal Gold Pipe


Blog by Steve Laug

The Alco pipes were made by Falcon in England. This particular version of the Alco was made to hold an in line triple air groove filter. All Alco bowls are interchangeable with any other Alco, but NOT with Falcon. The Alco I was given is an Alco Universal Gold pipe. The pipe was in decent shape with the finish on the bowl in good shape but dirty. The rim had an abundance of lava overflow that came from a thickly caked bowl. There was tobacco debris stuck to the bottom of the bowl. The copper coloured base was dirty but did not show damage. The gold band was attached to the stem and showed some oxidation. The stem itself had a lot of tooth chatter on both the top and bottom sides near the button. What complicated that a little was that the stem was a dental bit and had two scored marks on each side. The airway in the stem was tight and the slot was narrow. The stem had a gold Falcon on the top side. The stamping on the underside of the base read ALCO UNIVERSAL.Alco1 Alco2The pipe came apart easily. I twisted the bowl off the base and found that there was a plastic spacer between the bowl and the base. The bowl had been stamped ALCO on the underside and it was dirty. The base had a lot of tars and oils that had hardened around the centre post. The stem also had the above mentioned “Triple Air Groove Filter”. Surprisingly the filter was pretty new looking.Alco3I cleaned out the airway in the stem with pipe cleaners, cotton swabs and alcohol. It was not as dirty as I expected. It made me wonder if the previous owner had not cleaned it a bit before he put in the new filter.Alco4The base was another story. It looked as if it had not been cleaned for a long time. I loosened the hardened oils and tar with a dental pick. I cleaned up the loosened debris with cotton swabs and alcohol and was able to remove the hardened tars and oils that had accumulated in the base over the years. I used cotton swabs, pipe cleaners and alcohol to clean out the inside of the mortise and airway in the shank.Alco5Reaming the bowl was a challenge as the cake was hard and dense. Starting with the smallest cutting head on the PipNet reamer and moving through the first three heads I reamed the cake back to bare briar. I cleaned up the bowl and airway at the bottom using the Savinelli Pipe Knife. Thinking about it as I write I probably should have tried out the Falcon Pipe Reamer that I picked up not too long ago. I forgot I had it so it will have to be used next time.Alco6 Alco7I scrubbed the base of the bowl and airway with cotton swabs and alcohol to remove the accumulated oils and tars on the bottom. You can see the ALCO stamping on the briar at the top of the picture.Alco8I worked on the rim with a cotton pad and saliva to remove the build-up there. It just took a bit of elbow grease to remove it and the undamaged rim came out of the grime. I wiped down the bowl with alcohol on the cotton pad and cleaned the dirt off the surface of the bowl and touched up the rim.Alco9I wet sanded the rim and bowl with 1500-2400 grit micromesh sanding pads and wiped it down again. I finished by sanding it with 3200-4000 grit pads to raise the shine. I put the bowl back on the base for the photo below.Alco10I have always found plastic stems harder to polish than rubber ones. The dental bit was a challenge to clean out all of the tooth marks in the grooves. I sanded the stem with 220 grit sandpaper to smooth out the chatter and then used 2000-6000 grit wet dry sandpaper to begin polishing it. I wet sanded it with 1500-2400 grit micromesh sanding pads and gave it a coat of Obsidian Oil. I dry sanded it with 3200-4000 pads, gave it another coat of oil and finished sanding it with 6000-12000 grit pads. I gave it a final coat of Obsidian Oil and let it dry.Alco11 Alco12 Alco13I have found that buffing plastic stems is more trouble than it is worth as the heat of the buffing pads can easily melt the stem and create a mess. I hand polished the stem with Meguiar’s Scratch X2.0 with cotton pads to bring up the shine. I buffed the bowl with Blue Diamond and gave it several coats of carnauba wax. I buffed the bowl with a clean buffing pad. I gave the stem several coats of Conservator’s Wax and hand buffed it and the bowl with a microfibre cloth. The finished pipe is shown in the photos below.Alco14 Alco15 Alco16 Alco17 Alco18 Alco19 Alco20


An Interesting Churchill’s Volcano Brought to Life


Blog by Steve Laug

The next out of the box of pipes from my brother is the one below. It is stamped Churchill’s on the smooth underside of the shank. The shape number 882 is along the shank stem junction on the underside. I have refurbished several Churchill’s pipes from their pipe shop in Norwich. I wrote a bit about that shop when I did a refurbish on a Churchill’s Bent Pot. The link to that article is as follows: https://rebornpipes.com/2013/09/08/churchills-bent-pot/. This pipe had a rustication that is very similar to those I have seen on Lorenzo pipes. The stem on this pipe is stamped Italy on the underside. The finish was tired and dirty but the rustication was in good shape. The rim was solid with no damage to the inner or outer edge but it was thick with tars. The bowl was reamed while I was visiting in Idaho. The stem was in good shape at first glance. It was oxidized but there were no tooth marks. As I examined it I found that the stem had been cut off and a new button was cut into the surface. The slot was also reshaped. The button itself was very thin as the stem was also thin at this point.Church1 Church2I took a close up photo of the rim and the stamping on the underside of the bowl. The rim is dirty but the rustication is in good shape with no burn marks or damage. The stamping is also very clear.Church3I scrubbed the rim with a brass bristle wire brush to remove the tars and oils that had built up there. Once it was loosened I scrubbed it with a tooth brush and Murphy’s Oil Soap to clean off the grime in the finish. I rinsed the bowl with warm running water to remove the grime and soap.Church4 Church5The next photos show the cleaned finish on the pipe.Church6 Church7I used the dental spatula to scrape out the inside of the shank and break the tars and oil build-up away from the walls of the shank and mortise. I cleaned out the mortise and airway in the shank and stem with pipe cleaners, cotton swabs and alcohol.Church8 Church9I sanded the stem with 220 grit sandpaper to remove the oxidation. I built up the button with black super glue to add thickness and enable a grip on the button.Church10 Church11I used a file to shape the button and recut the sharp edge against the stem surface. I sanded it with 180 grit sandpaper to smooth out the areas in front of the button on the top and the bottom sides.Church12 Church13I continued to shape the stem surface and the button with 220 grit sandpaper and also used the needle files to open up the slot in the button and reshape that.Church14I sanded the stem with 220 grit sandpaper to clean off the oxidation. I wet sanded the stem with 1500-2400 grit micromesh sanding pads. I rubbed it down with Obsidian Oil. I dry sanded the stem with 3200-4000 grit sanding pads and gave it another coat of oil. I finished sanding the stem with 6000-12000 grit pads and gave it a final coat of Obsidian Oil. I let the stem dry.Church15 Church16 Church17I stained the bowl with a dark brown aniline stain and flamed it. I repeated the process until the coverage was good. I hand buffed the bowl with a shoe brush. I gave it a light coat of olive oil and hand buffed it again. I rubbed the surface down with some Conservator’s Wax and then hand buffed it with the shoe brush for a final shine.Church19 Church20I buffed the pipe lightly with Blue Diamond polish on the wheel and then gave the stem multiple coats of carnauba wax. I buffed the pipe with a clean buffing pad and then hand buffed it with a microfibre cloth. The finished pipe is shown in the photos below. The rustication has depth and textures both visually and tactilely. It feels great in the hand. The shape of the bowl and the faux military stem give the pipe a classic look with a flair that is almost Danish looking. I like the finished look of this one. Thanks for looking.Church21 Church22 Church23 Church24 Church25 Church26

Restoring a Semi-Churchwarden Pipe


Blog by Steve Laug

When I picked up the lot of pipes from my brother Jeff there was a small churchwarden, just seven inches in length among the assorted pipes. It was a dark sandblasted bowl with an undertone of dark brown and an overstain of medium brown. The bowl was in excellent shape and the rim was very clean. It was stamped on the underside of the shank with the words SEMI over CHURCHWARDEN over Italy. The shank was thinner on the top than on the bottom side. As I examined it I could see a small hairline crack on the right top side of the shank. The finish was perfect with no tars or build up on the rim and no cake in the bowl. The stem was oxidized to an ugly brown and the one side that looked like it had a ‘–‘ logo on the left side. The problem was that the side of the stem had been flattened in that area and if it was a logo it made the stem out of round. There was some tooth chatter on the top and the bottom of the stem at the button but there were not any deep tooth marks that I had to deal with. The way the pipe was made with the flat bottom made it a sitter.CW1I took some photos of the pipe when I brought it to the work table. These give a pretty clear picture of the condition of the pipe when I started cleaning it up. The shank needed to be repaired and the stem cleaned up and made round on the flat side.CW2 CW3I took a close-up photo of the rim to show the state of the inner and the outer edge of bowl. The sandblast finish was clean and the blast on the rim was well done. I also took some photos of both sides of the stem at the button to show the tooth chatter and the lack of deep dents or tooth marks. The fourth photo shows the stamping on the smooth bottom of the shank.CW4 CW5 CW6I cleaned out the inside of the mortise and the airway to the bowl and in the stem with pipe cleaners, cotton swabs and alcohol.CW7I sanded the stem with 220 grit sandpaper to remove the surface oxidation and begin the process of cleaning it off.CW8I cleaned the flat surface on the left side of the stem and then began to build up the smooth area to bring the stem back to round. I sprayed it with an accelerator and then gave it a second coat of glue.CW9I put the stem in the shank and sanded it with 220 grit sandpaper to smooth out and blend in the patch to the rest of the stem. I worked on it with the sandpaper until the surface was smooth to touch and blended well with the rest of the vulcanite.CW10Once it was smooth and round I wet sanded it with 1500-2400 grit micromesh sanding pads and wiped it down with Obsidian Oil. I dry sanded it with 3200-4000 grit pads and gave it another coat of oil. CW11 CW12I went through my assortment of bands to find one that was the correct diameter for the cracked shank. I measured it and then found the correct one. I heated it with a lighter and then pressed it into place on the shank of the pipe.CW13 CW14 CW15I took a close-up photo of the shank end to show the crack at the top of the photo under my finger. I have circled cracked area in red.CW16I finished sanding the stem with 6000-12000 grit micromesh pads and gave it a final coat of Obsidian Oil. I set it aside to dry.CW17I polished the band with a jeweler’s polishing cloth and then buffed the pipe and stem with Blue Diamond on the buffer. I gave the bowl and stem several coats of carnauba wax and buffed it with a clean buffing pad to raise the shine. I hand buffed it with a microfibre cloth to deepen the shine. The finished pipe is shown in the photos below. Thanks for looking. This one will show up on the rebornpipes store soon. Send me a pm or a message if you are interested in owning it.CW18 CW19 CW20 CW21 CW22 CW23 CW24

Restoring a Comoy’s The Guildhall Twin Bore Long Shank


Blog by Steve Laug

The next pipe I brought to my table to work on was stamped on the left side of the shank The Guildhall over London Made and on the right side Twin Bore over Made in England. The stamping was readable with a light and a magnifier but it was faint. It was a nicely shaped long shank billiard or some would call it a Lumberman. I have worked on many Comoy’s The Guildhall pipes but never have seen one stamped like this. The stem indeed is a twin bore. It was in decent shape but it did not bear testimony to the point of the twin bore “bite proof” stem. It had a lot of tooth marks and chatter on the top and the bottom side of the stem. The tooth marks were quite deep but did not enter the airway in the stem. So I guess in that way the stem was “bite through proof”. The finish was quite nice. The pipe was in good shape with just some grime on the surface of the briar. The rim had been topped and restained sometime in its history as the stain is quite a bit lighter than the rest of the pipe. The outer and inner edges of the rim were darker than the surface of the rim. The bowl had been reamed but the cake was left uneven on the walls of the bowl.Guild1 Guild2 Guild3 Guild4I took a close-up photo of the rim to show the previous topping and the darkening of the inner and out edges. You can see that it had been touched up and the rim edges not cleaned up. I also took some close-up photos of the damage to the stem in terms of tooth marks and chatter.Guild5 Guild6I sanded the top and bottom sides of the stem to remove the tooth chatter on the surface and to clean up the area around the deeper tooth marks. I wiped the areas down with alcohol and then used black super glue to fill in the deep marks.Guild7While the stem repairs were drying I reamed the bowl with the Savinelli Pipe Knife. I took the cake back to bare briar.Guild8I used a folded piece of 220 grit sandpaper to clean up the bevel on the inner edge of the bowl. I worked slowly to make sure that the bevel maintained the roundness of the bowl. Once I had it finished I stained the rim and inner edge with a medium brown stain pen to match the colour with the rest of the pipe.Guild9I used a dental spatula to scrape out the inside of the mortise as there was a ridge of tar and oil part way down the shank. I scraped out the grime and then scrubbed the inside of the mortise and the airway in the shank with pipe cleaners, cotton swabs and alcohol until it was clean.Guild10By the time I worked on the twin bore stem the repairs were dry. I lightly sanded them and then cleaned out the twin bore airways.Guild11I sanded the repairs on the stem with 220 grit sandpaper until the surface of the repairs was blended into the surface of the stem.Guild12I wet sanded the stem with 1500-2400 grit micromesh sanding pads. I rubbed down the stem with Obsidian Oil. I dry sanded it with 3200-4000 grit pads and gave it another coat of oil. I sanded it with the last set of three micromesh sanding pads – 6000-12000 grit pads. I gave it a final coat of Obsidian Oil and set it aside to dry.Guild13 Guild14 Guild15I buffed the pipe with Blue Diamond and worked over the scratches that still showed up on the top surface of the stem. It did not take much to remove them and get a deep shine on the stem. I buffed the bowl as well, being careful around the stampings on the shank of the pipe. I gave the bowl and stem multiple coats of carnauba wax and buffed it with a clean buffing pad to raise the shine on the briar and vulcanite. The finished pipe is shown in the photos below. It shines and has depth to the finish. The stamping is faint but is my only example of a Twin Bore Comoy’s The Guildhall Pipe. It is a beauty in my opinion. Thanks for looking.Guild16 Guild17 Guild18 Guild19 Guild20 Guild21 Guild22


An Interesting Antique Store Stummel


Blog by Steve Laug

I have a routine when I visit in Bellingham. I take the ladies in my life to the mall and leave them to shop and I set out on my circuit of pipe haunts to see if I can find some likely object of my attention to repair. I rarely come home empty handed, though I don’t know if that is because I will work on many kinds of pipes or if it is because I generally find something. It may be hard for the observer to discern the difference, I know it is for my wife and daughters. I visited several of my haunts and finally in the last one I did a quick walk through and found nothing… this time it looked like I would come home empty handed. Just to make sure I asked at the counter if there were any old pipes in the shop. The seller pointed directly behind me and there in a case that I had totally missed were four pipes. I bought them all. They had a look of age about them so I jumped and paid the price. It turned out that one of them had a cracked bowl but I was able to cannibalize a sterling silver band for an old KBB Yello Bole from the 20s. Two of them were also older – one a GBD and one a Dr. Plumb. The fourth, a Canadian had a gold coloured band and was missing the stem. It looked pretty dirty and the finish was gone. I figured that it too might be one I cannibalized for parts. I paid for them and went out to my car. I went through them and looked them over. The first three showed no surprises. But the stemless bowl was a real surprise. There on the shank was the arced Barlings stamping and under that was the stamping Ye Olde Wood over 237 on the left top side of the shank and Made in England on the right top side. There is also a remnant of the word EXEL. Boy was I surprised. Suddenly it went from a potential victim for cannibalization to one that had some interest for me. It turned out to be the best of the lot.Barling1 Barling2 Barling3 Barling4I took a close-up photo of the rim to show the extent of the damage to that area. The cake in the bowl had flown over the top of the rim. There were also dings and dents that were quite deep. The outer edge was compromised and rounded over and the inner edge was out of round. I also included a photo of the stamping and the crack in the shank. This is the stamping that I saw in the bright daylight when I left the basement antique shop.Barling5I went through my can of stems and found one that would work on this shank. I had to go with a bit of an oversized stem in terms of diameter as the shank was thinner on the top than on the bottom. I would have to hand fit the stem to accommodate that idiosyncrasy.Barling6I used a microdrill bit to put a tiny pin hole at the end of the crack and then filled in the crack with super glue. The drilled hole would keep the crack from spreading and the glue would fill it in. The integrity of the shank was stabilized by the band as well.Barling7Once I had a good fit of the stem to the shank I used the Dremel and sanding drum to remove the excess vulcanite on the diameter of the stem. The fine tuning and flow of the stem would be done by files and hand sanding.Barling8 Barling9I reamed the bowl with the PipNet reamer and took out the majority of the cake. I cleaned it up and took it back to briar with the Savinelli Pipe Knife.Barling10 Barling11I topped the bowl on a topping board using 220 grit sandpaper. I removed the damaged surface of the rim until the outer edges were sharp and there was no rounding.Barling12I scrubbed the exterior of the bowl with acetone on cotton pads to remove the grime and wax that had built up and made the exterior dull and lifeless.Barling13 Barling14I reworked the inner edge of the bowl to bevel it and bring it back to round using a folded piece of 180 grit sandpaper and then a piece of 220 grit sandpaper.Barling15I wiped the bowl down again with acetone to remove any remaining grit and also the sanding dust from the rim repairs.Barling16I put the stem in place and took some photos to be able to see what still remained to remove from the diameter of the stem and what shaping still needed to be done. There was some width to be removed from the top and bottom sides at the band and then the taper needed to be reduced as well to remove the slight hip. The width on the right and left side also needed a bit more work to make the flow seamless.Barling17 Barling18I sanded the stem with 180 grit sandpaper to further shape it and clean up the flow from the shank to the button. It took a lot of sanding to get the angles and flow just right.Barling19I scrubbed out the mortise and the airway in the stem and the shank with alcohol, cotton swabs and pipe cleaners.Barling20I sanded the rim with a medium and a fine grit sanding sponge to remove the scratches left behind by the topping and then stained it with a light brown stain pen to match the colour of the bowl.Barling21I wet sanded the stem with 1500-2400 grit micromesh sanding pads and gave it a coat of Obsidian Oil. I dry sanded with 3200-4000 grit pads and gave it another coat of oil. I finished the sanding with 6000-12000 grit pads and gave it a final coat of oil. I set it aside to dry.Barling22 Barling23 Barling24I buffed the pipe with Blue Diamond and gave it multiple coats of carnauba wax. The colour darkened slightly with the wax. I buffed it with a clean buffing pad and then by hand with a microfibre cloth. The finished pipe is shown below. I am pleased with the way the fit and finish of the stem came out and also the overall look of the pipe. Thanks for looking.Barling25 Barling26 Barling27 Barling28 Barling29 Barling30 Barling31


Restoring a Stanwell Handmade Danish Bulldog


Blog by Steve Laug

The second pipe I picked up from Charles Lemon of Dadspipes was a nice little Stanwell Bulldog that captured my attention. It is another one that I have added to my own collection. I loved the shape of it when I saw it in the photos that Charles sent me of the estate pipes he had purchased recently. It came in the mail through our ‘ultra quick’ Canada Post Express Mail on Friday. I cleaned up the W.O. Larsen and already wrote about that on the blog. This one looked amazing and came in its own Stanwell pipe pouch. It was stamped on the left underside of the diamond shank with the number 33 and next to that Stanwell Regd. No. 969-48 over Handmade in Denmark.Bull1When I removed the packing material and took the pipe out of the bag it was indeed a beauty. The colour was lighter than what was shown in the original photo that I had of the pipe. That does not matter too much to me as the lighter colour allows the grain to show through. This pipe has some amazing birdseye grain on the bowl sides. The diamond shank culminating in a vulcanite shank extension looks stunning.Bull2 Bull3The finish was quite clean on the pipe and it still had a shine. The vulcanite shank extension was lightly oxidized. The shank stamping was very clear and sharp. The double rings on the bowl were in perfect condition. The finish on the bowl and shank was in excellent condition. The rim was another story. It had some tar and oil (lava) build-up that flowed over from the cake in the bowl. The cake, though uneven, was hard. The rim also had a burned area on the middle of the rim top on the right side. It impacted the condition of the bowl and the roundness of the inner rim edge. The stem was oxidized and the stamping of the Crown S was worn and the gold stamping was gone. There was tooth chatter on the topside of the stem and tooth marks on the underside.Bull4 Bull5I took some close-up photos of the stem to show the tooth chatter and tooth mark on the underside near the button.Bull6I took a close-up photo of the rim to show the condition of the rim with the burned area (top left toward the front of the bowl) and the thickness of the cake.Bull7I reamed the cake back to bare briar with the Savinelli Pipe Knife. The carbon cake came out nicely and left the bowl quite clean. This reaming also gave me a clear picture of the condition of the burned area on the rim.Bull8 Bull9The next series of photos tell the story. I reamed the bowl and then topped it. I took a photo after I had topped it lightly to show the extent of the burn mark on the right side of the rim. I finished topping the bowl using 220 grit sandpaper on the topping board.Bull10 Bull11 Bull12I sanded the rim with a medium and fine grit sanding block to smooth out the scratches. I used the light brown stain pen to touch up the rim surface. The inside rim edge needed some more work but I wanted to see what the rim looked like at this point.Bull13I sanded the inner edge of the rim with a folded piece of sandpaper – beginning with 180 grit and then progressing to 220 grit sandpaper and then on to 1500-3200 grit micromesh sanding pads. I beveled the edge slightly to remove the rim damage and darkening. The second photo below shows the finished rim after sanding.Bull14 Bull15I touched up the inner bevel with a light brown stain pen. I wet sanded the vulcanite shank extension with 1500-2400 grit micromesh sanding pads and gave it a coat of Obsidian Oil. I dry sanded it with 3200-12000 grit pads and gave it a coat of micromesh between the 4000 and the 6000 grit pads. I gave it a final coat of Obsidian Oil and set it aside to dry.Bull16 Bull17I cleaned out the inside of the mortise and the airways in the shank and the stem with alcohol, cotton swabs and pipe cleaners until they came out clean.Bull18I scrubbed the stem with Meguiar’s Scratch X2.0 to begin removing the oxidation on the surface.Bull19Most of the oxidation came off so I used some Antique Gold Rub n’ Buff to highlight the Stanwell Crown S on the stem top.Bull20I wet sanded the stem with 1500-2400 grit micromesh pads and gave the stem a coat of Obsidian Oil. I dry sanded it with 3200-4000 grit pads (I forgot to take the photo) and gave it another coat of oil. I finished sanding it with 6000-12000 grit pads and gave it a final coat of Obsidian Oil. I set it aside to dry.Bull21 Bull22I buffed the stem and bowl with Blue Diamond carefully working over the stem and the shank extension to polish the vulcanite. I gave the bowl and stem multiple coats of carnauba wax to protect and preserve it. I buffed it with a clean buffing pad to raise the shine. I hand buffed it with a microfibre cloth to add depth to the shine. The finished pipe is shown in the photos below. I am looking forward to giving it an inaugural smoke soon. I really like the finished look of the pipe. The slightly beveled rim took care of the burn so that it can no longer be seen. The smooth finish shows off the birdseye grain and the swirls of cross grain. It is a beautiful pipe and I am glad to have it grace my pipe rack. Thanks for looking.Bull23 Bull24 Bull25 Bull26 Bull27 Bull28 Bull29