Tag Archives: polishing

Rejuvenating a “Malaga” Author


Blog by Steve Laug

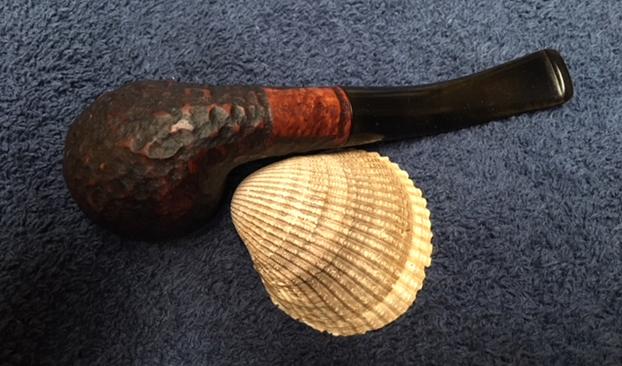
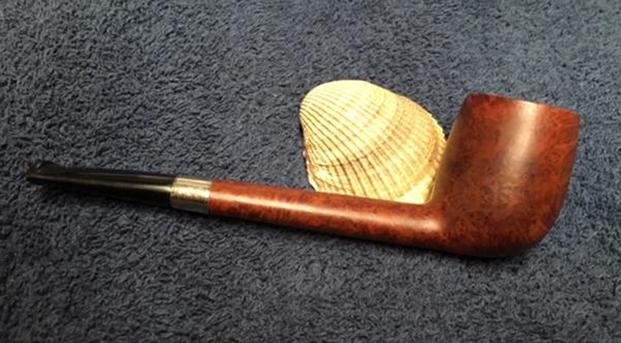
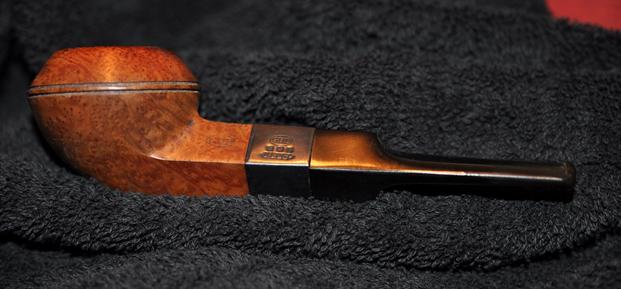
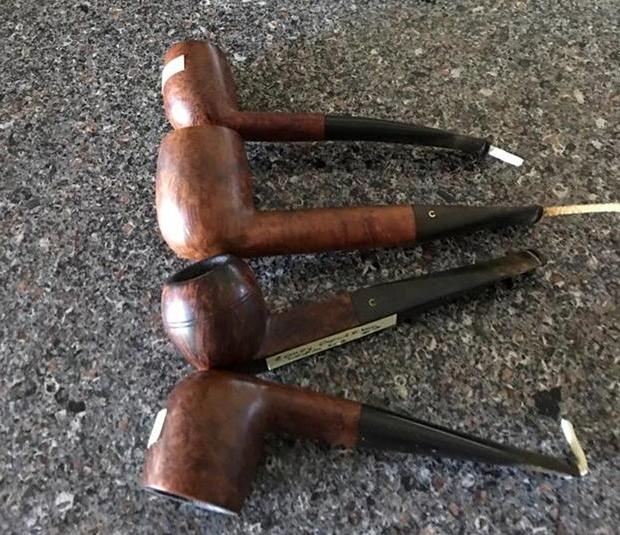
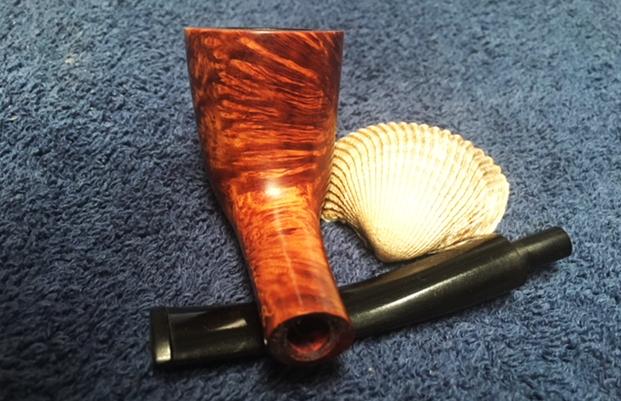
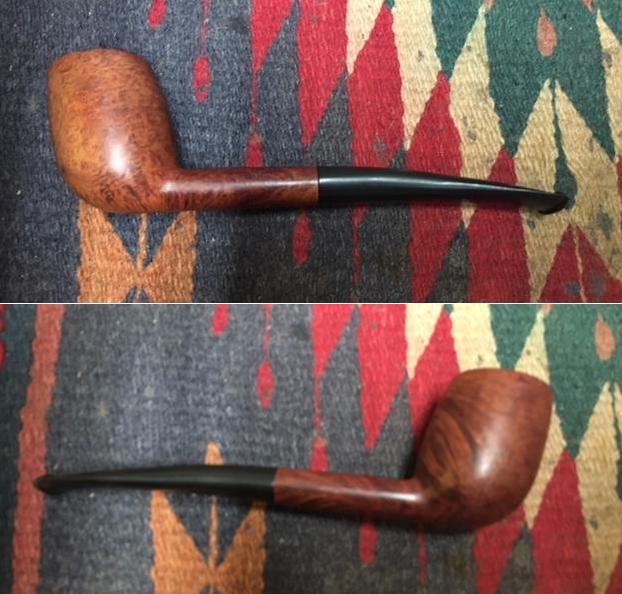
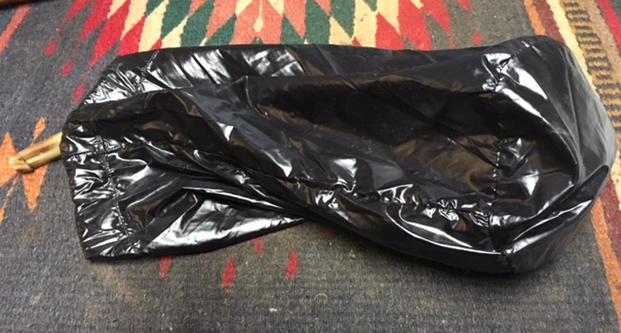
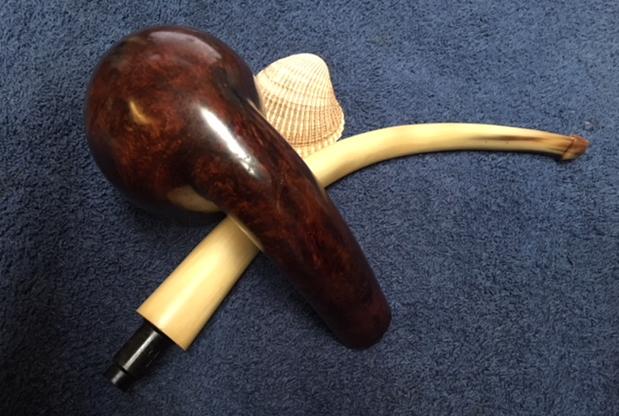
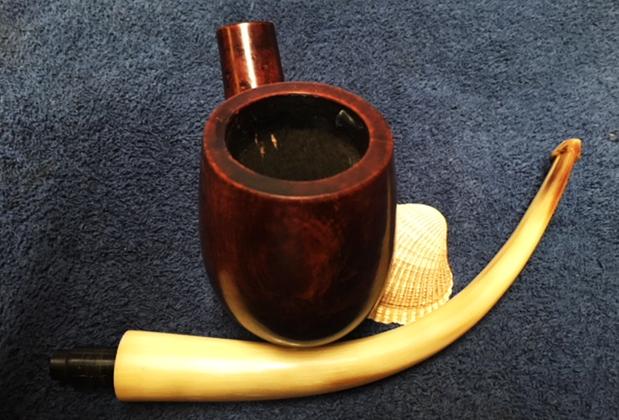
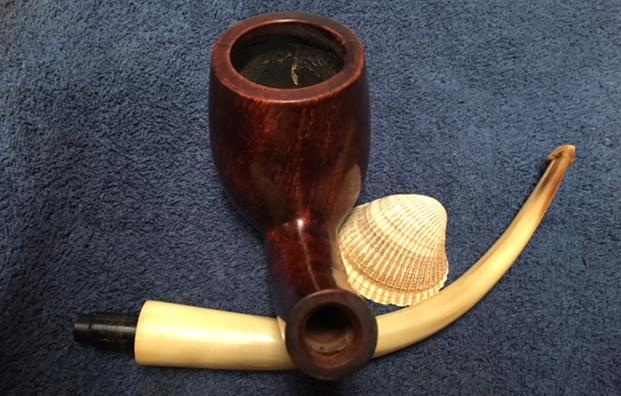
The next pipe on the worktable is another “Malaga” – a bent rusticated author. Jeff has picked up other pipes of this brand since we picked up the ones from Kathy’s Dad’s estate. They are of various shapes and finishes – rusticated, smooth and mixed finish. They are also various sizes from small to very large. They were all made by the Malaga Pipe Shop in Royal Oak, Michigan. They are all from various places around the US. It is interesting to see the breadth of the spread of one little pipe shop in Michigan. The more I work on the brand the more I am impressed by the quality of the craftsmanship and beauty of the pipes that came from the shop. I wrote a blog to give a little history of the Malaga Brand if you are interested: https://rebornpipes.com/tag/malaga-pipes/. There are also links there to a catalogue and the maker George Khoubesser.)

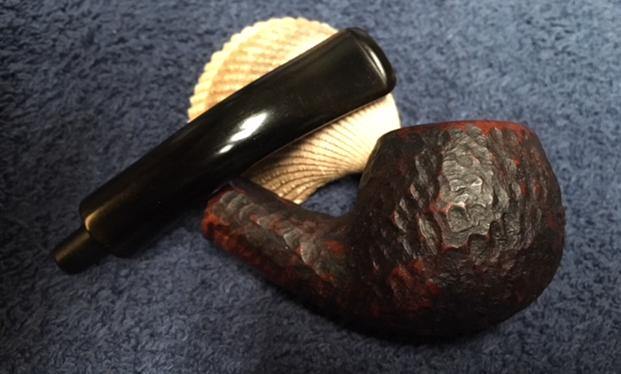
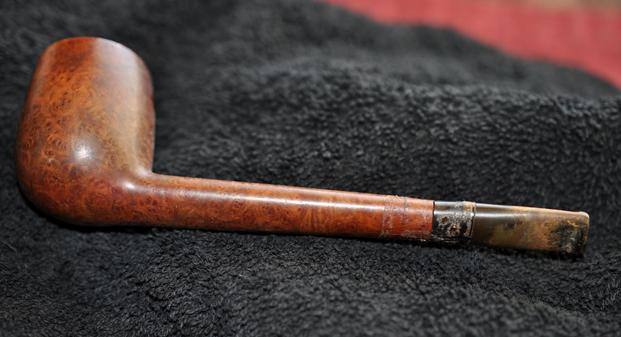
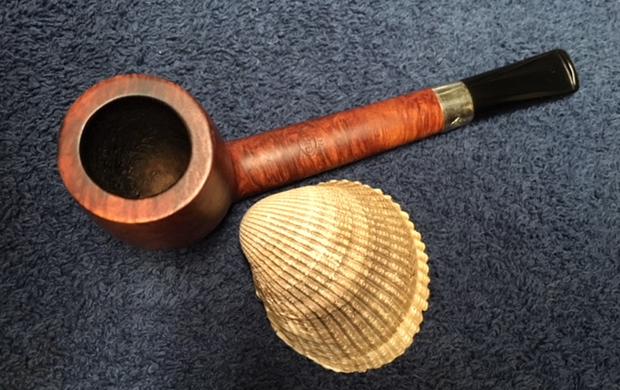
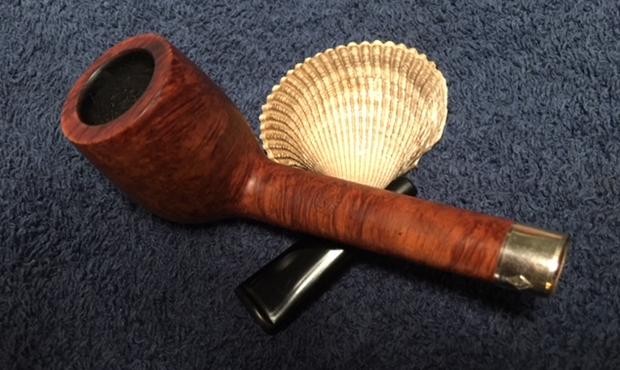
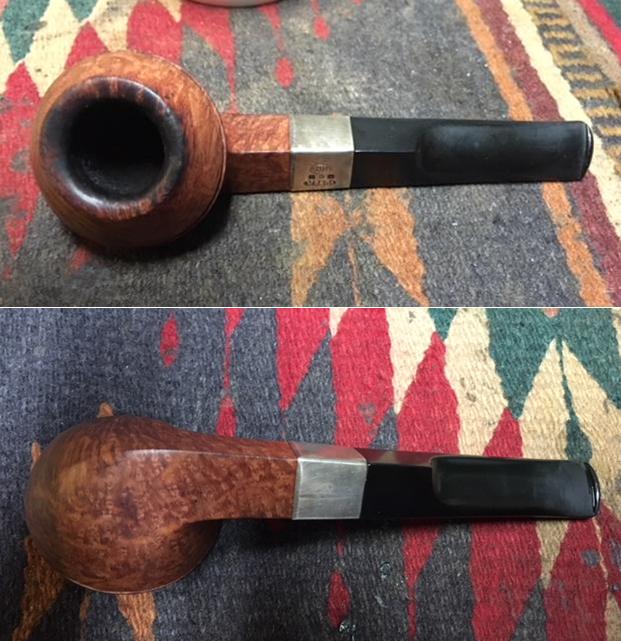
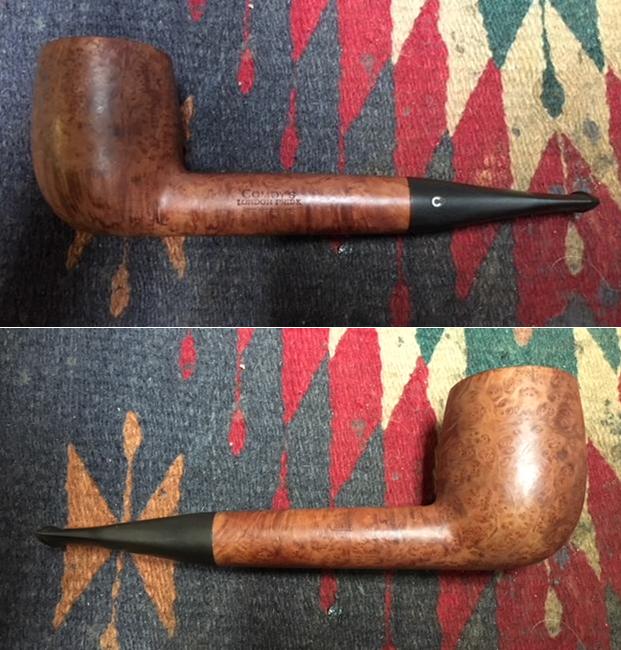
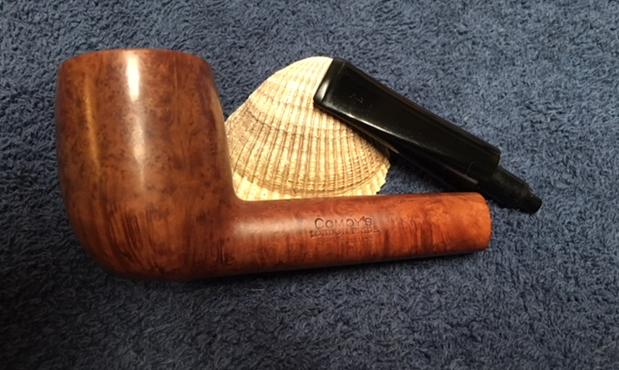
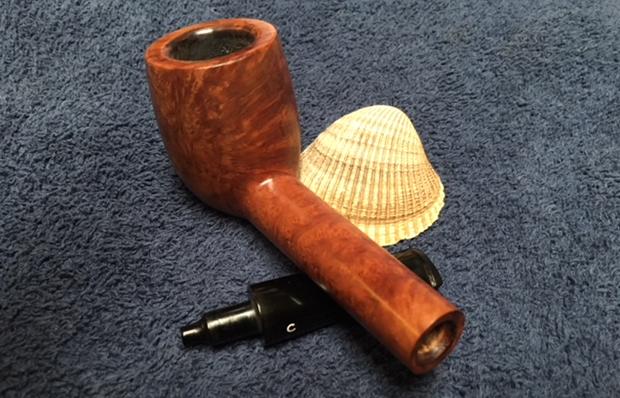
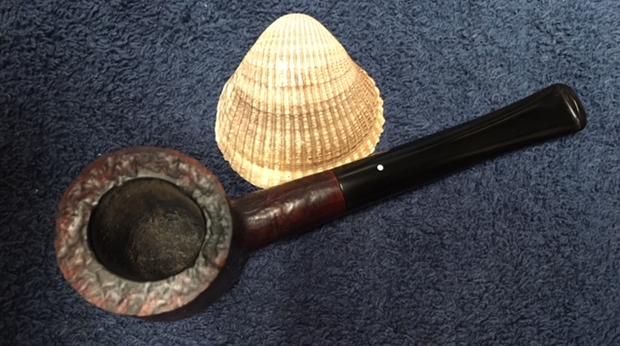
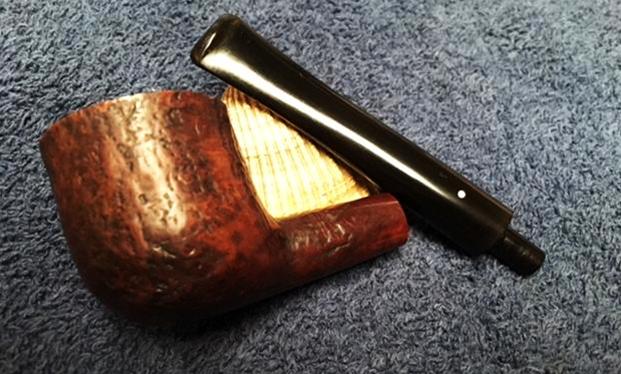
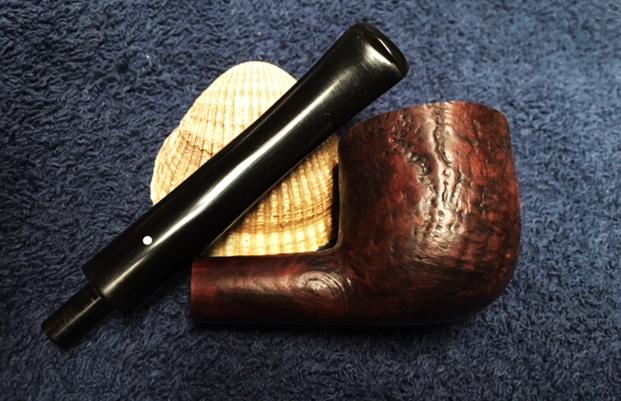
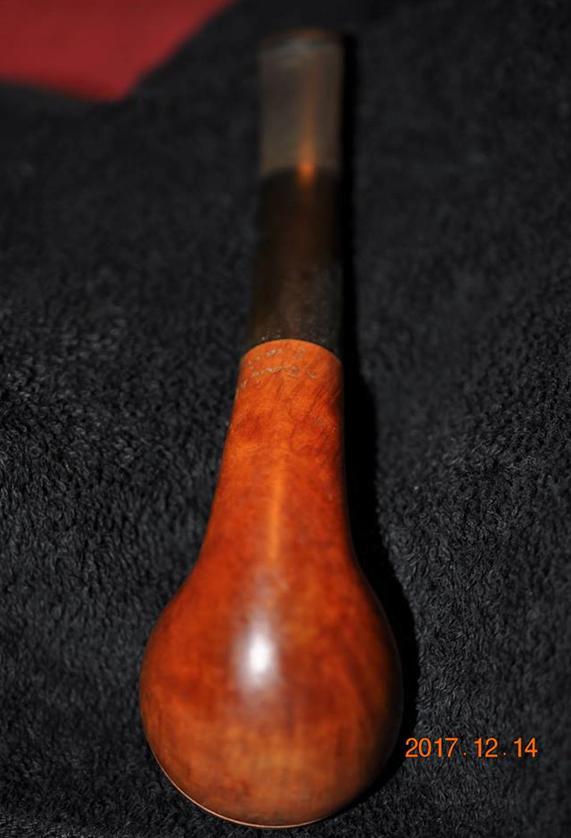
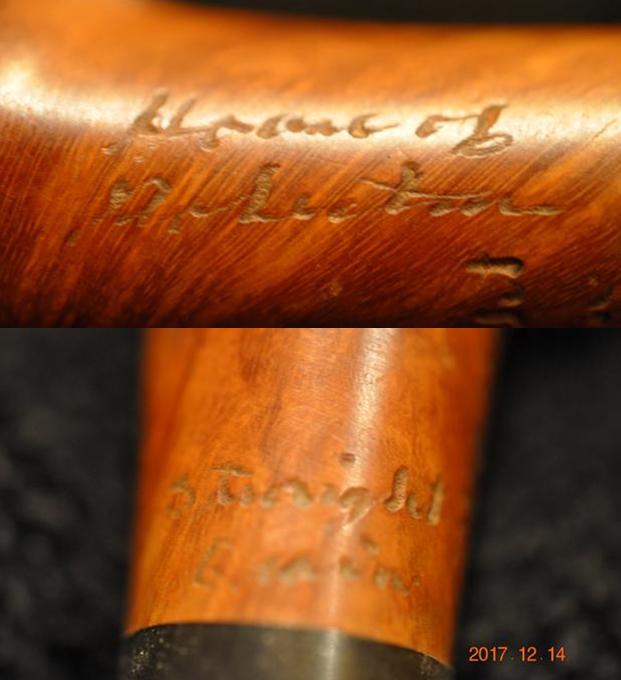
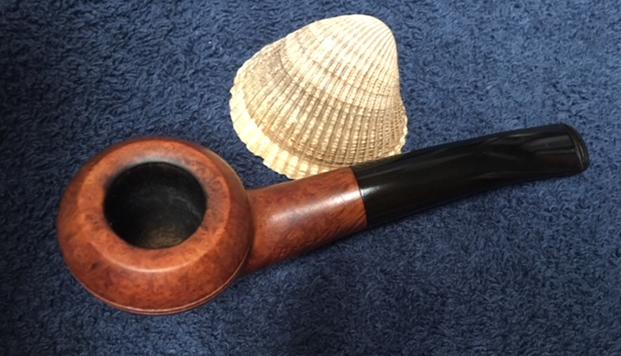
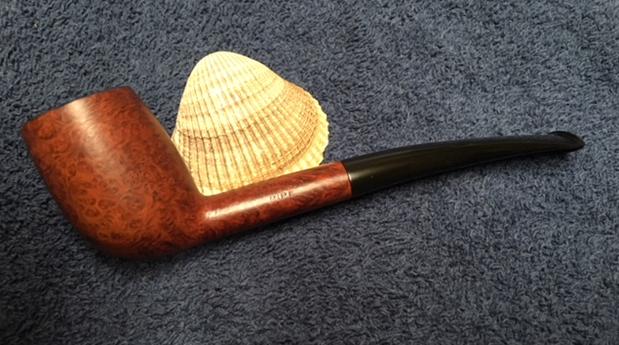
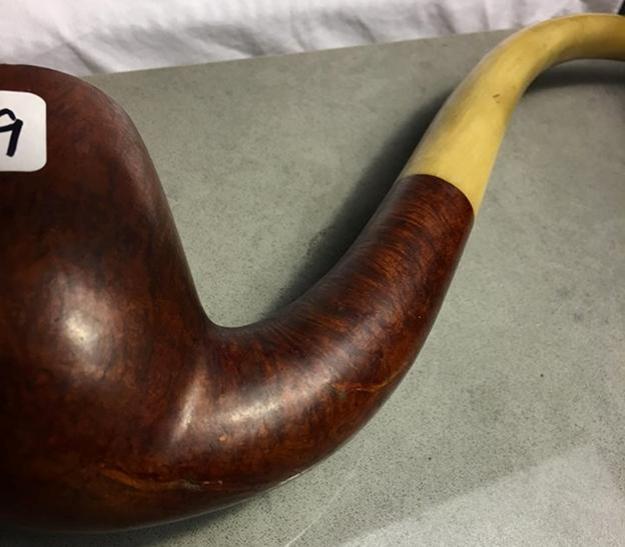
The rusticated finish goes around the bowl with a smooth rim top, a smooth band around the shank end and a smooth panel on the underside of the shank that was stamped “Malaga”. The smooth rim top shows some nice cross grain. This is one of my favourite shapes and the rusticated bowl and smooth rim top play together to make a beautiful pipe. The bowl had a thick cake but the previous owner kept the rim top free of lava. There was some dust and debris in the finish of the bowl and on the top of the rim. The shine on the bowl and the stem made me wonder if it had been given a coat of shellac before it was sold. The vulcanite stem was oxidized and the shiny coat had been applied over the top.  The combination of medium and dark brown stain worked together to create a warm brown finish. It is such a light weight pipe that it also adds certainty to my belief that Malaga pipes were oil cured. Once more there are no fills in the bowl or long shank. I have yet to find a fill in any of the bowls I have worked on in this lot and looking through what remains I think it is fair to say I won’t find any in them either. 
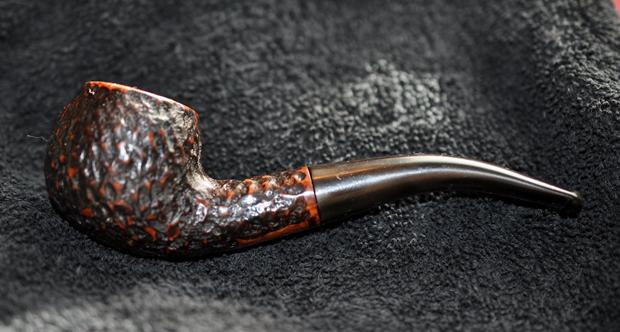
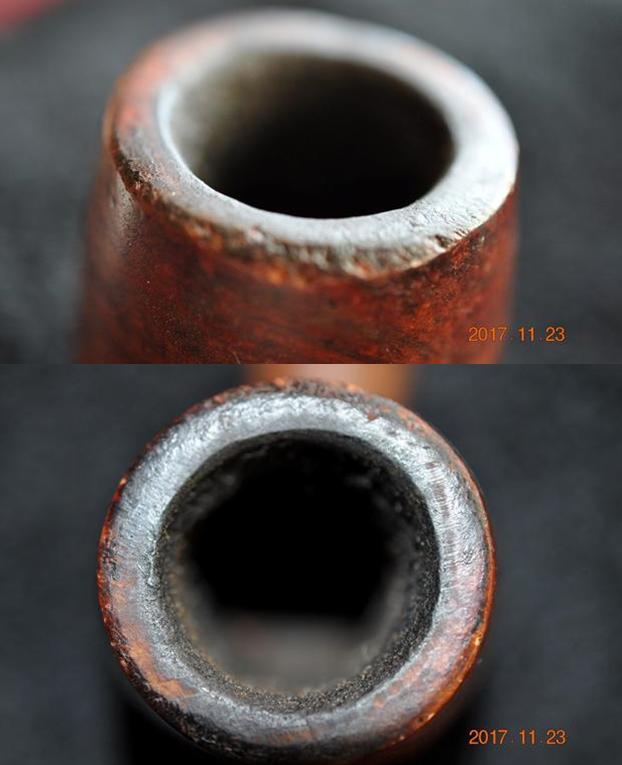
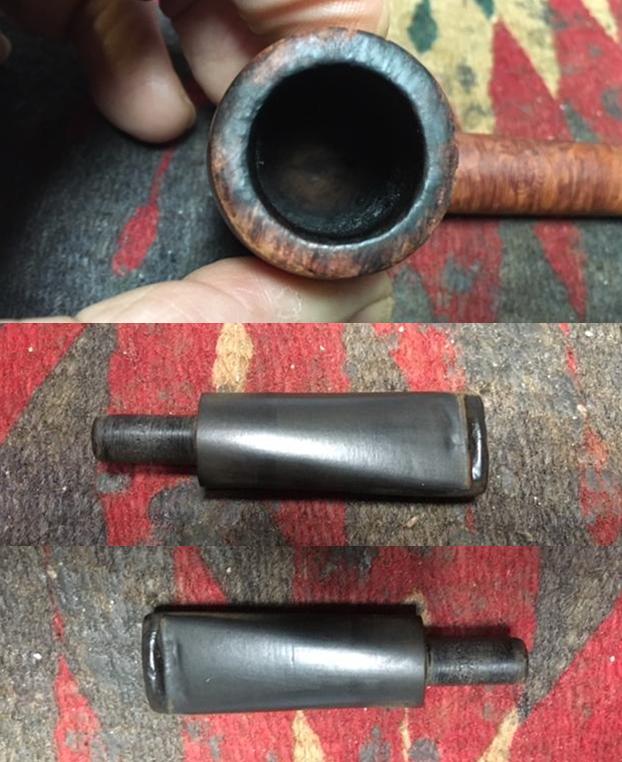
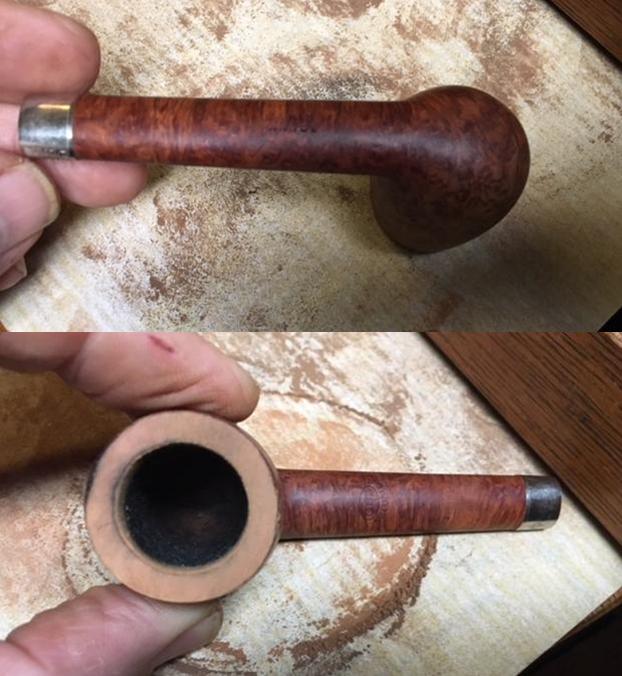
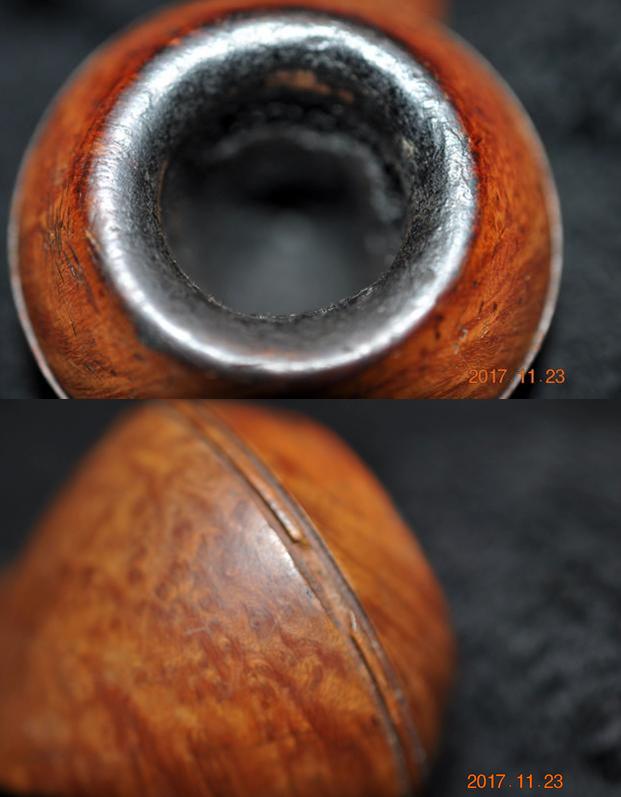
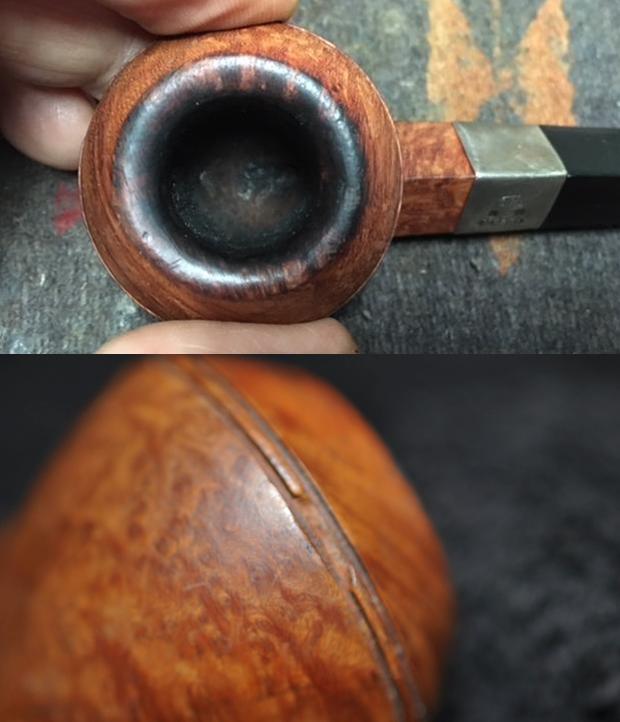
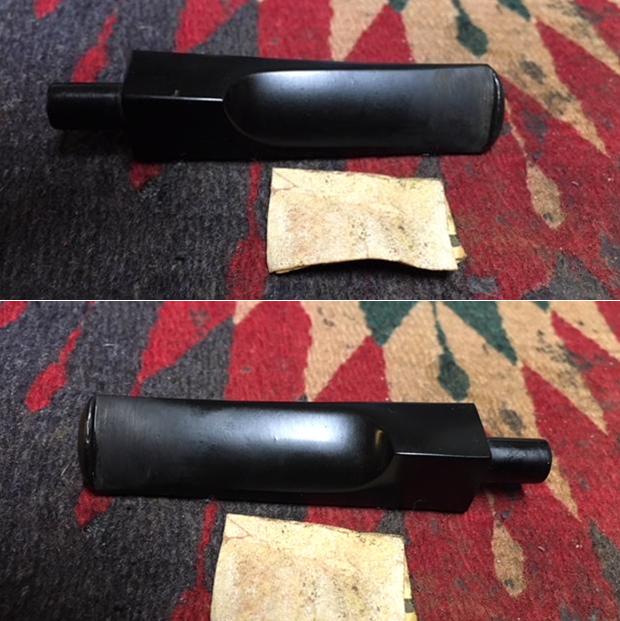
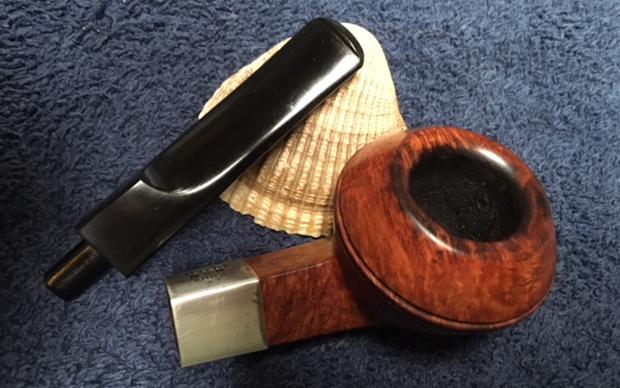
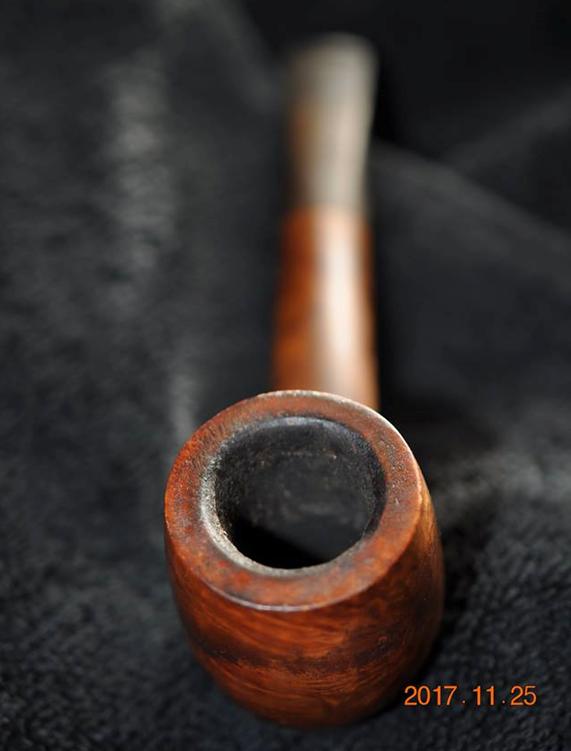
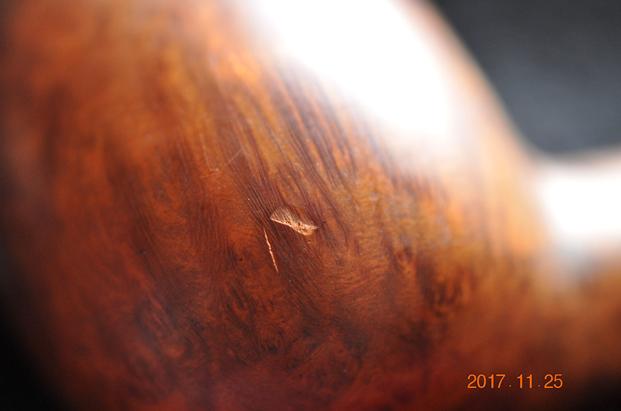
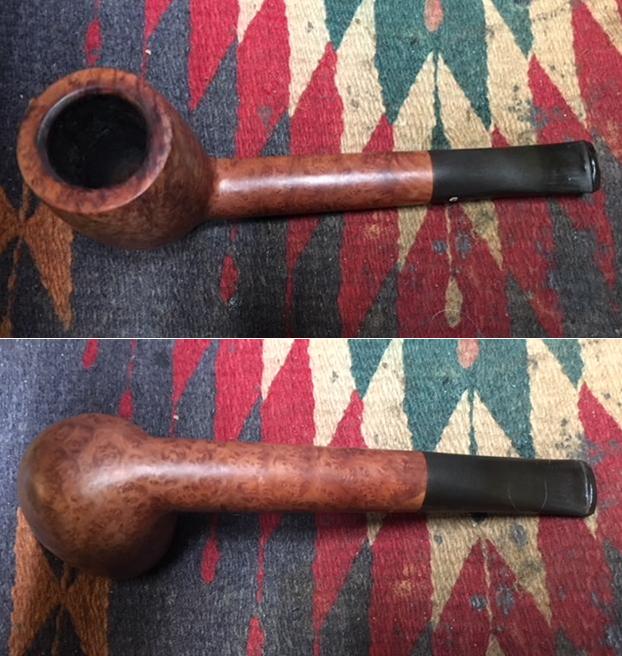
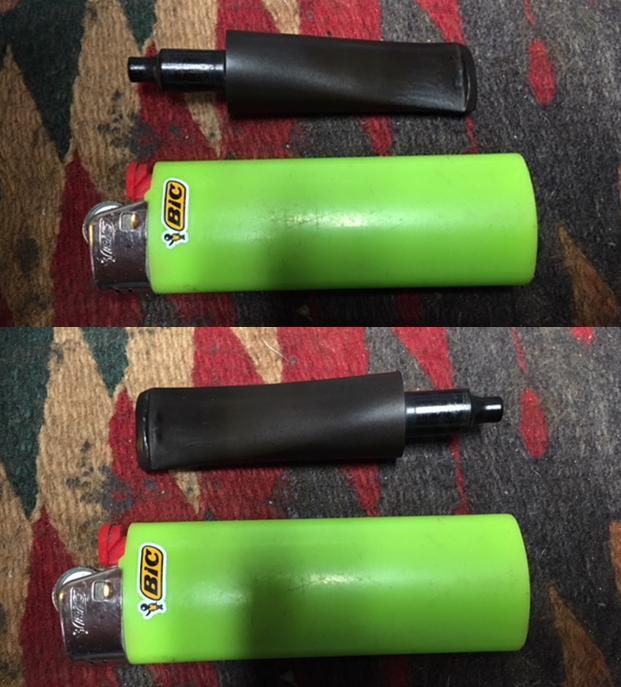
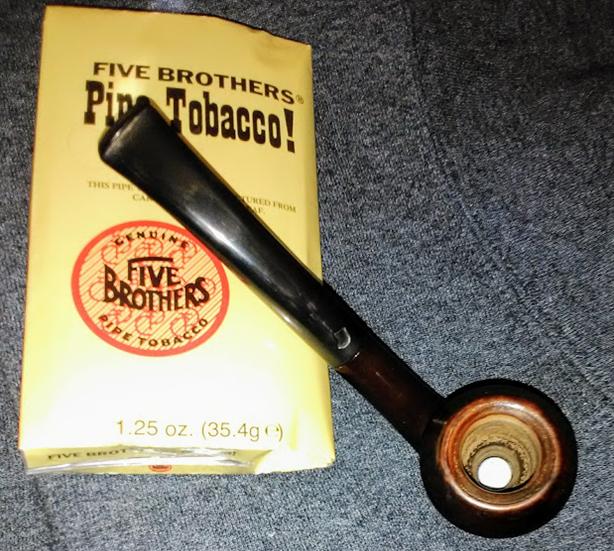
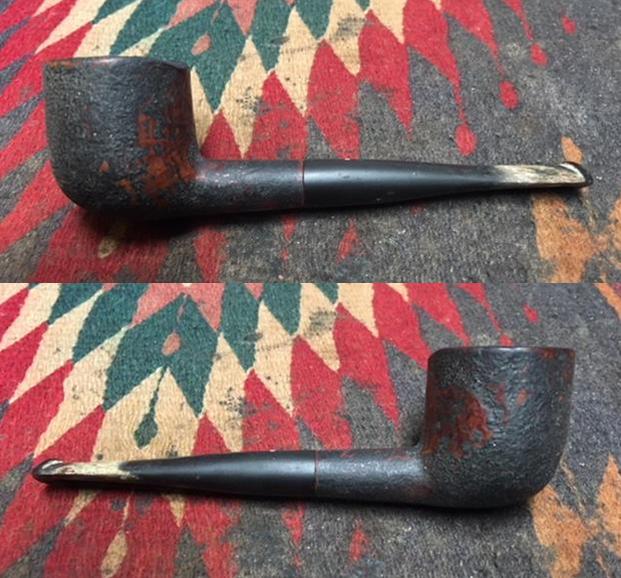
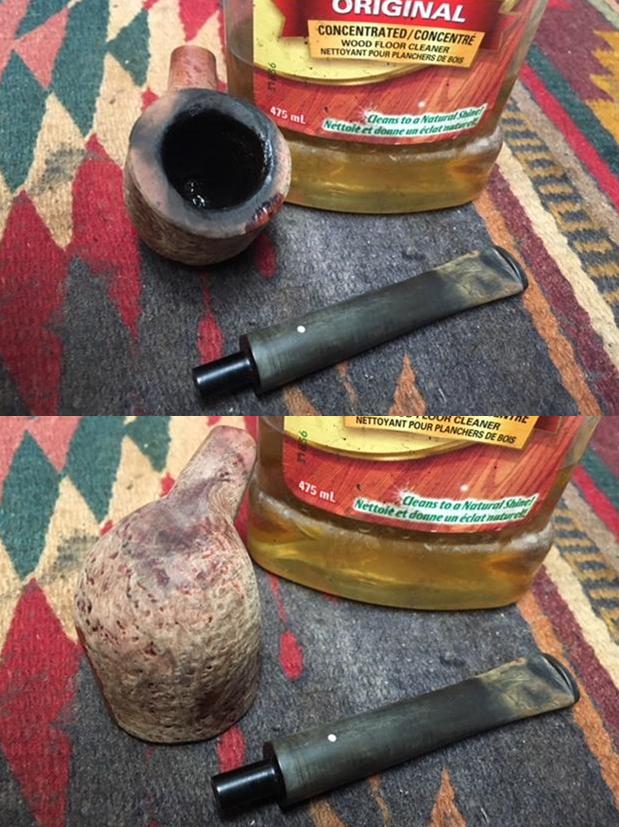
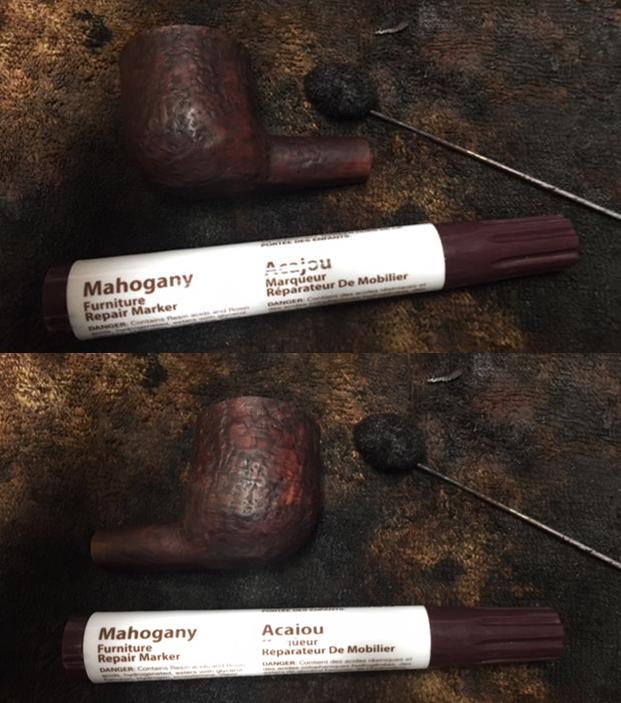
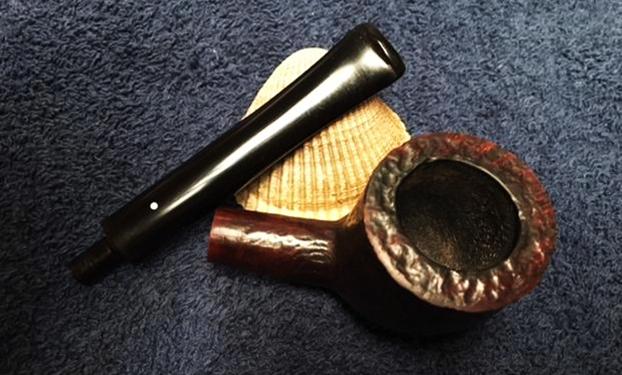
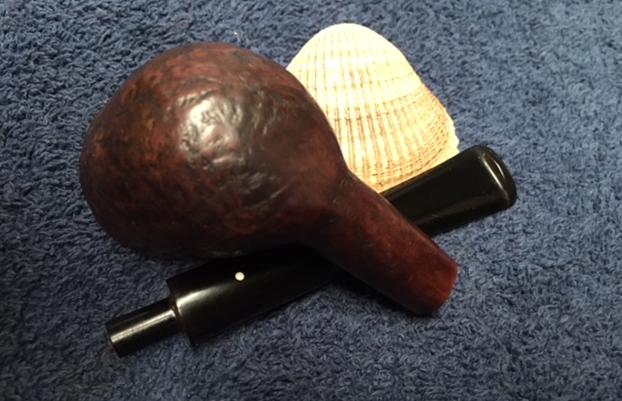
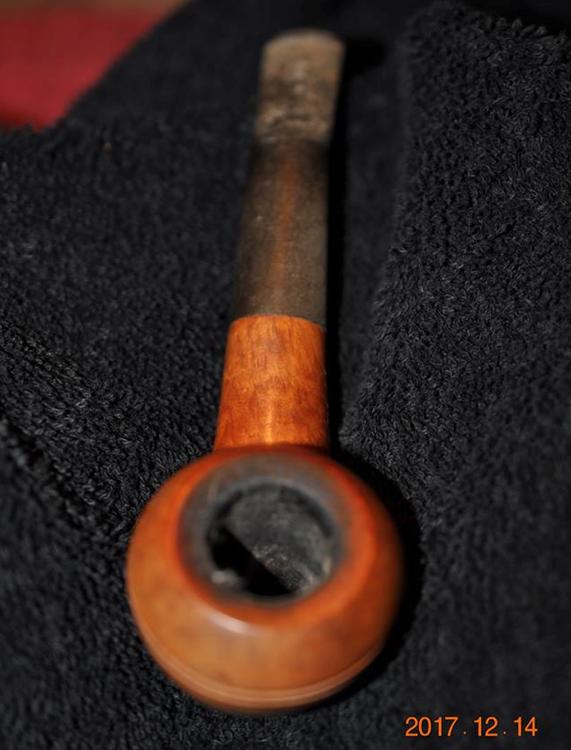
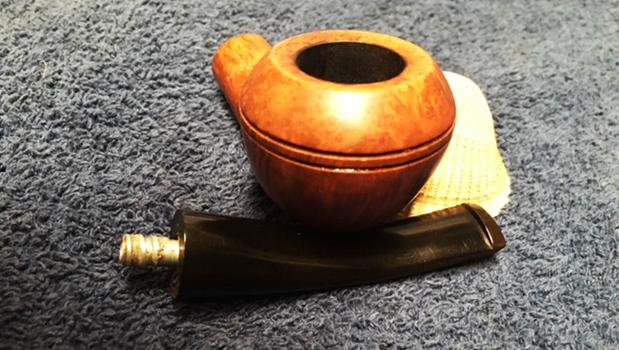
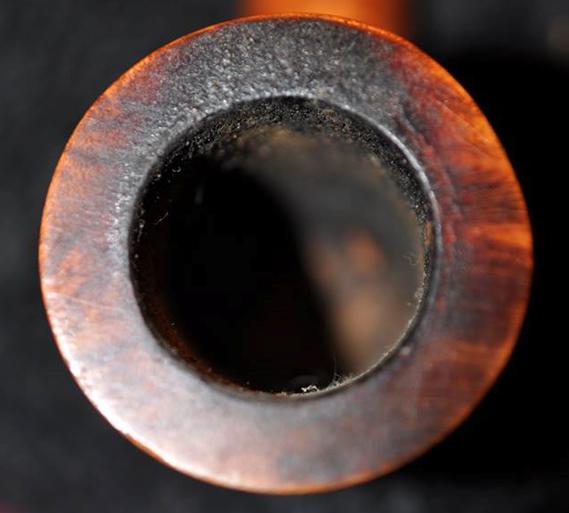
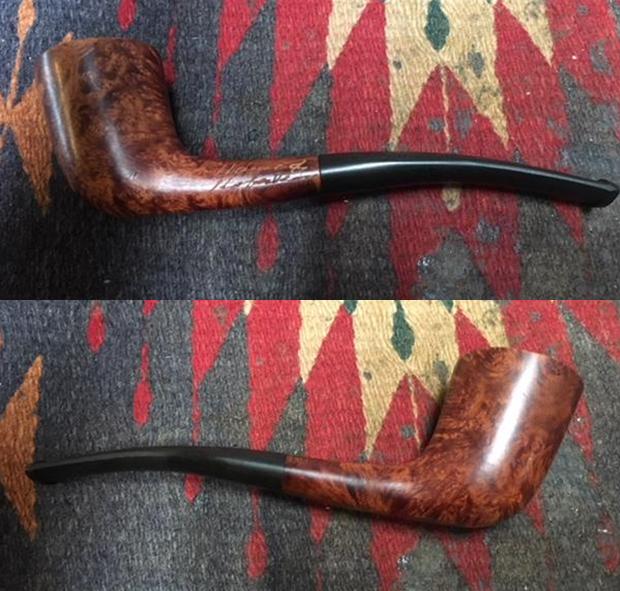
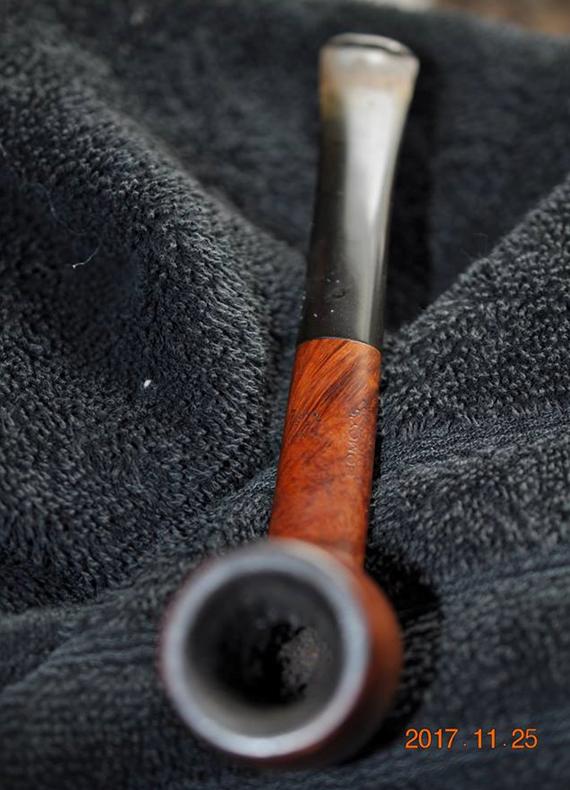
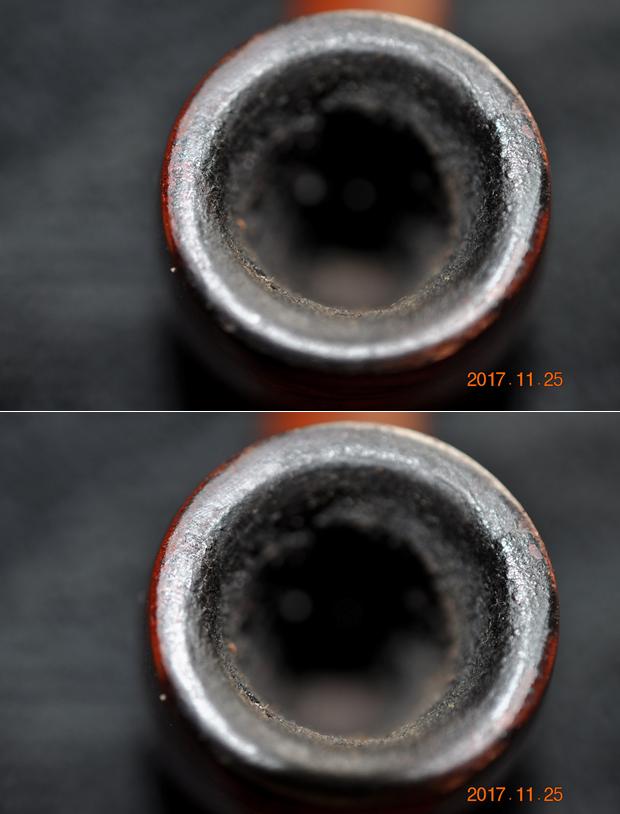
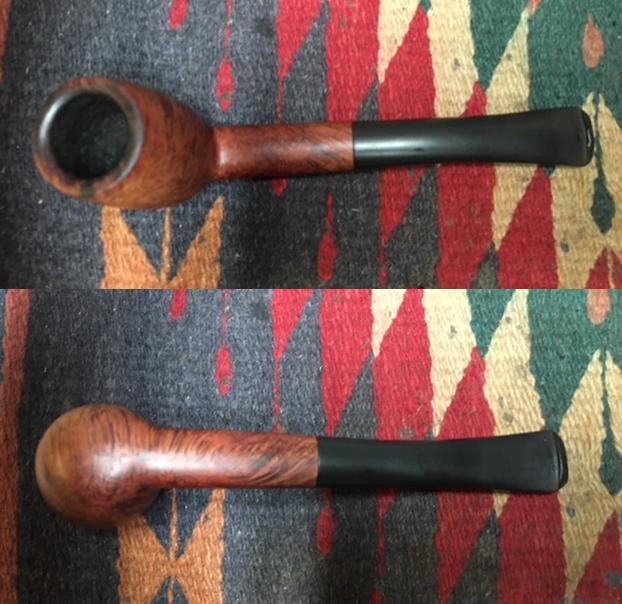
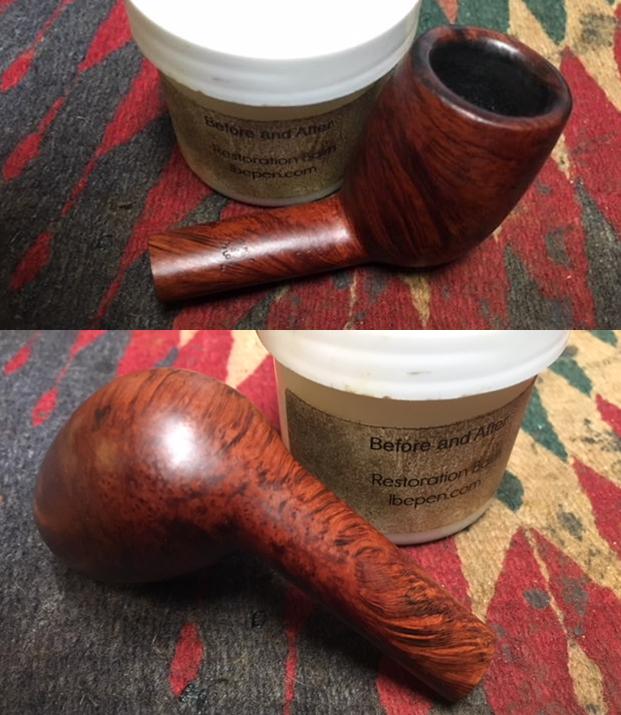
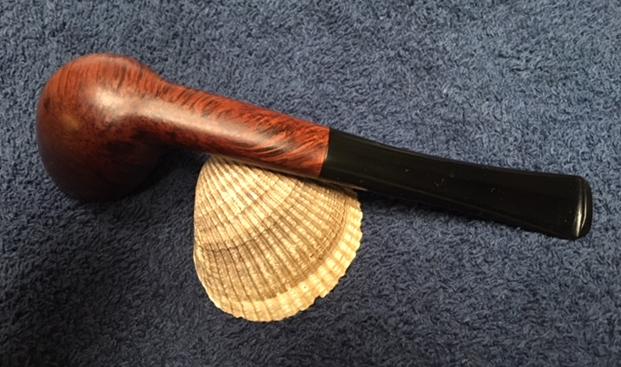
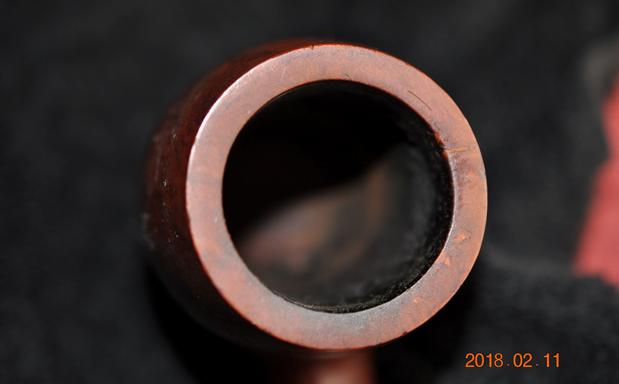
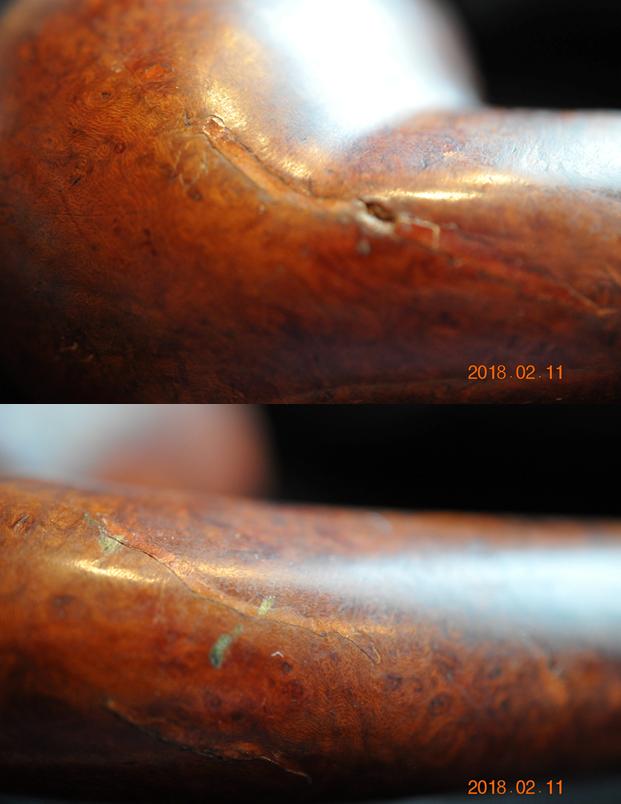
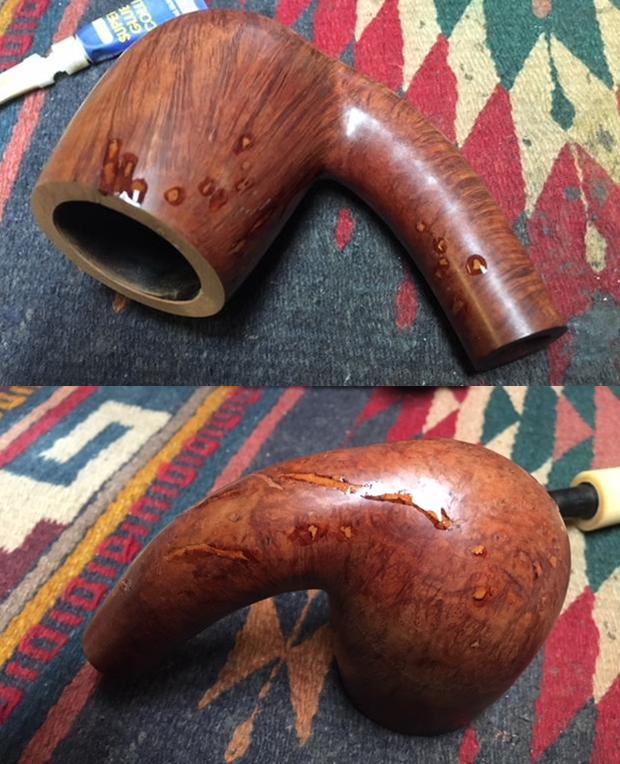
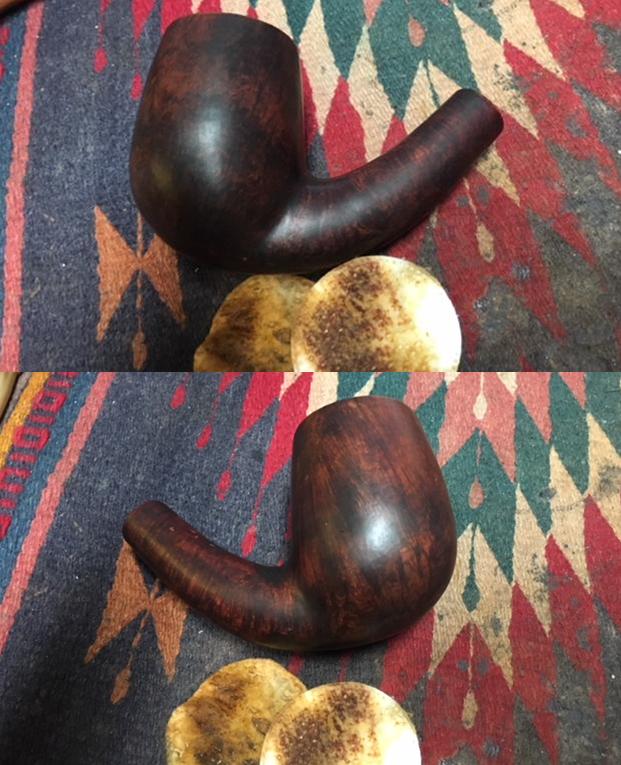
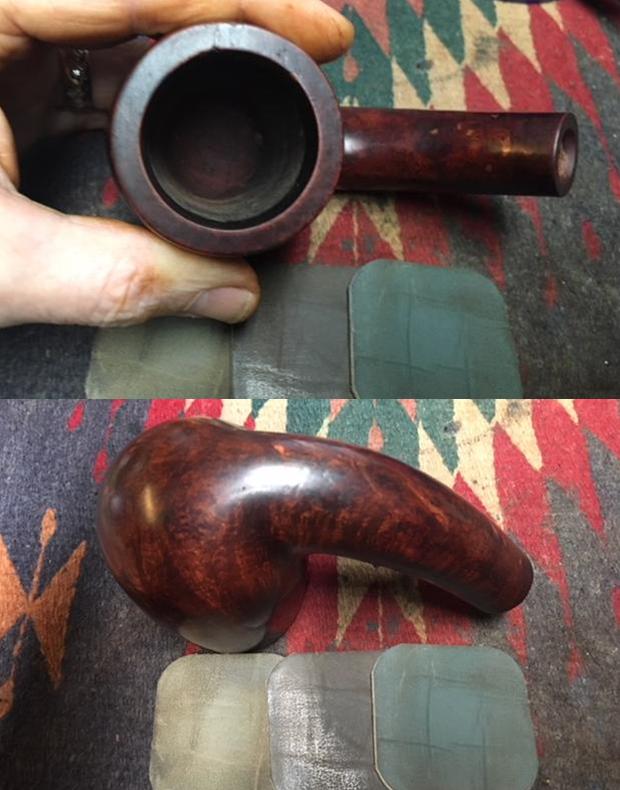
Jeff took close up photos of the bowl and rim to show the condition of the pipe before he started to work his magic on it. The exterior of the bowl and shank were dirty. You can see that the rim top is free of lava but has some peeling shellac. The cake in the bowl is visible but even. 
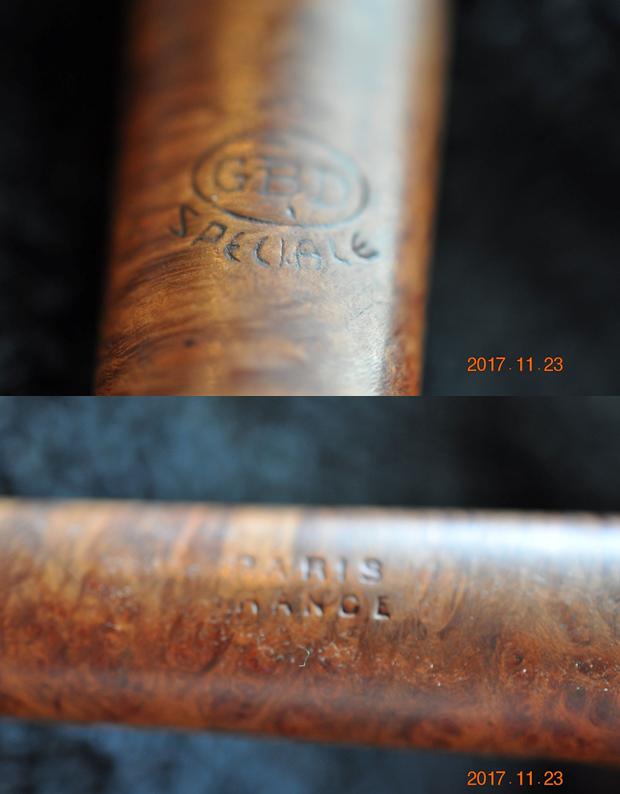
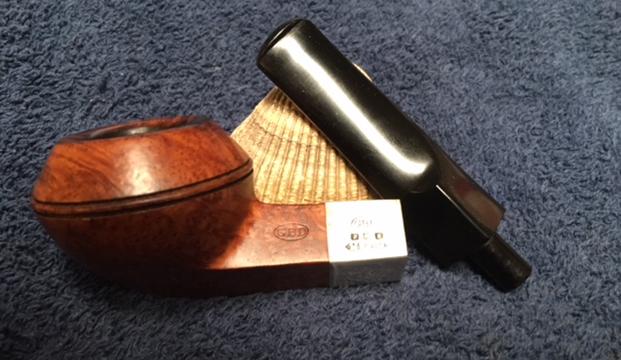
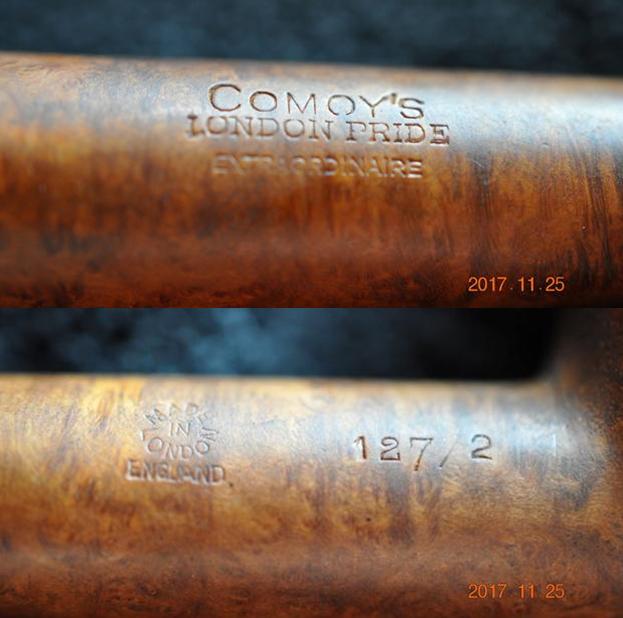
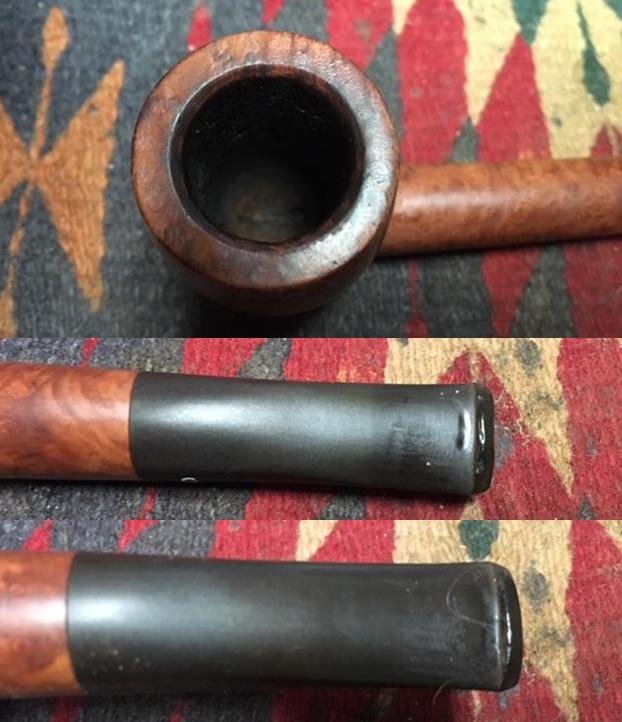
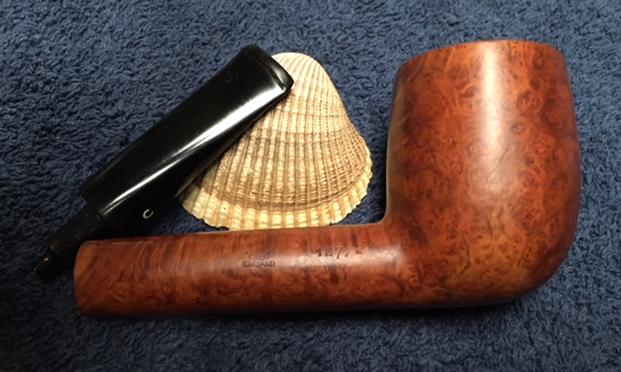
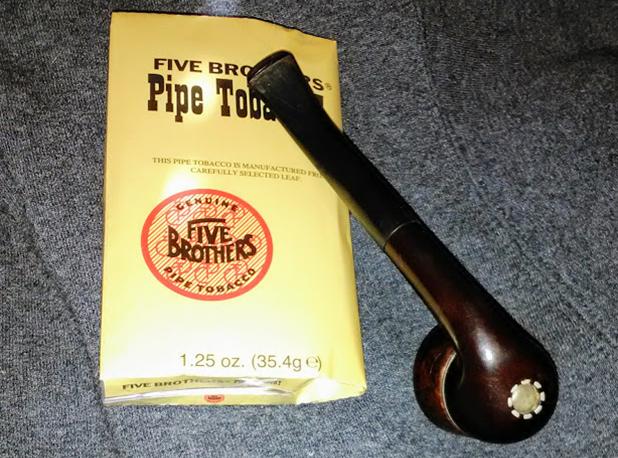
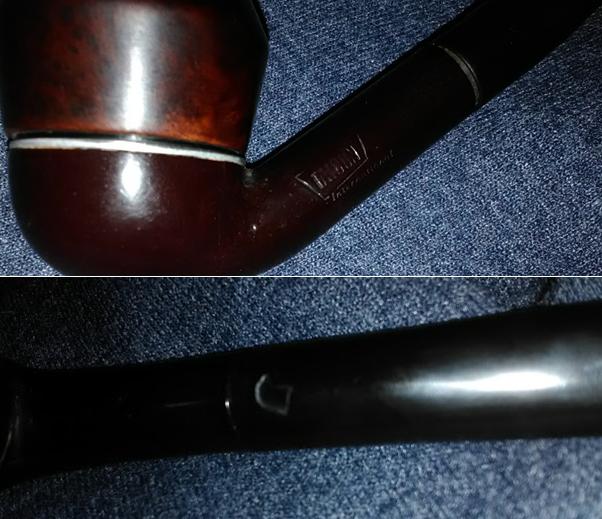
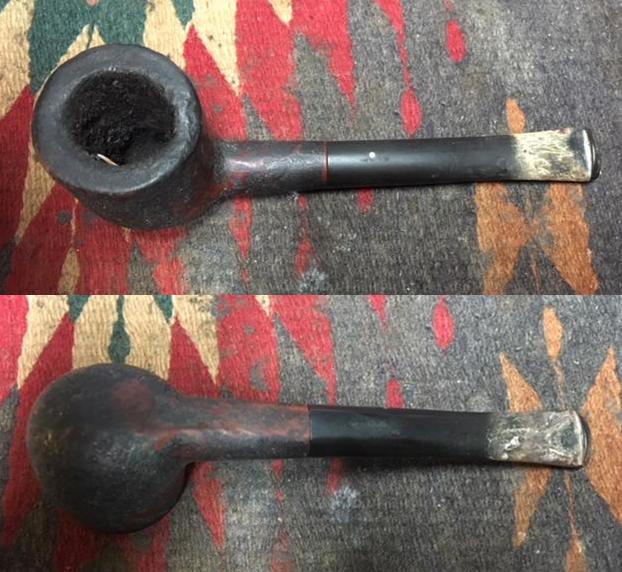
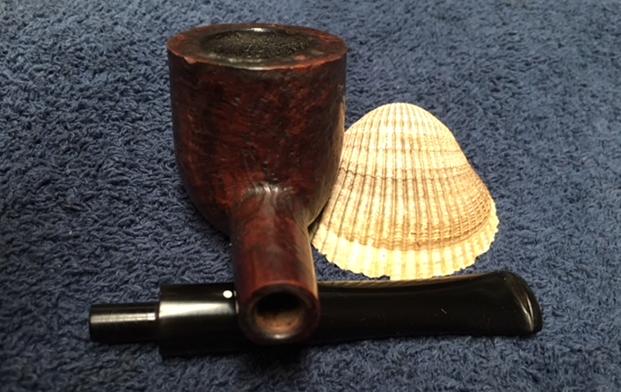
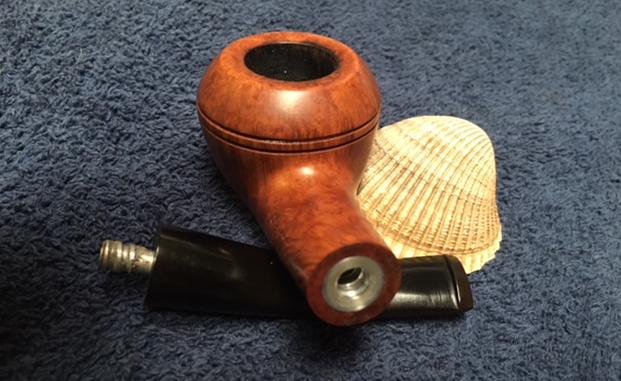
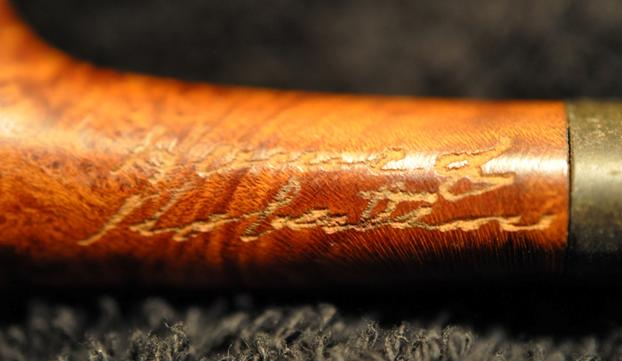
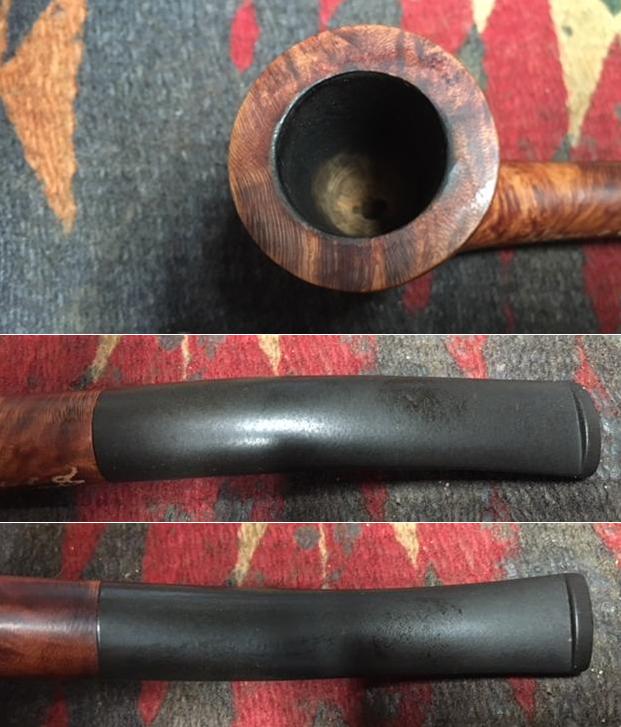
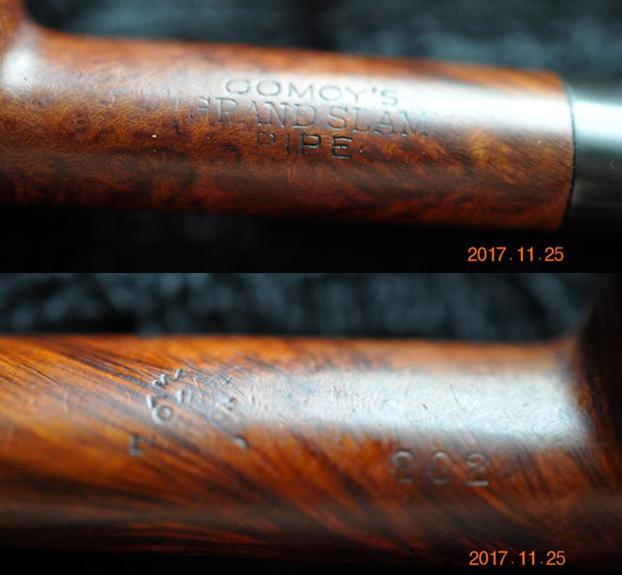
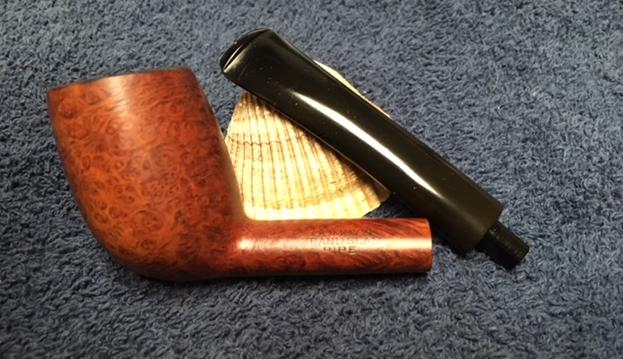
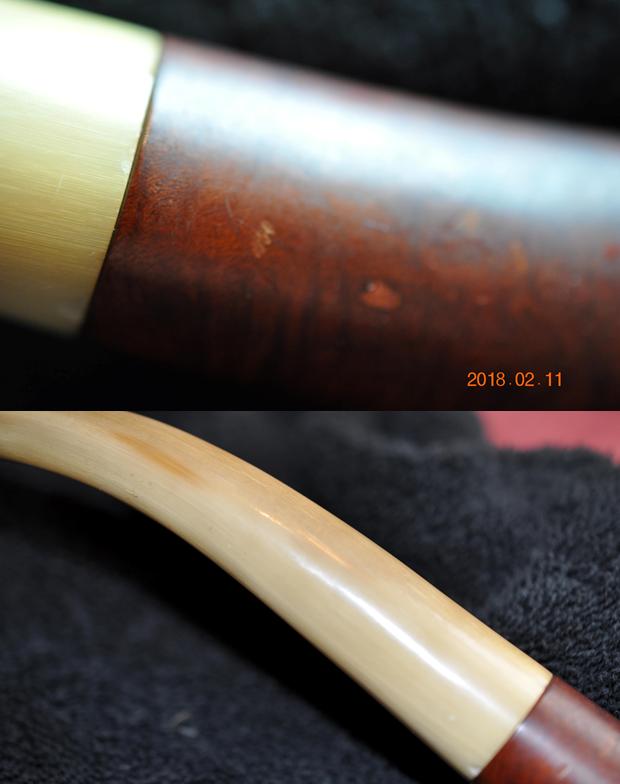
He also took a photo of the shank to show the stamping on the panel on the underside of the shank. You can see the dust and grime in the rustication on the shank before cleanup.
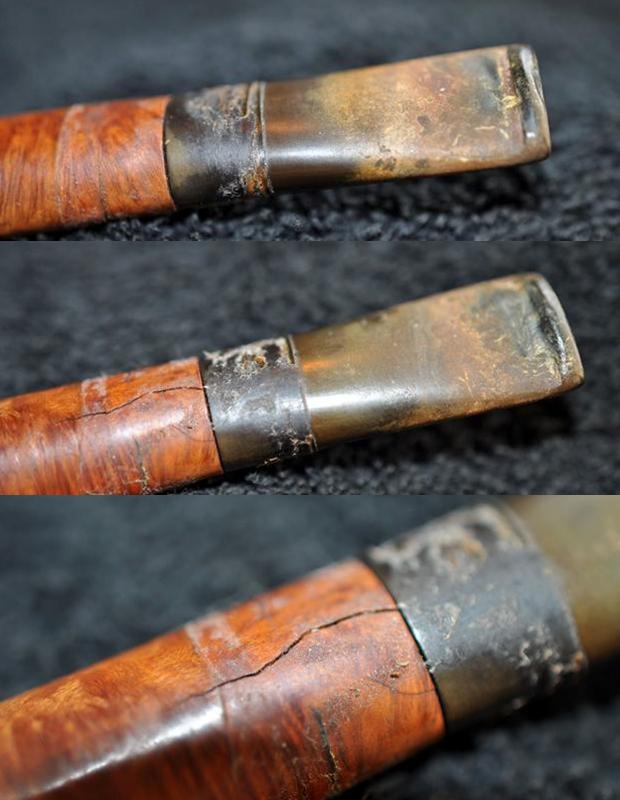
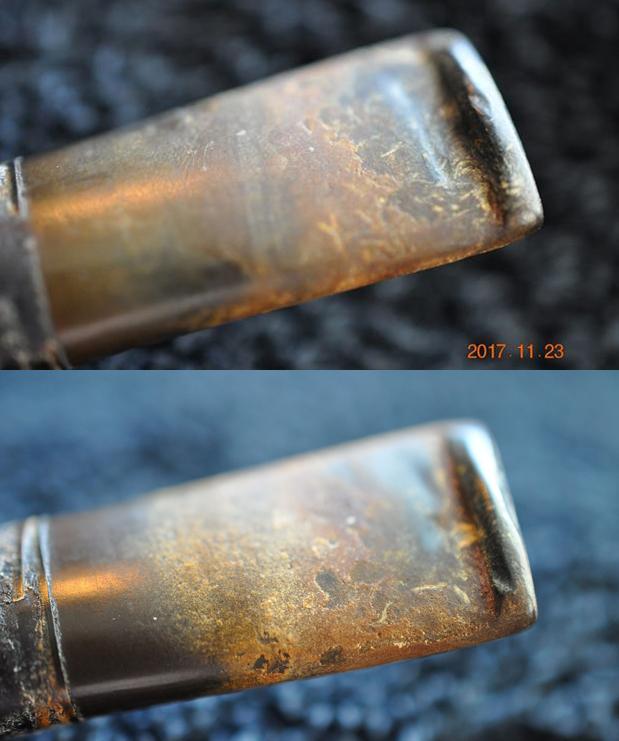
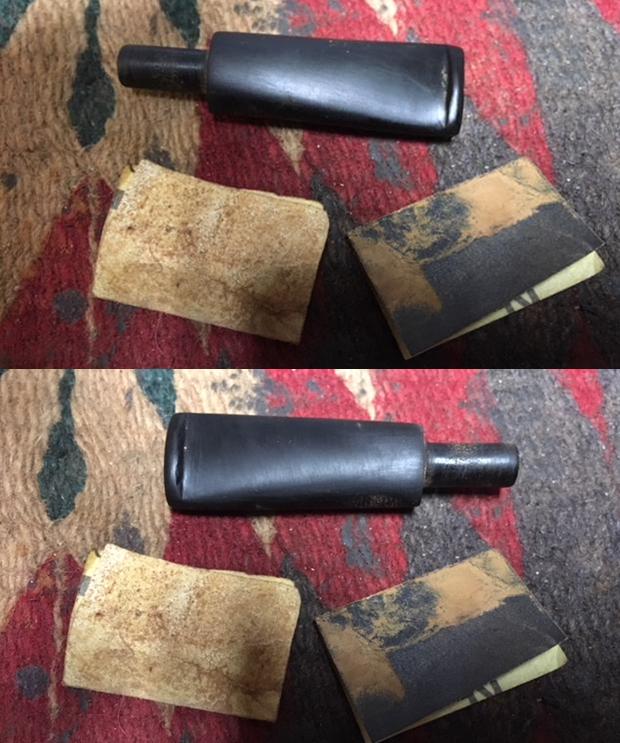
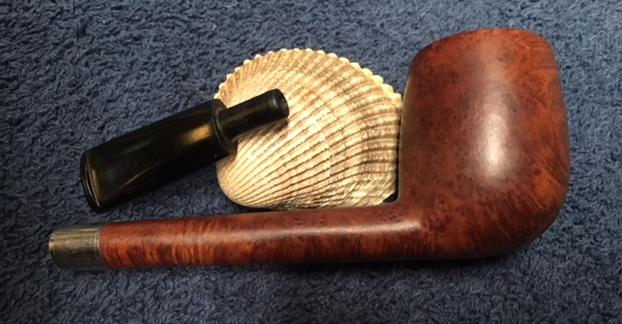
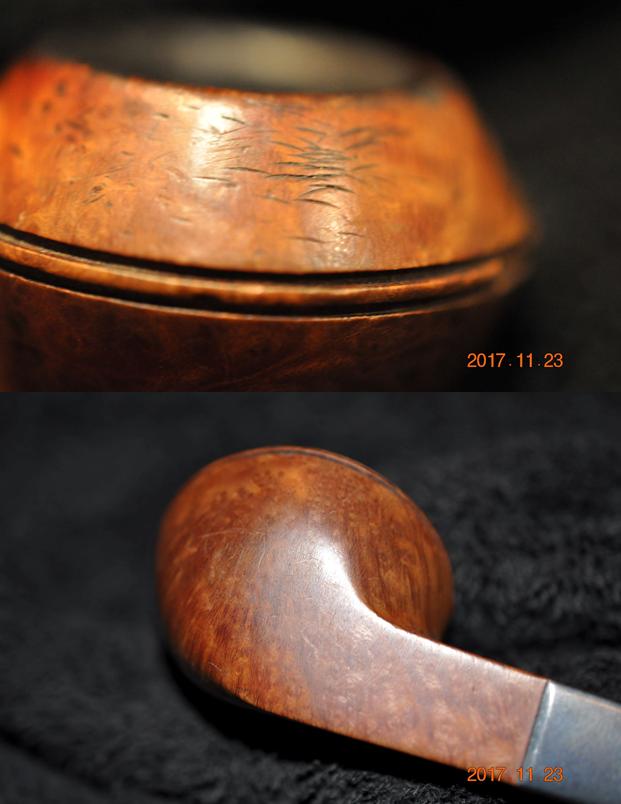
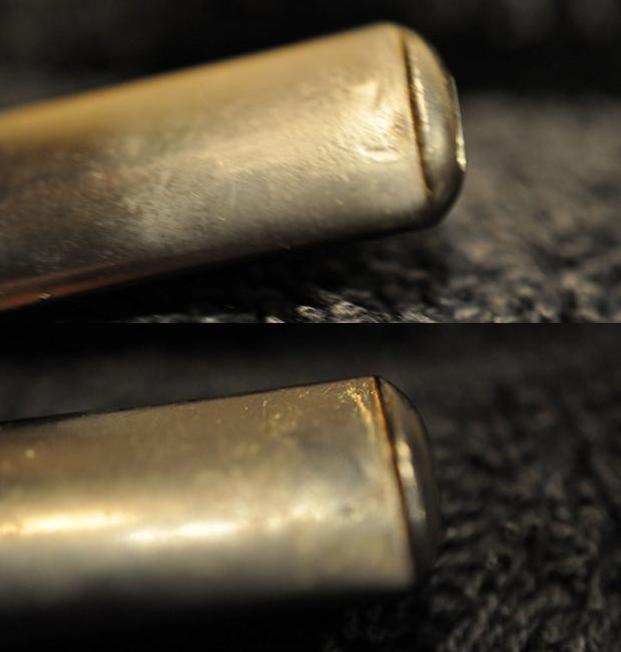
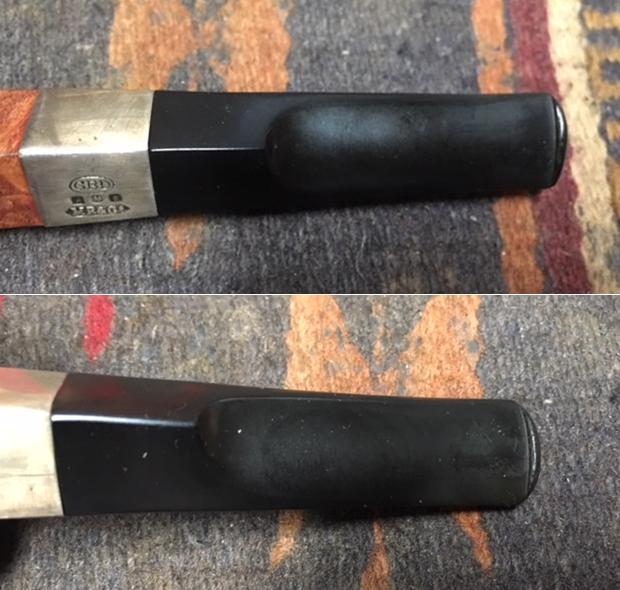
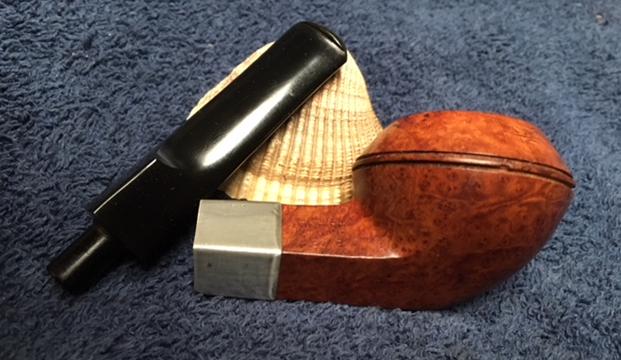
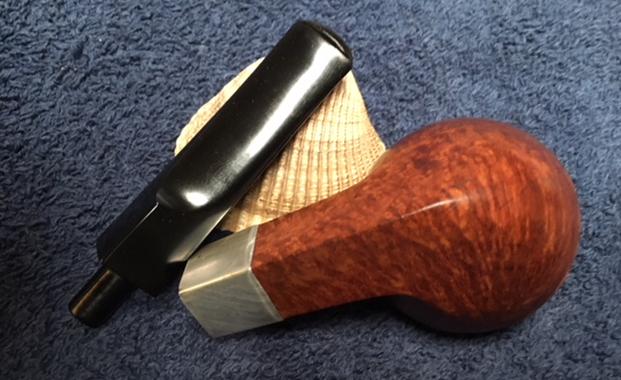
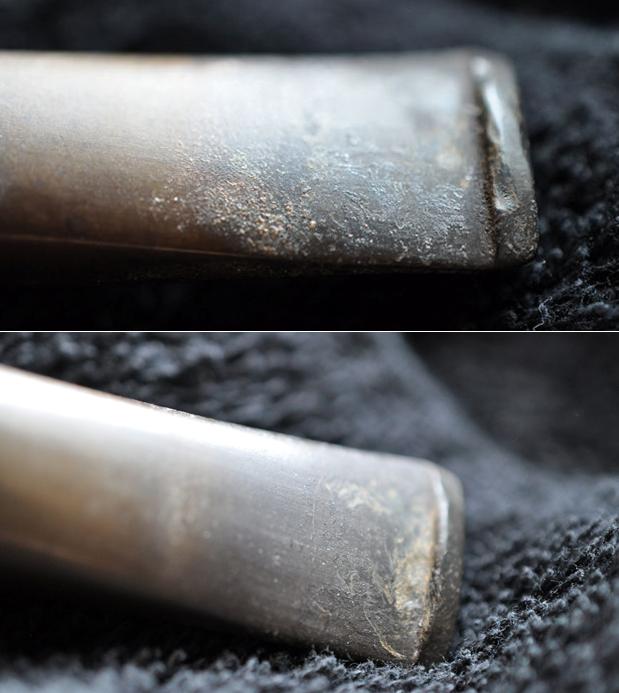
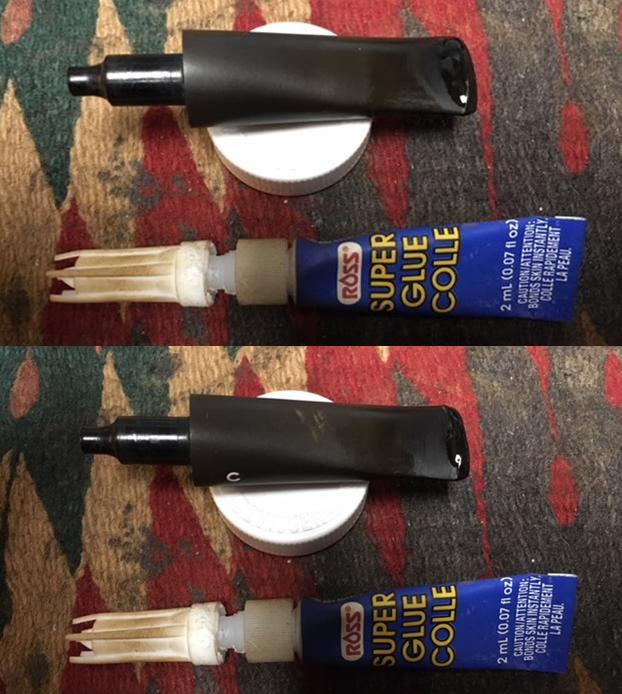
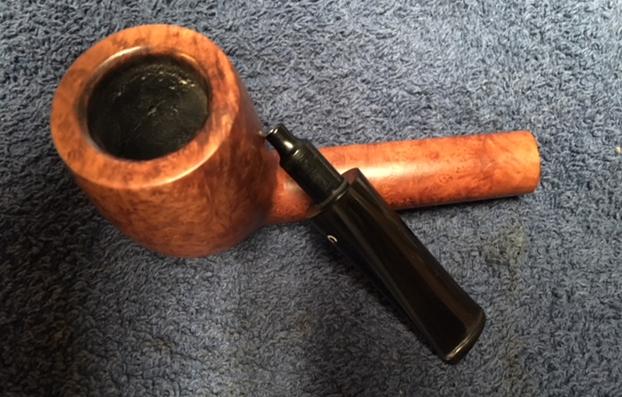
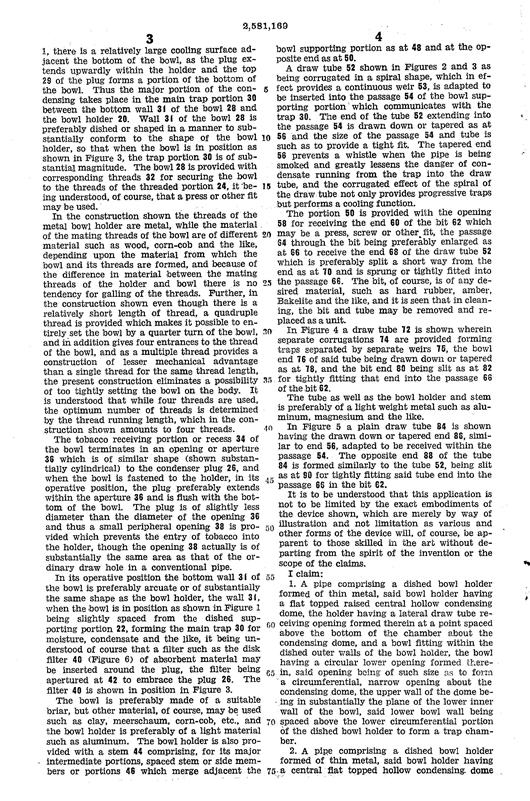
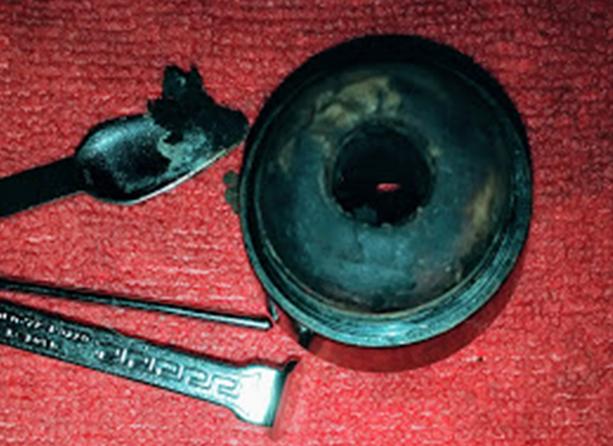
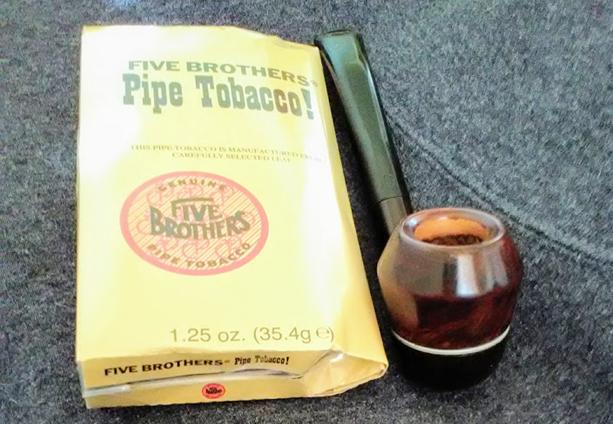
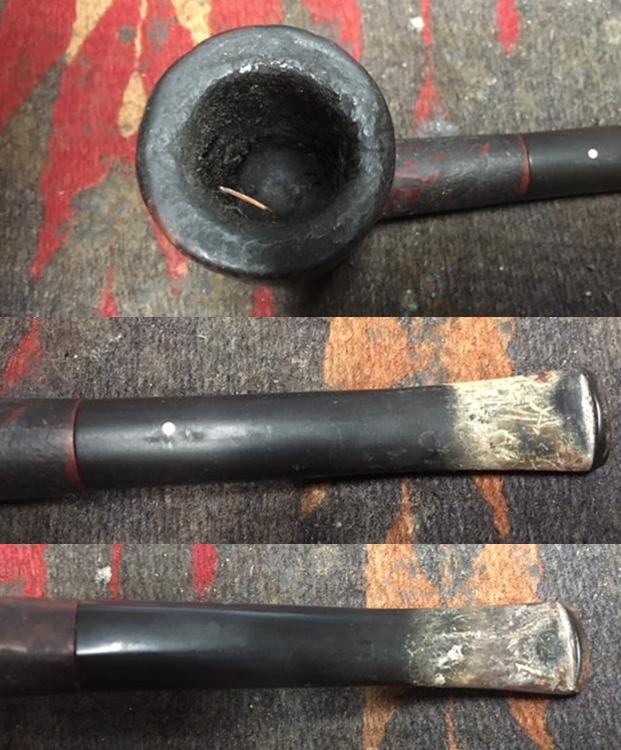
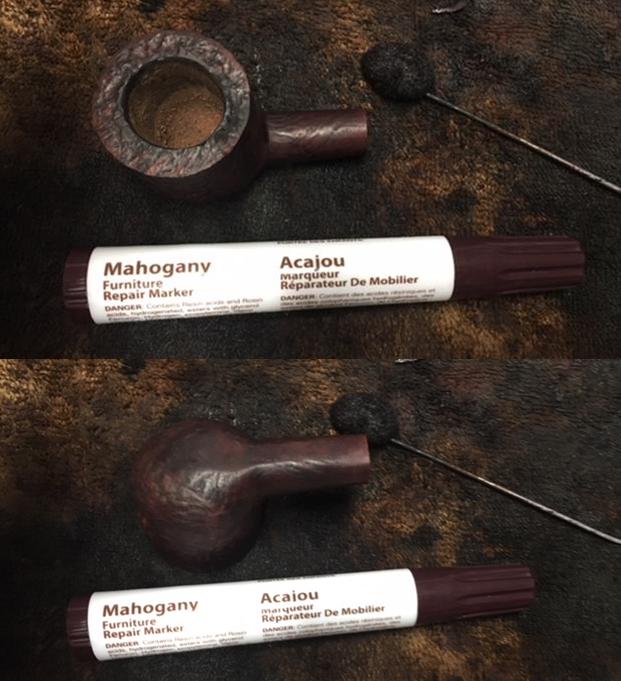
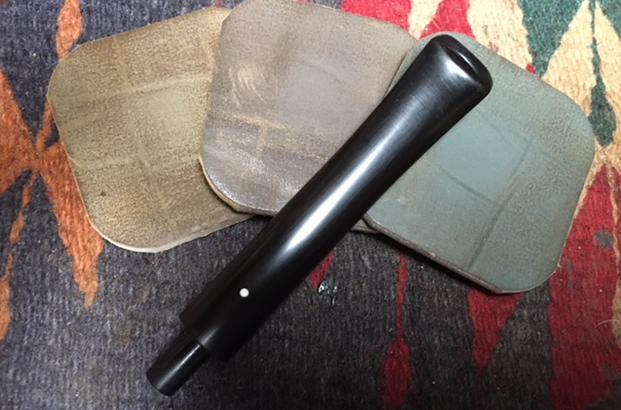
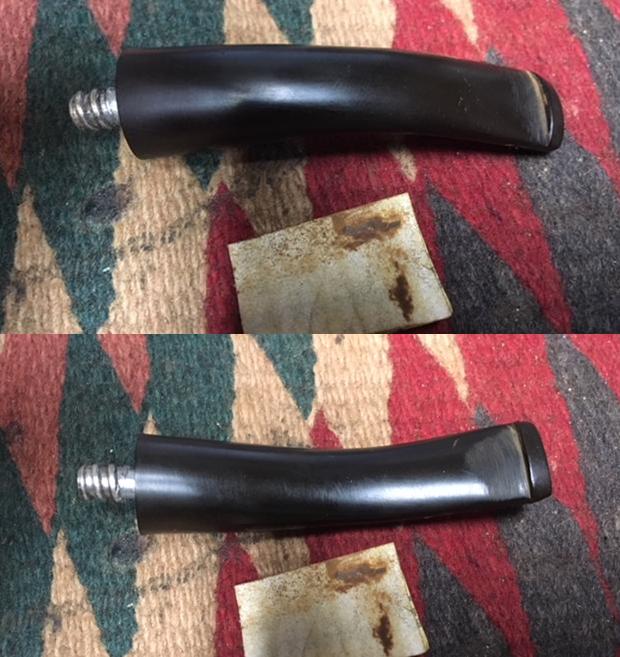
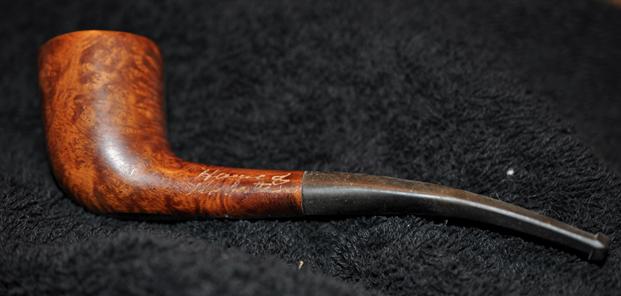
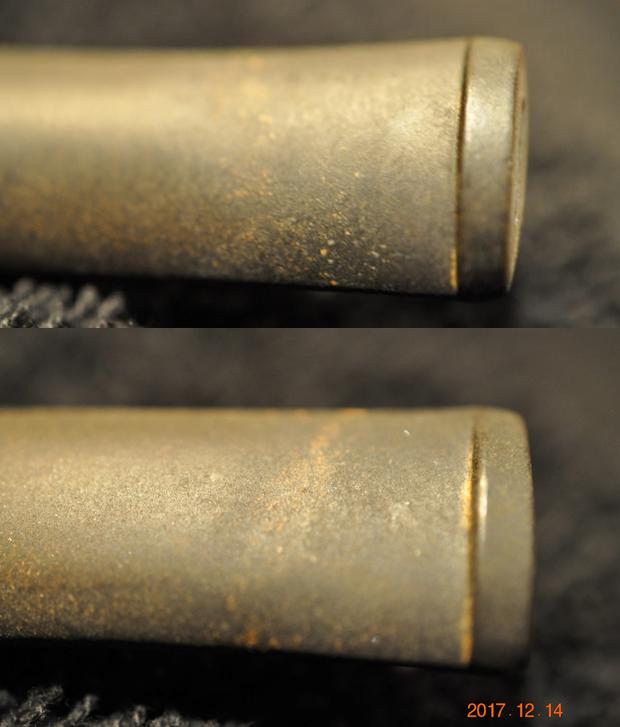
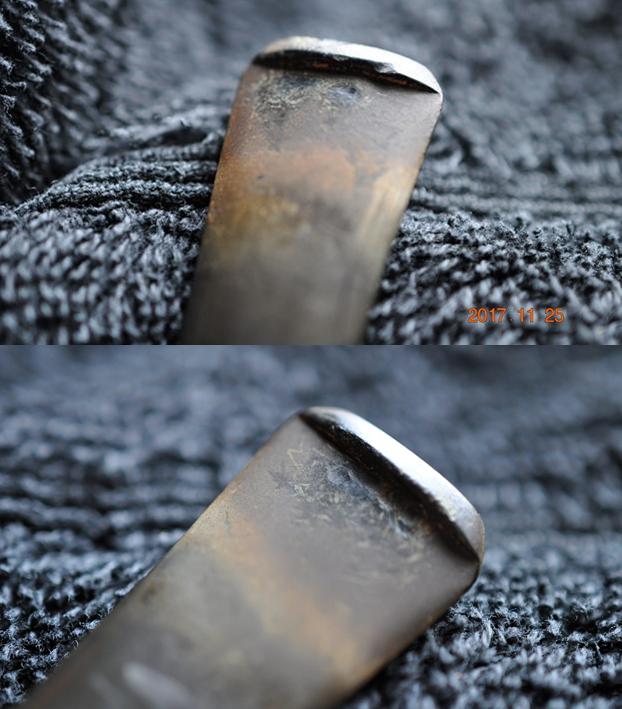
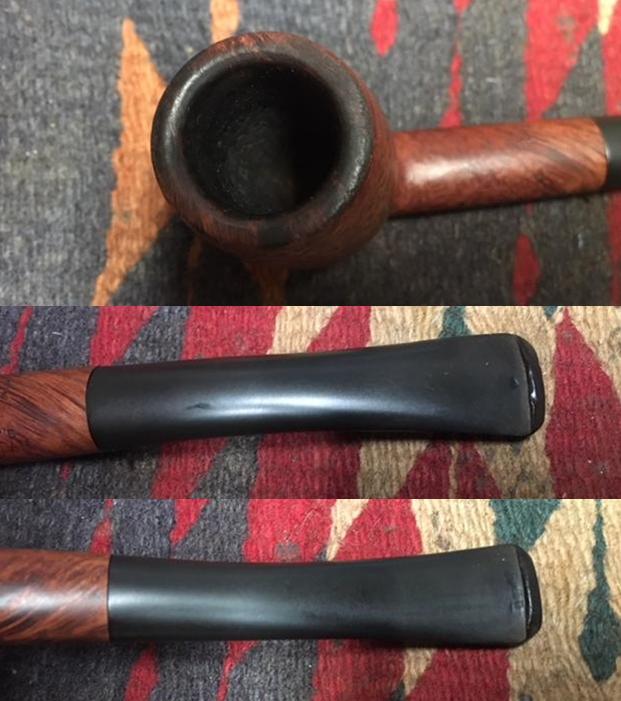
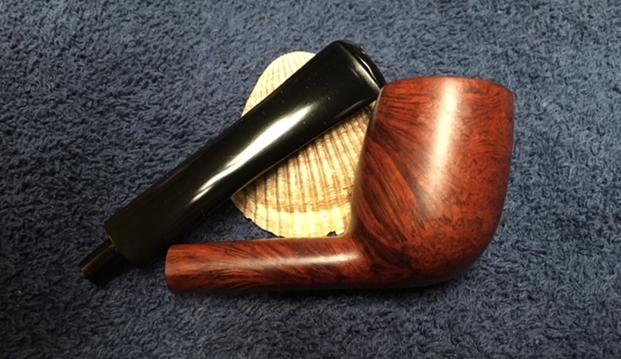
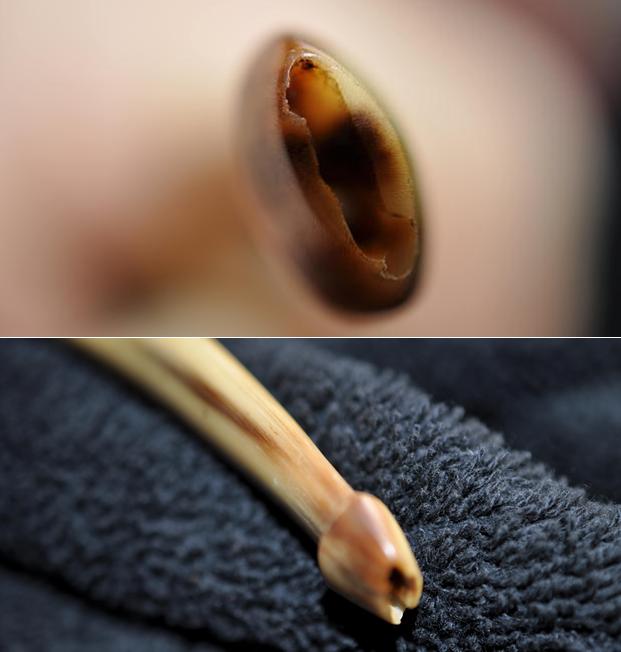
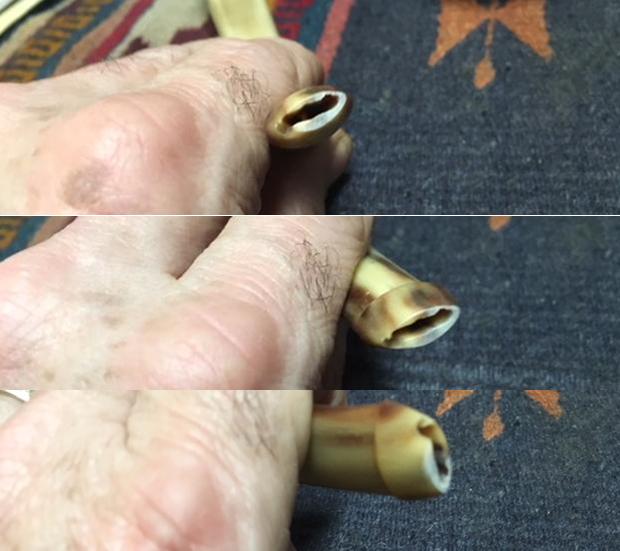
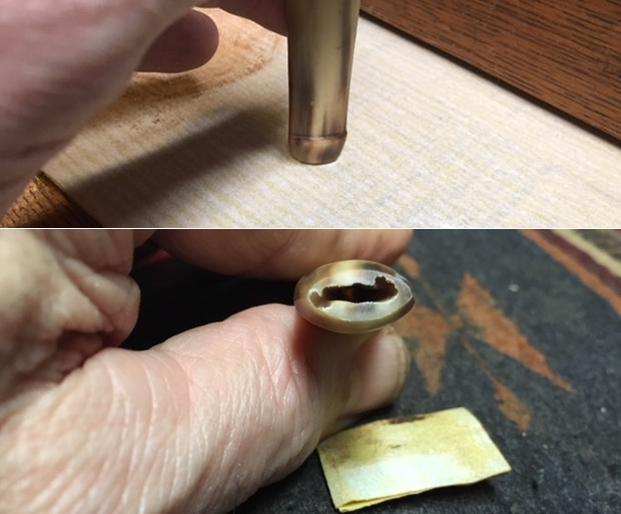
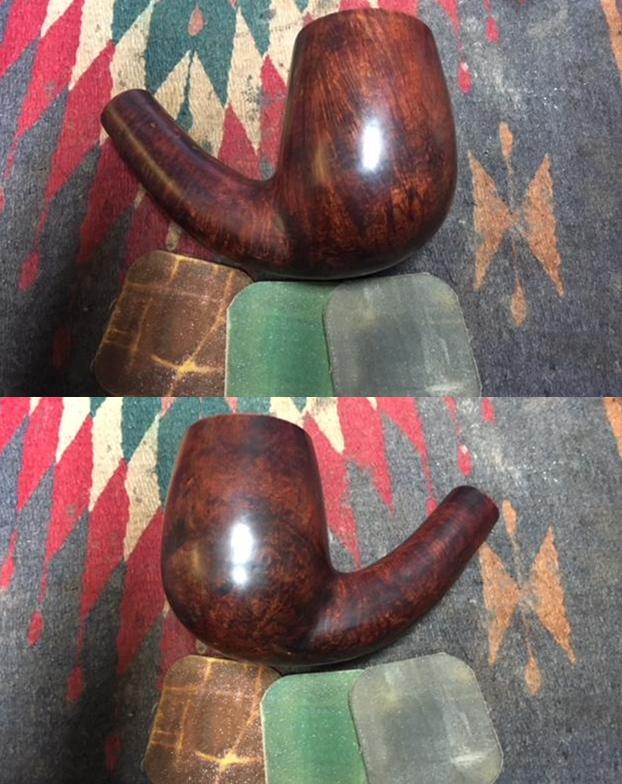
The next photos show that the stem was very clean. There was some light tooth chatter on both surfaces of the stem near the button and on the button edges itself.
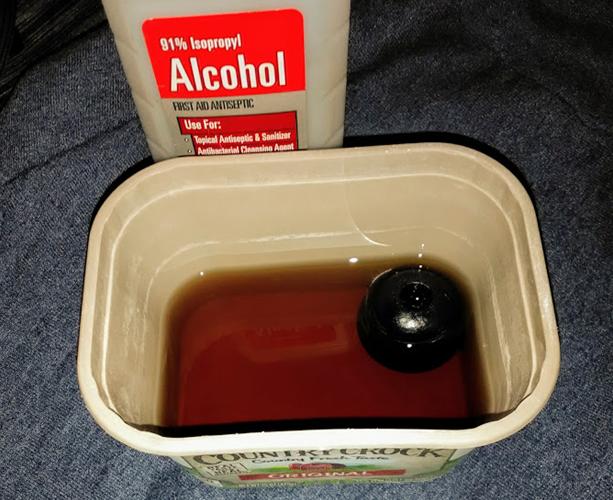
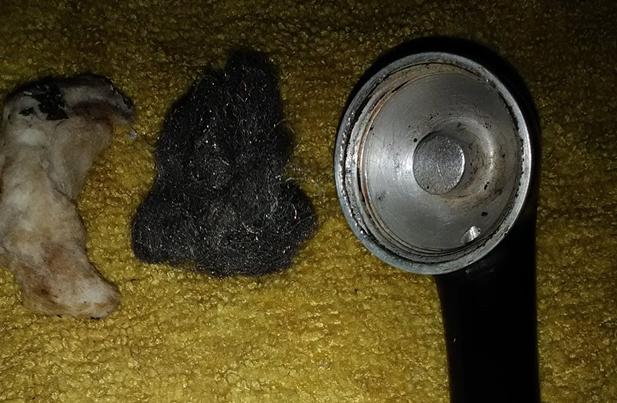
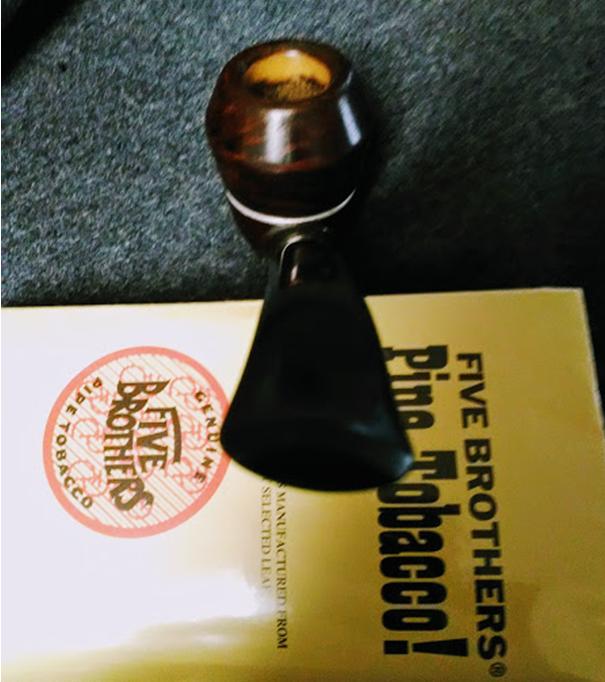
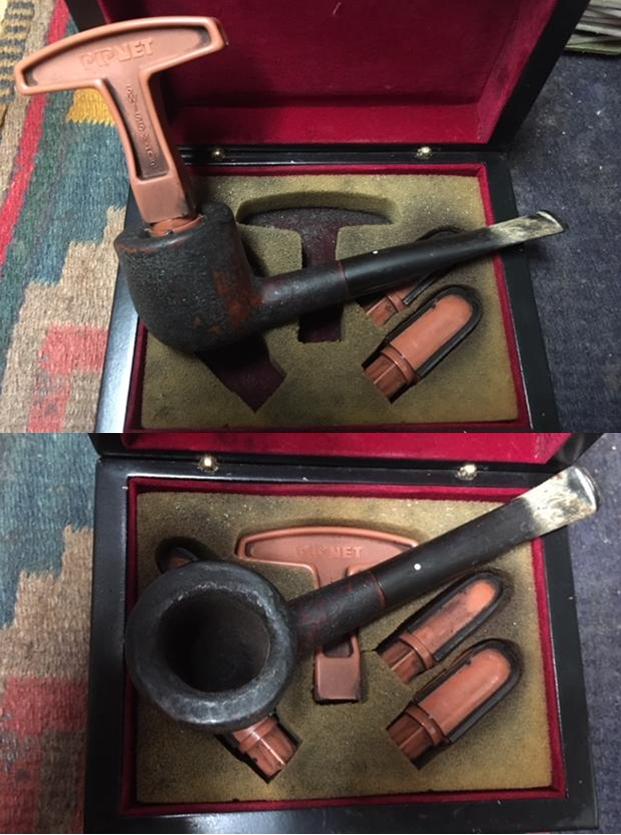
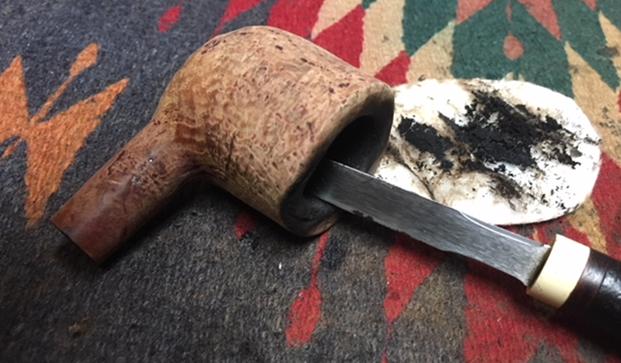
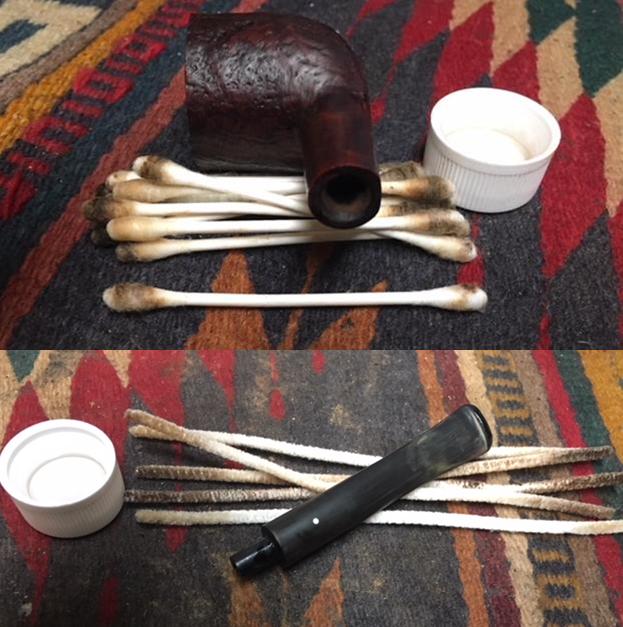
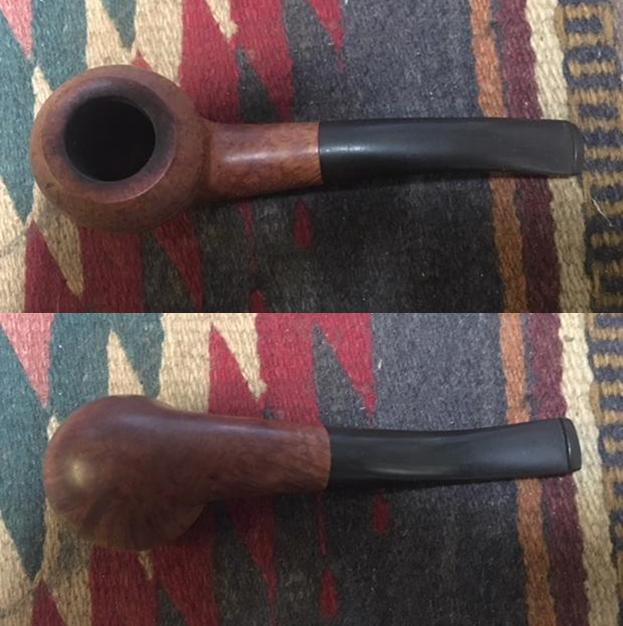
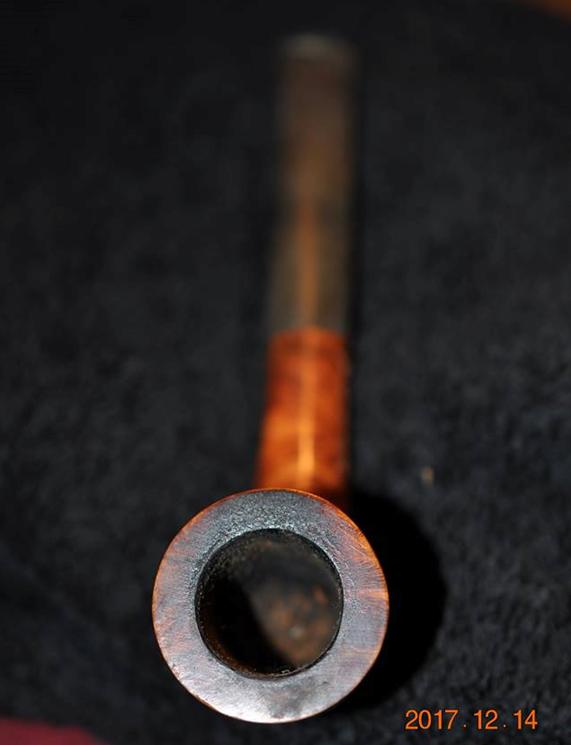
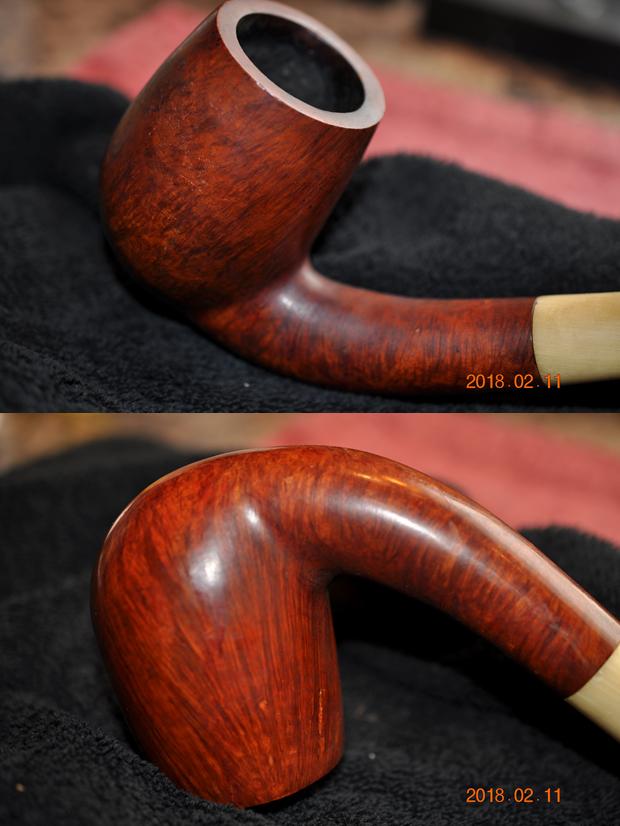
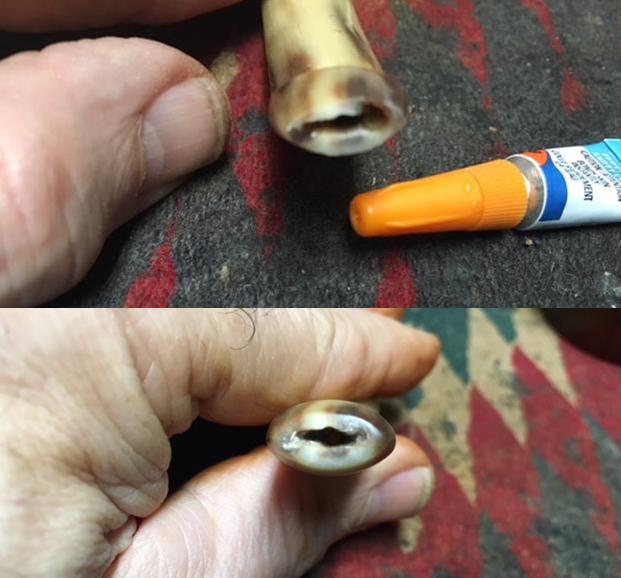
Jeff reamed the bowl with a PipNet pipe reamer and followed up with a Savinelli Fitsall pipe knife to remove the cake. He scrubbed out the mortise and the airway in the shank and the stem with alcohol, cotton swabs and pipe cleaners. He scrubbed the exterior of the bowl, rim, shank and stem with a tooth brush and Murphy’s Oil Soap to remove the oils and tars on the bowl, rim and shank. He rinsed it under running water. He dried it off with a soft cloth. He was able to remove the shellac coat on the bowl and some of it on the stem. The finish looked really good, though a little lifeless after the cleaning. I took photos of the pipe to show its condition before I started my work on it.   
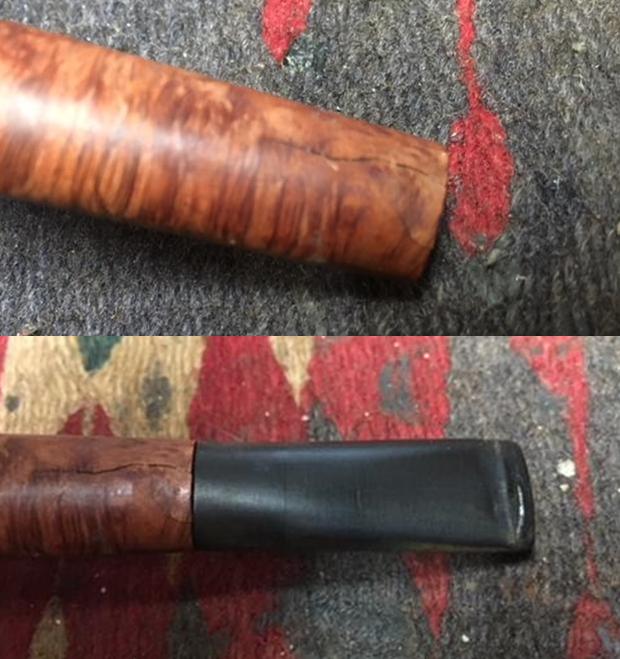
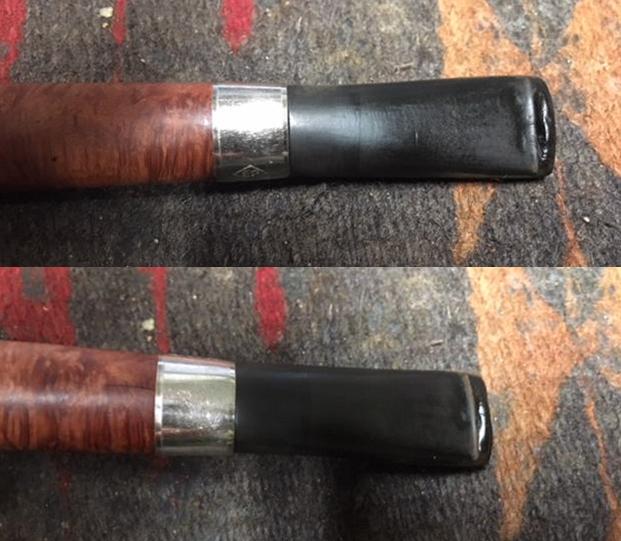
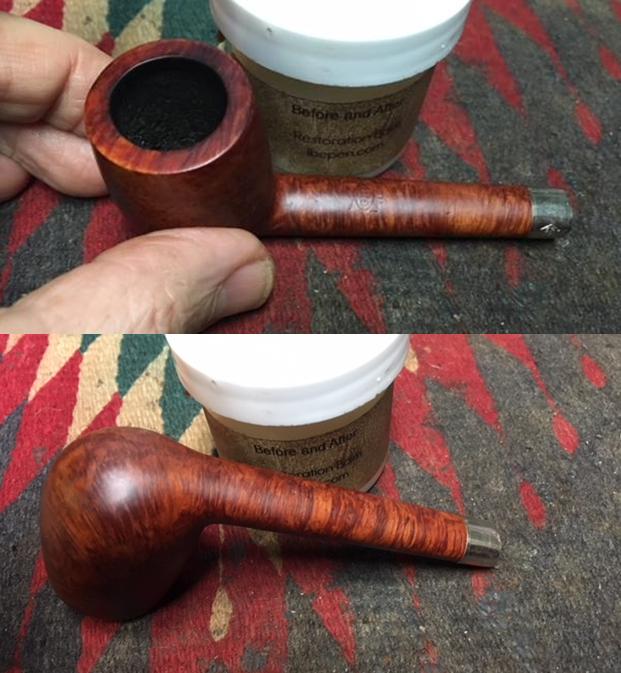
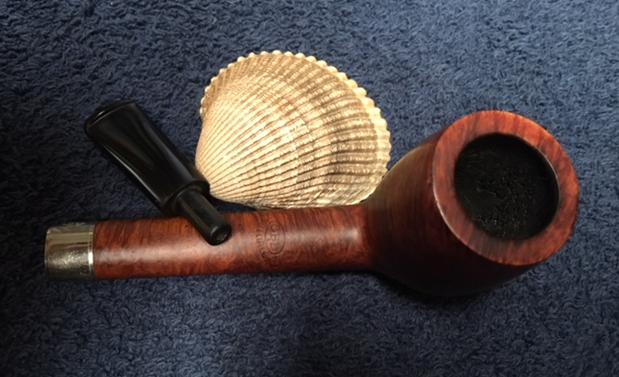
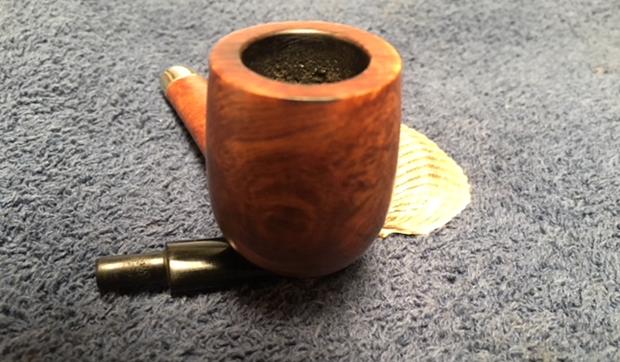
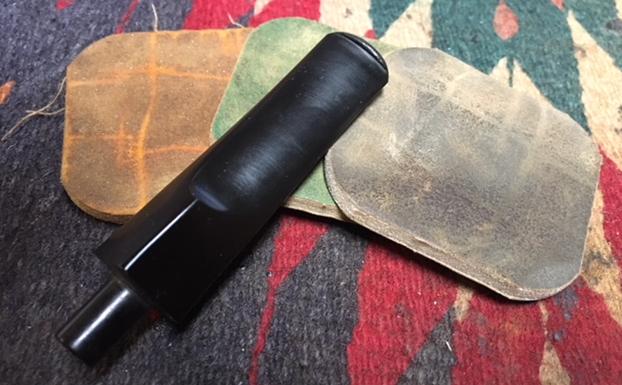
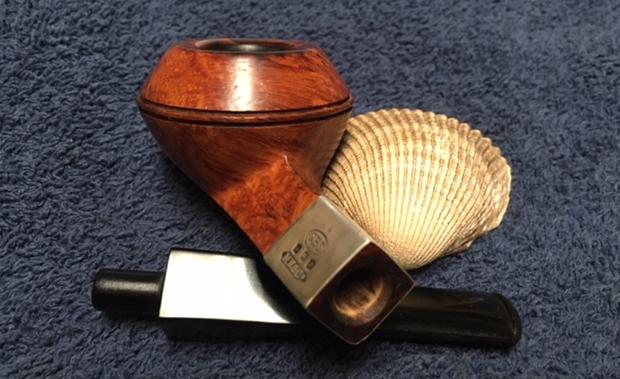
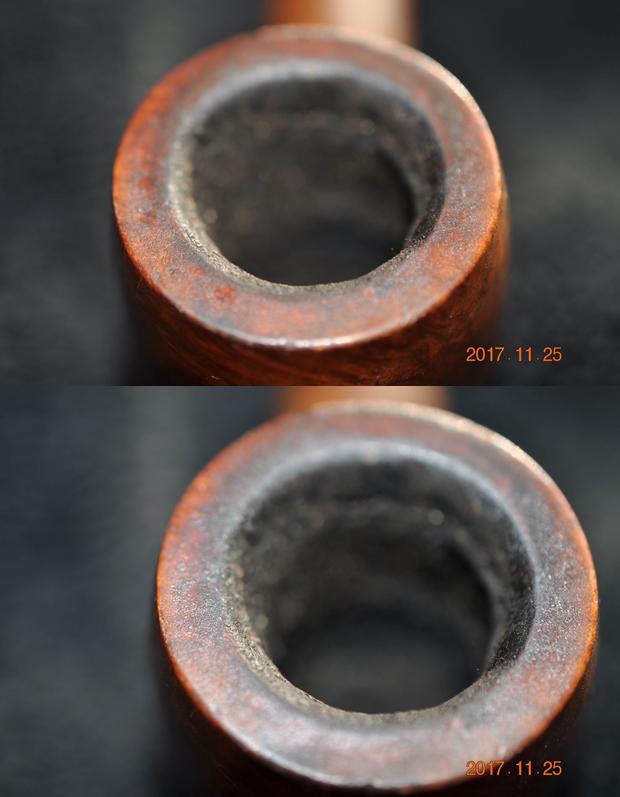
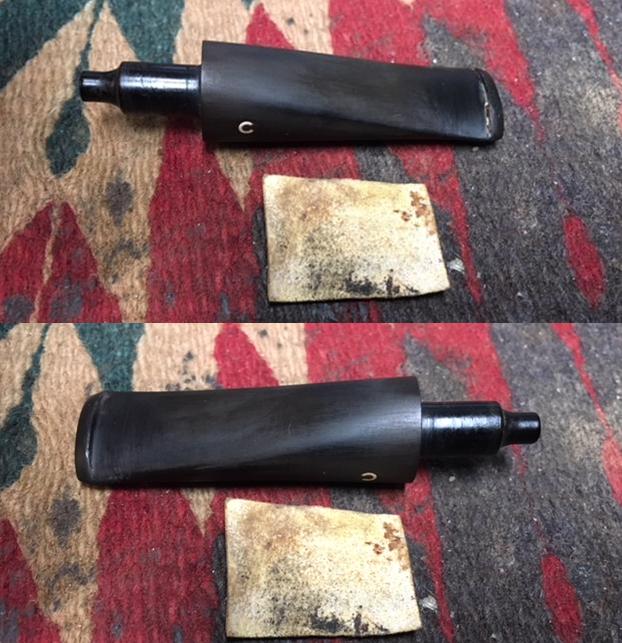
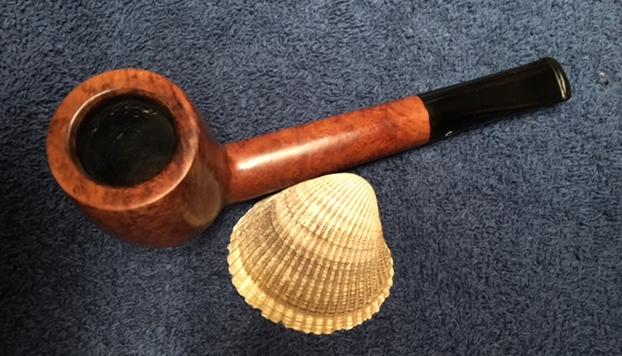
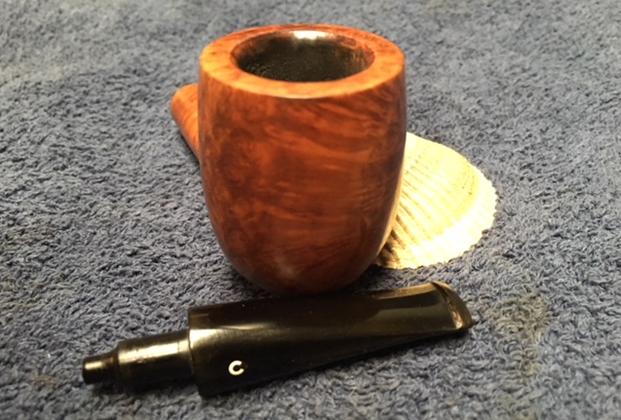
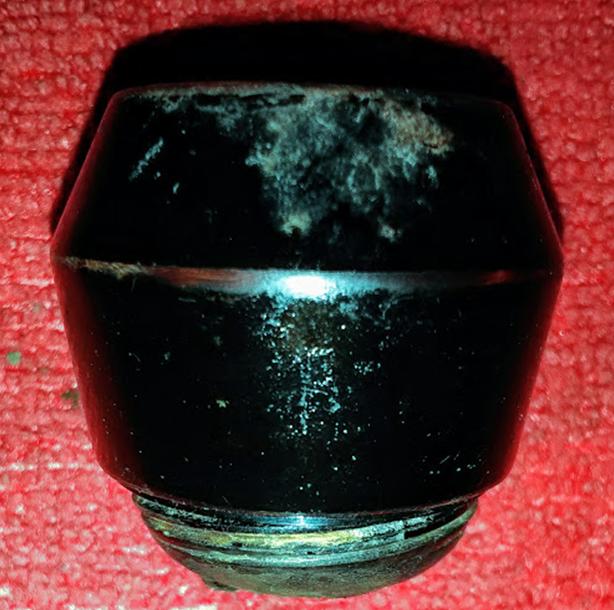
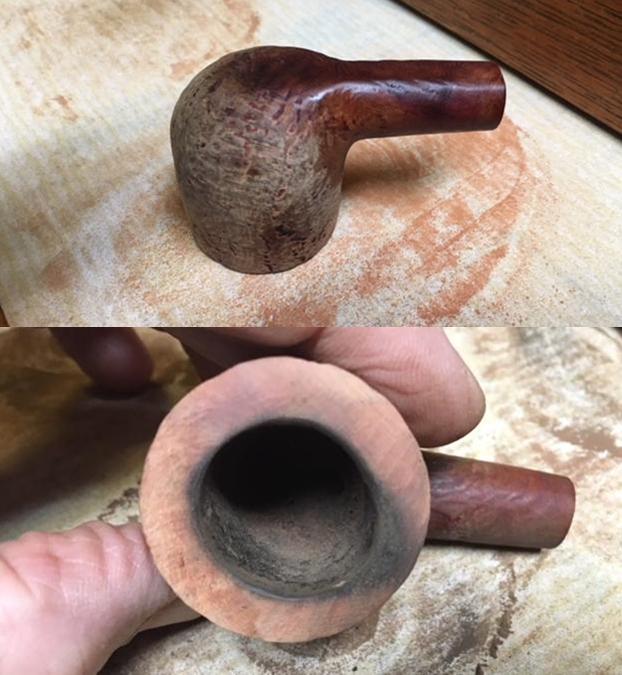
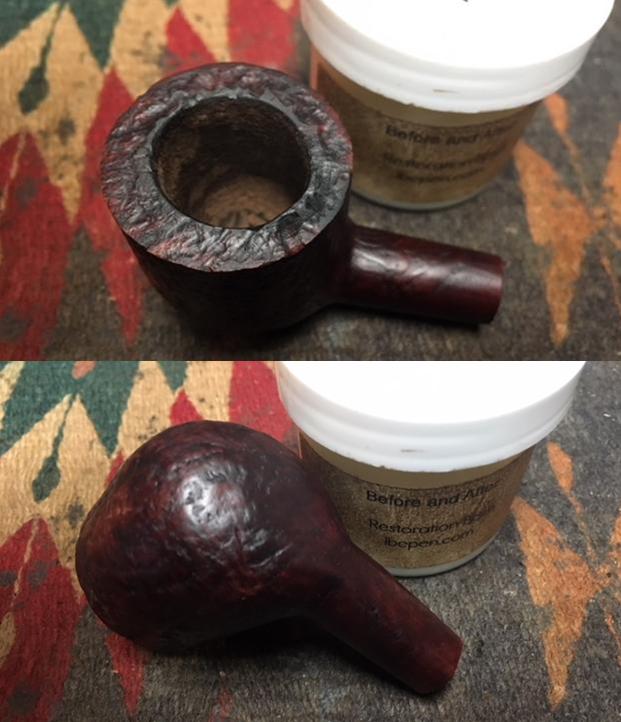
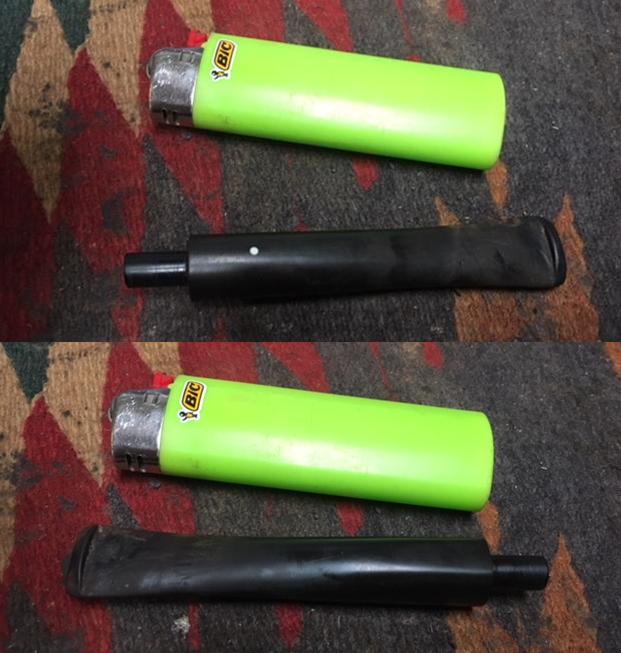
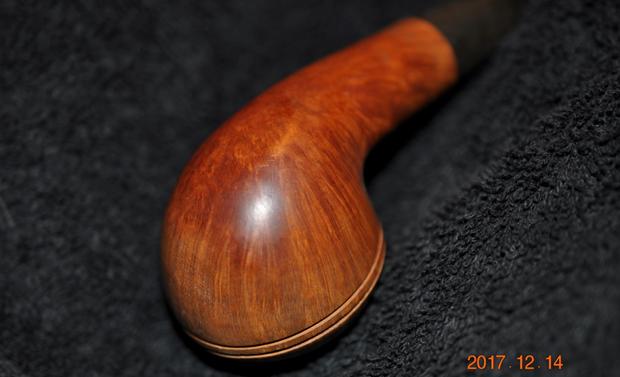
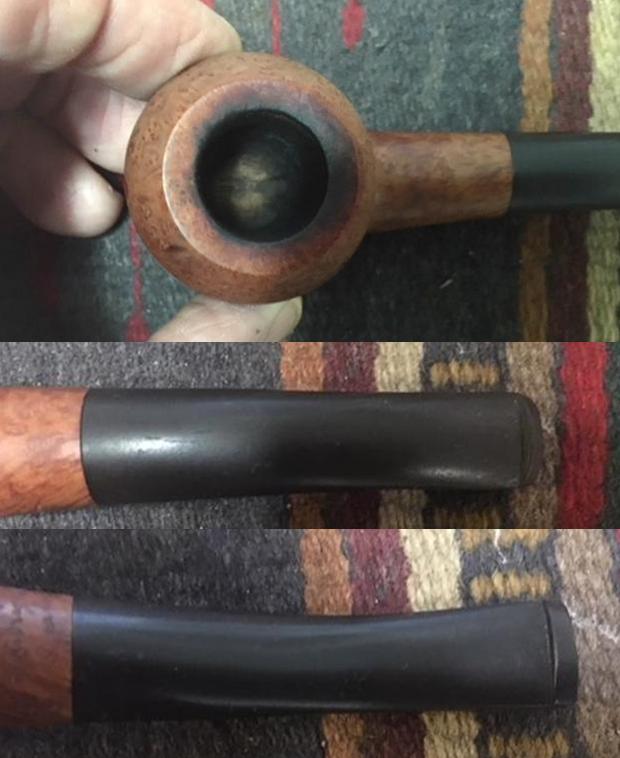
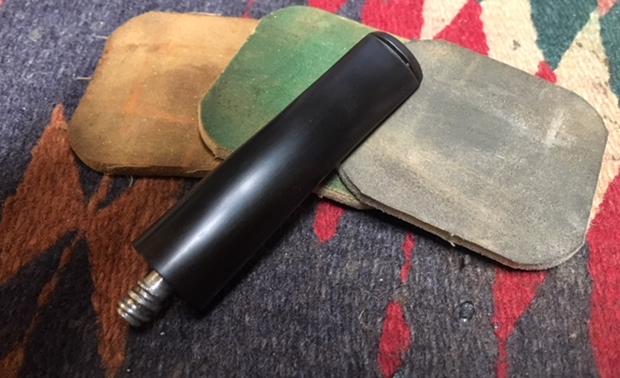
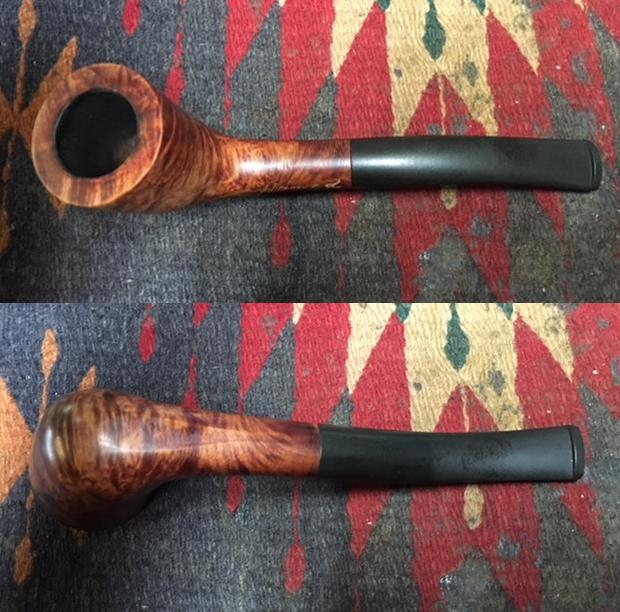
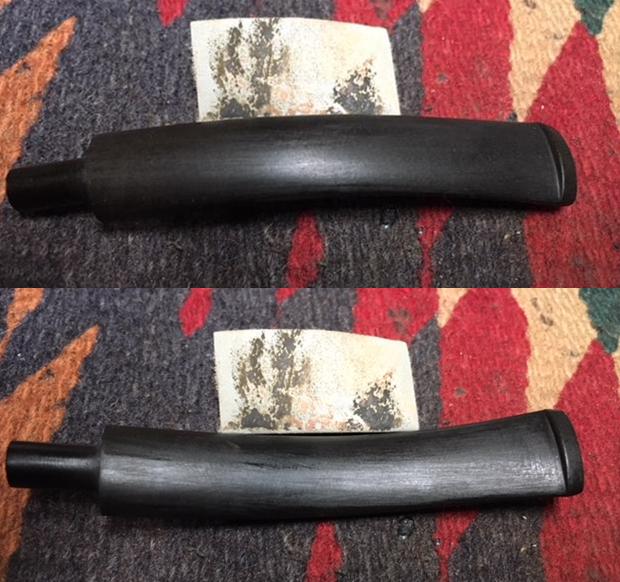
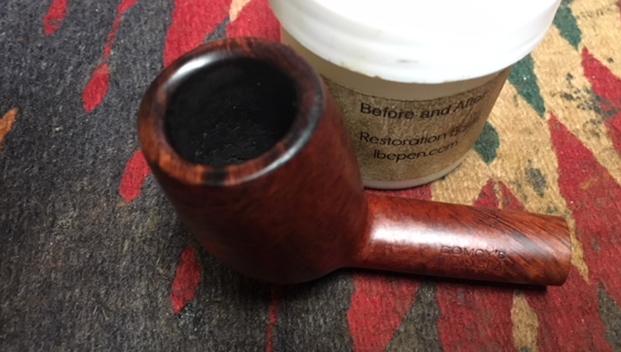
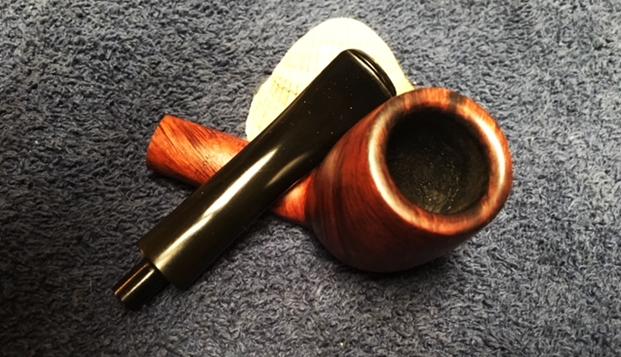
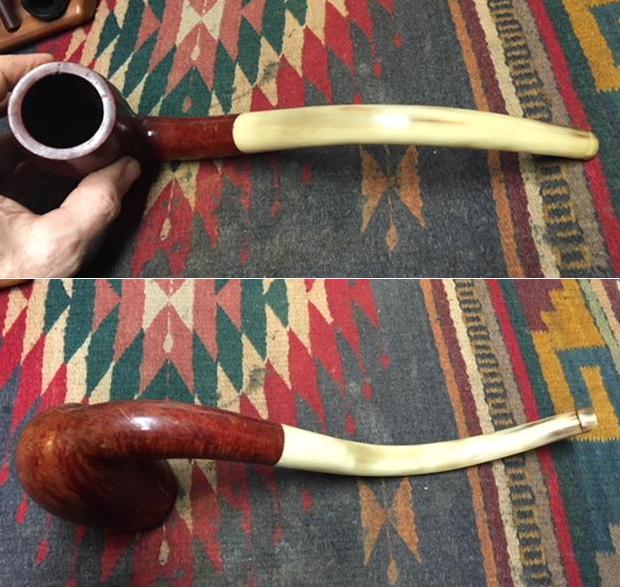
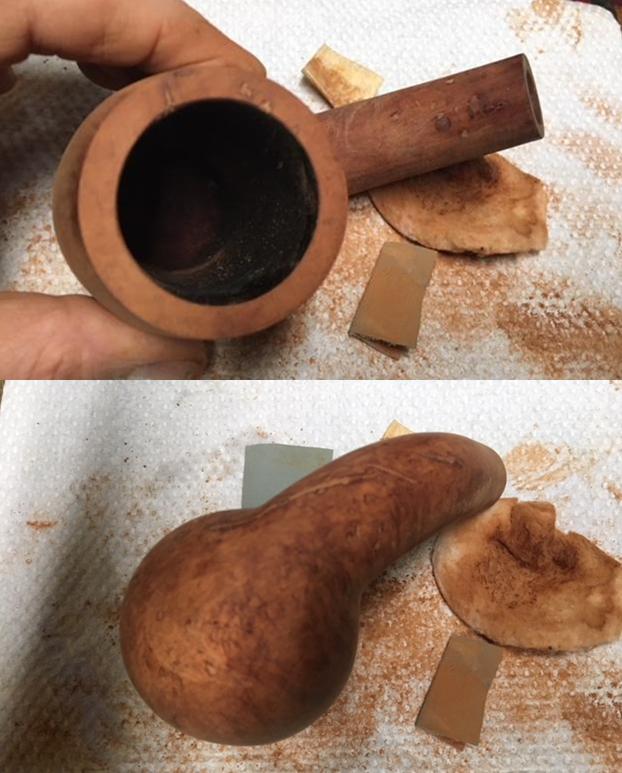
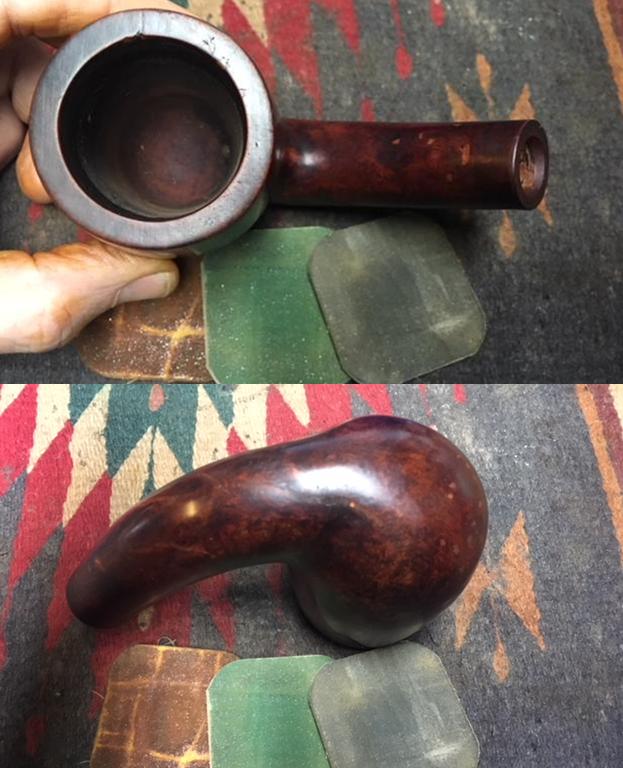
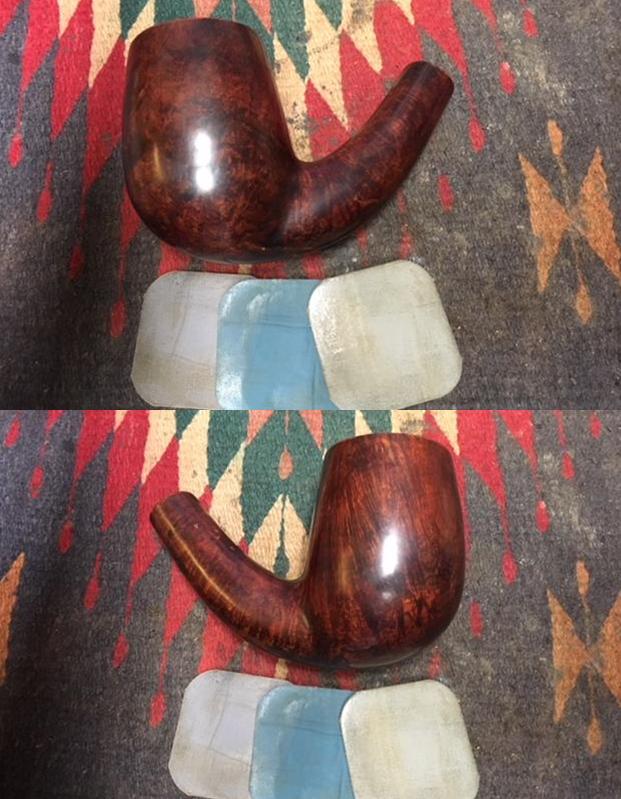
I took a photo of the rim top to show the condition it was in after the cleanup. Jeff was able to remove most of the peeling shellac on the rim top and edges. The grain on the top is quite clean and has a few slight dents in the finish. The inner edge of the bowl is in good condition. It is a nice looking finish. The stem was clean and you can see the oxidation on both sides of the stem and some slight wear on the edges of the button. There still seems to be a shiny top coat on the stem that would need to be removed to be able to deal with the oxidation. I think that the seller gave the rim top and the stem a coat of shellac or something similar to give it a shine.
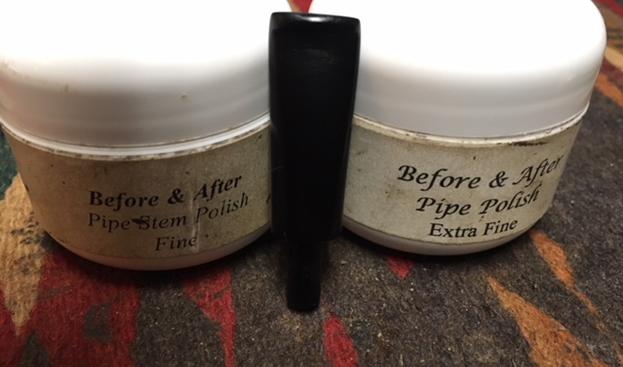
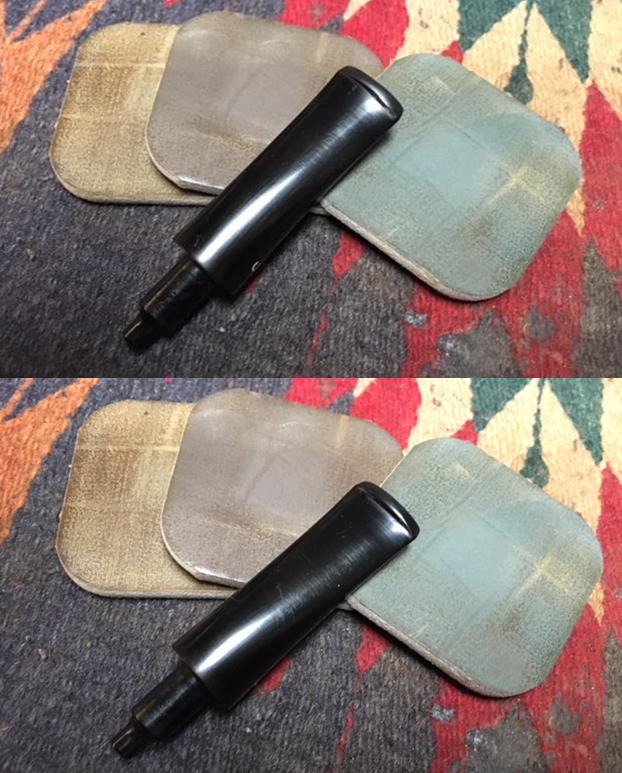
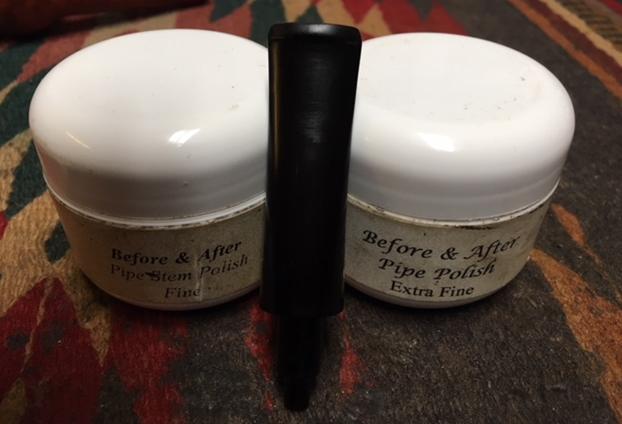
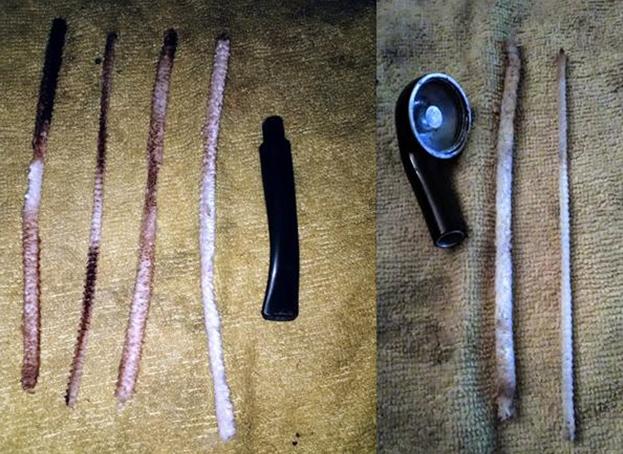
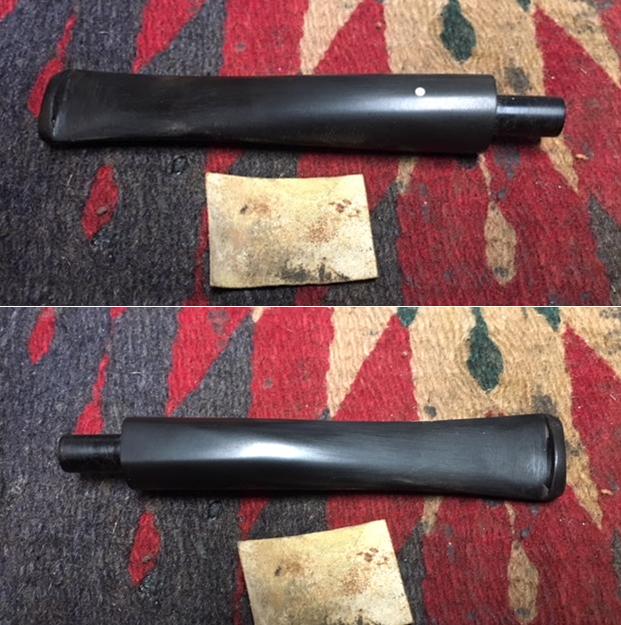
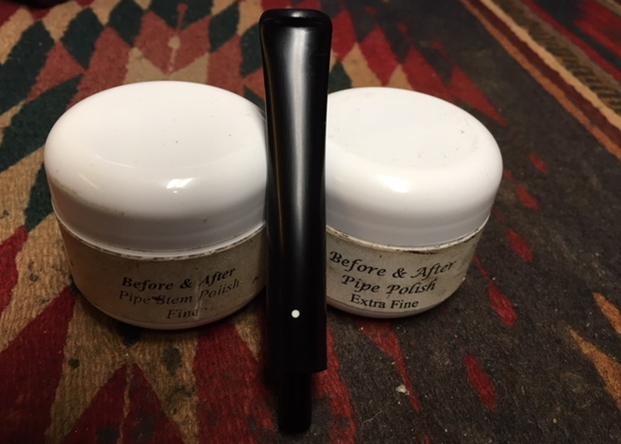
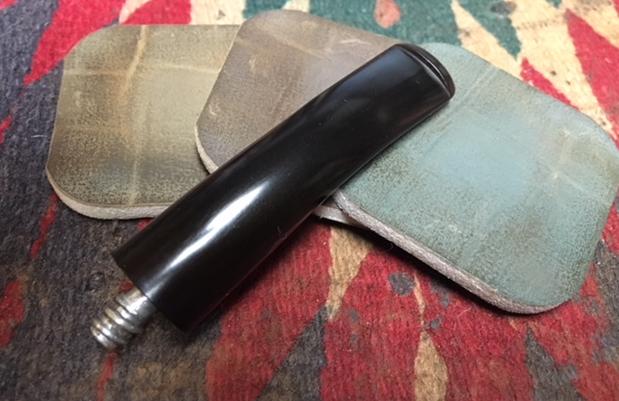
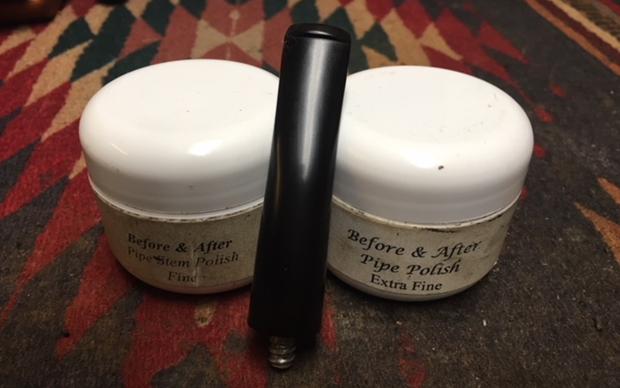
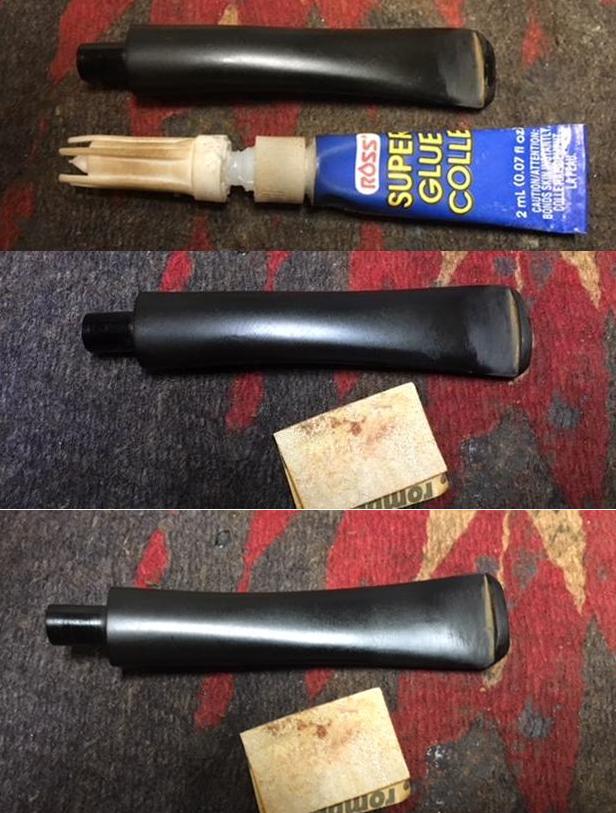
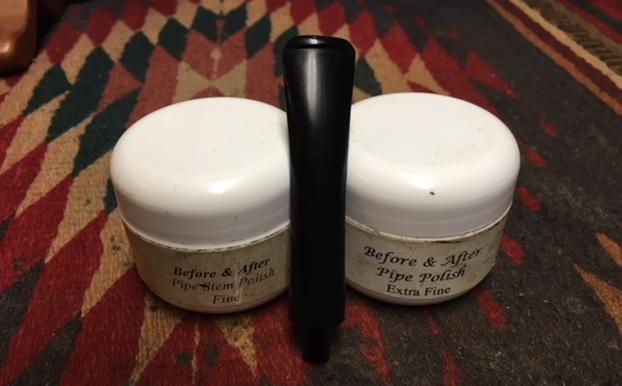
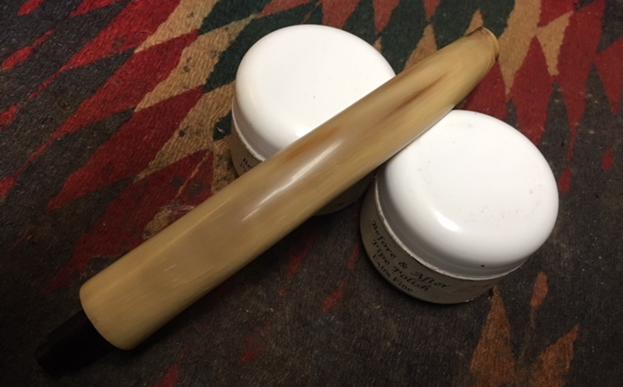
I sanded the surface of the stem smooth with 220 grit sandpaper. I sanded the rest of the stem at the same time and removed some of the oxidation on the surface. I neglected to take photos of this part of the process. I polished the stem with micromesh sanding pads – wet sanding with 1500-2400 grit pads and dry sanding with 3200-12000 grit pads. I wiped the stem down after each pad with a damp cloth to remove the sanding dust. I used the Before & After Pipe Polish to remove the small minute scratches left in the vulcanite. I finished by wiping the stem down with a final coat of Obsidian Oil and set it aside to dry. 
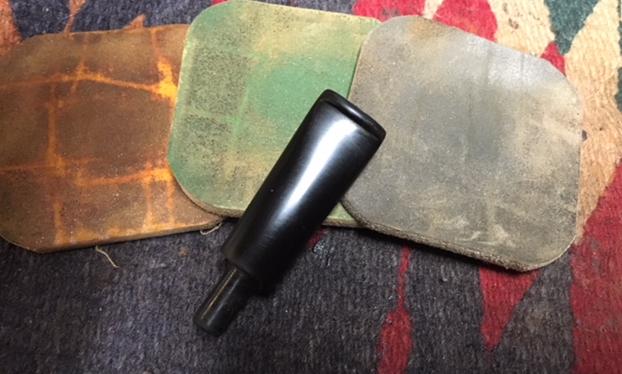
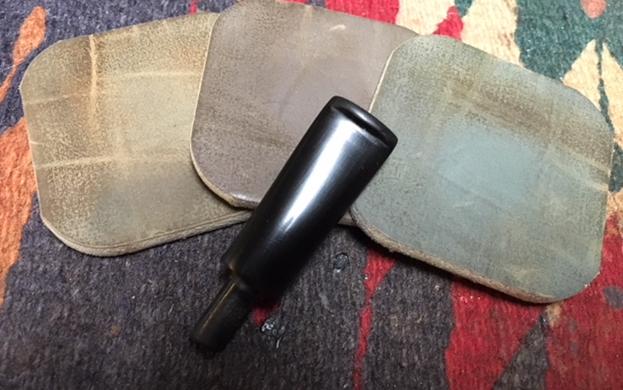
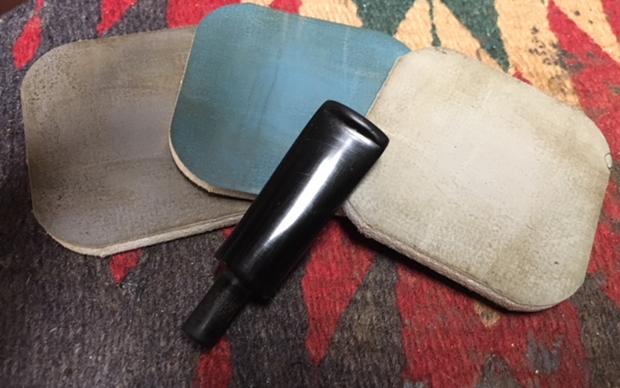
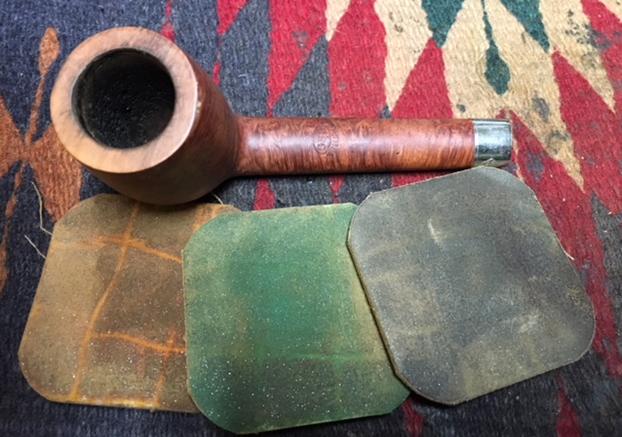
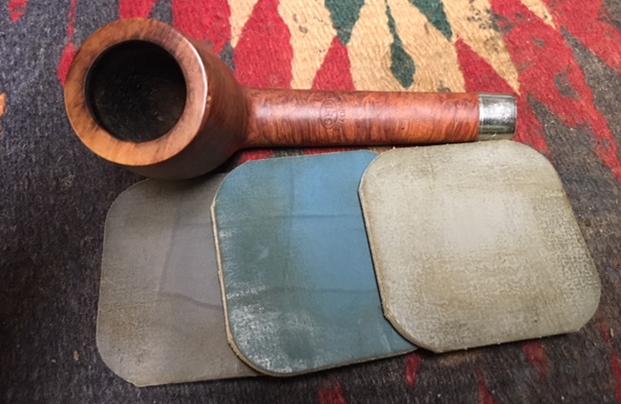
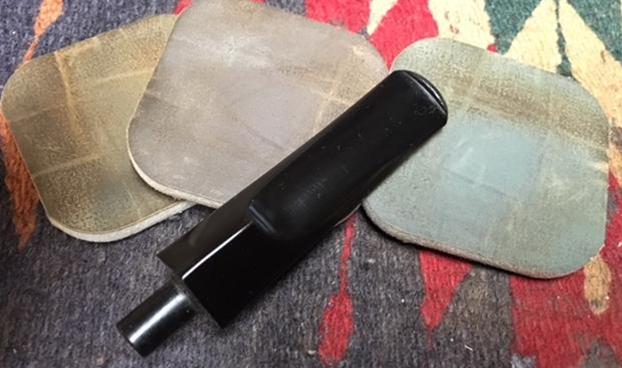
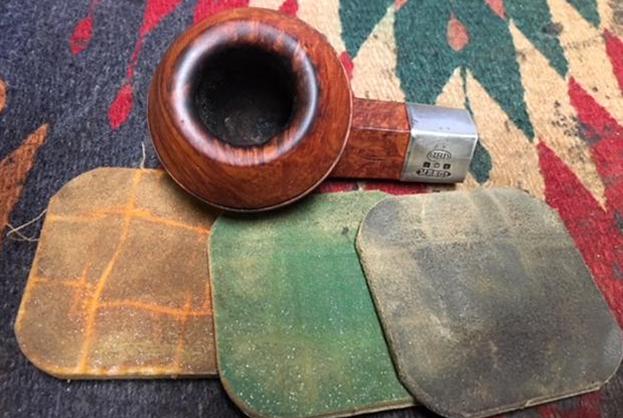
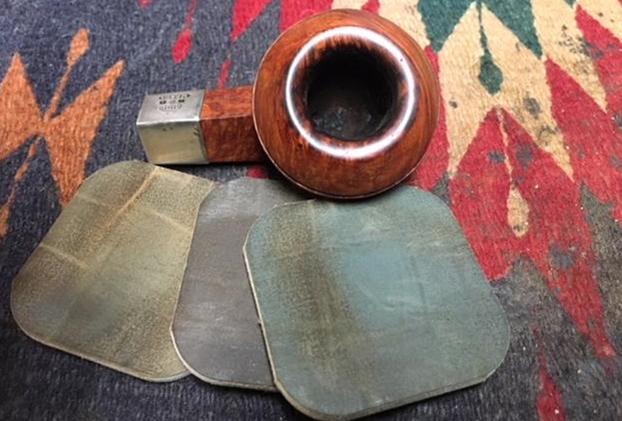
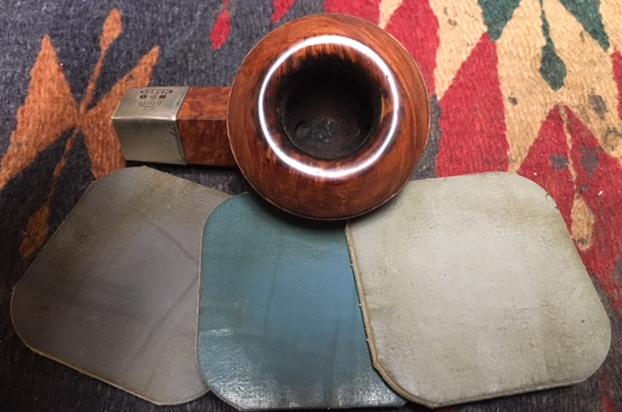
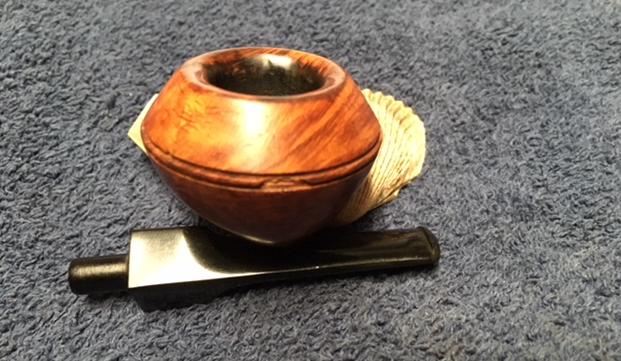
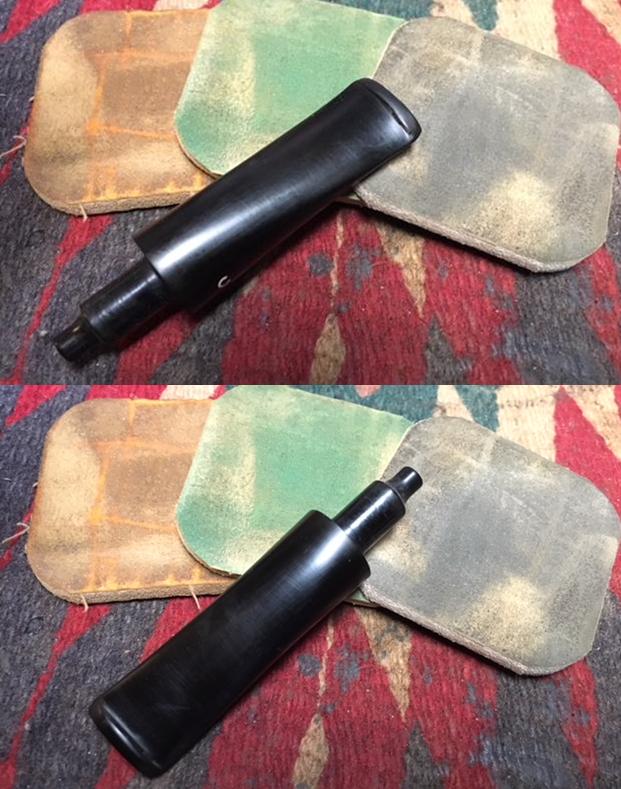
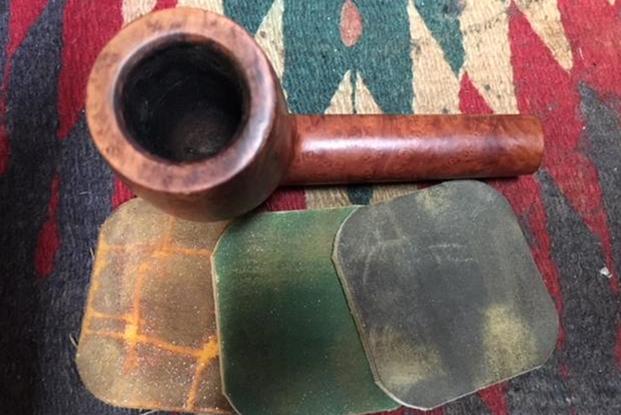
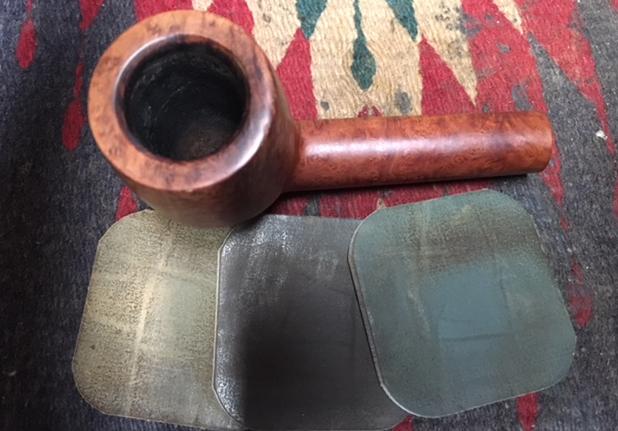
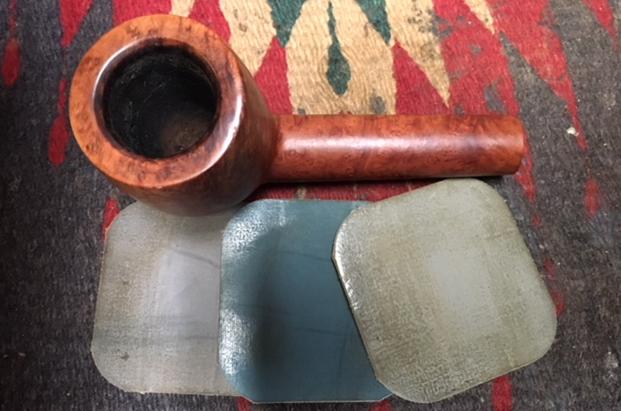
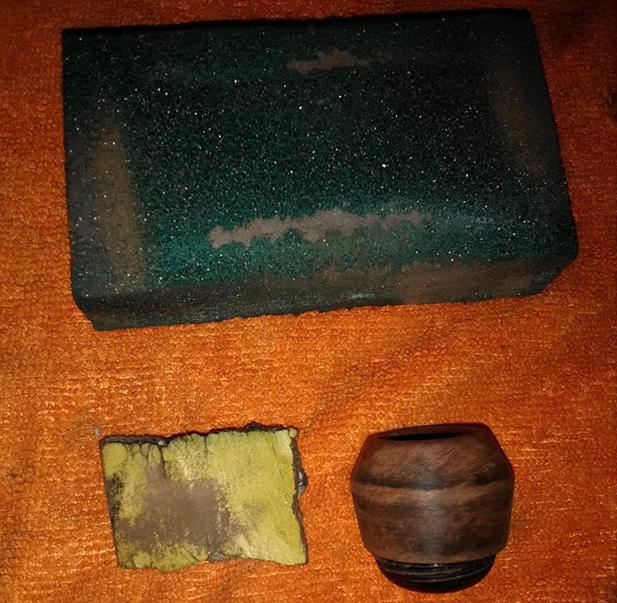
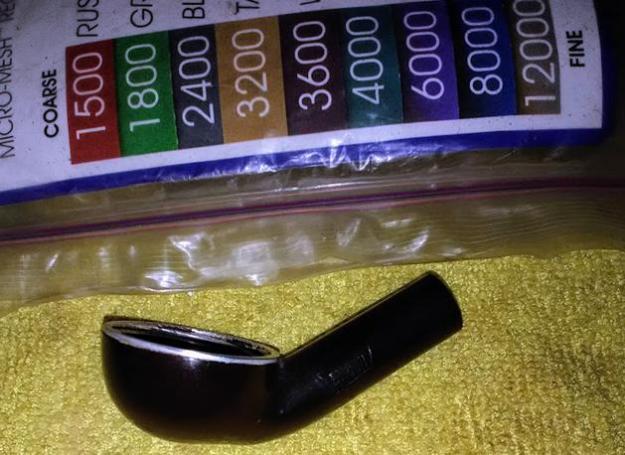
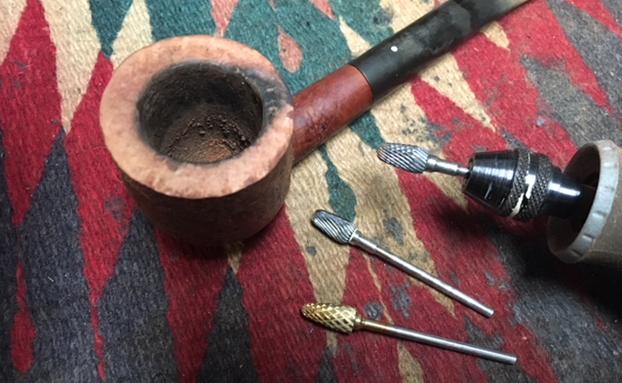
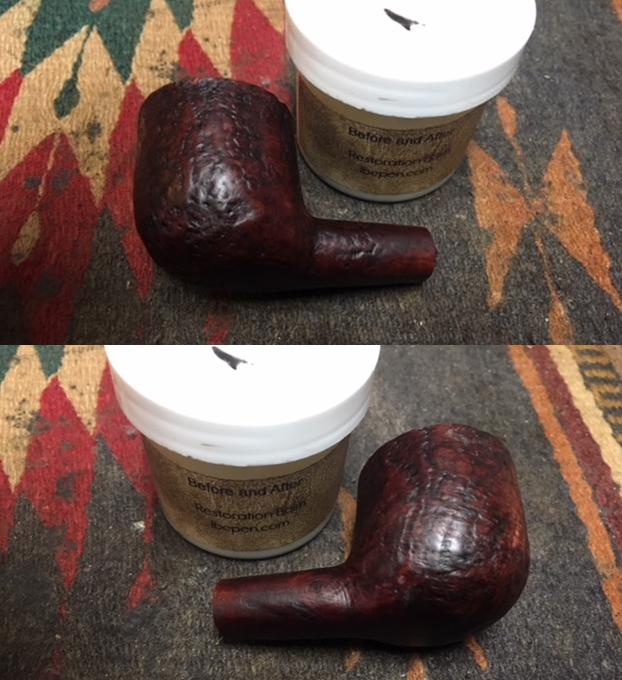
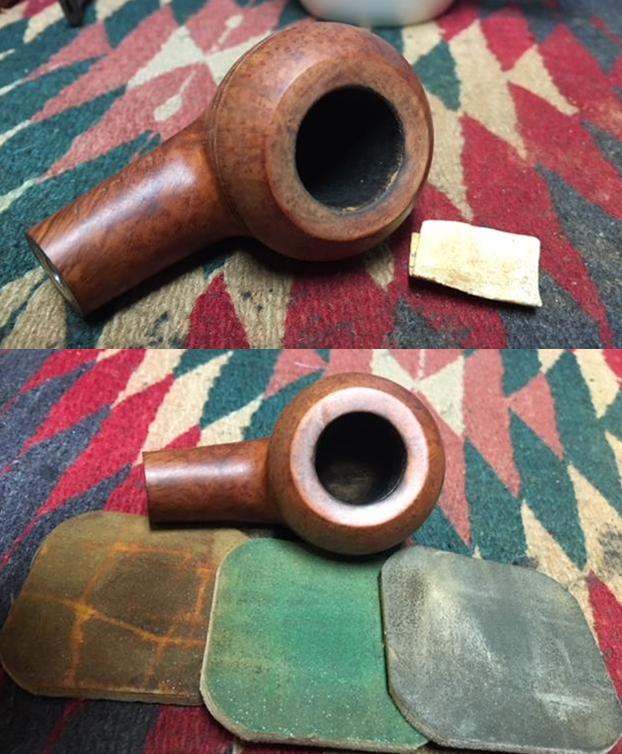
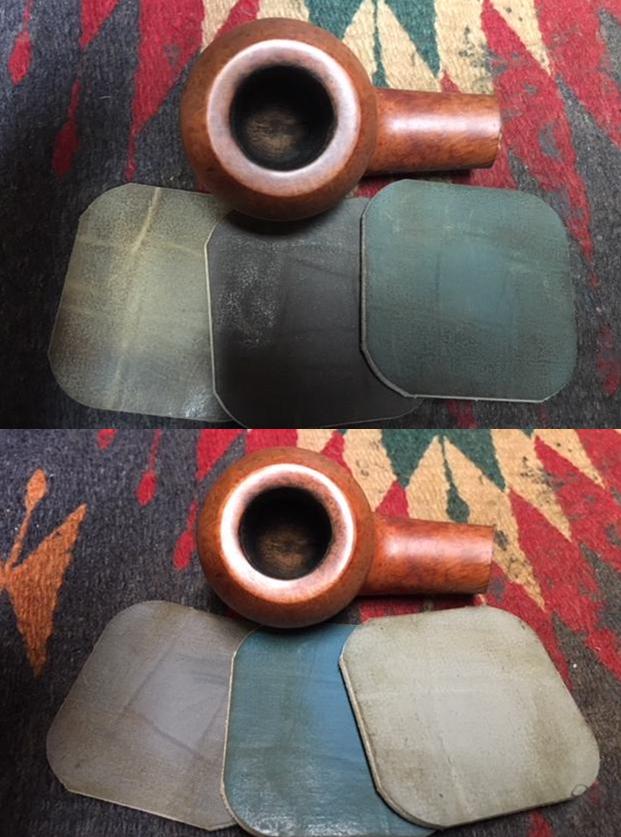
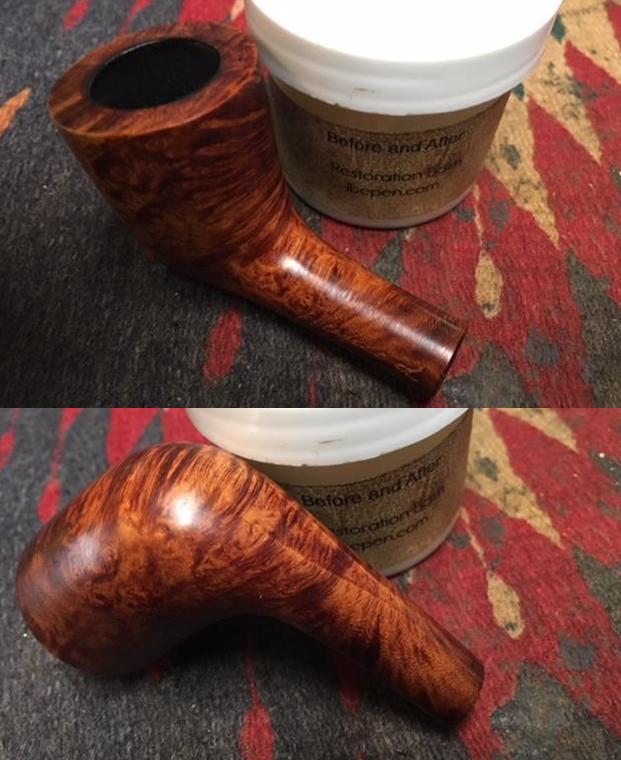
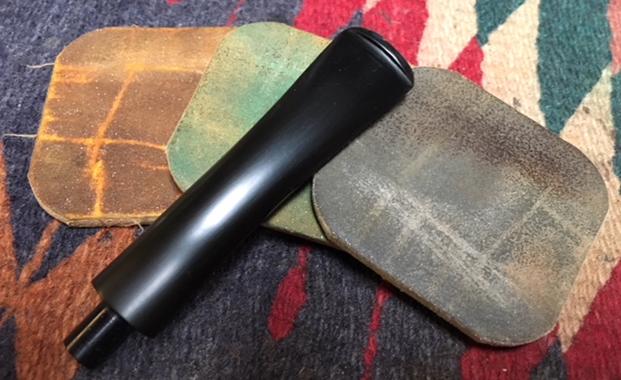
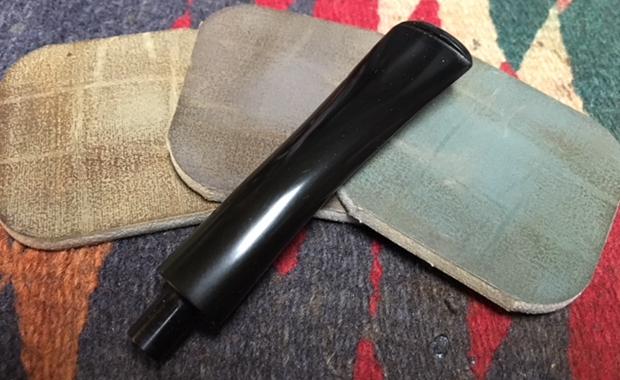
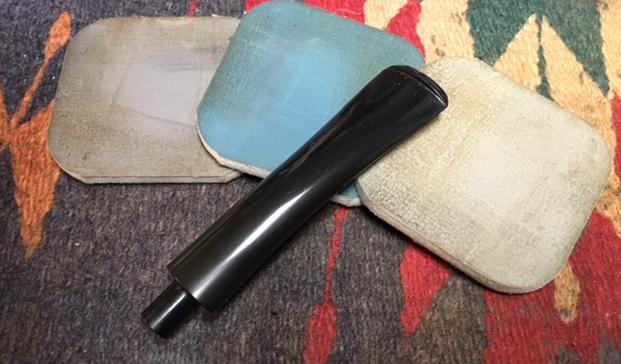
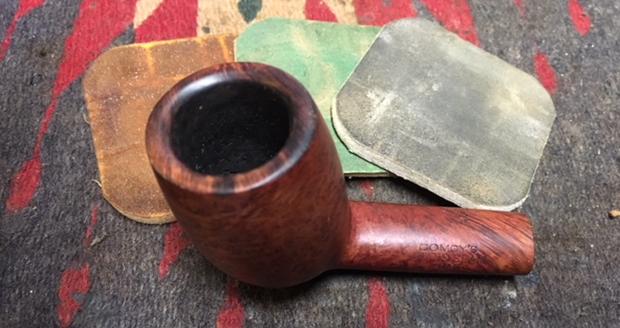
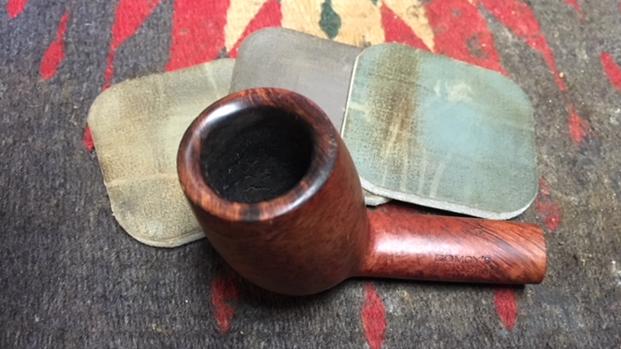
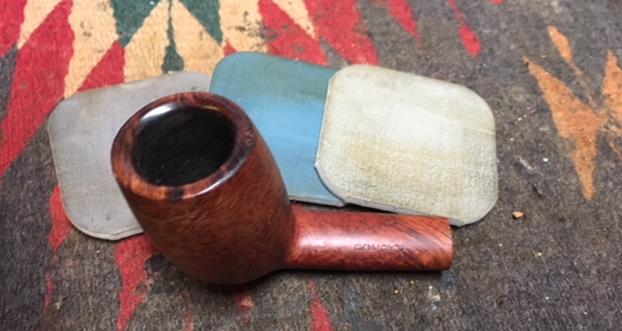
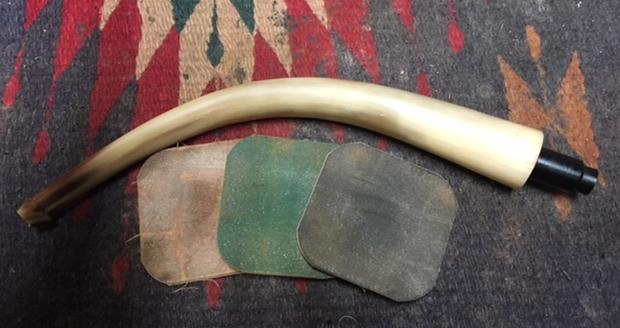
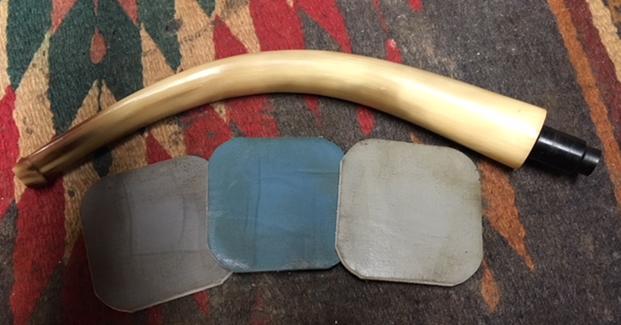
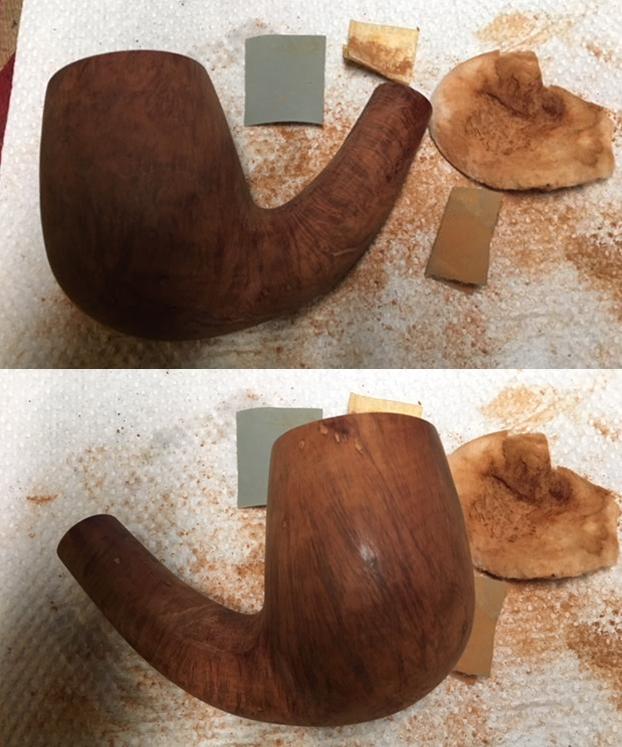
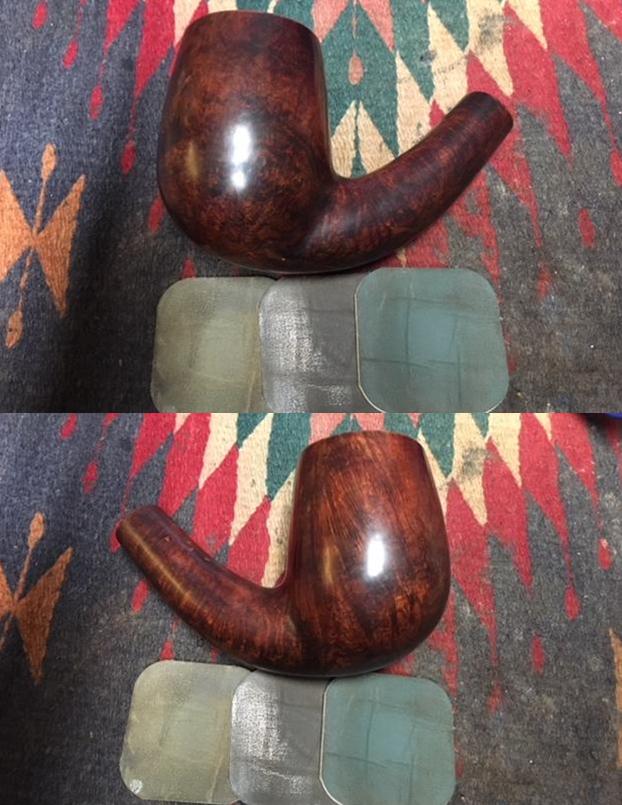
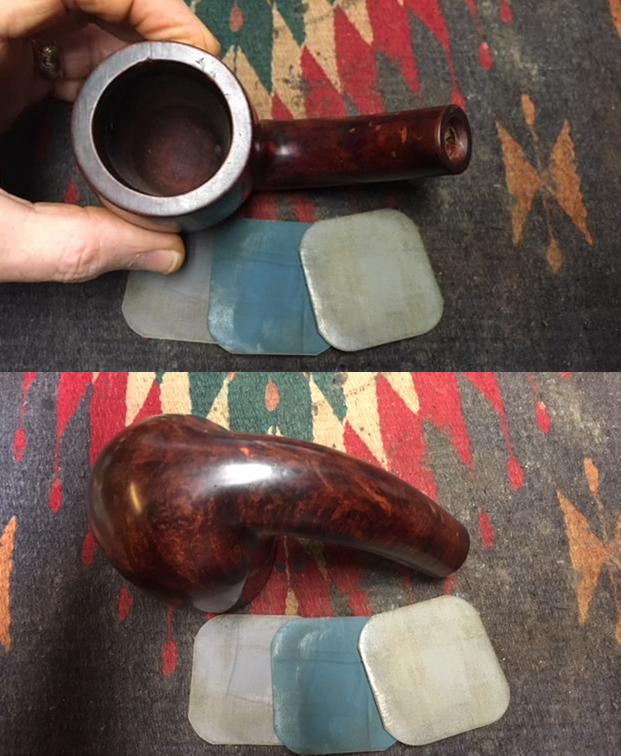
I used micromesh sanding pads to polish the smooth rim of the bowl and remove the remaining shellac and debris on the rim top. I wet sanded it with 1500-2400 grit sanding pads and dry sanded it with 3200-12000 grit pads. I wiped it down with a damp cloth after each sanding pad. The photos below show the progress in the polishing. 
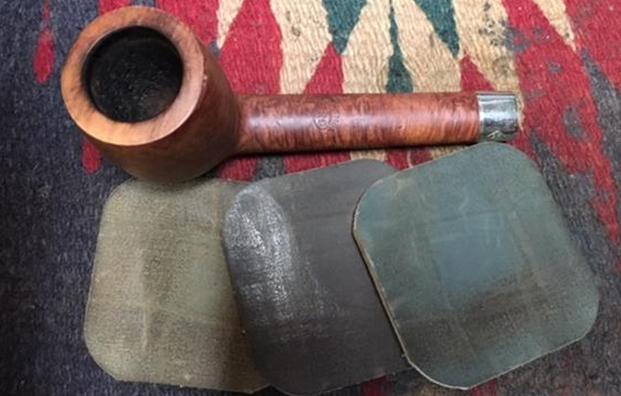
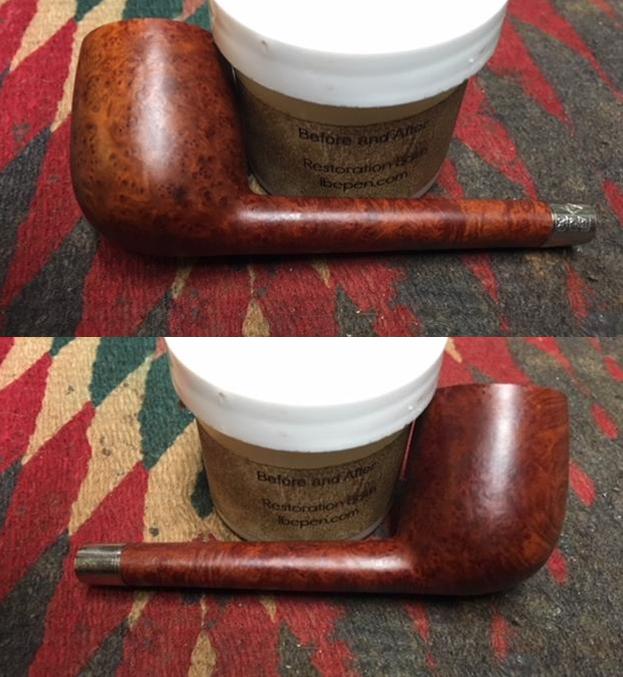
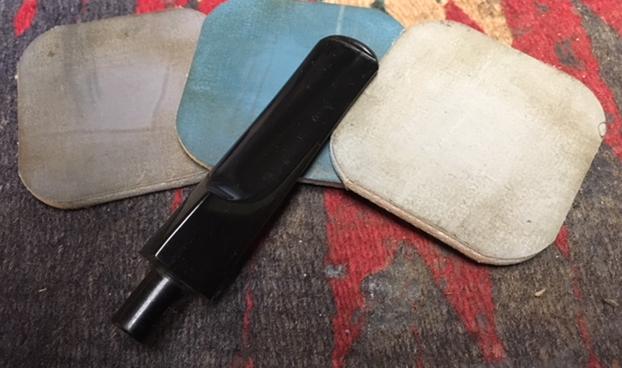
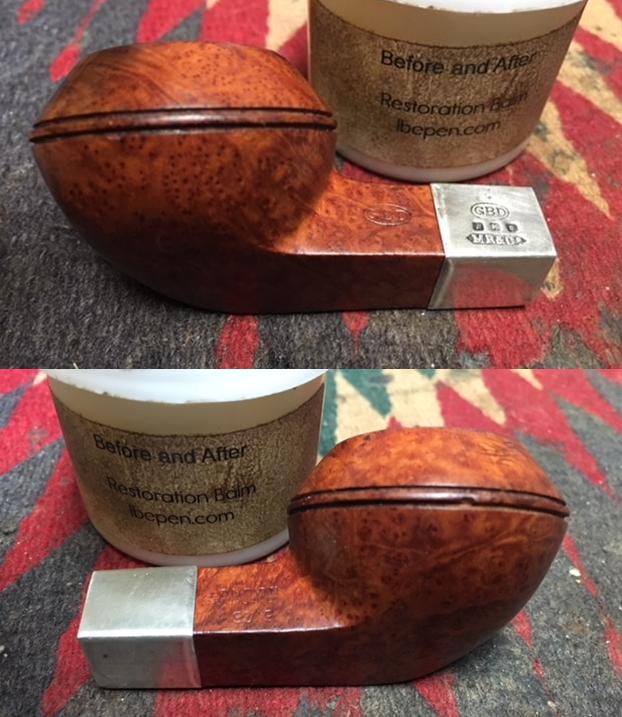
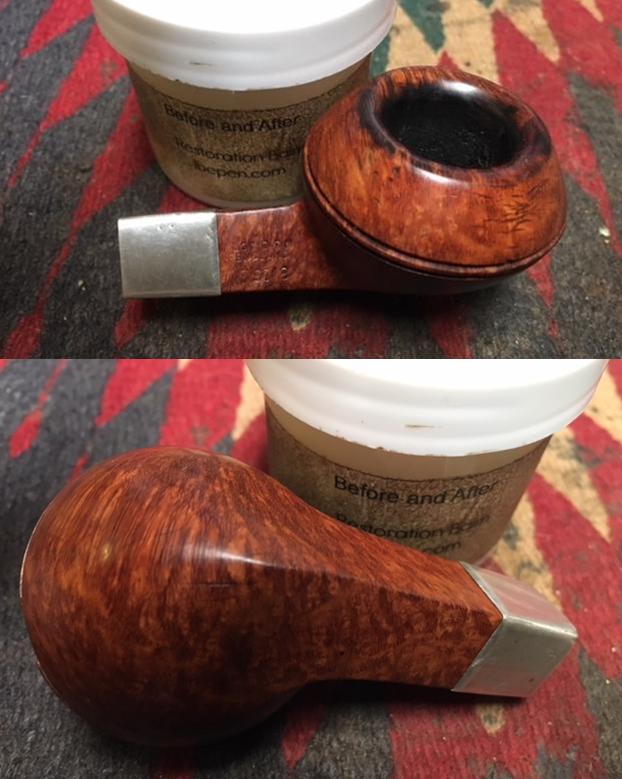
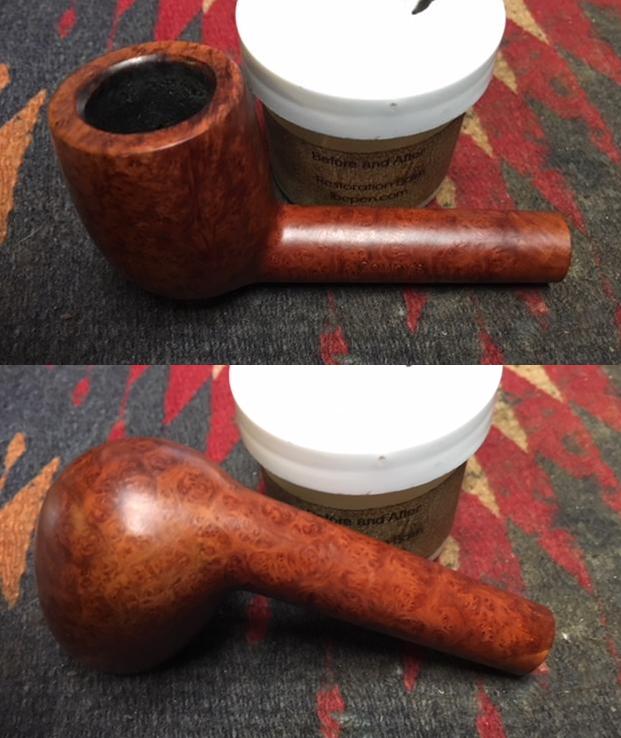
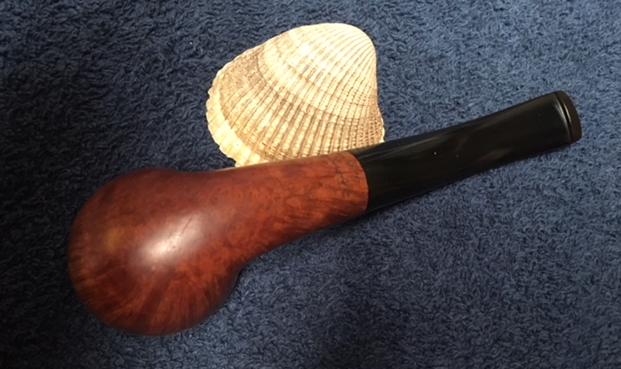
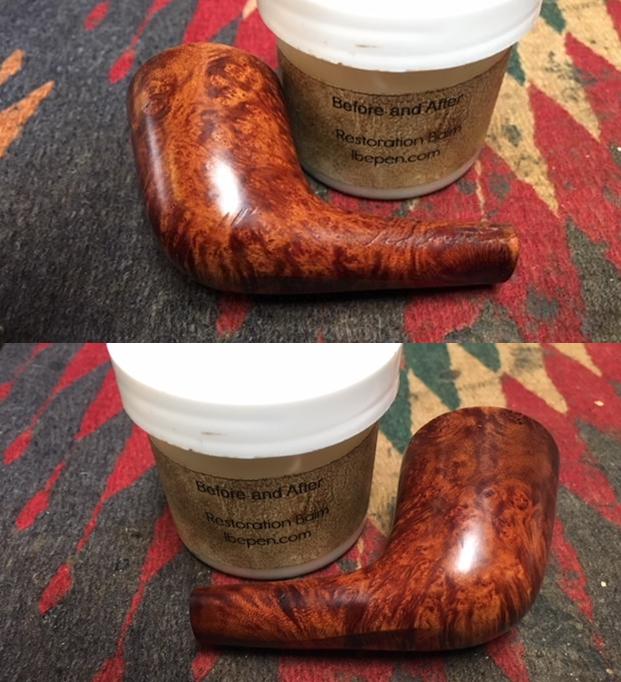
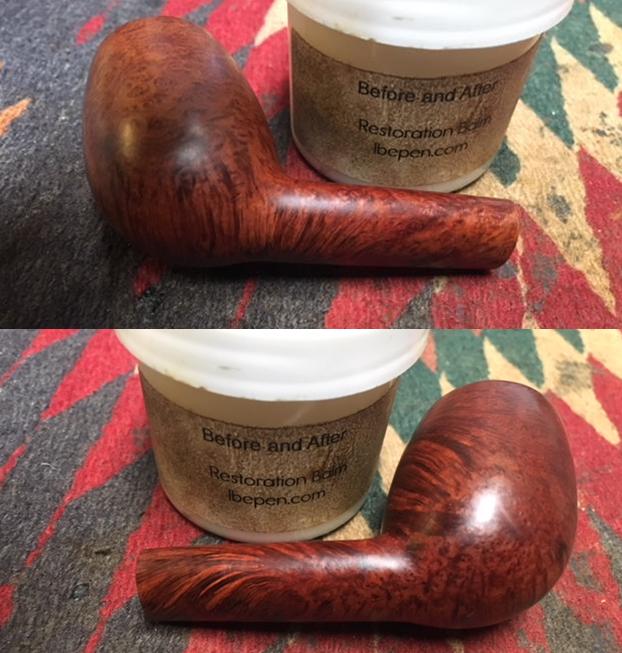
I rubbed the bowl down with Before & After Restoration Balm to deep clean the rusticated briar and the smooth rim. The product works to clean, enliven and protect the briar. I hand rubbed it with my fingers and wiped it off with a soft cloth. I buffed the bowl with a horsehair shoe brush to polish it. The briar really began to have a rich shine. I took some photos of the bowl at this point to mark the progress in the restoration. 
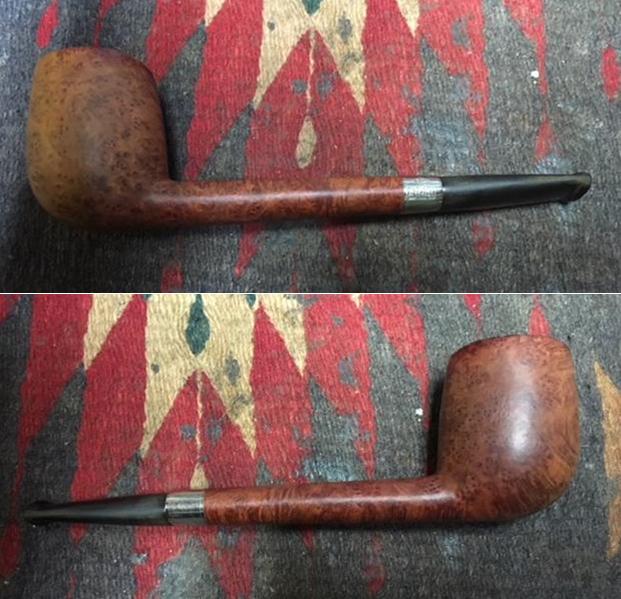
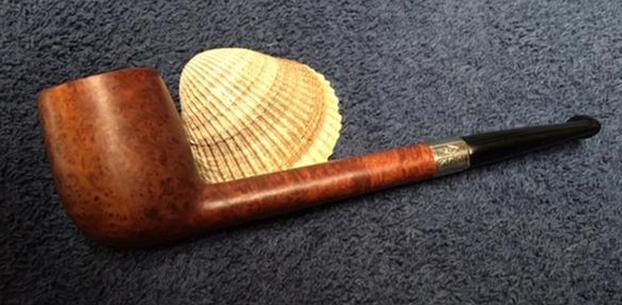
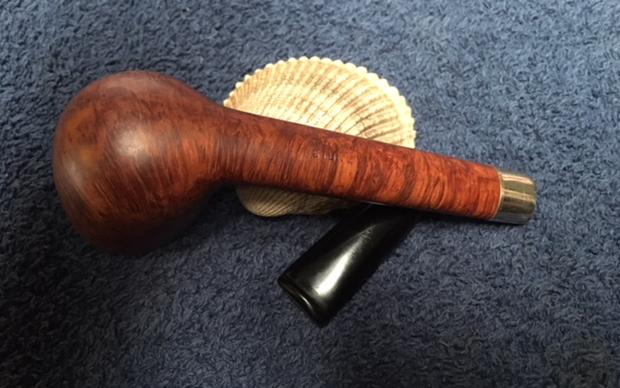
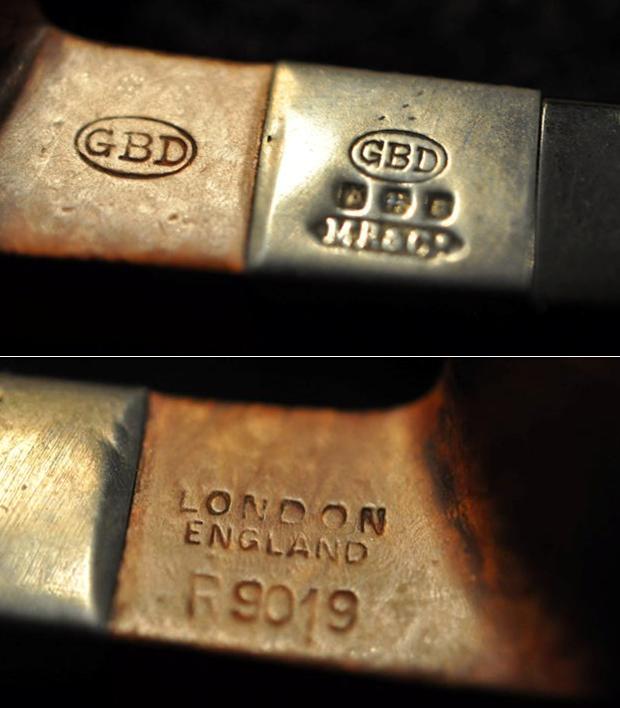
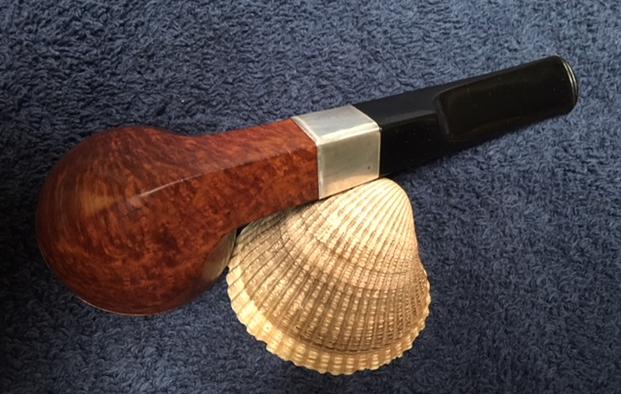
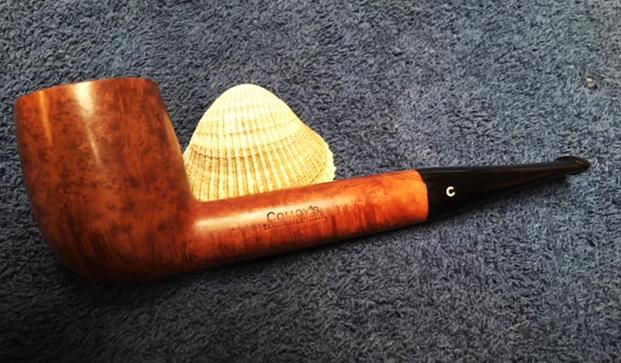
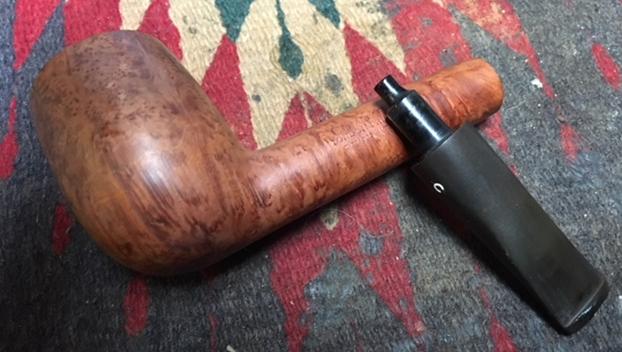
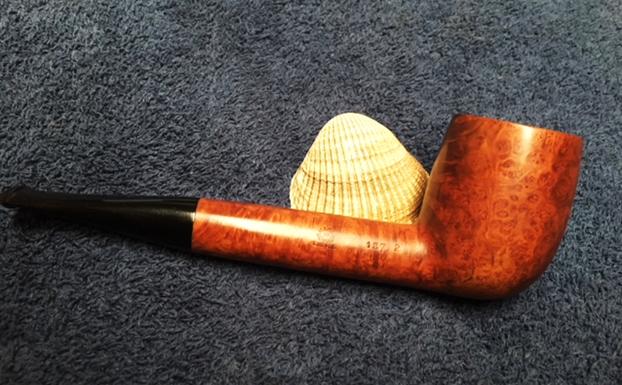
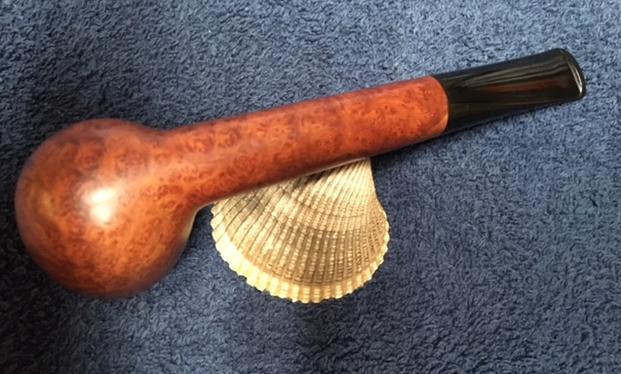
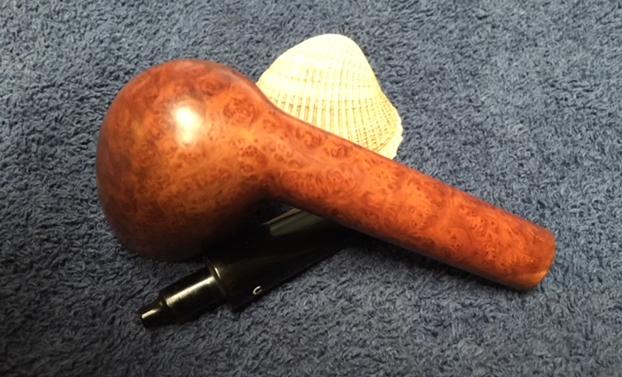
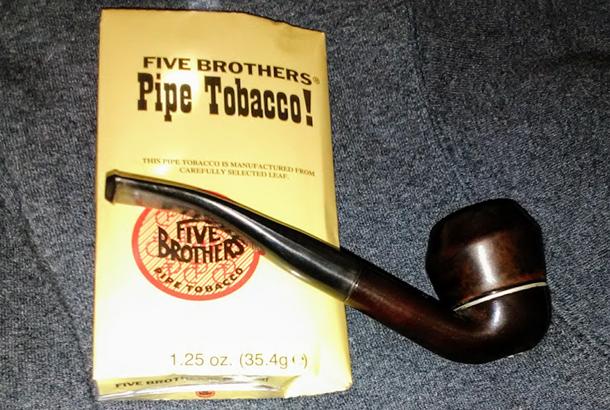
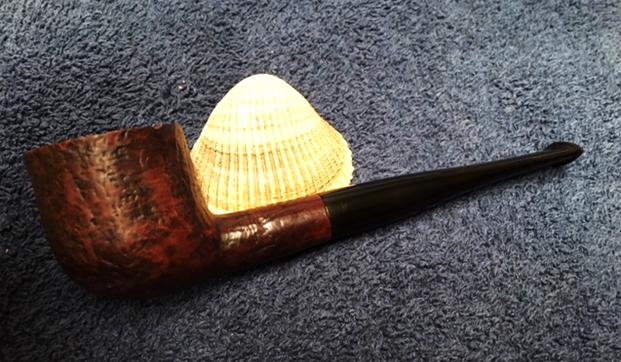
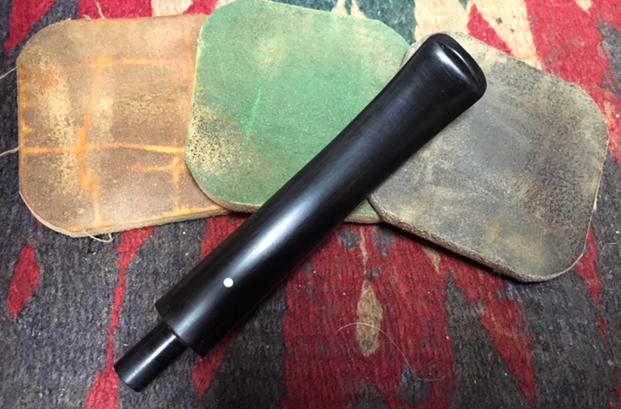
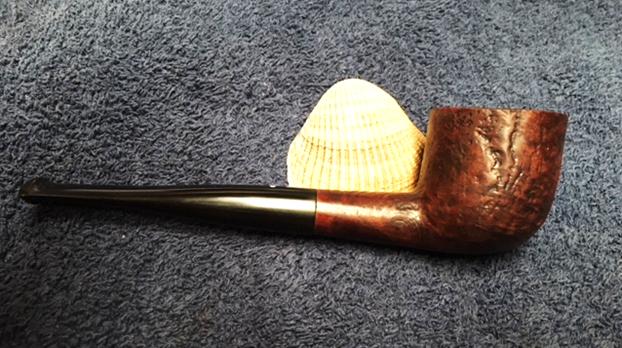
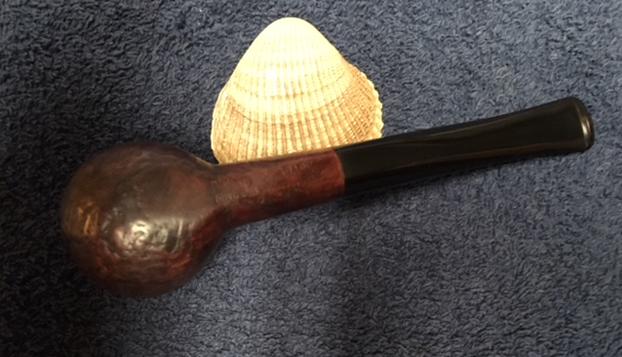
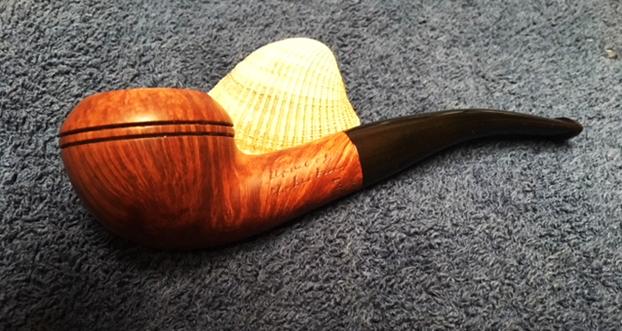
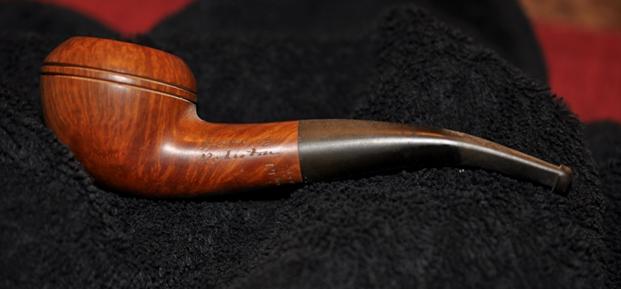
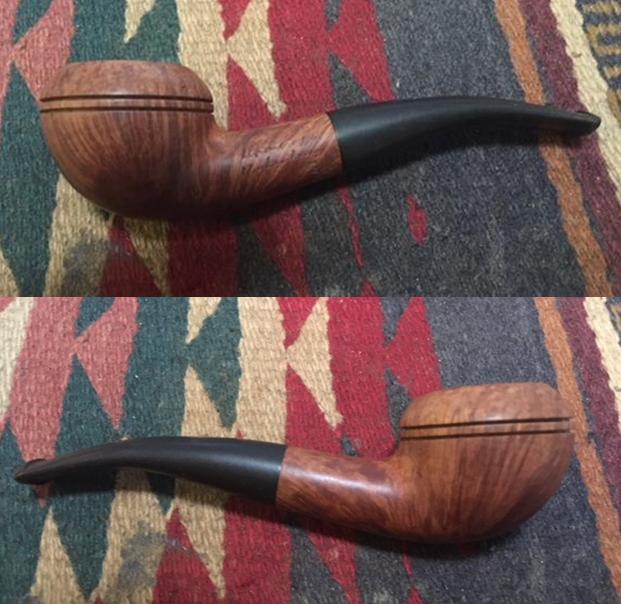
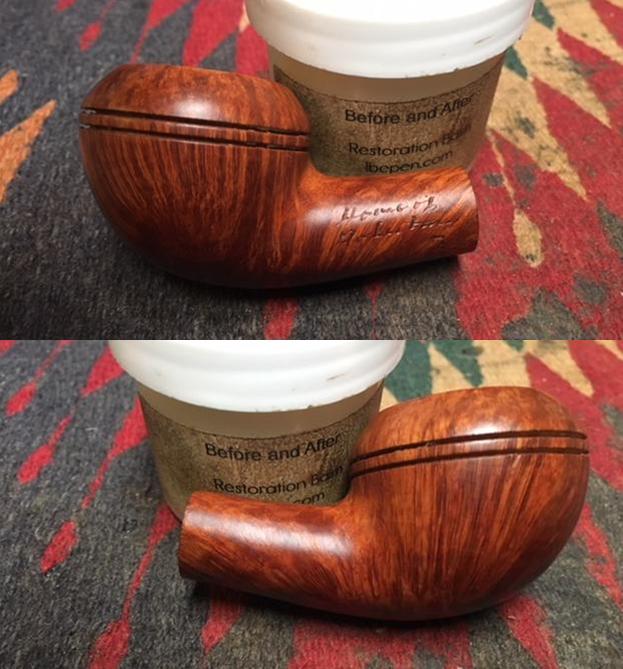
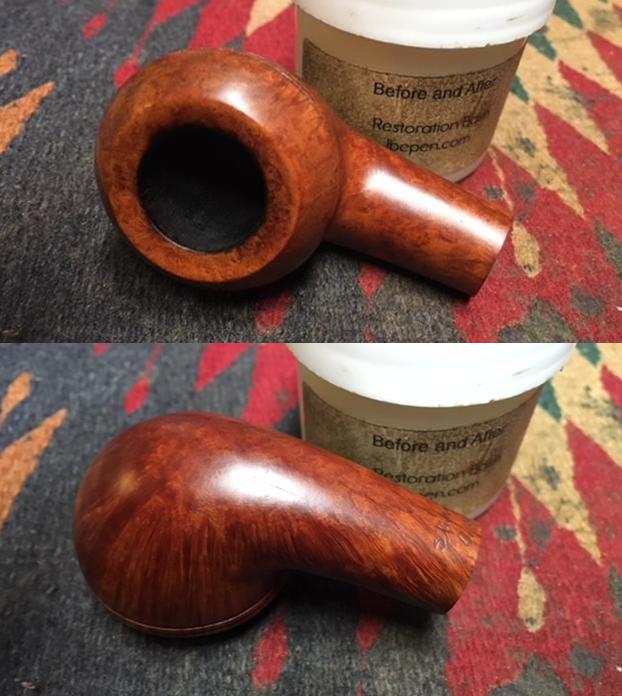
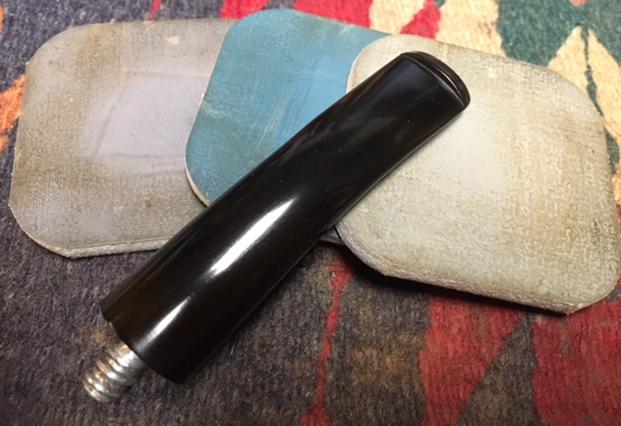
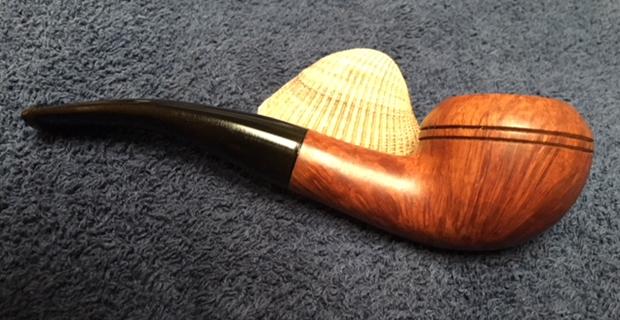
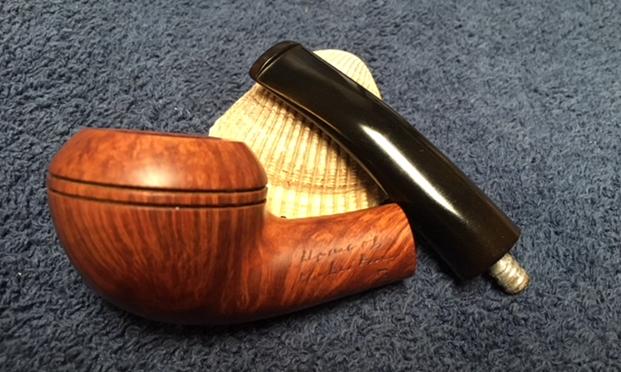
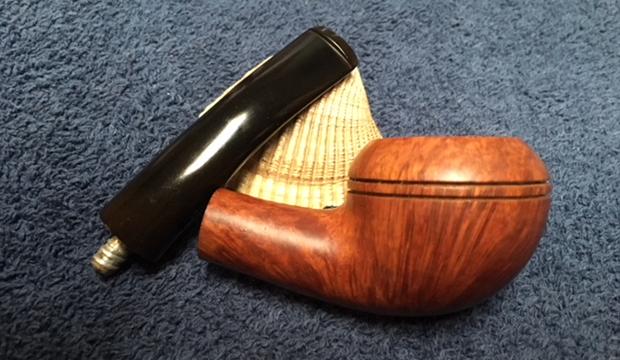
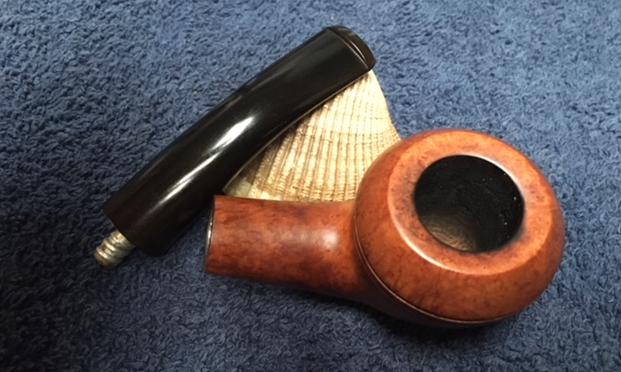
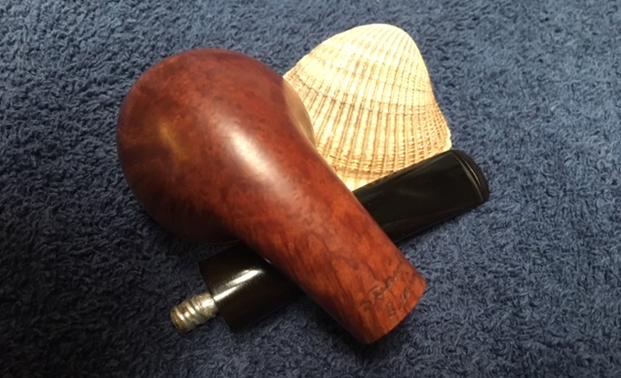
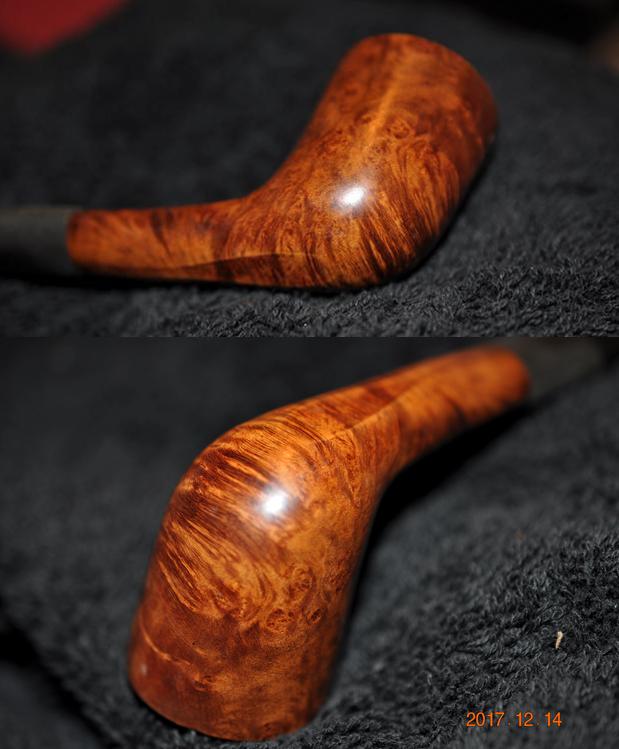
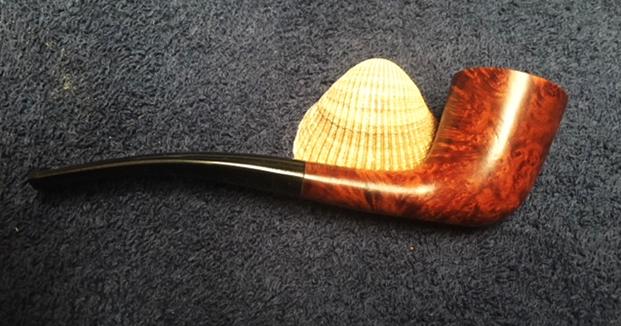
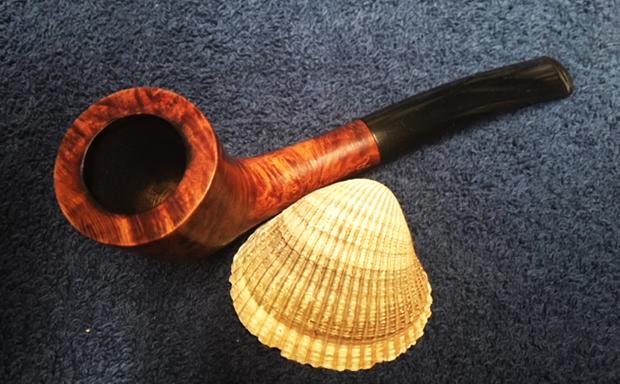
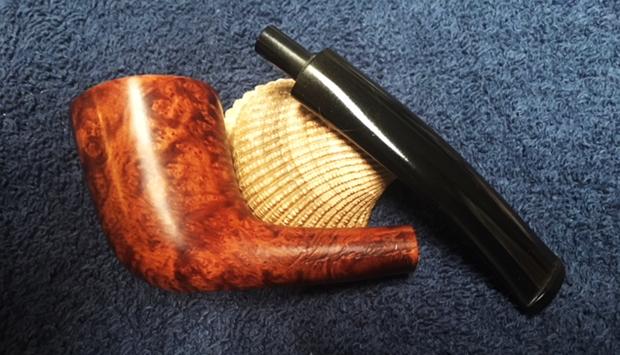
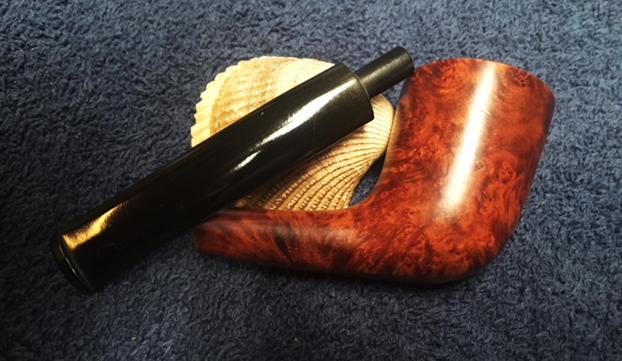
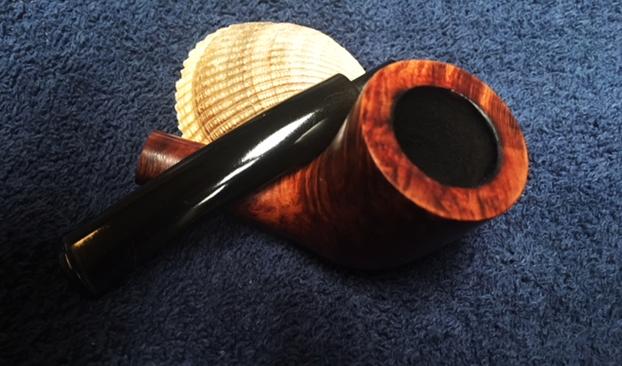
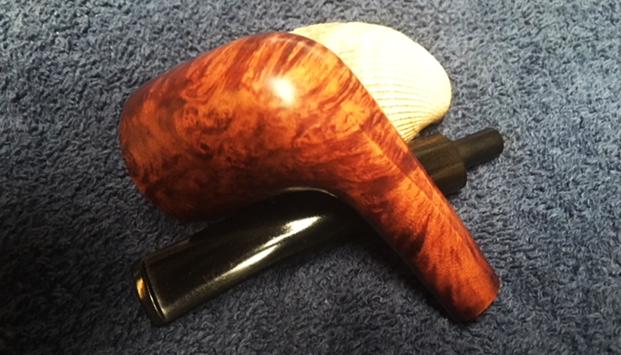
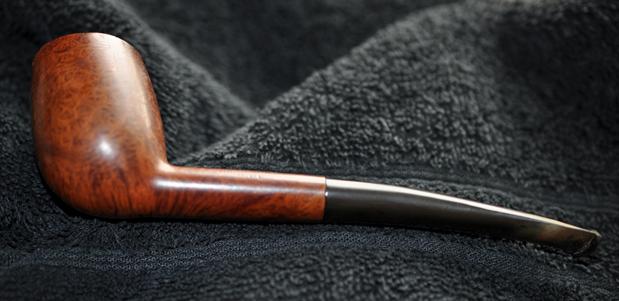
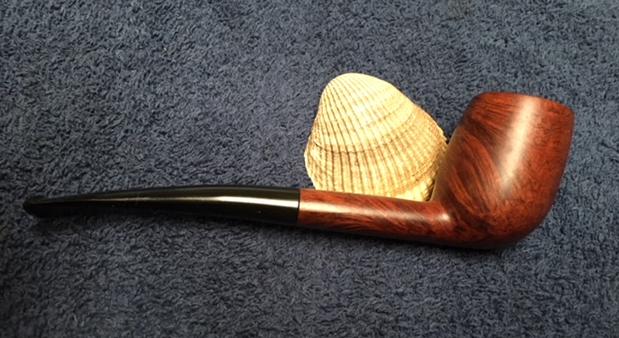
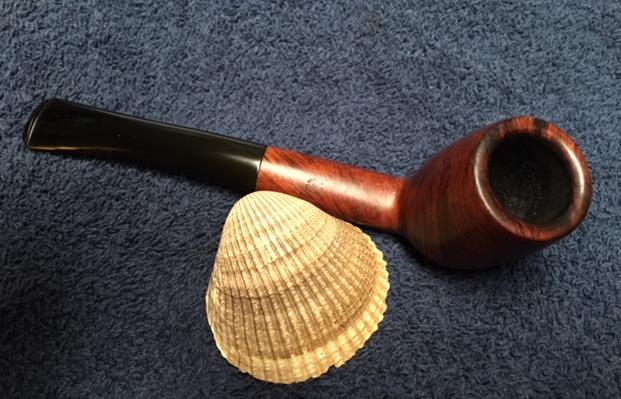
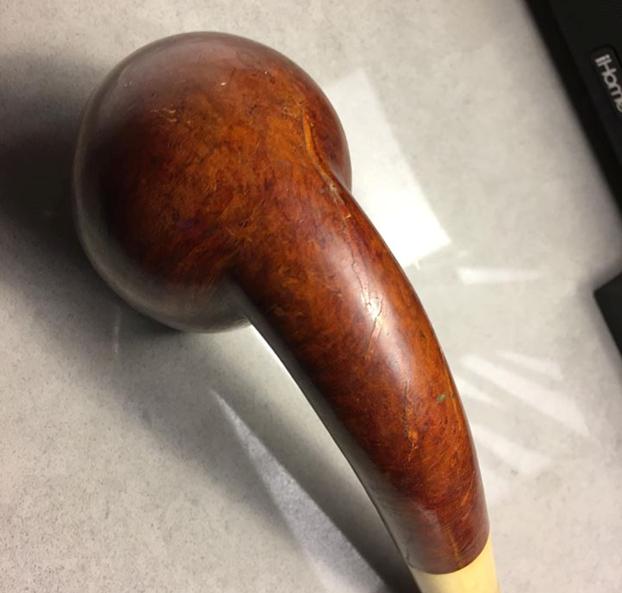
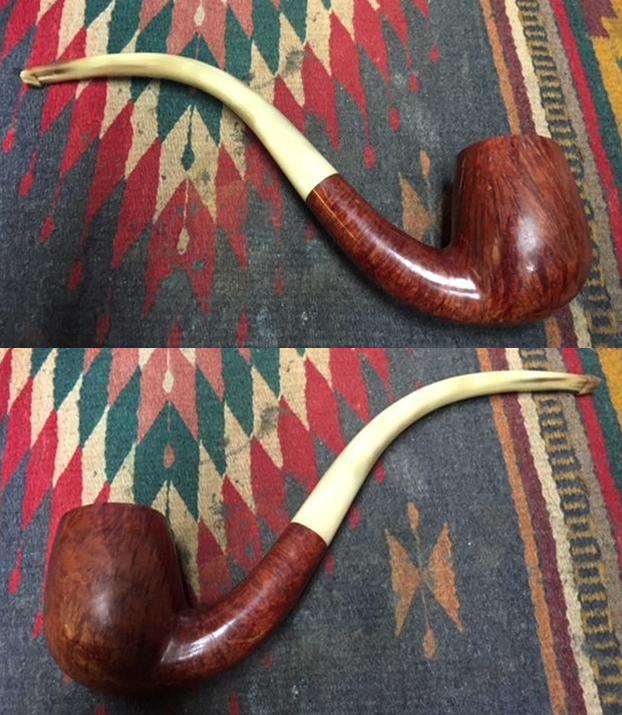
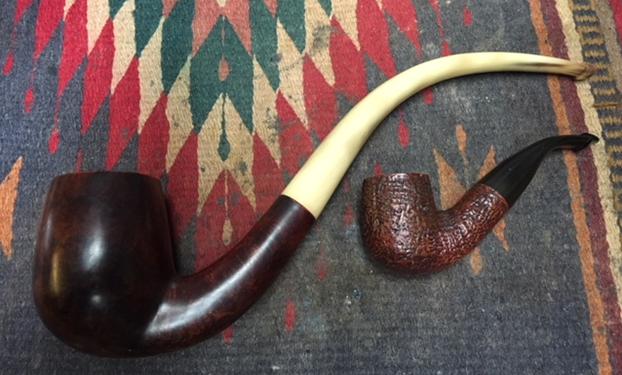
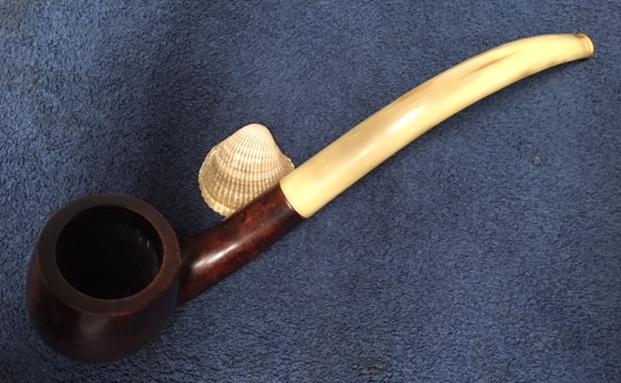
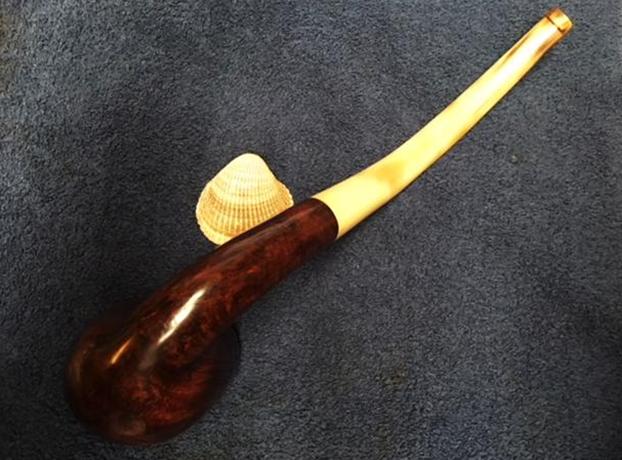
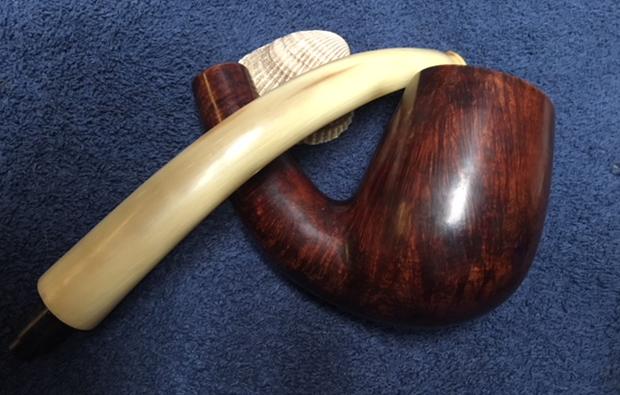
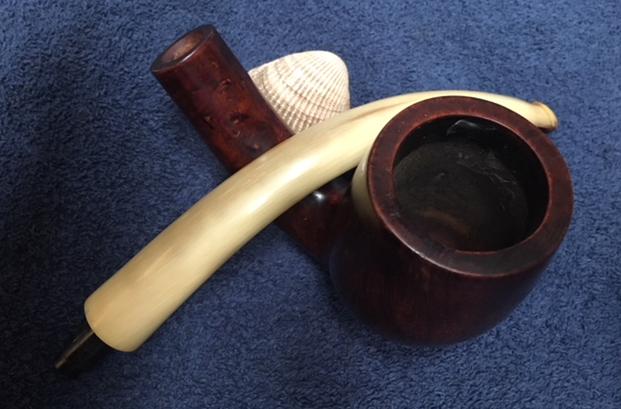
I polished stem and bowl with Blue Diamond to polish out the remaining small scratches. I gave the bowl multiple coats of Conservator’s Wax and the stem several coats of carnauba wax and buffed the pipe with a clean buffing pad to raise the shine. I hand buffed it with a microfiber cloth to deepen the shine. The pipe polished up pretty nicely. The finished pipe is shown in the photos below. This “Malaga” is a light weight beauty that is well shaped and has another unique finish on the bowl. This is one that is staying with me. The dimensions are Length: 5 ½ inches, Height: 1 1/2 inches, Outside diameter of the bowl: 1 1/4 inches, Chamber diameter: 3/4 inches. Thanks for walking through the restoration with me as I worked over this Malaga. I have quite a few more to work on in the days ahead.

Restoring Barry’s Dad’s Pipes #5 – a French GBD Speciale Canadian


Blog by Steve Laug

I have been including some of the back story in each of the restorations of these pipes because to me the story gives colour to the pipe as I work on it. I am including it once again. Skip over it if you want to. Late in the summer of 2017 I received an email on rebornpipes blog from Barry in Portland, Oregon. He wanted to know if I would be interested in purchasing his Dad’s pipes. I have finished three of them so far, a 1939 Dunhill Patent Shell Bulldog, a Comoy’s Grand Slam Zulu and a Comoy’s London Pride Liverpool. After I finished the second pipe Barry wrote me an email that gave me a little more information on his Dad and incidentally on himself as this pipe was one of his own. Here is what he wrote me.

Steve, — Another great restoration and writing to go with it. I appreciate these pipes more watching the work it takes to get them in good condition.

Your (mine?) floral words about my father are perhaps a little deceptive. Inside that man was a lifelong Bolshevik. Who yearned for the revolution and settled for the party of Roosevelt. His parents were born in the Russian Empire (Ukraine), his father having escaped after brief detention during the 1905 failed uprising and to avoid conscription. His father was gruff, a bit crude and all politics. Given those origins he made the best of himself, had tons of friends and would have been a great social worker.

I misled you on the origin of his pipe conversion. It seems clear based on the 1939 pipe that he smoked a pipe in college, returning to them after the 1964 Surgeon General ‘s report on the danger of cigarettes. After that he only reverted to cigarettes at moments of great stress, a death, business setback or a fight with his wife.

He gave me two pipes in college – the GBD bulldog and a “Parker”. The latter I used to smoke a few times but found I was allergic to it, fortunately. The GBD was to get girls with an MGB, a Harris Tweed sport coat with leather elbow patches and jug wine. Didn’t work. Stanford women were in revolt and saw through the pretense. I put both pipes away for nearly fifty years and now they are in your good hands. — Barry

Barry and I corresponded back and forth and concluded our deal. I became the proud owner of his Dad’s pipes. The inventory of the pipes he would be sending included some real beauties – Comoy’s, Parkers, Dunhills and some no name brands. They were beautiful and I could not wait to see them. I had him send them to Jeff where he would clean them up before I received them. Jeff took some photos of the lot as he opened the box. Each pipe was individually wrapped with bubble wrap and taped to protect them. There were 25 bubble wrapped packages and a lot of pipe accessories included – pipe racks, reamers, scrapers and Comoy’s filters and washers. There were pipe pouches and a wooden cigar box that held all of the accessories and reamers. There was a boxed KleenReem pipe reamer that was virtually unused. Jeff unwrapped the pipes and took pictures of the estate showing both the pipes and the accessories. Barry had labeled each pipe with a sticky note. It was an amazing addition to my pipe and tool collection. The next pipe I chose to work on from the collection was GBD Canadian with a cracked shank. The shank had been repaired with a piece of tape. In the photo above it is the pipe on the bottom of the three GBD pipes. I have no idea once again if this is an original stem. I do not think it is as there is no rondel on the stem top. It was stamped on the top side of the shank vertically near the shank bowl union and reads GBD in an oval over Speciale. On the underside of the shank it reads Paris over France. There is no shape number present on this pipe. I was unfamiliar with the  Speciale line and had never seen a GBD stamped in this manner. I looked it up on Pipedia to check out the various GBD Lines and found that it was not listed on the charts that I could access on the web.

This petite Canadian was interesting to me in that it was a GBD line that I had not seen before and because it had some beautiful grain on the bowl and shank. The shank had two cracks on the underside and the cracks met and a small piece of briar was loose. The classic Canadian shape has an oval shank. The finish was dirty and filled with the detritus of years of use followed by sitting unused. The bowl was thickly caked and had an overflow of lava on the rim top. The outer edges of the rim were rough from knocking the pipe against something hard. There was some burning on the top front of the rim. Even through the grime and grit the amazing birdseye on the sides and cross grain on the front and back of the bowl. The crack in the shank has been glued and taped back together with a piece of black electrical tape. The stem is a short oval shape and fits in the shank very well. It is most likely not the original stem as it does not have a brass rondel on the top side. It could certainly be a well-made replacement stem that his father had paid a great craftsman to make for the pipe as he had for several of his other pipes. It was lightly oxidized and had tooth chatter and deep tooth marks on both sides of the stem at the button. Jeff took photos of the pipe before he cleaned it up. As usual the photos tell the story better than my words can. He took some close up photos of the bowl and rim top to show the cake and the condition. The outer edges of the rim show damage. The top of the rim had some lava build up and had scratches and nicks in the surface. He also took a photo of the underside of the bowl to show the grain. It is a really nice piece of briar and should clean up well. He also photographed the stamping on both sides of the shank to show what it read and the condition of the stamping. The topside of the shank is stamped with the GBD oval over Speciale and on the underside it is stamped Paris over France. Someone had taped the cracked shank and stem together with black electrical tape. Jeff removed the tape and took photos of the shank repair. The stem was made of hard rubber and was oxidized as mentioned above and had tooth chatter and marks. There was also some calcification on the stem surfaces. Jeff took photos of both sides of the stem to capture their condition before he cleaned the pipe.Jeff once again did his usual great job on cleaning this pipe, leaving it pristine and without damage to the finish. He reamed the bowl with a PipNet pipe reamer and cleaned up the remnants with the Savinelli Fitsall Pipe Knife. He scrubbed out the mortise and the airway in the shank and the stem with alcohol, cotton swabs and pipe cleaners. He scrubbed the exterior of the bowl, rim and shank with a tooth brush and Murphy’s Oil Soap to remove the grime of the smooth finish on the bowl and shank. He rinsed it under running water. He dried it off with a soft cloth. Once the dust and debris were removed the finish looked very good.  He soaked the stem in Before & After Pipe Stem Deoxidizer to remove the light oxidation, rinsed it with warm water and dried it off. I took photos of the pipe to show its condition before I started my work on it. I took some close up photos of the bowl, rim top and damaged areas around the outer edge of the bowl. The front edge was rounded over. The bowl was very clean and the rim top had some nicks on both the inner and outer, some scorching and general darkening. Jeff had been able to remove the lava from the finish. The inner edge was in good condition and the roughness of the outer edge was visible. The stem is lightly oxidized as can be seen in the photos and has small tooth marks near the button on both sides.I took some photos of the cracked shank to show the damage. I put the stem back in place to show how the crack opened when the stem was present.I took out the broken chip of briar and glued the edges and pressed in place in the shank. I held it in place until it dried. Once the glue had dried I took a band out of the box that would work on the shank. I pressed it into an oval. I heated it and pressed it onto the shank by pressing it against the desk pad. The photos show the process of banding the shank. I put the stem back in the shank and took photos of the pipe with the stem in place. The band actually looks really good on the pipe and works well with the briar and vulcanite. I took close up photos of the fit of the stem against the band.I started working on the stem next. The photos show the process of the stem work. I used a Bic lighter to “paint” the tooth marks on the surface of the stem to raise the dents in the vulcanite. I was able to raise them quite a bit. I sanded out the tooth chatter and the lighter tooth marks next to the button on both sides with 220 grit sandpaper. I wiped the stem surface clean with a damp cloth. I dried if off and filled in the dents with clear super glue. Once the glue had cured I sanded it with 220 and 400 grit sandpaper to blend the repairs into the surface of the vulcanite. I polished stem with micromesh sanding pads – wet sanding with 1500-2400 grit pads and dry sanding with 3200-12000 grit pads. I wiped the stem down with Obsidian Oil after each pad. I polished it with Before & After Pipe Stem Polish, both Fine and Extra Fine. I gave it a final coat of Obsidian Oil and set it aside to dry. To remove the damage on the rim I decided to top the bowl. I used 220 grit sandpaper on a topping board to remove the damage. I worked on it until the top was smooth and the damage on the outer edge of the bowl was minimized. I used a folded piece of 220 grit sandpaper to smooth out the damages along the outer rim. I used it to also work on the inner edge of the bowl. I gave the inner edge a slight bevel like it original had before I started.I polished the rim with micromesh sanding pads – wet sanding with 1500-2400 grit pads and dry sanding with 3200-12000 grit micromesh sanding pads. I wiped it down after each pad to check on the progress. I worked Before & After Restoration Balm deep into the briar on the smooth finish to clean, enliven and protect it. I wiped it off with a soft cloth. I buffed the bowl with a cotton cloth to polish it. It really began to have a deep shine in the briar. I took some photos of the bowl at this point to mark the progress in the restoration. The grain on the bowl is really beginning to stand out and will only do so more as the pipe is waxed. This GBD Speciale Canadian is a beauty. The grain on the bowl and shank is really stunning. The rim top looks much better. The nickel band works well with the briar and the black vulcanite. I am not sure the stem is original or a replacement but it is definitely older. Once again I would guess that Barry’s Dad replaced the stem somewhere along the journey of its life. I suppose we will never know. The vulcanite is high quality and shined up well. I buffed the bowl and the stem with Blue Diamond polish to raise the shine on the briar and the vulcanite. I was careful to not buff the stamping and damage it. I gave the bowl and stem multiple coats of carnauba wax. I buffed the entire pipe with a clean buffing pad to raise the shine. I hand buffed it with a microfiber cloth to deepen the shine. The finished pipe is shown in the photos below. The rich brown stain allows the grain to really stand out on this little pipe and it works well with the polished nickel band and the rich black of the vulcanite stem. This GBD Speciale Canadian, Paris, France is a beautiful looking pipe. The dimensions of the pipe are: Length: 5 1/2 inches, Height: 1 5/8 inches, Outside Diameter: 1 1/4 inches, Diameter of the chamber: 3/4 inches. This old pipe will fit really well in someone’s collection. The richness of the grain, the band and the polished will stand out as a nice smaller Canadian. There is something about these older GBDs that add a touch of real class to a collection. I will be putting it on the rebornpipes store shortly. Thanks for walking through the restoration with me.

Restoring Barry’s Dad’s Pipes #4 – a very old GBD Squat Bulldog R9019


Blog by Steve Laug

Late in the summer of 2017 I received an email on rebornpipes blog from Barry in Portland, Oregon. He wanted to know if I would be interested in purchasing his Dad’s pipes. I have finished three of them so far, a 1939 Dunhill Patent Shell Bulldog, a Comoy’s Grand Slam Zulu and a Comoy’s London Pride Liverpool. After I finished the second pipe Barry wrote me an email that gave me a little more information on his Dad and incidentally on himself as this pipe was one of his own. Here is what he wrote me.

Steve, — Another great restoration and writing to go with it. I appreciate these pipes more watching the work it takes to get them in good condition.

Your (mine?) floral words about my father are perhaps a little deceptive. Inside that man was a lifelong Bolshevik. Who yearned for the revolution and settled for the party of Roosevelt. His parents were born in the Russian Empire (Ukraine), his father having escaped after brief detention during the 1905 failed uprising and to avoid conscription. His father was gruff, a bit crude and all politics. Given those origins he made the best of himself, had tons of friends and would have been a great social worker.

I misled you on the origin of his pipe conversion. It seems clear based on the 1939 pipe that he smoked a pipe in college, returning to them after the 1964 Surgeon General ‘s report on the danger of cigarettes. After that he only reverted to cigarettes at moments of great stress, a death, business setback or a fight with his wife.

He gave me two pipes in college – the GBD bulldog and a “Parker”. The latter I used to smoke a few times but found I was allergic to it, fortunately. The GBD was to get girls with an MGB, a Harris Tweed sport coat with leather elbow patches and jug wine. Didn’t work. Stanford women were in revolt and saw through the pretense. I put both pipes away for nearly fifty years and now they are in your good hands. — Barry

Barry and I corresponded back and forth and concluded our deal. I became the proud owner of his Dad’s pipes. The inventory of the pipes he would be sending included some real beauties – Comoy’s, Parkers, Dunhills and some no name brands. They were beautiful and I could not wait to see them. I had him send them to Jeff where he would clean them up before I received them. Jeff took some photos of the lot as he opened the box. Each pipe was individually wrapped with bubble wrap and taped to protect them. There were 25 bubble wrapped packages and a lot of pipe accessories included – pipe racks, reamers, scrapers and Comoy’s filters and washers. There were pipe pouches and a wooden cigar box that held all of the accessories and reamers. There was a boxed KleenReem pipe reamer that was virtually unused. Jeff unwrapped the pipes and took pictures of the estate showing both the pipes and the accessories. Barry had labeled each pipe with a sticky note. It was an amazing addition to my pipe and tool collection. The next pipe I chose to work on from the collection was GBD Squat Bulldog, the first of three GBD pipes. This pipe had the original stem and was in good condition. It was stamped on the left side of the shank GBD in an oval. On the right side of the shank it read London over England with shape number R9019. I was unfamiliar with the / shape number designation so I looked it up on a GBD Shape Number Chart and found that it was not listed on the charts that I could access on the web.  I would call it a squat Bulldog.

I wrote an email to Al Jones (upshallfan) to see if he could throw any light on the shape number on the pipe. Al loves GBD pipes as much as I do and is compiling a shape chart so I thought he might give some insight on the R shape and potentially on the 9019. Here is what he wrote back.

…The R code pipes are oddballs with shape numbers I’ve never seen duplicated elsewhere.  Like my 1937 R9249. It’s clearly the 9242 shape, who knows what the R code means. I’ve never seen R code shapes in any literature, so they may have been one-off’s. They all seem to have silver hallmarked bands. I speculate that perhaps the R shapes were given to special pipes pulled from the production line for silver work. Sadly, that is all lost to time… – Al

It seems that the information on the shape and R code is not to be found at this time so I decided to move ahead with the shank band. It was a Sterling Silver Band with the GBD oval logo over three hallmarks over MR&Cie. I looked up the history of GBD pipes on Pipedia and found this (https://pipedia.org/wiki/GBD) information.

In 1850 three gentlemen got together in Paris to establish a firm dedicated to the fabrication of Meerschaum pipes – a courageous step in politically restless times. Ganneval probably came from the area of Saint-Claude where he had learned making wooden pipes. Bondier’s family obviously came from Paris and had immigrated in 1789 to Geneva. He himself had worked as a wood turner in the clay and china pipe industry in and around Saint-Claude making stem extensions etc. Donninger was an Austrian or Swiss and had worked in Vienna, the world’s center of the Meerschaum pipe. They agreed on the acronym GBD selecting the initials of their surnames. Bondier survived his partners for nearly 30 years. Their places were taken by others. Hence the property of GBD and therewith the company’s official name changed several times.

Ganneval, Bondier & Donninger

Bondier, Ulrich & Cie.

Bine, Marechal & Cie. and finally

A. Marechal, Ruchon & Cie.

Meanwhile the GBD name was well established and thus retained. August Marechal and Ferdinand Ruchon led the firm into the 20th century. They were in charge of the company for more than 50 years…

 GBD became a British company soon after the turn of the century! In 1902 Marechal and Ruchon sold GBD to A. Oppenheimer & Co. in London. Charles Oppenheimer had founded this successful trade business in 1860 as an import-/export house. His brothers David and Adolphe and brother-in-law Louis Adler soon joined him. Adolphe took over when Charles went to Germany as British ambassador. Briar pipes were among the first products traded. The business relation to GBD in Paris began as early as 1870. Being the most important customer in the English speaking world, Oppenheimer & Co. were designated as sole distributor for Great Britain, the USA and Canada in 1897. Especially Adolphe Oppenheimer had a burning interest in the pipe business, and Louis’ son James Adler shared that. He should play the most important role in the amicable merger of GBD. A. Marechal, Ruchon and Cie. in Paris was now Marechal, Ruchon & Co. Ltd. (see Marechal Ruchon & Cie. page) – a British firm with four directors: Adolphe Oppenheimer and James Adler had their seat in the head office in London while Auguste Marechal and Ferdinand Ruchon went on leading the GBD factory in the Rue des Balkan in Paris, which was considerably extended and modernised. Ruchon acted as CEO.

I knew from the above history that the pipe was made before 1902 in that Marechal and Ruchon sold GBD to Oppenheimer & Co. in London at that time (I have marked that part of the text in bold Red above). Now I needed to see if I could narrow down the date on the pipe. Since there was a Sterling Silver Band on the shank I figured that close examination would give me clues in the form of hallmarks in the silver. This particular band had three hallmarks that helped to identify the city of manufacture, the composition of the band and the date of the pipe. From left to right the hallmarks are as follows: the first is an “A”, followed by a prancing Lion, and the final one is what looks like the head of leopard. Here is a closeup photo of the hallmarks.

I did some research on the British Silver Hallmarks website to see if I could pin down a date and information on the meaning of the hallmarks (http://www.925-1000.com/british_marks.html). The first thing I learned was that the Lion (the second hallmark) indicated that the band was .925 Sterling Silver (See A in the photo below).The last hallmark is a city mark and in this case is identical to the second leopard’s head in the photo below. That told me that the band was made in London and since it was the crownless leopard’s head I knew that the pipe was made between 1822- and the present.Now I knew that the band identified the pipe as made in London and the band was .925 Sterling Silver. I still needed to identify the date from the first hallmark – the letter “A”. I clicked on the link in the above photo that took me to a chart with the date letters. I have included that here for your use. It appears that the year that the pipe was made was 1876 as the letter “A” looks the most like that particular hallmark. I have put a red box around the date and hallmark in the photo below.So Barry’s Dad had given him this little 1876 Squat Bulldog to take to college with him. That is pretty remarkable. This beautiful little Bulldog has a double ring below the cap. There is a small piece missing between the rings on the front of the bowl. The pipe has a diamond shaped shank. The finish was dirty and filled with the detritus of years of use followed by sitting unused. The bowl was thickly caked and had an overflow of lava on the rounded rim top. Even through the grime and grit you can still see the amazing birdseye on the sides and cross grain on the front and back of the bowl. The Sterling Silver was oxidized and almost black but the marking was readable. The stem is a diamond shanked saddle with an older style button and slot. It is most likely the original stem but does not have a brass rondel on the side. (Although it could also certainly be a well-made replacement stem that his father had paid a great craftsman to make for the pipe as he had for several of the Comoy’s pipes.) It was lightly oxidized and had tooth chatter and marks on both sides of the stem at the button. Jeff took photos of the pipe before he cleaned it up. The photos tell the story better than my words can. He took some close up photos of the bowl and rim top to show the cake and the condition. He also took photos to show the grain on the side, front and underside of the bowl. There was a fairly large piece of briar missing on the ring between the two bands toward the front of the bowl (seen in the second photo below). The third photo shows some road rash on the cap at the front of the bowl above the missing piece of briar. I would need to make a decision about how far to go in restoring this one. Did I remove the marks on the rim cap? Did I repair the chip out of the spacer between the two rings? That would need to be decided. He also photographed the stamping on both sides of the shank to show what it read and the condition of the stamping. The left side of the shank is stamped with the GBD oval and on the silver band the same oval is over the three hallmarks as spoken of above and underneath that is stamped MR&Cie. On the right side it is stamped London over England with the shape number R9019. The stem was made of hard rubber and was oxidized as mentioned above and had tooth chatter and marks. Jeff took photos of both sides of the stem to capture their condition before he cleaned the pipe.Jeff once again did his usual great job on cleaning this pipe, leaving it pristine and without damage to the finish. He reamed the bowl with a PipNet pipe reamer and cleaned up the remnants with the Savinelli Fitsall Pipe Knife. He scrubbed out the mortise and the airway in the shank and the stem with alcohol, cotton swabs and pipe cleaners. He scrubbed the exterior of the bowl, rim and shank with a tooth brush and Murphy’s Oil Soap to remove the grime of the smooth finish on the bowl and shank. He rinsed it under running water. He dried it off with a soft cloth. Once the dust and debris were removed the finish looked very good.  He soaked the stem in Before & After Pipe Stem Deoxidizer to remove the light oxidation, rinsed it with warm water and dried it off. I took photos of the pipe to show its condition before I started my work on it. I took some close up photos of the bowl, rim top and damaged area on the front as well as both sides of the stem to show their condition. The bowl was very clean and the rim top had some nicks on both the inner and outer, some scorching and general darkening. He had been able to remove the lava from the finish. The inner edge was in excellent condition and the roughness of the outer edge was visible. I also took a photo of the damaged area between the double rings toward the front right side of the bowl. The stem is lightly oxidized as can be seen in the photos and has small tooth marks near the button on both sides. I started with the stem on this one. I sanded out the tooth chatter and the tooth marks next to the button on both sides and the repair on the top of the button with 220 grit sandpaper followed by 400 grit wet dry sandpaper.I polished stem with micromesh sanding pads – wet sanding with 1500-2400 grit pads and dry sanding with 3200-12000 grit pads. I wiped the stem down with Obsidian Oil after each pad. I polished it with Before & After Pipe Stem Polish, both Fine and Extra Fine. I gave it a final coat of Obsidian Oil and set it aside to dry. I worked on the damaged rim top, edges, bevel and the small marks and nicks on it 200 grit sandpaper to smooth out the damage and blend it with the rest of the rim. The rounded edges of the rim cap needed to be cleaned up. I polished the rim with micromesh sanding pads – 1500-12000 grit micromesh sanding pads. I wiped it down after each pad to check on the progress. I worked Before & After Restoration Balm deep into the briar on the smooth finish to clean, enliven and protect it. I wiped it off with a soft cloth. I buffed the bowl with a cotton cloth to polish it. It really began to have a deep shine in the briar. I took some photos of the bowl at this point to mark the progress in the restoration. The grain on the bowl is really beginning to stand out and will only do so more as the pipe is waxed. This is one of the oldest GBD pipes that I have worked on. I am not sure the stem is original or a replacement but it is definitely older. I wonder if Barry’s Dad did not have a replace done for this old pipe the same time he did for the 1939 Dunhill Patent Shell. I suppose we will never know. The vulcanite is high quality and shined up well. I decided to leave the small nicks and the damage to the ring as it tells the story of this old timer. I put the stem back on the bowl and worked the pipe over on the buffing wheel using Blue Diamond to polish the stem. I buffed the bowl and the stem to raise the shine on the briar and the vulcanite. I was careful to not buff the stamping and damage it. I gave the bowl and stem multiple coats of carnauba wax. I buffed the entire pipe with a clean buffing pad to raise the shine. I hand buffed it with a microfiber cloth to deepen the shine. The finished pipe is shown in the photos below. The rich brown stain allows the grain to really stand out on this little pipe and it works well with the rich black of the polished vulcanite stem. This GBD Squat Bulldog is a beautiful looking pipe. The dimensions of the pipe are: Length: 5 1/2 inches, Height: 1 1/2 inches, Outside Diameter: 1 3/4 inches, Diameter of the chamber: 3/4 inches. This 1876 GBD is one that fits well in my collection of older pipes. There is something about these older GBDs that add a touch of real class. Thanks for walking through the restoration with me.

An Ornery Falcon International Bulldog


Blog by Robert M. Boughton
Copyright © Reborn Pipes and the Author except as cited

If you get to thinking you’re a person of some importance, try ordering someone else’s dog around.

— William Penn Adair “Will” Rogers (1879-1935), U.S. stage and motion picture actor, vaudeville performer, cowboy, newspaper columnist and social humorist

INTRODUCTION

I came to understand the humorous comment above before push even came to shove with this Falcon International bent bulldog.  When I stumbled upon it on eBay, the metal system pipe’s most endearing aspect – that’s sarcasm, by the way – was its color, or rather, apparent lack of any.  Although I’m sure they exist, I had never seen one dressed all in black, or so I thought.  If for no other reason, as if I needed one, I had to have this thing, maybe to see if I could restore the rather ugly example of a type of pipe known for the more common sleek, shiny aluminum stems (which include the bit, shank and system filter dish) to the original condition.  But, of course, the threaded bowl coated with a thick black varnish did create a temptation, whether subconscious or not, to discover what lay beneath, and perhaps improve upon the condition, to my own way of thinking.

Understand, I have nothing against dress pipes, also called dinner or ebony, and have owned some remarkable representatives, from a Nat Sherman #862 billiard to a Peterson Kilarney #150 bulldog.  The International I purchased just seemed a bit wrong in that company.  I suppose my growing codger inclinations might be making me a tad old-fashioned, but in my humble opinion, the only proper place for a dress pipe is among fashionable all wood varieties.  I’ve always been against discrimination, but if that’s what this is, so be it!

Created in 1936 by an American engineer named Kenley Bugg, the Falcon idea was to use a novel system design that provided for the tobacco smoke and resulting moisture to pass from an interchangeable wooden bowl that screwed onto the dish.  The Humidome., as the small aluminum area was known, trapped the dottle that would have ended up in the unfortunate smoker’s mouth, or worse yet, all the way to his stomach.  The revolutionary arrangement of the parts presented other benefits such as ease of cleaning and maintaining, not to mention that if an owner were so crass as to burn out, crack or otherwise lay waste to the bowl, instead of tossing the entire pipe, all that was needed was a less expensive replacement bowl.  Truly this must have been the dawn of the disposable age!  However, the greatest achievement of the Falcon is the potential lack of any need to give the pipes a resting period – again because of the interchangeability of the bowls.  One frame had the potential to facilitate countless pipes.

At first an oddity that some pipers embraced as such or owing to P.A.D., which must have afflicted some though likely fewer connoisseurs then as now, after World War II the situation that could have been called a fad began to turn into serious business.  More than six million of the increasing Falcon models sold during the brief nine years from 1958 to 1963 in the U.S. alone.  Current worldwide sales figures are hard to come by, but from 1958-1974, Falcon sold more than 14 million pipes outside the U.S.

In a blog I wrote in January 2016 about the restorations of two different brands of similar pipes, one a Kaywoodie and the other a Delta, I concluded that Frederick Kirsten was the original inventor of the metal system pipe.  This may be true, but the fact remains that both Kirsten and Bugg came up with independent designs the same year: 1936.  Kirsten, however, filed for his U.S. Patent № 112,701 in 1937, while Bugg’s U.S. Patent № 2,561,169 wasn’t filed until 1947.  And so, who is the father of the metal system pipe?  We may never know. Here are the problems I saw to some extent in the eBay photos, but (surprise, surprise) with much more clarity using my own eyes and, better yet, taking pics, which always seems to reveal more.

  1. The briar bowl was coarse from whatever inappropriate black substance was used to “stain” it – much like the type of result one sees when the covered surface is not smooth enough.
  2. The right side of the base where the bowl screws in appeared to have a wicked scrape at best or a crack at worst.
  3. The rim was charred and dinged, and the coating was gone.
  4. The indented circular groove of the bulldog shape had a reddish tinge I suspected was the result of wear.
  5. The chamber had been cleaned but was crude, as if it had never been smoothed and sanded.
  6. The inside of the Humidome was dirty, but not very.
  7. The round, hard rubbery seal on the bottom of the bowl was grimy, and its hole was caked with sticky old tobacco by-products.
  8. The shape I saw on the lower top side of the bit looked more like a gash than a deliberate mark, and the tenon had an unnatural, uniform rawness.
  9. The overall appearance of the pipe was that it was all metal.

A good friend once told me I’m attracted to wounded people and things, and the International had all the earmarks of a nice challenge.

RESTORATION

Now, I really do try not to resort to alcohol stripping and/or sanding when less invasive measures will do.  Nevertheless, this called for more than the ideal.  Also, I had decided I needed to uncover the briar beneath the unholy glaze covering if only to see how bad it could be.  I soaked the bowl except for the rubbery seal in isopropyl alcohol for 10 hours, but confidence was high there would be minimal if any effect.  The last pic shows some of the crud I scraped out from around the hole.  Next, I used the 150-grit side of a sanding pad followed by 220-grit paper with somewhat better results.  The near absence of any grain at all explained why the folks at Falcon chose to obliterate it, although the use of varnish or some other glaze is never justified. Note the sparkling bits within the toxic coal black substance, which prevented the wood from expanding, or breathing to use the more apt word, when tobacco was lit.   The coal black almost debris covered the pad that has a normal maroon color.  The bowl needed another couple of hours in alcohol.  I have to say I was surprised by the improvement in the general look and color a full micro mesh progression made. Sanding the chamber with 150-, 320- and 600-grit paper worked well to render it smooth.Cleaning the Humidome with a cotton pad soaked with alcohol and a small piece of superfine 0000 steel wool was simple.I think this was the first time I worked on a pipe when the bit was dirtier than the shank.At last, my favorite part arrived – staining and flaming the wood.  Only the 8000 and 12000 micro mesh was needed to clear away the soot and improve the color.The last part was micro meshing the stem to remove scratches.  In the process, the apparent gash or crack turned out to be just a bigger scratch that almost disappeared. I gave the whole thing three coats of carnauba only. CONCLUSION

I chose to leave good enough alone concerning the remaining minor scratches on the stem.  I’ve tried to stain metal before, and it’s a nightmare if you don’t know what you’re doing.  My friend Don Gilmore, who makes beautiful pipes and accessories, is knowledgeable about Falcons in general.  He had never seen one with the rounded shank and told me at last months pipe club meting he thought it might be a Chinese knock-off.  He suggested I check Smoking Metal, and when I showed him the following pic from that site he was relieved.  So was I.

Falcon Internationals courtesy Smoking Metal

This is one unusual example of the company’s products I wanted to add to my own collection.  But I decided to offer it for sale at my online store, https://www.facebook.com/rebornpipes/ (click on Store in the left column).  I hope it finds a good home.

SOURCES

https://www.uktobacco.com/acatalog/Falcon-Pipe-Accessories.html
http://www.tobaccopipes.com/falcon-history/
http://www.gqtobaccos.com/falcon-metal-pipes
http://www.smokingmetal.co.uk/pipe.php?page=103
https://rebornpipes.com/2016/01/10/i-got-the-kaywoodie-delta-blues/
http://www.chesapeakepipeandcigar.com/?page_id=2952
https://patents.google.com/patent/US2581169A/en?oq=2581169
https://patents.google.com/patent/USD112701

Farida’s Dad’s Pipes #4 – Restoring a Dunhill Red Bark Pot 43061


Blog by Steve Laug

The next collection of pipes that I am working on comes from the estate of an elderly gentleman here in Vancouver. I met with his daughter Farida last summer and we looked at his pipes and talked about them then. Over the Christmas holiday she brought them by for me to work on, restore and then sell for her. There are 10 pipes in all – 7 Dunhills (one of them, a Shell Bulldog, has a burned out bowl), 2 Charatans, and a Savinelli Autograph. His pipes are worn and dirty and for some folks they have a lot of damage and wear that reduce their value. To me each one tells a story. I only wish they could speak and talk about the travels they have had with Farida’s Dad.

When I wrote the blog on the Classic Series Dunhill and thinking about its travels, Farida sent me an email with a short write up on her Dad. She remembered that I had asked her for it so that I could have a sense of the stories of her Dad’s pipes. Here is what she wrote: My dad, John Barber, loved his pipes. He was a huge fan of Dunhill and his favourite smoke was St. Bruno. No one ever complained of the smell of St. Bruno, we all loved it. I see the bowls and they’re large because he had big hands. When he was finished with his couple of puffs, he would grasp the bowl in the palm of his hand, holding the warmth as the embers faded. The rough bowled pipes were for daytime and especially if he was fixing something. The smooth bowled pipes were for an evening with a glass of brandy and a good movie. In his 20s, he was an adventurer travelling the world on ships as their radio operator. He spent a year in the Antarctic, a year in the Arctic and stopped in most ports in all the other continents. He immigrated to Canada in the mid-fifties, working on the BC Ferries earning money to pay for his education. He graduated from UBC as an engineer and spent the rest of his working life as a consultant, mostly to the mining companies. Whatever he was doing though, his pipe was always close by. 

She sent along this photo of him with his sled dogs in the Antarctic sometime in 1953-1954. It is a fascinating photo showing him with a pipe in his mouth. He is happily rough housing with his dogs. As a true pipeman the cold does not seem to bother him at all.Thank you Farida for sending the photo and the background story on your Dad for me to use on the blog. I find that it really explains a lot about their condition and gives me a sense of who Dad was. If your Dad was rarely without a pipe I can certainly tell which pipes were his favourites. As I looked over the pipes I noted that each of them had extensive rim damage and some had deeply burned gouges in the rim tops. The bowls seemed to have been reamed not too long ago because they did not show the amount of cake I would have expected. The stems were all covered with deep tooth marks and chatter and were oxidized and dirty. The internals of the mortise, the airway in the shank and stem were filled with tars and oils. These were nice looking pipes when her Dad bought them and they would be nice looking one more when I finished.

I finished two of the pipes and have written a blog on each of them. The first one was the Dunhill Shell with the oval shank pot (https://rebornpipes.com/2018/02/04/restoring-a-1983-dunhill-shell-41009-oval-shank-pot/) and the second was the Dunhill Classic Series Shell Billiard (https://rebornpipes.com/2018/02/08/faridas-dads-pipes-2-restoring-a-1990-lbs-classic-series-dunhill-shell-billiard/). The third pipe I restored from the estate was a Savinelli Autograph (https://rebornpipes.com/2018/02/15/faridas-dads-pipes-3-restoring-a-savinelli-autograph-4/).

I went back to the Dunhills today so I chose to work on a Dunhill Red Bark 43061 pot. It was so dirty it was hard to tell what it looked like under the thick grime. The blast itself was almost filled in with thick, oily grime. I wiped the grime off the underside of the shank to be able to read the stamping. It was worn but readable. On the bottom of the bowl is the 43061 shape number. Next to that it is stamped Dunhill Red Bark over Made in England 17.  Dating this pipe is a fairly easy proposition. You take the two digits following the D in England and add them to 1960. In this case it is 1960+17= 1977. (Pipephil’s site has a helpful dating tool for Dunhill pipes that I use regularly http://www.pipephil.eu/logos/en/dunhill/redbark1.html). The bowl was thickly caked and the cake had flowed over onto the light sandblast finish on the rim top forming a hard lava that made the top almost smooth. The inner and outer edges of the rim were damaged. On the front of the bowl the rim had been scraped and damaged and then burned. On the back edge there was the same kind of damage that was on the other Dunhill pipes in this estate. This one however was not quite as deep so it would need to be dealt with a bit differently when I got to that point. The stem was oxidized and calcified at the button end. There were tooth marks and chatter on both sides in front of the button. The Dunhill white spot was intact on the top of the stem. I took photos of the pipe to show what it looked like before I started the cleanup work. I took close up photos of the bowl and rim top as well as the stem. You can see the condition of the rim top and bowl in the first photo. The stem has tooth chatter and some deep bite marks on the top edge of the button and a deep tooth mark on the underside of the stem just ahead of the button. There is a lot of calcification and wear on the rest of the stem as well.I reamed the bowl with a PipNet reamer and I had to use three of the four cutting heads to clean out the cake. The bowl thickly caked so I started with the smallest of the three and worked my way up to the third which was about the same size as the bowl diameter. I took back the cake to bare briar. I took a photo of the cleaned bowl. I scrubbed the surface of the sandblast with Murphy’s Oil Soap and a tooth brush to clean out all of the dust. I worked on the top of the rim with a brass bristle wire brush and a brass bristle polishing brush to remove the lava on the rim. I scrubbed the stem with the tooth brush as well to remove the calcification and grime. I rinsed the pipe under warm running water to remove the dirt, grime and soap. I dried off the bowl with a soft rag. The cleaned and scrubbed pipe really made the rim top damage very clear. It looked to me that I would need to top the bowl. I cleaned up the reaming of the bowl with a Savinelli Fitsall Pipe Knife to remove the remaining cake that was on the walls around the airway and the lower part of the bowl.I topped the bowl to remove the damage to the top surface of the rim and clean up the damage to the edges. I did not have to remove a lot and repeatedly checked it to make sure that I had removed enough but not too much.I used a series of dental burrs on the Dremel to etch a pattern into the top of the rim to blend it into the sandblast around the bowl sides. It was not a deep sandblast so the pattern on the rim needed to be random looking and not deep. I wanted it to blend in the damaged area on the back side of the rim. The photo below shows the rusticated rim top and the three burrs that I used to create it.I restained the bowl and rim with a Mahogany stain pen. I wanted to match the colour of the Red Bark shown in the photo below. After I stained the pipe with the Mahogany and I used a red oil based stain. I rubbed it onto the finish and buffed it off with a soft cloth. I rubbed down the briar with Before & After Restoration Balm. I worked it into the nooks and crannies of the sandblast finish to clean, enliven and protect the new finish. It also evened out the stain coat and gave the stain a dimensional feel. I let the balm sit for a little wall and then buffed it with a horsehair shoe brush. I buffed the bowl with a cotton cloth to raise the shine. Once again I have gotten so used to Jeff cleaning the pipes before I got them I just I realized that I had not worked on the internals of the pipe. I looked down the shank and it was filthy as was to be expected. Arghhh. Went back to clean out the shank and airway in the stem and shank. I scraped the hardened tars on the walls of the mortise with a pen knife. I cleaned the mortise and the airway in the shank with pipe cleaners, cotton swabs and alcohol until it was clean. I painted the surface of the stem with the flame of a Bic lighter to lift the tooth dents in the underside of the stem. It took a few swaths of the lighter and the dents lifted. There was only one small pin prick left next to the button that would need to be repaired.  I repaired the remaining deep tooth marks on both sides of the stem with black super glue. Once it dried I sanded the surface of the stem with 220 grit sandpaper to smooth out the repaired tooth marks and chatter and removing the remnants of calcification and oxidation on the stem until the oxidation was removed.I polished the stem with micromesh sanding pads – wet sanding with 1500-2400 grit micromesh sanding pads and dry sanding it with 3200-12000 grit pads. I rubbed the stem down with Obsidian Oil after each pad. I polished it further with Before & After Pipe Polish, using both the Fine and Extra Fine polishes to further protect and polish out the scratches. When I finished with those I gave it a final rub down with the oil and set it aside to dry. With the stem polished I put it back on the pipe and lightly buffed the bowl with Blue Diamond. I buffed the stem with a more aggressive buff of Blue Diamond. I gave the bowl several coats of Conservator’s Wax and the stem several coats of carnauba wax and buffed the pipe with a clean buffing pad to raise the shine. I hand buffed it with a microfiber cloth to deepen the shine. The pipe polished up pretty nicely. The finished pipe is shown in the photos below. This is the fourth of Farida’s Dad’s pipes that I am restoring from his collection. I am looking forward to hearing what Farida thinks once she sees the finished pipe on the blog. I will be posting it on the rebornpipes store very soon. It should make a nice addition to your pipe rack if you have been looking for a reasonably priced Dunhill. When you add it to your collection you carry on the trust from her father. The dimensions are Length: 5 3/4 inches, Height: 1 1/2 inches, Outside diameter of the bowl: 1 1/2 inches, Chamber diameter: ¾ inches. Thanks for walking through the restoration with me as I worked over this estate Autograph. More of his pipes will follow including some Charatans and more Dunhills.

Restoring a Smooth Finished House of Robertson Straight Grain Rhodesian


Blog by Steve Laug

My brother Jeff found an assortment of House of Robertson pipes at an auction in Wilder, Idaho which is an area in the greater Boise, Idaho area. He picked them up for us to restore. I had forgotten that I had mentioned the brand in passing in a blog on Leonard’s Pipe Shop in Portland, Oregon. Here is the link to that blog where I mention it as one of the brands that Leonard’s sold: https://rebornpipes.com/2013/06/06/leonards-pipe-shop-portland-oregon/. It is a fascinating brand that really I had never had the privilege of seeing first hand. He cleaned them all up and on a recent trip to Idaho, I picked them up and brought them back to Canada. I took pictures of the lot of them to show the wide variety of pipes that they made in terms of both size and style. The craftsmanship is very good with the fit of the stem and shank well done and the finish both rusticated and smooth exemplary. Jeff picked up three more of the brand in Pocatello, Idaho so I will be working on more of these pipes in the future. They all have the name House of Robertson roughly hand etched on the side or underside of the shank with an engraving tool. I have posted this information on the brand on the previous House of Robertson pipes that I have worked on but I thought I would add it on this blog as well. There is very little information available and what I found on Pipedia pretty well summarizes all I could find. I include that here.

“House of Robertson” was in business for many years, but alas, closed their doors in 1999. They were located in Boise, Idaho. They are noted for making rather large and interesting pipes. Thayne Robertson was a Master Mason, AF & AM, and started the shop about 1947 and his son Jon started working there in 1970 when he finished college, along with Thayne’s daughter. Thayne and his son started making the big pipes at that time, and made them together until 1987 when Thayne passed away. Jon kept the store and his sister moved on to other things. The House of Robertson appears to have closed around 1999. https://pipedia.org/wiki/Robertson

I am restoring the last of the five pipes in this lot – this one a beautiful little Rhodesian Straight Grain. It is the pipe on the lower left in all of the above photos. Like the rest of the pipes in this fivesome this pipe still has raw briar in the bottom third of the bowl and appears to never have been smoked to the bottom of the bowl. It is etched with the House of Robertson signature on a smooth panel on the left side of the oval shank. On the underside of the shank next to the shank/stem union it is etched Straight Grain. The smooth finish on the pipe was dirty but showed some real promise through the grime. There was a light coat of lava that had overflowed from the cake in the bowl over the top of the rim. The cake was quite thick and was hard. Overall the pipe was in excellent condition and had some interesting grain around the bowl. The bottom of the bowl and shank has a flat panel that allows the bowl to sit upright on the desk or table. The stem was lightly oxidized but clean. The oxidation had caused some pitting on the surface. The fit of the stem to the shank was good. The vulcanite appeared to have been a pre-formed stem that was shaped to fit this pipe. Jeff took photos of the pipe before he started the cleanup. The next close-up photos show the finish on the top and the underside of the bowl. The first two photos show the lava on the rim top and the dust bunnies and cake in the bowl. The grain on the top of the bowl and the inner and outer edge of the rim looks really good. The third photo shows the side and underside of the pipe. The next two photos show the etched name on the left side of shank – House of Robertson. On the underside of the shank it reads Straight Grain.The tapered stem surprised me. The pipe etched Straight Grain made me assume it was a higher end House of Robertson. It still may be one but the stem was loose and I really had not taken time to check it out. I tried to pull the loose stem only to find that it had a threaded tenon. I unscrewed it from the shank and was surprised to find that it had a Grabow style threaded metal tenon and a threaded mortise insert. In all of the other House of Robertson that I have worked one I had not ever seen a threaded metal tenon. This was a first. The surface of the vulcanite was oxidized and pitted from the oxidation. There was tooth chatter and some light tooth marks on both sides of the stem at the button.Jeff once again performed his usual stellar clean up job on the pipe leaving it pristine and without damage to the finish. He reamed the bowl with a PipNet pipe reamer and cleaned up the remnants with the Savinelli Fitsall Pipe Knife. He scrubbed out the mortise and the airway in the shank and the stem with alcohol, cotton swabs and pipe cleaners. He scrubbed the exterior of the bowl, rim and shank with a tooth brush and Murphy’s Oil Soap to remove the grime of the smooth finish on the bowl and shank. He rinsed it under running water. He dried it off with a soft cloth. Once the dust and debris were removed the finish looked very good. I took photos of the pipe to show its condition before I started my work on it.   I took a photo of the bowl and rim top to show the condition of the pipe. The bowl was quite clean in the bottom third of the bowl – the briar was not darkened but was still raw briar. The rim itself was very clean with none of the dark lava and very little darkening along the edges. The inner and outer edge of the rim was very clean. The photos of the stem show that it was clean but oxidized on both sides and pitted in the surface of the vulcanite.I worked over the top of the rim with a folded piece of 220 grit sandpaper to remove the darkened areas left behind by repeated lighting of the pipe in that area. I polished the briar with micromesh sanding pads – wet sanding with 1500-2400 grit sanding pads and dry sanding with 3200-12000 grit sanding pads. I wiped the rim down with a damp cloth to remove the sanding dust left behind after each pad. I rubbed the bowl down with Before & After Restoration Balm to deep clean the finish, enliven and protect the briar. I hand rubbed it with my fingers, worked it into the finish with a horsehair shoe brush. I wiped it off with a soft cloth. I buffed the bowl with a horsehair shoe brush to polish it. It really began to have a deep shine in the briar. I took some photos of the bowl at this point to mark the progress in the restoration. The birdseye grain stands out on the two sides and the cross grain stands out on the rim top, the front and back of the bowl and the top and underside of the shank.    I sanded the stem with 220 grit sandpaper to remove the tooth chatter and marks on both sides of the stem near the button.I polished out the sanding scratches and marks in the vulcanite with micromesh sanding pads – wet sanding it with 1500-2400 grit pads and dry sanding it with 3200-4000 grit pads. I wiped the stem down with Obsidian Oil after each sanding pad. I buffed the stem with Blue Diamond on the buffing wheel. I brought it back to the table and sanded it with the final three 6000-12000 grit pads. I polished it further with Before & After Pipe Polish –using both the Fine and Extra Fine Polishes. I gave it a rubdown with Obsidian Oil one last time and set it aside to dry. I put the stem back on the bowl and worked the pipe over on the buffing wheel using Blue Diamond to lightly polish the stem. I buffed the bowl and stem to raise the shine on the briar and on the vulcanite. I gave the bowl and stem multiple coats of carnauba wax. I buffed the entire pipe with a clean buffing pad to raise the shine. I hand buffed it with a microfiber cloth to deepen the shine. The finished pipe is shown in the photos below. The medium brown stain on the smooth finish of the Rhodesian shaped bowl works well with the rich black of the vulcanite stem. The polishing of the stem left this a beautiful and interesting looking pipe. The dimensions of the pipe are: Length: 5 1/2 inches, Height: 1 1/2 inches, Outside Diameter: 1 5/8 inches, Diameter of the chamber: 3/4 inches. Still thinking through whether or not I am going to keep this House of Robertson in my collection or let it go. Keep an eye open for it to appear on the store if decide to pass it on. Thanks for looking.

Restoring a Smooth House of Robertson Zulu


Blog by Steve Laug

My brother Jeff found an assortment of House of Robertson pipes at an auction in Wilder, Idaho which is an area in the greater Boise, Idaho area. He picked them up for us to restore. I had forgotten that I had mentioned the brand in passing in a blog on Leonard’s Pipe Shop in Portland, Oregon. Here is the link to that blog where I mention it as one of the brands that Leonard’s sold: https://rebornpipes.com/2013/06/06/leonards-pipe-shop-portland-oregon/. It is a fascinating brand that really I had never had the privilege of seeing first hand. He cleaned them all up and on a recent trip to Idaho, I picked them up and brought them back to Canada. I took pictures of the lot of them to show the wide variety of pipes that they made in terms of both size and style. The craftsmanship is very good with the fit of the stem and shank well done and the finish both rusticated and smooth exemplary. Jeff picked up three more of the brand in Pocatello, Idaho so I will be working on more of these pipes in the future. They all have the name House of Robertson roughly hand etched on the side or underside of the shank with an engraving tool.I have posted this information on the brand on the previous House of Robertson pipes that I have worked on but I thought I would add it on this blog as well. There is very little information available and what I found on Pipedia pretty well summarizes all I could find. I include that here.

“House of Robertson” was in business for many years, but alas, closed their doors in 1999. They were located in Boise, Idaho. They are noted for making rather large and interesting pipes. Thayne Robertson was a Master Mason, AF & AM, and started the shop about 1947 and his son Jon started working there in 1970 when he finished college, along with Thayne’s daughter. Thayne and his son started making the big pipes at that time, and made them together until 1987 when Thayne passed away. Jon kept the store and his sister moved on to other things. The House of Robertson appears to have closed around 1999. https://pipedia.org/wiki/Robertson.

The fourth of the five pipes in this lot that I chose to work on was a smooth Zulu or Yachtsman shaped pipe. It is the pipe on the lower right in all of the above photos. It still has raw briar in the bottom third of the bowl and appears to never have been smoked to the bottom of the bowl. It is engraved with the House of Robertson signature on a smooth panel on the left side of the oval shank. The smooth finish on the pipe was dirty but showed some real promise through the grime. There was a light coat of lava that had overflowed from the cake in the bowl over the top of the rim. The cake was quite thick and was hard. Overall the pipe was in excellent condition and had some interesting grain around the bowl. The bottom of the bowl and shank has a flat panel that allows the bowl to sit upright on the desk or table. The stem was lightly oxidized but clean. The oxidation had caused some pitting on the surface. The fit of the stem to the shank was good. The vulcanite appeared to have been a pre-formed stem that was shaped to fit this pipe. Jeff took photos of the pipe before he started the cleanup. The next close-up photos show the finish on the top and the underside of the bowl. The first photo shows the lava on the rim top and the cake in the bowl. The grain on the top of the bowl and the inner and outer edge of the rim looks really good. The next three photos show the sides and underside of the pipe. The next photo shows the etched name on the left side of shank on the oval side of the shank. It reads House of Robertson. The tapered stem was oxidized and pitted from the oxidation. It was otherwise very clean and unsmoked. Jeff once again performed his usual stellar clean up job on the pipe leaving it pristine and without damage to the finish. He reamed the bowl with a PipNet pipe reamer and cleaned up the remnants with the Savinelli Fitsall Pipe Knife. He scrubbed out the mortise and the airway in the shank and the stem with alcohol, cotton swabs and pipe cleaners. He scrubbed the exterior of the bowl, rim and shank with a tooth brush and Murphy’s Oil Soap to remove the grime of the smooth finish on the bowl and shank. He rinsed it under running water. He dried it off with a soft cloth. Once the dust and debris were removed the finish looked very good. I took photos of the pipe to show its condition before I started my work on it.   I took a photo of the bowl and rim top to show the condition of the pipe. The bowl was quite clean in the bottom third of the bowl – the briar was not darkened but was still raw briar. The rim itself was very clean with none of the dark lava and very little darkening along the edges. The inner and outer edge of the rim was very clean. The photos of the stem show that it was clean but oxidized on both sides and pitted in the surface of the vulcanite.I rubbed the bowl down with Before & After Restoration Balm to deep clean the finish, enliven and protect the briar. I hand rubbed it with my fingers, worked it into the finish with a horsehair shoe brush. I wiped it off with a soft cloth. I buffed the bowl with a horsehair shoe brush to polish it. It really began to have a deep shine in the briar. I took some photos of the bowl at this point to mark the progress in the restoration. The birdseye grain stands out on the two sides and the cross grain stands out on the rim top, the front and back of the bowl and the top and underside of the shank. I sanded the stem with 220 grit sandpaper to remove the oxidation on both sides of the tapered stem.I polished out the sanding scratches and marks in the vulcanite with micromesh sanding pads – wet sanding it with 1500-2400 grit pads and dry sanding it with 3200-4000 grit pads. I wiped the stem down with Obsidian Oil after each sanding pad. I buffed the stem with Blue Diamond on the buffing wheel. I brought it back to the table and sanded it with the final three 6000-12000 grit pads. I polished it further with Before & After Pipe Polish –using both the Fine and Extra Fine Polishes. I gave it a rubdown with Obsidian Oil one last time and set it aside to dry. I put the stem back on the bowl and worked the pipe over on the buffing wheel using Blue Diamond to lightly polish the stem. I buffed the bowl and stem to raise the shine on the briar and on the vulcanite. I gave the bowl and stem multiple coats of carnauba wax. I buffed the entire pipe with a clean buffing pad to raise the shine. I hand buffed it with a microfiber cloth to deepen the shine. The finished pipe is shown in the photos below. The medium brown stain on the smooth finish of the Zulu shaped bowl works well with the rich black of the vulcanite stem. The polishing of the stem left this a beautiful and interesting looking pipe. The dimensions of the pipe are: Length: 6 inches, Height: 1 3/4 inches, Outside Diameter: 1 3/8 inches, Diameter of the chamber: 3/4 inches. This one will be going on the rebornpipes store shortly if you want to add it to your collection. Why not take this opportunity to add a House of Robertson pipe to your rack. Thanks for looking.

Restoring another of Barry’s Dad’s Pipes – a Comoy’s Grand Slam Pipe 202


Blog by Steve Laug

Late in the summer of 2017 I received an email on rebornpipes blog from Barry in Portland, Oregon. He wanted to know if I would be interested in purchasing his father’s pipes. He wrote that his Dad was a gracious, dignified and dedicated father, businessman and community leader for many years in Fresno, California where he was raised. He acquired his pipes when he gave up smoking cigarettes in the 1960s. There wasn’t an ounce of pretense in the man and he smoked his pipes for pleasure and as a pass-time while reading, enjoying company or watching sports on TV. Barry and I corresponded back and forth and concluded our deal. I became the proud owner of his Dad’s pipes. The inventory of the pipes he would be sending included some real beauties – Comoy’s, Parkers, Dunhills and some no name brands. They were beautiful and I could not wait to see them. I had him send them to Jeff where he would clean them up before I received them. Jeff took some photos of the lot as he opened the box. Each pipe was individually wrapped with bubble wrap and taped to protect them. There were 25 bubble wrapped packages and a lot of pipe accessories included – pipe racks, reamers, scrapers and Comoy’s filters and washers. There were pipe pouches and a wooden cigar box that held all of the accessories and reamers. There was a boxed KleenReem pipe reamer that was virtually unused. Jeff unwrapped the pipes and took pictures of the estate showing both the pipes and the accessories. Barry had labeled each pipe with a sticky note. It was an amazing addition to my pipe and tool collection. The next pipe I chose to work on from the collection was a Comoy’s Grand Slam Pipe, one of four Comoy’s pipes. It was also was missing the original stem but the shape of the bowl and shank were elegant. The shape was a classic Yachtsman or Zulu. The bottom of the shank was flattened and the pipe could stand on the desktop. The finish was dirty and filled with the detritus of years of use followed by sitting unused. The bowl was thickly caked and had an overflow of lava on the rim top. Even through the grime and grit you can still see the amazing birdseye on the sides and cross grain on the front and back of the bowl and the top and underside of the shank. Once more the presence of the replacement stem told me that the pipe had been a favourite and that the original stem had been either gnawed or broken and replaced. The new stem was well made and fit the shank perfectly. The pipe repairman had done a great job on the stem. I also had some use and was lightly oxidized and had tooth chatter and marks on both sides of the stem at the button. The surface edges of the button also had tooth marks that were present. This stem also had some calcification around the button as well that made me think that perhaps the stem had once sported a softee bit. Jeff took photos of the pipe before he cleaned it up. The photos tell the story better than my words can. He took some close up photos of the bowl and rim top to show the cake and their condition.  He also took photos to show the grain on the side, front and underside of the bowl. He also photographed the stamping on both sides of the shank to show what it read and the condition of the stamping. The left side is stamped Comoy’s over Grand Slam over Pipe. On the right side it is stamped with the Comoy’s Com stamp Made in London in a circle over England. Next to that is the shape number 202. There is no patent number on the shank and the markings of the leather washer size *5 on the underside of the shank at the shank/stem union. The replacement stem was oxidized as mentioned above and had tooth chatter and marks. Jeff took photos of both sides of the stem to capture their condition before he cleaned the pipe.I wanted to learn a bit more about the Grand Slam line. The pipe had originally come with a special stinger/filter apparatus screwed into the tenon. I found the following photos and info on the pipephil website. I include both the link and the following photos for your information. http://www.pipephil.eu/logos/en/infos/comoy1.htmlThe next photo shows the original metal filter system that  was made to force “the air stream through a go-between space before entering the stem and the smokers mouth.” The stem that I have does not have the threaded tenon and thus cannot hold the apparatus. The photos below show the stem and the diagram of the system.I also wanted to have some idea of the date on this old pipe so I did a bit of digging on Pipedia. I found a helpful dating guide there. I found that the Comoy’s Grand Slam stamp on the shank dated it to the 1950s. At that time there were four variants to the stamping.

  1. A simple block-letter style without serifs but with the C larger than the other letters and the apostrophe before the “S”.
  2. A return to the slightly more fancy block letters with serifs and the apostrophe. (It seems that some grades carried different stamps, or at least that the stamping changed in different years for some grades.)
  3. A simple block-letter style without serifs and without the apostrophe and with the “C” the same size as the rest of the letters. This stamp was probably not used very long.
  4. A simple block-letter style without serifs but with the apostrophe before the “S” and with the “C” the same size as the rest of the letters.

Variant number 4 fits the style of stamping on this pipe. It is stamped with capital letters, block style without serifs and having an apostrophe between the Y and the S of Comoy’s. That helped me identify the pipe as coming from the 1950s.

The COM stamp (Country of Manufacture) is like the one in the picture to the left. The picture shows exactly what is stamped on the shank of this pipe. It is stamped in a circle with “MADE” at the top, “IN” in the middle, and “LONDON” at the bottom, with “ENGLAND” in a straight line beneath. According to the Pipedia article it can be assumed that this stamp was first used in the export drive in the early 1950s. Here is the link to the article: https://pipedia.org/wiki/Comoy%27s_Dating_Guide

Jeff did his usual stellar clean up job on the pipe leaving it pristine and without damage to the finish. He reamed the bowl with a PipNet pipe reamer and cleaned up the remnants with the Savinelli Fitsall Pipe Knife. He scrubbed out the mortise and the airway in the shank and the stem with alcohol, cotton swabs and pipe cleaners. He scrubbed the exterior of the bowl, rim and shank with a tooth brush and Murphy’s Oil Soap to remove the grime of the smooth finish on the bowl and shank. He rinsed it under running water. He dried it off with a soft cloth. Once the dust and debris were removed the finish looked very good. I took photos of the pipe to show its condition before I started my work on it. I took some close up photos of the bowl and rim top as well as both sides of the stem to show their condition. The bowl was very clean and the rim top looked good other thank some light nicks and darkening. He had been able to remove the lava from the finish. The inner edge was in excellent condition and there was some slight roughness on the outer edge. The stem is lightly oxidized as can be seen in the photos and has small tooth marks near the button on both sides.I started with the stem on this one. I “painted” the tooth marks with the flame of a Bic lighter and was able raise most of them even with the surface of the stem. I used some clear super glue to fill in the tooth mark on the top of the button that did not rise with the heat. Once the glue dried I sanded out the tooth chatter and the tooth marks next to the button on both sides and the repair on the top of the button with 220 grit sandpaper. I polished stem with micromesh sanding pads – wet sanding with 1500-2400 grit pads and dry sanding with 3200-12000 grit pads. I wiped the stem down with Obsidian Oil after each pad. I polished it with Before & After Pipe Stem Polish, both Fine and Extra Fine. I gave it a final coat of Obsidian Oil and set it aside to dry. I worked on the darkened rim and the small marks and nicks on it with micromesh sanding pads. I lightly sanded it first with 220 grit sandpaper and followed it up with 1500-12000 grit micromesh sanding pads. I wiped it down after each pad to check on the progress. I worked Before & After Restoration Balm deep into the briar on the smooth finish to clean, enliven and protect it. I wiped it off with a soft cloth. I buffed the bowl with a cotton cloth to polish it. It really began to have a deep shine in the briar. I took some photos of the bowl at this point to mark the progress in the restoration. The grain on the bowl is really beginning to stand out and will only do so more as the pipe is waxed. I put the stem back on the bowl and worked the pipe over on the buffing wheel using Blue Diamond to polish the stem. I buffed the bowl and the stem with Blue Diamond polish to raise the shine on the briar and the vulcanite. I was careful to not buff the stamping and damage it. I gave the bowl and stem multiple coats of carnauba wax. I buffed the entire pipe with a clean buffing pad to raise the shine. I hand buffed it with a microfiber cloth to deepen the shine. The finished pipe is shown in the photos below. The rich brown stain allows the grain to really stand out on this little pipe and it works well with the rich black of the polished vulcanite stem. This Comoy’s Grand Slam is a beautiful and interesting looking pipe. The dimensions of the pipe are: Length: 5 1/2 inches, Height: 1 3/4 inches, Outside Diameter: 1 1/8 inches, Diameter of the chamber: 3/4 inches. This 1950s era Comoy’s is one that will fit well in any pipeman’s collection and add a touch of real class. Thanks for walking through the restoration with me.

Resuscitating a Gentle Giant Bent Billiard


Blog by Steve Laug

Several weeks ago I got a Facetime call from my brother Jeff. He was in Bozeman, Montana at an antique shop and had found a pipe that intrigued him. The seller wanted $49 for it and it was a large chunk of briar, well carved with a horn stem. He showed me photos on Facetime and it was indeed intriguing. It had gentle curves both from the bend of the shank to the curve of the horn stem. The horn stem appeared to be in good condition overall. The button and slot were damaged but it would not take too much work to clean up the slot and the nicks at stem/shank junction. We decided to pick it up and restore it. I have to tell you I had no idea how big the pipe was.Jeff took some photos of the pipe before he cleaned it up. It was in pretty good condition. The bowl had a light cake but there was no lava overflow on the rim top. The varnish finish on the bowl was peeling and spotty. The grain on the sides of the pipe was really nice. There were a lot of fills on the bottom and back sides of the bowl and all along the sides of the shank. On the underside of the shank and on part of the bottom of the bowl there were some very large fills that were chipped and damaged.The next series of photos show the rim top and the sides and bottom of the bowl. The cake in the bowl is not thick. The rim top is clean and there are fills that are chipped and nicked on the flat surface. The grain on bowl sides is really quite nice. The photo below of the bottom of the bowl and shank show the damaged fills. They are quite long and extend all along the shank bottom. The second and third photos below show the damaged areas of the fills. The fit of the stem to the shank was snug. There were a couple small nicks in the horn stem.The slot in the button end was damaged. On the top and the bottom edges the horn was missing. The second photo gives perspective on the damage along the edges of the button. The good thing was that the button itself was quite deep and I would be able to “top” it and remove much of the damage to the end. Jeff did his usual great job cleaning the pipe before he sent it to me. He reamed the bowl with a Savinelli Fitsall Pipe Knife. He scrubbed out the mortise and the airway in the shank and the stem with alcohol, cotton swabs and pipe cleaners. He scrubbed the exterior of the bowl, rim and shank with a tooth brush and Murphy’s Oil Soap to remove the peeling varnish coat on the bowl and shank. He rinsed it under running water. He dried it off with a soft cloth. Once the peeling varnish debris was removed, the finish was in decent condition. When it arrived it was in a vinyl bag that had been made for it. I had no idea how large the pipe was. I slowly took it out of the bag and took photos of the pipe to show its condition before I started my work on it.It was large enough that I can honestly say I have never seen a pipe this large. To get a better idea of the size I measured it for myself. The dimensions were Length: 12 inches, Height: 3 ½ inches, Outside Diameter of the Bowl: 2 inches, Diameter of the Chamber: 1 ½ inches. Later I will take a photo of the pipe with a regular sized bent billiard. I took some photos of the pipe to show what he had done in the cleanup work. It was a beautiful pipe. I took a close up photo of the rim and bowl to show the condition after the cleanup. You can see the fills on the top and inner edge of the bowl as well as the damage on the front inner edge. The stem itself looks to be in great condition other than several chips around the end next to the shank and the damage to the slot in the button.I took close up photos of the slot in the button to show the damage. In the photos you can see the damage to the edges of the slot on the sides and the top and bottom.Because of the depth of the button, the thickness of the stem end I decided to start on that first. I used the topping board and 220 grit sandpaper and topped the end of the button to remove the damaged areas as much as possible.I filled in the notches in the slot with clear super glue. I worked on them to repair the damages in those areas. I sanded the end of the button and slot to remove the excess and used a needle file to clean up the slot edges.I blew air through the stem and found that the flow was constricted. I pushed a pipe cleaner into the airway from both end and found that it hit a clogged or constriction at the midpoint of the stem. I pushed a flexible wire through the airway and pushed out thick tars and hardened oils from the stem. I used long churchwarden pipe cleaners dipped in alcohol through the airway to clean out the debris. Once I had cleaned it out the flow of air through the stem both ways was unrestricted.I repaired the chipped areas on the tenon end of the stem with clear super glue. Once the glue had cured I sanded the repaired areas to remove the excess and blend it into the surface of the horn. I polished the stem with micromesh sanding pads – wet sanding with 1500-2400 grit pads and dry sanding with 3200-12000 grit pads. I wiped the stem down with Obsidian Oil after each pad. I polished it with Before & After Pipe Polish and rubbed it down with a cotton pad to deeply polish the horn. I set the stem aside and worked on the bowl. I decided to top the bowl to remove the damaged areas from the surface and edges of the rim. I used 220 grit sandpaper to clean it up. I topped it until the rim top was clean.I repaired the fills in the briar with clear super glue. I filled them until they were slightly over filled so that as the glue cured it would not shrink and require a second coat.When the glue dried I sanded the bowl with 220 and 380 grit sandpaper to blend the fills into the surface of the briar. I wiped the sanded briar down with alcohol on a cotton pad. I sanded the bowl with a medium and a fine grit sanding sponge and then stained it with a dark brown stain. I flamed it and repeated the process until the coverage was even. You might wonder why I stained it with such a dark stain… my reason was quite simple. I wanted to mask the fills – particularly the large ones on the underside of the shank. I set the bowl aside to let the stain dry and called it a night. In the morning I wiped it down with alcohol on cotton pads to make the dark brown stain more transparent and allow the grain to pop through the finish. The fills though still present were in better condition and less obvious. I polished the briar with micromesh sanding pads – dry sanding with 1500-12000 grit pads. I wiped the bowl down with an alcohol dampened cotton pad after each grit of micromesh. I put the polished stem back on the shank and took a photo of the pipe next to a Peterson’s London Made Kapruf 9BC to give an idea of the sheer size of this giant pipe. The Peterson is an average sized pipe and it appears almost like a nosewarmer next to this big one.I took the pipe to the buffer and worked it over on the buffing wheel using Blue Diamond to polish it. I buffed the entire pipe to raise the gloss on the briar and really bring shine to the horn. I gave the bowl and stem multiple coats of Carnauba Wax. I buffed the entire pipe with a clean buffing pad to raise the shine. I hand buffed it with a microfiber cloth to deepen the shine. The finished pipe is shown in the photos below. The dark brown stains on the bowl do not hide the grain and the fills though present do not stand out as much. The bowl and the rich striated colours of the horn work really well to create a rich looking pipe. The pipe is so big that I want to once again give you the dimensions; Length: 12 inches, Height: 3 ½ inches, Outside Diameter of the Bowl: 2 inches, Diameter of the Chamber: 1 ½ inches.  This humongous briar and horn stem pipe is truly a beauty. I have never seen a pipe this big before and it makes me wonder if it was not originally made as a display pipe. I don’t think I will ever know for sure but I do know that it was smoked and it is available to anyone who is interested in adding big pipe to their own collection. I would have said rack but it is too big to fit even a large rack. I will be putting it on the rebornpipes store shortly so if you are interested let me know. Thanks for walking through the restoration with me.