Ask any pipe smoker or collector and they will tell you that pipes can be a lot more than simple smoking instruments. They can become conduits …
Rescuing an Heirloom Lion Head Figural Meerschaum
Ask any pipe smoker or collector and they will tell you that pipes can be a lot more than simple smoking instruments. They can become conduits …
Rescuing an Heirloom Lion Head Figural Meerschaum

Blog by Steve Laug
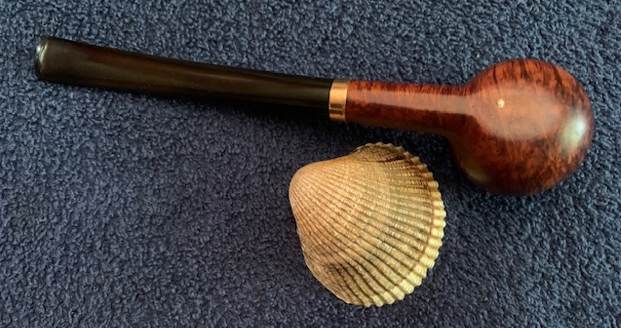
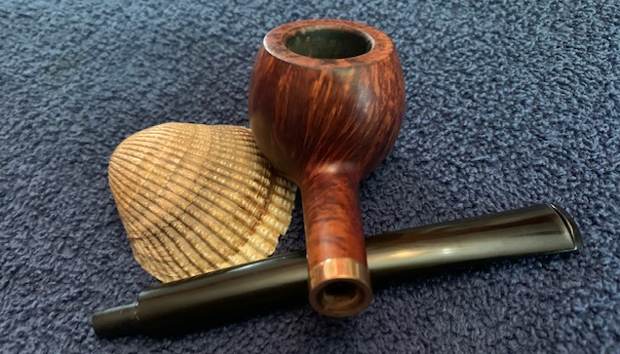
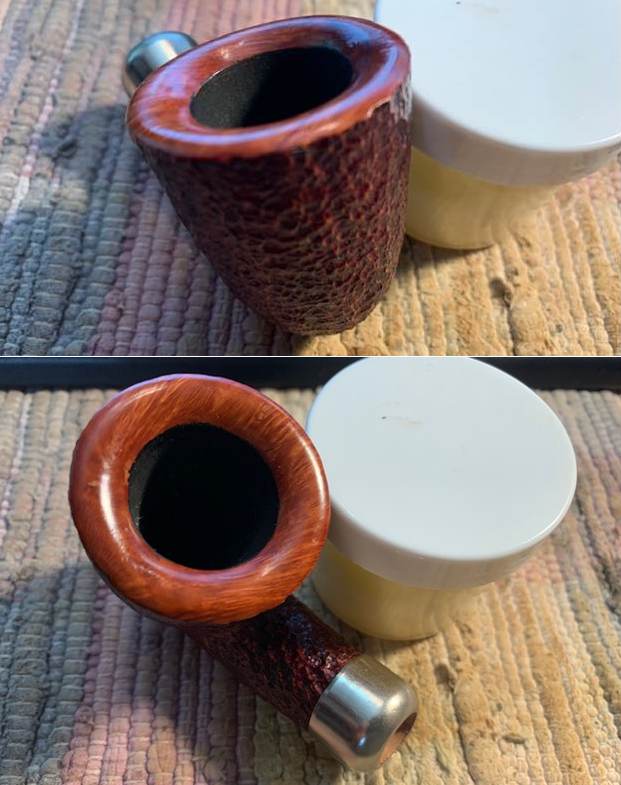
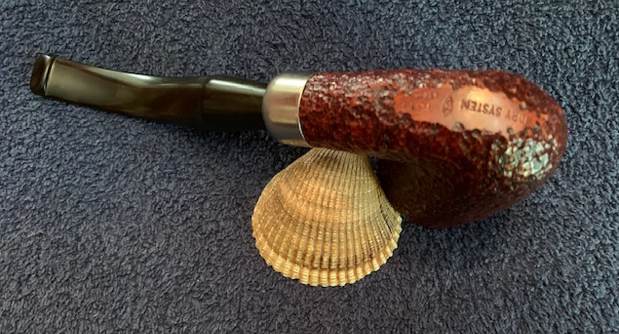
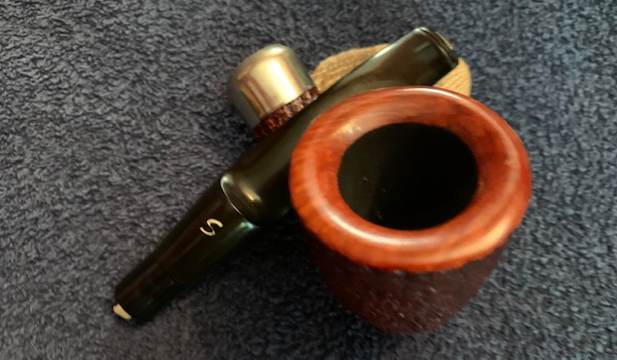
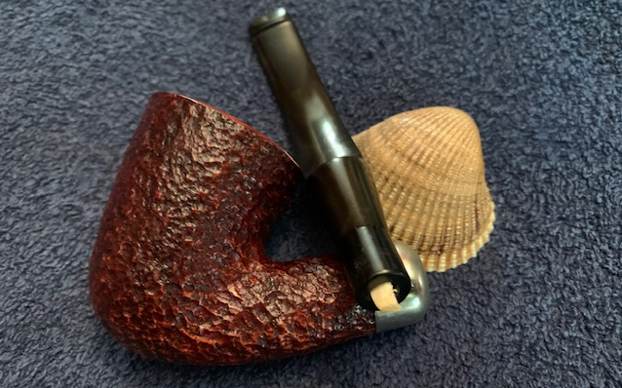
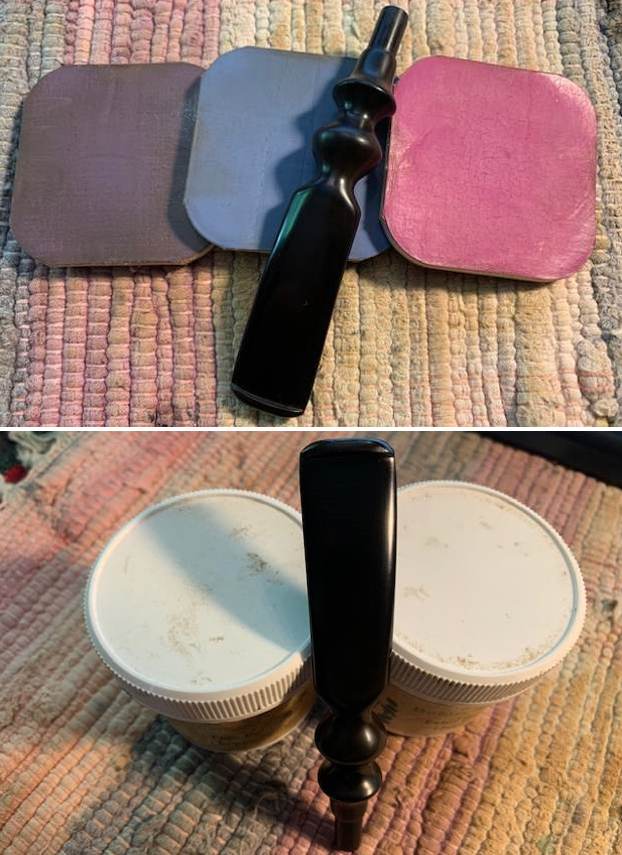
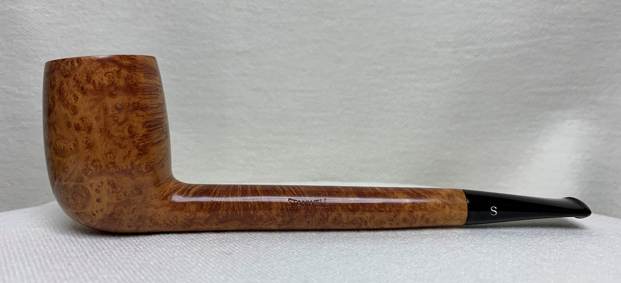
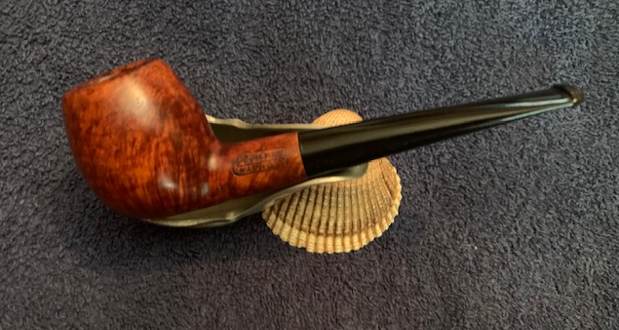
Jeff picked up this unsmoked New Old Stock Savinelli Dry System 1611 Bent Dublin a while ago from an online auction on 02/02/22 from Cottage Grove, Minnesota, USA. It has a Savinelli Balsa Filter in the tenon and a characteristic Dry Smoke drilling on the P-lip style stem. The airway came out on top like a Peterson but instead of a round hold this one has a rectangular slit. It came with the box, plastic bag, sock and package of Balsa Filters. All of the paperwork that may have come with it was included as well. The box was worn on the corners but it was in great condition otherwise. The stem showed some light oxidation from the light when it was on display. It also had some gummy substance just ahead of the button on both sides where it looked like there had been a price tag. There was a new Balsa filter in the stem. The pipe smelled musty. I took photos of the box before I removed the lid and then after I removed it to show what I saw. 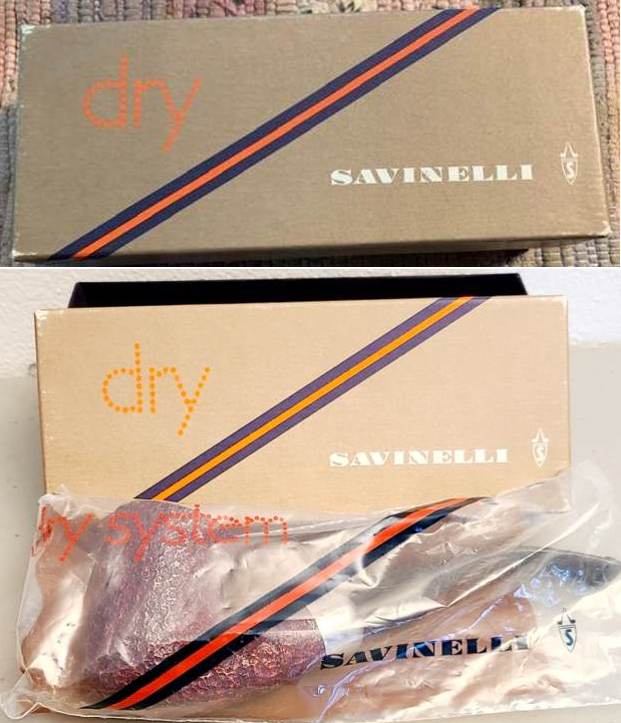
 I removed it from the box along with the filters and the papers. I took a photo of the pieces in the box. It is a pretty pipe with a polished nickel ferrule.
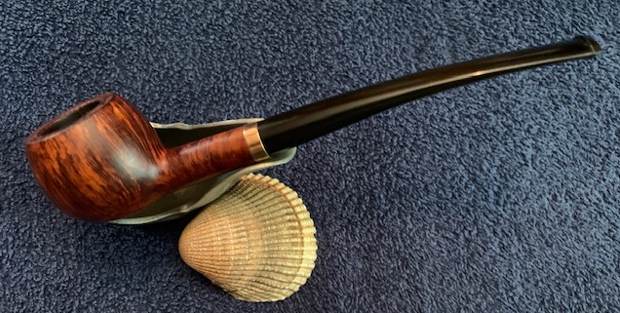
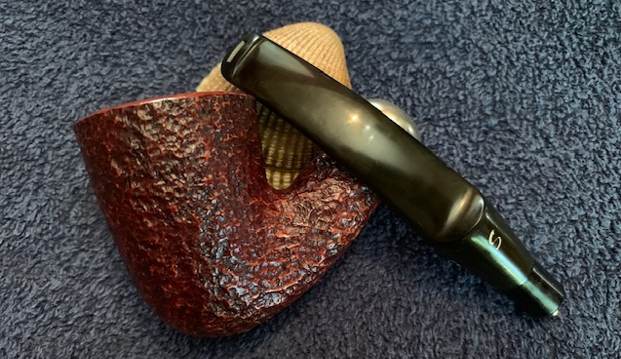
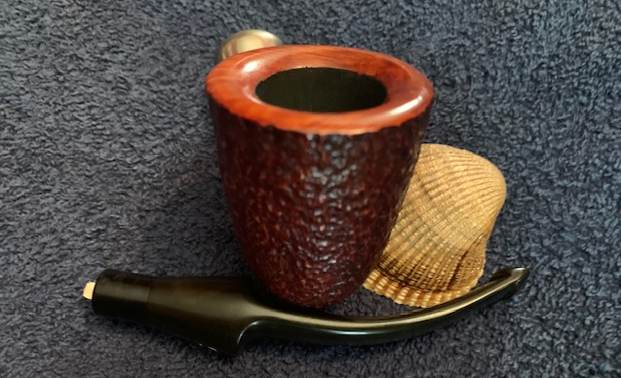
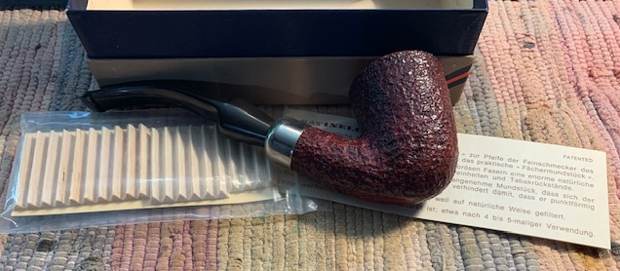 I took the pipe out the box and took pictures of this beauty. It is a nice looking pipe with a nice rustication that works well on the bowl and goes well with the smooth crowned rim top.
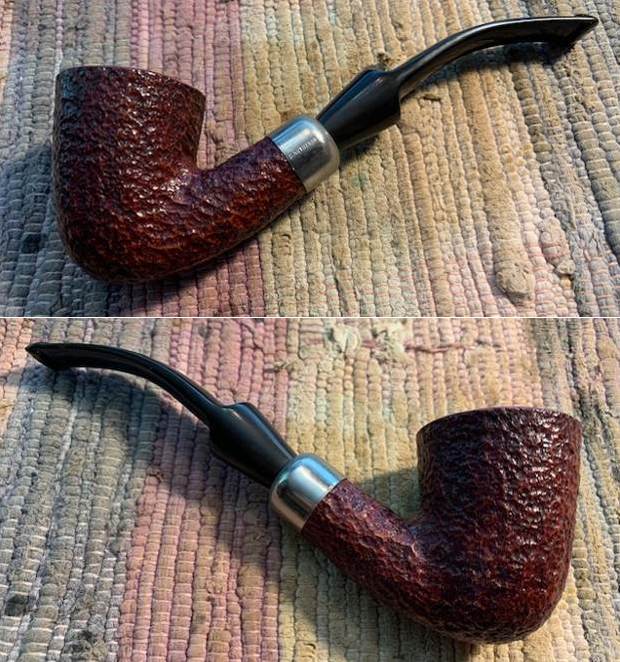
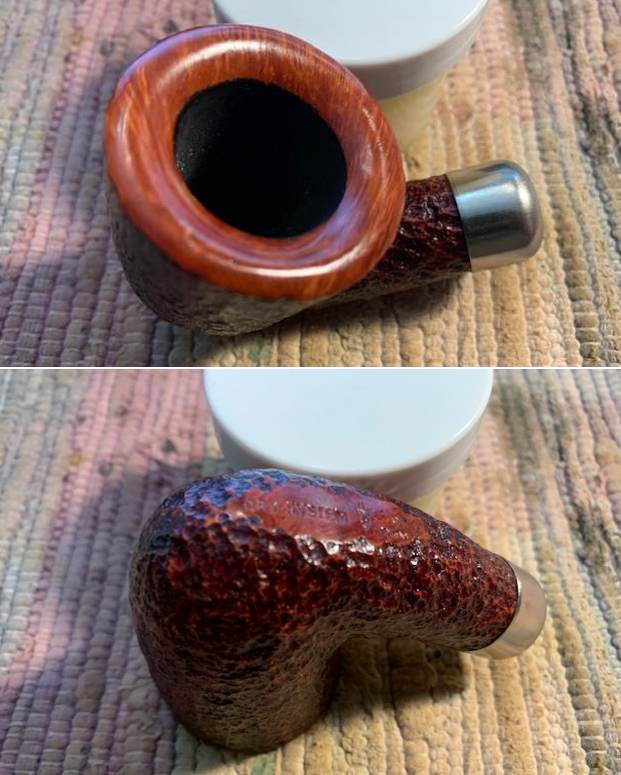
 I took some close up photos of the rim top and stem to show the condition of the pipe. There were a couple of small fills on the rim top – right side and left side both toward the front. They are solid and not loose at all.
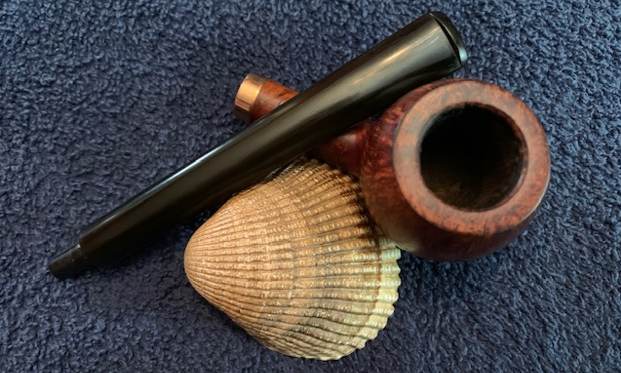
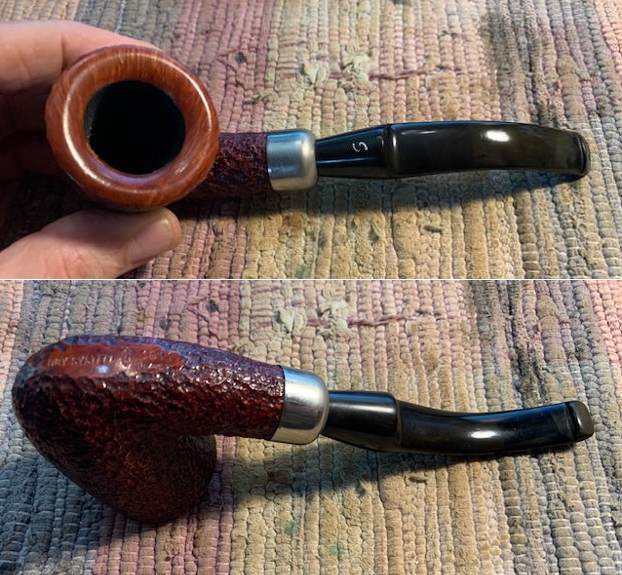
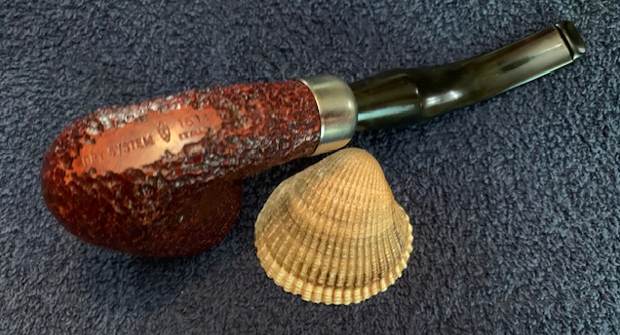
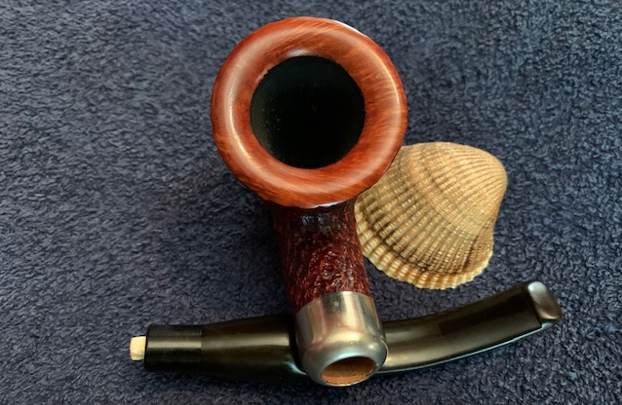
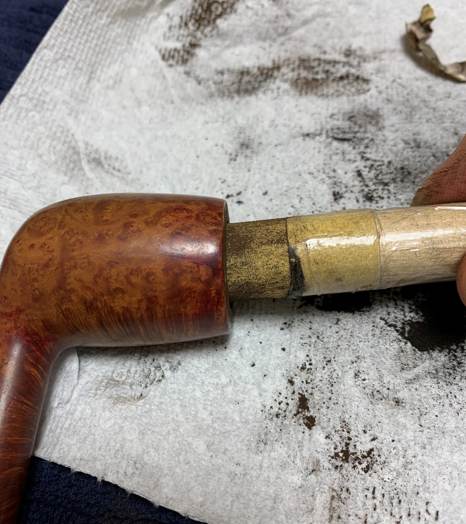
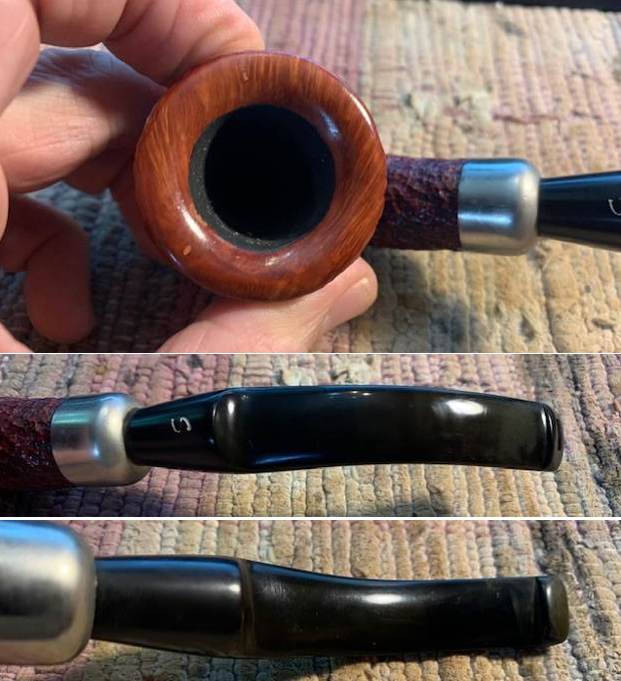 I took a photo of the stamping on the underside of the shank. It reads Dry System on the heel of the bowl followed by S in a shield (Savinelli Logo) followed by 1611 (shape number) over Italy. There was a Savinelli stamp on the left sad of the nickel ferrule and an S on the top of the saddle stem.
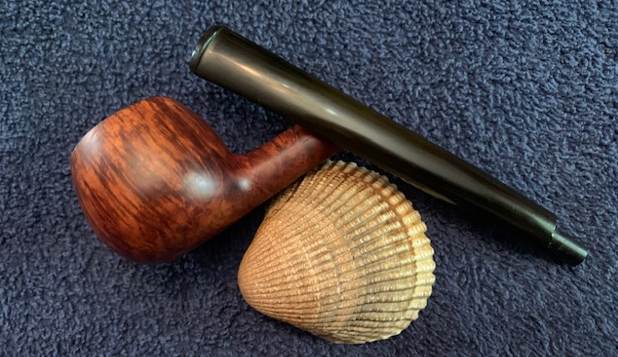
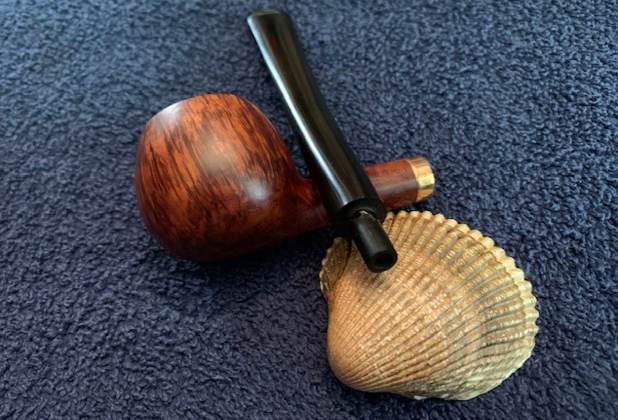
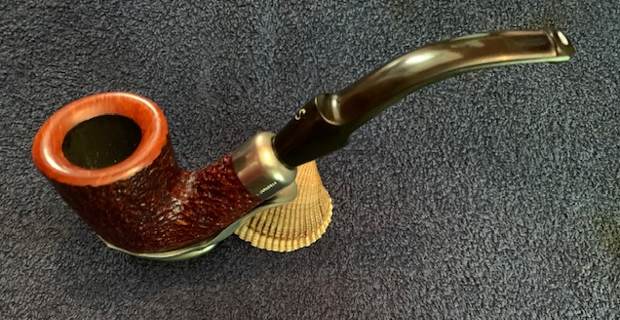
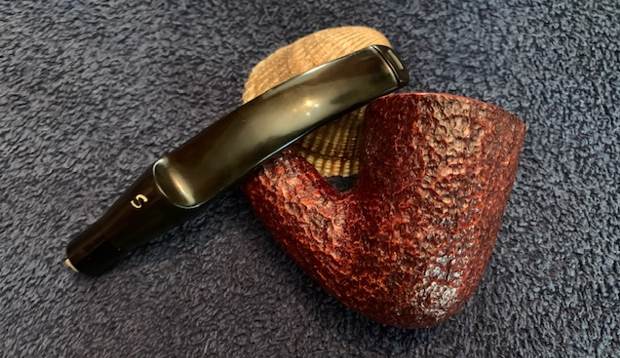
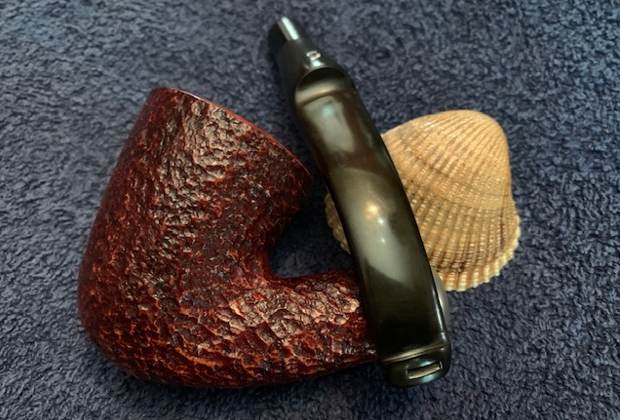
 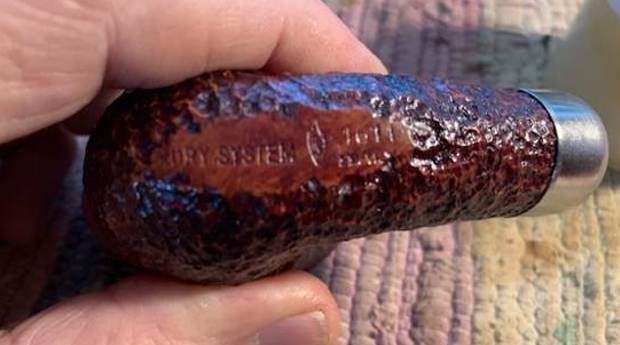 I removed the stem from the shank and took a photo of the look of the pipe to show the nice shape and flow of the pipe.
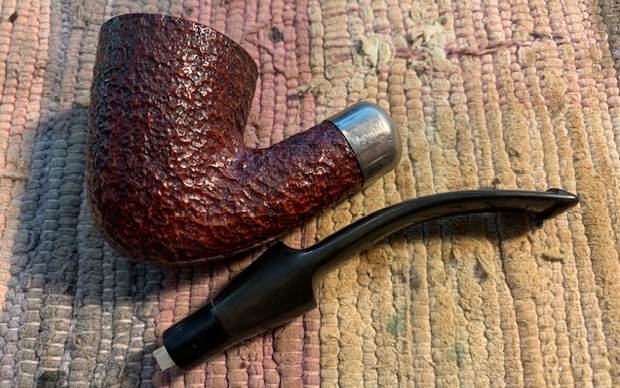 I rubbed the bowl down with some Before & After Restoration Balm. I worked it into the rustication on the bowl and the smooth rim top with my finger tips to clean, revive and preserve the wood. It really brings the grain alive once again. I let it sit for 15 minutes then buffed it off with a soft cloth. The grain really pops at this point in the process.
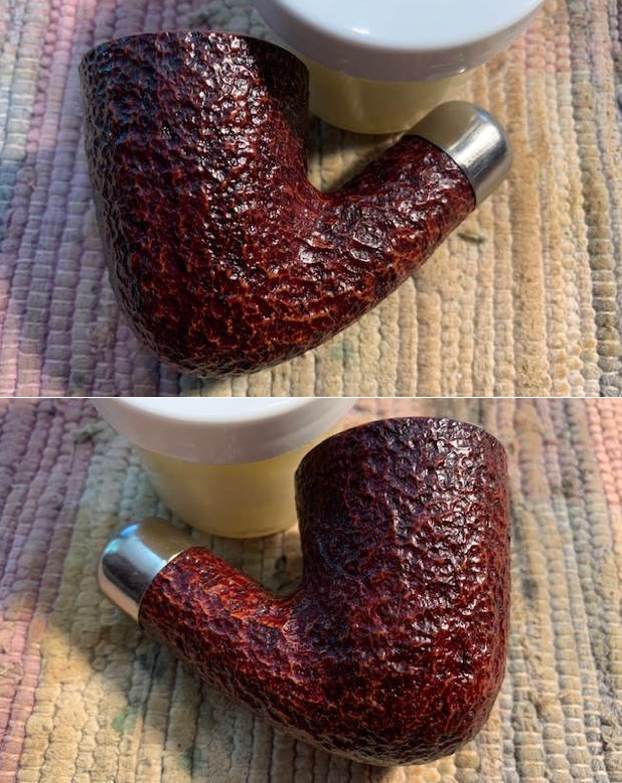
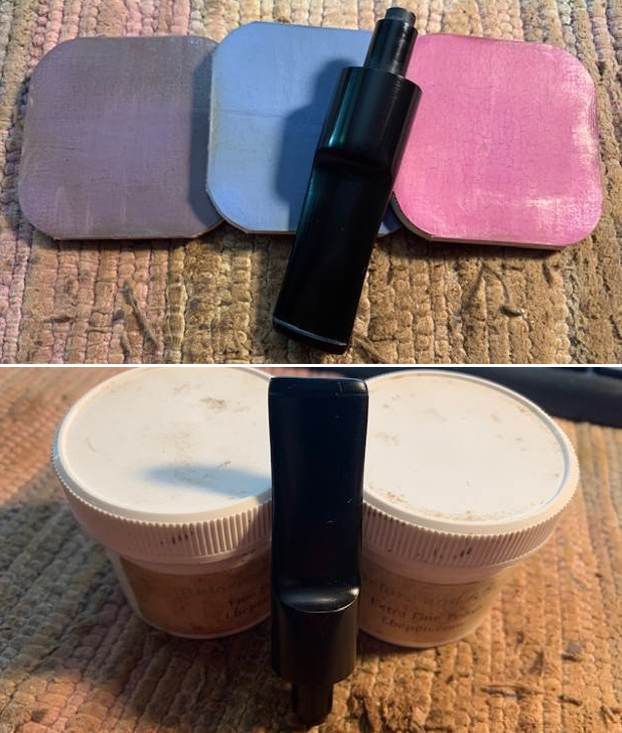
 I set the bowl aside and turned my attention to the stem. I polished the stem with micromesh sanding pads – 1500-12000 grit pads. I wiped the stem down after each pad with a cloth impregnated with Obsidian Oil. I finished the polishing with some Before & After Pipe Stem Polish – both Fine and Extra Fine. I wiped it down a final time with Obsidian Oil. The stem looked very good.
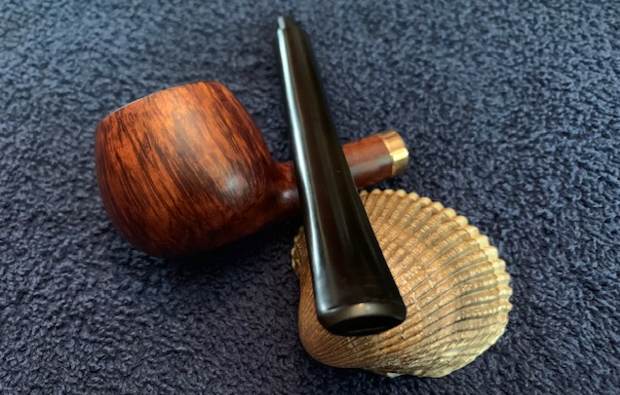
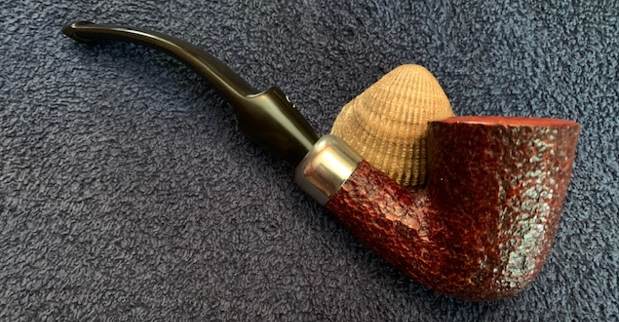
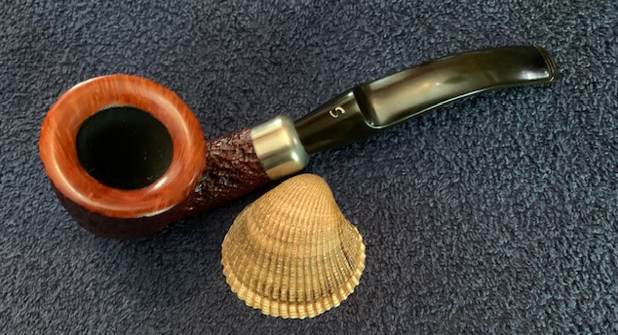
 I put the UNSMOKED, NOS Savinelli Dry System 1611 Bent Dublin back together and buffed it with Blue Diamond on the buffing wheel. I gave the bowl multiple coats of Conservator’s Wax and the stem multiple coats of carnauba wax. I buffed the pipe with a clean buffing pad and hand buffed it to raise the shine. It is fun to see what the polished bowl looks like with the grain popping through on the smooth rim top and the variety of colour in the rustication. Added to that the polished nickel ferrule and the vulcanite saddle stem was a beautiful touch. It is light and well balanced. Have a look at it with the photos below. The dimensions are Length: 6 ½ inches, Height: 2 ¼ inches, Outside diameter of the bowl: 1 ¾ inches, Chamber diameter: 7/8 of an inch. The weight of the pipe is 68 grams/2.40 ounces. It is a beautiful pipe and one that will be on the rebornpipes store in the Italian Pipe Makers Section. If you are interested in breaking in a new unsmoked Savinelli Dry System and adding it to your collection let me know. Thanks for walking through the restoration with me as I worked over this pipe. Thanks to each of you who are reading this blog. I want to keep reminding us of the fact that we are not pipe owners; we are pipemen and women who hold our pipes in trust until they pass on into the trust of the next pipeman or woman.


Blog by Steve Laug
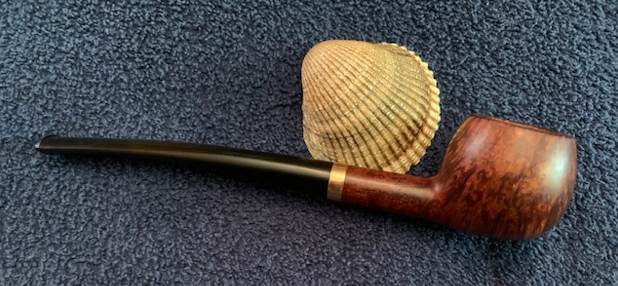
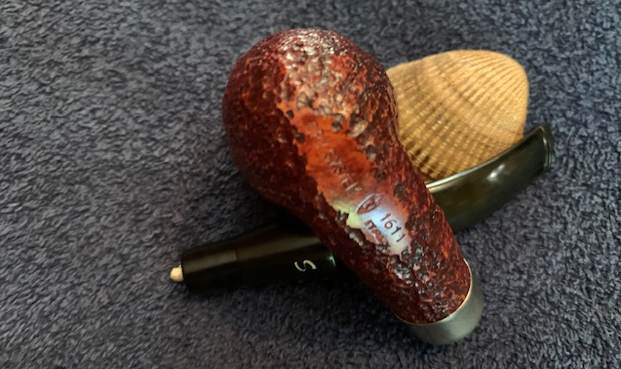
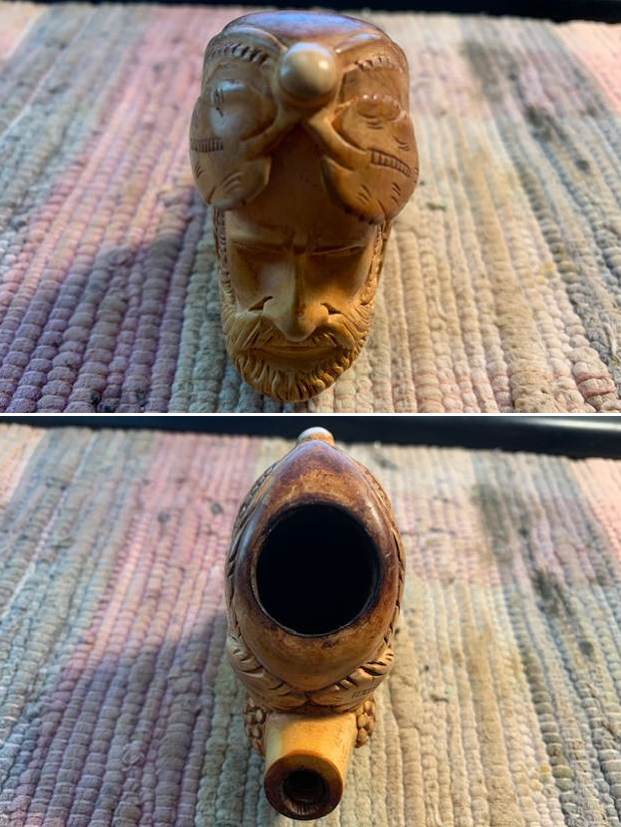
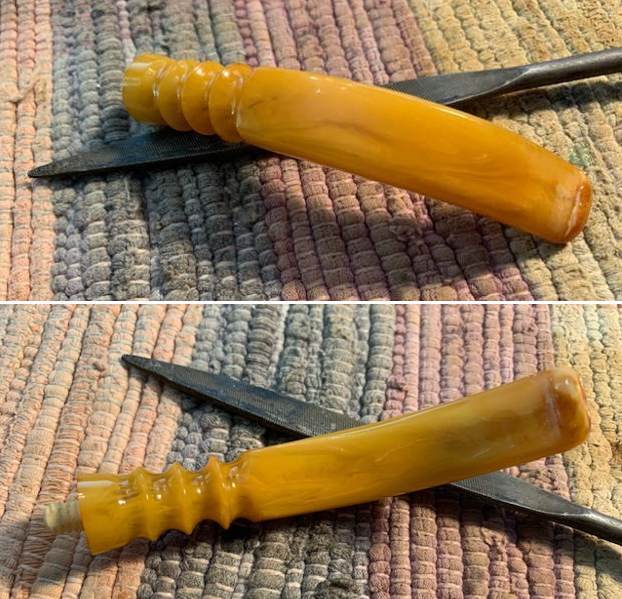
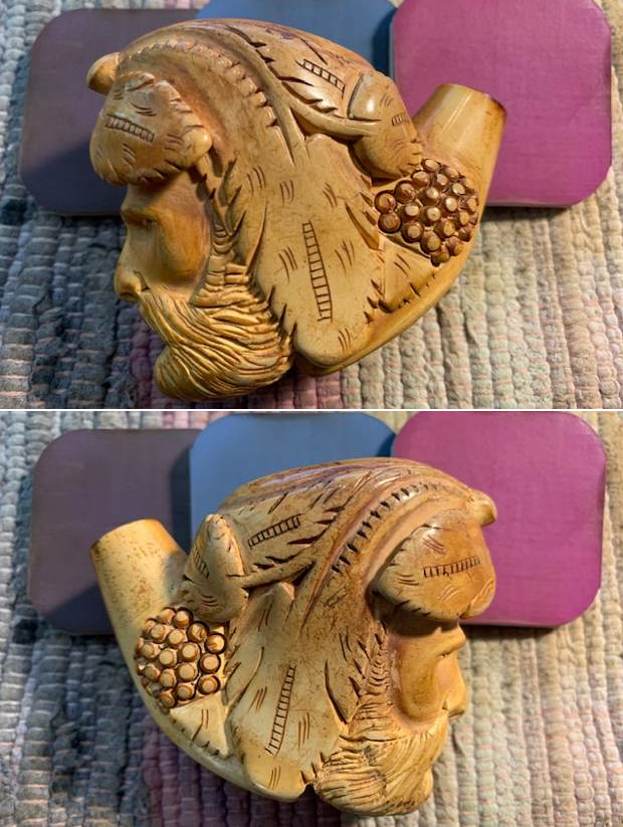
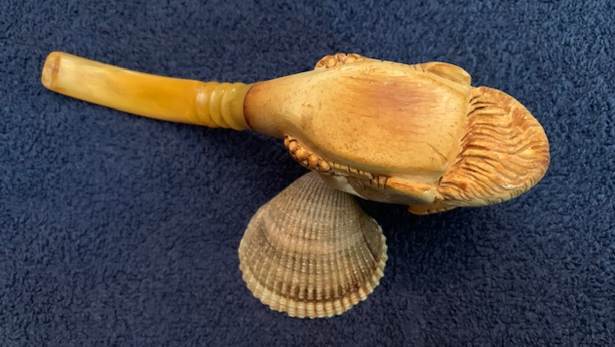
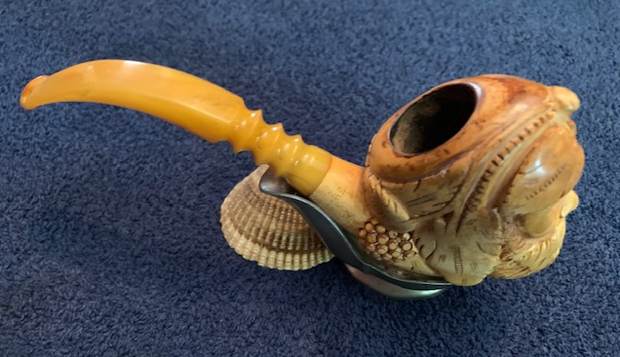
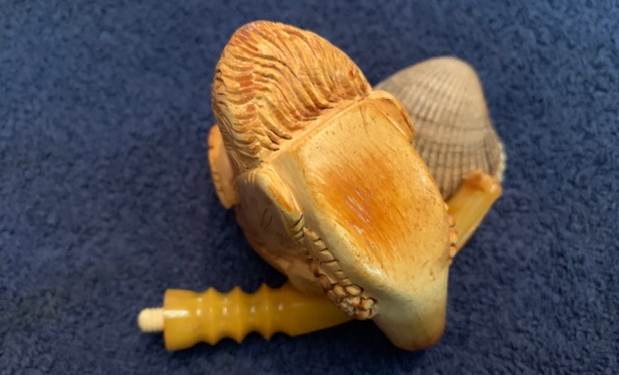
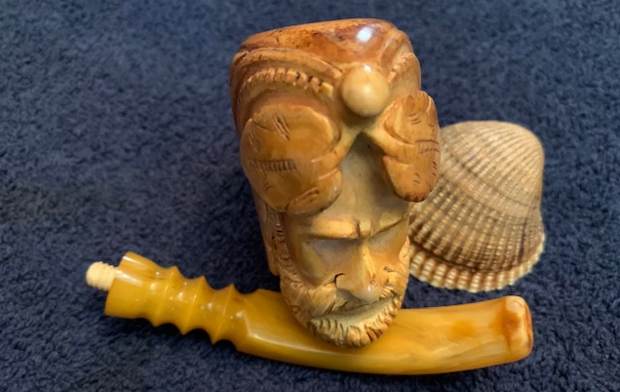
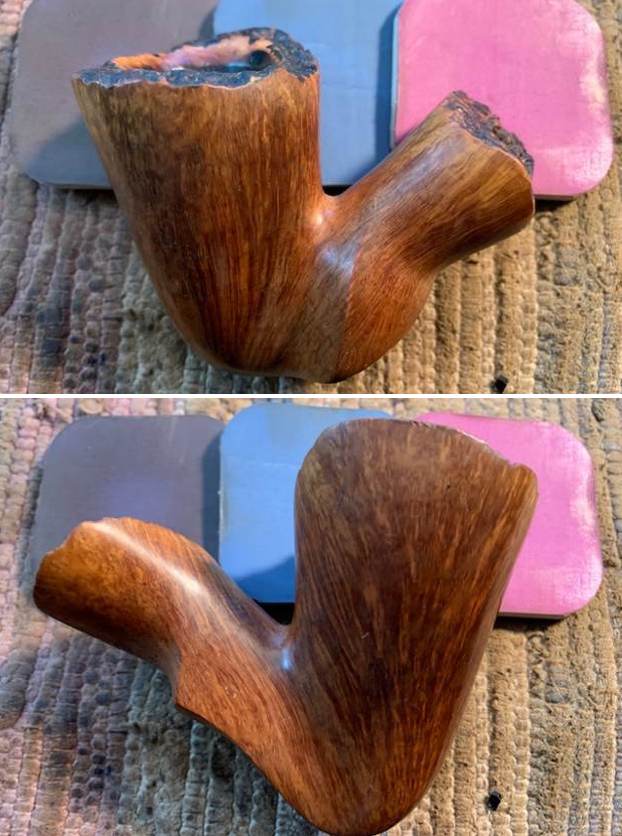
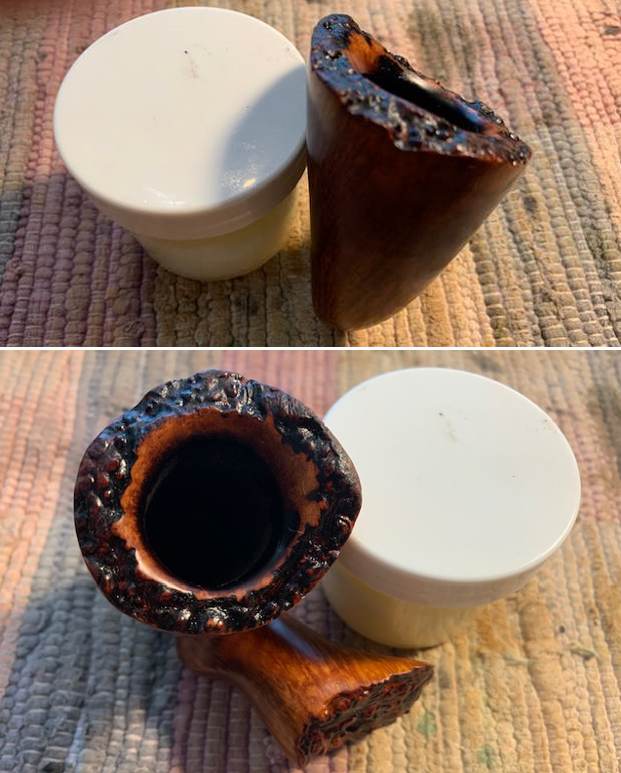
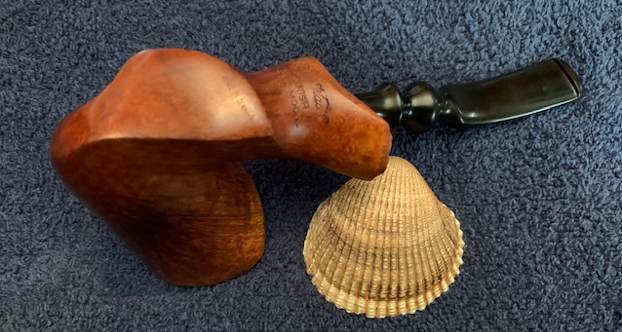
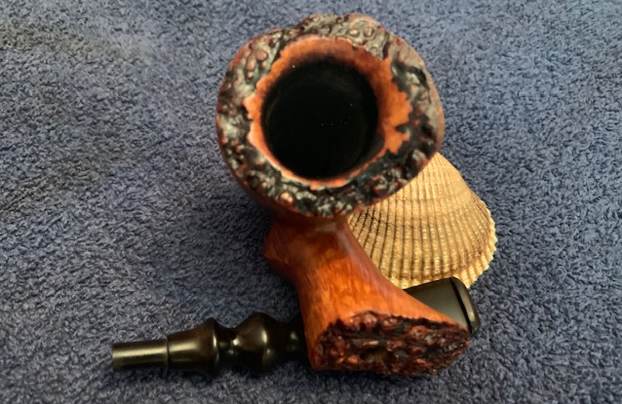
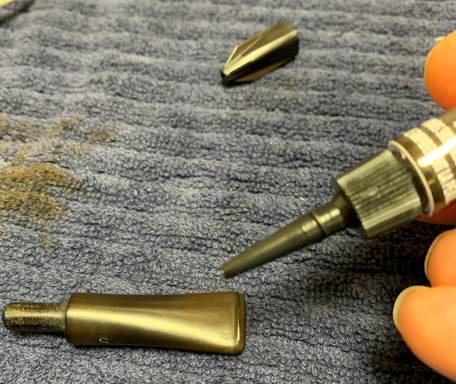
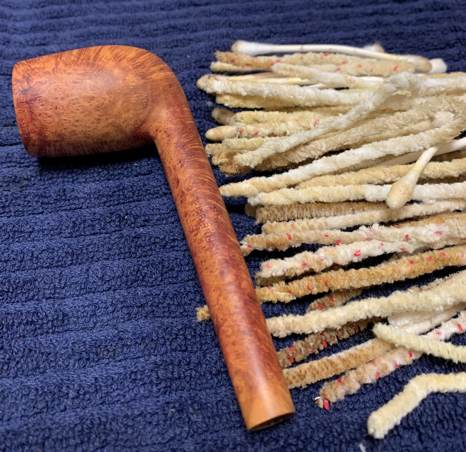
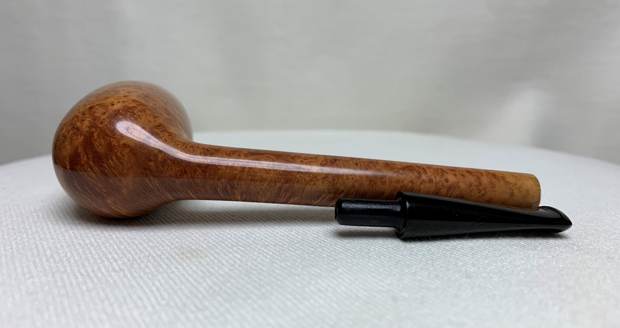
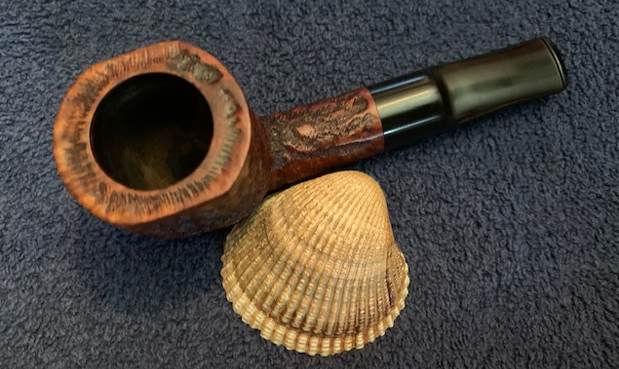
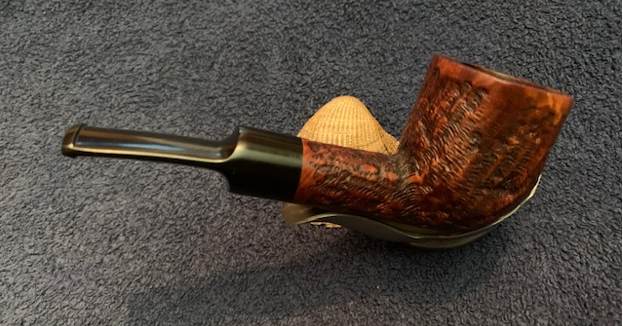
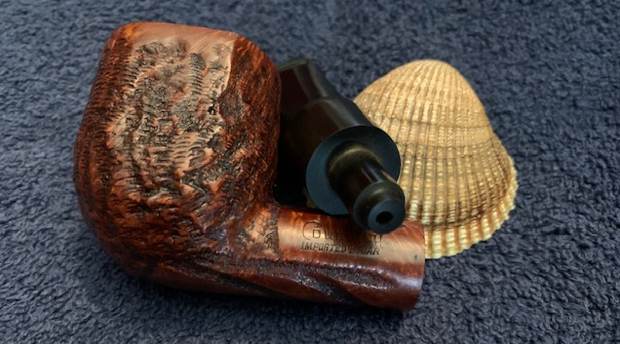
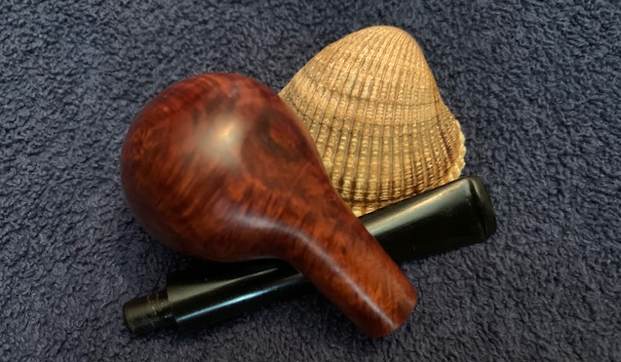
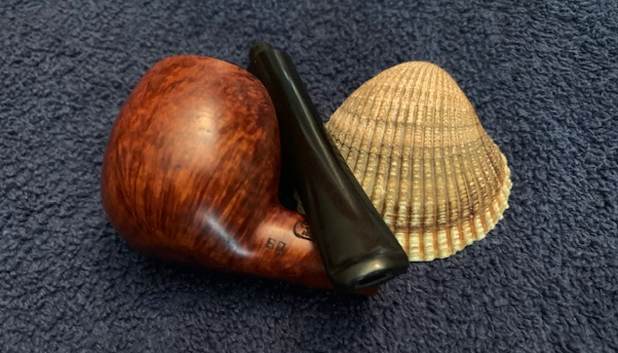
The next pipe on my table was a filthy meerschaum carved figural. Jeff believes that we got this meerschaum on 07/30/2019 from an online auction in Oceanside, New York, USA. It had some golden brown patina developed under the thick dark grime and tar on the face and leaf had of the figural. It also cover the rim top and the grapes on the shank. There was a thick cake in the bowl and a heavy build up of lava on the rim top. It really was a mess. The carving on the figural was very well done as were the leaves and grapes that made up the headdress. The stem was a replacement I believe as it was a soft acrylic that did not fit very well. Someone had fit the stem with a push tenon but the shank was threaded so it was a poor and sloppy fit. It was dirty and the airway was almost clogged with tars and oils. The surface of the button on the end had been chewed through and there were holes on both sides. Long and short of it the stem would need to be replaced yet again. Here are some photos Jeff took of the pipe before he started his clean up work on it. It has a lot of potential and a lot of promise. Time and work will tell!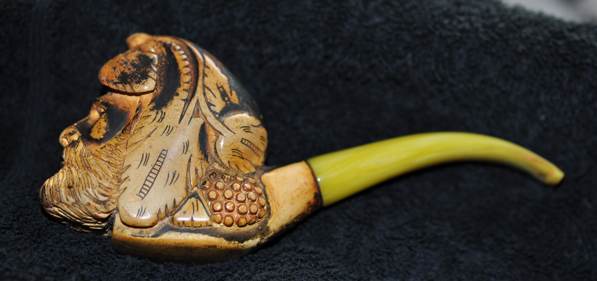 He took photos of the bowl to clearly show the facial features of this well carved meerschaum. The features are really well done and the details are quite remarkable. The pipe should clean up really well and look quite amazing. It is certainly worth restemming.
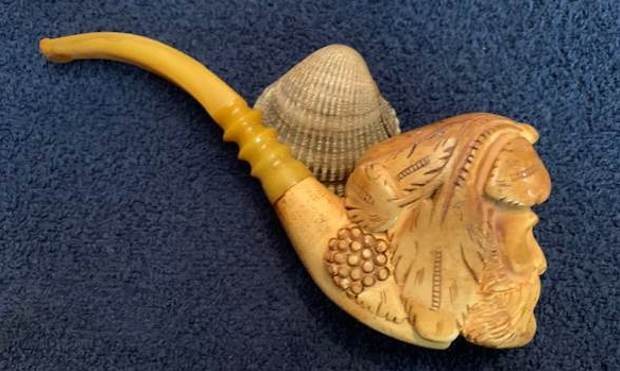
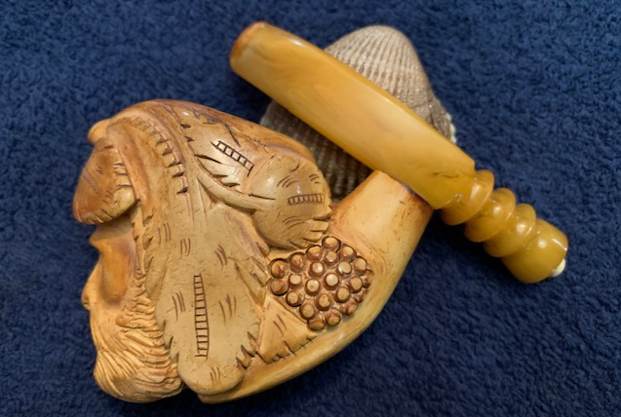
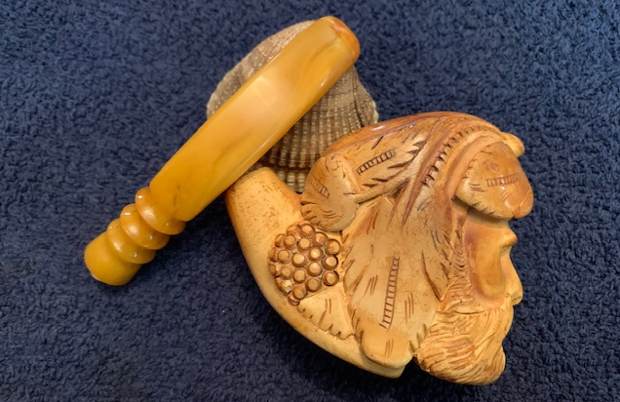
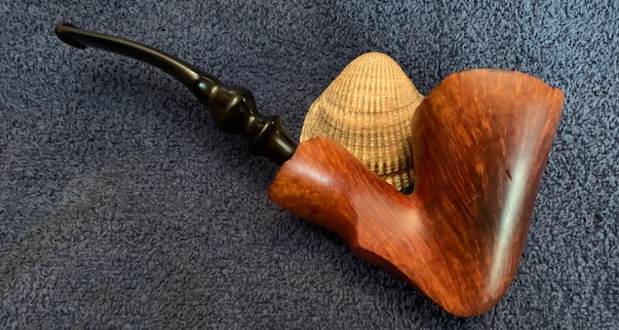
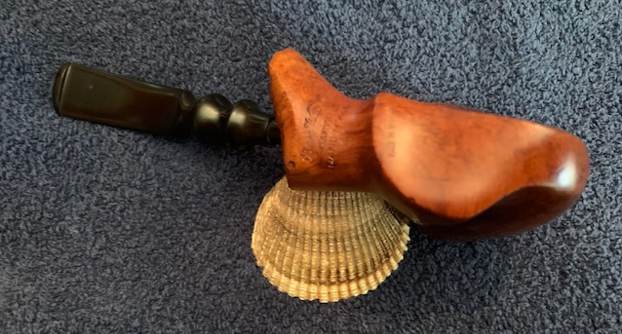
  He took photos of the bowl from the side to show the carving details on the leave and grapes along the side of the bowl and shank. Even those details are quite well done.
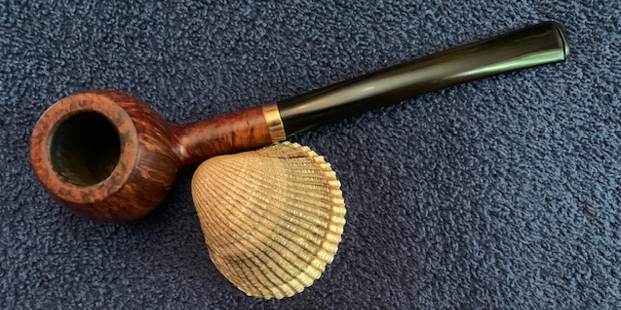
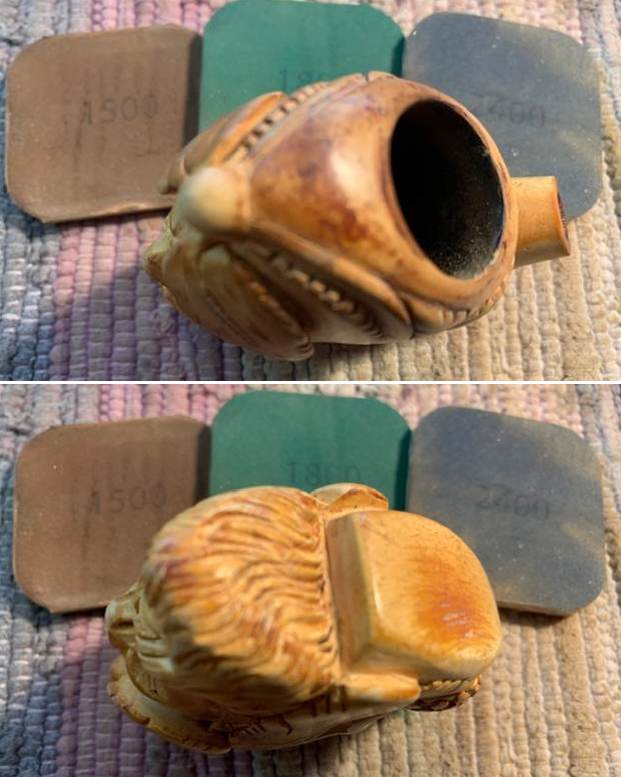
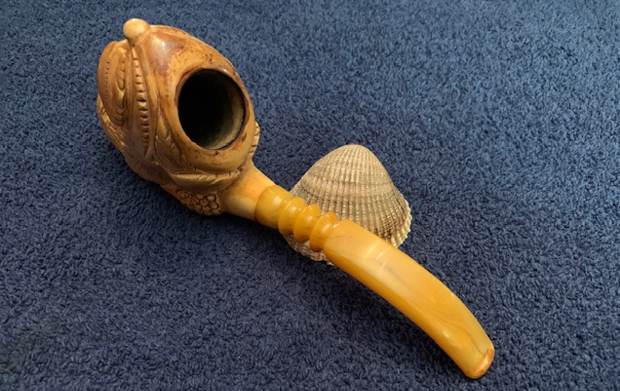
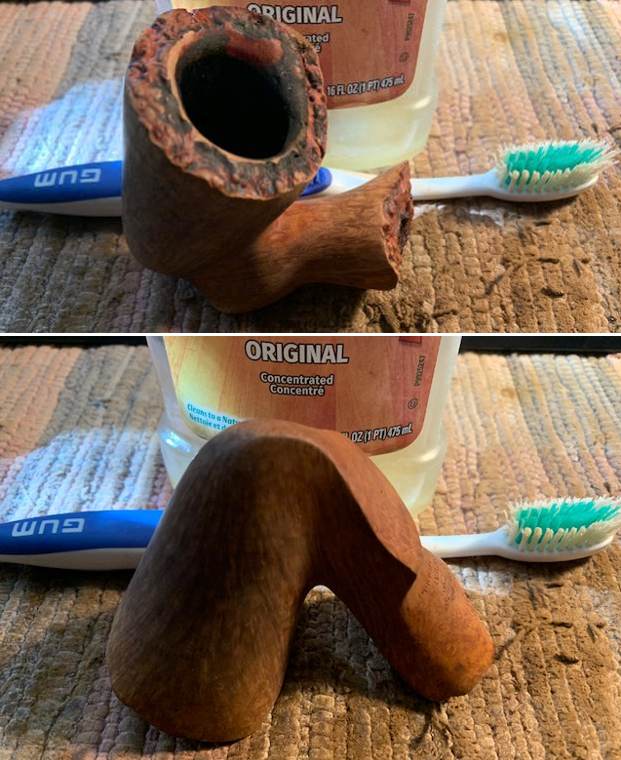
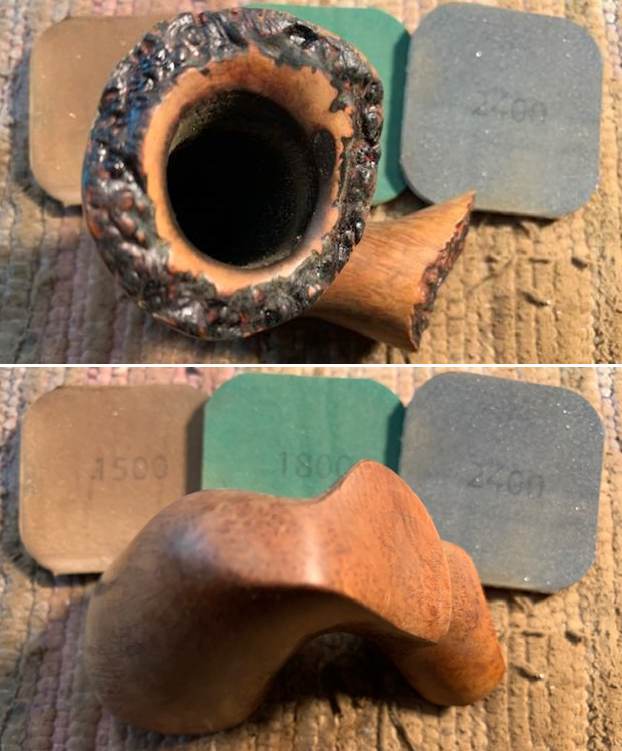
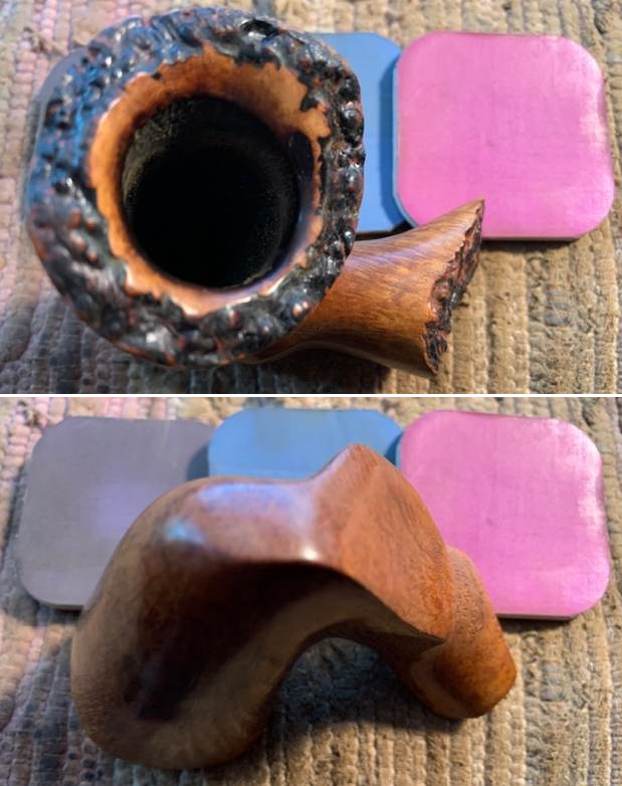
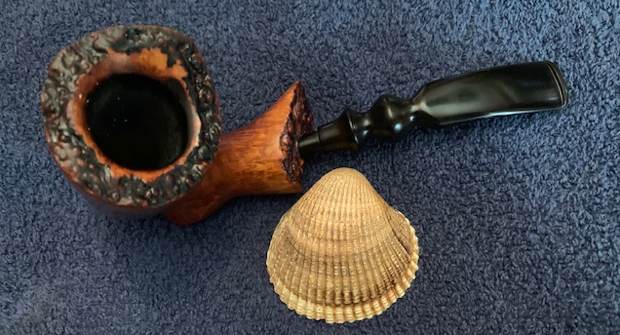
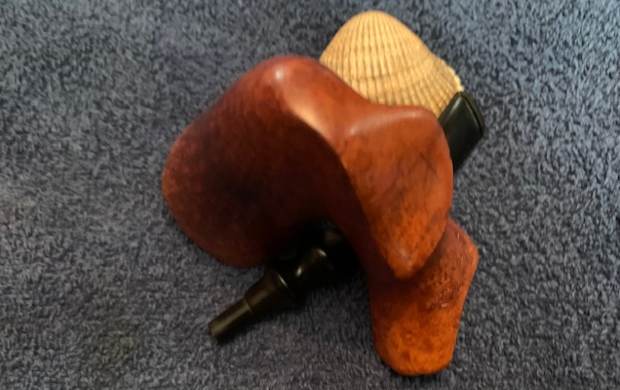
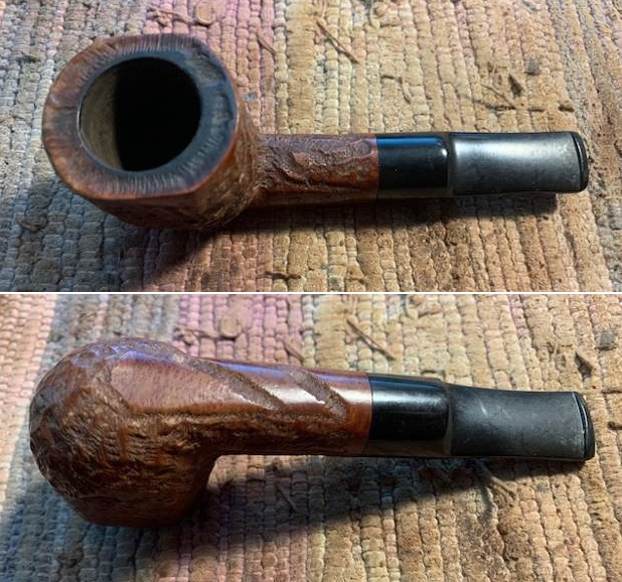
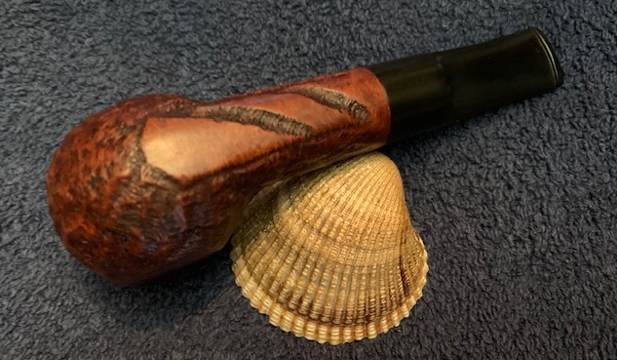
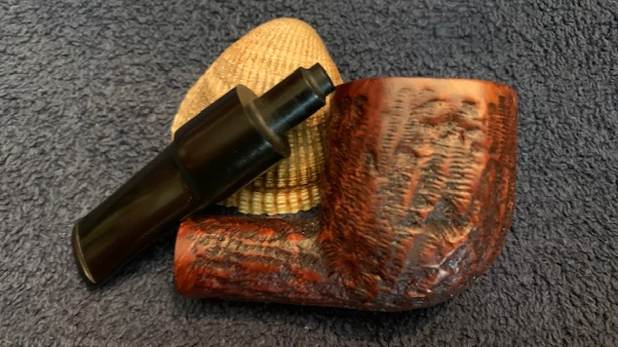
 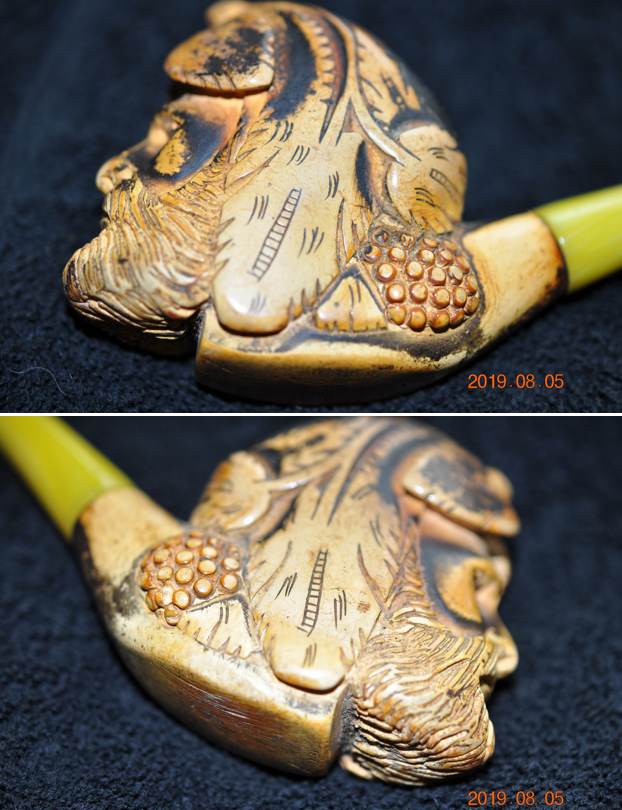 Jeff took a photo of the heel of the bowl. It was flat and the bowl sat as a sitter with the stem removed. It also has some scratches and nicks in the surface and debris in the carved swirls of the beard.
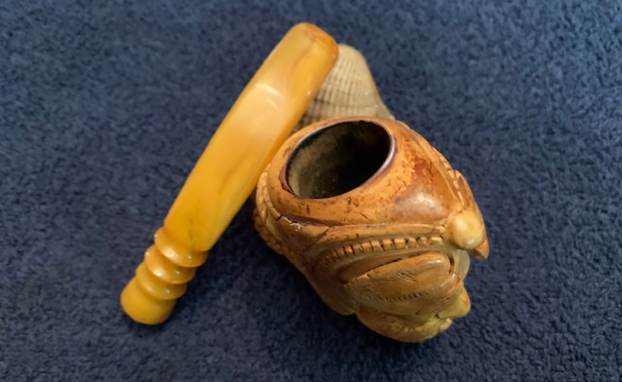
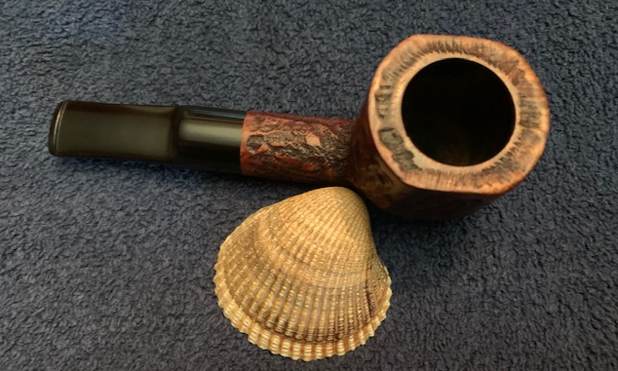
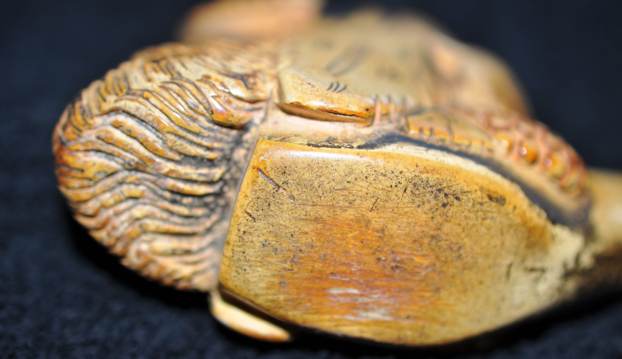 The rim top and bowl were filthy. There was a thick cake on the walls of the bowl and a heavy overflow of lava on the rim top and top of the headdress. It was black, heavy and quite thick. The replacement stem was a disaster as well with major holes in the top and underside of the stem at the button and on the button itself.
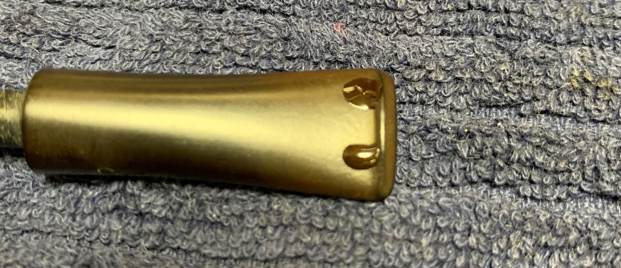
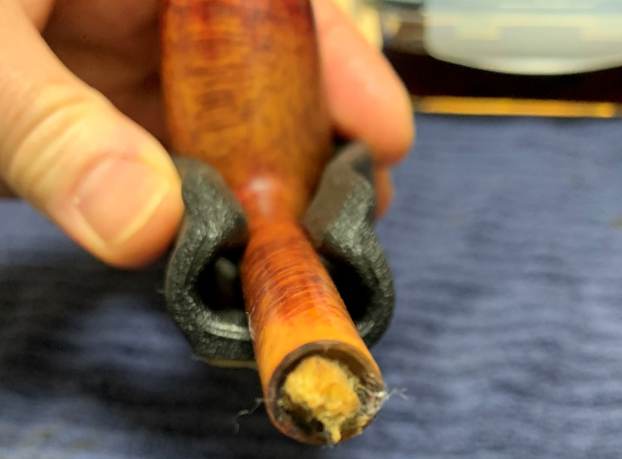
 The photos of the stem show the odd placement of a push tenon in the stem end even though the shank is threaded. You can also see the split in the top side and the chewed end of the button and hole I the underside.
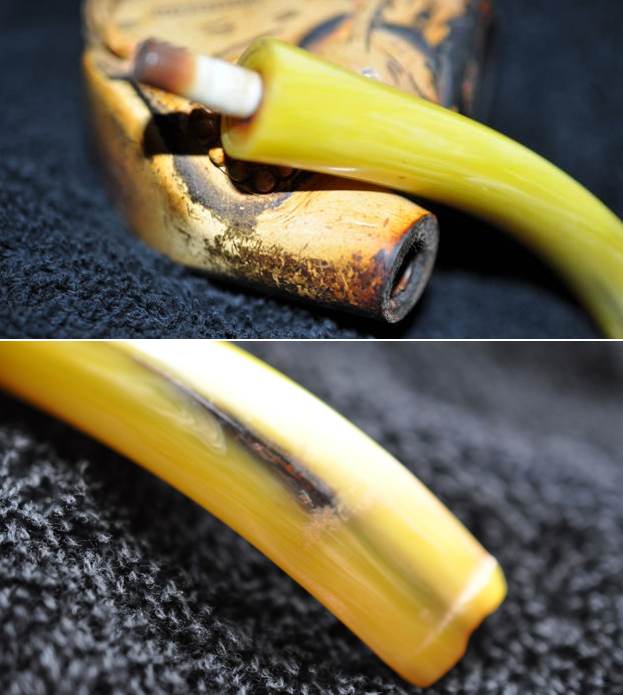
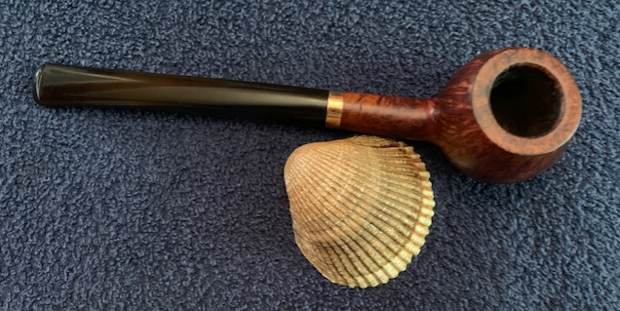
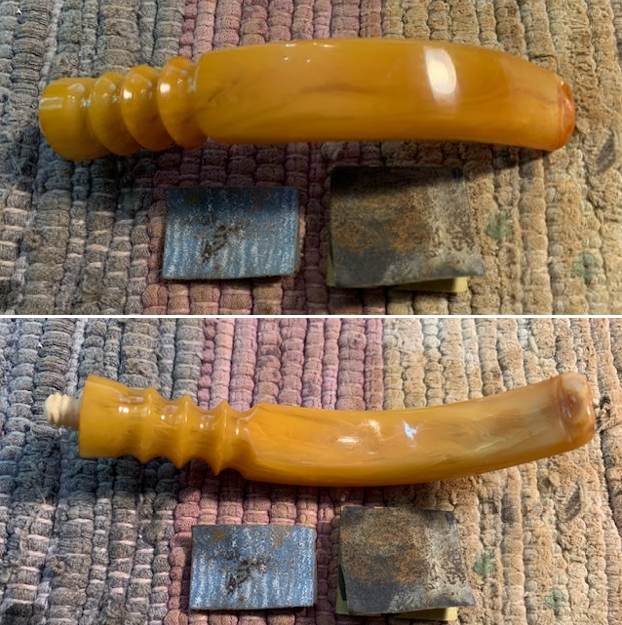
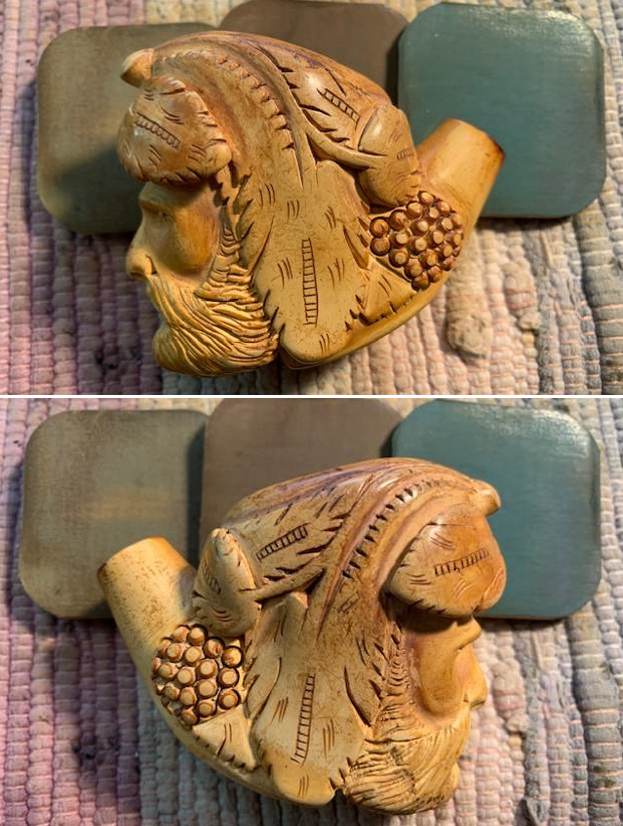
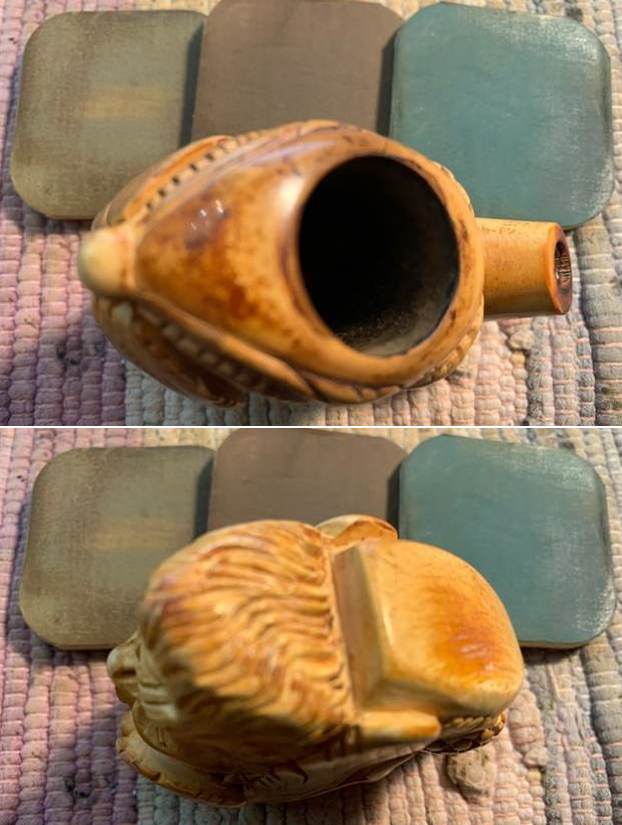
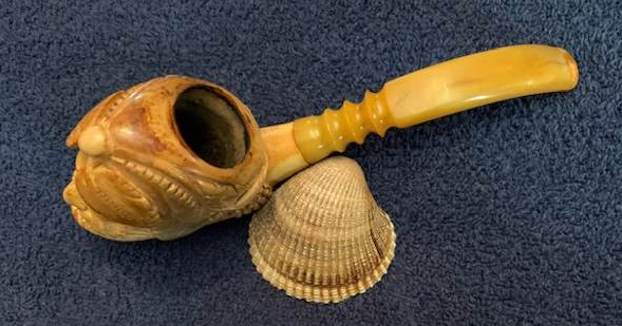
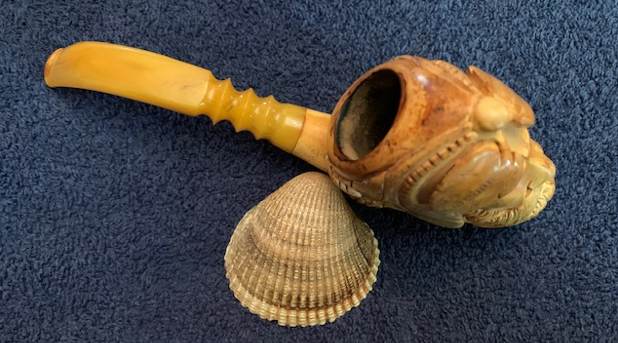
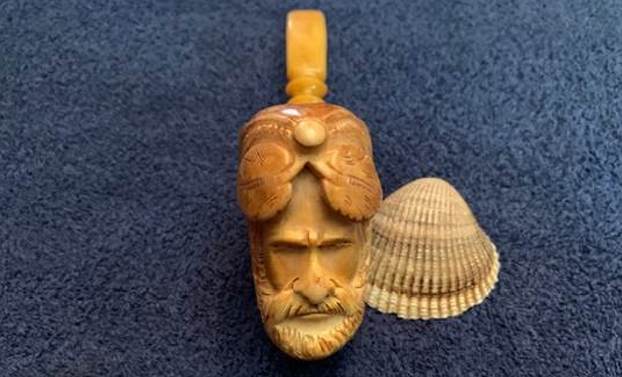
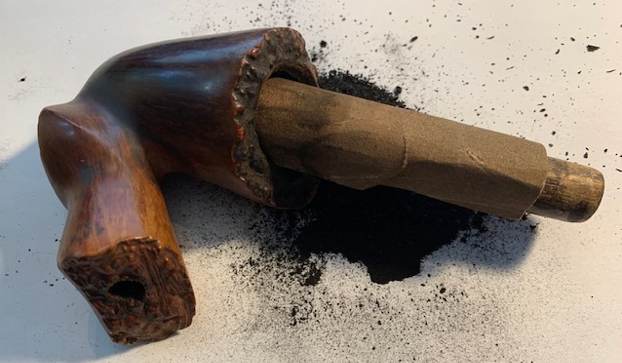
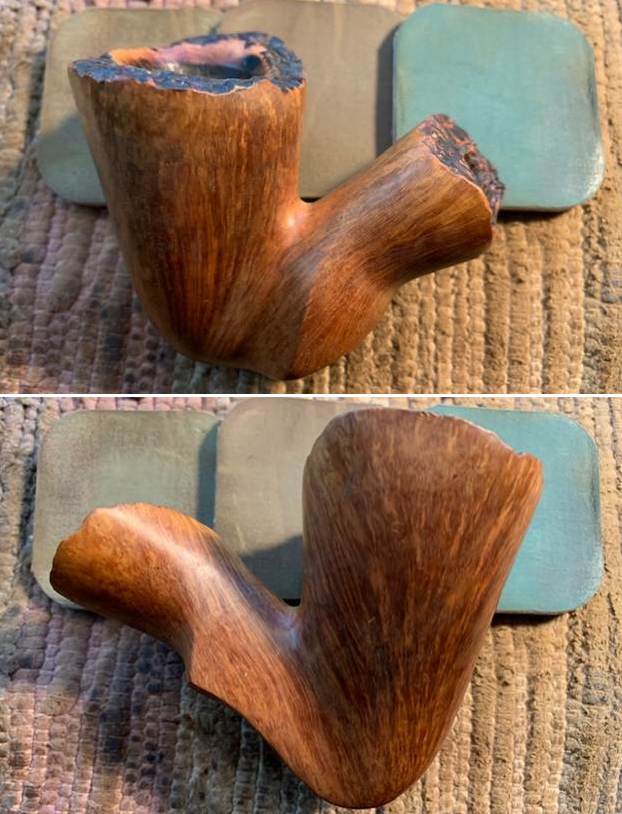
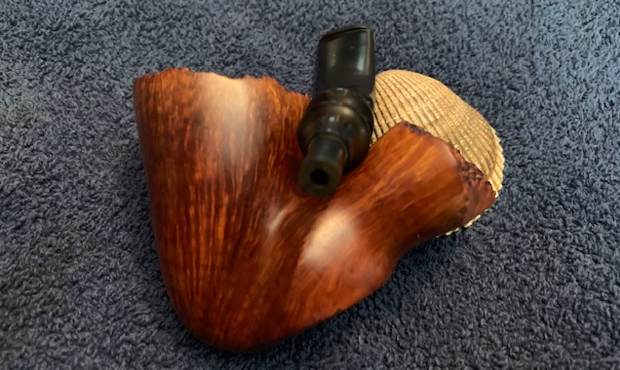
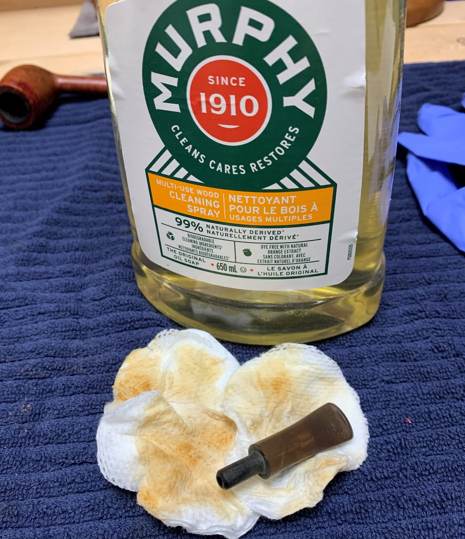
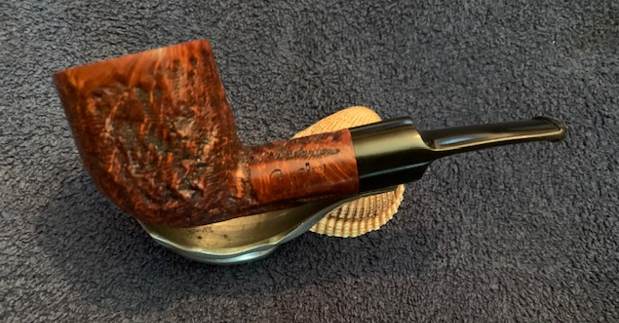
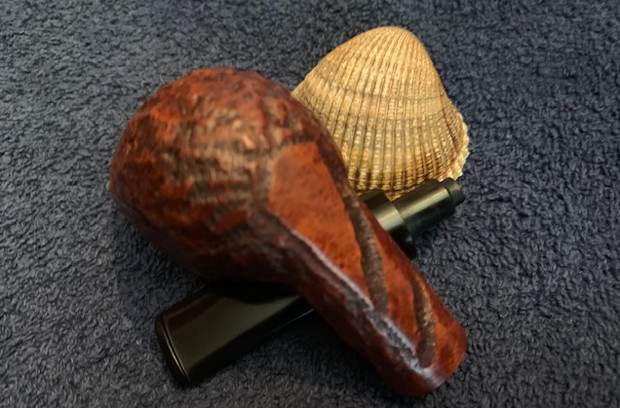
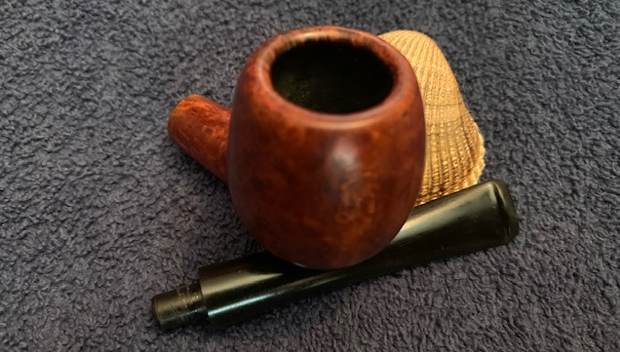
 Jeff did a remarkable job on the cleanup of this pipe. He reamed the bowl carefully with a PipNet reamer and cleaned up the reaming with a Savinelli Fitsall Pipe Knife. He scrubbed the surface and crevices of the carved figural with undiluted Murphy’s Oil Soap and a tooth brush to remove the grime and leave behind the patina. He rinsed the bowl with warm water and dried it off with a clean cotton towel. He cleaned the internals of the bowl and shank with alcohol, cotton swabs and pipe cleaners to clean out the built up tars and oils that were present there. We through away the stem as it was very unusable. When the pipe arrived here it looked amazing and the features and the patina in the meerschaum is beautiful. I took photos of it when I brought it to the table this morning. I would need to restem it but it would be worth it.
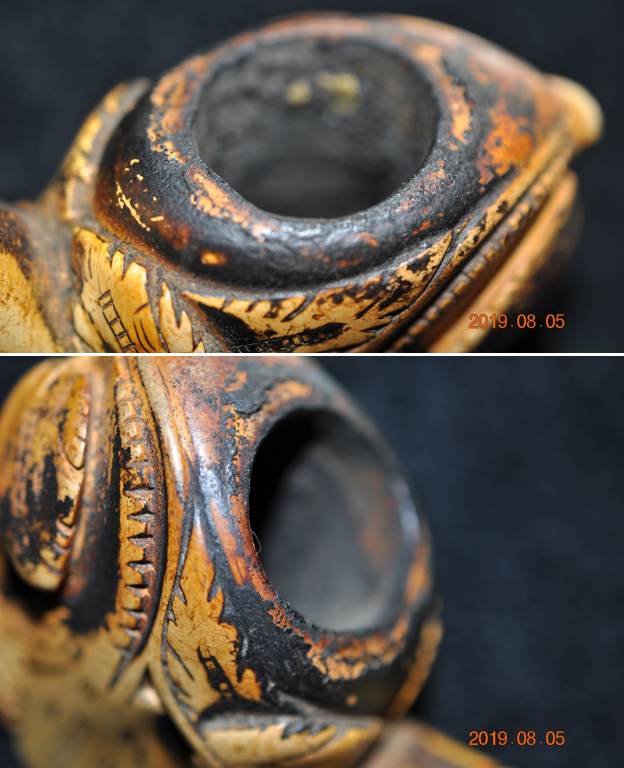
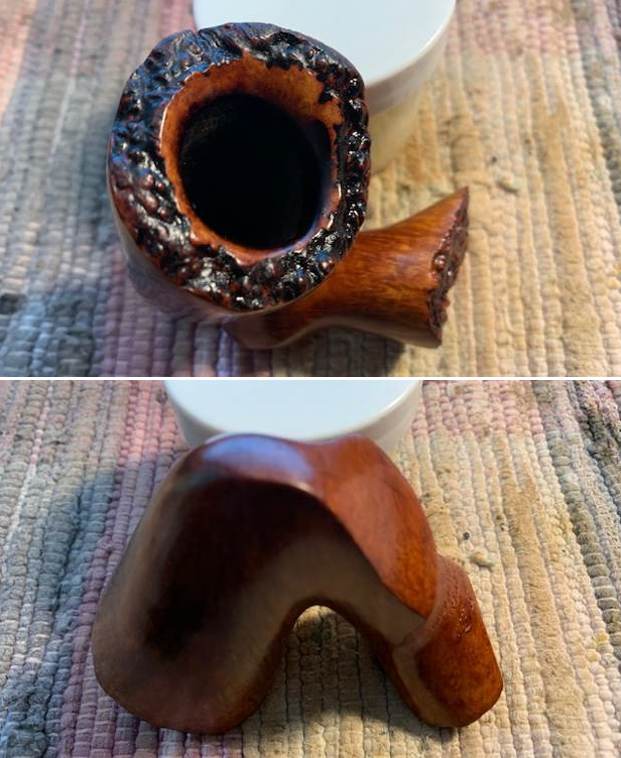
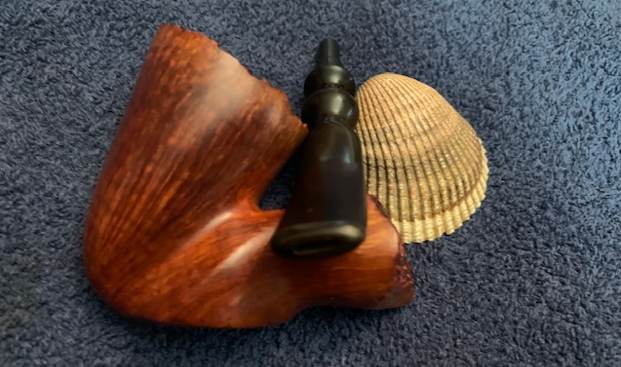
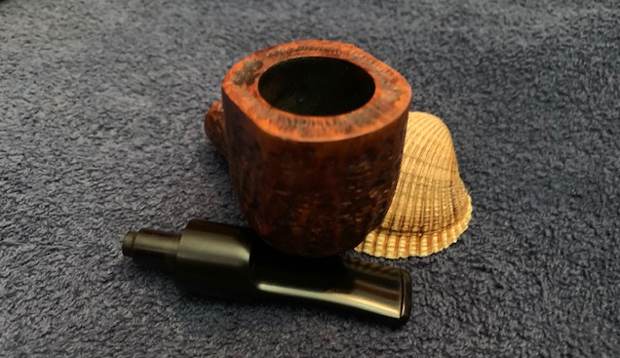
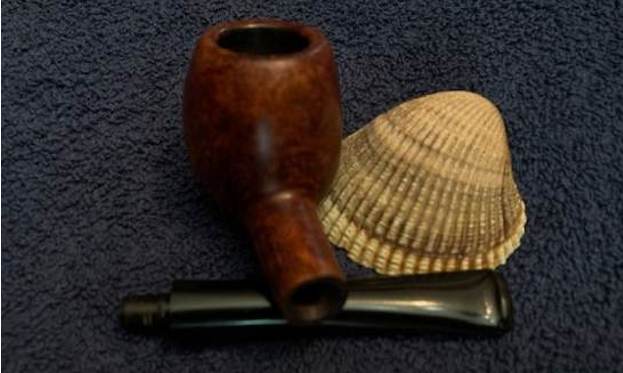
 I started my work on the pipe by working on the darkening and damage on the inner edge of the rim. I used a folded piece of 220 grit sandpaper to smooth it out and clean it. The finished edges looked much better.
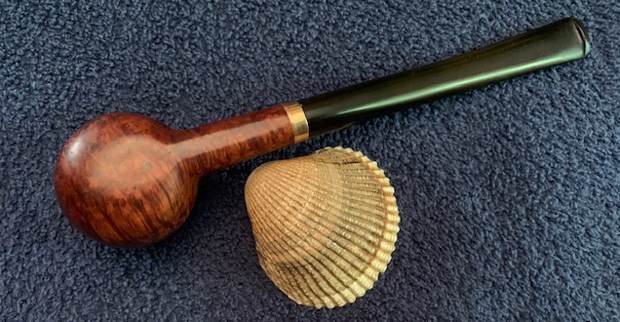
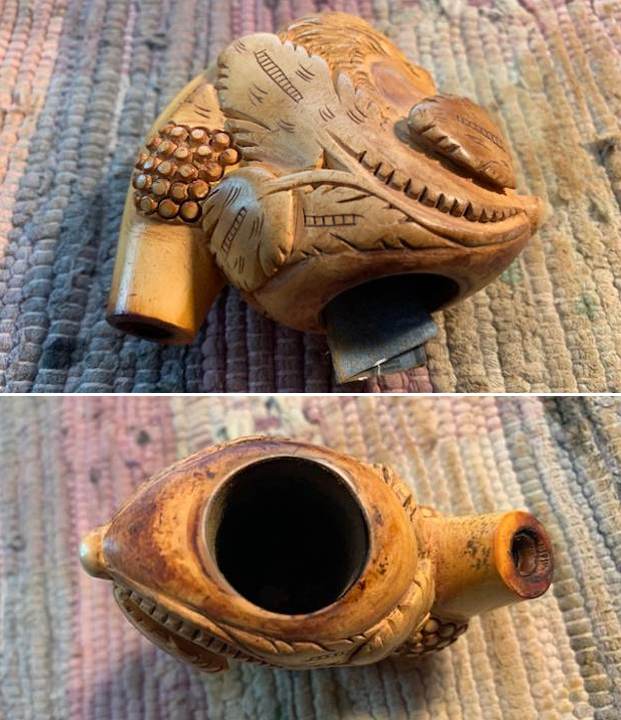 I went through my can of stems and found several that looked like they would work. I settled on gold/amber fancy turned acrylic stem that had a bone tenon in place. It would look great but had a few tooth marks and chatter on the top and underside of the stem.
 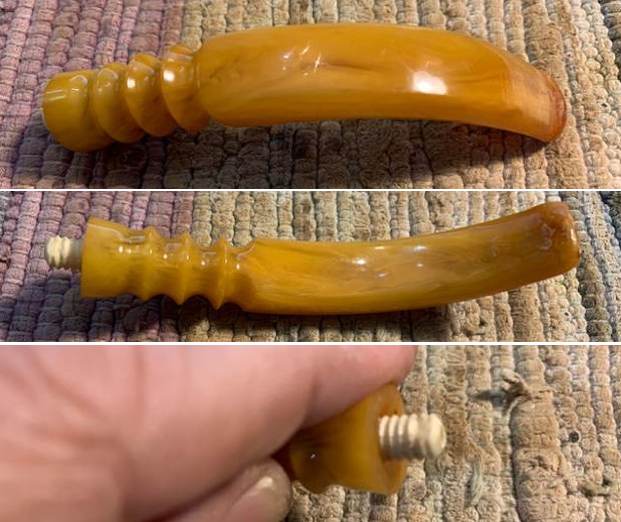 I filled in the tooth marks on the button edge and surface of the stem on both sides with clear CA glue. I set it aside to let the repairs cure. Once they had cured I reshaped the button edges and top with a small file. I smooth it out further and reshaped it with 220 grit sandpaper. I started the polishing with 400 grit wet dry sandpaper.
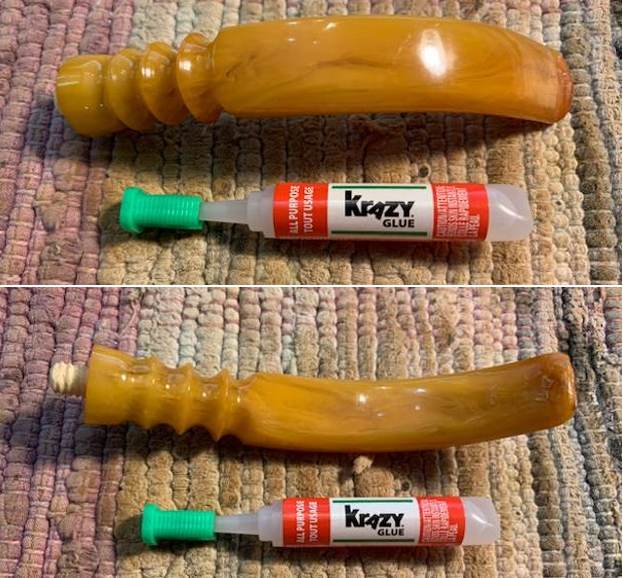
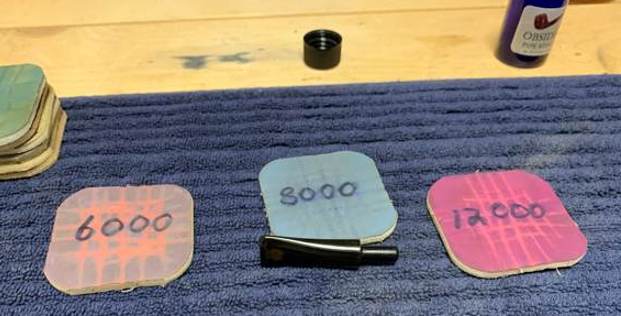
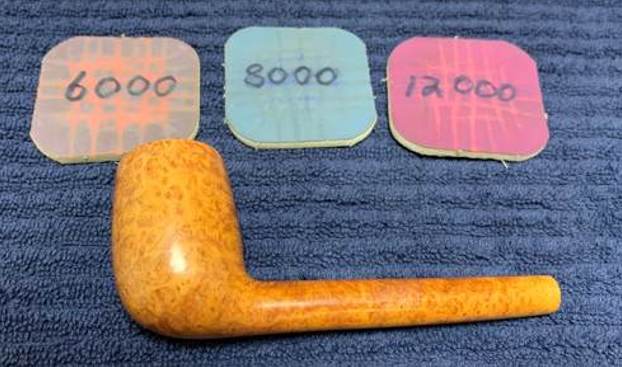
 I polished the stem with micromesh sanding pads – dry sanding with 1500-12000 grit pads. I wiped it down after each sanding pad with a cloth impregnated with Obsidian Oil. I polished it with Before & After Pipe Stem Polish – both Fine and Extra Fine. I gave it a final rubdown with Obsidian Oil and set it aside to cure.
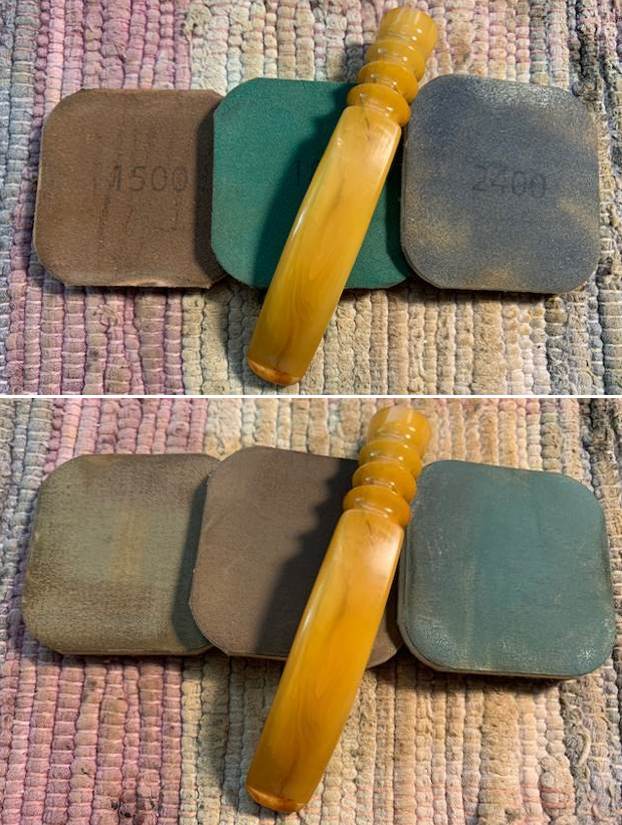
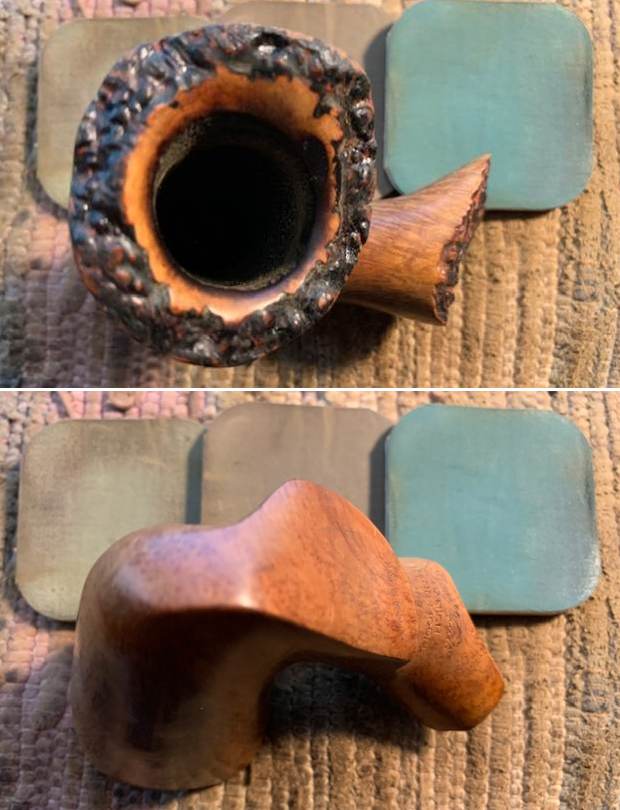
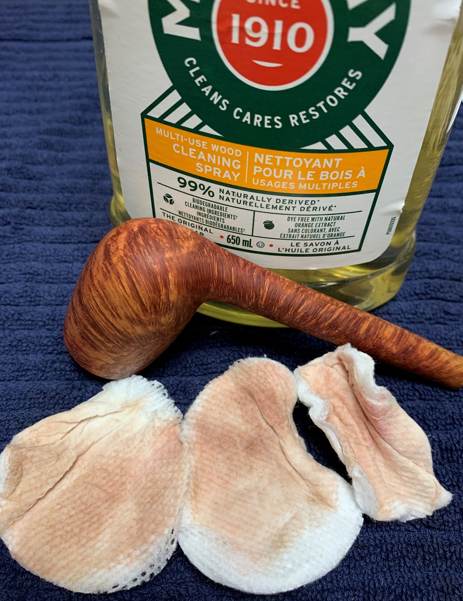
 I set the stem aside and polished the meerschaum with micromesh sanding pads – dry sanding with 1500-12000 grit pads. I wiped it down after each pad with a damp cloth to remove the sanding dust.
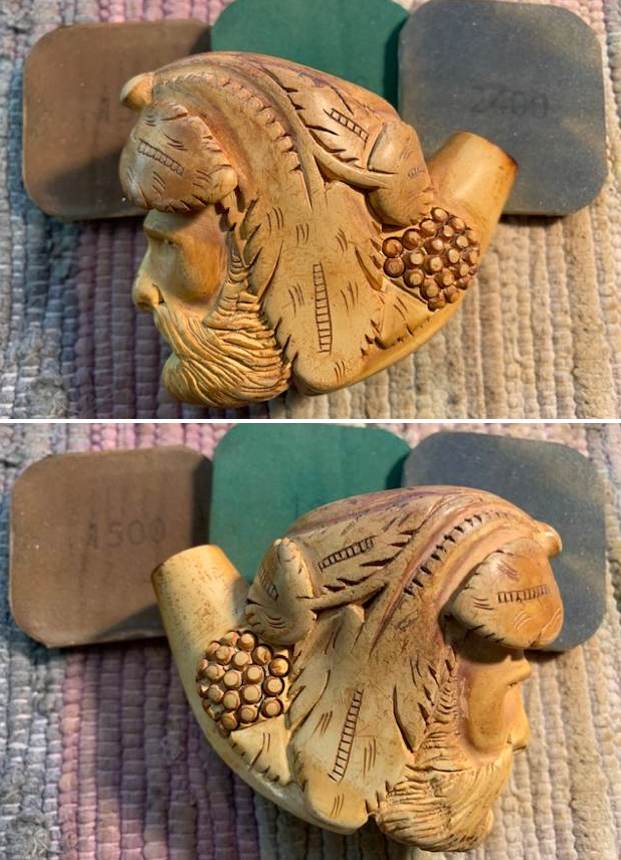
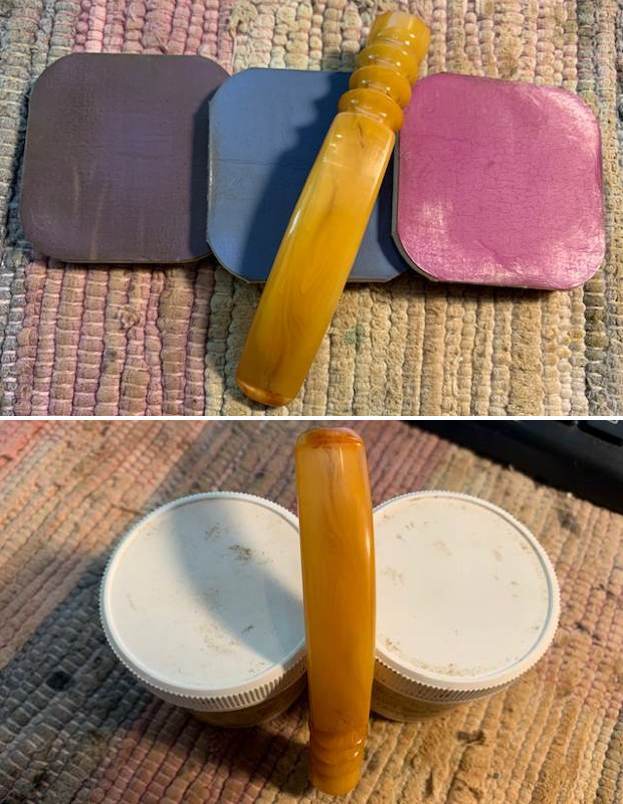
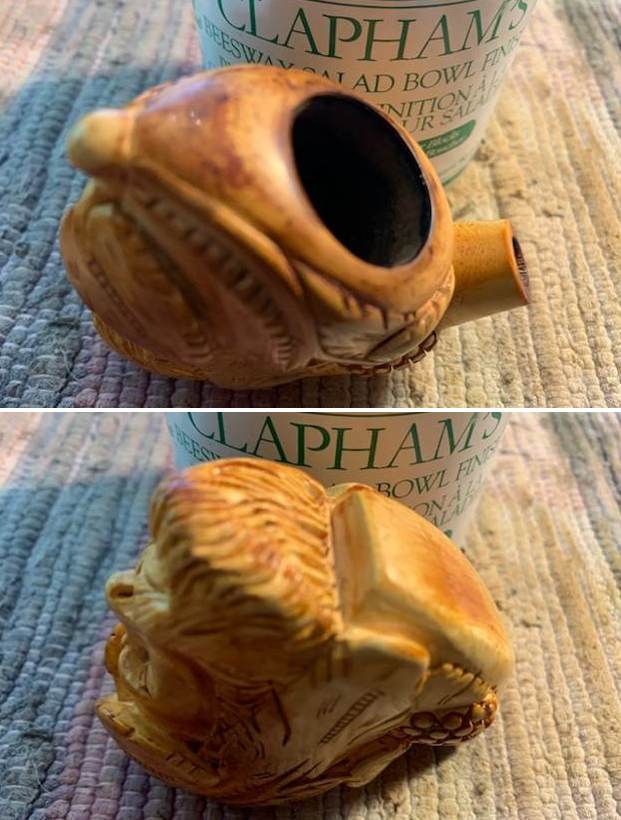
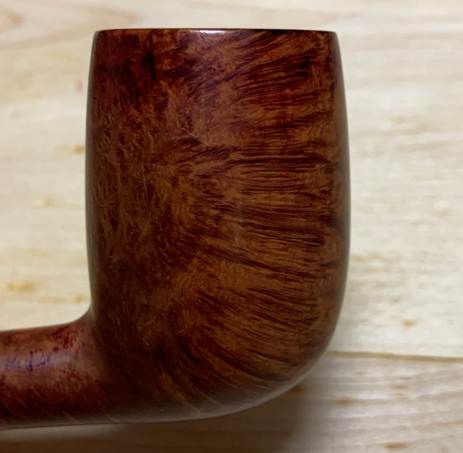
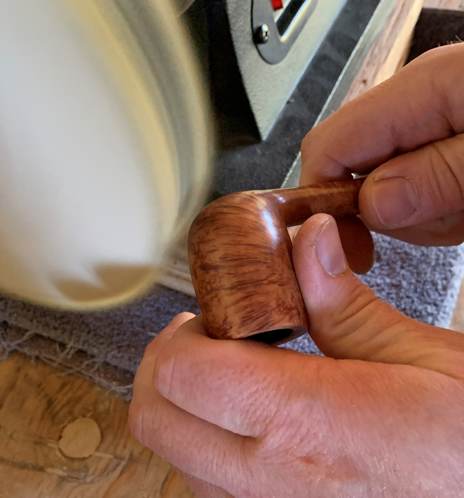
 I worked some Clapham Beeswax Salad Bowl Finish into the meerschaum carving on the bowl. It is a combination of Mineral Oil, Beeswax and Carnauba Wax that works very well on waxing a bowl. I buffed it briskly with a cotton cloth to raise a shine and the bowl looks very good.
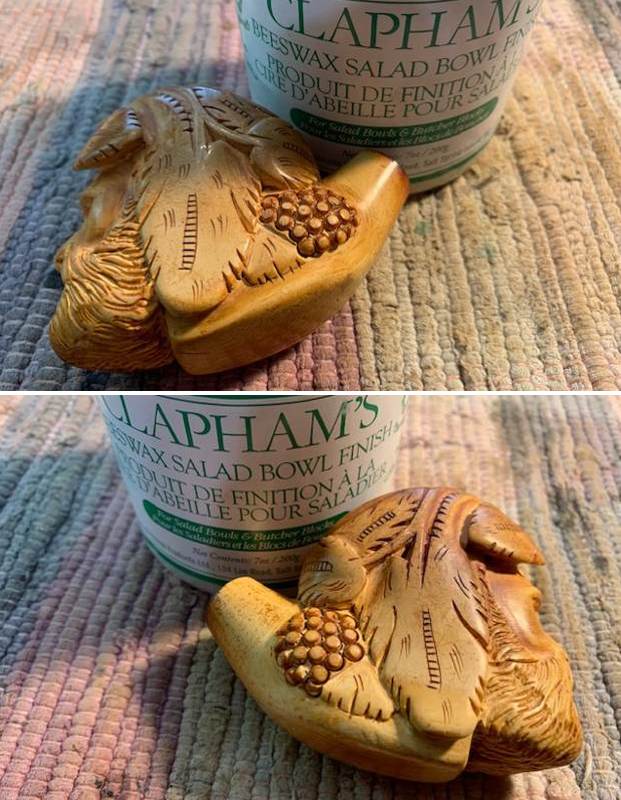
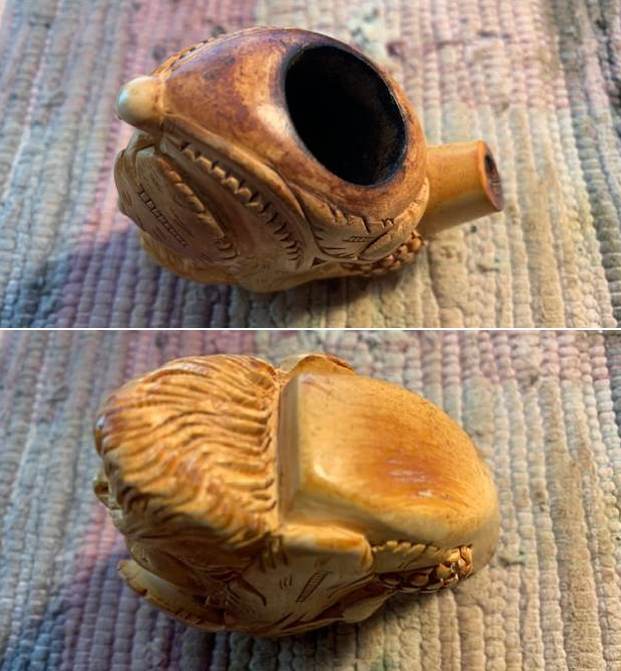
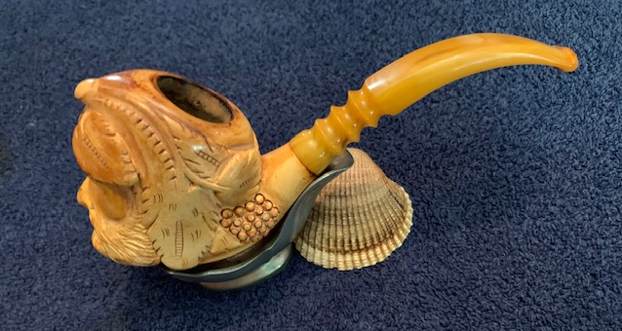
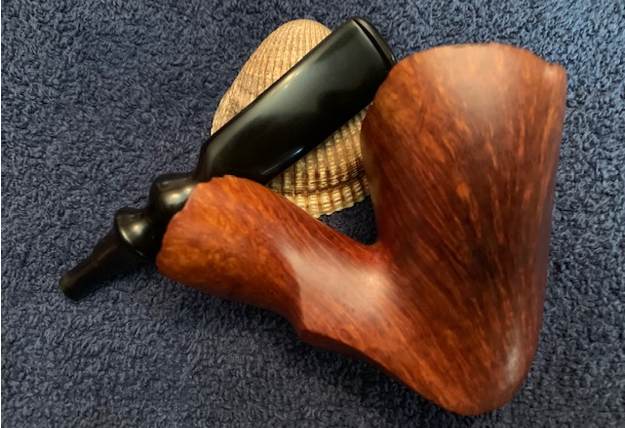
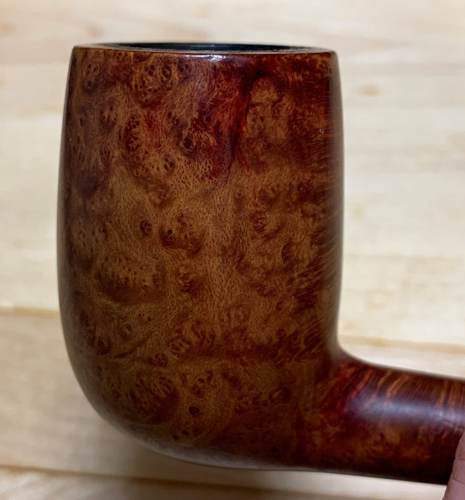
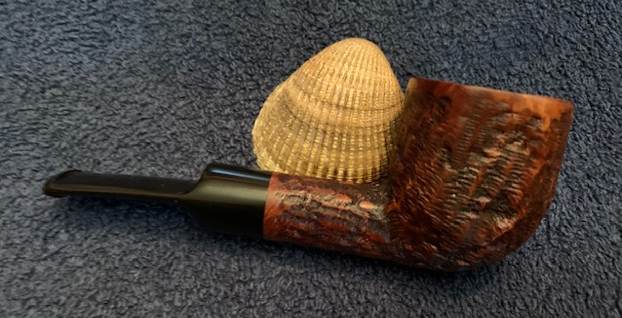
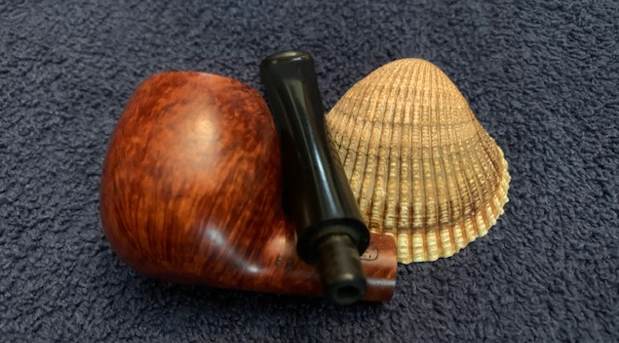
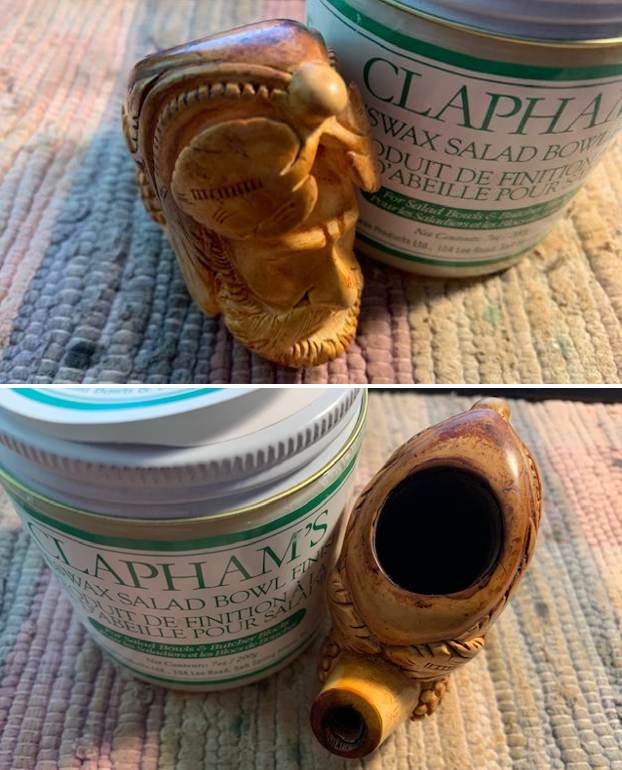 Once again I am excited to finish a pipe that I am working on. I put the nicely patinaed Bent Bacchus Meerschaum back together and buffed it with Blue Diamond on the buffing wheel. I gave the bowl multiple coats of Clapham’s Beeswax and the stem multiple coats of carnauba wax. I buffed the pipe with a clean buffing pad and hand buffed it to raise the shine. It is fun to see what the polished bowl looks like with the patina colouring the meerschaum on the smooth and the grooves of the carving. Added to that the polished golden acrylic fancy saddle stem worked to give the pipe just the right touch. It is light and well balanced. Have a look at it with the photos below. The dimensions are Length: 6 inches, Height: 2 ½ inches, Outside diameter of the bowl: 1 ½ x 2 ¼ inches, Chamber diameter: 7/8 of an inch. The weight of the pipe is 86 grams/3.03 ounces. It is a beautiful pipe and one that will be on the rebornpipes store in the Ceramic and Meerschaum Pipes Section. If you are interested in adding it to your collection let me know. Thanks for walking through the restoration with me as I worked over this pipe. Thanks to each of you who are reading this blog. I remind us all of the fact that we are not pipe owners; we are pipemen and women who hold our pipes in trust until they pass on into the trust of the next pipeman or woman.
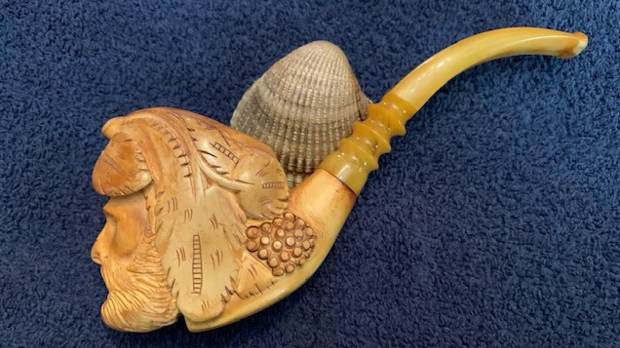


Blog by Steve Laug
Jeff and I no longer remember where or when we purchased this pipe. It is a large attractive Freehand that has all the signs of being a Ben Wade. Sure enough it is stamped on the underside of the shank and reads Ben Wade [over] Danish [over] Hand Model [over] 200 [over] Made in Denmark. The stamping was clear and readable. Even though the finish was dull and lifeless it showed promise under the grit and grime of the years. The finish is filthy with grime and oils ground into the smooth briar of the bowl and shank sides. The bowl had a thick cake that overflowed in heavy lava onto the plateau rim top filling in the grooves and valleys of the finish. The plateau shank end was also dirty with dust and debris in the grooves and valleys of the shank. The vulcanite stem was oxidized, dirty and had some tooth marks and chatter on both sides ahead of the button. I took photos of the pipe before I started working on it.
 I took photos of the bowl and rim top to give a clear picture of the thickness of the cake and the lava on the plateau finish of the rim top. There is dust and debris stuck to the walls of the bowl clearly visible in the photos. I also took photos of the top and underside of the stem to show the chatter and tooth marks.
 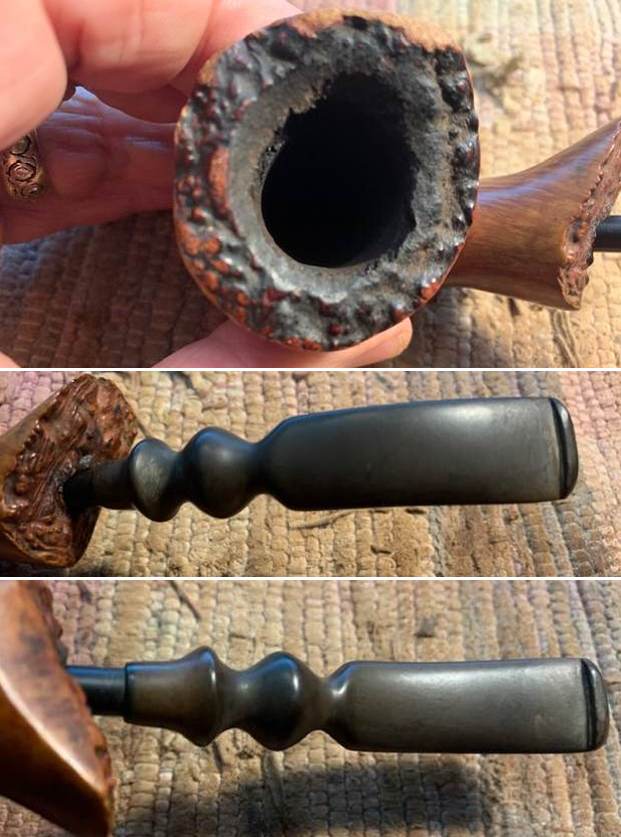 I took a photo of the stamping on the underside of the shank. It is clear and readable.
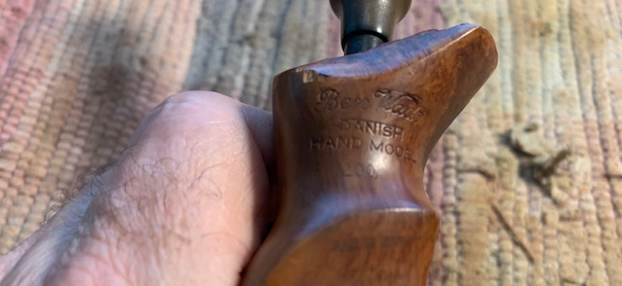 I removed the stem from the shank and took a photo of the pipe. It is proportionally pleasing and quite an eye catching pipe.
 I knew that the Preben Holm pipes were marketed under the Ben Wade label in the US and imported through Lane Ltd. I turned to Pipedia and read the listing on the brand to flesh out the knowledge of the brand (https://pipedia.org/wiki/Ben_Wade). I have included a photo from that site that was taken from a Tinderbox advertisement.
 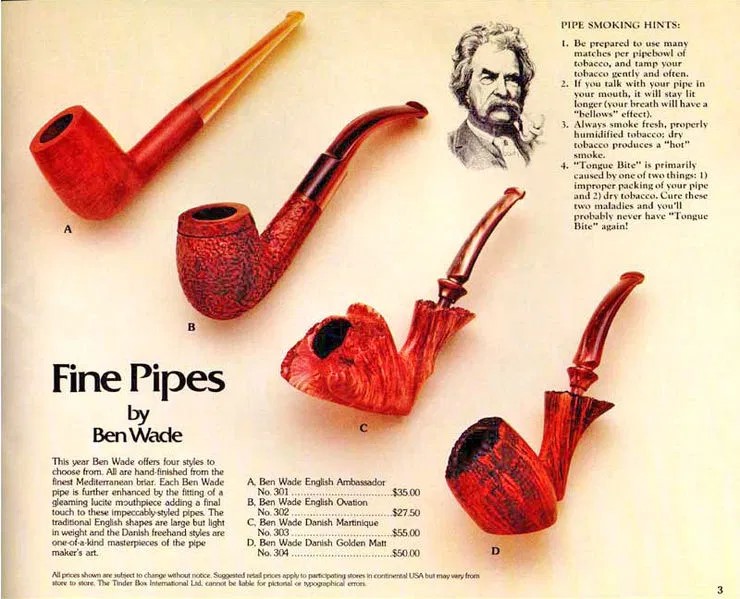 I quote the portion of the article that summarizes the Danish period of the history of the brand:
Young Copenhagen master pipemaker Preben Holm had made a meteoric career heading a pipe manufacture employing 45 people at the age of 22! But around the turn of 1970/71 he was in major financial difficulties. His US distributor, Snug Harbour Ltd. in New York City, left him in the lurch. Holm had three unpaid invoices on his desk and another large shipment was ready for the USA, when Snug Harbour’s manager told him on the phone that there was no money at all on the account to pay him.
So the Dane went to New York for an almost desperate search for a new distribution partner. He made contacts with Lane Ltd. and met Herman G. Lane in February 1971. Lane Ltd. had no interest in Holm’s serial pipes produced at that time but so much the more in the hand-carved freehands because the hype for Danish freehands and fancies in the States was still on its way to the climax then. The meeting resulted in an agreement to start a cooperation. Lane insisted to improve the quality considerably and in return he assured to be able to sell essentially larger quantities.
Holm went back home to work on new samples with all-new designs and altered finishes for Lane. Both, Lane and Holm, agreed that it would be unwise to sell the pipes under Preben Holm’s name as long as Snug Harbour had a considerable stock of Preben Holm pipes and might sell them pipes at very low prices just to bring in some money.
So on Mr. Lane’s proposal it was determined to use the name Ben Wade belonging to Lane Ltd. Lane spent considerable amounts of money for advertising the new brand in the big magazines– the centerpiece being whole-page ads showing a very exclusive Seven Day’s Set.
The cooperation with Lane Ltd. proved to be an eminent business success for both partners. Within a very short time Ben Wade Handmade Denmark sold in much larger quantities and at higher prices than they had ever dreamed of. And the hype these freehands and fancy pipes caused went on unbroken long after Herman G. Lane deceased. Preben Holm – obviously much more brilliant in pipe making than in pipe business – was in major troubles again in 1986 and had to sack most of his staff. The Ben Wade production was significantly lowered but continued until his untimely death in June of 1989.
Up to now Preben Holm made Ben Wade pipes are cult and highly sought for on the estate markets.
With that information my initial thoughts were confirmed. This pipe was a Preben Holm made Freehand distributed in the US by Lane Ltd under the name Ben Wade. The freehand rage occurred in the late 70s and the pipes were made until Preben’s death in 1989. My guess would be that this pipe was made sometime during that time period and potentially in the late 70s.
I started my work on the pipe reaming the thick cake out of the bowl with a PipNet pipe reamer using all four reaming heads. I cleaned up the reaming with a Savinelli Fitsall Pipe Knife and then sanded it with 220 grit sandpaper wrapped around a piece of dowel. I sanded until the walls of the bowl were smooth and clear. It was getting cleaner but the plateau and rim top still have a lot of lava on the top that needs to be cleaned off. 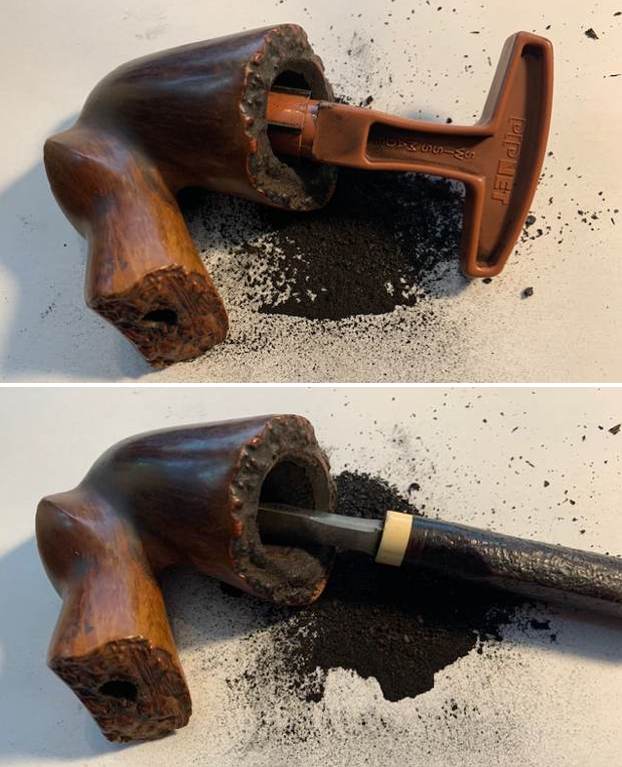
 I worked on the rim top with a brass bristle wire brush to remove as much of the lava buildup there. I was able to remove some of it and loosen it so that when I scrubbed it it would look better.
 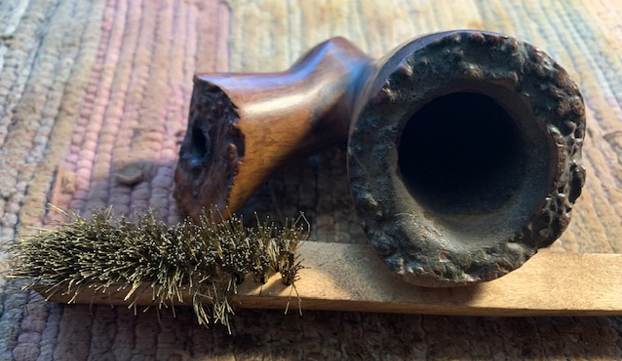 I worked on the smooth inner edge with 220 grit sandpaper. I worked to remove as much of the darkening and tars as I could possible with the sandpaper. I loosened the debris with the sandpaper so that when I scrubbed it with the soap it would look better.
 Now it was time to let the Murphy’s Oil Soap do its magic. I scrubbed the bowl and shank with undiluted soap and a tooth brush and rinsed it off with running water. I worked on the plateau rim top and smooth briar to clean up the dust and debris in the finish. While the rim top looked better it still needed some more work to remove the darkening on the top and edges of the bowl.
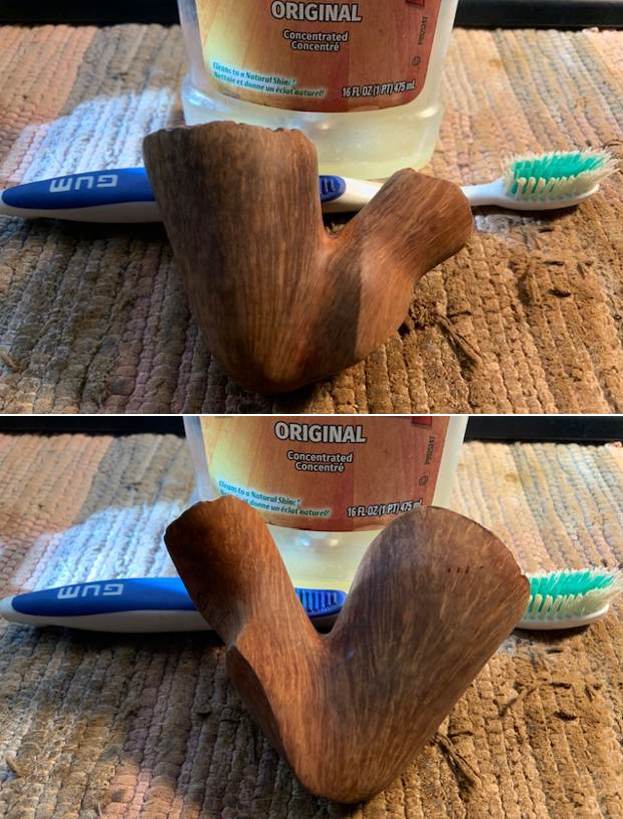
 I touched up the black in the valleys of the plateau on the top and the end of the shank with a Black Sharpie Pen. It matched the existing black in the crevices/valleys. When finished it definitely looked good.
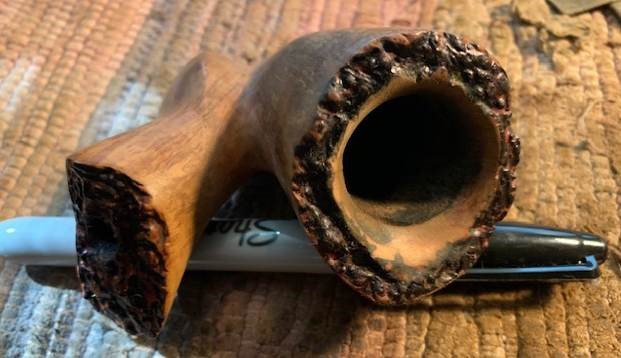 I lightly sanded it with 220 grit sandpaper to remove the remaining darkening and it looked very good.
  I cleaned out the inside of the shank and the stem with 99% isopropyl alcohol, cotton swabs and pipe cleaners. It was quite dirty inside the shank and airway in the stem. It came out very clean and looks very good.
 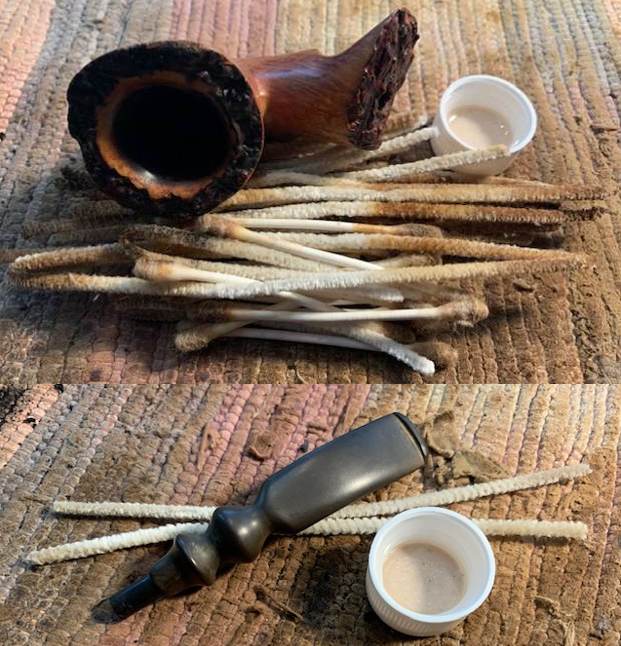 I polished the briar with micromesh sanding pads – dry sanding it with 1500-12000 grit pads. I wiped the briar down with a damp cloth to remove the sanding dust. The briar really took on a rich shine with the polishing.
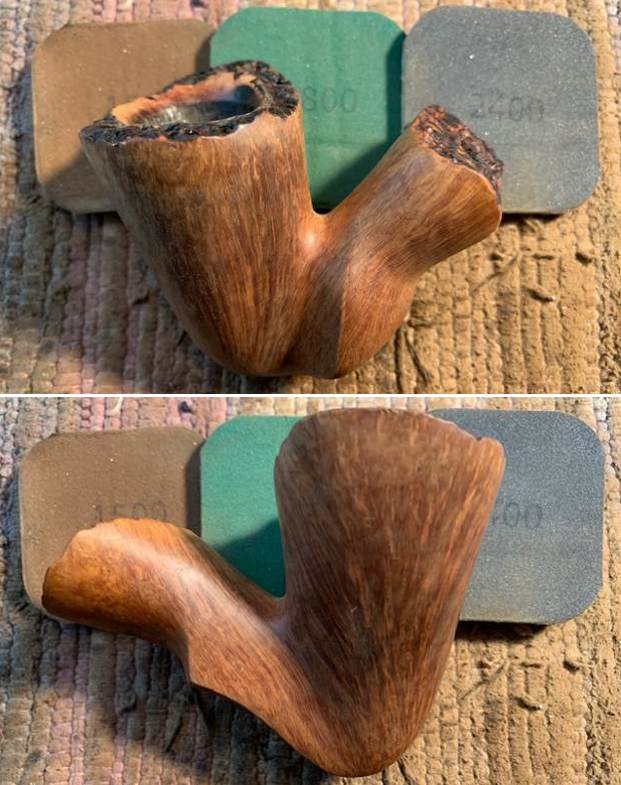
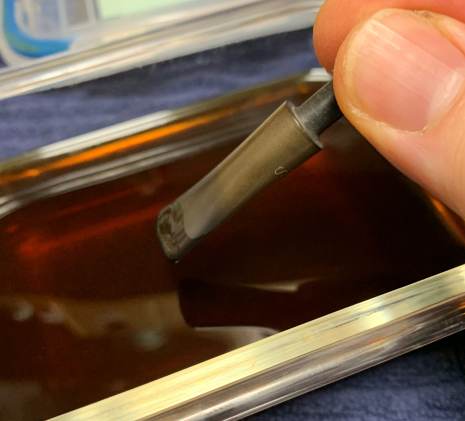
 With the bowl and shank clean there was still a strong ghost of aromatics wafting from the clean bowl. I decided to deghost it with cotton bolls and isopropyl alcohol. I stuffed the bowl with the cotton bolls and used an ear syringe to fill it with alcohol. I twisted a cotton boll and made a wick to insert in the shank. In the morning when I checked it the cotton was brown in the bowl and the wick in the shank is dark with oils. The alcohol had done its job.
 I rubbed the bowl down with some Before & After Restoration Balm. I worked it into the briar with my finger tips to clean, revive and preserve the wood. It really brings the grain alive once again. I let it sit for 15 minutes then buffed it off with a soft cloth. The grain really pops at this point in the process.
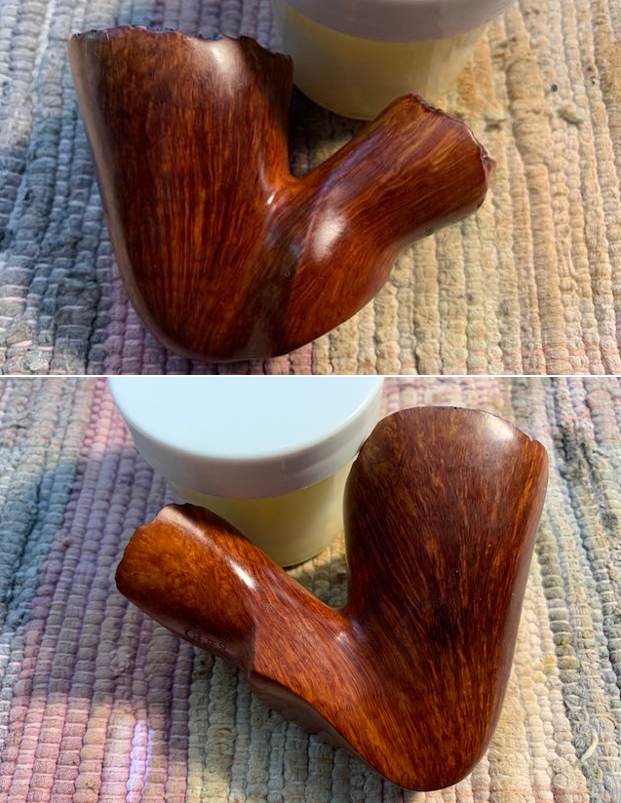
 I set the bowl aside and turned my attention to the stem. I scrubbed it with Soft Scrub and cotton pads to remove the oxidation as much as possible. It took a bit of elbow grease but it was significantly cleaner when I was finished.
 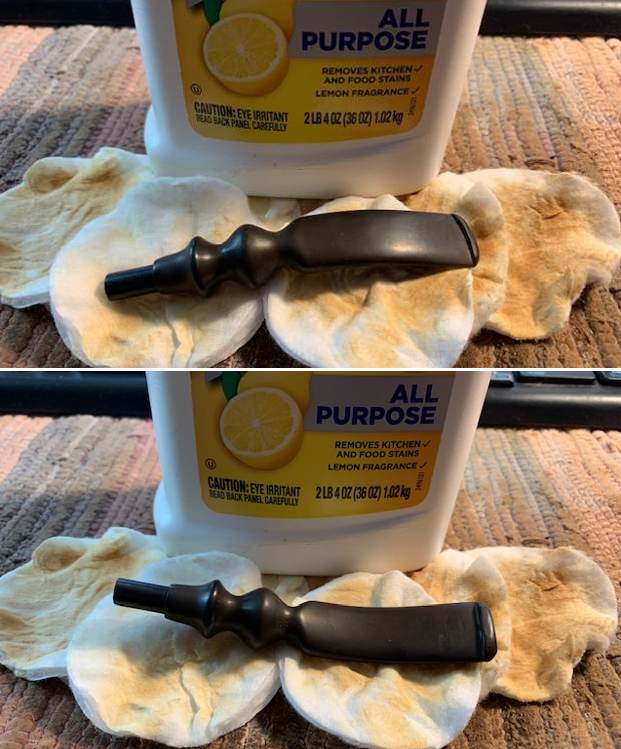 I sanded the tooth marks and chatter out around the button with 220 grit sandpaper and started the polishing with 400 grit wet dry sandpaper.
 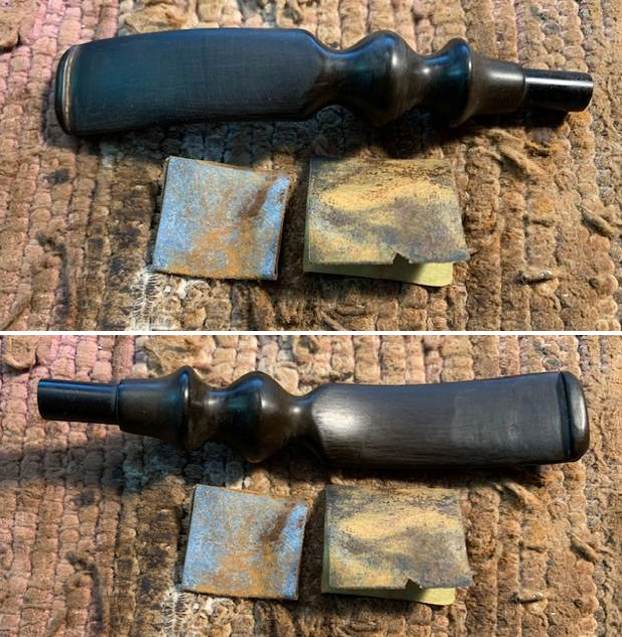 I polished the stem with micromesh sanding pads – 1500-12000 grit pads. I wiped the stem down after each pad with a cloth impregnated with Obsidian Oil. I finished the polishing with some Before & After Pipe Stem Polish – both Fine and Extra Fine. I wiped it down a final time with Obsidian Oil. The stem looked very good.
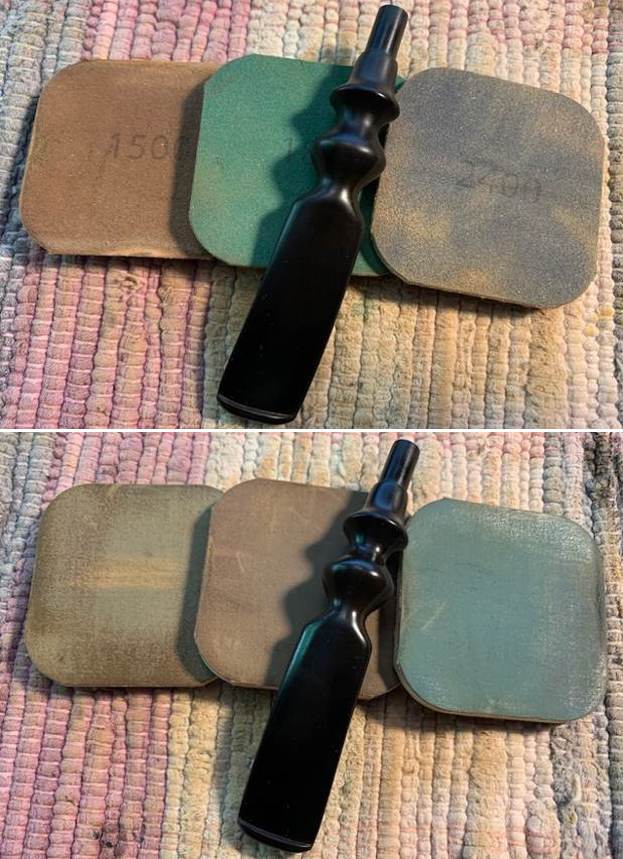
 As always I am excited to finish a pipe that I am working on. I put the Ben Wade Hand Model 400 Made in Denmark Freehand back together and buffed it with Blue Diamond on the buffing wheel. I gave the bowl and the stem multiple coats of carnauba wax. I buffed the pipe with a clean buffing pad and hand buffed it to raise the shine. It is fun to see what the polished bowl looks like with the grain popping through on the smooth portions and the variety of colour in the rustication. Added to that the polished vulcanite fancy saddle stem was a beautiful touch. It is light and well balanced. Have a look at it with the photos below. The dimensions are Length: 6 ½ inches, Height: 2 ¾ inches, Outside diameter of the bowl: 1 ¾ inches, Chamber diameter: 1inch. The weight of the pipe is 65 grams/2.26 ounces. It is a beautiful pipe and one that will be on the rebornpipes store in the Danish Pipe Makers section. If you are interested in adding it to your collection let me know. Thanks for walking through the restoration with me as I worked over this pipe. Thanks to each of you who are reading this blog. I remind us all of the fact that we are not pipe owners; we are pipemen and women who hold our pipes in trust until they pass on into the trust of the next pipeman or woman.
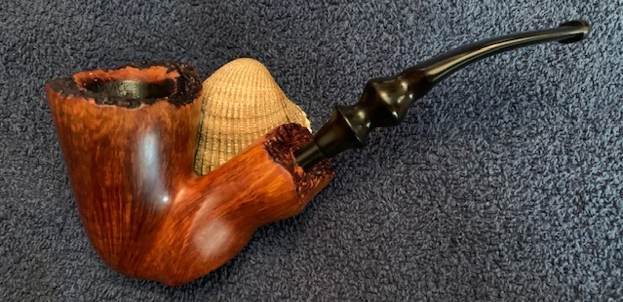


by Kenneth Lieblich
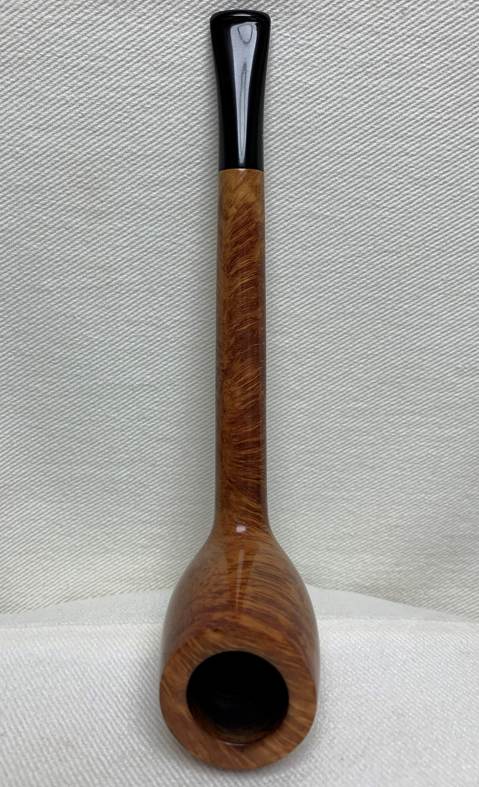
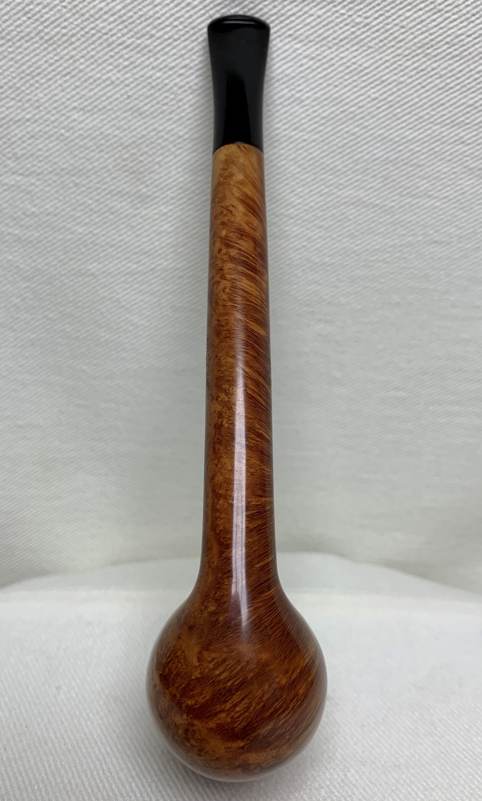
Next on the chopping block is beautiful Danish pipe from Stanwell. I acquired it locally from the estate of an old boy who kept a lovely collection of pipes. The shape of this pipe is a Liverpool – a member of the Canadian pipe family. For some reason, the Liverpool is far less common than the Canadian. Both types have a shank length 1½ to 2 times the height of the bowl. The difference between the two is as follows: the Canadian has an oval-shaped shank whereas the Liverpool has a round-shaped shank. This Stanwell Liverpool is so charming that I was tempted to keep for myself, but, as a life-long Manchester United fan, I cannot have anything named Liverpool in my home! 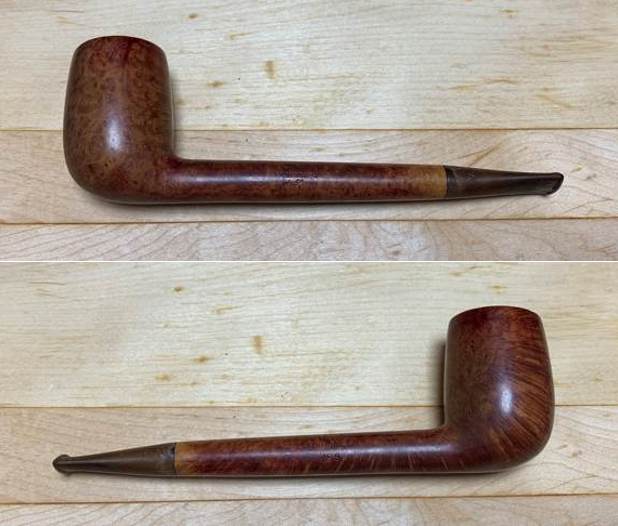
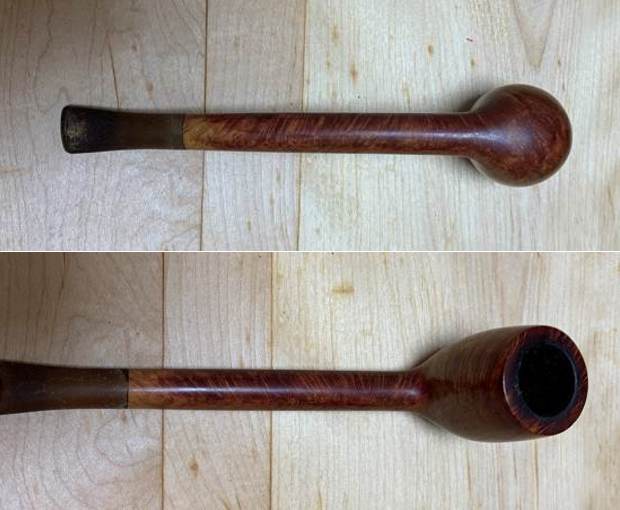 As I mentioned, this is a Stanwell de Luxe 298 Liverpool. It has beautiful briar from the bowl all the way down the long shank to a short-but-elegant stem. The left side of the shank reads Stanwell [over] Regd. No. 969-48 [over] de Luxe. The right side of the shank reads Fine Briar [over] 298. Finally, the stem’s left side also has the trademark S of the Stanwell company. Of course, 298 refers to the model number and I went to check the list of Stanwell shapes, here on Reborn Pipes. There was no 298 on this list. Hmm.
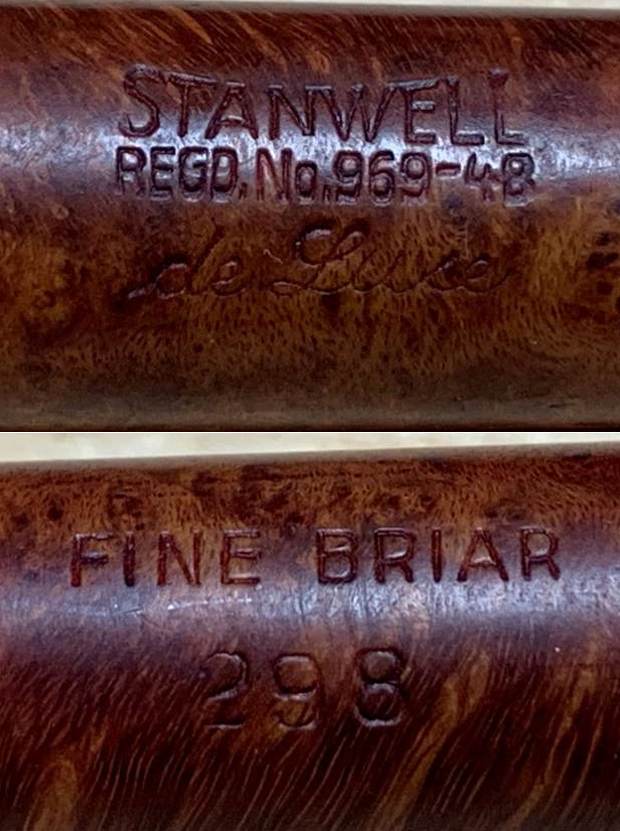
 Well, I did find some images from an old Stanwell catalogue (rather vaguely dated as 1960-70). The image below does not mention a shape “298”, but it does show a “98” which looks very similar to the pipe I have. I am assuming that there is a connection.
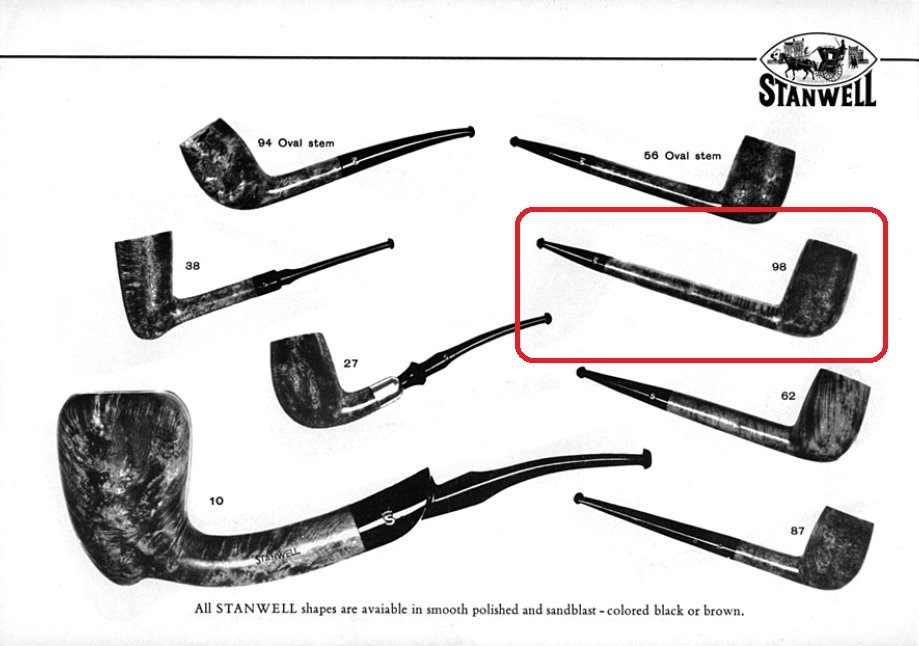 I know from information at Pipephil that the pipe I have is certainly more than 50 years old – and this corresponds to the catalogue above. My pipe has both the “Regd. No.” and the S logo without a crown. This screen capture explains that clearly.
 Meanwhile, Pipedia has a good amount of information on the Stanwell brand and its history. I c
 ertainly recommend looking it over: https://pipedia.org/wiki/Stanwell.
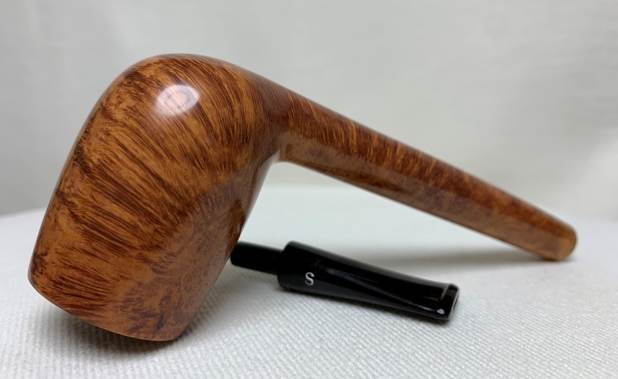
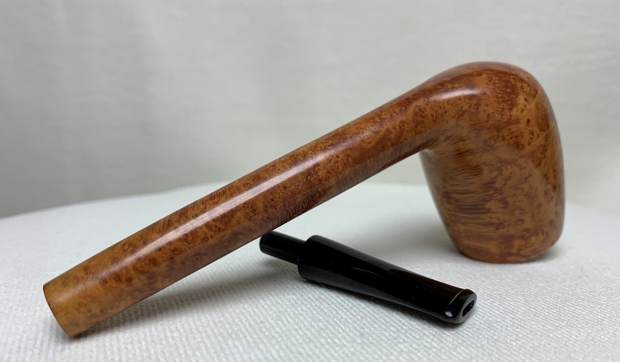
Anyway, this really is a good-looking pipe. No major issues to resolve – just a few minor ones. The stem was dirty, though not too beat up. There were some small scratches and a couple of bite marks, as well as some oxidation and calcification on the vulcanite.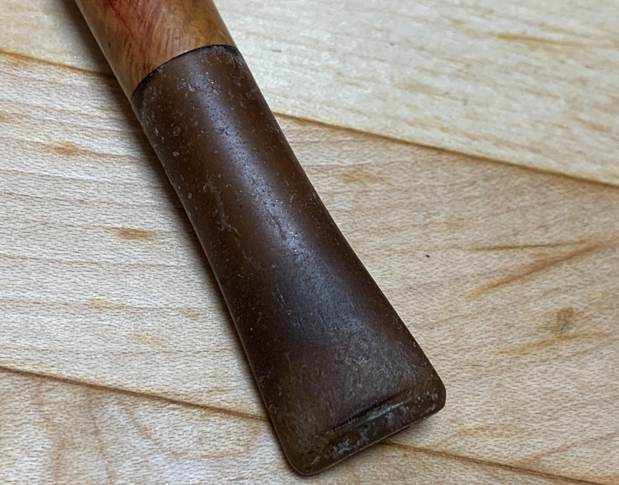
 The rim on the stummel was blackened and a bit burnt – that would need to be addressed. The insides were fairly dirty and would need some work to clean out. In addition, there was a strange colour to the wood that just wasn’t right.
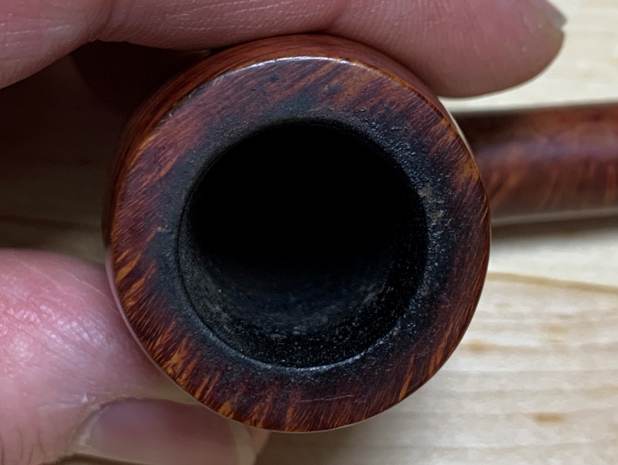
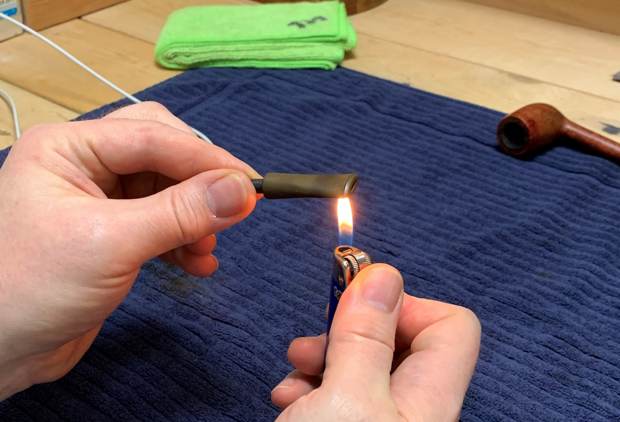
 The stem was first on my list. I wiped down the outside of the stem with Murphy’s Oil Soap on some cotton pads. There was enough calcification on the stem that I decided to take a blade and gently scrape it off. I also took a BIC lighter and ‘painted’ the stem with its flame in order to lift the bite marks and dents. Unfortunately, this didn’t really work, but I have ways of sorting this out.
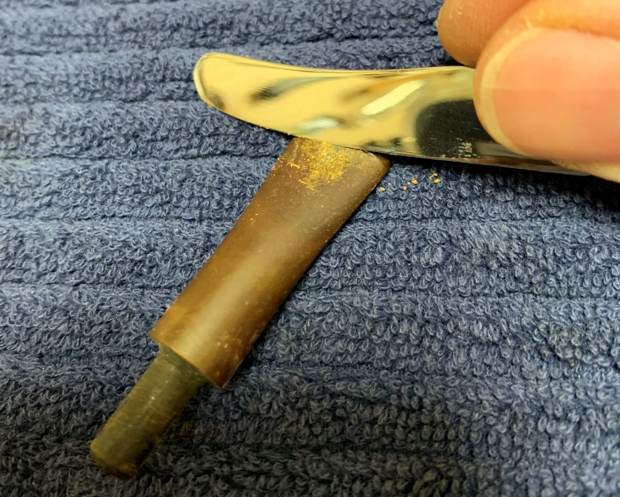
 Then, I cleaned out the inside with pipe cleaners and isopropyl alcohol. It wasn’t too dirty and only required a few pipe cleaners.
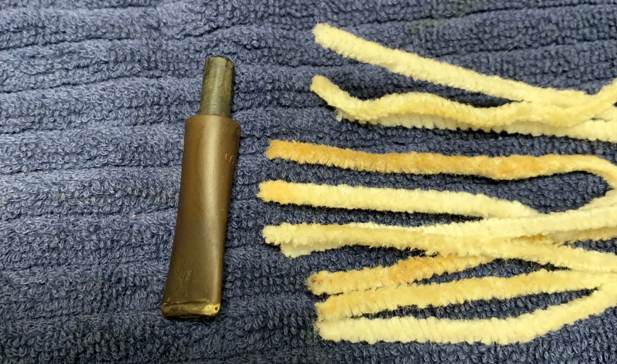 I then wiped down the stem with SoftScrub cleaner to remove some surface oxidation. Once this process was done, the stem went for an overnight soak in the Pipe Stem Oxidation Remover. As the name suggests, this liquid removes oxidation, but, more than anything, it helps draw oxidation to the surface of the vulcanite. This allows me to clean the oxidation off in a couple of ways: both by applying a mild abrasive cleaner to the surface, then by sanding the stem.
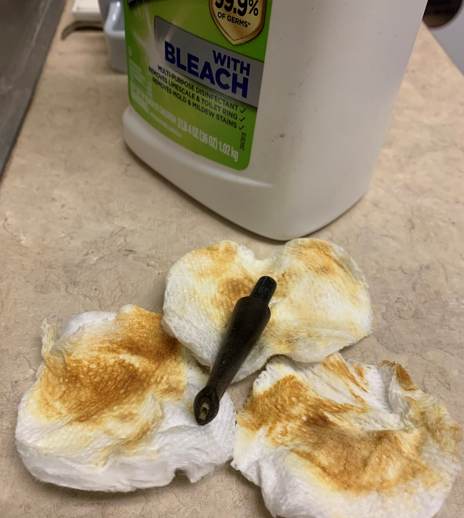
 The next day, I used SoftScrub again with some cotton rounds and, as you can see, more revolting colour came off the stem.
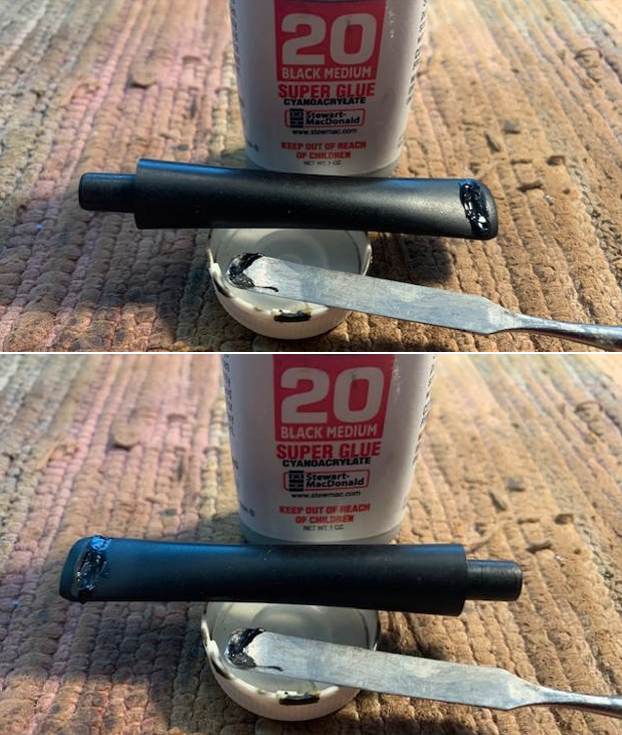
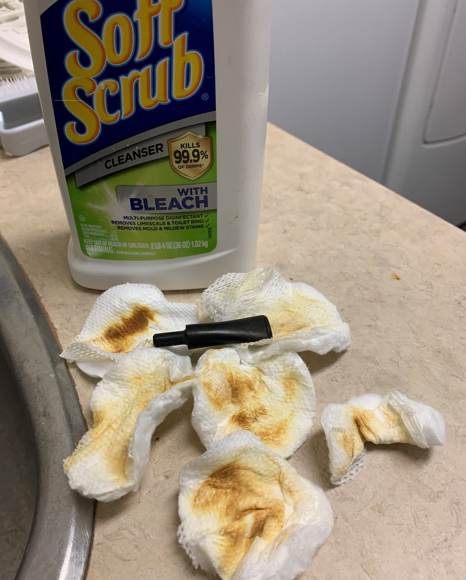 The bite marks on and around the button had to be dealt with, so I whipped out my black cyanoacrylate adhesive to fill those in and let them fully cure.
 After curing, I used some nail polish to restore the letter S on the stem. I painted the area carefully and let it fully set before proceeding.
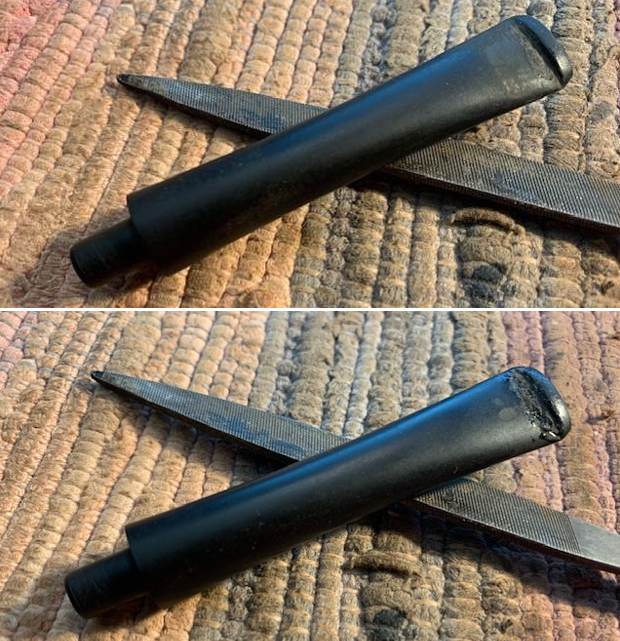
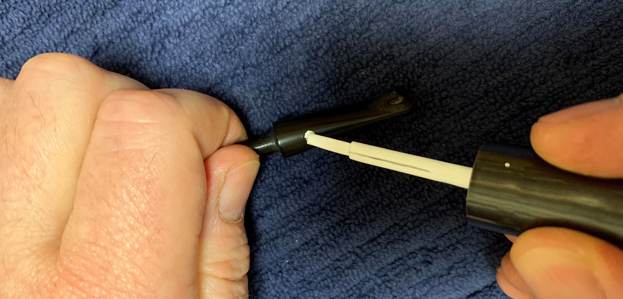 For sanding the adhesive, I used 220- and 400-grit sandpapers to meld seamlessly into the stem. Then I used a set of nine Micromesh pads (1,500 through 12,000 grit) which gradually erased the ravages of time and brought out the stem’s lovely black lustre. For the last five pads, I also lightly coated the stem with Obsidian Pipe Stem Oil in between each scrubbing. At last, I set the finished stem aside.
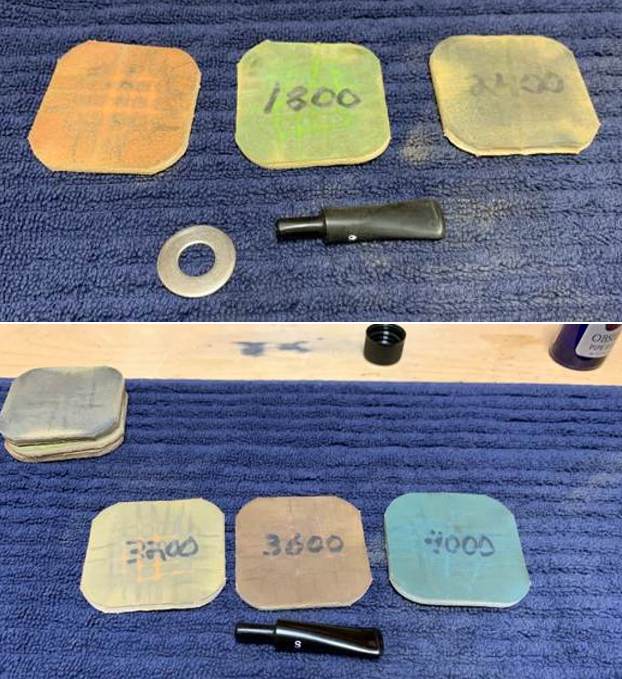
 Off to work on the stummel! The bowl needed a bit of reaming, so I used the PipNet Reamer to scrape off the built-up cake and I followed that with 220-grit sandpaper taped to a dowel to eliminate as much as possible. Generally, I prefer to sand the chamber down to bare briar. When restoring, it is important to ensure that there is no damage to the briar in the bowl, under the cake. Fortunately, there were no hidden flaws to the briar on this pipe.
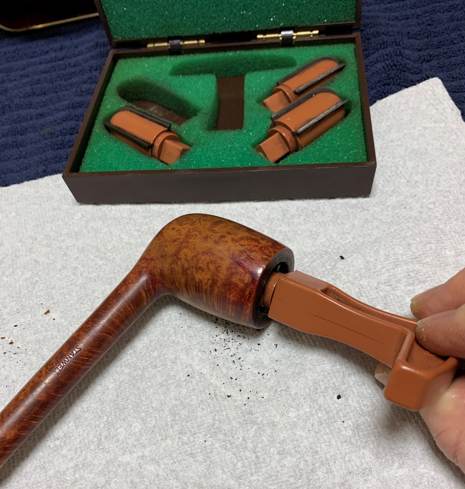
 I then proceeded to clean out the insides of the shank with Q-tips, pipe cleaners, and lemon-infused isopropyl alcohol. There was a bit of filth inside this stummel and it took a fair amount of cotton to get it clean. I followed that up by cleaning the insides with some dish soap and tube brushes.
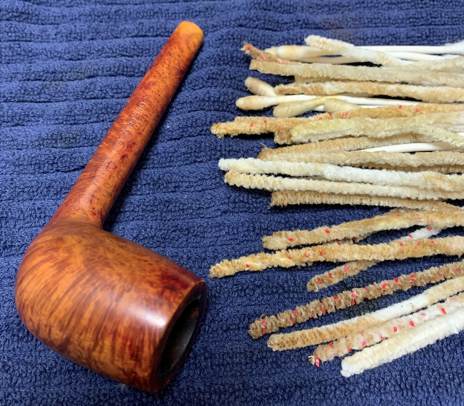
 I decided to de-ghost the pipe in order to remove any lingering smells of the past. I thrust cotton balls into the bowl and the shank and saturated them with 99% isopropyl alcohol. I let the stummel sit overnight. This caused any remaining oils, tars and smells to leach out into the cotton. The bowl was nice and clean after this.
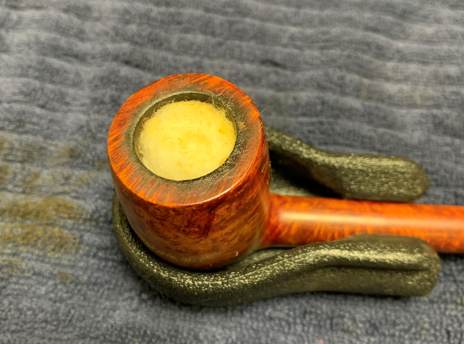
 I used cotton rounds and some Murphy’s Oil Soap to scrub the outside of the stummel and a toothbrush with Murphy’s for the lava on the rim of the pipe.
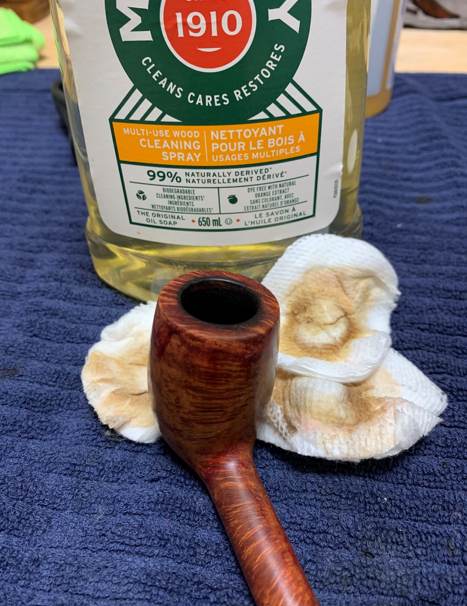
 With the lava on the rim removed, I could see that the burn marks remained (see the photo below).
 In order to remove the remaining burns, I “topped” the pipe – that is to say, I gently and evenly sanded down the rim on a piece of 220-grit sandpaper. I enhanced this further by running the same sandpaper along the inside edge of the rim and creating a very subtle (and beautiful) chamfer. This effectively removed the damage, without altering the look of the pipe. This is always a tricky business – I want to find the balance between removing old burns and maintaining as much of the pipe as possible. But I believe that the photos at the end of this blog show that I got the balance right.
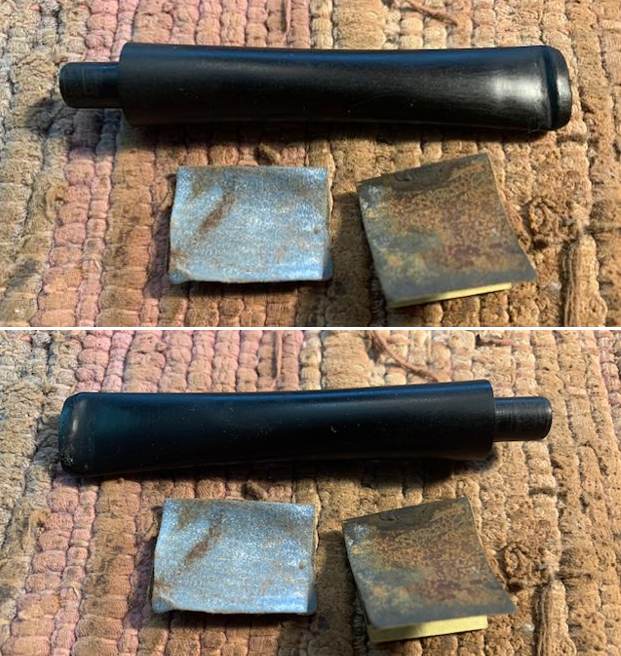
As I mentioned earlier, there were some remnants of an oxblood-like stain on the wood. I’m not sure if this was the original colour of the pipe or if it was added later, but – regardless – it didn’t look good at all. I hoped (and expected) that sanding would help this problem. I used all nine Micromesh pads (1,500 through 12,000 grit) on the stummel to make it lovely and smooth. 
 However, not all of the colour was gone, so I removed it with 99% isopropyl alcohol and other stuff I had on hand. It looked so much better with that colour gone.
At this point, I rubbed some Before & After Restoration Balm into the briar and left it to sit for 10 or 15 minutes. I brushed it with a horsehair brush and buffed it with a microfibre cloth. The BARB does wonderful things to the wood, and I really like the natural colour of the briar. 
 Finally, it was off for a trip to the bench polisher. A dose of White Diamond and a few coats of carnauba wax were the perfect complement to the briar. The lovely shine made the wood look absolutely beautiful. This pipe is elegant, light, and incredibly comfortable to hold.
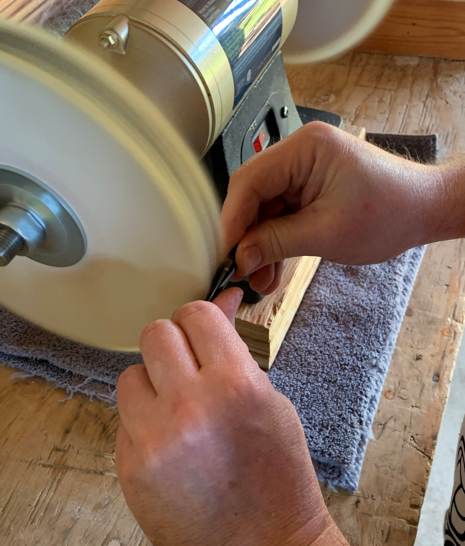
 I thoroughly enjoyed bringing this Stanwell de Luxe 298 Liverpool back to life and I am pleased to announce that this pipe is for sale! If you are interested in acquiring it for your collection, please have a look in the “Danish” pipe section of the store here on Steve’s website. You can also email me directly at kenneth@knightsofthepipe.com. The approximate dimensions of the Stanwell are as follows: length 6 in. (152 mm); height 2 in. (50 mm); bowl diameter 1⅛ in. (29 mm); chamber diameter ¾ in. (19 mm). The weight of the pipe is 1⅛ oz. (33 g). I hope you enjoyed reading the story of this restoration as much as I enjoyed restoring it. If you are interested in more of my work, please follow me here on Steve’s website or send me an email. Thank you very much for reading and, as always, I welcome and encourage your comments.


Blog by Steve Laug
Jeff and I no longer remember where or when we purchased this pipe. It is a large rusticated saddle stem Billiard with panel sides. It is stamped on the left side of the shank and reads Courtley [over] Imported Briar. The stamping was clear and readable. There was no other stamping on the other sides of the shank. I am not sure if Jeff even had this pipe on his table. Perhaps it is one that came to me in a trade. I have no clear memory of that. However, the bowl appeared to have been lightly reamed but the shank was dirty and the a light cake remained. The rim top and briar were dusty but clean. There was some darkening on the back top of the rim but the inner edge looked good. The vulcanite saddle stem is clean but has some tooth marks on the top and underside ahead of the button. I took some photos of the pipe before I started my work on it. 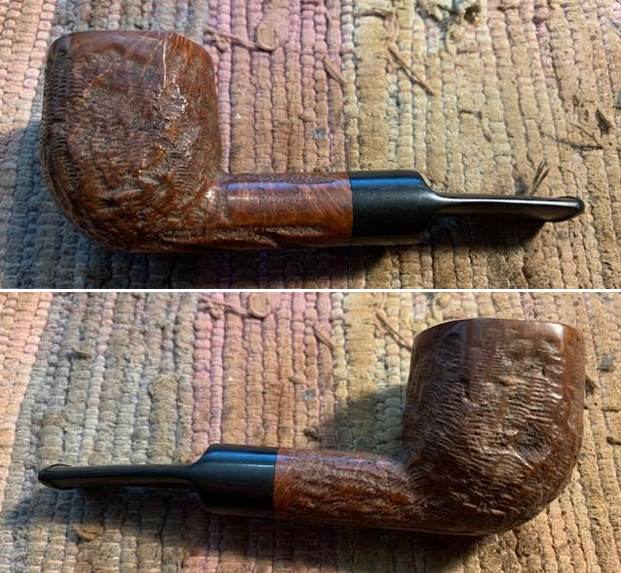
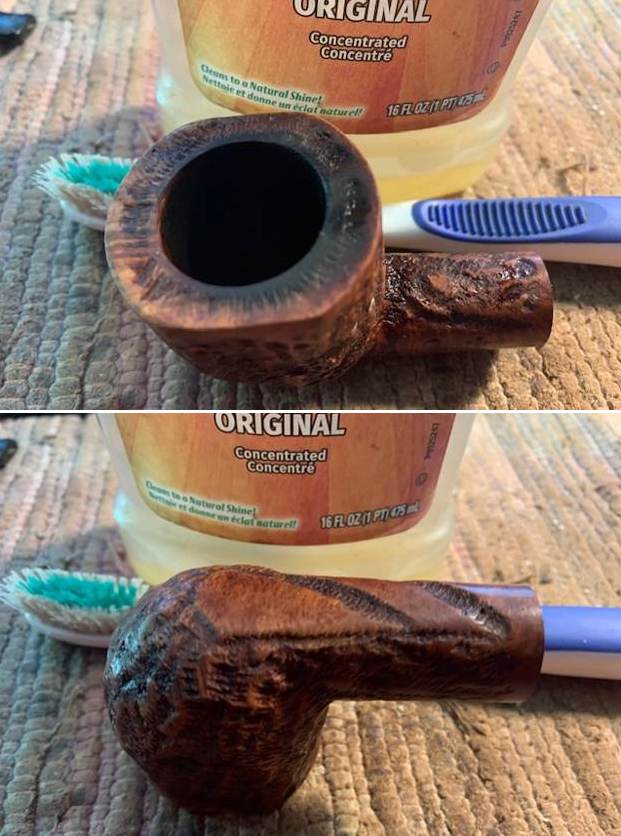
 I took photos of the bowl and rim top to show the condition of both. The bowl is very clean but you can see some darkening on the inner beveled edge. There was some slight darkening was also on the rim top and inner edge on the back of the bowl. I took photos of the stem as well to show the tooth marks on the top and underside ahead of the button and on the button surface as well.
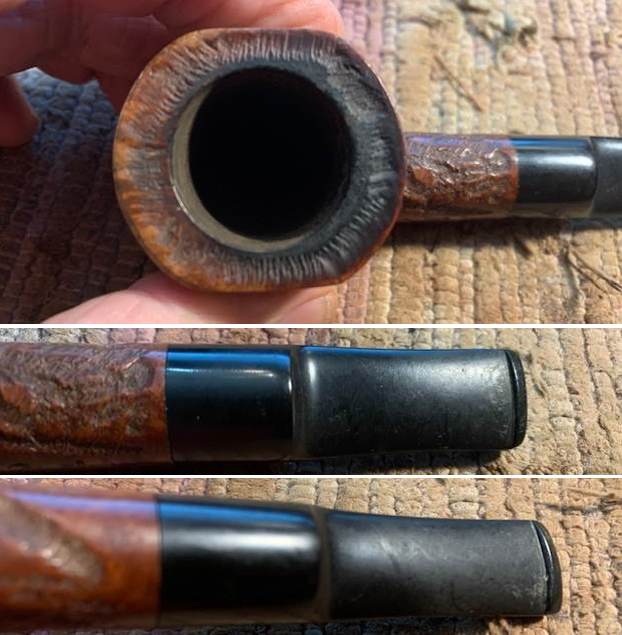 I took a photo of the stamping on the left side of the shank. The stamping on the left side is clear and very readable.
 I removed the stem from the shank and took a photo of the pipe. It is proportionally pleasing and quite an eye catching pipe.
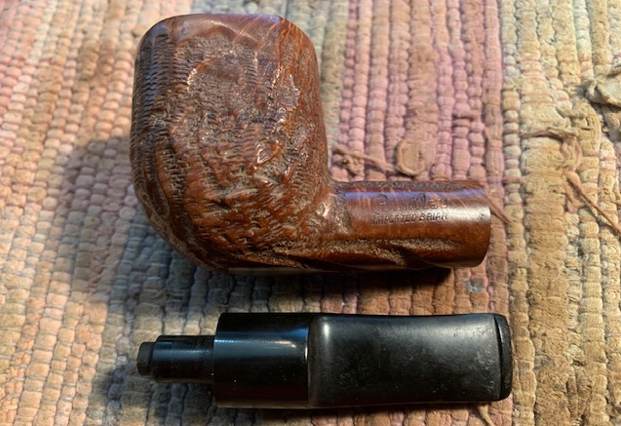 I knew that there was connection between Courtley Imported Briar and Custombilt but I was not 100% certain of the nature of the connection. So I turned to Pipedia to see what I could find out about my supposed connection (https://pipedia.org/wiki/Courtley). I quote from the site in full below and follow that with a screen capture of a catalogue page from the site that was provided on the PipesMagazine.com pipe forum by member “ichbinmuede” – to whom, thanks.
Courtley was a sub-brand or second of Custom-Bilt and quite inexpensive, retailing for $1.79 in 1957. However, His Nibs was another Custom-Bilt sub-brand or second that was even cheaper, retailing for $1.00 the same year.
Below is an ad from Rogers Imports Catalog of 1957, showing different Courtley shapes for sale, describing Courtley as an economical version of the distinctive Custombilt Pipe (as spelled in the ad). They had a walnut finish and vulcanite bit. And they were packed one dozen to a display box.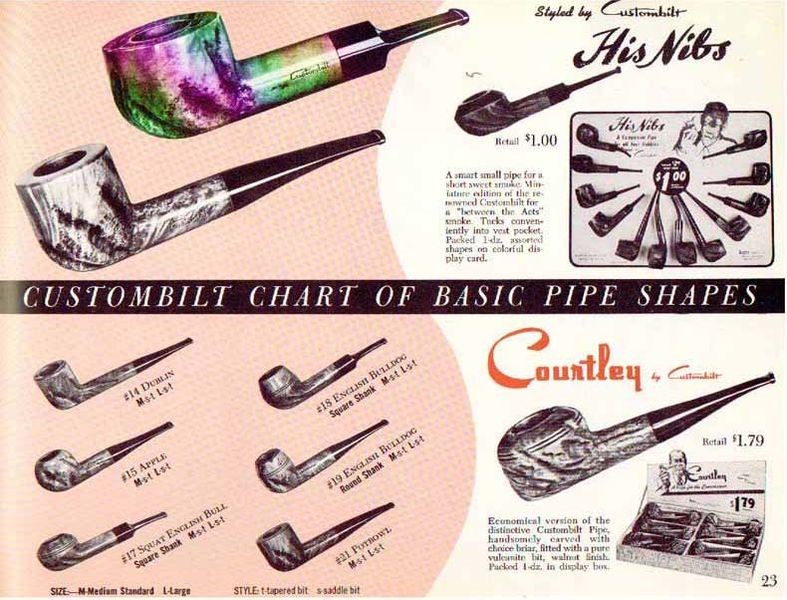 The brochure clearly link the Custombilt and Courtley. It says that the Courtley by Custombilt is an economical version of the distinctive Custombilt Pipe – handsomely carved with choice briar, fitted with a pure vulcanite bit, walnut finish.
The information was very clear that the pipe was indeed connected to Custombilt pipes. I also found it interesting that it was an economic version of the famous pipe. Now it was time to work on this old timer.
I started my work on the pipe by sanding out thin light cake in the bowl with 220 grit sandpaper wrapped around a piece of dowel. I sanded until the walls of the bowl were smooth and clear. I scrubbed the bowl and shank with undiluted Murphy’s Oil Soap and a tooth brush and rinsed it off with running water. I worked on the rustication on the bowl and rim top to clean up the dust and debris in the finish. While the rim top looked better it still needed some more work to remove the darkening on the top and edges of the bowl.
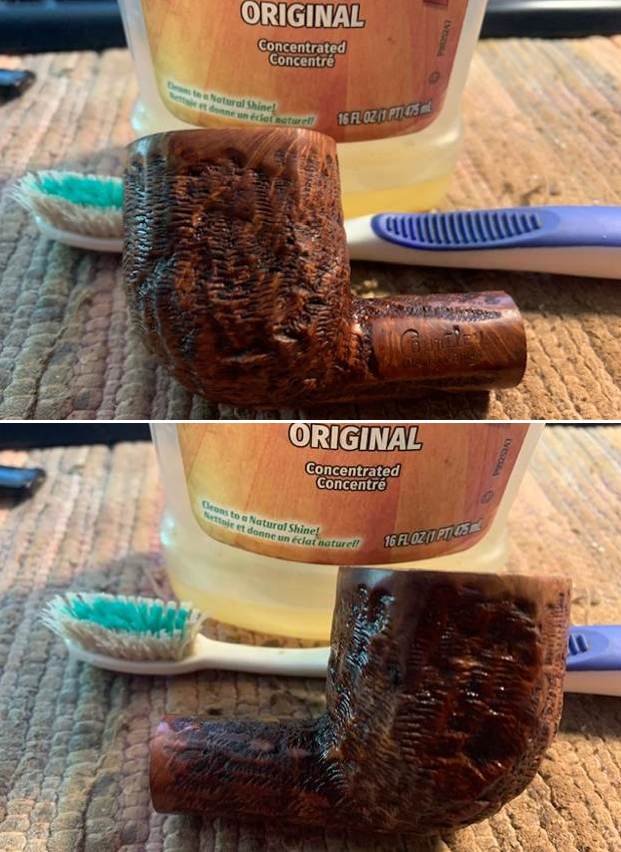
 I cleaned up the rim top some more with a brass bristle wire brush. I was able to remove the debris and to minimize the darkening. It looks much better.
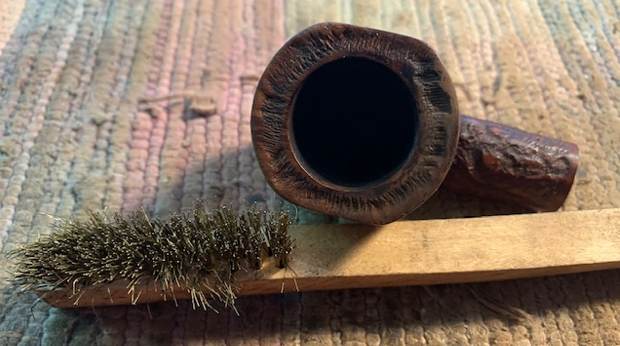 I cleaned out the inside of the shank and the stem with 99% isopropyl alcohol, cotton swabs and pipe cleaners. It was quite dirty inside the shank and airway in the stem. It came out very clean and looks very good.
  I polished the briar with micromesh sanding pads – dry sanding it with 1500-12000 grit pads. I wiped the briar down with a damp cloth to remove the sanding dust. The briar really took on a rich shine with the polishing.
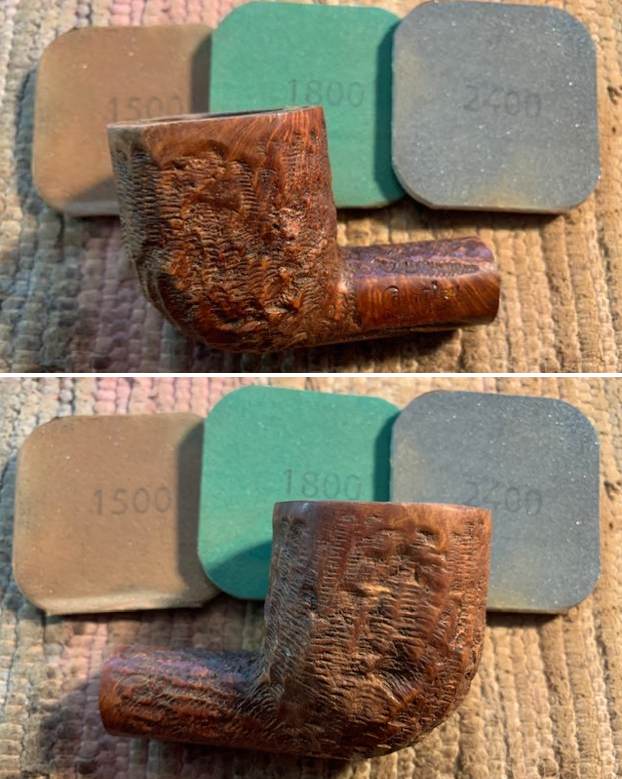


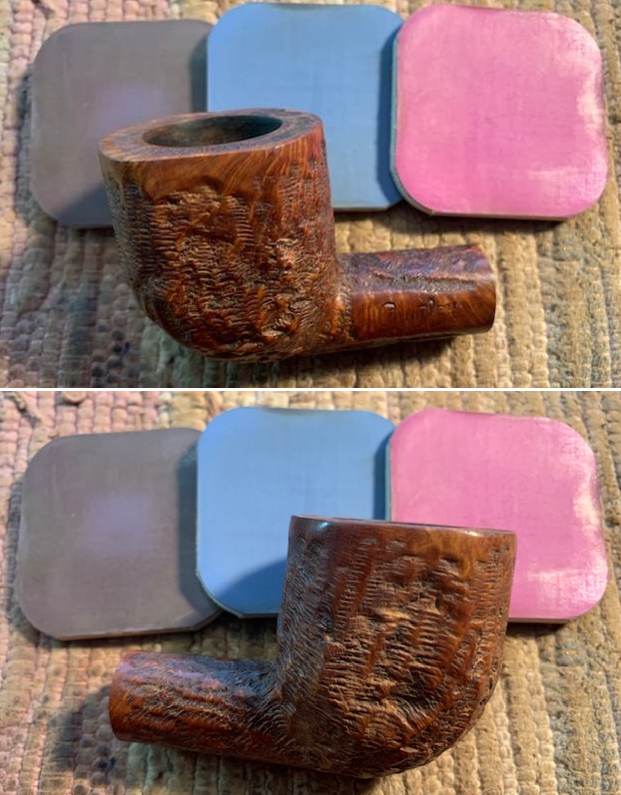
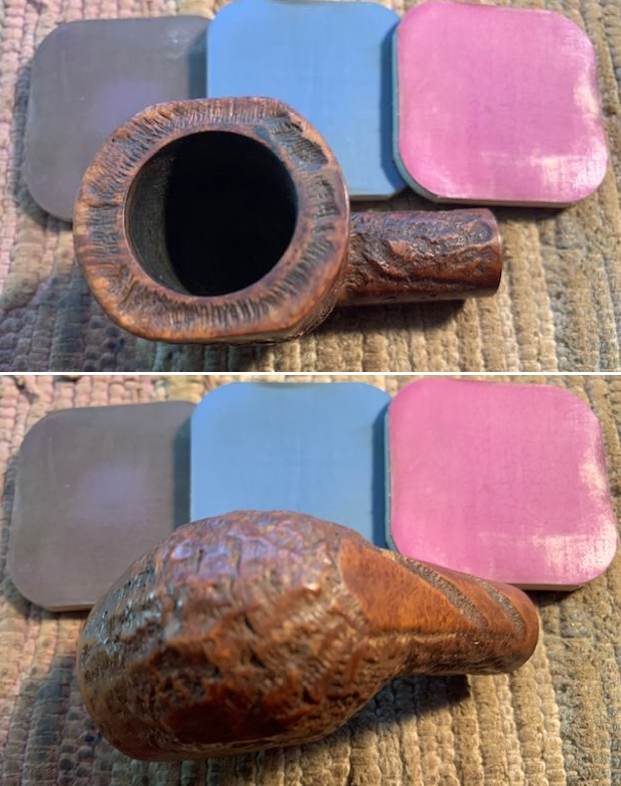 I rubbed the bowl down with some Before & After Restoration Balm. I worked it into the briar with my finger tips to clean, revive and preserve the wood. It really brings the grain alive once again. I let it sit for 15 minutes then buffed it off with a soft cloth. The grain really pops at this point in the process.
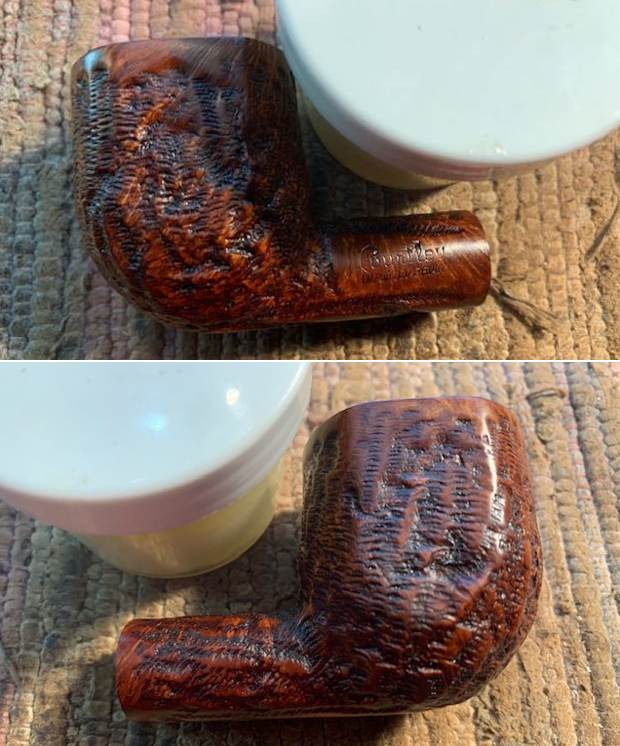

 I set the bowl aside and turned my attention to the stem. I sanded the tooth marks and chatter out around the button with 220 grit sandpaper and started the polishing with 400 grit wet dry sandpaper.
 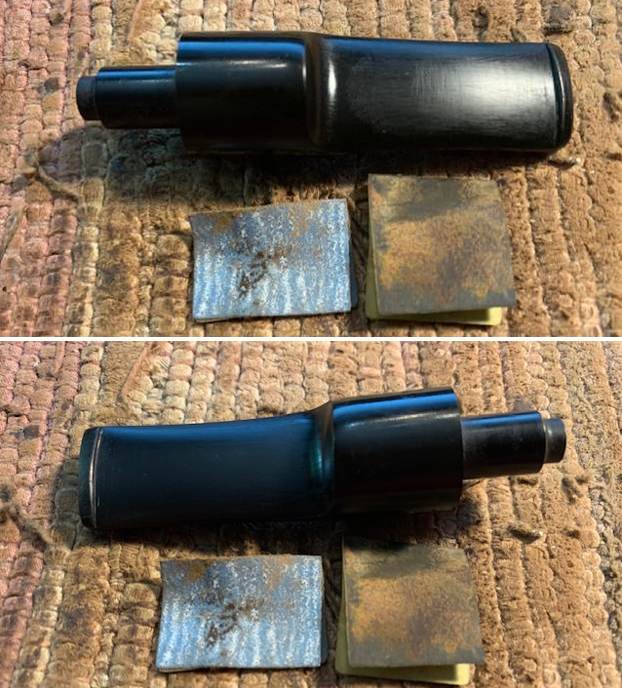 I polished the stem with micromesh sanding pads – 1500-12000 grit pads. I wiped the stem down after each pad with a cloth impregnated with Obsidian Oil. I finished the polishing with some Before & After Pipe Stem Polish – both Fine and Extra Fine. I wiped it down a final time with Obsidian Oil. The stem looked very good.
 As always I am excited to finish a pipe that I am working on. I put the Courtley Imported Briar Panel Billiard back together and buffed it with Blue Diamond on the buffing wheel. I gave the bowl and the stem multiple coats of carnauba wax. I buffed the pipe with a clean buffing pad and hand buffed it to raise the shine. It is fun to see what the polished bowl looks like with the grain popping through on the smooth portions and the variety of colour in the rustication. Added to that the polished vulcanite saddle stem was a beautiful touch. It is light and well balanced. Have a look at it with the photos below. The dimensions are Length: 5 inches, Height: 1 ¾ inches, Outside diameter of the bowl: 1 ½ inches, Chamber diameter: 7/8 of an inch. The weight of the pipe is 43 grams/1.52 ounces. It is a beautiful pipe and one that will be on the rebornpipes store in the American Pipe Makers section. If you are interested in adding it to your collection let me know. Thanks for walking through the restoration with me as I worked over this pipe. Thanks to each of you who are reading this blog. I want to keep reminding us of the fact that we are not pipe owners; we are pipemen and women who hold our pipes in trust until they pass on into the trust of the next pipeman or woman.
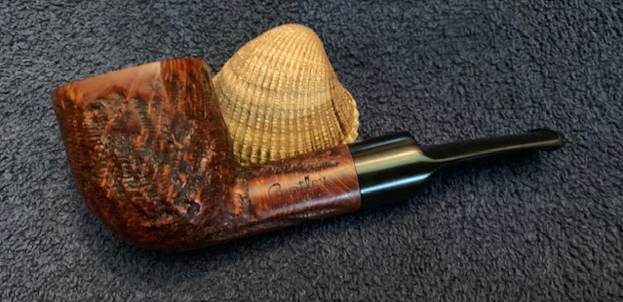


Blog by Steve Laug
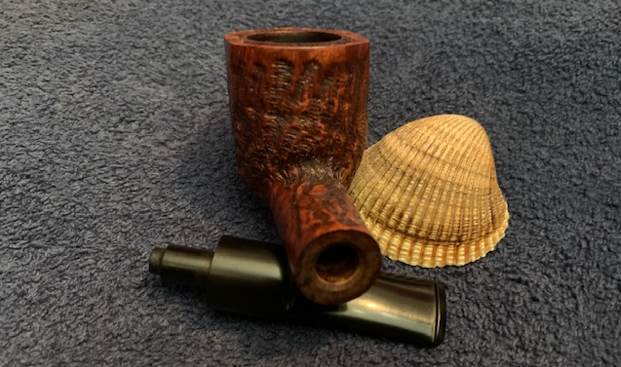
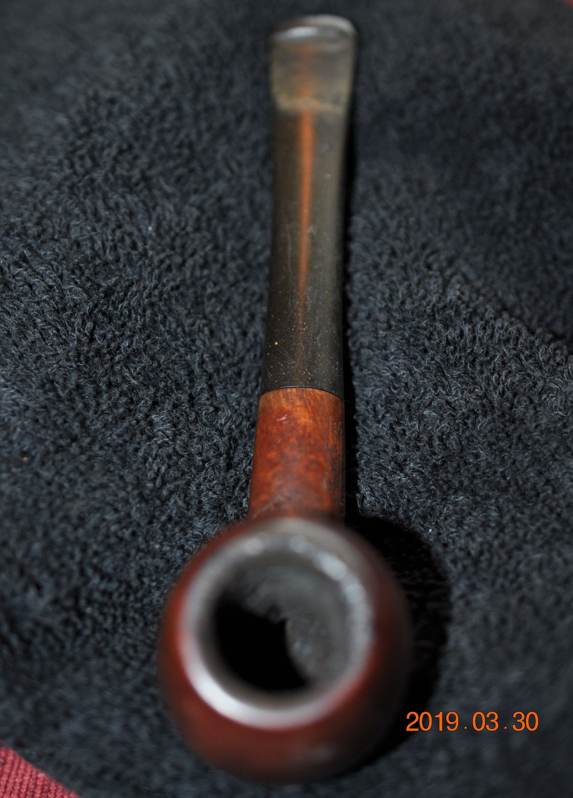
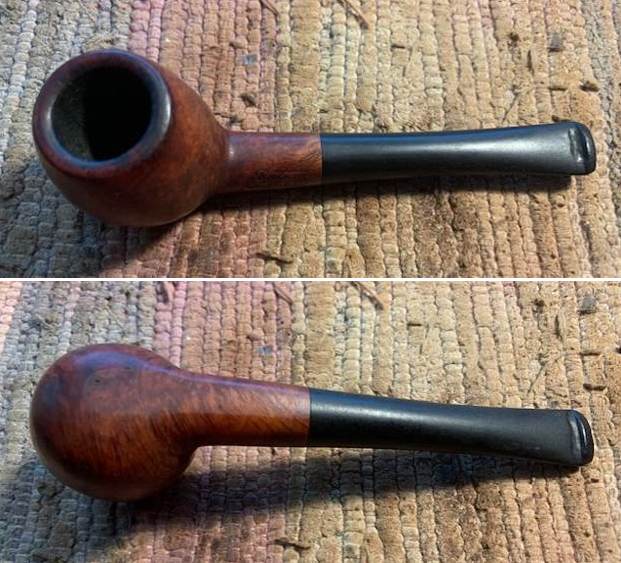
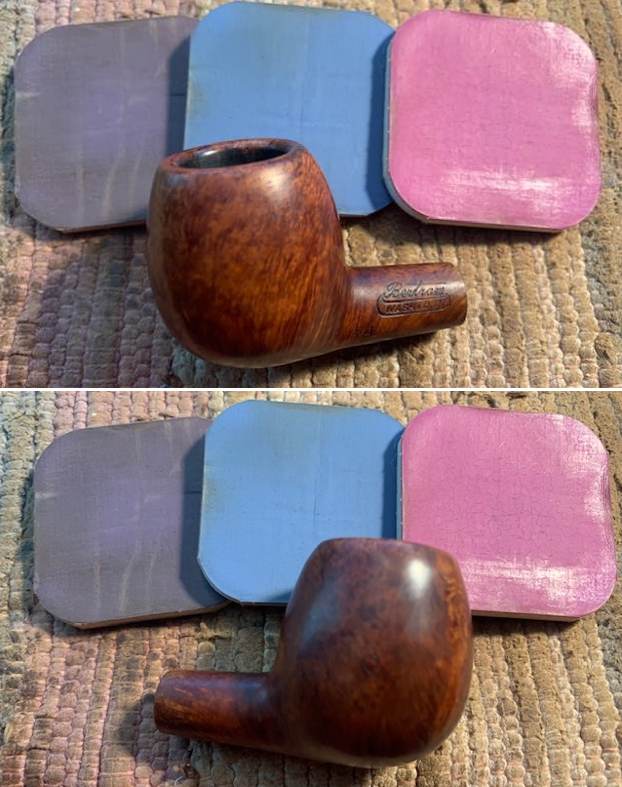
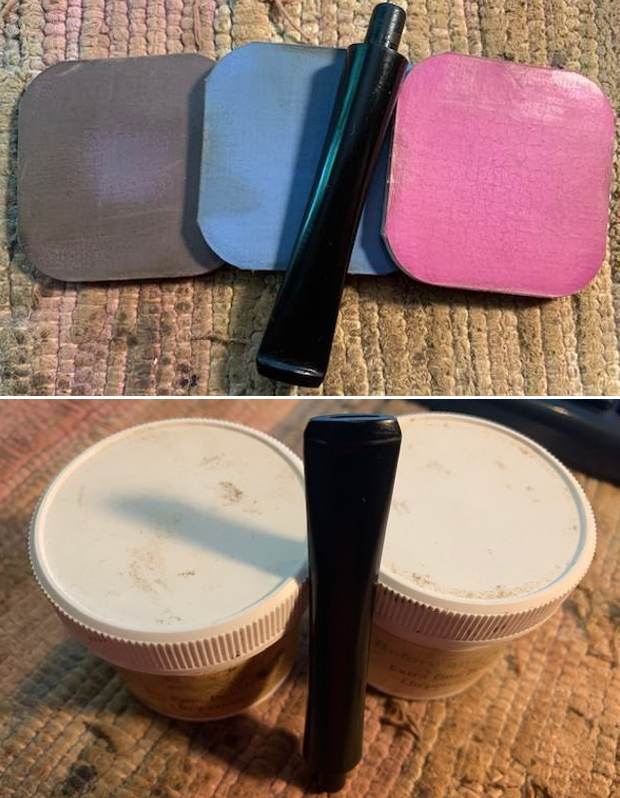
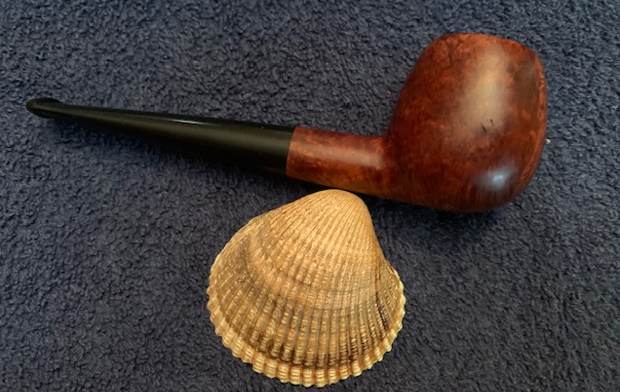
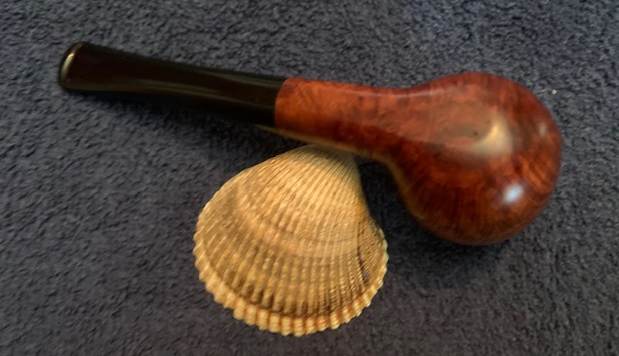
Rather than repeat myself and give the blog readers grief with the repetition please refer to the previous blogs posts on the Bertrams to learn about how we got this collection. Just know that we purchased a collection of Bertrams and a smattering of other brands, that when they were unwrapped, filled three boxes. The photo below is included to show the size of the collection we had purchased. To be honest it was a bit overwhelming to see all of the collection in boxes. We were looking at a lot of work to bring these back to life. The pipe I am working on now is one from that collection. I am gradually finishing most of these pipes.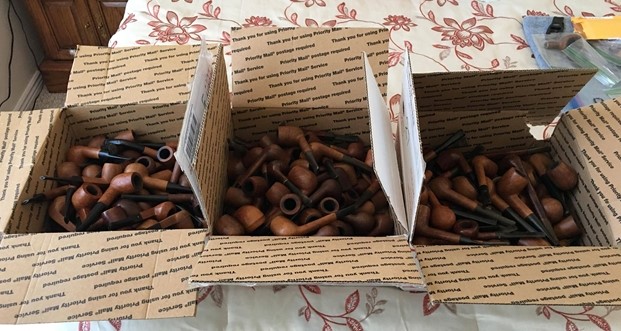 I cannot tell you how glad I am that Jeff worked through the clean up of all of these pipes as they many and they were filthy! It would have been a more daunting task than it was if I had to clean and restore all of them. I am leaving it to him to choose which pipes to work on. He has chosen some interesting shaped ones to restore. Here is how we are working out the transfer from him to me. As he finishes a batch of them he boxes them up and sends them to me. I believe I have all of the pipes here and the numbers are thinning down a lot. I am working through the pipes I have boxed to work on here and this Bertram caught my eye as the next pipe that I would work on. This pipe was another very dirty one! The smooth finish was grimy and dusty but some interesting grain shone through showing me that this was a beautiful pipe. It was a short, thick shank Apple shaped pipe with a tapered stem. There was a thick cake in the bowl and heavy lava overflowing on to the rim top. It was hard to know the condition of the edges due to the cake and lava. The stem showed some light oxidation and some chatter on the top and some deep tooth marks on both sides ahead of the button. It almost looked like someone had converted it to a bit of a dental bit. The photos below tell the story and give a glimpse of the pipe.
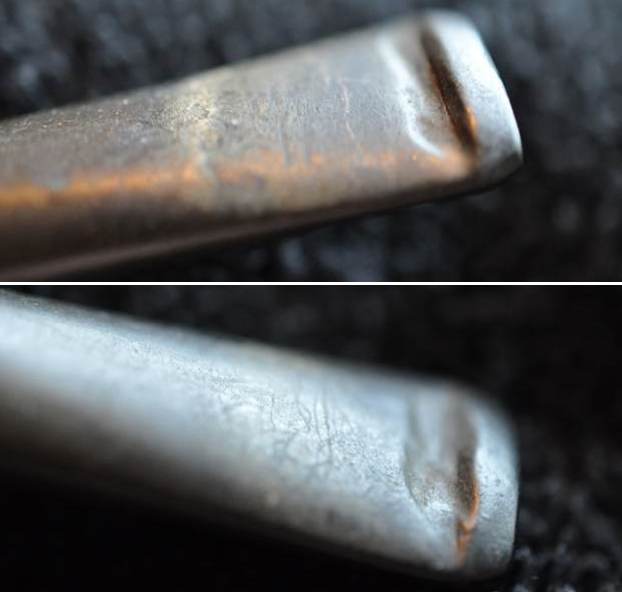
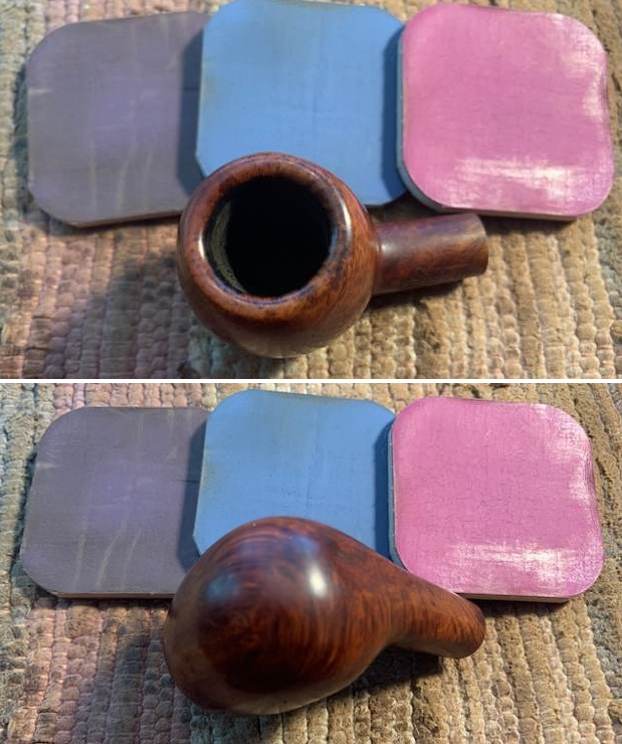
 Jeff took a close-up photo of the bowl and the crowned rim to capture the condition of the pipe when it arrived. The bowl had a thick cake. The crowned rim top had a thick coat of lava that was heavier on the back side thick around the edges. The photos of the stem show the deep gouge along the edge of the button on both sides.
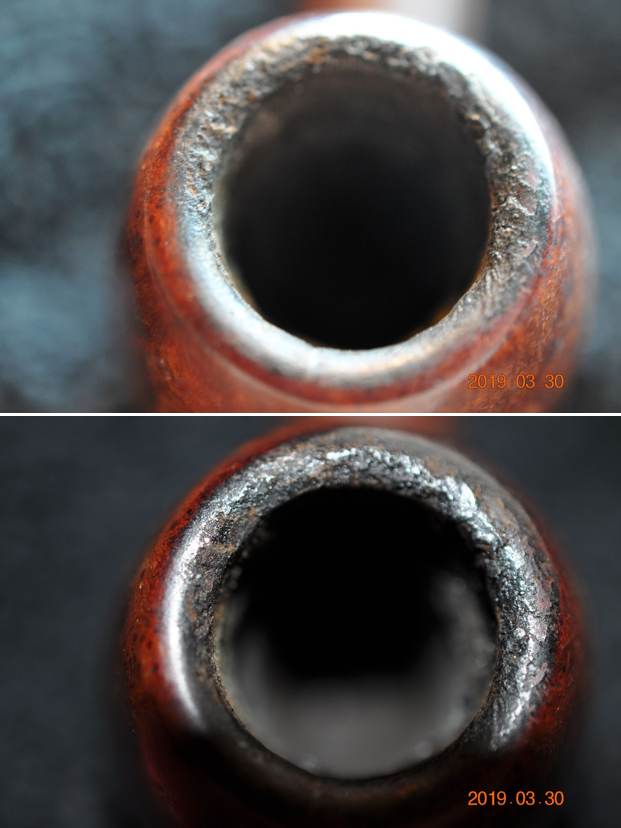
 Jeff took pictures of the bowl sides and the heel to show the marvelous grain on the bowl. It really is quite stunning underneath the thick and ugly grime!
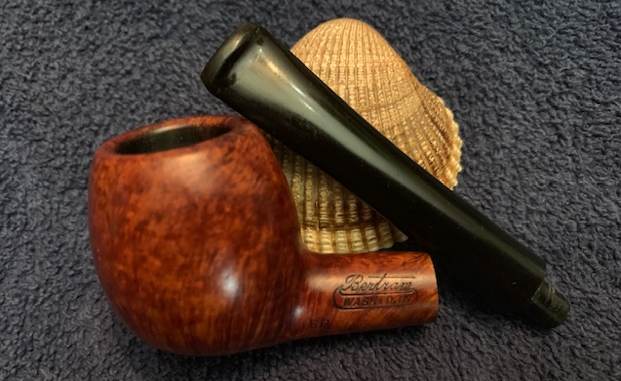
  Jeff took 2 photos to capture the stamping on the left side of the shank. The first photo shows stamping on the left side which read Bertram over Washington, D.C. The stamping on this pipe is clear and readable. The second photo shows the grade number stamping lower on the left side near the bowl/shank junction. It read number 60 which shows the quality of the pipe.
  If you have read the previous blogs I have posted on the Bertram pipes that I have cleaned up you can skip the next bit. But if you have not, then I include the link to Bertram history and information. I would recommend that if you don’t know much about them do some research on them. I include a link to the write up on Pipedia (http://pipedia.org/wiki/Bertram). Bertram pipes were based out of Washington DC. They were popular among famous politicians and celebrities of the time. They made many products for them, from FDR’s cigarette holders to Joseph Stalin’s favorite pipe. They were considered some of the best America had to offer till they finally closed their doors in the 70s. They graded their pipes by 10s, the higher the grade the better. Above 60s are uncommon and 80-90s are quite rare. I’ve only seen one 100 grade. I have several blogs that I have written on rebornpipes that give some history and background to Bertram pipes. (https://rebornpipes.com/2015/06/16/an-easy-restoration-of-a-bertram-grade-60-217-poker/).
I have included the following link to give a bit of historical information on the pipe company. It is a well written article that gives a glimpse of the heart of the company. http://www.streetsofwashington.com/2012/01/bertrams-pipe-shop-on-14th-street.html#
I am also including this photo of the shop in Washington D.C. and a post card of the shop.
 From this information I have learned that the shape and grade Bertram I have in front of me now was made before the closure of the shop in the 1970s. This Bertram Apple one of the unique shapes among the Bertram pipes I have worked on. With a grade 60 stamp it is just above the mid-range mark.
Jeff reamed the bowl with a PipNet pipe reamer and followed up with a Savinelli Fitsall pipe knife to remove the cake. He scrubbed out the mortise and the airway in the shank and the stem with alcohol, cotton swabs and pipe cleaners. He scrubbed the exterior of the bowl, rim, shank and stem with a tooth brush and undiluted Murphy’s Oil Soap to remove the lava, oils and tars on the rim and the grime on the finish of the bowl. He rinsed it under running water. He dried it off with a soft cloth. He was able to remove lava build up on the rim top and you could see the great condition of the bowl top and edges of the rim. There was still some darkening to the rim top toward the back of the bowl. He soaked the stem in Before & After Deoxidizer to remove the oxidation. I took photos of the pipe before I started my work on it. 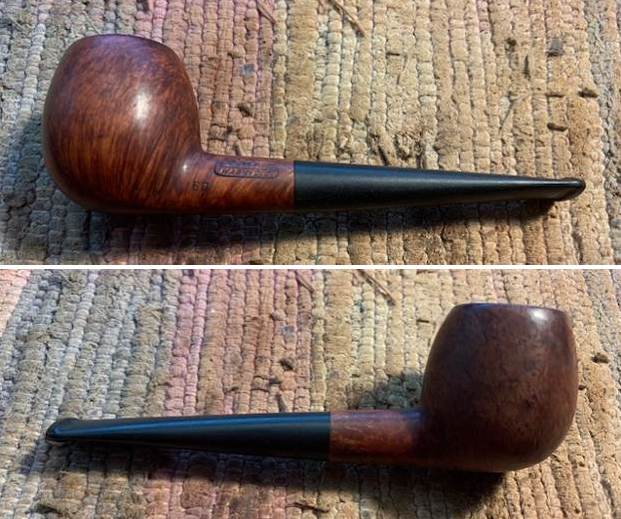
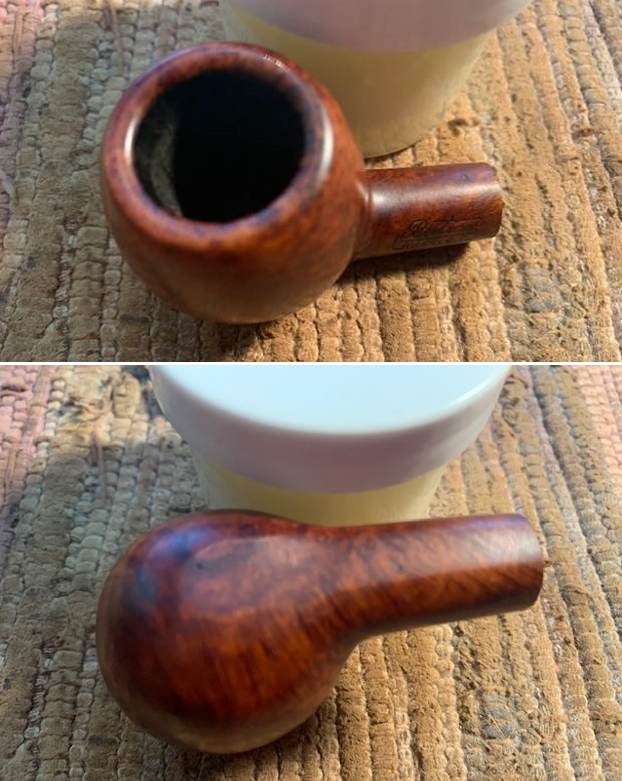
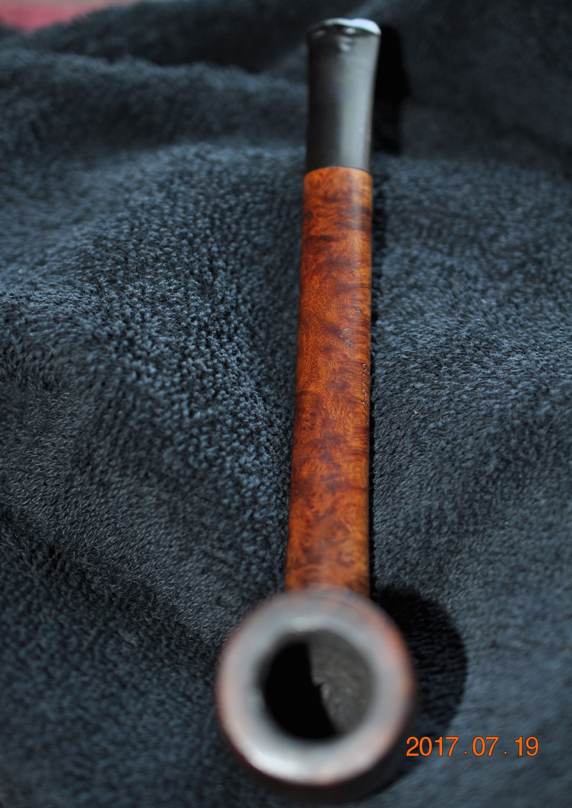
 I took a close up photo of the rim top to show the condition of the bowl and rim after Jeff had cleaned up the grime and lava but the crowned rim top had some darkening on the whole rim top though darker on the backside of the rim. Otherwise the crowned rim look good. The stem photos show that the oxidation is gone. The light tooth chatter is hard to see but I should be able to sand it out quite easily. The deep tooth marks on both sides near the button will take a little more work to remove.
 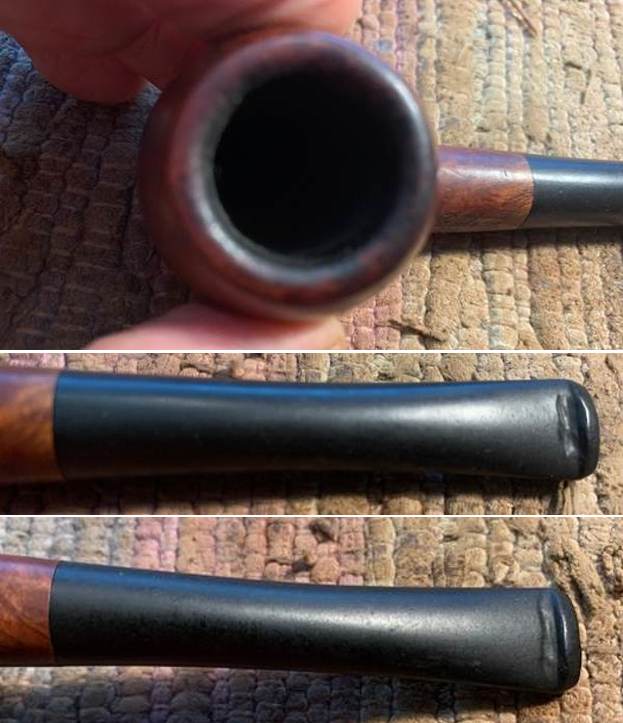 I also took a photo of the stamping on the left side and the underside of the shank showing how the stamping was laid out.
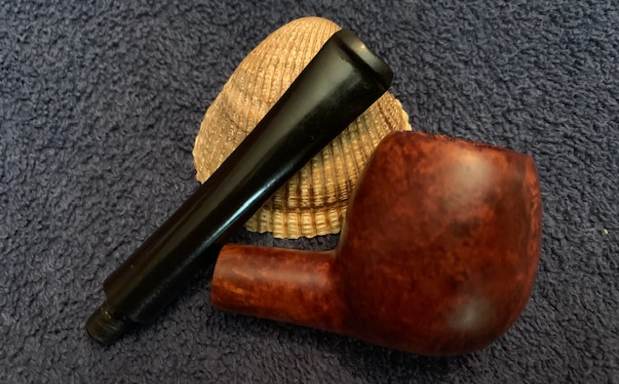
 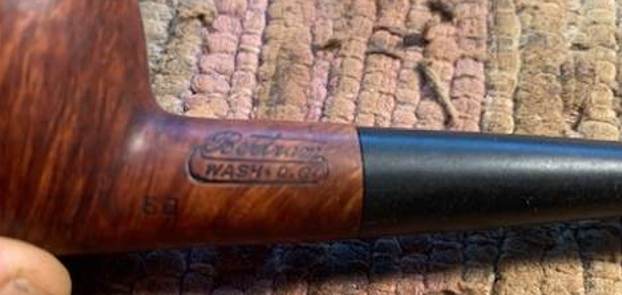 I removed the stem from the shank and took a photo of the pipe to show the proportions and the look of the grain on the bowl. It is a beauty!
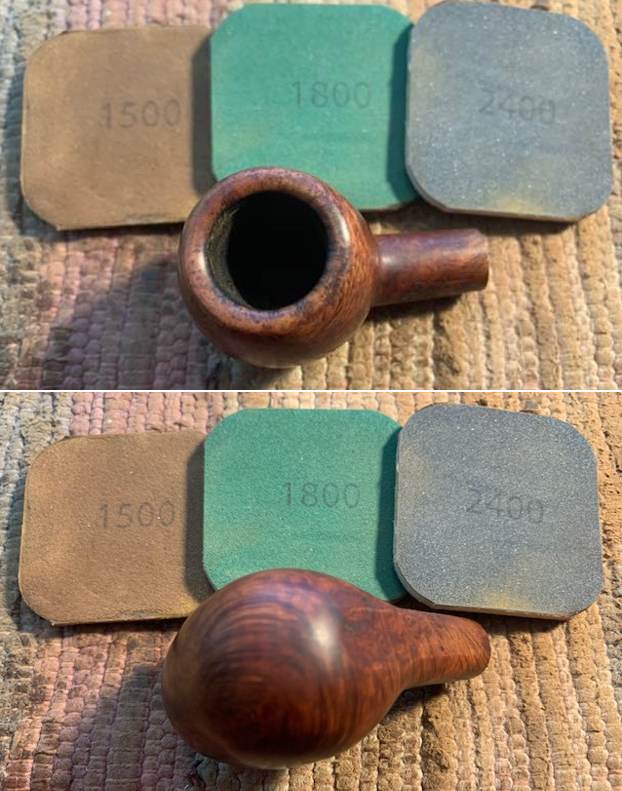
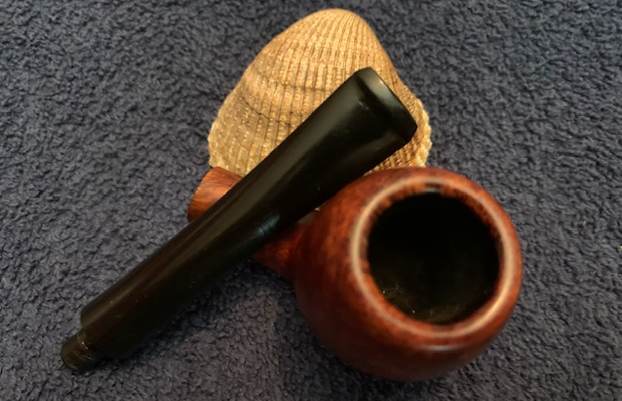
 I sanded the top of the rim with a folded piece of 220 grit sandpaper to remove the damage and the darkening. I would polish it later and think it would look very good. The photo shows how the rim looked at this point.
 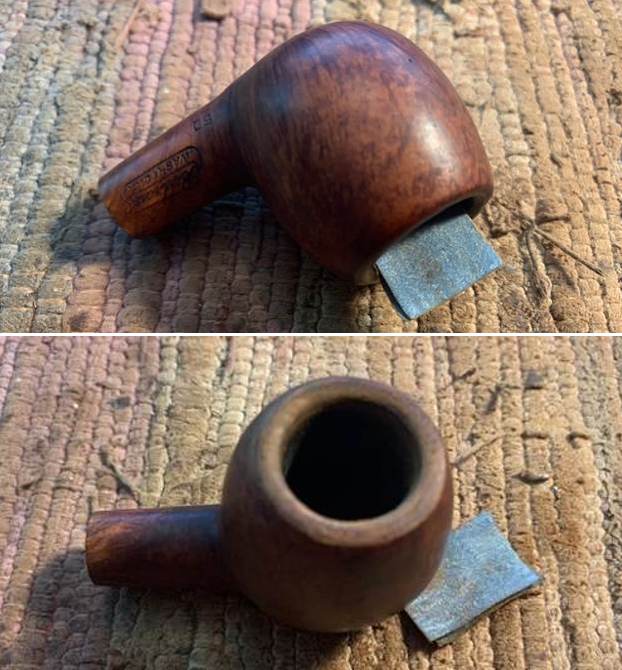 I polished the bowl and rim top with micromesh sanding pads – dry sanding it with 1500-12000 grit pads. I wiped the bowl down with a damp cloth after each pad to remove the sanding debris. After the final sanding pad I hand buffed it with a cotton cloth to raise a shine.
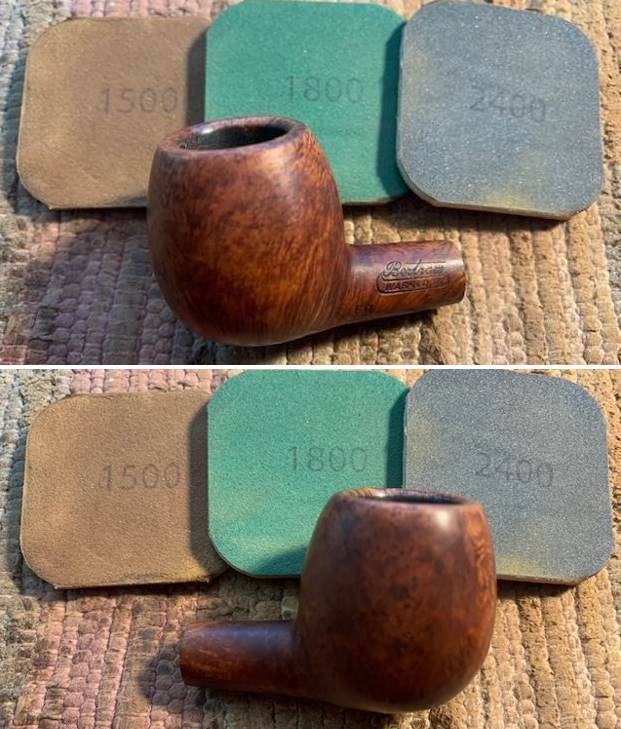
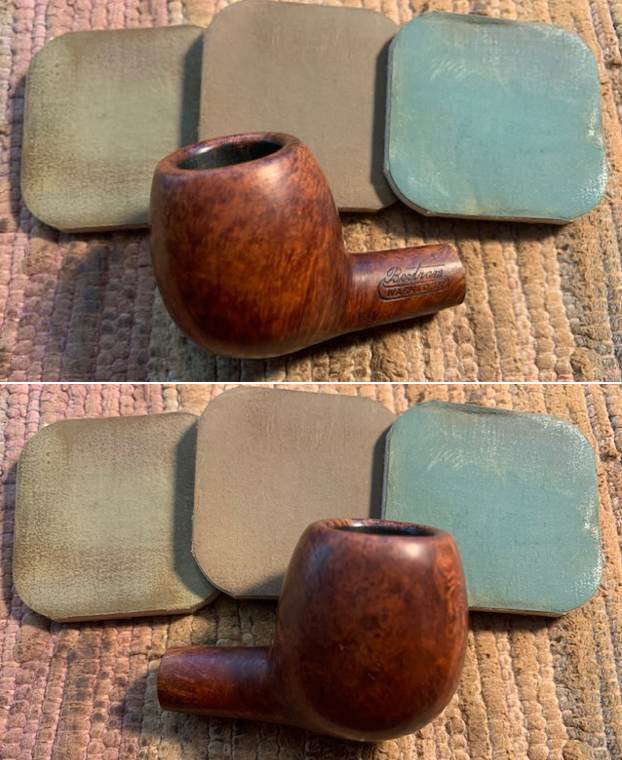
 I worked some Before & After Restoration Balm into finish of the briar with my fingertips to clean, enliven and protect it. I let the balm sit for a little while and then buffed with a cotton cloth to raise the shine. The Restoration Balm really makes the grain stands out beautifully.
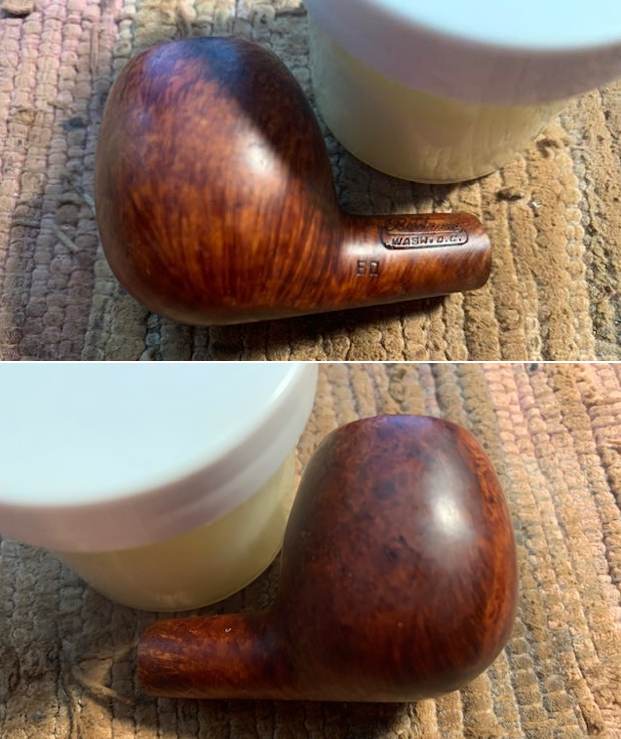
 I used a lighter to “paint” the deep marks on both sides of the stem near the button. I was able to lift them a bit but not significantly, I filled in what remained with black super glue and flattened the repair with a dental spatula. Once it cured I used a small file to redefine the button edge. I used a folded piece of 220 grit sandpaper to blend the repairs into the surface of the stem. I started polishing the stem with a folded piece of 400 grit sandpaper. I wiped the stem down with Obsidian Oil.
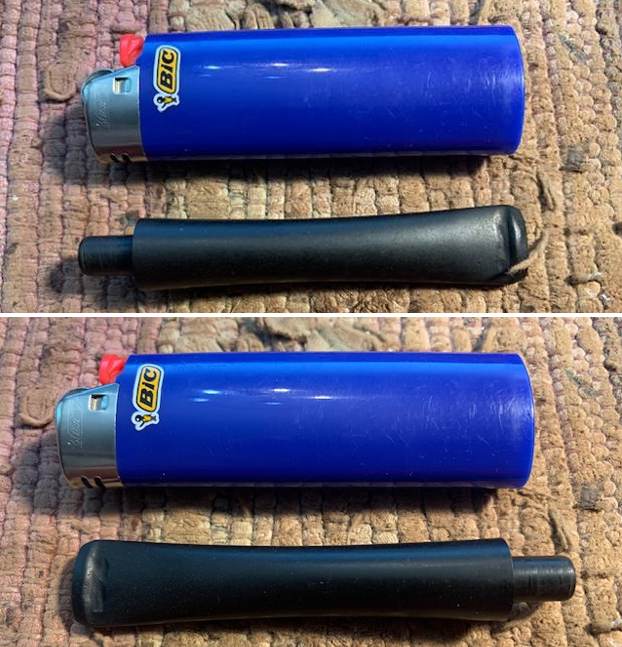
 I polished the stem with micromesh sanding pads – dry sanding it with 1500-12000 grit pads. I wiped the stem down with Obsidian Oil after each pad. I polished it with Before & After Pipe Polish – both Fine and Extra Fine and gave it a final coat and set it aside to dry.
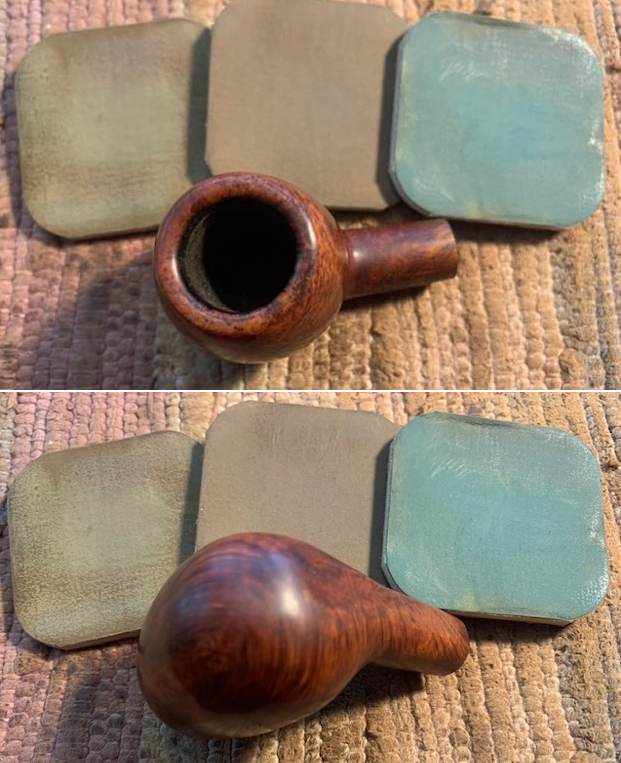
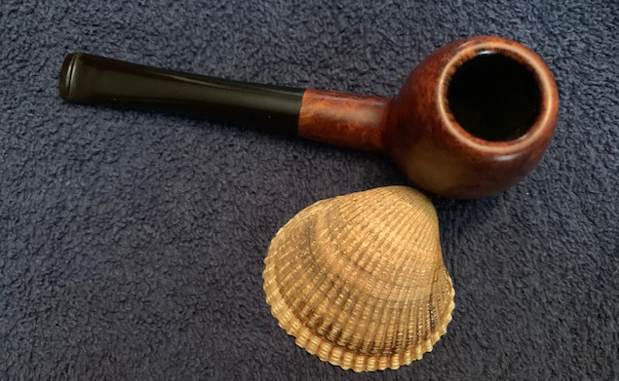
 I put the stem back on the Bertram Apple and buffed the pipe with Blue Diamond on the buffing wheel. I polished the briar and the vulcanite of the stem until there was a rich shine. This Bertram classic Apple shape and oil cured finish really highlights some amazing grain on a proportionally well carved pipe. Once I buffed the pipe the briar came alive and the mixture of grain – straight, flame and birdseye – popped with polishing. The black vulcanite stem had a rich glow. Like the other Bertrams I have worked on, this one fits well in the hand and sits right in the mouth. Have a look at it with the photos below. The dimensions are Length: 5 inches, Height: 1 ½ inches, Outside diameter of the bowl: 1 inch, Chamber diameter: ¾ of an inch. The weight of the pipe is 1.20 ounces/34 grams. This beauty will be going on the rebornpipes online store in the American Pipemakers Section. If you are interested let me know. Thanks for walking through the restoration with me as it was a pleasure to work on.
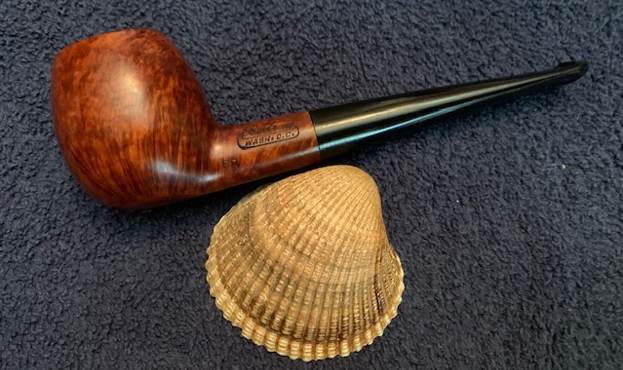


Blog by Steve Laug
The next has been around here for a very long time – a little over five years. We purchased the pipe off eBay on 07/02/17 from Akron, Ohio, USA. The pipe came from Jost’s Pipe Shop in St. Louis, Ohio and I will go into the details of that below. It is a nice mixed grain long shank Canadian. It is stamped on the left side of the shank and reads JOST’S [over] Eccentric Grain. On the right side of the shank it is stamped 73S (shape number). The pipe had some interesting grain peaking through the grime on the outside. There was a thick cake in the bowl and a heavy overflow of lava on the rim top. The inner edge looks like it has some damage and is slightly out of round on the right front side. The stem has deep tooth marks on both sides on and ahead of the button. There is some light oxidation on the stem surface. Despite all of that it is a beautiful long Canadian that has great potential. Jeff took photos of the pipe before he clean it so you can see what we were dealing with.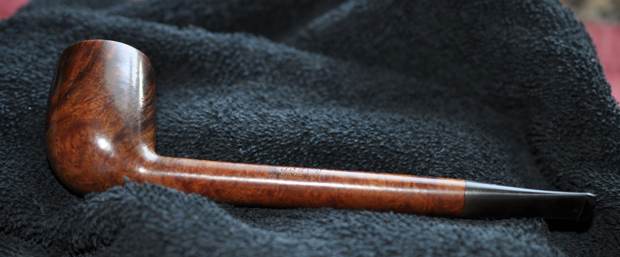
 He took photos of the bowl, rim top and stem to give a clear picture of their condition. The bowl is thickly cake and the lava on the inner edge and rim top is moderate. The inner edge shows damage on the right front side. The stem has some deep tooth marks and chatter on both sides on and ahead of the button.
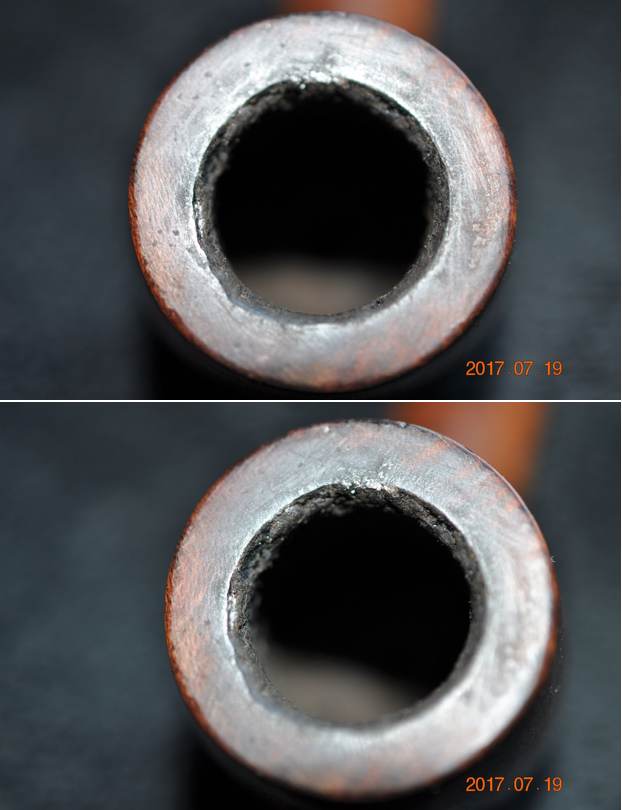
 Jeff’s photos of the sides and heel of the bowl show why the pipe was labeled eccentric grain. It is a wild, random pattern of swirls and birdseye grain that has it sown beauty. It should look great after it is cleaned up.
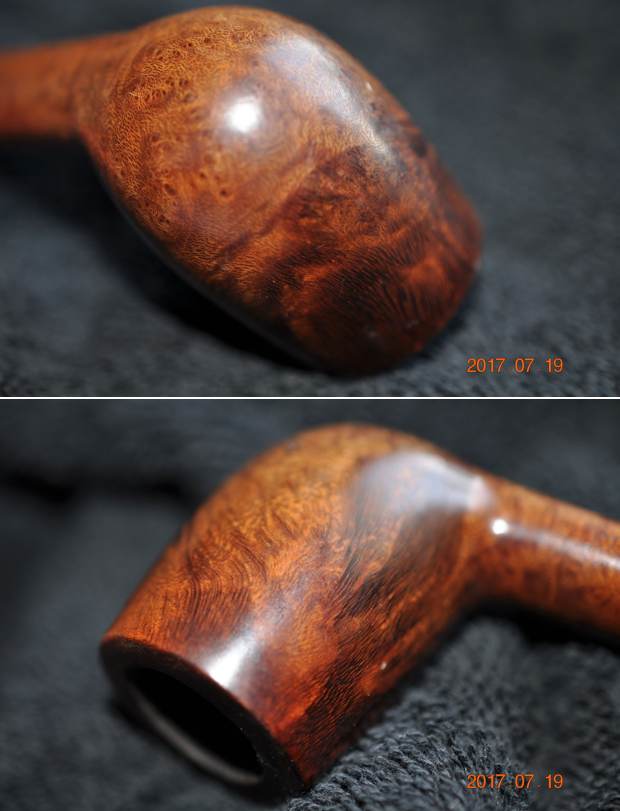 He also captured a flaw on the underside of the long shank near the stem. It will need to be addressed in the final work.
 Jeff captured the stamping on the shank sides. It is clear and readable as noted above. There was also a faint circle J stamp on the left side of the stem that I hope will survive the clean up.
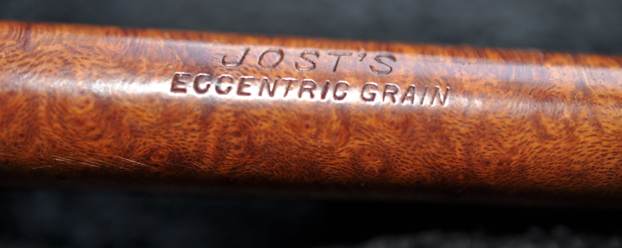
 Before I started on my part of the restoration I decided to do a bit of reading on the brand. I knew it was US made and connected to Jost’s Pipe Shop in St. Louis, Missouri but it had been awhile since I had worked on one of their pipes. I first reread an old blog I had written on the restoration of a Jost’s De Luxe Supreme that I had restored in 2016. Here is the link to that if you would like to see more detail (https://rebornpipes.com/2016/09/03/josts-olde-english-de-luxesupreme-overstamped-j214-bent-billiard/).
I then turned to Pipephil’s as I had in the previous blog but specifically to see if there was any mention of the Eccentric Grain 73S Canadian. Here is the link (http://pipephil.eu/logos/en/logo-j4.html). I found that while the site did not reference the line it did give some helpful information on the brand and the potential carver of this pipe. I have included the following screen capture and some notes from the side bar on the brand with a possible lead to the maker – Harvey Raspberry.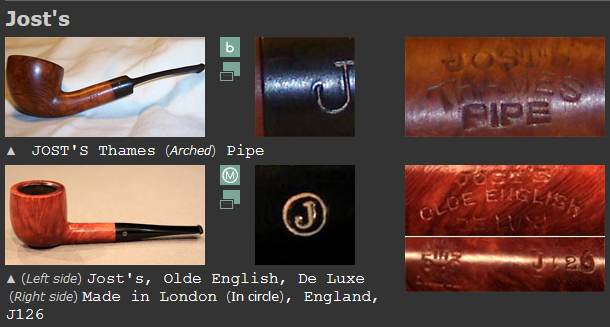 The Proprietor of the tobacco shop was Mrs Henry A. Jost. She was a pipesmoker. Jost’s Pipes are closely tied to Comoy. Many of Jost’s pipes have the standard Comoy shape number and the “Made in England ” in a circle. If the Jost’s pipe doesn’t have the “Made in England ” it is probably made by Harvey Raspberry.
From the 2016 blog I followed a link to the classicpipeshop blog that had some helpful information on the brand (http://classicpipeshop.blogspot.ca/2015/03/josts-pipe-shop-201-north-6th-street-st.html). The site includes a great history of the brand and also some interesting details about grades of pipes they made and sold as well as their shop blends of tobacco.
I have included the section of the blog on the pipes. It covers a lot of information regarding the source of the pipes and the levels/grades of pipes. However, the Eccentric Grain line was not included on the site. There was also good information on the carver Harvey Raspberry. I quote:
 Jost’s Pipes are closely tied to Comoy’s. Many of Jost’s pipes have the standard Comoy’s shape number and the “Made in England ” in a circle. If the Jost’s pipe doesn’t have the “Made in England” it is probably made by Harvey Raspberry.
If the pipe has a shape number that is preceded by a “J” that is a Comoy’s product without question. Typically these will have the words “Made in London England” on the reverse side of the shank from where the Jost stamp is made. There are always exceptions to the rule but 95% of the time, this is accurate.
Many different levels of pipes were offered by Jost’s Pipe Shop. From a 1950s catalog I have the following available:
Jost Old English De Luxe: $85.00
These were typically of the highest… Grain is stunning and the briar is flawless. These are the grade you should look out for as they are great smokers.
Jost Old English Supreme: (no pricing available)
The majority of the Old English version pipes you see are marked Supreme. These are stained in a darker color and are presumably from the same Algerian aged Briar as the De Luxe brothers. These are also of the highest quality available.
Jost Virgin Briar Supreme: $35.00
Don’t see too many marked as Virgin Briar Supreme but you will often find “Supreme” Jost pipes on the second hand market (see above). Excellent quality briar and displays the lighter toned finish of the De Luxe above. Grain is not as flashy or desirable as the De Luxe model.
Jost Thames Briars: $25.00
I’ve seen these offered as blasted /rusticated pipes and look quite nice. Most of the smooth finish Thames pipes are riddled with fills. Good smokers but not much to look at (smooth).
Jost Sandblast Briars: $25.00
These are a great value. The shop made sand-blasted pipes are usually quite large and snapped up very quickly by collectors. The Comoy’s versions (with J shape #s) are of excellent quality and typically rather small compared to the shop-made variety.
Dukes Briars: $15.00
These come up very rarely. The two I’ve seen in recent years are rather small in size. Smooth finish with light / honey stain color. Not sure what the story is behind these.
From the above information I knew that the pipe I had was one of the pipes made by Harvey Raspberry for Jost’s and not one of the Comoy’s made pipes. It is interesting to me though that the pipe has a very English/Comoys look to it nonetheless. The Pipe Shop not only made the Eccentric Grain pipe they also made and Eccentric Blend of tobacco that actually sounded quite good.
Jeff had cleaned the pipe as usual from the inside out. He reamed the bowl with a Pipnet pipe reamer and cleaned up the remnants of cake with a Savinelli Fitsall Pipe Knife. Once the cake was removed he cleaned out the internals of the shank and stem with 99% isopropyl alcohol, cotton swabs and pipe cleaners. He scrubbed the exterior with undiluted Murphy’s Oil Soap and a tooth brush. He rinsed it in warm water to remove the soap and the grime. He soaked the stem in Before & After Stem Deoxidizer and then cleaned it out once more with pipe cleaners and alcohol. When it arrived in Vancouver it was in clean shape and ready for my contribution to the restoration. I took some photos of the pipe to show how it looked when I brought it to the table last evening.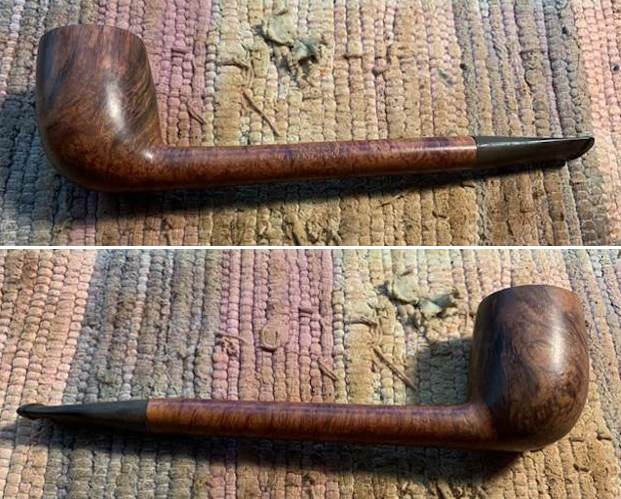
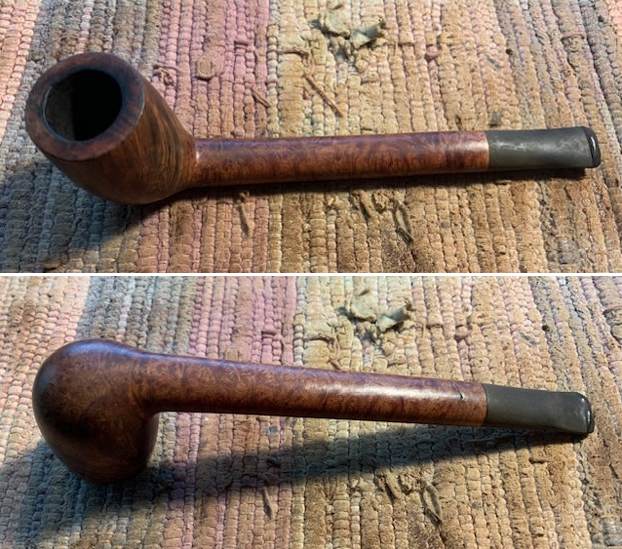 The rim top and edges cleaned up very well. The photos I took of the bowl and stem show what I am dealing with now. You can see the darkening on the back of the rim top and the damage on the right front inner edge of the bowl. The stem shows some light oxidation remaining and the tooth marks on both sides and on the button.
 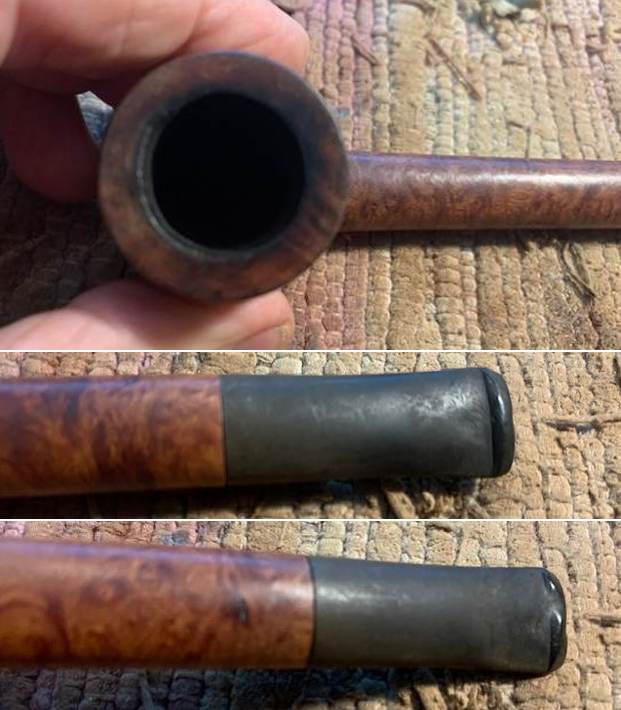 I took photos of the stamping. They are clear and readable as noted above.
 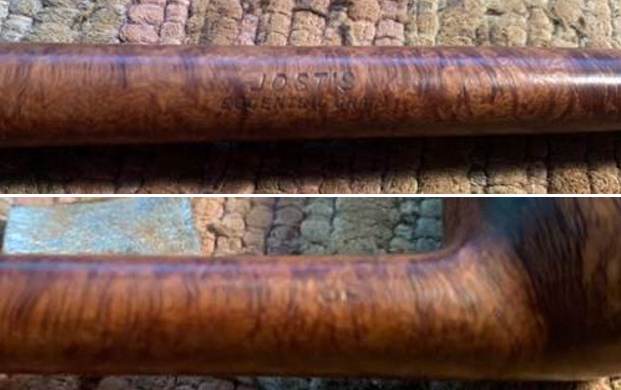 I removed the stem from the shank and took a photo to give a sense of the length of the shank in proportion to the bowl. It is a long and pretty looking pipe.
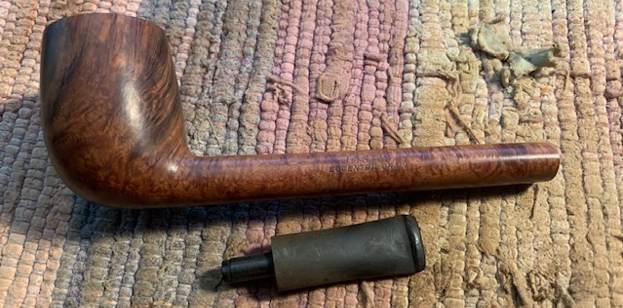 Now it was time to work on the pipe. I started by dealing with the rim top and out of round and damaged inner edge. I used a folded piece of 220 grit sandpaper to give the rim a slight bevel to clean up and minimize the damage. It definitely looked better than when I started.
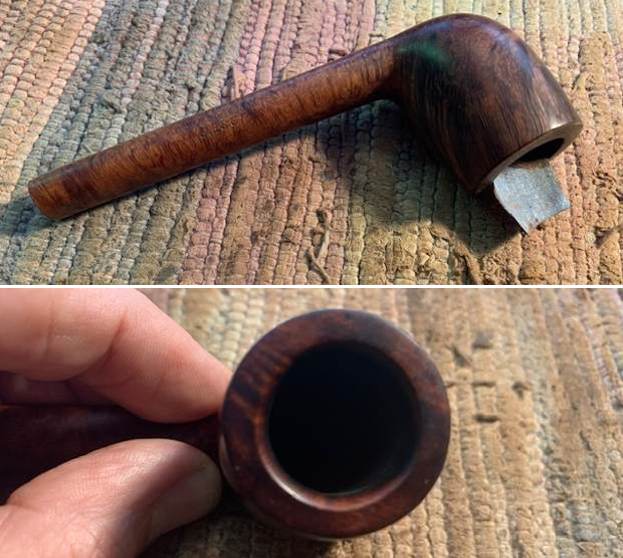 I polished the briar with micromesh sanding pads – dry sanding with 1500-12000 grit pads. I wiped the bowl down with a damp cloth after each pad. The pipe began to take on a rich shine and the grain stood out. I decided to leave the small flaw on the underside of the shank as once cleaned and polished it was really quite minimal.
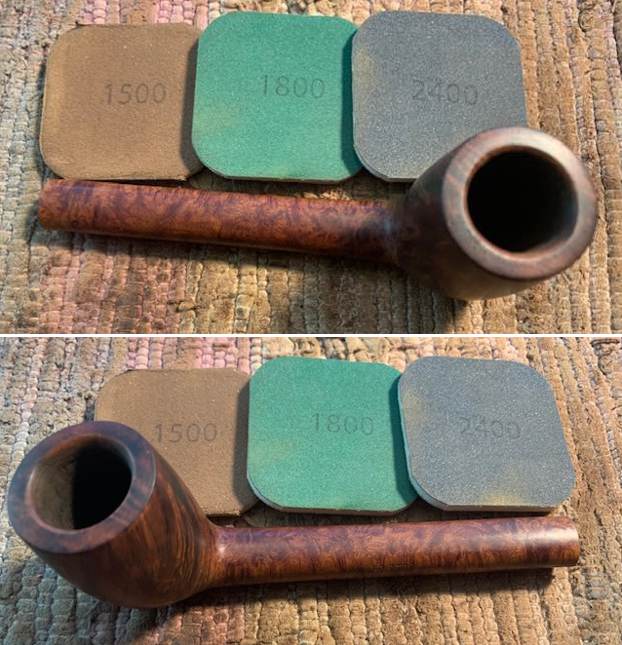
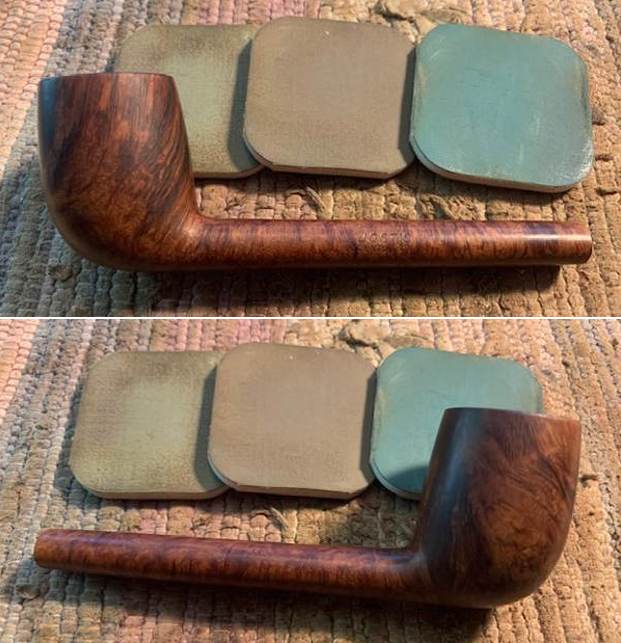
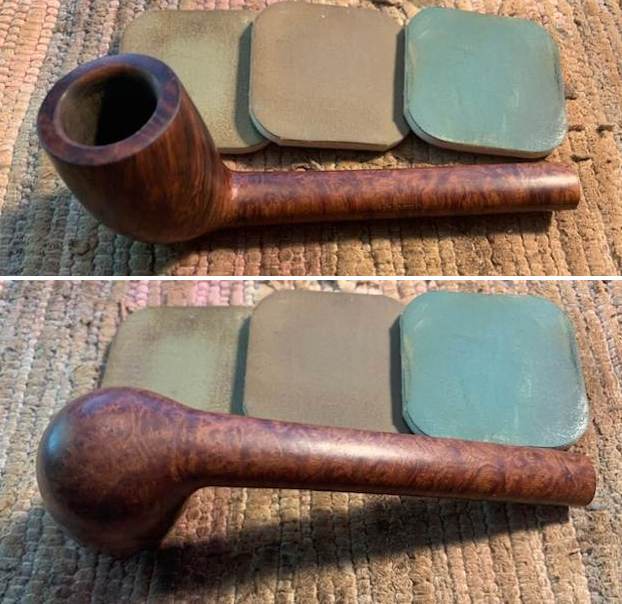
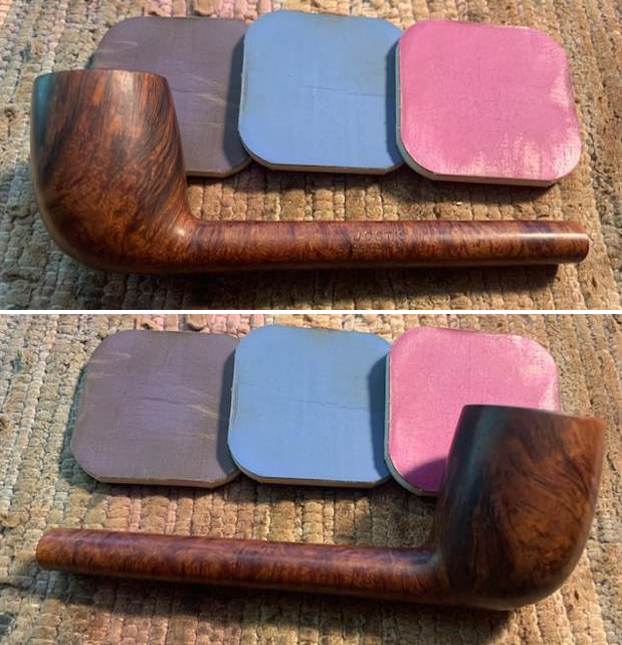
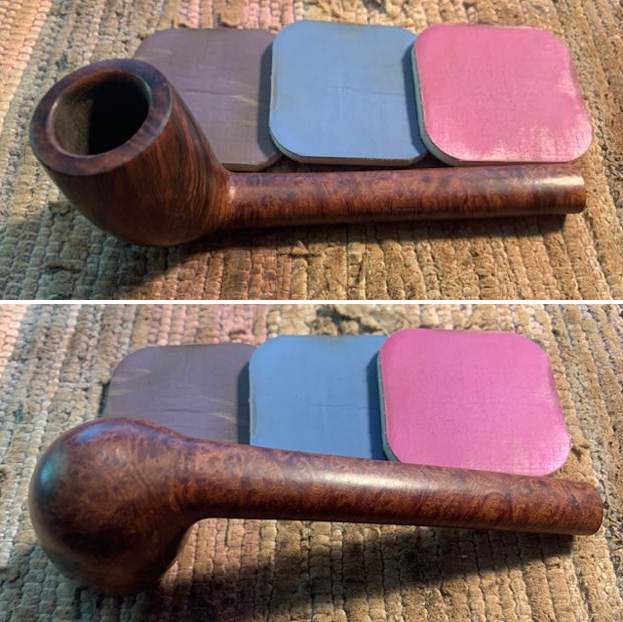 I rubbed some Before & After Restoration Balm into the briar with my fingertips to clean, enliven and protect the briar. I let it sit on the briar for 15 minutes then buffed it off with a clean cloth. It really makes the grain come alive.
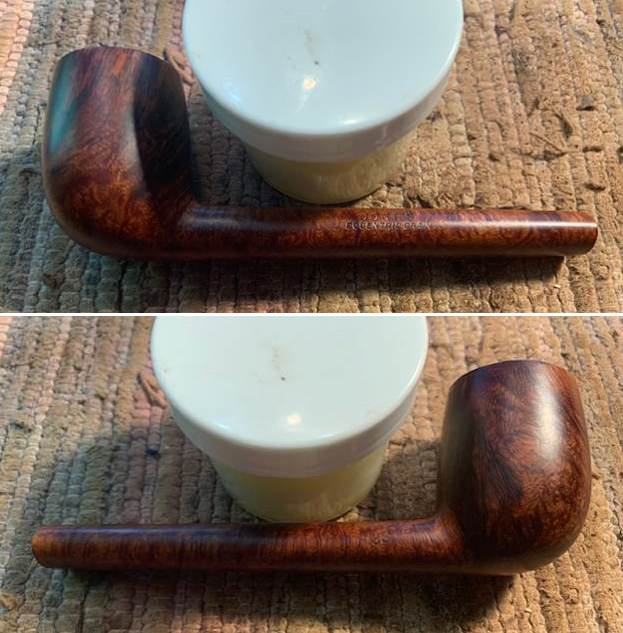
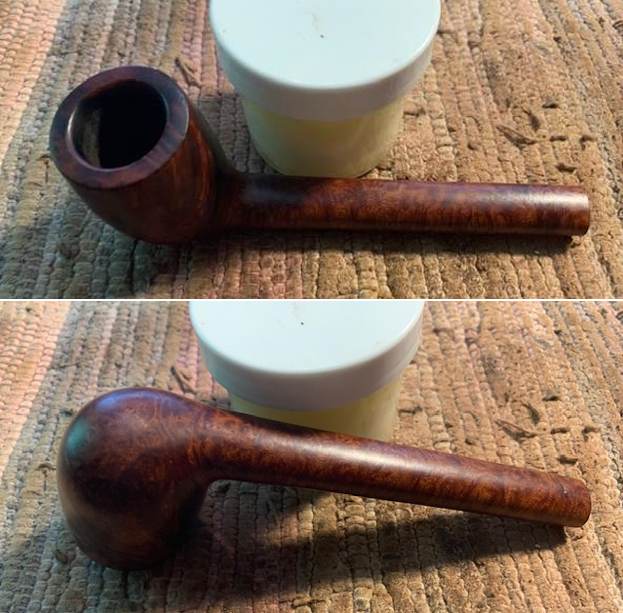
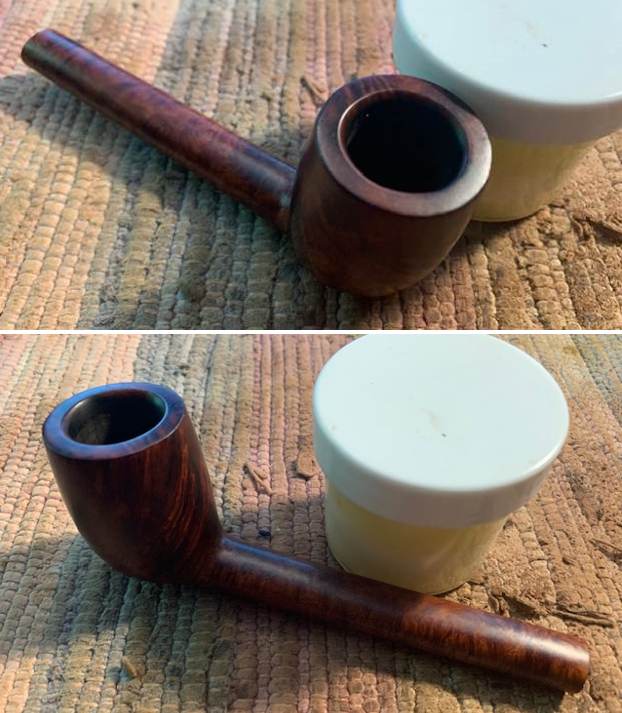 I set the bowl aside and turned my attention to the stem. I “painted” it with a Bic lighter flame to lift as many of the dents as possible. Most were removed. Those that remained I filled in with clear CA glue. I set it aside to cure. Once it had cured I used a small file to smooth out the repair and recut the edge of the button. I cleaned it up further with a folded piece of 220 grit sandpaper. I started the polishing with 400 grit wet dry sandpaper.
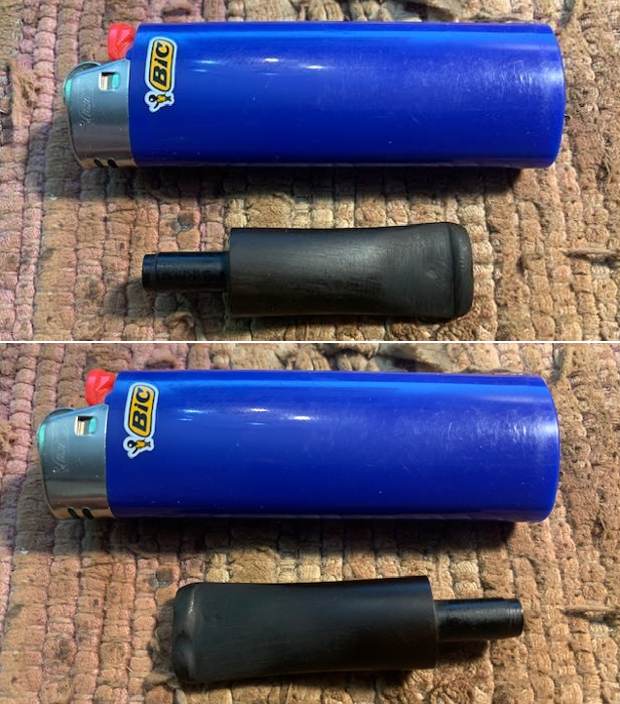


 I touched up the J with a circle using some White Acrylic Nail Polish. I let it dry and scraped off the excess with a tooth pick. I polished off the excess with 1500 grit sandpaper and rubbed it down with Obsidian Oil.
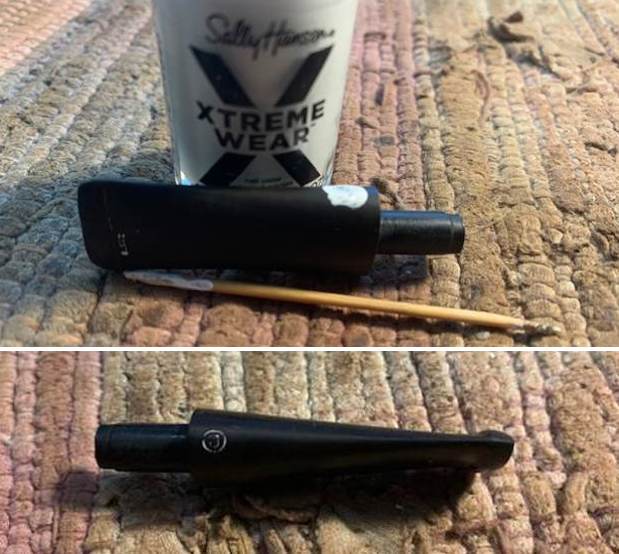 I polished the stem with micromesh sanding pads – I dry sanded it with 1500-12000 grit pads. I wiped it down with Obsidian Oil between each sanding pad. I finished the polishing with Before & After stem polish and gave it a final coat of Obsidian Oil.
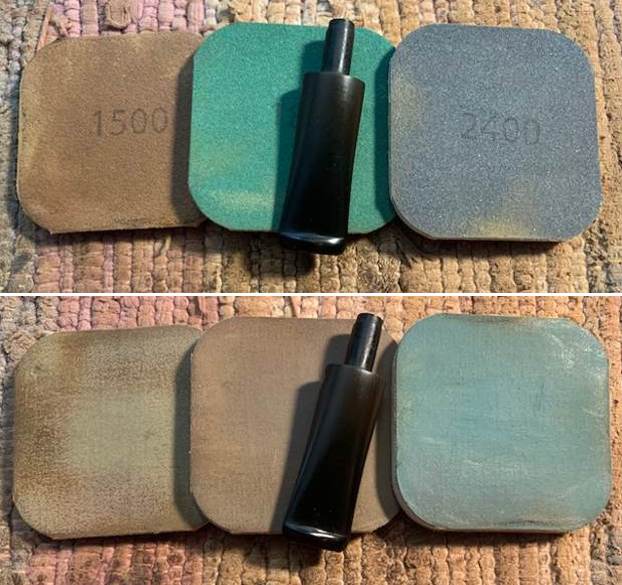
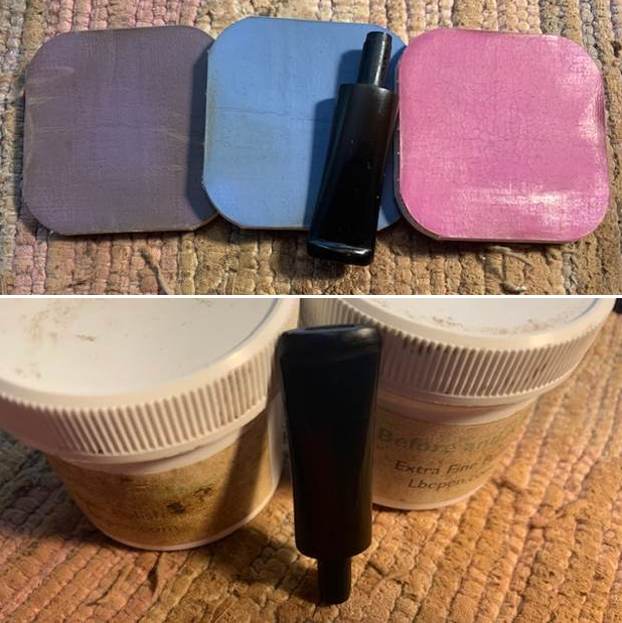 This Jost’s Eccentric Grain 73S Long Canadian is a great looking pipe now that it has been restored. The medium reddish brown stain highlights the grain and works well with the polished vulcanite bent taper stem. I put the stem back on the bowl and carefully buffed the pipe with Blue Diamond on the buffing wheel using a light touch on the briar. I gave the bowl and the stem multiple coats of carnauba wax on the buffing wheel and followed that by buffing the entire pipe with a clean buffing pad. I hand buffed the pipe with a microfiber cloth to deepen the shine. The finished Long Canadian fits nicely in the hand and feels great. Give the finished pipe a look in the photos below. The dimensions of the pipe are; Length: 6 ½ inches, Height: 1 ¾ inches, Outer diameter of the bowl: 1 1/8 inches, Chamber diameter: ¾ inches. The weight of the pipe is 1.38 ounces/39 grams. I will be adding it to the rebornpipes store in the American Pipemakers Section. Thanks for reading this blog and my reflections on the pipe while I worked on it. This is an interesting estate to bring back to life.
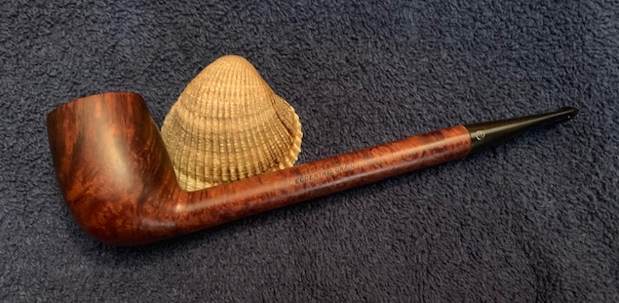
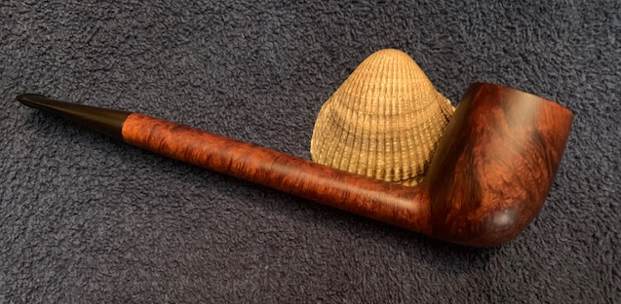
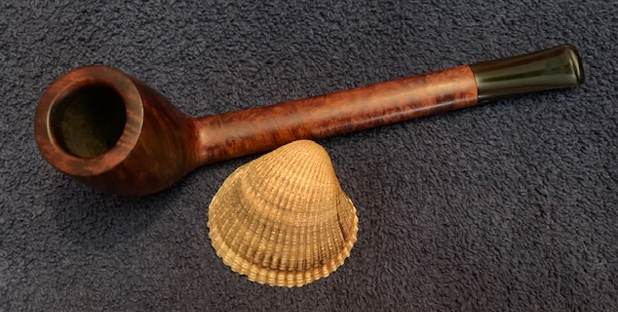
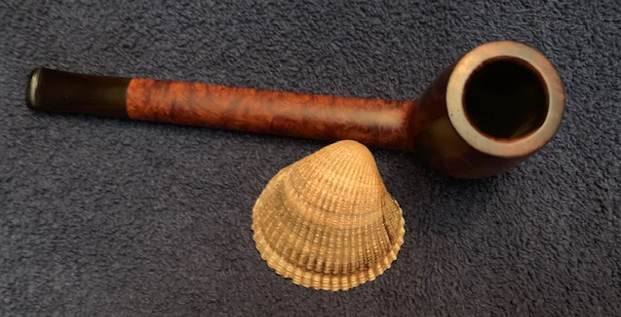
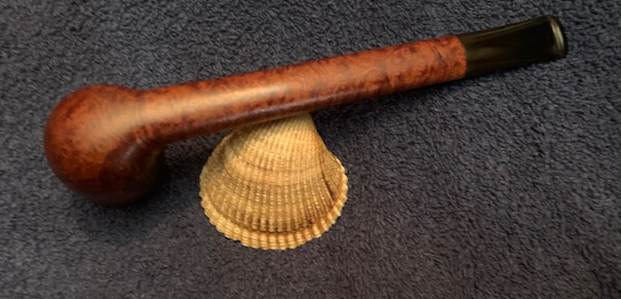
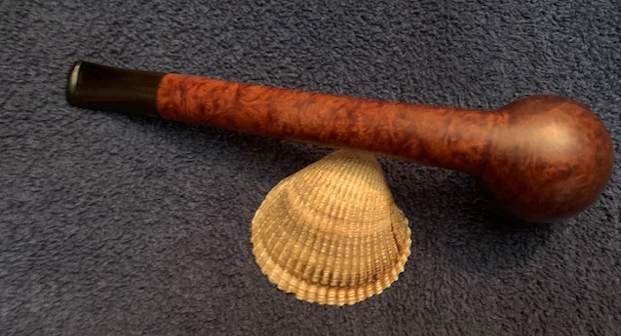
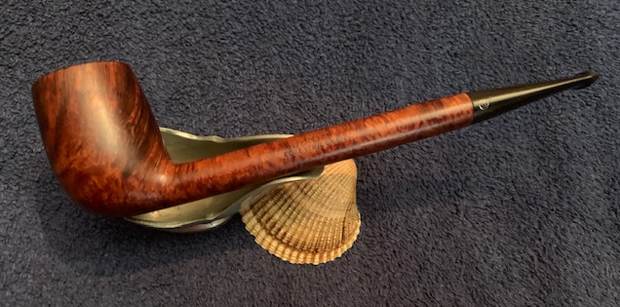
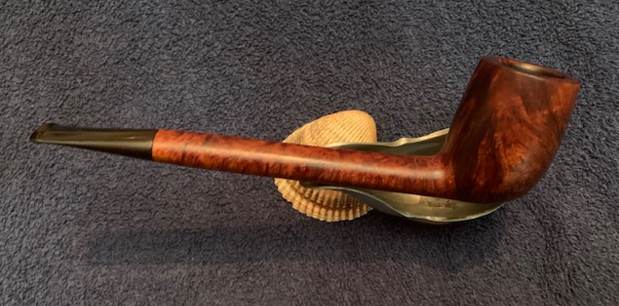
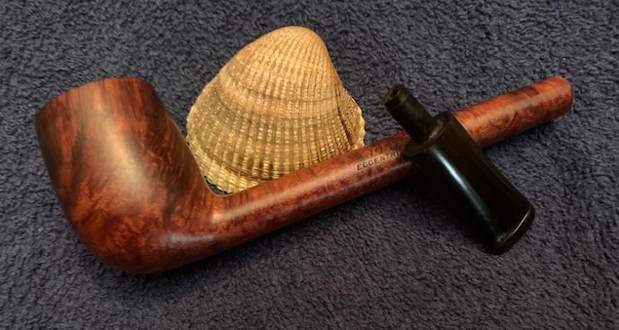
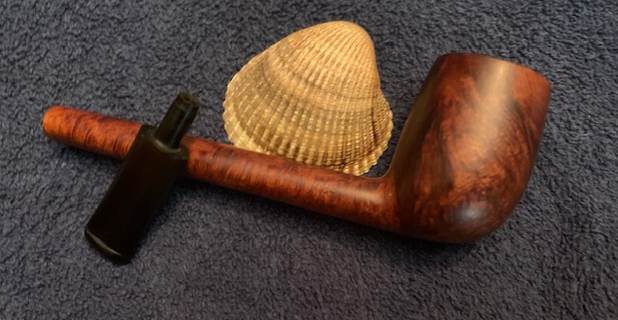

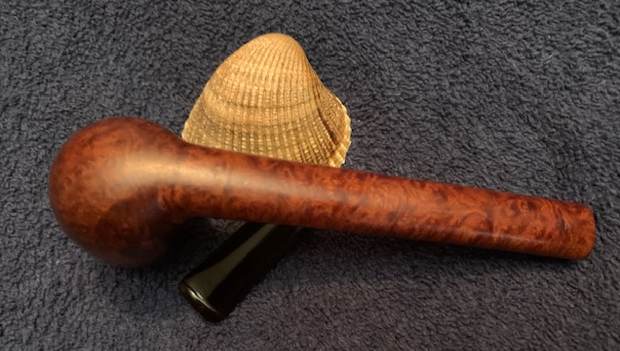
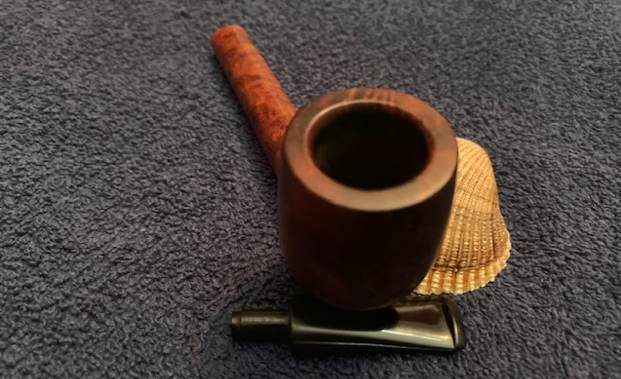
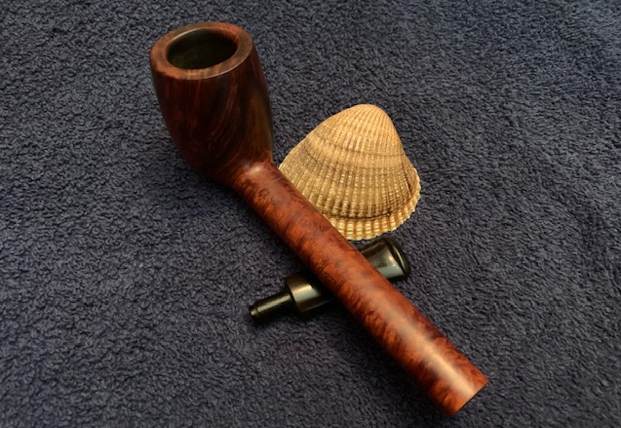

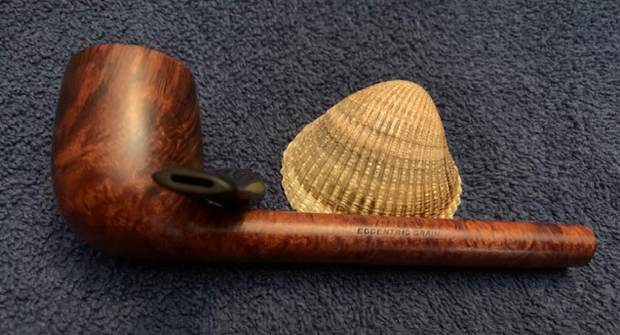
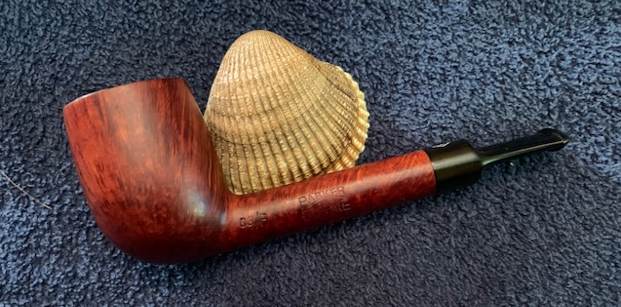
Blog by Steve Laug
The next pipe on the work table was purchased on 08/16/17 from the same estate in Portland, Oregon, USA as the other Parker I worked on. This one is a beautiful little Parker Lovat. The stamping on the left side of the shank reads Parker over Super in a diamond over Bruyere. To the left of that next to the shank bowl junction is the shape number 63/F. On the right side of the shank the stamping reads Made in London over England with an underlined superscript 3 following the D in England that is the date stamp 1953. The date stamp was easily read after the previous 1954 Parker Super Bruyere Cherrywood that I restored and added to my collection (https://rebornpipes.com/2022/07/16/restoring-my-birth-year-1954-parker-super-bruyere-patent-cherrywood-281-f/). Further stamping under that reads PAT NO. 116989/17 which should also help with dating the pipe. The finish on the pipe was filthy with grime ground into the briar. There was a thick cake in the bowl that flowed out on top of the crowned rim top and down the outer edge of the rim. The cake was thick so it was hard to know what the edge of the rim looked like. The stem was heavily oxidized and calcified with tooth marks on the top and underside ahead of the button. There was a Diamond P logo on the top of the stem. Jeff took photos of the pipe before he cleaned it up. 
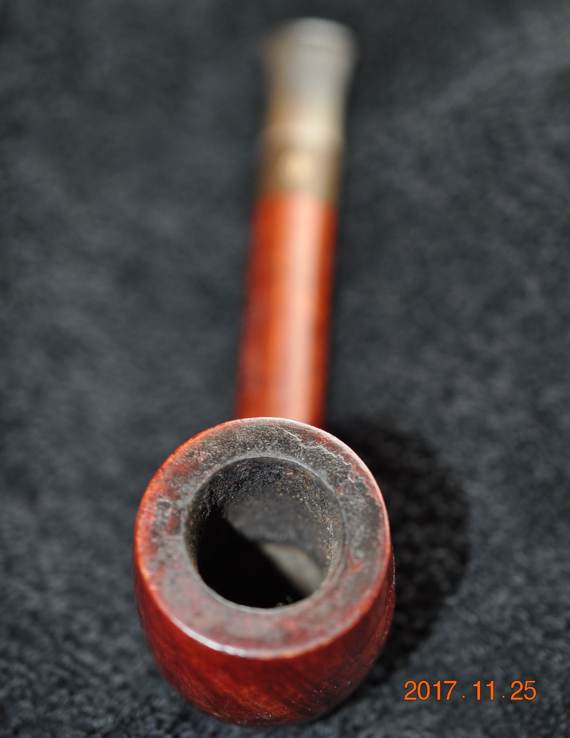 He took photos of the bowl and rim top to show the condition of the pipe. You can see the cake in the bowl and the thick lava build up on the inner edge and the rim top. The stem photos show the oxidation and tooth marks and chatter on the top and underside ahead of the button.

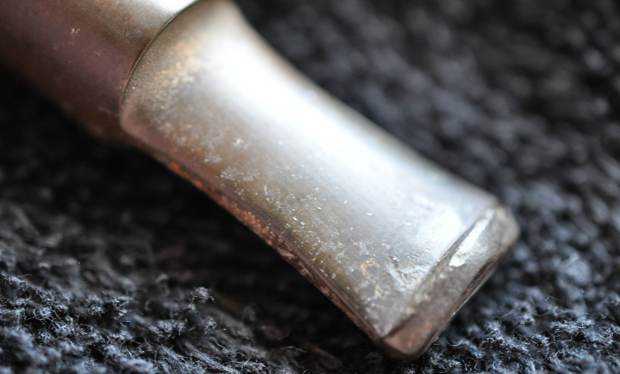 He took photos of the bowl and the heel to capture a sense of the grain around the bowl. It is a really nice piece of briar.
  He took photos of the stamping on sides of the shank as well as the logo stamp on the top side of the saddle stem. All are clear and readable as noted above.
 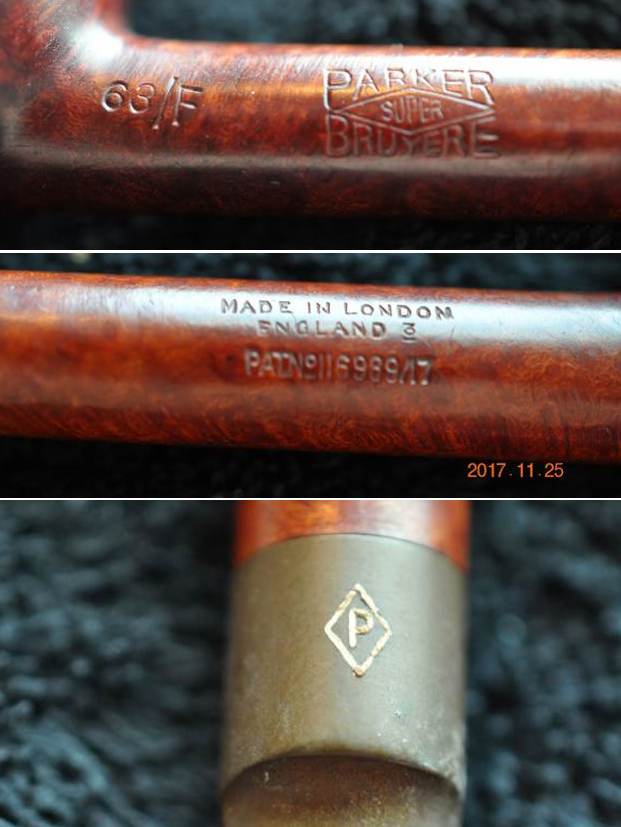 I have worked on quite a few Parkers over time but this is the second one stamped with both a date stamp and a Patent number. The superscript 3 after the D in England and a Patent Number under that. The pipe was a 1953. I found a picture of a pipe that had the same stamping on both sides of the shank as the one I am working on but it has a different shape number and date after the D (http://www.pipephil.eu/logos/en/logo-parker.html). I have included a screen capture of the section showing pipe.
 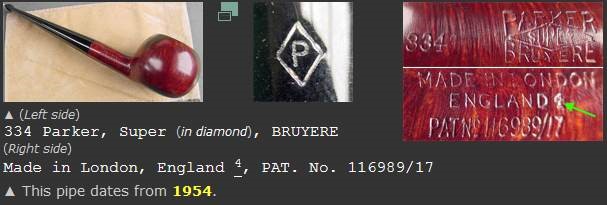 At the top of the listing there was a short summary of the history of the brand. I quote from it below.
Parker Pipe Co. was created in 1923 by Dunhill. After Dunhill acquired Hardcastle the two companies were merged (1967) in the Parker-Hardcastle Ltd.
Patent number 116989/17 is the only one which may appear on a Parker pipe prior to 1954. This was the year Parker and Dunhill both stopped stamping pat#.
On the side bar next to the listing for Parker Super Bruyere the following information was available.
Like Dunhill pipes, Parkers were also date coded but had a independent cycle.
Pat n° 116989/17 is the number corresponding to the Inner Tube patent (with flange).
I turned to Pipedia and did a bit more reading on the brand (https://pipedia.org/wiki/Parker). I quote in part below:
In 1922 the Parker Pipe Co. Limited was formed by Alfred Dunhill to finish and market what Dunhill called its “failings” or what has come to be called by collectors as seconds. Previous to that time, Dunhill marketed its own “failings”, often designated by a large “X” over the typical Dunhill stamping or “Damaged Price” with the reduced price actually stamped on the pipe.
While the timing and exact nature of the early relationship remains a bit of mystery, Parker was destined to eventually merge with Hardcastle when in 1935 Dunhill opened a new pipe factory next door to Hardcastle, and purchased 49% of the company shares in 1936. In 1946, the remaining shares of Hardcastle were obtained, but it was not until 1967 when Parker-Hardcastle Limited was formed.
It is evident through the Dunhill factory stamp logs that Parker and Dunhill were closely linked at the factory level through the 1950s, yet it was much more than a few minor flaws that distinguishing the two brands. Most Dunhill “failings” would have been graded out after the bowl turning process exposed unacceptable flaws. This was prior to stoving, curing, carving, bit work and finishing. In others words, very few Parkers would be subjected to the same rigorous processes and care as pipes destined to become Dunhills. Only those that somehow made it to the end finishing process before becoming “failings” enjoy significant Dunhill characteristics, and this likely represents very few Parker pipes.
After the war, and especially after the mid 1950s the differences between Parker and Dunhill became even more evident, and with the merger of Parker with Hardcastle Pipe Ltd, in 1967 the Parker pipe must be considered as an independent product. There is no record of Parker ever being marketed by Dunhill either in it’s retail catalog or stores.
Parker was a successful pipe in the US market during the 1930s up through the 1950s, at which point it faded from view in the US, while continuing to be popular in the UK. It was re-introduced into the US market in 1991 and is also sold in Europe…
…Prior to Word War II, the possessive PARKER’S stamp was used. However, at least some pipes were stamped with the non-possessive as early as 1936.
Like Dunhill, Parker pipes are date stamped, but differently than Dunhill. The Parker date code always followed the MADE IN LONDON over ENGLAND stamping. The first year’s pipes (1923) had no date code; from 1924 on it ran consecutively from 1 to 19.
There is no indication of a date code for the war years. Parker was not a government approved pipe manufacturer, while Dunhill and Hardcastle were. During the war years Parker manufactured the “Wunup” pipe made of Bakelite and clay. A Parker pipe with a 19 date code has been reported, indicating there was perhaps some production of briar pipes as well, but no dating record.
From 1945 through 1949 the Parker date code runs from 20 to 24 and from 1950 through 1957 it runs from an underlined and raised 0 to an underlined and raised 7.
A little help here from anyone with date code information beyond 1957 would be most appreciated.
The site did give me a lot of information about the Parker brand and its connection to Dunhill. It confirmed without a doubt that the pipe that I was working on was made in 1953 from the date stamp underlined superscript 3 following the D in England. The Patent Number 116989/17 is the only one which may appear on a Parker pipe prior to 1954. This was the year Parker and Dunhill both stopped stamping Patent Numbers. The patent refers to an inner tube with a flange.
Jeff cleaned the Parker up really well. He reamed it with a Pipnet Reamer and cleaned up the reaming with a Savinelli Fitsall pipe knife. He had scrubbed the exterior of the bowl with Murphy’s Oil Soap and a tooth brush and rinsed it off with warm water to remove the grime from the finish. He cleaned the internals of the shank and stem with alcohol, cotton swabs and pipe cleaners to remove the tarry residue and oils from the airway in the shank and stem. He soaked the stem in Before & After Deoxidizer to remove the oxidation on the stem surface. When it arrived here on my work table I took photos of the pipe before I started my part of the restoration. The pipe looked very good with a light oxidation still remaining on the stem surface. The Diamond P stamp was clean but had no colour left in the stamping. 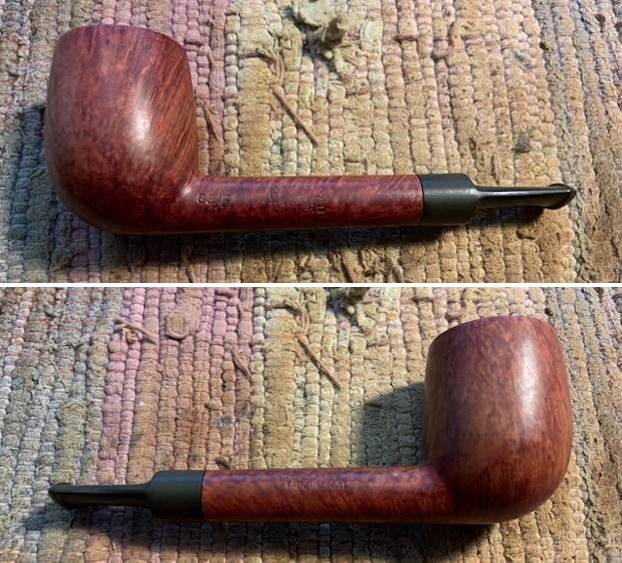
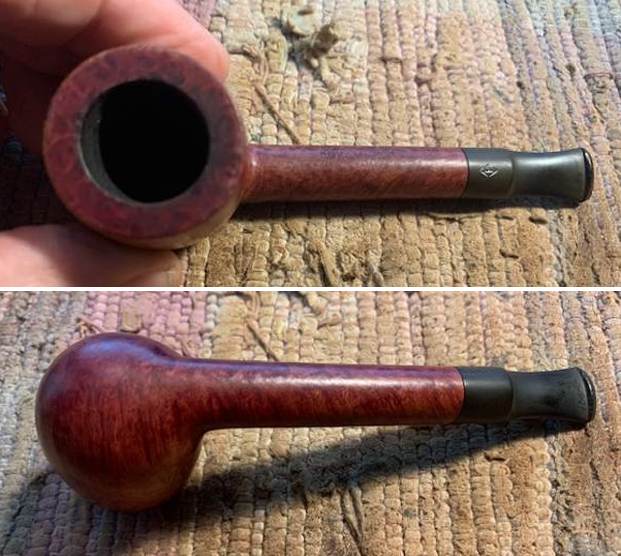 The inner and outer edges were in good condition. There was some darkening on the back of the rim top and around the inner edge. There was some light marks or nicks on the front edge. The stem looked good but there was still some oxidation and there were tooth marks and chatter on both sides near the button.
  I took a photo of the stamping on the sides of the shank. The stamping is clear and readable and reads as noted above.
 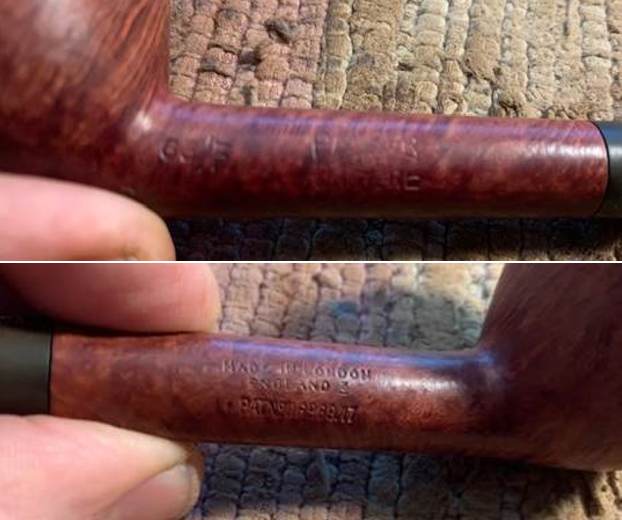 I took the stem off the pipe and took a photo of the parts to show the look of the pipe as a whole.
 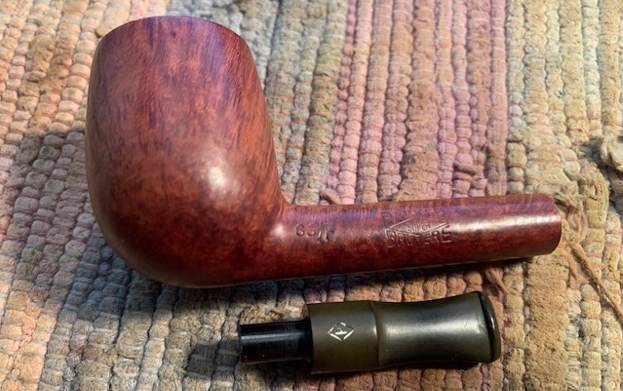 I started my work on the inner edge of the bowl and rim top with a folded piece of sandpaper to clean up the darkening and damage. It looked much better after the work.
 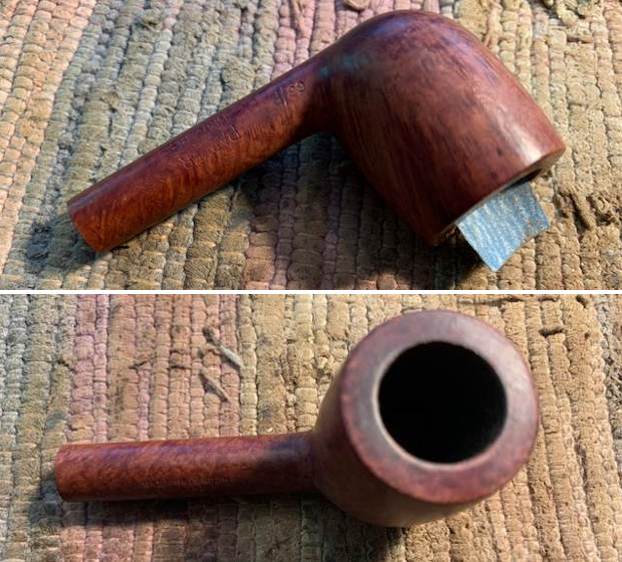 I polished the rim top and bowl with 1500-12000 grit micromesh sanding pads to polish the briar. I wiped it down with a damp cloth after each sanding pad.
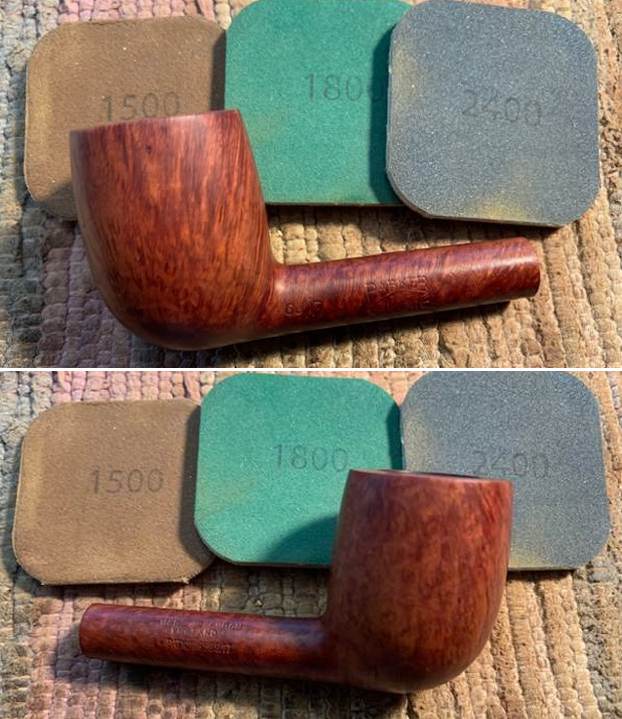
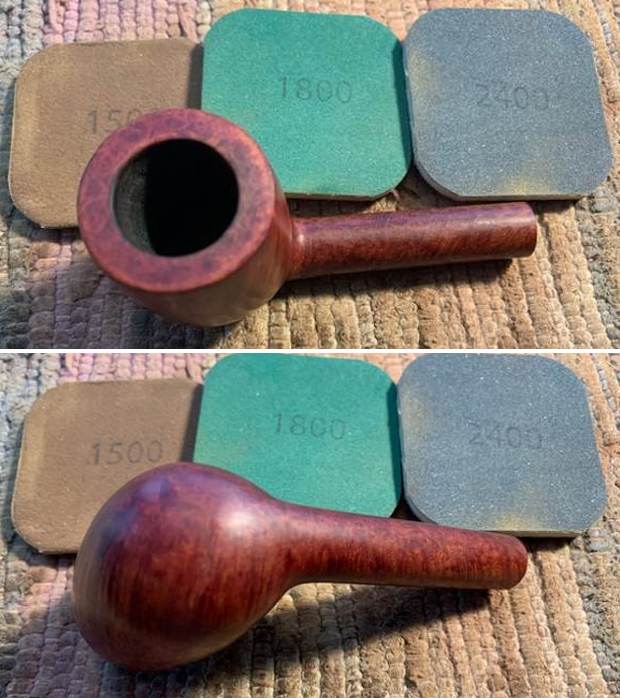


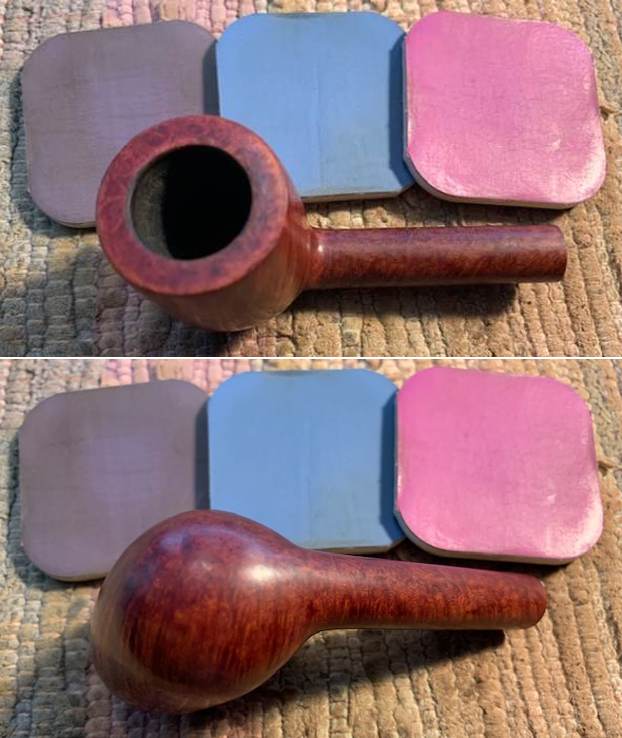 I rubbed the bowl and shank down with Before & After Restoration Balm. I worked it into the surface of the bowl sides and shank with my fingertips to clean, enliven and protect the briar. I let the balm sit for 15 minutes then buffed with a cotton cloth to raise the shine. You can see the grain showing through the deep glow.
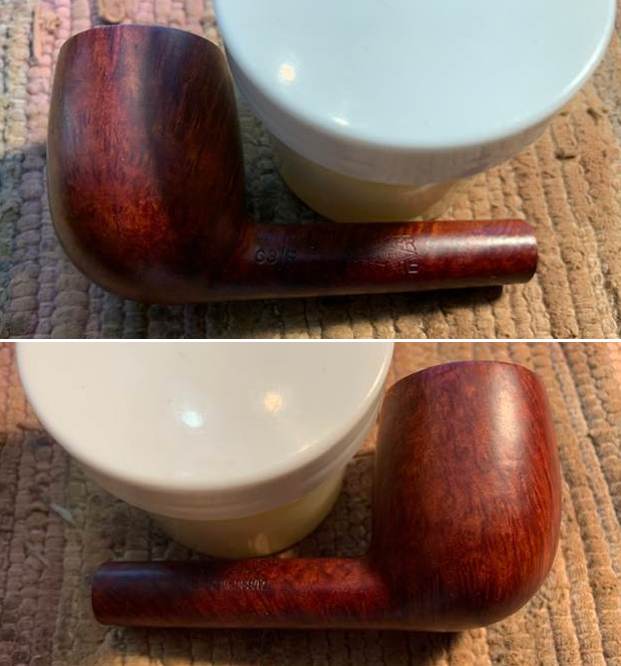
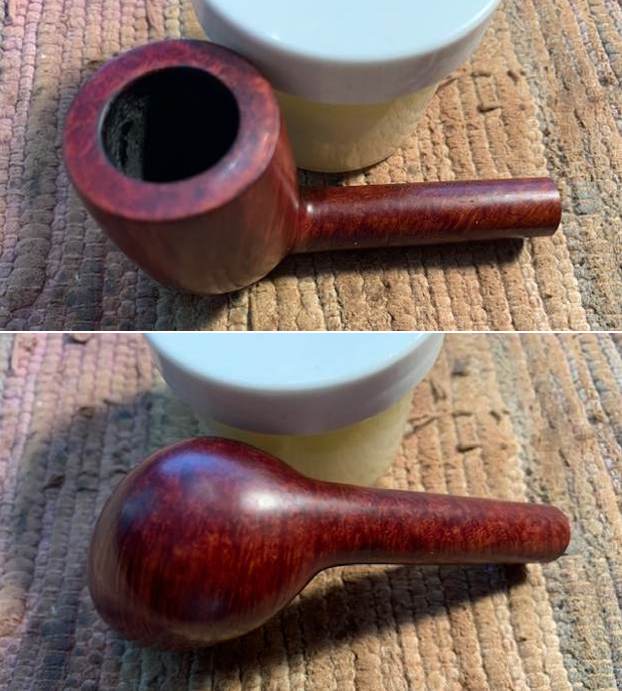
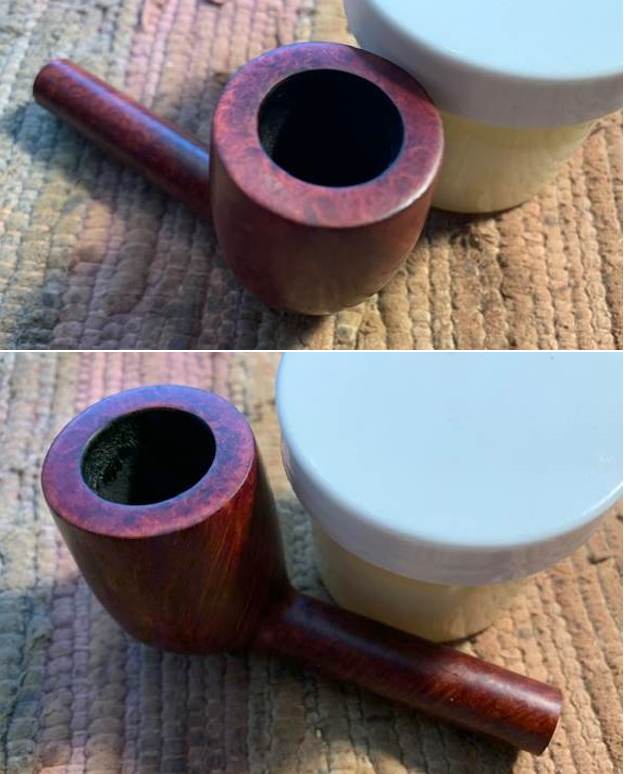 I “painted” the stem surface with the flame of a Bic lighter. I was able to lift the dents and then sanded out the remnants of chatter and marks with 220 grit sandpaper. I started polishing the stem with 400 grit wet dry sandpaper.
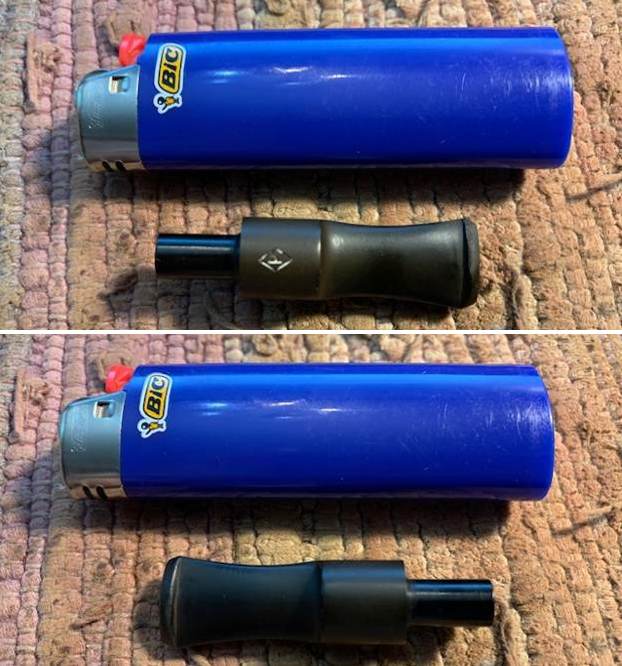
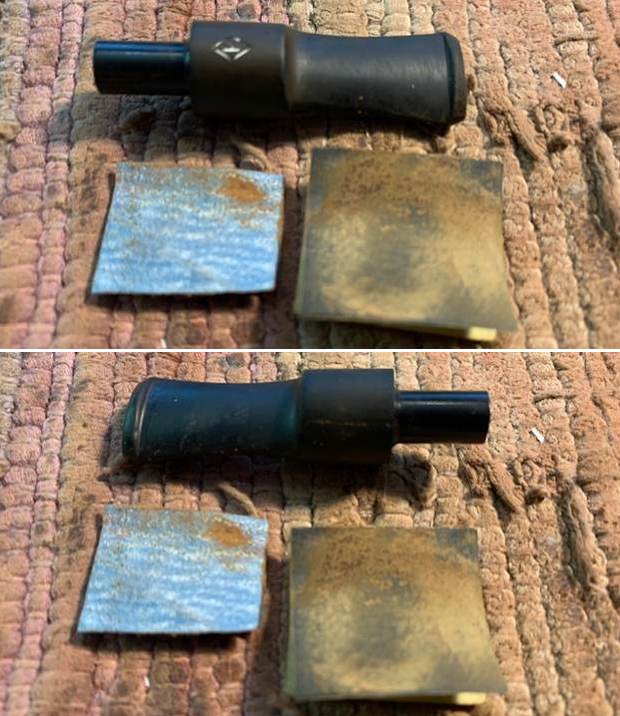 I touched up the Diamond P stamp with White Acrylic Fingernail Polish. I pushed it into the stamping with a tooth pick. I scraped it off with the tooth pipe and a cotton pad to remove the excess and still leave some in the stamping. Afterwards I used a 1500 grit micromesh sanding pad to remove the remaining acrylic.
  I polished the vulcanite stem with micromesh sanding pads – 1500-12000 grit pads. I wiped it down with cloth impregnated with Obsidian Oil after each sanding pad.
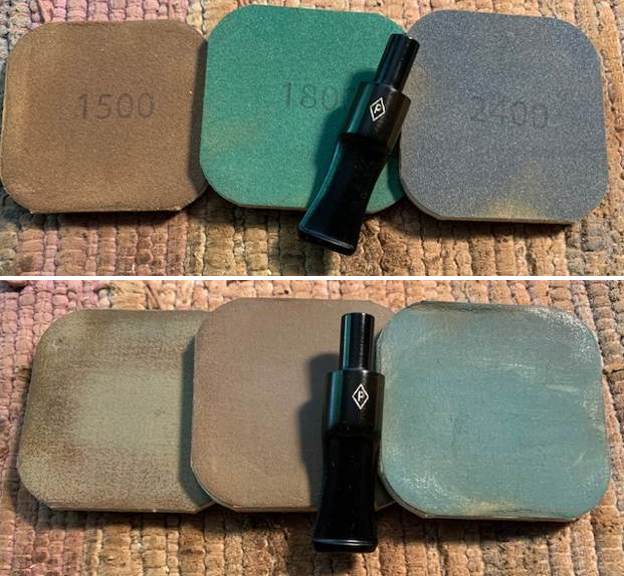
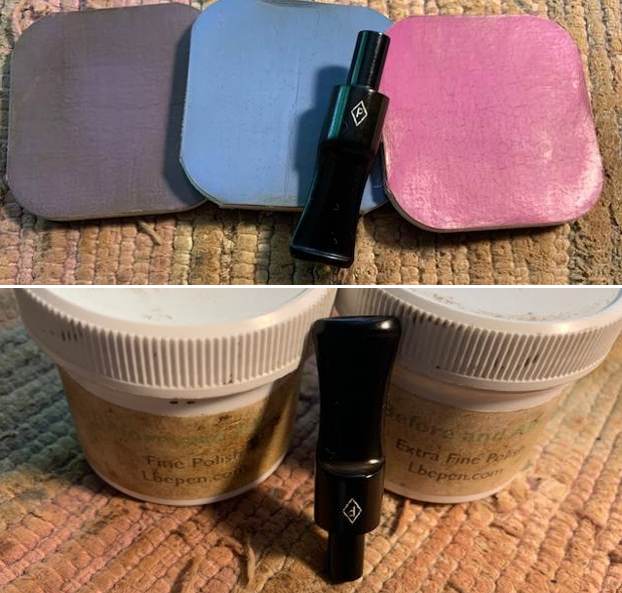 This 1953 Parker British Made Super Bruyere 68F Lovat is a great looking pipe now that it has been restored. The medium reddish brown stain highlights the grain and works well with the polished vulcanite bent taper stem. I put the stem back on the bowl and carefully buffed the pipe with Blue Diamond on the buffing wheel using a light touch on the briar. I gave the bowl and the stem multiple coats of carnauba wax on the buffing wheel and followed that by buffing the entire pipe with a clean buffing pad. I hand buffed the pipe with a microfiber cloth to deepen the shine. The finished Lovat fits nicely in the hand and feels great. Give the finished pipe a look in the photos below. The dimensions of the pipe are; Length: 5 inches, Height: 1 ¾ inches, Outer diameter of the bowl: 1 ¼ inches, Chamber diameter: ¾ inches. The weight of the pipe is 1.20 ounces/34 grams. I will be adding it to the rebornpipes store in the British Pipemakers Section. Thanks for reading this blog and my reflections on the pipe while I worked on it. This is an interesting estate to bring back to life.
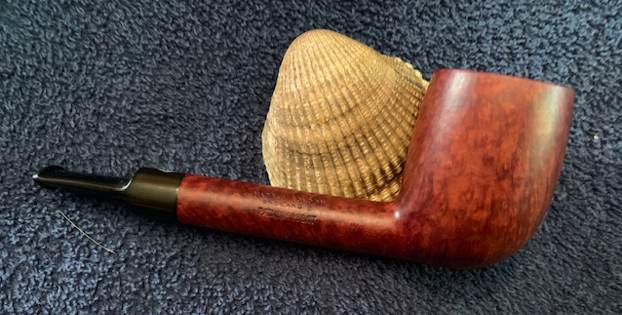
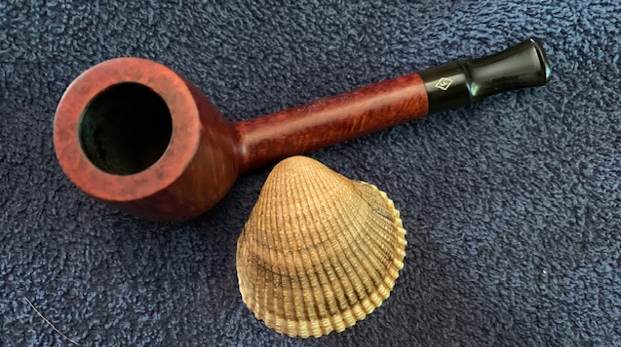
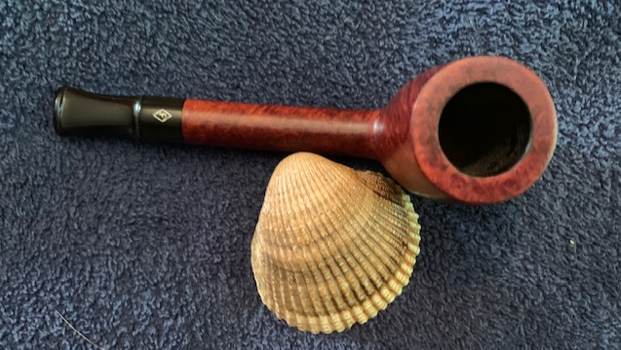
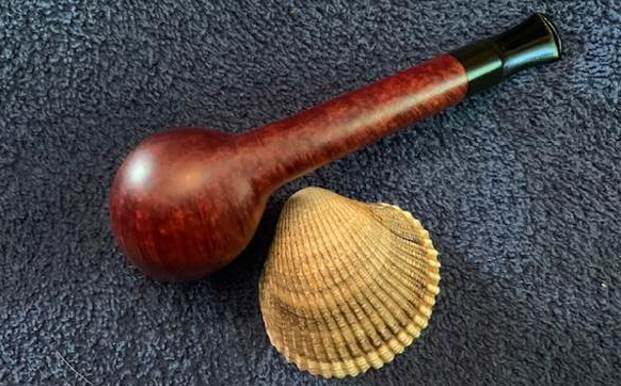
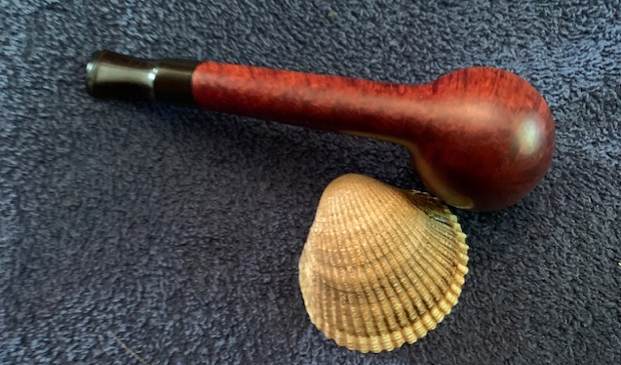


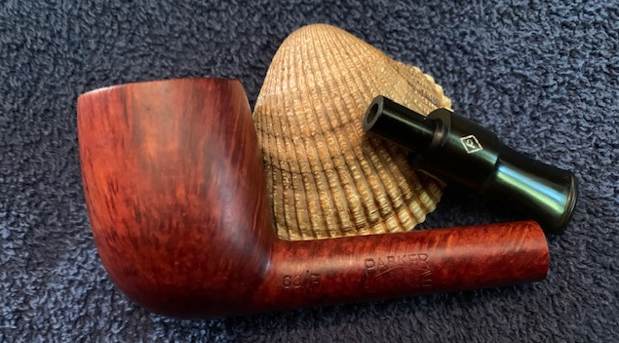
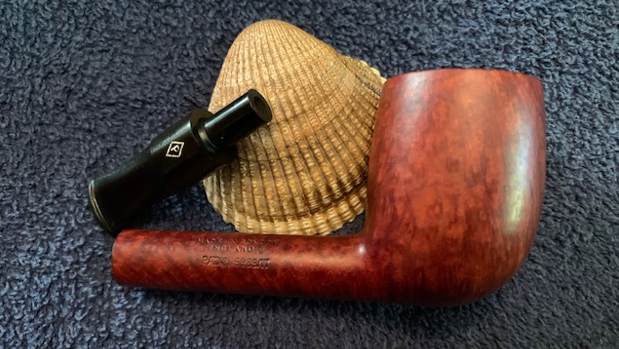
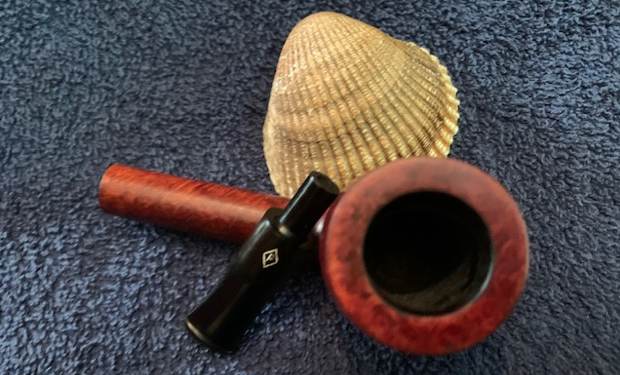
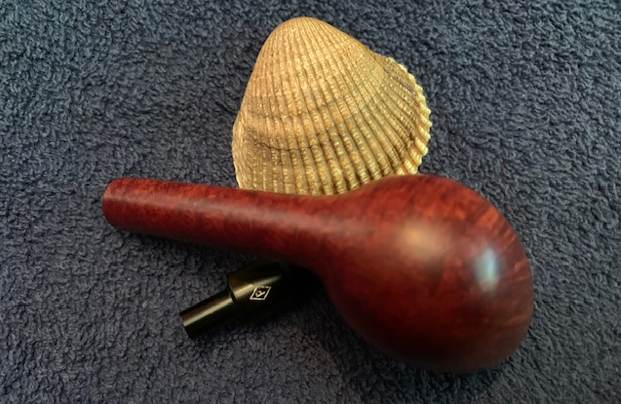
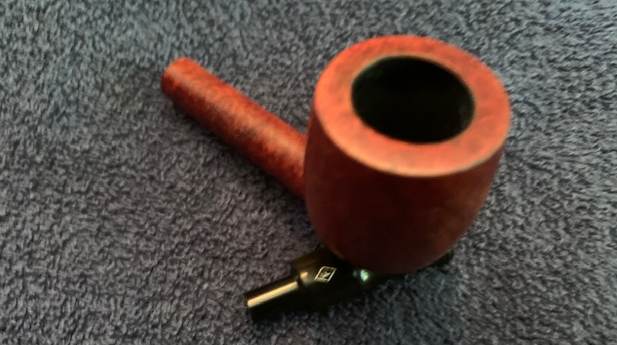
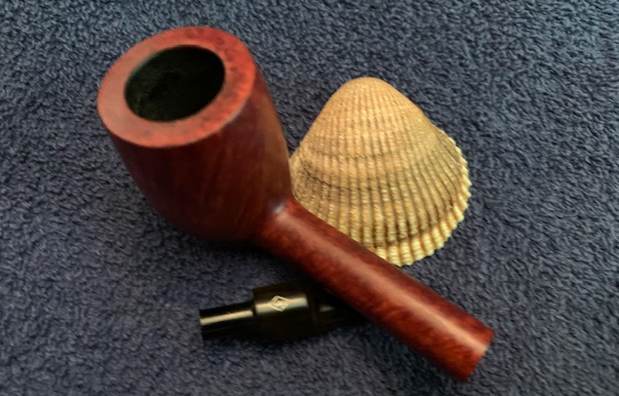

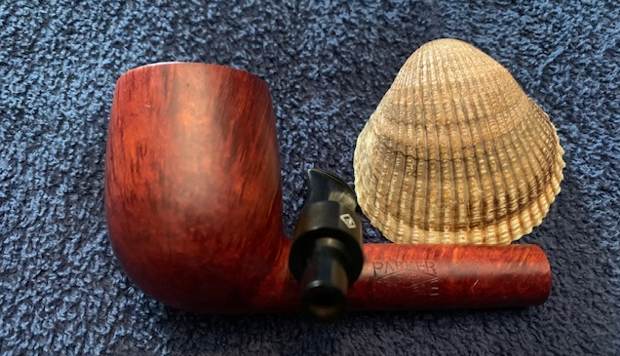
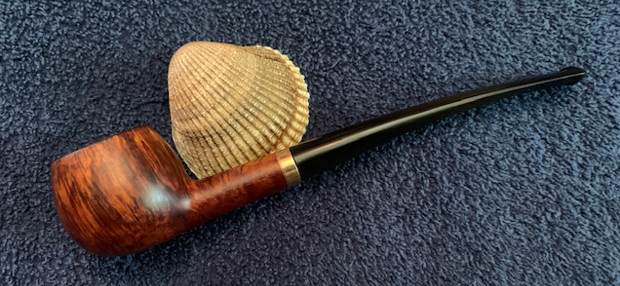
Blog by Steve Laug
The next pipe is a really nicely grained Prince with a slender vulcanite taper stem. The classic Prince was made to hold in your hand and has a flat bottom on the bowl and shank so it can be a sitter as well. It is another light weight pipe with a taper stem and looks comfortable. We picked up this pipe off eBay on 02/10/18 from Manchester Township, New Jersey, USA. Jeff cleaned the pipe in 2018 and now I am working on it in 2022 so it has been sitting around here for over four years. The stamping is on the left side and reads Grain de Luxe and on the right side reads Algerian Bruyere. The exterior of the briar was filthy and had ground in dust and grime in the finish but the grain shone through the dirt. There was a thick cake in the bowl and a thick overflow of lava on the inner edge and rim top. It was hard to know what the edge looked like underneath the lava but the cleaning would make it very clear! The stem was oxidized, calcified and had tooth marks and chatter on both sides near the button. Jeff took photos of the pipe to give a clear picture of what we were up against with this pipe. 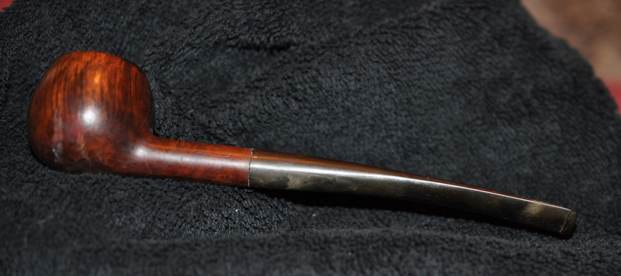
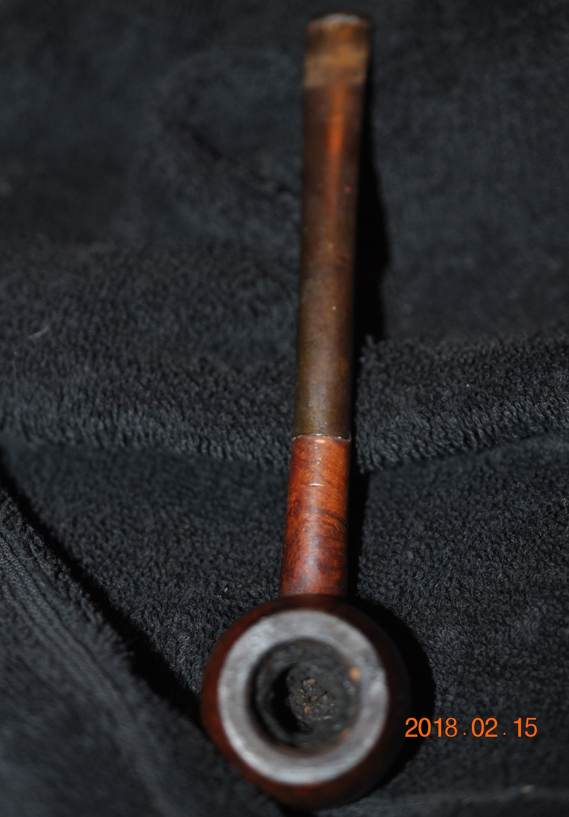 He captured the cake in the bowl and the debris and lava on the rim top and edges in the next photos. It was very clear that it was another exceptional smoker! The stem is oxidized, calcified and shows the tooth marks and chatter on both sides ahead of the button. There is an oval shaped mark on the top of the stem in the photos. It appears that there was a decal of something on the top of the stem that had long since disappeared.
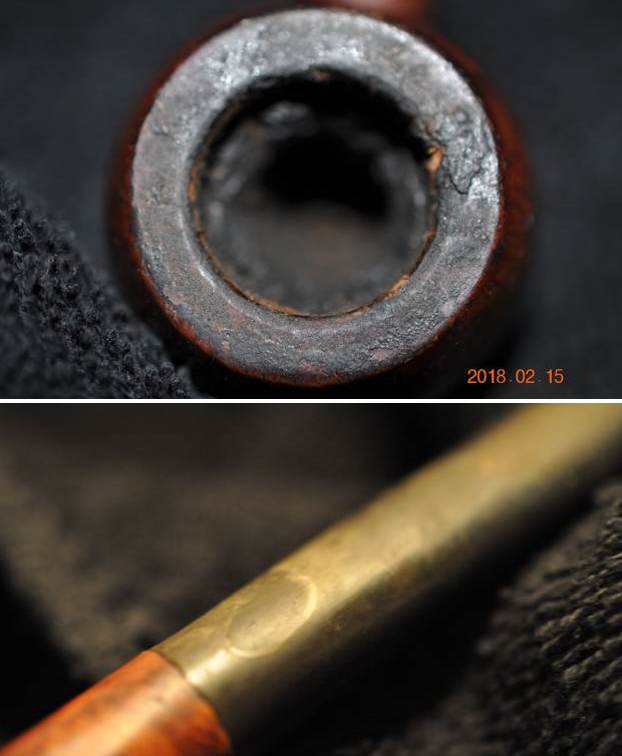
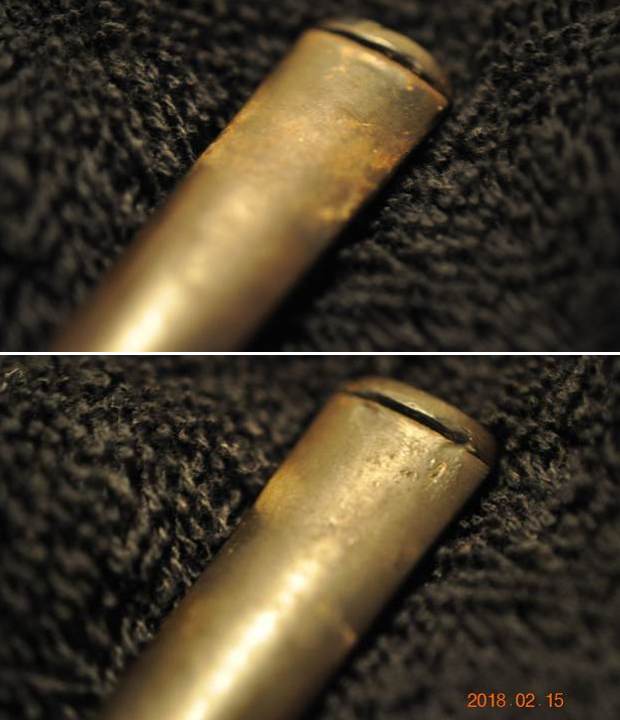 Jeff captured some of the beauty of the shape and the grain in the next photo. The mix of grains in the smooth portions and the rustication is quite lovely as can be seen in the photo of the heel. The second photo below shows the large flaw in the briar on the heel.
 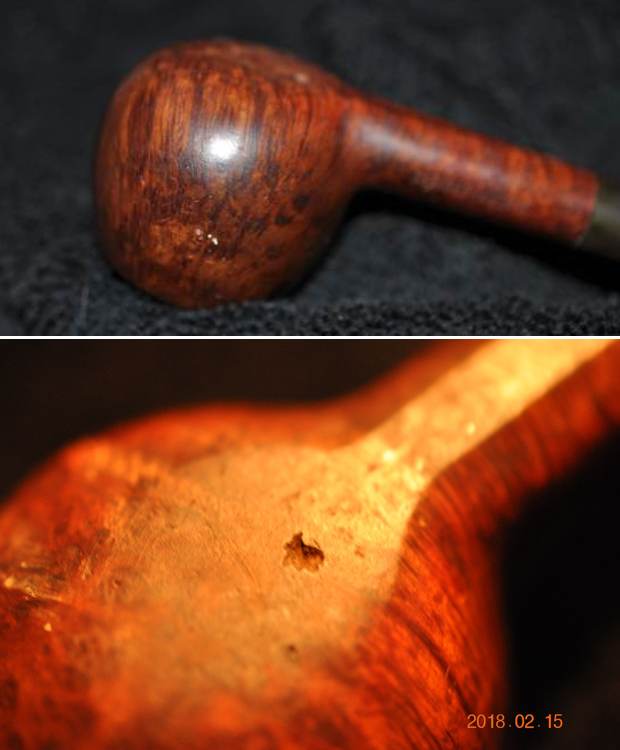 He took a photos of the stamping on the sides of the shank. It is clearly stamped on the right and left and reads as noted above.
 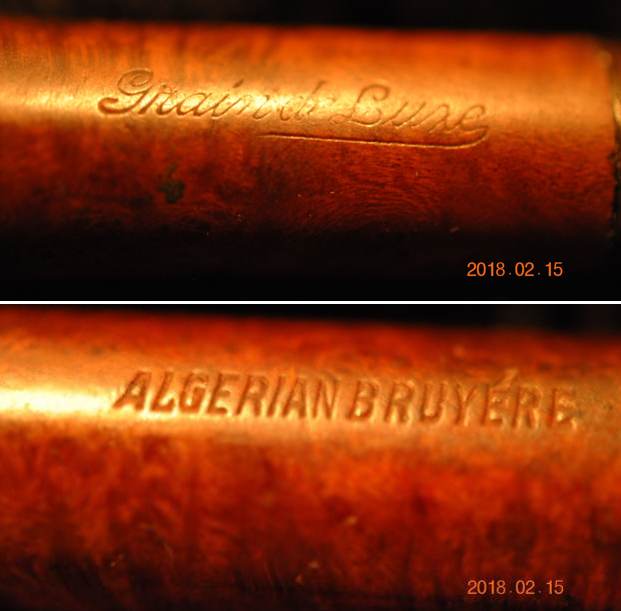 I am enjoying a nice artisan Red Ale made by Luppolo Brewing here in Vancouver as I work on this next pipe. It is really a unique short snorter. Jeff had done a great cleanup on the pipe. He reamed the bowl with a PipNet pipe reamer and followed up with a Savinelli Fitsall pipe knife to remove the cake. He scrubbed out the mortise and the airway in the shank and the stem with alcohol, cotton swabs and pipe cleaners. He scrubbed the bowl exterior with a tooth brush and Murphy’s Oil Soap to remove the grime on the finish of the bowl and the lava from the rim top. He rinsed it under running water. One of the benefits of this scrub is that it also tends to lift some of the scratches and nicks in the surface of the briar. He dried it off with a soft cloth. He cleaned the internals and externals of the stem with alcohol, pipe cleaners and cotton swabs. He soaked the stem in Briarville’s Pipe Stem Deoxidizer and rinsed it off with warm water and cleaned out the airway in the stem with alcohol, pipe cleaners and cotton swabs. I took photos of the pipe as it looked when I put it on the table.
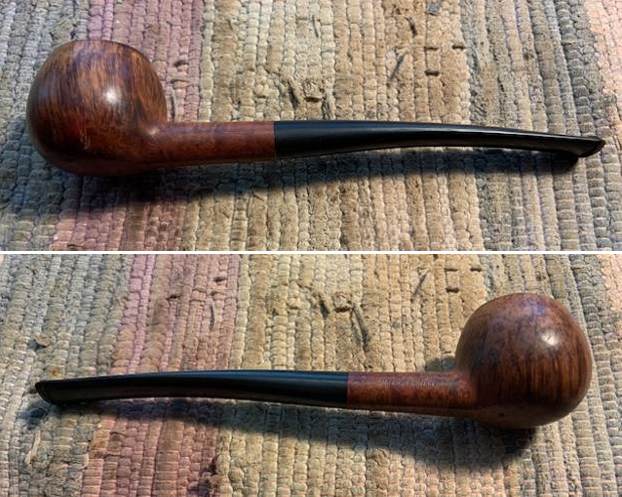
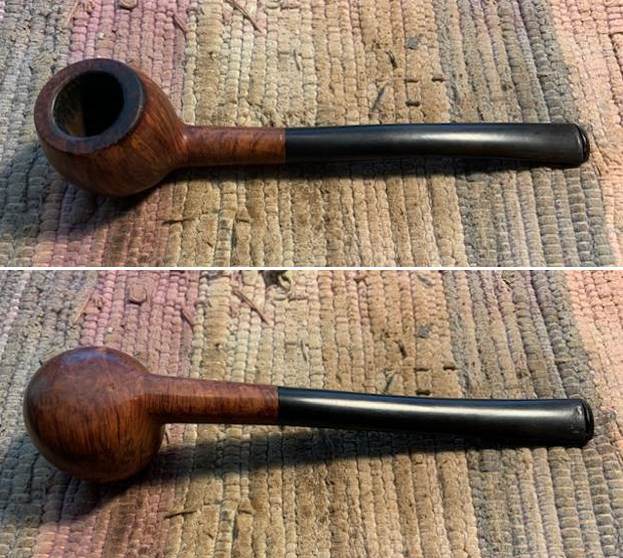 I took photos of the rim top and stem to show the condition. The rim top had some darkening and there was damage on the inner edge of the bowl. There were also some small nicks in the outer edge at the back of the bowl. The stem was vulcanite and there were tooth marks and chatter on both sides ahead of the button. The oval mark on the top of the stem was no longer visible.
 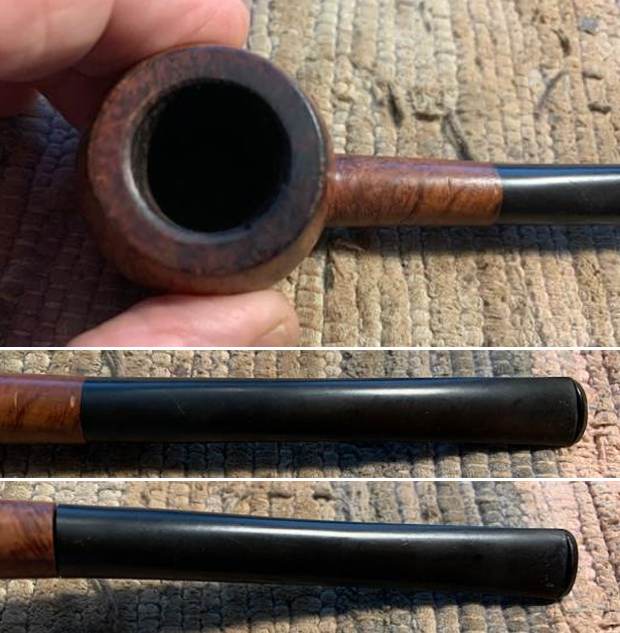 I took photos of the stamping on the left and right side of the bowl to show the stamping that was there. It was clear and readable as noted above.
 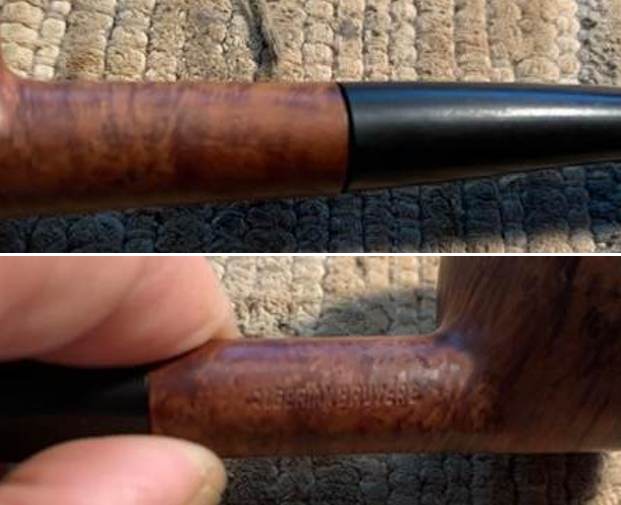 I removed the stem from the shank and took a photo of the pipe to give a sense of the proportions of the bowl and stem.
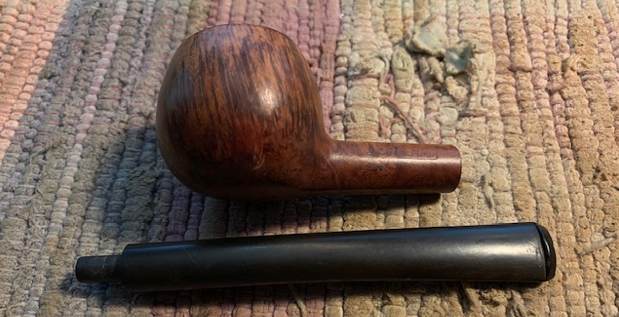 I started my work on pipe by dealing with the roughening of the inner edge of the bowl with 220 grit sandpaper. I also smoothed out the damage and the darkening on the rim top and was able to smooth it out and remove the damage. The finished bowl top and inner edge looked much better.
  I filled in the flaws in the bottom of the bowl and left side with clear CA glue. Once it cured I sanded the spots smooth with 220 grit sandpaper to blend it into the surface of the briar.
 I polished the bowl and shank with micromesh sanding pads – 1500-12000 grit pads. I wiped the bowl down between pads with a damp cloth to remove the debris.
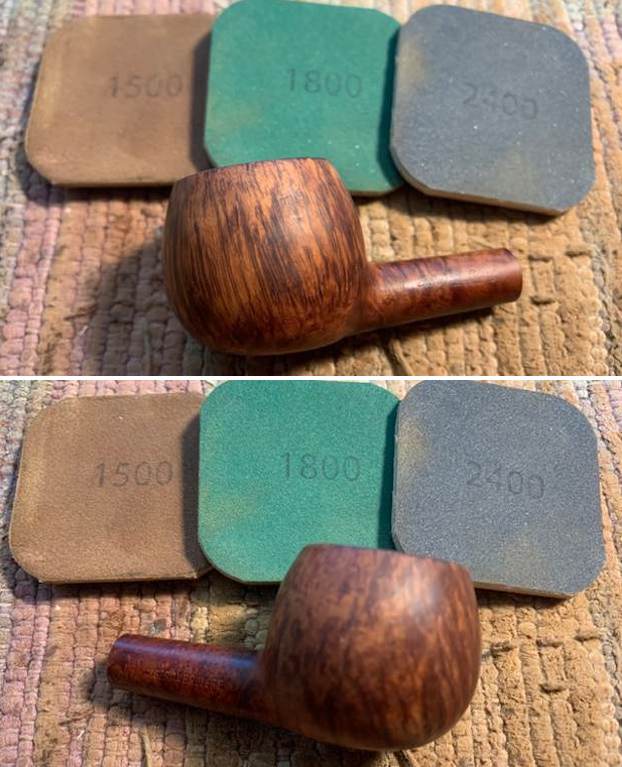
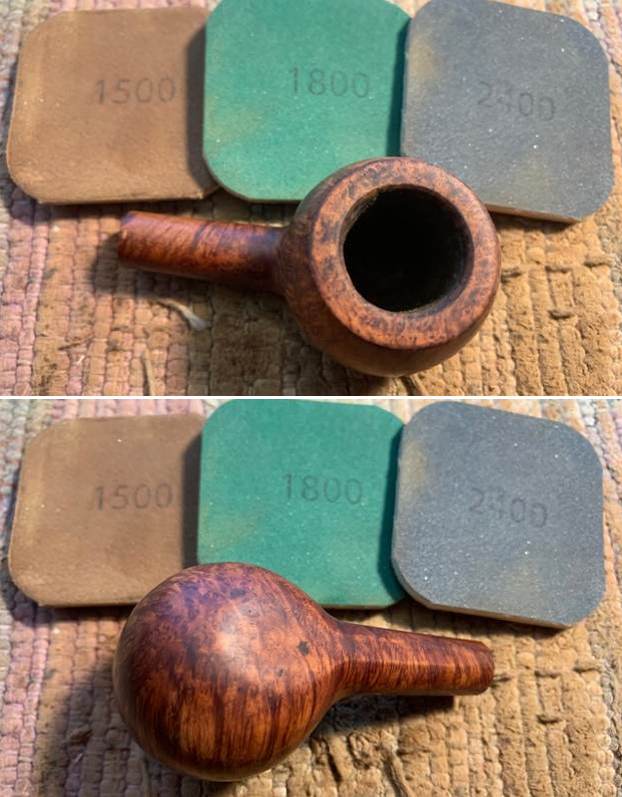

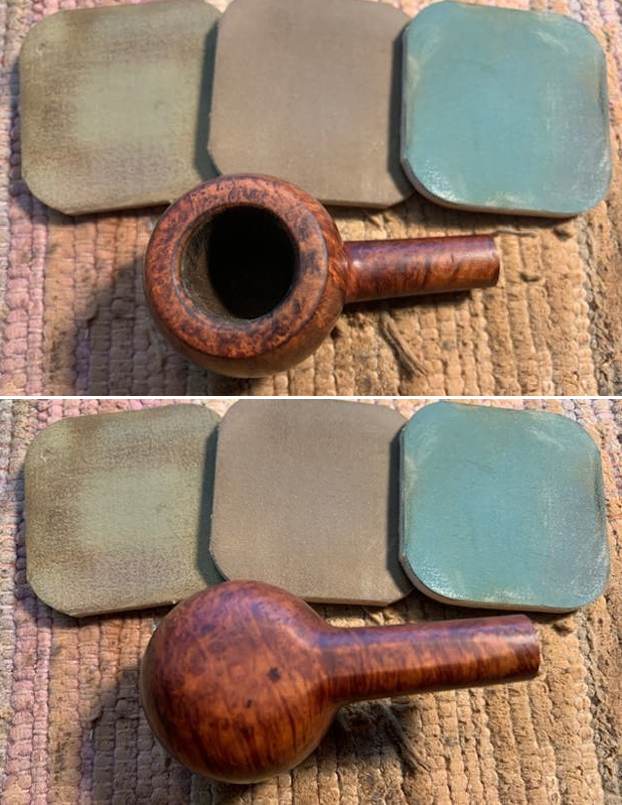
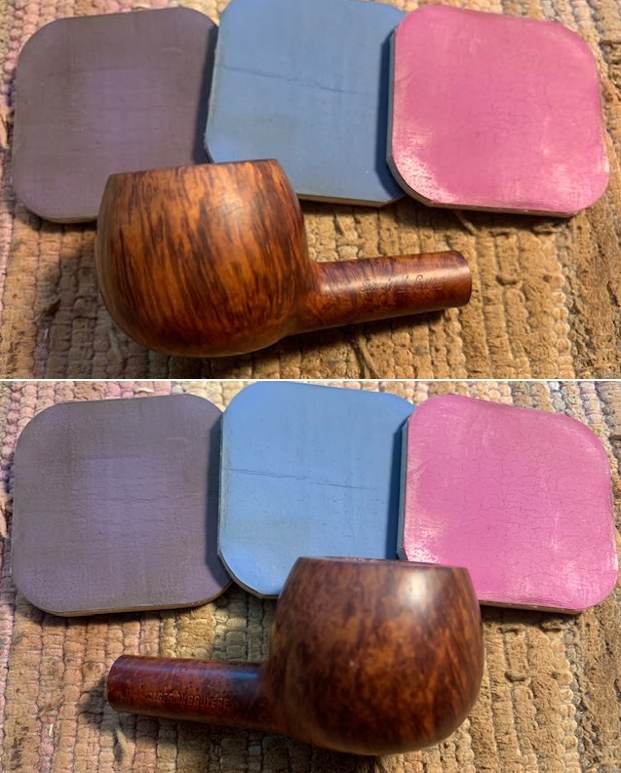
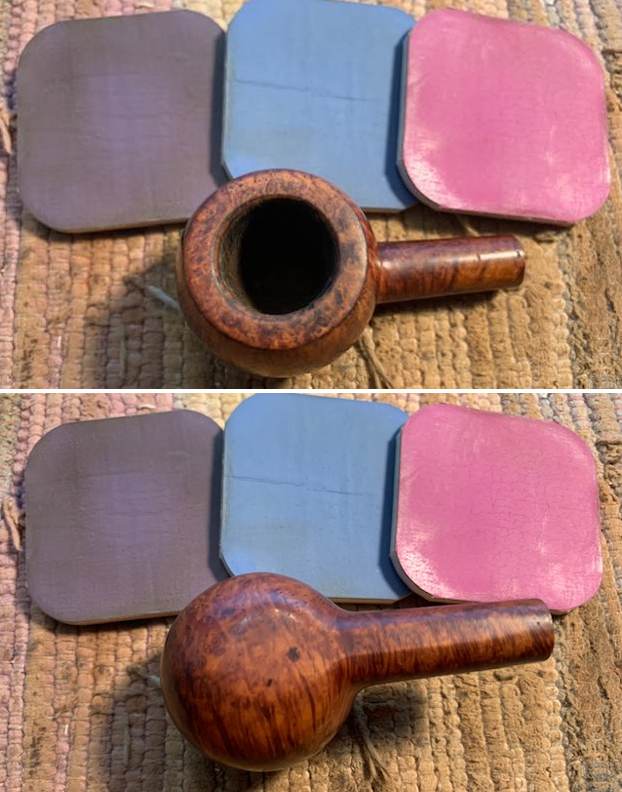 I rubbed the bowl and shank down with Before & After Restoration Balm. I worked it into the surface of the bowl sides and shank with my fingertips to clean, enliven and protect the briar. I let the balm sit for 10 minutes, then buffed with a cotton cloth to raise the shine. The Balm did its magic and the grain stood out on the briar.
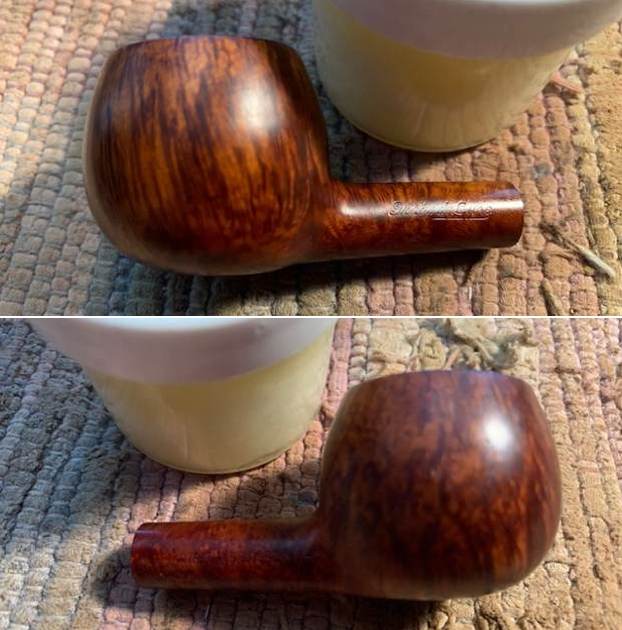
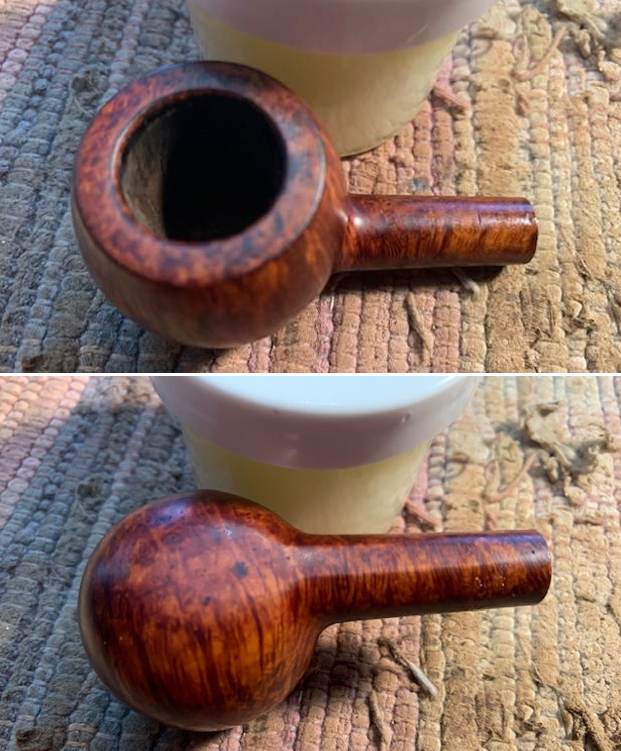
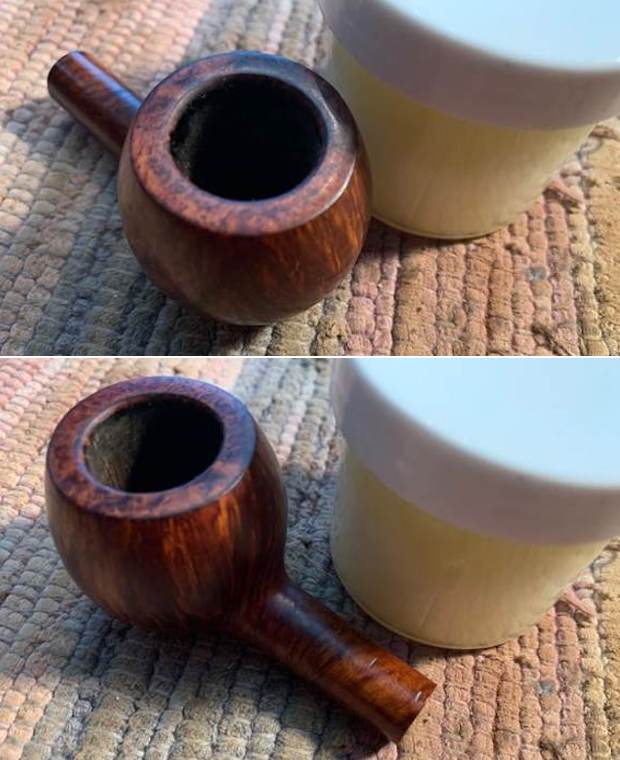 I set the bowl aside and turned my attention to the stem. I “painted” the tooth marks with the flame of a lighter and was able to lift all of them. I sanded out the remaining chatter with a folded piece of 220 grit sandpaper and then started polishing it with 400 grit wet dry sandpaper.
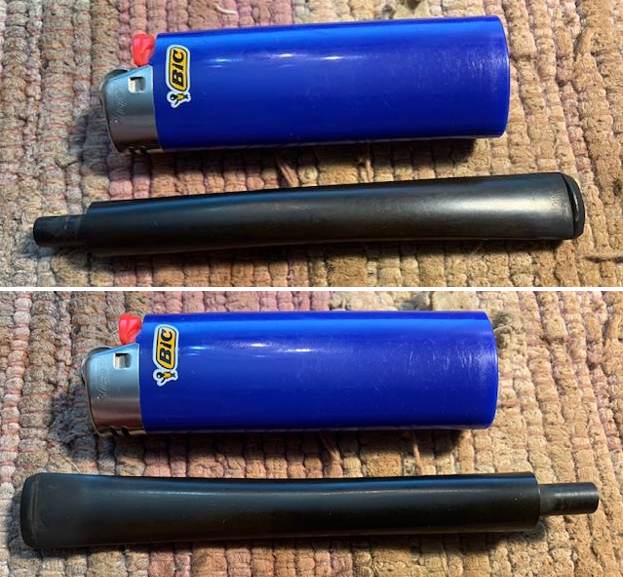
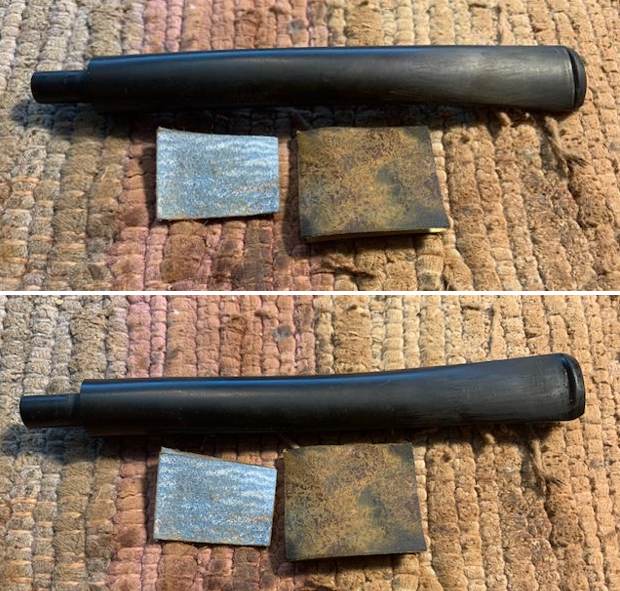 I polished the stem with micromesh sanding pads – 1500-12000 grit pads. I wiped it down with Obsidian Oil after each sanding pad. I finished the polishing with Before & After Polishes – both Fine and Extra Fine. I gave it a final rub down with Obsidian Oil and set it aside to dry.
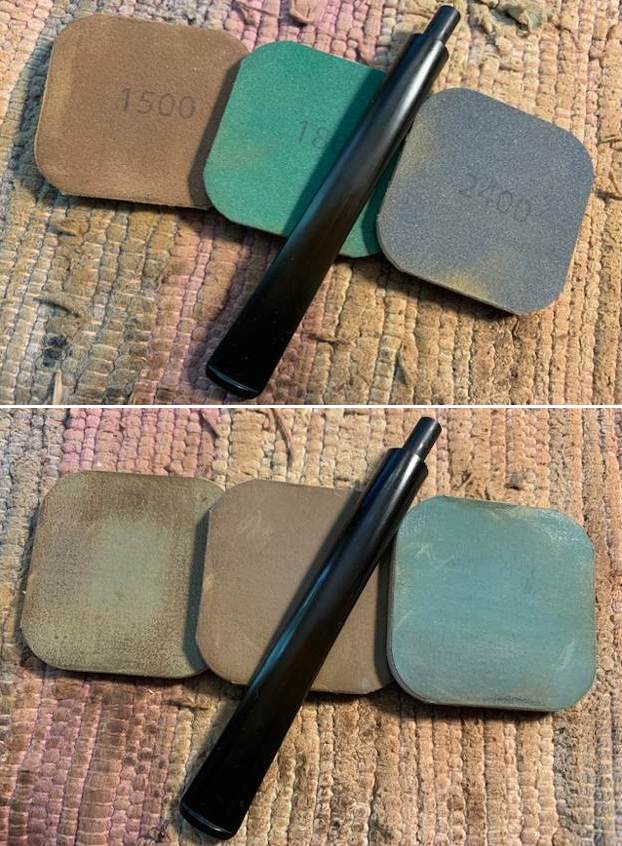
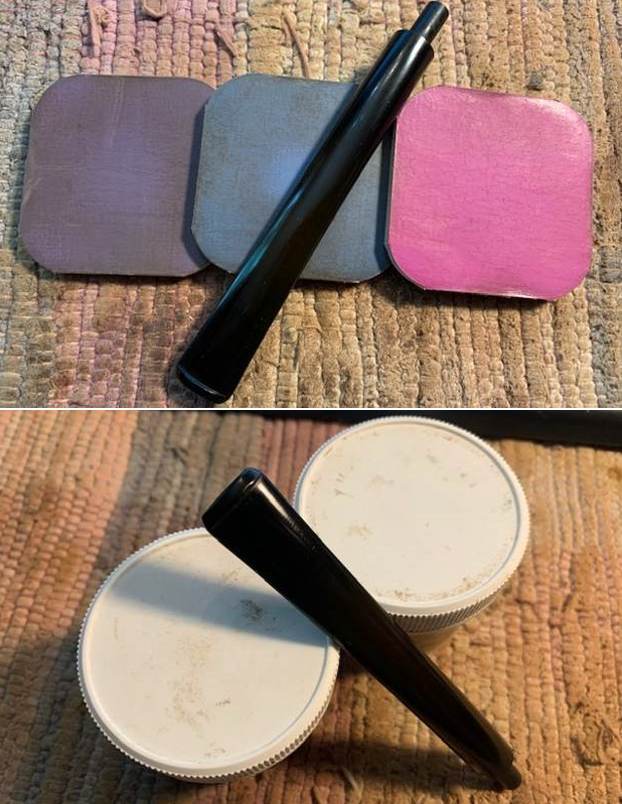 I checked the fit of the stem in the shank and found that it was a bit loose. I checked out the shank end and found some small cracks – multiple hairline fissures on the shank end but none worked their way up the shank. I went through my bands and found one that was the right size for the shank. I pressed it on to the shank end by pressing it against the place mat that I worked on. It tightened up the fit of the stem in the shank and added a nice touch to the pipe.
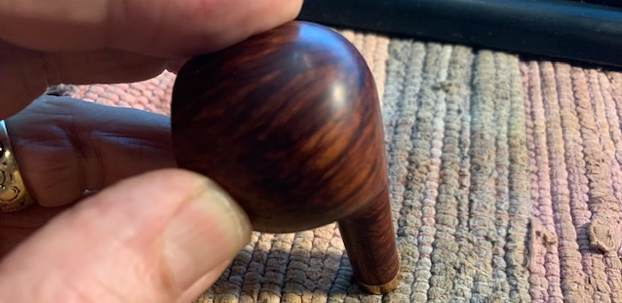
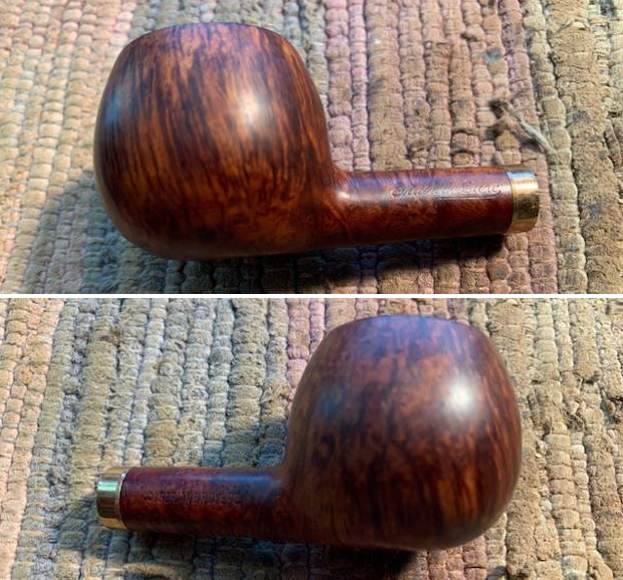
 I took photos of the pipe with the stem on the shank end. The look works well with the wood and the vulcanite. It was a great final touch with this restoration.
  This Grain de Luxe Algerian Bruyere Prince with a polished brass band and a vulcanite taper stem has beautiful grain around the bowl and shank. The rich browns and blacks of the contrasting stain makes the grain come alive with the polishing and waxing. I put the stem back on the bowl and carefully buffed the pipe with Blue Diamond on the buffing wheel using a light touch on the briar. I gave the bowl and the stem multiple coats of carnauba wax on the buffing wheel and followed that by buffing the entire pipe with a clean buffing pad. I hand buffed the pipe with a microfiber cloth to deepen the shine. The finished Grain de Luxe Prince really is unique looking and fits nicely in the hand and looks very good. Give the finished pipe a look in the photos below. The dimensions of the pipe are Length: 6 ½ inches, Height: 1 ¼ inches, Outside diameter of the bowl: 1 ¼ inches, Chamber diameter: ¾ of an inch. The weight of the pipe is 1.13 oz./32 grams. This pipe will soon be on the American Pipe Makers Section of the rebornpipes store if you would like to add it to your collection. Thanks for reading this blog and my reflections on the pipe while I worked on it. There are many more to come!