Tag Archives: waxing a stem

GBD Tapestry 9438 Re-boot


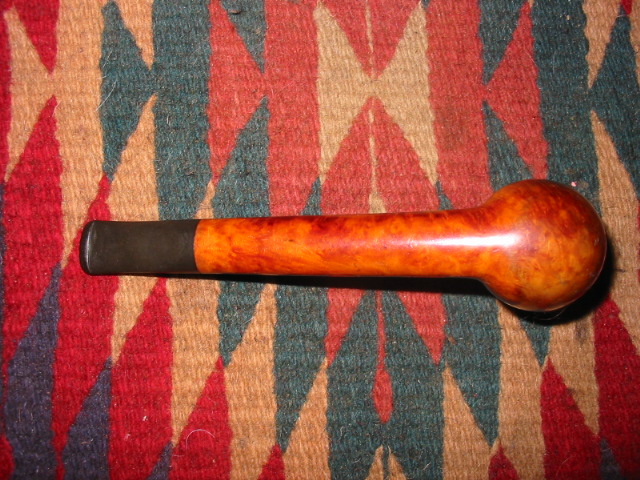
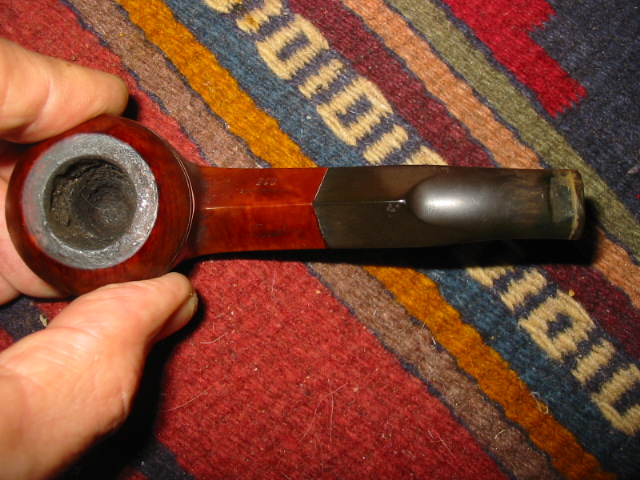
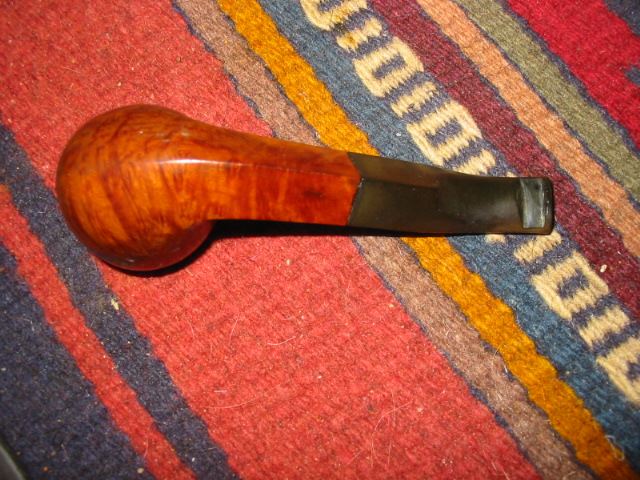
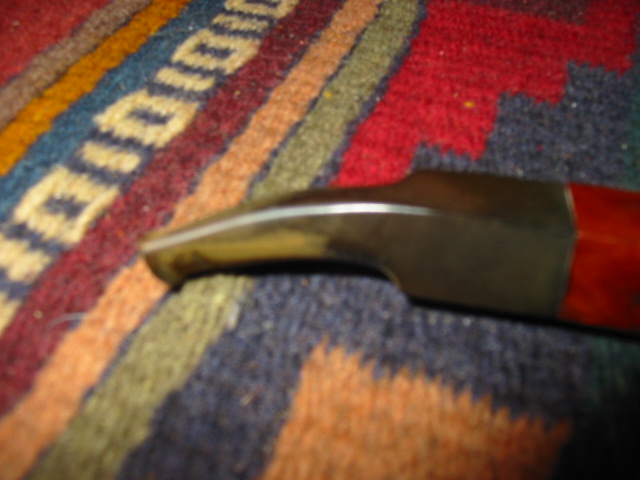
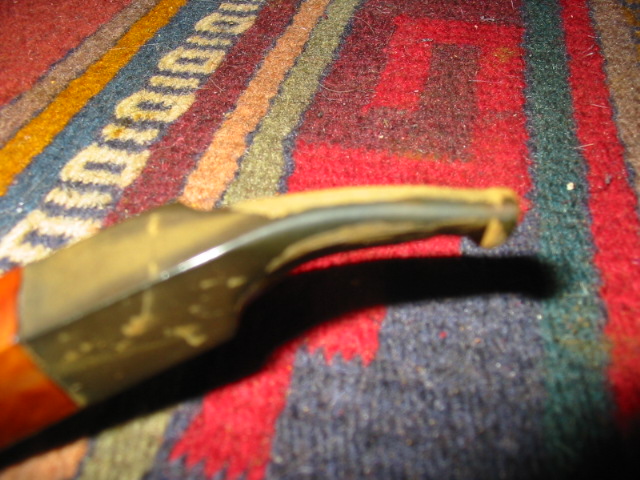
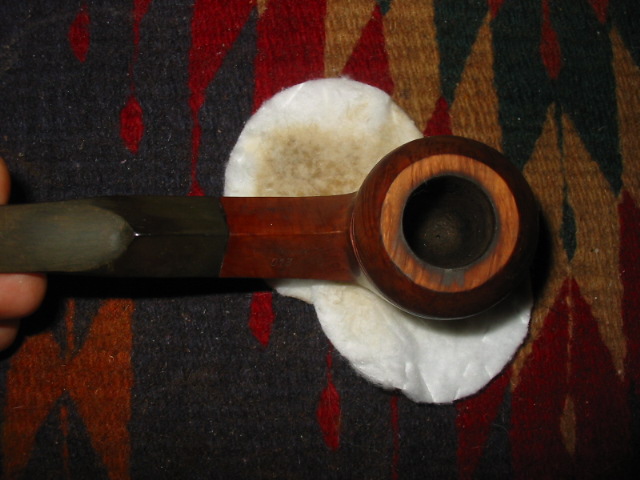
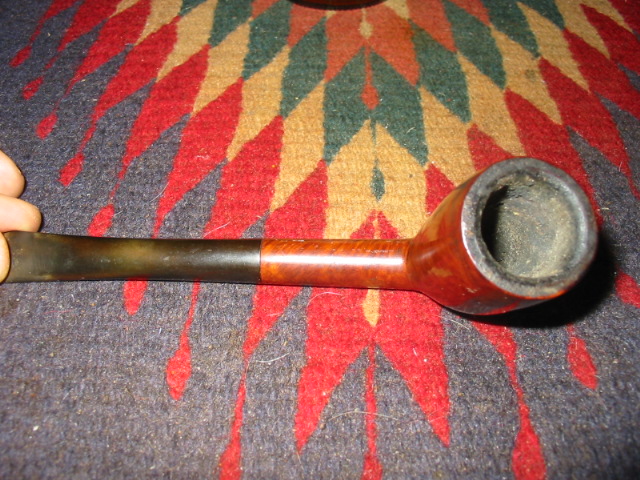
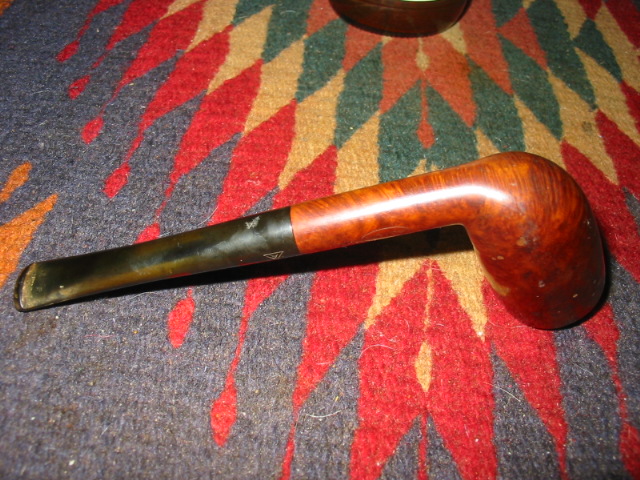
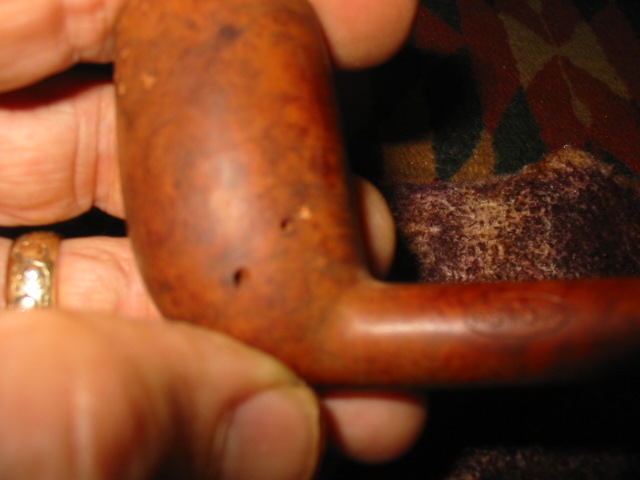
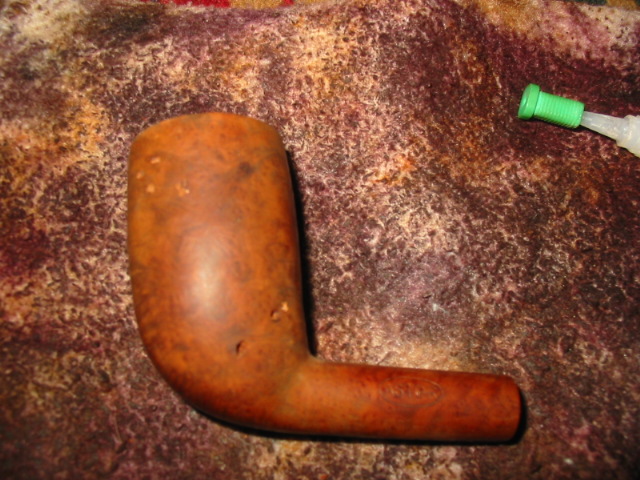
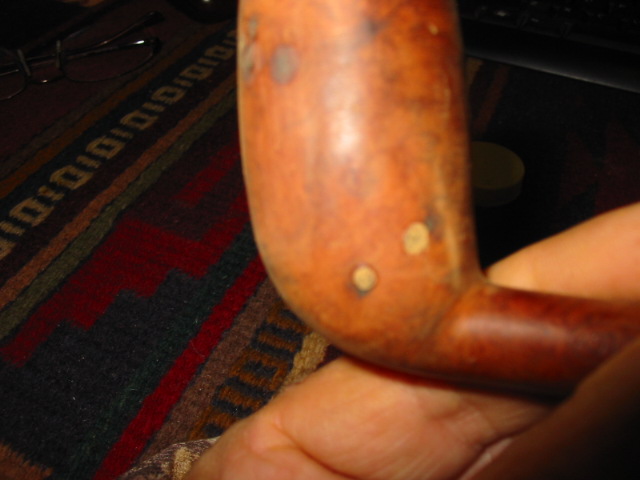
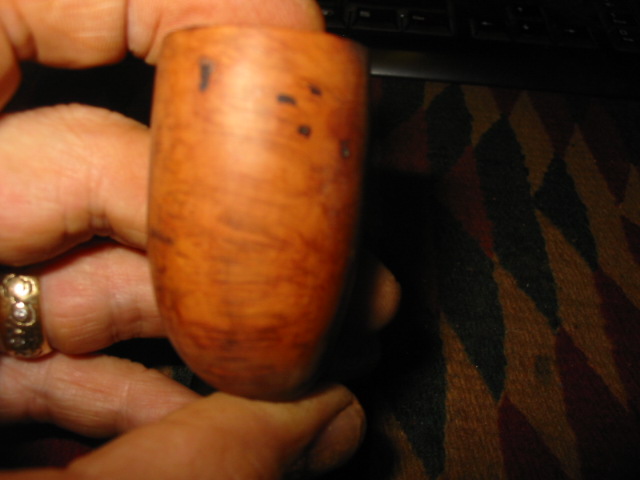
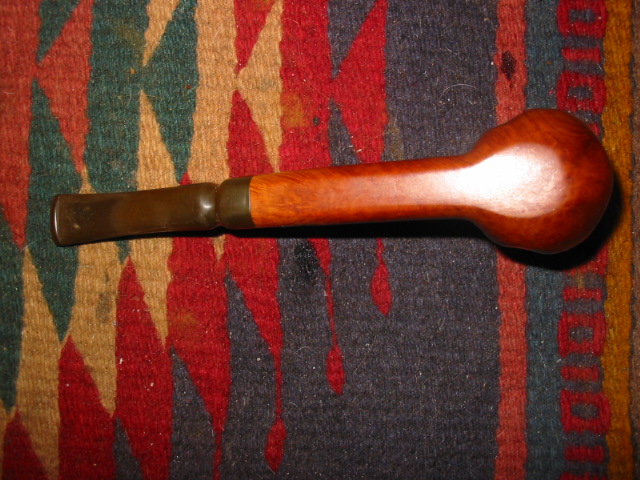
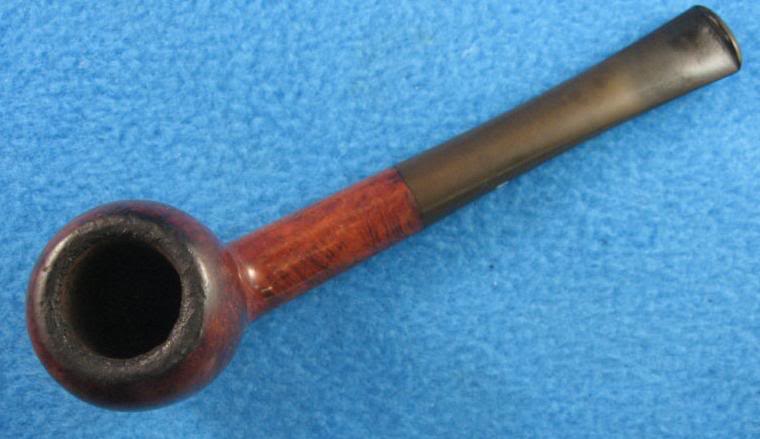
Earlier this year I refurbished a GBD 9438 in Tapestry finish and vowed never to touch a chair-leg stem again. That pipe proved to be a wonderful smoker and is a frequently used pipe in my rotation. A few weeks ago I found the identical pipe on Ebay and won the auction. This second 9438 was in a little better shape and the stem was not nearly as oxidized. The Rondell appeared to be damaged.

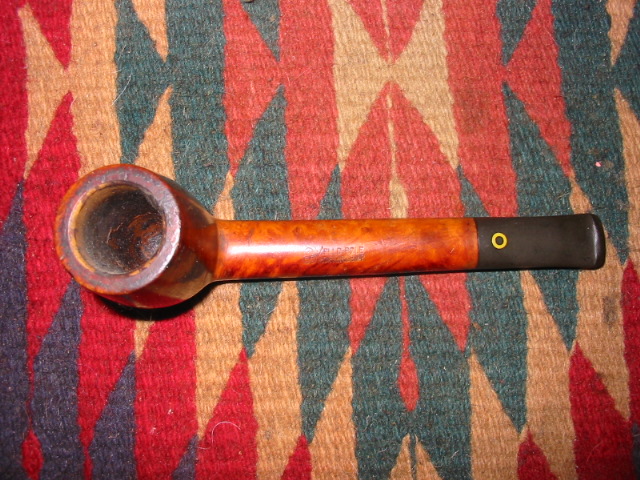
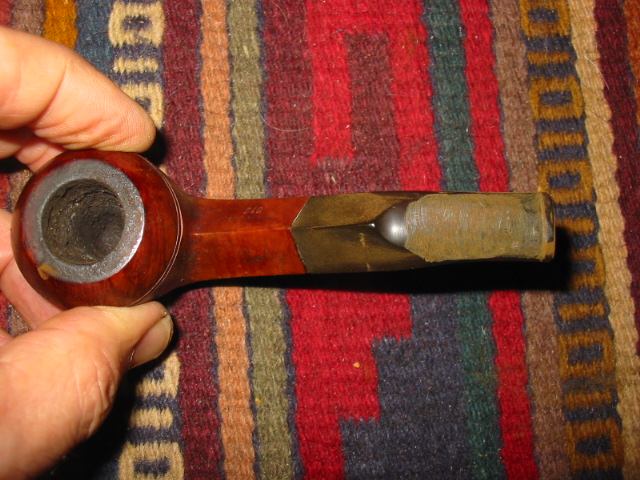
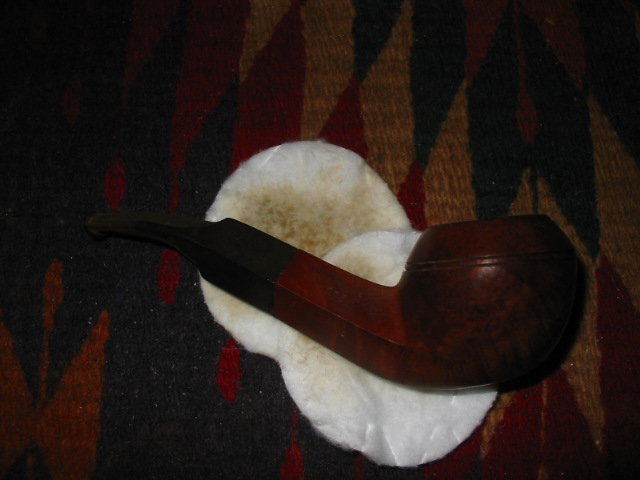
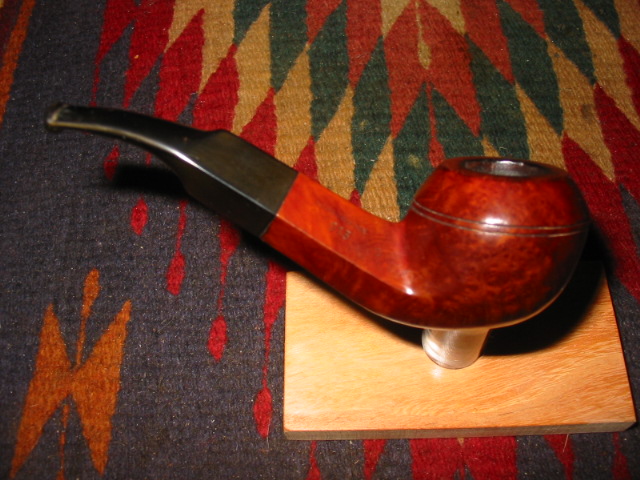
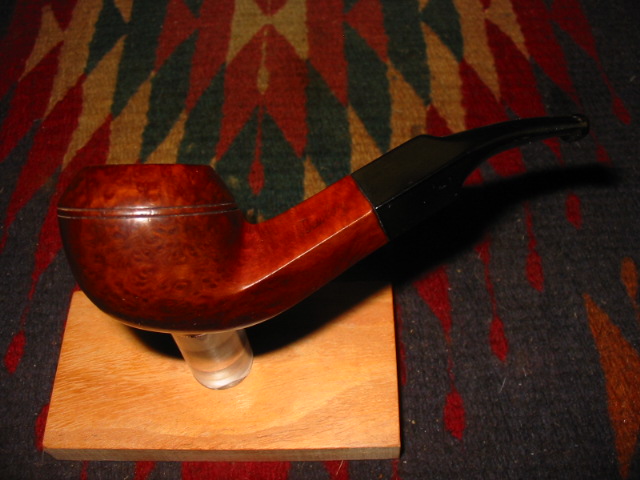
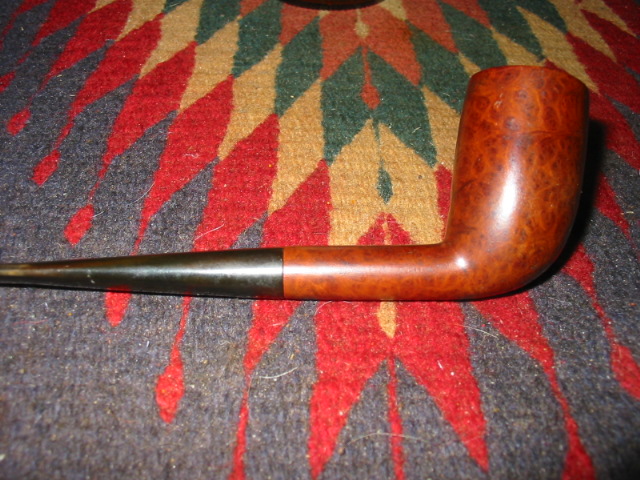
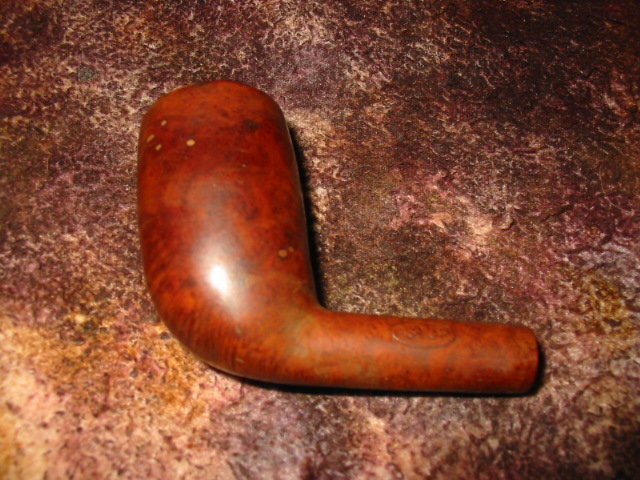
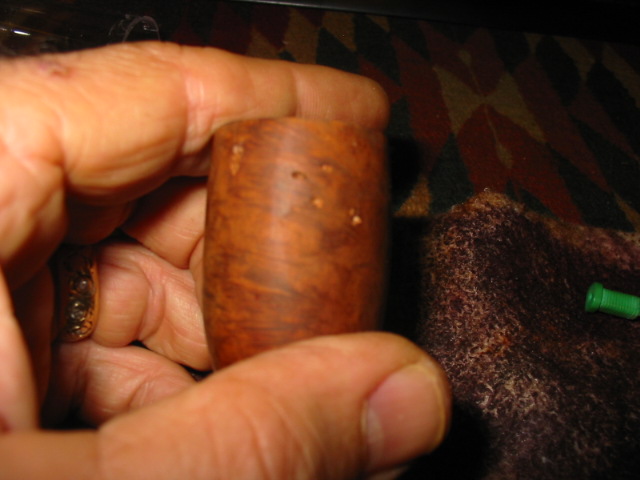
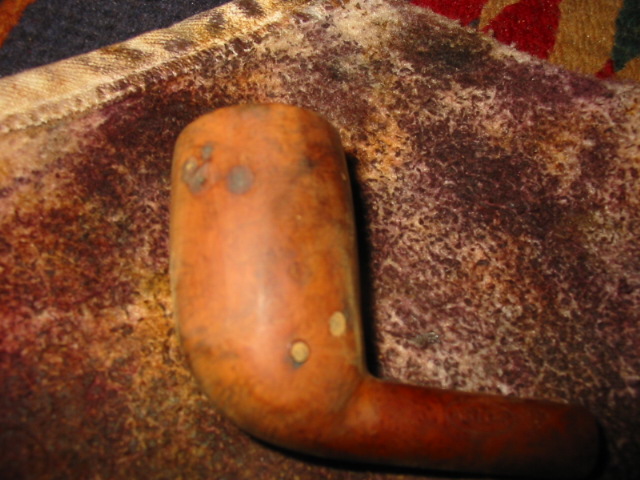
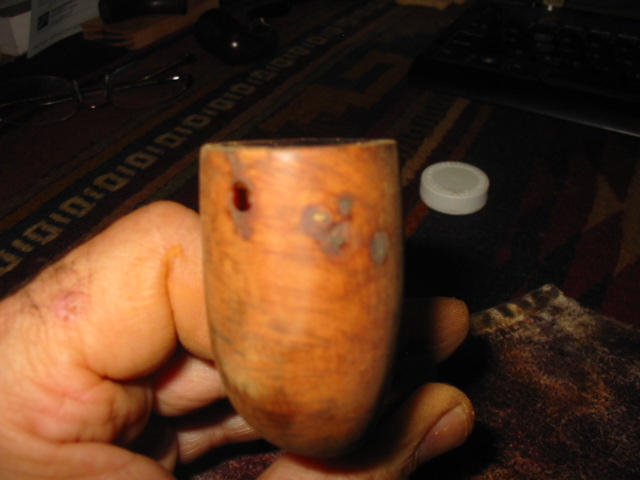
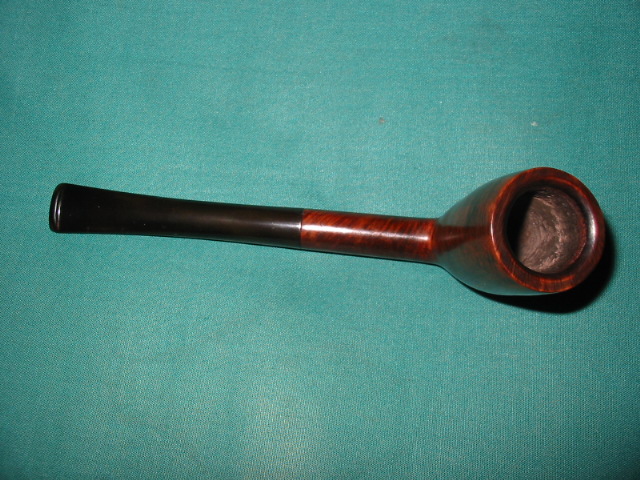
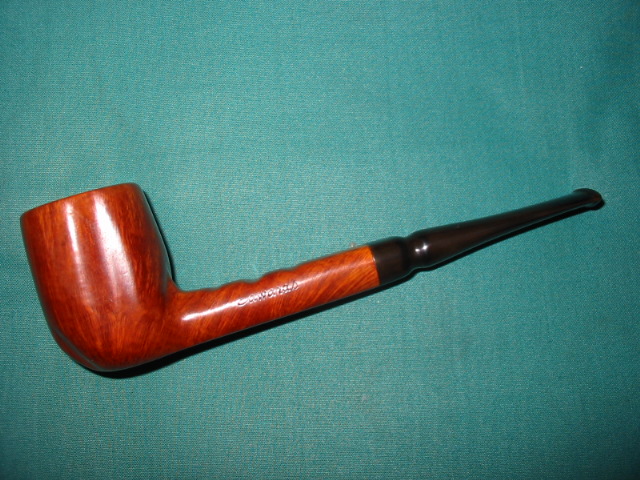
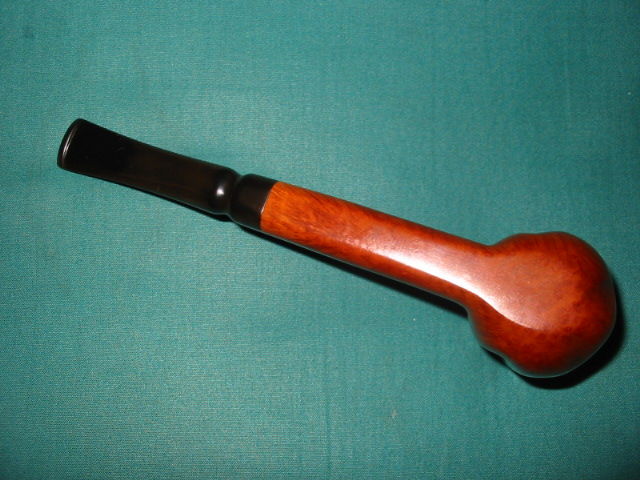
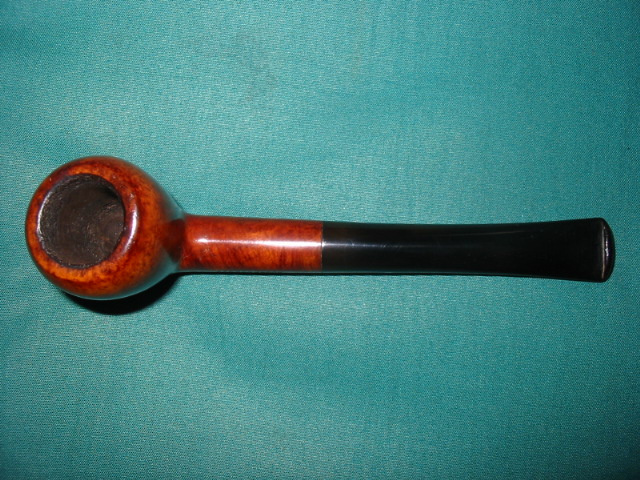
The bowl was in terrific shape, with very crisp nomenclature. There is an “E” stamp just at the end of the stem. If anyone has an insight as to what that means, please comment. The bowl was lightly reamed, then soaked with Everclear and sea salt. After the bowl was soaked, I buffed the briar with some Tripoli, White Diamond and finally a few coats of Carnuba wax. The briar is in really nice shape and the polished top is unmarred.

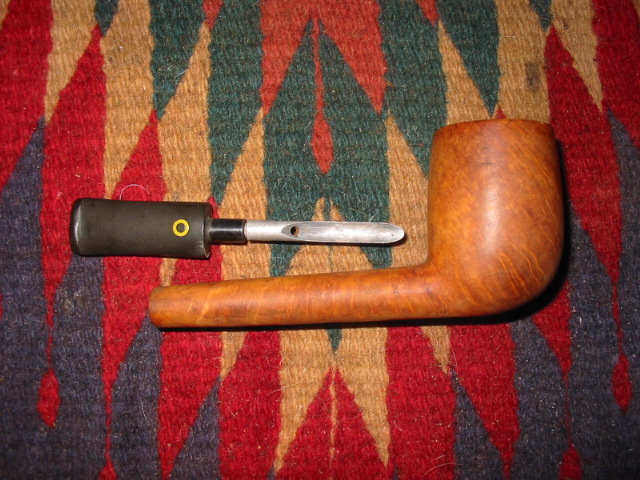
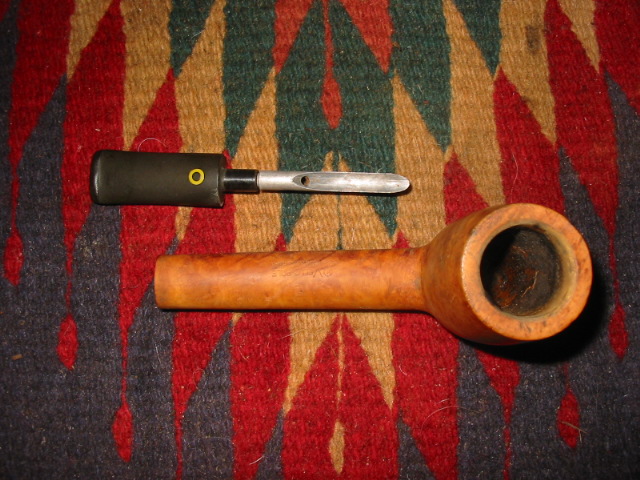
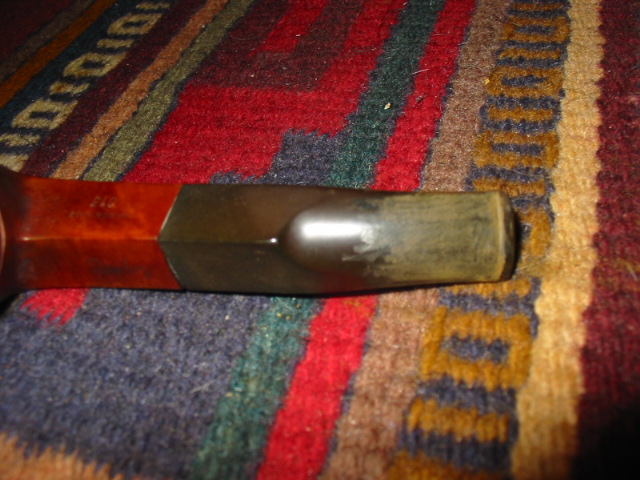
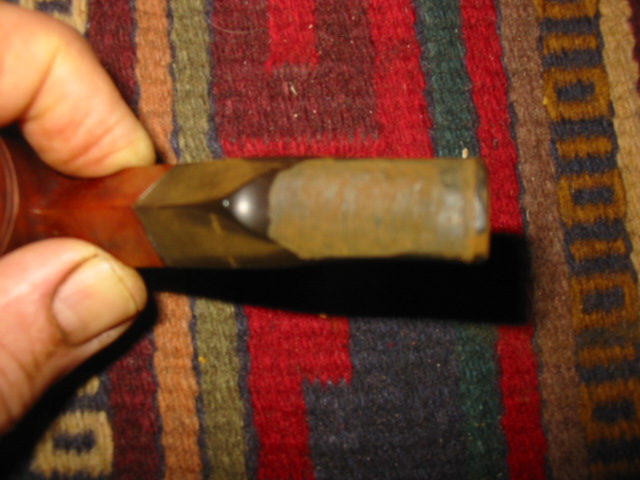
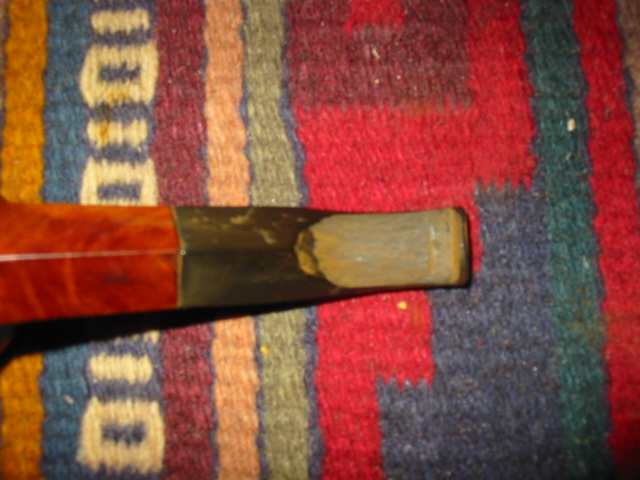
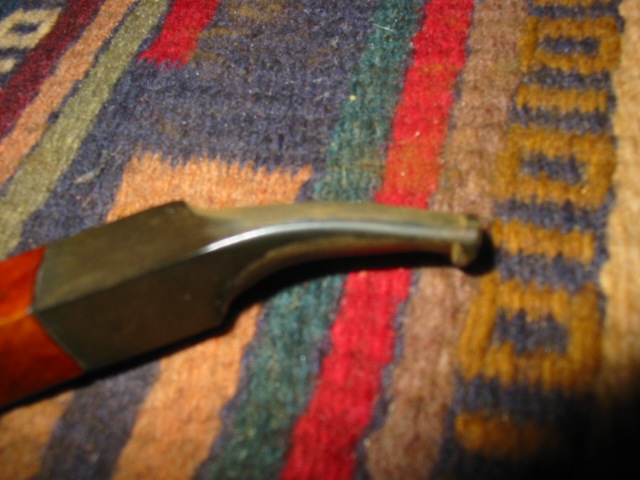
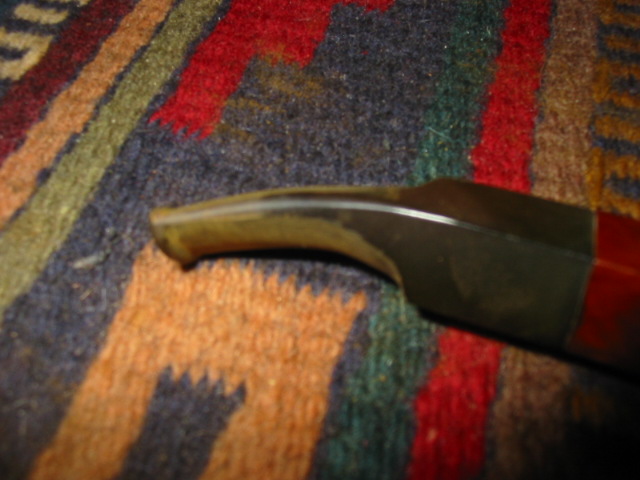
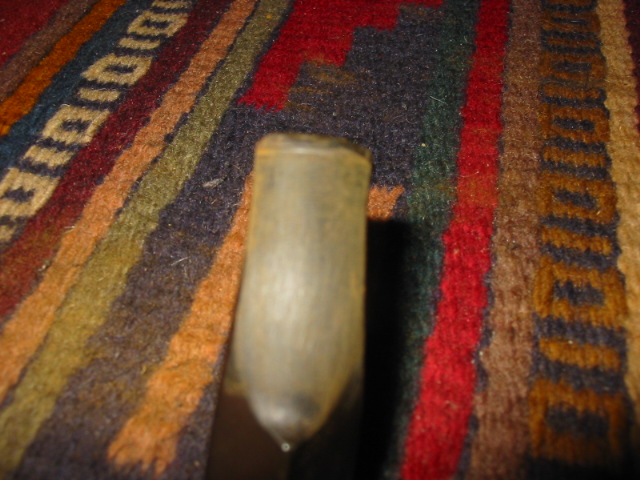
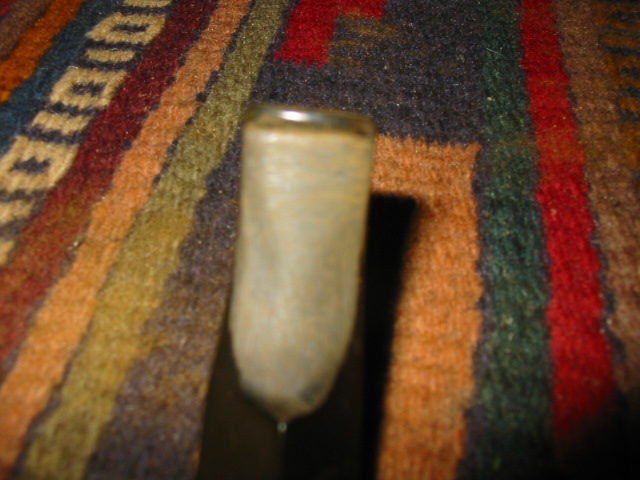
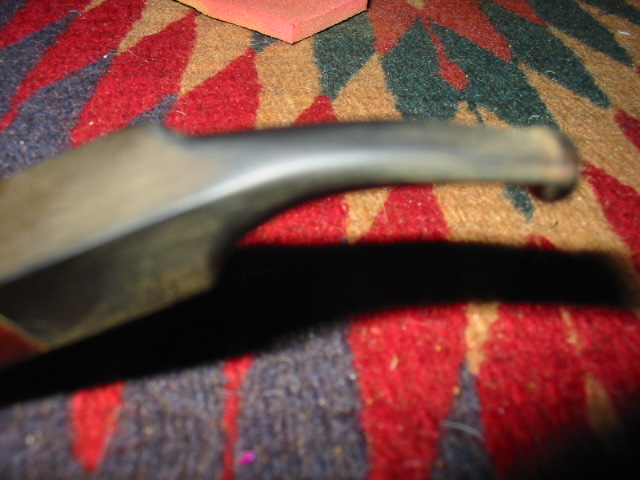
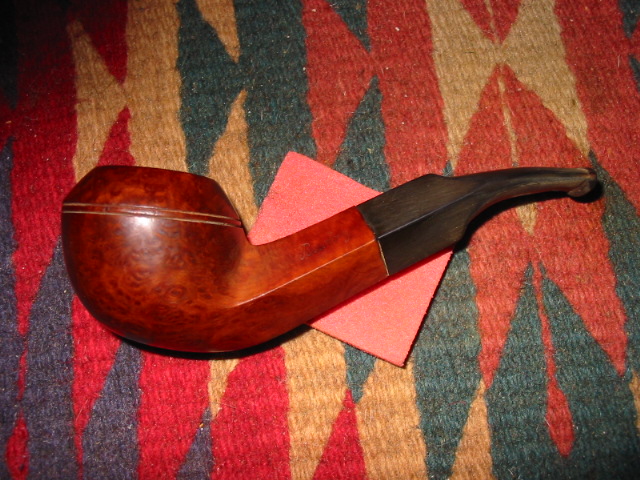
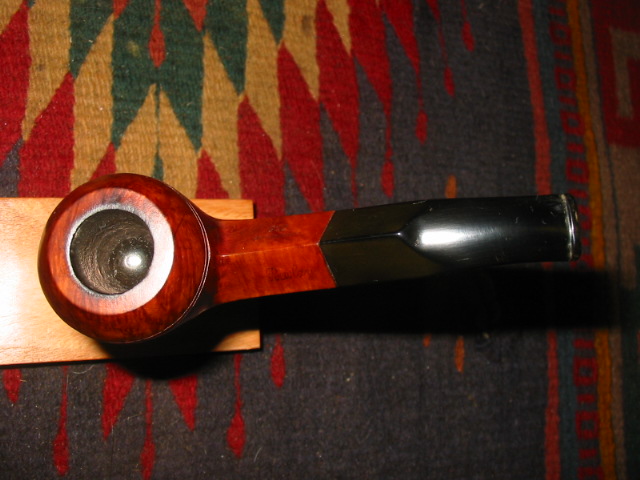
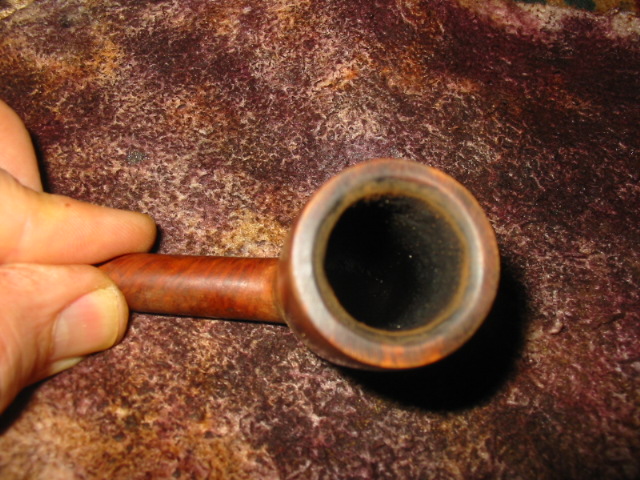
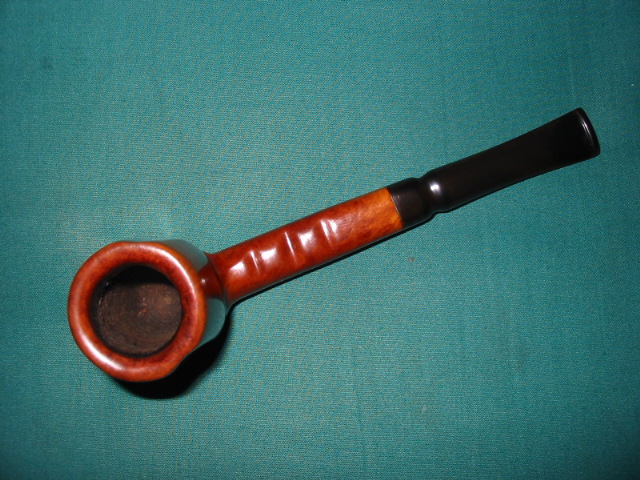
My attention then went to the stem. From the Ebay picture, I thought a piece of the brass rondell was missing. But that proved to be only grime. These rondells now appear to be unattainable, so I was pleased to discover this. The stem was soaked in an oxyclean solution. It was then cleaned with 2000 grit wet paper, than the last few grades of micromesh. After sanding, I buffed the stem with white diamond and then plastic polish.

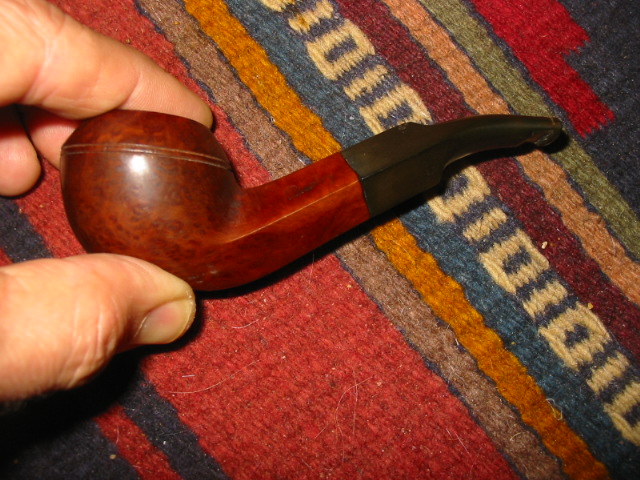
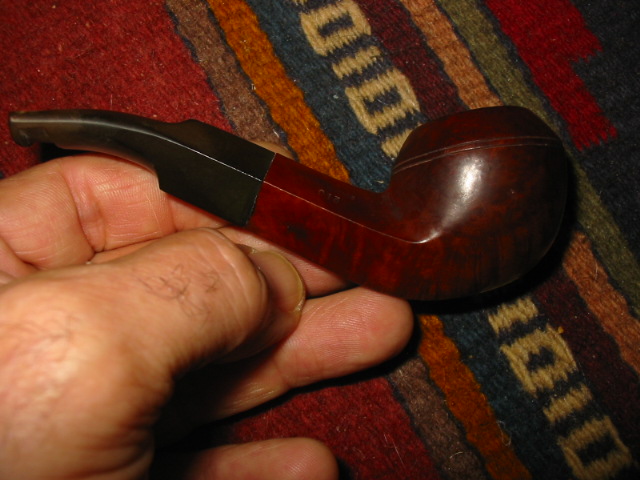
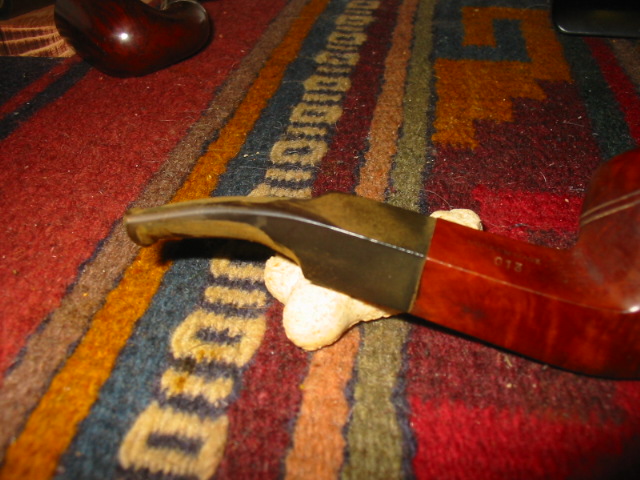
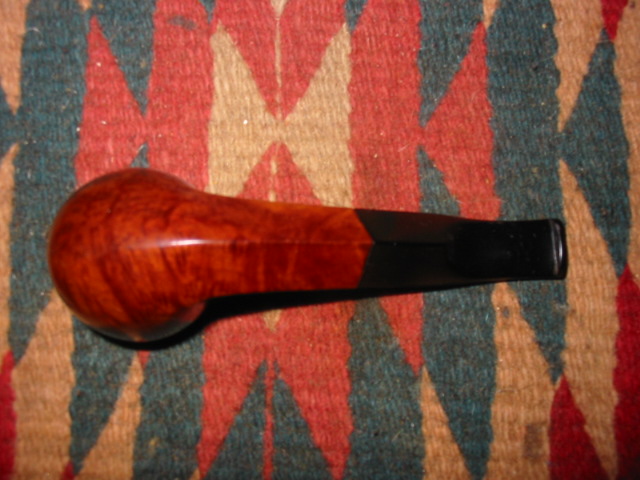
I’m very pleased with the finished pipe. The briar a bit nicer than my first 9438 Tapestry. I bought it with the intention of giving to a family member as a Christmas gift, but now.….

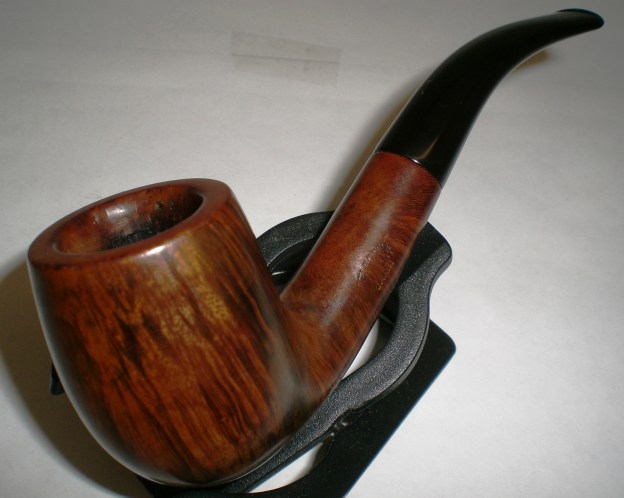
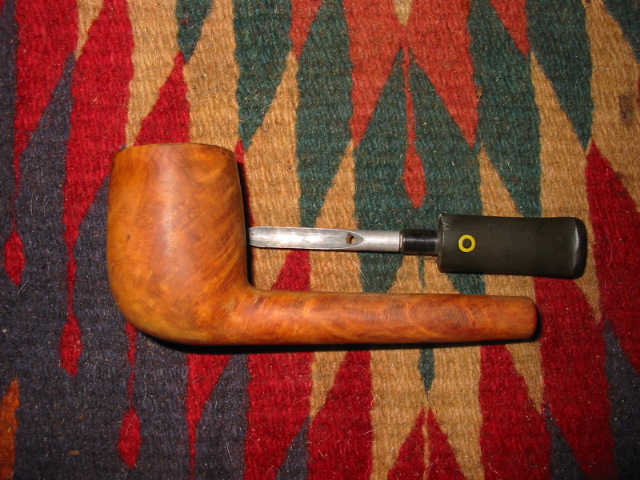
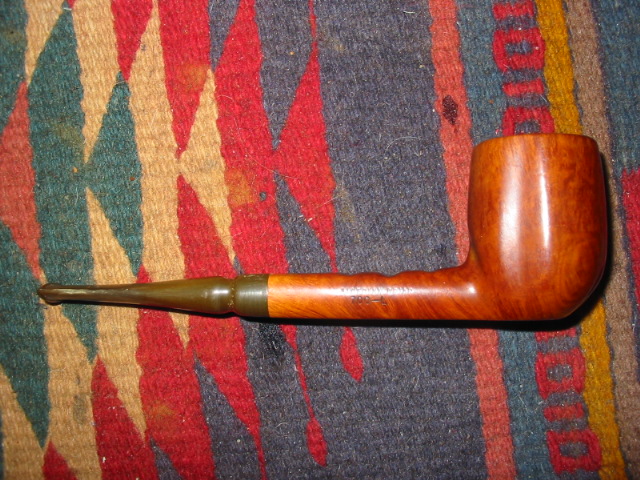
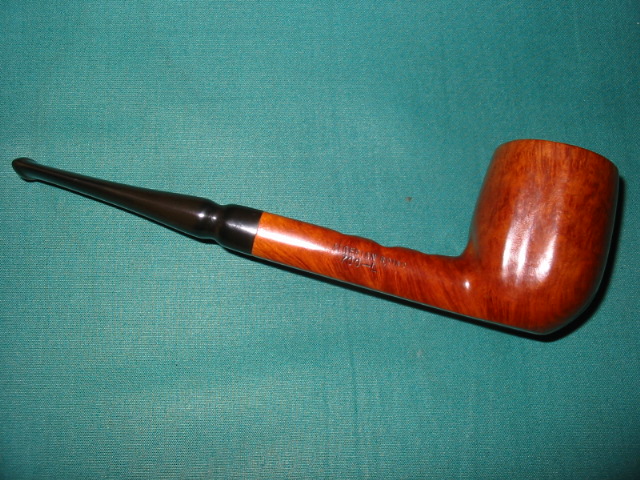
Perspective of the pictures makes it appear the pipes are different sizes. However, they are identical in size. The tenon on the recent addition is curiously a bit longer than my first 9438.
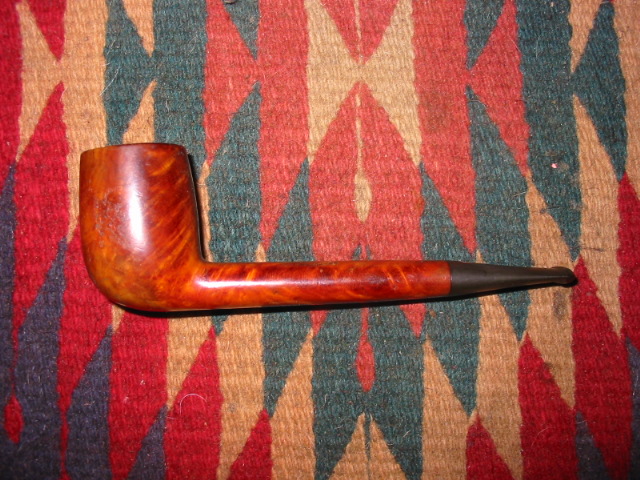
Before:

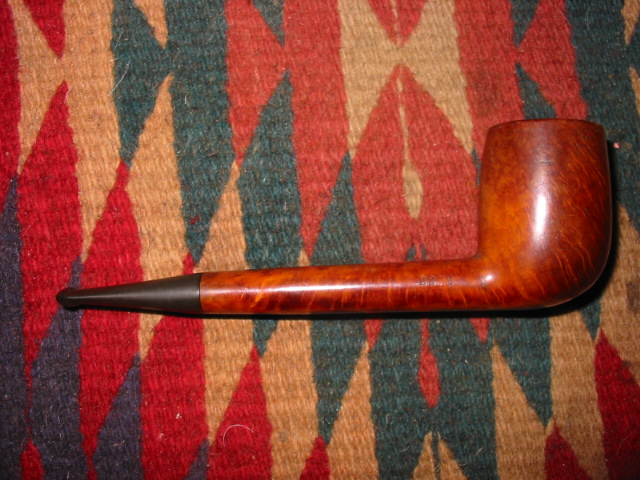
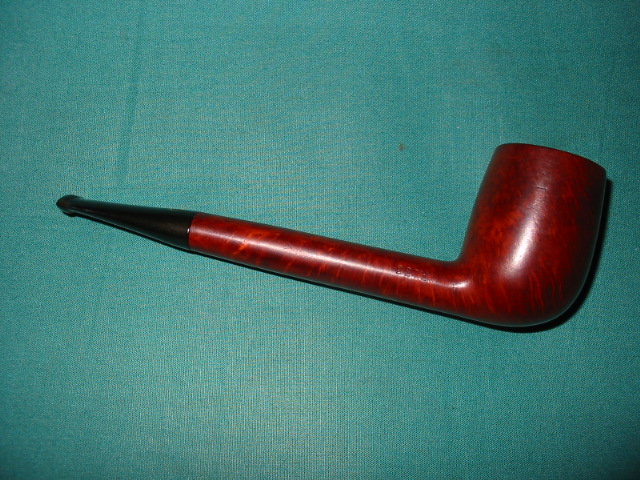
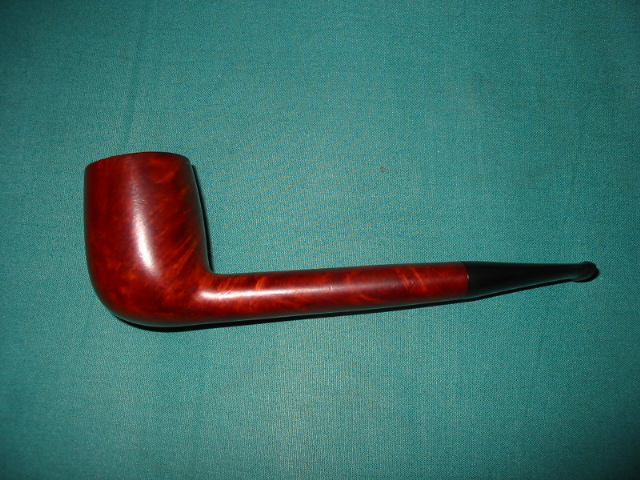
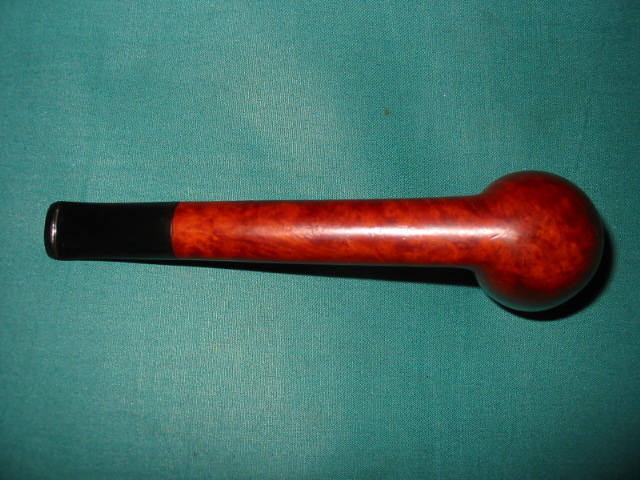
The fisnished pipe and some shots with the sister 9438 Tapestry:

Al Jones aka “Upshallfan”

Reshaping a button and stem on a Bewlay Bulldog


I picked up this nice older Bewlay Bulldog in a group of pipes I got off of Ebay. It was part of a lot that included two other Bewlay’s and two Barlings as well as quite a few other older pipes. This one is a nice little Bulldog – 4 ¾ inches long. When it arrived the stem was really a bit of a mess. The previous owner seemed to have cut off a portion of the stem and cut a groove on the top of the stem and the bottom as well to form some sort of new button. You can see from the first two photos below what the stem looked like. There were channels on the top and bottom of the stem that were about a ¼ inch wide and went the width of the stem. The stem was a bit oxidized and the bowl was dirty and tars and carbon were built up on the rim.

ImageImage

The next two photos show the stem in profile and you can see the channels if you look closely at the button area of the stem. The button had no real profile or shape to it. The briar was very nice on this one so I really wanted to rework the stem and keep the original stem intact.

ImageImage

I used needle files to begin to reshape the stem and the button. There was a lot of material to remove to even out the slope of the stem to the button. I also needed to reshape the button to make it truly a button. The slot needed to be cut in the button as well as there was only the end of the airway and it was very close to the top of the button. The next series of four photos show the work of the needle file in reshaping the stem. The groove on the top of the stem is shown in the first photo and you can see that it was not too deep. The angle of the blade to the saddle however was very steep and the stem was thick. While the groove is gone there still was a lot of work to do in reshaping the angles of the stem. In the second photo you can see the work done on the underside of the stem. This groove was very deep and there was a lot of work to do to smooth the surface to remove the groove and reshape the angles on the blade of the stem. All the work done at this point was done with flat blade needle files to smooth the grooves, flatten the stem and shape the button. The third and fourth photos in the series show the stem in profile so that you can see the button begin to take shape and the grooves begin to be blended into the surface of the stem blade.

ImageImageImageImage

I decided at this point to use my Dremel with the sanding drum to thin the stem down and to work out the groove on the underside of the stem. The next series of five photos show the stem after the sanding with the Dremel. I was careful to not cut too deeply in the top of the stem as the airway seemed very close to the surface of the stem. I thinned the upper portion of the stem just before the saddle. I wanted the slope from the saddle to the button to be gentler and to make the bit thinner. The first two photos show the stem after sanding the top of the stem with the Dremel. The third photo shows the underside of the stem where I sanded to thin the stem and to remove the groove. At this point the groove is just a simple line that is cut in the stem. The groove is gone. The rest I decided to remove with sandpaper and hand sanding. The last two photos in the series show the stem in profile to give an idea of the slope from the saddle to the button and how the shape is beginning to develop. There was still much sanding to do.

ImageImageImageImageImage

From this point on I used sandpaper to shape the stem. The next series of four photos were taken after I sanded the stem with 240 grit sandpaper to remove the marks and scratches from the Dremel sanding drum. The shape is beginning to get close to what I am aiming for in terms of thickness and slope of the stem from saddle to the newly formed button. You will note that the top edge of the button is still pretty shallow – that is because the airway is pretty close to the surface at this point and I do not want to sand through it. The groove on the top and the line that was left in the above photos of the bottom of the stem are gone.

ImageImageImageImage

I then switched to a finer grit sanding pad. The pad is pictured in the photos below. It is pink foam with fine grit sandpaper attached. It allows me to follow the bends of the stem and to get in close to the button and smooth the scratches out even more. I also used it to sand the saddle to remove the oxidation on the flat parts. The next series of two photos show the new look to the stem and button. They are close ups of the stem in profile. I wanted you to see the slope of the stem and the shape of the button. The sanding foam worked great to be able to smooth out the lines and the edges of the stem so that the edge of the diamond saddle follow to the end of the button in a nice smooth slope. The last four photos show the stem once it has been wiped down with some Isopropyl alcohol after finishing with the sanding foam. There is still a bit of oxidation on the stem but the angles and flow of the stem look natural and the button is clearly visible.

ImageImage

I restained the bowl at this point just for a change of pace. The next series of photos show the bowl of the pipe after I had wiped it down with acetone. From that point I went on to restain it with some oxblood aniline stain.
ImageImageImageImage

This series of photos show the restained bowl and the remaining oxidation that needed to be dealt with on the stem.

ImageImageImageImage

In the next photos the pipe is finished. Before it got to this point I sanded the bowl and the stem with micromesh sanding pads from 1500-6000 grit to polish the bowl and rim and to finish polishing the stem. The 1500 grit micromesh worked well to remove the remaining oxidation on the saddle and the remaining scratches on the stem. From there each course of sanding with the different grits of micromesh added more and more shine to the stem. The biggest change in the polishing comes with the shift to 4000 and 6000 grit. I then took the pipe to the buffer and used White Diamond to finish the polishing of the entire pipe and then gave it several coats of carnauba wax to make it shine.

ImageImageImageImage

Restoring an Astor Belge


This was one of the pipes I picked up recently on a trip to the US. It is a small Astor Belge shape which is one of my favourite shapes of pipes. Astor pipes were made by Comoy as a second line of pipes. From the number of fills on this one it can easily be seen why it is a second. It is a shame as it also has some amazing cross grain on the front and back and some beautiful birdseye among the fills on both sides. The extent of the birdseye grain can be seen in the second photo below.

ImageImageImageImage

The pipe was dirty but really in pretty good shape for its age. I reamed the bowl and cleaned the bowl and shank with Isopropyl alcohol (99%) to remove the tars and oils from the inside. Then I dropped the stem in some oxyclean to soak and wiped the bowl down with acetone (fingernail polish remover) to remove the finish. I dropped the bowl in the alcohol bath for awhile to give it a good soak and worked on several others for awhile.

After an hour in the bath, I removed the bowl and dried it off. The next series of three photos show the pipe after removal from the bath. I used micromesh 1500 grit sanding pads to remove the grime and tar from the rim and the inside bevelled edge. It took a bit of work to smooth this out and keep the angles the same all the way around. The third photo below shows the finished bevel and the top after quite a bit of sanding. The top took a bit more sanding with the micromesh to remove the darkening as it was on the surface and not too deep into the briar.

ImageImageImage

At that point I decided to remove the fills from the bowl as I personally dislike the pink putty fills that are often used on these old timers. I used the dental pick to remove the as can be seen in the next series of three photos. They were all pretty deep and would need to be repaired. After picking out the fill I wipe the bowl down with a soft cloth and Isopropyl alcohol to clean the surface of any remaining bits of putty. When they are clean and dry I fill them with briar dust that I have saved for this purpose.

ImageImageImage

After filling them with briar dust I drip the super glue/krazy glue into the dust and it dries almost instantly. The next three photos show the newly filled holes at various stages of the repair. The first photo shows the dust and super glue in the bottom holes before I sanded them. The top holes in the photo have been sanded a bit to smooth them out but are not finished. The second photo of the front of the bowl shows both the sanded ones and a newly filled hole with the super glue patch before it dried. The final photo in this series of three shows all the holes filled and the initial sanding completed.

ImageImageImage

The next two photos sow the holes patched and sanded smooth. The super glue and briar dust turned black in this case. This does not always happen but it did this time. I have no explanation for that in this case but they do look better than the previous pink fills. I have also learned that they can be hidden a bit with a dark understain. In this case I decided to stain the entire bowl with black aniline stain for a first coat. I flamed the stain and when it dried I took the pipe to the buffer and buffed the entire bowl with Tripoli to remove the excess stain and leave the black in the grain and around the fills. You can also use black permanent marker to build the grain pattern around the fills to help hide them though I did not use that method on this pipe. I then sanded the bowl with the 1500 and 1800 grit micromesh pads to remove more of the overstain. I washed the bowl down several times with acetone to also lighten the black. Once it was at the saturation I wanted it was ready for the overcoat of stain.

ImageImage

I decided to use oxblood coloured aniline stain for the finish coat on this one. I wiped it on and then wiped it off before it dried to get good coverage I repeated that several times and finally gave it a full coat and flamed the stain to set it. When it was dry I took it to the buffer and buffed it with Tripoli and White Diamond to give the final coat a real shine.

I finished the stem with my usual regimen of micromesh pads from 1500-6000 before putting it back on the bowl and buffing the pipe with White Diamond. I coated the stem with several coatings of Obsidian Oil and then gave the whole pipe multiple coats of carnauba wax to finish. The pictures below show the finished pipe. Though the fills are still visible they are diminished in their overall presence in the pipe. They no longer stand out in the finish. I personally love the depth of colour that this old Belge has with the new stains.

ImageImageImage

Edwards Contour or Criterion Restoration


I found this old Edwards pipe while I was visiting a small community in Washington in the US. My wife and I were away for our 36th wedding anniversary and always love visiting second hand shops and antique malls. We must have visited a dozen or more shops on that trip. This older Edwards pipe was in the last shop we visited. It was an interesting shape and intrigued my eye. I made an offer for it and it soon became mine.

Once I got home I decided to refurbish it as one of the first I dealt with. I am not sure of the name of the particular Edwards line this one came from but on one of the online forums someone thought that it belonged to either the Contour or Criterion line. He had pointed out that the lines were carved in France but the only sign of that was that the word France was usually stamped on the underside of the stem. However, on this one there was no stamping on the stem – no France or other name, just smooth brown oxidation. The stem also had tooth marks on the top near the button and a very prominent dent on the underside of the stem near the button. The finish on the pipe was dirty but in great shape. There were no dents or scratches and the pipe seemed to have been well cared for. Edwards did not stain their pipes as is evidenced by the natural finish on this one. The rim was probably the most potentially problematic area on the pipe. It was tarred, caked and possibly charred on the bevel inward.

ImageImageImageImage

I reamed the bowl and cleaned the inside of the bowl and the shank. I wiped down the entire pipe with undiluted Murphy’s Oil soap on a cotton pad and removed the grime and old waxes. I scrubbed the bevelled rim with the oil soap as well to remove the tars and the surface carbons. I used some 1500 and 1800 grit micromesh to remove the rest of the tars and bring it back to a smooth surface. I was pleased to see that there was not any charring or burn to the surface of the rim and once cleaned it looked pristine. The pipe has not been stained but had a natural finish so I buffed and polished the rim and the rest of the surface of the pipe to get the shine back. While I was at the buffer I also buffed the stem with Tripoli to break up the oxidation and then took it back to my work table. At the table I used nail polishing sticks (these are fingernail polishing stick and come with micromesh sandpaper on a foam stick) to sand out the bite marks on the top and underside of the stem. I worked with the 1500-6000 grit micromesh pads to polish the stem and remove the remaining oxidation. A folded pad worked well to sand in the grooves of the stem to give even that area a clean glow. I coated it with Obsidian Oil and once it was dry I buffed the entirety with several coats of carnauba wax.

ImageImageImageImage

A WDC Milano Hesson Guard Reworked


I just worked over this old timer – A WDC Milano Hesson Guard. In order to know more about the pipe I was working on I searched for information regarding the patent number stamped on the pipe and went to the US Patent site where I found documentation. The patent was filed for it in 1932. It is an early example of the pipe. It is in the acorn shape. It has the patent number stamped on it as well as the other WDC labels. The triangle on the stem is silver or steel inlay. For me this is a part of the mystery of unpacking the history and life of the brand and mark. I always like to know as much of the back story as I can find on any of the pipes I refurbish. Patent numbers stamped on the pipe provide a means of ferretting out information on the design and the particular part of the pipe that is patented. I have included the patent site information on the pipe for your reading pleasure. At least to me this part is fascinating information.

ImageImageImage

The pipe was caked with a crumbly thick cake that pretty much filled the bowl when I picked it up. I reamed it out to field dress the pipe. I generally do this with most of the pipes I bring home for renewal. It keeps the mess of the carbon from the cake outside and away from my work desk. In the photos below you can see that the finish was pretty dirty with a lot of hand oils and grease ground into the bowl surface. The rim was caked and tarred and it looked like it was damaged. The finish was worn and the stain faded in many places on the bowl sides. The stem was oxidized and had some bubbles in the surface along the button – the bubbles are visible near the button in the second photo below.

ImageImage

I scrubbed the exterior of the pipe with Murphy’s Oil soap, undiluted. I wipe it on with a cotton cloth and immediately wipe it off. Others have said that it removes the stain if left to long and it does indeed do that. But I have found it unsurpassed in quickly removing grime and grease if rubbed on and rubbed off quickly. I worked on the rim as well with a soft bristle tooth brush and the oil soap to remove the buildup. Once that was done I put it in the alcohol bath and removed the finish that was on it. It seemed to have had some built up waxes and also some kind of varnish coat over the stain. It came off with a bit of elbow grease after soaking. I decided to not stain this pipe as the briar looked great as it was. I just sanded it with the micromesh pads to polish it and remove the surface scratches. Then I took it to the buffer to give it a buff with White Diamond.

I worked on the stem while the bowl soaked in the bath. I soaked it in the Oxyclean mixture for a while to soften the oxidation. I dried it and buffed it with Tripoli to remove the surface oxidation. I sanded it with 240 grit sandpaper to get the deeper oxidation. I also had to lift a few tooth marks from the underside of the stem near the button. I used the heat gun to do that. The bubble on the top of the stem also was heated to try to smooth it out. It was evidently not a blister but a bump from teeth. It went back in place with the heat. I sanded the remaining signs of bite with 240 grit sandpaper and then 400 and 600 grit wet dry and water. I finished it with the normal regimen of 1500-6000 grit micromesh pads to polish. I put it back on the bowl and then gave the entirety a buff with White Diamond to polish it and finished the restoration with several coats of carnauba wax.

ImageImageImage

Restored a Comoy’s Tradition from the 50’s


I have been looking for a Comoy’s pipe in the higher grades since I read a thread on Smokers Forums on the various grades of Comoy’s. On my anniversary trip to the States I came across a nice Tradition at an antique store. With a little bit of haggling the pipe and three others became mine (in the picture below the top pipe is an older Edwards that I picked up the next day at a different shop).

Please forgive the blurry pictures in the next foursome, I was too hurried to get at the clean up and restoration and did not focus them well. They are clear enough to see that the finish was in pretty good shape. The bowl was thickly caked and the rim was gummed up and looked to be dented. The stem was clean but oxidized and had tooth marks on the top of the stem near the button and on the underside in a matching pattern. I did a bit of field dressing to the pipe last evening while we were at the hotel, cleaned the stem and the inside of the shank with Isopropyl alcohol and also sanded the stem with a piece of 240 grit sand paper and some micromesh pads I had in my bag. (I know – it was my anniversary but I had thrown my book bag in from work and when I opened it I found the sanding disks. I have them in the bag when I have a break at work and want to get outside and have a pipe and work on one I have with me.) My wife was occupied with talking to the kids on the phone and looking through her purchases from the days shopping. So I had about an hour to do a bit of work!

I wiped down the top of the bowl with some Murphy’s Oil Soap (undiluted) on a cotton facial cleansing pad I picked up in the US. I had read about that on a post by Alan (Castana on SF) and they work very well. I applied the soap and removed it three times to soften and remove the grime. Once it was gone I found that the rim itself was pretty pristine. Just a little bit of wear on the chamfering on the right front. I reamed and cleaned the bowl and shank. I also used the micromesh pads (1500 and 1800 grit) on the rim and then restained the rim only with a dark brown aniline stain, wiped on and buffed off to match the bowl.

I worked on the stem next. It had bite marks on the top and bottom side near the button. I heated the stem and raised them as far as I could with heat then sanded out the remaining marks. To sand them I used 240 grit sandpaper first then used a fingernail sanding board that I picked up at Walmart this afternoon before coming home. It is pictured below in several of the pictures with the stem. It worked extremely well to remove the remaining tooth marks in the stem. I cleaned the oxidation with micromesh pads (1500-6000 grit) and put it back on the pipe to give it a buff with some Tripoli before returning to finish the polishing with the micromesh pads. I gave the stem a coat of Obsidian Oil and let it soak in before taking the whole pipe to the buffer to buff it lightly with White Diamond and several coats of carnauba wax.

Here is the finished pipe. I have been researching the stamping on this one. I found out that the stamping dates it to the early 1950’s. It is stamped in a circle with “Made” at the top, “In” in the middle and “London” at the bottom with “England in a straight line beneath. From the Derek Green’s History of Comoy’s Article I quote: “I believe this stamp was first used in the export drive in the early 1950’s and I have not seen any pre WW11 Comoy’s stamped in this way”.
http://www.derek-green.com/comoy_history03.htm

Dr. Plumb Bulldog Restoration


My daughter’s boyfriend found this neat little Dr. Plumb bulldog at a New Orleans shop and sent it to me for restoration. I thought Dr. Plumb had a connection to GBD and I believe they are now owned by the Cadogan group. The stem was in terrific shape, save for a heavy coat of oxidation. The top of the bowl was scorched and it had some dents and scratches.

Before:

I reamed the bowl with both my Castleford and Senor reamers. Someone in the pipes past had reamed it a little out of round, but it wasn’t too bad. I removed some of the dents with a knife heated by a flame and a wet towel. Most of the major ones popped back out nicely. The bowl has some fills, but they are hidden well by the factory finish. In order to remove the scorched top, it would have required a restain. I was afraid with the numerous fills, it would look better with the factory finish. “Character” as they say. I buffed the bowl with some Tripoli, White diamond and with a final buff using Carnuba. The stamping is very legible.

The stem was soaked in an Oxyclean solution overnight to soften the brown coating. Unfortunately, the stem logo proved very problematic. I could not get the oxidation off this part of the stem without removing the logo. The owner opted for me to leave the logo and brown patch.

Here is the finished product.

The pipe sure looks like it would be a good smoking piece and I hope the young man enjoys it for many years.

Selected Straight Grain (Comoys) Restoration


By Al Jones

Several months ago, a thread on the SmokersForum.uk about the Comoys “Selected Straight Grain” pipes piqued my interest. Member Dirigo (Tom) was kind enough to share with me how to identify these interesting pipes. I was able to grab this Shape 13 via Ebay last week, which corresponds with the Comoys shape chart. That shape looked to be in decent shape, with the exception of one putty fill. I assume this flaw made the pipe unworthy of the Comoys stamping. There were only the slightest tooth marks and no pesky stem logo to worry about.

From the Ebay picture, you can see the ugly fill.

There was only minimal cake inside the bowl so it was lightly reamed and soaked with Everclear and sea salt. The top of the bowl was scarred, so that was going to take some work.

While the bowl was soaking, I started on the stem, which had been soaking in a Oxyclean solution. I went thru my usual 1500/2000 grit wet paper that onto the final four micromesh grades. The stem was then buffed with white diamond and a final plastic polish. Removing the light chatter was pretty straight forward. The button was worn, so I used a needle file to slightly reform the edges.  Unfortunately, I was unable to remove the oxidation without making the edge of stem slightly rounded.  I need to learn how to avoid this issue.

Once the bowl was done soaking it was moved to an alcohol bath to remove the stain. I spoke to Steve prior to this step and he recommended the fill be corrected using the superglue & briar technique he recently posted on Reborn Pipes. That solution worked well and I used two steps to fill in the pit. After restaining, the fill is just slightly visible, a big improvement from the factories solution using the bubble-gum putty.
The Super-Glue and briar dust patch.

I used a two-step stain process to highlight the grain, also a recommendation from Steve. First I “painted” on some black stain, after the bowl was warmed to open the grain. Then, the bowl was sanded with micromesh and a very diluted application of Medium Brown stain was applied. The bowl was than buffed with Tripoli and white diamond, followed by a final buff with Carnuba wax. I was careful on all steps not to diminish the stamping, which is quite legible.

Thanks to Steven Laug for his help with this one and Tom for information on this interesting Comoys niche.

New Life for a Yello Bole Canadian


On a recent trip to the US to visit my parents I also visited several antique malls in their city. I have three that I usually have on my list when I go there. The one I want to focus on in this post is in an old grain elevator and has three floors of many “antiques” which always surprise me because many are the same age as I am!  Anyway, on the second floor I found a booth with two pipe racks containing over a dozen older pipes. Most were junk in that they had cracked bowls and broken shanks etc. But also in the midst of it was this old Yello Bole Canadian. It had some beautiful briar in it. Yello Bole is the grade down the line for KayWoodie, or so I am told. Pipes that don’t make the grade for KW will often be stamped with the Yello Bole brand. This one was stamped KBB in a cloverleaf on the top of the shank and next to it Yello Bole over honey cured, over imported briar. The stem has the yellow circle inlaid in the vulcanite. If memory serves me correctly this is one of the older pipes in the line.

ImageImage

The bowl was in pretty clean shape. The yellow coating was still visible in the bowl and the bottom half of the bowl was very clean with just a bit of darkening to the yellow coating. The rim was dirty and dented. There were tars on the rim and some deep scratches to go along with the dents. The bowl however, was still round, it had not been ruined by a reamer going a muck. The stem was oxidized and was slightly brown. There was light tooth chatter but no dents on the surface of the stem. The overall finish of the pipe had light spots and dark spots where the finish seems to have been exposed to light or was wiped down and finish removed. There was no over coat of varnish or of lacquer just solid clean briar with a spotty stain.

ImageImage

I broke the pipe down as seen in the pictures below. The stinger apparatus can be seen in the pictures. It is an aluminum shovel like contraption with the hole near the tenon and a long shovel like extension that extends through most of the shank. I cleaned out the bowl with an alcohol scrub on cotton swabs and cleaned out the shank with a shank brush, bristle pipe cleaners and fluffy pipe cleaners and alcohol. When they came out clean I worked on the outside of the bowl. I used cotton balls and acetone to wipe down the outside of the bowl and shank. I wanted to remove the rest of the finish so that I could prepare it for restaining. I applied the acetone until the bowl was free of the stain and finish. The pictures below show the cleaned surface of the bowl. I also used the acetone and some 400 and 600 wet dry sandpaper to clean the top of the bowl and rim. A folded piece of sand paper was used on the inner edge of the rim to clean the beveled edge. Before I stained the pipe I decided to clean and polish the stem. I used the Bic lighter method mentioned in an earlier blog post to get rid of the oxidation. In the pictures below the stem has the majority of the oxidation removed using that method. I then used 400 and 600 grit wet dry sandpaper with water and my usual list of micromesh pads from 1500-6000 grit to polish the stem.

ImageImageImage

Once the stem was cleaned and polished by hand I inserted it into the bowl and used it to hold the pipe while I restained it. I used a medium brown aniline stain on this pipe to approximate the original stain and to highlight the grain. I applied it with the dauber that came with the stain and then flamed it to set the stain. I then took it to the buffer and buffed it with Tripoli to remove some of the opacity of the medium brown stain and bring the grain to life. Once that was done it was buffed with White Diamond. Both the stem and the bowl were buffed. Care should be exercised in the buffing process to not obliterate the stamping. I use a light touch when buffing around the stamping. The four pictures below show the finished pipe – ready to load with a favourite tobacco and enjoy!

ImageImageImageImage


Barling Garnet Grain Small Bent Billiard 2034 Given New Life


Blog by Steve Laug

I picked up this little Barling (transition era pipe so the Barling stamping is missing the “s” and is a script) in a lot I bought on EBay. It had a broken stem that was also chewed through on the end and not repairable. The tenon was still in the shank and was exceptionally tight. I put the bowl in the freezer for about 30 minutes and then used a screw to remove the broken piece from the shank. The key here is to not screw in the screw too much or you can crack the shank. I was able to easily pull it out as can be seen in picture 3. The finish on the bowl was rough on the top with tars and some denting. The sides of the bowl also had some denting. I cleaned the top of the bowl and removed the tars. I steamed the dents out of the top and bowl sides.

ImageImageImage

I wiped down the bowl with acetone to remove the grime and the waxes that were on the finish. When I had finished I inspected the shank area because the drilling was off a bit in the shank and the walls were thin near the top left. There were small hairline cracks that went through several places and spidered up to about a 1/8 inch into the length of the shank. I glued those and pressure fit a nickel band on the shank.

I turned the tenon on a recycled stem I had here and fit it on the pipe. I used my Dremel to remove the excess material where the diameter of the stem was greater than that of the pipe. I kept the broken stem near at hand to match the diameter, the flow of the stem and the shape. I used it as a bit of a template to shape the new stem. The three pictures below show the process of shaping the stem from Dremel to hand sanding with 240 grit sandpaper.

ImageImageImage

In the picture below I have finished the initial shaping with the sandpaper and have a good fit. You will notice the lightening of the shank below the band – that is part of the process of sanding to fit the band to the shank. I place the original stem below the pipe in the picture for comparison sake. It is a bit thinner in profile than the new one in this photo. I continued to sand the stem with 400 and 600 grit wet dry sandpaper and water to remove the remaining scratches and grooves that the 240 grit sandpaper left. Once I had them removed I proceeded to use the micromesh pads – 1500, 1800 and 2400 grit to sand the stem smooth. When I finished with those I buffed the stem with Tripoli and White Diamond and finished by returning to the micromesh pads -3200, 4000 and 6000 to polish it. One more trip to the buffer with White Diamond finished the polishing. I gave the stem a coat of Obsidian Oil and removed it and set it aside. It was time to work on the finish of the bowl.

Image

I used an oxblood aniline stain to match the stain to the original Garnet Grain colour. I have done this in the past and compared it to a very nice original Garnet Grain and the colour is a perfect match. Before staining I polished the bowl with the 3200 and 4000 micromesh pads avoiding the stamping on the pipe. I applied the stain with a cotton swab and then wiped it off, applied and wiped it off until I got the colour I wanted. I then flamed it and set it aside to dry. Once it was dry I put the stem on it and took it to the buffer and gave it a buff with White Diamond and carnauba wax.

In the first picture below I put the original stem in to show the damage to the underside near the button. I also put a 1 cent piece, a penny in to give perspective on the size of this diminutive billiard. I am very pleased with the overall look of the pipe. The finish came out as a perfect match to the original Garnet Grain colour.

ImageImageImageImage