Tag Archives: contrast staining

Previous Repairs Can Wreak Havoc in a Restoration – Dunhill Shell Briar R F/T 1962 Pot


Blog by Steve Laug

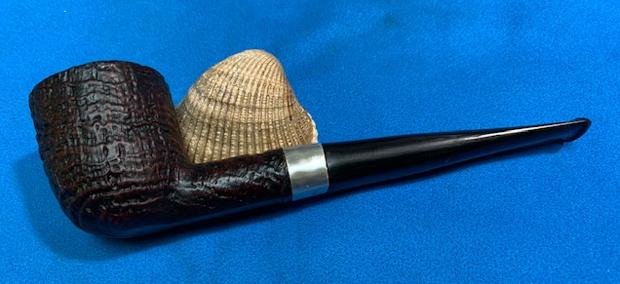
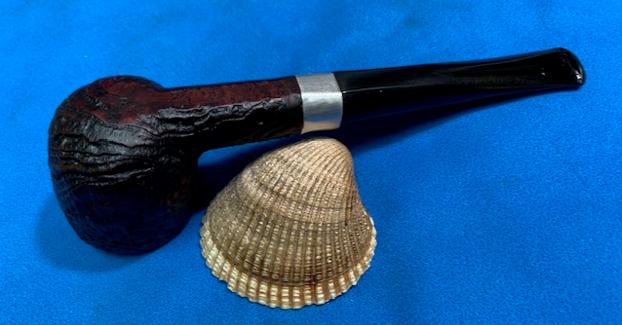
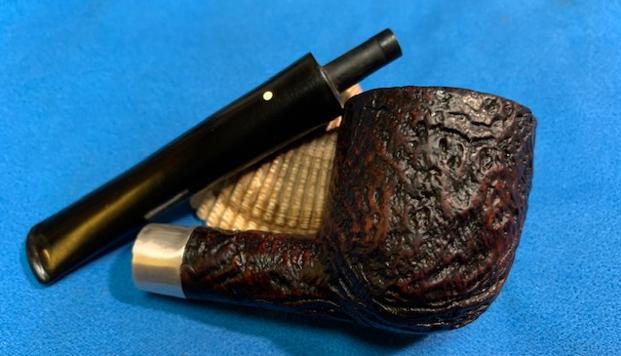
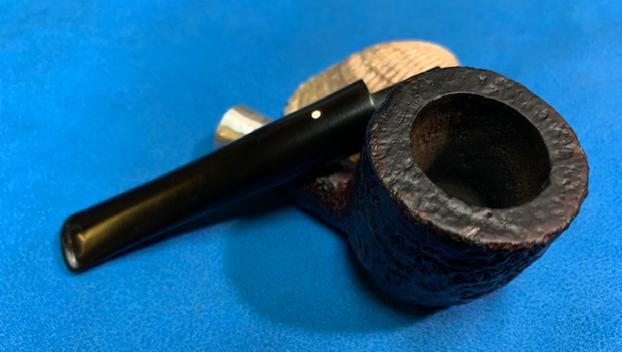
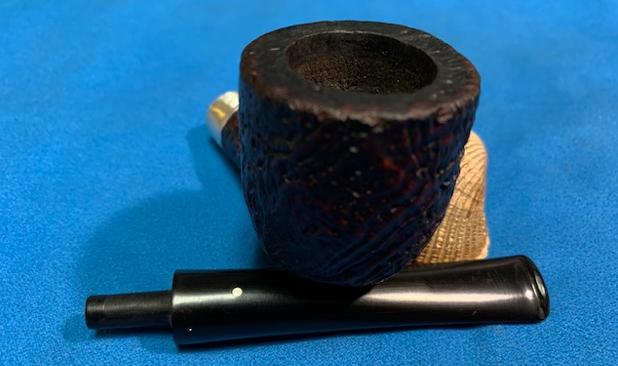
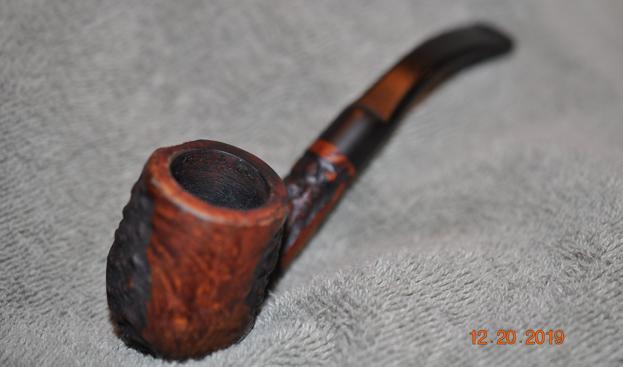
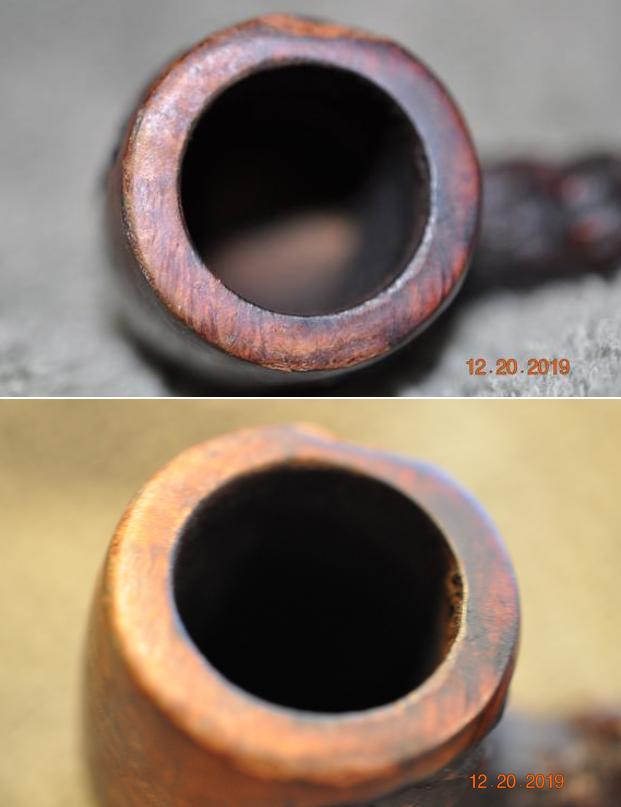
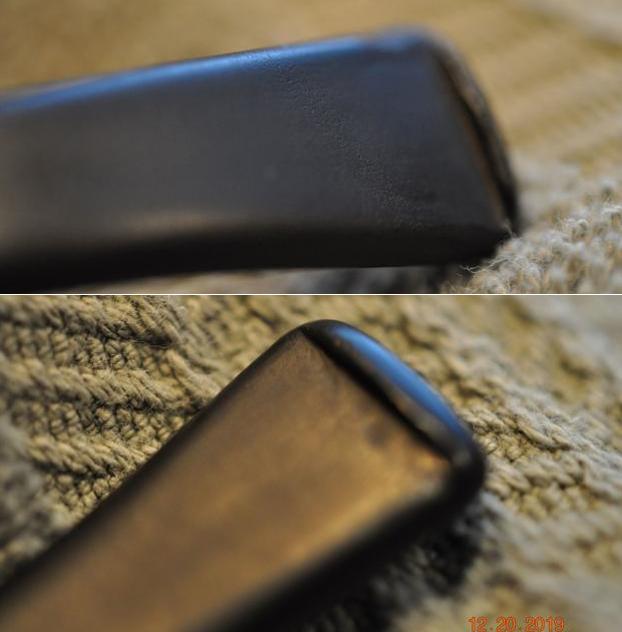
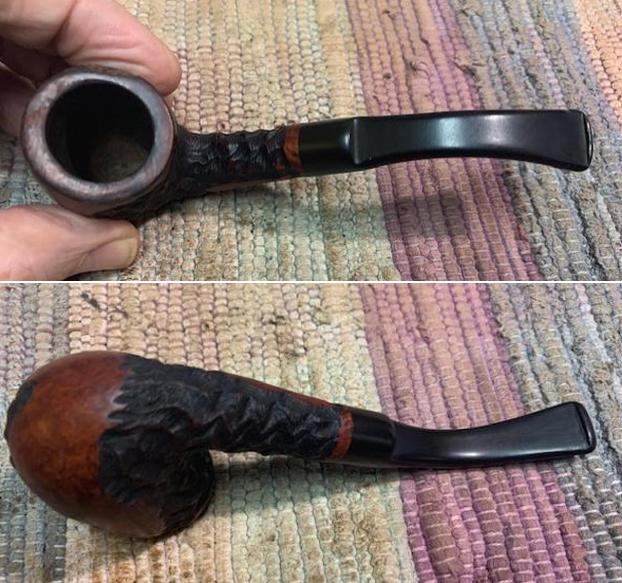
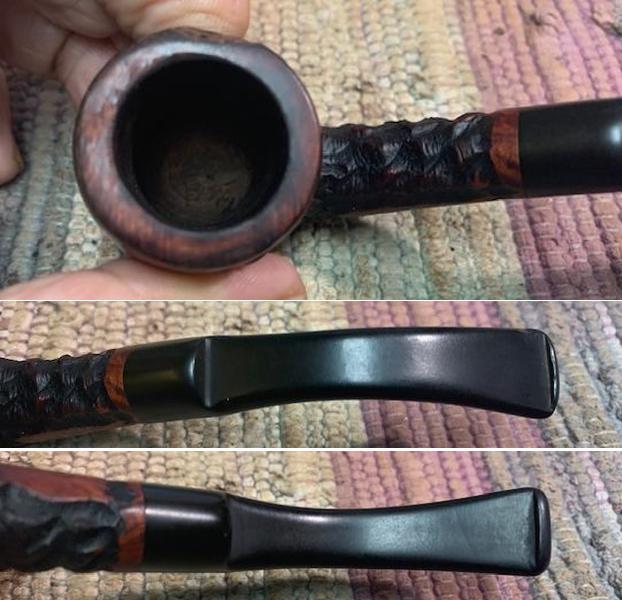
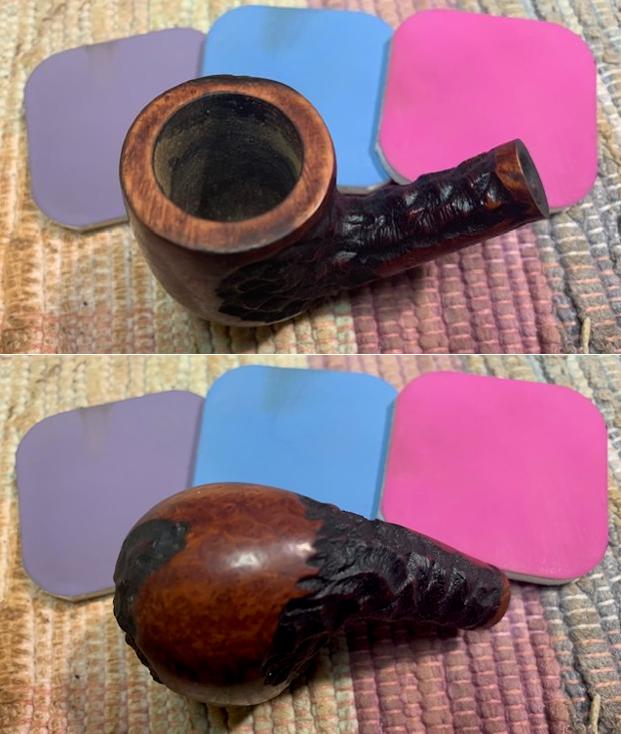
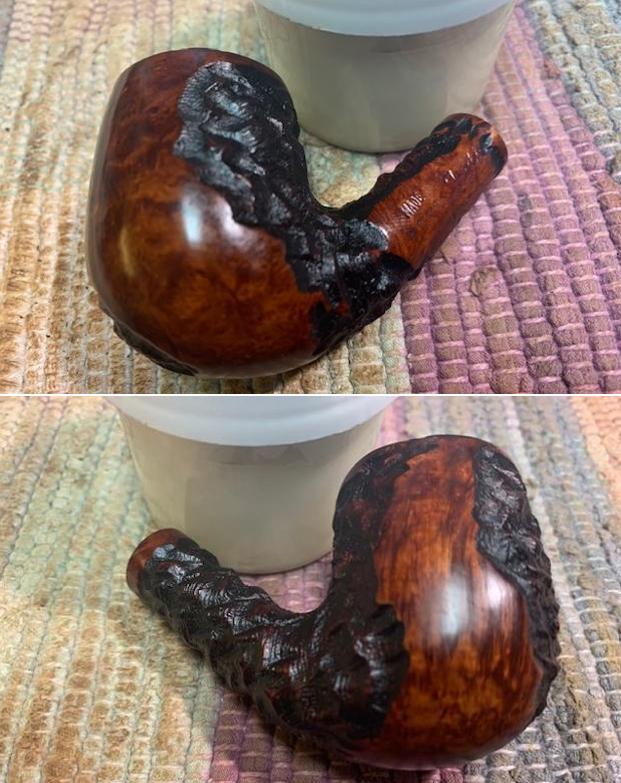
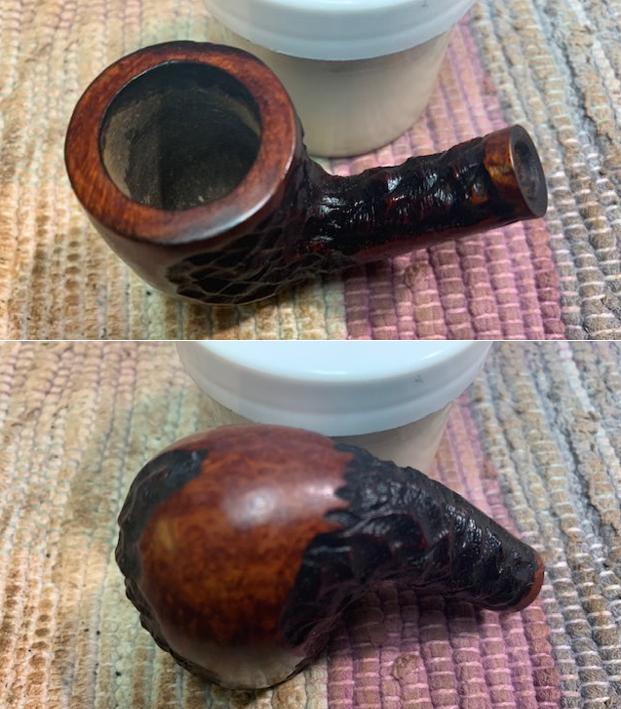
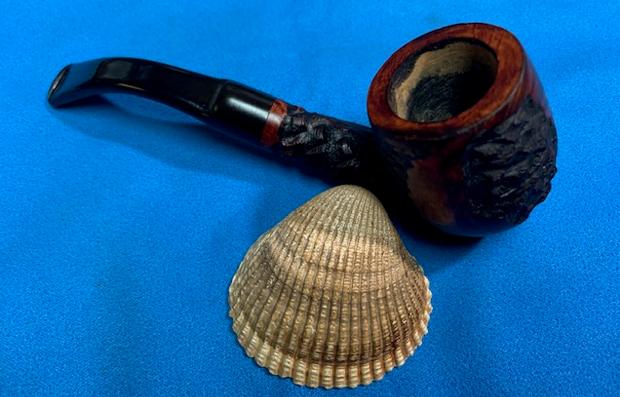
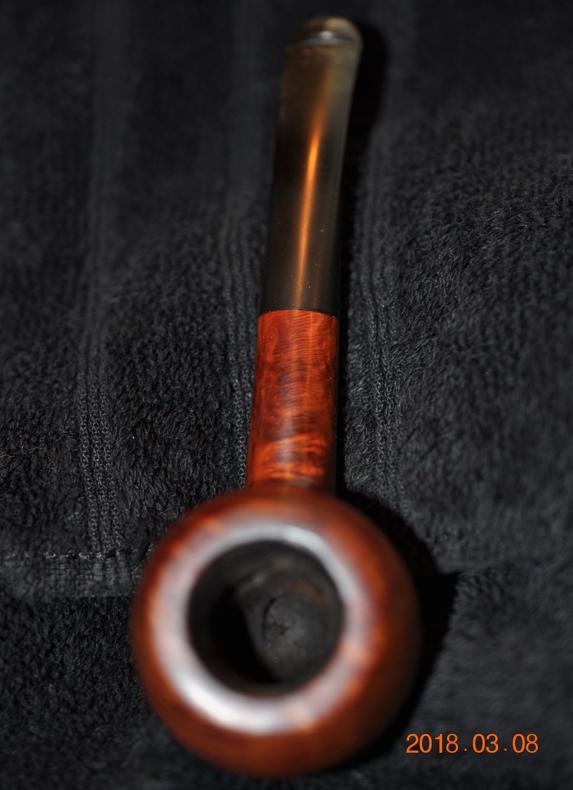
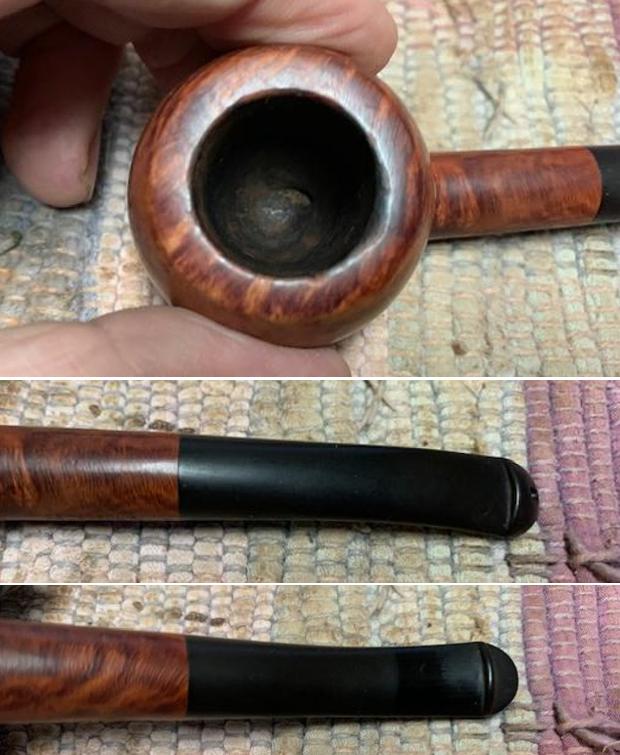
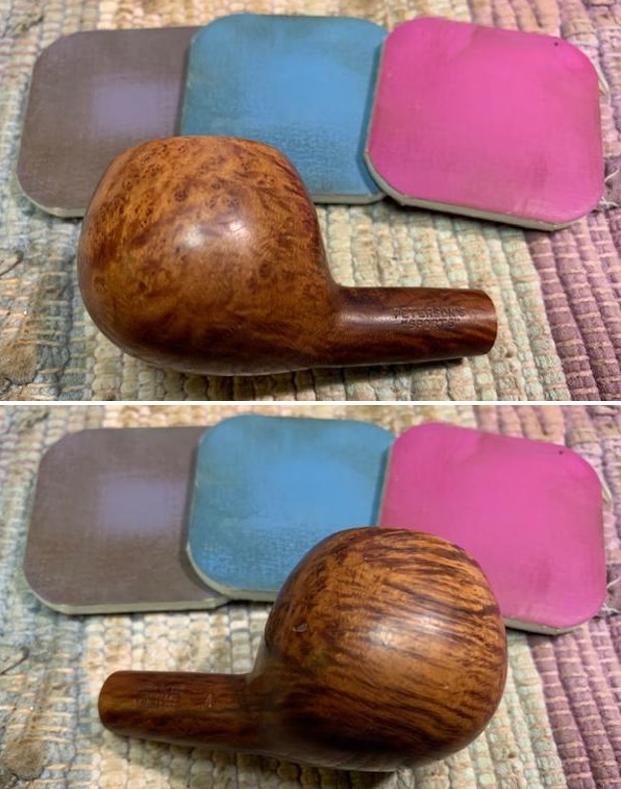
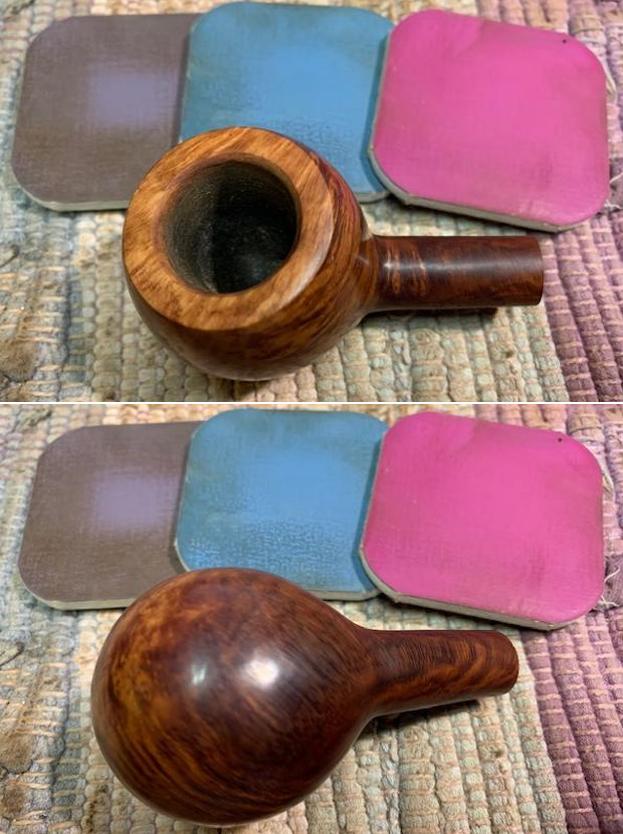
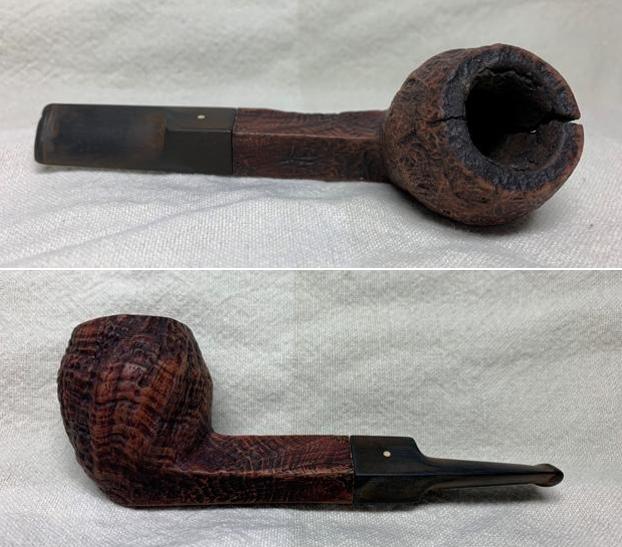
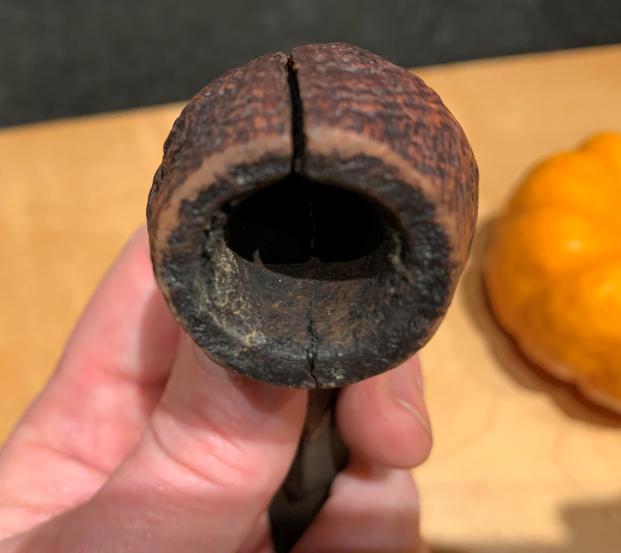
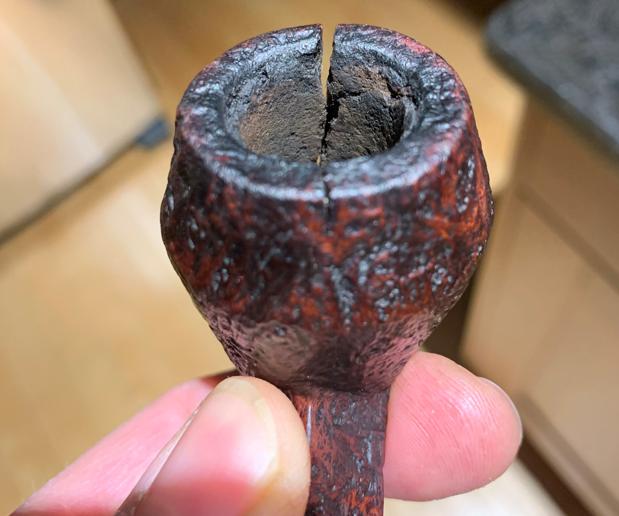
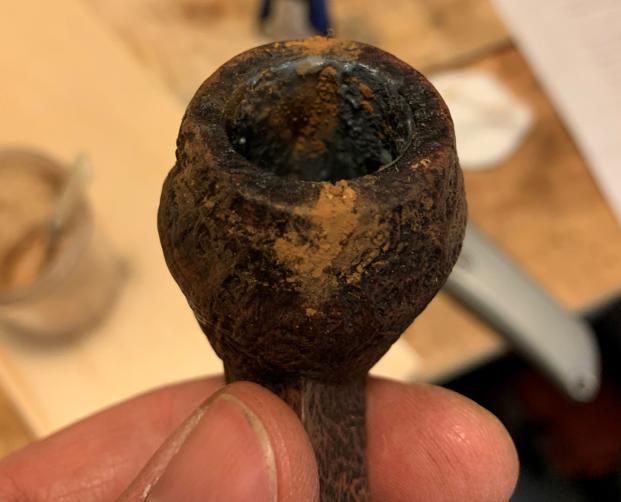
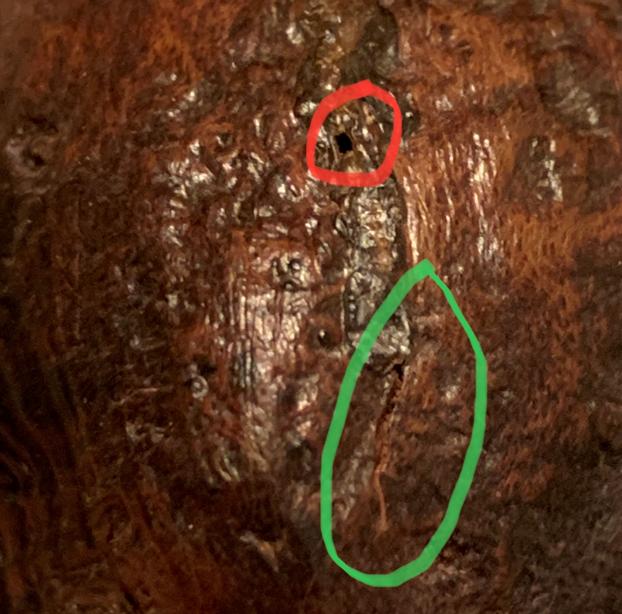
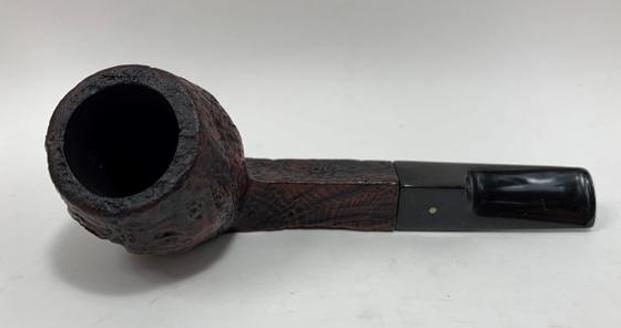
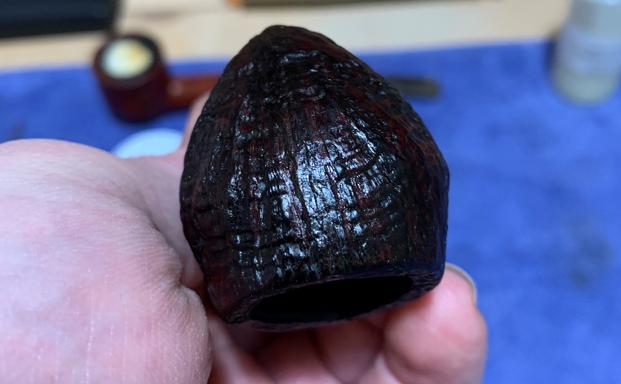
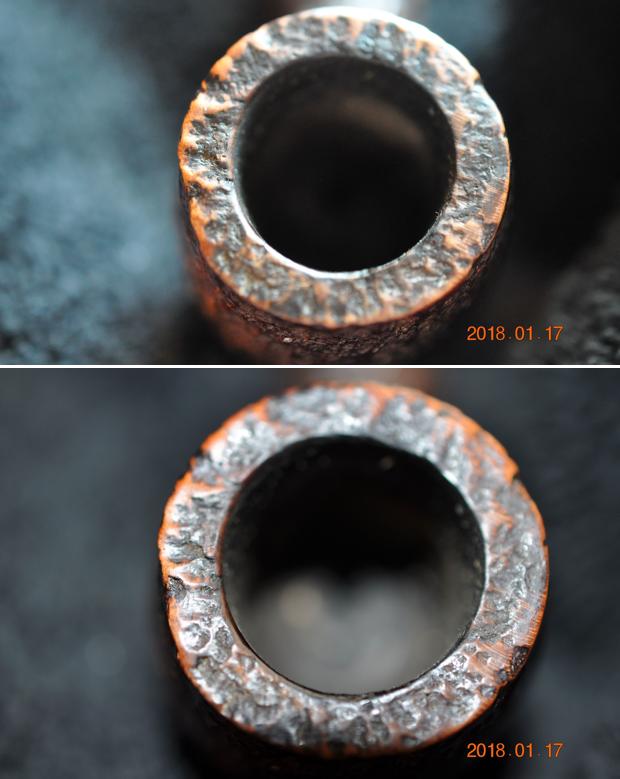
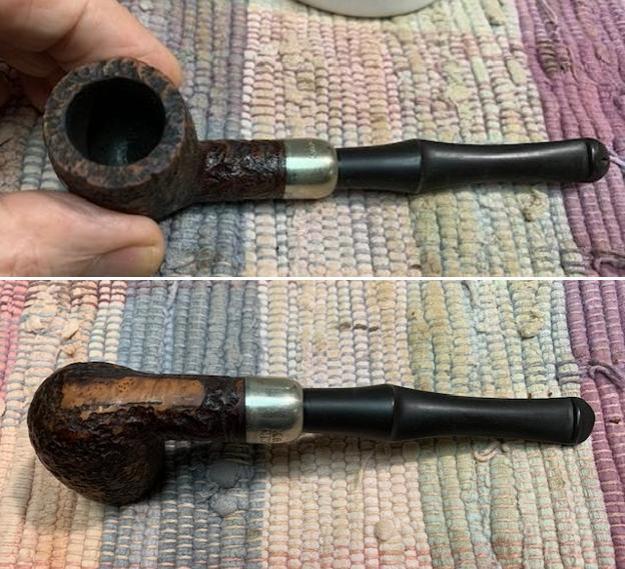
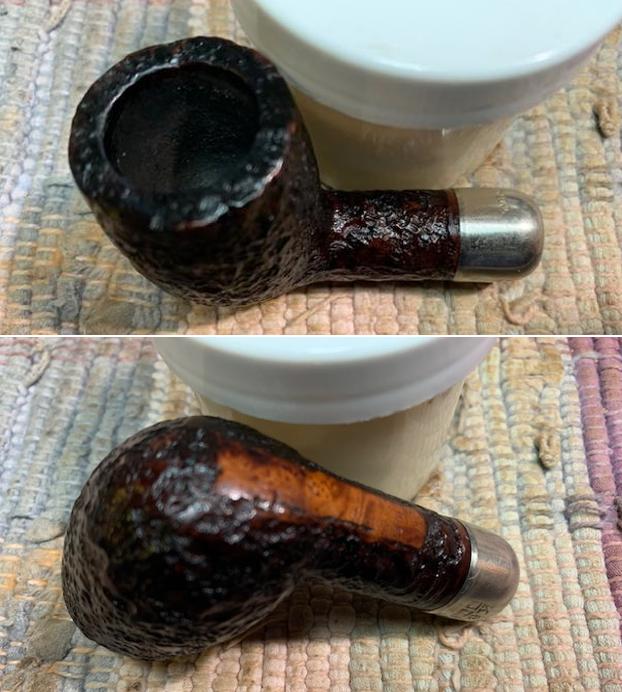
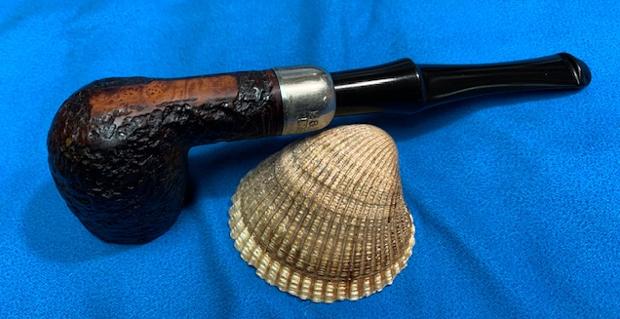
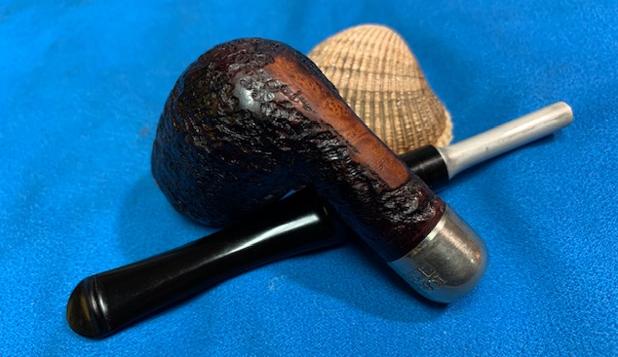
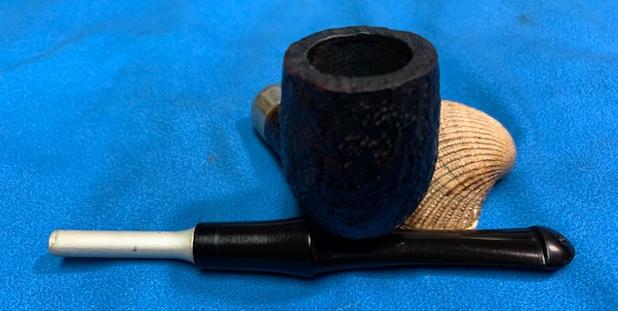
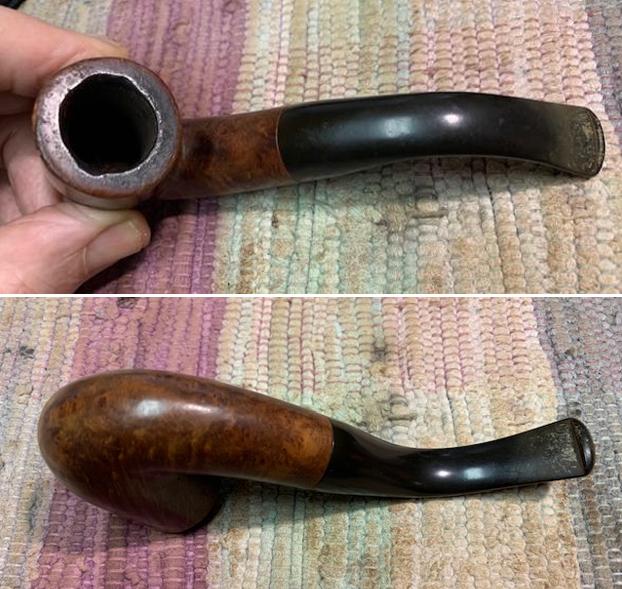
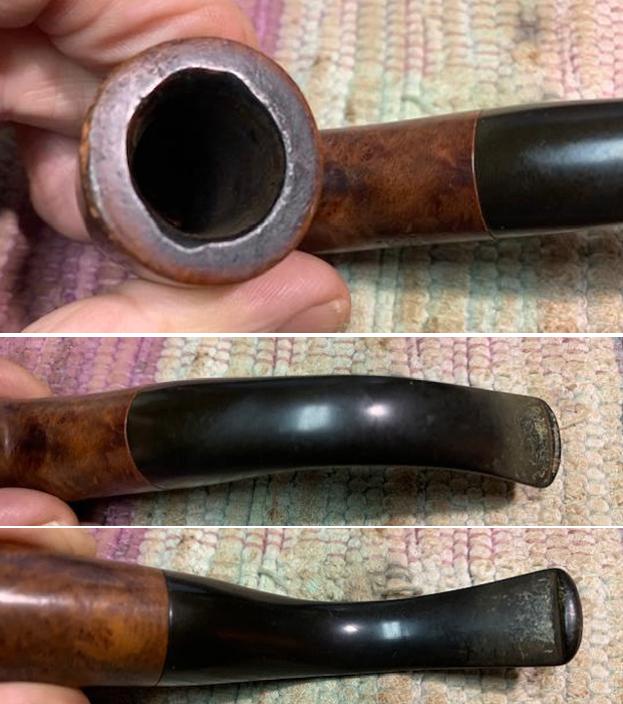
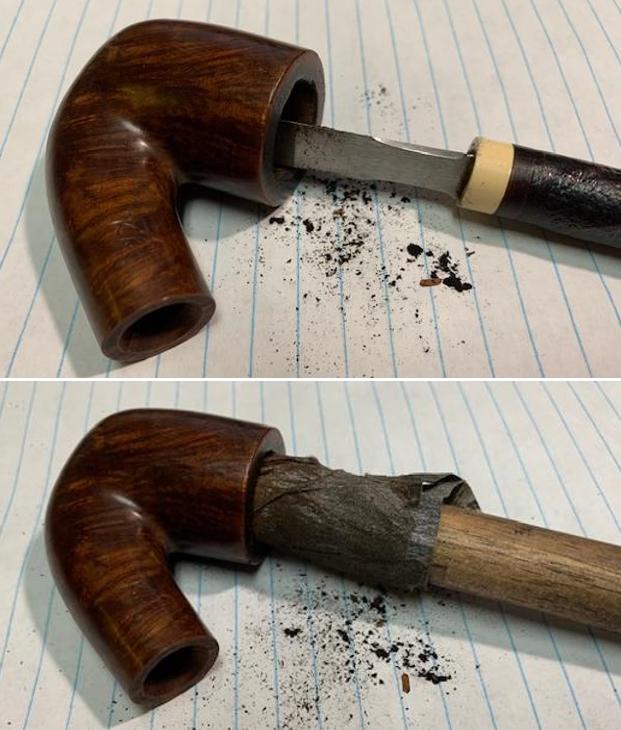
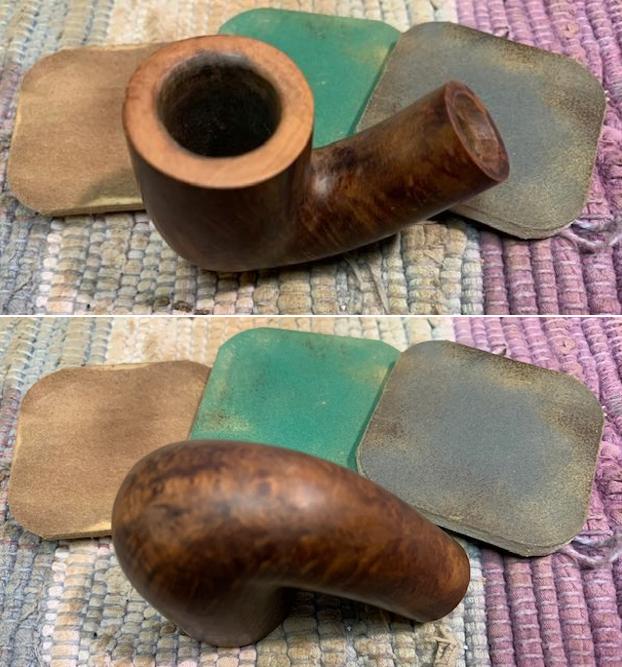
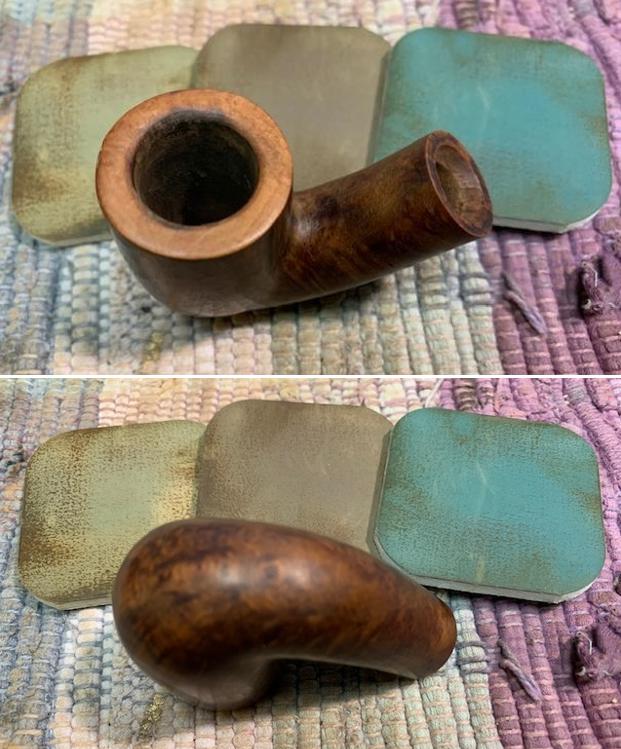
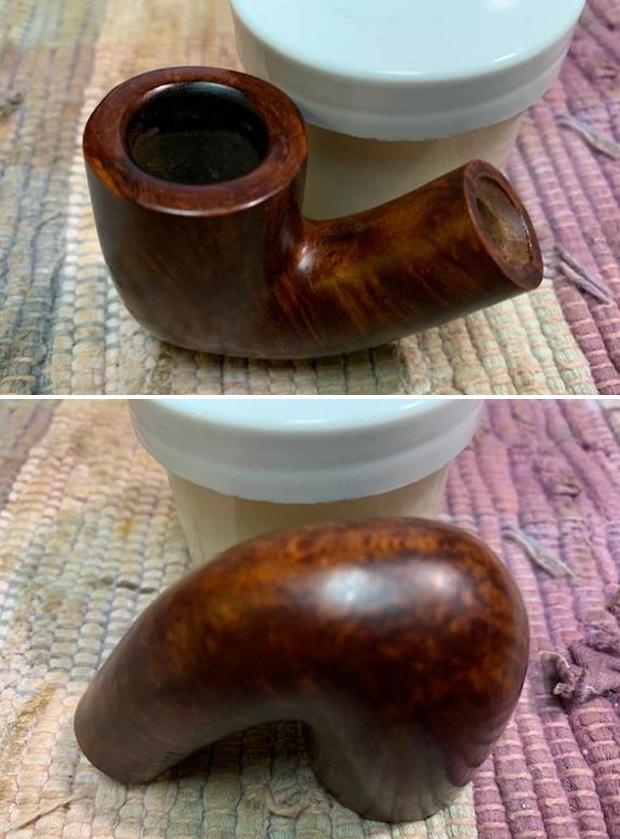
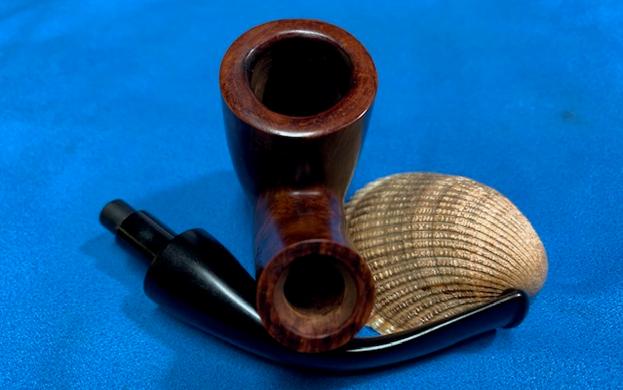
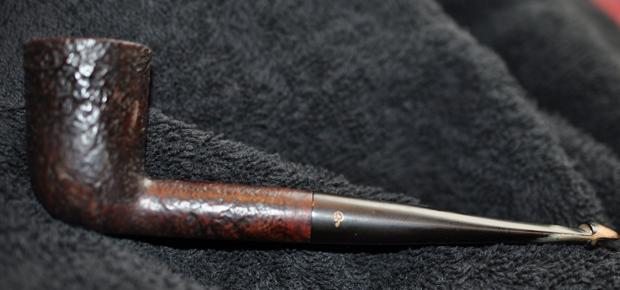
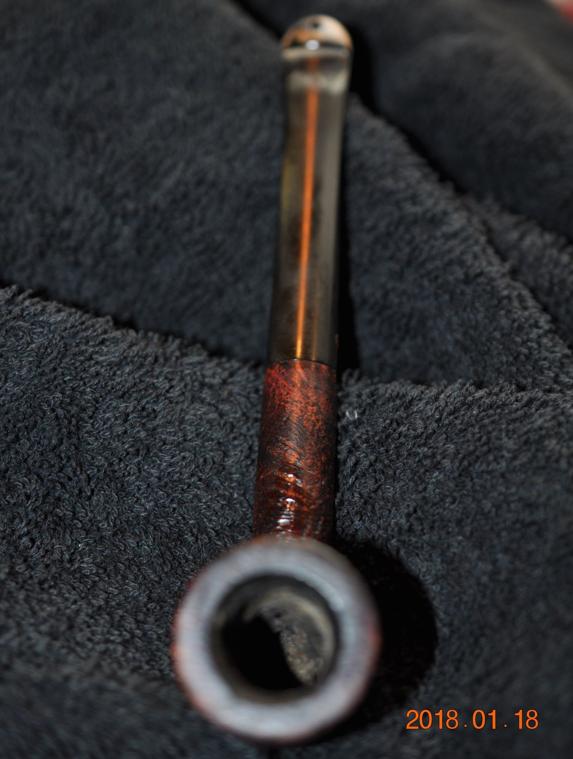
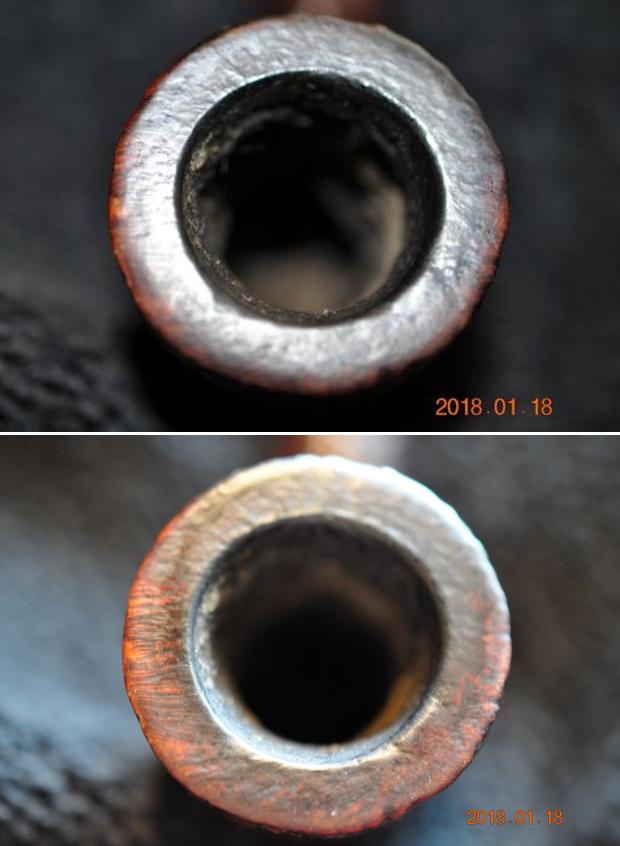
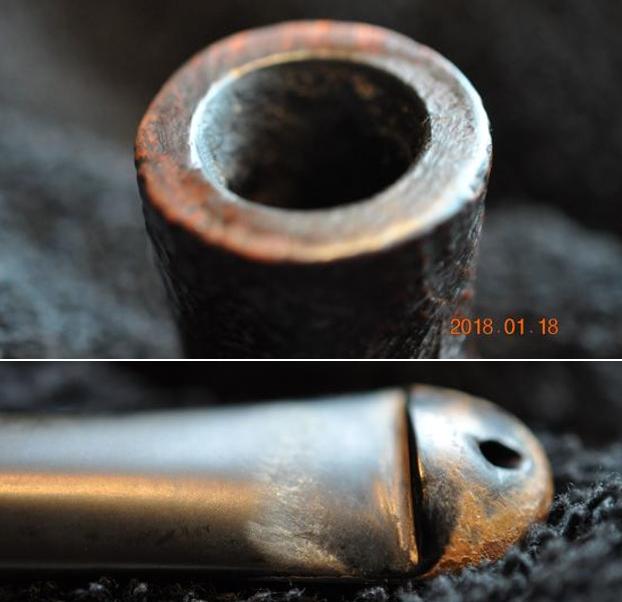
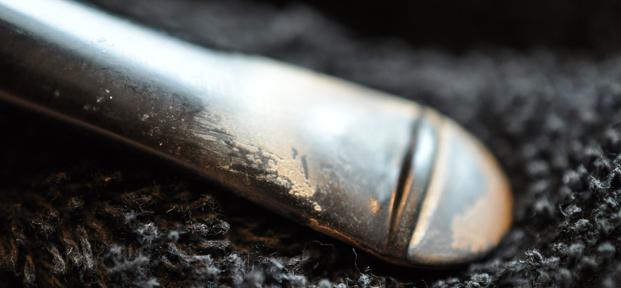
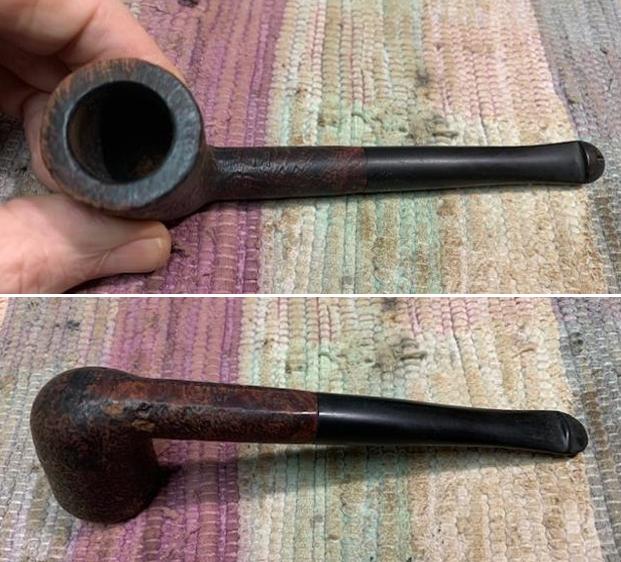
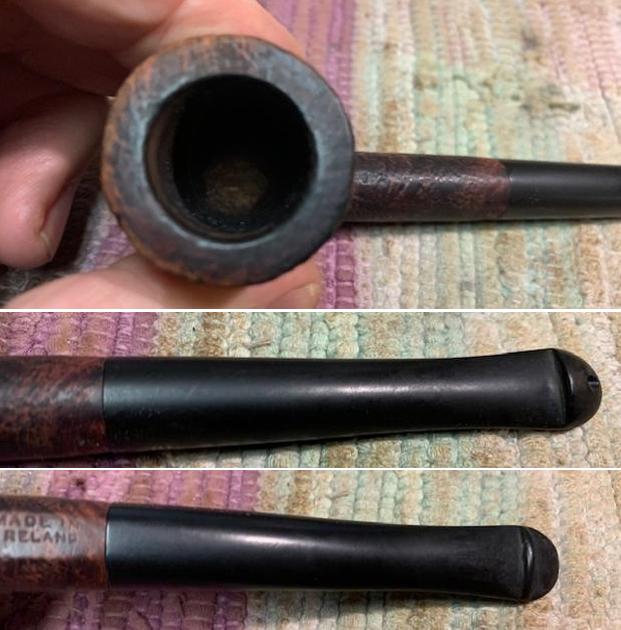
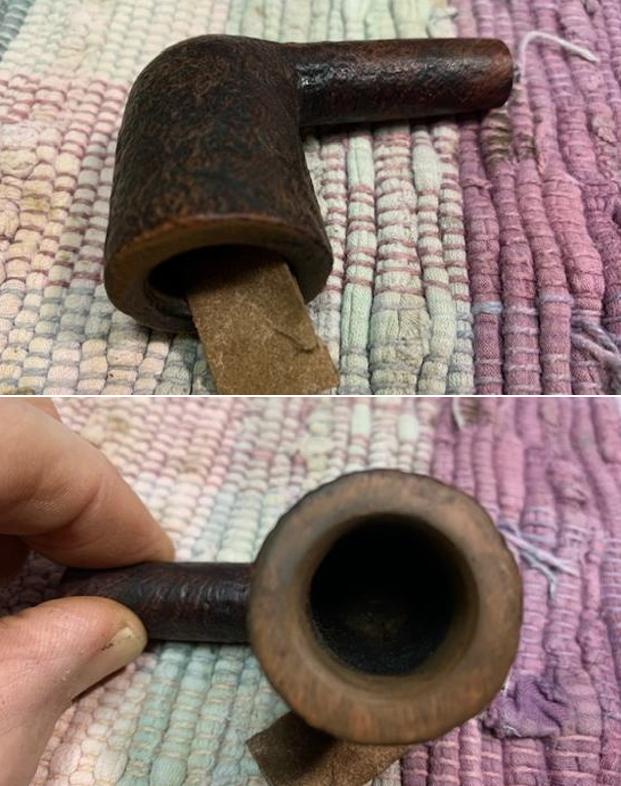
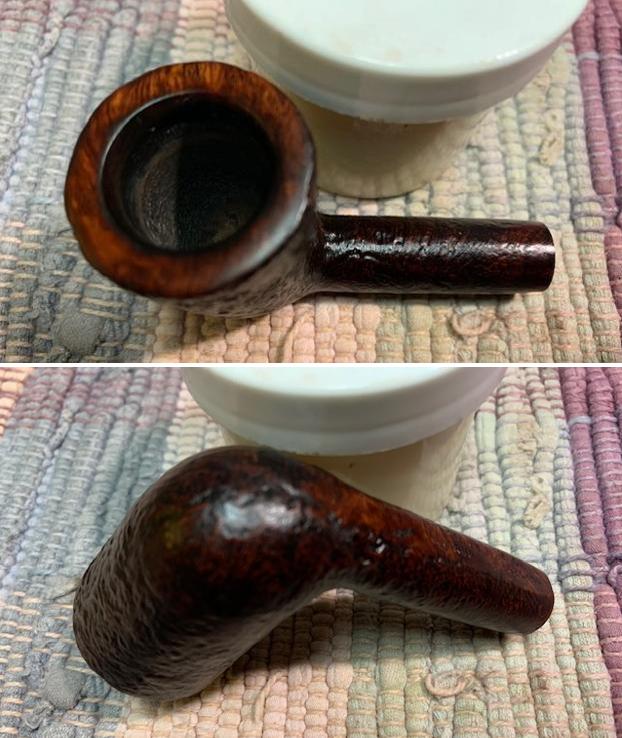
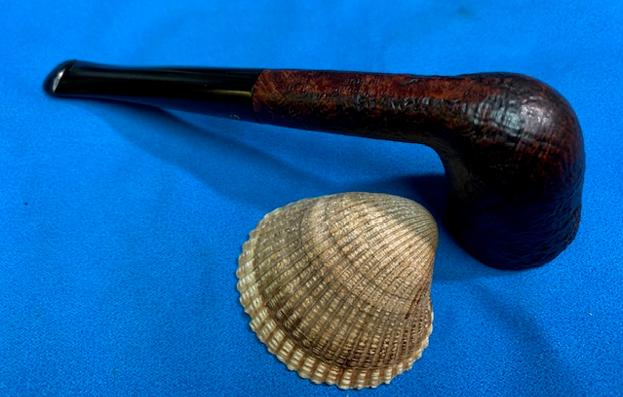
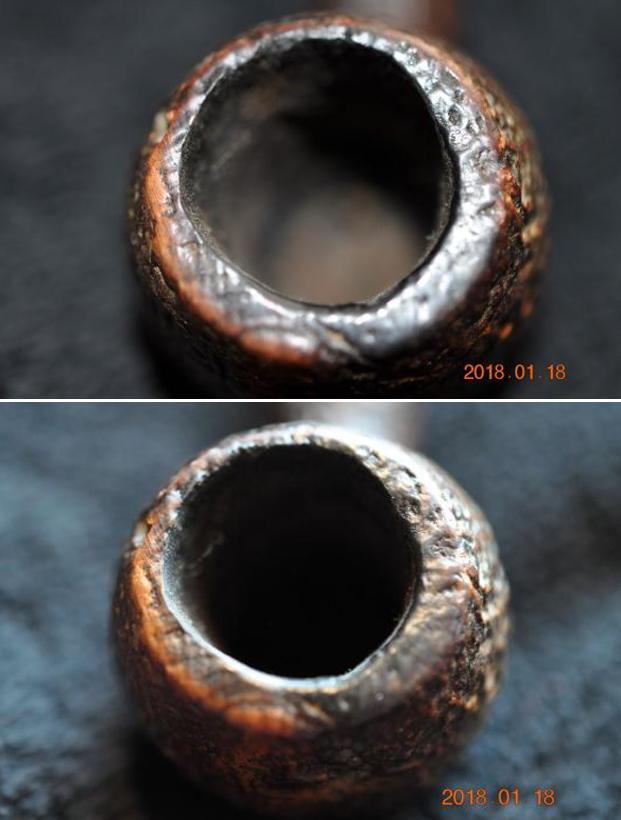
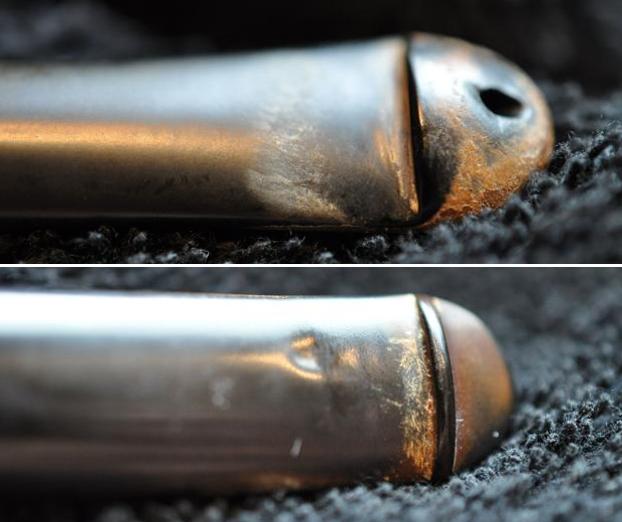
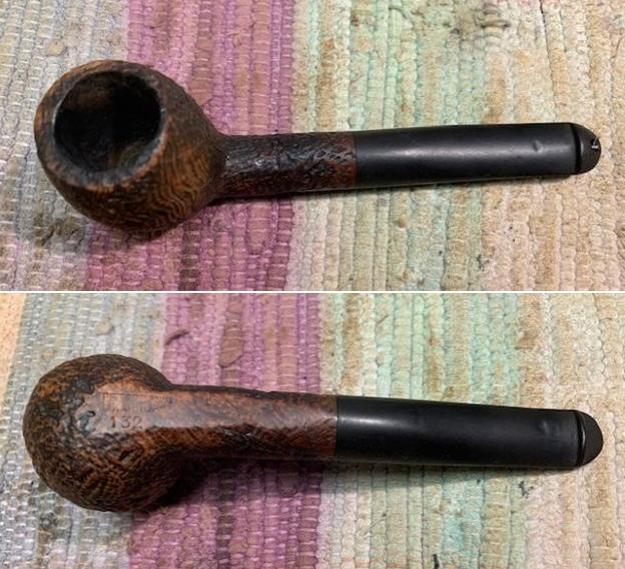
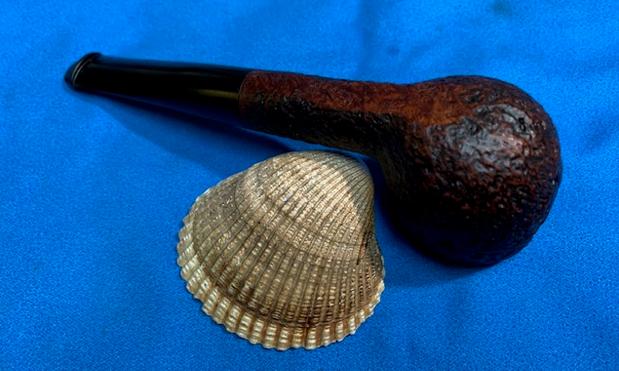
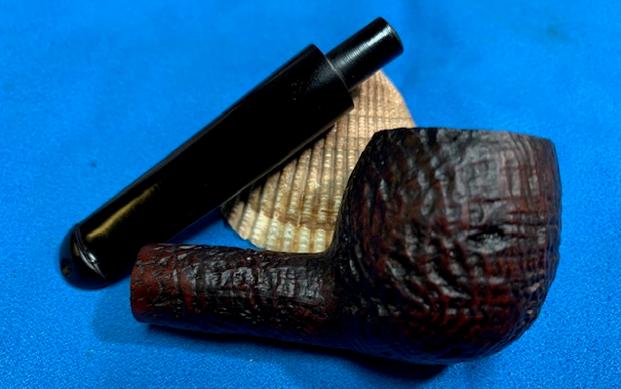
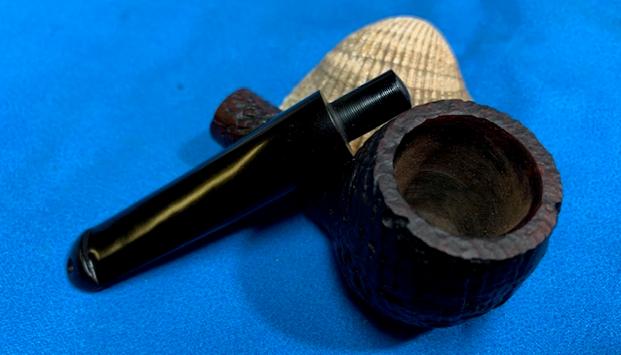
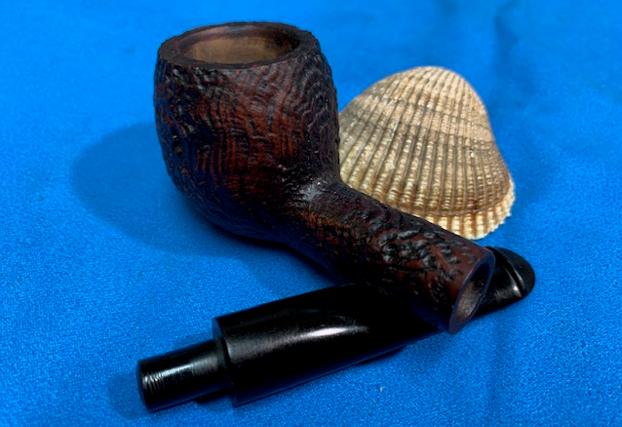
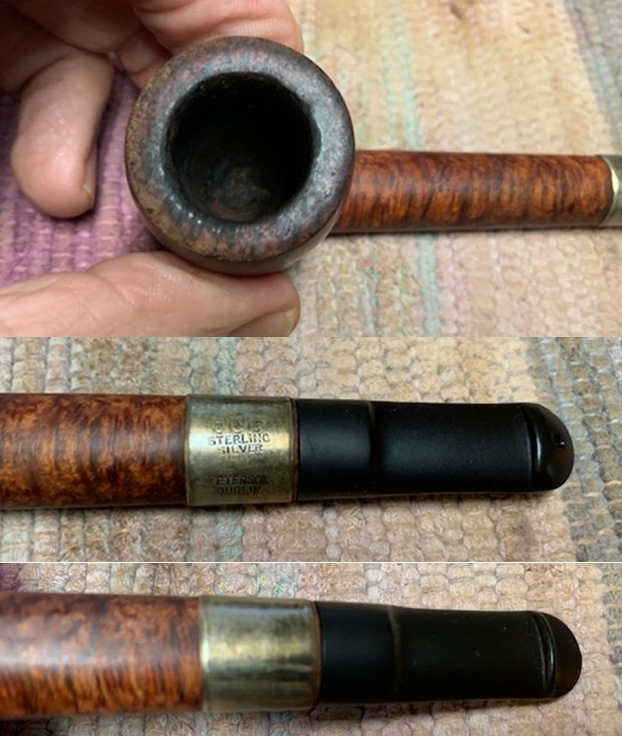
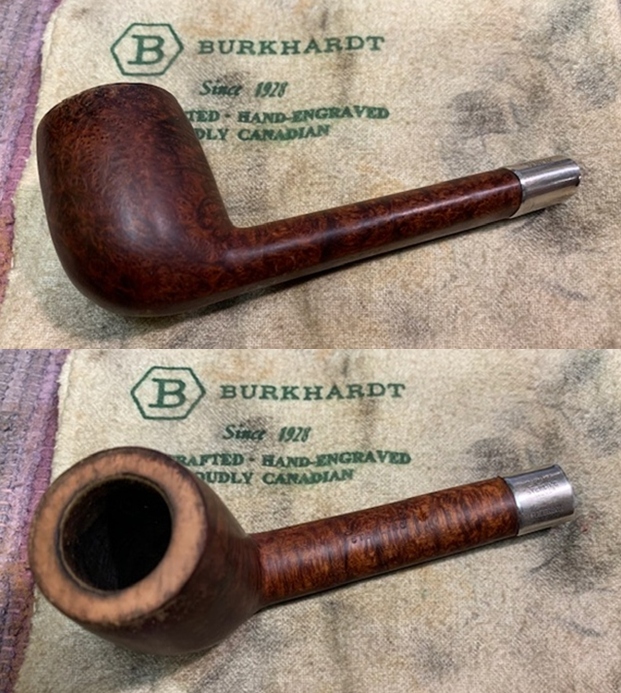
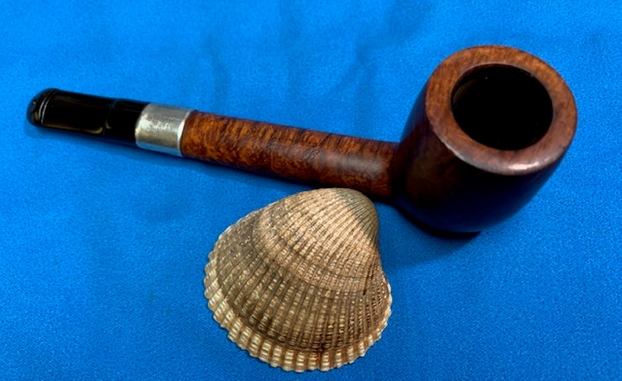
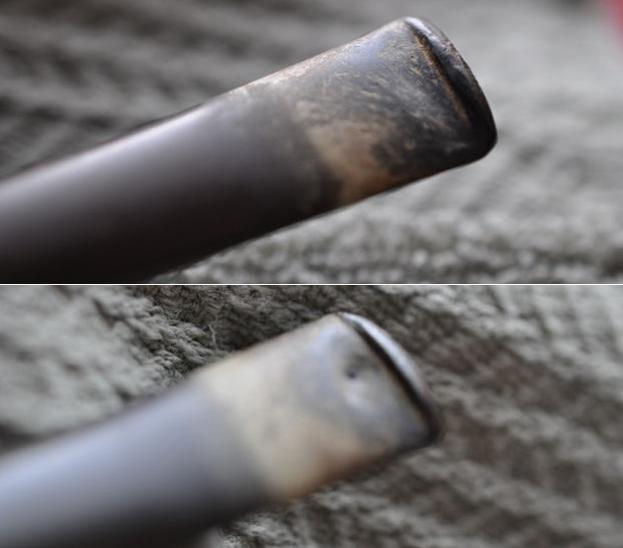
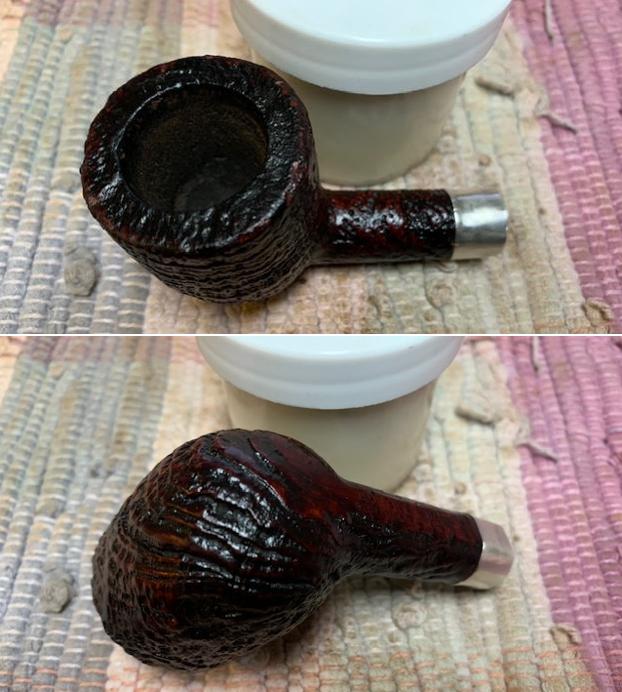
This Dunhill came to us in the same lot of pipes as the 1922 Dunhill Bruyere Reading Pipe and the BBB Calabash Reading Pipe that I have already restored and written blogs on. It was a great looking blast on this pipe that caught our attention. The silver band on the shank was definitely an aftermarket addition to repair a cracked shank. It was made out of Sterling Silver so that was not a big deal to us when we purchased the lot. It was a filthy pipe with a thick cake in the bowl and a heavy lava overflow on the rim top. The stem was oxidized, calcified and had deep tooth marks on both sides next to the button. It is hard to see until the close up photos but the shank was seriously crack about 1/8 of an inch ahead of the band on the underside of the shank and from the shank end you could see two large crack at 3 and 9 o’clock. Jeff took photos of the pipe as it stood when we received it.  He took photos of the bowl and rim to give a picture of the depth of the cake and lava on the rim top. You can also see the nicks around the outer edge of the rim. Even the stem was pretty normal fare – tooth marks with a small hole in the underside and heavy wear and tear on the rest of the stem. Everything was pretty common in terms of the restorations that we work on at least we thought so at this point! 
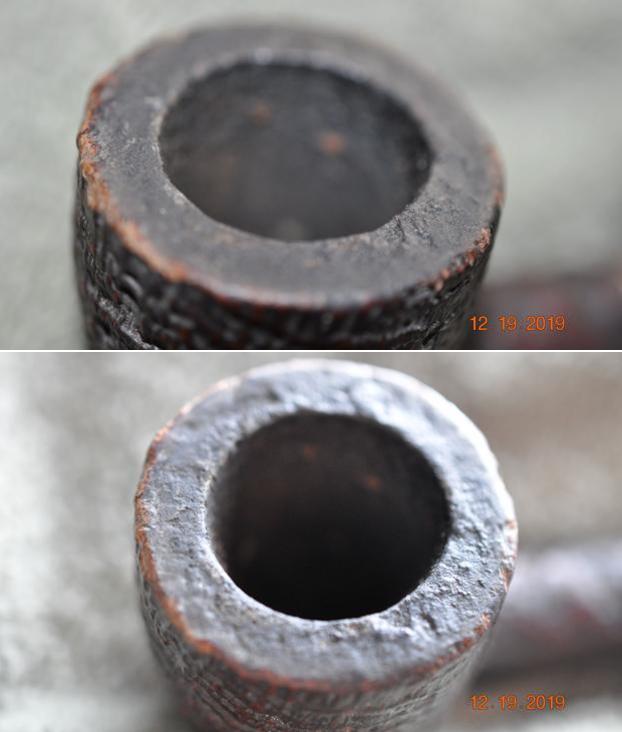
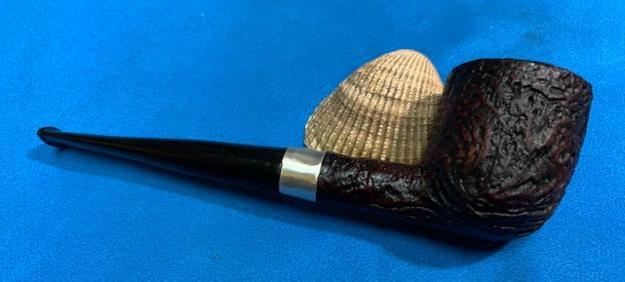
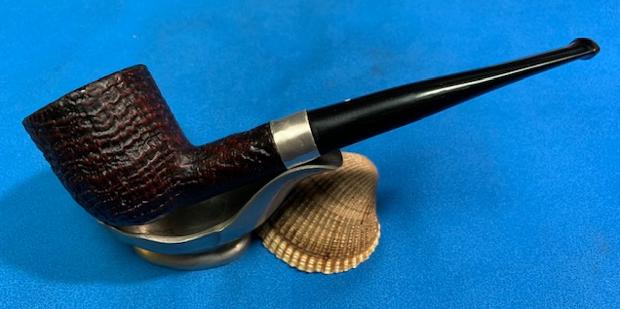
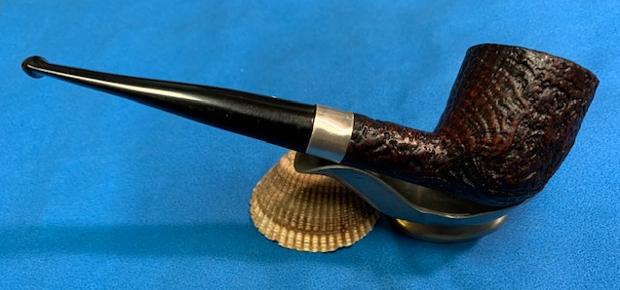
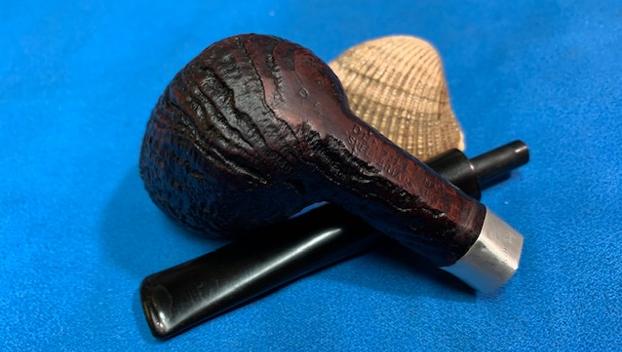
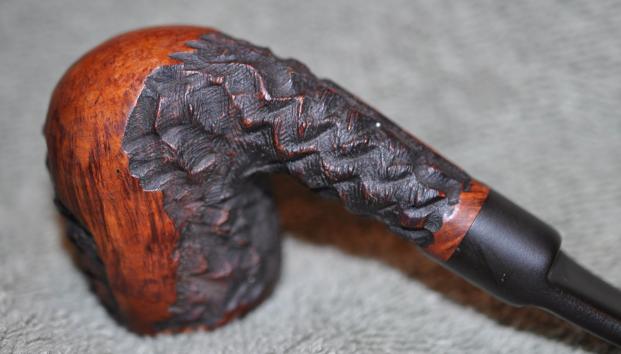
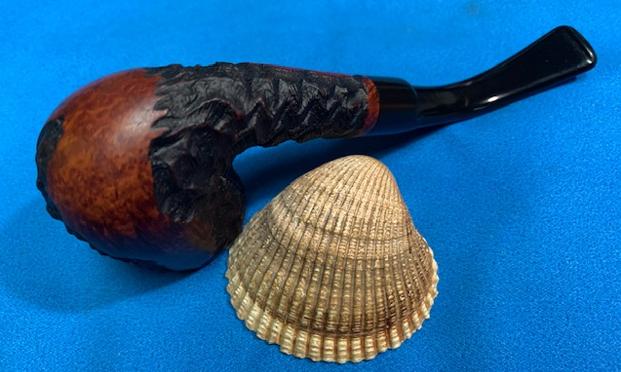
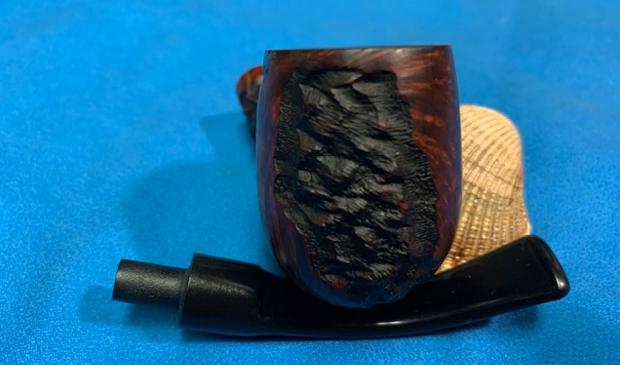
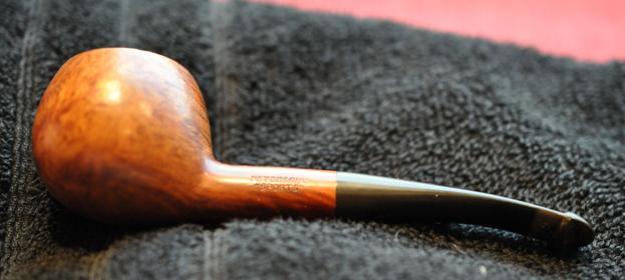
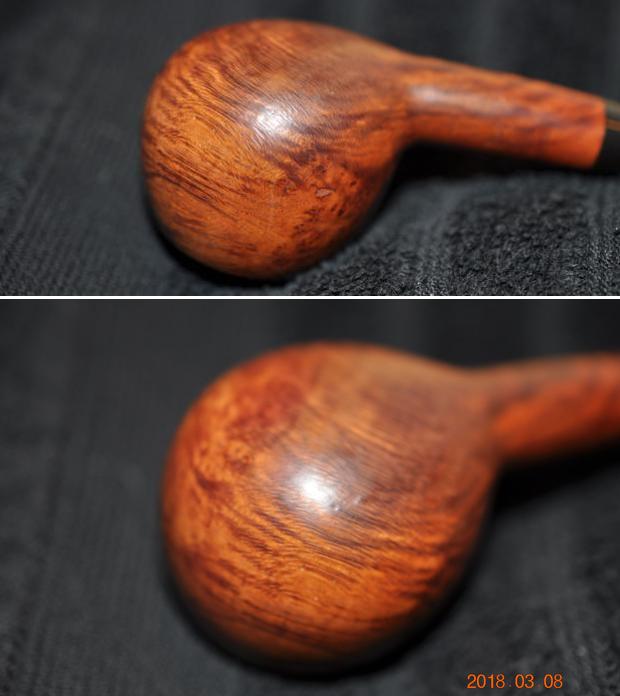
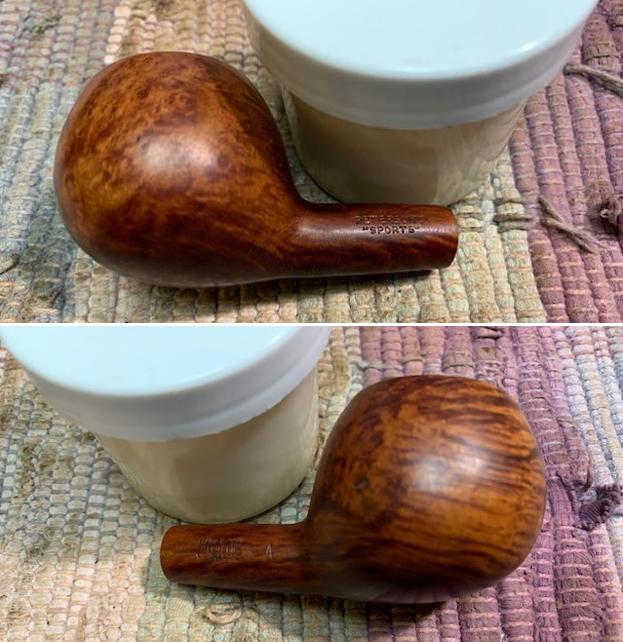
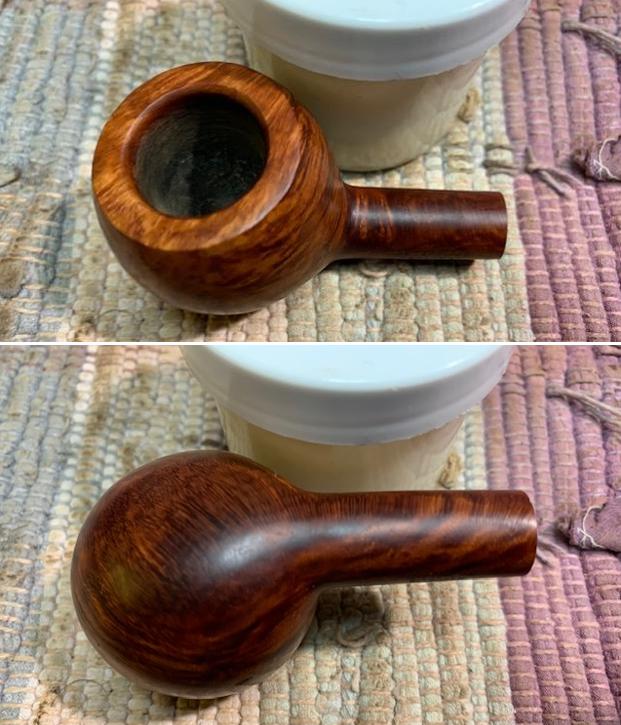
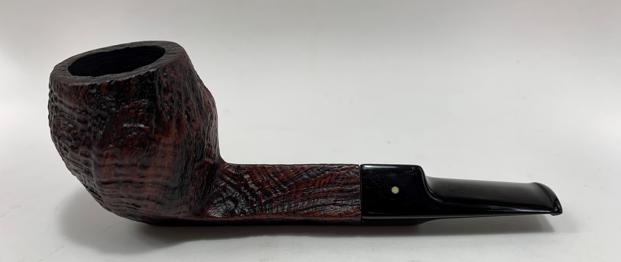
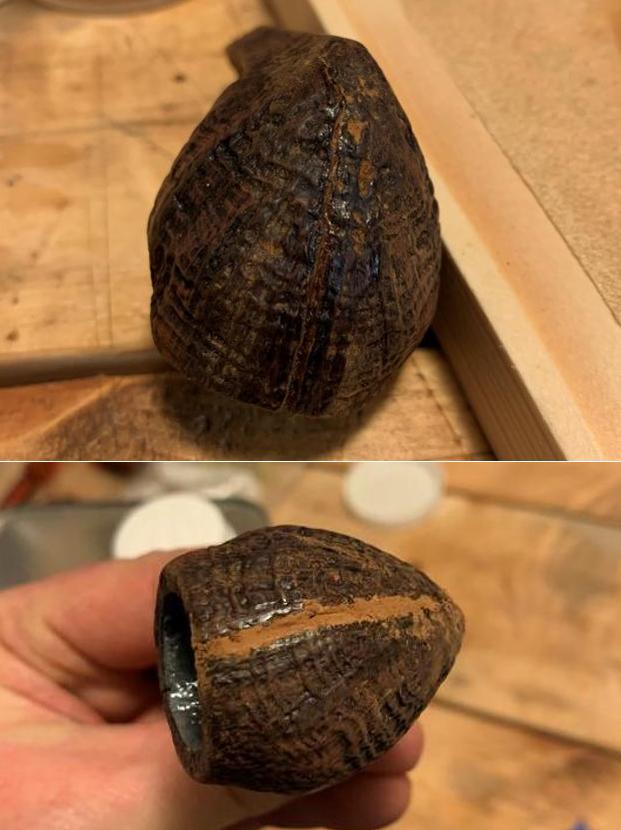
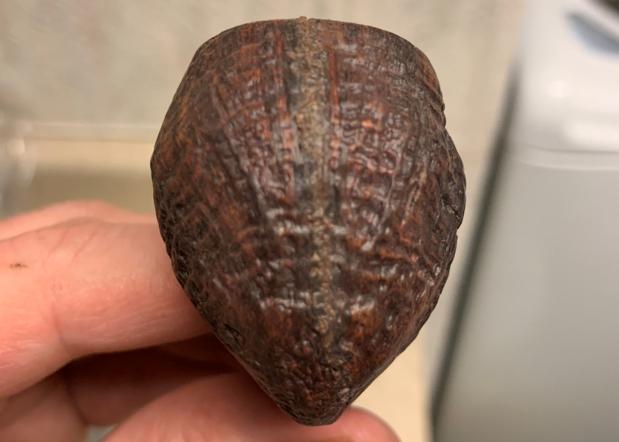
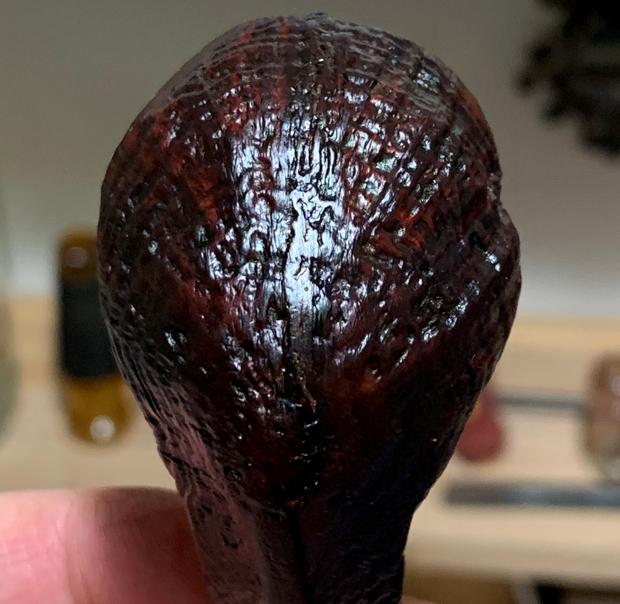
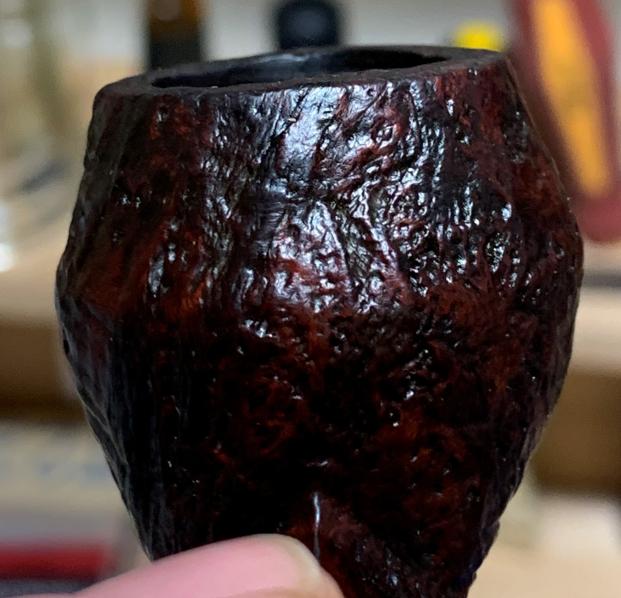
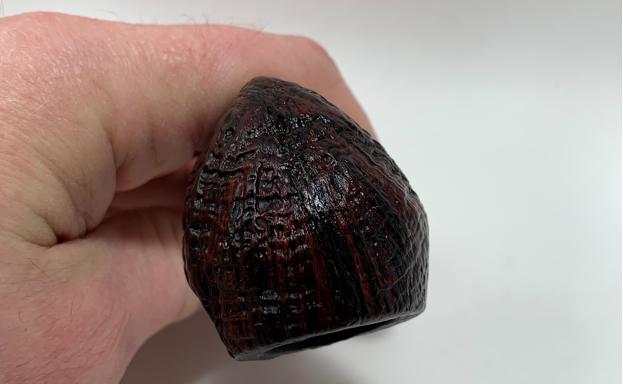
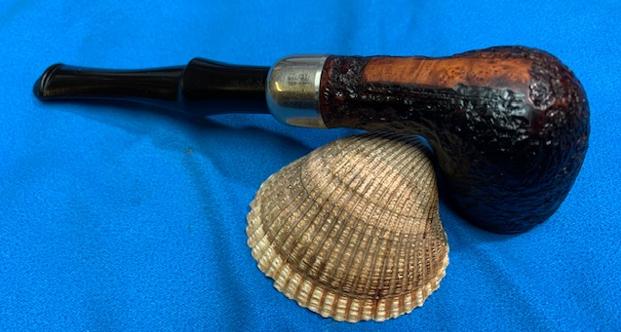
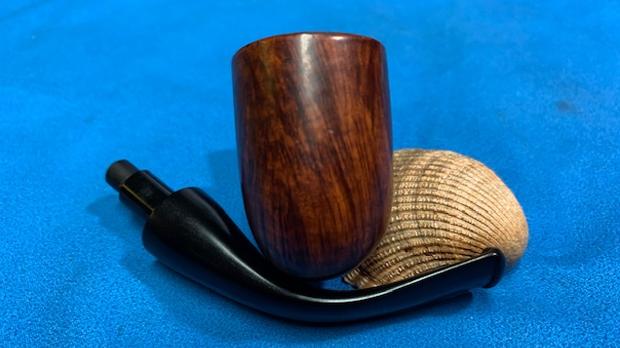
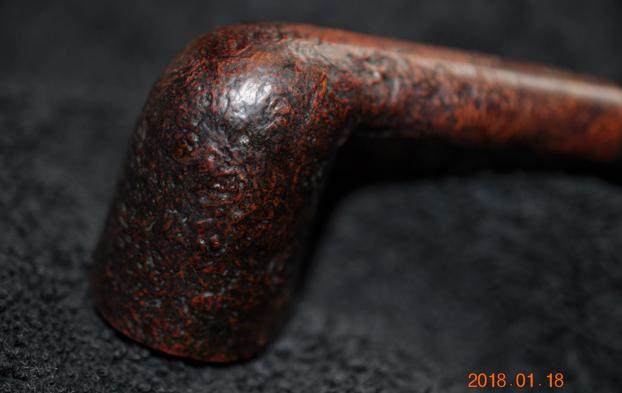
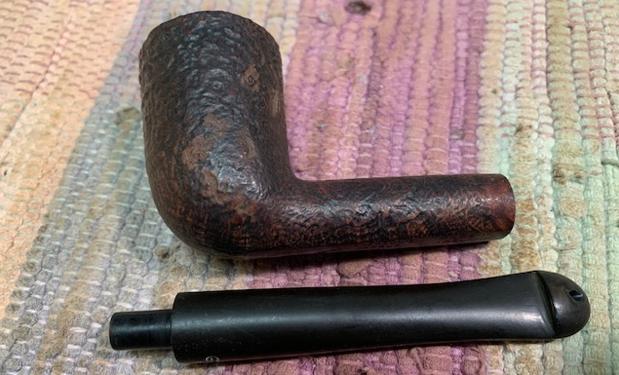
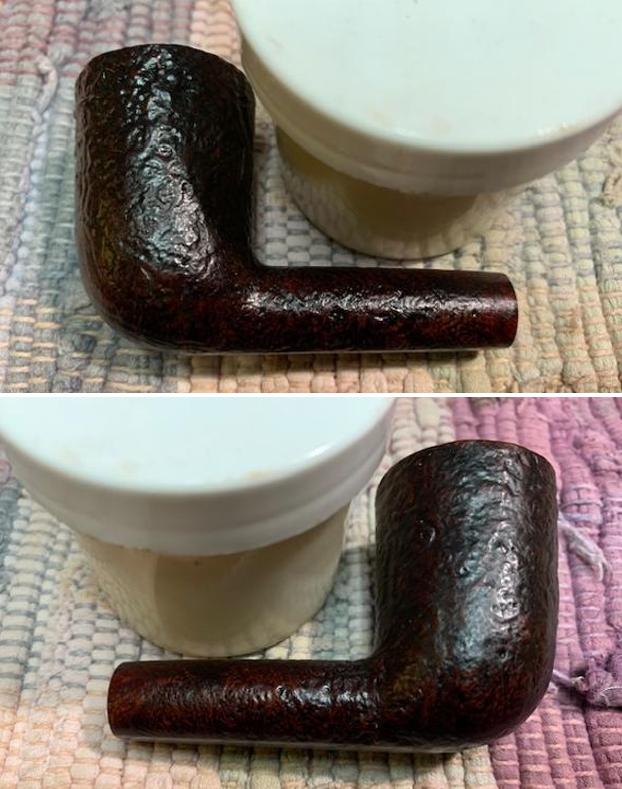
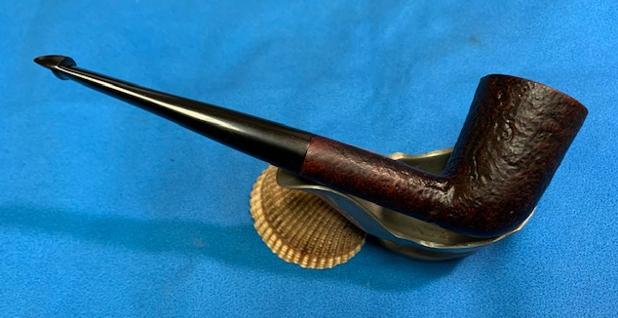
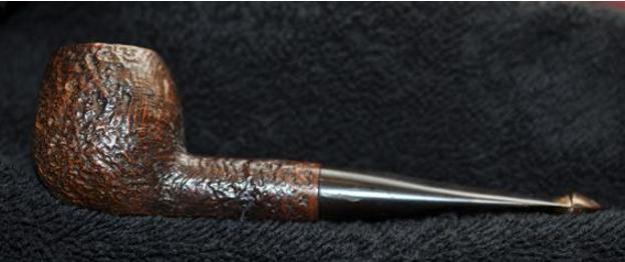
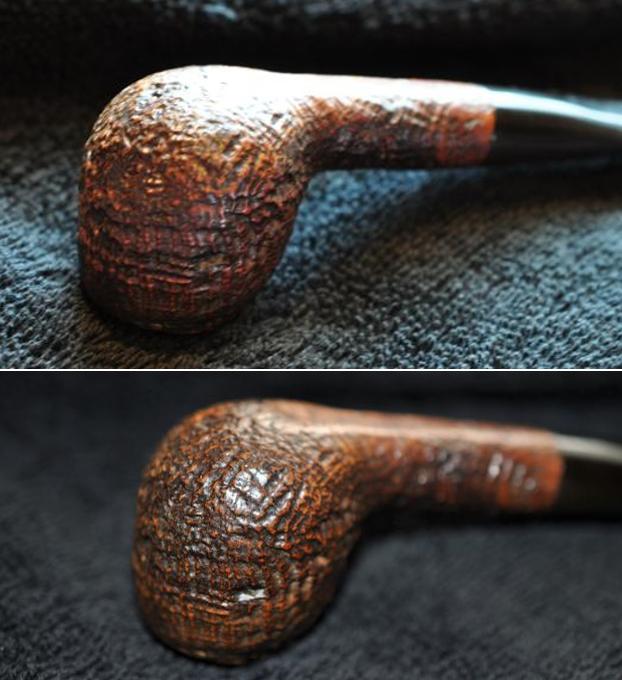
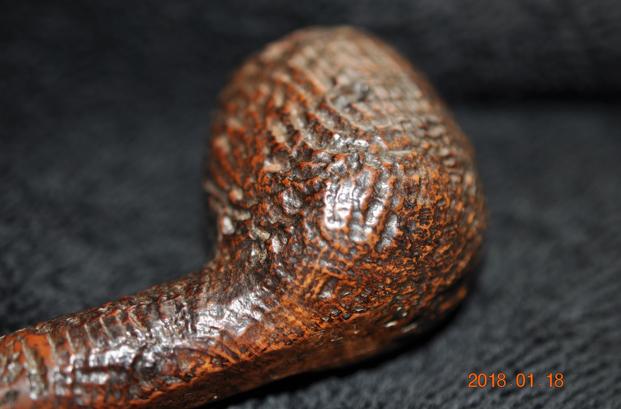
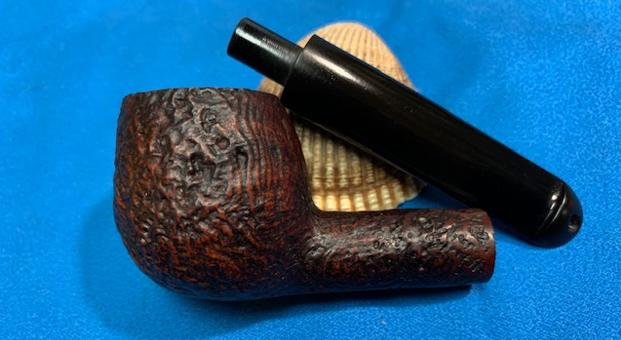
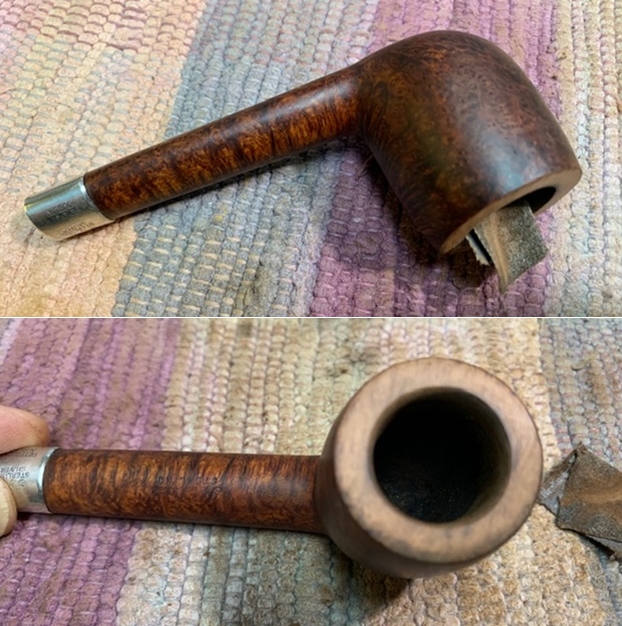
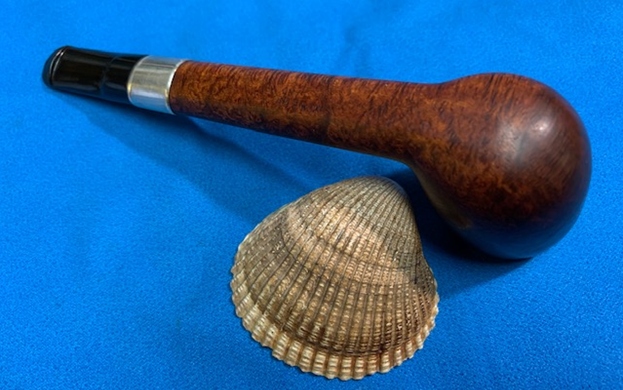
He took some photos of the sides of the bowl to show the beautiful (and filthy), rugged sandblast around the bowl. It really was a magnificent looking bowl. 
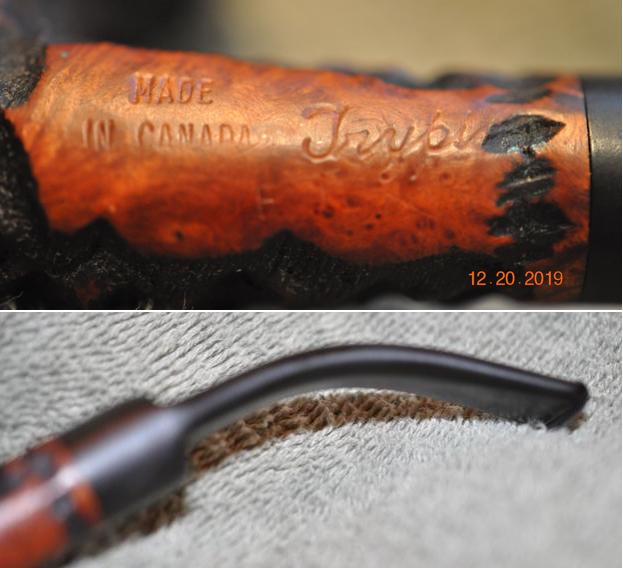
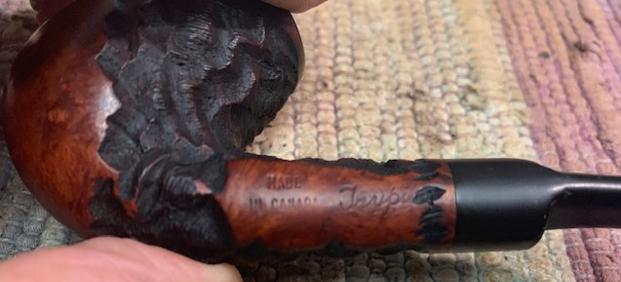
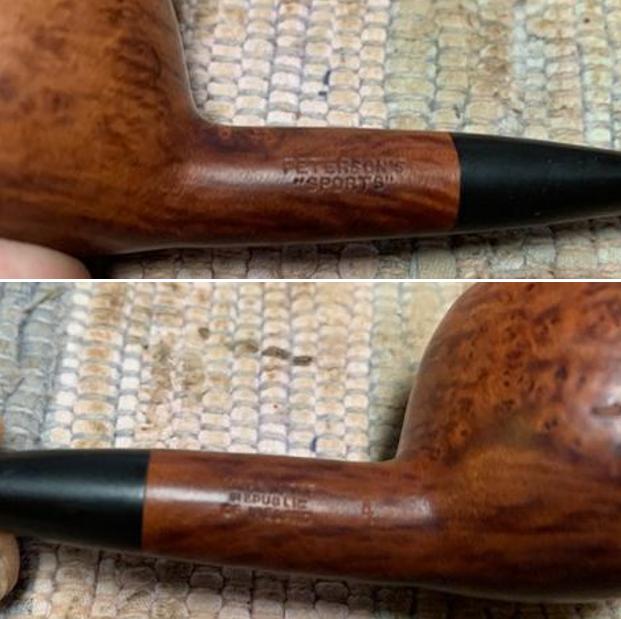
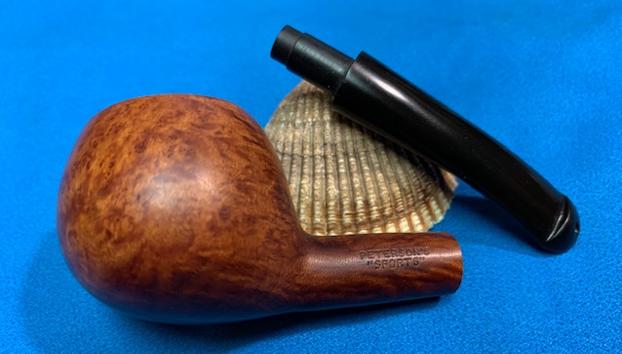
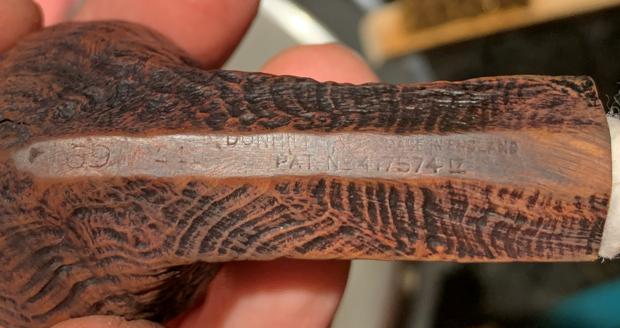
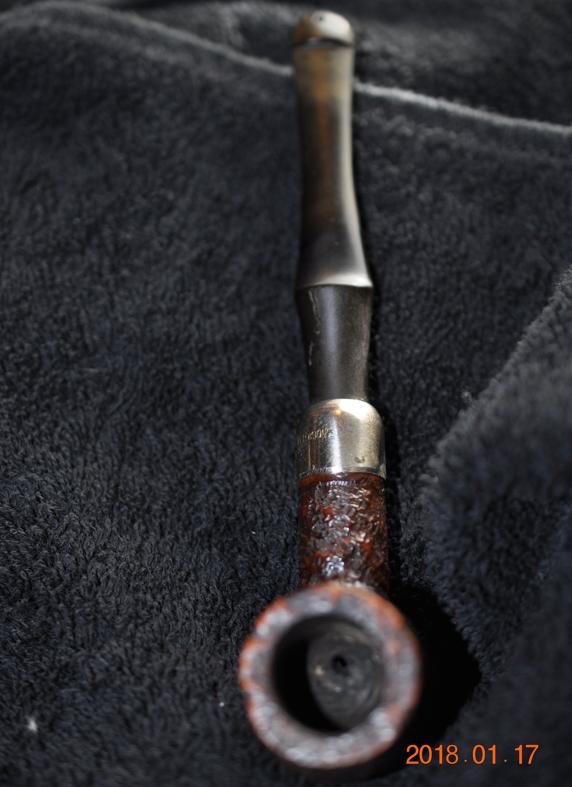
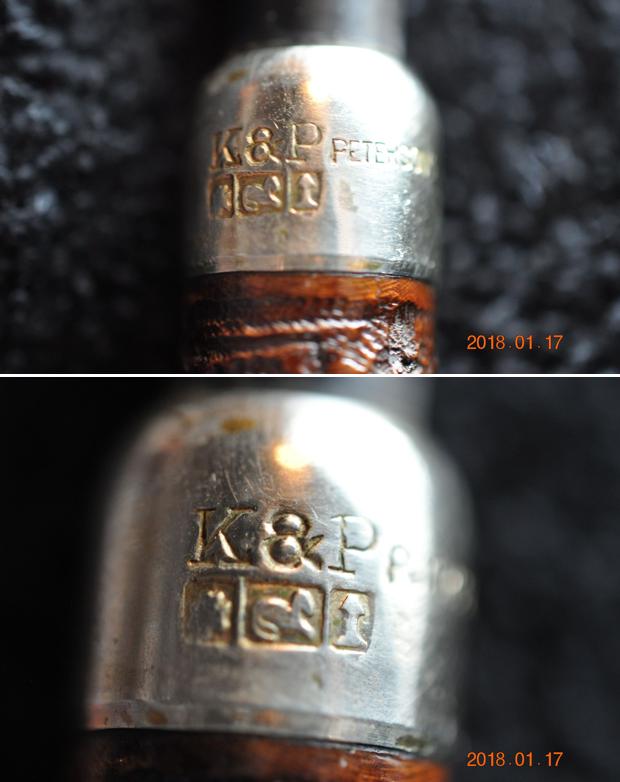
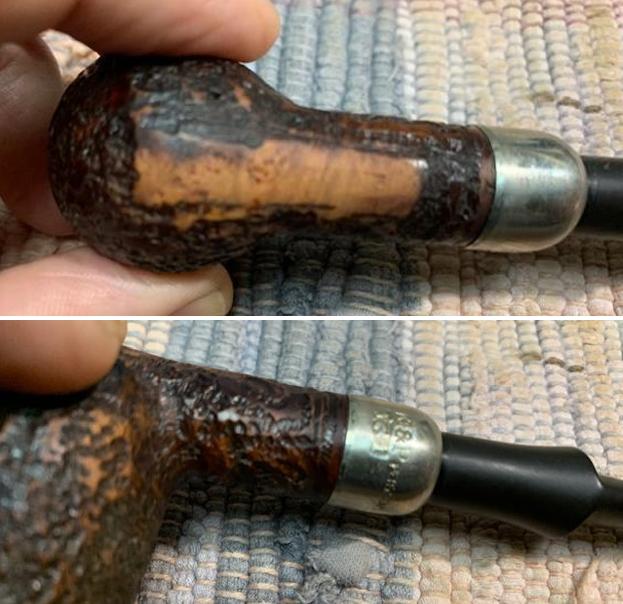
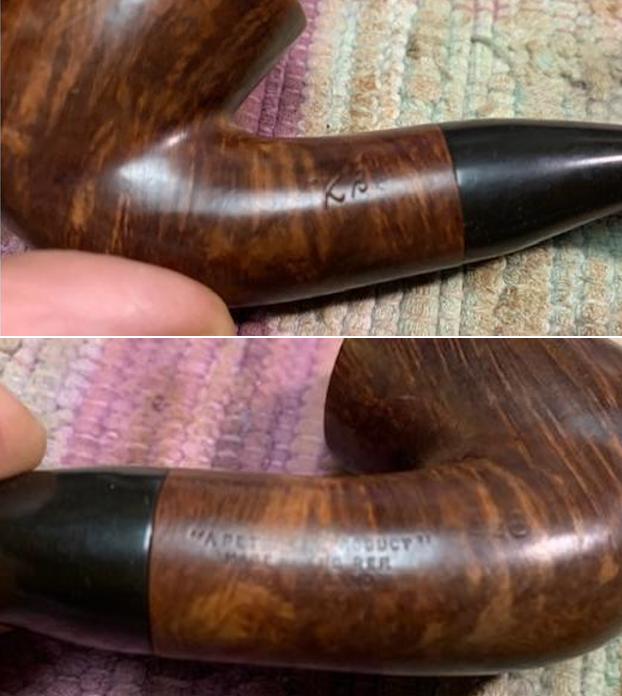
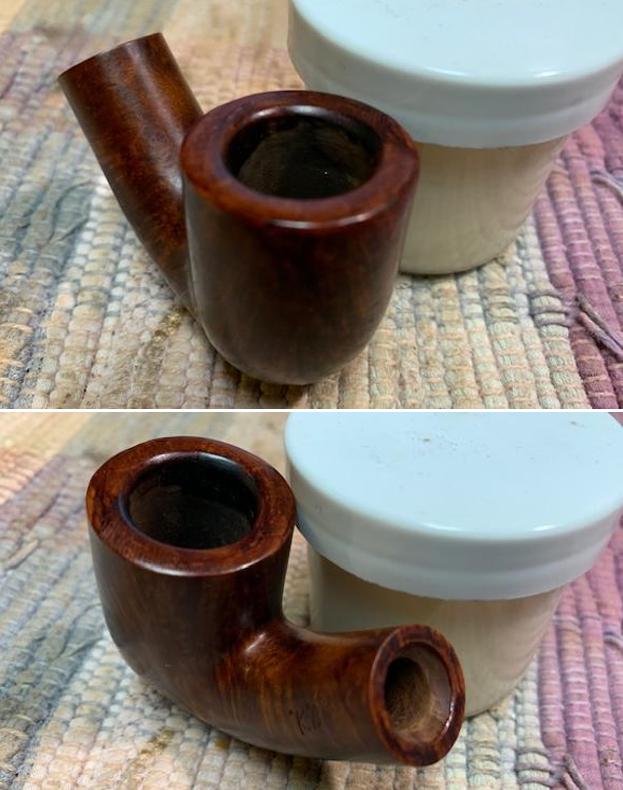
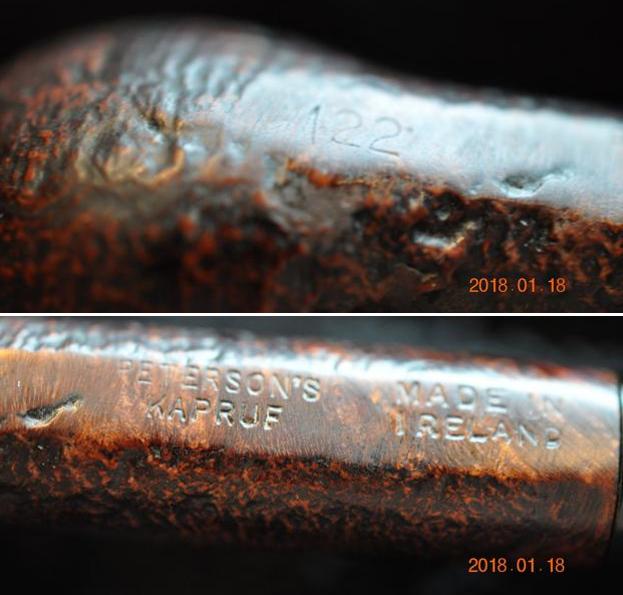
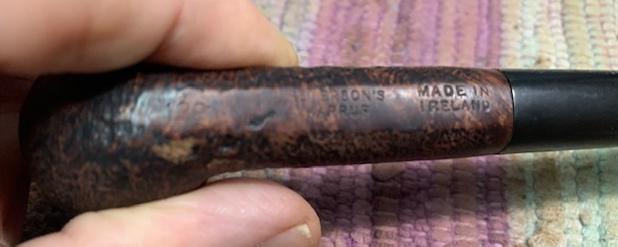
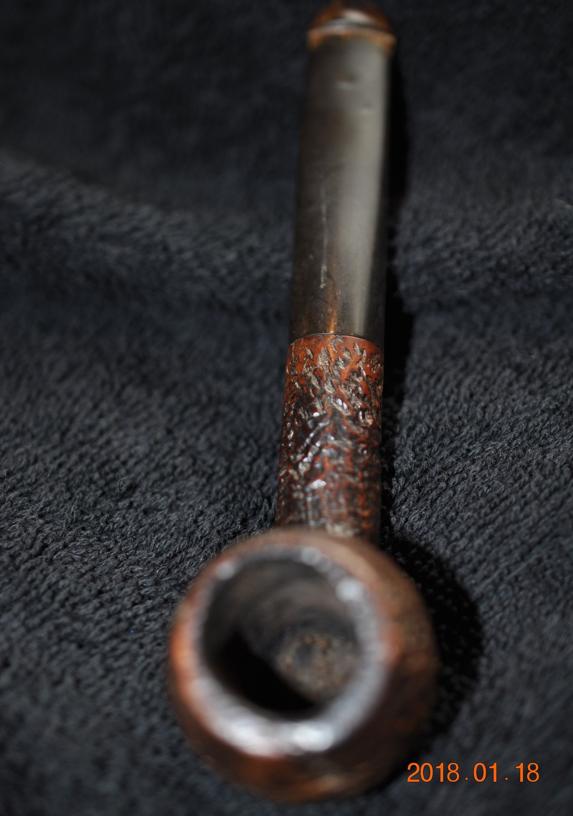
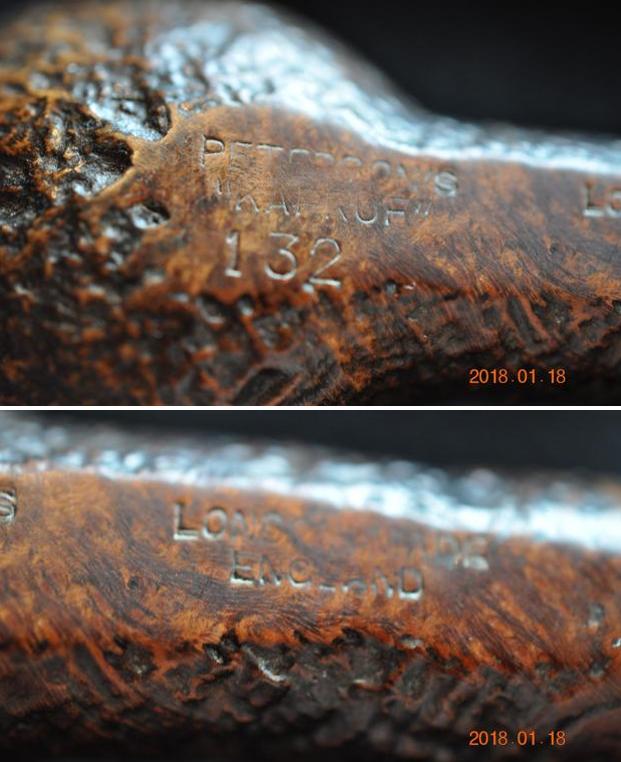
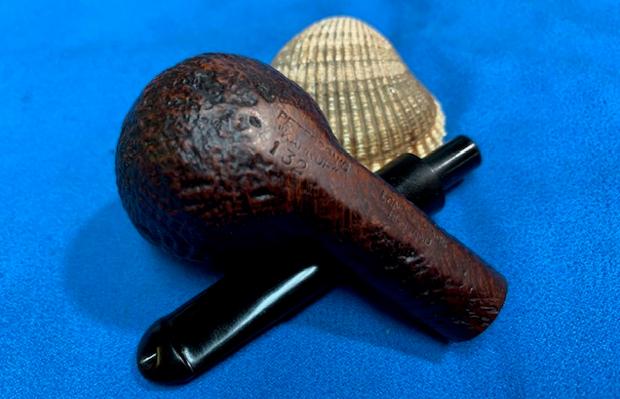
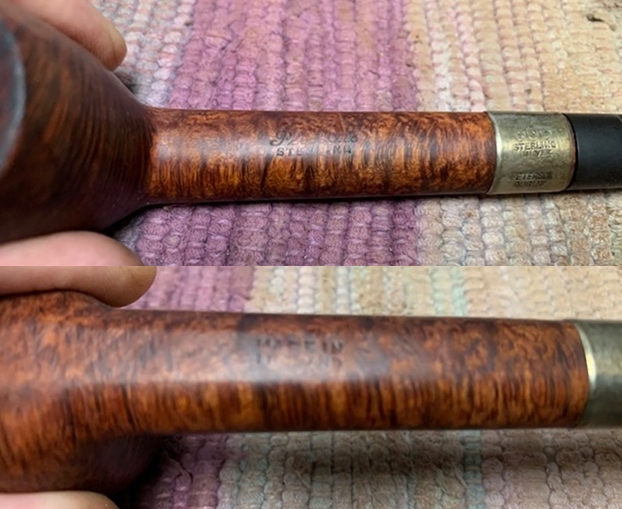
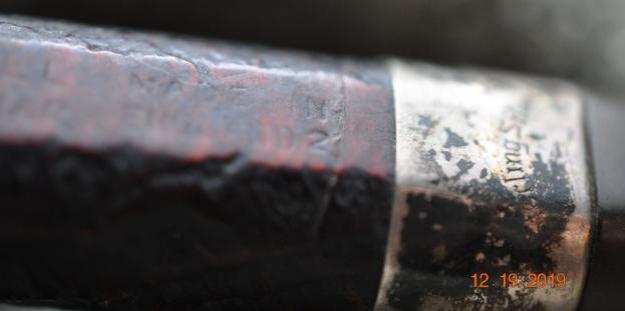
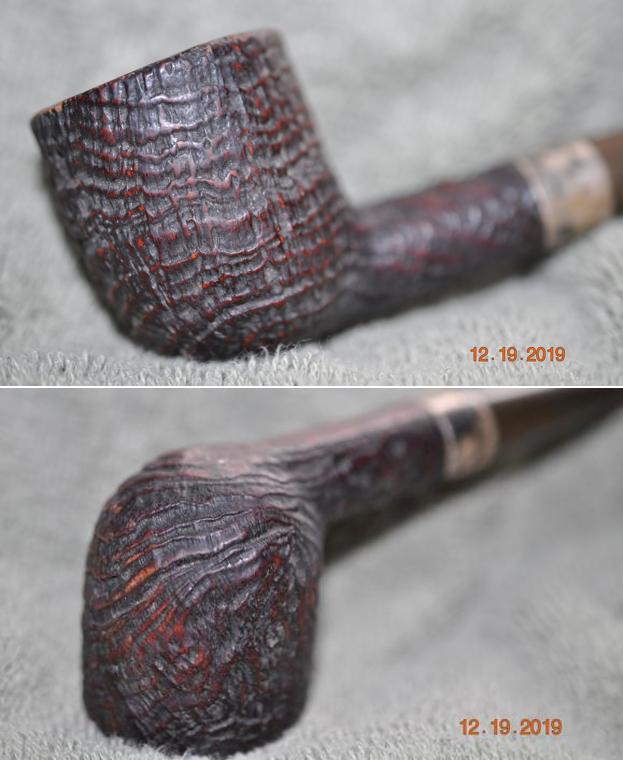
It took a few photos to try to capture the stamping on the underside of the shank. There are deep scratches in the smooth portion of the shank and heel of the bowl. On the heel it is stamped R F/T. That is followed by Dunhill [over] Shell Briar followed by Made In [over] England with a 2 following the D in England. You can also see the repaired cracked shank in the photos below. The silver band is stamped Sterling Silver on the underside. 
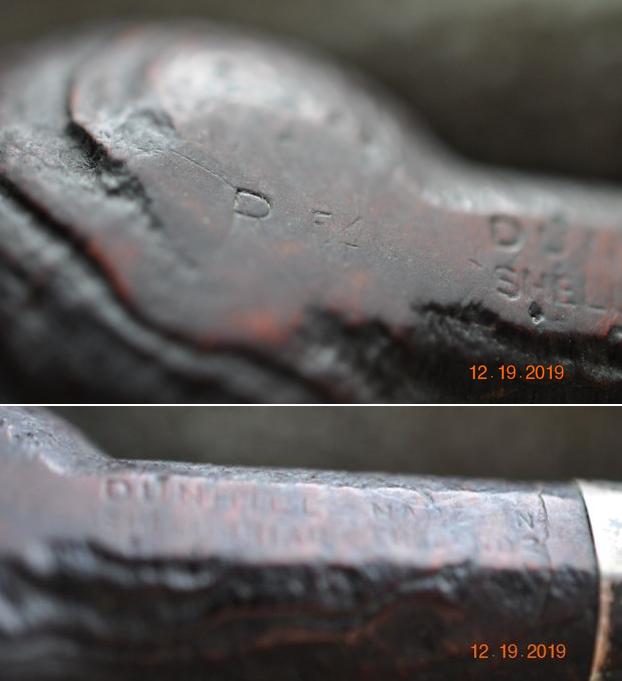
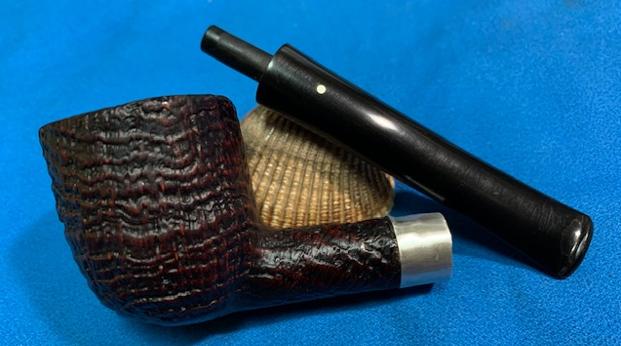
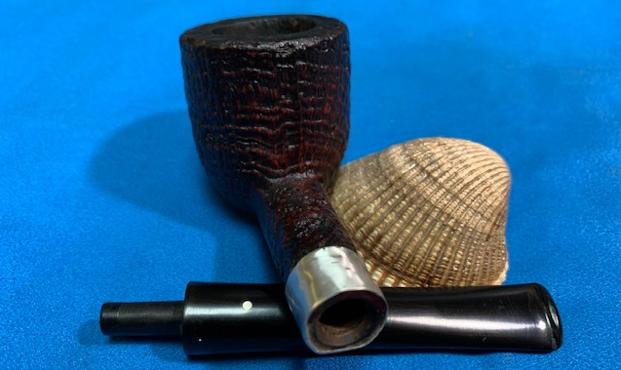
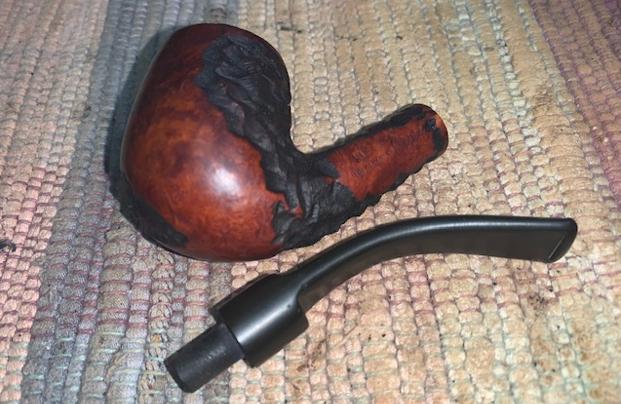
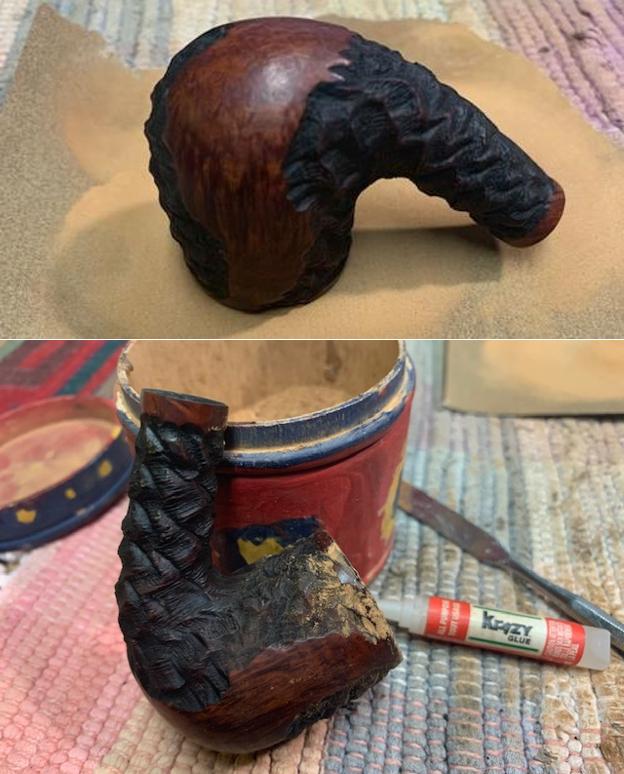
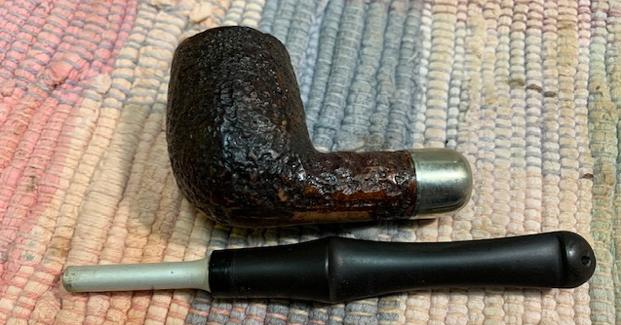
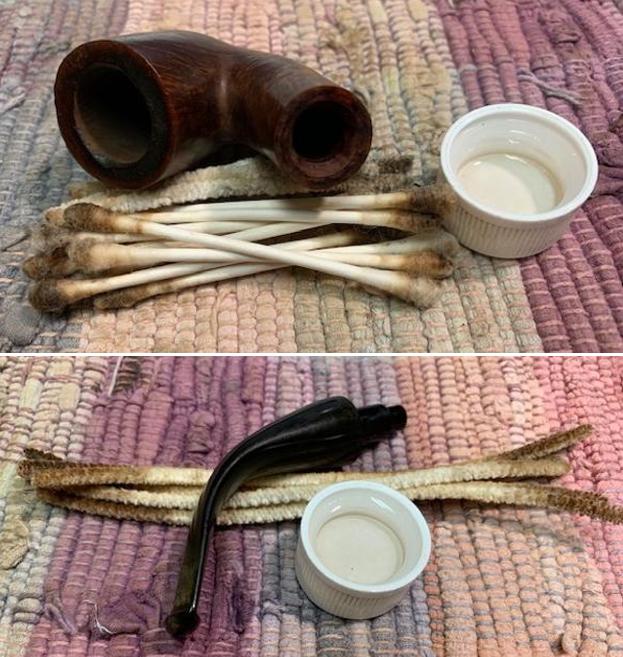
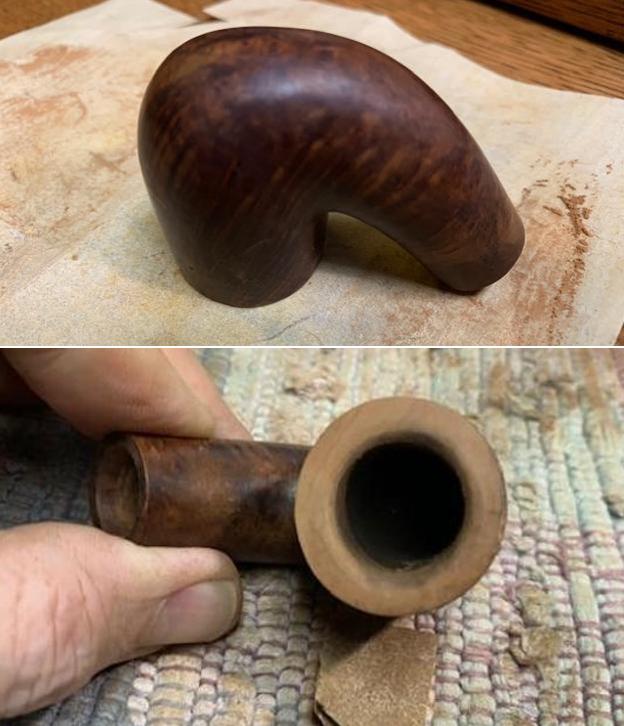
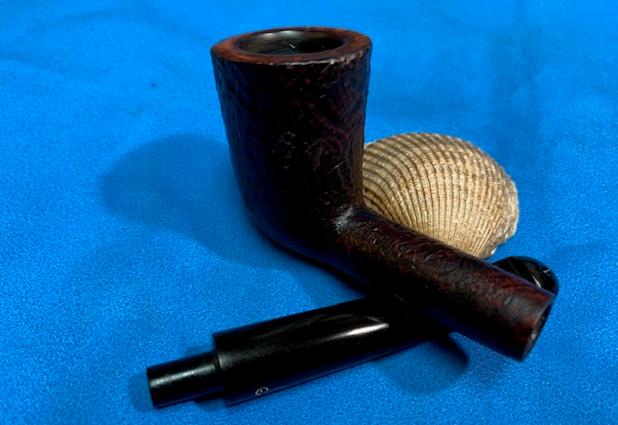
If we had stopped here a lot of pain could have been avoided! If we just left is dirty and did a cursory clean up and just smoked it we could have avoided a multitude of issues. But that is not the way we work. Jeff attacked the cleanup by trying to take the pipe apart. The stem was stuck in the shank. He tried heat, cold and even pouring alcohol down the shank to try and loosen what we assumed was the grime and grit that held the stem firmly in the shank. Nothing worked. He even heated the band area to try to loosen the stem from the shank but nothing work. Finally after a combination of all of the above he felt what he thought was a bit of give in the stem and gave it a very careful twist…. Here is where all went horribly wrong. Remember that crack in the shank shown in the above photos? That is what gave and the shank came off in his hand! Now what to do. We talked and he was sick with what had happened but there was nothing to be done. And do you know what the worst part was? The stem was still stuck! He went back through all of the methods we all use to loosen a stem and finally it came free! BUT the band had been epoxied on the shank and it was not removable!

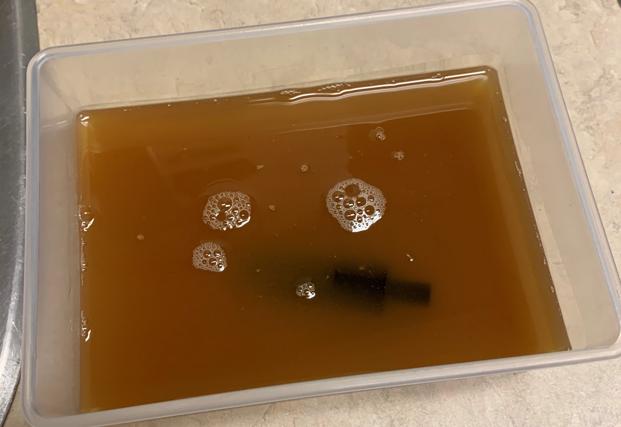
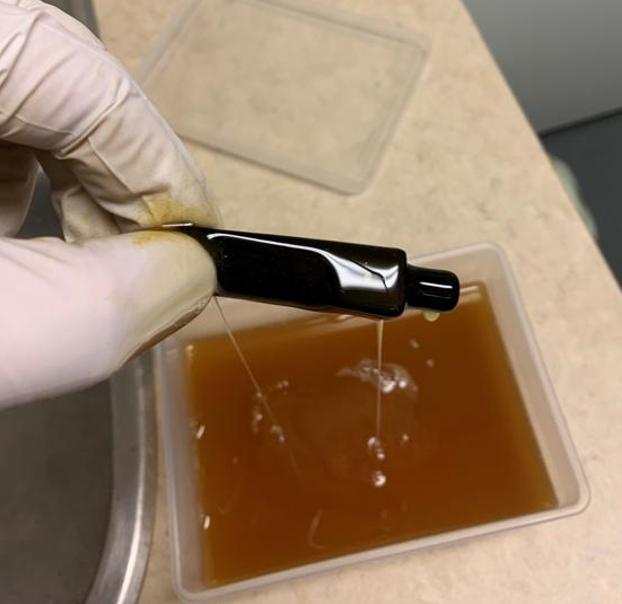
It was in this state that the pipe came to me in a bag. Now it was my turn to try to see if I could loosen the band. I took the broken shank and band and filled up a small jar with enough acetone to cover the band and let the piece soak for two days in the bath. I replenished the acetone as it evaporated. The incredible thing for me was that this had absolutely no effect on the band and briar. It was permanently bonded! Time to come up with a new plan of attack.I let the broken shank sit on my desk in pieces for several days – probably about a week while I worked on other pipes. Finally after recently repairing the broken shank on the Butz-Choquin for Randy (https://rebornpipes.com/2021/01/16/a-badly-broken-butz-choquin-pipe-makes-its-way-back-to-me-for-repair-and-restoration/) I had an idea for fixing this one. Give that blog a read if you want to know the difference.

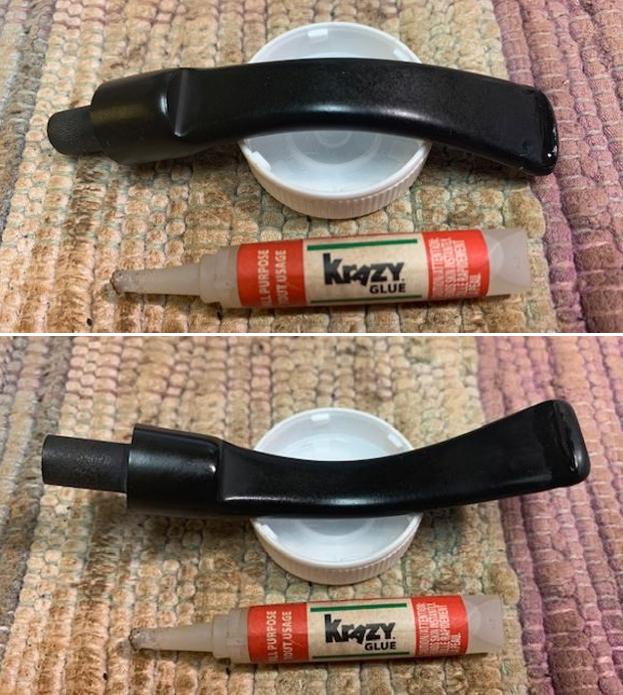
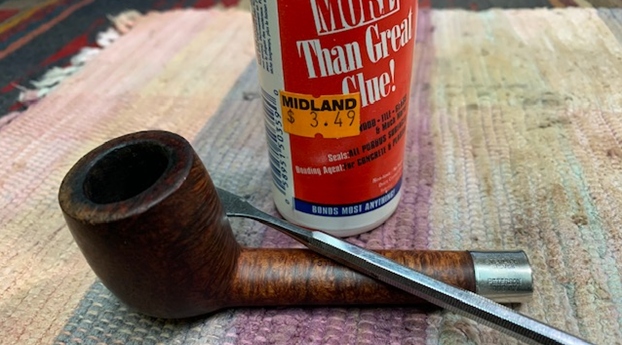
In this case there was already a band and the break was further down the shank making it a bit more problematic to address. I cut a short piece of Delrin that would extend far enough into the bowl side of the broken shank to provide some stability and into the shank end to tie it together. I decided to leave the mortise the depth it was to add stability to the shank rather than drill it out and extend the tube in further. I would need to drill out the Delrin a bit and reduce the diameter of the tenon to fit inside the tube I the shank. It just might work and was certainly worth a try. I roughened up the Delrin with a sanding drum on the Dremel to provide a rough surface of the glue to bind to in the shank.
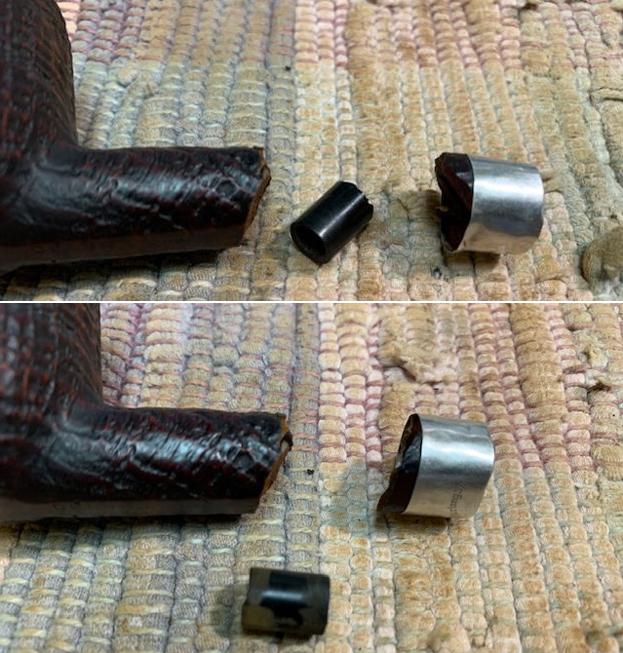
I fit the Delrin piece in the bowl end of the broken shank to make sure it fit. I then painted the surface of the Delrin with super glue and pressed into the banded shank end. I coated the briar ends with an all purpose glue and joined the pieces together. I clamped them until the glue set. Once it had I filled in the gaps in the crack with clear CA glue and set it aside to cure. 
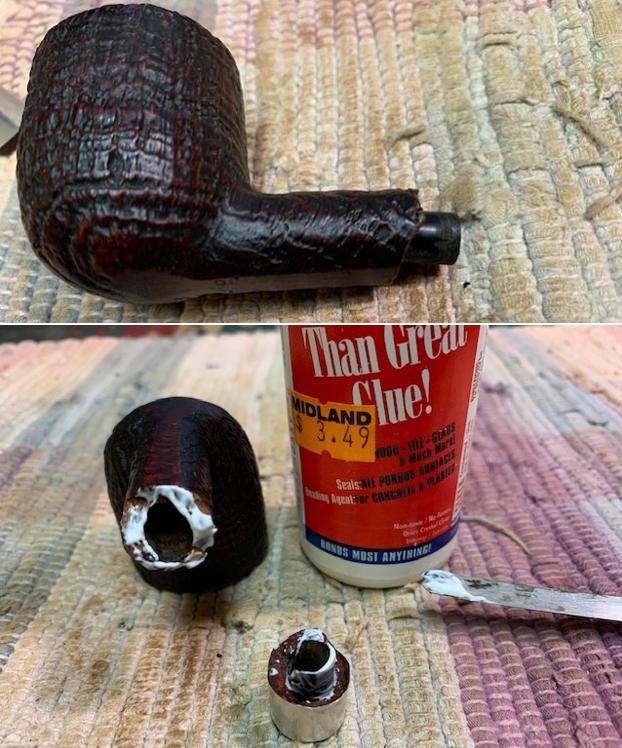
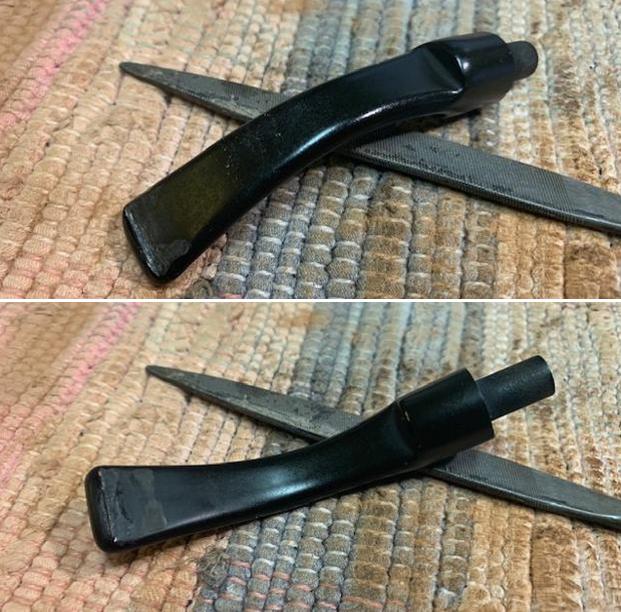
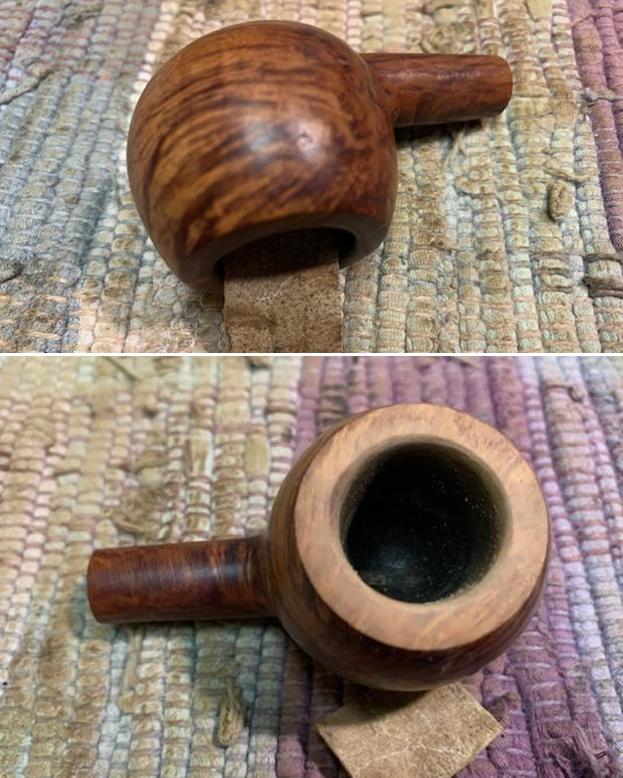
I used a corner of 220 sandpaper to carefully smooth out the glue on the crack repair. I was able to make it smooth and not ruin the sandblast! That alone was an accomplishment. The repair obscured the 2 on the date stamp. It is still present but now blurred.

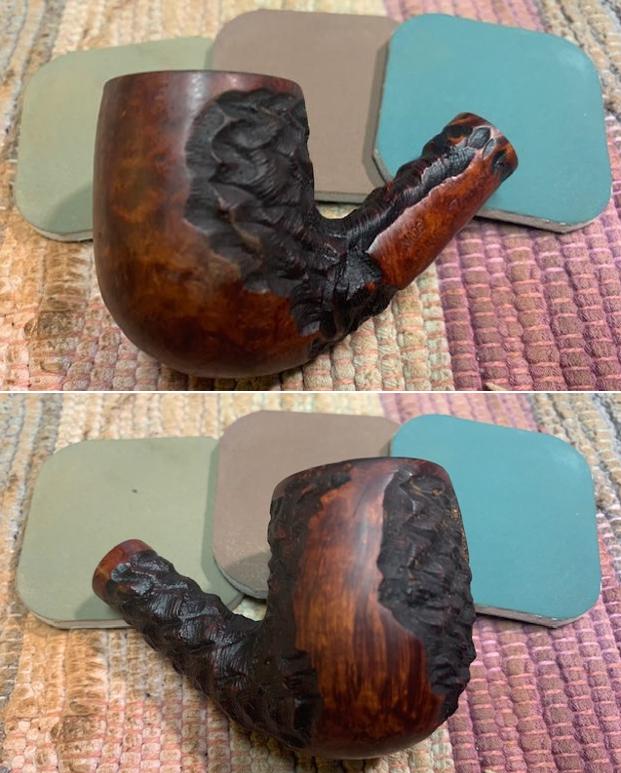
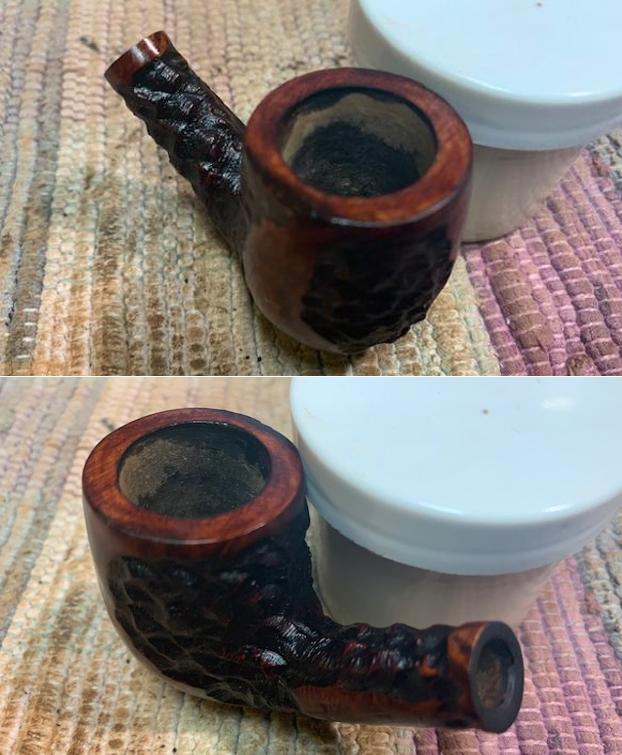
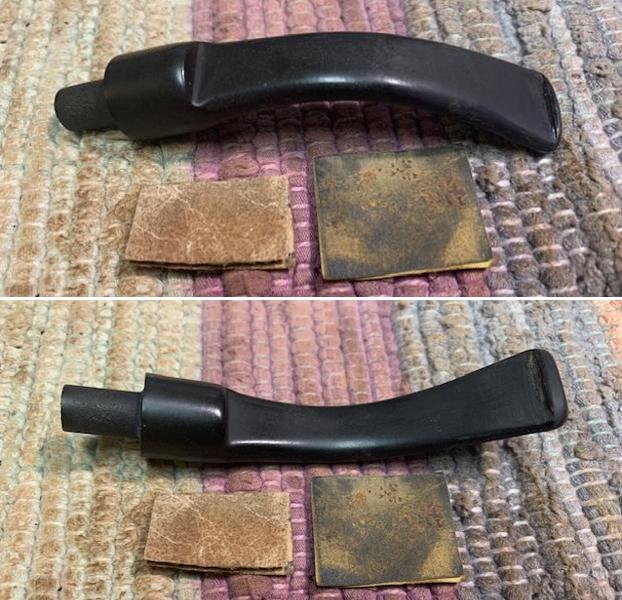
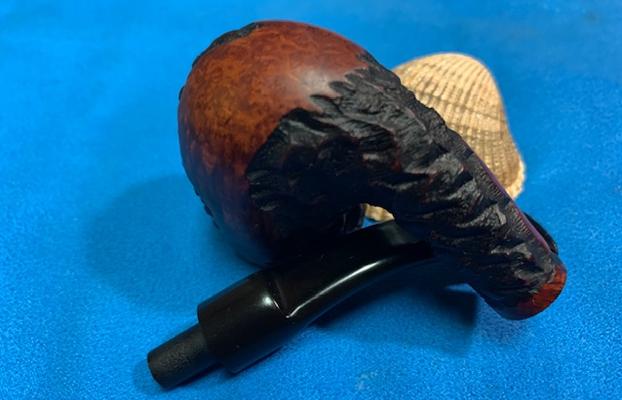
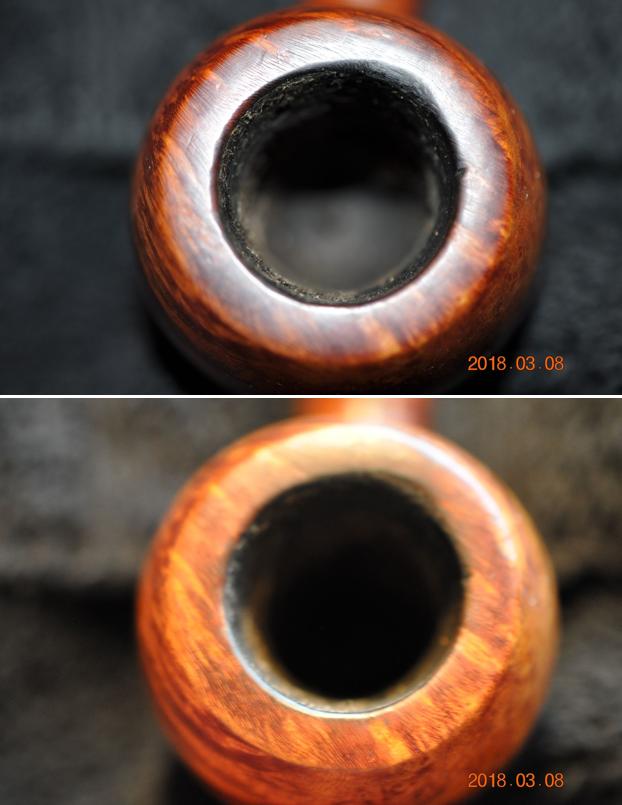
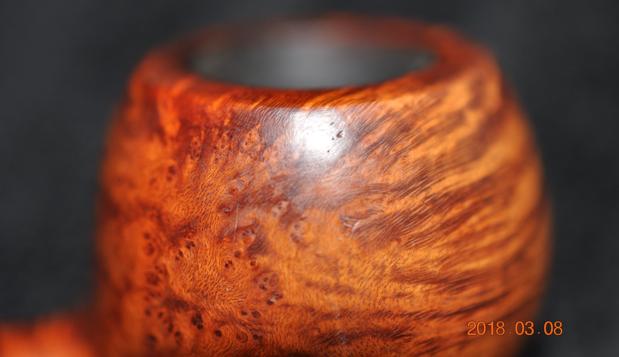
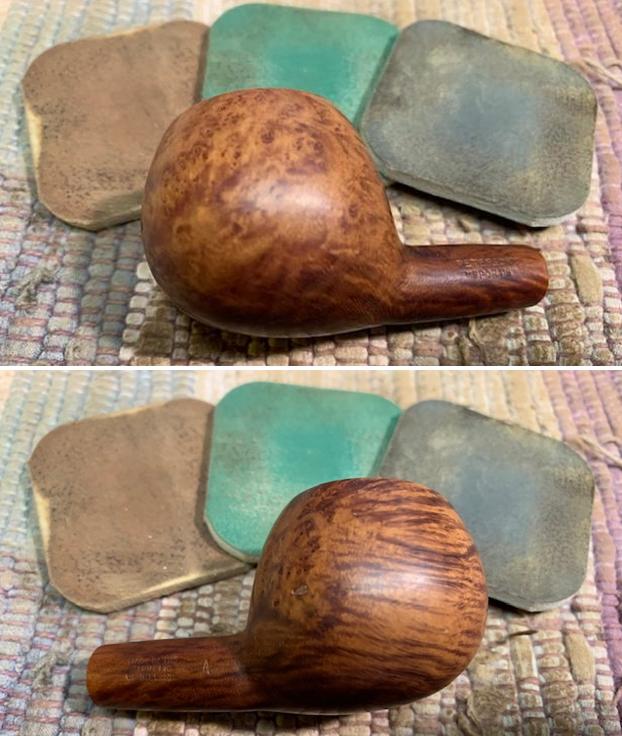
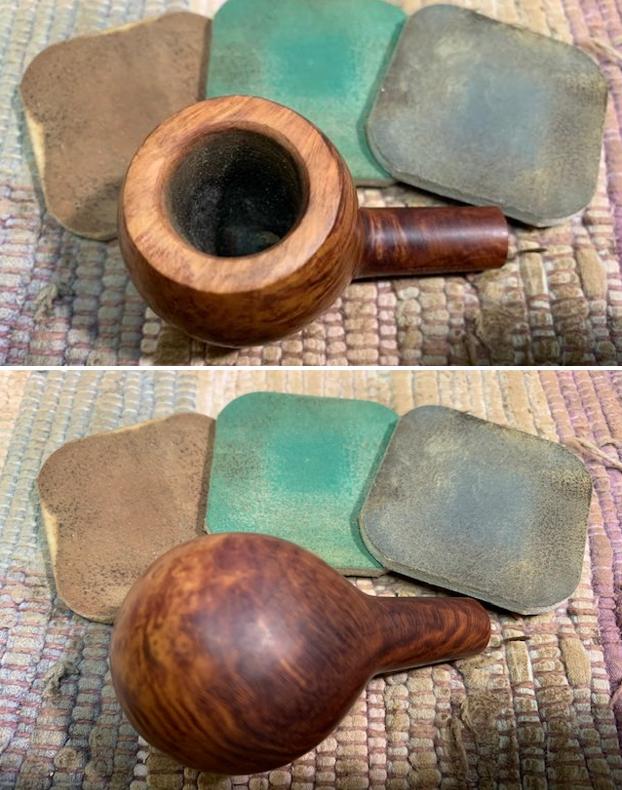
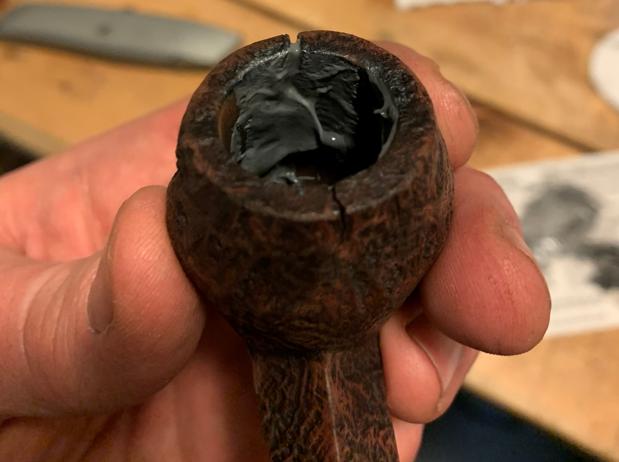
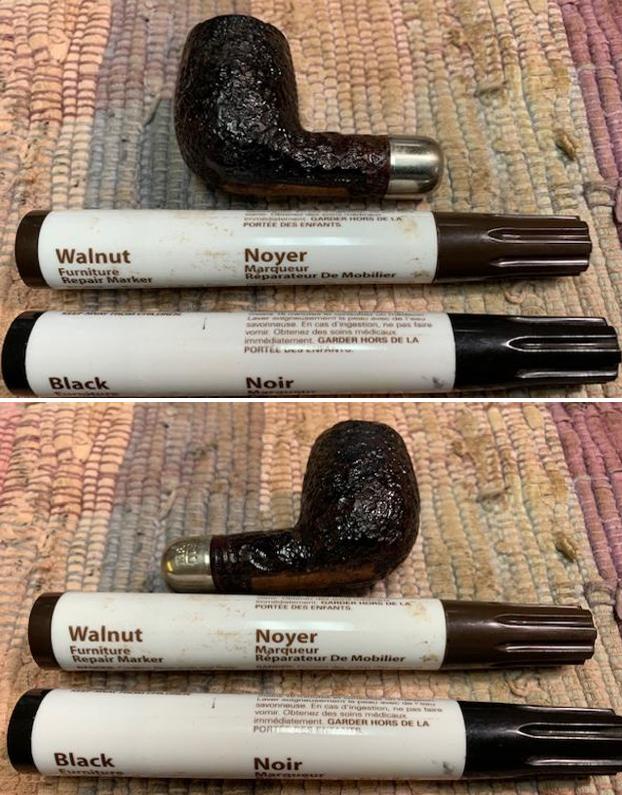
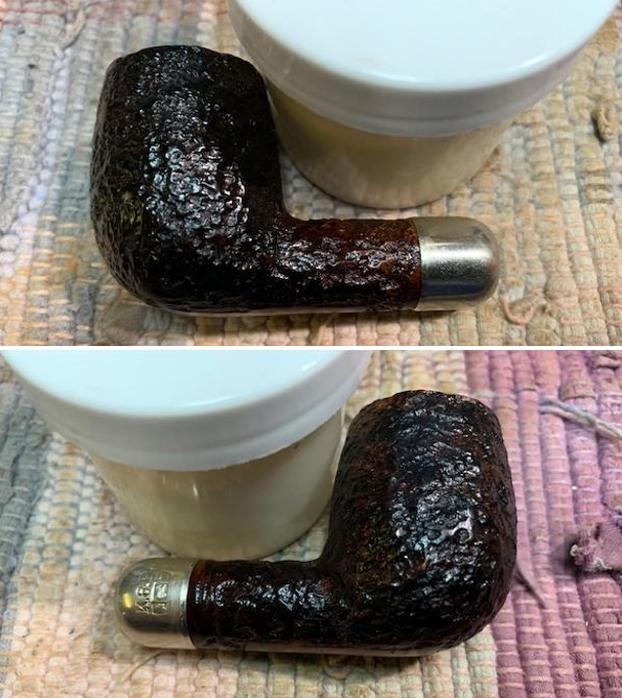
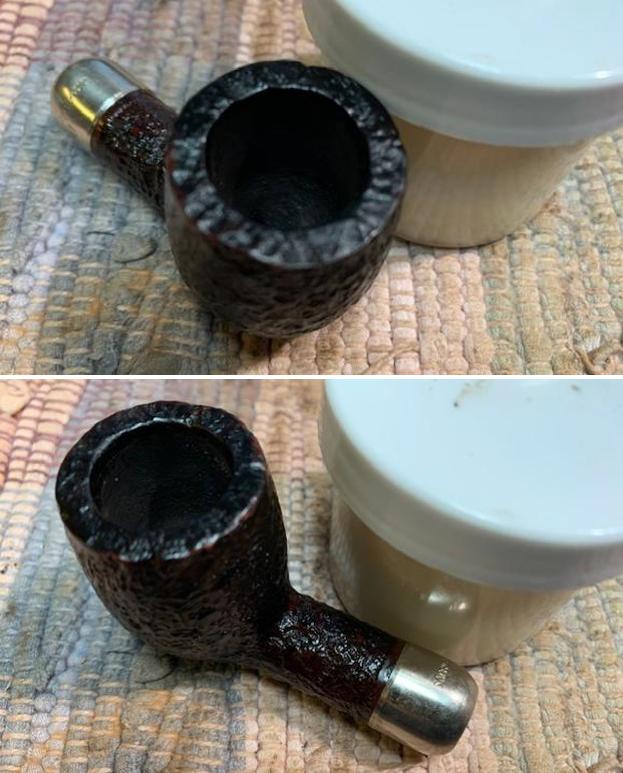
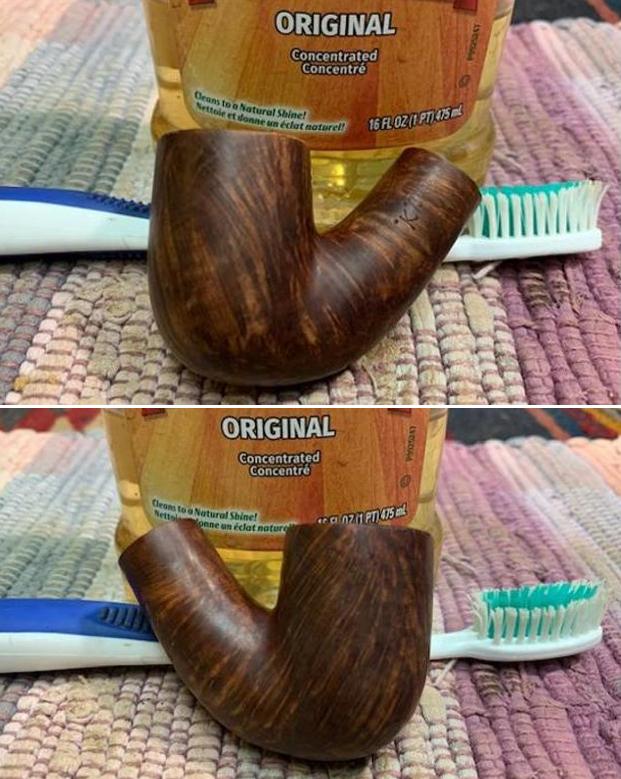
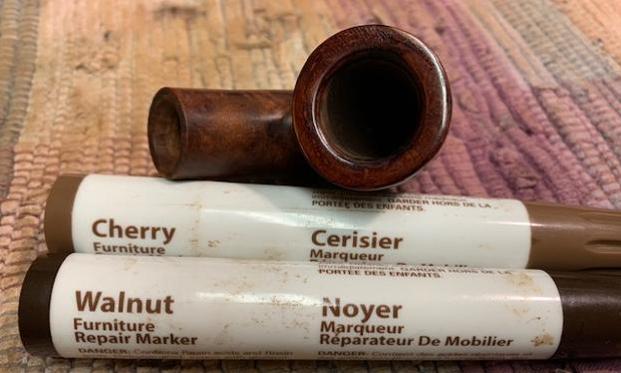
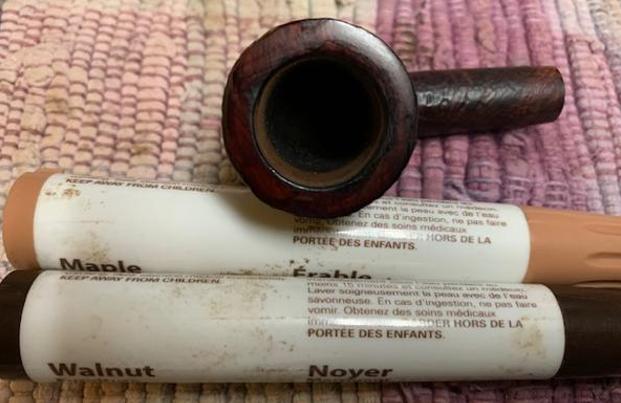
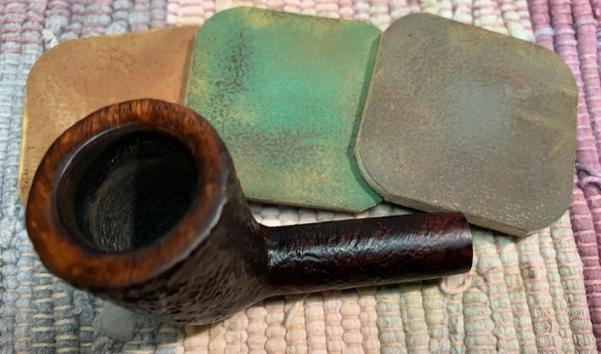
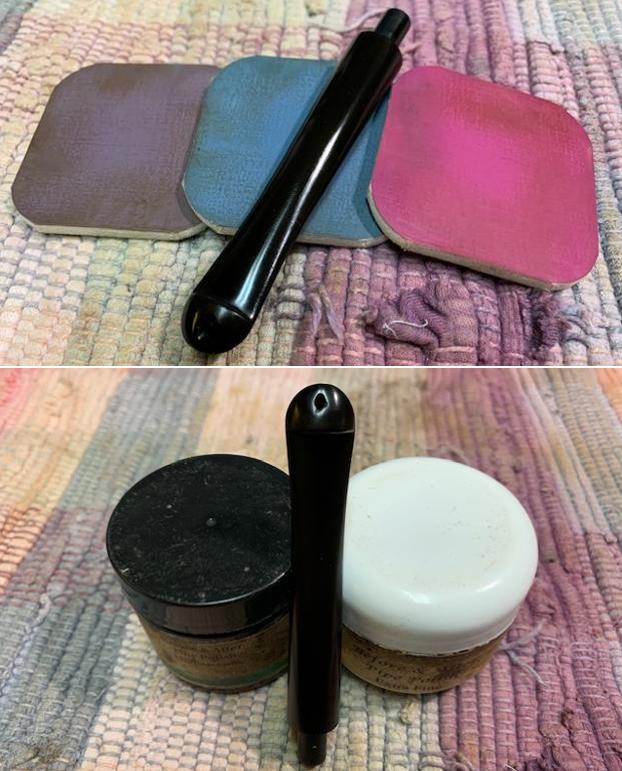
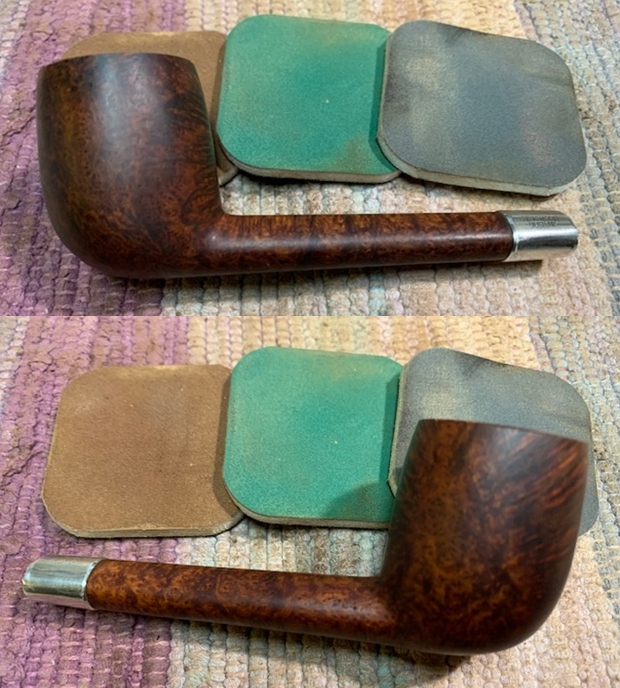
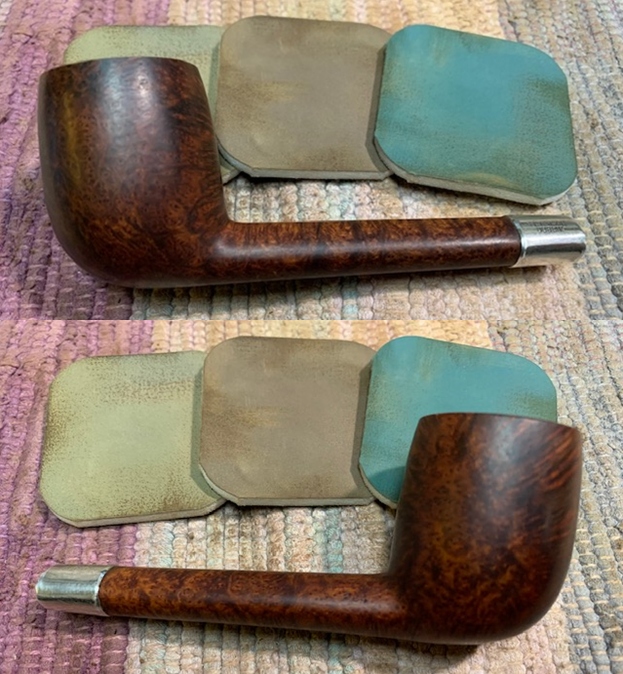
I used a brass bristle wire brush to clean up a bit more of the sandblast on the rim top and then used a combination of Cherry and Mahogany stain pens to restain the rim edges and the repaired area of the shank and blend it into the rest of the bowl. 
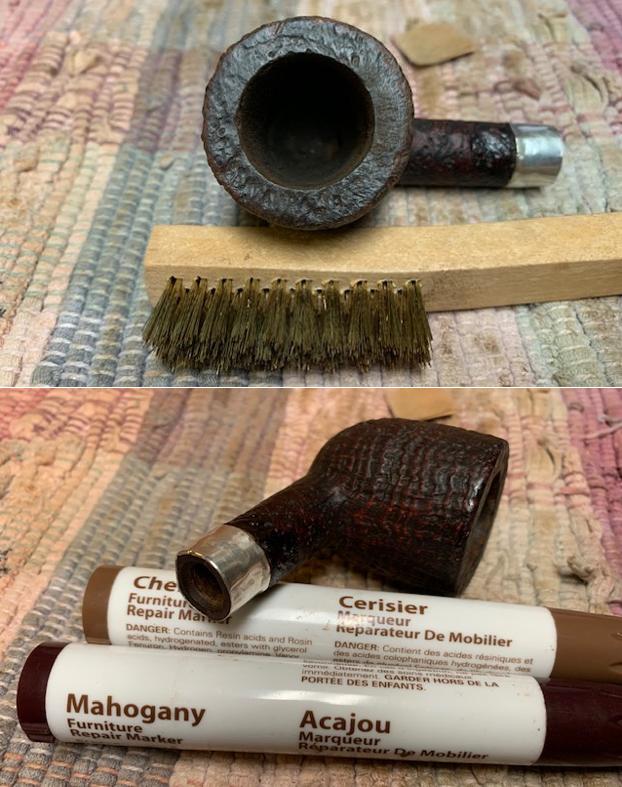
With the repair completed and the briar restained I rubbed the briar down with Before & After Restoration Balm. I worked it into the briar with my fingertips and a horsehair shoe brush. The product works to clean, enliven and preserve the briar. I let it sit for 15 minutes while I worked on the stem. After the time passed I buffed it with a cotton cloth to deepen the shine. The briar really comes alive with the balm.     
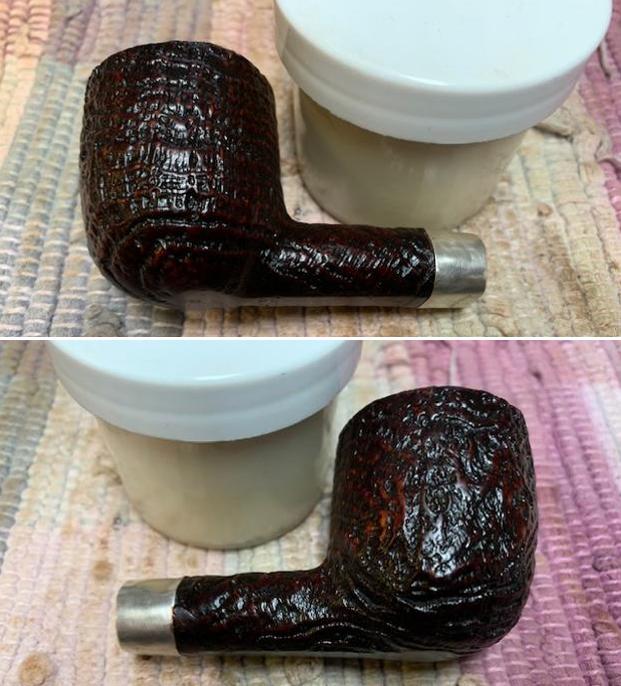
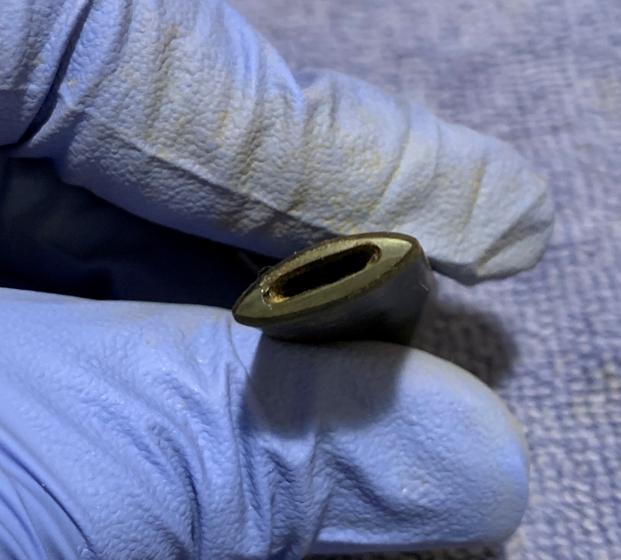
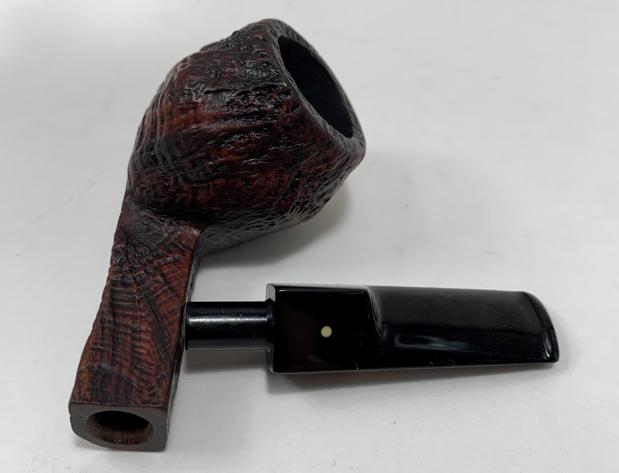
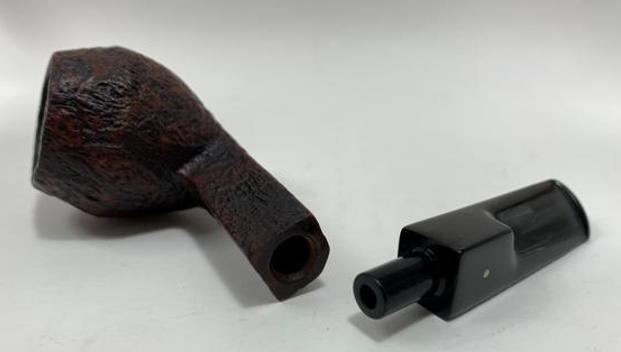
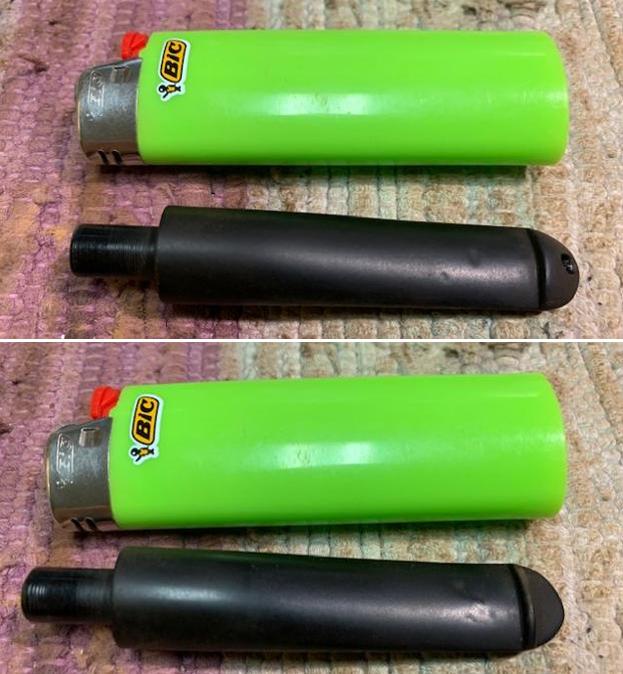
Now it was time to deal with the fit of the stem in the newly lined shank! I had a couple of options here. I could either drill out the tube and open the shank up a bit more or I could reduce the diameter of the tenon and make it fit that way. Since the shank was already fragile and twice repaired I opted for reducing the diameter of the tenon. I took it down with a Dremel and sanding drum until it was a close fit in the shank. I worked on it with 220 grit sandpaper to get it even closer. Once I had the tenon end in I could see that things were slightly off. So instead of continuing to reduce the diameter of the tenon I used a needle file to even out the inside of the shank and get as close to an equal fit on all sides of the tube. That was more of a job that I make it sound and actually took a fair bit of time.
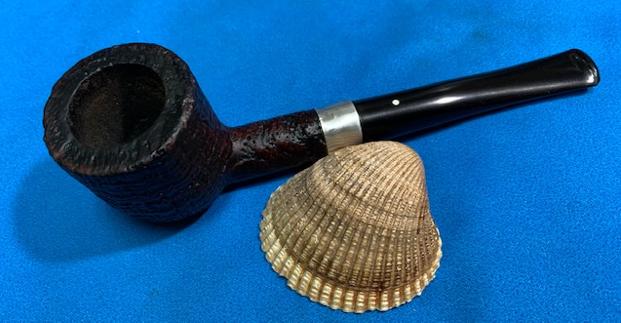
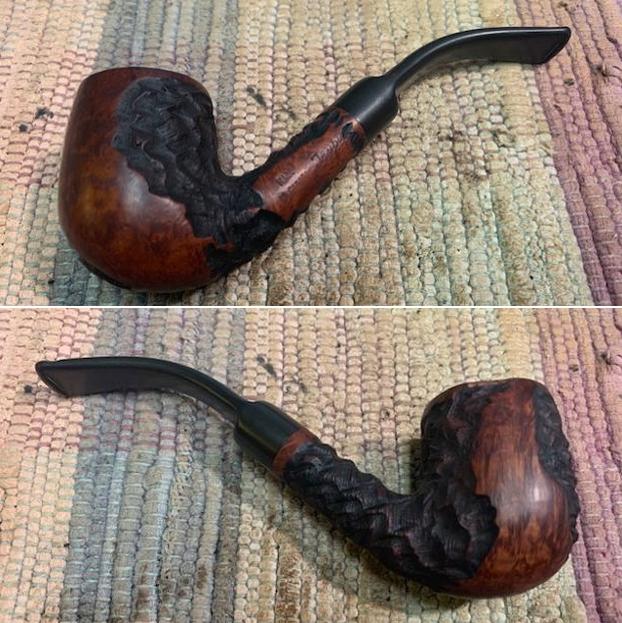
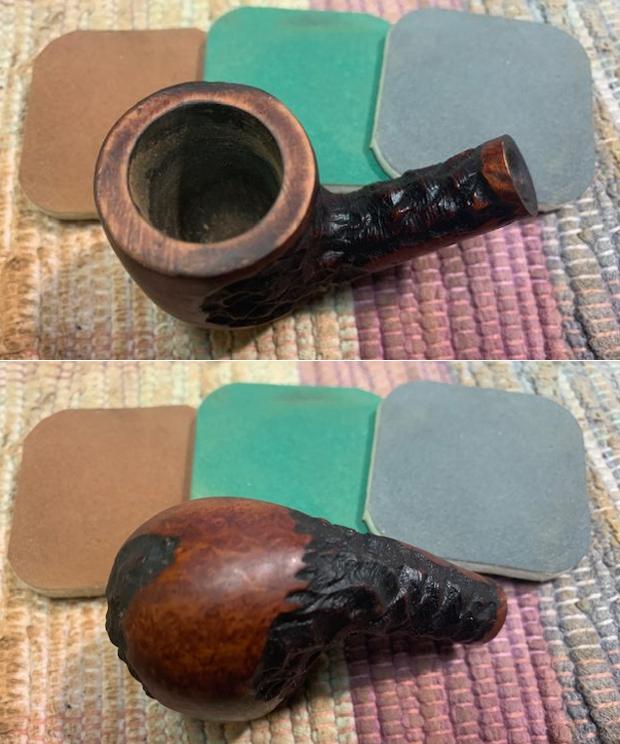
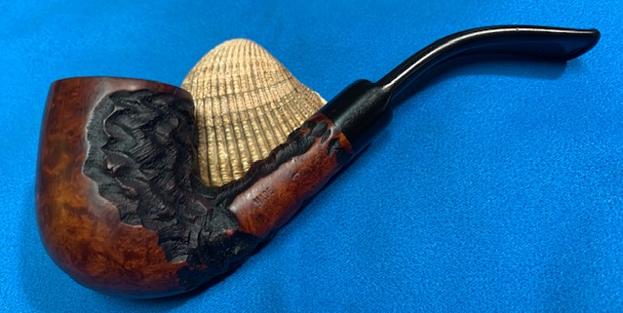
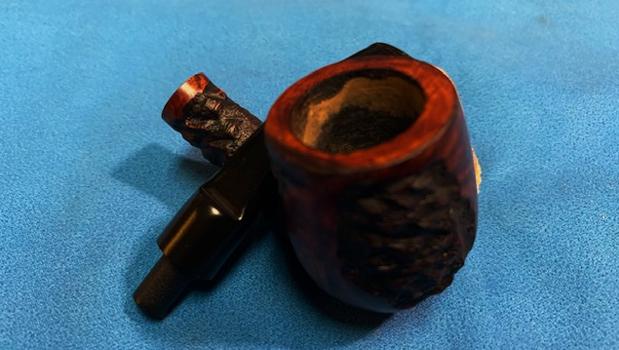
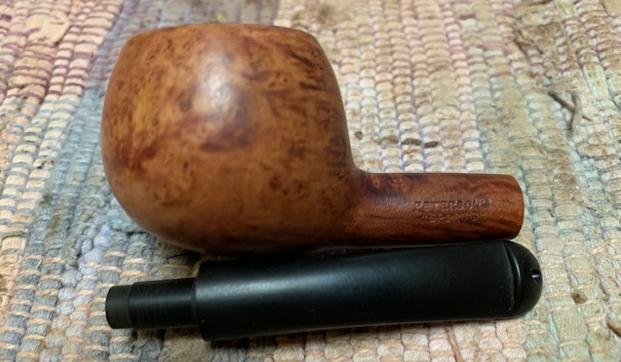
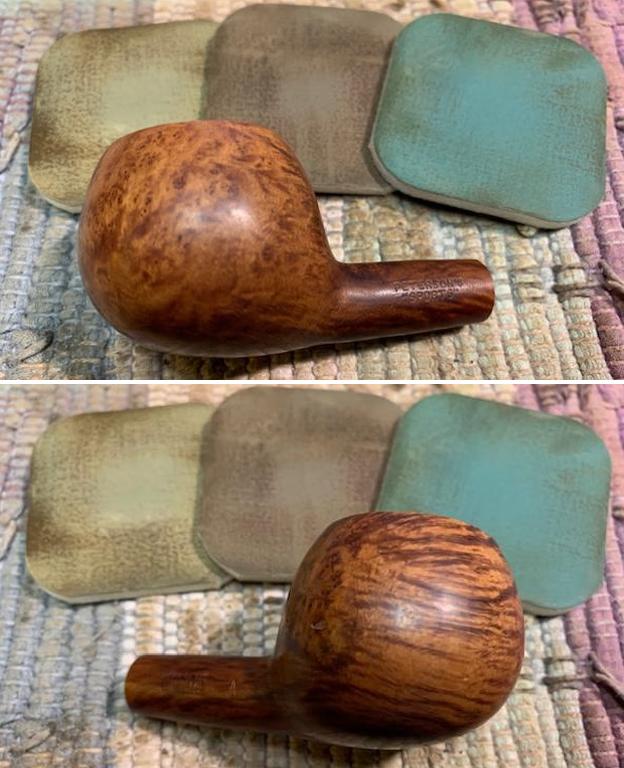
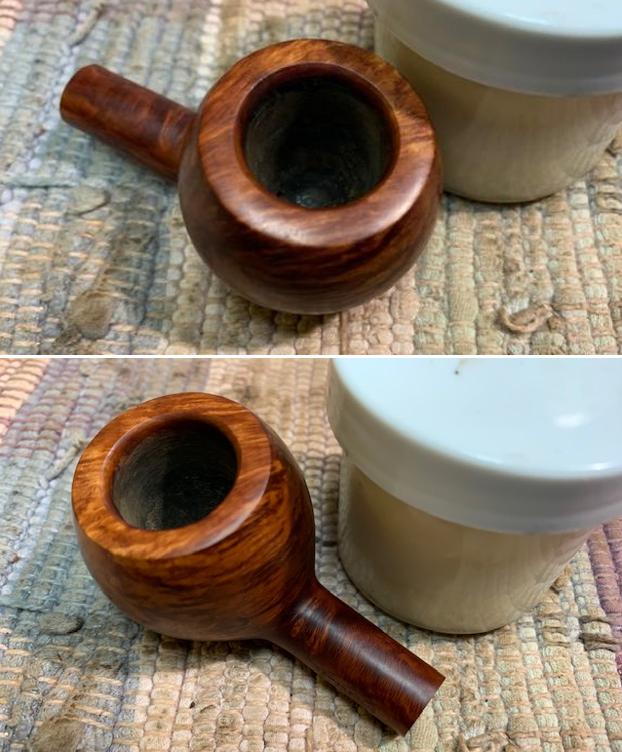
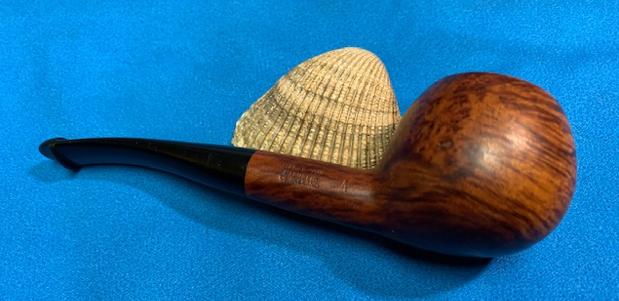
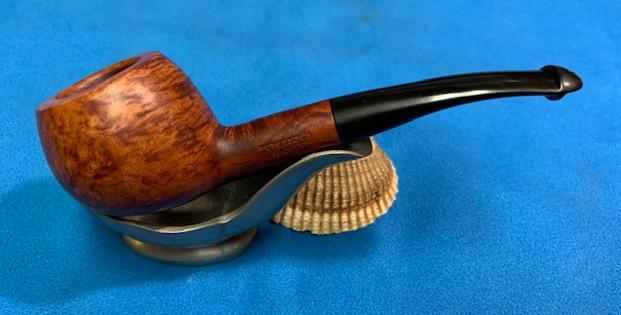
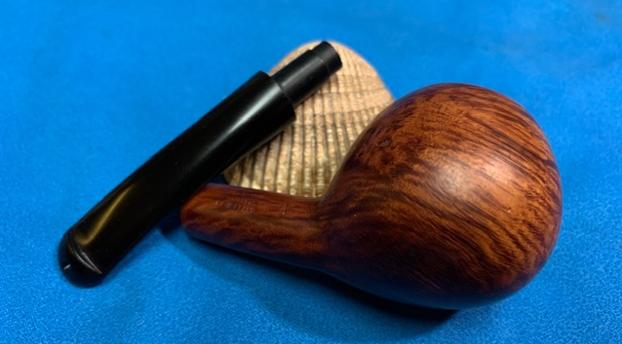
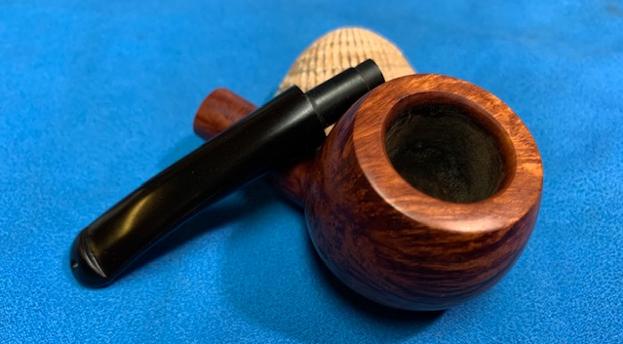
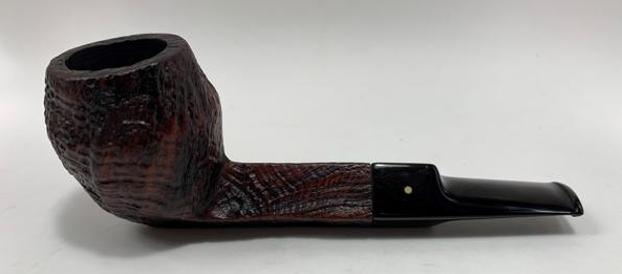
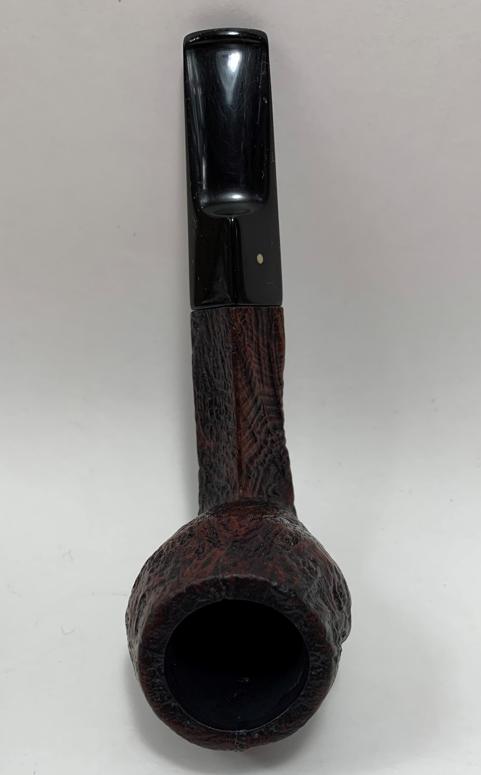
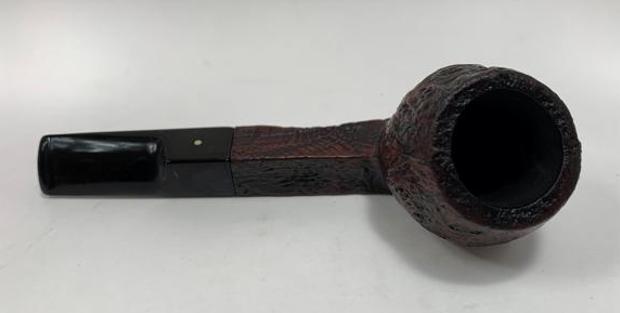
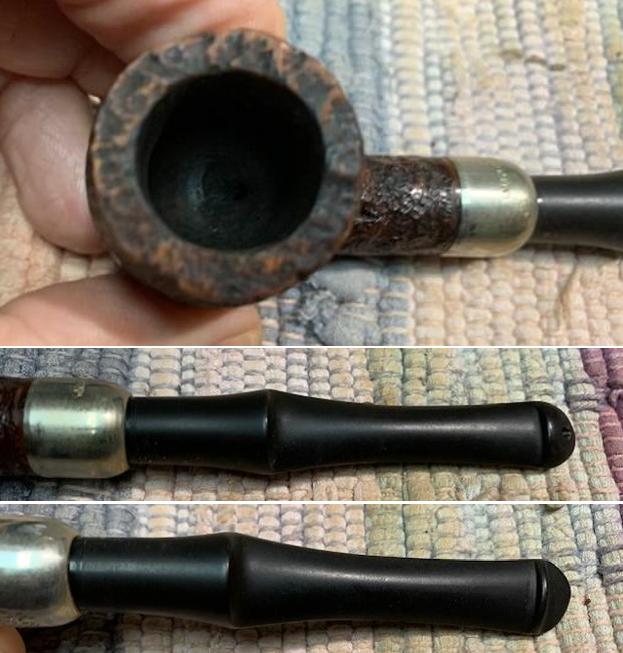
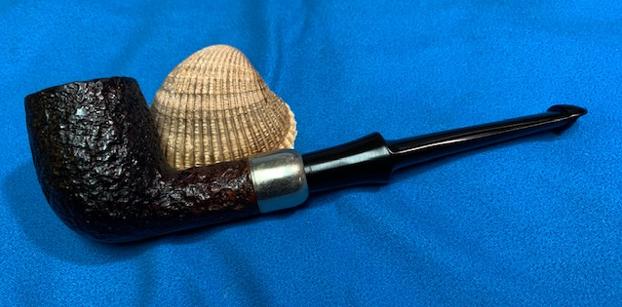
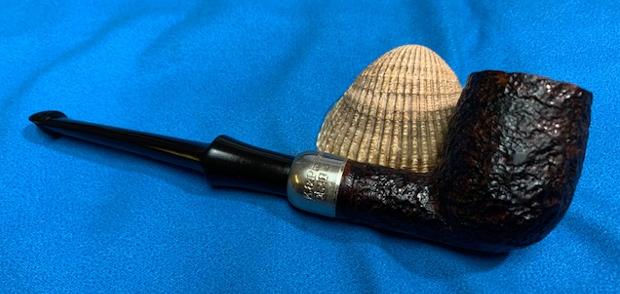
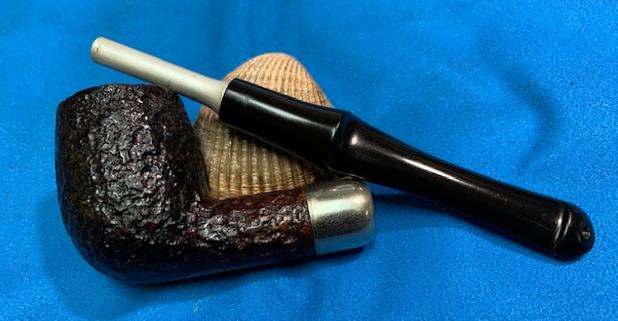
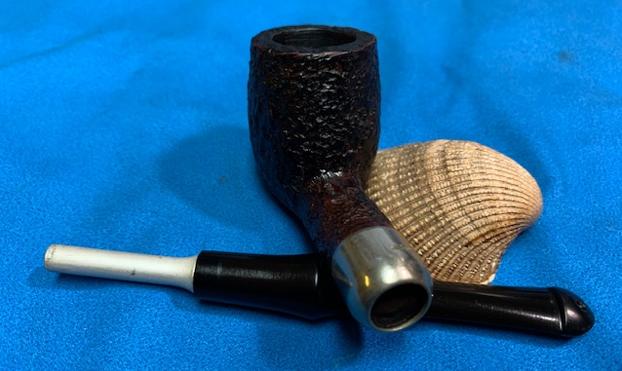
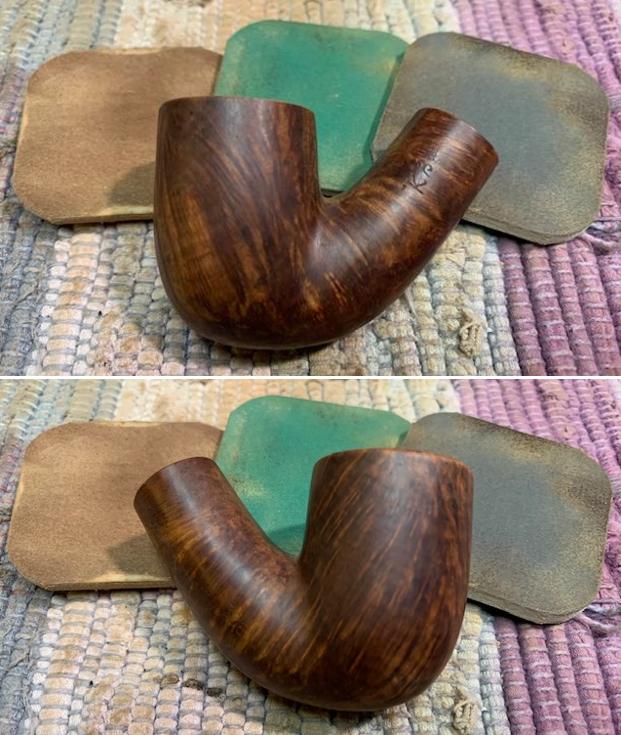
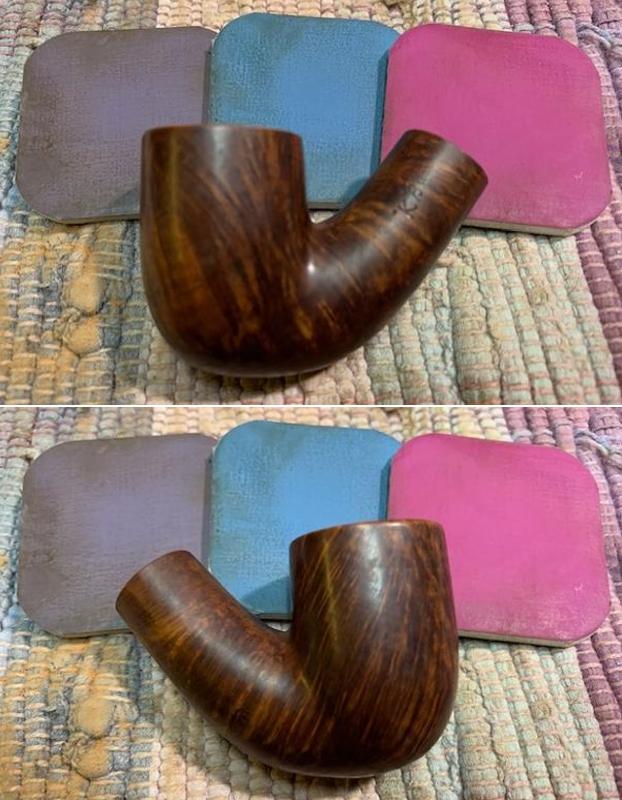
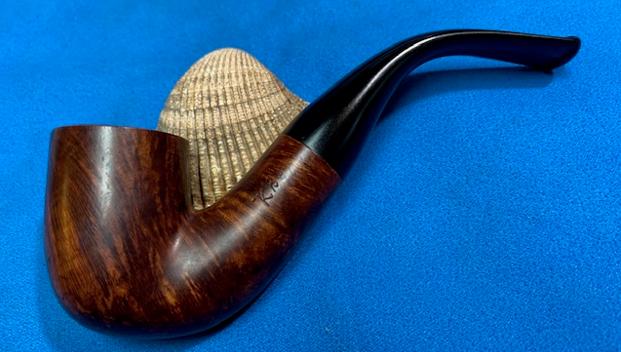
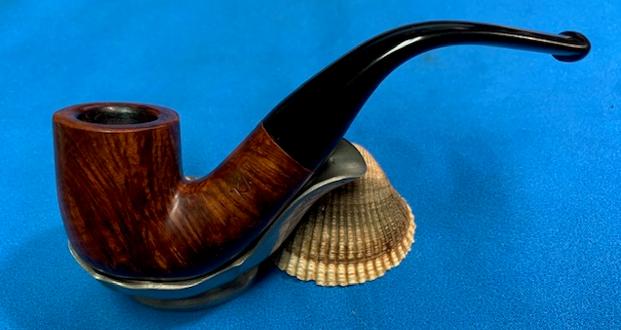
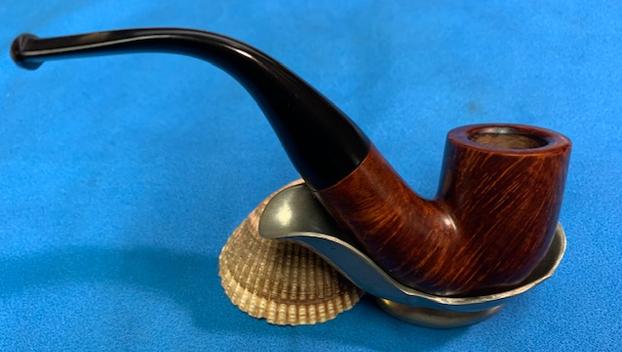
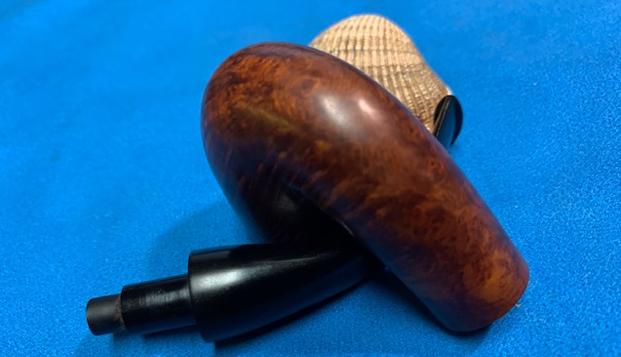
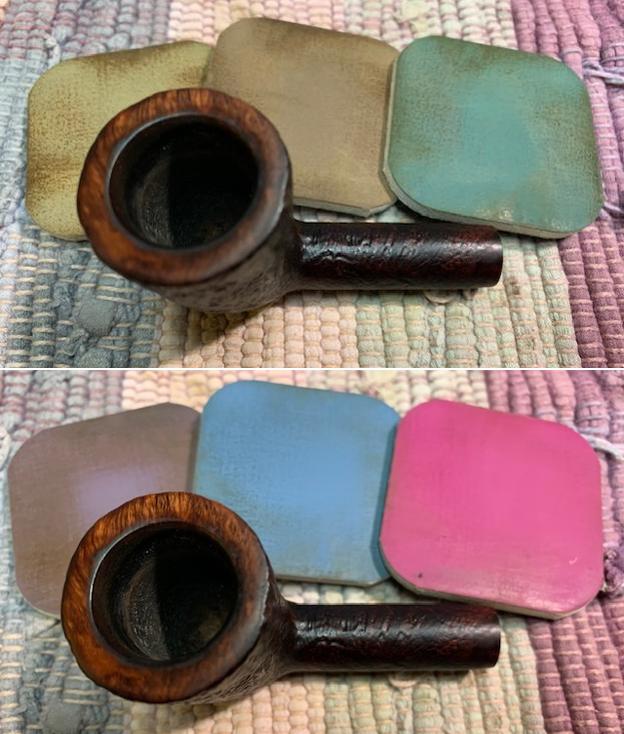
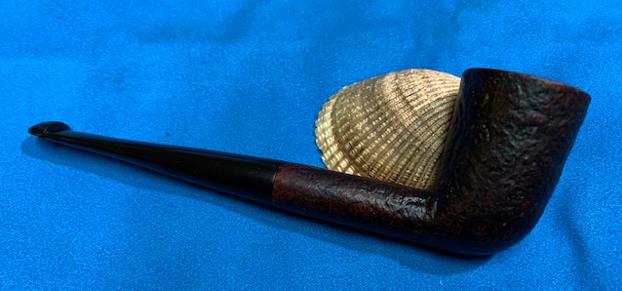
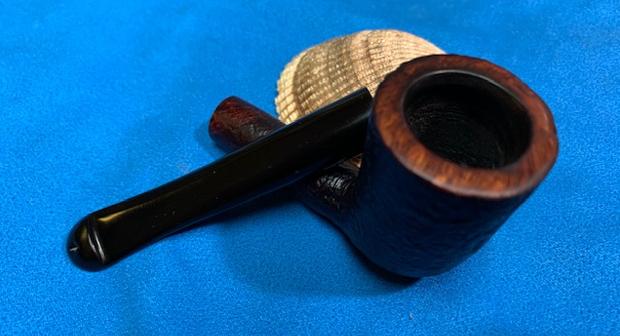
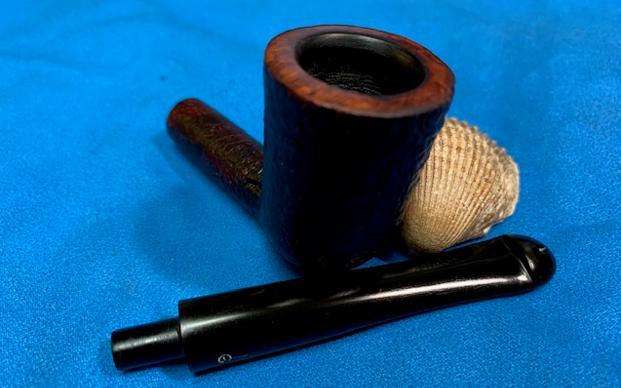
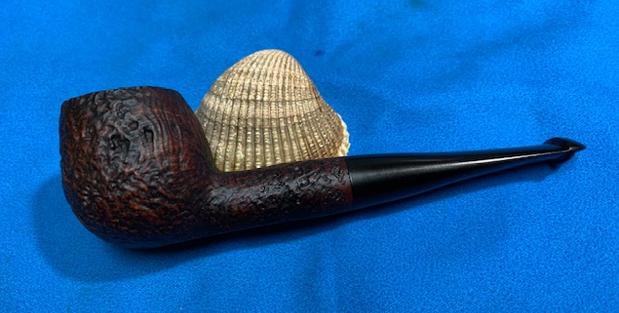
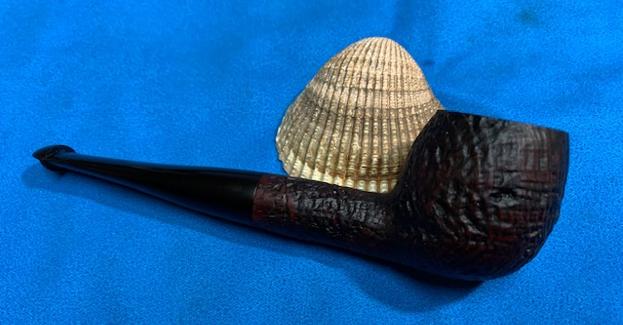
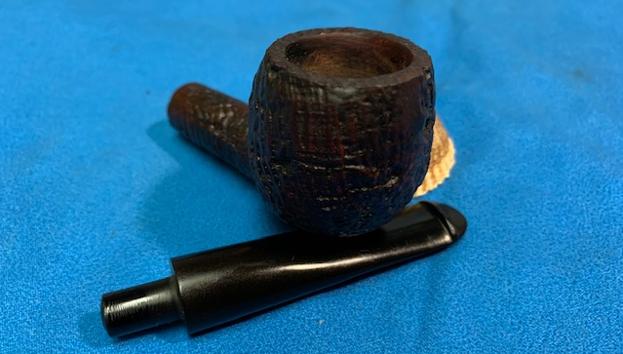
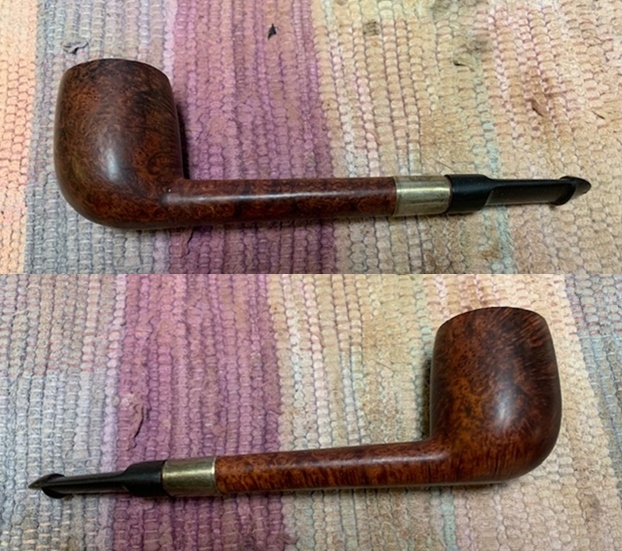
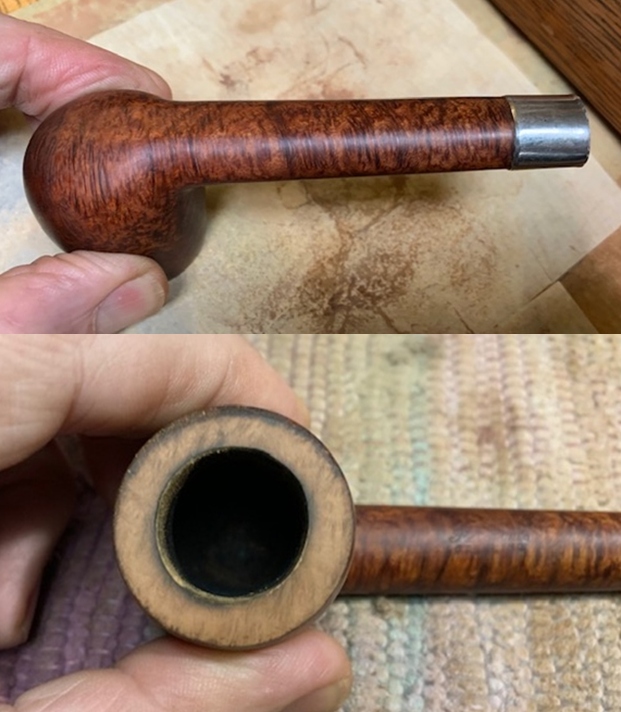
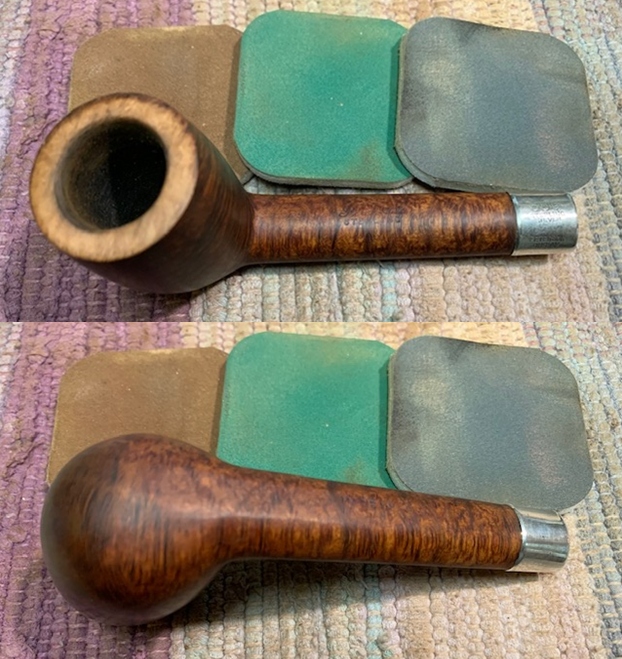
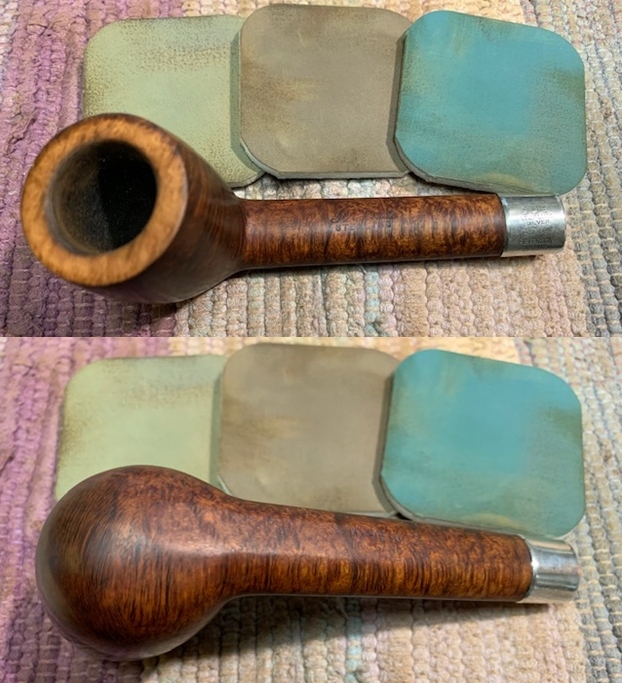
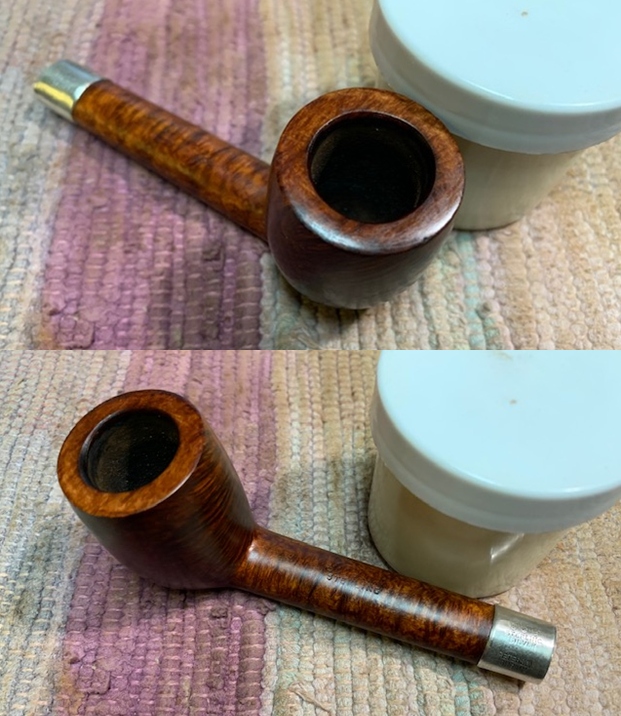
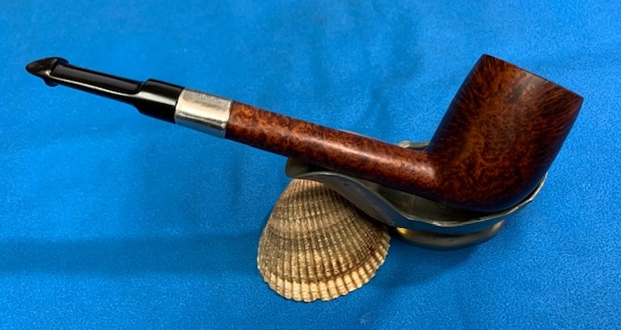
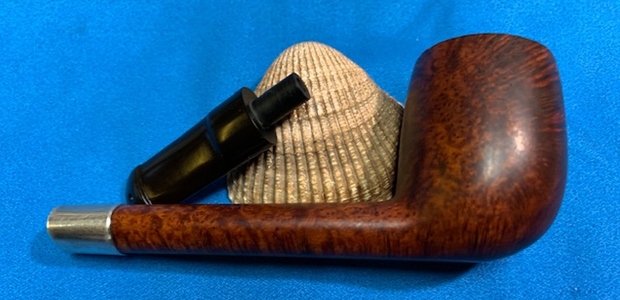
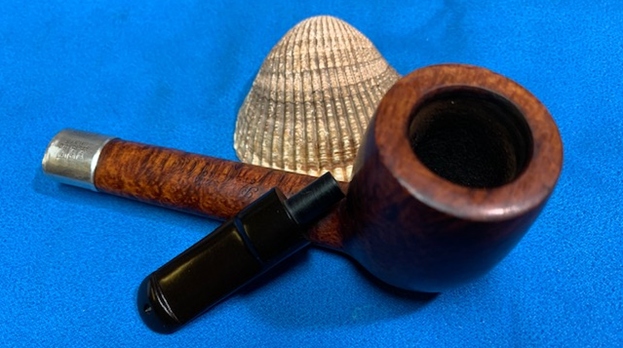
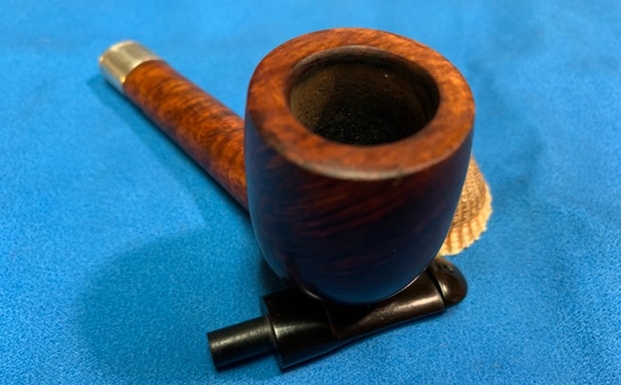
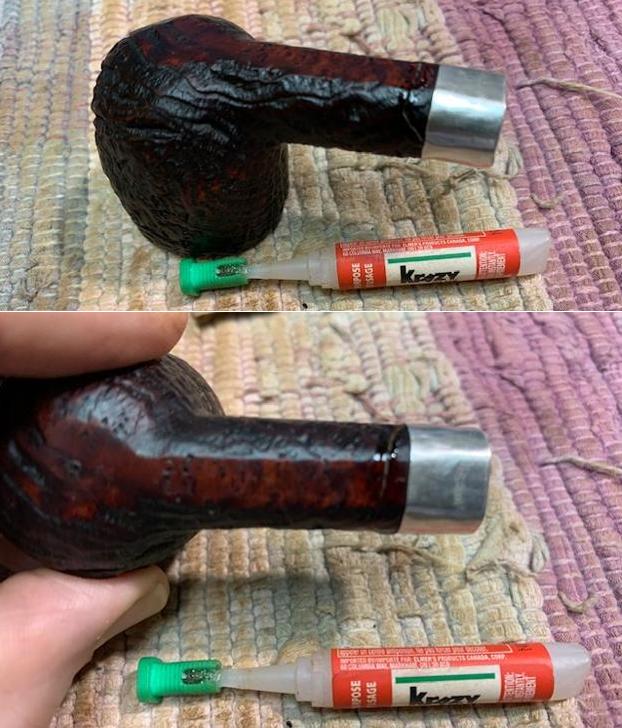
Once I had a good fit to the shank I put the stem and bowl together and took some photos of the pipe at this point in the process. I still needed to work on the fit of the stem to the shank and alignment and gaps but the tenon fit well. I also need to work on repairing the tooth marks. You will see in the last photo of the underside of the stem that I had already started the process.   
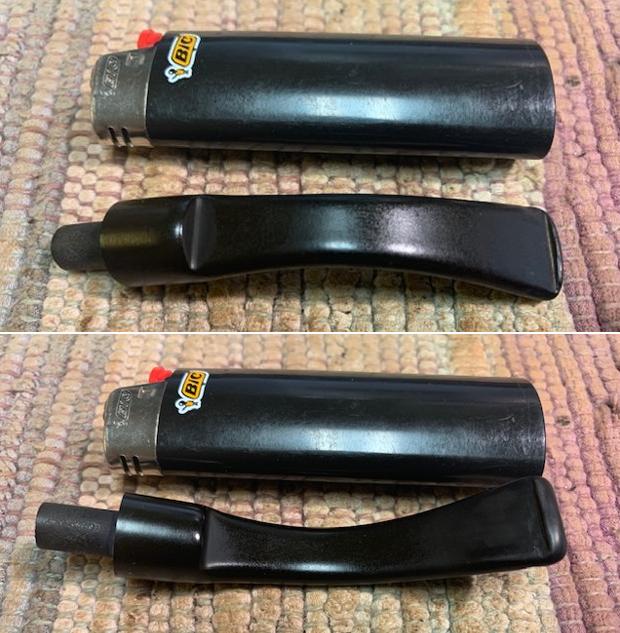
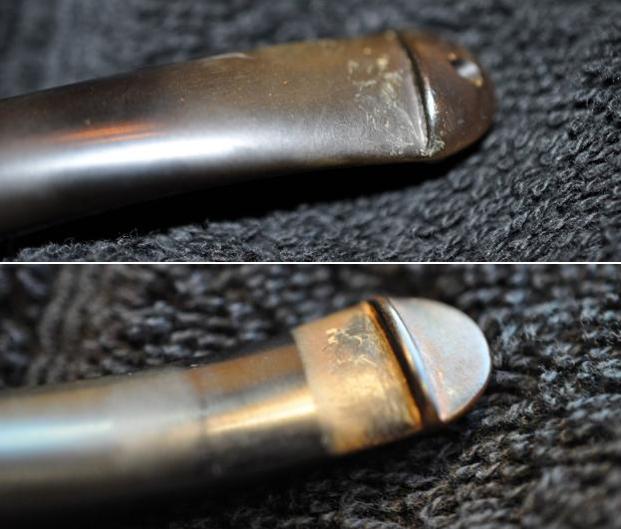
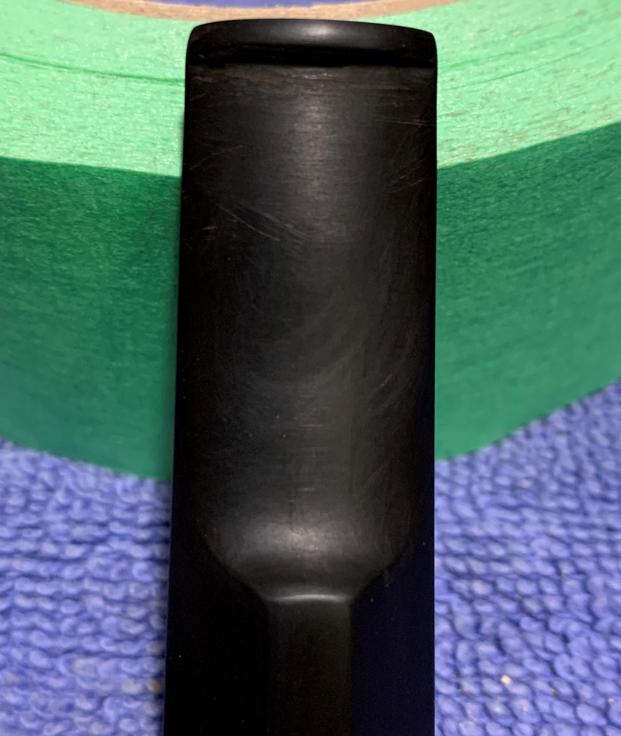
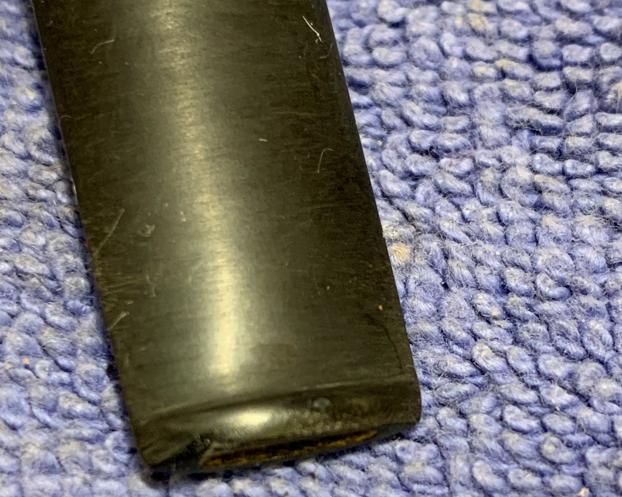
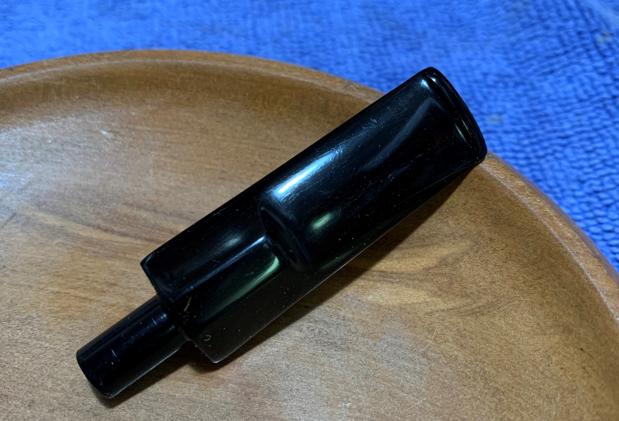
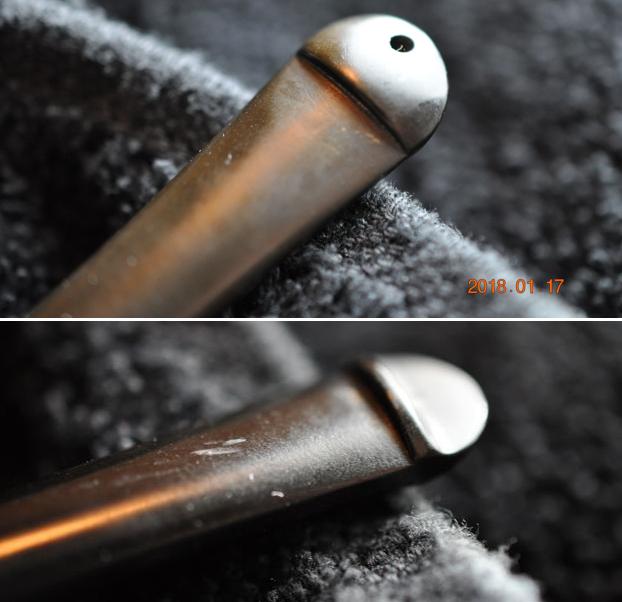
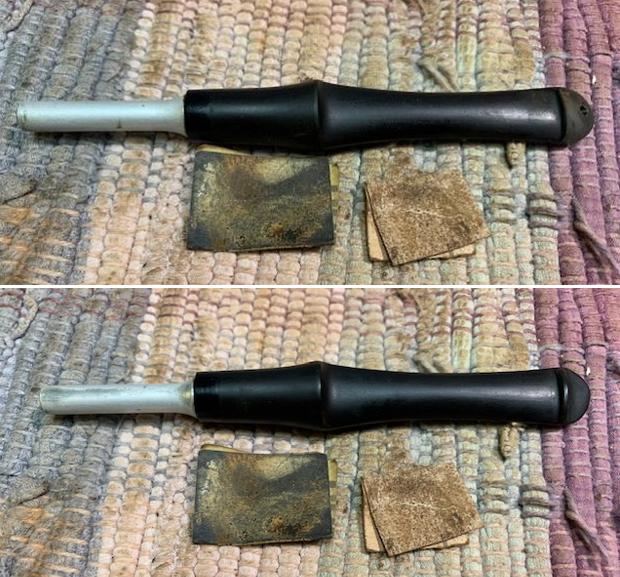
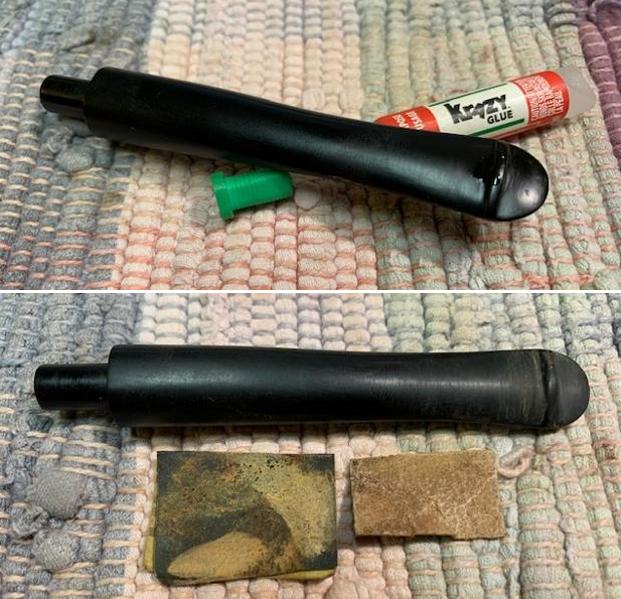
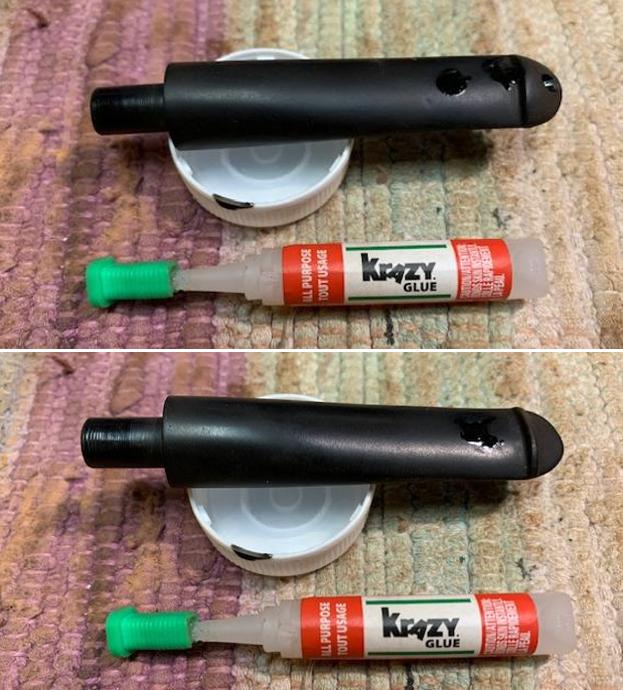
With the fit of the stem taken care of I worked on the repairs necessary to make it fully functional. I took a bit of excess stem material off the flattened bottom of the stem at the shank to make the fit seamless. I also filled in the tooth marks and pin prick with black super glue and set the stem aside to cure.  
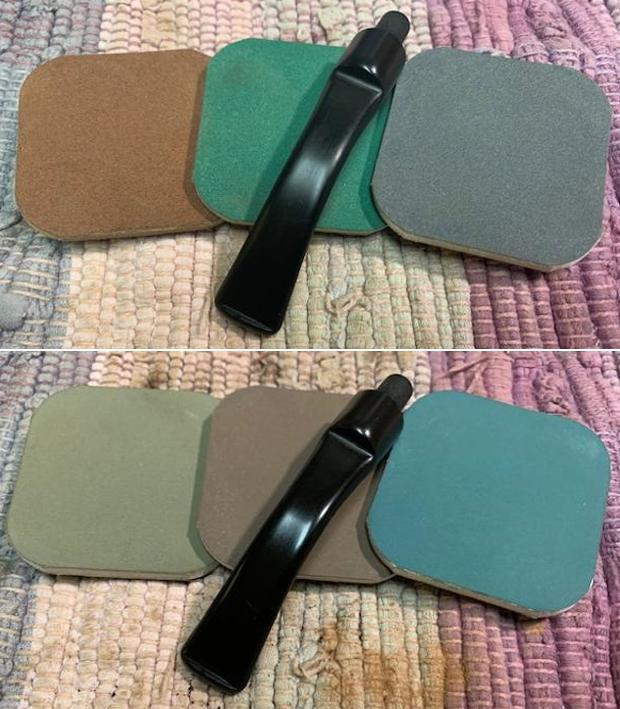
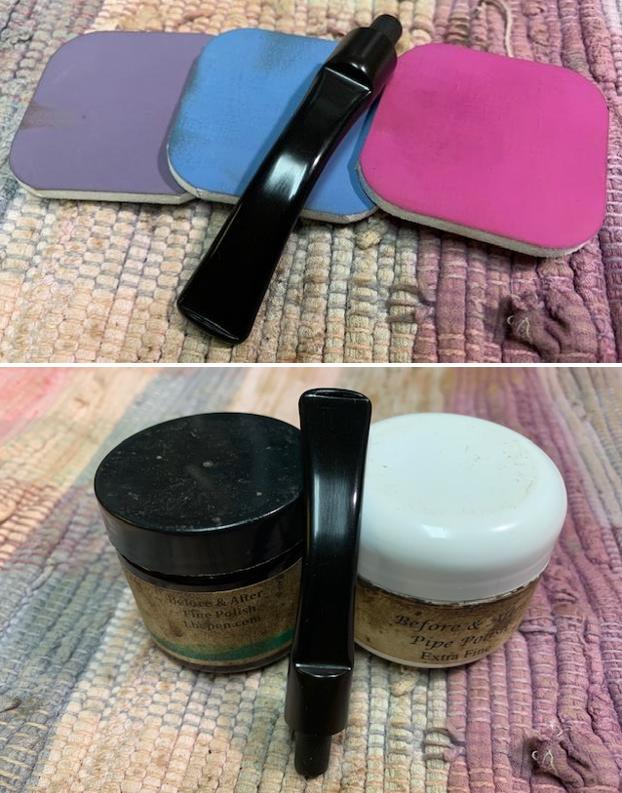
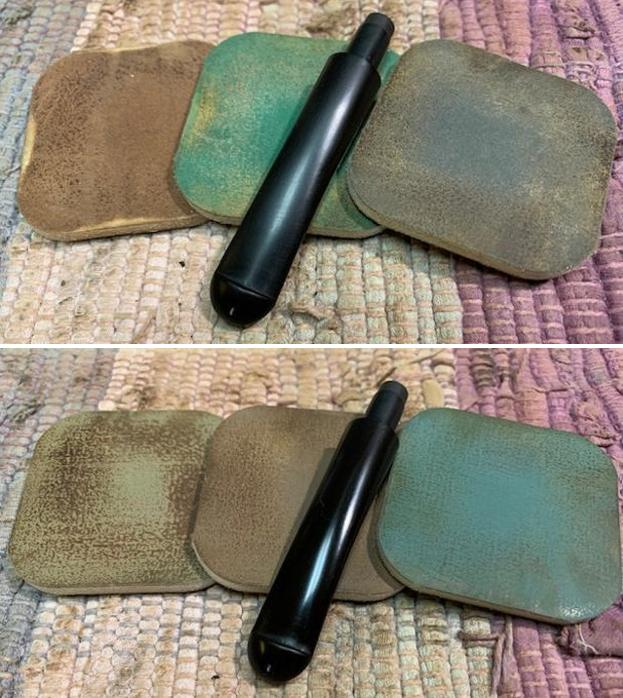
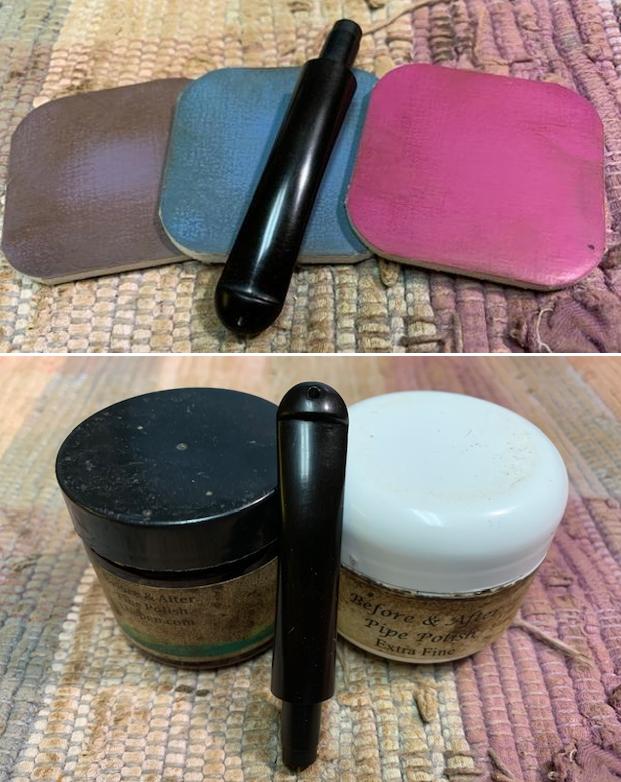
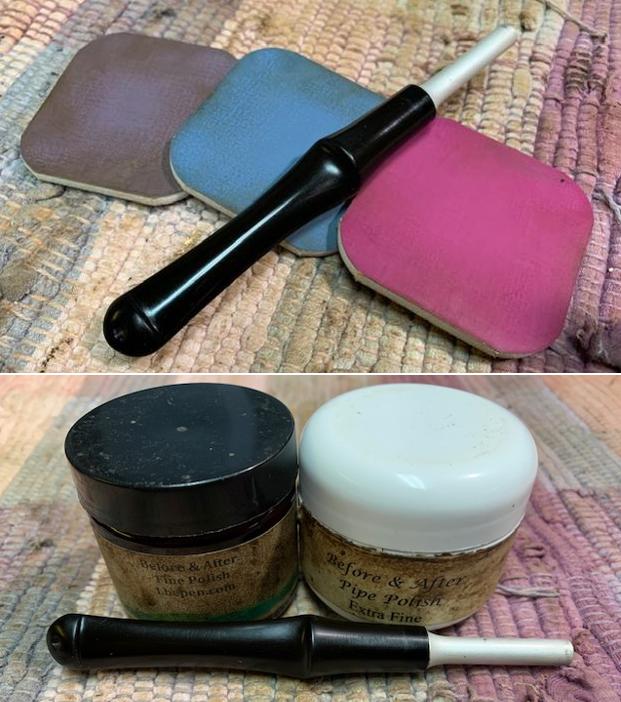
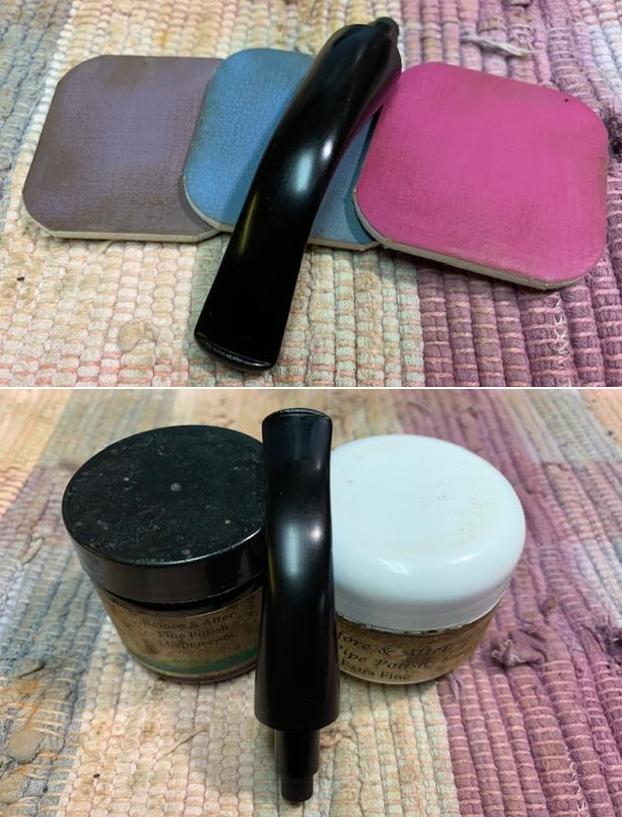
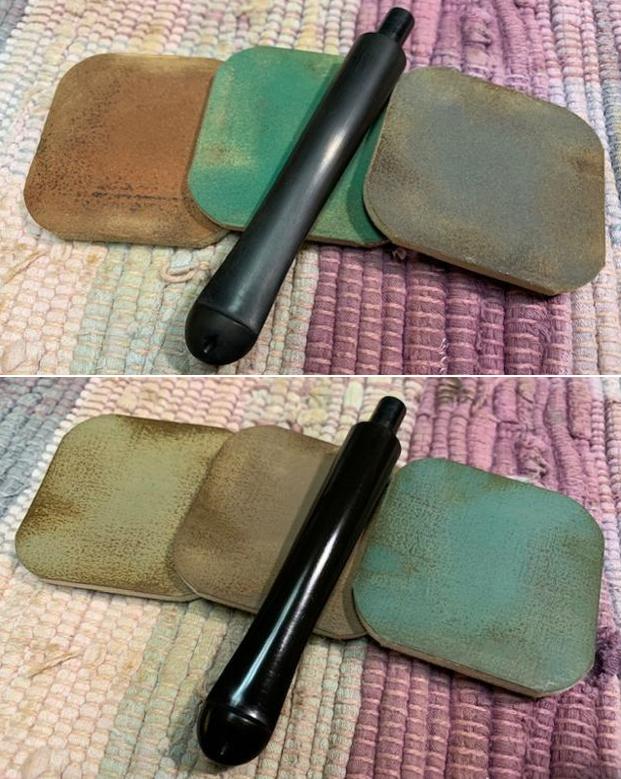
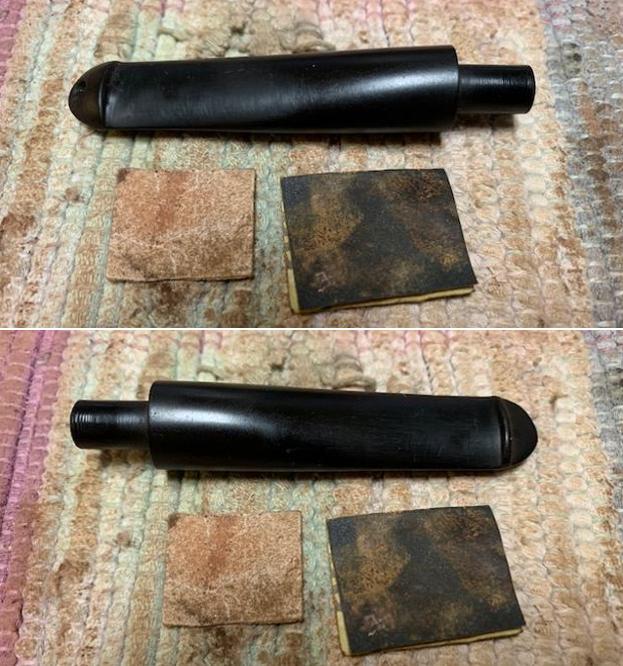
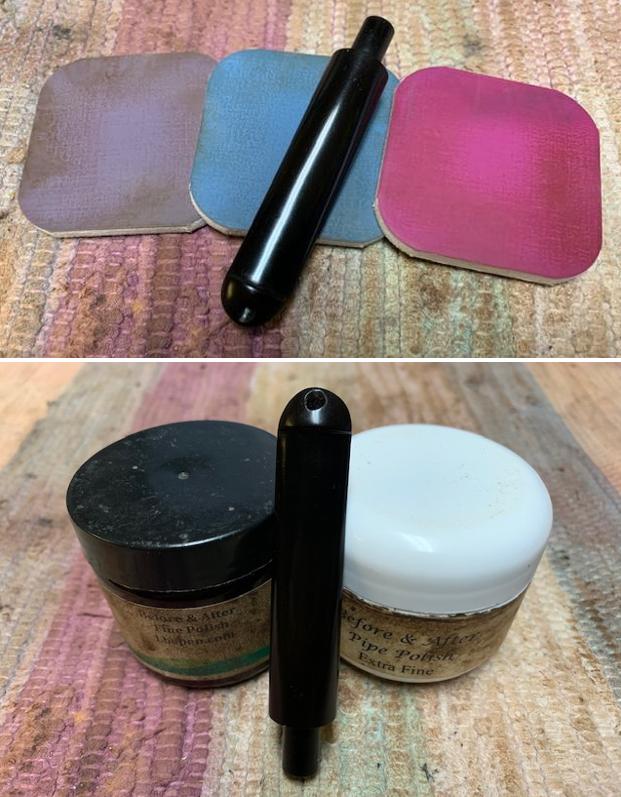
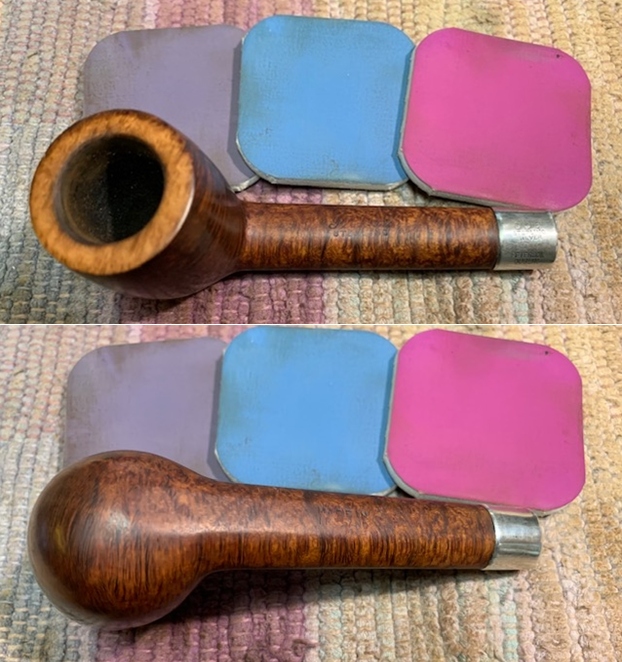
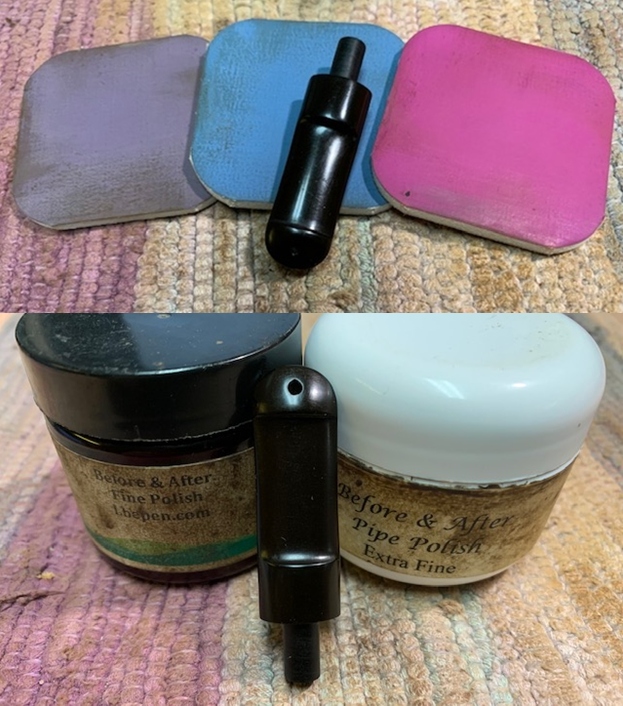
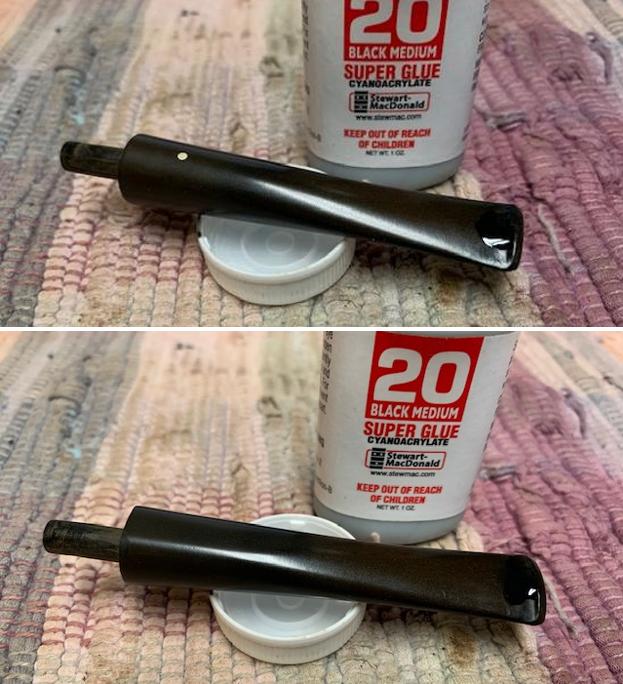
Once the repairs cured I smoothed them out with a 1500 grit micromesh sanding pad until they blended in well with the surrounding vulcanite. I used a small flat needle file to clean up the sharp edge of the button but forgot to take photos of that! Once the repair was smoothed out I polished the stem with micromesh sanding pads – dry sanding with 1500-12000 grit pads and wiping the stem down after each pad with Obsidian Oil. I finished by polishing the stem with Before & After Stem Polish – both fine and extra fine and gave the stem a final wipe down with Obsidian Oil.    
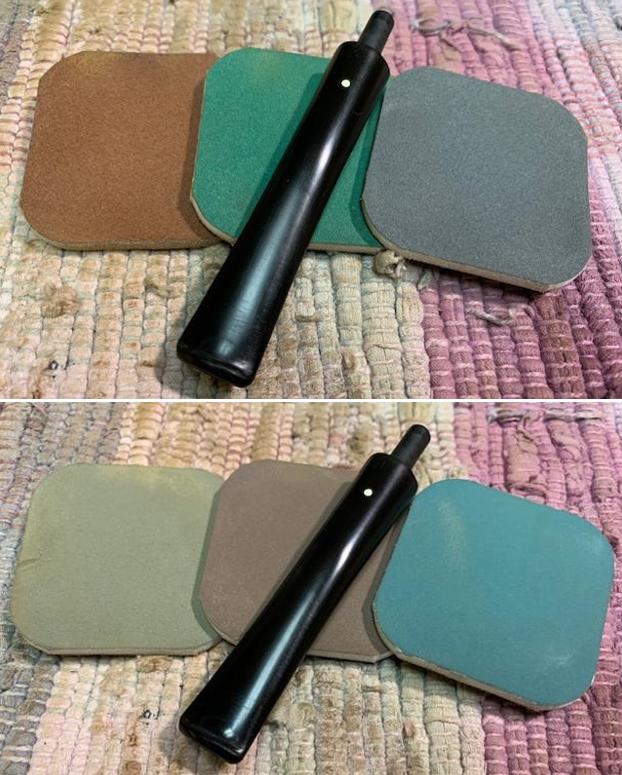
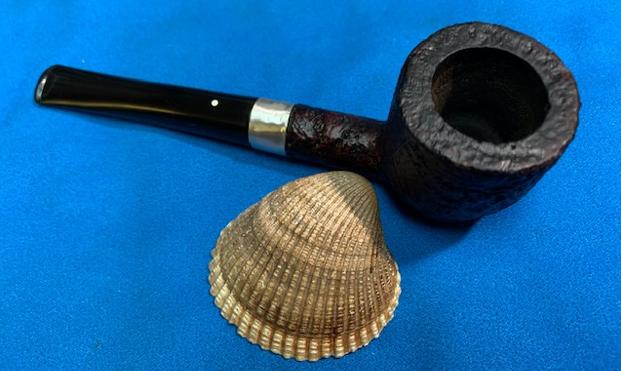
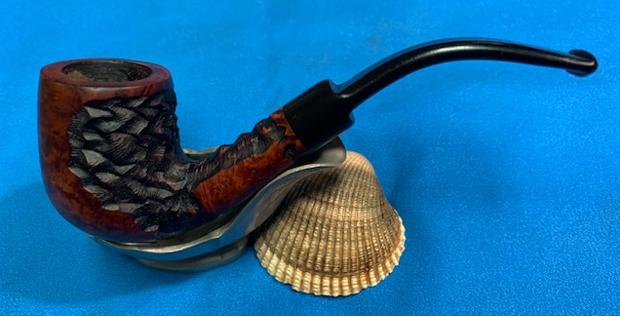
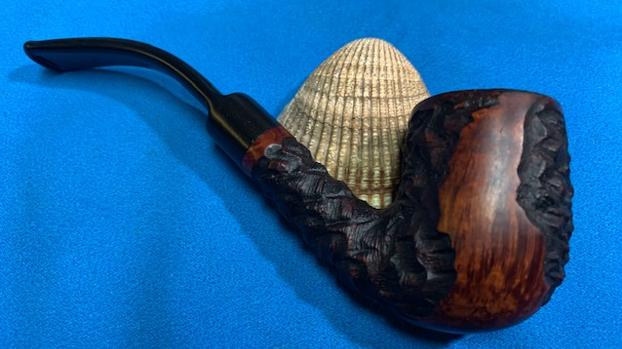
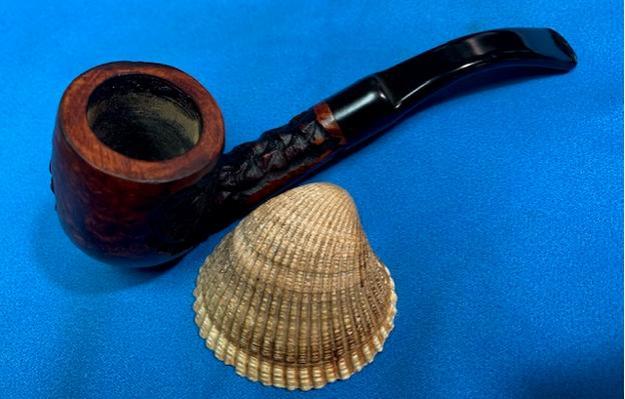
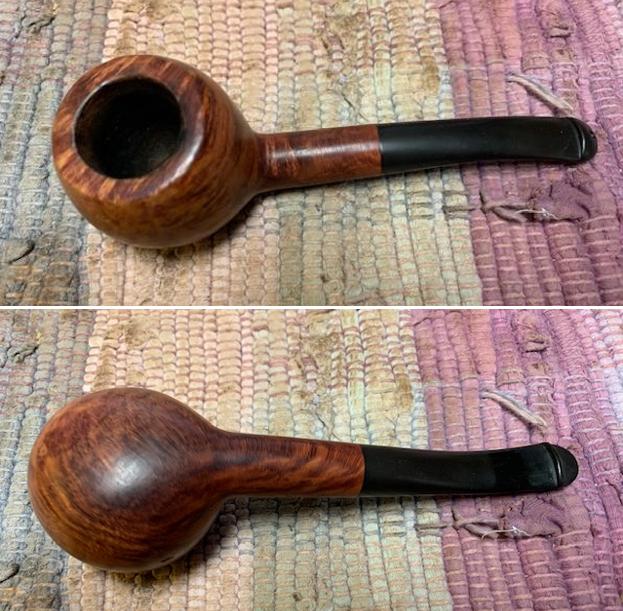
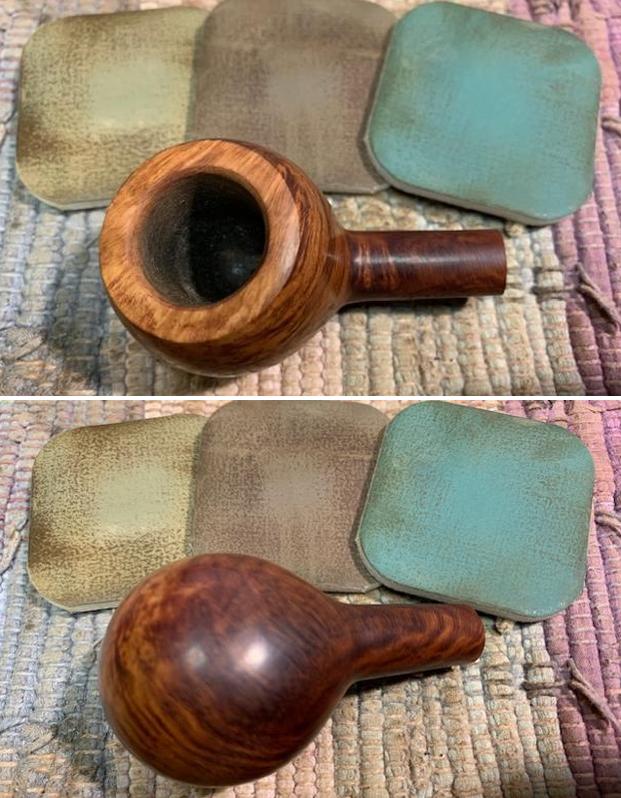
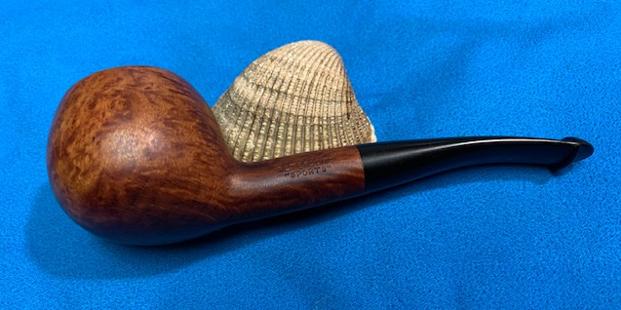
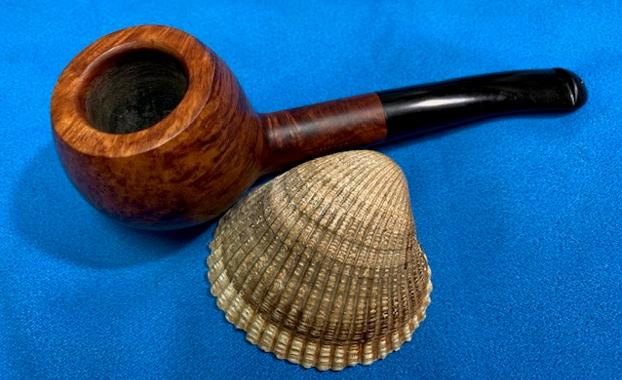
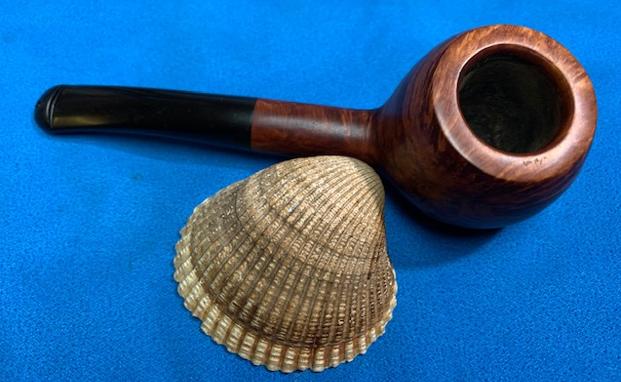
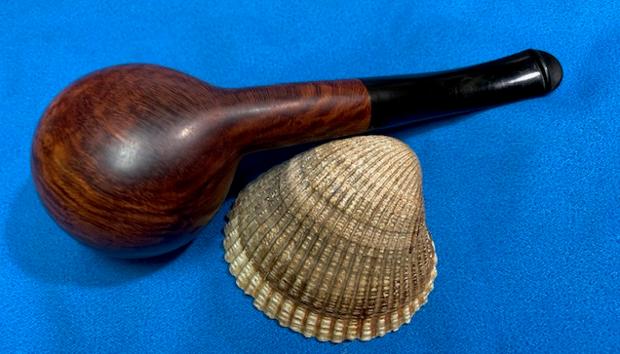
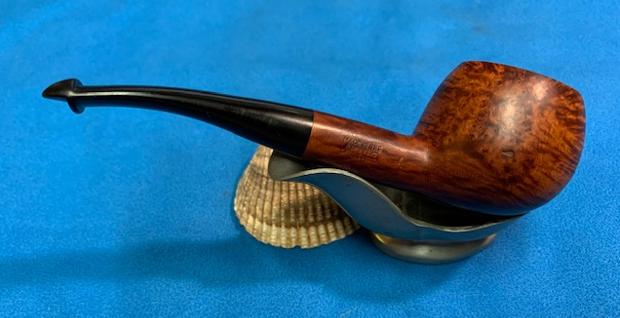
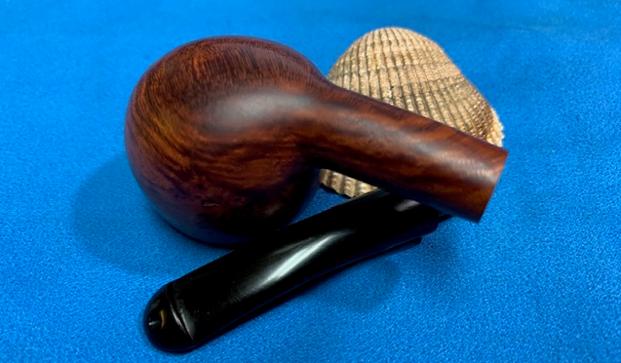
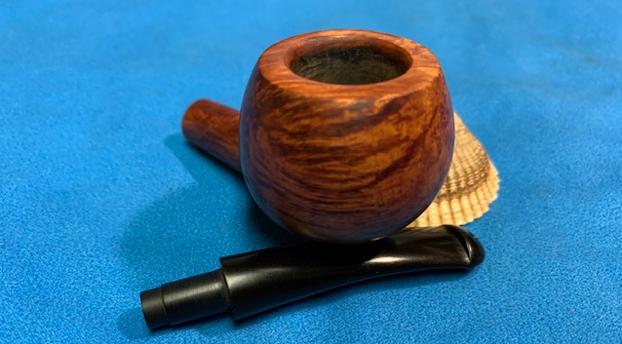
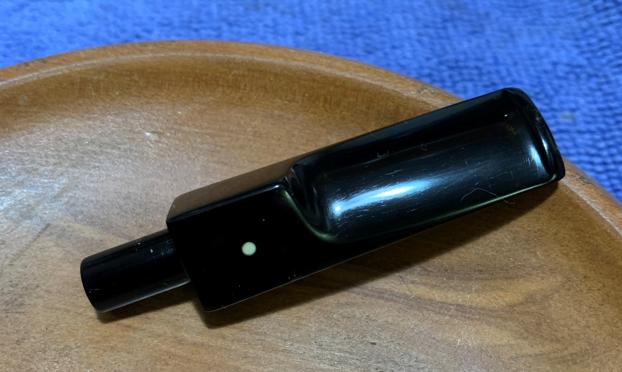
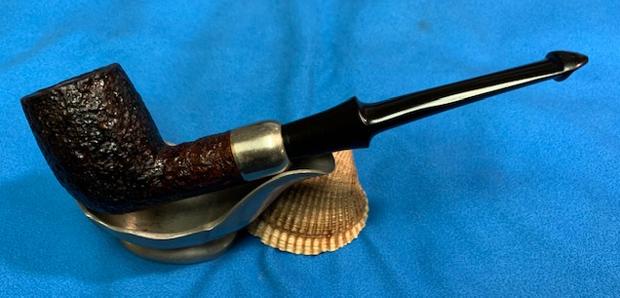
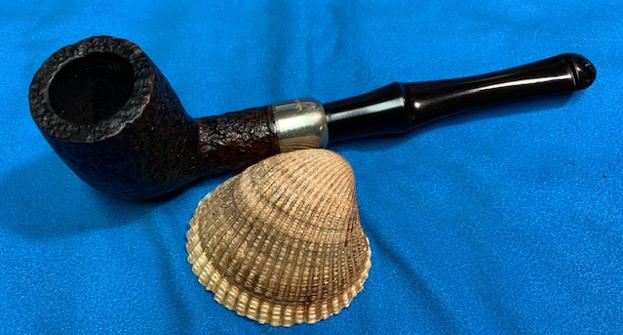
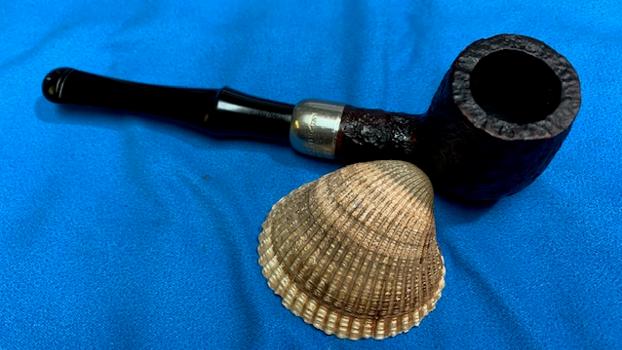
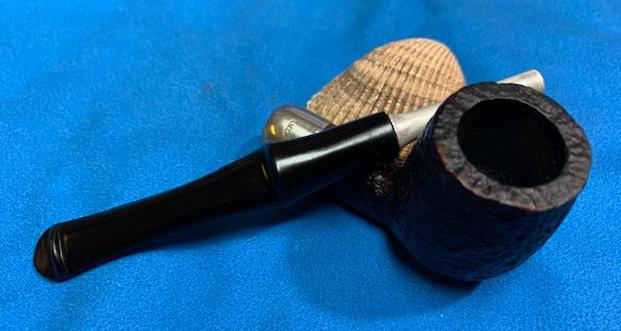
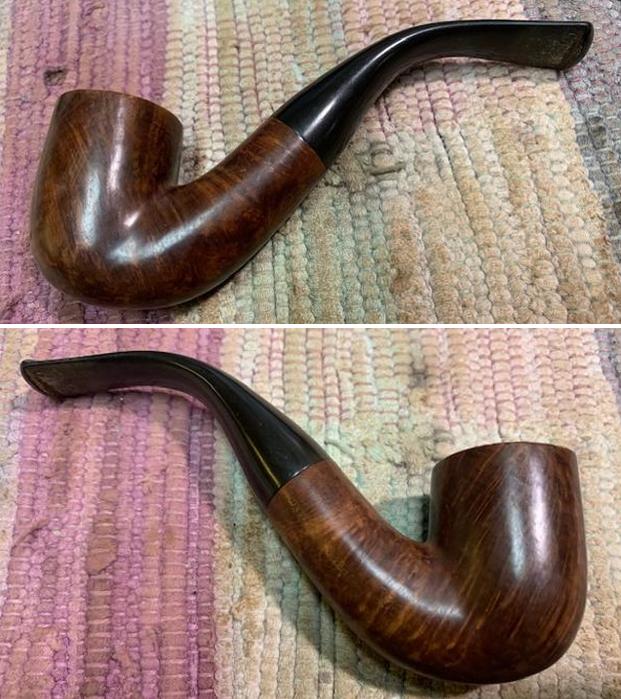
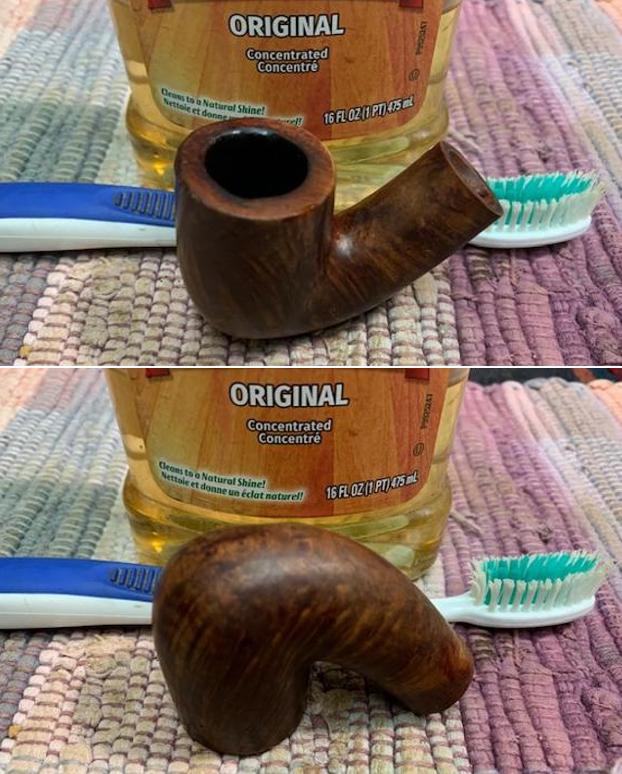
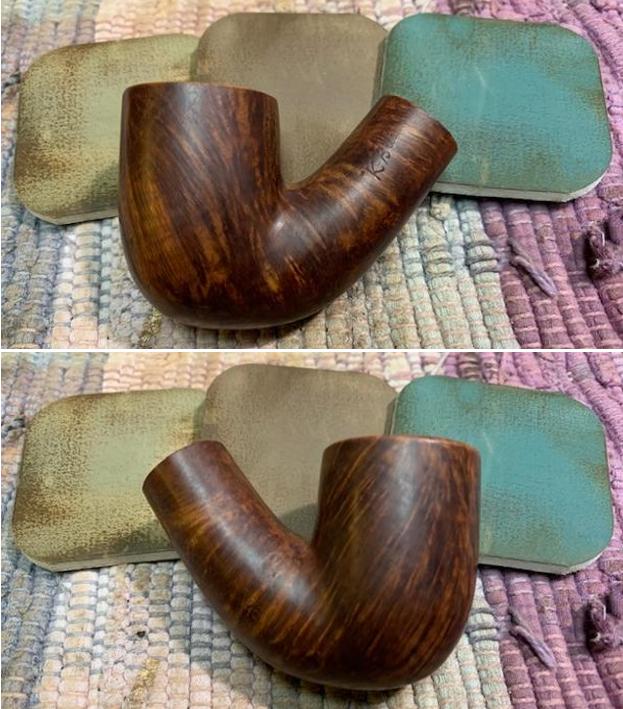
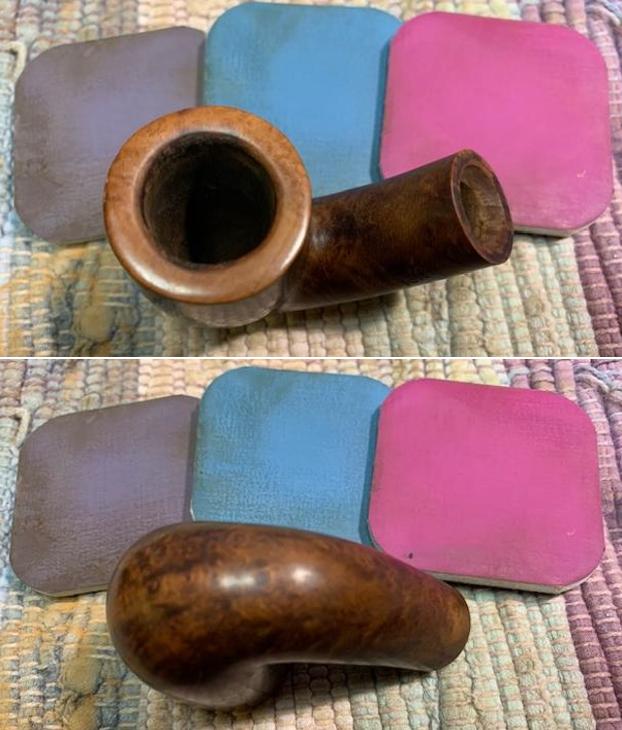
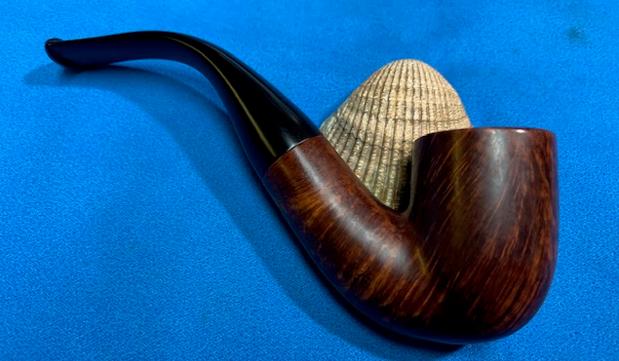
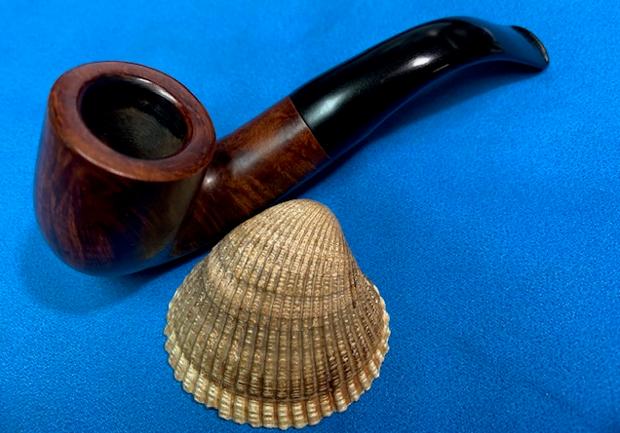
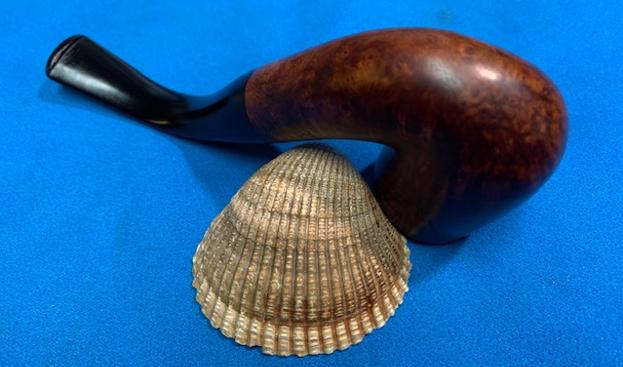
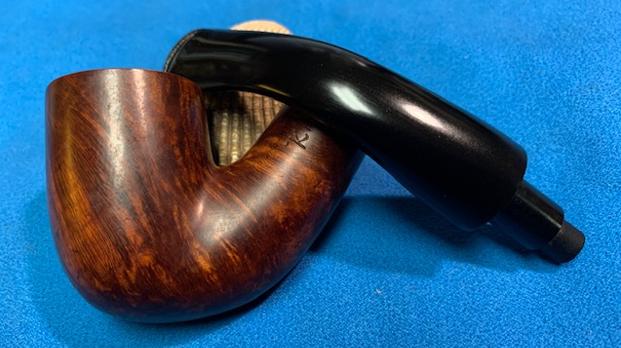
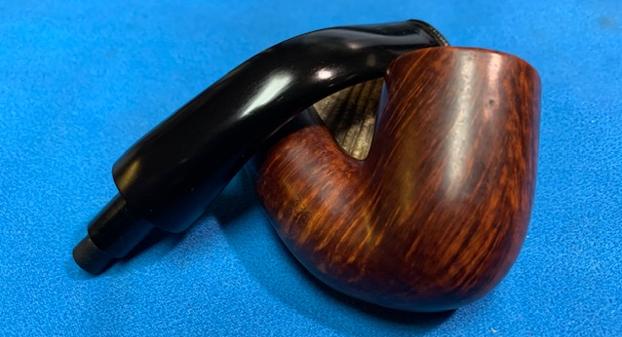
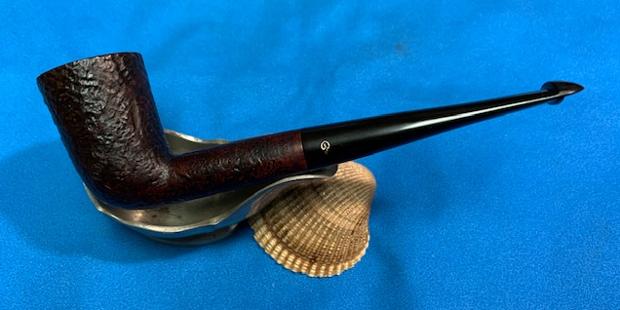
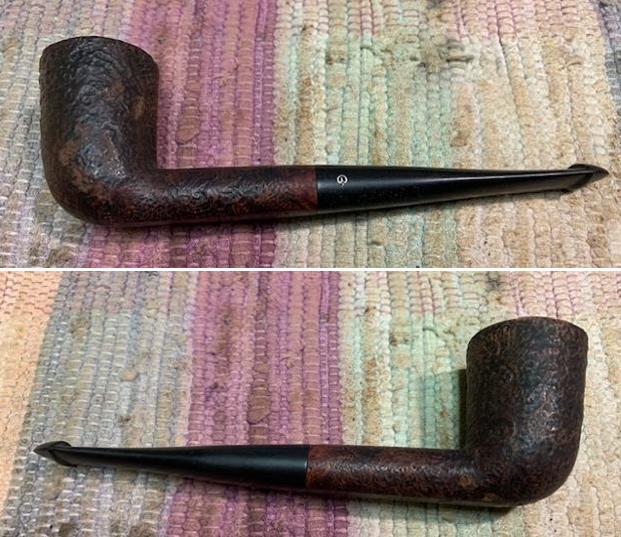
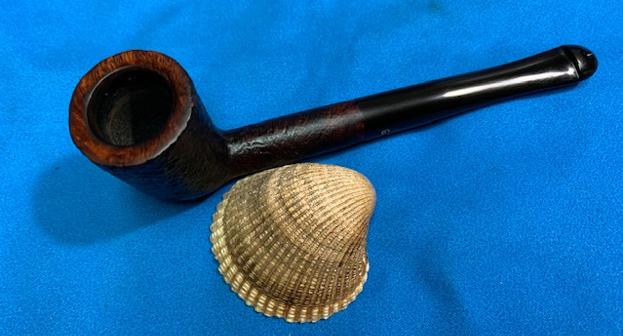
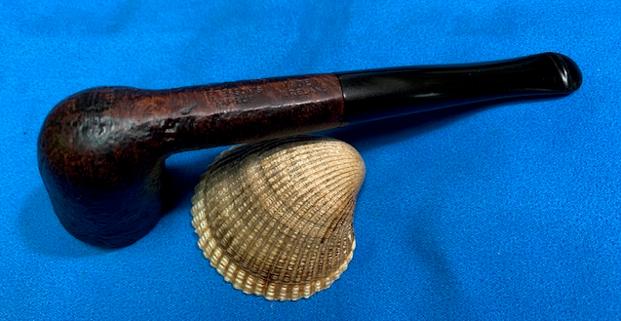
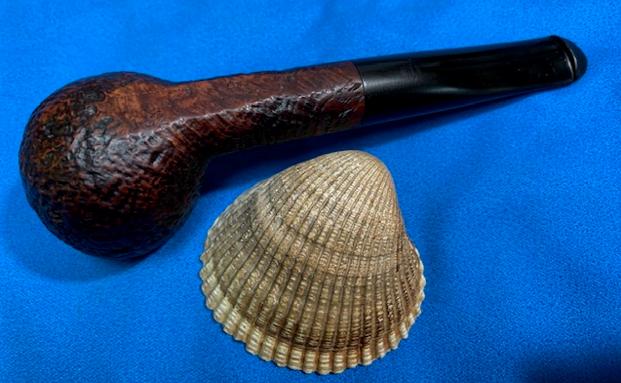
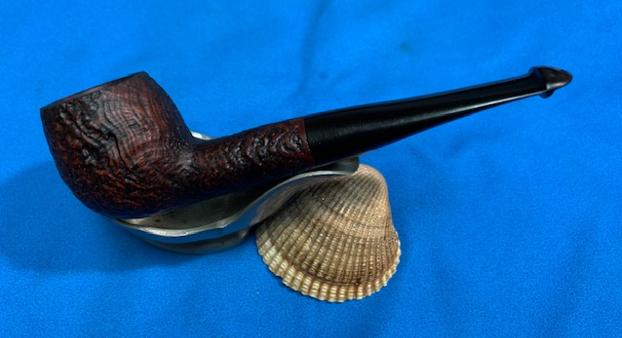
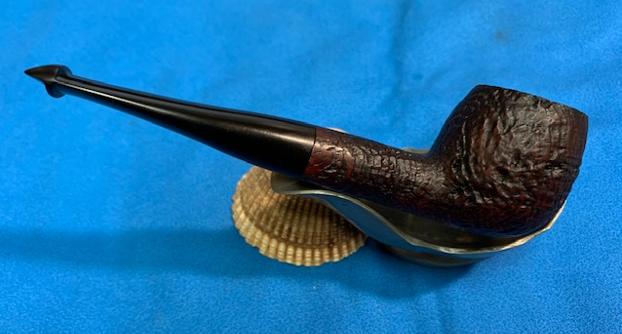
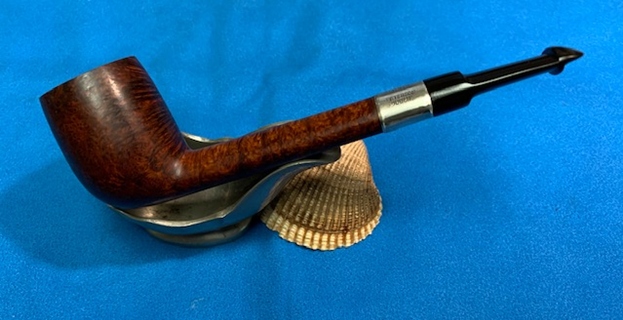
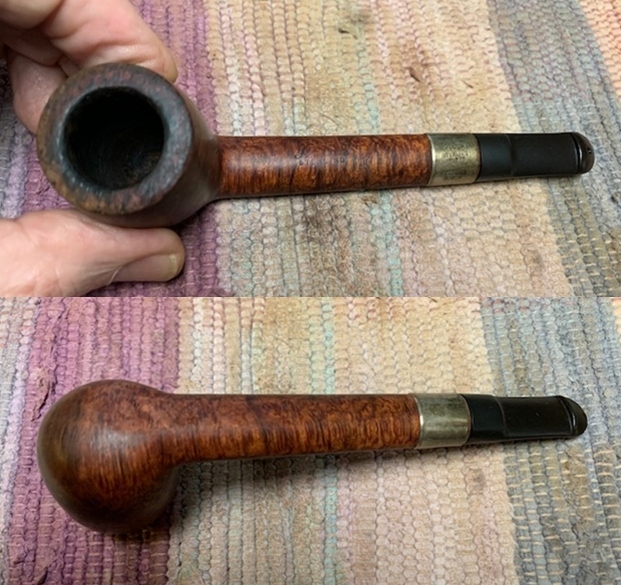
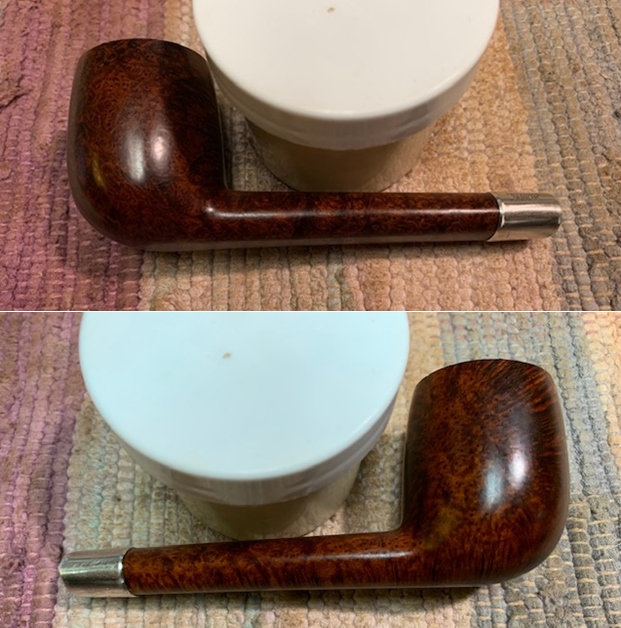
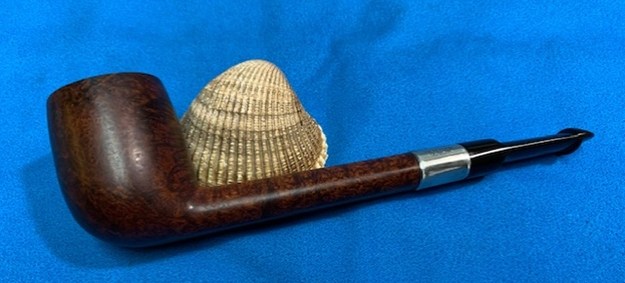
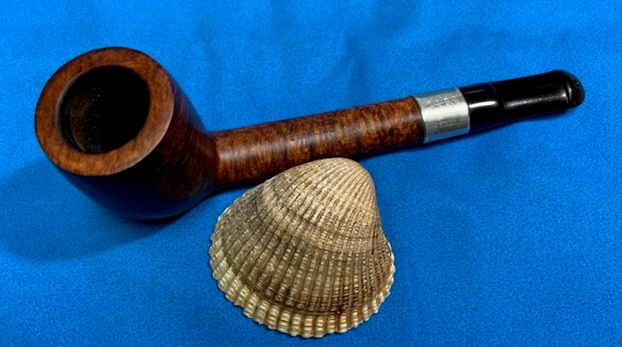
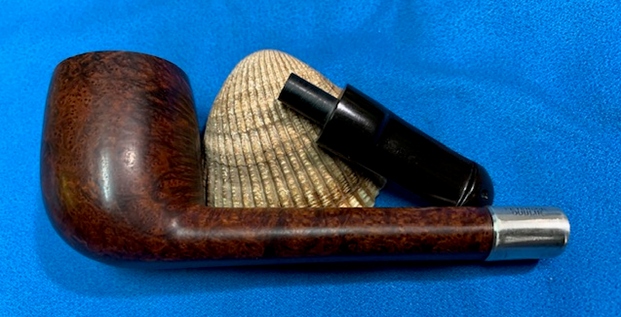
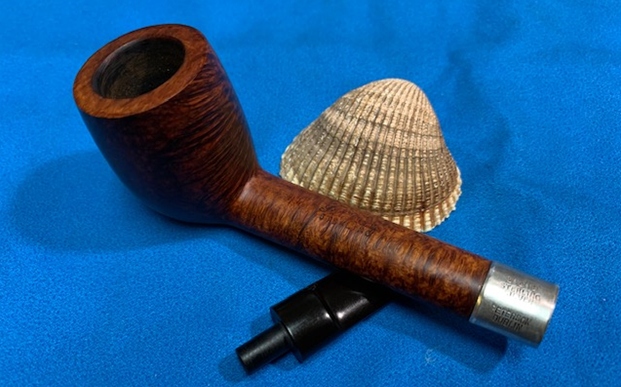
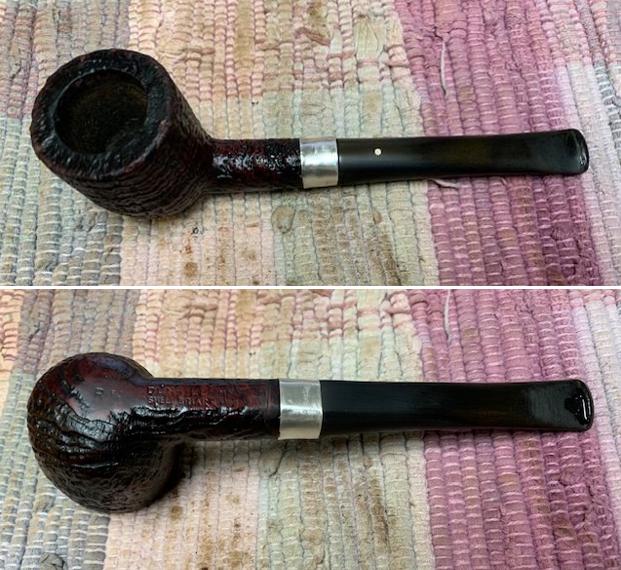
I am really happy to be finished with the rescue of this beautifully grained sandblast 1962 Dunhill Shell Briar R Pot. The grain is quite stunning and the blast is rugged. The repair to the broken shank while not a total thing of beauty worked very well and makes the pipe usable once again. The permanently affixed Sterling Silver band is useful reinforcement externally for the tube in the shank. The refit stem came out looking very good. The pipe should be a good smoking pipe and outlast all of us as it moves through the hands of the pipe men and women who take on the trust. The dimensions of this pipe are Length: 5 ¾ inches, Height: 1 ¾ inches, Outside diameter of the bowl: 1 ½ inches, Chamber diameter: 7/8 of an inch. The weight of the pipe is 1.48 ounces/41 grams. Because of the repairs to the pipe I will soon be adding it to the rebornpipes store in the British Pipe Makers section at a price that is significantly lower than it would have been had it not been repaired.   It might be a chance for one of you to add it to your collection for a good price. Thanks for following the work on this pipe in the blog.


A Badly Broken Butz-Choquin Pipe makes its way back to me for Repair and Restoration


Blog by Steve Laug

Back in August of 2018 I worked through the pipes in the estate of George Koch and one of them was an interesting Butz-Choquin Simour Pot that had a piece of copper inlaid into the back of the bowl on the left side. The stamping on the left side of the shank read Butz-Choquin and underneath it is a bit more faint but looks to read Simour. On the right side it was stamped St. Claude over France and a shape number 1507 beneath that. I was a great looking pipe when I finished. Here is the link to the blog on the pipe (https://rebornpipes.com/2018/08/16/bringing-a-butz-choquin-simour-1507-back-to-life/). I have included a photo of the pipe when I finished it and when it was sold to a fellow named Randy in North Carolina.Randy loved the pipe and thoroughly enjoyed smoking it. Here is where the story shifts to the journey of the pipe back to Canada.

I received an email from Randy early in December about the pipe he had purchased. It was in need of a repair. I include his email below.

Steve, I bought a pipe from you about a year ago. I think l paid around $60 for it. I dropped it off my deck and broke the shank. Is that something that can normally be fixed and would it be worth it when comparing the original cost vs whatever your repair is. generally speaking? I know you haven’t seen the it, just trying to get a general idea if you think it might be worth the expense.

I had Randy send me some photos of the pipe which due to computer issues on my old computer I know longer have but it was broken at the shank with a nasty break. We talked a bit back and forth by email and after the holidays he put it in the mail to me. I received it on Thursday late in the day and opened the package to see it up close and personal. The pipe was obviously a favourite of Randy’s and had been well smoked. The bowl had a thick cake and I needed to be able to see what was happening where the airway entered the bowl. I reamed it back with a PipNet pipe reamed so I could see it clearly. The shank had a thick build up of tars in the airway that made it hard to know what was happening with the airway from the break to bowl. I cleaned out the airway with a pick, knife and a lot of pipe cleaners and alcohol until was clean.I scrubbed down the externals of the bowl and the cracked shank area with alcohol, cotton swabs and pipe cleaners to remove the grime so that  I could work on the fit of the shank pieces together. The next photos show the cleaned bowl and shank pieces. It was a large chunk of briar that had broken off. I studied it for a while trying to figure out how I was going to repair it for him. Finally I figured out a plan. I would cut a piece of Delrin tubing and use it on the inside of the shank to provide a base to fuse the two parts together. The next photo shows the piece of Delrin. I needed to shorten the piece but it fit nicely in the shank and the broken piece.I roughed up the surface of the Delrin tube and glued it in the bowl half of the broken shank with black CA glue. I let it cure for a short period until the tube was solidly anchored in the bowl end.Once the tube was solidly in place. I gave the other end of the tube a coat of the black super glue and also coated the ends of the crack with clear super glue. The clear dries faster and that is what I wanted when I pressed the two halves together. I held them together until the glue cured and when it was finished I took the following photos. The depth of the crack for the shank end and the feather like rustications on the shank complicated the work a bit for me. I filled them in with clear CA glue so that the fit of the band would be solid. I filled in the crack with briar dust and clear CA glue until the surface of the crack was even with the surrounding briar on the shank.I sanded the shank repairs smooth with 220 grit sandpaper to prepare it for fitting the nickel band on the shank. My thinking was that the internal Delrin tube would stabilize the shank and the band on the outside would bind it together. Once it was cleaned off I knew I would need to do a bit more filling with briar dust but it was definitely getting there.   I fit the band on the end of the shank. It was snug so I heated the band with a lighter flame and pressed it onto the shank by pushing the shank end down on a piece of padding on my desk top. I pressed into place so that the edge of the band was at the edge of the shank. It was a tight fit and held the pieces of the repair in place from the outside. I sanded the repaired area above the band with a folded piece of sandpaper and then with micromesh sanding pads until it was smooth. I cleaned off the rim top with a pen knife to scrape away the lava build up. I polished it with 1500-12000 grit micromesh sanding pads. I cleaned up the beveled edge and the top until it was smooth. I restained the rim top and the shank repair with a Cherry and Walnut stain pen to match the rest of the pipe.   I worked some Before & After Restoration Balm into the surface of the briar with my finger tips to clean, enrich and enliven the briar. I let it sit on the briar for 15 minutes and buffed it off with a soft cotton cloth. I used a piece of 220 grit sandpaper to take some of the vulcanite off of the tenon to refit it to the shank of the pipe. Once a shank has been banded it compresses the diameter of the shank enough that the original tenon was too large to fit in the mortise. I slightly reduced it and the fit was perfect. I put it in place in the shank and took photos of the pipe at this point. I polished the stem with micromesh sanding pads – wet sanding with 1500-12000 grit sanding pads. I wiped it down after each sanding pad with Obsidian Oil. I polished it with Before & After Pipe Stem Polish – both Fine and Extra Fine. With the stem done it was time to put the pipe back together. From where it was when it arrived to where it is now is a long hard push and it is definitely a different looking pipe. While it is not flawless it should now give Randy a good smoking pipe that looks very good. The finish and even the band looks really quite good with the rest of the pipe. The finish hides the repair quite a bit and it is solid. I will send it back to Randy later this week. I am looking forward to what he thinks of the restoration. Thanks for walking through this with me.

Working on a Trypis Bent Billiard with a Saddle Stem


Blog by Steve Laug

I finished the Brigham pipes and have one more Canadian Made pipe to work on. This one is a partially rusticated bent Billiard, stamped on a smooth panel on the left side of the shank with that reads Made in Canada next to the bowl and that is followed by Trypis. There is no shape number stamped on the pipe. There was a thick cake in the bowl with remnants of tobacco stuck on the walls. There was a lava overflow on the rim. The smooth rim top and edges appear to have some damage on the right side. It looks like the pipe had been dropped and the outer edge of the bowl was out of round. The smooth finish looks great but is dull with grime ground into the surface. The rustication is rugged and unique to Trypis pipes and while similar to Brigham Pipes it is uniquely his design. There was a beautiful pipe underneath all of the buildup of years of use. The thin saddle stem was oxidized and calcified toward the end with some tooth marks and chatter on both sides ahead of the button. Jeff took photos of the pipe before he started his cleanup work on it. Jeff took photos of the bowl and rim top to show the cake in the bowl. The smooth rim top showed some darkening and damage as did the inner and outer edges of the bowl. He took photos of the top and underside of the stem showing the tooth chatter, scratching and oxidation on the stem surface and wear on the edges of the button.   Jeff took a photo of the side and heel of the bowl to show the condition of the finish. You can see the well done and rugged rustication that I have seen on other Trypis pipes. Even under the dirt and debris of the years it looked very good. You can see the damage on the outer edge of the rim on the right side in the first photo below. The stamping is clear and readable as noted above. The flow of the stem is well done but there is no identifying marks on the stem side.I turned to Pipephil and looked up the brand for a quick summary of the detail on the brand (http://pipephil.eu/logos/en/logo-t8.html). I have included a photo of Phillip Trypis and a short summary of what was written in the side bar of the section. I quote in full below.

Phillip Trypis first worked for Brigham as production manager. He continued to supply the Canadian brand when he was established on his own with his own Trypis label. Phillip Trypis had a pipe shop in Toronto.

I then turned to Pipedia for more information (https://pipedia.org/wiki/Trypis_Pipes). There was a great quote from Stefan Seles. I have included that in full below.

“Phillip Trypis has been a pipe maker in Canada for well over 40 years. Originally from Greece, his experience ranges from cutting burls in a briar mill to making literally thousands of pipes out of his home in the hamlet of Oakwood, Ontario. Brigham pipes benefited from Phillip’s skills where he worked for a number of years. There he directed the pipe production of the company when it was producing over 50,000 a year. Even though he left to start his own pipe shop, he still imported briar and turned tens of thousands of bowls for Brigham not to mention produce a large number of his own branded pipes.

Just over a year ago, Phillip had a serious fall and although he is back making pipes, he is unable to travel around to sell them as he once did. He has asked me to help him in that effort.

The pipes listed below are some of his best work made from decades old MF and R ebuchauns as well as some recently purchased Italian plateau. The prices are excellent, especially given the age and quality of the briar used. In fact, I would venture to say that these pipes have no peers, especially below the $100.00 price. You must be the judge.

Many of the styles are traditional in form although Phillip has a number of freehand styles that are both familiar and off the beaten path. The vast majority of the higher priced pipes are very large pieces to be sure.”

With the information from the two sites I had the background on the pipe maker that I really enjoy to know when working on the pipe. This was a beauty and though I did not have any idea of when it was made it was a beauty. Now it was time to work on the pipe.

I am really happy to have Jeff’s help on cleaning up the pipes that we pick up along the way. He cleaned this filthy pipe with his usual penchant for thoroughness that I really appreciate. This one was a real mess and I did not know what to expect when I unwrapped it from his box. He reamed it with a PipNet pipe reamer and cleaned up the reaming with a Savinelli Fitsall Pipe Knife. He scrubbed out the internals with alcohol, pipe cleaners and cotton swabs until the pipe was clean. He scrubbed the exterior of the bowl with Murphy’s Oil Soap and a tooth brush to remove the grime and grit on the briar and the lava on the rim top. The finish looks much better and the great rustication on the bowl and shank had greatly improved. The rim top still was a mess. Jeff soaked the stem in Before & After Deoxidizer to remove the oxidation on the rubber. He scrubbed it with Soft Scrub All Purpose Cleaner to remove the majority of the oxidation. When the pipe arrived here in Vancouver for the second stop of its restoration tour I was amazed it looked so good. I took some close up photos of the rim top and the stem surface. The rim top had a large chip out of the right outer edge that affected the look of the bowl. I would need to work on that edge of the bowl to bring it back to round. I took close up photos of the stem to show the condition of the surface and button. I took a photo of the stamping on the left side of the shank. You can see that it is stamped as noted above. It is faint but readable.  I took the pipe apart and took a photo of the pipe. It is a good looking pipe and has some great looking rustication on the bowl and shank. I decided to start my restoration work on this one by dealing with the damaged rim top and edges. I topped the bowl on a topping board with 220 grit sandpaper to remove the darkening and damage. I filled in the damaged right outer edge of the rim with briar dust and clear super glue to bring it back to round. I topped the bowl once again to smooth out the repair and blend it into the rim top of the bowl. It looked a lot better than when I started.    I polished the smooth rim top and sides of the bowl with micromesh sanding pads – wet sanding it with 1500-12000 grit pads. After each pad I wiped the briar down with a damp cloth.   I stained the rim top with a combination of Cherry and Walnut stain pens. With that combination I was able to match the colour on the rest of the bowl.I worked some Before & After Restoration Balm into the surface of the briar with my fingertips and a horsehair shoe brush on the rustication to clean, enliven and protect the briar. I let the balm sit for 15 minutes and then buffed with a cotton cloth to raise the shine. The photos show the bowl at this point in the restoration process.    With that done the bowl was finished other than the final buffing. I set it aside and turned my attention to the stem. I “painted” the surface of the vulcanite with the flame of a lighter to lift the tooth marks. While some of them came out nicely there were several against the edge of the button that would not life. I filled them in with clear super glue. Once the repairs cured I used a file to flatten them out and then sanded the stem with 220 grit sandpaper. I started the polishing with 400 grit wet dry sandpaper.       I polished the stem with micromesh sanding pads – wet sanding with 1500-12000 grit sanding pads. I wiped it down after each sanding pad with Obsidian Oil. I polished it with Before & After Pipe Stem Polish – both Fine and Extra Fine. I am excited to finish this Trypis Bent Billiard as it is the last of Canadian Made pipes that I had in my to do box. It turned out to be a nice looking Bent Billiard. It has a combined finish with a smooth rim top and sides with a deep rustication on the front and back of the bowl and around the shank. I put the pipe back together and buffed it with Blue Diamond on the buffing wheel. I gave the bowl and the stem multiple coats of carnauba wax. I hand buffed the pipe with a clean buffing pad to raise the shine. It is fun to see what the polished bowl looks like with the grain popping through on the rim top, smooth panels and the rustication on the rest of the bowl and shank. Added to that the polished black vulcanite saddle stem was beautiful. This semi-rusticated Bent Billiard is nice looking and the pipe feels great in my hand. It is light and well balanced. Have a look at it with the photos below. The dimensions are Length: 5 ½ inches, Height: 2 inches, Outside diameter of the bowl: 1 ¼ inches, Chamber diameter: ¾ of an inch. The weight of the pipe is 37grams/1.31ounces. It is a beautiful pipe and one that will be on the rebornpipes store soon. If you are interested in adding it to your collection let me know. Thanks for walking through the restoration with me as I worked over this pipe. Thanks to each of you who are reading this blog. Remember we are not pipe owners; we are pipemen and women who hold our pipes in trust until they pass on into the trust of the next pipeman or woman. 

Restoring a Republic Era Peterson’s “Sports” 4 Apple


Blog by Steve Laug

The next pipe I have chosen is smooth finished Peterson’s Apple shaped pipe that had a bit of a bland looking finish but had some good looking grain around the bowl sides and shank. It also came to us from the estate of Anglican minister that was a great friend of mine here in Canada. This Apple did not have a nickel ferrule on the shank end. It was stamped on the left side of the shank and read Peterson’s [over] “Sports”. It was stamped on the right side and reads Made in the Republic of Ireland (3 lines). Next to the bowl it is stamped 4. The pipe was in filthy condition when he brought it to the table. The finish was dirty with grime ground into the briar sides and rim. There was a thick cake in the bowl and there was some damage to the rim top and the inner edge of the rim. The stem was oxidized, calcified and had tooth marks and chatter on the top and underside on and near the button. Jeff took photos of the pipe before his cleanup work. They tell the story and give a glimpse of the promise that we see in this pipe. Jeff took photos of the rim top and stem to show the general condition of the pipe. The bowl is thickly caked and the rim top and edges show quite a bit of damage around the bowl. The photo of the stem shows some oxidation and light tooth marks on both sides near the button. Jeff took some photos of the bowl sides and heel to show the amazing grain that was around this bowl. It is a nice looking pipe. He took photos of the sides of the shank to show the stamping. The stamping is worn but is still readable in the photos below and is as noted above.   I am including the link to the Pipedia’s article on Peterson pipes. It is a great read in terms of the history of the brand (https://pipedia.org/wiki/Peterson).

I turned to “The Peterson Pipe” by Mark Irwin and Gary Malmberg to get some background on the Peterson’s Sports. On page 313-314 it had the following information.

“SPORTS” (1947-) A “Sport” is traditionally a compact pipe made for smokers engaged in athletic pursuits, most notably equestrian riders who do not want the bowl to bounce up and down. Six shapes described in 1947 shape chart. Occasional later catalogs show as many as 11 shapes. Last  appeared in shape chart in ’98, but still made in small numbers. Recorded specimens are stamped MADE IN IRELAND (forming a circle) or MADE IN THE over REPUBLIC over OF IRELAND. See Outdoor and Outdoor Sportsman.

Now it was time to work on the pipe. Jeff had done a great job cleaning up the pipe as usual. He reamed the pipe with a PipNet reamer and cut back the cake back to the bare briar. He cleaned up the walls with a Savinelli Fitsall Pipe Knife. He scrubbed the interior of the bowl and shank with pipe cleaners, cotton swabs and alcohol to remove the tars and oils. He scrubbed the exterior of the pipe with Murphy’s Oil Soap and a tooth brush to remove the grime from the finish. He worked on the rim top lava and darkening with the soap and tooth brush. He scrubbed the inside of the stem with alcohol and pipe cleaners. He scrubbed the exterior with Soft Scrub and then soaked it in Before & After Deoxidizer. He washed it off with warm water to remove the Deoxidizer. The pipe looked far better when it arrived.    I took some close up photos of the rim top and also of the stem surface. I wanted to show how well it had cleaned up. The rim top had some looked quite good and the inner edge had some darkening and damage. It should clean up really well. I also took close up photos of the stem to show the tooth marks on the surface near the button.   I took photos of the stamping on the sides of the shank. You can see that it is stamped as noted above. It is clear and readable.    I removed the stem and took a photo of the pipe to have a look at the parts and overall look. I decided to address the damage to the edge of the bowl and the rim top first. I topped the bowl on a topping board with 220 grit sandpaper to smooth out the damage to the rim top. I used a folded piece of 220 grit sandpaper to give the inner edge of the bowl a slight bevel to accommodate the burned areas and blend them into the surrounding briar. I polished the briar with micromesh sanding pads – dry sanding with 1500-12000 grit sanding pads. I wiped the bowl down with a damp cloth after each sanding pad.    I touched up the rim top with an oak stain pen to match it to the surround briar of the bowl.I worked some Before & After Restoration Balm into the surface of the briar with my fingertips to clean, enliven and protect the briar. I let the balm sit for 15 minutes and then buffed with a cotton cloth to raise the shine. The photos show the bowl at this point in the restoration process. I set the bowl aside and turned my attention to the stem. I polished the stem with micromesh sanding pads – wet sanding with 1500-12000 grit sanding pads. I wiped it down after each sanding pad with Obsidian Oil. I polished it with Before & After Pipe Stem Polish – both Fine and Extra Fine.          I am excited to finish this Republic of Ireland Made Peterson’s “Sports” 4 Apple. I put the pipe back together and buffed it with Blue Diamond on the buffing wheel. I gave the bowl and the stem multiple coats of carnauba wax. I hand buffed the pipe with a clean buffing pad to raise the shine. It is fun to see what the polished bowl looks like with beautiful mixed grain all around it. Added to that the polished black vulcanite stem combined with the bowl and made a stunning pipe. This smooth Classic Older Peterson’s “Sports” 4 Apple is great looking and the pipe feels great in my hand. It is light and well balanced. Have a look at it with the photos below. The dimensions are Length: 5 inches, Height: 1 ¼ inches, Outside diameter of the bowl: 1 ½ inches, Chamber diameter: ¾ of an inch. The weight of the pipe is 33grams/1.16oz. It is a beautiful pipe that I will soon be putting on the rebornpipes store in the Irish Pipe Makers section. If you are interested in adding it to your collection send me an email or a message. Thanks for walking through the restoration with me as I worked over this pipe. Thanks to each of you who are reading this blog.

Dropped in at the Dunhill Deep End


Blog by Kenneth Lieblich

This is the first and introductory blog by Kenneth. We have been working through his Grandfather’s pipes and others that he has purchased to help him learn the processes that I use to restore and refurbish pipes. He is a quick study and able student. Give his first blog a read and enjoy it. Thanks Kenneth and welcome to rebornpipes.

I must admit that I never thought that the first pipe I ever restored would be a Dunhill Shell Briar Bulldog. Talk about nerve-wracking! I figured I would start out on an old clunker of a pipe so that if I made a mess of it, there was no great loss. But Steve Laug insisted that this was the one I had work on first because it was, in fact, a microcosm of pipe restoration all in one little pipe. I want to express my gratitude to Steve for not only permitting me to post the story of this pipe’s restoration, but most especially for guiding me every step of the way through the process. The vagaries of life (thanks to Covid) necessitated several FaceTime and Zoom chats, but he was always generous, friendly, and helpful. Any compliments on this restoration are for him – any criticisms are for me.

This charming Dunhill Shell Briar Bulldog pipe belonged to my paternal grandfather and was one of seventeen pipes left to my father, and which he has now given to me. A little detective work over at http://www.pipephil.eu revealed that this Dunhill dates from 1937 – which would have made my grandfather 29 years old when it was made.He died in 1975, so this pipe has not been smoked for at least 45 years (and probably more). As a side note, while this restoration was ongoing, I also restored his Dunhill Rollagas lighter (dated to the mid-1950s), so that I could use it to light the pipe one day. In that pipe will be some very old tobacco that is also from my grandfather. I am not sure what the tobacco is, but it smells lovely. I have another two Dunhill pipes I inherited from my grandfather, but I will save those restorations for future posts! As you can see from these initial photos, this poor pipe had some serious issues! The front of the bowl had a large crack, reaching all the way from the rim to the heel. There was also another crack (albeit considerably smaller) on the opposite side of the bowl. Smaller it may have been, but no less daunting to me. There was some cleaning that needed to be done inside the shank and stem, but less than might have been expected from an 85-year-old pipe. The usual routine of isopropyl alcohol, pipe cleaners, Q-tips, etc. made short work of that. Unfortunately, I do not have a handy brother like Jeff Laug to help clean my pipes, so I did it myself. I learn by doing, so this was just as well.

After using both the Pipnet Reamer and the KleenReem, the bowl was stripped down to the bare briar. This afforded me a good look at the condition of the bowl and just how far the two cracks had penetrated the wood. The smaller crack was not any worse than it initially appeared, but the large crack went all the way to the underside of the bowl. I cleaned the stummel with Murphy’s Oil Soap and that made a world of difference to the overall appearance of the wood, but not to the cracks, obviously. I prepared some J.B. Weld epoxy and filled the breach from the inside, ensuring that the epoxy did not ooze out to the front. I filled in the crack from the outside with a mixture of briar dust and cyanoacrylate adhesive. This was a tricky business, as the crack varied from ‘gaping’ at the rim to essentially ‘imperceptible’ at the heel. After putting down some layers of briar dust and glue, I noticed that there were still some small gaps that only iPhone magnification could reveal, as seen here. These were soon mended and left to cure.Following this, some rustication was needed, and a brass-bristle brush was the tool I used. In fact, the brush was used several times – including after I applied some stain to the briar-glue repair. The stain was used in conjunction with the Before & After Restoration Balm, to help meld everything together. I must admit that I wish I could have done this step better – all I could see were flaws, but everyone else told me how much better it looked, especially when compared with how it began. These photographs show you that it wasn’t complete, but I guess it really was better. Once this had fully cured, I coated the entire inside of the bowl with a mixture of activated charcoal and my wife’s homemade yogurt. Once hardened, this provided a good, slightly rough surface for a new cake to build. Then it was time for the stem. It was in pretty good condition, considering its age. There were a couple of relatively minor tooth marks and the button needed some work. However, without doubt, restoring the stem was the most frustrating part of the restoration. It began easily enough, with the stem taking a swim in the Before & After Hard Rubber Deoxidizer. In order to address the chatter, I waved the flame of a BIC lighter over the mouthpiece. I also took some of the cyanoacrylate adhesive and filled in the deeper tooth marks. But then the tough stuff came: sanding, more sanding, then even more sanding. Did I mention the sanding? As you know from Steve’s similar work, I used 220, 400, and 600 sandpapers to wet-sand the stem. Then followed that with all nine Micromesh pads (1,500 through 12,000 grit) – using Obsidian Pipe Stem Oil in between each pad. The pictures only tell a fraction of the story. Quite frankly, my lack of experience was my undoing, as I had to do this entire sanding sequence twice over. It just did not look right the first time. In fact, I was not even convinced that it looked right the second time, but Steve reassured me (with his typical kindness) that I was merely suffering from the same sort of pipe perfectionism that he does – not to mention the fact that this pipe is 85 years old: it is not meant to look brand new! At some point, one has to stop or else one will simply sand the pipe away into oblivion!

At long last, I was at the point where I could throw down some more Obsidian Pipe Stem Oil, Before & After Restoration Balm, and Paragon II Wax. Microfibre cloths, horsehair shoe brushes, and buffing pads followed – all to provide a final product (hopefully) worthy of my beloved grandfather’s memory. This was certainly a labour of love and I look forward to firing up his 85-year-old Dunhill pipe, with his 65+ year-old Dunhill lighter, filled to the rim with his 50+ year-old tobacco. The dimensions of the pipe are as follows: length 4⅝ inches; height 1⅝ inches; bowl diameter 1½ inches; chamber diameter: ¾ of an inch. The weight of the pipe is ⅞ of an ounce (or 27 grams).

Thank you very much for reading and I welcome and encourage your comments. Kenneth sent me this message and photo on Facebook.

This is my grandfather, Alfred Lieblich,  in Vienna in 1938. Look what’s in his mouth! Amazing!

Breathing Life into a Rusticated Peterson’s System 71 Straight Billiard


Blog by Steve Laug

The next pipe I have chosen is smooth finished Peterson’s Billiard pipe. This one is a System 71 Straight Billiard that has a rich coloured rusticated finish around the bowl sides and shank. It also came to us from the estate of Anglican minister that was a great friend of mine here in Canada. This Billiard had a badly oxidized nickel ferrule on the shank end. The contrast of the brown stains makes the grain really pop. It was stamped on the underside of the shank and read Peterson’s arched [over] System arched [over] 71. It was stamped to the right of that and reads Made in the Republic of Ireland (3 lines). The tarnished ferrule is stamped with K&P [over] 3 shields as follows: in the first was a shamrock, in the second was a lion and in the third was a tower. That is followed by Peterson’s. It was in filthy condition when he brought it to the table. The finish was dirty with grime ground into the rustication around the sides and rim. There was a cake in the bowl and light spattering of lava on the rim top and the inner edge of the bowl. The rim top looked to be in good condition. The stem was oxidized, calcified and had tooth marks and chatter on the top and underside on and near the button. Jeff took photos of the pipe before his cleanup work. They tell the story and give a glimpse of the promise that we see in this pipe. Jeff took photos of the rim top and stem to show the general condition of the pipe. The bowl is heavily caked and the rim top and edges have some light lava overflow. The stem is oxidized, calcified and has tooth marks on the top and underside near the button.   Jeff took some photos of the bowl sides and heel to show the rugged rustication that was around this bowl. It is a nice looking pipe.     He took photos of the sides of the shank to show the stamping. The stamping is readable in the photos below and is as noted above. He also took a photo of the ferrule. I am including the link to the Pipedia’s article on Peterson pipes. It is a great read in terms of the history of the brand (https://pipedia.org/wiki/Peterson).

I turned to “The Peterson Pipe” by Mark Irwin and Gary Malmberg to get some background on the Peterson’s System Line. On page 314 it had the following information.

System (1891) The Peterson’s System pipe is the backbone of the company’s body of work, offered continuously since 1891. Defined by its reservoir, graduated bore, and the unique Peterson Lip mouthpiece, the design originated with an 1890 patent and was further refined by modifications patented in 1894 and ’98. Offered in numerous shapes and sizes, in bent and straight stemmed styles, marketed in smooth, sandblasted, rusticated or ebony finish, and rendered in briar, clay and meerschaum with mouthpieces of vulcanite, amber, horn, Bakelite and acrylic. From 1891-1915, Systems were labeled Peterson’s over PATENT, then from 1906-11 occasionally PETERSON’S over PATENT over DUBLIN, followed thereafter by PETERSON’S over DUBLIN. See Dublin. Chronologically, documented System stamps include the following. (A list of the different stamping follows)

I quote the section that fits the stamping on the pipe I am working on.

PETERSON’S over SYSTEM. Pipes stamped PETERSON’S SYSTEM have been documented as early as 1920. A ’20 brochure s the earliest printed reference to the Peterson System. The pipe came in three quality grades (no mark, 2 or 3) until 1959, thereafter De Luxe (no mark), Premier (the old 2) and Standard (the old 3). See Grading Marks.

Now it was time to work on the pipe. Jeff had done a great job cleaning up the pipe as usual. He reamed the pipe with a PipNet reamer and cut back the cake back to the bare briar. He cleaned up the walls with a Savinelli Fitsall Pipe Knife. He scrubbed the interior of the bowl and shank with pipe cleaners, cotton swabs and alcohol to remove the tars and oils. He scrubbed the exterior of the pipe with Murphy’s Oil Soap and a tooth brush to remove the grime from the finish. He worked on the rim top lava and darkening with the soap and tooth brush. He scrubbed the inside of the stem with alcohol and pipe cleaners. He scrubbed the exterior with Soft Scrub and then soaked it in Before & After Deoxidizer. He washed it off with warm water to remove the Deoxidizer. The pipe looked far better when it arrived.    I took some close up photos of the rim top and also of the stem surface. I wanted to show how well it had cleaned up. The rim top looked to be in good condition and the inner edge looked good as well. I also took close up photos of the stem to show the tooth marks on the surface near the button.  I took photos of the stamping on the underside of the shank. It is faint but reads as noted above. I also took a photo of the nickel ferrule.   I removed the stem and took a photo of the pipe to have a look at the parts and overall look.I restained the faded spots on the sides of the bowl and the rim top with a Walnut and a Black stain pen. The combination of colours worked well to blend it with the rest of the bowl and shank colours.  I worked some Before & After Restoration Balm into the surface of the briar with my fingertips and a horsehair shoe brush to clean, enliven and protect the briar. I let the balm sit for 15 minutes and then buffed with a cotton cloth to raise the shine. The photos show the bowl at this point in the restoration process.     .   I set the bowl aside and turned my attention to the stem. I “painted” the stem and button surface with the flame of a lighter to lift the tooth marks. It worked amazingly well and the they lifted completely. I sanded the stem with 220 grit sandpaper to blend them into the surface of the vulcanite. I started polishing the stem by wet sanding it with 400 grit wet dry sandpaper. I polished the stem with micromesh sanding pads – wet sanding with 1500-12000 grit sanding pads. I wiped it down after each sanding pad with Obsidian Oil. I polished it with Before & After Pipe Stem Polish – both Fine and Extra Fine. I am excited to finish this Peterson’s System 71 Rusticated Straight Billiard. I put the pipe back together and buffed it with Blue Diamond on the buffing wheel. I gave the bowl and the stem multiple coats of carnauba wax. I hand buffed the pipe with a clean buffing pad to raise the shine. It is fun to see what the polished bowl looks like with beautiful flame grain all around it. Added to that the polished Sterling Silver band and the black vulcanite stem was beautiful. This smooth Classic Older Peterson’s System 71 Billiard is great looking and the pipe feels great in my hand. It is light and well balanced. Have a look at it with the photos below. The dimensions are Length: 5 inches, Height: 1 ¾ inches, Outside diameter of the bowl: 1 ¼ inches, Chamber diameter: ¾ of an inch. The weight of the pipe is 29grams/1.02oz. It is a beautiful pipe and one that will be stay in my collection for the time being. It is yet another of my friend’s estate that will stay in my trust. Thanks for walking through the restoration with me as I worked over this pipe. Thanks to each of you who are reading this blog.

Restoring a Peterson’s Product “K” Briar Republic Era System Standard 338 Bent Billiard


Blog by Steve Laug

The next pipe on the work table was another mystery. It was in the bin with my friend’s estate pipes but it had not been cleaned or worked on by Jeff at all. Sorting through his pipes I came across this one. I had no idea where it had come from and where I had picked it up. It was just a present pipe to work on that is all. This one is a bent billiard with a fishtail stem. It had some interesting grain around the bowl but it also had a lot of damage on the rim top. The inner edge of the bowl was damaged and the bowl was completely out of round. Somewhere along the way it had been reamed back to bare briar. The pipe is stamped on the left side of the shank and reads “K” Briar in script at a bit of a diagonal on the shank. On the right side it is stamped “A Peterson’s Product” [over] Made in the Rep. of Ireland (two lines) to the right of that near the bowl junction the shape number 338 is stamped. The stem was oxidized, calcified and had tooth chatter and marks on the top and underside near the P-lip style button. There was no identifying stamp on the stem. The pipe showed promise but it was very dirty. I took these photos before I started my work on it.    I took a photo of the rim top and bowl to give a clear picture of the condition of bowl and the damage to the rim top and edges. I also took photos of the top and underside of the stem to show the oxidation, calcification and chatter and tooth marks.     He took photos of the stamping on the shank and the nickel ferrule. It reads as noted above and is faint but readable.   I removed the stem from the shank and took a photo of the pipe as a whole. It showed a lot of promise. I am including the information from Pipedia’s article on Peterson pipes. It is a great read in terms of the history of the brand (https://pipedia.org/wiki/Peterson). I have included a bit of the pertinent history here.

1950 – 1989 The Republic Era – From 1950 to the present time, the stamp for this era is “Made in the Republic of Ireland” in a block format generally in three lines but two lines have been used with or without Republic being abbreviated.

I knew that I was dealing with a Republic Era pipe made between 1950-1989. It was a smooth Peterson’s “K” Briar 338 Bent Billiard with nice grain. The finish was stained with a combination of brown stains.

I turned to “The Peterson Pipe” by Mark Irwin and Gary Malmberg to get some background on the “K” Briar. On page 305 it had the following information.

K Briar (1937-2005) The K Briar appeared as a “Product Line” or lowest quality prior to WWII but was not widely marketed until after 1940. Catalog illustrations show pipes stamped Peterson’s over Dublin over K but most document specimens read K over Briar over A “Peterson’s Product” of “K” Briar over A “Peterson’s Product” or simply “K” Briar in italics. The model appears in occasional catalogs until 2005. An early 1980’s catalog lists a K Etched line with small patches of the bowl rusticated.

Now it was time to work on the pipe. To start my work on the pipe I reamed the bowl with a Savinelli Fitsall pipe knife. I finished the bowl by sanding the walls with 220 grit sandpaper wrapped around a piece of dowel.    I scraped the rim top lava with the edge of the Fitsall knife. I was able to remove all of the lava buildup and leave a smooth rim top.I scraped out the buildup in the shank with a dental spatula to remove the thick coat of tars and oils.  I cleaned out the shank and the mortise as well as the airway into the bowl and in the stem with alcohol, pipe cleaners and cotton swabs. It came out quite clean and smelled significantly better. I scrubbed the pipe with undiluted Murphy’s Oil Soap and a tooth brush to remove the grime on the bowl and shank. I rinsed it off with warm running water and dried it off with a soft towel. The pictures show the grain around the sides of the pipe.    I put the stem in a bath of Briarvilles’ Dexodizer to soak while I addressed the damage on the rim top and edges. I topped the bowl on a topping board with 220 grit sandpaper and started reshaping the inner edge of the bowl with a folded piece of 220 grit sandpaper.    I polished the briar with micromesh sanding pads – wet sanding with 1500-12000 grit pads. I wiped the bowl down after each pad with a damp cloth.     I restained the rim top with a combination of Walnut and Cherry stain pens to blend in the colour of those areas to the rest of the bowl.I rubbed the bowl down with Before & After Restoration Balm. I worked it into the surface of the bowl sides and shank with my fingertips. The product works to clean, enliven and protect the briar. I let the balm sit for a little while and then buffed with a cotton cloth to raise the shine. I set the bowl aside and turned my attention to the stem. Earlier in the day I had dropped the stem in a Deoxidizer Bath from Briarville and let it sit most of the day. Once I removed it from the bath it had soaked for about 5-6 hours. I removed it and wiped it down with a paper towel. I worked it over pretty roughly to remove the calcification and oxidation that sat on top of the vulcanite. It came out looking very good.  I polished the vulcanite stem with micromesh sanding pads – 1500-12000 grit pads. I wiped it down with a damp cloth after each sanding pad. I used Before & After Pipe Polish – both Fine and Extra Fine to further polish the stem.    This Peterson’s Product “K” Briar 338 Bent Billiard with a vulcanite stem is a great looking pipe now that it has been restored. The beautiful grain that shines through the polished finish is stunning. I put the stem back on the bowl and carefully buffed the pipe with Blue Diamond on the buffing wheel. I gave the bowl and the stem multiple coats of carnauba wax on the buffing wheel and followed that by buffing the entire pipe with a clean buffing pad. I hand buffed the pipe with a microfiber cloth to deepen the shine. The grain just popped with the wax and the buffing. It is a beauty! The finished Peterson’s “K” Briar Bent Billiard 338 fits nicely in the hand and feels great. Give the finished pipe a look in the photos below. The dimensions of the pipe are Length: 5 inches, Height: 1 ¾ inches, Outside diameter of the bowl: 1 ¼ inches, Chamber diameter: ¾ of an inch. The weight of the pipe is 39gr/1.34oz. If you are interested in adding this pipe to your collection send me a message or an email. Thanks for reading this blog and my reflections on the pipe while I worked on it. There are many more to come!

Breathing New Life into a Peterson’s “Kapruf” 122 Sandblast Dublin


Blog by Steve Laug

The next pipe I have chosen is another sandblasted Peterson’s Kapruf. This Dublin shaped pipe has a medium brown finish around the bowl sides and shank and a nice looking shallow sandblast finish. It also came to us from the estate of Anglican minister that was a great friend of mine here in Canada. The smooth rim top and edges were in good condition. The finish on the bowl sides was dirty. It was stamped on the underside of the shank and read 122 on the heel of the bowl followed by Peterson’s [over] Kapruf. That is followed by Made in [over] Ireland. There was a heavy cake in the bowl and thick lava on the rim top. The edges of the bowl seemed to be ok but I would know more once it was cleaned. The was oxidized, calcified and there were heavy tooth marks on the top and underside and on the button. The “P” stamp on the left side of the taper stem looks good. Jeff took photos of the pipe before his cleanup work. They tell the story and give a glimpse of the promise that we see in this pipe. Jeff took photos of the rim top and stem to show the general condition of the pipe. The bowl is heavily caked and the rim top and edges have some lava overflow. The stem is oxidized, calcified has tooth marks on the top and underside near the button.     Jeff took a photo of the bowl side and heel to show the look of the sandblast that on this bowl. It is an interesting looking pipe.    He took photos of the underside of the bowl and shank to show the stamping. The stamping is readable in the photos below and is as noted above.   I am including the information from Pipedia’s article on Peterson pipes. It is a great read in terms of the history of the brand (https://pipedia.org/wiki/Peterson).

I turned to “The Peterson Pipe” by Mark Irwin and Gary Malmberg to get some background on the Kapruf line. On page 306 it had the following information.

Kapruf and “Kapruf” (c.1922-87) Sandblast (hence the name, Kapp-rough) P-lip or fishtail mouthpiece, in catalogs from 1940-87. Early documented specimens stamped IRISH over FREE STATE, no Eire specimens documented. Mid-century specimens may be stamped LONDON MADE [over] ENGLAND or MADE IN ENGLAND forming a circle or MADE IN [over] IRELAND, all dating no later than 1970. Those of recent vintage stamped MADE IN THE[over] REPUBLIC [over]OF IRELAND.

I knew that I was dealing with a KAPRUF made before 1970 (or as they say in the book above “Mid-Century” as it is stamped MADE IN [over] IRELAND as noted above. That fit with the majority of his pipes so I was clear what I was working on. Now it was time to work on the pipe.

Jeff had done a great job cleaning up the pipe as usual. He reamed the pipe with a PipNet reamer and cut back the cake back to the bare briar. He cleaned up the walls with a Savinelli Fitsall Pipe Knife. He scrubbed the interior of the bowl and shank with pipe cleaners, cotton swabs and alcohol to remove the tars and oils. He scrubbed the exterior of the pipe with Murphy’s Oil Soap and a tooth brush to remove the grime from the finish. He worked on the rim top lava and darkening with the soap and tooth brush. He scrubbed the inside of the stem with alcohol and pipe cleaners. He scrubbed the exterior with Soft Scrub and then soaked it in Before & After Deoxidizer. He washed it off with warm water to remove the Deoxidizer. The pipe looked far better when it arrived. I took some close up photos of the rim top and also of the stem surface. I wanted to show how thin the back of the inner edge of the bowl is. You can see the out of round bowl is on the sides and rear of the bowl. There was some darkening on the back of the rim top but the edges looked very good. I also took close up photos of the stem to show the tooth marks on the surface of the stem and button. I took a photo of the stamping on the underside of the shank. You can see that it is stamped as noted above. It is faint but very readable. I took the pipe apart and took a photo of the pipe. It is a good looking pipe and has a great looking sandblast. I decided to start by addressing the issue of the darkened rim top and edges of the bowl. I cleaned up both with a folded piece of 220 grit sandpaper. I was happy with the results.    I blended a Maple and a Walnut stain pen to match the colour around the bowl sides and the smooth, flat bottom of the shank.I polished the rim top with micromesh sanding pads – dry sanding it with 1500-12000 grit sanding pads. I wiped the briar down with a damp cloth after each sanding pad. I worked some Before & After Restoration Balm into the surface of the briar with my fingertips and a horsehair shoe brush to clean, enliven and protect the briar. I let the balm sit for 15 minutes and then buffed with a cotton cloth to raise the shine. The photos show the bowl at this point in the restoration process. I set the bowl aside and turned my attention to the stem. I filled in the tooth mark on the underside of the stem next to the button with clear super glue. Once the repair had cured I flattened it out with 220 grit sandpaper to blend them into the surface of the vulcanite. I started polishing the stem by wet sanding it with 400 grit wet dry sandpaper.   I polished the stem with micromesh sanding pads – wet sanding with 1500-12000 grit sanding pads. I wiped it down after each sanding pad with Obsidian Oil. I polished it with Before & After Pipe Stem Polish – both Fine and Extra Fine.   I am excited to finish this Peterson’s “Kapruf” 122 Made in Ireland Sandblast Dublin. I am really happy with how the bowl turned out when I consider the damage that needed to be addressed. I put the pipe back together and buffed it with Blue Diamond on the buffing wheel. I gave the bowl multiple coats of Conservator’s Wax and the stem multiple coats of carnauba wax. I buffed the pipe with a clean buffing pad to raise the shine. I hand buffed it with a microfibre cloth to deepen the shine. It is fun to see what the polished bowl looks like with the colours popping through the sandblast. Added to that the polished  black vulcanite taper stem was beautiful. This shapely Classic Peterson’s Made in Ireland Dublin is nice looking and the pipe feels great in my hand. It is light and well balanced. Have a look at it with the photos below. The dimensions are Length: 5 ¾ inches, Height: 1 ¾ inches, Outside diameter of the bowl: 1 ¼ inch, Chamber diameter: ¾ of an inch. The weight of the pipe is 29grams/1.02oz. It is a beautiful pipe and one that I soon put on the rebornpipes store I you are interested in carrying on the pipeman’s legacy. Thanks for walking through the restoration with me as I worked over this pipe. Thanks to each of you who are reading this blog.

The first for 2021 – A Resurrection of a Peterson’s “Kapruf” 132 Sandblast Apple


Blog by Steve Laug

The next pipe I have chosen is sandblasted Peterson’s Kapruf. This Apple has a medium brown finish around the bowl sides and shank and a very nice looking sandblast finish. It also came to us from the estate of Anglican minister that was a great friend of mine here in Canada. The rim top and top of the apple were in very rough condition. The condition caused me to pause. I talked with Jeff about taking the part from this and scrapping the bowl but I find that hard to do! After spending time chatting about it and turning it over in my hands for a bit I decided to give it a go and see what I could do with it. The finish on the bowl sides was dirty. It was stamped on the underside of the shank and read 132 on the heel of the bowl followed by Peterson’s [over] “Kapruf”. That is followed by London Made [over] England. There was a heavy cake in the bowl and lava filling in the sandblast on the rim top. The back inner edge of the bowl was badly damaged and appeared to be quite thin. I would know more once it was cleaned. The was oxidized, calcified and there were heavy tooth marks on the top and underside and on the button. The “P” stamp on the left side of the taper stem was worn off. Jeff took photos of the pipe before his cleanup work. They tell the story and give a glimpse of the promise that we see in this pipe. Jeff took photos of the rim top and stem to show the general condition of the pipe. The bowl is heavily caked and the rim top and edges have some lava overflow. There is some major damage on the back of the inner edge of the bowl. The bowl is really out of round and thin on the back side. The stem is oxidized, calcified has tooth marks on the top and underside near the button.  Jeff took some photos of the bowl sides and heel to show the look of the sandblast that was around this bowl. It is an interesting looking pipe.  He took photos of the underside of the bowl and shank to show the stamping. The stamping is readable in the photos below and is as noted above.    I am including the information from Pipedia’s article on Peterson pipes. It is a great read in terms of the history of the brand (https://pipedia.org/wiki/Peterson).

I turned to “The Peterson Pipe” by Mark Irwin and Gary Malmberg to get some background on the Kapruf line. On page 306 it had the following information.

Kapruf and “Kapruf” (c.1922-87) Sandblast (hence the name, Kapp-rough) P-lip or fishtail mouthpiece, in catalogs from 1940-87. Early documented specimens stamped IRISH over FREE STATE, no Eire specimens documented. Mid-century specimens may be stamped LONDON MADE [over] ENGLAND or MADE IN ENGLAND forming a circle or MADE IN [over] IRELAND, all dating no later than 1970. Those of recent vintage stamped MADE IN THE[over] REPUBLIC [over]OF IRELAND.

I knew that I was dealing with a KAPRUF made before 1970 (or as they say in the book above “Mid-Century” as it is stamped LONDON MADE [over] ENGLAND as noted above. That fit with the majority of his pipes so I was clear what I was working on. Now it was time to work on the pipe.

Jeff had done a great job cleaning up the pipe as usual. He reamed the pipe with a PipNet reamer and cut back the cake back to the bare briar. He cleaned up the walls with a Savinelli Fitsall Pipe Knife. He scrubbed the interior of the bowl and shank with pipe cleaners, cotton swabs and alcohol to remove the tars and oils. He scrubbed the exterior of the pipe with Murphy’s Oil Soap and a tooth brush to remove the grime from the finish. He worked on the rim top lava and darkening with the soap and tooth brush. He scrubbed the inside of the stem with alcohol and pipe cleaners. He scrubbed the exterior with Soft Scrub and then soaked it in Before & After Deoxidizer. He washed it off with warm water to remove the Deoxidizer. The pipe looked far better when it arrived.   I took some close up photos of the rim top and also of the stem surface. I wanted to show how thin the back of the inner edge of the bowl is. You can see the out of round bowl is on the sides and rear of the bowl. There was some darkening on the back of the rim top but the edges looked very good. I also took close up photos of the stem to show the tooth marks on the surface of the stem and button.      I took a photo of the stamping on the underside of the shank. You can see that it is stamped as noted above. It is faint but very readable. I took the pipe apart and took a photo of the pipe. It is a good looking pipe and has a great looking sandblast. I decided to start by addressing the issue of the thin rim top and edge at the back of the bowl. I took a photo of the bowl to show the damage that needed to be addressed. I measured the thickness of the walls at the back of the bowl and found that the damage was actually not too deep in the bowl. I figured I could top the bowl and gain some thickness back and then use a Dremel to put a sandblast like finish on the rim top.I topped the bowl with 220 grit sandpaper on a topping board to remove the damaged areas. Once that was finished I had some solid rim top and edge to work with on the back of the bowl. The second photo below shows the starting point of the bowl after the topping. I used the Dremel and sanding drum running at a low speed to bring the bowl back into round. Of course I forgot to take photos of that part of the process. You can see the results in the photo below. I used a Dremel and dental burrs to rusticate the top of the bowl to give it a rusticated finish that approximates the style of the sandblast on the rest of the bowl. I stained the rim to with a dark Walnut stain pen to lay an undercoat of colour to the rusticated rim top. I used a Cherry stain pen to give a top coat on the rim top. I am pleased with the over all look and feel of the newly rusticated rim top.    I worked some Before & After Restoration Balm into the surface of the briar with my fingertips and a horsehair shoe brush to clean, enliven and protect the briar. I let the balm sit for 15 minutes and then buffed with a cotton cloth to raise the shine. The photos show the bowl at this point in the restoration process. I set the bowl aside and turned my attention to the stem. I “painted” the stem and button surface with the flame of a lighter to lift the tooth marks. It worked amazingly well and the majority of them lifted completely or significantly. I filled in the remaining marks with clear super glue. Once the repairs had cured I flattened them out with 220 grit sandpaper to blend them into the surface of the vulcanite. I started polishing the stem by wet sanding it with 400 grit wet dry sandpaper.   I polished the stem with micromesh sanding pads – wet sanding with 1500-12000 grit sanding pads. I wiped it down after each sanding pad with Obsidian Oil. I polished it with Before & After Pipe Stem Polish – both Fine and Extra Fine.  I am excited to finish this Peterson’s “Kapruf” 132 London Made Sandblast Apple. I am really happy with how the bowl turned out when I consider the damage that needed to be addressed. I put the pipe back together and buffed it with Blue Diamond on the buffing wheel. I gave the bowl multiple coats of Conservator’s Wax and the stem multiple coats of carnauba wax. I buffed the pipe with a clean buffing pad to raise the shine. I hand buffed it with a microfibre cloth to deepen the shine. It is fun to see what the polished bowl looks like with the colours popping through the sandblast. Added to that the polished  black vulcanite taper stem was beautiful. This shapely Classic English Peterson’s Sandblast Apple is nice looking and the pipe feels great in my hand. It is light and well balanced. Have a look at it with the photos below. The dimensions are Length: 5 ½ inches, Height: 1 ½ inches, Outside diameter of the bowl: 1 ¼ inch, Chamber diameter: ¾ of an inch. The weight of the pipe is 32grams/1.13oz. It is a beautiful pipe and one that I soon put on the rebornpipes store I you are interested in carrying on the pipeman’s legacy. Thanks for walking through the restoration with me as I worked over this pipe. Thanks to each of you who are reading this blog.

Breathing Life a Peterson’s Pre-Republic 1947-1949 “Sterling” 264 Lumberman


Blog by Steve Laug

The next pipe I have chosen is smooth finished Peterson’s “Sterling” pipe. This one is part of the Canadian shape family and is what I would call a Lumberman as it has an oval shank and a saddle stem. It is shown as the second pipe in the photo to the left. It has a medium brown coloured finish with amazing grain around the bowl sides and shank. It is also incredibly dirty.

It also came to us from the estate of Anglican minister that was a great friend of mine here in Canada. I was in the airport in Hong Kong when his daughter contacted me to tell me of his death and asked if I wanted to take on his pipes. I told her that I was sad to hear of his death but would gladly take on his pipes to restore and sell.

This Lumberman has a silver band on the shank that was badly oxidized. The grime on the finish was ground into the finish on the bowl sides. The contrast of the brown stains the grain really pop. It was stamped on the topside of the shank and read Peterson’s [over] “Sterling”. It was stamped on the underside and read Made in Ireland. The shape number 264 is next to the bowl on the right side. The tarnished band is stamped with K&P in shields [over] Sterling Silver [over] Peterson [over] Dublin. It was in filthy when Jeff brought it to the table. He remembers that the finish was dirty with grime ground into the briar sides and rim. There was a thin cake in the bowl and light spattering of lava on the rim top and the inner edge of the bowl. The stem was lightly oxidized and had light tooth marks and chatter on the top and underside on and near the button. Jeff took photos of the pipe before his cleanup work but cannot find them. I am including the photos of the pipe as it was when it arrived here. I am including the information from Pipedia’s article on Peterson pipes. It is a great read in terms of the history of the brand (https://pipedia.org/wiki/Peterson). I have included a bit of the pertinent history here.

The Made in Eire era stamps were from 1938 through till 1941. Peterson now stamped their pipes with “Made in Eire” in a circle format with “Made” and “Eire” in a circle with the “in” located in the centre of the circle. This was used during the years of 1938 – 41. Later they stamped their pipes with “Made in Ireland” in a circle format 1945-1947 and still later with “Made in Ireland” in a block format 1947-1949. The “Made in Ireland” block format came in either one line or two lines.

 I knew that I was dealing with a Pre-Republic Era pipe made between 1938-1949. The pipe is stamped with the Made in Ireland Block format stamp dating it between 1947-1949 so I am working on an old one. Now it was time to work on the pipe.

Jeff had done a great job cleaning up the pipe as usual. He reamed the pipe with a PipNet reamer and cut back the cake back to the bare briar. He cleaned up the walls with a Savinelli Fitsall Pipe Knife. He scrubbed the interior of the bowl and shank with pipe cleaners, cotton swabs and alcohol to remove the tars and oils. He scrubbed the exterior of the pipe with Murphy’s Oil Soap and a tooth brush to remove the grime from the finish. He worked on the rim top lava and darkening with the soap and tooth brush. He scrubbed the inside of the stem with alcohol and pipe cleaners. He scrubbed the exterior with Soft Scrub and then soaked it in Before & After Deoxidizer. He washed it off with warm water to remove the deoxidizer. I took some close up photos of the rim top and also of the stem surface. The rim top had some darkening on the back top and the inner edge had burn damage on the front right and back. It was in rough condition. I took close up photos of the stem to show the light tooth marks on the surface near the button. I took photos of the stamping on the top and underside of the shank. You can see that it is stamped as noted above. It is faint and readable.  I took the pipe apart and took a photo of the pipe. It is a good looking pipe and has some nice looking grain around the bowl. The band was loose on the shank so I removed it and cleaned up the glue that had dried on the shank with alcohol. I applied some all-purpose glue on the shank with a dental spatula and pressed on the band and aligned it with the shank end. I wiped off the excess glue with a damp cloth and set it aside for the glue to cure.I topped the bowl on a topping board with 220 grit sandpaper to remove the damage to the rim top and smooth out the damage on the bowl edges. Once I finished the rim top and edges looked much better.  I polished the Sterling Silver band on the shank with a jeweler’s cloth to remove the tarnish and polish it.        I decided to address the darkening around the rim top and the inner edge of the bowl next. I used a folded piece of 220 grit sandpaper to minimize the darkening and smooth out the inner and outer edges of the bowl.    I polished the briar with micromesh sanding pads – dry sanding with 1500-12000 grit sanding pads. I wiped the bowl down with a damp cloth after each sanding pad.  I blended a Maple, Cherry and Walnut stain pen to match the rim top to the rest of the surrounding briar. I worked some Before & After Restoration Balm into the surface of the briar with my fingertips and a horsehair shoe brush to clean, enliven and protect the briar. I let the balm sit for 15 minutes and then buffed with a cotton cloth to raise the shine. The photos show the bowl at this point in the restoration process.    I polished the stem with micromesh sanding pads – wet sanding with 1500-12000 grit sanding pads. I wiped it down after each sanding pad with Obsidian Oil. I polished it with Before & After Pipe Stem Polish – both Fine and Extra Fine.   I am excited to finish this Pre-Republic Era Peterson’s “Sterling” 264 Lumberman. I put the pipe back together and buffed it with Blue Diamond on the buffing wheel. I gave the bowl and the stem multiple coats of carnauba wax. I hand buffed the pipe with a clean buffing pad to raise the shine. It is fun to see what the polished bowl looks like with the grain popping all around it. Added to that the polished Sterling Silver band and the black vulcanite stem was beautiful. This smooth Classic Peterson’s Lumberman is nice looking and the pipe feels great in my hand. It is light and well balanced. Have a look at it with the photos below. The dimensions are Length: 6 inches, Height: 1 ¾ inches, Outside diameter of the bowl: 1 ¼ inches, Chamber diameter: ¾ of an inch. The weight of the pipe is 35grams/1.27oz. It is a beautiful pipe and one that will be on the Irish Pipe Makers section of the rebornpipes store soon. If you are interested in adding it to your collection let me know. Thanks for walking through the restoration with me as I worked over this pipe. Thanks to each of you who are reading this blog.