Tag Archives: Bowl – refinishing

Bringing a Silver Match Toronto 115 Squat Lumberman Back to Life


Blog by Dal Stanton

I acquired this Silver Match Toronto from what I have called, the ‘French Lot of 50’.  It was on the French eBay auction block and I was fortunate enough to have the winning bid.  When the Lot arrived here in Bulgaria from France, I unpacked it, took pictures of each pipe and posted them in the ‘For “Pipe Dreamers” Only!’ collection for potential new stewards to find and commission.  I have already restored many treasures in this French Lot of 50 for new stewards.  Robert saw the Silver Match Toronto 115 Squat Lumberman in the ‘Dreamers Only!’ collection and wrote me about commissioning it.  In my interchanges with Robert describing the pipe and what was involved in commissioning it, he wrote this in response:

Dal I’m still interested in commissioning the lumberman pipe and I’m in no rush. My wife and I just had a baby he just turned 1 week old! I found out about your restorations on Facebook on The Gentleman’s Pipe Smoking Society.  Thanks for returning my email and I can’t wait to see the outcome of this little pipe!

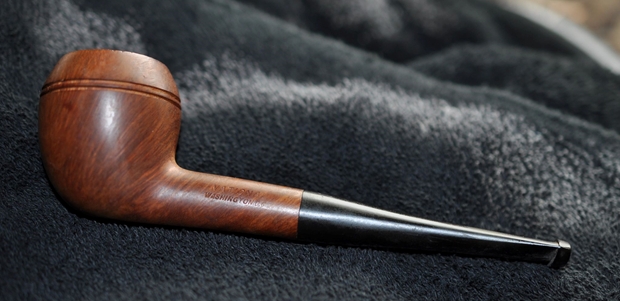
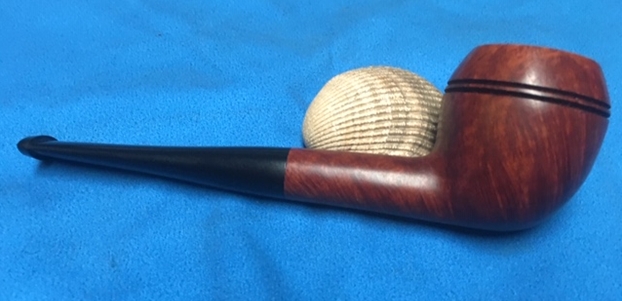
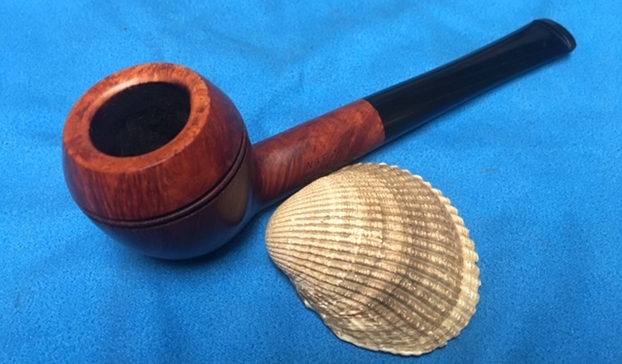
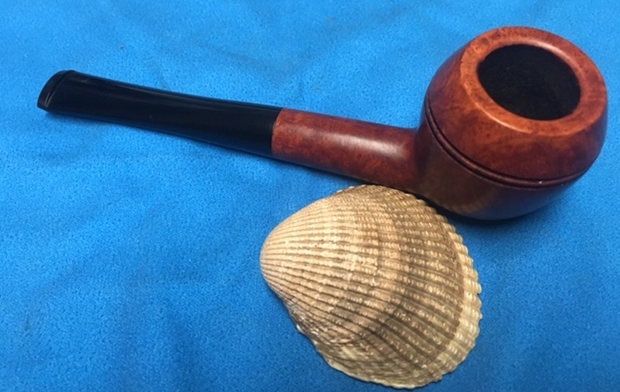
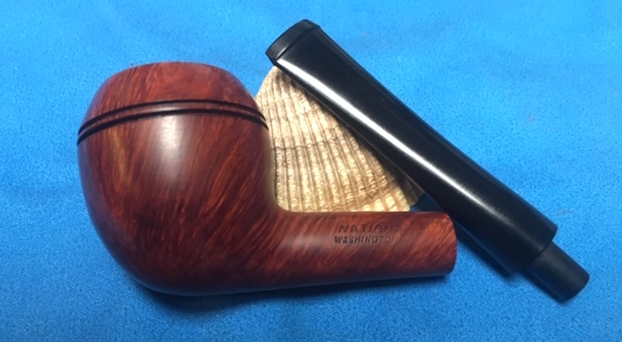
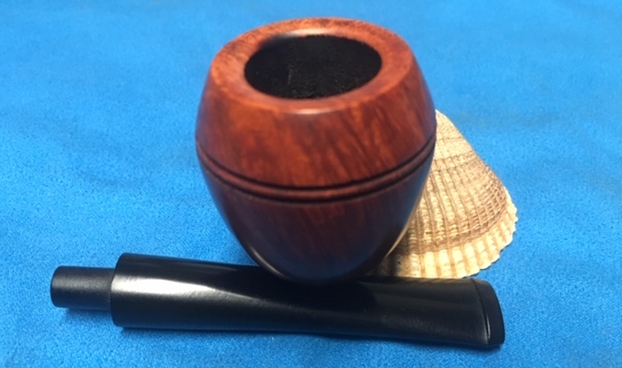
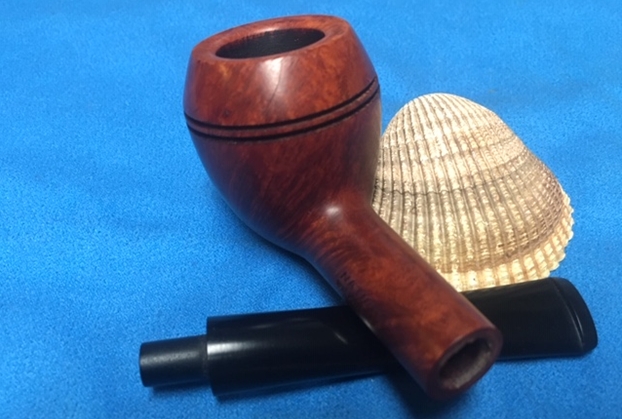
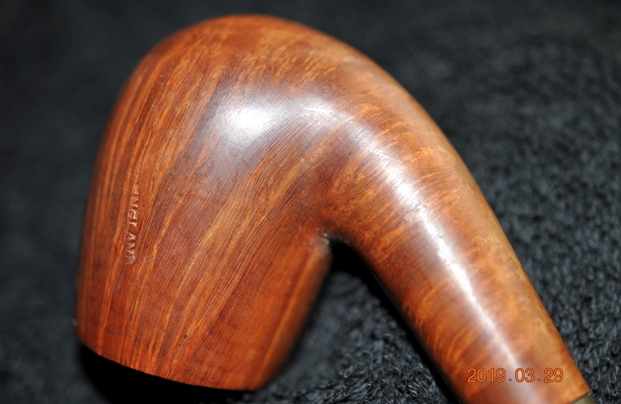
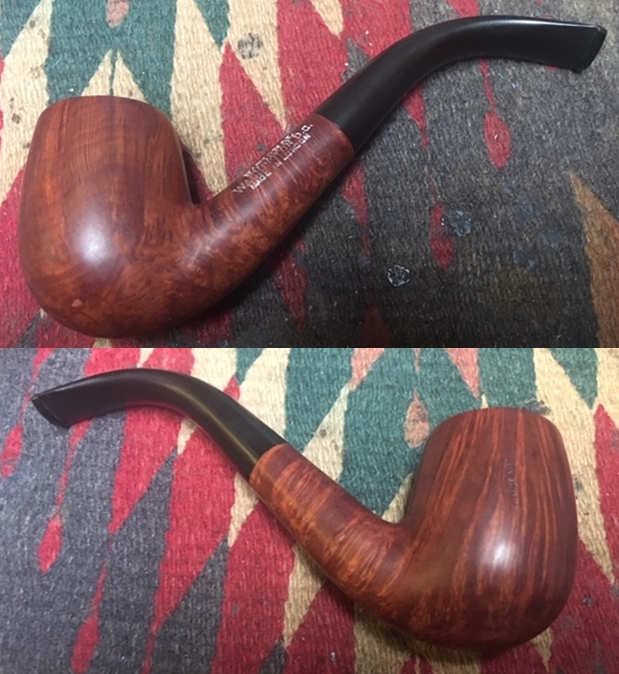
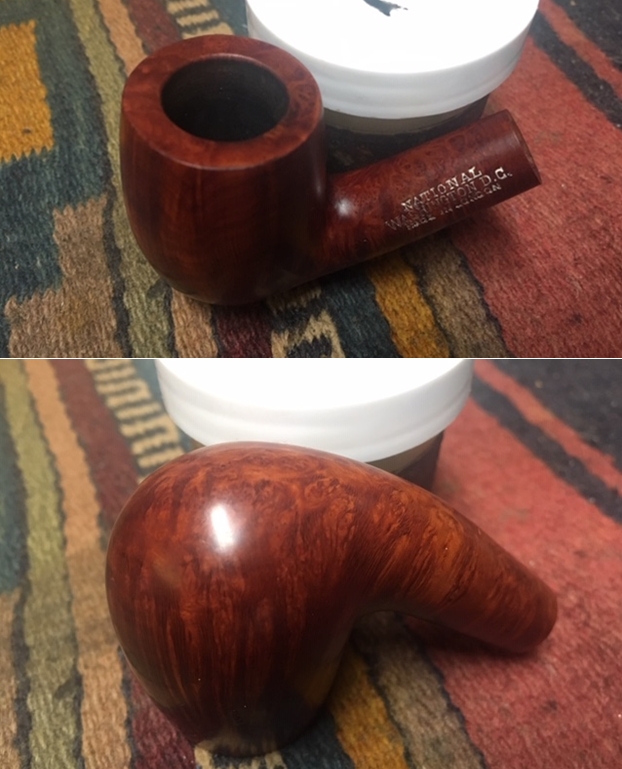
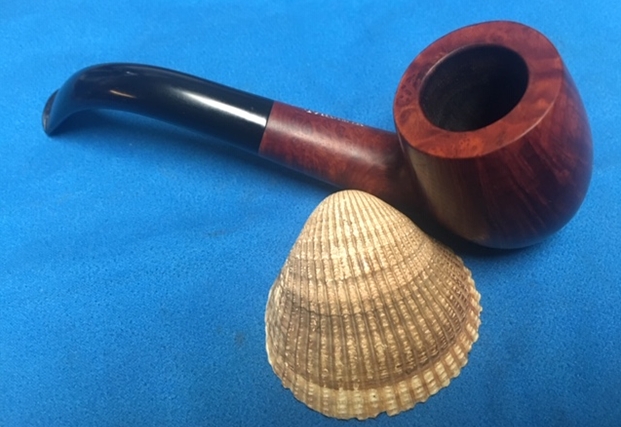
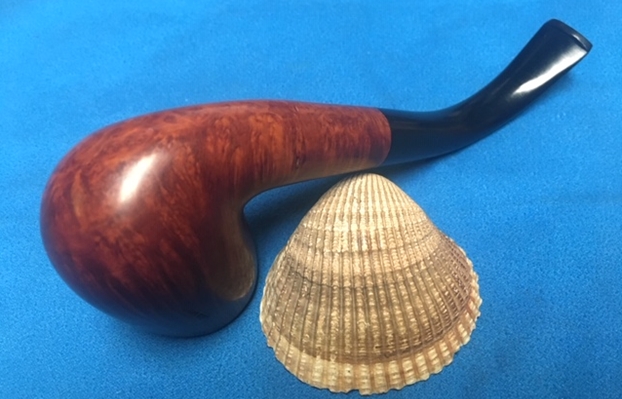
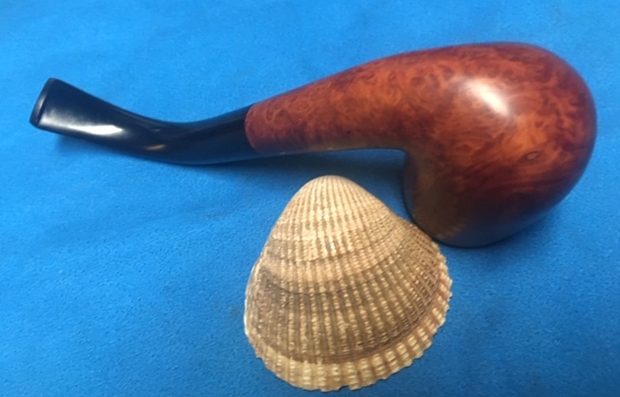
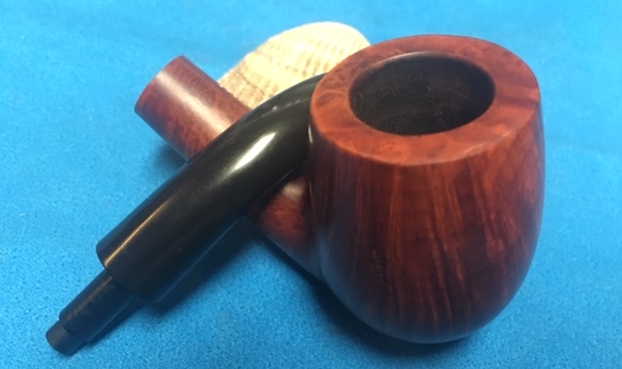
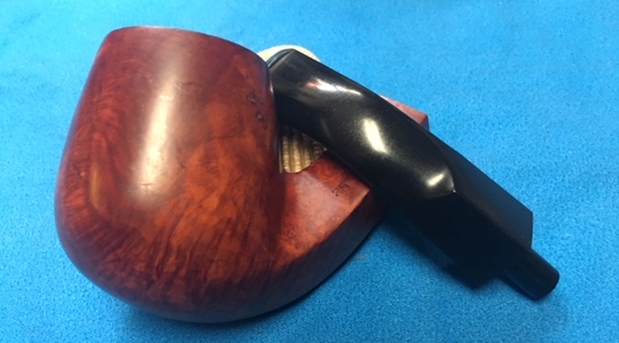
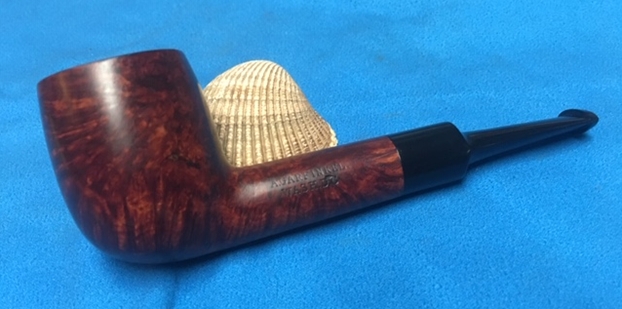
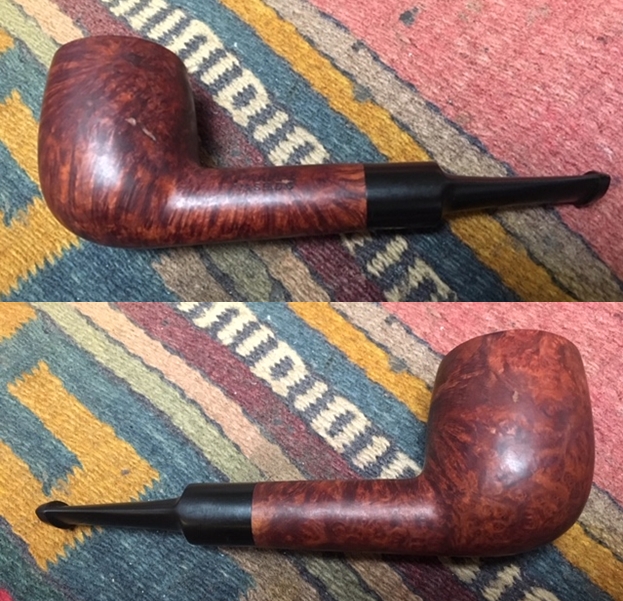
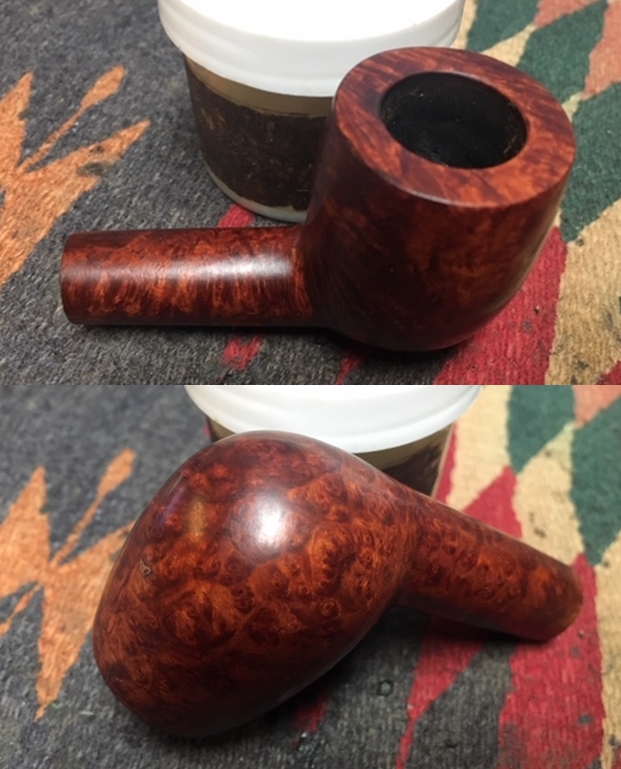
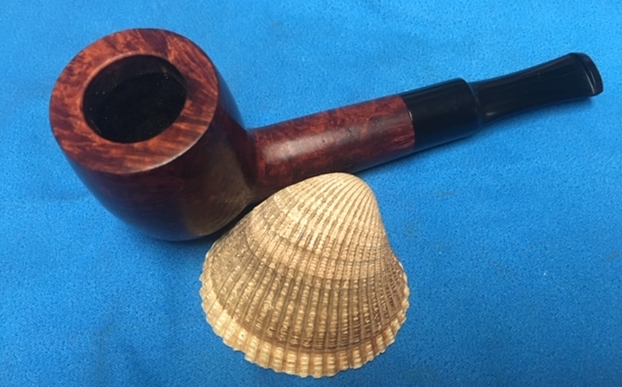
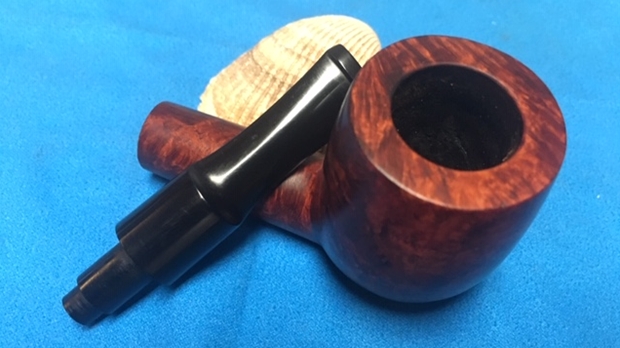
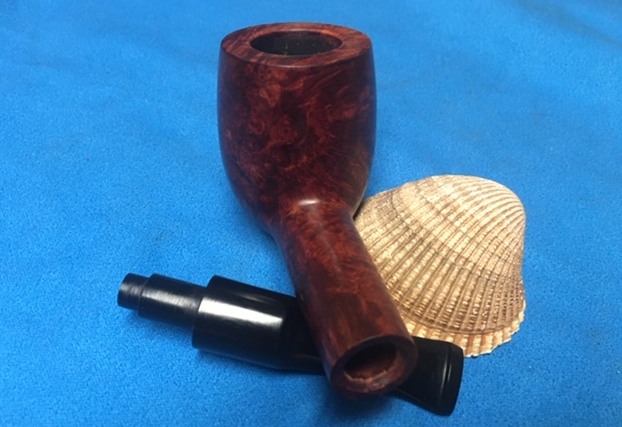
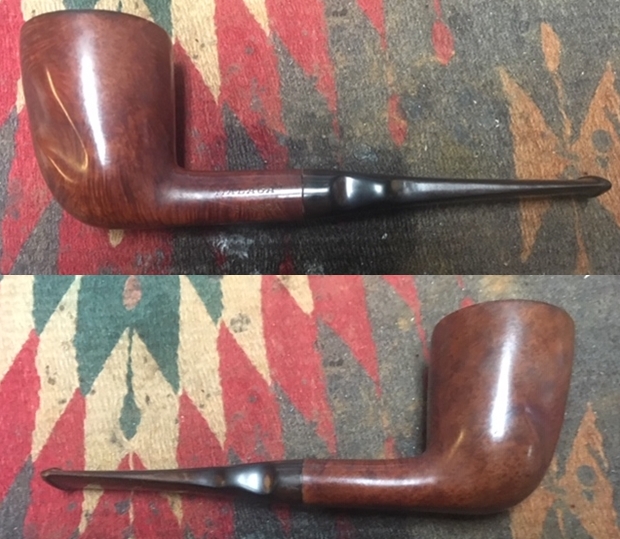
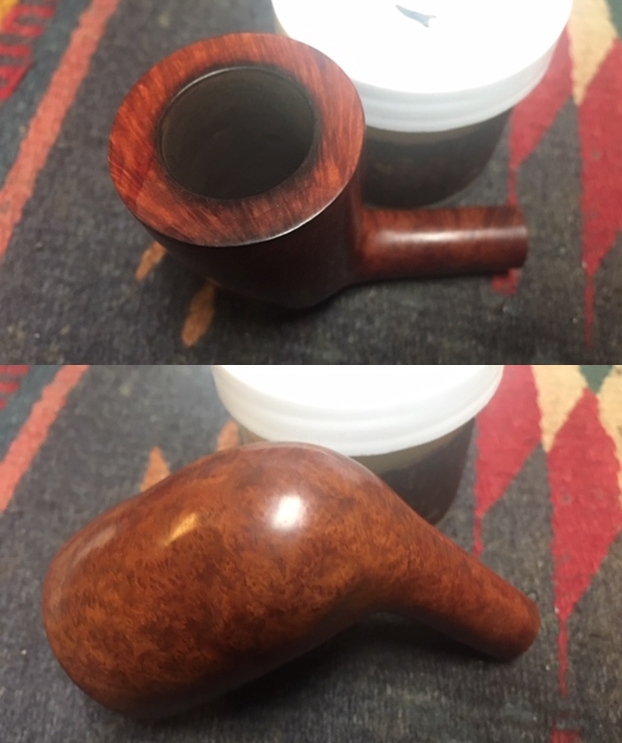
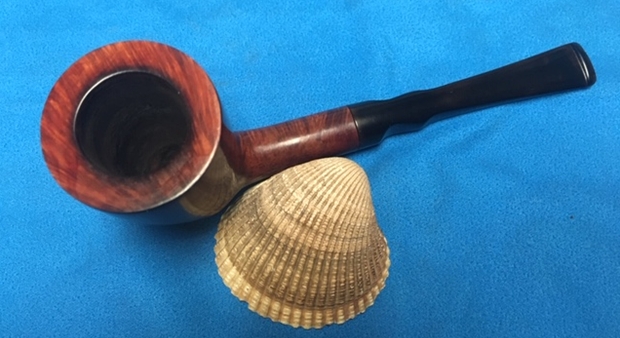
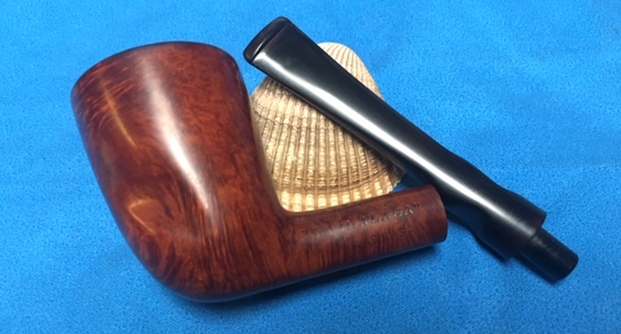
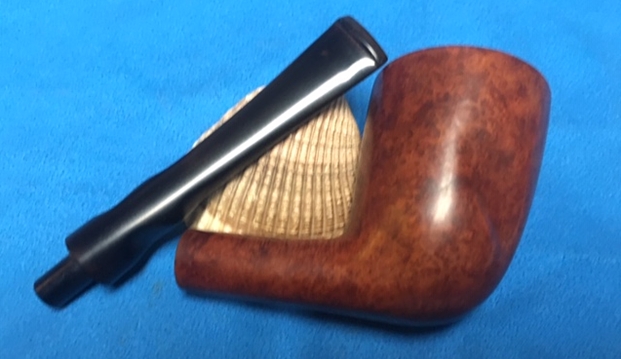
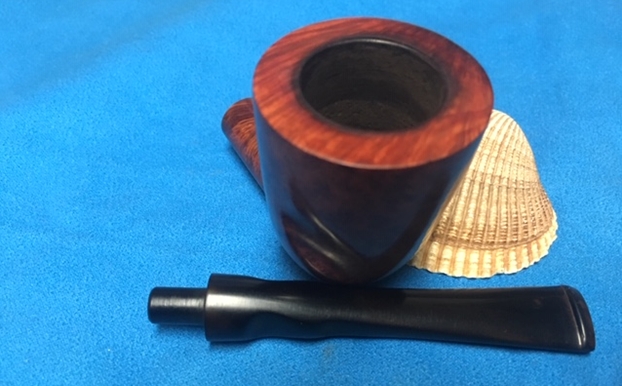
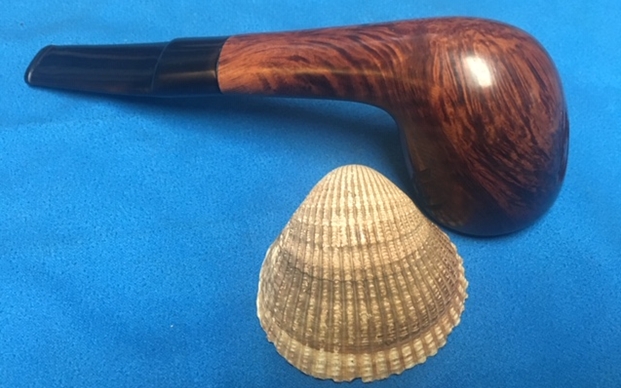
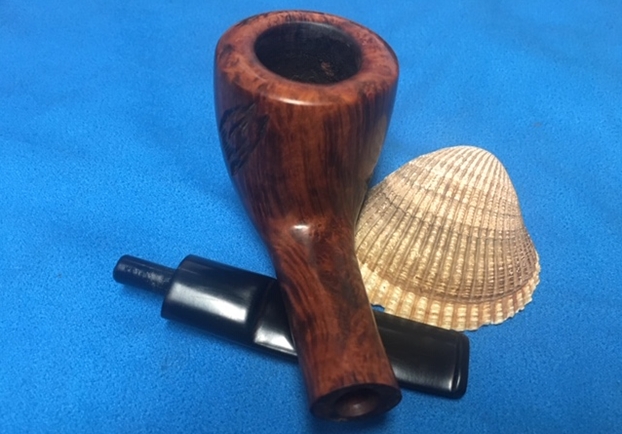
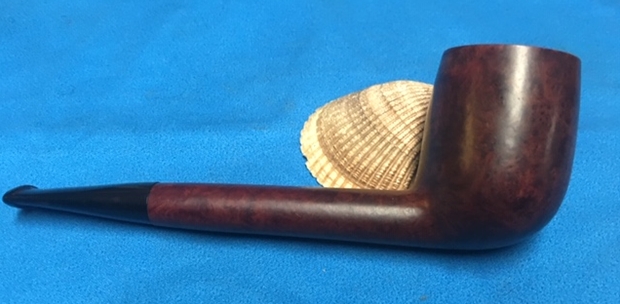
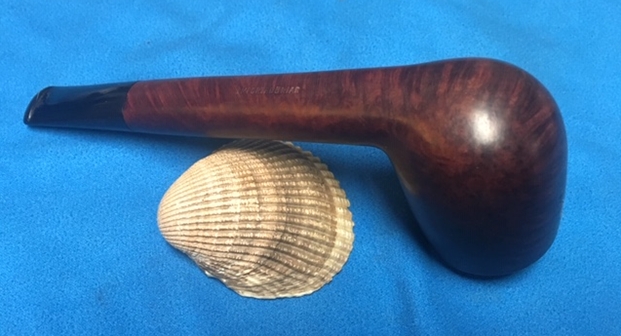
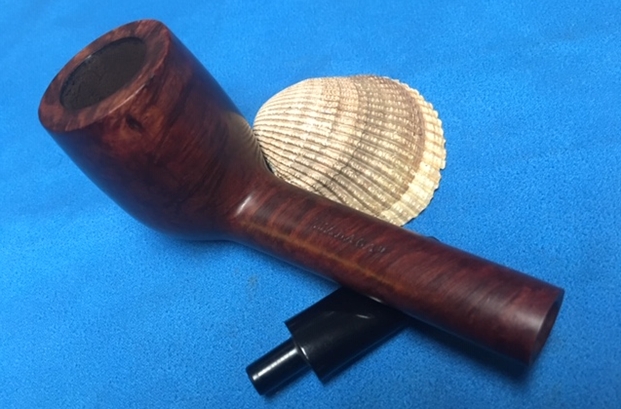
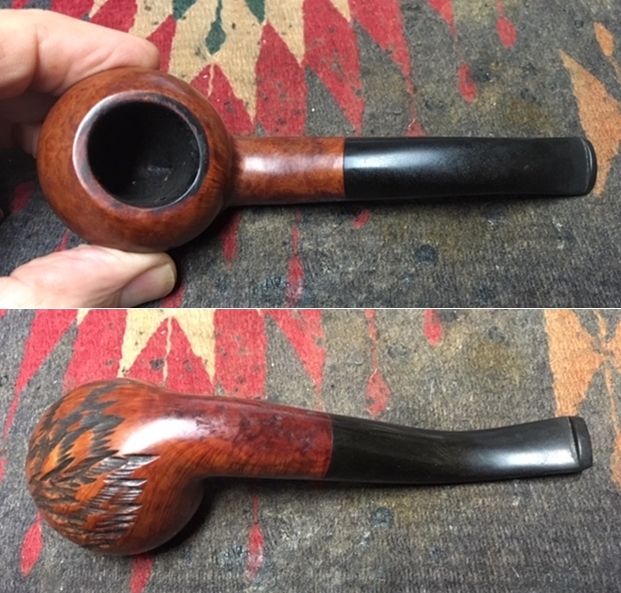
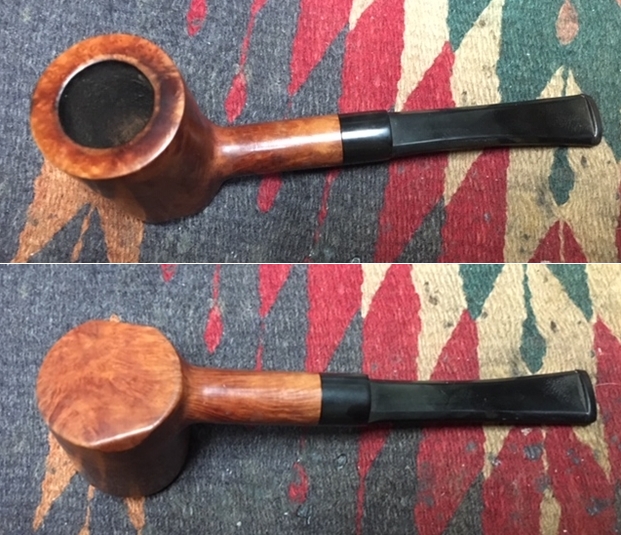
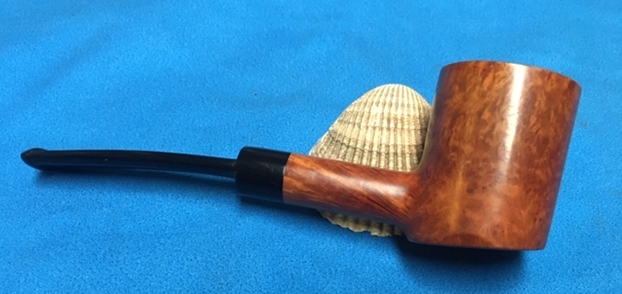
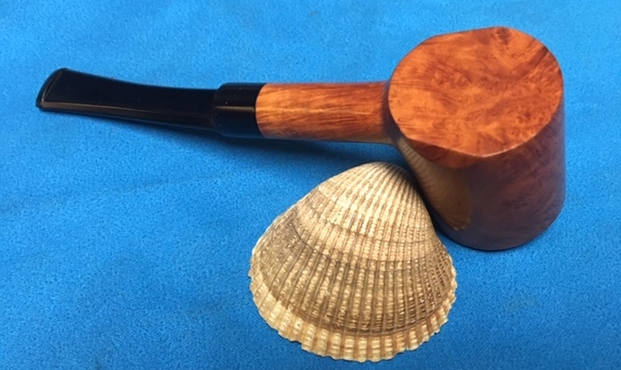
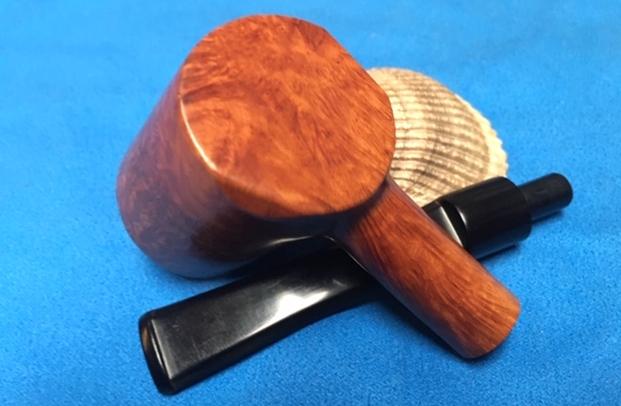
I also found out that he and his family reside in central Virginia and when we were writing, it was getting ready to snow where he lived!  Well, that was last November, and it has taken this long for Robert’s Lumberman to work its way up the queue and I’m thankful for Robert’s patience! – As well as all the stewards who commission pipes which benefit the Daughters of Bulgaria – women and girls who have been trafficked and sexually exploited.  Here’s a picture of the original Lot of 50 in the ‘wild’ that I saw on eBay – the Lumberman it identified with an arrow.Now with Robert’s commission on my worktable, I take more pictures to show this smart squat Lumberman – I call it ‘Squat’ but the bowl is large and will handle a nice packing of one’s favorite blend. 
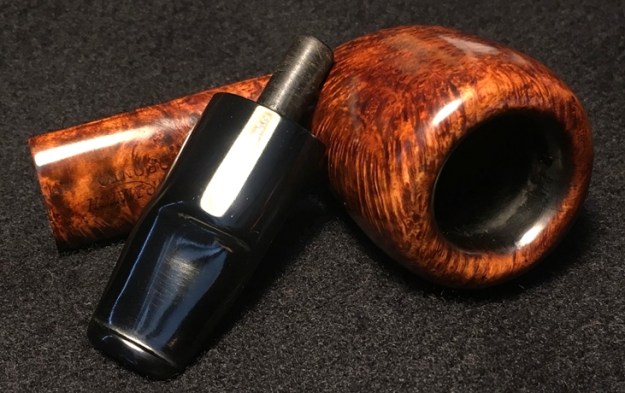
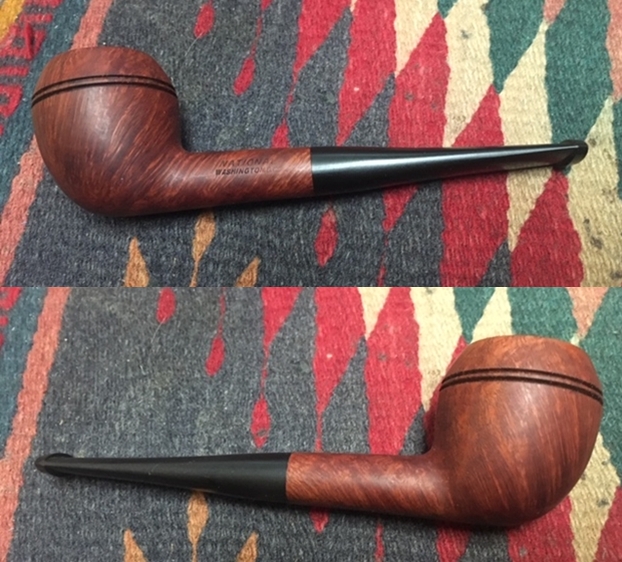
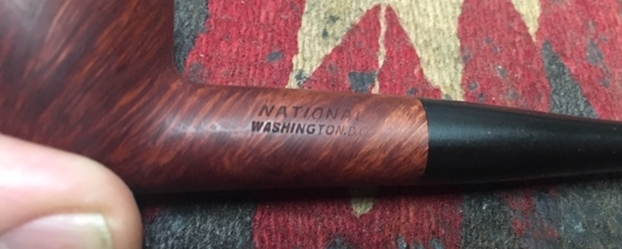
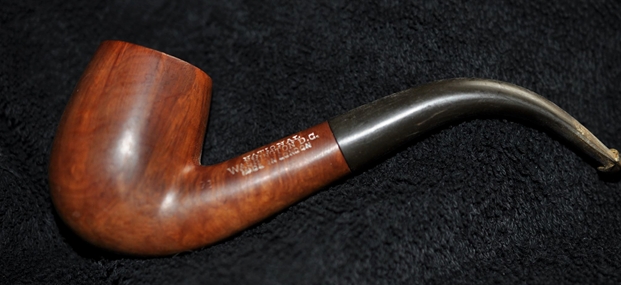
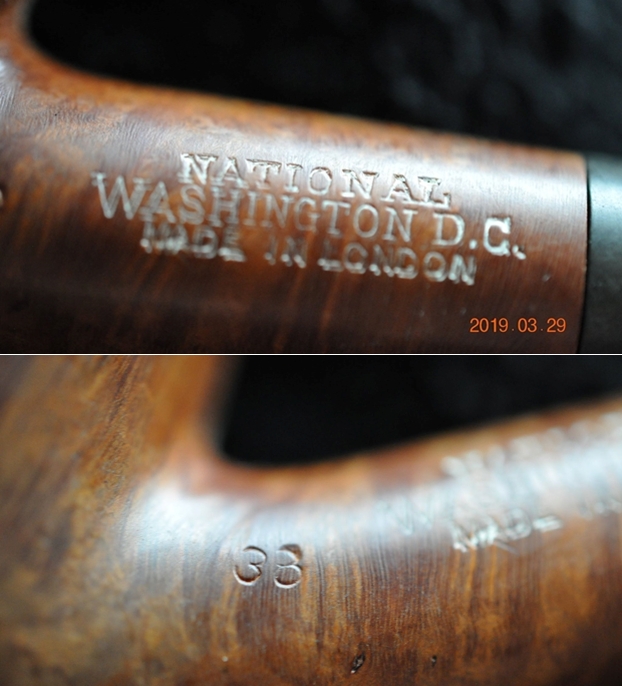
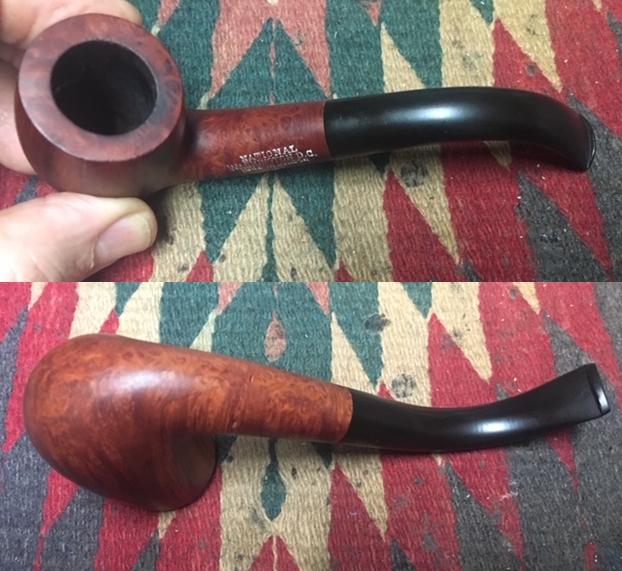
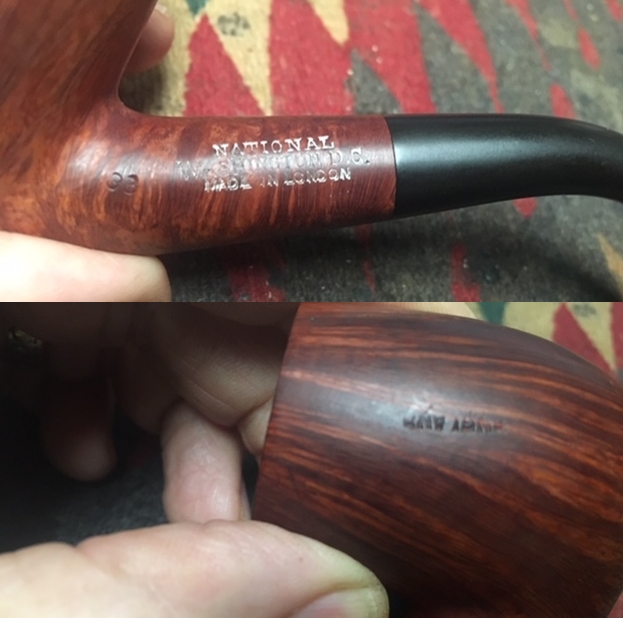
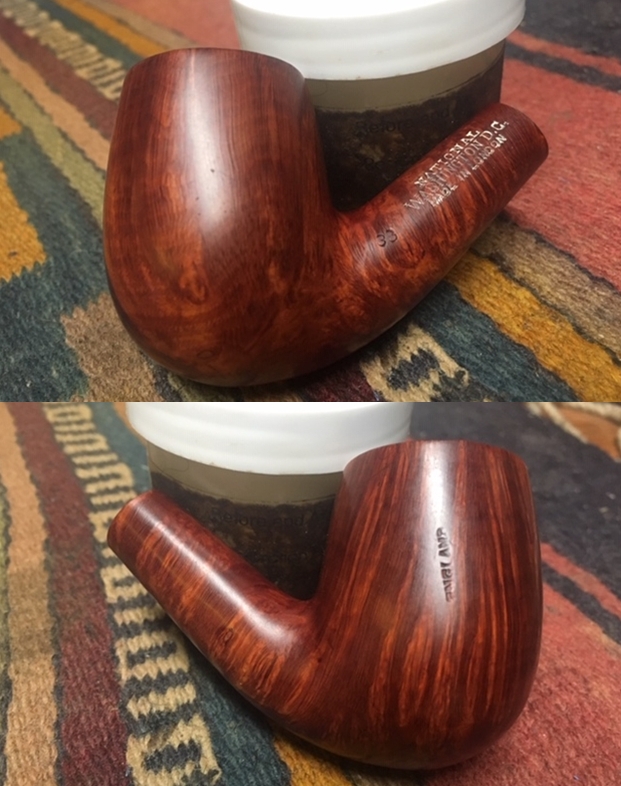
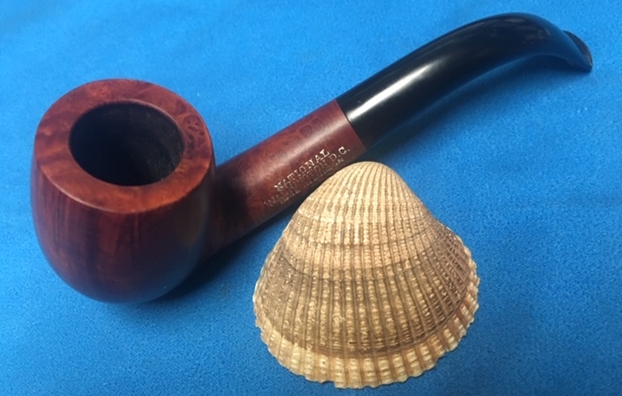
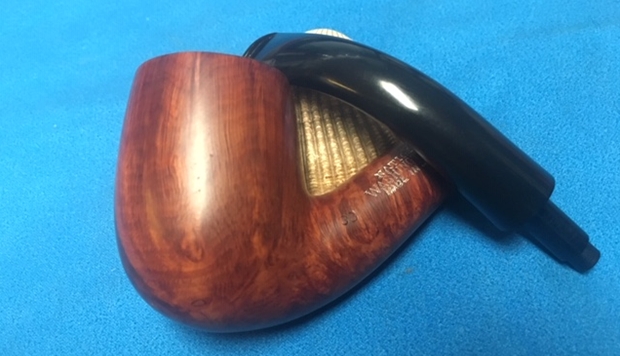
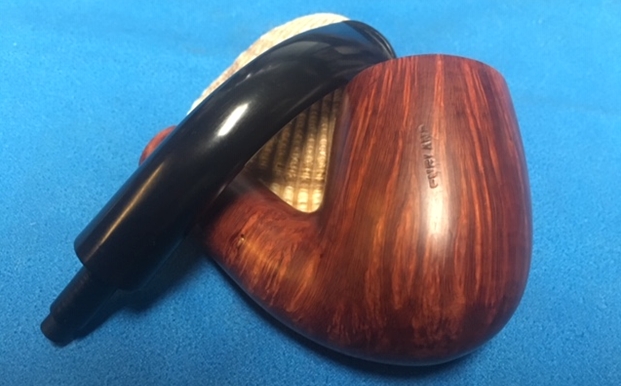
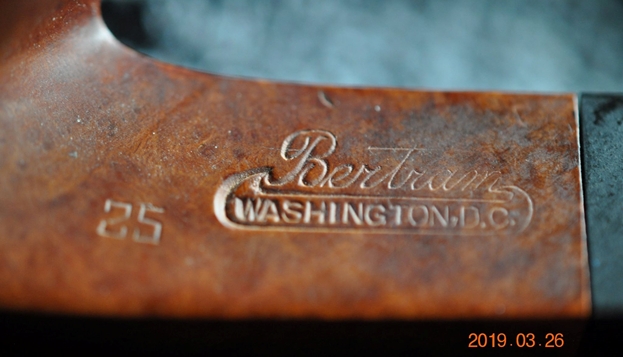
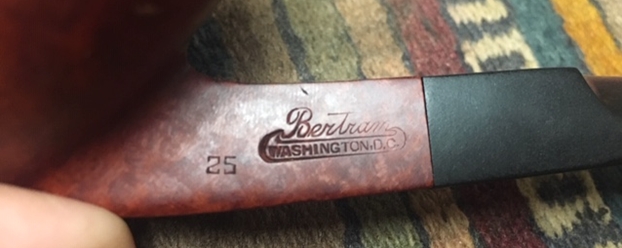
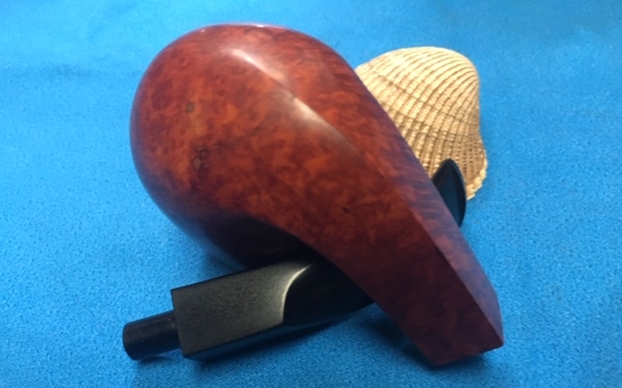
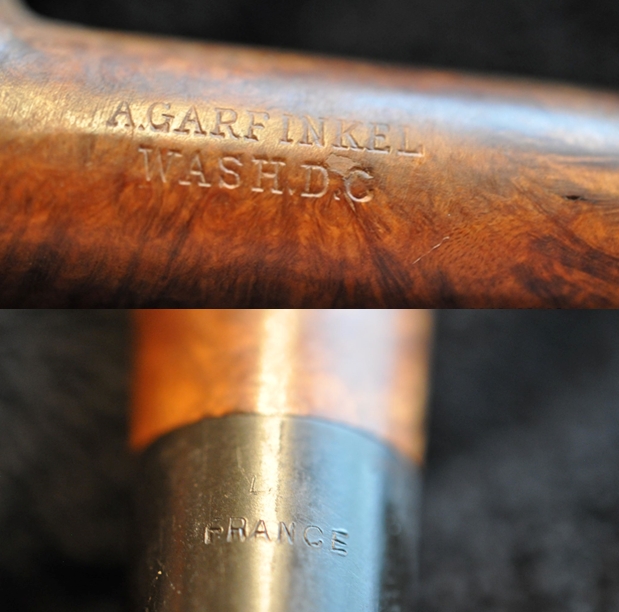
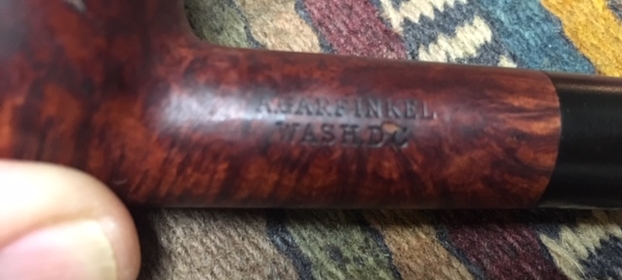
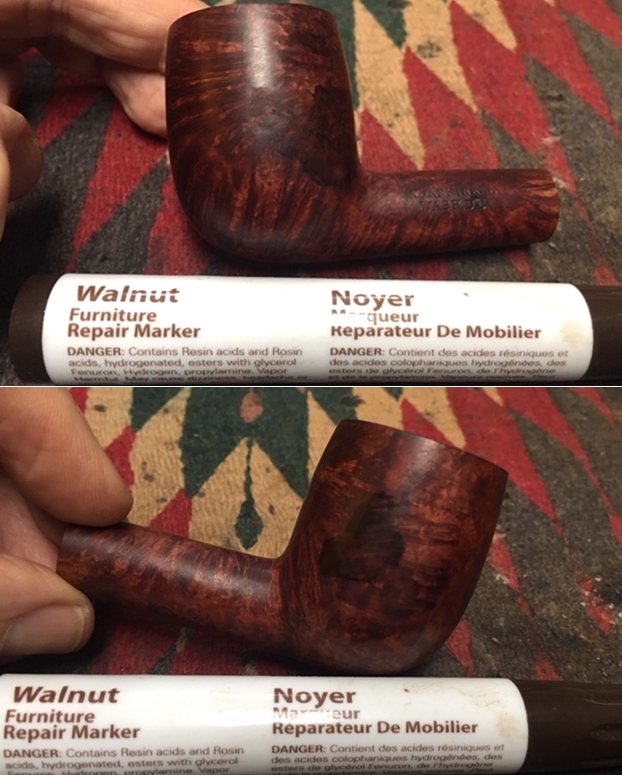
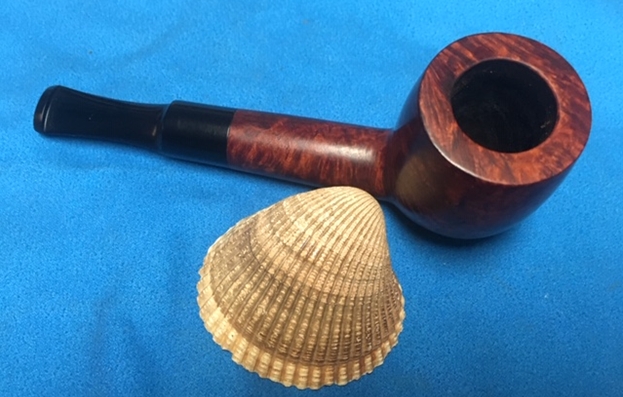
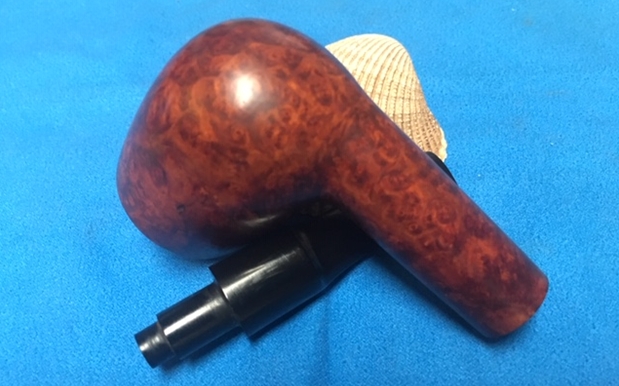
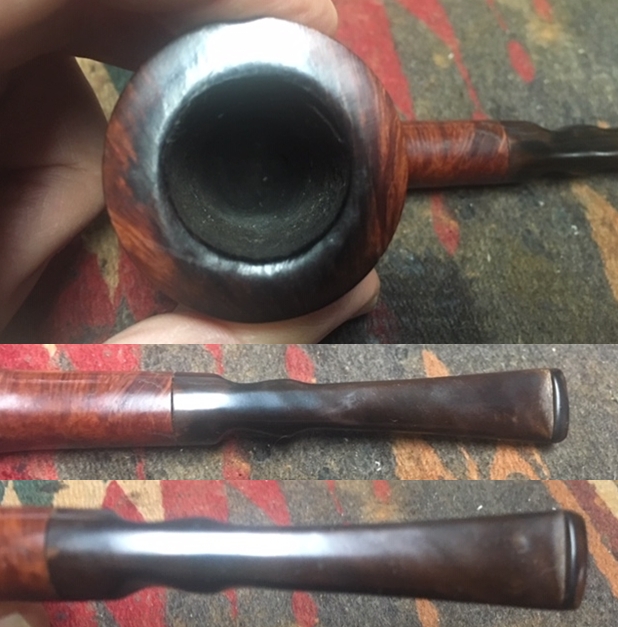
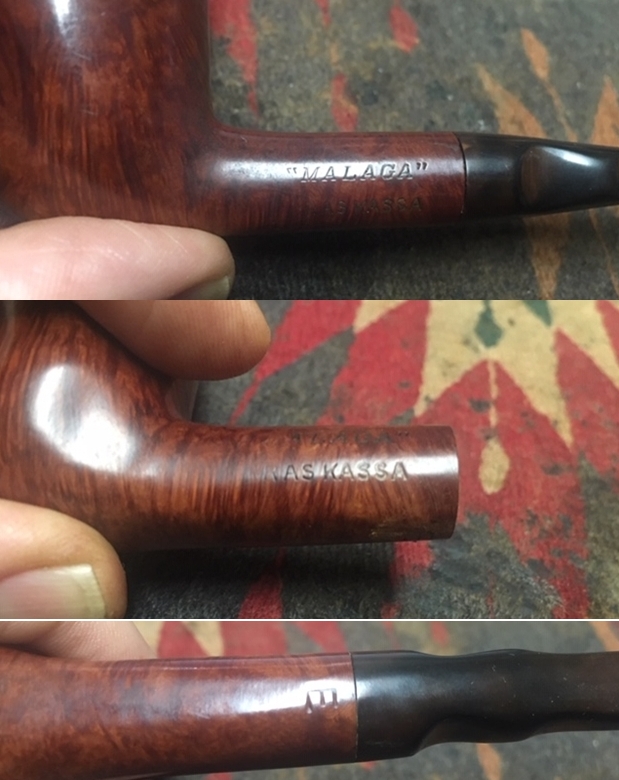
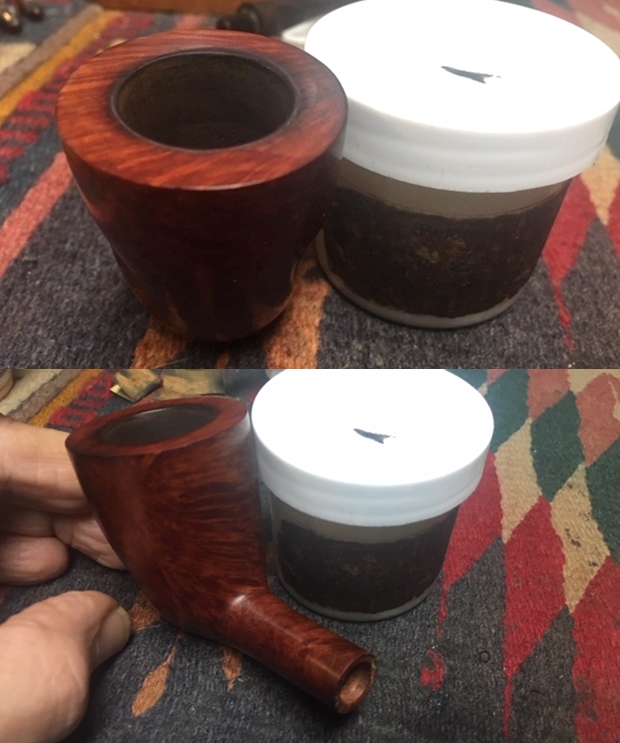
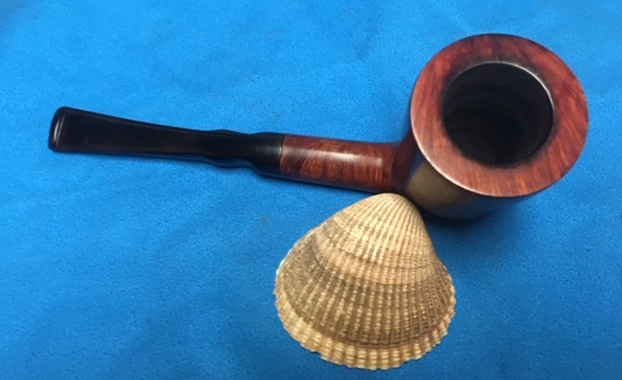
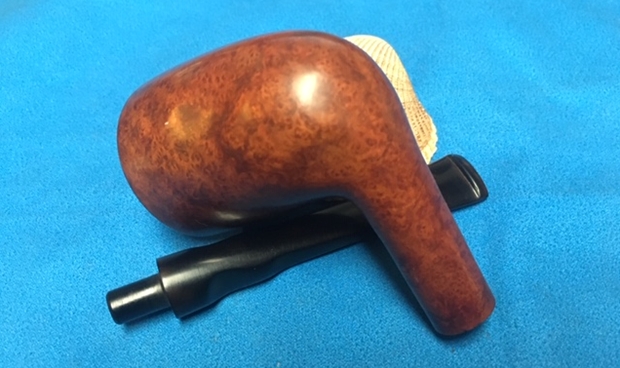
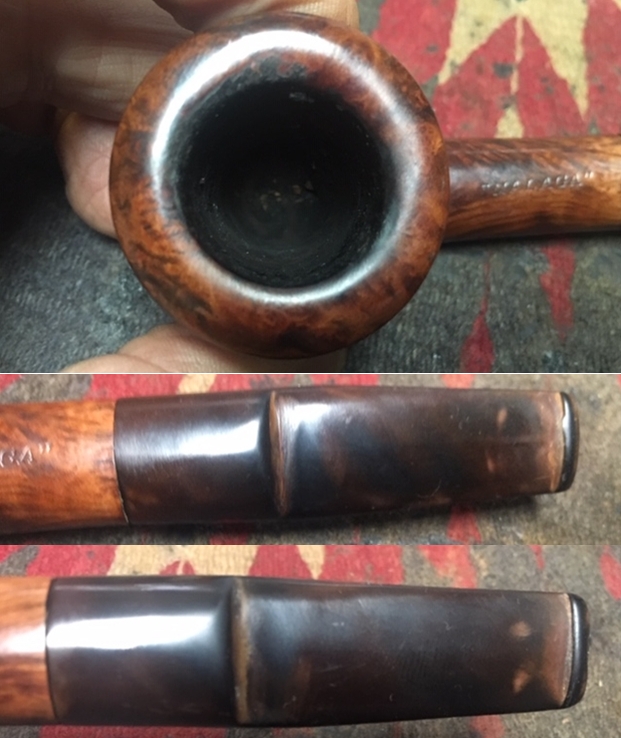
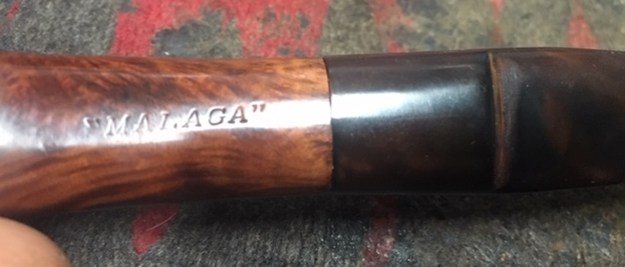
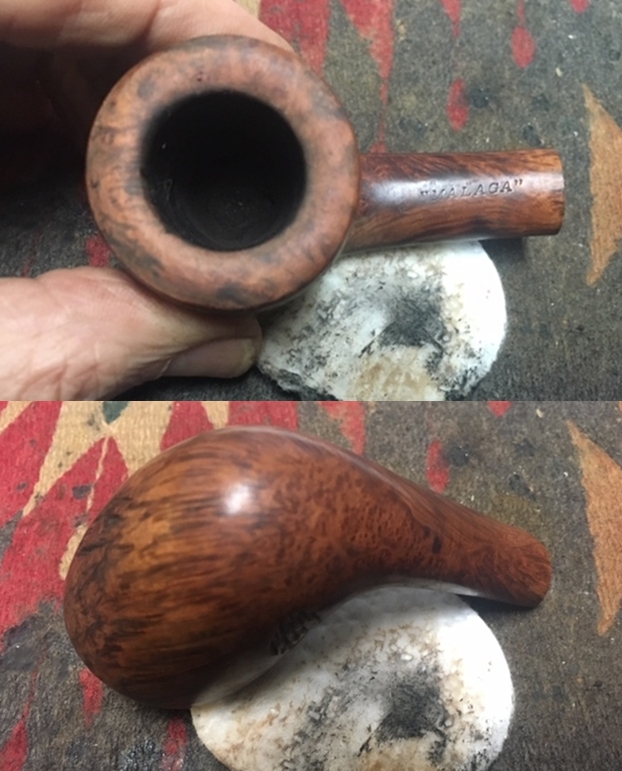
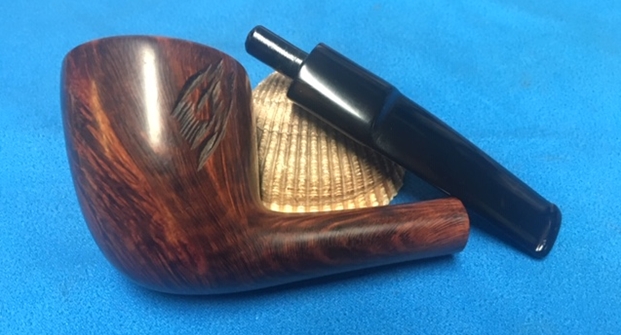
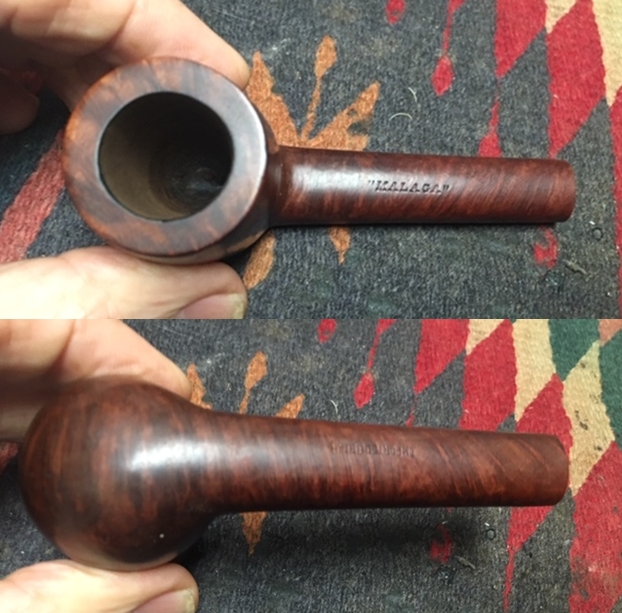
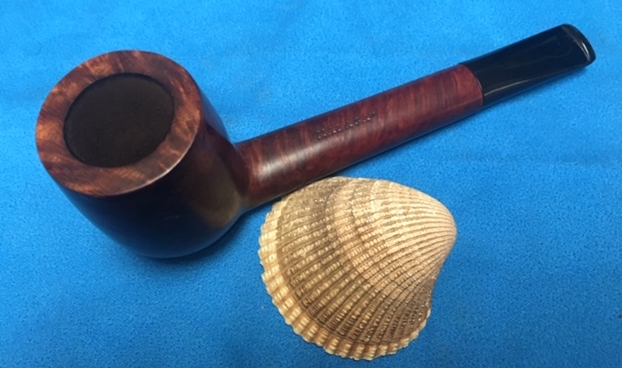
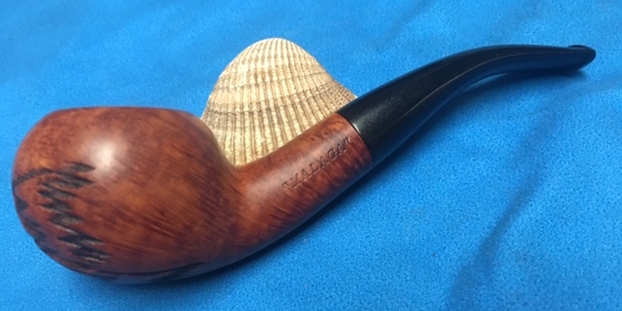
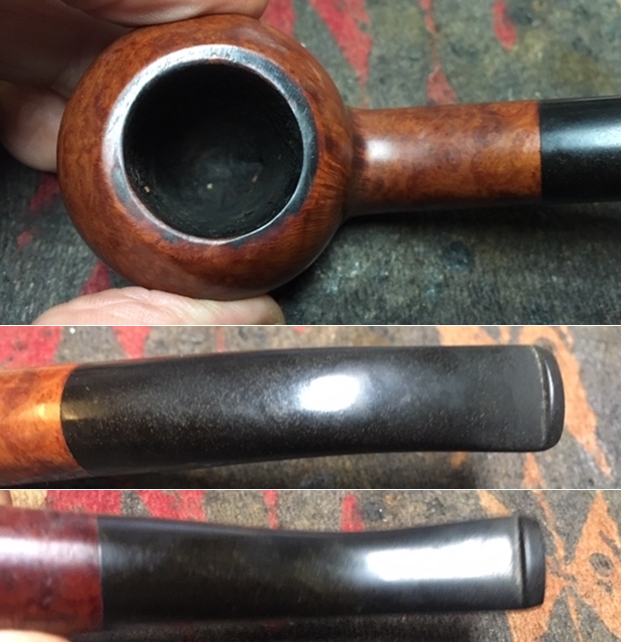
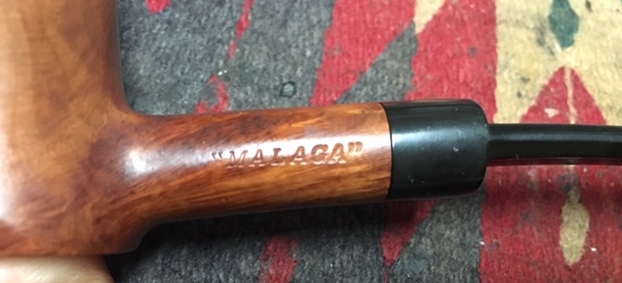
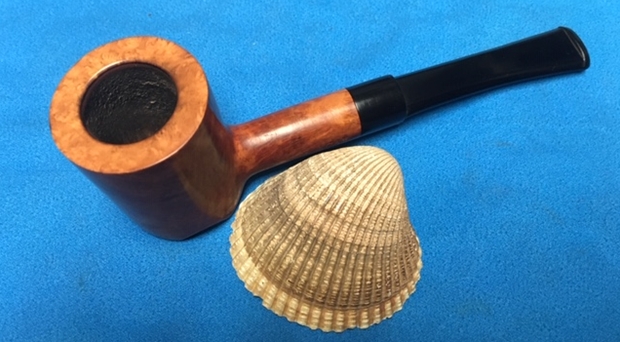
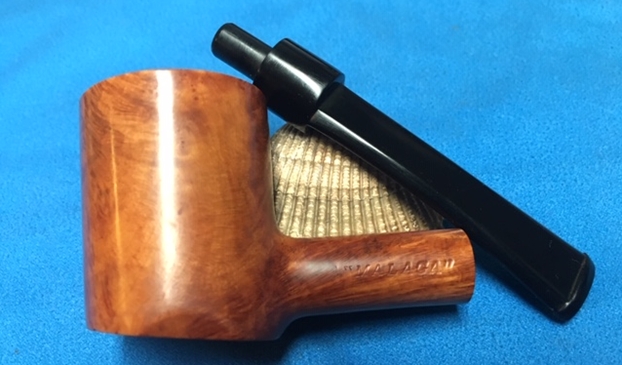
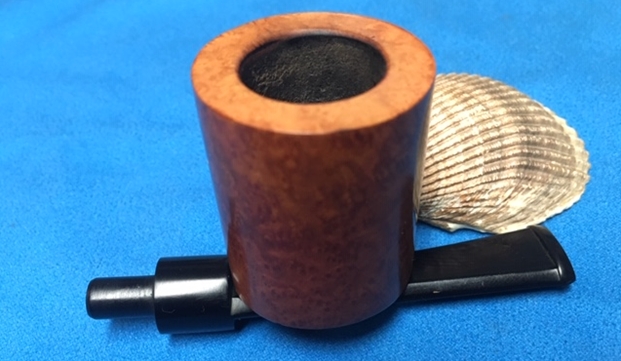
The nomenclature is stamped on the upper and lower sides of the oval stem.  On the upper is stamped ‘SILVER MATCH’ [over] ‘TORONTO’.  The lower shank bears what I’m assuming to be a shape number: ‘115’.  The stem is also stamped with a design which I assume is the flame of a match being depicted – my best guess at this point, but I’m not sure! 
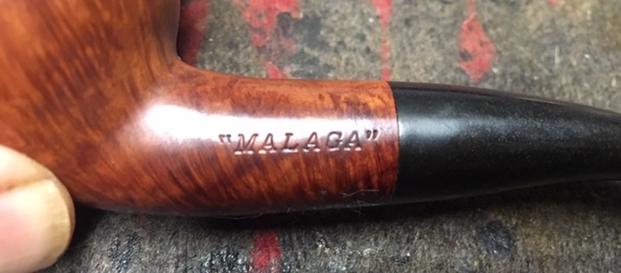
The information about the Silver Match name is thin.  A quick search on the internet shows that Silver Match has been the name of tobacco accessories manufacturer since the 1800s, but mainly of lighters.  Silver Match lighters seem to be highly collectable with vintage lighters dating back to the 1800s but most listed that I saw have a French origin.  The only information in Pipedia refers to Silver Match in the list of British pipe makers as an inexpensive brand sold by Roy Tallent Ltd., and marked with the stamping SM (LINK).  This is confirmed in my copy of Wilczak & Colwell’s, ‘Who Made That Pipe?’ that Silver Match has English origins and manufactured by Roy Tallent LTD/S’Elite LTD – both of which seem more to be in the accessories market than focusing on the manufacturing of pipes.  Pipephil.eu (LINK) brings these two together in the following panel.  It pictures pipes distributed by the famous lighter brand, Silver Match, but shows the two different stem stampings that may indicate either French or British manufacturing – the flame (French) and the SM (England).  If this is correct, the Silver Match Toronto 115 has a French origin, but I found no other information to corroborate this.  Arriving from France in my ‘French Lot of 50’ is anecdotal evidence perhaps supporting this.
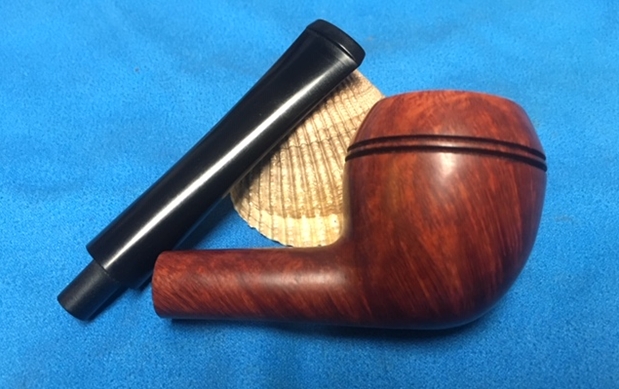
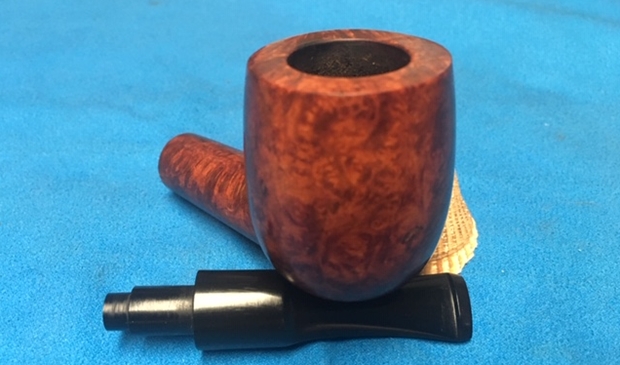
I’m calling this Silver Match a ‘Squat’ Lumberman because he meets all the qualifications of his place in the Canadian family with the oval shank, but he’s on the shorter side but I’m impressed with the nice ample bowl. I did look at both French and British made shape charts to see if I could discover a lead on who produced the Silver Match but found no matches with 115 that provided this information.

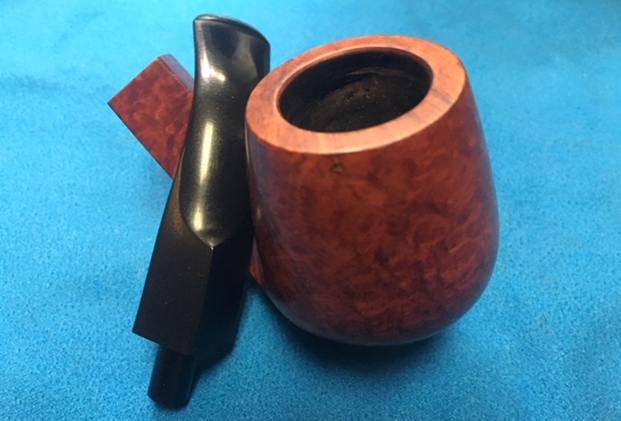
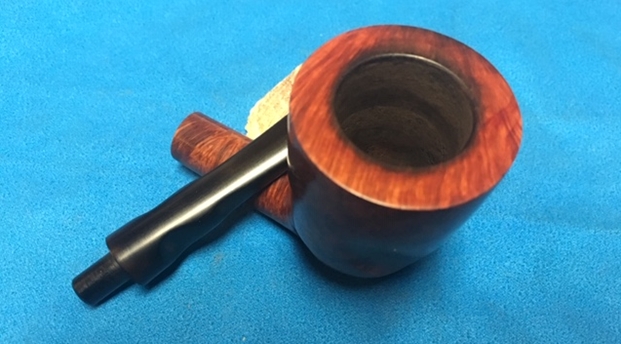
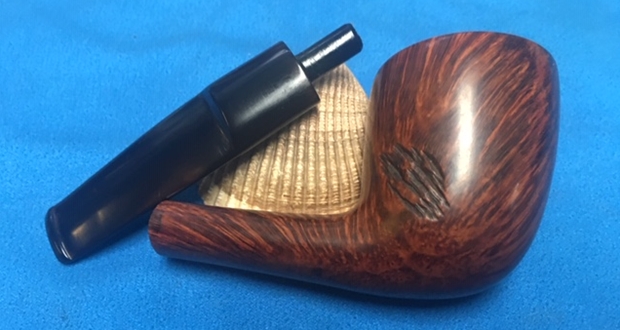
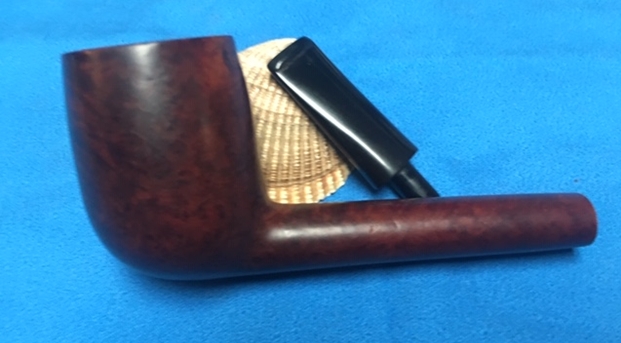
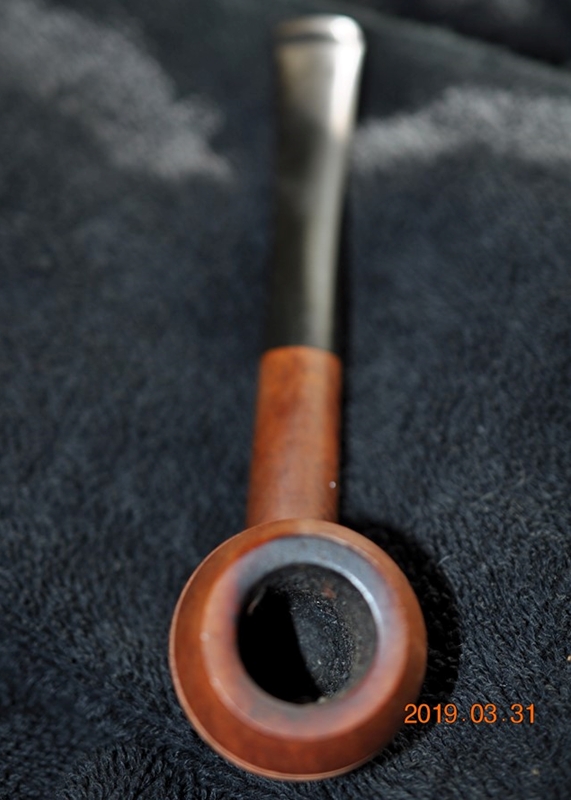
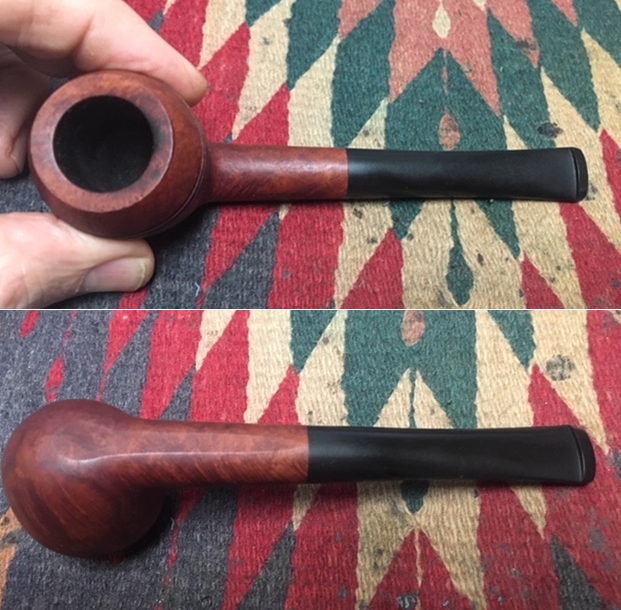
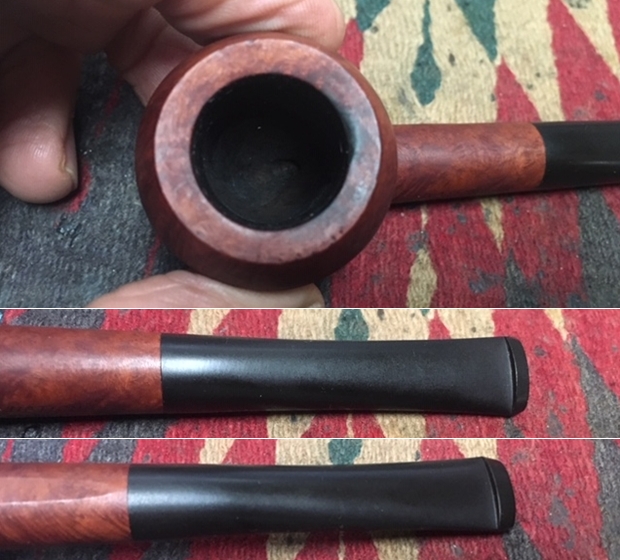
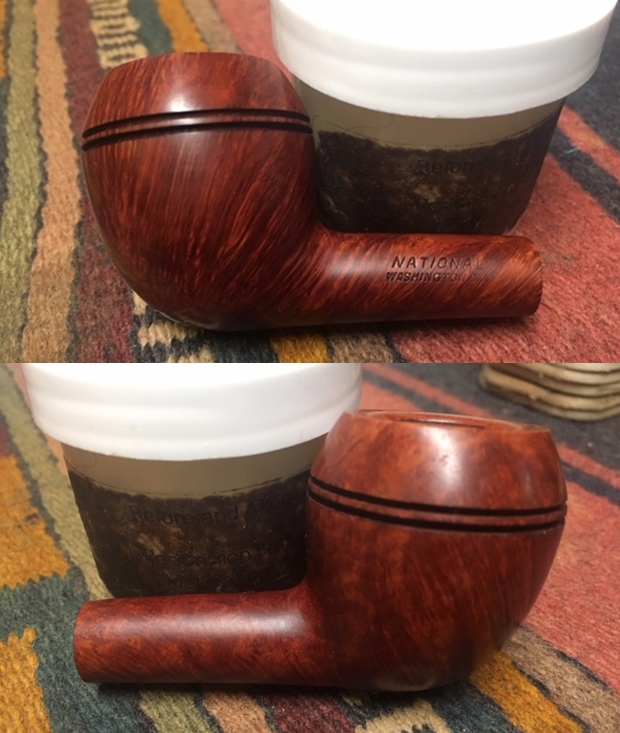
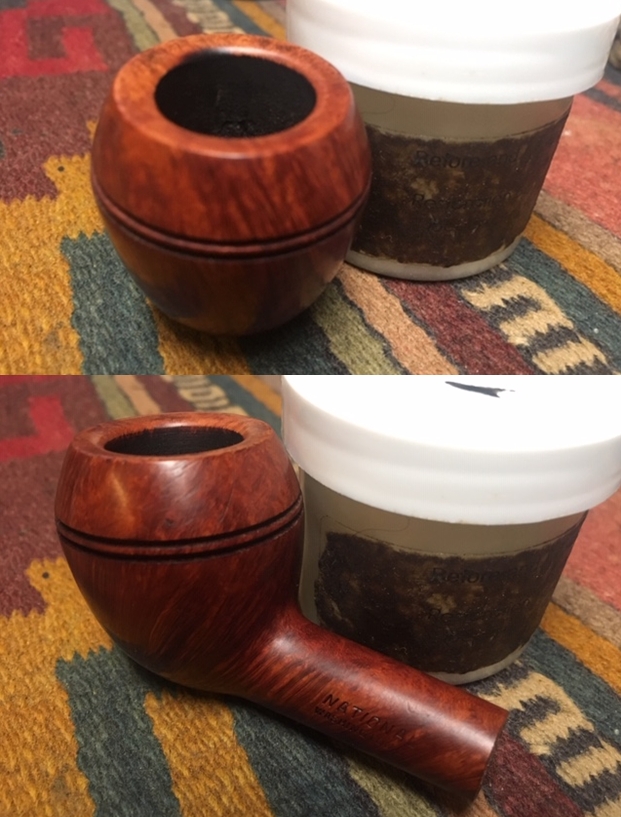
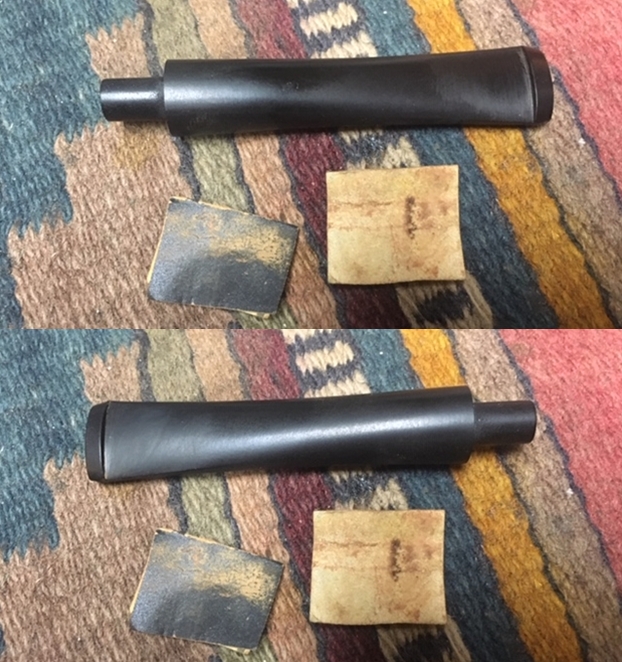
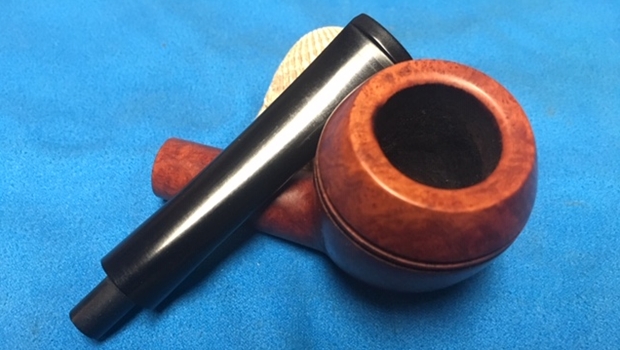
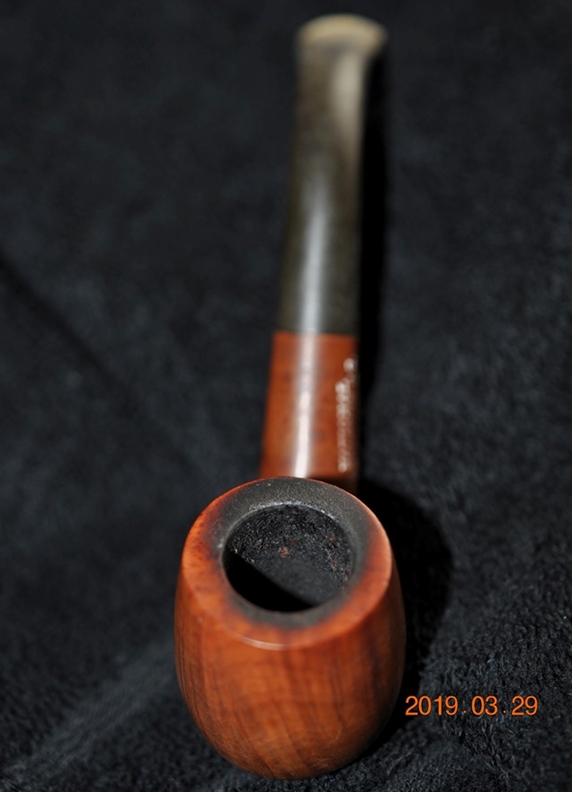
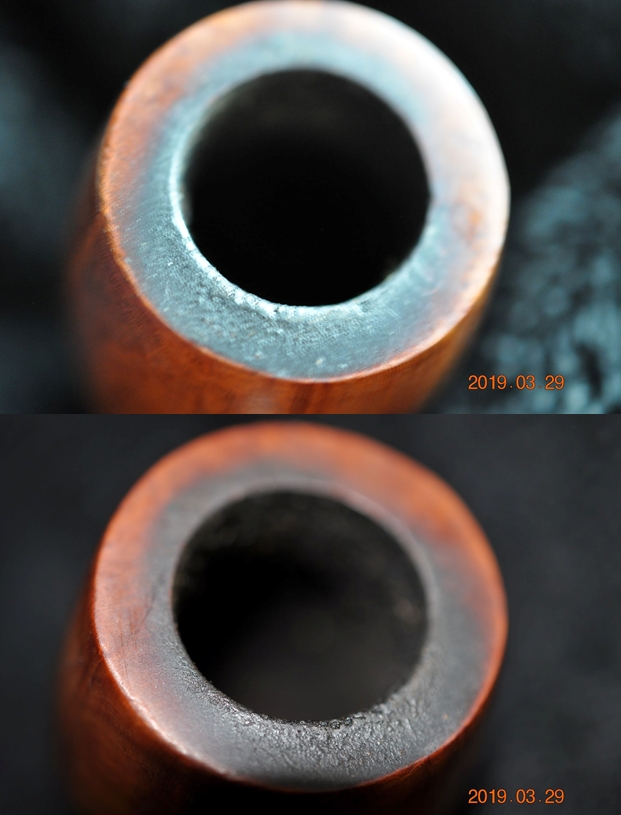
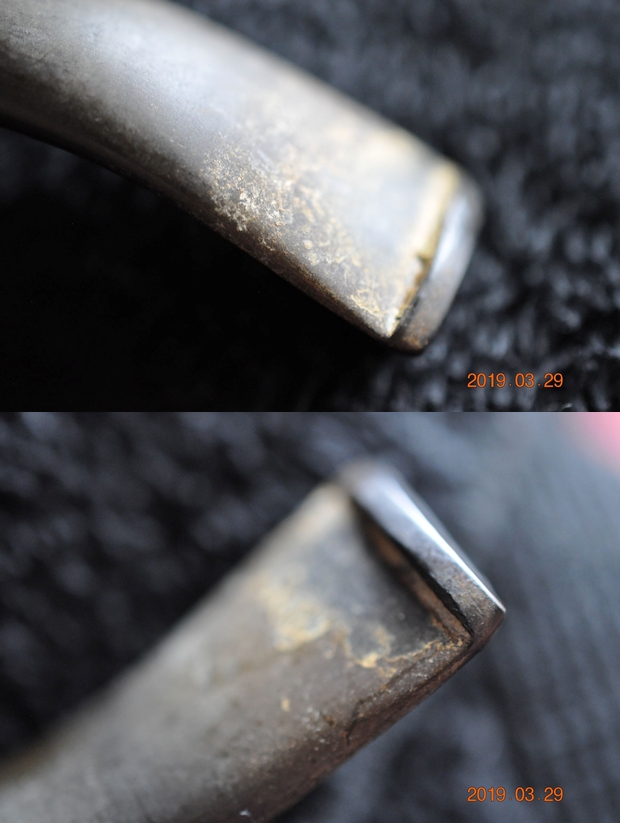
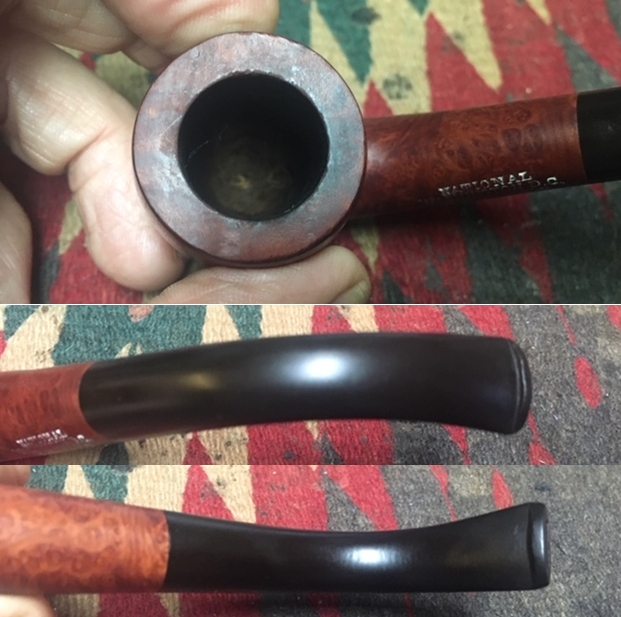
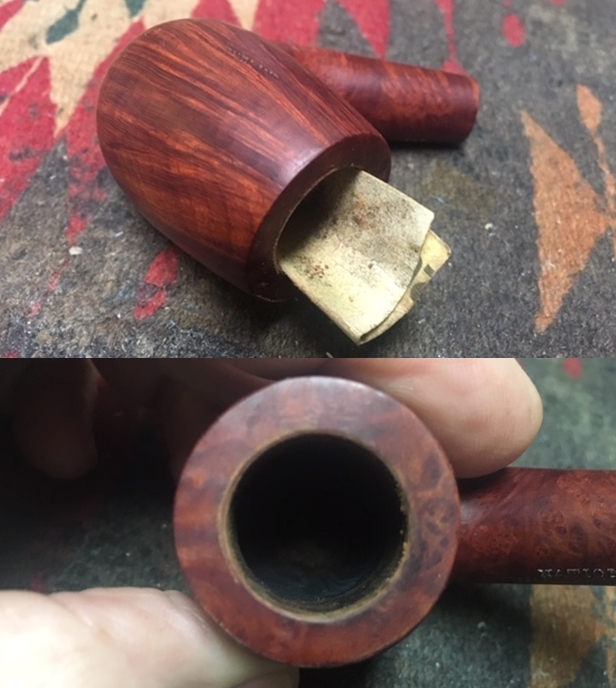
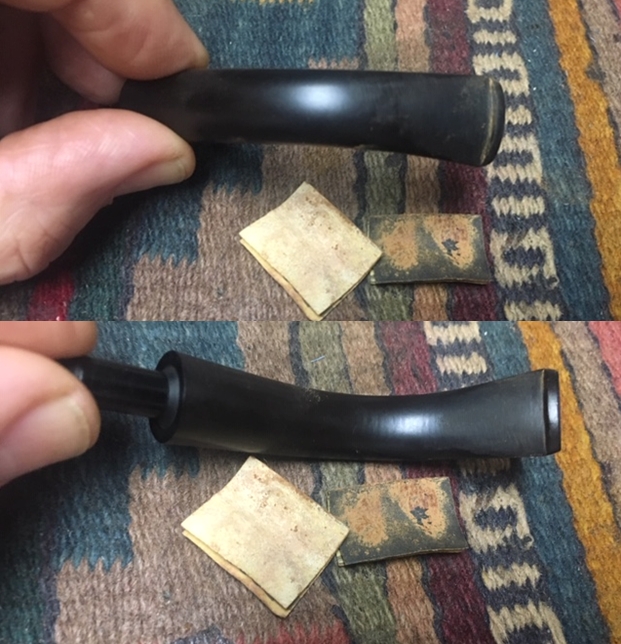
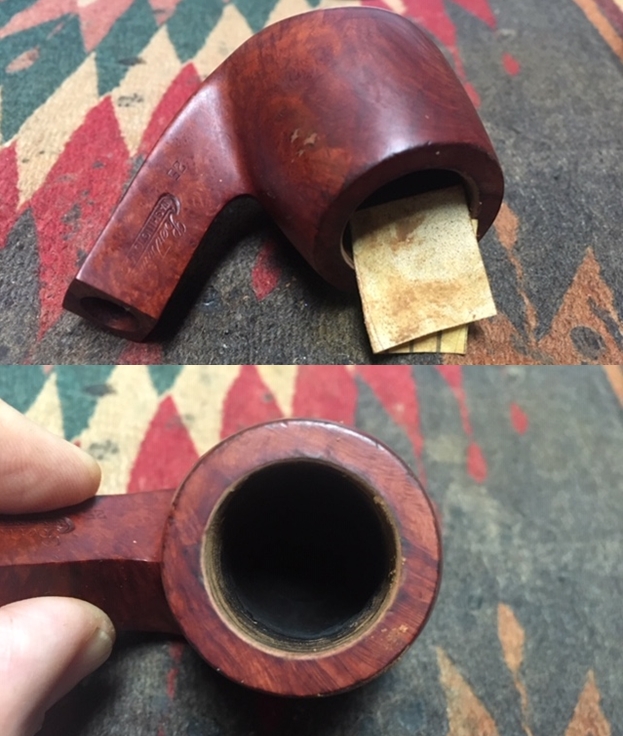
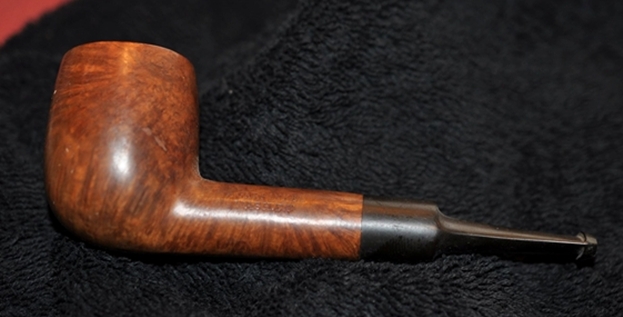
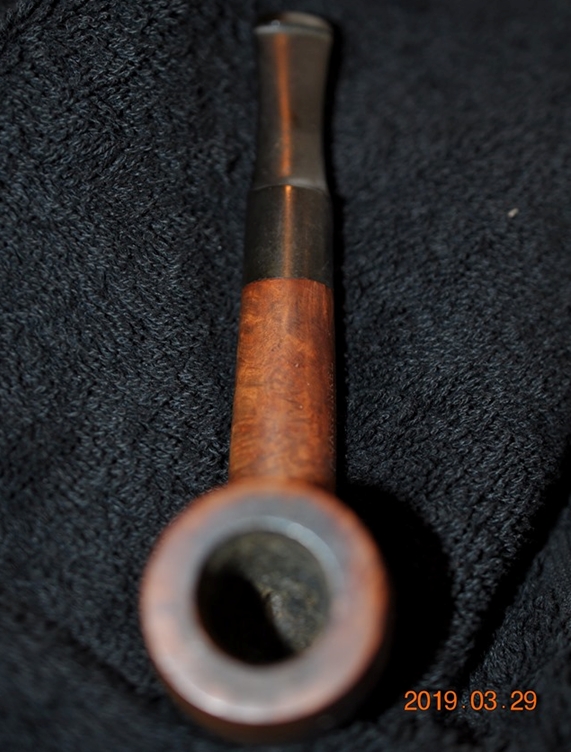
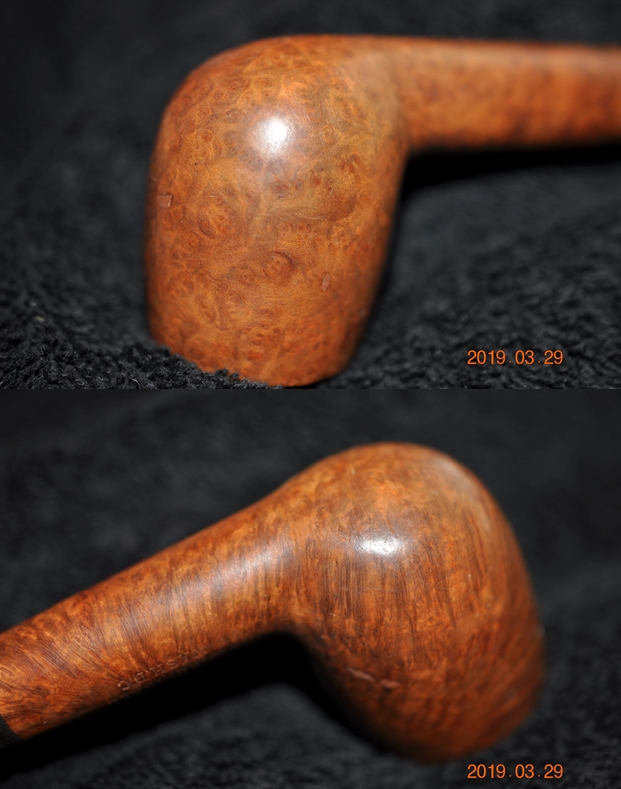
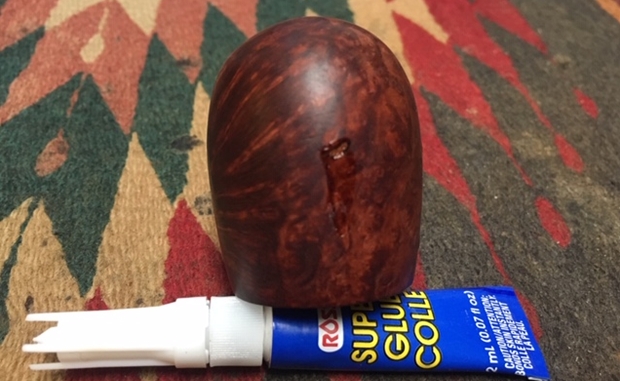
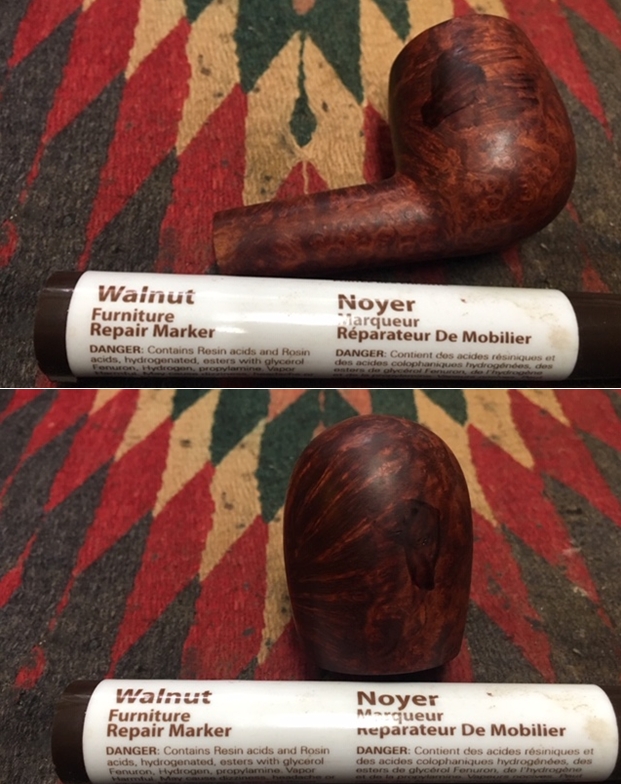
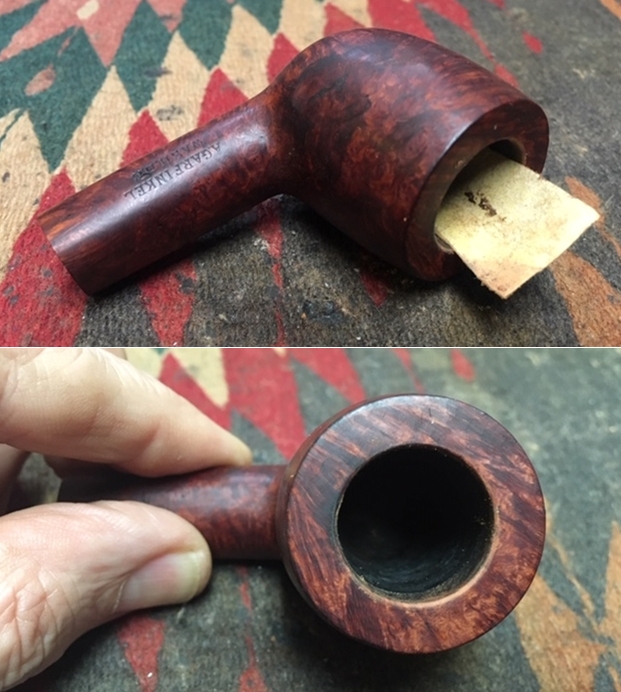
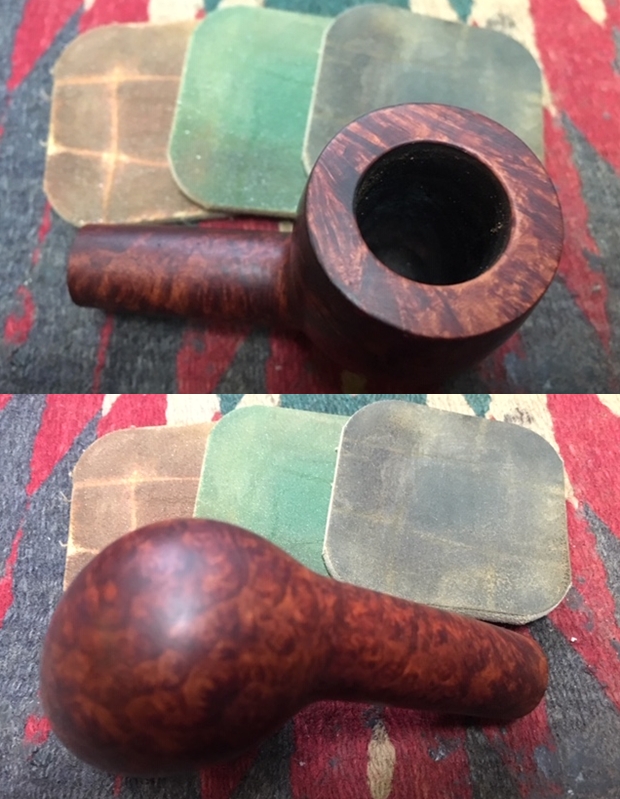
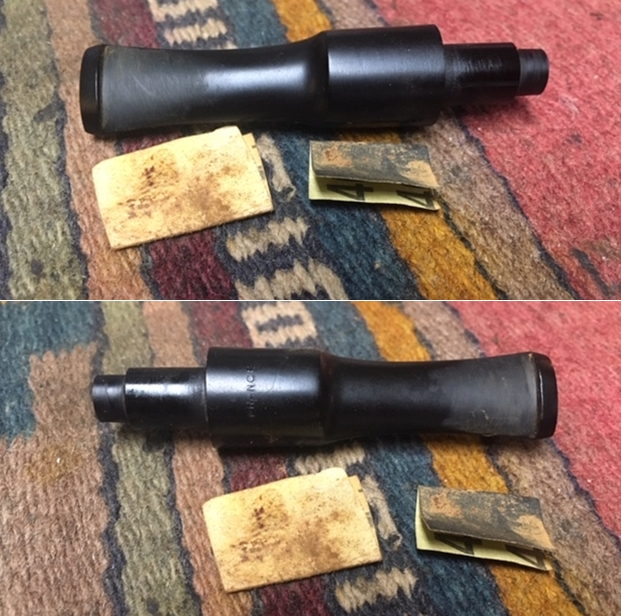
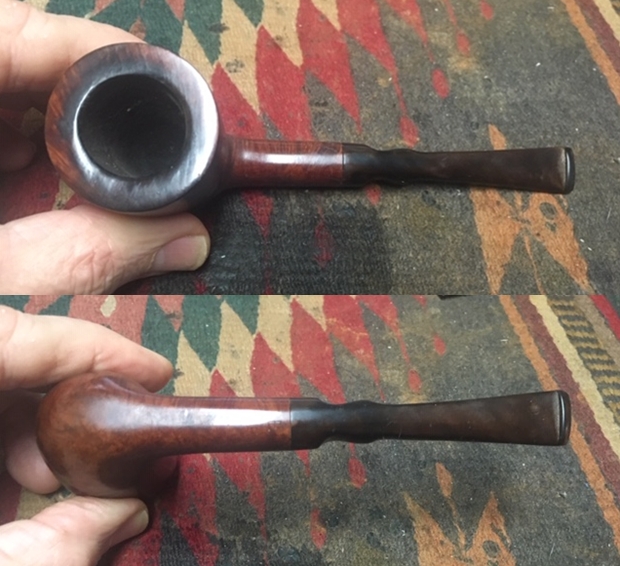
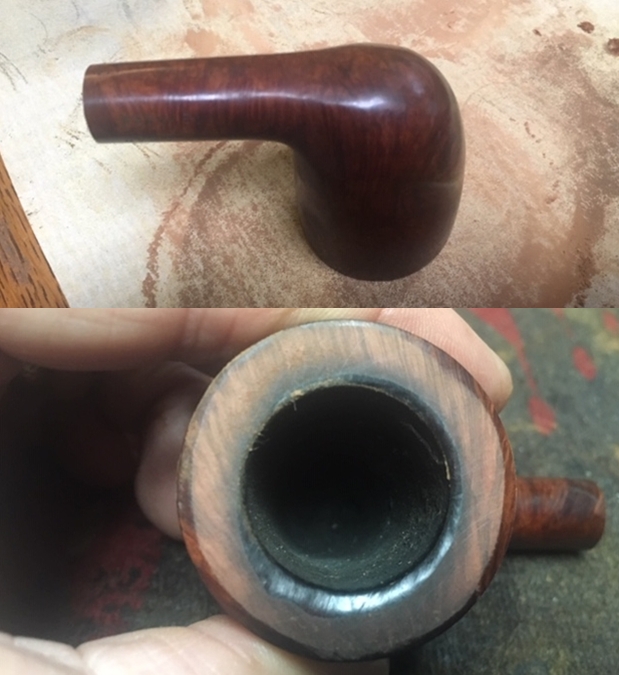
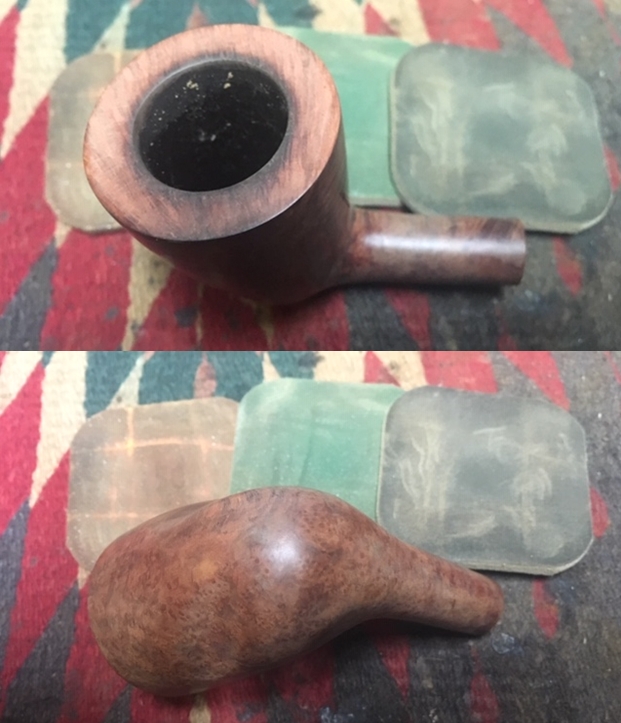
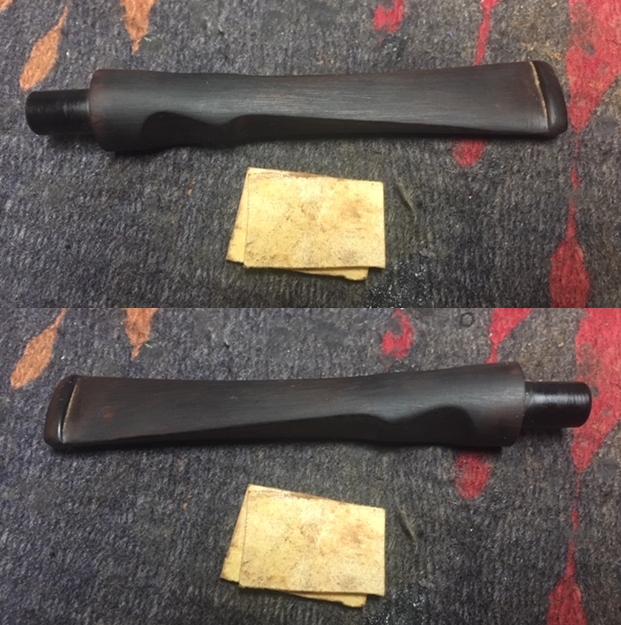
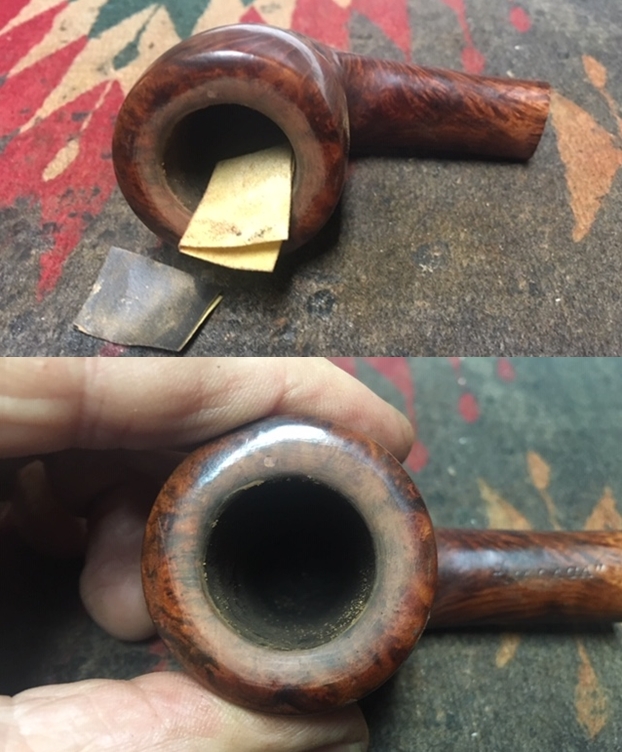
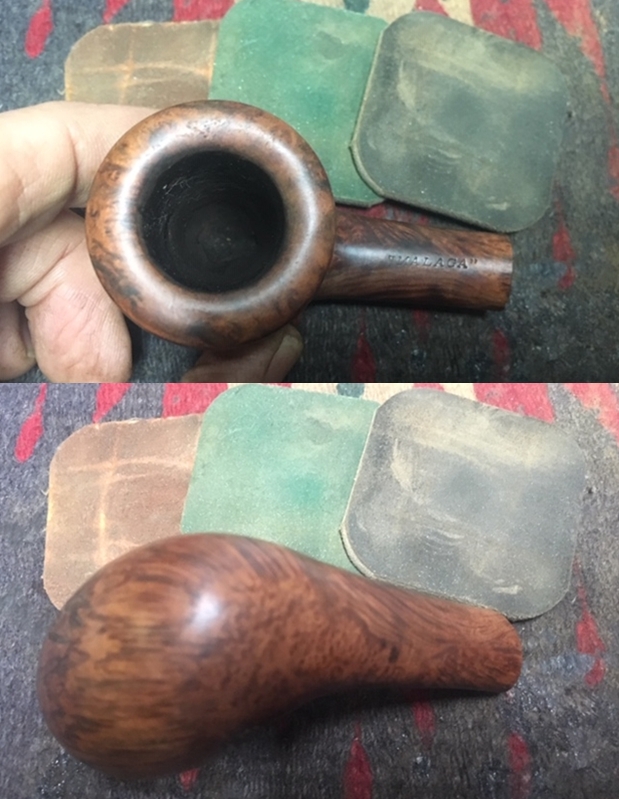
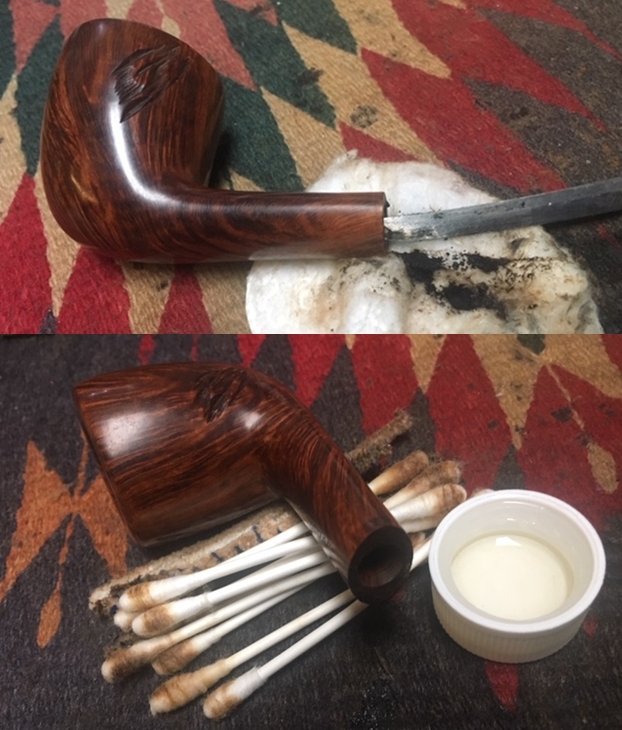
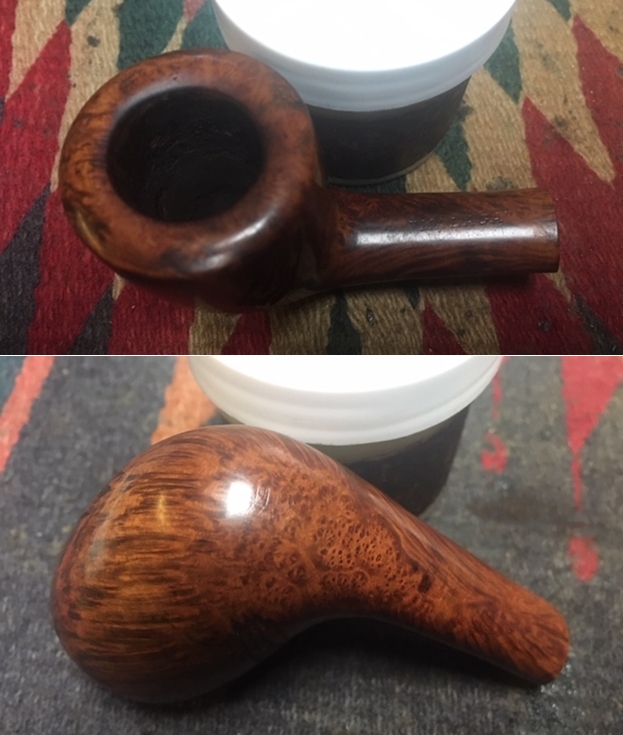
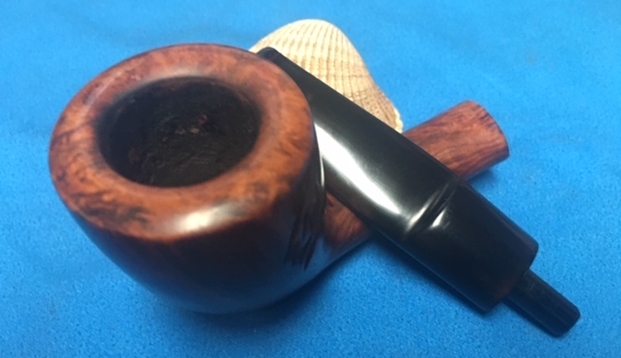
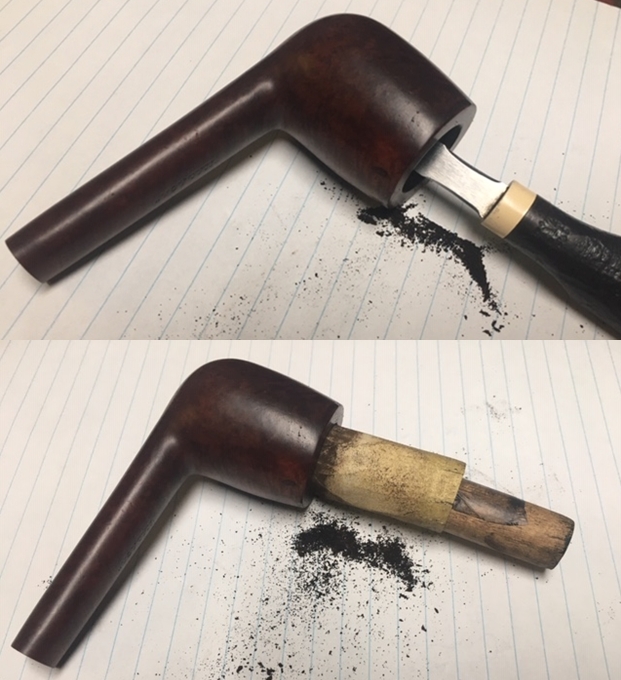
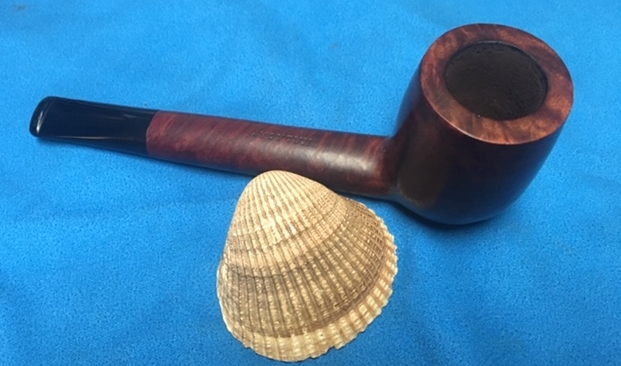
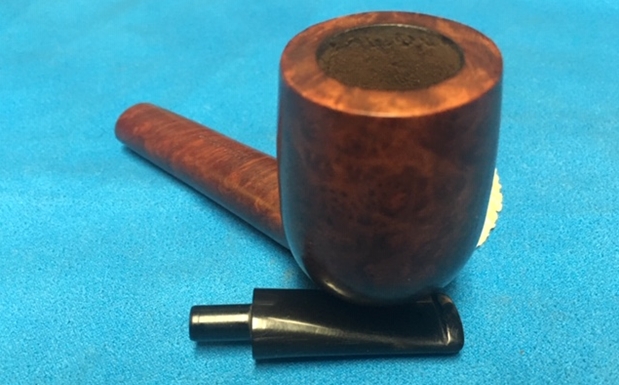
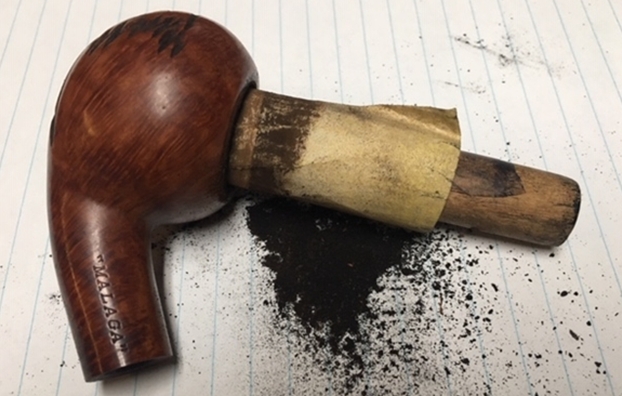
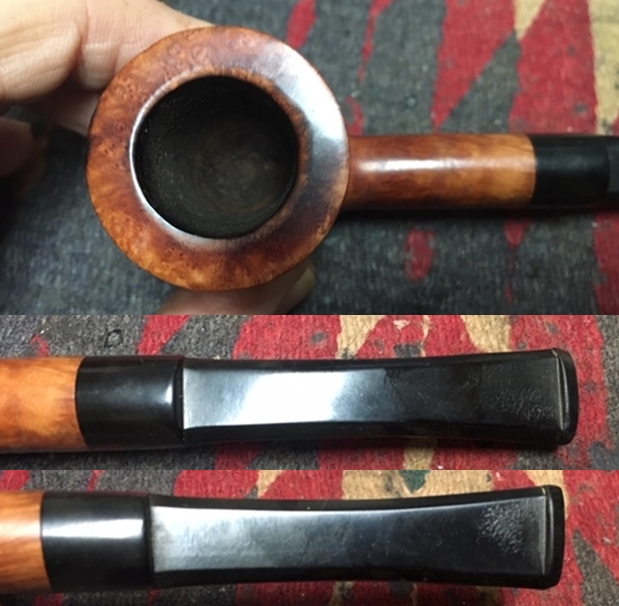
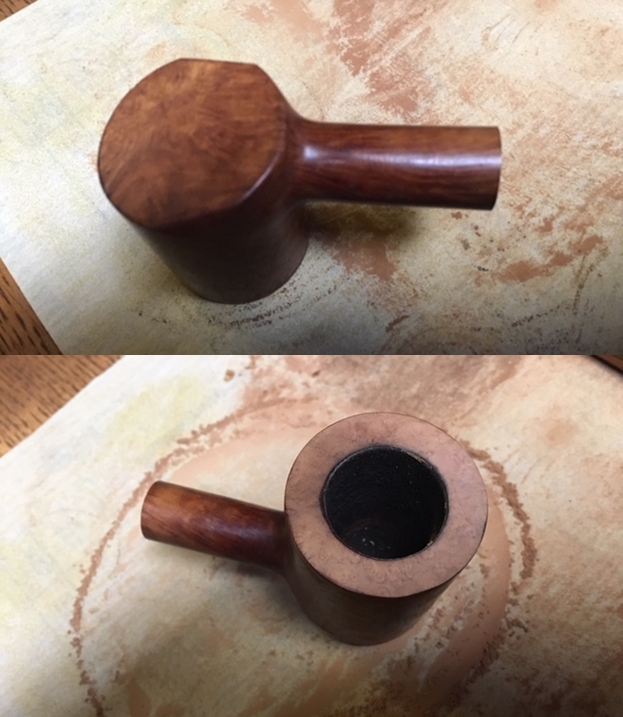
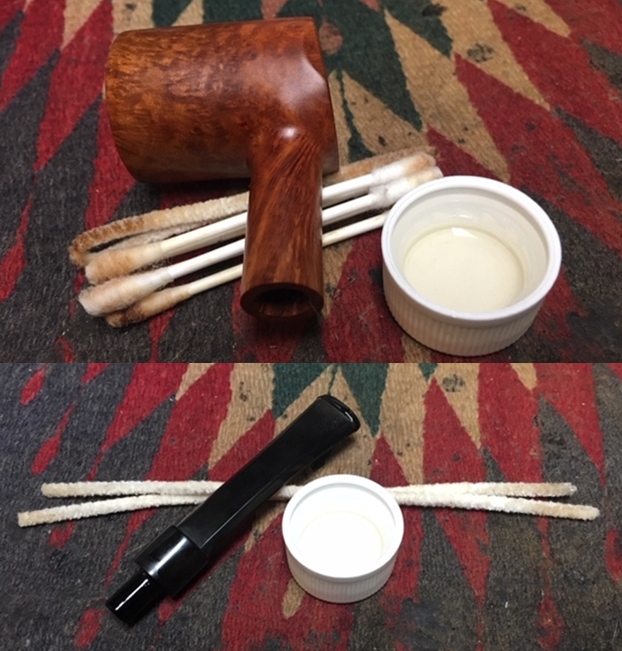
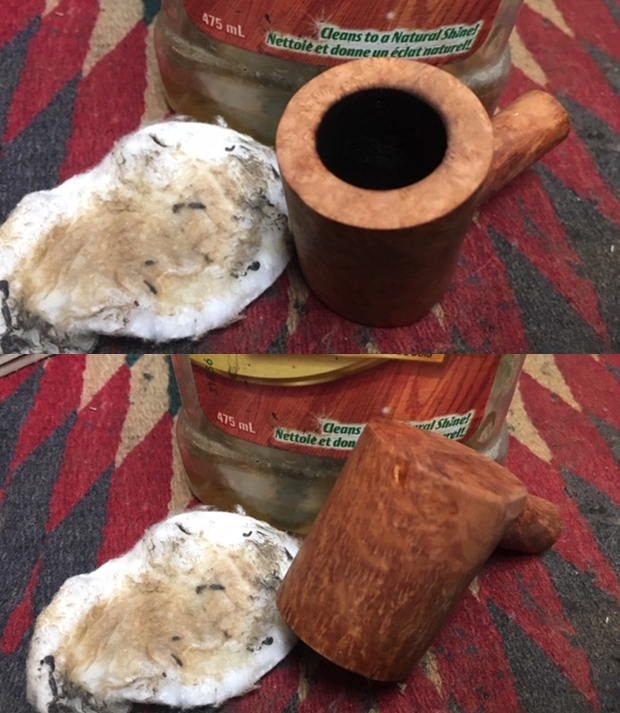
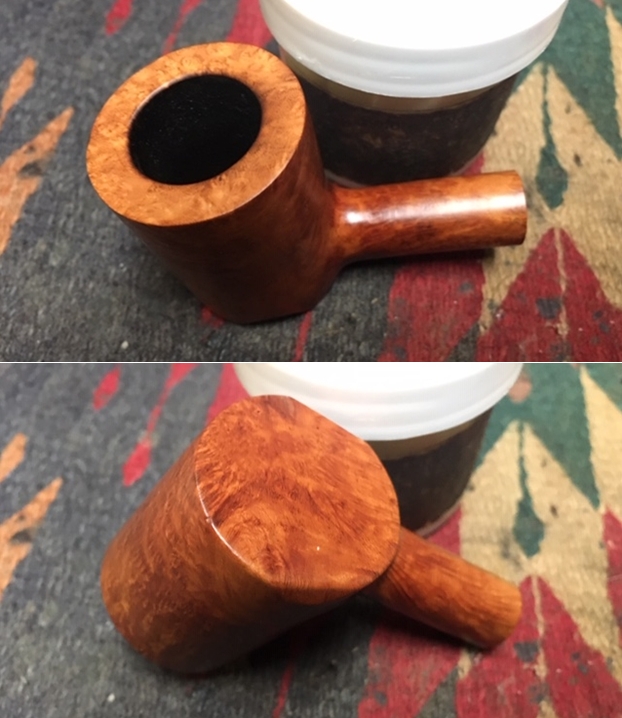
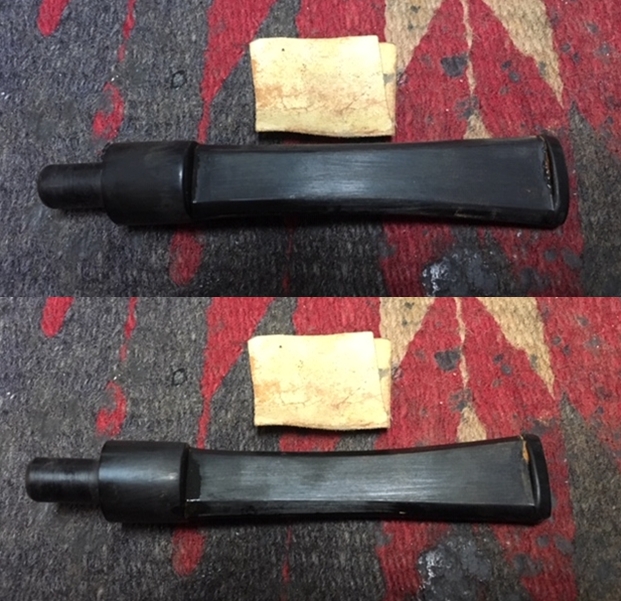
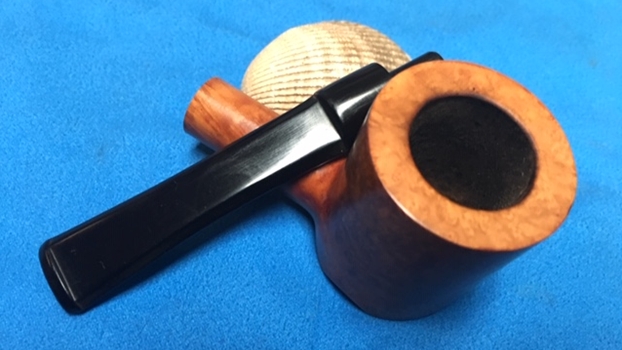
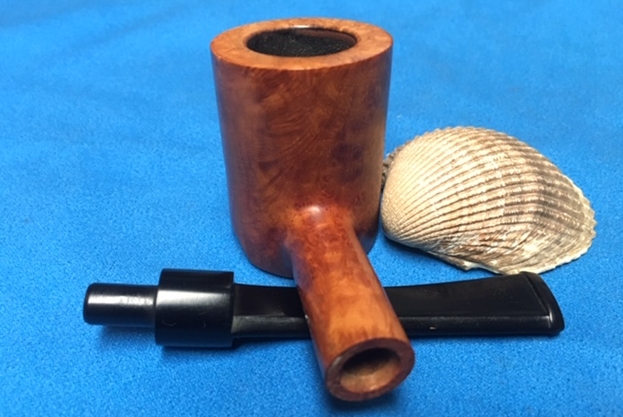
I can see some nice briar underneath the thick layer of grime over the briar surface, but I see one large fill that will need attention on the lower shank near the shape number.  The cake is thick in the chamber with corresponding lava covering the rim.  The stem has oxidation and the button is chipped and will need to be rebuilt.  With this inventory of the challenges this Silver Match Toronto Lumberman faces, I start the restoration by adding the oxidized stem to a soak of Before & After Deoxidizer along with other pipes in the queue.  I first clean the airway with a pipe cleaner wetted with isopropyl 95%. After several hours I fish the Silver Match stem out of the Deoxidizer and use a cotton pad wetted with alcohol to wipe off the raised oxidation. I also run another pipe cleaner wetted with isopropyl 95% through the stem to clean the Deoxidizer remaining in the airway.The Before & After Deoxidizer does a good job and it preserves the white in the Silver Match stem stamp logo – I still can’t figure out for sure what it’s depicting!  I follow by applying paraffin oil to the stem to begin the rejuvenation process.  I put the stem aside to dry and absorb the oil. 
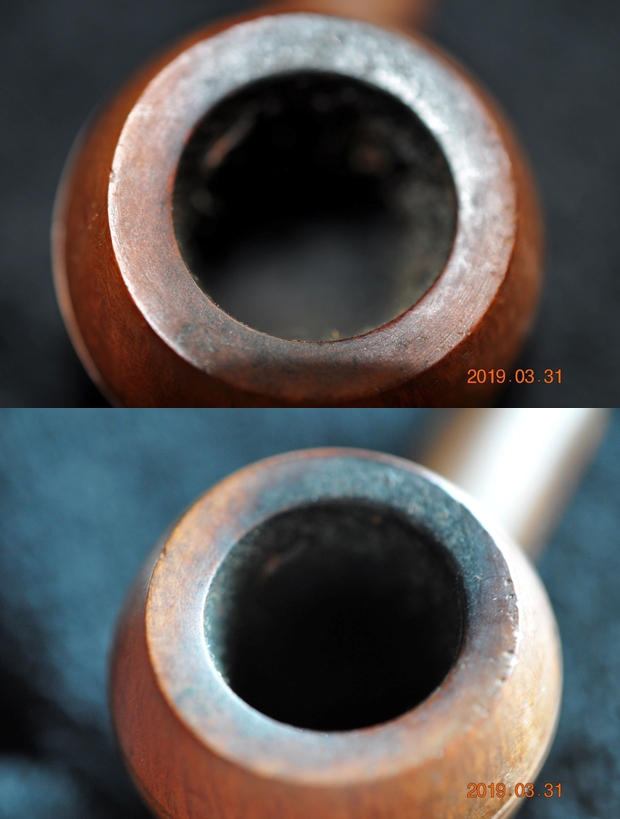
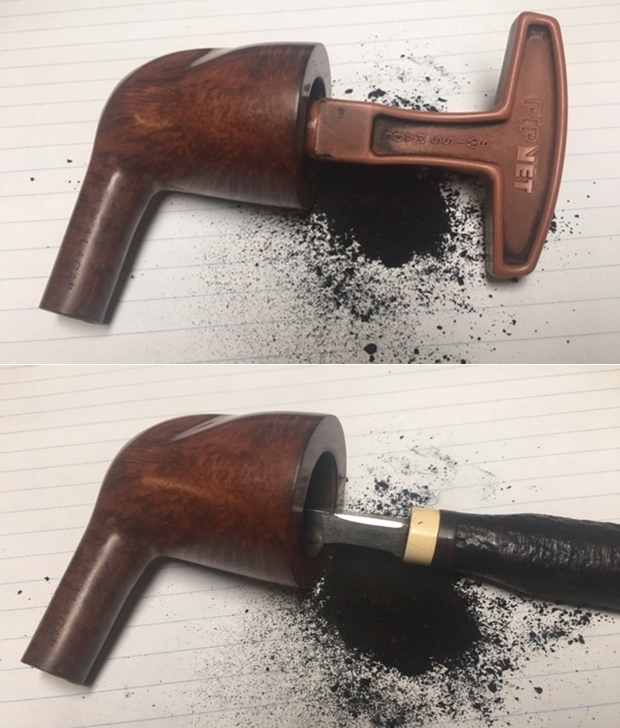
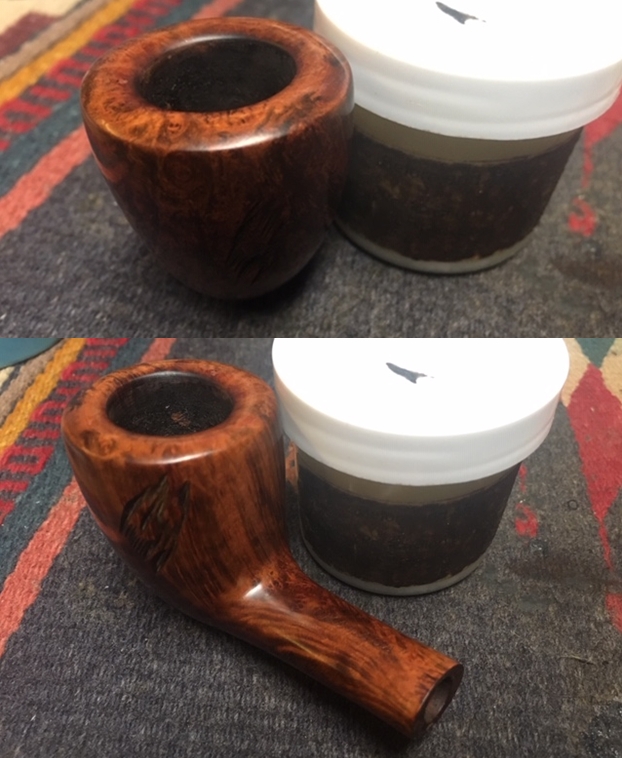
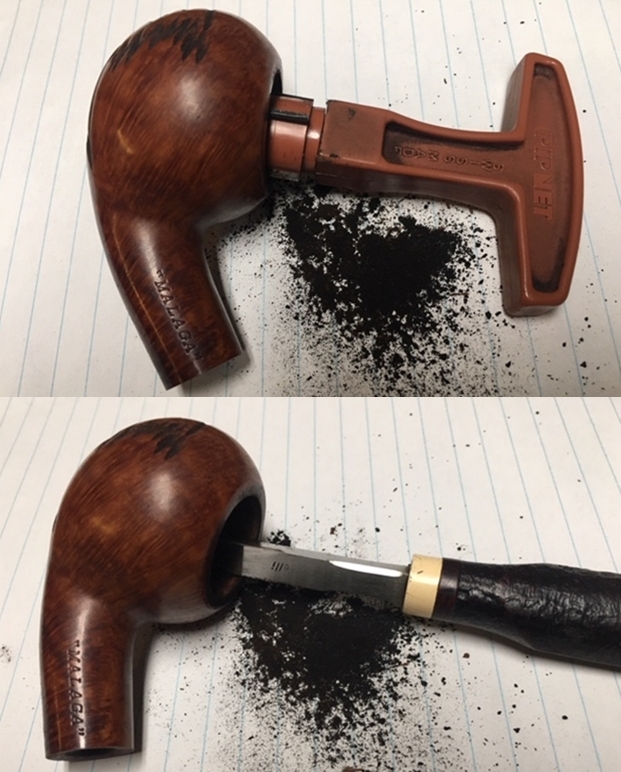
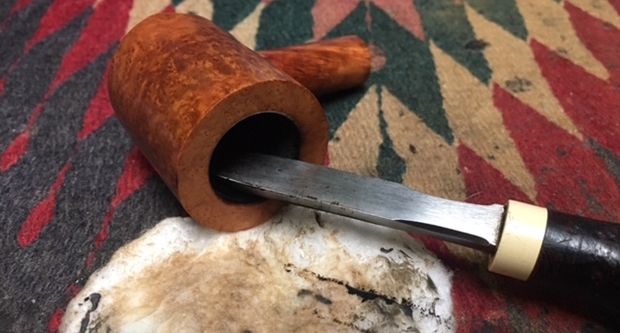
Next, I address the very thick cake in the chamber.  The chamber is almost closed off as the cake angles down the chamber.  Using the Pipnet Reaming Kit, starting with the smallest blade head, I use 2 blades of the 4 available to me.  I follow the reaming by using the Savinelli Fitsall Tool to further scrape and clean out the carbon build-up.  Finally, I sand the chamber after wrapping a piece of 240 grade paper around a sharpie pen to give me reach and leverage.  To remove the carbon dust, I wipe the chamber with a cotton pad wetted with isopropyl 95%. 
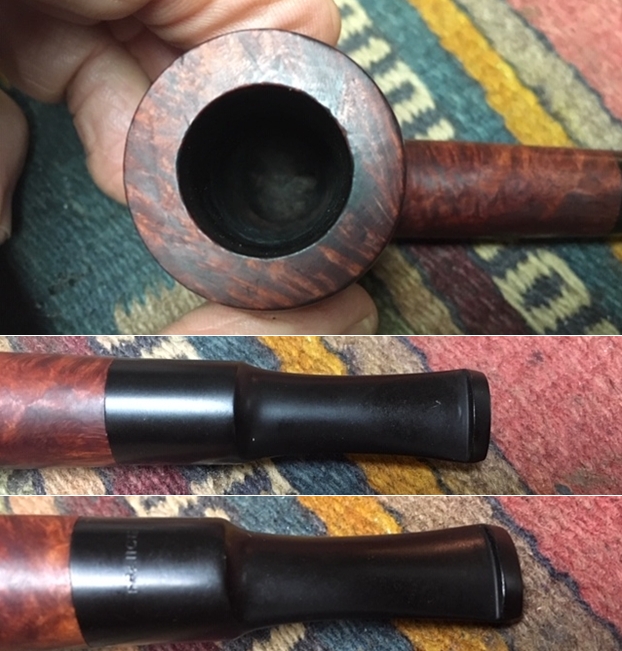
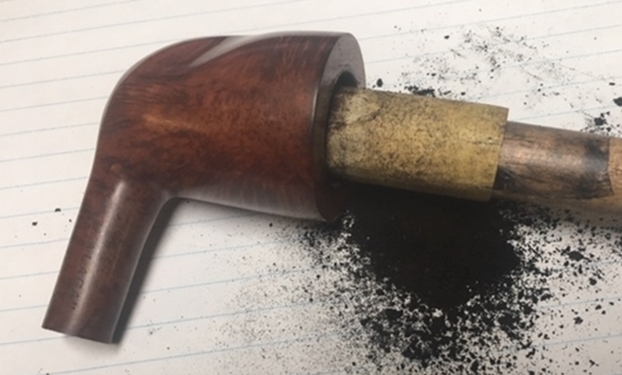
After the cleaning, I inspect the chamber and it doesn’t have any cracks and fissures from heating damage.  It looks good!
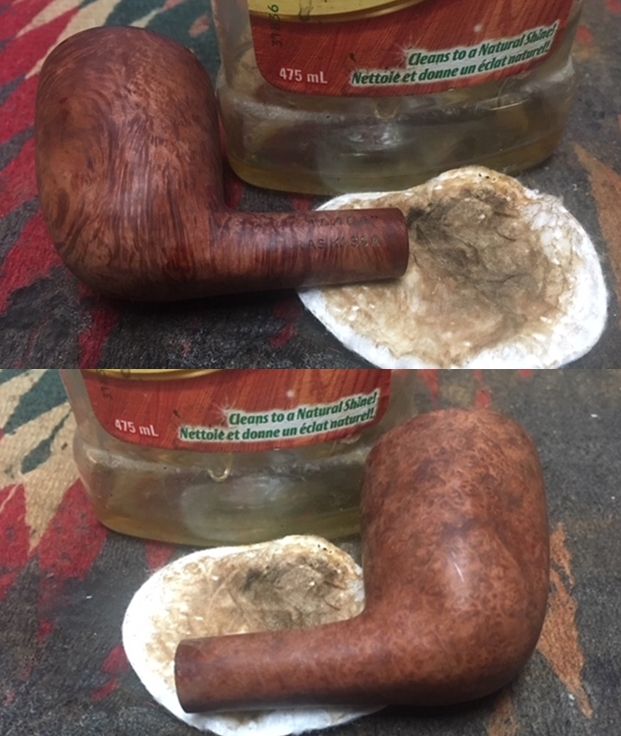
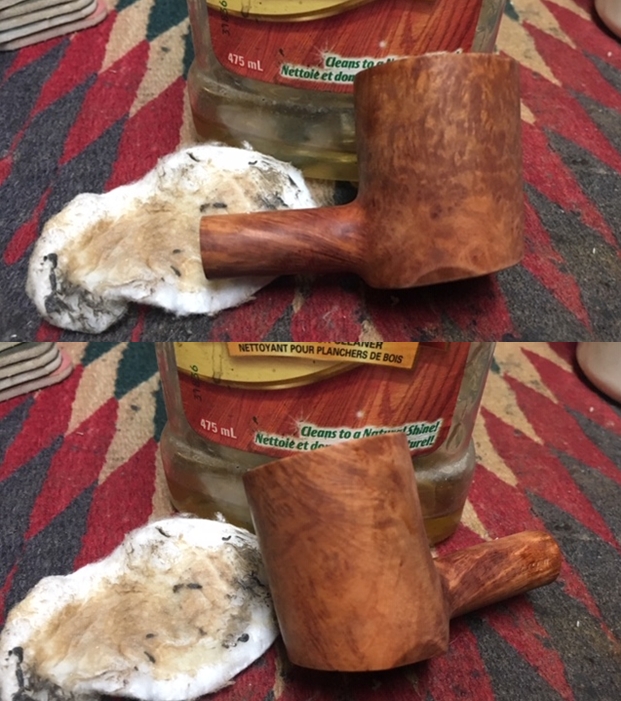
Next, I continue the cleaning by using undiluted Murphy’s Soap on the external surface using a cotton pad to scrub.  I also use a Winchester blade to scrape the rim addressing the thick lava you can see in the picture above. I also use a brass wire brush on the rim which doesn’t damage the briar.  After being in India, I learned about some of Jeff Laug’s (Steve’s brother) cleaning techniques and I decide to employ some of them.  After cleaning the stummel with Murphy’s, I take the stummel to the sink and clean the external surface with a bristled toothbrush with regular dish soap – the kind that is anti-oil.  I also use shank brushes to clean the mortise with the dish soap and warm water. After rinsing well, I dry the stummel with a cloth.  It came out well.As I observed earlier, there is a very large fill on the underside of the shank.  As expected, the cleaning of the stummel softens the old fill material and most of it fell out with the cleaning.  Using a sharp dental probe, I continued to excavate the material from the hole to clean it.Addressing the internals, I now use cotton buds, pipe cleaners, shank brushes and a dental spatula to scrape the mortise wall.  Using my tools to clean takes a bit of effort, but after some time, the buds started coming out lighter.  Later I will give the internals a further cleaning using a kosher salt and alcohol soak.
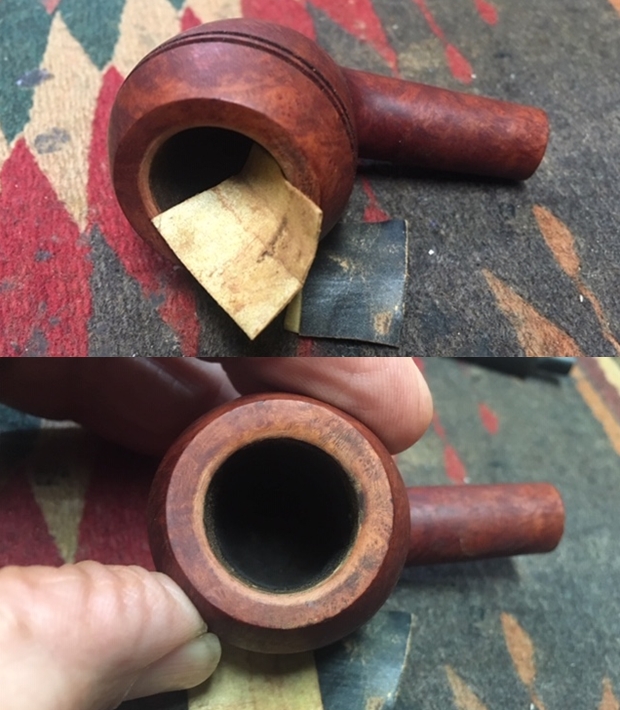
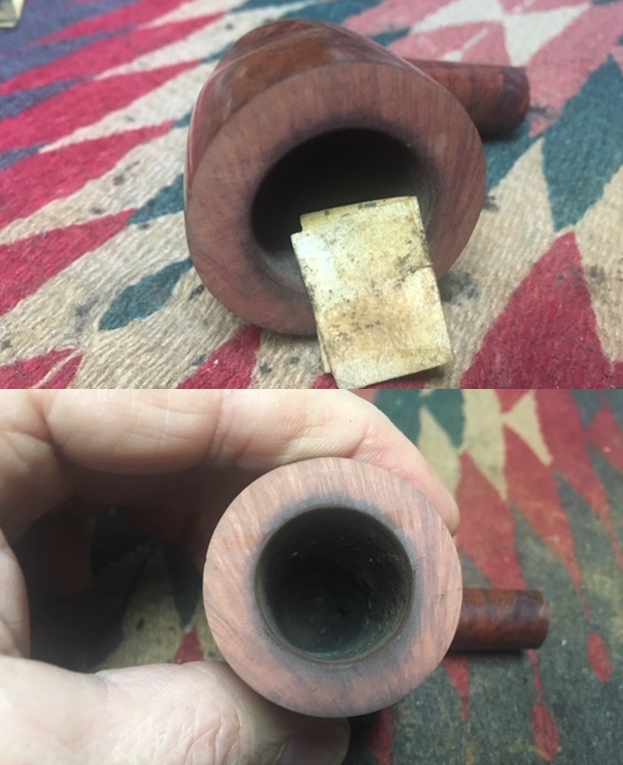
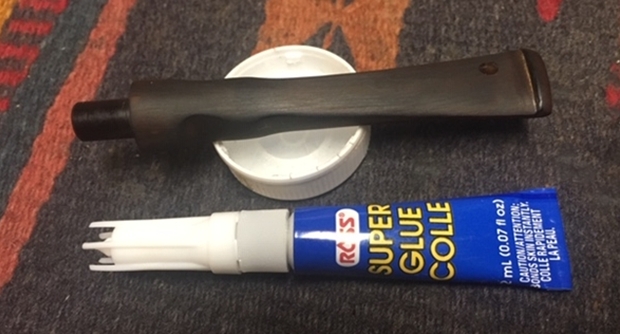
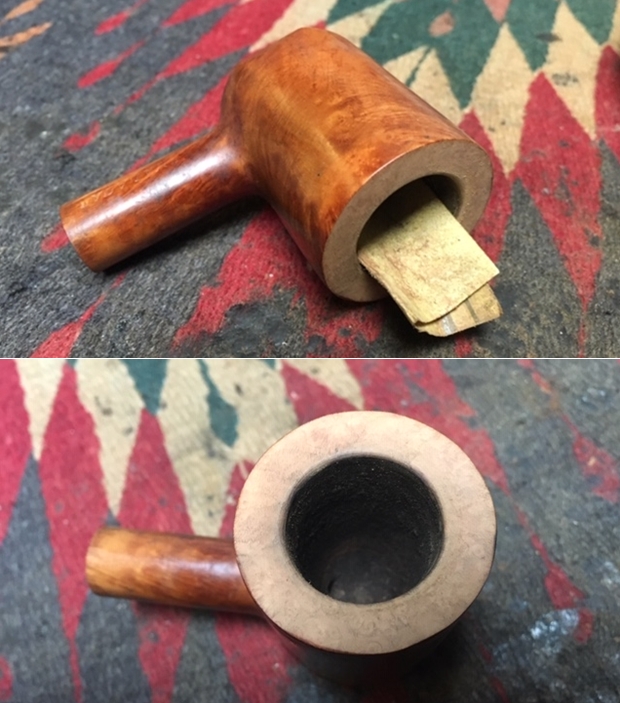
Next, I patch the huge crater on the shank.  After I make sure all the old fill material has been removed, I clean the hole with alcohol. 
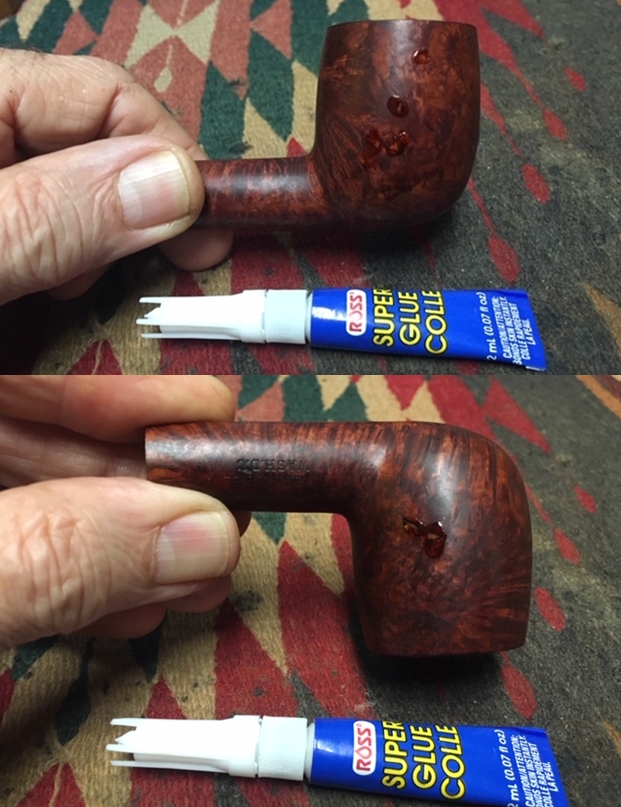
In the recent trip to India I discovered that there was some mild controversy around my method for filling holes using a putty created by mixing CA glue and briar dust.  Both Steve and Paresh said that they could not duplicate what I’ve been doing for some time – mixing the two components and creating a putty that remained supple.  What they experienced was the CA glue instantaneously solidifying when it touched the briar dust.  We discussed many different possible factors that would cause this difference in results – elevation, kind of glue, etc.  Another possible difference I suggested was that when I used an index card as a mixing platform, I would first cover the card with a strip of packing tape so that the glue would not be absorbed into the paper – which may, if it did absorb, cause the CA to solidify more rapidly.  Both Steve and Paresh were mixing on an index card surface without the tape.  I don’t know if they’ve had better results yet!  I decide to use a plastic lid as my new mixing platform.  You can see that I also put some scotch tape down so that I can clean easily.  I place briar dust on the tape and add BSI Extra Thick Max-Cure CA glue.I gradually pull briar dust into the puddle of CA glue and mix it with a toothpick.  I don’t overwhelm the glue with a lot of briar dust but gradually mix more in.As you can see, the CA is not solidifying as I add more.When the resulting mixture thickens to that of molasses, I use the toothpick and trowel the putty to the shank and fill the huge hole.  After filled, I put the stummel aside to allow the briar dust putty to cure.
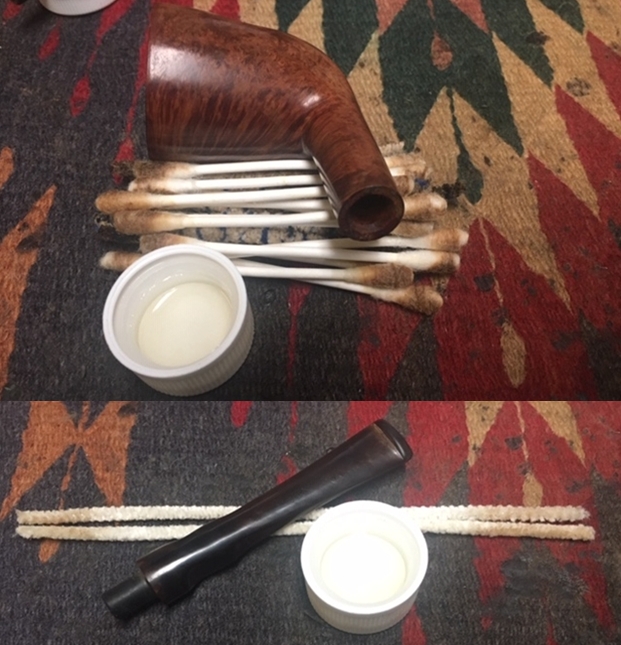
With the hour becoming late, I further advance the internal cleaning with a kosher salt and alcohol soak.  The patch on the shank has set up sufficiently.  I fashion a ‘mortise wick’ using a cotton ball. I stretch and twist the cotton until it creates a wick that will serve to draw out the tars and oils from the mortise.  I stuff the wick down the mortise with the help of a stiff wire.  After placing the stummel in a egg carton for stability, I fill the bowl with kosher salt which doesn’t leave an aftertaste as does iodized salt.  I then add isopropyl 95% to the bowl until it surfaces over the salt.  After a few minutes, the alcohol absorbs, and I top off with some additional alcohol and then put the stummel aside to soak through the night.   The next morning, I see what I was hoping to see.  The salt has soiled and after I draw out the wick it shows that it has continued the internal cleaning process of drawing out the tars and oils. After thumping and dumping the expended salt in the waste, I wipe the bowl with a paper towel and blow through the mortise to remove the salt crystals.I follow with a pipe cleaner and cotton bud wetted with isopropyl 95% to clean residue left behind after the soak.  I find that the internals are clean and refreshed for the new steward.  I move on!
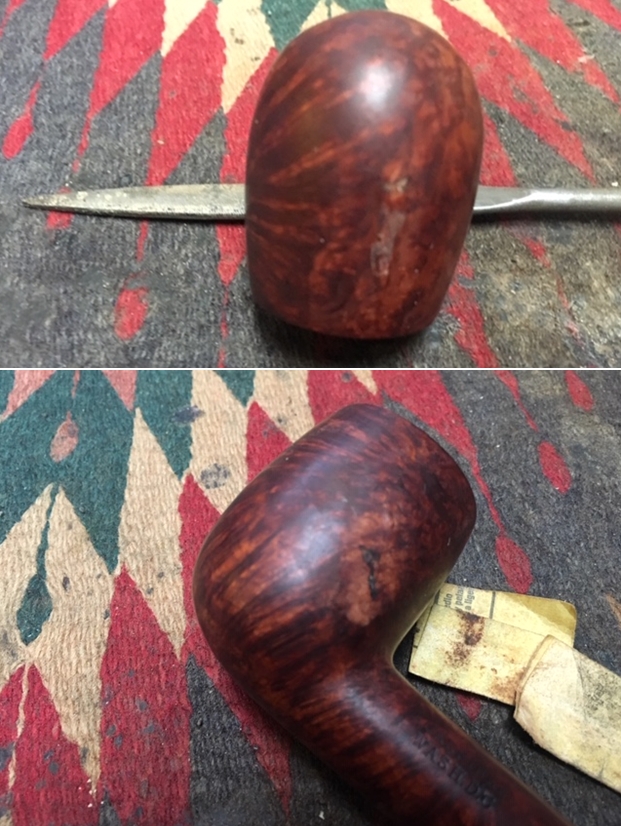
The crater fill on the lower side of the Lumberman shank has cured, and I begin the process of removing the excess briar putty using a flat needle file.  I file the mound down almost to the briar surface and then I switch to sanding with 240 grade paper to bring the patch flush with the briar surface. 
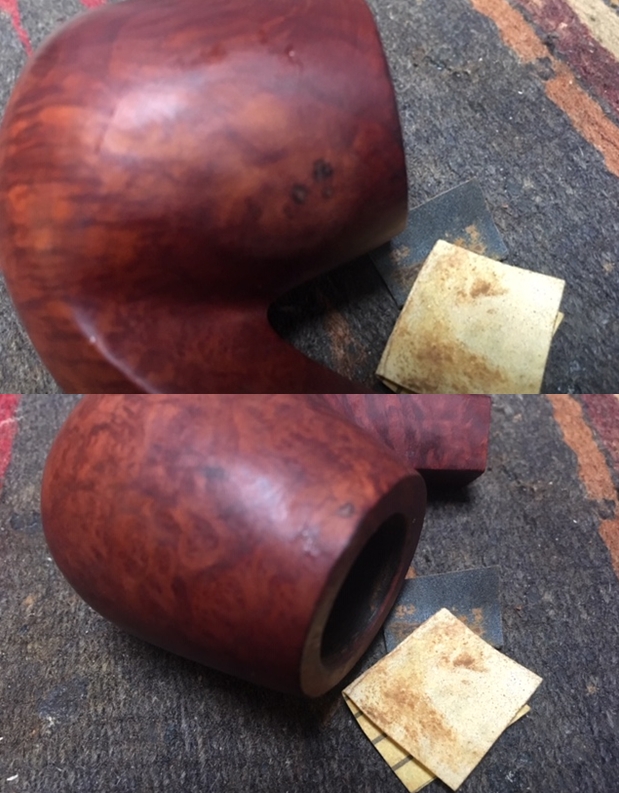
As is often the case, from the picture above, you can see the air pockets left in the sanded patch material.  To blend this, I touch up the patch with a dye stick after sanding the patch further using 600 grade paper.
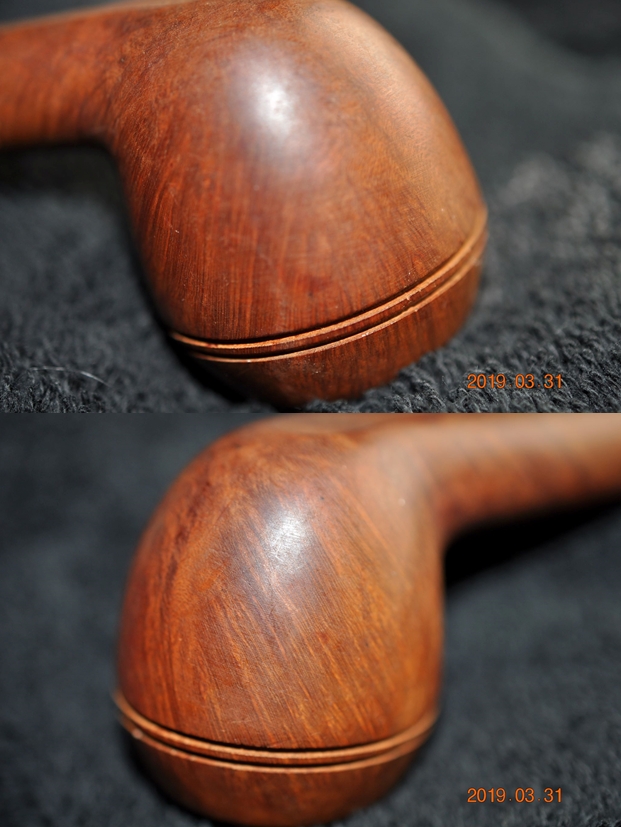
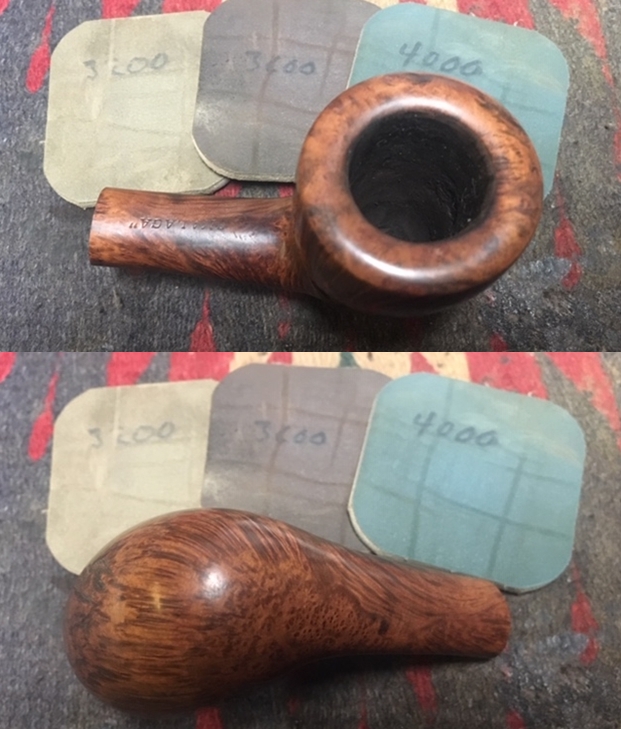
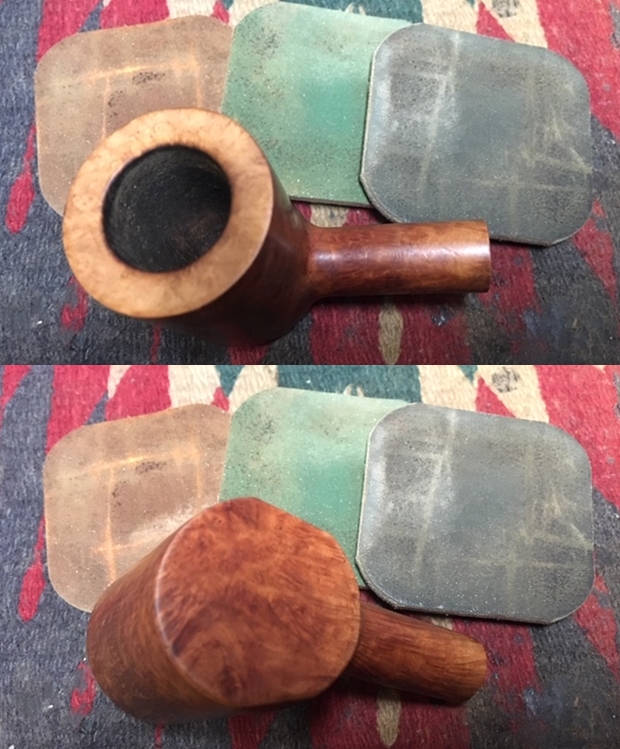
Turning now to the rim, the front and sides of the rounded rim have been skinned up a good bit which the following two pictures show. I use 240 grade paper on the rim and go with the rounded rim flow and sand out the roughened areas around the rim. 
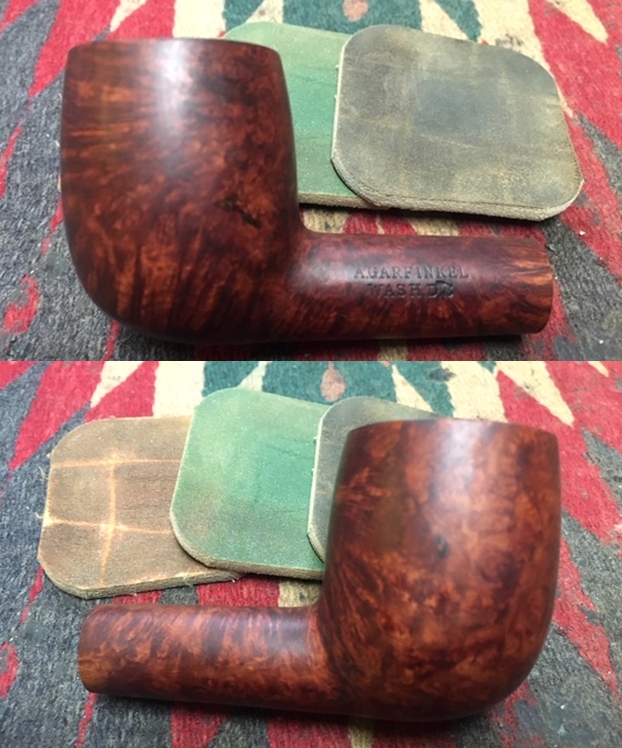
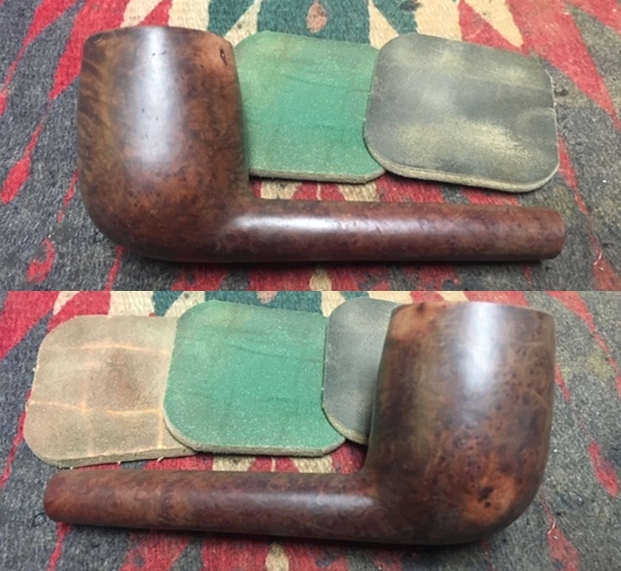
I follow the rim sanding using sanding sponges over the entire stummel, including the rim.  I use a coarse sponge, followed by a medium sponge and finish with a fine sanding sponge.  The briar on this Silver Match Toronto is expressive and It’s coming out nicely with the sanding. 
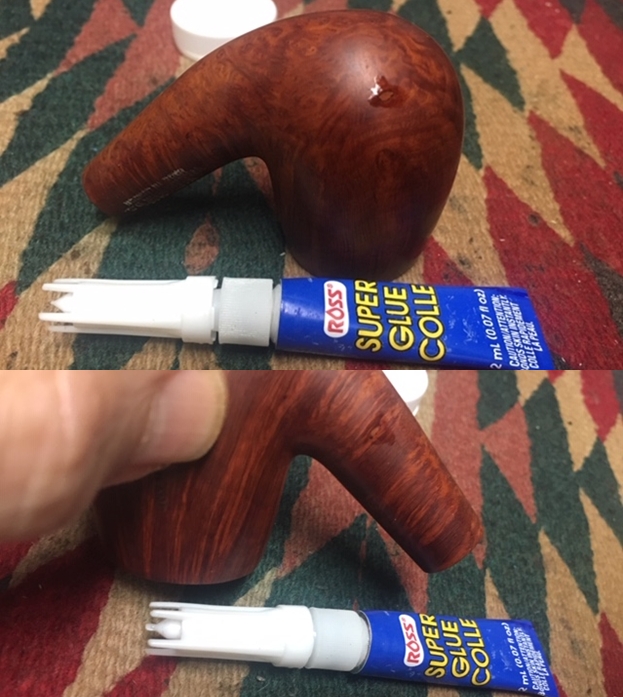
After the sponge sanding, I identify a pit on the lower left side of the bowl. I decide to apply a clear CA glue patch to fill this pit.  After cleaning this area with alcohol, I blacken in the pit using a fine point Sharpie Pen then apply a drop of regular clear CA glue and set the stummel aside for the glue to cure. Not long after, the CA glue cures and I file the patch with a flat needle file followed by 240 and 600 grade papers. 
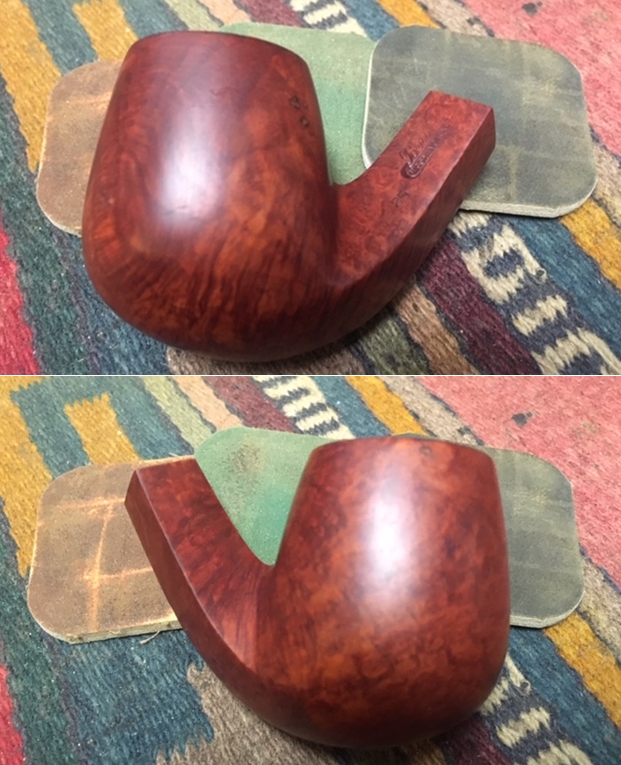
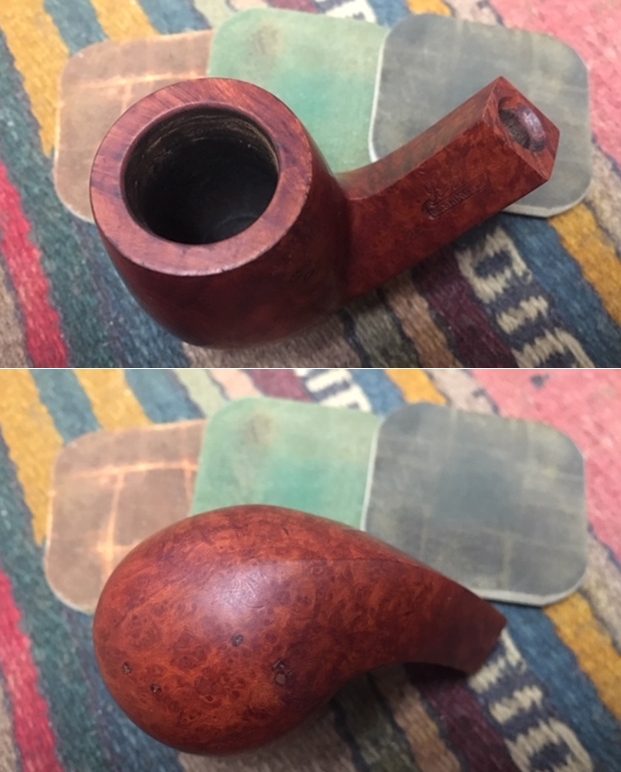
The result of this quick patch looks good.
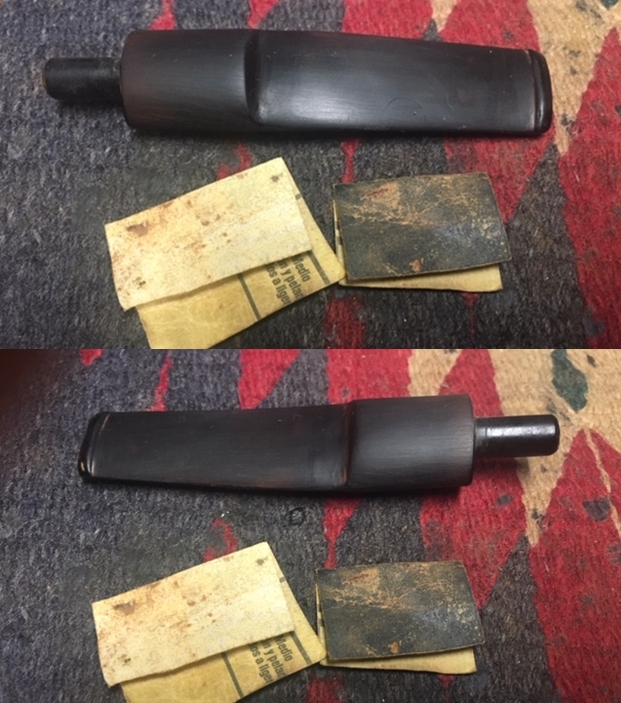
Waiting in the wings is the short stem of the Lumberman which sports a chipped button.  The button will need to be rebuilt using a mixture of activated charcoal powder and CA glue.I form an initial triangular insert from index card stock which fits into the slot of the button fully.  I had covered the inserted part with a layer of scotch tape to serve as a barrier to the patch material – to easily be able to remove the insert after the charcoal powder and CA mixture cures.  I then insert another triangular piece of card stock into the initial insert.  This serves to expand and tighten the insert.I open one capsule of activated charcoal dust on the plastic disc (also put a few strips of tape down for easier cleaning) and add BSI Maxi-Cure Extra Thick CA glue in a small puddle next to the charcoal powder and mix in gradually using the toothpick.  As with the briar dust putty, I draw charcoal powder into the CA glue until it reaches the viscosity of molasses and then trowel the putty to the stem to fill the missing button cavity. I trowel enough to fully over-coat the area.As hoped, after the charcoal patch sets up after a few minutes, with a bit of wiggling, the insert comes out leaving the slot and airway clear of the patch material.After several hours, the patch material has fully cured, and I go to work using a flat needle file.  I first work on clearing the excess patch material on the end of the stem.To more rapidly remove the mound of excess patch over the button I employ a small sanding drum mounted on the Dremel.  This removes the patch material very easily. I follow using the flat needle file to bring about the fine shaping of the button repair. 
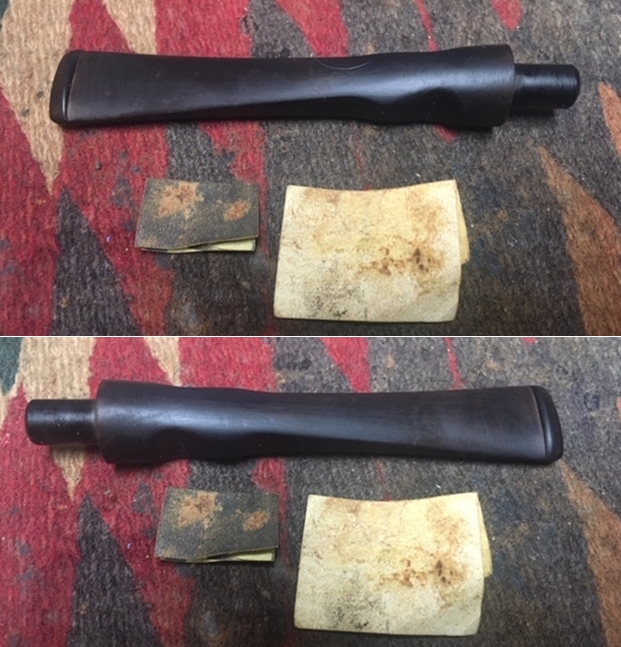
I follow the filing and shaping of the button with 240 grade sanding paper to further smooth and shape.  I notice significant air bubbles being revealed by the sanding – ugh…Following the 240 paper, sanding with 600 grade paper and 0000 grade steel wool – upper and lower stem, brings out the air pockets even more distinctly. To address the significant presence of air pockets in this button repair, I first darken the pockets with a fine point Sharpie Pen then I paint thin CA glue over the button lip.  I put the stem aside for the CA to cure.
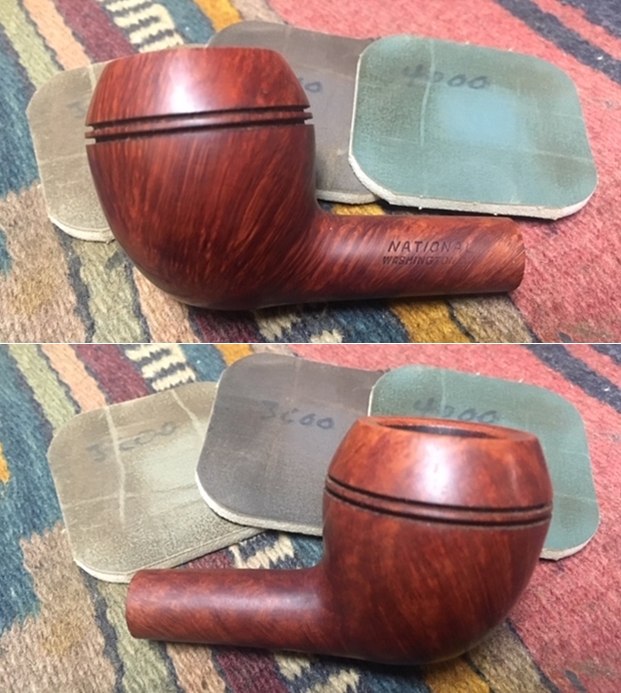
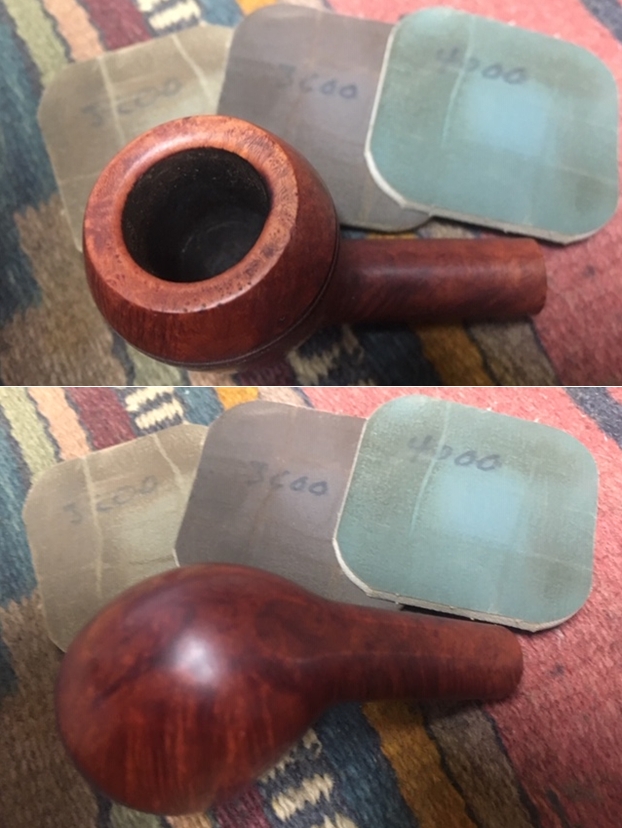
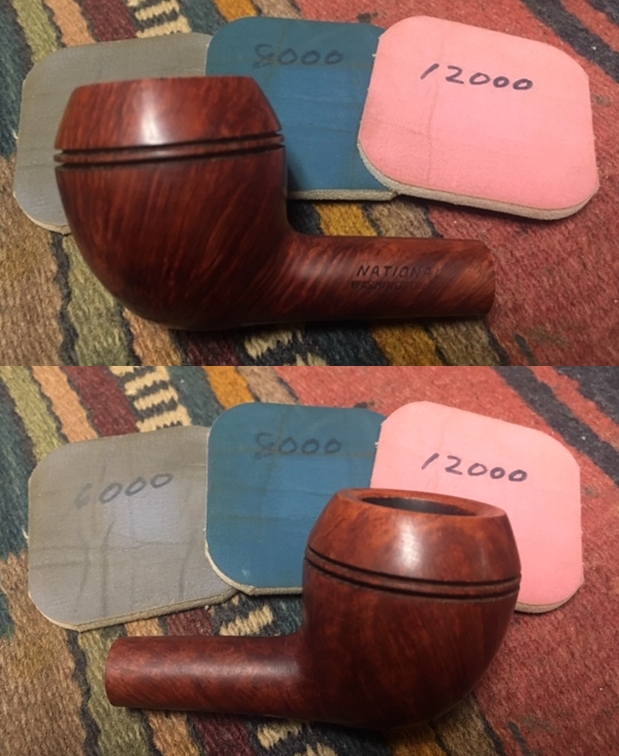
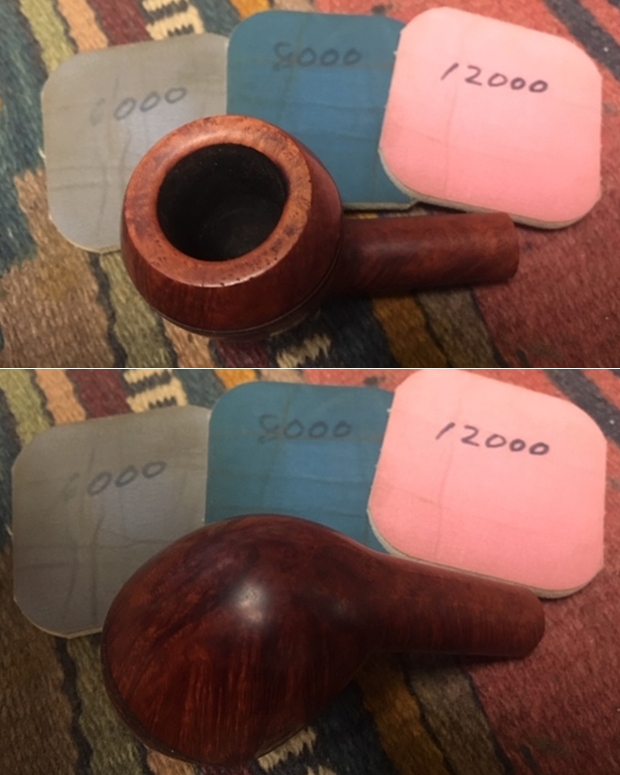
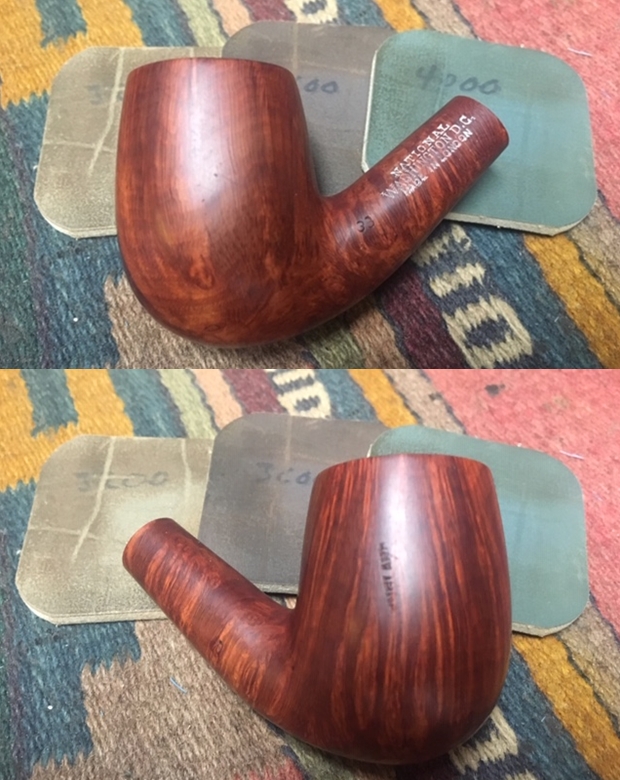
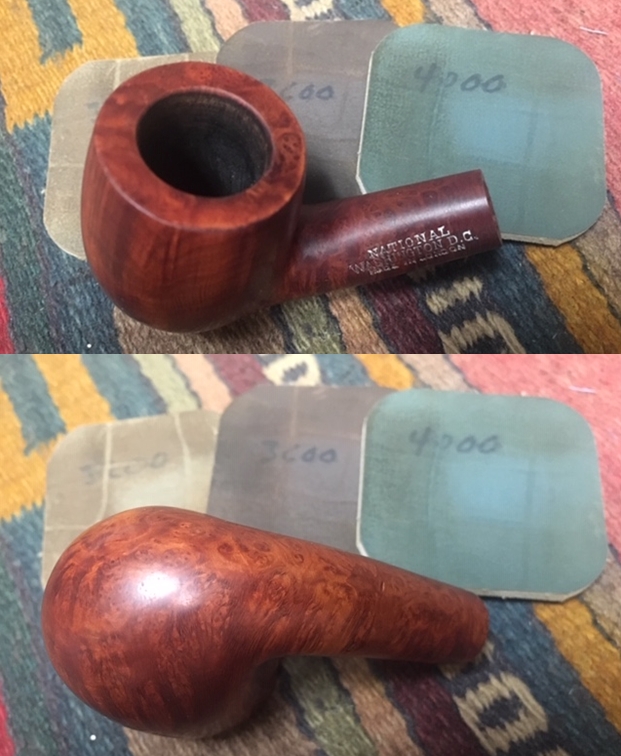
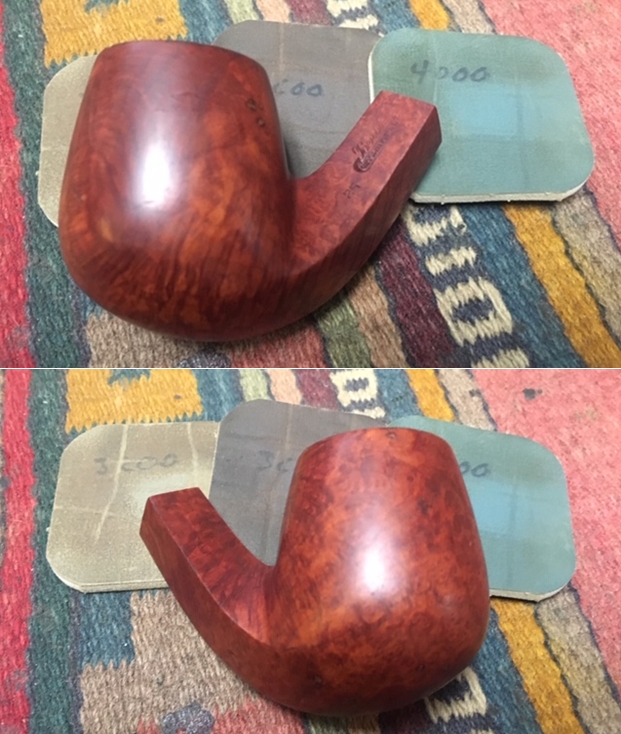
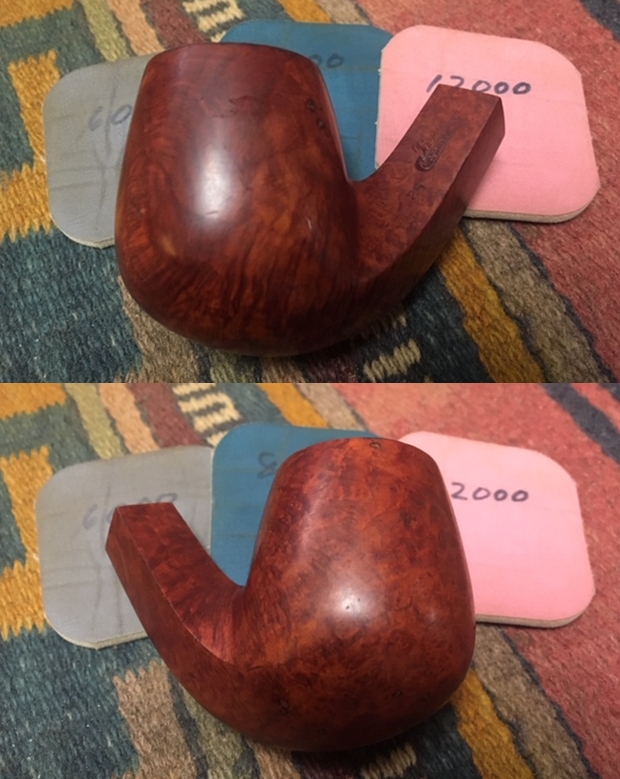
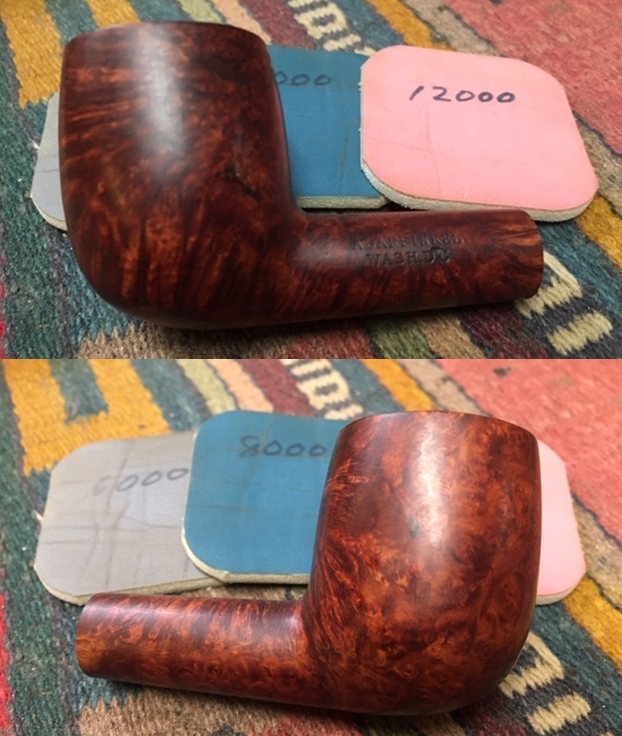
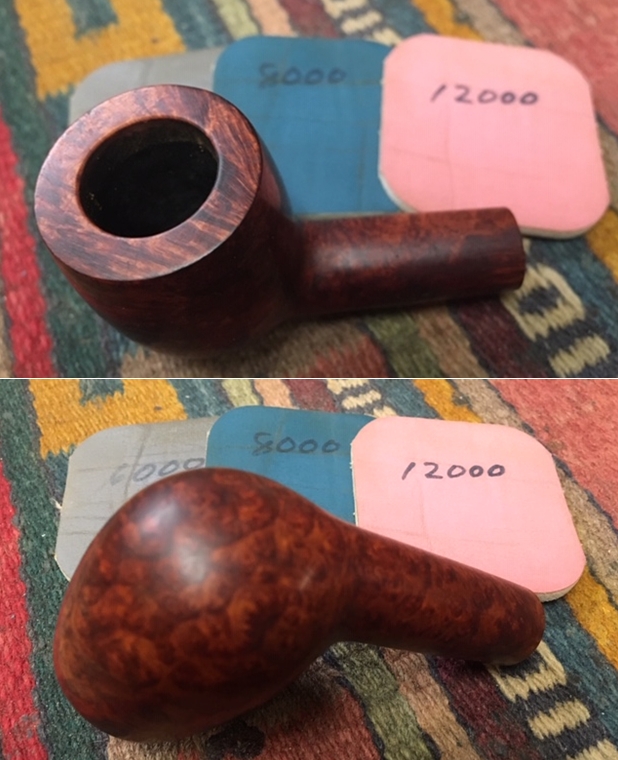
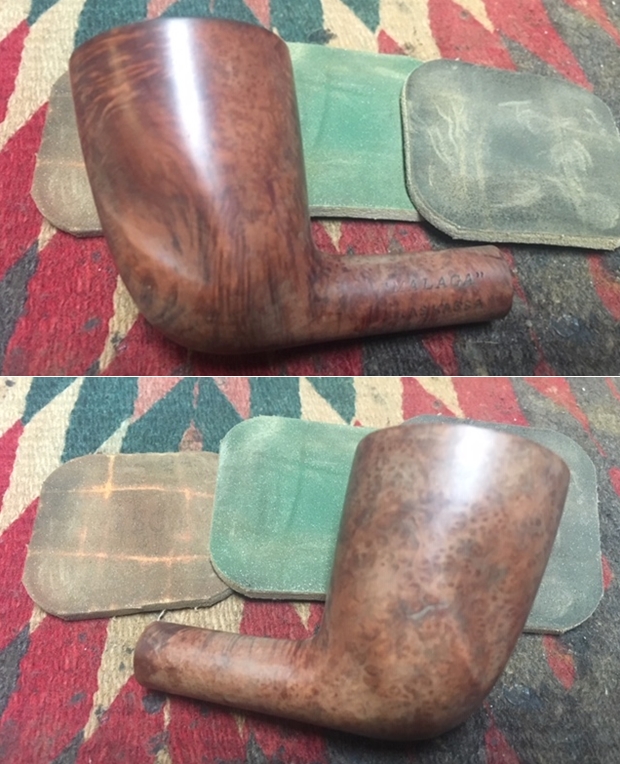
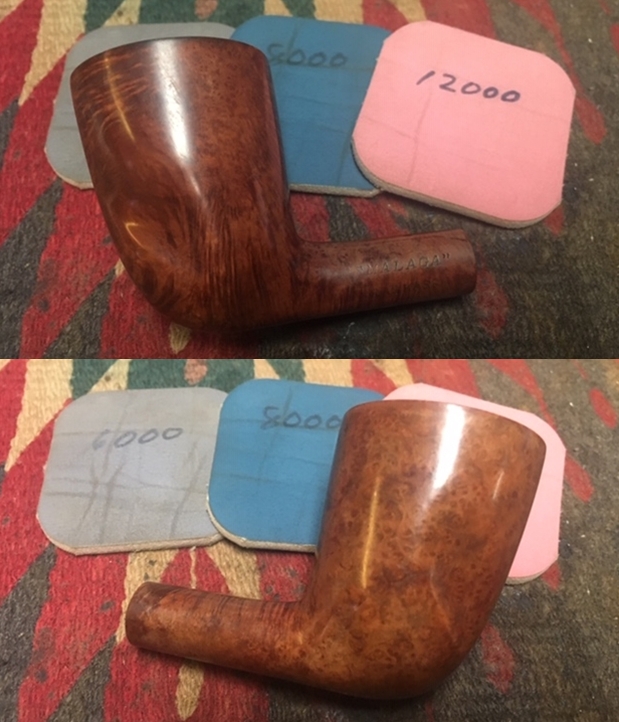
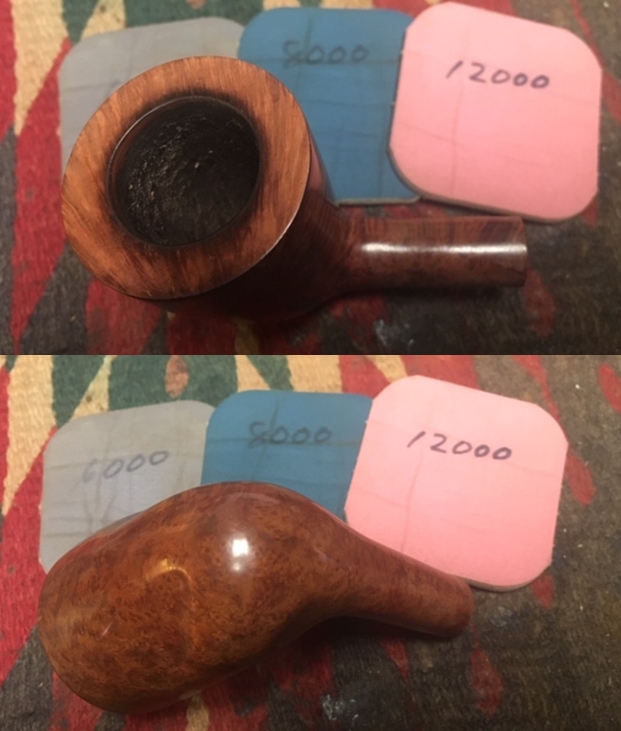
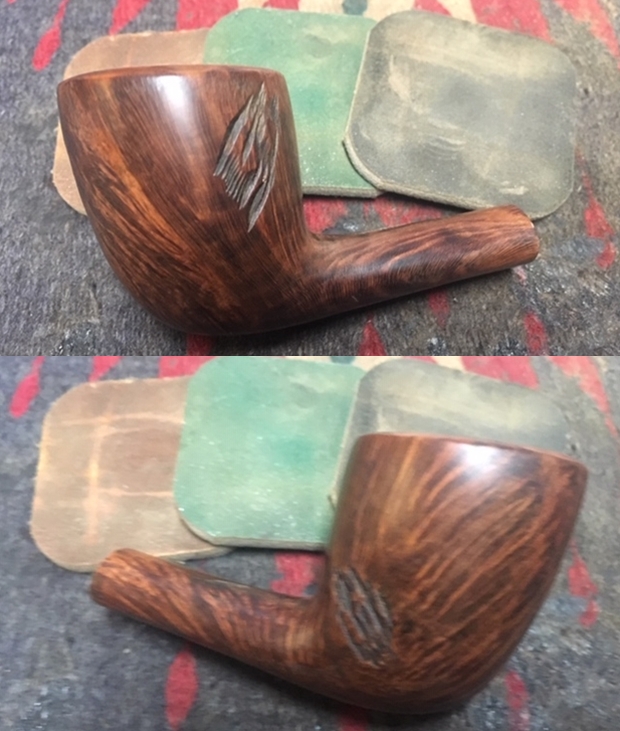
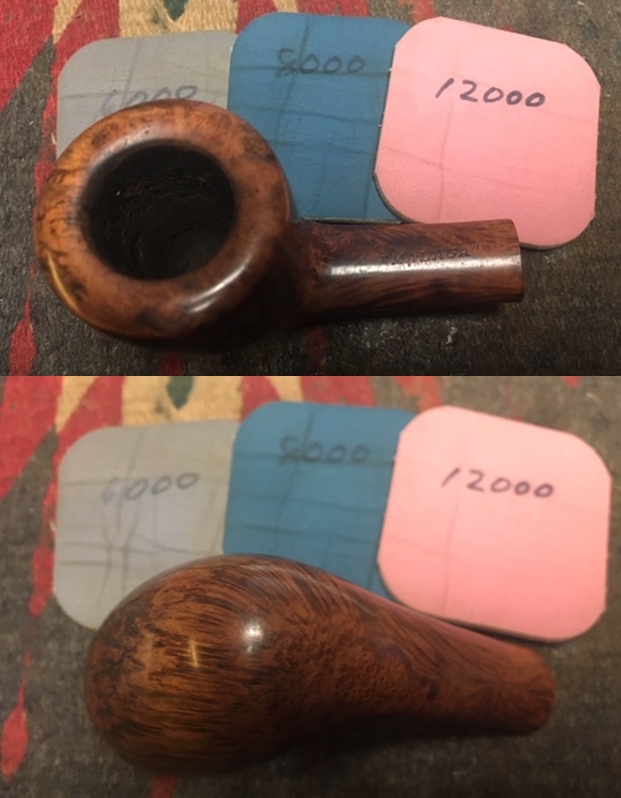
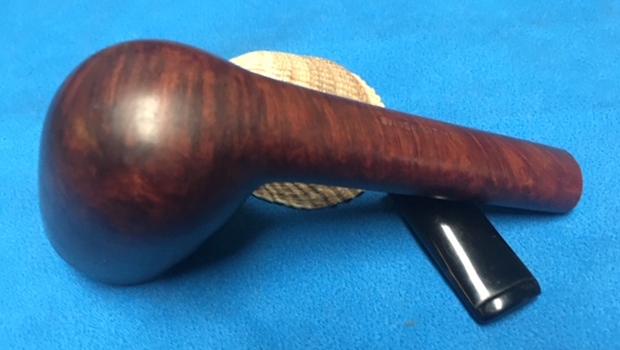
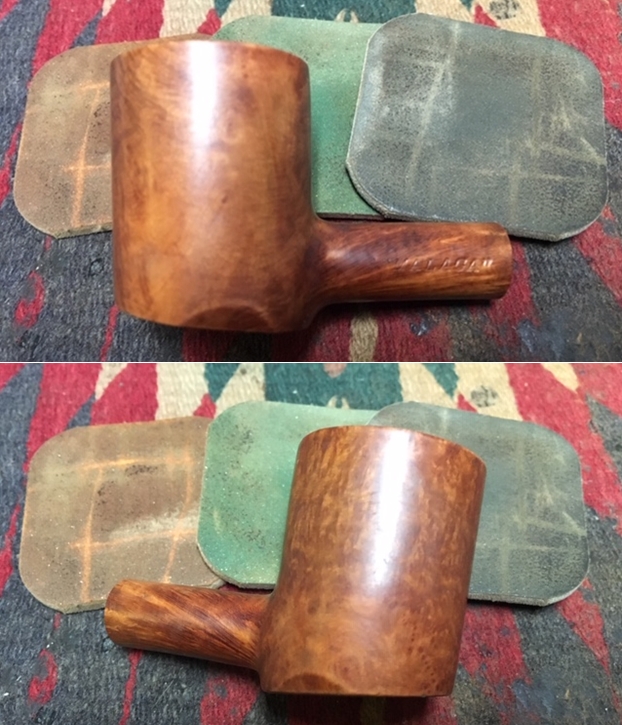
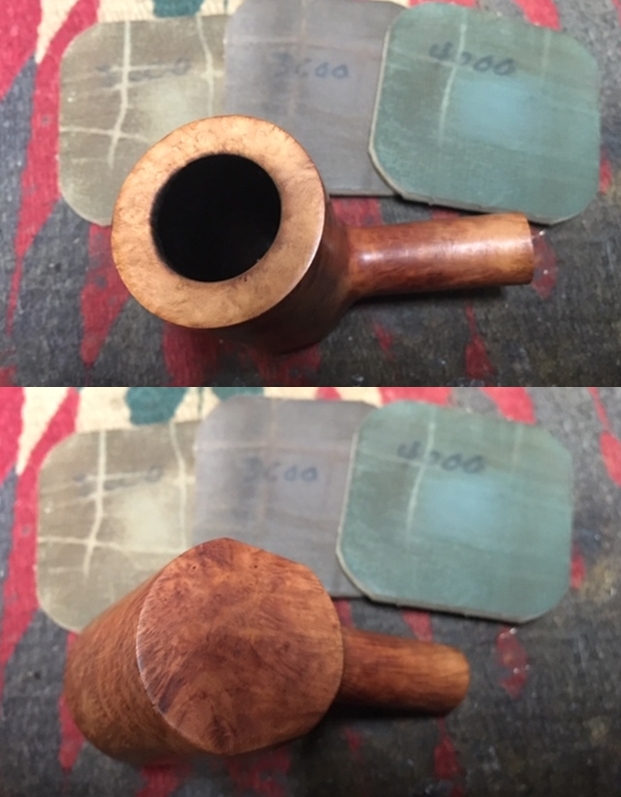
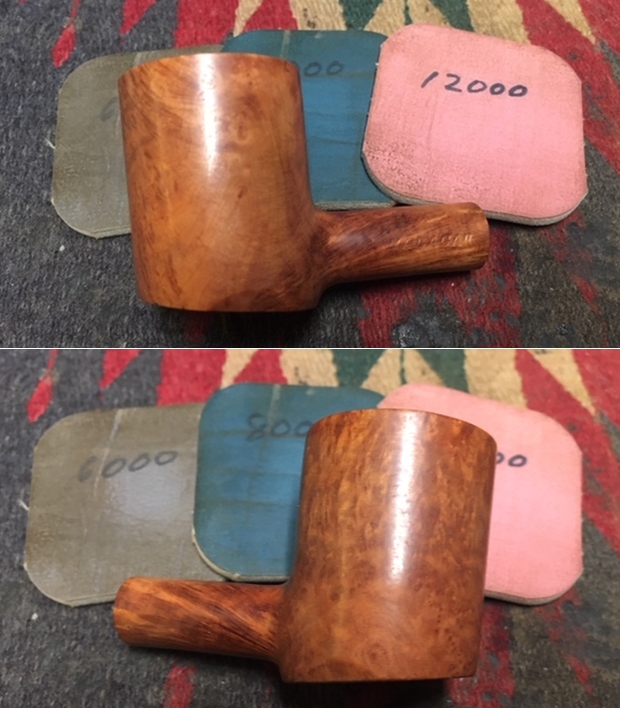
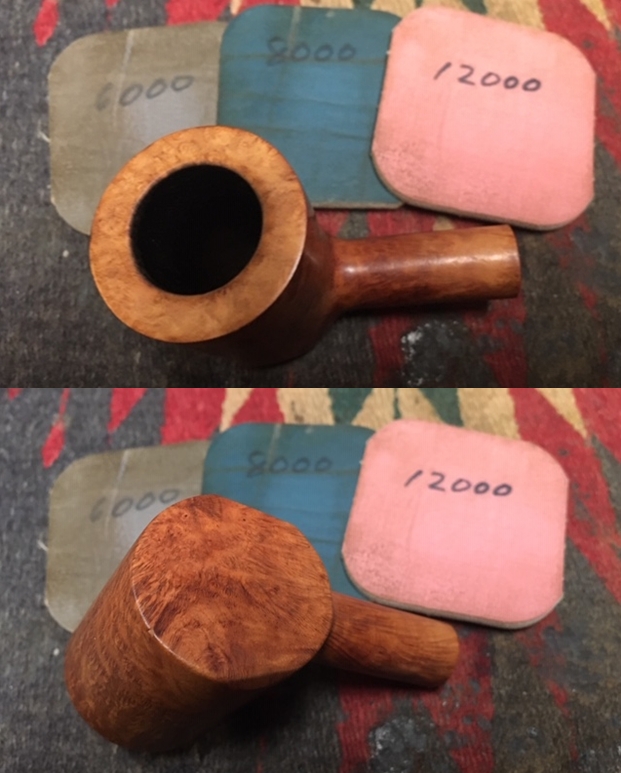
Putting the stem aside for the time, I turn back to the stummel sanding it with the full regimen of micromesh pads.  Beginning with pads 1500 to 2400, I wet sand the stummel.  Following this, I dry sand using pads 3200 to 4000 and 6000 to 12000.  Wow!  The grain on this Silver Match Lumberman is nice.  You can tell that when the grain patterns in the briar are random, as in this stummel, it is usually a good indication that it was cut from the upper part of the burl which is called the ‘branch wood’ section where the branches of the briar shrub form.  This article I’ve found helpful in understanding better the nature of briar grain – Published in Pipes & Tobaccos, Fall 1999, GRAIN: The first of an infrequent series of articles concerning THE BRIAR PIPE By R. D. Field (See: LINK).  The grain that emerges through the micromesh process is very nice – the Silver Match Toronto is shaping up well. The thing that bothers me like a burr under a saddle is the huge crater fill on the underside of the shank. Even with a darkened stain to mask the fill, it will still be there.  Yet, the light briar surrounding it in the current state is too much contrast for me to swallow!  I come to a decision to stain the stummel a dark brown to provide as much blending as possible and to use the staining process to tease out in greater contrast of the grain. I assemble on the worktable all the needed components for applying stain to the stummel.  I will use Fiebing’s Dark Brown Leather Dye with the possibility of lightening the dye because it’s an aniline dye – alcohol based.  I can wipe it with a cotton pad wetted with alcohol to lighten the finish and blend it.  I first clean the surface using isopropyl 95% and a cotton pad and using a cork inserted into the shank as a handle, I heat the stummel with a hot air gun.  This expands the briar and helps the grain to be more receptive to the dye.  I then use a folded over pipe cleaner to apply dye in swatches and then I flame the wet dye using a lit candle.  This immediately combusts the alcohol in the dye and it sets the dye pigment into the surface.  I methodically apply dye to the surface and flame as I go.  I then set the newly dyed stummel aside to allow the dye to rest – I’ll let it sit through the night.  This helps setting the new stain so that it will not come off on the hands when the stummel is first fired up when it goes into service. 
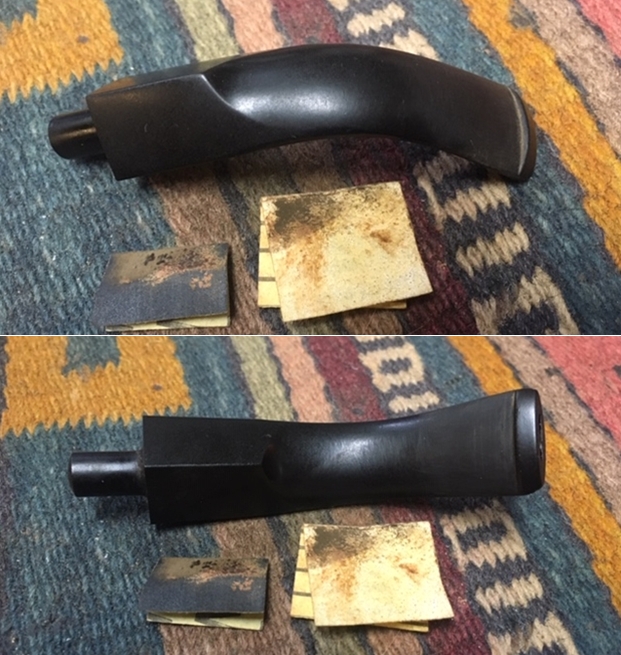
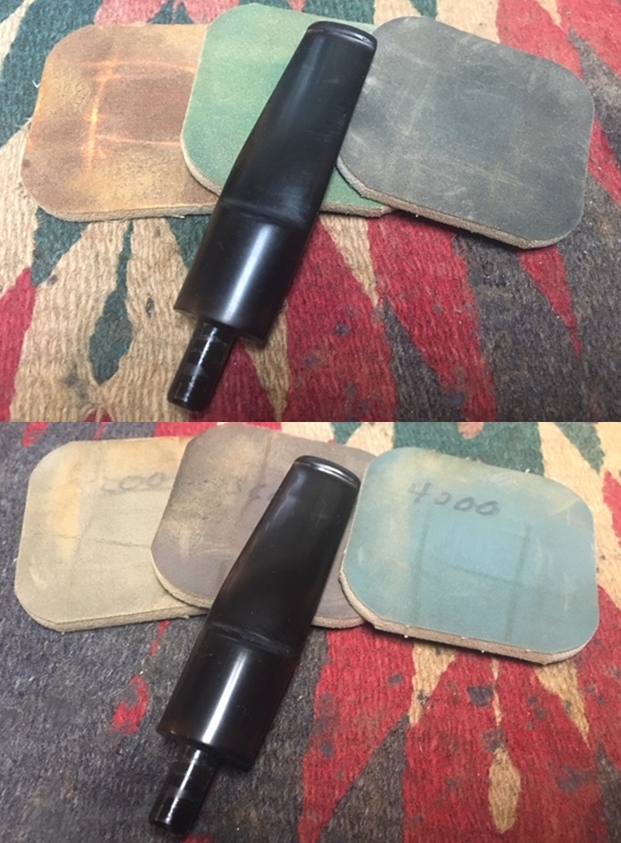
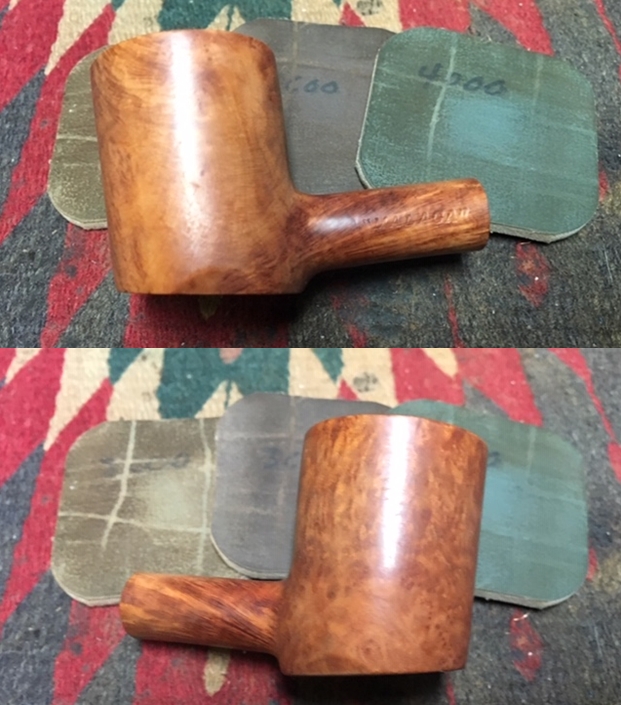
With the stummel resting, I return to the patched button addressing the air pockets.  Unfortunately, I forgot to take pictures during this process, but the result is shown.  I use a flat file to remove the some of excess patch material and then gently sand with 240 grade paper and 600 paper.  I finish this phase using 0000 steel wool over the entire stem.  I’m not 100% satisfied with the button rebuild, but the stem is structurally ready to return to service.
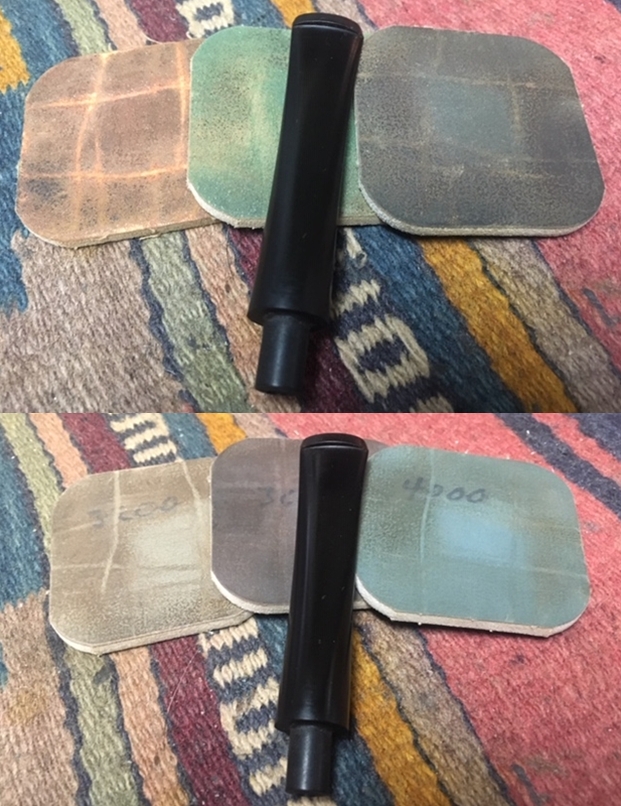
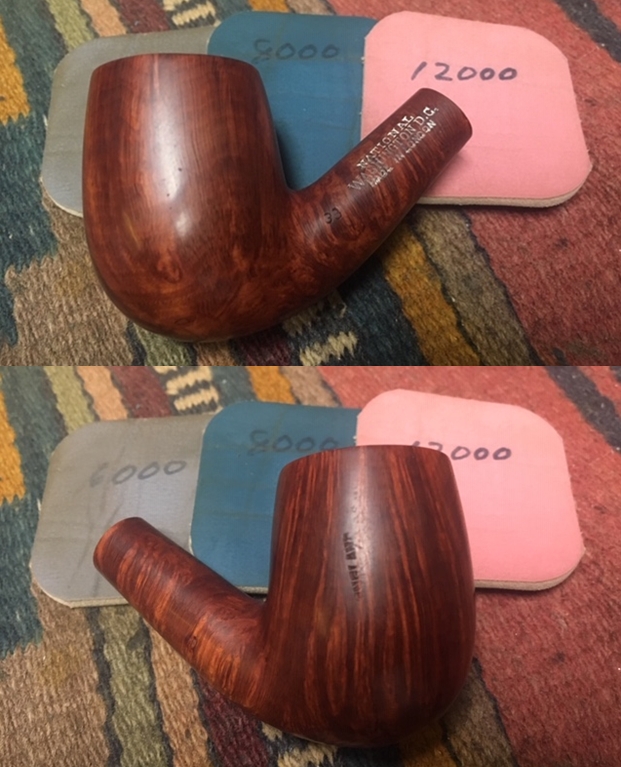
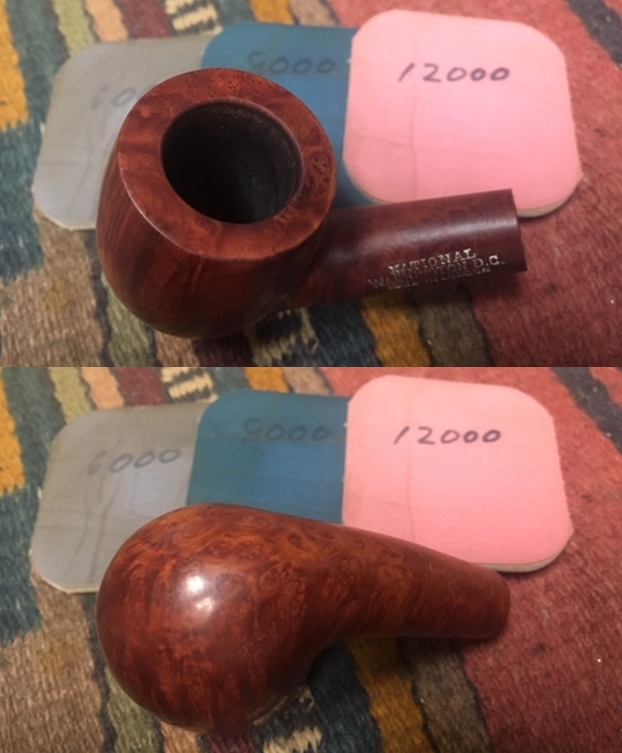
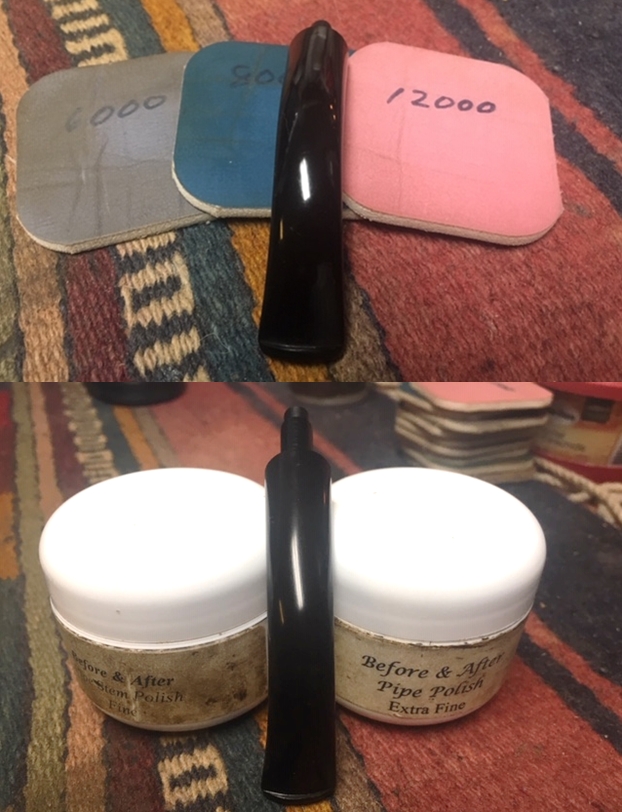
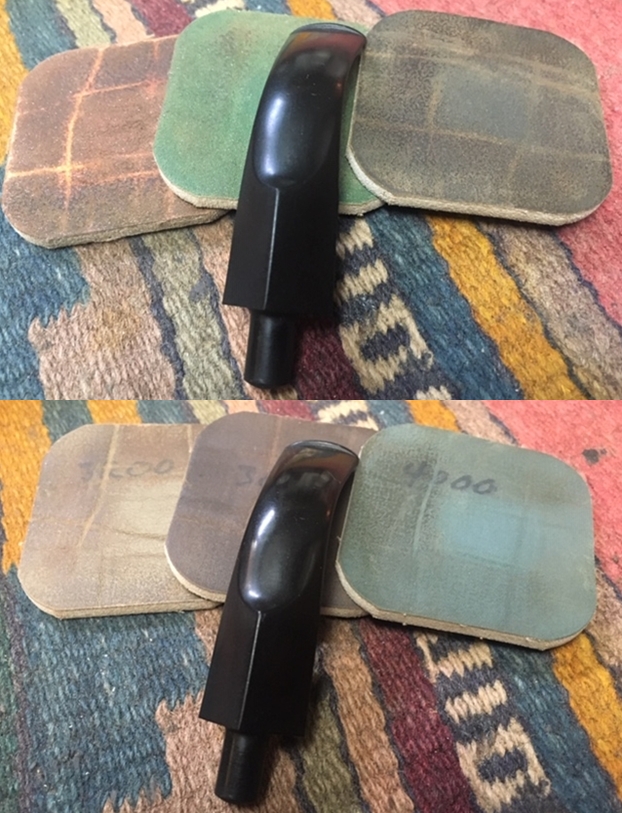
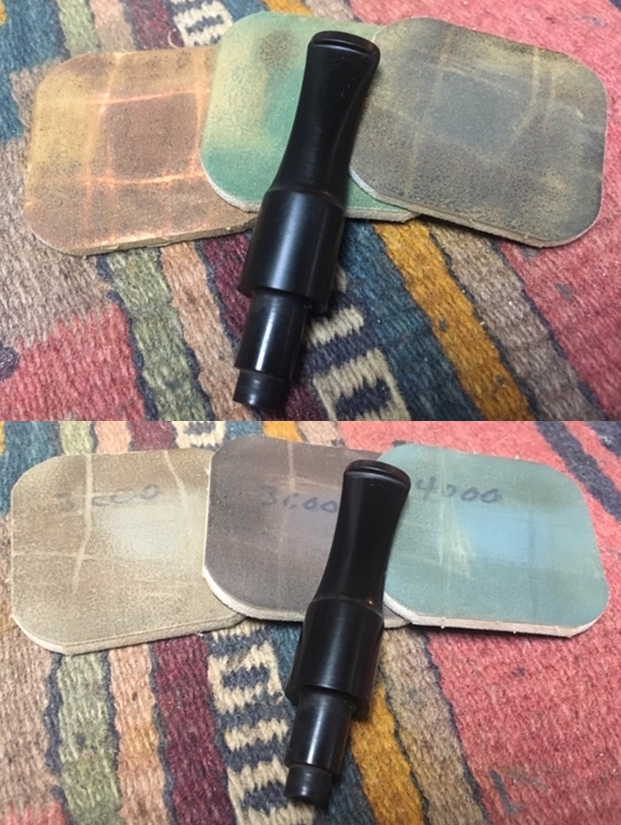
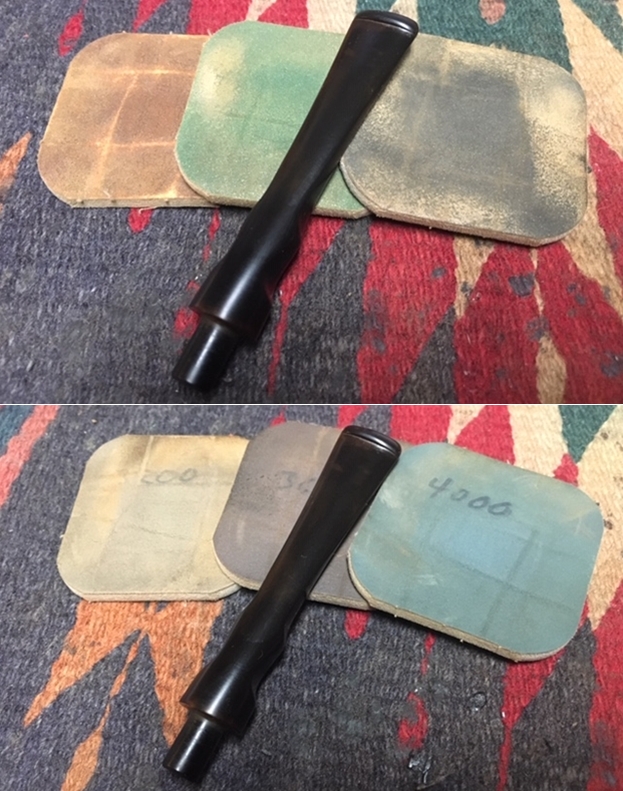
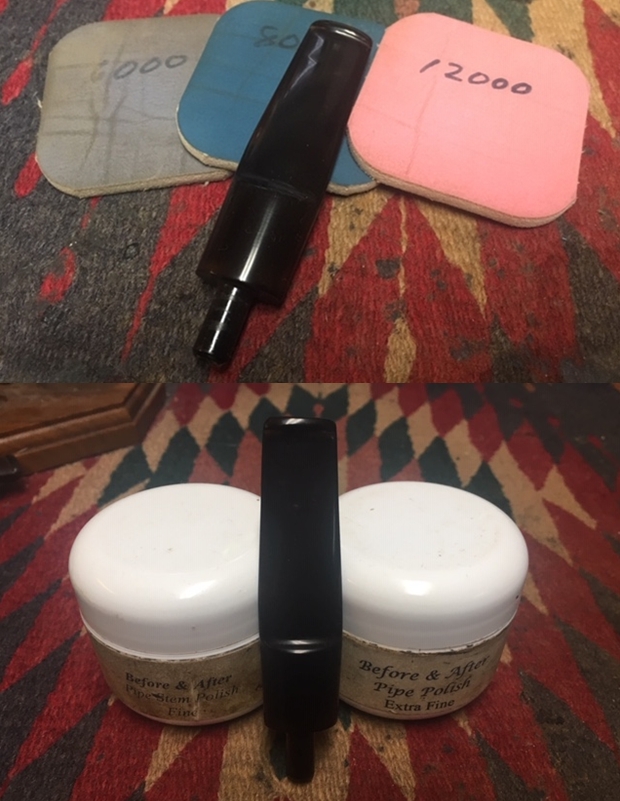
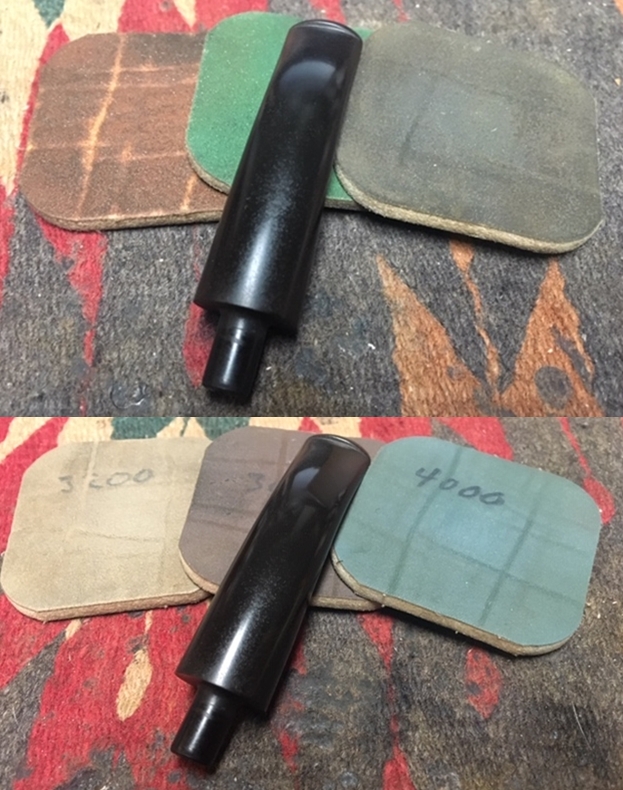
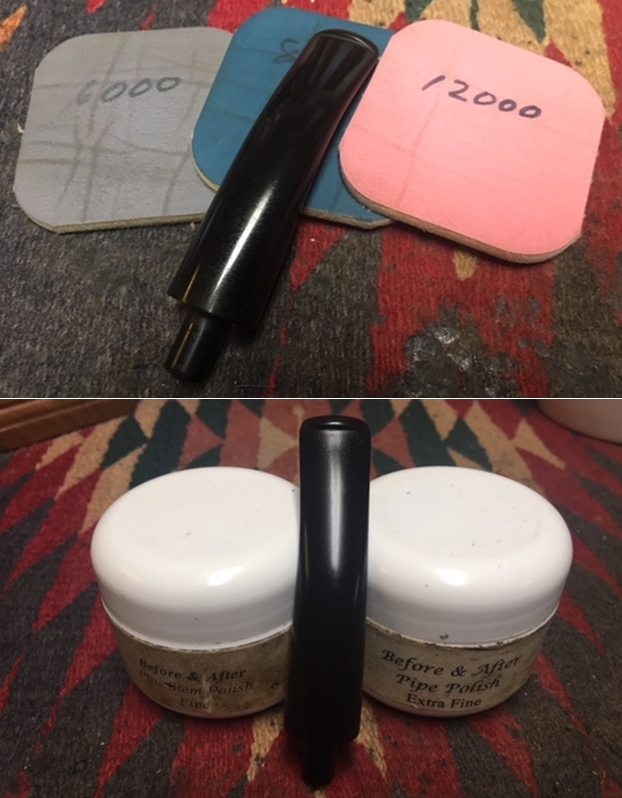
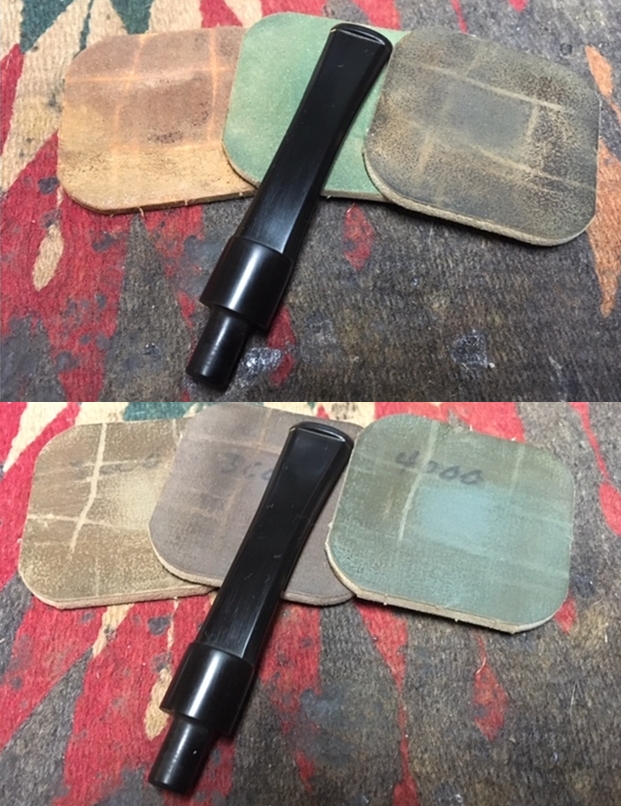
I move straightaway to using micromesh pads on the stem.  I begin wet sanding with pads 1500, 1800, and 2400 and follow with dry sanding with pads 3200, 3600, and 4000 and finish with pads 6000, 8000 and 12000.  Between each set of three I apply Obsidian Oil to the stem to help rejuvenate the vulcanite and the expected high-level gloss of the stem makes an appearance.  Nice.  I put the stem aside to dry and absorb the oil. 
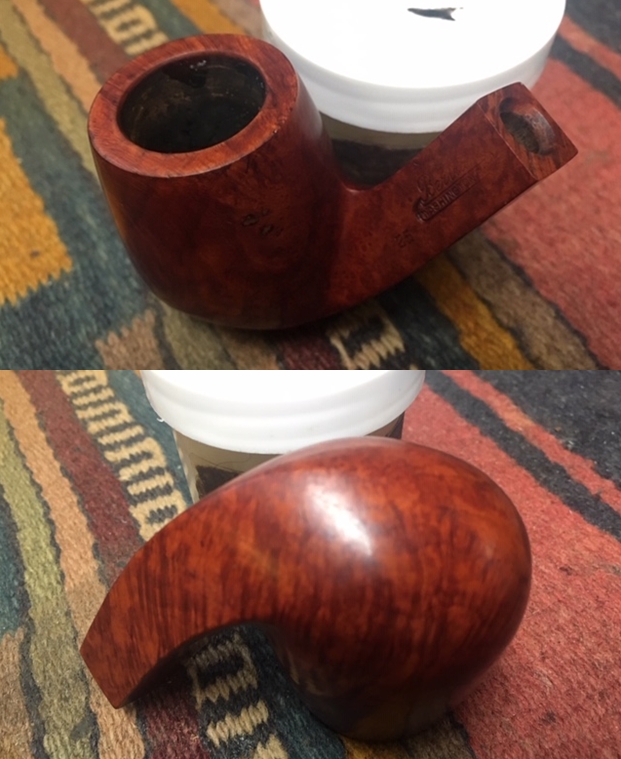
The newly stained stummel rested through the night and it’s time to unwrap the stummel from the flamed crust residue revealing the grain below.  To do this I mount a new felt cloth buffing wheel to the Dremel and set the speed to the slowest possible to reduce the possibility of overheating with the friction.  I then apply Tripoli compound to the entire stummel.  I have been asked how long this process takes as I ‘plow off’ the crust and ‘clean’ the residue dye revealing the grain detail.  I timed it this time and the Tripoli compound application took me one hour and 10 minutes – yep, that long. When the help of my wife, she takes a picture of the process of removing the crust and revealing the hue of the newly stained briar underneath.  I’m pleased with the results.  The crater fill on the underside of the shank almost disappears as it blends with Fiebing’s Dark Brown Leather Dyed grain.  After I complete the application of Tripoli with the felt cloth wheel, I switch to a cotton cloth wheel, increase the speed to about 40% full power, and again apply Tripoli to the stummel.  I do this for two reasons.  First, with the cotton cloth wheel I’m able to reach into the crook of the bowl and shank which the felt cloth wheel cannot reach.  Secondly, I find that it sharpens the grain presentation as additional excess dye is taken away.  The result is almost like a luminescent effect. After applying the Tripoli, I give the stummel a gentle wipe with a cotton pad wetted with alcohol.  This lightens the hue a bit and helps blend the new dye.Next, I mount another cotton cloth buffing wheel and maintain speed at 40% and apply Blue Diamond compound, less coarse than Tripoli, to both stummel and stem.
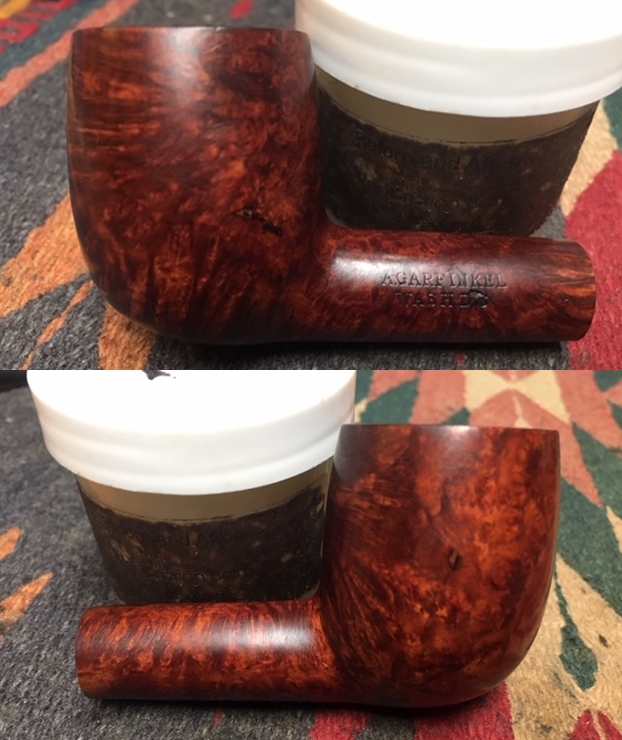
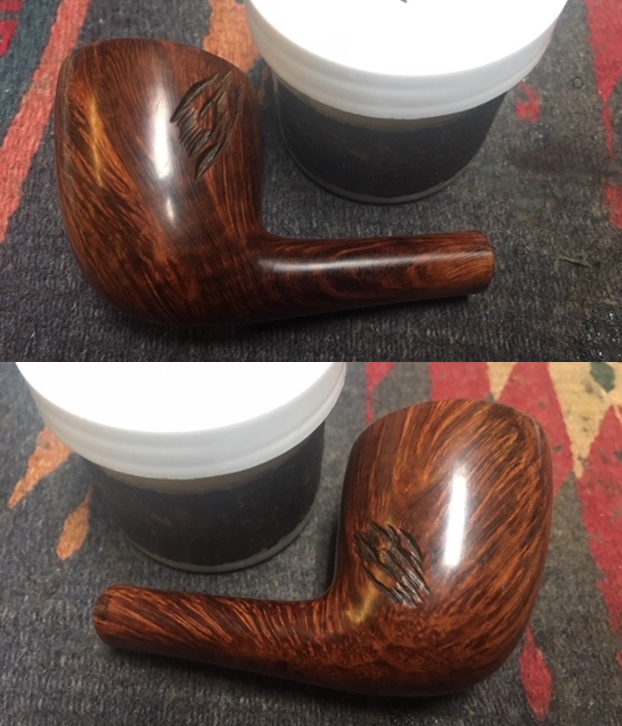
Next, I again detach the stem and I want to freshen the Silver Match ‘flame’ stamping.  It took me a while to figure out that was what it was – at least that’s what I think it is!  I apply white acrylic paint over the stamp and then gently wipe it off while still wet using the flat side of a toothpick. I use a cotton bud and the point of the toothpick to clean off the excess. The result is about 80% success.  The upper part of the flame wasn’t deep enough to catch the paint.  The result still looks good.
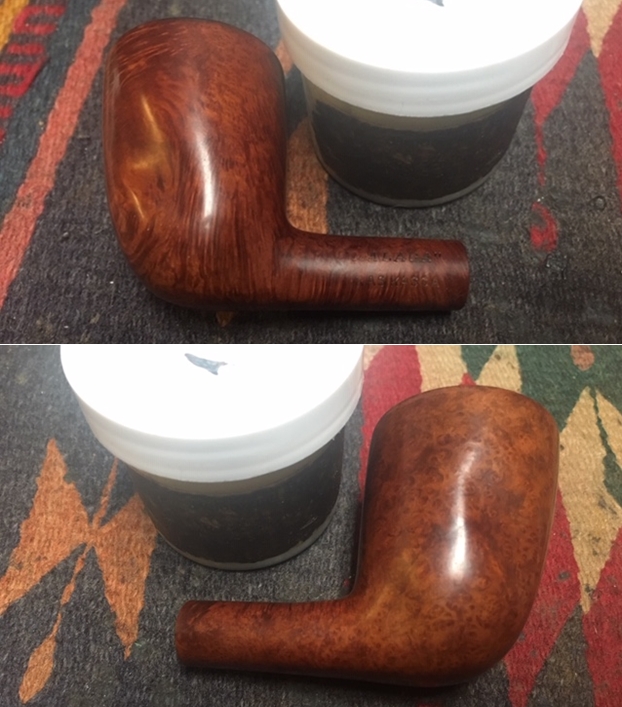
After reuniting the stem and stummel, I mount another cotton cloth wheel to the Dremel, maintaining 40% full power, and apply carnauba wax to the entire pipe.  I give the pipe a few coats of wax then I give it a rigorous hand buffing with a microfiber cloth to raise the shine and complete the restoration of this nice looking pipe.

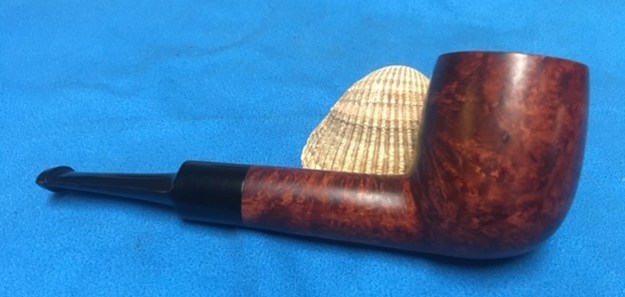
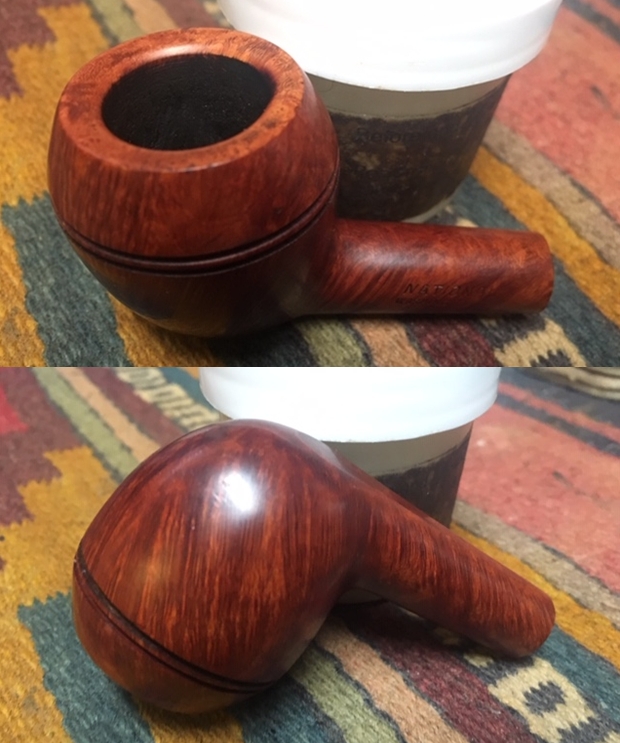
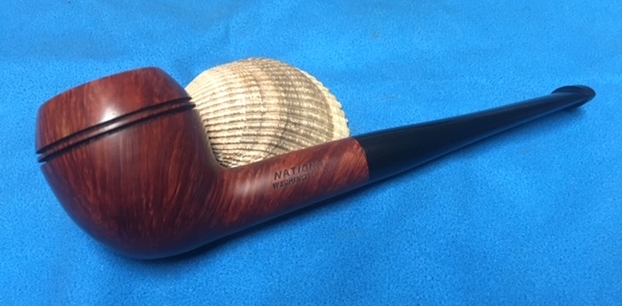
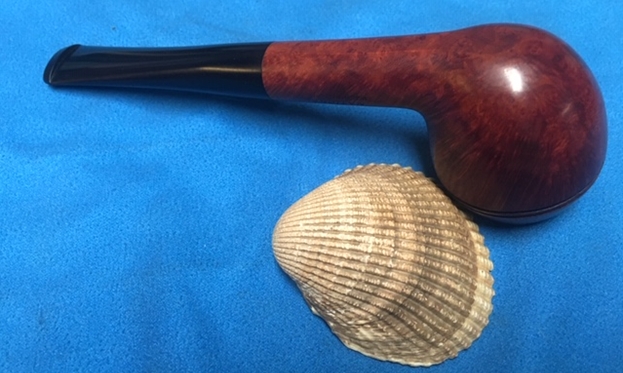
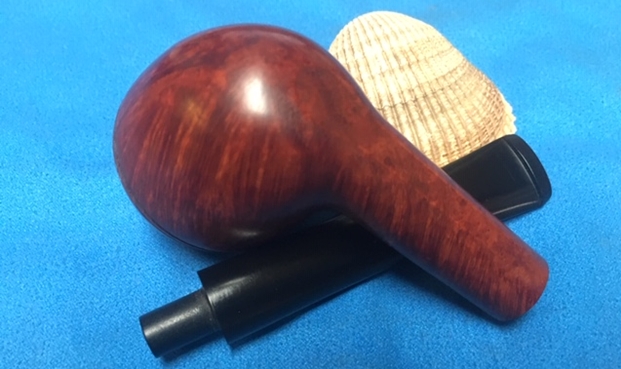
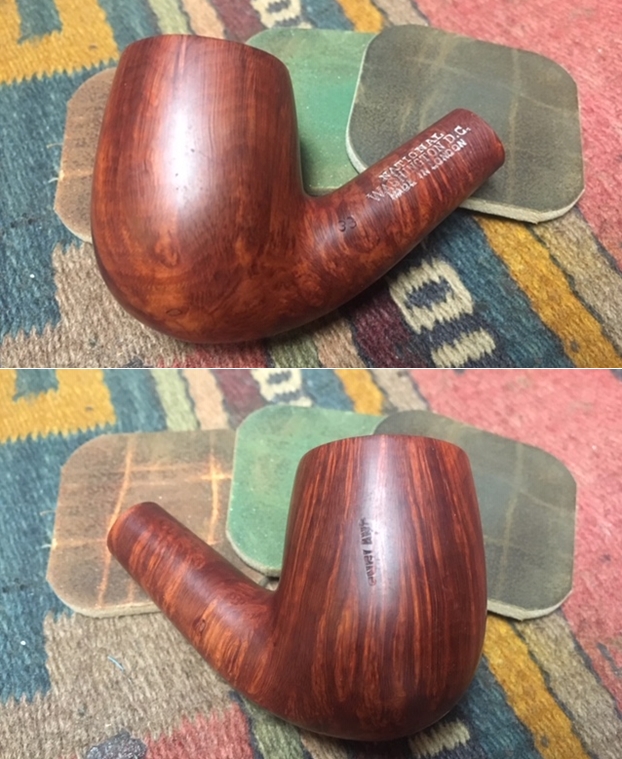
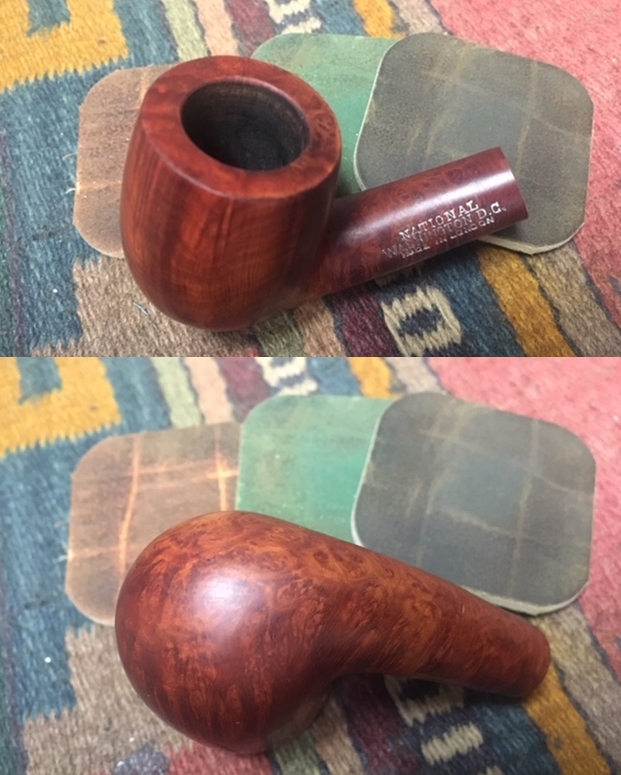
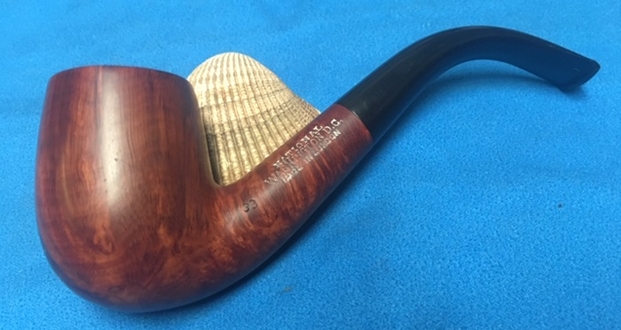
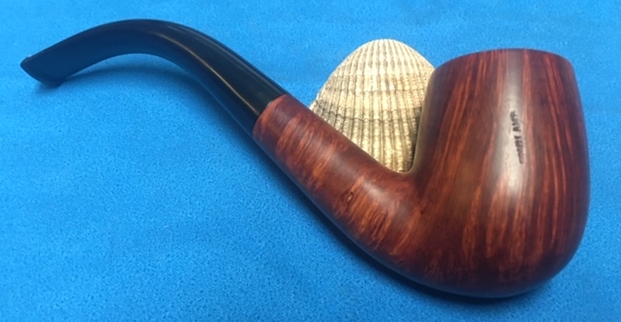
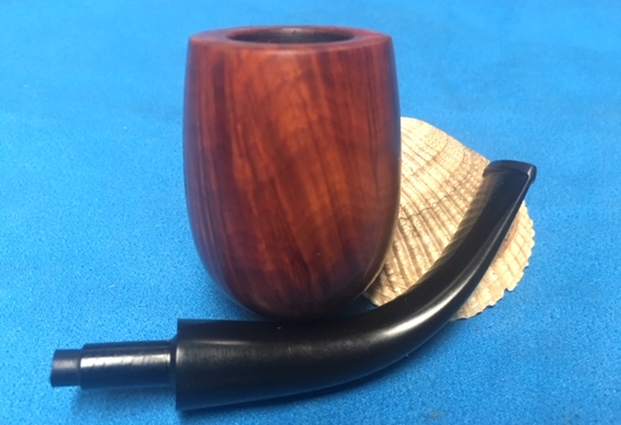
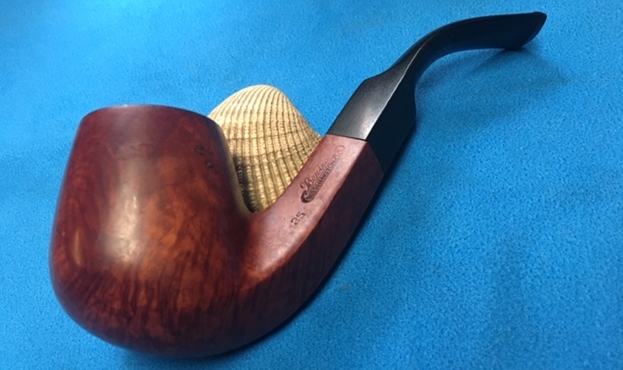
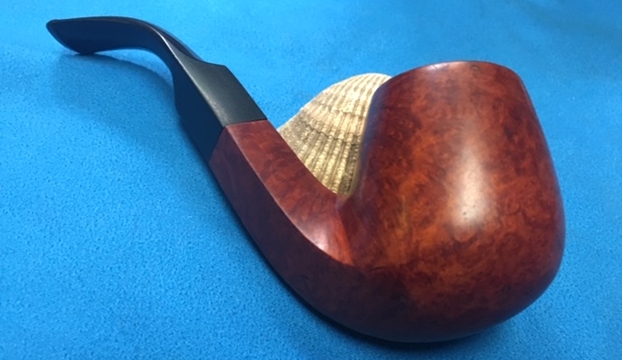
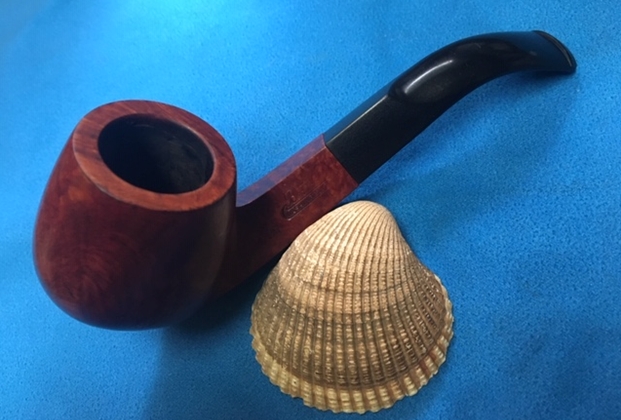
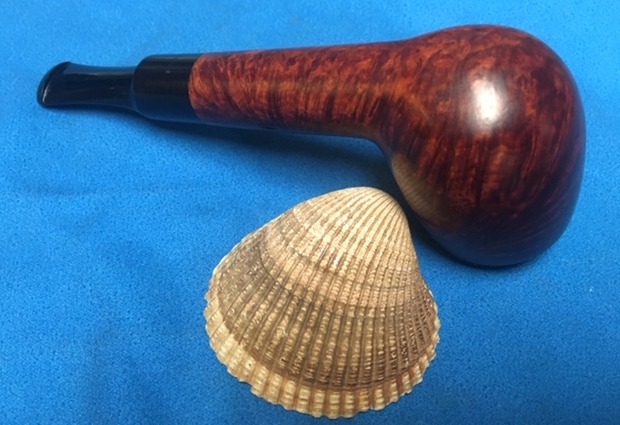
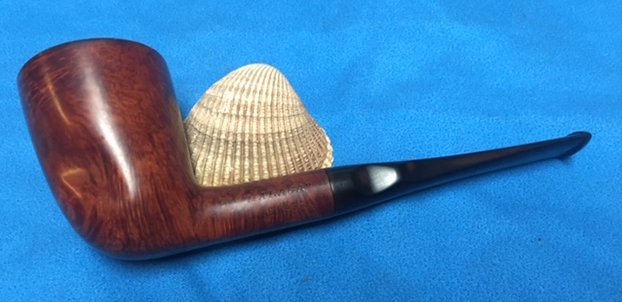
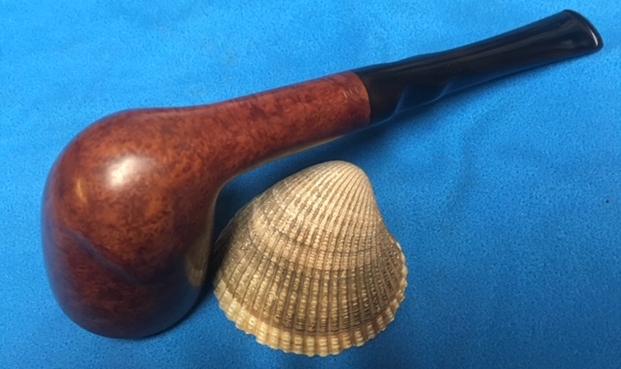
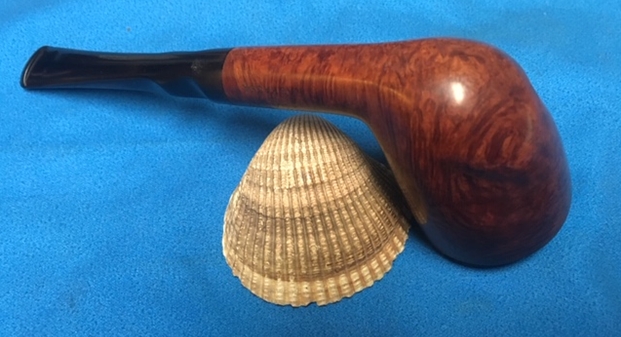
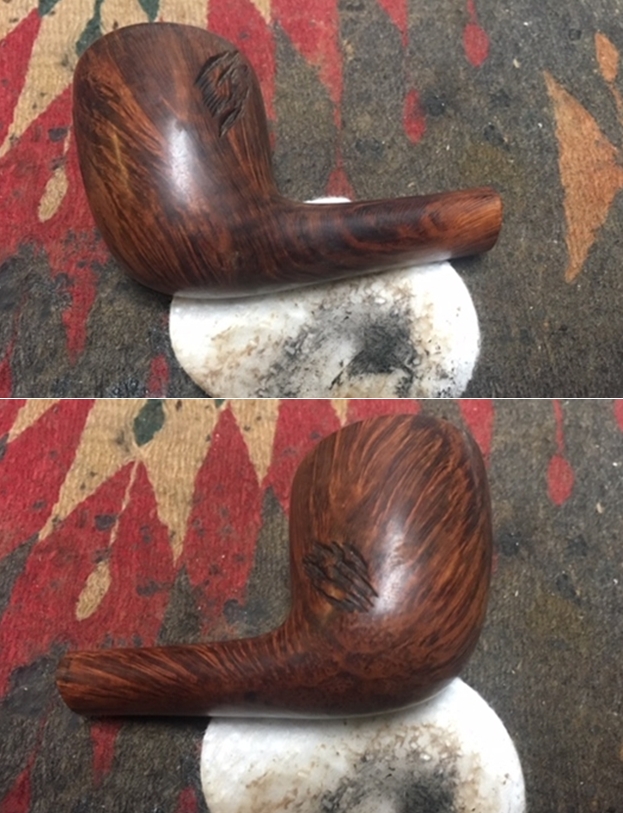
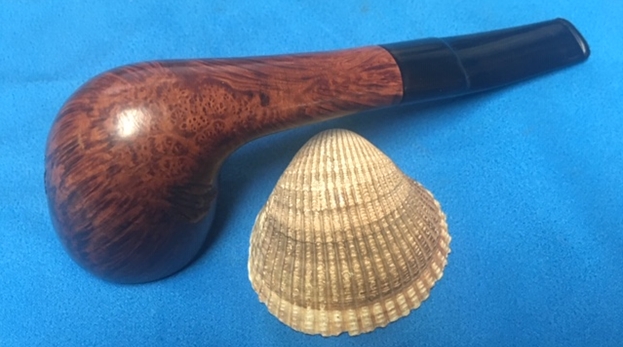
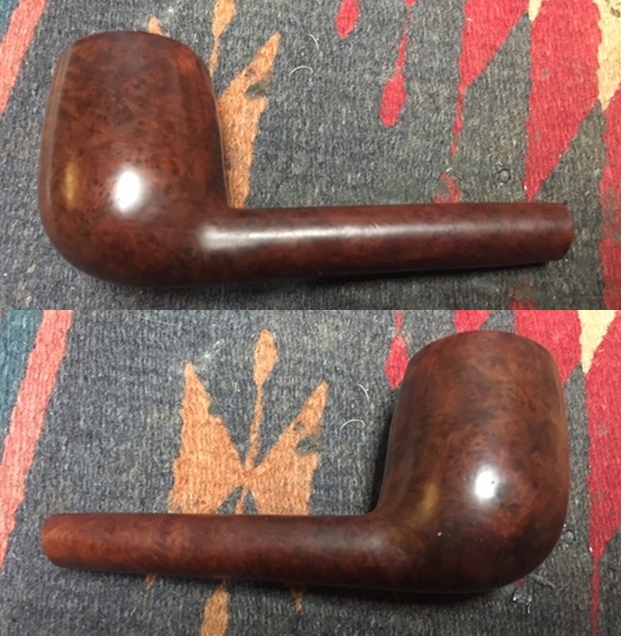
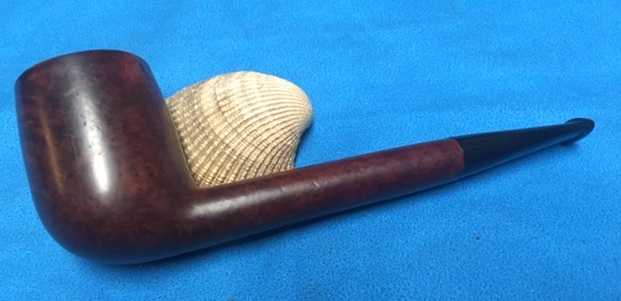
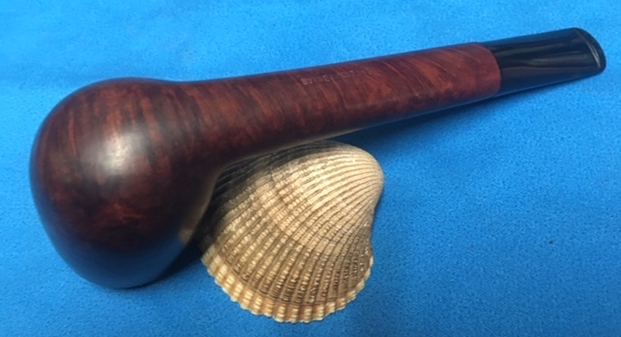
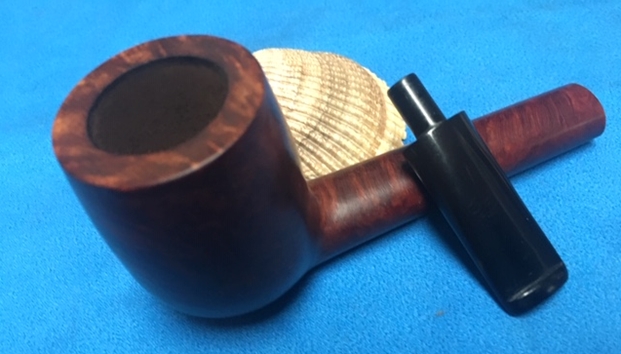
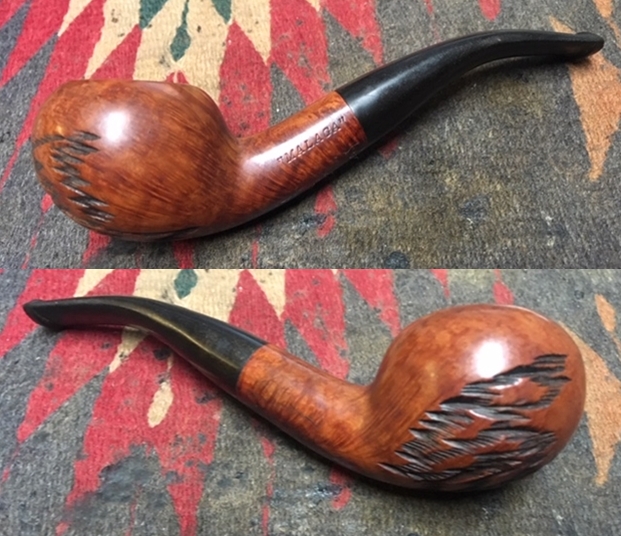
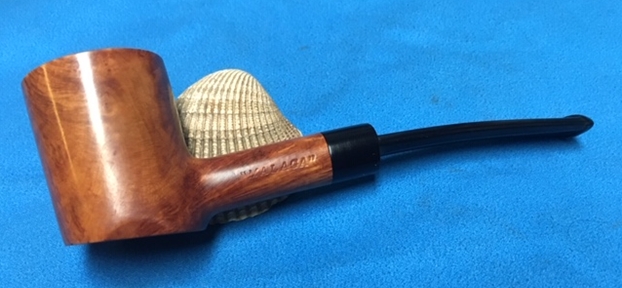
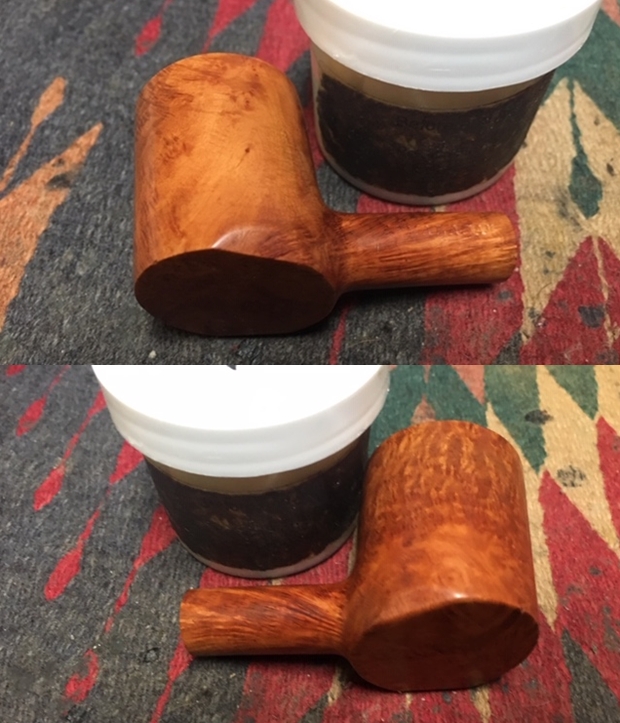
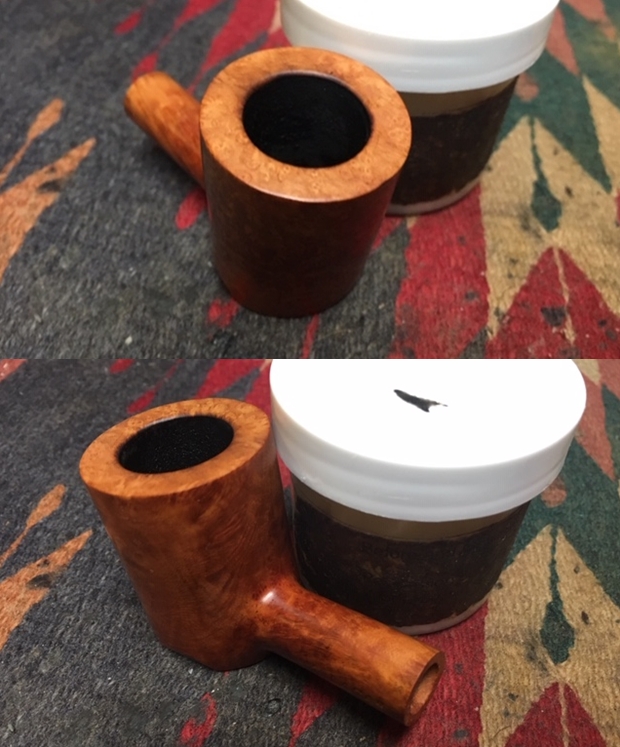
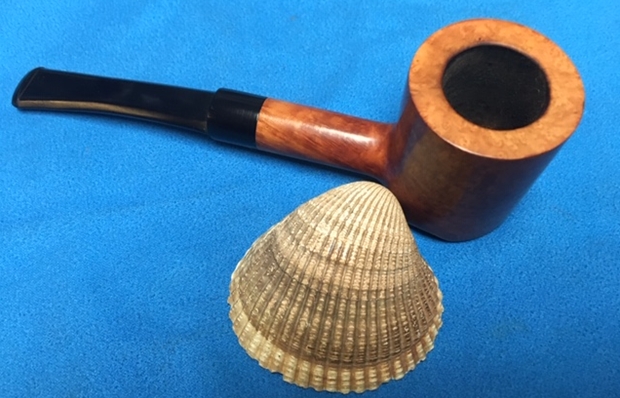
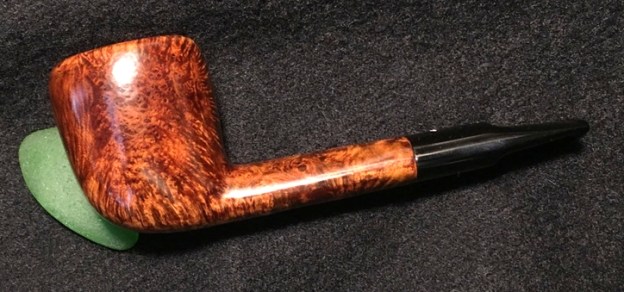
This Silver Match Toronto Squat Lumberman came out well.  The grain is striking with a smattering of swirls, waves, bird’s eye, and flame…, it’s an expressive piece of briar!  The darkened stain works great and masked the fill on the underside of the shank almost to perfection.  I’m pleased with the button rebuild, though I want to work more on reducing the air pockets in the process.  Overall, this stout Lumberman is ready for service.  Robert commissioned him and has the first opportunity to purchase this pipe from The Pipe Steward Store.  This pipe benefits the Daughters of Bulgaria – helping women and girls who have been trafficked and sexually exploited.  Thanks for joining me!

A National Washington, D.C. Straight Rhodesian from the Bertram Collection


Blog by Steve Laug

Give the previous blogs a read to have an idea about the Bertram Collection that I am working on these days. I can’t adequately describe how overwhelmed I am when I look at the 200+ pipes that need to be restored but there is only one way to move ahead – 1 pipe at a time. Jeff is doing the major cleanup on the lot as that would be more than I could handle by myself in moving through this many pipes. From his cleaned pipes the next one I chose is a National Washington, D.C. straight Rhodesian to be the next pipe that I would work on. It has some amazing straight grain around the bowl and shank. The bowl had cake in the chamber that was no problem. The rim top had some darkening and lava overflow on the back side. The inner edge of the bowl looked like it might have some burn damage and the outer edge of the bowl appeared to be in good condition but we would know more once the bowl had been reamed and cleaned. The exterior of the briar looked lifeless and was dusty with the grime of years of storage. The stem had some oxidation, tooth chatter and marks near the button on both sides. Jeff took some photos of the pipe before he began his cleanup work on it. Jeff took close-up photos of the bowl and rim to capture the condition of the pipe when it arrived. The rim top had a thick coat of lava and the bowl had a thick cake. It was hard to see what the inner and outer edge looked like with the cake and lava. Jeff took a picture of the bowl side and the heel to show the marvelous grain on the bowl. It really is quite stunning and very dirty!The next photo shows the stamping on the left side of the shank. The left side is stamped with National over Washington, D.C. The stamping on the shank is very readable.The next two photos show the condition of the stem surfaces. The stem was oxidized and had some calcification on the surface as well as tooth marks and chatter on both sides near the button.I have already done the work on one of the National pipes in the Bertram lot so I turned to that to have another look at the history of the brand (https://rebornpipes.com/2019/05/21/doing-some-cosmetic-work-on-a-national-pipes-rhodesian/). I quote in full from that blog.

Before I started my restoration work I wanted to refresh my memory about the brand. I remembered from previous National Pipes that I had worked on that there was a tie to the Bertram Pipe Company in Washington, D.C. I also knew that it was a very different company than the National Briar Pipe Company of Jersey City, New Jersey but that is where all the trails let in terms of Pipedia and Pipephil’s site. I turned back to a previous blog that I had written on the brand when I restored a pipe with the same stampings to review the history and connection of the brand to Bertram. https://rebornpipes.com/tag/national-washington-d-c-pipes/. I knew that the fact that there were several of these included with the large lot of Bertram pipes that Jeff and I purchased was not accidental. Here is the link to that previous blog. I quote in part:

I had a gut feeling that the pipe had some connection to Bertram Pipe Company of Washington DC but only the vaguest memory of that connection. I could not remember where I picked that up but just had the memory. I did some searching on the Internet and found a National Briar Pipe Company of Jersey City, New Jersey with no clear ties to Washington DC on the Pipedia site. This was the company that purchased the Doodler after Tracy Mincer died. I could see that the Jersey City pipes were stamped differently and all had line names stamped on them. On the Pipephil site I found an English version that had very different stamping on the left side of the shank as well as Made in England on the right side of the shank.

Thus I was reminded of the non-connection to the New Jersey Pipe Company. The blog went on to record some information that tied the National Washington, D.C. Company to Bertram more definitively. I quote

I…posted a question on Smokers Forum (SF) and Pipe Smokers Unlimited regarding the brand. I received several responses that gave me information. One of them on SF came from Ed Klang and provided me with some confirmation regarding my memory of the connection with Bertram. I quote him in full, “In the history of the Bertram company, after the fire at the Washington, D.C. facility and the decision was made to discontinue Bertram production a group of employees and a few investors wanted to buy the rights to the Bertram name, which was turned down and it was then proposed that they would rebrand the pipes as National, no mention was made whether anything ever came of that proposal. Supposedly this group did produce pipes for a while but the effort was finally abandoned and I have never been able to reliably confirm this. Just bits and pieces here and there.” Thanks Ed. This is the random memory that I was trying to dig up.

I also received a reply on SF from Radiobob that read as follows: “National Pipe and Tobacco was located on the 1700 block of Pennsylvania Avenue in Washington, D.C., just about a block from where I worked. I still have two Canadians that I bought there, as well as a Comoy’s Patina Apple. In my recollection, it closed down–much to my regret–in the mid to late 1980s.”

Those responses gave me the kind of details that I always find helpful in my restoration work. I will continue to do some digging on the company and see what I can find but that bit confirmed the visual tie to the Bertram Company of DC. Thank you for your help Ed and Bob.

When I received the pipe Jeff had already reamed the bowl with a PipNet pipe reamer and followed up with a Savinelli Fitsall pipe knife to remove the cake. He had scrubbed out the mortise and the airway in the shank and the stem with alcohol, cotton swabs and pipe cleaners. He had scrubbed the exterior of the bowl, rim, shank and stem with a tooth brush and Murphy’s Oil Soap to remove the oils and tars on the rim and the grime on the finish of the bowl. He had rinsed it under running water. He dried it off with a soft cloth. He was able to remove lava build up on the rim top and you could see the great condition of the bowl top and edges of the rim. There was still some damage on the back inner edge and some darkening to the rim top toward the back of the bowl. He soaked the stem in Before & After Deoxidizer to remove the oxidation. I took photos of the pipe before I started my work on it. I took a close up photo of the rim top to show the condition of the bowl and rim after Jeff had cleaned up the grime and lava. You can see the damage on the inner edge of the rim at the back side and the darkening on the rim top. The stem photos show that the oxidation is gone. The surface of the vulcanite looked very good. There were some light tooth marks and chatter on the top and underside of the stem near the button.I also took a photo of the stamping on the left and right side of the shank showing how the stamping was laid out.I worked on the inner edge of the rim and the darkening on the backside of the top with a folded piece of 220 grit sandpaper to smooth out the damage and remove the darkening. I polished it further with 400 grit wet dry sandpaper to smooth out the scratches in the briar.I polished the bowl and rim top with micromesh sanding pads – wet sanding it with 1500-12000 grit pads. I wiped the bowl down with a damp cloth after each pad to remove the sanding debris. After the final sanding pad I hand buffed it with a cotton cloth to raise a shine. (I forgot to take photos of the bowl and rim top after I polished it with 1500-2400 grit micromesh pads.) I worked some Before & After Restoration Balm into finish of the briar with my fingertips to clean, enliven and protect it. I let the balm sit for a little while and then buffed with a cotton cloth to raise the shine. The Restoration Balm really makes the grain stands out beautifully. I set the bowl aside and worked on the stem. I used a folded piece of 220 grit sandpaper to blend the tooth marks and chatter into the surface of the stem. Once the surface was smooth I sanded out the scratch marks and started the polishing of the stem with a folded piece of 400 grit sandpaper. I wiped the stem down with Obsidian Oil.I polished the stem with micromesh sanding pads – wetsanding it with 1500-12000 grit pads. I wiped the stem down with Obsidian Oil after each pad. I polished it with Before & After Pipe Polish – both Fine and Extra Fine and gave it a final coat and set it aside to dry. This is the part of the restoration process that I really look forward to! When all the parts are finished and the pipe is clean then I put the stem and bowl back together and buff the pipe with Blue Diamond on the buffing wheel. I polish the briar and any minute scratches still in the vulcanite of the stem until there is a rich shine. This National Washington, D.C. pipe is a classic straight Rhodesian shape with a natural finish that highlights some amazing straight and flame grain on a proportionally well carved pipe. Buffing the pipe made the briar come alive and the grain popped with polishing. The black vulcanite stem had a rich glow. The finished pipe is a beautifully grained National Straight Rhodesian that feels really good in the hand and sits right in the mouth. Have a look at it with the photos below. The dimensions are Length: 5 ½ inches, Height: 1 3/4 inches, Outside diameter of the bowl: 1 1/4 inches, Chamber diameter: ¾ of an inch. Thanks for walking through the restoration with me as it was a pleasure to work on.

A National Washington, D.C. Bent Billiard from the Bertram Collection


Blog by Steve Laug

Give the previous blogs a read to have an idea about the Bertram Collection that I am working on these days. I can’t adequately describe how overwhelmed I am when I look at the 200+ pipes that need to be restored but there is only one way to move ahead – 1 pipe at a time. Jeff is doing the major cleanup on the lot as that would be more than I could handle by myself in moving through this many pipes. From his cleaned pipes the next one I chose is a Made in London National Washington, D.C. 33 Bent Billiard to be the next pipe that I would work on. It has some amazing straight grain around the bowl and shank. The bowl had cake in the chamber that was no problem. The rim top had some darkening and lava overflow on the back side. The inner and outer edge of the bowl appeared to be in good condition but we would know more once the bowl had been reamed and cleaned. The exterior of the briar looked lifeless and was dusty with the grime of years of storage. The stem had some oxidation, tooth chatter and marks near the button on both sides. Jeff took some photos of the pipe before he began his cleanup work on it. Jeff took close-up photos of the bowl and rim to capture the condition of the pipe when it arrived. The rim top had a thick coat of lava and the bowl had a thick cake. It was hard to see what the inner and outer edge looked like with the cake and lava.Jeff took a picture of the bowl side and the heel to show the marvelous grain on the bowl. It really is quite stunning and very dirty! There is also something mis-stamped on right side of the bowl. Under a magnifying lens it reads England.The next two photos show the stamping on the sides of the shank. The left side is stamped with National over Washington, D.C.  over Made in London. At the shank/bowl junction it is stamped 33. The stamping on the shank was slightly double stamped and had some white paint in it.The next two photos show the condition of the stem surfaces. The stem was oxidized and had some calcification on the surface as well as tooth marks and chatter on both sides near the button.I have already done the work on one of the National pipes in the Bertram lot so I turned to that to have another look at the history of the brand (https://rebornpipes.com/2019/05/21/doing-some-cosmetic-work-on-a-national-pipes-rhodesian/). I quote in full from that blog.

Before I started my restoration work I wanted to refresh my memory about the brand. I remembered from previous National Pipes that I had worked on that there was a tie to the Bertram Pipe Company in Washington, D.C. I also knew that it was a very different company than the National Briar Pipe Company of Jersey City, New Jersey but that is where all the trails let in terms of Pipedia and Pipephil’s site. I turned back to a previous blog that I had written on the brand when I restored a pipe with the same stampings to review the history and connection of the brand to Bertram. https://rebornpipes.com/tag/national-washington-d-c-pipes/. I knew that the fact that there were several of these included with the large lot of Bertram pipes that Jeff and I purchased was not accidental. Here is the link to that previous blog. I quote in part:

I had a gut feeling that the pipe had some connection to Bertram Pipe Company of Washington DC but only the vaguest memory of that connection. I could not remember where I picked that up but just had the memory. I did some searching on the Internet and found a National Briar Pipe Company of Jersey City, New Jersey with no clear ties to Washington DC on the Pipedia site. This was the company that purchased the Doodler after Tracy Mincer died. I could see that the Jersey City pipes were stamped differently and all had line names stamped on them. On the Pipephil site I found an English version that had very different stamping on the left side of the shank as well as Made in England on the right side of the shank.

Thus I was reminded of the non-connection to the New Jersey Pipe Company. The blog went on to record some information that tied the National Washington, D.C. company to Bertram more definitively. I quote

I…posted a question on Smokers Forum (SF) and Pipe Smokers Unlimited regarding the brand. I received several responses that gave me information. One of them on SF came from Ed Klang and provided me with some confirmation regarding my memory of the connection with Bertram. I quote him in full, “In the history of the Bertram company, after the fire at the Washington, D.C. facility and the decision was made to discontinue Bertram production a group of employees and a few investors wanted to buy the rights to the Bertram name, which was turned down and it was then proposed that they would rebrand the pipes as National, no mention was made whether anything ever came of that proposal. Supposedly this group did produce pipes for a while but the effort was finally abandoned and I have never been able to reliably confirm this. Just bits and pieces here and there.” Thanks Ed. This is the random memory that I was trying to dig up.

I also received a reply on SF from Radiobob that read as follows: “National Pipe and Tobacco was located on the 1700 block of Pennsylvania Avenue in Washington, D.C., just about a block from where I worked. I still have two Canadians that I bought there, as well as a Comoy’s Patina Apple. In my recollection, it closed down–much to my regret–in the mid to late 1980s.”

Those responses gave me the kind of details that I always find helpful in my restoration work. I will continue to do some digging on the company and see what I can find but that bit confirmed the visual tie to the Bertram Company of DC. Thank you for your help Ed and Bob.

Now I have a different one that has the National stamp and also is stamped Made in London. There is also a mistaken stamp on the side of the bowl that says ENGLAND. This is another piece of the puzzle for me. I know National had other pipe companies in Europe make there pipes. This one has a very Barling like look to it. I wonder if it was not made by them for National? On with the cleanup and restoration on this Bent Billiard.

When I received the pipe Jeff had already reamed the bowl with a PipNet pipe reamer and followed up with a Savinelli Fitsall pipe knife to remove the cake. He had scrubbed out the mortise and the airway in the shank and the stem with alcohol, cotton swabs and pipe cleaners. He had scrubbed the exterior of the bowl, rim, shank and stem with a tooth brush and Murphy’s Oil Soap to remove the oils and tars on the rim and the grime on the finish of the bowl. He had rinsed it under running water. He dried it off with a soft cloth. He was able to remove lava build up on the rim top and you could see the great condition of the bowl top and edges of the rim. There was still some darkening to the rim top toward the back of the bowl. He soaked the stem in Before & After Deoxidizer to remove the oxidation. I took photos of the pipe before I started my work on it. I took a close up photo of the rim top to show the condition of the bowl and rim after Jeff had cleaned up the grime and lava. The inner edge of the rim has some damage and nicks on it. The out edge of the rim looks good. There is some rim darkening on the back side of the bowl. The stem photos show that the oxidation is gone. The surface of the vulcanite looked very good. The tooth marks and chatter are near the button on both sides. I also took a photo of the stamping on the left side of the shank showing how the stamping was laid out. It appeared to have been double stamped and the stamping whitened. There was also a strange mistaken stamping on the right side of the bowl – it read ENGLAND.I worked on the inner edge of the rim and the darkening on the backside of the top with a folded piece of 220 grit sandpaper to smooth out the damage and remove the darkening. There were two noticeable divots in the otherwise flawless briar – one on the left side of the heel of the bowl and the other on the right side of the shank. I darkened them with a black Sharpie pen and then filled them in with clear super glue. Once the repair cured I sanded it smooth with 220 grit sandpaper and smoothed further with 400 grit sandpaper. I polished the bowl and rim top with micromesh sanding pads – wet sanding it with 1500-12000 grit pads. I wiped the bowl down with a damp cloth after each pad to remove the sanding debris. After the final sanding pad I hand buffed it with a cotton cloth to raise a shine. I worked some Before & After Restoration Balm into finish of the briar with my fingertips to clean, enliven and protect it. I let the balm sit for a little while and then buffed with a cotton cloth to raise the shine. The Restoration Balm really makes the grain stands out beautifully. Between the polishing with the micromesh pads and the balm I did not have to stain the repaired areas. They blend in very well. I set the bowl aside and worked on the stem. I used a folded piece of 220 grit sandpaper to blend the tooth marks and chatter into the surface of the stem. Once the surface was smooth I sanded out the scratch marks and started the polishing of the stem with a folded piece of 400 grit sandpaper. I wiped the stem down with Obsidian Oil. I polished the stem with micromesh sanding pads – wetsanding it with 1500-12000 grit pads. I wiped the stem down with Obsidian Oil after each pad. I polished it with Before & After Pipe Polish – both Fine and Extra Fine and gave it a final coat and set it aside to dry.  This is the part of the restoration process that I really look forward to! When all the parts are finished and the pipe I clean then I put the stem and bowl back together and buff the pipe with Blue Diamond on the buffing wheel. I polish the briar and any minute scratches still in the vulcanite of the stem until there is a rich shine. This National Washington, D.C. pipe is a classic English looking bent billiard shape with a natural finish that highlights some amazing straight and flame grain on a proportionally well carved pipe. Buffing the pipe made the briar come alive and the grain popped with polishing. The black vulcanite stem had a rich glow. The finished pipe is a beautifully grained English Made National Bent Billiard. The pipe feels really good in the hand and sits right in the mouth. Have a look at it with the photos below. The dimensions are Length: 5 ½ inches, Height: 2 inches, Outside diameter of the bowl: 1 1/4 inches, Chamber diameter: ¾ of an inch. Thanks for walking through the restoration with me as it was a pleasure to work on.


A Bent Diamond Shank Billiard Bertram 25 from the Bertram Collection


Blog by Steve Laug

Once again rather than repeat myself with the repetition please refer to the previous blog posts on the collection of Bertrams and other brands that Jeff and I purchased. I can’t adequately describe how overwhelmed I am when I look at the 200+ pipes that need to be restored but there is only one way to move ahead – 1 pipe at a time. I am glad Jeff is helping with the clean up on the lot as that would be more than I could handle by myself in moving through this many pipes. From his cleaned pipes I chose a Diamond Shank Bent Billiard Bertram 25 with mixed grain to be the next pipe that I would work on. It was a1/2 bent Billiard with a saddle stem. The bowl had cake in the chamber that was no problem. The rim top had some darkening and lava overflow on the back side. The inner and outer edge of the bowl appeared to be in good condition but we would know more once the bowl had been reamed and cleaned. The exterior of the briar looked lifeless and was dusty with the grime of years of storage. I am still trying to figure out Bertrams numbering system as some of the higher number pipes seems to have more fills than the 25s. The stem had some oxidation and tooth marks near the button on both sides. Jeff took some photos of the pipe before he began his cleanup work on it. Jeff took a close-up photo of the bowl and rim to capture the condition of the pipe when it arrived. The rim top had a thick coat of lava and the bowl had a thick cake.Jeff took pictures of he bowl sides and the heel to show the great looking grain around the sides of the bowl. It really is quite stunning and very dirty! Jeff took a photo to capture the stamping on the top and left side of the shank. It shows the stamping on the topside which read Bertram over Washington, D.C. The stamping on this pipe is clear and readable. It also shows the number stamp 25 which shows the quality of the pipe.The next two photos show the stem surface. They show the oxidation and the chatter on both sides near the button. The tooth marks are visible on the underside next to the button. There is also some wear on the underside button edge.If you have read the previous Bertram blogs I have posted about the pipes that I have cleaned up so far you can skip the next bit. But if you have not, then I include the link to Bertram history and information. I would recommend that if you don’t know much about them do some research on them. I include a link to the write up on Pipedia (http://pipedia.org/wiki/Bertram). Bertram pipes were based out of Washington DC. They were popular among famous politicians and celebrities of the time. They made many products for them from FDR’s cigarette holders to Joseph Stalin’s favorite pipe. They were considered some of the best America had to offer till they finally closed their doors in the 70s. They graded their pipes by 10s, the higher the grade the better. Above 60s are uncommon and 80-90s are quite rare. I’ve never heard of or seen a 100 grade. I have several blogs that I have written on rebornpipes that give some history and background to Bertram pipes. (https://rebornpipes.com/2015/06/16/an-easy-restoration-of-a-bertram-grade-60-217-poker/).

I have included the following link to give a bit of historical information on the pipe company. It is a well written article that gives a glimpse of the heart of the company. http://www.streetsofwashington.com/2012/01/bertrams-pipe-shop-on-14th-street.html#

From this information I have learned that the shape and grade Bertram I have in front of me now was made before the closure of the shop in the 1970s. This Bertram Diamond Shank Bent Billiard with a darker finish is different from the other Bertram shapes I have worked. With a grade 25 stamp it is a lower range pipe.

By now if you have been a reader for long you have Jeff’s cleaning regimen pretty well memorized. If you know it you can skip right to the pictures. If not I will include them once more. Jeff reamed the bowl with a PipNet pipe reamer and followed up with a Savinelli Fitsall pipe knife to remove the cake. He scrubbed out the mortise and the airway in the shank and the stem with alcohol, cotton swabs and pipe cleaners. He scrubbed the exterior of the bowl, rim, shank and stem with a tooth brush and Murphy’s Oil Soap to remove the oils and tars on the rim and the grime on the finish of the bowl. He rinsed it under running water. He dried it off with a soft cloth. He was able to remove lava build up on the rim top and you could see the great condition of the bowl top and edges of the rim. There was still some darkening to the rim top toward the back of the bowl. He soaked the stem in Before & After Deoxidizer to remove the oxidation. I took photos of the pipe before I started my work on it. I took a close up photo of the rim top to show the condition of the bowl and rim after Jeff had cleaned up the grime and lava but the rim top had some light damage, some pits and darkening on the inner edge of the rim. The stem photos show that the oxidation is gone. The light tooth chatter is hard to see but I should be able to sand it out quite easily. Every one of the pipes that I have worked on from this Bertram Collection has had tooth marks on the underside of the stem and some on the topside as well. The tooth marks on the underside will take a little more work to remove.I also took a photo of the stamping on the left side of the shank showing how the stamping was laid out.I used a folded piece of 220 grit sandpaper to cleanup the light damage to the inner edge of the rim. I would address the darkening when I polished it with micromesh sanding pads.I used a black Sharpie pen to put a black spot in each of the fills on the bowl sides. Once I had done that I filled in the dents with clear super glue. Once the repairs had cured I sanded the repaired spots with 220 grit sandpaper to blend them into the surface of the briar. I polished the bowl and rim top with micromesh sanding pads – dry sanding it with 1500-12000 grit pads. I wiped the bowl down with a damp cloth after each pad to remove the sanding debris. After the final sanding pad I hand buffed it with a cotton cloth to raise a shine. I know I have mentioned it before but I really like the balm that Mark Hoover created. It really does wonders on a dry piece of briar. I worked some Before & After Restoration Balm into finish of the briar with my fingertips to clean, enliven and protect it. I let the balm sit for a little while and then buffed with a cotton cloth to raise the shine. The Restoration Balm really makes the grain stands out beautifully. I set the bowl aside to work on the stem. I used a folded piece of 240 grit sandpaper to blend the tooth marks and chatter into the surface of the stem. Once the surface was smooth I sanded out the scratch marks and started the polishing of the stem with a folded piece of 400 grit sandpaper. I wiped the stem down with Obsidian Oil. I polished the stem with micromesh sanding pads – wetsanding it with 1500-12000 grit pads. I wiped the stem down with Obsidian Oil after each pad. I polished it with Before & After Pipe Polish – both Fine and Extra Fine and gave it a final coat and set it aside to dry. I am having fun doing these pipes from the Bertram Collection. Each one presents different challenges but all are well laid out classic shapes. This is no exception. I put the stem and bowl back together and buffed the pipe with Blue Diamond on the buffing wheel. I polished the briar and the minute scratches still in the vulcanite of the stem until there was a rich shine. This Bertram is a classic Bent Billiard shape with a diamond shank and saddle stem. The stain really highlights some amazing grain on a proportionally well carved pipe. Once I buffed the pipe the briar came alive and the mixture of grain popped with polishing. The black vulcanite stem had a rich glow. The finished pipe is a beautiful grained Billiard. Like the other Bertrams I have worked on this one fits well in the hand and sits right in the mouth. Have a look at it with the photos below. The dimensions are Length: 5 inches, Height: 2 inches, Outside diameter of the bowl: 1 3/8 inches, Chamber diameter: ¾ of an inch. This one will soon be on the rebornpipes store. If you are interested let me know. Thanks for walking through the restoration with me as it was a pleasure to work on.

New Life for an A. Garfinkel Washington, D.C. Lovat


Blog by Steve Laug

Rather than repeat myself and give readers grief with the repetition please refer to the previous blog posts on the collection of Bertrams and a smattering of other brands that Jeff and I purchased. I can’t adequately describe the sense of being overwhelmed that I have when I look at the 200+ pipes that need to be restored but there is only one way to move ahead – 1 pipe at a time. I am glad Jeff is helping with the clean up on the lot as that would be more than I could handle by myself in moving through this many pipes. From his cleaned pipes I chose another interesting little Lovat with great grain to be the next pipe that I would work on. It was a small Lovat with a saddle stem. The bowl had a medium cake in the chamber that was no problem. The rim top had some darkening and a little bit of lava overflow on the back side. The inner and outer edge of the bowl appeared to be in good condition but we would know more once the bowl had been reamed and cleaned. The exterior of the briar looked lifeless and was dusty with the grime of years of storage. There were some fills on the sides of the bowl and shank. The stem had some light oxidation and tooth marks near the button on both sides. Jeff took some photos of the pipe before he began his clean up work on it. I have included them below and they tell the story and give a glimpse of the pipe before clean up. Jeff took a closeup photo of the bowl and rim to capture the condition of the pipe before his work on it. You can see the cake in the bowl and some of the lava on the rim top. He took photos of the sides and the heel of the bowl to show the grain and the overall condition of the pipe.He also took a photo of left side of the shank to show the stamping. The stamping is readable in the photo below and is as noted above – A. Garfinkel over Wash. D.C. The underside of the stem read France. I have seen many stems stamped France and in the past it does not necessarily mean that the pipe was made in France as much as that the stem was French made. The mystery remains and I suppose we will never know for sure.He took photos of what the stem looked like before the clean up and soak in the deoxidizer.I have done a bit of research to see what I could learn about the brand when I worked on the other A. Garfinkel Pipe. I quote from that blog (https://rebornpipes.com/2019/05/28/new-life-for-an-a-garfinkel-washington-d-c-large-billiard/).

I turned first to the Pipephil website and did not find any information on the brand. That surprised me a bit but such is the hunt for information. I turned next to the Pipedia website and was more successful. Here is the link to the article – https://pipedia.org/wiki/Garfinkel. I quote in full below.

Garfinkel Inc. was a celebrated Washington, D.C. importer and retailer of pipes, tobaccos and cigars. The founder was Arnold Garfinkel (1903-1988). Arnold was originally from Germany, and the family had already been in the tobacco trade for two generations before he was born; his father sold tobacco to Kaiser Wilhelm in Berlin. Fleeing Nazi Germany in 1938, Arnold soon settled in the District of Columbia; in 1940 he established his first tobacco shop there, although it closed a few years later during the Second World War.

It wasn’t until July of 1960 that Arnold established A. Garfinkel. Originally located at 720 14th Street, N.W., in April of 1980 the shop advertised its move to 1585 Eye Street, N.W. The new location of was a block from Lafayette Square and not much further from the White House. In 1972, author Hugh Sidey wrote in Newsweek that while interviewing then President Richard M. Nixon he spotted some pipes and a tin of Garfinkel tobacco on Nixon’s desk.

Among aficionados the shop remains well known to this day for the imported tobacco blends sold under its own name; these were manufactured by Robert McConnell and Sobranie. In addition custom blending was done for customers both domestic and foreign, with Arnold sometimes using recipes he had brought with him from Europe. A. Garfinkel carried pipes under its own name as well; these too were apparently manufactured elsewhere. Pipes were stamped A. Garfinkel, Wash D.C.; some are marked Algerian Briar and others simply Imported Briar. Many appear to be Made in France. Finally, A. Garfinkel was renowned for its selection of cigars.

In 1940 Arnold married Esther Kolker. One of their three children, Larry, was managing A. Garfinkel by May of 1980 and eventually took over sole responsibility for running the shop. Notwithstanding Arnold remained active at A. Garfinkel throughout his life, with son Larry noting that “He had a great personality and a great smile…and a very good head for business.”

A victim of declining demand reflecting both increased pressures on smokers and changing tastes, A. Garfinkel shut its doors in the summer of 1992.

Once again I knew for certain that Garfinkel’s Pipe Shop did not make its own pipes. It is noted above that “many appear to have been Made in France. However, I have reason to believe that this is another pipe that was made for them by Bertrams. The style of the stamping, the wording of the stamping, the shape of the pipe and the layout of the grain to the shape all signal a connection to Bertrams. I can find nothing definitive about that connection but it certainly seems likely. Perhaps some of you who are reading this blog can help with the connection. Is there one or not?

Jeff reamed the bowl with a PipNet pipe reamer and followed up with a Savinelli Fitsall pipe knife to remove the cake. He scrubbed out the mortise and the airway in the shank and the stem with alcohol, cotton swabs and pipe cleaners. He scrubbed the exterior of the bowl, rim, shank and stem with a tooth brush and Murphy’s Oil Soap to remove the oils and tars on the rim and the grime on the finish of the bowl. He rinsed it under running water. He dried it off with a soft cloth. He was able to remove lava build up on the rim top and you could see the great condition of the bowl top and edges of the rim. He soaked the stem in Before & After Deoxidizer to remove the oxidation. I took photos of the pipe before I started my work on it. I took a close up photo of the rim top to show the condition of the bowl and rim after Jeff had cleaned up the grime and lava and the rim top looked flawless. The bowl was clean and there was not any cake left in the bowl. There was some light damage to the backside of the inner edge of the rim. The outer edge of the rim looked good. The stem photos show that the oxidation is gone. The light tooth chatter is hard to see but I should be able to sand it out quite easily. I took a photo of the stamping. It is clear and readable but there is a fill between the D and C of the second line. I should be able to darken the fill and hide it a bit.I decided to address the shrunken fills around the sides of the bowl first. I used a black Sharpie pen to fill in the spots first then filled them in with clear super glue and set the bowl aside until the glue cured. I used a needle file to flatten the repaired areas on the sides of the bowl. Once they had been flattened I sanded them with 220 grit sandpaper to blend them into the surface of the briar. Once they were smooth to touch I could move on to the next step in blending them into the surface of the surrounding briar. I used a black Sharpie Pen to touch up the light areas of the fills and then stained the sanded area with a Walnut stain pen. It looks dark in the photos below but it will blend in once I have finished. I decided to clean up the damage to the inner edge of the rim. I used a folded piece of 220 grit sandpaper to smooth out the nicks and marks in the edge. When I finished it looked much better.To further blend the repairs and the rim work on the bowl, I polished the rim and the outside of the bowl with micromesh sanding pads. I dry sanded with 1500-12000 grit micromesh sanding pads and wiped the bowl and shank down after each pad with a damp cloth. The photos show how the repaired areas look at this point in the process. I am pretty happy with the results. I worked some Before & After Restoration Balm into finish of the briar with my fingertips to clean, enliven and protect it. I let the balm sit for a little while and then buffed with a cotton cloth to raise the shine. The Restoration Balm really makes the grain stands out beautifully. With the bowl finished I set it aside and turned my attention to the stem. I used a folded piece of 220 grit sandpaper to blend the tooth marks and chatter into the surface of the stem. Once the surface was smooth I sanded out the scratch marks and started the polishing of the stem with a folded piece of 400 grit sandpaper. I wiped the stem down with Obsidian Oil. I polished the entire stem with micromesh sanding pads – wet sanding it with 1500-12000 grit pads. I wiped the stem down with Obsidian Oil after each pad. I further polished it with Before & After Pipe Polish – both Fine and Extra Fine. I wiped it down with a coat of Obsidian Oil and set it aside to dry. With the parts finished it was time to polish up this interesting piece of American pipe history. In talking with the guy we bought the pipes from he said he got all of the pipes at an auction at Bertrams when they closed the shop. One more interesting piece for this mystery. Did Bertram carve these pipes for A. Garfinkel? I suppose we may never know. It was time to finish this pipe. I put the stem and bowl back together and buffed the pipe with Blue Diamond on the buffing wheel. I polished the briar and the minute scratches still in the vulcanite of the stem until there was a rich shine. This A. Garfinkel has a classic thick shank Lovat shape that has a darker finish than the other pipes I have worked on from the shop. The finish really highlights some amazing grain and hides the fills on a proportionally well carved pipe. Once I buffed the pipe the briar came alive and the mixture of grain popped with polishing. The black vulcanite stem had a rich glow. The finished pipe is a beautiful grained Lovat. Like the other pipes in this lot that I have worked on this one fits well in the hand and sits right in the mouth. Have a look at it with the photos below. The dimensions are Length: 5 inches, Height: 1 7/8 inches, Outside diameter of the bowl: 1 3/8 inches, Chamber diameter: ¾ of an inch. This beautiful A. Garfinkel Lovat will soon be going on the rebornpipes store. If you are interested let me know. Thanks for walking through the restoration with me as it was a pleasure to work on.

Restoring the Last of Alex’s Current “Malagas” – A Twisted Ras Kassa Dublin


Blog by Steve Laug

The next pipe in the queue is the last Malaga pipe from Alex’s batch.This is a “Malaga” Ras Kassa –a twisted carved Dublin. It has some amazing grain around the bowl that is carved to highlight the grain around the bowl and give the briar some playful carved twists. The pipe is stamped on the left side of the shank, “MALAGA” over RAS KASSA. The tapered vulcanite stem has notches and twists like the bowl. There is no marking or stamping on the stem. This is a second RAS KASSA from Alex and it is as nice as the previous one. I have included the link so you can check it out (https://rebornpipes.com/2019/05/23/rebirthing-a-malaga-ras-kassa-canadian/). The bowl had a medium cake in the chamber that was no problem. The rim top was really in rough condition. There was major burn damage on the rim top and the inner edge. The entire inner edge had been compromised. The outer edge had some darkening and burn damage as well particularly at the back of the bowl. The exterior of the briar was dusty with grime and dust. The stem had heavy, deep oxidation and deep tooth marks in the surface of the stem on both sides. The photos below tell the story and give a glimpse of the pipe before clean up. I took a photo of the bowl and rim to capture the condition of the pipe before I started my cleanup work. You can see the extent of the damage to the inner edge of the rim and the rim top. The burn marks were quite deep and extensive. You can see the cake in the bowl and some of the lava on the rim top. The stem had deep oxidation on the surface of the vulcanite. There were deep tooth marks on the underside of the  stem.I also took a photo of top side of the shank from two angles to show the stamping. The stamping is readable in the photos below and is as noted above – “MALAGA” over RAS KASSA. It is stamped on the underside of the shank with the lower case “m”.For those of you who are unfamiliar with the brand, I am also including the link to a blog that I wrote that gives some of the history of the Malaga brand and the Malaga Pipe Shop in Royal Oak, Michigan in the USA. Here is the link – https://rebornpipes.com/tag/malaga-pipes/. That blog also includes links to a catalogue and the history of the pipemaker George Khoubesser. If you are interested to learn more then I invite you to follow the link to get a feel for the brand and the pipemaker.

I am also am including a link to some printed material on the Malaga brand that came to me from the daughter of George Koch to help identify the particular stamping on the pipe. The link takes you to the entire collection of materials that were sent to me. I have included a screen capture of one particular page that helps identify the RAS KASSA stamping on the pipe (https://rebornpipes.com/2019/02/27/malaga-pipes-catalogue-of-pipes-and-tobaccos/).I have enclosed the section on the brand in a red box in the picture above. To summarize, it basically says that the stamping is applied to pipes with special rare grain patterns in the briar. These appear to be straight grain, birdseye, swirled grains etc. that are tight patterns. They are rare – 1 or 2 in every hundred pipes. This pipe is one of those. You can read the description in the detailed explanation below.

I decided to address the damage to the rim top and edges first. I topped the bowl on a topping board using 220 grit sandpaper to remove the damaged portions of the rim surface. The second photo clearly shows the extent of the damage. I continued to top the bowl until the rim damage was removed and the inner and outer edges were clean. Once the damage was removed from the top of the bowl I used a folded piece of 220 grit sandpaper to clean up the inside edge of the bowl.I scrubbed the exterior of the bowl with Murphy’s Oil Soap and a cotton pad to remove the grime and build up on the surface of the briar. I rinsed the bowl down with warm water to remove the grime and soap. I dried the bowl off with a soft cotton cloth to dry it off. I reamed the bowl with a PipNet reamer with the second and third cutting head to take the cake back to bare briar. I cleaned it up with a Savinelli Fitsall Pipe Knife to get rid of the remnants of the cake. I finished by sanding the bowl with a dowel wrapped with 220 grit sandpaper until the inside of the bowl was smooth. With the bowl reamed, I cleaned up the inside of the shank and mortise with a pen knife to remove the tar build up. I ran cotton swabs, pipe cleaners and alcohol through the shank to remove the tars and oils. I also cleaned out the airway in the stem using pipe cleaners and alcohol. I polished the rim and the outside of the bowl with micromesh sanding pads – wet sanding with 1500-12000 grit micromesh sanding pads and wiped the bowl and shank down after each pad with a damp cloth. The photos show how the grain really stands out after polishing. I am pretty happy with the results. I worked Before & After Restoration Balm into the surface of the briar with my fingertips to clean, enliven and protect it. I worked it into the craving on the sides of the bowl to make sure I covered all of the grooves, nooks and crannies. I let the balm sit for a little while and then buffed with a cotton cloth to raise the shine. With the bowl finished I set it aside and turned my attention to the stem. I sanded out the tooth chatter, marks and oxidation to clean up the look of the stem. I was able to remove the majority of the damage to the stem by sanding. The photos below show the stem after sanding. There was one tooth mark on the underside of the stem that I filled with clear super glue. I set the stem aside to cure. I sanded the repairs on the stem surface with 220 grit sandpaper to blend the repairs into the surface of the stem. I am happy with the stem surface once that was done. I started the polishing of the surface with 400 grit wet dry sandpaper.  I polished the stem with micromesh sanding pads – wet sanding it with 1500-12000 grit pads. I wiped the stem down with a damp cloth after each pad. I further polished it with Before & After Pipe Polish – both Fine and Extra Fine. I wiped it down with a coat of Obsidian Oil and set it aside to dry. I put the pipe back together and polished both the bowl and the stem with Blue Diamond polish on the buffing wheel. I gave the bowl and the stem multiple coats of carnauba wax. I buffed the pipe with a clean buffing pad to raise the shine. I hand buffed it with a microfiber cloth to deepen the shine. The pipe polished up pretty nicely. The oil cured finish and the grain came alive with the buffing. The grain really stands out against the oil cured finish providing a rich contrast. The finish on the briar works well with the polished black vulcanite stem. The finished pipe is a well-proportioned, nicely grained Dublin. Have a look at it with the photos below. The dimensions are Length: 5 3/4 inches, Height: 2 inches, Outside diameter of the bowl: 1 3/8 inches, Chamber diameter: 3/4 of an inch. This Malaga Ras Kassa Dublin will be going back to Alex to add to his rack of Malaga pipes that are in his collection. Thanks for walking through the restoration with me on another of Alex’s Malaga collection.


New Life for a “Malaga” Saddle Stem Scoop


Blog by Steve Laug

The next pipe in the queue is yet another pipe from the batch of pipes I am cleaning up for Alex – this one is another “Malaga” –a shape they call a scoop. It has some amazing grain around the bowl and has some carved feather/leaf patterns around the bowl. The shank is oval and gives the bowl an almost Stanwell look. Malaga’s take on the shape is carved to highlight the grain around the bowl. The pipe is stamped on the top side of the shank. It reads “MALAGA”. The oval saddle stem is vulcanite and has no marking or stamping. It is a nice looking piece like many of the pipes Alex is picking up. The bowl had a light cake in the chamber and the rim top has some lava on the inner edge. The cake and lava made it hard to know the condition of the rim and edge. The rim had a slight domed look to it. The exterior of the briar was dusty with grime and dust. The stem had heavy, deep oxidation and deep tooth marks in the surface of the stem and button. The photos below tell the story and give a glimpse of the pipe before clean up. I took a photo of the bowl and rim to capture the condition of the pipe before I started my cleanup work. You can see the lava overflow on the rim top and the cake in the bowl. The crowned top and edges of the bowl appeared to be in good condition but I would know more once it was cleaned and reamed. The stem was a mess. There was some deep oxidation on the surface of the vulcanite. The deep tooth marks on the stem and the button were on both sides.I also took a photo of top side of the shank to show the stamping. The stamping is readable in the photo below and is as noted above – “MALAGA”.For those of you who are unfamiliar with the brand, I am also including the link to a blog that I wrote that gives some of the history of the Malaga brand and the Malaga Pipe Shop in Royal Oak, Michigan in the USA. Here is the link – https://rebornpipes.com/tag/malaga-pipes/. That blog also includes links to a catalogue and the history of the pipemaker George Khoubesser. If you are interested to learn more then I invite you to follow the link to get a feel for the brand and the pipemaker.

I have included a page from the Malaga catalogue I received from Kathy recently that shows the scoop shape (https://rebornpipes.com/2019/02/27/malaga-pipes-catalogue-of-pipes-and-tobaccos/). I have put a red box around the shape for easy identification. The shape of the bowl is the same, however, the shank and stem are both oval on the one I am working on.The bowl had a thin cake so I reamed it with a Savinelli Fitsall Pipe Knife to get rid of the thin cake. I finished by sanding the bowl with a dowel wrapped with 220 grit sandpaper until the inside of the bowl was smooth. I decided to address the damage to the rim top and edges first. I sanded the damage on the rim top and edges using 220 grit sandpaper to remove the damaged portions of the rim surface. I started the polishing with 400 grit sandpaper.I scrubbed the bowl with a cotton pad and isopropyl alcohol. I washed the bowl down with alcohol to remove the remnants of the waxes and finish on the bowl. It also removed the grime and dirt in the briar. I polished the rim and the outside of the bowl with micromesh sanding pads – wet sanding with 1500-12000 grit micromesh sanding pads and wiped the bowl and shank down after each pad with a damp cloth. The photos show how the grain really stands out after polishing. I am pretty happy with the results. I cleaned up the inside of the shank and mortise with a pen knife to remove the tar build up. I ran cotton swabs, pipe cleaners and alcohol through the shank to remove the tars and oils. I also cleaned out the airway in the stem using pipe cleaners and alcohol. I worked Before & After Restoration Balm into the surface of the briar with my fingertips to clean, enliven and protect it. I worked it into the craving on the sides of the bowl to make sure I covered all of the grooves, nooks and crannies. I let the balm sit for a little while and then buffed with a cotton cloth to raise the shine. I sanded the stem surface with 220 grit sandpaper to remove the oxidation and to smooth out the tooth marks into the surface of the stem. I polished the stem with 400 grit sandpaper. I am happy with the stem surface once that was done. I started the polishing of the surface with 400 grit wet dry sandpaper.  I polished the stem with micromesh sanding pads – wet sanding it with 1500-12000 grit pads. I wiped the stem down with a damp cloth after each pad. I further polished it with Before & After Pipe Polish – both Fine and Extra Fine. I wiped it down with a coat of Obsidian Oil and set it aside to dry. I put the pipe back together and polished both the bowl and the stem with Blue Diamond polish on the buffing wheel. I gave the bowl and the stem multiple coats of carnauba wax. I buffed the pipe with a clean buffing pad to raise the shine. I hand buffed it with a microfiber cloth to deepen the shine. The pipe polished up pretty nicely. The oil cured finish and the grain came alive with the buffing. The grain really stands out and provides a rich contrast. The finish on the briar works well with the polished black vulcanite stem. The finished pipe is a well-proportioned, nicely grained Scoop. Have a look at it with the photos below. The dimensions are Length: 6 inches, Height: 2 inches, Outside diameter of the bowl: 1 1/2 inches, Chamber diameter: 7/8 of an inch. This Malaga Scoop will be going back to Alex to add to his rack of Malaga pipes that are in his collection. Thanks for walking through the restoration with me on another of Alex’s Malaga collection.

New Life for a Dark “Malaga” Canadian


Blog by Steve Laug

The next pipe in the queue is yet another pipe from the batch of pipes I am cleaning up for Alex – this one is another “Malaga” –a Canadian it is a stained version of the pipe and has some interesting grain around the oil cured bowl and shank. The classic Canadian shape is carved to highlight the grain around the bowl. The pipe is stamped on the top side of the shank. It reads “MALAGA”. On the underside it is stamped IMPORTED BRIAR. The tapered stem is vulcanite and has no marking or stamping. It is a nice looking piece much like many of the pipes Alex is picking up. The bowl had a light cake in the chamber and the rim top and edges were in rough condition. There were dents and nicks and some darkening on the rim top. The outer edges had nicks and there was a chip in the back side of the bowl. The exterior of the briar was dusty with grime and dust. The stem has a lot of tooth marks and some very deep dents in the surface of the stem and button.. The photos below tell the story and give a glimpse of the pipe before clean up. I took a photo of the bowl and rim to capture the condition of the pipe before I started my cleanup work. The bowl had a thin cake and the rim top significant damage to the top and edges of the bowl. The inner edge of the rim seemed to be slightly out of round and showed some burn damage. The outer edge had chips and dents and was rounded. The stem was a mess. There was some deep tooth marks on the stem and the button on both sides.I also took a photo of top side of the shank to show the stamping. The stamping is readable in the photo below and is as noted above – “MALAGA”. The stamping on the underside reads IMPORTED BRIAR very visible in the second photo below.For those of you who are unfamiliar with the brand, I am also including the link to a blog that I wrote that gives some of the history of the Malaga brand and the Malaga Pipe Shop in Royal Oak, Michigan in the USA. Here is the link – https://rebornpipes.com/tag/malaga-pipes/. That blog also includes links to a catalogue and the history of the pipemaker George Khoubesser. If you are interested to learn more then I invite you to follow the link to get a feel for the brand and the pipemaker.

The bowl had a thin cake so I reamed it with a Savinelli Fitsall Pipe Knife to get rid of remnants of cake. I finished by sanding the bowl with a dowel wrapped with 220 grit sandpaper until the inside of the bowl was smooth.I decided to address the damage to the rim top and edges first. I topped the bowl on a topping board using 220 grit sandpaper to remove the damaged portions of the rim surface.I filled in the damaged around rim and the bowl with clear super glue. The photos below show the extent of the damaged areas.When the repairs had cured I sanded the briar with a folded piece of 220 followed by 400 grit sandpaper. I used the sandpaper to blend the repairs into the surface of the briar and to smooth out the inner edge of the bowl at the same time.I scrubbed the bowl with a cotton pad and undiluted Murphy’s Oil Soap. I rinsed the bowl under running water to wash off the soap and the grime that had been loosened. I cleaned up the inside of the shank and mortise with a dental spatula to remove the tar build up. I ran some cotton swabs, pipe cleaners and alcohol through the shank to remove the tars and oils. I also cleaned out the airway in the stem using pipe cleaners and alcohol. I polished the rim and the outside of the bowl with micromesh sanding pads – wet sanding with 1500-2400 grit pads. I wiped the bowl down after each pad with a damp cloth to remove the sanding debris. I started the process of matching the stain on the bowl to the repaired and sanded areas I had worked on. I used a Walnut and a Cherry stain to begin the match.I polished the bowl further, wet sanding it with 3200-4000 grit micromesh sanding pads. I wiped the bowl down after each pad with a damp cloth. I wiped the bowl down with alcohol on a cotton pad to further blend the stain into the surrounding finish on the rest of the bowl and shank. I used Black stain pen to further blend the stain into the surface of the surrounding briar. I wiped it off with the alcohol dampened cotton pad. The photos below tell the story. I finished polishing the bowl and shank with 6000-12000 grit micromesh sanding pads and wiped the bowl and shank down after each pad with a damp cloth. The photos show the stain blend on the newly repaired areas. I am pretty happy with the results. I worked some Before & After Restoration Balm into the surface of the briar with my fingertips to clean, enliven and protect it. I let the balm sit for a little while and then buffed with a cotton cloth to raise the shine. I buffed the bowl with a microfiber cloth to polish the briar. I took photos of the pipe at this point to show what it looked like. With the bowl finished I set it aside and turned my attention to the stem. I filled in the deep tooth marks and rebuilt the surface of the button with clear super glue. Once the repair had cured I used a needle file to smooth out the repairs to the surface of the vulcanite. I sanded the repairs on the stem surface with 220 grit sandpaper to blend the repairs into the surface of the stem. I am happy with the stem surface once that was done. I started the polishing of the surface with 400 grit wet dry sandpaper.  I polished the stem with micromesh sanding pads – wet sanding it with 1500-12000 grit pads. I wiped the stem down with a damp cloth after each pad. I further polished it with Before & After Pipe Polish – both Fine and Extra Fine. I wiped it down with a coat of Obsidian Oil and set it aside to dry. I put the pipe back together and polished both the bowl and the stem with Blue Diamond polish on the buffing wheel. I gave the bowl and the stem multiple coats of carnauba wax. I buffed the pipe with a clean buffing pad to raise the shine. I hand buffed it with a microfiber cloth to deepen the shine. The pipe polished up pretty nicely. The oil cured finish and the grain came alive with the buffing. The grain really stands out against the dark finish providing a rich contrast. The finish on the briar works well with the polished black vulcanite stem. The finished pipe is a well-proportioned, nicely grained Canadian. Have a look at it with the photos below. The dimensions are Length: 5 3/4 inches, Height: 2 inches, Outside diameter of the bowl: 1 3/8 inches, Chamber diameter: 3/4 of an inch. This Malaga Canadian will be going back to Alex to add to his rack of Malaga pipes that are in his collection. Thanks for walking through the restoration with me on another of Alex’s Malaga collection.

Breathing Life into a “Malaga” Carved Ball


Blog by Steve Laug

The next pipe in the queue is another pipe from the batch of pipes I am cleaning up for Alex – this one is another “Malaga” –a Ball or Apple with some interesting grain around the oil cured bowl and shank and some carved “feathers” around the bowl bottom. There is some beautiful grain around the bowl – almost a flame grain pattern. The pipe has not been stained but sports the usual Malaga oil cured look. The carver did a great job utilizing the block of briar to maximize the grain. The pipe is stamped on the left side of the shank. It reads “MALAGA”. The tapered stem is vulcanite and has no marking or stamping. This is the first Malaga Ball/Apple that I have worked on. It is a nice looking piece much like many of the pipes Alex is picking up. The bowl had a light cake in the chamber but the edges appeared to be in good condition. There was some lava on the rim top and some darkening on the rim top. The exterior of the briar and the carved areas were dusty with grime and dust. The stem is lightly oxidized and there was some tooth chatter on the top and underside near the button. The stem was in good condition under the grime. The photos below tell the story and give a glimpse of the pipe before clean up. I took a photo of the bowl and rim to capture the condition of the pipe before I started my cleanup work. The bowl had a thin cake and the rim top had a lava overflow on the front and back side. The inner edge of the rim seemed to be undamaged but the lava made it hard to know for sure. The stem was in decent condition. There was some light pitting and deep oxidation on the stem. There was also some light tooth chatter on the top and underside of the stem at the button. I also took a photo of left side of the shank to show the stamping. The stamping is readable in the photo below and is as noted above – “MALAGA”.For those of you who are unfamiliar with the brand, I am also including the link to a blog that I wrote that gives some of the history of the Malaga brand and the Malaga Pipe Shop in Royal Oak, Michigan in the USA. Here is the link – https://rebornpipes.com/tag/malaga-pipes/. That blog also includes links to a catalogue and the history of the pipemaker George Khoubesser. If you are interested to learn more then I invite you to follow the link to get a feel for the brand and the pipemaker.

I reamed bowl with a PipNet pipe reamer using the third cutting head. I  took the cake back to bare briar so I could check out the walls of the chamber. I cleaned up the reaming with a Savinelli Fitsall Pipe Knife to get rid of remnants of cake. I finished by sanding the bowl with a dowel wrapped with 220 grit sandpaper until the inside of the bowl was smooth. I scrubbed the bowl with a cotton pad and undiluted Murphy’s Oil Soap. I rinsed the bowl under running water to wash off the soap and the grime that had been loosened. I then turned to address the damage to the inner edge and top of the rim by carefully sanding it with a folded piece of 220 grit sandpaper. I was able to remove the darkening to the rim top. I used a folded piece of 220 grit sandpaper to smooth out the inner edge of the bowl.I polished the rim and the outside of the bowl with micromesh sanding pads – wet sanding with 1500-12000 grit pads. I wiped the bowl down after each pad to remove the sanding debris. I worked some Before & After Restoration Balm into the surface of the briar with my fingertips to clean, enliven and protect it. I let the balm sit for a little while and then buffed with a cotton cloth to raise the shine. I had forgotten to clean up the inside of the shank and mortise. So I went back to clean up the internals. I scraped the mortise with a dental spatula to remove the tar build up. I ran some cotton swabs, pipe cleaners and alcohol through the shank to remove the tars and oils. I also cleaned out the airway in the stem using pipe cleaners and alcohol. With the bowl finished I set it aside and turned my attention to the stem. I sanded the stem surface with 220 grit sandpaper to remove the oxidation and the tooth marks and chatter on both sides ahead of the button. I am happy with the stem surface once that was done. I started the polishing of the surface with 400 grit wet dry sandpaper. I polished the stem with micromesh sanding pads – wet sanding it with 1500-12000 grit pads. I wiped the stem down with a damp cloth after each pad. I further polished it with Before & After Pipe Polish – both Fine and Extra Fine. I wiped it down with a coat of Obsidian Oil and set it aside to dry. I put the pipe back together and polished both the bowl and the stem with Blue Diamond polish on the buffing wheel. I gave the bowl and the stem multiple coats of carnauba wax. I buffed the pipe with a clean buffing pad to raise the shine. I hand buffed it with a microfiber cloth to deepen the shine. The pipe polished up pretty nicely. The oil cured finish and the grain came alive with the buffing. The dark feather/leaf like carvings stand out dark against the grain providing a rich contrast. The rich finish on the briar works well with the polished black vulcanite stem. The finished pipe is a well-proportioned, nicely grained Apple. Have a look at it with the photos below. The dimensions are Length: 5 1/2 inches, Height: 1 1/2 inches, Outside diameter of the bowl: 1 3/4 inches, Chamber diameter: 7/8 of an inch. This apple shaped Malaga with its unique carved surface is a new shape and carving design for me. The Apple/Ball will be going back to Alex to add to his rack of Malaga pipes that are in his collection. Thanks for walking through the restoration with me on another of Alex’s Malaga collection.

Giving New Life to a “Malaga” Cherrywood Sitter


Blog by Steve Laug

The next pipe in the queue is another pipe from the batch of pipes I am cleaning up for Alex – this one is another “Malaga” –a Cherrywood with some interesting grain around the oil cured bowl and shank. There was a “bald” spot on the left side of the bowl but otherwise there was great grain around the rest of the bowl. There is some beautiful birdseye grain around the bowl and cross grain on the shank. The pipe has not been stained but sports the usual Malaga oil cured look. The carver did a great job utilizing the block of briar to maximize the grain. The pipe is stamped on the left side of the shank. It reads “MALAGA”. The saddle stem is vulcanite and has no marking or stamping. This is the first Cherrywood Malaga that I have been working on. It is a nice looking piece much like many of the pipes Alex is picking up. The bowl had been reamed and was in decent condition. There were some burn marks on the front outer edge of the bowl and some darkening on the rim top toward the back. The exterior of the briar was dusty with grime on the shank and bowl. The stem is lightly oxidized and there was some tooth chatter and marks on the top and underside near the button. The stem was in good condition under the grime. The photos below tell the story and give a glimpse of the pipe before clean up. I took a photo of the bowl and rim to capture the condition of the pipe before I started my cleanup work. The rim top was clean but there was burn damage on the front outer edge of the rim. There was some darkening on the back topside of the rim. The inner edge of the rim was damaged at the back side and had been poorly beveled inward to mask it. The stem was in decent condition. There was some light oxidation on the stem. There was also some tooth marks and chatter on the top and underside of the stem at the button.I also took a photo of left side of the shank to show the stamping. The stamping is readable in the photo below and is as noted above – “MALAGA”.For those of you who are unfamiliar with the brand, I am also including the link to a blog that I wrote that gives some of the history of the Malaga brand and the Malaga Pipe Shop in Royal Oak, Michigan in the USA. Here is the link – https://rebornpipes.com/tag/malaga-pipes/. That blog also includes links to a catalogue and the history of the pipemaker George Khoubesser. If you are interested to learn more then I invite you to follow the link to get a feel for the brand and the pipemaker.

Since the pipe had been cleaned and reamed by the pipe shop that sold the pipe to Alex I decided to check out the clean up. The bowl had been well reamed. I used a Savinelli Fitsall Pipe Knife to scrape out the slight cake remnants that remained. I then turned to address the damage to the outer and inner edge of the rim by topping it on a topping board with 220 grit sandpaper. I was able to remove the damage and the burned areas. I also sanded to remove the darkening and burn marks on the rim top. I used a folded piece of 220 grit sandpaper to smooth out the inner edge of the bowl. I decided to check on the cleanup work on the inside of the shank and mortise. I scraped the mortise with a dental spatula to check on tar build up and it was clean. I then ran some cotton swabs through the shank and found that it was filthy. Upon that discovery I scrubbed out the mortise and the airway in the shank and the stem with alcohol, cotton swabs and pipe cleaners. I also cleaned out the airway in the stem using pipe cleaners and alcohol. I scrubbed out the airway in the stem in the same manner.I scrubbed the bowl with a cotton pad and undiluted Murphy’s Oil Soap. I rinsed the bowl under running water to wash off the soap and the grime that had been loosened. I polished the outside of the bowl with micromesh sanding pads – wet sanding with 1500-12000 grit pads. I wiped the bowl down after each pad to remove the sanding debris. I worked some Before & After Restoration Balm into the surface of the briar with my fingertips to clean, enliven and protect it. I let the balm sit for a little while and then buffed with a cotton cloth to raise the shine. With the bowl finished I set it aside and turned my attention to the stem. I sanded the stem surface with 220 grit sandpaper to remove the oxidation and the tooth marks and chatter on both sides ahead of the button. I am happy with the stem surface once that was done. I started the polishing of the surface with 400 grit wet dry sandpaper. I polished the stem with micromesh sanding pads – wet sanding it with 1500-12000 grit pads. I wiped the stem down with a damp cloth after each pad. I further polished it with Before & After Pipe Polish – both Fine and Extra Fine. I wiped it down with a coat of Obsidian Oil and set it aside to dry. With both parts of the pipe finished, I polished the bowl and the stem with Blue Diamond polish on the buffing wheel. I gave the bowl and the stem multiple coats of carnauba wax. I buffed the pipe with a clean buffing pad to raise the shine. I hand buffed it with a microfiber cloth to deepen the shine. The pipe polished up pretty nicely. The oil cured finish and the grain came alive with the buffing. The rich finish on the briar works well with the polished black vulcanite stem. The finished pipe is a well-proportioned, nicely grained classic Cherrywood Sitter. Have a look at it with the photos below. The dimensions are Length: 5 1/2 inches, Height: 1 ¾ inches, Outside diameter of the bowl: 1 3/8 inches, Chamber diameter: 3/4 of an inch. This unique shaped Malaga, one I had not seen before. The Cherrywood Sitter will be going back to Alex to add to his rack of Malaga pipes that are in his collection. Thanks for walking through the restoration with me on another of Alex’s Malaga collection.