Monthly Archives: December 2016

A Sterling Hall Pamphlet


Blog by Steve Laug

I included this in a blog that I just posted on a New Old Stock (NOS) WDC Wellington that my brother found (https://rebornpipes.com/2016/12/23/when-he-opened-the-sterling-hall-hand-made-pipe-box-i-did-not-see-what-i-expected/). It came in a cream coloured Sterling Hall Hand Made Pipe Box that had the Briarcraft B logo in a shield in the left corner over Aged Imported Briar Root in the lower left corner. In the lower right corner it read Inlaid Sterling Silver. On the silver coloured inside cover of the box it read Sterling Hall over Hand Made. In the bottom of the box was a pipe sock with the same stamping as the cover of the box other than it also read A Product of Briarcraft.

sh1 sh4

I took photos of the pamphlet that was included with the original Sterling Hall pipe. It gives directions on breaking in your new briar as well as a small shape chart in case you are tempted to order another pipe. It is a good read and I had to chuckle when I saw the prices. I wanted to share it with you all! Enjoy. sh7 sh8 sh9 sh10

When he opened the Sterling Hall Hand Made Pipe box I did not see what I expected


Blog by Steve Laug

Sometimes you are hunting for pipes in antique shops, antique malls or even thrift shops when you come on a box like the one below. I don’t know about you but my first reaction when I see a box like this one is to walk away. I have found that they are often empty or at best holding worn out pipe that is cracked, chewed or both and certainly one I don’t want. Well I have tried to instill that habit in my brother but he is a better hunter than me! He opens the boxes to see what is in them. Now, understand, I used to do that but I have gotten jaded over the years of finding next to nothing or worse in these old pipe boxes. He opened this one and found something he was not expecting. When he showed me the box on Facetime I fully expected it to be useless even though he assured me I would be surprised.sh1He opened the box and showed me what was inside – well it was not a Sterling Hall Hand Made nor was it a useless worn out pipe. Instead it was a WDC Wellington that through the camera looked remarkably good. The finish looked good, the stem looked good, the nickel ferrule looked good. I was hooked. Okay so it is a Wellington I said – we have cleaned up quite a few of these system style pipes so I was still not that impressed. It so far appeared to be a nice looking old pipe in the wrong box. Heck, there was even a Sterling Hall pipe sock in the box along with the pamphlet included with every Sterling Hall pipe.sh2 sh3 sh4He just laughed and held the pipe up to the camera and rotated it from side to side so I could see the grain and the stem. It looked really good. The grain on both sides was nice and from the front and the back it also looked good. The stem was shiny black and bore the WDC in a triangle under the Wellington logo on the topside. In fact it appeared to be almost flawless but I still felt that there was something that he was not telling me. What was it with this Wellington pipe he had found in the Sterling Hall box?sh5Finally he turned the pipe bowl toward me. The bowl was unsmoked! It was unsmoked and clean! It was not worn or damaged or…. You know that feeling when you are looking at a New Old Stock (NOS) pipe? Yes he had found a new unsmoked old stock WDC Wellington in flawless condition. The fact that it had been kept in the wrong box had probably preserved it. There was no oxidation on the stem and it was like the day it had left the WDC factory.sh6I honestly could not believe my eyes. I don’t think I have ever seen a unsmoked new Wellington in my life. It was a first for me and I have to guess that it will probably be the only one that I ever see. He shipped it to me in the last shipment of pipes and I took the pictures above to let you see what I saw when it arrived. I have also included photos of the brochure that was in the Sterling Hall box for your reading enjoyment. Look at the prices of the pipes and quaint descriptions of how to break in and care for a pipe. Look also at the variety of shapes that were available in the Sterling Hall line. These pipes were made by Briarcraft in New York and were one of their higher grade lines. Enjoy the read and thanks for walking with me in the unveiling of this pipe hunt find!sh7 sh8 sh9 sh10

Reclamation Project: The Tobacconist Inc. Rhodesian


Blog by Steve Laug

In the last box of pipe that my brother sent there was a pipe that is of course one of my favourite shapes – a 9438/9242 GBD style Rhodesian though the taper stem makes me think of a 9242 shape. It is not stamped with a shape number or a make but the Made in England stamping on the underside of the shank matches that found on GBD pipes. From first glance at the pictures of the pipe that my brother sent me it looked to be in decent shape. This was to be proved wrong once my brother started to clean it and I received it in Vancouver. But from the photos the contrast finish of blacks and browns looked really good. The rustication on the bowl is a combination of worm trails and “squiggles” that is reminiscent of Custombilt pipes. From the front there is a worm trail that divides the bowl into two hemispheres like a brain (photo 5). Strange humour of the original pipe maker, I think.tob1 tob2The close up photos of the rim and bowl give a bit of a foretaste of the hidden issues in the bowl and on the rim. It is hard to see the inside of the bowl from this photo but there was a light cake in the bowl and it had run over the top edge of the bowl filling in some of the grooves and crevices in the rustication. The second photo below shows the worm trail on the front and underside of the bowl that divides the bowl into two hemispheres.tob3The stamping on the underside of the shank on a smooth portion of briar was faint but could still be read. It said The Tobacconist Inc. over Made in England.tob4The stem was lightly oxidized around the shank end and the button end, though the middle was strangely clean. There were tooth marks on the top and underside near the button. The top edge of the button on both sides had tooth marks as well.tob5I have restored a Liverpool shaped pipe with The Tobacconist Inc. stamping and written a blog on it – (https://rebornpipes.com/2016/07/16/a-liverpool-stamped-tobacconist-inc/). I remember hunting to no avail on information on the brand and finding nothing. I checked once again with my usual sources – the book Who Made that Pipe and the online sites Pipedia and Pipephil. None of the sources had any new information. For that blog, I searched for the name of the shop – The Tobacconist Inc. to see if I could find any information on it and possibly see if they had shop pipes made for them. The name Tobacconist Inc. came up shop a tobacco shop in Chicago. It is called The Tobacconist Inc. and is located at 3524 W. Irving Park Rd. Chicago, Illinois. The phone number is 773-463-8468. I have included two photos from that blog – one of the sign and the other of the shop. The sign says the shop has “Everything for the Smoker” and has been in existence since 1946. Sounds like a place I need to visit one day. Now that I have worked on a second pipe with the name stamped on it I really need to call them and see if they have any information about the pipe. tob7My brother wrote that cleaning out the inside of the pipe was a pain. It took a lot of work to get the buildup of tars and grime out of the bowl and the shank. The rim top also had some damage under the thick tars. When it arrived in Vancouver I could see that the pipe was in pretty rough shape with a poorly fitting stem. The diameter of the stem and the shank don’t match. Not sure if it was because the stem was poorly fitting to start with or if it is a replacement stem. It looks to be original so I am opting for a poor fit. I took some photos of the pipe before I started working on it (well almost – I had done a little sanding at the shank stem union before I remembered to take the photos). tob8 tob9I took a close up photo of the rim and bowl. The rim inner edge had some chips and nicks that would need to blended in to make the rim more balances looking. It is hard to see from the photos but the walls of the bowl are in damaged condition.tob10The tooth dents in the top and underside of the stem near the button were quite deep. I heated the dents with a Bic lighter to raise them as much as possible. I painted them with the flame of the lighter and when I was finished they were not as deep as before. It would not take too much now to sand them out to match the surface of the rest of the stem.tob11I cleaned out the inside of the shank with alcohol, pipe cleaners and cotton swabs to remove the last of the debris on the walls. The bevel on the edge of the mortise was rough and needed to be cleaned up and smoothed out but the wood was solid with no cracks.tob12I used a Dremel and sanding drum to remove the excess briar and vulcanite and get the shank and the bowl to match in diameter. It took some work but it certainly was a better fit once I was finished. I sanded the bevel in the shank end until it was smooth but the stem still did not fit tightly against the shank. I heated the tenon to soften the vulcanite and make it flexible. I pushed the stem carefully into the shank and held it against the shank end to align it until the tenon cooled.tob13I sanded the stem/shank union with 220 grit sandpaper to smooth it out and make the transition clean. I took the following photos to show the restoration at this point.tob14 tob15I used a brass bristle tire brush to work over the rim top. It took some work but I was able to get the grime and grit out of the grooves of the rim.tob16I scrubbed off the finish on the bowl and rim to remove the stain and the remaining varnish coat on the briar. When I finished cleaning the surface the pipe was ready for the stain coat.tob17 tob18I stained the bowl with a dark brown aniline stain and flamed it to set it in the grain. I repeated the process until the stain coverage was even across the bowl.tob19 tob20I used the Savinelli Fitsall pipe knife to scrape out the walls of the bowl. I examined the interior and saw a lot of spidering cracks on the walls of the bowl. While the briar around them was still solid and the briar was not too badly damaged. This would need to be addressed to assure that the briar would be protected until a new cake had formed.tob21I decided to mix up a batch of pipe mud with some tap water and a dental spatula. I applied the mud mixture to the inside of the bowl pressing it into the cracks in the bowl walls. I coated the inside of the bowl with the mud until there was a solid bowl coating.tob23 tob24I set the bowl aside to dry overnight. I took the following photos to show what the inside looked like after the mud had cured.tob25I sanded the stem with 220 grit sandpaper to remove the last remnants of the tooth dents and reshape the button on both sides. It also removed the surface oxidation.tob27I used a black Sharpie Pen to touch up the grooves in briar on the sides and the rim top. I gave briar a touch up coat of dark brown stain. I waxed the rusticated briar with multiple coats of Conservator’s Wax and once it had dried buffed it with a shoe brush to raise the shine.tob28 tob29I polished the stem with micromesh sanding pads – wet sanding with 1500-2400 grit pads and dry sanding with 3200-12000 grit pads. I rubbed the stem down with Obsidian Oil after each set of three pads. I gave it the final coat of oil and set it aside to dry.tob30 tob31 tob32I buffed the bowl and stem with Blue Diamond polish on the wheel. I gave the stem multiple coats of carnauba wax and put another coat of Conservator’s Wax on the briar. I buffed the bowl and stem with a clean buffing pad. I hand buffed the pipe with a microfibre cloth to deepen the shine. The fit of the stem against the shank is far better than it was when I started the cleanup. I like the way the flow is now between the stem and the shank. The finished pipe is shown in the photos below. It had a great feel in hand and I think the rustication will heat up nicely with the next first smoke. I think that the pipe mud will protect the bowl until a new cake is built. Thanks for walking through the restoration with me.tob33 tob34 tob35 tob36 tob37 tob38 tob39 tob40

Family Heirloom Comes in From the Cold


Really nicely done reclamation by Charles! Thought I would share what can be done! Great work Charles.

Charles Lemon's avatar

It’s officially Winter, and as the cold takes hold here in Southern Ontario, here is a pipe story that is sure to warm the heart. It involves a long-lost pipe, a walk in the pasture and a clever fellow who recognized a unique opportunity to secure the perfect gift for a hard-to-buy-for family member.

I was contacted by a DadsPipes reader with a restoration request. It would be, he said, a “full overhaul” job, and included this picture of the pipe – well, really half a pipe.

image1

As you can see, the pipe was just a stummel and an old-style threaded reverse tenon. There were no obvious cracks or other major structural damage, and I was fairly certain I could find a suitable stem, so I asked the owner to send the pipe to me. In due time, a parcel arrived at the door. Here are a few pics of…

View original post 1,357 more words

GBD 133 New Era Restored


By Al Jones

This GBD New Era looked like a simple restore. It held one surprise that was in the sellers photos, but something I had not noticed. At some point in it’s life, a previous owner had put a flat bottom on it, make it a “sitter”. The stem had some mild oxidation, but no teeth marks. There was some darkening of the rim.

The rondell and stamping identified it as a pre-Cadogan era pipe. New Era grade GBD’s always have nice briar and are a step up from the typical New Standard grade that more often seen.

gbd_133_ne_before-1

gbd_133_ne_before-4

gbd_133_ne_before-2

gbd_133_ne_before-3

Here you can see the flat bottom. Fortunately, only a small portion of the briar had been removed and it should not effect the smoking of the pipe. And, it does sit nicely, which is always convenient.

gbd_133_ne_before-5

The mild cake was reamed and the bowl soaked with alcohol and sea salt. At the same time, the stem was soaked in a mild Oxy-clean solution with a dab of grease on the rondell.

I used some 2000 grade sandpaper to remove the bowl top build-up followed by 8000 micromesh. The stem was mounted and oxidation removed with 800, 1000 and 2000 grade paper. This was followed by 8000 and 12000 grade micromesh sheets. The stem was then buffed with White Diamond and Meguiars Plastic Polish. The briar was buffed lightly with White Diamond and then several coats of Carnuba wax.

Below is the finished pipe, which is en-route to a new owner on the island of Corfu in Greece.

gbd_133_ne_finish-1

gbd_133_ne_finish-4gbd_133_ne_finish-3gbd_133_ne_finish-5gbd_133_ne_finish-6gbd_133_ne_finish-7gbd_133_ne_finish-2gbd_133_ne_finish-8gbd_133_ne_finish-12

gbd_133_ne_finish-web11

?

gbd_133_ne_finish-web10

?

I wonder how old this Sasieni Ruff Root Light 4 Dot Dublin is?


Blog by Steve Laug

Not being too knowledgeable about the ebb and flow of Sasieni pipe history leaves me with a lot of questions about the latest pipe that my brother sent my way. It is stamped on the underside of the shank Sasieni 4 Dot over Ruff Root Light. There is a 4 stamped at the end of the name stamping next to the stem/shank junction. The stem itself is stamped France. There are four blue dots on the left side of the saddle portion of the stem. He picked it up in a thrift shop in Boise, Idaho along with the Dunhill Shell 5113 I wrote about restoring in an earlier blog (https://rebornpipes.com/2016/12/18/an-unsullied-once-the-paint-was-removed-dunhill-5113-bent-apple/). When my brother first sent the following photos before his cleanup work I was intrigued but the finish looked very spotty. The stem appeared to be in overall good condition with no bite marks or tooth chatter on either side. Can any of you help me regarding the age of the pipe? Any help would be much appreciated.sas1We discussed this a bit and he sent me a photo of the front of the bowl from the bottom side that showed the spotty finish that I noted. There was also a lot of grime in the sandblast grooves on the bowl leaving it with a muddy appearance.sas2The bowl had a thick cake that overflowed over the top of the rim obscuring the blast features on the top side. They also made it hard to tell if there was any damage to the inner or outer edges of the rim.sas3The stamping on the smooth underside of the shank was really quite clear and sharp. The bowl and stem had not been over buffed which were good omens for what it would look like when it was cleaned up.sas4The close up photos of the stem told a little different story than the overall photos. There was light oxidation on the surface and what appeared to be some sticky glue left behind by a price tag from the shop the pipe came from. Just and aside; if you sell pipes in an antique shop or have a booth in an antique mall do not used gummed labels to price your merchandise. It leaves behind residue that is a pain to remove.sas5I was curious to see what the pipe would look like once my brother had worked his cleaning magic on it. I was sure I would be surprised at what it came out looking like. I wondered if the mottled finish would survive the cleanup and whether the stem would be oxidized further as well in the process. When the pipe arrived in Vancouver I took some photos of it to show what it looked like before I worked on it. He had been able to remove much of the mottled finish and the grime in the grooves of the sandblast. The gummy substance on the stem was gone and the stem was not too badly oxidized. There were no tooth marks or chatter on the stem. The reaming job on the bowl had taken care of the cake and the scrubbing had removed most of the buildup on the rim. What remained was a little darkening and some grime deep in the grooves.sas6 sas7I took a close up photo of the rim and bowl. The bowl was reamed clean. The rim needed some more work with a brass bristle brush to clean out the remaining debris deep in the grooves of the blast.sas8I took some photos of the stem to show the overall condition it was in before I started working on it. I was glad to see that there were no deep bite marks or tooth chatter that I would need to deal with on this one. It would be a pleasant change.sas9I scrubbed the rim with a brass bristle tire brush and was able to remove more of the grime in the grooves. I scrubbed down the exterior of the bowl and shank with acetone on a cotton pad to remove the shiny spots of varnish on the finish and even out the mottled appearance.sas10 sas11I used a black Sharpie Pen to add some dark to the rim and to some of the spots on the bowl that appeared to be lighter. I put a cork in the bowl to use as a handle while I stained the bowl with a dark brown aniline stain cut 50/50 with isopropyl alcohol. I was aiming for the brown colour with darker highlights that I had seen on other Ruff Root Light pipes. I flamed the stain and repeat the process until the coverage was even.sas12 sas13Since the oxidation was on the surface and I was not dealing with any tooth marks on the stem I started right away with polishing the stem. I wet sanded it with 1500-2400 grit micromesh sanding pads and rubbed it down with Obsidian Oil. I dry sanded it with 3200-12000 grit pads and gave it a coat of oil after each set of three pads. After the final set of pads I gave it a final coat of oil and set the stem aside to dry.sas14 sas15 sas16I gave the bowl and shank several coats of Conservator’s Wax, let it dry and buffed it with a shoe brush.sas17 sas18I gave the stem multiple coats of carnauba wax and buffed the bowl and stem with a clean buffing pad to raise the shine. I hand buffed it with a microfibre cloth to deepen the shine. The finished pipe is shown in the photos below. I think the look of the finished pipe is pretty close to the original look it must have had when it left the Sasieni factory. The depth of the shine, the multifaceted colours that come through with the browns and black on the sandblast add another dimension to the look of the pipe. The blue four dots on the stem stand out nicely against the shiny and polished vulcanite stem. Overall it is a pleasant looking pipe and one that was a pleasure to restore. Thanks for looking.sas19 sas20 sas21 sas22 sas23 sas24 sas25 sas26

An Aristocob Brochure


Blog by Steve Laug

In the recent Aristocob restoration I finished I showed some pictures of the brochure that was included in the box. I wanted to post it here and give all of you a chance to read it. The description is on one side and the catalogue list on the other side of the brochure. Enjoy your read.cob13 cob14

I have always wanted to see one up close – an Aristocob


Blog by Steve Laug

Over the years I have spent quite a bit of quiet time scanning through the smokingmetal.co.uk website reading over all of the various metal pipes that have been made. I love reading and looking at the inventive creations made to capture that illusive grand smoke. One of the pipes that stood out to me on the site was the Aristocob metal bowl that came with two corn cobs that fit inside the bowl, held in place by the screw on metal cap. I wanted to see one of those but somehow always missed them on eBay at the last minute or at an antique shop by a matter of minutes. I included two of the photos from the website. The first one showed a plastic box with a form fitted purple velvet nest for the pipe and the pair of cob inserts that came with it. The pipe had a black nylon stem that held a Medico paper filter in place in the metal shank of the pipe. cobaThe second photo showed the pipe taken apart with a pretty good descriptive view of the metal bowl and cap, the cob insert, the filter and the stem with an O-ring on the tenon to keep it in the metal shank.cobbI remember first reading this description years ago when I looked up the pipe on the site. I was struck then as I am now that I could not have described it any better. I have included it here in full with a link for you to look it up should you desire to do so:

The ARISTOCOB is an American made system pipe with corn cob bowl inserts. Originally the AL-COB CORPORATION out of Grand Haven, Michigan, which later became ARISTOCOB INCORPORATED from Caledonia, Michigan. Later still they were bought out by Missouri Meerschaum Company

Apparently available in the first place in a plastic case containing one pipe, 2 replacement corn cob bowl inserts and instructions for use. The cob inserts were made for some time by The Missouri Meerschaum Company, manufacturer of corn cob pipes in Washington, MO. The box shown is their box. They made the inserts from the early 1970’s until 1983. They are no longer available from that source but do appear on eBay at times

The top of the vaned outer bowl unscrews to enable easy replacement of the bowl insert. An inline filter can be used in the stem. The mouthpiece has been seen in two version, with and without an ‘O’ ring. The patent was filed on 20 Dec 1966 with the US patent # 3,292,639. The inventor was Joesph W. Zarikta of Grand Haven, Michigan USA – the assignor was the Al Cobb Corp. (http://smokingmetal.co.uk/pipe.php?page=56).

I mentioned to my brother to keep an eye open for one of these never expecting him to find what he did. I have not seen a cased version of the pipe in my hunts but have only found the pipe with the inserted cob bowl if I was lucky. He happened to find a boxed set and bought it. He sent me the following photos of the pipe. The next set of photos are the ones that the seller posted on the eBay sale.cob1 cob2 cob3 cob4When the pipe arrived in Idaho my brother took some photos before he cleaned it up. I have included a few of those photos next. The pipe was quite dirty. The rim cap had a buildup of tars and oils on the top. The cob insert was dirty and crumbling on the top edge. The aluminum pipe body was oxidized and dirty as well.cob5When he took it apart, the inside of the aluminum body had also built up tars in the bottom and on the inside walls.cob6The inner edge of the insert was in rough condition. The rest of the bowl appears to be solid. The aluminum disk on the bottom of the bowl was dirty but undamaged.cob7The stem was darkened on the tenon end. The O-ring was still in good condition. The paper Medico Filter in the tenon was dirty and would need to be replaced. The top and undersides of the nylon stem had some tooth chatter on the surface near the button. The inside of the shank was dirty and there was some tarry buildup on the walls of the aluminum.cob8 cob9My brother cleaned up the cap and the interior of the aluminum bowl holder and shank. He cleaned the aluminum with Murphy’s Oil Soap inside and out. He scrubbed out the airway in the shank and stem. He cleaned up the damaged edge of the cob insert. When it arrived in Vancouver, I brought it to the work table and took some photos of the condition it was in before I started.cob10 cob11Inside the plastic box there was a pamphlet that explained the function of the pipe and all of its parts. The description of the pipe and how to use it was a marketing document that sold the pipe and all of its design as the best smoking pipe available.cob13 cob14I polished the aluminum with micromesh sanding pads. I started polishing with 1500-2400 grit pads and wiped it down with a damp cotton pad. I continued to polish it with 3200-12000 pads and the finish began to shine.cob15 cob16I sanded the stem to remove the tooth marks and chatter from the top and bottom sides of the stem. I ran a pair of bristle pipe cleaners and alcohol through the airway in the stem to remove the residue that still remained in the stem.cob17 cob18I polished the stem with micromesh sanding pads – wet sanding with 1500-2400 grit pads and dry sanding with 3200-12000 grit pads. I wiped it down with a damp cotton pad after each set of three pads.cob19 cob20 cob21Because the stem was nylon I decided not to use the buffing wheel. I gave it several coats of Conservator’s Wax and hand buffed it with a microfibre cloth. I lightly buffed the aluminum on the Blue Diamond wheel and then with a clean buffing pad to raise the shine. The finished pipe is shown in the photos below. It makes a great piece of pipe history in the ongoing search for the illusive perfect smoke. It will hold a place in my collection of tobacciana. Thanks for walking through this restoration with me.cob22 cob23 cob24 cob25 cob26 cob27 cob28 cob29

Breathing Life into a Comoy’s Spectrum Boxed Bent Billiard


Blog by Steve Laug

My brother picked an interesting Comoy’s pipe. It is from a line of Comoy’s that I was unfamiliar with. I could not find much information in my online searches either. It was a nicely made Comoy’s with a single drilled letter C on the stem side. It came in a black velvet lined presentation box with the Comoy’s of London logo and Pipemakers since 1825 in gold on black felt on the inside of the lid. The well-made box with dovetailed corners is mahogany that is stained with a rich cherry stain. The gold latches and hinges look very good with the red stain of the wood. On the underside the box is stamped Made in England.comoy1 comoy2Once the box was opened and the pipe visible it clear to see it is a beautiful pipe. I am actually surprised that there is not more information on the line available. It is stamped Comoy’s over Spectrum on the left side of the shank and the COM stamp on the right shank is the expected Made in London circle over England. Next to that the shape number 42 is stamped. Looking that up on Comoy’s Shape Charts shows that it is the number for a medium sized ½ bent billiard. This is exactly what I have here. There is also an H stamped on the underside of the shank next to the brass and blue band.comoy3The pipe appears to have some nice grain in the photos that my brother sent to me. The front, underside and back and top of the shank are beautiful cross grain. The sides of the bowl are full of birds-eye grain. The pipe has a brass band that had a wipe enameled strip of royal blue in between two ridges of polished brass. The stem was oxidized in the early photos but the single drilled C stamp is very clean.comoy4 comoy5My brother took some close up photos of the bowl and rim to give me a clear picture of the pipe. It appeared that the bowl had been reamed and well care for. The rim looked very good – a little bit of lava overflow from the bowl but the inner beveled edges and the outer edges of the rim were both very clean. The rim itself was also undamaged. The underside of the bowl and shank showed beautiful cross grain.comoy6The stamping on the pipe was deep and sharp. It had not been over buffed or damaged. It was readable and clean. The finish was dirty and the buildup of grime and grit on the surface of the bowl and band seemed to be the only major issue on the pipe. You can also see the single drilled C logo on the stem in the photo below.comoy7From the next photos you can see the deep oxidation on the stem. What is not visible at this point is if there was any tooth chatter or damage to the stem. That would have to wait until the pipe arrived in Vancouver.comoy8While I was waiting for the pipe to arrive in Vancouver I did some hunting for information on the Spectrum line of Comoy’s pipes on the internet. Sadly I was unable to find much that was definitive. There was a similar pipe for sale on smokingpipes.com that had a brief write up. From that I learned that the pipe dates after 1980 because of the single drilled C. Evidently that was when Comoy’s no longer used the three-part inlaid C on the stem. I wrote to a friend of mine and writer on rebornpipes, Al Jones and asked what he knew about the line. He wrote back that “they are early post-merger, with the single drill C logo. They usually have an adornment of some kind and box. It was the go-go 80’s, right! They’re most likely made with good stock leftover from pre-merger, so she should be a good smoker. As an added bonus, this pipe comes in wooden box complete with matching tamper.”

This confirmed what I had gleaned online so far. I Googled and found a question and short discussion on alt.smokers.pipes community regarding the line and found some more information from friend, Mike Stanley. He wrote: “The only thing I can pass along is what R.C. hacker wrote in his Ultimate Pipe Book. The Spectrum came with a wooden box and matching tamper with the same brass and enameled ring as the pipe. They were, I suppose, “firsts and fairly pricey. I had one I picked up from ebay. It had no tamp or box. It was a fine enough looking pipe. No putty or sand pits. It was too big for my taste. I re sold it. I would guess that they were made up until the late seventies or early eighties. Just a guess though.” (http://alt.smokers.pipes.narkive.com/yA8KASQj/comoy-s-spectrum)

When the pipe arrived in Vancouver and I unpacked it I was amazed at how clean my brother Jeff had gotten the rim and the bowl. The finish was very clean. The enameled band was also clean an undamaged. The oxidation had really come to the surface on the stem. However, all that being said, the briar on the pipe is very stunning. I took some photos of the pipe before I began to work on it to try to capture what it looked like when it arrived.comoy9 comoy10The next picture is a bit out of focus. It will teach me to have a look at the photos before moving on with the cleanup. However, you can see that the rim is spotless. He was able to get all of the darkening and debris off the rim and also ream the bowl clean.comoy11I took photos of the stamping on both sides of the shank. You can see in the first photo the stamping on the left side of the shank. The second shows the COM stamp and shape number on the right side.comoy11aI took photos of the stem to show the oxidation and to try to capture the tooth chatter and tooth marks on both sides of the stem near the button. They are hard to see through the oxidation. The ones on the topside of the stem are not too bad. The ones on the underside are a little deeper. Once I clean off the oxidation a bit I will be able to assess how bad they are.comoy12I sanded the stem with 220 grit sandpaper to break up the oxidation on the surface and also to sand out the tooth chatter and tooth marks on the stem. I was able to remove all of them as they proved to be fairly shallow and superficial.comoy13I polished the stem with micromesh sanding pads – wet sanding with 1500-2400 grit pads and dry sanding with 3200-12000 grit pads. I rubbed the stem down with Obsidian Oil after each set of three pads. After rubbing it down with the final coat of oil I set the stem aside and let it dry.comoy14 comoy15 comoy16I buffed the bowl and stem with Blue Diamond on the buffing wheel. I avoided buffing the enameled band on the shank. I gave the stem and bowl multiple coats of carnauba wax and buffed it with a clean buffing pad to shine it. I hand buffed it with a microfibre cloth to deepen the shine. The finished pipe is shown in the photos that follow. It is a beautiful pipe with stunning grain. The contrast of the black vulcanite, the blue and brass enameled band and the cross grain and birds-eye grain formed a great contrast. It comes with the velvet lined mahogany case with brass clasps and hinges. The only thing lacking was the tamper that originally came with the pipe. Thanks for walking through this restoration with me.comoy17 comoy18 comoy19 comoy20 comoy21 comoy22 comoy23 comoy24 comoy25

Sasieni “Sashar” Restoration


By Al Jones

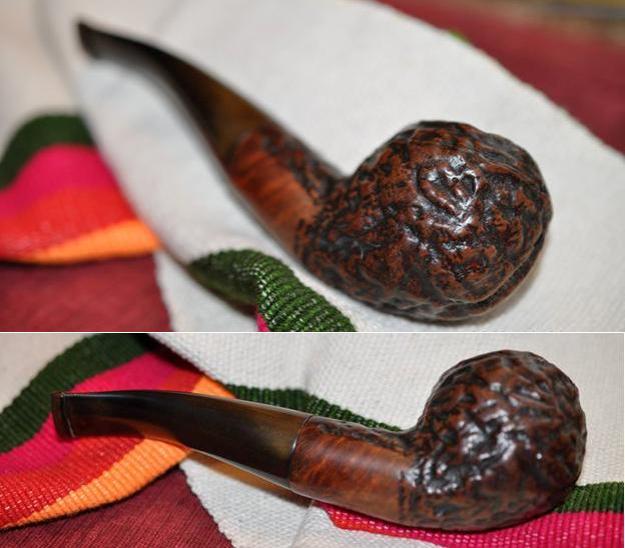
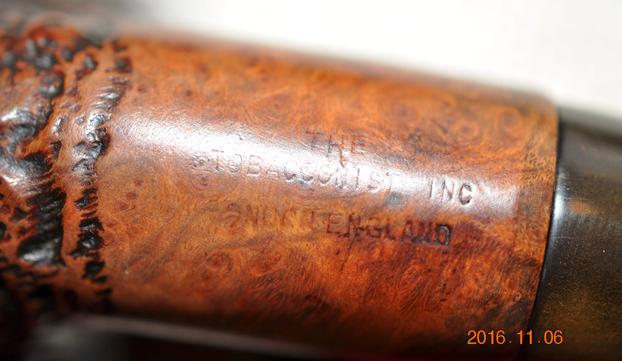
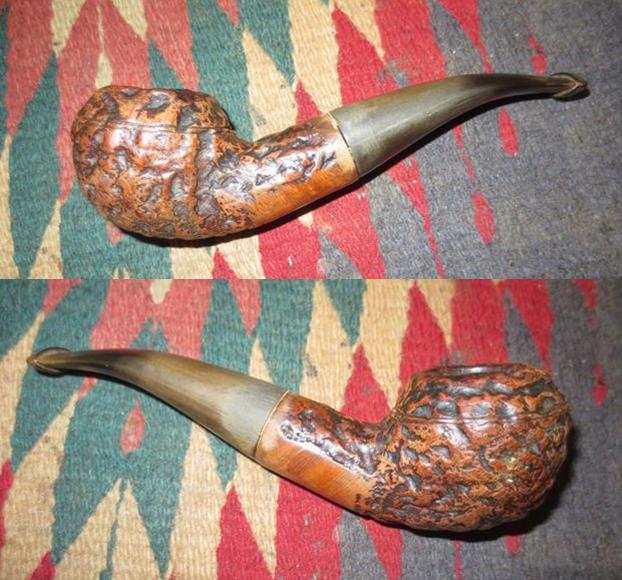
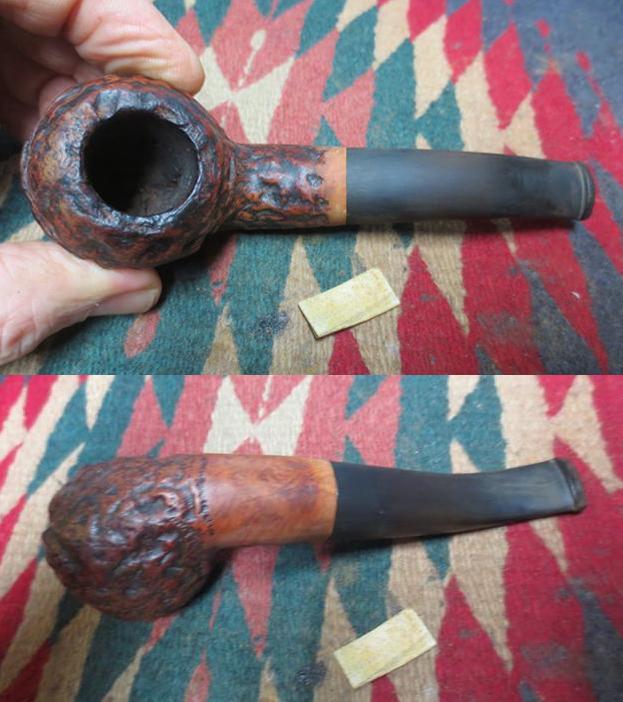
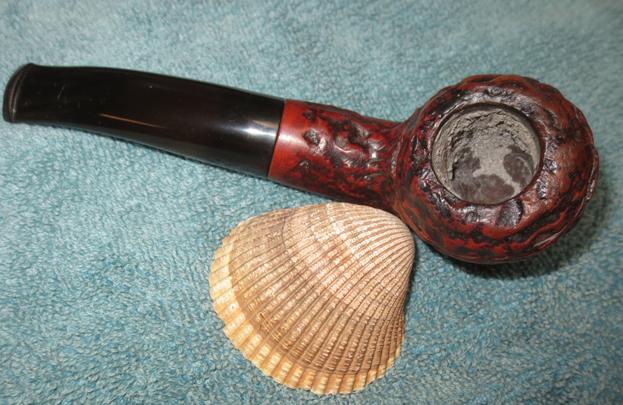
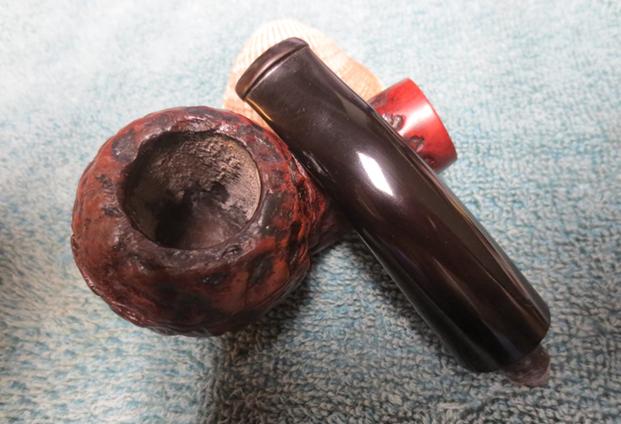
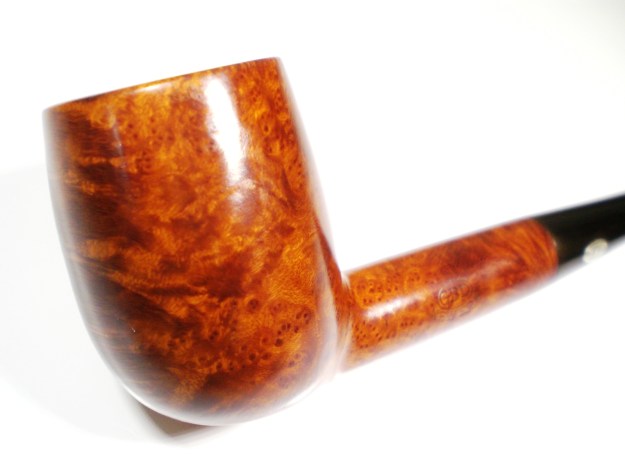
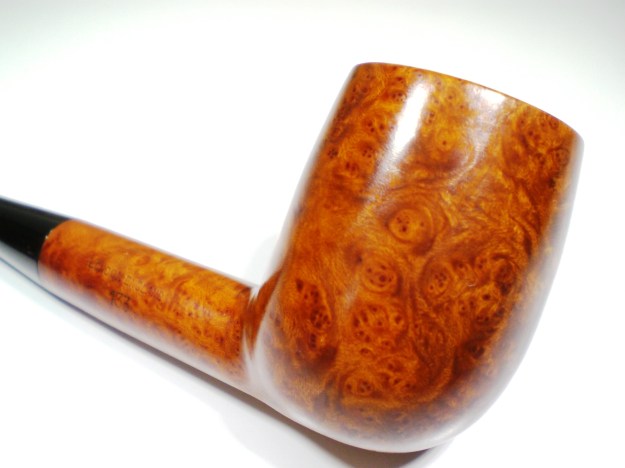
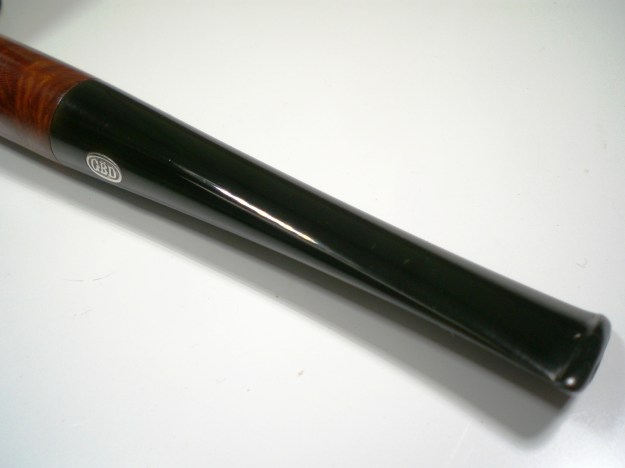
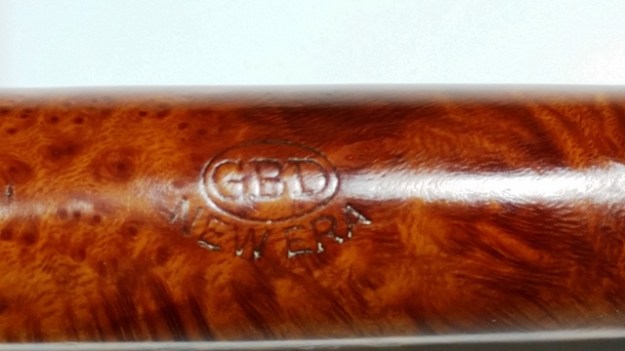
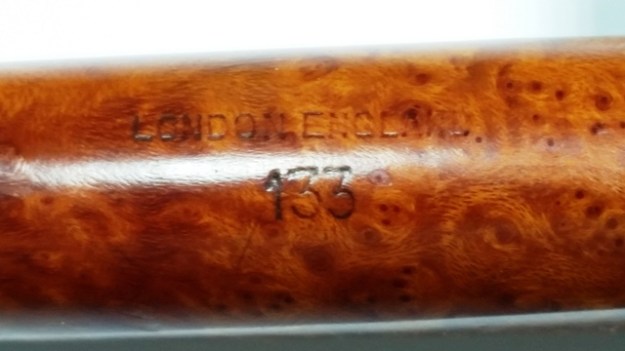
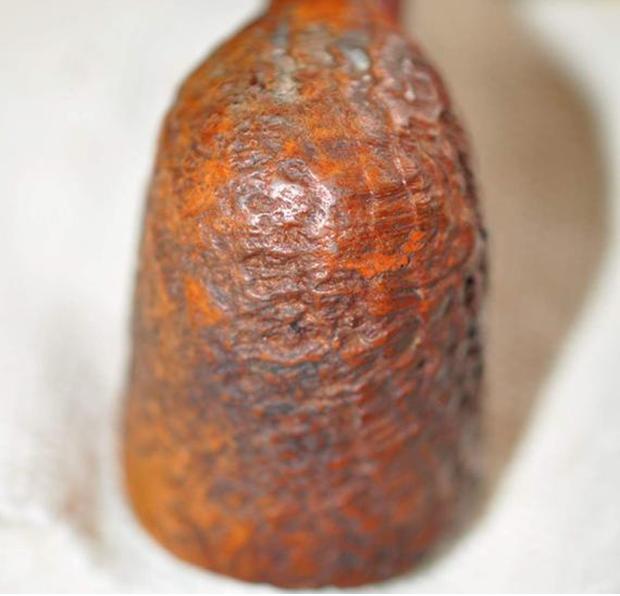
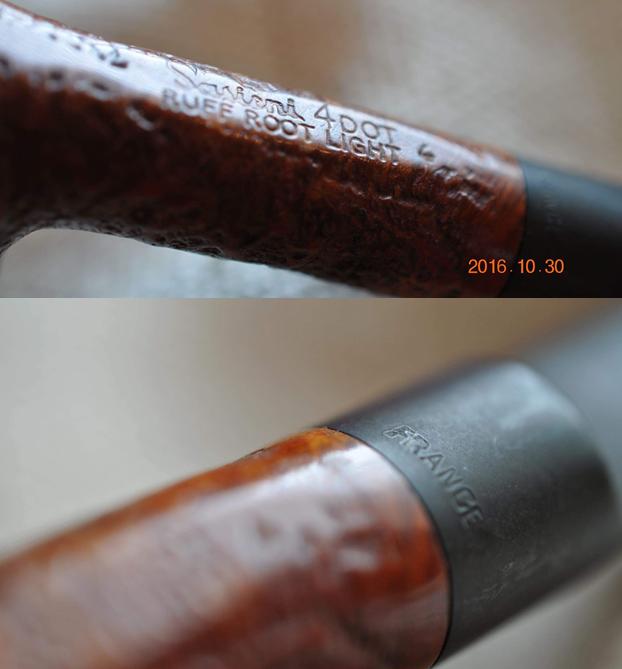
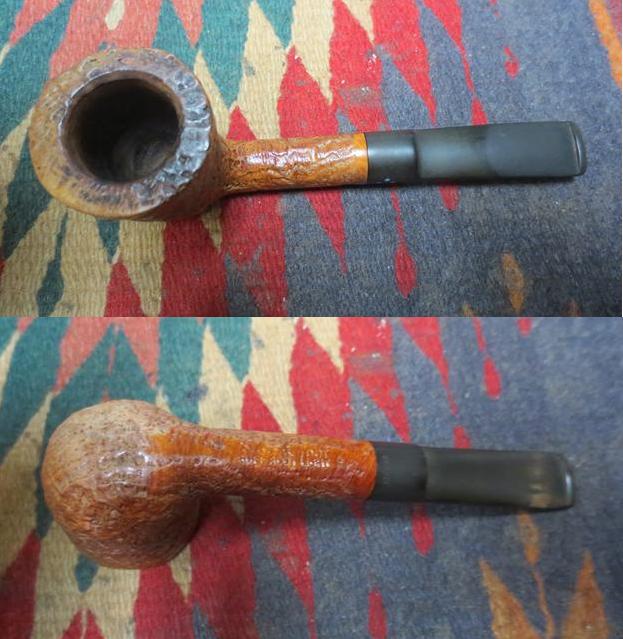
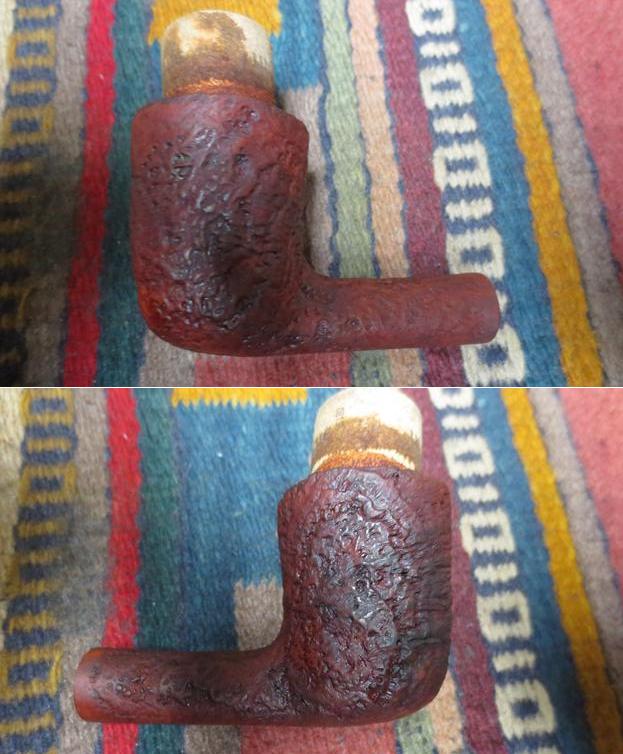
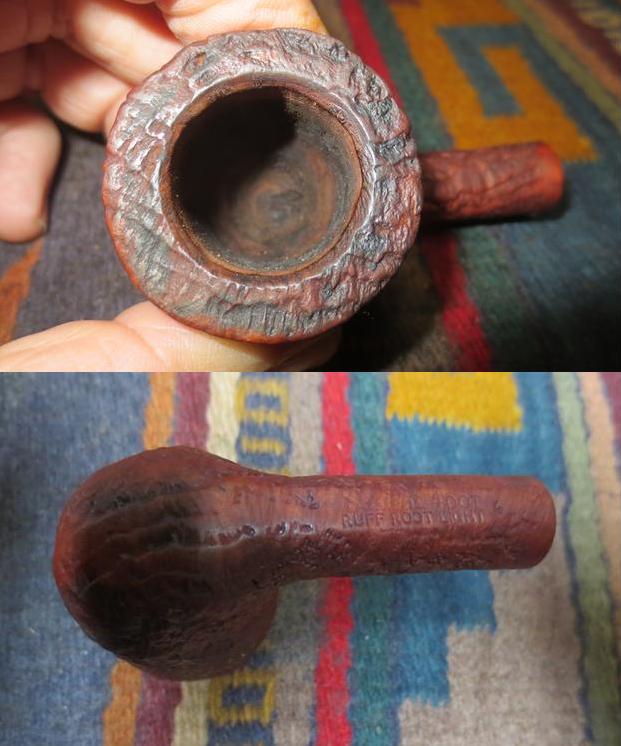
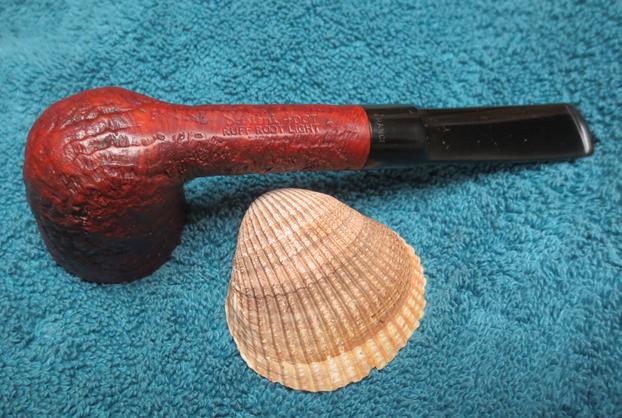
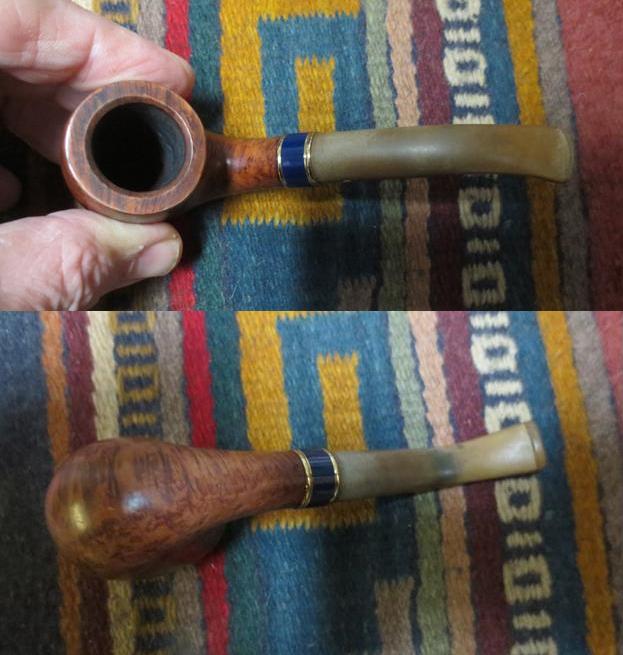
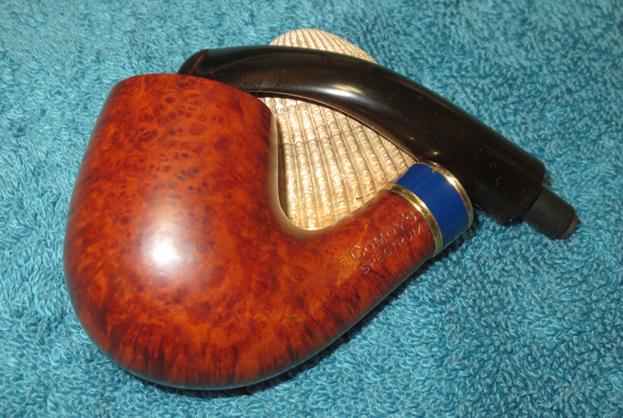
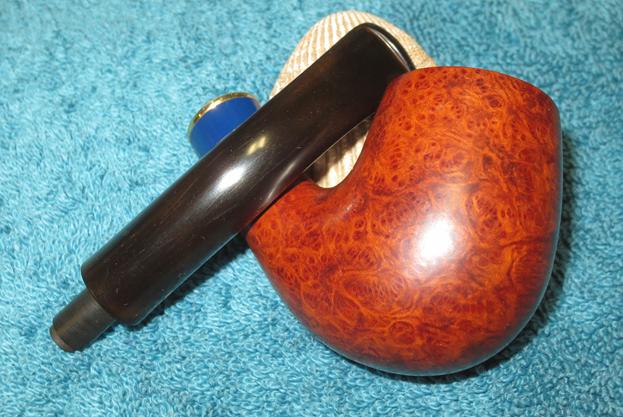
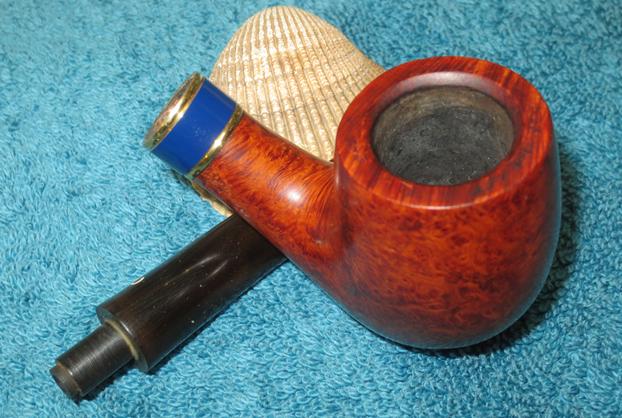
When I spied this pipe, I wasn’t familiar with the Sashar line or that it was a Sasieni 2nd’s line. The shape and style spoke to me as Sasieni and sure enough, the nomenclature read “London Made By Sasieni”. Upon receipt of the pipe, which came via England, I could see the stem also had a Sasieni feel. The pipe is rusticated, but with a texture and detail that I’ve not seen before. The rustication on Sasieni Rustic pipes is lovely, but I think this method may have a nicer hand feel. I’m familiar with the other Sasieni 2nd’s: Mayfair, Fantail and Olde English but Sashar was new to me. The pipe was stamped with the shape 959R. It is similar to the Viscount Lascelles, but on a slightly smaller scale. The nomenclature was lightly stamped, but completely visible. I didn’t capture it well on my photo below, but it reads:

959R
Sashar
London Made
By Sasieni
Made in England (straight line)

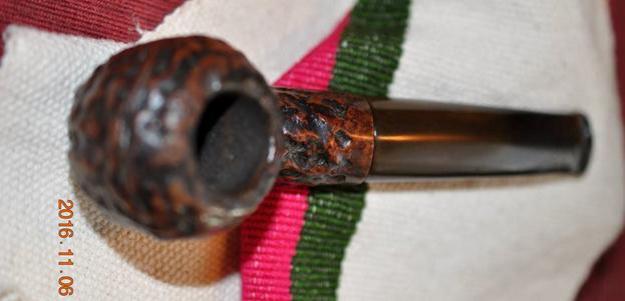
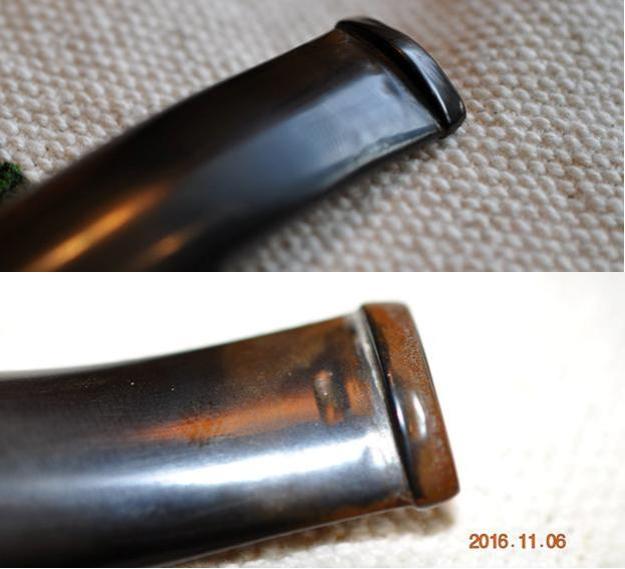
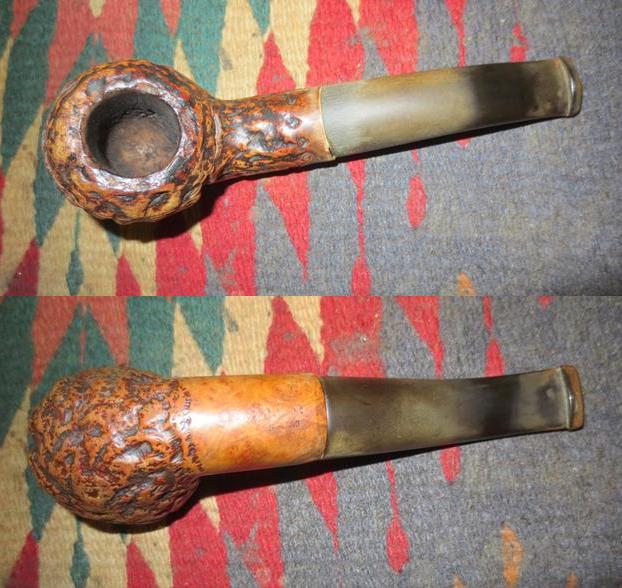
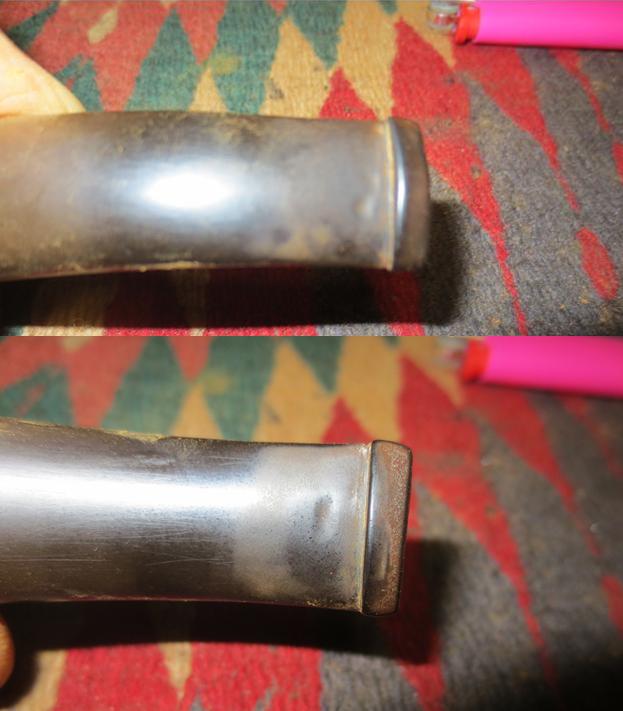
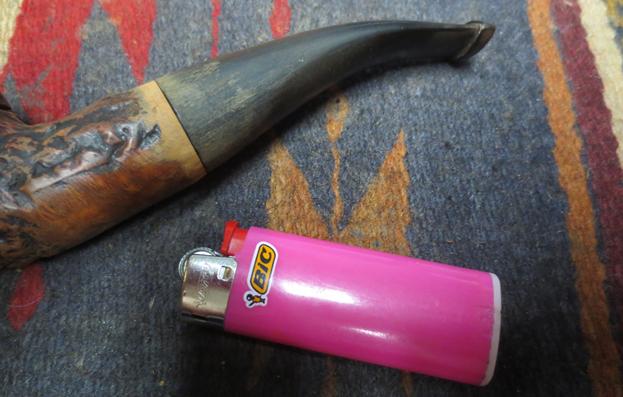
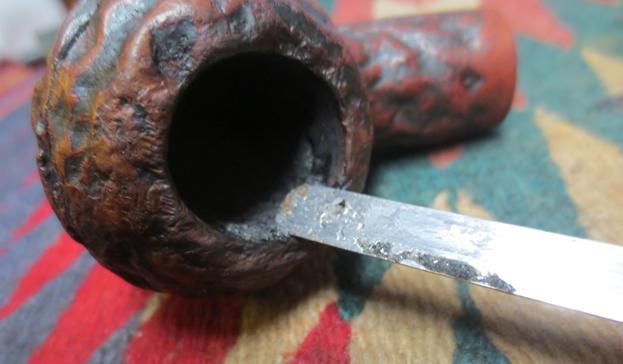
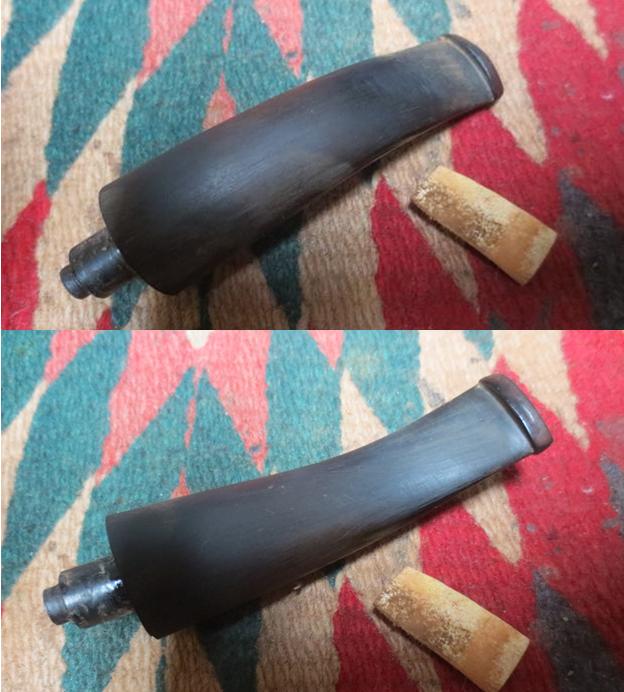
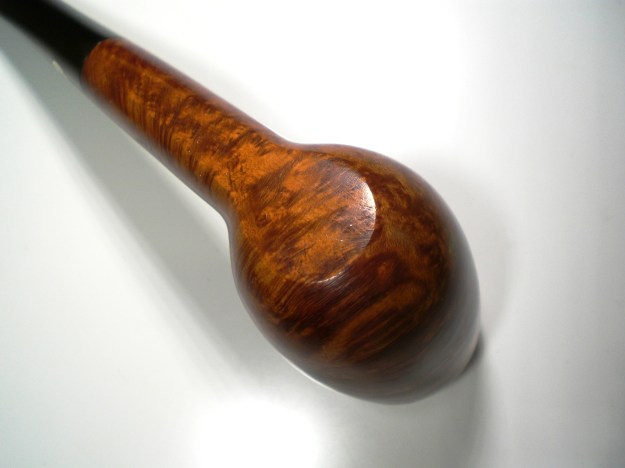
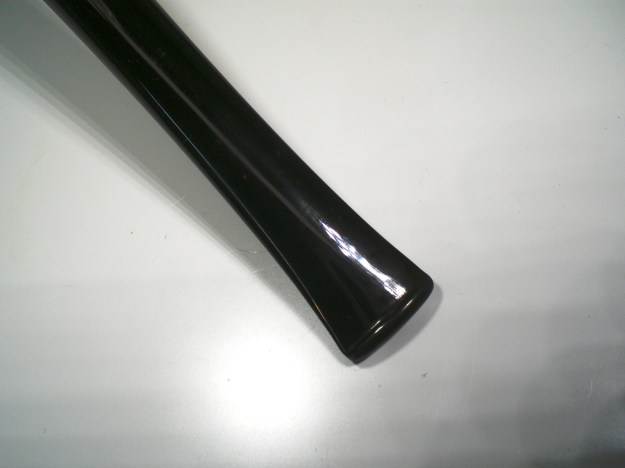
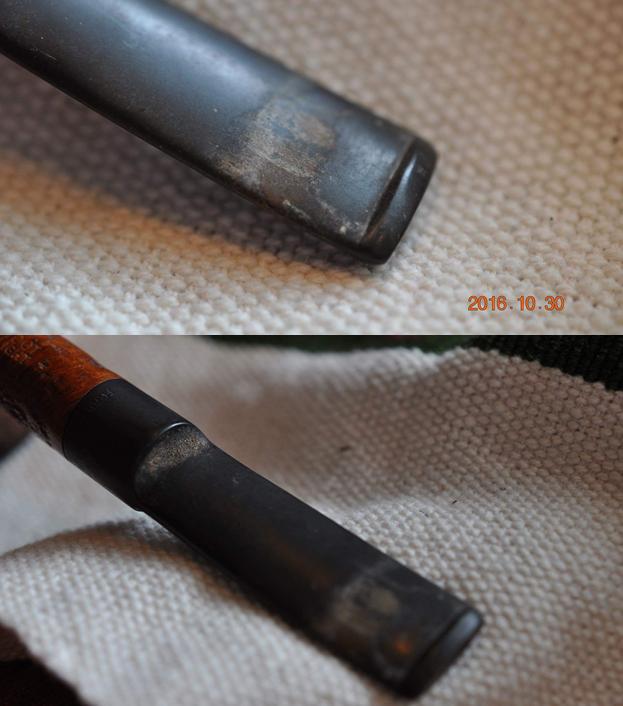
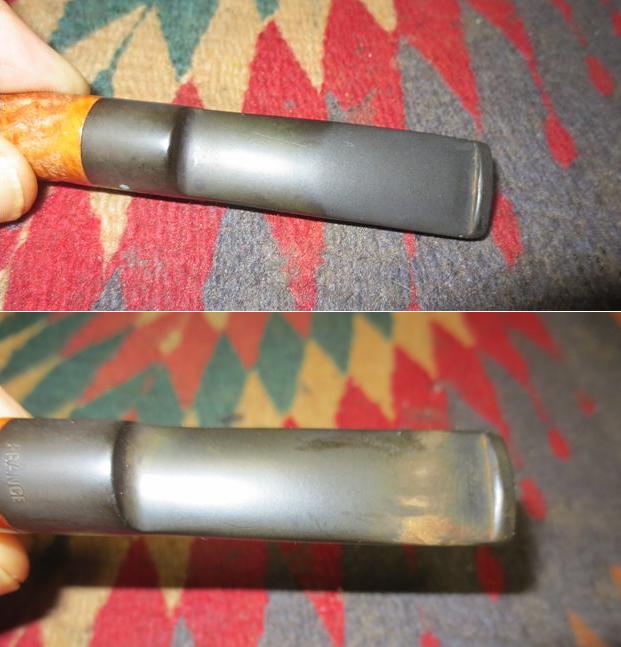
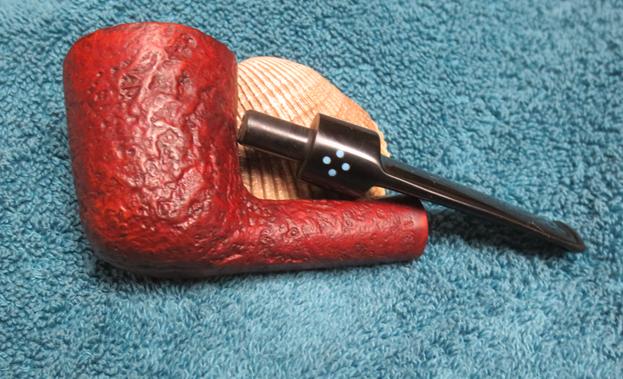
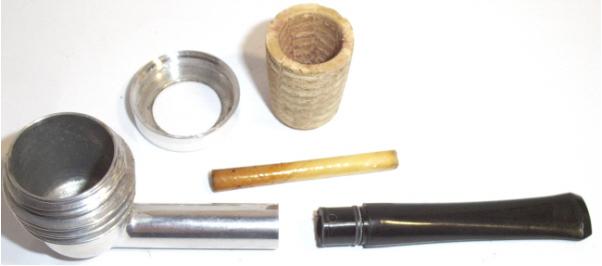
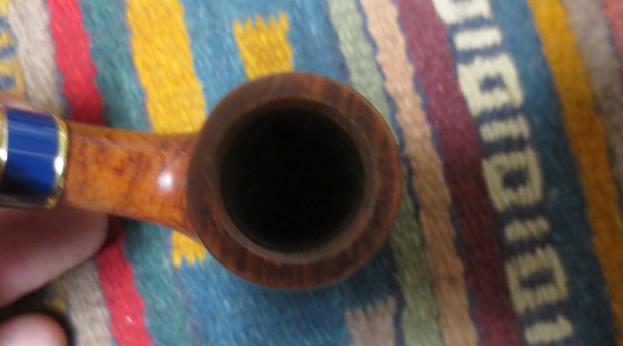
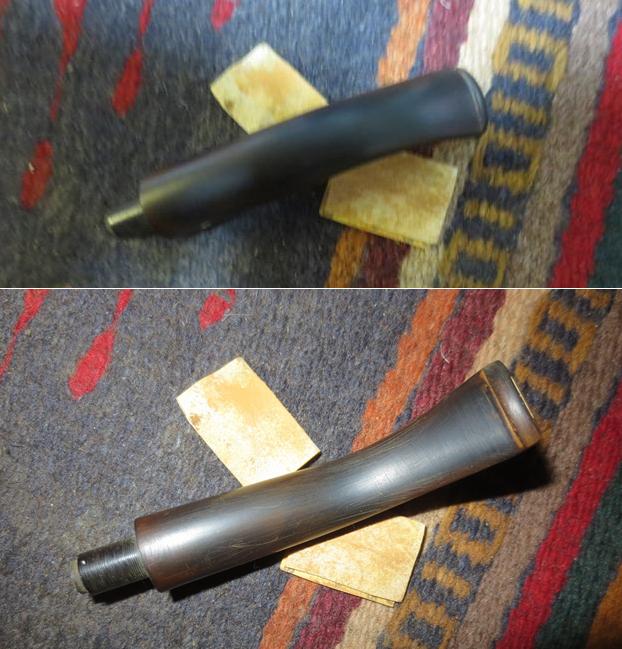
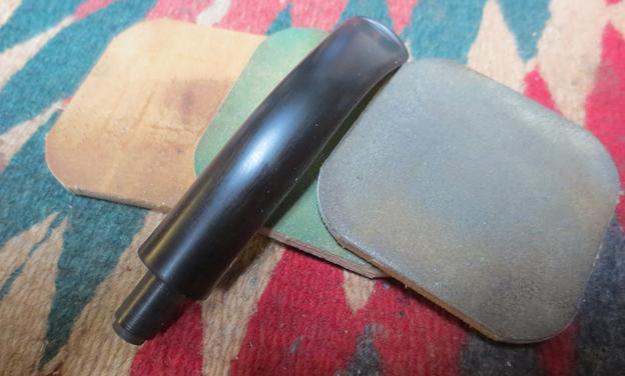
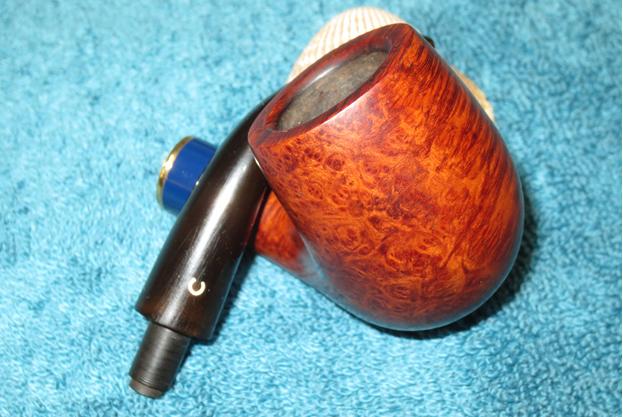
The pipe had a badly oxidized stem and some wear marks on the polished bowl top. The “S” stem logo imprint was still visible.

sashar_959r_before-1

sashar_959r_before-4

sashar_959r_before-3

sashar_959r_before-2

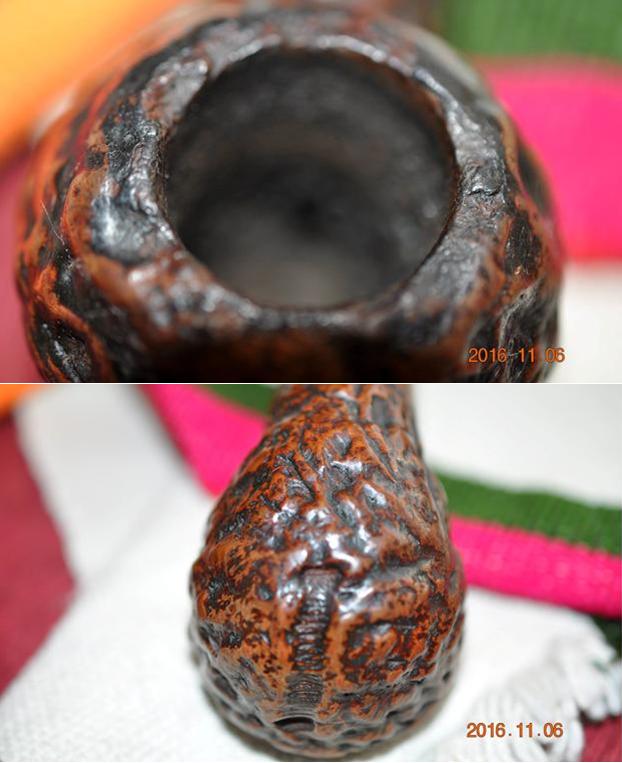
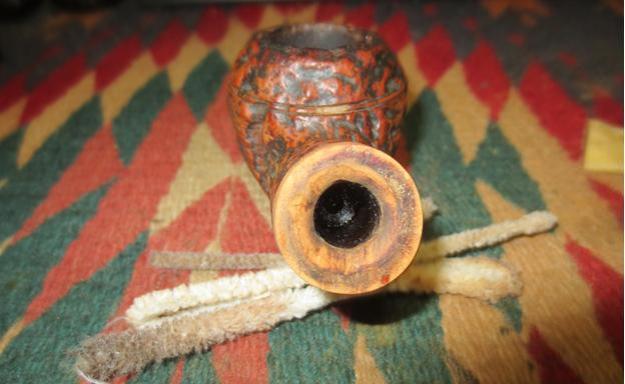
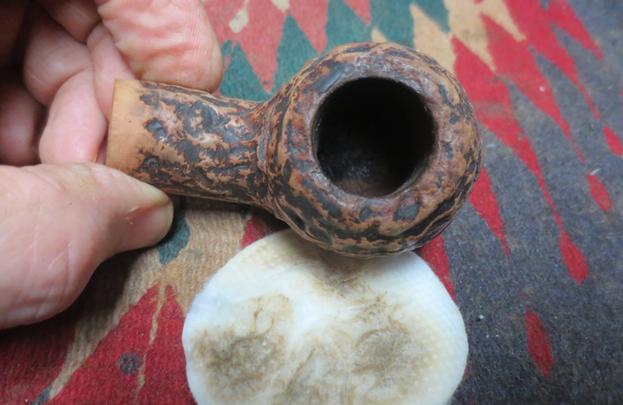
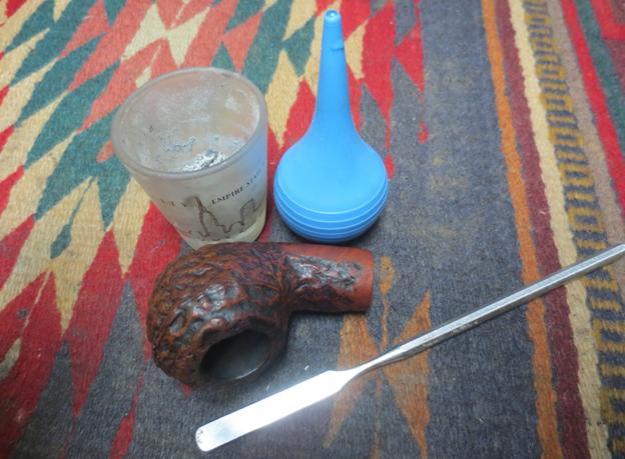
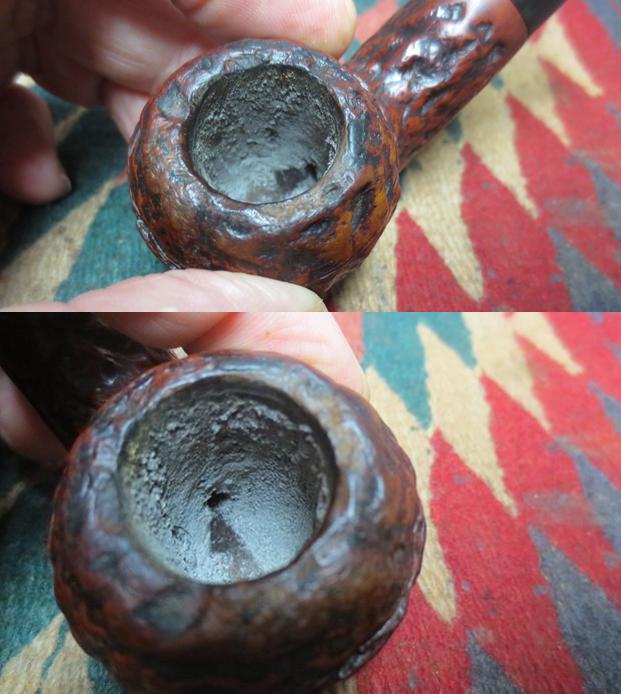
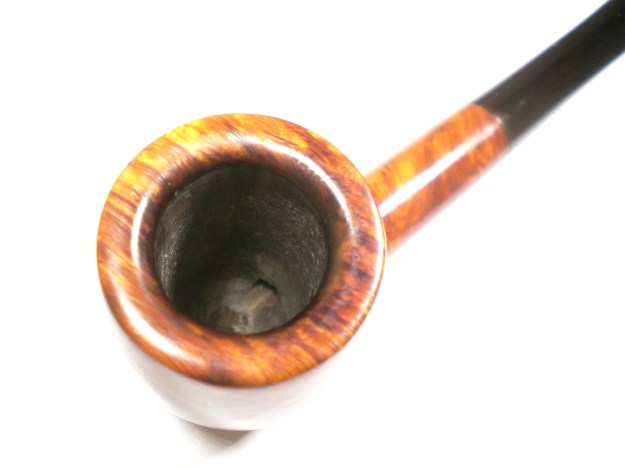
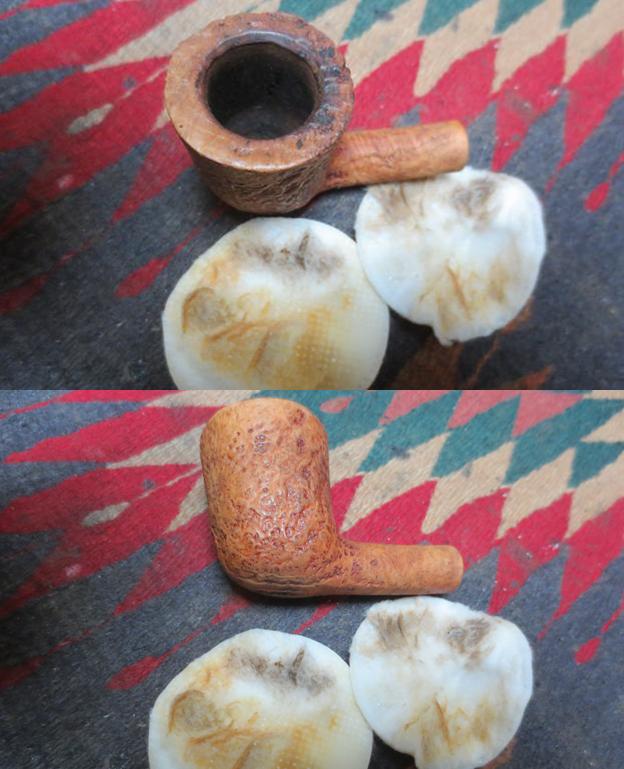
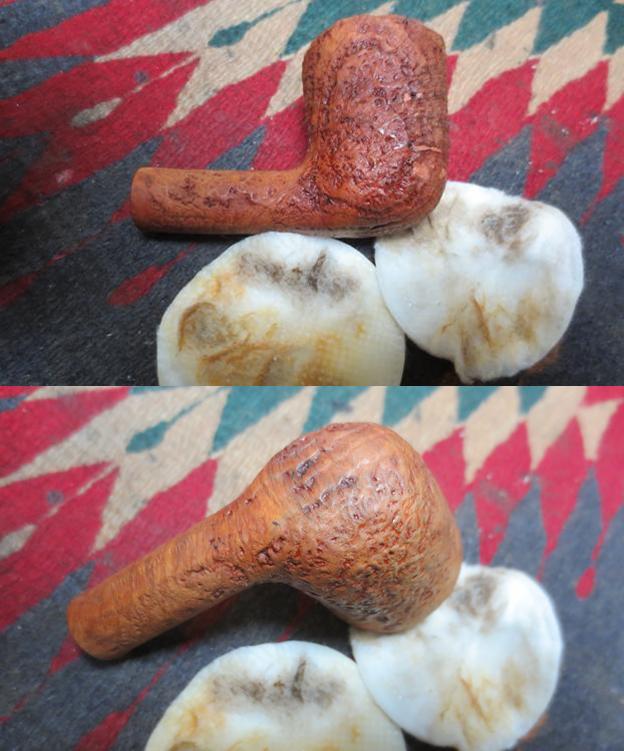
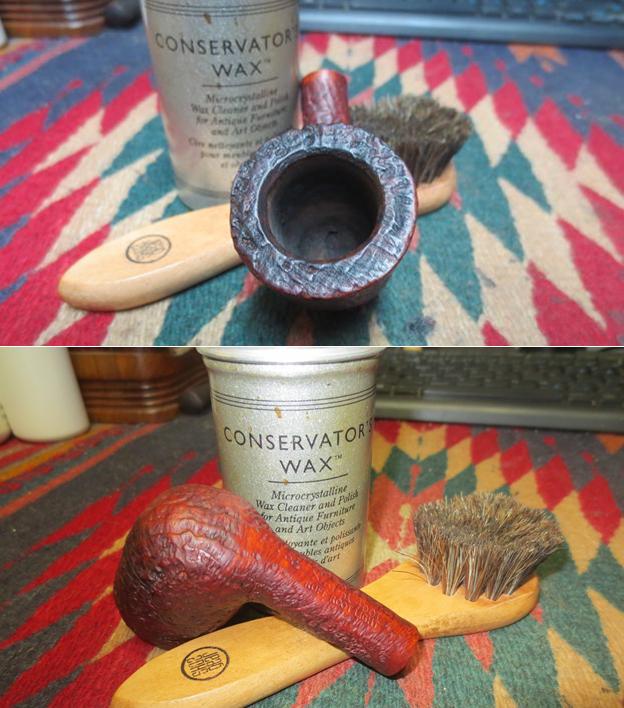
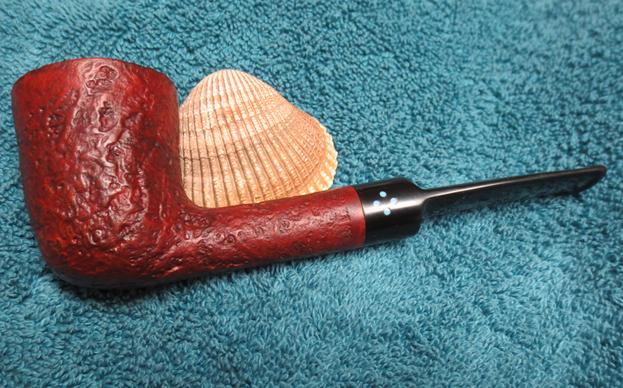
I reamed the slight cake from the bowl and found an interior in excellent condition. The bowl was soaked with sea salt and alcohol. The stem was soaked for several hours in a mild solution of Oxy-Clean, with a dab of grease on the logo.

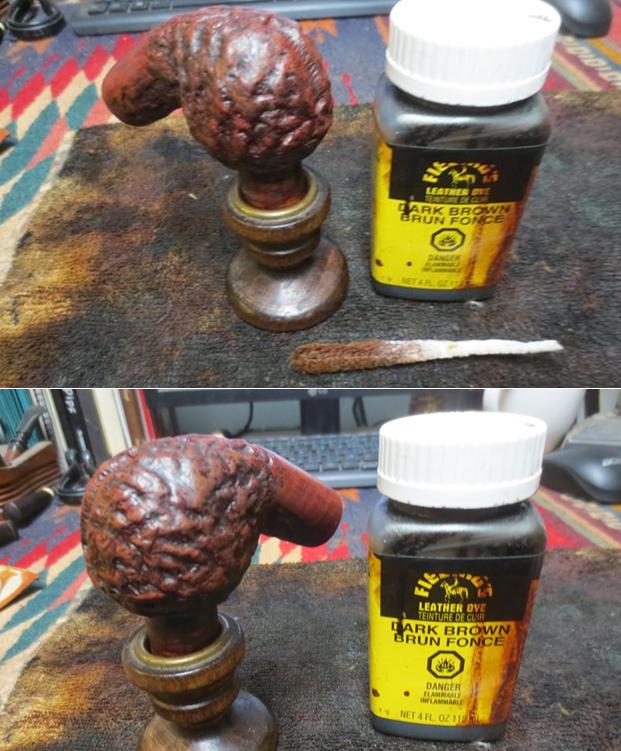
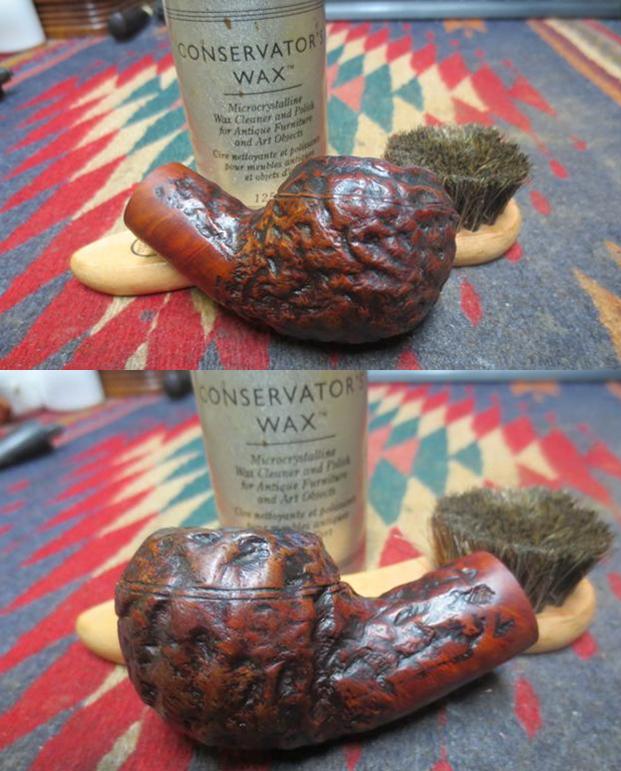
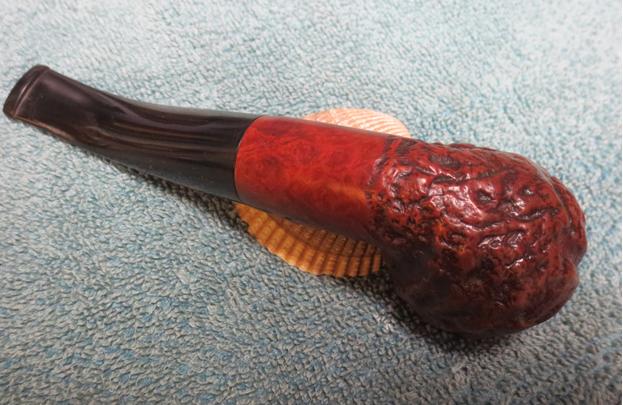
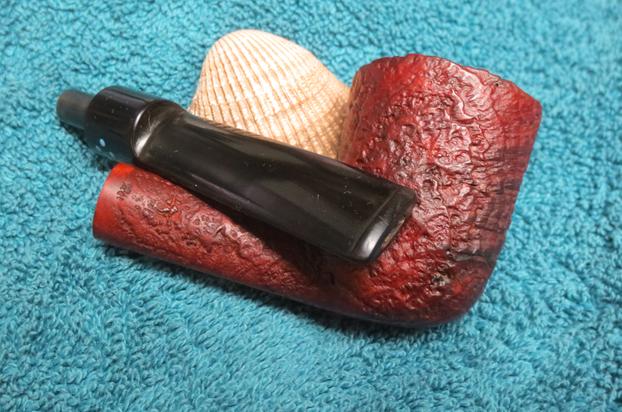
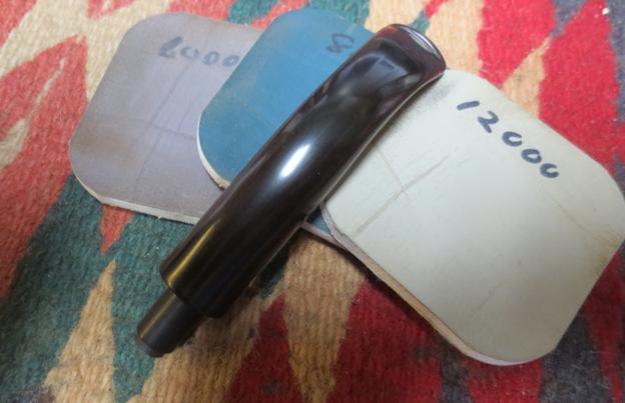
I smoothed the nicks on the bowl top with some 800 grit, then 1000 and 2000 grade wet papers. The bowl top was buffed with White diamond and several coats of Carnuba wax.

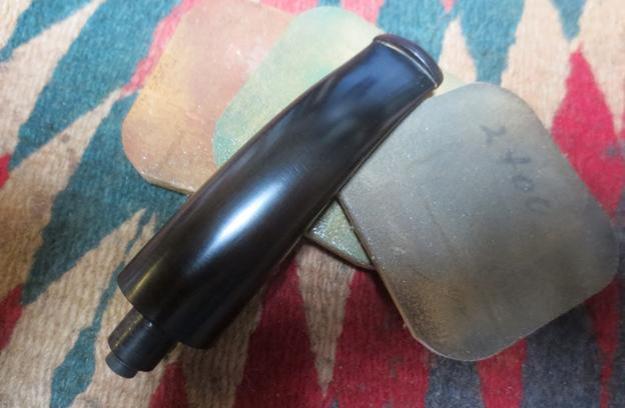
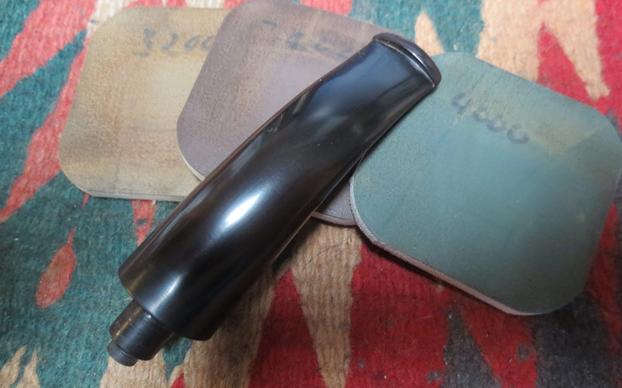
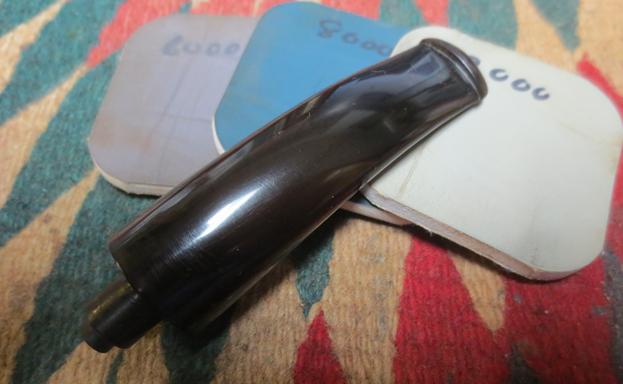
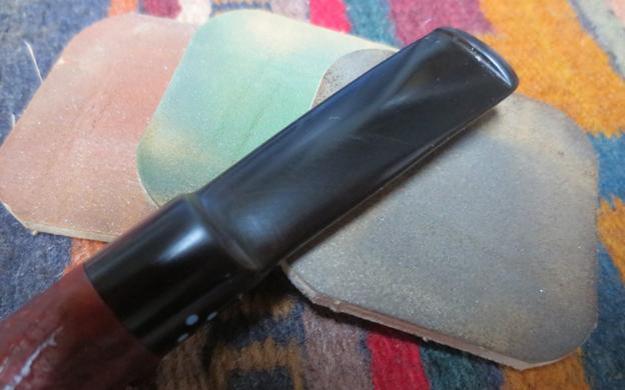
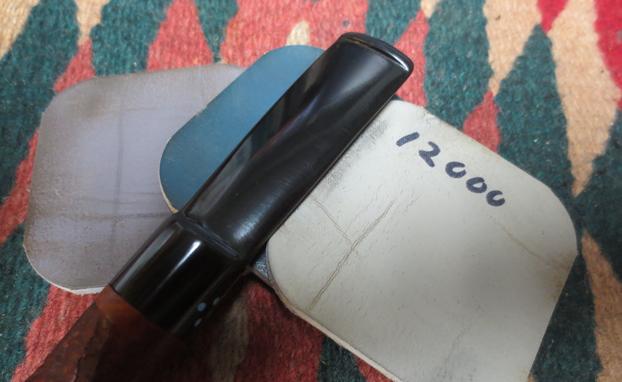
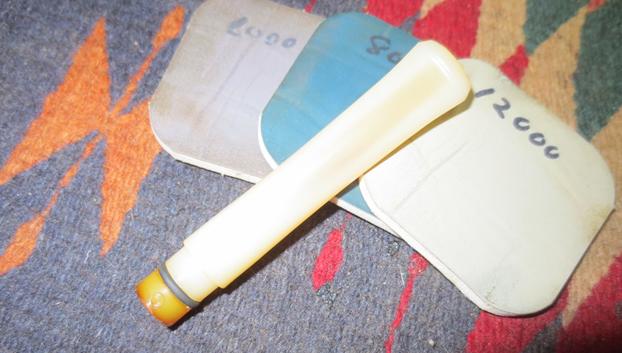
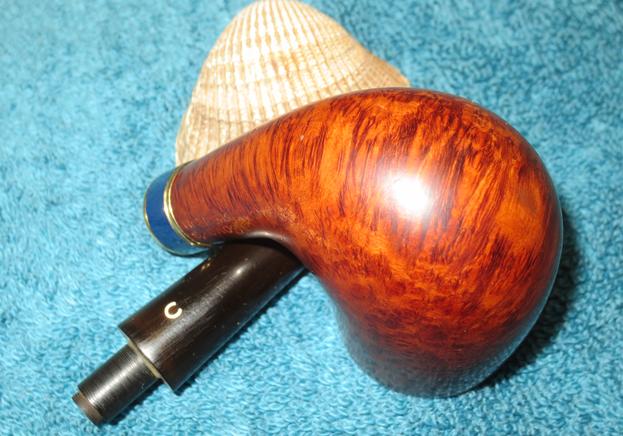
The stem was mounted and heavy layer of oxidation removed with 800 grade paper, followed by 1000 and 2000 grades. That was followed with micro-mesh sheets in 8,000 and 12,000 grades. The stem logo was brightened with a dab of white Acrylic paint. After it started to harden, I wiped it off leaving paint in the recess. It was set aside to dry overnight. The stem was then buffed with White Diamond and Meguiars Plastic polish.

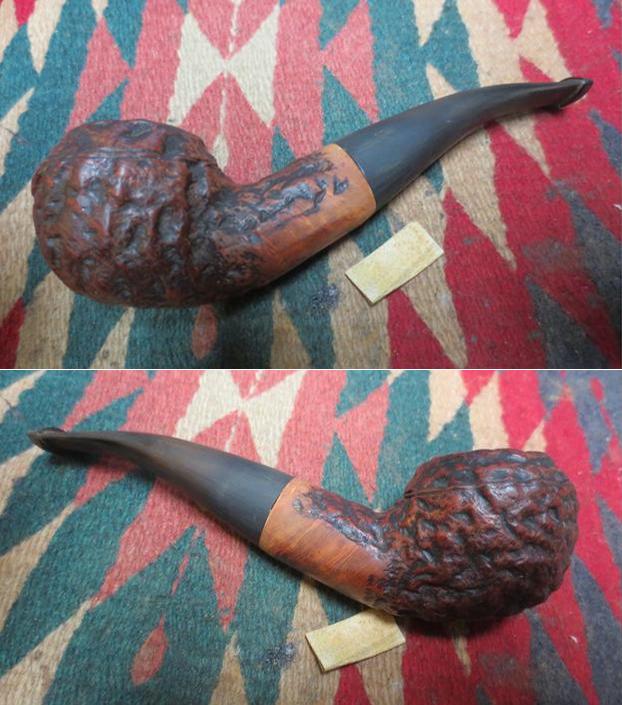
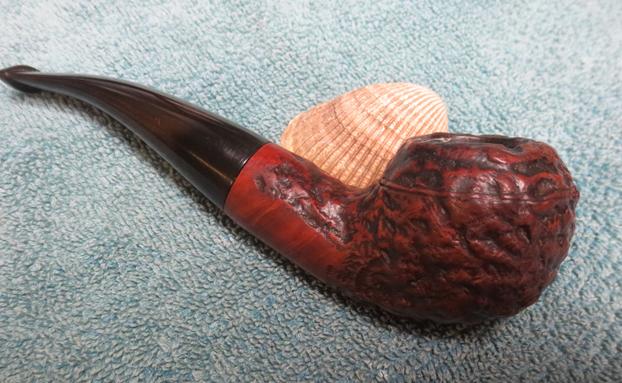
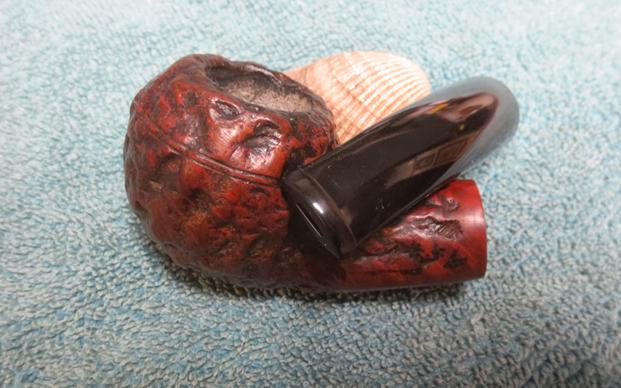
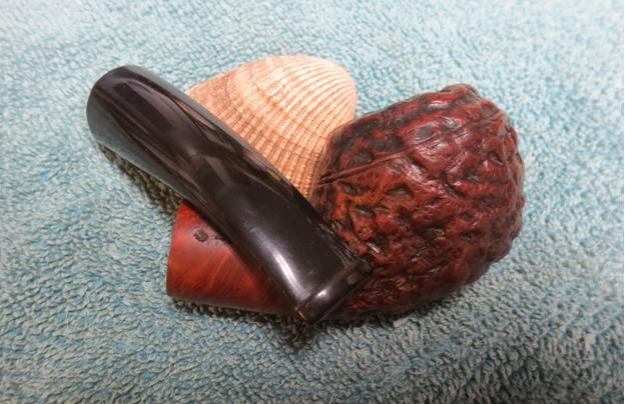
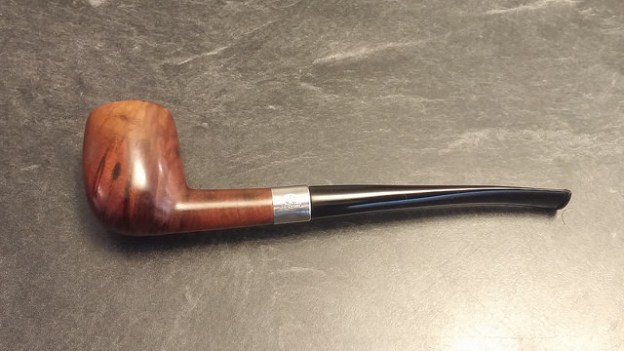
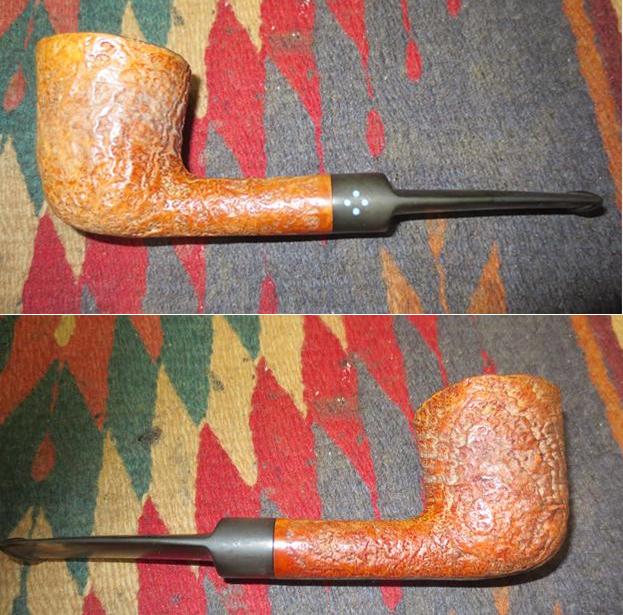
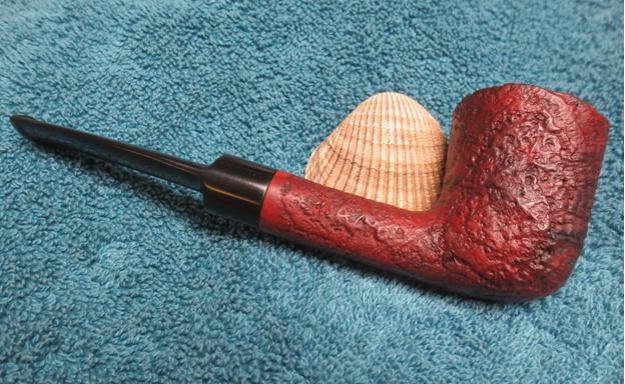
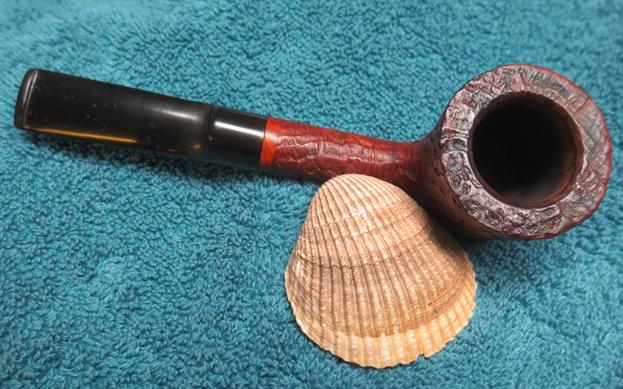
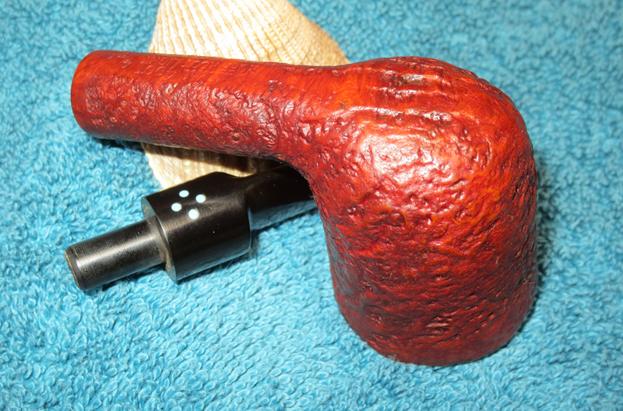
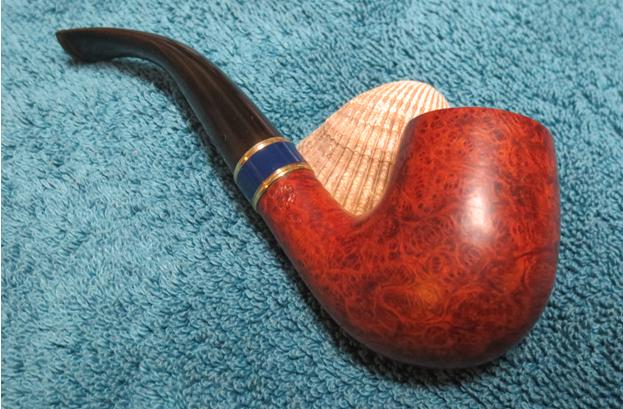
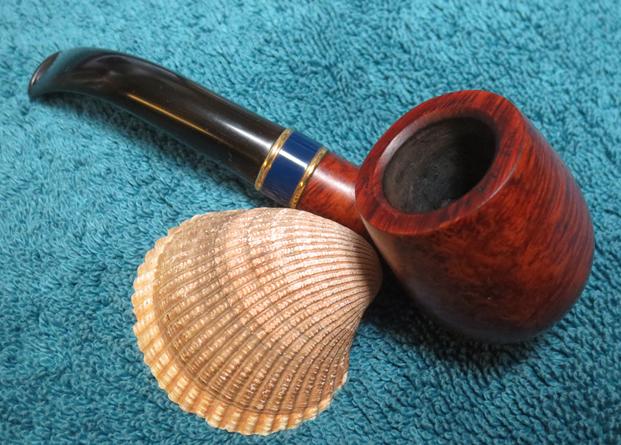
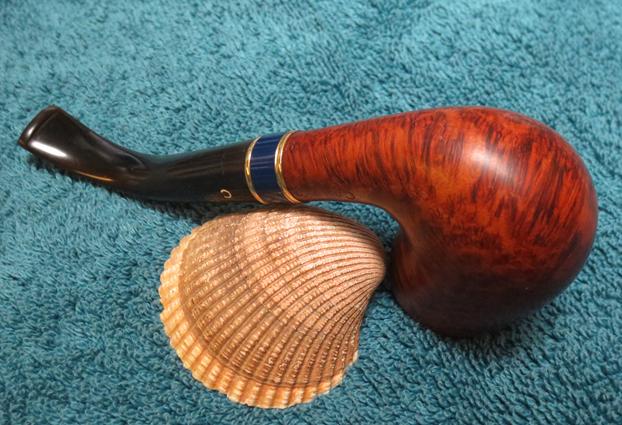
Below is the finished pipe. To my eye, the tapered stem Bent Billiard epitomizes the British briar pipe. I reluctantly packed up the pipe. It was sold and is now heading to a new owner on the Greek island of Corfu.

sashar_959r_finish-1

sashar_959r_finish-3

sashar_959r_finish-2

sashar_959r_finish-4

sashar_959r_finish-5

sashar_959r_finish-6

sashar_959r_finish-7

?