Tag Archives: topping a bowl

An Old Manhattan Billiard with a Bakelite Stem


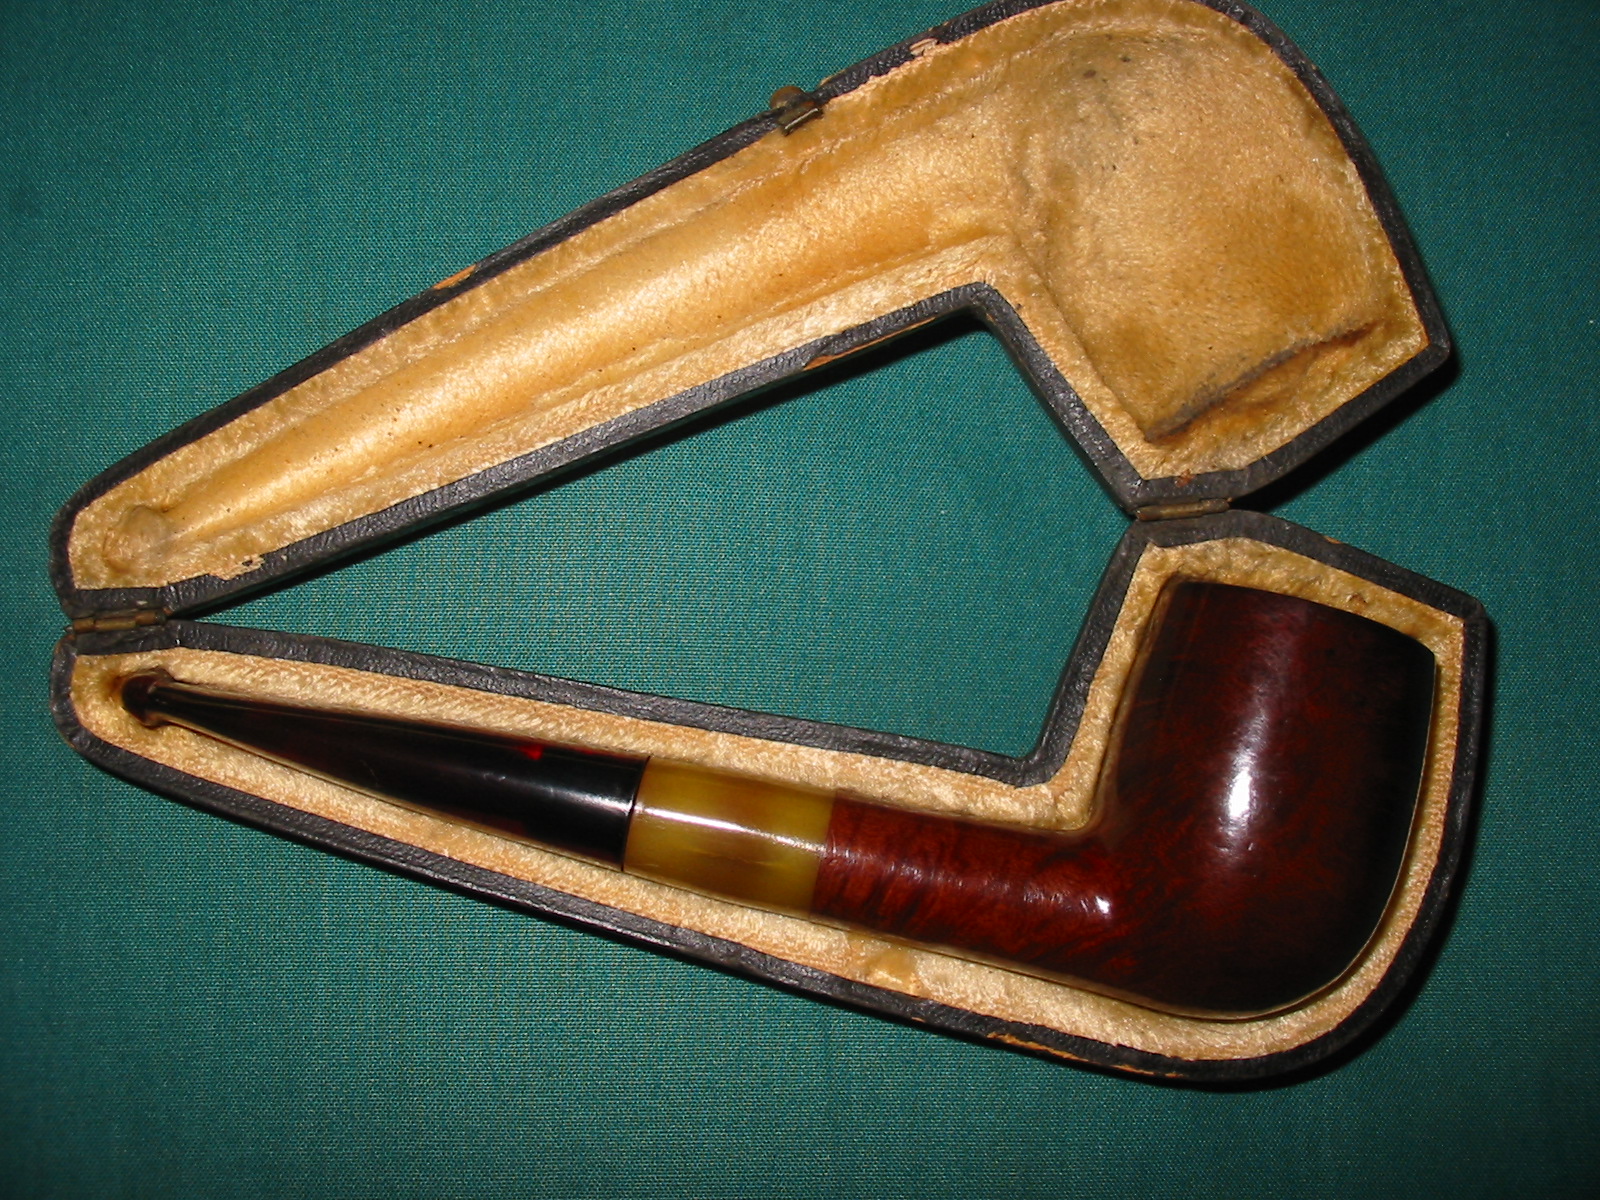
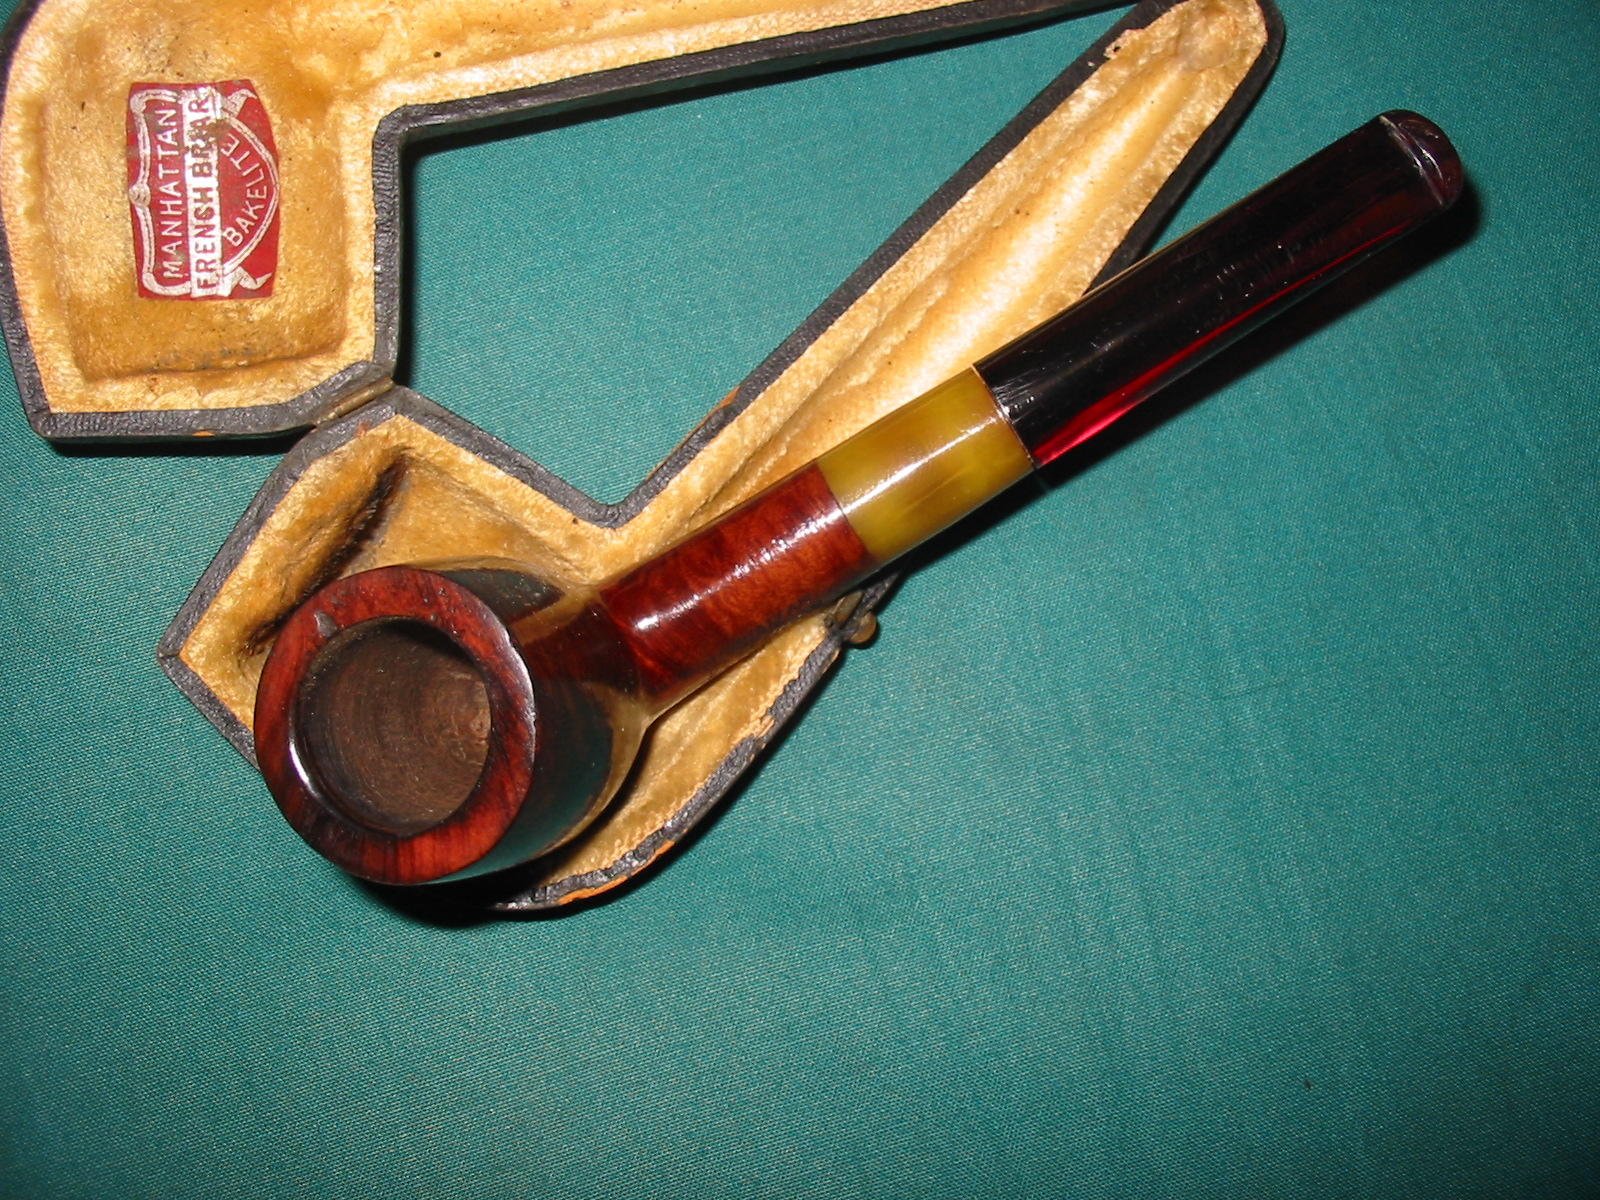
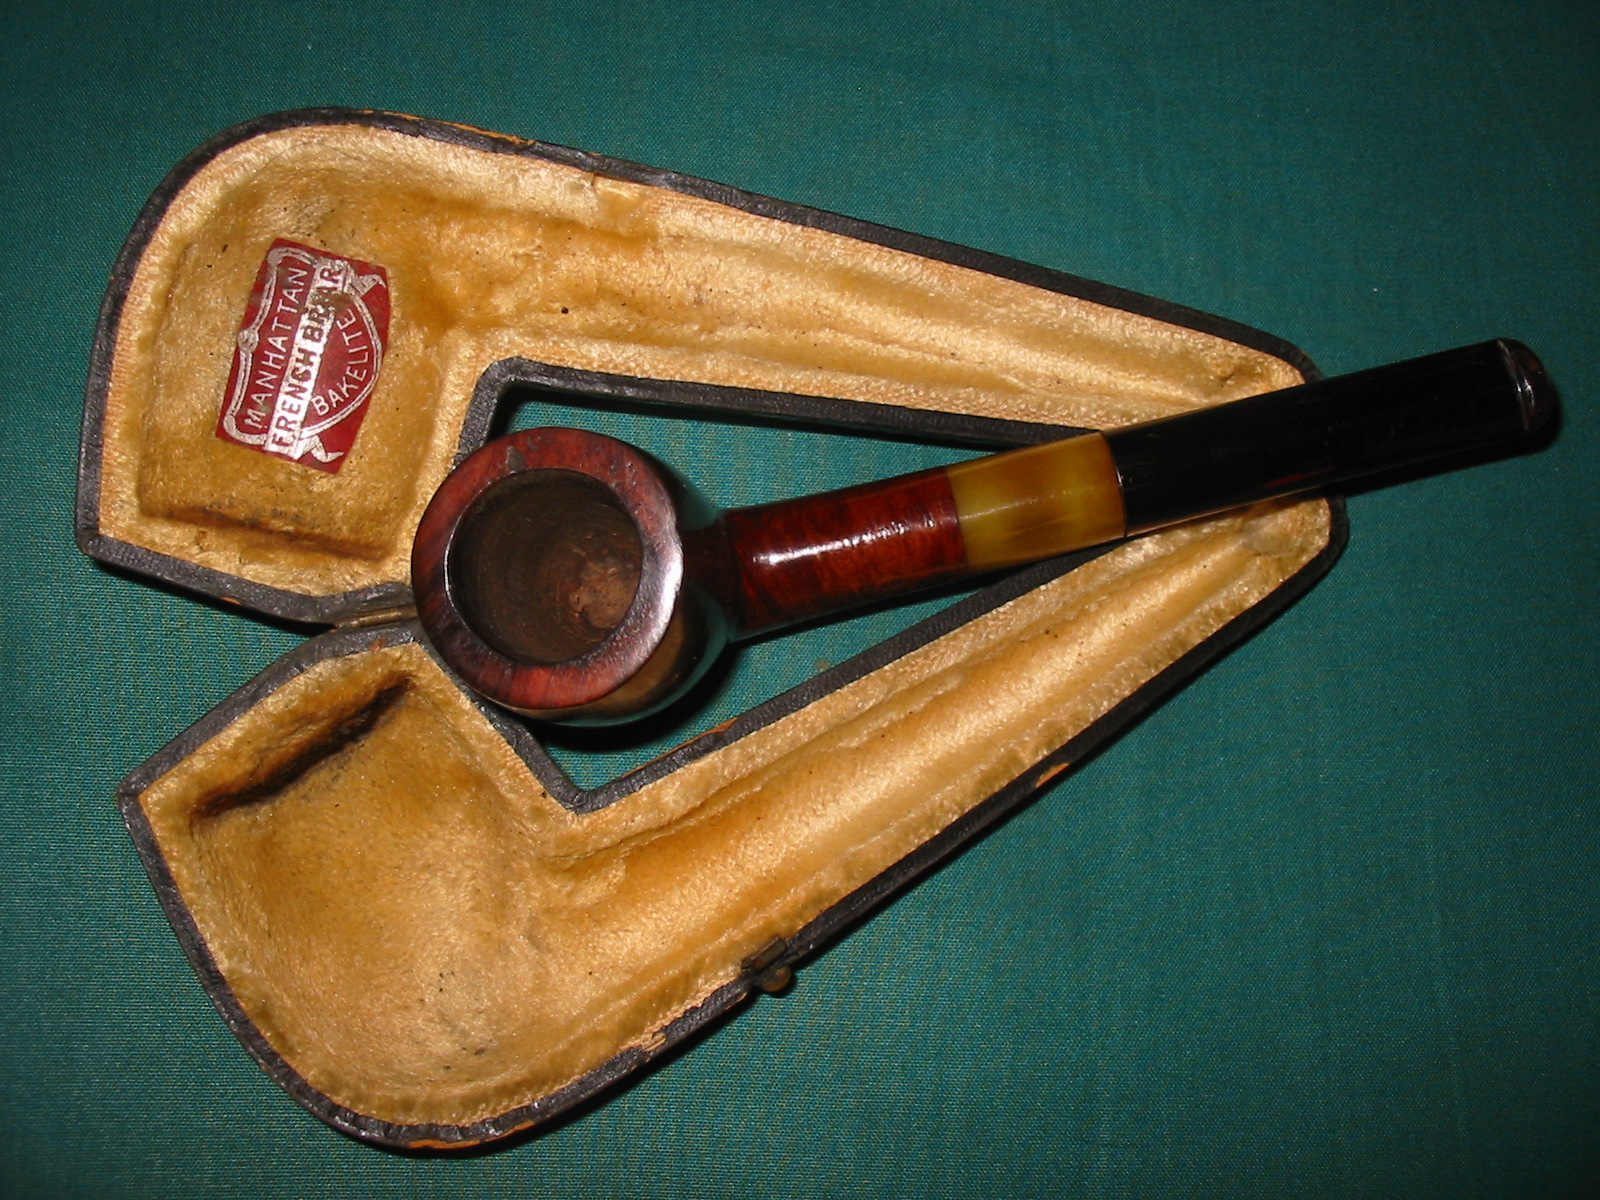
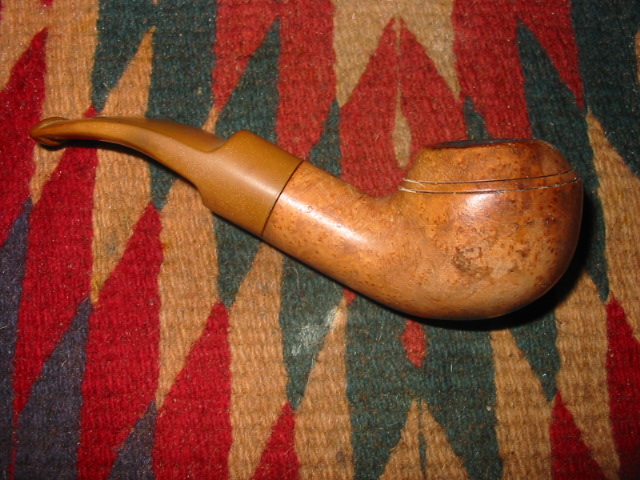
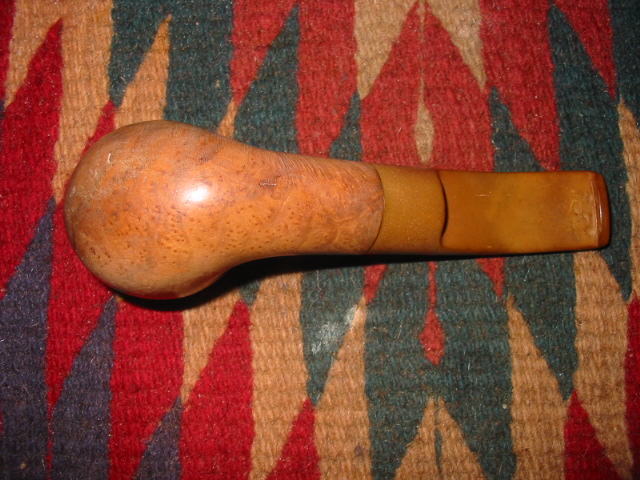
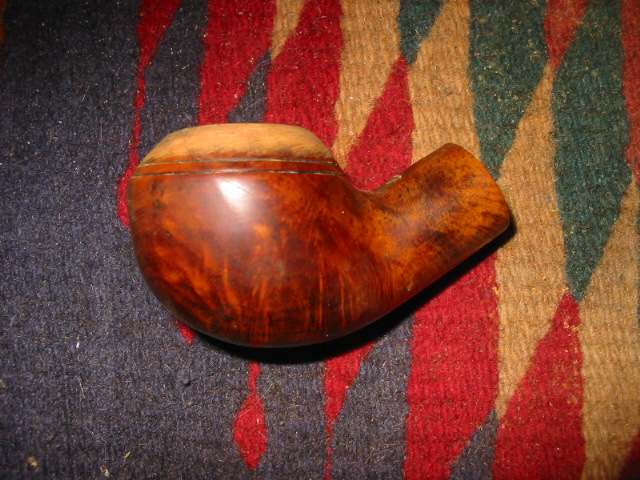
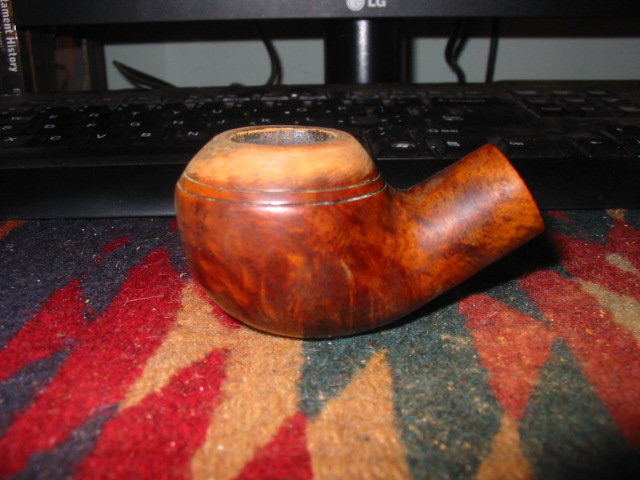
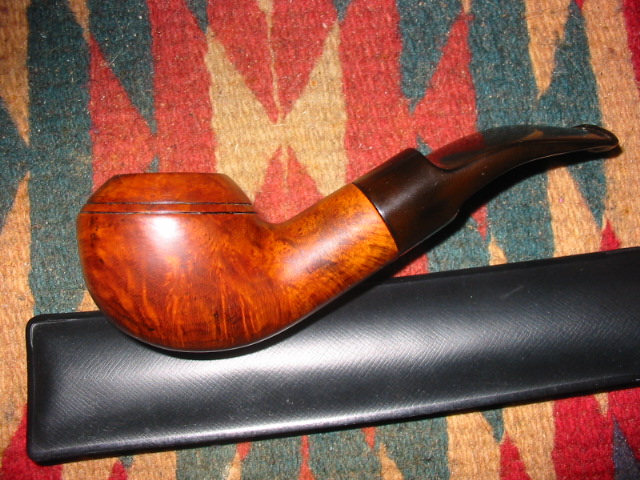
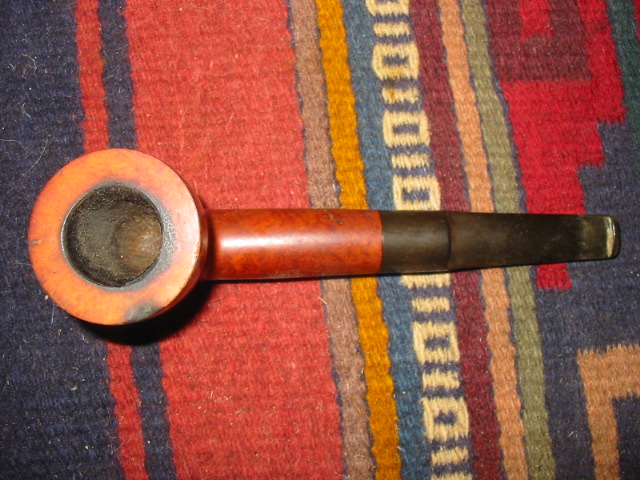
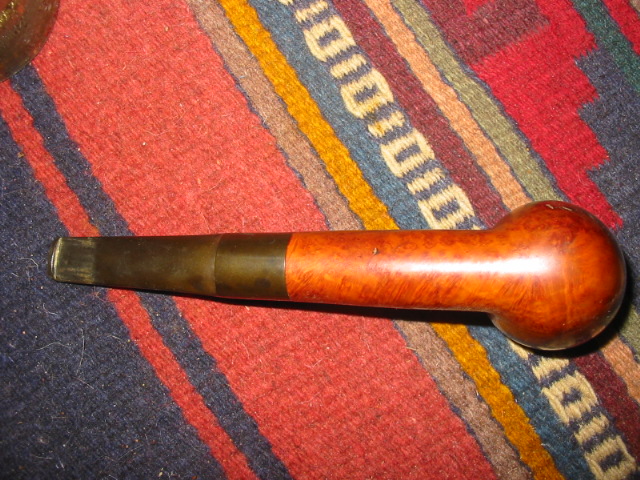
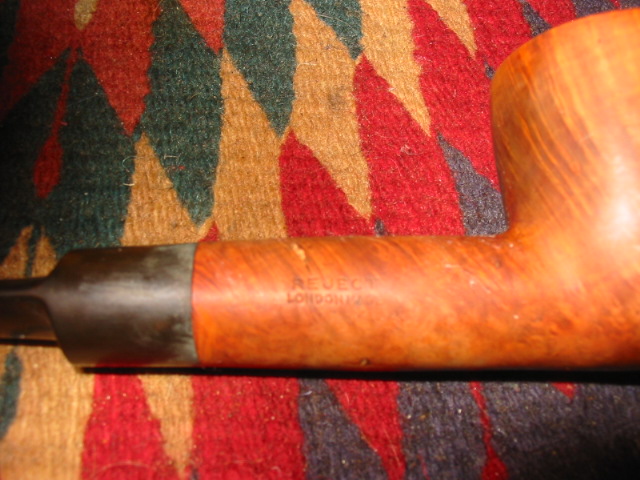
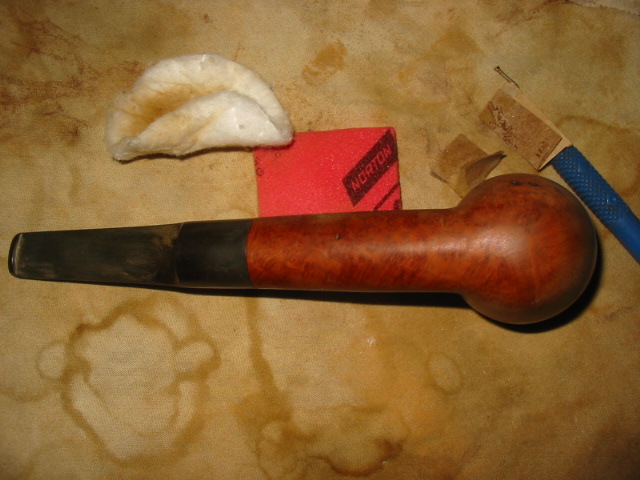
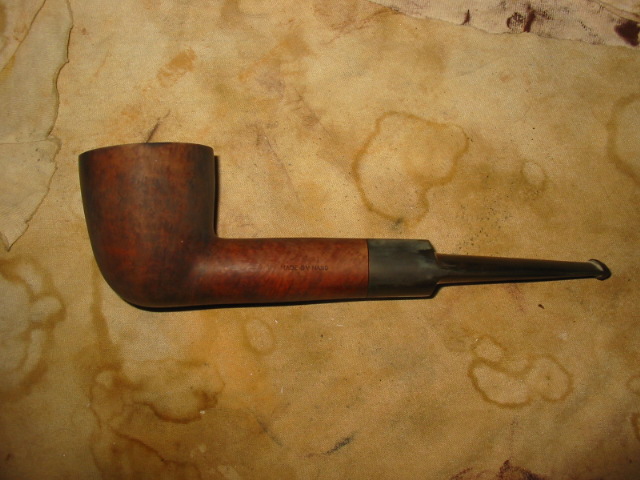
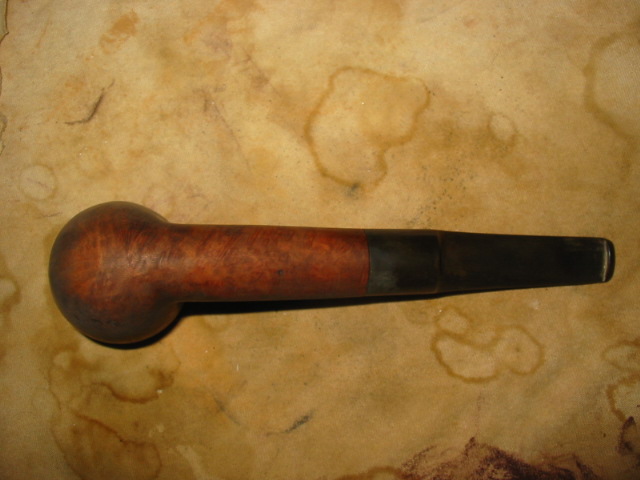
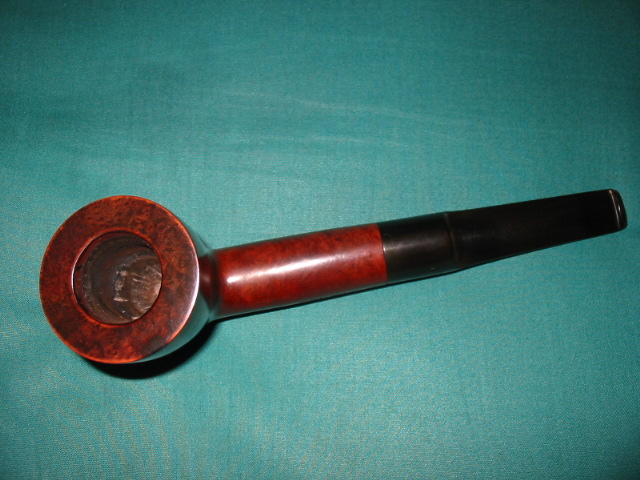
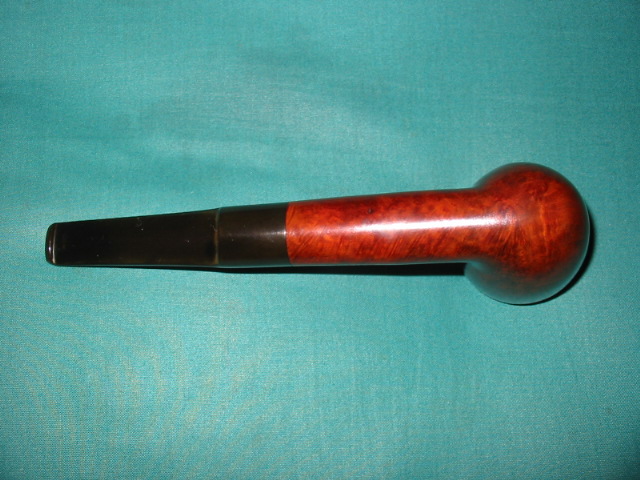
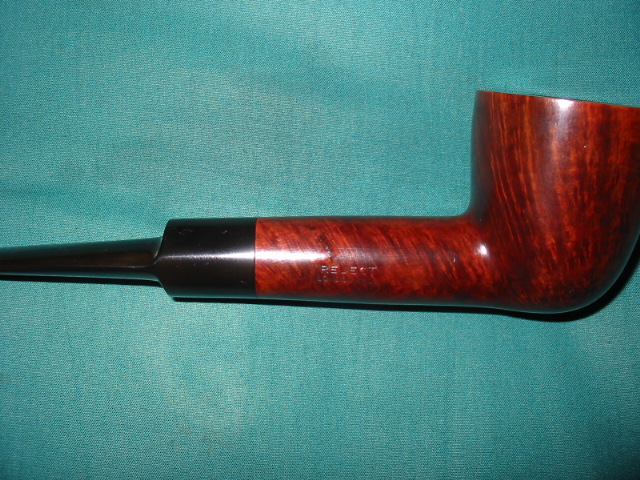
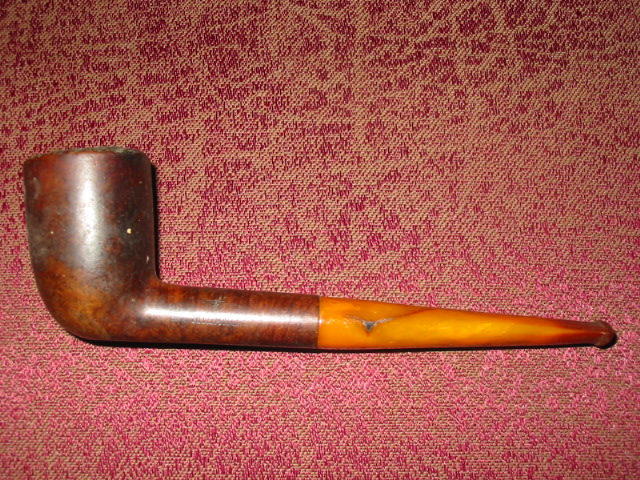
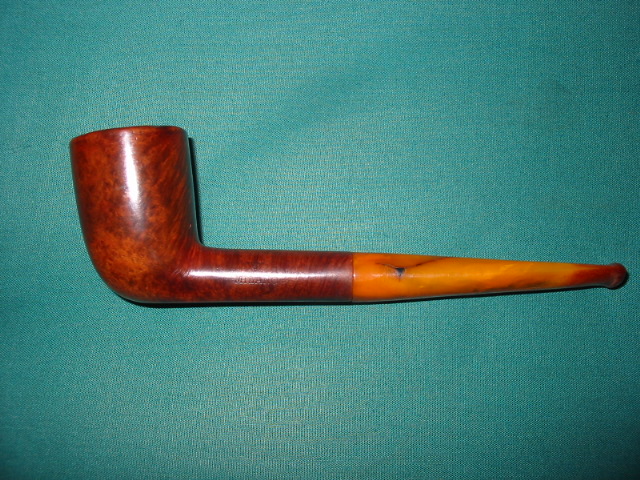
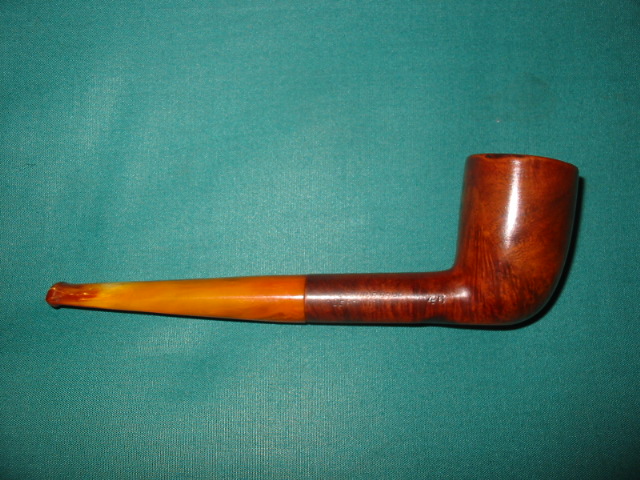
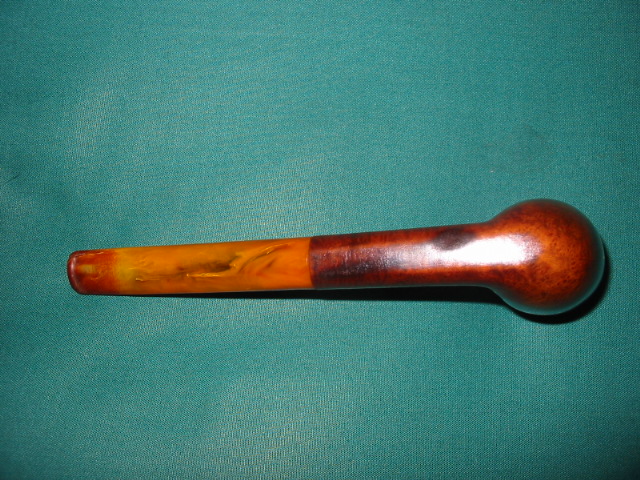
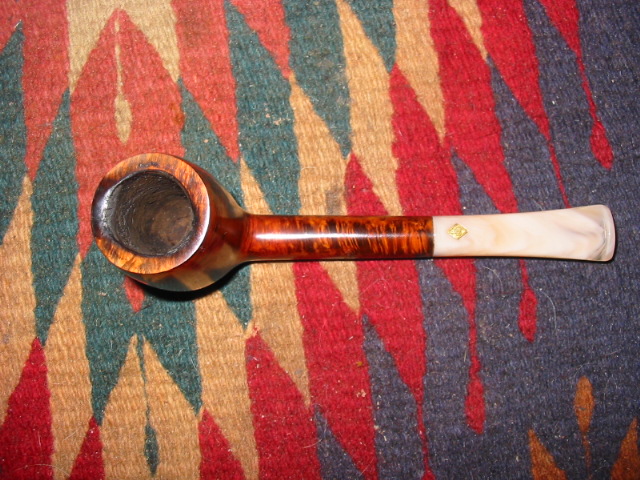
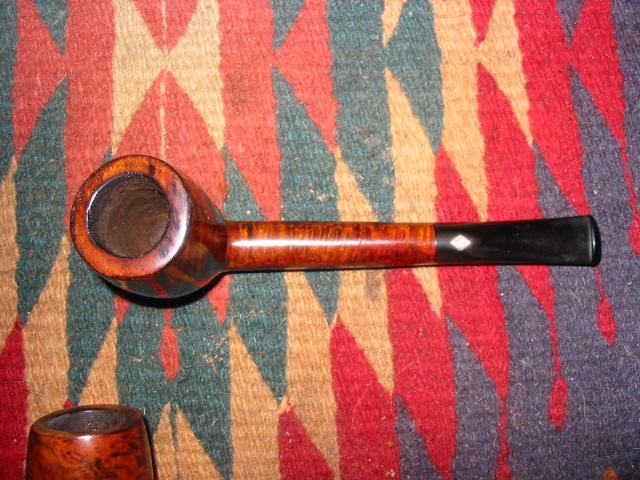
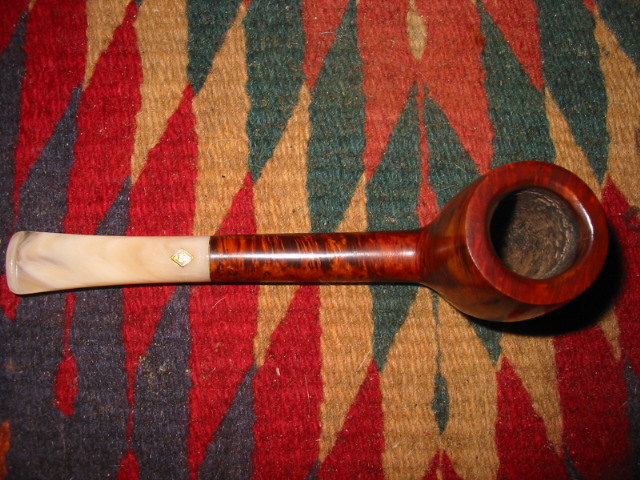
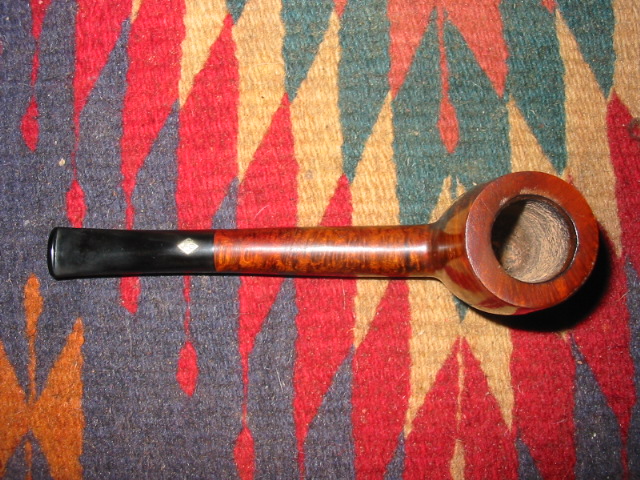
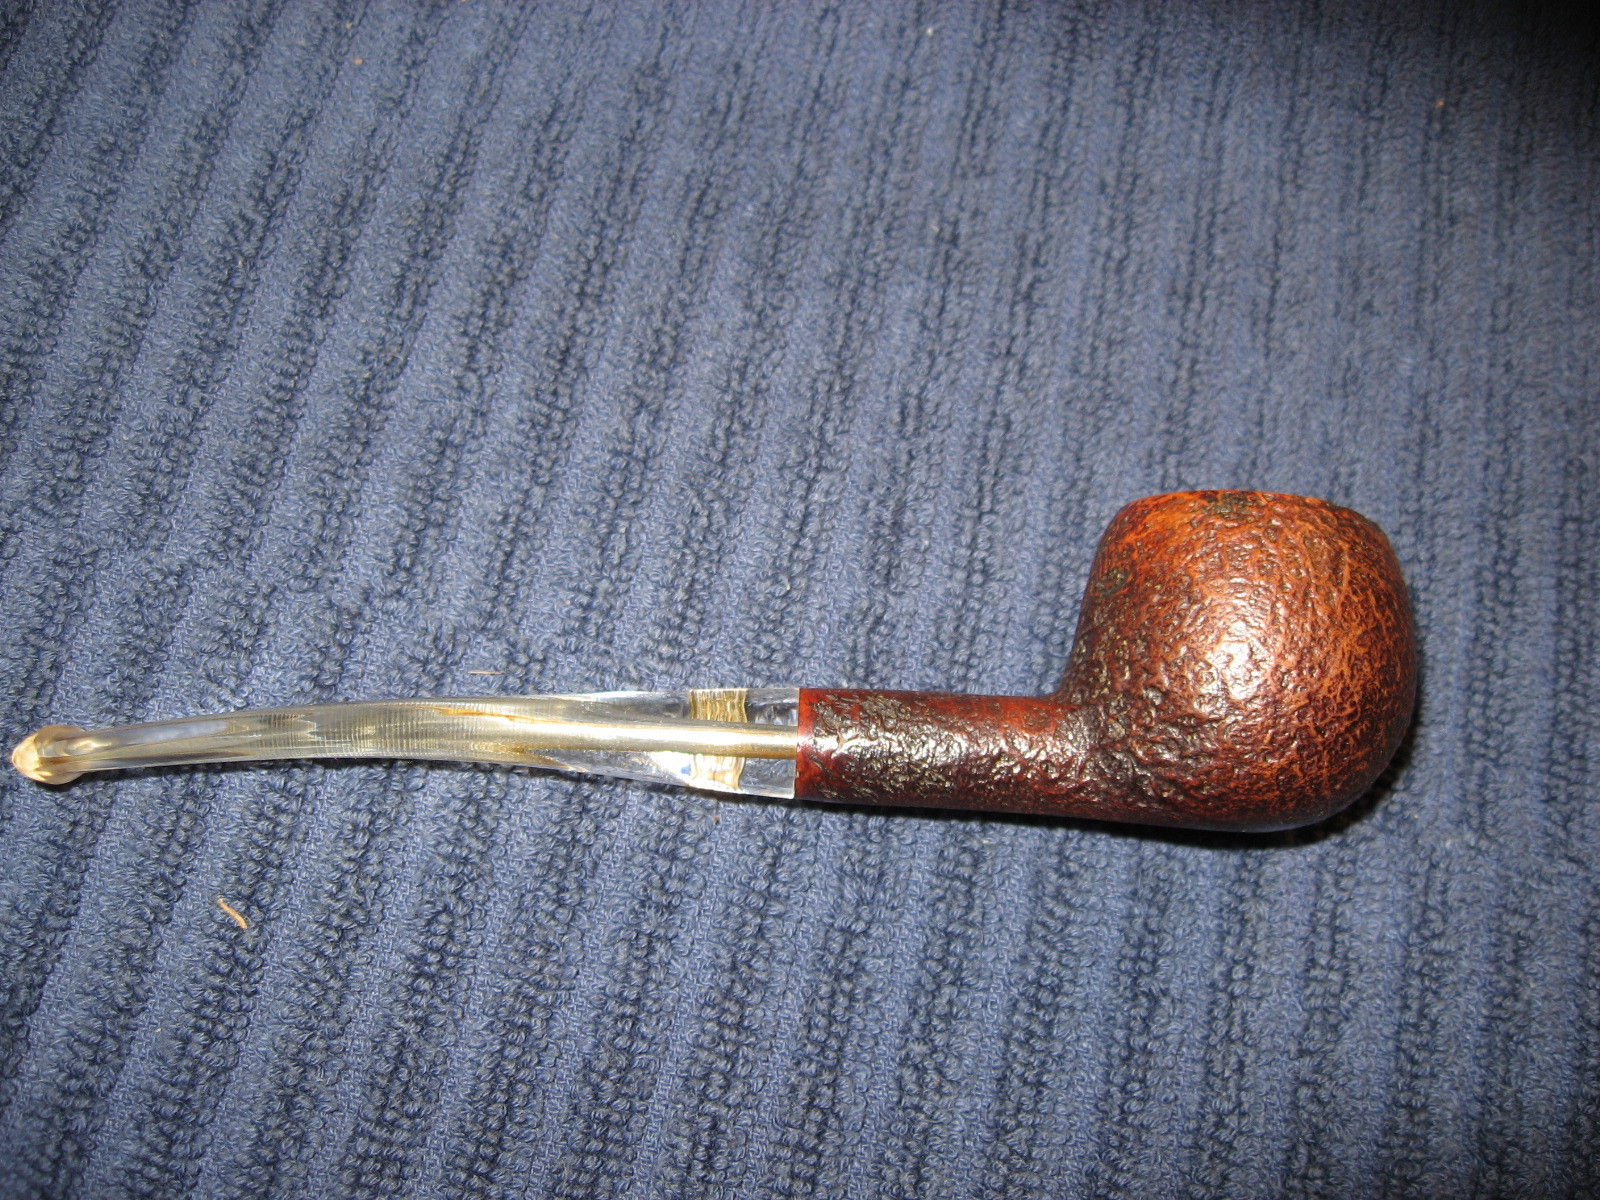
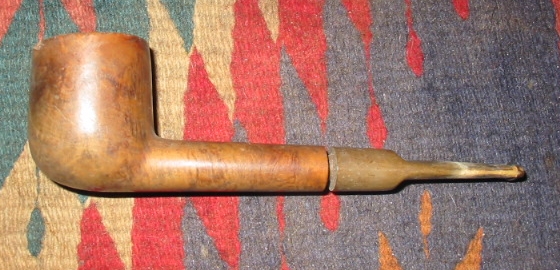
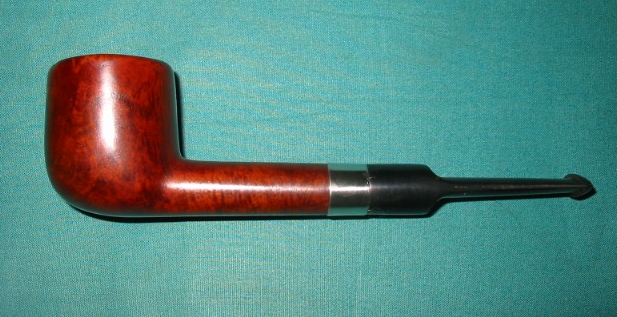
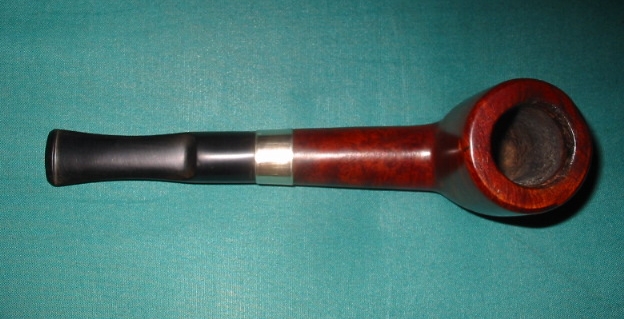
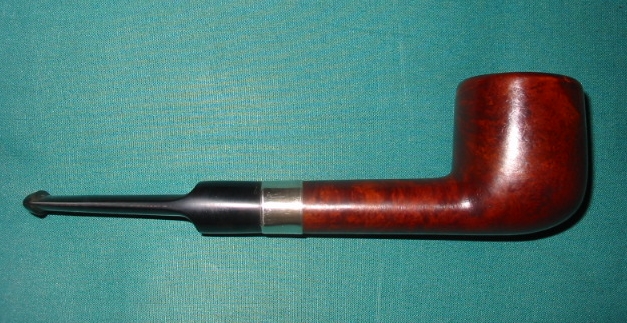
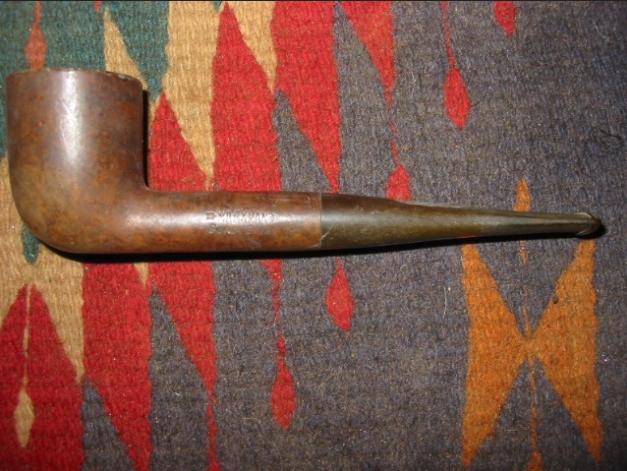
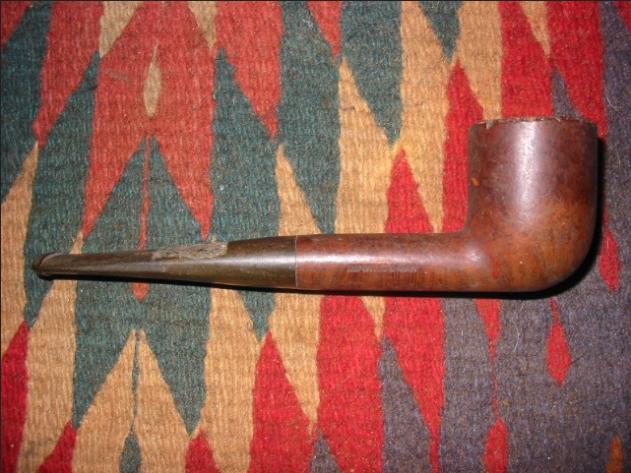
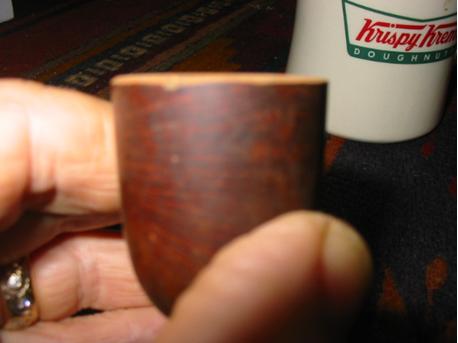
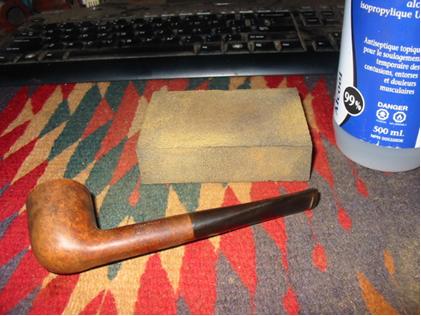
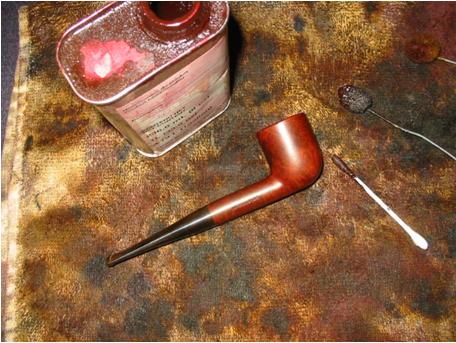
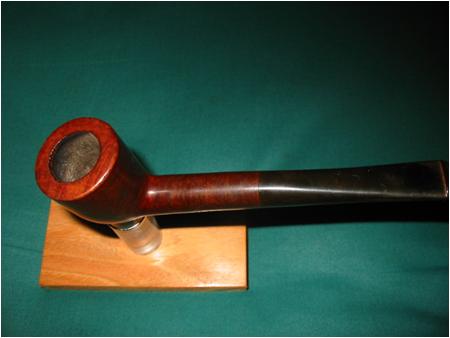
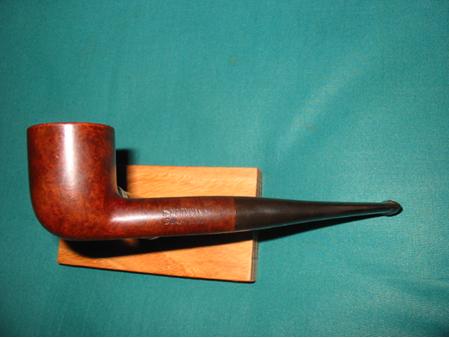
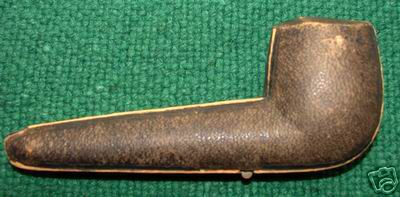
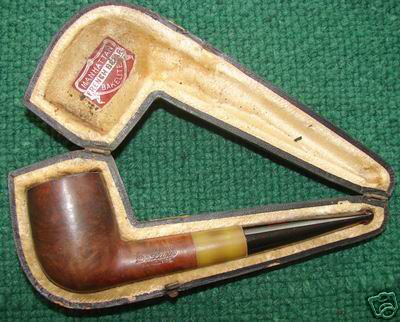
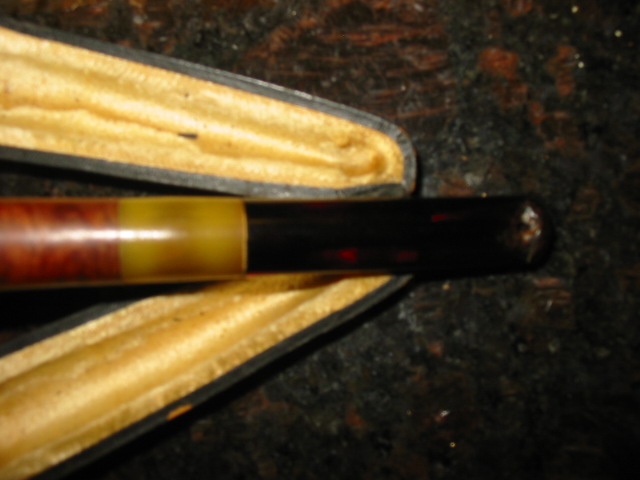
I picked up this old timer a while ago now and did a quick clean on it and put it away. Today I decided to take it out and finish it. The first tree pictures below are photos that were with the EBay auction. I liked the look of the pipe in those photos and decided to bid on it. From the EBay photos it appeared to be in pretty good shape. It appeared to be dirty and in need of a good cleaning. The stem was red Bakelite and the shank extension appeared to be yellow Bakelite. The rim looked dirty and tarred but pretty sound.

ImageImageImage

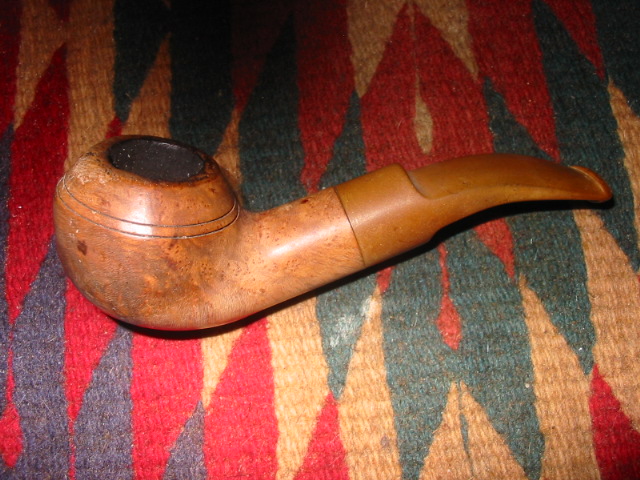
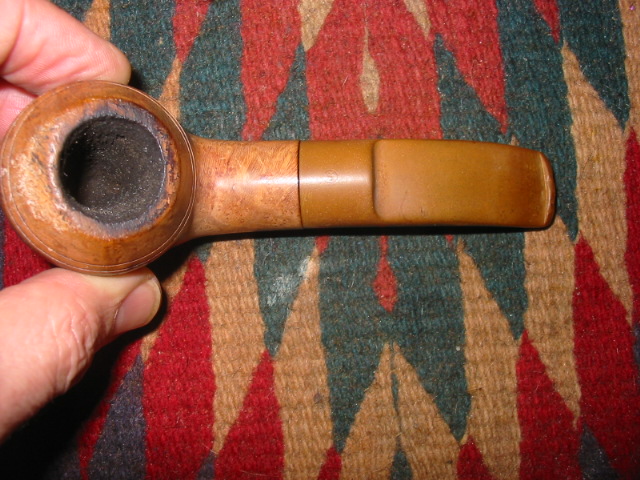
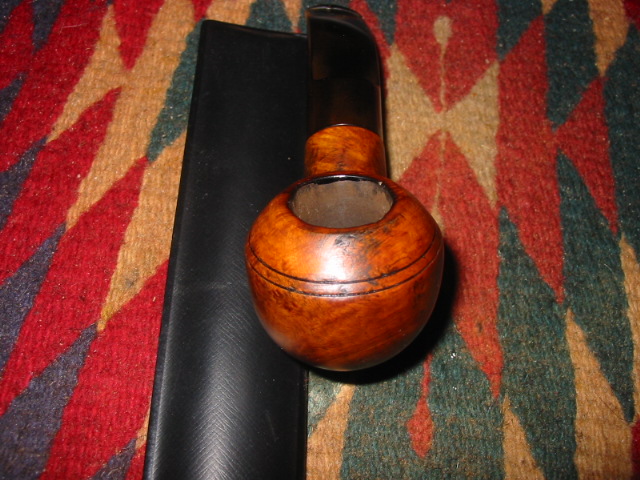
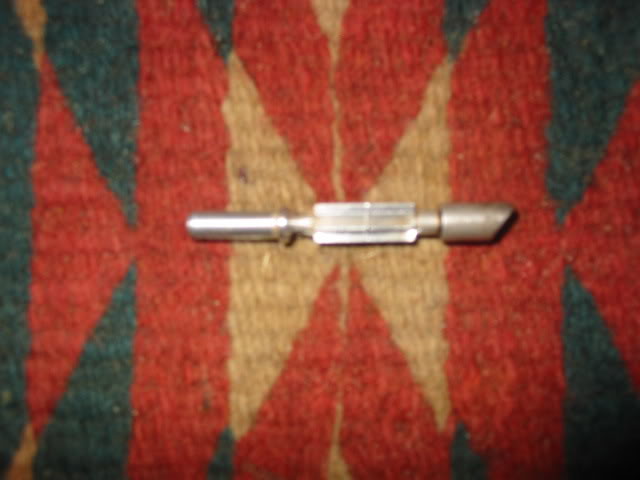
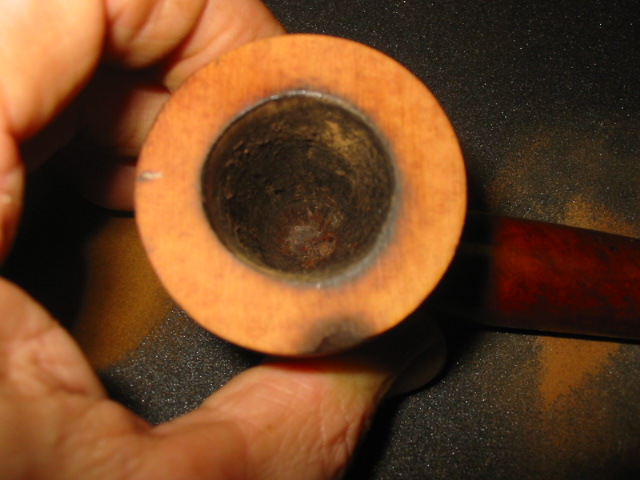
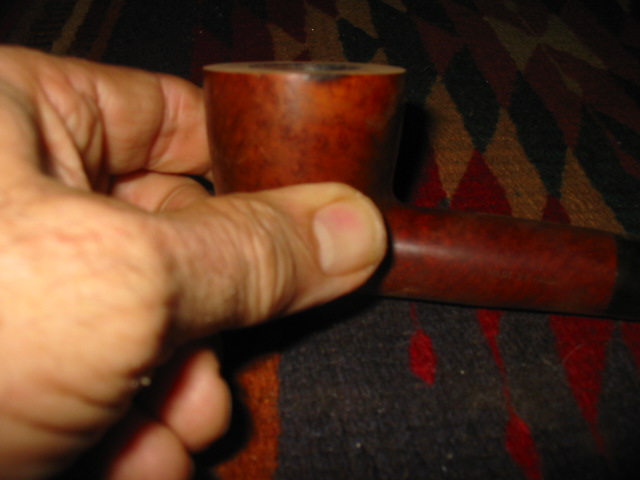
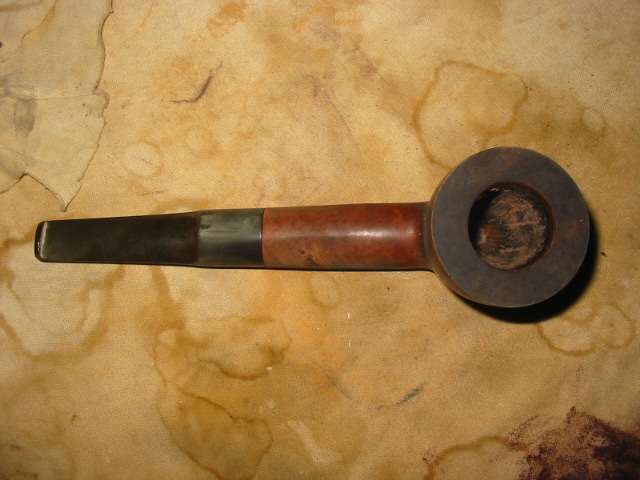
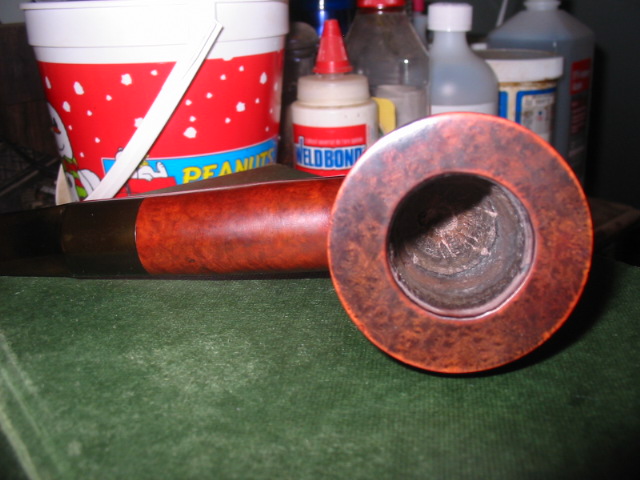
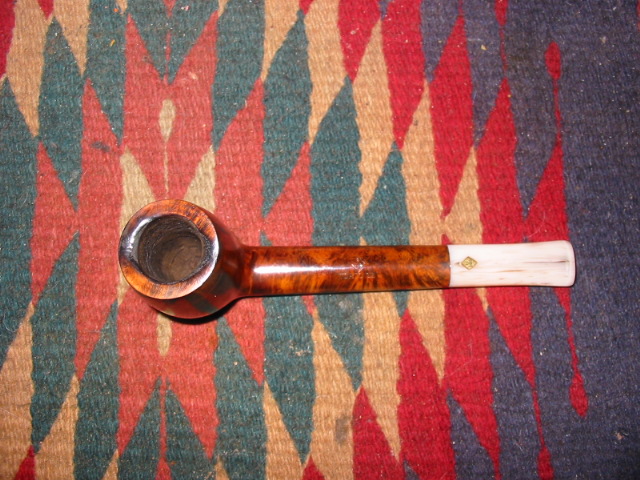
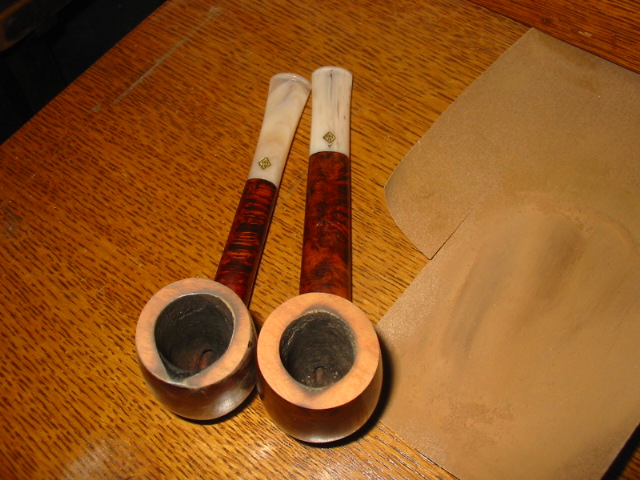
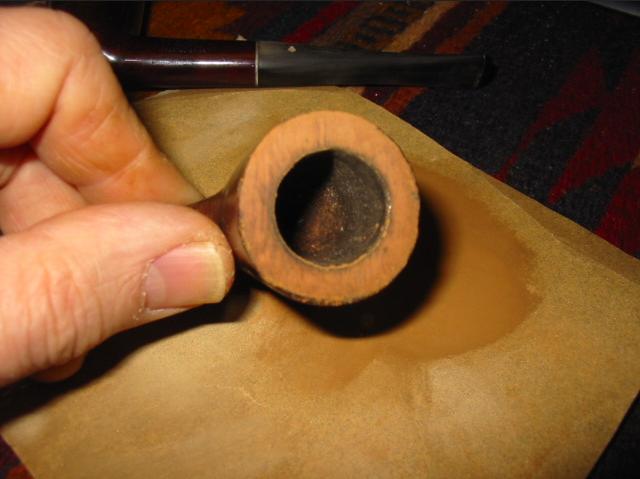
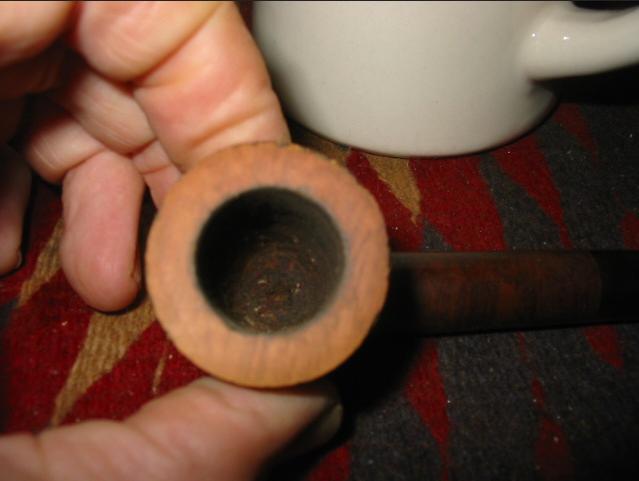
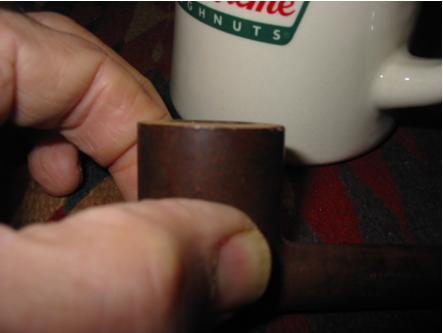
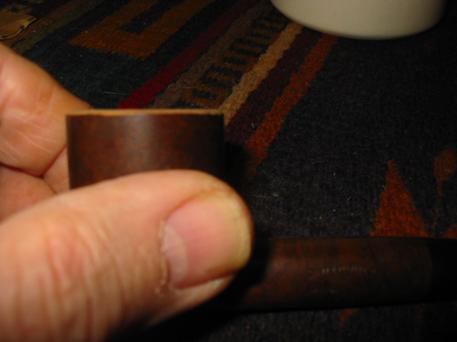
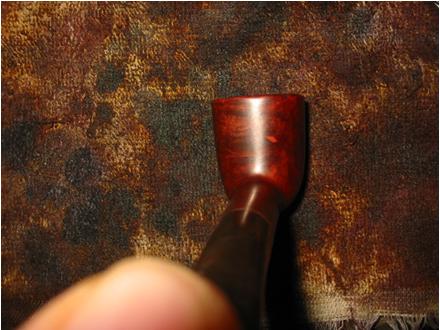
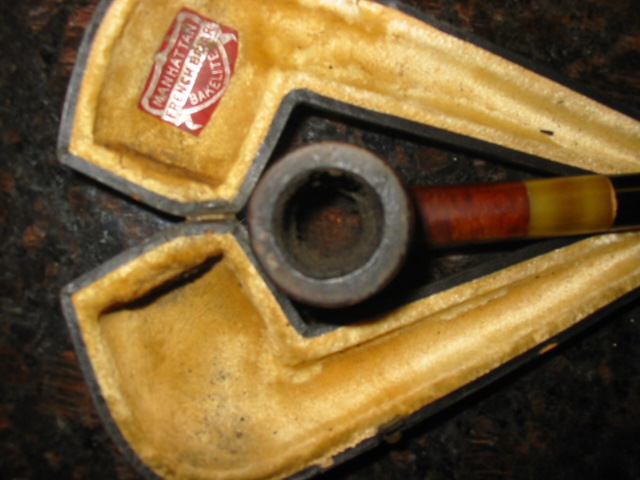
When it arrived it was in worse shape than the pictures showed. The rim was rough around the outer edge. The inner edge was also rough and out of round. The bowl was caked with a broken and chipped cake. The stem was over turned and had some significant bite marks in it on the top surface near the button. On the underside of the stem there was what appeared to be a repair to a bit through. It looked like an epoxy patch. The fill on the patch was overdone and the edge of the button was virtually gone. The top side bite marks were deeper than I expected and would need some work to raise them.

ImageImageImageImage

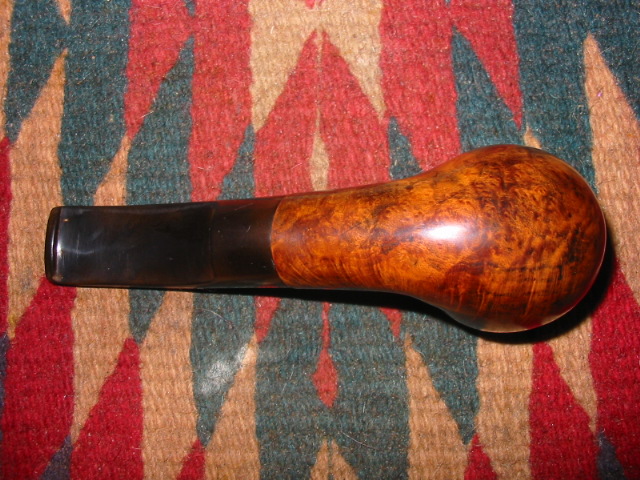
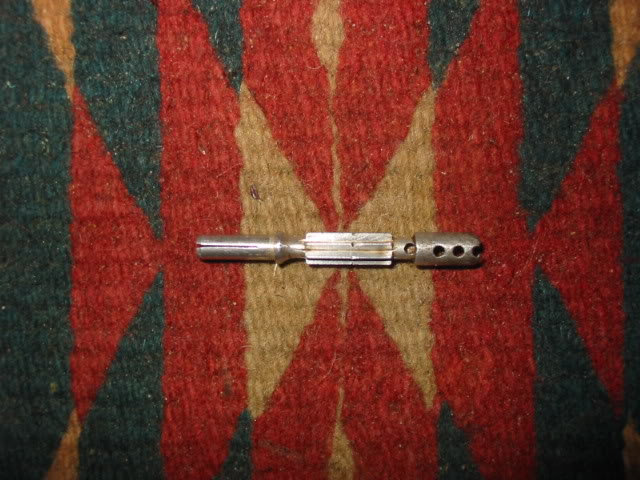
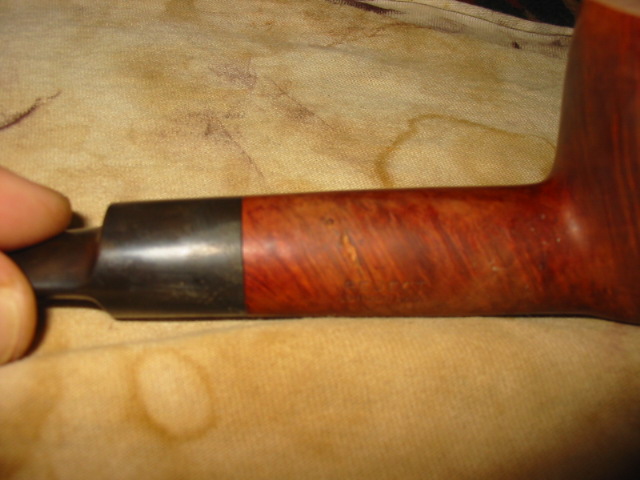
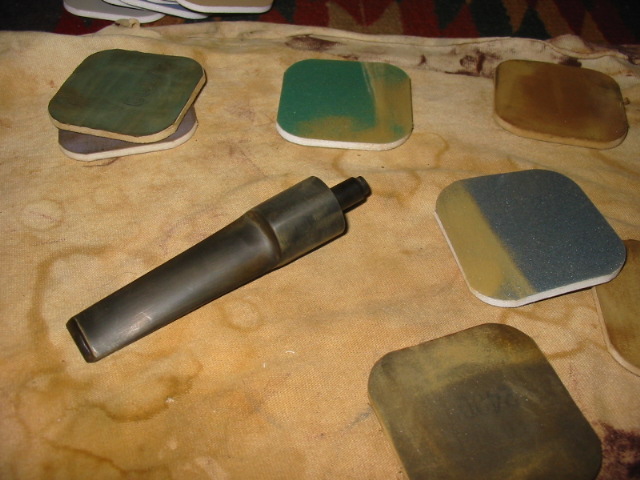
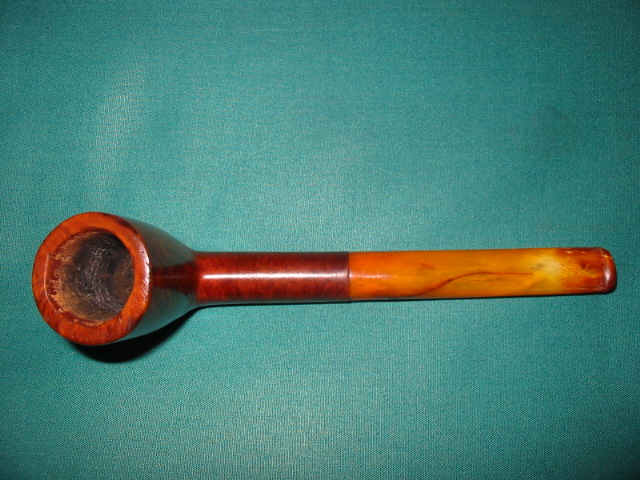
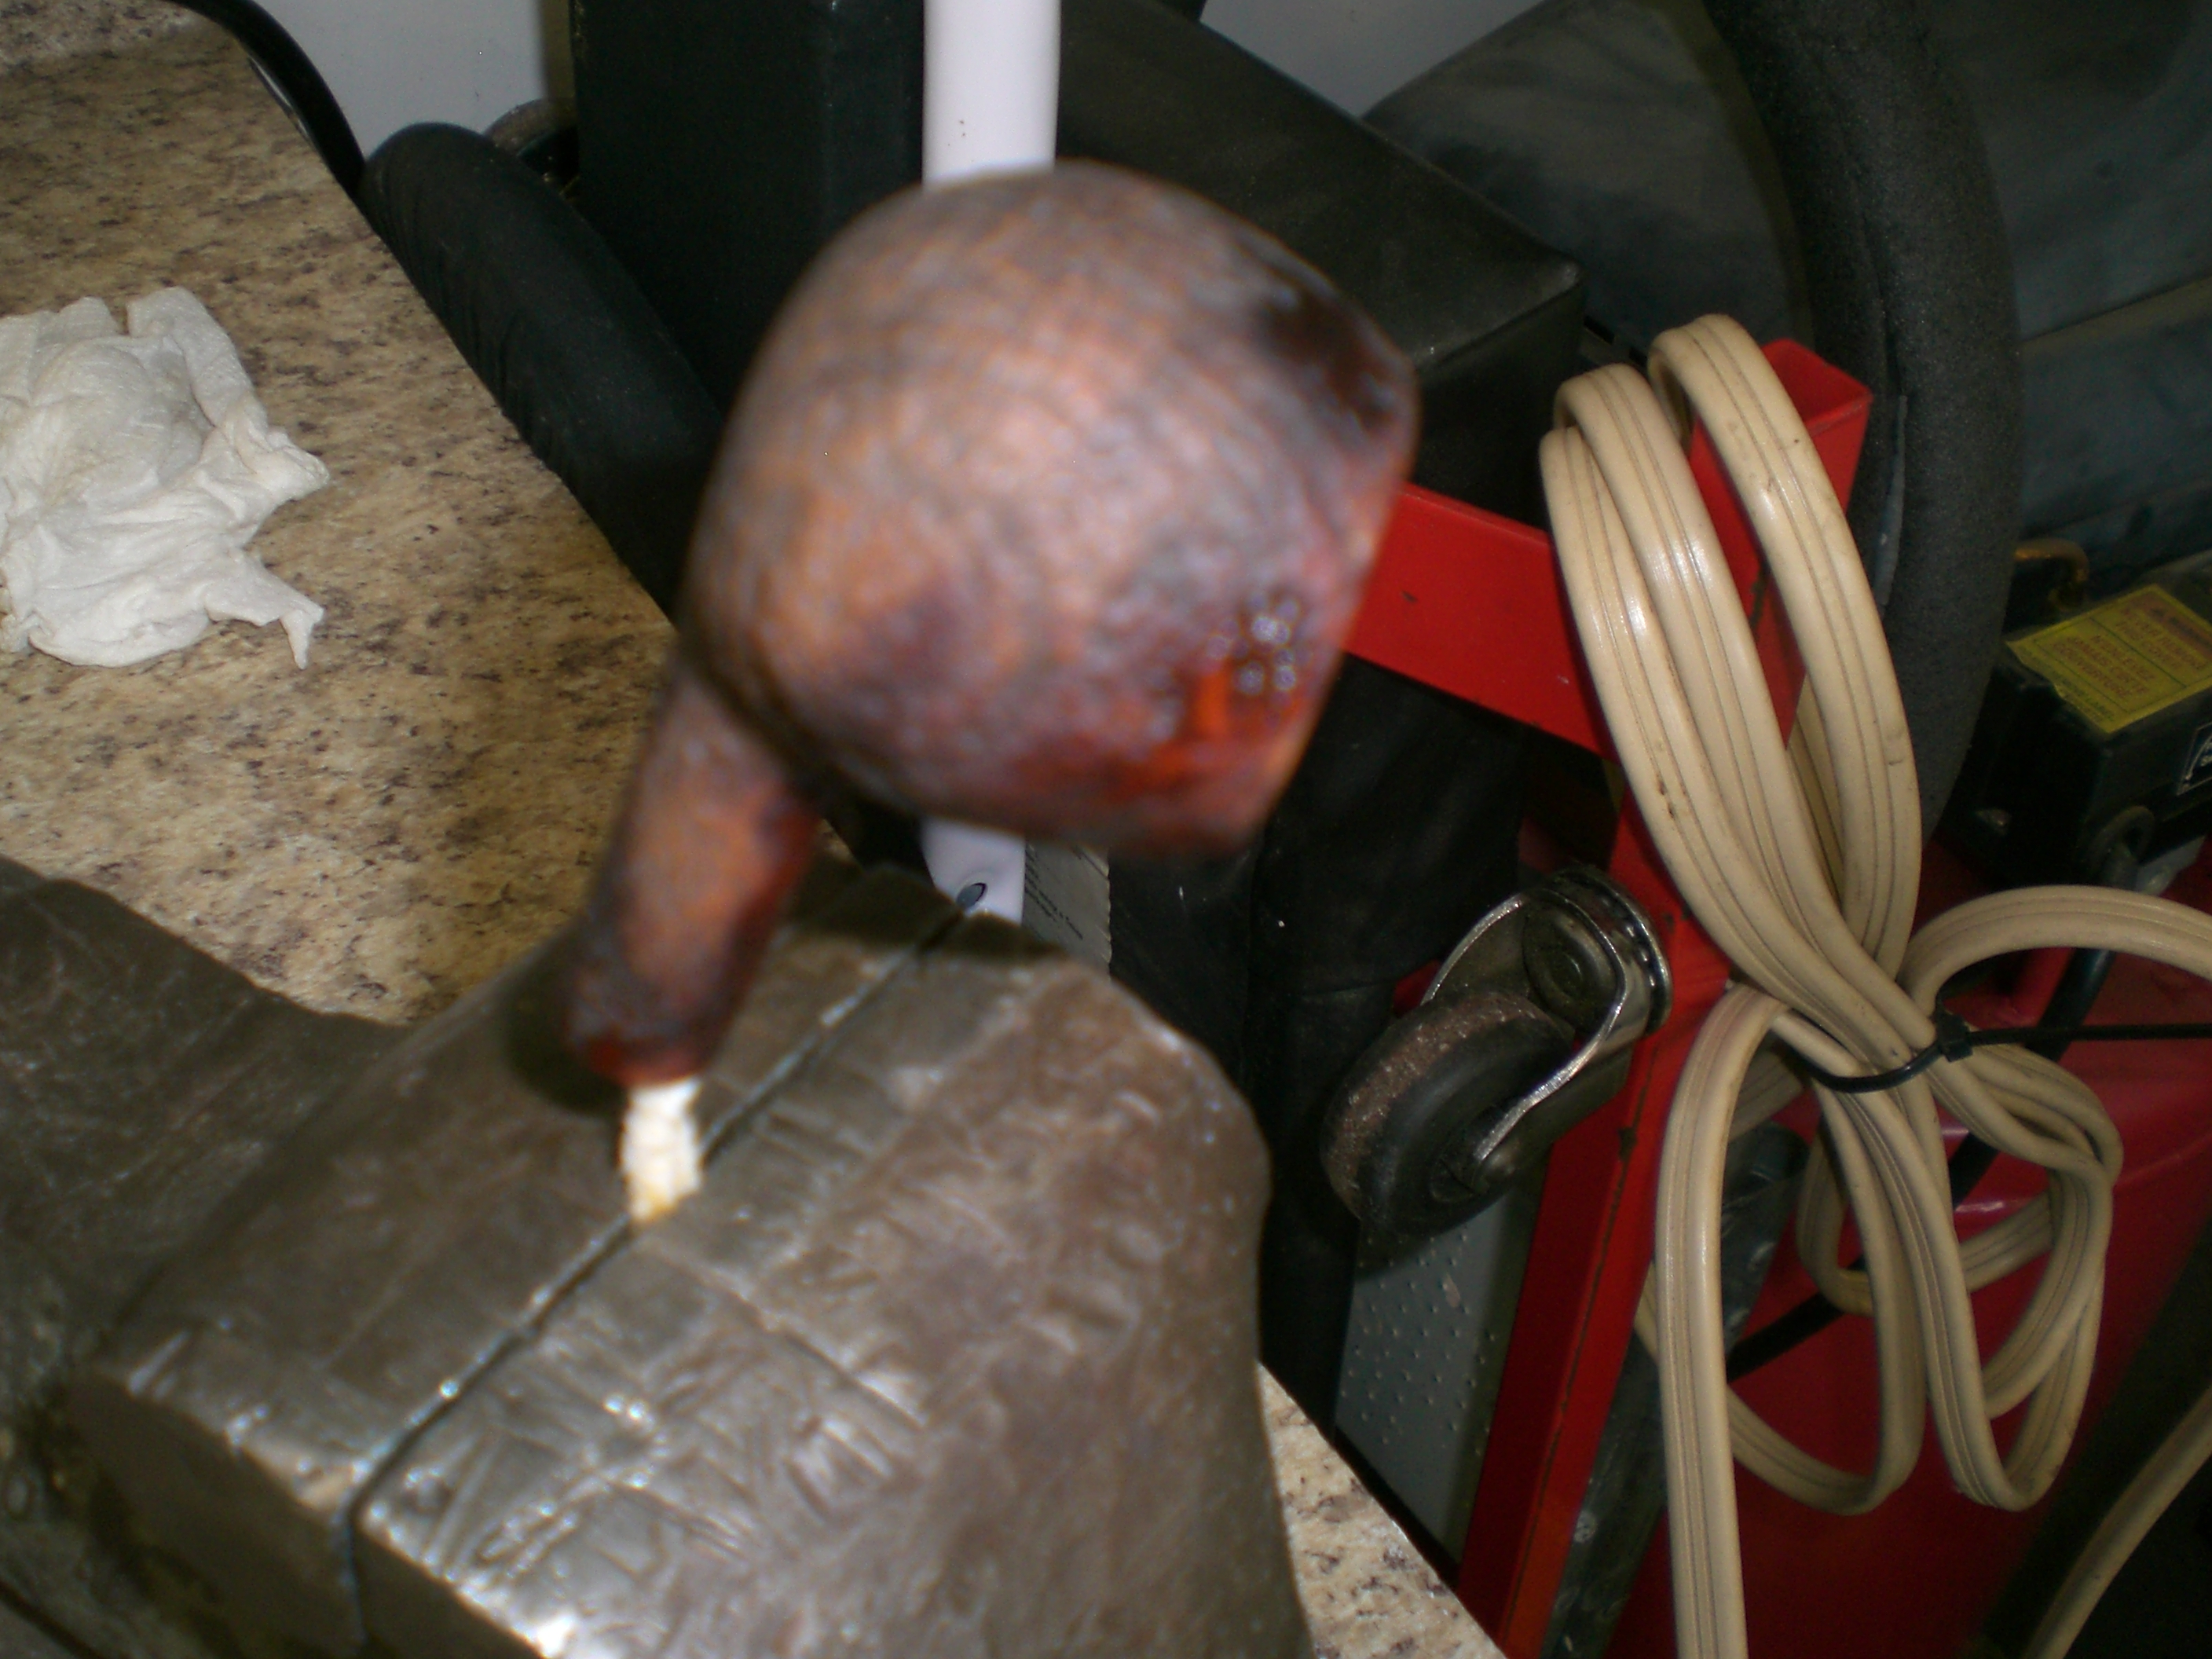
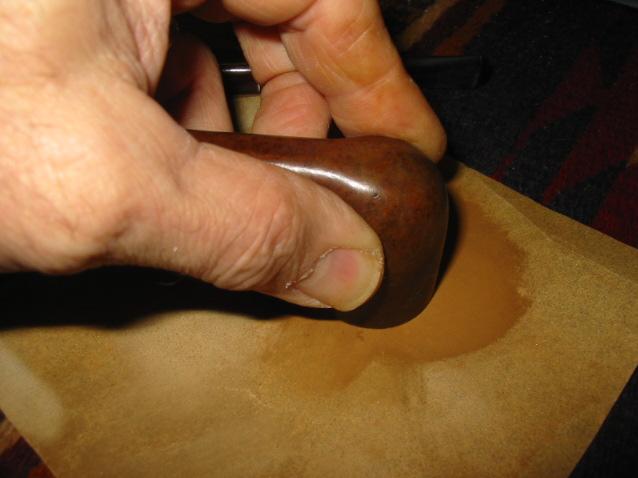
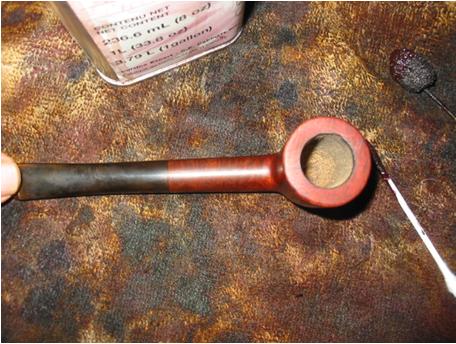
I reamed the bowl and cleaned the shank and bowl with pipe cleaners and Isopropyl alcohol. Once the pipe cleaners came out clean I was happy with it. The stem also needed a thorough cleaning. The tenon was a screw tenon and appeared to be metal as it was corroded and a little rusty. The previous owner or maybe the seller had put a paper washer on the stem before turning the stem on tightly. I think this was the solution to the overturned stem. I scraped the washer off of the shank and the stem and cleaned up the tenon with steel wool and alcohol. Once it was clean I worked on the button area on the underside of the stem. The epoxy repair was thick so I sanded it down and then recut the button edge with my flat needle file. I recut the top edge as well to clean it up and give it a new sharpness. I sanded the patch and the tooth marks until they were smooth and then used micromesh sanding pads from 1500-12,000 grit to sand the surface smooth. I also used the Maguiar’s scratch polish to polish out the scratches. Once that was finished I took it to the buffer and buffed it with White Diamond. To readjust the overturned tenon I heated the tenon and then turned it until it aligned. I also turned and turned it back until I had a good solid fit on the shank. Once the stem was aligned I gave it a coating of Obsidian Oil and set it aside for a little while and worked on the bowl rim.

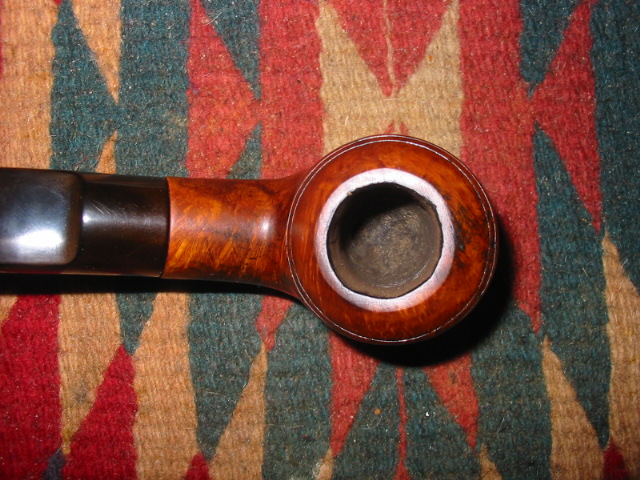
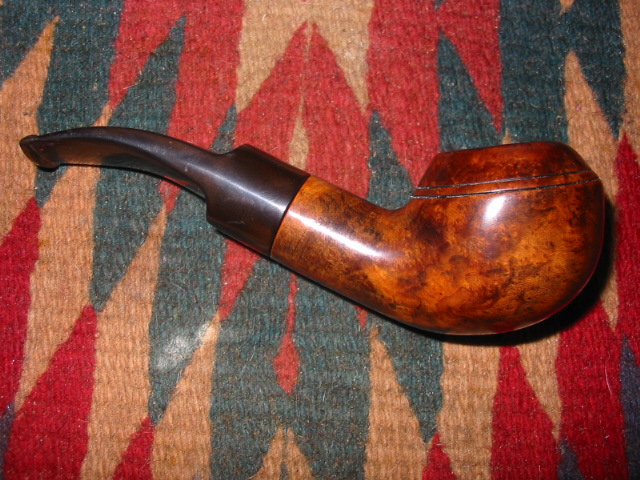
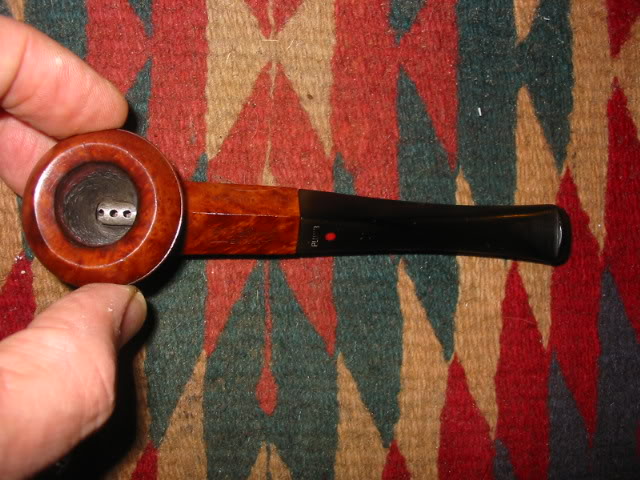
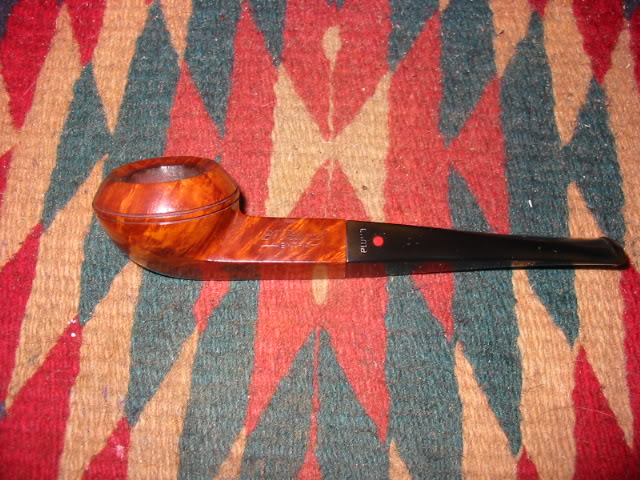
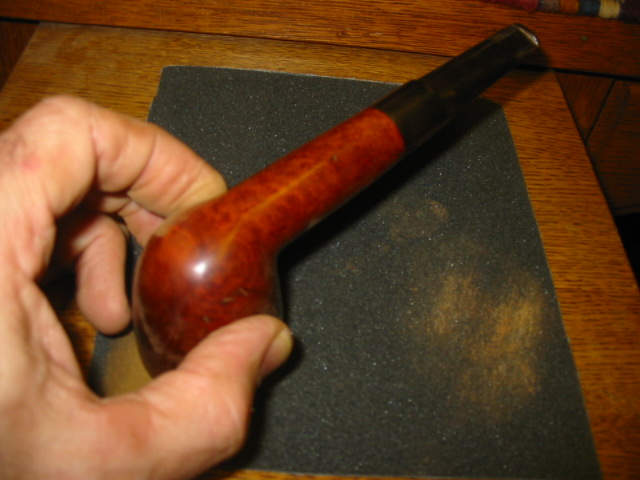
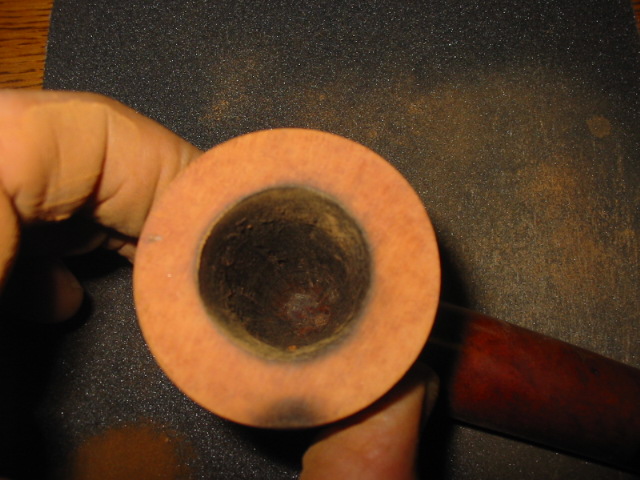
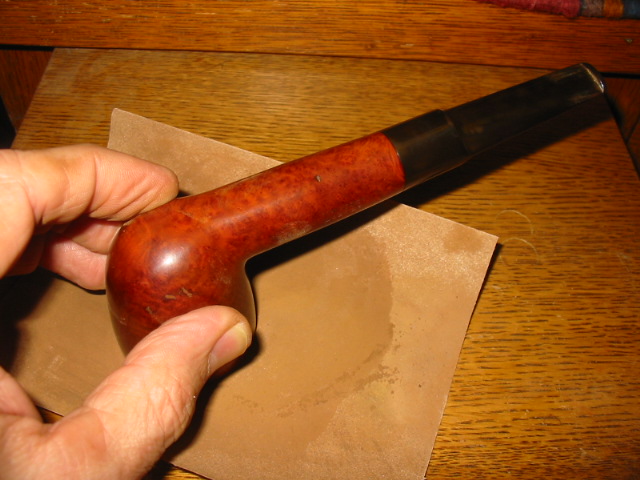
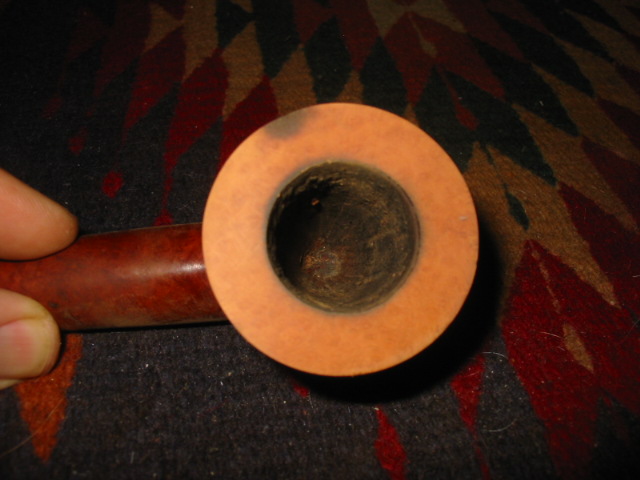
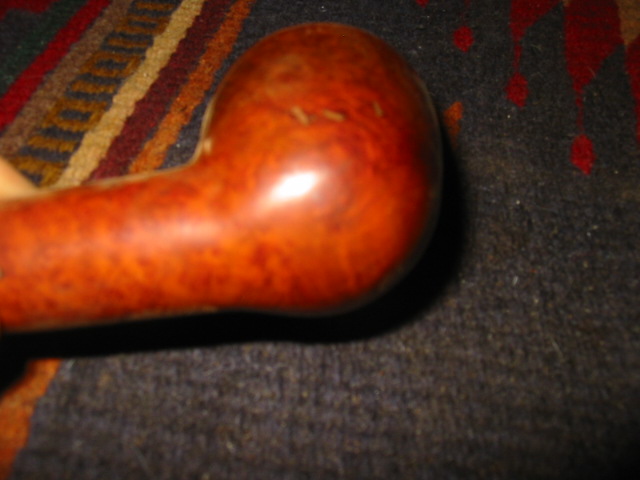
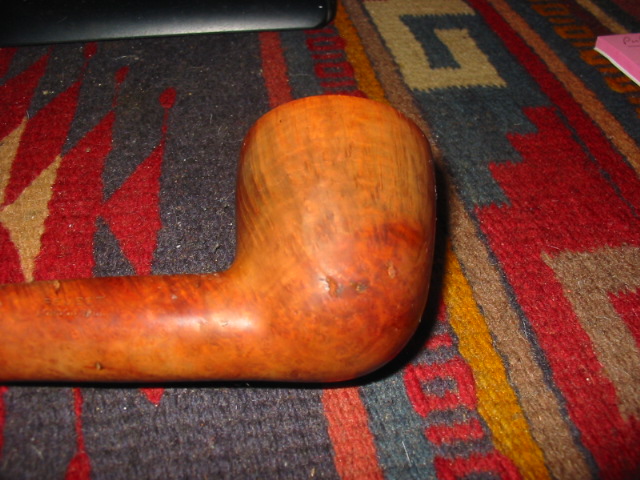
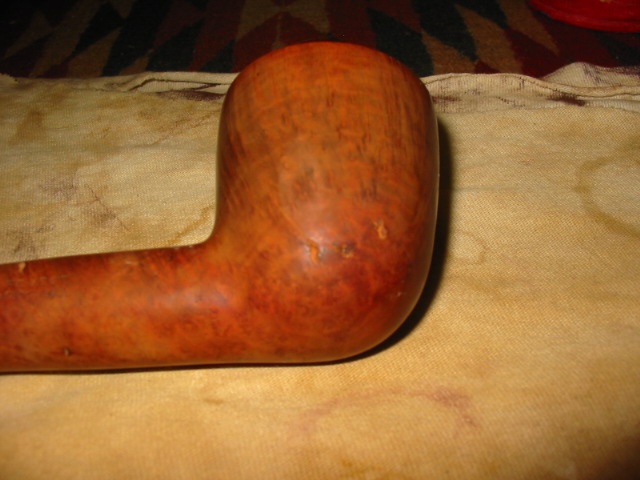
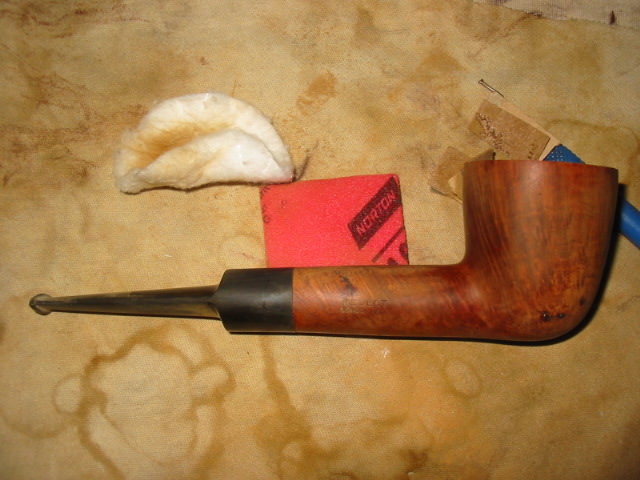
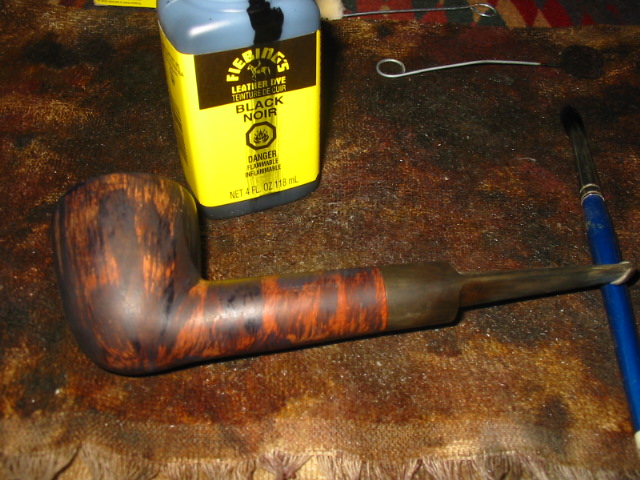
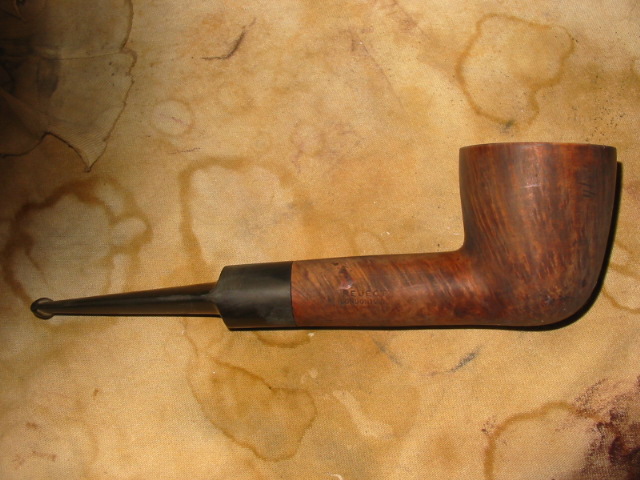
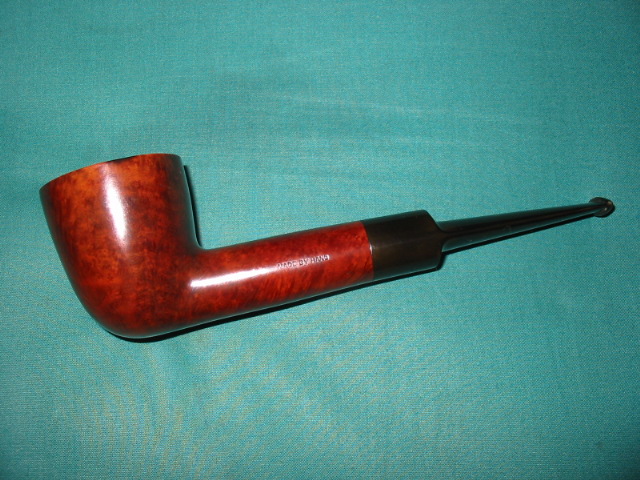
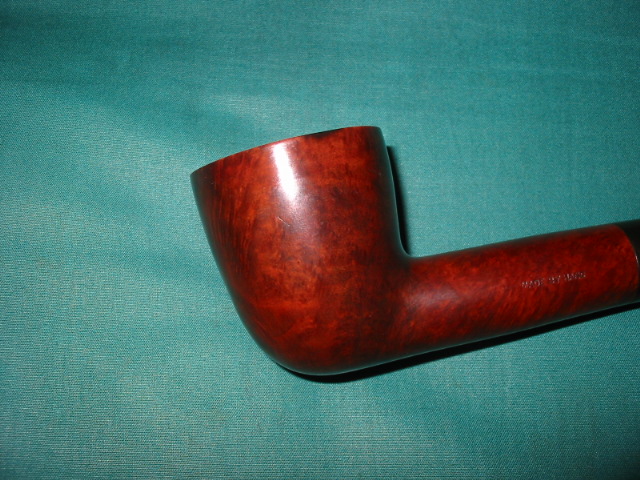
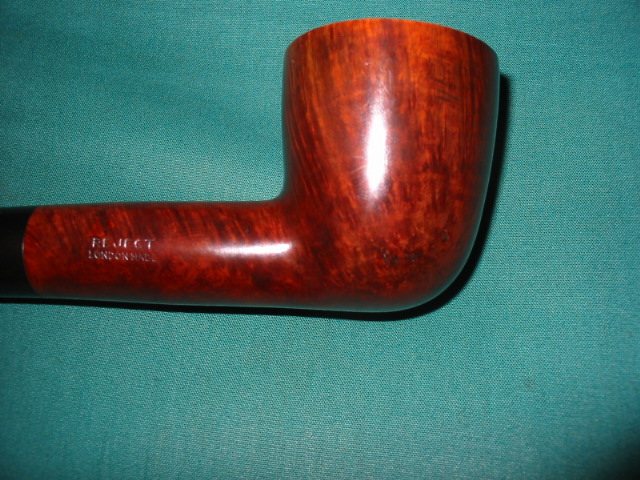
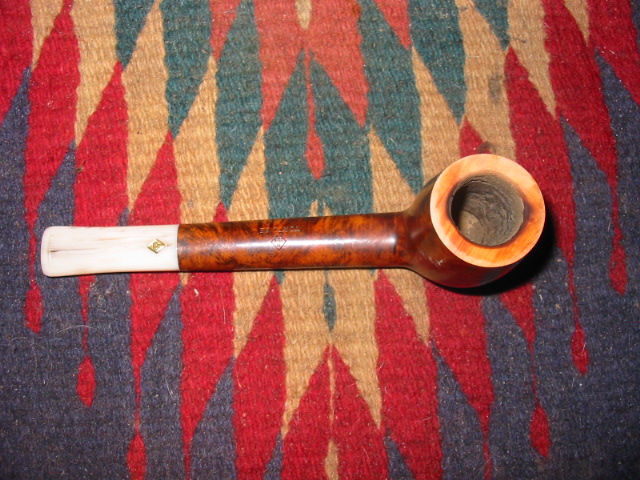
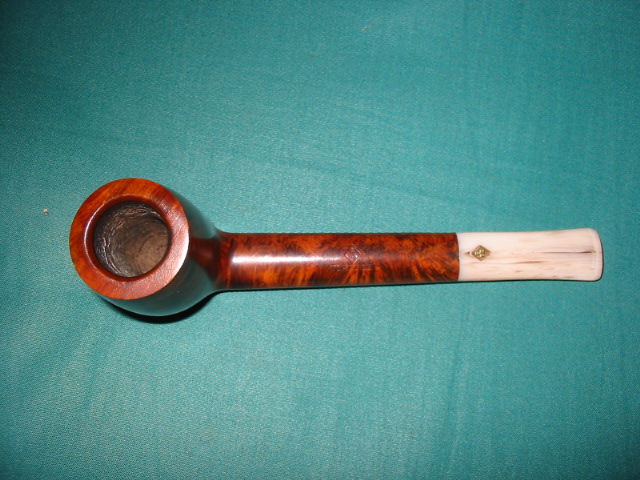
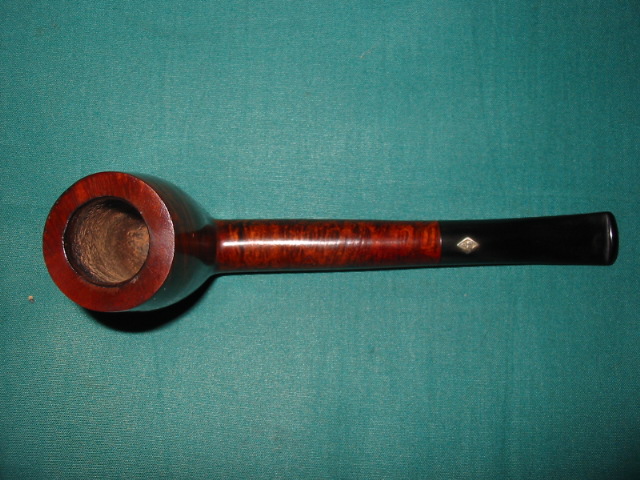
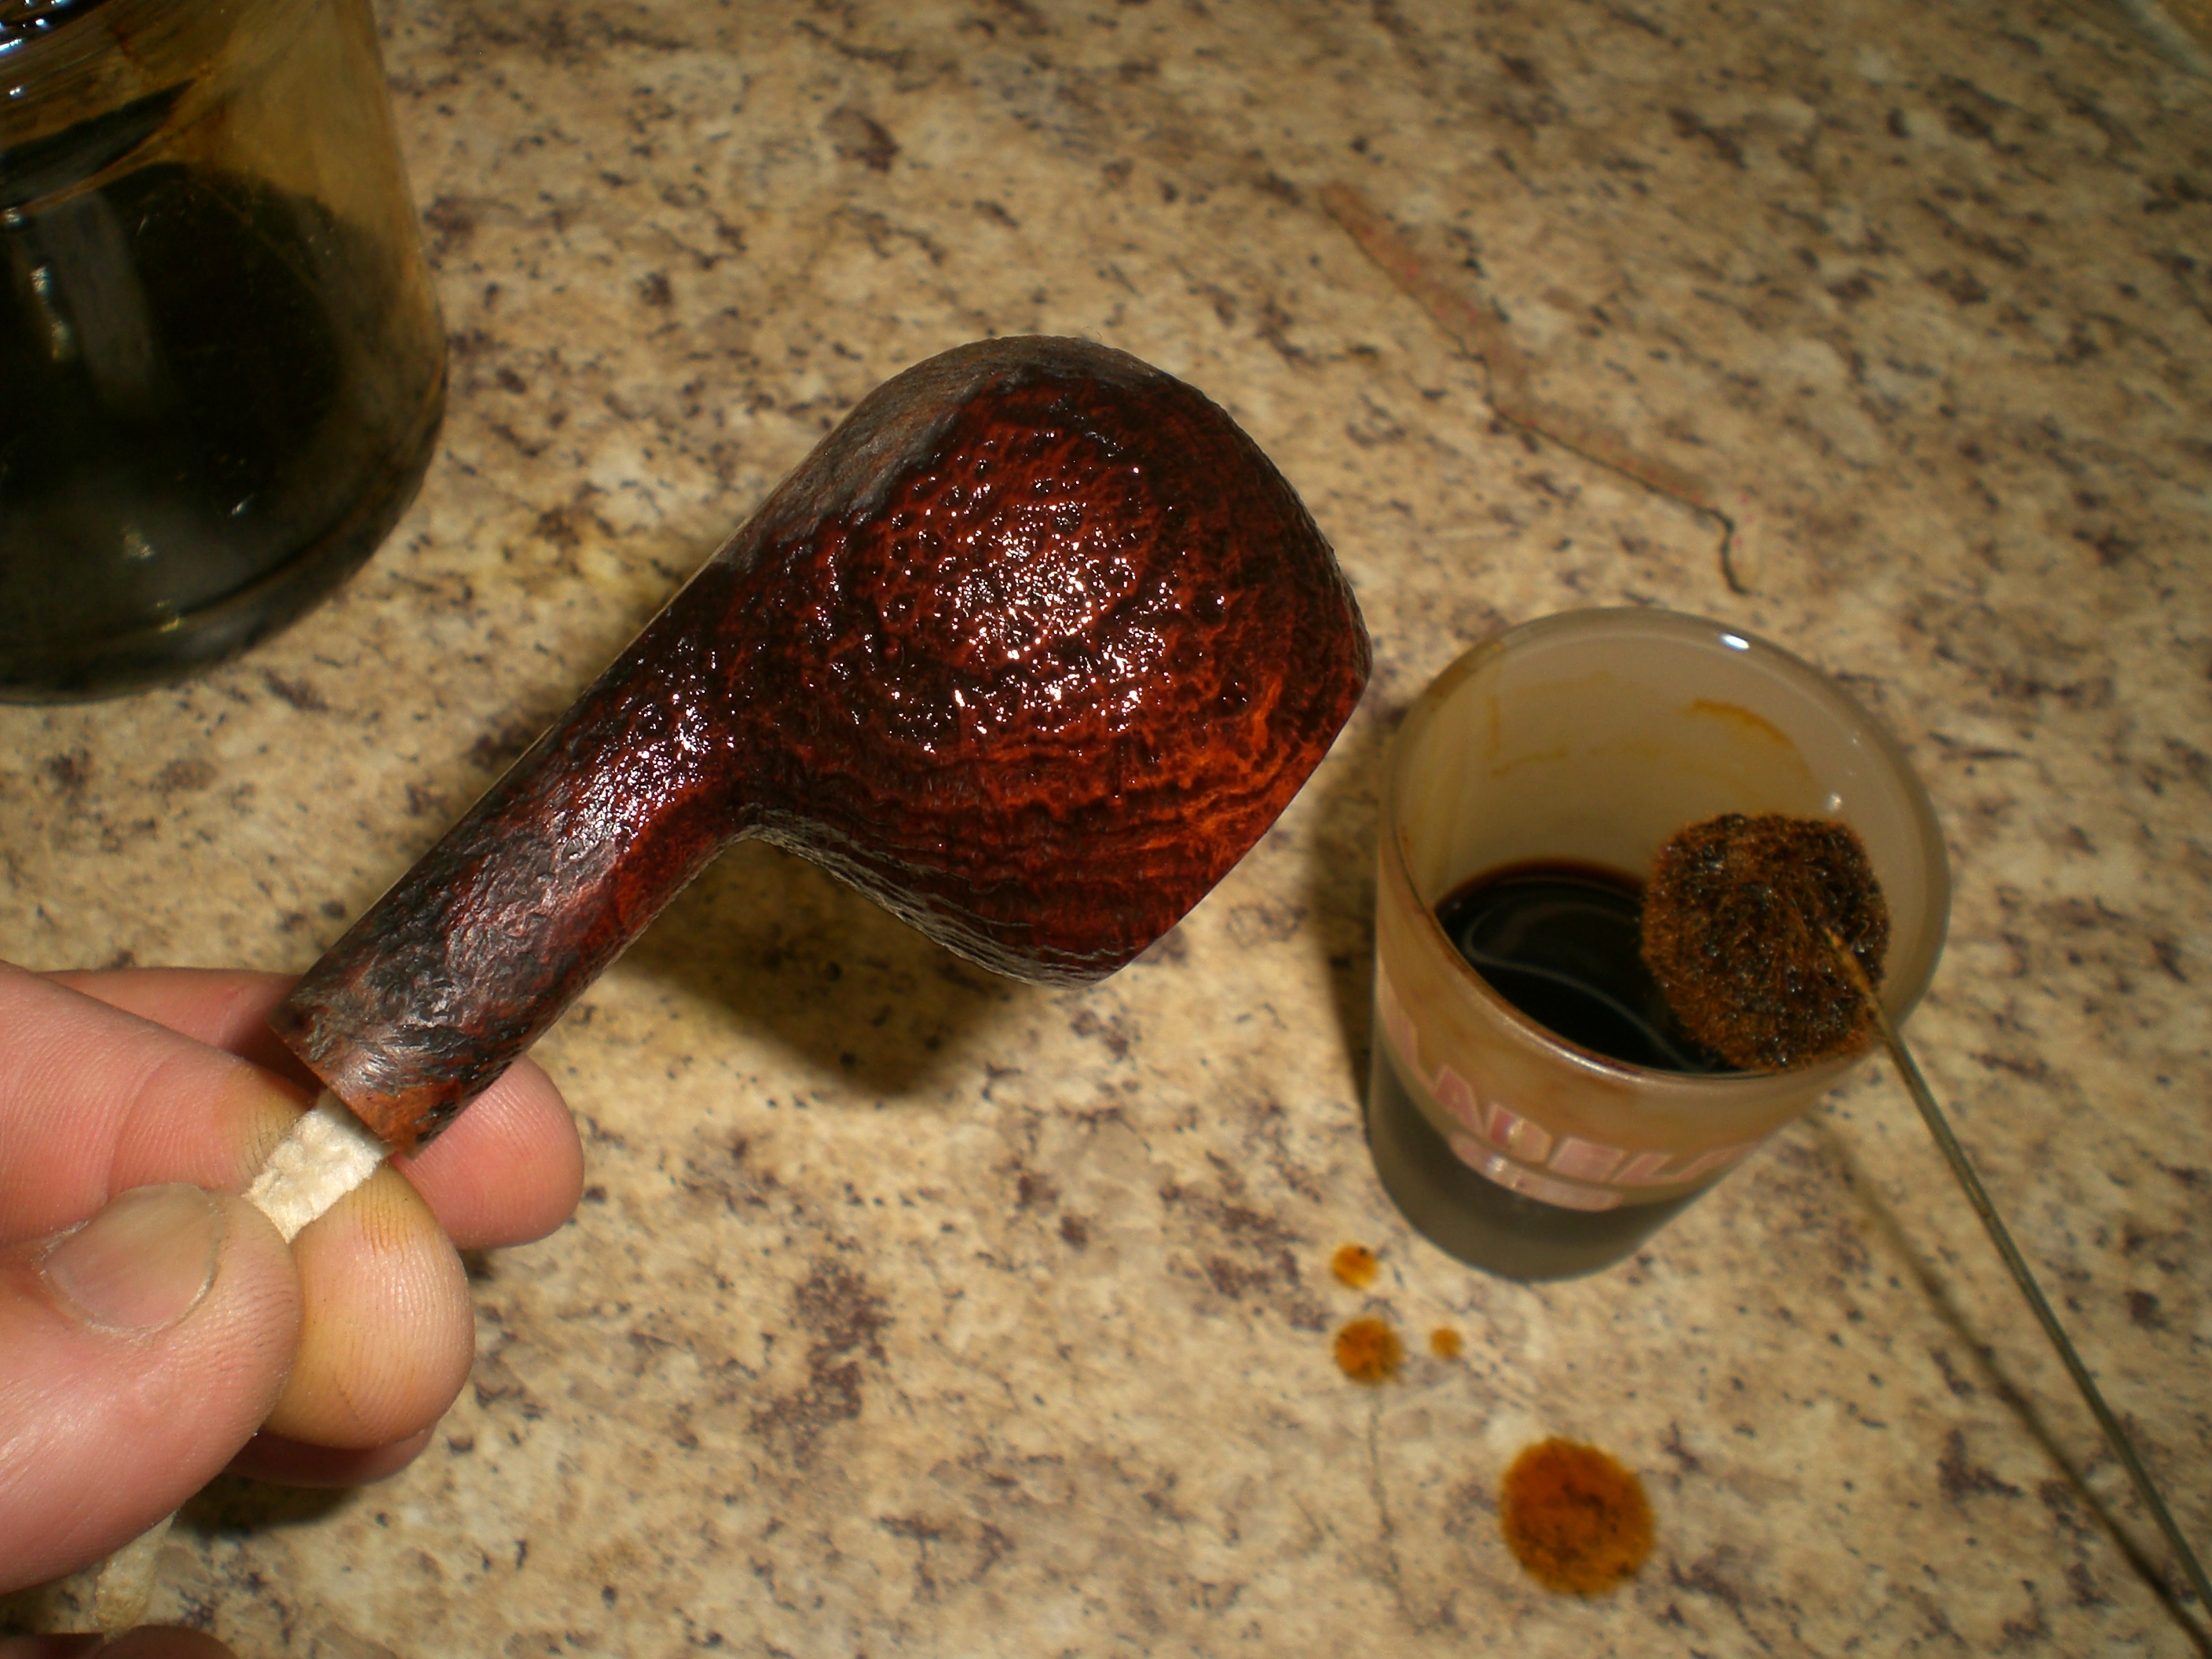
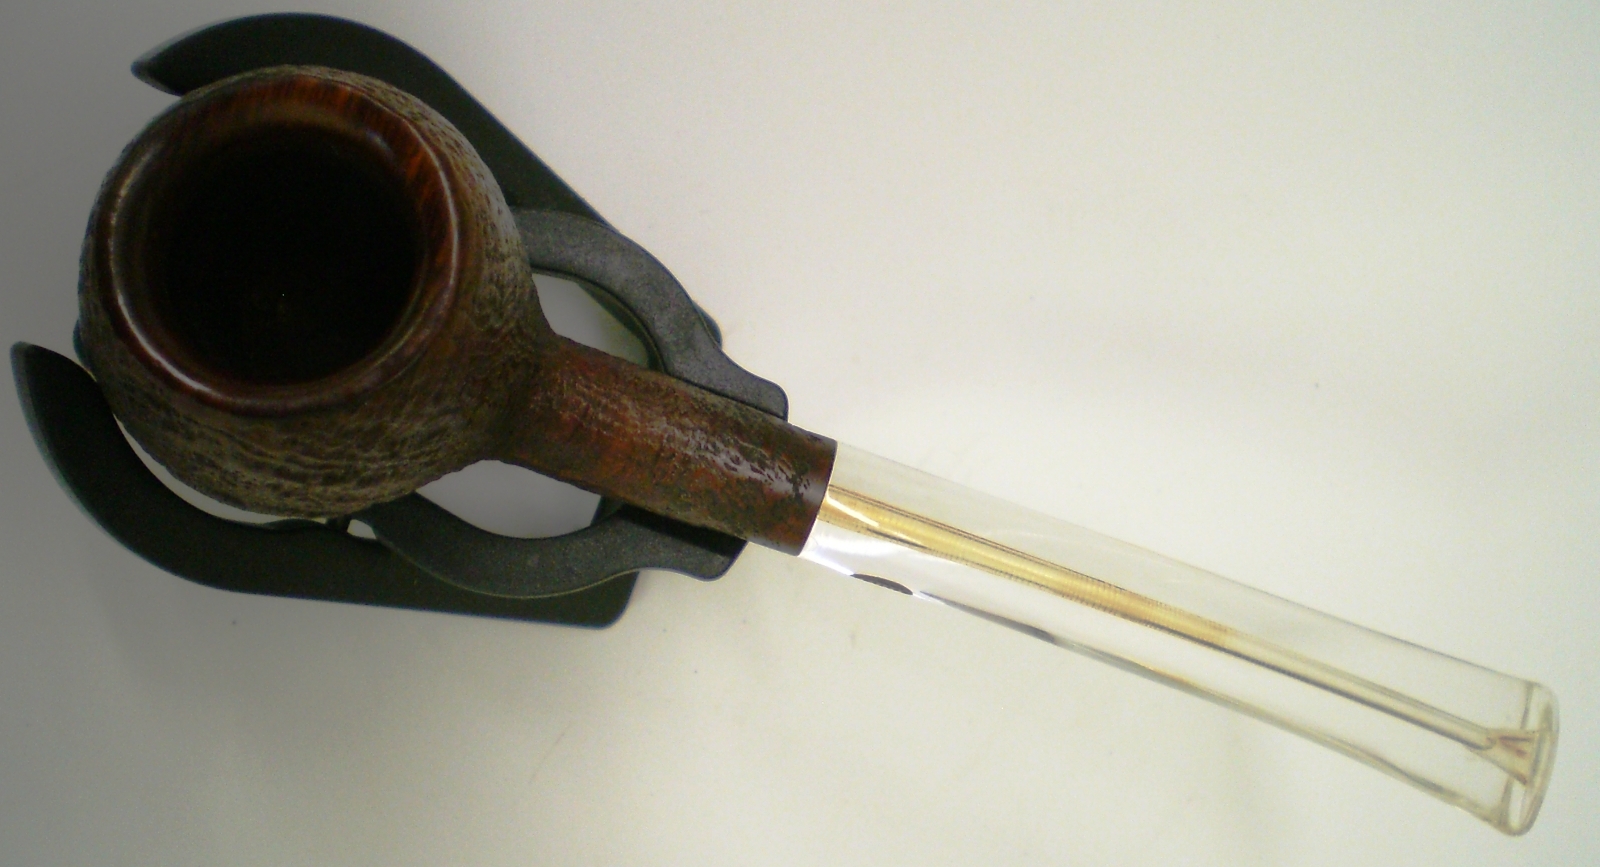
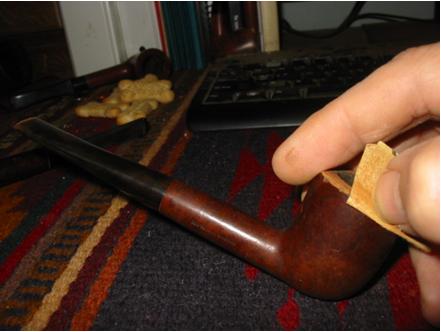
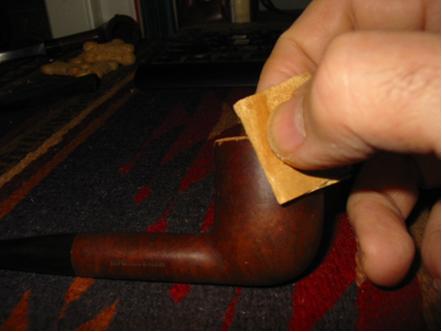
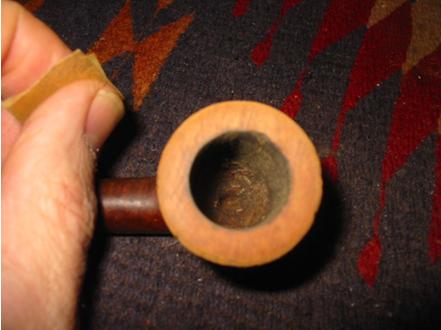
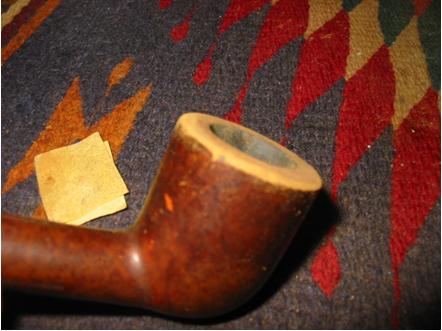
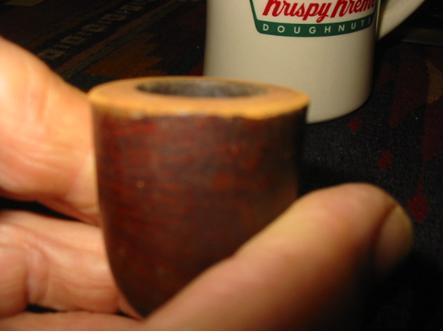
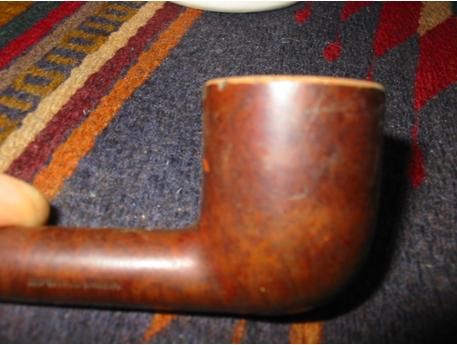
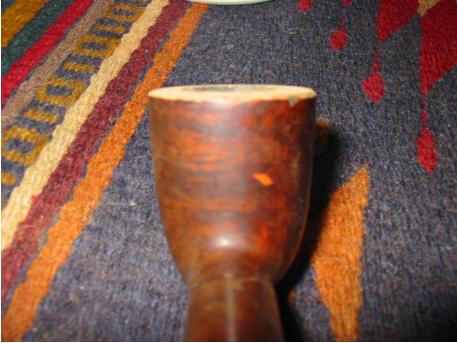
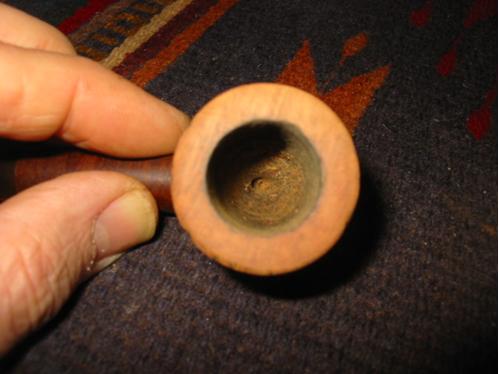
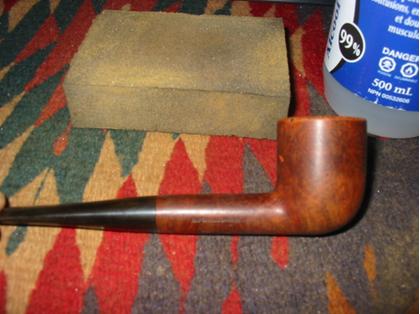
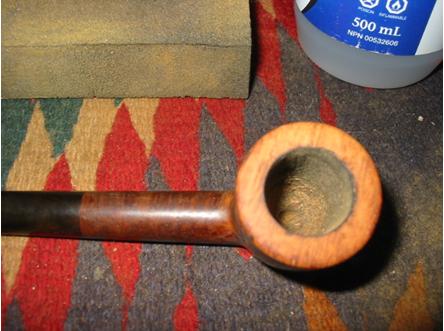
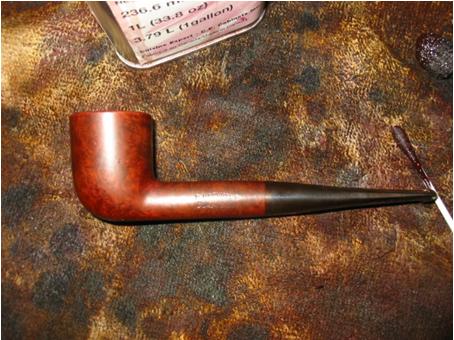
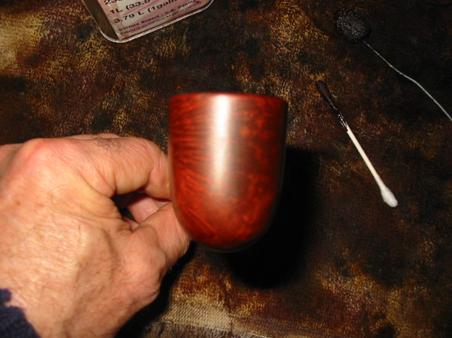
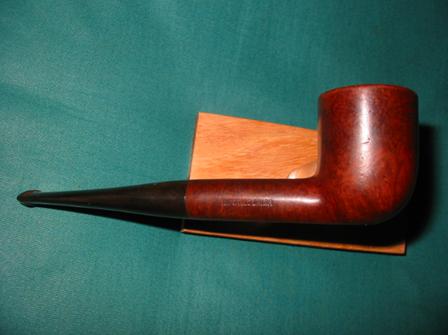
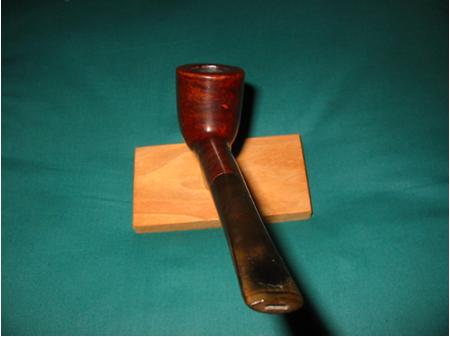
The rim took a bit of work as there were quite a few deep marks in the surface of the rim and also a rough edge on the outside of the bowl all the way around. I steamed the dents to the surface and then topped the bowl on a flat board until the edge was smooth once again. I worked the inner edge of the bowl with sandpaper to minimize the out of round shape of the bowl and make it at least appear to be more round again. I then sanded the bowl rim with progressively higher grit sandpaper end with 400 and 600 grit wet dry. I finished sanding with micromesh sanding pads using all grits from 1500-12,000. There is one small fill that is visible on the top right edge of the rim that is the only fill I find in the pipe. I restained the pipe with an oxblood aniline stain and carefully applied it with a cotton swab as I did not want the stain to mark the shank extension. I did not flame it this time around as I did not want to risk any melting of the extension with the fire. Once it was dry I put the stem on and took it to the buffer to buff with White Diamond. I finished by buffing the entire pipe with carnauba wax until it shone. The finished pipe is pictured below.

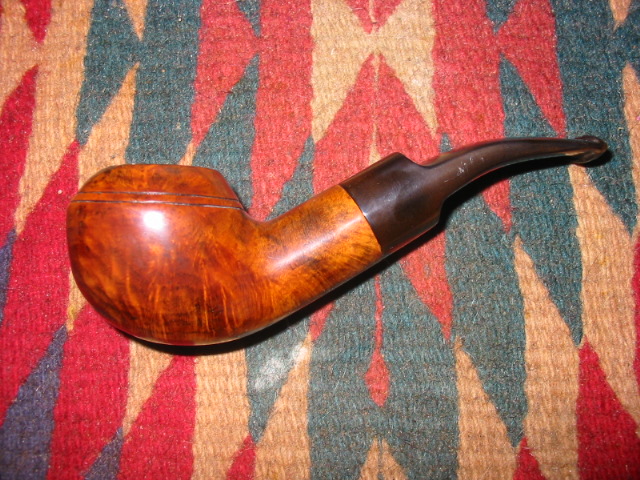
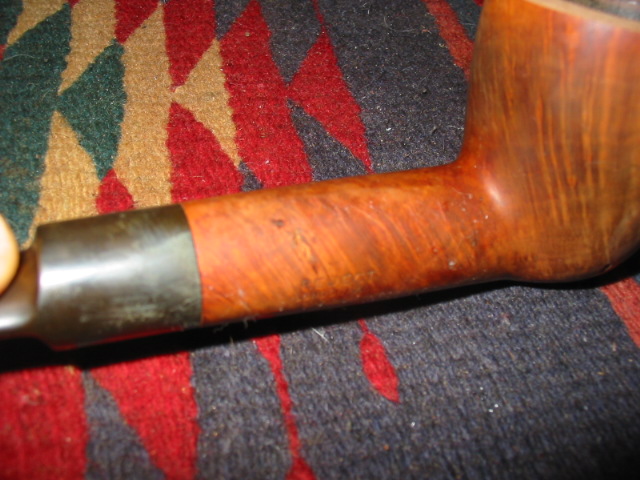
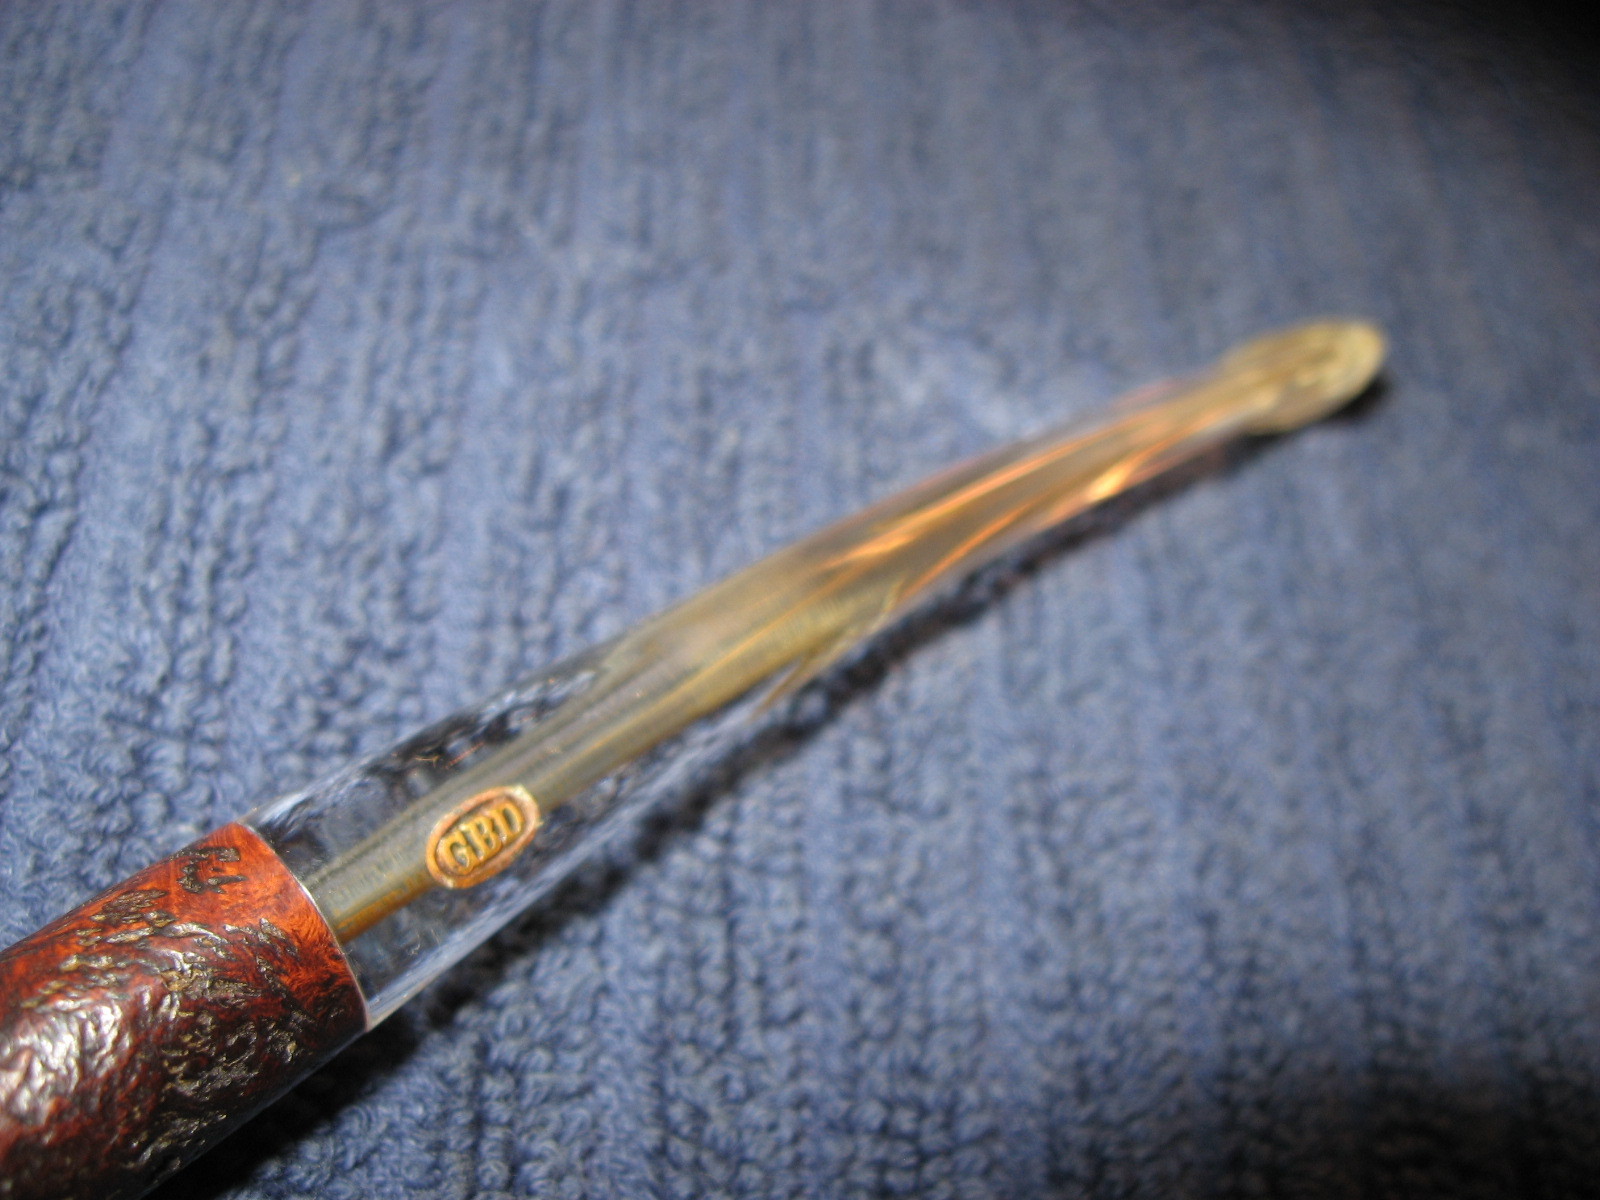
I am not familiar with the Manhattan brand but am pretty sure that it is a US made pipe. It is older as it has the Bakelite stem with an orific button. Manhattan Pipe Company made pipes in the US and I would assume made this one. It is stamped only on the left side of the shank with the words MANHATTAN over DeLuxe (in script) over the word BAKELITE. The case has a tag in it that also reads MANHATTAN over French Briar over Bakelite in a shield style logo.

ImageImageImageImage

A Beatup GBD 9438 Given a New Look


I bid on this one knowing full well that it was going to take a lot of work to get it back to some semblance of beauty and functionality. When I found it on EBay I thought it might be worth the effort but let it sit for awhile and then before the bidding ended I put in my bid. I honestly think I was the only bidder so I got it for a pittance.

When it arrived it was more rough than the EBay pictures intimated. The front edge of the bowl and rim looked like it had been used as a hammer. Not only were there dents and holes on the front of the bowl but the rim was chewed up like it had been hammered out on a piece of concrete. The finish was absolutely gone. The surface of the bowl was permeated with oils and grease from dirty hands and from looked like having been laid on its side in a full ashtray! At least the bowl was still semi-round and there were no burn marks. The other remarkable thing to me was that the stem was virtually unchewed. That surprised me actually given the overall state of the pipe. It was very oxidized and a deep brown colour. ImageImageImageImage

I reamed and cleaned the bowl and shank to remove the grime and tars. It took a lot of pipe cleaners and isopropyl alcohol to clean things up. I dropped the bowl in the alcohol bath and the stem in a bath of Oxyclean for a while and went about other work that I had going. I believe it soaked overnight before I got back to it. When I did I removed it from the bath, dried it off and went to work on the damaged rim and bowl. I used some medium grit emery cloth to reshape the rim. The tricky part here was to keep the angles even on all sides of the bowl. The front edge was heavily damaged and the rim itself was also badly chewed up. After the emery cloth I used 240 grit sandpaper to smooth the scratches out and then 400 and 600 grit wet dry sandpaper to finish the shaping. The series of three photos below show the progression of the shaping. ImageImageImage

Once the top was smooth and the shape retained I wiped the bowl down with an alcohol soaked cloth to remove any dust from the sanding. I also used a dental pick to clean out the rings around the bowl to prepare them for staining. I find that those collect a lot of grit and grime and can almost be smooth due to the buildup. I then stained the bowl with a medium brown aniline stain and flamed it to set the stain. I took it to the buffer and gave it a light buff with Tripoli to remove the excess stain and also give it a slight polish. Then took it back to the work table to work on the stem and to sand the bowl with micromesh to smooth the surface and bring the grain to the front. The pictures below show the stem after the soak in Oxyclean and then light sanding with 400 grit wet dry sand paper to remove the oxidation that was softened. The stem still needed more work to get out some of the stubborn places but it was getting close. ImageImageImage

I used micromesh pads 1500-6000 grit on the bowl and the stem to finish the smoothing and restoration. Once it was done and shining I gave the whole pipe a buff with White Diamond to polish it and then gave it multiple coats of carnauba wax and buffed it with a clean soft flannel buff to polish. ImageImageImageImage

This little Dr. Plumb Bulldog is a beauty


Blog by Steve Laug

This little pipe came to me via a friend in Germany. I finished cleaning up what has turned out to be a very nice squat straight bulldog that is stamped Dr. Plumb Extra on one side and 13 D.R.G.M. on the other. I have been familiar with Dr. Plumb pipes for quite a while and love the fact that they were a GBD seconds line. In fact they often share the same numbering system for shapes. This little guy had some serious issues when I took it under my wing. It needed a bit of work. The bowl was scorched along the front outer edge of the rim as it looked to have been lit with a torch lighter. The finish was shot and not only faded and washed out but also pitted and darkened along the bowl sides. The stem was oxidized and a bit chewed on the end. The stinger apparatus was dark and filled with tars and hardened tobacco oils.

My friend had started removing the burn mark and the bowl angles were slightly out or line. I finished removing the scorched briar and reworked the angles on all the outer edges of the bowl to keep the perspective and rim correct. I gave a ream and clean to remove any of the remaining cake and the sanding dust that had become embedded in the cracks in the cake. I put the bowl in the alcohol bath and then worked on the stem.

The pipe had the strangest stinger contraption I have ever seen that extends into the bottom of the bowl. It almost looks like a motorcycle exhaust pipe. I have inserted a few pictures of the stinger and fit in the bowl. I removed the stinger and placed in a small bowl of alcohol to soak. The stem was badly oxidized – not the brown oxidation that sat on the surface but a deep oxidation that left the stem a deep brown under the surface. I had been soaking the stem in Oxyclean while I worked on the burn on the rim of the bowl so that when I removed it from the water the oxidation had been brought to the surface. I used my buffer to remove the surface oxidation that had softened. I use Tripoli at this stage and work the stem carefully on the buffer to avoid rounding the shoulders on the stem. Then I sanded it with 240 grit sandpaper until it was matte black and clean. I then sanded it with 400 and 600 grit wet dry sandpaper and water to remove the scratches. I finished the stem by sanding with the micromesh pads 1500-6000 grit until the stem had a sheen to it. ImageImage

I then took the bowl out of the alcohol bath and dried it off. I sanded it with the 1800-2400 grit micromesh pads until the surface was free of scratches and grooves and was smooth. Then I refinished it with an oxblood aniline stain to bring out the red highlights in the briar. I put the stem back on the pipe and took it to the buffer to buff with White Diamond. Once finished I gave the whole pipe several coats of carnauba wax. ImageImageImage

London Made Reject – Hand Made


Blog by Steve Laug

This is one big pipe. I got it in a group of pipes I bought on EBay. The others in the lot were Barlings and Bewlays. They were normal group 3 and 4 sized pipes. This one is just over 7 inches long and 2 inches tall. The outer diameter of the bowl is 1 ¾ inches and the inner diameter of the bowl is 1 inch. It presented some interesting issues that would need to be addressed in the refurbishing process. The biggest of those was a significant cigarette burn on the outer edge and the top of the rim. It was quite deep and was an actually divot in the surface of the bowl. The rim – inner edge toward the stem also was charred and tarred. The finish was actually worn and had lost most of the stain. There were some very obvious pink putty fills on the right side of the bowl near the bottom and on the top of the shank near the stem. The stem was oxidized and there was a bit of tooth chatter.

ImageImageImageImage

I have taken a picture of the pipe with a group 4 sized billiard to give an idea of the massive size of this old beauty. It is stamped on the left side of the shank “Made By Hand” and on the right side of the shank ‘Reject” over “London Made”.  I am pretty sure that it is a Charatan reject though I cannot be certain. What do you all think? Who is the maker? The only thing making this a reject are the few fills as it has some pretty decent grain all the way around.

Image

After I reamed and cleaned the pipe inside with isopropyl alcohol I decided to address the cigarette burn on the top and side of the rim. The only way to remove it was to top the pipe. The next series of four photos show the emery cloth attached to a cutting board so that I could work on the topping procedure. The first photo shows the angle of attack that I use on the bowl. I place it flat on the cloth and work it in circles on the paper. I keep the bowl rim flat on the paper to ensure that the surface does not become angled or slanted. The next three photos show the top after sanding. Each photo is sequential so that you can see the progress in removing the divot. The second photo below shows the side shot of the damage and you can see the depth of the burn. The next two show the gradual removal of the burn and the flattening out of the surface of the rim.

ImageImageImageImage

When I finished with the emery cloth I used 240 grit sandpaper to smooth out the surface and remove scratches left by the emery cloth. I used the same circular motion to sand the rim. I find that the circular motion leaves fewer scratches and also keeps the bowl flat as I work on it. The next series of three photos show the rim and side after sanding with the 240 grit sandpaper. The burn mark is now flattened out and the edge of the rim is smooth. The divot is gone. The decision I had to make at this point was whether to continue sanding to remove all of the darkening on the bowl rim or to use stains to hide it a bit and keep the profile at its current height. I opted to use the stains on the burn mark and leave it at this point. Once I had the bowl rim at this point I proceeded to use 400 and 600 grit wet dry sandpaper and then micromesh from 1500-6000 grit to smooth out the surface of the rim.

ImageImageImage

From there I decided to work on the fills. The pink putty just does not work for me. It does not take stain and it is always glaringly present in the finished pipe. The next two photos show the fills on the right side toward the bottom of the bowl and on the shank near the stem.

ImageImage

I wiped the bowl down with acetone (fingernail polish remover) to get the stain and finish removed. Then I used the dental pick to remove the fills. The next five photos show the opening up of the pits that were under the fills. I use the sharp point of the dental pick to pick away all of the putty and leave the holes open and free of debris. I also wipe the bowl down with acetone before filling them with the new patch.ImageImageImageImageImage

After wiping down the surface of the pipe and cleaning out any remaining debris in the pits or holes I filled the holes with briar dust that I had saved from sanding the rim. I packed the dust into the hole with the dental pick. I find that if I wet the end of the pick the briar dust clumps on the pick. I scrape it over the holes and then tamp them full with the briar dust. I purposely over fill them with the dust. Then I drip super glue onto the briar dust patch. In the three photos below you can see the patches after the initial sanding with a fine grit pink sanding pad. They are the dark spots on the right side of the photo and on the shank near the stem. These dark spots lessen with more sanding. The second photo also shows the state of the rim from the top shot.ImageImageImage

I heated the bowl so that I could do the contrast staining to highlight the grain. I used an artist’s brush to apply black aniline stain to the bowl. I follow the lines of the grain. I painted the bowl, shank and rim with the black stain. Then I lit it with a lighter to flame the stain and set it. Once it was dry I sanded the stain to remove the excess.Image

The next series of four photos show the bowl after the initial sanding. I had removed much of the stain. The reason I am showing these photos is to highlight how the fill on the side of the bowl and on the shank have faded into the finish of the pipe. The black stain not only highlights the grain but also blends in the fills with the contrast stain on the bowl. In the second and third photo I also wanted to show how the stain takes care of the burn mark on the bowl side and rim. It is still present in terms of the darkening but it is less visible at this point. That is what I was aiming for. From this point I took the pipe to my buffer and used Tripoli and White Diamond to buff out a bit more of the black so that it would highlight the grain but not be the overwhelmingly dark coat under the finish stain that I would later use. I also used micromesh pads from 3200 to 6000 grit to work out any of the remaining scratches on the rim and bowl surfaces.ImageImageImageImage

At this point I set the bowl aside and went to work on the stem. In the picture below you can see the variety of micromesh pads that I use to remove the oxidation. The brown dust on the pads is the oxidation that comes off with the sanding. I always have a bowl of water at the side of the table to dip the pads in and wash off the oxidation dust and grime and also to give the pads more bite when I am sanding the stem. I went back and forth through the pads and the buffer with Tripoli and White Diamond to bring the stem back to the rich black that it had originally. I always buff the stem with it back on the pipe. I do not want to risk rounding the edge at the point where it sits against the shank. Once it was shiny black and acceptable I took the pipe back to the work table to give it the final stain coat.Image

For a top coat of stain I chose oxblood coloured aniline stain. I find that the contrast between it and the black undercoat work well together. The next series of four photos show the finished pipe. The first shows the left side and what remains of the burn mark near the top of the rim. It is still present but certainly less visible and it is smooth to touch. The second photo shows the right side of the pipe and how well the stain has hidden the reworked fills on the shank and near the bottom of the bowl. If you did not know they were present you would have a hard time seeing them. The third photo shows the rim and how well the stain has hidden the burn mark and brought out the birdseye grain on the rim. The final photo shows the bottom of the bowl and is included to show the contrast stain and the graining on that part of the bowl.ImageImageImageImage

The next series of photos show closer views of the repairs that were down and how they blend in with the contrast stain. The first is the left side of the bowl and you can see the darkening of the rim where the burn mark was. It is smooth to touch and none of the profile of the pipe is affected. The second photo shows the part of the bowl where I removed the putty fills, refilled them with briar dust and superglue and then restained with the two coats of contrasting stain. The third photo shows the same repairs on the shank. The final photo is of the rim of the bowl. The birdseye grain is highlighted. In the slight glare at the top of the photo you can see the remaining mark from the burn. The black and oxblood stains minimize the visibility of the burn darkening. I finished the pipe by giving the entirety several coats of carnauba wax to give it a rich glow. The pipe is finished and ready to give many years of service to whoever becomes the next owner.

ImageImageImageImage

Rebirth of a WDC Milano Dublin


This old WDC Milano was a challenge that I wanted to take on and see how it would turn out. In the pictures below you can see the state of the pipe when I received it. The stem was deeply darkened in the button area as well as scratched and marked with tooth chatter on the first inch of the stem. The bowl was badly caked – much of the cake had broken away in chunks and what remained was soft and crumbling. It also appeared to have been reamed with a pocket knife and had nicks and cuts around the inner edge of the rim and the resulting effect left the bowl way out of round. The finish was damaged and parts of the stain had rubbed away and what was left was underneath layers of black grime. The sides of the bowl and the bottom side of the shank both showed signs of having been laid in an ashtray and burned with a cigarette. The burn on the bowl side was not deep and would be easily addressed but the one on the shank was pretty deep. I would have to take out as much as possible without changing the integrity of the shape. That gives you a pretty clear assessment of the damages facing me as I decided to work on this old pipe.

ImageImage

I reamed and cleaned the bowl back to the bare wood in order to remove the crumbling and cracked soft cake in the bowl. My thinking was that a good clean surface would encourage the build-up of a proper cake. With a sharp knife I worked on the inner rim. I worked to get it evened out with the knife and then turned to a folded 1 inch piece of 240 grit sandpaper to smooth out the roughness of the inner rim and to bring it back as close as possible to being round. The roughness of the rim required topping to even it out as well. I used my normal procedure of sandpaper anchored on a solid flat hard surface and turning the bowl clockwise or counter clockwise into the sandpaper – exercising caution to keep the bowl flat on the surface and vertical in order to keep the rim flat and not slanted. To remove the burn mark on the bowl and on the shank took a little time. On the bowl side it was not deep so it only needed to be sanded to remove the damage. But on the shank I scraped until I got to hard wood and then sanded. Once I had solid briar under the burn I put the bowl in an alcohol bath to remove the grime and the remaining finish. I left it overnight to soak and turned my attention to the stem.

The stem has a steel tenon and insert that is the system in these old Milano pipes. It seems to be some sort of condensing chamber to collect the moisture generated in a smoke. In any case this one was filled with tars inside and coated with them on the outside. I cleaned it out with a shank brush, bristle pipe cleaners and then fluffy ones until they came out clean. The outside of the condenser I scrubbed with 0000 steel wool to polish and remove the grime and tars. The aluminum polished up nicely and the tenon looks like new. The Bakelite stem took a bit more work and creativity. I cleaned the inside of the stem scrubbing it with soft scrub and bristle cleaners. I was able to remove much of the interior stains. I sanded the exterior of the stem to remove the tooth chatter and external discolouration. I sanded it with 400 and 600 grit wet dry sandpaper and then the usual course of micromesh pads from 1500-6000 grit. I finished by buffing the stem with Tripoli, White Diamond and carnauba wax.

I put the stem aside and removed the bowl from the alcohol bath and dried it off. I sanded the bowl with 1500 and 1800 grit micromesh to remove any remaining finish. I also sanded it with 3200 and 4000 grit micromesh to polish the bowl. I restained it with an oxblood stain. I flamed the stain and then took the pipe to the buffer and buffed the pipe and stem with White Diamond and carnauba wax. Below are the pictures of the finished pipe.

ImageImageImageImage

A Trio of BBB’s in need of topping!


Blog by Steve Laug

Tonight I went to work on a trio of BBB’s I just purchased. Two of them, those stamped BBB Tortoise (with the ivory stem) looked to have come from the same pipe smoker wielding the same torch lighter. He had in essence cut a trough across the top of the rim from front right to back middle. In the three photos below you can see the damages to the rims. The top photo shows the oval shank Canadian and the second shows the round shank Liverpool. The third one is a BBB Silver Grain and it looked to have been used as a hammer. The outer edges of the rim were rough and beaten and the rim itself was marred with dents. Besides the damage to the rim the Tortoise Liverpool had a cracked shank that I needed to repair. That repair will be the subject of another blog post.  

ImageImageImage

I have a board on my desk that I attach a piece of 220 grit sandpaper to and use that to top the bowls. In the picture below it is to the right of the two Tortoise pipes. I hold the bowl flat against the sandpaper and rotate it to remove the damaged portions of the briar. It is important to keep the bowl perfectly flat against the board and paper so that the top remains flat. It is very easy to sand an angle to the bowl if you are not careful with this process. In the picture the two bowls have been sanded to remove the finish and the top layers of the darkening. Both bowls have a slight trench burned into the surface that moves from the front right to the rear centre. The topping will need to be deep enough to remove the damage yet not too deep to change the profile of the two pipes.

Image

In the next series of two pictures you can begin to see that the rims are returning to a normal and the troughs are disappearing under the sanding. The top photo is of the Canadian and it is pretty close to being finished in this photo. The second photo shows that the trough in the Liverpool is also disappearing though it will take a bit more sanding.

ImageImage

The Silver Grain Liverpool also was topped using the same process to remove the damage to the outer rim and the top of the rim. The nicks and dents on the tops and the damage to the edges made it necessary to top this bowl as well. It was a much simpler process as the rim did not have a deep trough across it but rather rough edges on the outer edge of the rim. The picture below shows the final result of the topping on that pipe. Once it was topped with the 220 grit sandpaper I moved to a fine grit sanding block – 400 grit and then on to the micromesh pads to polish the sanding marks out of the rim. I finished the sanding by buffing it with Tripoli and White Diamond to remove any remnant of the sanding marks.

Image

I then used a small one inch square piece of sandpaper folded in half and held at an angle to sand a slight bevel into the inner rim of the two Tortoise pipes. This took care of the inner damage that remained after topping the bowl. I then sanded the two pipes in the same manner as described for the Silver Grain above. Finishing with 6000 grit micromesh and then buffing with Tripoli and White diamond. I stained the trio with a medium brown aniline stain applied to the surface with a dauber. It took two coats to cover the fresh briar of the repairs. The stain was wiped off and the pipes were taken to the buffer when dry.

Image

The three pictures below of the three pipes show the buffed rims before waxing. The stain matched exceptionally well. The inner bevel took care of the inner rim damage and the topping took care of the trough that went across the bowl. In both of the Tortoise pipes below the damage is virtually removed and the rim surface and edges look new. The rim on the Silver Grain also came out very well and is smooth and looks as good as new. The outer rim damage and the nicks on the top of the rim are gone and a smooth shiny surface is what remains.

Image

ImageImage

The final three pictures show the rims after they have been given several coats of carnauba wax and buffed to a sheen. The pipes are ready to smoke and look renewed and reborn. You can see from the process that is spelled out above that it is not difficult to do and the results are worth the effort. Take your time and proceed with caution, checking to make sure that enough of the damage surface has been removed but not too much. Once that is done it is a simple matter of sanding, staining and polishing.

ImageImageImage

GBD Prehistoric Prince 357 Refurb


Blog by Al Jones

These old GBD’s just seem to follow me home. This one, a Model 357 in Prehistoric finish, wasn’t getting much action on Ebay and I bit. The Ebay pictures showed the briar was in pretty good shape and Perspex stems are generally pretty easy to restore. I didn’t have a Prince style pipe in my collection and this one looked like a suitable candidate. I weighed the pipe at 35 grams. That was also appealing and it should be comfortable in the mouth.

The pipe as I received it from the seller:

GBD_357_Prehistoric_Prince_Ebay ad (2)

GBD_357_Prehistoric_Prince_Ebay ad

GBD_357_Prehistoric_Prince_Ebay ad (3)

Using my Castleford tool, I reamed the light cake in the bowl and let it soak with some Sea Salt and Everclear. The Everclear took some of the finish off the bowl top and revealed some scrapes as well. I decided the blast was too nice to leave it in that condition and I knew the nicks on the bowl top would polish smooth. A smooth, beveled GBD bowl top looks great in my opinion and that feature is an attractive aspect of these pipes.

While the bowl was soaking, I worked on the Perspex stem. It had a few tooth marks that I was able to sand out starting with some 1500 than 2000 grit wet paper. I than buffed it with the 8,000 and 12,000 grade micromesh pads. I ran some bristle pipe cleaners with Everclear thru the stem. I’d been advised previously to run a dry cleaner thru following the Everclear as to not cloud the stem draft hold of Perspex material.

Then, as with the stem, I used some 1500 than 2000 grit wet paper on the polished bowl top, than the last two grades of micromesh. Next up, re-staining, which is still a little nerve-wracking to me.

I reviewed Steve’s past blog entries on re-staining a bowl. I had previously completed that step only two other times. I soaked the bowl in a small container of isopropyl alcohol for several hours. I used an old brass bristle brush to help remove the stain and any wax. Than, I let it soak for another few hours. Once the finish was removed, I prepared to re-stain it. I really liked the light brown factory finish and used some Fieberlings Medium Brown stain, but thinned it considerably. On my first two re-stain jobs, my finish came out too dark. This time, I nailed it and the color is just what I desired. I used the dauber supplied by Fieberlings to apply the stain, held by a bent pipe cleaner. After the first coat dried, I applied a second coat. This time I set the stain with a flamer from a lighter. Be sure to not have the pipe sopping with stain, as that burns too long and could leave a burn mark on the briar.

Applying the stain:

GBD_357_Prehistoric_Prince_Restain (1)

GBD_357_Prehistoric_Prince_Restain (2)

GBD_357_Prehistoric_Prince_Restain

The next step was on the buffing wheel with some White Diamond rouge. A light touch is used as to not damage the bowl or add any unnecessary wear. Carnuba wax was then applied using a dedicated loose cotton buff. The bowl following the White Diamond and Carnuba wax applications:

GBD_357_Prehistoric_Prince_Finished (8)

The final step was a hand polish with Halycon wax and she was ready to smoke. I’m dedicating this one to Orlik’s “Golden Sliced” blend, which is a good smoke in the hot summer months of Maryland.

The finished pipe:

GBD_357_Prehistoric_Prince_Gallery

GBD_357_Prehistoric_Prince_Finished (3) Cropped

GBD_357_Prehistoric_Prince_Finished (1) Cropped

From Sow’s Ear to Silk Purse


Blog by Steve Laug

This morning I decided to do a few more refurbs on pipes from my box. It is getting low on options as I have reworked the majority of the interesting ones. There are about 25 or so pipes to choose from now and many are in a real state of disrepair. As I sorted through them I came upon this one. I took it out of the box and turned it over in my hands. The bowl was clogged with the remnants of the last smoke – dried tobacco and sticky tars. I decided that this was the first pipe I would work on today. It would be a challenge to see if anything beautiful could come from this mess. It was a beat up old pipe. I think the previous owner must have always had it in mouth and chewed on it like a piece of straw and then used it to hammer nails. The top was chipped and dented with valleys and mountains and the whole covered in a thick coating of tars – pipe lava. The stem was gnawed on had deep dents and tooth marks. It was oxidized to a rich brown that stank of sulfur.

The first step in the process for me is always to ream the bowl and clean out the detritus of the past. I used a dental pick to get the remaining dottle out of the bowl and to make way for my reamers. I find that the dental pick works well as it is sharp enough to break into the hardened ball of tobacco remnant and remove it quickly. I work it around to clean out any loose leftovers so that I can work on the hardened cake that is left in the bowl. This one had a thick cake that was a bit crumbly and soft once the tobacco ball was removed. It would need to be reamed back quite a bit. I generally ream back to bare wood on these old timers as I want to start a hard cake that is not built upon the old crumbling base cake that was in the pipe when I started. I used the PipNet reamer on this one. I fit the cutting head into the T handle and began to carefully turn the reamer into the bowl. I generally do this over a plastic bucket as it is a mess. The coarse dust of the carbon that is cut away is a black cloud if you are not careful. I proceed slowly as it is easy to angle the cutting head and take the bowl out of round. Once it is done I tap out any dust that remains before moving the pipe to my work desk.

 ImageImage

On the desk I had placed a work surface that was washable and then took out the soft cotton wash cloths that I use to remove grime and stains and wet them with Isopropyl. I washed down the outside of the bowl including the rim. It removed much of the dirt the first pass and I continued to scrub until the cloth came back clean. For this part of the process I leave the old stem in place as it serves as a handle for me to hang on to while I am working with the bowl. I picked at the grime on the top of the bowl a bit with the dental pick and decided that indeed this one was a candidate for topping. The two pictures above show the pipe after the reaming and cleaning of the bowl. It is ready to be topped.

In preparation for topping the bowl I use a flat surface – either a hard flat board or a piece of glass to which I anchor the sand paper. This time however I wanted to try out a new trick that I had learned from a friend on one of the online forums so I anchored a piece of 240 grit sand paper on a Masonite clipboard and put the clipboard on the desk top. Topping the bowl is a careful process that involves keeping the rim flat on the sand paper and turning it either clockwise or counter clockwise until the chips and dents are minimized. The trick is to take if far enough to remove the majority of the dents and chips without changing the overall profile of the bowl. Too much of the top removed changes the pipe rather than merely restoring it. As I sand the top of the bowl I stop to check it regularly to see if I have removed enough of the damage to the bowl. On this particular pipe it took me quite a bit of time to take it down slowly to the point it was smooth enough to do the next step in the process.

Often once the top is close to being smooth enough the last remaining dents can be steamed out and then a minimal amount of sanding will finish the job. On this particular pipe the top was smooth after sanding it. There was no need to remove any further dents. However there were some major chips out the outer edge of the rim. To remove them would have involved sanding off a fairly significant amount of the top and would have changed the overall look of the pipe. I decided instead to chamfer the edges on the outer portion of the rim. I used a piece of sand paper held at an angle that I maintained throughout the sanding. The idea was to hide the battered edge and remove some of the damage while minimizing some of the larger chips. Once I had the outer rim repaired to my satisfaction I did the same to the inside rim to regain some of the roundness of the bowl. The previous owner seemed to have used a knife to remove cake so there were major chunks taken out of the inside edge. Chamfering the inner edge took care of most of the damage and made the rest relatively invisible to a quick glance.

I then cut a stem to fit – turning the tenon on a precast stem and also taking off the excess vulcanite on the area where the stem joined the shank. I wanted to get the fit to be precise without gaps. Once I had the fit correct and just needed to sand out the scratches I put the bowl in the alcohol bath to let it soak and remove the stain. I continued to work on the stem while it soaked. I generally leave the bowl in the bath for a minimum of 30 minutes and have even left them over night in an extremely dirty bowl. Once I take it out of the bath I wipe it down with a dry cotton cloth and let it dry. I then sand the bowl down to remove any scratches in the surface. I start with a 400 grit wet dry sand paper and work my way through the Micro-mesh pads 1500, 1800, 2400, 3200, 4000, and 6000 to get a good smooth surface. As I worked on the shank I noticed a fine crack that became evident as I removed the grime from the inside of the shank. I heated a nickel band and pressure fit it to the shank to take care of the crack.

I finished the bowl by re-staining it with a medium brown stain as an undercoat and then buffed and sanded it yet again. A top coat of oxblood stain followed that sanding. I find that the two coats of stain complement each other and add some depth and patina to the pipe that only the one colour does not give. It was then polished on the buffing wheel with White Diamond and then given several coats of carnauba wax. I had also finished the stem and put it on the bowl and buffed and waxed the entirety.

This is the finished product. I think you would agree it has ceased to be a sow’s ear and has become a silk purse!

ImageImageImage


Topping a Bowl – A Pictorial Essay


I finally used my camera to take photos of the process I use when I top a pipe. I decided to put together this pictorial essay to show the steps on topping a pipe bowl. It is an easy process and can return an otherwise beat up pipe bowl top to new or at least a cleaner vintage look. In the following essay I will take pictures throughout the process from beginning to the finished product with the bowl restored to an acceptable look for me.

The pipe is a Marxman Super Briar billiard. The bowl overall is in pretty rough shape, but the top looks like it was used for a hammer. All the outer edges of the bowl are chipped and rough. To clean and polish it as it stands would leave a very rough looking bowl top and no one clean edge. It was a perfect candidate to benefit from a slight topping.

Before taking it to the sand paper I reamed the bowl and cleaned up the inside so I was working with something a bit cleaner. I also did a quick buff with Tripoli to remove the external chunks of dirt and stickiness that were on the bowl. A clean surface gives me a clearer picture of what I have to work with and how far I will be able to go in the topping process.

Below are three pictures of the pipe when I picked it out of the box. Note the grime that needs to be removed before cleaning and the rough edges around the top and the deep chunks missing on it. Many of these go to a depth of about 1/8th to 1/16th of an inch so it is in need of topping to clean it up. The decision that needs to be made is how far to go without changing the profile of the pipe too much. I will decide that as I work with the bowl sanding off the roughness. It is hard to say how much will need to come off without actually starting the process. I may have to stop at some point and bevel the outer edge a bit to keep the profile in tact but time will tell.
topping1

topping2

topping3

When you are topping a bowl it is important to maintain the flat and straight profile of the bowl top. It is easy to change the angle if care is not exercised. I use a flat desk top or a piece of wood to ensure that the flatness is maintained. I put a piece of sand paper, usually 240 grit, on the board or desk top. Others use a piece of glass to provide the hard surface. Sometimes I sand it on a desk pad like the one pictured below. I hold the sand paper with one hand to make sure it does not move. The desk pad helps keep it from slipping as I work the bowl on it. The bowl is held top down and tightly placed on the surface of the sand paper. I move the bowl in a rotating pattern, turning clockwise, always applying equal pressure on all points to keep it flat on the paper. The process is pictured below.
topping4

As I sand the top, I repeatedly check to see if it is staying level and to see progress in removing the rough edges. I have found that as I work the process the rough edges are highlighted by the freshly sanded bowl top. They really are clearly visible as most of the time they are either blackened or at least more stained than the fresh wood. I give me a constant picture of what needs to come off on each edge of the top. The picture below clearly shows the rough edges on the outside of the bowl. I continue to sand until I have minimized those and the outer edge begins to return to round. I sand until the top is smooth and round. I generally have to make a decision regarding when to stop based on the depth of the chips and rough edges and whether I should bevel the edge to finish the work.
topping5

In the next two pictures the bowl is at the point of decision. Either I continue to sand and take out more of the roughness or I will do a slight bevel on the outer edge of the pipe. I take the overall look of the pipe into consideration in this decision. How much will more sanding change the profile of the pipe? How much will a slight bevel change or maintain that integral look and flow? Those are considerations that I make at this point in the topping process. I check the depth of the remaining spots on the bowl and from there come to a decision.
topping6

topping7

This bowl is finished with the topping and I have decided to bevel the edge to minimize the remaining chips on the edge. To do that I take a small piece of sandpaper and fold it in half and place it at an angle to the bowl edge between my fingers. I am aiming for an even bevel at this point and must be careful to maintain the angle the entire circumference of the bowl. To facilitate this I work the entire circumference each time I go around the bowl. Between each time around I check to see that the angle is maintained and to see what remains to be removed in order to give a new smooth surface to the bowl. The two pictures below show that angle and the general work of the beveling.
topping8

topping9

The four pictures below show the first turn of the beveling. You can see from the first picture that the roundness of the bowl top is coming into shape. The other three pictures show the two sides and the front of the bowl from the side to show the angle of the bevel – it is subtle as I do not want it to look to rounded. I am aiming for the roundness that comes with age and wear on a pipe.
topping10

topping11

topping12

topping13

The four pictures below show the beveling process completed. You will note that a few deep chips still remain on the edge of the bowl. The stain will hide most of these and those that remain give character to the old pipe in my opinion.
topping14

topping15

topping16

topping17

When I have finished beveling the pipe I will often sand the entire bowl with 1200 grit sand paper to even out the rough spots from the bowl sides, front and back. It also allows me to better match the new stain that will be applied to the entire bowl. After sanding I wipe the bowl down with 99% isopropyl alcohol (less water content with more percentage). The wipe down removes a bit of the colour of the original stain which aids the match on the restain. It also highlights areas that I need to give more attention to with sanding. The pictures below show the pipe after sanding and the alcohol wipe down.
topping18

topping19

topping20

topping21

The prepped bowl provides a few challenges to a good restain. The very visible pink fill on the back of the bowl will need to be blended in with stain. I will also have to blend the edges that have been beveled with the colour of the bowl sides and top. My goal is to make that transition look natural and original. Before staining it I wipe the entirety of the bowl with isopropyl alcohol one final time. This wipe will take off any remaining dust on the wood and ready it for the stain. I will be using a black cherry aniline stain on the bowl as I hope it will blend in the fill and make it a bit less noticeable. I apply the stain with a q-tip and then light it on fire with a match or lighter to set the stain. This process is called flaming the bowl and burns off the alcohol but does not harm the briar. Once it has been flamed I wipe the bowl off with a soft cloth and completing the staining process. Further application of stain is an option that will darken the bowl. I applied the stain a second and third time to the fill and surrounding areas to see if I could blend it a bit more. The fifth picture below shows the fill. It still shows in the picture but in hand it looks more subtle and subdued. From the pictures you can see the effect of beveling the edge very clearly. The top shows some nice grain and a gentle curve to the sides of the bowl. The overall effect is to restore the clean and well broken in look of the pipe. The colour brings out the natural patina in the briar and blends the older and the newly stained freshly sanded briar. Here are pictures of this step in the process.
topping22

topping23

topping24

topping25

topping26

Once the stain is well dried the pipe is taken to the buffer and given a good buff with white diamond. The idea is to polish and give a bit of depth to the pipe bowl. Carnuaba wax is then applied for a final shine to both pipe and the stem. For the sake of this essay I have not done much with the stem. I still need to sand and clean off the remaining oxidation. But I wanted to show the flow of the entire pipe in its topped, finished and stained form. The stem still needs work at this point but that will come next.
topping27

topping28

topping29

topping30

topping31