Tag Archives: Stem repairs

A Piece of WWI History – A CCC Officier’s Pipe from the France Campagne 1914-1918

Blog by Steve Laug

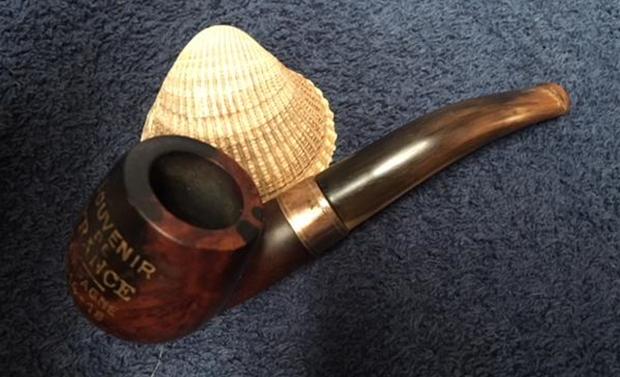
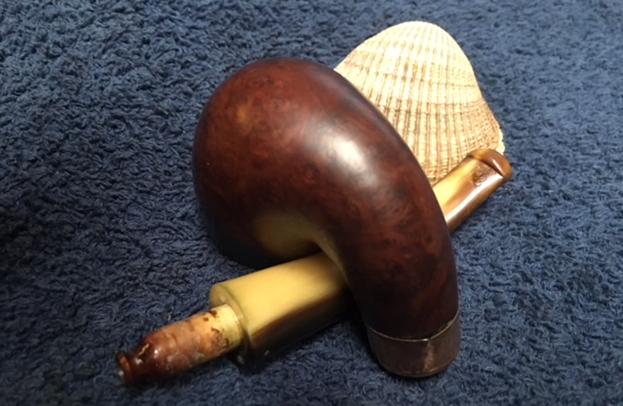
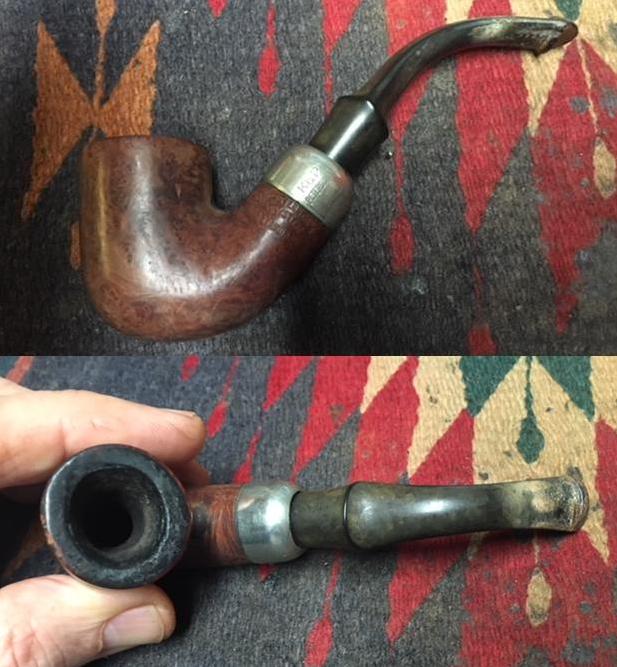
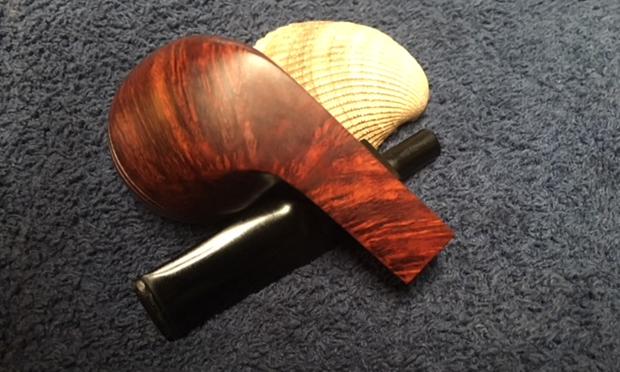
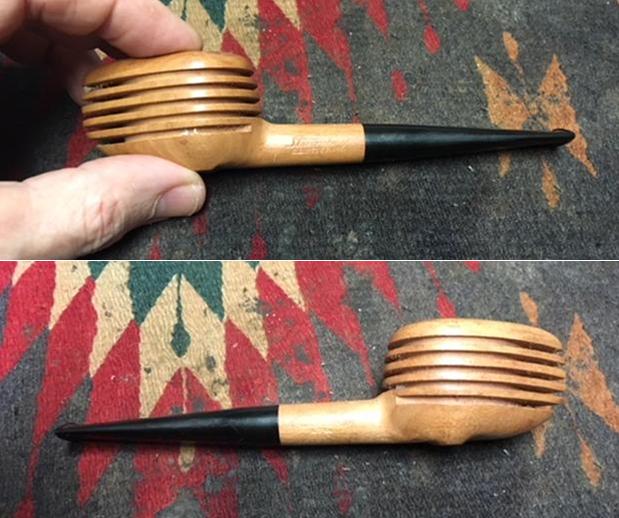
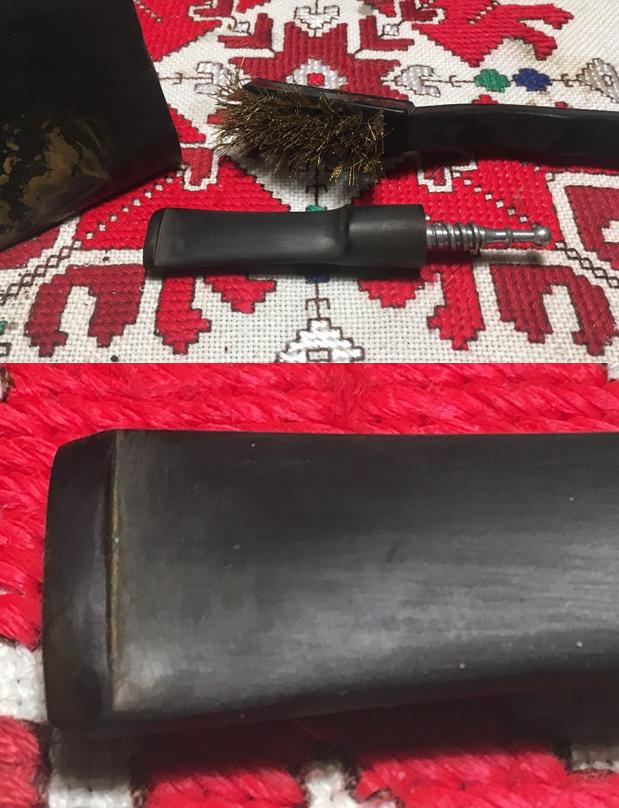
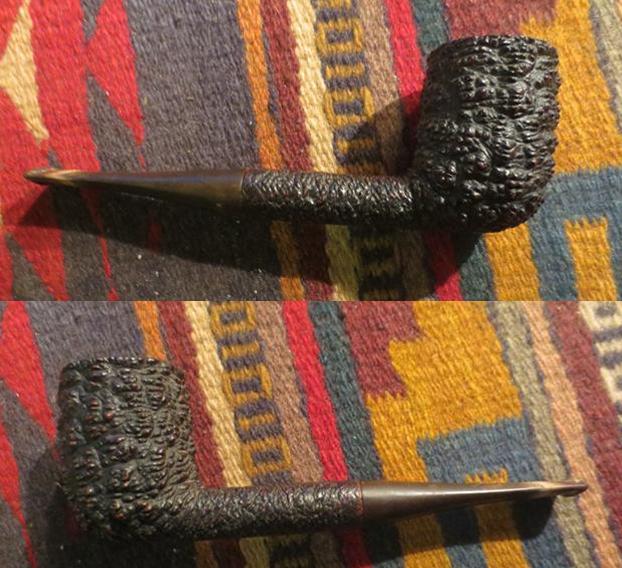
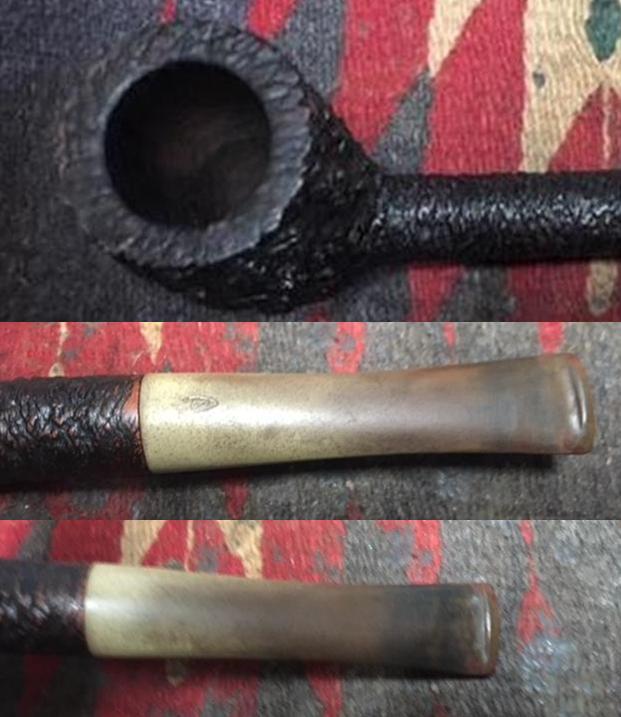
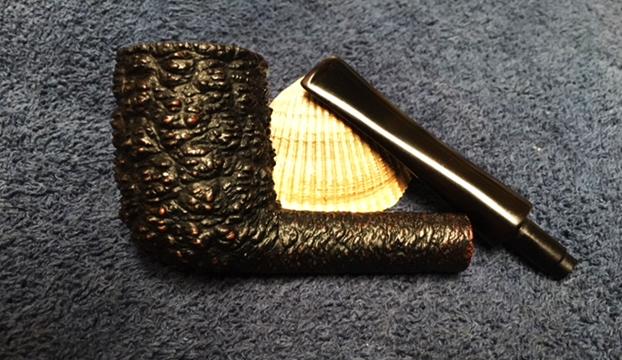
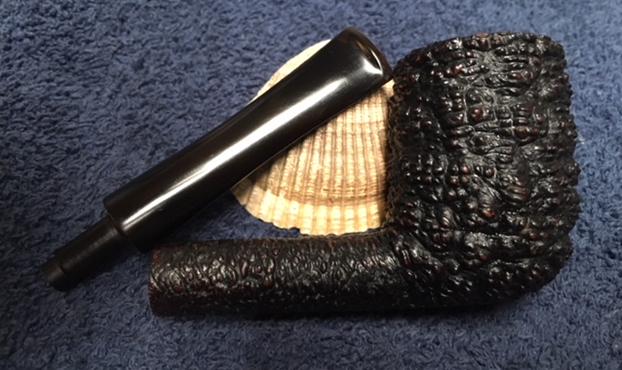
I have been doing quite a few repairs lately and really needed a break to work on some of my own. I decided to work on one that my brother sent recently. It is a horn stemmed briar that is stamped Officier with a CCC triangle logo next to that. There is a copper coloured band on the shank for decoration since the shank is not cracked or damaged. The bowl also has embossed filigree on the front side. It reads Souvenir De France Campagne 1914-18. The band had several dents in the surface and there was a stamp on the band as well – a diamond with something stamped on the inside that is unreadable. The band is more of a ferrule than a band with the shank end cover by the edge of the ferrule. The pipe was incredibly dirty with grime and grit all over the outside of the bowl.  There was also some dark stain on the front and right side of the bowl. The rim also has some dark spots. Removing that damage would also damage the gold lettering on the front of the bowl. There was a light cake in the bowl and some darkening on the top of the rim. The inner and outer edge of the bowl was also in great condition. There were some small nicks around the outer edge. The horn stem had a slight twist to the right side. There were some worm holes on the right side near the union of the stem and band. There was also some worm damage on the underside of the stem next to the button on the left side. There were some rough spots on the top of the stem between the shank and the button – almost some delaminated spots. Jeff took the following photos before he cleaned the pipe. 
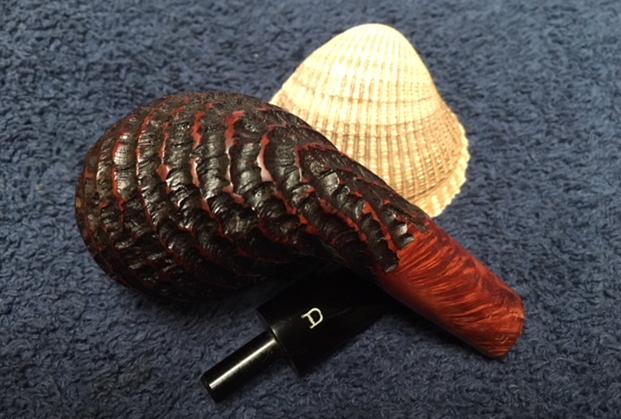
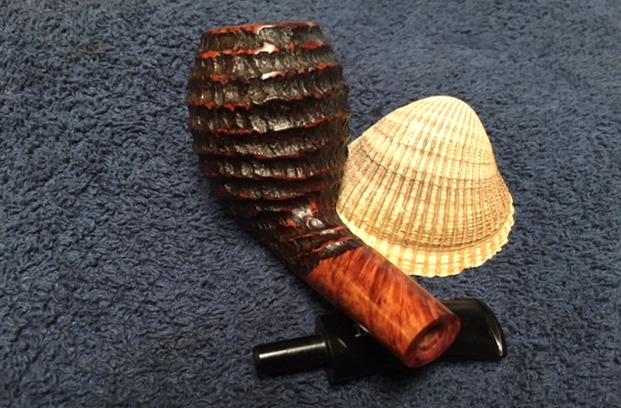
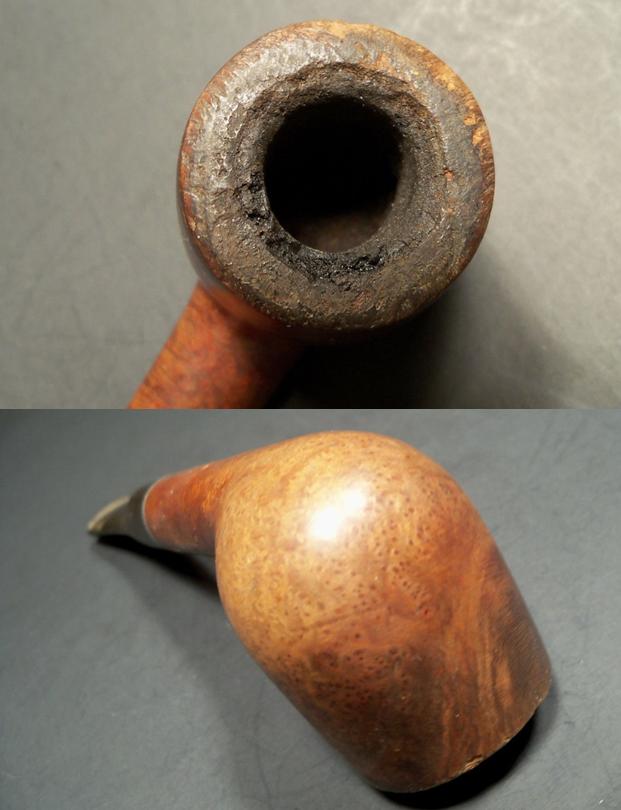
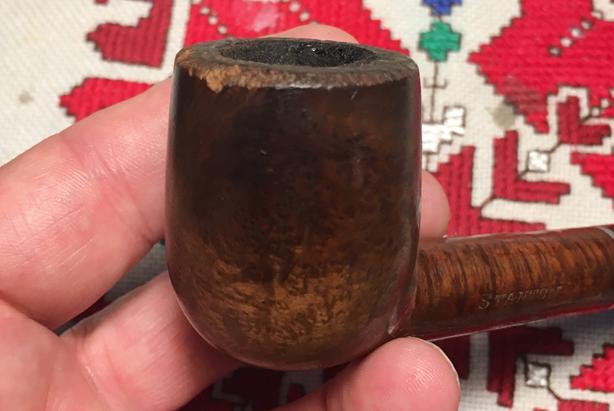
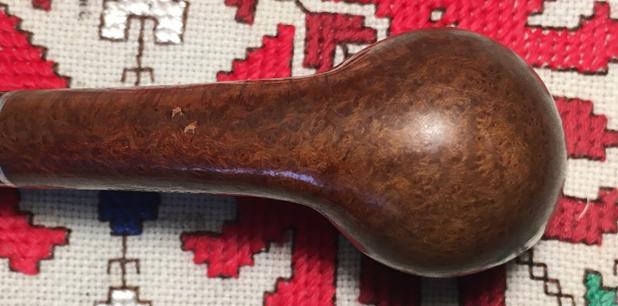
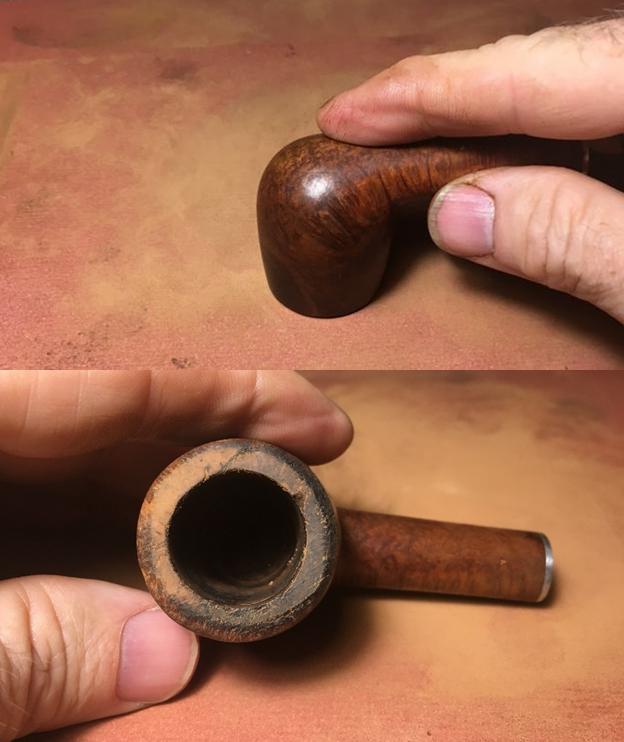
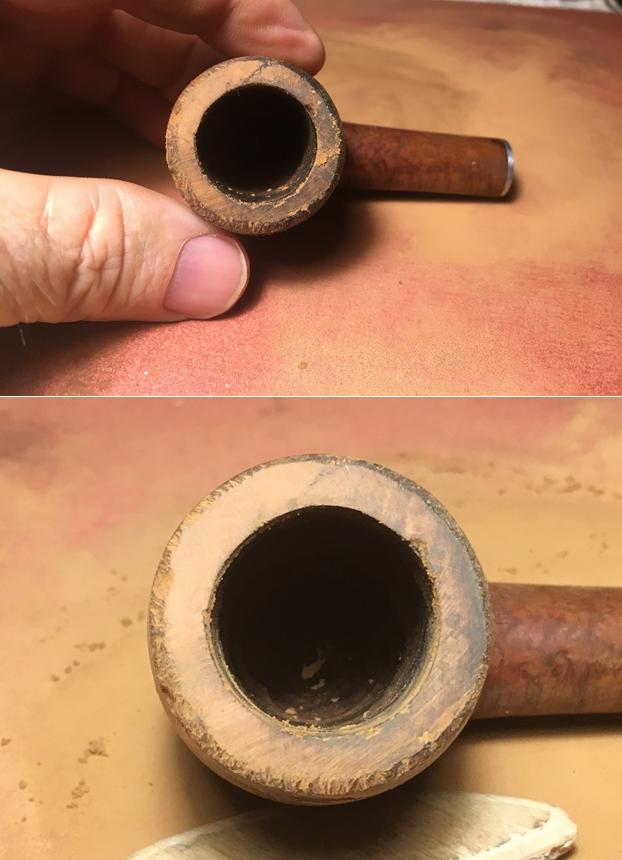
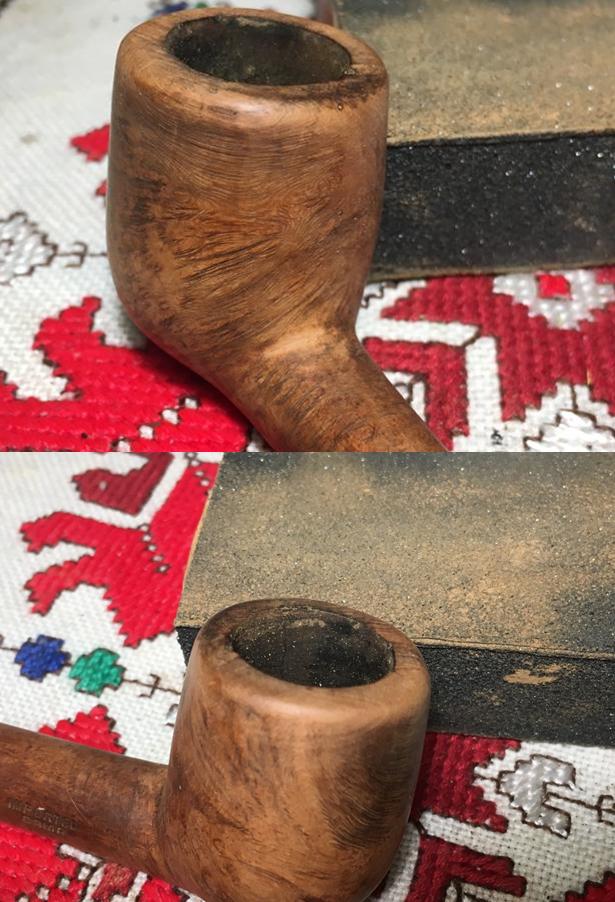
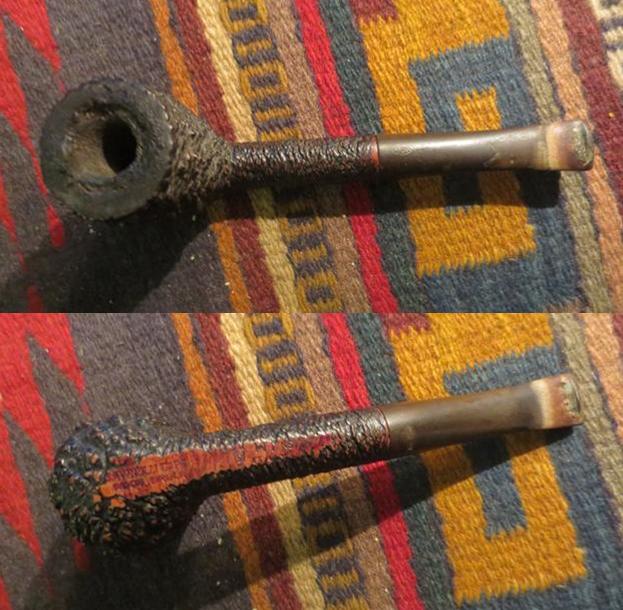
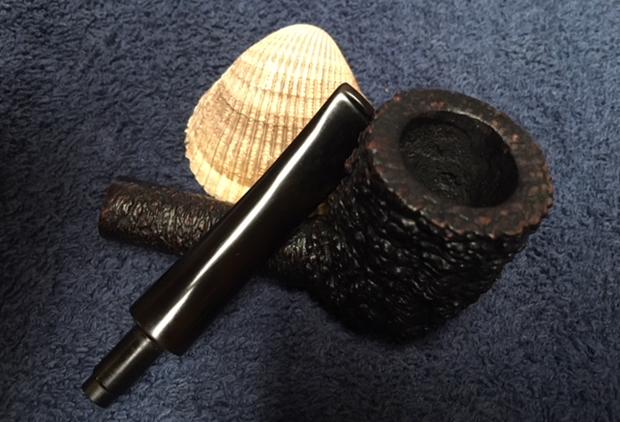
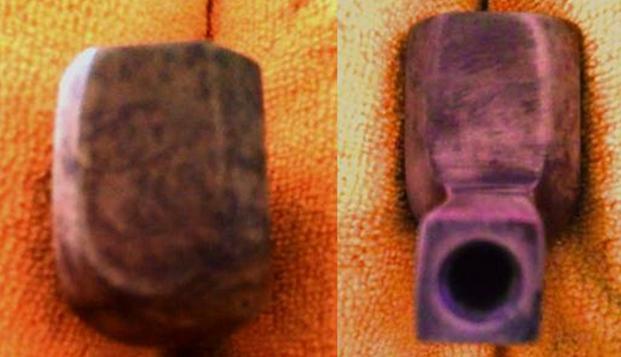
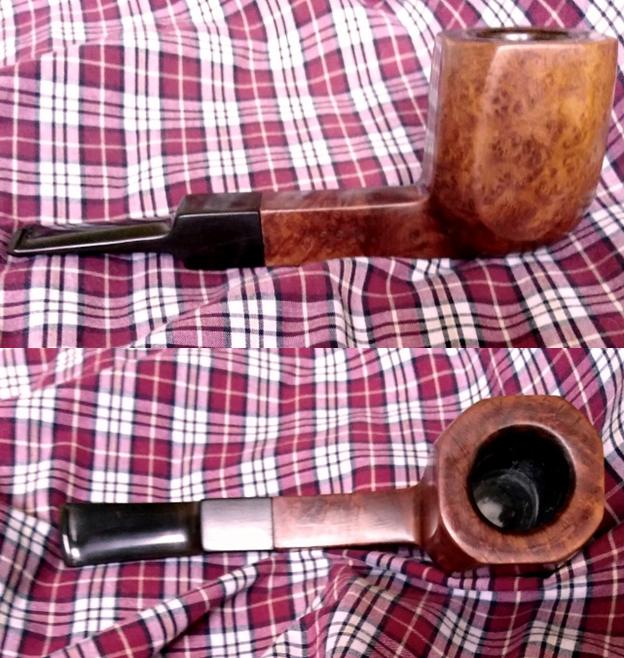
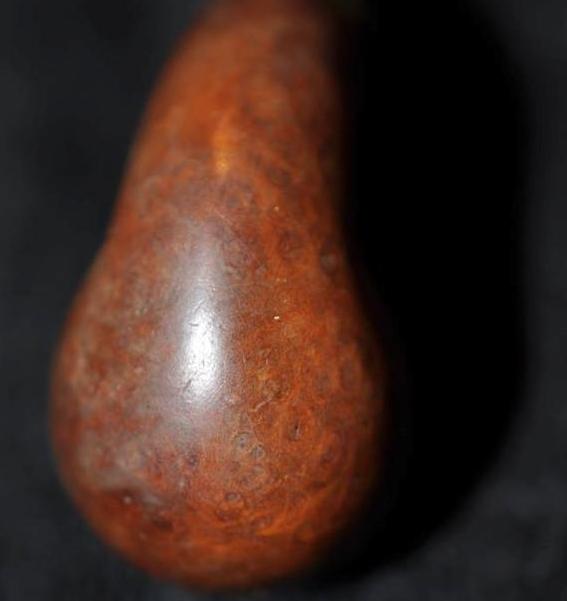
Jeff took close up photos of the rim top, the bottom of the bowl to show their general condition the grain is quite beautiful under the grime. 
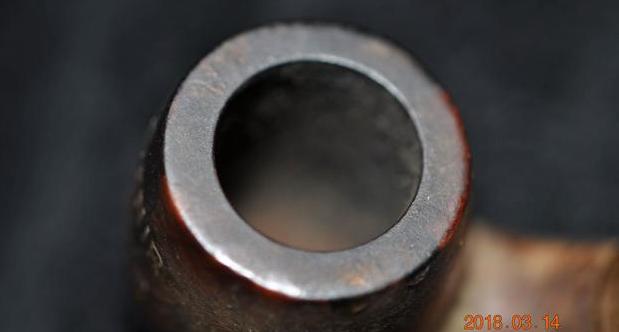
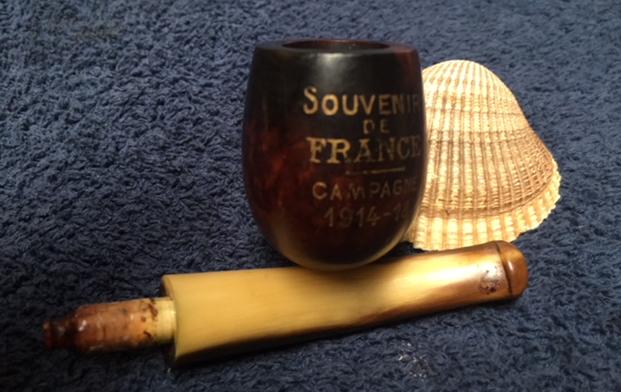
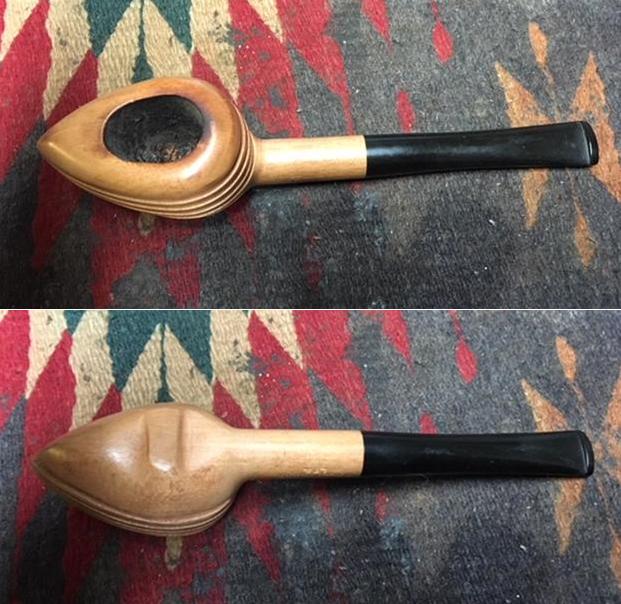
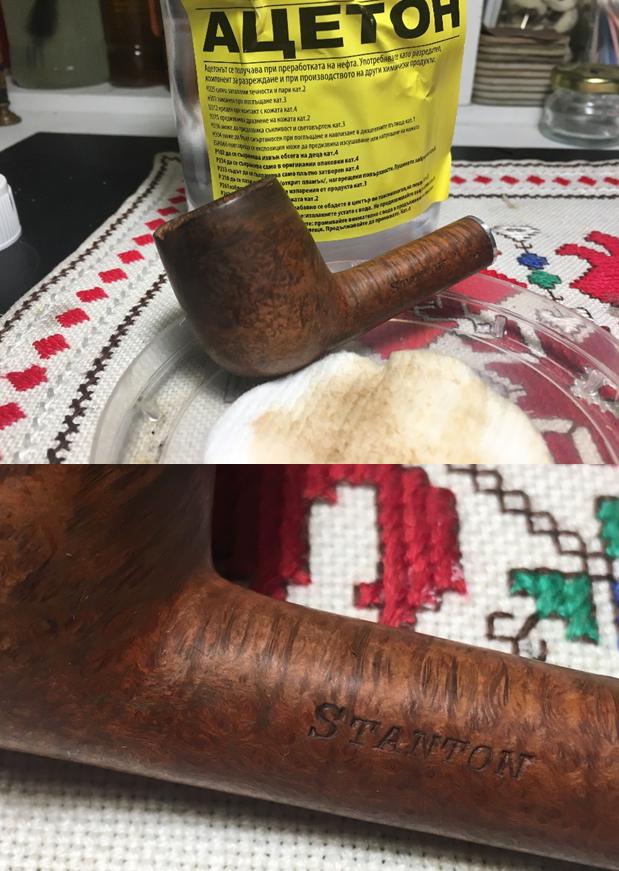
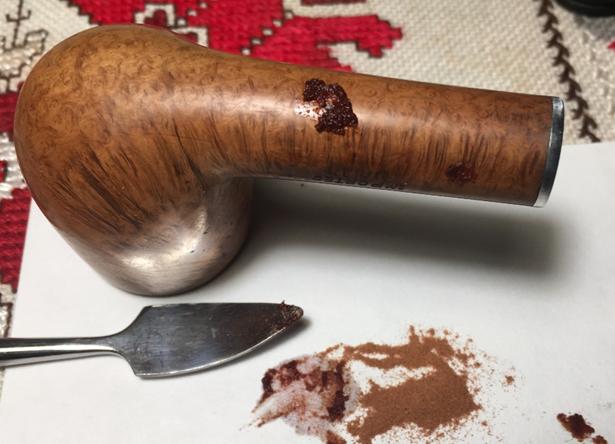
He took a great photo of the front of the bowl to show the gold stamping. It is very readable and in good condition. You can also see the dark stain on the briar underneath the stamping. I have seen this kind of stain on pipes in the past that has been caused by water or some kind of moisture that the pipe was laid in for a long period of time. In this case you can use your imagination and consider that possibly this damage occurred while in the hands of an officer in the French Campaign in WWI in between the years of 1914-18 or possibly after the closing date of the stamping.
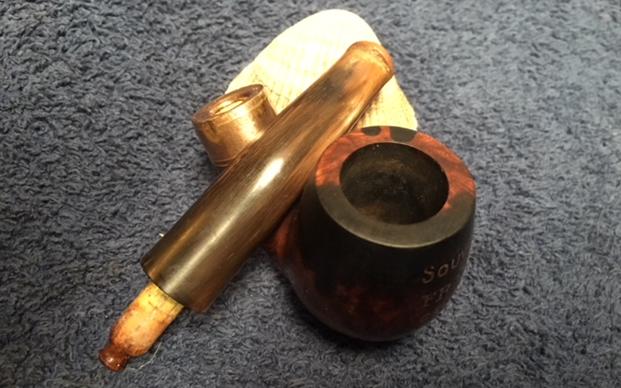
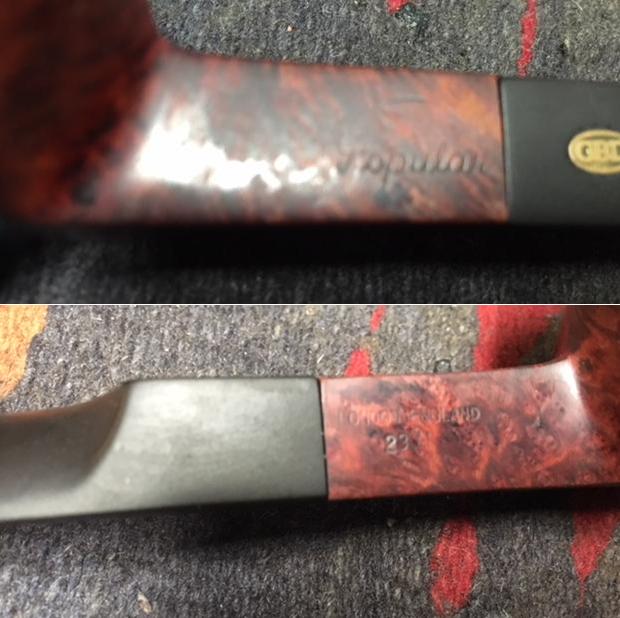
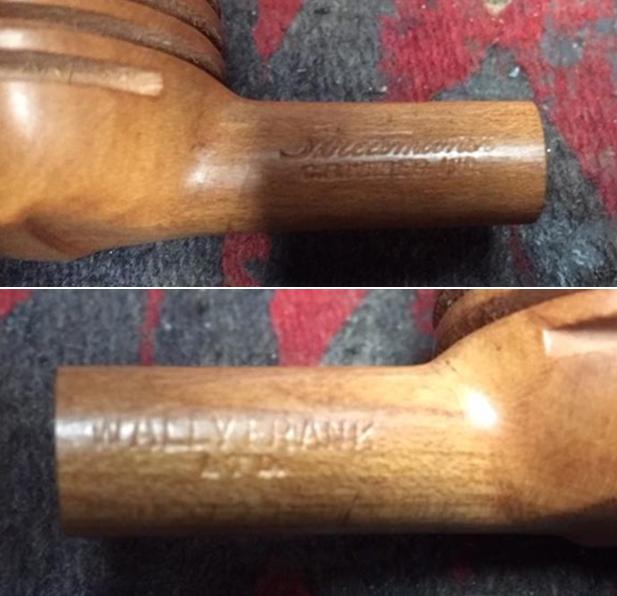
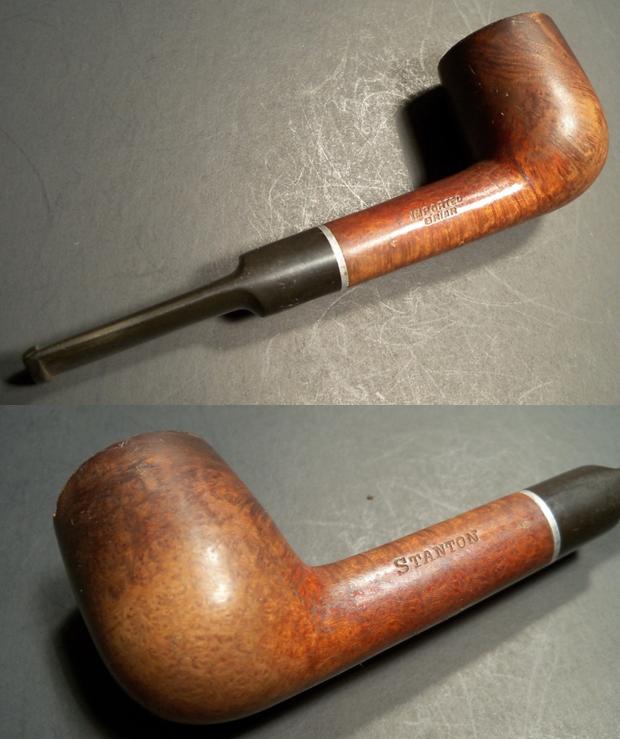
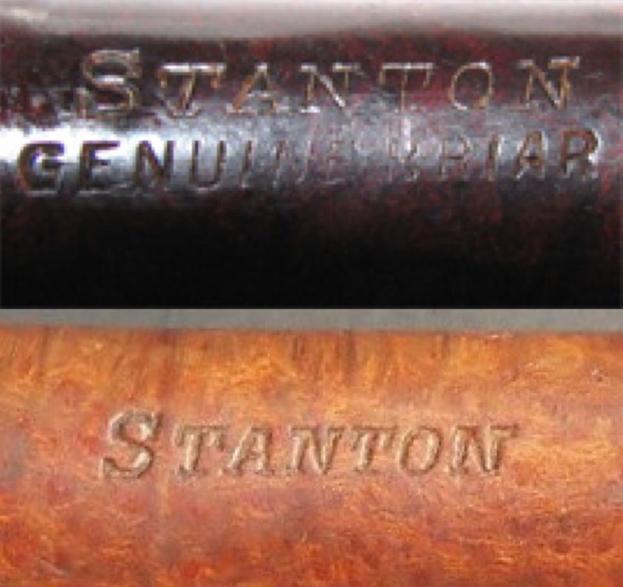
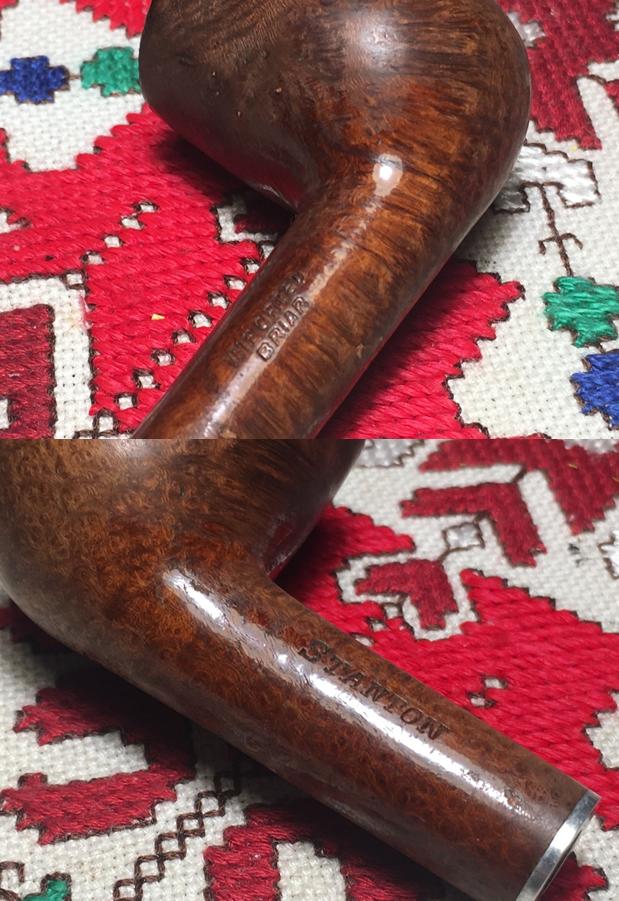
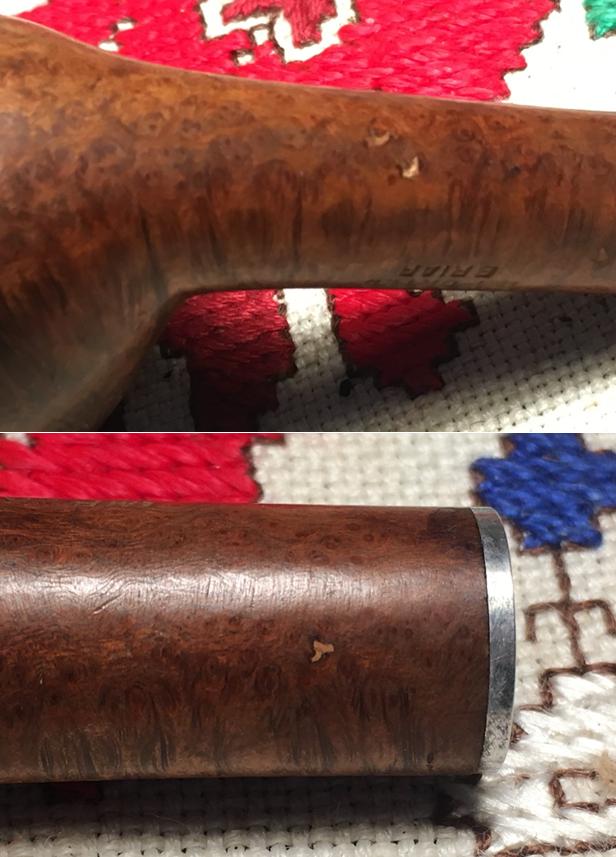
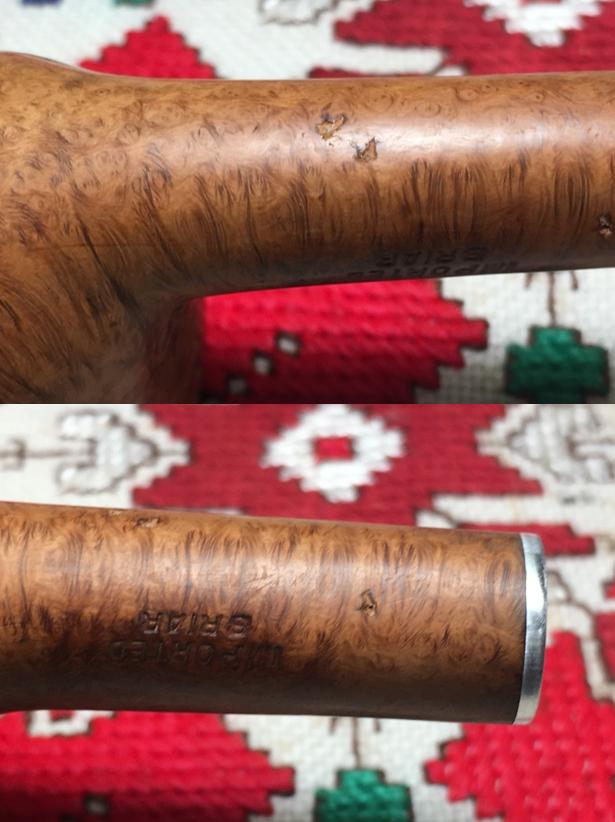
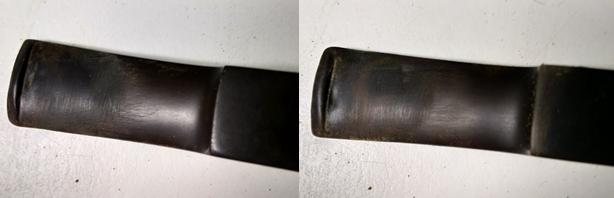
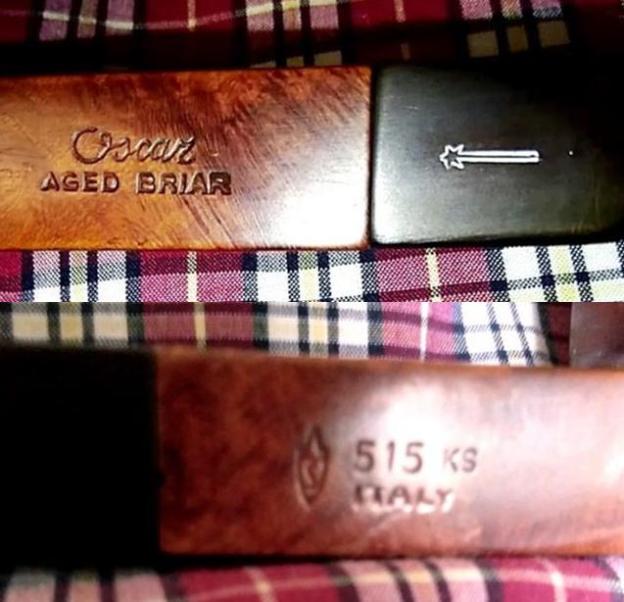
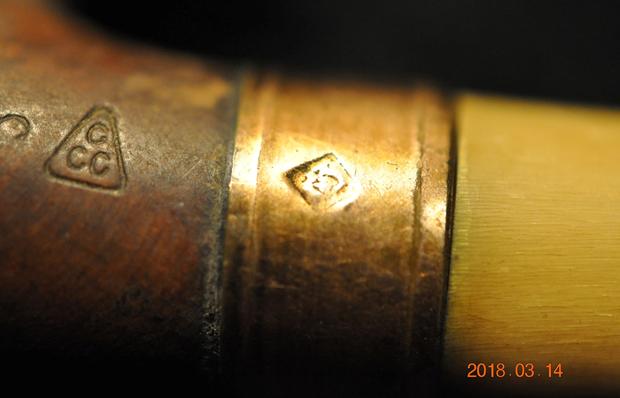
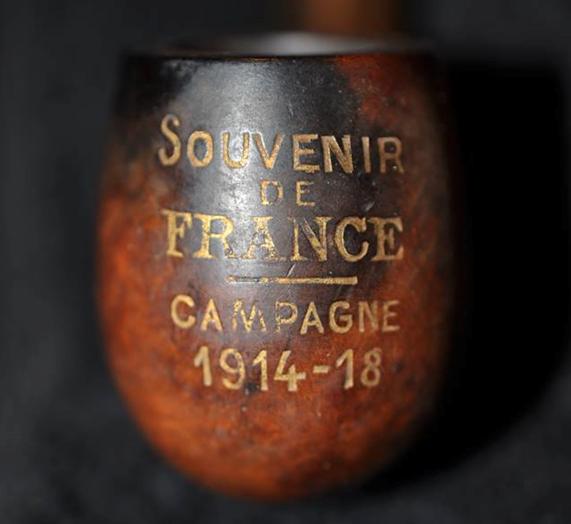
He took several photos of the stamping on the shank and band. The shank bears a script text with the French spelling Officier and next to that is the rounded edge triangle with three C’s stamped inside. The band has a diamond stamp with something inside of it but it is not discernible. 
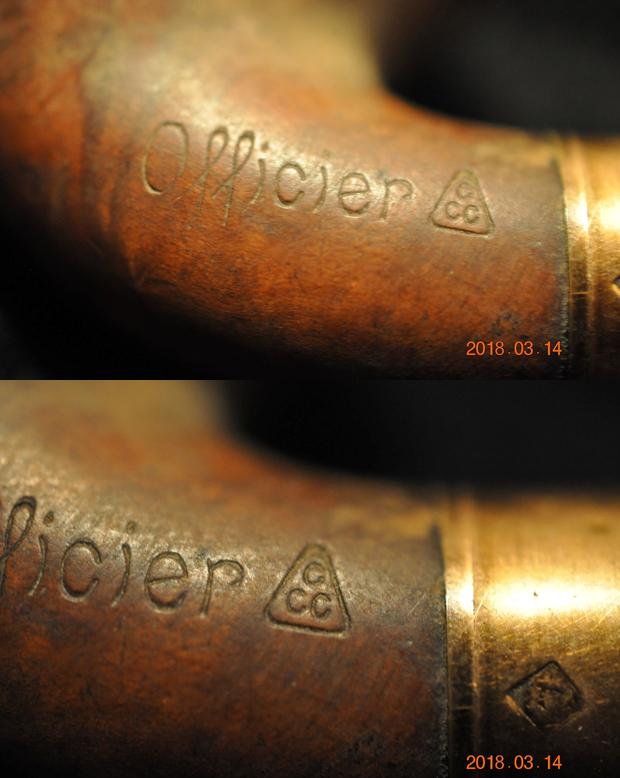
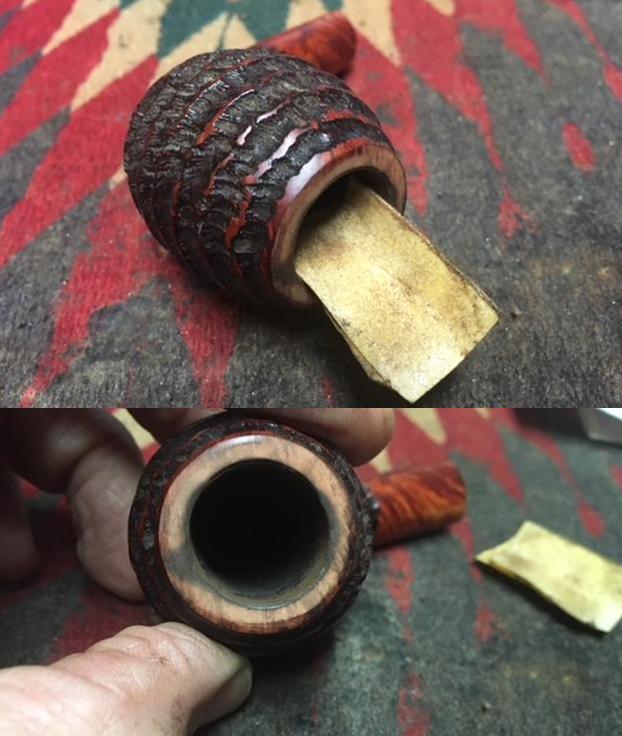
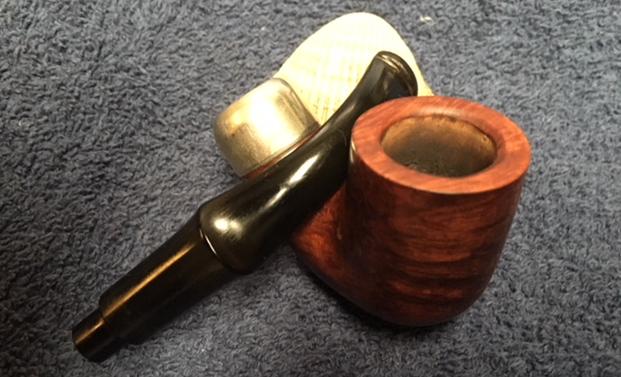
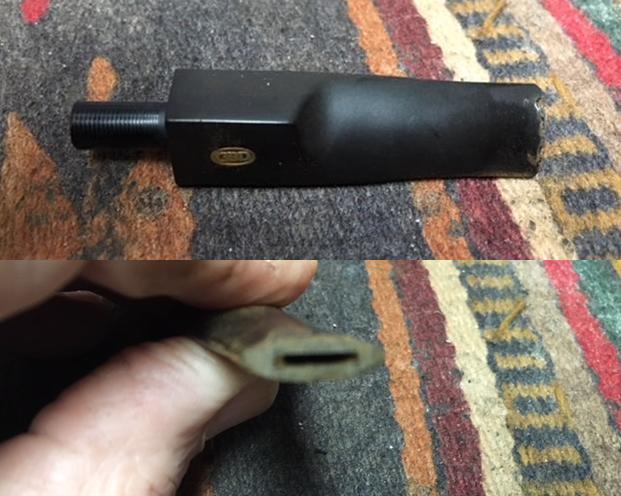
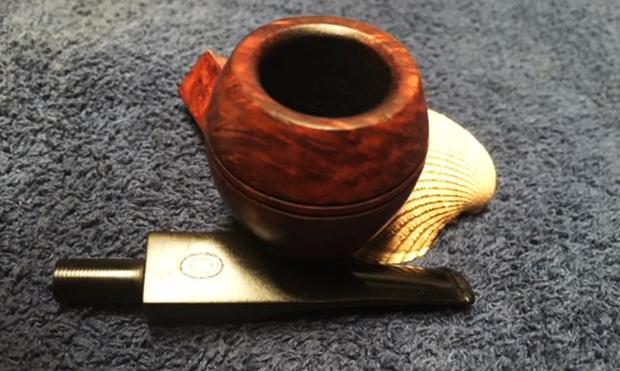
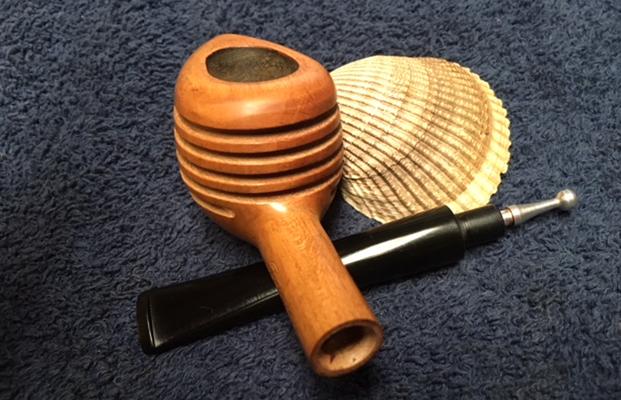
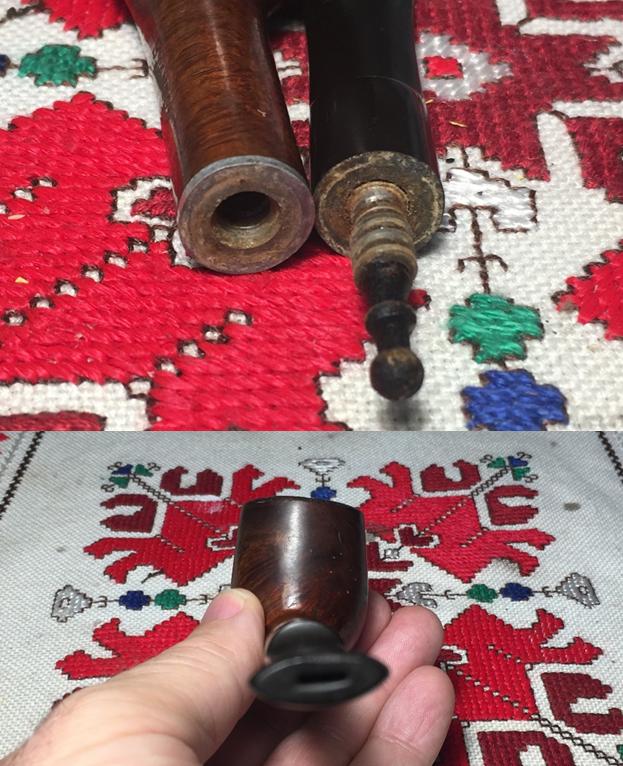
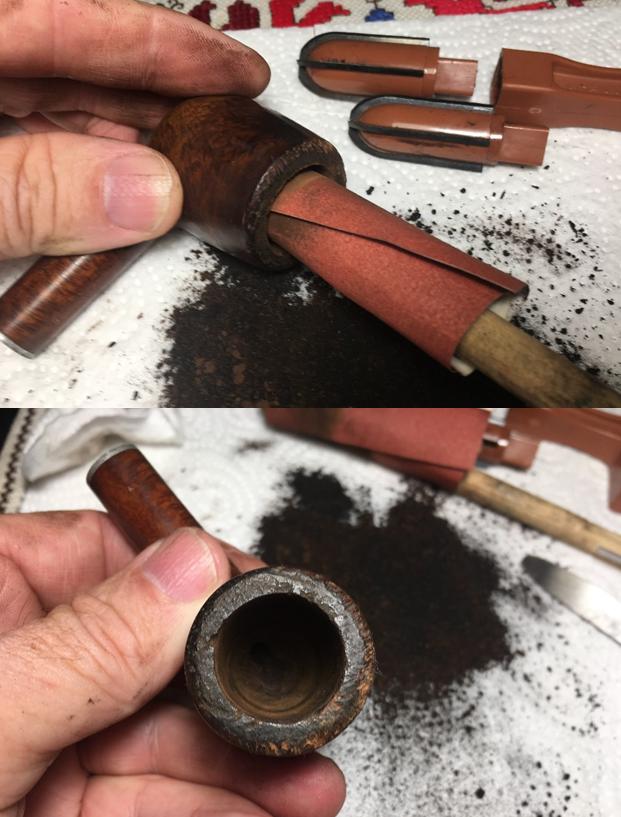
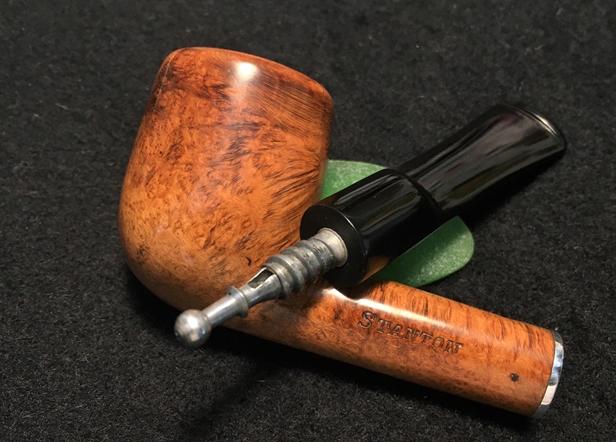
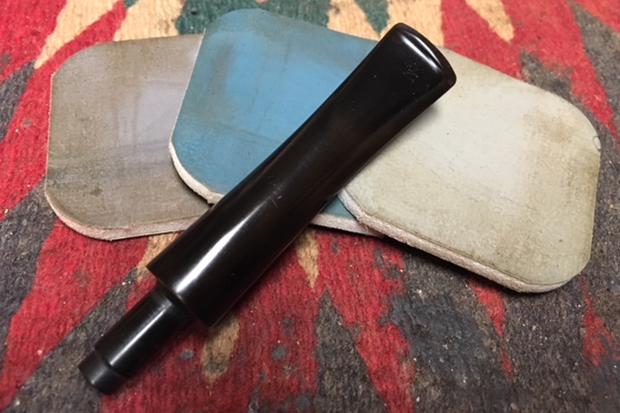
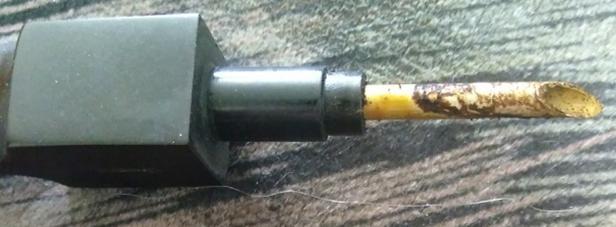
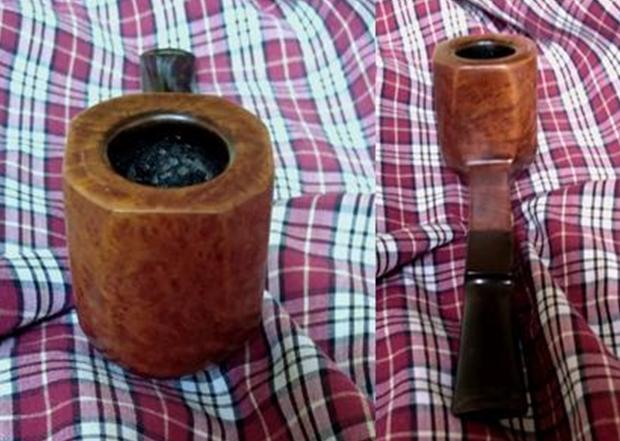
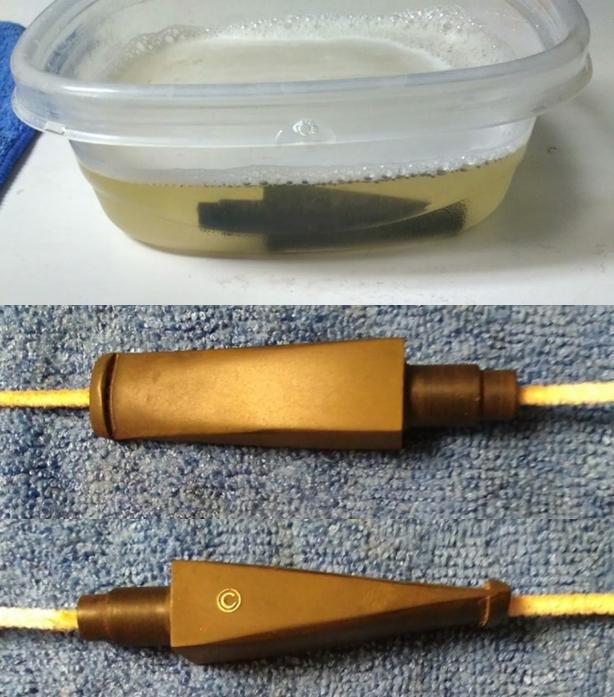
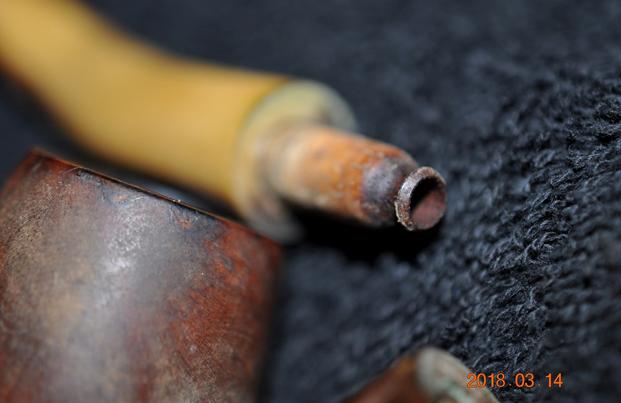
The band/ferrule on the shank was loose on the shank. When the stem was removed the ferrule came off in hand. The tenon on the horn stem was an older nipple style tenon. It appears to be either horn or bone. It was intact but dirty. 
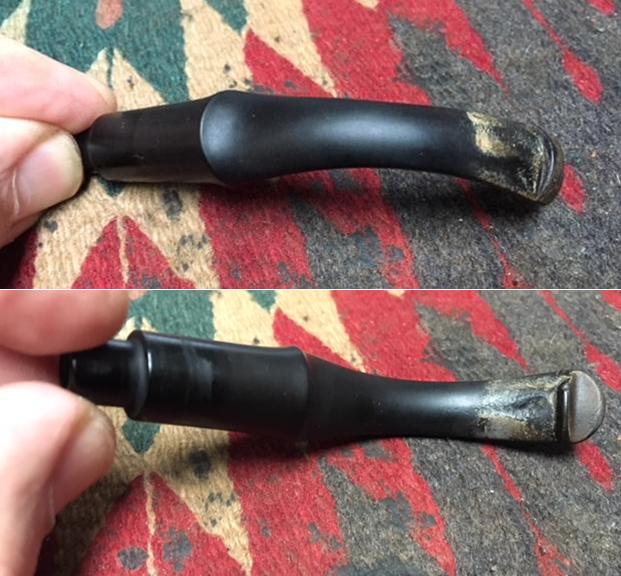
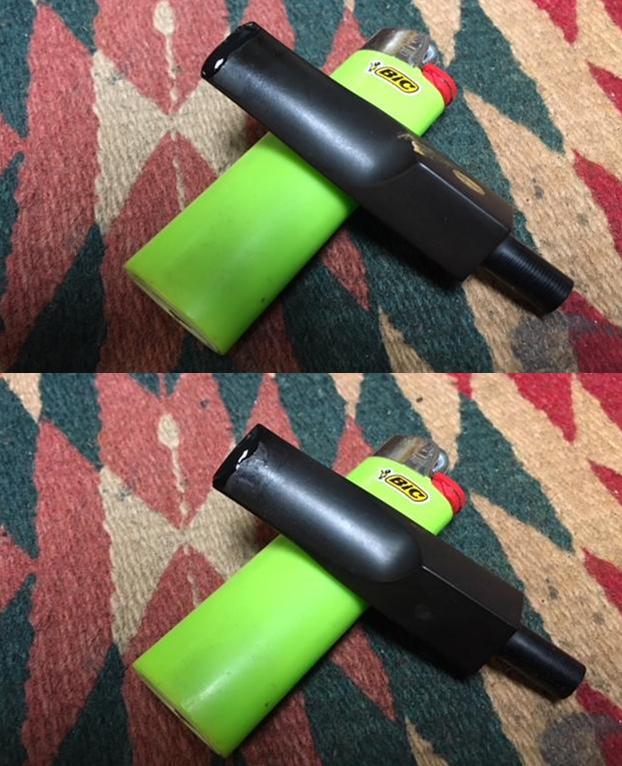
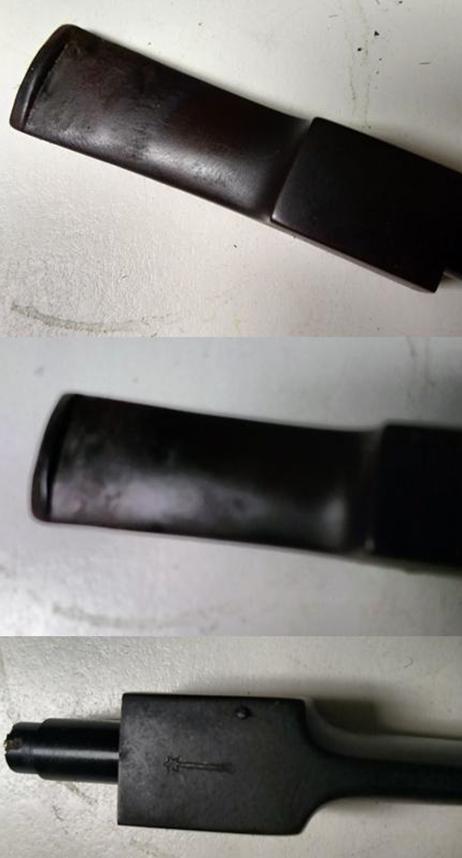
The next photos show the worm damage to the right side of the stem near the band union and on the underside of stem at the button. Fortunately none of them went all the way through the horn. I was unfamiliar with the triangle CCC brand so I did a bit of research. I looked on PipePhil’s site and did not find any information on the site. I also looked on Pipedia and found a possible link to a CC Paris in a triangle stamp. I followed the link on the French Pipes and Makers page to the CC Paris page. There I found the following information and interestingly photos of an Officier pipe. The only difference in the triangle logo was the stamping of Paris under the CC stamp instead of the CCC stamping. I am fairly confident that the CCC and CC Paris brands are linked together. I quote in full:

Every collector of antique pipes knows that pipe factory and retail store catalogs from the 1800s – early 1900s are as rare as hen’s teeth to find…and an even rarer occasion, when found complete and in good to better condition. This fragile catalog from this little-known French manufactory, merchandised its pipes with the logo of a triangle bearing the letters “C C Paris” embossed in fitted cases. Cases with this logo are known, but the Wolf and Mathiss name, until now, was not known as the factory behind the retail establishment. Wolf & Mathiss was originally known as Cawley & Henry, a pipe manufacturer founded in 1867. The product line was fairly robust, catering to not only pipe and cigar smokers, but also to cigarette consumers, because the catalog includes cigarette rolling papers that, according to company information, had received silver medals at two expositions, Anvers (1885) and Paris (1889). https://pipedia.org/wiki/CC_Paris

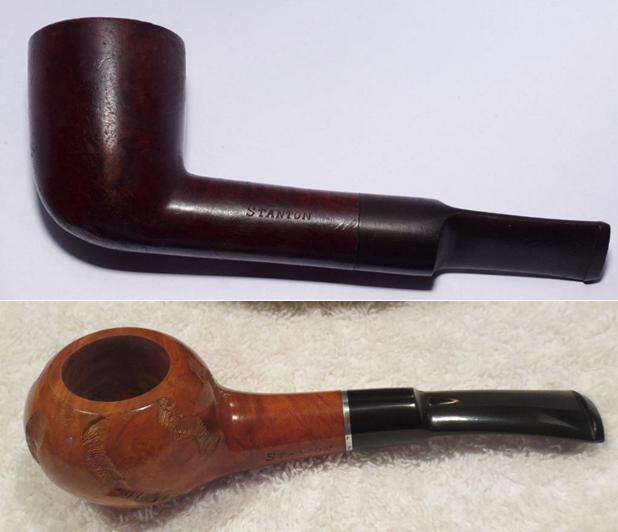
I have included two photos from that website. The first is a photo of the cover of a catalogue of the CC Paris brand. The second is of the left side of the shank revealing the stamping – the Officier with a triangle CC Paris to the right of that. The photos are courtesy of Doug Valitchka.There was also a link to the Tobacco Pipe Artistory blog. That site has a full catalogue of the pipe brand and some interesting information. I have included the link for easy access to the info.

http://tobaccopipeartistory.blogspot.ca/2015/11/wolf-and-mathiss-catalog-paris-1890-1900.html

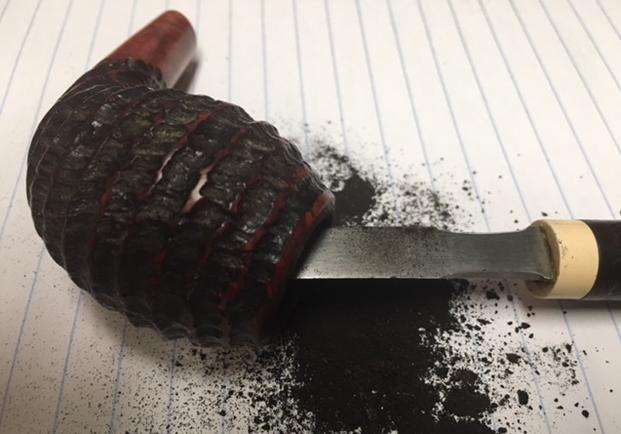
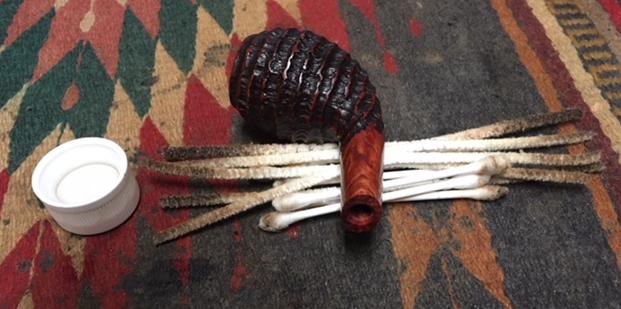
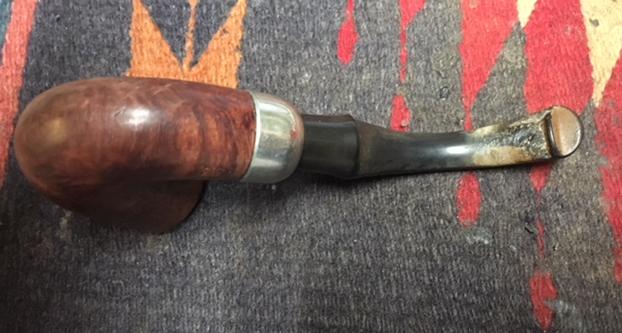
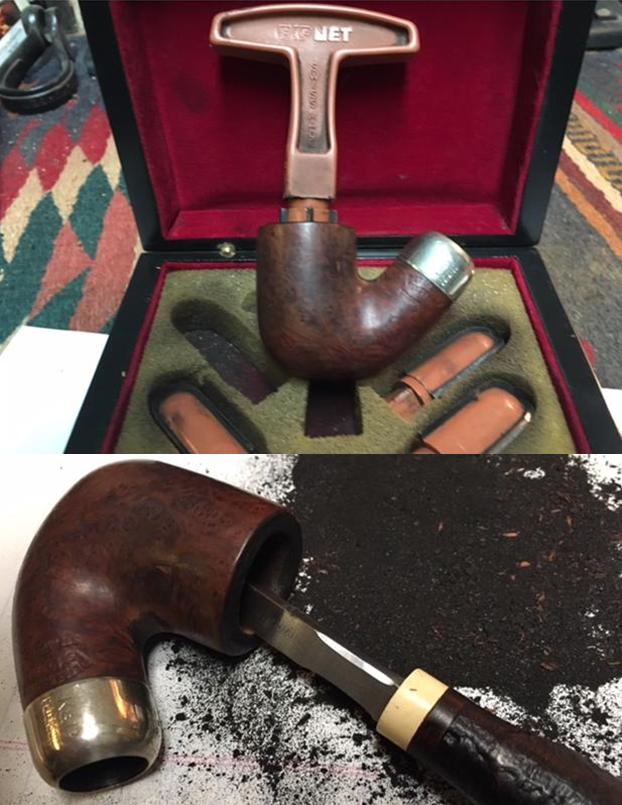
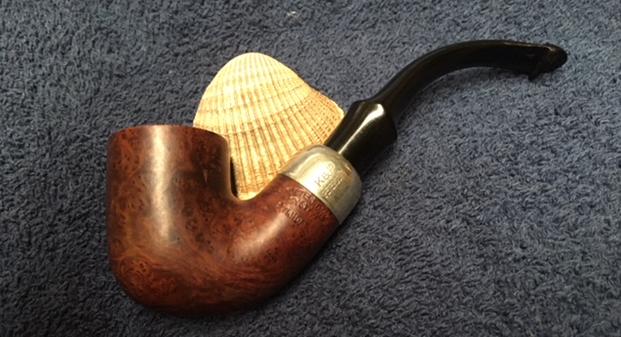
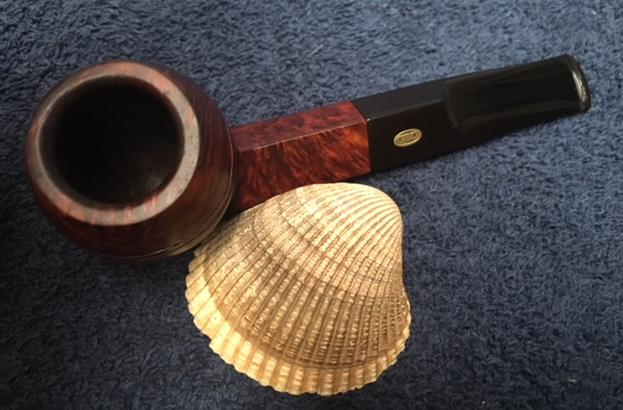
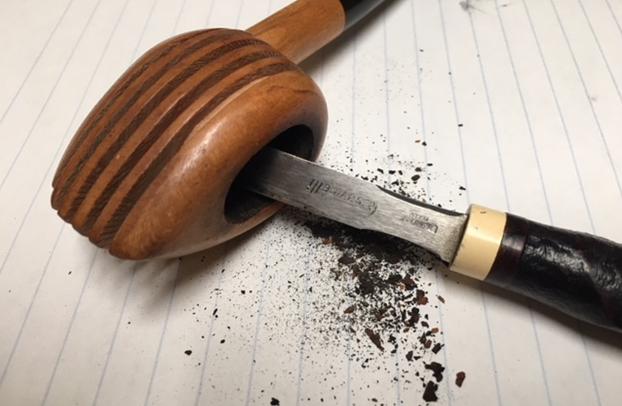
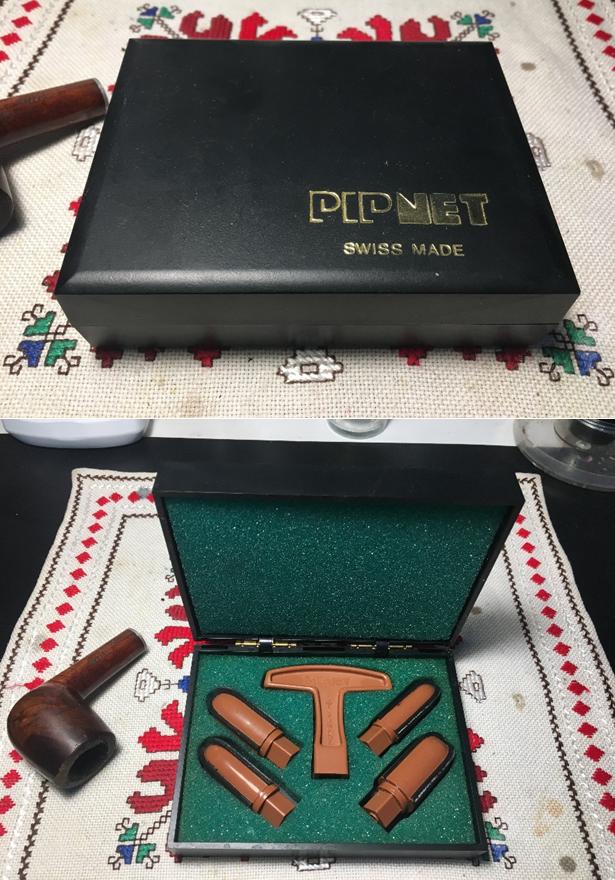
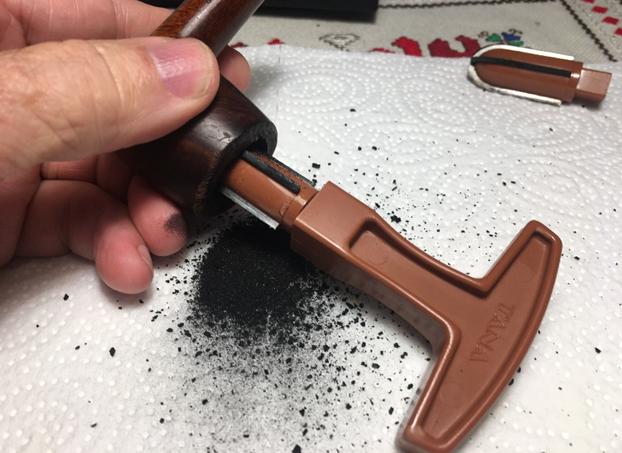
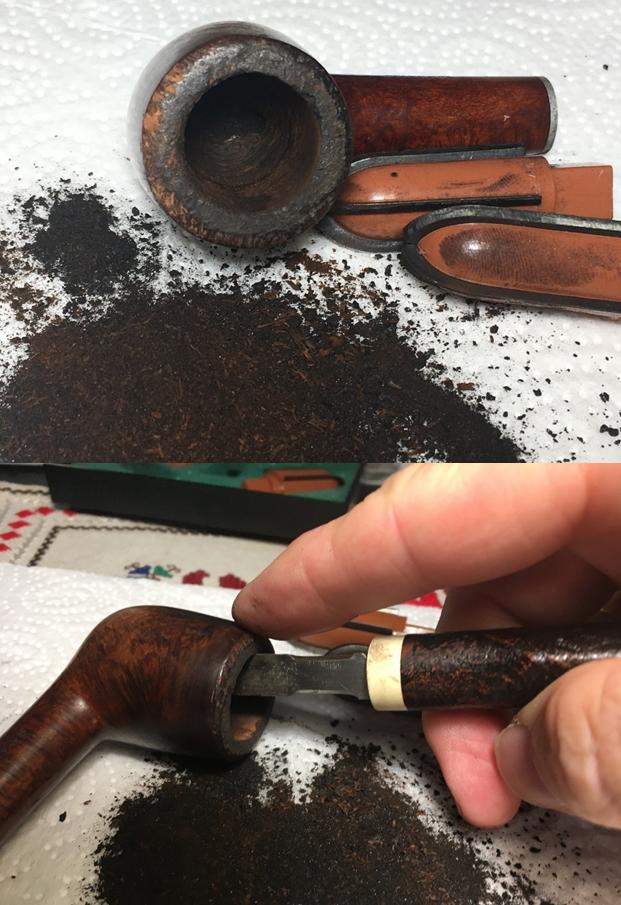
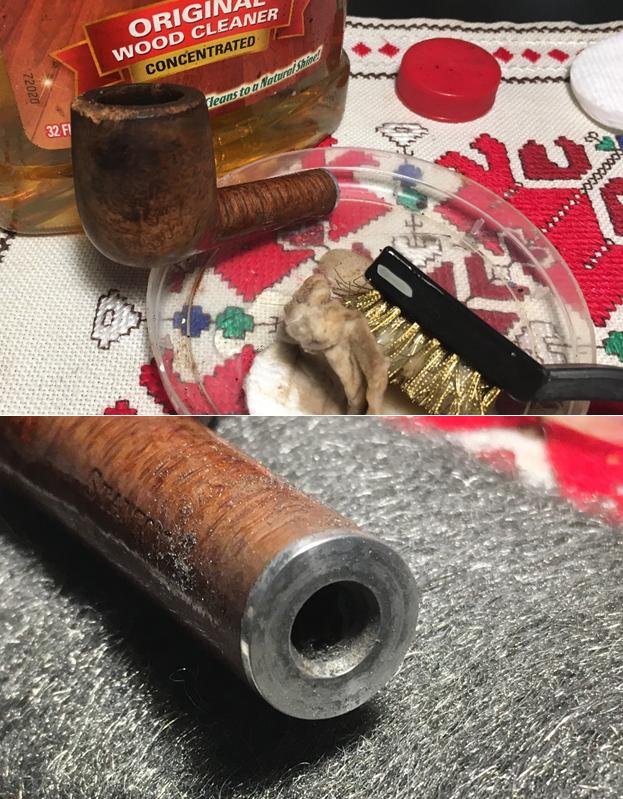
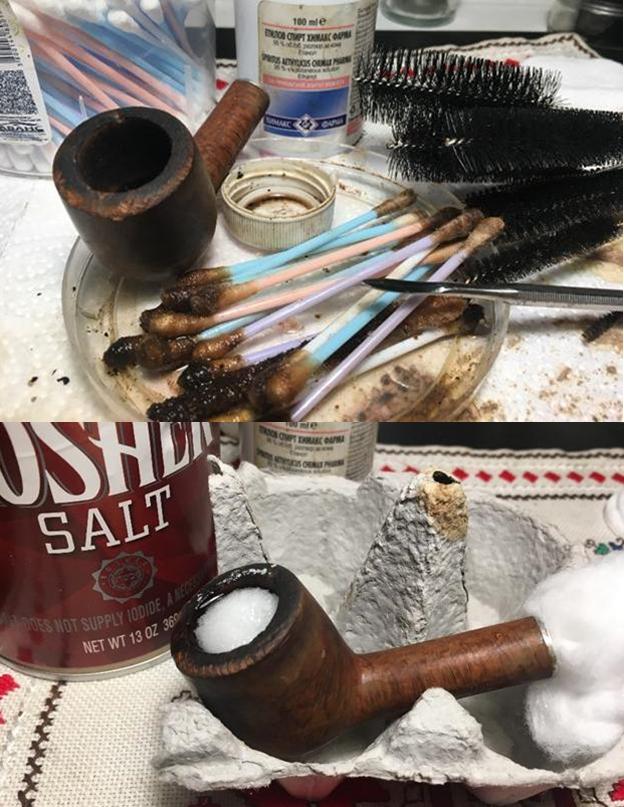
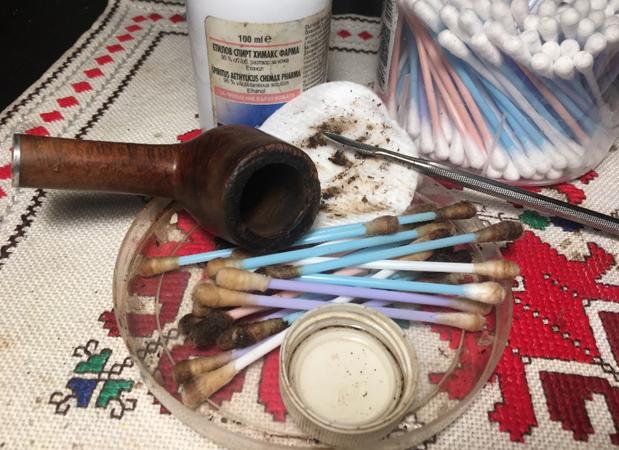
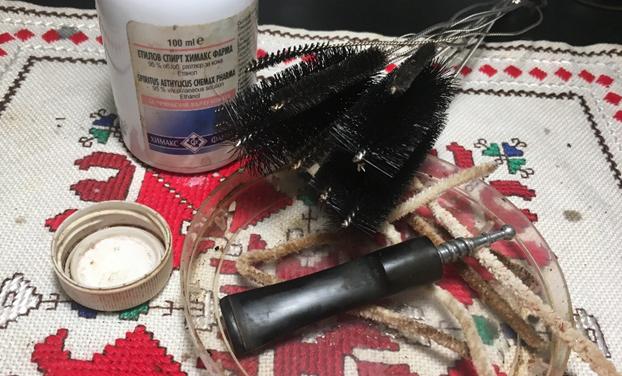
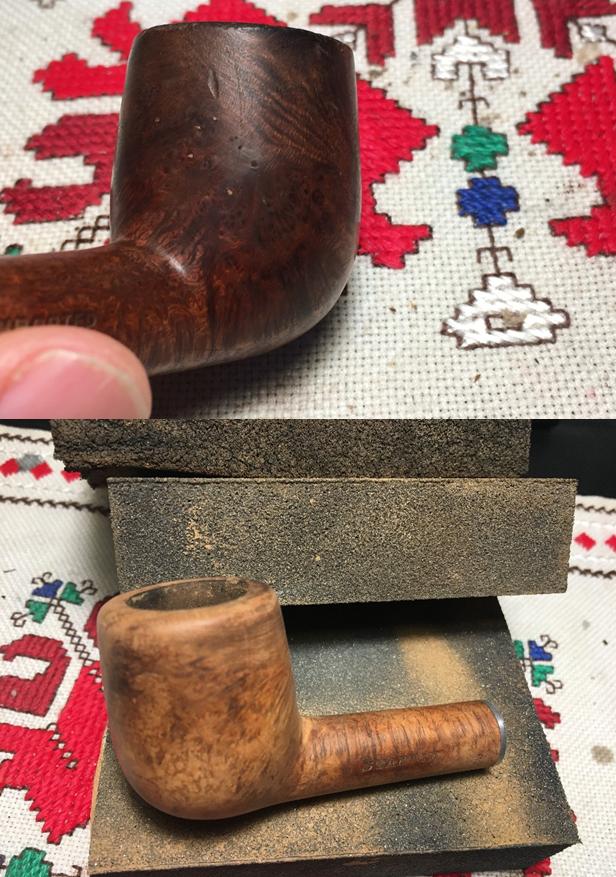
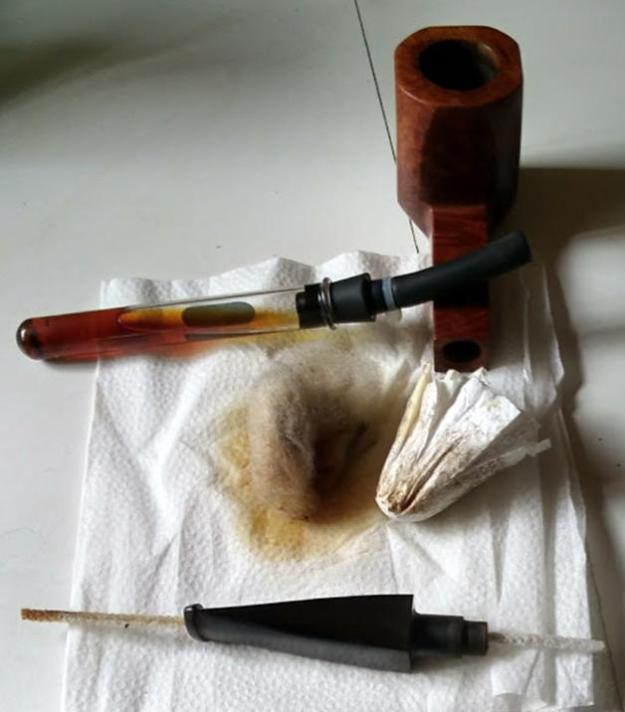
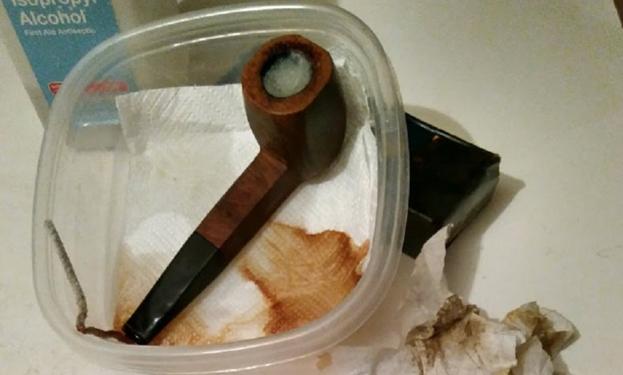
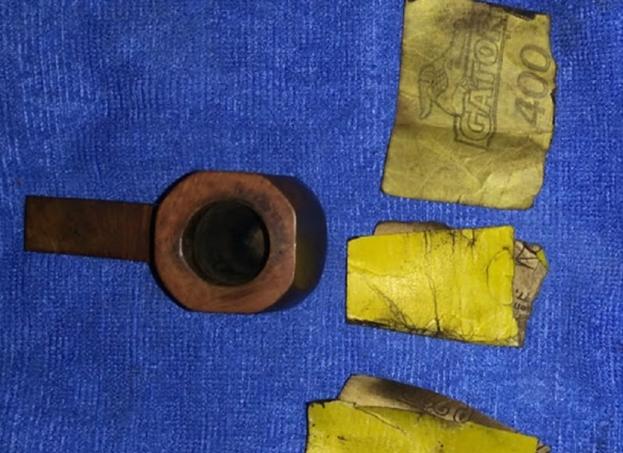
Jeff once again did his usual great job on cleaning this pipe, leaving it pristine and without damage to the finish. He was very careful to not damage the historic stamping on the front of the bowl. He reamed the bowl with a PipNet pipe reamer and cleaned up the remnants with the Savinelli Fitsall Pipe Knife. He scrubbed out the mortise and the airway in the shank and the stem with alcohol, cotton swabs and pipe cleaners. He carefully cleaned the exterior of the bowl, rim and shank with a tooth brush and Murphy’s Oil Soap to remove the grime of the smooth finish on the bowl and shank. He was able to remove the tars and oil on the rim but the dark stain on the front, the right side and the rim top remained. He wiped off the soap with a damp cloth. He dried it off with a soft cloth. Once the dust and debris were removed the finish looked very good. He cleaned the inside of the stem with alcohol, pipe cleaners and cotton swabs to remove the tars and oils. He washed the exterior of the stem to remove debris from the worm damaged areas. I took photos of the pipe to show its condition before I started my work on it. 
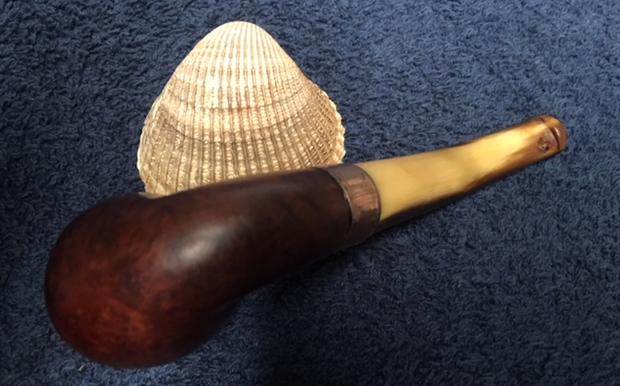
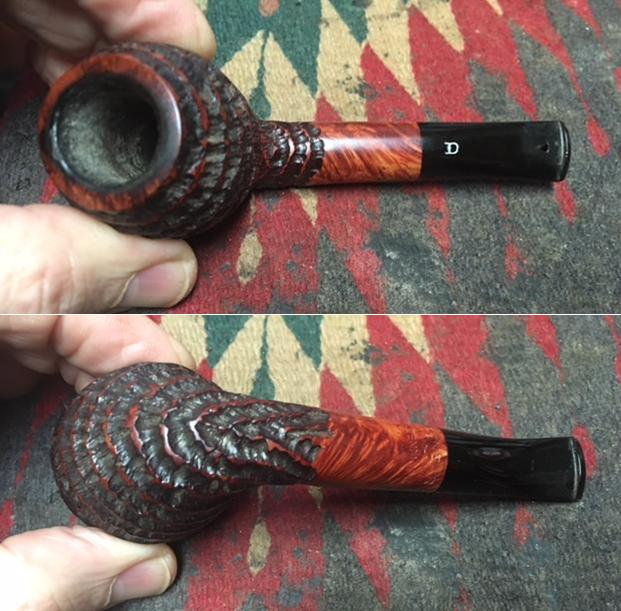
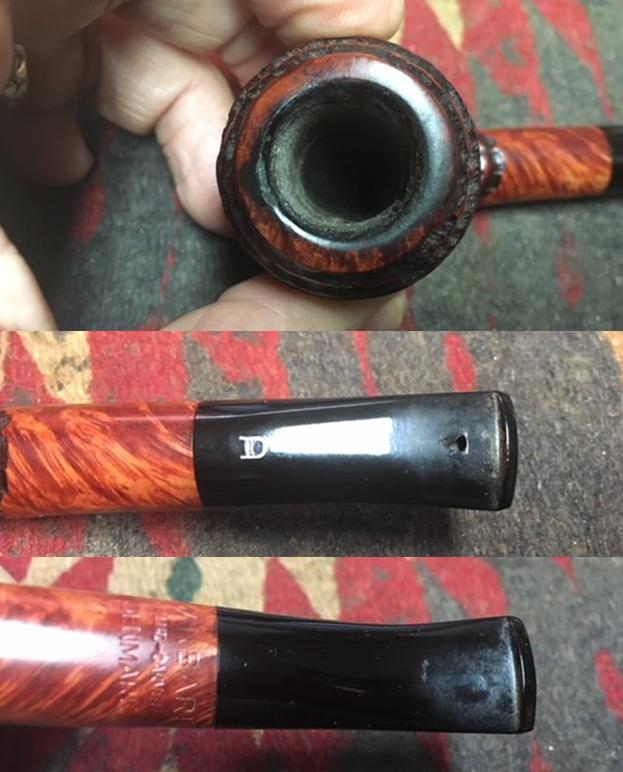
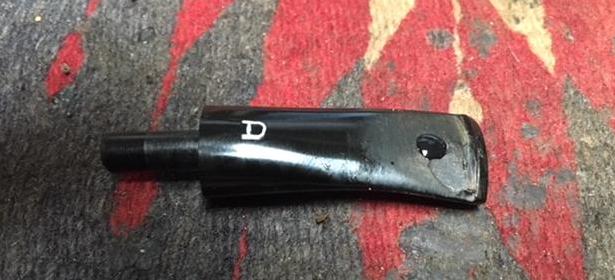
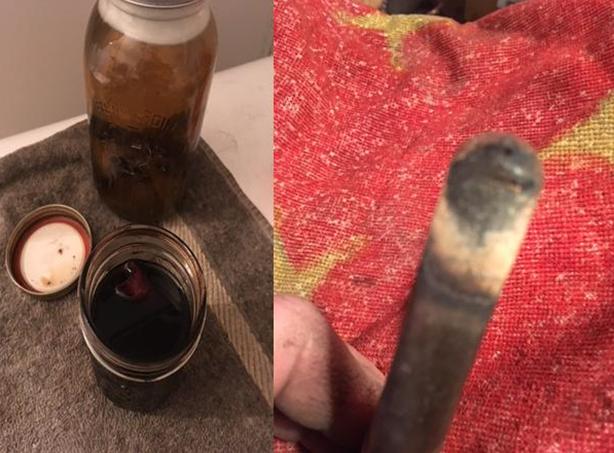
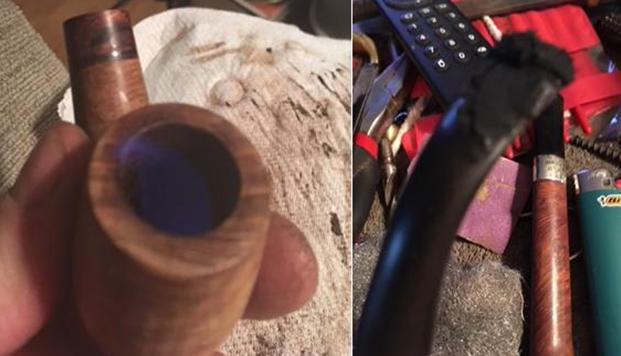
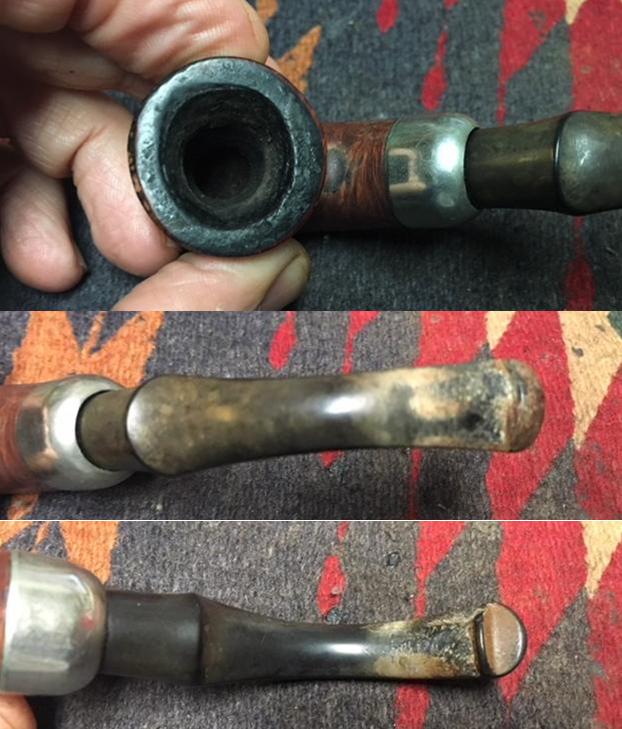
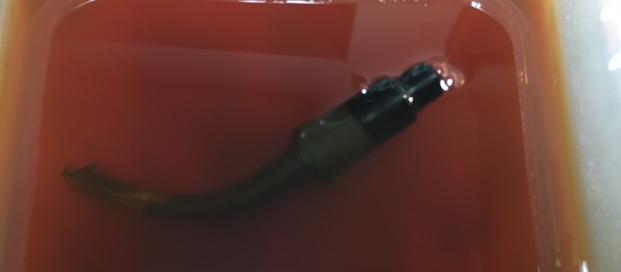
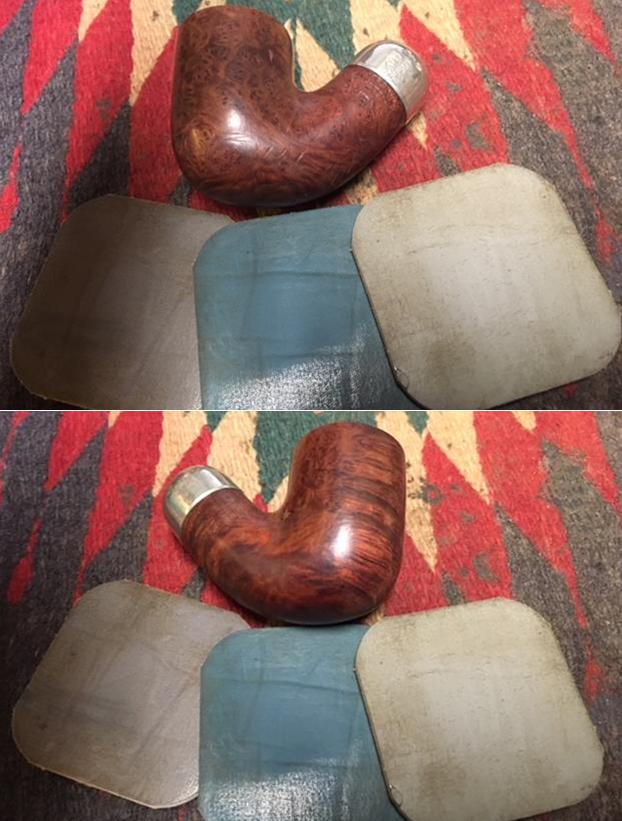
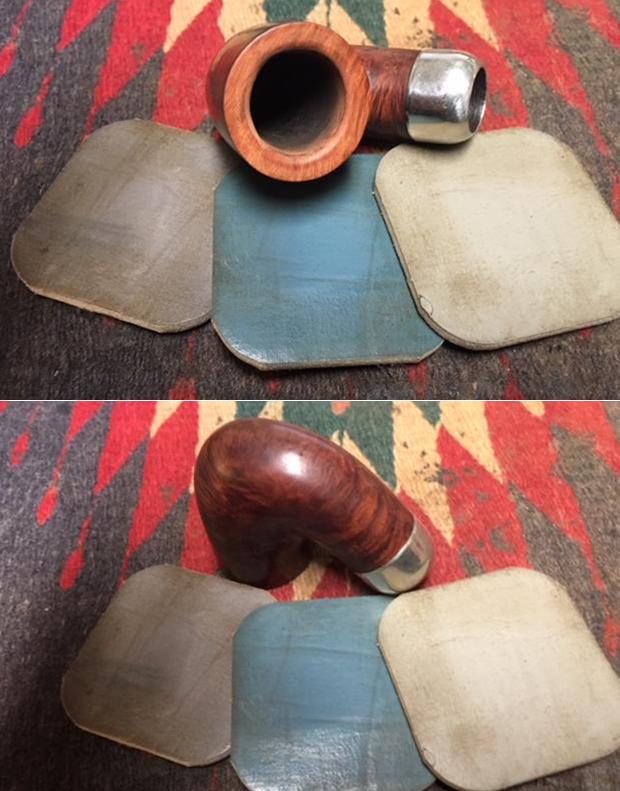
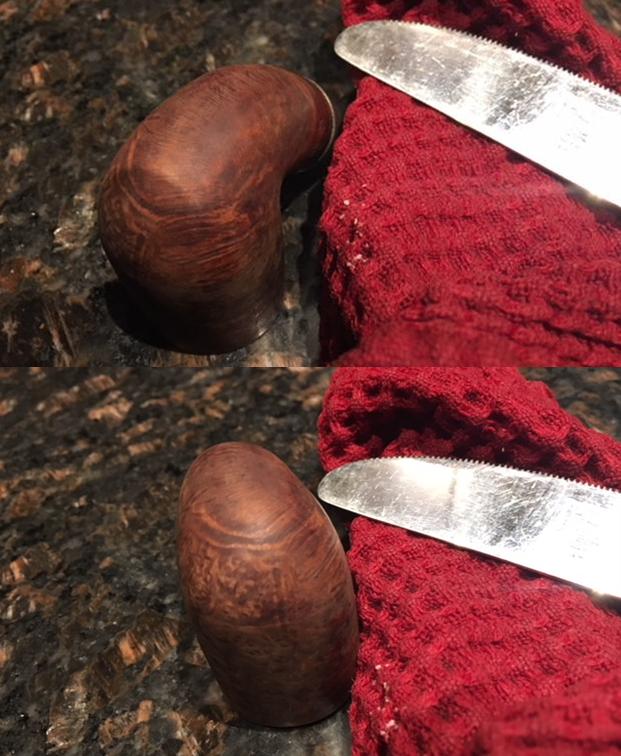
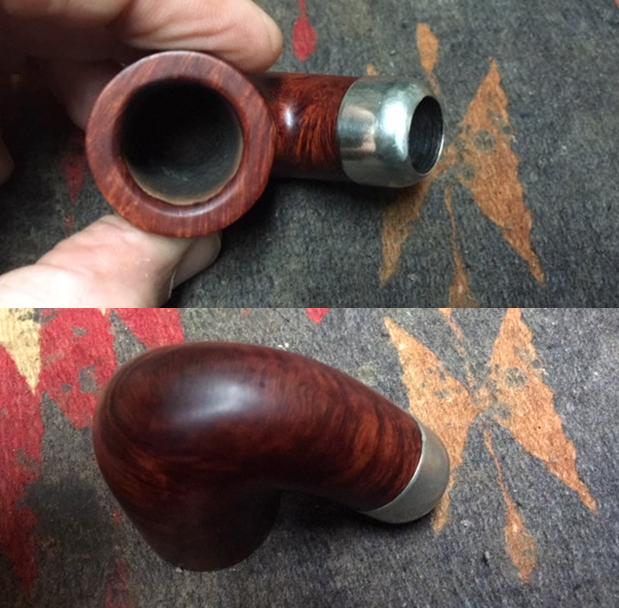
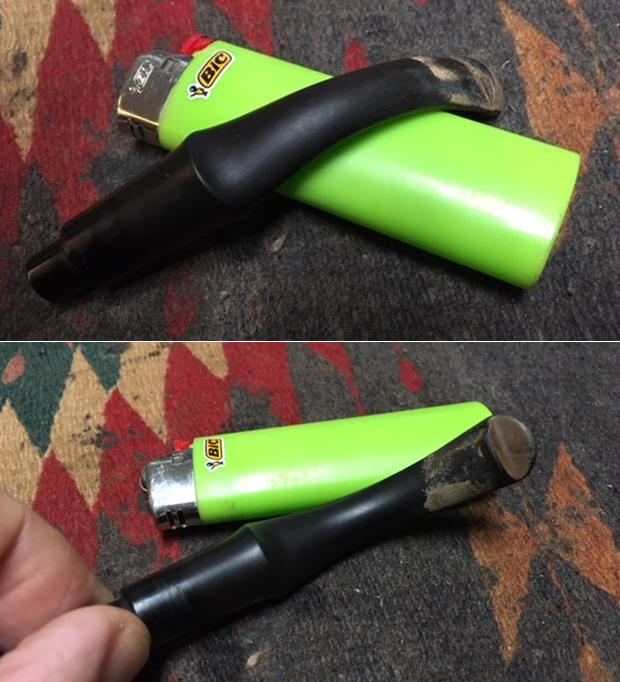
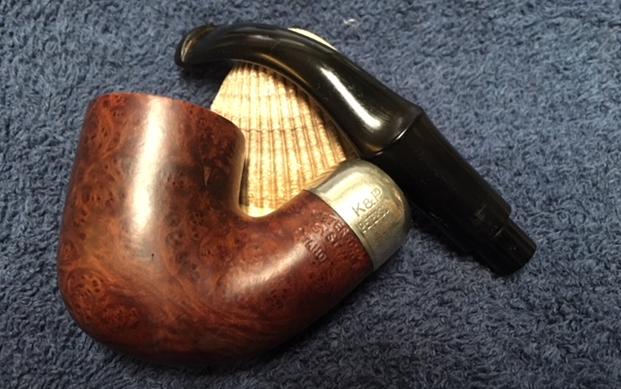
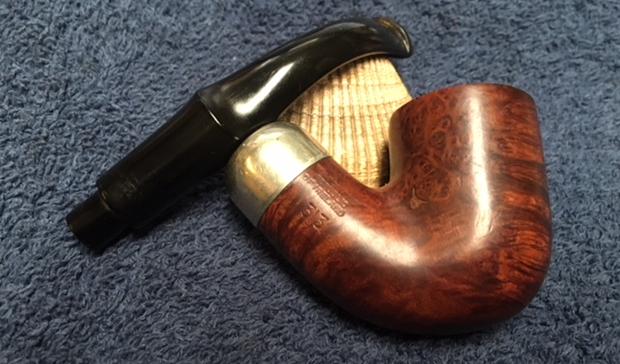
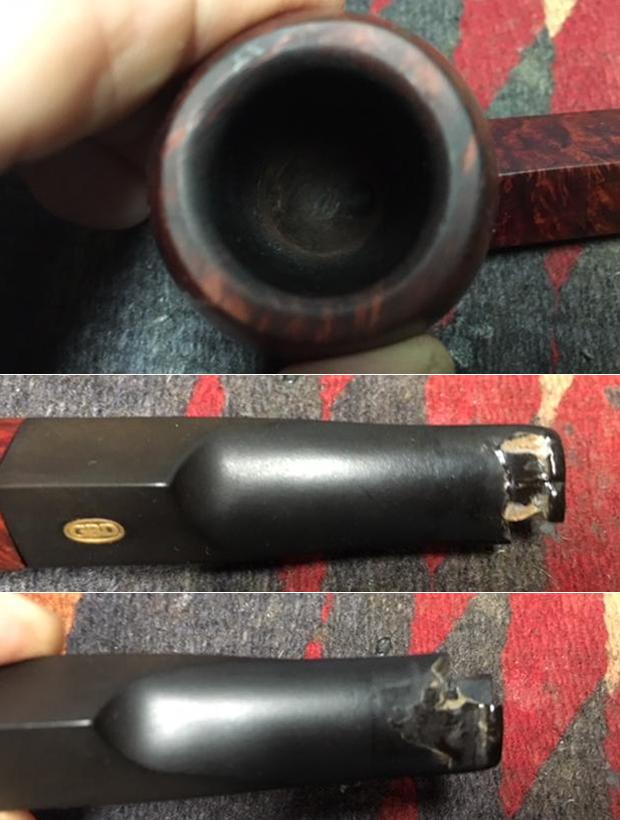
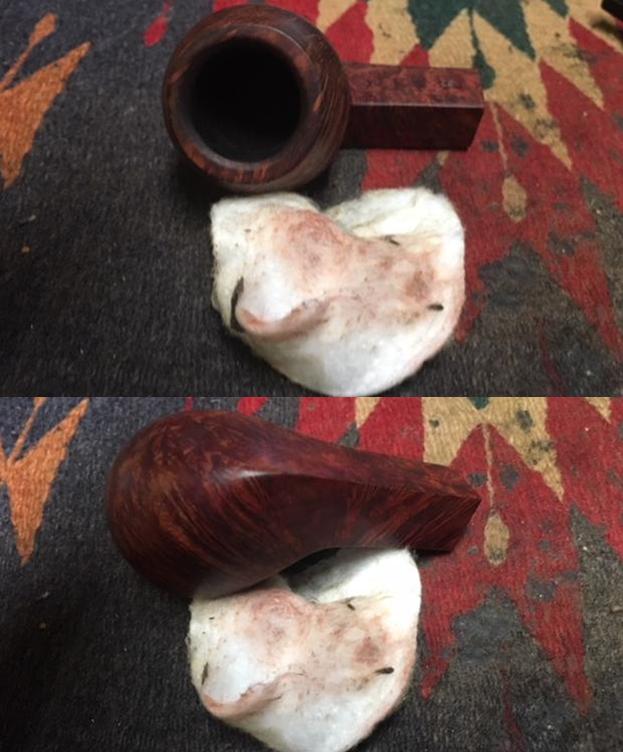
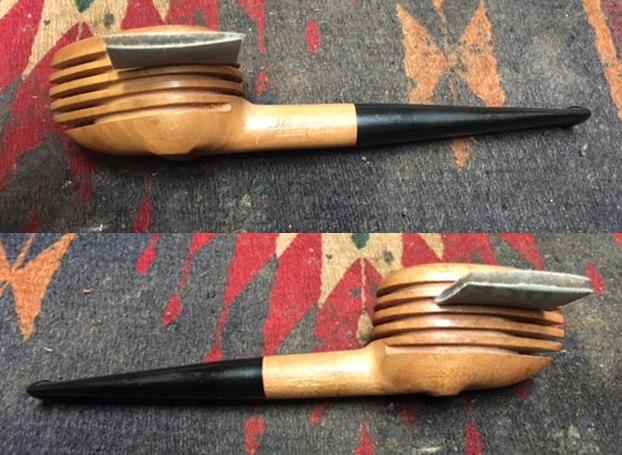
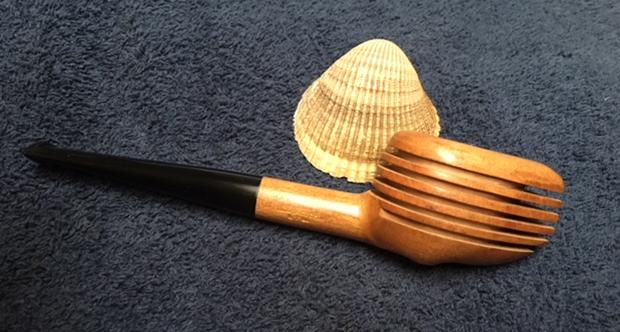
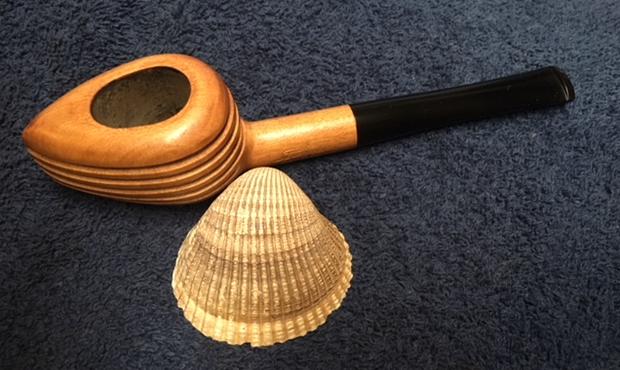
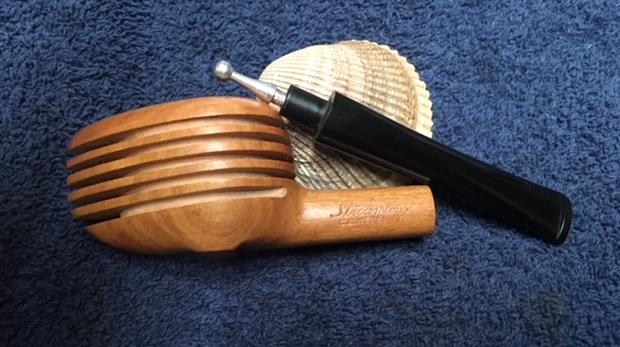
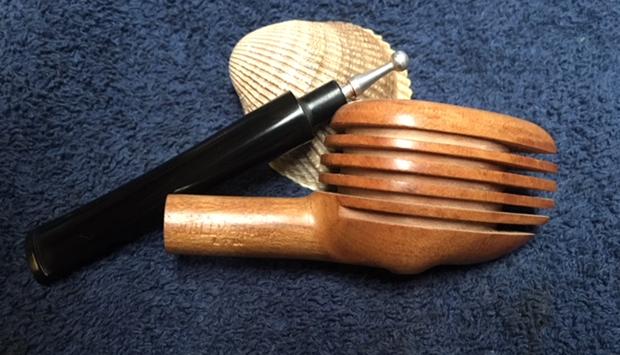
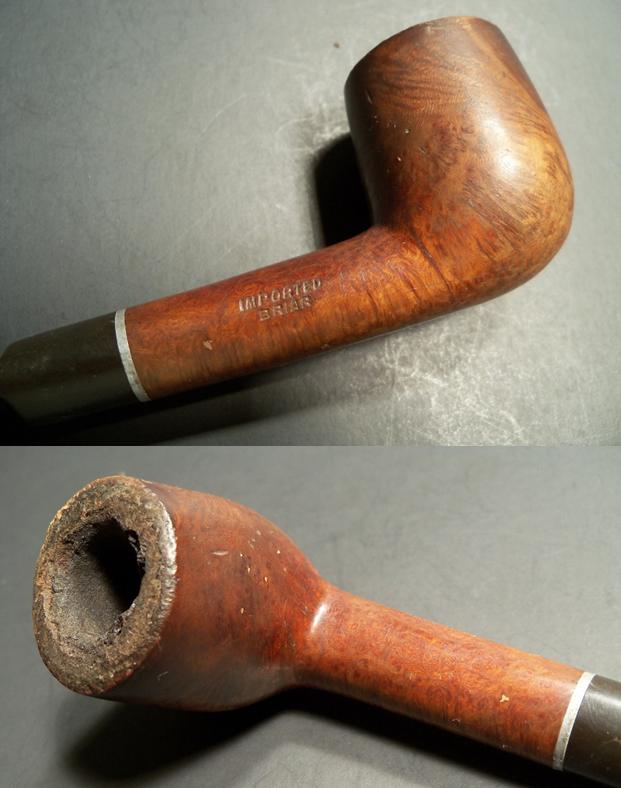
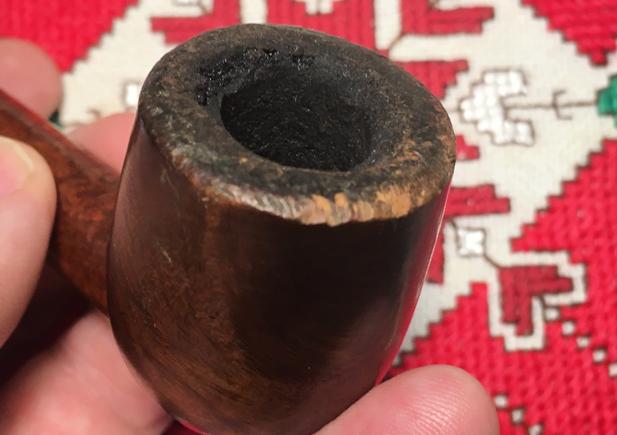
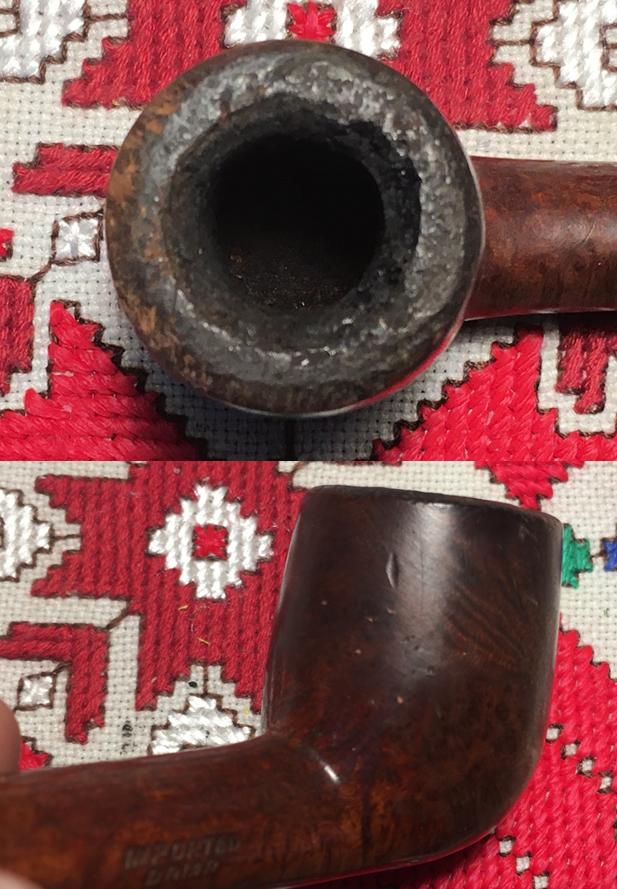
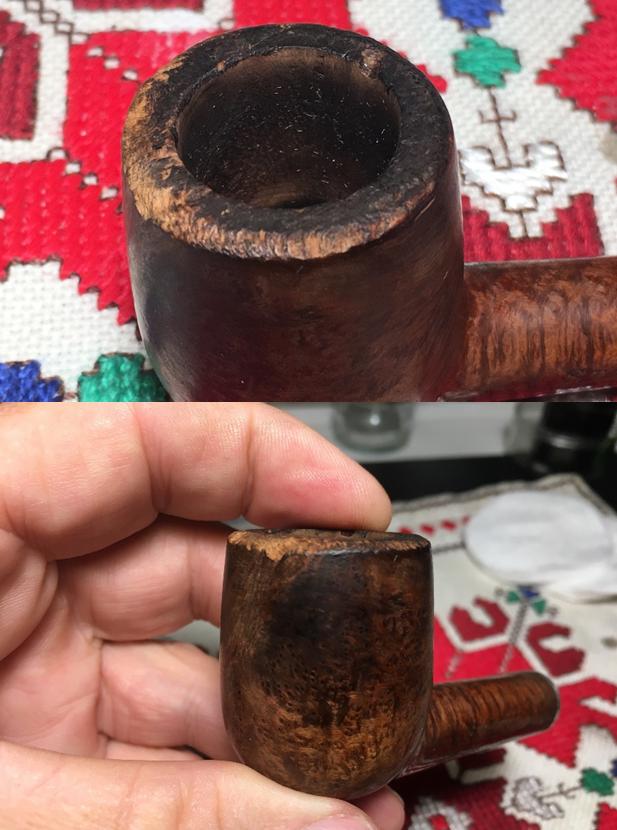
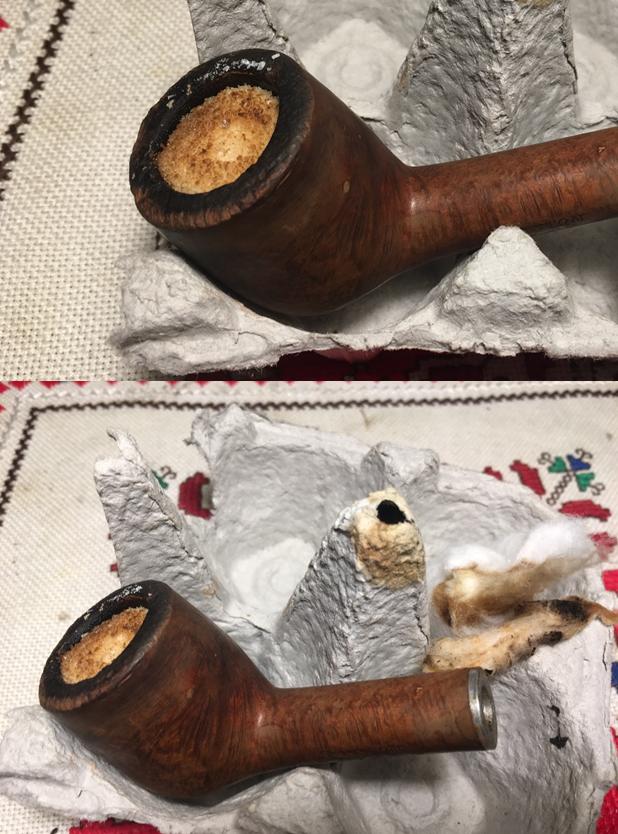
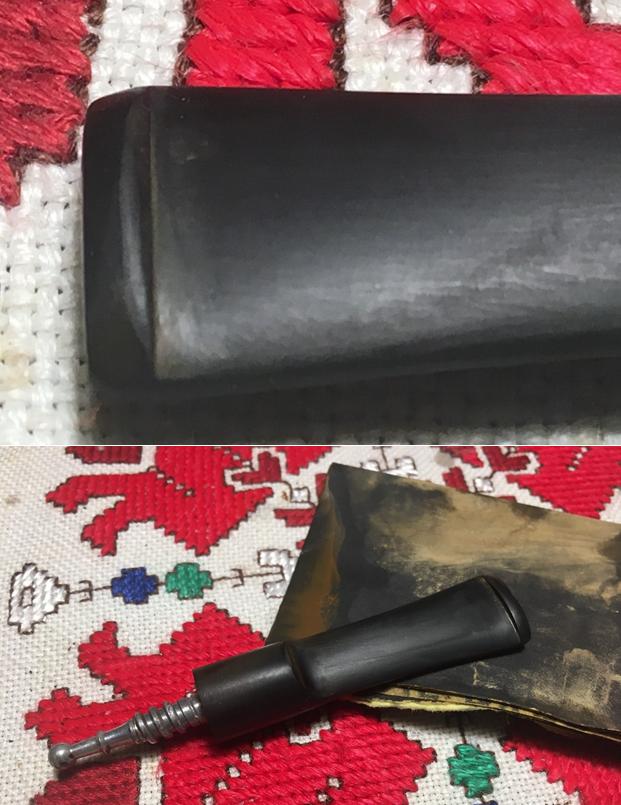
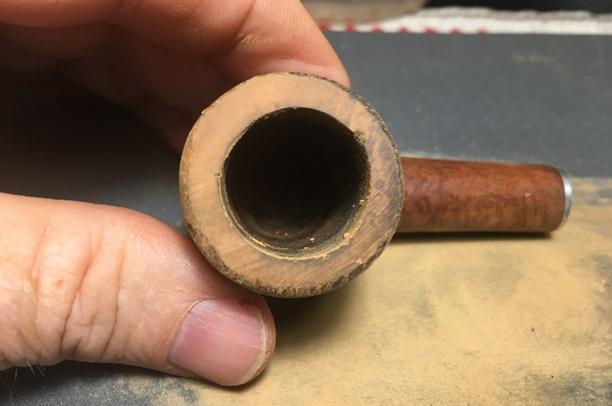
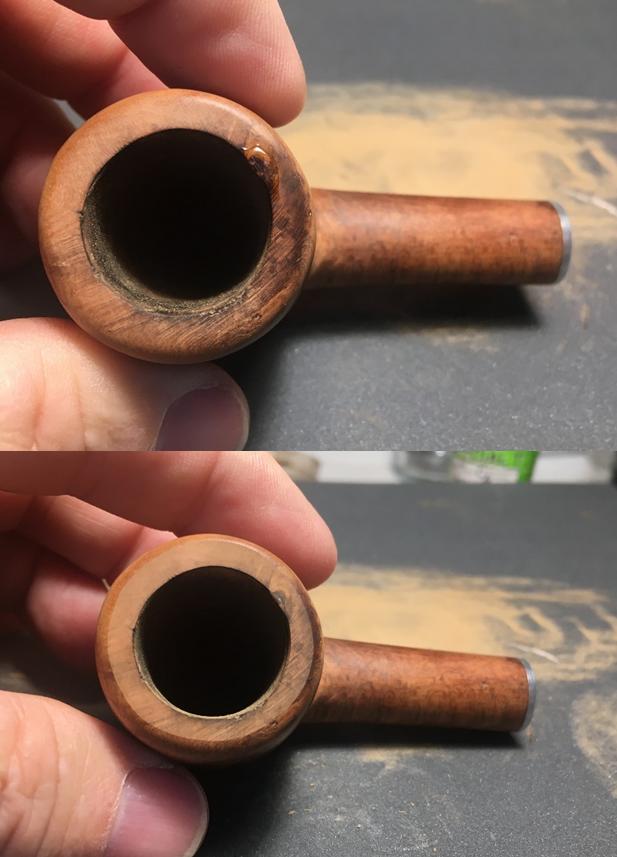
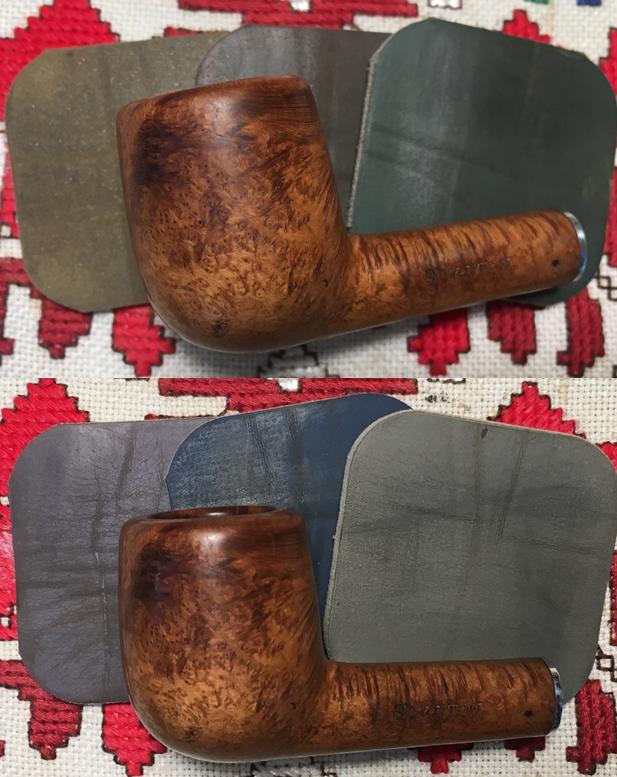
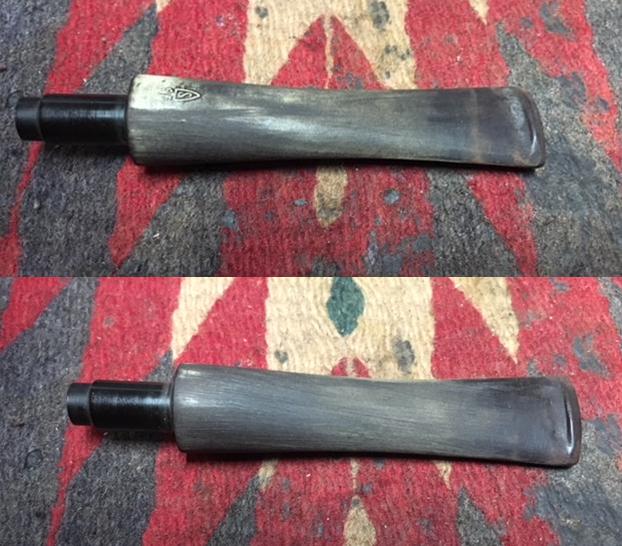
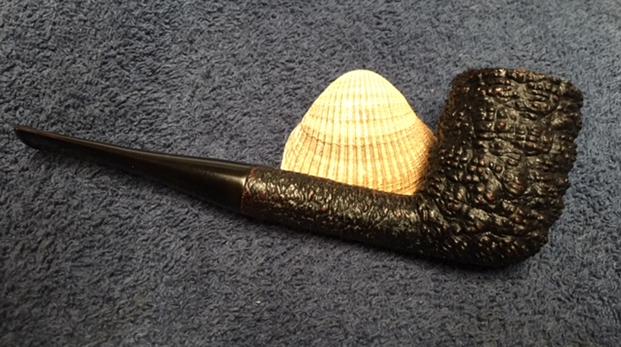
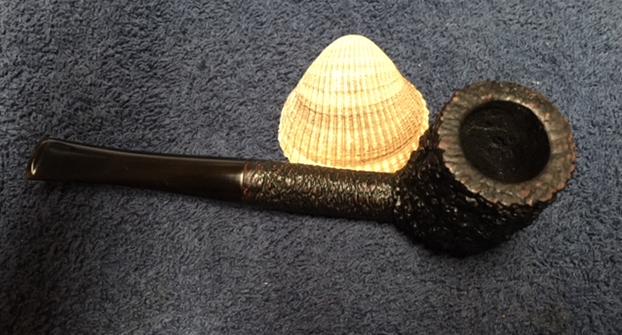
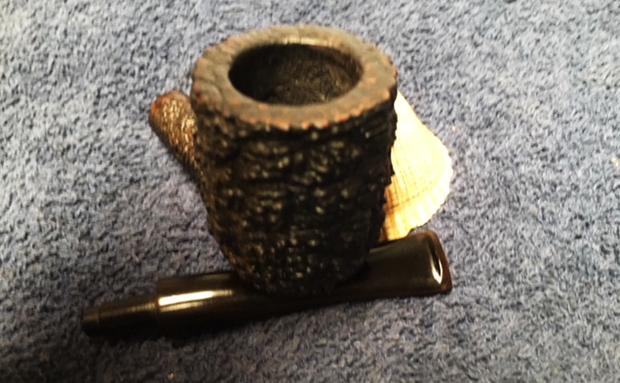
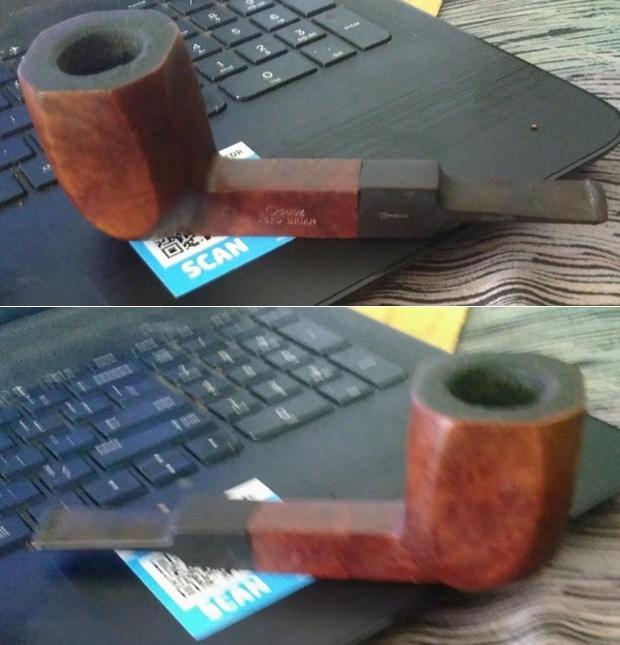
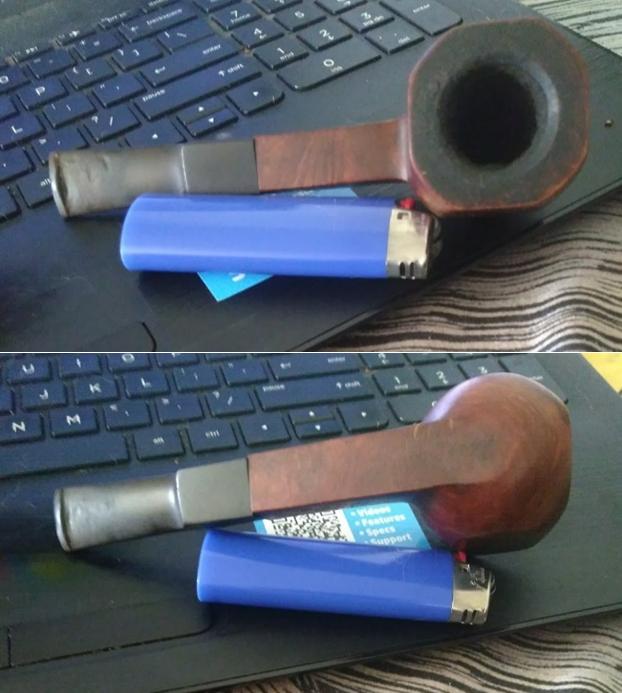
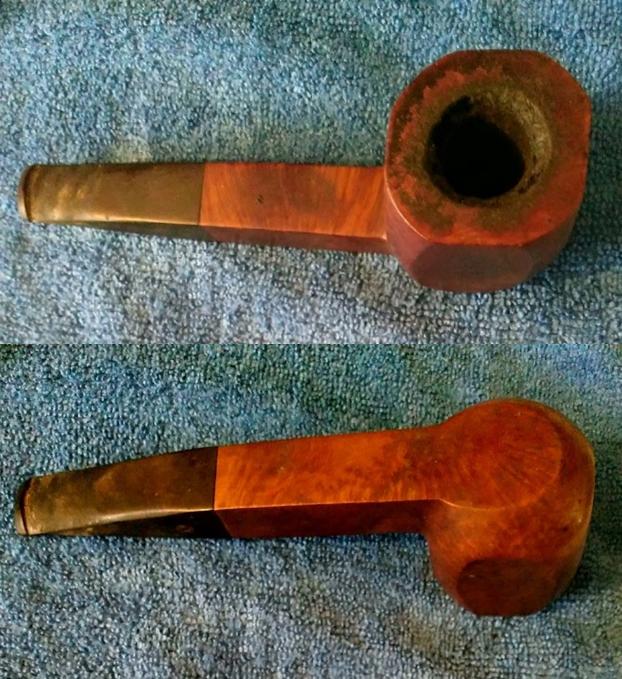
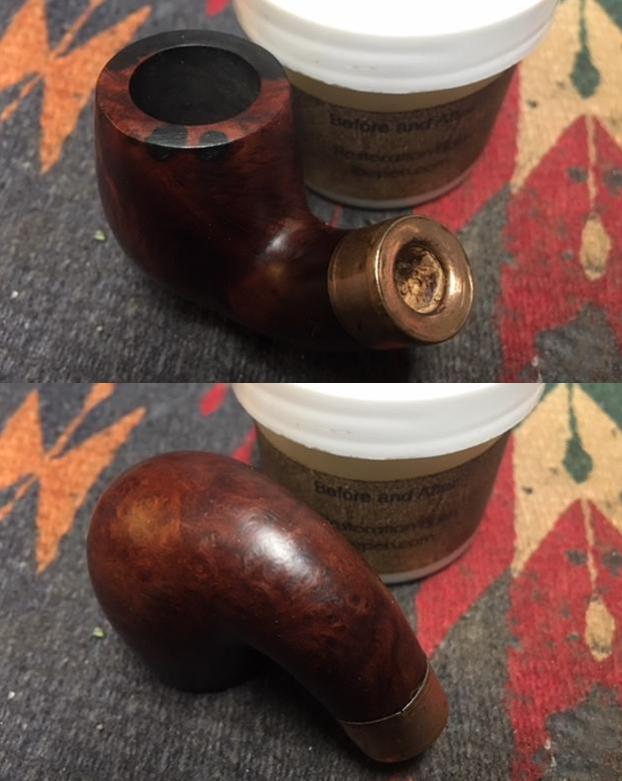
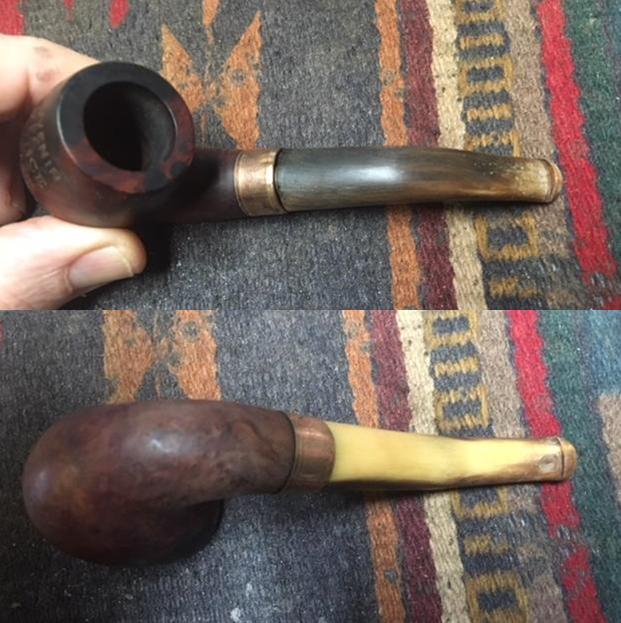
I took photos of the rim top and stem to show the condition of the pipe and stem when it came to Vancouver from Idaho.
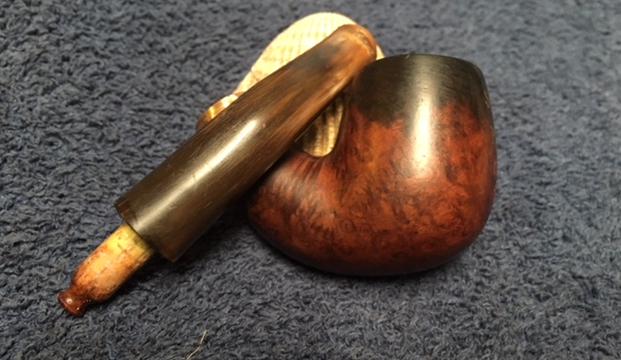
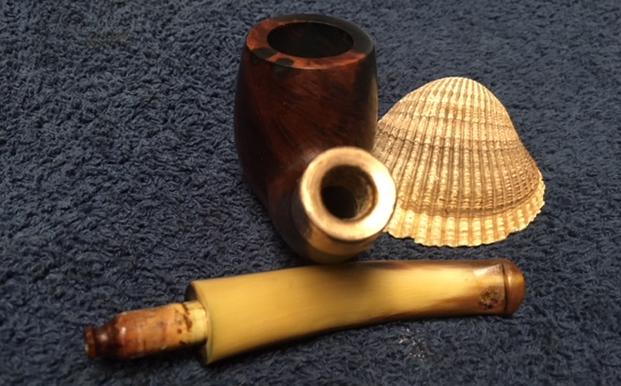
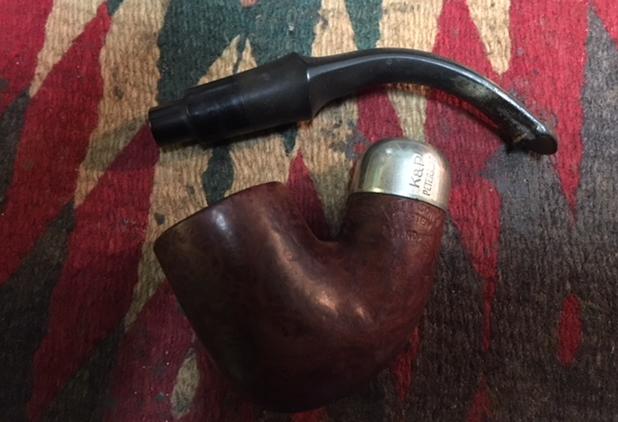
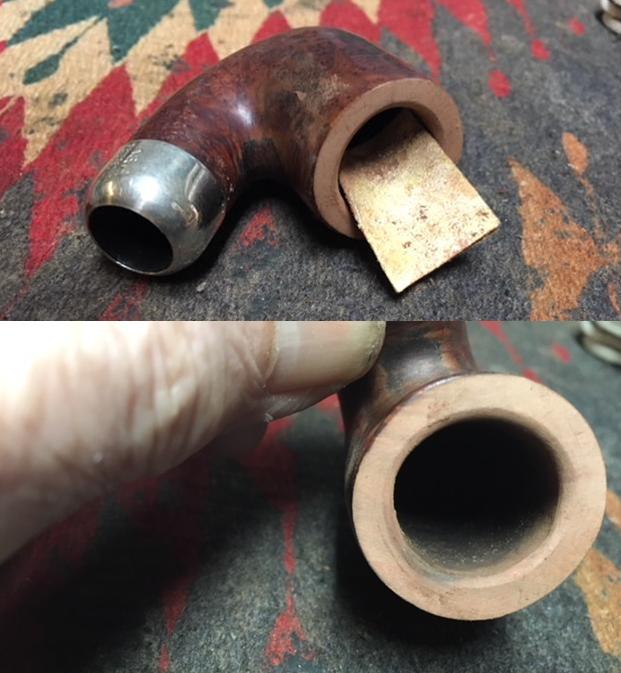
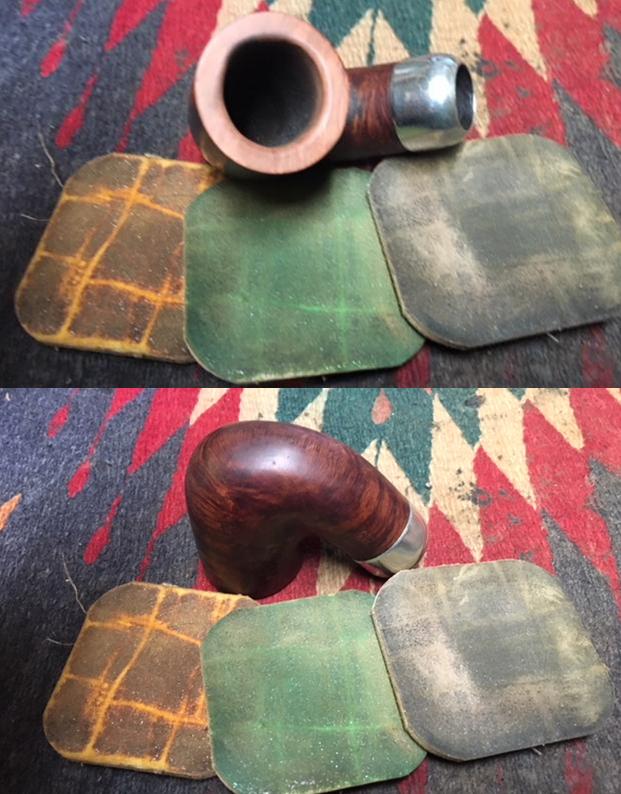
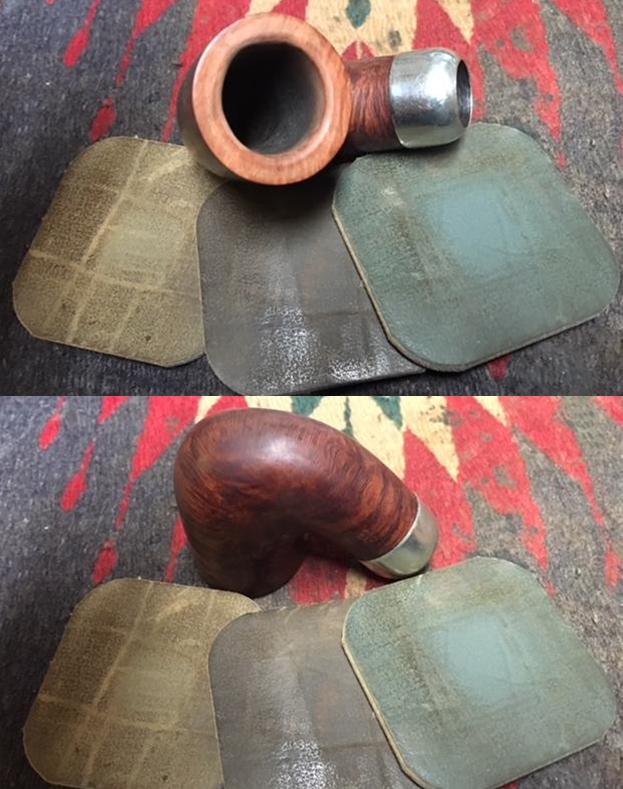
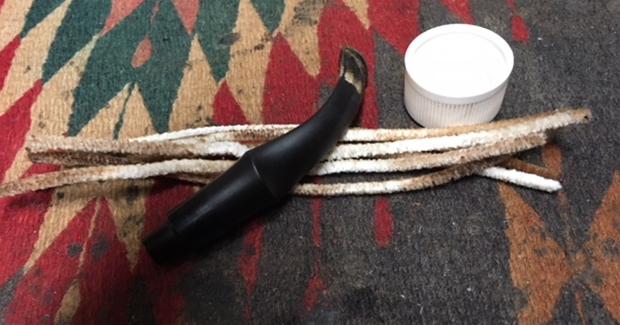
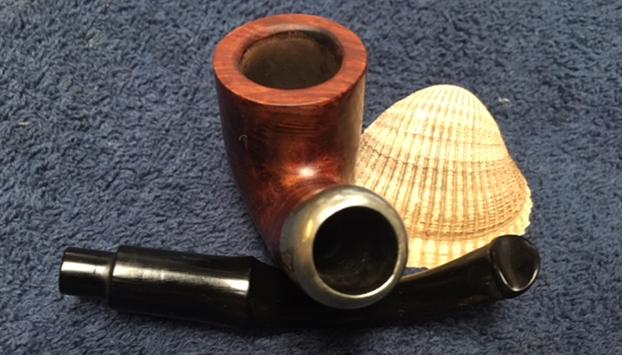
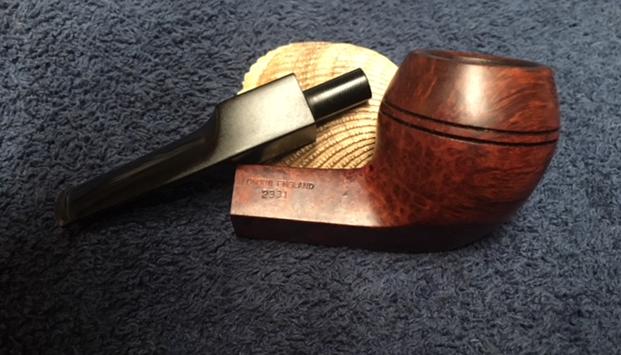
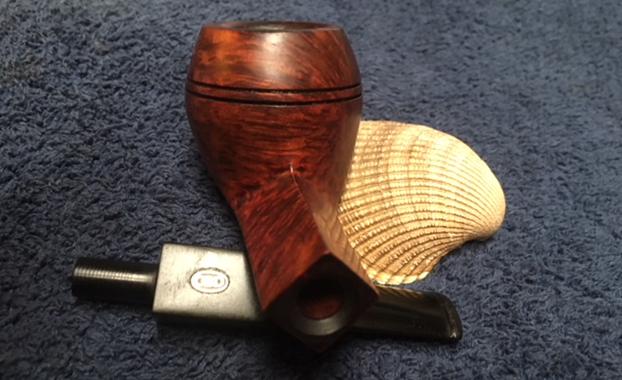
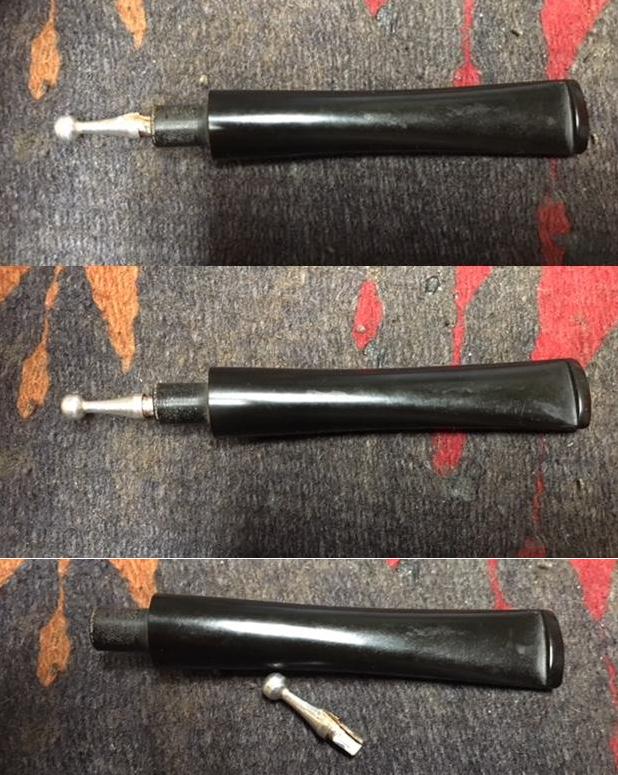
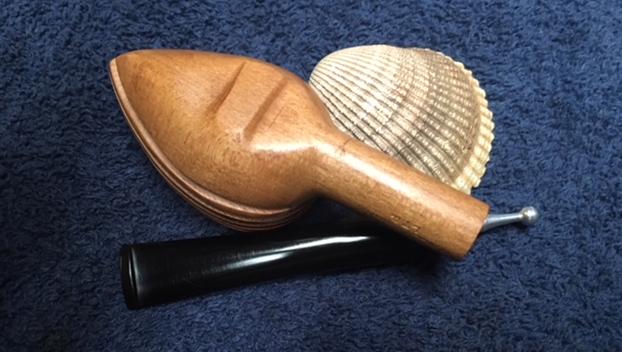
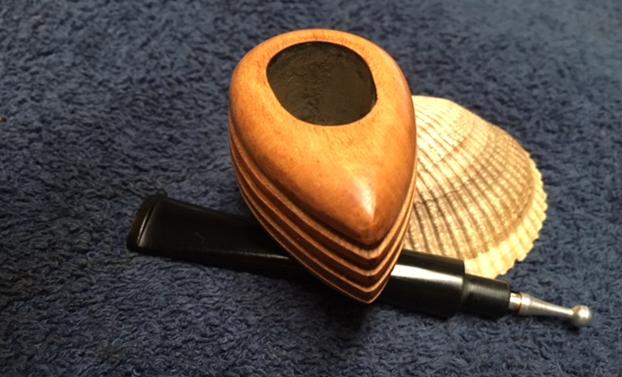
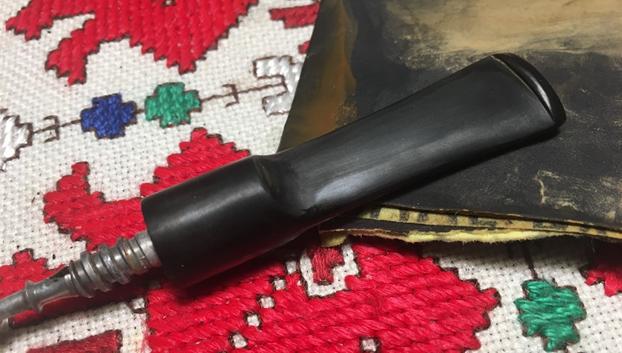
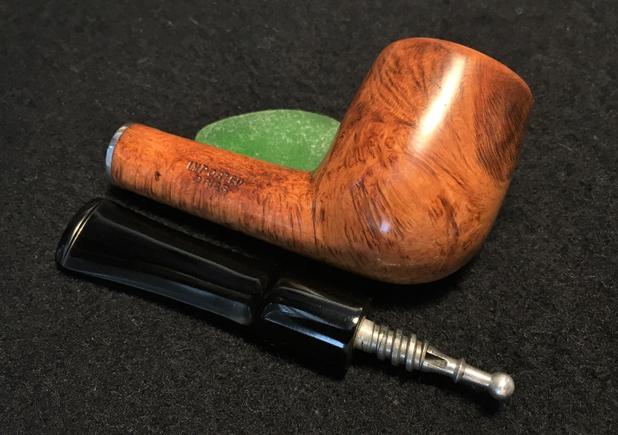
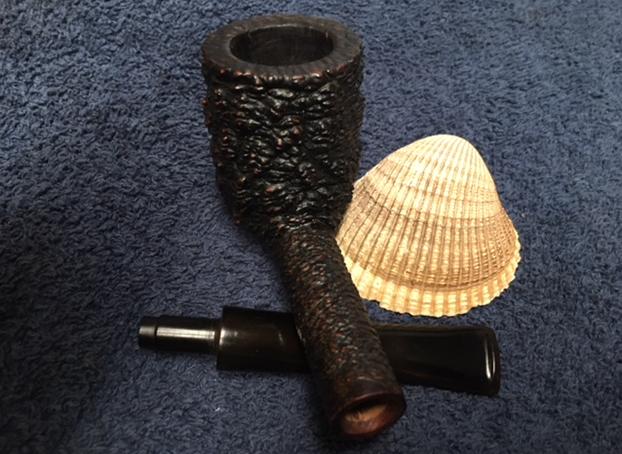
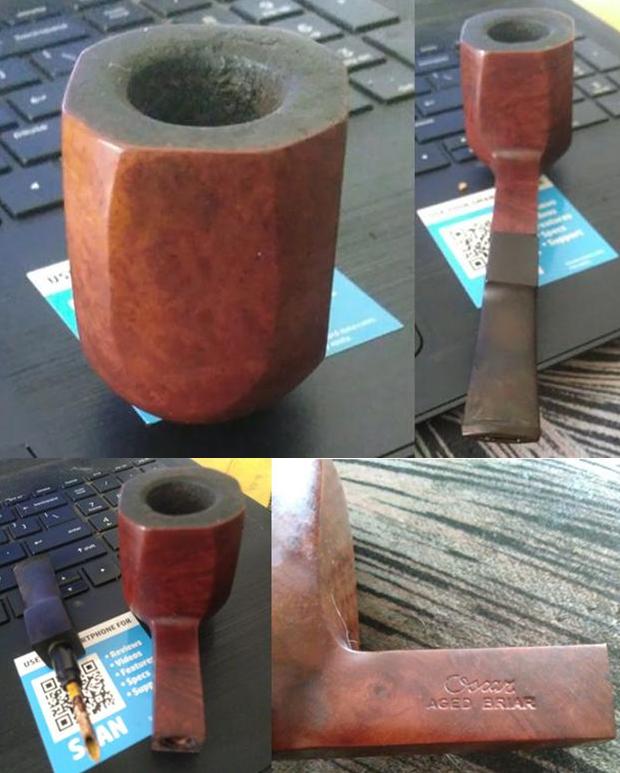
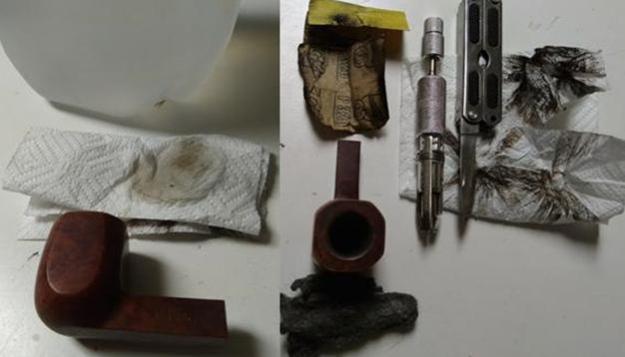
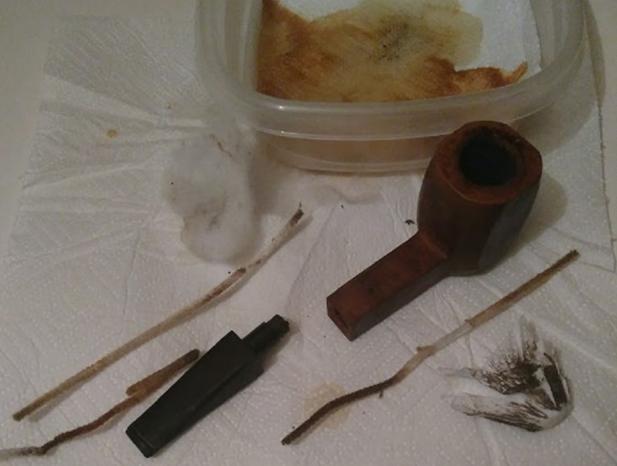
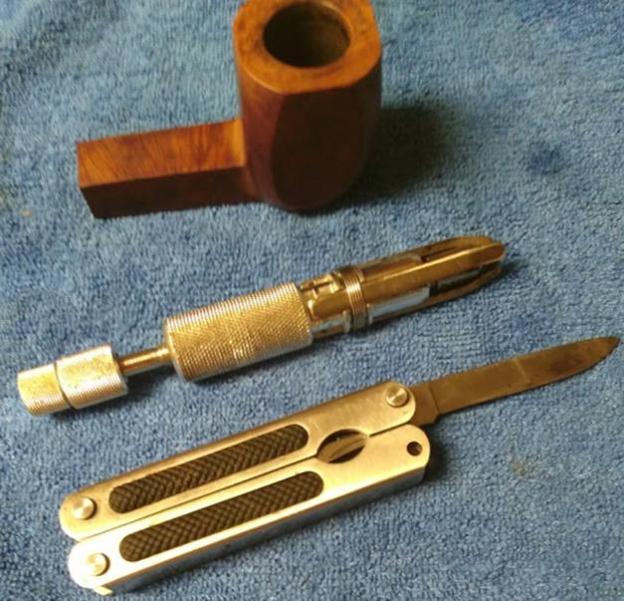
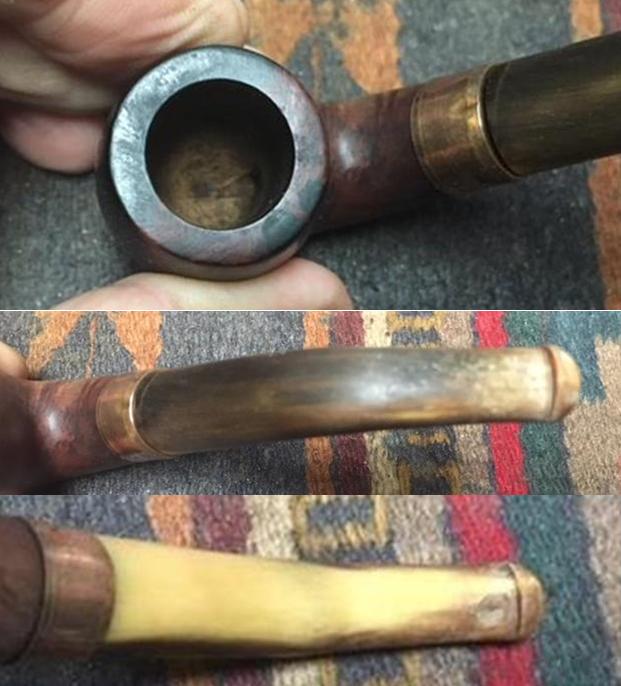
I took the pipe apart and took a photo of the parts from the left side and from the front of the bowl. The ferrule was loose as was the fit of the stem in the shank.I used a multi-purpose white glue to reglue the ferrule to the shank. I pressed the ferrule into place and aligned the stamping on the ferrule with the shank stamping. I wiped off the excess glue that squeezed out and let the glue set.
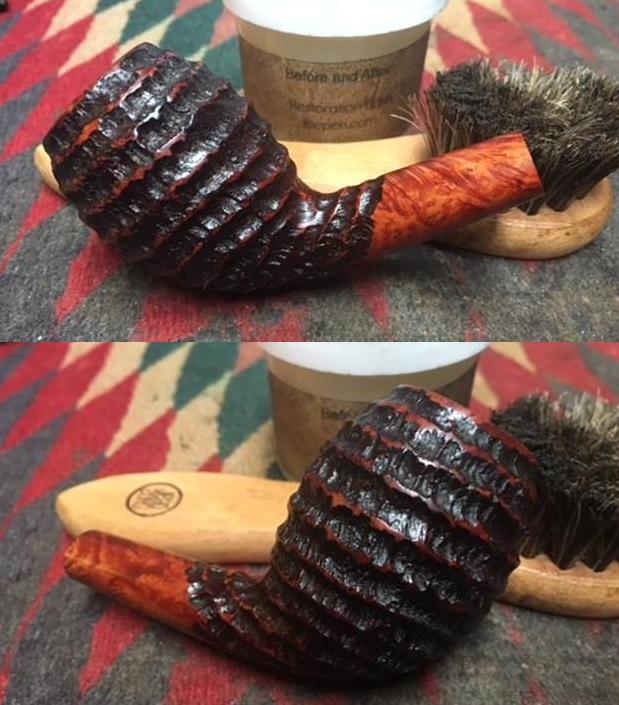
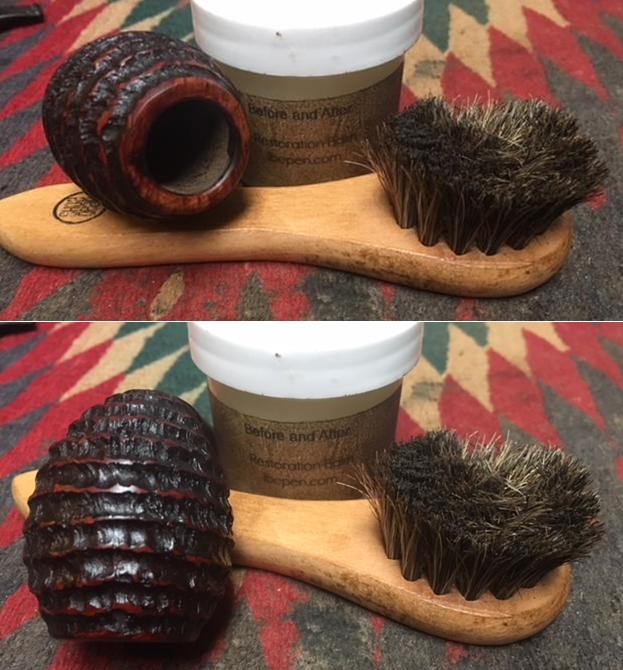
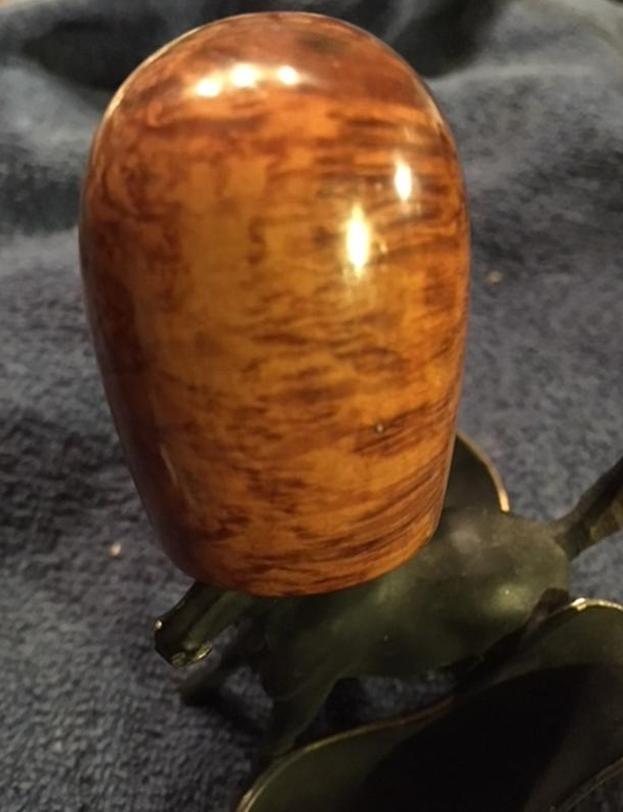
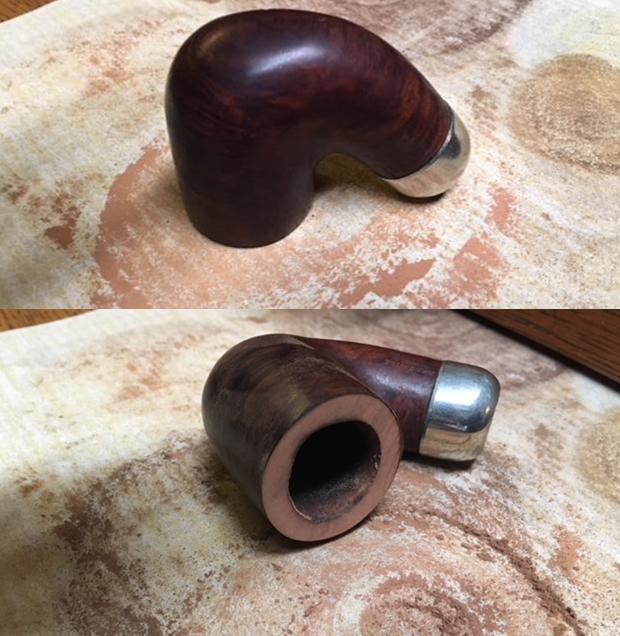
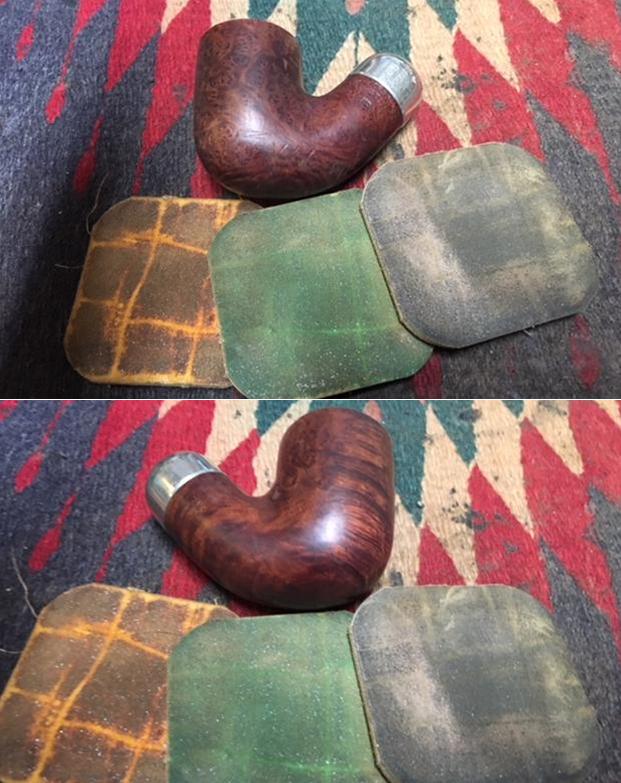
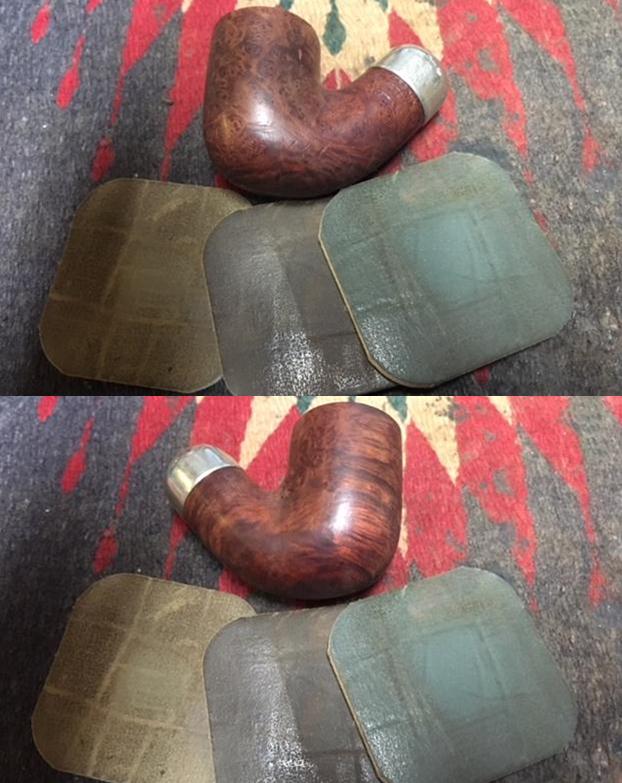
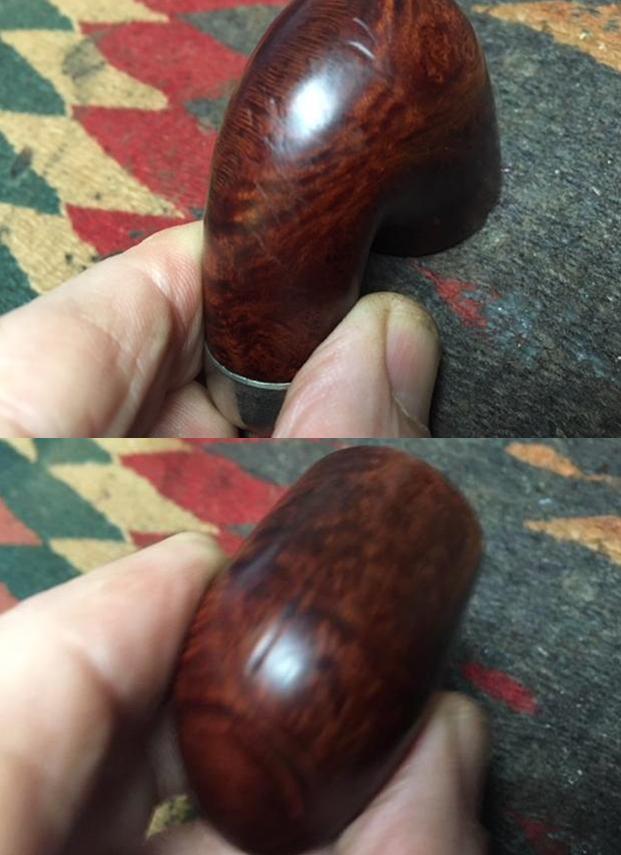
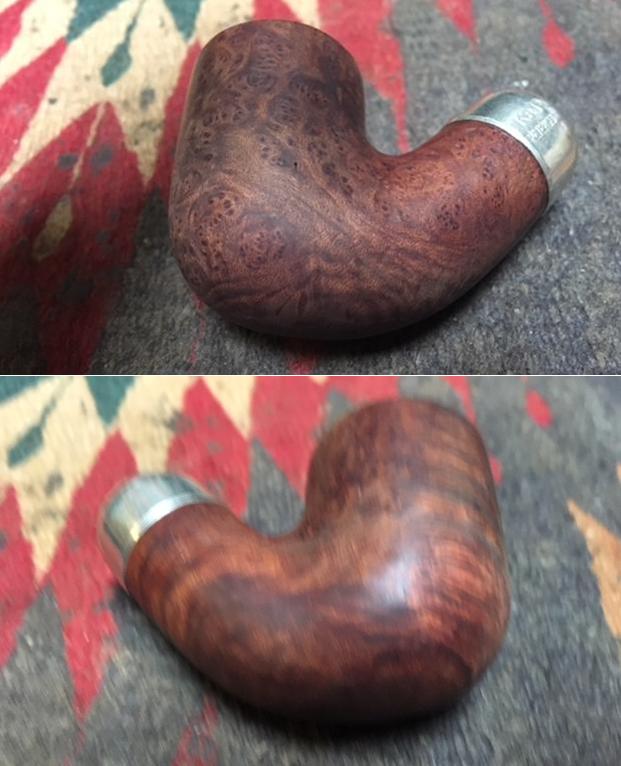
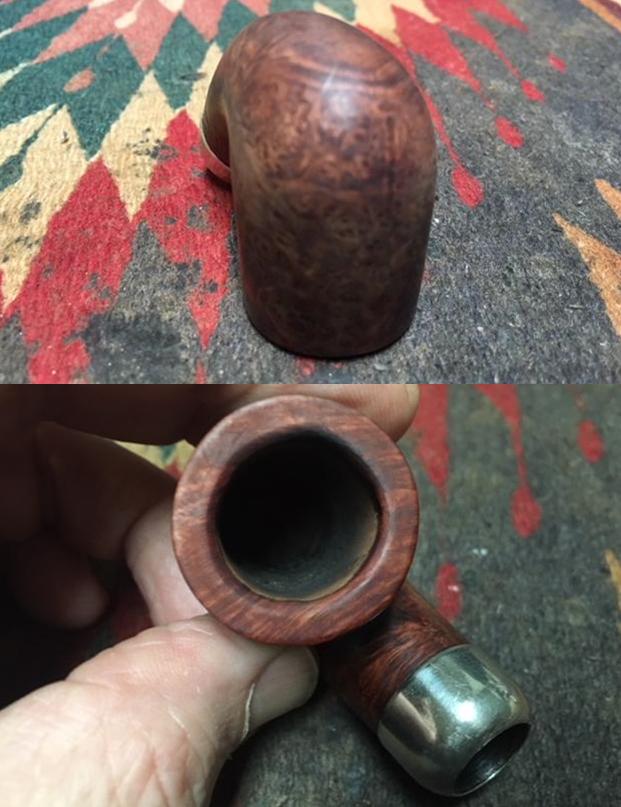
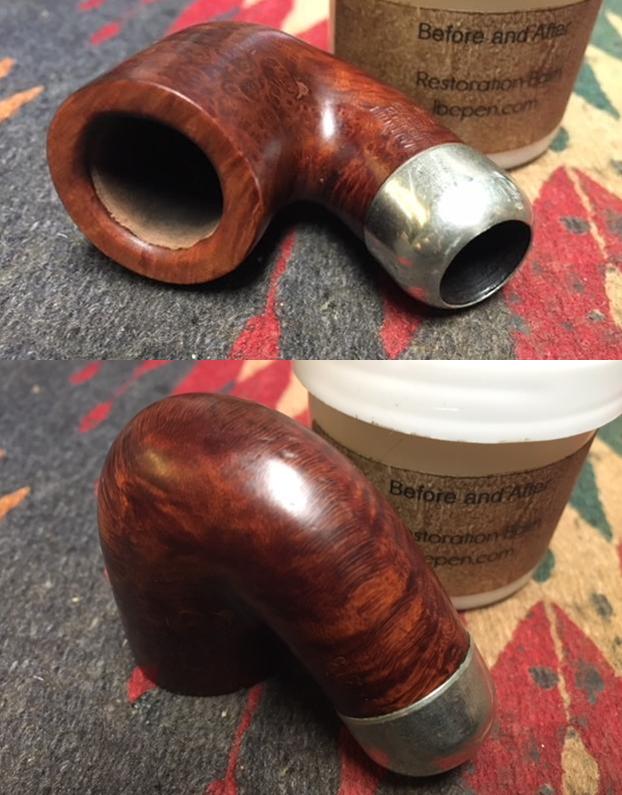
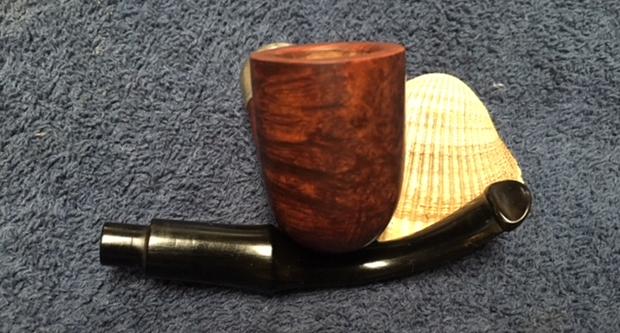
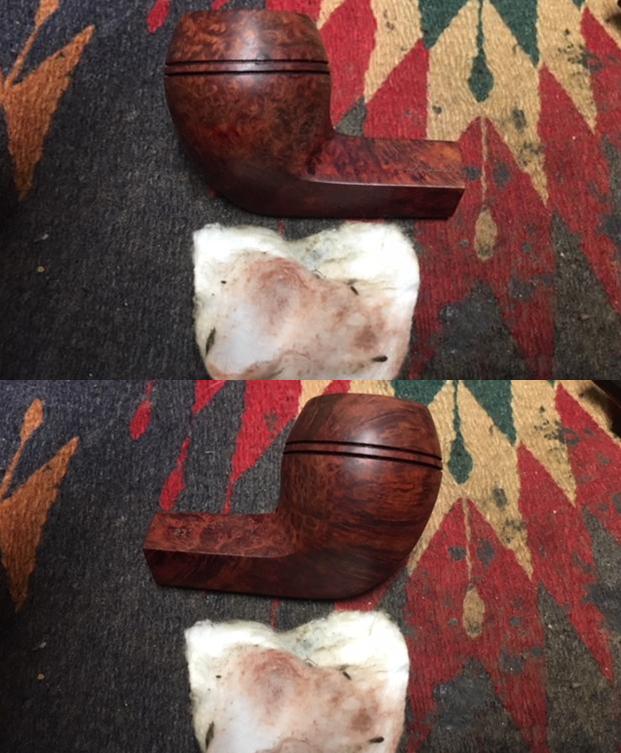
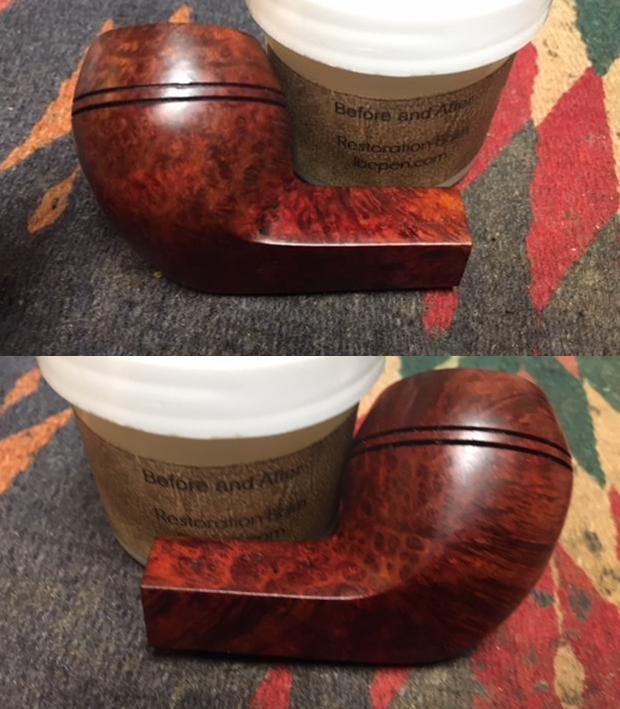
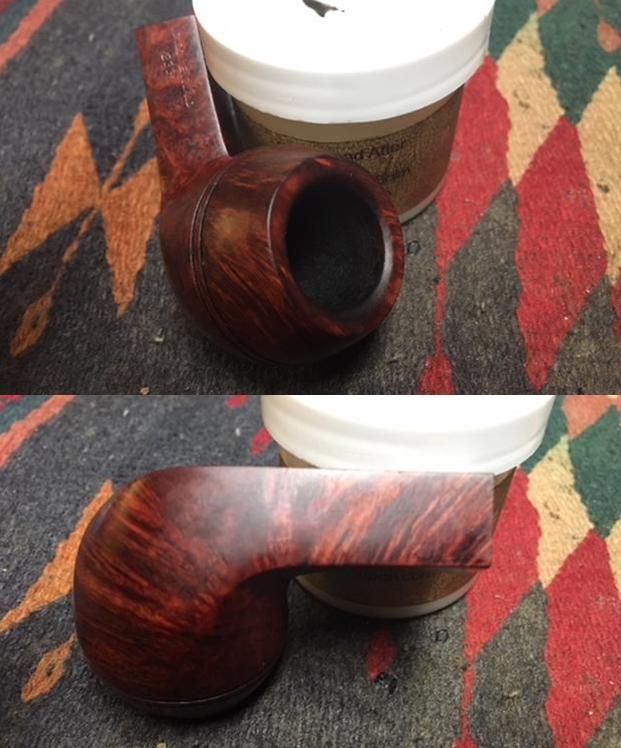
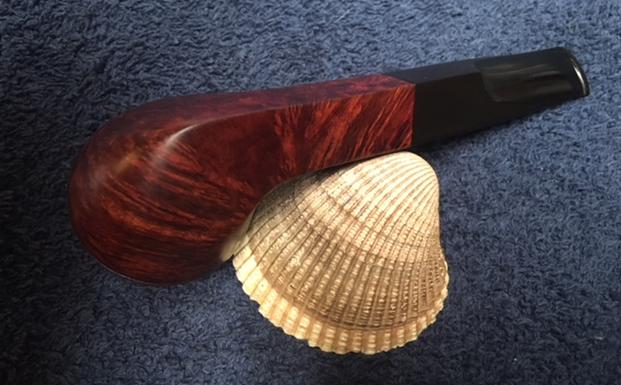
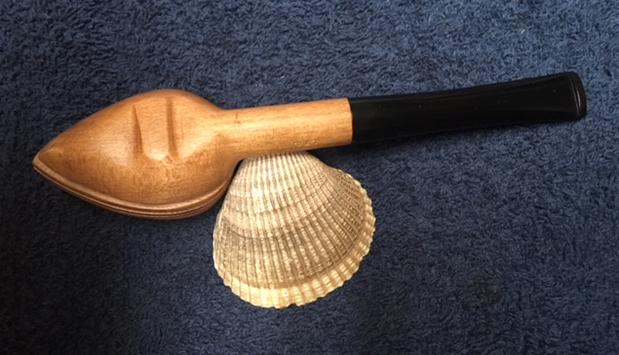
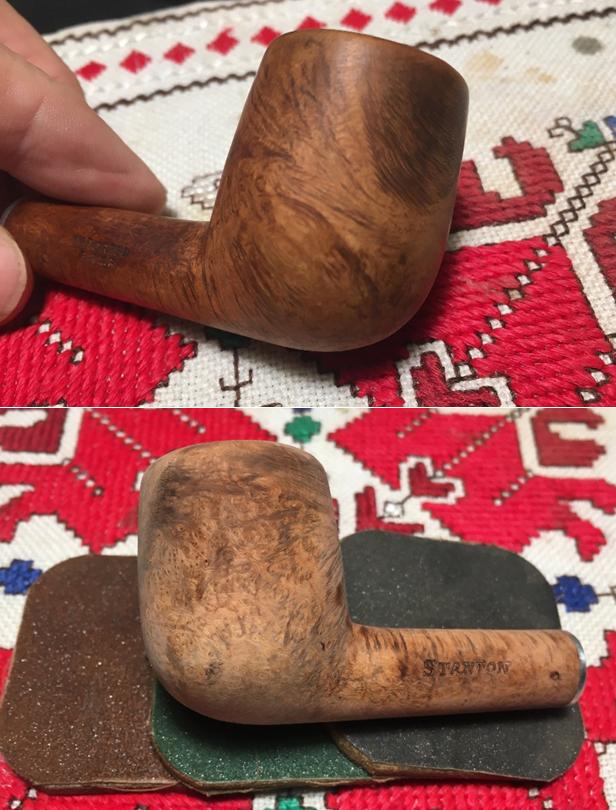
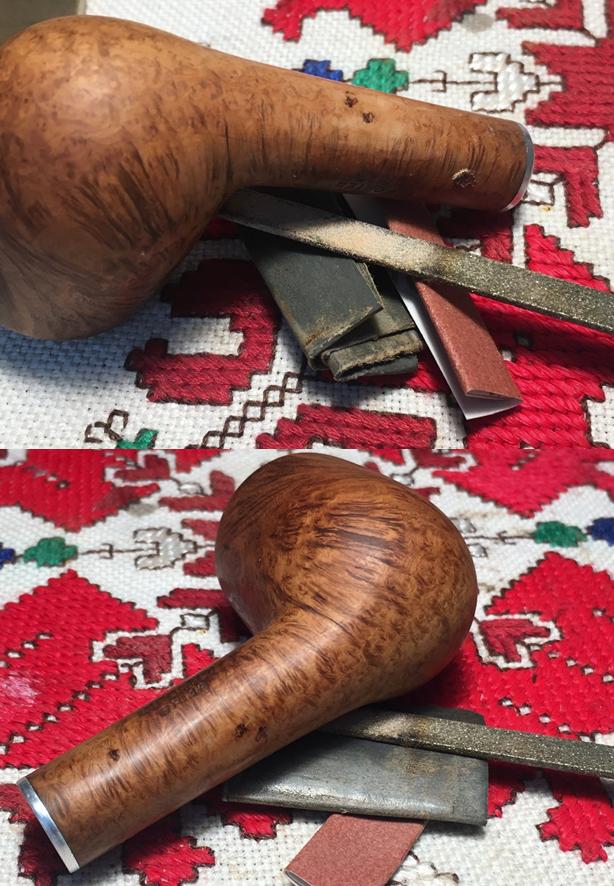
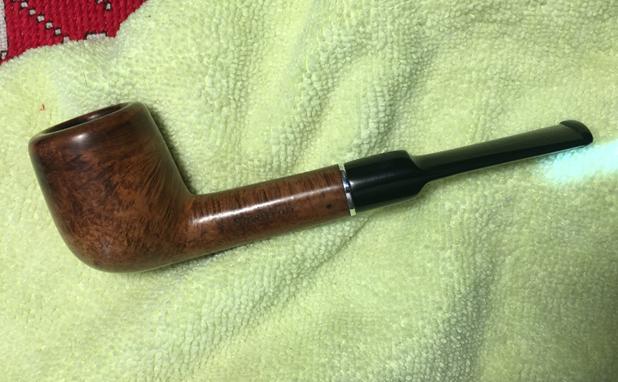
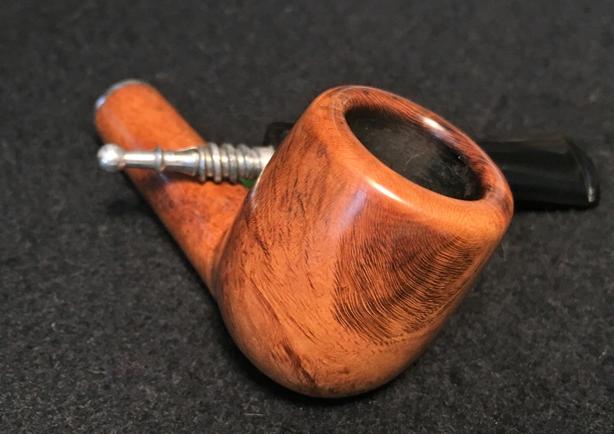
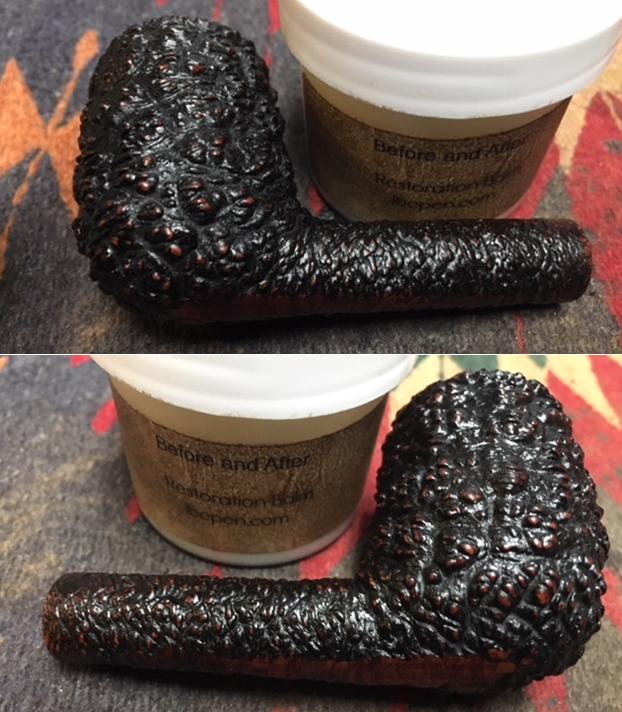
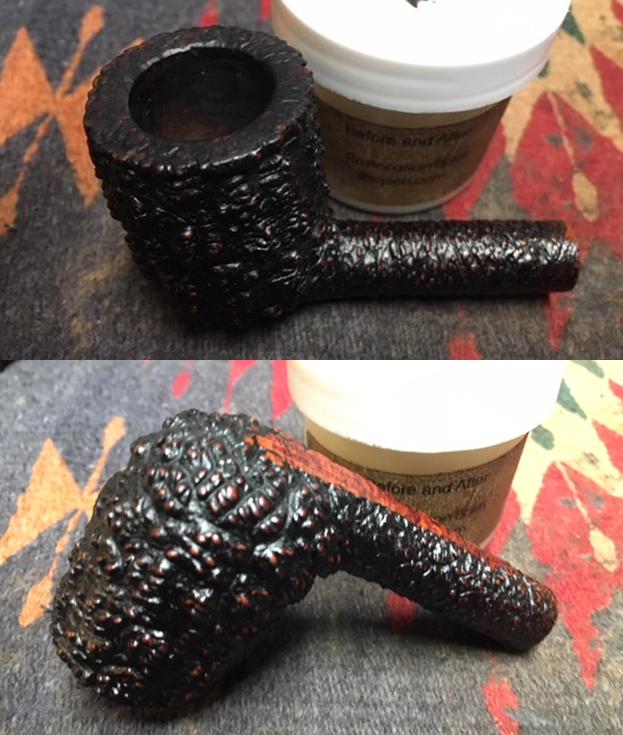
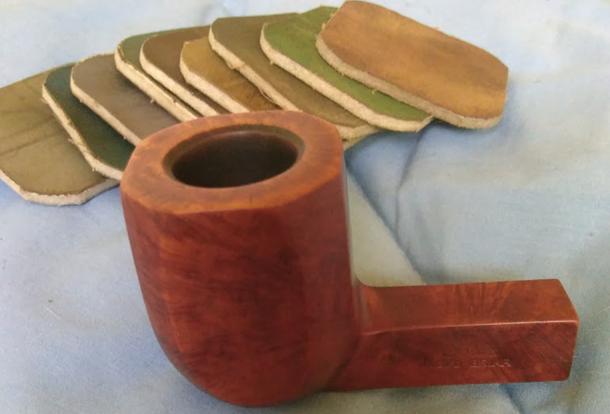
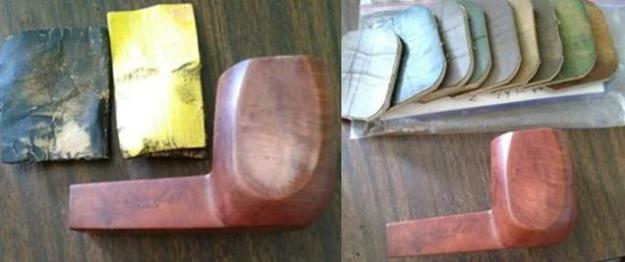
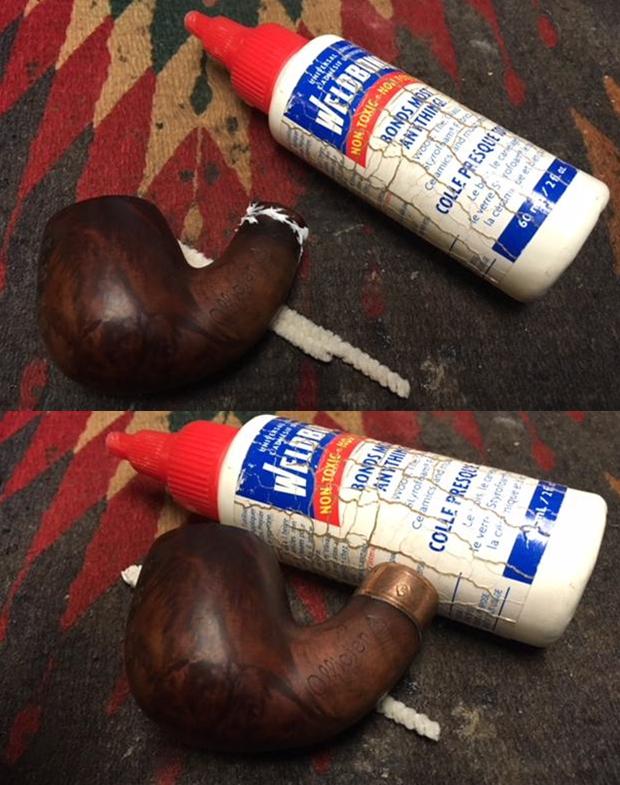
I worked Before & After Restoration Balm deep into the briar on the smooth finish to clean, enliven and protect it. I wiped it off with a soft cloth. I worked it into the rim and also on the stamping on the front of the bowl. I set it aside for a few minutes to let the balm work. I buffed it off carefully with a cotton cloth to polish it. The briar really began to have a deep shine. The dark spot though still present does not look bad and really is a part of the pipe’s story. I took some photos of the bowl at this point to mark the progress in the restoration. The grain on the bowl is really beginning to stand out and will only do so more as the pipe is waxed. 
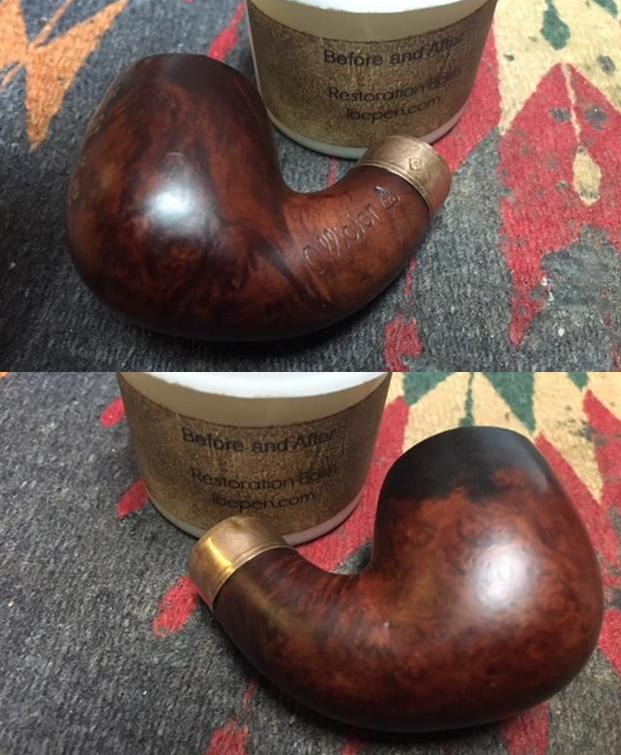
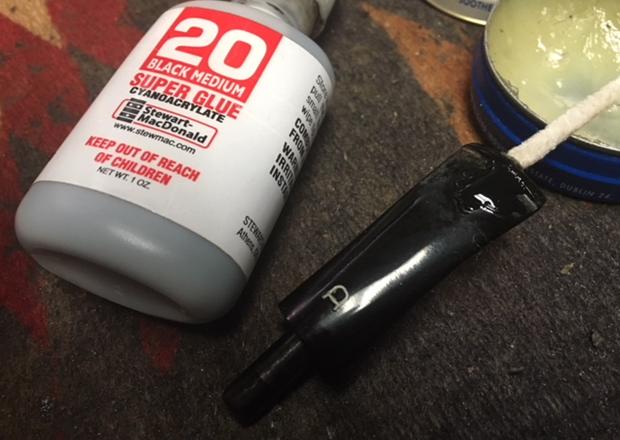
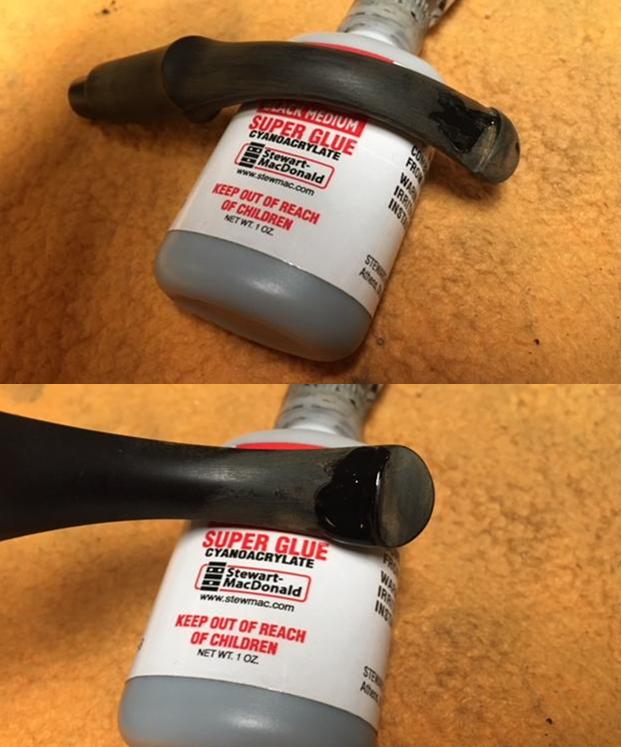
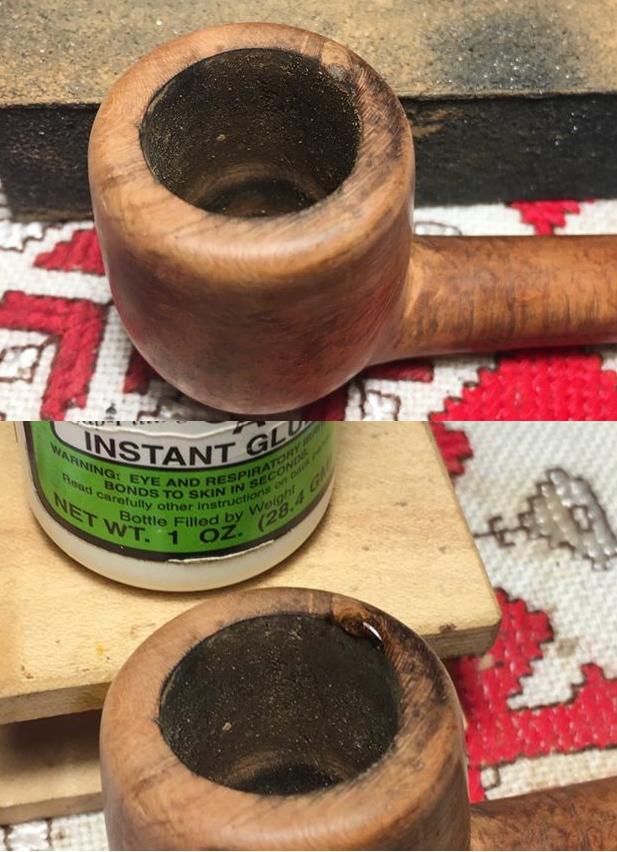
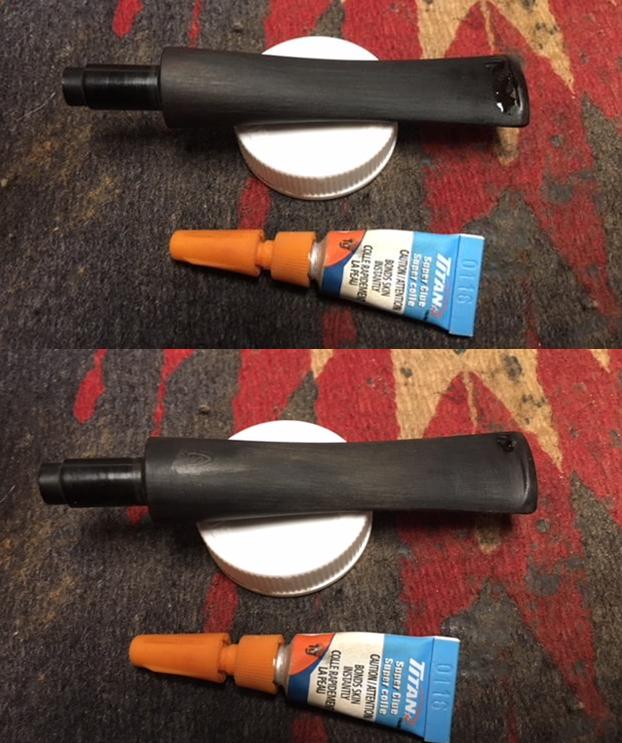
I cleaned out the worm damage with a qtip and alcohol. I filled in the damaged areas on the right side of the stem near the shank end and on the underside of the stem at the button with clear super glue. I set the stem aside to let the glue cure. 
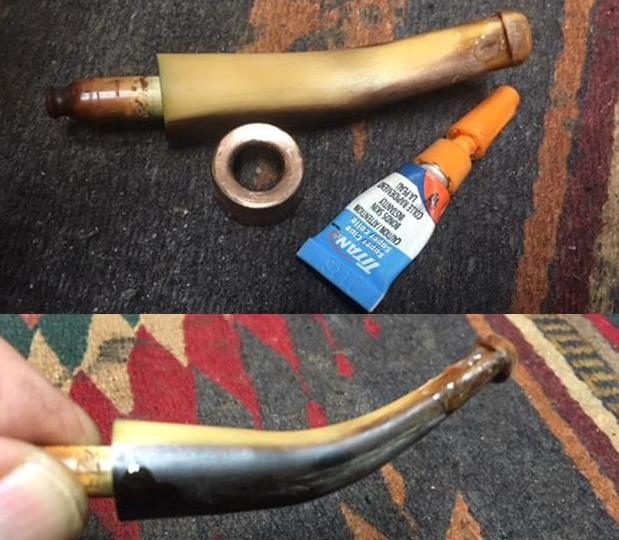
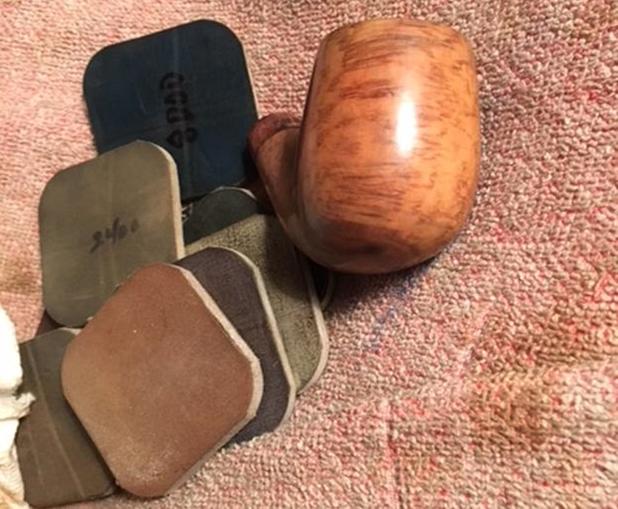
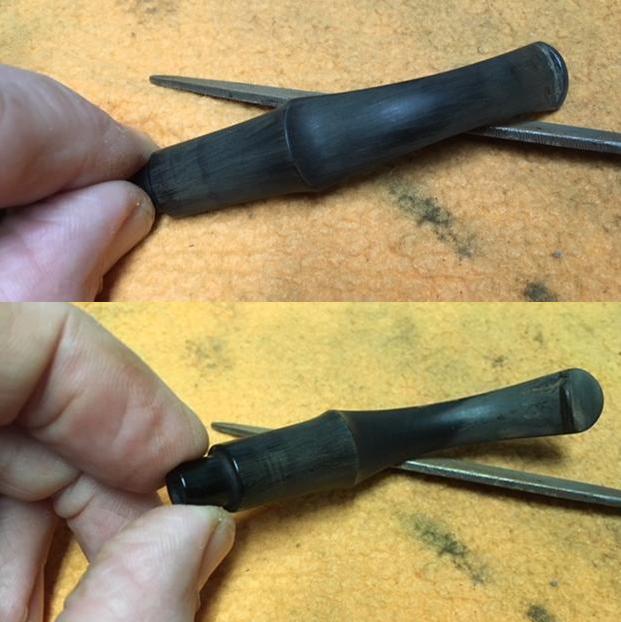
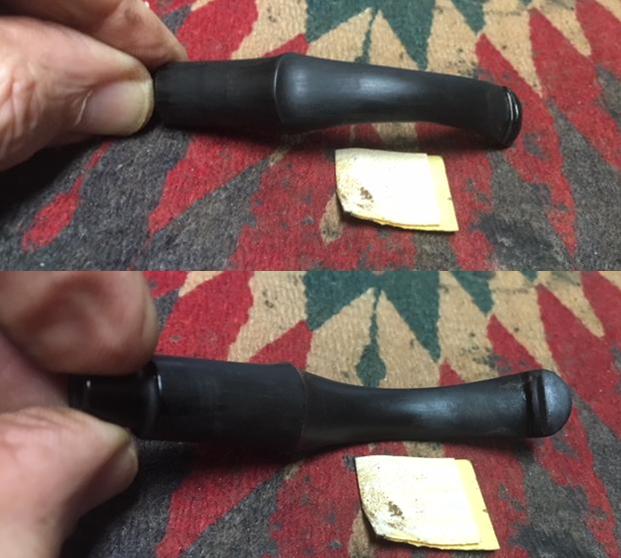
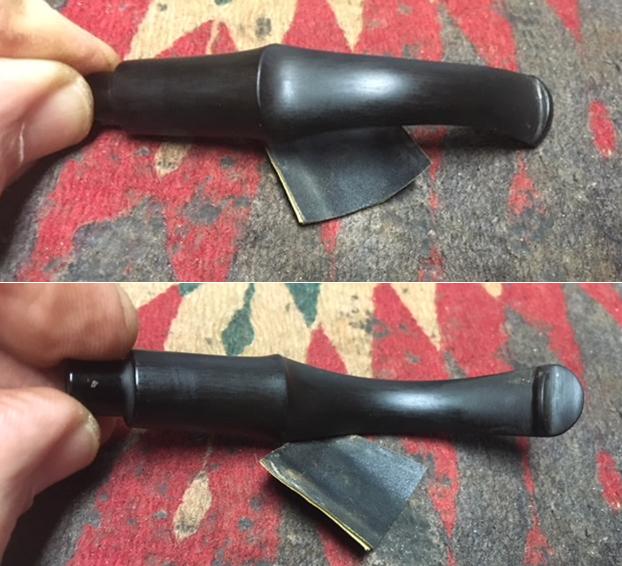
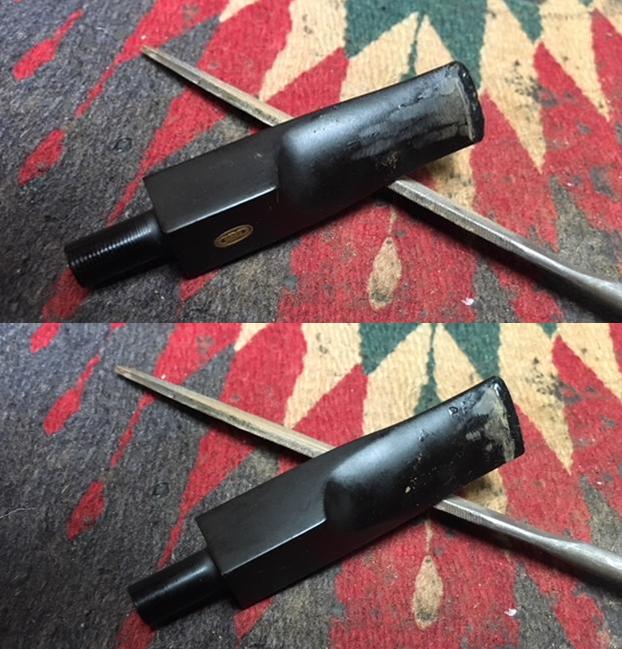
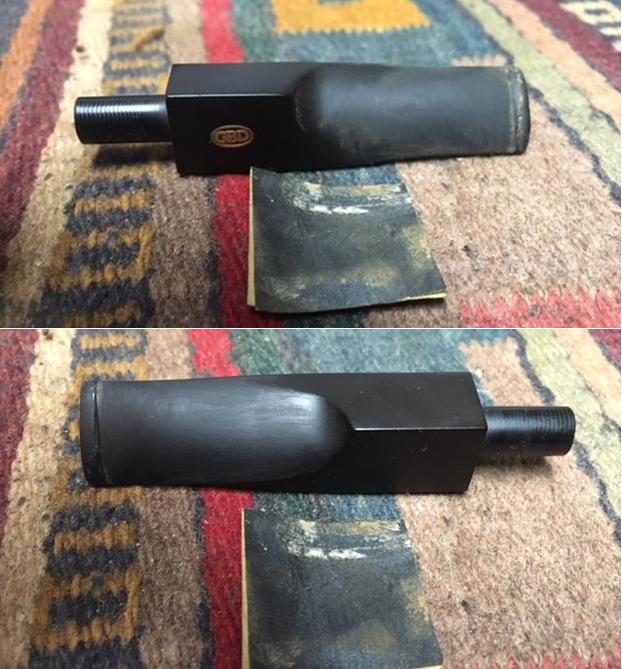
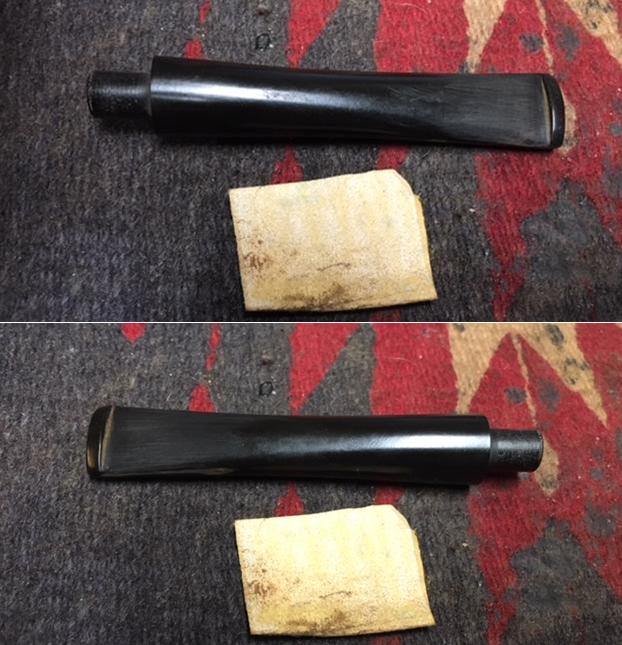
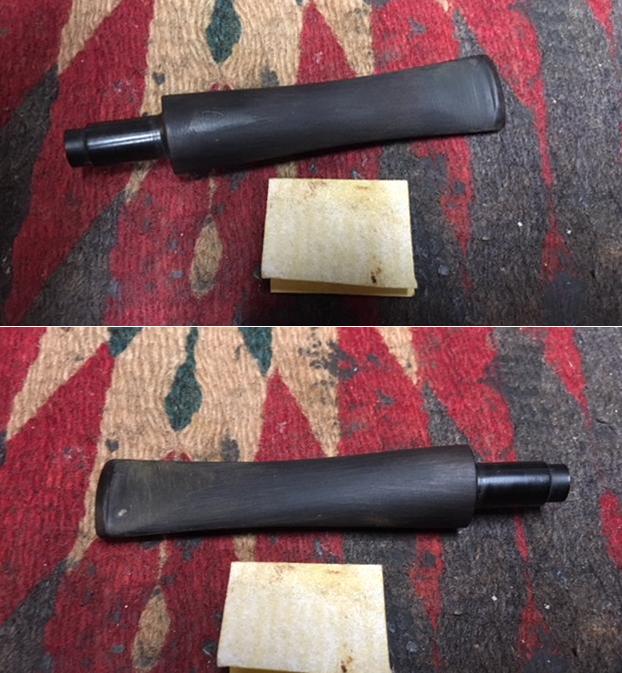
Once the glue had cured I sanded the repaired areas with 220 grit sandpaper to blend in the repairs with the surface of the horn. I also sanded out the areas of the stem that were beginning to delaminate. I used a small file to sharpen the edge of the button. 
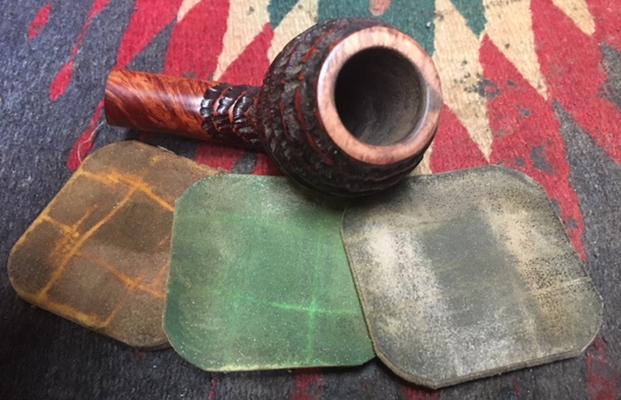
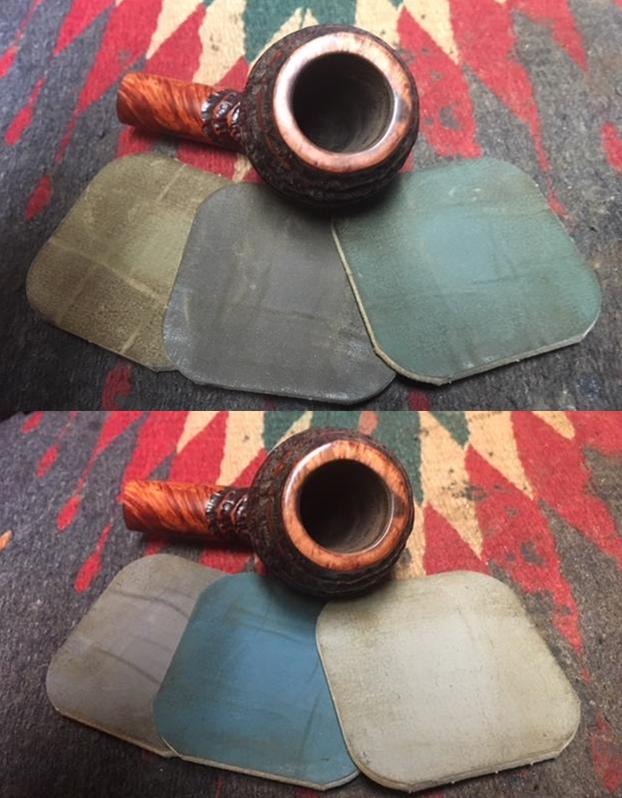
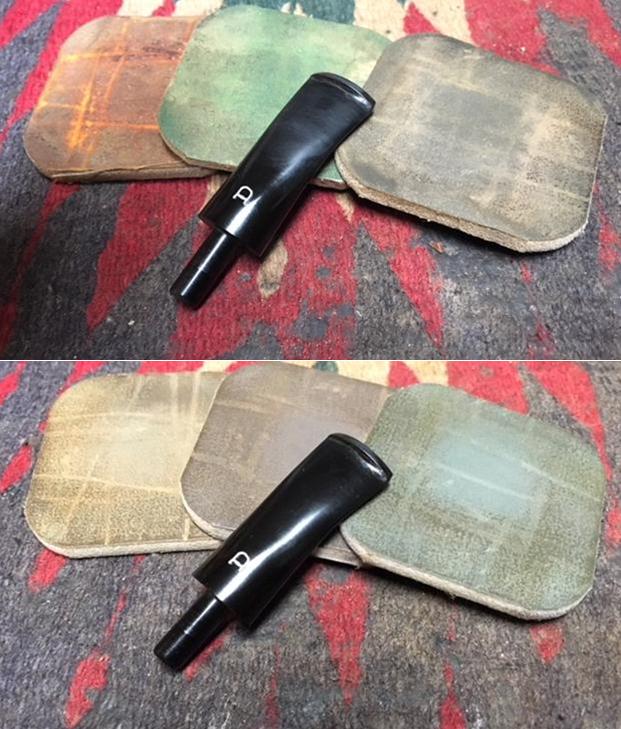
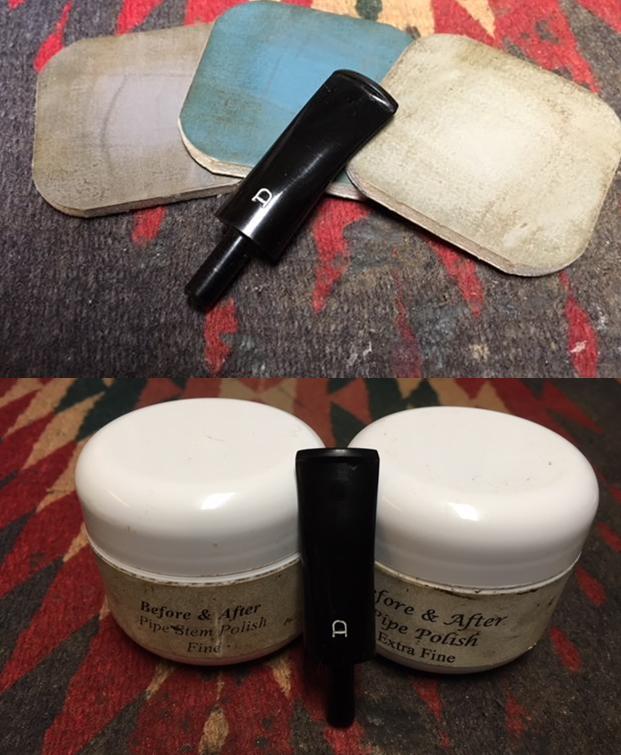
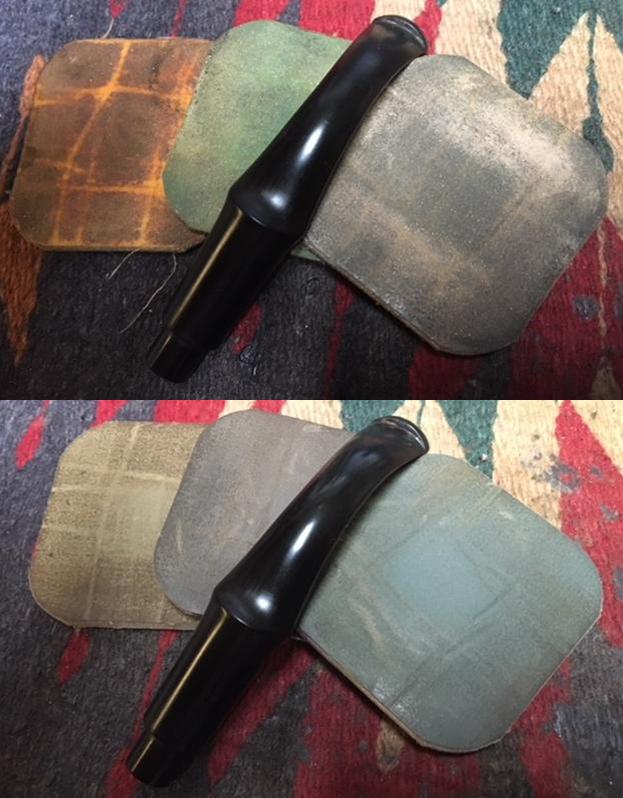
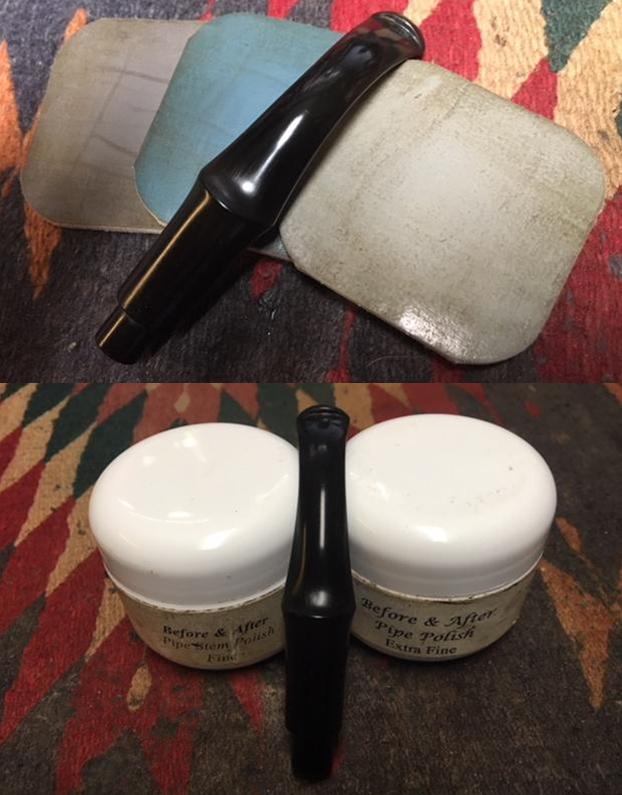
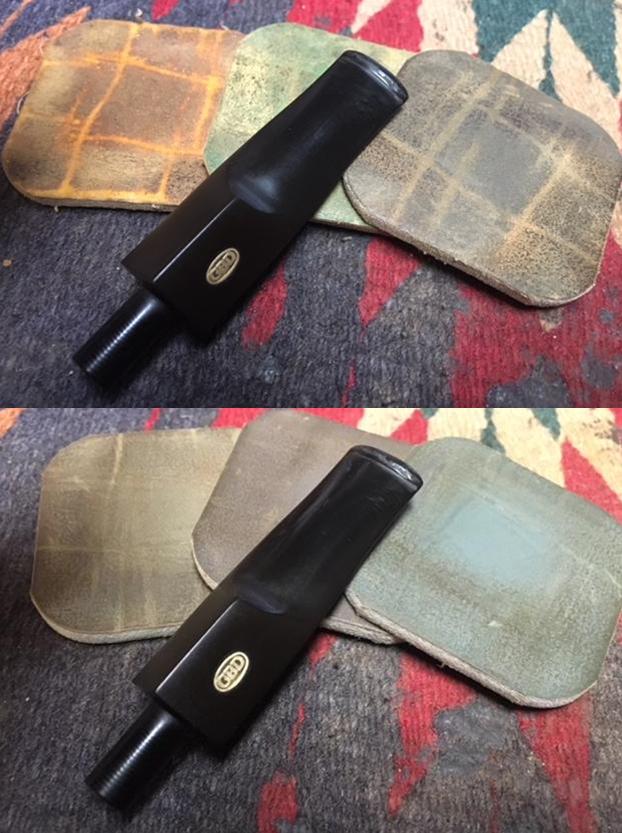
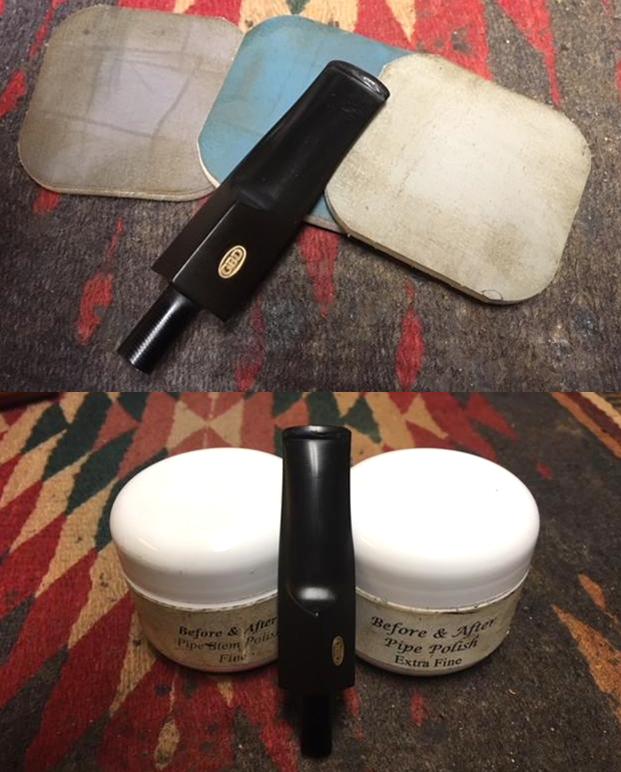
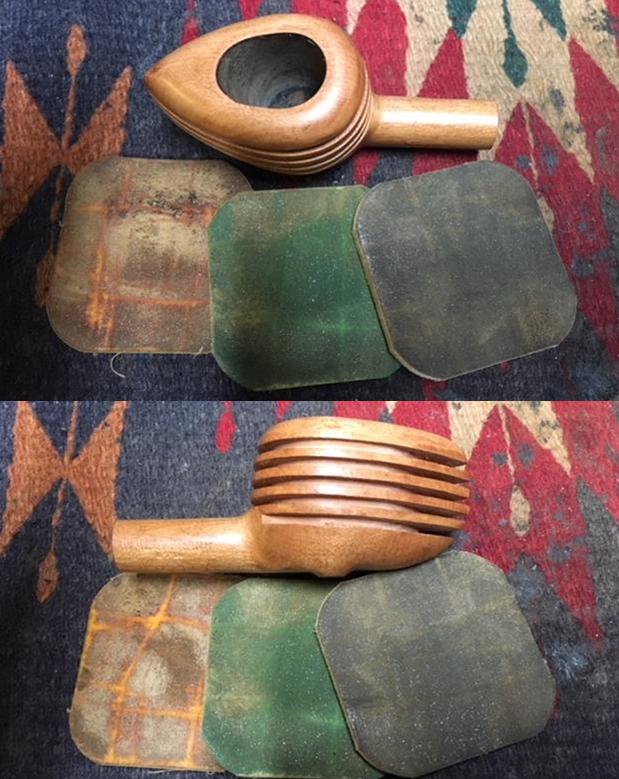
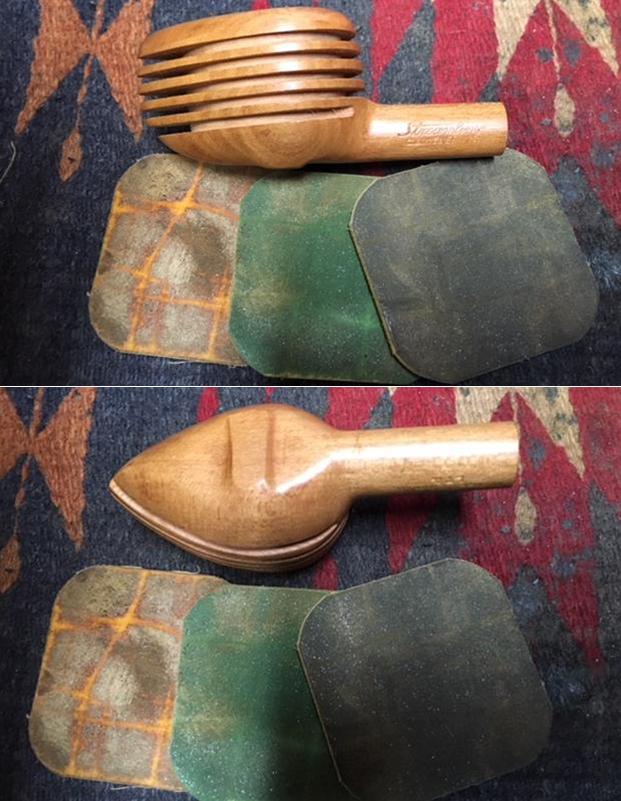
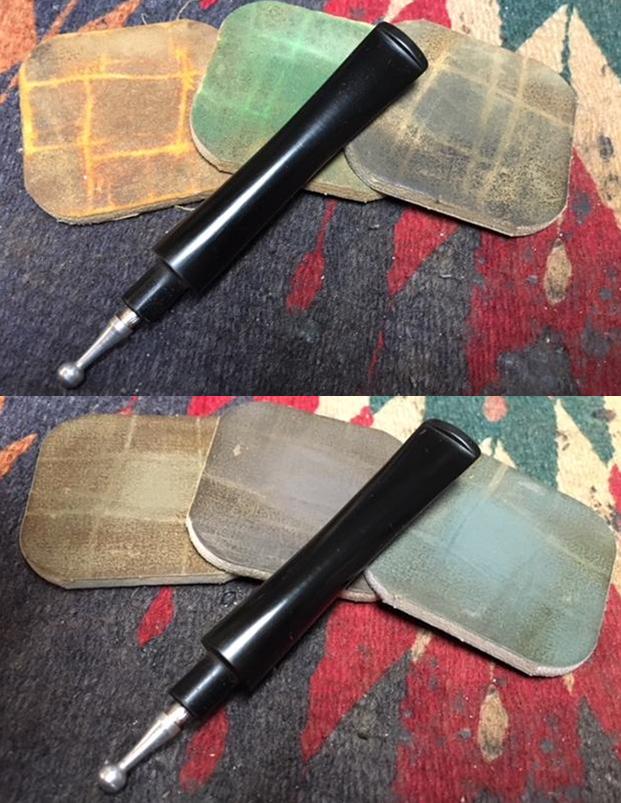
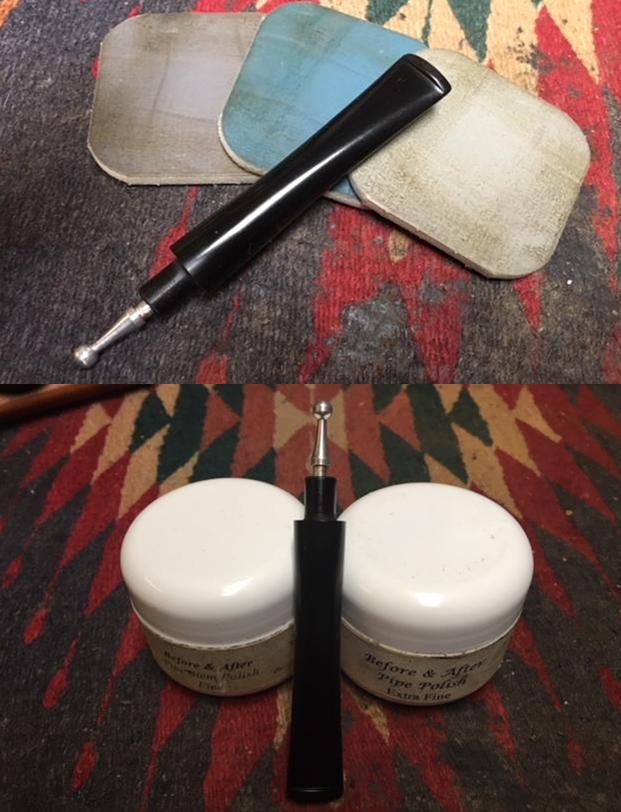
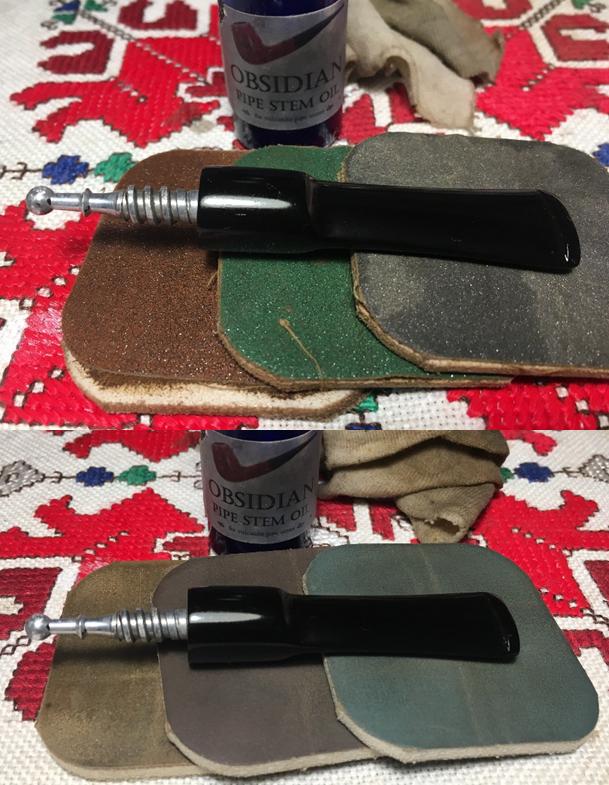
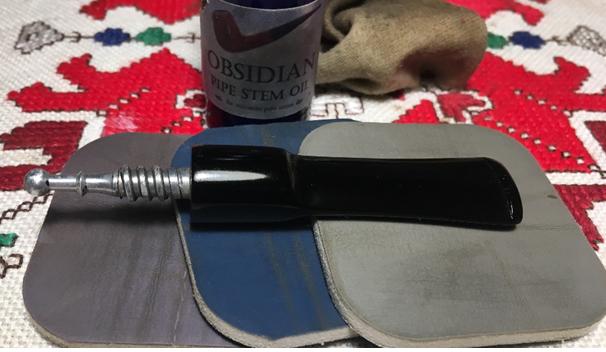
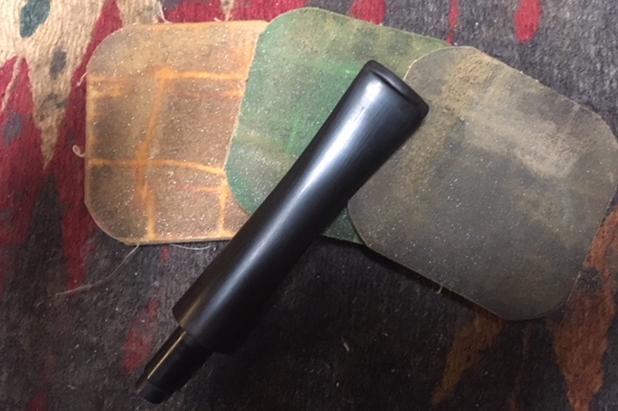
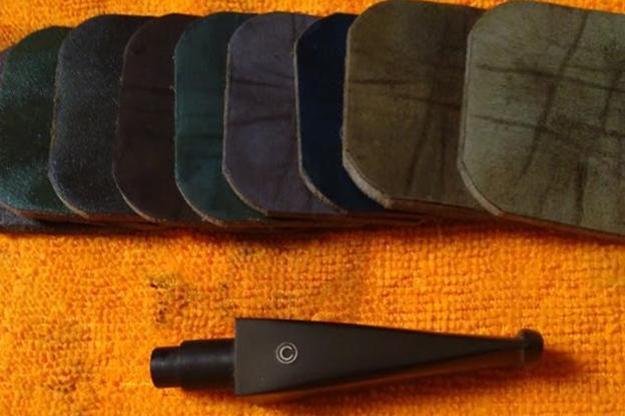
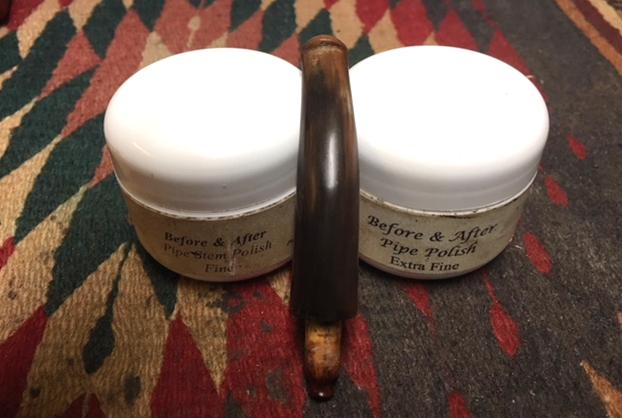
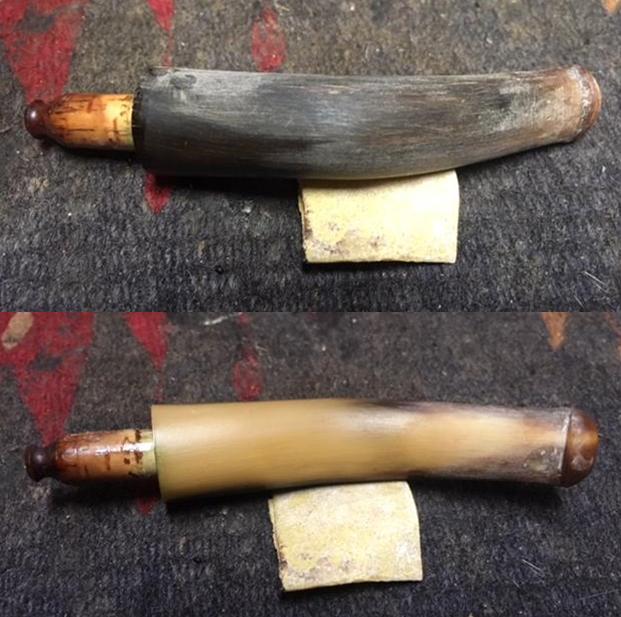
I polished stem with micromesh sanding pads – wet sanding with 1500-2400 grit pads and dry sanding with 3200-12000 grit pads. I wiped the stem down with Obsidian Oil after each pad. I polished it with Before & After Pipe Stem Polish, both Fine and Extra Fine. I gave it a final coat of Obsidian Oil and set it aside to dry. 
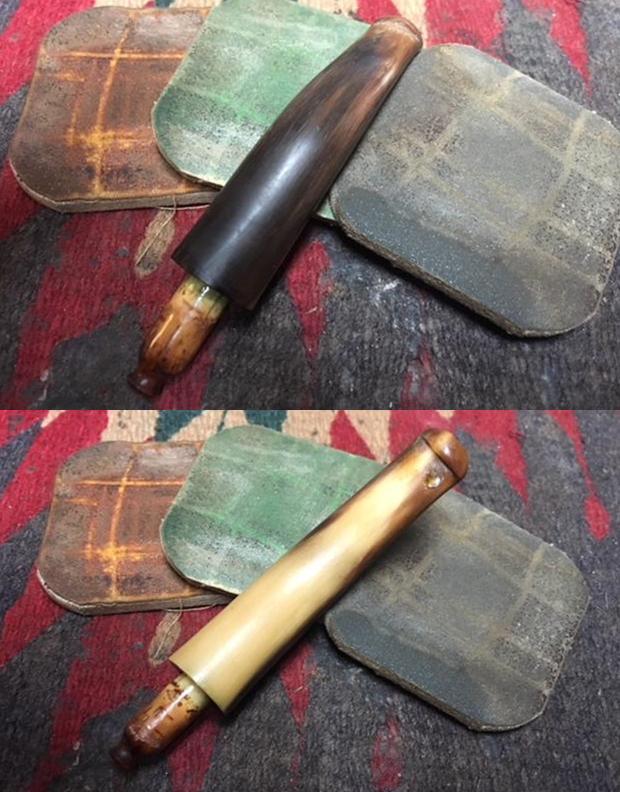
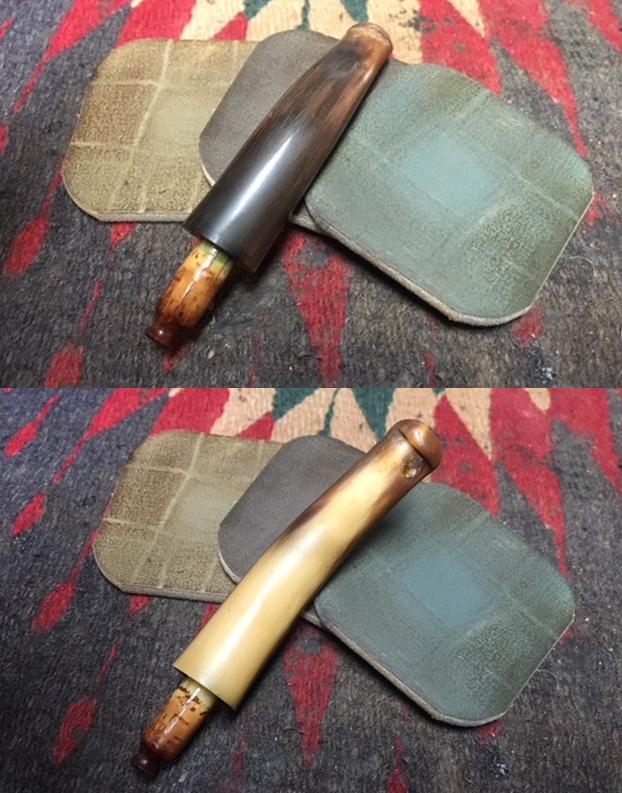
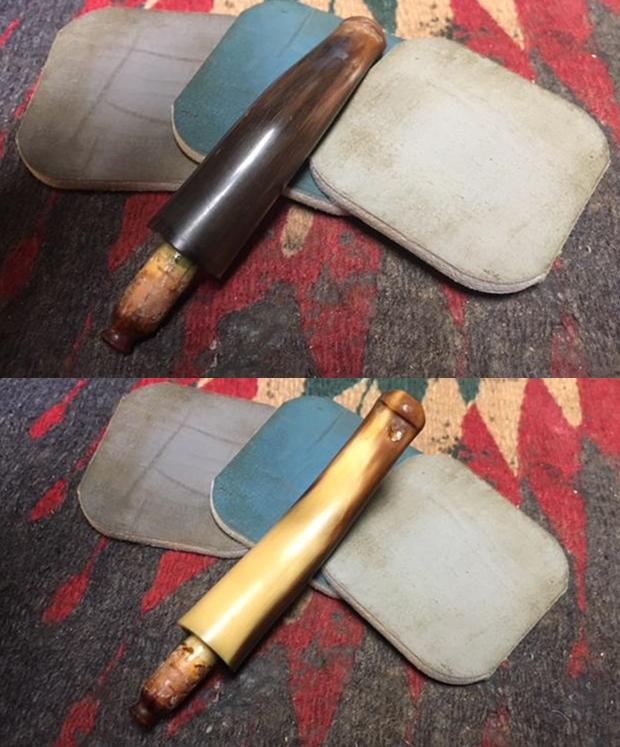
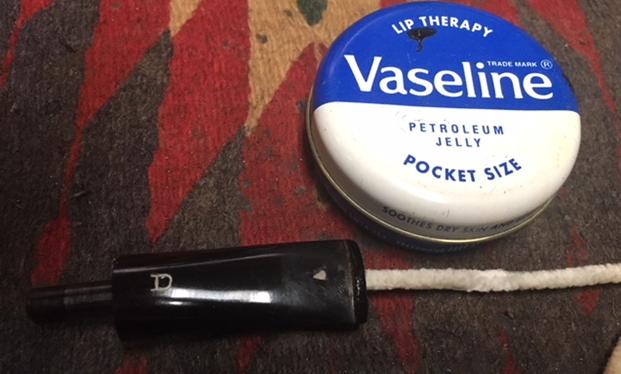
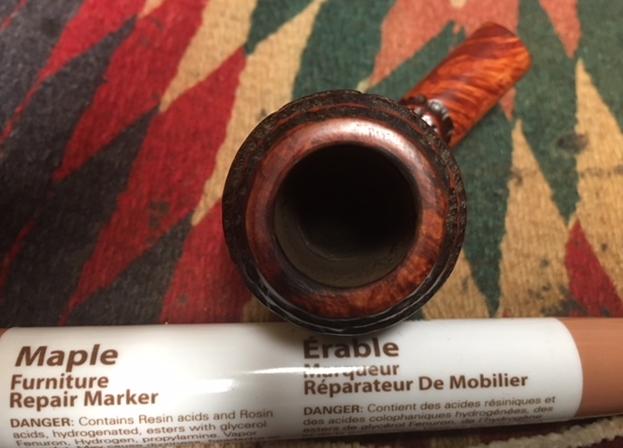
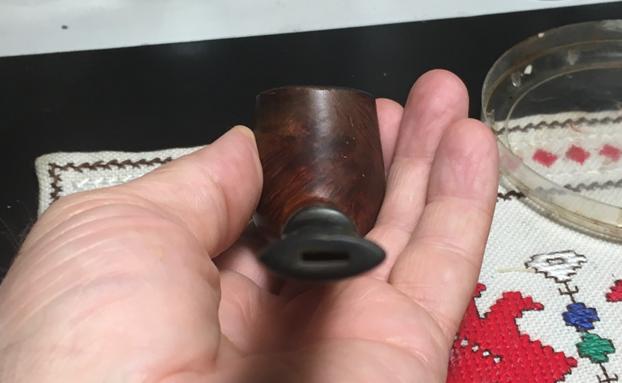
I used a dark brown stain pen to touch up the repairs on the horn stem. Somehow they had dried with a white spot in the center of each. The stain blended them into the surface of the horn and though they still showed were much better concealed. The loose tenon was an easy repair. I coated the tenon with several layers of clear fingernail polish to build up the diameter of the tenon.
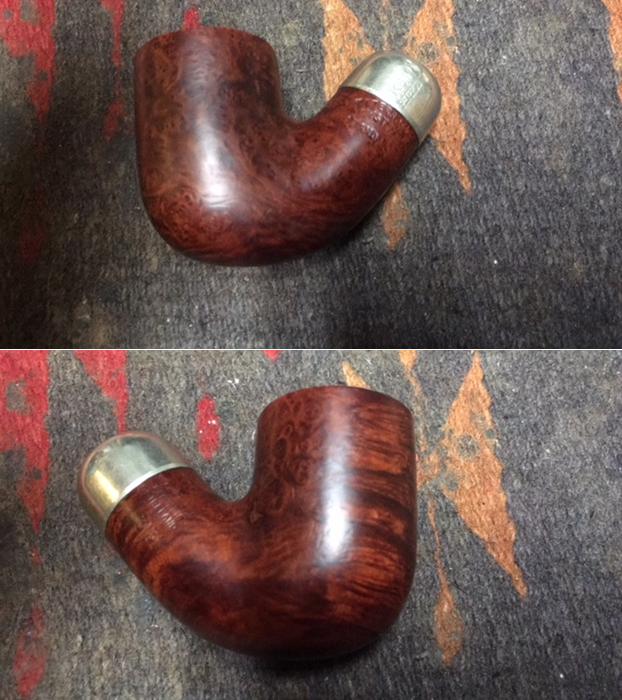
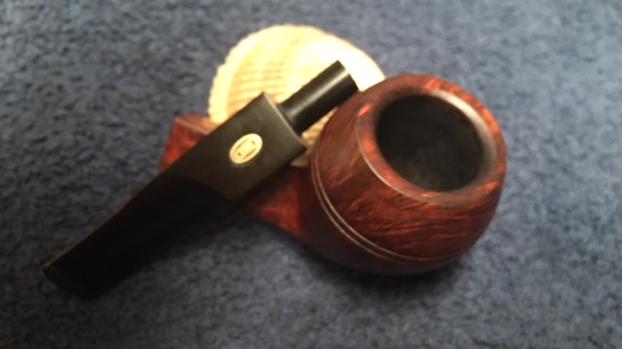
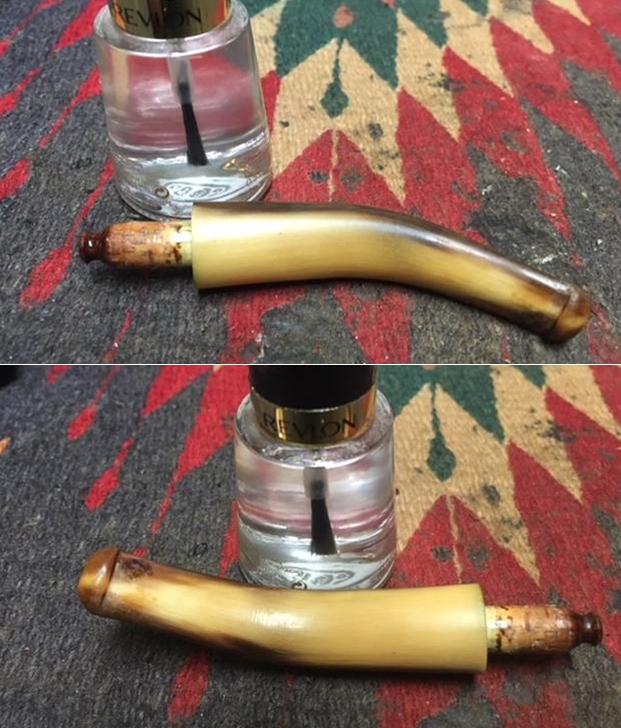
Stem fit snugly in the shank and the pipe was beginning to look really good.
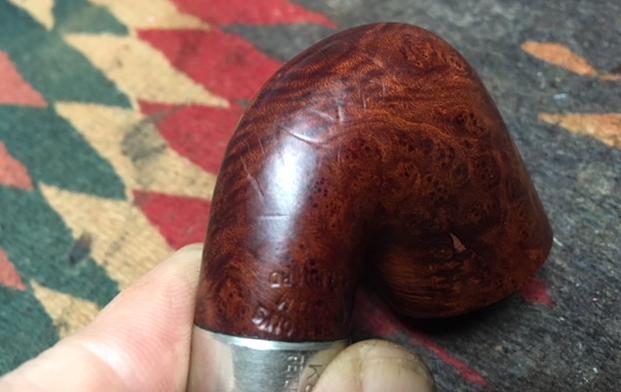
I took a photo of the stamping on the front of the bowl. I wanted to try to get more information on the history of the time. I did some research on the Campagne de France between the years 1914-1918 to see if I get a feel for that period – the time of World War I. My initial thinking was that the pipe was a souvenir of the war time intrusion of the Germans through the Alsace into the capital of France itself – Paris.I am quoting in part from two of the articles I found online about that time period. The first is part of a history that was written by Major Hubert Midy looking at the war from the perspective of the French Foreign Legion. It is entitled: HISTORY: The Foreign Legion, French Campaign 1914/1918. I have included a screen capture of the painting that was at the head of the article.…This first world war is a baptism to the horror that will follow and will remain the most deadly century in the history of humanity.

The centenary should be able to refresh our memory; thousands of books are dedicated to this war which still remains enigmatic in comparison with this second war whose motives for triggering are perfectly expressed.

And yet, everything was perfectly orchestrated, the French pointed out the German culprits, the latter accused the Russians, all suffered the latent aggressiveness of Austria and his hostility to his neighbor Serbia; the attack in Sarajevo giving him the opportunity to end once and for all.

As a result of this hostile Austrian act, the Russians take the responsibility to mobilize for Serbia, which immediately leads Germany to come to the aid of Austria.

Kaiser William II certainly did not imagine giving Vienna a “carte blanche” that a European war could take place.

Yet he could not ignore that there was a system of “bloc of alliance” which entailed a solidarity of several countries among them grouped against any external threat.

But in the end, despite this simplistic explanation of the outbreak of conflict, the objective factors are insufficient to understand how Europe threw itself into the furnace. Admittedly, there was indeed a suffocating climate of fear and suspicion, Germany scared and terrorized the French with its 25 million more than it, but nothing justified the entry into the war.

The war, deep down, no one knew what it was after forty years of armed peace. No one imagined the violence of a conflict in the industrial age, all thought that if it took place, it must be necessarily short, rough and brutal and specialists unanimously said that a war would mean total ruin belligerents.

Contrary to expectations, this war was long and marked with the red-hot iron of the blood of the fighters morally and physically destroyed by the destructive power of the heavy artillery which was able to neutralize an army of kilometers before the battlefield.

https://translate.google.ca/translate?hl=en&sl=fr&u=http://legionetrangere.fr/index.php/79-infos-fsale/299-histoire-la-legion-etrangere-campagne-de-france-1914-1918&prev=search

I searched further and found a second article that is a great summary of the war tracing the history from its beginnings in 1914 to its closure in 1918. I have included it for the information it gives.

The international context in which hostilities broke out in 1914 resulted from the profound changes that have affected Europe since the mid-nineteenth century.

The fragility of the Balkans crossed by strong nationalist pushes, the regrouping of the Austro-Hungarian monarchy (1867), the realization of the Italian unity (1870) and that of Germany (1871) destabilize the European equilibrium resulting from the treaty Vienna (1815).

Tensions between France, eager to find Alsace and Lorraine annexed in 1871, and Germany on the one hand, between Austria-Hungary and Russia on the other, not to mention the role of England, always anxious to maintain its global influence, fuel the risk of crises. The Ottoman Empire itself was forced at the Berlin Congress (1878) to recognize the independence of several countries that were integrated into its administration (Serbia, Romania, Bulgaria, Montenegro in particular).

Through the combination of these new divisions and competition between major states (repeated crises between 1904 and 1914), the confrontation could not be avoided.

The war broke out following the assassination on June 28, 1914 in Sarajevo of Franz Ferdinand, nephew and heir to the Emperor of Austria, by a Bosnian student linked to Serbian nationalist circles. Austria, after securing the support of Germany, presents an ultimatum to Serbia: this ultimatum requires that the investigation into the circumstances of the assassination be conducted on the Serbian territory by Austrian officials. Serbia accepts the conditions with the exception of the presence of Austrian agents which would constitute an attack on its sovereignty. Austria-Hungary declares war on July 28, 1914.

The cog of the alliances begins immediately: between the general mobilizations and the reciprocal ultimatums, Germany declares war on Russia on August 1st and on France on August 3rd, causing the reply of England declaring war in turn to Germany on August 4th. Patriotism, long nourished by various public opinions, allows the populations and the political classes of the different belligerents to accept this situation perceived as legitimate by each of the camps.

The German armies, regardless of the neutrality of Belgium, attack France first. This operation will be called the “Battle of the Borders” (7-24 August 1914): the French are moving forward to Mulhouse, Strasbourg and Lorraine. But in Mons and Charleroi the English and French are forced to retreat after fierce battles where they have difficulty coping with the dynamism of the attackers despite the effectiveness of the French artillery (exceptional light gun of 75).

Arrived at the gates of Paris on September 2, the Germans, instead of attempting to seize the capital, try to take the whole of the French battle body by a maneuver encirclement. Then commits the “Battle of the Marne” where Joffre, Chief of Staff, and General Gallieni, commanding the Place de Paris, launch a general counter-offensive marked by great feats of arms: General Foch heroically resisted in the swamps of Saint-Gond, and the army of General Maunoury was transported by Paris taxis to the north of the Marne: noting the failure of their action, the Germans retreated on September 10 to the Aisne; their commander-in-chief, von Moltke, is replaced by von Falkenhayn. Paris is saved.

Then begins the “race to the sea” between October and November 1914. The German army tries to outflank the allies on the left up to the north to reach the ports allowing British troops to disembark. The English and the French face tough and deadly engagements especially in Flanders (1-27 October). The first trenches appear, the soldiers digging them to protect themselves from both the enemy and winter. Finally the front stabilizes between the North Sea and Switzerland for nearly 700 km; 10 French departments are partially or totally occupied. The eastern front at the same time enabled the Germans to secure a victory over the Russians who had taken the offensive (Battle of Tannenberg, August 26-30, 1914); but the necessity of taking troops from the French battlefield weakened German power in the battle of the Marne.

The war of movement, initially planned to quickly defeat France, thus ends at the end of the year 1914 with two unexpected consequences: on the one hand a reciprocal neutralization of the armies in the presence, on the other hand a worldwide extension of the conflict Japan joined the Entente (Great Britain, Russia and France) and the Ottoman Empire and Bulgaria joined Germany and Austria-Hungary (October 1914).

The characteristics of this new conflict appear on both sides: the States must organize a real economy of war mobilizing all the means which they have to avoid the defeat (organization of the resources, supply, production of armaments, massive use of the railways, financing of the war effort).

In July 1918, Foch launched a counter-offensive which gave the signal for a progressive decline of the Germans, whose retreat continued to increase (the German front was sunk in Montdidier in August, the general offensive of Verdun to the Yser is triggered on October 31). The Italians erase on their side the disaster of Caporetto (October 1917) beating the Austrians to Vittorio-Veneto (October 1918). In the Balkans, under the influence of Allied pressure (Franchet d’Esperey, victorious at Uskub), the central empires are taken in reverse; Bulgaria and Turkey are increasingly isolated and demand an armistice (30 October); Austria does the same on November 3rd. Faced with the reversal of the military situation, political agitation spread to Germany: the German fleet revolts in Kiel, the revolution breaks out in Berlin, William II abdicates and the republic is proclaimed on November 9, the armistice is signed in Rethondes the 11th of November.

https://translate.google.ca/translate?hl=en&sl=fr&u=http://www.cheminsdememoire.gouv.fr/fr/la-premiere-guerre-mondiale-1914-1918&prev=search

Given that information I thought it would be helpful to look up the meaning of the French word Souvenir. I expected it to mean the same as the English word and it indeed did have. Here is the definition of the word:

Noun: a thing that is kept as a reminder of a person, place, or event. Synonyms: memento, keepsake, reminder, remembrance, token, memorial; bomboniere; trophy, relic. Use: “keep the key ring as a souvenir”

Verb: souvenir; 3rd person present: souvenirs; past tense: souvenired; past participle: souvenired; gerund or present participle: souveniring. Use: take as a memento -“many parts of the aircraft have been souvenired”

So now I knew that the pipe was a memento, memorial token, or remembrance  of a horrible time in the history of the French. It was a time when Paris itself came under siege of the German army and the world as it was then known came to screeching end. The war forever changed the way people in those days viewed their time in history.

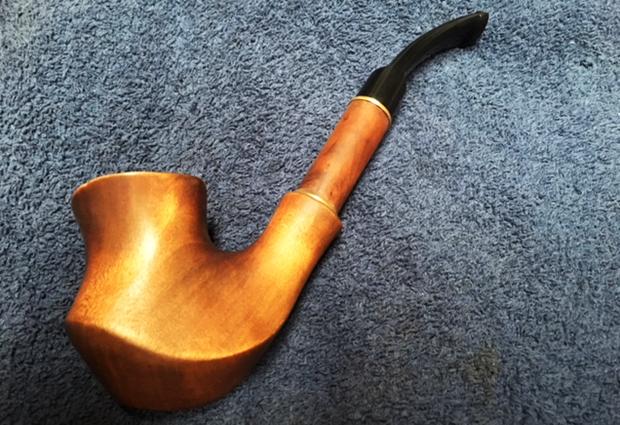
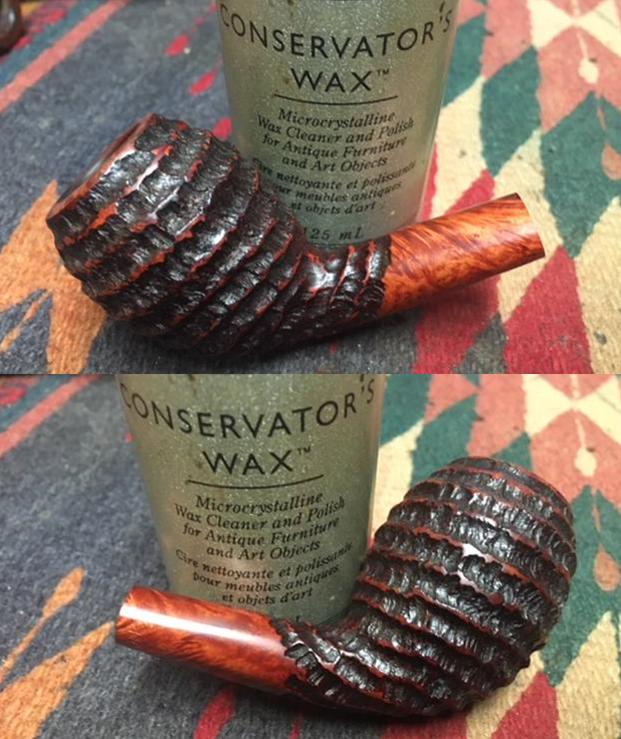
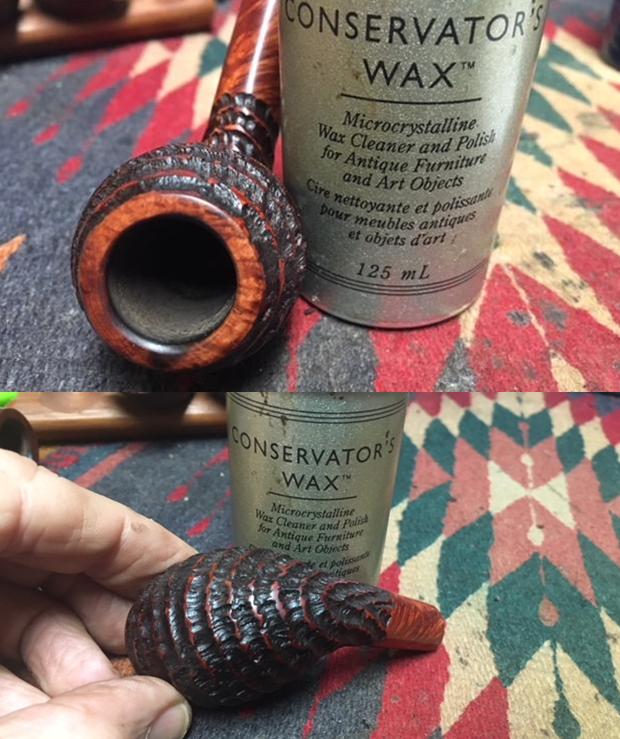
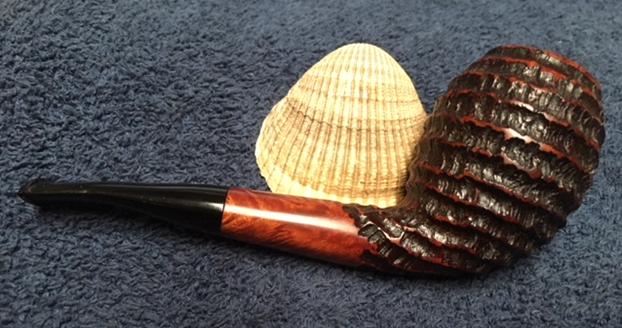
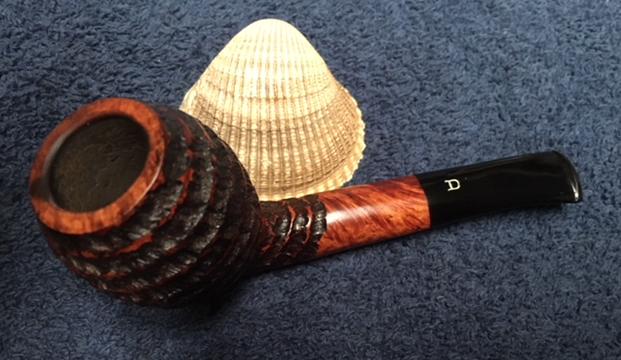
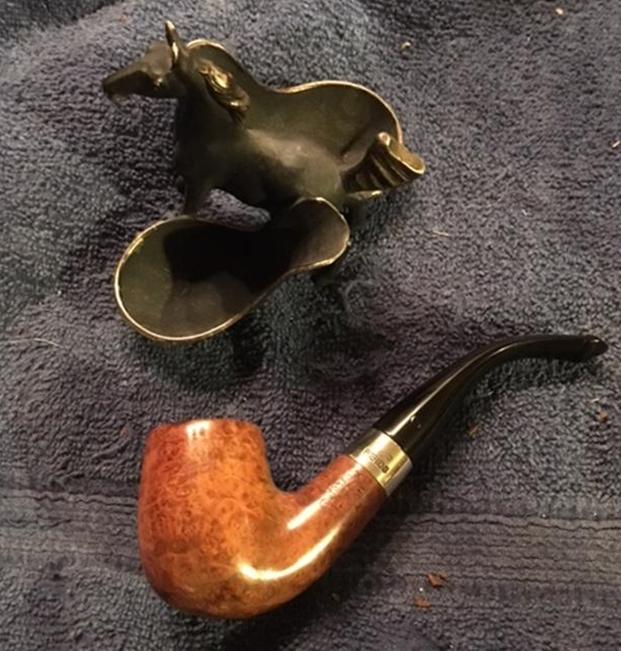
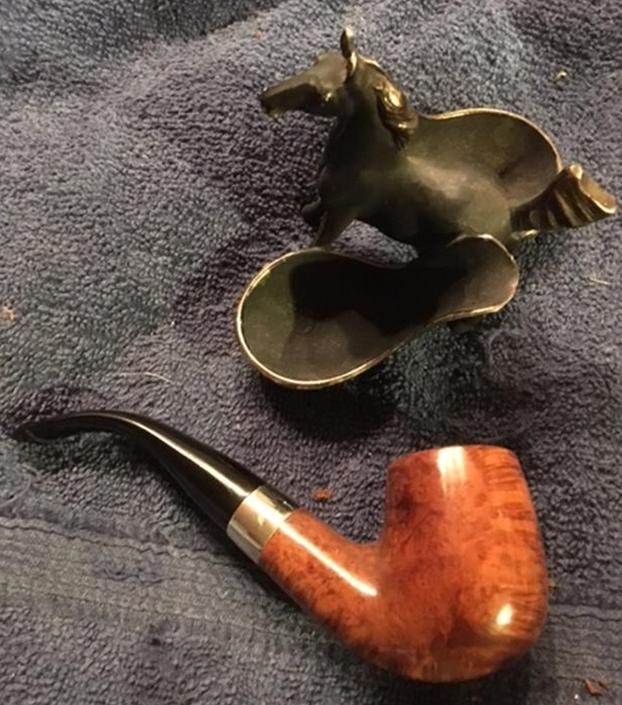
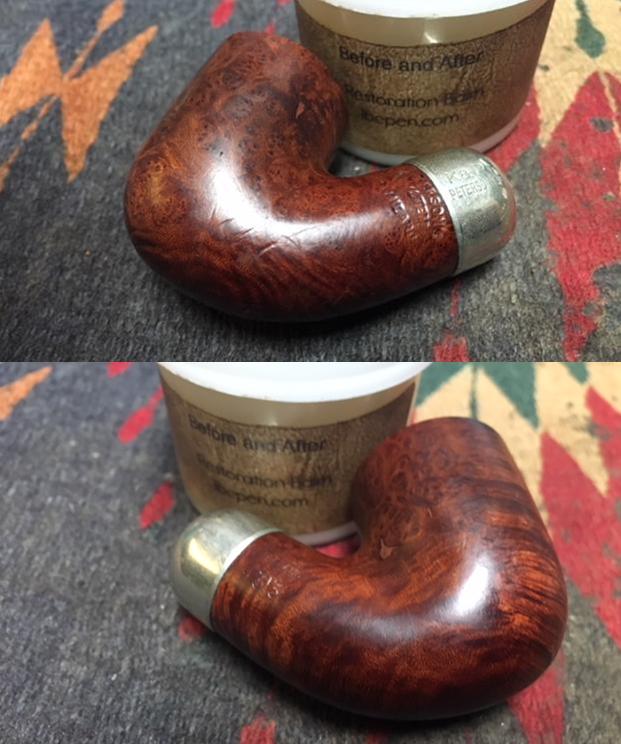
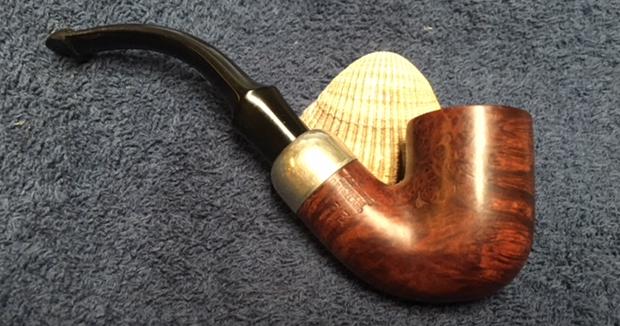
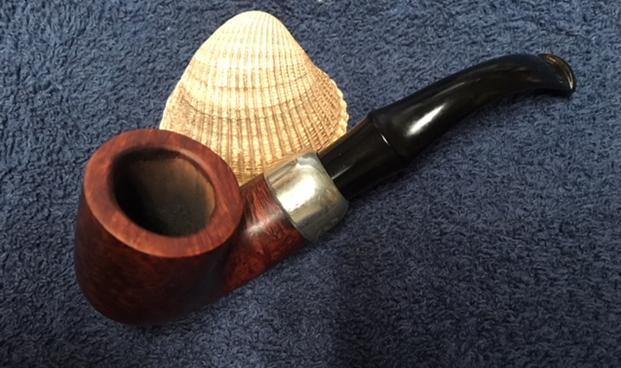
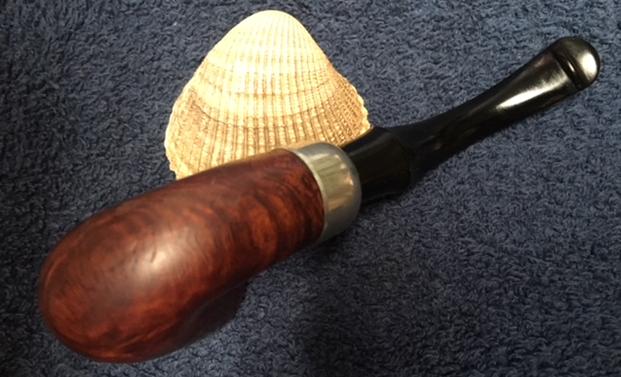
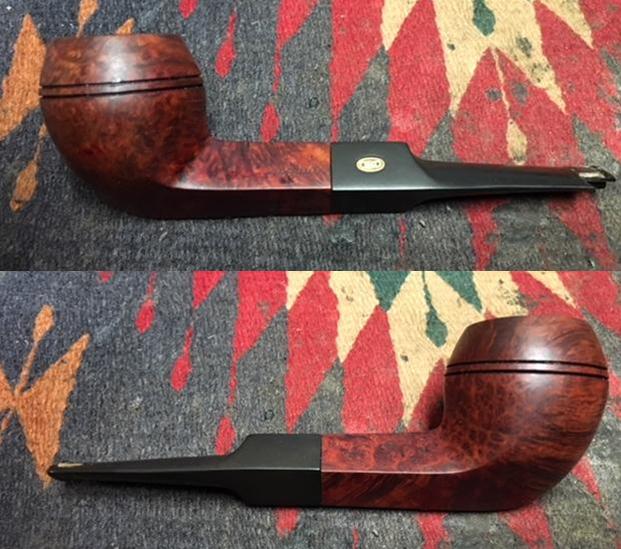
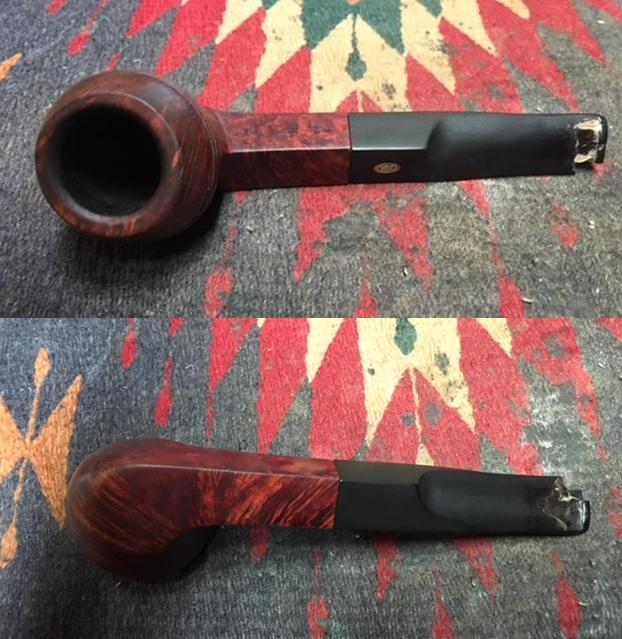
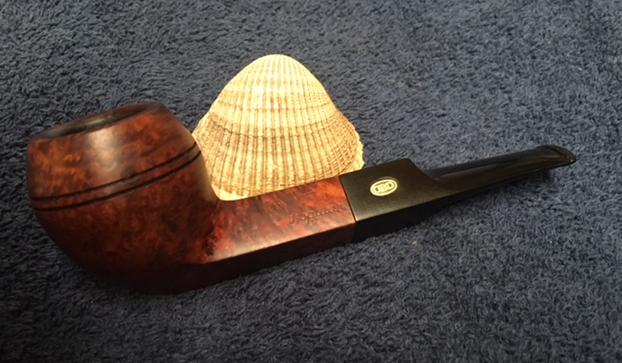
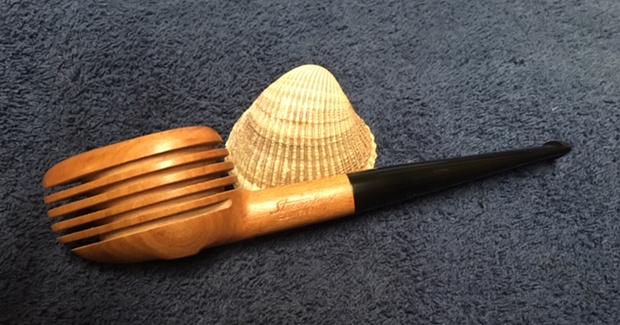
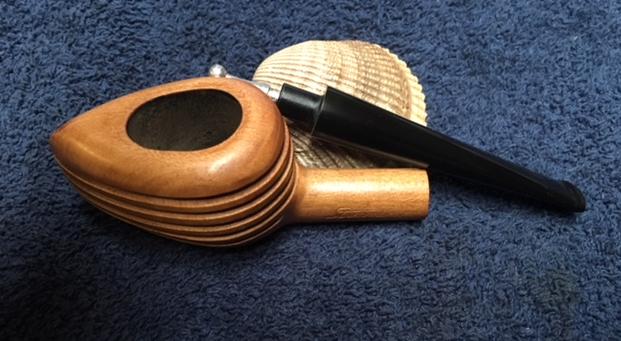
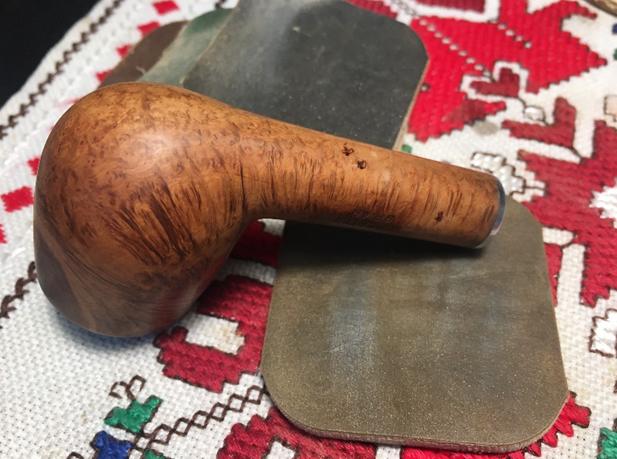
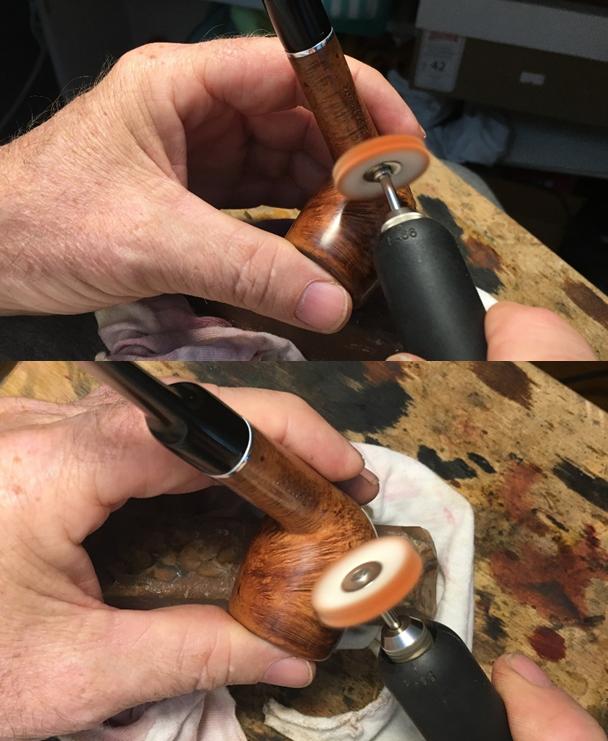
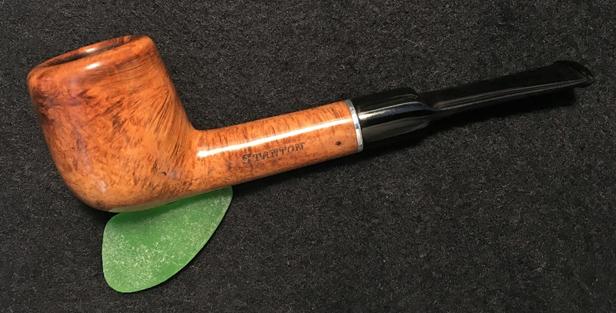
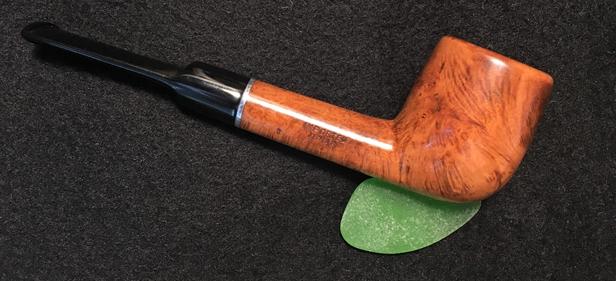
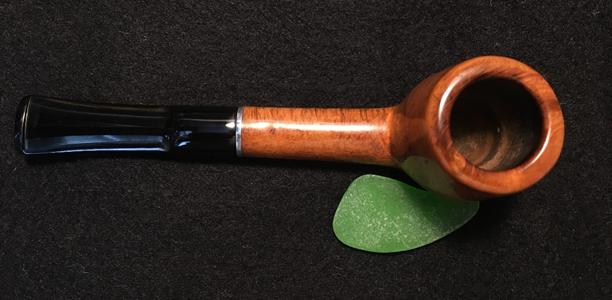
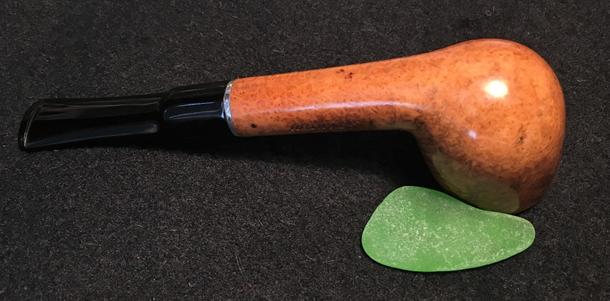
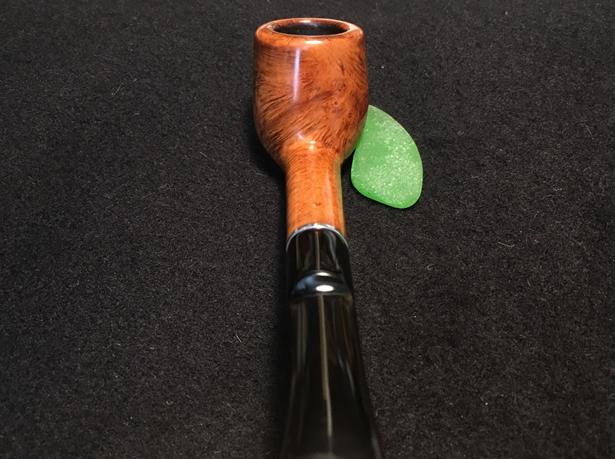
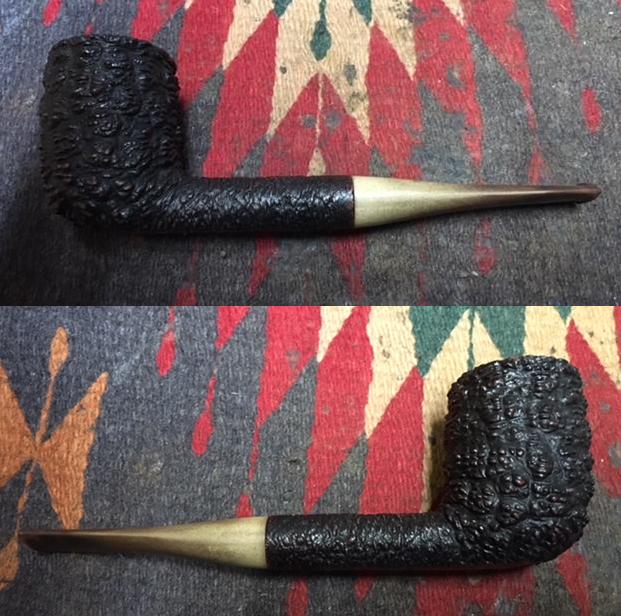
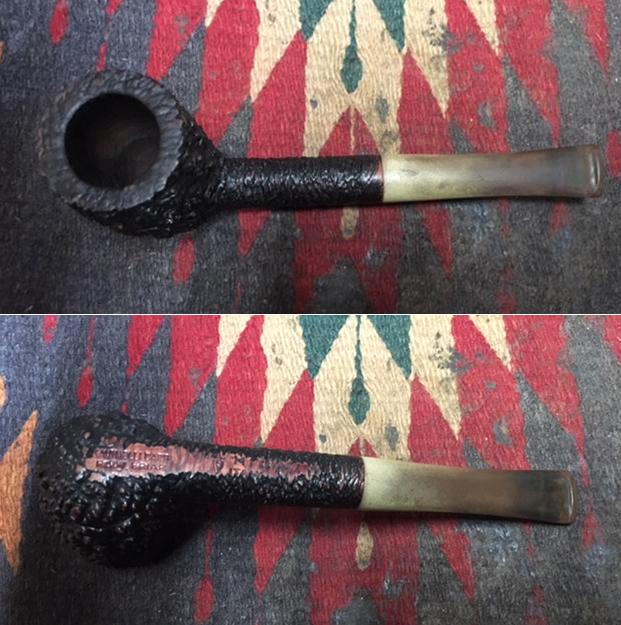
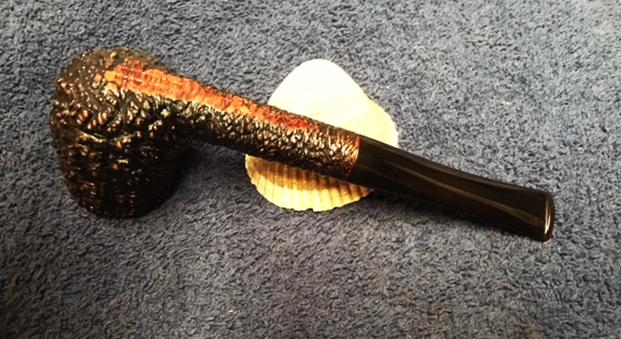
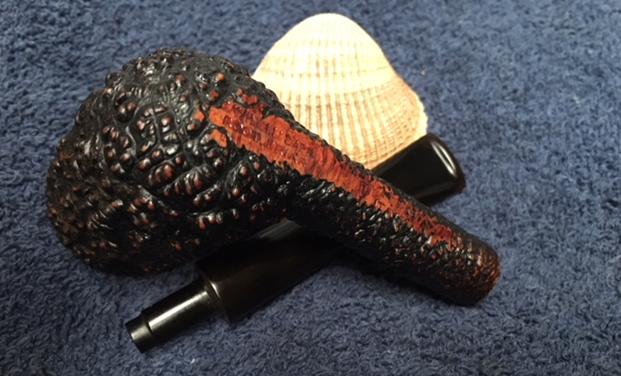
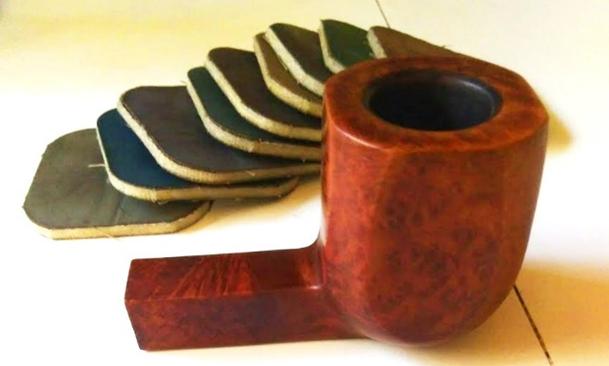
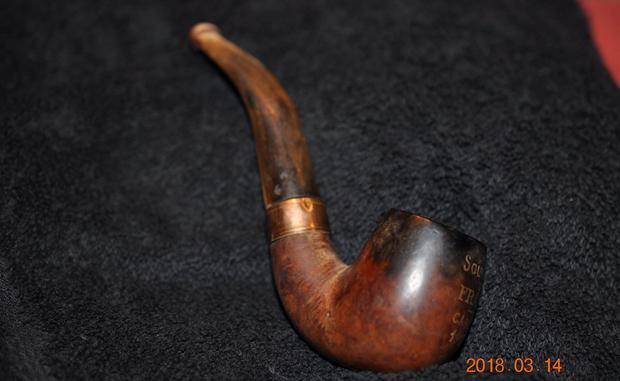
This small CCC Officier bent billiard with a horn stem is a real beauty with a mix of grains around the bowl and shank. The grain really is quite stunning. The rim top and the right side of the bowl have some dark stains that could not be removed without damaging the stamping on the front of the bowl. The horn stem is repaired and polished and has a shine that looks very good with the brass ferrule on the shank end. I buffed the bowl and the stem with Blue Diamond polish being careful to avoid the stamping on the front side of the bowl. The briar and the horn took on a deep and rich looking shine. I gave the bowl and stem multiple coats of Conservator’s Wax and buffed by hand with a microfiber cloth to raise the shine. The finished pipe is shown in the photos below. The rich brown stain allows the grain to really stand out on this little pipe and it works well with the polished richness of the stem. The dimensions of the pipe are: Length: 5 inches, Height: 1 5/8 inches, Outside Diameter: 1 inches, Diameter of the chamber: 5/8 inches. This little commemorative pipe has quite a history. I only wish that it could tell the story of its journey from France, to the US and up to Canada. I am sure that it would be a fascinating tale that would I am sure capture out imaginations. Thanks for walking through the restoration with me.

Putting Humpty Dumpty Back Together Again

Blog by Steve Laug

I was contacted by Mike, reader of rebornpipes about fixing two of his pipes. It was probably over a month ago when he emailed me. The first one was a gift from a friend and when he tried to take of the stem the shank broke away from the bowl. This sounds awful but it is not as bad as it sounds. He sent me photos of the pipe so I could have a look at it. It is made out of pear wood I believe and is a Chinese made pipe (at least it appears to be). He packed it up with another pipe, an old Custombilt that needed a new stem and mailed them to me. When it came the pipe was in a bag – it looked much liked the first series of photos below. It looked like Mike had been loading a bowl for a smoke when it broke. The shank and bowl were held together by an inner tube that appears to be plastic but even that is not overly clear at this point. Whatever it was it was brittle and broke neatly apart. The brass washer that was used for decoration was loose, having been held in place by the joint. The pipe was very dirty on the outside and the inside and needed some work. I would soon find out why it was not cleaned.The stem was tight in the shank and was hard to remove. Mike had said that the pipe was a filter pipe but I am not certain of that. Certainly the tube looked like it could hold a paper filter but the inside of the tube had been stepped down several times. There was a thick cake in the bowl and an overflow of lava on the rim top and some darkening around the edges and top.I took a photo of the end of the shank to give a bit of an idea of what that portion looked like. It was a tube within a tube with something stuffed in between the two tubes.I scraped out the load of tobacco in the bowl to begin my cleaning process. I reamed the bowl with a Savinelli Fitsall Pipe Knife and took the cake back to bare wood. I wanted to be able to see what was going on under the cake. Everything looked good once I had removed the cake.I cleaned out the internals of the pipe and shank with pipe cleaners, cotton swabs and alcohol. Cleaning out the airway into the bowl proved to be a difficult proposition. It was hard to work a pipe cleaner through and blowing air through it seemed really constricted. I worked on it quite a while and was able to work the pipe cleaner through. It seemed like there was some kind of fitting in the bottom where the airway entered the bowl that dissipated the smoke. It felt like some kind of nipple with multiple air holes. Cleaning the shank was simpler but even there I ran into several step downs along the inside of the shank piece.I took a photo looking down into the airway and you can see the broken tube that held the shank to the bowl just inside the shank walls. Deeper down the shank is another tube that appears to be aluminum. Inside that tube at the bottom is a centered hole that descends into the bowl and to the nipple with multiple air holes at the bottom where it enters the bowl bottom.I cleaned the end of the short shank entering the bowl and flattened the broken tube that held the shank and bowl together on both. It was ragged and crooked. I cleaned up the brass washer that acted as an ornamental space with 1500-2400 micromesh sanding pads. I used all-purpose glue and reset the washer in place on the bowl end of things.I had a piece of steel tubing that was the right size to insert in both the shank and the bowl end of the broken tube. I roughed it up with a file to give the glue something to anchor too on the smooth steel. I mixed a batch of JB Weld to bind the metal tube in the shank first. I packed the mixture in around the broken tube and the outside of the wooden shank with a dental spatula and set it aside to dry.  I joined the family for dinner and afterwards the glue was cured enough to connect the bowl end. I applied another coat of the JB Weld mixture to the tube and to the edge of the two sides that would be pressed together. I aligned the two parts and held it tightly until the glue had set enough for it to be stable when I laid it down. I set it aside to let the glue harden. After a short time I took photos of the newly joined bowl and shank. I set the bowl aside for the evening to let the glue cure overnight and turned to work on the stem. I cleaned the inside with pipe cleaners, cotton swabs and alcohol. Once more I was in for a surprise. There was a brass grate inside the airway at the place the saddle portion is on the outside of the stem. It was very dirty but the cotton swabs and alcohol cleaned the grate. I was able to work the pipe cleaner through each section of the grate until the grate and stem was very clean. The tenon was wide open like it was made for a paper filter. A 9mm filter would work well in this tenon. My only issue is that with all of the brass pieces in the airway in the bowl, shank and stem the filter would further constrict the flow of the smoke through the airway into the mouth of the smoker. I don’t think it is worth smoking with a filter.I sanded out the tooth marks and chatter on the top and underside of the stem next to the button to remove the damage in those areas. I used 220 grit sandpaper and was able to smooth out all of the damage. The stem is not vulcanite but seems to be a soft plastic that is similar to the tube that runs through the entire shank and that broke at the joint of the bowl and shank. I polished it with 400 grit wet/dry sandpaper to polish out the scratches in the soft plastic. I continued to polish the stem with micromesh sanding pads – wet sanding with 1500-2400 grit pads and dry sanding with 3200-12000 grit pads. I wiped down the stem after each pad with Obsidian Oil. After the final 12000 grit pad I gave it a final wipe with Obsidian Oil and set it aside to dry. The oil is not absorbed like it is with the vulcanite but it did clean up the remaining dust and grime from the polishing. I set the stem aside and wiped the bowl down with alcohol. I cleaned up the excess glue that has squeezed out at the bowl shank joint. I removed all of the oils, grime and dirt that were ground into the pear wood. I worked on the rim top with alcohol and micromesh sanding pads until the wood was clean. With the wood clean I polished it with micromesh sanding pads – wet sanding it with 1500-2400 grit pads and dry sanding it with 3200-12000 grit pads. I wiped it down with a damp cloth between each pad. When I finished with the 12000 grit pad I wiped it down a final time and hand buffed it with a soft cloth. I waxed the bowl and shank with multiple coats of Conservator’s Wax. I buffed the stem with carnauba wax. I buffed bowl and stem with a clean buffing wheel to raise a shine in the pear wood. The photos below show the finished pipe. It is actually quite unique in terms of shape and design the multiple brass grates in the bowl, shank and stem constrict the air flow but the draw is ok. It definitely should be smoked without a filter. Once I finish the second of Mike’s pipes they will wing their way back to New York where I am sure he is waiting to fire them up and enjoy them once again. Thanks for looking.

Repairing and Restoring a Hand Carved Danbark “Honey Stick”

Blog by Steve Laug

Sometimes a voice from the past is a good thing for both parties. Many years ago now, here in Vancouver I met Eric at the Vancouver Pipe Club. We talked at pipe club meetings and had a common calling as ministers in within different Christian Churches. Over time Eric moved to Eastern Canada and I moved on to work for an NGO here in Vancouver. Not too long ago I received an email from Eric about some pipes that he had that he wanted me to work on for him. We made arrangements and soon a box with three of his pipes was traveling to me from Ontario. It arrived quite quickly and I opened it when it arrived. Eric had thoughtfully included a tin of Samuel Gawith’s Commonwealth Mixture Full Strength for me to smoke and I was looking forward to cracking it open. Included in the box were three pipes – a Danbark Hand Carved from Denmark that was quite stunning, a Bewlay Sandblast Billiard and a Le Nuvole Long Shank Dublin. Each had different challenges to address but each was a beautiful example of the pipe maker’s craft. I decided to work on the Danbark Hand Carved pipe next.

The finish on the pipe was very dirty with a lot of grit and grim in the grooves and crevices of the spiral style of rustication. The rim top was heavily tarred with lava that flowed from a caked bowl. The edges and top of the rim looked like it had burn marks on the front just left of centre and on the rear left side. Other than the burn marks it appeared to be in okay condition though I would not know for sure until I had reamed the bowl and cleaned off the rim top. The bowl was rusticated all around other than the rim top and about half of the shank. The grain on the smooth parts was very nice. The underside of the shank is stamped Danbark over Hand Carved over Denmark.The acrylic stem had the white Danbark “D” logo on the top side. There was tooth chatter on both sides at the button and a triangular shaped puncture on the top side about ¼ inch from the button. The pipe was not as dirty or smelly as the first pipe of Eric’s I worked on. I took photos of the pipe to show the condition it was in when it arrived.  I took close up photos of the bowl and rim top to show its condition. You can see the thick cake in the bowl and the overflow of lava onto the inner edge bevel and on the rim. You can also see the burn marks on the rim top just left of centre and on the back side mid rim. The rim does not look damaged on the outer edge in this photo. I also took photos of the stem to show the general condition it was in as well. It looked pretty good other than chatter on both sides ahead of the button and the puncture on the topside of the stem.I decided to read a little about the brand and the pipemaker. It turns out that the pipe was made by Soren Refbjerg Rasmussen who also made Refbjerg and Soren pipes. That was a surprise to me as I had no recollection of the connection. This “honey stick” style pipe is a Danbark with the same stamping on the shank as the pipe in the photo from Pipephil’s site. I have cleaned and restored several or Soren’s pipes in the past, both Refbjerg and Soren stamped ones but I have never worked on a Danbark. I did a screen capture of all three of the brands carved by Soren and the information included in them. It turns out that the Refbjerg pipes were made for the European market and the Soren ones for the US market. The Danbark pipes seem to overlap on both sides of the Atlantic. The D on the stem is also the same in the photo as the pipe I am working on for Eric.The Danbark that I am working on is stamped on the underside of the bowl and shank at the stem/shank junction. It is stamped with the following information: DANBARK over Hand Carved over Denmark. Soren’s handmade stems have a funneled airway leading through the tenon to a normal rectangular slot in the end of the stem. There is no flaring or shaping done to the slot. It almost looks like a factory blank that has been reworked slightly.

I did a bit more searching and on Pipedia I found out that Danbark was a second line that came from Soren (https://pipedia.org/wiki/Refbjerg). There was also a direct quote from Soren speaking of the Danbark line on Frenchy’s Pipes online. Frenchy’s was an online seller that retailed both new and estate pipes quite a few years back. I did business with him in those years and enjoyed him – great sense of humour. Here is what he quotes from Soren and is requoted on Pipedia.

“A note from the carver: I am very proud to introduce my new (!) series of hand-carved Danbark Pipes by Søren. These pipes are crafted from the finest Corsican and Grecian briars. I take a great deal of pride in crafting the Danbark Pipes to be highly functional and so they will provide the smoker with many years of dedicated service. The Danbark Pipes by Søren are available in several different styles and finishes with my personal touch and inspirations. At this time I favor making classic shaped pipes with a slight touch of my own hands and feelings. I do not produce many pipes today but the pipes that I do make available are individually crafted from the finest Corsican and Grecian Briars available to me. I still make free-hand pipes but not as many as I once made. For the past 35 years I have always tried to make good smoking pipes in my workshop located near Copenhagen, Denmark. I have always tried to craft my pipes in such a way as they will be long lasting and best friends with the owners. I take great pride in the shape of my pipes, the drilling of the pipes, and the overall dimensions of the pipes. I enjoy spending my spare time on the very long, rugged coasts of Denmark. I derive much relaxation from being on the coast while angling for Sea Trout with my own hand-tied flies. I find this environment is a great inspiration to me for making pipes. Many times I think to myself, ‘Inspired by nature, made by me’. — Happy puffing, Søren”

I decided to start the work on this pipe by repairing the puncture in the stem. I cleaned the inside of the stem with pipe cleaners to remove the grime. I wiped the stem down with alcohol on cotton pads to remove any debris or grime on the puncture wound. I cleaned the edges of the puncture with a cotton swab and alcohol. Once it was clean, I greased a pipe cleaner with Vaseline and inserted it through the slot making sure that the space below the puncture was filled with greased fuzz. I filled in the puncture with black super glue. I sprayed it with an accelerator to set the repair quickly so that I could remove the pipe cleaner. I sanded the repair lightly to smooth it out. I refilled the repaired area with a bubble of black super glue to fill in the air bubbles in the repair. I set the stem aside until the repair had hardened. While the repair was curing I turned my attention to the bowl. I reamed the bowl with a Savinelli Fitsall Pipe Knife to scrape away the cake and take it back to bare briar. I worked it over from top to bottom removing the thick cake coat.I rolled a piece of sandpaper around my finger and sanded the walls of the bowl smooth. I worked over the inner edge of the rim and the rim top to remove as much of the burn damage and damage to the edge of the bowl. I worked on it with a folded piece of 220 grit sandpaper to smooth it out. I lightly topped the bowl on the topping board with 220 grit sandpaper to remove more of the damaged wood. The top of the bowl was charred at the front edge a little left of center. I topped it to remove the char and smooth it out. The wood that is left is solid. I did not take too much of the top because of the smooth outer edge above the last spiral of rustication.I cleaned out the interior of the mortise and the airway in the shank and the stem with alcohol, cotton swabs and pipe cleaners. I cleaned it until the cleaners came out white.I sanded newly topped rim gently with a worn piece of 220 sandpaper and wet sanded it with some 400 grit wet dry sandpaper. I polished the rim top with micromesh sanding pads – wet sanding with 1500-2400 grit pads and dry sanding it with 3200-12000 grit pads. I wiped it down after each pad with a damp cloth. The photos below tell the story of the polishing of the rim top. Once the rim was polished and scratch free I used a Maple stain pen to match the colour of the rest of the smooth areas around the shank and bowl. I wanted the stain to hide the burn marks on the rim. I figured that it would at least mask them a bit.I let the stain dry and then rubbed the briar down with Before & After Restoration Balm working it into the nooks and crannies of the rusticated finish with my fingertips. I am really enjoying working with the balm and it cleans, enlivens and protects the briar and removes the dust and debris in the rustication. It also helped to blend in the stain on the rim and brought new life to it as well. I rubbed it in, used a horsehair shoe brush to work the balm into the finish, let it sit for a little while then buffed it off with a cotton cloth. The photos below show the progress of the polishing.  I gave the bowl and shank multiple coats of Conservator’s wax – once again rubbing it into the finish with my fingertips and then letting harden slightly. I buffed it with a shoe brush and a cotton cloth. I repeated the process until I had given the bowl several coats of the wax. The finish really had taken on a shine that was beautiful. I set the bowl aside and called it a night. When I returned the next evening after work I turned my attention to the stem. The repair had hardened and looked good. I sanded it smooth with a 1500 grit micromesh sanding pad. I did not want to sand too deeply into the repair rather I wanted to have it form a protective layer over the puncture mark. I used 400 grit wet/dry sandpaper to feather in the edges of the repair. I polished the entire stem with micromesh sanding pads – wet sanding with 1500-2400 grit pads and dry sanding with 3200-12000 grit pads. I wiped it down after each pad with a damp cloth. I polished it further with Before & After Pipe Stem Polish – both the Fine and Extra Fine. I wiped it down and gave it a shine with some Obsidian Oil. With the stem polished I put it back on the shank and polished the bowl and stem with Blue Diamond on the buffing wheel. I used a light touch on the briar so as not to fill in the rustication or the rings with buffing compound and a slightly heavier touch on the acrylic stem. I gave the bowl multiple coats of Conservator’s Wax by hand rubbing it into the finish and the stem multiple coats of carnauba on the buffing wheel. I buffed the entire pipe with a clean buffing pad to raise the shine on the briar and the acrylic. I hand buffed it with a microfiber cloth to deepen the shine. The finished pipe is shown in the photos that follow. It is a beautiful piece of pipe crafting. I am sure Eric will enjoy this beauty once it heads back to Ontario. Just one more of his pipes to work on before they all travel east. Thanks for walking with me through the restoration. Cheers.

Cleaning a Peterson Aran – aka The Curse of the Tar Monster

Blog by Dave Weagle

I know my sub-title sounds like a Scooby Doo episode from the 70’s but when you see the condition of the pipe when it arrived in the mail, my first thought was “The Tar Monster”.  Here’s the story of the restoration.

One Saturday afternoon while waiting to go out for supper I had a few minutes to kill so I grabbed my phone and went surfing Ebay for any new pipe listings.  My common searches are Peterson, Kaywoodie & Yello Bole.  When I typed in Peterson a listing appeared for a pipe lot that included two Peterson Aran pipes and a group of pipes.  The only other pipes in the lot other that I could identify from the photos were five Carey Magic Inch (the vents in the stems gave them away).  The sellers description was “Large Lot of Vintage Pipes in Used Condition.  I’ve learned that could be anything from cracked bowls to chewed stems.

Of the eight pictures that appeared in the Ebay listing, one showed both Peterson pipes.  A Canadian (needing a quick cleaning and a stem) and a Bent Billiard that appeared to be partially rusticated.  It looked like the rustication had been nicely done and both pipes appeared to be in good shape.   When the box arrived, I found each pipe was individually wrapped with bubble wrap and taped.  It was like Christmas.  Twenty- seven little presents to unwrap.  I quickly found the five Carey Magic Inch pipes but to my delight there was a GBD, a Wally Frank, a Weber, two Edwards, a few basket pipes and ten Kaywoodie’s (most older four-hole stingers).  The Petersons were at the bottom of the box and to my shock this was not a rusticated billiard.  This was an eruption of lava.  My stomach sank.  My first thought, with this much lava covering the bowl, the pipe must have been smoked hard and the inner bowl would be destroyed.  Between the condition of the bowl and stem I figured the first step was to soak both the stem and the bowl.  I removed the nickel band and placed the bowl to soak in isopropyl alcohol.  The stem actually had so much calcium buildup on it I figured it would take an evening of sanding and rebuilding just to save the stem. While the bowl soaked I mixed up an Oxy clean bath and soaked the stem.   When I pulled the bowl out of the isopropyl alcohol I took it to the sink and using 0000 steel wool I scrubbed the bowl attempting to remove the softened lava.  Some came off. I then removed the stem from its bath and took it to the sink as well.  I used a pot scrubber to remover the buildup on the stem and then using hot water and a sank brush I managed to clean the stem to the point that a pipe cleaner could pass through it.   Not to speak ill of a fellow pipe smoker but I couldn’t smoke a pipe in this condition.Next, I decide to gently scrape the bowl using the back side of my pipe knife.  I didn’t want to gouge the bowl, so I went at it slowly and took a few breaks during the process.  Once I had removed all traces of the lava it was on to sanding.  Using micro mesh pads, I started with 1500 and progressed to 12000.

It cleaned up beautifully. The grain was gorgeous.  I was beginning to feel a bit better about my newest Peterson.  Maybe it would be salvageable.  Maybe it would actually become a nice addition to my Peterson collection and not just another old beater pipe to hangout in the garage with me when I work on my trucks.Now that there was some light at the end of the tunnel, there was still the inner bowl and the stem to deal with. As I said before. I’m not sure how someone smoked this pipe.  The stem was plugged.  The draft hole was plugged.  There was still tobacco flakes still in the bowl.

Starting with my Hedge Hog I opened the bowl enough to move on to my Castleford reamer.  After reaming the bowl, I used a piece of 220 grit sand paper to level out the bowl (I lost the pics of this process).  To my surprise the inner bowl had no scars, no burns or cracks.  It was in excellent shape.  It smelled like an outhouse but was in excellent shape.  Using a 4mm drill bit, I opened up the draft hole. Next using cotton swabs, a shank brush, pipe cleaners and isopropyl alcohol I scrub the bowl and the shank.  After cleaning the bowl, it still stank.  My wife, actually came downstairs to ask me what I was working on.  She could smell the pipe all the way upstairs.  In the 300+ estate pipes I have worked on this is the first that could be smelled on another floor.  I guess reaming the bowl unleashed the funk.  It was off to the retort to remove the smell.  It took four test tubes of alcohol before it came out clear.After finishing with the retort, I flamed the bowl to remove any excess alcohol.The next step was to fix the damage to the stem.  The top of the P-lip was dented and the underside ridge was chewed.  Mixture of rubberized CA glue and charcoal powder was applied to stem and left to dry overnight.   The next evening after a long day it was nice to sit down by the woodstove with a coarse file and set about getting the rough shape of the stem back.  To remove the file marks I sanded the stem starting with 220 grit paper finishing with 800 grit.  I then switched to wet sanding finishing at 3000 grit.  Micro mesh pads were used prior to buffing the stem. Blue diamond was used on the buffing wheel.  Before waxing the stem the P stamped on the side was highlighted with Rub n Buff silver paste.  The bowl was also polished with blue diamond compound on the buffer.  Before waxing the bowl the band was fastened with white glue.  The band was polished with Autosol and the bowl was sweetened.And this is the finished pipe after a few coats of Carnauba Wax. Still blows me away how nice this pipe cleaned up.  Keep on pipe’n.

Breathing Life into a Republic Era Peterson’s System 313 Pipe

Blog by Steve Laug

I have been corresponding with Paresh for some time now and have repaired and restored two of his pipes and sent him others as well. We carry on conversation via WhatsApp on the internet and discuss the various pipes he is purchasing as well as ones that he has inherited from his grandfather. This Peterson 313 System pipe came to me direct from the eBay seller in England. It took so long to get here (almost 2 months) that we both had pretty well given up on it. It arrived in a crushed package that I had to pick up at the post office. I was worried that the pipe inside had been damaged as well. This was one of those times that the seller had done a very thorough wrapping of the pipe in bubble wrap so it was unscathed by the crushing of the box. The pipe was stamped Peterson’s arched over System over Standard on the left side of the shank and Made in the Republic of Ireland on the right of the shank with the shape number 313 under that. The nickel ferrule was stamped K&P over Peterson.

The finish on the pipe was very dirty with a lot of dents on the bottom side of the bowl and shank. There was a long deep dent on the front of the bowl. The bowl had a very thick, hard cake that had overflowed onto the rim top. The bowl was out of round and the inner bevel was burned and damaged. It looked as if some had tried to ream the bowl with a knife sometime in its life. There were two fills – one on the back left and one on the back right. In the angle of where the shank and bowl connected there was a heavy oily grime build up. The inside of the shank and sump were filled with tars and oils. The nickel ferrule was in great condition with light scratching but no real oxidation. The stem was a mess. The top side of the stem had deep tooth grooves extending forward from the p-lip button about 1 inch. On the underside there were also tooth marks. Both sides had a lot of serious chatter and some calcification build up. The stem was oxidized and very dirty. I took some photos of the pipe before I started working on it. I took close up photos of the rim top and the stem to show the condition it was in when it arrived in Vancouver. You can see the heavy lava buildup on the rim top. You can also see the damage on the inner edge, particularly heavy on the right front side. The cake was quite thick and very hard leaving barely enough room for my little finger to fit in the bowl. You can see the condition of the stem and the tooth marks in the oxidation on both sides. The tooth marks and chatter on both sides are deep and worn looking.The stem was stuck in the shank and would not move. I tried to twist it and turn it but nothing moved. I put the pipe in the freezer for half an hour let it do its magic. At the end of the half hour I was able to easily remove the stem from the shank.I decided to soak the stem in a bath of Before & After Pipe Stem Deoxidizer so I dropped it in the airtight container and set it aside overnight to let it do its work.I turned my attention to the bowl. I started by reaming the hard cake back with a PipNet pipe reamer. I started with the smallest cutting head and worked my way up to the second head. I took the cake all the way back to bare briar. I cleaned up the remnants in the bowl with a Savinelli Fitsall Pipe Knife. The knife allowed me to get all the way to the bottom of the bowl and remove the cake that still remained around the airway.I topped the bowl on a topping board with 220 grit sandpaper. I worked on it until I had removed the damage on the top of the rim and was able to minimize the damage to the inner and outer edges of the bowl. I used a folded piece of sandpaper to rework the inner edge of the bowl and give it a slight bevel to hide the burn marks and the damage from the knife reaming. With a little work I was able to remove the damage on the inner edge of the bowl. I also ran the folded sandpaper around the outer edge to smooth out the nicks and marks.The briar on the bowl had some dents around the sides, front and back of the bowl. The underside of the shank was also dented. Before I dealt with the dents in the surface I decided to polish the briar and raise a shine. I wet sanded it with 1500-2400 grit micromesh sanding pads and dry sanded it with 3200-12000 grit pads. I wiped it down after each pad with a damp cloth to remove any sanding dust. The grain in the briar really began to stand out. There was some really nice birdseye on the sides of the bowl and cross grain on the front and back sides. I used a cherry stain pen to restain the rim top to match the colour of the rest of the bowl. I have found that this particular cherry stain perfectly matches the colour of the Peterson’s System Standard pipe.I cleaned out the inside of the shank, the sump and the airway into the bowl with pipe cleaners, cotton swabs and alcohol. It took a few of each but after while the cleaners and cotton swabs came out clean and the pipe smelled fresh.With the internals clean and the externals clean I decided to address all of the dents in the briar on the bottom and front of the bowl. I took photos of the dents to give an idea of the sheer number of them all around the shank, bowl bottom and up the front. They were all quite rounded dents rather than cuts so I figured that I could steam most of them out. I use a wet cloth (not dripping but enough to make steam when heated) and a hot butter knife to steam the dents. I heated the knife over a flame on my gas stove, put the wet cloth over the dents and touched the surface of the briar with the hot knife. The heated blade on the wet cloth created steam and began to lift the dents. I repeated the process until the majority of the dents had been lifted. I took photos of the pipe, knife and wet cloth.I dried off the bowl and took photos of the briar to show how well the steam had lifted the dents in the wood. I rubbed some Before & After Restoration Balm into the briar to lift out the dust in the grain, enliven and protect the clean and steamed bowl. I let it sit for a little while then buffed it off with a soft cloth. I like the way the grain stands out now. Some of the dents are still visible on the bottom left side of the shank but they are far better than they were. I took the bowl to my buffer and buffed it with Blue Diamond to polish it and raise a shine. I was careful around the stamping so as not to damage it or reduce its readability. The bowl looks really good at this point. All that remains for the bowl is to wax it and buff it. I set it aside and began my work on the stem. I took the stem out of the Before & After Stem Deoxidizer bath and rinsed it under warm water. I blew air through the stem to remove the deoxidizer from the inside of the airway. I dried it off with a paper towel to remove the residual oxidation that was on the surface. I took photos of the stem at this point in the process. You can see some of the calcification on the stem around the button and the tooth marks on both sides. The tooth marks on the underside are by far the deepest.I cleaned the inside of the stem with pipe cleaners, cotton swabs and alcohol to remove the residual deoxidizer in the airway.I painted the surface of the stem with the flame of a Bic lighter to left as much of the tooth denting as possible. Once I had repeated that and the stem would no longer rise I sanded it with 220 grit sandpaper to smooth out the damage. I finished by sanding it with 400 grit wet/dry sandpaper to remove more of the scratches in the vulcanite. I sanded the entire stem with 220 grit sandpaper to remove the calcification and remaining oxidation. I used a needle files to sharpen and reshape the sharp edge of the p-lip button on the top side and the shelf on the underside. I need to clean up those areas before I could repair the deep tooth marks. I cleaned out the deeper tooth marks with alcohol and cotton swabs to remove the debris and dust from the divots. I dried them off with a cotton pads. I filled in the tooth dents with black super glue. I spread the glue and smoothed it out with a dental spatula. I set it aside to let the glue cure.I sanded the repairs smooth with 220 grit sandpaper and with 400 grit wet/dry sandpaper. I blended them into the surface or the stem and reshaped the button and shelf. I polished the stem with micromesh sanding pads. I wet sanded it with 1500-2400 grit pads and dry sanded with 3200-12000 grit pads. I wiped the stem down after each pad with a damp cloth. I finished polishing the stem with Before & After Pipe Polish – both Fine and Extra Fine. I rubbed it into the stem and polished it with a cotton pad. I gave it a final coat of Obsidian Oil and set it aside to dry. With the stem reshaped and polished I put it back on the pipe and buffed the bowl and stem with Blue Diamond. I used a light touch on the stem to polish out any remaining scratches. I gave the bowl and the stem several coats of carnauba wax and buffed the pipe with a clean buffing pad to raise the shine. I hand buffed it with a microfiber cloth to deepen the shine. The pipe polished up pretty nicely. The finished pipe is shown in the photos below. This is the fifth pipe I have worked over for Paresh. Once I finish the other two pipes that he has in the queue I will pack them up and send them to India. I look forward to hearing what he thinks one he has them in hand. Thanks for walking through the restoration with me as this one provided a few different challenges to the restoration craft. Cheers.

Finishing the last of Mark’s Challenges – this one a GBD Bulldog 2331

Blog by Steve Laug

I finished the restoration work on Mark’s uncle’s pipes and a few of his own and sent them back to him in late January of this year. I wrote a blog on each of the restorations. They were a fun batch of pipes to restore for him. He sent me another package a few weeks ago that had just three pipes in it – A GBD 2331 Popular Straight Bulldog, a GBD 9242 Rhodesian (one of my holy grail pipes) and a long Churchwarden pipe. Each pipe had a different set of issues that would provide a variety of challenges. The GBD 9242 had suffered much at the hands of a hack repair person. The Churchwarden had a broken tenon stuck in the shank. I am finally working on the last of the pipes – the little classic shaped GBD Bulldog. The Bulldog was in excellent condition other than the first ½ inch of the stem missing in chunks. This pipe was by far in the best condition of the lot. The finish has spots of varnish on the sides of the bowl and shank. Most of it was gone but there were still flecks of it present. The finish underneath was in decent shape and the oxblood stain looked very good with the mixed grain patterns around the bowl. The bowl was clean and looked like it had been recently reamed. The rim top was free of lava and though it had some light rim darkening on the top. The edges of the bowl – both inner and outer were in good shape. The stem looked really good other than the missing chunks. There was little oxidation and after the damaged part was removed it was pretty clean. The stem had enough length on it that I thought I might be able to cut it off and reshape it. Time would tell. I took a close up photo of the rim top to show the general condition of the pipe. You can see how clean the bowl, rim top and edges are. You can see the broken end of the stem with the missing chunks. It appeared as if someone had tried to glue the pieces on the stem and affect a repair. The repair had not worked but the glue was left behind.I took some close up photos of the shank to show the stamping on both sides. The left side shows the GBD oval over the Brand Popular. The right side is stamped London England in a straight line over 2331 which is the shape number. The stamping is faint in some places but it is still readable. The GBD brass oval rondel is in good condition on the left side of the saddle stem.I decided to start working on this pipe by addressing the issue with the damaged stem. I removed the stem and set the bowl aside. I used a Dremel and sanding drum to remove the damaged portions of the stem on both sides. I cut off as much as the damage as necessary to remove the broken and chipped edges and still leave behind enough stem to work with in shaping the new button.I used a  mixture of black super glue and charcoal powder to build up a button edge on both sides of the stem. I set it over a lighter so that it could dry on both sides.Once the repair had dried/cured I reshaped the stem and button. I cut a sharp edge on both sides of the stem with a needle file. I shaped the taper of the stem surface on both sides with the blade of the file.I sanded out the file marks on the stem with 220 grit sandpaper and reshaped the button and slot with the sandpaper. I cleaned up the sanding marks with 400 wet dry sandpaper. I sanded the entire stem to clean up all of the scratches and marks in the vulcanite.I followed the sanding by polishing the stem with micromesh sanding pads – wet sanding with 1500-2400 grit pads and dry sanding with 3200-12000 grit pads. I wiped it down with Obsidian Oil after each pad. I finished polishing it with Before & After Pipe Polish – using both the Fine and the Extra Fine polish. I gave it a final coat of Obsidian Oil and set it aside to dry. I was happy with the new look of the button and stem. I rubbed down the surface of the briar with a cotton pad and acetone. I was able to remove the entire patchy varnish coat. The briar looked far better with that removed. The photos below show the bowl after the acetone wash. I rubbed the bowl down with Before & After Restoration Balm to deep clean the briar and the smooth rim. The product works to clean, enliven and protect the briar. I hand rubbed it with my fingers and wiped it off with a soft cloth and buffed it with a shoe brush to polish it. The briar really began to have a rich shine. I took some photos of the bowl at this point to mark the progress in the restoration. I put the stem back on the bowl and buffed the pipe with Blue Diamond on the buffing wheel. I gave it several coats of carnauba wax and buffed it with a clean buffing pad to raise a shine. I hand buffed it with a microfiber cloth to deepen the shine. The finished pipe is shown in the photos below. The new button and reshaping of the stem looks really good. Now that I have finished the last of Mark’s pipes I will be packing them up soon to send back to him. It won’t be long before Mark gets to enjoy them with their inaugural smokes. With the damage removed I think the pipe looks a lot better. Thanks for walking with me through the process of the reshaping.

Restoring a CB Weber Inc. Maplewood Streamliner

Blog by Steve Laug

Recently I was contacted by a reader about restoring a couple of pipes that he had picked up at a local antique shop. It was a nice looking Art Deco style pipe with a prow and fins around the bowl. The inside of the bowl itself was oval. The pipe was made out of Maple rather than briar. The fins went around the sides, back and front of the bowl. The finish was dirty but otherwise not too bad. The cuts around the bowl were rough and unsanded with a lot of burrs around the edges of each fin. The top of the bowl was darkened and also had a buildup of lava on the back side of the bowl and some darkening on the rim top. There was a cake in the bowl and shards of tobacco stuck to the sides and bottom. There were scratches on the shank and the bottom of the bowl. The bottom of the bowl had a raised ridge across the middle which made the pipe sit upright on the desk top. The stem appeared to be vulcanite with scratches and tooth chatter on the top and underside at the button. There was a small metal stinger in the tenon. I took photos of the rim top and both sides of the stem to show the condition of both. The close up of the rim top shows the darkening one the back side of the rim top and some around the other sides. The photo shows the tobacco debris stuck in bottom and on the sides of the bowl. Both sides of the stem had tooth chatter near the button. There were no deep tooth marks so it would be a fairly easy cleanup.The first article that I quoted from in that blog came from the following blogpost on WordPress: http://streamlinesdeluxe.wordpress.com/2012/06/01/weber-streamliner-pipe-2/. The author of the blog makes a brief reference to the pipe I found (and this one by the way) and even has a picture of it. He speaks of the stem being made of something other than vulcanite. Other references I found in online pipe forums spoke of the fact that the bowl was not made of briar but of some composite material. Others said that the bowls were made of American hardwoods. Interestingly no one spoke of what hardwoods were used. I have hunted high and low on the web and can find nothing definitive on the pipe’s manufacture or composition.

I broadened my search to information on finned pipes. I did not want information on Porsche design pipes or metal finned pipes but was looking for anything on wooden finned pipes. I came across the following information on a patent taken by a carver/designer named Wayne Leser. His diagrams and patent application is included below and it can be seen that it is actually very close to CB Weber’s Streamliner. His patent was applied for through the US Patent Office in January of 1941. I assume the patent was granted as it is on the Patent website. Weber’s design seems to be elongated a bit more than the Leser design but the tear drop shape of the outer bowl and the similarly tear drop shape of the drilling match quite well.

I can find no further information on Wayne Leser so I have no idea if he sold his concept to Weber, or worked for Weber. If anyone has further information on that connection it would be great to learn about it. Please post a response below. Refreshing myself on the history of the brand gave me the kind of background information that I enjoy when working on pipes that I am restoring. I took some close up photos to show that the pipe is made of Maple wood. It also shows that the shank of the pipe I am working bears stamping on both sides. On the left side it is stamped Streamliner in script over C.B. Weber Ltd. On the right side it is stamped Wally Frank Ltd. That means that while the pipe was made by C.B. Weber it was sold and distributed by Wally Frank. I wonder if it was not one of their Pipe of the Month sales.I reamed the bowl with a Savinelli Fitsall Pipe Knife to remove all of the cake and the tobacco debris that was stuck to the walls of the bowl. I scraped the cake back to bare wood so that I could examine the walls of the bowl. There were very clean and there was no checking or burn marks.I used a folded piece of 320 grit sandpaper to smooth out the inside of each of the fins so that the sawed areas were smooth and all of the burrs left behind by the sawing of each fin were removed and smoothed out.I polished the rim top to remove the darkening and the light lava overflow. I also sanded the outside of the bowl with micromesh sanding pads. I wet sanded it with 1500-2400 grit pads and dry sanded it with 3200-12000 grit pads. I wiped the bowl down after each pad with a damp cloth to remove the sanding debris. I took some more photos of the stem when it had been removed from the shank. You can see the scratching and wear on the top and underside near the button and other scratches up the stem toward the stinger in the tenon.  I removed the stinger and took a photo of it next to the stem.I sanded the stem with 220 grit sandpaper to smooth out the tooth marks and chatter. I worked on it until the surface was smooth. I polished the stem surface with micromesh sanding pads – wet sanding with 1500-2400 grit pads and dry sanding with 3200-12000 grit pads. I wiped it down with Obsidian Oil after each sanding pad. I further polished it with Before & After Pipe Stem Polish – both Fine and Extra Fine deepen the shine. I gave the pipe a final coat of Obsidian Oil and set it aside to dry. I put the stem back on the bowl and worked the pipe over on the buffing wheel using Blue Diamond to lightly polish both the bowl and the stem. I buffed the bowl and stem to raise the gloss on the briar and the vulcanite. I gave the pipe multiple coats of carnauba wax. I buffed the entire pipe with a clean buffing pad to raise the shine. I hand buffed it with a microfiber cloth to deepen the shine. The finished pipe is shown in the photos below. The C.B. Weber Maple Streamliner is unstained. The grain on the Maple wood shows through on the rim, sides and shank of the pipe. The blonde maple goes well with the rich black of the vulcanite stem. The dimensions of the pipe are: Length: 6 inches, Height: 1 1/2 inches, Outside Diameter: 1 1/4 inches, Diameter of the chamber: 5/8 inches wide and 1 inch long. This is an interesting pipe with an Art Deco look and a streamlined flow. The fins along the sides, front and back of the bowl act as cooling fins when the pipe is smoked. I have a second pipe to work on for Daniel and then I will mail both of them back to him. I know he is looking forward to loading it up and smoking it. Thanks for walking with me through the restoration.


A Pipe for Vanity – a Stanton for a Stanton

Blog by Dal Stanton

I suppose it IS vain to restart my restoration operations after 6 months with a pipe bearing my name.  In my recent travelogue blog, ‘There and Back again – to Bulgaria’, I described what I called my ‘Vanity Pipe’ as one of the 105 pipes I acquired during our 6 month US visit.  I came across this name-sake while trolling eBay’s offerings.  I hadn’t come across a ‘Stanton’ before and so I decided to place a bid.  As it turned out, I was the only Stanton bidding on the Stanton and claimed my Vanity Pipe with no competition.Name aside, the medium sized billiard looked to me like he was a hearty pipe – I will see if he’s a good smoker.  Yet, if the heavy use, thick cake, and banged up stummel is any indication of the former steward’s affections, I would say it was very much part of the rotation and saw much active duty!  The eBay seller provided good pictures of the Stanton which show the numerous challenges, but also the potential.  The grain is attractive and will look great when the surface is refurbished and polished up.  Here are some the pictures I saw on eBay. ‘STANTON’ is stamped on the left side of the shank, and ‘IMPORTED’ over ‘Briar’ on the right.  Of course, one of my first questions when I landed the Stanton from eBay was, where was this pipe manufactured?  Are there any clues?  My first inquiry was in Wilczak & Colwell’s, ‘Who Made That Pipe?’  Stanton was listed but designated as ‘Unknown’.  My next stop after Pipedia came up empty, was PipePhil.eu where I found my first Stanton cousin listed:There were some differences in the nomenclature – my Stanton has ‘Imported Briar’ stamped on the left side shank.  The specimen from Pipephil has ‘Genuine Briar’ under Stanton.  Another difference is the dot.  My Stanton’s saddle stem has no identifying mark.  Yet, what was very clear from the comparison of the ‘Stanton’ on both pipes is that the same stamp pressed Stanton in the briar.  The font is identical.  My Stanton is the lower comparison. Simple google searches revealed the clan was larger with additional Stanton cousins showing up demonstrating a variety of shapes being produced under the Stanton name.

Two cousins from eBay:The only thing I found of a Stanton that provided any remote tidbit on origin was from SmokingPipes.com where the listing was for a very attractive Stanton Rhodesian described as an American Estate pipe.  I liked Eric N. Squires’ description which I thought was apropos for my rugged and worn billiard:

American Estates: Stanton Smooth Rhodesian

Product Number: 004-009-6323

Here is another example of a pipe that was built extra stout, where it is a good thing that it was. This is because whoever else owned it, sure as hell didn’t baby it. I can see why they kept it so long though, as the broad chamber promises plenty of flavor, the drilling is nice and straight, and wide, firmly rounded bowl is pleasing in hand.

– Eric N. SquiresSo, it’s starting to become clearer – my new Vanity Pipe isn’t quite as vain as I!  He has humble origins it would seem.  If anyone can add information to this query into this Stanton’s roots, I would be appreciative.

When I take a closer look at the Stanton billiard on my Pipe Steward work table here in Sofia, Bulgaria, I take a few more pictures to chronicle some of the challenges.  The rim is in rough shape, with most of the front quadrant showing heavy wear – almost looks like the edge was scraped on concrete. The cake is heavy and thick in the chamber and will need to be removed to reveal the condition of the chamber wall.  The bowl surface is grimy and dark with old finish, several pocks and dents.  Surprisingly, I do not detect any fills – the briar underneath the surface carnage looks to be very expressive, with much flow and character.  The heel of the stummel is populated with tight bird’s eye grain. The saddle stem looks to be in good condition, with some oxidation and wee bit of tooth chatter and dents.  The old screw in stinger needs to be cleaned along with the nickel insert/band – which seems to be a consistent design with the other Stantons.  I did note that the set of the tenon, when fully engaged, is under-clocked.  I’ll need to address this as well.   I begin the restoration of my first pipe after a 6-month hiatus AND one bearing my name by inserting a pipe cleaner into the stem, through the stinger, and putting it into OxiClean solution to raise the oxidation from the vulcanite.  As a side note, after reading several of Steve’s posts testing and then using Before & After Deoxidizer from Ibepen.com, I decided to try it.  I brought a bottle of it back with me to Bulgaria along with the balm and polishes.  Down the road I’ll give them a try.Turning to the stummel, I begin the reaming process with my newly acquired vintage Swiss Made Pipnet reaming kit made with heavier duty hard rubber.  Previously, I used the acrylic version that Pipnet put out later which tended to be more prone to breaking – the blades cracked on harder jobs.  With a bit of patience watching eBay, the older, stronger Pipnet system surfaced and I’m thankful to have it back in Bulgaria! Now, to take the new Pipnet blades for a test spin!  After putting some paper towel down to help in cleanup, starting with the smallest blade, I work on removing the hard, thick cake.  The blade went through with little effort.  The next larger blade did its job as well.  I then used the Savinelli Fitsall reaming tool to fine tune, removing more of the carbon in the harder to reach places.  Then, wrapping a piece of 240 grade sanding paper around a dowel rod, I sand the chamber walls and finish the job wiping out the remaining carbon dust with a cotton pad wetted with alcohol.  The pictures show the reaming process. Turning to the rim and the stummel surface, I need to clean the lava off the rim and the grime on the briar surface.  Using undiluted Murphys Oil Soap, I scrub the rim and surface with a cotton pad.  I also utilize a brass brush to work on the rim which will not add to the damage already present.  I then rinse the stummel with cool tap water.  While I’m working on the surface, I take 0000 steel wool and clean the nickel plate band/connector.  An inspection of the clean chamber walls reveals no problems.After the surface cleaning, I take a closer look at the stummel surface.  The rim will need to be topped, but it is possible that the severe outer lip damage to the rim can be leveraged to my advantage.  I can introduce an outer, rounded bevel and blend it with the freshened top.  This can allow less real estate to be lost in the topping process.  Along with the dents and pocks I saw before, I notice a dark area on the left front quadrant of the stummel which may indicate overheating of the stummel.  I also note that in the shank area, around the stamping, the old, shiny finish persists.  I want to remove all the old finish, especially around the stampings. To address this old residue of finish I use acetone and a cotton pad and make short work of the finish.  As hoped, the surface is now clean.Before moving further with the surface, I attack the internal cleaning of the mortise and airway.  I use pipe cleaners, cotton buds wetted with isopropyl 95% to do the dirty work.  I also use a dental probe to scrape the mortise surface and to excavate the oils and tars that have congealed over time in the airway.  That was the frontal attack.  With grunge still surfacing on the cotton buds, and with the late hour approaching, I decide to use the passive-aggressive approach.  Using Kosher salt, I fill the bowl and then add alcohol to sit overnight to work on cleaning the mortise.  I set the stummel in an egg crate to provide stability.  Then I fill the bowl with Kosher salt – not iodized salt which leaves an aftertaste.  I then stretch and twist a cotton ball, to create ‘wick’ to draw the crud out of the mortise as the salt/alcohol does its work.  I then fill the bowl with isopropyl alcohol 95% until full.  I wait a few minutes and top it off.  With that, I turn off the lights and head to bed.  Another day coming.  The next day, as hoped, the salt and cotton wick showed signs of the extraction of old oils and tars from the internals of the stummel.  I clean out the dried salt and used a dry paper towel and bristle brushes to remove the residue salt.  I also blow through the airway to help out.  Even after the salt treatment, there is gunk left in the mortise.  I continued to scrape the mortise wall with a dental spatula and follow with cotton buds dipped in alcohol to finish the job.  The pictures tell the story. I put the stummel aside to work on the stem, now soaking in OxiClean.  After taking it out of the soak, I take a picture and see that a moderate amount of oxidation had raised to the surface.  Taking a piece of 600 grade paper I wet sand the stem removing the oxidation from the vulcanite.  I also use a brass brush to remove the caked residue off the stinger.  Taking a close look at the bit, there were only very small dents remaining after the sanding.  I returned with the 600-grade paper focusing on those minute points and the stem is looking good. On a hunch, after the cleaning of the stinger and the mortise receptor band/plate, I refitted the stem to see if it still was under-clocked a few degrees as I saw earlier.  As hoped, the cleaning corrected the alignment – now, looking down the pipe from the steward’s view, one sees a true alignment.  Nice..To complete the clean-up, I turn to the stem using pipe cleaners dipped in isopropyl 95%.  I also utilize a long-bristled brush.  I find that utilizing the set of bristled brushes that I acquired some time ago saves on the pipe cleaners and are effective in getting at the gunk.  Stem and stummel are now clean. The rim needs my attention now.  I take a close look again.  I will top the stummel using 240 grade paper on a chopping board.  Looking at the first picture below, most of the external rim damage is on the front – 7 to 11 o’clock in the picture.  What I’m a bit concerned about is the large internal rim divot at the 2 o’clock position.  I’ll top a little and see if can address this without taking too much briar off.  Otherwise, I’ll need to fill it with a superglue/briar dust patch to build it up to the rim surface.On the topping board with 240 grade paper, I rotate the stummel as evenly as I can to avoid leaning in one direction or the other.  I check the progress to make sure I’m not leaning into softer wood.  I take some intermittent pictures below to show the progress.  I come to a point where not all the damage is removed, but enough that can be addressed by cutting bevels in the external and internal lips of the rim.  To me, applying bevels to rims generally makes it look classier.  I finish the topping by using a sheet of 600 grade and rotate the stummel several times to provide a smoothing of the surface.  The pictures show the progress.  Without going any further with the topping, I look closely at the dents and pocks on the stummel surface.  I see that some of the ‘pocks’ as I’ve described them may be very small fills on the underside of the shank and one on the top.  The fill is a light material.  The shank-side of the stummel is especially banged up with small dents.  I utilize sanding sponges to remove these and work toward smoothing out and rounding of the outer rim lip to remove the damage.  Careful to avoid the stampings on the shank, I progress by using the roughest grade, medium then fine grade sanding sponges in order.  I’m pleased with the results with most all the damage removed from the stummel.  The rounding of the rim looks great.  The pictures show the progress. The inner lip of the rim is next.  The one major divot at the 2 o’clock position I decide is too deep to remove it by creating an internal bevel.  To build this divot up, I apply a few drops of Hot Stuff Special ‘T’ CA Glue.  I’ll let the glue sit overnight before I bevel the inside lip. The next day, the CA has cured well.  To re-establish crisp rim lines, I take the stummel again to the topping board covered by 600 grade paper.  I’ll remove the CA glue mound and redefine the rim after the rounding of the rim edge.  I take a before and after pix. That does the job. Next, to complete this phase of the rim repair, I roll pieces of 120, 240 and 600 grade papers and cut an internal rim bevel to remove the remaining nicks and to soften the look.  With each rolled piece, I pinch the inside of the rim with the paper using my thumb and rotate evenly around the circumference.  The bevel is slight, and I think it looks good.  Again, before internal bevel and after pictures. I set the stummel aside and turn now to the stem.  The initial wet sanding of the stem with 600 grade paper removed the minor bite marks and I’m ready to move to the micromesh cycle.  Using all nine pads, 1500 to 12000, I wet sand with 1500 to 2400, then dry sand from 3200 to 4000 then 6000 to 12000.  Between each set of 3 pads, I apply an ample amount of Obsidian Oil to refresh the vulcanite stem. I love the pop of newly polished vulcanite!  My vanity pipe is shaping up nicely. As I pick up the stummel, I look closely at the briar grain and a dark area I thought might be an overheating of the stummel – scorching.  Now, with the old finish off and the hidden briar making an appearance, the area is a briar knot – a tight swirl of briar. It has character and I think it looks good.  To continue the preparation of the stummel, I wet sand using micromesh pads 1500 to 2400, followed by dry sanding with grades 3200 to 4000 then finishing up with pads 6000 to 12000.After finishing the first wet sanding cycle, I notice that the ‘pocks’ or fills on the shank had softened and become more noticeable and in need of filling.  A detour, but better now than later!  I use a dental probe to work out the softer fill.  I then mixed a small batch of superglue and briar dust to fill the holes.  I use a dental spoon to pack the mixture in the holes and put the stummel aside for it to cure. After the glue cures, I use a flat needle file surgically to bring the patch mounds down to the briar surface.  I am careful to keep the file on the glue mound not to create collateral damage to the surrounding briar.  Then using a tightly rolled piece of 240 grade paper, I remove the remaining glue residue by using the tight abrasive edge of the roll and rotate it in a circular motion over the mound area.  With touch and a close look, I’m able to determine the excess glue is removed.  Then, using 600 grade paper, I fine tune the entire area, not as concerned about the overrun on neighboring briar.  At this point the fine abrasion is blending and shining.  I finish the patches by catching the repair areas up with the first 3 micromesh pads.  The areas are still visible, but now smooth and will blend better as I continue with the finishing process.  The pictures show the detour progress. With the detour completed, I continue with the last two sets of dry sanding with micromesh pads 3200 to 12000.  This pipe’s briar is looking very nice. Well, there are a few pipes the make it through the restoration gauntlet up to this point, and the natural briar just says, I’m enough.  I had been planning to apply a lighter dye to the surface, but now…no.  The actual look of the briar is lighter than the pictures above, which I like.  So, with that decision made by my Stanton Vanity Pipe 😊, “I’m enough!”, I reunite the waiting stem with the stummel and take a picture – the bird’s eye view looks good.To tease out the briar grain even more, I finally take my Dremel off the hook and again use it after the 6 months hiatus!  Using Red Tripoli compound, I begin the buffing process on stem and stummel using a cotton cloth wheel mounted on the Dremel at the lowest speed. After completing a methodical circuit with the Tripoli, I switch to the lesser abrasive, Blue Diamond, using another cotton cloth wheel at the same speed.  Completing the abrasive compounds, I give the pipe a quick buff with a clean cotton cloth to remove the compound dust/powder before applying the wax.  I apply the carnauba wax with, yet another cotton cloth wheel dedicated to application of wax.  I increase the speed of the Dremel by about 20% and I apply a couple of coats of wax to the entire pipe.  For those who have not read my restorations, I live on the 10th floor of a former Communist block apartment building here in Sofia.  I do not have a lot of room, so my techniques for restoration, especially polishing techniques have had to bend to the realities – hence, my exclusive utilization of a Dremel with no room for the more powerful full wheel buffers.  After Steve asked me to write an essay on my techniques using a Dremel, I discovered out in the blogosphere many people who appreciated what I had written out of my own trials and errors.  You can find this essay at the Pipe Steward website here: My Dremel Polishing Techniques with a No-Name pipe from Sozopol Bulgaria.  My techniques have developed since then, but it’s a helpful essay.  Thanks to my wife for helping take the following pixs since I don’t have a third hand to use!After completing the application of carnauba wax, I give the pipe a rigorous hand buffing with a microfiber cloth.  This helps bring out the shine even more but also removes wax buildups that I may have not spread adequately with the Dremel.

The Stanton Vanity pipe came out well.  I’m please with the rim repair that was significant. The removal of the old finish and cleaning revealed a very nice presentation of briar grain – the highlight is the dark knot cluster that almost looks like a thumb print.  If anyone has any leads on more information about the ‘Stanton’ nomenclature I would appreciate a note!  It is good to back to The Pipe Steward work table.  The vast majority of my pipes are put in the store to help benefit the Daughters of Bulgaria, helping women and girls who have been trafficked and sexually exploited, but this fellow, Stanton, is staying in my collection.  Thanks for joining me!


Breathing Life into a Savinelli Capri Root Briar 141KS Billiard

Blog by Steve Laug

The next pipe on the work table is another pipe from the estate of a Vancouver pipe smoker whose widow left them with a local Pipe Shop. I was asked to clean them and sell them for the shop. The photos show the pipe when I brought it to my work table. It is a nice Savinelli Capri Root Briar with an almost Sea Rock type finish. The bowl was heavily caked with a lava coat on the top of the rim. It was hard to tell how the inner and outer edge of the rim actually looked until the bowl was reamed. The exterior of the bowl was dirty and covered with grime dust in the deep grooves of the finish. The stem had the same tooth marks and chatter on the top and underside near the button as the rest of the pipes in this estate. There was calcification on the first inch from what looked like a Softee bit. The stem has the Savinelli Shield S logo on the top. The pipe is stamped on the underside of the shank with the words Savinelli Capri over Root Briar. There is a Shield S logo next to that and the shape number 141KS at the shank/stem junction. I have included a Savinelli Shape Chart and circled the 141KS in red. It is a billiard with a tapered stem.I took photos of the pipe when it arrived so I would have a base point before I did any clean up or restoration. When I went back to the States after Christmas to visit my parents and brothers I took a box of these pipes with me so that I could have Jeff clean them for me. When they came back to Canada they looked like different pipes. He had reamed the bowl with a PipNet pipe reamer and cleaned it up with a Savinelli Fitsall Pipe Knife. He scrubbed the exterior with Murphy’s Oil Soap and a tooth brush to clean off the grime on the finish and the heavy overflow of lava on the rim top. He cleaned up the internals of the shank, mortise and stem with pipe cleaners, cotton swabs and alcohol to remove all of the oils and tars in the pipe. When it came back to Vancouver it was a quite different pipe. I took pictures of it to show the condition at this point – the bowl looked great and the stem was very oxidized. I took photos of the rim top and the stem to show their condition. Jeff was able to clean out the bowl completely and the rim top. He removed the tars and lava and left behind a clean top that showed all of the original rustication and looked very good. The stem was oxidized and there was tooth chatter and marks on both sides near the button and on the surface edges of the button itself.I am working on five of the pipes from that estate at the same time. I put all of the stems in a bath of Before & After Pipe Stem Deoxidizer to soak. I submerged them all of the stems in the bath and let them soak overnight to break down the oxidation.I took the stem out of the deoxidizer and rinsed it under warm water to rinse off the mixture. I blew air through the stem and ran water through it as well to rinse out the mixture there as well. The stem still had some oxidation spots but it was all on the surface as seen in the first two photos below. I painted the surface of the stem with the flame of a Bic lighter to lift the tooth marks. One of the benefits of the lighter is that it burned off the sulfur on the surface of the stem. It did not take too much work for the vulcanite to return to its smooth condition. I sanded out the lighter tooth marks and chatter with 220 grit sandpaper until there were two deep tooth marks on the underside of the stem that remained. I filled those in with clear super glue and laid the stem aside to let the repairs cure. While the repairs on the stem were  curing I rubbed down the briar with Before & After Restoration Balm. I worked it into the nooks and crannies of the rusticated briar to clean, enliven and protect the finish. I let the balm sit for a little while and then buffed it with a cotton cloth to raise the shine. The following photos show the bowl now. Once the repairs had dried/cured I sanded them smooth with 220 grit sandpaper to blend them into the surface of the bowl. It took a lot of sanding to smooth them all out.I polished out the scratches in the vulcanite with 400 grit wet dry sandpaper and with micromesh sanding pads. I wet sanded with 1500-2400 grit pads and dry sanded with 3200-12000 grit pads. I wiped the stem down after each pad with Obsidian Oil. After sanding with the 12000 grit pad I polished the stem with Before & After Pipe Stem Polish – both Fine and Extra Fine. With the stem polished I put it back on the pipe and lightly buffed the bowl with Blue Diamond. I buffed the stem with a more aggressive buff of Blue Diamond. I gave the bowl multiple coats of Conservator’s Wax and the stem several coats of carnauba wax and buffed the pipe with a clean buffing pad to raise the shine. I hand buffed it with a microfiber cloth to deepen the shine. The pipe polished up pretty nicely. The finished pipe is shown in the photos below. I will be posting it on the rebornpipes store very soon. It should make a nice addition to your pipe rack if you have been looking for a reasonably priced pipe with a Sea Rock style finish. It should be a great smoking pipe with a good hand feel. The dimensions are Length: 6 inches, Height: 2 inches, Outside diameter of the bowl: 1 3/8 inches, Chamber diameter: 3/4 inches. Thanks for walking through the restoration with me as I worked this pipe over.

About Savinelli Panels, and a Couple of Restores

Blog by Robert M. Boughton

Copyright © Reborn Pipes and the Author except as cited
https://www.facebook.com/roadrunnerpipes/

Thinking outside of the box is unnecessary when there are no boxes in your imagination.
— Matshona Dhliwayo, Canadian-based philosopher, entrepreneur and author born in Zimbabwe

INTRODUCTION

Four generations of the Savinelli family have managed not only to maintain but enhance the quality of pipes produced since Achille Savinelli Sr. opened his little business in Milan in 1876.  That shop is still there today.  In 1890, the founder’s son, Carlo, continued the original practice of assigning actual pipe production to skilled artisans.  For more than 55 years, that tradition went unbroken, until Carlo’s son, Achille Savinelli Jr., returned from his service in World War II and moved the business to Brebbia, where the pipes first began being made in the family’s own factory/workshop in 1948.  Since 1987, when Achille Jr. died, his son, Giancarlo, has been at the helm.

The Savinelli shop was the first to offer general pipe smoking items in Italy, and the name gained respect to Italian pipes, which before them had almost universally low opinions due to the general low standards of craftsmanship.  Of all the Savinelli pipes I’ve owned, I would describe just one as being notably less than exceptional.  My personal favorite styles are the many panel lines, examples of which I will show.  I had hoped to succeed in providing also a definitive list of shape numbers associated with panels, but every turn in my online searches leads to still more.

The chart below, although not official and woefully incomplete, includes the most panel shapes: 502, 506, 513KS, 515, 619EX and 824KS. Savinelli Pipe Shape Chart courtesy Pipephil

The easiest to find seems to be KS variations of the 515 such as the two I restored before.

Champagne 515KS

de luxe Milano 515KS

Here are more gorgeous specimens, all but one of them not to be found on any chart I can locate.  The official Savinelli chart lists the 505.

Autograph Grade 8 0007 courtesy Savinelli

de luxe Milano 505 courtesy Smoking Pipes

And here’s one I would so love to own.

120th Anniversary 6-panel D courtesy Smoking Pipes

At some point, Savinelli appears to have abandoned the number system altogether, but fighting the urge to show all that I found, I’ll limit it to the two most extraordinary.

Autograph Half Rustic-Half Smooth courtesy Tobacco Pipes

Autograph Mignon Freehand courtesy Smoking Pipes

Now for the two more common panels I restored a few months ago, an Oscar 515KS and an un-numbered Colossal, in that order.

RESTORATION: OSCAR AGED BRIAR 515KS

Starting with the stummel that was cleaner than most, some purified water on a paper towel made it look a little better but did almost nothing for the very charred rim.  I reamed the chamber and, in a measure uncommon to me, used the knife from a pocket utility tool to remove large, hardened spots of obdurate cake buildup before smoothing the area with 320- and 400-grit papers.  The rest of the black rim came clean with gentle use of super fine 0000 steel wool. As a preliminary cleaning, I put a soft cotton ball in the chamber and filled it with isopropyl alcohol, plugging the bit with a pipe cleaner.  Then I ran more cleaners through the shank and only one to clear the bit’s air hole. Turning to the bit, I heated the crusty old tenon and removed it before considering how to proceed with the well-used Vulcanite.After wiping it down with a little purified water on a paper towel, I used my Bic to raise some of the chatter and dings. That helped, but I decided on the 180-grit side of a sanding pad to remove some of the remaining marks.Focusing on the deeper marks below the lip with 150-grit paper before smoothing it all out with a progression all the way up to 600-grit, I finished with a full micro mesh workup.  Unfortunately, I didn’t snap any pics of the paper work, but here’s how the bit turned out.I retorted the pipe.To lighten the color, I sanded with 400-grit paper. A full micro mesh progression made the wood shine like new. The shooting star on the bit filled in well with a white grease china marker.  The Oscar is one of four pipes with the shooting star mark on the bit, including the Antique Shell, the Garda and the Sila. Machine buffing with carnauba was all that was needed to finish.

RESTORATION: COLOSSAL CUSTOM MADE FIRST QUALITY This time I decided to start with the bit.Again, the Bic raised some of the blemishes.After that, oddly enough, I gave it an OxiClean bath that had a remarkable effect, followed by wet micro mesh.  The Colossal’s inlaid C is unique. With the stummel, as before, I gave it a preliminary cleaning before the retort. I tried super fine steel wool on the rim, for some reason without success, and turned to 220-, 320- and 400-grit papers.The chamber had the same kind of obstinate cake buildup as the Oscar, so I again reamed it and scraped more with the blade of my utility tool.Micro mesh worked fine on all but the right side.  To eliminate more pernicious scratches there, I turned to 400- and 600-grit papers and re-micro meshed. And that was that other than the final machine carnauba buffing. CONCLUSION

Savinelli panels tend to be big, thick, sturdy pipes that smoke with a uniform, cool evenness.  I really love all of them that I’ve owned and kept the Colossal for my collection but sold the Oscar.  A more complete list of panel shape numbers is in the works, and I’m going to contact Savinelli to see what they have to say on the matter.  I’ll keep you posted.

Ciao!

SOURCES

https://www.savinelli.it/it_en/history
http://www.pipephil.eu/logos/en/logo-savinelli1.html
http://www.pipephil.eu/logos/en/infos/savinelli-chart.html
https://www.smokingpipes.com/pipes/new/savinelli-autograph/
https://www.cupojoes.com/pipes/savinelli/?sort=bestselling&page=1
https://www.cupojoes.com/savinelli-cumberland-smooth-dark-brown-pipe-812/
https://www.cupojoes.com/savinelli-porto-cervo-smooth-pipe-506/
https://www.google.com/search?q=savinelli+panel+pipes&rlz=1C1CHBF_enUS769US769&tbm=isch&tbo=u&source=univ&sa=X&ved=0ahUKEwiGnN2D34TaAhUeHGMKHRBSDJgQsAQIeA&biw=1366&bih=598
https://www.savinelli.it/it_en/pipe-freehand/autograph.html