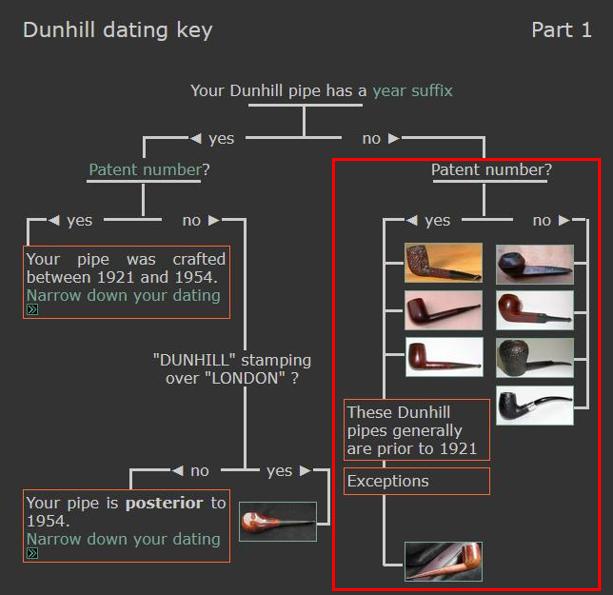
Tag Archives: shaping a stem

Help for what looked like a hopeless 1956 Dunhill Shell Briar LBS Long Billiard


Blog by Steve Laug

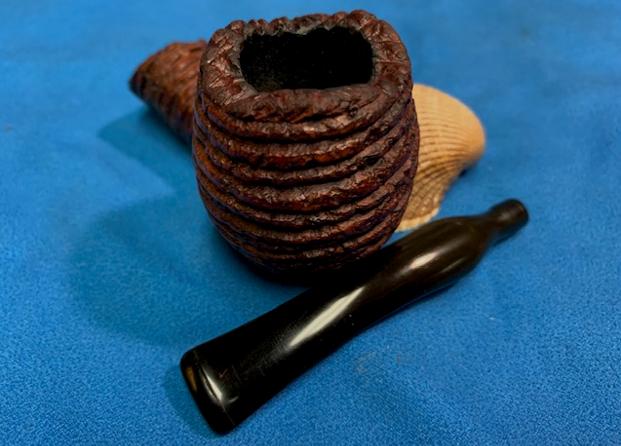
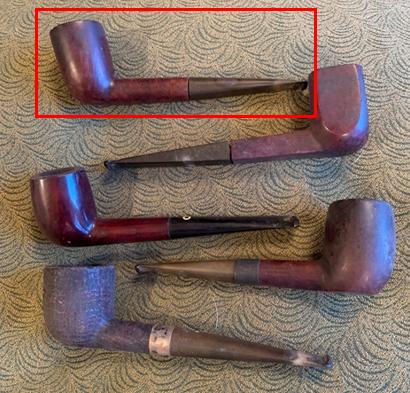
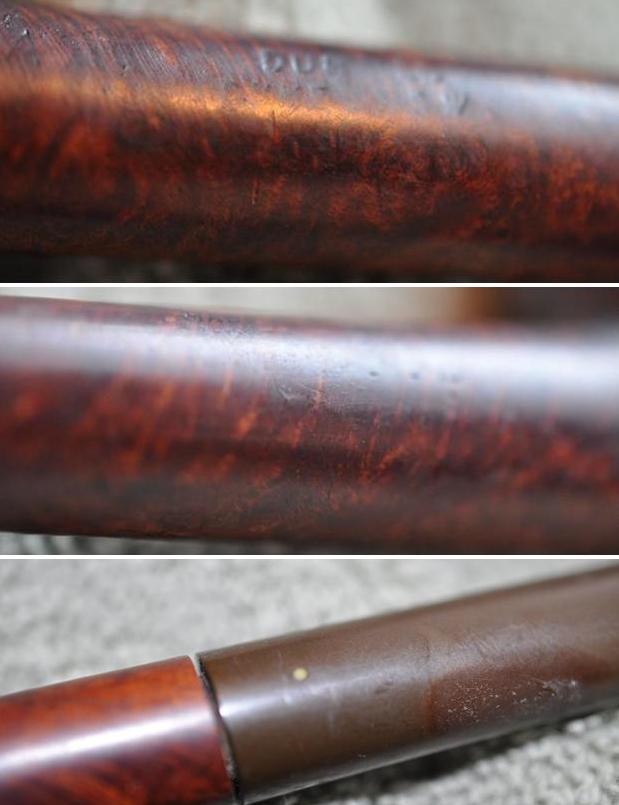
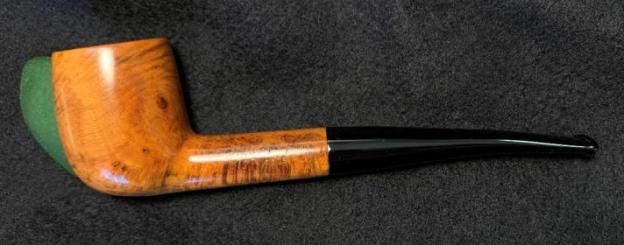
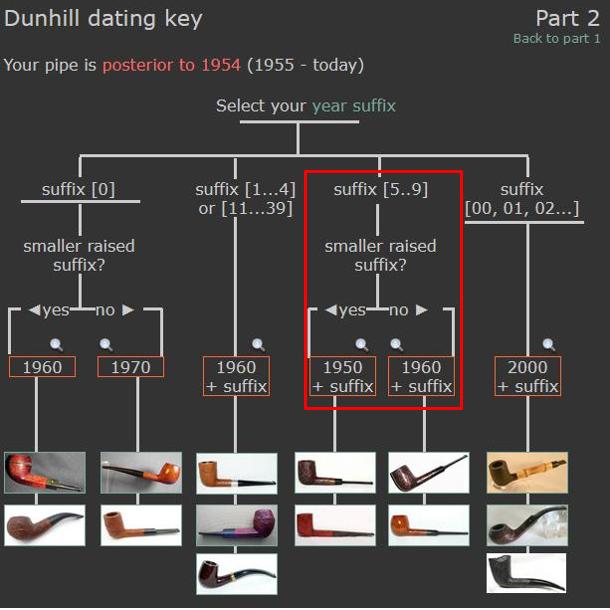
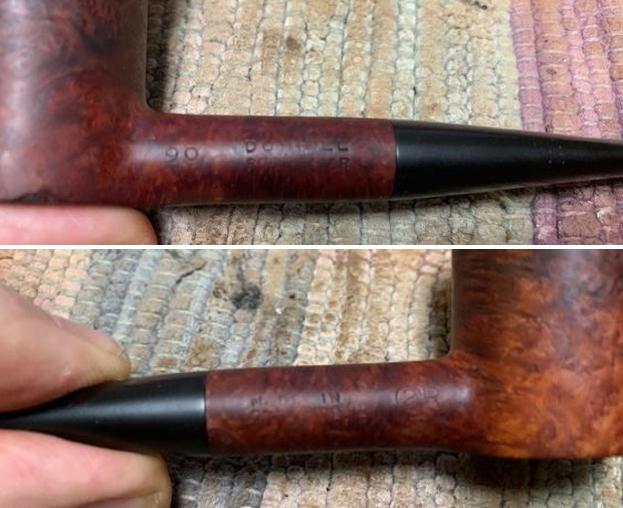
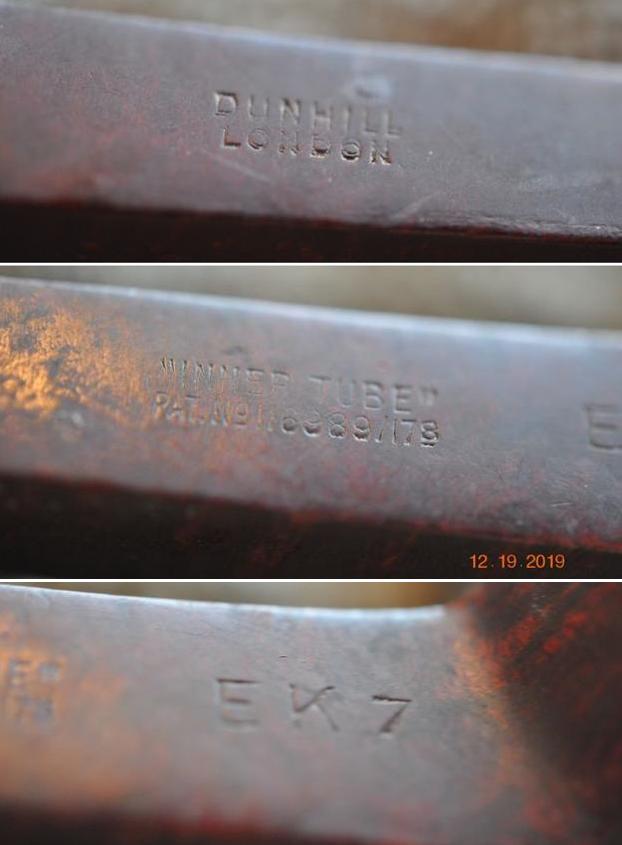
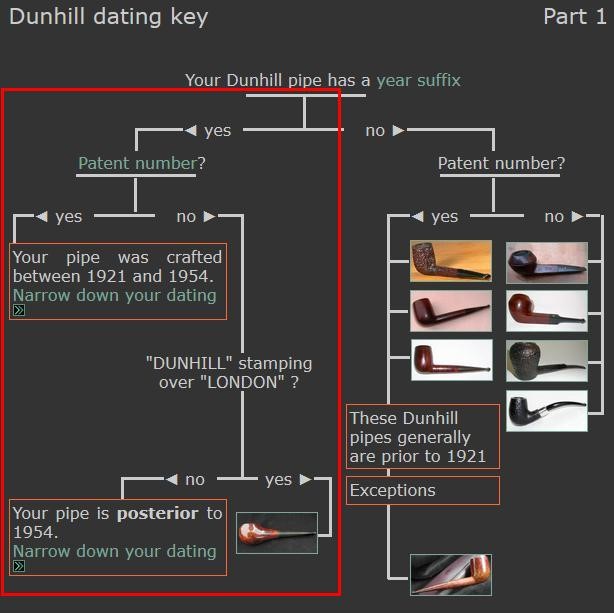
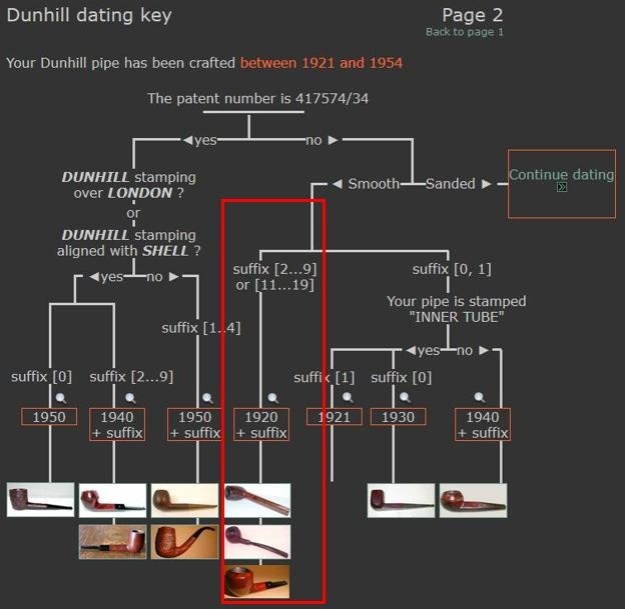
A friend of mine, Scott picked up this deeply sandblasted Dunhill LBS in a shape I would call a Liverpool but Dunhill called a long billiard. He bought it off eBay and when it arrived it had a lot of surprises for him under the thick build up of cake and grime. He has purchased enough estate pipes know what he was getting into but this one had even more issues than he reckoned it would have. He sent me the eBay sellers photos and I have included them below. This is what he saw and honestly if I had seen the pipe I would have sprung for it immediately. The sandblast though dirty, is quite rugged and stunning. The seller dated the pipe as a 1956 based on the following stamping. On the heel of the bowl it was stamped with the shape designation – LBS followed by DUNHILL [over] SHELL BRIAR (Sandblast finish) on the shank. That was followed by MADE IN ENGLAND6 . Next to the shank/stem junction it was stamped with a Circle 4S – the group 4 size designation and the S for Shell Briar.  
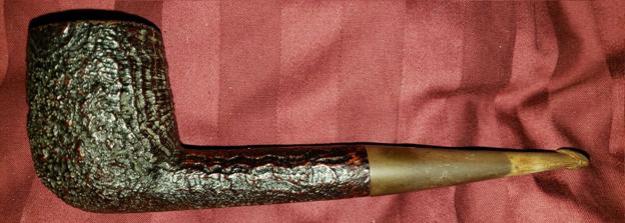
I turned to PipePhil’s Site and looked up the shape letters that Dunhill used on the helpful chart that is included there (http://pipephil.eu/logos/en/dunhill/shapes-l.html). I did a screen capture of the pertinent part of the chart to show the shape letters noted above.   I have included that below.
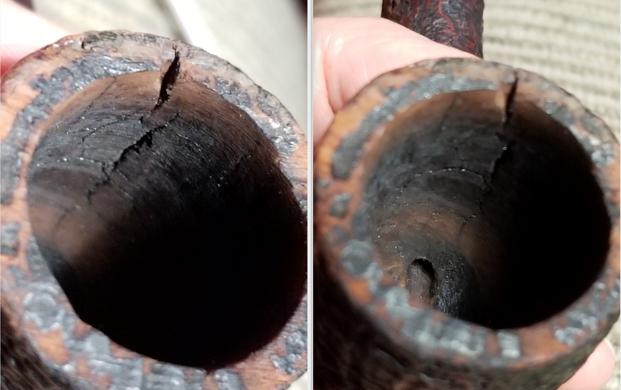
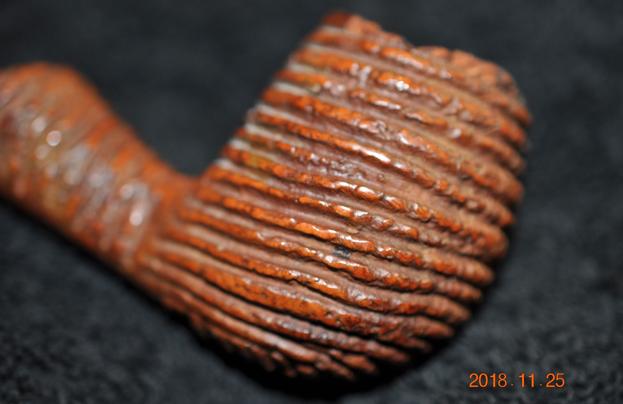
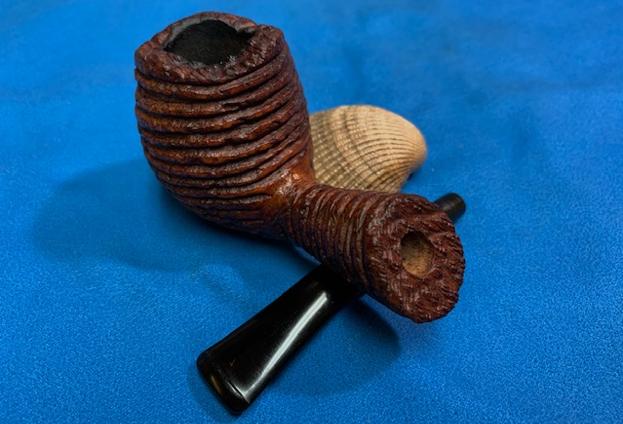
The bowl had a very thick cake and the rim top had a heavy lava  buildup. The bowl had a crack running down the back side of the bowl. It was hard to know how bad it was because of the filth of the dirty pipe. It was a good bet that it would be messy inside the bowl under the cake! The stem was oxidized, calcified and had deep tooth dents on both sides at the button as well as wear on the button surface itself. It would be a challenge.When the pipe arrived at Scott’s place it was in rougher condition than he had expected. Nonetheless he went to work on it. He knew that he needed to ream the cake back to bare briar and clean up the exterior of the bowl to know for sure how bad the damage was on the inside and outside of the bowl. He did a great job cleaning up the exterior and reaming and cleaning out the bowl so the damage on the inside and out were incredibly visible. This pipe was in serious trouble. Scott and I share and affinity for these older craggy Dunhills so he sent me an email. I have included that below.

Hi Steve, Great job on that 1936 Dunhill.  Are you going to be putting it up for sale?  If so, I’m interested.  Also, I have a large 1956 shell briar Dunhill billiard that has a great blast and good stem, but has a crack in the front and a bad interior.  It’s out of my comfort zone – will you do such work for pay?

Thanks,  Scott

We sent several emails back and forth regarding the pipe discussing what needed to be done. I asked him to send me some pics of the pipe after his clean up. He did so along with the email below.

Hi  Steve, Here are pics of the Dunhill.  The crack is on the shank side, straight above the shank – it’s splits to form two cracks (hard to see).  I cleaned the bowl (inside and out) then put a clamp around the bowl to see if it would push together, and it moved a lot, but not all the way, so the next step would have been to use compressed air to get any slivers/dust out  of the crack.  That’s where I stopped, figuring it had waited for 30 or so years, so it would be okay.

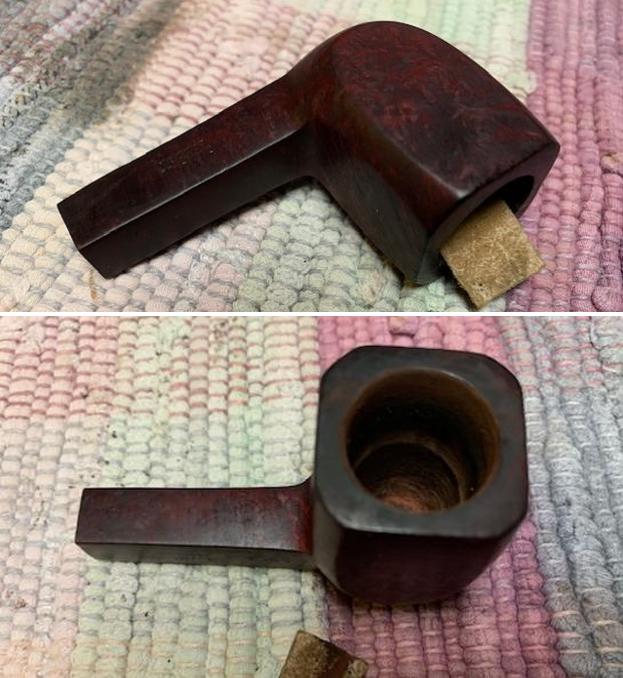
There also seems to be some rot on the rim of the bowl and there is a small chunk out at the top of the crack.  My plan had been to sand down the top after the repair was done.

Thanks, Scott 
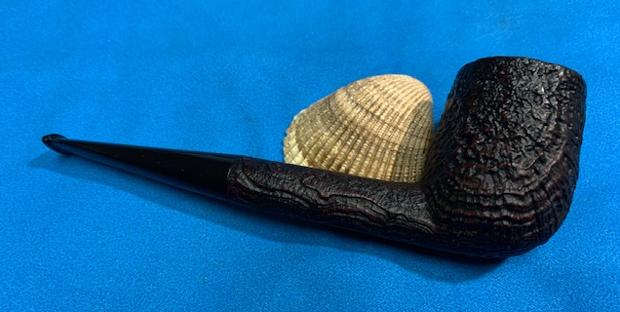
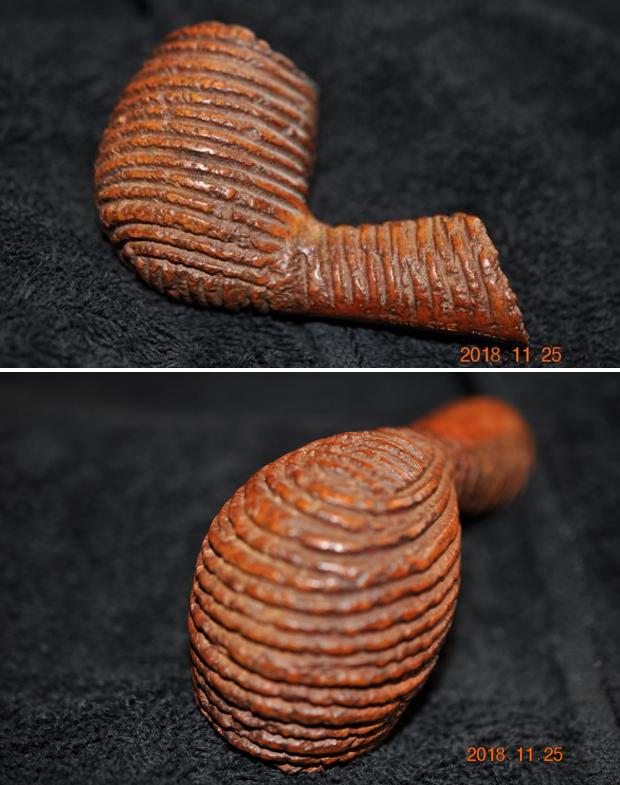
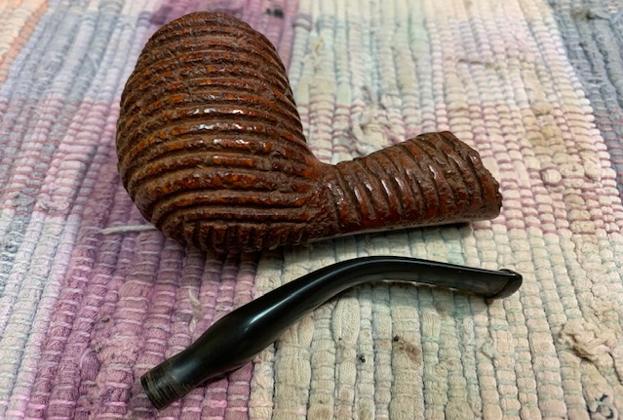
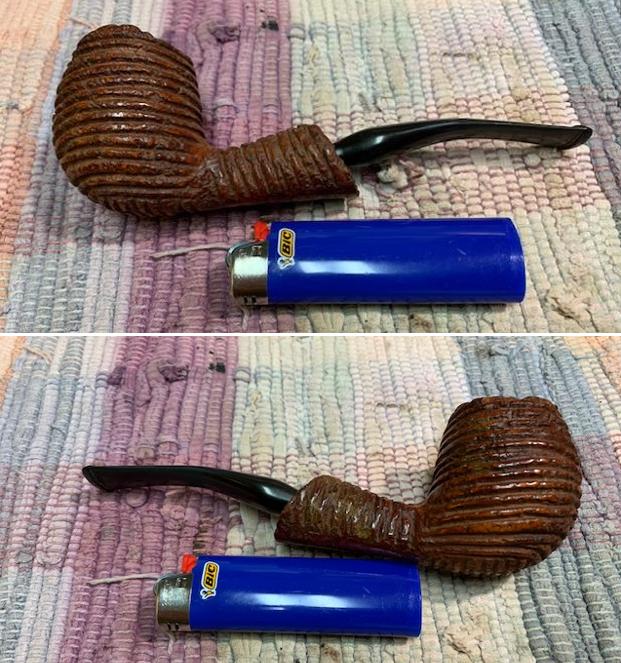
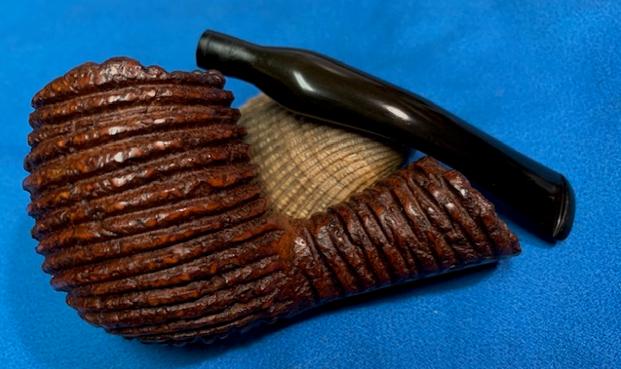
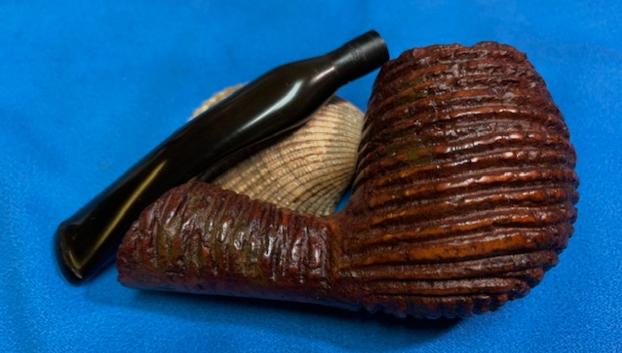
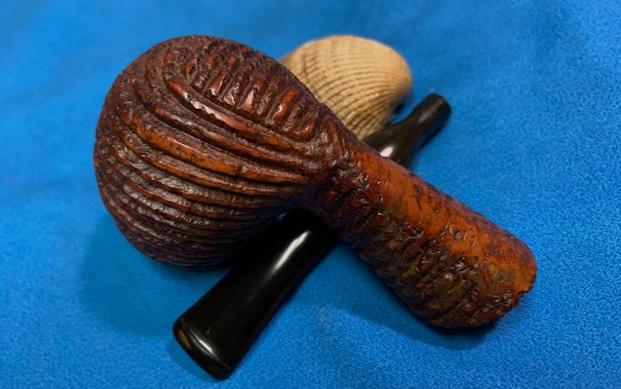
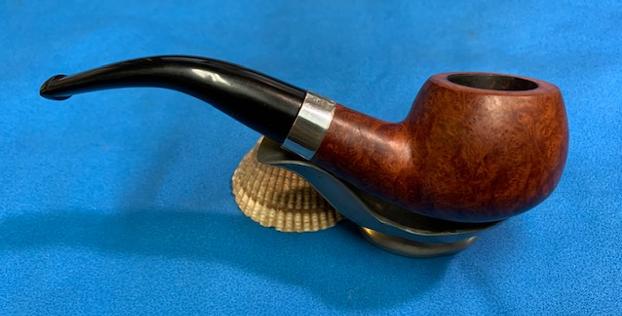
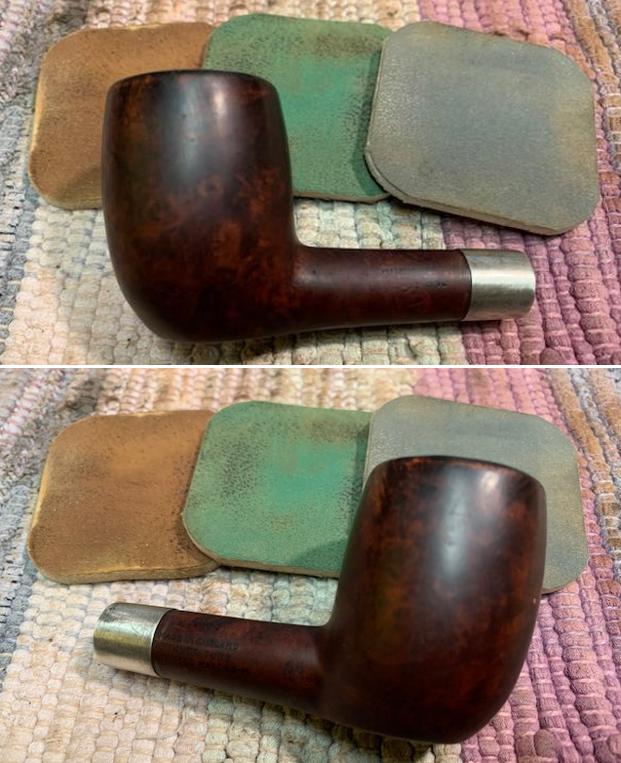
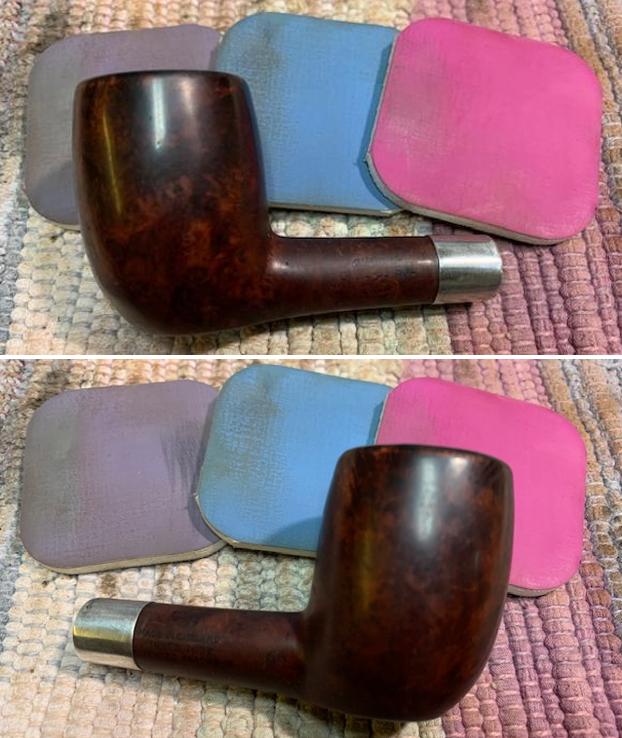
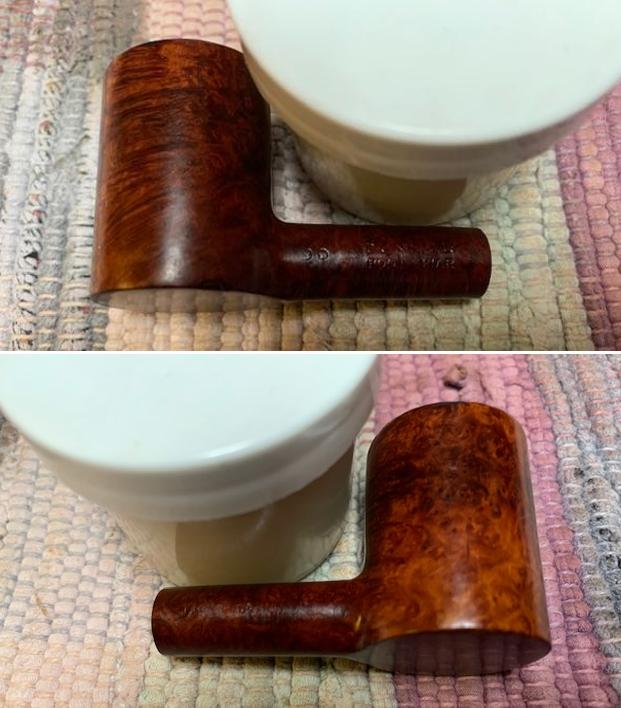
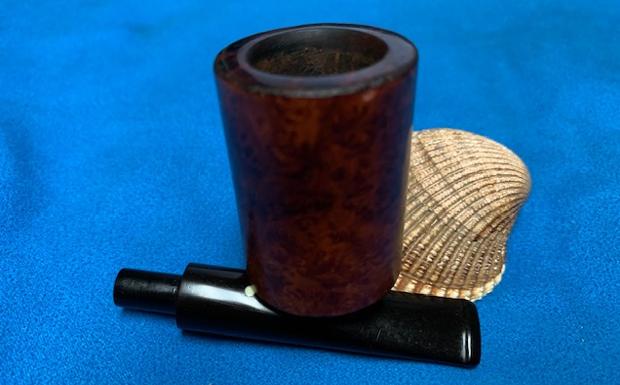
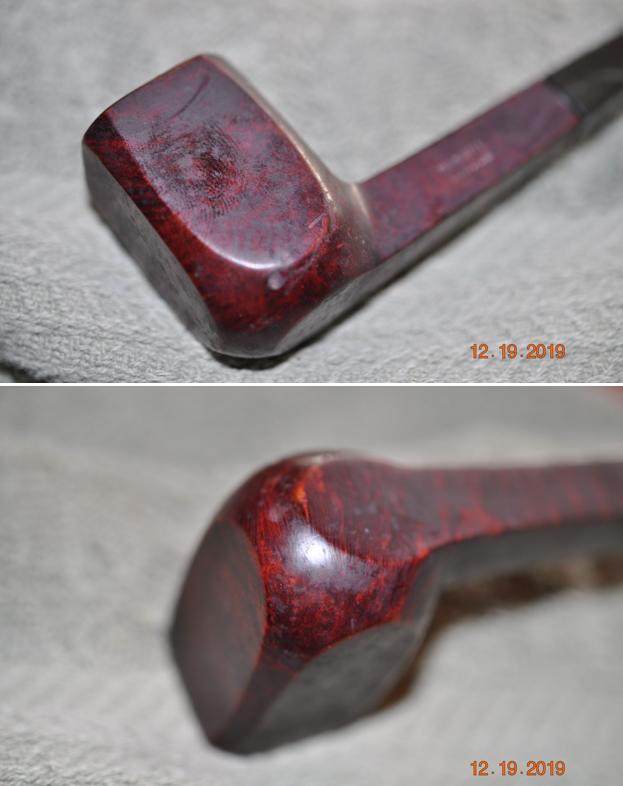
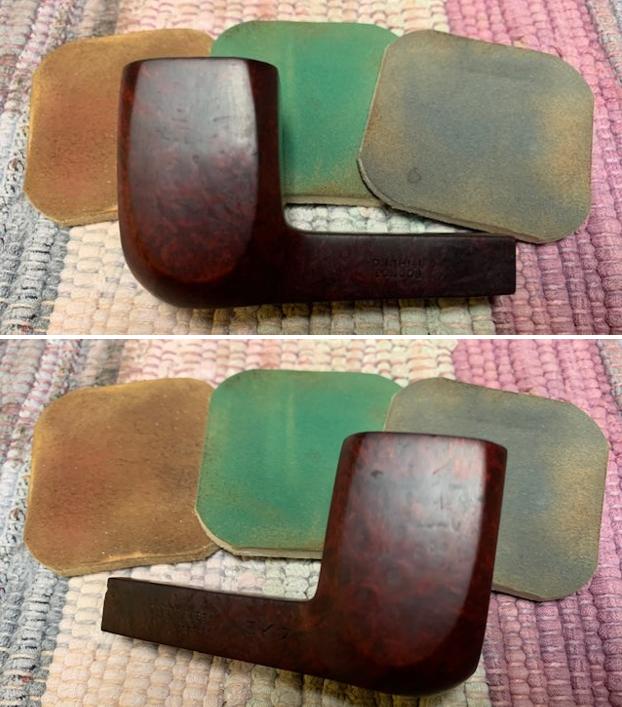
When I saw the pipe in his pictures I fell in love with the shape and the rich, rugged looking blast. I could see at once why Scott had been drawn to it. We chatted back and forth and the long and short of it is that it is now on my work desk to see what I can do with it. I will give it a shot and then send it back to Scott once it is finished. I took photos of when I received it. 
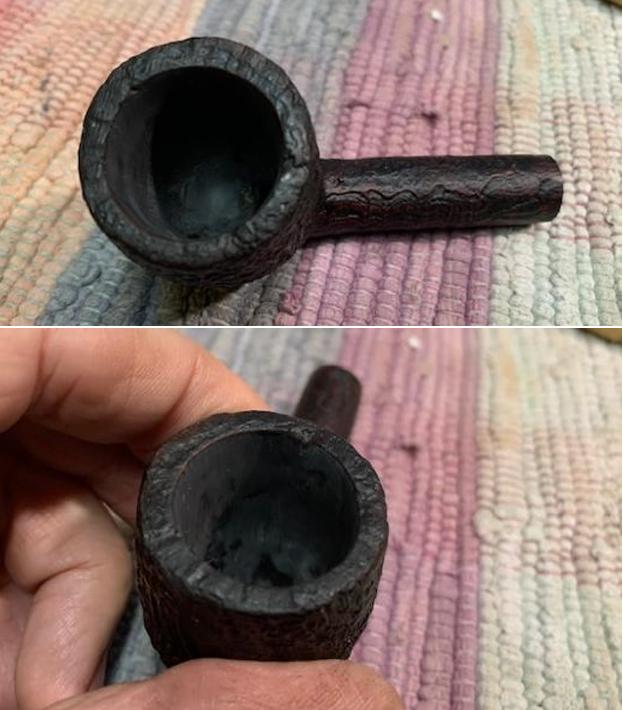
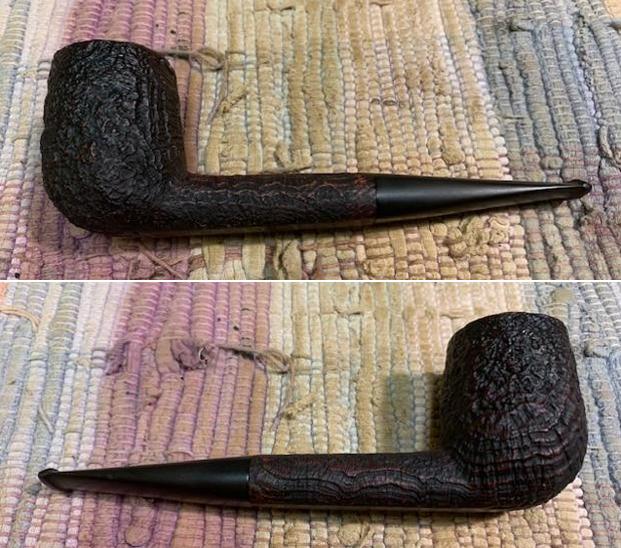
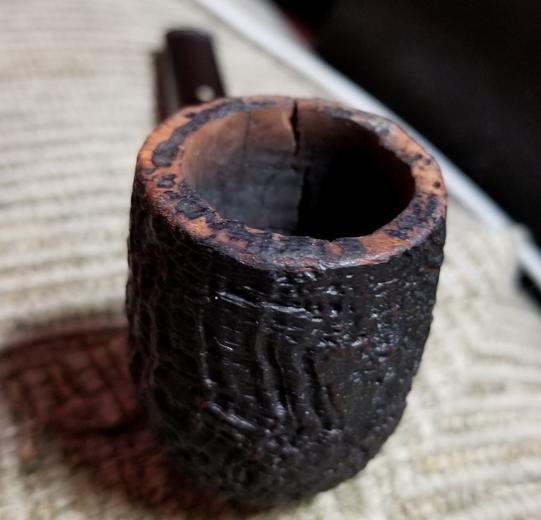
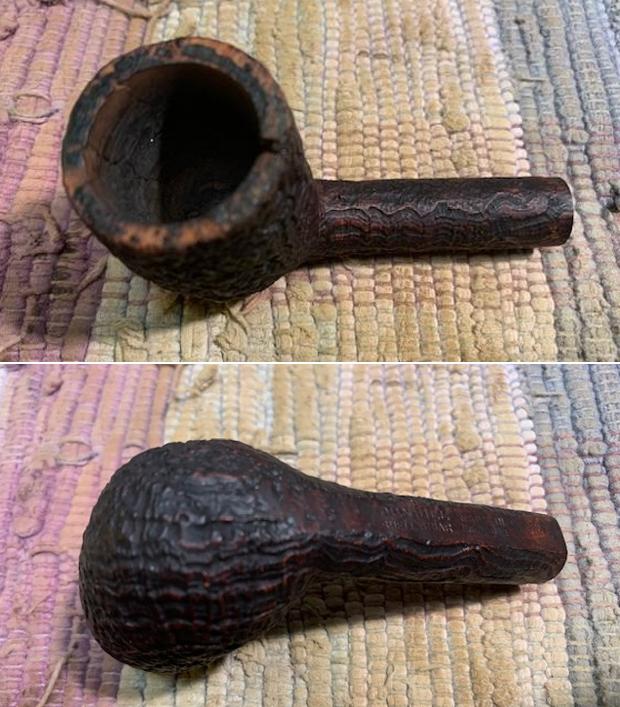
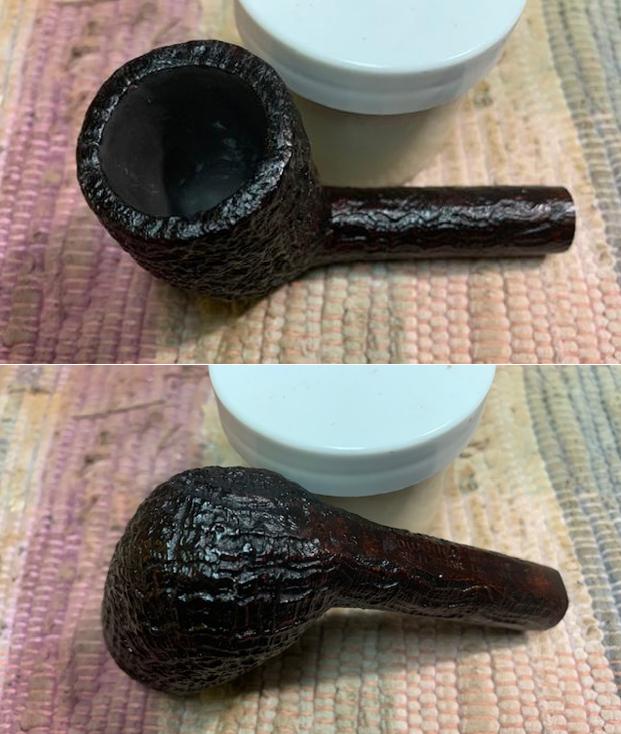
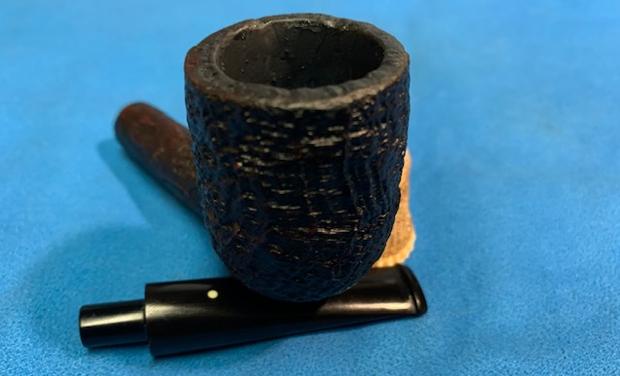
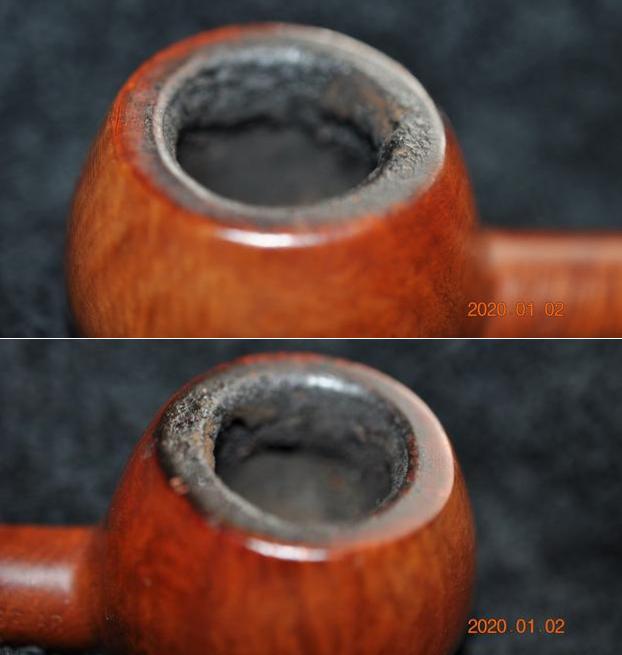
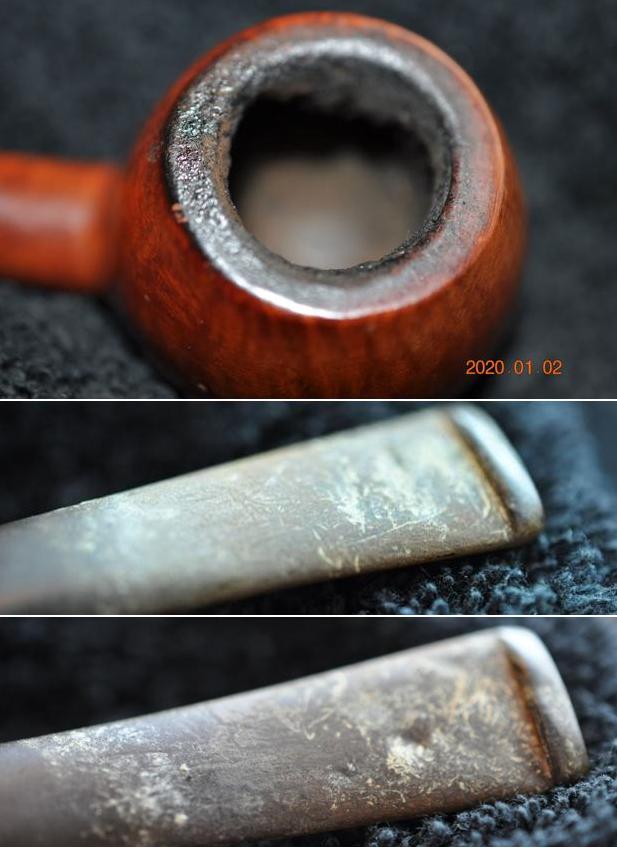
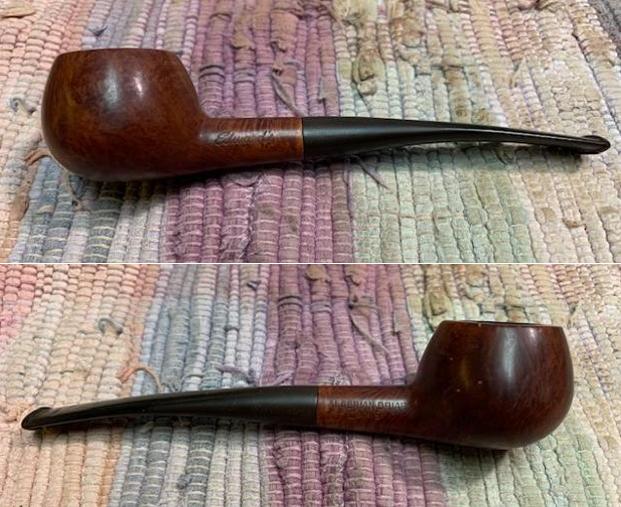
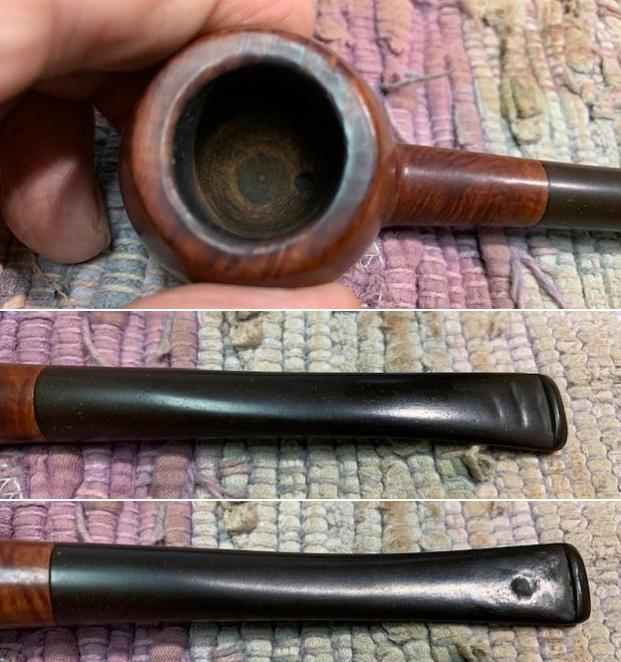
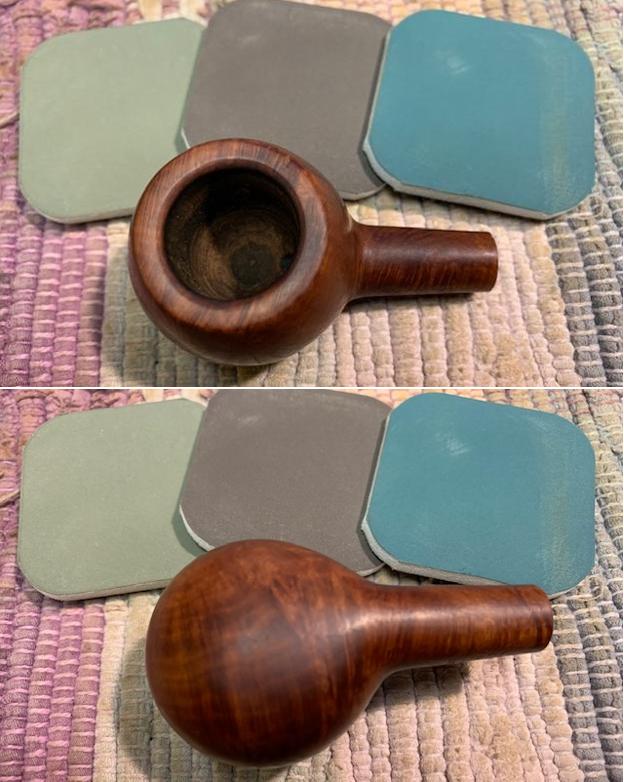
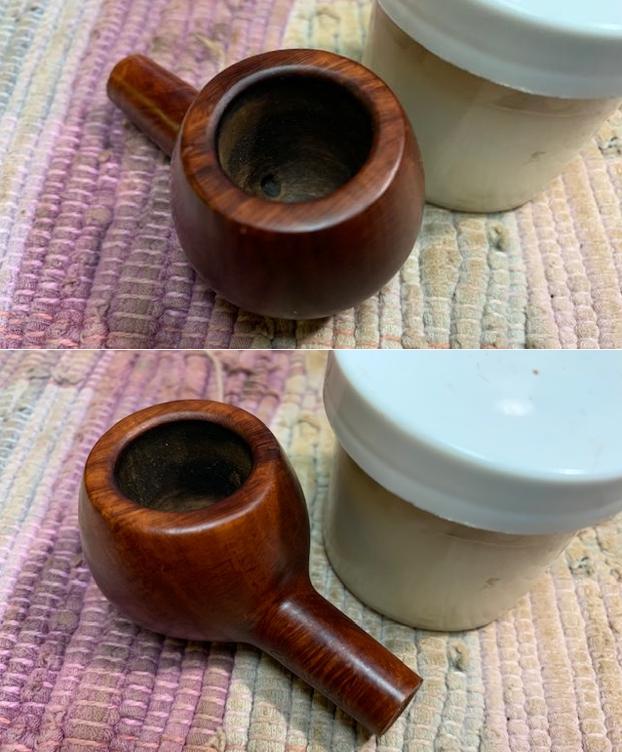
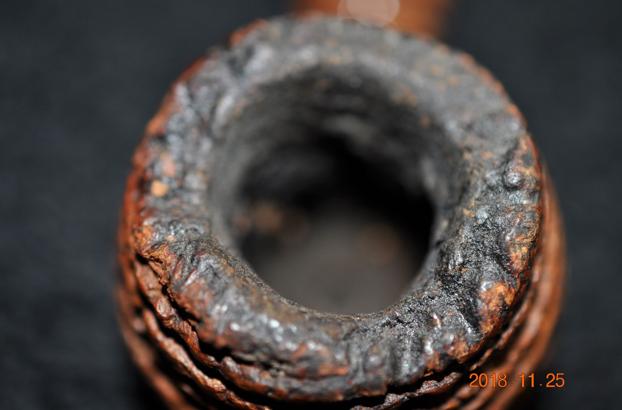
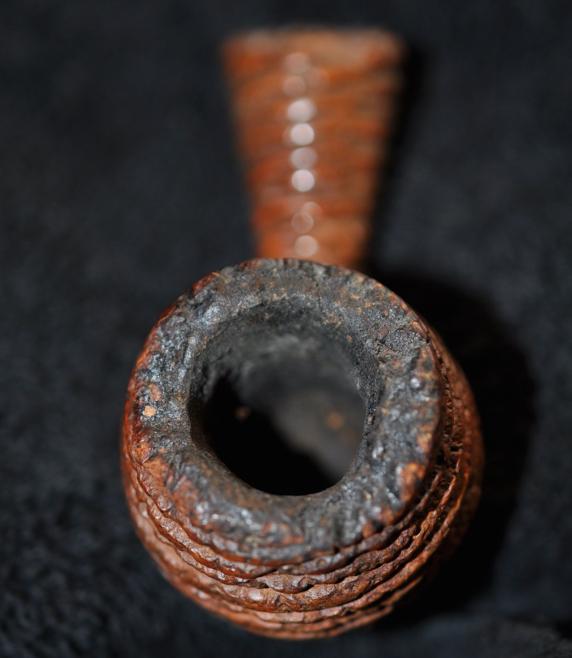
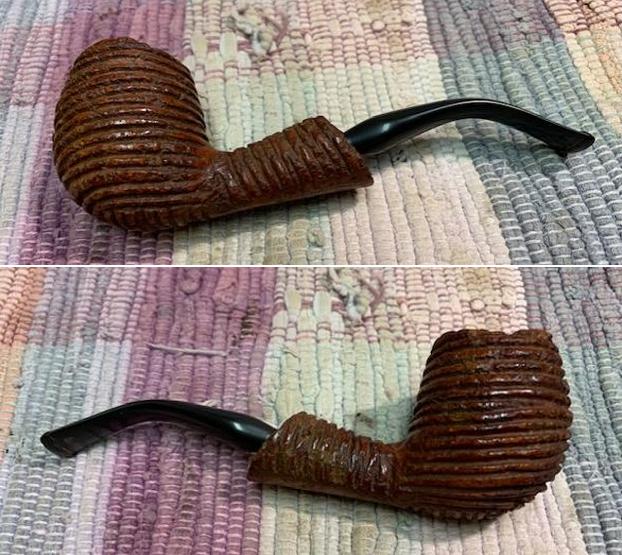
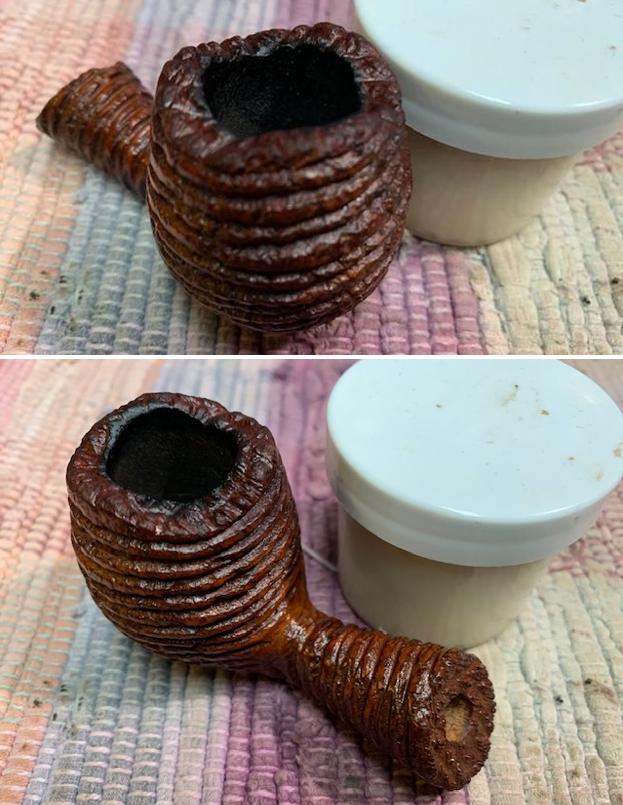
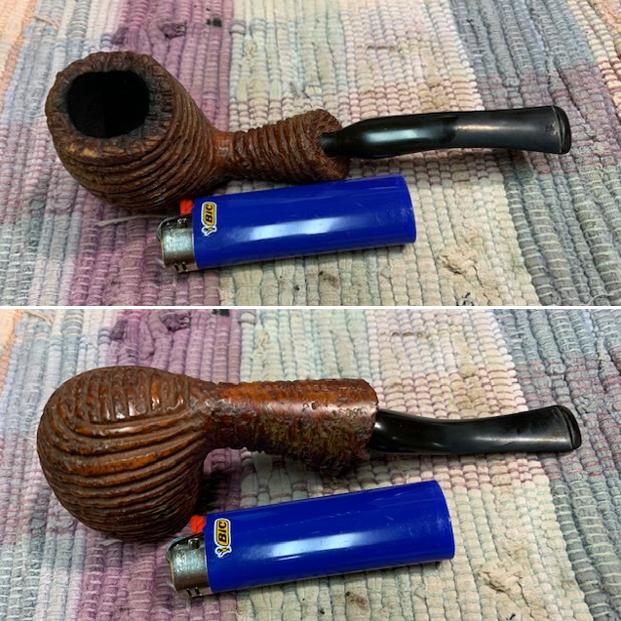
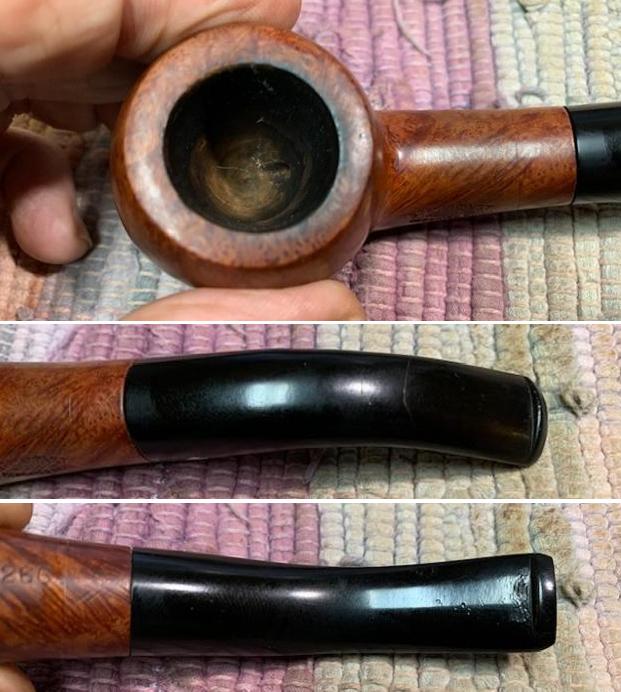
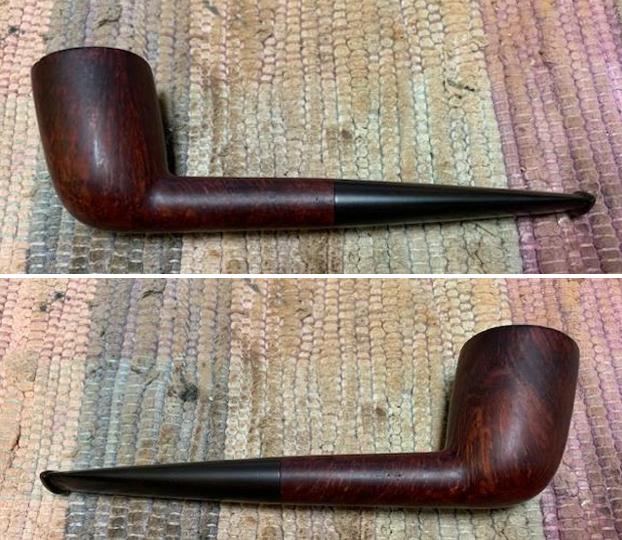
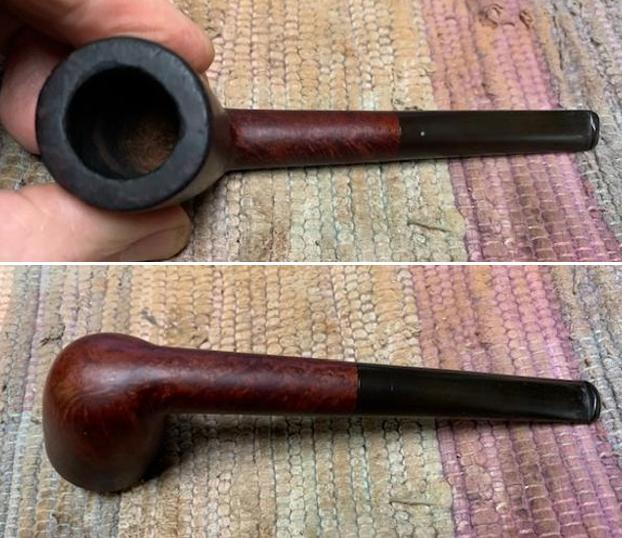
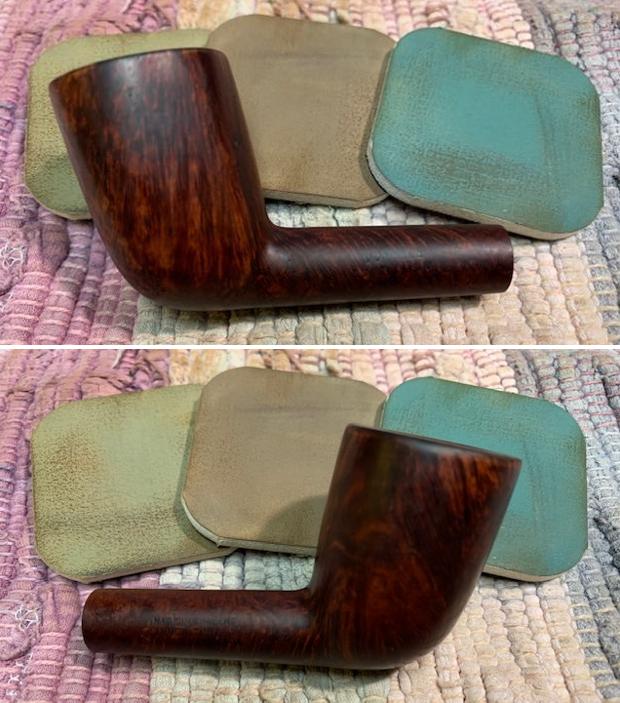
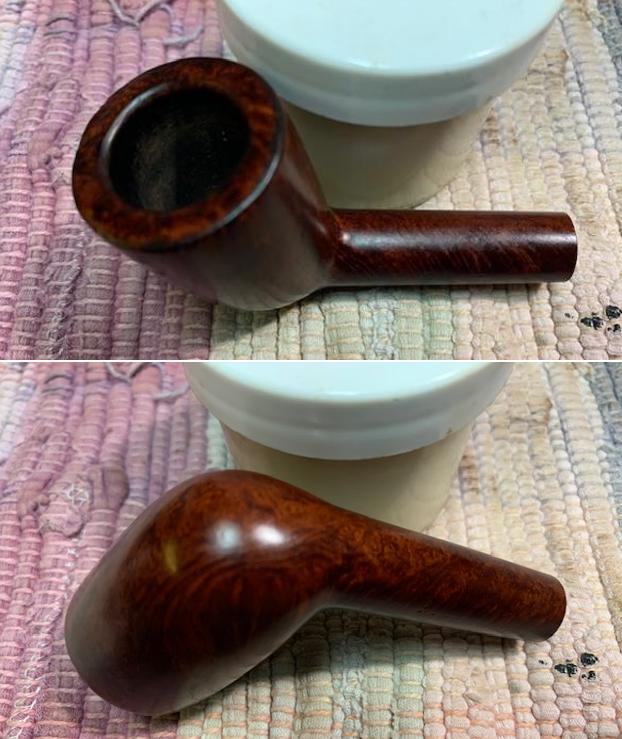
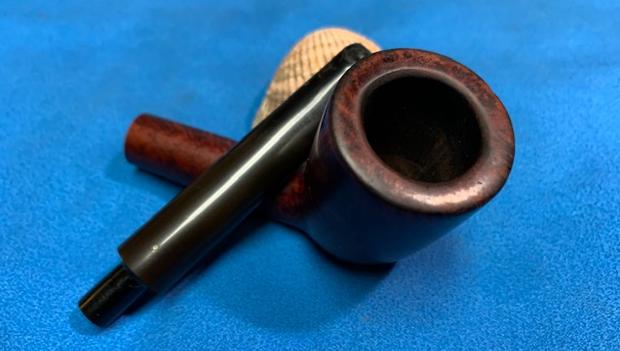
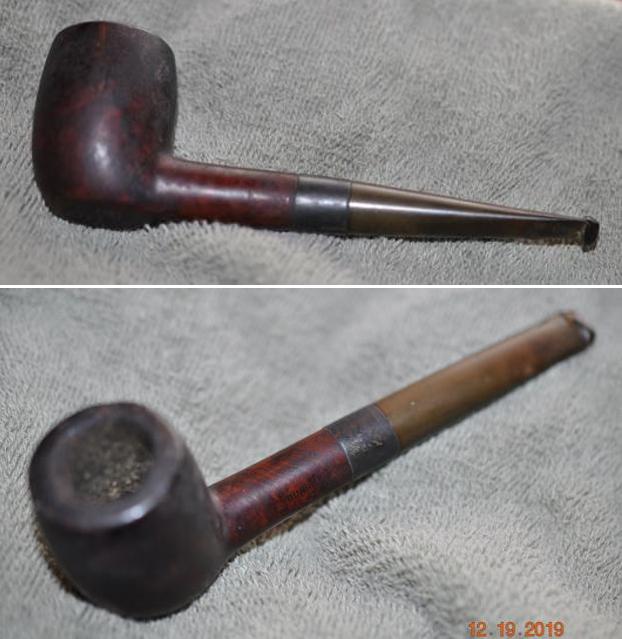
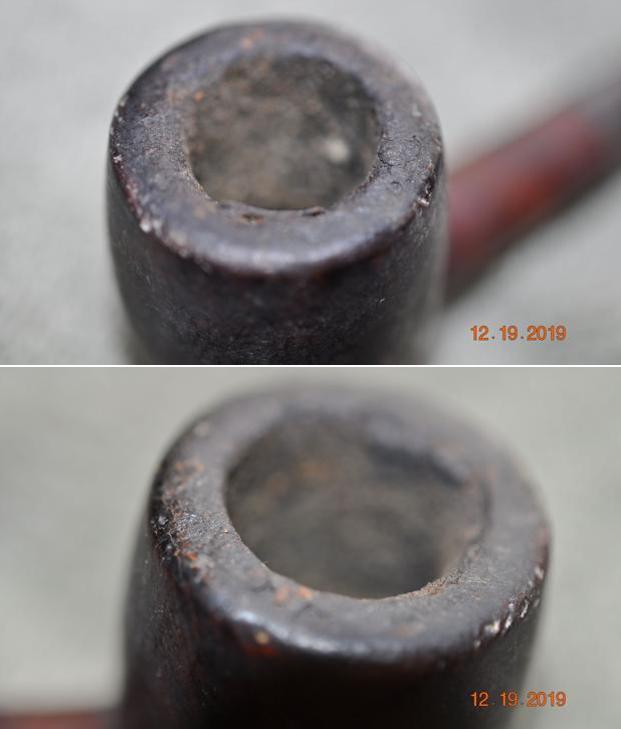
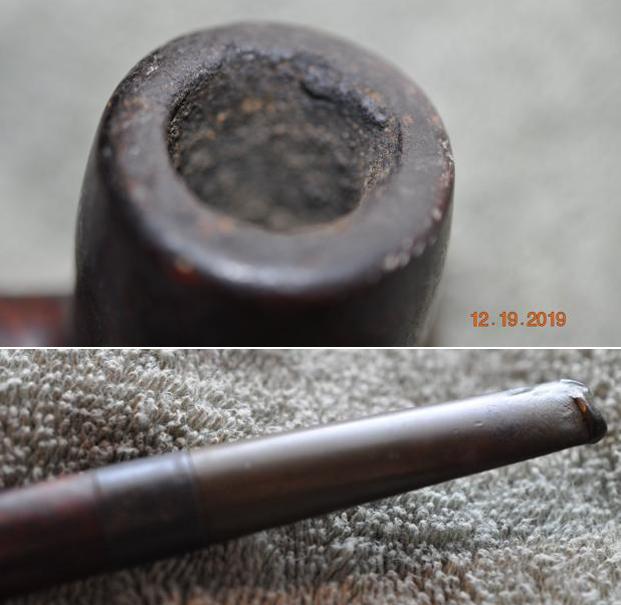
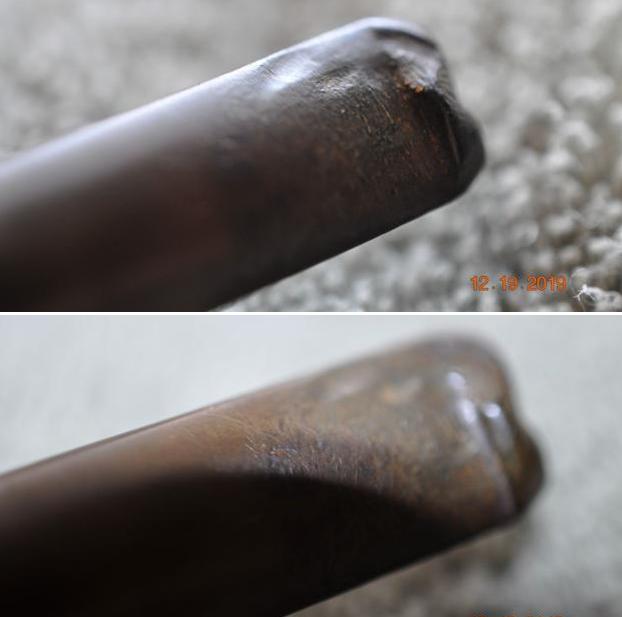
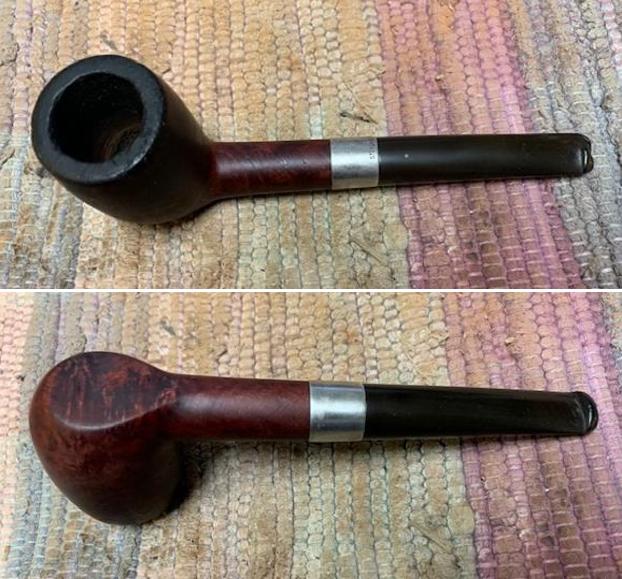
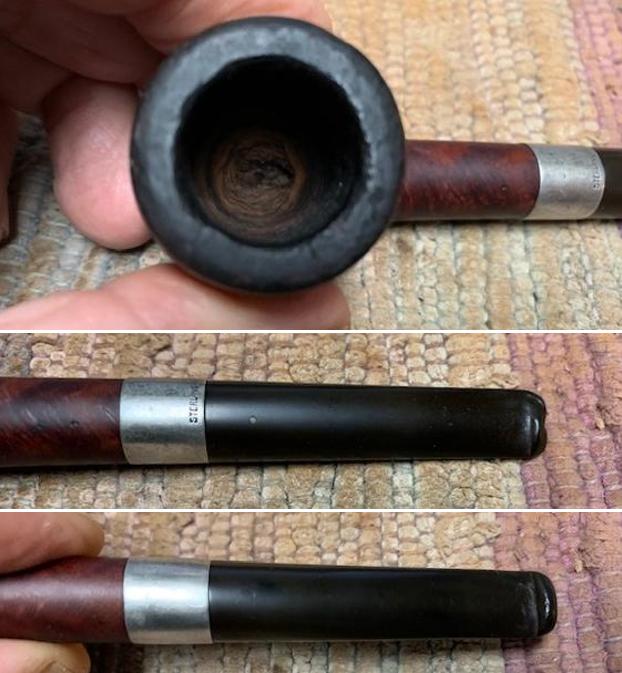
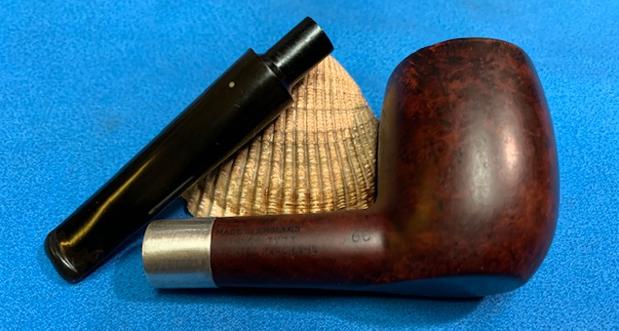
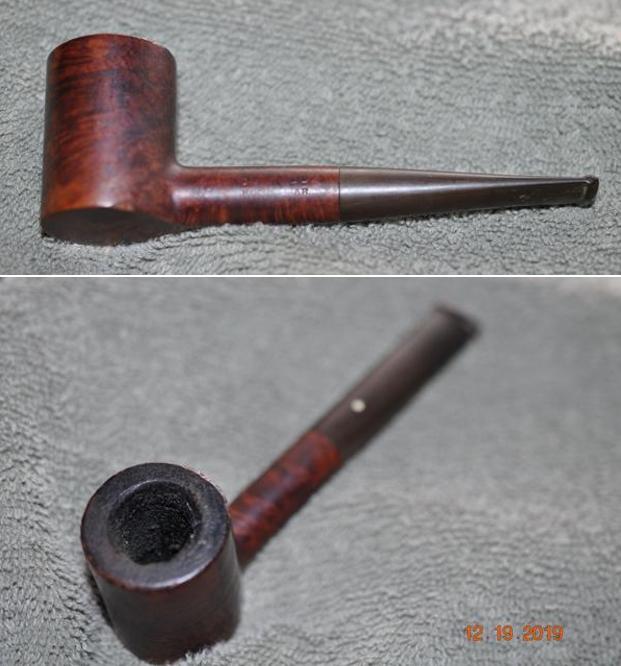
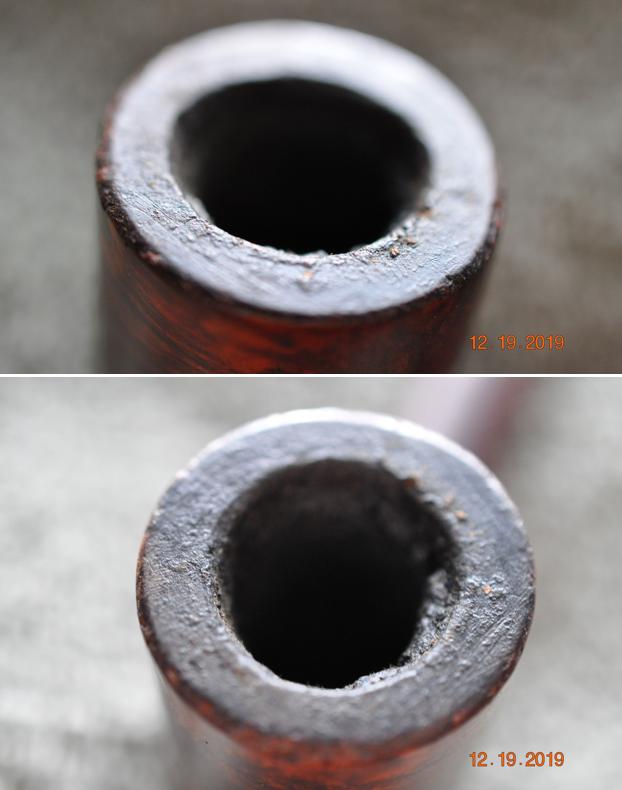
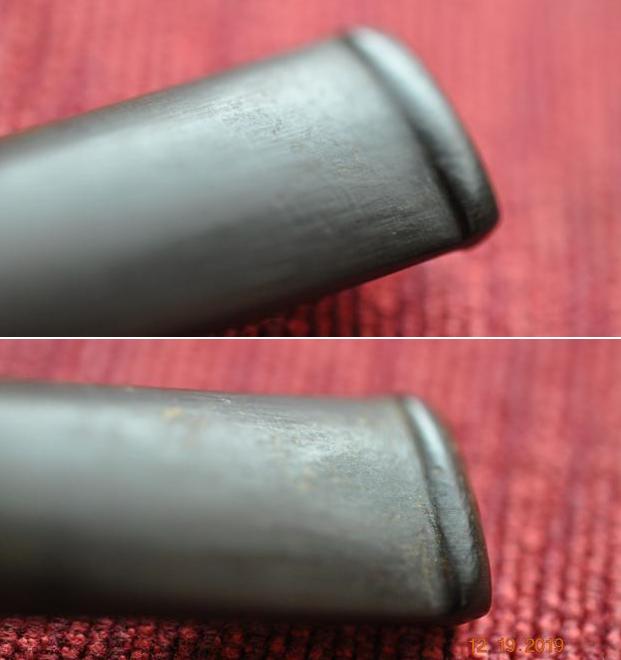
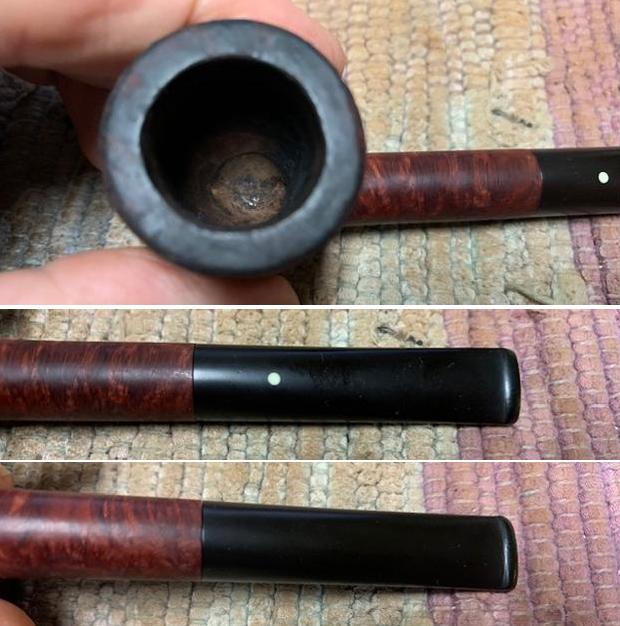
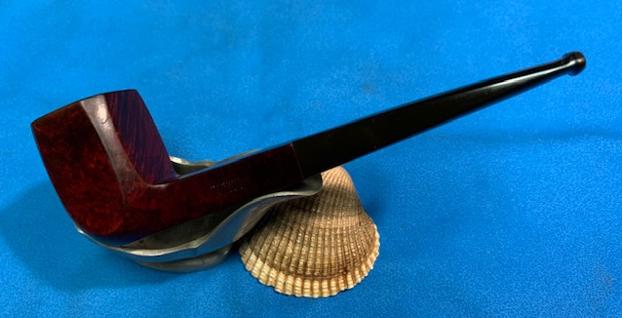
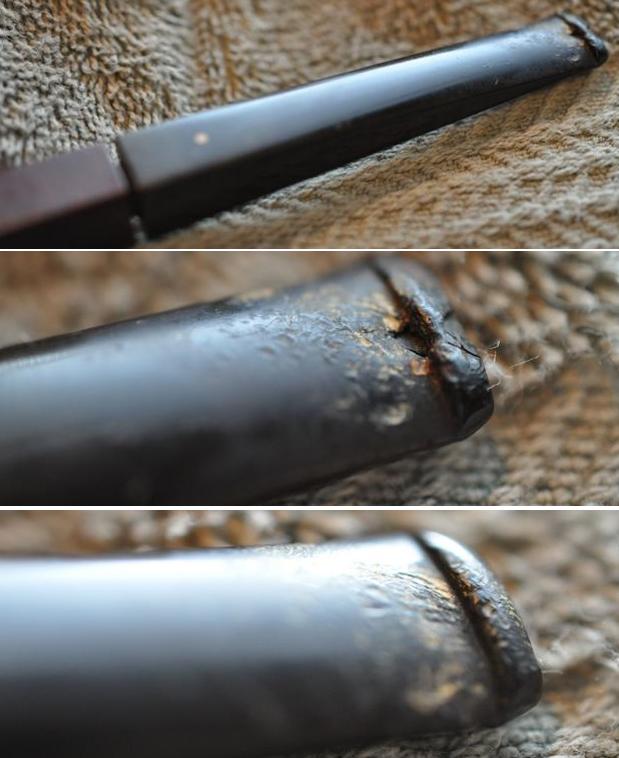
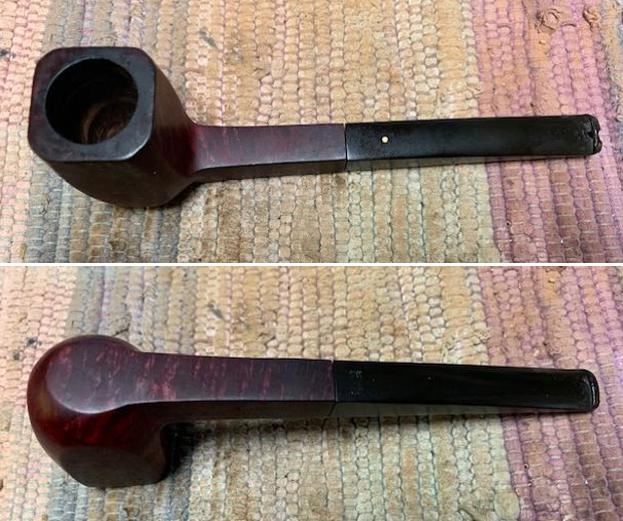
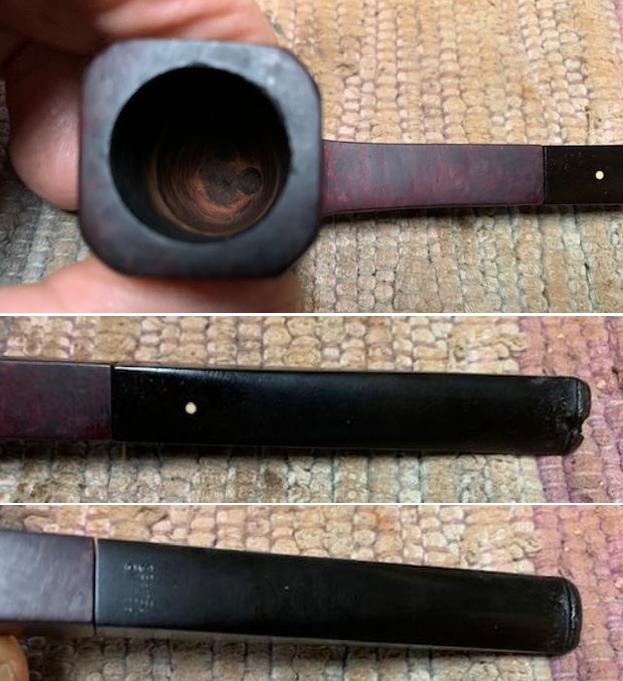
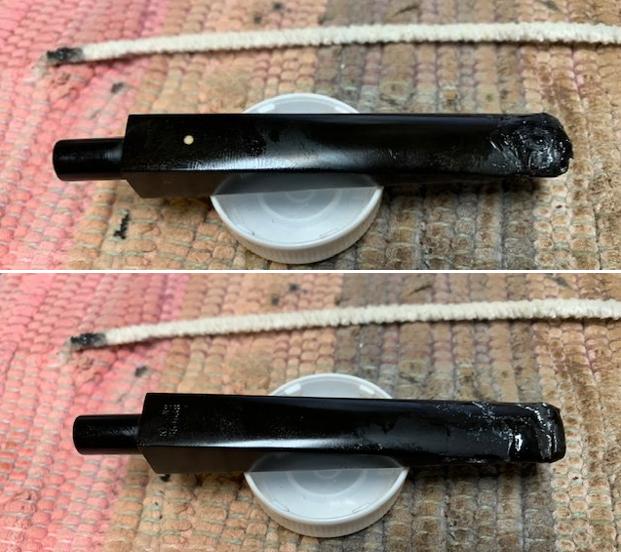
The rim top looked rough. It was beat up and missing a chunk over the crack on the back of the bowl. The finish was pretty much removed. The bowl was clean and the damage on the inside was extensive. The stem had cleaned up well. The tooth marks are visible in the photos of the stem that I have included below.
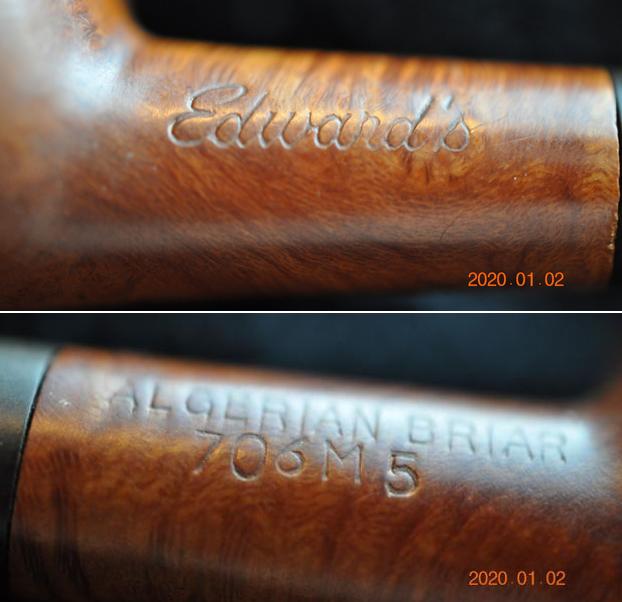
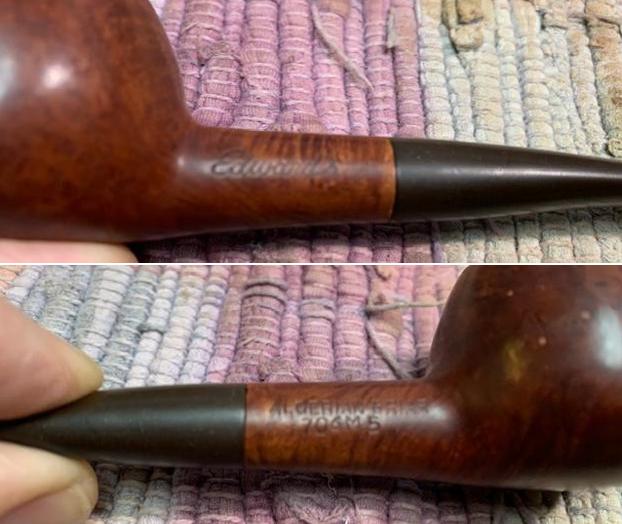
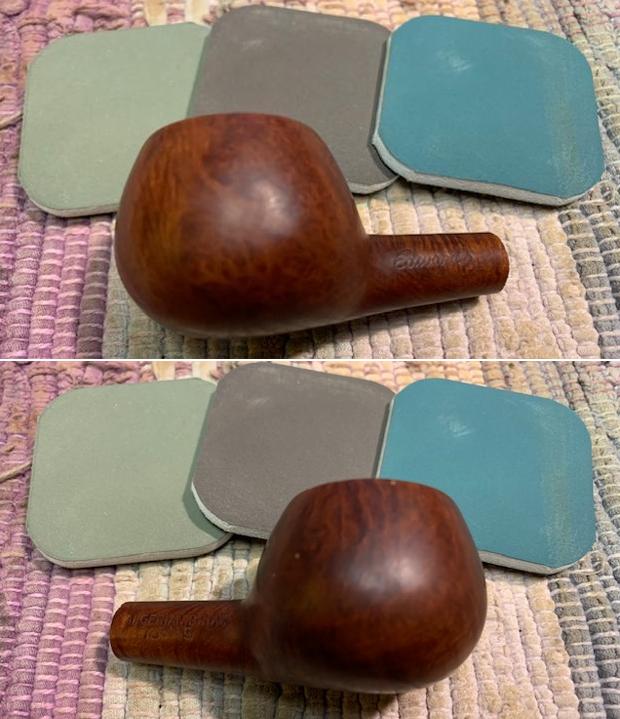
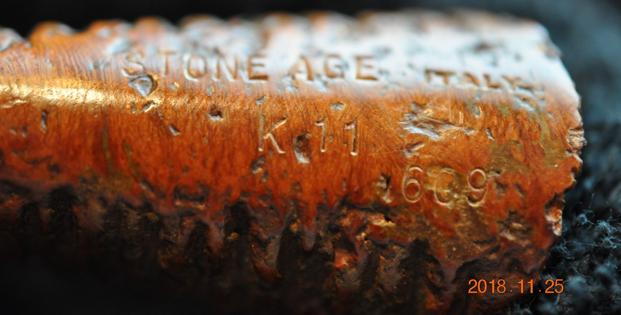
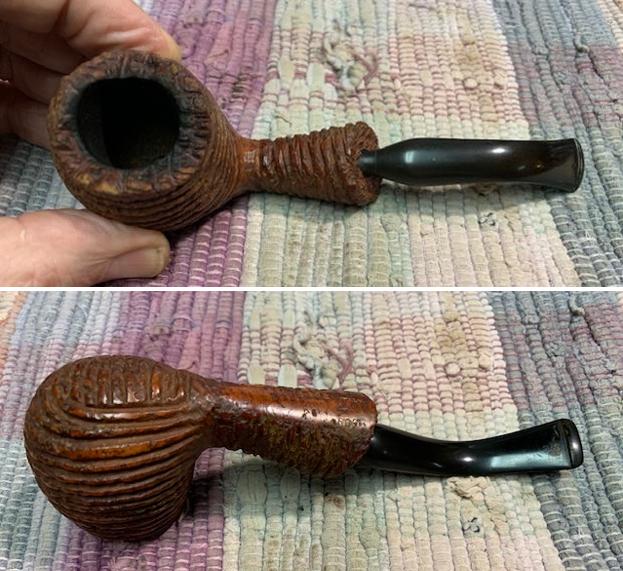
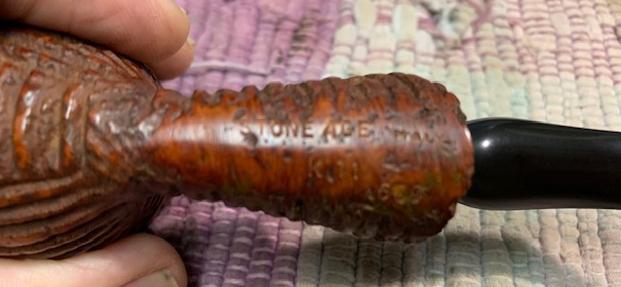
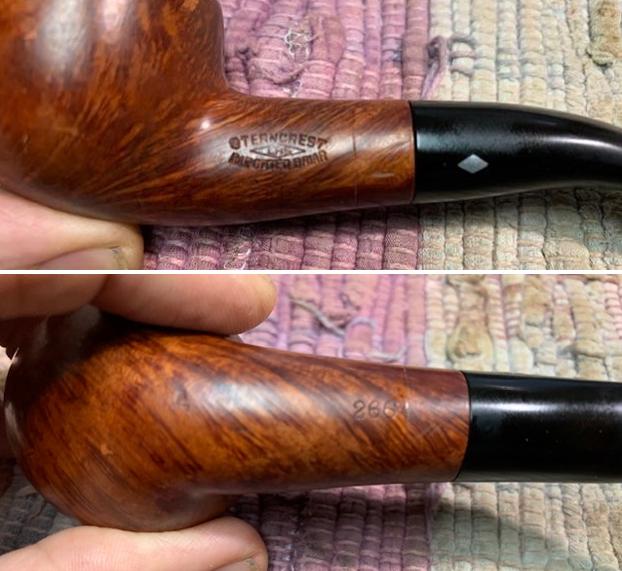
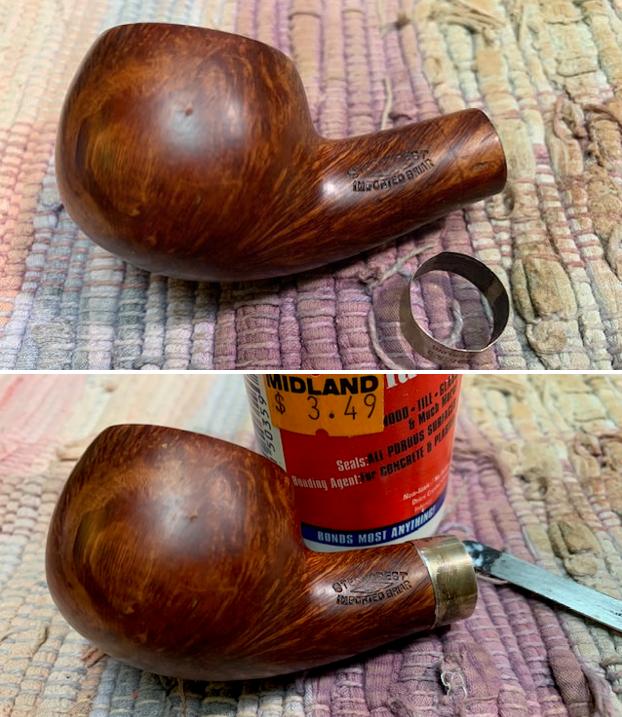
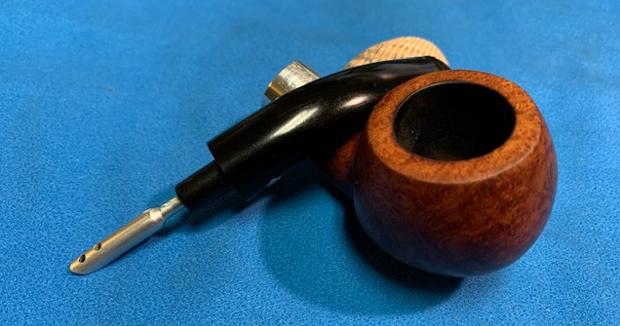
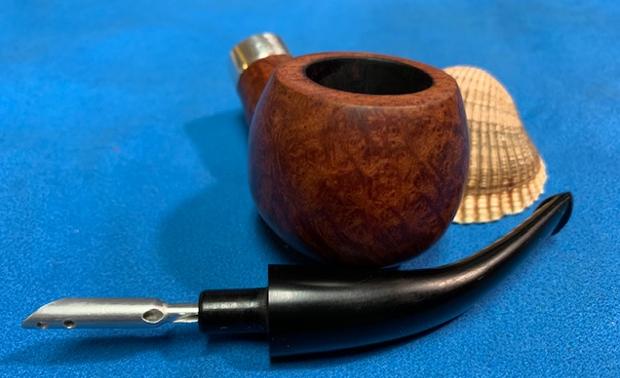
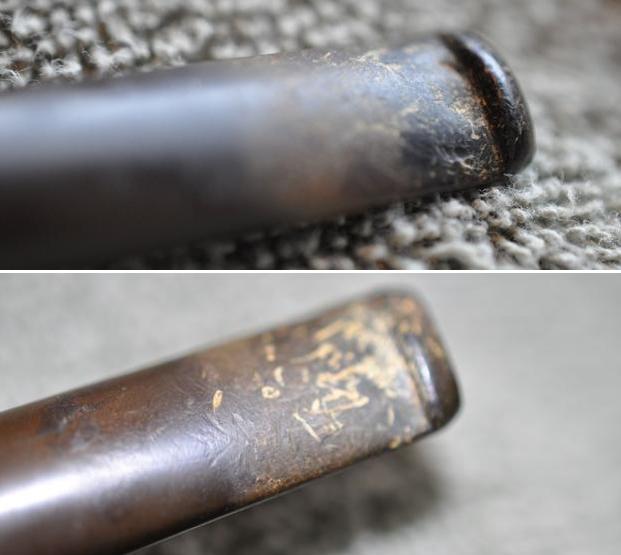
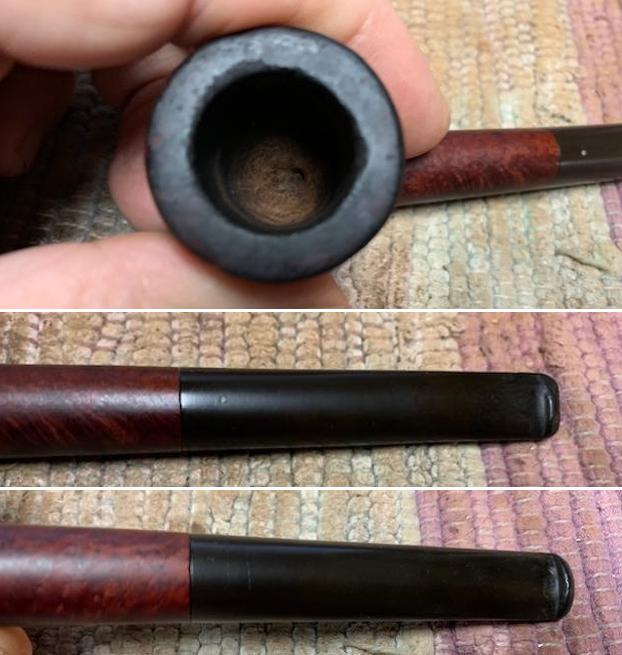
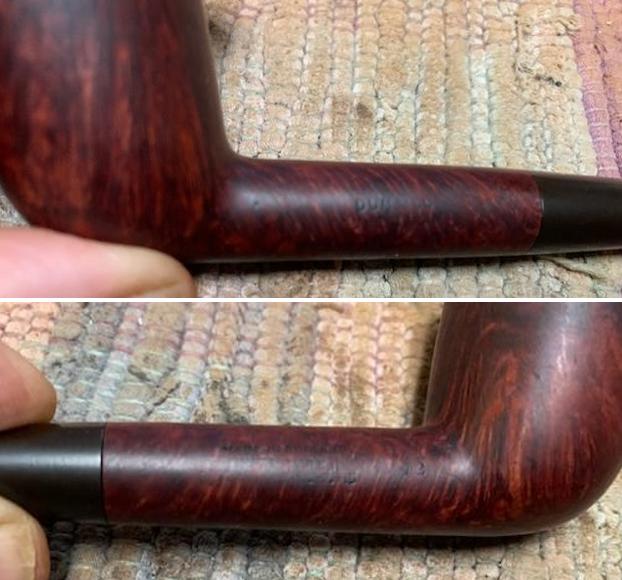
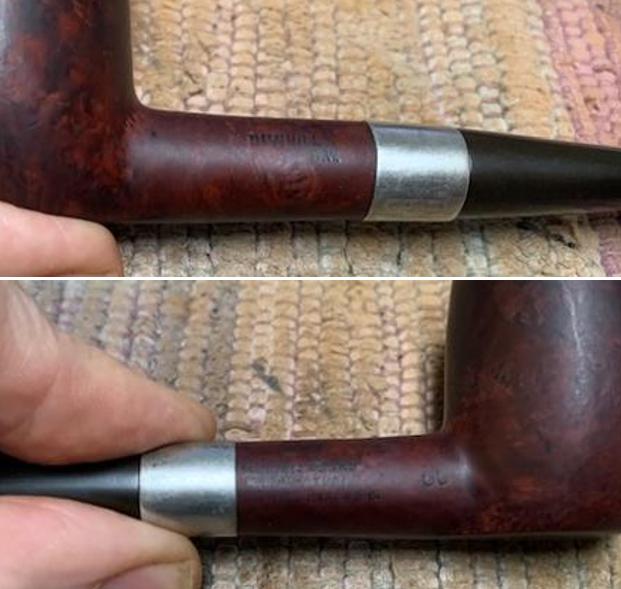
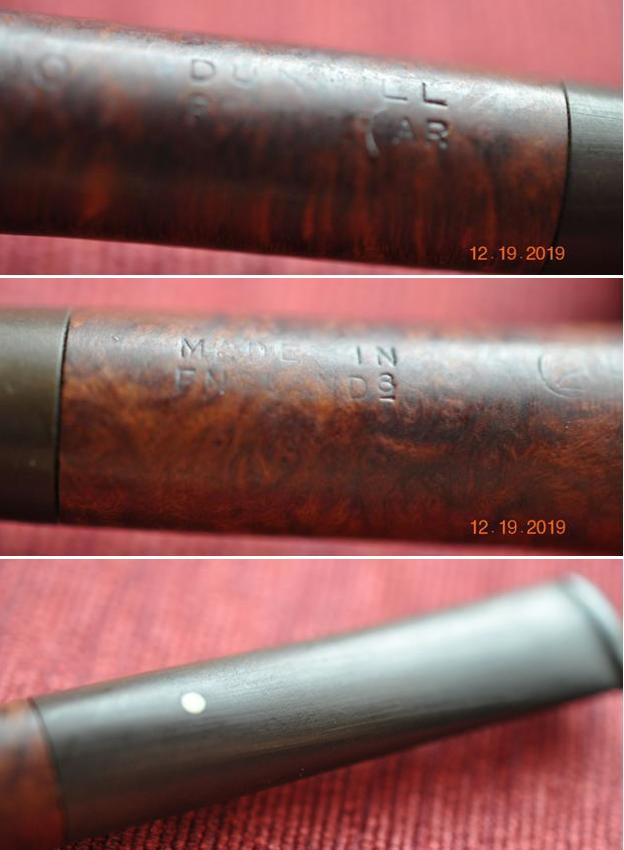
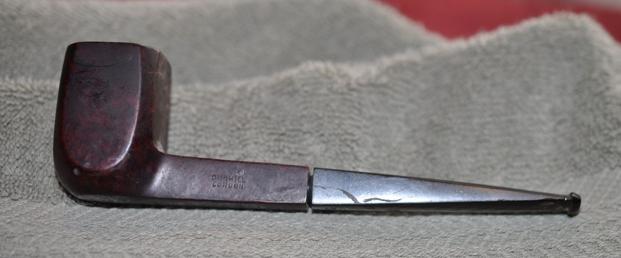
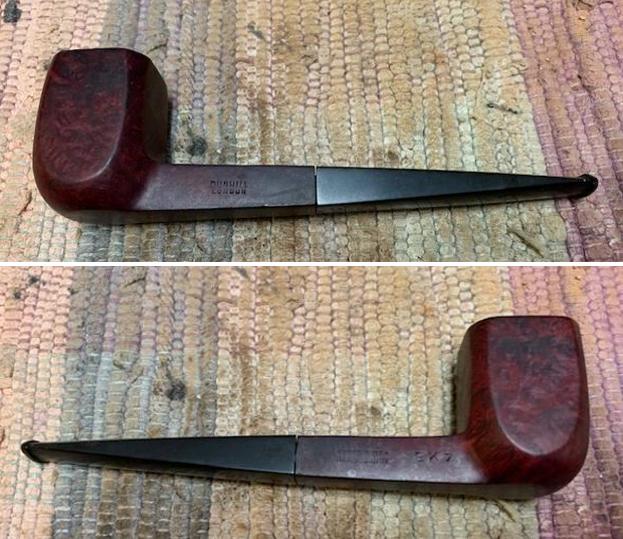
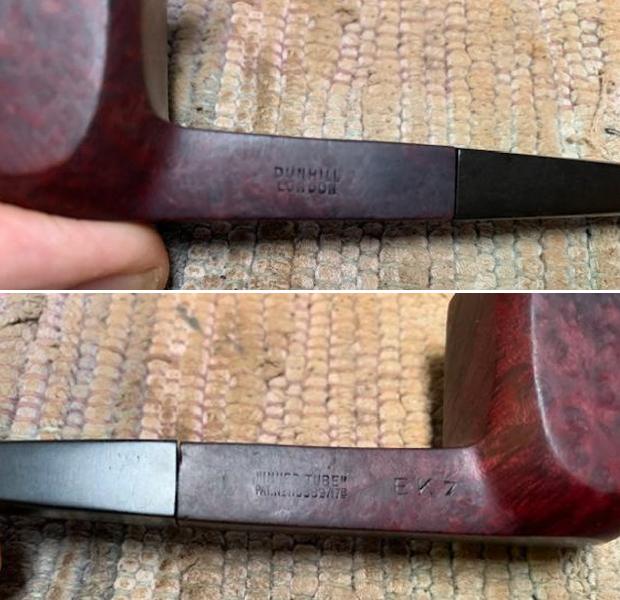
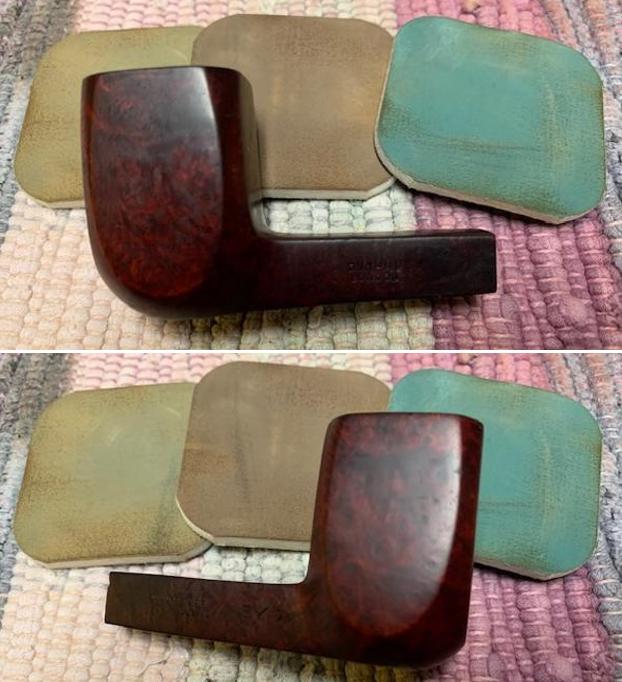
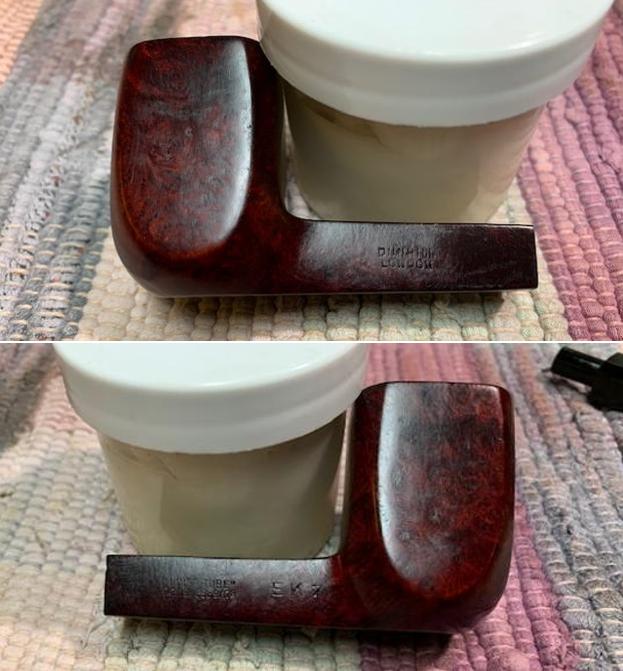
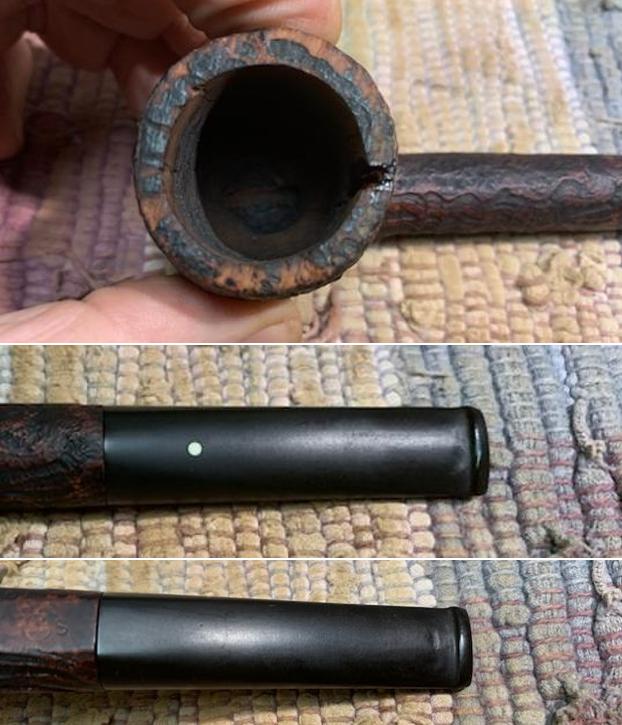
I took a photo of the stamping on the underside of the shank. It is faint in spots but is still very readable.
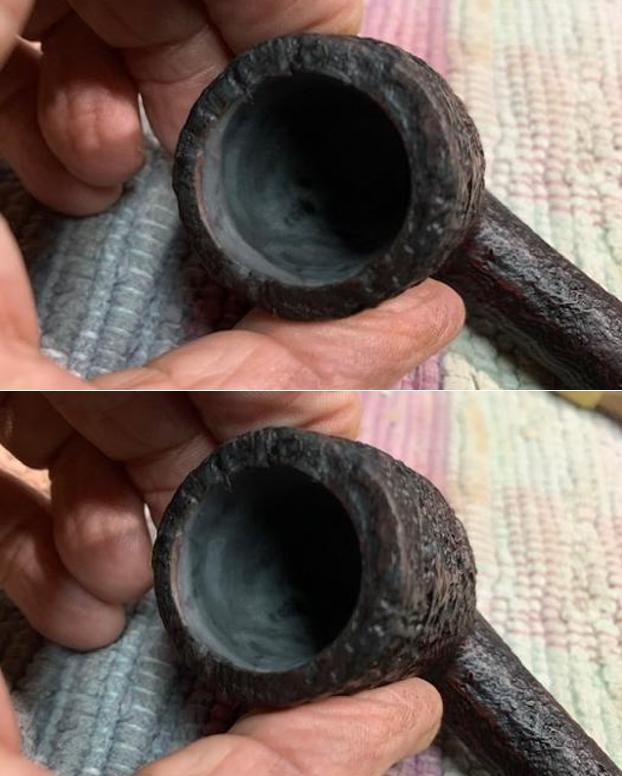
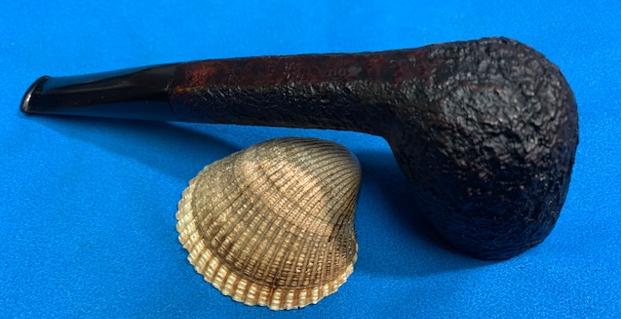
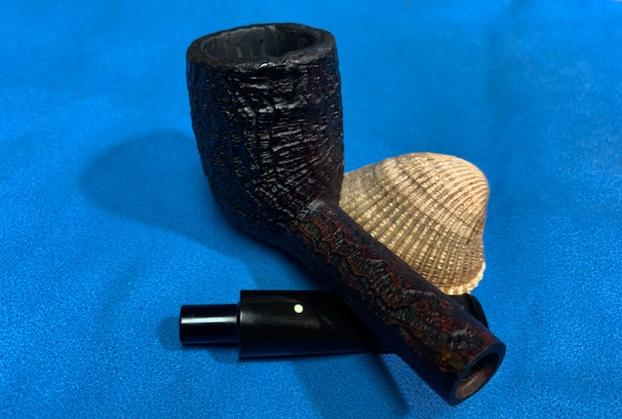
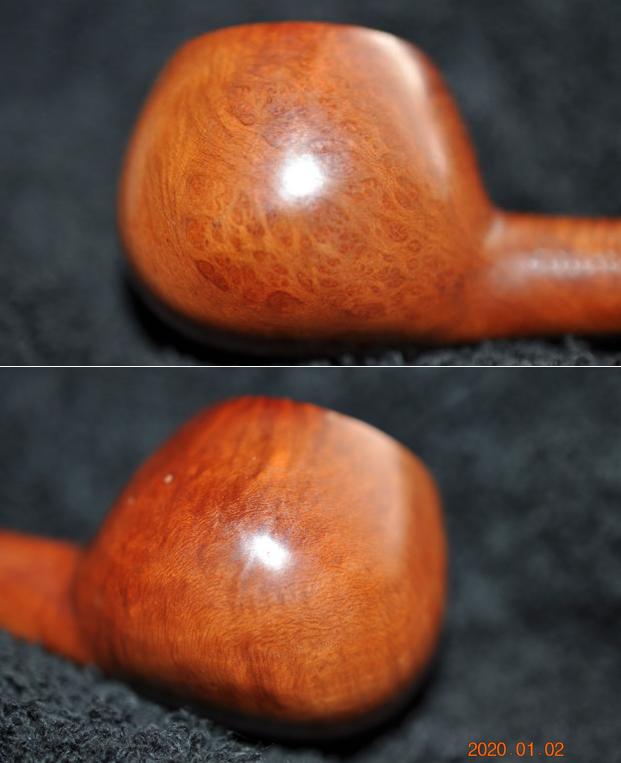
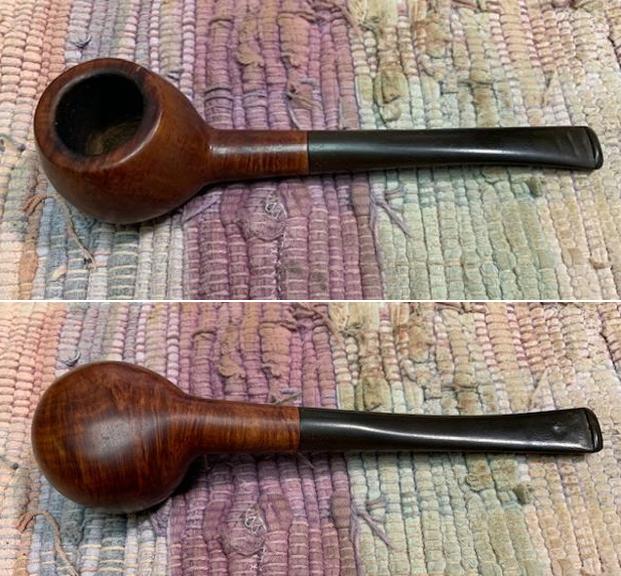
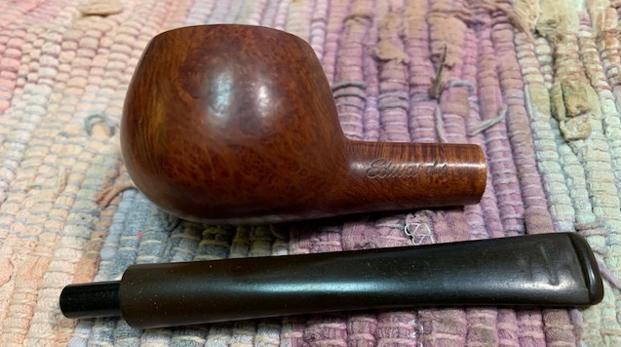
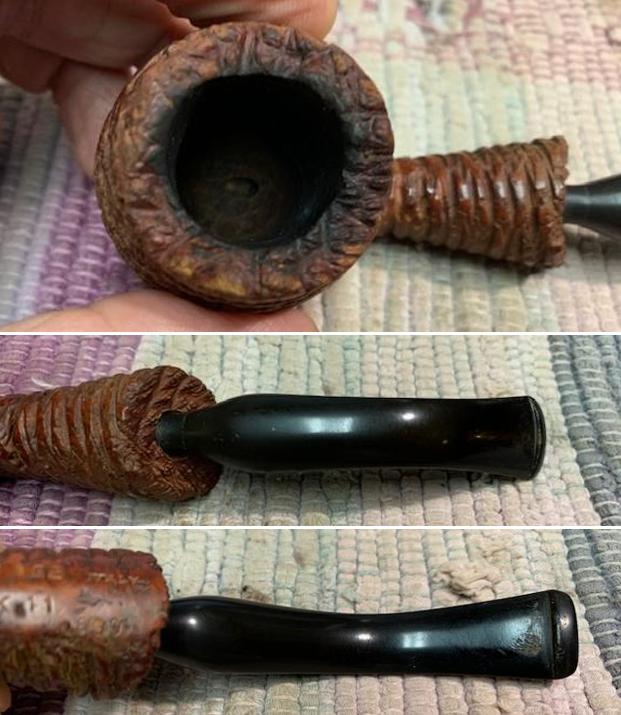
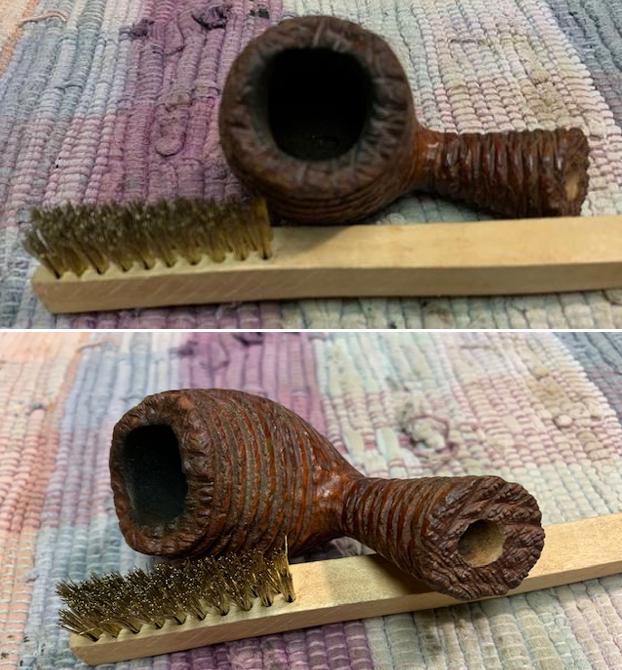
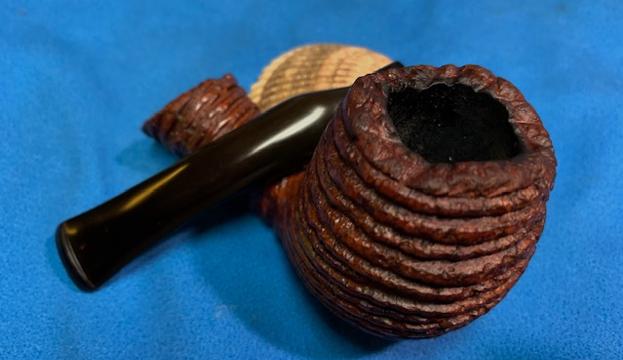
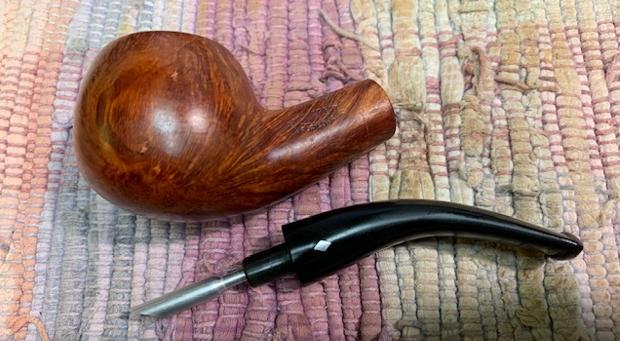
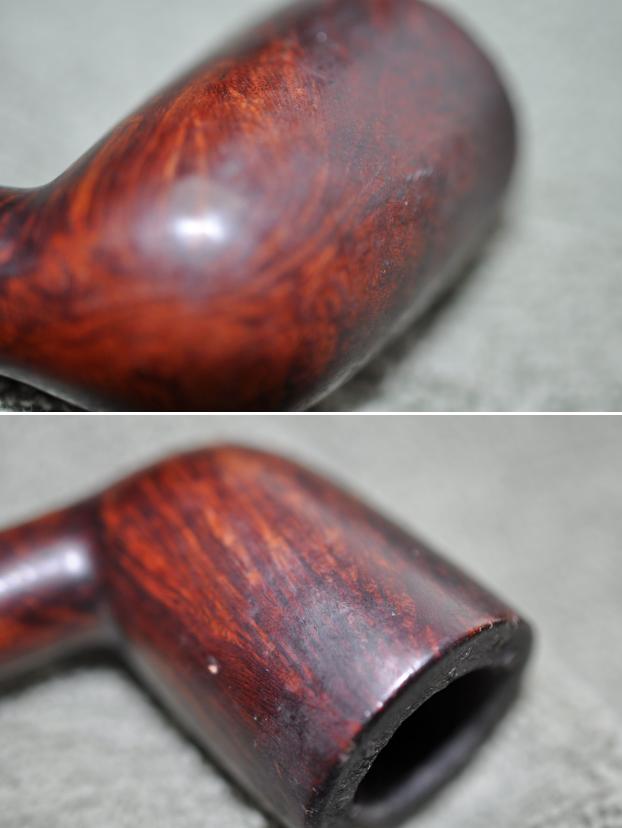
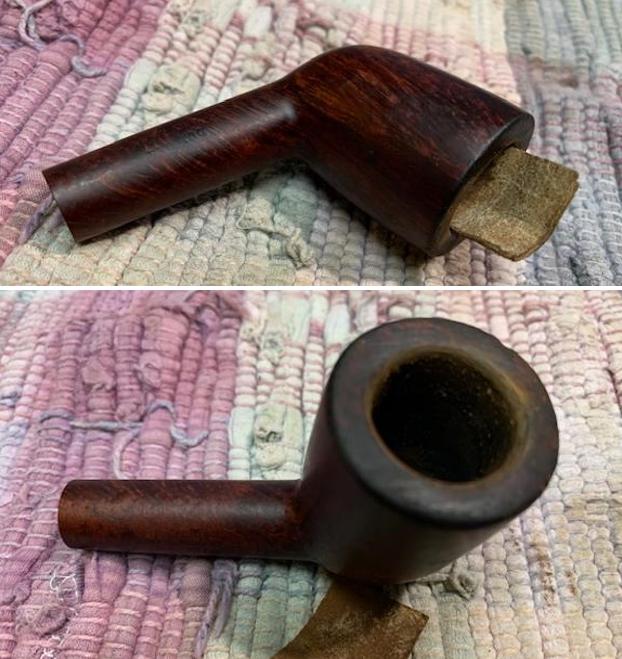
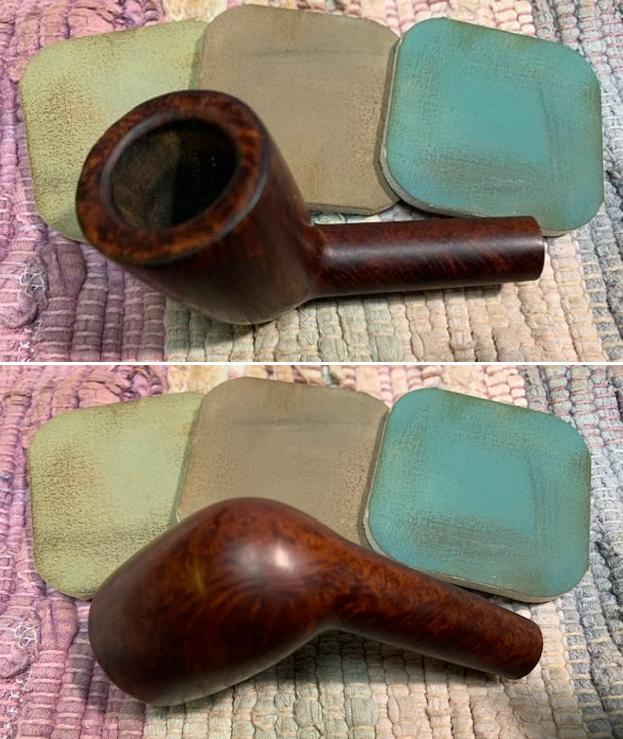
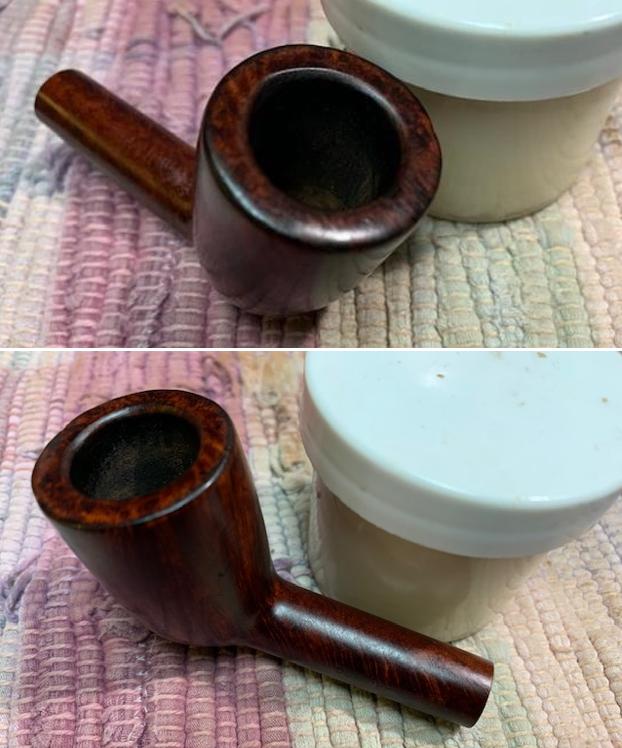
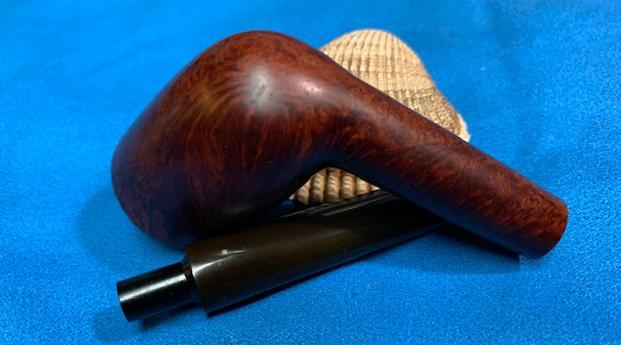
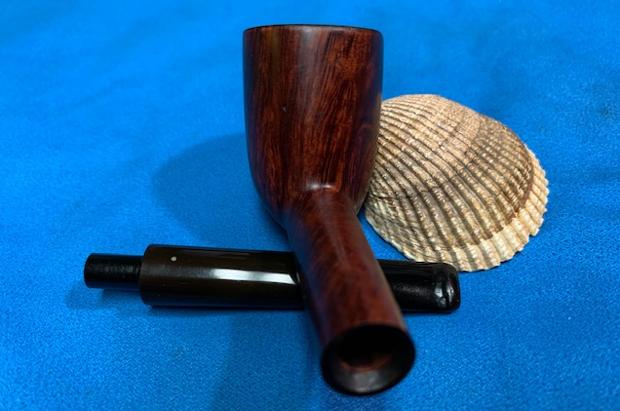
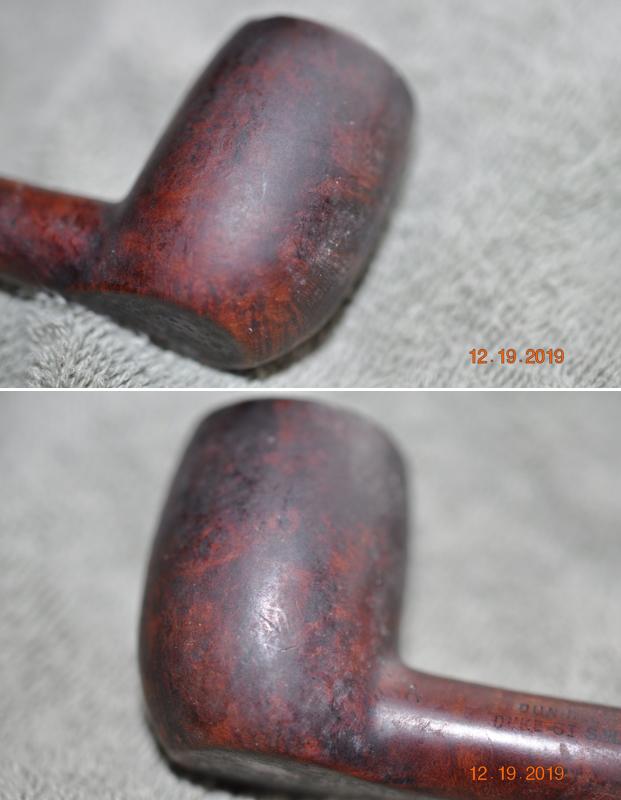
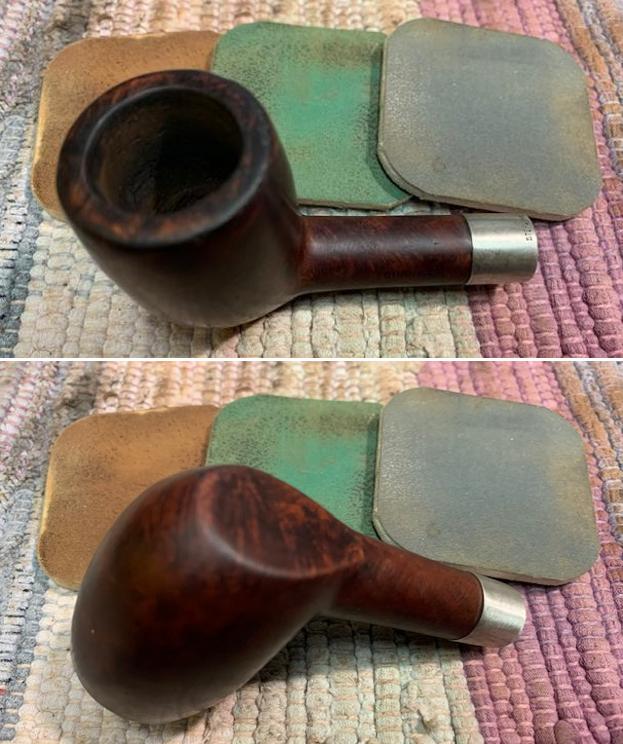
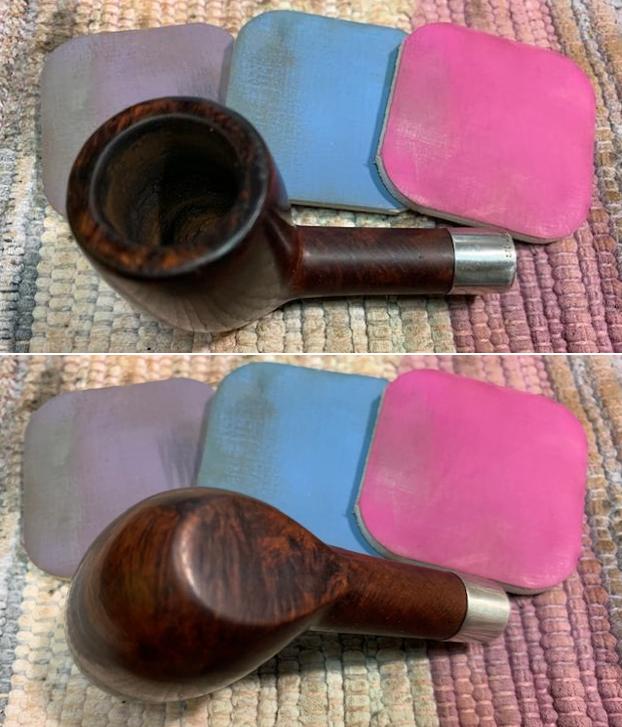
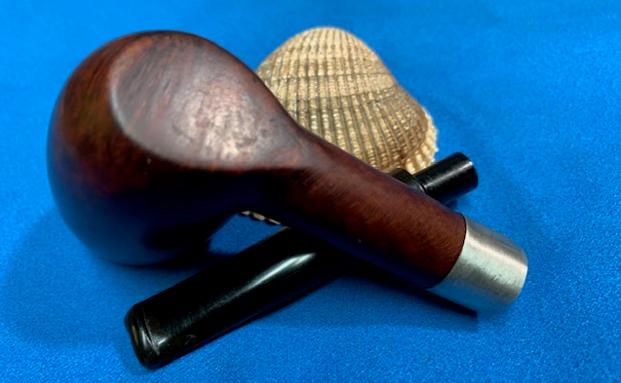
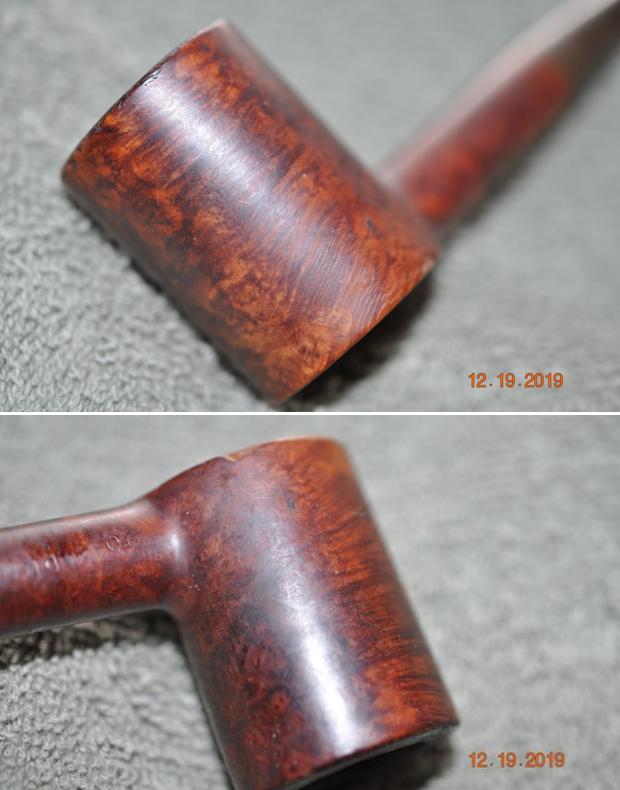
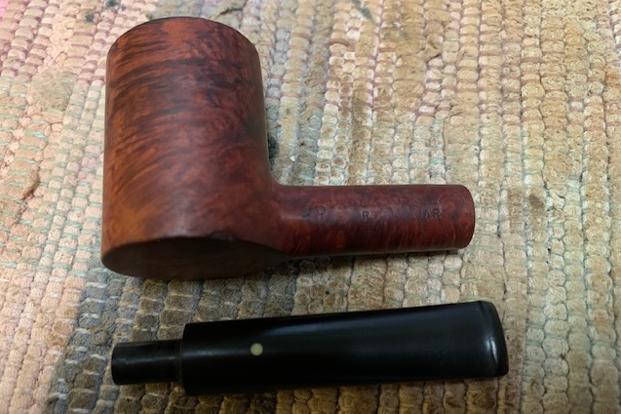
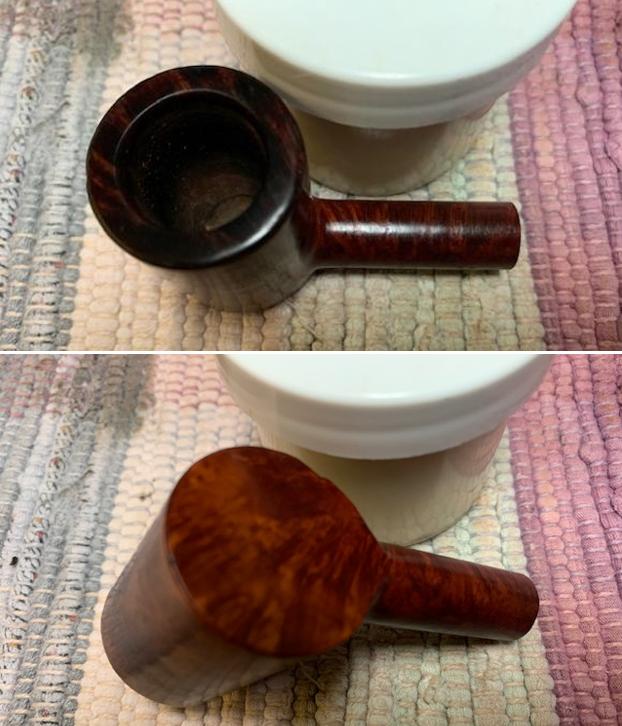
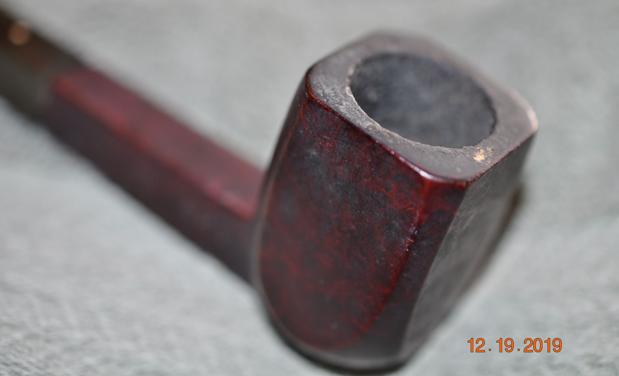
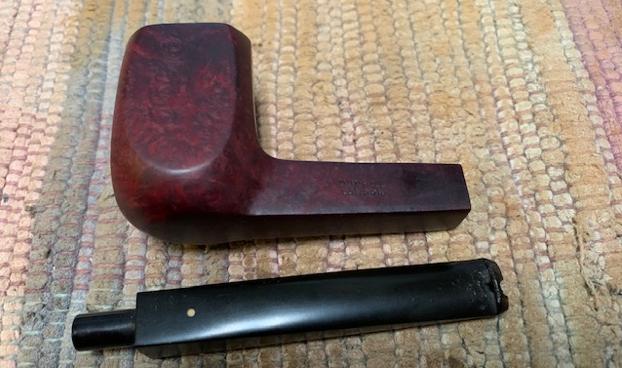
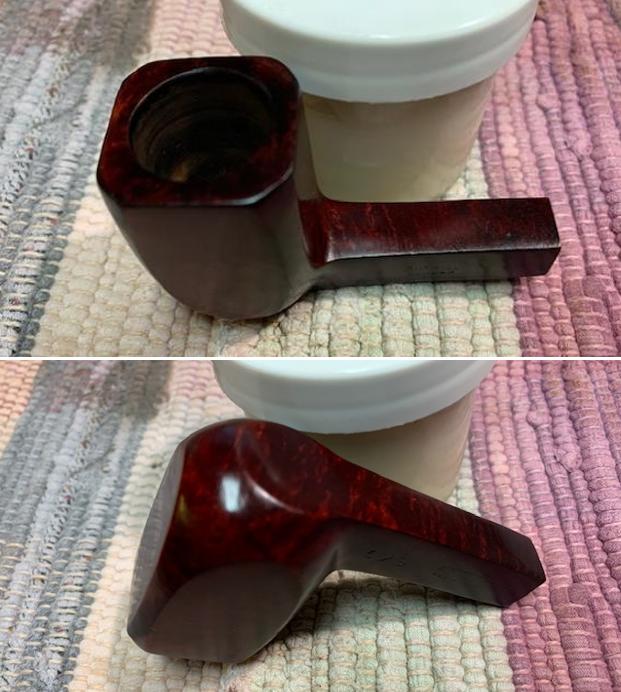
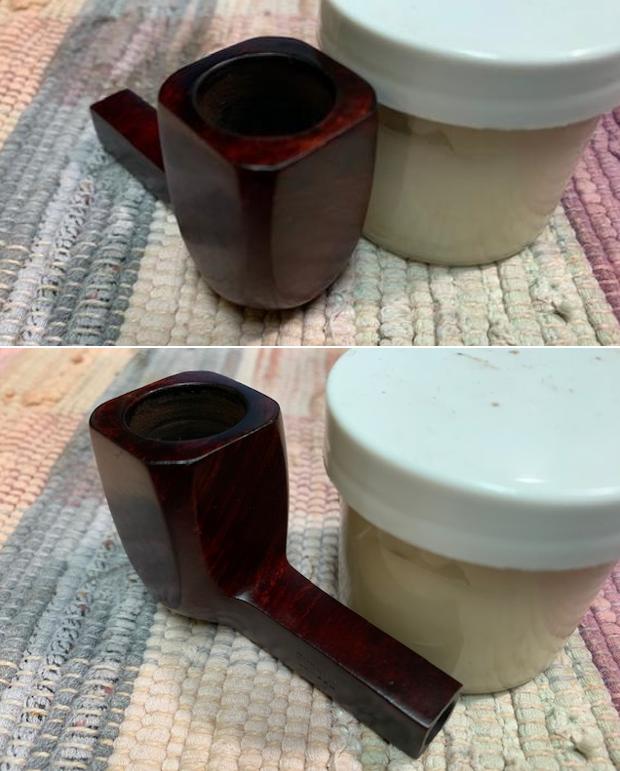
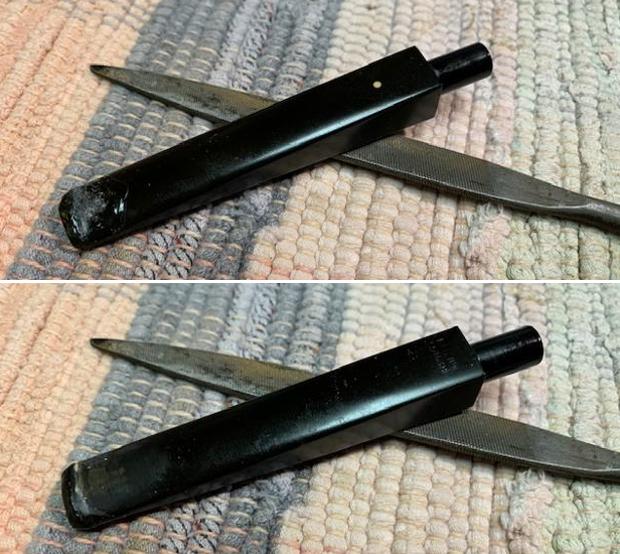
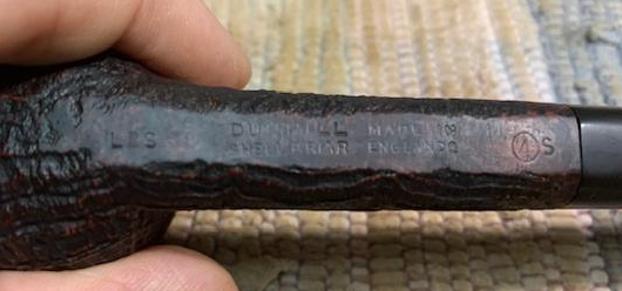
I removed the stem from the shank to prepare to work on the bowl. I put the stem aside and took pictures of the bowl to just savor the rugged sandblast. Even the rim top, as damaged as it was still has a bit of the sandblast finish that I thought would be redeemable. 
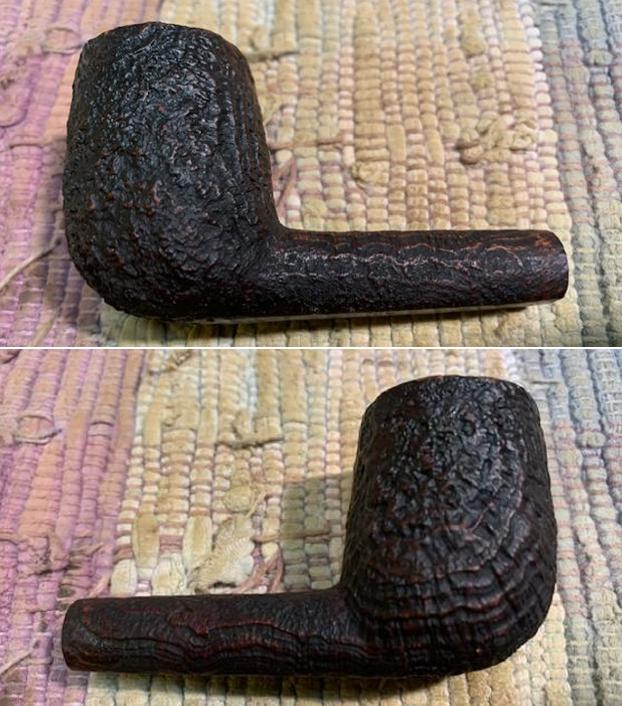
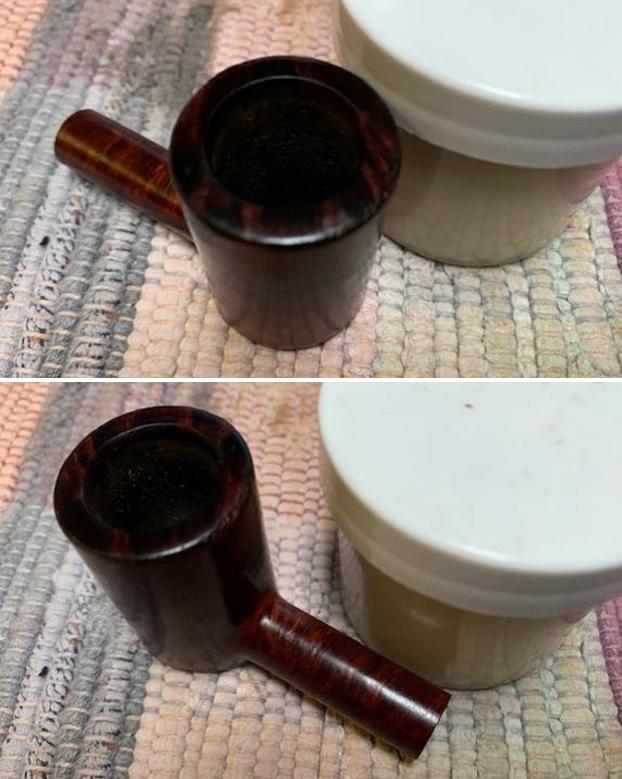
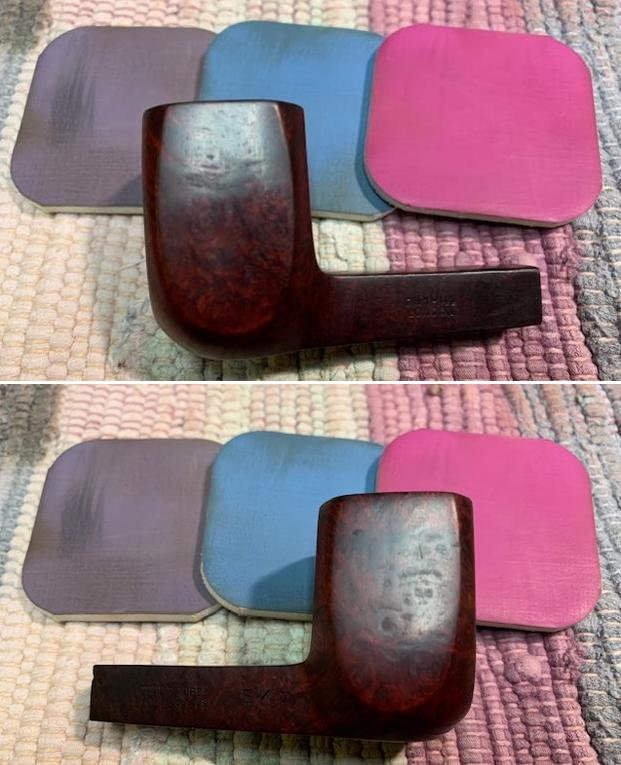
I cleaned out the cracks on the exterior with alcohol to remove the remaining debris. I checked the entire bowl with a bright light and lens to make sure I could see all the cracks and not be surprised with ones I had missed. Sure enough they were all around the back side of the bowl. They ran from the rim down and then turned to the left and then down once again. I layered briar dust and clear CA glue in the cracks. I repaired the chip out of the back side of the rim top at the same time in the same manner. Before it completely dried I used a brass bristle brush to clean up the repairs and blend them into the nooks and crannies of the sandblast finish. I find that if you do not do this you end up with flat spots where the repair occurred
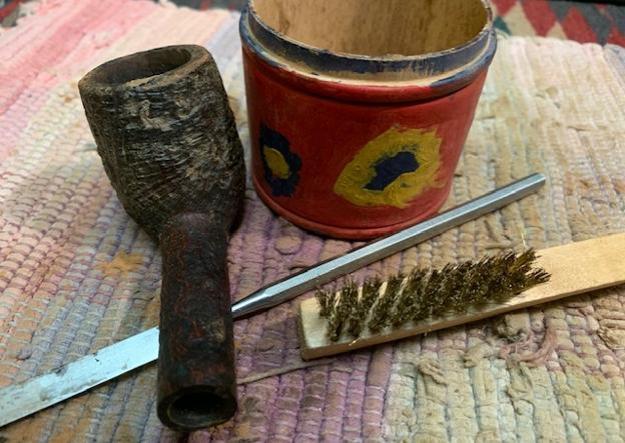
Once the repair cured I wiped the areas down with alcohol on a cotton pad and stained the areas with a walnut stain pen. I would use a combination of stains later to further blend them in. I just wanted to see what the repair looked like and be able to send photos to Scott.
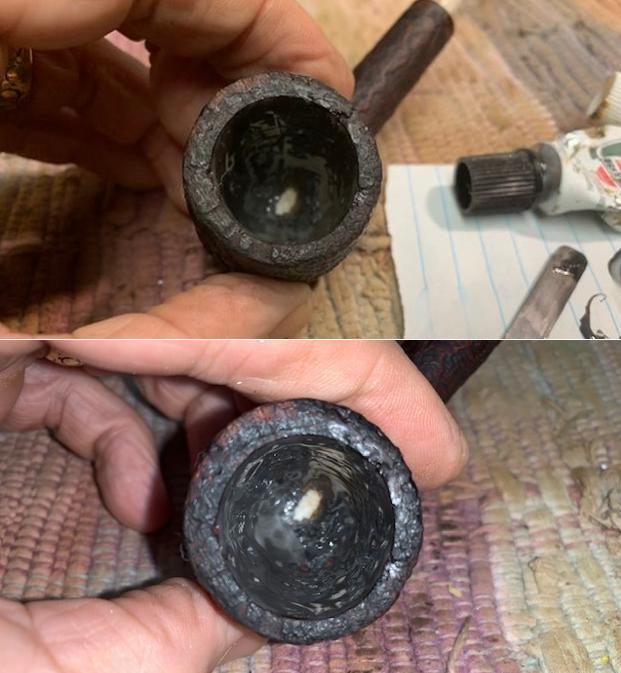
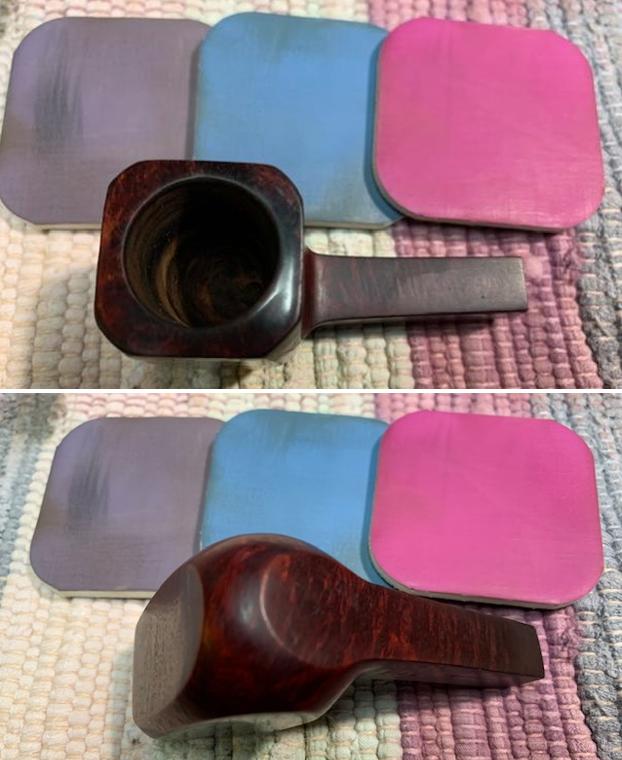
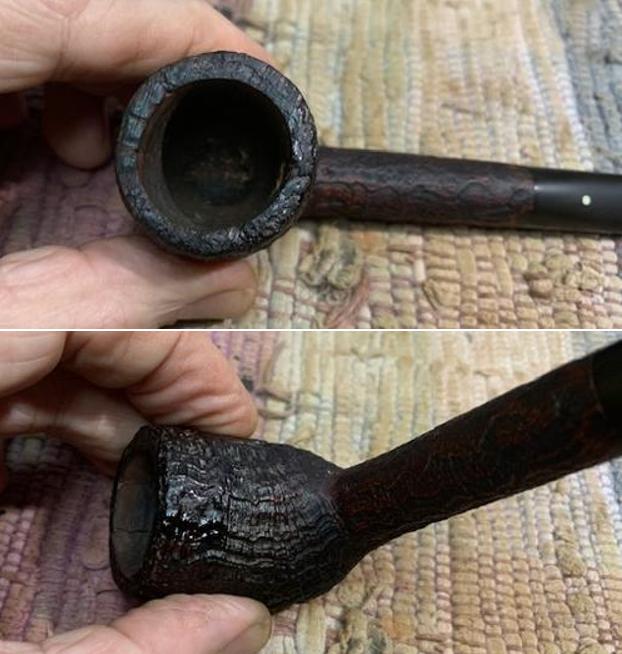
With the exterior finished it was time to work on the inside of the bowl and deal with all of the spidering cracks and large cracks around the interior walls. They were not just confined to the back of the bowl but covered the majority of the bowl and heel surface. I mixed a batch of JB Weld with a dental spatula and applied it to the walls of the bowl with a folded pipe cleaner to act like a paint brush. I pushed the JB Weld into the cracks in the bowl walls and gave the entire interior a coat of the product. I have checked out the research on the product and find that it dries inert and does not gas off when heated. I have used it on my own pipes and smoked them for over 10 or more years with no issues. 
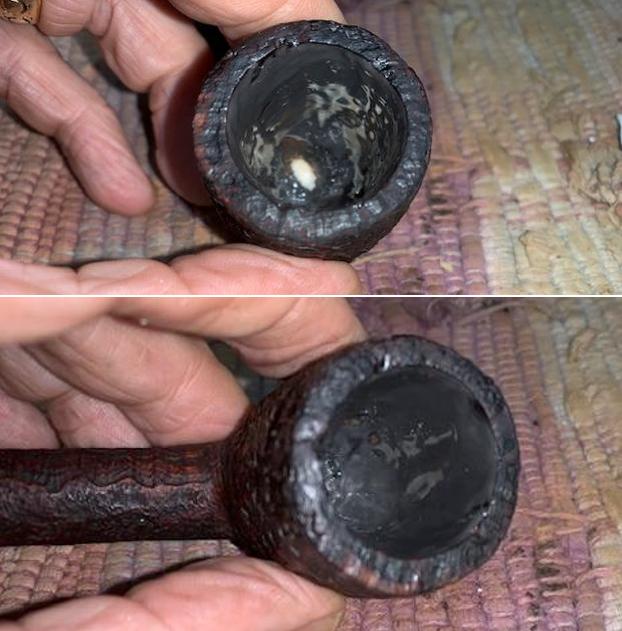
With that finished I called it a night and set the bowl aside for the repairs on the interior to cure overnight. In the morning I sanded inner edge of the bowl with a folded piece of 220 grit sandpaper to smooth out that area. I wrapped a dowel with 220 grit sandpaper extending it just below the dowel so that it would form a cone on the end and allow me to sand the bottom of the bowl. I worked on it to smooth the repairs and remove as much of the JB Weld as possible while leaving it in the cracks and fissures of the walls. 
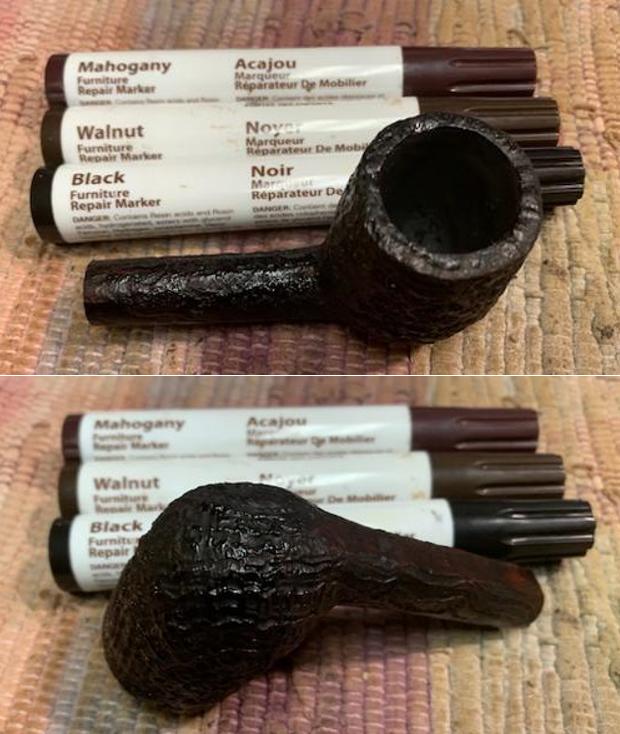
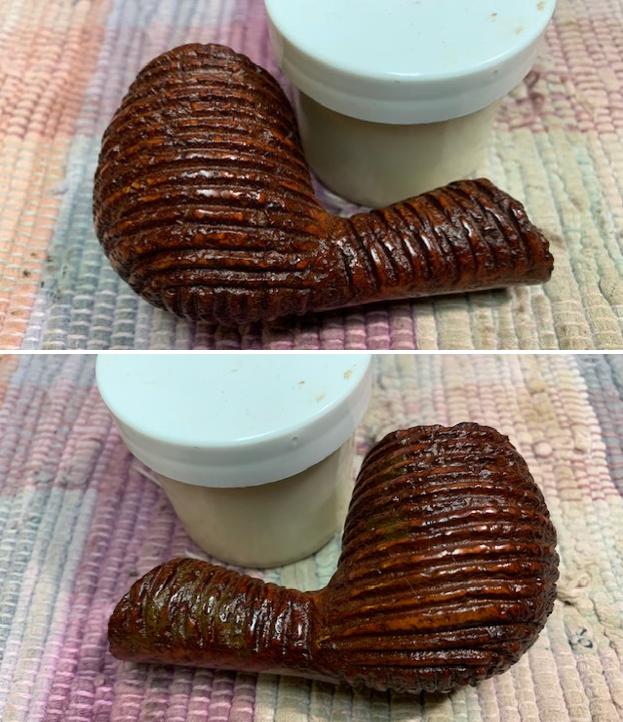
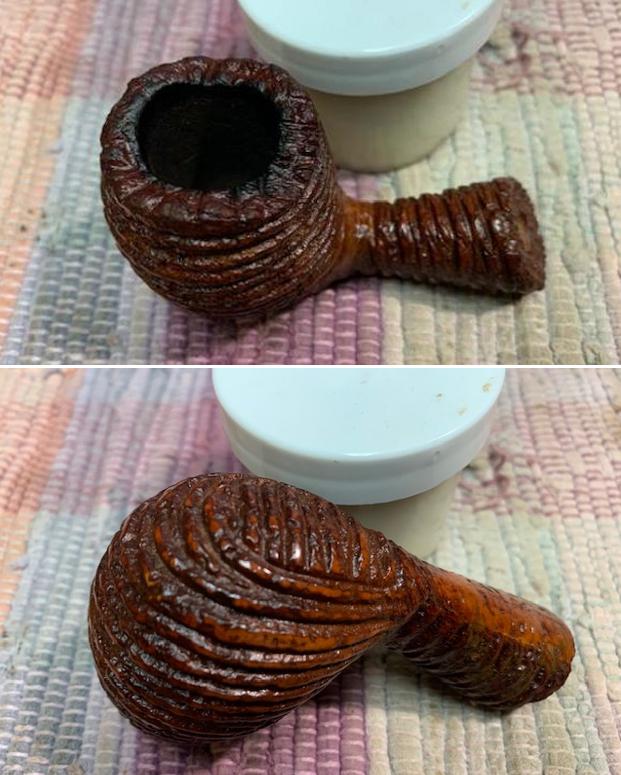
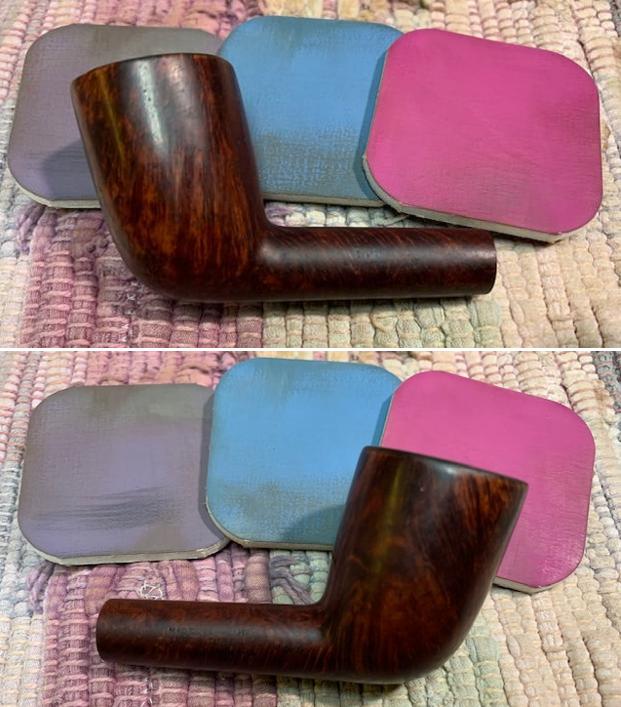
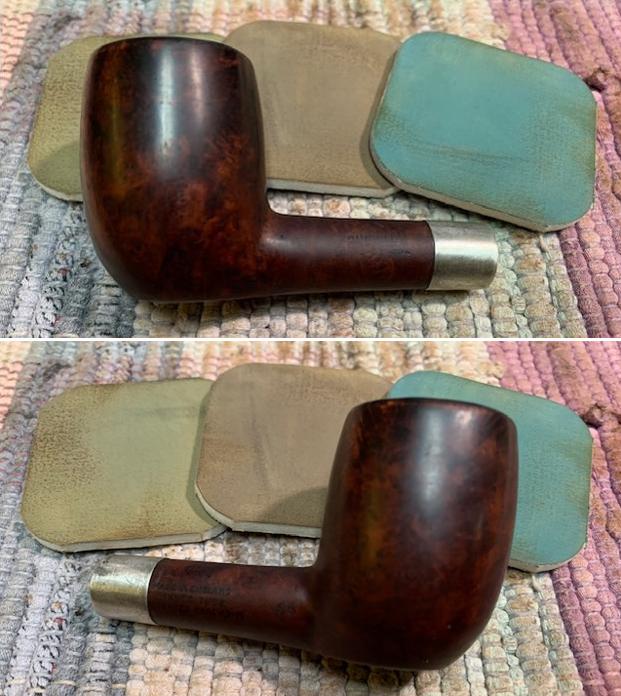
With the bowl repair finished I stained the bowl and rim with Mahogany, Walnut and Black stain pens to match the combination of stains used on the bowl that was not repaired. I was happy with the overall look of the pipe. 
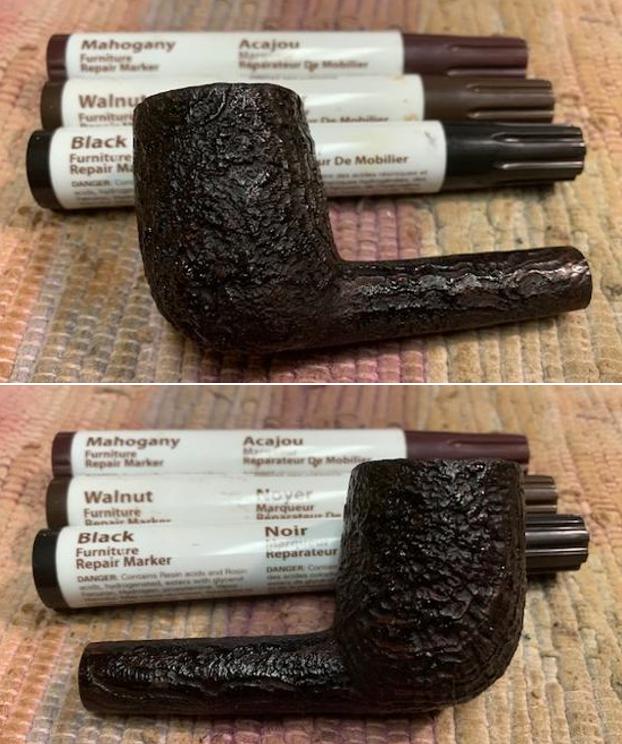
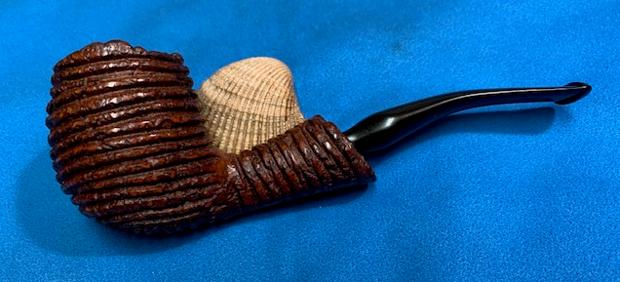
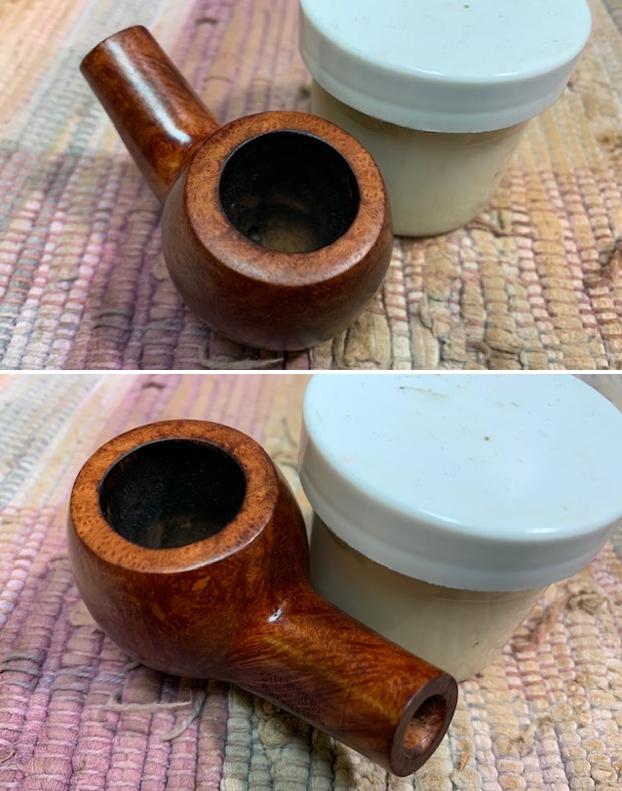
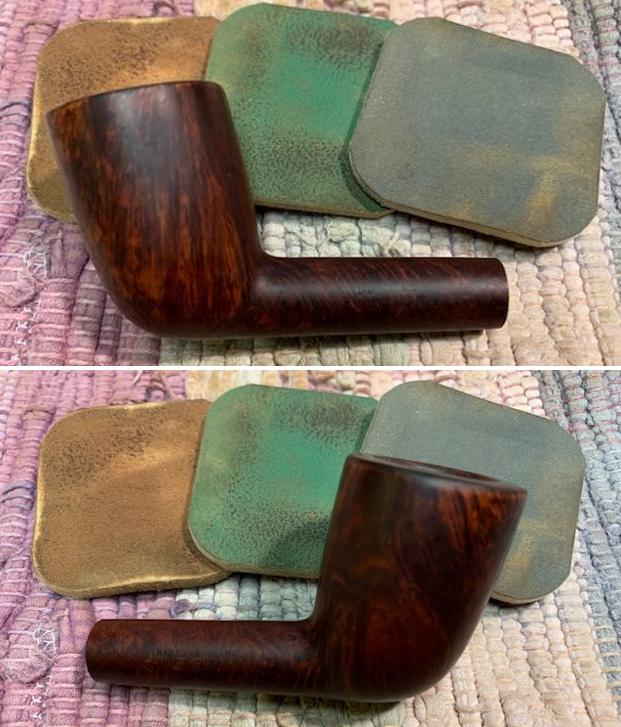
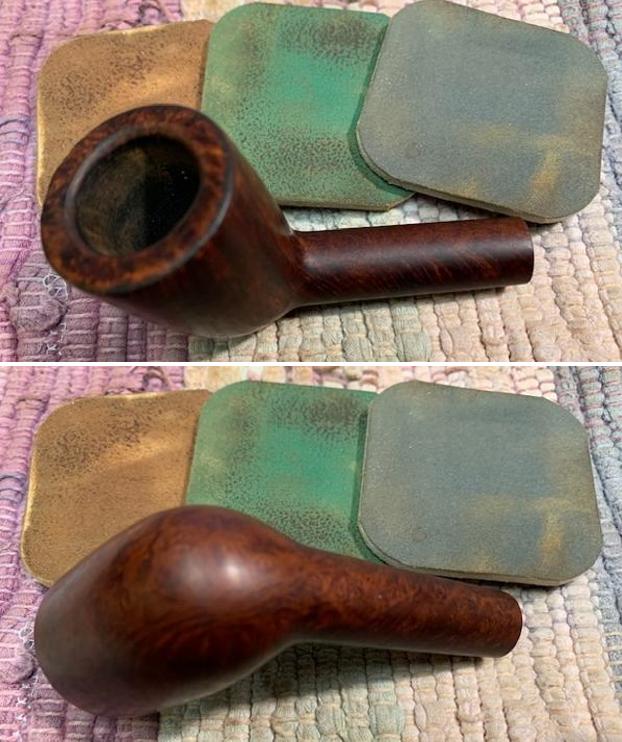
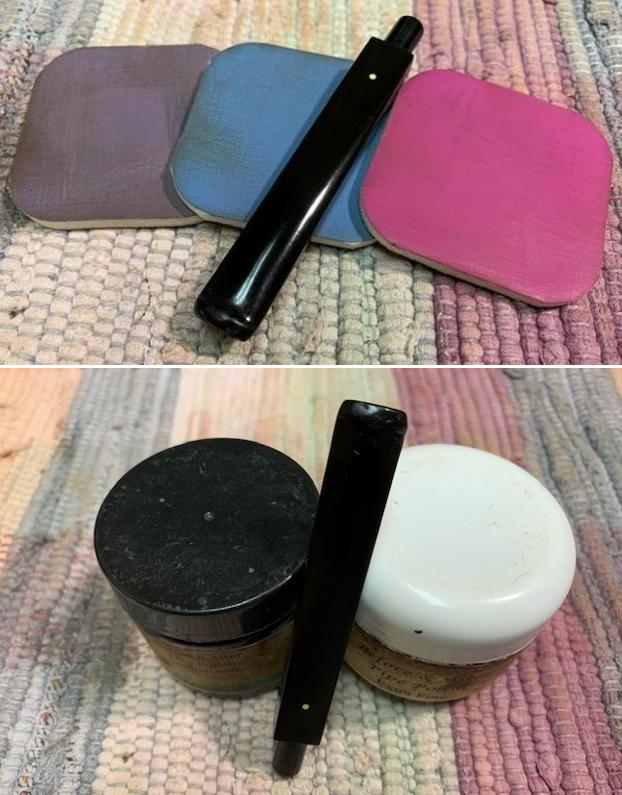
I rubbed the bowl and shank down with Before & After Restoration Balm. I worked it into the surface of the bowl sides and shank with my fingertips and a horsehair shoe brush to get into the nooks and crannies of the blast. The product works to clean, enliven and protect the briar. I let the balm sit for 15 minutes and then buffed with a cotton cloth  and shoe brush to raise the shine.      
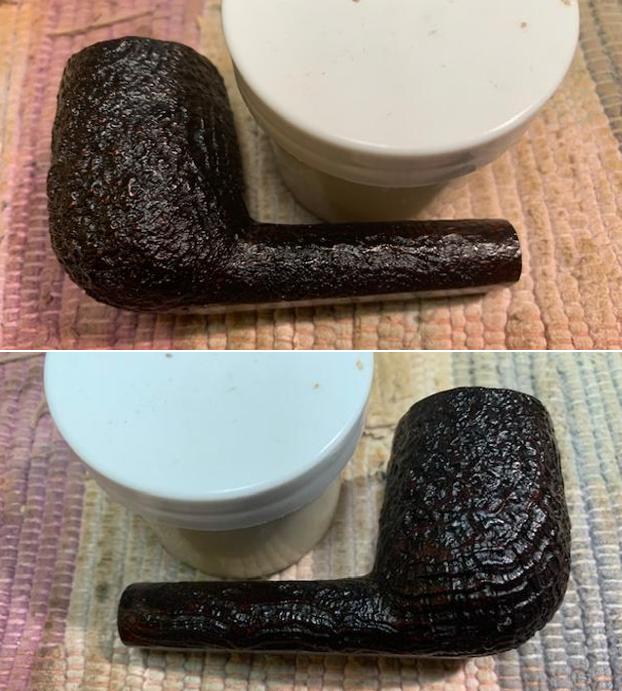
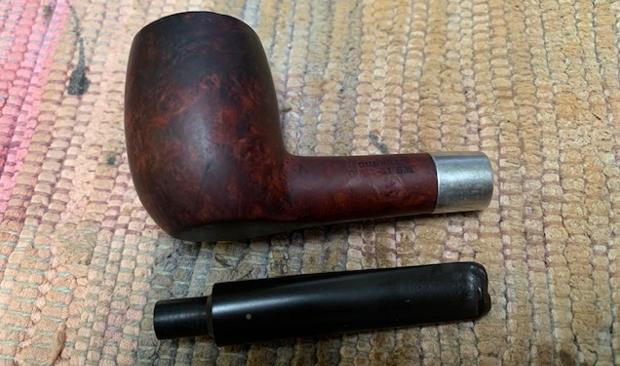
I cleaned the interior of the bowl and shank with pipe cleaners, cotton swabs and isopropyl alcohol to remove my sanding debris and residual tars and oils in the mortise and airway. I cleaned the internals of the stem the same way. Once finished the pipe was clean and repaired inside and out.
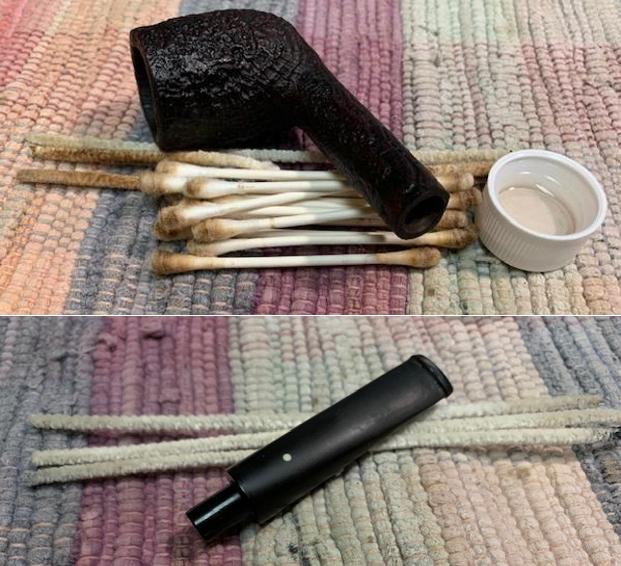
Now it was time to mix a bowl coating. Different folks used different things for this. I use a mix of sour cream and charcoal powder. I learned this from a pipe maker friend. I use it on a bowl that I have repaired with JB Weld because when I sand the bowl it is very smooth and I want to facilitate the building of a carbon cake. The bowl coating does that. Surprisingly it cures neutral in taste and imparts no flavour to the tobacco when smoked. Within a few bowls it is basically covered with the developing cake. It works for me!I applied the mixture to the bottom and walls of the bowl with a folded pipe cleaner. I paint it on and smooth it out with the pipe cleaner. I am not looking for a thick coating of the product but merely a top coat. Too thick a coat will just peel off when the pipe is smoked. I want it to stay put for a few bowls anyway! 
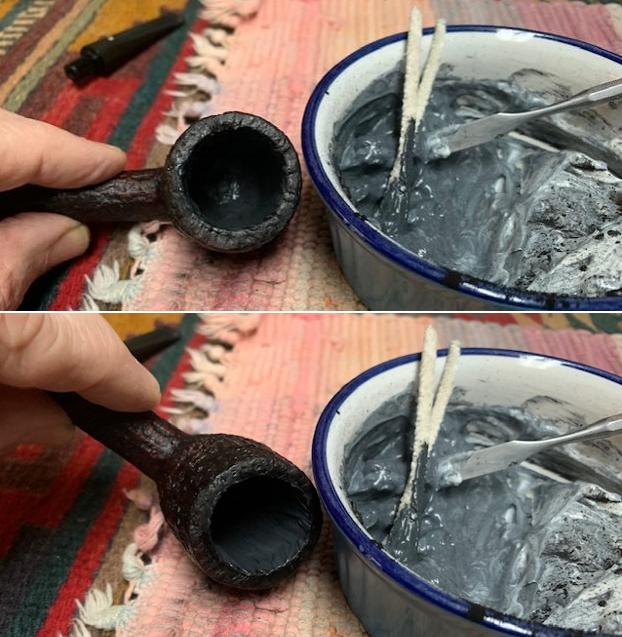
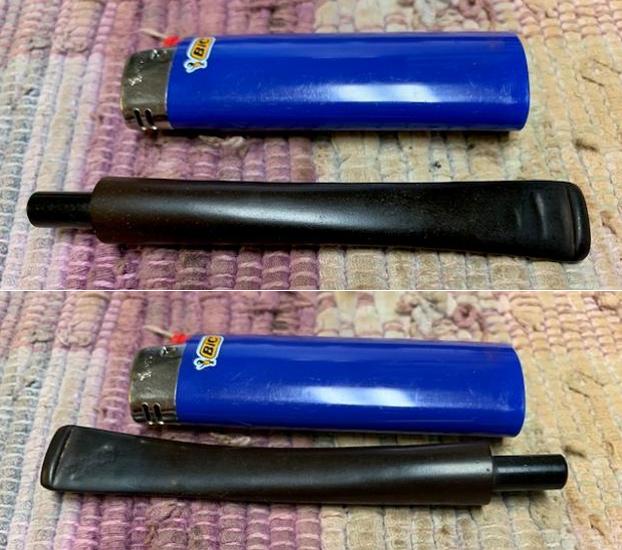
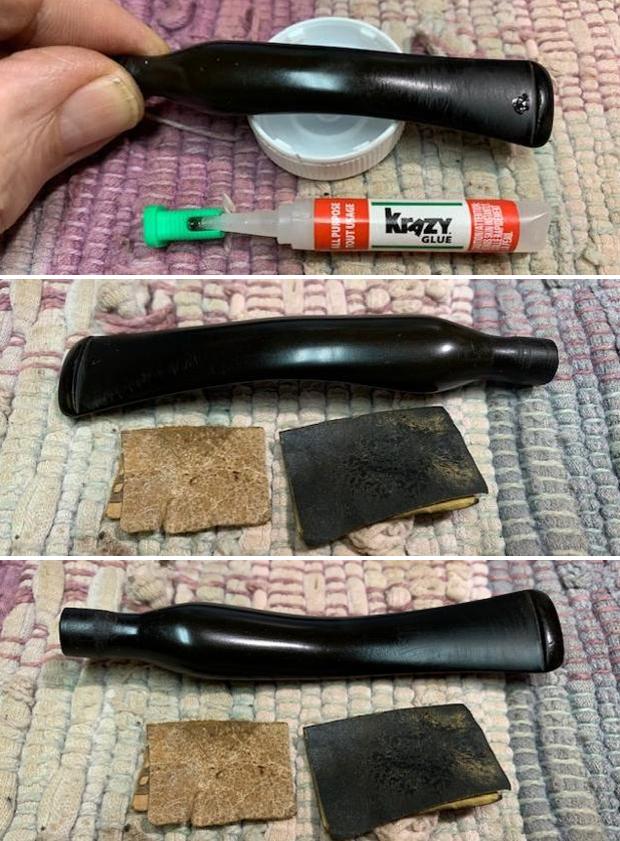
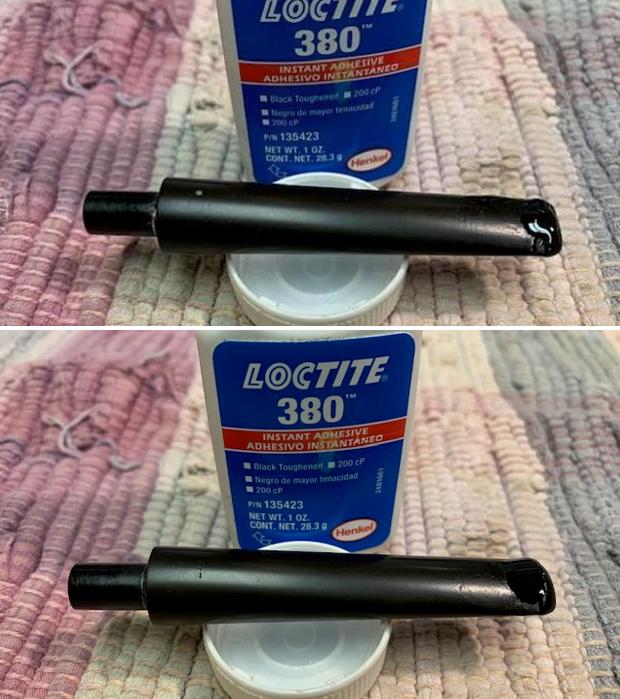
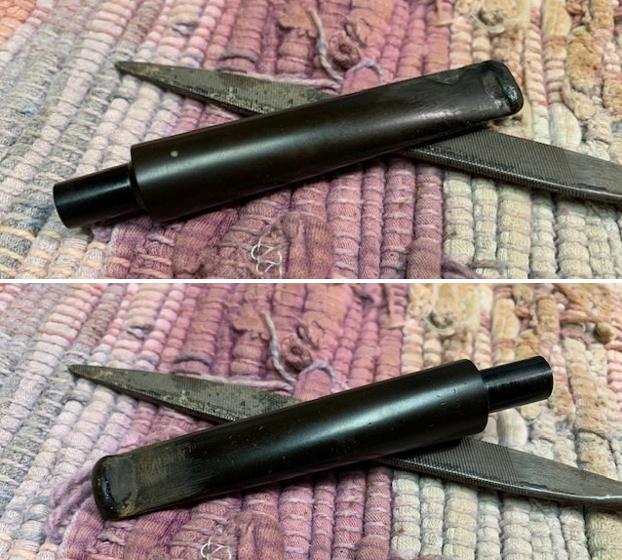
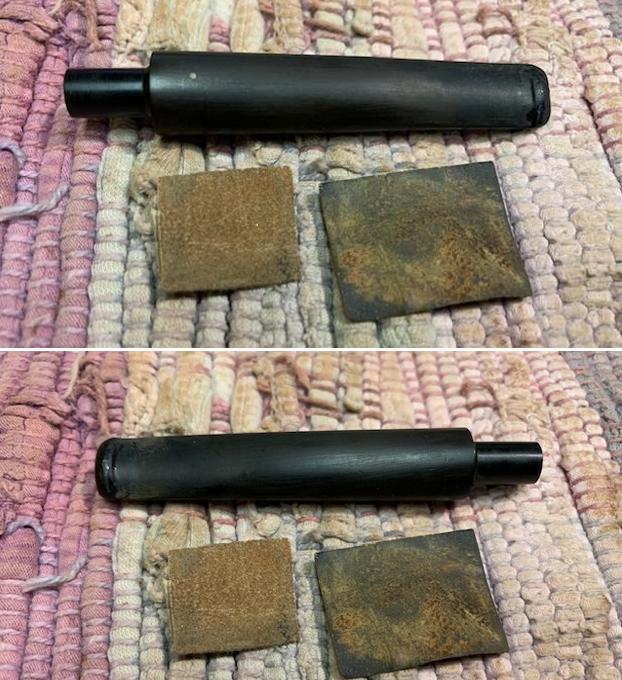
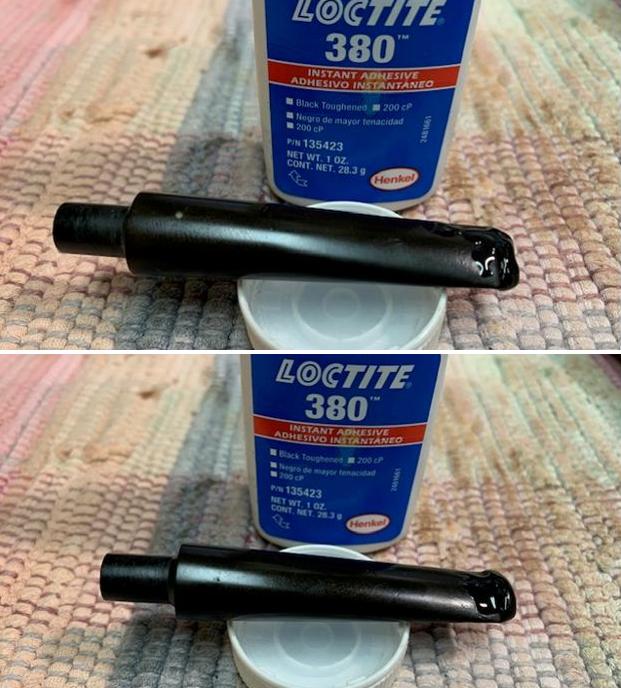
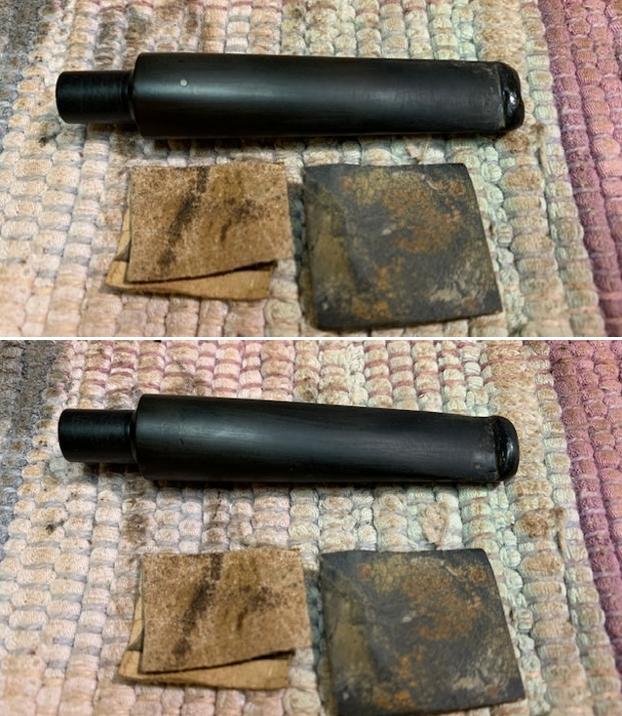
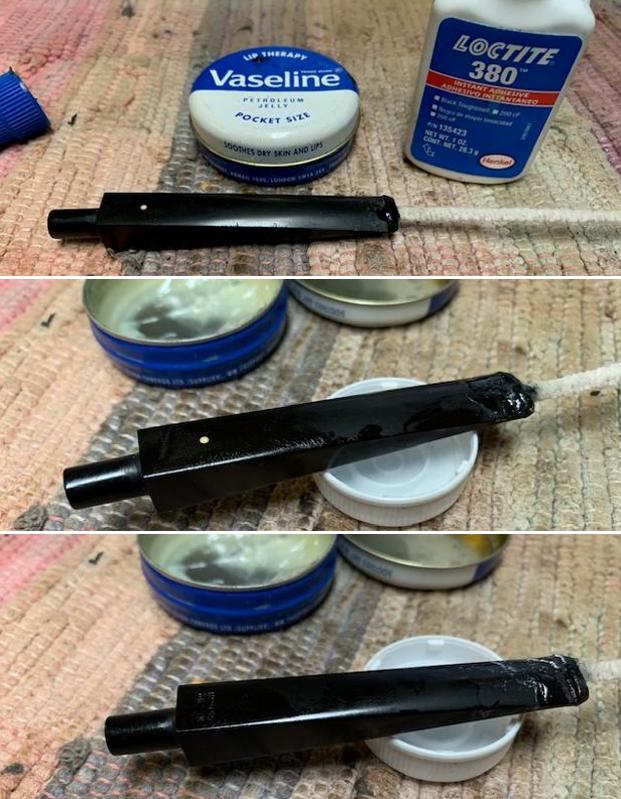
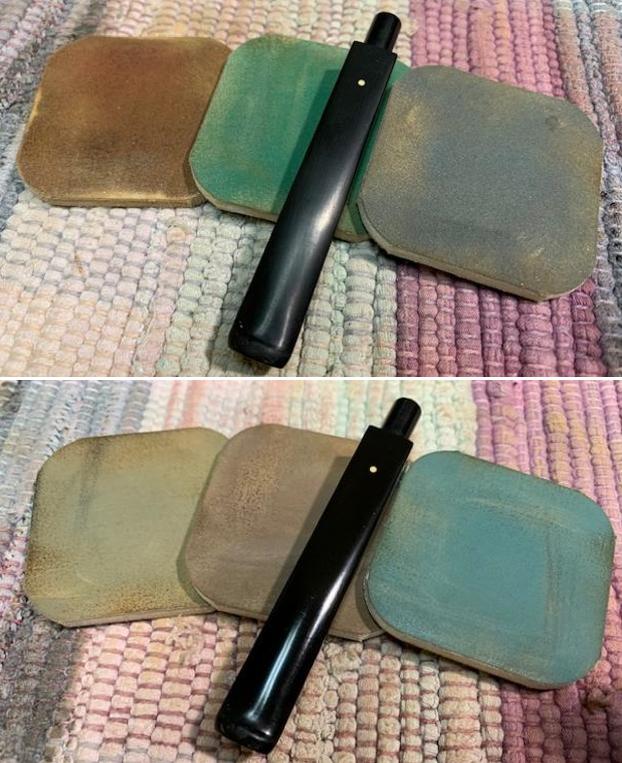
I set the bowl aside for the bowl coating to cure and turned my attention to the stem. I “painted” the stem with the flame of a Bic lighter to lift the tooth marks. The method worked extremely well and I was able to lift the majority of them. There were two marks – one on each side that lifted but needed to be filled. I filled them in with clear CA glue. Once it cured I sanded them smooth with 220 grit sandpaper and reshaped the button edges. I started the polishing with 400 grit wet dry sandpaper. 
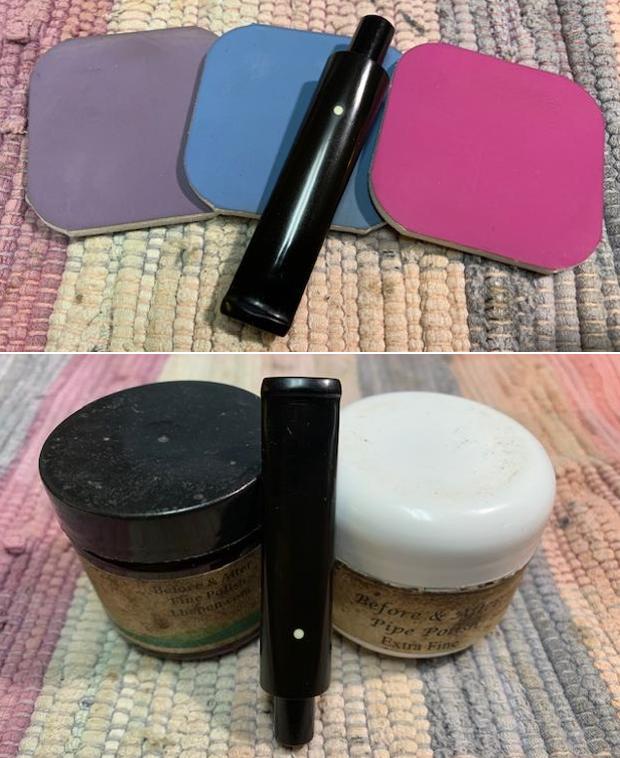
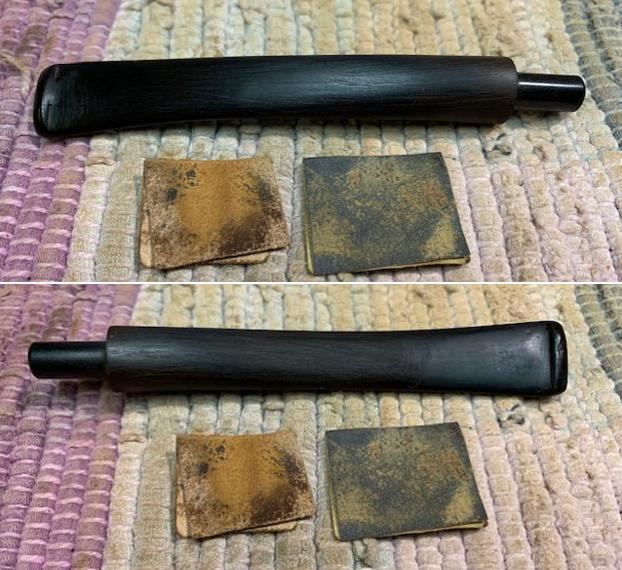
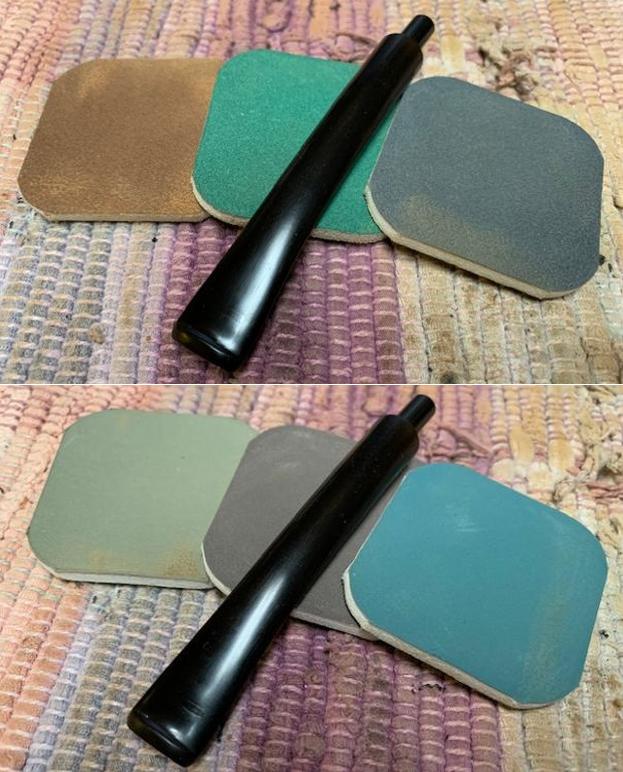
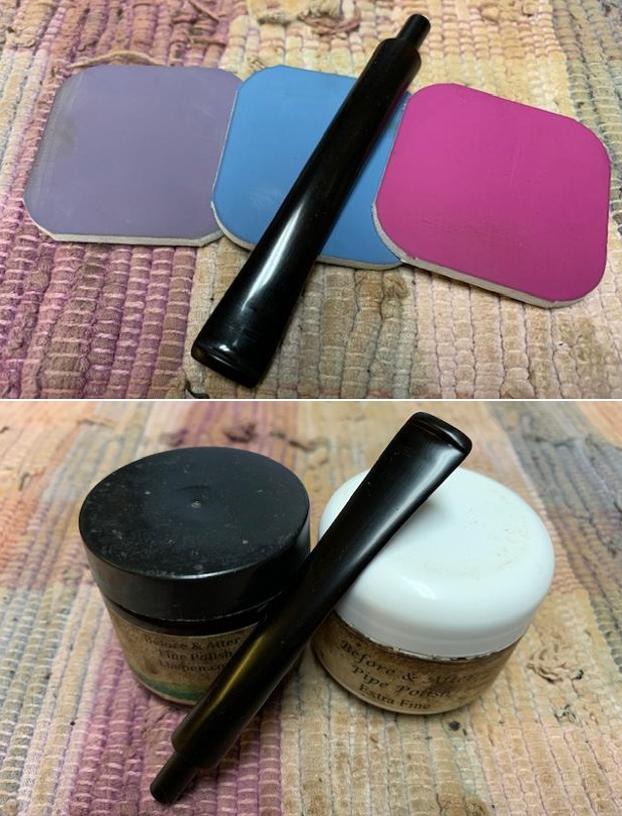
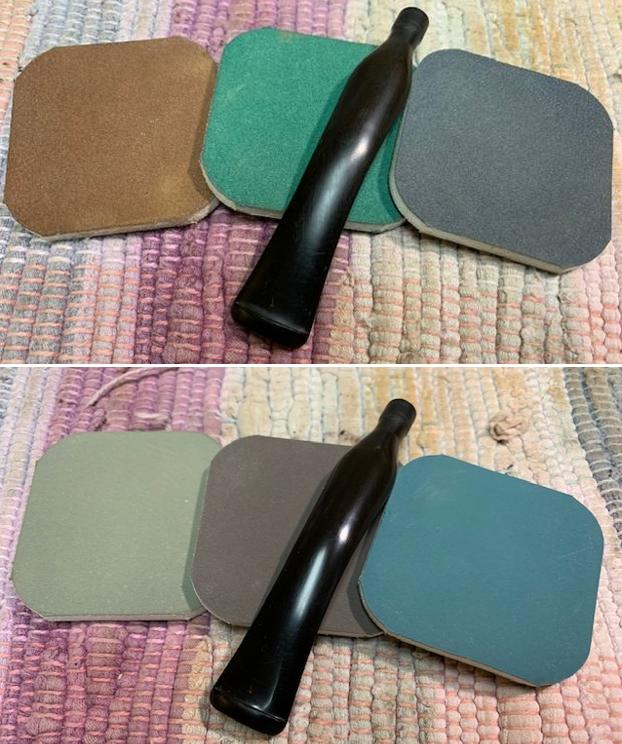
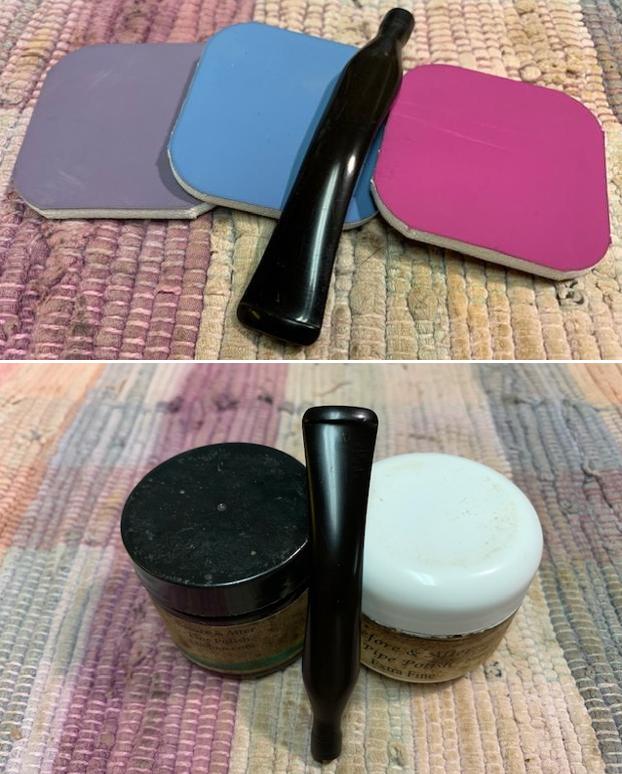
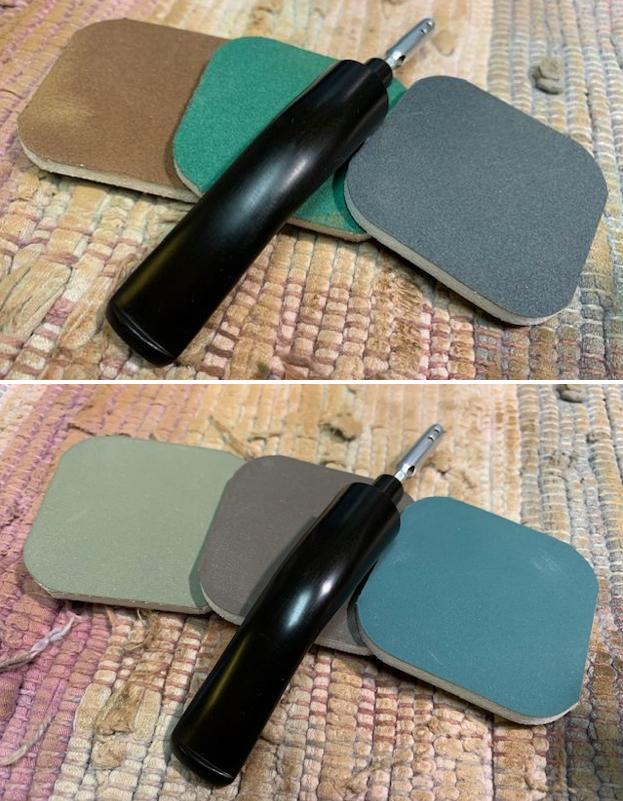
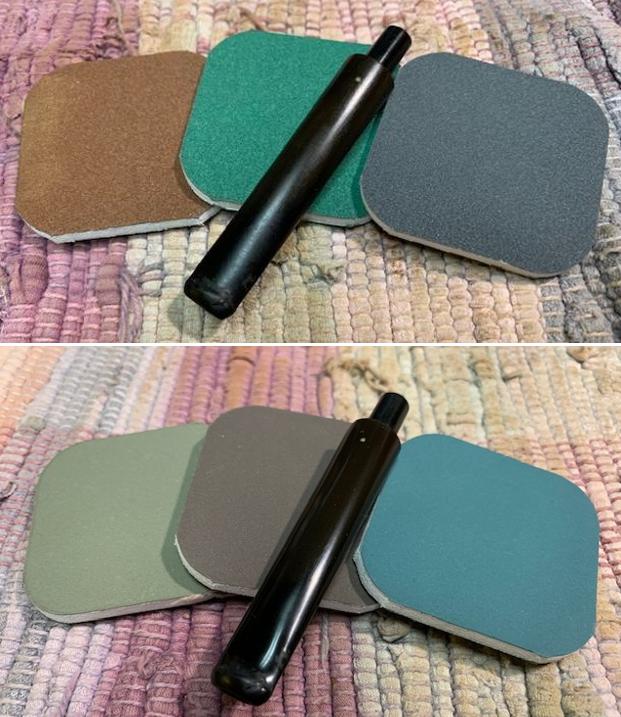
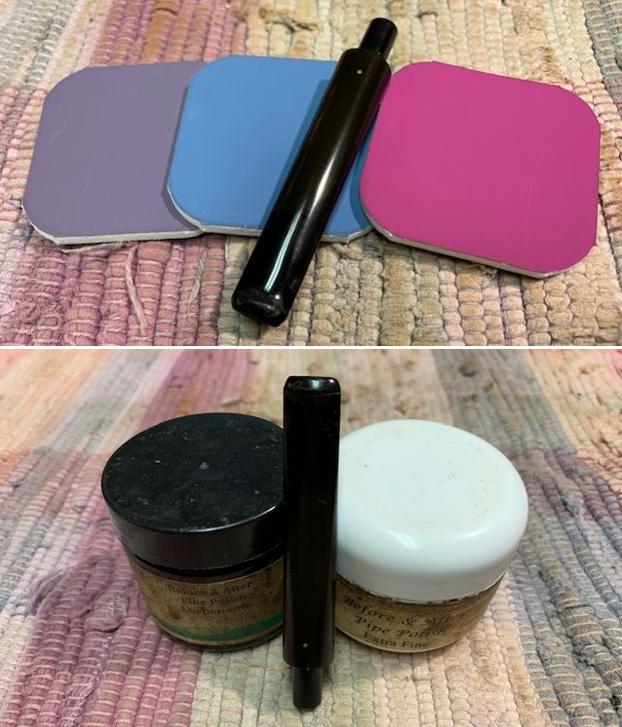
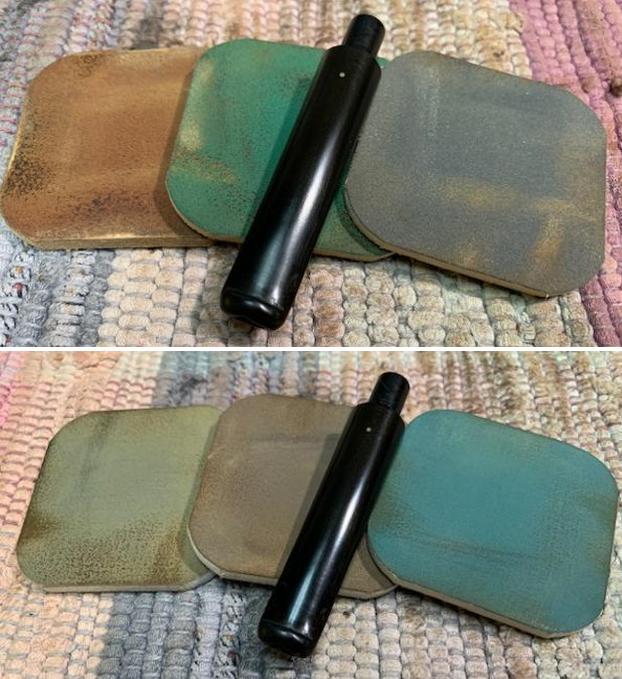
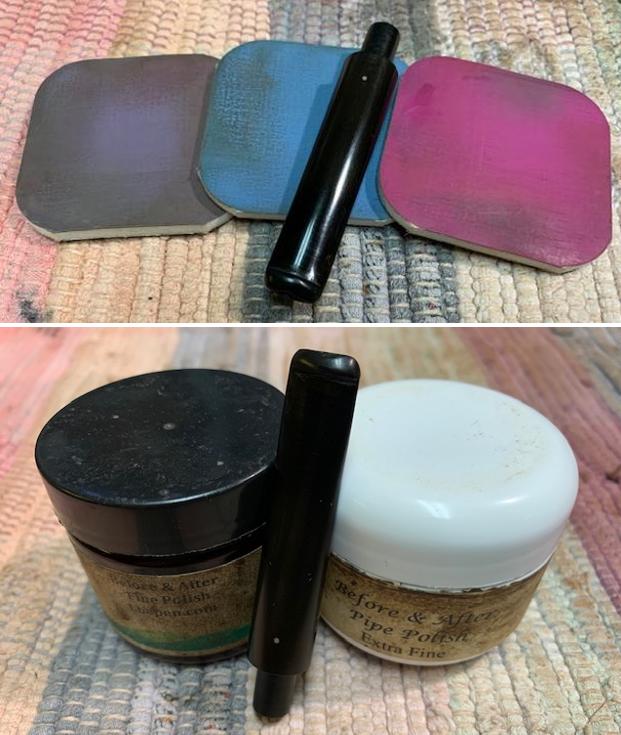
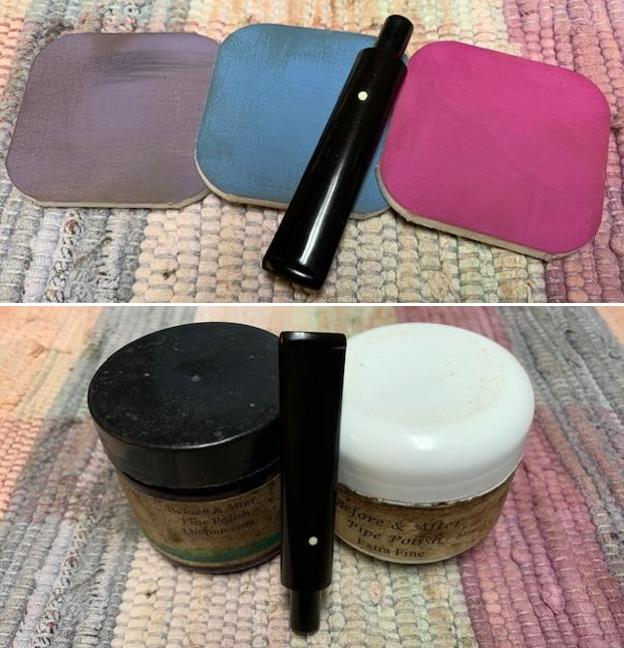
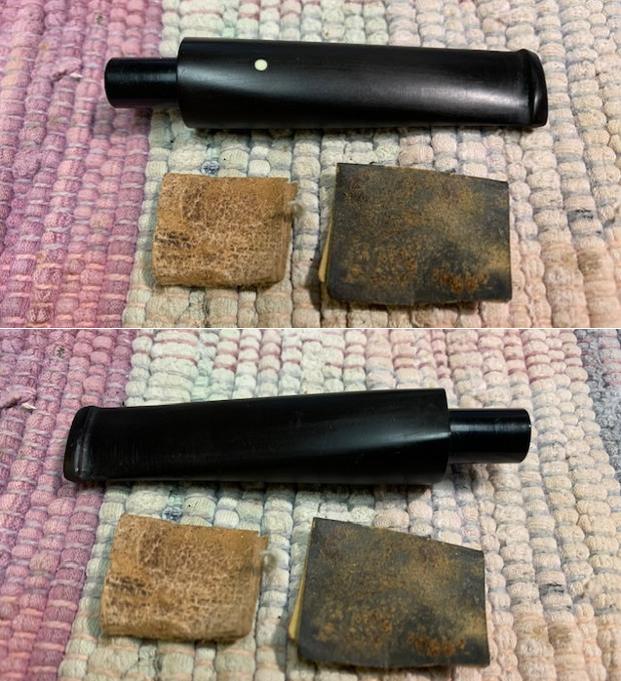
I polished the vulcanite stem with micromesh sanding pads – 1500-12000 grit pads. I wiped it down with Obsidian Oil after each sanding pad. I used Before & After Pipe Polish – both Fine and Extra Fine to further polish the stem.     
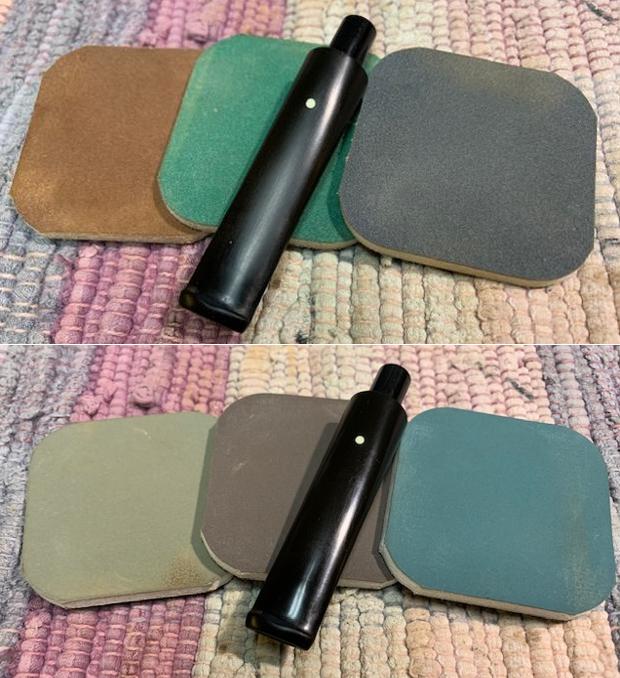
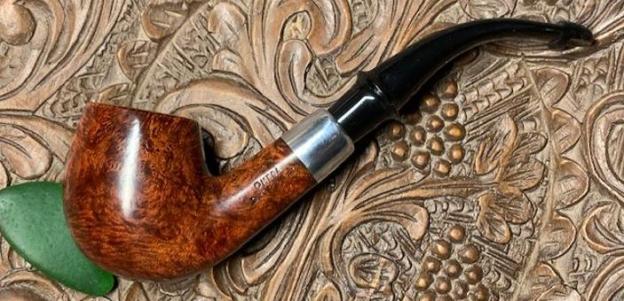
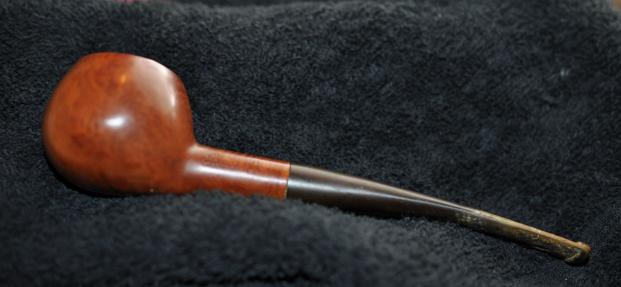
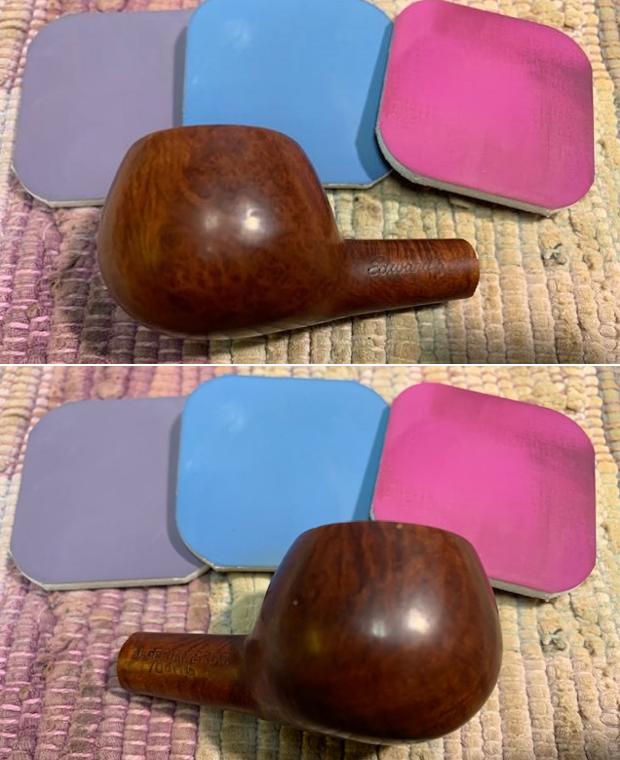
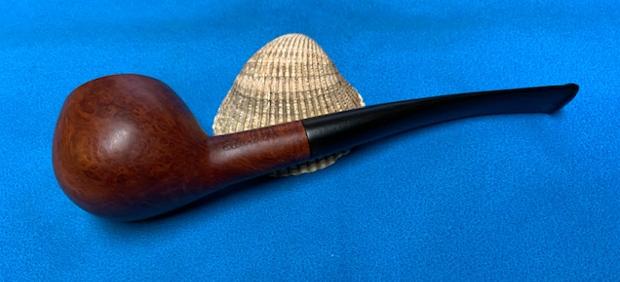
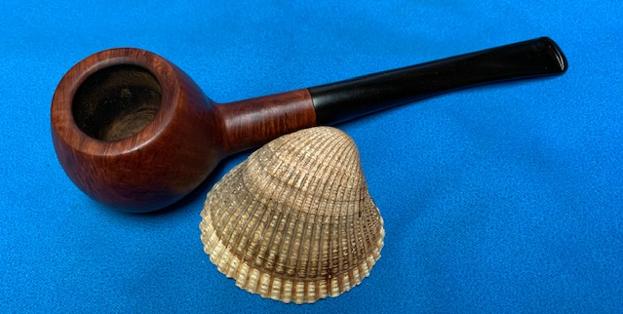
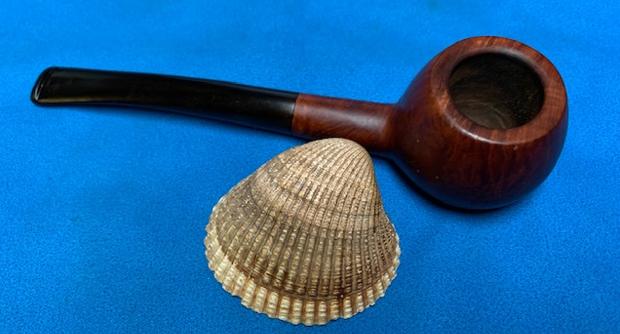
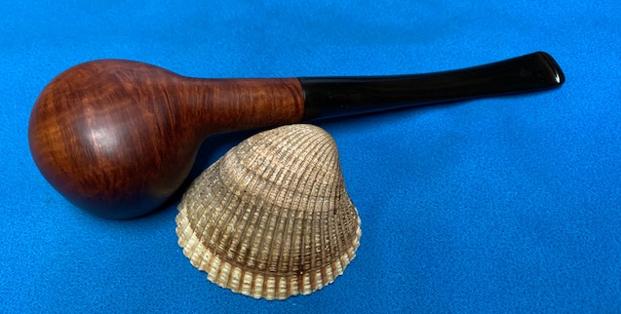
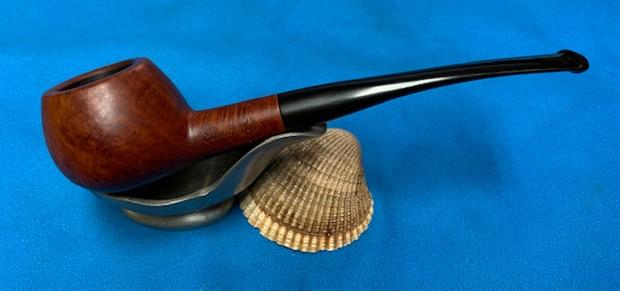
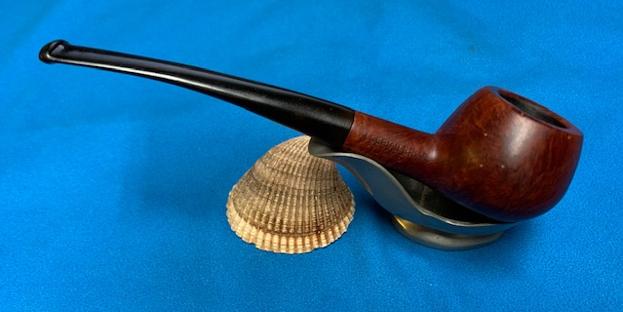
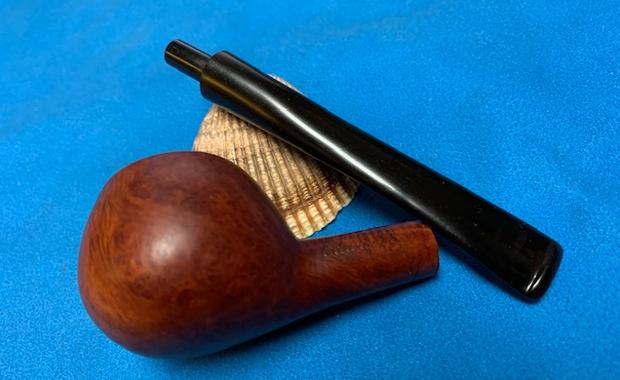
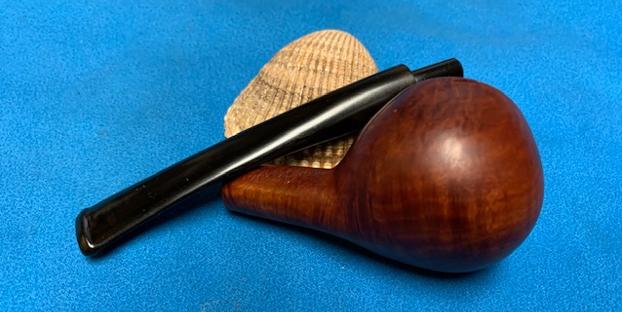
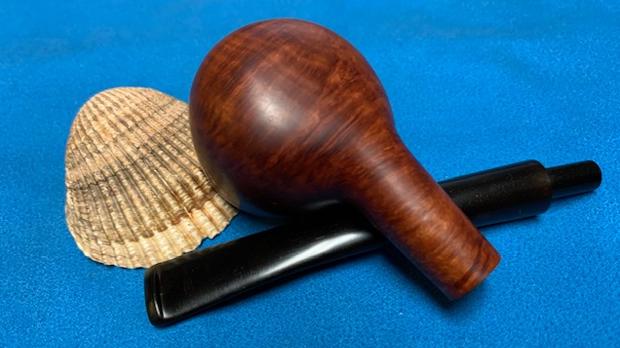
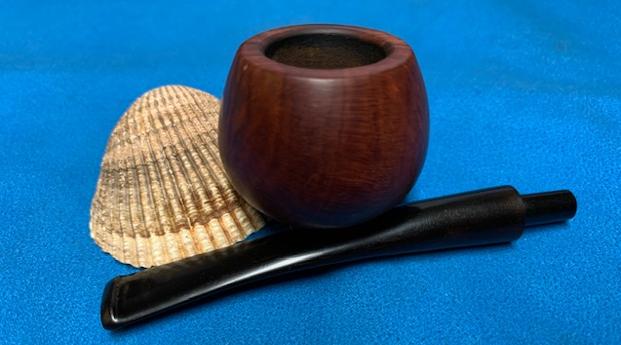
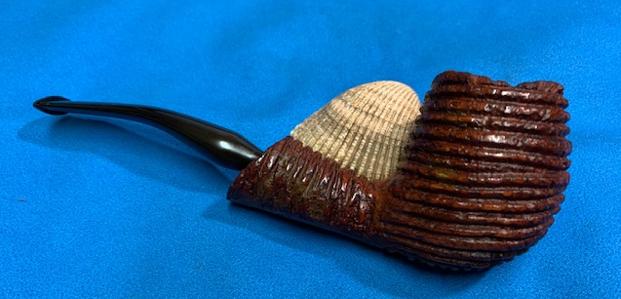
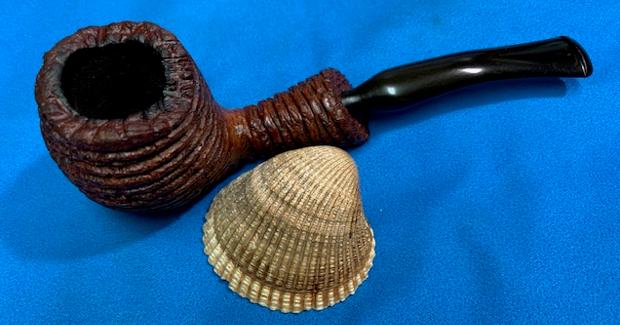
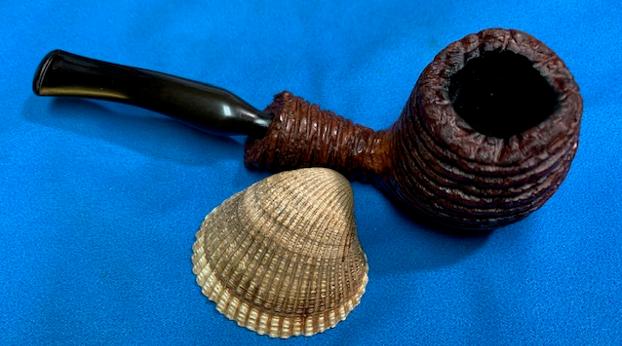
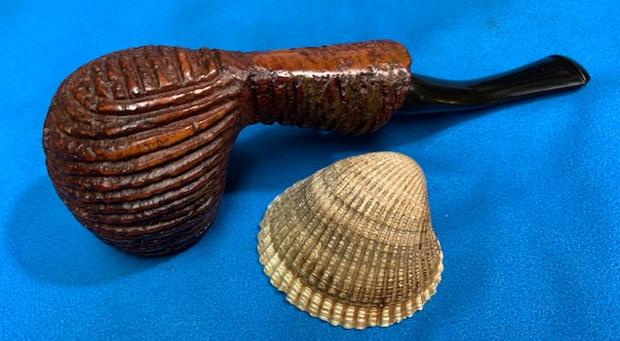
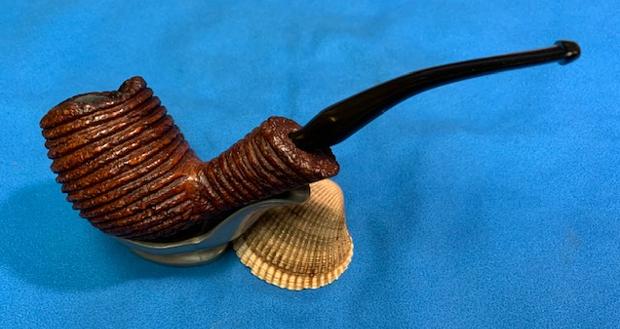
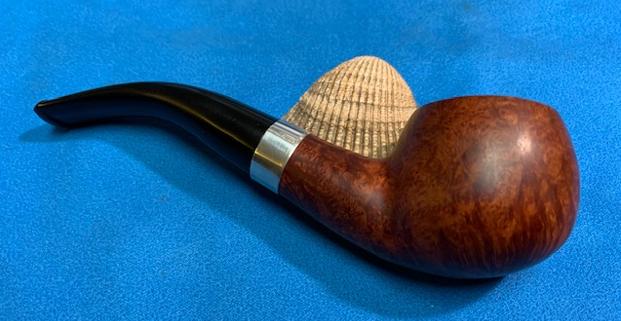
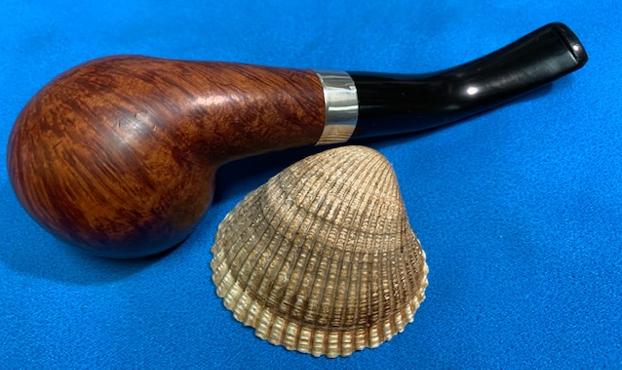
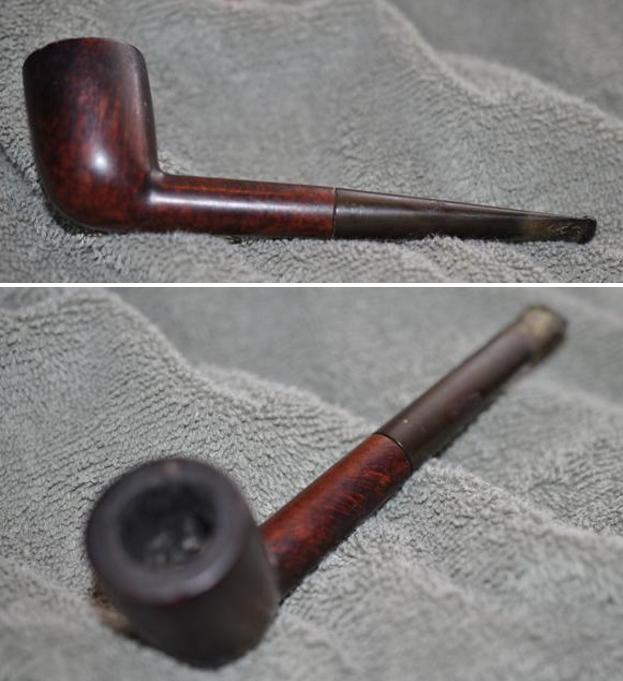
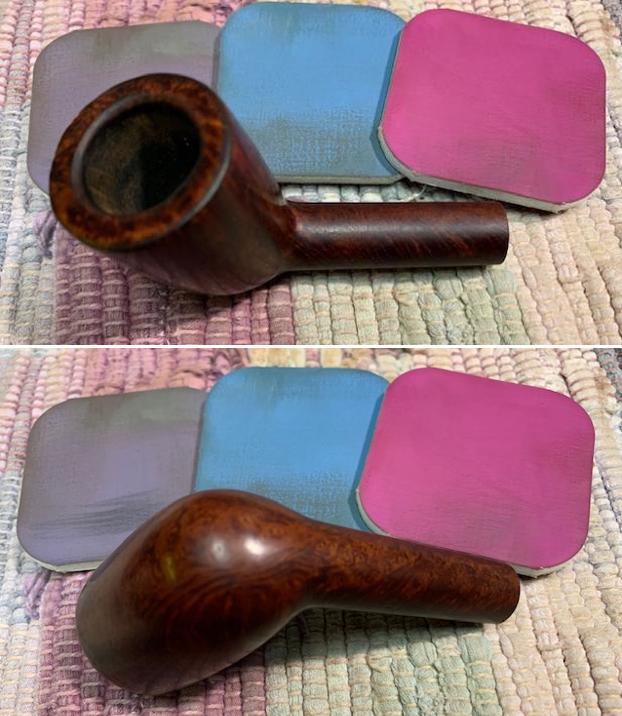
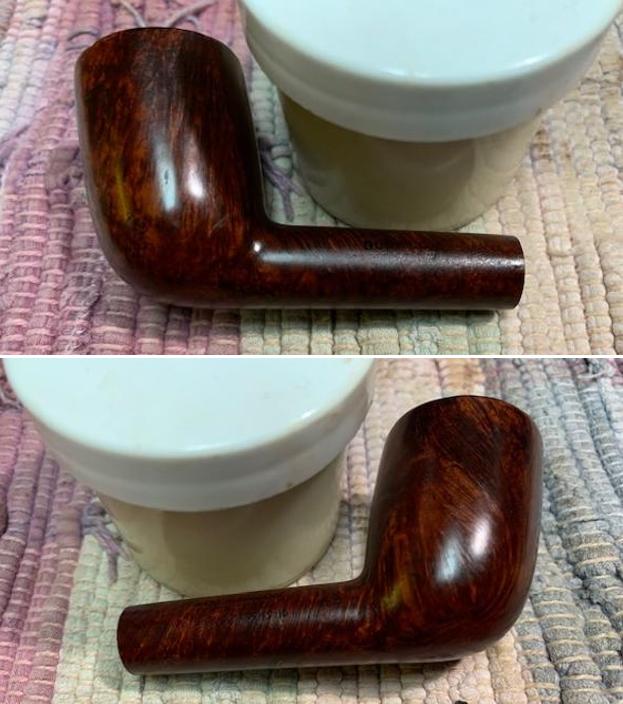
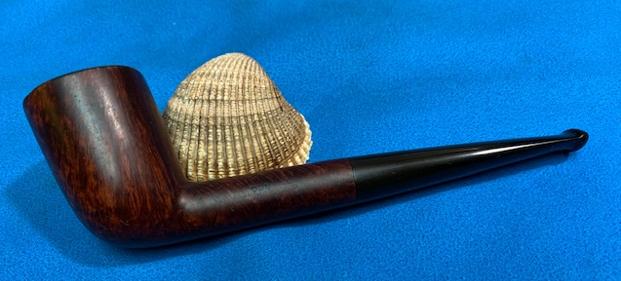
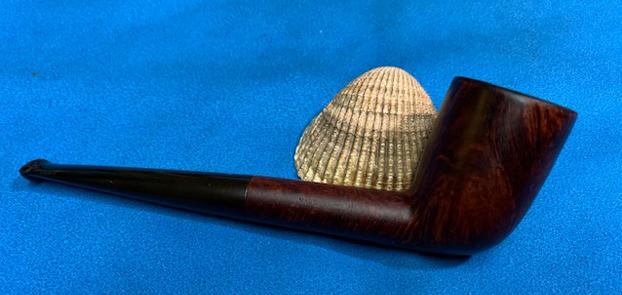
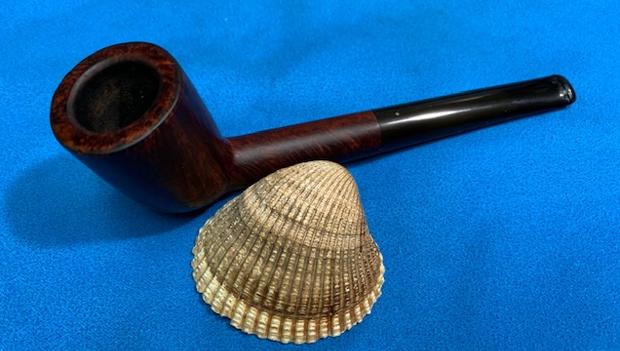
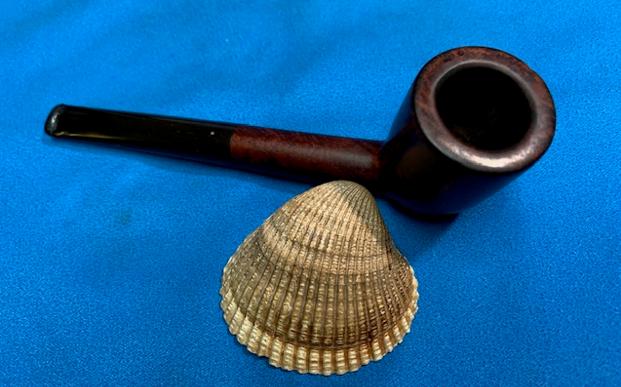
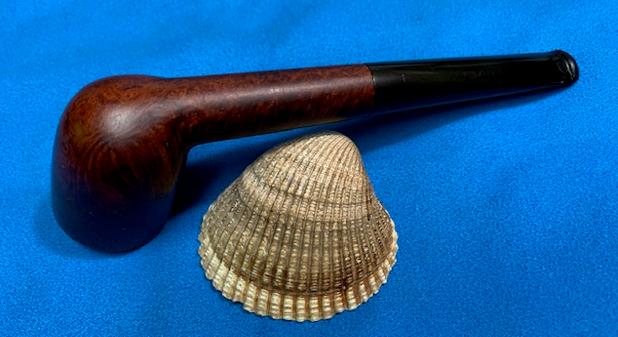
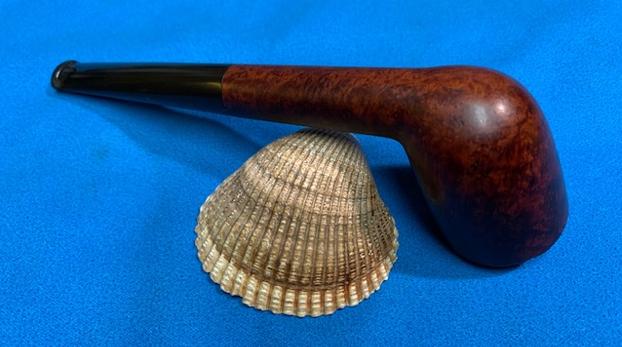
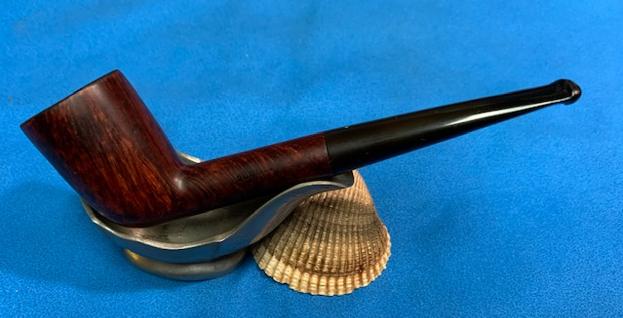
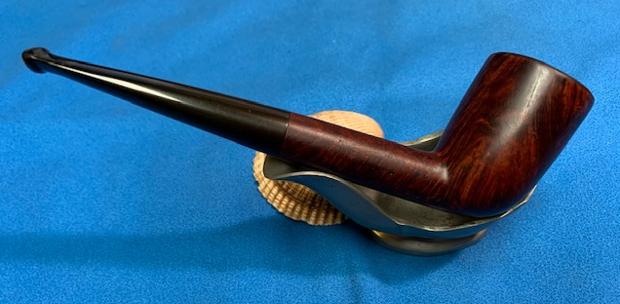
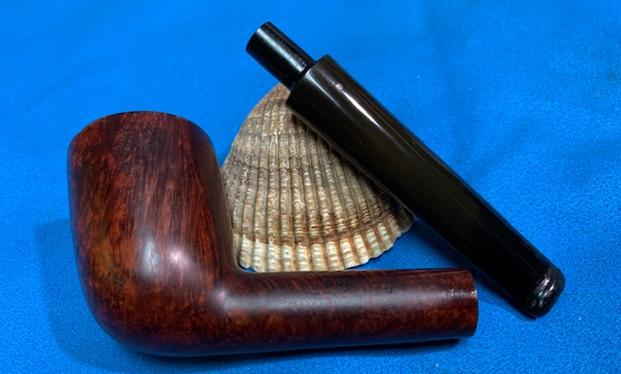
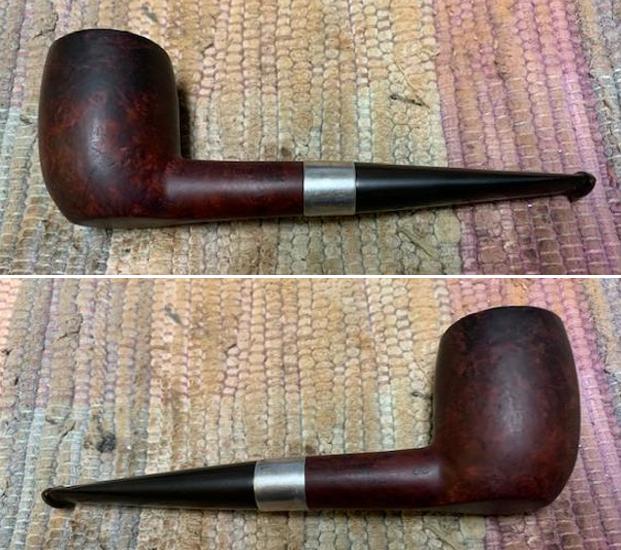
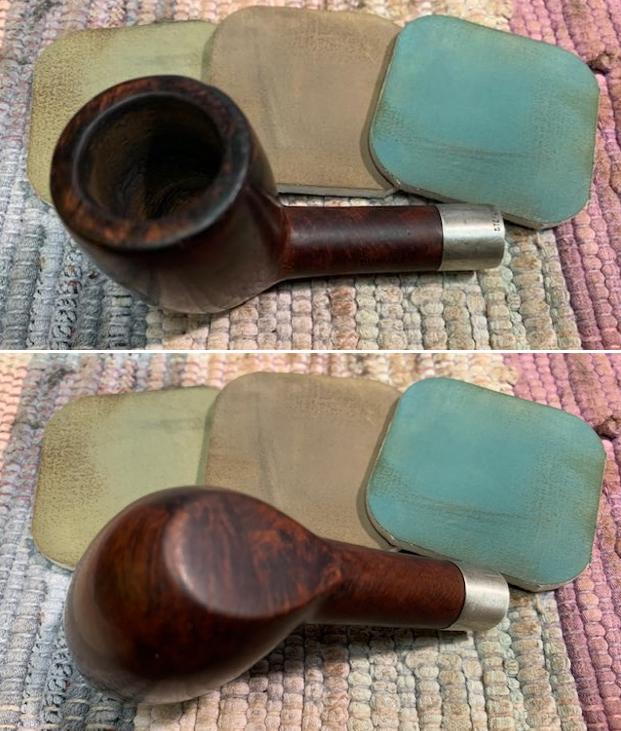
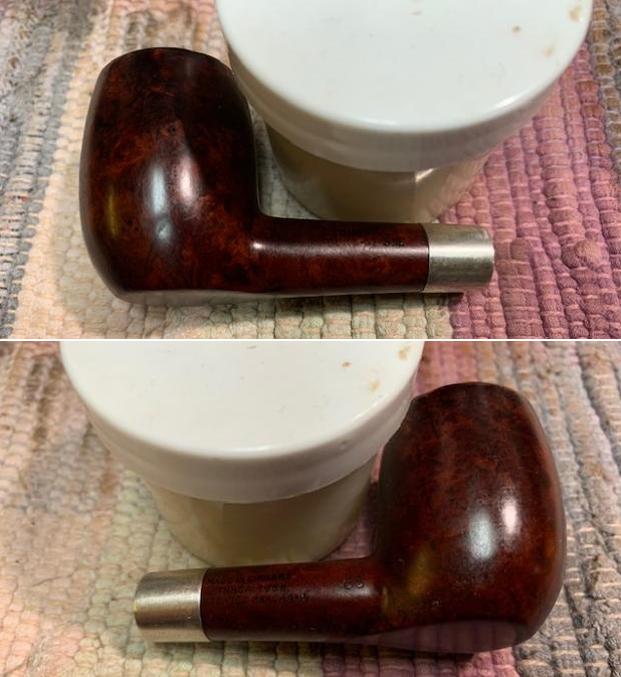
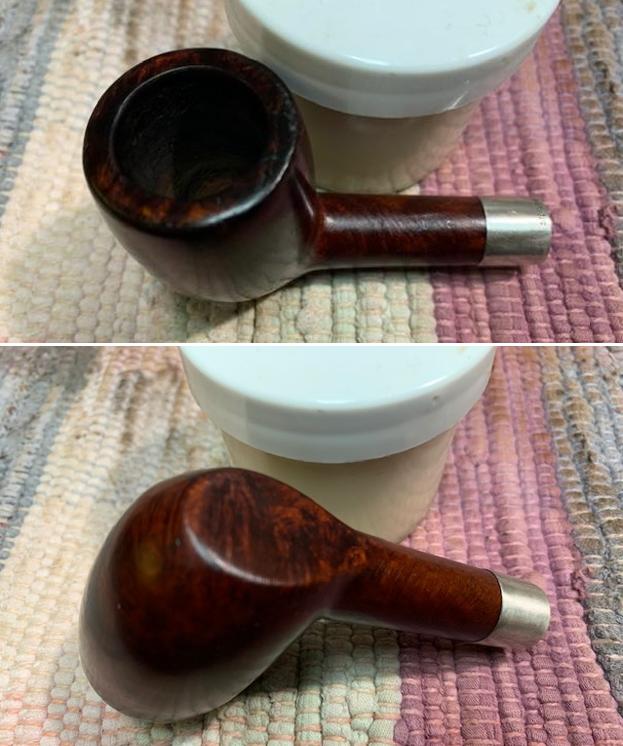
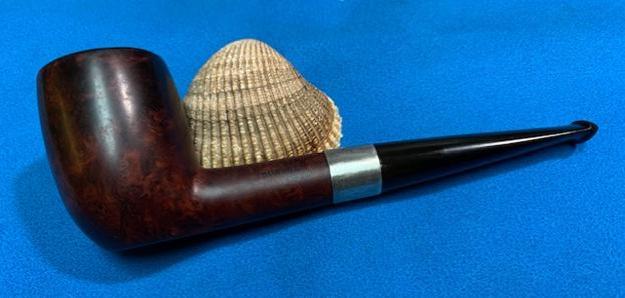
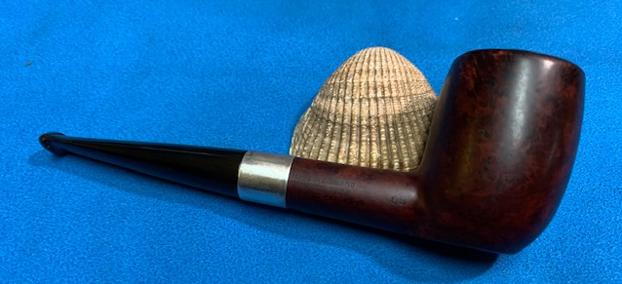
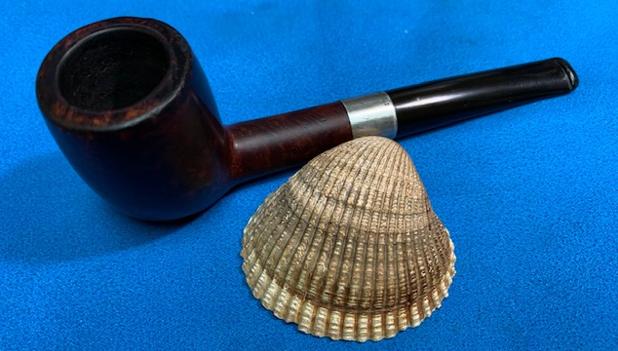
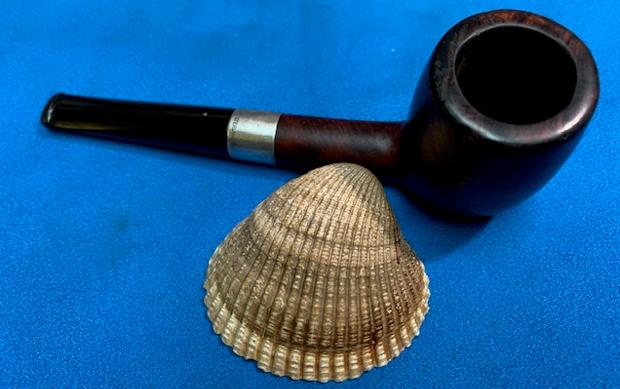
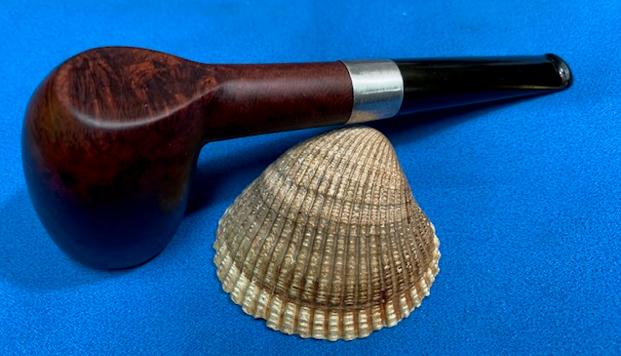
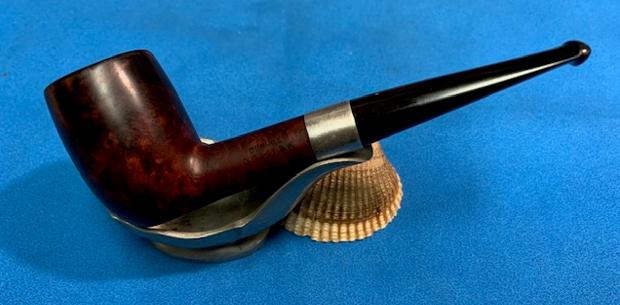
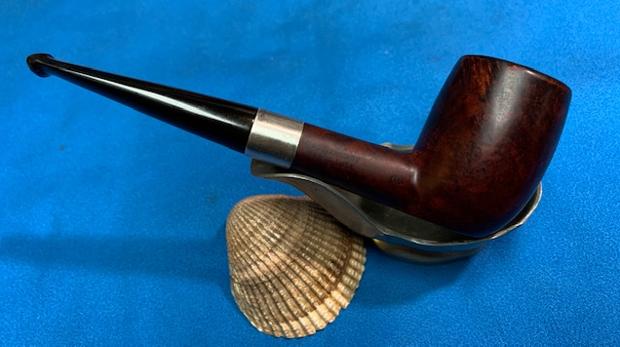
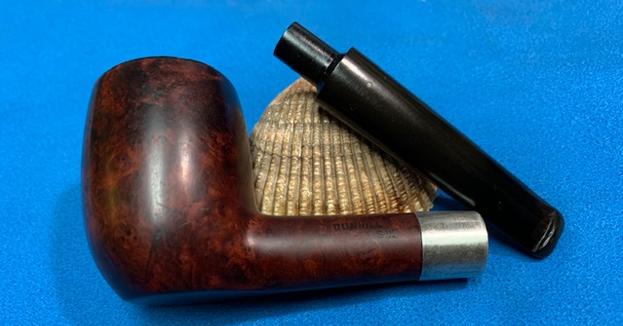
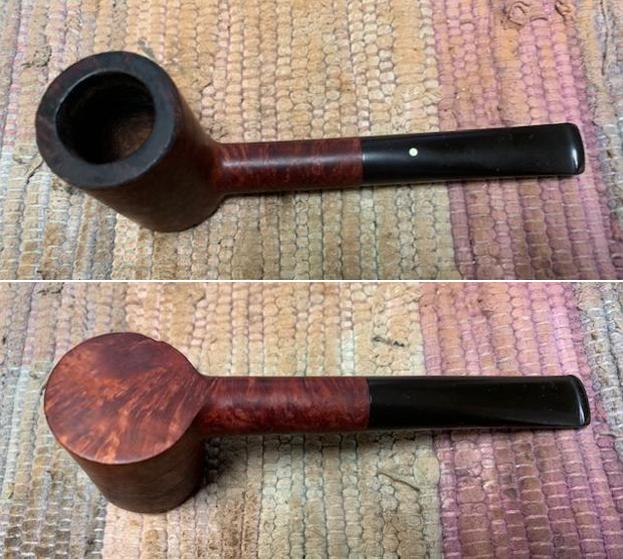
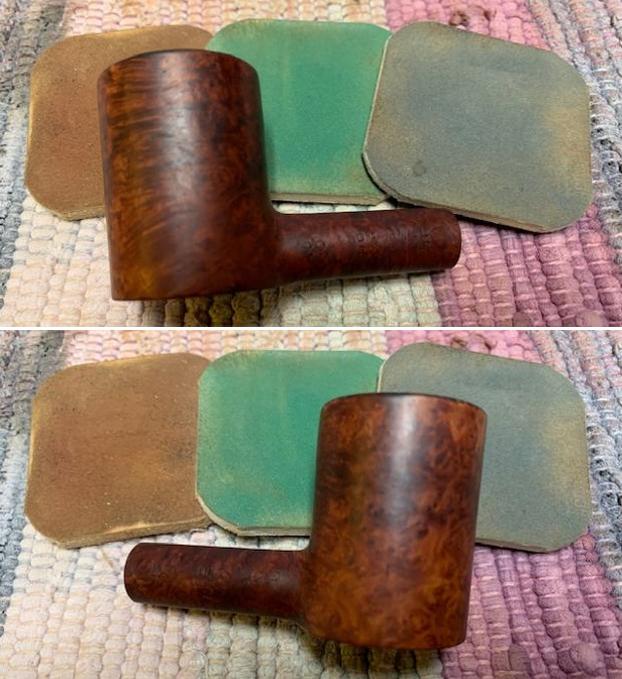
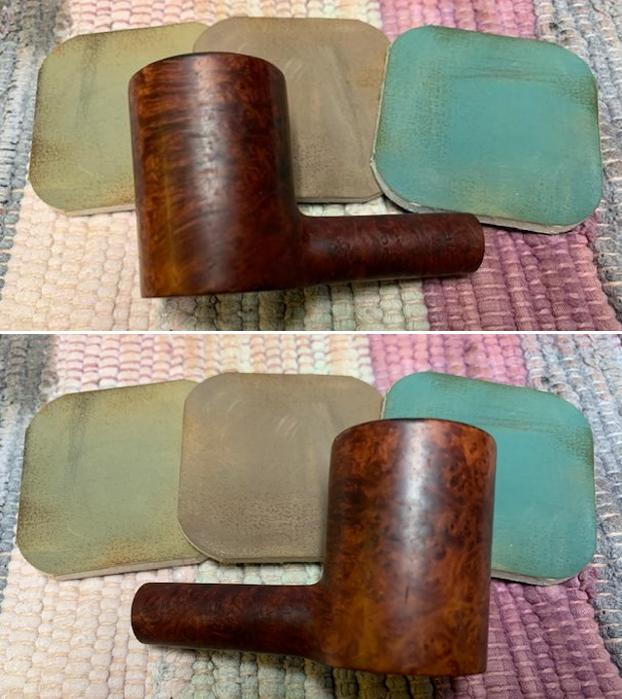
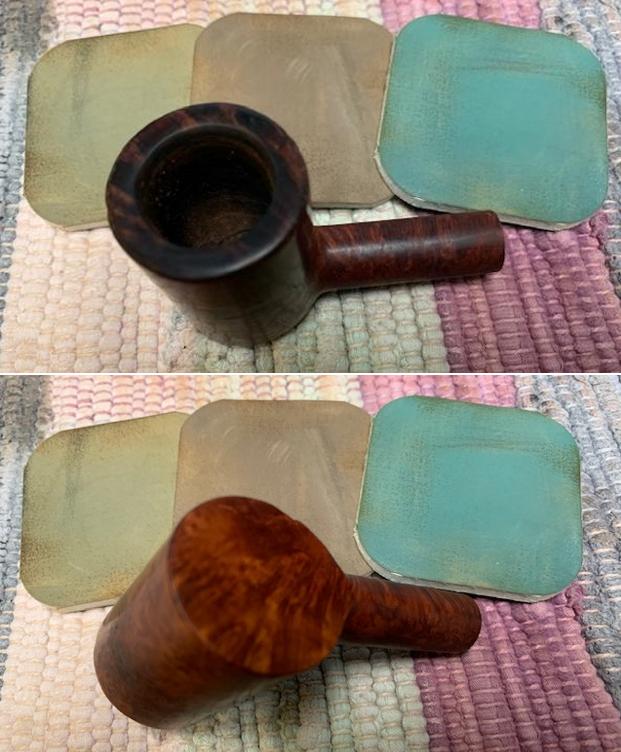
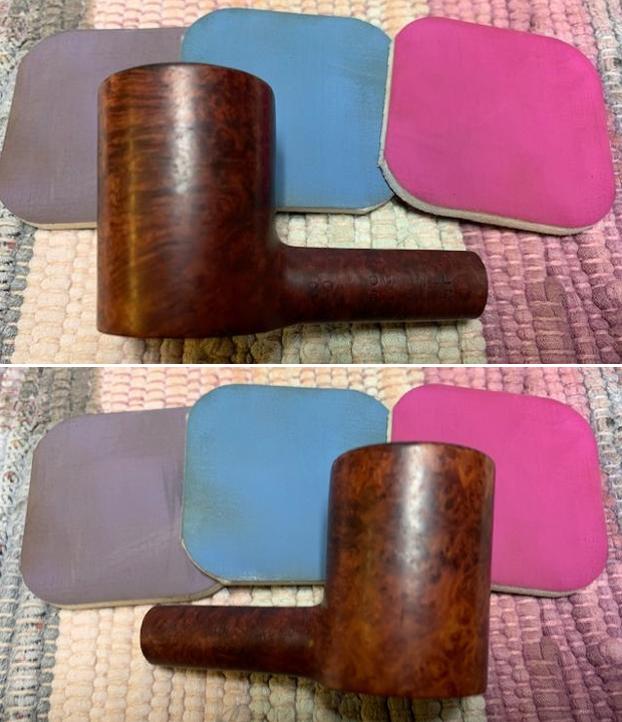
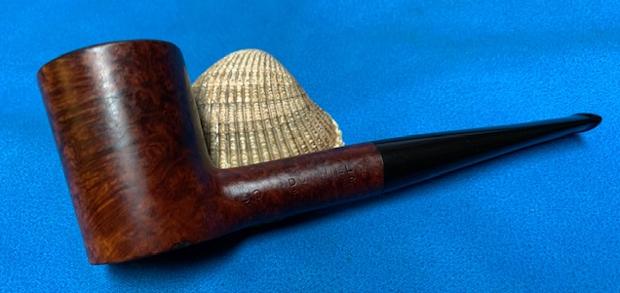
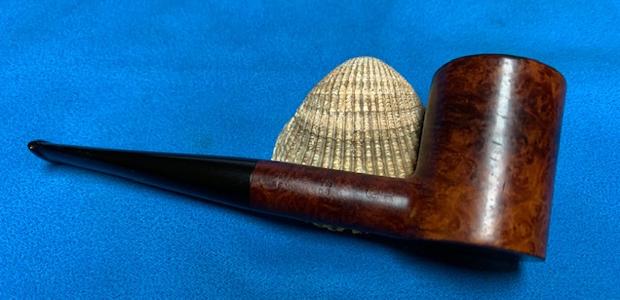
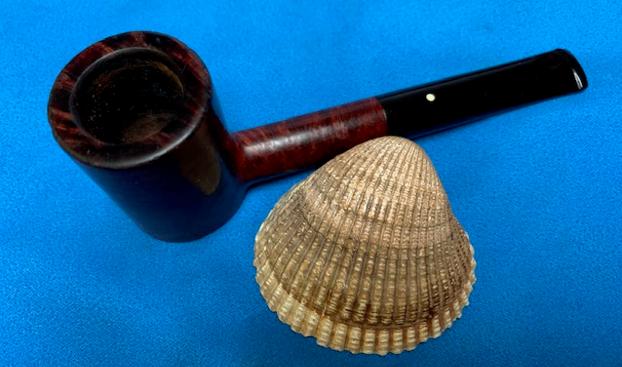
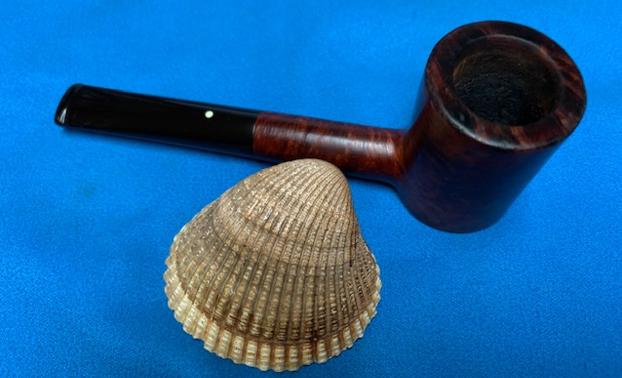
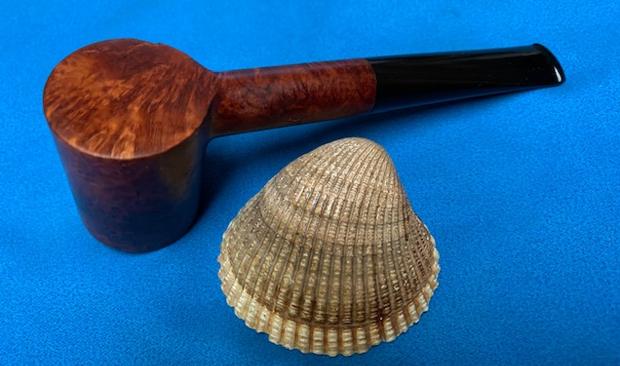
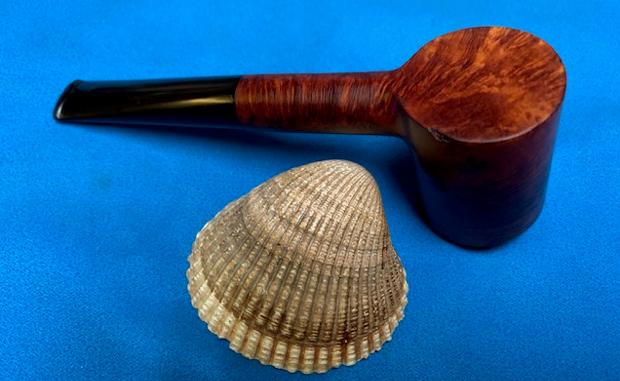
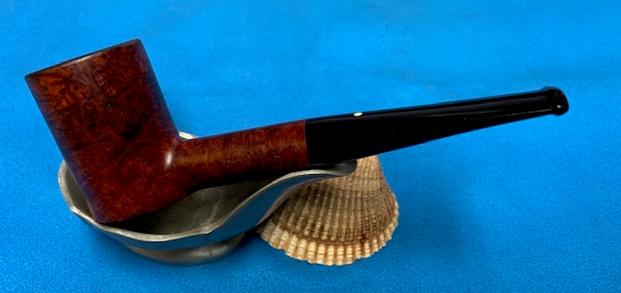
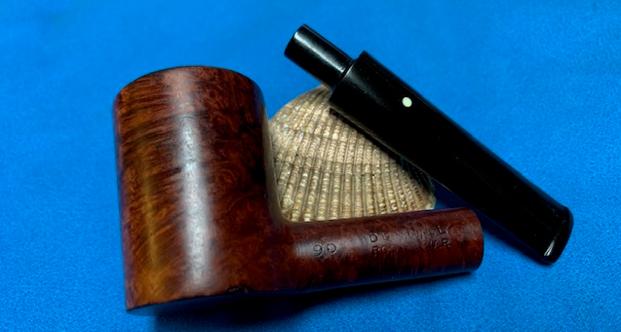
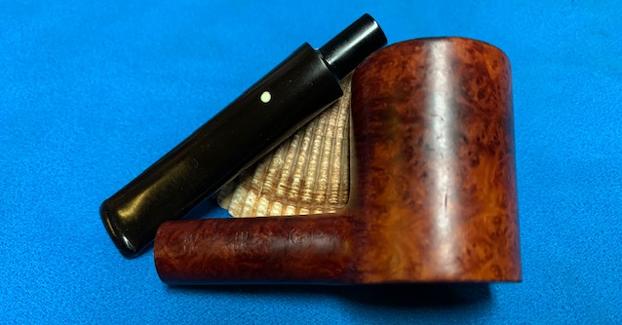
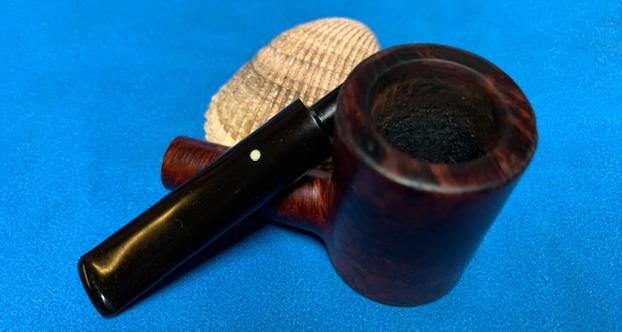
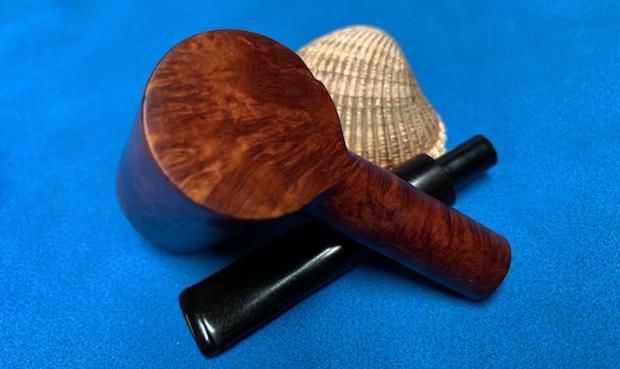
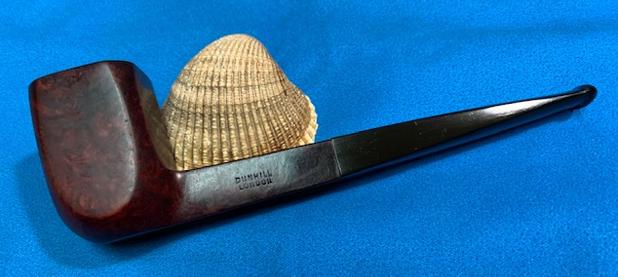
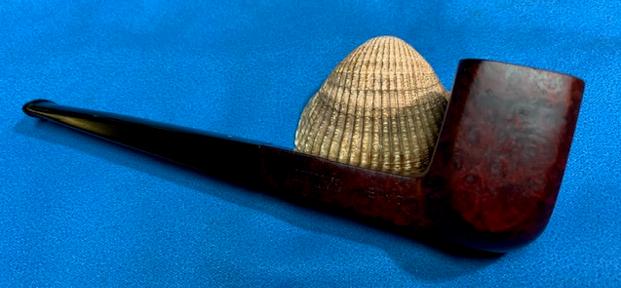
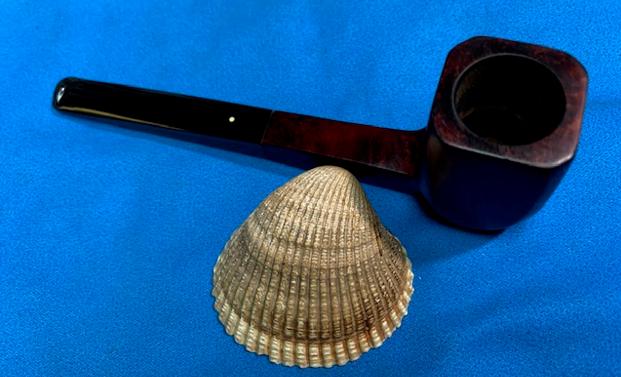
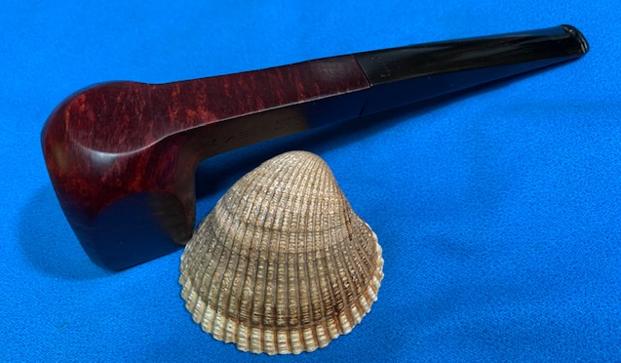
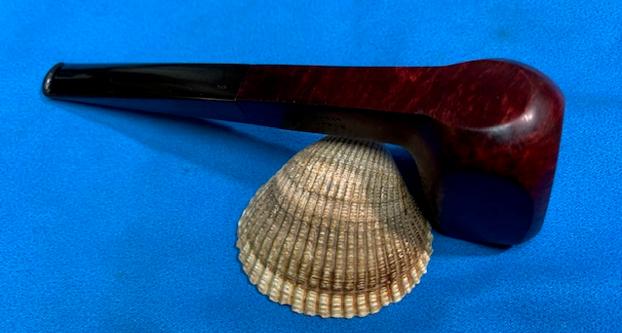
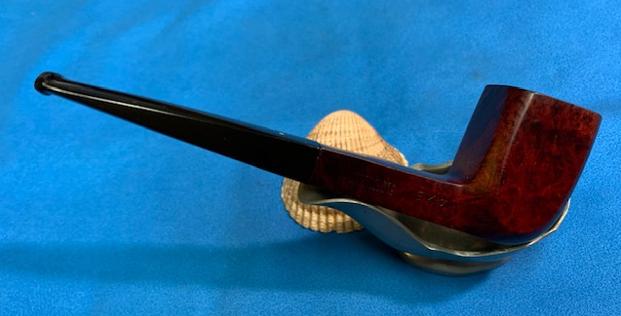
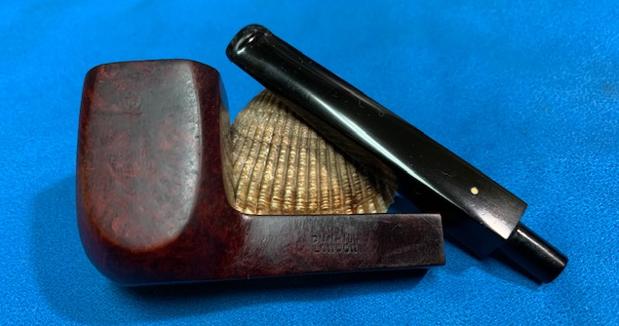
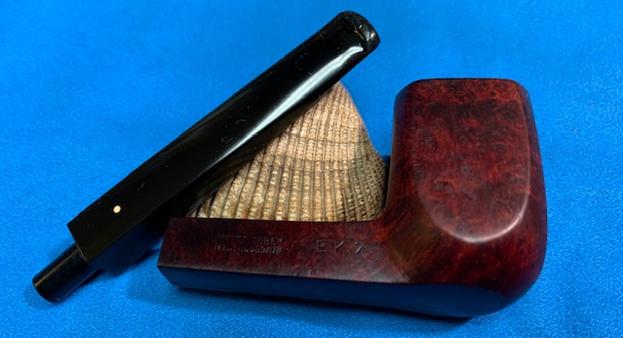
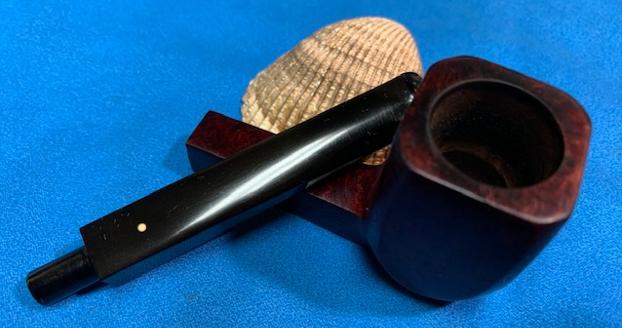
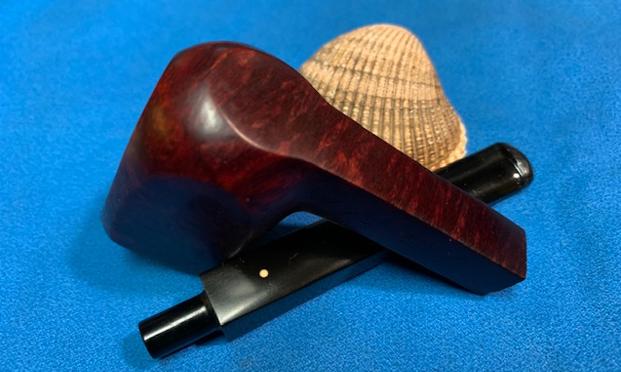
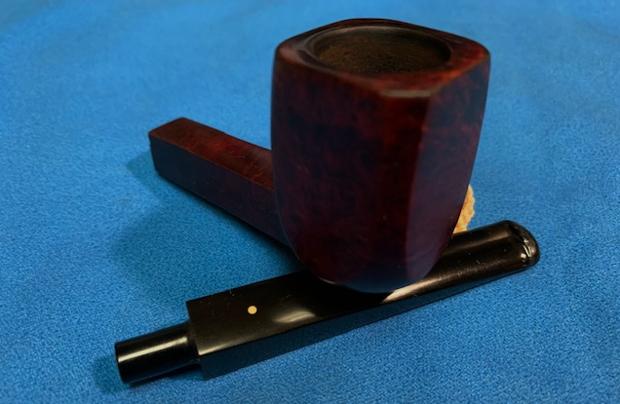
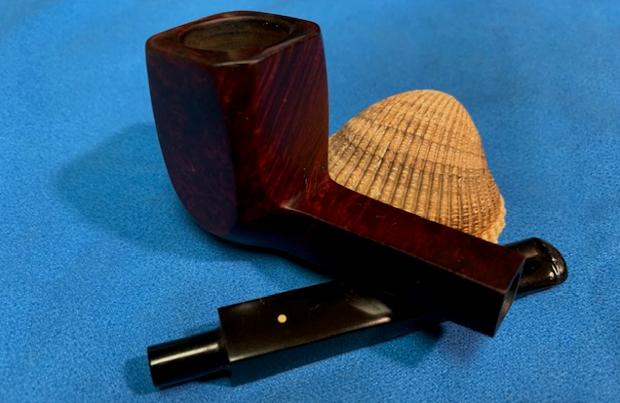
This really is a beautiful Dunhill Shell Briar LBS Long Billiard.  The relatively short vulcanite taper stem just adds to an already great looking pipe. If you did not know where the cracks were you would never be able to find them now. The rich combination of Mahogany, Black and Walnut stains on the bowl give depth and dimension to the sandblast. It came alive with the polishing and waxing. I gave the bowl multiple coats of Conservator’s Wax as I did not want to fill in the valleys. I gave the stem multiple coats of carnauba wax on the buffing wheel and followed that by buffing the entire pipe with a clean buffing pad. I hand buffed the pipe with a microfiber cloth to deepen the shine. The finished Dunhill Shell Briar LBS Group 4 pipe is a beauty and fits nicely in the hand and looks very good. Give the finished pipe a look in the photos below. The dimensions of the pipe are Length: 5 3/4 inches, Height: 2 inches, Outside diameter of the bowl: 1 ¼ inches, Chamber diameter: 7/8 of an inch. . The weight of the pipe is 40grams/1.41oz. Once the bowl coating completely cures I will be packing it up and sending it back to Scott. I can’t wait to hear what he thinks of it when he has it in hand. Thanks for reading this blog and my reflections on the pipe while I worked on it.
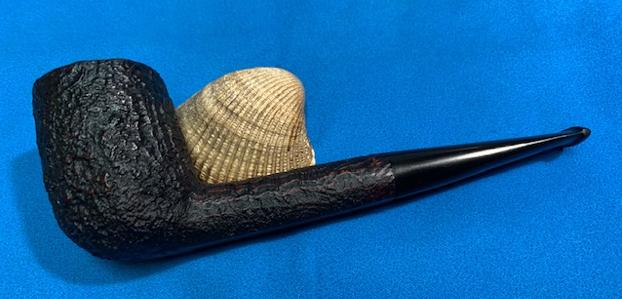
Upgrading a ‘Lowly Drugstore Pipe’: A Dr. Grabow Omega Billiard


Blog by Dal Stanton

Ryan described his Dr. Grabow Omega as a lowly drugstore pipe – not me! 😊 He emailed me several months ago about his Dr. Grabow Omega and which set the table for what followed:

Dear Mr. Stanton, I recently came across one of your blog posts from 2017 detailing a restoration you performed on a Dr. Grabow Omega billiard. The final product was stunning and made me wonder whether you allow customers to send pipes in for restoration or whether commissions are limited to the pipes listed on your website. I ask because I also own a Dr. Grabow Omega and have always been bothered by the heavy red finish that completely obscures the grain. I wanted to ask (if outside commissions are accepted) whether you could perform the same sort of restoration on my pipe and about how much it might cost.  Thanks for any information you can provide!

Part of my response to Ryan shortly followed:

Ryan, Great to hear from you!  Thanks for your kind words regarding the restoration of the Omega I did. I think the Omega is a nice-looking pipe.  Dr. Grabow’s ‘Peterson’ and you share my problem with Dr. Grabow’s production of Omegas with the ‘candy apple’ finish.  It’s a quicker way to finish a factory pipe and it’s always a question about what lurks beneath the artificial gloss.  The Omega I did surprised me with a nice patch of briar beneath and left me with the question, why would anyone cover this grain with a finish like that?  I’m sure economics is a partial answer.  So, for your Omega, I would examine it closely to see if you can see some huge fills in the briar beneath the finish.  Even if it has fills, natural briar just beats candy apple even with sub-par blocks of briar, in my opinion. 

In our emailing back and forth, I discovered that Ryan too, was living in Europe at the time.  He had finished up his graduate work in Scotland and was teaching in the Black Forest region of Germany for the past 10 years and was also in the process of transitioning back to the US.  When he said he was in the Black Forest region of Germany, I perked up.  Several years ago two of our five children attended Black Forest Academy in Kandern, Germany – a very beautiful part of Europe which we enjoyed visiting several times.  Ryan sent me some pictures of his Omega from Germany, which he had used only a few times.  Here are the pictures Ryan sent: My impression of his pictures was that the Omega was practically new and not beat up at all.  Since we both were in the process of transitioning to the US, he from Germany and we from Bulgaria, the decision was made to wait till we both were settled on the other side of the pond and he would send the Omega to me.   Which brings us to the present – Ryan’s Dr. Grabow Omega is now on my worktable.  I am in Golden, Colorado, and Ryan is in Albuquerque, New Mexico.  We both are adjusting to our new realities!

The primary desire Ryan expressed was to allow the natural briar to emerge by removing the candy apple, thick factory finish.  He referenced seeing a restoration for another Omega I had done for Jenny, a former intern we had with us in Bulgaria.  She had commissioned several pipes from the For “Pipe Dreamers” Only! collection to give as gifts to the special men in her family and she kept one for herself too! (See: Jen’s Trove No. 8 – Restore & Upgrade of a Dr. Grabow Omega Smooth Billiard)  The Dr. Grabow Omega she chose for one fortunate person turned out well – before and after results were striking!This was the result that Ryan compared to his Dr. Grabow factory fresh Omega finish which shrouded the natural grain.  Ryan’s Omega appears to me to be a newer pipe off the production line and differs in the nomenclature from the former older Omega I restored.  In common is that both are stamped on the left shank flank: OMEGA [over] DR. GRABOW.  The right was stamped on Jen’s Omega, IMPORTED BRIAR, which is not present on Ryan’s Omega.

In the former Omega restoration, the biggest problem that I expressed was the finish.  I did not like it!  In my research for that Omega, I found these two comments from bloggers on a Pipes Magazine Forum discussion about Dr. Grabow Omegas’ cost, quality, and appeal, which resonated with my own thoughts regarding the positives and negative:

Positives: An Omega was the first briar pipe that I ever owned. It still gets regular use and like Brewshooter, I have no complaints with it. Bowl size is a little bit smaller than I like, but it makes for a nice quick smoke, and the military mount makes it really easy to clean. I have Savinellis that I have easily paid four times more for, and sure, they smoke a little bit better, but in terms of a good smoking instrument, the Omega will do you well as long as it is smoked properly and maintained properly.

Negative: One thing I noticed about my Omega is that it had a heavy varnish or clear coat. I sanded it and gave it a nice wax. It seems to breathe a little better now and I like seeing more of the grain. I also gave the band a bit of a brushed look with some fine grain sandpaper. It’s a nice little pipe for that quick smoke.

Ryan’s desire for his Omega is to remove the ‘candy apple’ or heavy varnish finish.  He is also hopeful that there is a nice patch of briar beneath it.  I am hopeful, too!  The second issue that Ryan expressed about his Omega was that the factory stem was made of a plastic material and not rubber or vulcanite.  I could not recall that the former Omega’s stem I had restored was plastic – I believe it was indeed vulcanite because of the way it spruced up.  Ryan shared with me that his research uncovered that Dr. Grabow started using plastic stems along the way.  Ryan said he could live with the factory plastic stem but did not like it.

When Ryan’s Omega arrived, I was curious to check out the stem as well.  The seam is different from a normal precast rubber stem – the factory seam is vertically dissecting the stem rather than a horizontal seam – the norm for rubber precast stems.  The picture below shows the vertical seam that splits the P-Lip and runs up the stem.  I would say that I agree with Ryan’s assessment.  The stem is plastic.I decided to investigate whether I could find a rubber stem that would match the Omega’s Military Mount, fancy P-Lip stem.  I sent a note to Tim West at J. H. Lowe (www.jhlowe.com) where I acquire pipe supplies and included pictures for Tim to see if I could find a non-factory match for the Omega.  Ryan had indicated to me that a factory stem with the Dr. Grabow ‘Spade’ logo was not critically important to him.  Tim’s email came saying that he had a Greek rubber stem that had similar style and shape to the Dr. Grabow Wellington stems for a few dollars. He said that they were rough and needed bending and polishing – plain with no logo on the stem. I asked Tim to send it along with 5 additional Churchwarden stems.  When the stems arrived a few days ago from Tim, I was pleased with the match he provided with the Wellington stem.  The pictures below show the comparison.  The Wellington stem is precast with rough horizontal seams running down the sides of the stem rather than vertically in comparison to the factory stem.Before beginning on the upgrade of Ryan’s Omega, I take a few fresh pictures of the stummel on my worktable.  The finish is not as ‘candy apple’ acrylic as was the first Omega I restored but the finish is thick and obstructive.  In addition to the finish, the stummel has some minor dents from normal wear.  There appears to be a round fill on the right shank side.  When the stummel is cleaned, I will need to see if this apparent fill needs attention. Because I like working on clean pipes, I first use the Savinelli Fitsall Tool to scrape the chamber.  Ryan had said that he had used the pipe only a few times – the lack of carbon cake buildup confirms this.A quick spin with one pipe cleaner and one cotton bud confirms that the internals are clean.My general approach will be to emulate what I did with the first Omega I restored that Ryan noticed.  The goal is to provide a briar canvas that will produce more natural grain pop.  To do this I start the upgrade of this Dr. Grabow Omega by using acetone on a cotton pad to see if this will be sufficient to remove the finish.  The acetone cuts through the finish efficiently.  The cotton pad shows a purple-ish or dark burgundy/Oxblood hue of the factory finish.  As I did before, I decide to put the stummel in a soak of acetone to remove the old finish more fully.With the stummel soaking in acetone, I turn to the precast Wellington stem.  Even though the stem is new, it is in a rough state.  The seam is rough from the excess rubber during the fashioning process.   Around the P-Lip button the edge is also rough as is the rubber surface itself.To begin, a small sanding drum is mounted onto the rotary tool and with care the seam edges are smoothed off.  I’m careful because the rotary tool can easily dig a wedge into the rubber if I’m too impatient!After the sanding drum, 240 sanding paper is used to sand the entire stem.  Special attention is given to the seam lines to make sure there are no factory divots remaining in the vulcanite.  The precast factory surface is not even and has ribs and small gaps.  Sanding with 240 takes some time but helps to smooth out the surface.   After 240, the entire stem is first wet sanded with 600 grade paper then 0000 grade steel wool is applied to smooth the surface further.Next, the full regimen of micromesh pads is applied starting with wet sanding using pads 1500 to 2400.  Next, the stem is dry sanded with pads 3200 to 4000 and 6000 to 12000.  Between each set of 3 micromesh pads, Obsidian Oil is applied to the stem to help guard against oxidation. Wow!  The Greek rubber Wellington stem shined up with that pop I like. After several hours of soaking in the acetone, the stummel is fished out and I take a closer look at the results.  The briar is a salmon color.  Interesting!  An inspection of the briar surface shows the minor dents I saw previously.  The round fill on the right shank is solid – second picture. To clean the surface of minor dents and scratches, sanding sponges are used.  The sanding sponges are good for not being invasive but sanding enough to clean the surface.  I start with a coarser sponge and then transition to a medium, then light grade sanding sponge.  I avoid the nomenclature on the shank during the first two sponges. Before moving on with the application of micromesh pads, I dress up the bland rim a bit.  To do this, a small internal bevel is cut in the rim to give it some additional contour.  To me, this adds a touch of class to the Omega and that’s what ‘upgrading’ is all about. Using 240 paper, a hard surface is pressed behind the sanding paper to create the fresh lines of the bevel.  This is followed again using 600 grade paper.  I like the results.Next, the stummel is sanded with the full regimen of micromesh pads to coax out the tight, compact grain.  Starting the process by wet sanding with pads 1500 to 2400, this is followed by dry sanding with pads 3200 to 4000 and 6000 to 12000.  I stay clear of the nomenclature on the shank during the wet sanding phase.  The grain emerges through the micromesh process of sanding.  The pictures show the progression.The grain is subtle on this Omega which is different from the Omega I worked on before.  That Omega had more expressive and turbulent grain patterns.  My reading about briar grains suggests that Ryan’s Omega was fashioned from a briar block that was more toward the center of the briar bole and not the edge.  The ‘edge’ blocks tend to be more twirly, expressive, and distinct but also contain more imperfections which require patching.  Whereas, blocks cut closer toward the center of the bole, have more subtle grain patterns but fewer imperfections – the wood seems to be tighter or compressed.  The grain is there but lacks distinction at this point.At this juncture, I can’t resist uniting the stummel with the unbent Wellington stem to get a sense of the progress.  I also take a picture of the factory Grabow stem.  Not bad!  Ryan will have his pick whether he’s in the mood for the factory Dr. Grabow stem or the Greek rubber Wellington stem – as far as I can see, a perfect match. As I think about the next step in coloring the stummel, I decide to bend the Wellington replacement stem.  To do this the stem is threaded with a pipe cleaner to guard the integrity of the airway during the bend.  Using the hot air gun, the vulcanite is gently warmed at the mid-stem where the bend is to happen.  To heat gradually, I rotate the stem to balance the heating and not scorch the stem.I use a small shot glass which is about 1 1/2 inches across to serve as the bending template.  As I’m heating the stem, I gently bend the stem a bit with my hands as it become supple.  When it has heated enough and the rubber has softened, the stem is placed over the glass and bent over it to form the shape.I hold the stem in place while it is taken to the sink where cool water is run over the stem, thus solidifying the bend in place. When the stem is taken back to the work table to compare with the factory stem, it looks like a match to me the first time around!  The great thing about bending rubber stems is that if you do not get it right the first time, the process is easily repeated until the bend is on target.I have given some thought to the finish to apply to the Dr. Grabow Omega bowl.  With my last Omega I applied a mixture of 2/3s-part Fiebing’s Dark Brown Leather Dye with 1/3-part Fiebing’s Black Leather Dye with the lightening option available by wiping down the bowl with alcohol later.  With this Omega, I will do the same for the dark brown/black undercoat.  However, following this, an additional step will be tried.  A wash dye with red I believe will deepen the tones and bend the finish toward a reddish palette and not toward the purplish/burgundy of the original Omega motif.  I believe this will give the pipe more eye-catching pop in the end – or this is my hope!  Applying dyes often feels like a roll of the dice – different woods absorb dyes differently and one never knows for sure what the exact results will be!  My goal is to bring out the grain distinctiveness with the undercoat and then to get in the ballpark of the right color template with the overcoat washing.  To begin, after assembling all the components on the worktable, Fiebing’s Dark Brown Leather Dye and Fiebing’s Black Leather Dye are mixed at a 2 to 1 ratio to use as the undercoat. After wiping the bowl with a cotton pad wetted with alcohol, the stummel is heated with the hot gun.  This heating expands the briar and makes the wood grain more receptive to the dye.When the stummel is heated sufficiently, the aniline dye mixture is applied to the stummel in sections with a folded pipe cleaner and then ‘flamed’ using a lighted candle.  The alcohol in the aniline dye combusts setting the dye pigment in the briar grain.  This flaming process continues as dye is applied in sections until the entire stummel is covered.The stummel is then put aside to rest for several hours.  This helps the dye to ‘settle’ and be absorbed into the wood. After several hours, the time to ‘unwrap’ the stummel has arrived – one of my favorite parts of a restoration when new dye has been applied to a stummel.  I call this phase unwrapping because the fired dye is crusted around the stummel like a shell.  The shell is unwrapped using more abrasive Tripoli compound and a felt buffing wheel mounted onto the rotary tool.  The speed of the rotary tool is set to about 25 to 30% full power – slower than usual guarding against too much heat buildup from friction generated by the more abrasive combination of compound and felt wheel.  This combination is like a bulldozer!As the crusted dye is removed, I purge the felt wheel repeatedly with the edge of the metal rotary tool wrench.  This keeps the felt wheel softer and cleaner.  As hoped, as the Tripoli compound is applied to the crusted surface, an eye-catching landscape of grain is now more distinctive.  The pictures below show the unwrapping in process.  I love to watch this unveiling! The dye process darkens and accents the grain patterns. After the crusted dye is removed, the bowl is gently wiped with a cotton pad and alcohol.  This is done not to lighten the stummel but to blend the dye.  Little dye is removed on the cotton pad which seems to indicate that the undercoat of dye is well established.The next step, to deepen the hue and bend it more to a rich red tone, the stummel is dye washed with red dye.  The stummel is again heated, but this time the dye is washed on with a pipe cleaner without firing because the alcohol content in the red dye is not as great.  After the red dye is applied thoroughly, the lesser abrasive, Blue Diamond compound is applied to the stummel with a cotton cloth buffing wheel on the rotary tool set at about 40% full power. This removes the excess dye.  Not pictured is that I wiped the stummel a number time with a cotton pad wetted with alcohol to blend the red dye with the dark brown/black under coat.  Afterwards, Blue Diamond was again applied until the hue looked good.  Also not shown is that the Wellington stem was also polished with Blue Diamond compound with a cotton cloth buffing wheel.To refresh the Omega’s nickel shank cap, another cotton cloth buffing wheel dedicated to applying compound on metal is mounted on the rotary tool.  Blue Diamond is applied, and the bling factor of the shank cap went up a few notches! The final step is to apply carnauba wax to the entire pipe.  After mounting another cotton cloth buffing wheel, with the speed set at about 40% full power, the wax is applied to the stummel and Wellington stem – not to the nickel shank cap.  After application of the wax, the Omega is given a rigorous hand buffing to raise the shine and to remove any excess wax that may have collected on the surface.Wow, what a change!  And then the next thought, ‘Wow, maybe too much change!’  At this point I was ready to send the write up to Steve to publish on rebornpipes, but my concern continued to grow, and that small voice was gnawing inside – the finish may have gone a little too far from the original Dr. Grabow Omega motif which was bent more to the burgundy pallet than what I did, going more toward the red.  I decided to send a pre-published PDF of the write up with final presentation pictures to receive his assessment.  I expressed to Ryan that I could take the Omega back to the worktable and bend the hue back to more of a burgundy palette – that working with dyes is like a dance.  After sending that email and PDF, I waited to find out if the Dr. Grabow Omega was finished or whether I was headed back to the worktable.  Ryan’s response did not take long:

Hi Dal, I think we can definitely call it finished (and then some)! I couldn’t stop smiling as I read through your write-up because every time I thought the pipe must be nearly finalized (I was already amazed at how much better it looked after unwrapping the initial coat of dye), there would be another step in the process that made it look even better. I’m genuinely awestruck at how well it turned out. That a lowly drugstore pipe can be transformed to such a degree is a testament to the tremendous skill and care you put into your work. As far as the color is concerned, I think you chose the ideal shade: not too dark, not too light, and a perfect showcase for the more subtle grain patterns of this pipe. I wouldn’t change it one bit. The stem came out looking like a million bucks, as well, which is quite a feat considering how (literally) rough around the edges it was at the beginning. Just extraordinary work all around. I can’t thank you enough!…. Once again, thanks very much for doing such a wonderful job and taking the trouble to document each individual step. I really enjoyed reading about the restoration process and I can’t wait to see the pipe in person!

Best regards,

Ryan

The upgrade of Ryan’s Dr. Grabow Omega ‘drugstore pipe’ is an amazing transformation and a grain popping display.  The transition from the finish that clouded the grain has been replaced with a sharp, distinctive cornucopia of grain patterns.  The Wellington stem is a perfect replacement for the Dr. Grabow factory stem.  This Omega upgrade, as with all my restorations, benefits the Daughters of Bulgaria – helping women and girls who have been trafficked and sexually exploited.  Thanks, Ryan!  Thank you for joining me!

Next on the table is an Edward’s Algerian Briar 706M5 Prince


Blog by Steve Laug

Courtesy Doug Valitchka

The next pipe on the work table is an Edward’s pipe that we bought from a fellow in Los Angeles, California, USA. It is a classic Prince in terms of the flow of the stem and shank. The bowl had a thick cake and lava overflow on the rim. It was hard to estimate the condition of the rim top with the cake and lava coat but I was hoping it had been protected from damage. The bowl was smooth and a natural finish. The finish was dusty and tired but had some nice grain under the grime and the finish appeared to be in good condition. There were small fills all around the right side of the bowl. A lot would be revealed once Jeff had worked his magic on it. The stem was dirty but came with tooth chatter and deep tooth marks near the button on both sides. Jeff took photos of the pipe before he started his cleanup work. Jeff captured the condition of the bowl and rim top with the next series of photos. You can see the work that is ahead of us in the photos. The cake is very thick and heavy. The rim looked like it might have some damage on the back inner edge of the bowl. The next two photos of the stem show the top and underside of the stem. It is oxidized and calcified an you can see the tooth marks and chatter on the surface of both sides. Jeff took some great photos of the sides of the bowl and heel showing what is underneath the grime and debris of time and use. You can see the fills in briar on the right side. It will be interesting to see what happens as the pipe is cleaned and restored. He captured the stamping on the sides of the shank. They are clear and readable. The left side reads Edwards. On the right side it reads Algerian Briar 706M5.I turned to Pipedia to have a look at a bit of history on the brand and refresh my memory of the pipe line (https://pipedia.org/wiki/Edward%27s). I quote the article in full below.

Edward’s pipes were originally produced in Saint-Claude, France when Francais actually was a world-class pipe maker with longstanding business & political connections to Colonial Algeria that allowed them to obtain the finest briar.

During the tumultuous 1960’s, Edward’s created a business model to offer the finest briar available in both Classic and Freehand shapes – all at a fair price. They bought the company & equipment and cornered the market on the finest, choice Algerian Briar just before the supply vanished in political turmoil of Algeria’s independence. Edward’s packed up both machinery and briar-treasure to America, safely caching the essentials to create a new pipe-making dynasty. This was a coup, for the 70’s and 80’s were grim years for pipe smokers as quality briar all but disappeared.

Edward’s Design Philosophy is hard to pin down, think of their style as the “American Charatan” with unique & clever twists all their own. Today, they fashion pipes in several locations across the USA. All of Edward’s pipes are Algerian Briar – a fact very few pipe companies can claim, and all are oil-cured utilizing natural finishes – no strange concoctions are used to interfere in your tastebud’s dance with the briar. Algerian, Calabrian, Sardinian, Corsican – take your pick, but Algerian Briar is generally considered the finest smoking briar ever used. When combined with oil-curing, Algerian takes on a magical quality that even Alfred Dunhill recognized as far back as 1918 as the choice for both his Bruyere and Shell.

Now it was time to work on the pipe. I took it out of the box from Jeff and looked it over. It was amazingly clean and looked like a different pipe. He reamed it with a PipNet pipe reamer and cleaned up the reaming with a Savinelli Fitsall Pipe Knife. He scrubbed out the internals with alcohol, pipe cleaners and cotton swabs until the pipe was clean. He scrubbed the exterior of the bowl with Murphy’s Oil Soap and a tooth brush to remove the grime and grit on the briar and the lava on the rim top. The bowl looked very good. Jeff scrubbed the stem with Soft Scrub to remove the grime and soaked it in Before & After Deoxidizer. When he took it out of the soak it came out looking far better. I took photos before I started my part of the work. I took some photos of the rim top and stem. The rim top is clean but there is a lot of damage to the inner edge on the front half of the bowl. The bowl itself looks very clean. The close up photos of the stem shows that is it very clean and the deep tooth marks are very visible. It almost looks as if the  previous owner had lightly carved grooves to emulate a dental bit on the top of the stem.I took photos of the stamping because they had cleaned up very well.I removed the stem from the shank and took a photo of the bowl and to give a sense of the proportion of the pipe. It is a classic Prince for sure.I decided to take care of the damage on the rim top and inner edge first. I worked over the inner edge with a folded piece of 220 grit sandpaper and repaired the existing bevel to obscure the damage to the edge. Once I had finished the bowl was round and the edge looked very good.I polished the briar and the shank with micromesh sanding pads – dry sanding with 1500-12000 grit pads. I was able to blend in the repairs into the side of the bowl. I wiped the bowl down after each pad with a damp cloth. The grain really began to stand out and the finish took on a shine by the last sanding pad. The photos tell the story! I worked some Before & After Restoration Balm into the surface of the smooth briar with my fingertips. The product works to clean, enliven and protect the briar. I let the balm sit for about twenty minutes and then buffed with a cotton cloth to raise the shine. The photos show the bowl at this point in the restoration process. I set the bowl aside and turned to deal with the stem. I “painted” the surface of the stem with the flame of a Bic lighter to lift the tooth marks on the underside and grooves on the top side. I was able to lift most of them significantly. The few that remained I filled in with Loctite 380 CA glue. Once it had hardened I sanded it with 220 grit sandpaper and 400 grit wet dry sandpaper to blend it into the surface of the vulcanite. I polished the vulcanite stem with micromesh sanding pads – dry sanding with 1500-12000 grit sanding pads. I wiped it down after each sanding pad with a cloth containing some Obsidian Oil. I finished polishing it with Before & After Pipe Stem Polish – both Fine and Extra Fine and buffed it off with a cotton cloth. One irritation for me is that the repairs of the grooves on the topside with the Loctite 380 CA glue are not quite the same black as the stem surface. Because of that the grooves in the stem show even though they are smooth too the touch!! Arghhh. This oil cured Edward’s Algerian Briar 706M5 Prince was another fun pipe to work on and I really was looking forward to seeing it come back together again. With the grime and debris gone from the finish it was a beauty and the grain just pops at this point. I put the stem back on the bowl and buffed the pipe with Blue Diamond on the buffing wheel. I carefully avoided the stamping on the shank during the process. I gave the bowl and the stem multiple coats of carnauba wax on the buffing wheel and followed that by buffing it with a clean buffing pad on the buffer. I hand buffed the pipe with a microfiber cloth to deepen the shine. The rich natural finish on the bowl looks really good with the polished black vulcanite stem. It is very well done. Give the finished pipe a look in the photos below. I can only tell you that it is much prettier in person than the photos capture. The dimensions of the pipe are Length: 6 inches, Height: 1  ¼ inches, Outside diameter of the bowl: 1 ¼ inches, Chamber diameter: ¾ of an inch. The weight of the pipe is 35grams/1.23oz. This is truly a great looking Edward’s. Thanks for walking through the restoration with me as I worked over another beautiful pipe. I will be adding it to the American Pipe Makers section of the rebornpipes store soon. If you want to add it to your collection send me an email or a message! Thanks for your time.

Restemming and Restoring a Stone Age K11 609 Italian Freehand Bowl


Blog by Steve Laug

The next pipe I chose to work on was a bowl sans stem that is interestingly rusticated and reads Stone Age K11 [over] shape number 609 followed by Italy on a smooth panel on the underside of the shank. The shape number reminded me of a Savinelli number but I was not certain. It was purchased in November, 2018 from a fellow in Scottsdale, Arizona, USA. It has been sitting in my box of bowls since that time. Jeff cleaned it up and mailed it to me. It is another pipe that I have been postponing restemming for a while. This morning while going through my collection of stem I found one that fit the pipe. At least it works for me! When I found the stem I pulled the bowl out of the box and set aside to be the next pipe to work on. It has a very unique rustication that is quite different – both rugged and spun that reminds me of a honey swizzle stick. The flared shank and rim top both look like rusticated plateau – faux or real, I am unsure. Overall it is a pretty pipe. The bowl had thick cake in the bowl and the rim top had a coat of lava on the inner edge of the bowl and in the grooves of the rim top. The finish had a lot of dust and debris in the valleys of the rustication. I have no idea who made it but it is definitely interesting. Jeff took some photos of the bowl before he cleaned it up. The next two close up photos show the condition of the bowl and rim top. You can see the thick lava coat on the inner edge of the bowl and in the rustication of the rim top. Jeff took a photo of the stamping on the underside of the shank. It read as noted above and is  clear and readable.I decided to see if could confirm my thinking that the pipe was connected with Savinelli. I turned to Pipephil’s site and found nothing connecting the Stone Age K11 609 to the brand. However I was not convinced as I am sure the shape number 609 is a Savinelli number.

I turned to Pipedia (https://pipedia.org/images/4/41/Sav_Shape_Chart_2017.jpg) and found a shape chart and indeed for the 609 listed as a shape for a bent billiard. I am pretty sure that with a bit of imagination this freehand that I am working on could possibly be construed as a Freehand in a Bent Billiard shape. But I am uncertain. I have included the chart below.I found pipes with a similar rustication on several sites on the internet. Worthpoint, an online auction site (https://www.worthpoint.com/worthopedia/stone-age-italy-k11-603-tobacco-428555927) listed a 603 with the same rustication style and stamping on the underside of the shank. Smokingpipes.com also listed a Stone Age K11 613 Volcano sitter with the same rustication and stamping on the shank that they had sold in the past (possibly as early as 2010 from the photo (https://www.smokingpipes.com/pipes/estate/italy/moreinfo.cfm?product_id=73396).

With those photos and the shape numbers that at least appear to be made by Savinelli it leaves me wondering. The shapes really do not match the shape chart above but the numbers are present. Ah well another mystery!

I turned to work on the pipe itself. Jeff had carried out his usual thorough cleanup of the pipe. He had reamed it with a PipNet reamer to remove the cake and cleaned the reaming up with a Savinelli Fitsall Pipe Knife. He scrubbed the internals of the bowl and stem with alcohol, cotton swabs and pipe cleaners. He scrubbed the externals with undiluted Murphy’s Oil Soap and rinsed the bowl off with running water. The pipe looked very clean when I received it. I went through my can of stems and found turned freehand style vulcanite stem that I thought would work well with the bowl and shank. I took a photo of the combination below. The stem fit the mortise perfectly though the bend to much to work well with the pipe. There were tooth marks in surface of the top and underside of the stem at the button that would need to be dealt with in the restoration. I put the stem in the shank and took some photos of the pipe. The rim top and shank end cleaned up really well as can be seen in the close up photos below. There appeared to be some debris in the grooves of the plateau top of the rim that would need to be dealt with but without the lava coat it was impressively cleaned. The stem looked like it belonged. I already noted the tooth marks and chatter on both sides near the button.I took a photo of the stamping on the underside of the shank. It really is clear and readable. I decided to start my work on restoring the pipe by addressing the debris and darkening on the rim top. I used a brass bristle brush and scrubbed the surface of the rim top and shank end working on removing debris and darkening from the grooves of the plateau and rustication. It looked much better than when I started.I rubbed the briar down with Before & After Restoration Balm. I worked it into the briar and the the grooves around the bowl and shank with my fingertips and a horsehair shoe brush. The product works to clean, enliven and preserve the briar. I let it sit for 15 minutes while I worked on the stem. After the time passed I buffed it with a cotton cloth to deepen the shine. The briar really comes alive with the balm.   Now it was time to straighten the bend I the stem to match the flow of the pipe. Instead of using my heat gun I painted the stem surface with the flame of a Bic lighter until the vulcanite became flexible. I straightened it out to the angles I wanted for the pipe. I took photos of the pipe at this point in the process. I removed the stem from the bowl and set the bowl aside. I turned my attention to the stem. I “painted” the tooth marks on both sides of the stem with the flame of a lighter to lift them as much as possible. They all lifted but one on the topside. I filled in the remaining tooth mark with clear super glue and set it aside to cure. Once cured, I blended the repairs into the surface of the vulcanite with 220 grit sandpaper. I started polishing the stem with 400 grit wet dry sandpaper. The stem was looking much better. I polished the vulcanite with micromesh sanding pads – 1500-12000 grit pads. I wiped it down with Obsidian Oil after each sanding pad. I used Before & After Pipe Polish – both Fine and Extra Fine to further polish the stem. This restemmed, rusticated Stone Age K11 609 Italian Freehand is a beautiful looking pipe that combines a rusticated finish with a unique shaped. I may never know for sure if Savinelli made it but I think so! The brown stains on the bowl work well to highlight the finish. The polished turned fancy black vulcanite stem adds to the mix. I put the finished stem on the bowl and buffed it with Blue Diamond on the buffing wheel being careful to not buff the stamping. I gave the bowl multiple coats of Conservator’s Wax and the stem multiple coats of carnauba wax on the buffing wheel and followed that by buffing it with a clean buffing pad. I hand buffed the pipe with a microfiber cloth to deepen the shine. The finished pipe is quite nice and feels great in the hand. Give the finished pipe a look in the photos below. I can only tell you that like the other pipes I am working that it is much prettier in person than the photos capture. The dimensions of the pipe are Length: 6 inches, Height: 2 inches, Outside diameter of the bowl: 1 ½ inches, Chamber diameter: ¾ of an inch. The weight of the pipe is 54grams/1.90oz. It will soon be added to the Italian Pipe Makers section on the rebornpipes store. Thanks for walking through the restoration with me as I worked over another beautiful pipe. Remember we are not pipe owners; we are pipemen and women who hold our pipes in trust until they pass on into the trust of the next generation.

Cleaning up a Great Looking L.H. Stern Sterncrest 266 Bent Apple


Blog by Steve Laug

The next pipe on the table is one that Jeff picked up from an antique store on the Oregon Coast, USA early in 2019. It has been sitting here for a long time. It is a nice looking bent Apple with great grain. The stem is a taper that looks very good. The stamping on the left side of the shank read LHS in a diamond with Sterncrest [over] the top of the diamond and with Imported Briar under the diamond. On the underside of the shank it is stamped with the shape number 266. The shank had a line around the entirety that appeared to be left behind by a missing band. The finish has great grain that flairs up from the heel of the bowl. It is unique and attractive. There was a lot of grime and grit ground into the finish of the bowl. There was a heavy cake in the bowl  and a heavy overflow of lava on the sandblast rim top. The fit of the stem in the shank was smooth and flawless. On the left side of the stem was a silver diamond LHS logo inlaid on the stem. The stem was vulcanite and it was lightly oxidized, calcified and had some wear on both sides near the button.  Jeff took photos of the bowl and rim top to show the cake in the bowl. The rim top showed thick coat of lava was heavier on the backside and was thick enough that I hoped it would protect the rim edge. You can also see a fill on the back of the bowl toward the top. He took photos of the top and underside of the stem showing the tooth chatter, scratching, oxidation and calcification on the stem surface and wear on the edges of the button.   Jeff took a photo of the heel of the bowl to show the condition of the finish. You can see the well done shape and he amazing grain around the bowl and shank. Even under the dirt and debris of the years it looked very good. The stamping is clear and readable as noted above. You can see the line in the briar from where the band had previously been set. I turned first to Pipephil to get a quick review of the brand (http://pipephil.eu/logos/en/logo-lhs.html). I quote the information listed below.

The L&H Stern Inc. was established by Ludwig Stern (1877-1942) in 1911. His brother Hugo (1872-?) acted as vice-president & secretary. The firm moved to 56 Pearl St. Brooklyn in 1920. It closed down in the 1960s. LHS was one of the main pipe supplier for US soldiers during WWII.

I also did a screen capture of the section on the Sterncrest line. I have included it below. Sure enough the pipe originally had a sterling silver band. I would need to look through my bands and see if I could find a band that would fit the shank.I then turned to Pipedia to have a look at the history of the LH Stern brand and see if there were any pipes like the one in hand (https://pipedia.org/wiki/LHS). There were photos of many different LHS Sterncrest pipes but none quite like this one. The history was worth a read and I have included a summary of that below:

Ludwig Stern, a successful pipe manufacturer since 1893 and closing around 1960, reorganized his company along with his brother Hugo Stern, opening a factory in 1911. They named the company L&H Stern Smoking Pipes & Holders. The newly formed company was moved into a six story building on the corner of Pearl and Waters street Brooklyn, NY.

Thoroughly organized in all departments, and housed in a well-lighted and ventilated modern office and manufacturing building, the firm of L&H Stern Inc. is located near the first arch of the Manhattan bridge, near the river and convenient to the Brooklyn bridge, which makes it accessible from all the hotels in the metropolis for visiting buyers. The structure is six stories with a seventeen-foot basement, with light on three sides through prismatic glass windows, the first floor being seven feet above the sidewalk. Light enters the upper floors from all four sides.

L&H Stern is known to every important wholesaler and jobber in the country. LHS manufactures a complete line of briar pipes. Ginmetto wood pipes are also made, as well as Redmanol goods, the man-made amber. The first substitute for amber. Everything, even down to the sterling silver and other metal trimmings are made under one roof.

With the information I learned in the above articles I had the background on the pipe. Now it was time to work on it.

I am really happy to have Jeff’s help on cleaning up the pipes that we pick up along the way. He reamed the bowl with a PipNet pipe reamer and cleaned up the reaming with a Savinelli Fitsall Pipe Knife. He scrubbed out the internals with alcohol, pipe cleaners and cotton swabs until the pipe was clean. He scrubbed the exterior of the bowl with Murphy’s Oil Soap and a tooth brush to remove the grime and grit on the briar and the lava on the rim top. The finish looks much better and the rim top was actually very visible and it looked good. Jeff soaked the stem in Before & After Deoxidizer bath for several house. He rinsed it off with warm water and clean out the internals. He scrubbed the stem with Soft Scrub All Purpose Cleaner to remove the remaining oxidation on the stem. When the pipe arrived here in Vancouver it looked very good. I took some close up photos of the rim top and the stem surface. The rim top looked very good with a little darkening along the inner edge of the bowl at the back. I took close up photos of the stem to show the condition of the surface and button. The stem was very clean with tooth chatter on both sides near the button. There were some deep scratches on the topside.I took a photos of the stamping on the sides of the shank You can see that it is stamped as noted above. It is clear and readable.I took the pipe apart and took a photo of the pipe. It is a good looking pipe and has some great grain on the bowl and shank.I decided to start my restoration work on this one by polishing the briar with micromesh sanding pads. I worked it over with 1500-12000 grit sanding pads. I wiped the bowl down with a damp cloth to remove the dust. I worked some Before & After Restoration Balm into the surface of the briar with my fingertips to clean, enliven and protect the briar. I let the balm sit for 15 minutes and then buffed with a cotton cloth to raise the shine. The photos show the bowl at this point in the restoration process.     I smoothed out the marks from the missing band as best I could and readied the pipe shank for a new silver band. I found a sterling silver band in my collection of bands. I smeared the shank end with glue and pressed the band in place on the shank.I wiped the band down with a jeweler’s cloth to remove the tarnish. It did not take a lot to remove the tarnish and when it was finished it looked very good. With that done the bowl was finished other than the final buffing. I set it aside and turned my attention to the stem. I looked at the worn areas on the stem and decided to sand them out with 220 grit sandpaper and start polishing it with 400 grit wet dry sandpaper.     I polished the stem with 1500-12000 grit sanding pads. I wiped it down after each sanding pad with Obsidian Oil. I polished it with Before & After Pipe Stem Polish – both Fine and Extra Fine.   It is fun to come to end of the restoration of the LHS Sterncrest 266 Bent Apple. It turned out to be a nice looking pipe. The finish came alive with the work I had done on it. I put the pipe back together and buffed it with Blue Diamond on the buffing wheel. I gave the bowl and the stem multiple coats of carnauba wax. I hand buffed the pipe with a clean buffing pad to raise the shine. It is fun to see what the polished bowl looks like with the polished shank ring and black vulcanite saddle stem. It really was beautiful. This LHS Sterncrest 266 Bent Apple is nice looking and the pipe feels great in my hand. It is light and well balanced. Have a look at it with the photos below. The dimensions are Length: 5 ½ inches, Height: 1 ½ inches, Outside diameter of the bowl: 1 ¼ inch, Chamber diameter: 7/8 of an inch. The weight of the pipe is 47grams/1.66ounces. It is a beautiful pipe that I will soon put on the rebornpipes store in the American Pipe Makers section. If you are interested in adding it to your collection let me know. Thanks to each of you who are reading this blog. Remember we are not pipe owners; we are pipemen and women who hold our pipes in trust until they pass on into the trust of the next pipeman or woman.


New Life for a Patent Era 1915-18 Dunhill A Bruyere 42 Dublin


Blog by Steve Laug

This Dunhill Standing Billiard is the last of five Dunhills that came to us in the same lot as the 1922 Dunhill Bruyere Reading Pipe, and included a cracked shank 1962 Dunhill Shell Briar Pot, a 1928 Dunhill Bruyere EK7 Panel Billiard, a 1915-18 Dunhill Bruyere 66 Standing Billiard, a 1936 Dunhill Bruyere 35 Billiard and the 1905 BBB Calabash Reading Pipe and 1911 BBB Glokar Poker. I have drawn a red box around the pipe in the picture to the left. It is an interesting canted Dublin. The pipe is stamped on the left side of the shank DUNHILL [over] Duke St. S.W. On the right side of the shank it was stamped MADE IN ENGLAND [over] “INNER TUBE” [over] PATENTED MARCH 9-15 that is followed by the shape number 42. Other than the shape number the pipe is stamped the same way as the Standing Billiard shape 66 that I finished recently.

It was another filthy pipe with a thick cake in the bowl and a heavy lava overflow on the rim top. The finish was tired and dirty with grime and debris stuck to the surface of the briar. The stem has a small white dot on top and the button on the topside had a deep tooth mark and damage. There was tooth chatter and marks on both sides ahead of the button. Jeff took photos of the pipe before he did his clean up work.He took photos of the bowl and rim to give a picture of the thickness of the cake and lava on the rim top. This must have been a favourite pipe to have that thick of a cake and lava buildup. The stem has tooth chatter and marks on both sides. The top is worse than the underside with deep marks in the top of the button. The pipe is old enough that it had an ivory white spot on the topside. Jeff took photos of the bowl from various angles to give a sense of the dirtiness of the finish but also the unique shape of the billiard sitter. It is going to be a real beauty!Jeff took photos of the stamping on the sides of the shank . The stamping is quite faint and could not be captured with a camera. There are some faint spots but over all it is readable as noted above. I turned to Pipedia’s section on Dunhill Root Briar Pipes to get a bit of background on the Dunhill finishes (https://pipedia.org/wiki/Dunhill#Root_Briar). I quote:

Bruyere

The original finish produced (usually made using Calabrian briar), and a big part of developing and marketing the brand. It was the only finish from 1910 until 1917. A dark reddish-brown stain. Before the 1950s, there were three possible finishes for Dunhill pipes. The Bruyere was a smooth finish with a deep red stain, obtained through two coats, a brown understain followed by a deep red.

There was a link on the above site to a section specifically written regarding the Bruyere finish (https://pipedia.org/wiki/Dunhill_Bruyere). I turned there and have included the information from that short article below.

Initially, made from over century-old briar burls, classified by a “B” (denoted highest quality pipe); “DR” (denoted straight-grained) and an “A” (denoted first quality), until early 1915. After that, they became a high-end subset to the Dunhill ‘Bruyere’. The DR and B pipes, a limited production, they should be distinguished as hand-cut in London from burls as opposed to the Bruyere line which was generally finished from French turned bowls until 1917, when the Calabrian briar started to be used, but not completely. Only in 1920 Dunhill took the final step in its pipe making operation and began sourcing and cutting all of its own bowls, proudly announcing thereafter that “no French briar was employed”.

Bruyere pipes were usually made using Calabrian briar, a very dense and hardy briar that has a modest grain but does very well with the deep red stain.

“Before the 1950s, there were three possible finishes for Dunhill pipes. The Bruyere was a smooth finish with a deep red stain, obtained through two coats, a brown understain followed by a deep red. The Shell finish was the original sandblast with a near-black stain (though the degree to which it is truly black has varied over the years). Lastly, the Root finish was smooth also but with a light brown finish. Early Dunhill used different briars with different stains, resulting in more distinct and identifiable creations… Over the years, to these traditional styles were added four new finishes: Cumberland, Dress, Chestnut and Amber Root, plus some now-defunct finishes, such as County, Russet and Red Bark.”

There was also a link to a catalogue page that gave examples and dates that the various finishes were introduced (https://pipedia.org/wiki/File:Dunnypipescatalog-1.png).I turned to Pipephil’s dating guide to show how I arrived at the date of manufacture for this pipe (http://www.pipephil.eu/logos/en/dunhill/cledat-en1.html). I am including a chart that is provided there for the dating of a pipe. I have drawn a red box around the pertinent section in the chart. Since the pipe I am working on has no clear patent number but says Patented March 9-15 I take that to clearly show that the pipe was made prior to 1921 and would have been included in the exceptions.I also turned to John Loring’s, The Dunhill Briar Pipe – The Patent Year and After, to work on understanding the DUNHILL [over]DUKE ST. S.W. I found information on page 5 of the book. It read as follows:

The Bruyere pipes were stamped DUNHILL over DUKE ST. S.W. on the shank with an “A” near the bowl to indicate first quality (the reverse side stamping in 1910 is presently unknown) and given shape numbers beginning with 31.

I read earlier sections of the book to do some checking on the Patent Stamping on this pipe. I found what I was looking for on page 58 where he spells out the Smooth Finish Patent Nomenclature Usage. In a very helpful chart he identifies PATENTED MARCH 9-15 that links the pipe to a US Patent for the years between 1915-23.On page 9 it reads:

…Dunhill applied for Canadian and American patents (granted in 1914 and 1915 respectively).

On page 12 it reads:

…From 1910 through October 1918 Dunhill branded its pipes with DUNHILL over DUKE ST. S.W….Inner tube patent numbers or references also serve to denote the earliest the pipe could have been manufactured., e.g. an English patent reference (PAT. No 5861/12) would not have been stamped prior to the 1913 grant, nor a Canadian patent reference (PATENTED 1914) prior to the 1914 grant nor a US patent reference (PATENTED MARCH.9-15 or PAT.AMERICA1915) prior to the 1915 grant.

I now knew that I was working on a Bruyere that came out in between 1915 and 1918 when the Duke St. SW stamp ceased to be used. The shape of the pipe was one of many Billiards that Dunhill put out and that the 66 was a normal Billiard Sitter shape with a taper stem.

I turned to work on the pipe itself. Jeff had carried out his usual thorough cleanup of the pipe. He had reamed it with a PipNet reamer to remove the cake and cleaned the reaming up with a Savinelli Fitsall Pipe Knife. He scrubbed the internals of the bowl and stem with alcohol, cotton swabs and pipe cleaners. He scrubbed the externals with undiluted Murphy’s Oil Soap and rinsed the bowl off with running water. He soaked the stem in Before & After Deoxidizer and once it had soaked rinsed it off with warm water to remove the residual solution. He dried it off and scrubbed it down with Soft Scrub All-Purpose cleaner to remove any oxidation that was still on the stem. The pipe looked very clean when I received it.  I took a photo of the rim top to show the condition. You can see the darkening on the rim top. It is roughened and slightly out of round with nicks on the inner edge. The stem had deep tooth marks and chatter on both sides near the button and on the button itself. The oxidation was gone.  The damage on the topside at the button can be seen in the second photo of the stem surface below.I took photos of the sides of the shank to show the stamping. It is faint but readable as noted above. I removed the stem from the shank and took a photo of the pipe parts to show what I was working with. It is another nice looking 100+ year old pipe.I decided to start the restoration on this one by working on the damage on the inner edge of the bowl. It had darkening and some damage to the edge. The pipe is over a 100 years old so it is not surprising that there was burn and reaming damage marks on the edge from a previous pipeman. I worked it over with a folded piece of 220 grit sandpaper to remove and minimize the damage. When I finished with it, the bowl and the rim top looked much better.I polished the rim top and bowl with micromesh sanding pads – dry sanding with 1500-12000 grit sanding pads. I wiped the bowl down with a damp cloth after each sanding pad. The grain on the pipe is quite beautiful. I rubbed the briar down with Before & After Restoration Balm. I worked it into the briar with my fingertips. The product works to clean, enliven and preserve the briar. I let it sit for 15 minutes while I worked on the stem. After the time passed I buffed it with a cotton cloth to deepen the shine. The briar really comes alive with the balm. I set the bowl aside and work on the stem. I filled in the tooth marks in the stem surface and the edge of the button on the top side. Once the repairs cured I recut the edges of the button with a file and smoothed out the repairs. I sanded them with 220 grit sandpaper to blend them into the surface. I started polishing the stem with 400 grit wet dry sandpaper.

I polished the vulcanite with micromesh sanding pads – 1500-12000 grit pads. I wiped it down with Obsidian Oil after each sanding pad. I used Before & After Pipe Polish – both Fine and Extra Fine to further polish the stem. This Dunhill A Bruyere 42 Patent Dublin from 1915-18 is a beautiful looking piece of briar that has a shape that follows grain. The Bruyere is an early finish that Dunhill specialized in making. The finish on the pipe is in excellent condition. The red and brown stain on the bowl works well to highlight the grain. The polished black vulcanite panel taper stem adds to the mix. I put the stem back on the bowl and buffed the pipe with Blue Diamond on the buffing wheel being careful to not buff the stamping. I gave the bowl and the stem multiple coats of carnauba wax on the buffing wheel and followed that by buffing it with a clean buffing pad. I hand buffed the pipe with a microfiber cloth to deepen the shine. The finished 1915-18 Dunhill A Bruyere 42 Patent Dublin is quite nice and feels great in the hand. Give the finished pipe a look in the photos below. I can only tell you that like the other pipes I am working that it is much prettier in person than the photos capture. The dimensions of the pipe are Length: 5 ½ inches, Height: 1 ¾ inches, Outside diameter of the bowl: 1 ¼ inches, Chamber diameter: ¾ of an inch. The weight of the pipe is 29grams/1.02oz. I am still working through what I am going to do with this old timer. I will keep it with me for a while until I decide. Thanks for walking through the restoration with me as I worked over another beautiful pipe. This pipe is classic reminder that we are not pipe owners; we are pipemen and women who hold our pipes in trust until they pass on into the trust of the next generation.


A Mobile Restoration at 10,804 Feet in the Colorado Mountains: A Butz-Choquin Régate, St. Claude 1275 Billiard


Blog by Dal Stanton

For those in the metric world, I am 3,293 meters above sea level here in skiing heaven, Keystone, Colorado.  One of the wonderful things about being based in Golden, Colorado, is that the Rocky Mountains are literally in our back yard!  With two of my children and their families along with us (that would total 5 grandchildren to dote on!), we’ve enjoyed God’s creation looking at mountain peaks, hiking through pristine countryside and enjoying family – the frosting on the cake.  I packed my mobile work desk, and The Pipe Steward is on the road again!

What does a ‘mobile’ restoration unit look like?  I have a smaller DeWalt TSTAK tool chest that opens on the top with an organizer section and a larger open compartment below.  I’ve ordered a deeper DeWalt TSTAK that will stack with the one I have and hold the taller bottles and baskets that are now in a plastic tub.  I take a few pictures to show my DeWalt mobile system.This Butz-Choquin now on the worktable is the last of 3 pipes that Skeet commissioned from The “Pipe Dreamers” Only! collection.  His first two commissions were truly in the spirit of the Pipe Dreamers mandate – to see in a pipe its potential even when it is in its unrestored rough state.  Here are pictures of the first 2 pipes, a French Jeantet Superior Chimney and an a venerable Kaywoodie Flame Grain Pear – both turned out exceedingly well.

The final pipe is another product of St. Claude, France.  I acquired this Butz Choquin Régate from the ‘Lot of 66’ – the very first larger lot of pipes added to my online collection a few years ago benefiting the Daughters of Bulgaria.  Here are a few pictures to get a closer look.The nomenclature on the left of the shank is stamped in the chiseled diagonal cursive ‘Butz-Choquin’ [over] Régate.  The right side of the shank is stamped, but very thin, ST. CLAUDE-FRANCE [over] 1275, the shape number pointing to a BC Billiard. The stylish slightly bent stem has no ‘BC’ stamping that I can see.  The stem doesn’t appear to be a replacement stem so the expected ‘BC’ stamping on the side of the stem appears to have disappeared into historical oblivion.To provide a brief overview of the Butz-Choquin name, Pipephil.eu’s information is helpful.

The origin of the brand reaches back to 1858 when Jean-Baptiste Choquin in collaboration with his son-in-law Gustave Butz created their first pipe in Metz (France). Since 1951 Butz-Choquin  is a brand of the Berrod-Regad group (Saint-Claude, France). Jean Paul Berrod managed the company from 1969 to 2002 when he retired and sold the corporate to Mr Fabien Gichon. Denis Blanc, already owner of EWA, took over the S.A. Berrod-Regad in 2006.

Pipedia’s Butz-Choquin article includes some BC catalog pages which unfortunately, have no dating included.  The BC Régate line is described in the catalog page below. A quick trip to Google Translate confirms that the English word is, ‘regatta’ which is essentially a boat race, usually including yachts.  The text description of the Régate below is: “The veining of the Briar is shown to particular advantage (BC Silver)”.  With the sales pitch emphasizing the beauty of the grain, I’m hopeful that the Régate on the worktable will live up to this expectation!Looking now at the BC Régate slightly bent Billiard on the table, the chamber is thick with carbon buildup.  This will be removed to allow fresh briar to emerge. The internally beveled rim has some lava flow and nicks and scratches around the rim edge.  Taking a survey of the bowl, it’s been through a bit of wear and tear with nicks, dents, and scratches.  The bowl is darkened with dirt and grime built up for some time.  There is nice looking grain beneath it all which will look nice.  The rim pictured above shows a patch of  dents and scratches.  A large dent is nestled amid several scratches on the lower left side of the bowl. There are 2 large pits that have been filled on the back side of the bowl. The lateral grain on the aft of the bowl looks good.  The heel shows scratches and scrapes but nice-looking bird’s-eye grain providing a promising backdrop. The stem has heavy oxidation and calcium buildup especially on the upper side. The bit has significant tooth chatter on the upper and lower sides. To begin the restoration of the Butz-Choquin Régate Billiard, the slightly bent tapered stem’s airway is cleaned with pipe cleaners wetted with 99% isopropyl.To get a jump on the deep oxidation in vulcanite stem and to work on the tooth chatter, 0000 steel wool is used with Soft Scrub cleanser.  Before starting with the steel wool, I take one more look at the side of the stem to confirm that there is no BC stem stamping.  Again, I see nothing even with a magnifying glass.  The stem scrubbing commences. After scrubbing with Soft Scrub and steel wool, the stem is rinsed with water.  The stem is then added to a soak of Before & After Deoxidizer along with the other pipes commissioned by Skeet which have been completed.After soaking in the Deoxidizer overnight, the stem is hooked using a stiff wire and the Deoxidizer fluid is drained.  I assist the draining by squeegeeing the fluid with my fingers.The airway is cleaned of the Deoxidizer using pipe cleaners and alcohol.  A cotton pad wetted with isopropyl 99% is also used to scrub the stem removing raised oxidation.  To help condition the stem, paraffin oil is applied to the vulcanite and set aside.With the stem on the sideline, I turn to the stummel.  To begin its restoration, the chamber is cleared of the thick carbon cake using the Pipnet Reaming Kit.  I take a fresh picture to mark the starting point.  The cake is thicker on the upper part of the chamber and opens as you go down.I use two smaller blade heads of the Pipnet Reaming Kit and transition after this to the Savinelli Fitsall Tool to scrape the chamber walls.  The clearing of carbon is completed with sanding the chamber wall using 240 grade paper wrapped around a Sharpie Pen to provide some pressure. After wiping the chamber with a cotton cloth to remove carbon dust, the chamber wall is inspected revealing healthy briar.With the carbon cake cleared from the chamber, the next step is to clean the externals of the stummel starting with the rim.  I take a few pictures of the stummel surface before beginning the cleaning to compare.Using undiluted Murphy’s Oil Soap and a cotton pad, the stummel is scrubbed. With the lava flow on the rim, I also employ a brass wired brush to scrub the rim. Brass brushes generally do not hurt the briar surface but help in the cleaning. The stummel is then taken to the sink to clean further.  Unfortunately, I discover that I had forgotten shank brushes which are usually used to scrub the internal mortise and airway.  Instead, with warmish to hot water using liquid anti-oil dishwashing soap, cotton buds are employed to clean the internal mortise and airway.  After scrubbing and rinsing the stummel thoroughly, it is brought back to the worktable.Continuing with the internal cleaning, only one cotton bud and pipe cleaner wetted with isopropyl 99%, were needed to finish cleaning this phase.  I move on!With the internals clean, I take some pictures to survey the condition of the stummel surface after the external cleaning.  The rim cleaned up nicely, though the wear and tear is still evident.The finish on the BC Régate was removed with the cleaning.  The raw briar surface shows a lot of very minuscule scratching on the front and heel of the stummel. On the aft of the stummel are two fills that I noticed earlier.  The fills have shrunk revealing gaps between the briar and filler material. The patches will need to be restored using briar putty – a mixture using briar dust and CA glue.  The old filler material is removed using a sharp dental probe.Since the two pits are small, I decide not to make the putty, but something much like it.  After cleaning the area with alcohol, CA glue is spot dropped into the pits and then sprinkled with briar dust.  A toothpick is used to mix the CA glue and briar dust so that the patch is blended. After the patches are cured, a flat needle file is used to file the excess patch material down to the briar surface.  The file stays on top of the patch so as to not impact the surrounding briar.After filing, 240 sanding paper and then 600 paper are used to further clean the excess patch material.  The patches will blend well as the sanding and polishing process continues.With the pits on the stummel refilled with fresh patch material, I turn next to the rim.  The rim has seen better days. The inner rim bevel remains darkened from charring.  The edge of the rim is skinned and worn down.Overall, the rim needs refreshing.  To do this the chopping board is used as a topping board.  I take a final ‘before’ picture to track the topping progress.The general rule of thumb is to take off only as much briar as needed to freshen the rim.  With 240 grade paper on the topping board, the stummel is inverted and rotated several times over the paper.The first look after the initial rotation shows the progress.  The rotation continues several more times and a second look.  Almost there.Finally, the rim is good to go.  I’ve reached the stopping point with the more abrasive 240 grade paper.Next, 600 paper replaces the 240 grade paper and the stummel is rotated several more times.  I’m satisfied with the progress of this phase of the rim refreshing.Next, the internal rim bevel needs refreshing as well.  This will sharpen the rim definition as well as remove the darkened, stained briar.  A few pictures show the old bevel.  In these pictures, I can still see some roughness on the outer rim edge.  I’m not concerned about this because additional sanding to clean the entire stummel will remove the rough briar on the edge of the rim. Using a hard surface against the back of the sandpaper to provide a firm cut and not a rounding effect, 240 paper is used followed by 600 grade.  This removes the darkened briar as well as provide the rim with fresh, distinct lines.Moving next to sanding the entire stummel to remove the plethora of small cuts, scratches, and dents, I first use a coarse sanding sponge on rough spots on the heel and near the rim, on the upper bowl.  I follow this with medium grade and light grade sanding sponges. I’m careful to avoid the Butz-Choquin nomenclature during the sanding.Next, continuing with sanding, the full regimen of micromesh pads is used.  This transitions from sanding to polishing starting with wet sanding with pads 1500 to 2400 and then dry sanding with pads 3200 to 4000 and 6000 to 12000.  The grain emerges nicely during the micromesh polishing phase.  One more step with the stummel before transitioning to finishing the stem.  I apply Before & After Restoration Balm to the stummel by placing some on my finger and then working it in to the briar surface.  This product by Mark Hoover does a great job coaxing out the subtle hues in the briar.  After working the Balm in thoroughly, I put the stummel aside for about 20 minutes for the Balm to be absorbed.After the time is complete, a microfiber cloth is used to wipe off the excess Balm.  Then, another microfiber cloth is used to buff up the stummel and fully removing the excess Restoration Balm.  As usual, the Balm does a good job bringing out the hues of the briar.  I like it.Turning now to the stem, fresh pictures are taken looking at the upper- and lower-bit area.  There is tooth chatter and some small tooth compressions.  The initial application of steel wool to break up oxidation was also helpful in removing some of the roughness on the bit.  To address the remaining tooth chatter, the heating method is used initially to reduce further the chatter to enable sanding to address the remaining roughness.  Using a Bic lighter, the flame paints the upper and lower bit.  The heat expands the vulcanite enabling it to reclaim its original condition, or closer to it.  The before and after pictures show the comparison.  The method did help, especially on the lower bit. Next, the entire stem is sanded with 240 grade paper.  I first reunite the BC stem and stummel with a sanding disk between them to guard against sanding the end of the stem creating a shouldering effect.Next, the stem is wet sanded with 600 grade paper followed by applying 0000 grade steel wool. Continuing the sanding/polishing process, next the full regimen of micromesh pads is applied.  Starting with wet sanding with pads 1500 to 2400 followed by dry sanding with pads 3200 to 4000 and 6000 to 12000.  Between each set of three pads Obsidian Oil is applied.  Obsidian Oil is used to further condition the vulcanite stem and to guard against oxidation. After trying to reunite the stem and stummel, as often happens, after the cleaning the briar in the mortise has expanded somewhat and the tenon/mortise fit it too tight.  It’s dangerous to force the tenon into the mortise because a cracked shank can be the result. To remedy the tightness, a piece of 240 paper is wrapped around the tenon and pinched to tighten it around the tenon.  I then, while holding the pinched paper stationary around the tenon, rotate the stem to create the abrasiveness to sand down the tenon.  I rotate several times and try the fit in the shank.  Eventually, the fit is snug, but not too tight.Now the home stretch.  With the stem and stummel reunited, a cotton cloth buffing wheel is mounted on the rotary tool and set at about 40% full power.  Blue Diamond compound is then applied to the entire pipe.  Blue Diamond compound is the last stage in using an abrasive for the sanding/polishing of the pipe.  After completing application of the Blue Diamond, a felt cloth is used to buff the pipe to remove the excess compound that collects on the surface.  I want to make sure compound dust is removed before applying wax.After mounting another cotton cloth wheel to the rotary tool maintaining the same speed, carnauba wax is applied to the pipe.  After completing the application of wax, the pipe is given a rigorous hand buffing to raise the shine and to disperse excess wax from the surface.This Butz-Choquin Régate of Saint Claude, France, turned out very well.  The grain is expressive and reminds one of tiger fur on the front and back of the bowl.  Bird’s eye outcroppings also can be seen.  The Billiard shape is a workhorse among pipes and this Billiard cradles nicely in the palm and will serve a new steward well.  The slightly bent stem adds a touch of class.  This is the final of 3 pipes that Skeet commissioned benefiting the Daughters of Bulgaria – helping women and girls who have been trafficked and sexually exploited.  As the commissioner, Skeet will have the first opportunity to claim the BC from The Pipe Steward Store.  Thanks for joining me! ono


New Life for a Patent Era 1915-18 Dunhill A Bruyere 66 Standing Billiard


Blog by Steve Laug

This Dunhill Standing Billiard was one of five Dunhills that came to us in the same lot as the 1922 Dunhill Bruyere Reading Pipe, a cracked shank 1962 Dunhill Shell Briar Pot, a 1928 Dunhill Bruyere EK7 Panel Billiard and the 1905 BBB Calabash Reading Pipe and 1911 BBB Glokar Poker. I have drawn a red box around the pipe in the picture to the left. It is an interesting flat bottom silver banded Standing Billiard. The pipe is stamped on the left side of the shank DUNHILL [over] Duke St. S.W. On the right side of the shank it was stamped MADE IN ENGLAND [over] “INNER TUBE” [over] PATENTED MARCH 9-15 that is followed by the shape number 66.

It was another filthy pipe with a thick cake in the bowl and a heavy lava overflow on the rim top. The finish was tired and dirty with grime and debris stuck to the surface of the briar. The stem has a small white dot on top and the button on the topside had a deep tooth mark and damage. There was tooth chatter and marks on both sides ahead of the button. Jeff took photos of the pipe before he did his clean up work. He took photos of the bowl and rim to give a picture of the thickness of the cake and lava on the rim top. This must have been a favourite pipe to have that thick of a cake and lava buildup. The stem has tooth chatter and marks on both sides. The top is worse than the underside with deep marks in the top of the button. The pipe is old enough that it had an ivory white spot on the topside. Jeff took photos of the bowl from various angles to give a sense of the dirtiness of the finish but also the unique shape of the billiard sitter. It is going to be a real beauty! Jeff took photos of the stamping on the left side of the shank . The stamping on the right side is quite faint and could not be captured with a camera. There are some faint spots but over all it is readable as noted above. The second photo shows the band on the shank stamped Sterling Silver.I turned to Pipedia’s section on Dunhill Root Briar Pipes to get a bit of background on the Dunhill finishes (https://pipedia.org/wiki/Dunhill#Root_Briar). I quote:

Bruyere

The original finish produced (usually made using Calabrian briar), and a big part of developing and marketing the brand. It was the only finish from 1910 until 1917. A dark reddish-brown stain. Before the 1950s, there were three possible finishes for Dunhill pipes. The Bruyere was a smooth finish with a deep red stain, obtained through two coats, a brown understain followed by a deep red.

There was a link on the above site to a section specifically written regarding the Bruyere finish (https://pipedia.org/wiki/Dunhill_Bruyere). I turned there and have included the information from that short article below.

Initially, made from over century-old briar burls, classified by a “B” (denoted highest quality pipe); “DR” (denoted straight-grained) and an “A” (denoted first quality), until early 1915. After that, they became a high-end subset to the Dunhill ‘Bruyere’. The DR and B pipes, a limited production, they should be distinguished as hand-cut in London from burls as opposed to the Bruyere line which was generally finished from French turned bowls until 1917, when the Calabrian briar started to be used, but not completely. Only in 1920 Dunhill took the final step in its pipe making operation and began sourcing and cutting all of its own bowls, proudly announcing thereafter that “no French briar was employed”.

Bruyere pipes were usually made using Calabrian briar, a very dense and hardy briar that has a modest grain but does very well with the deep red stain.

“Before the 1950s, there were three possible finishes for Dunhill pipes. The Bruyere was a smooth finish with a deep red stain, obtained through two coats, a brown understain followed by a deep red. The Shell finish was the original sandblast with a near-black stain (though the degree to which it is truly black has varied over the years). Lastly, the Root finish was smooth also but with a light brown finish. Early Dunhill used different briars with different stains, resulting in more distinct and identifiable creations… Over the years, to these traditional styles were added four new finishes: Cumberland, Dress, Chestnut and Amber Root, plus some now-defunct finishes, such as County, Russet and Red Bark.”

There was also a link to a catalogue page that gave examples and dates that the various finishes were introduced (https://pipedia.org/wiki/File:Dunnypipescatalog-1.png)I turned to Pipephil’s dating guide to show how I arrived at the date of manufacture for this pipe (http://www.pipephil.eu/logos/en/dunhill/cledat-en1.html). I am including a chart that is provided there for the dating of a pipe. I have drawn a red box around the pertinent section in the chart. Since the pipe I am working on has no clear patent number but says Patented March 9-15 I take that to clearly show that the pipe was made prior to 1921 and would have been included in the exceptions.I also turned to John Loring’s, The Dunhill Briar Pipe – The Patent Year and After, to work on understanding the DUNHILL [over]DUKE ST. S.W. I found information on page 5 of the book. It read as follows:

The Bruyere pipes were stamped DUNHILL over DUKE ST. S.W. on the shank with an “A” near the bowl to indicate first quality (the reverse side stamping in 1910 is presently unknown) and given shape numbers beginning with 31.

I read earlier sections of the book to do some checking on the Patent Stamping on this pipe. I found what I was looking for on page 58 where he spells out the Smooth Finish Patent Nomenclature Usage. In a very helpful chart he identifies PATENTED MARCH 9-15 that links the pipe to a US Patent for the years between 1915-23.On page 9 it reads:

…Dunhill applied for Canadian and American patents (granted in 1914 and 1915 respectively).

On page 12 it reads:

…From 1910 through October 1918 Dunhill branded its pipes with DUNHILL over DUKE ST. S.W….Inner tube patent numbers or references also serve to denote the earliest the pipe could have been manufactured., e.g. an English patent reference (PAT. No 5861/12) would not have been stamped prior to the 1913 grant, nor a Canadian patent reference (PATENTED 1914) prior to the 1914 grant nor a US patent reference (PATENTED MARCH.9-15 or PAT.AMERICA1915) prior to the 1915 grant.

I now knew that I was working on a Bruyere that came out in between 1915 and 1918 when the Duke St. SW stamp ceased to be used. The shape of the pipe was one of many Billiards that Dunhill put out and that the 66 was a normal Billiard Sitter shape with a taper stem.

I turned to work on the pipe itself. Jeff had carried out his usual thorough cleanup of the pipe. He had reamed it with a PipNet reamer to remove the cake and cleaned the reaming up with a Savinelli Fitsall Pipe Knife. He scrubbed the internals of the bowl and stem with alcohol, cotton swabs and pipe cleaners. He scrubbed the externals with undiluted Murphy’s Oil Soap and rinsed the bowl off with running water. He soaked the stem in Before & After Deoxidizer and once it had soaked rinsed it off with warm water to remove the residual solution. He dried it off and scrubbed it down with Soft Scrub All-Purpose cleaner to remove any oxidation that was still on the stem. The pipe looked very clean when I received it. I took a photo of the rim top to show the condition. You can see the darkening on the rim top. It is roughened and slightly out of round with nicks on the inner edge. The stem had deep tooth marks and chatter on both sides near the button and on the button itself. The oxidation was gone.  The damage on the topside at the button can be seen in the second photo of the stem surface below.I took photos of the sides of the shank to show the stamping. It is faint but readable as noted above. I removed the stem from the shank and took a photo of the pipe parts to show what I was working with. It is a nice looking pipe.I decided to start the restoration on this one by working on the damage on the inner edge of the bowl. It had darkening and some damage to the edge. The pipe is almost 100 years old so it is not surprising that there was burn and reaming damage marks on the edge from a previous pipeman. I worked it over with a folded piece of 220 grit sandpaper to remove and minimize the damage. When I finished with it, the bowl and the rim top looked much better. I polished the rim top and bowl with micromesh sanding pads – dry sanding with 1500-12000 grit sanding pads. I wiped the bowl down with a damp cloth after each sanding pad. Even though there were small marks on the briar from the pipe’s journey it began to take on a shine.   I rubbed the briar down with Before & After Restoration Balm. I worked it into the briar with my fingertips. The product works to clean, enliven and preserve the briar. I let it sit for 15 minutes while I worked on the stem. After the time passed I buffed it with a cotton cloth to deepen the shine. The briar really comes alive with the balm. I set the bowl aside and work on the stem. I filled in the tooth marks in the stem surface and rebuilt the edge of the button on the top side. Once the repairs cured I recut the edges of the button with a file and smoothed out the repairs. I sanded them with 220 grit sandpaper to blend them into the surface. I started polishing the stem with 400 grit wet dry sandpaper. I polished the vulcanite with micromesh sanding pads – 1500-12000 grit pads. I wiped it down with Obsidian Oil after each sanding pad. I used Before & After Pipe Polish – both Fine and Extra Fine to further polish the stem.  This Dunhill A Bruyere 66 Patent Standing Billiard from 1915-18 is a beautiful looking piece of briar that has a shape that follows grain. The Bruyere is an early finish that Dunhill specialized in making. The finish on the pipe is in excellent condition. The red and brown stain on the bowl works well to highlight the grain. The Sterling Silver Band is a great break between the briar and the stem. The polished black vulcanite panel taper stem adds to the mix. I put the stem back on the bowl and buffed the pipe with Blue Diamond on the buffing wheel being careful to not buff the stamping. I gave the bowl and the stem multiple coats of carnauba wax on the buffing wheel and followed that by buffing it with a clean buffing pad. I hand buffed the pipe with a microfiber cloth to deepen the shine. The finished 1915-18 Dunhill A Bruyere 66 Patent Standing Billiard is quite nice and feels great in the hand. Give the finished pipe a look in the photos below. I can only tell you that like the other pipes I am working that it is much prettier in person than the photos capture. The dimensions of the pipe are Length: 5 inches, Height: 1 ¾ inches, Outside diameter of the bowl: 1  ¼ inches, Chamber diameter: ¾ of an inch. The weight of the pipe is 31grams/1.09oz. I am still working through what I am going to do with this old timer. I will keep it with me for a while until I decide. Thanks for walking through the restoration with me as I worked over another beautiful pipe. This pipe is classic reminder that we are not pipe owners; we are pipemen and women who hold our pipes in trust until they pass on into the trust of the next generation.

Breathing Life into a 1958 Dunhill Root Briar 90 Group 2R Poker


Blog by Steve Laug

The next pipe on the table came to us in a group of pipes that we purchased from an Antique Mall on the Oregon Coast, Oregon, USA. It is a Dunhill Root Briar Poker/Sitter that is in good condition. It is stamped both sides of the shank. On the left side it is stamped with the shape number 90 followed by Dunhill [over] Root Briar. On the right side it is stamped with 2 in a circle followed by R for Root Briar next to the bowl. That is followed by Made in [over] England8. Interpreting that stamp it is as follows: The 90 is the shape for a Poker. The Dunhill Root Briar is the finish which is corroborated by the R at the end of the stamping. The 8 following the D of England gives the date the pipe was made and identifies it as 1958. The stamping is clear and readable. The age of the pipe and the oils in the finish has given the pipe a rich reddish brown finish. There is also some amazing grain that the shape follows well. The finish was dirty with dust ground into the surface of the bowl and shank. There was a thick cake in the bowl and tobacco debris stuck to the walls of the bowl. The rim top showed darkening and some lava on the surface. The vulcanite taper stem was oxidized, calcified and had light tooth marks and chatter ahead of the button on both sides.  Jeff took photos of the pipe to show what it looked like before he started working on it.  He took photos of the bowl and rim top to show the thickness of the cake and the darkening and lava overflow on the rim top. There were also nicks around the outer edge of the bowl. The photos of the stem show the oxidation, calcification and tooth marks and chatter on the surface on both sides.  The photos of the sides and heel of the bowl show the great grain on the pipe. It is a beauty under the grime and dust.    The stamping on the sides of the shank is shown in the photos below. It looks faint but is still readable. It reads as noted and explained above. The third photo shows the white spot on the stem.      I turned to Pipedia’s section on Dunhill Root Briar Pipes to get a bit of background on the Dunhill finishes (https://pipedia.org/wiki/Dunhill#Root_Briar). I quote:

Root Briar

Introduced in 1931 and highly prized because the grain is more pronounced in this finish (usually made using Corsican briar – was made exclusively from that briar into the 60s). The Root Briar finish requires a perfectly clean bowl with excellent graining. Therefore, it is the most expensive of the Dunhill pipes. Corsican briar was most often used for the Root finish since it was generally more finely grained. This is a rare finish, due to the scarcity of briar suitable to achieve it. These pipes are normally only available at Company stores, or at Principle Pipe Dealers. Straight grained pipes were formerly graded A through H, but are now only “Dr’s” and graded with one to six stars, with the letters G and H still used for the very finest pieces.

“Dunhill introduced its third major finish, the Root finish, in 1931. Corsican mountain briar is characteristically beautifully grained and the Root was made exclusively from that briar into the 1960s. The pipe was finished with a light natural stain to allow the beauty of the graining to show through. Although always available with a traditional black vulcanite bit, the Root was introduced in either 1930 or more likely 1931 and fitted with a marble brown dark and light grained vulcanite bit that has since become known as the ‘bowling ball’ bit because of the similarity in appearance between the bit’s finish and that of some bowling balls of the time. With the war, however, the bowling ball bit was dropped from production. Through 1954 (and after) the Root pipe nomenclature (including shape numbers) was identical to that of the Bruyere except that instead of the “A” of the Bruyere, the Root was stamped with an “R”. In 1952 when the finish rather then LONDON was placed under DUNHILL, ROOT BRIAR rather then BRUYERE was used for the Root.” Loring, J. C., The Dunhill Briar Pipe, The Patent Years and After (self-published, Chicago, 1998).

There was also a link to a catalogue page that gave examples and dates that the various finishes were introduced (https://pipedia.org/wiki/File:Dunnypipescatalog-1.png). I turned to Pipephil’s dating guide to show how I arrived at the date of manufacture for this pipe (http://www.pipephil.eu/logos/en/dunhill/cledat-en1a.html). I am including the chart that is provided there for the dating a pipe. I have drawn a red box around the section. Since the pipe I am working on has a suffix 8 that is raised, underlined superscript it points to the 1958 line on the chart below.I now knew that I was working on a Root Briar that came out in 1958. The shape of the pipe was a Poker/Sitter circle 2R in a shape 90 with a taper stem.

I turned to work on the pipe itself. Jeff had carried out his usual thorough cleanup of the pipe. He had reamed it with a PipNet reamer to remove the cake and cleaned the reaming up with a Savinelli Fitsall Pipe Knife. He scrubbed the internals of the bowl and stem with alcohol, cotton swabs and pipe cleaners. He scrubbed the externals with undiluted Murphy’s Oil Soap and rinsed the bowl off with running water. He soaked the stem in Before & After Deoxidizer and once it had soaked rinsed it off with warm water to remove the residual solution. He dried it off and scrubbed it down with Soft Scrub All-Purpose cleaner to remove any oxidation that was still on the stem. The pipe looked very clean when I received it.    I took a photo of the rim top to show the condition. You can see the darkening on the rim top. The bowl is roughened and slightly out of round. The stem came out looking quite good. There are light tooth marks and chatter on both sides near the button but the oxidation was gone.     I took photos of the sides of the shank to show the stamping. It is faint but readable as noted above.      I removed the stem from the shank and took a photo of the pipe parts to show what I was working with. It is a nice looking pipe. I decided to start the restoration on this one by working on the damage on the inner edge of the bowl. It had darkening and some damage to the edge. There were burn and reaming damage marks on the edge from a previous pipeman. I worked it over with a folded piece of 220 grit sandpaper to minimize the damage on the edge. When I finished with it, the bowl and the rim top looked much better.          I polished the rim top and bowl with micromesh sanding pads – dry sanding with 1500-12000 grit sanding pads. I wiped the bowl down with a damp cloth after each sanding pad. The briar began to take on a shine.     With the repair completed I rubbed the briar down with Before & After Restoration Balm. I worked it into the briar with my fingertips. The product works to clean, enliven and preserve the briar. I let it sit for 15 minutes while I worked on the stem. After the time passed I buffed it with a cotton cloth to deepen the shine. The briar really comes alive with the balm.     I set the bowl aside and turned my attention to the stem. I polished the vulcanite with micromesh sanding pads – 1500-12000 grit pads. I wiped it down with Obsidian Oil after each sanding pad. I used Before & After Pipe Polish – both Fine and Extra Fine to further polish the stem.   This Dunhill Root Briar 90 Group 2R Poker from 1958 is a beautiful looking piece of briar that has a shape that follows grain. It is a great looking pipe that came out looking even better after the cleanup. The Root Briar is an early finish that Dunhill specialized in making. The finish on the pipe is in excellent condition. The brown stains on the bowl works well to highlight the grain. The polished black vulcanite taper stem adds to the mix. With the grime gone from the finish and the bowl it was a beauty and is eye-catching. I put the stem back on the bowl and buffed the pipe with Blue Diamond on the buffing wheel being careful to not buff the stamping. I gave the bowl and the stem multiple coats of carnauba wax on the buffing wheel and followed that by buffing it with a clean buffing pad. I hand buffed the pipe with a microfiber cloth to deepen the shine. The finished 1958 Root Briar 90 Poker is quite nice and feels great in the hand. Give the finished pipe a look in the photos below. I can only tell you that like the other pipes I am working that it is much prettier in person than the photos capture. The dimensions of the pipe are Length: 4 ¾ inches, Height: 1 5/8 inches, Outside diameter of the bowl: 1 ¼ inches, Chamber diameter: ¾ of an inch. The weight of the pipe is 27grams/.95oz. It will soon be added to the British Pipe Makers section on the rebornpipes store. Thanks for walking through the restoration with me as I worked over another beautiful pipe. Remember we are not pipe owners; we are pipemen and women who hold our pipes in trust until they pass on into the trust of the next generation.

New Life for another Dunhill – A Patent Era 1928 Dunhill Bruyere EK7 Panel Billiard


Blog by Steve Laug

This Dunhill Panel Billiard was one of five other Billiards that came to us in the same lot as the 1922 Dunhill Bruyere Reading Pipe, a cracked shank 1962 Dunhill Shell Briar Pot and the 1905 BBB Calabash Reading Pipe and 1911 BBB Glokar Poker. I have drawn a red box around the pipe in the picture to the left. It is an interesting square shank Panel billiard. The pipe is stamped on the left side of the shank DUNHILL [over] LONDON. On the right side of the shank it was stamped “INNER TUBE [over] PAT. NO 116989/178 that is followed by the shape number EK7.

It was another filthy pipe with a thick cake in the bowl and a heavy lava overflow on the rim top. The finish was tired and dirty with grime and debris stuck to the surface of the briar. The stem has a small white dot on top and the button on the topside had a deep tooth mark and damage. There was tooth chatter and marks on both sides ahead of the button. Jeff took photos of the pipe before he did his clean up work.   He took photos of the bowl and rim to give a picture of the thickness of the cake and lava on the rim top. This must have been a favourite pipe to have that thick of a cake and lava buildup. The stem had a chip out of the button on the topside and tooth chatter and marks on both sides. It was a square stem that looked very good with the pipe. Jeff took photos of the bowl from various angles to give a sense of the dirtiness of the finish but also the unique shape of the panel billiard. It is going to be a real beauty! Jeff took photos of the stamping on the sides of the shank . There are some faint spots but over all it is readable as noted above.There was also a Reg. No. stamped on the stem that read REG.NO. [over] 654638. I looked up what the Reg. No. stamp meant in John Loring’s The Dunhill Briar Pipe – The Patent Year and After, pg. 42. I quote the pertinent section below.

Prior to the war the bottom of the Dunhill black vulcanite bit had a “REG. No 654638” stamped (without color) on thee underside of the bit near the meeting point with the shank. I have yet been able to determine what the number refers to but I am fairly certain it is not to the White Spot trade mark since the stamping has been consistently found on pipe bits dating back to the 1918 while the White Spot trademark stamp was not awarded until 1922.

I turned to Pipedia’s section on Dunhill Root Briar Pipes to get a bit of background on the Dunhill finishes (https://pipedia.org/wiki/Dunhill#Root_Briar). I quote:

Bruyere

The original finish produced (usually made using Calabrian briar), and a big part of developing and marketing the brand. It was the only finish from 1910 until 1917. A dark reddish-brown stain. Before the 1950s, there were three possible finishes for Dunhill pipes. The Bruyere was a smooth finish with a deep red stain, obtained through two coats, a brown understain followed by a deep red.

There was a link on the above site to a section specifically written regarding the Bruyere finish (https://pipedia.org/wiki/Dunhill_Bruyere). I turned there and have included the information from that short article below.

Initially, made from over century-old briar burls, classified by a “B” (denoted highest quality pipe); “DR” (denoted straight-grained) and an “A” (denoted first quality), until early 1915. After that, they became a high-end subset to the Dunhill ‘Bruyere’. The DR and B pipes, a limited production, they should be distinguished as hand-cut in London from burls as opposed to the Bruyere line which was generally finished from French turned bowls until 1917, when the Calabrian briar started to be used, but not completely. Only in 1920 Dunhill took the final step in its pipe making operation and began sourcing and cutting all of its own bowls, proudly announcing thereafter that “no French briar was employed”.

Bruyere pipes were usually made using Calabrian briar, a very dense and hardy briar that has a modest grain but does very well with the deep red stain.

“Before the 1950s, there were three possible finishes for Dunhill pipes. The Bruyere was a smooth finish with a deep red stain, obtained through two coats, a brown understain followed by a deep red. The Shell finish was the original sandblast with a near-black stain (though the degree to which it is truly black has varied over the years). Lastly, the Root finish was smooth also but with a light brown finish. Early Dunhill used different briars with different stains, resulting in more distinct and identifiable creations… Over the years, to these traditional styles were added four new finishes: Cumberland, Dress, Chestnut and Amber Root, plus some now-defunct finishes, such as County, Russet and Red Bark.”

There was also a link to a catalogue page that gave examples and dates that the various finishes were introduced (https://pipedia.org/wiki/File:Dunnypipescatalog-1.png).I turned to Pipephil’s dating guide to show how I arrived at the date of manufacture for this pipe (http://www.pipephil.eu/logos/en/dunhill/cledat-en1.html). I am including two charts that are provided there for the dating a pipe. I have drawn a red box around the pertinent section in each chart. Since the pipe I am working on has a suffix 8 that is raised superscript it points to 1920+ 8 for a date of 1928 on the charts below. I also turned to John Loring’s, The Dunhill Briar Pipe – The Patent Year and After, to do some checking on the Patent number on this pipe. I found what I was looking for on page 58 where he spells out the Smooth Finish Patent Nomenclature Usage. In a very helpful chart he identifies the Pat No. 116989/17 as occurring between 1918? and 1934. The date stamp of 8 coincided with that identifying the year as 1928.

I now knew that I was working on a Bruyere that came out in 1928 because of the date stamp 8. The shape of the pipe was one of many Billiards that Dunhill put out and that the EK7 was a normal Panel Billiard shape with a taper stem. The Reg. No. on the underside of the stem also fits well within that date time.

I turned to work on the pipe itself. Jeff had carried out his usual thorough cleanup of the pipe. He had reamed it with a PipNet reamer to remove the cake and cleaned the reaming up with a Savinelli Fitsall Pipe Knife. He scrubbed the internals of the bowl and stem with alcohol, cotton swabs and pipe cleaners. He scrubbed the externals with undiluted Murphy’s Oil Soap and rinsed the bowl off with running water. He soaked the stem in Before & After Deoxidizer and once it had soaked rinsed it off with warm water to remove the residual solution. He dried it off and scrubbed it down with Soft Scrub All-Purpose cleaner to remove any oxidation that was still on the stem. The pipe looked very clean when I received it.  I took a photo of the rim top to show the condition. You can see the darkening on the rim top. It is roughened and slightly out of round with nicks on the inner edge. The stem came out looking quite good. There are light tooth marks and chatter on both sides near the button but the oxidation was gone.  The damage on the topside at the button can be seen in the second photo of the stem surface below.I took photos of the sides of the shank to show the stamping. It is clear and readable as noted above. I removed the stem from the shank and took a photo of the pipe parts to show what I was working with. It is a nice looking pipe.I decided to start the restoration on this one by working on the damage on the inner edge of the bowl. It had darkening and some damage to the edge. The pipe is almost 100 years old so it is not surprising that there was burn and reaming damage marks on the edge from a previous pipeman. I worked it over with a folded piece of 220 grit sandpaper to remove and minimize the damage. When I finished with it, the bowl and the rim top looked much better.I polished the rim top and bowl with micromesh sanding pads – dry sanding with 1500-12000 grit sanding pads. I wiped the bowl down with a damp cloth after each sanding pad. Even though there were small marks on the briar from the pipe’s journey it began to take on a shine.     I rubbed the briar down with Before & After Restoration Balm. I worked it into the briar with my fingertips. The product works to clean, enliven and preserve the briar. I let it sit for 15 minutes while I worked on the stem. After the time passed I buffed it with a cotton cloth to deepen the shine. The briar really comes alive with the balm. I set the bowl aside and work on the stem. I greased a pipe cleaner with Vaseline and inserted it in the button and filled in the damaged areas with black rubberized Loctite 380 CA glue. I sprayed the repair with an accelerator and removed the pipe cleaner. I checked and the airway was wide open… Whew! Once it cured I used files to sharpen the edge of the button and smooth out the top and undersides. I sanded it with 220 grit sandpaper to blend it into the surrounding vulcanite. I started polishing it with 400 grit wet dry sandpaper. I polished the vulcanite with micromesh sanding pads – 1500-12000 grit pads. I wiped it down with Obsidian Oil after each sanding pad. I used Before & After Pipe Polish – both Fine and Extra Fine to further polish the stem. This Dunhill Bruyere EK7 Patent Panel Billiard from 1928 is a beautiful looking piece of briar that has a shape that follows grain. The Bruyere is an early finish that Dunhill specialized in making. The finish on the pipe is in excellent condition. The red and brown stain on the bowl works well to highlight the grain. The polished black vulcanite panel taper stem adds to the mix. I put the stem back on the bowl and buffed the pipe with Blue Diamond on the buffing wheel being careful to not buff the stamping. I gave the bowl and the stem multiple coats of carnauba wax on the buffing wheel and followed that by buffing it with a clean buffing pad. I hand buffed the pipe with a microfiber cloth to deepen the shine. The finished Bruyere EK7 Panel Billiard is quite nice and feels great in the hand. Give the finished pipe a look in the photos below. I can only tell you that like the other pipes I am working that it is much prettier in person than the photos capture. The dimensions of the pipe are Length: 5 ½ inches, Height: 1 ¾ inches, Outside diameter of the bowl: 1 inch, Chamber diameter: ¾ of an inch. The weight of the pipe is 29grams/1.02oz. I am still working through what I am going to do with this old timer. I will keep it with me for a while until I decide. Thanks for walking through the restoration with me as I worked over another beautiful pipe. This pipe is classic reminder that we are not pipe owners; we are pipemen and women who hold our pipes in trust until they pass on into the trust of the next generation.