Tag Archives: restemming a pipe

Restemming and Restoring a Weber Deep Grain Lovat


Blog by Steve Laug

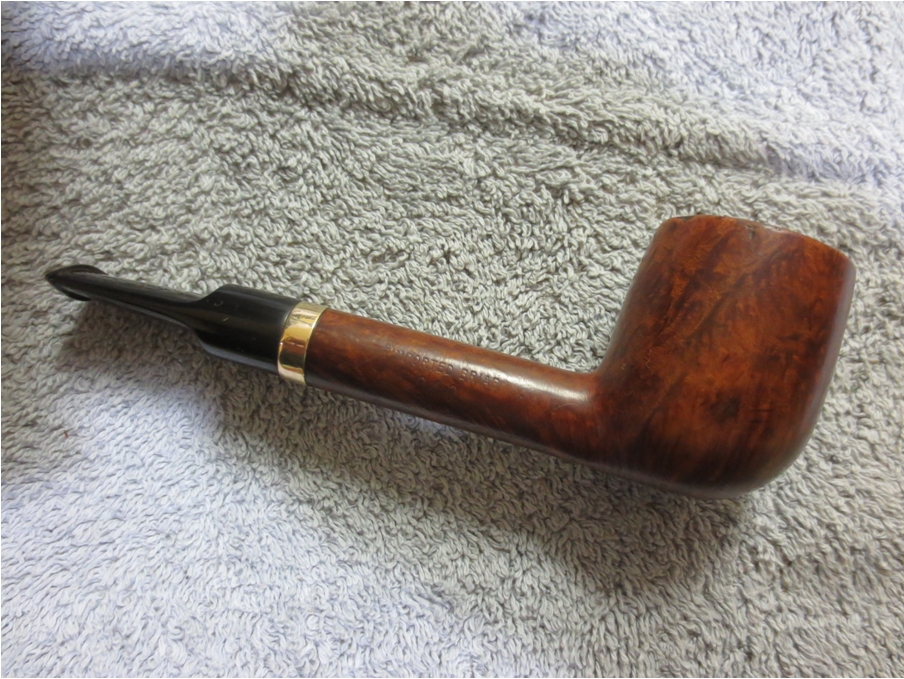
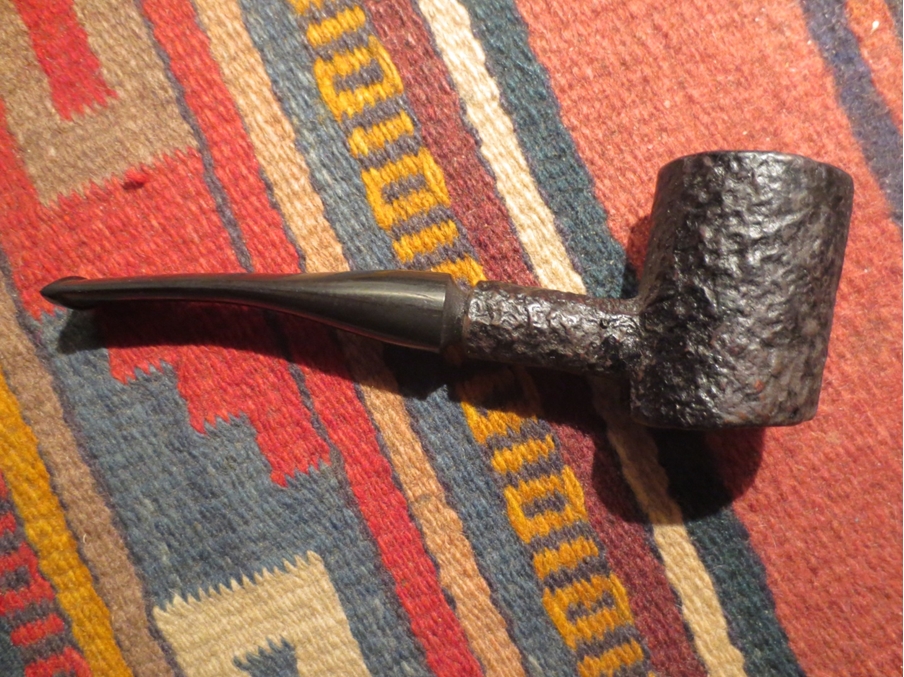
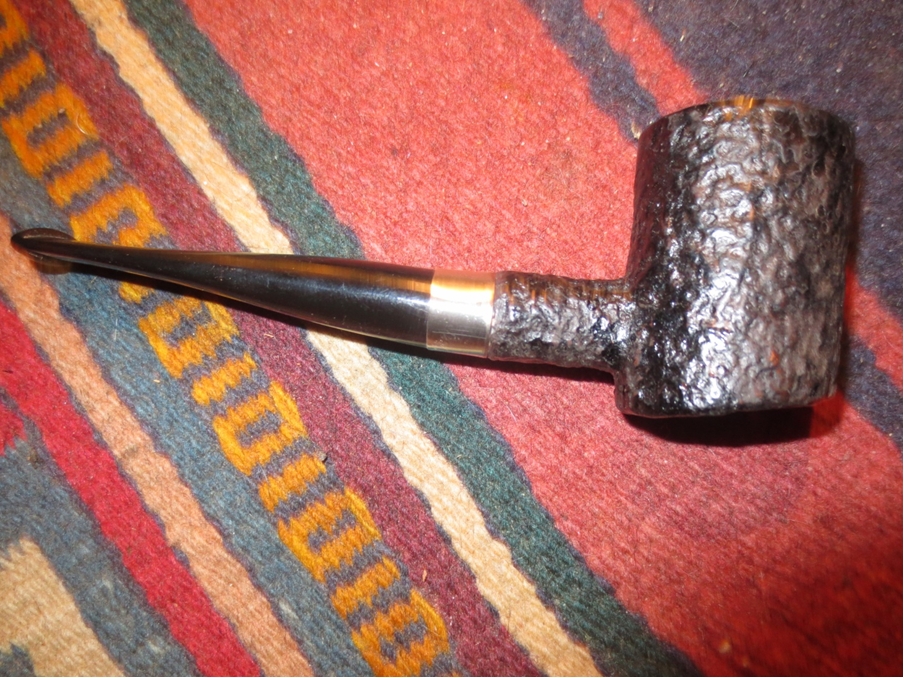
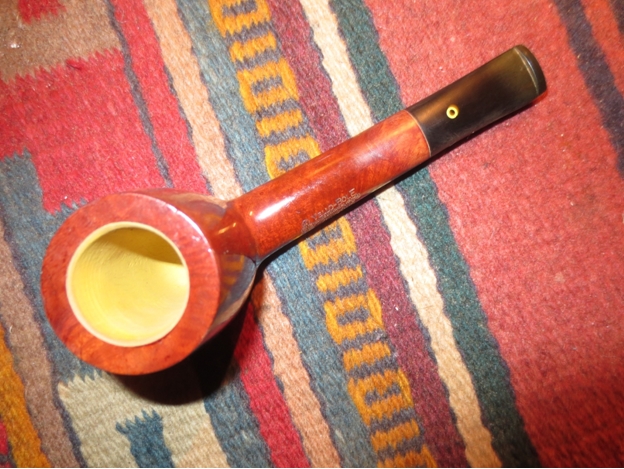
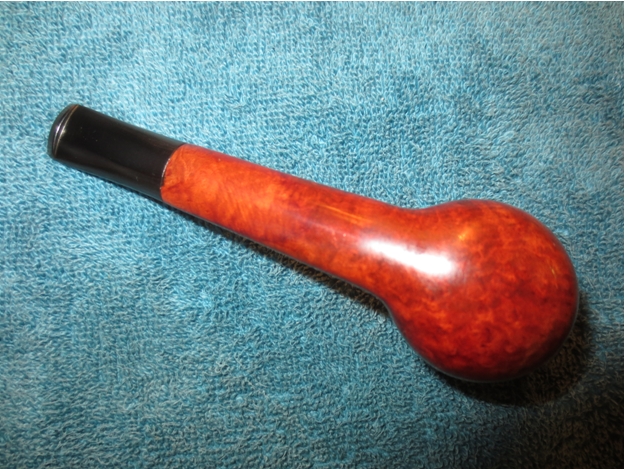
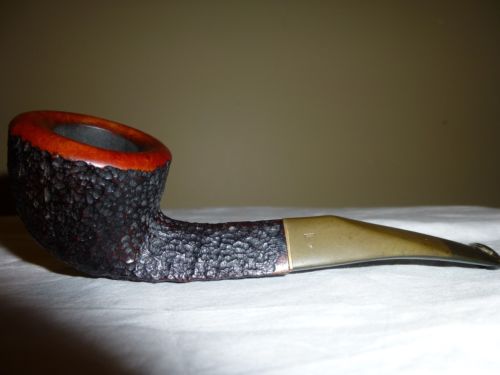
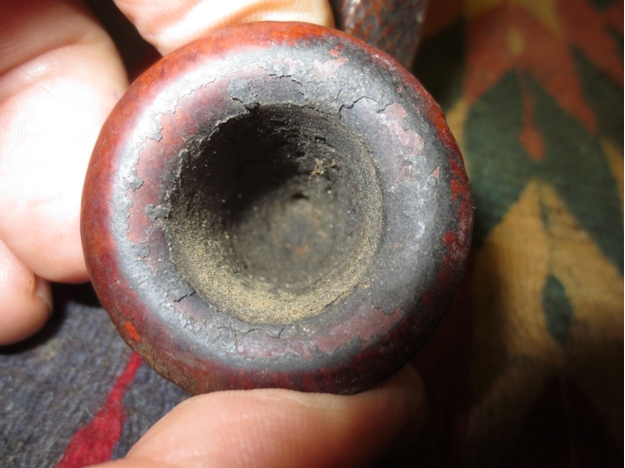
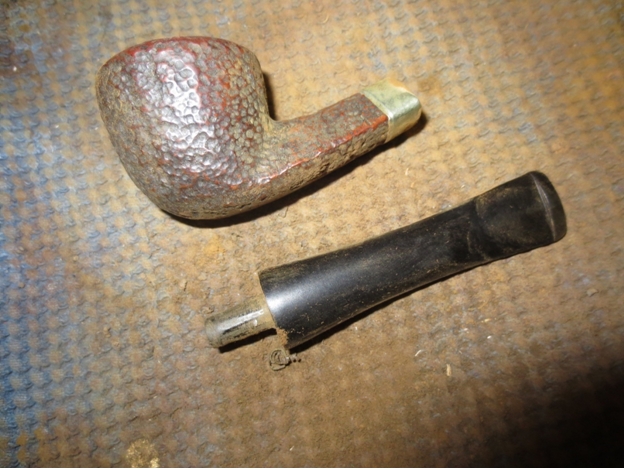
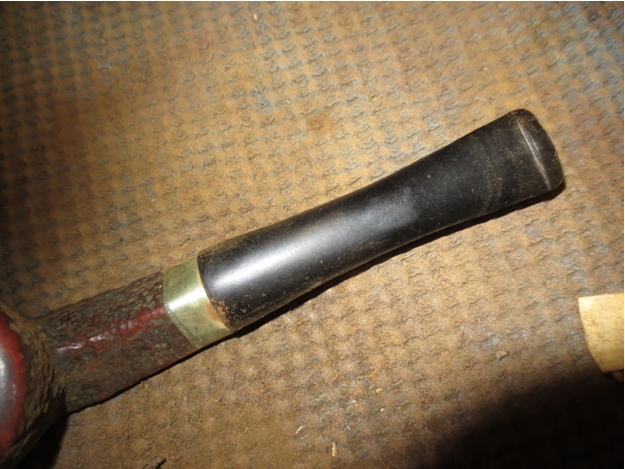
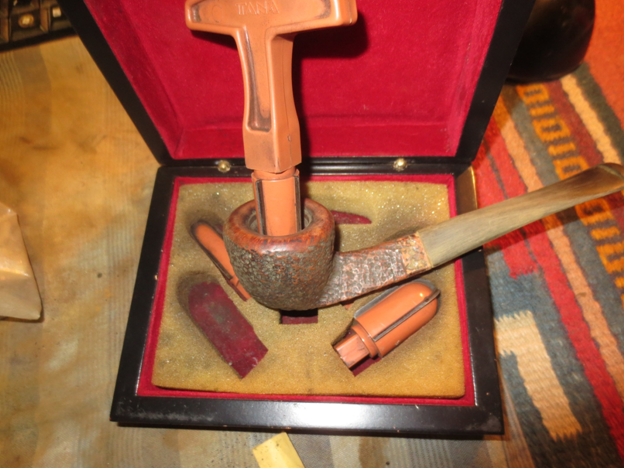
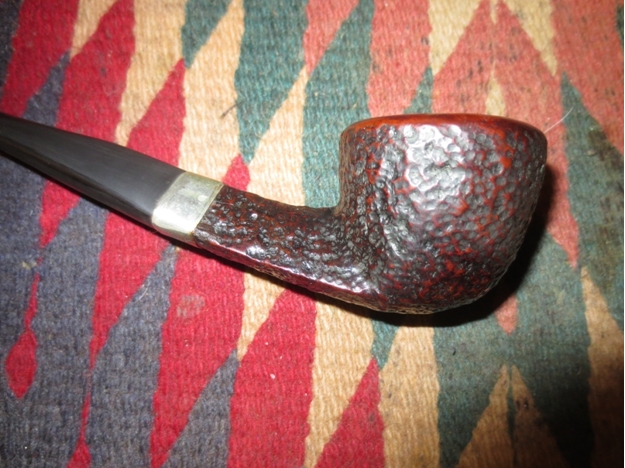
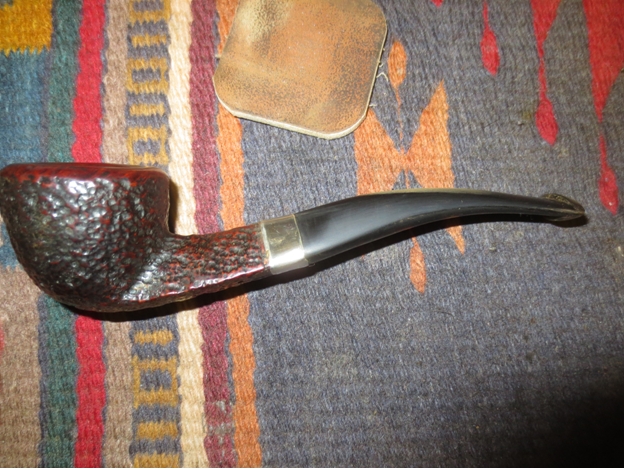
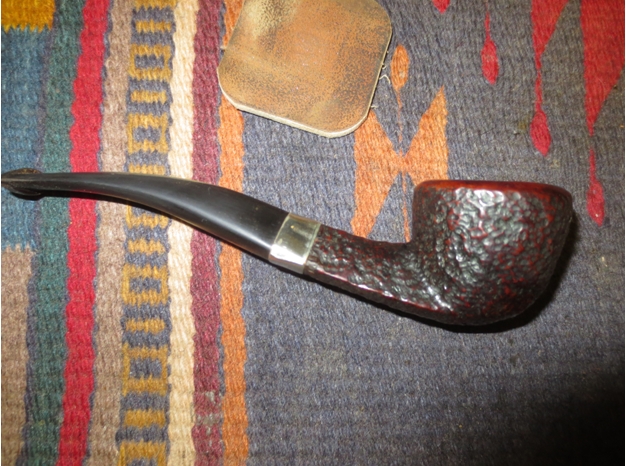
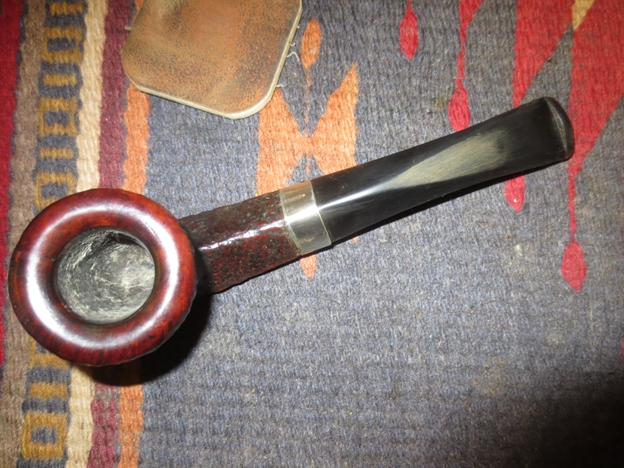
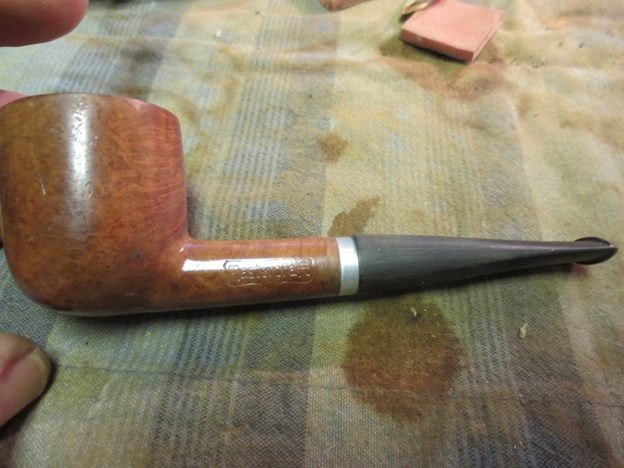
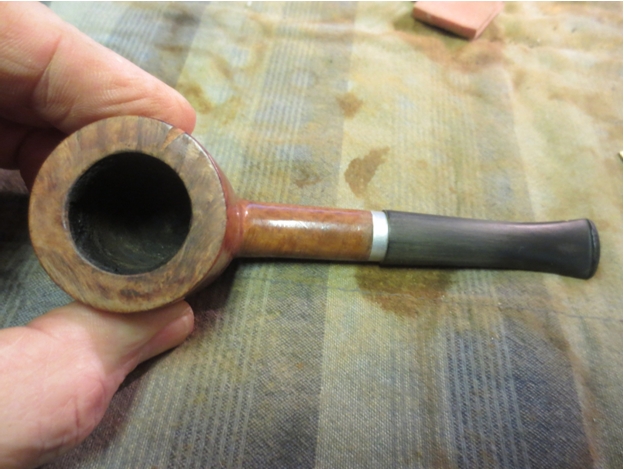
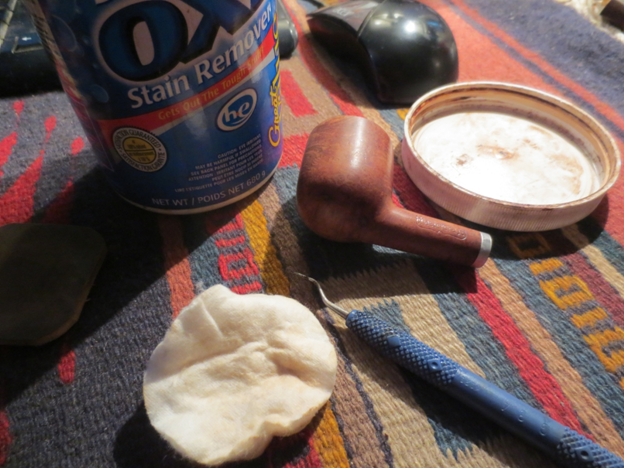
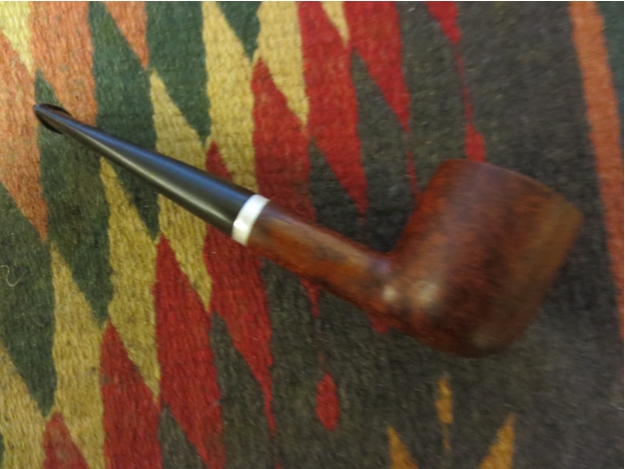
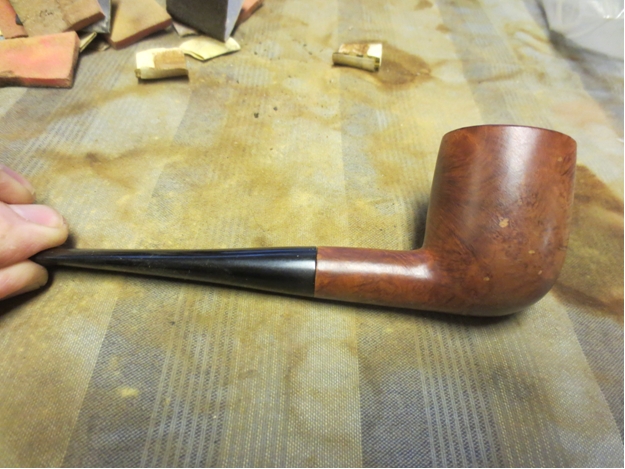
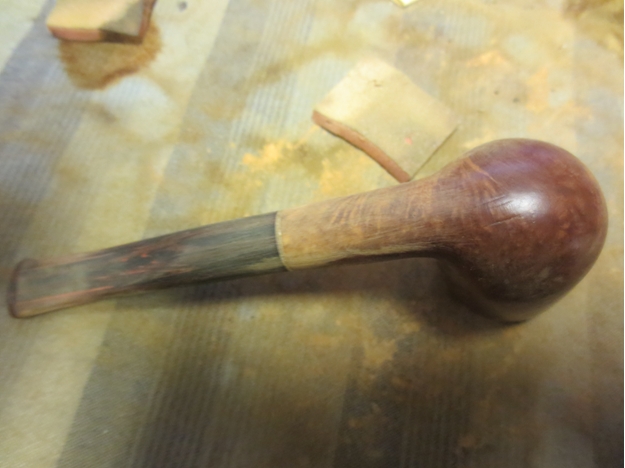
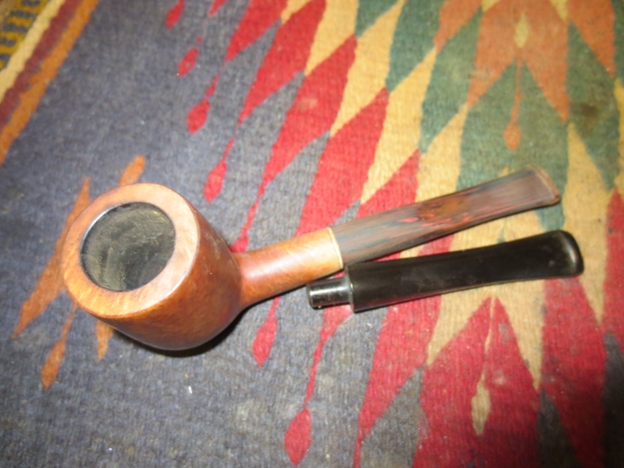
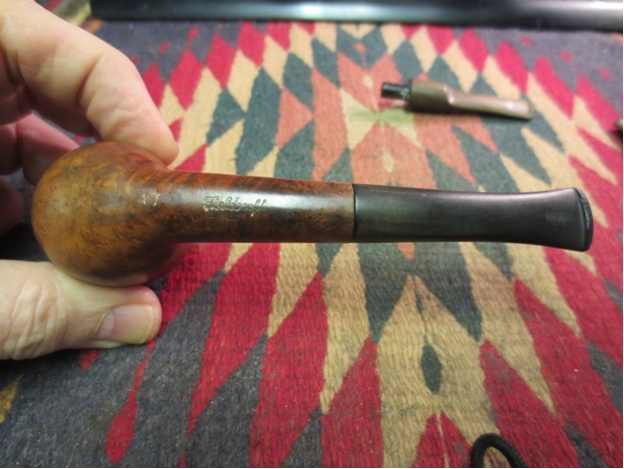
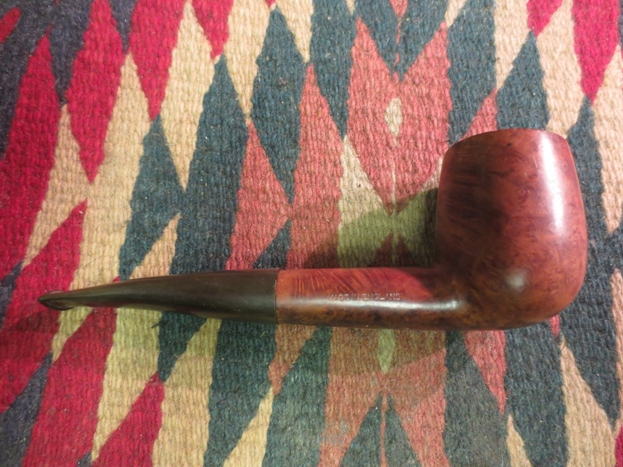
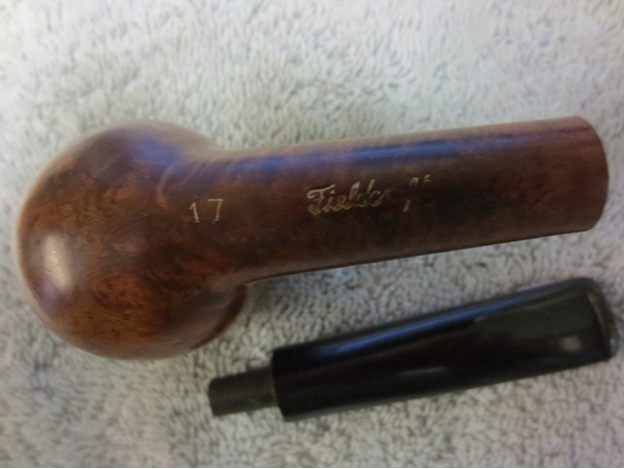
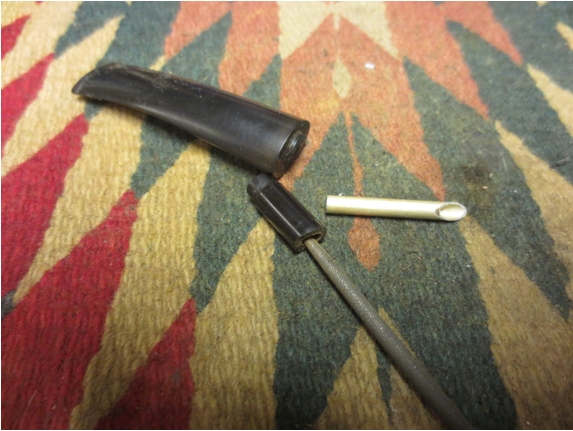
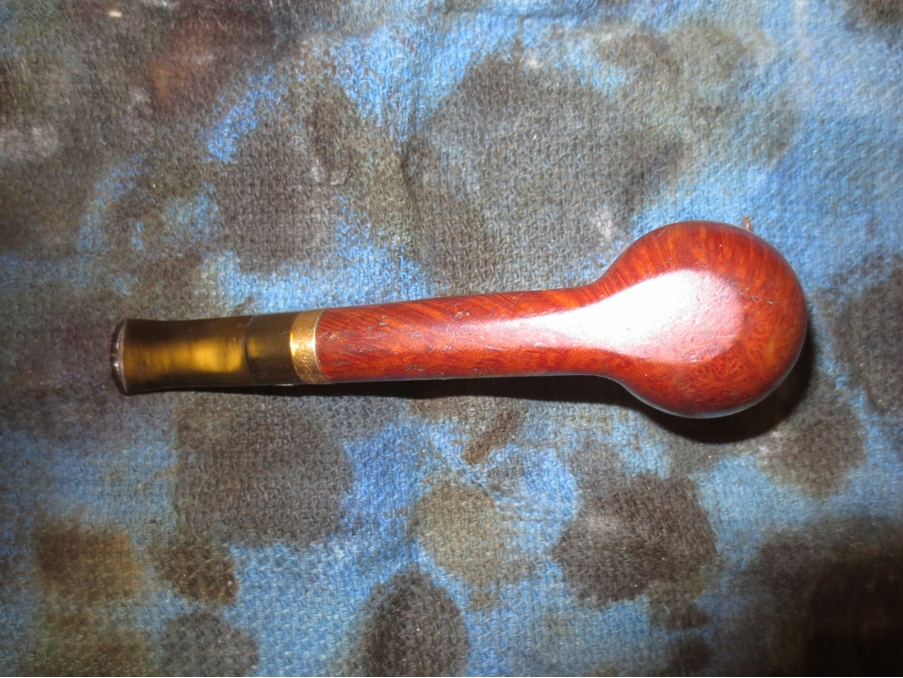
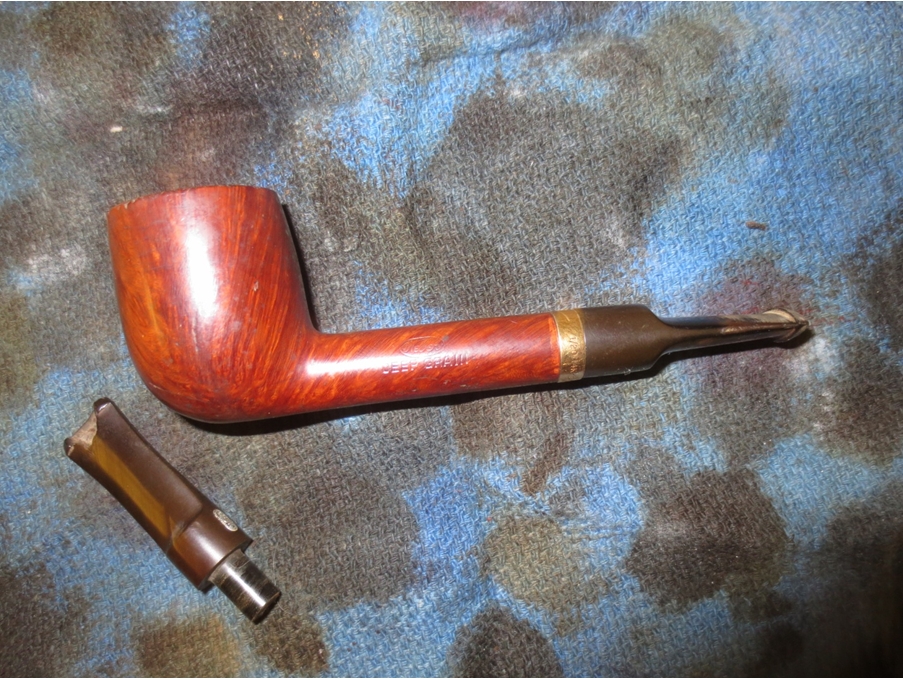
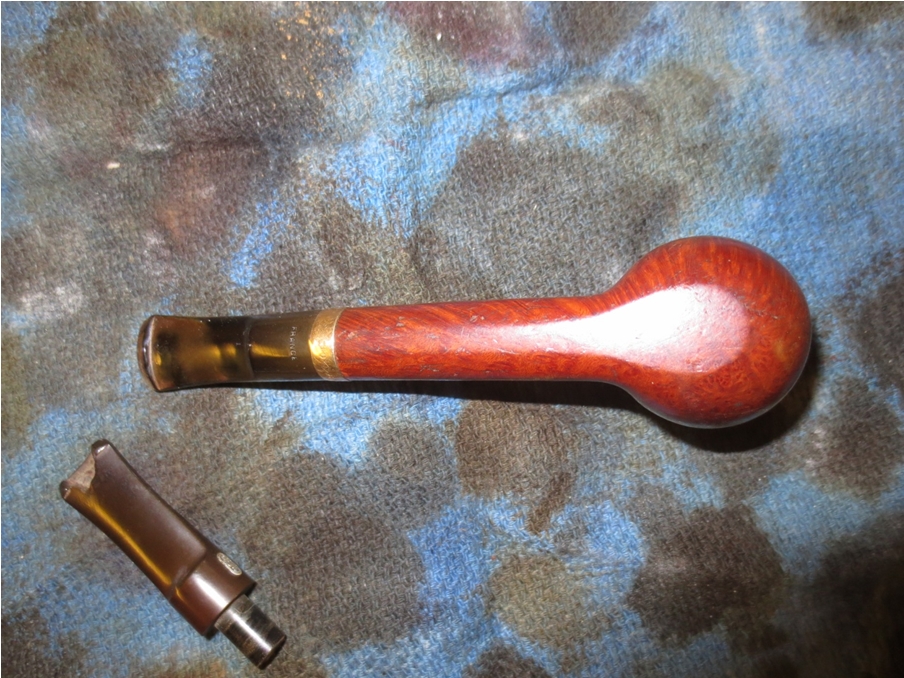
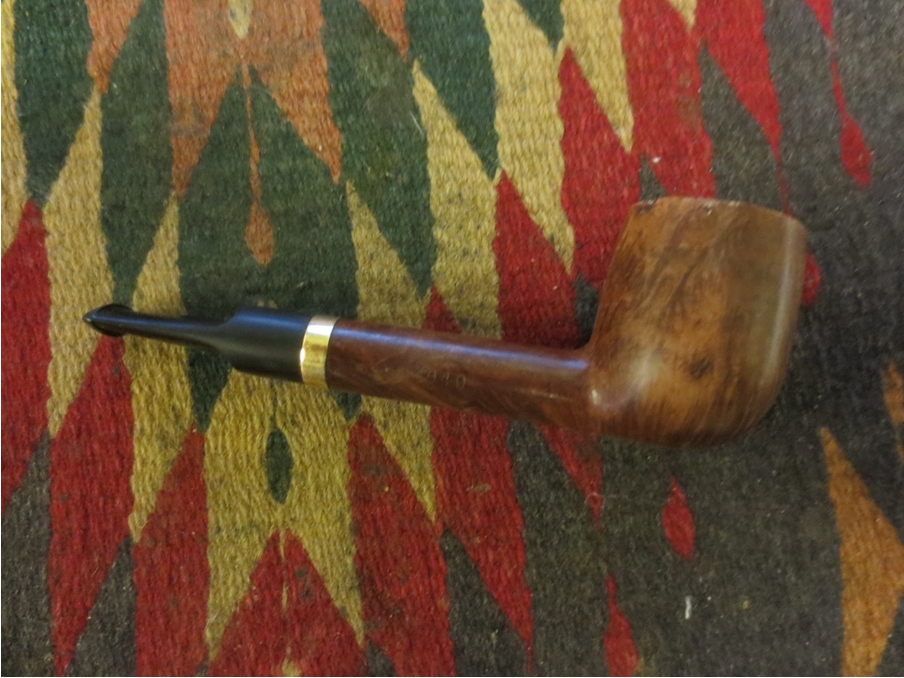
I have been doing a bit of reading on the Dr. Grabow Collectors Forum and have been learning a lot from the folks there. On one of the threads on refurbishing Scot wrote and asked about restemming an older Weber Deep Grain Lovat. He had it sitting and did not feel confident about doing the stem work on it. I offered to restem it for him for the postage. When the pipe arrived I took it to the work table and took the following photos. The bowl had some really nice grain on it. The finish was rough with a lot of scratches, dents and nicks. Next to the band the finish was work off on the right side. There were some deep gouges and a scratch across the surface on the right side of the bowl. The rim was in rough shape. The outer edges were beat up pretty badly with gouges and chunks missing from the edge. The inner edge was clean and undamaged. The top of the rim was very rough. There were nicks and dents and it was almost crowned looking – though uneven. The bowl was badly caked forming a thick ring about mid bowl. Below that the cake was almost non-existent and above that it was flaking off in sheets. The stem was worn out with a large bite taken out of the top side near the button and the underside it was cracked. It was ruined.Weber1

Weber2

Weber3

Weber4 
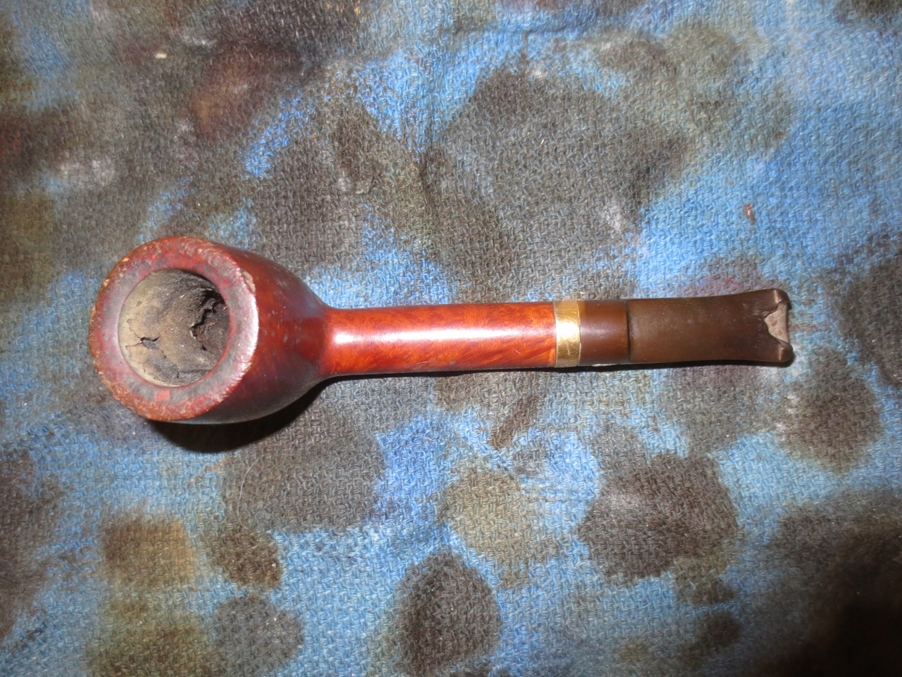
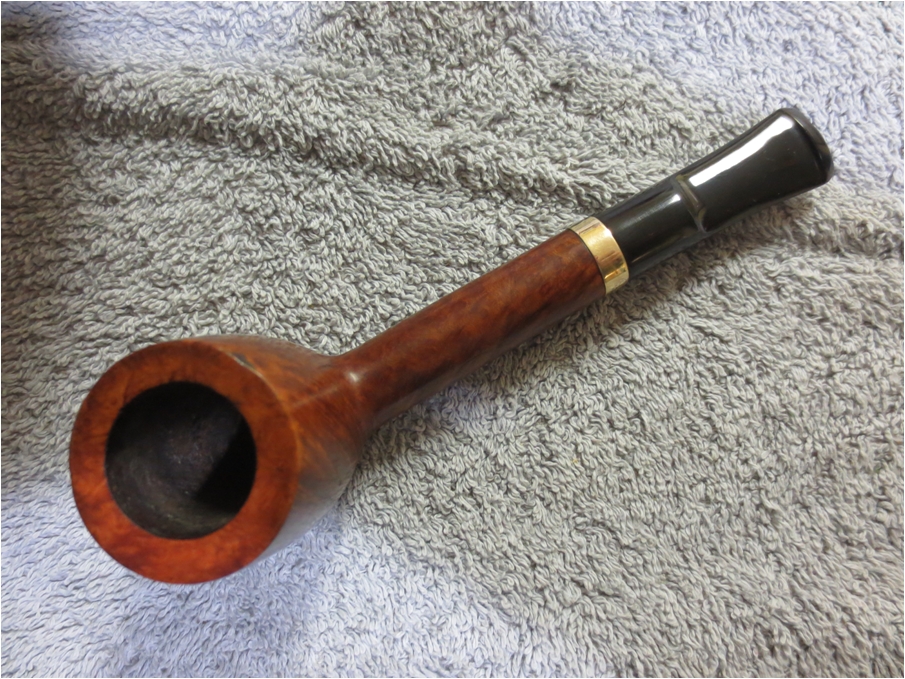
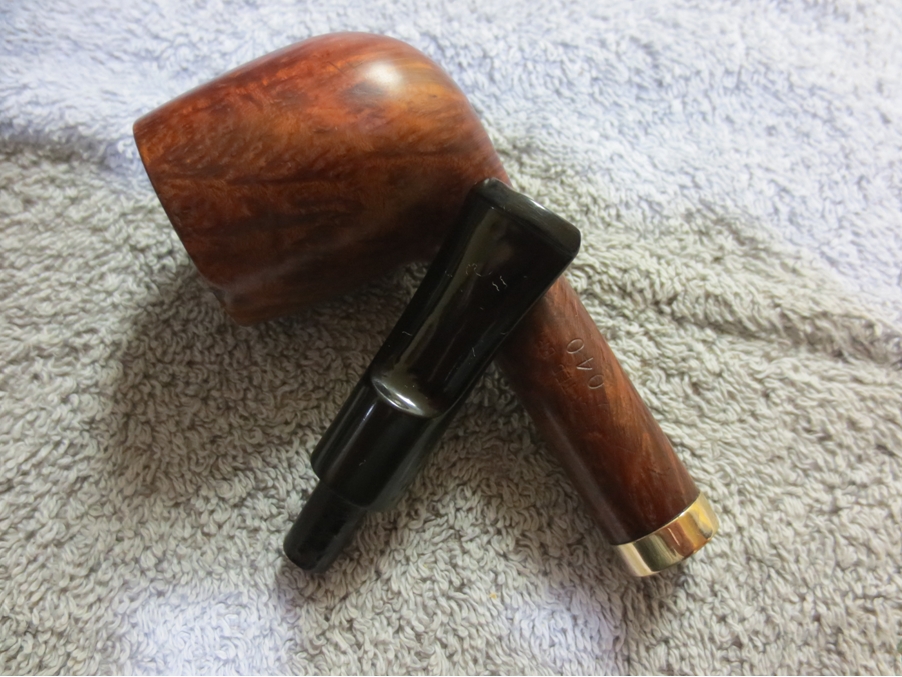
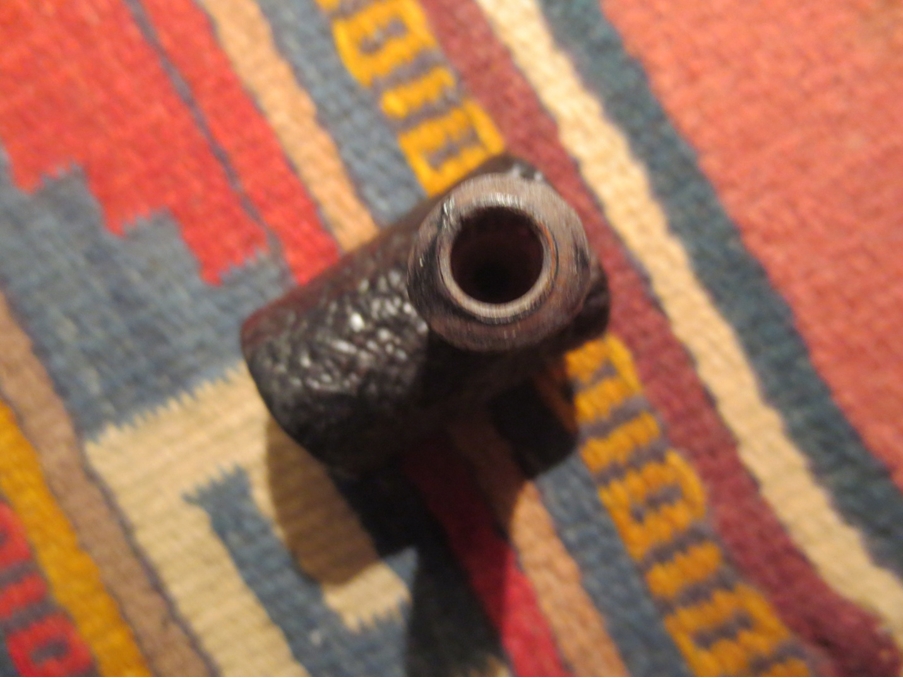
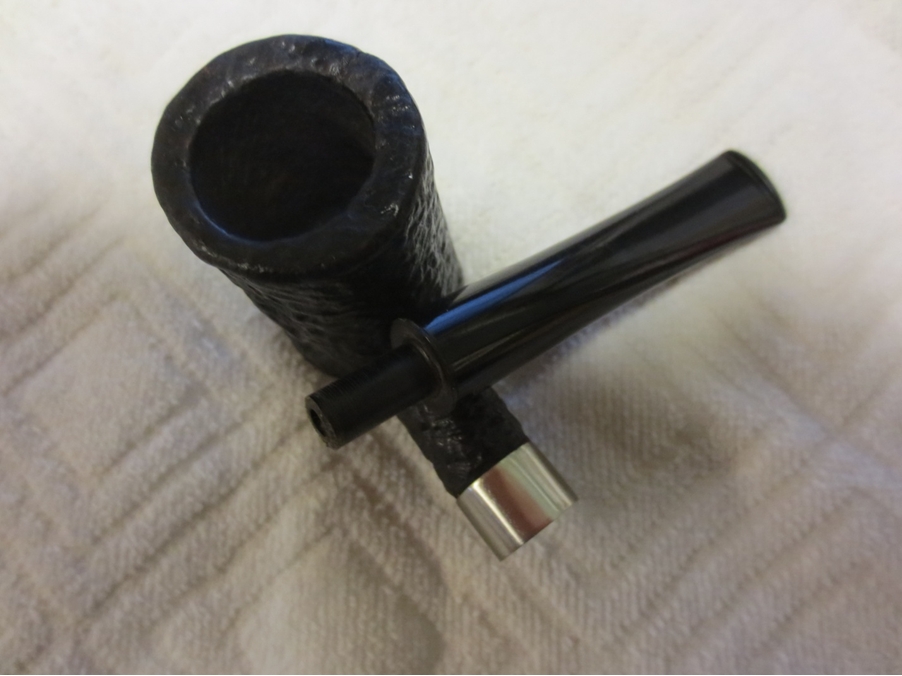
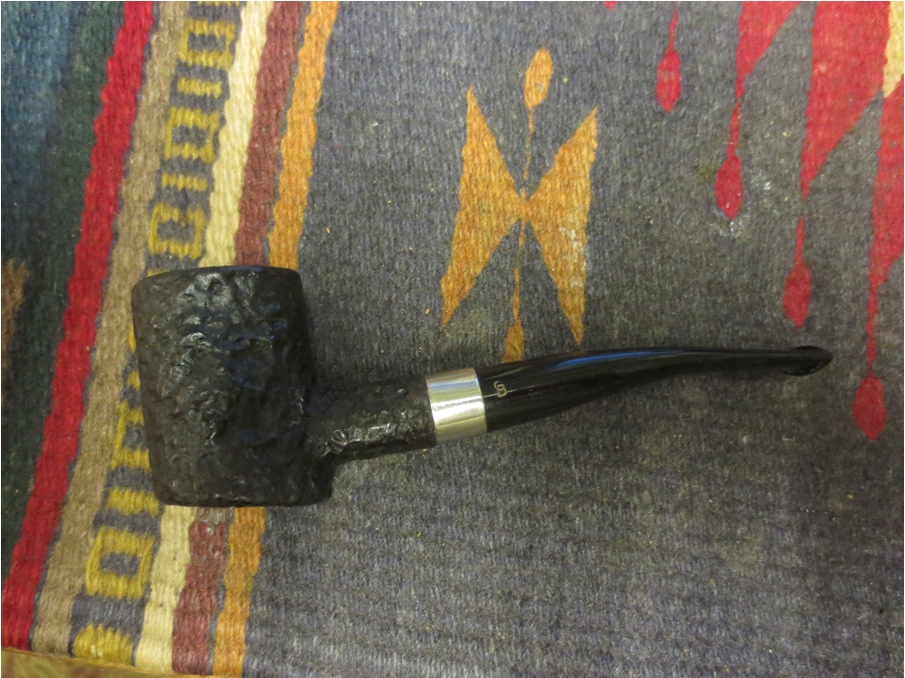
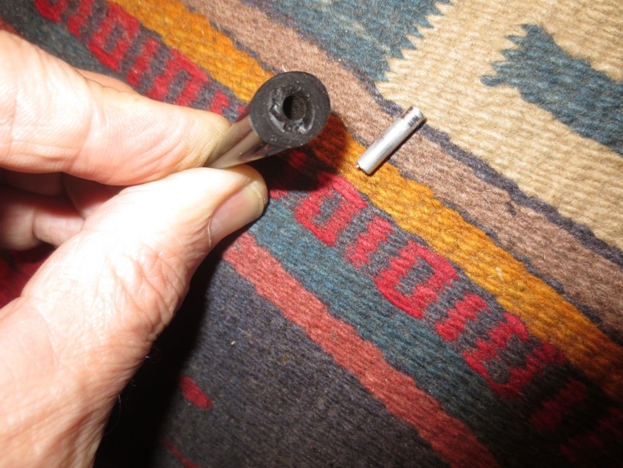
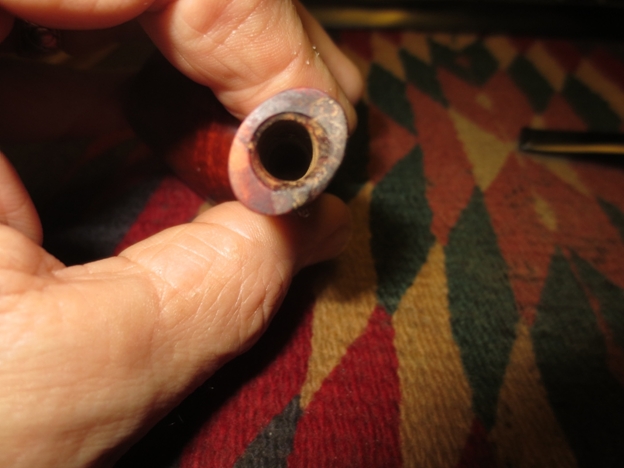
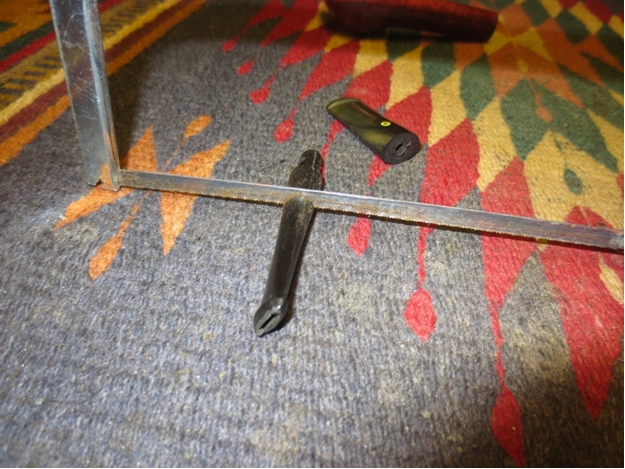
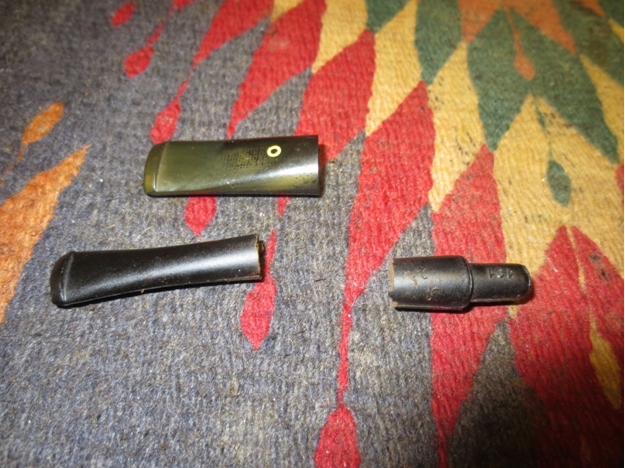
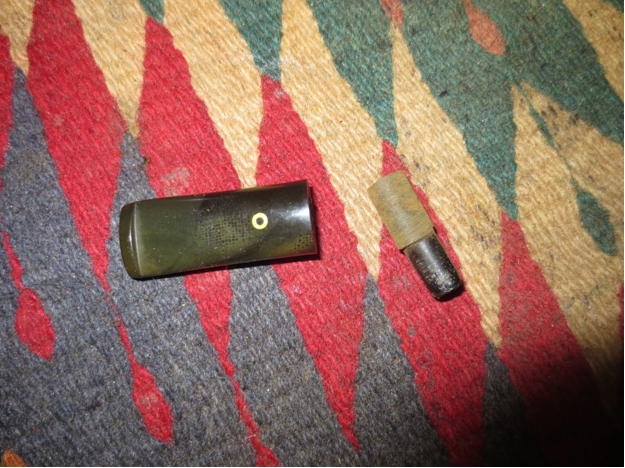
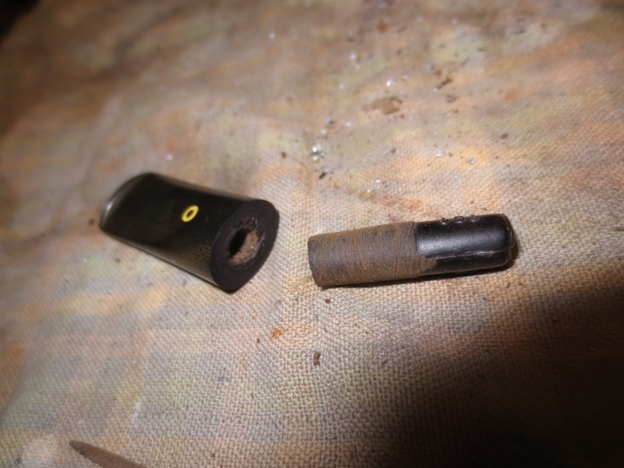
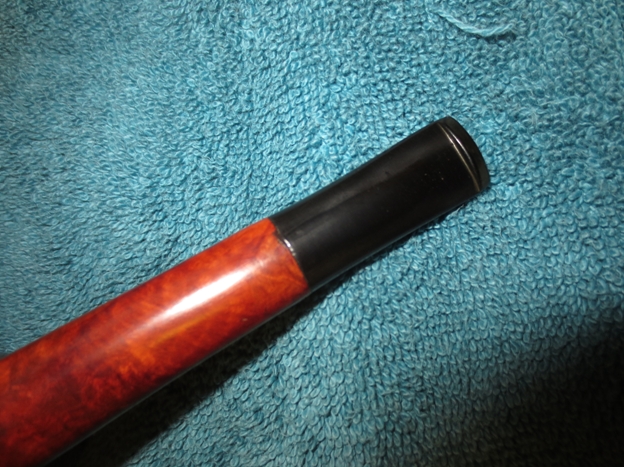
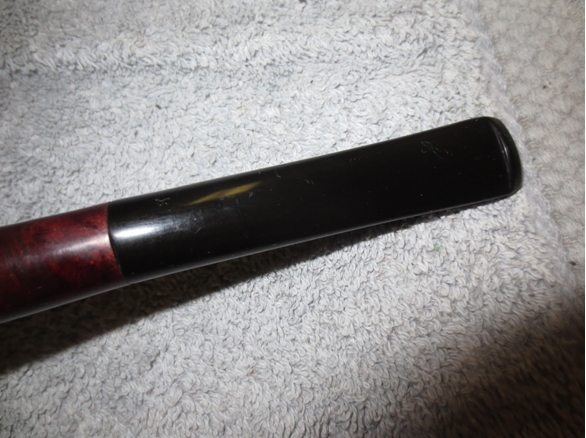
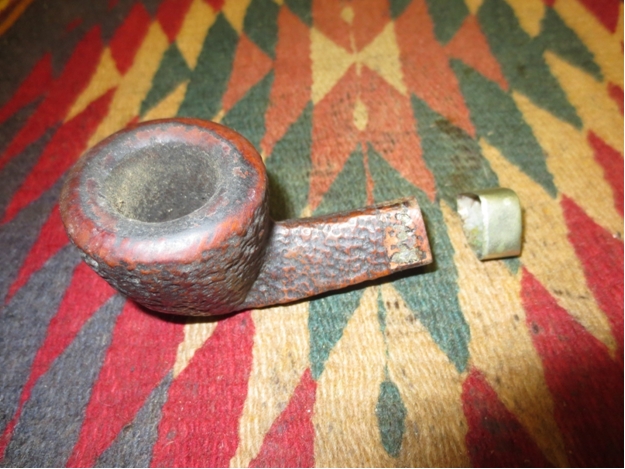
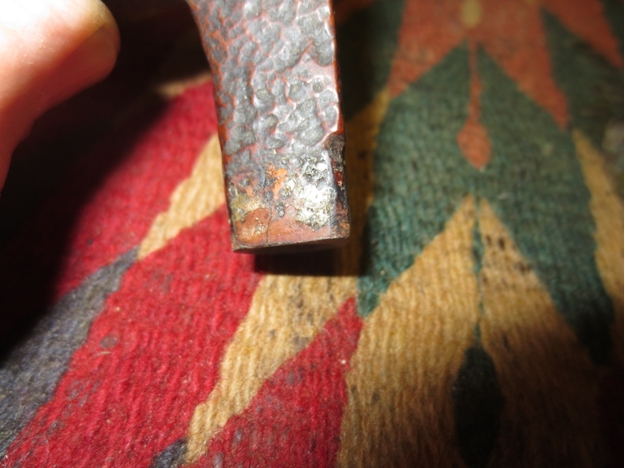
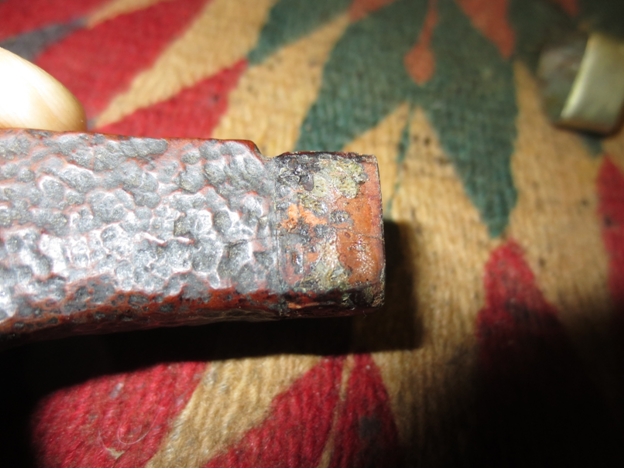
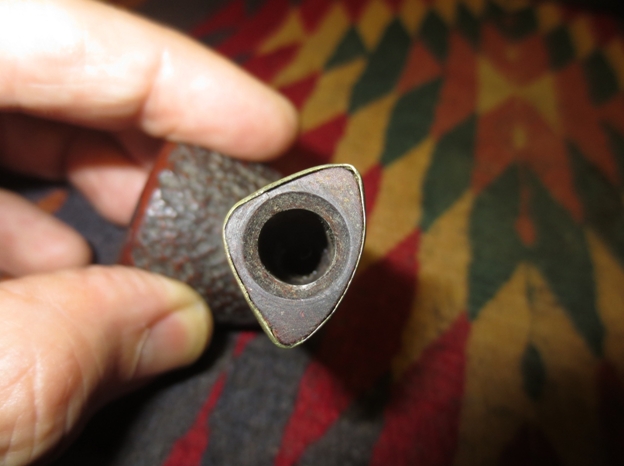
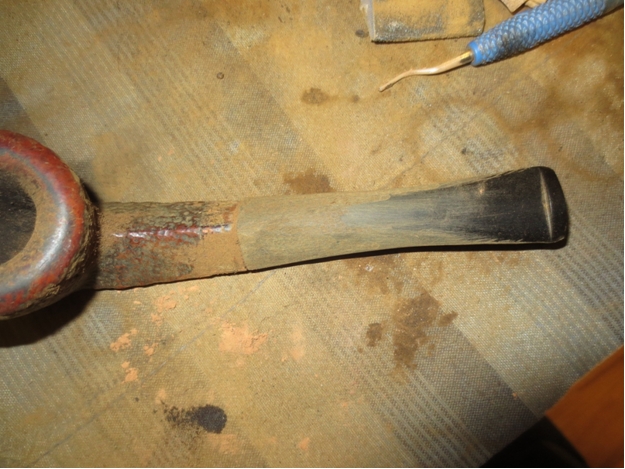
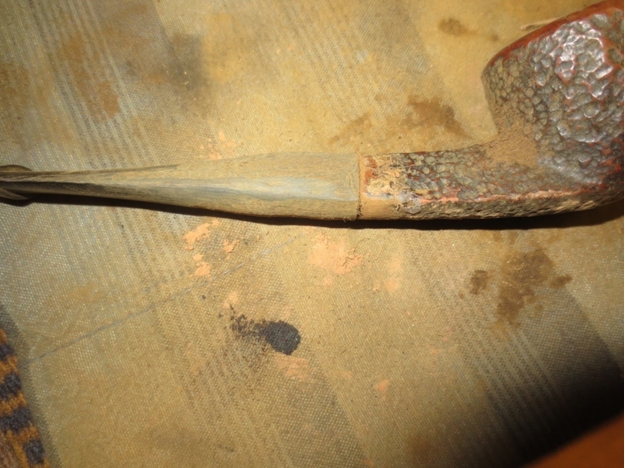
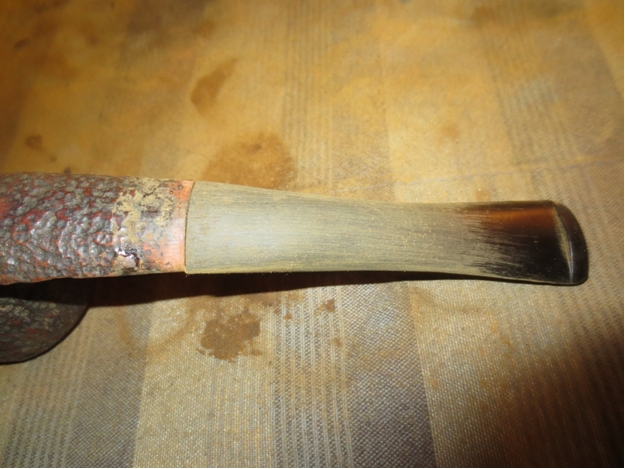
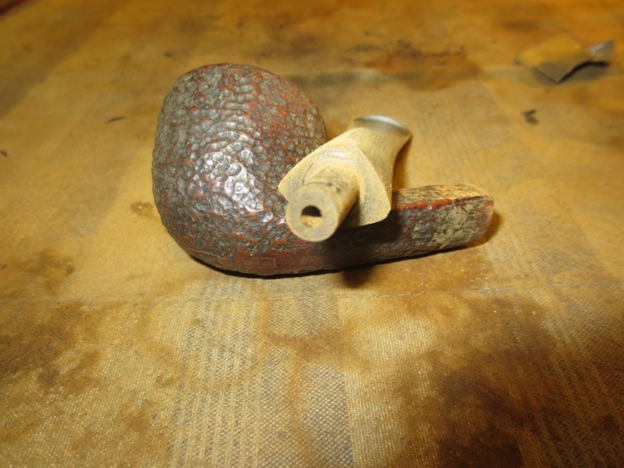
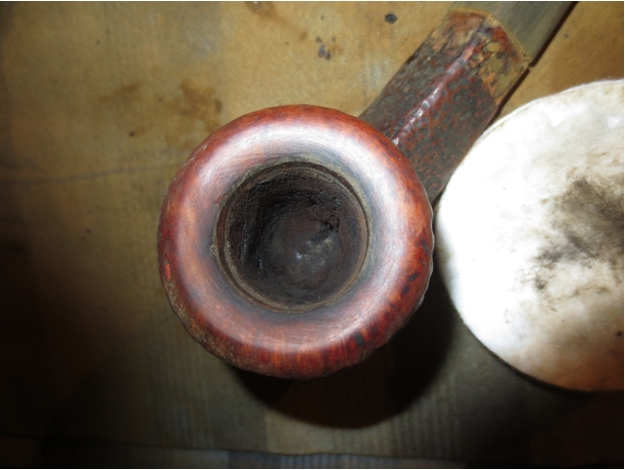
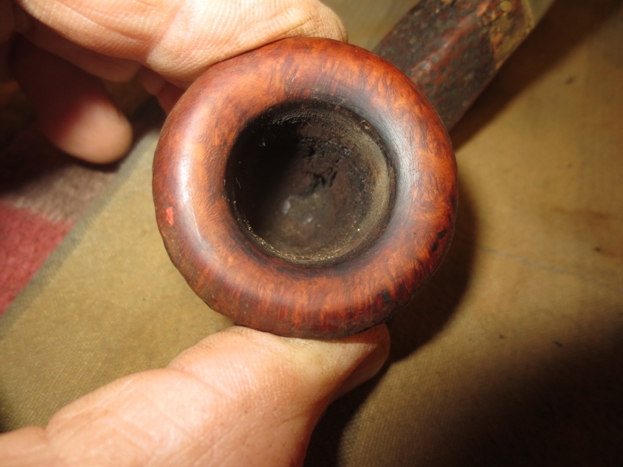
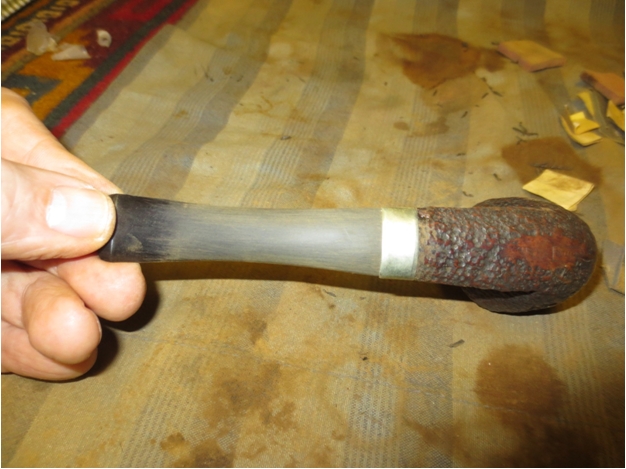
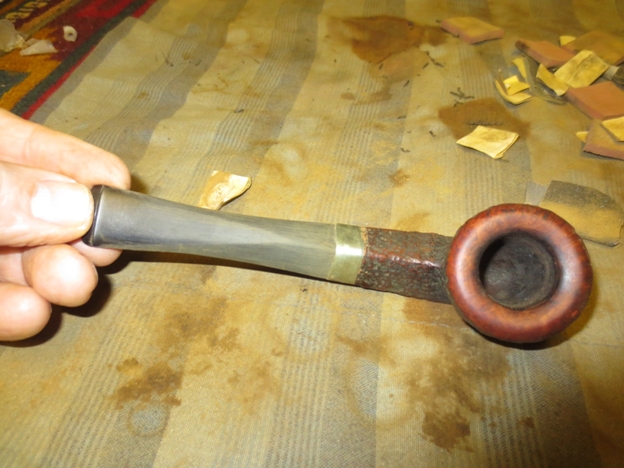
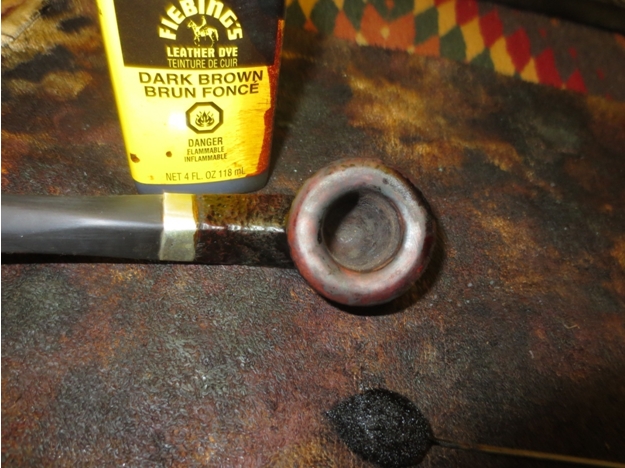
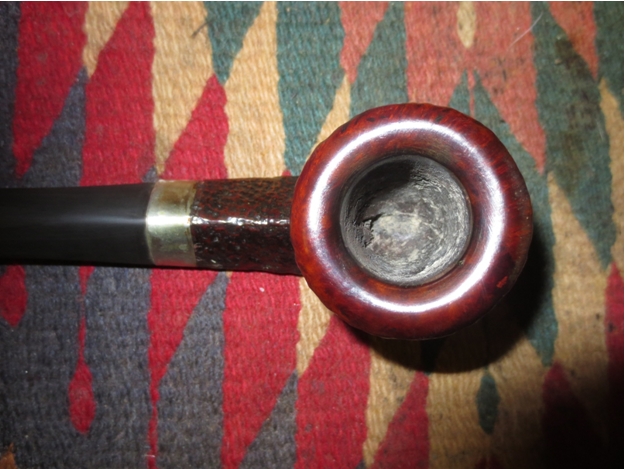
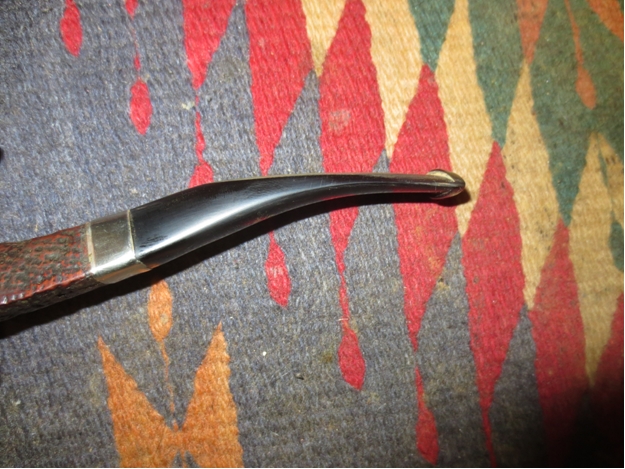
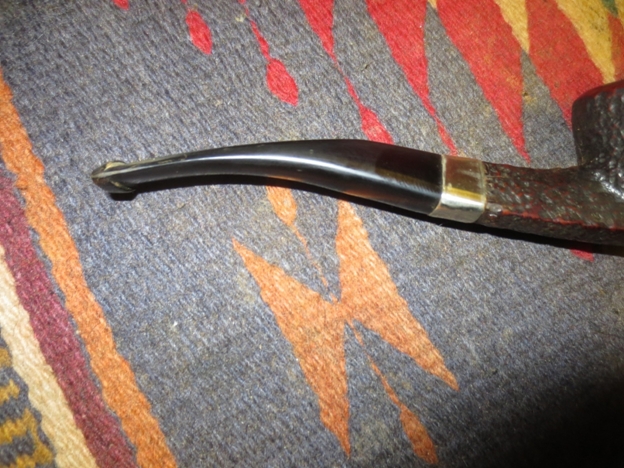
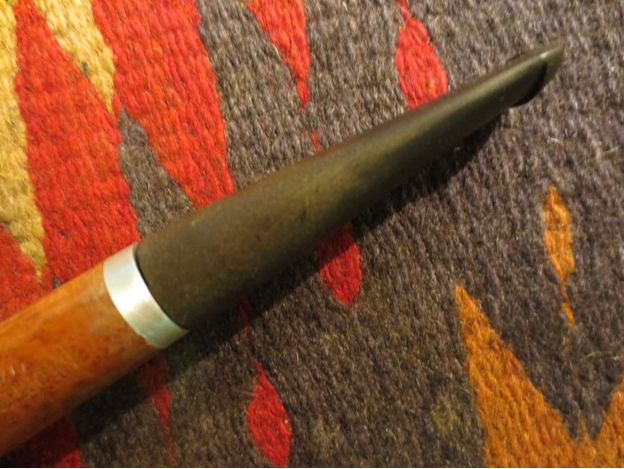
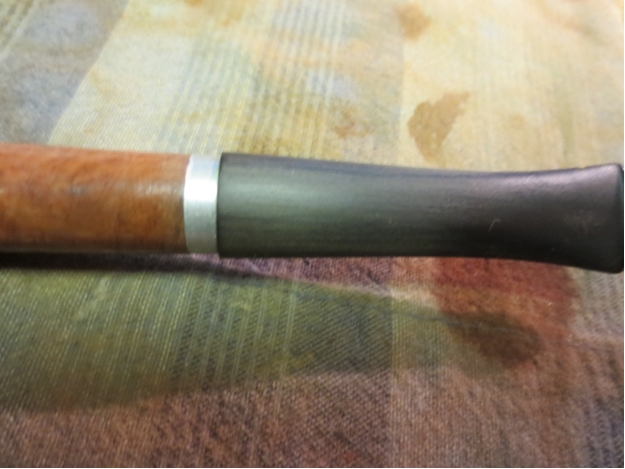
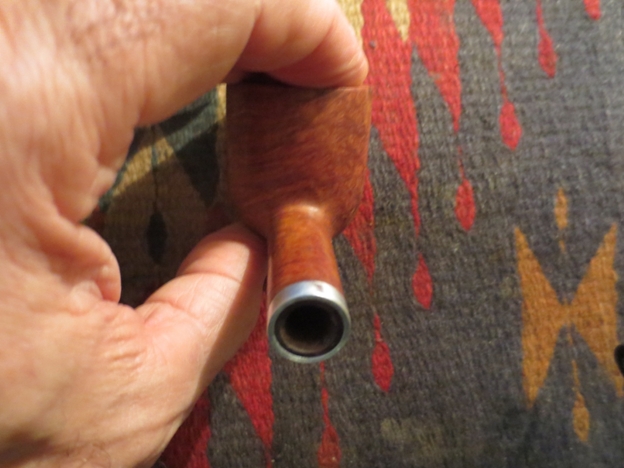
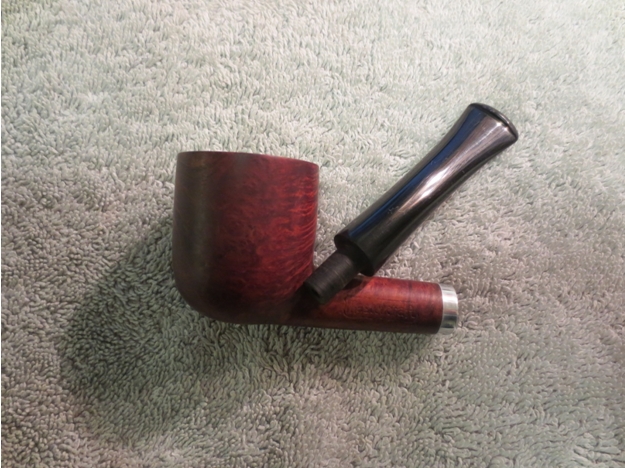
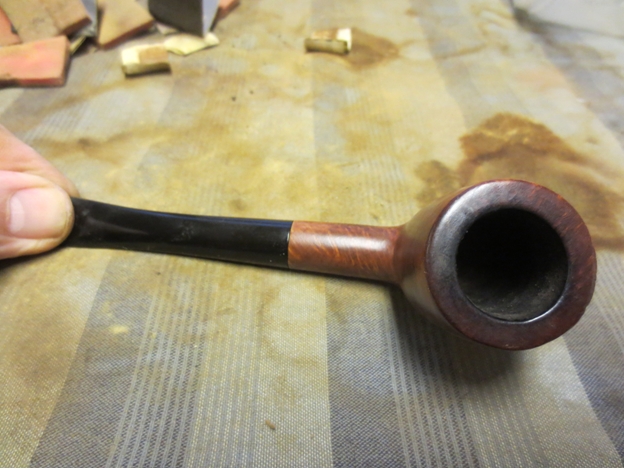
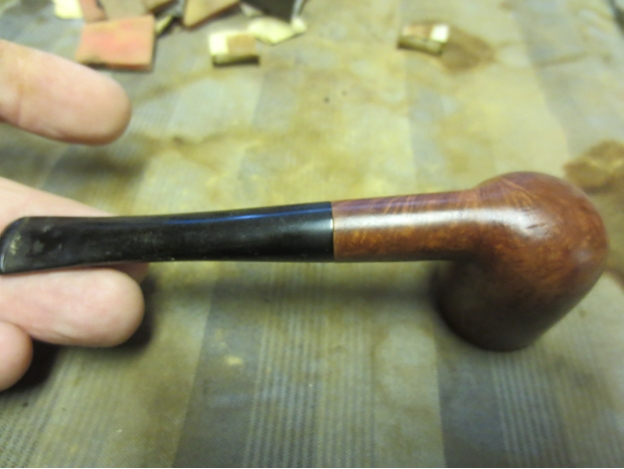
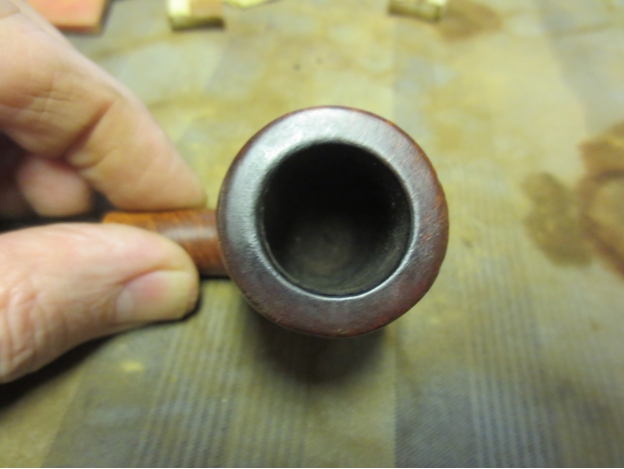
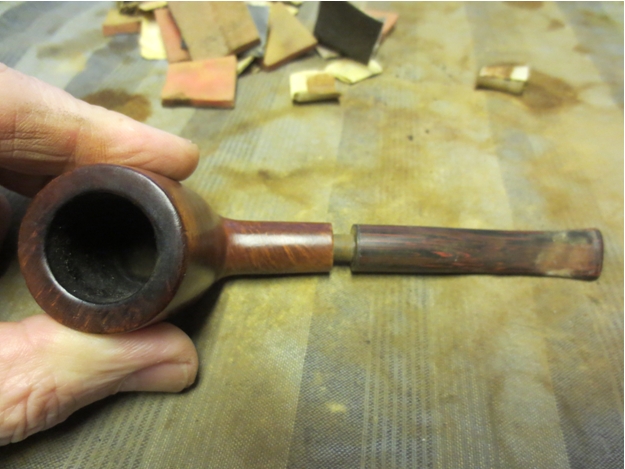
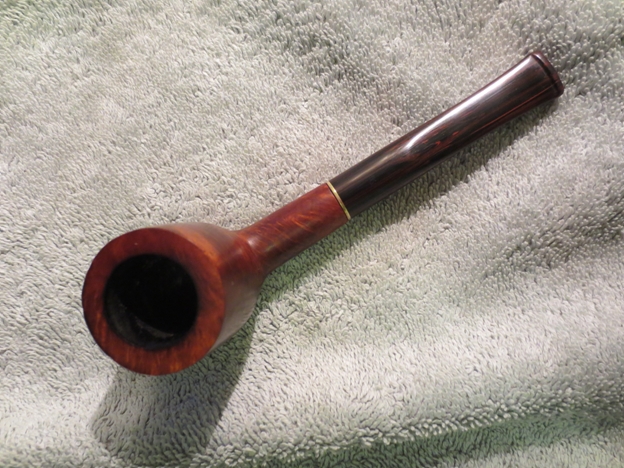
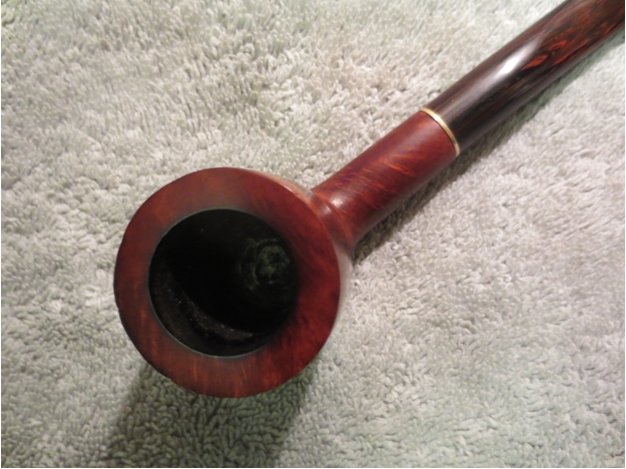
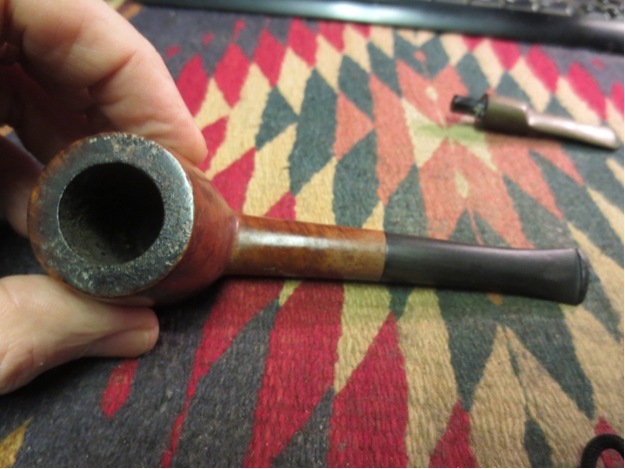
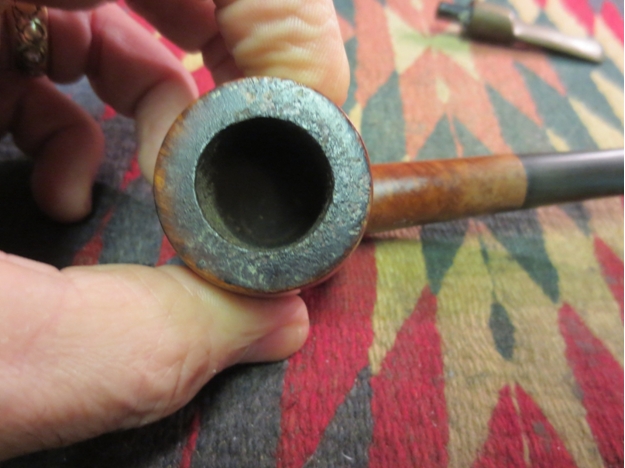
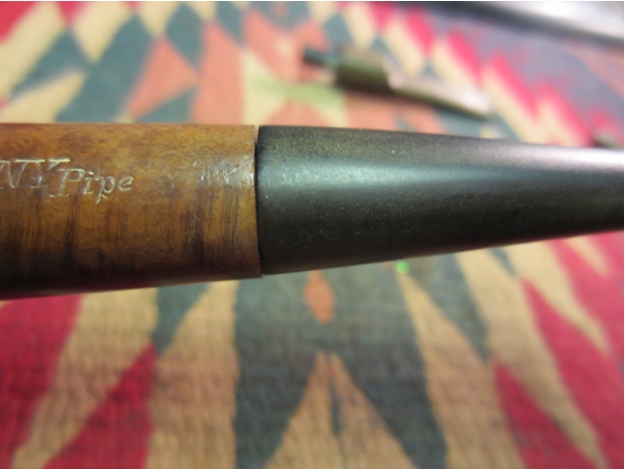
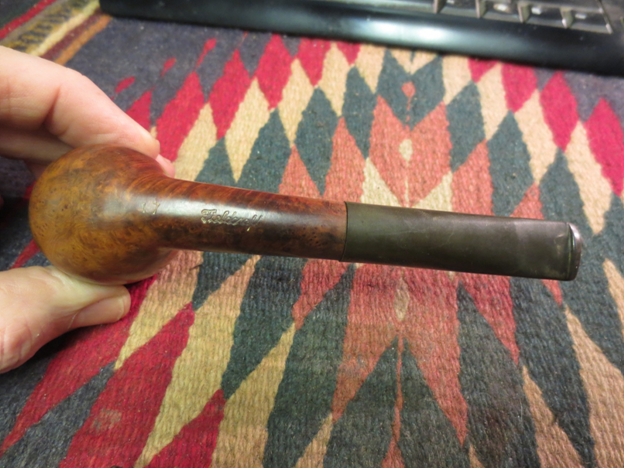
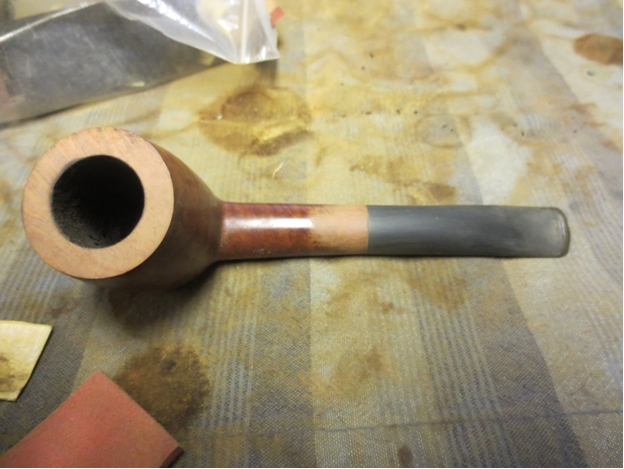
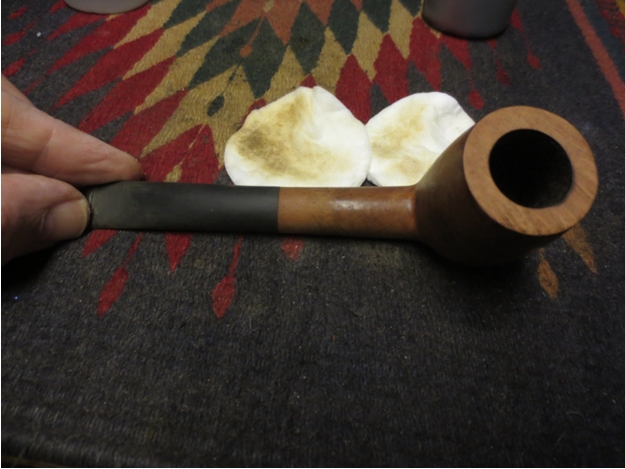
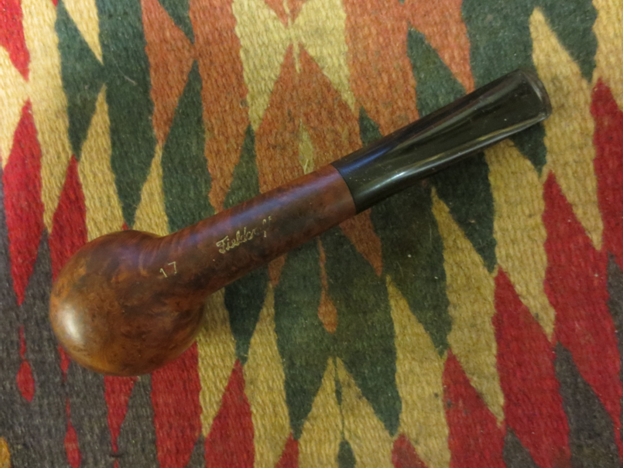
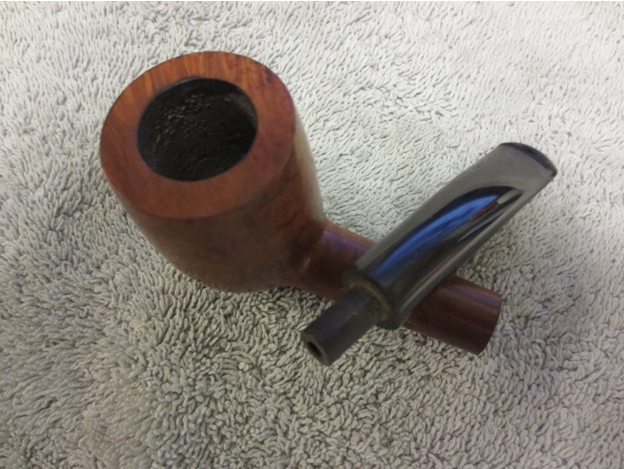
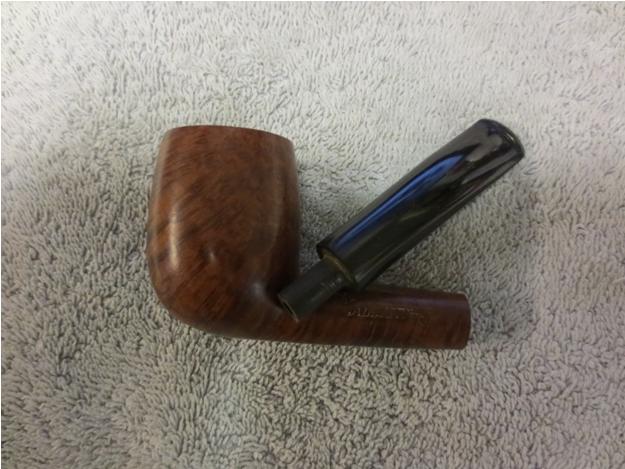
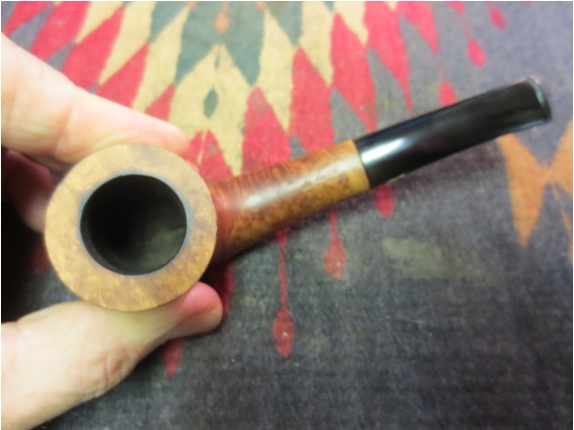
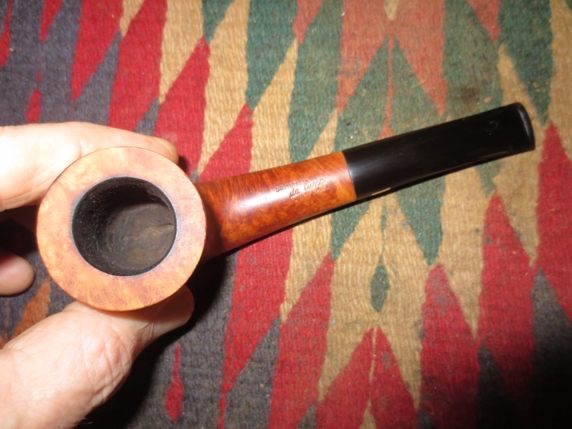
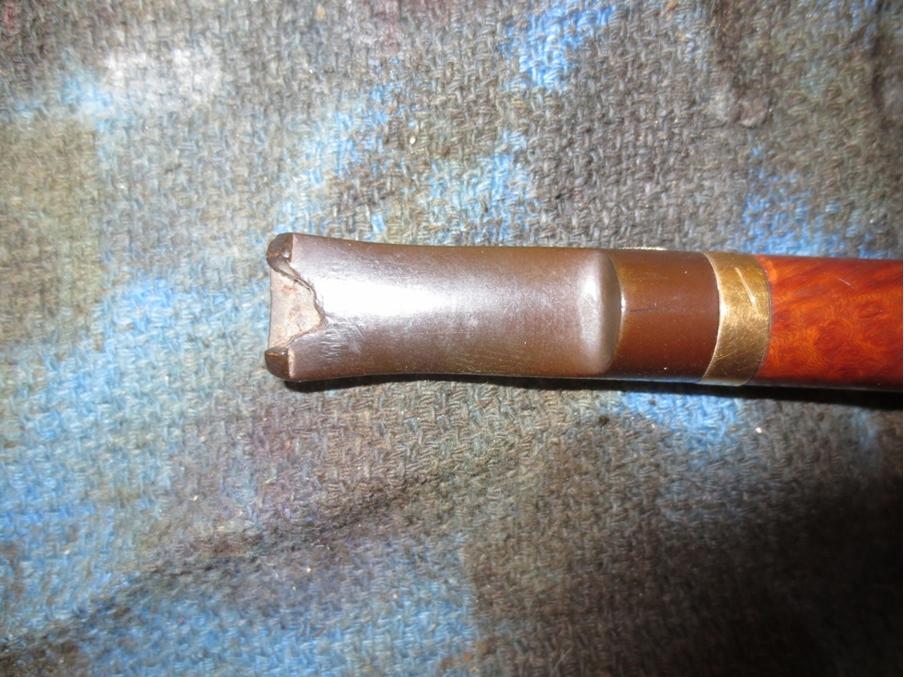
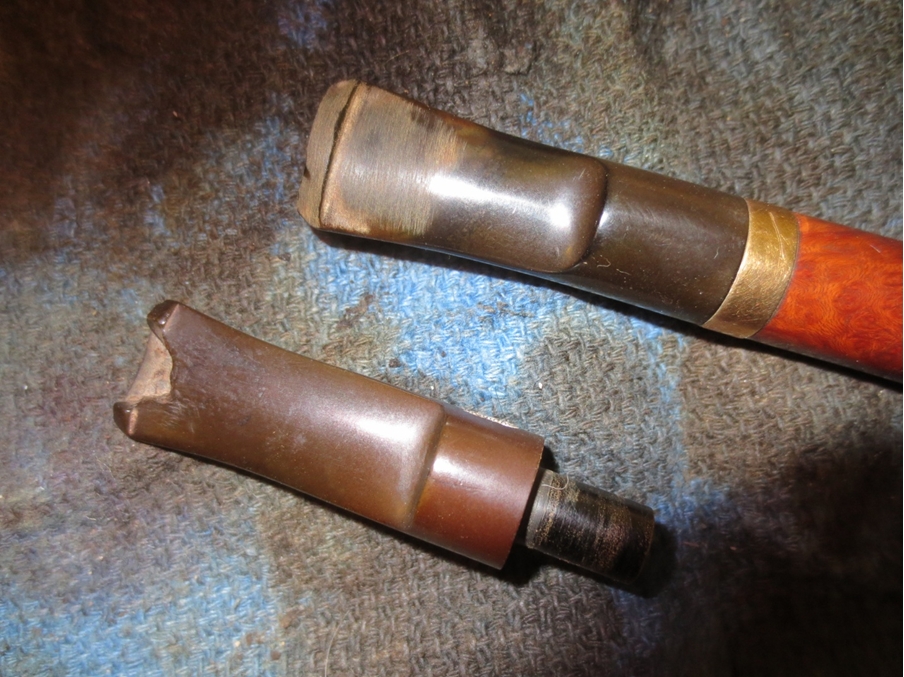
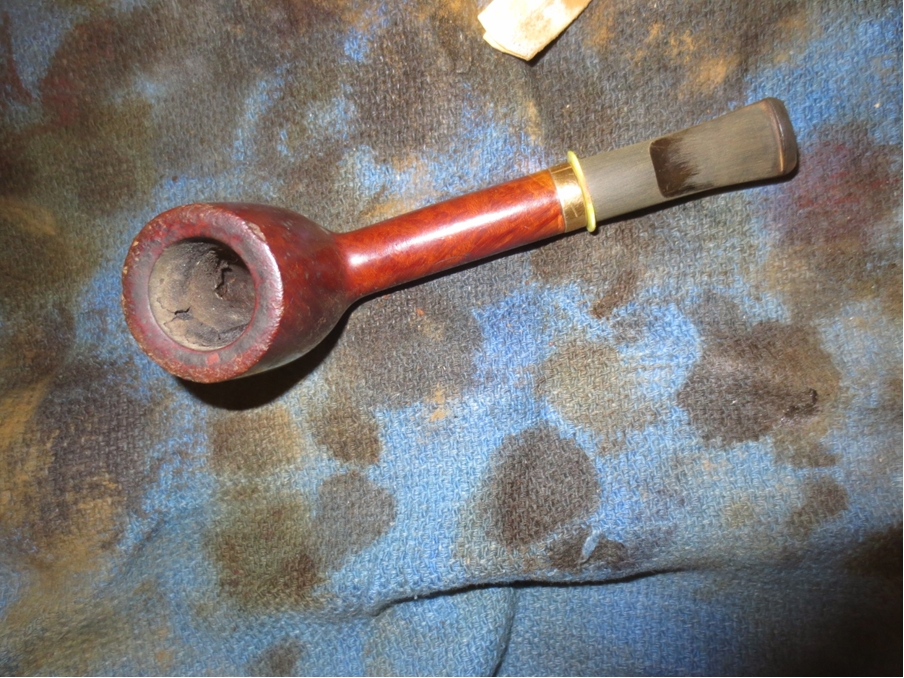
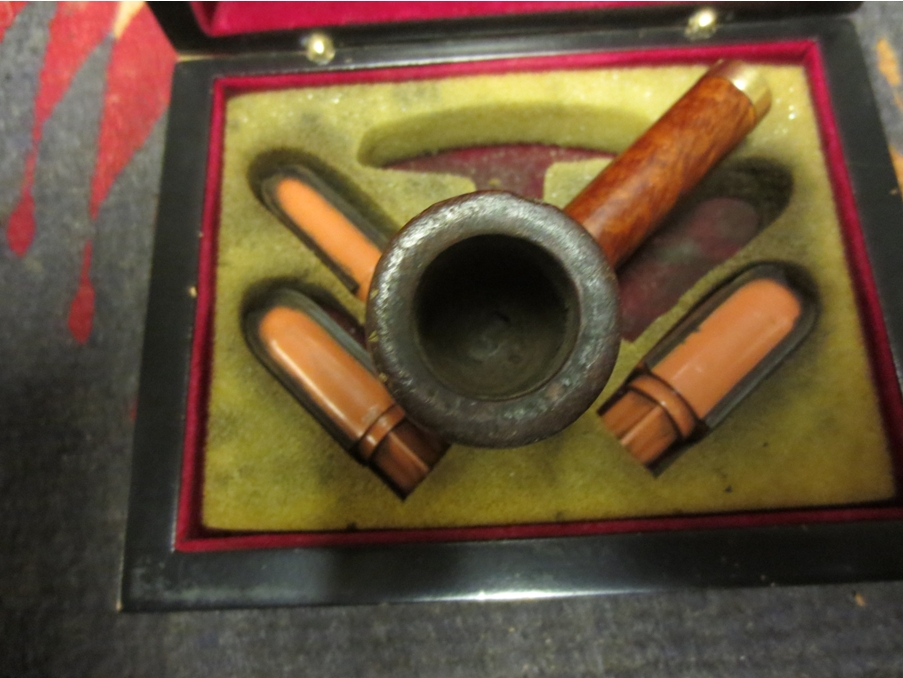
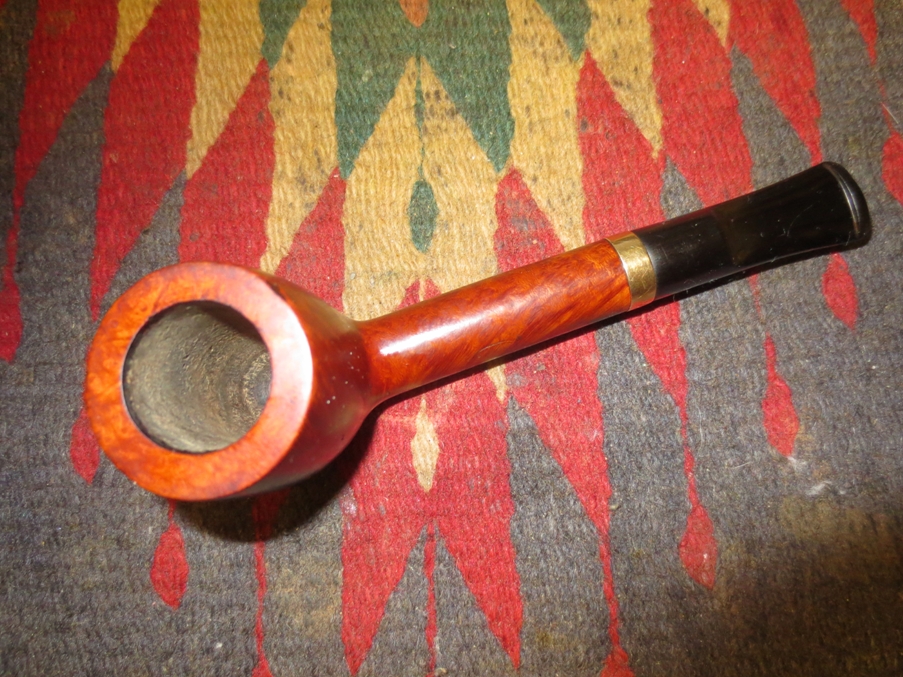
I took the next two close-up photos to show the rim damage and the odd cake in the bowl and also the damage to the stem.Weber5

Weber6 
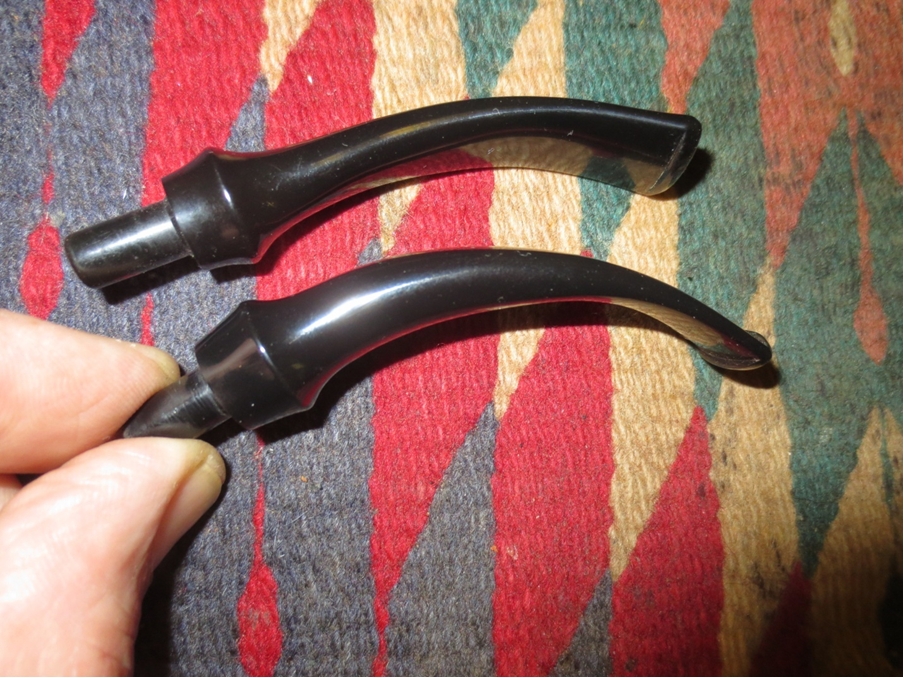
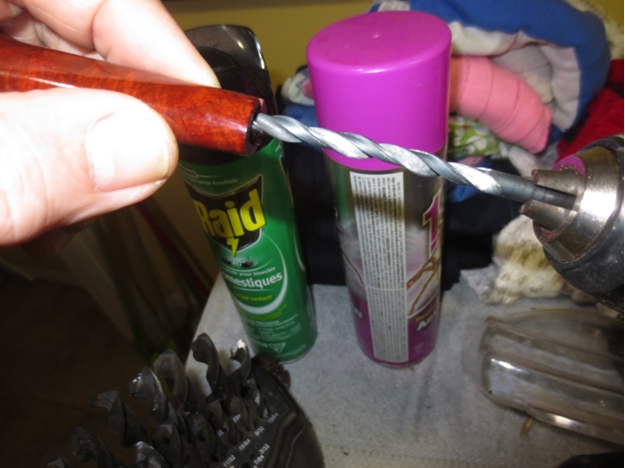
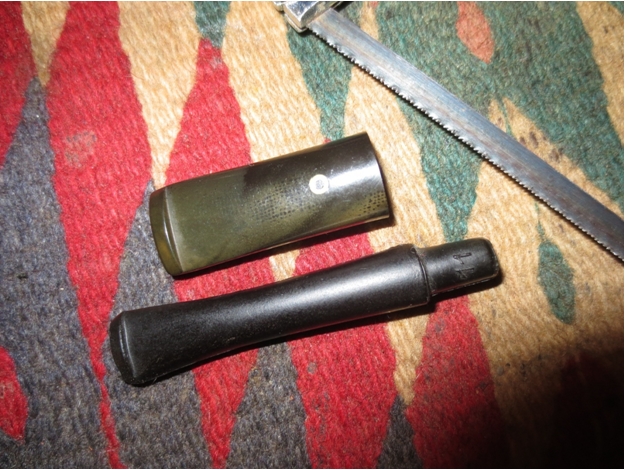
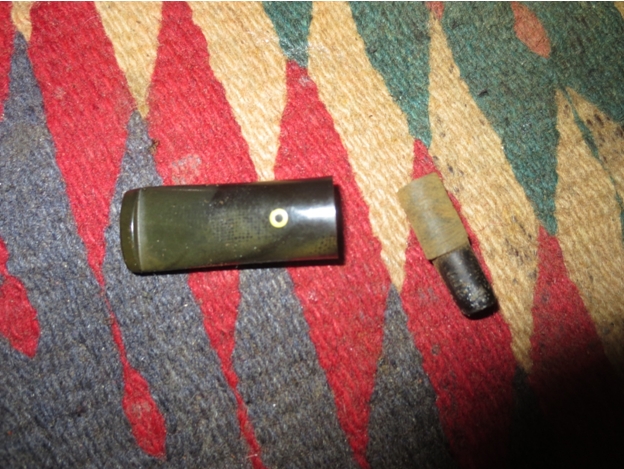
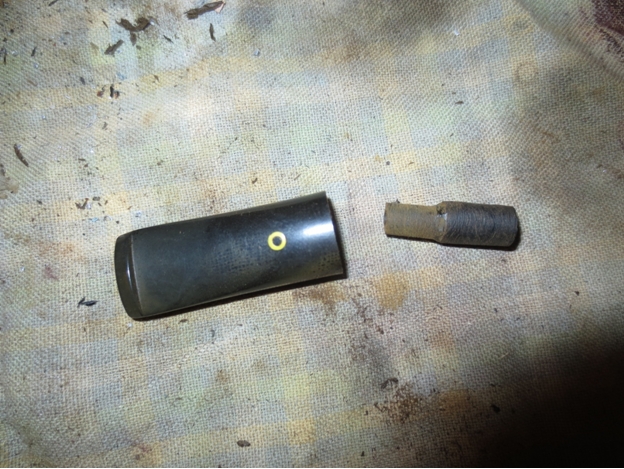
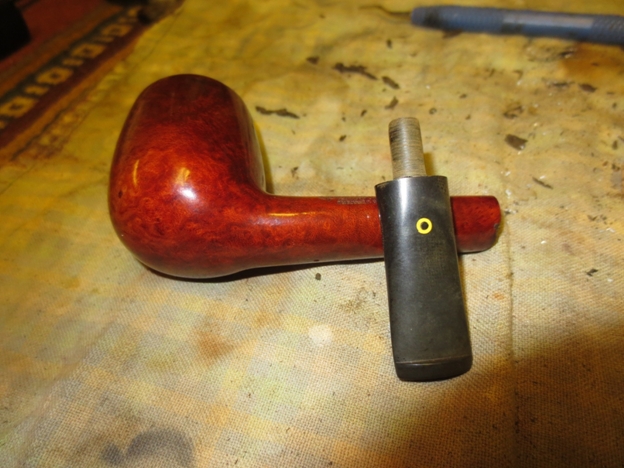
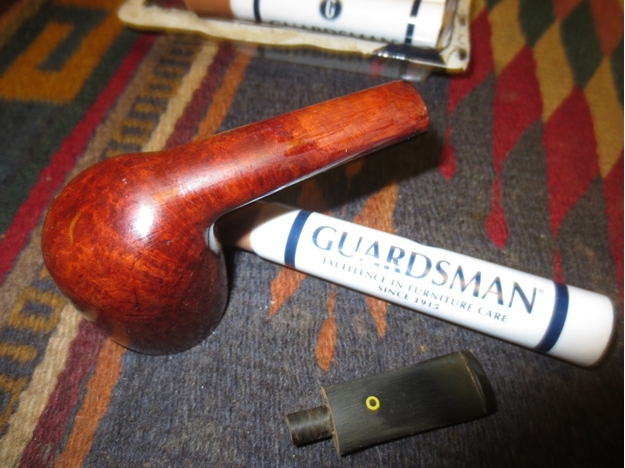
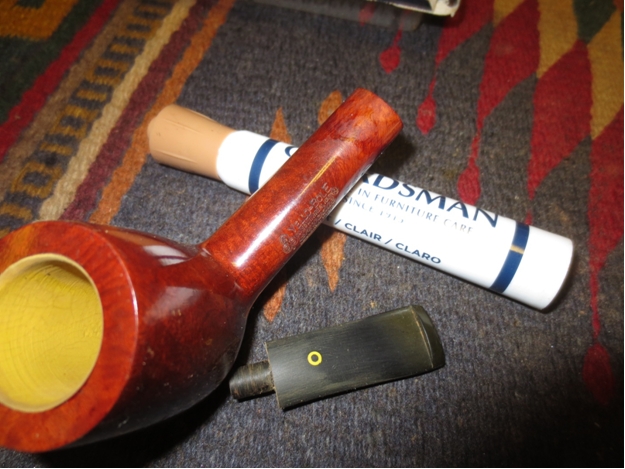
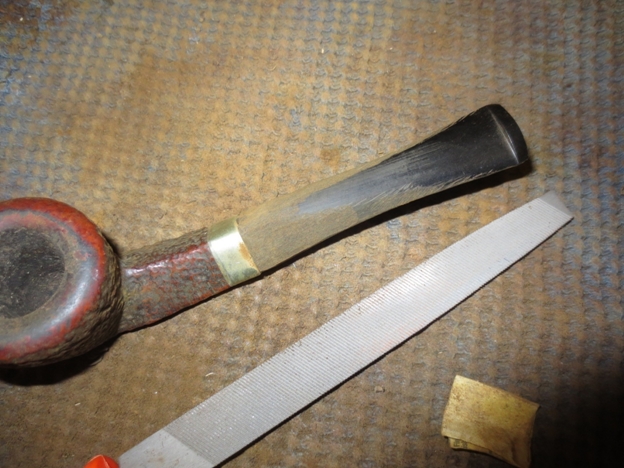
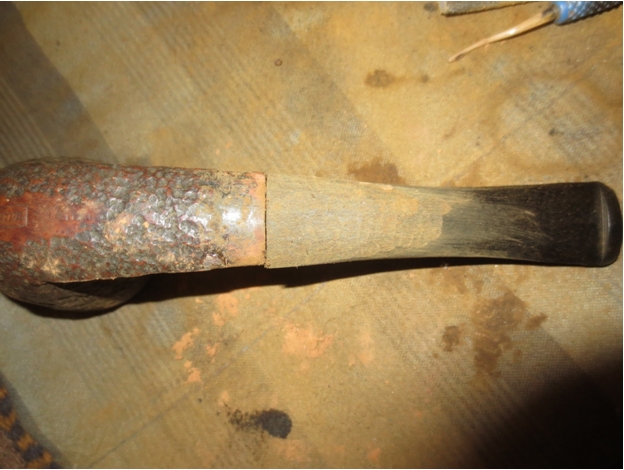
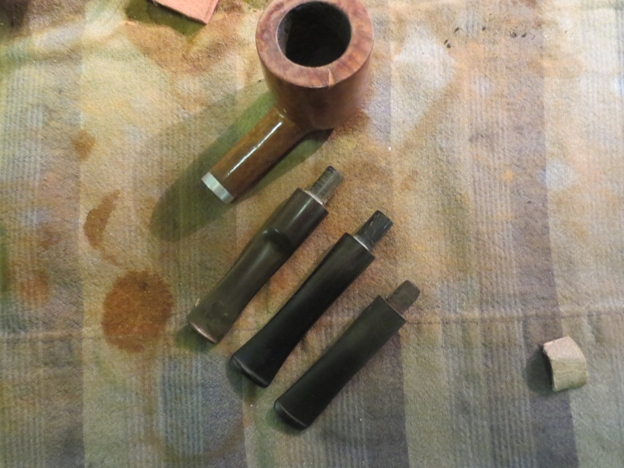
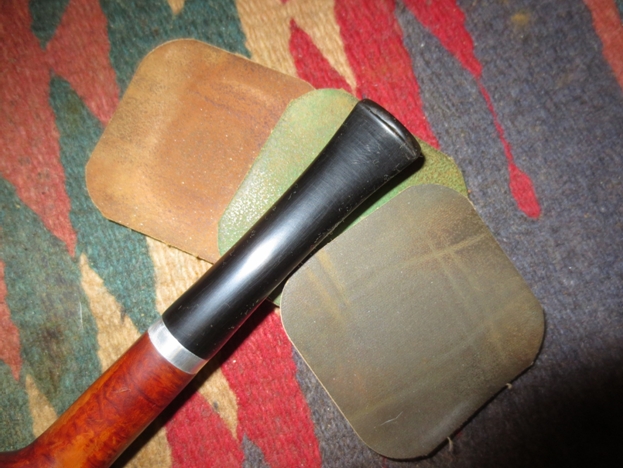
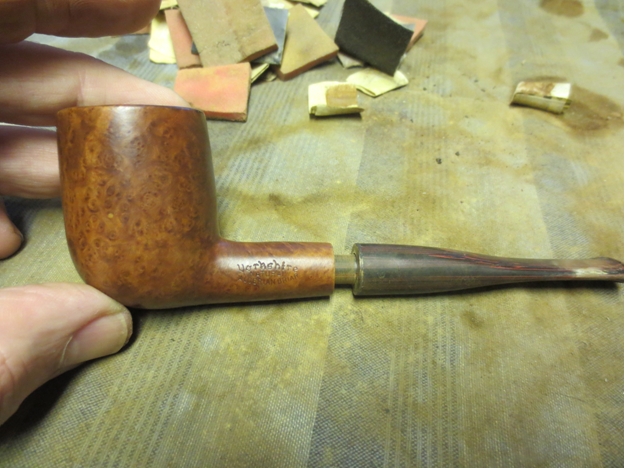
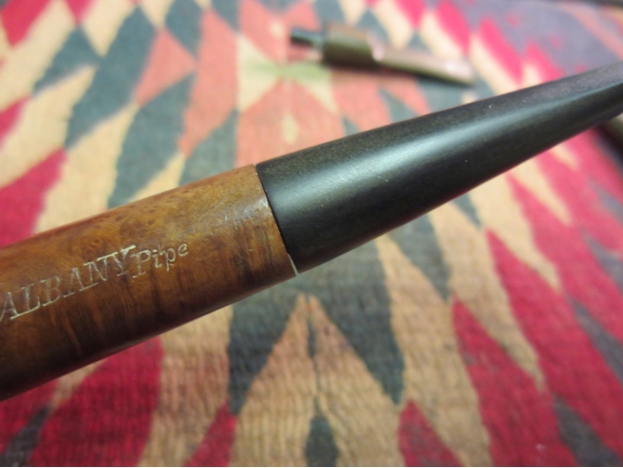
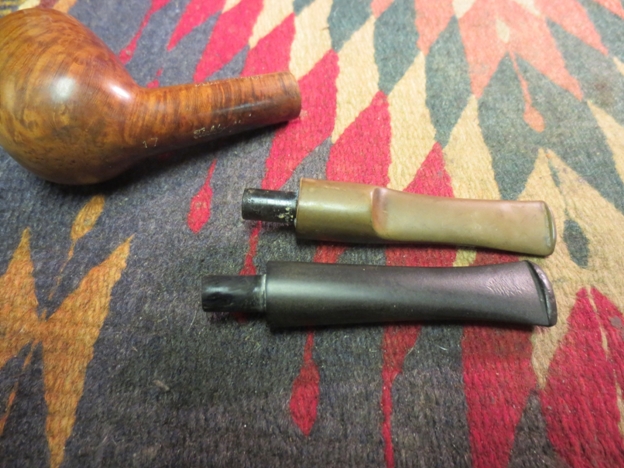
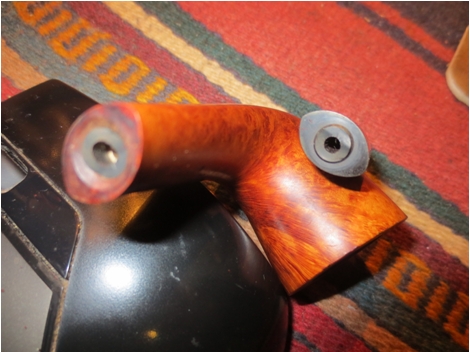
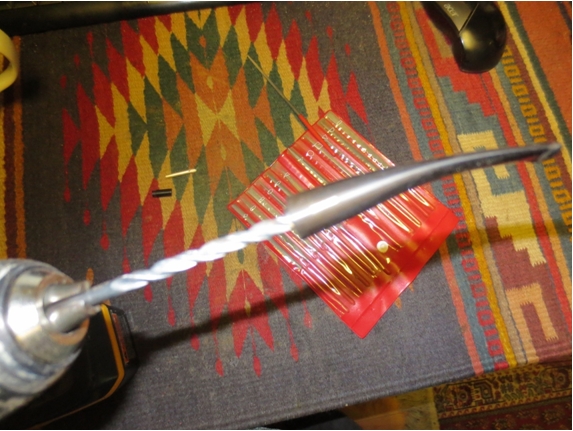
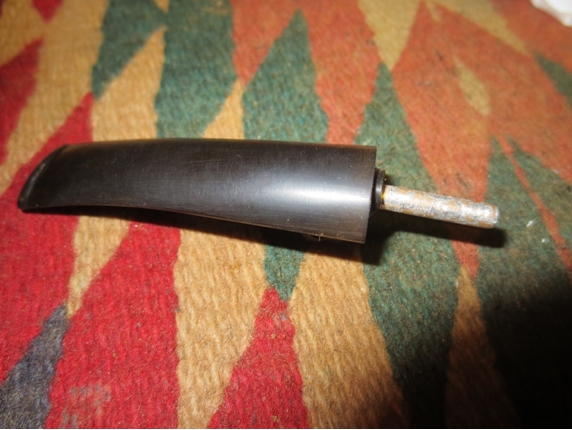
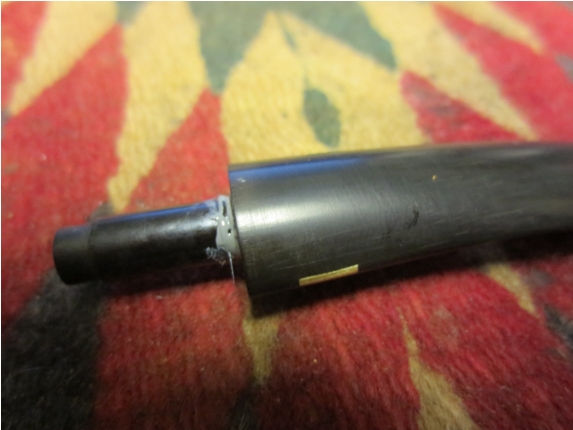
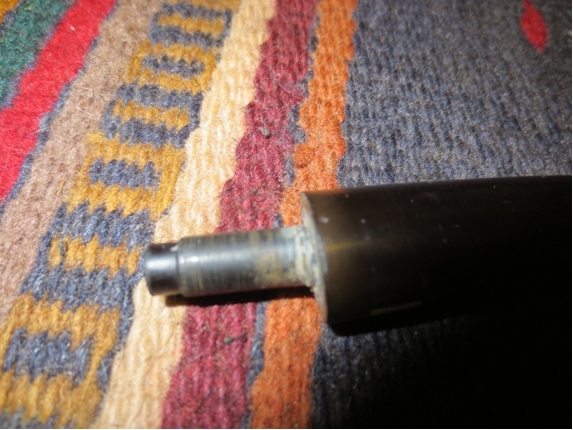
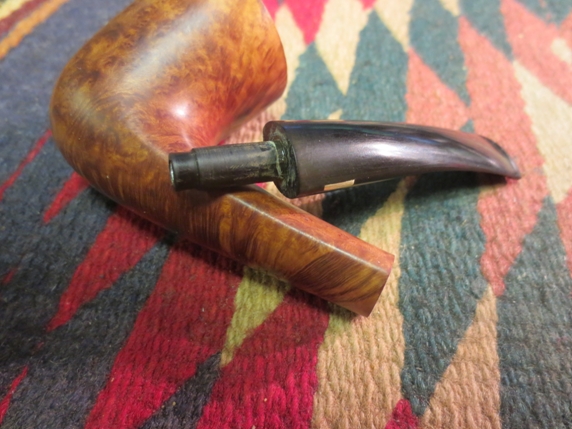
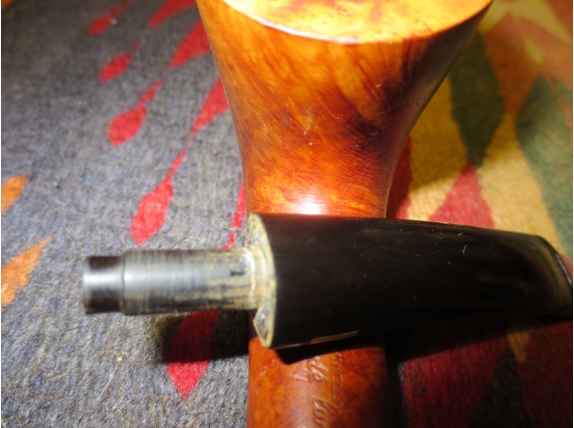
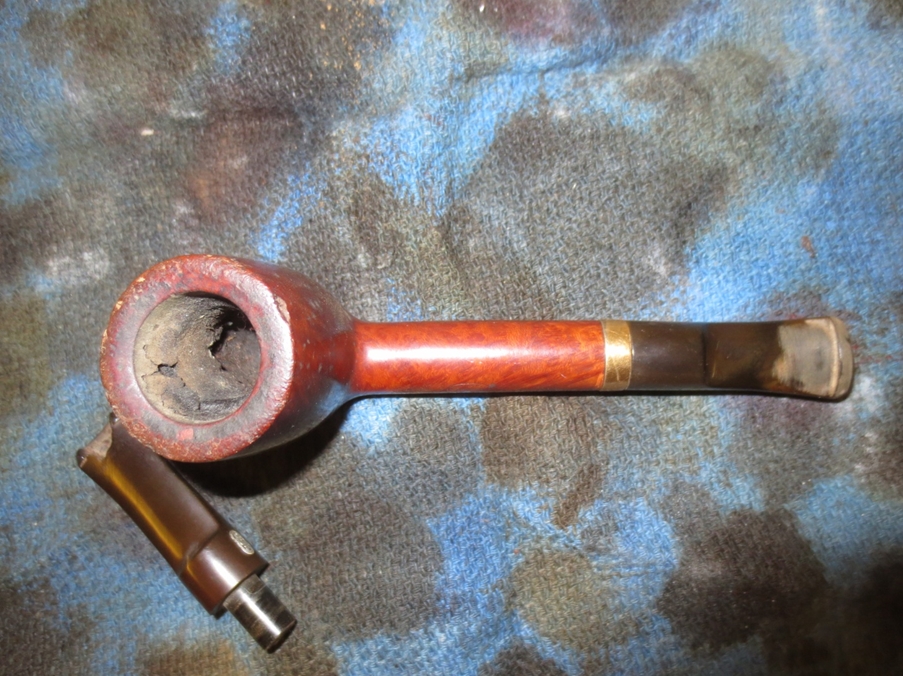
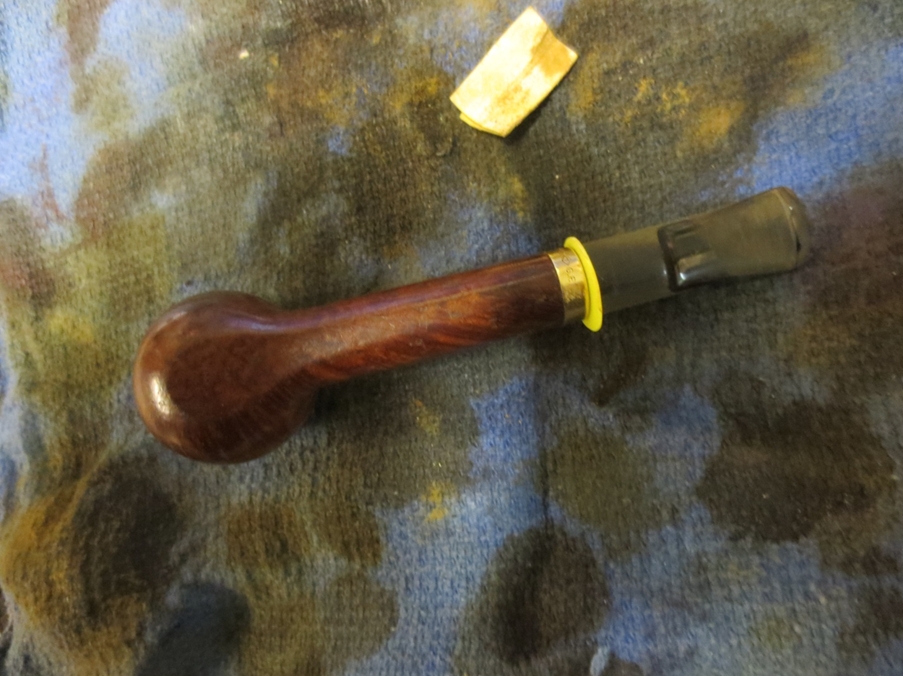
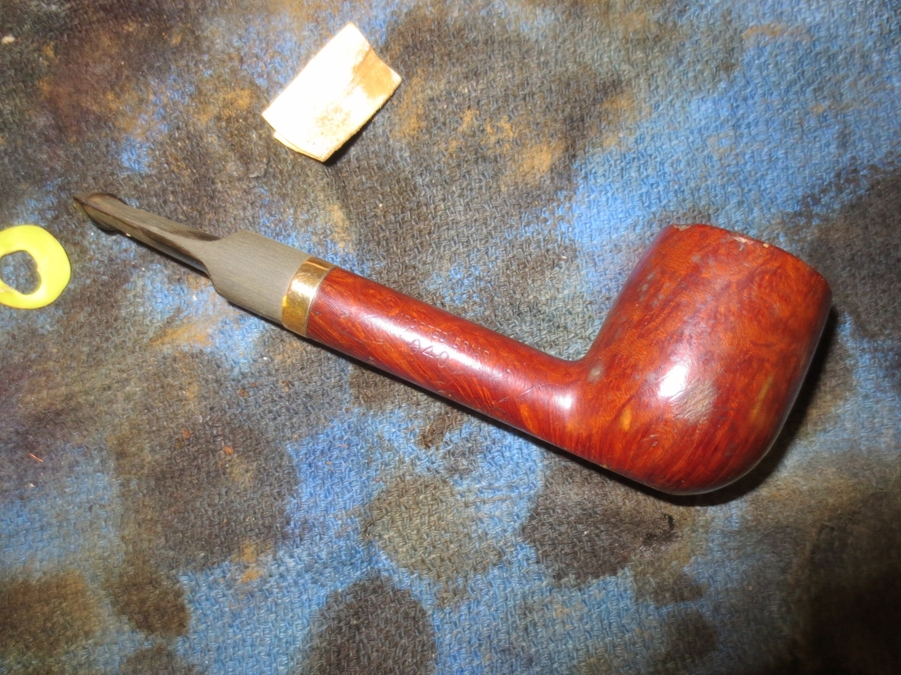
When Scott first sent it I was under the impression that he merely wanted me to make a new stem for it. After I saw it I wrote him and asked if he wanted me to clean it up and restore it for him. While I waited for his response I worked on the new stem. I had a stem that was the same length and had a tenon that was not only the right length but also almost the right diameter. I sanded the tenon down lightly and fit the stem to the shank. It was perfect in diameter on the bottom side of the band but was a little large on the top and left side of the saddle.Weber7

Weber8

Weber9

Weber10

Weber11

Weber12

Weber13 
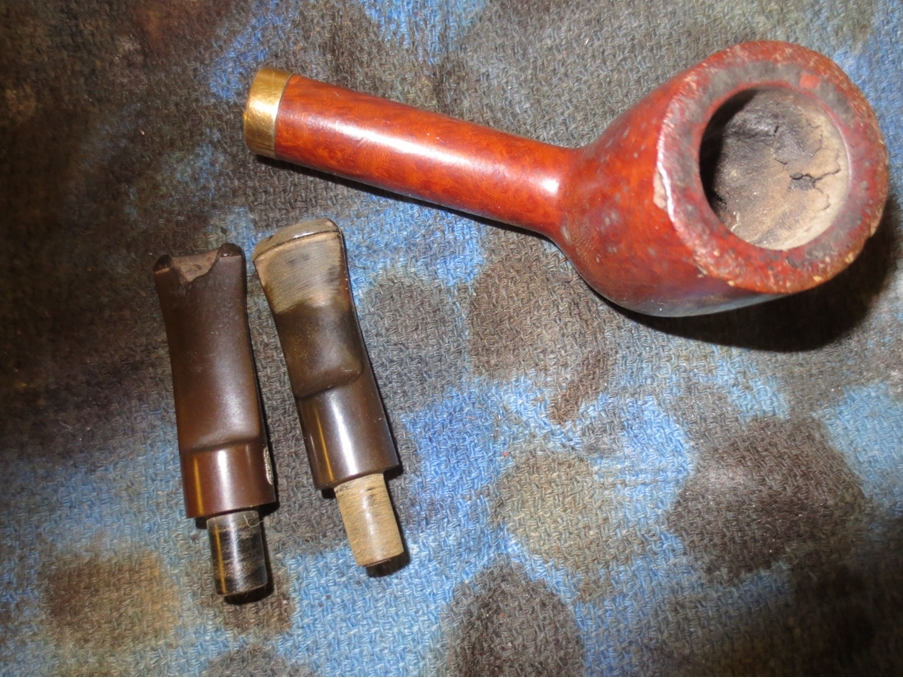
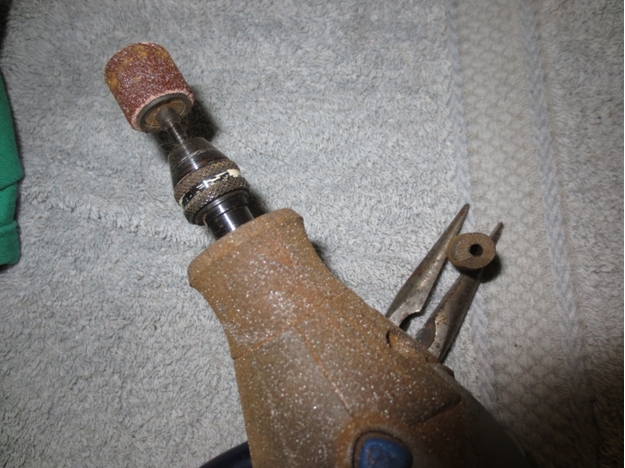
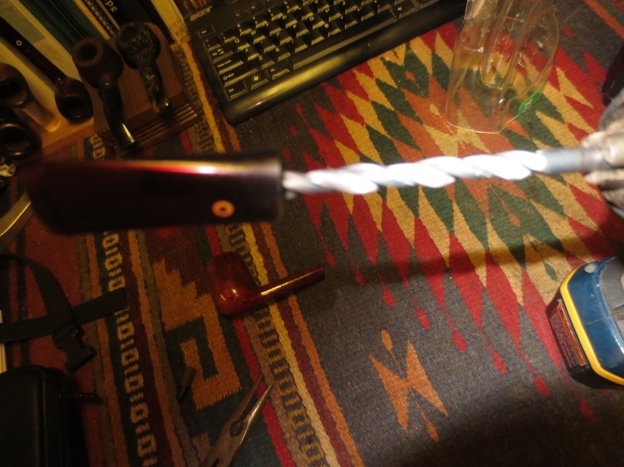
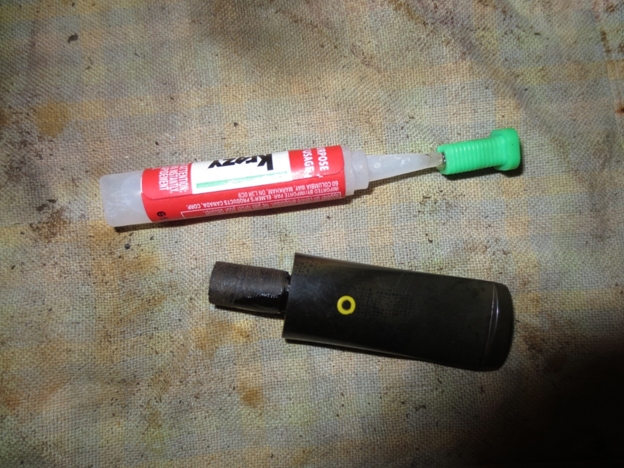
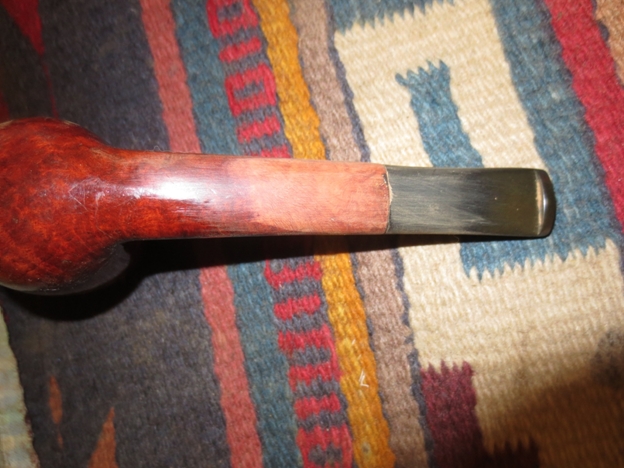
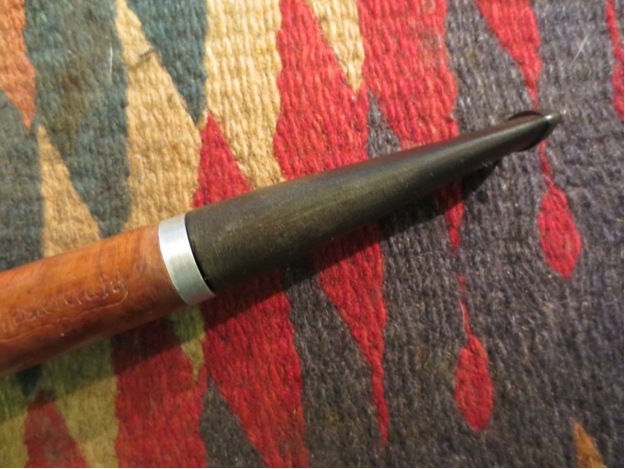
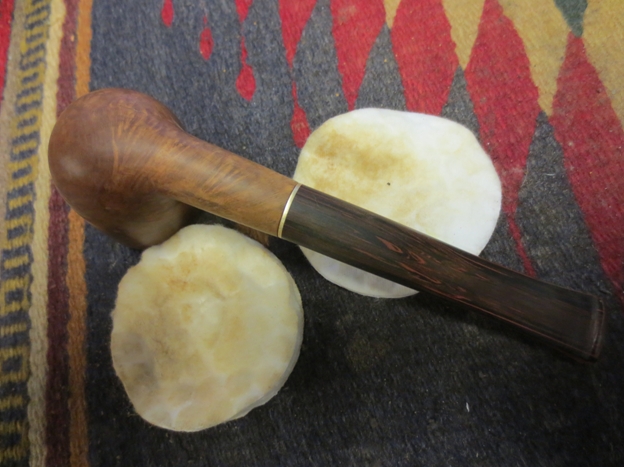
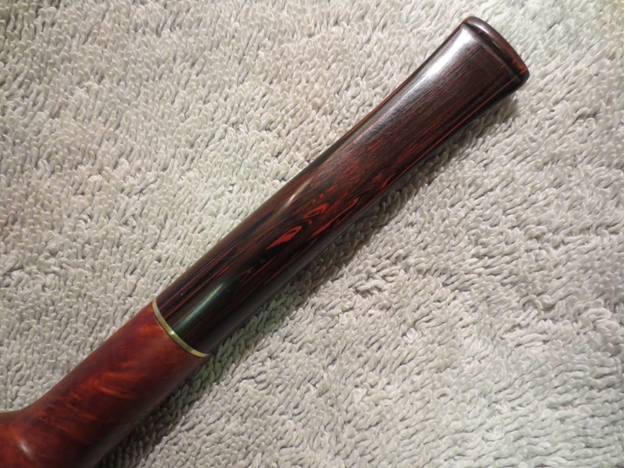
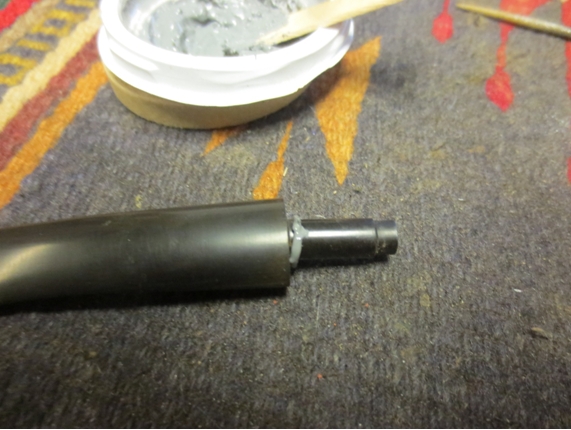
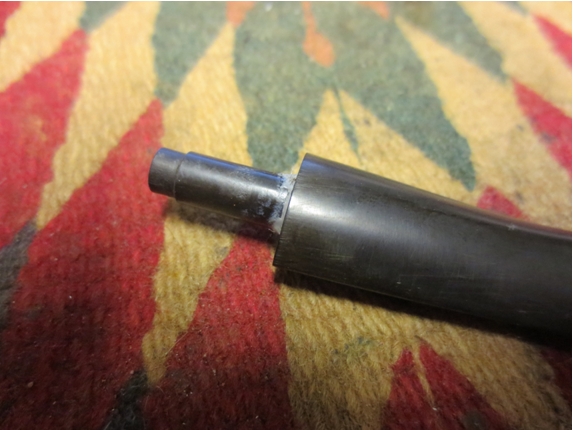
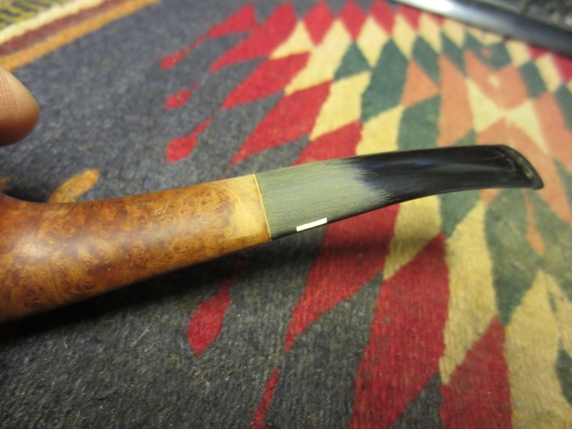
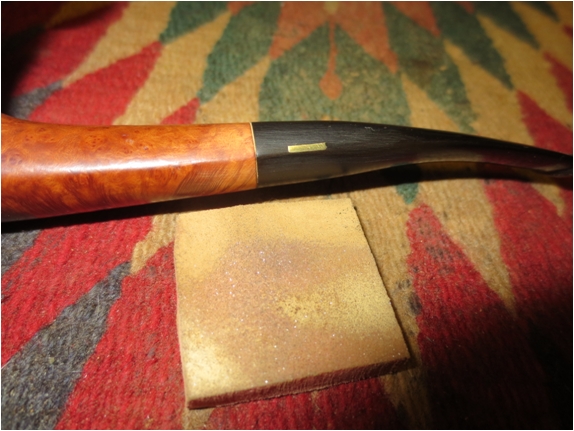
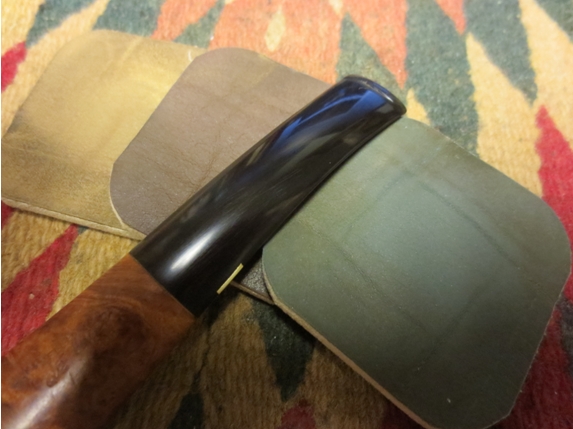
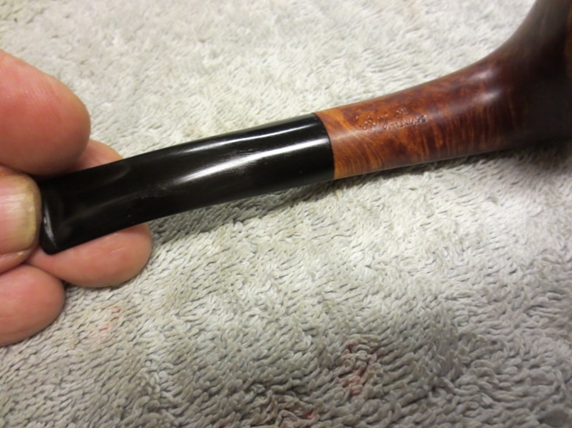
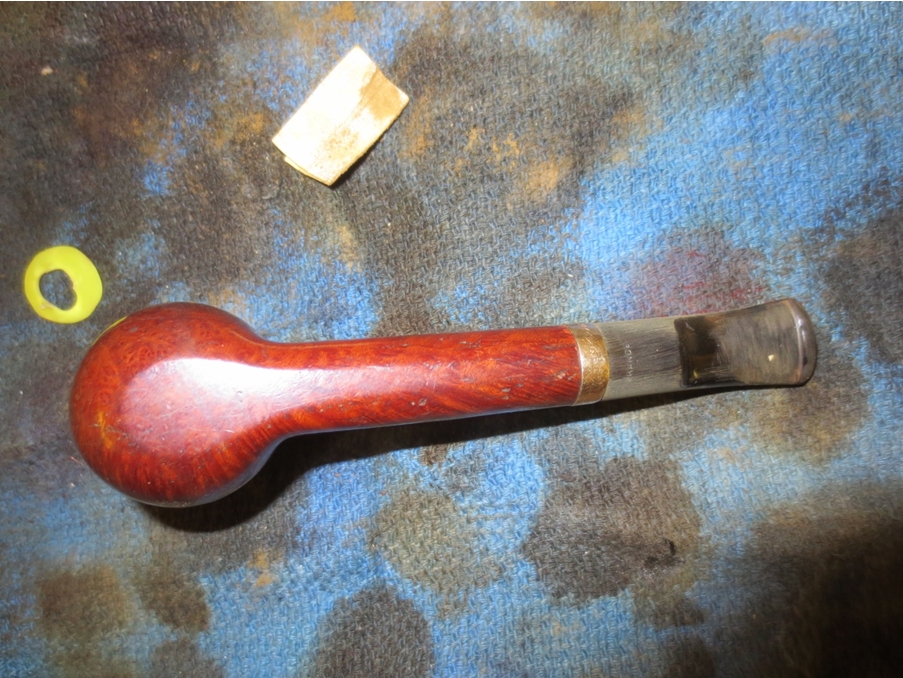
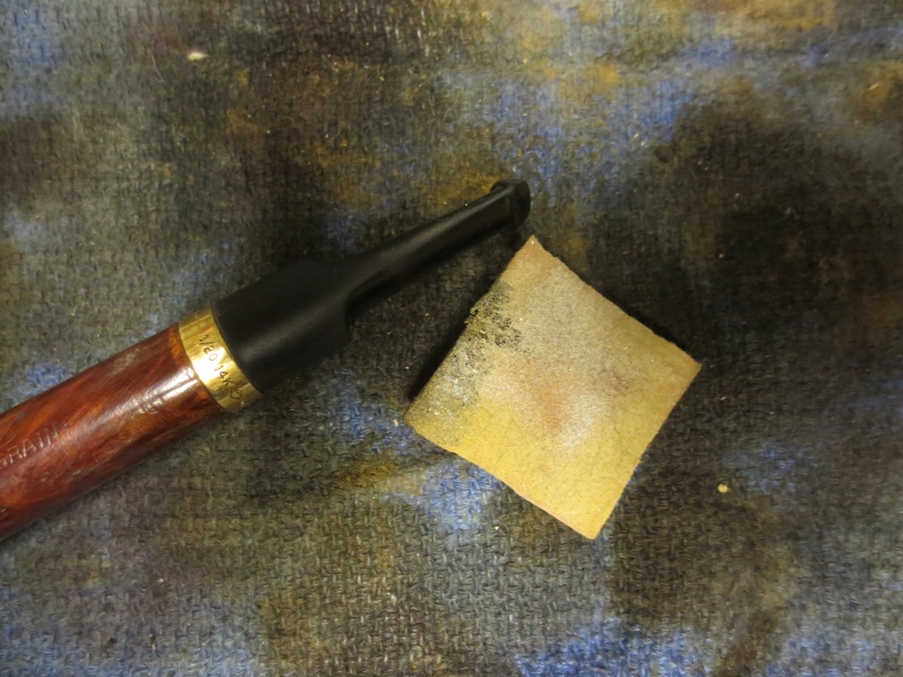
I put a plastic washer between the shank and the stem so that I could sand it to the edge without rounding the shoulders of the stem. I sanded it with 220 grit sandpaper to shape it and fit it to the band diameter. I also sanded off the oxidation that was on the surface of the stem and some of the wavy lines that were present on the flat surface of the blade.Weber14

Weber15

Weber16

Weber17 
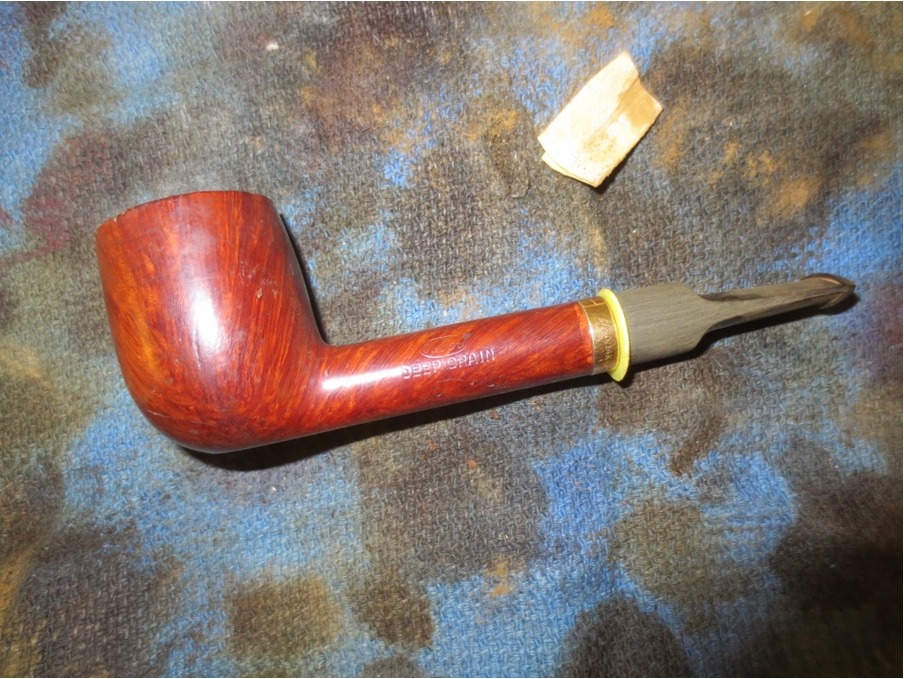
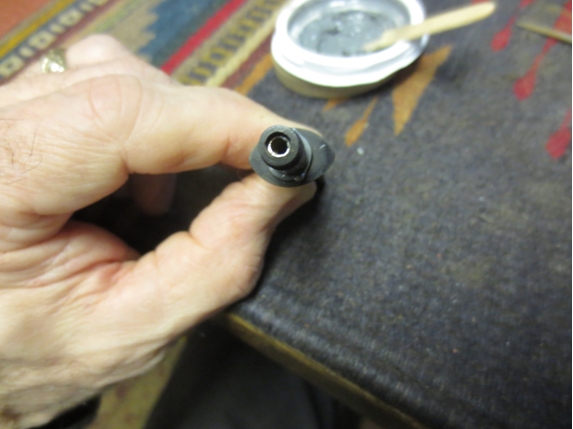
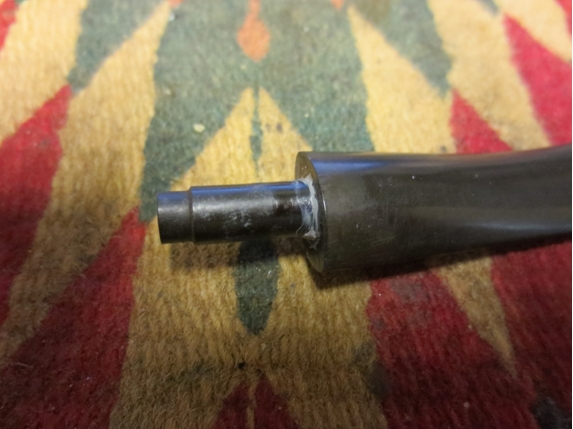
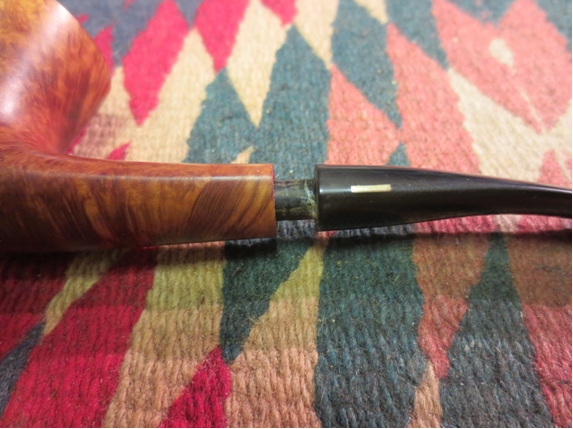
removed the washer and carefully sanded around the shank/band junction to clean up that edge.Weber18

Weber19

Weber20

Weber21 
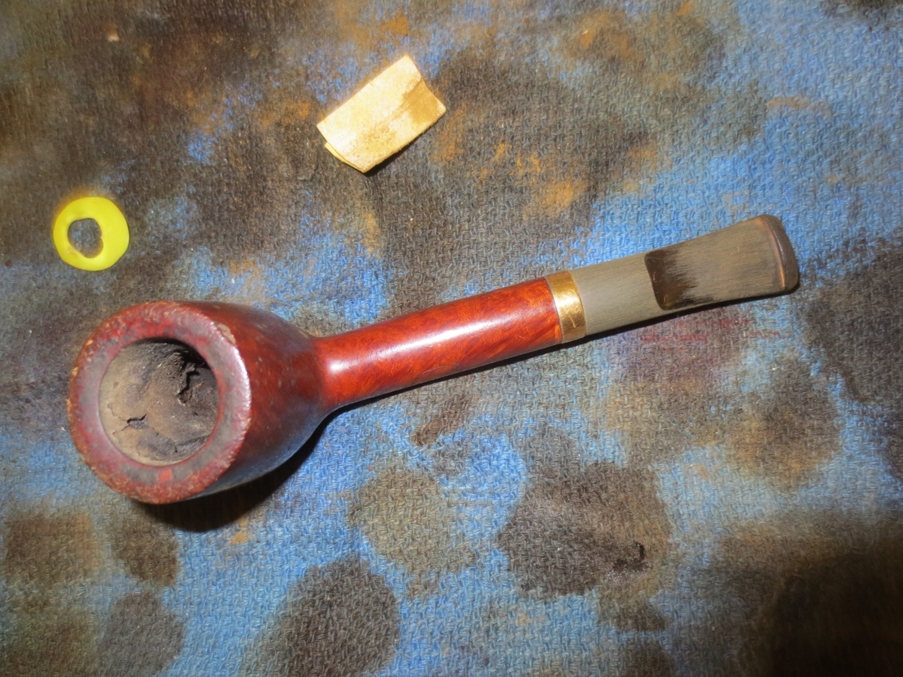
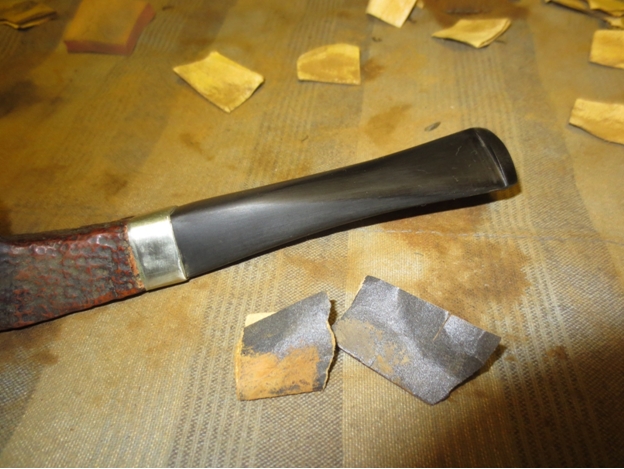
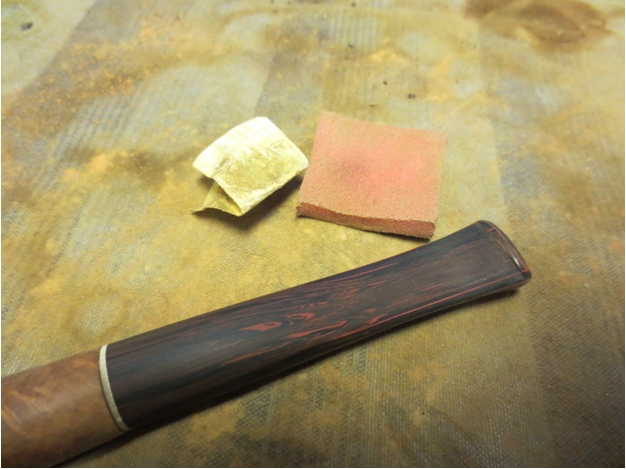
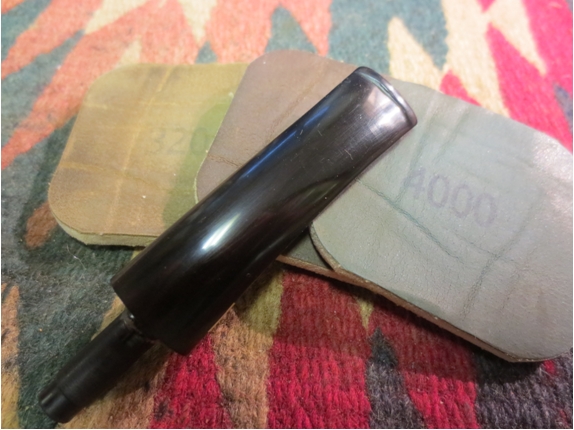
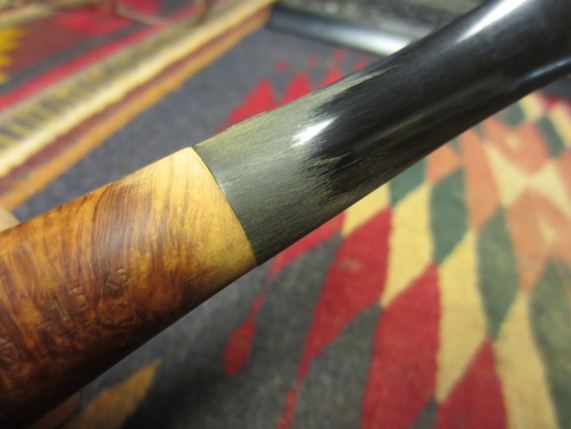
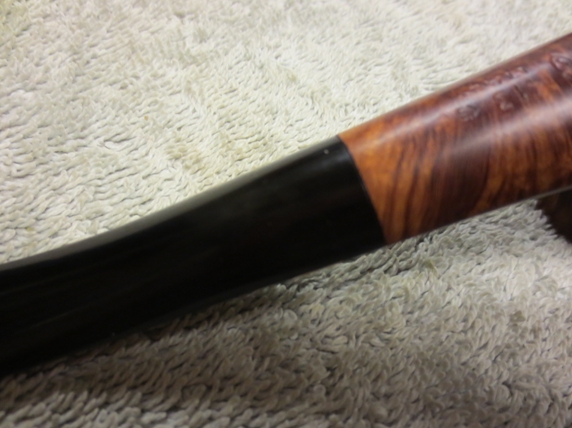
I sanded the stem with a medium and a fine grit sanding sponge to remove the scratches that were present on the stem from the sandpaper.Weber22

Weber23

Weber24 
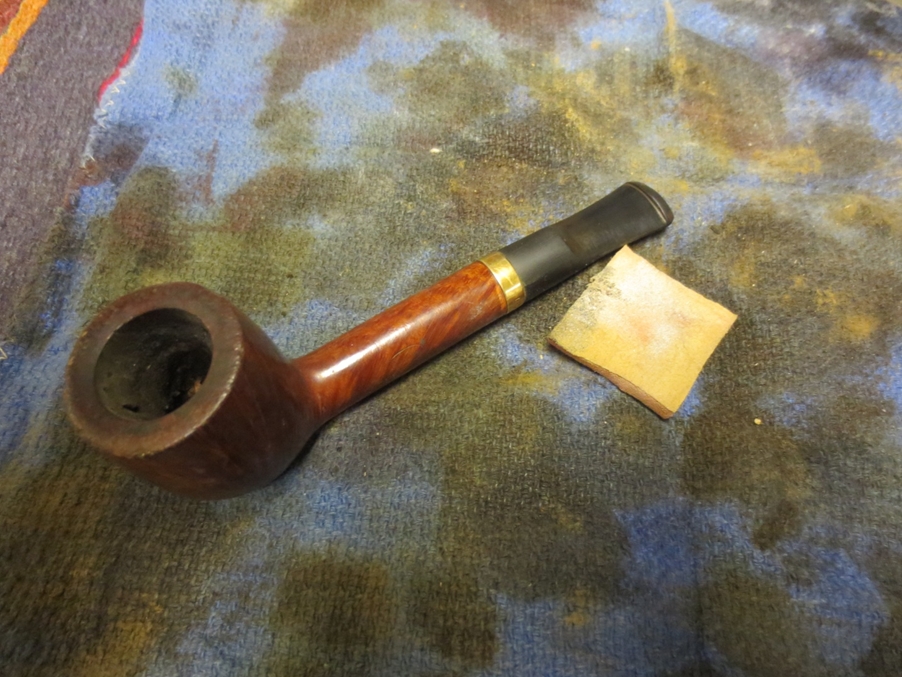
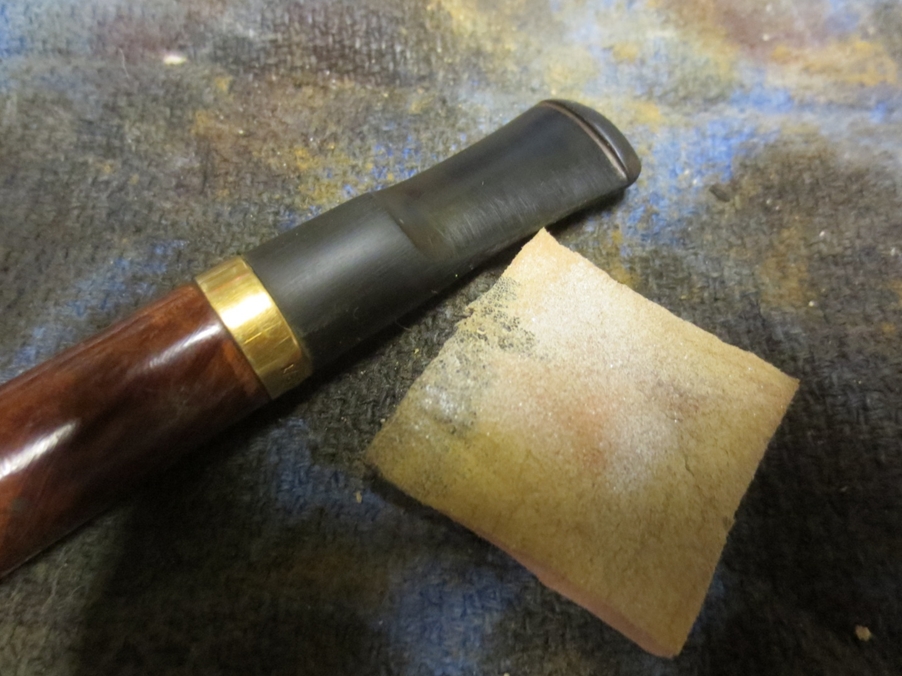
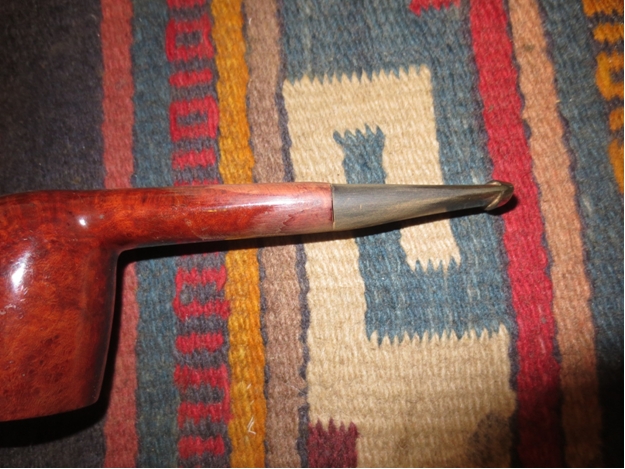
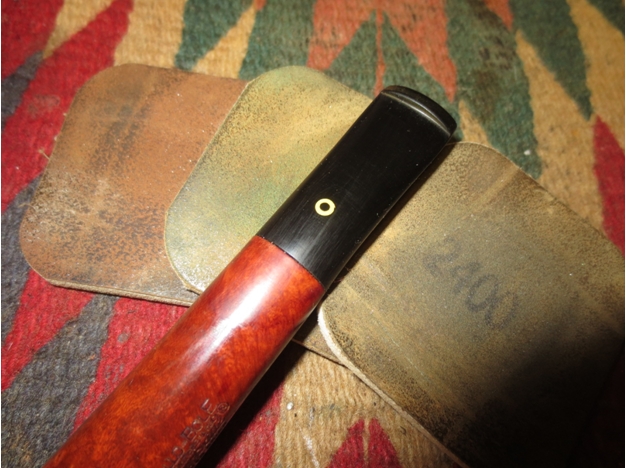
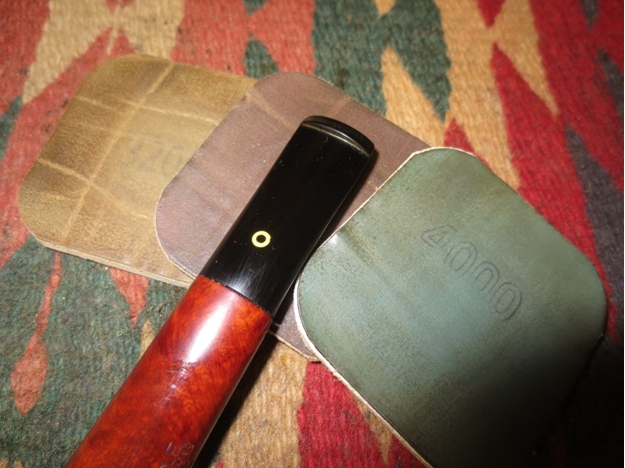
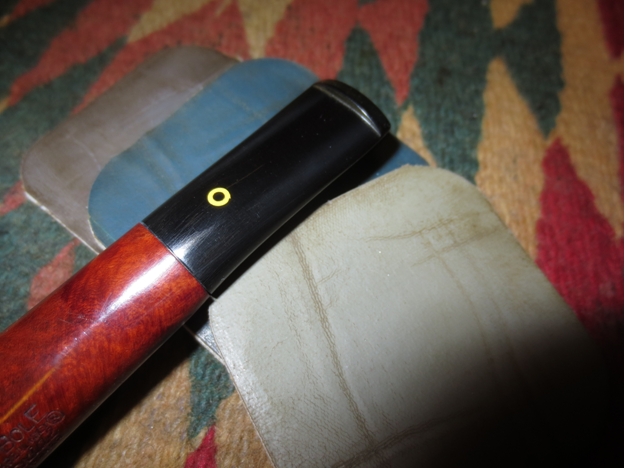
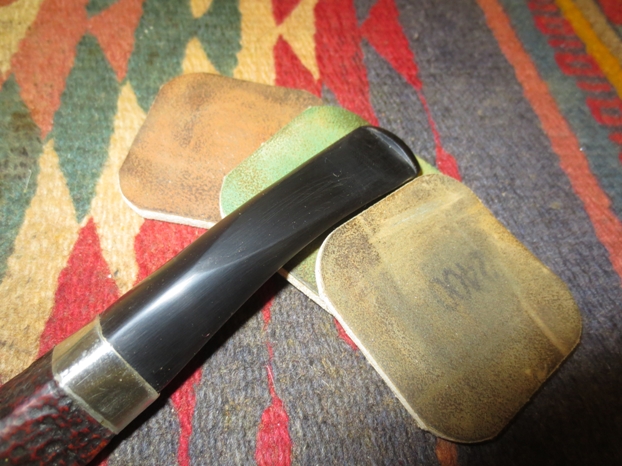
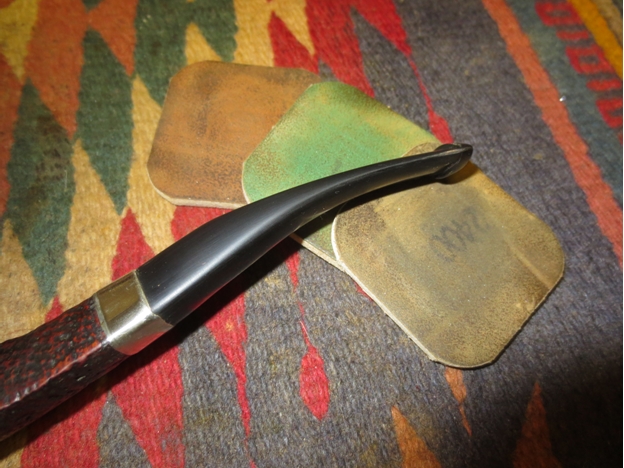
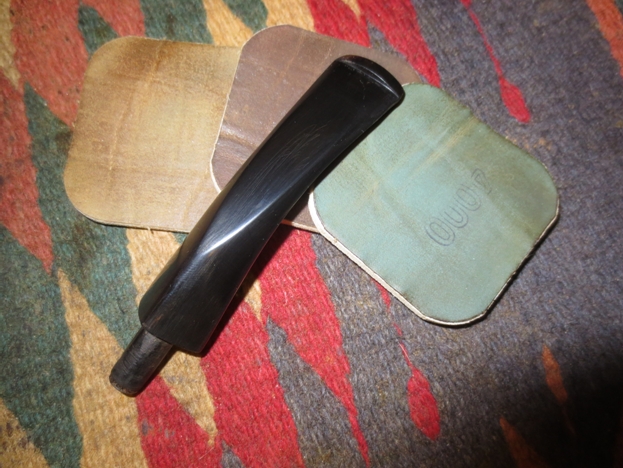
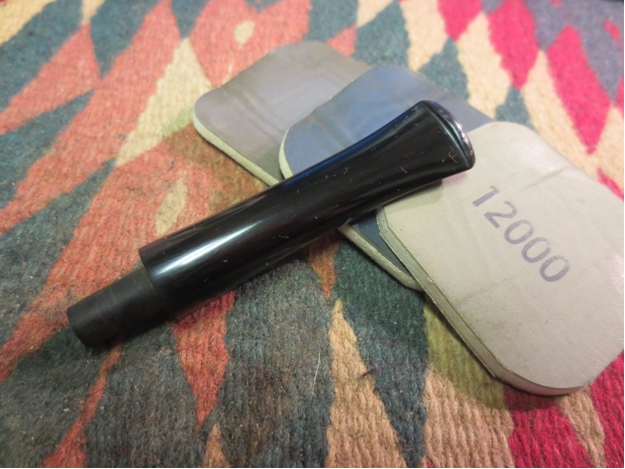
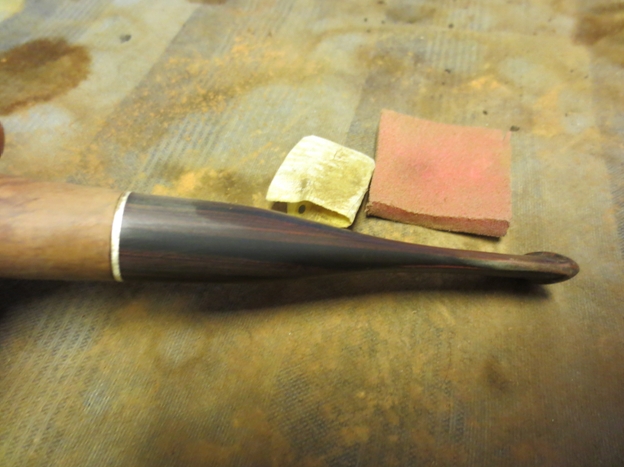
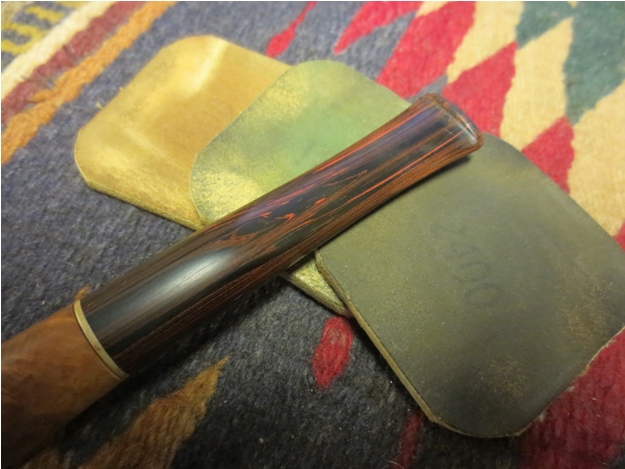
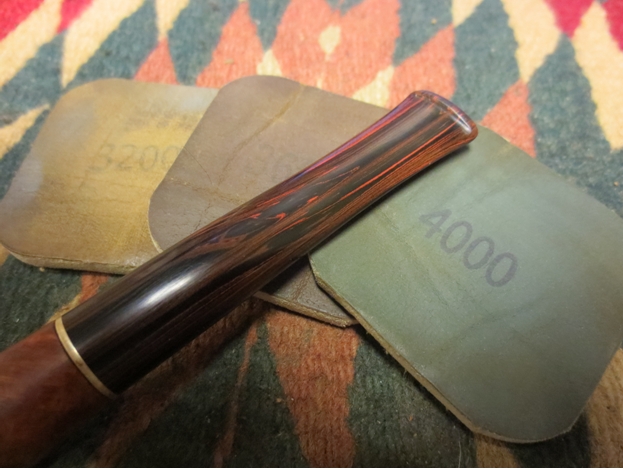
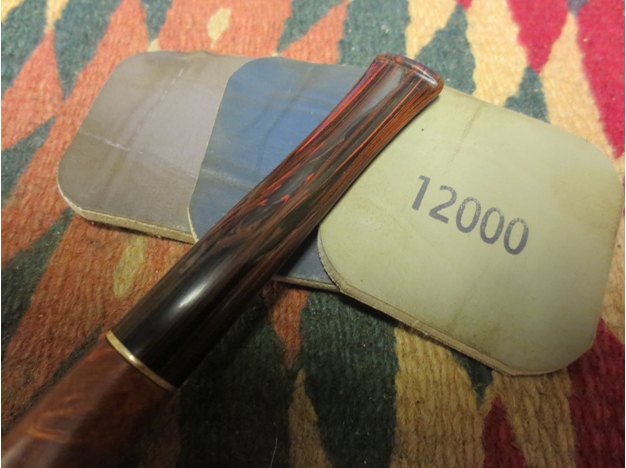
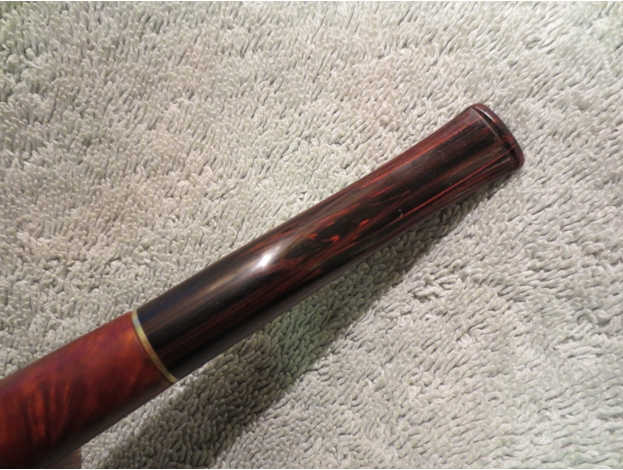
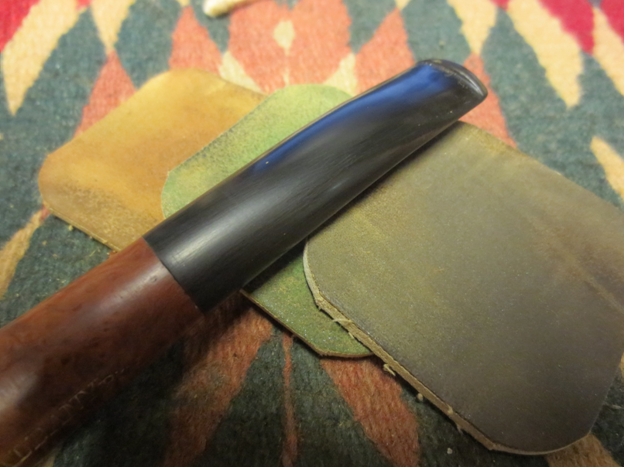
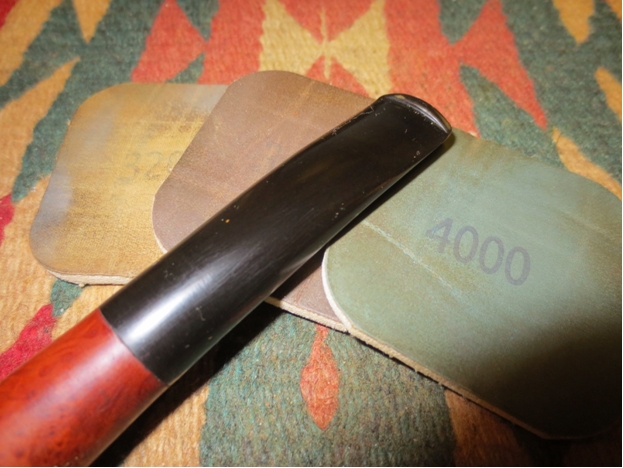
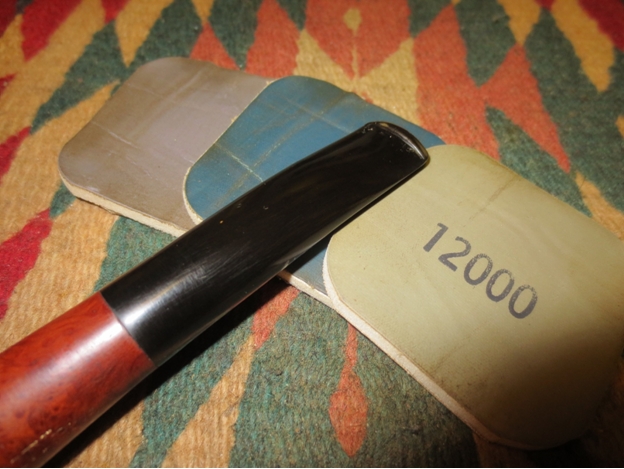
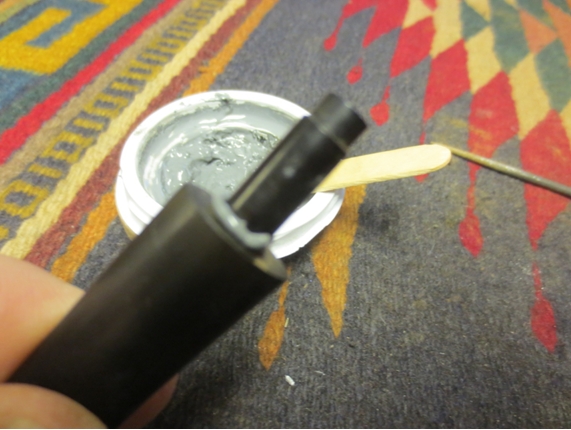
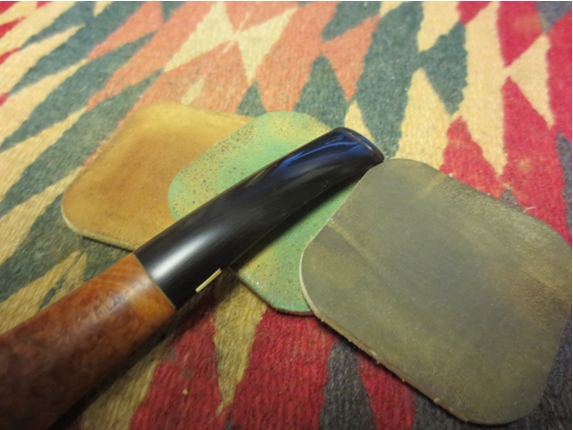
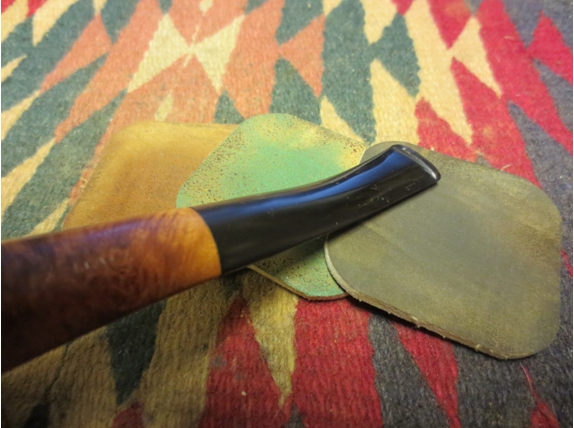
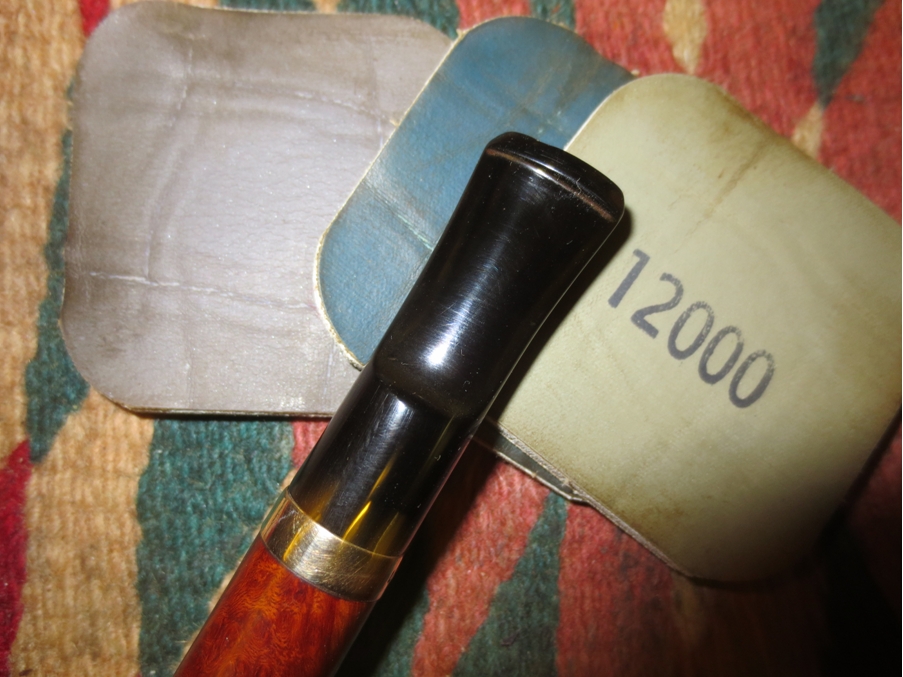
Once I had removed the majority of them I sanded the stem with micromesh sanding pads – wet sanding with 1500-2400 grit pads and dry sanding with 3200-12,000 grit pads. I rubbed the stem down with Obsidian Oil between each set of three pads.Weber25

Weber26

Weber27 
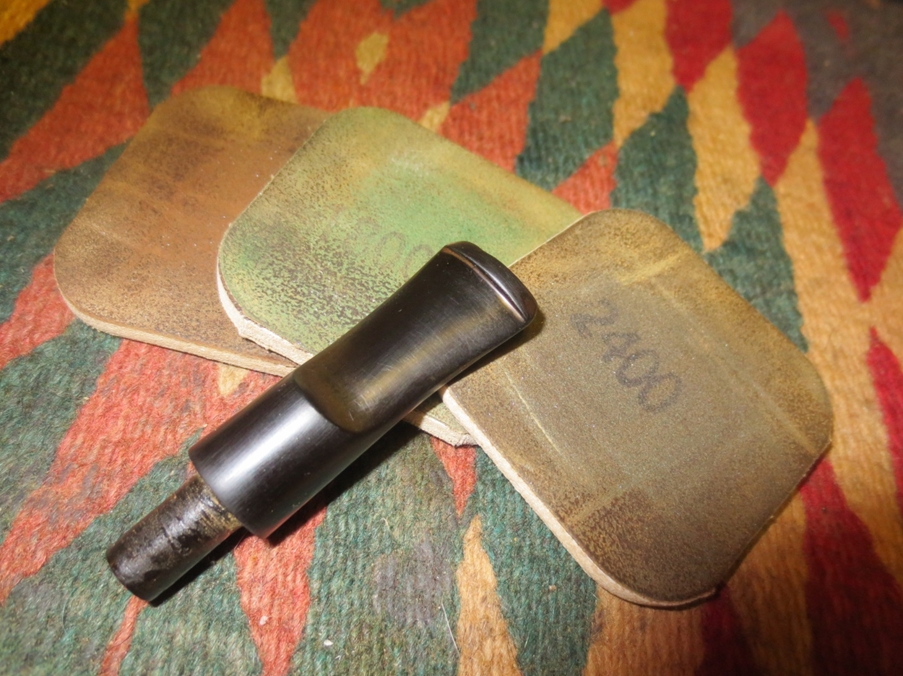
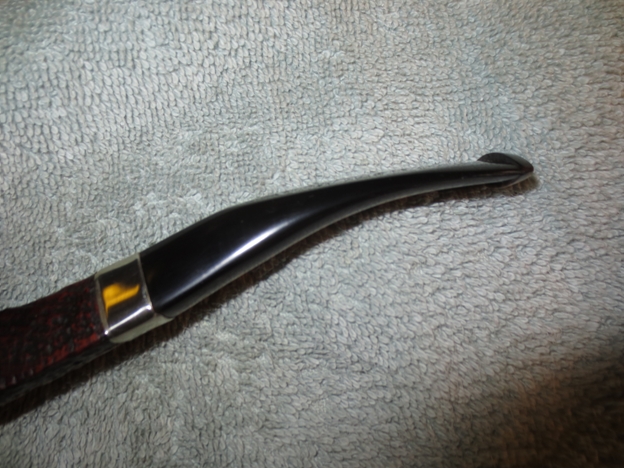
There were still some scratches present on the stem that would go once I had buffed it with Blue Diamond but just before I took it to the buffer I heard back from Scott. He said he would be glad to have me give the pipe a work over. Given that go ahead I set aside the stem and turned to work on the bowl. Once I had the bowl finished I would buff the entire pipe.

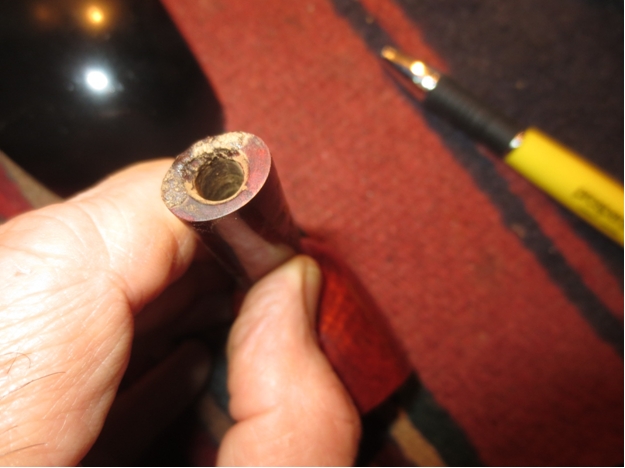
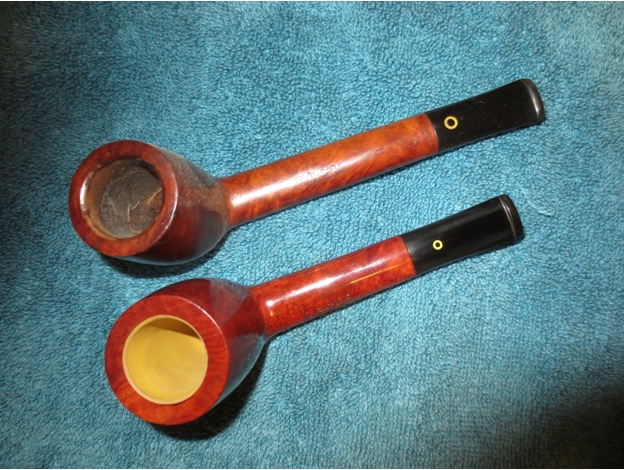
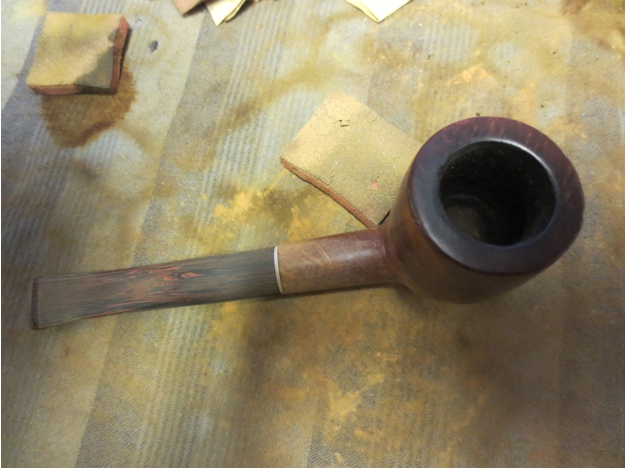
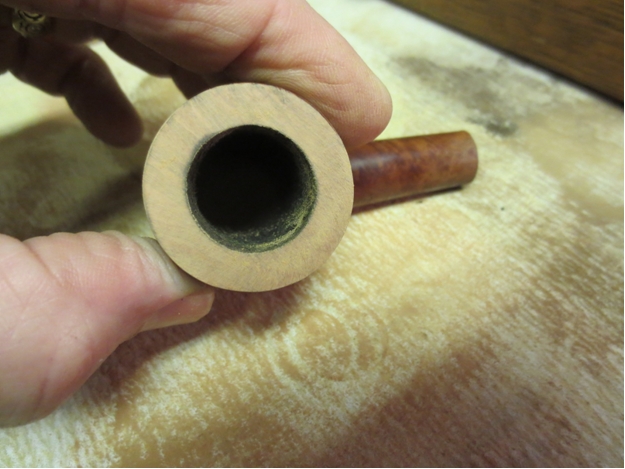
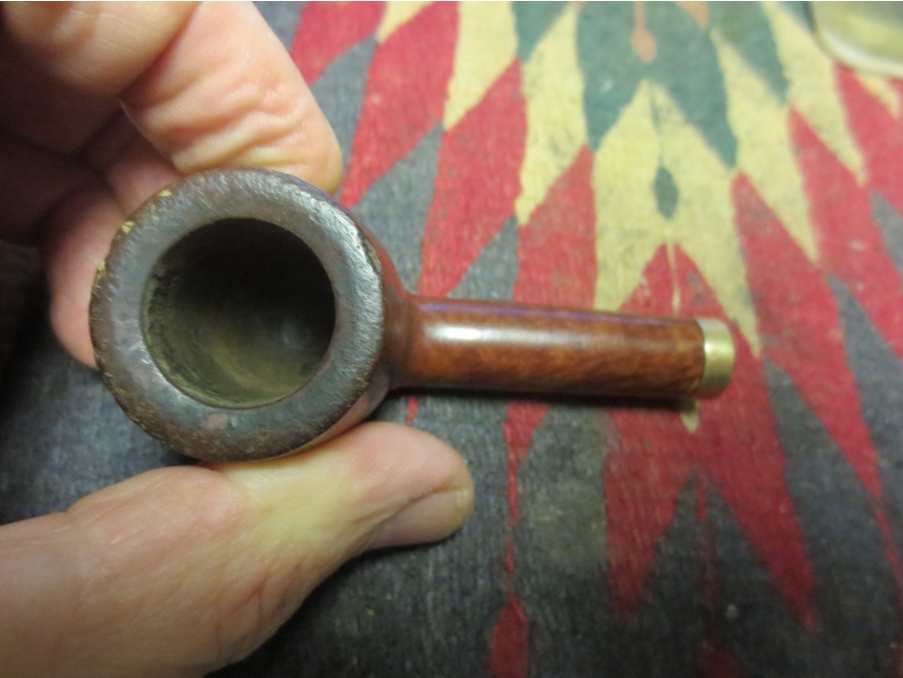
I reamed it with a PipNet reamer starting with the smallest cutting head and then finishing with the second smallest head. With that I took the crumbling, flaking uneven cake back to bare wood. I figured that Scott could start over and build an even hard cake of his own choosing.Weber28

Weber29 
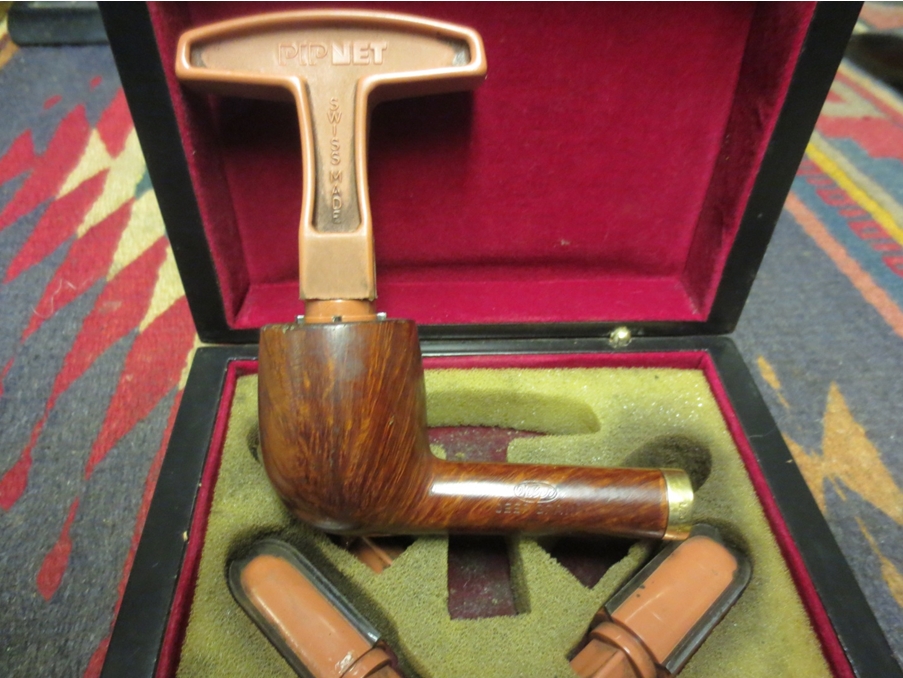
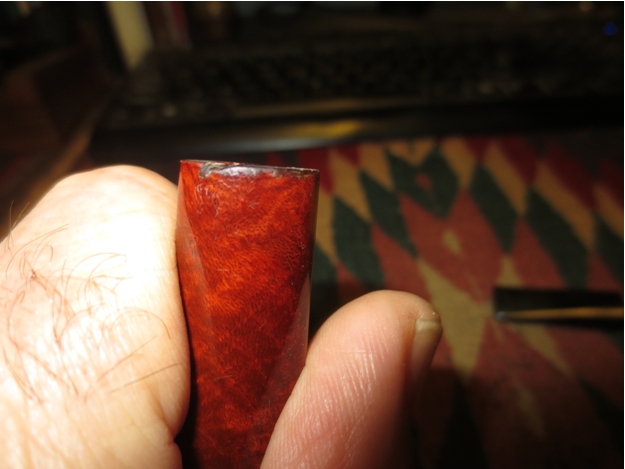
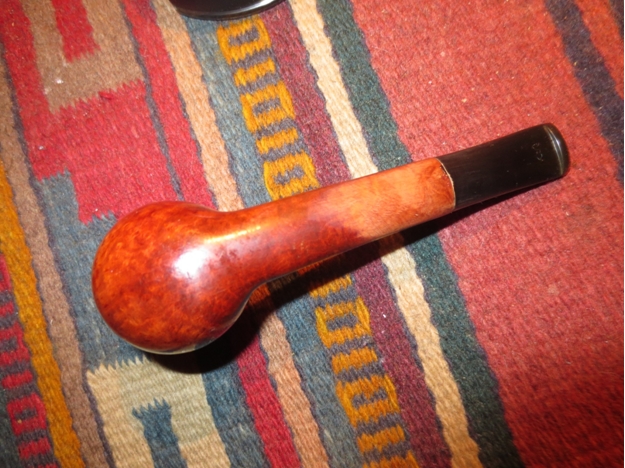
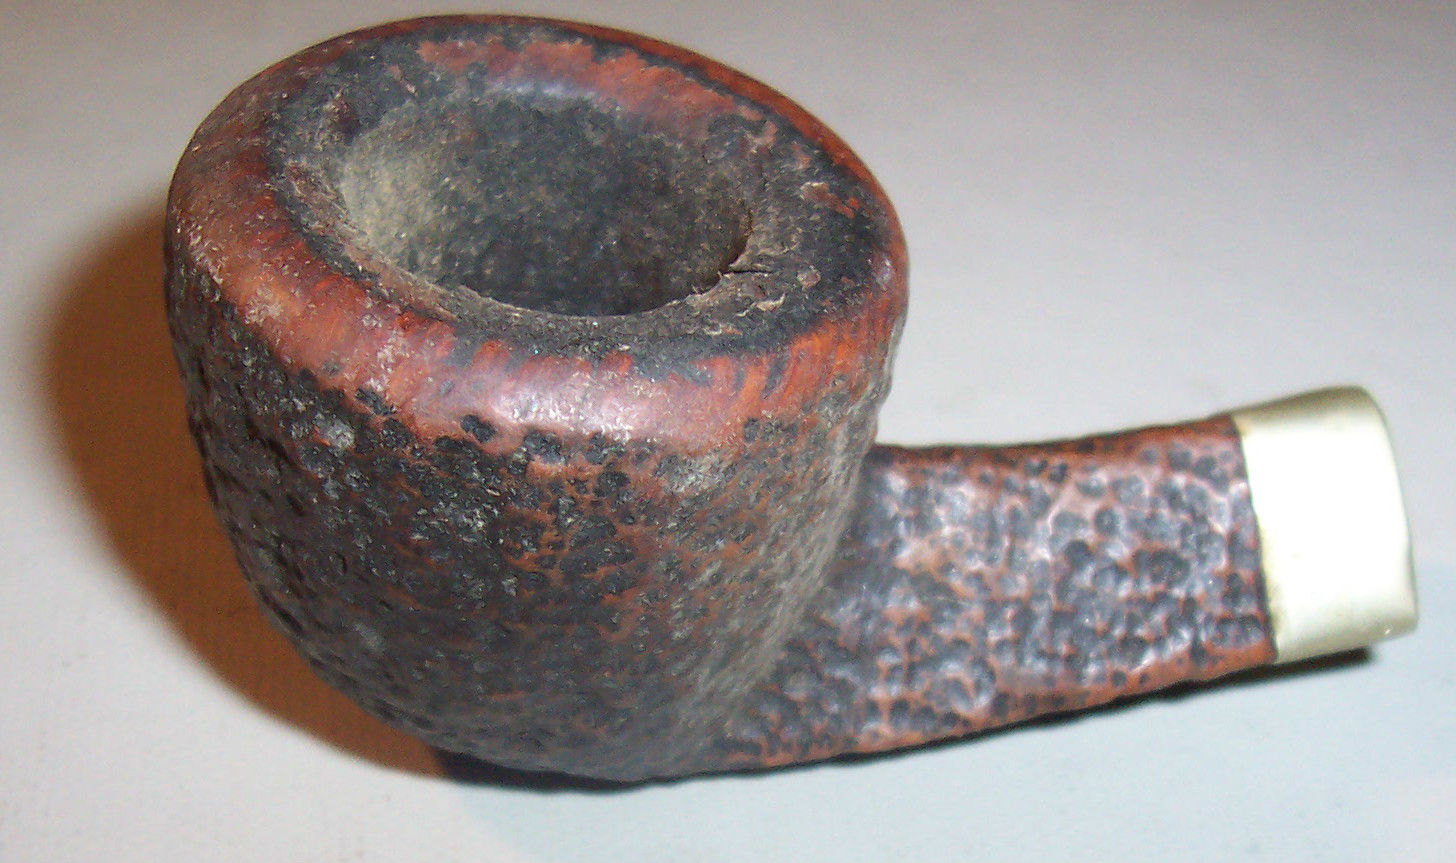
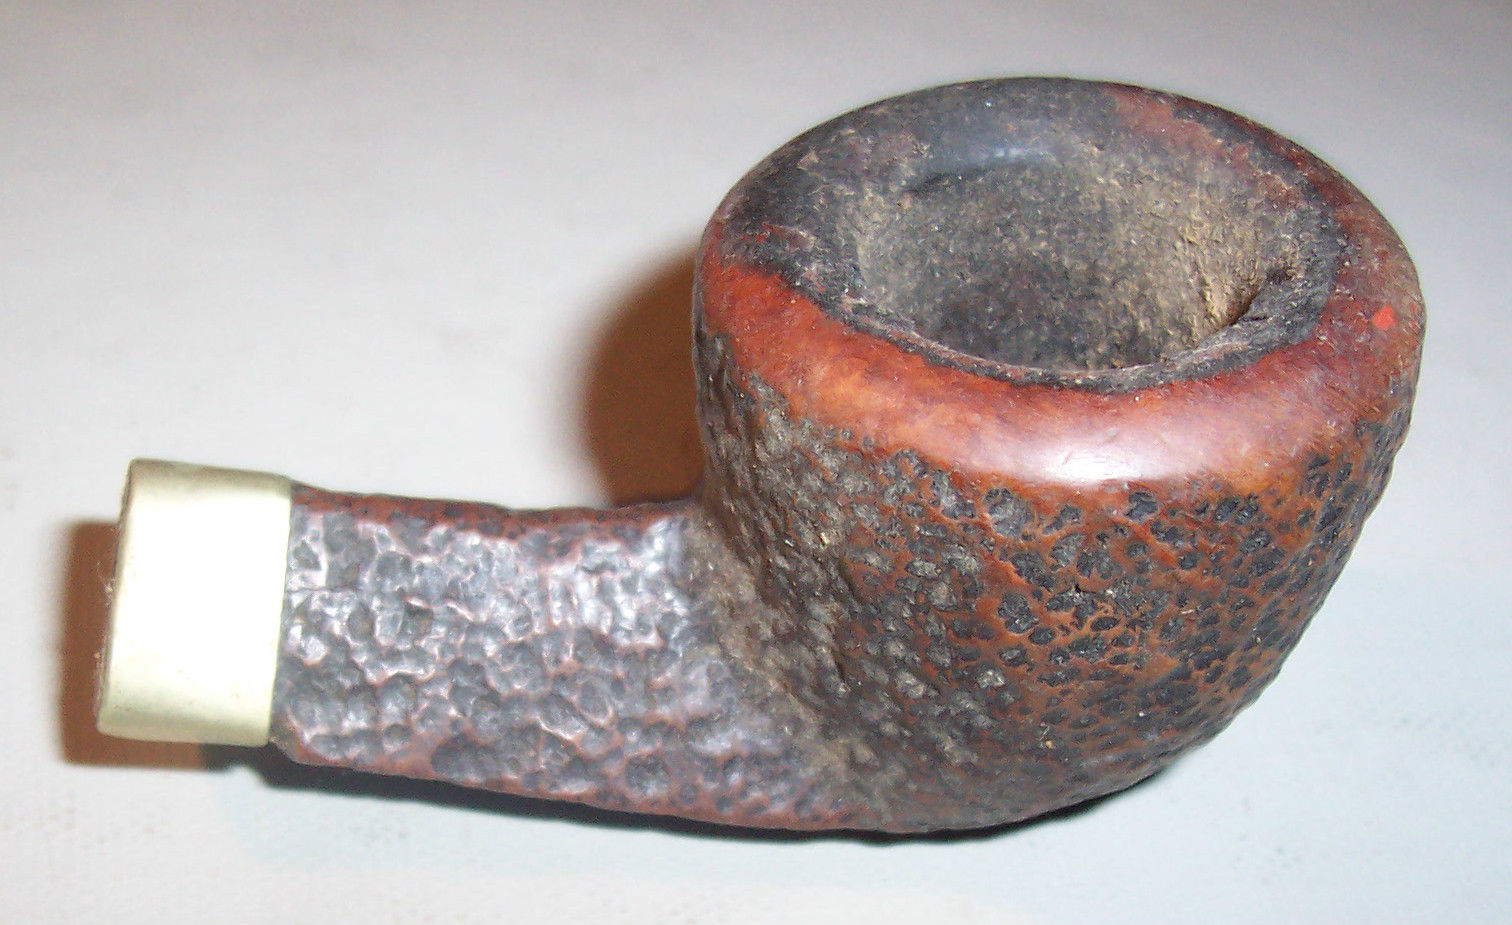
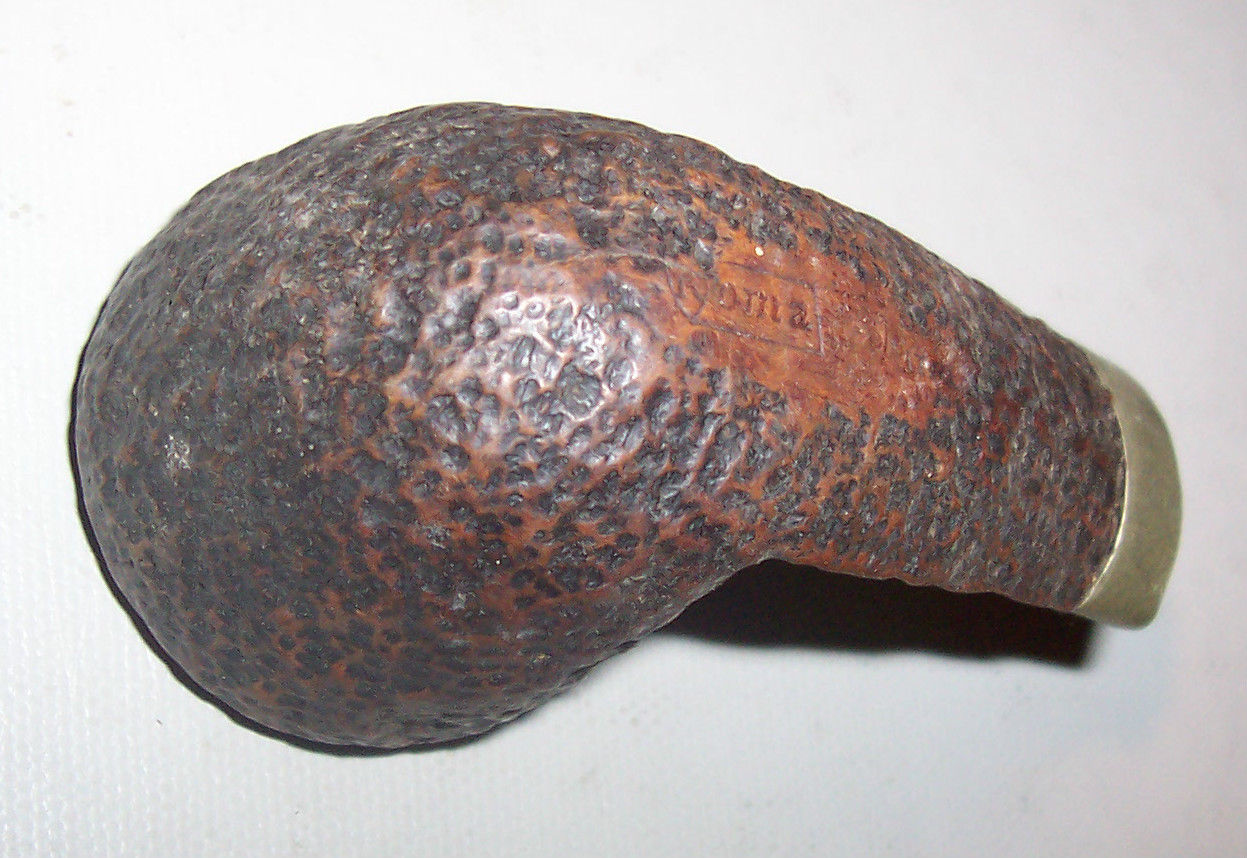
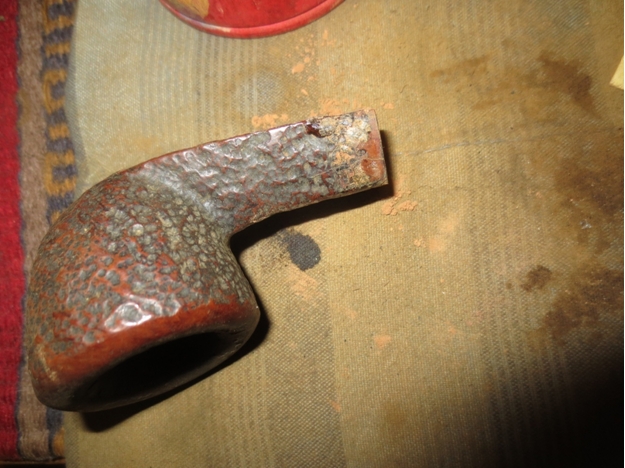
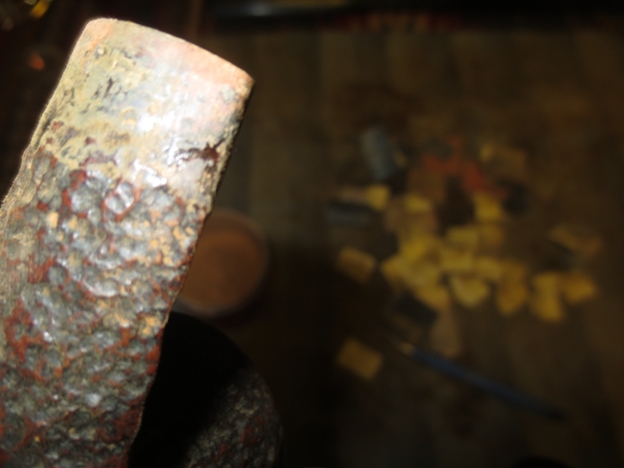
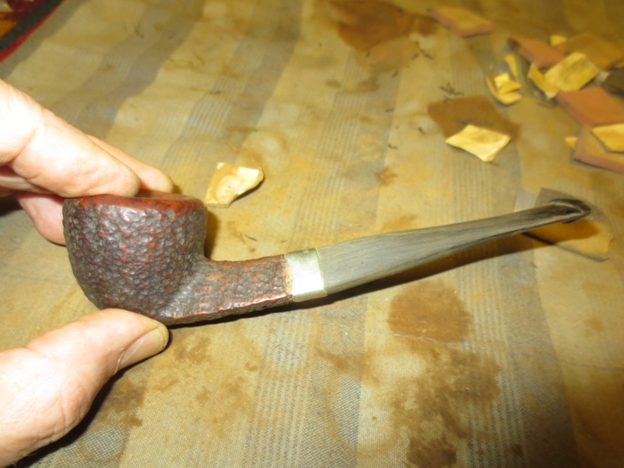
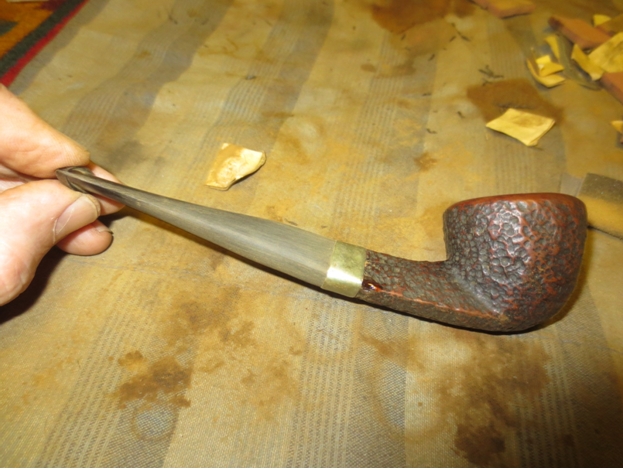
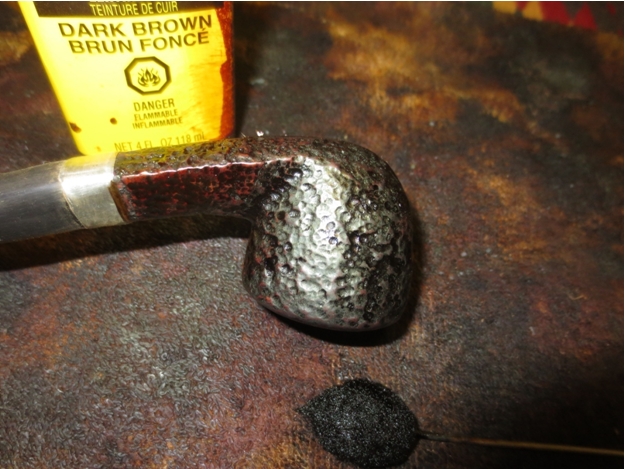
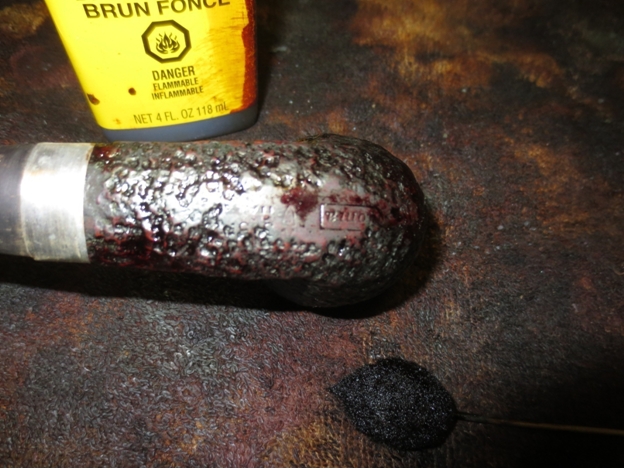
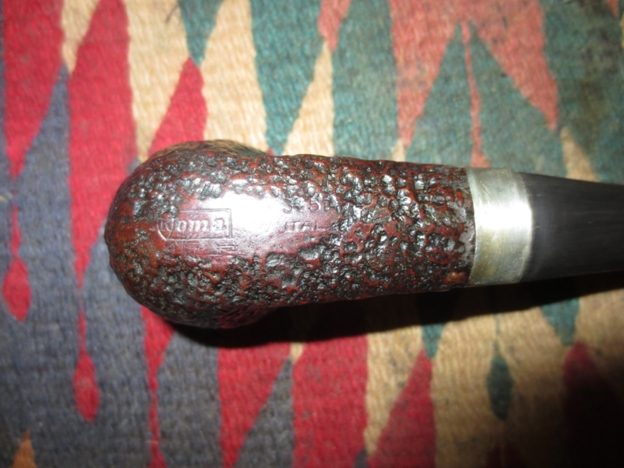
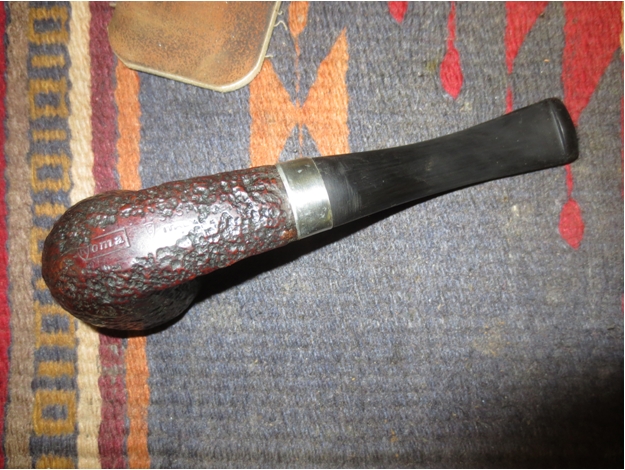
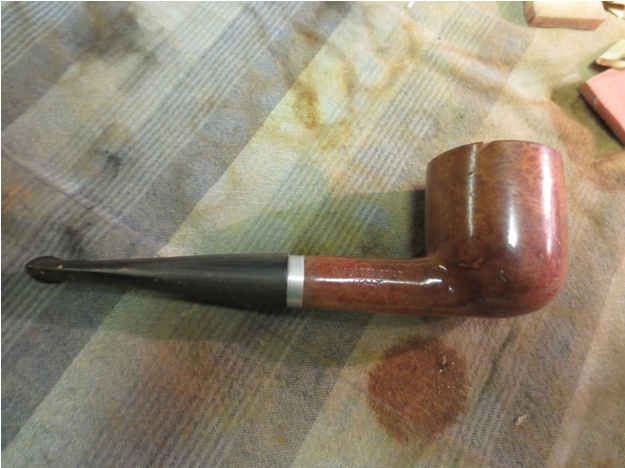
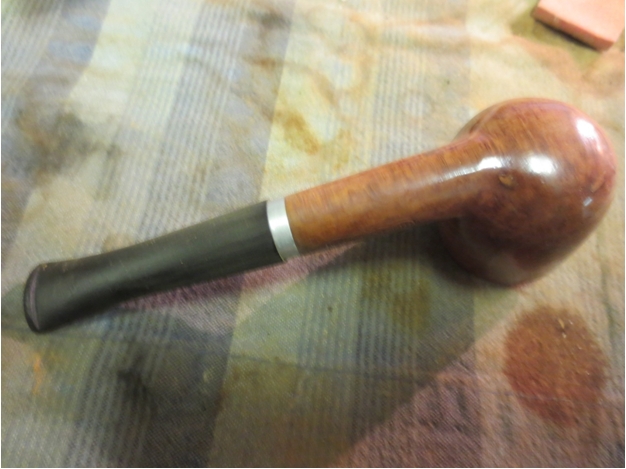
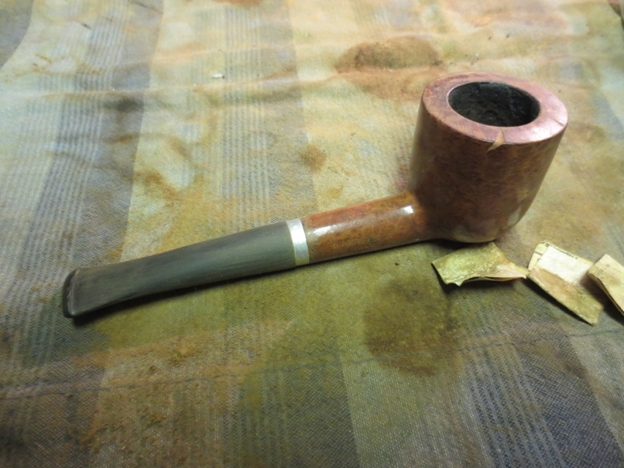
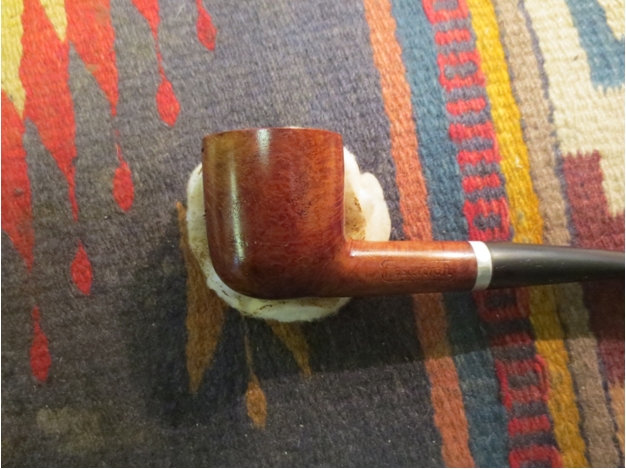
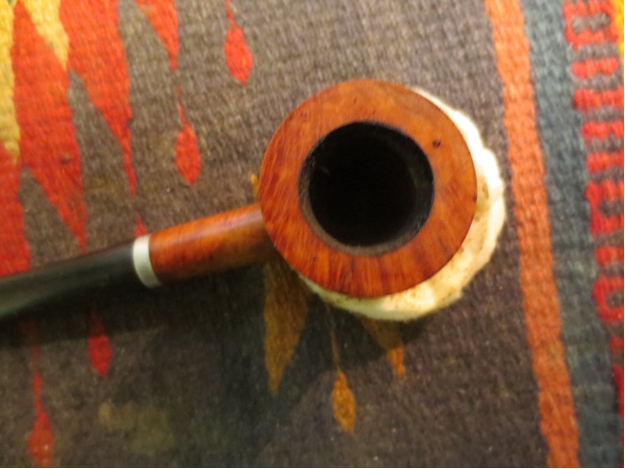
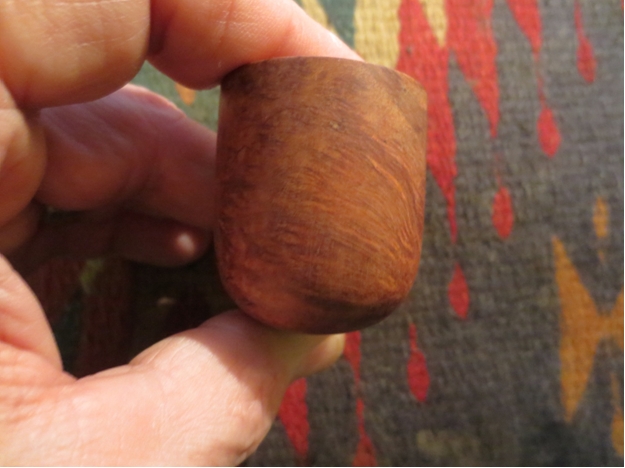
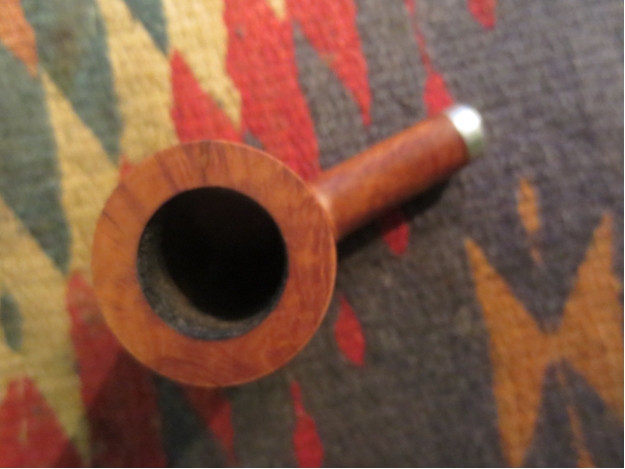
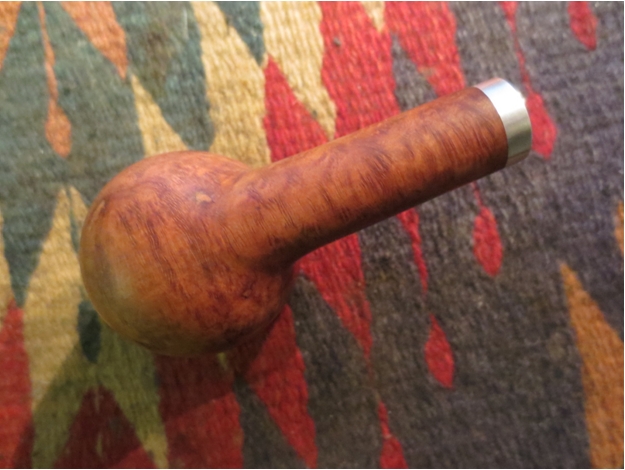
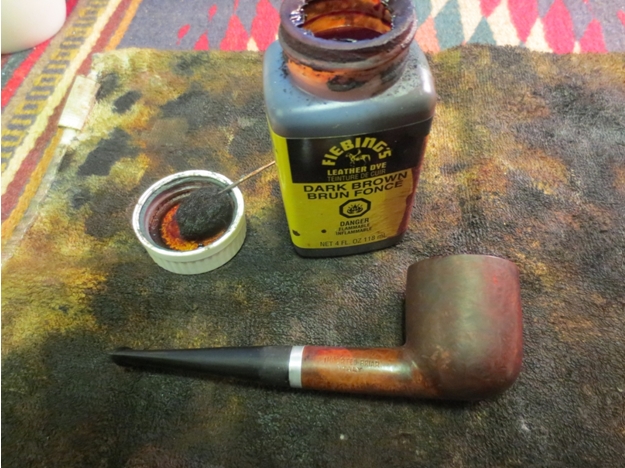
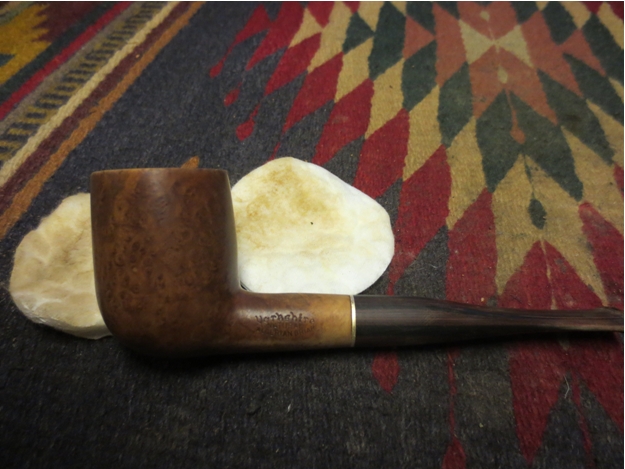
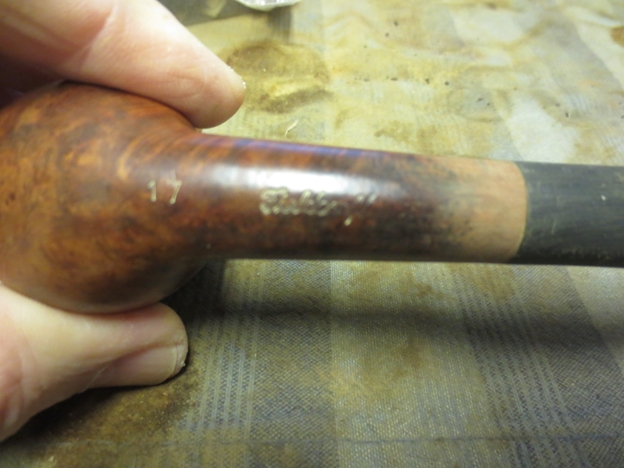
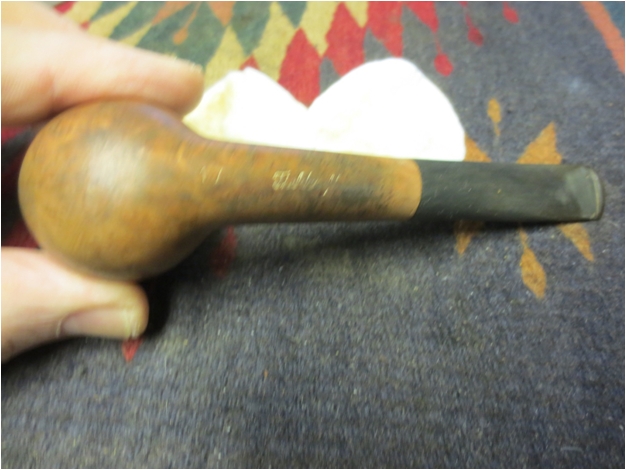
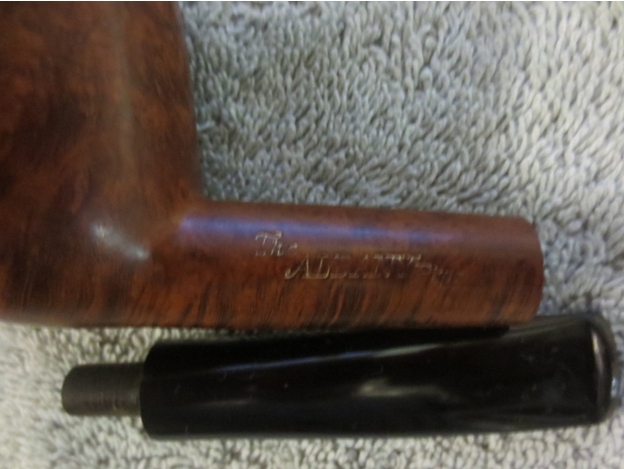
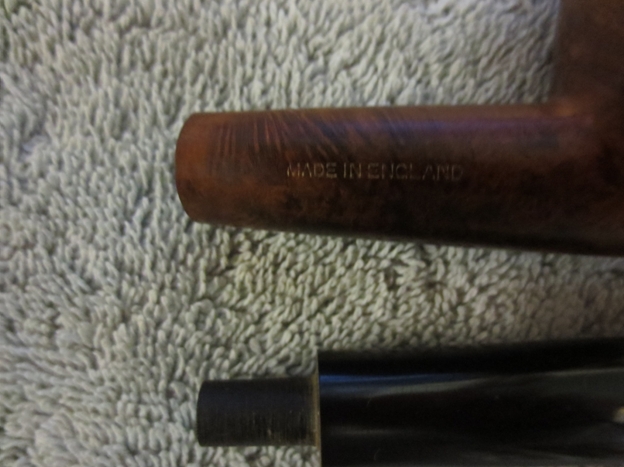
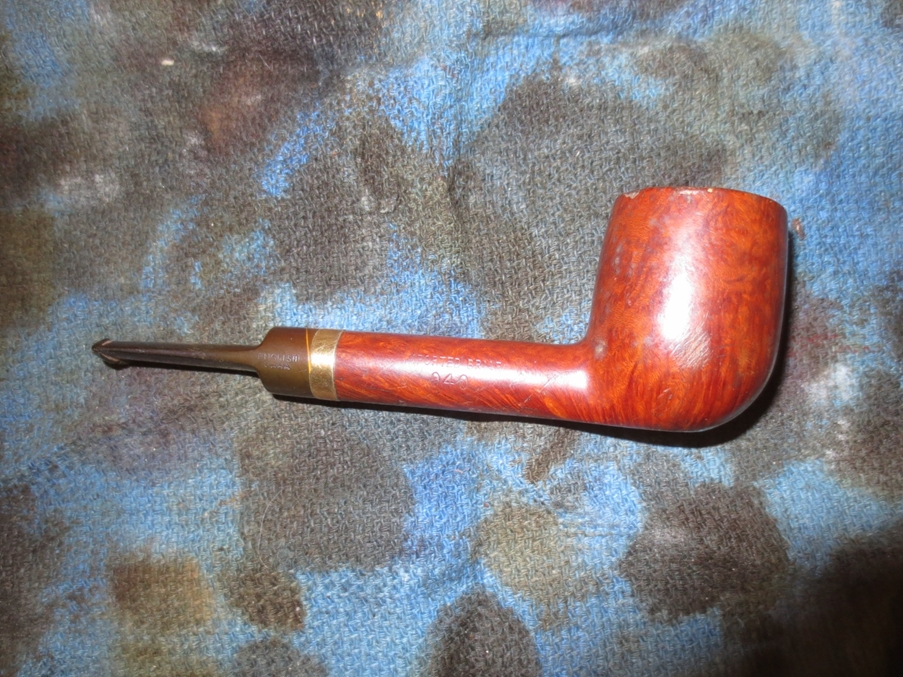
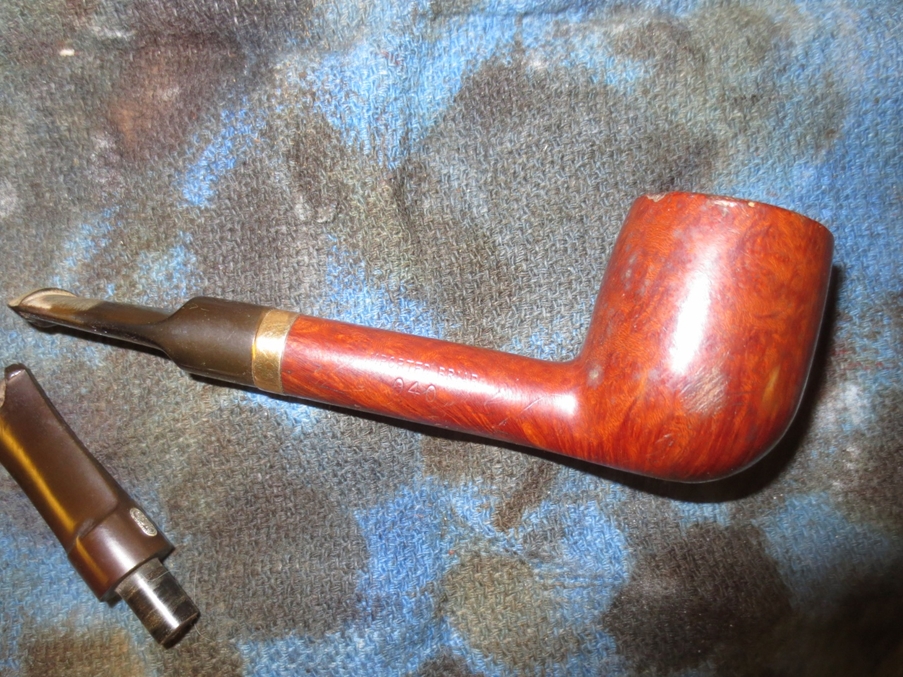
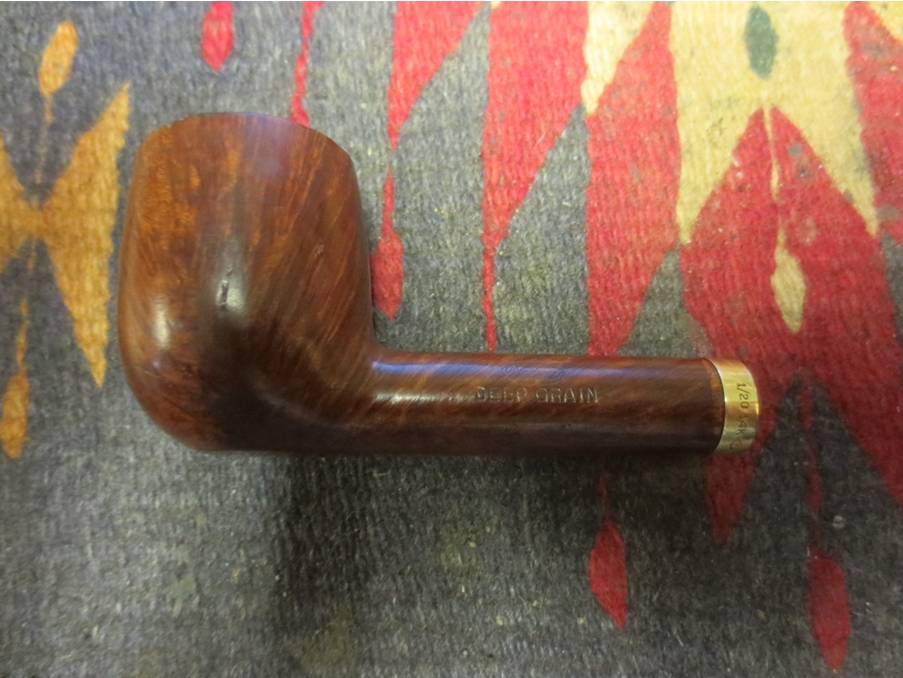
I took a few photos of the bowl to record the damage and scratches to the finish. I wanted to not only get a good look at them but I also wanted to document them. The right side of the bowl had a large series of scratches and grooves from what looked like dropping the pipe on concrete. There were also scratches on the shank and outer edge of the rim. In fact the rim edge was very rough. The left side of the bowl also had some scratches that were pretty deep. The top view of the rim shows the missing chunks of briar around the edge of the bowl and the uneven crown that came from tapping the bowl out against a hard surface. The underside of the shank had a rough spot next to the band and quite a bit of scratching.Weber30

Weber31

Weber32

Weber33
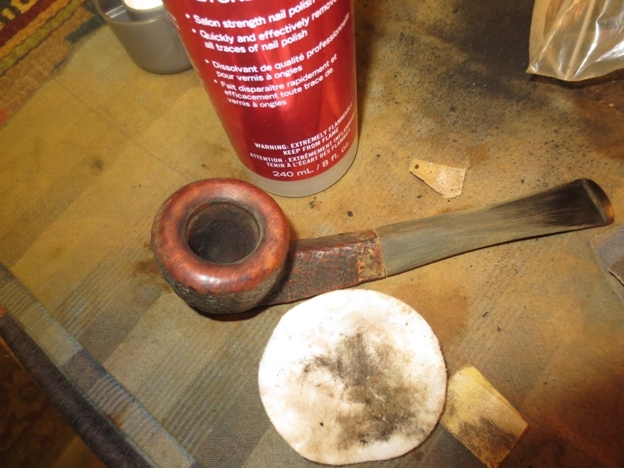
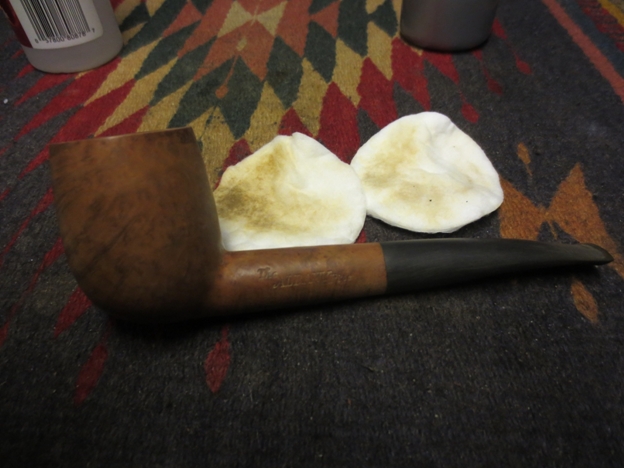
I washed down the bowl with acetone on cotton pads to remove the remnants of the finish before I worked on the scratches and dents in the bowl and shank.Weber34 
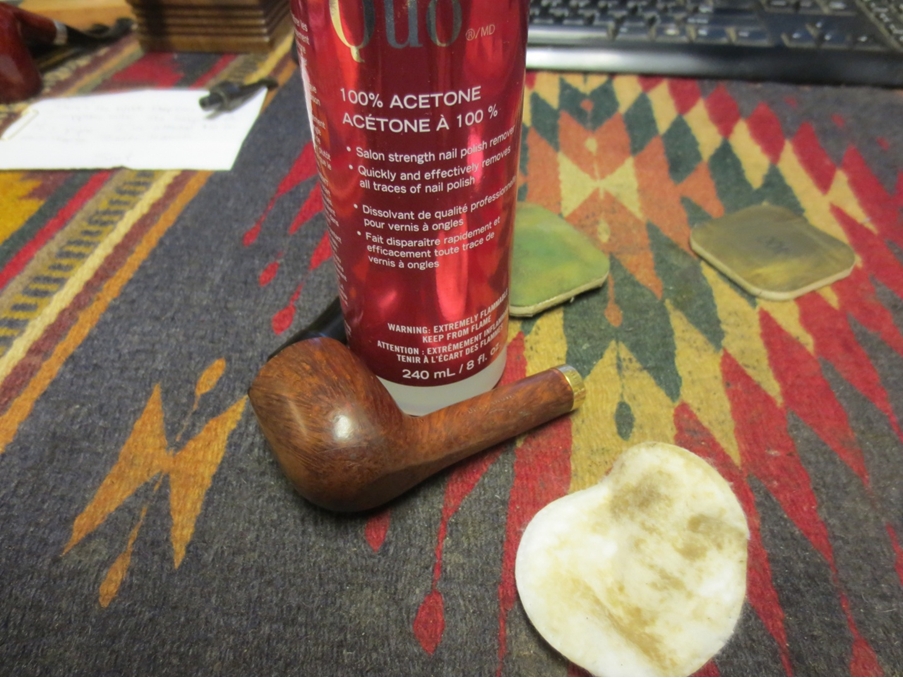
topped the bowl on a topping board to remove the damaged surface and outer edge of the rim.Weber35 
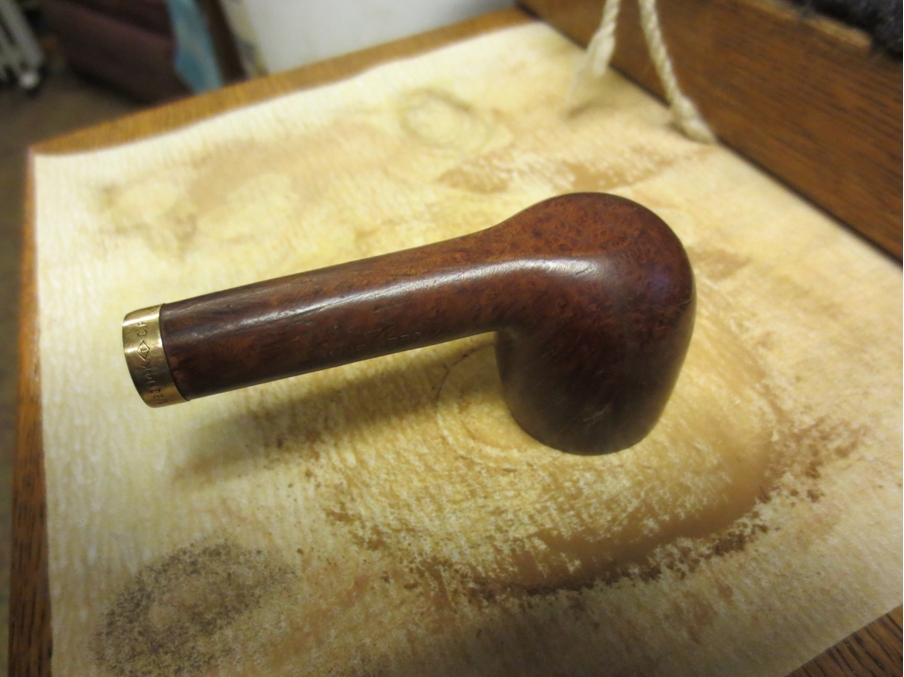
Once I had the bowl topped and the rim smooth and flat again I decided to repair the missing chunks of briar on the outer edge and the deep cuts on the right side of the bowl. I sanded the edge and scratches with a sanding sponge to clean up the jagged edges. I wiped the areas down with alcohol. I then filled the cuts and the missing chunks with superglue and packed in briar dust to fill them. I generally overfill them and then sand them back until they are smooth and blend into the surface area around them.Weber36

Weber37 
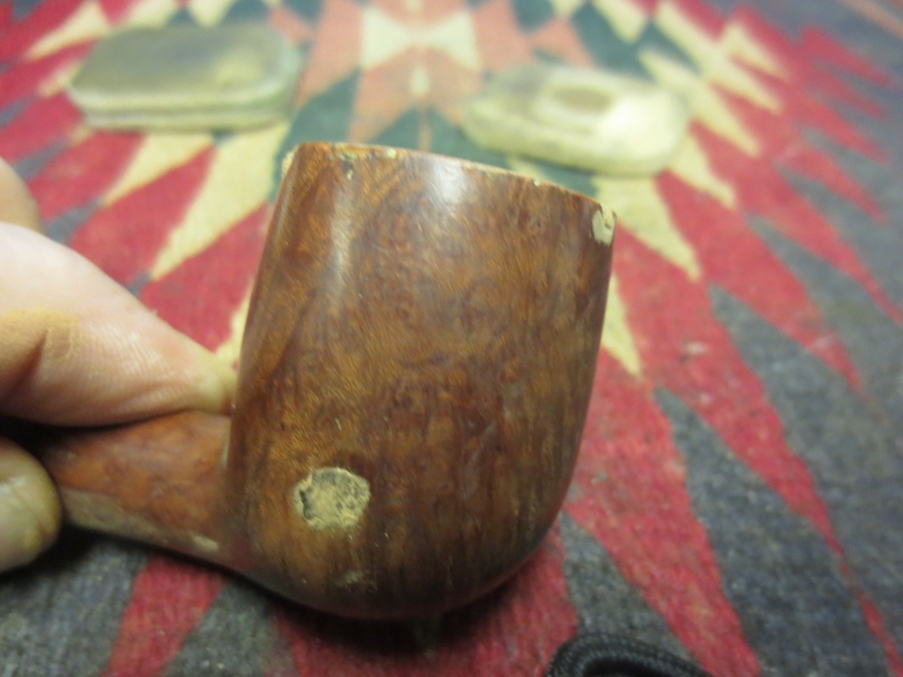
I sanded the fills with a folded piece of 220 grit sandpaper and then with sanding sponges until I had blended the area in with the surrounding surface of the bowl.Weber38 
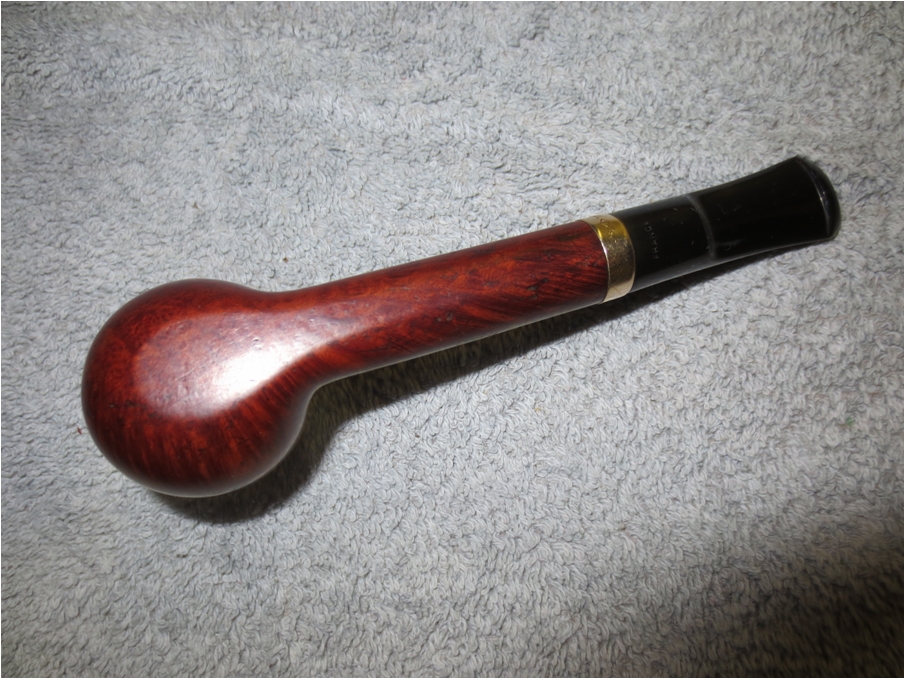
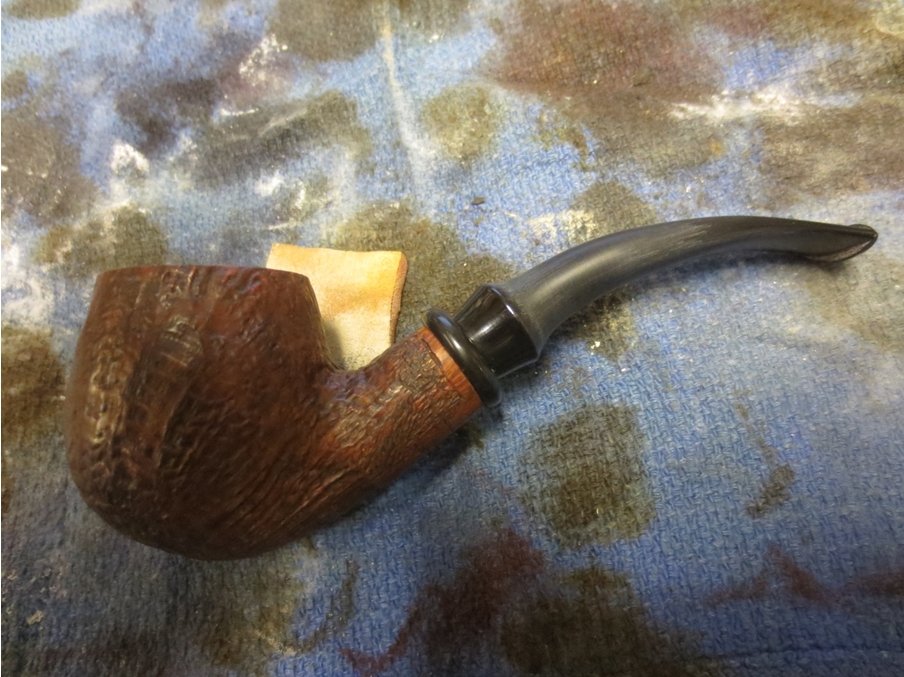
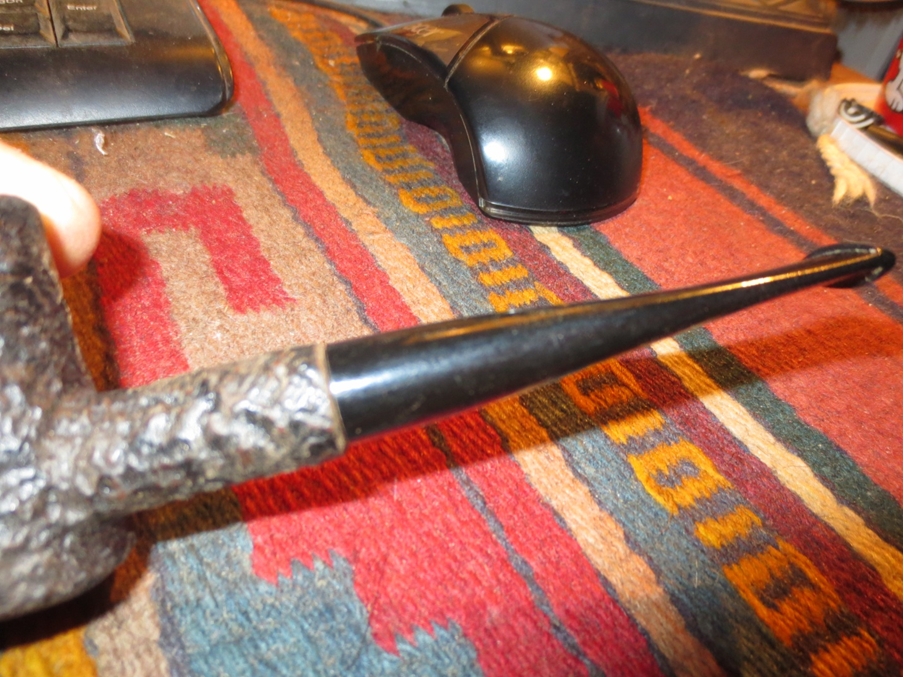
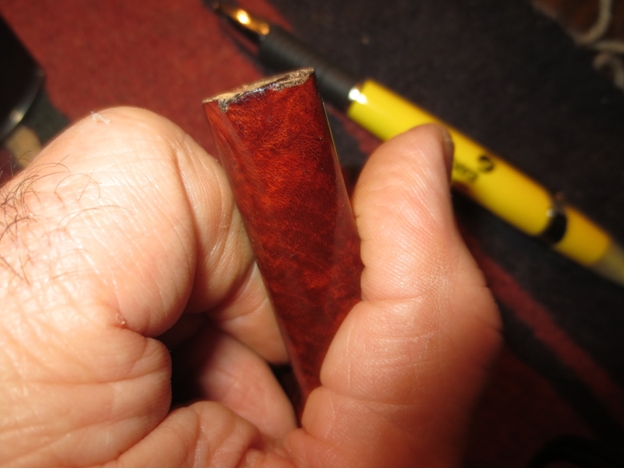
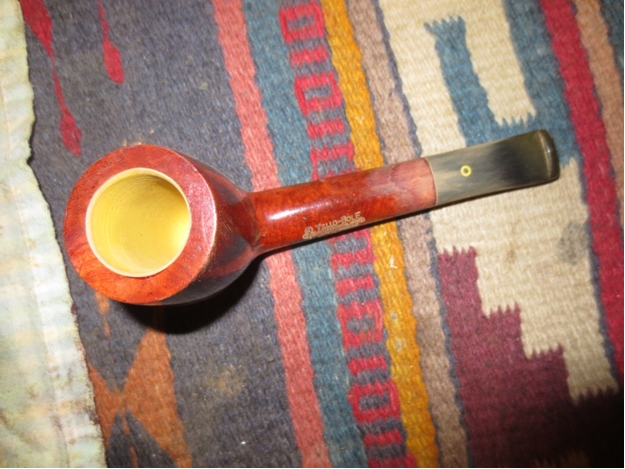
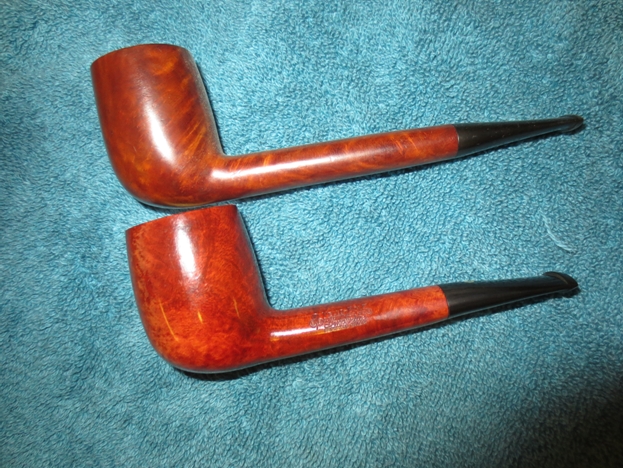
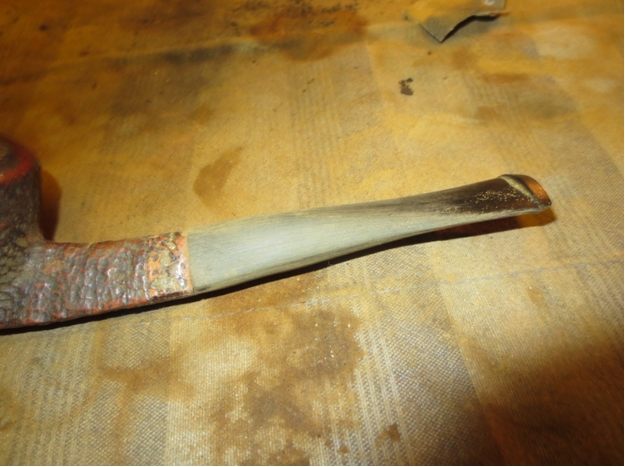
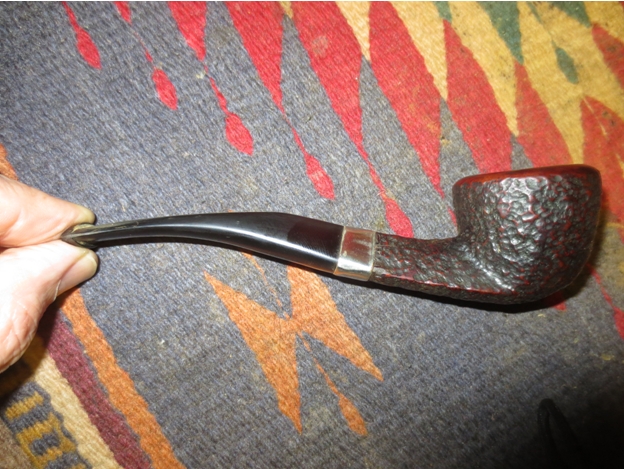
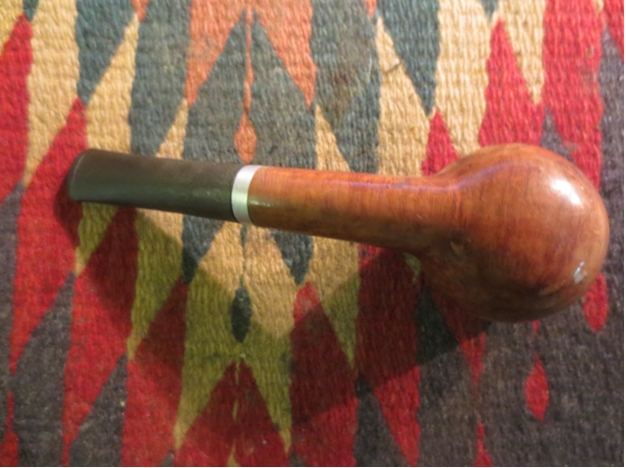
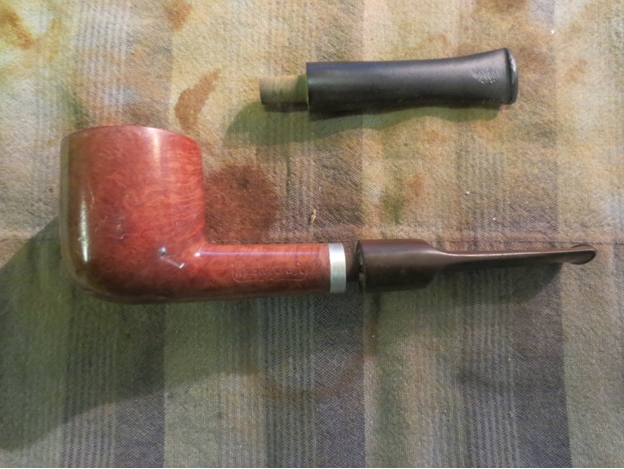
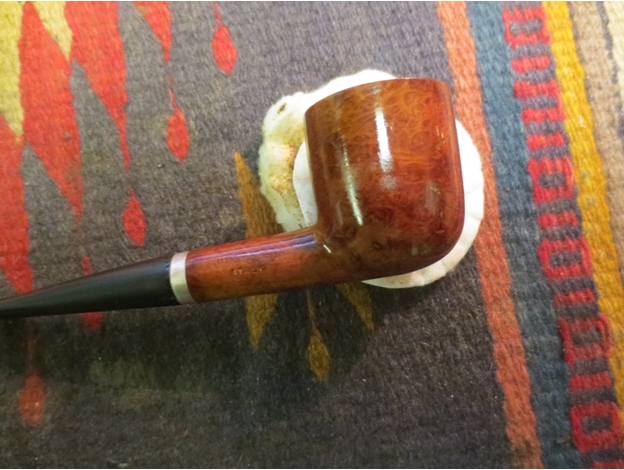
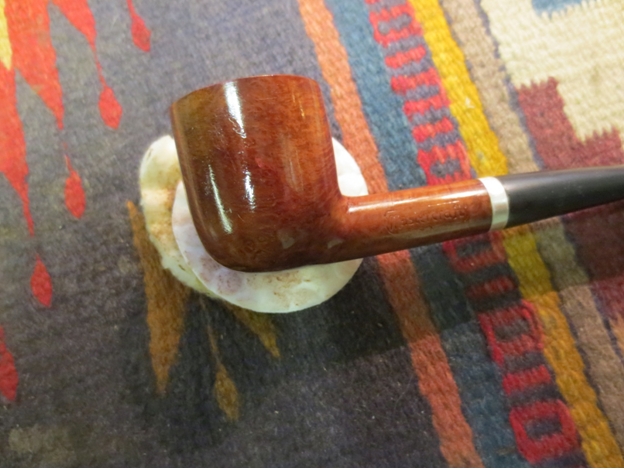
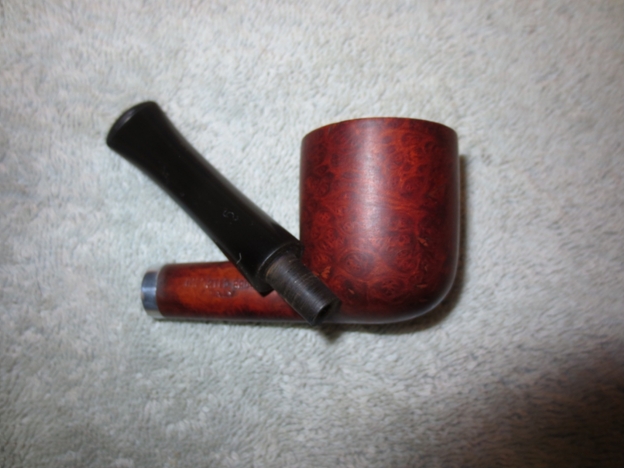
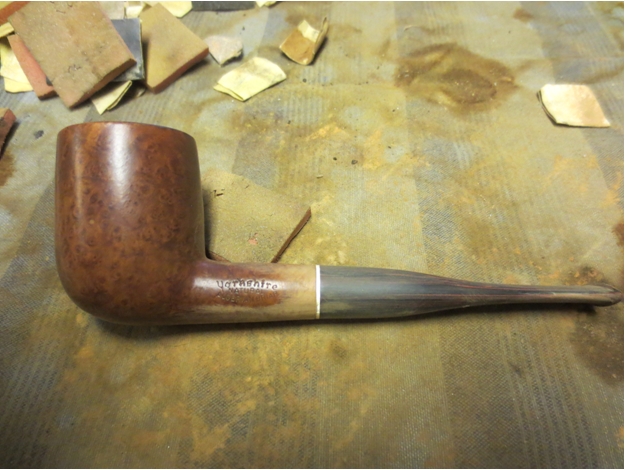
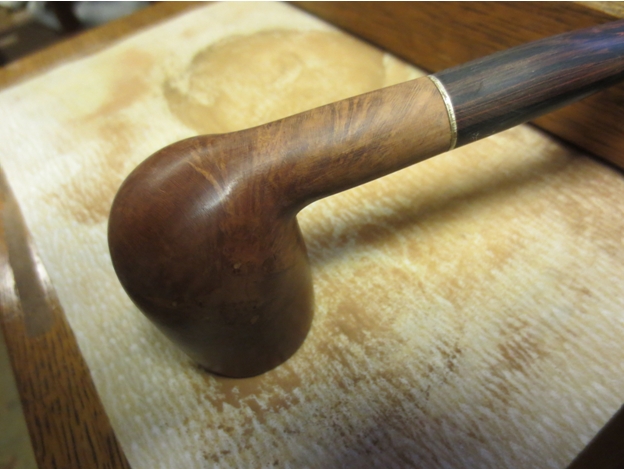
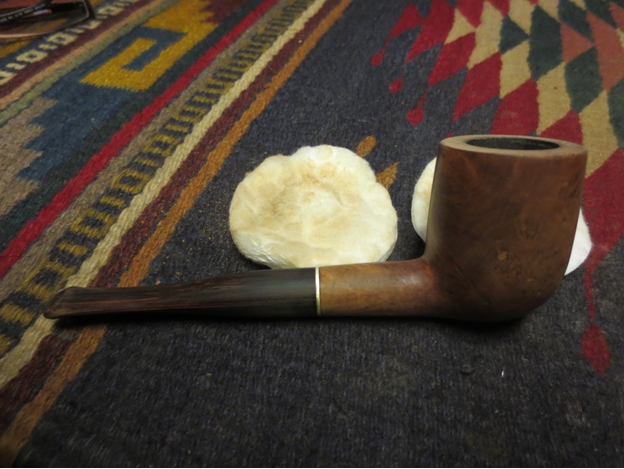
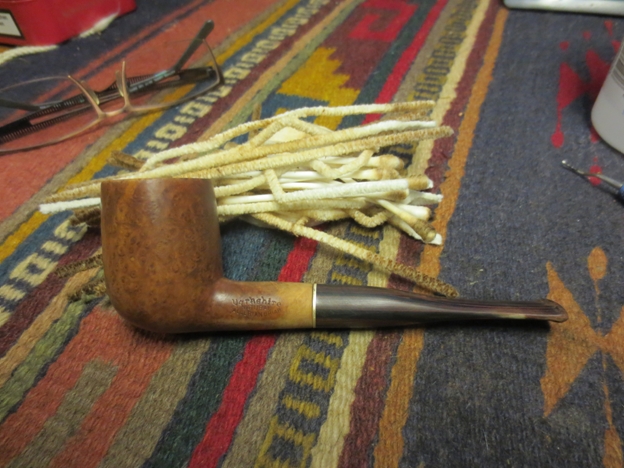
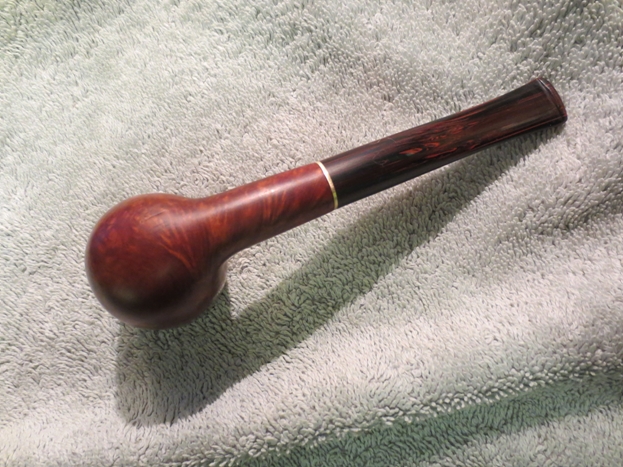
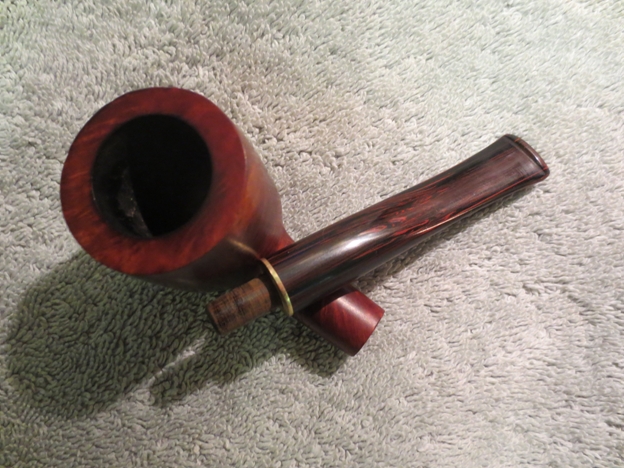
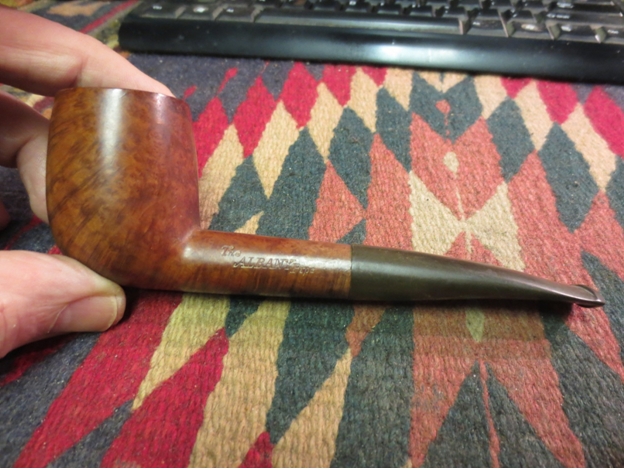
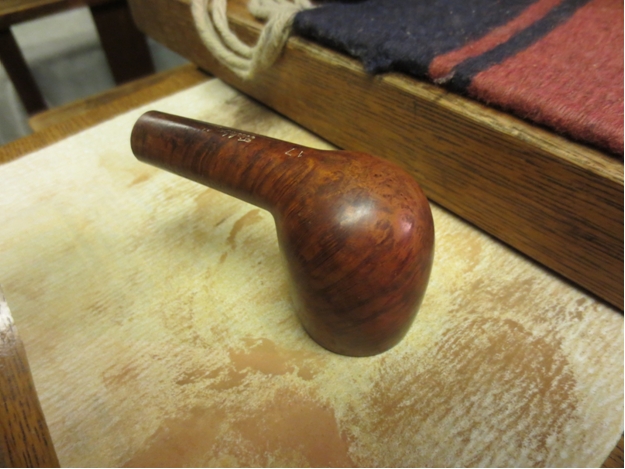
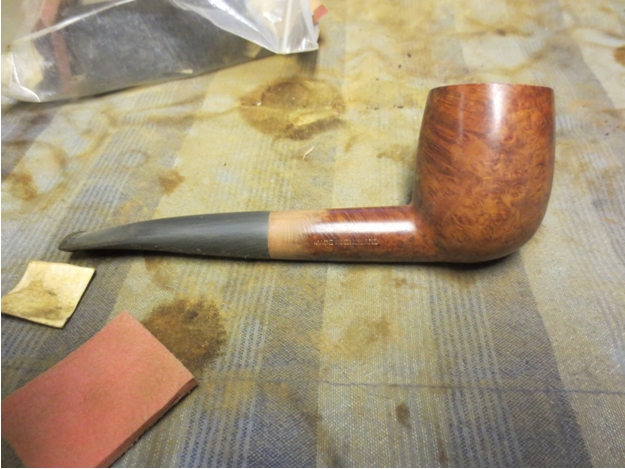
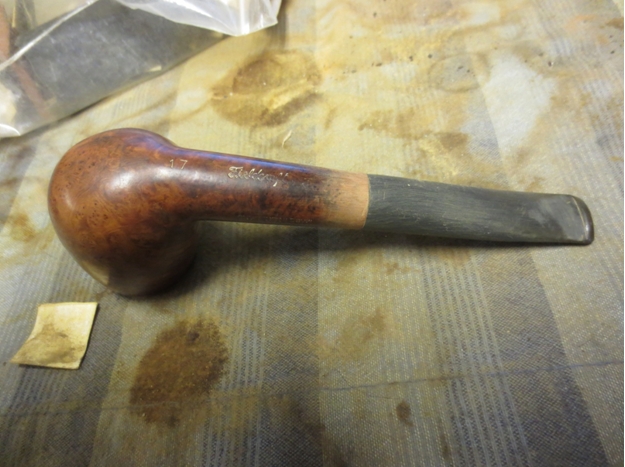
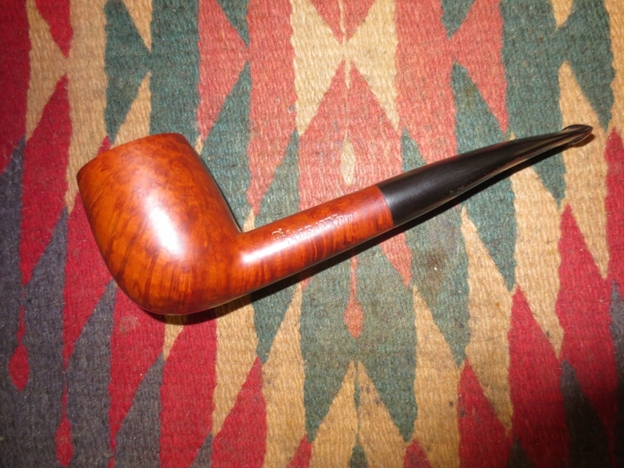
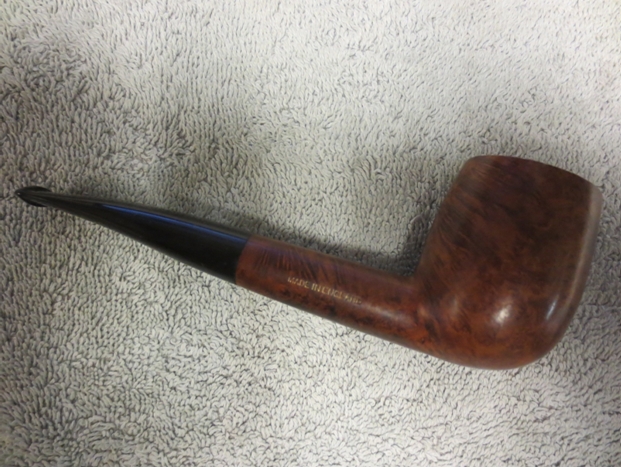
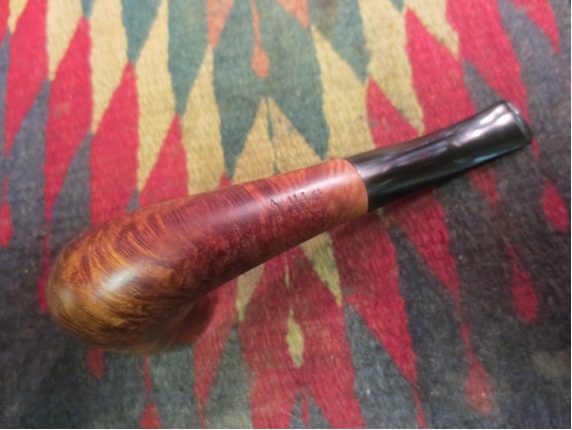
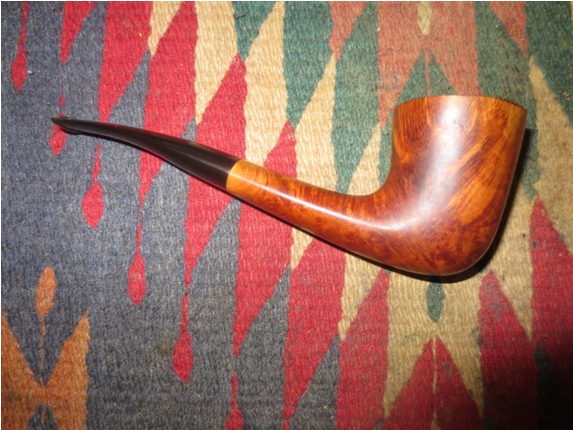
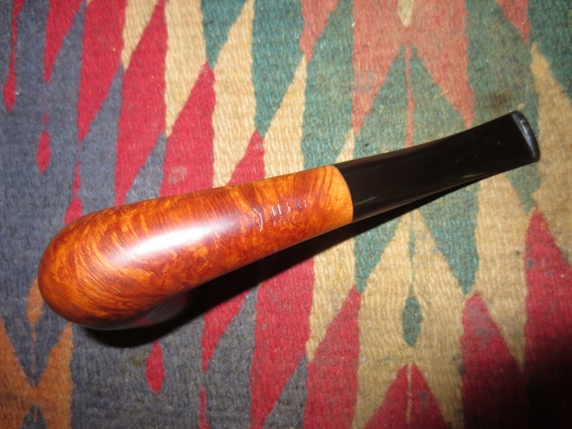
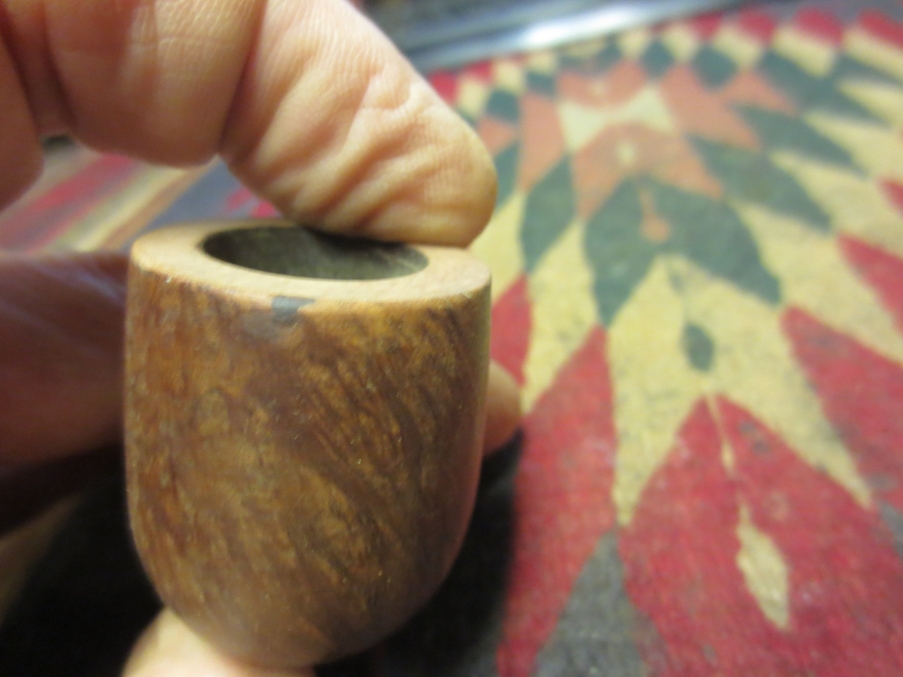
I took the next two profile photos of the pipe to show the clean look of the bowl rim. Notice on the second photo the repair to the cuts on the right side of the bowl toward the lower ¼.Weber39

Weber40 
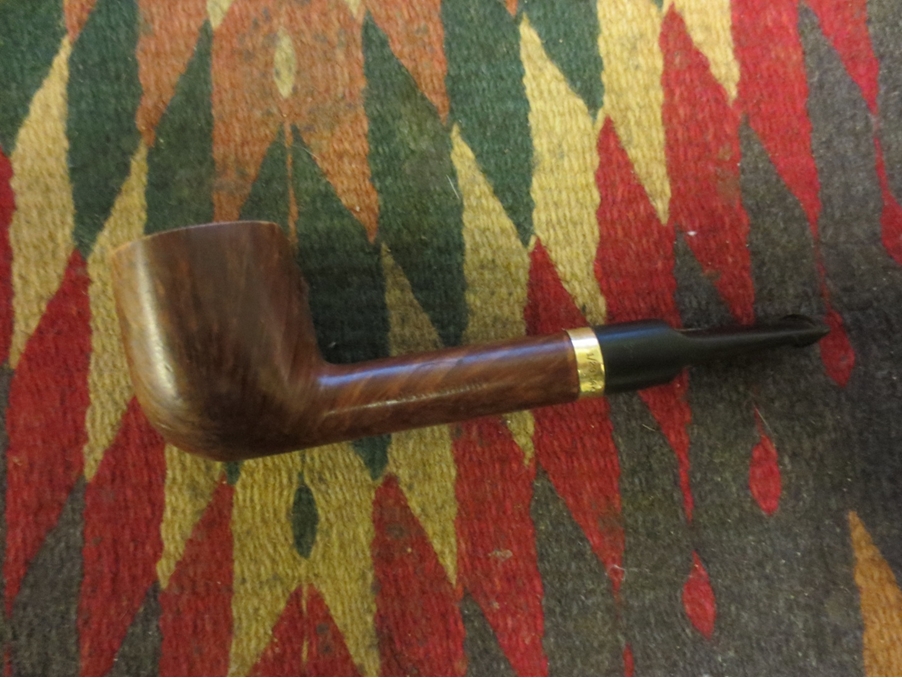
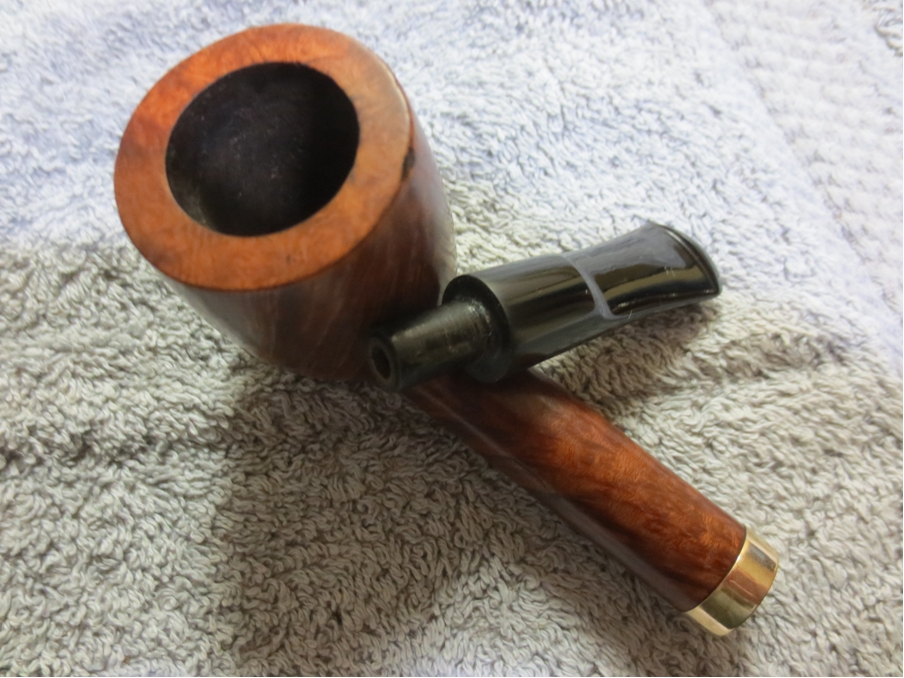
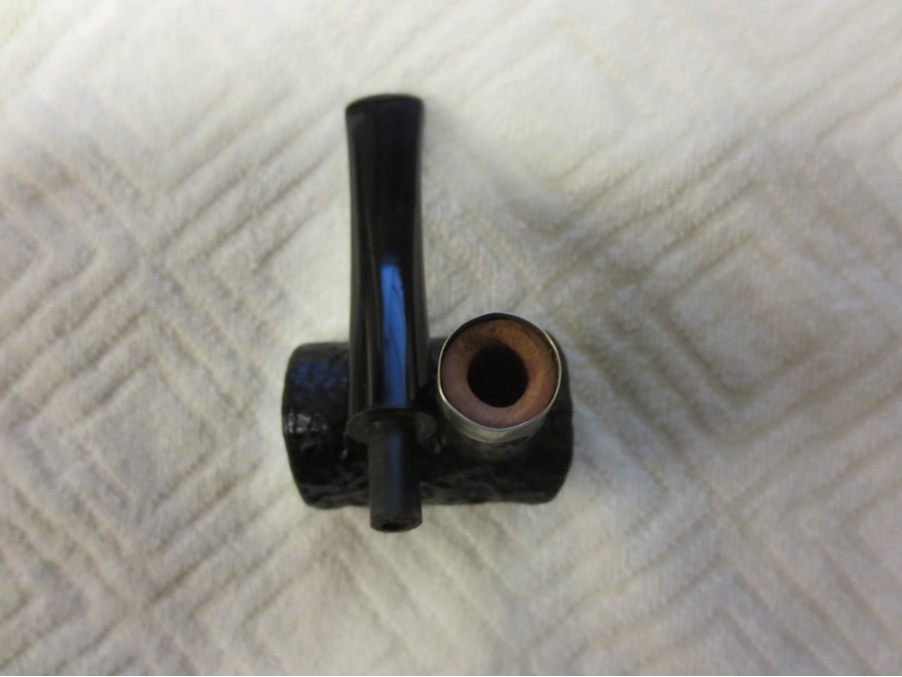
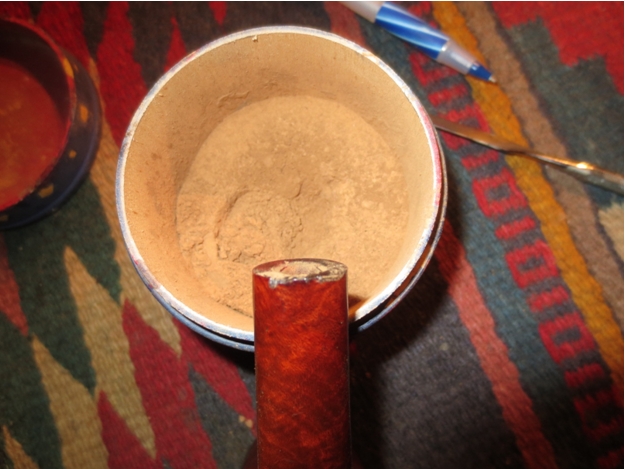
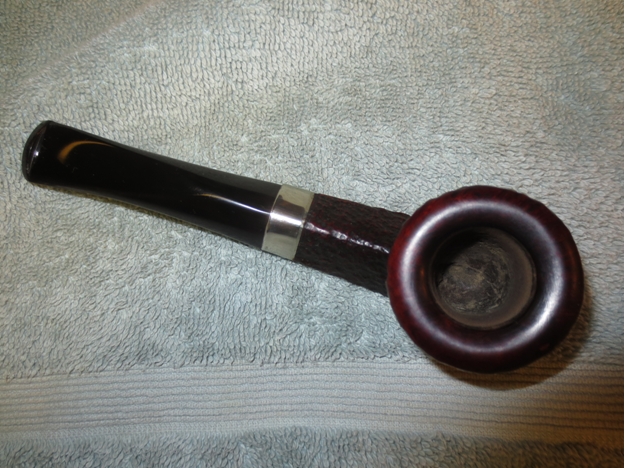
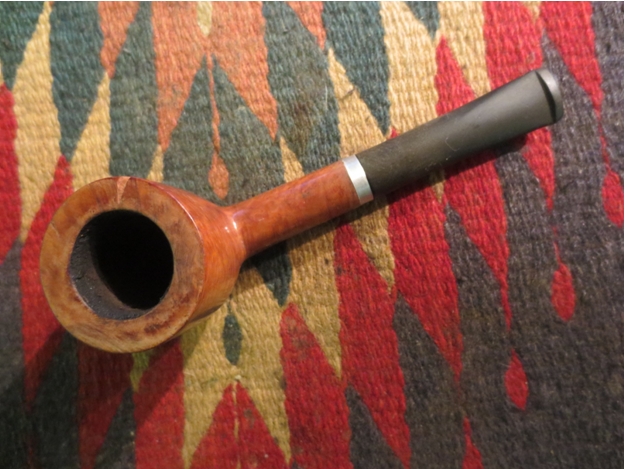
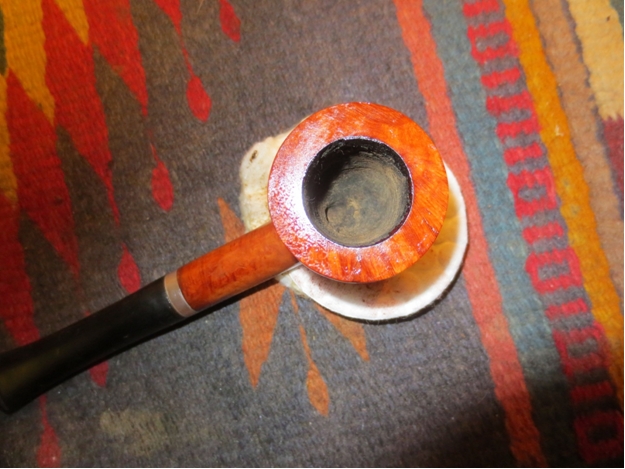
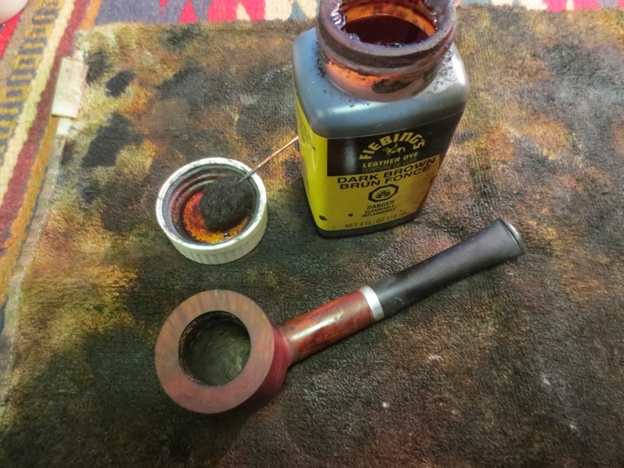
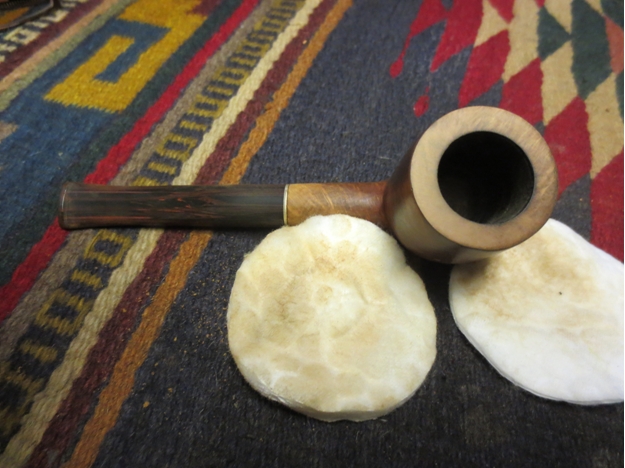
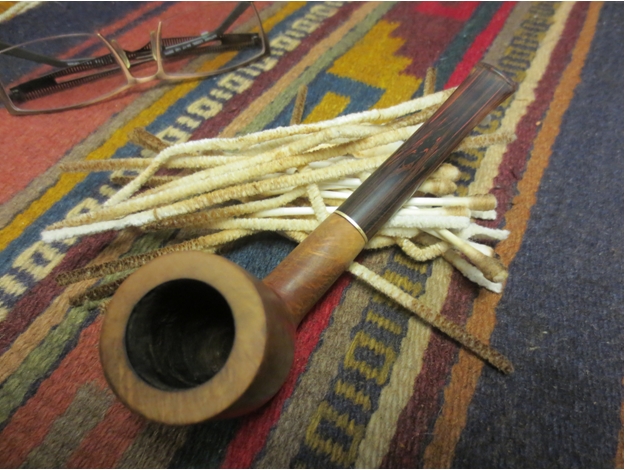
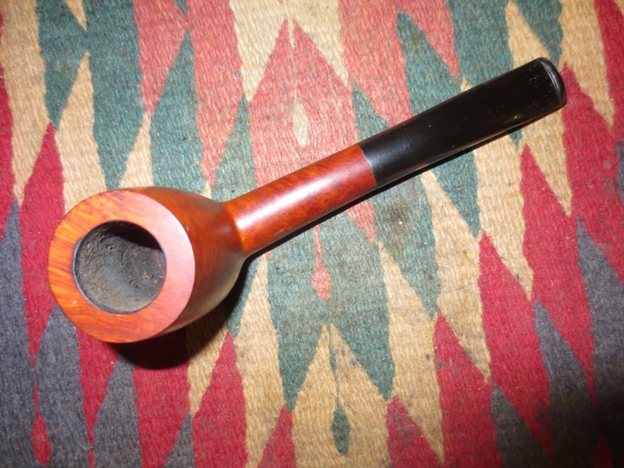
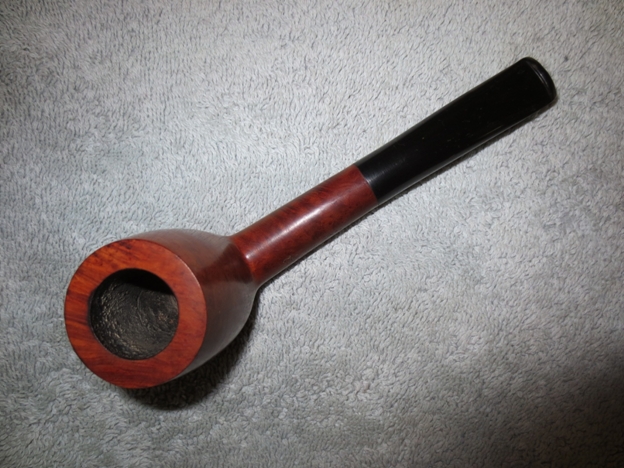
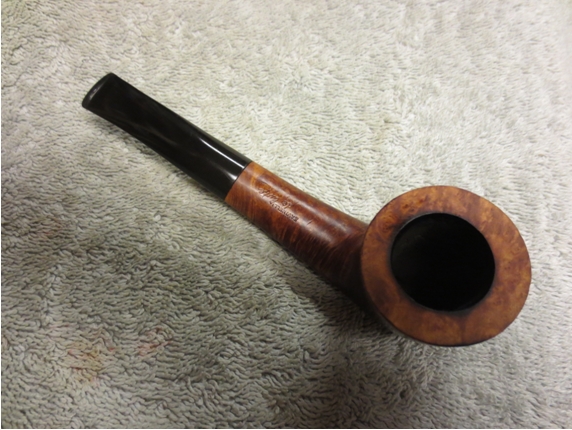
The next photo shows the newly topped and repaired rim from the top.Weber41 
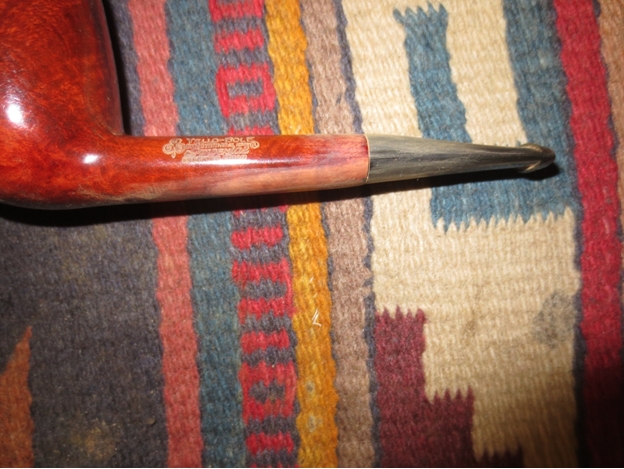
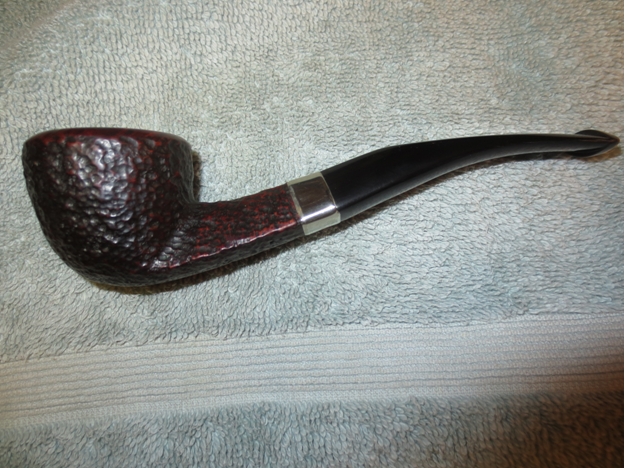
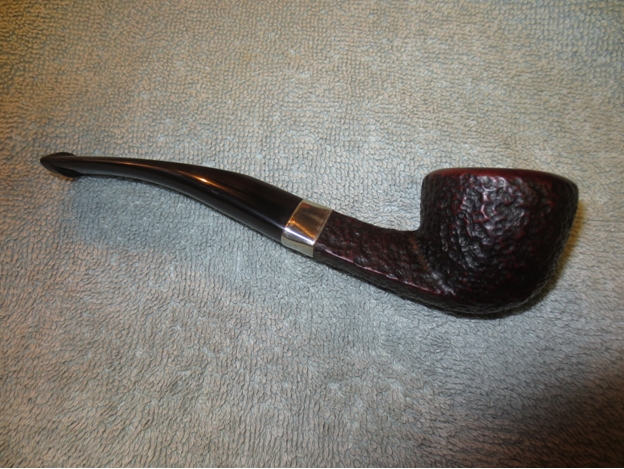
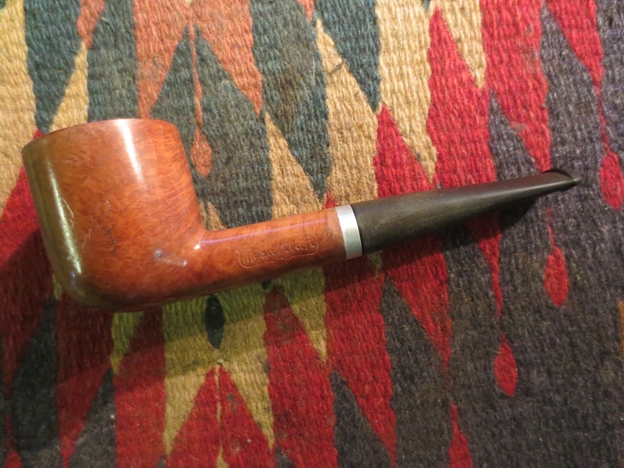
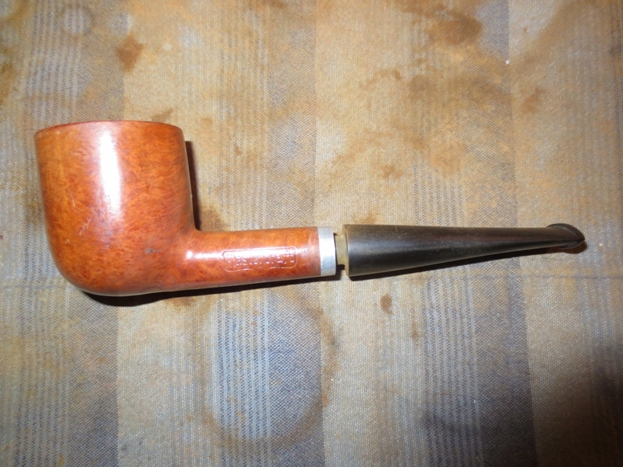
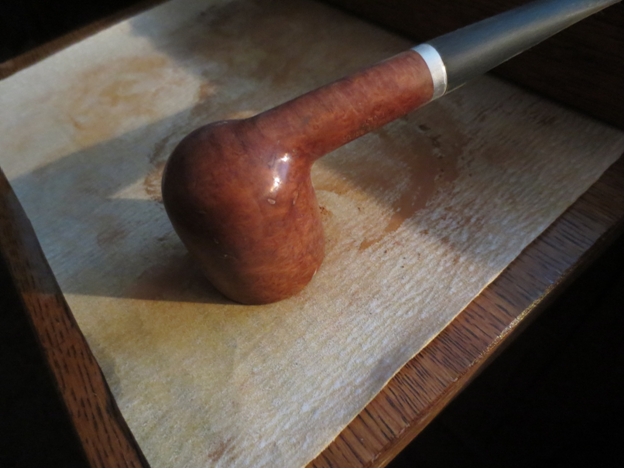
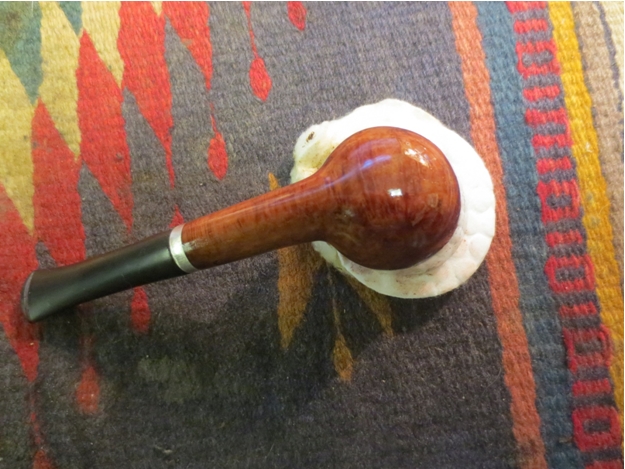
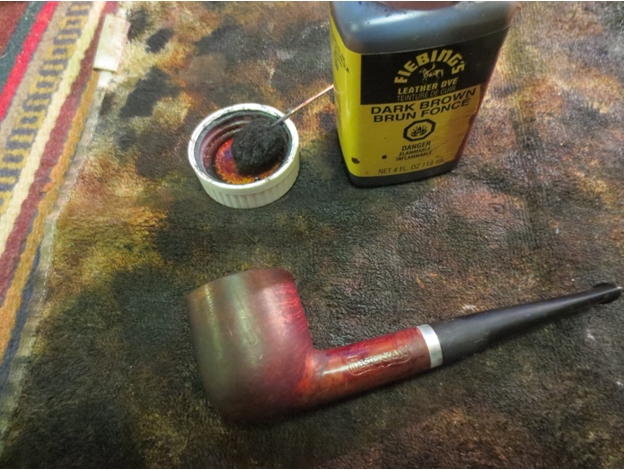
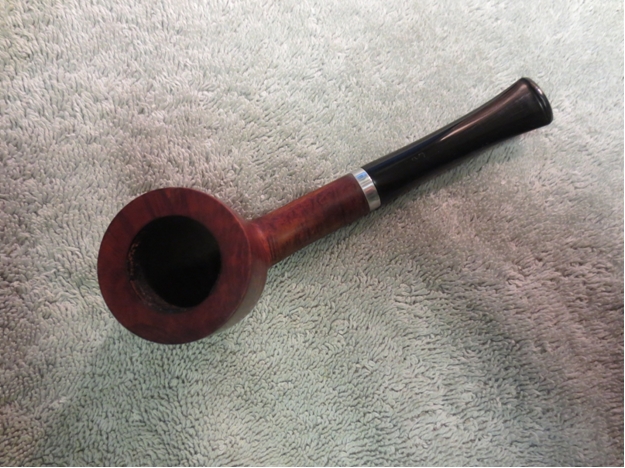
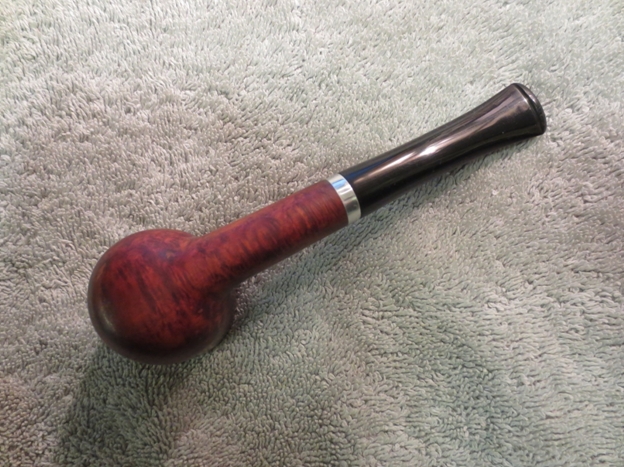
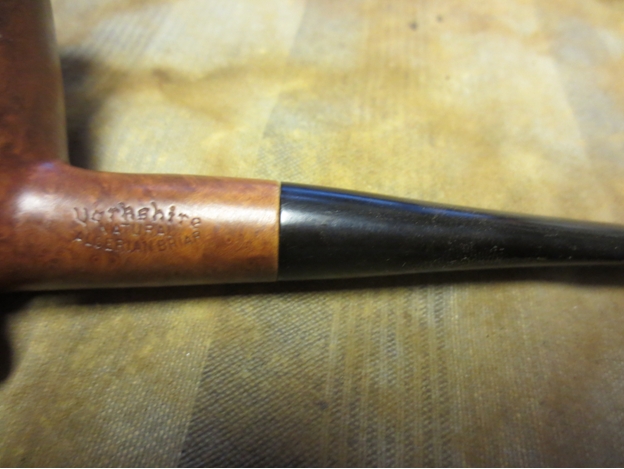
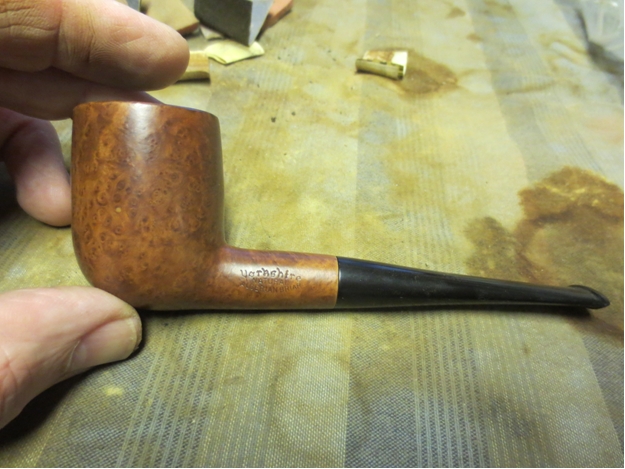
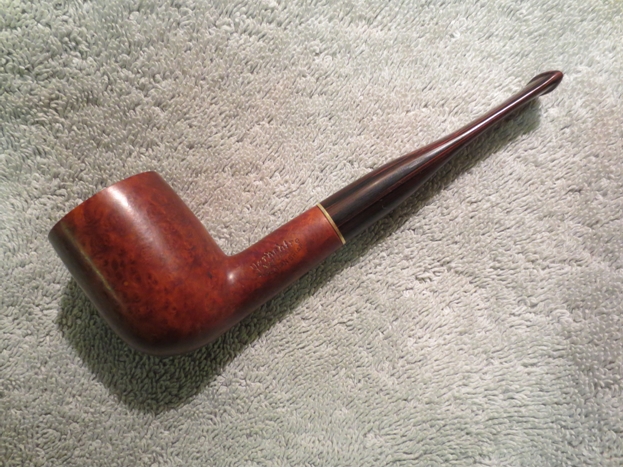
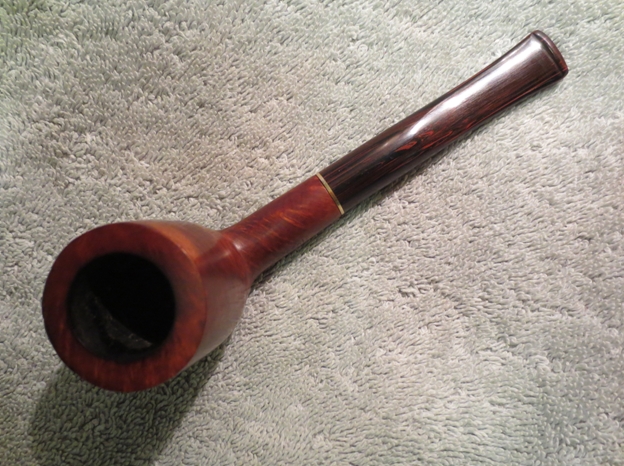
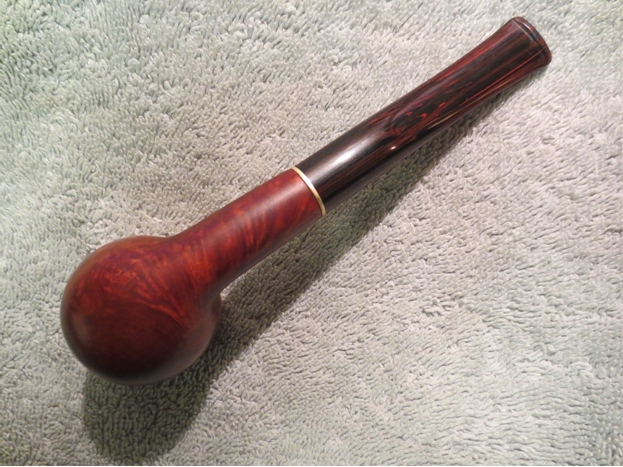
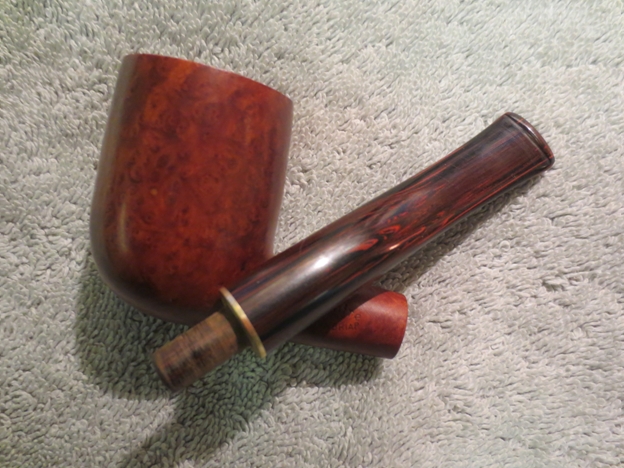
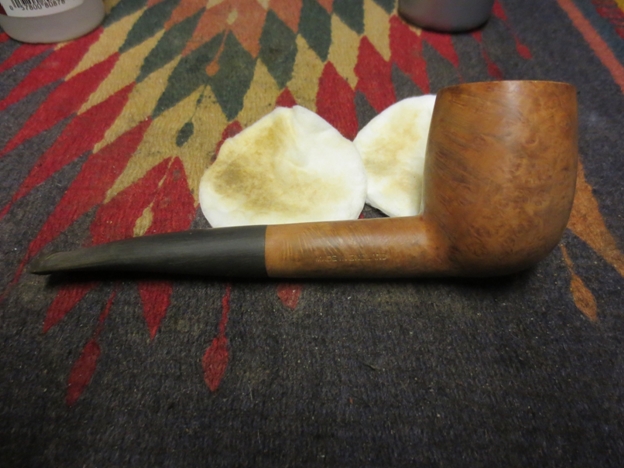
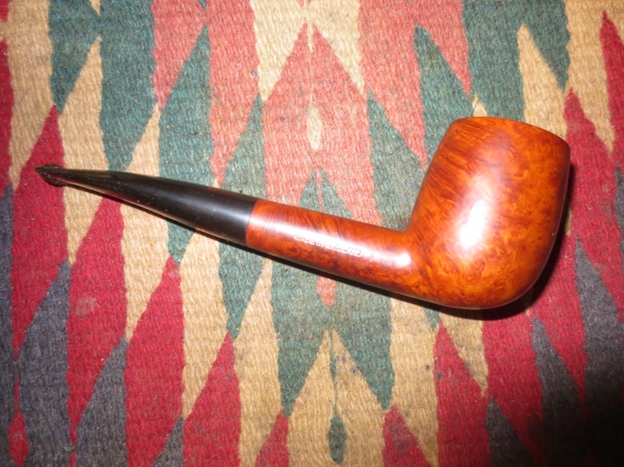
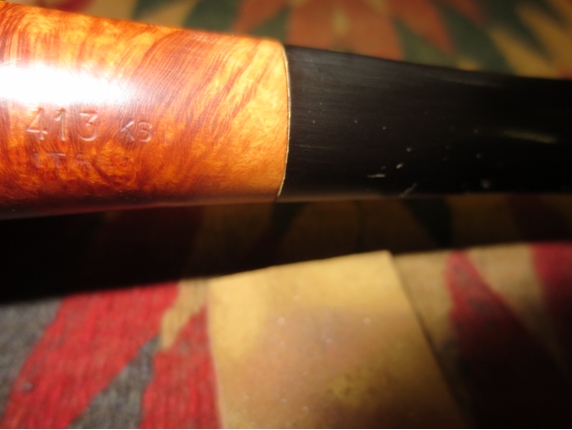
I sanded the bowl surface with a medium and a fine grit sanding sponge being careful around the stamping so as not to damage it. Once it was smooth and the scratches minimized I rubbed down the bowl with a light coat of olive oil. The olive oil gives some life to the grain and highlights the areas that I still needed to sand. The next four photos show the pipe after it had been rubbed down with a soft cloth after the olive oil.Weber42

Weber43

Weber44

Weber45 
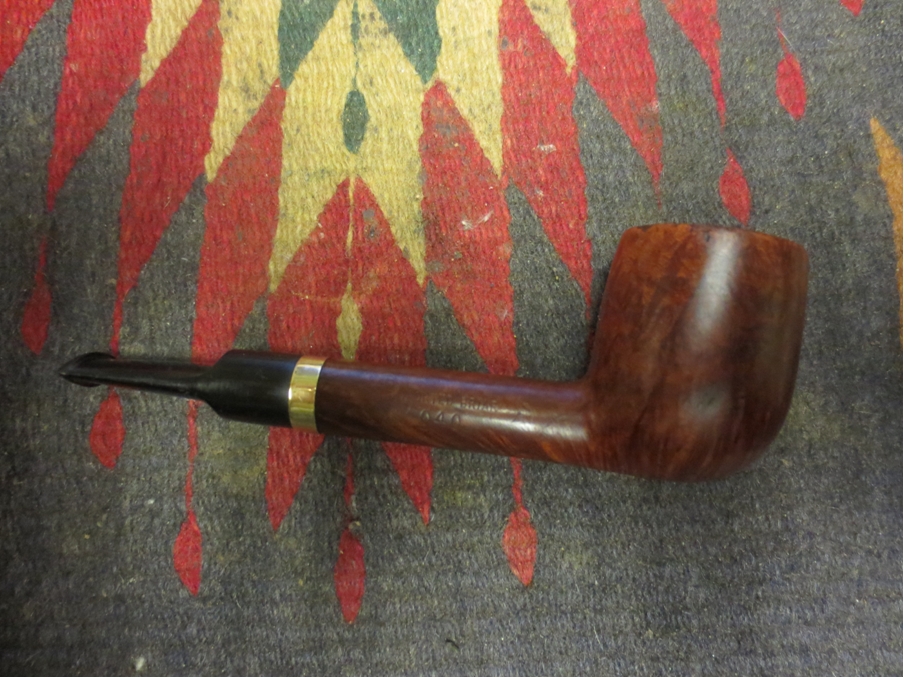
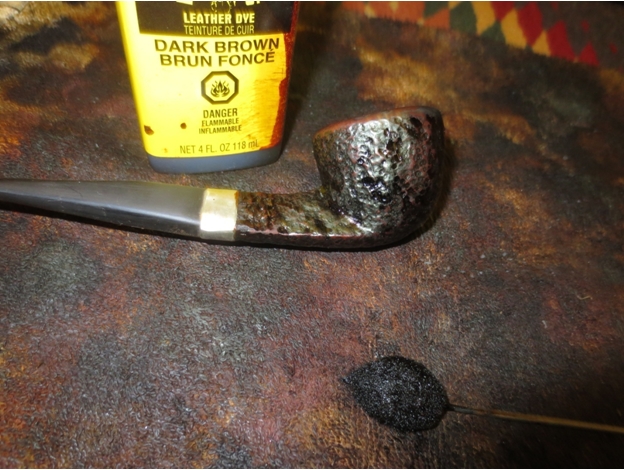
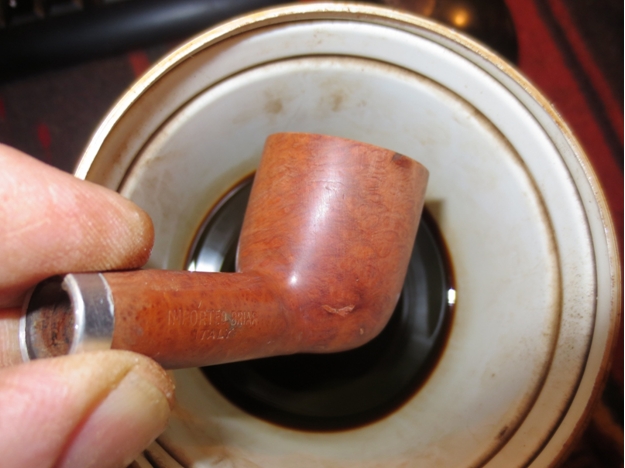
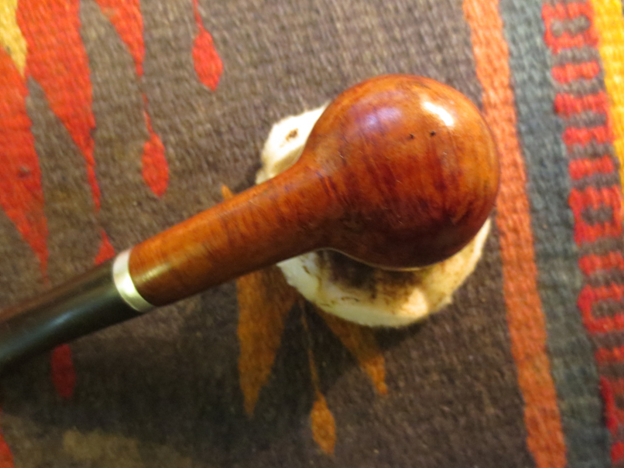
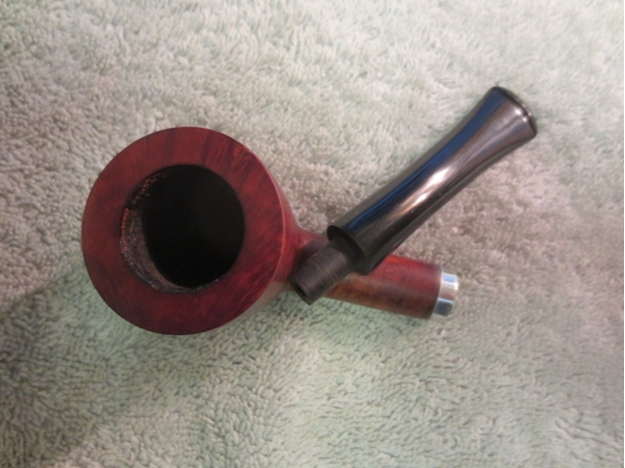
I took another close up of the rim to show the repairs and how the olive oil brought out the colour of the rim so that it matched the rest of the pipe.Weber46 
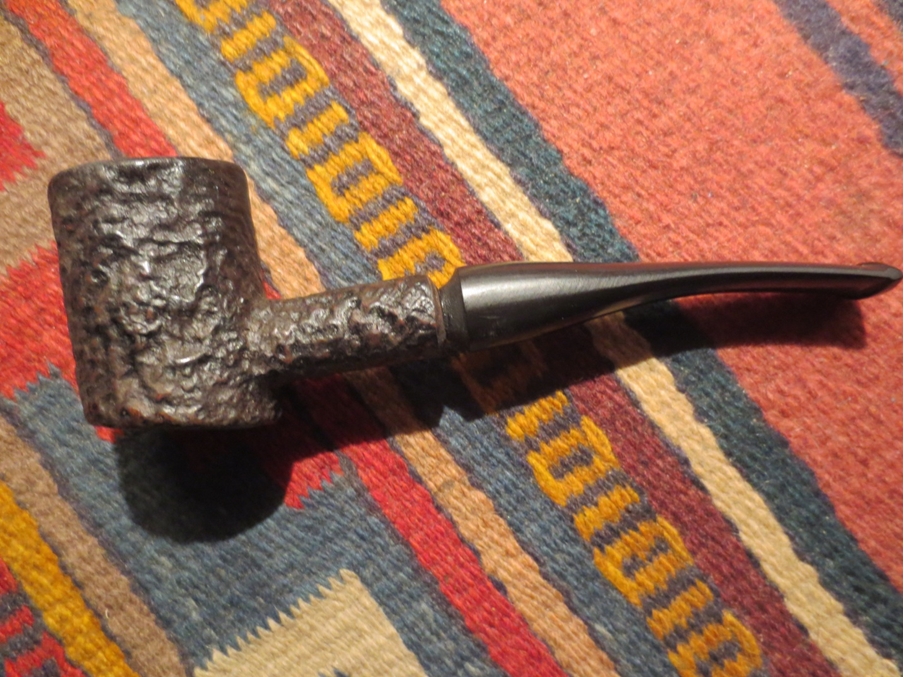
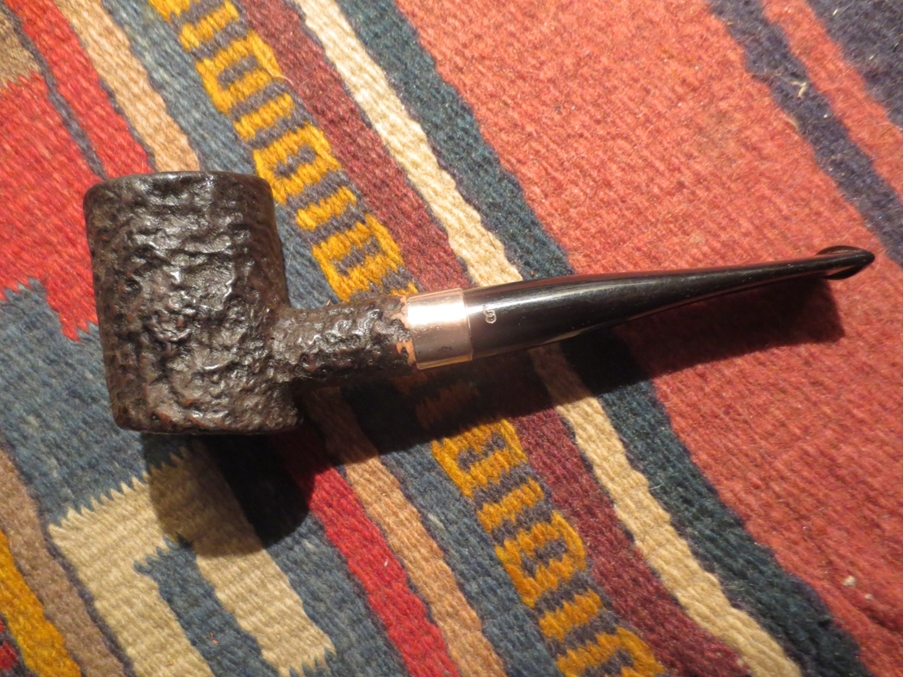
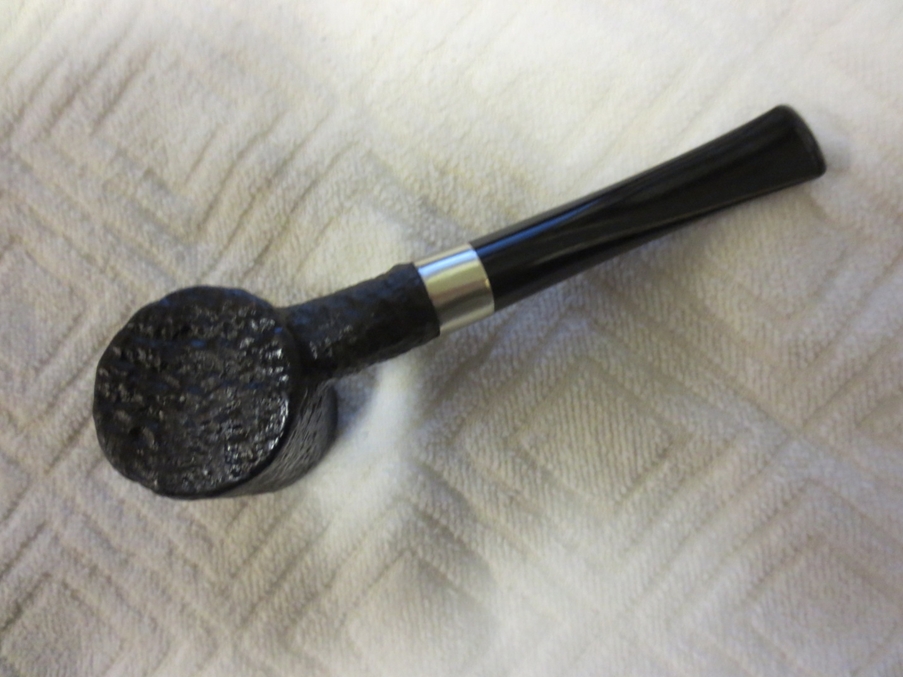
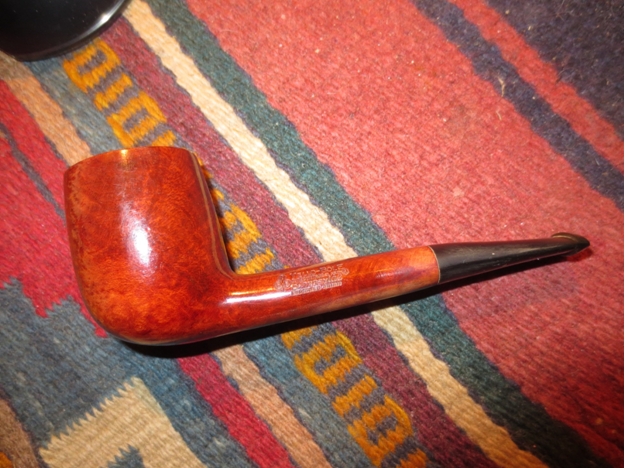
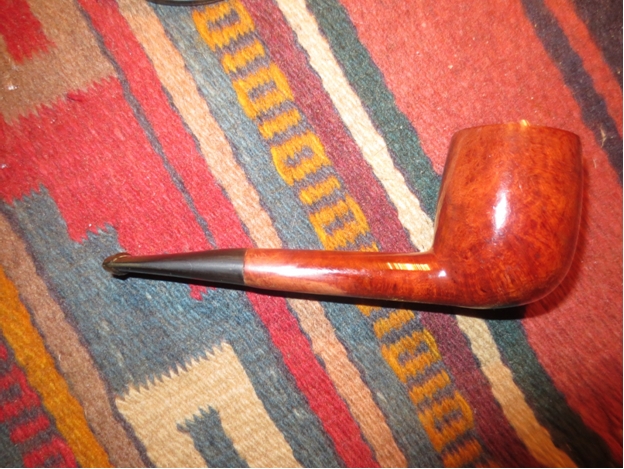
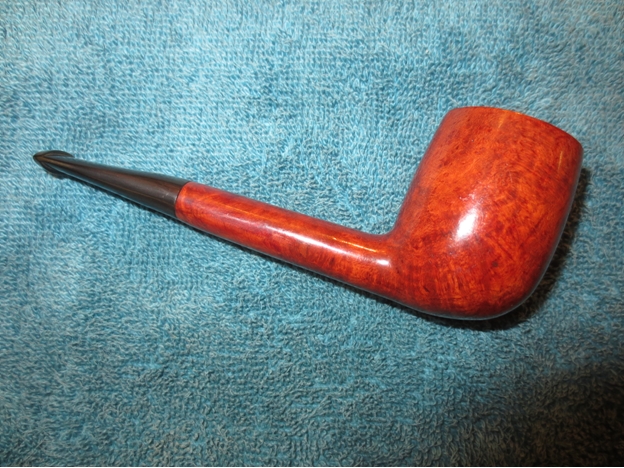
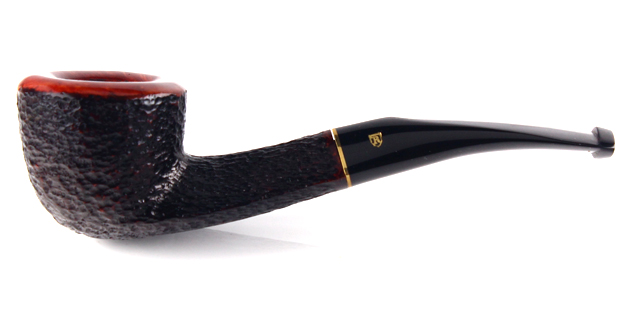
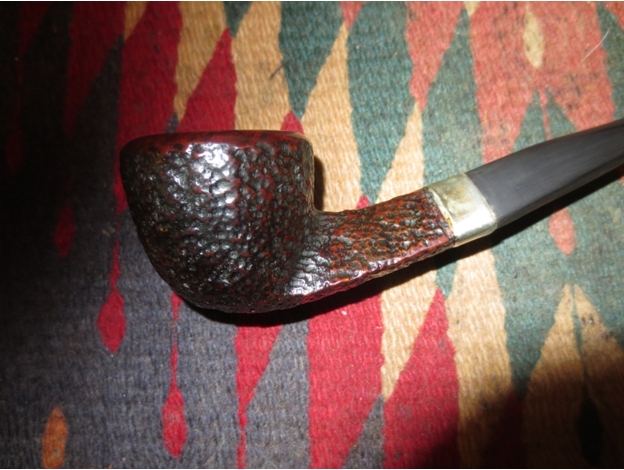
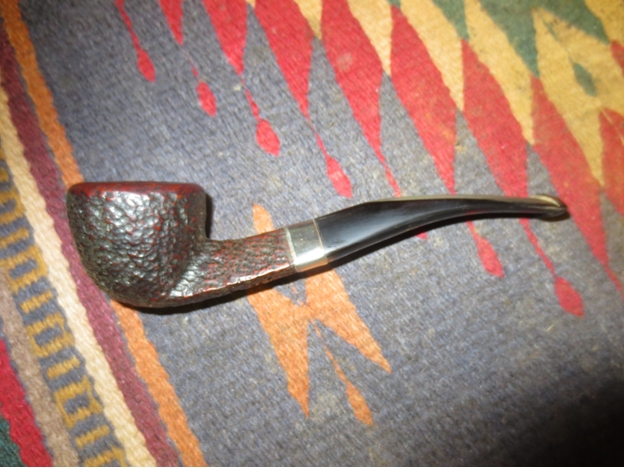
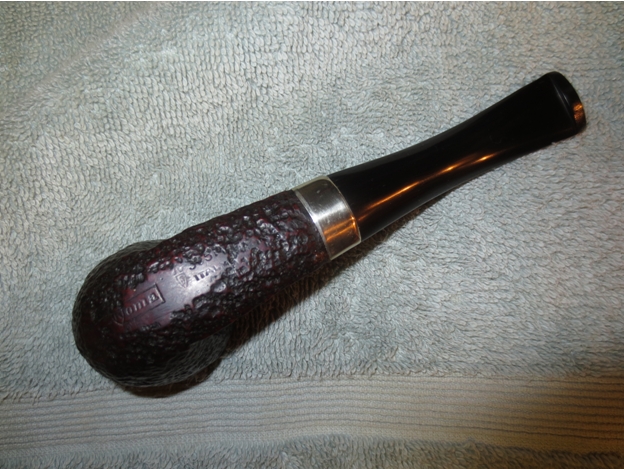
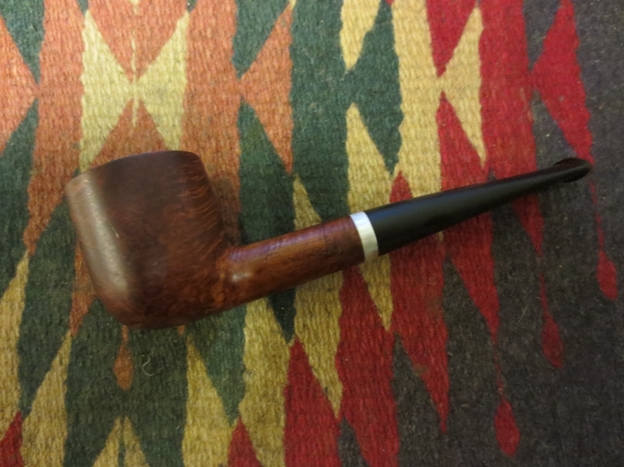
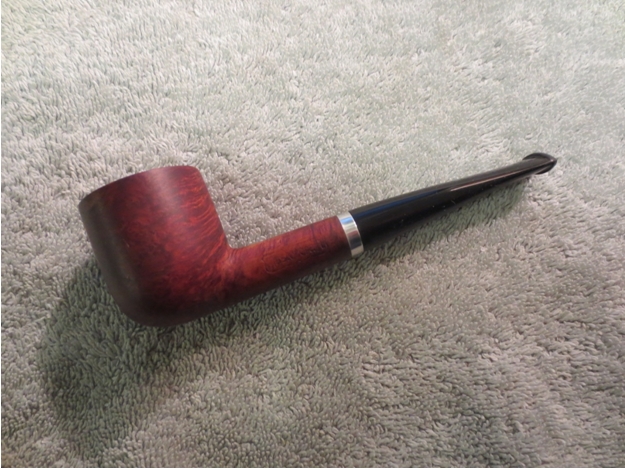
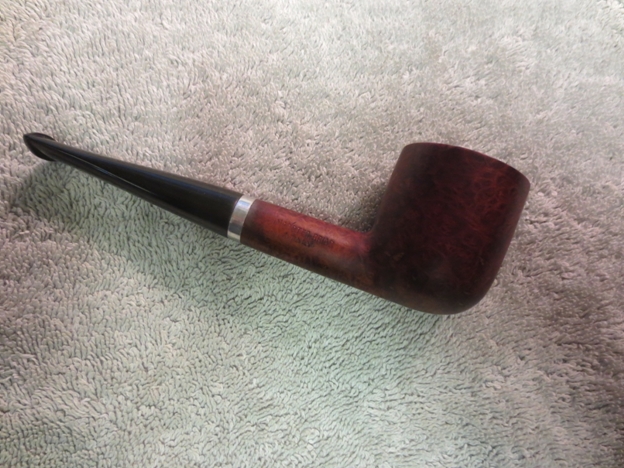
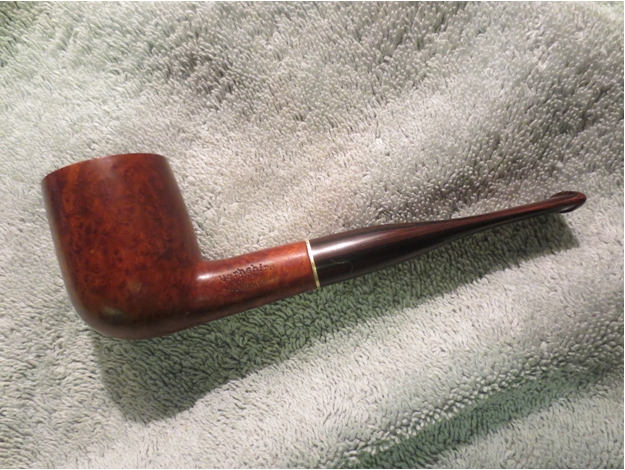
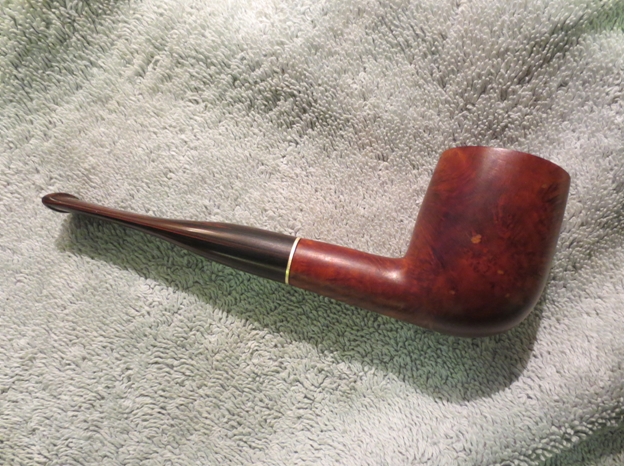
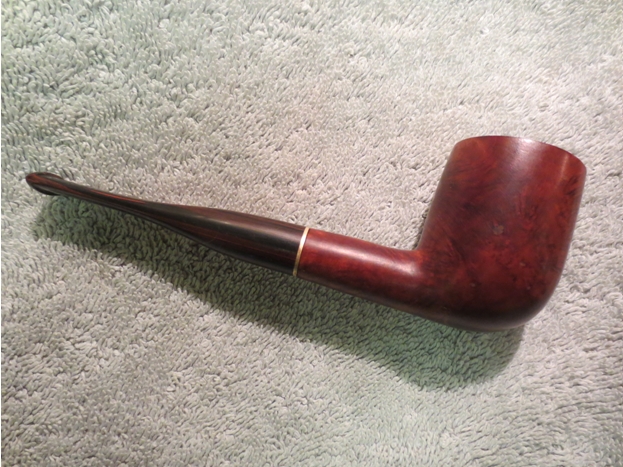
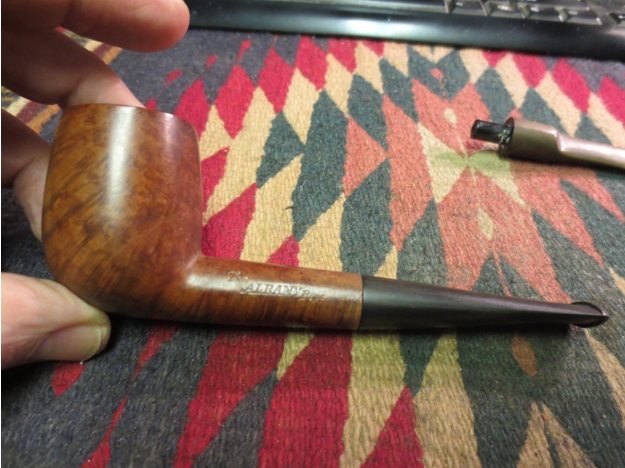
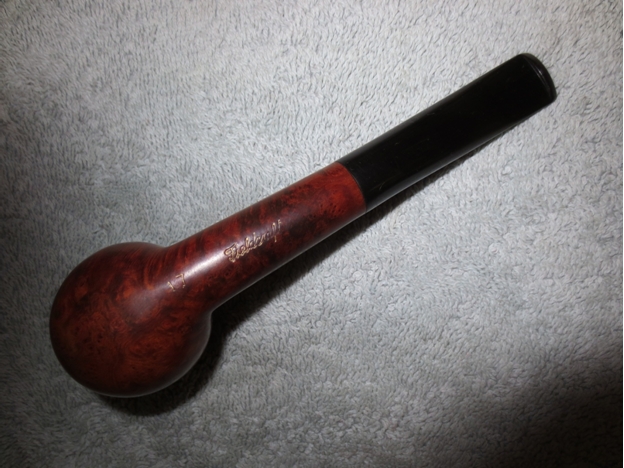
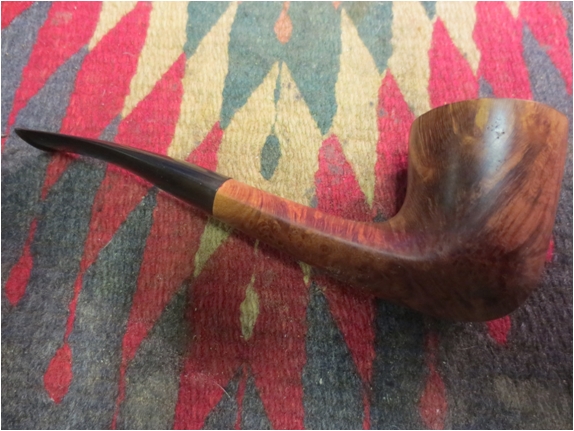
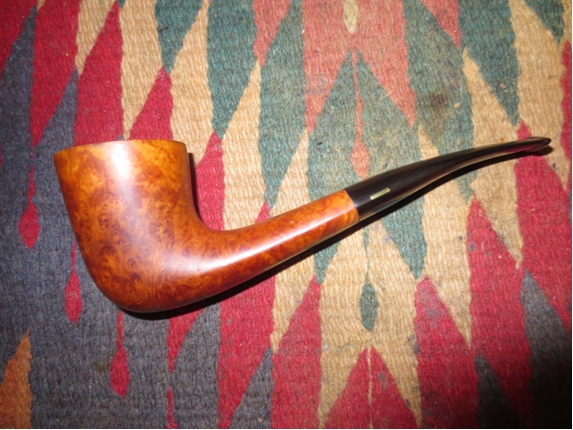
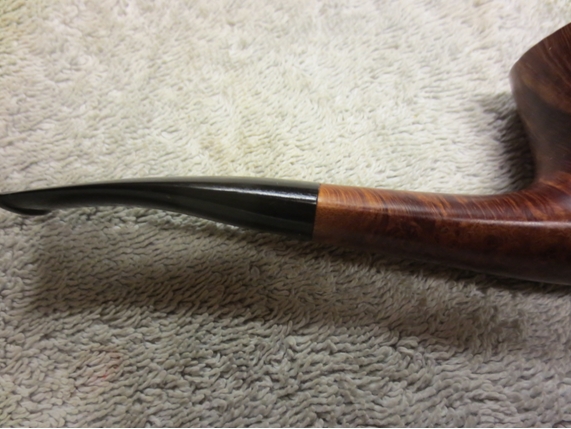
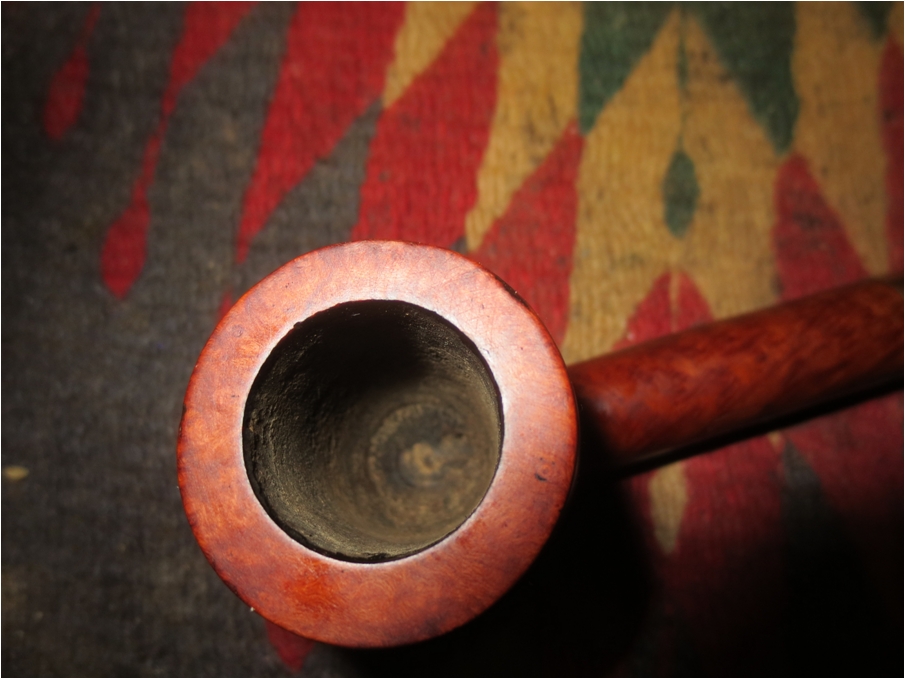
I then took the pipe to the buffing wheel and buffed it with Blue Diamond Plastic Polish. I worked the stem over with the polish and then buffed the briar as well. Afterwards I gave the bowl and stem several coats of carnauba wax and buffed it with a clean, flannel pad to raise the shine of the wax. The finished pipe is shown below. Tomorrow I will get it packed up and sent back to Scott. It should serve him well for a good many years to come. Thanks for letting me work on this old pipe. It was a pleasure.Weber47

Weber48

Weber49

Weber50

Weber51

Weber52

A Tinsky sent back to Mark for a new stem and then given personal adjustments by me


Blog by Steve Laug

I had a surprise just before my recent trip to Europe when I went to my pipe cupboard and took out my Tinsky apple. It is a pipe that has traveled with me around the world and one I love to smoke when I am traveling. It is a smoking machine. Well when I took it out I noticed that the original stem had a split on the top side and the underside that went from the bend to the button just over the airway. It was a crack that with time would grow. I took it to Europe and enjoyed it in Greece and Germany. It did not split further. When I got back I sent it off to Mark for a new Tinsky Stem. It did not take him too long to make a new one for it. I received within a week or less of his repair.

The photo below shows the pipe when I got it originally. It quickly became a favourite. I think I have probably had it over 15 years if I remember it correctly. It is just an old friend now and one that gets a lot of use. The shape in the hand feels great. The thinness of the mouthpiece and the shape hangs just right. The length is good for me. The blast and finish on the pipe is tactile and as it warms from the fire in its belly all seems right with my world. So that being said of course I would replace the stem and of course I would send it to Mark for another Tinsky stem.Tinskyapple When the pipe came back I have to say I was a little disappointed with the new stem. Not disappointed enough to send it back for an adjustment but not at all satisfied with the new look of the pipe. It just did not work well for me. To my eye the stem was chunkier and less delicate than the original. I wrote that off to the possibility that Mark was correcting the issue with the thinness and size of the airway leading to potential for this one to crack as well. The new stem was a good ½ or ¾ inch longer than the original and the bend was not as gentle. The bend did not look right to me and seemed in my opinion to be over bent. It definitely was not a copy of the original stem it is slightly thicker all the way around, a deeper bend and not as delicate looking all made me concerned. I decided to smoke the pipe for a while and see if the difference was that big of a deal to me. All of the issues were ones that I could address so I was not too concerned.

Here are some photos of the stem and pipe. The stem on the pipe is the new one. The one underneath to the pipe is the original. In each of the photos below the thicker stem is the new one regardless of the angle of the camera. The difference is very evident.Tinsky1

Tinsky2

Tinsky3

Tinsky4 I have been smoking it now for over a month. I think that is adequate time to adjust to the new feel of the stem. However, I did not adjust to it. It sat “wrong” in my mouth and hung with the bowl tilted toward the front too far. It was easier to light but was not nearly as easy to clench. The thickness added some weight to the pipe and was nowhere near as comfortable in the mouth. To put it in just a few words, the overall look of the new stem just bugged me.

So tonight I decided it was time to tackle the stem and do some work to remedy my concerns. I set up my heat gun and heated the acrylic stem to take out some of the bend and try to match it to the original stem. I really wanted the end of the stem to be in line with the bowl top when it was flat. In the first photo below you can see the variation in the bend. The top stem is the old one and the bottom one is the new stem.Tinsky5 I heated it slowly above the heat gun on low heat. I have learned the hard way that if it gets too close to the gun the acrylic can bubble and burn and give me more issues to deal with. I heated it until it was pliable and then flattened it against the top of my work table until the bend was the same as the original stem. I set the bend with cool water.Tinsky6 I put the stem back in the shank and took the photo below to show the modification of the bend in contrast to the original stem which sits below the pipe in the photo.Tinsky7 With the bend corrected I also want to thin down the stem and remove some of the heaviness in the area above the saddle. I wanted more of a taper from the saddle to the button and give the saddle to the slope of the stem a bit more definition. I sanded the stem with 220 grit sandpaper to get the angles right to my eye. I also wanted the pinch between the saddle and the blade of the stem to be more defined.Tinsky8

Tinsky9 I sanded and sanded for about forty five minutes to clean up the flow of the stem and finally I was getting to the place that I liked the look of it.Tinsky10

Tinsky11

Tinsky12 I sanded the top and underside of the stem to modify the thickness back toward the button. I wanted more of a flattened taper from the saddle back.Tinsky13

Tinsky14 When I got it to the place I wanted I put the stem back on the pipe to get a feel for the new look. It was definitely thinner than when I started. I did not want to take too much off the top of the stem toward the button as I wanted to leave more material over the airway than was on the original stem in that area.Tinsky15

Tinsky16

Tinsky17 I still needed to do some more shaping with the 220 grit sandpaper so I worked on the stem with it on the pipe so that I could continue to see the effect on the overall look of the pipe.Tinsky18

Tinsky19

Tinsky20

Tinsky21 I was finally happy with the overall shape. It was time to work on the finish of the stem. I sanded it with a medium and a fine grit sanding sponge to remove the scratches left behind by the sandpaper.Tinsky22

Tinsky23

Tinsky24 I moved on to sand it with micromesh sanding pads. I wet sanded with 1500-2400 grit pads and dry sanded with 3200-12,000 grit pads. Between each set of three I rubbed the stem down with some Obsidian Oil as I have found that it enables the micromesh to have a better bite on the stem material.Tinsky25

Tinsky26

Tinsky27

Tinsky28 When I finished with the micromesh I gave it a light buff on the wheel with Blue Diamond Plastic Polish. I then buffed it with carnauba wax and finally with a clean, flannel buff to raise the shine and give it depth. I also gave the bowl several coats of wax with a light touch so it did not clog up in the blast. The finished pipe is shown below from a variety of angles to show the new shape of the stem. It is so much more comfortable to me than it was and I really like the more refined look.Tinsky29

Tinsky30

Tinsky31

Tinsky32

Tinsky33

TInsky34

Tinsky35

Tinsky36

Tinsky37

TInsky38 Now it is time to load up a bowl and give it a smoke. I picked up some McClellands 2035 this past weekend when I was in the US and this pipe loves flake tobacco. I am really looking forward to having this old friend back in the regular rotation.

Giving a no name Poker a new stem and a new look


Blog by Steve Laug

Over the past six or seven months I have picked this pipe up and looked it over at the small antique shop I visit regularly. Every time I put it back down and leave it there. There was really nothing redeeming about the shape with its one thin side and the odd shank that was not quite round. The stem was just plain ugly and unfinished. It was as if the maker or owner just turned a blank to fit the mortise and flared it backwards to avoid having to deal with a smooth fit to the shank as it was everything but flat and round. The sides of the stem still showed file marks and the diameter was markedly different than that of the shank. All in all it was one that I could do without that is for sure.

Then this past weekend I was in the shop again. I picked it up and looked at it once more. I don’t know if my mood was different or I was on the adrenaline high of finding the old Zeus at the shop before or what but this time I saw some possibilities in the pipe. I paid the $8 cash and the pipe was mine. Now what would I do with it?

When I got home I took some photos and weighed my options over Saturday evening and Sunday. I thought about making a freehand style stem for the pipe and ditching the old one. I thought about cleaning up and reshaping the old stem. I thought about facing off the shank end and giving it a more classic look. I took the stem off and looked at the shape of the shank, the shape of the shank end and tried to visualize it with a classic look. As you can guess by this point if you know my likes I went for the classic look.Poker1

Poker2

Poker3

Poker4 I took a couple of close-up photos of the rim and the shank end to give an idea of how the bowl and shank were not round or close to it. The first photo of the dirty rim of the bowl shows the odd shape it was in. The right side of the bowl wrapping about half way around both the back and the front had a nice thick, even width while the left side tapered in from the thickness and roundness of the right, back and front to a thinner width. Besides that it also seemed to be a bit oval on the back and front but after measuring it I could see that it was an illusion. The second photo shows the shank end. It is a bit hard to see but the shank end was crowned and rounded over but inconsistently. The shank itself had the same problem as the bowl – it too was not round but was thicker on the left side than on the right; just the opposite of the bowl. This little pipe was going to be a challenge to make look correct.Poker5

Poker6 I decided to face the end of the shank and remove the uneven crown and to flatten it to fit a flush stem. I used the topping board and carefully pressed the end of the shank into the sandpaper. I had to make sure that I held it straight vertically while sanding so that I did not slant the end of the shank and make things worse.Poker7 I worked it against the 220 grit sandpaper until it was smooth and the crown was gone. I then used a medium grit sanding block to make sure the shank end was flat and even.Poker8 I had an old Georg Jensen stem that fit on the right side of the shank perfectly. The left side and the bottom and top on that same side were off. I tried a saddle stem I had as well. No matter which stem I use the shape of the shank made a perfect fit impossible. The good news was that the flush stem fit snugly in the mortise and flat against the end of the shank. Now I would need to make adjustments to the shank diameter without losing the nice sandblast finish.Poker9 I went through my bands and found one that would fit both the shank and the stem once it was in place. I used my Dremel and sanding drum to take down and round out the shank end so that the band would sit properly. I wanted to make the adjustments to the shank before the band so that once it was in place the stem would fit without adjusting the roundness of the stem to match the out of round shank. It took some work to round out the shank but the Dremel made short work of the process.Poker10 I was able to put the band loosely on the shank to get an idea of the overall look of the pipe with the band. It appeared to me that it would work well.Poker11

Poker12 I decided to heat the band with a lighter rather than set my heat gun to do the simple heat up of the band. Once I heated it I pressed it into place on the shank. The metal expanded slightly with the heat and by pressing the shank end against a flat surface I was able to push the band into place.Poker13

Poker14

Poker15

Poker16One problem was solved. The shank was now round at the end and the stem would fit tightly against the shank and the band made the match perfect.Poker17

Poker18

Poker19

Poker20 I used a dark brown stain pen and a black permanent marker to touch up the raw briar in front of the band and blend it into the colour of the bowl and shank.Poker21

Poker22

Poker23

Poker24 Once I had the stained matched, it was time to clean the sandblast finish. I used Murphy’s Oil Soap and a tooth brush to scrub the bowl and shank. I did it after the stain touch up as I figured that the scrub would help blend the stains together.Poker25 I rinsed the bowl with fresh water avoiding getting it into the shank and the bowl. I dried it off and brought it back to the work table. I cleaned out the shank and the used stem with a few pipe cleaners and alcohol. The pictures below show the pipe at this point in the process.Poker26 The stem needed some work to clean up the scratches and wear around the button. I wet sanded it with 1500-2400 grit micromesh sanding pads and dry sanded it with 3200-12,000 grit pads. I rubbed it down with Obsidian Oil and then buffed it with Blue Diamond Plastic Polish on the buffing wheel. I gave it a quick coat of carnauba and took it back to the work table.Poker27

Poker28

Poker29 I gave the bowl and stem a light buff and rubbed the bowl down with a light coat of olive oil. When it dried, I hand buffed the bowl with a shoe brush to raise the shine. The finished pipe is shown in the pictures below. I think I achieved what I set out to do when I started this project. I took a pretty ugly poker with a misfit stem and with work transformed it into a more classic poker look. What do you think? Thanks for looking and giving your opinion on the new look.Poker30

Poker31

Poker32

Poker33

Poker34

Poker35

Taking the idea that several readers gave regarding the straight stem I bent it this morning. I heated it with the heat gun and then gave it a gentle 1/8 bend. Here are the photos.Bent1

Bent2

Bent3

Bent4

An Odd Yello Bole Imperial Nosewarmer Canadian worth saving


Blog by Steve Laug

The second pipe that Troy Wilburn sent me to restem was a short Canadian with a large bowl. It was a bit of an odd pipe – no shape number and no catalogue shape that matched it. It was almost like a Canadian that had been cut off somewhere along the way. However it was sent out from the factory like this. It is stamped on the top rolling down the left side of the shank with the older KBB in a cloverleaf. Next to that it reads Yello Bole. Underneath it reads cured with real honey and an R in a circle. Underneath that is stamped Imperial in Script with small block letters reading IMPORTED BRIAR.

It came to Troy as New Old Stock or NOS – unsmoked pipe. It had a strange tenon repair that someone had made some time in its history. The tenon had broken off in the shank and rather than remove it, the decision had been made to leave it in the shank. In the first photo below you can see the broken tenon and at the end of it is the YB stinger apparatus still sitting in the shank. There was a notch taken out of the shank on the left underside near the end of the mortise and in the mortise end. The repair that had been made was to smooth out the end of the stem and insert a stainless steel rod in the stem. The rod was the same diameter as the inside of the tenon. Effectively it was like the repair I did on Troy’s other pipe. The problem with this one was the very constricted draw due to the narrow airway constricted by the tenon. With the notch in the end of the mortise the fit of the stem against the shank was also compromised. This pipe was going to be a bear to get all of the alignments straight. The airway drilled in the stem for the metal tenon was slightly off centre and a little angular. The notch in the shank would need to be corrected or removed. The fit in the shank would need to be adjusted. You can see that this NOS pipe would take a bit of creativity to reconstruct.YB1 I began the reconstruction of a new tenon by addressing the constricted airway and broken tenon in the shank of the pipe. I used a drill bit that fit well against the end of the tenon that was stuck in the shank and slowly drilled into the broken tenon. My hope was that the drill bit would catch on the material of the tenon and I would be able to back it out of the shank. It worked on the first try. The bit stuck in the bit and I reversed the direction of the drill and the broken tenon came out on the drill bit. Once it was free I was able to shake out the stinger from the airway and the shank was clear. This unsmoked pipe now had an unconstricted airway. The first part of the repair had gone off without a hitch.YB2 The next photo shows the parts that were in the shank. The broken tenon piece and the spoon shaped stinger are to the left of the end of the shank. You can also see the short metal tenon that had been inserted in the stem end.YB3 I gripped the end of the metal tenon with needle nosed pliers and wiggled it free of the stem. It had not been glued but rather heated and inserted deep in the airway of the stem. With very little effort I was able to remove the tube from the stem. The next two photos give two different views of the tenon and the end of the stem. You can see in the second photo that the airway had been drilled open to take the metal tube tenon. It would not take much to open it slightly larger to put a repair tenon in place.YB4

YB5 With the airway opened I decided to address the notch out of the end of the shank. I did this by using super glue and briar dust to build up the shank end. The trick was to keep the glue isolated to the shank end and not let it run on the finish of the shank bottom.YB6 I carefully put a few drops of glue in the notch and then packed in briar dust with a dental pick. I repeated this process until I had built up the notch slightly higher than the flat end of the shank. I then used the topping board and carefully stood the pipe against the sandpaper and slowly worked the filled area smooth with the paper. I repeated the process until the area was evenly built up and the notch was gone. There remained a little darkening at the edge of the repair on the bottom edge of the shank end but the notch was gone. Once the stem is repaired and is in place the notch will be virtually invisible. I cleaned up any of the glue bits and briar dust in the shank with the dental pick and a sharp knife.YB7

YB8

YB9 The next three photos show the shank end from different angles to show the state of the repair at this point in the process. It still needs to be cleaned up and touched up once the stem is fit in the shank, however the notch itself is virtually gone and the stem (sans tenon) sits smoothly against the shank end.YB10

YB11

YB12I decided that rather than wait for a new tenon to arrive I would make my own. I had a very small stem that I knew would work well to fashion a tenon. I used a hacksaw to cut off a portion of the stem to use for the tenon. I purposely cut it long to give me material to work with.YB13

YB14

YB15 The cut off portion is shown in the photo below. I held the smaller portion in the tip of a pair of needle nose pliers and used the Dremel with a sanding drum to bring down the larger portion to match the smaller one. I would sand until I had a vulcanite tenon that I could insert into the stem.YB16

YB17 Here is a photo of the shop “foreman” sitting in my chair while I worked on the tenon. Spencer loves to hang out with me while I work.YB18 The thinner part of the tenon in the photo below will be the part I insert in the stem once it is drilled out. The larger part will need to be turned down to fit in the mortise.YB19

YB20 I started by using a drill bit that was slightly larger than the airway that had been opened in the stem for the metal tenon. I worked my way up to a drill bit that would open the airway and deep enough to take the new tenon and provide stability.YB21 When I had drilled the opening in the stem as large as I could, given the taper of the stem I needed to take down the diameter of the replacement tenon I had made. I used a Dremel to take off the excess material to reduce it to the same size as the stem opening. Once I got close in diameter with the Dremel I hand sanded it to fit.YB22

YB23 When the tenon end fit snugly in the stem, I squared off the end of the tenon and then superglued it in place in the stem. I coated the tenon with the glue and pressed it into place. The tenon itself would also need to be turned to fit the shank of the pipe.YB24 I used the Dremel and sanding drum to sand down the tenon and then used sand paper to get a snug fit.YB25 Once it fit well I polished it with fine grit sanding sponges and micromesh.YB26 The fit in shank was good and snug. It was at this point that the alignment issues became clear. I would need to do some work on the shank to clean up the repair and also get a good transition from the shank to the stem. The fit on the topside was slightly high and the fit on the underside was a little low. I needed to sand the shank anyway to clean up the repaired notch on the underside so to sand it a bit more was not an issue.YB28 I sanded the shank and stem with 220 grit sandpaper to smooth out the transition between the two and to give a better flow to the taper on the stem.YB28

YB29

YB30

YB31 I sanded the stem and shank with a medium and a fine grit sanding block to make the transition smooth and remove the scratches left behind by the sandpaper.YB32

YB33

YB34

YB35 Once the transition was smooth I sanded the briar with micromesh sanding pads from 2400-4000 grit and then used the Guardsman brand stain pens to stain the shank. I used the lightest stain pen first and finished with the medium stain pen. Once it dried I buffed the pipe with Blue Diamond to raise the shine on the shank and to even out the stain.YB36

YB37 I sanded the stem with micromesh sanding pads – wet sanding with 1500-2400 grit pads and dry sanding with 3200-12,000 grit pads. I buffed the stem with White Diamond and Blue Diamond and then buff the shank with the same once again.YB38

YB39

YB40 I buffed the stem and the shank with Blue Diamond on the wheel and then gave the pipe several coats of carnauba wax. I finished by buffing it with a soft flannel buffing pad. The finished pipe is shown below.YB41

YB42

YB43

YB44 The next two photos show a close up of the fit of the stem to the shank. I am pleased with the way it turned out.YB45

YB46 The last two photos are of a regular sized Yello Bole Canadian (top pipe) and the little nose warmer (bottom pipe). I put these together to give a bit of perspective. The bowl on the nose warmer is larger and the shank is definitely shorter.YB47

YB48 Thanks Troy for the challenge on this little Canadian. It was a pleasure to work on it. Each time I work on putting a new tenon on a pipe I learn something new. This time around, between the new tenon on the billiard, the insert in the cracked shank and the new tenon on this little one I had a good week in pipe school. They will soon be on their way back to you Troy. I hope they smoke well and you enjoy them.

Replacing a Broken Tenon and Repairing a Cracked Shank on an Old KBB Yello Bole Billiard


Blog by Steve Laug

Troy Wilburn and I have been corresponding for a few months now about pipe restoring and the fun of the hobby. He has posted some of his work here so he is no stranger to pipe restoration. I had not heard from him for a while so I sent him and email to check on him. I know he loves the older Yello Bole pipes and I wondered if he had worked on any recently. I am including a portion of the email he sent me in response to mine. He wrote:

“Funny thing you have contacted me as I do have a couple of Yello Boles I need tenon repairs on. One is an old favorite of mine that snapped off. I have tried to repair it and it failed. The other is an odd shaped NOS (I can’t find the shape on any KW chart. It’s a large bowl billiard with a short oval shank and short straight stem) pipe that I purchased with a broken tenon already but I can’t get the broken piece out (it’s really stuck!) So it might need to be drilled out and a new tenon made, I don’t know.”

“Tenon repair is something I’m not that experienced on and they are both very nice old KBB YBs and would like nice repairs done on them, so I was thinking about sending them to someone more experienced in those types of repairs. I was gonna ask Ed but I know he is always swamped with projects, so I was thinking about asking you if you would be interested in repairing them for me…”

I replied that I would gladly have a look and them and give them a go if they were something that I could fix. When they arrived last week I unpacked the box that Troy sent. I have to tell you he did a masterful job of packing these old pipes. They were individually wrapped in bubble wrap and then placed in small plastic containers. Then the plastic containers were put in bubble wrap and put in a box. There was no movement or rattle in that package.

When I took the pipes out I could see what Troy was talking about. The little odd shaped NOS Canadian was strange. It had a metal tenon. Upon observation I could see that someone had left the broken tenon in the shank and then made a metal tenon that slipped inside the broken tenon. Deep in the shank was the stinger rattling around free in the airway between the broken tenon and the bowl. The billiard that I chose to work on first was another matter. I think Troy tried to epoxy the stem on the tenon but it did not hold. The face of the stem was spotty with glue. The shank on the pipe was clean but I did not spend too much time checking it out to see if there were cracks or problems. Even though the tenon snapped I just by passed my normal observation and went to work. That was a decision I would regret shortly… but let’s not get ahead of ourselves yet.

I faced the surface of the stem and smoothed out the broken area on a topping board. I started with a drill bit slightly larger than the airway and worked my way up to a large enough drill bit that I could turn a tap into it to thread it for the new threaded tenon. This has to be done very slowly and carefully to not drill to deeply into the stem or to angle things so that the tenon does not sit straight in the shank once it is in place. The stem had some spots of glue on the surface and some marks around the end where the tenon had snapped off that would need to be addressed once I got to that point.tenon1 I generally have a few threaded tenons to work with around here. Wouldn’t you know it all of my ¼ inch tenons were gone and all I had left were these large ½ inch ones. It would have to work for this repair. I used a tap to thread the newly drilled stem. I fit the tenon in place and twisted it down until it sat flat against the stem. I then twisted it free and put some glue on the threads and twisted the new tenon into the stem. I cleaned up the excess glue around the junction so that the fit of the tenon was smooth and tight.Tenon2 Once the glue set in place I set up my PIMO Tenon Turning tool on my cordless drill and took down the tenon slowly until I had removed enough of the excess Delrin to get it close to a fit. Because there are no micro adjustments on the tenon turning tool I always get as close as possible with the tool and then use the Dremel and sanding drum and to strip it more and then finish it by hand with sandpaper.Tenon3 I love the way the Delrin spins off the cutter on the tool. Here is the new tenon sitting among the Delrin scraps ready to take to the Dremel and then hand sand.Tenon4 I used the Dremel to take the tenon down some more. I then sanded it by hand until the size was the same as the shank. When I slid it in place the fit was perfect. I was happy to have finished what seemed to be an easy repair. I slipped the stem out of the shank to clean and polish the tenon. When I slid it back in place the sound that makes me cringe was heard. It was just a slight low pop. I removed the stem and could see a small crack had either appeared on the shank with the new tenon in place or the new tenon had made the crack appear. I will never know for sure as I did not check it before. I cleaned off that area of the shank and examined the crack. It was just under ½ long and curved up through the stamping on the shank. I was sick.

I wrote Troy a quick email and told him the situation as it stood – great fitting stem, repaired tenon and now a cracked shank. I asked if it was cracked before or if I had cracked it. He was not sure either. Ah well no matter. I was hoping he would confirm that it was previously cracked but he didn’t know. I asked about banding the shank and he said he would rather not as he did not like bands. But if I had to a thin one would do. The problem was twofold – I did not have a thin band and a thin one would not fix the crack. I suggested that maybe I could do an internal repair and thin down the new tenon to fit inside of the tube that would be used to repair the shank. He said to go for it and see what I could do.

So I did a bit of looking through my parts bin to see if I could find either a piece of Delrin tube that I could drill and fit or a piece of metal that would work for the repair. I found I had a metal tube that would work. I cut off a piece the length of the mortise. I used the Dremel and sanding drum to roughen the surface of the tube and to reduce the diameter slightly. I wanted a good snug fit in the shank but did not want to open the crack or crack it further. I spread the crack slightly and put super glue in it and clamped it until it set.

While it was drying I used the Dremel to reduce the diameter of the tenon until it would fit inside of the metal tube. I figured it would be easier to do that fitting with the tube out of the shank than when it was inserted in the cracked shank. Again I sanded with the Dremel and then finished by hand sanding until the fit was a nice snug fit with the tenon all the way into the tube.tenon5

Tenon6 I sanded and smoothed the ends of the tube and made sure that the surface was rough enough to bond to the inside of the mortise. I roughened the walls of the mortise with a dental pick so that it was scored. I wanted to make both surfaces rough enough for the glue to bond to and make the tube secure in the shank. It would have to be a tight fit as I did not want the tube to come out with the stem when Troy took it off the pipe to clean it. I coated the outside of the metal tube with glue and let it get tacky. When it was tacky I pressed into the shank with the sharp end of a pair of needle nose pliers. I pushed it in until it sat against the end of the mortise in the shank.Tenon7 With the tube in place in the shank I still needed to flare the end so that it would fit against the bevel of the mortise end. I probably could have shortened the tube slightly but beveling the end would take care of that.Tenon8 I pressed the end of rounded tip of the needle nose pliers into the end of the tube and worked on the flare. It took some work to mould it to shape. I then use a small round needle nose file to smooth out the flare and match the angle of the bevel.Tenon9 I stained the end of the shank with a stain pencil and also touched up the cracked area on the shank. I will need to polish that to get it to match the shine on the bowl but you can see the fit of the stem against the shank and look of the shank.Tenon10 With the shank repair completed I needed to work on the stem. I sanded it with 220 grit sandpaper to remove the scratches and glue build up that was on the surface of the stem. I sanded it with medium and fine grit sanding sponges. Then it was time to sand it with micromesh sanding pads. Instead of wet sanding I used a little olive oil on the stem and sanded with the micromesh with oil. I did that with 1500-2400 grit pads. I continued with 3600-12,000 grit pads without adding any further oil to the surface of the stem. With these older Yello Bole stem I find that wet sanding does not work well but to sand with oil is perfect and will raise a nice shine. I also am careful about buffing them as they have a pretty low melting point and are easily damaged. This particular stem does not appear to be vulcanite so I was careful.Tenon11

Tenon12

Tenon13 The next two photos show the shank end. The stain got on the flare of the metal tube and I will need to wipe it out with a bit of alcohol. However you can see the flare of the metal and the briar to take the new tenon and hold the stem tight against the shank. The airway has what appears to be a loose piece of metal on the second photo at the bottom of the shank. I blew out the shank with air and the dust and fibres that were present disappeared.tenon14

tenon15 The next four photos show the finished pipe and stem. The newly fit stem sits nicely against the shank. The repair to the shank is solid and the crack is closed. With the metal insert it should be free from further cracking and the tenon slides in snugly to the mortise.tenon16

tenon17

tenon18

tenon19 The next two photos give a close look at the shank/stem junction. It is good and tight. The final photo shows that the new tenon sits tight against the stem and looks like it was when it left the factory – just narrower in diameter to fit in the metal tube.tenon20

tenon21

tenon22 The first pipe is finished Troy. Hopefully the second one will be much simpler. This one is ready for you to load up and enjoy once again.

Restoring and Shaping a New Stem for a Savinelli Roma 305


Blog by Steve Laug

When I saw this old Savinelli Roma on eBay I decided to bid on it and see what I could do with it. It had a triangular shank without a stem. The bowl had a cake build-up and the rim was covered with tars that were flaking off. The finish was dirty and worn as these pipes usually have a contrast dark stain on the bowl and a lighter stain on the rim. The rim is chamfered or bevelled inward toward the bowl. The edges of the rim – both inner and outer – were in great shape. The bowl was still in round.Roma1 The band was an aftermarket addition and from the looks of it covered a cracked shank. In the photo below you can see the band has been pressed into place and damaged the shape of the shank on the bottom right side. Notice the step down from the band to the bottom edge of the shank and you will see what I mean.Roma2

Roma3 I have included the next photo of the Savinelli Roma 305 to show what the pipe originally looked like. The triangular shank and matching stem are attractive. This should be interesting to duplicate on a replacement stem! The round rim and the contrast colour of the bowl and rim look very good. The thin metal spacer between the stem and shank would have been connected to the stem and with the cracked shank on the one I picked up will not be possible to duplicate.Roma5 I have also included a picture I found on the web of a badly oxidized stem. I saved this because it gives a good close up of the angles on the stem that I will need to duplicate.Roma4 When the pipe arrived I took it out of the package and gave it a thorough inspection. As I suspected the band was an added feature. It was pressed loosely in place to deal with a crack in the right side of the shank and also on the bottom edge. It was poorly fit and would need shaping before I put it permanently in place. I would also need to address the cracks in the shank and the missing notch on the right side of the shank.Roma6 The next group of three photos shows the damaged areas on the bowl and shank. The crack is visible in the first photo and the missing notch is visible in the second photo. The third photo gives a close up of the bowl and rim.Roma7

Roma8

Roma9 I slipped the band in place and took a photo of the end of the shank to give an idea of what the shape of the stem will need to be when I worked on it. You can see the poor fit of the band at this point as well.Roma10 I went through my can of stems to find one that fit. I tried diamond shaped stems and none had a wide enough diameter to match the width of the shank without being too long to look right. I finally settled on a round stem blank that had the correct diameter. I turned the tenon down with a PIMO Tenon turning tool until it fit the shank. In the photo below you can see the stem and the stem before I corrected the tenon.Roma11 With the tenon turned to fit I pushed it into the shank of the pipe.Roma12

Roma13 Using a rasp and files I roughed in the shape of the new stem. I used a Dremel and sanding drum to take it down as close as possible to the finished shape and then brought it back to the work table to use the files again. The photo below shows the roughly shaped stem. Much more sanding will be necessary before this stem is finished.Roma14 I slipped off the band from the shank and worked on the area on the right side of the shank where there was a large divot in the shank. I also cleaned the cracks on that side of the shank and the underside of the shank with alcohol. I picked out the loose briar with a dental pick and then filled in the divot with briar dust and superglue. I built it up to match the current level of the shank and carved it with the dental pick and needle files to match the finish around the repair. I put super glue in the cracked areas on the shank as well and pressed them until the glue set.Roma15

Roma16 The next photo shows the repaired edge of the shank. The shiny area on the right side of the photo is the glue and briar dust repair.Roma17 With the band off and the repairs made I inserted the stem and used the files to further shape the angles on the stem. I sanded it with 100 grit emery cloth to smooth out the file marks and further shape it.Roma18

Roma19

Roma20

Roma21 After more sanding with 180 grit sandpaper the stem is finally beginning to take shape. You can see the shape in the photos below.Roma22

Roma23

Roma24

Roma25 I decided to clean up the bowl before continuing further on the stem. I reamed it with a PipNet reamer and took it back to a thin cake. I would sand it smooth later in the process.Roma26 With hard sanding work done on the stem I worked on the bowl. I scrubbed down the bowl and shank with acetone to remove the remaining finish and scrubbed and scraped the buildup of tars on the rim. I used a small piece of folded 220 grit sandpaper to clean up the rim further.Roma27

Roma28 I scrubbed the rim with acetone and elbow grease and was able to remove all of the tars on the rim.Roma29 I put some wood glue on the shank and pressed the band into place. I wiped off the excess glue with a little alcohol on a cotton pad. I sanded the stem with 220 grit sandpaper to continue shaping and fitting it against the shank. I would need to clean up the straight edges on the sides of the stem and the flattened top portion before I was finished but I wanted to get the shank fit done first.Roma30

Roma31

Roma32

Roma33 I sanded the stem (particularly working on the shank stem junction) with 600 grit wet dry sandpaper. I also sanded the bottom and the sides of the stems at the same time.Roma34 I stained the bowl with a dark brown aniline stain, flamed it and repeated the process.Roma35

Roma36

Roma37

Roma38 I buffed the pipe with White Diamond to even out the stain and bring some shine to it.Roma39

Roma40

Roma41

Roma42 Then it was time to bend the stem to match the original in the photo that I had. I heated it with a heat gun until it was flexible and then bent it over a rolling pin that I use to get an even and straight bend.Roma43 I took the pipe back to the worktable and took the following photos so I could compare the stem with the original photo. The bend looked correct.Roma44

Roma45 However, the top of the stem needed to be flattened more and lose the arched look. I used a flat file that I have and worked on the top of the stem to flatten it.Roma46

Roma47

Roma48

Roma49 The next three photos show the stem after I had filed and flattened the top of the stem to get the angles correct.Roma50

Roma51

Roma52 I sanded the stem with 220 grit sandpaper, medium and fine grit sanding sponges and with 600 grit wet dry sandpaper. I moved on to polishing it with the micromesh sanding pads – wet sanding with 1500-2400 grit pads and dry sanding with 3600-12,000 grit pads.Roma53

Roma54

Roma55

Roma56 I buffed the stem with White Diamond and Blue Diamond plastic polish to further shine the stem.Roma57

Roma58 I polished the band with micromesh sanding pads and then buffed the pipe with Blue Diamond to bring out a shine. I then gave it multiple coats of carnauba wax and buffed it with a soft flannel buff to lift the shine even higher. The finished pipe is shown in the photos below.Roma59

Roma60

Roma61

Roma62

Restemming & Working on New Staining Techniques on a Mastercraft Pot


Blog by Steve Laug

The next pipe from the gift box is a Mastercraft Pot. It is stamped Mastercraft in a shield on the left side of the shank and Imported Briar over Italy on the right side. There are no shape numbers. There are a lot of fills on the bottom of the bowl and the right side of the bowl. The finish is a thick coat of what appears to be urethane – almost plastic looking. Someone had previous started refurbishing it – to bowl had been carefully reamed and the bowl topped. There was a large fill on the rim that was loose that ran from the middle of the right side of the bowl almost all the way across the rim. This pipe would be a great one to experiment with using different stains to blend the fills and highlight the grain. The urethane coat would prove a challenge to remove completely but once gone it would prove a perfect candidate for the new staining techniques I wanted to learn. The band on the shank is aluminum and is oxidized and dull. The stem is a replacement that is poorly fit. It is loose in the shank and does not fit against the shank well. The tenon is very short and almost conical in shape. I will break the work on this pipe into two parts: Part 1: Fitting a Stem and Part 2: The Staining Experiment and a Conclusion called Finishing Touches.Mas1

Mas2

Mas3

Mas4 I took a few close-up photos of the rim and the stem. These will help to give an idea of the state of affairs when I brought the pipe to the work table.Mas5

Mas6

Mas7

Mas8
Part 1: Fitting a Stem

I removed the stem and found two possible replacements in my stem can. The original replace in the one at the bottom of the photo below. The two options were a longer taper and a saddle stem. Both of them worked well with the length of the shank. They looked better than the one the pipe arrived with.Mas9 I tried the bowl with each of the stems to get an idea of the look of the pipe. I made a decision for the taper once I had seen them both in place in the shank.Mas10

Mas11 The taper stem was slightly larger in diameter than the shank so I would need to adjust the diameter. I cleaned out the shank and the stem with pipe cleaners, cotton swabs and isopropyl alcohol to remove the tars and oils from the shank. Because someone had already started the process on this pipe it was not a long clean. It took very few cleaners before the shank was clean.Mas12

Mas13

Mas14

Mas15 I sanded the stem with 220 grit sandpaper to start and then decided it was taking too much time. I used the Dremel with a sanding drum and quickly removed the excess material.Mas16

Mas17 I brought it back to the work table and sanded it with 180 and 220 grit sandpaper to smooth out the marks left by the sanding drum. I needed to fine tune the fit but it was working with the bowl.Mas18

Mas19
Part 2: The Staining Experiment

To prepare the bowl for staining I needed to do the repairs and remove the old finish. I decided to re-top the bowl to remove some of the damage and smooth out the area around the fill on the right side top and edge. I wanted to bring the top down to lessen the area that the fill intruded on.Mas20 I wiped the bowl down with acetone to remove the finish only to find that it did not work to cut through the finish. Before I intruded on the finish with my next measure I decided to repair the fill on the outer edge of the rim on the right side. I used briar dust and super glue to repair the fill on the side and top of the rim. Most of the fill had been smoothed out on the top but there was some of the fill missing on the edge of the rim. I cleaned and sanded the repair to blend it into the finish. When that was smoothed out I sanded the bowl with a medium grit sanding sponge to break the gloss of the finish and then dropped it into the alcohol bath.Mas21 When I took it out of the bath the finish was dulled but still not broken. This top coat was a real bear to remove. I needed to do quite a bit more sanding on the coating to remove the finish.Mas22 Once the finish was gone and I was at bare wood I decided I would use a three part staining process to try to hide the fills and blend them into the briar. I wanted to try something new as well with the staining of this pipe. I wiped it down a final time with acetone to clean off the dust and any remnants of finish, scrubbing hard around the stamping on the shank. I stained it with a medium walnut stain, flamed it and buffed it.Mas23

Mas24

Mas25

Mas26 When the stain dried I gave it a light buff with a cloth and a shoe brush and then gave it the second coat of stain. This time I gave it a coat of oxblood coloured stain. I wanted to bring out the grain on the sides and front and back of the bowl and try to blend the fills more. I stained it and flamed the stain.Mas27

Mas28

Mas29

Mas30 When that stain dried I buffed the bowl with White Diamond and wiped it down with isopropyl to even out the stain coat. I hand buffed it afterwards with a soft cloth. The bowl was beginning to take on the colour I wanted from these first two coats of stain.Mas31

Mas32

Mas33

Mas34

Mas35

Mas36 Then it was time for the third coat of stain. I stained the pipe with a dark brown aniline stain. I applied it and flamed it and repeated the process until I had good coverage on the pipe. The dark brown looked opaque when first applied.Mas37

Mas38

Mas39 I buffed the pipe with White Diamond on the wheel and gradually the grain began to show through the finish. The combination of stains gave the pipe precisely the colour I was wanting – a warm reddish brown with dark highlights in the grain patterns. The fills though still present, did not stick out as badly and seemed to blend into the finish.Mas40

Mas41

Mas42

Mas43
Conclusion: Finishing Touches

With the finish on the pipe completed I worked on the stem. I sanded it with a fine grit sanding sponge and then with micromesh sanding pads. I also sanded the band on the shank with the micromesh pads at the same time. I wet sanded with 1500-2400 grit pads and sanded the band without the stem present. You have to be careful with the pads when polishing metal as they will leave a dark stain on the briar and the vulcanite.Mas44 I rubbed the stem down with Obsidian Oil and dry sanded the stem with 3200-12,000 grit pads. I polished the band with the same and also with a silver polishing cloth. After each set of three pads I rubbed the stem down with the oil. When I had finished the stem I gave it a final coat of the oil and then let it dry.Mas45

Mas46 The next photos show the finished pipe. It is a rich brown/red colour that has warmth and depth to it. The silver band and the new stem make the pipe look quite rich. I figure it is at least as nice or nicer than when it left the Mastercraft warehouse.Mas47

Mas48

Mas49

Mas50

Mas51

Mas52

Mas53

Giving a Yorkshire Natural Billiard a new look – Restain & Cumberland Stem


Blog by Steve Laug

I am slowly but surely working my way through the gift box of pipes I received. The next one that I chose to work on was a billiard. It is stamped Yorkshire in an arch over Natural and another reverse arch with the words Algerian Briar.York1 The stem on it was a replacement and did not fit well on the shank. It was slightly smaller in diameter and also had rounded shoulders. The angles and flow of the stem did not work well with the pipe in my opinion as the taper on the top of the stem was different from the one on the bottom side. The bowl itself was clean but and the finish dirty. The rim had been damaged around the outer edge on the front of the bowl rounding it slightly. The stamping was clear and distinct. From what I can find on the internet the Yorkshire brand is a US Made pipe that came from Barnaby Briars (smoking pipe retailer) that was located at 28 Powell St. in Brooklyn (NY). They also made pipes stamped Barnaby. The Germanic Script differentiates it from the other Yorkshire Brand that was made in Italy by Gasparini for Sears and Roebuck.York2 The right side of the bowl had the only fills present on the pipe – and there were about five of them visible. The largest is almost in the middle toward the back. These fills were hard, smooth and tan in colour.York3

York4

York5 The close-up photo of the rim below shows the rounding of the edges on both the front and the back sides of the rim.York6 I absolutely hated the look of the stem on this pipe so I went through my can of stems until I found one that would work well. It was a well broken in stem that had a lot of oxidation and calcification on the top and bottom of the stem. There were no tooth marks which were a bonus and the stem was Cumberland! Once I had cleaned up the bowl and the stem the combination would look really good.

The tenon was slightly larger than the mortise so I used a Dremel with a sanding drum and took some of the Cumberland material off the tenon. I worked on it until it was close to fitting. Then I took it back to the work table and use a folded piece of sandpaper to get a good snug fit in the mortise. I had no idea that there was a brass band that was a part of the stem until I began to clean it up.York7

York8 When the stem was in place I sanded the stem and the junction of the shank and stem to make sure that the fit was smooth and the transition was as seamless as I could make it. I sanded with 220 grit sandpaper to even things out. As I did it I found that there was a brass coloured band that was a part of the stem. I removed the stem and cleaned off the face of the stem and found the band extended across the face of the stem like a washer around the tenon. I really liked the way the stem tapered quickly to from the shank to the button.York9

York10

York11

York12 I topped the bowl on a topping board to remove the damage on the rim and clean up the outer edges. I wanted to remove the damaged, rounded edges. I also sanded the scratches on the underside of the bowl.York13 I sanded the stem and shank with a medium and a fine grit sanding sponge. I also sanded the brass shank adornment to remove the scratches and polish it. I wiped it down with a wet cloth to remove the sanding dust. The Cumberland is coming to life the more I sand it and remove the oxidation and buildup. The lines of red and burgundy flow through the stem horizontally along the taper and the sides.York14

York15

York16

York17 I took a picture of the pipe and stem with the old stem beside it for comparison sake. The stem is about ¼ inch longer than the old one and the taper more radical. The Cumberland looked better with the briar than the old as well.York18 I wiped down the bowl and shank with acetone on cotton pads to remove the oils and grime that was on the surface of the briar. I wanted to bring the rest of the briar as close to the colour of the sanded rim and shank.York19

York20

York21

York22 I cleaned out the shank and the stem with cotton swabs, pipe cleaners and isopropyl alcohol to remove the tars and oils.York23

York24 I sanded the stem and shank with micromesh sanding pads – wet sanding with 1500-2400 grit pads and dry sanding with 3200-12,000 grit pads. I rubbed the stem down with Obsidian Oil between each set of three pads. I did not let the oil dry between rub downs as I find that the oil gives the micromesh some cut on the surface of the stem. The translucence of the Cumberland really shows through the shine.York25

York26

York27 I rubbed the bowl and down with olive oil and let it soak into the briar. The oil brought out the reddish brown tones of the briar and made the grain stand out. Sadly it also made the fills on the right side of the bowl stand out as well.York28

York29

York30

York31 While the brown tones stood out well I wanted to bring out some of the red tones in the briar. To highlight the reds I stained the bowl with a coat of oxblood stain. Before I stained the briar I used a permanent black marker to darken the fills on the side of the bowl. When it had dried so that it would not rub off when I put the stain coat on the bowl. I applied the stain with a cotton pad and then flamed it. Once it dried I polished the bowl with White Diamond on the buffing wheel. The finished pipe is shown below.York32

York33

York34

York35 The rich colours of the briar work really well with the reds of the Cumberland stem. The light brass band that separates the stem and the shank adds a light brass coloured horizontal line that breaks up the vertical Cumberland and the horizontal grain of the briar.York36

York37 The sharp edges of the rim and the grain on the surface look far better than the round outer edge of the bowl.York38

York39

York40

Restemming and Restoring The Albany Pipe by ?Orlik?


Blog by Steve Laug

In a recent gift box of pipes there was a billiard that had a replacement stem. The stem did not fit correctly and when it was rotated in any other way but the one it did not fit and showed light between the shank and stem. The diameter of the shank and that of the stem did not match either and the shoulders on the stem were rounded – one of my pet peeves. The pipe is stamped with gold on the left side of the shank The Albany Pipe. On the right side it is gold stamped Made in England. On the bottom of the shank it is gold stamped 17 and Fieldcraft in script.Albany1

Albany2 The finish was natural – no stain and had begun to pick up a patina of age. The stamping was clear but the gold was faded and missing in some parts. The rim was dirty and also damaged on the outer edge and had some deep scratches in the top. The stem was not original. The bowl had a light cake and looked like someone had reamed it recently.Albany3

Albany4 I took a few close-up pictures of the rim and the stamping to give a clear picture of the state of the pipe when I brought it to the work table. You can also see the poor fit of the replacement stem in the photos as well.Albany5

Albany6

Albany7 The brand is one that I am unfamiliar with though in the back of my mind I have a memory of seeing it somewhere listed as a second line of a major English brand. I just cannot find it now. Does anyone have any ideas regarding the maker? I have looked in WMTP and on PipePhil and Pipedia and found nothing so far. I like knowing some of the history of the brands I restore so I am still digging on this one.

One suggestion in response to a post I made on Smokers Forums was from flatticus (Chris) who wrote the following: “Steve, I think The Albany Pipe must be the tobacconist (there was The Albany Pipe Hospital circa 1920?) and Fieldcraft must be the brand of the pipe. There was another Fieldcraft marked for Frederick Tranter Pipe Shop in Bath, England which came up on eBay some years back, unfortunately too long ago to link properly. I can’t find a thing (trademarks, old ads, what have you) mentioning the Fieldcraft name in relation to pipes, but Tranter is still in business. I wonder if someone there would know who used to make their pipes. They were bought out by Havana House, but only about 4 years ago, so you may get lucky.”

Thanks Chris I will keep looking. I did a bit more digging on PipePhil’s site and looked at the major English brands and sub-brands. The Made in England stamping looks much like that on Orlik Pipes. The shape number 17 also fits one shown in the Orlik Catalogue on Chris Keene’s Pipe pages.Albany8 I removed the stem and looked through my can of stems to find one that would work better for this billiard bowl. Two options came to the front. The first is shown in the photo below next to the replacement stem that came on the pipe. It is a saddle stem that could have worked but the tenon was too small for a snug fit in the shank.Albany9 The second stem I chose was a fat taper stem that had a tenon that was a little too large. I decided to use that one. I used a Dremel with a sanding drum to reduce the tenon enough that I could get a snug fit.Albany10 The next four photos show the pipe with the new stem. It has a slight bend in it that looks dapper on the bowl. There was light oxidation on the stem and tooth marks on the top and underside of the stem next to the button. Other than that the stem was in great shape. It was also slightly larger in diameter than the shank and would need to be fit properly.Albany11

Albany12

Albany13

Albany14 I decided to clean up the bowl before working on the fit of the stem. I lightly topped the bowl to remove the damage to the surface of the rim. I also scraped the remaining cake out of the bowl with a PipeNet pipe reamer.Albany15

Albany16 With the bowl cleaned I put the stem back on the shank and worked on the fit of the stem at the junction of the two. I sanded the stem and lightly sanded the shank, being careful of the stamping to clean up the transition. Because the bowl did not have a stain coat and was natural briar I figured this would be easy to blend in later when I worked on the finish. I used 220 grit sandpaper and medium and fine grit sanding sponges to blend the transition.Albany17

Albany18

Albany19

Albany20 I took several close-up photos of the transition to show the finished fit of the stem and shank. They also show the gold stamping on the bowl.Albany21

Albany22

Albany23 I wiped down the bowl with acetone on cotton pads. I did not worry too much about the gold stamping as I have some rub and buff that I could use to redo the gold once I cleaned up the pipe.Albany24

Albany25

Albany26

Albany27 I sanded the stem and worked out the tooth marks with 220 grit sandpaper and then with medium and fine grit sanding sponges. I followed that with micromesh sanding pads – wet sanding with 1500-2400 grit pads and dry sanding with 3200-12,000 grit pads. I continue to use Obsidian Oil in between each set of three pads.Albany28

Albany29

Albany30 I buffed the stem with White Diamond and then gave it several coats of carnauba wax to protect and shine. I used the Rub and Buff antique gold on the stamping to give it the same look as before and then rubbed down the bowl with a light coat of olive oil before calling it a night. The olive oil soaked in and blended the sanded area of the shank and the topped rim with the rest of the pipe. I sanded the rim, shank and bowl with micromesh sanding pads to smooth out any scratches left behind by the sanding sponges. I usually do this while the oil is on the surface of the briar as the oil gives bite to the micromesh sanding pads. The next four photos show the pipe as it looked when I quit for the evening.Albany31

Albany32

Albany33

Albany34 In the morning I buffed the pipe with a Blue Diamond wheel and then gave it multiple coats of carnauba wax to bring a shine to the pipe. The finished pipe is shown below. I am still undecided if I will leave the slight bend in the stem or not. We shall see.Albany35

Albany36 The next two photos – top and bottom view turned out more read in the photos than they are in real life. The colour of the bowl is more properly shown in the photos above and the close-up photos following them.Albany37

Albany38

Albany39

Albany40

Albany41

Albany42

Albany43

A Savinelli de Luxe Milano 431KS Reborn Twice – PART 2: repairing a broken tenon


Blog by Steve Laug

In Part One I wrote about the refinishing of this pipe and how I cut off the broken stem and reshaped the button. I wrote of the time and energy it took to rebirth this pipe. I also ended with the sound of the click as the pipe hit the floor and the tenon snapped off in the shank. You have to understand the sick feeling that settled into the pit of my stomach. I knew I could cut a new stem and reshape it to fit the pipe – no problem. I knew I could drill out the stem and put in a new replacement tenon – again no problem. I had done both of those things many times. But you also need to understand that I am stubborn. I hated, having invested the time and energy into this repair to this point to throw it away and start over. To me that is a frustration that I did not want to deal with. Besides I would lose the straight brass insert in the stem that is so much a part of these older Savinellis.

I laid the pipe aside and went to bed. I was irritated and frustrated with myself for even carrying it upstairs in the first place. A good night’s sleep would give me a different perspective. I woke up with a kernel of an idea regarding the broken pipe. Really it was a bit of an experiment for me as I had never tried the idea in reality. I think it was born out of conversations with Troy about repairing a cracked shank on a LHS billiard that he was working on and from my recent putting together my latest Frankenpipe. If a metal tube could provide a strong bond in joining two parts of a shank together why wouldn’t it work to bond a broken tenon to the stem? I know that the repair works well on a stable, unmovable shank but would it work on a removable stem and tenon? Would it be stable enough to endure repeated removal from the shank for cleaning and just observing that pipe smokers do? I had no idea but figured it was an experiment worth trying and also worth documenting.

In Part 2 I want to look at that experiment in from the idea to the execution and see what develops. I want to look at the challenges and the issues that arose in executing this repair. And ultimately I want to document it so that I can come back to it and report on its durability and feasibility as a long term solution to a broken tenon. I took the first photo below just after the event happened. I took the pipe back to the worktable to lay it aside and before I did I thought I would take a photo to document the damage. Those of you who have snapped a tenon will well know the thoughts going through my mind. And those of you who restore old pipes only to have a fiasco occur at the end of a long clean up will know the “pain” of the moment.Sav47 In the morning when I got up I pulled the tenon out of the shank using a screw that I keep on the work table for that purpose. I screw it into the tenon and then work the tenon out of the shank. This time it would be both easy and difficult. The shank was clean and the pipe had not been smoked so it would not be stuck in the shank – that was the easy part. The hard part was the metal inner tube that was in the end of the tenon. It would be in the way of the screw when I turned it into the shank. On an off chance that the tube would pop free of the tenon I inserted an ice pick into the end of the shank and push on the tube. I let out a sigh of relief when I heard it drop into the airway and bowl. I inserted the screw and with no effort popped the broken tenon free. I tipped the shank back and the tube fell out of the airway. It was at this moment that my idea was born. The metal tube lay on the table next to the tenon and stem. Why not use that already fitting tube to try to join the broken parts? It was worth a try.Sav48 I tried to run the tube through the broken tenon only to find that it did not go all the way through. It stopped ¾ of the way in and would not go through. I used a needle file to open up the airway until the tube could be pressed all the way through. I removed the tube and opened it further so that once it had a coat of epoxy on it the tube would still fit through the airway. I had decided to sacrifice the inner tube to this purpose.Sav49 With the tube easily fitting through the tenon I then tackled the airway in the stem portion of the break. It was too small for the tube to fit. It would need to be opened up considerably for the tube to slide in place with the epoxy. I decided to begin opening it with a drill bit. I set up my cordless drill with the proper sized bit and hand turned the stem on the bit. I do this without powering up the drill as I find that I can turn it by hand without risking going too far with the bit.Sav50 Once I had the airway opened far enough into the stem to give it a decent depth for the tube when inserted I cleaned up the airway with needle files to ensure a smooth transition from the tube to the remainder of the airway. I did not want a lip between the two that a pipe cleaner would catch on when cleaning the pipe.Sav51

Sav52 With the airway open on the tenon and the stem I used a flat knife blade needle file to score the smooth surface of the inner tube. Smooth aluminum does not provide a surface that epoxy will bind to so I need to score. I then coated the sharp end of the tube with a two part epoxy and pushed the tube into the stem portion of the break. I slide the tenon on to ensure that the tube was straight and the tenon when glued on would still fit tightly against the shank.Sav53 When the epoxy had set in the stem I gave the tube a quick once over with the file to further score the surface and then brushed on the epoxy mix. I pressed the tenon onto the tube and before pressing it in place used a tooth pick to coat the broken surfaces of the tenon and stem with epoxy.Sav54 When pushed into place the excess epoxy squeezed out.Sav55

Sav56 The next photo shows the fit of the tenon on the metal tube. I pushed it in just below the surface of the face of the tenon.Sav57 I used a dental pick to clean off the excess epoxy from the joint then set aside the stem to let the epoxy set and cure for several days.Sav58

Sav59

Sav60 Once I figured that the epoxy had cured and the joint was solid I cleaned it off with a dental pick, a sharp knife and sandpaper. I did not want a ridge at the joint that would catch when the tenon was pushed into the shank. I still needed to sand the joint and clean it up but the repair seems strong.Sav61

Sav62 I put the stem back in the shank and found that I had not let the epoxy cure enough. When I removed the stem from the shank the tenon remained in the shank. The epoxy holding the tenon to the tube was solid and rock hard. The epoxy on the stem side was dry but soft. It had not hardened enough. I am wondering if I should have glued it into the stem side first and let it harden before putting the tenon in place. Well, I will never know with this one. I cleaned off the metal tube and the airway in the stem and mixed a second batch of epoxy. I roughed up the surface of the metal tube even more to give the glue something to bite onto. I pressed the stem in place. This time I will let it cure for a longer before fussing with it. I wonder if the fact that it is in a confined space with limited airflow makes it take longer for the epoxy to harden. Time will tell. I am hoping that the fix works.

I let it dry for two days and then did some sanding with micromesh sanding pads to polish the stem. I did not put it into the shank at this point as I wanted it to have at least another day to cure. I did a quick, wet sand with 1500-2400 grit micromesh pads and then rubbed it down with Obsidian Oil then dry sanded with the 3200-4000 grit pads. I cleaned up the excess epoxy with a flat needle file to smooth out the joint and to clean up the face of the stem. All of this was done to prepare for refitting the stem in the shank.Sav63 After another day sitting and curing I decided to carefully put the stem in place. I once more sanded the tenon to make sure it was clean and smooth. I wanted a snug fit but not a tight fit.Sav64 I put the first half of the tenon into the shank, literally holding my breath as I pushed it carefully into the shank. I was fully expecting the epoxy to break loose again and leave the tenon in the shank. But it did not. I push the stem in and took it out carefully several times to check the joint. I checked the crack that I had repaired and it was holding. I let out the breath I must have been holding. It was working.Sav65

Sav66

Sav67

Sav68

Sav69 With the stem in place and apparently solid I turned the pipe over in my hands to check it out. You cannot imagine the frustration when I saw that somehow the tenon was slightly lower than it had been and now the fit against the shank did not match. The two edges along the shank and the stem no longer lined up but were both equally off – maybe 1/16 of an inch, but off nonetheless. I set the pipe down and took a deep breath. I was not going to leave this alone. I was going to make the fit perfect. I sanded the shank and stem junction carefully with 220 grit sandpaper to smooth out the transition and remove the excess briar on the top of the junction and the excess vulcanite on the bottom of the junction. I worked on the sharp edge on both sides of the stem and shank to bring them back into alignment. Once I was done with the sandpaper I took a few photos to check the alignment.Sav70

Sav71

Sav72 I sanded the stem and shank with a medium and a fine grit sanding sponge to minimize the scratches left by the sandpaper and smooth out the surface of both.Sav73

Sav74 I wiped off the sanding dust and rubbed the stem down with Obsidian Oil and took the next two close-up photos.Sav75

Sav76 I took the stem off the pipe and cleaned out the sanding dust that had slipped in the joint of the stem and shank. I pushed the stem back in place and worked it over with micromesh sanding pads – wet sanding with 1500-2400 grit pads and dry sanding with 3200-12,000 grit pads. I rubbed the stem down with Obsidian Oil after each set of three pads.Sav77

Sav78

Sav79

Sav80 After all of the sanding I was worried that I might have jarred the repair to the tenon so I took the stem out and took a close look. The crack was still solidly close and the repair was holding well.Sav81 I put the stem back in place and took the next four photos of the pipe with the stem in place. The repair had worked so far.Sav82

Sav83

Sav84

Sav85 I wanted the portion of the shank that I had sanded match the colour of the rest of the pipe. Since I had oiled the bowl with olive oil, I did the same again. I rubbed the bowl and shank down with the oil and let it absorb. I then gave the bowl and stem several coats of Conservator’s Wax and hand buffed it with a shoe brush. The finished pipe is shown below. The repair is holding well and the pipe looks good as new. The new button on the stem worked well and the repaired tenon worked. Now comes the period of waiting to see if it will hold up to regular use and cleaning. Smoking it should be no problem as the airway is open and has a clean draught. All that remains is to fire up a bowl… and wait.Sav86

Sav87

Sav88

Sav89

Sav90

Sav91

Sav92

Sav93