Tag Archives: restaining a bowl and rim

A Labour of Love – Repairing a Badly Damaged, Cracked Karl Erik Grade A Hand Made


Blog by Steve Laug

I am pretty sure that I am a sucker for both a good story and a badly damaged pipe. The next pipe on the table came with both. I received an email from Dewey in Iowa about a pipe he bought over 20 years ago. It was one of his favourite pipes and it had a serious crack in the exterior of the bowl. He wrote asking what he could do about it. Here is what he wrote:

Dear Steve,

I have owned a Karl Erik pipe for over 20 years. Bought it from the National Cigar Store in Waterloo, Iowa…..it is my favorite pipe…

just yesterday I found a large crack has appeared on the bottom of the pipe. It still smokes fine but is there anything that can be done to stop it from cracking further and can the crack be filled?The crack does extend up the front of the pipe into a small design where a short second crack is present…wow…

I was going to send pics but don’t know how to add them here

Thank you so much for your time and consideration.

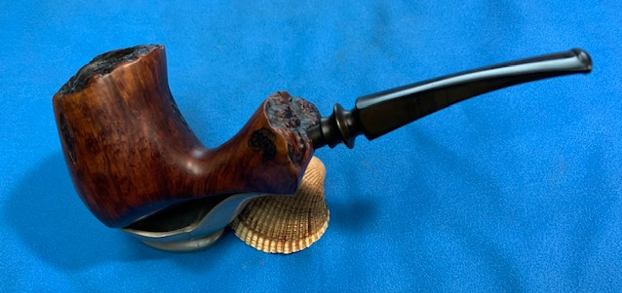
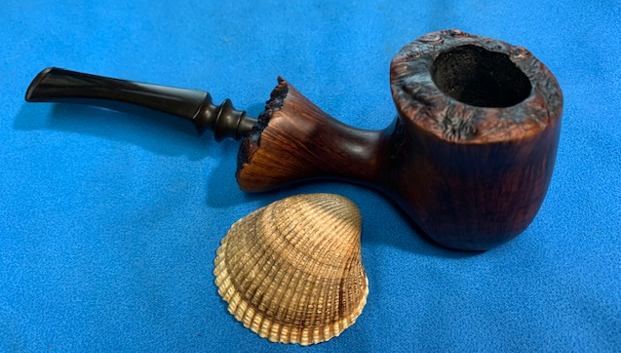
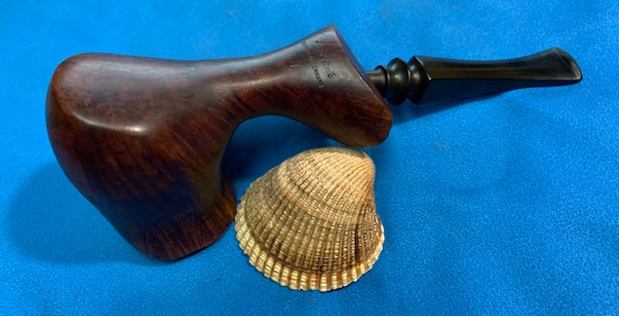
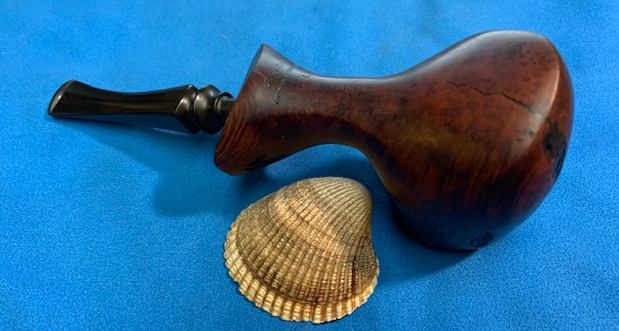
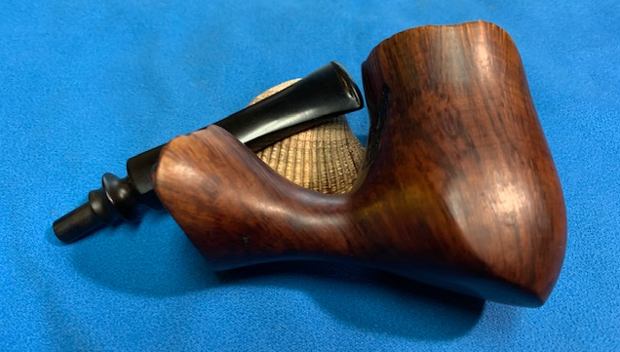
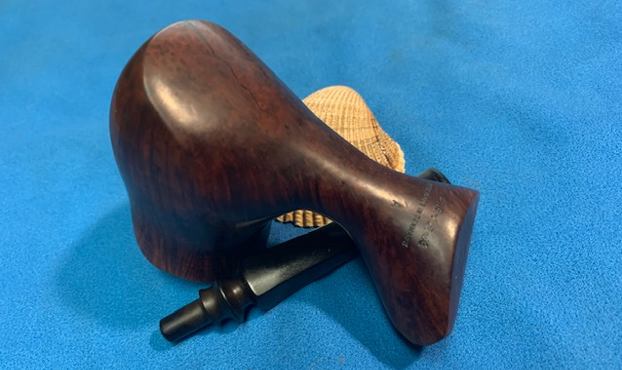
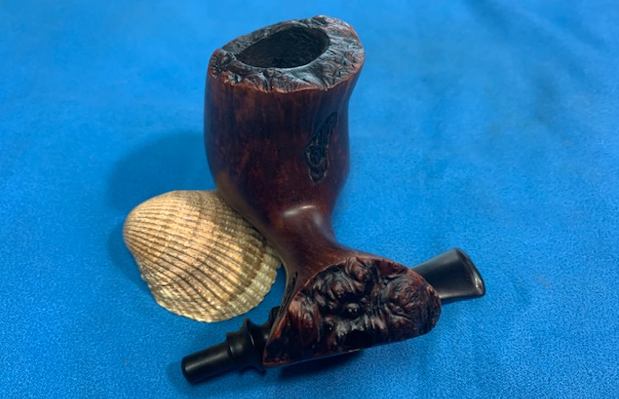
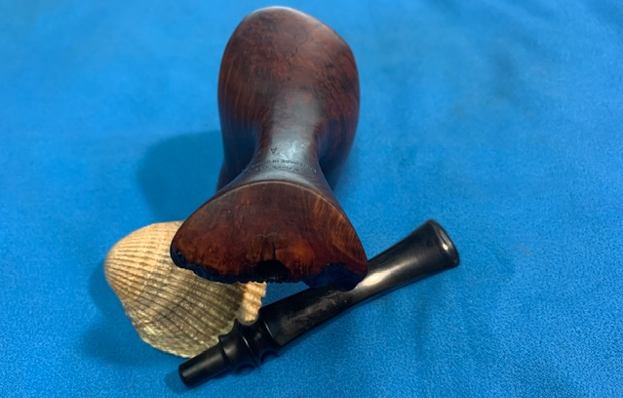
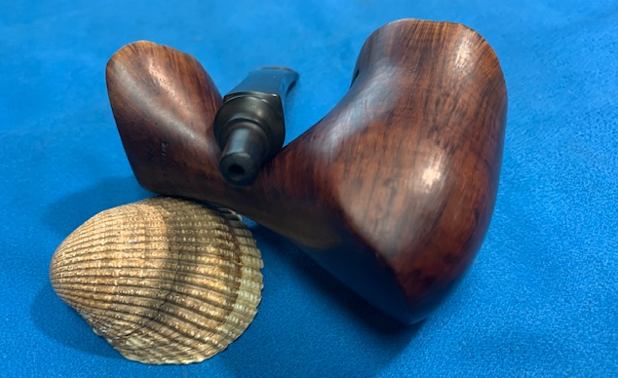
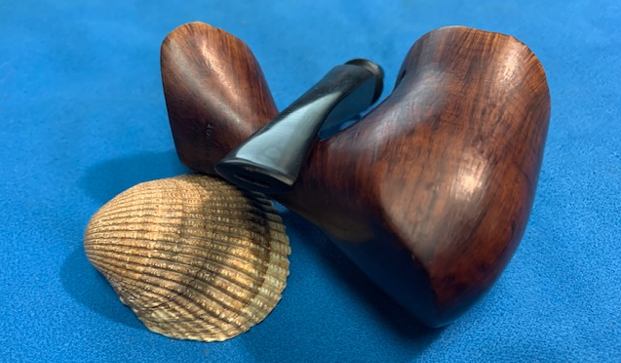
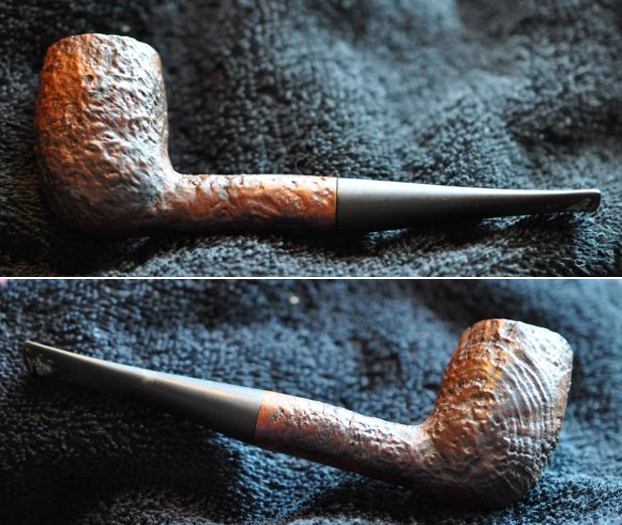
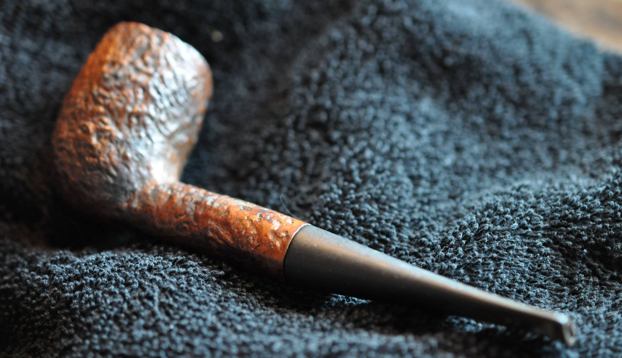
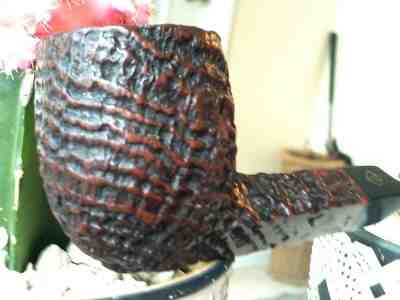
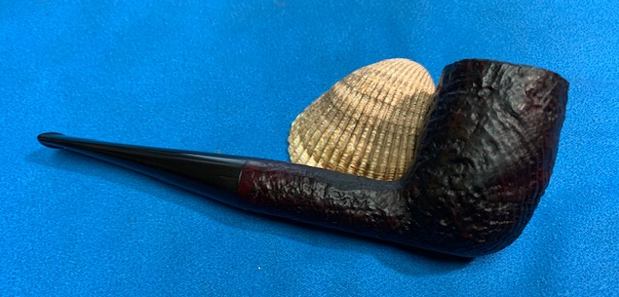
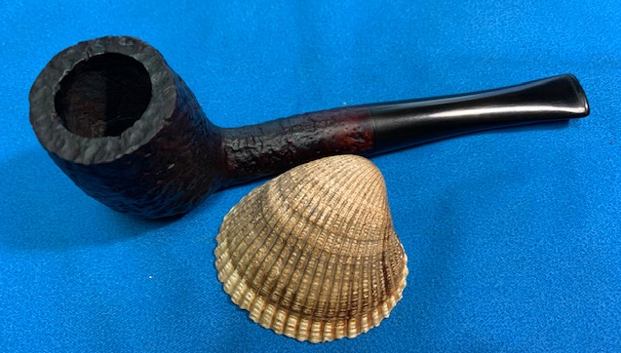
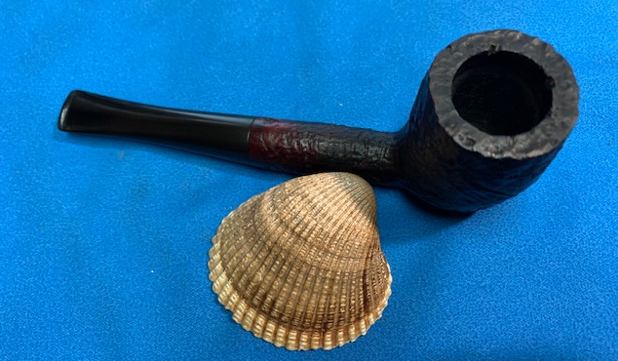
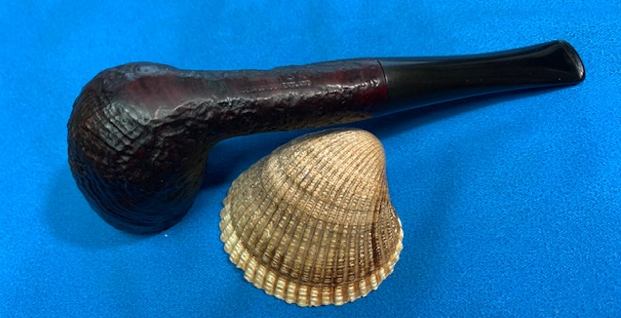
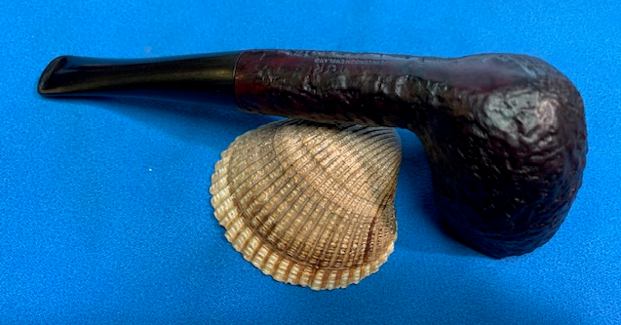
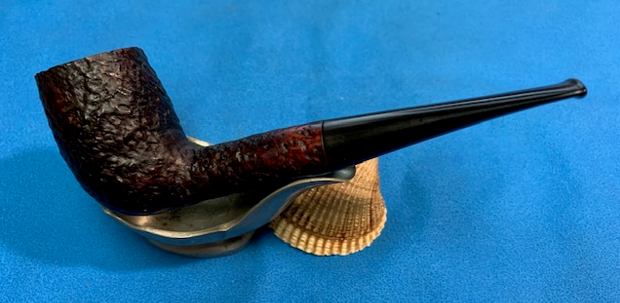
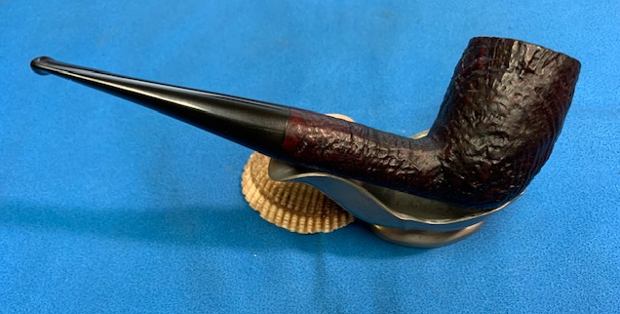
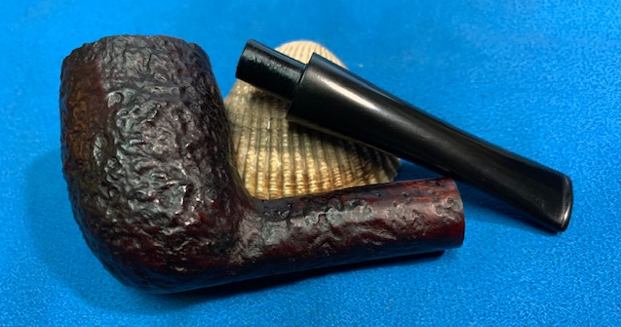
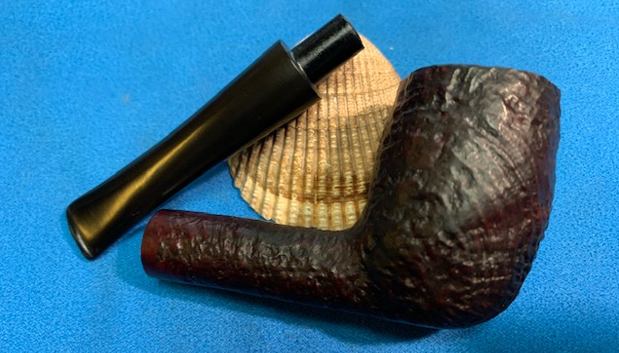
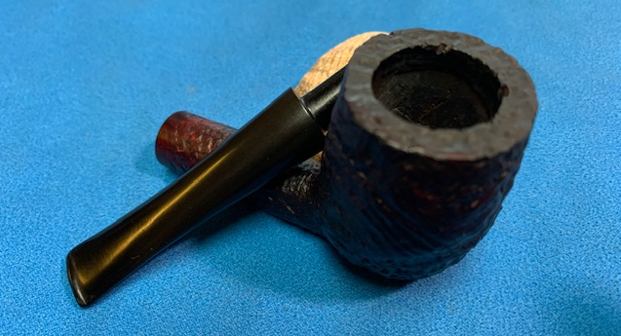
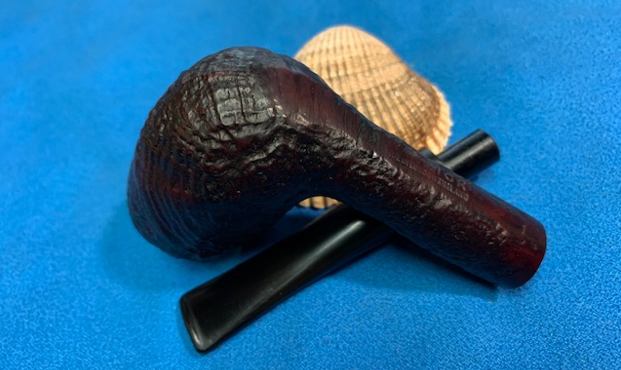
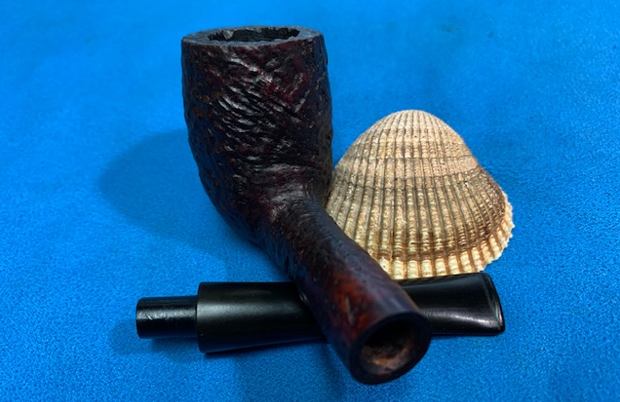
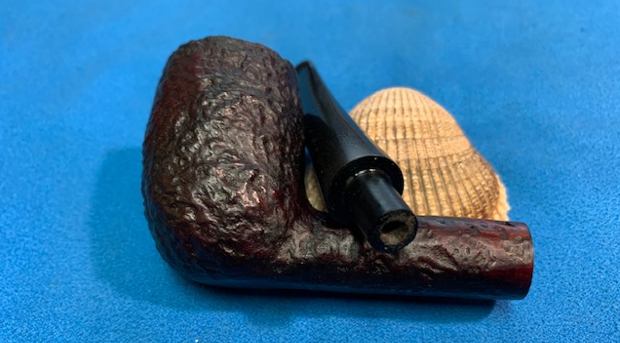
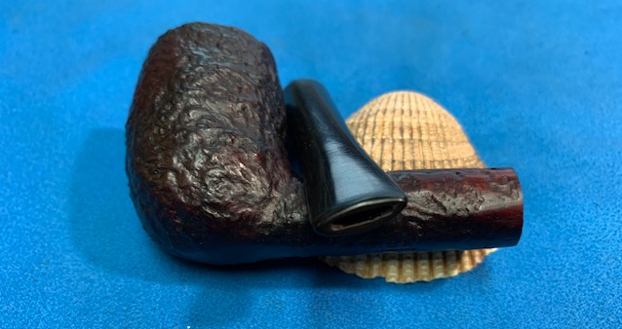
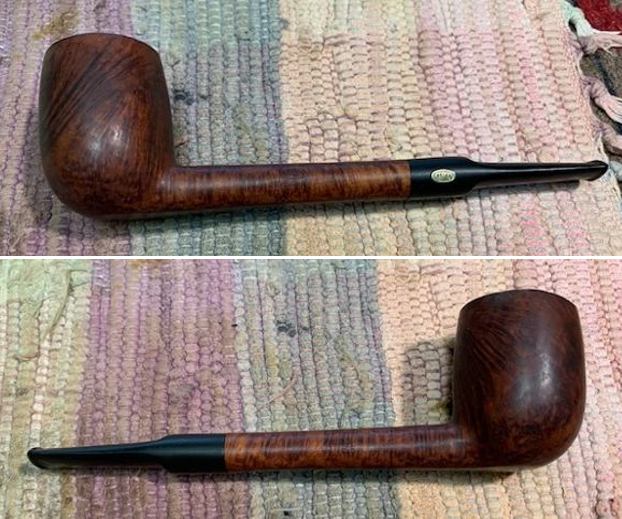
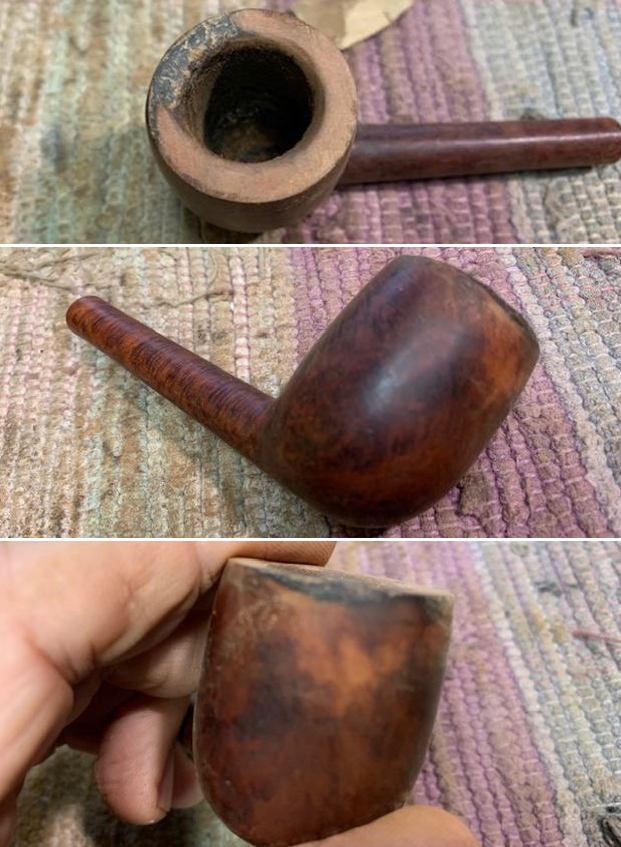
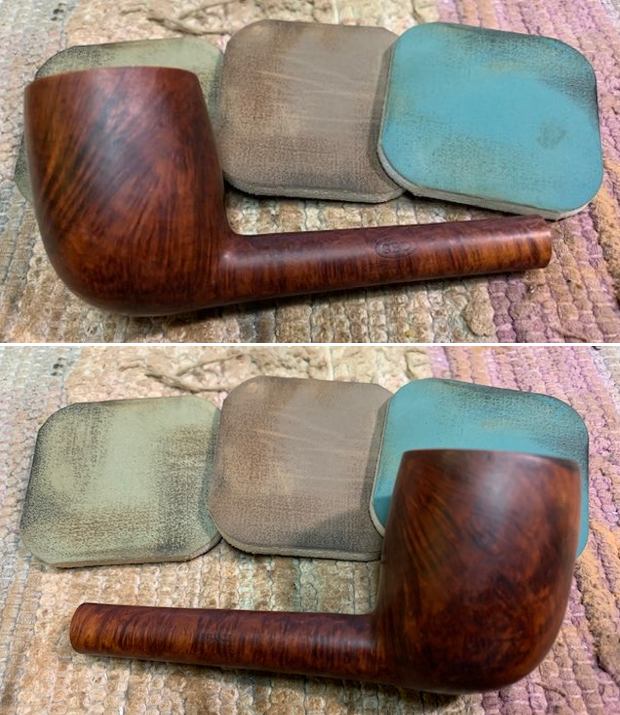
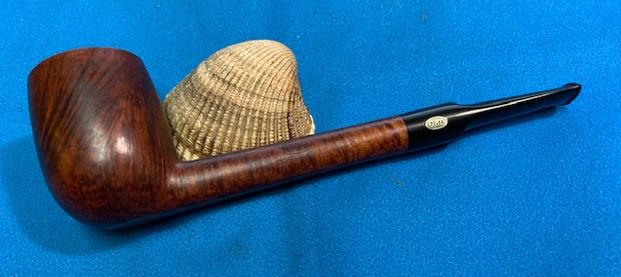
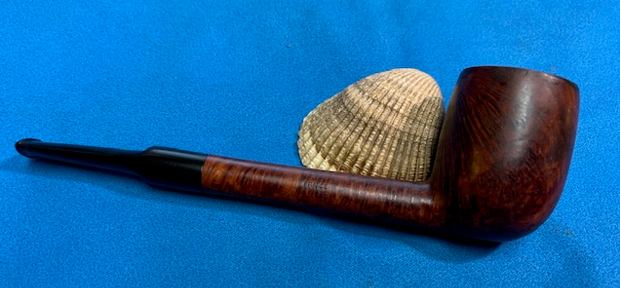
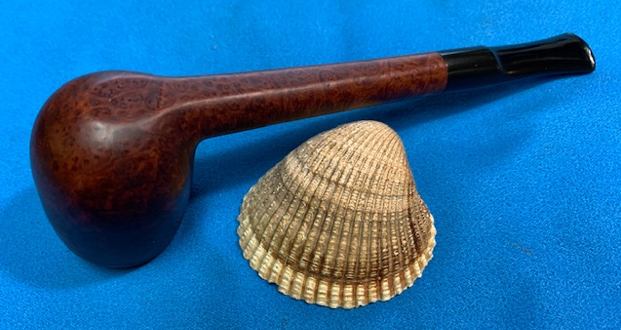
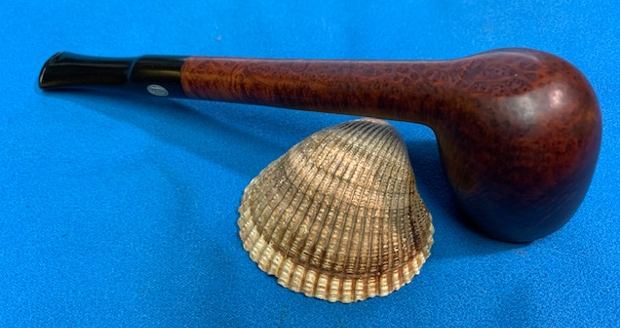
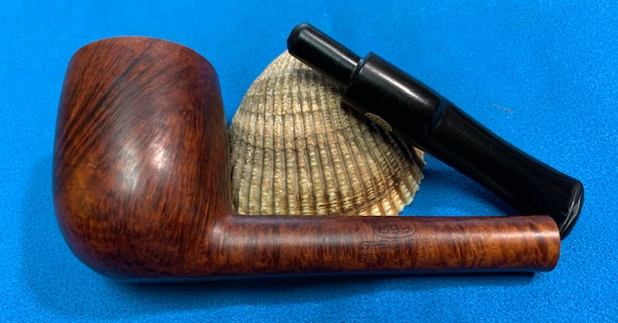
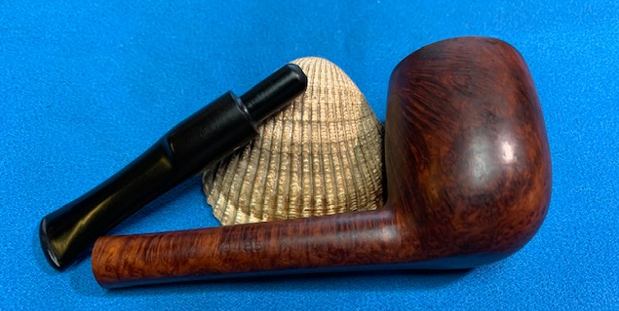
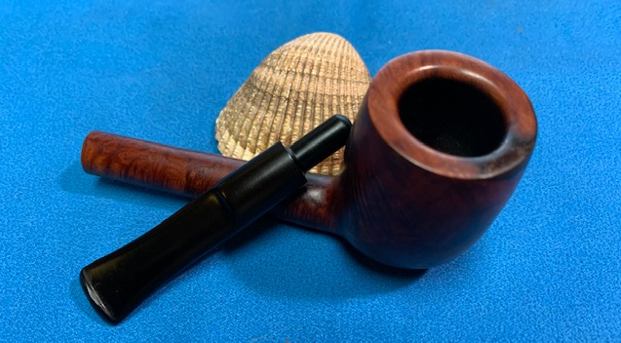
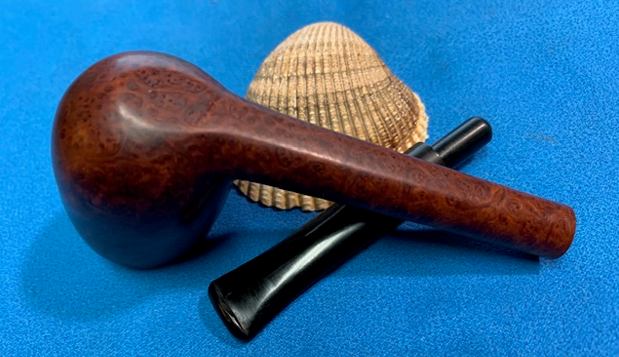
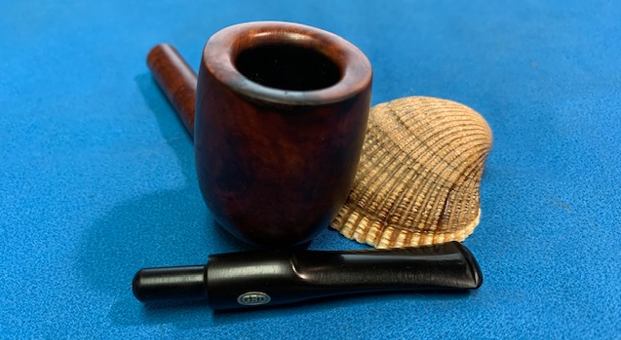
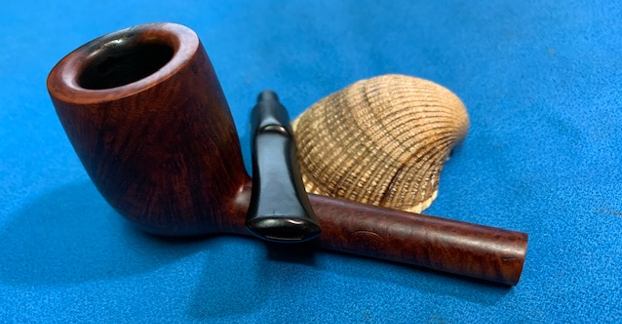
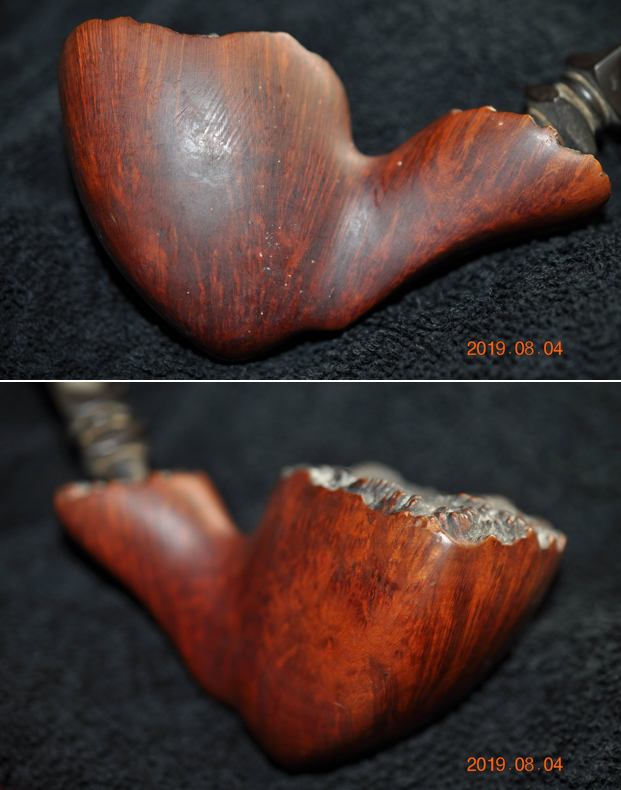
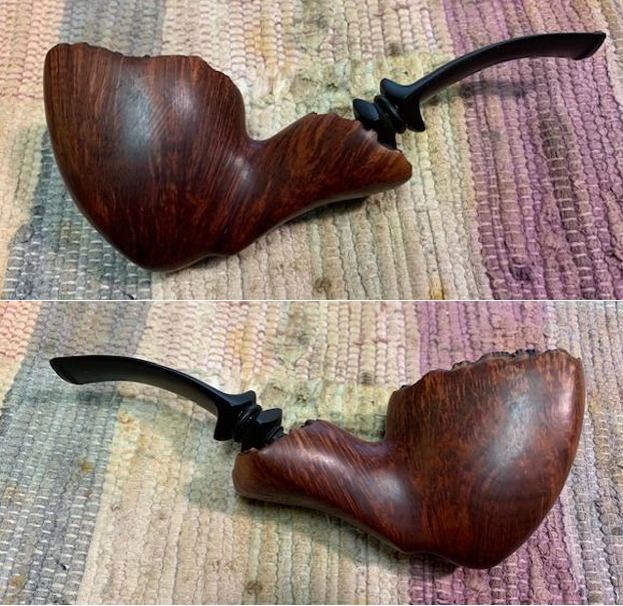
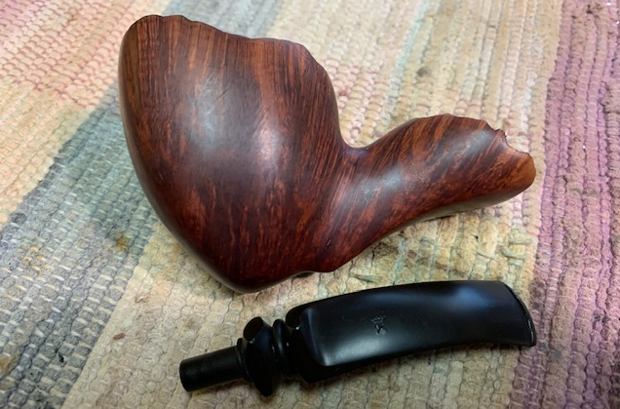
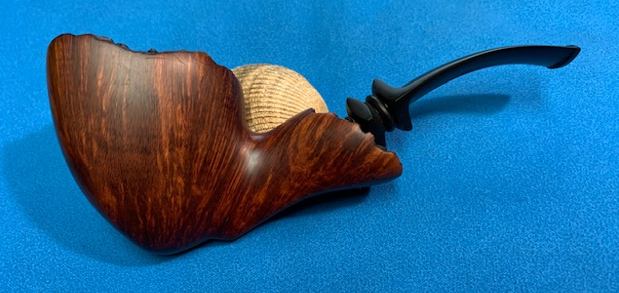
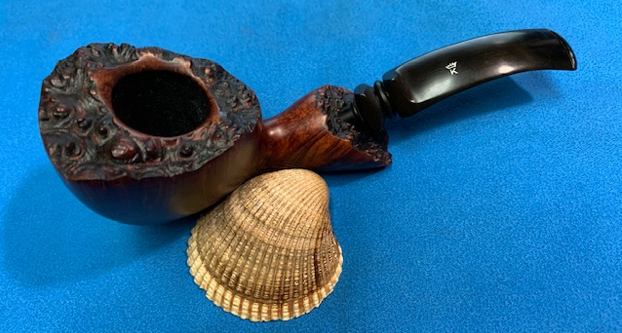
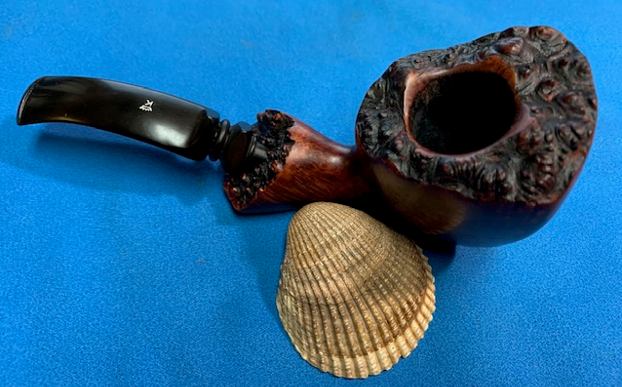
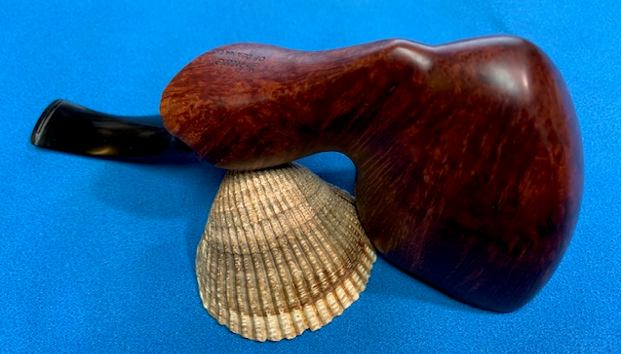
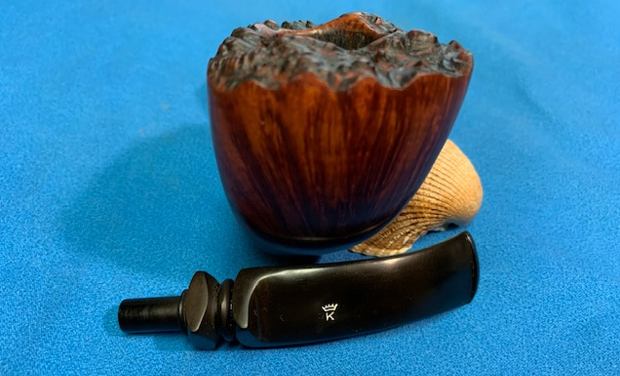
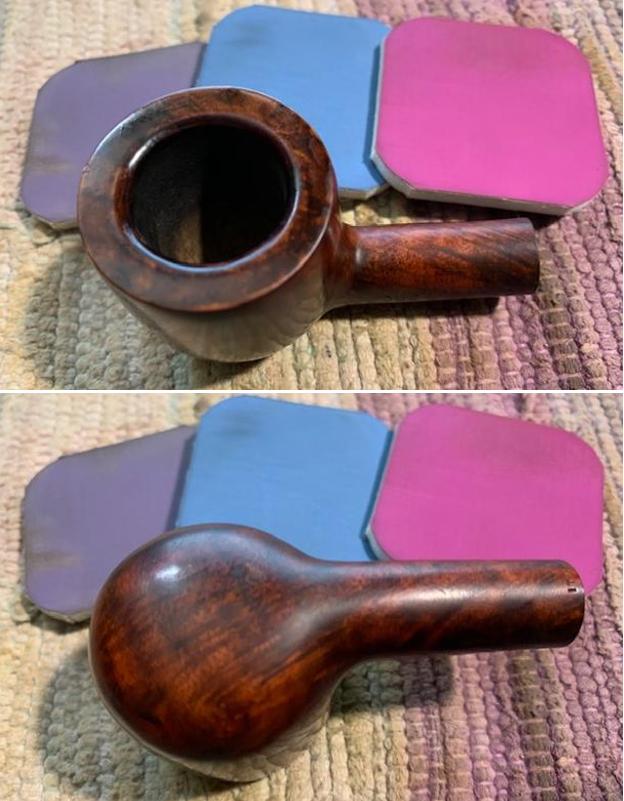
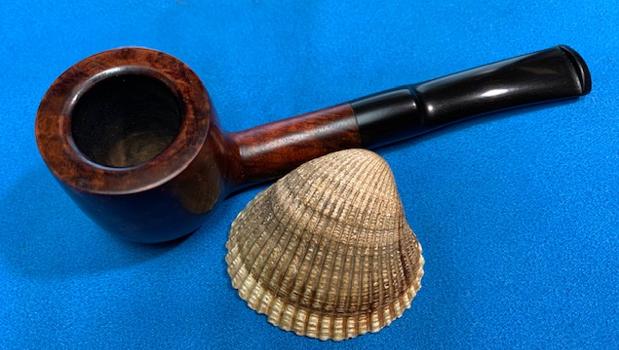
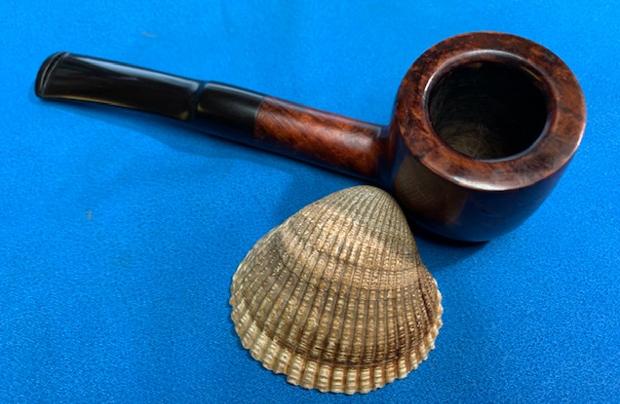
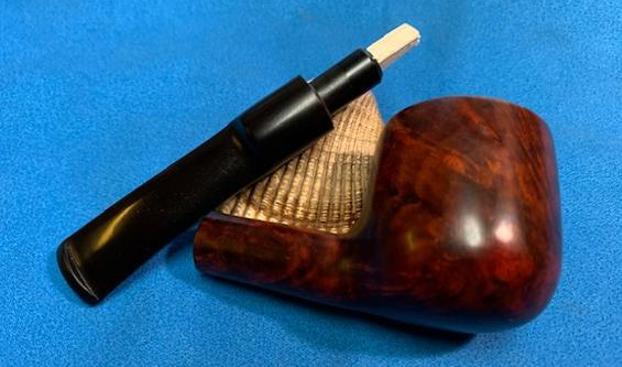
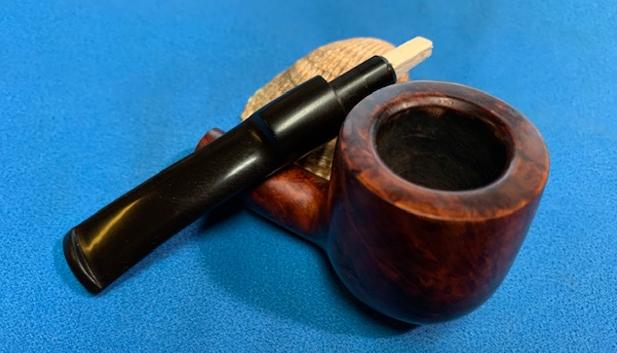
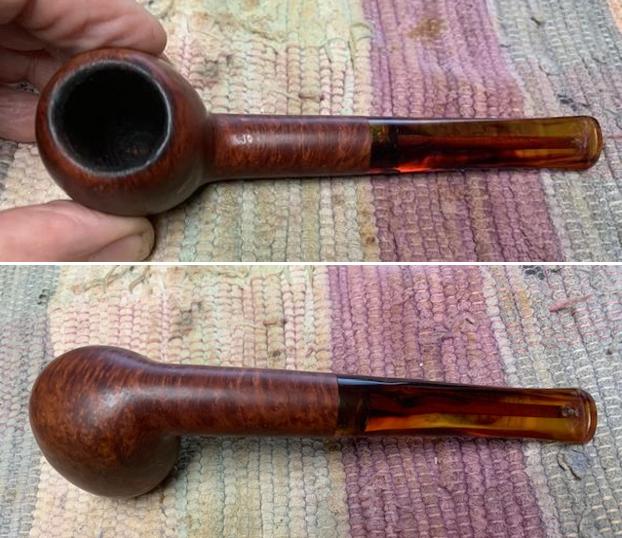
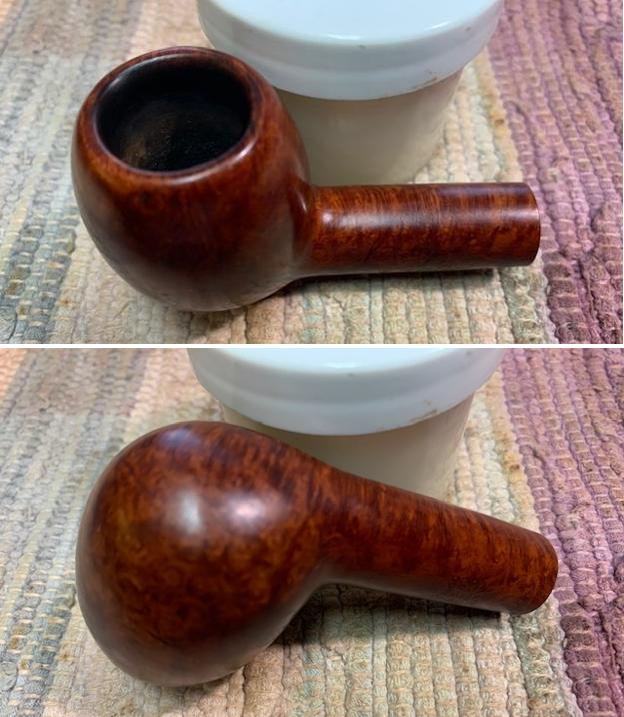
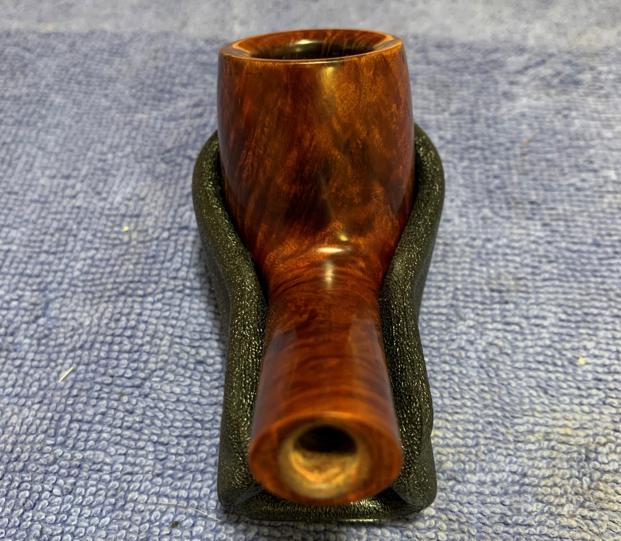
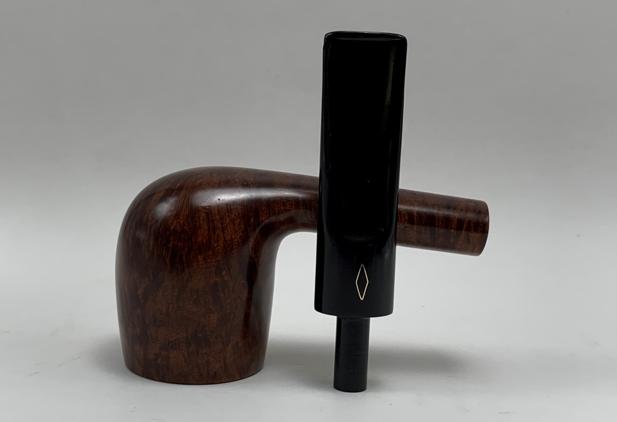
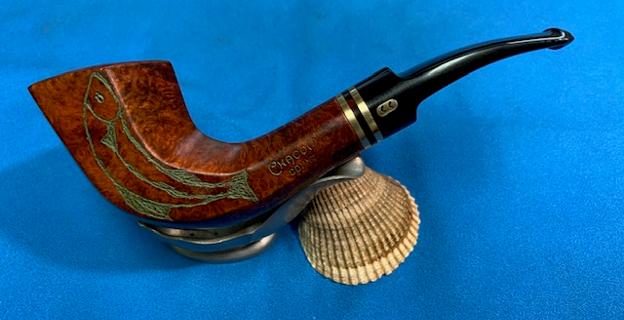
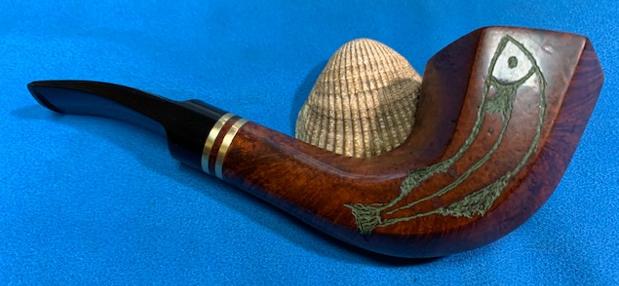
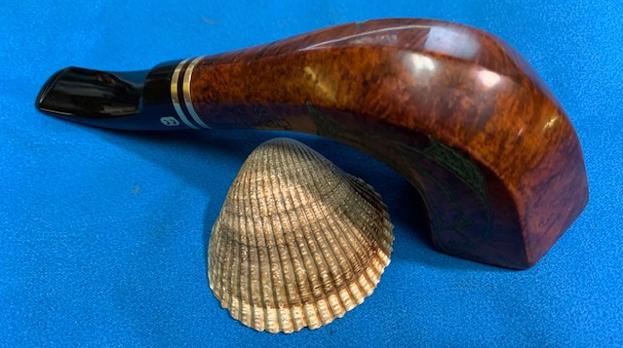
I wrote him back and asked him to send the photos to my email account. He sent three photos of the pipe. I think that the first two are teasers to get my interest before he hits me with the photo of the damage to the bowl. He obviously took photos mid smoke. It is a uniquely shaped pipe and one that he really loves to smoke. 
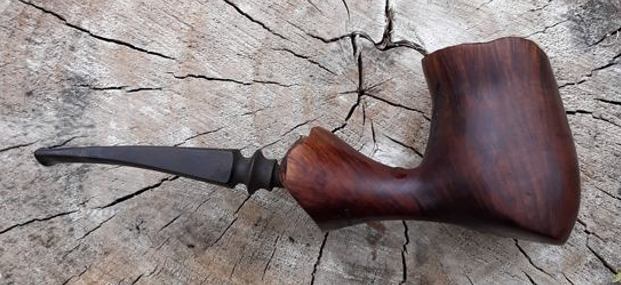
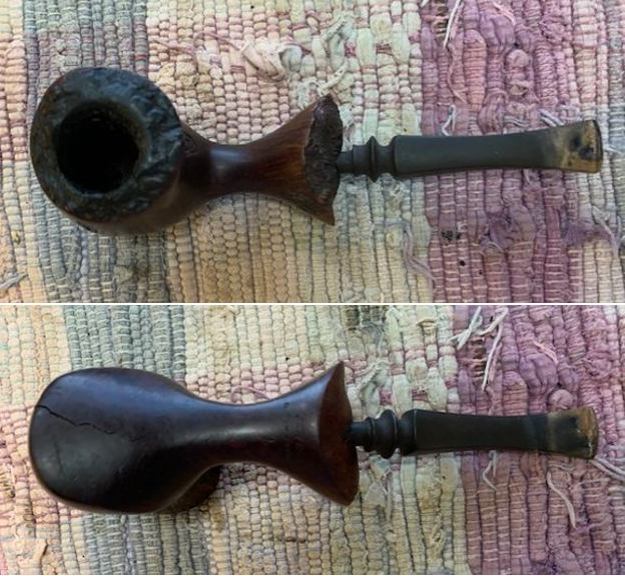
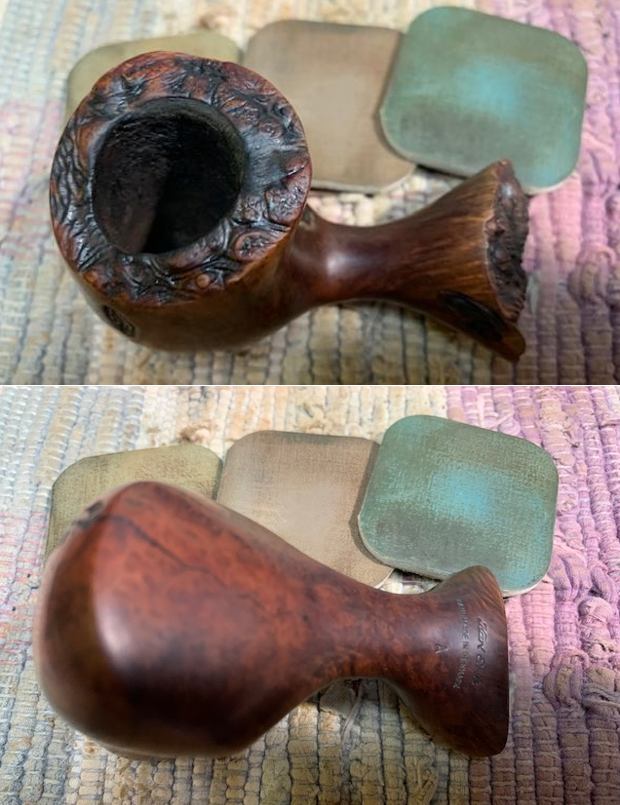
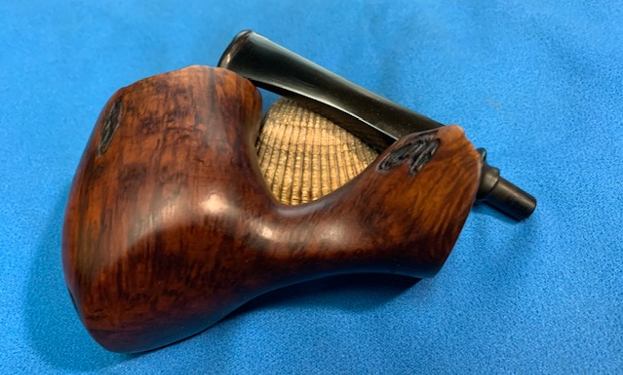
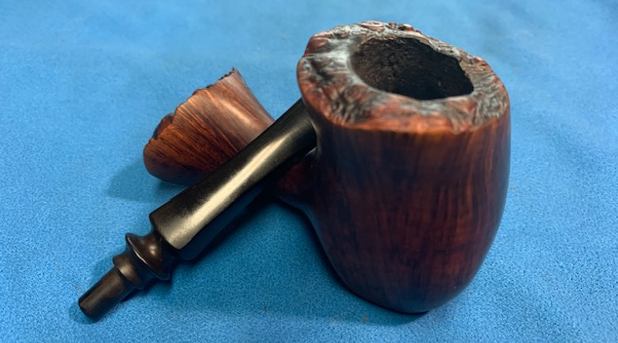
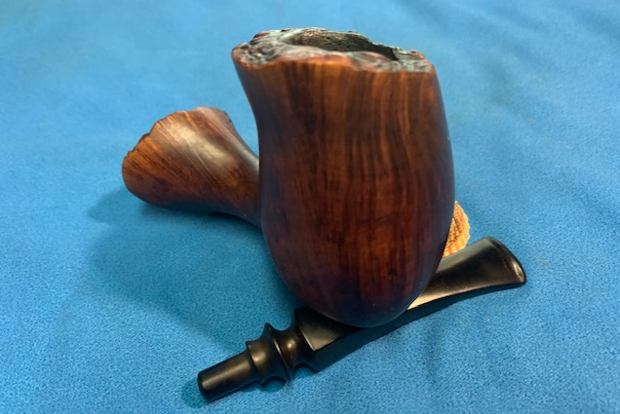
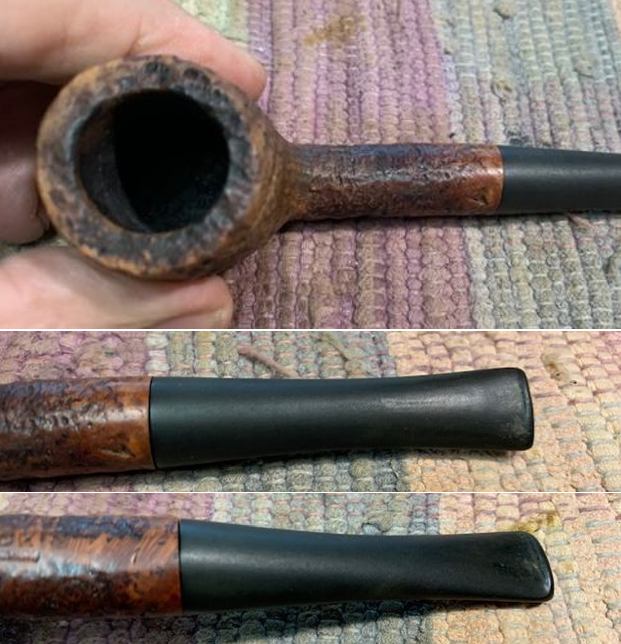
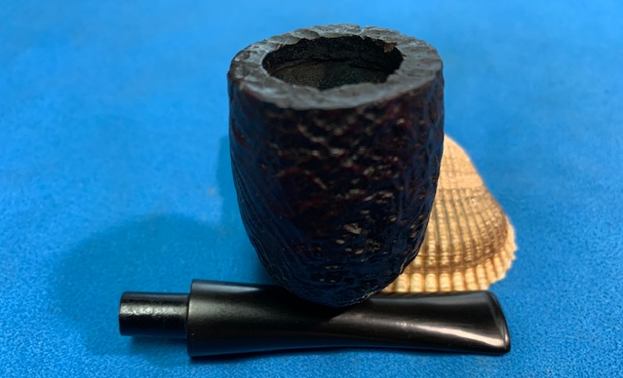
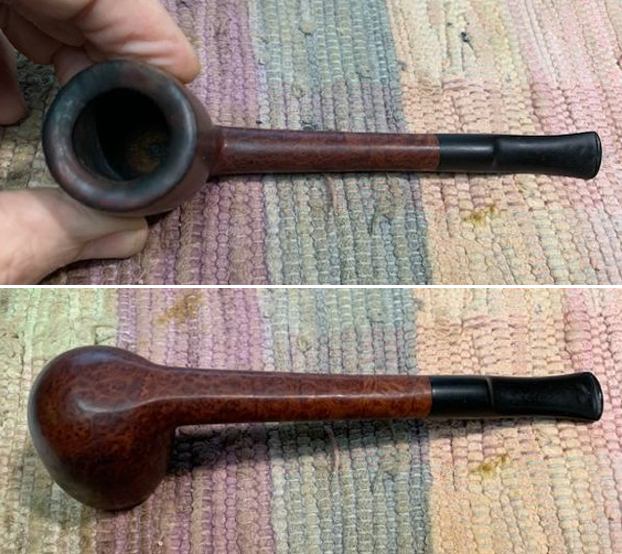
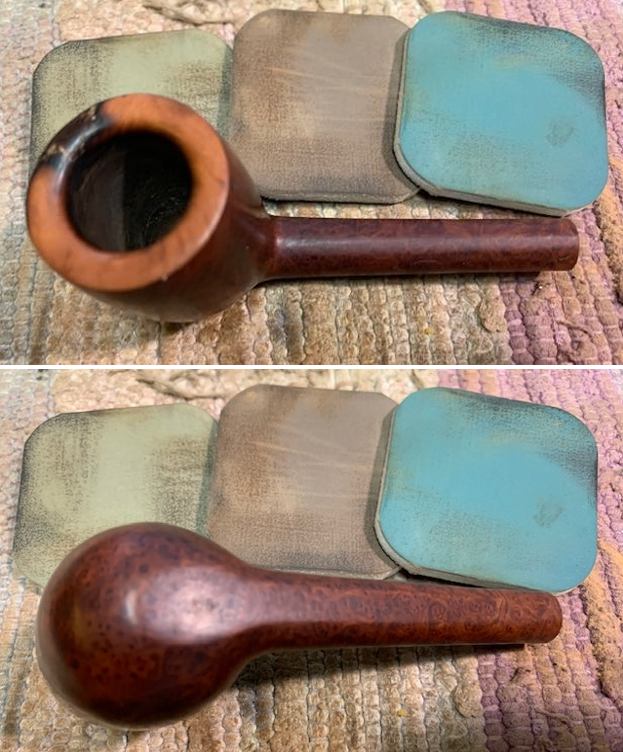
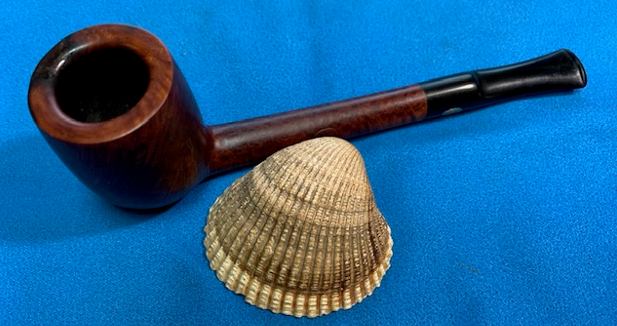
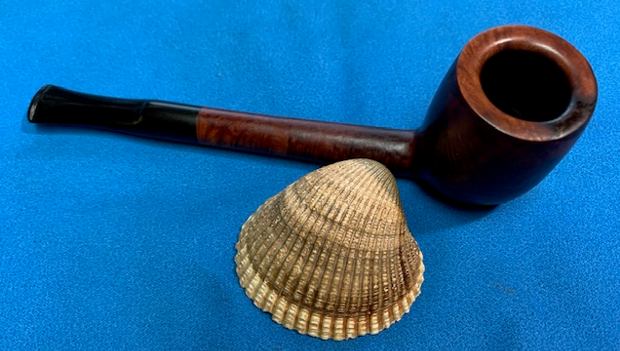
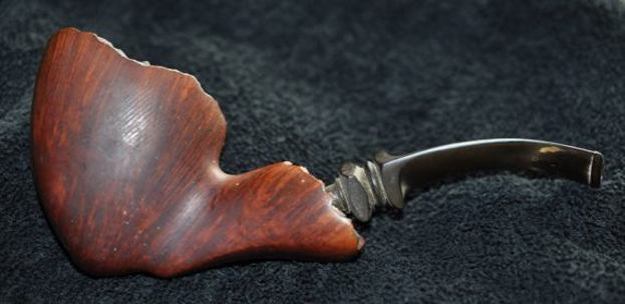
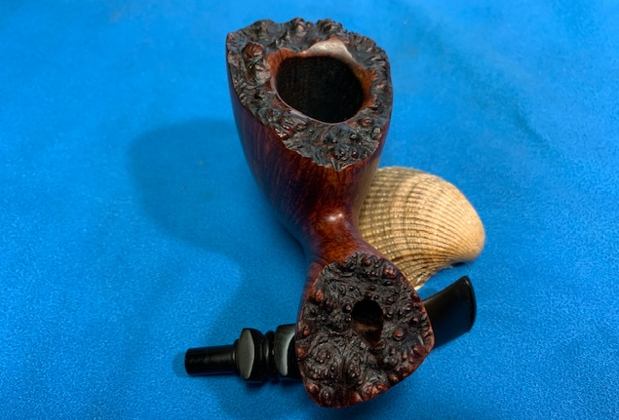
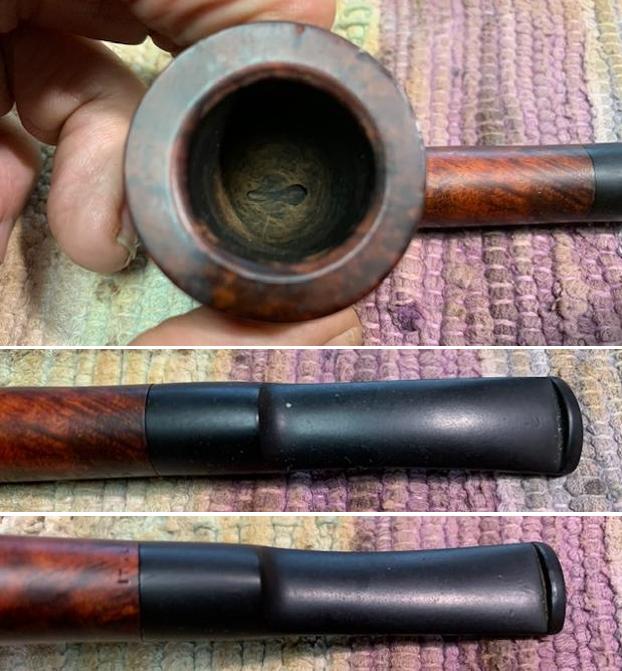
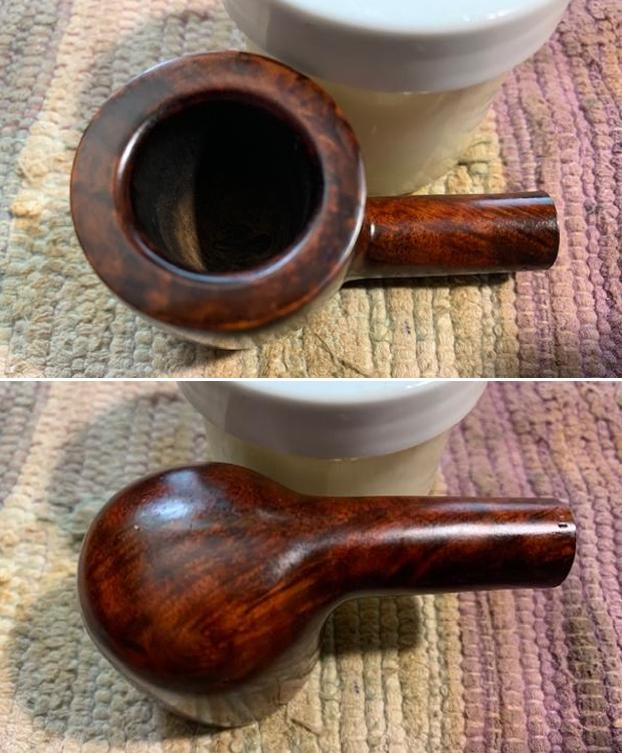
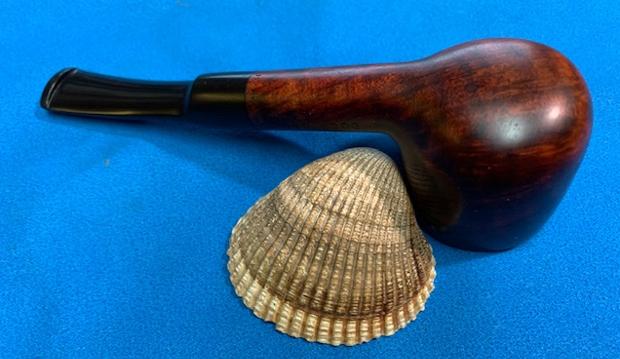
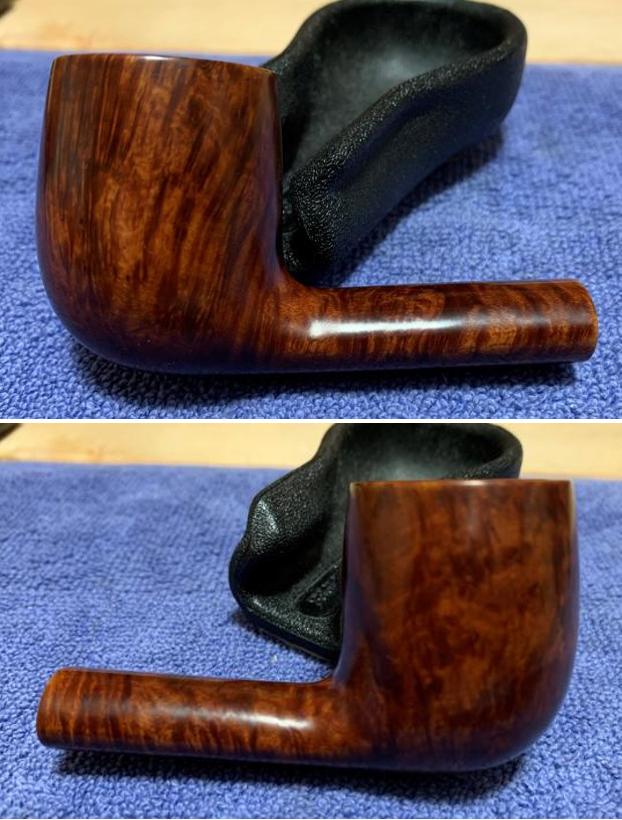
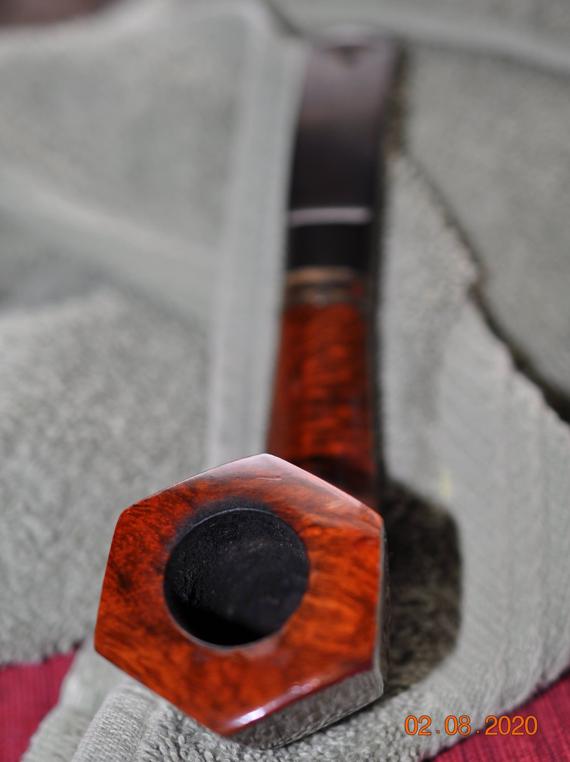
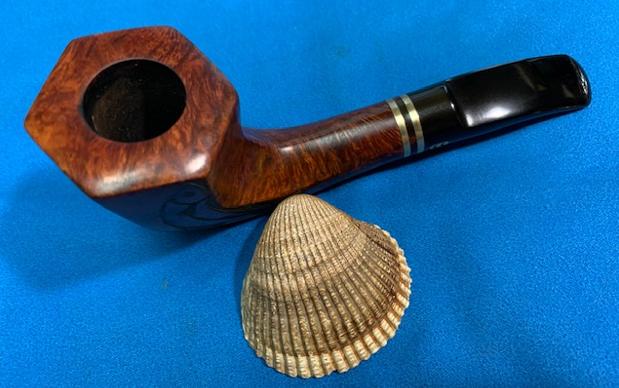
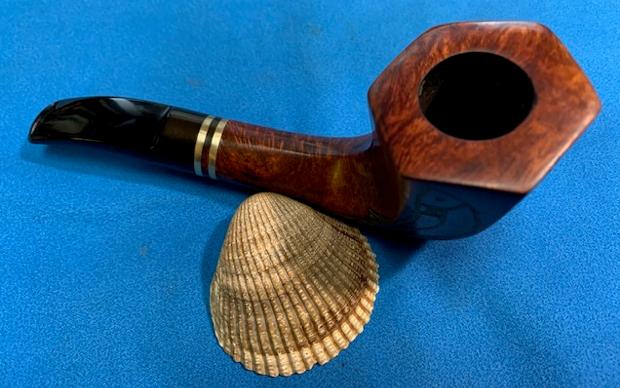
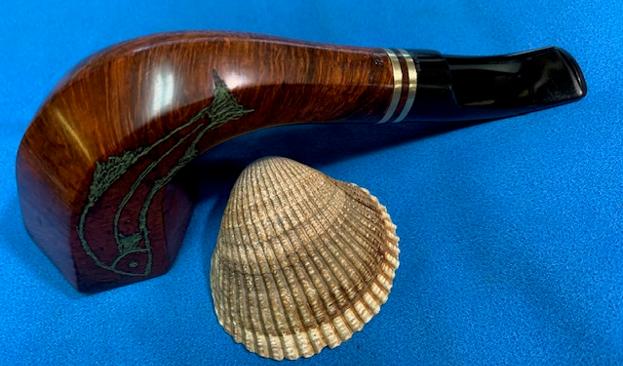
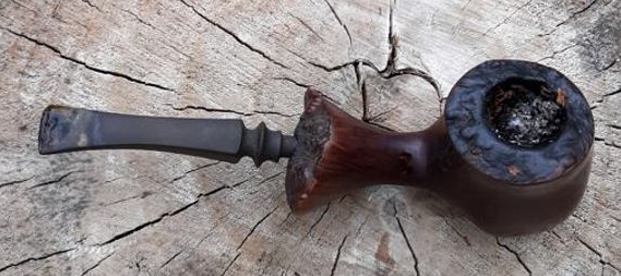
You can see from the photos above what I saw. The pipe was obviously heavily caked and the plateau on the rim top was filled in with lava overflow. The stem was chomped and had deep tooth marks visible on the topside. But so far it looked no different than any other pipes that I have worked on. It was a nice looking Karl Erik pipe that had been thoroughly enjoyed for over 20 years. Then came the next picture of the damage in question. Wow!
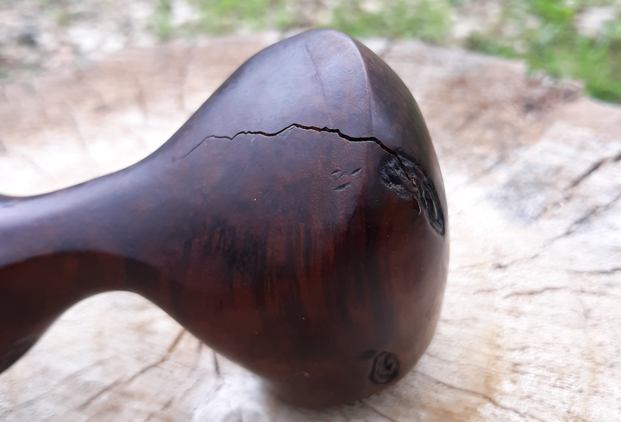
He also added that there was more damage. I have included our further email conversation below.

Steve, the crack does extend up the front of the pipe into a small design where a short second crack is present…wow…

…there is also a very small crack extending below the stem hole…but it has been there for quite a while now and doesn’t seem to be growing larger.

Thanx, Dewey

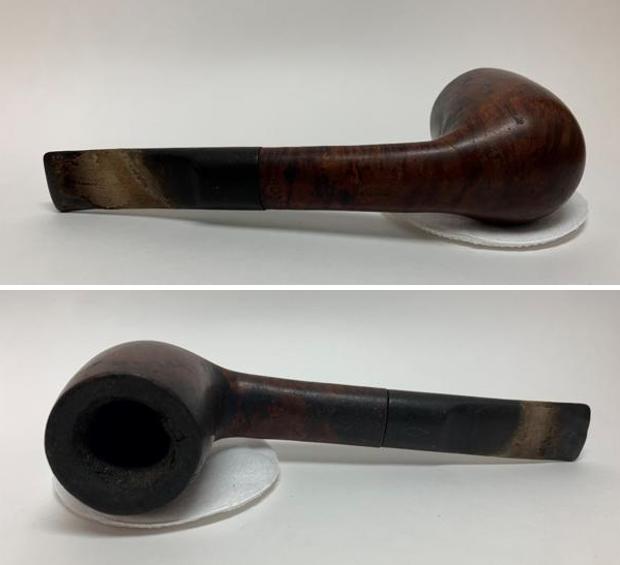
So now I knew what we were talking about. A crack in the heel of the bowl and up the front into the carved design with a second smaller crack in the design itself. There was also a small crack on the shank end extending downward from the mortise. I wrote Dewey back about what he could do with the crack in terms of self repair. His response was to ask if I would do the repair. We wrote back and forth for a while and finally I agreed to take on the project. I wanted to make sure that he understood that the repair would be solid but that it could possibly crack again. He was fine with that and reiterated that he was in no hurry with the pipe. Several weeks went by and the pipe arrived in Vancouver. Here is what I saw. 
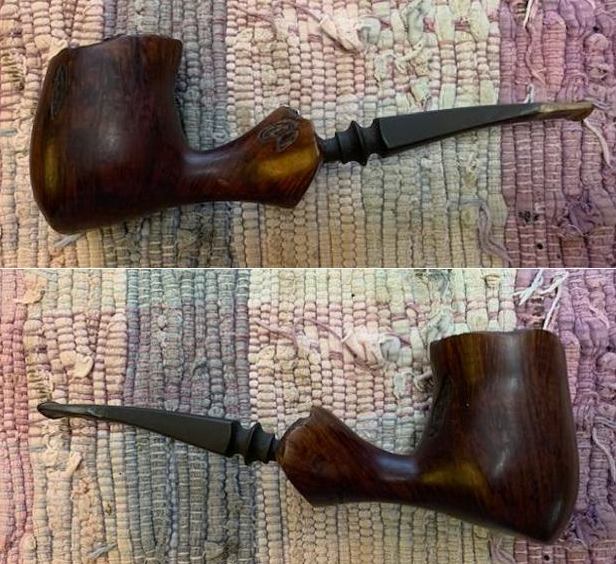
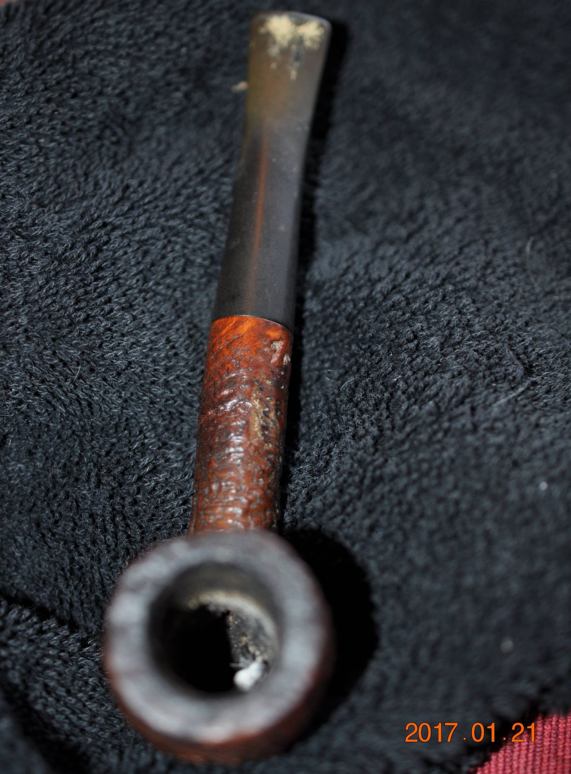
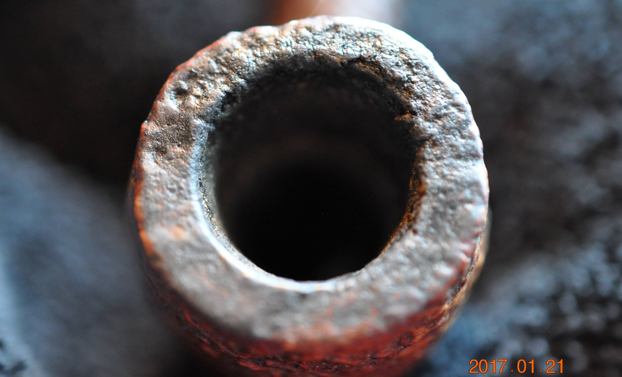
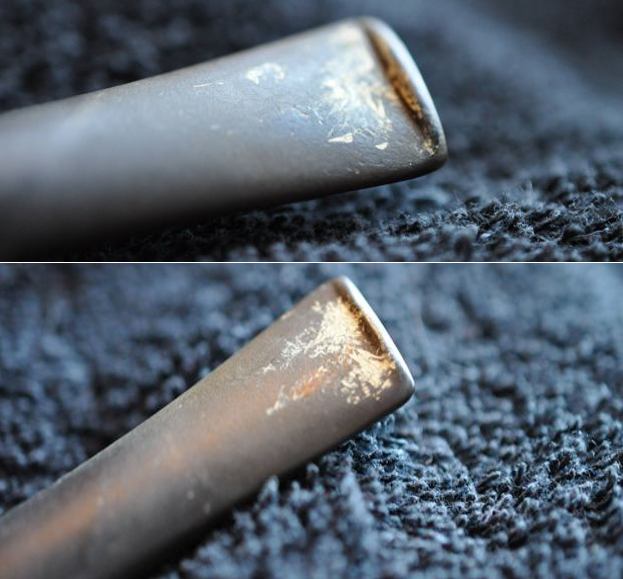
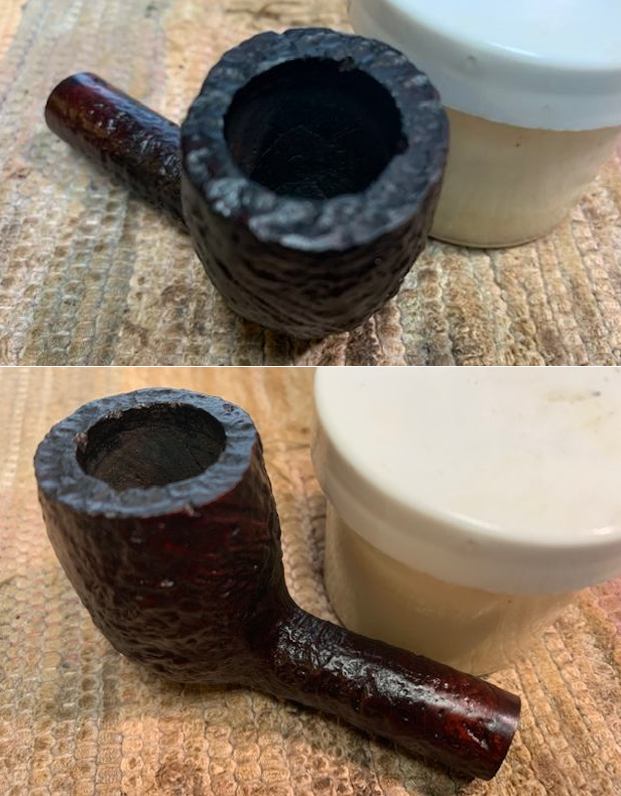
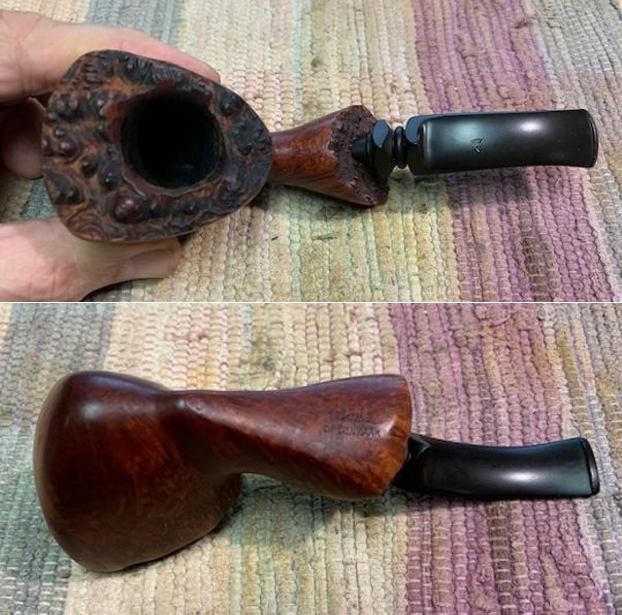
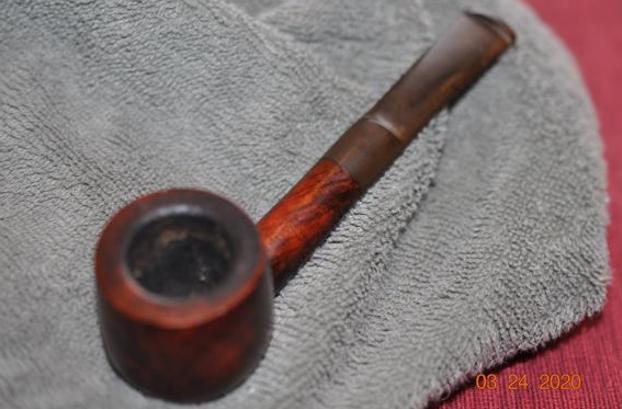
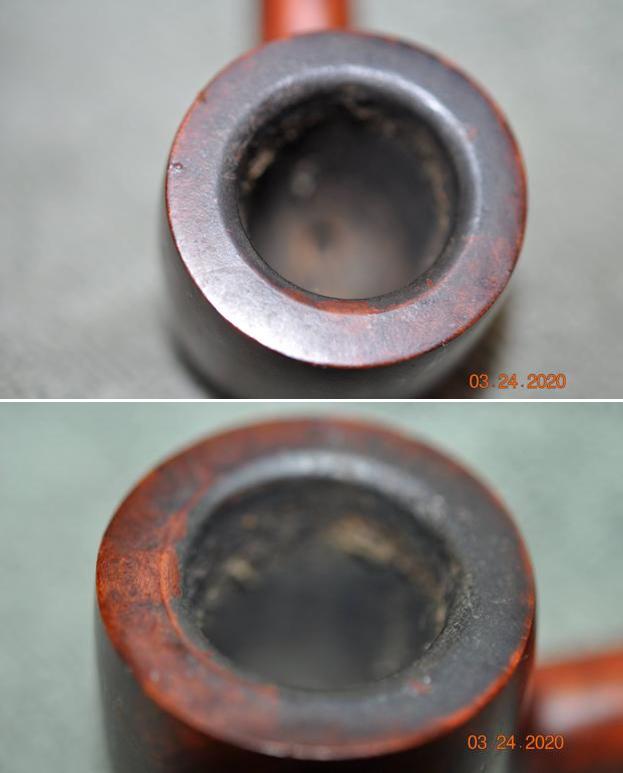
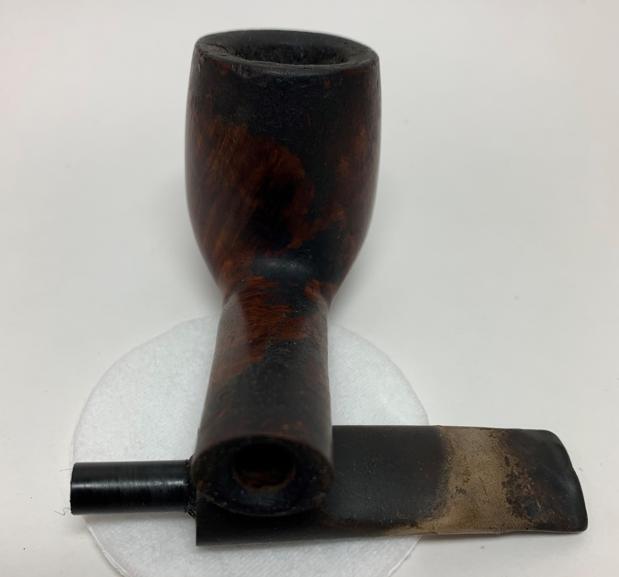
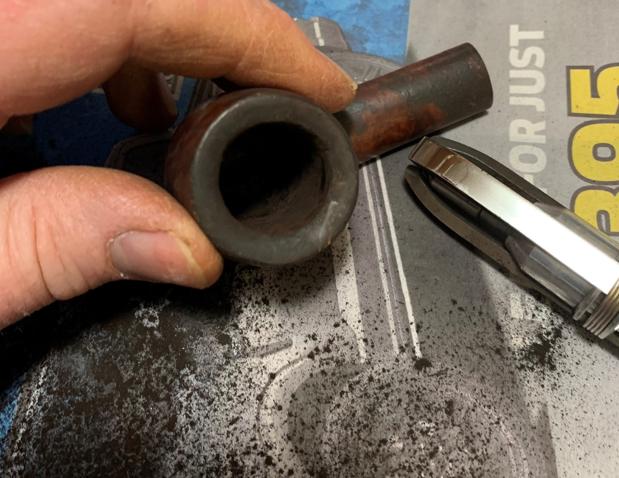
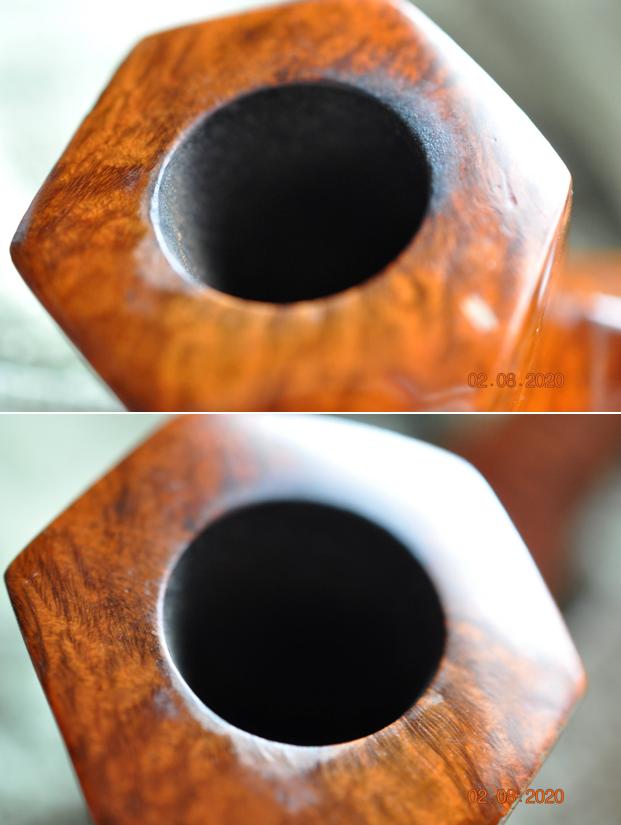
The pipe was far dirtier than I could see from the photos. When the package arrived and my wife brought it in I could smell the sweet, smoky aroma of the pipe through the padded envelope. My wife handed it to me we the short declaration “IT STINKS”. I had to admit that it did. The bowl had a lot of oils and grime ground into the surface of the briar that all but hid the grain on the bowl. The plateau rim top was almost smooth with the filled in lava overflow and there was a thick cake in the bowl. The stem was oxidized, calcified and chomped with heavy tooth marks on both sides ahead of the button. When I removed the stem the mortise and airway were reduced from the tars and the airflow through the shank and stem were restricted. The pipe would need a serious ream and clean before I could assess the damage from the crack. I would need to ream it back to bare briar to see if the cracks went into the chamber. It was impossible to see the condition of the chamber.

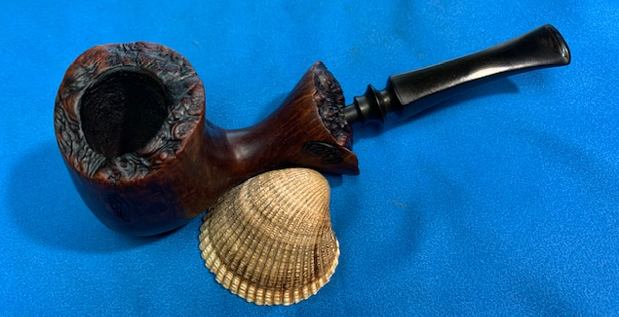
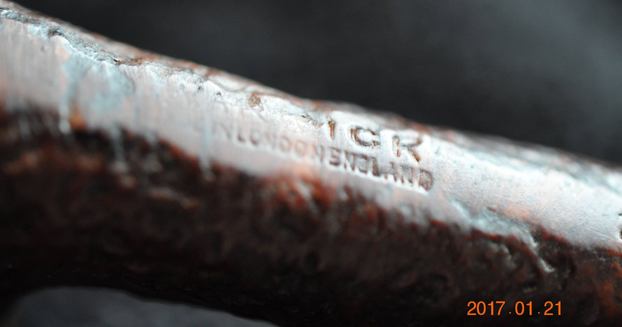
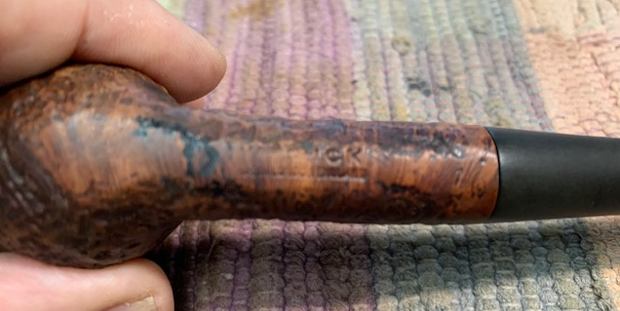
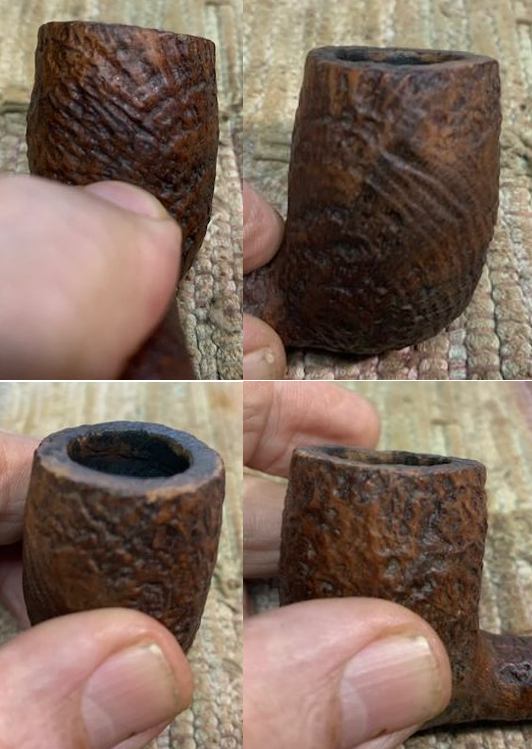
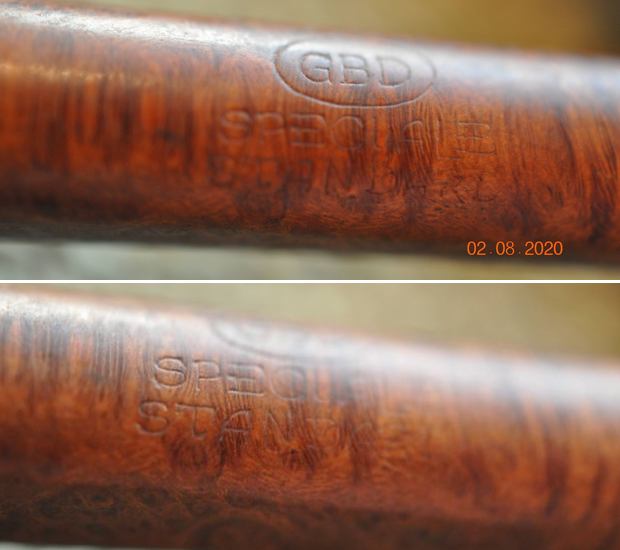
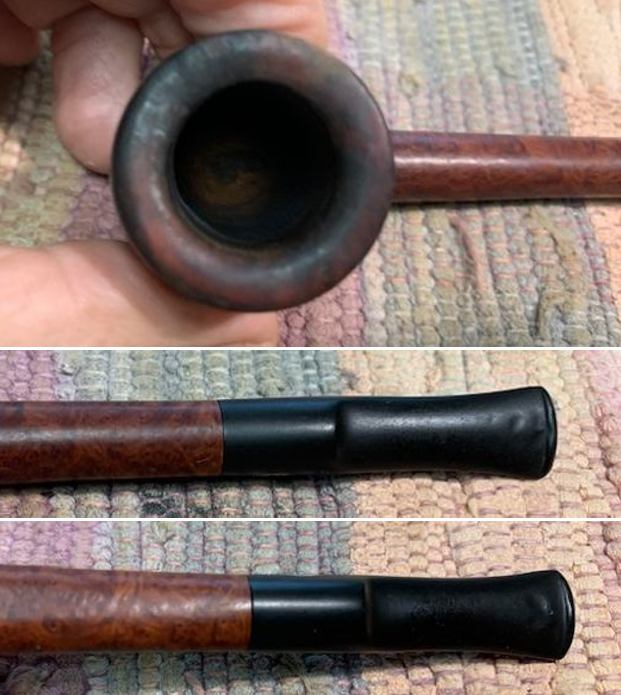
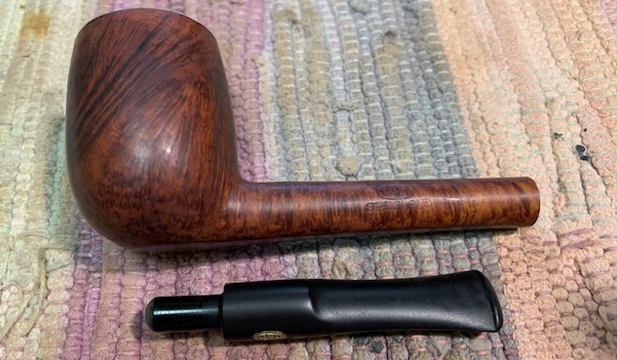
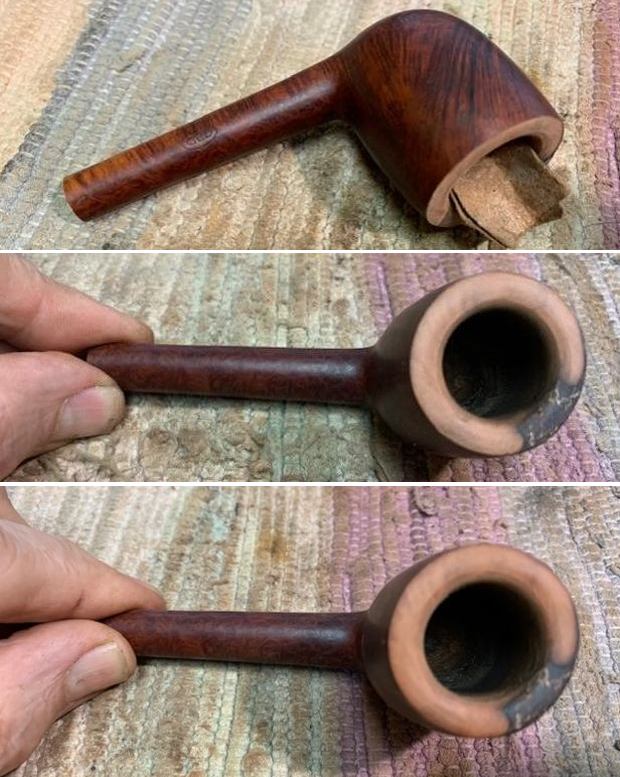
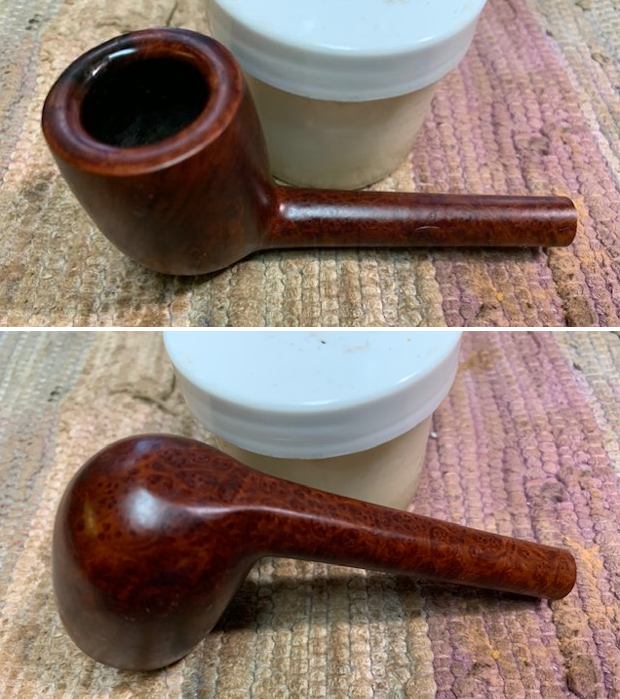
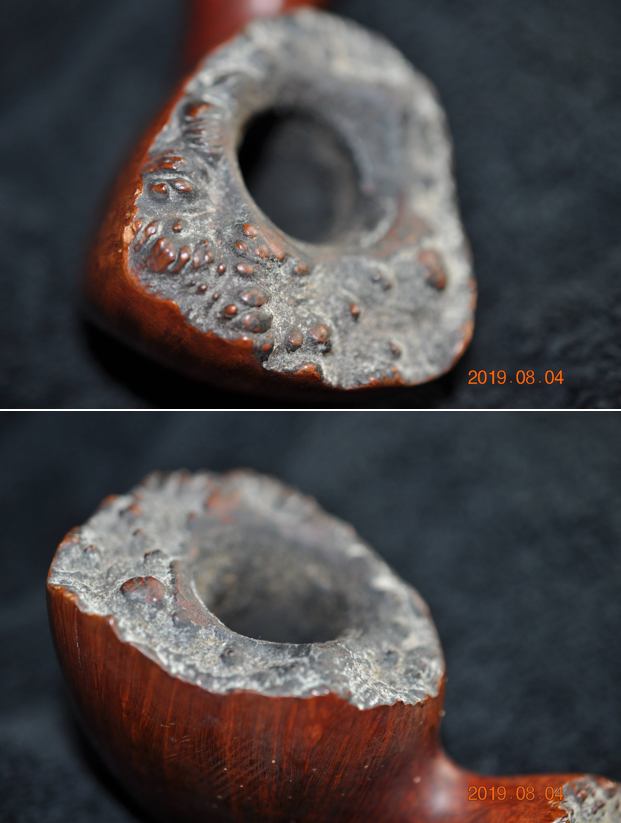
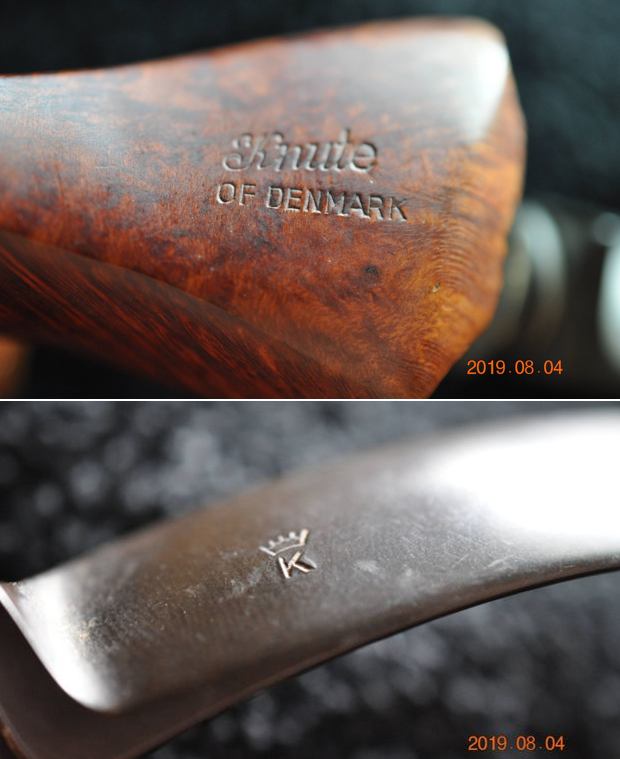
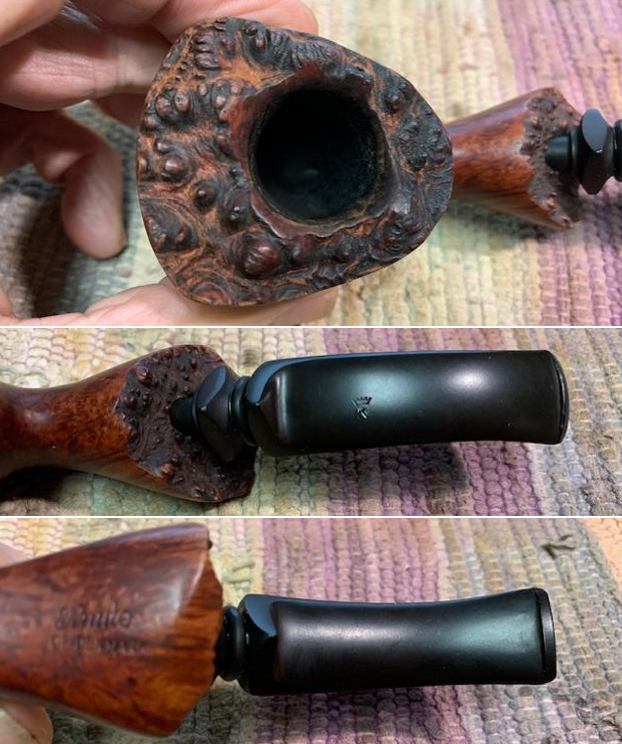
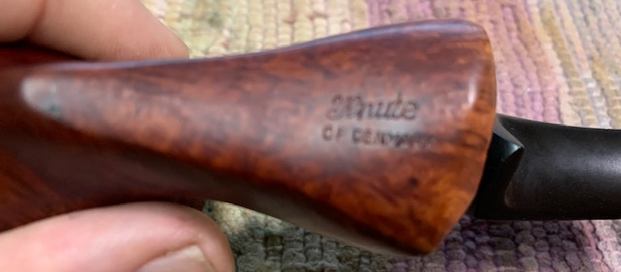
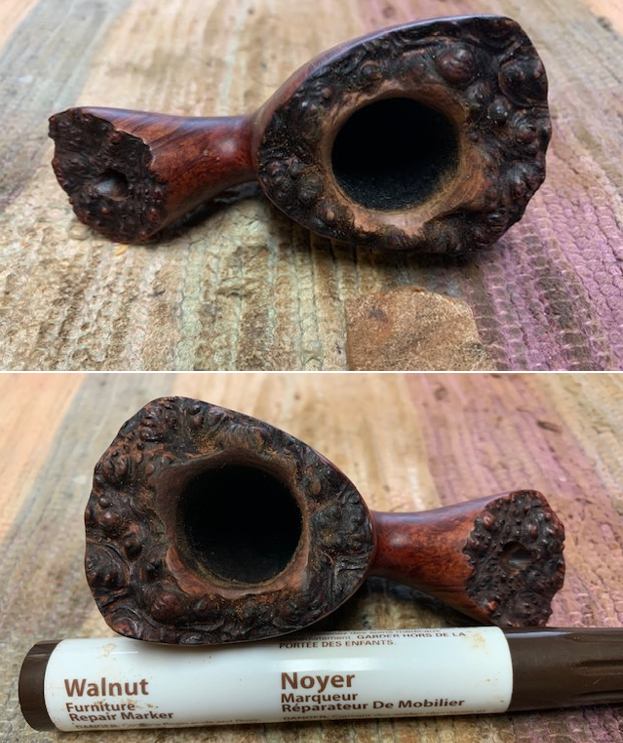
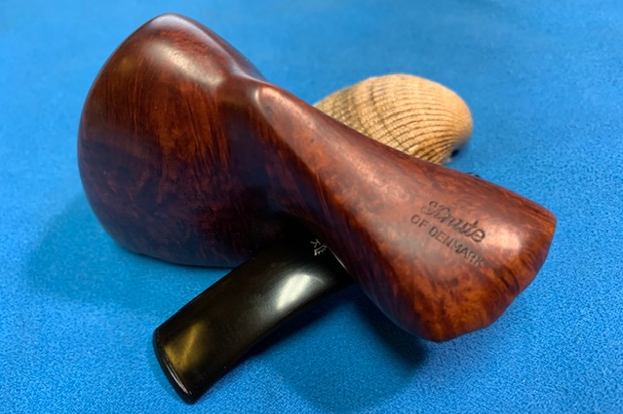
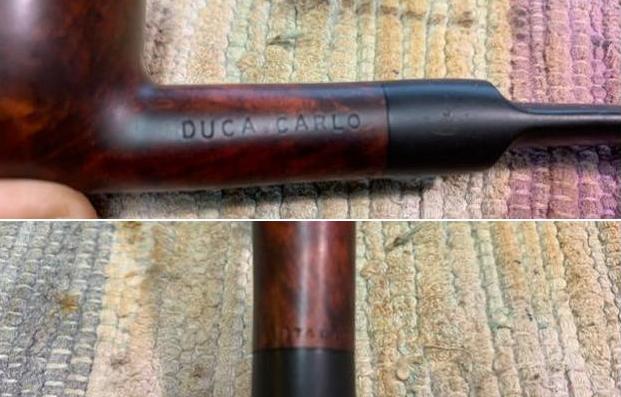
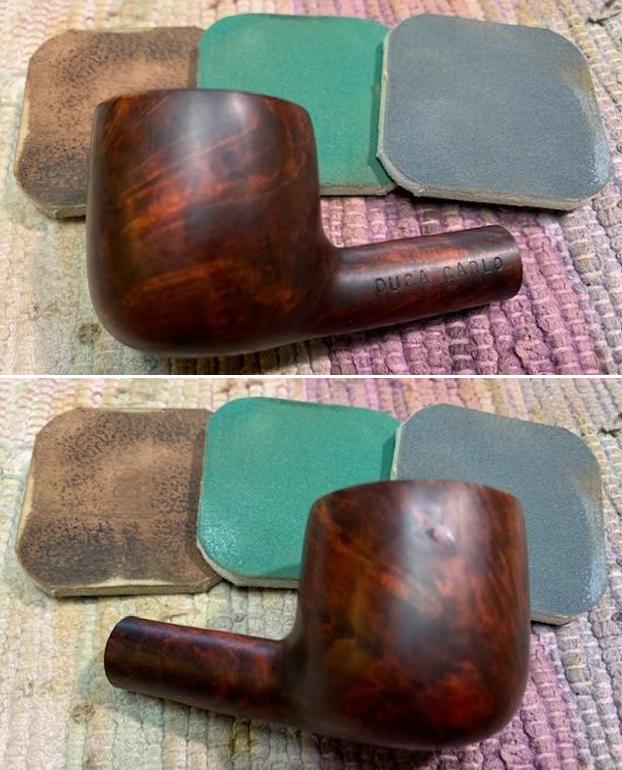
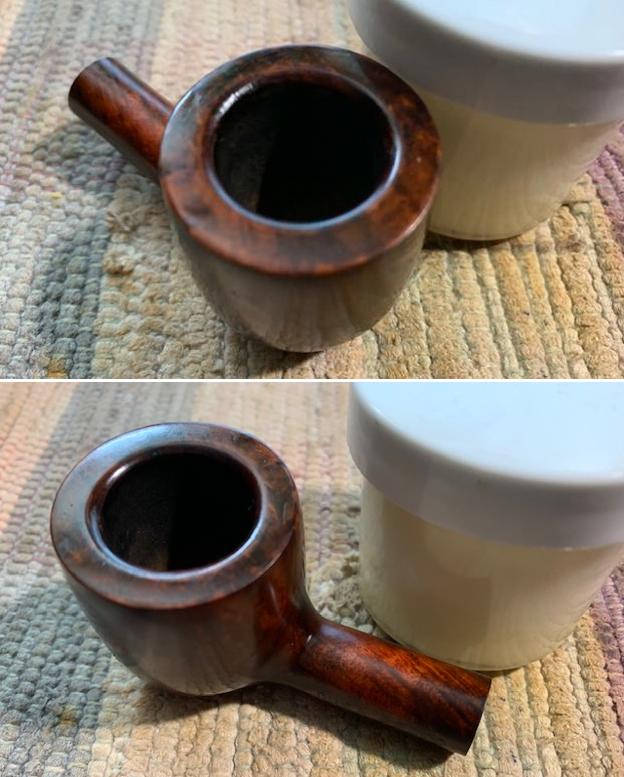
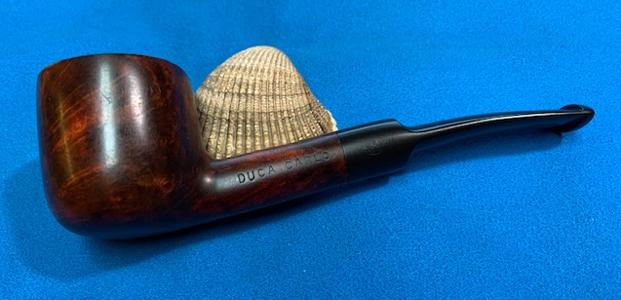
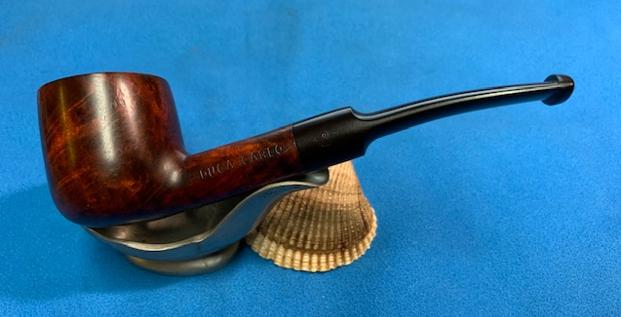
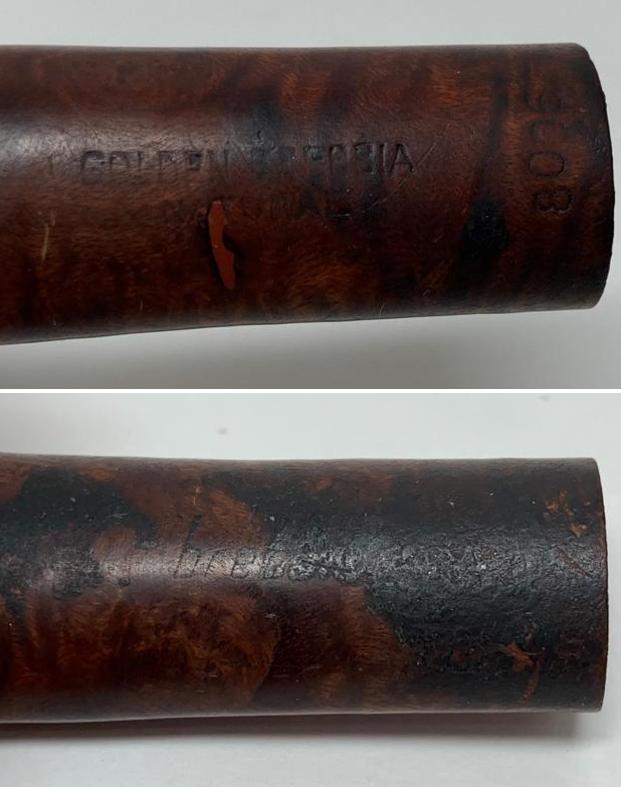
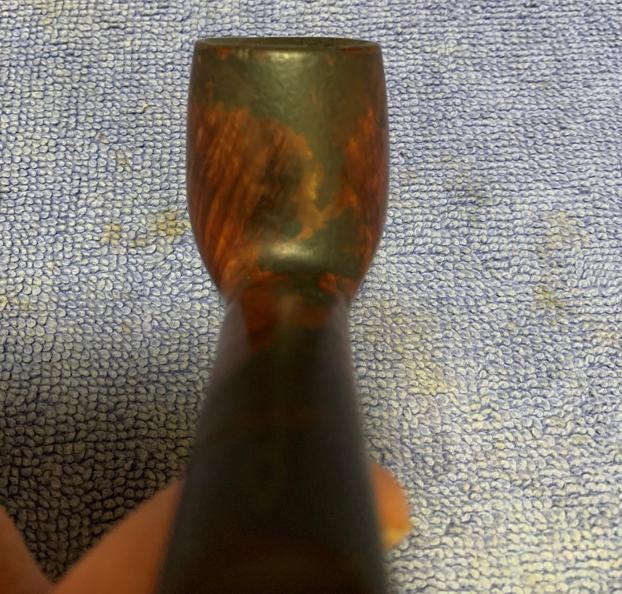
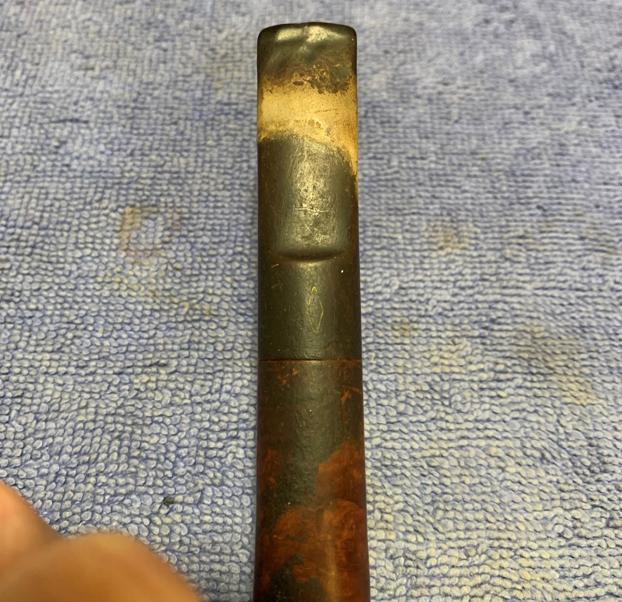
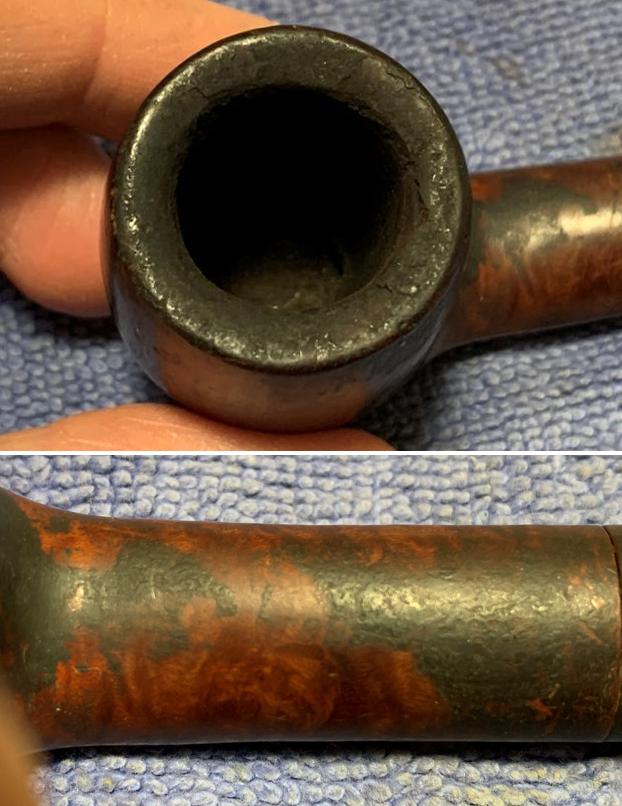
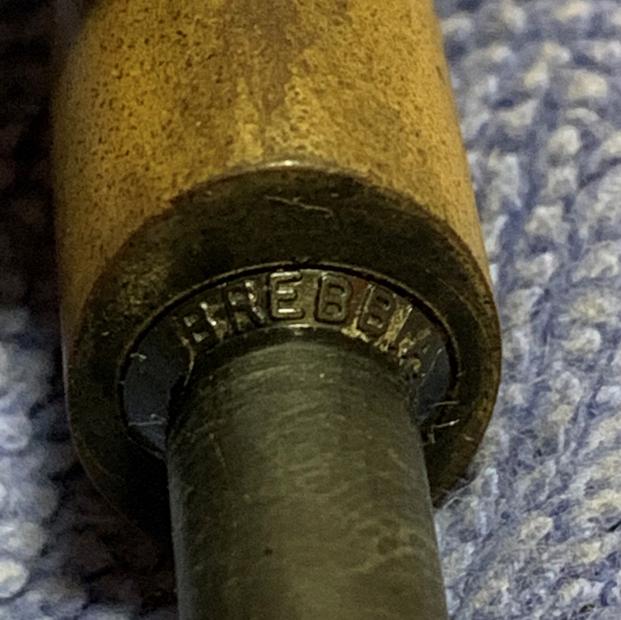
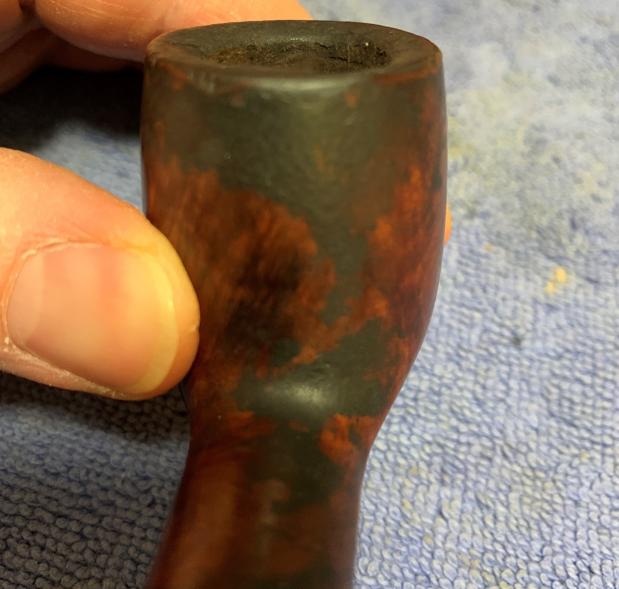
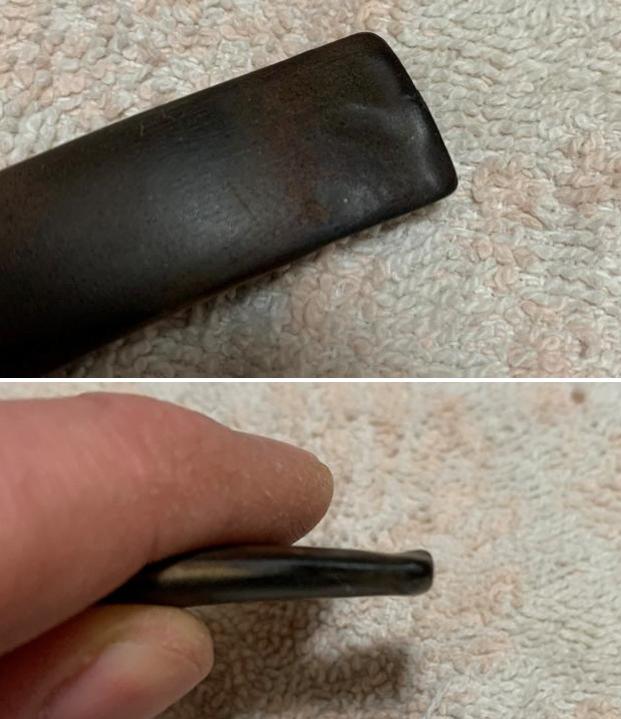
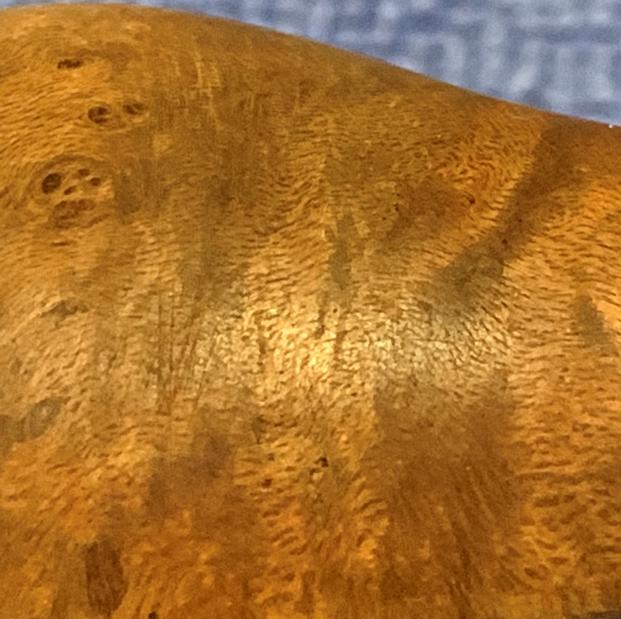
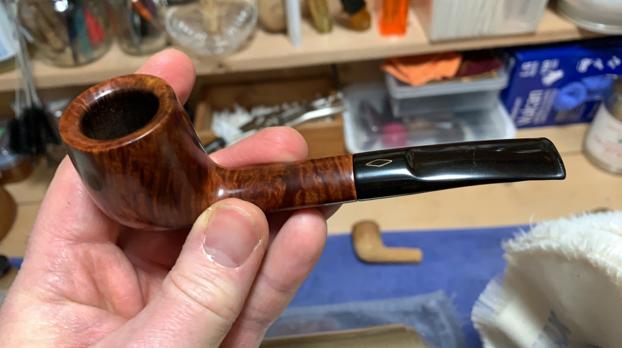
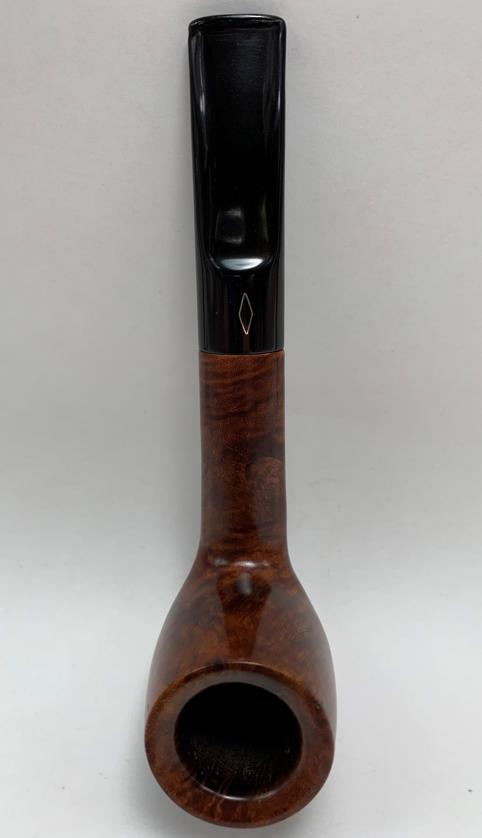
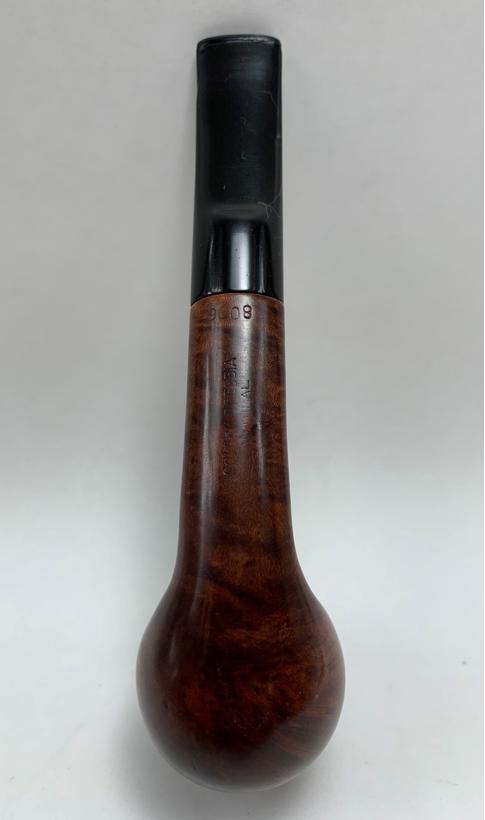
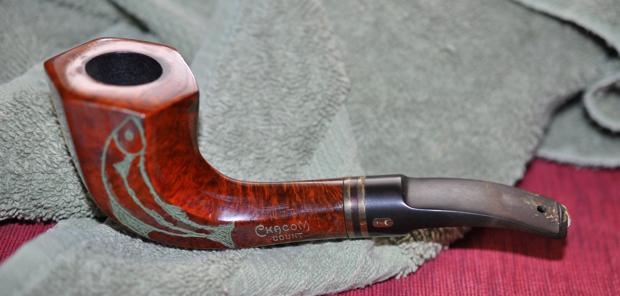
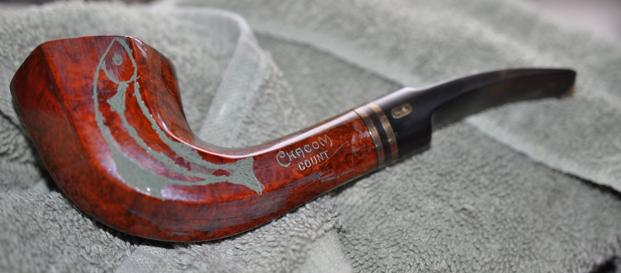
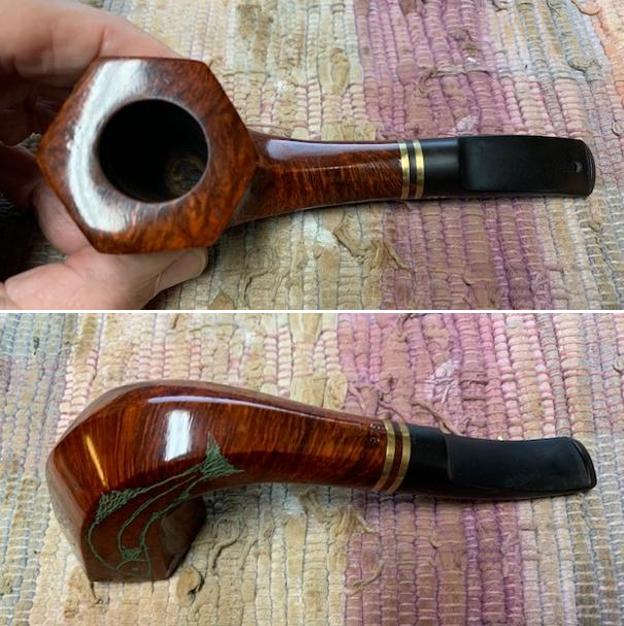
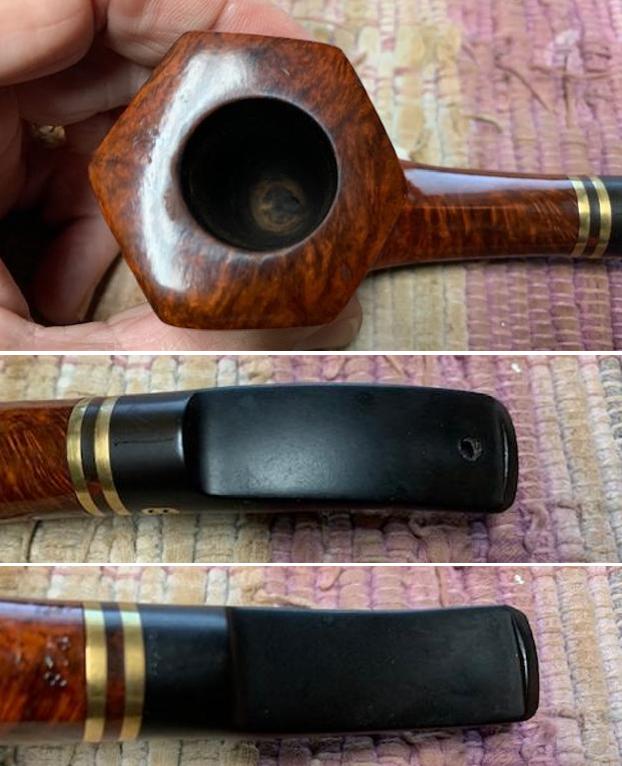
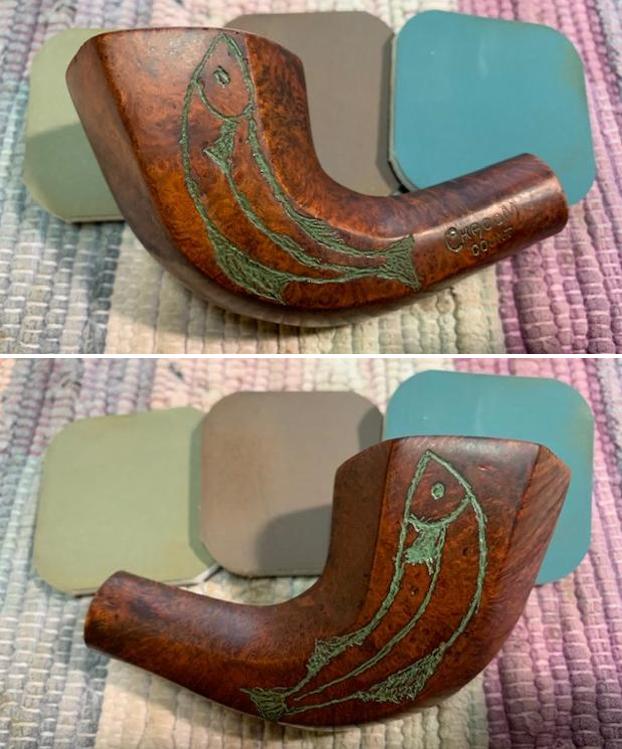
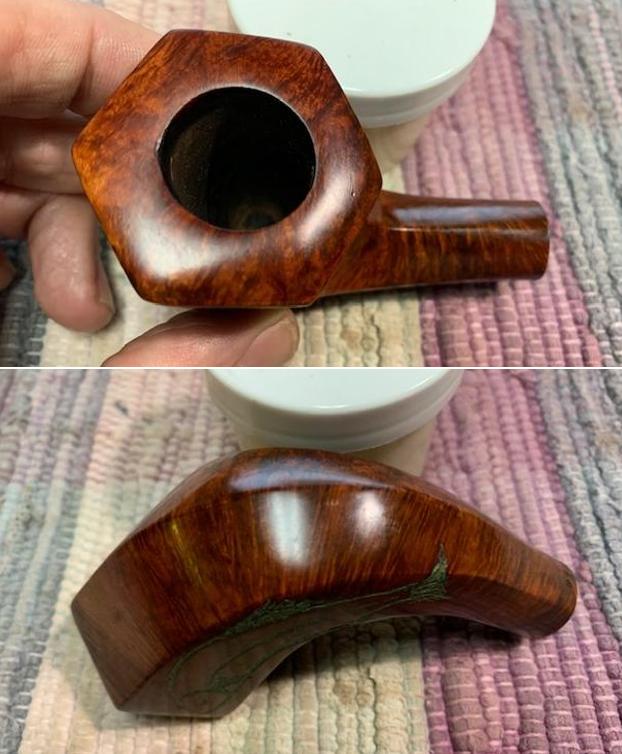
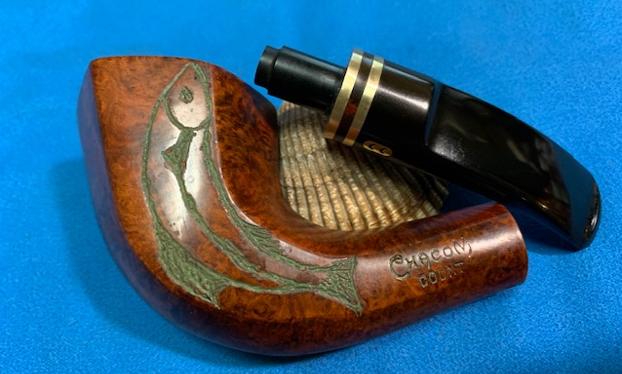
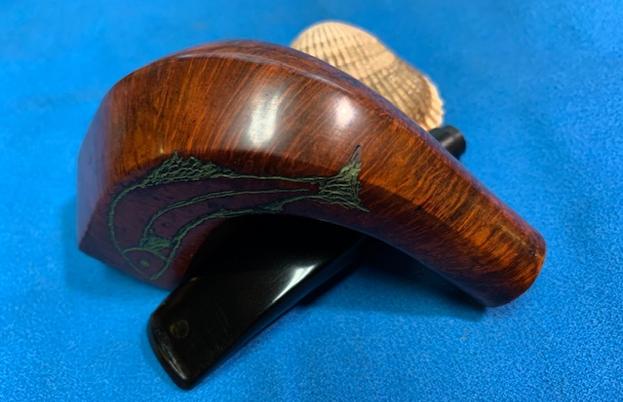
I took close up photos of the rim top and bowl and the stem before I started my clean up work so that I could document the condition of the pipe when I started my work on it.
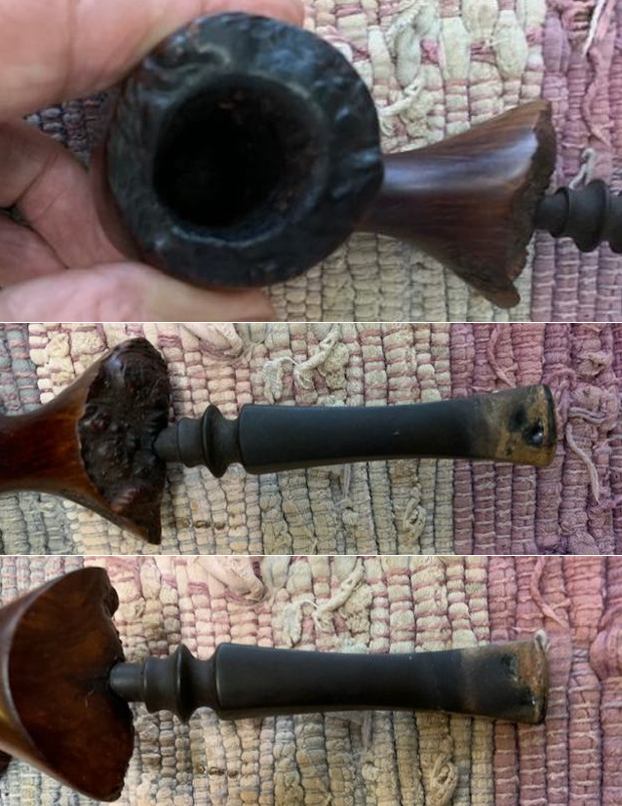
The stamping on the underside of the shank is quite filled in with the grime but reads Karl Erik [over] Hand Made in Denmark [over] A which is the grade stamp.
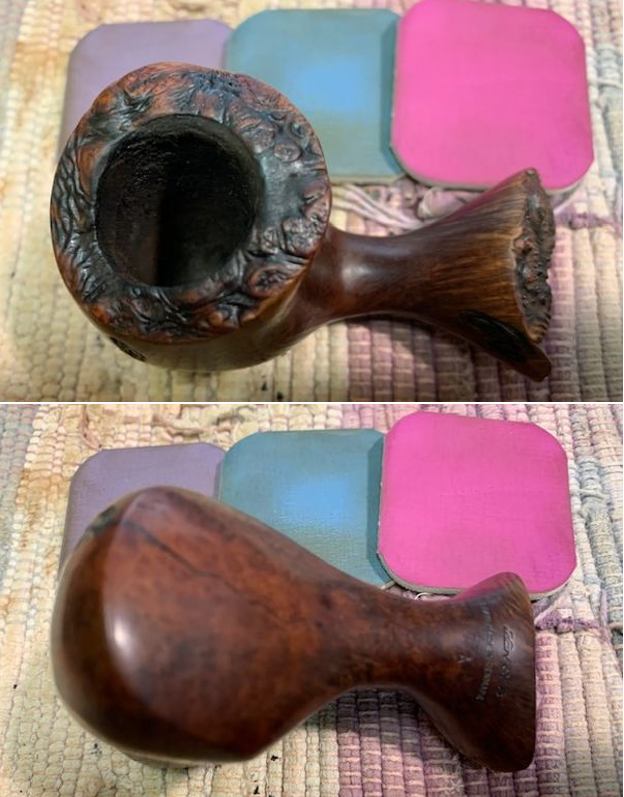
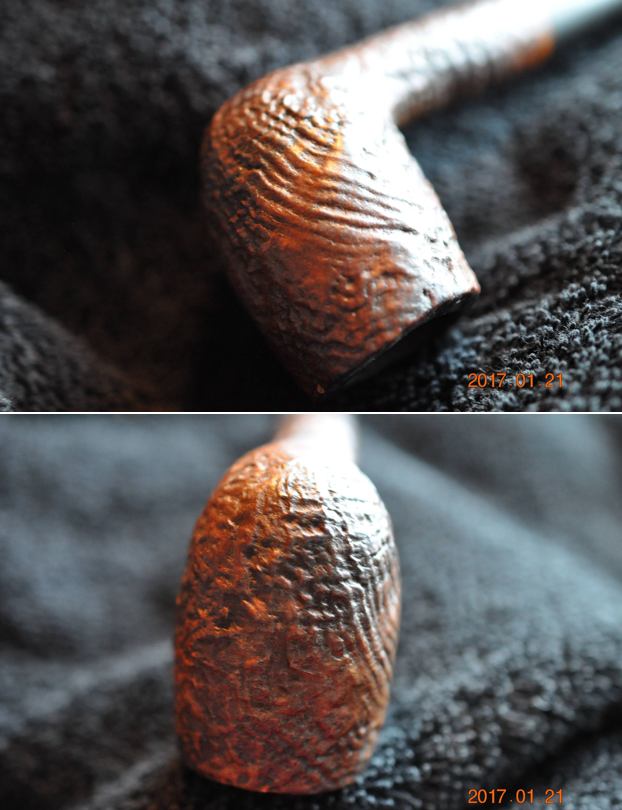
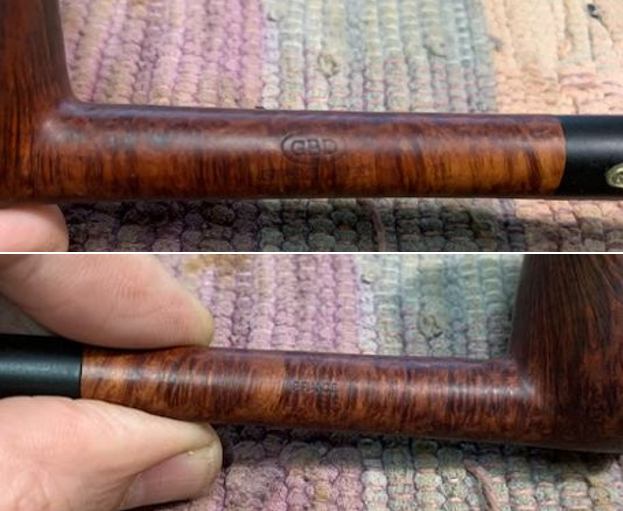
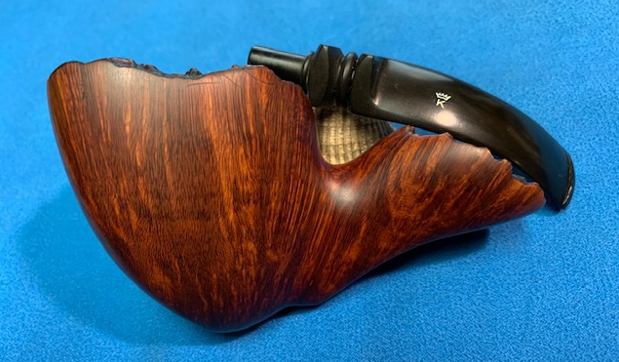
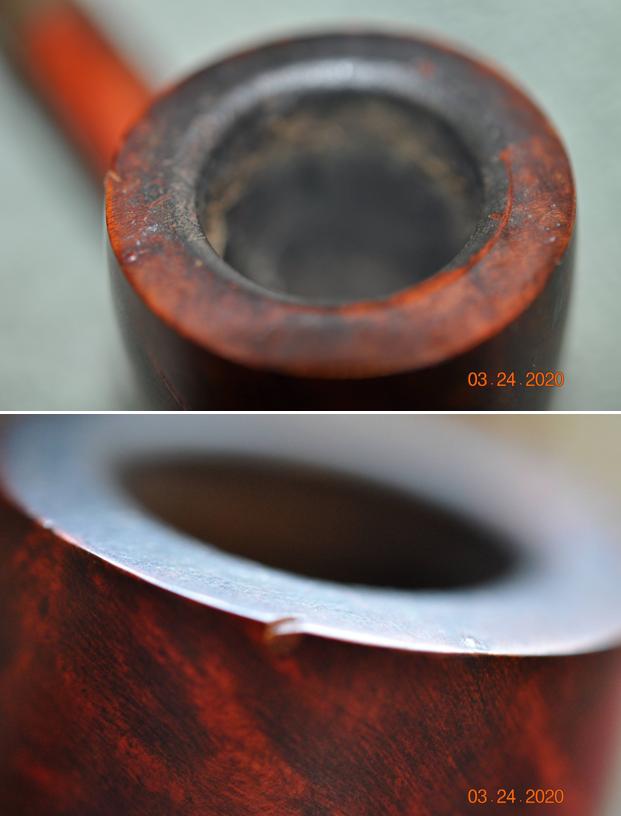
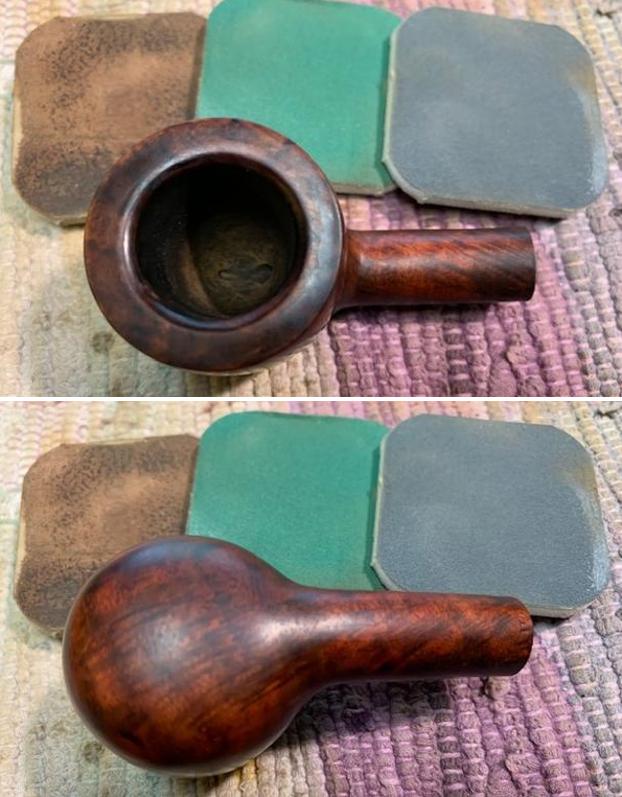
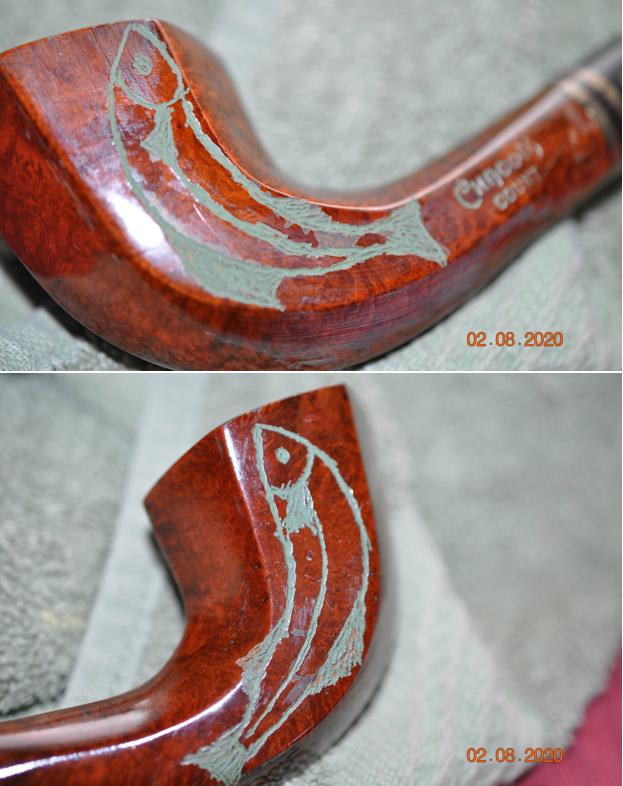
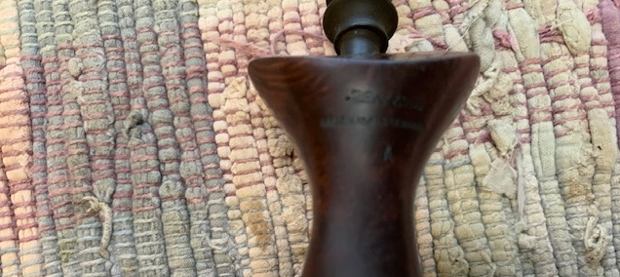
I took photos of the crack in the heel of the bowl and up the front side into the carving. It is quite long and large and the crack is singular. It has not taken off in other directions. That is the good news with this damaged bowl.
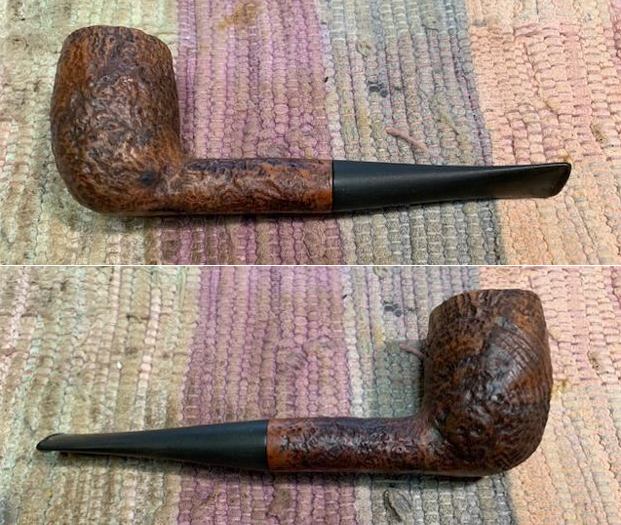
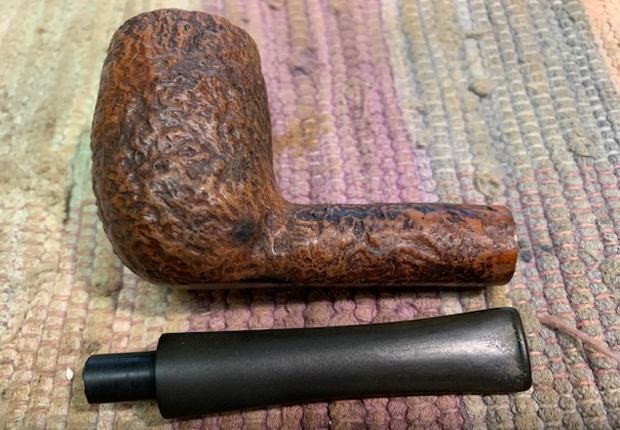
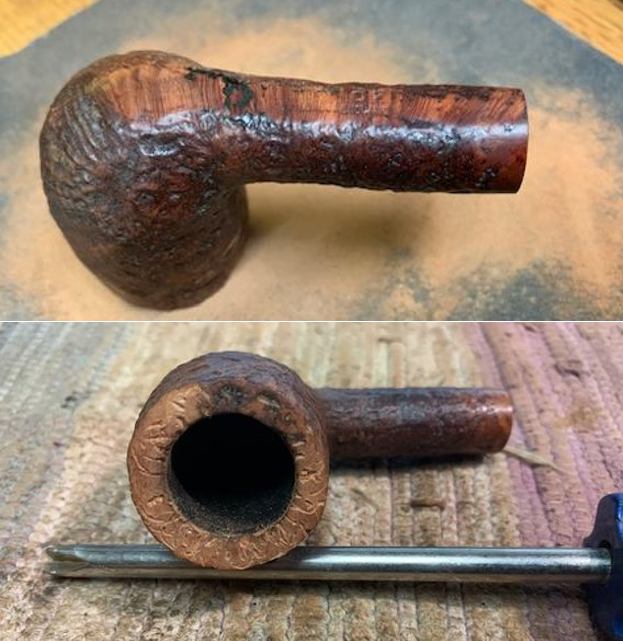
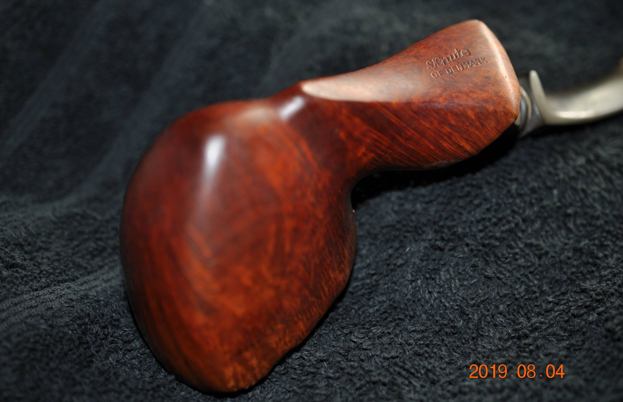
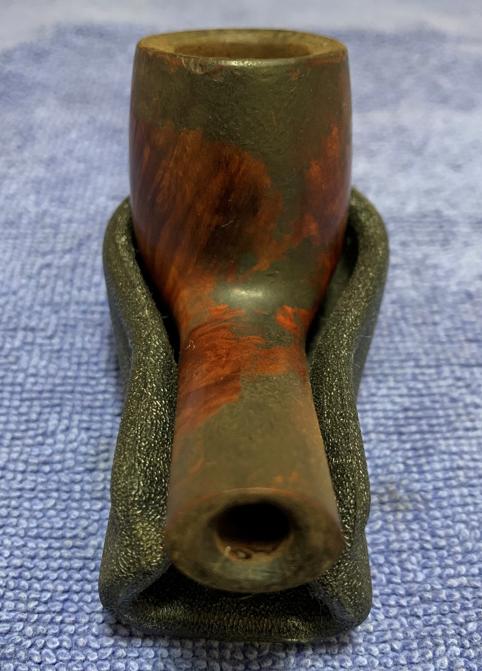
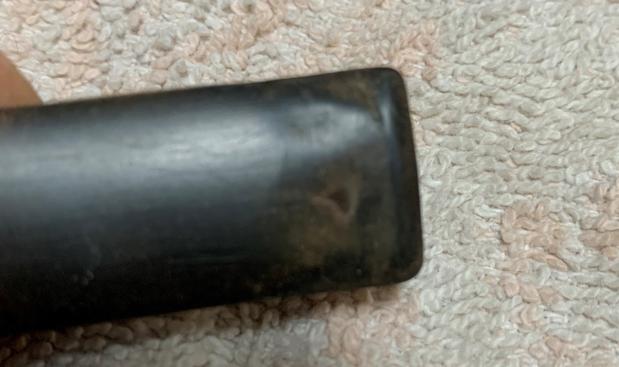
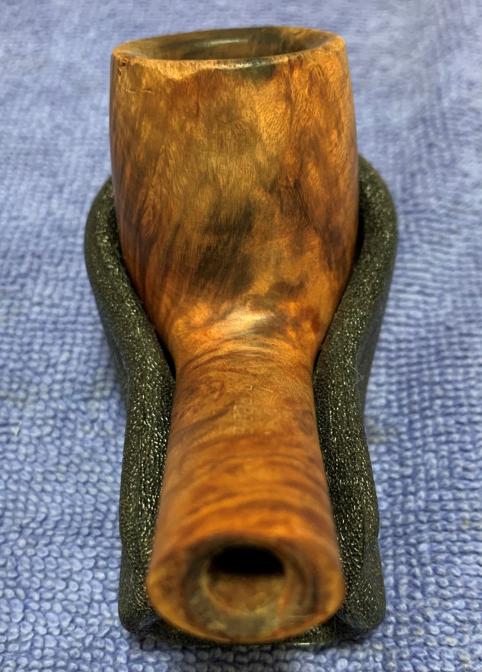
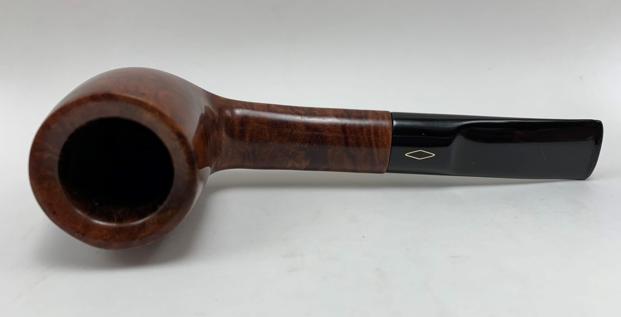
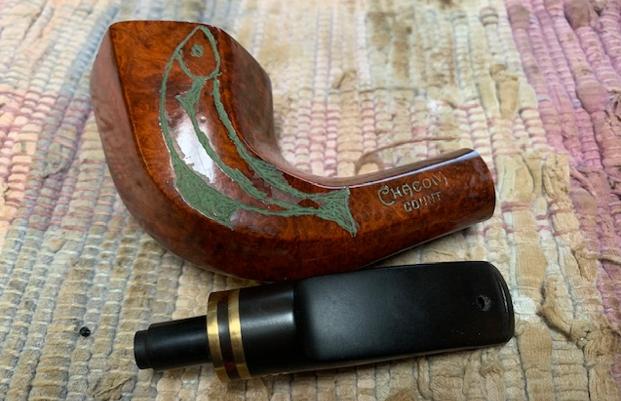
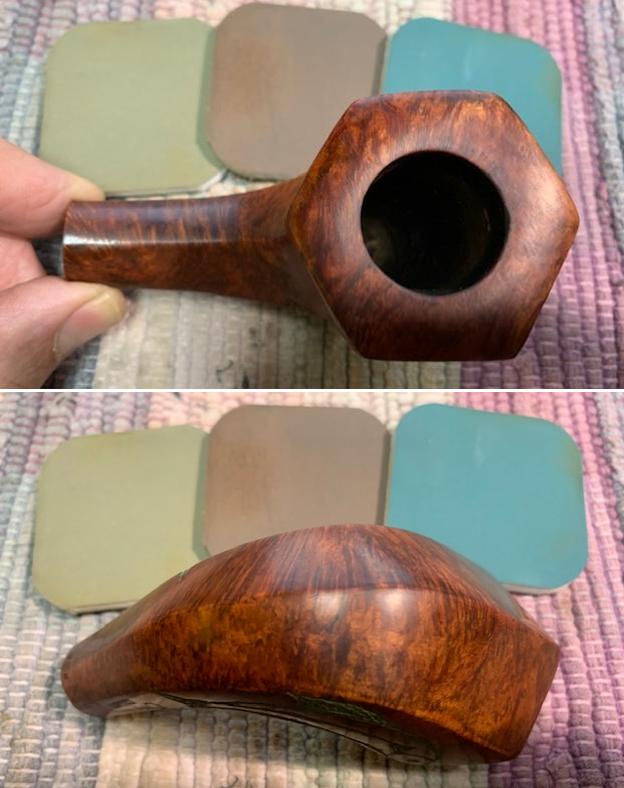
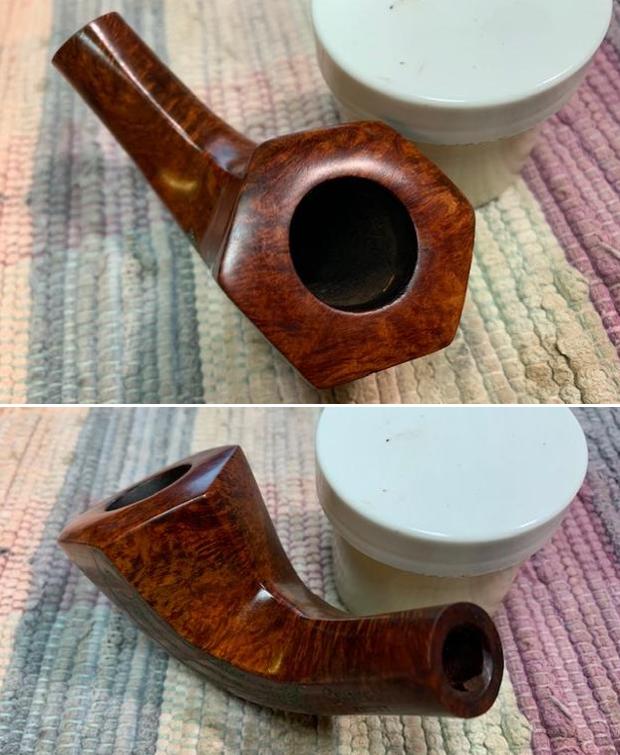
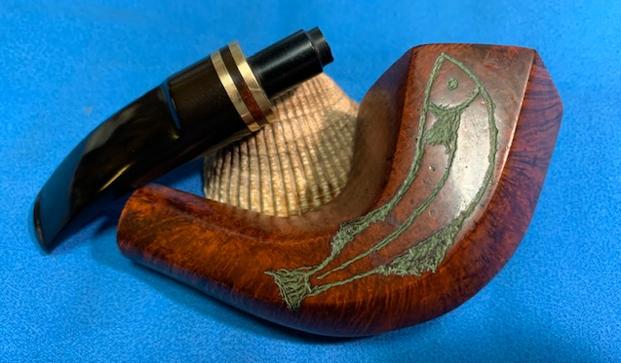
I removed the stem from the shank and took a photo of the look of the pipe. It is an interesting shaped pipe with a jutting chin on the front.
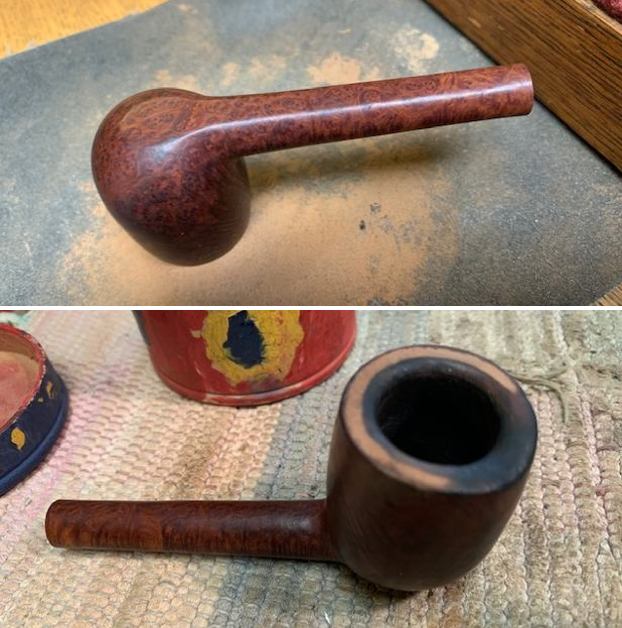
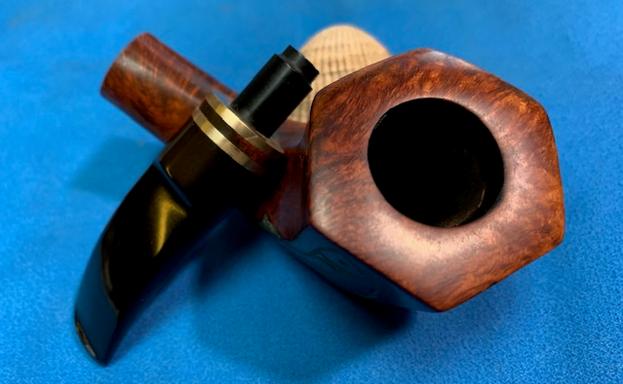
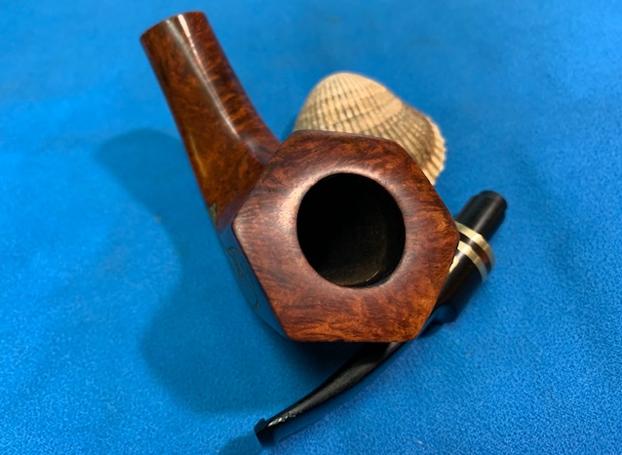
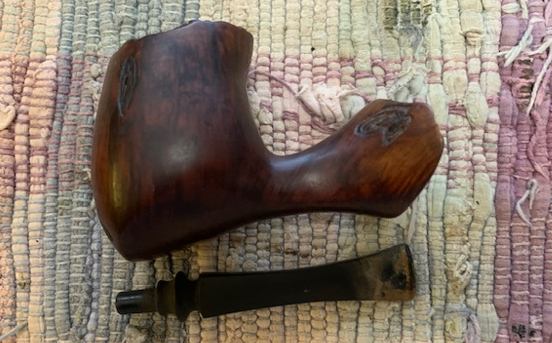
In order to move forward with the examination of the bowl I needed to clean it up. To inspect the inside walls of the chamber and the base of the chamber to see if the crack goes into the chamber I needed to remove all of the cake. It needed to be smooth if I was going to be able to examine it properly. I reamed the bowl with a PipNet pipe reamer and cleaned up the remnants in the chamber with a Savinelli Fitsall Pipe Knife. I wrapped a dowel with 220 grit sandpaper and sanded the walls and bottom of the bowl to further clean it up.
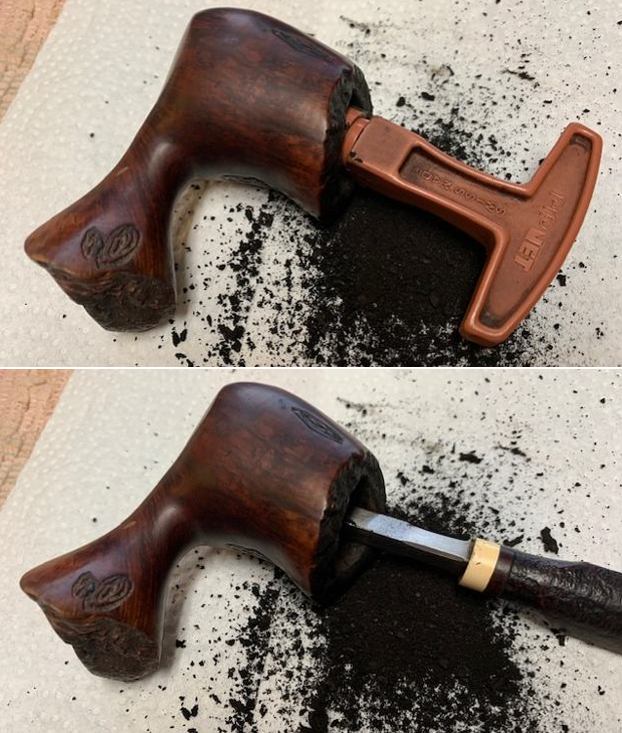
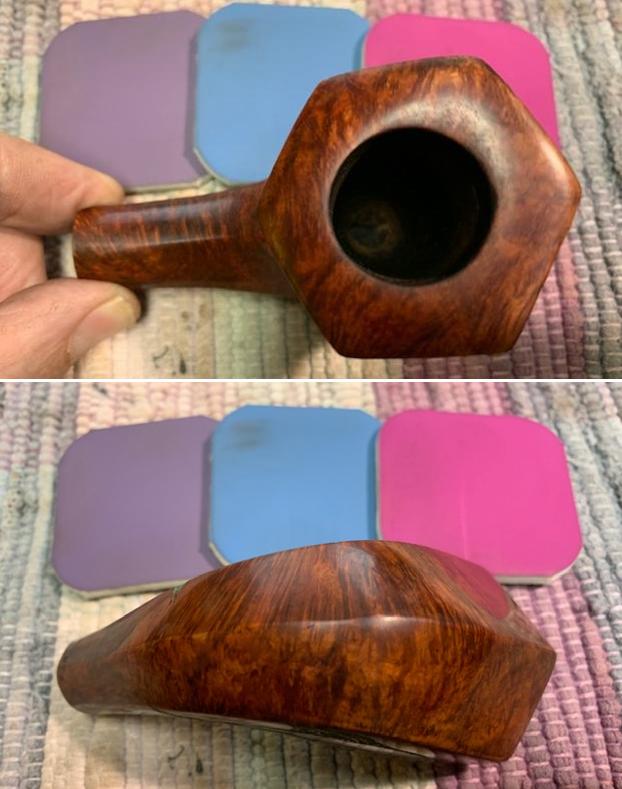
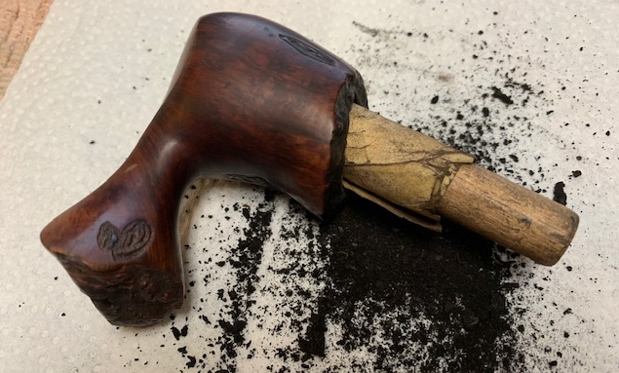
At this point I examined the bowl with a flashlight and a dental probe and I could not see any cracking on the bottom of the bowl or the sides parallel to the crack on the heel and the front of the bowl in the carving. That was a wonderful discovery! I knew now that I was dealing with a crack on the exterior of the bowl that had not proceeded inside. I am wondering at this point if Dewey had dropped the pipe on a hard surface as that would explain what we were dealing with.

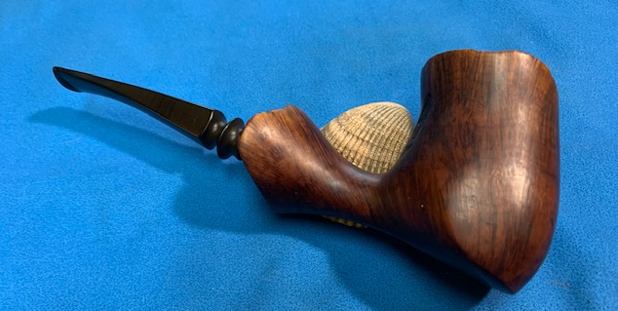
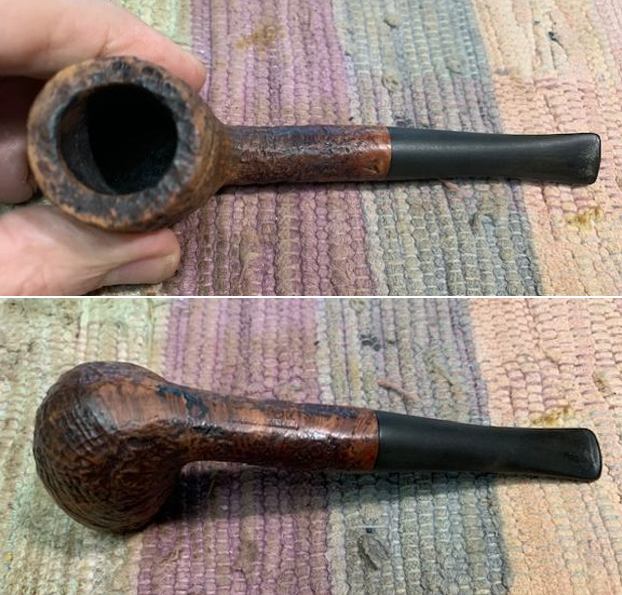
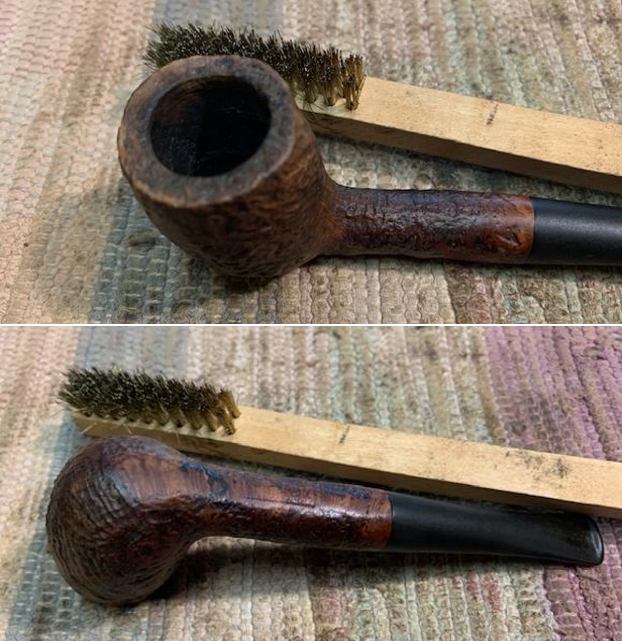
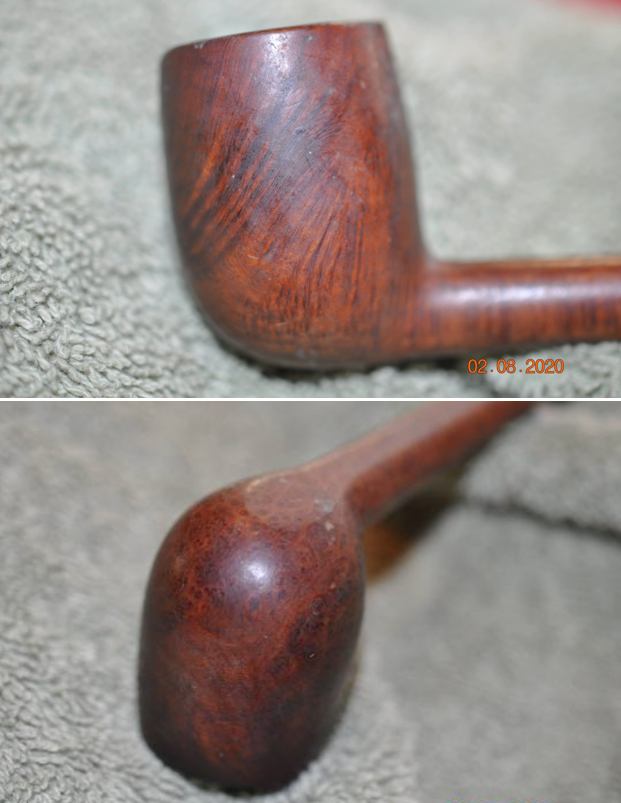
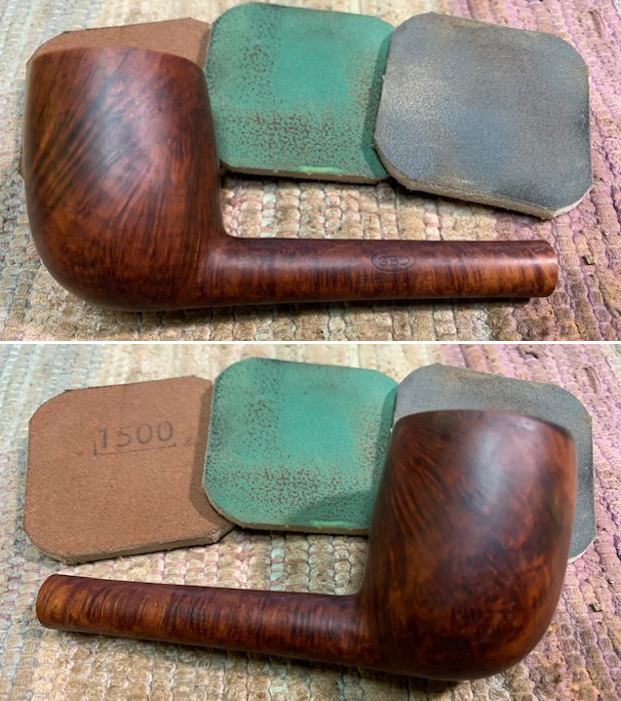
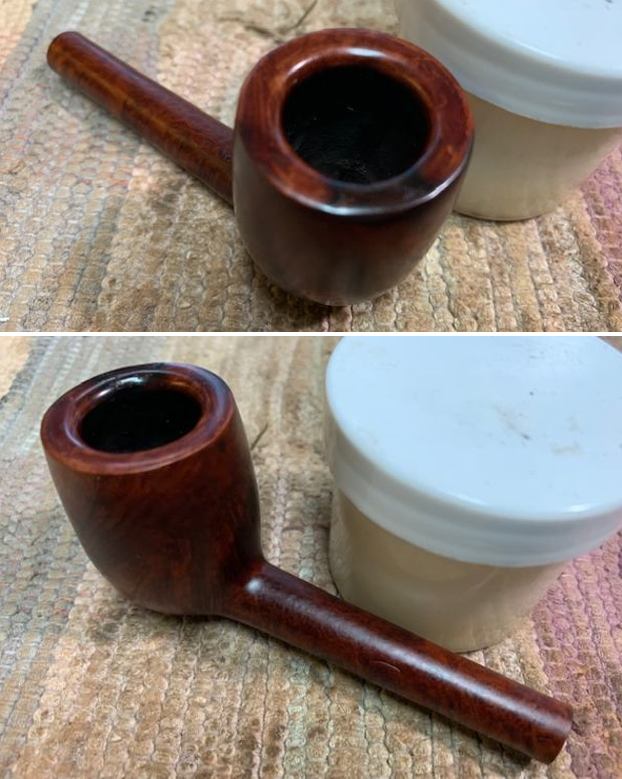
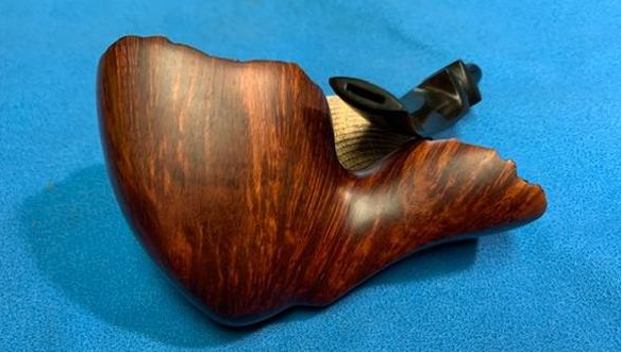
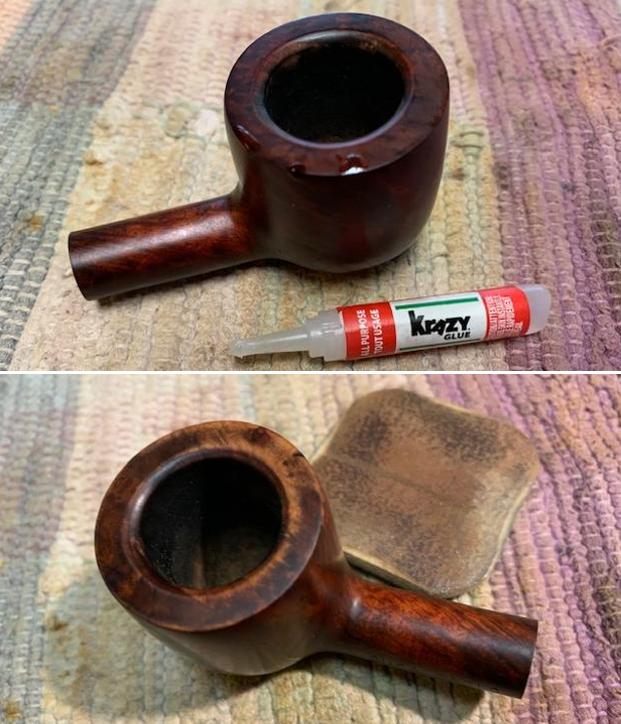
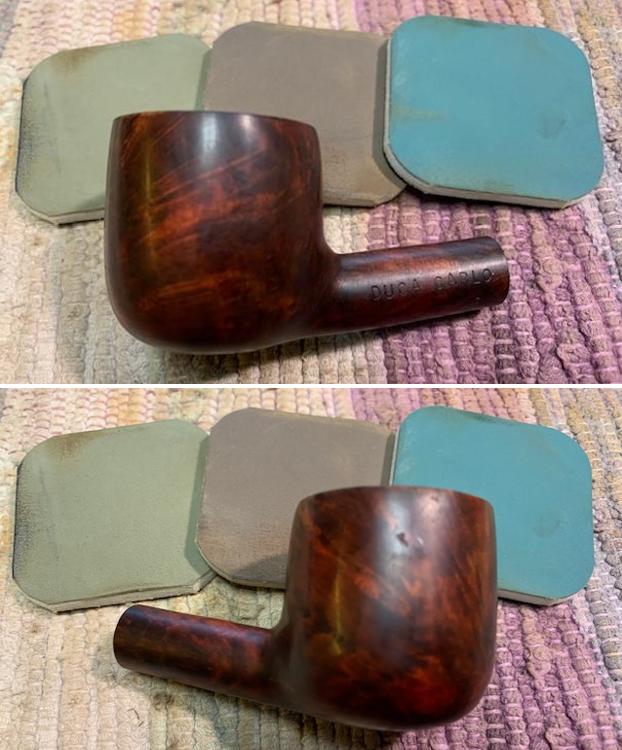
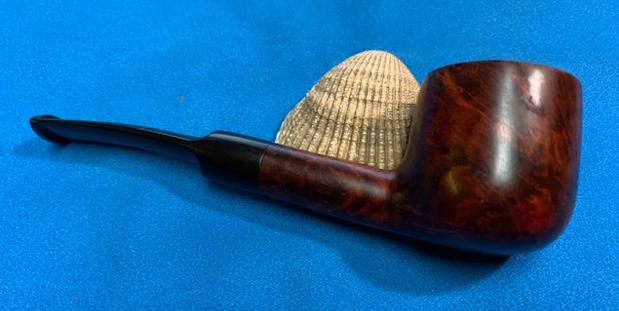
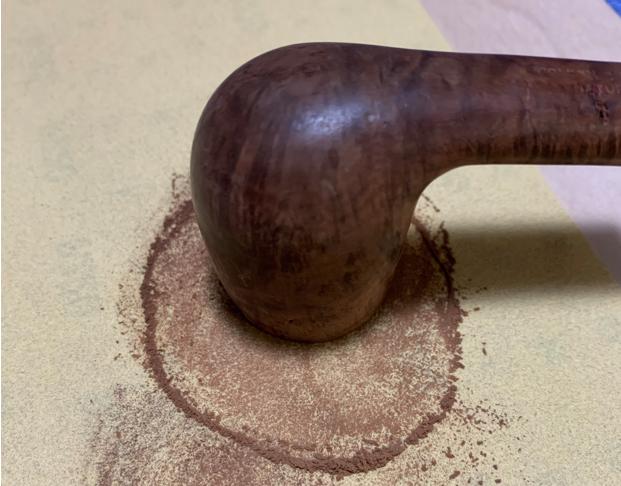
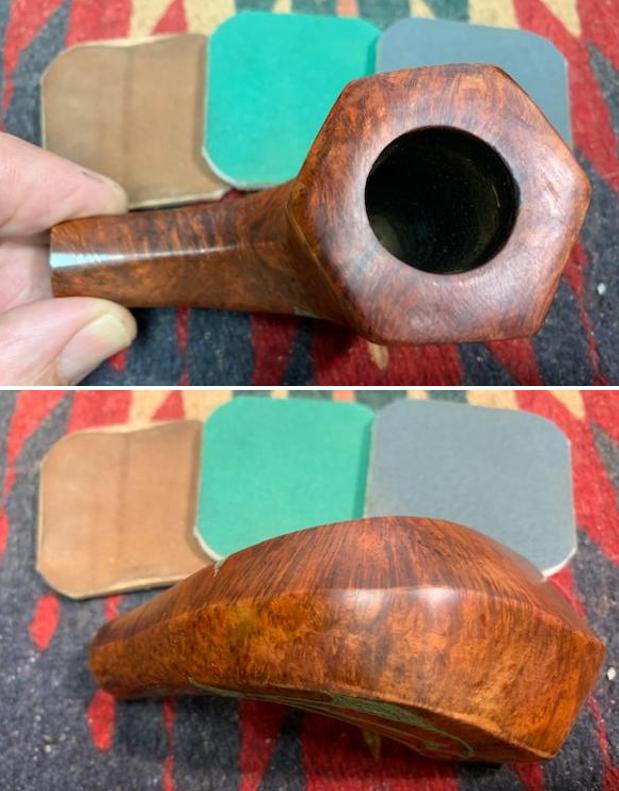
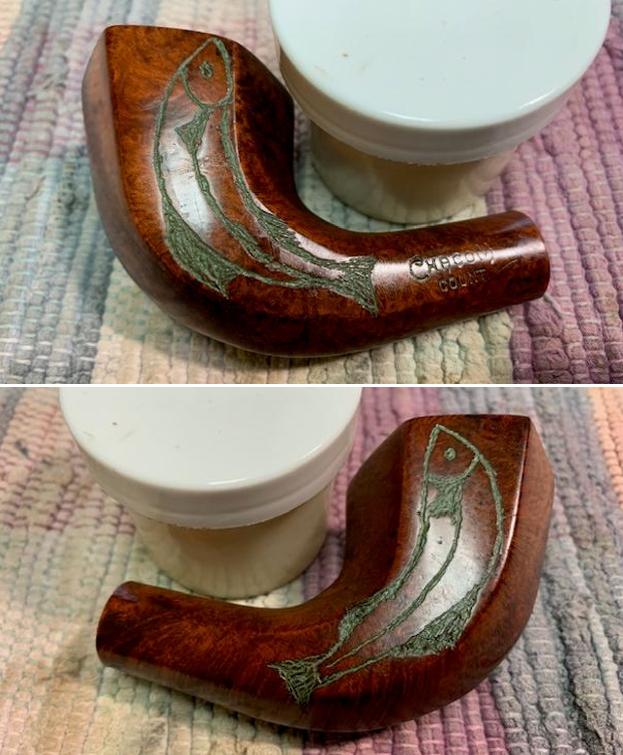
I decided to clean up the exterior of the bowl next. I scrubbed it with undiluted Murphy’s Oil Soap, a tooth brush and a brass bristle brush for the plateau. I scrubbed it with the soap and the brushes until it was a mess and rinsed it off with warm running water. I repeated the process until I was convinced I had removed the thick grime coat and lava on the rim top. I took photos of the cleaned bowl at this point. It is nice to see the grain poking through. It is a really nicely grained pipe. I am thinking that the characteristic carved patterns around the bowl and shank were done to deal with flaws in the briar. I wonder if the crack started in the carved area and proceeded downward? 
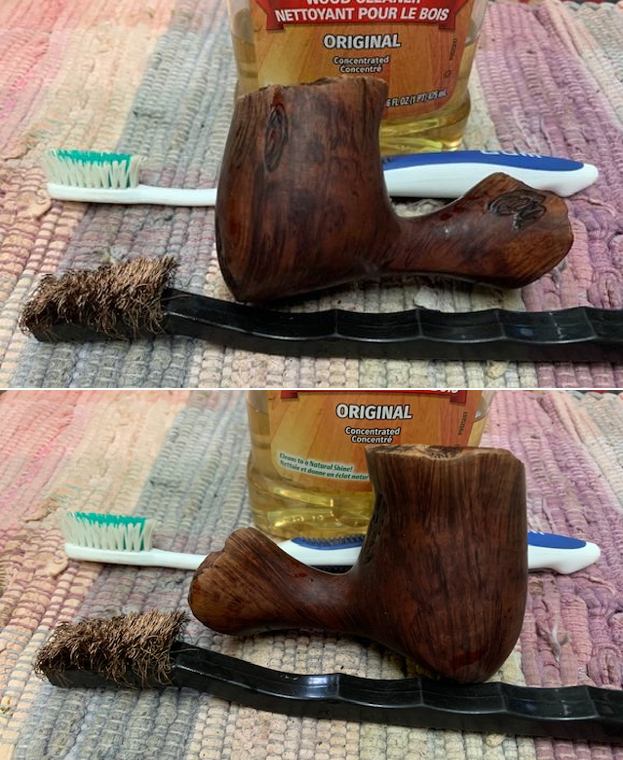
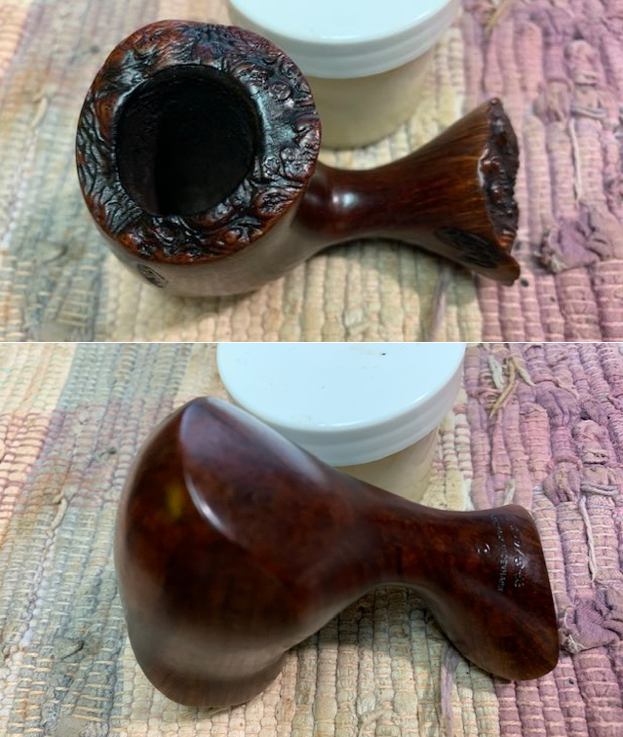
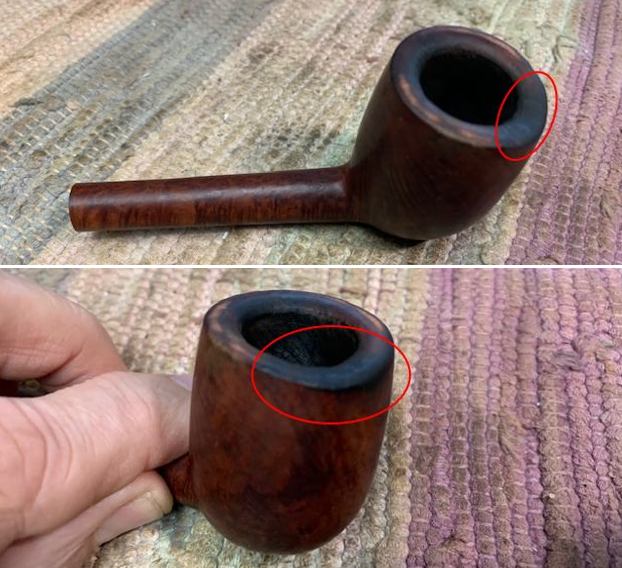
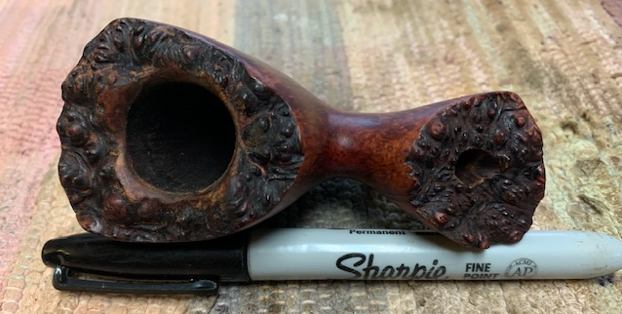
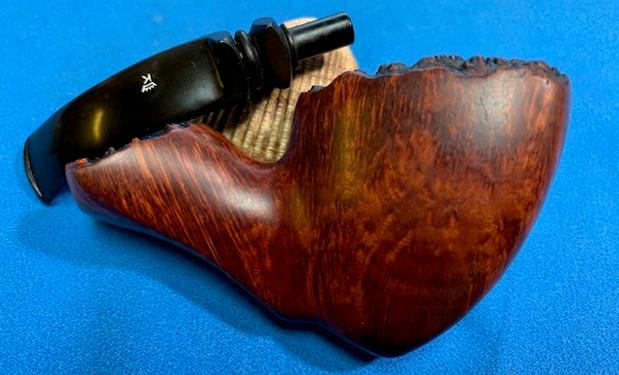
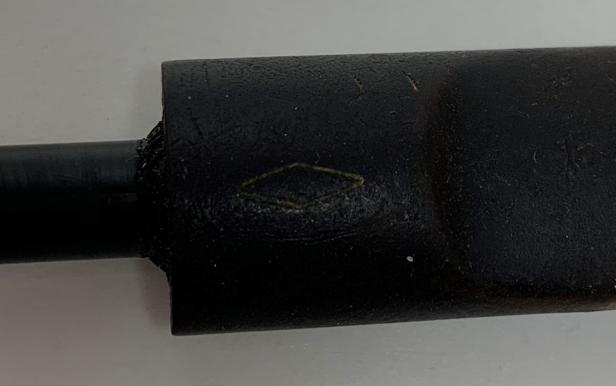
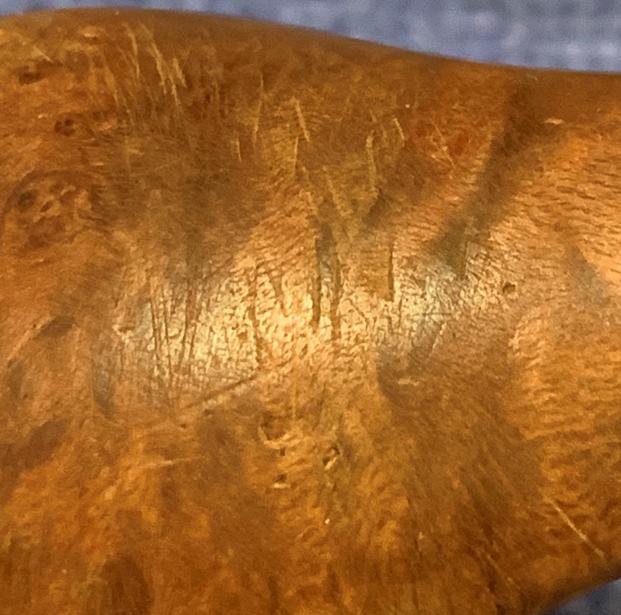
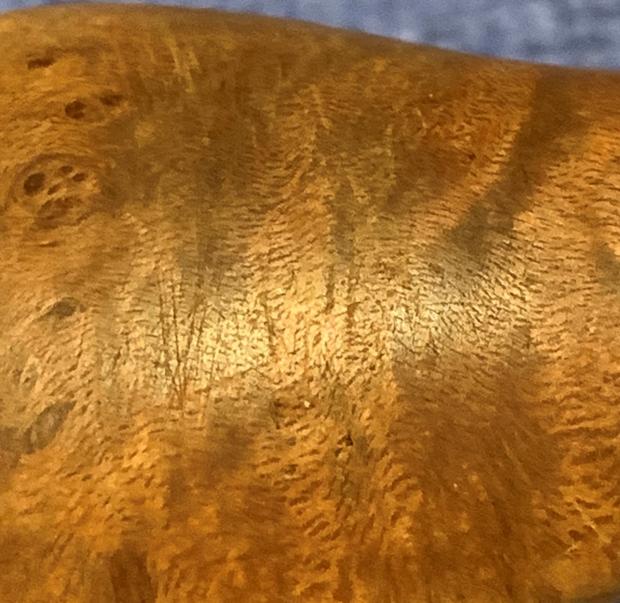
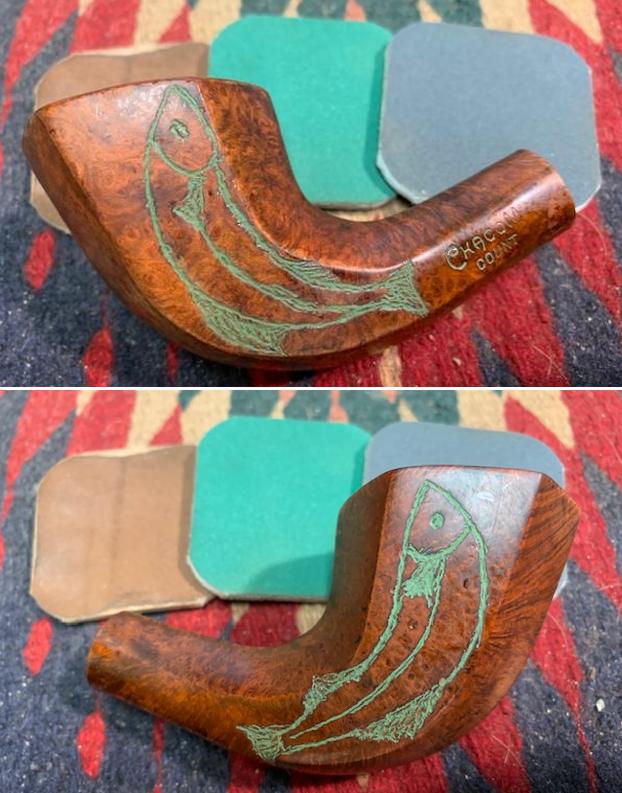
I focused some of the cleaning on the crack on the front carving where it appeared that there were two cracks. I have circled the crack in the second photo and have red arrows pointing to the damaged spots. I also cleaned the crack down into the heel of the bowl. I wanted it to be free of grime and oils so that the repair would be solid.
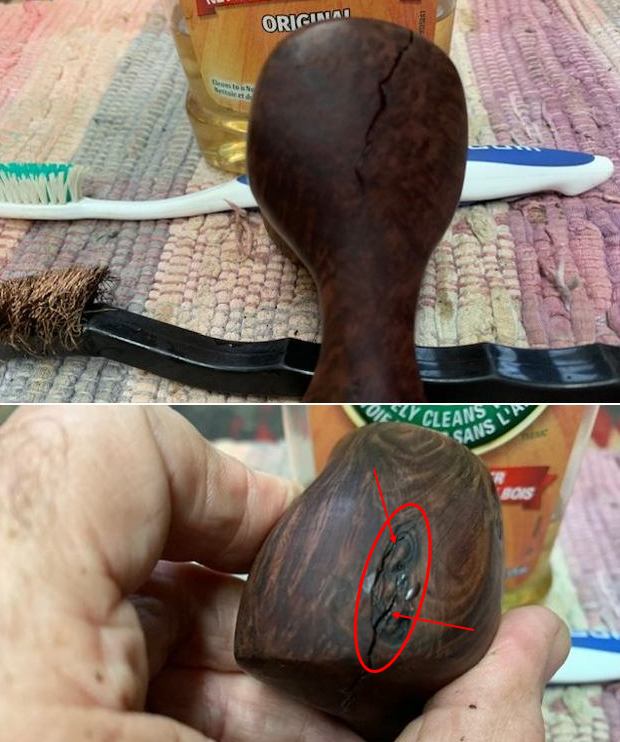
With the externals clean and the bowl reamed it was time to clean out the mortise and the airway in the shank and the stem. I scrubbed them with 99% isopropyl alcohol, cotton swabs and pipe cleaners until they came out clean. The pipe was finally beginning to smell less sour.
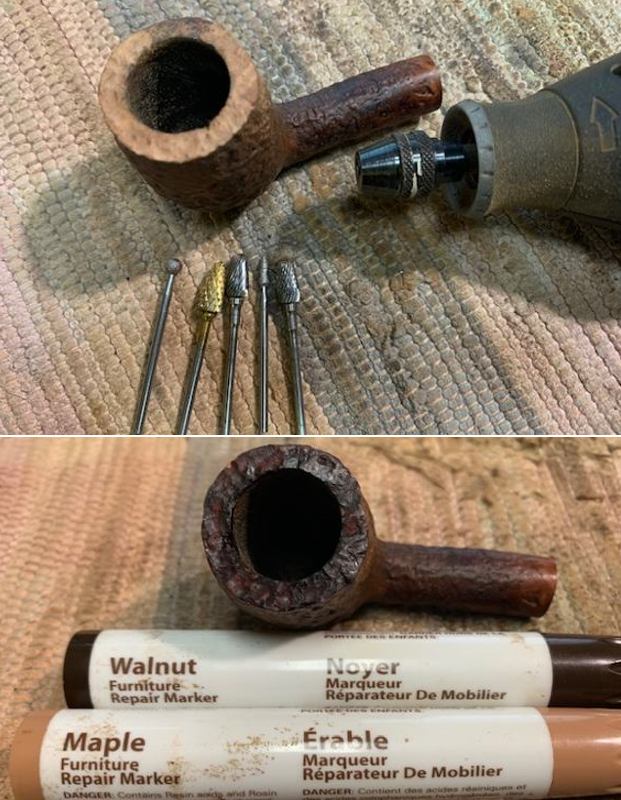
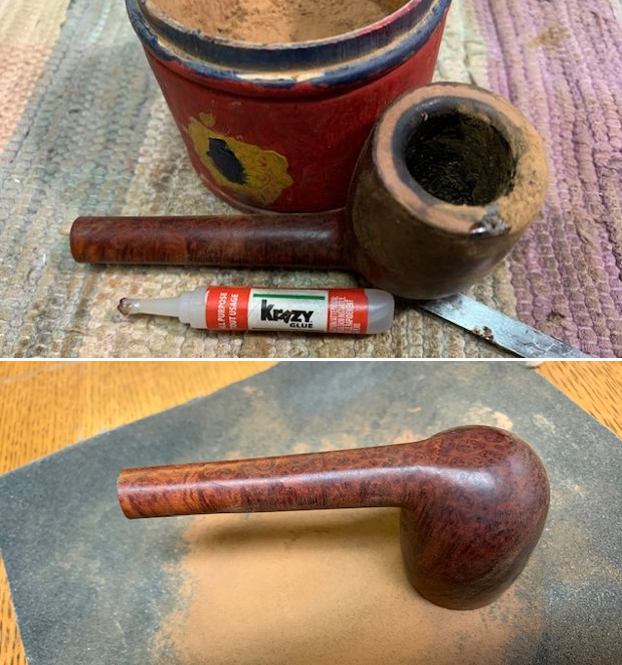
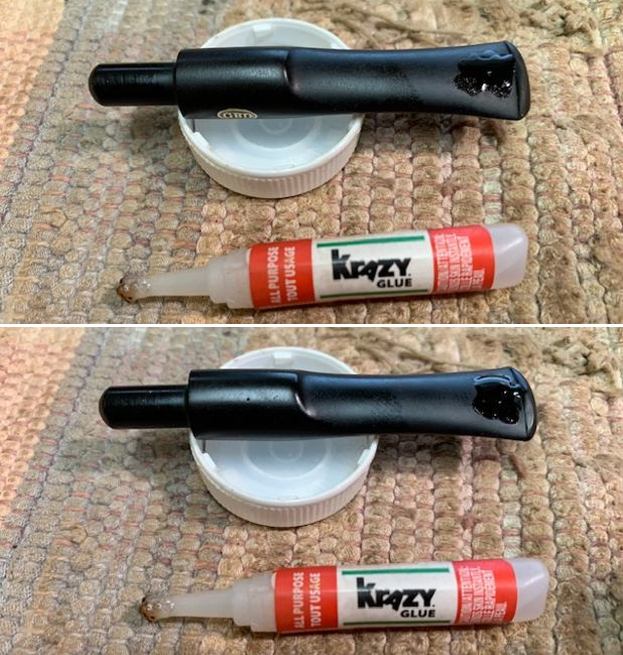
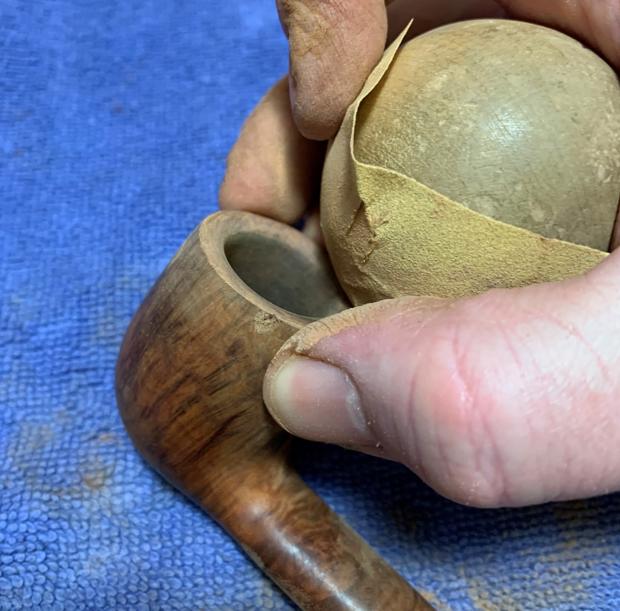
With the pipe clean it was now time to work on the cracks. I drilled a small micro pin hole at each end of the crack to stop it from spreading further. I filled in the pin holes and the crack with briar dust and clear super glue. I layered the repair using a dental spatula to pressed the dust deep in the cracked area. I did the same thing with the small hairline crack on the shank end.Once the repair had cured I sanded the heel of the bowl, the front of the repair and the chin edge with 220 grit sandpaper to smooth out the repaired area and blend it into the surrounding briar.
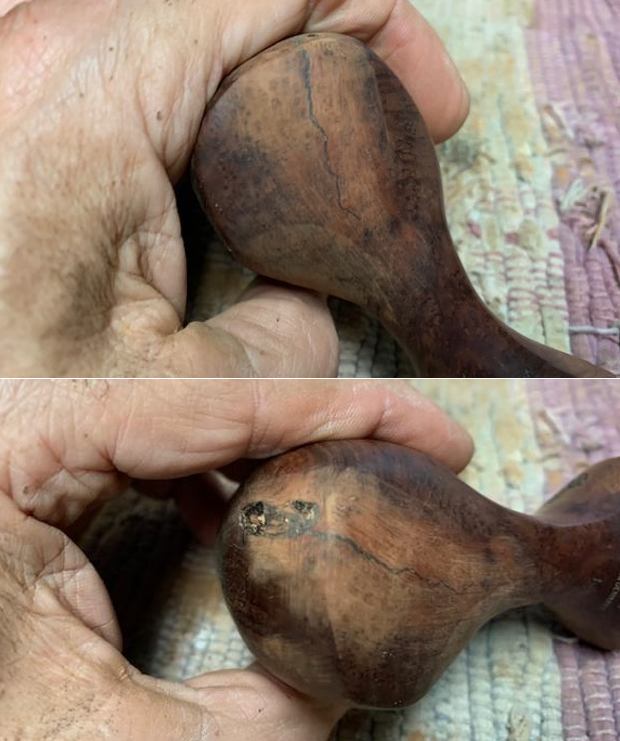
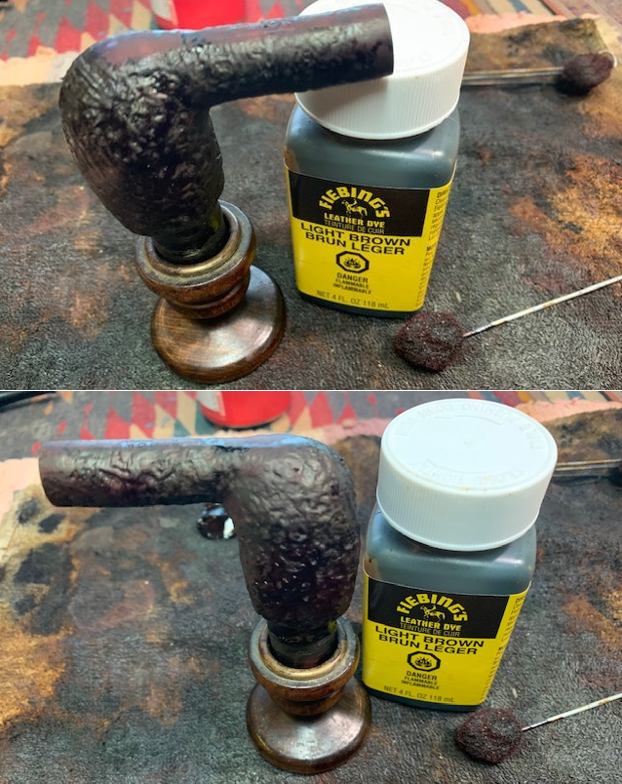
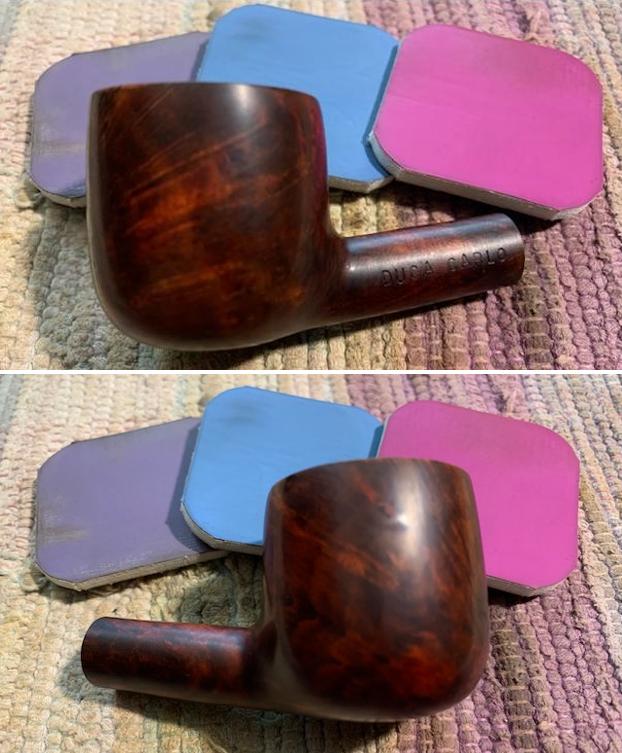
I used a black stain pen to fill in the crevices of each of the carved areas around the bowl and shank sides as well as those in the plateau areas on the rim top and shank end. It appeared that this is what it looked like originally and I like the sense of contrast and depth that it gives those areas once the bowl is polished.
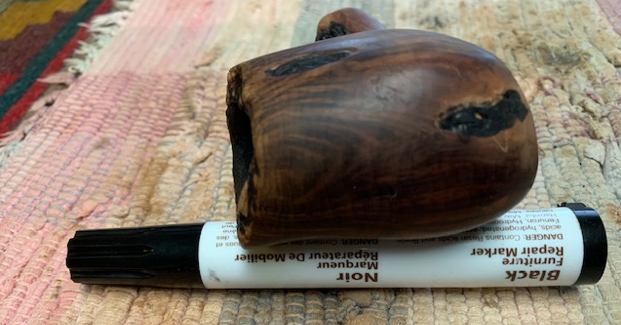
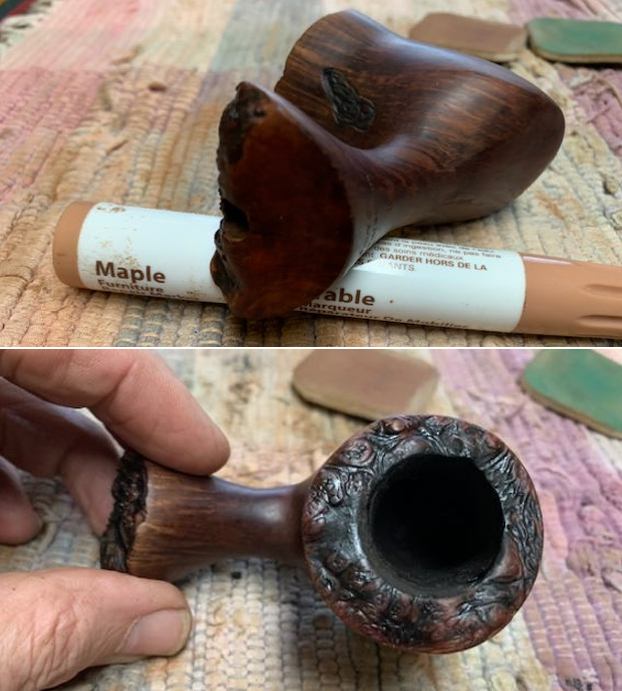
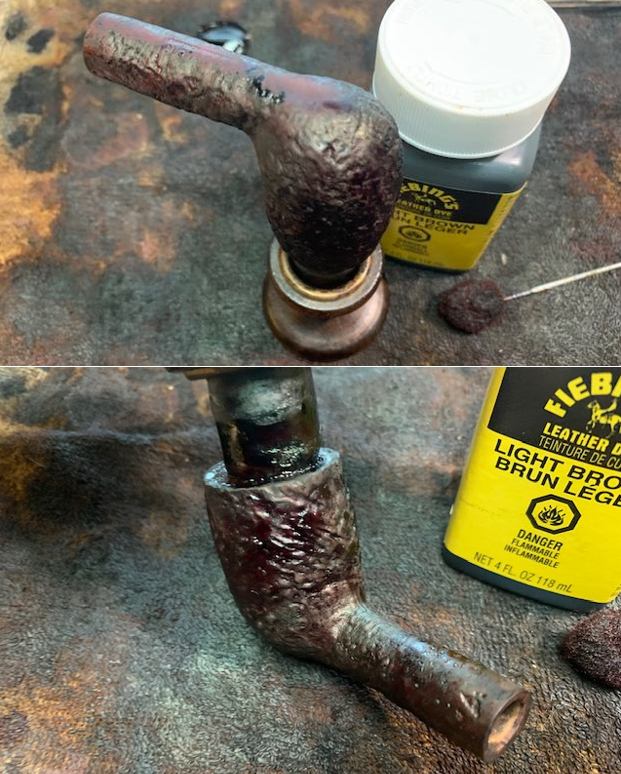
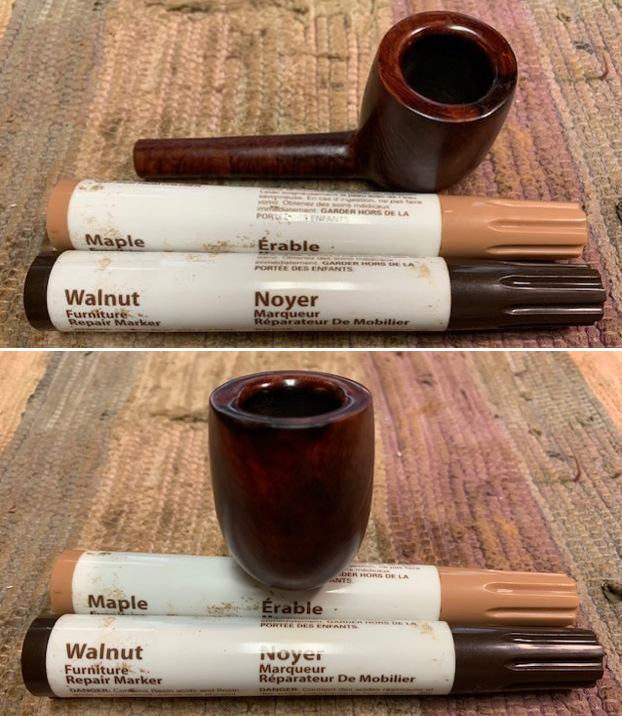
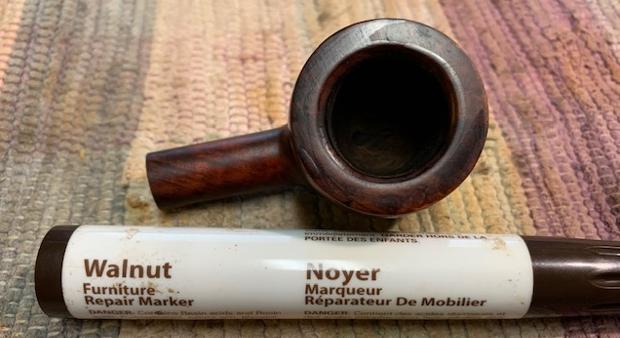
I stained the repaired areas with a Maple stain pen to match the surrounding briar. It involved staining the heel of the bowl, the nose and carved area on the front of the bowl, the rim top high points on the plateau and the high points on the plateau on the shank end. The pipe is beginning to take shape and look better.
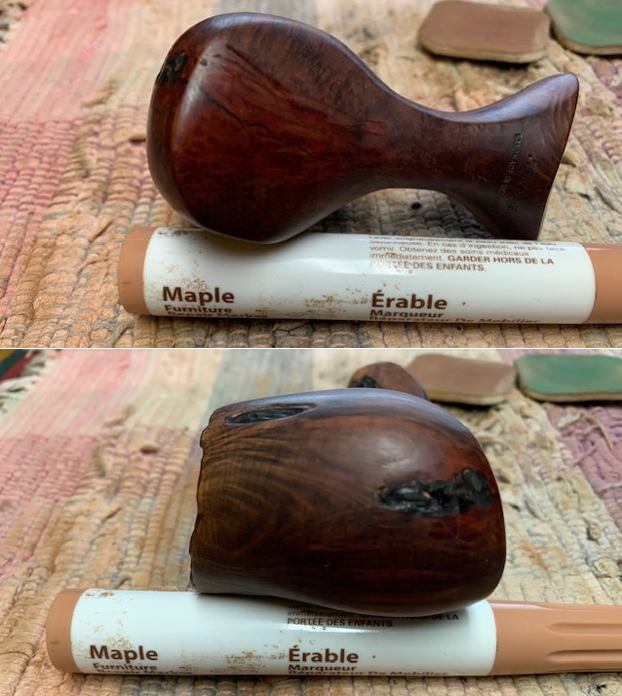
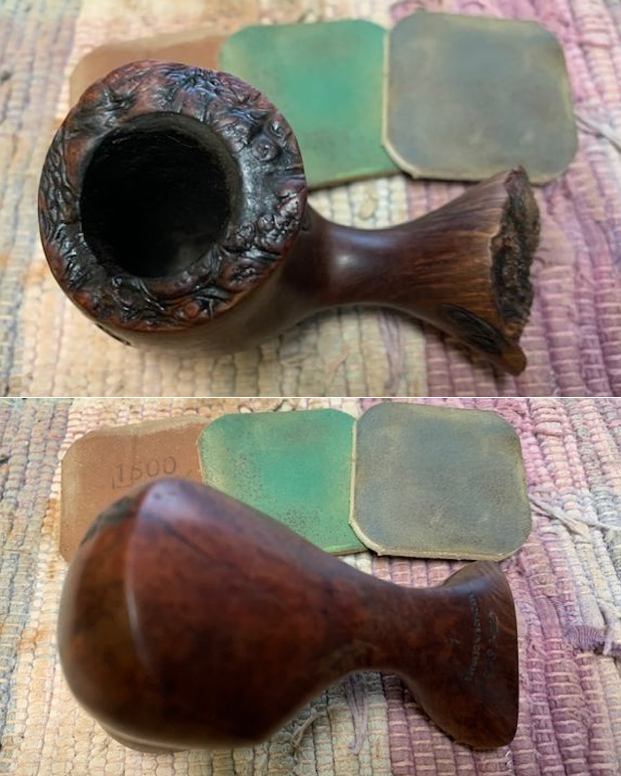
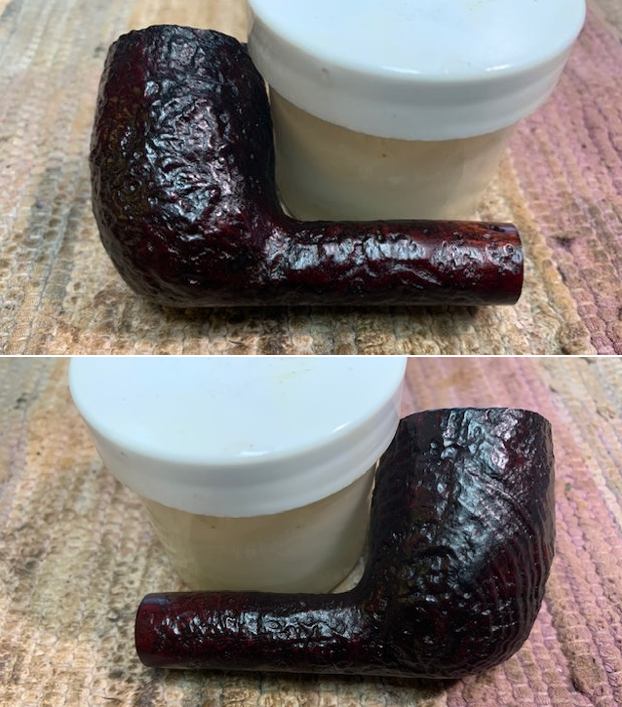
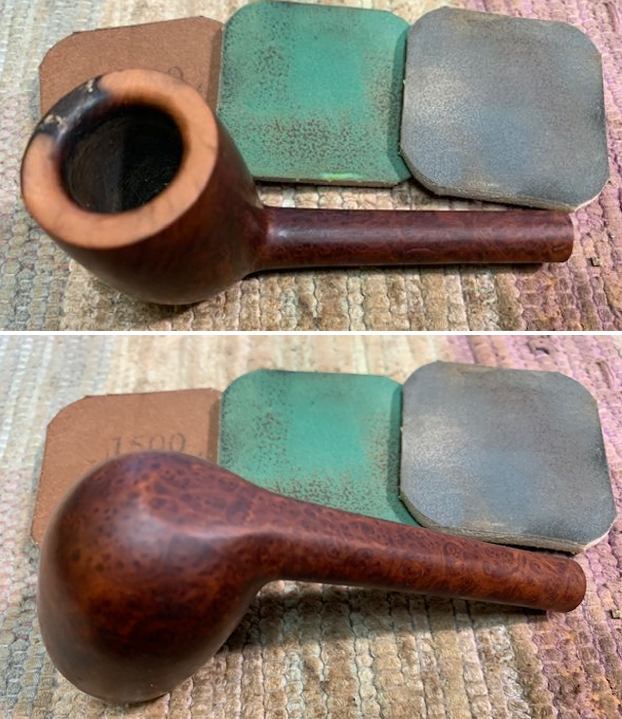
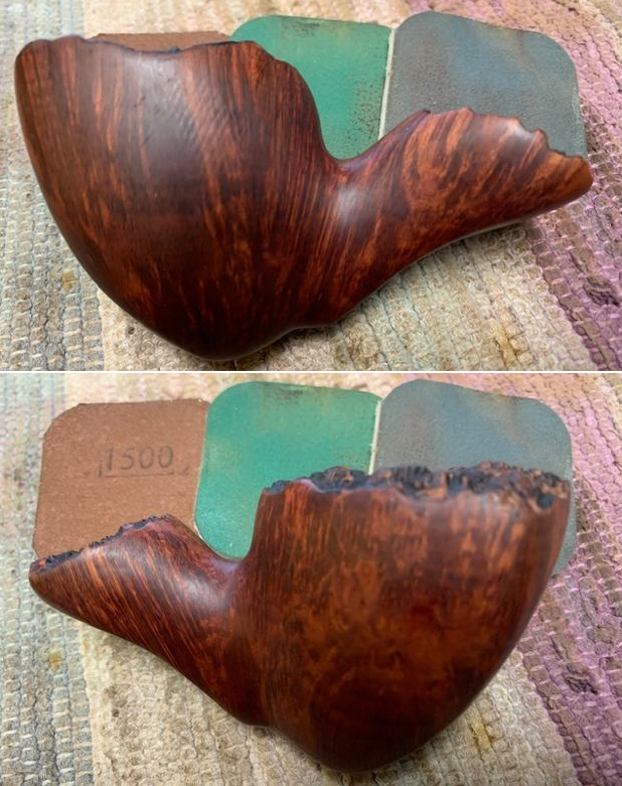
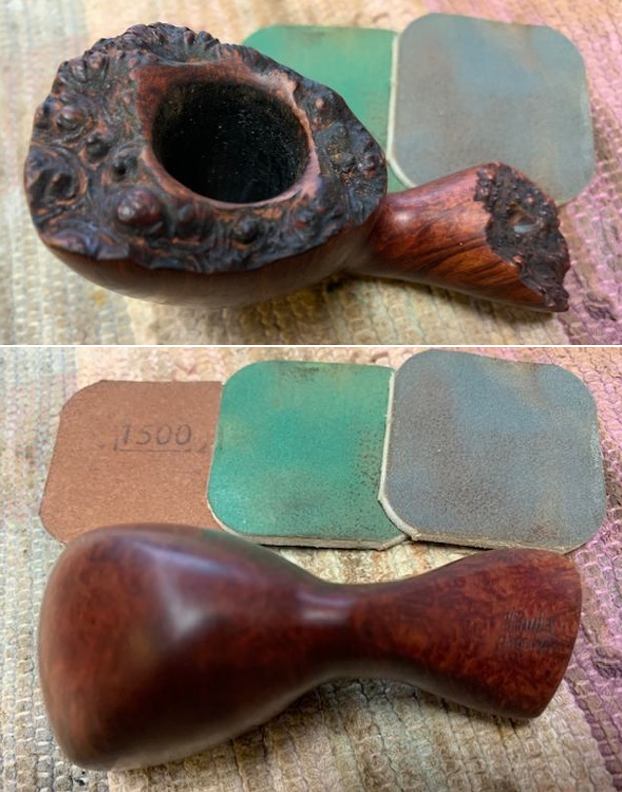
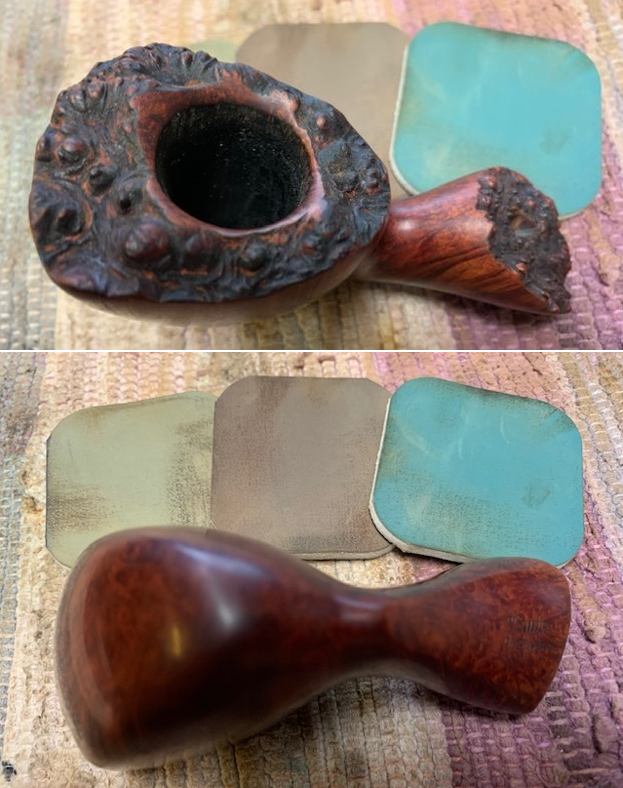
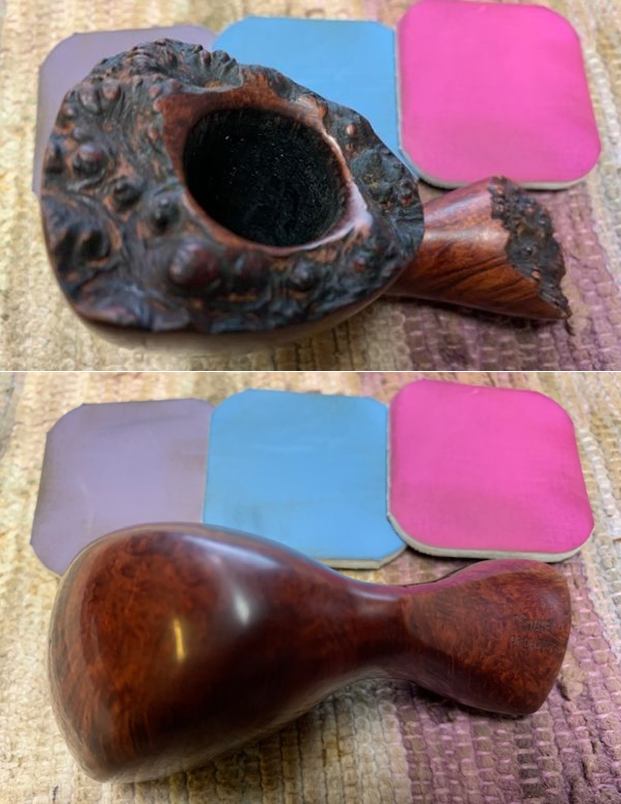
With the staining finished I polished the briar with micromesh sanding pads – dry sanding with 1500-12000 grit pads. I wiped the bowl down between the pads with a damp cloth to remove the debris. By the end o f the process the bowl began to take on a rich shine. The repairs, while still visible were less so than when I started the polishing. 
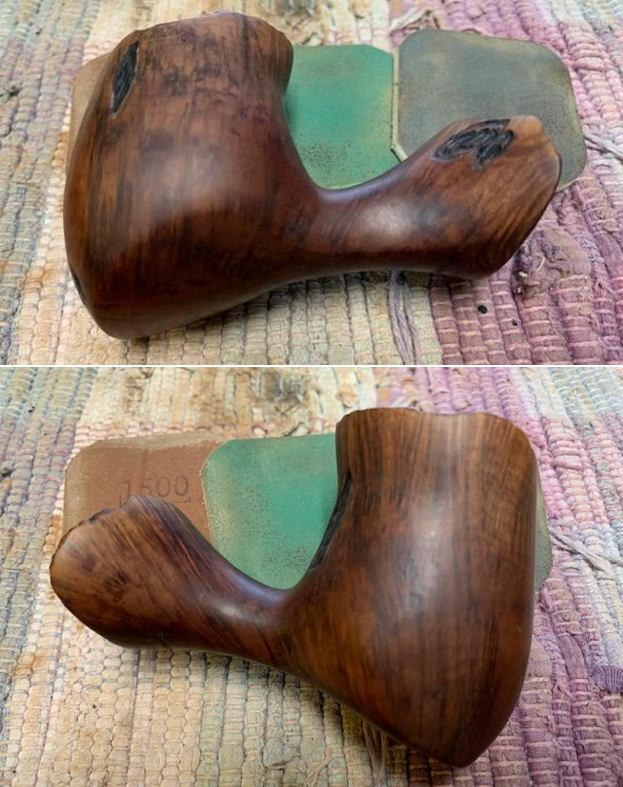
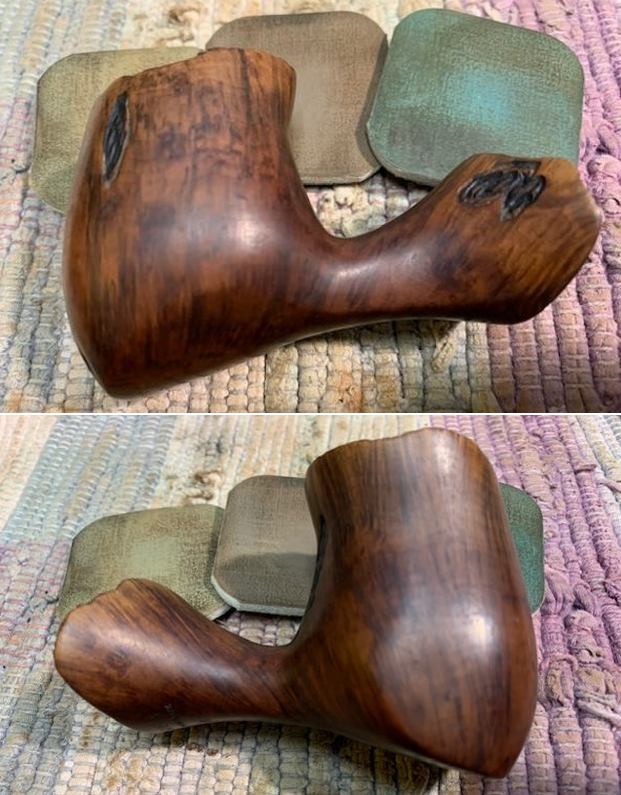
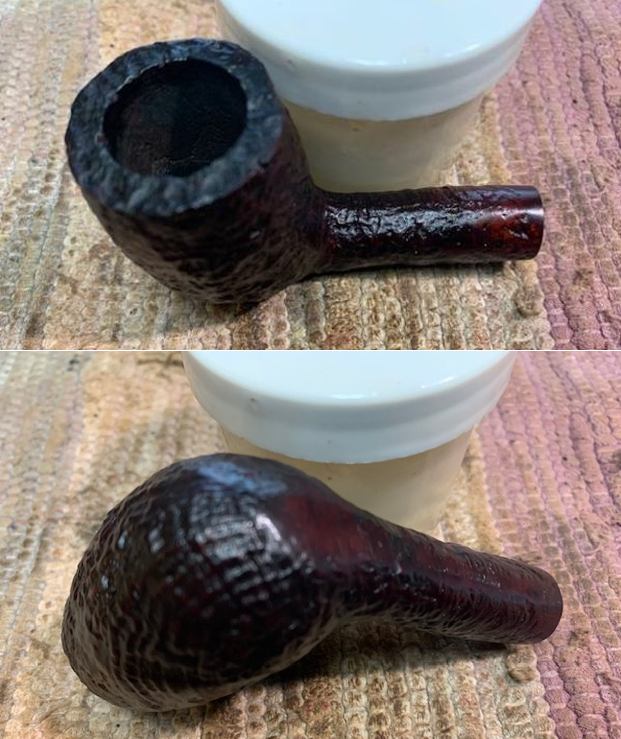
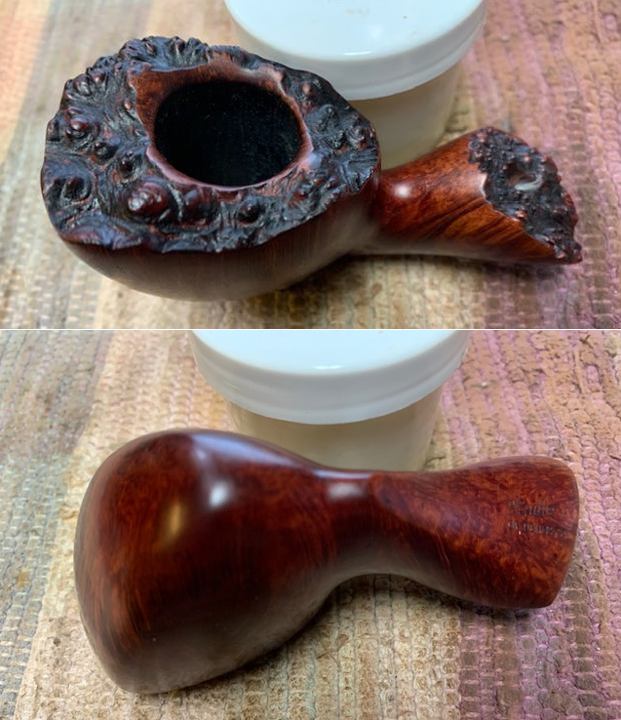
I rubbed the bowl down with some Before & After Restoration Balm. I worked it into the briar with my finger tips to clean, preserve and protect the briar. I let it sit for 10-15 minutes then buffed it off with a cotton cloth. 
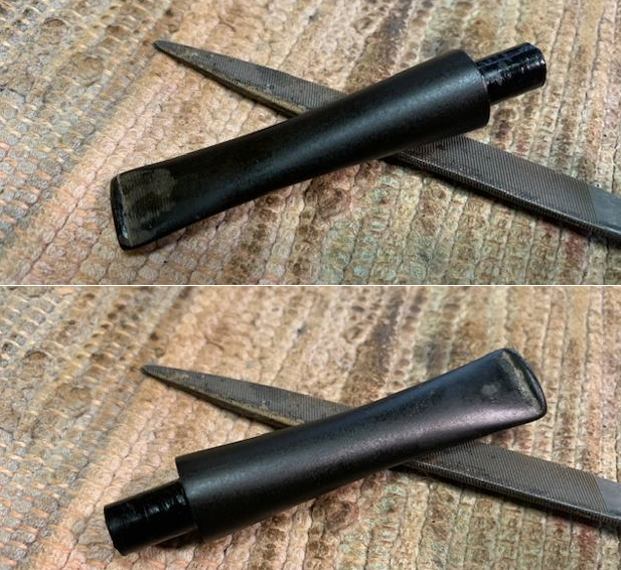
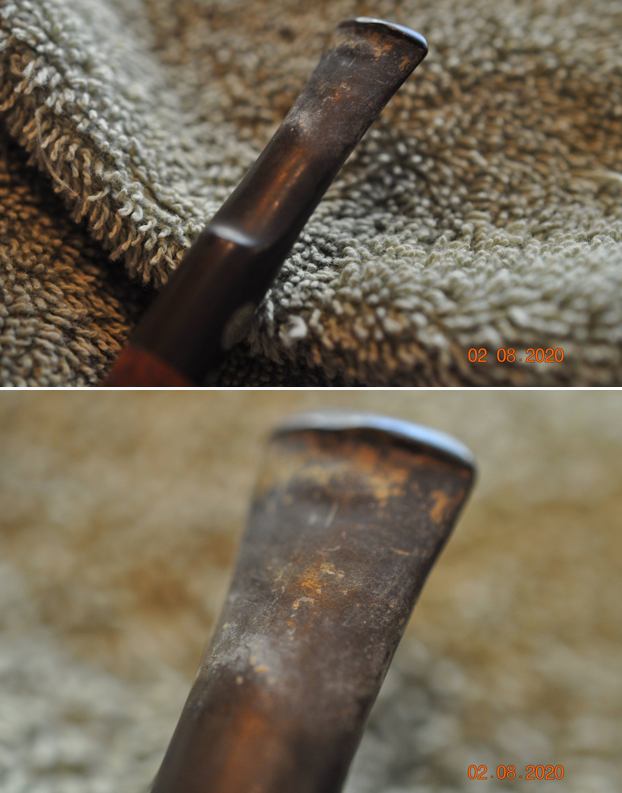
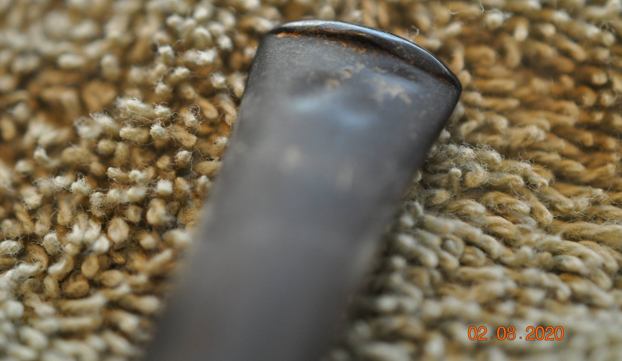
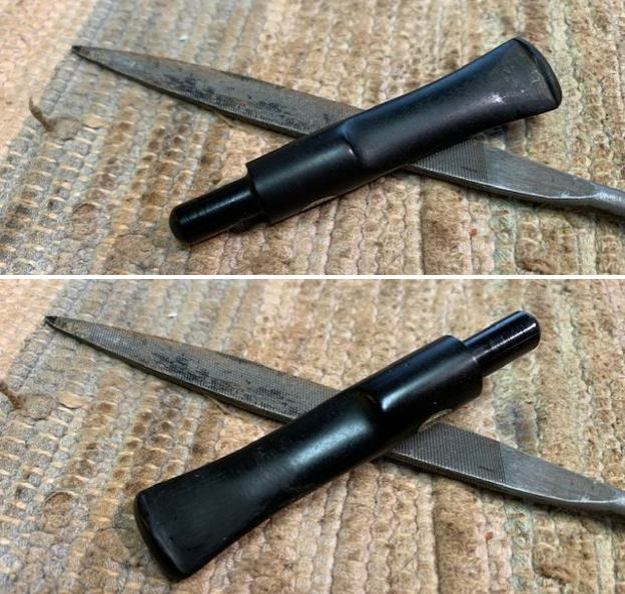
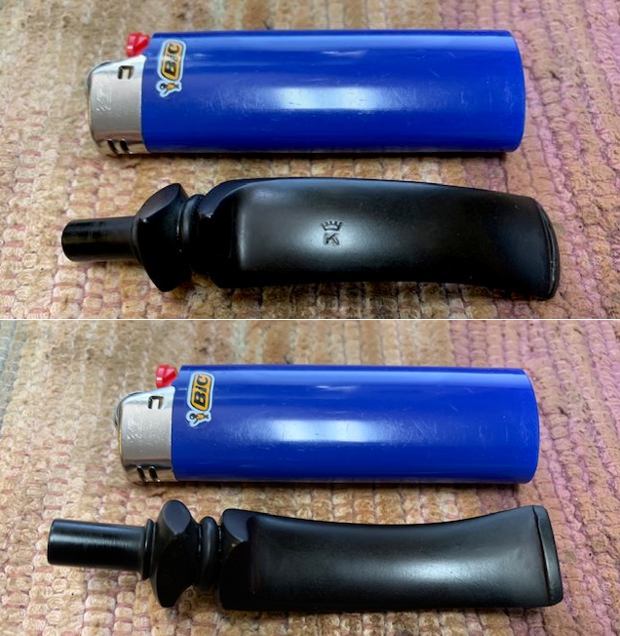
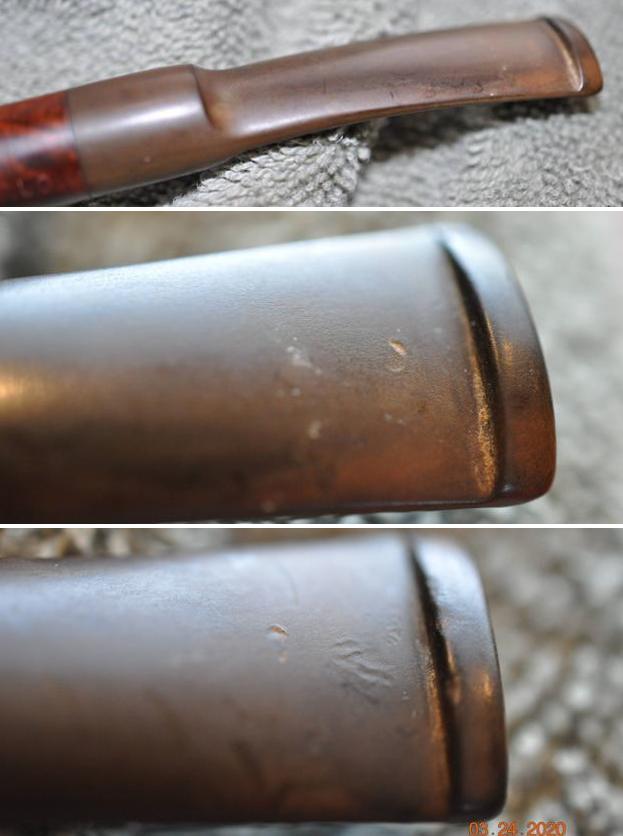
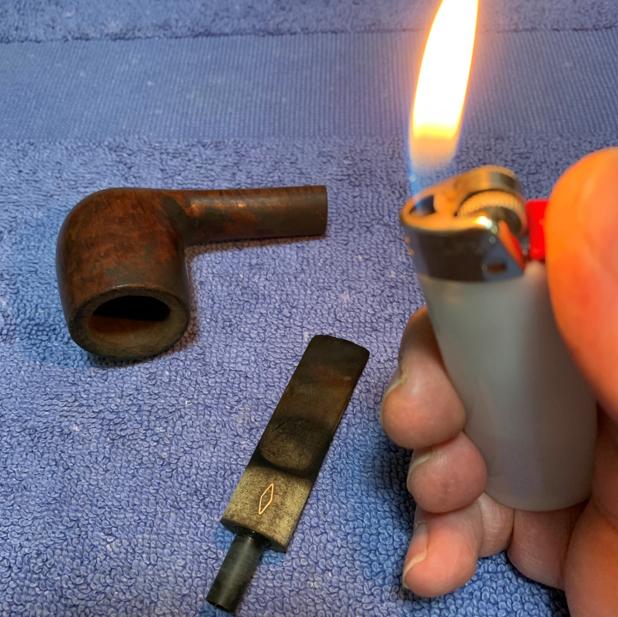
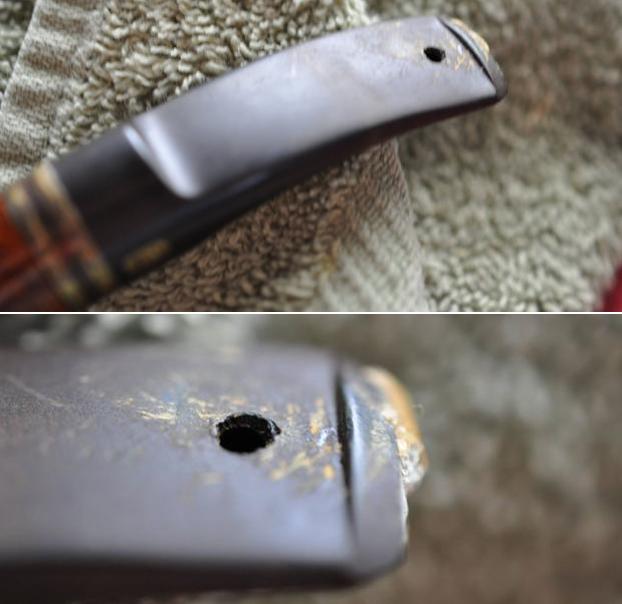
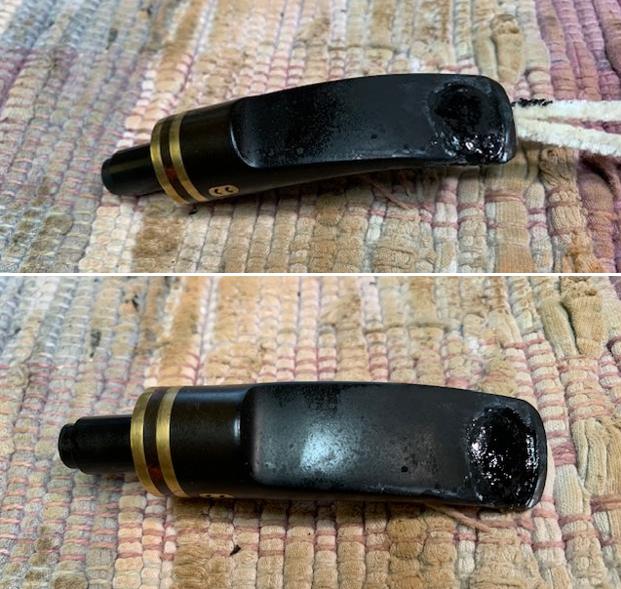
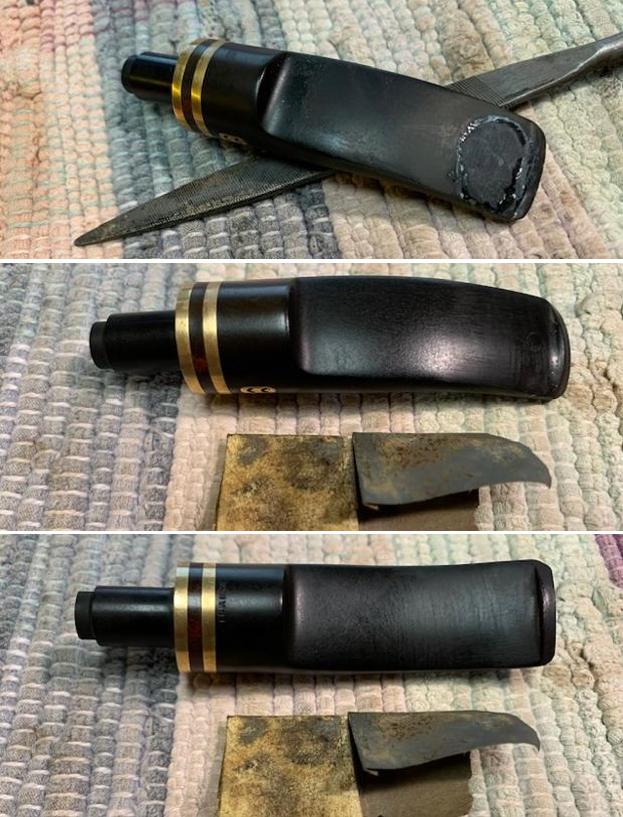
I set the bowl aside and turned my attention to the stem. I scrubbed the stem with Soft Scrub and cotton pads to remove the oxidation and calcification which seemed to reside on the surface of the vulcanite. I scrubbed out the tooth marks at the same time working the scrub deep into them. I was amazed at how clean it was when I had finished. 
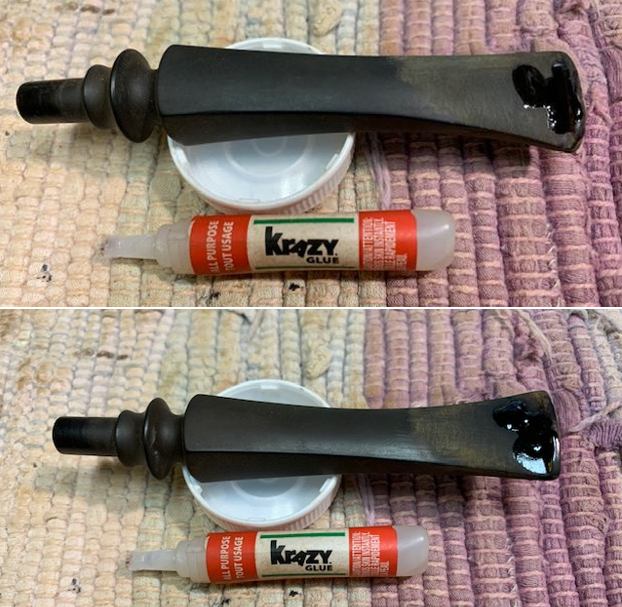
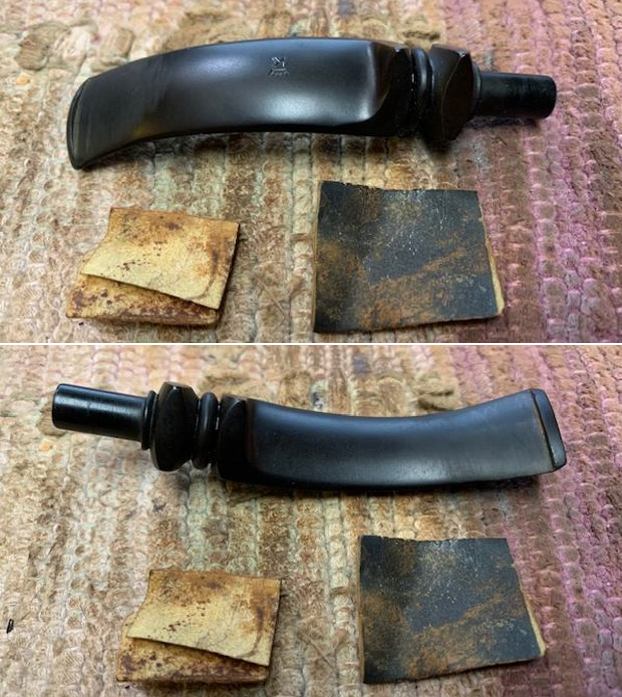
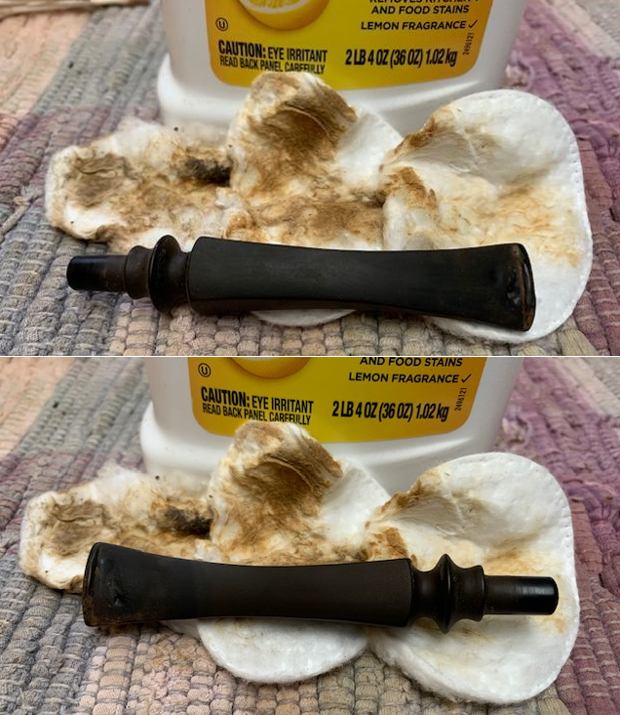
I “painted” the tooth marks with the flame of a lighter to lift them to the surface. The heat raised them significantly but not completely. I filled in the remaining marks with clear super glue and once it had cured flattened the repairs with a file and also recut the button edges. I sanded the stem with 220 grit sandpaper to blend the repairs into the surface and started polishing the stem with 400 grit wet dry sandpaper. 
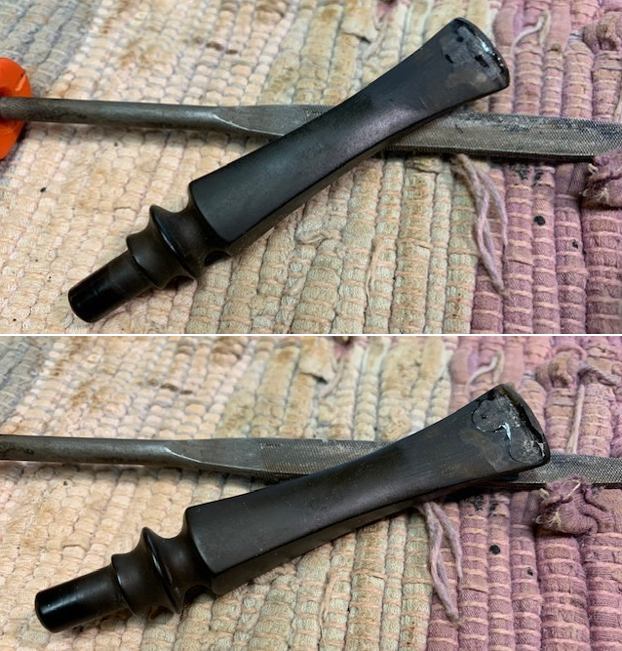
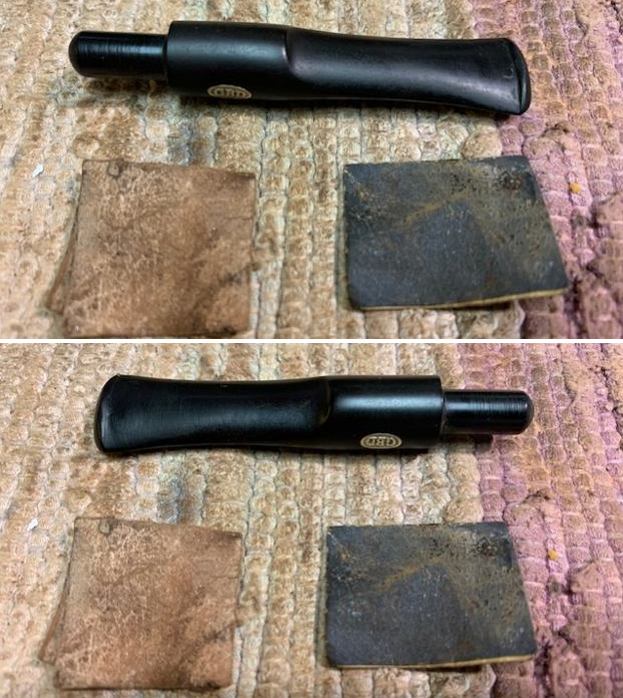
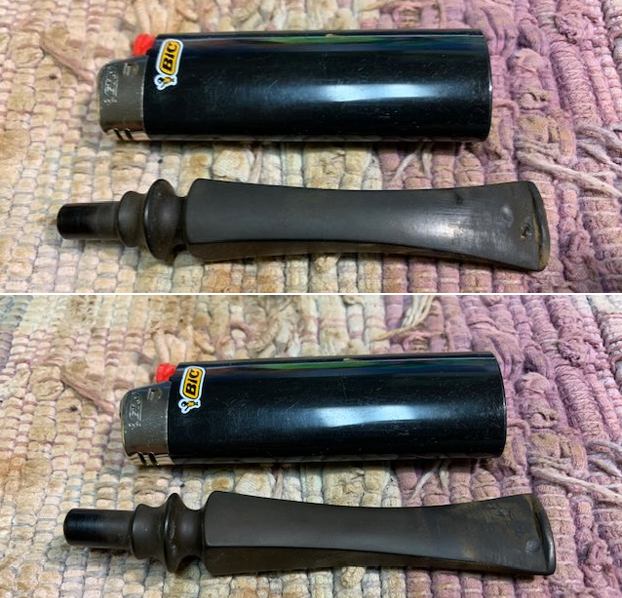
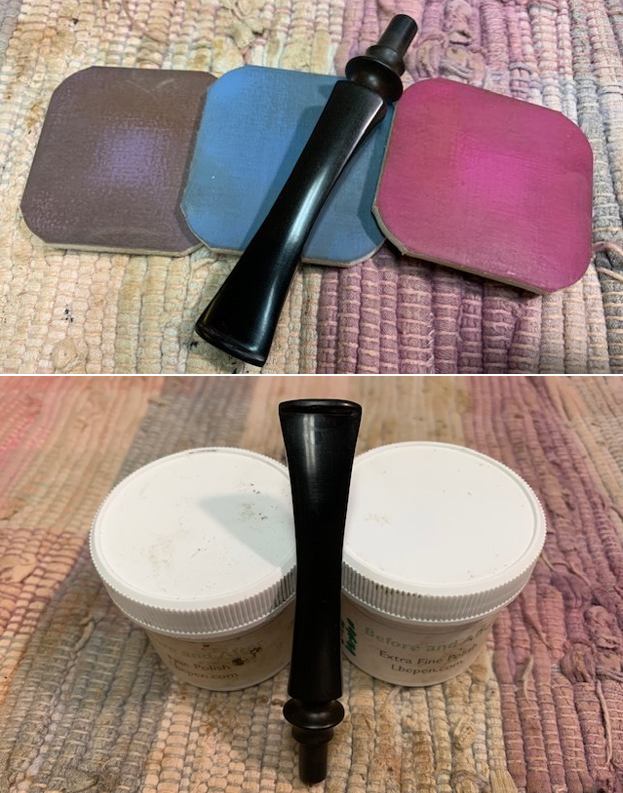
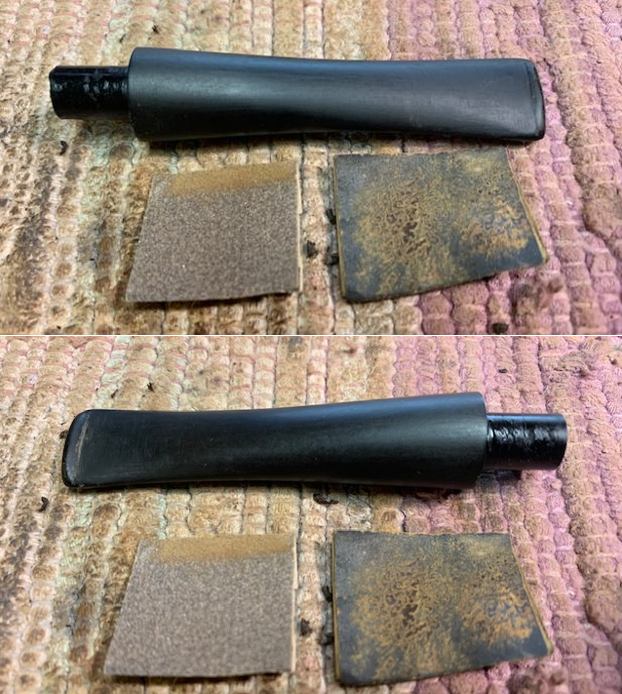
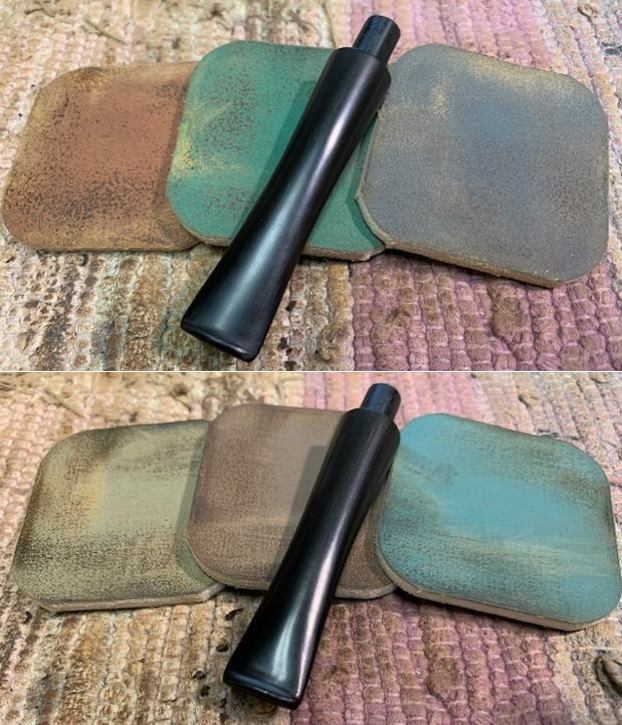
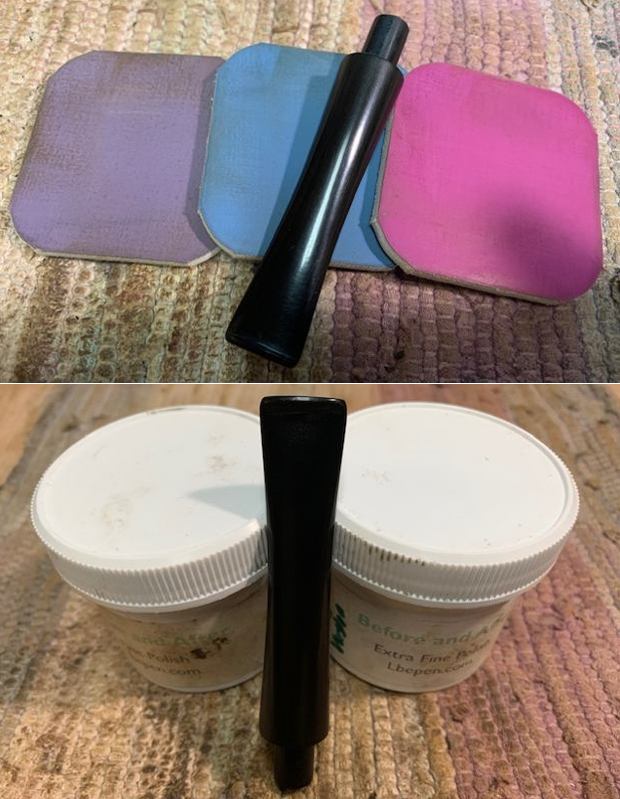
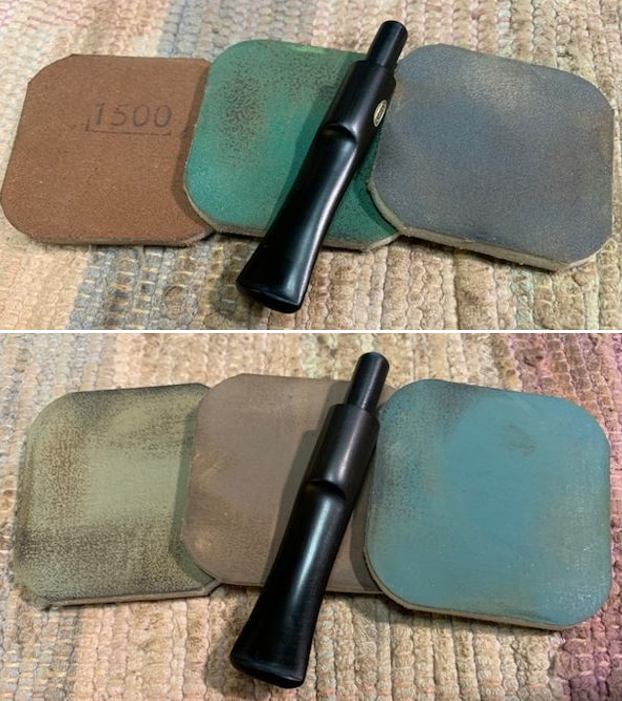
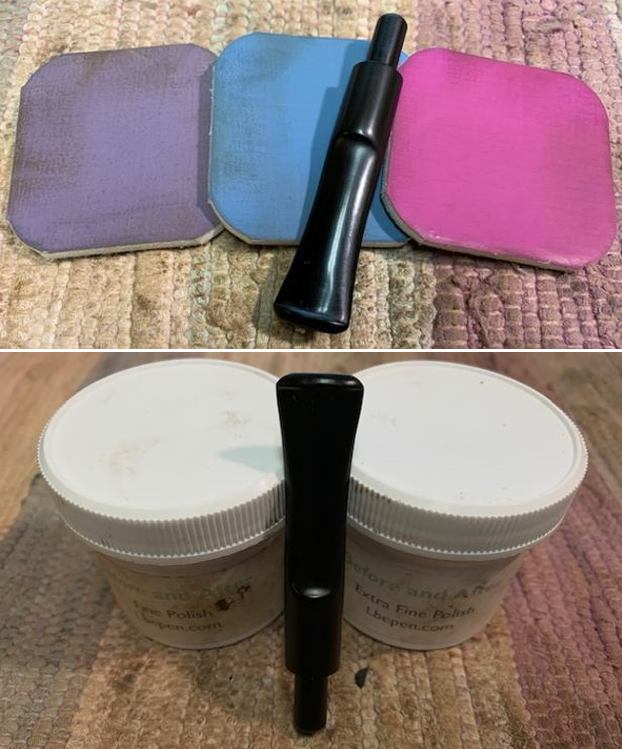
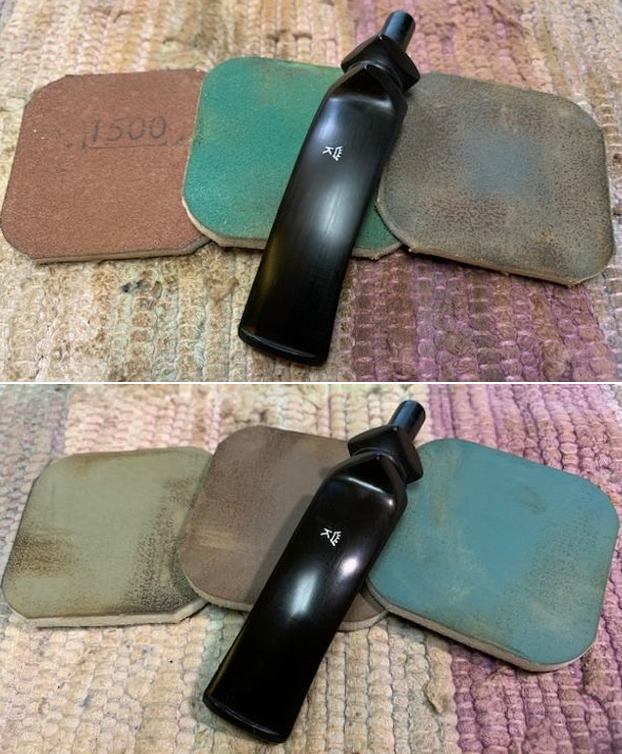
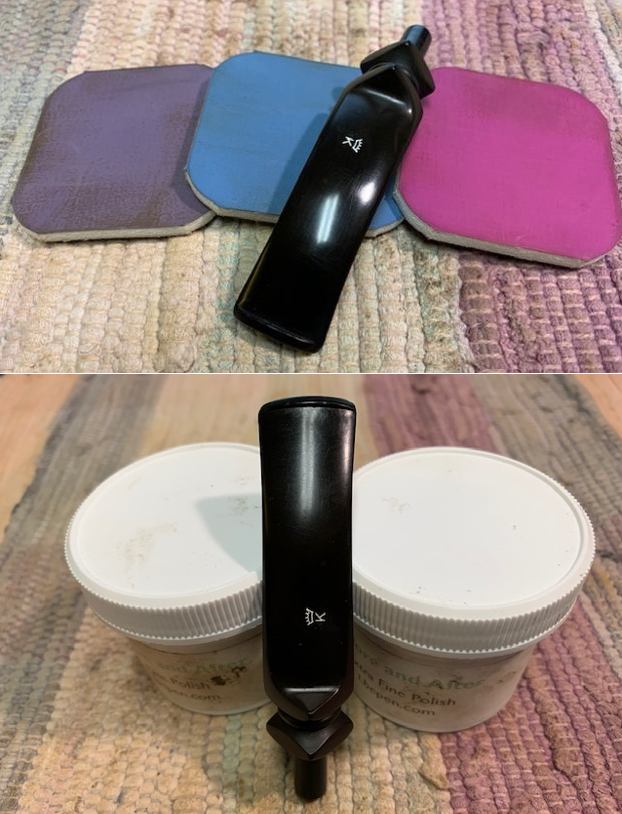
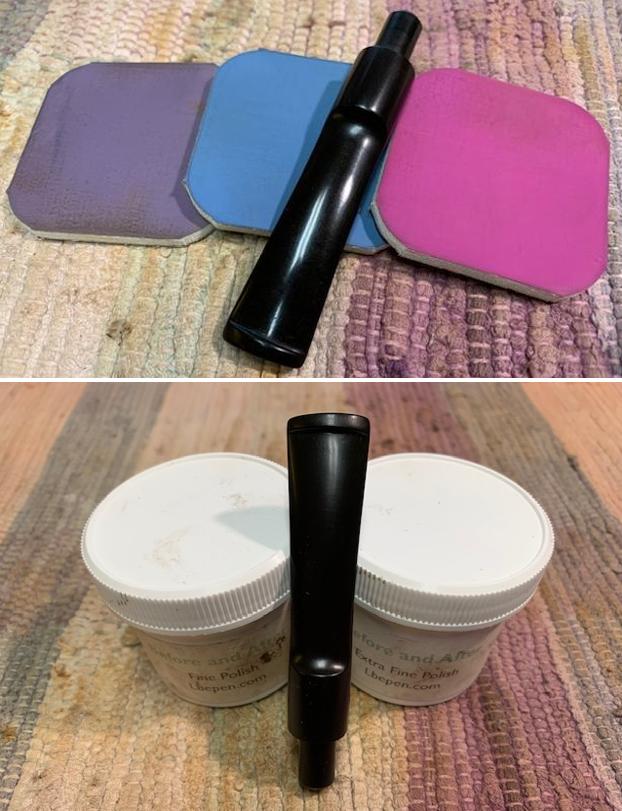
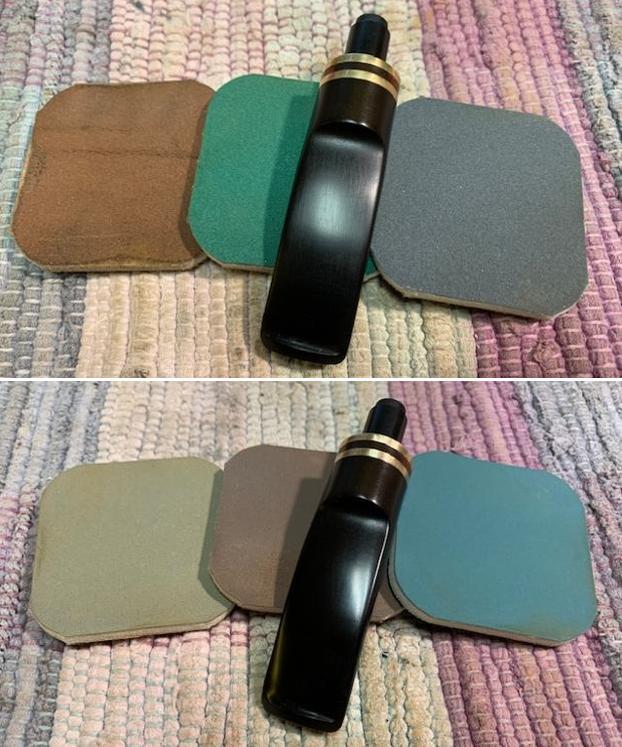
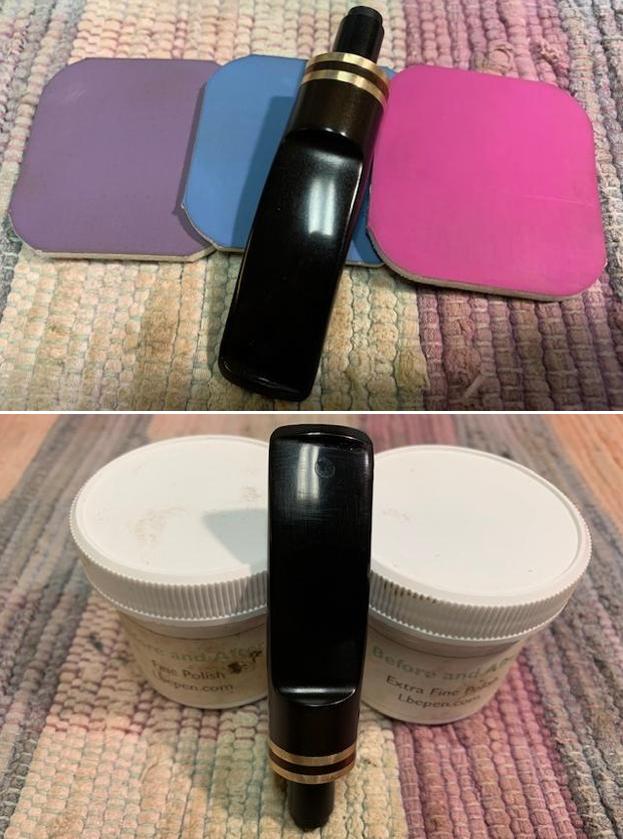
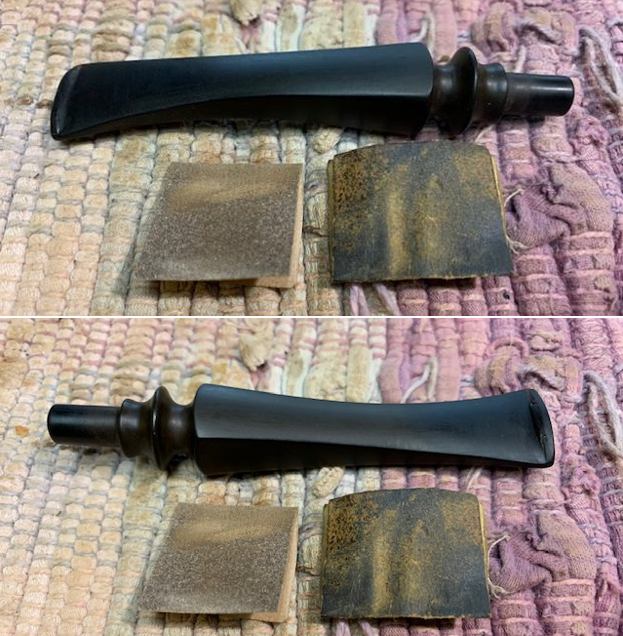
I polished the stem with micromesh sanding pads – wet sanding with 1500-2400 grit pads and dry sanding with 3200-12000 grit pads. I wiped the stem down after each pad with Obsidian Oil which cleans and protects the vulcanite. I polished it further with Before & After Pipe Stem Polish – both Fine and Extra Fine. I gave it a final wipe of Obsidian Oil and set it aside to dry. 
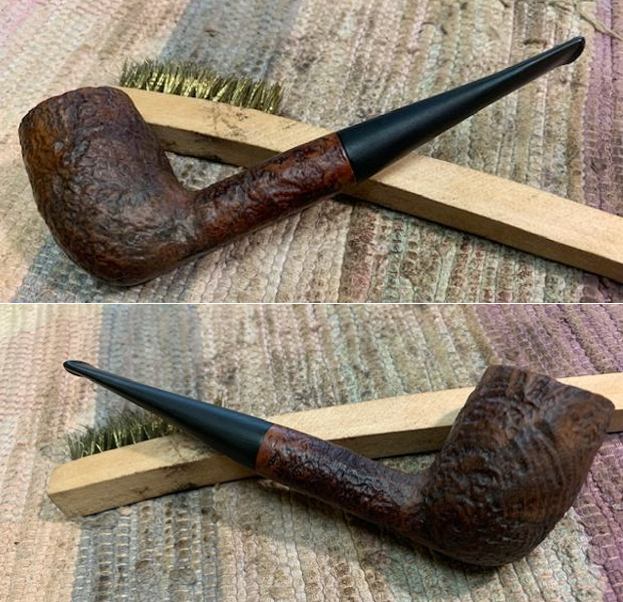
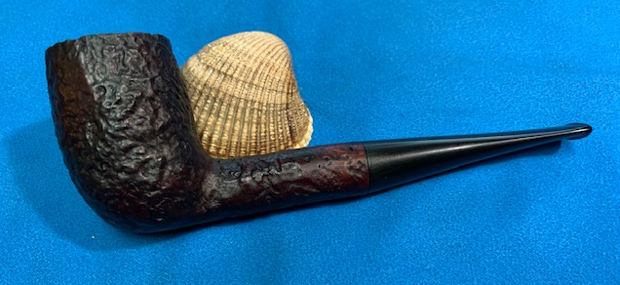
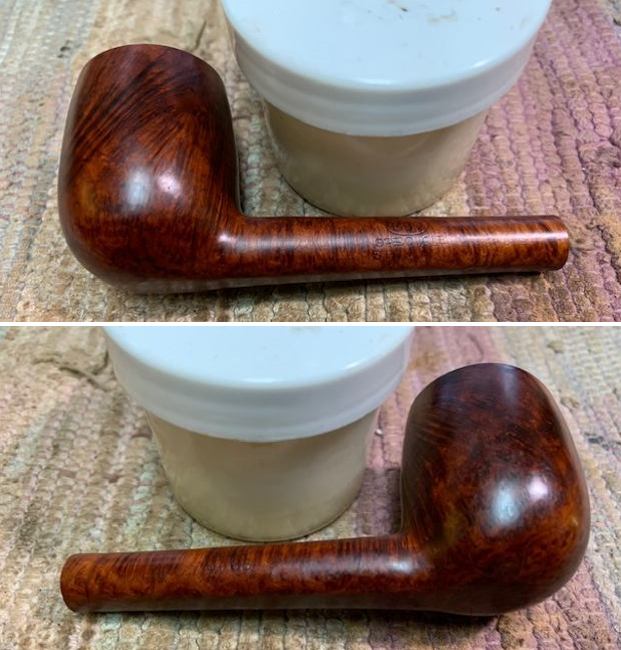
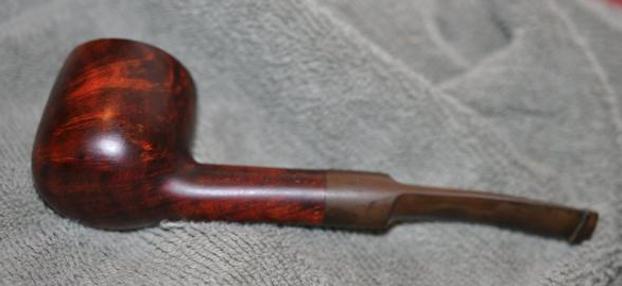
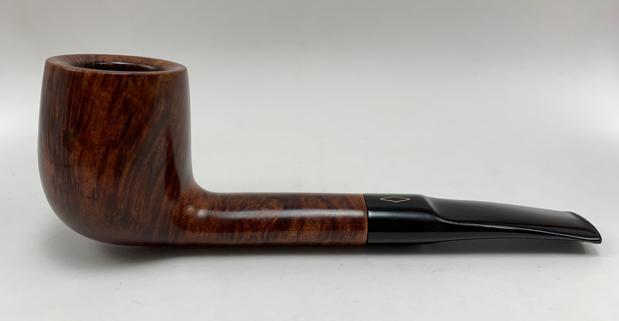
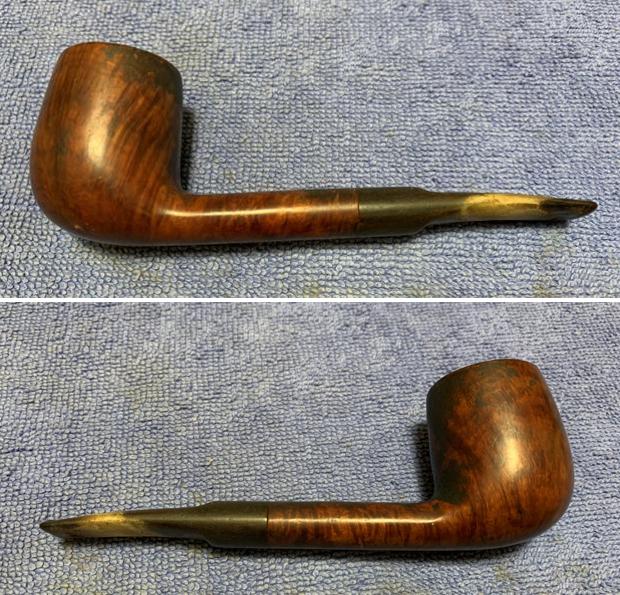
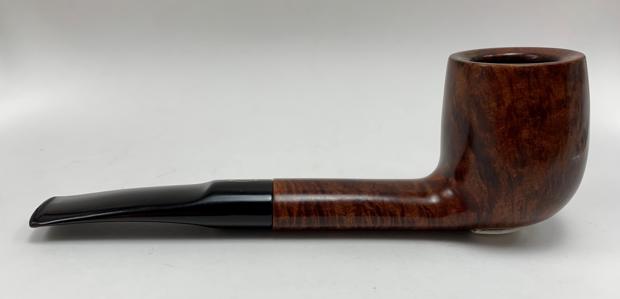
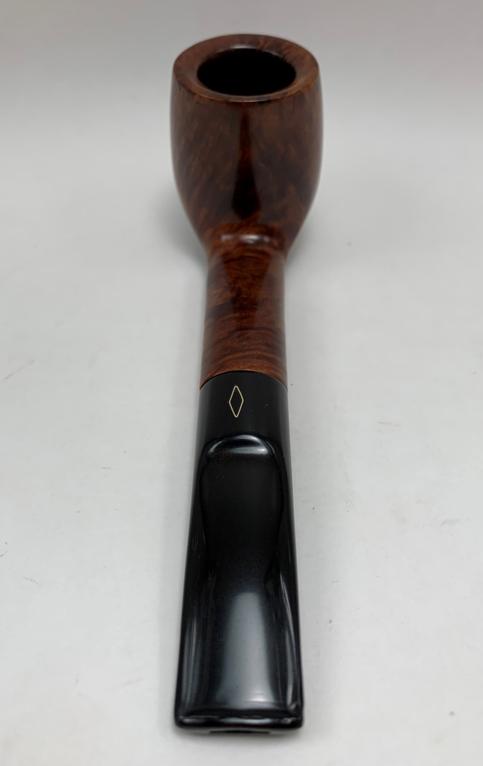
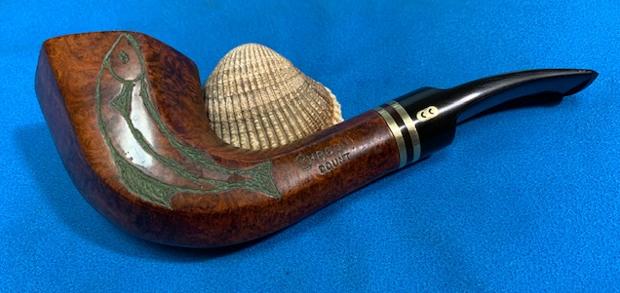
It was good to be finished with this labour of love. I would be glad to pack it up and send it back to Dewey. It looks amazingly good considering where it was when I started. Some may not agree with my method of repair but it has worked for me for many years. The cracks in the exterior of the briar were repaired and filled in. The bowl been restained and polished. I buffed the bowl and stem with Blue Diamond on the buffing wheel and the bowl began to shine. The Karl Erik A Hand Made Freehand looked almost like new (minus the dark line of the crack repair). The dimensions of the pipe are Length: 7 inches, Height: 2 ½ inches, Outer diameter of the bowl:1 ¾ inches, Chamber diameter: 7/8 of an inch. I know Dewey will be excited to get this back when I send it out next week. It is a beautiful pipe and with the repair and restoration it should continue to serve Dewey for a long time to come. Thanks for walking through this repair with me.
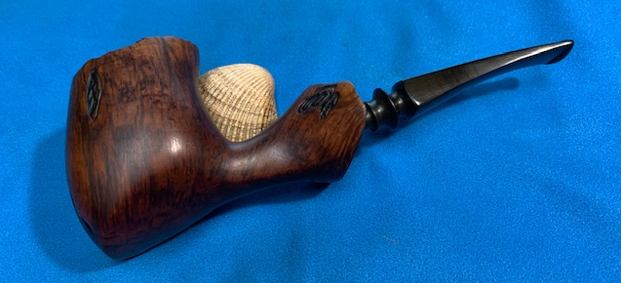
Refreshing A Guildhall 250 Straight Stemmed Dublin by Comoy’s


Post by Mike Belarde

Hello. Thank you for taking the time to read this post, and walk with me through a fun and enjoyable restoration project.

Pipe restoration has become a recent hobby for me, and I’ve been restoring estate pipes for my personal collection over the last year and a half.  Most of the techniques I use, I have gleaned from the Reborn Pipes and The Pipe Steward websites.  Both Steve and Dal have been a great source of info. Steve has also been very gracious, and has let me share a post on the site.

I have had this nice Dublin for several months now, and am finally getting a weekend to work on it and clean it up.  I purchased it through an online auction from a seller out of Minnesota. What caught my eye with this pipe was the interesting looking grain, and the shape.  I have several bent Dublins, but did not own a straight stemmed version.  The fact that the pipe was a Guildhall also caught my attention.  I own several Everyman Pipes, which are also Comoy’s seconds, and seem to be of good quality.

This pipe is marked with the Guildhall, and made in England stamps, and a shape number of 250.

I have provided a link to the Comoy’s article from Pipedia here, which lists Guildhall as a Comoy’s second.  https://pipedia.org/wiki/Comoy%27s.  Also, on the Pipedia site there is an interesting example of a Comoy’s advertisement briefly describing the Guildhall line, and I have included it below.According the Pipedia site’s shape chart reference, the shape number 250 corresponds to a straight stemmed, oval shanked, Dublin. This matches the pipe that I’m working on. When I received the pipe, it was in fairly good condition. The stummel had a light shine, but still looked slightly grimy. The rim had a light coating of carbon/lava overflow, and the chamber was lightly caked. From what I could see, the shank and draft seemed to be in good condition without a lot of tar and carbon build up. As you can see from the pictures, the pipe has some interesting cross grain and perhaps small birds’ eyes. Once the cleanup process is complete, I’m expecting that this will be a very attractive pipe, and a nice addition to my collection. The stamping on the pipe was in good condition and easily legible. The stem looked to also be in great condition. The stem was only lightly oxidized. There didn’t seem to be any tooth marks or chatter, but there was a small area of calcification around the button portion of the stem. Perhaps the prior owner had utilized softy bits? All in all, the pipe looked to be in great shape! The first step in the process is to address the internals of both the briar and stem, and then clean up the grime on the stummel, and the carbon build up on the rim.   Recently, I’ve been trying to clean the shank with a shank reamer and nylon shank brush dipped in alcohol first in order to save on the amount of pipe cleaners that I have been going through. My first step is to ream the bowl and clear as much of the cake that I can. I used two head sizes on the reamer, and gently cleared out the majority of the carbon. I transitioned next to a piece of 220 grit sandpaper wrapped around a small dowel to further sand out the chamber.I then turned my attention to the shank. I first run the shank reamer through the shank and gently turn it in a clockwise motion to remove any of the buildup in the airway.  This particular reamer is 3.5mm in diameter. I only want to remove the build up without removing any of the actual briar. I don’t want to alter and widen the draft on this pipe. On Steve’s advice, I have also attached a similar sized drill bit to a cordless drill and have gently turned other stummels by hand to clear the airways.I run a shank brush several times through the shank and rinse it under running water, then dip the bristles about half way up the brush. I found out the hard way that if you dip the entire brush in alcohol, you can inadvertently sprits the stummel with alcohol on the backstock, potentially damaging a good stain and finish.

Once that shank brush starts to come out only lightly soiled, I move on to cleaning the shank with bristled pipe cleaners, and then soft pipe cleaners. Thankfully this pipe was fairly clean, and I only ran through a handful of cleaners on the stummel and stem.Once that step is completed, I moved on to cleaning the shank and the chamber with cotton swabs dipped in alcohol. As you can see by the swabs, the pipe cleaners still left some tar in the shank. With the internals cleaned, I scrubbed the stummel with Oil Soap and an old toothbrush. I gently sanded some of the lava build up on the rim with a piece of 220 grit sandpaper, and removed the rest of the build up with a green scouring pad. Now that everything is clean, it looks like the rim and chamber are in great shape! I decided to de-ghost and clean the stummel further.  I inserted two tapered fluffy pipe cleaners through the shank and down into the chamber to act as a wick.  I have found using the fluffy pipe cleaners is easier for me than trying to fish an elongated cotton ball down the shank.  I then placed a cotton ball in the chamber and saturated it with isopropyl alcohol.   I resaturated the cotton ball every couple of hours and then left the stummel to sit overnight.

While the stummel was de-ghosting. I placed the stem in a small Tupperware container to soak overnight in Briarville’s Oxidation Remover solution.  After soaking overnight more of the tar build up was removed from the stummel. The stem also looked good. The light oxidation and calcium build up was removed, and this revealed a few light toothmarks on the underside of the stem. I decided to work on the stem first. I tried lifting some of the toothmarks with a Bic lighter. It raised the indentations some. I sanded the rest of the marks out with a small piece of 320 grit sandpaper.  After the toothmarks were dealt with I began to polish the stem. I took the stem through the progression of micromesh pads. After each pad I wiped down the stem with a cotton pad soaked in Obsidian Oil.  In the last step I polished the stem with Before and After’s Extra Fine Polish. The stem seemed to have come out pretty well. I moved on to the stummel. I started to polish the stummel with the micromesh pads and about halfway through the process decided that the stain looked a little worn and washed out. So, I decided to touch up the stain.

I mixed a one-to-one ratio of Cordovan Leather with alcohol to thin the leather dye down a bit.  Recently I have been finding that my dye jobs have been darkening the briar too much, and hiding a lot of grain. I wanted to see how this would turnout.  I like to apply the stain with a small hobby brush. I find it helps me to coat the stummel evenly. Once the stain was applied, I used a small tea candle to fire the briar and set the dye.  I let the stummel sit for a couple of hours and then removed some of the excess stain with a cotton pad soaked in acetone. After removing some of the excess stain with acetone I began to polish the stummel with the micromesh pad series. I wiped the briar down with a damp paper towel between each pad.Once I was finished with the micro pads, I worked some Before and After Restoration Balm into the stummel. It is always encouraging to see the grain come to life after applying the balm! I let the balm sit for about 10 minutes and then buffed the stummel with a cotton cloth. The last step in the process, I buffed both the stummel and stem with Red Tripoli and Blue Diamond.  I then gave both several coats of Carnauba wax and buffed them with a cotton cloth.

I am pretty please with how the pipe turned out.  Thanks for taking the time to read this post!

Resurrecting a Tired Warrior – a Butz-Choquin Casino 1575 Spigot Billiard


Blog by Steve Laug

The next pipe on the table is a Butz-Choquin Spigot style pipe with a polished nickel ferrule and a polished nickel stem end. The pipe had classic shape and at first glance looked very good. We purchased this from an online auction late in 2020 in Elgin, South Carolina, USA. It had a rich finish somewhere underneath all of the debris, grime and damage to rim edges and sides. There was a thick cake in bowl and lava on the rim top. The rim top was uneven with dips and burns on the top. The front of the bowl had significant burn damage from the rim top down into the surface of the briar on the front. The left side had the same issue and had been worn away over time so that it was canted inward making that part of the bowl thinner on the side. The pipe is stamped on the left side of the shank Butz-Choquin at an angle [over] Casino and on the right side it was stamped St Claude in an arch over France [over] the shape number 1575. The nickel ferrule and stem end were oxidized and scratched. The stem was oxidized but had deep tooth marks on the top and underside near the button. The deepest marks were on the underside with one that was almost a bite through. The BC logo on the topside was faded and needed to be touched up. Jeff took photos of the pipe before he started his clean up work. I like to have an idea of how the pipe was smoked before we got it and what the bowl and rim top looked like. Jeff always takes some photos of the bowl and rim from various angles to show what it looked like. This bowl and rim top were in rough condition. The stem was a real mess with deep tooth marks and damage on both sides. He took a photo of the nickel ferrule and stem end to give a picture of their condition when we received the pipe. It definitely needs work. He took photos of the sides and heel of the bowl to give a sense of the grain on the pipe. You can also see the damage around the top front and sides in the photos. Jeff captured the burn damage on the front of the bowl in the next photo and some of the nicks and gouges in the sides of the bowl in the second photo. There is work to do on this one!The next photos show the stamping on the left and right side of the shank. It is clear and readable as noted above. Jeff also captured the BC stamp on the topside of the stem. I turned to Pipephil.eu and read through the listing on the brand. It is always a quick reminder to me of the basics of a brand. The Casino line was not listed there. I include the short summary of the history below.

The origin of the brand reaches back to 1858 when Jean-Baptiste Choquin in collaboration with his son-in-law Gustave Butz created their first pipe in Metz (France). Since 1951 Butz-Choquin  is a brand of the Berrod-Regad group (Saint-Claude, France).

Jean Paul Berrod managed the company from 1969 to 2002 when he retired and sold the corporate to Mr Fabien Gichon. Denis Blanc, already owner of EWA, took over the S.A. Berrod-Regad in 2006.

I could not find anything specific in Pipedia about the Casino line, but a simple search on the internet will show many different shapes available in the Casino line from Butz-Choquin.   Now it was time to work on the pipe.

Jeff had done a great cleanup on the pipe. He reamed the bowl with a PipNet pipe reamer and followed up with a Savinelli Fitsall pipe knife to remove the cake. He scrubbed out the mortise and the airway in the shank and the stem with alcohol, cotton swabs and pipe cleaners. He scrubbed the bowl exterior with a tooth brush and Murphy’s Oil Soap to remove the grime on the finish of the bowl and the lava from the rim top. He rinsed it under running water. One of the benefits of this scrub is that it also tends to lift some of the scratches and nicks in the surface of the briar. He dried it off with a soft cloth. He cleaned the internals and externals of the stem with alcohol, pipe cleaners and cotton swabs. He soaked the stem in Briarville’s Pipe Stem Deoxidizer and rinsed it off with warm water and cleaned out the airway in the stem with alcohol. When I received it the pipe looked very good.  I took a photo of the rim top and stem to show the condition. The rim top and the inner edge of the bowl were in rough shape. The outer edge had a lot of burn damage on the front and the left side. The rim top and inner edge also has significant burn damage and was not flat. The stem was vulcanite and there were some deep tooth marks and chatter on both sides ahead of the button. The stamping on the pipe is clear and readable as noted above. The BC logo on the stem is deep and needs to be repainted with white (as seen in the photo of the top of the stem above).I started my work on this pipe by dealing with the damage to the outer edge of the bowl and rim top. I topped the bowl first on a topping board with 220 grit sandpaper. I flattened out the rim top and made the top of the rim consistently flat. I removed much of the burn damage to the bowl top. I worked on the damaged areas on the left side and front of the bowl by building them up with briar dust and clear super glue. I built up the left side of the inner edge with super glue and briar dust as well. There the burn damage was shallow but it made the bowl out of round. I topped it once again to smooth out the repair on the rim top. I used a piece of dowel wrapped in sandpaper to sand the inner edge of the rim and smooth out the repair in that area. It worked well.I smoothed out the repairs on the left and front of the bowl with 220 grit sandpaper and blended them into the surrounding briar.I gave the inner edge of the bowl a slight bevel with 220 grit sandpaper to help reshape it and bring it back to round. The rim top and edges looked good at this point in the process.I restained the pipe with a light brown aniline stain. I applied it with a dauber and flamed it with a Bic lighter to set it in the grain. I repeated the process until I was happy with the coverage.Once the stain had dried I wiped the bowl down with 99% isopropyl alcohol to make it a bit more transparent. I find that doing a wipe down at this point evens the finish before I start polishing it with micromesh.I polished the briar with 1200-1500 micromesh sanding pads and wiping it down with damp cloth after each sanding pad. As I worked through the cycle of pads the shine developed with each change of pad. The damage on the rim sides looks better. I left some of the nicks and sandpits as they really are a part of the pipe’s story. I rubbed the bowl and shank down with Before & After Restoration Balm. I worked it into the surface of the bowl sides and shank with my fingertips to clean, enliven and protect the briar. I let the balm sit for 10 minutes, then buffed with a cotton cloth to raise the shine. The Balm did its magic and the grain stood out on the briar. I set the bowl aside and turned my attention to the stem. I decided to address the tooth marks on the stem. They were ragged, with sharp edges and heat did not lift them at all. I filled them in with clear super glue. I let the repairs cure and once they hardened I flattened and shaped them with a small file. I sanded them with 220 grit sandpaper to blend them into the surface of the stem. I started the polishing of the stem with 400 grit wet dry sandpaper. I touched up the BC stamp on the left side of the stem with white acrylic nail polish. I worked it into the stamp with a tooth pick and then sanded off the excess once it had dried with a 1500 micromesh sanding pad.I polished it with micromesh sanding pads – 1500-12000 grit pads. I wiped it down with Obsidian Oil after each sanding pad. I used Before & After Pipe Polish – both Fine and Extra Fine to further polish the stem. The photos below show the polished stem. This Butz-Choquin Casino 1575 Spigot Billiard with a polished nickel ferrule and stem cap on a vulcanite stem is a great looking pipe now that it has been restored. It was a lot of work and I took a decision to leave some of the journey of the pipe in the finish so it is far from flawless but it is a beauty. The rich browns of the stain made the grain come alive with the polishing and waxing. I put the stem back on the bowl and carefully buffed the pipe with Blue Diamond on the buffing wheel using a light touch on the briar. I gave the bowl and the stem multiple coats of carnauba wax on the buffing wheel and followed that by buffing the entire pipe with a clean buffing pad. I hand buffed the pipe with a microfiber cloth to deepen the shine. The finished BC Casino 1575 Spigot really is a beauty and fits nicely in the hand and looks very good. Give the finished pipe a look in the photos below. The dimensions of the pipe are Length: 6 ¼ inches, Height: 1 ¾ inches, Outside diameter of the bowl: 1 ¼ inches, Chamber diameter: ¾ of an inch. The weight of the pipe is 1.87oz./53grams. This beauty will be going off to its new trustee in Michigan along with several other nice pipes. Thanks for reading this blog and my reflections on the pipe while I worked on it. There are many more to come!

Resurrecting a Beat up Warwick Sandblast Billiard


Blog by Steve Laug

We picked up this next pipe back in 2017 from an auction in Rochester, New York, USA. It has been around a long time. Jeff cleaned it up in 2017 and I have had it sitting here since then. I am finally getting around to working on it. It is stamped on the underside of the shank and reads Warwick [over] Made in London England. There is a shape number 1 next to the stem/shank junction. It is a sandblast billiard. The stamping and the shape name and number make me wonder about a connection to Sasieni but I am not certain of that. The bowl was heavily caked and the sandblast on the rim top was almost filled in with the lava overflow. It appeared that there was damage on the rim top as it was no longer flat looking. That would become more clear as it was cleaned up. The sandblast around the bowl and shank was dirty and filled with debris and dust. There was also darkening around the briar from hand oils. The stem was oxidized, calcified and had tooth marks on the top and underside near the button. Jeff took photos of the pipe before he started the clean up work. He took photos of the rim top and stem to give a feel for the overall condition of the pipe before he started. You can see the thick lava coat filling in the rim top but you can also see the unevenness of the top of the bowl and the edges. There is some definite damage under the grime. The stem is oxidized, calcified and has tooth chatter and marks on the top and the underside of the stem near the button. He took some photos of the sides and heel of the bowl to capture the deep and craggy sandblast around the bowl. It really has some beauty to the blast.He captured the stamping on the underside of the shank in the next photo. It is readable though the left side of the stamping is more faint that the rest of the stamping toward the right. It reads as noted above. Now we would need to make a connection to the maker. I turned to Pipephil’s site (http://pipephil.eu/logos/en/logo-w1.html) to see what I could learn about the brand. What I found was a pipe stamped Warwick but the font was slightly different. This one was made in Italy and said so. The one I was working on was stamped Made in London England.On the side bar it had a note that I copy as follows: A sub brand of Comoy or Singleton & Cole. Not to be confused with Warwyck. I turned to the section on Comoy’s to see if there was any note for this stamping. There was not. I also turned to the section on the site on Singleton & Cole (http://pipephil.eu/logos/en/logo-s7.html). I have included a screen capture of the section that shows a Singleton Warwick that is stamped Made in England. The Warwick stamp is similar but the one on the pipe I am working on is heavier. So the hunt continues.I searched on Google and found a link on a sale site The Collection Hero that linked Warwick to a BBB pipe. https://pipes.collectionhero.com/view_item.php?id=43025&ekeywords=BBB. I have included that photo as well. The sale site says that the pipe is stamped BBB Own Make “Warwick”. It has a deep rugged sandblast but the finish is quite different from the one that I am working on. There also were no photos showing the stamping on the shank so I had nothing to compare my pipe with.

I was not convinced. So far I have seen the name attached to Comoy’s, Cole & Singleton and now BBB and none of them are conclusive. I still needed to do some more digging.

I did a bit more digging and found the name Warwick attached to Sasieni on a  pipe on smokingpipes.com (https://www.smokingpipes.com/pipes/estate/england/moreinfo.cfm?product_id=89779). It is described as follows:

…An old Sasieni pipe like this on an update. Named after a town, Warwick, this piece is a true part of English charm, stained beautifully, and a lovely example of a Sasieni patent.

I looked up Sasieni seconds on Pipedia (https://pipedia.org/images/e/e4/Sasieni_Seconds.jpg) and found a chart that listed the various names. At the bottom of the alphabetical list is the name Warwick.Now I had all of the options in front of me and I was still no further ahead than when I started. I seemed to be able to link it to either Singleton & Cole or Sasieni. I would probably never know for certain but at least I knew it was an old English made pipe. Now it was time to work on the pipe.

Jeff had cleaned up the pipe very well as usual. He has detailed his process other places so I will summarize it here. He reamed the pipe with a PipNet Pipe Reamer and cleaned up the remnants with a Savinelli Fitsall Pipe Knife. He scrubbed the bowl and rim top with undiluted Murphy’s Oil Soap and a tooth brush. He rinsed it under running warm water to remove the soap and grime. He cleaned out the inside of the shank and the airway in the stem with alcohol, cotton swabs and pipe cleaners. He soaked the stem in Briarvilles Pipe Stem Deoxidizer and rinsed it off with warm water. I took photos of the pipe once I received it. The rim top had some damage and darkening on the top. The front right and left sides were almost smooth and the sandblast was gone. The sandblast on the back side was deeper and also had some damage. The inner edge of the bowl was damaged at the front. The stem surface looked good with light tooth marks and chatter on both sides near the button.   I took a photo of the stamping on the underside of the shank. The stamping was faint on the left side of the stamp and the stamping on the right side was more readable as noted above. You can see the shape number 1 near the shank/stem union. I removed the stem and took a photo of the pipe to give a sense of the whole. The stem is tapered. I started my work on the pipe by cleaning up the sandblast with a brass bristle wire brush. I worked it over the rim top and the blast on the sides and underside of the bowl until I cleaned up the blast. It looked much better once I finished with the brush. The rim top had other issues that I would need to address as well. I took some photos of the rim top to try and capture the damage to the rim top. It is no longer flat and the top from the back is at an angle and the sides have dips and valleys – it is a real mess.I would need to flatten the rim top on a topping board to get things flat again. Then I would need to try to duplicate the sandblast finish on the rim top. I topped the bowl on a topping board with 220 grit sandpaper. I started the rustication process with the tool for rustication that I made from a Philips screwdriver. I followed that up with a Dremel and burrs to rusticate the rim top and give it the appearance of a sandblast. I restained it with a Maple and Walnut stain pen to approximate the colour of the bowl.To deal with the darkened areas around the bowl sides and the washed out stain on the rest of the bowl I restained it with a light brown aniline stain. I applied it with a dauber and then flamed it with a lighter to set it in the briar. I repeated the process until I was happy with the coverage.I buffed the bowl with Blue Diamond on the buffing wheel and worked some Before & After Restoration Balm into the sandblast finish my fingertips and a horsehair shoe brush to clean, enliven and protect the briar. I let the balm sit for a little while and then buffed with a cotton cloth to raise the shine. The product brought the briar to life and gave some dimensionality to the sandblast. I set the bowl aside and turned my attention to the stem. I “painted” the tooth marks with the flame of a lighter and was able to lift them significantly. I filled in the remaining marks with clear CA glue. Once it cured I used a small file to recut the edge of the button and to flatten out the repairs. I sanded out the repairs with a folded piece of 220 grit sandpaper and then started polishing it with 400 grit wet dry sandpaper. I polished the stem with micromesh sanding pads – dry sanding with 1500-12000 grit pads. I rubbed the stem down between pads with Obsidian Oil. I finished polishing using Before & After Stem polish – both Fine and Extra Fine. I rubbed the stem down a final time with Obsidian Oil. The Warwick Sandblast 1 Sandblast Billiard is a beautiful pipe with an great looking, rugged sandblast finish. The blast is very nice and the rich brown stain on the briar goes amazingly well with the polished black vulcanite taper stem. The combination works to create a pipe that is a pleasure to look at and is comfortable in  the hand. The dimensions of the pipe are Length: 5 inches, Height: 1 ¾ inches, Bowl diameter: 1 ¼ inch, Chamber diameter: ¾ of an inch. The weight of the pipe is 1.13 ounces/35 grams. Considering what the pipe looked like when we started, the now resurrected pipe is quite amazing looking. I will be adding it to the British Pipe Makers section of the rebornpipes store shortly. If you are interested in adding it to your collection send me a message on Facebook or an email. Thanks for walking through the process with me. Cheers.

Reworking a Damaged French Made GBD Speciale Standard 9465 Liverpool


Blog by Steve Laug

Jeff and I purchased the lovely long shank GBD Liverpool from a fellow in Brazil, Indiana, USA. The grain on the pipe is a nice mix of flame, swirled and birdseye that works well with the brown stains of the briar and the black of the saddle stem. The rim top is crowned with a bevel inward and has some significant damage on the front right outer edge and top. The repeated burning of that area with a lighter flame has left behind a deep dip and burn that will need to be dealt with. It was hard to see with the thick cake in the bowl and the veritable eruption of lava over the top of the rim but it was very present. The finish was quite dirty with grit, grime and oils ground into the surface of the bowl and shank. The shank is stamped on both sides and on the left it reads GBD in an oval [over] Speciale [over] Standard. On the right side it reads France [over] the shape number 9465. The vulcanite stem was lightly oxidized and well dented with tooth marks and chatter on both sides near the button. The button area was worn as well. There is a GBD brass oval roundel on the left side of the saddle stem. Jeff took photos of the pipe to capture its condition when it arrived at his place. It was going to take some work to bring this one back to life. But both of us thought that it would be worth it. Jeff took photos of the rim top and bowl that show the cake and overflowing lava on the top and edges of the bowl. It is really hard to know what it looks like under all of that. We have learned that it with either be badly damaged or it will have been well protected. Only cleaning it off would reveal which result was on this pipe. You can also see the burn damage on the right front outer edge. The stem had a lot of tooth chatter and marks that are clear in the photos that follow. There is some oxidation and the calcification on the stem surface. He took photos of the sides and heel of the bowl to show condition of the briar. You can see the dust and debris ground into the bowl. The burn damage on the outer rim edge of the right front is more apparent from the side view in the first photo. The grain is still quite nice. He took photos of the stamping on the sides of the shank. It was faint but was still was clear and readable as noted above. The brass GBD roundel looked good as well. I always like to be able to set the pipe I am working on in its historical setting so I turn to Pipedia (https://pipedia.org/wiki/GBD) and read through the brand history. Toward the middle of the article I found what I was looking for. I quote below:

The Paris factory moved to Saint-Claude in 1952. Since 1981 the majority of GBD pipes come from the English factory.

The premium lines of GBD offered very good values, and are considered amongst the most affordable high end pipe of the 1960’s and earlier and a rival in quality, design, and price to Dunhill. Smokers’ Haven was the main retail supplier for GBD’s in the US until the early 1980’s.

GBD produced consistently well made pipes, almost entirely of Algerian or Grecian briar. In the late 1960’s to late 1970’s, they introduced the “Collector” and “Unique” lines, made primarily by Horry Jamieson, who had carved for Barling for many years, and was skilled in freehand design. Older GBD pieces are excellent smokers and unique in design. They did an excellent executions of classic pipe shapes, as well as some beautiful freehands in the “Unique” line. [2]

The following list comprises the better grades in descending order:

Pedigree, Pedigree I, Pedigree II, Straight Grain, Prodigy, Bronze Velvet, Virgin, Varichrome, Prestige, Jubilee, New Era, Prehistoric, International, Universe, Speciale Standard, Ebony, Tapestry, New Standard, Granitan, Sauvage, Sierra, Penthouse, Legacy, Concorde.

Since the pipe I was working on was made in France I knew that it was made either in Paris before 1952 or in St. Claude after that date and before 1981 when production moved to England. I also new that I was dealing with one of the better grade pipes with the Speciale Standard stamp.

I then followed the links included to a listing of the shapes and numbers on the GBD pipes (https://pipedia.org/wiki/GBD_Shapes/Numbers). The pipe I was working on was labeled by GBD as a 9465 which is a Liverpool with a round shank. Now it was time to work on the pipe itself. Jeff had cleaned up the pipe with his usual focus on detail. He reamed the pipe with a PipNet pipe reamer and removed the rest of the cake with a Savinelli Fitsall Pipe Knife. He scrubbed the exterior of the bowl with undiluted Murphy’s Oil Soap with a tooth brush and was able to remove the thick lava build up on the rim top. He rinsed it under running warm water to remove the soap and grime. He cleaned out the inside of the shank and the airway in the stem with alcohol, cotton swabs and pipe cleaners. He soaked the stem in Briarville’s Stem Deoxidizer and rinsed it off with warm water. I took photos of the pipe once I received it. The rim top cleaned up really well. The rim top, inner and outer edges of the bowl other than the burn damage on the front right were in good condition. The crowned inner edge also has some rim darkening and burn damage on the front right as well. The stem surface looked good with some large and deep tooth marks and chatter on both sides near the button.  He took photos of the stamping on the sides of the shank. It was faint but readable as noted above.I removed the stem and took a photo of the pipe to give a sense of the whole.  Now it was time to do my work on the pipe. I decided to begin by dealing with the damage on the front of the rim top and bowl. I sanded it slightly to give a clear picture of the damage in the photo below. I have marked it in red to help identify the damaged area.Now I had a decision to make on this repair. I could top the bowl and shorten the height of the entire bowl to accommodate the damage on the front of the rim. To me this would look awkward as the dip is quite deep. The other option to me was to build up the dip in the rim top and edge with briar dust and clear CA glue (super glue) to the same height as the rest of the bowl. I decided to build up the bowl top. To begin the process I topped the bowl to give me a flat surface and to remove the other damage to the rim top.I wiped off the burned area with alcohol on a cotton pad to clean off any debris. I layered on the first batch of CA glue and then used a dental spatula to put briar dust on top of the glue. I repeated the process until I had the rim top level. Once the repair cured I topped it once again to make sure that the repaired area matched the rest of the rim top. I used a topping board and 220 grit sandpaper.I took photos of the rim top and bowl front to show the repair. It is dark and still needs a lot of work but it is at least the right height and is smooth. You can also see the slight bevel that was on the inner edge of the rim on the rest of the bowl. I would need to continue that on the repaired area to match.I worked on the inner beveled edge with a folded piece of 220 grit sandpaper to give it a deep bevel. I also sanded the rim top repair to further smooth it out. The repair is starting to look good at this point.  I polished the briar with micromesh sanding pads – dry sanding with 1500-12000 grit sanding pads. I wiped it down after each pad with a damp cloth to remove the sanding debris and dust.   I restained the rim edge and top with a combination of Maple and Walnut stain pens to blend the colour to the rest of the bowl. The rim top looked darker but it looked much better than when I started the repair.I rubbed the bowl and shank down with Before & After Restoration Balm. I worked it into the surface of the bowl sides and shank with my fingertips to clean, enliven and protect the briar. I let the balm sit for a little while and then buffed with a cotton cloth to raise the shine.    I set the bowl aside and turned my attention to the stem. I “painted” the surface of the stem with the flame of a lighter to lift the tooth marks. It worked very well and many of the marks lifted. I filled in the remaining marks with clear CA glue and let the repairs cure. I used a small file to flatten out the repairs. I sanded the stem with 220 grit sandpaper to blend the repairs into the stem surface. I started the polishing with 400 grit sandpaper.     I polished the vulcanite stem with micromesh sanding pads – 1500-12000 grit pads. I wiped it down with Obsidian Oil after each sanding pad. I used Before & After Pipe Polish – both Fine and Extra Fine to further polish the stem.  This French Made GBD Speciale Standard 9465 Liverpool is a great looking pipe now that it has been restored. The rich contrasting brown stained finish around the bowl is quite beautiful and highlights the a finish that works well with the polished vulcanite stem. I put the stem back on the bowl and carefully buffed the pipe with Blue Diamond on the buffing wheel using a light touch on the briar. I gave the bowl and the stem multiple coats of Conservator’s Wax and buffed the entire pipe with a clean buffing pad. I hand buffed the pipe with a microfiber cloth to deepen the shine. The finished GBD Speciale Standard Liverpool sits nicely on the desk top and in the hand. Give the finished pipe a look in the photos below. The dimensions of the pipe are Length: 6 inches, Height: 1 ¾ of an inch, Outside diameter of the bowl: 1 ¼ inch, Chamber diameter: ¾ of an inch. The weight of the pipe is 35 grams/1.23 ounces. I will be putting it on the French Pipe Maker section of the rebornpipes store shortly. If you are interested in adding this pipe to your collection send me a message or an email. Thanks for reading this blog and my reflections on the pipe while I worked on it. There are many more to come!

One Among A Batch of 4 Knute of Denmark Freehand Pipes


Blog by Steve Laug

The next pipe is a really is one of four Knute Freehand pipes that we picked up in 2019. Because of that we are not sure where exactly this one came from – whether an auction, a sale or an antique store. Jeff cleaned the pipe in 2019 and now I am working on it in 2021. It is stamped on the underside of the shank and reads Knute [over] of Denmark. The exterior of the bowl was filthy with grime on the surface of the briar and there were paint flicks on the briar all the way around. There was a heavy cake in the bowl and an eruption of thick lava on the rim top that filled in most of the plateau on the rim top. Along with that there was dust and debris on both the rim top plateau and the shank end plateau. It was hard to know the condition of the rim top and rim edges because of the grime and thickness of the cake and lava. The cleaning would make it very clear! The fancy turned stem was dirty, oxidized, calcified with light tooth marks and chatter on both sides but nothing like what I was expecting from the condition of the bowl. Jeff took photos of the pipe to give a clear picture of what we were up against with this pipe. He captured the cake in the bowl and the thick eruption of lava on the rim top plateau in all of the grooves and valleys exceptionally well in the next photos. It was very clear that it was someone’s favourite pipe! The stem is oxidized, calcified and shows the tooth marks and chatter on both sides ahead of the button. Jeff captured some of the beauty of the shape and the grain in the next photo. It is quite stunning. He took photos of the plateau shank end to show how filthy it was too. The grime, dust and grit filled in most of the valleys and grooves of the finish.He took photos of the stamping on the underside of the shank. It is clear and readable as noted above. He also took a photo of the Crown K stamp on the top of the stem.I turned to Pipephil’s site (http://pipephil.eu/logos/en/logo-k3.html) to confirm what I knew about the brand being made by Karl Erik. It did but did not give a whole lot of other information. I turned then to Pipedia (https://pipedia.org/wiki/Knute). I quote the article in full below.

Knute of Denmark pipes are said to be made by Karl Erik, see his listing herein.

Karl Erik Ottendahl was born in Aalborg in 1942, just a few miles from the very northernmost tip of Denmark. He began his career as a Lithographer as an apprentice in the craft at the age of 16. While working as an apprentice he began hand carving pipes as a hobby and to give as gifts to his more senior colleagues. He began his career making pipes for various labels in Denmark and the United States. Often he would make the higher grade pipes for a well known brand that was known for their midrange or low end pieces such as Wally Frank. While doing this he administered a factory of fifteen craftsmen. During this period he did make of some of his own handmade pipes, but he felt that the responsibility of managing the factory did not give him the freedom he wished he had.

Other brands confirmed to be from Karl Erik are: Champ of Denmark, HTL, Jobey Dansk, Knute, Golden Danish, Lars of Denmark, Larsen & Stigart (Copenhagen pipe shop), Shelburne, Sven Eghold and Wenhall (for Wenhall Pipes, New York), some Ben Wade and pipes marked IS and IIS.

Now it was time to work on the pipe. It is really a beautiful piece. Jeff had done a great cleanup on the pipe. He reamed the bowl with a PipNet pipe reamer and followed up with a Savinelli Fitsall pipe knife to remove the cake. He scrubbed out the mortise and the airway in the shank and the stem with alcohol, cotton swabs and pipe cleaners. He scrubbed the bowl exterior with a tooth brush and Murphy’s Oil Soap to remove the grime on the finish of the bowl and the lava from the rim top. He rinsed it under running water. One of the benefits of this scrub is that it also tends to lift some of the scratches and nicks in the surface of the briar. He dried it off with a soft cloth. He cleaned the internals and externals of the stem with alcohol, pipe cleaners and cotton swabs. He soaked the stem in Briarville’s Pipe Stem Deoxidizer and rinsed it off with warm water and cleaned out the airway in the stem with alcohol, pipe cleaners and cotton swabs. I took photos of the pipe as I saw it when I put it on the table.  I took photos of the plateau rim top and stem to show the condition. The rim top and inner bevel looked very good. The smooth bevel has some darkening but is clean. The stem was vulcanite and there were light tooth marks and chatter on both sides ahead of the button. The stamping on the underside of the shank is clear and readable. It reads as noted above. I removed the stem from the shank and took a photo of the pipe to give a sense of the proportions of the bowl and stem.I started my work on it by sanding the smooth inner beveled rim top to remove the darkening on the edge. I used a folded piece of 220 grit sandpaper to clean it up. I stained it with a Walnut Stain pen and wiped it down. I filled in the valleys in the plateau with a Black Sharpie Pen. The contrast of the the bevel and the plateau is very nice. I polished the briar with micromesh sanding pads – dry sanding with 1500-12000 grit sanding pads. I wiped the briar down with a damp cloth to remove the sanding dust and debris on the briar. The pipe began to take on a shine. I rubbed the bowl and shank down with Before & After Restoration Balm. I worked it into the surface of the bowl sides and shank with my fingertips to clean, enliven and protect the briar. I let the balm sit for 10 minutes, then buffed with a cotton cloth to raise the shine. The Balm did its magic and the grain stood out on the briar. I set the bowl aside and turned to the stem. I “painted” the stem surface with the flame of a Bic lighter to lift the tooth marks. I was able to lift them all enough that sanding them would remove what remained. I sanded out the remaining tooth marks and chatter with  200 grit sandpaper and started the polishing with 400 grit wet dry sandpaper.   I touched up the Crown K stamp on the stem top with white acrylic nail polish. Once it cured I scraped it off with my fingernail and then sanded the stem surface with a 1500 grit micromesh sanding pad.I polished the stem with micromesh sanding pads – 1500-12000 grit pads. I wiped it down with Obsidian Oil after each sanding pad. I finished the polishing with Before & After Polishes – both Fine and Extra Fine. I gave it a final rub down with Obsidian Oil and set it aside to dry. This Knute of Denmark Freehand with a fancy turned vulcanite saddle stem is a beautifully grained pipe with a flowing shape that looks great . The rich browns and black on the plateau areas of the bowl makes the grain come alive with the polishing and waxing. I put the stem back on the bowl and carefully buffed the pipe with Blue Diamond on the buffing wheel using a light touch on the briar. I gave the bowl and the stem multiple coats of carnauba wax on the buffing wheel and followed that by buffing the entire pipe with a clean buffing pad. I hand buffed the pipe with a microfiber cloth to deepen the shine. The finished Knute of Denmark really is a beauty and fits nicely in the hand and looks very good. Give the finished pipe a look in the photos below. The dimensions of the pipe are Length: 6 inches, Height: 2 ½ inches, Outside diameter of the bowl: 1 ¾ inches wide X 2 ¼ inches long, Chamber diameter: 7/8 of an inch. The weight of the pipe is 2.68oz./76grams. This pipe will soon be on the Danish Pipe Makers section of the rebornpipes store if you would like to add it to your collection. Thanks for reading this blog and my reflections on the pipe while I worked on it. There are many more to come!

Breathing Life into this Savinelli Made Duca Carlo Pot


Blog by Steve Laug

This July long weekend has been a bit of rest and relaxation for me as I have been able to take time in the basement at my work table and deal with pipes that have been piling up in the boxes around the table. I have posted two I have worked on already – both French Made – a Butz-Choquin Optima and a Chatham Volcano. They were interesting pipes because of the shape and style. This one was more of a relaxed restoration because it was a classic shape and did not present too many challenges. Jeff purchased this pipe from an antique mall Logan, Utah, USA. It had an interesting fire-like finish on it that reminded me of molten lava. The bowl was classic Pot shaped. There was a thick cake in bowl and lava on the rim top. There were nicks around the out edge of the rim  on the right side. There were several fills around the bowl sides. The finish was filthy with grit and grime ground into the surface of the briar. The pipe is stamped on the left side of the shank DUCA CARLO and on the underside across the shank just below the shank/stem union it was stamped ITALY. I remembered that the pipe was a Savinelli made pipe but I could not remember how it was connected. I would need to check the blog. The stem was oxidized and had light tooth marks and chatter on both sides at the stem. Jeff took photos of the pipe before he started his clean up work. I like to have an idea of how the pipe was smoked before we got it and what the bowl and rim top looked like. Jeff always takes some photos of the bowl and rim from various angles to show what it looked like. He also captured the nicked right outer edge. The stem looked very good under the oxidation. He took photos of the sides and heel of the bowl to give a sense of the grain on the pipe. You can also see the fills on the right side of the bowl. The next two photos show the stamping on the left side and underside of the shank. It is clear and readable as noted above.I did a quick scan of the rebornpipes blog and found a link to the Duca Carlo pipe that Dal Stanton had restored (https://thepipesteward.com/2021/05/04/liberating-the-grain-of-a-candy-apple-finish-a-savinelli-duca-carlo-poker-of-italy/). I always appreciate the research that Dal does when he works on pipes because it is what I like doing when I am restoring the pipes on my table. I quote from the portion of the blog that gives the background information on the brand. (Thanks Dal for the leg work on this one!)

Whenever I work on a pipe, I’m always interested to know something of the pipe.  My first stop at Pipedia reveals that the Duca Carlo is a second of Savinelli, the well-known Italian pipe manufacturer.Savinelli’s history as an Italian pipe maker goes back to 1876 – a rich history and tradition which can be read in Pipedia’s Savinelli article.  The Duca Carlo is listed in the main Savinelli article within an extensive listing of “Savinelli made sub-brands, seconds & order productions”.  The Duca (Duke) Carlo is listed with the Duca di Milano and Duca di Paolo giving the impression that Savinelli produced these as special lines commemorating these historical figures.  With a quick internet search brings me to a Wikipedia article.  Duca Carlo reveals an interesting story of a child that died of smallpox at age 3 (See: Carlo, Duke of Calabria):

Carlo of Naples and Sicily (ItalianCarlo Tito Francesco Giuseppe; 4 January 1775 – 17 December 1778) was Duke of Calabria as heir to Naples and Sicily. Born at the Caserta Palace near Naples, he was known as the Duke of Calabria at birth as the heir apparent to his father’s throne. His mother was a daughter of Empress Maria Theresa and thus sister of Marie Antoinette.

A member of the House of Bourbon, he was a prince of Naples and Sicily by birth. He was the hereditary prince of Naples. His birth allowed his mother to have a place in the Council of State, pursuant to his parents’ marriage contract.

Carlo died of smallpox[1] aged 3. Six of his younger siblings would die of smallpox also: Princess Maria Anna (in 1780), Prince Giuseppe (in 1783), Prince Gennaro (in 1789), Prince Carlo Gennaro (also in 1789), Princess Maria Clotilde (in 1792) and Princess Maria Enricheta (also in 1792).  He was buried at the Church of Santa Chiara in Naples.

The only other reference to the Duca series in the Savinelli Pipedia article comes from a photo that does not mention a name, but the stem stamping is clearly from the Duca series of pipes listed.  No dating on the picture can be seen.The Savinelli Duca line is confirmed by my next stop. Pipephil (http://pipephil.eu/logos/en/logo-d9.html) gives two examples of Savinelli Ducas – a Duca Carlo and Duca Eraldo.  Consistent between each example is the crown stem stamping.Armed with the information that I had gleaned from Dal’s blog, I turned my attention to the pipe itself. Jeff had done a great cleanup on the pipe. He reamed the bowl with a PipNet pipe reamer and followed up with a Savinelli Fitsall pipe knife to remove the cake. He scrubbed out the mortise and the airway in the shank and the stem with alcohol, cotton swabs and pipe cleaners. He scrubbed the bowl exterior with a tooth brush and Murphy’s Oil Soap to remove the grime on the finish of the bowl and the lava from the rim top. He rinsed it under running water. One of the benefits of this scrub is that it also tends to lift some of the scratches and nicks in the surface of the briar. He dried it off with a soft cloth. He cleaned the internals and externals of the stem with alcohol, pipe cleaners and cotton swabs. He soaked the stem in Briarville’s Pipe Stem Deoxidizer and rinsed it off with warm water and cleaned out the airway in the stem with alcohol. When I received it the pipe looked very good. I took a photo of the rim top and stem to show the condition. The rim top and the inner edge of the bowl were in good condition. There were some nicks on the right outer edge of the bowl but otherwise it looked good. The stem was vulcanite and there were some tooth marks and chatter on both sides ahead of the button. The stem is made for a 6mm filter or a Savinelli Balsa Filter System.The stamping on the pipe is clear and readable as noted above. There are the remnants of the crown stamp on the left side of the saddle stem.I removed the stem from the shank and took a photo of the pipe to give a sense of the whole. I started my work on this pipe by addressing the nicks along the edges. I filled them in with a clear CA glue and set them aside to cure. Once cured I blended them into the surrounding briar with a 1500 grit micromesh sanding pad. I touched up the rim top with a Walnut stain pen to blend it into the surrounding briar. I would probably need to do a bit more work on it but I liked what I saw. I sanded the bowl with micromesh sanding pads, dry sanding with 1500-12000 grit sanding pads and wiping it down with damp cloth after each sanding pad. As I worked through the cycle of pads the shine developed with each change of pad. The pipe looks very good. I rubbed the bowl and shank down with Before & After Restoration Balm. I worked it into the surface of the bowl sides and shank with my fingertips to clean, enliven and protect the briar. I let the balm sit for 10 minutes, then buffed with a cotton cloth to raise the shine. The Balm did its magic and the grain stood out on the briar. I set the bowl aside and turned my attention to the stem. I polished it with micromesh sanding pads – 1500-12000 grit pads. I wiped it down with Obsidian Oil after each sanding pad. I used Before & After Pipe Polish – both Fine and Extra Fine to further polish the stem. The photos below show the polished stem. I fit the stem with a Savineli 6mm Balsa System filter. The fit was perfect and the draw seems remarkably open. This Savinelli Made Duca Carlo Italian Pot with a vulcanite saddle stem is a great looking pipe now that it has been restored. The rich browns and blacks of the contrasting stains came alive with the polishing and waxing. I put the stem back on the bowl and carefully buffed the pipe with Blue Diamond on the buffing wheel using a light touch on the briar. I gave the bowl and the stem multiple coats of carnauba wax on the buffing wheel and followed that by buffing the entire pipe with a clean buffing pad. I hand buffed the pipe with a microfiber cloth to deepen the shine. The finished Duca Carlo Pot is a beauty and fits nicely in the hand and looks very good. Give the finished pipe a look in the photos below. The dimensions of the pipe are Length: 5 ¾ inches, Height: 1 ½ inches, Outside diameter of the bowl: 1 ½ inches, Chamber diameter: 7/8 of an inch. The weight of the pipe is 1.31oz./37grams. This beauty will be going on the rebornpipes store in the Italian Pipe Makers section. Let me know if you are interested in adding it to your collection. Thanks for reading this blog and my reflections on the pipe while I worked on it. There are many more to come!

Restoring a Butz-Choquin C’est bon 1689 Apple with an amber acrylic stem


Blog by Steve Laug

The next pipe on the table – a Butz-Choquin Apple with a smooth finish purchased from Mandy Valsinger about a year ago when she was closing her husband’s estate. It came to us from Australia. The shape of the bowl is an apple with an acrylic stem. The pipe was in overall good condition but was very tired and dirty. It is stamped on the left side of the shank and reads Butz-Choquin at an angle [over] C’est bon. On the right side of the shank it is stamped St. Claude France [over] the number 1689. The finish was dull and lifeless and a little dirty from sitting around. There was a thick cake in the bowl and an overflow of lava on the rim top toward the back. There were scratches around the sides of the bowl where it appeared that the pipe had been dropped. The amber acrylic stem had a deep tooth marks on both sides with a bit through on the underside ahead of the button. The BC logo inset in black acrylic and set on the left side of the taper stem. Jeff took the following photos before he started his cleanup work on the pipe. Jeff took close-up photos of the bowl and rim top from various angles to capture the condition of the bowl and rim top edges. You can see the cake in the bowl and the lava on the inner of the rim and the top at the back of the bowl. The photos of the stem show the general condition of the stem. He took the stem out of the shank and revealed a Delrin tenon with a lot of tars and oils on on the end of the tenon.He took photos of the sides and heel of the bowl to show condition of the briar. You can see the swirls of grain in the smooth bowl – both birdseye and cross grain around the sides and shank. There are scratches on the right side of the bowl. The stamping is very clear on both sides of the pipe. The third photo shows the BC inlay on the left side of the taper stem.I turned to Pipedia (https://pipedia.org/wiki/Butz-Choquin) and found a great read of the history of the brand. I did find a shape chart however, that had the 1689 shape. I have included that below.Now it was time to look at it up close and personal. Jeff had great job in cleaning up this BC C’est bon Apple. He had reamed the bowl with a PipNet Pipe Reamer and cleaned up the remnants with a Savinelli Fitsall Pipe Knife. He took the cake back to bare briar so we could check the walls for damage and also see the condition of the inner edge of the rim. He scrubbed the exterior of the bowl with Murphy’s Oil Soap and a tooth brush to remove the grime on the bowl and rim and was able to remove much of the grime and dirt. He cleaned out the interior of the bowl and shank with pipe cleaners, cotton swabs and alcohol until they came out clean. The rim top looked much better. The bowl looked very good. He cleaned the stem with Soft Scrub to remove the grime on the interior and the exterior and rinsed it off with warm water to remove the product. He cleaned out the airway with alcohol, cotton swabs and pipe cleaners. I took some photos of the pipe as I saw it. To show how clean the rim top and stem really was I took a close-up photo of the rim and stem. The bowl was clean and cake free. The rim top is quite clean the inner and outer edges were darkened. The surface and the button edge of the stem had tooth marks and chatter on the top near the button on both sides. What I thought was a hole all the way through the stem on the underside turned out not to be that deep.I took some photos of the stamping on the sides of the shank. It is clear and readable as noted above.I removed the stem from the shank and took a photo of the pipe from the left side to give a clear picture of the beauty of this particular pipe.I turned to Pipephil (http://pipephil.eu/logos/en/logo-butzchoquin.html) and found the C’est bon pipe shown below. I did a screen capture of the of the listing and have included it below.I started working on the pipe by dealing with the damage and darkening to the rim top and inner edge of the bowl. I sanded it with 220 grit sandpaper to remove the damage.I used to some clear CA glue to fill in the deep scratches on the right side of the bowl. Once the repairs cured I sanded them smooth with a folded piece of 220 grit sandpaper. I started polishing the areas of the repair with 400 grit wet dry sandpaper. I stained the sanded area with a Maple Stain pen. I polished the briar with micromesh sanding pads – dry sanding with 1500-12000 grit pads. I wiped the bowl down after each sanding pad with a damp cloth to remove the dust and debris. The began to take on a deep shine. I worked some Before & After Restoration Balm into the surface of the bowl with my finger tips. The product is incredible and the way it brings the grain to the fore is unique. It works to clean, protect and invigorate the wood. I greased a pipe cleaner with Vaseline and inserted it in the button. I did not see the hole going through the stem but I put a pipe cleaner in just in case there was. I then built up the tooth marks and chatter on both sides with clear CA glue. I used a small file to reshape the button edge on both side and smooth out the repairs. I then sanded the repaired areas with 220 grit sandpaper until they were smooth and blended it into the surrounding acrylic. I started the polishing with a 400 grit wet dry sandpaper. I polished the stem with micromesh sanding pads – wet sanding it 1500-12000 pads. I wiped it down with a damp cloth to remove the dust and polishing debris. I polished it with Before  After Pipe Polish – both Fine and Extra Fine. I gave it a final coat of Obsidian Oil and set it aside to dry. I am really happy with the way that this Butz-Choquin C’est bon Apple with an Amber Acrylic Stem turned out. It really is a great looking pipe with character. The rich brown stains gave the grain a sense of depth with the polishing and waxing. The grain really popped. I put the stem back on the bowl and carefully buffed the pipe with Blue Diamond on the buffing wheel using a light touch. I gave the bowl and the acrylic stem multiple coats of carnauba wax on the buffing wheel. I buffed the pipe with a clean buffing pad to raise the shine. I hand buffed the pipe with a microfiber cloth to deepen the shine. The finished Butz-Choquin C’est bon Apple really is a beauty and feels great in the hand and looks very good. Give the finished pipe a look in the photos below. The dimensions of the pipe are Length: 5 ¾ inches, Height: 1 ¾ inches, Outside diameter of the bowl: 1 inches, Chamber diameter: ¾ of an inch. The weight of the pipe is 44 grams/1.55 oz. The pipe will be going on the rebornpipes store soon. It will be in the section on French Pipe Makers if you would like to add it to your collection.Thanks for reading this blog and my reflections on the pipe while I worked on it. It was a fun one to work on!

The Italian Swan


Blog by Kenneth Lieblich

I have seen a great many pipes now, but this Brebbia is among the most filthy that I have ever worked on. This pipe came from Sudbury, Ontario – in the same lot of dirty pipes as the one that Steve and I dubbed ‘The Sudbury’. You may recall that I wrote about that pipe last time and you can read about it here. It was obvious from the start that this was a great pipe that just needed some attention and TLC – an ugly duckling, if you will. And just like the Hans Christian Andersen story, this pipe clearly spent a long time in misery and disdain before its true beauty was revealed. This pipe is a Golden Brebbia Natural 8006. It is a slightly bent billiard with an oval shank and stem. The Brebbia pipe company is named after the locality of Bosco Grosso di Brebbia in Lombardy, Italy. The company was founded by Enea Buzzi and Achille Savinelli in 1947, but they parted ways in 1953. Mr Savinelli went on to form his eponymous company, while Mr Buzzi kept the factory and created Maniffatura Pipe Brebbia. His family still run it today.

The stem of this pipe was badly oxidized and thoroughly chewed. In fact, the button had been chewed to the point that there was hardly any left – it would have to be rebuilt. The stummel was covered in grime. Perhaps hand oils or other stuff mixed with dirt over the years to leave the muck you can see in the photos. Furthermore, there were scratches in the wood, gouges in the rim, and an ugly putty fill that needed to be addressed. Well, the usual cleaning procedures were in order for this pipe. I used both the PipNet Reamer and the KleenReem to take it down to bare briar, as I wanted to ensure there were no hidden flaws in the walls of the bowl. Fortunately, there were none. I then proceeded to clean out the insides of the shank with Q-tips, pipe cleaners, and isopropyl alcohol. There was a lot of nastiness inside this stummel and – boy-oh-boy – it took a lot of cotton to get this thing clean! I then moved on to cleaning the outside of the stummel with Murphy’s Oil Soap and some cotton pads. What a difference that made! A light application of Before & After Restoration Balm brought out the best in the stummel’s grain. There is some beautiful wood under the grime! A de-ghosting session seemed in order to rid this pipe of the foul smells of the past. This de-ghosting consisted of thrusting cotton balls in the bowl and the shank, and saturating them with 99% isopropyl alcohol. I let the stummel sit for 24 hours. This caused the oils, tars and smells to leech out into the cotton. Finally, a relatively clean and fresh-smelling bowl emerged.

While the de-ghosting was going on, I moved on to the stem. I took a BIC lighter and ‘painted’ the stem with its flame in order to remove the tooth marks. This was moderately successful in raising the dents. Then, I cleaned out the insides of the stem with pipe cleaners and isopropyl alcohol. Once this process was done, the stem went for an overnight soak in the Before & After Hard Rubber Deoxidizer. The following day, I cleaned all of the de-oxidizing sludge off with alcohol, pipe cleaners, et cetera. The oxidation had migrated to the surface and would be fairly straightforward to remove. Before I moved on to the Micromesh pads, I built up the squashed button on the stem with cyanoacrylate adhesive and let it fully cure. I used my miniature files to do a proper cutting of the new button –this ensures that it keeps its shape and looks like it should. I then sanded it down with 220-, 400-, and 600-grit sandpapers to meld seamlessly into the stem. I did the same to the remaining tooth marks. I then used all nine Micromesh pads (1,500 through 12,000 grit) to bring out the lovely black lustre on the stem. I also used Obsidian Pipe Stem Oil in between each pad scrubbing. Back to the stummel – the banged up rim needed some serious attention. In order to minimize the impact of the damaged, I “topped” the pipe – that is to say, I gently and evenly sanded down the rim on a piece of 220-grit sandpaper. This successfully eliminated the damage, without altering the look of the pipe. Then I took a solid wooden sphere, wrapped sandpaper around it, and sanded thoroughly. This was to achieve on the inner part of the rim the same thing that I achieved by “topping” on sandpaper. Furthermore, there was an ugly blotch of pink putty in a fill on the shank. What made this more complicated was that part of the fill went into the markings. Naturally, I intended to remove the pink putty, but if I removed it all, I would also remove part of the word “natural” on the shank. I had to decide which was worse (or better): a bit of putty with the marking intact or no putty with a wrecked marking. I opted for the former. I left a bit of putty, added some colour from my furniture markers, and filled in the remaining hole with cyanoacrylate adhesive. Neither option was perfect, but I think I made the right choice. After this, I used all nine Micromesh pads (1,500 through 12,000 grit) to remove the frustrating scratches in the wood and make everything smooth. All of the work I had done to this point had taken its toll on the colour of the wood. In order to bring back some life to this pipe, I opted for aniline dye. I applied some of Fiebing’s Medium Brown Leather Dye and then applied flame in order to set the colour. Worked like a charm! Since it is an alcohol-based dye, I was able to adjust the colour to my liking by applying my own isopropyl alcohol to the colour. I applied more Before & After Restoration Balm, then took it to the buffer. A dose of White Diamond and a few coats of carnauba wax were just what this pipe needed. This Brebbia was in need of a reminder of its Italian beauty. The pipe began its journey looking though it had been dropped down the mines. Now, it can show its true self – a real beauty from Italy. Not an Ugly Duckling, but an Italian Swan. In fact, it turned out so well that this pipe has already sold! I know that the new owner will enjoy smoking it for many years to come. Thank you very much for reading and, as always, I welcome and encourage your comments.

Sometimes a pipe is so ugly that it just charms you – Someone’s Personalized Chacom Count 875


Blog by Steve Laug

The title on this blog really says it all for me. This next six sided pipe was purchased from an auction in Columbus, Michigan, USA in 2020. Jeff saw it and actually went for it even though he knew I would not like it at first. It was just too much to take in but he picked it up for a good price. It is carved on each side of the bowl with a rising fish. I do not know if the pipeman carved them or if it came that way but it was strange to me! On top of that, the carved fish are then stained with a wash of green as is the stamping on the shank side that reads Chacom [over] Count. It is stamped on the underside of the shank with the shape number 875. If that was all of the unusual features of this pipe that would be enough but there were more unique modifications. The previous pipe man must have like the P-lip feature on Peterson’s pipes because he drilled a round hole in the top of the stem ahead of the button and filled in the slot in the button with what looks like spray foam. Other than the modification the shape was unique and the shiny finish, though dirty, was in good condition. There was a light cake in the bowl and some lava on the back side of the rim top. There was also a bit of damage on the front inner edge and rim top where it appeared that the varnish coat had peeled. The twin brass ringed stem was oxidized and had some calcification. There were light tooth marks and chatter on both sides. The drilled hole was clean and undamaged. The spray foam oozing from the slot on the stem end was hardened and quite ugly. Jeff took some photos of the pipe before he started his cleanup. Looking at the pipe from the top down it is quite a pretty pipe and I had a good idea why Jeff was drawn to it. The hexagonal shape of the bowl and the finish was quite nice as was the grain on the rim top. Okay maybe it would turn out to be a nice looking pipe when it was cleaned up! Time would tell.Jeff took photos of the rim top and bowl to give and idea of the general condition of the pipe. It had some damage on the front edge and some lava on the back left edge and top. There was some scratching on the rim top itself. The stem was the disaster as I noted above with its modifications that would take some work to remedy. The hole would need to be patched and the slot cleared of the spray foam that filled it. Jeff included several photos of the stem to show what was going on with it. Jeff took some photos of the carved fish on the sides of the bowl and the green wash highlighting it. He also took a photo of the heel and underside of the bowl and shank. It appears that there was some nice grain under the carving. The stamping on the shank reads as noted above and is clear and readable. I am not sure if it was originally green but it is now! The CC logo in brass is on the left side of the stem and the underside of the stem is stamped France. There also appears to be a ring of exotic wood between the brass rings on the stem. I turned to Pipephil to see if there was any information on the Chacom Count line of pipes (http://pipephil.eu/logos/en/logo-chacom.html). Of course there was not any information that directly referred to the line and there was nothing with the kind of carving on this one. I quote the top bar of the article there.

The brand Chacom Chacom, créateur et distributeur de pipes turned up (1934) after fusion of Chapuis-Comoy with La Bruyère. Yves Grenard (†2012), second cousin of Pierre Comoy headed the company from 1971. He was responsible for Chapuis Comoy’s recovering its independance from Comoy. His son Antoine Grenard took over the direction of the company in 2007. Chacom is a brand of Cuty-Fort Entreprises (Jeantet, Vuillard, Jean Lacroix, Ropp …).

I then turned to Pipedia (https://pipedia.org/wiki/Chacom) to see if there was any information on the line there. There was a great time line of the history of the brand but nothing specific on this pipe.

The carving looked good but was also too amateurish to me to have come from Chacom who are known as innovators and fine craftsman of great pipes but I thought maybe there would be something. However there was nothing.

Jeff had cleaned up the pipe following his normal cleaning process. In short, he reamed the bowl with a PipNet pipe reamer and cleaned up the reaming with a Savinelli Fitsall Pipe Knife.  He scrubbed the smooth bowl with undiluted Murphy’s Oil Soap with a tooth brush. He worked over the lava and debris on the rim top and was able to remove it. He rinsed it under running warm water to remove the soap and grime. He cleaned out the inside of the shank and the airway in the stem with alcohol, cotton swabs and pipe cleaners. He was able to clean out the spray foam that had filled in the slot in the button. I was not sure that would come out as it looked to be hard as a rock. He scrubbed the stem with Soft Scrub and cotton pads to remove the debris and oils on the stem. He soaked it in a bath of Briarville’s Pipe Stem Deoxidizer to remove the oxidation. He rinsed it with warm water and dried it off. I took photos of the pipe once I received it. It cleaned up well and looked better. I took close up photos of the stem and the rim top to show both how clean they were and what needed to be addresses with both. The rim top and bowl edges look very good. The stem looked better and the tooth marks and chatter was very light. The drilled hole in the stem top was obvious and I think quite repairable.I took a photo of the stamping on the left and underside of the bowl. You can see from the photo that it is readable. The brass bands and insert on the saddle stem look very good. To be honest even the fish had cleaned up well!I removed the stem from the bowl and took a photo of the parts to give a sense of the shape and “attraction” of the pipe.I decided to start by working on the heavy varnish coat on the rim top and bowl. I needed to remove it or at least break the sheen so I could smooth out the damage on the front top of the rim and the end of the shank on both sides where the varnish had peeled. I may well have to leave it on the sides of the bowl where the fish is carved but I would see what I could do without damaging that too much :). I combined wiping it carefully down with acetone and polishing it with a 1500 grit micromesh sanding pad to remove the varnish coat. I forgot to take a picture of the rim before I stained it to blend in the sanded edge and top. The photo below shows the rim top after staining with a Maple stain pen. You can see how clean the top looks in this photo. I wiped the rest of the bowl down with acetone on a cotton pad and was able to remove the varnish coat. I polished the briar with micromesh sanding pads – dry sanding with 1500-12000 grit pads.. I wiped the bowl down after each sanding pad with a damp cloth to remove the dust and debris. I was able to get the varnish off without damaging the green carving on the bowl sides. I rubbed the bowl down with Before & After Restoration Balm working it into the briar and the carving with my finger tips. The product works to clean, revive and protect the briar. I let it sit on the pipe for 10 minutes then buffed it off with a soft cloth. I set the bowl aside and turned my attention to the stem. Jeff had gotten the spray foam plug out of the slot in the button so I needed to address the drilled hole on the topside of the stem. I greased a pipe cleaner with Vaseline and slipped it into the stem below the hole. I wanted to have  a base to build over but I did not want the cleaner to be glued in place. I mixed a batch of charcoal powder and black super glue and made a thick paste with it. I applied it to the surface of the stem with a dental spatula and made sure it was in the hole. I sprayed it with an accelerator to harden the CA glue enough that I could remove the pipe cleaner without pulling out the patch. I remove it and set the stem aside to cure for what I thought would be overnight but ended up being two days! It was as hard as a rock. When I finally got back to it I used a small file to flatten the repair and prepare it for sanding. I sanded the stem repair with a folded piece of 220 sandpaper to blend it into the surface of the stem. I started polishing it with 400 grit wet dry sandpaper.I polished the repaired stem with micromesh sanding pads – wet sanding it 1500-12000 pads. I wiped it down with some Obsidian Oil each pad to remove the dust and polishing debris. I polished it with Before After Pipe Polish – both Fine and Extra Fine. I gave it a final coat of Obsidian Oil and set it aside to dry. This pipe has some great grain under the varnish and I have to say that the carving of the fish kind of grew on me during the restoration. This Chacom Count Hexagon Scoop turned out really well. The bowl and shank are hexagonal and the fish carved on the sides look a lot better now. The polished twin brass bands, exotic wood spacer and black of the stem works well with the briar. The grain in the briar really came alive with the buffing. The rich brown stains of the finish make the grain really pop with the polishing and waxing. I put the stem back on the bowl and carefully buffed the pipe with Blue Diamond on the buffing wheel. I gave the bowl and the stem multiple coats of carnauba wax on the buffing wheel. I buffed the pipe with a clean buffing pad to raise the shine. I hand buffed the pipe with a microfiber cloth to deepen the shine. The finished Chacom Count really has a unique beauty and feels great in the hand. It looks very good. Give the finished pipe a look in the photos below. The dimensions of the pipe are Length: 6 ½ inches, Height: 2 ¼ inches, Outside diameter of the bowl: 1 ¾ inches, Chamber diameter: ¾ of an inch. The weight of the pipe is 71 grams/2.54 oz. The pipe will be going on the rebornpipes store soon. It will be in the section on French Pipe Makers if you would like to add it to your collection. Thanks for reading this blog and my reflections on the pipe while I worked on it. It was a fun one to work on!