Tag Archives: Bowls – refinishing

Fashioning a Churchwarden from a Dimpled Bent Billiard Bowl


Blog by Dal Stanton

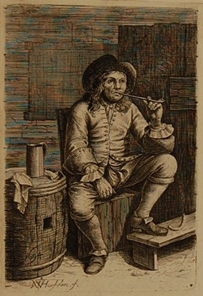
The great thing about the Churchwarden shape is that it is the only pipe that is identified not strictly by the shape of the bowl but by the length of the stem.  Bill Burney’s Pipedia Pipe Chart explanation describes this unique characteristic of the Churchwarden shape.  When I received an email from Coleman, he was looking to add a Churchwarden to his collection.  He wrote:

Hey Dal, I was browsing your website love the pipes, wanted to see if you had any more churchwardens available for commission or sale. I’ve always wanted one, and I can’t think of a better place to buy one than from Daughters of Bulgaria. The longer the stem the better. I really liked the billiard churchwarden, and the French imperial one in the shop that’s already sold. Do you think you’ll get anymore?

Last time I was with Coleman was he was an intern serving with us here in Bulgaria about 5 or so years ago.  He was single then, but as life happens, he is now happily married to Rebecca for 4 years!  He had spoken to Rebecca about adding a Churchwarden to his collection from The Pipe Steward and was agreeable to Coleman’s acquisition because the sales benefit the Daughters of Bulgaria – women and girls who have been trafficked and sexually exploited.  Thank you, Rebecca!
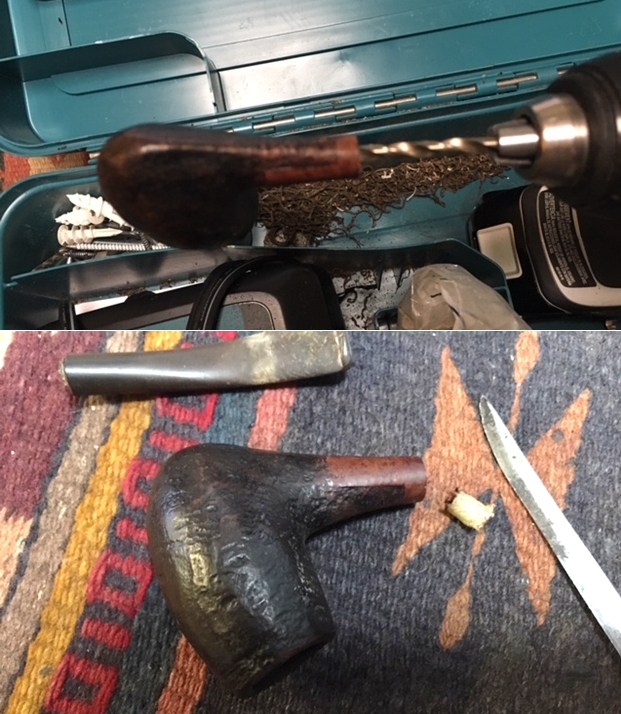
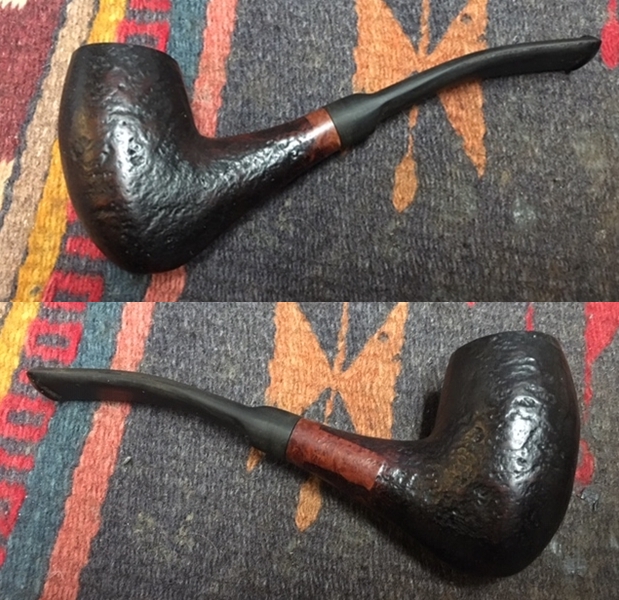
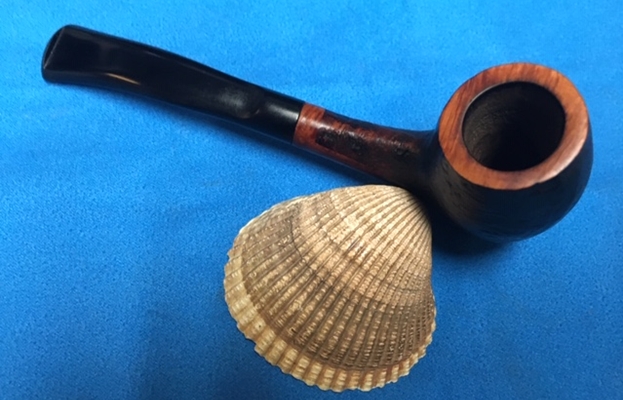
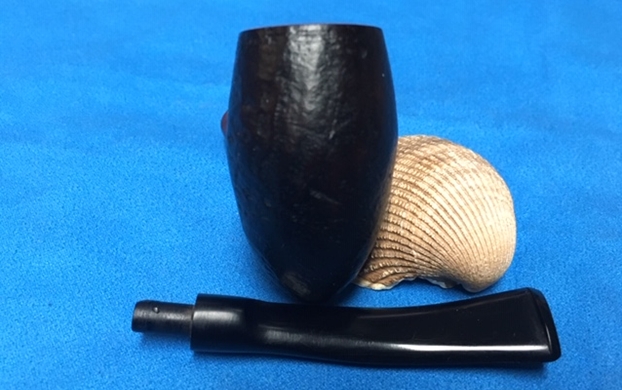
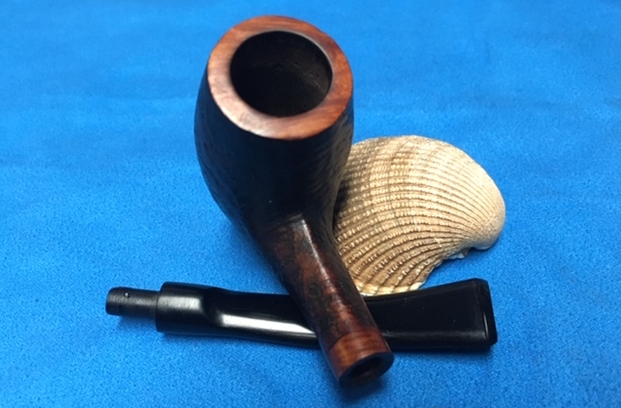
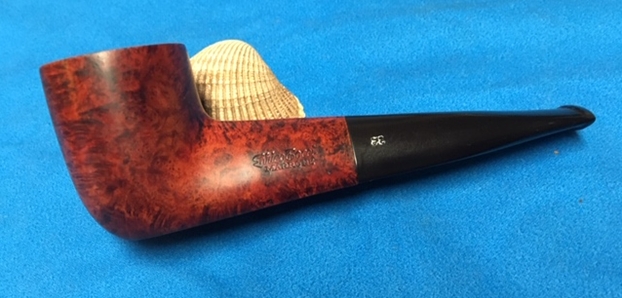
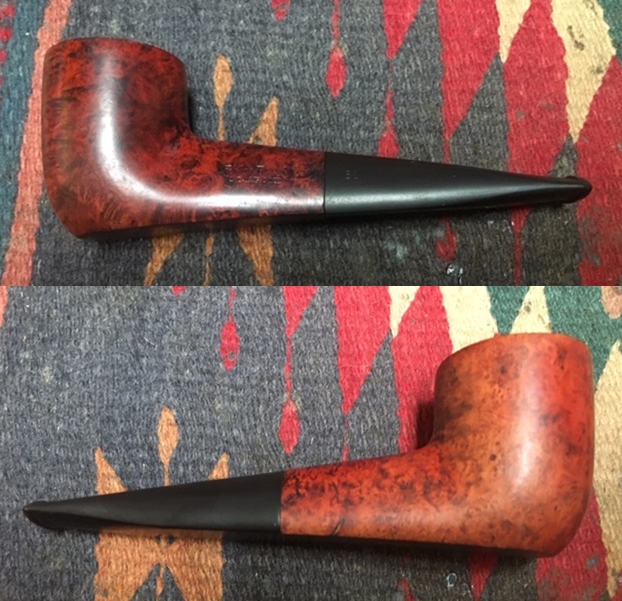
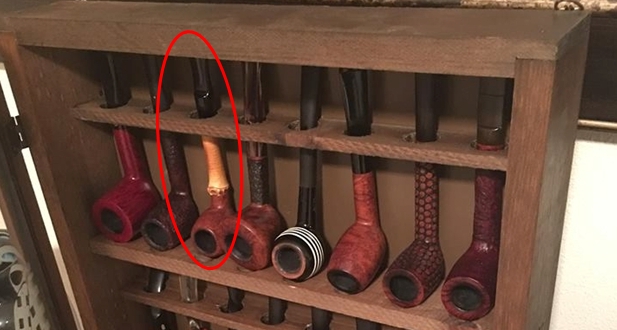
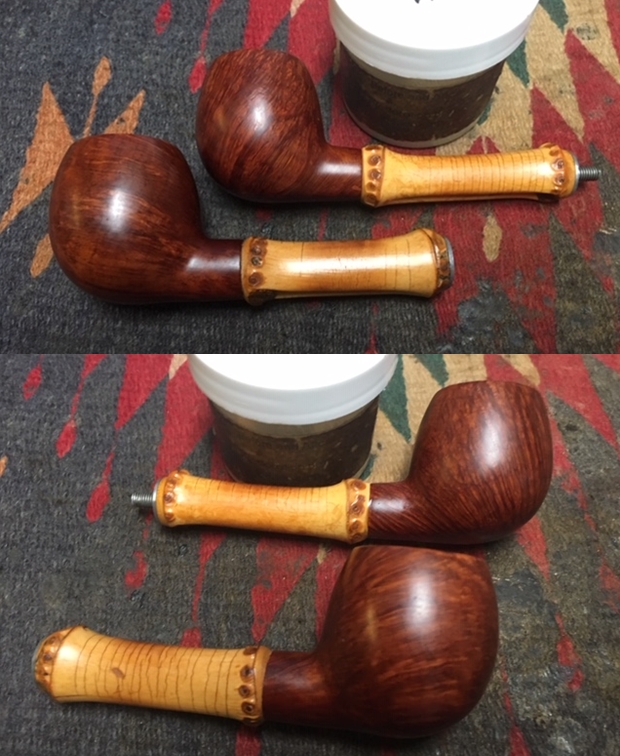
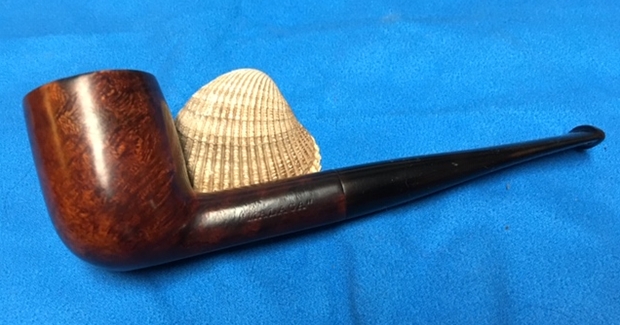
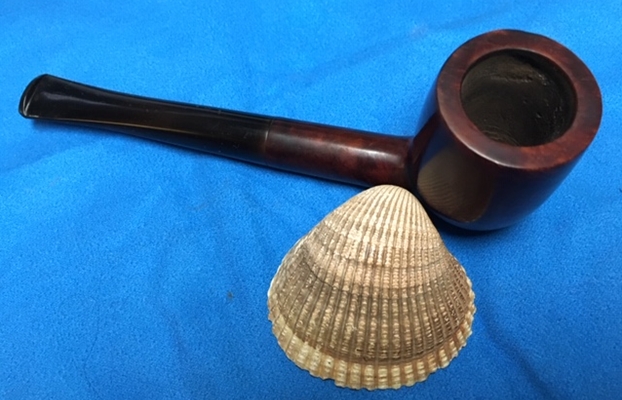
Coleman described wanting a Billiard stummel with a bent shank.  I rummaged through potential stummels that could be repurposed to fashion an acceptable Churchwarden for Coleman.  I found three good candidates and sent pictures to him.  In the end, he settled on the Dimpled Bent Billiard in the center which has great promise for a beautiful display of natural briar grain with interesting rusticated accents.  We discussed the terms and came to an accord and I placed Coleman’s Churchwarden project in the queue.

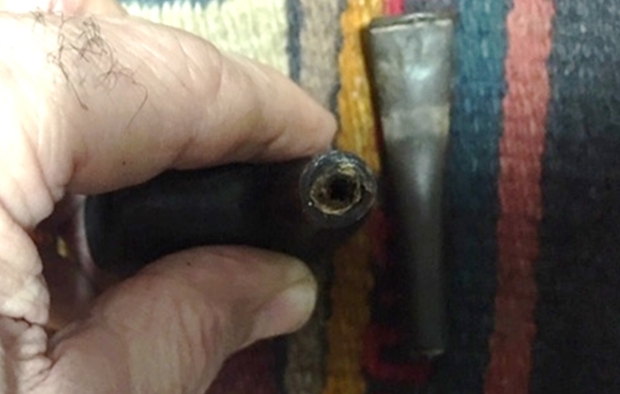
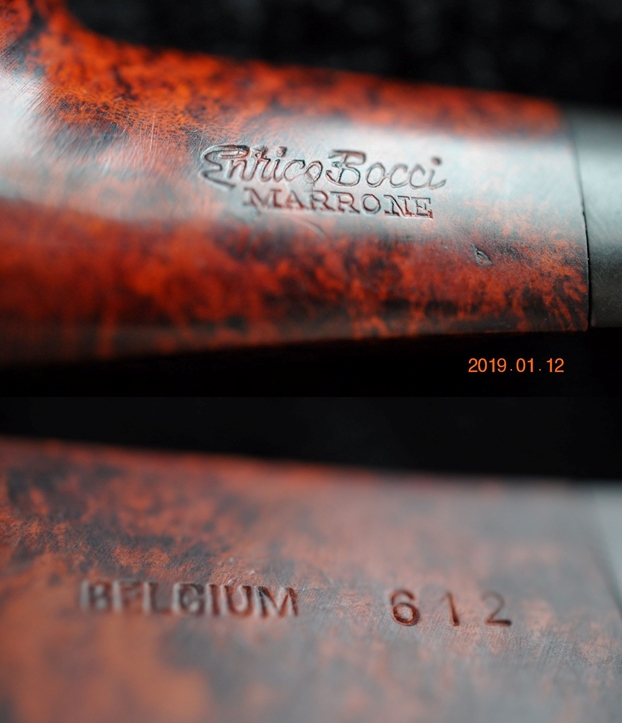
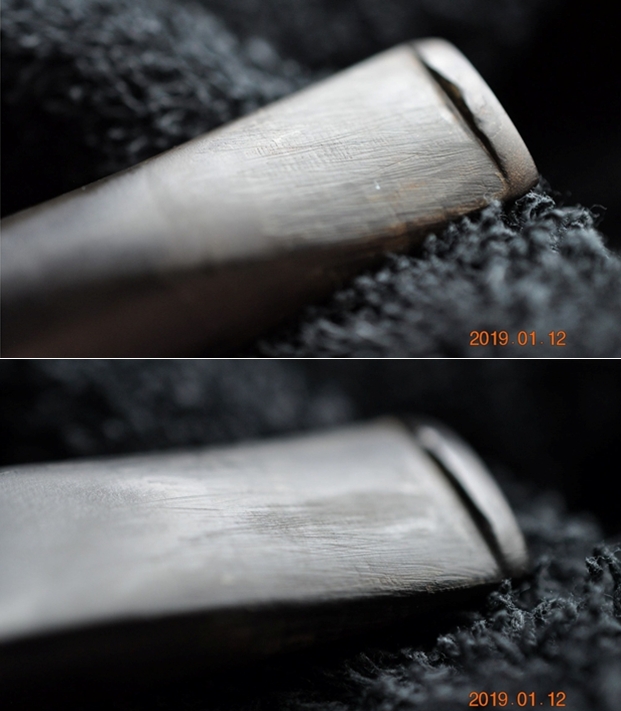
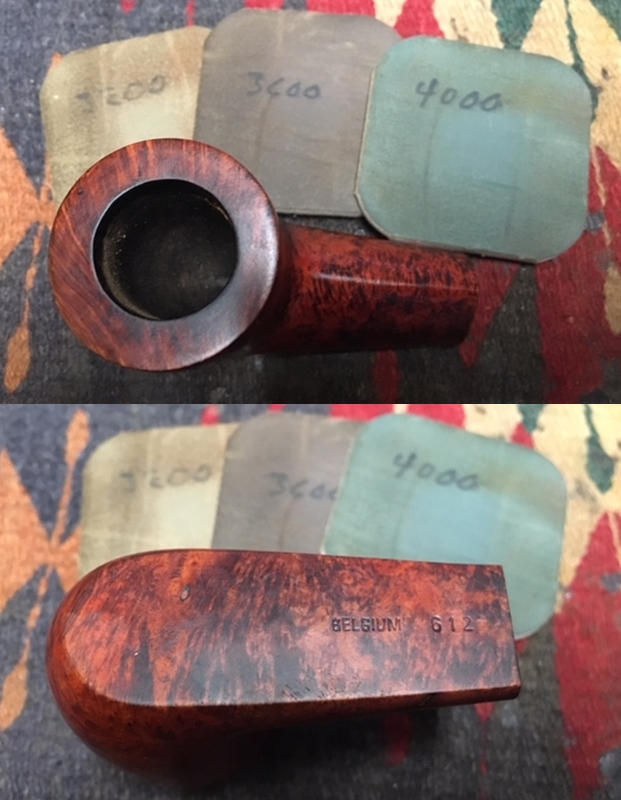
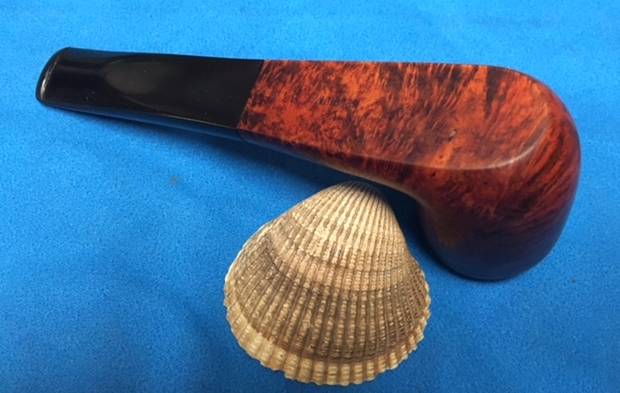
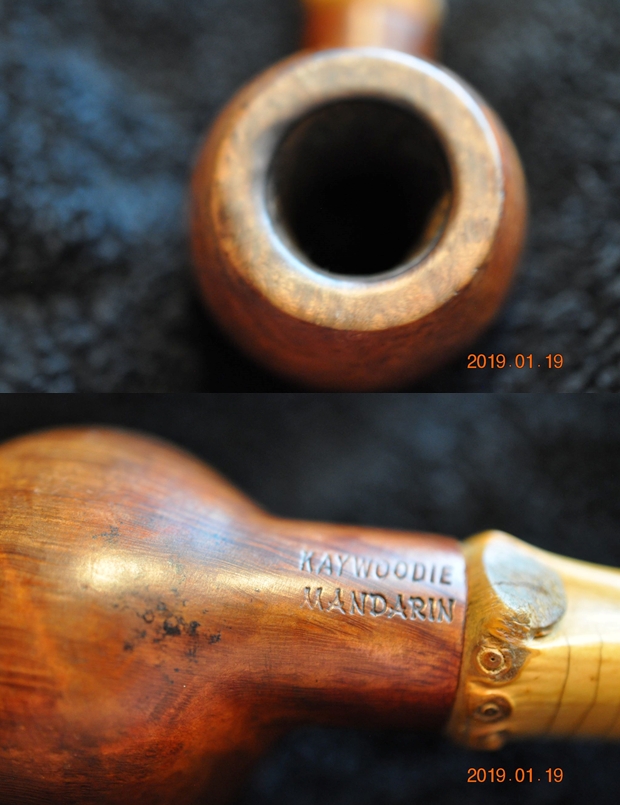
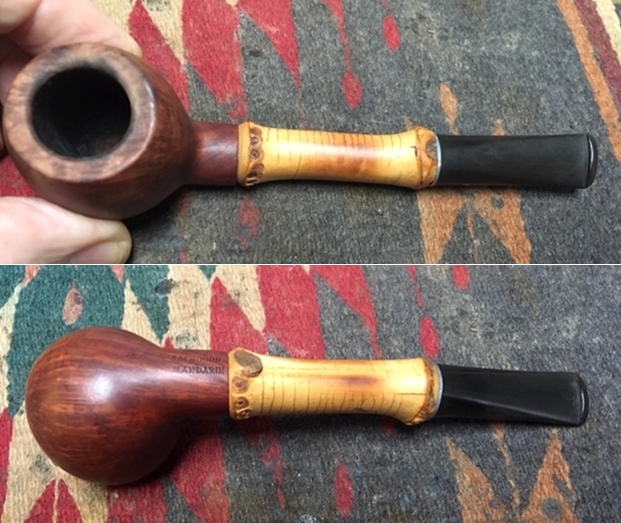
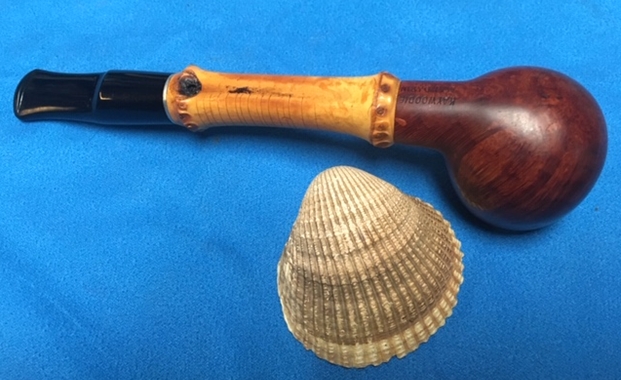
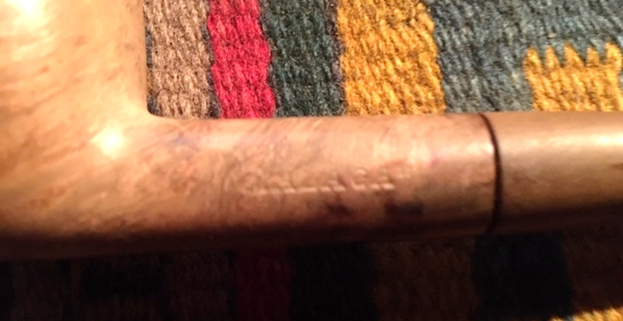
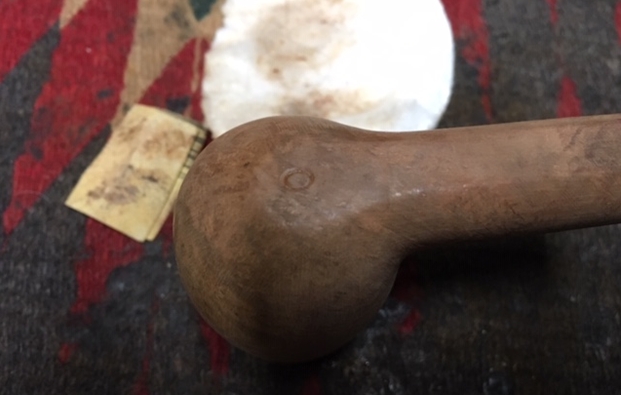
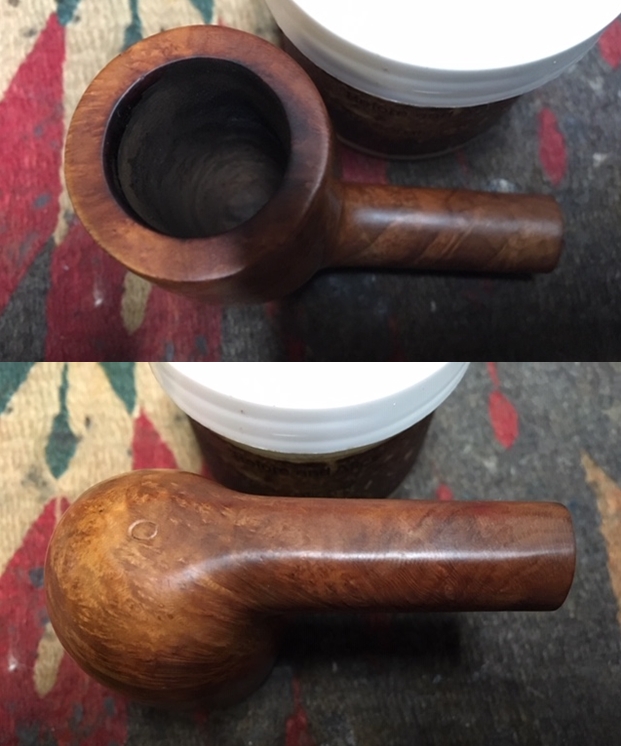
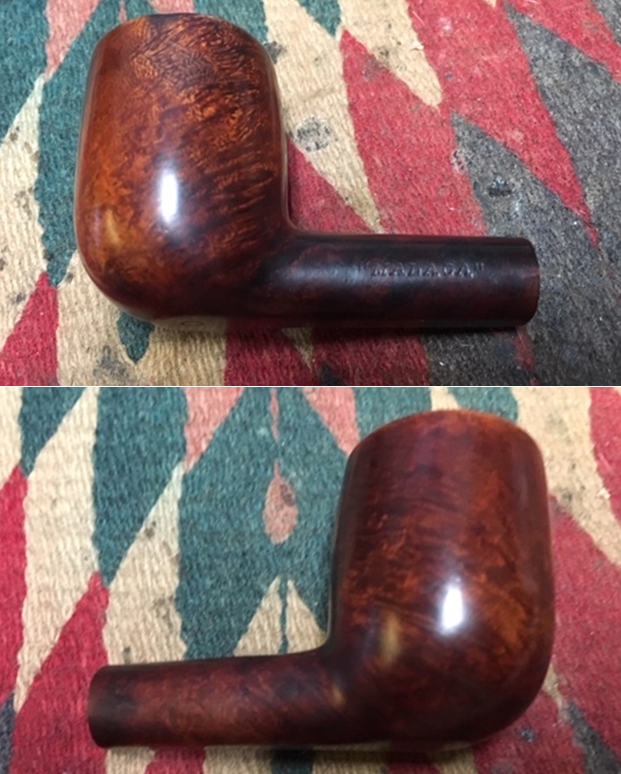
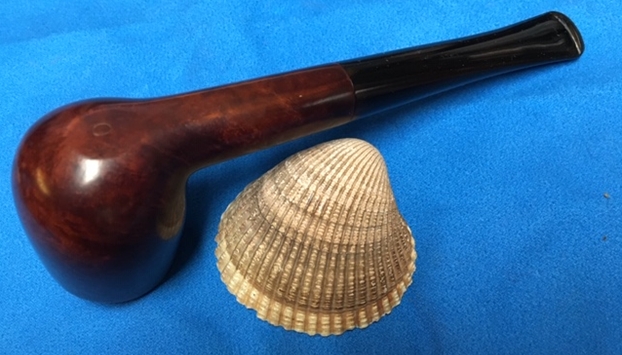
Taking the stummel out and placing it on the work table, when I first acquired the Dimpled Bent Billiard, it came in the Lot of 66 I got off the eBay auction block.  When I initially looked at it, I did not see anything that looked like markings.  With a closer look now, I can just make out on the lower side of the shank the COM being France – I can barely make out ‘ANCE’.  The markings are now so thin that they have nearly passed out of remembrance and undoubtedly will with this fabrication.  I take a closeup of the ghosted marking on the lower shank.What I was not looking for but what is obviously revealed in the closer look at the lower shank is a small stress fracture in the briar.  I take a few more pictures with different angles of light highlighting it.  The good news is that the crack is isolated – not going through to the shank end. I’m assured of this after inspecting closely looking at the shank end and mortise.  My guess is that the small, barely visible crack was formed from a fall where the stem was the first to hit and it pressed up and in opposite reaction, the tenon pressured downwardly on the lower mortise wall and the stress crack resulted on the lower shank. A guess.  I’ll think about what needs to be done about the crack and address it later.
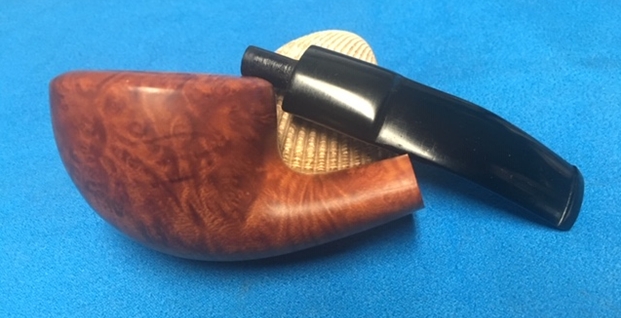
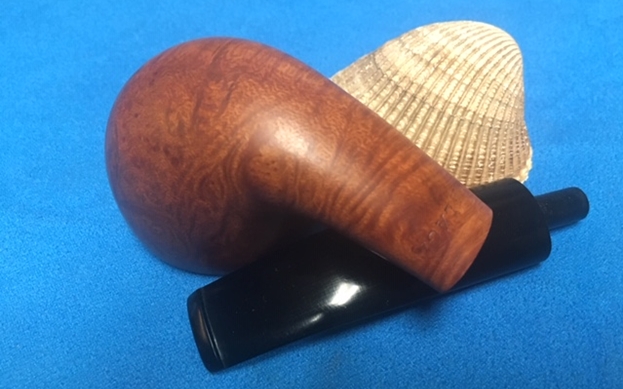
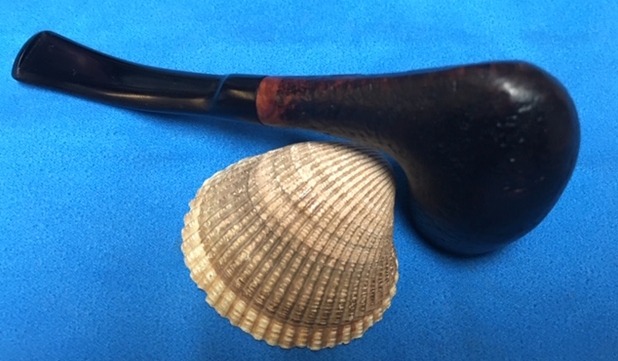
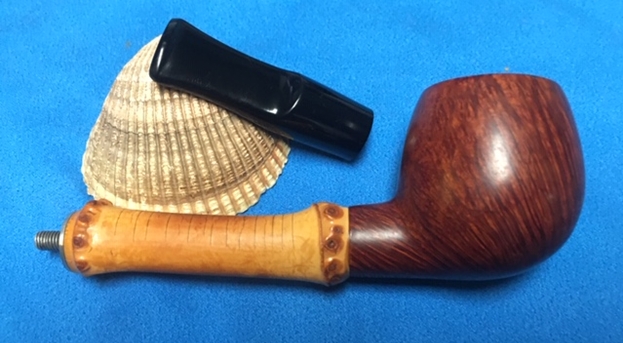
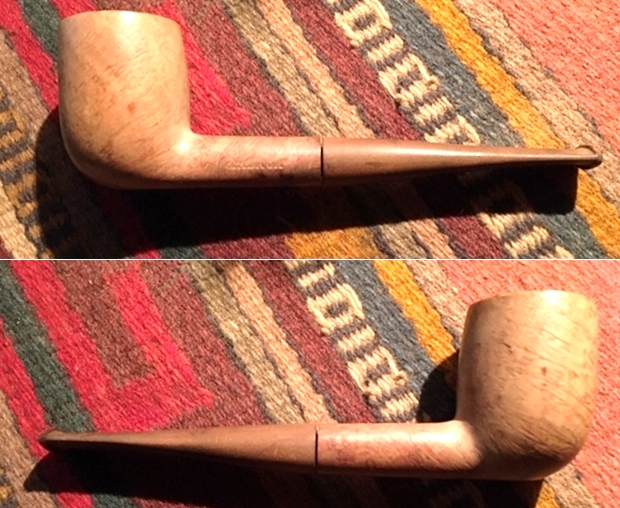
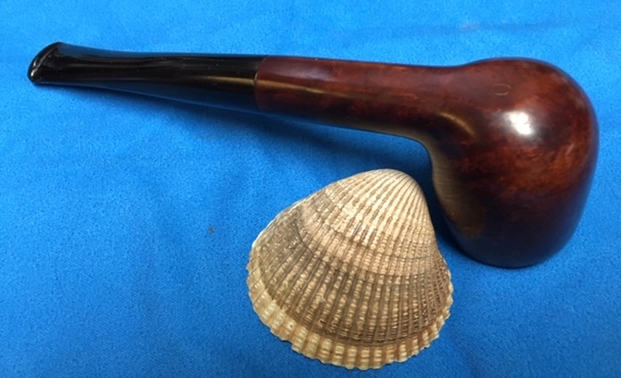
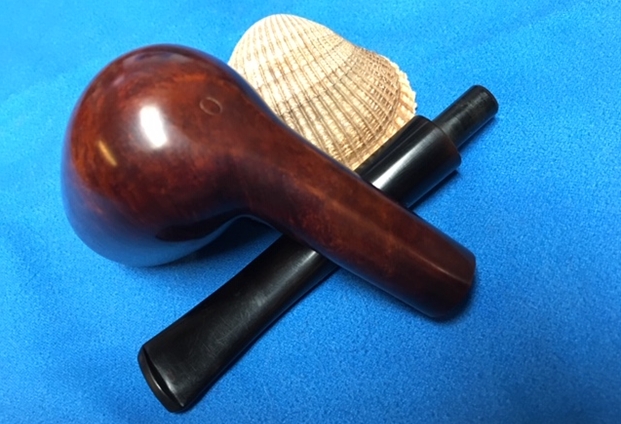
The accenting rusticated dimple effect is interesting giving the smooth briar contoured, rustic relief – I like it, and so did Coleman.  The grain shows nice potential in the pictures below. 
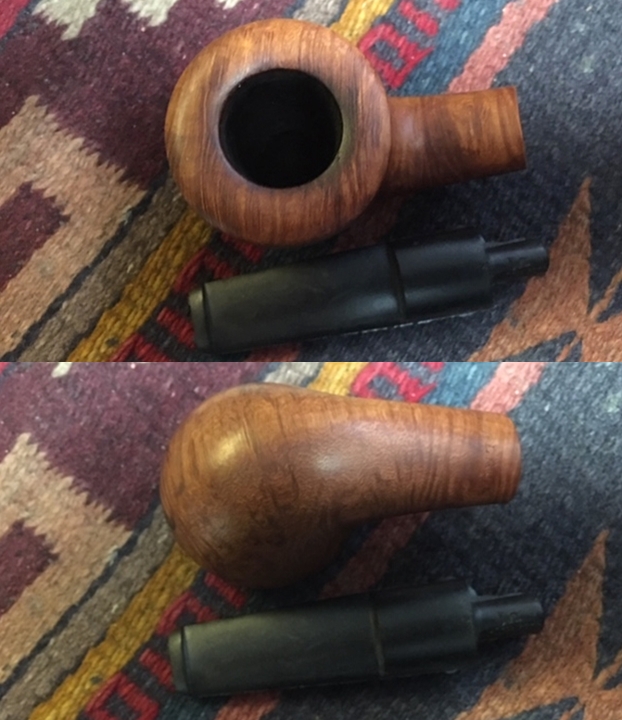
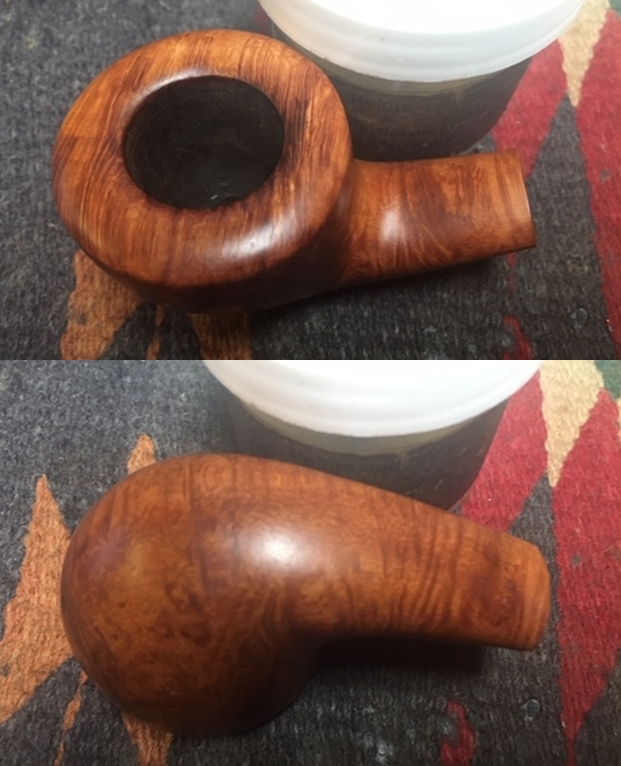
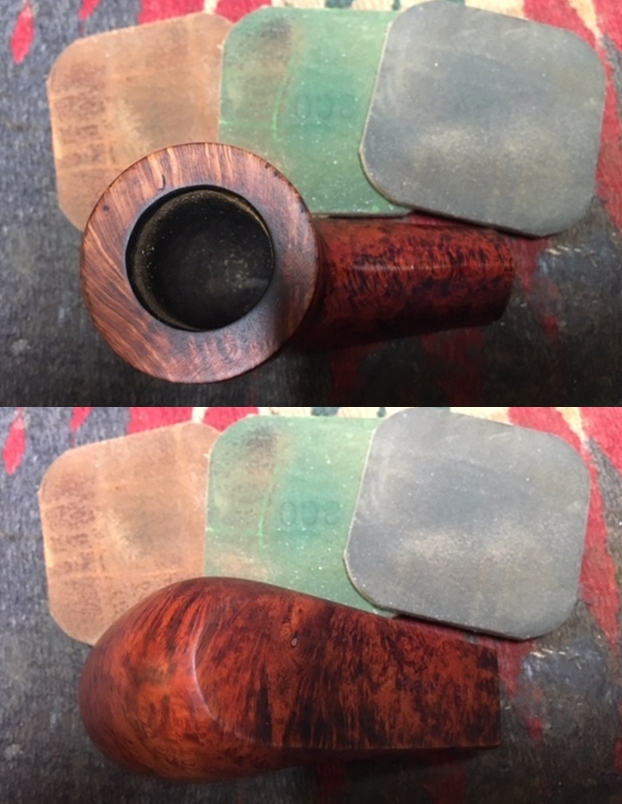
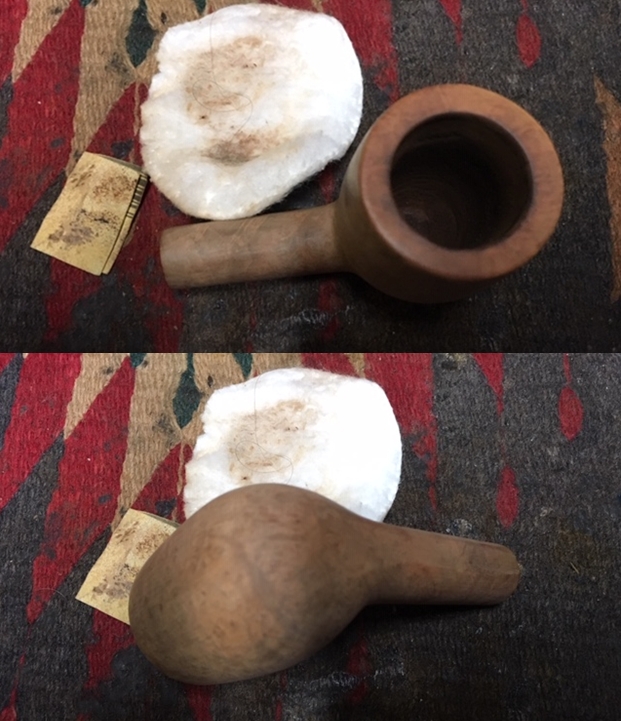
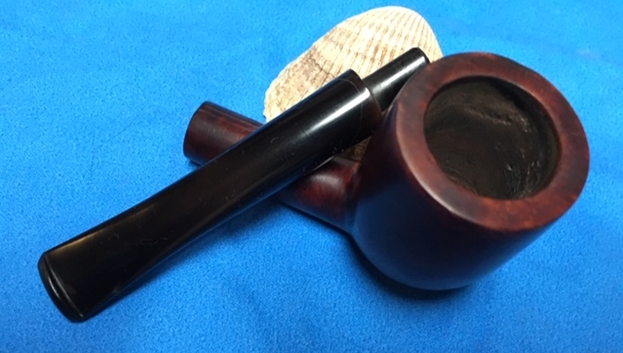
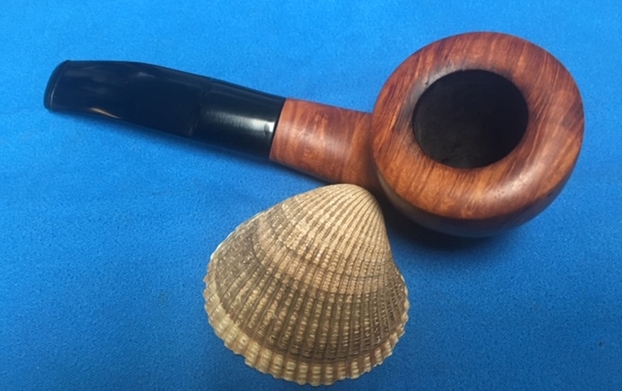
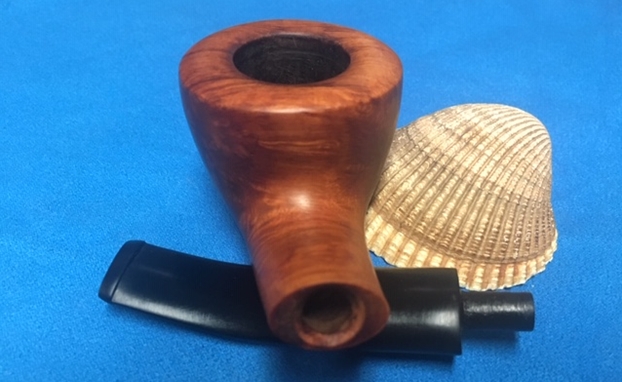
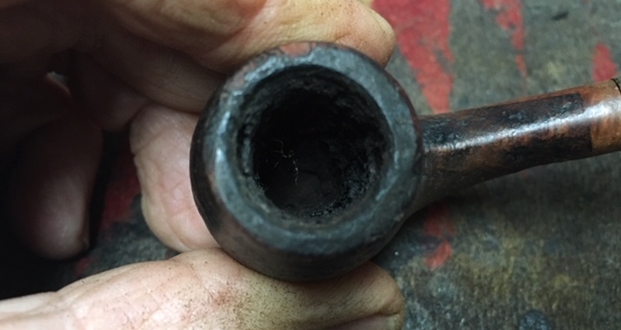
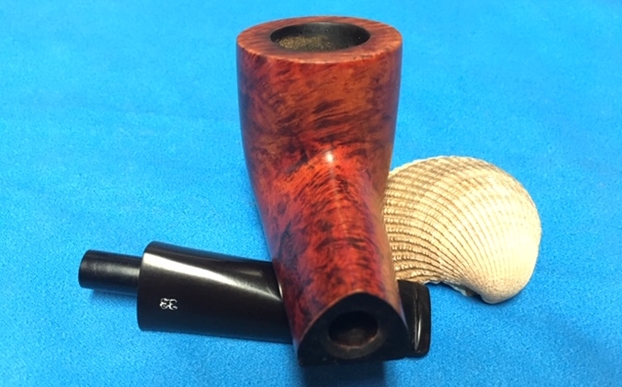
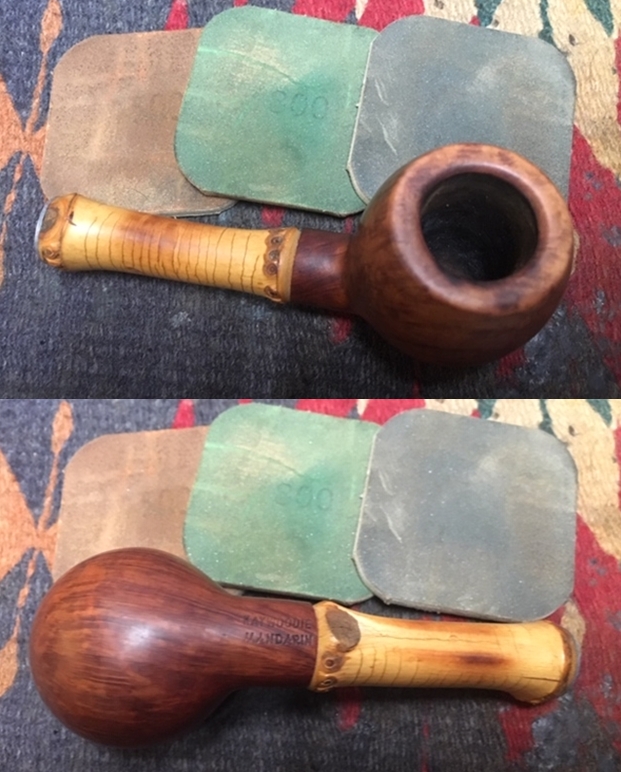
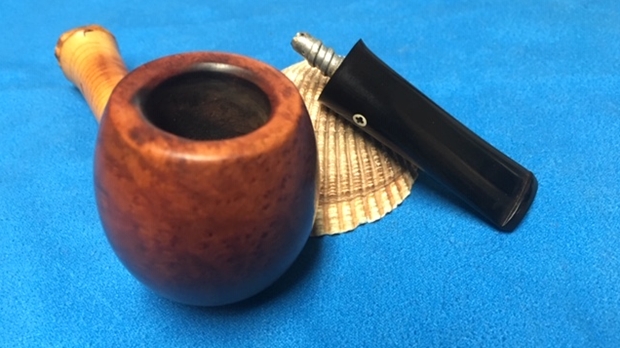
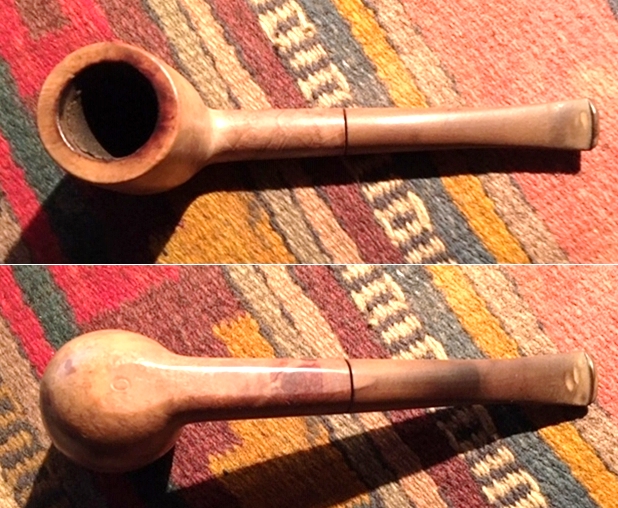
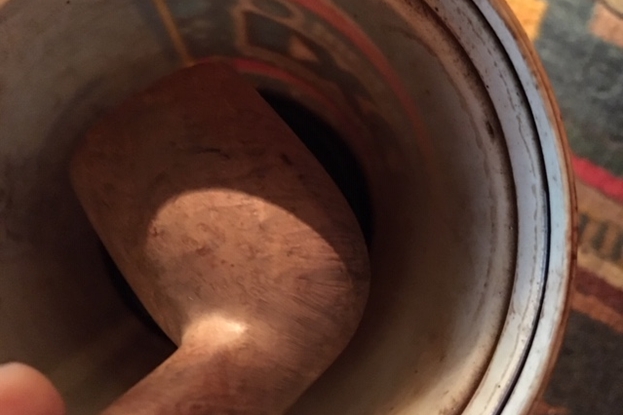
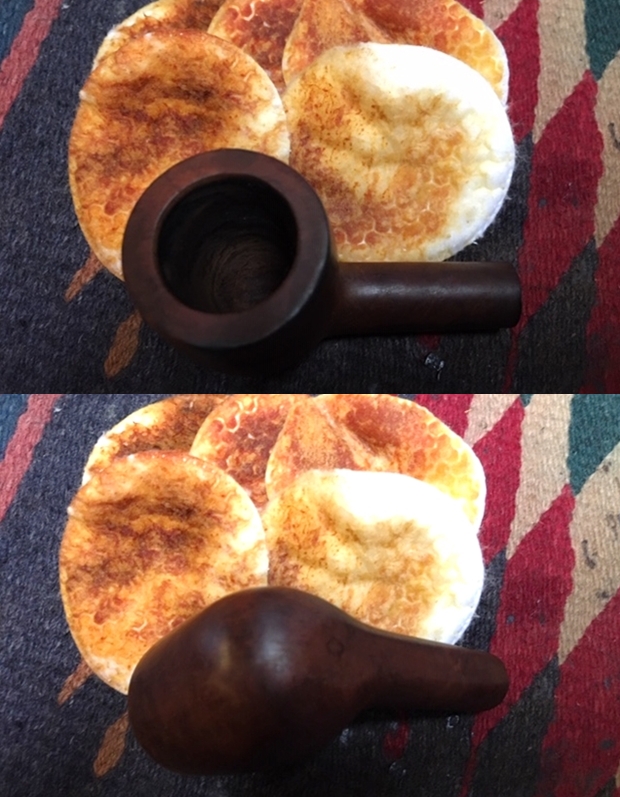
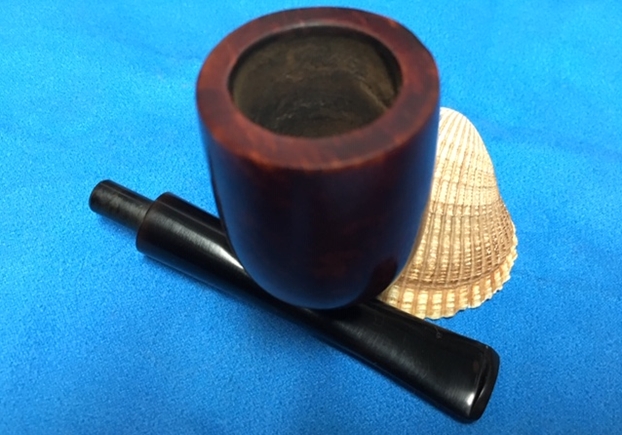
The chamber has some carbon cake build up – I’ll be removing it to give the briar a fresh start.
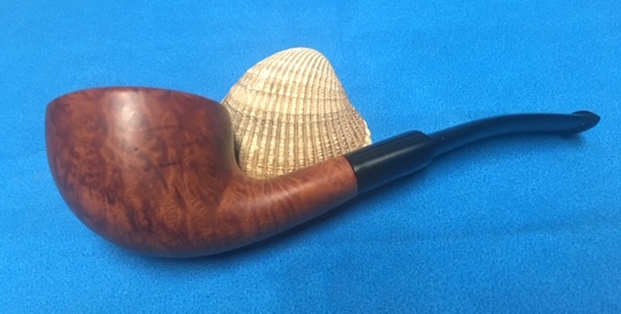
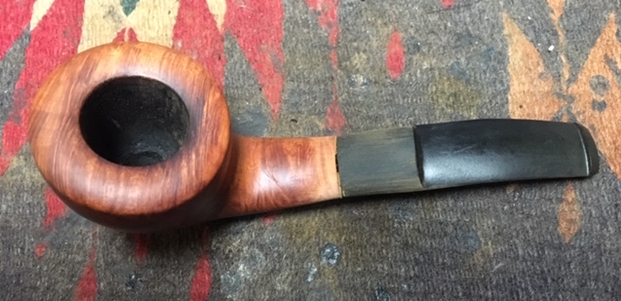
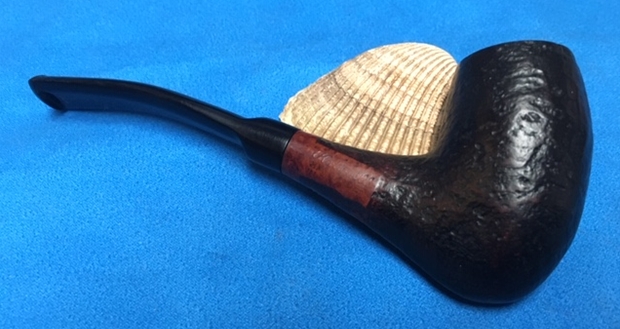
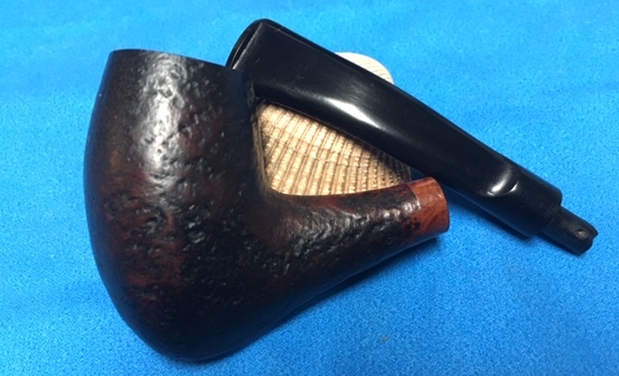
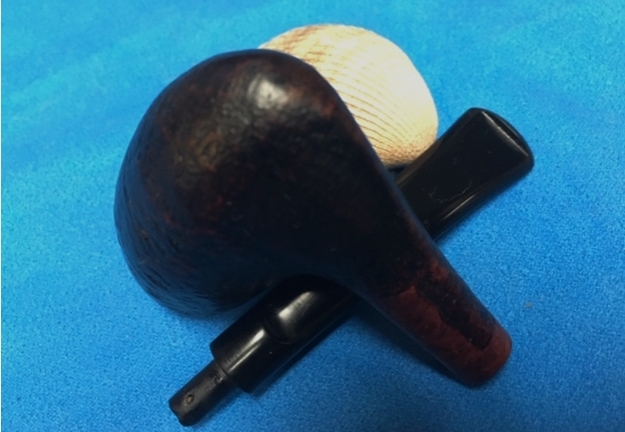
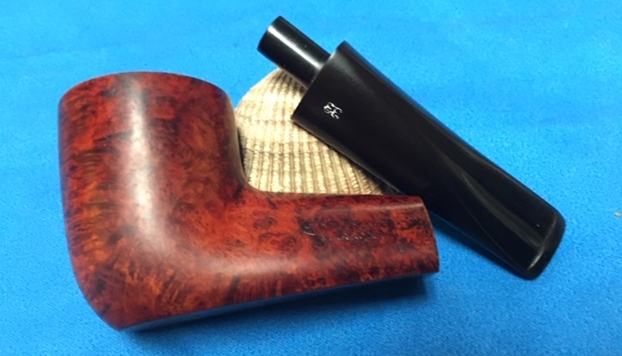
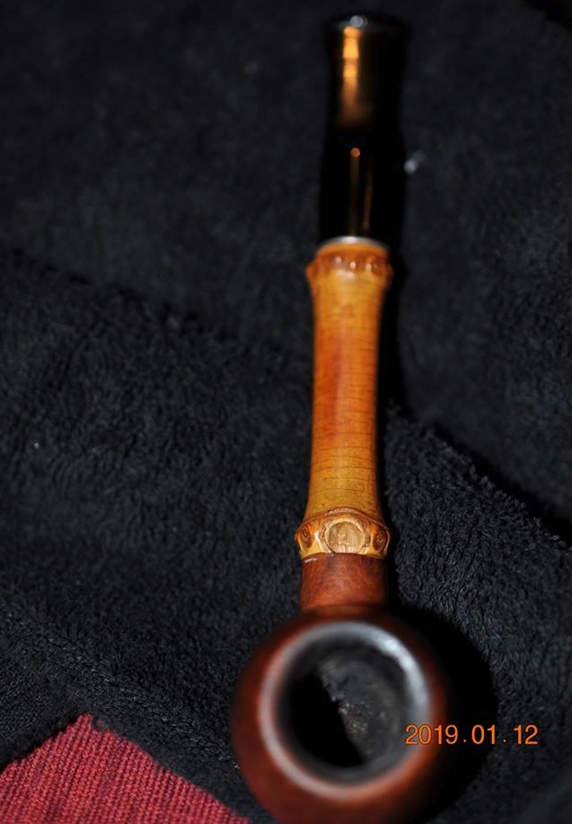
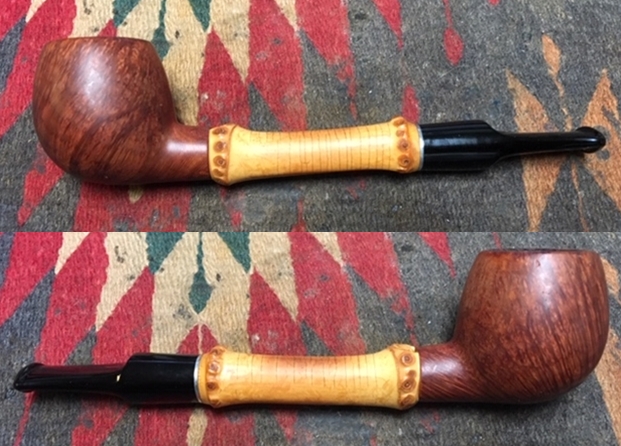
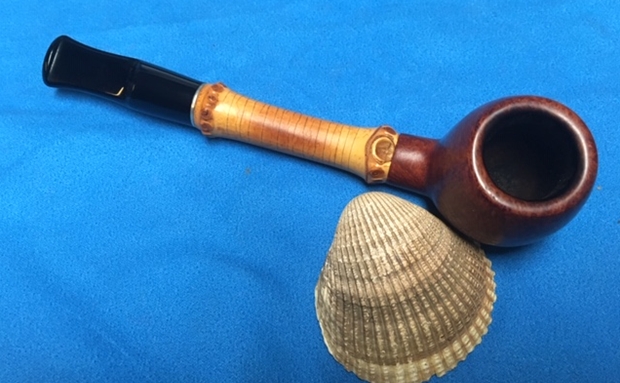
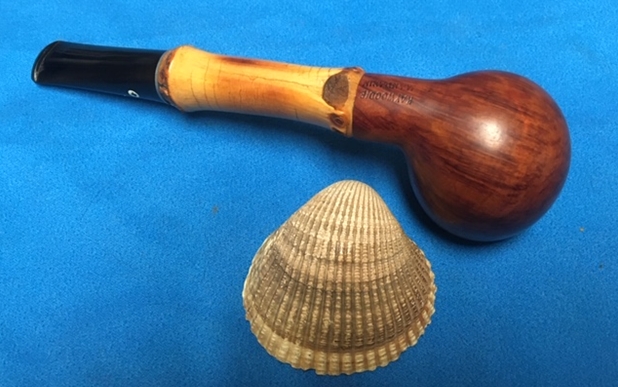
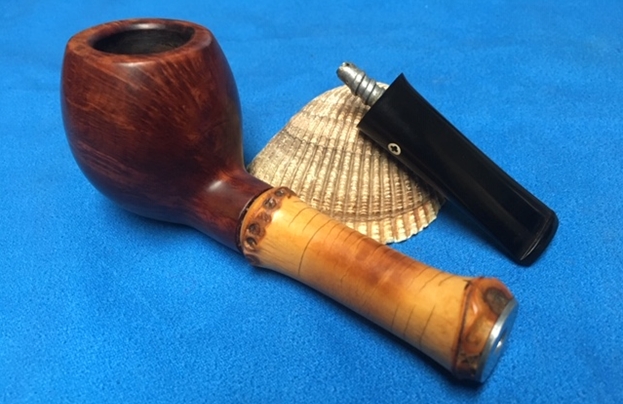
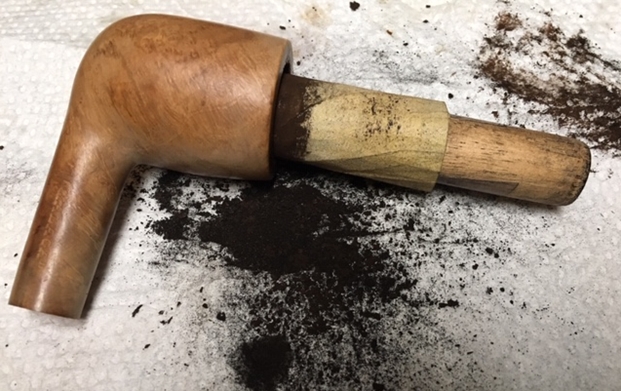
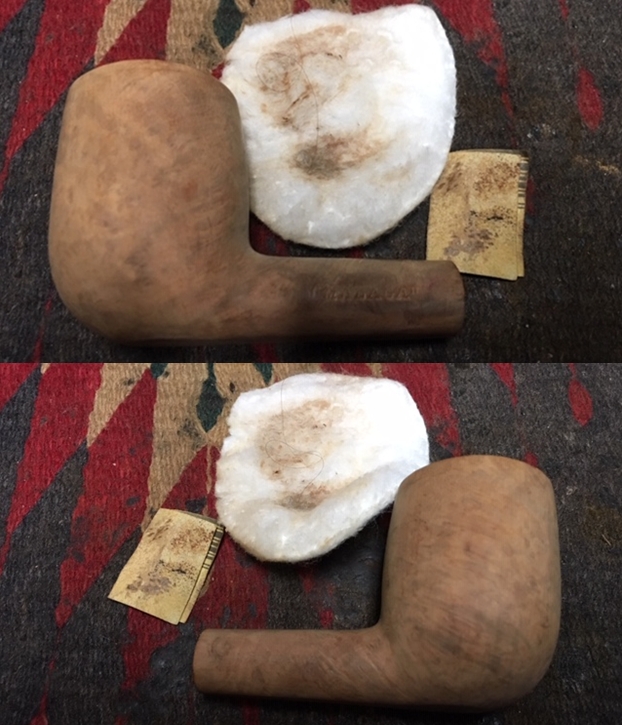
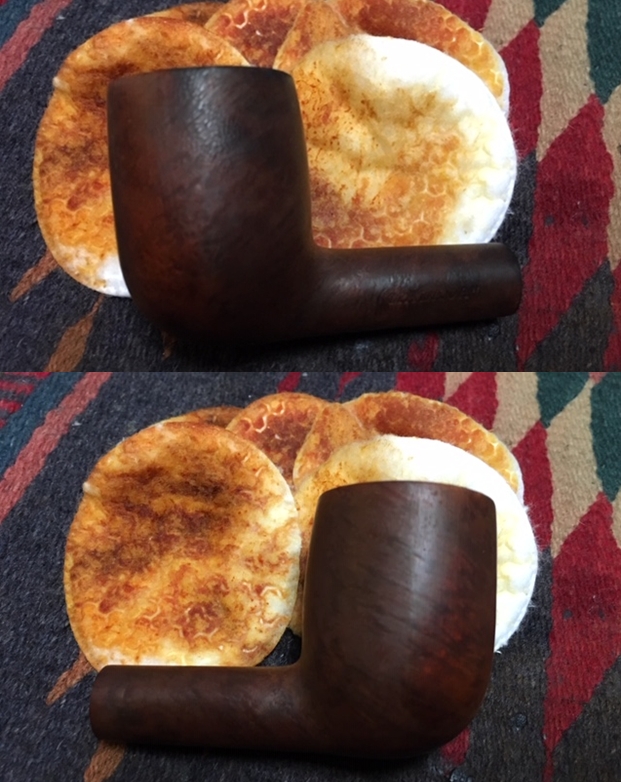
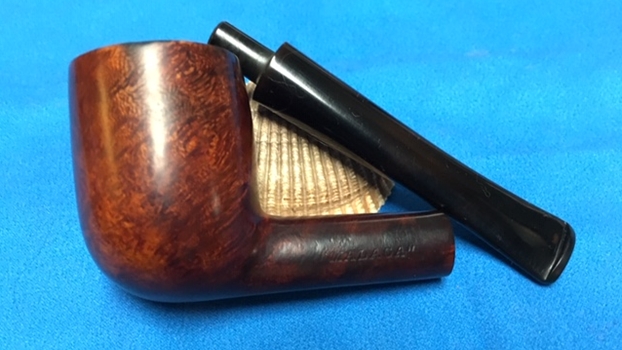
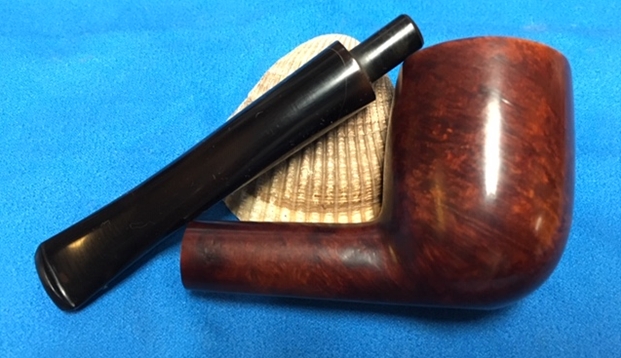
Finally, I take a picture showing the stummel and the Warden stem together – what we’re aiming for!  The bend of the shank sets the stage for a nice, long sweeping Warden stem.
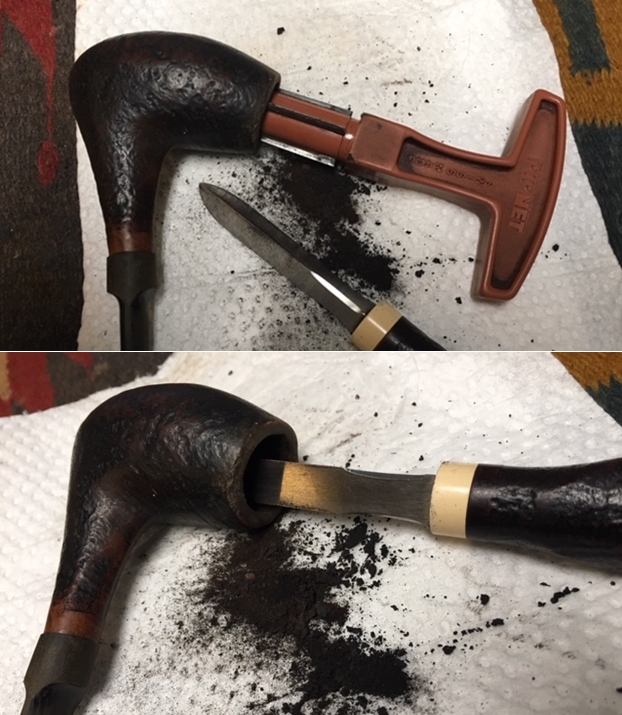
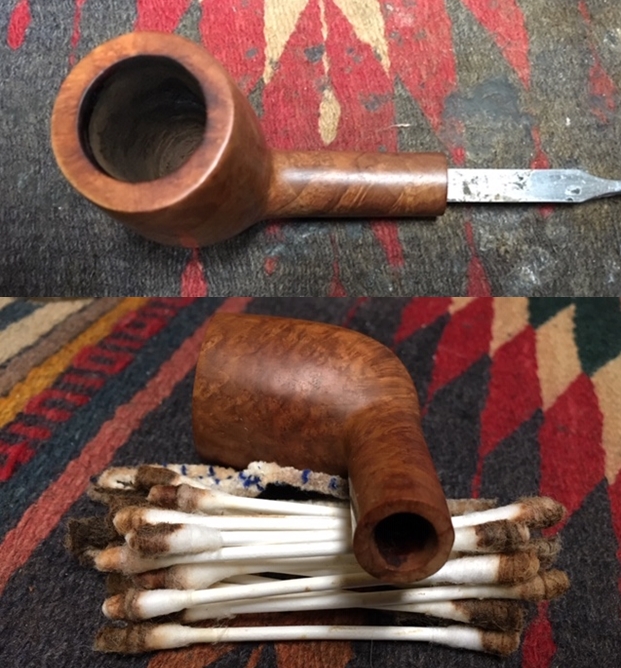
I start the Warden fabrication by cleaning the stummel.  Starting with reaming the chamber, I use only the smallest blade head from the Pipnet Reaming kit and follow by scraping the chamber wall with the Savinelli Fitsall tool.  Finally, after wrapping 240 grit paper around a Sharpie Pen, I sand the chamber removing more of the carbon and getting down to the briar.  To remove the carbon dust, I wipe the chamber with a cotton pad wetted with alcohol.  After an inspection of the chamber, it shows no signs of heat damage with cracks or fissures.
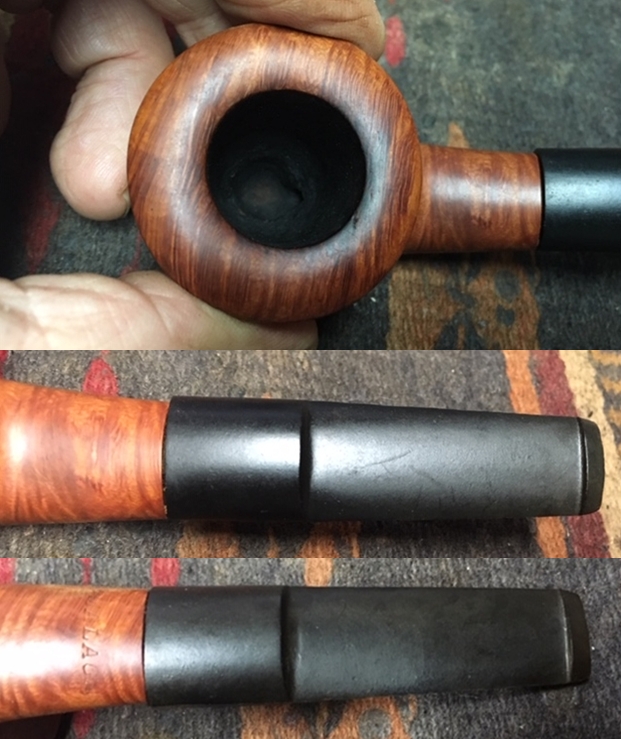
To clean the external briar, I use undiluted Murphy’s Oil Soap and a cotton pad to scrub.  I also get into the dimples to clean them.  On the rim, the internal lip of the rim is darkened from scorching.  I use a brass wire brush to clean the rim, but even after scrubbing the darkened briar is still evident. 
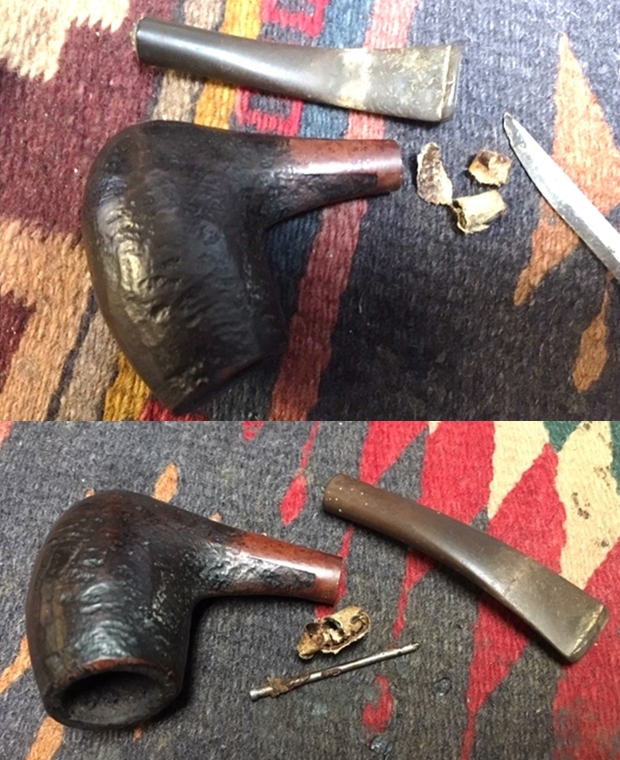
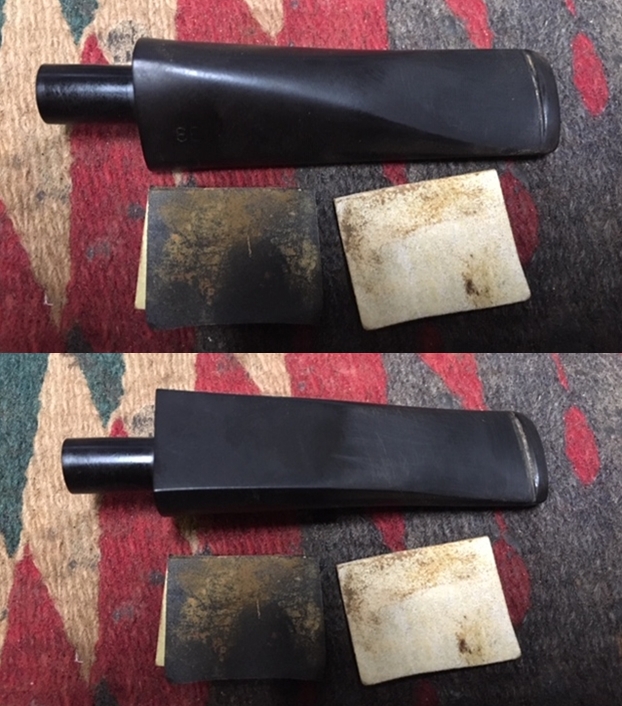
The internals of this stummel was no picnic!  Using pipe cleaners and cotton buds dipped in isopropyl 95%, I clean the mortise and airway.  I also do a lot of excavating of tars and oils by scraping the mortise walls with a dental spatula which you can see wiped in plenty on the cotton pad in the picture below.  Using a long shank brush, I’m able to scrub the airway.  It took a good bit of time, but the buds started lightening until enough progress had been made.  Later, I will continue the cleaning by giving the bowl a kosher salt and alcohol soak.I decide to move forward with the stummel repair before beginning the shaping of the Churchwarden stem.  I have two issues to address before moving on.  The rim is scorched and even after cleaning a dark ring persists around the inner lip of the rim.  With the rim already rounded, I will simply go with that flow and bevel out the internal rim damage.  The other challenge is to address the small stress crack on the lower shank.

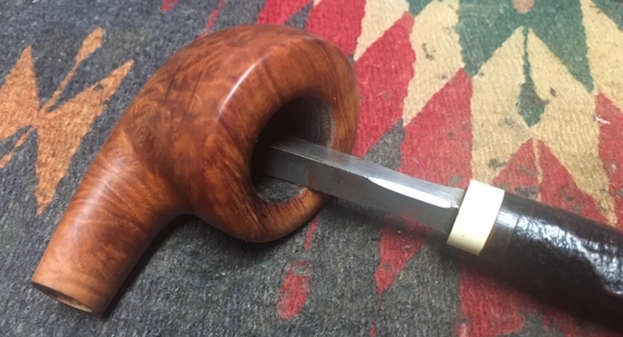
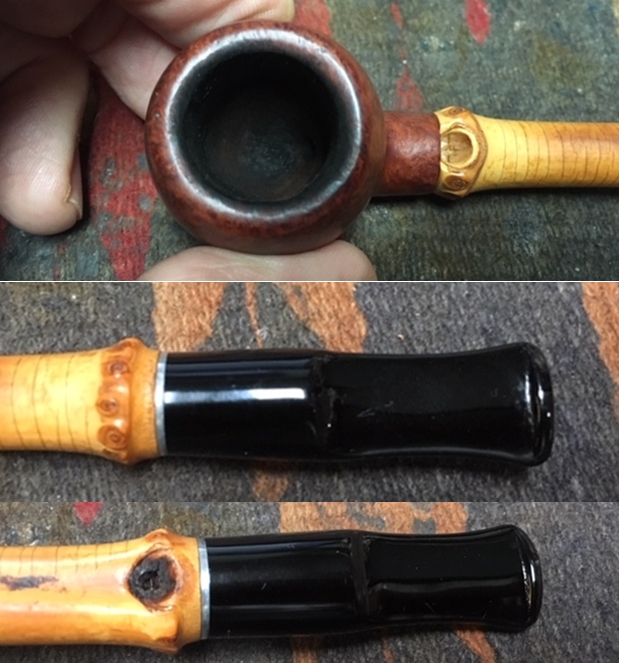
First, I address the rim.  After taking a close-up of the rim to mark the starting point.  In succession, I pinch rolled pieces of sanding papers between my thumb and the inner rim from coarser to less coarse grades: first 120, then, 240, 470 and 600 grade papers.  This removes the damaged briar and freshens the rim and it looks much better.  The rounded rim will look good as a Churchwarden.  Before and after pictures follow: Now, I decide to address the pressure crack on the lower shank.  I will drill two counter-holes at the ends of the crack to guard against the crack growing.  This stops the possibility of the crack creeping in the future.  Drilling these holes is not easy using a hand held Dremel extension with a 1mm drill bit.  Not only do I have the ‘shakes’ as an obstacle of accomplishing a good, true hole drilling, but the depth of the drilling is also of concern.  The shank is not a thick piece of briar!  I do not want to see sunlight coming into the mortise! The first picture is simply of the crack – difficult to see with a magnifying glass.  In order to help guide the drilling, I use a sharp dental probe, again with the aid of a magnifying glass, to mark the ends of the crack with an imprint where the counter-holes will be drilled.Next, I change out the Dremel clamping and mount a 1mm drill bit into the handheld extender.  This is where the jitters really start jittering.  Perhaps, one day I’ll secure a more stable drilling platform but today is not that day!  Thankfully, and I do mean thankfully, the drilling goes well.  Not too much shaking nor too deep. Next, I use thin CA glue because the crack is very subtle, and I want the CA glue to fill and penetrate what it can.  I apply CA glue to the two holes and crack and apply briar dust to the patch.  Hopefully, this aids the holes to later blend.  I put the stummel aside to allow the patch to cure.Several hours later I make it back to the work table and the shank patch has cured and I begin filing the mound with a flat needle file until the patch mound is almost flush with the briar surface.  I then switch to sanding with 240 grade paper to bring the patch flush with the surface and finish at this point with 600 grade paper to smooth it out and blend it.  The patch looks good and I believe the repair was necessary.  It should blend well with the surrounding bird’s eye grain. 
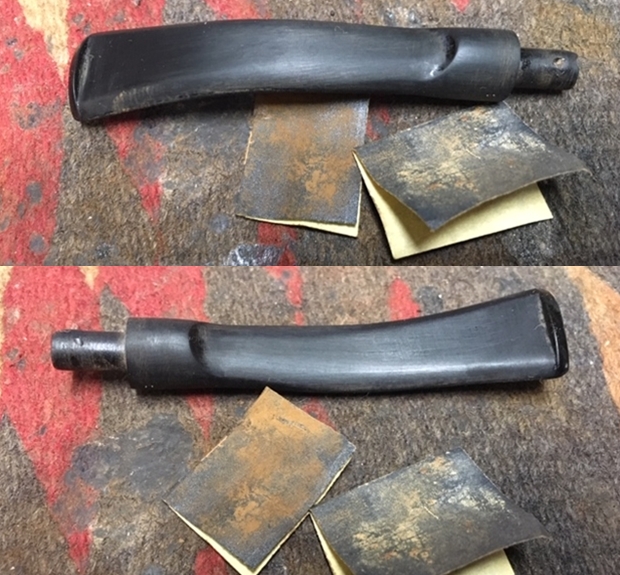
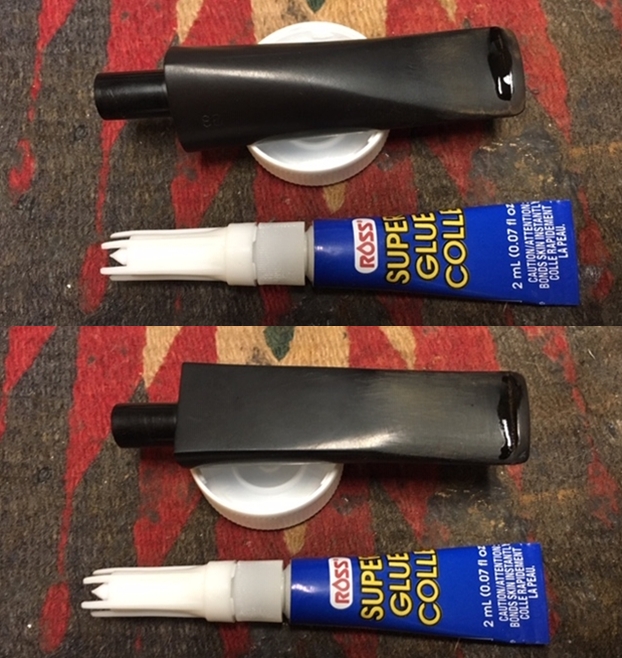
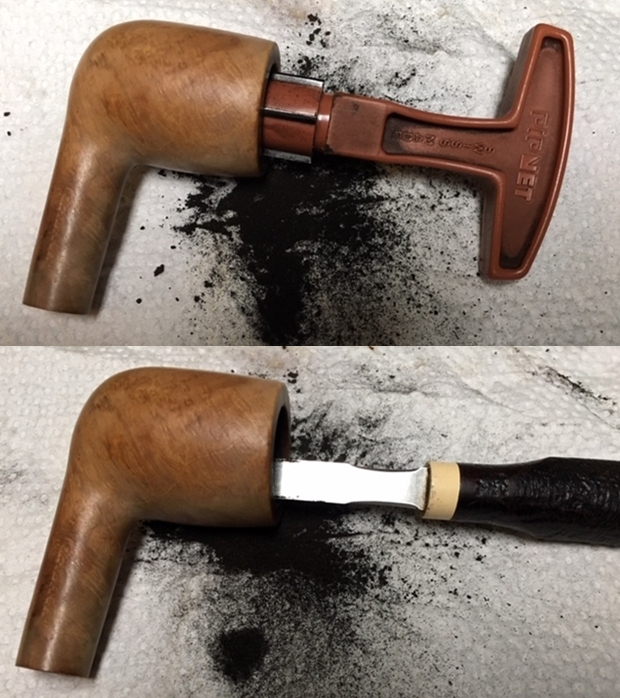
Time to focus on fashioning the Warden stem with the use of the Pimo Tenon Turning tool which has been a very useful addition to my instruments in my restoration toolbox.  I keep the directions on the wall in front of me!  The visuals give an idea of how this tool works to quickly and accurately resize a tenon.The precast stem is 8 5/8 inches long.  I begin by measuring the inside diameter of the mortise using an electronic caliper.  The measurement is 8.50 mm.  This represents the critical target width of the tenon to fit the mortise.  The precast tenon is obviously fat and I use the Pimo Tool to take off a layer of the fat tenon simply to serve as a starting point.I first pre-drill the airway with the drill bit provided by the Pimo kit to allow the guide pin of the Turning Tool to fit into the airway.After the first ‘fat’ cut of the tenon, the tenon is 9.60mm.  My goal is not to cut the tenon exactly at 8.50mm for a ‘perfect’ fit, but to give myself about .40mm of extra width to then conservatively sand my way to a good tenon/mortise fit. Every mortise is different, and I have found it better to go at it slowly.  So, adding .40 to 8.50 gives me a tenon target width of about 8.90 to aim for using the Pimo tool. With the hex wrench provided I turn the set screw to the left to reduce or tighten the Carbide Cutter Arm of the Pimo tool.  Again for an initial measurement, I only cut small portion of the tenon and measure (picture below).  There’s always the chance of taking too much off!  The test measurement is 8.79mm.  This cut results in the tenon being underneath the 8.90 conservative target but still above the 8.50mm critical measurement.  I take the tenon down to that measurement and begin sanding. 
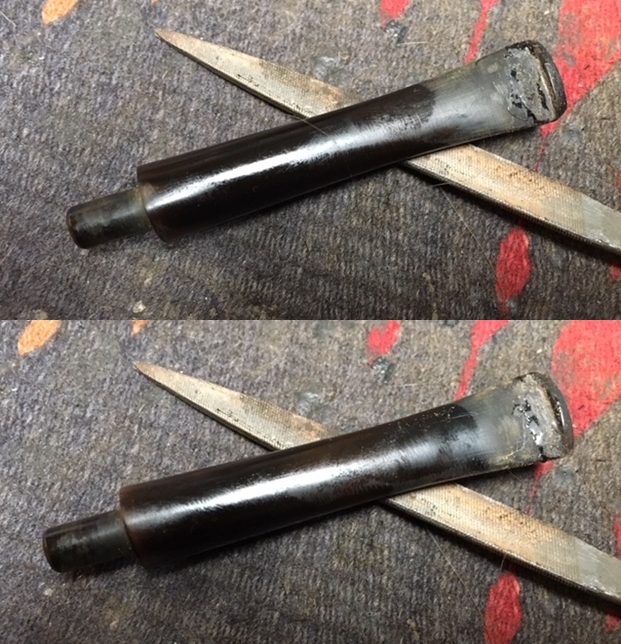
To smooth off and form the end of the rough tenon, I make quick work of it with a sanding drum mounted on the Dremel.Gradually sanding with 240 grit paper as well as using a flat needle file, eventually I achieve a good fit.  The tenon is snug but not too snug.
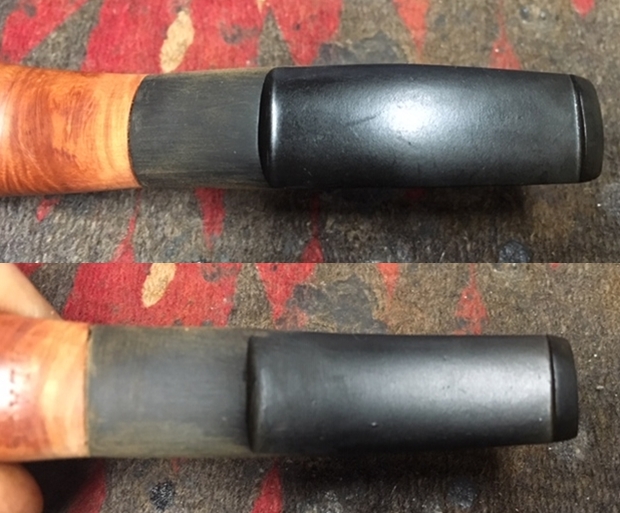
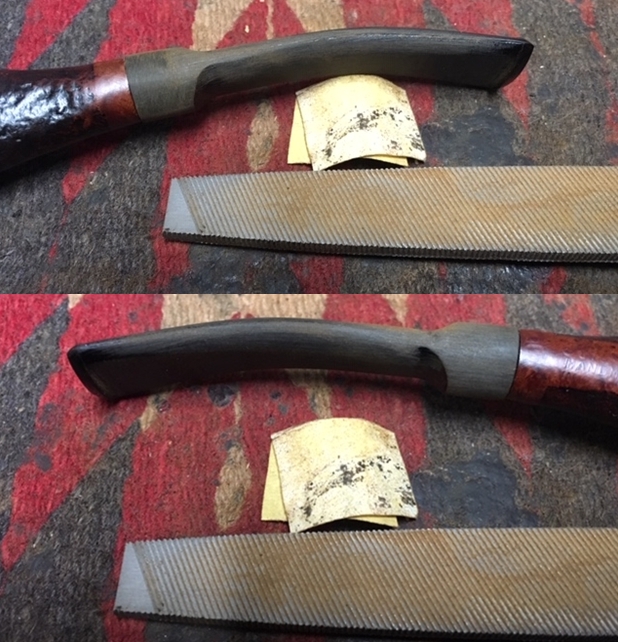
You can see in the next picture the overhang of the shank which needs to be sanded down flush with the stem butting against the shank face.  What I also notice is that the face of the stem is shouldered – or down-turned.  This is from not taking off enough vulcanite to have a flat face surface for the stem face to seat against the shank face.  Not shown is remounting the Pimo tool onto the drill and shaving off a bit more of the stem face to improve the junction.  With the flattening of the stem face the tenon seats well.  I go to work sanding the shank to bring it flush with the stem.  I also taper the sanding up the shank to achieve more flow – not having the stuffed pants look.  After sanding the shank/stem junction looks great. 
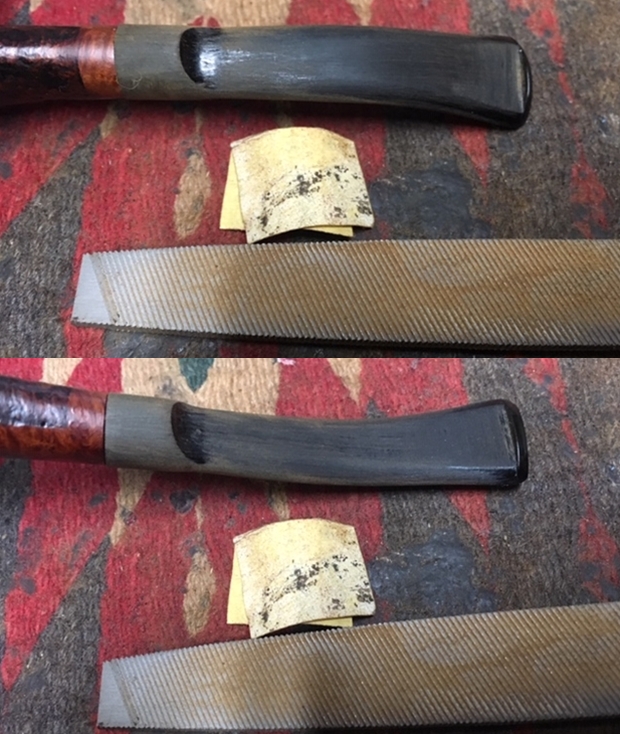
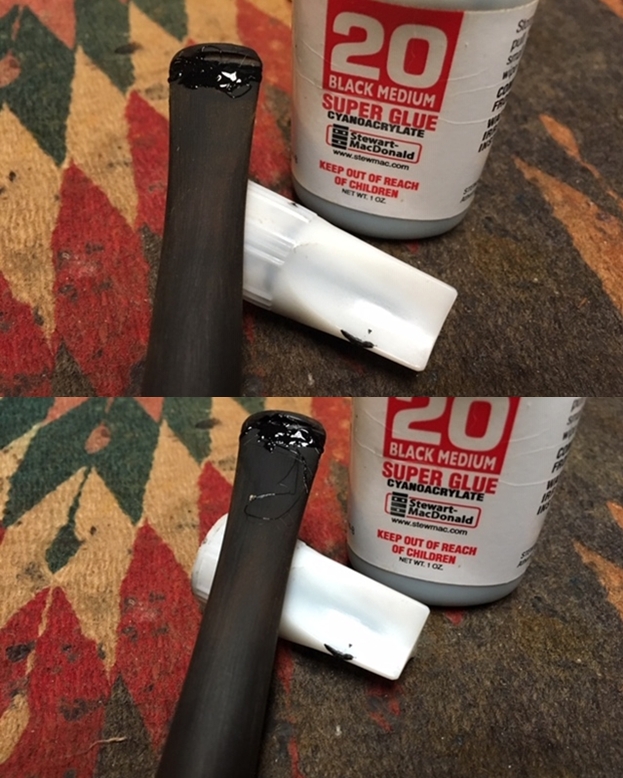
Even though the Warden stem is a new precast stem, it must be shaped, filed and sanded to remove vulcanite ripples and manufacturing seams.  I work on the button area with the flat needle file and then 240 grade paper.  I also fully sand the entire stem with 240 grade paper.  You can see manufacturing ripples in the new stem which the sanding smooths out. 
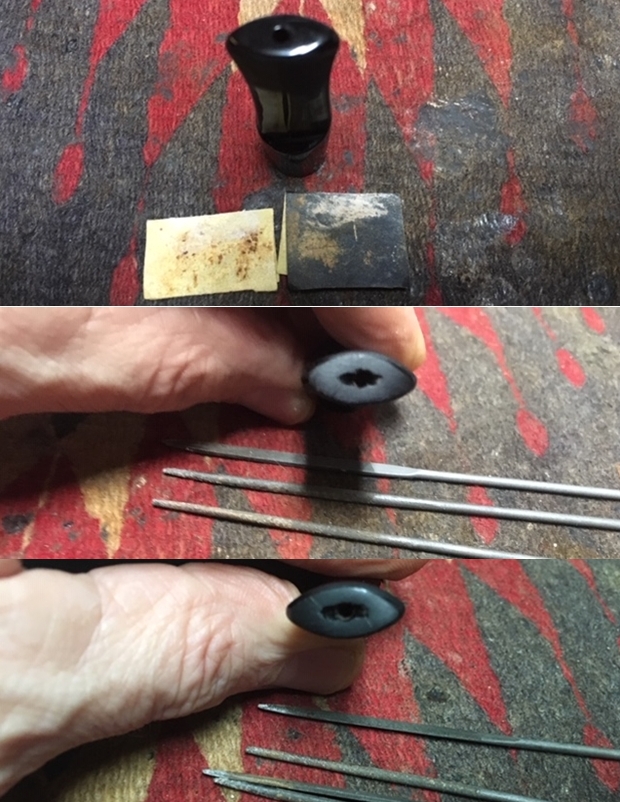
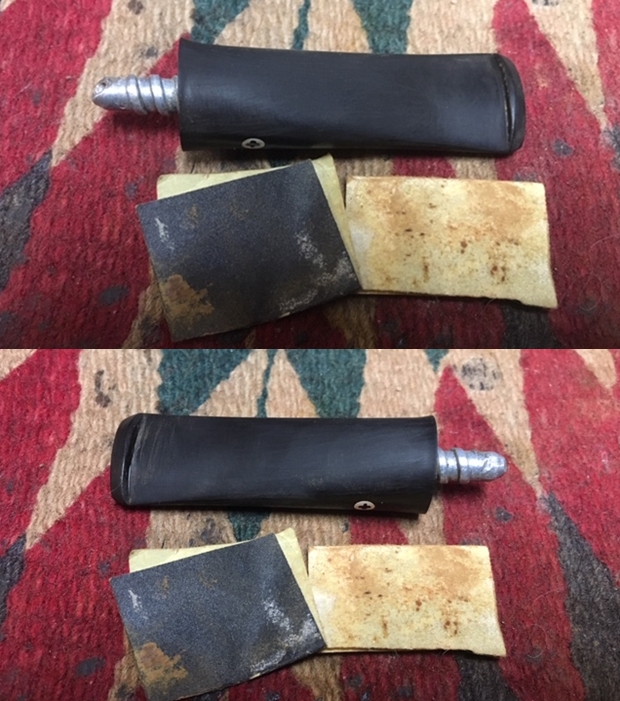
After completing the sanding with the 240 grade paper, I wet sand the entire stem with 600 grade paper followed by applying 0000 steel wool.  The Warden stem is looking great.  It’s difficult to take good pictures of the Warden stem because the view is always from orbit to get the full length!  So, I provide a few close-ups as well.To hydrate the vulcanite, I then wipe it down with paraffin oil, a mineral oil.
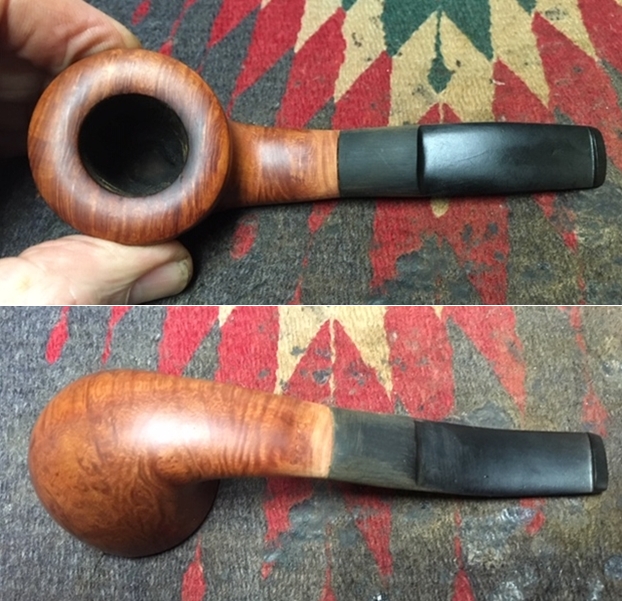
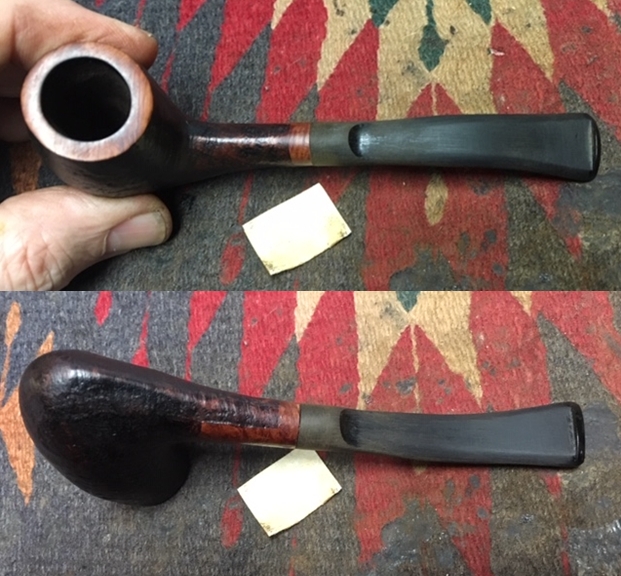
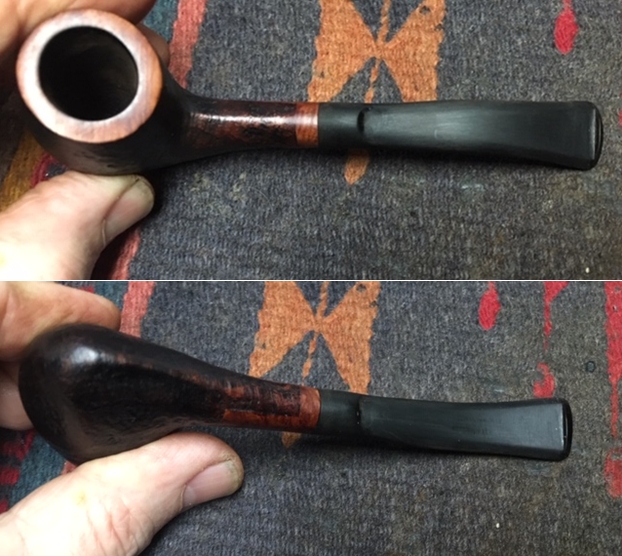
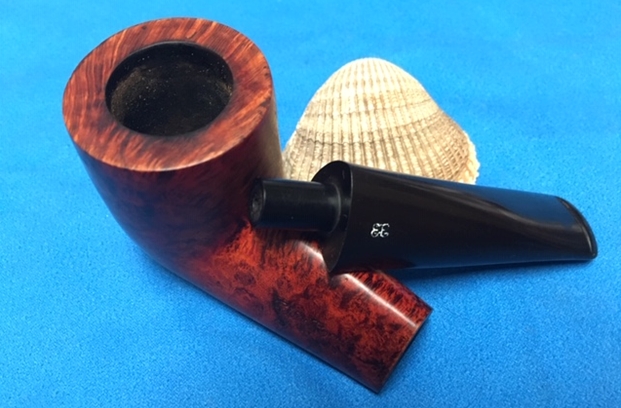
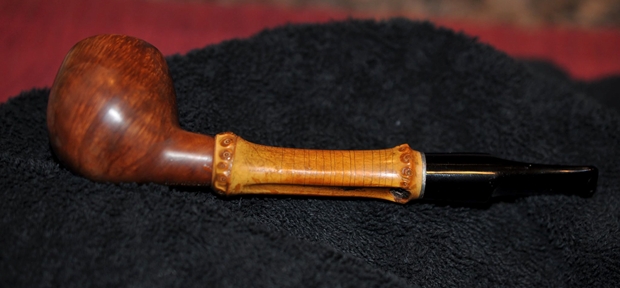
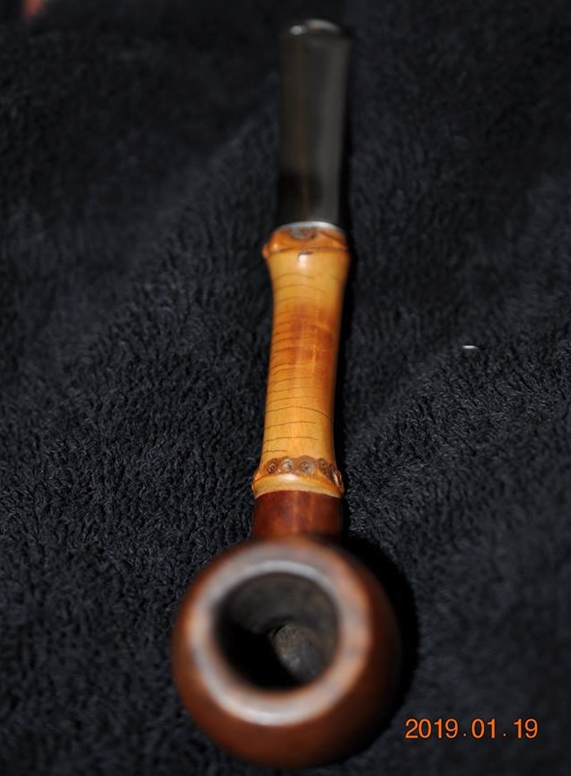
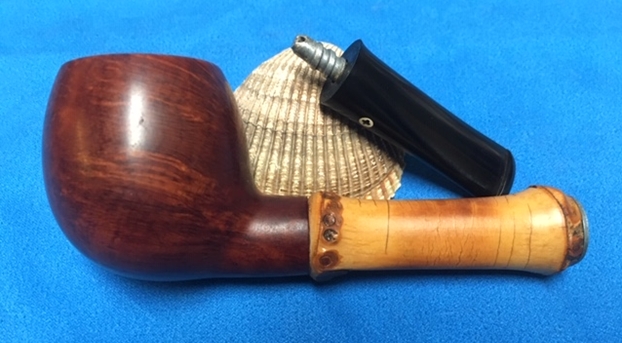
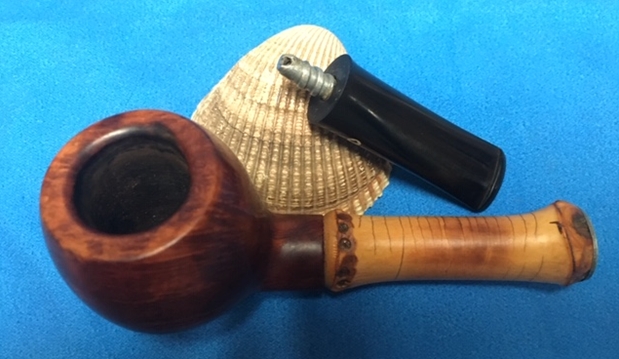
I refit the stem with the Dimpled Billiard stem to get a look at the progress.  I’m liking what I’m seeing.
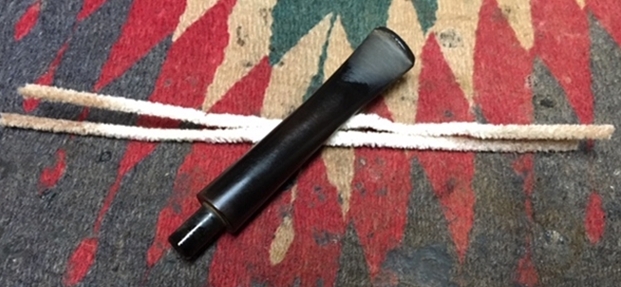
Now I need to bend the stem.  I use a hot air gun to heat the vulcanite to make it supple and bendable.  I first put a pipe cleaner in the airway just to make sure the airway does not collapse during the bending.  The general aim is to give the Warden stem a gentle and flowing bend so that the end of the stem is generally in a parallel orientation with plane of the rim.
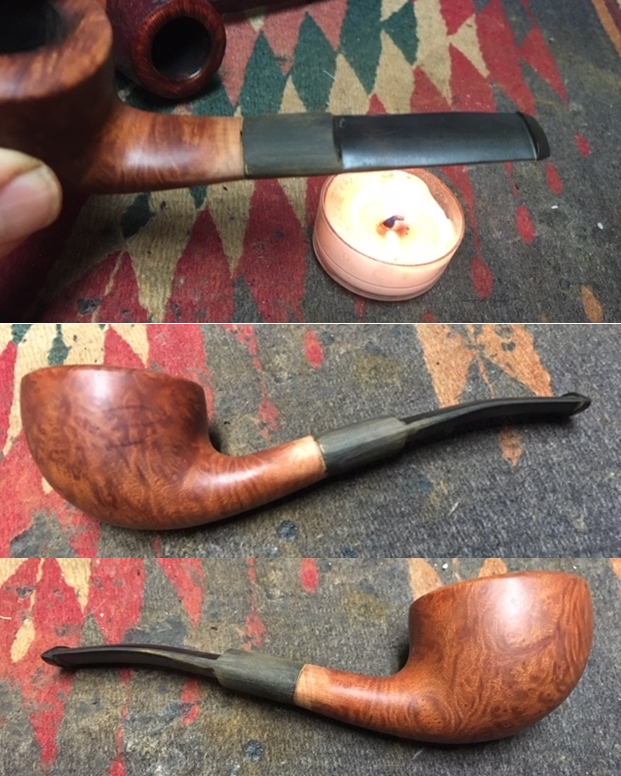
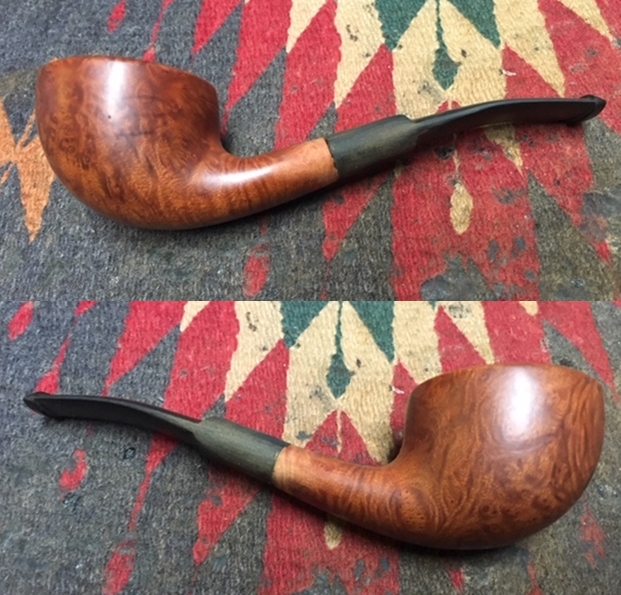
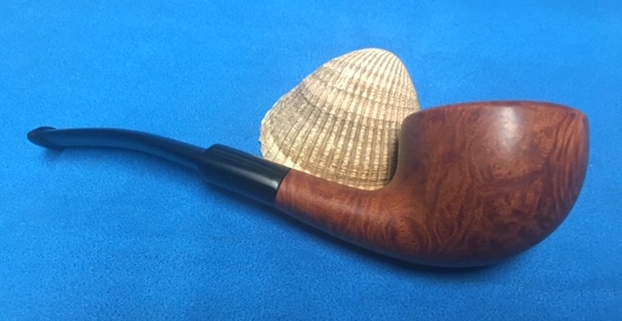
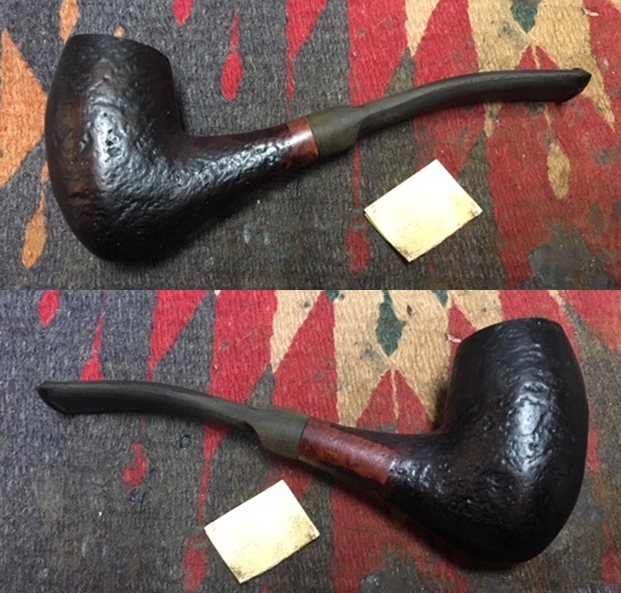
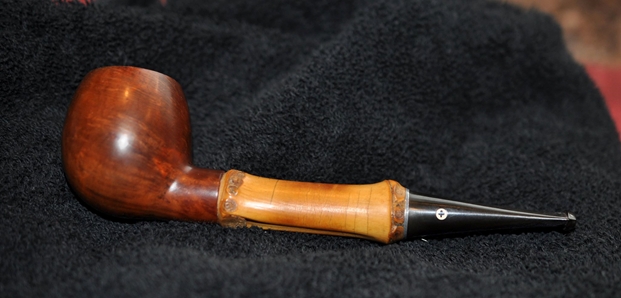
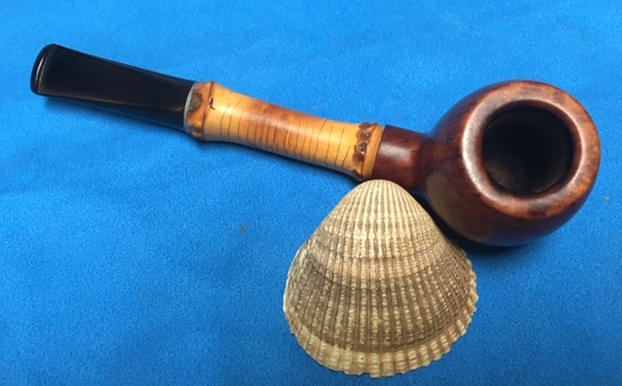
In the end, I re-heat, re-bend, re-heat and re-bend a few times until I was satisfied. I think it looks good.  I go for the flowing look which is more ‘Gandalf-like’ – the subjective bar for all Churchwardens!  I think this will be agreeable to Coleman.
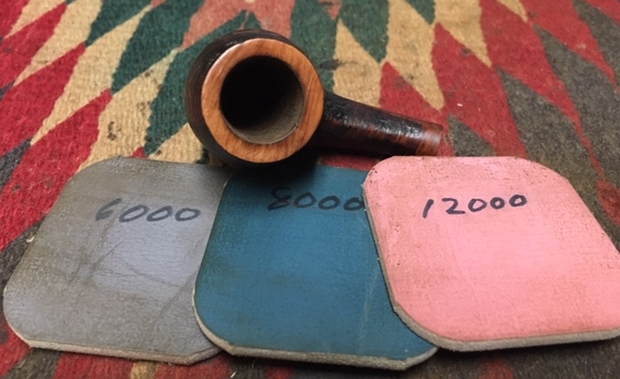
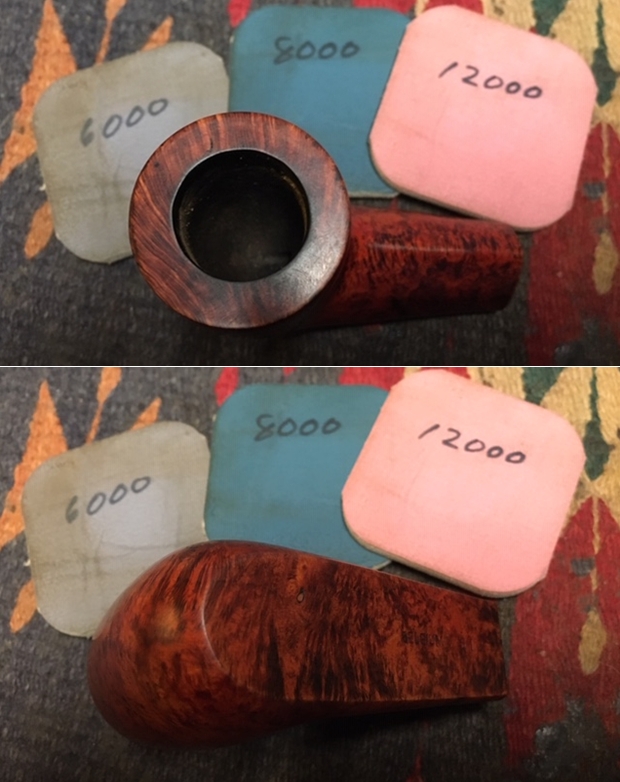
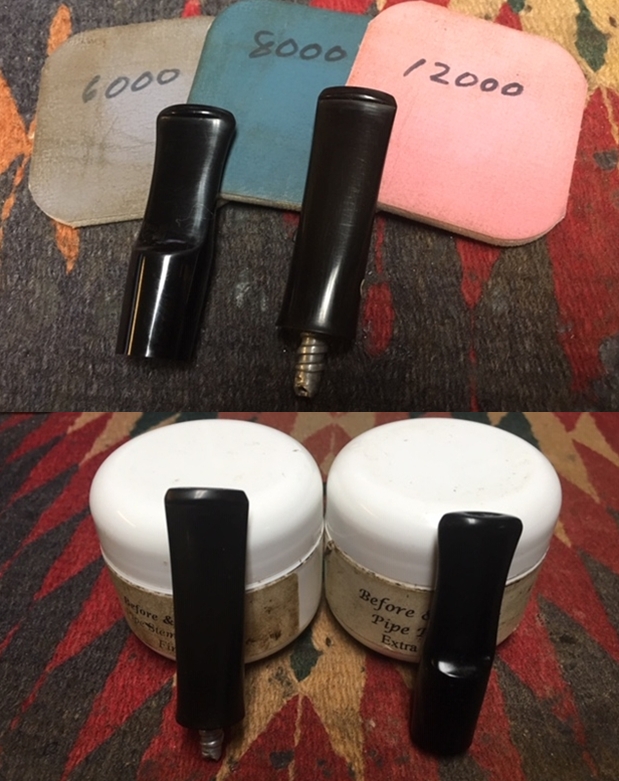
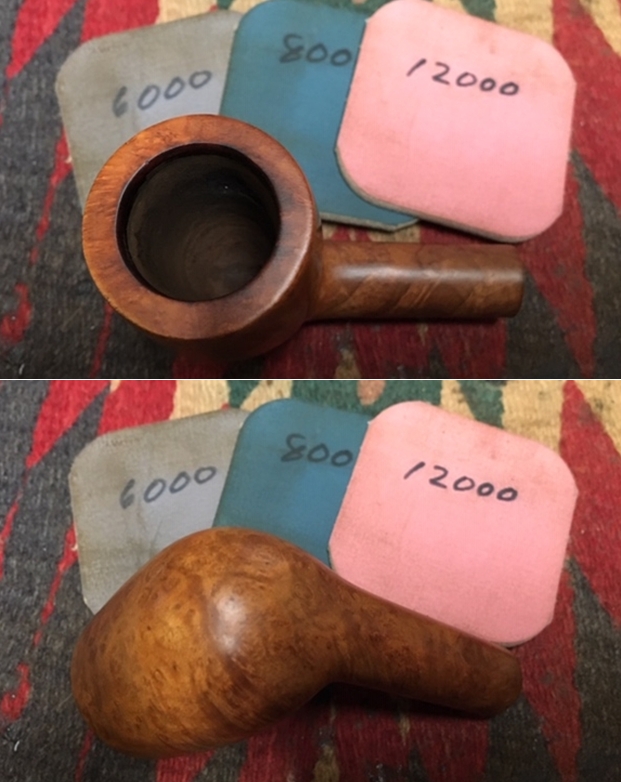
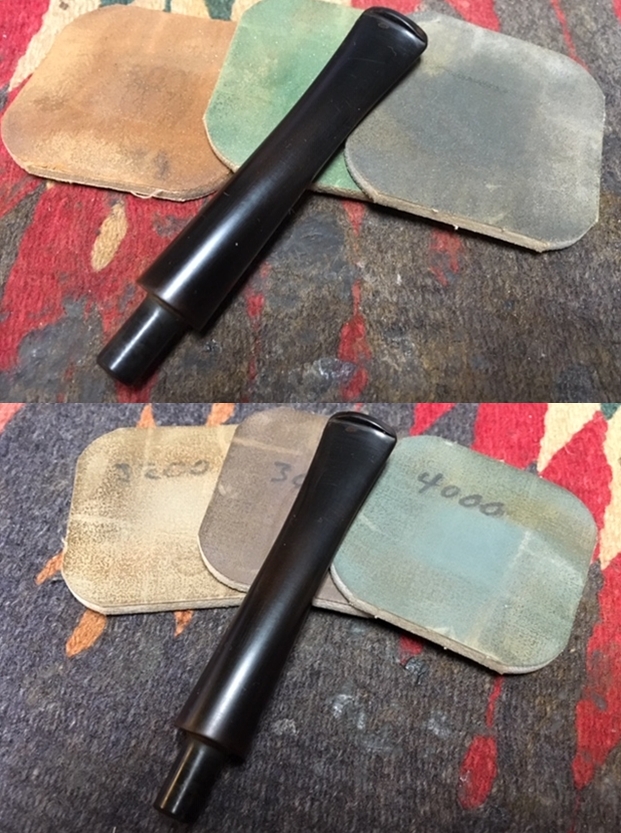
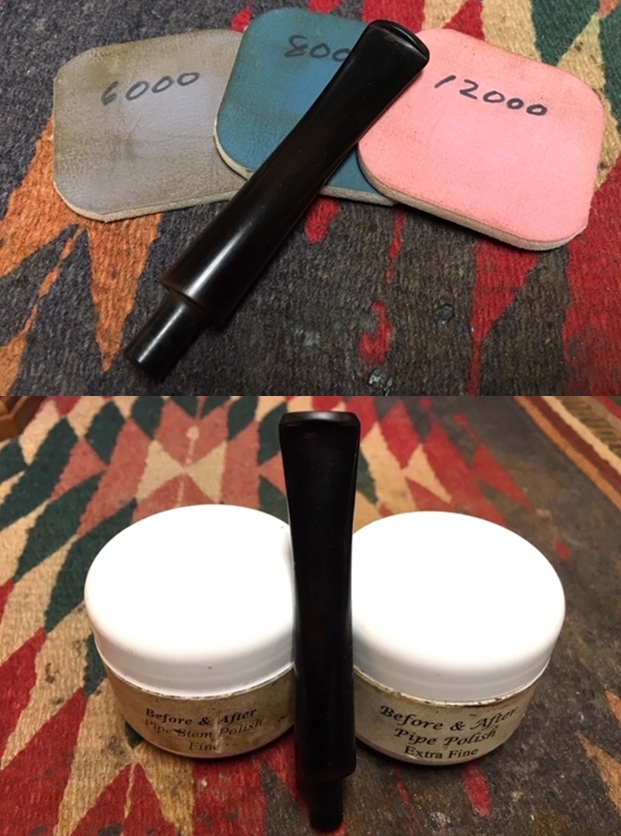
With the Warden stem bent, I start the micromesh process by wet sanding the stem with pads 1500 to 2400, then dry sanding with pads 3200 to 4000 and 6000 to 12000.  After each set of 3 pads I apply Obsidian Oil to continue to hydrate the vulcanite.  There is a pop to the freshly sanding/polished vulcanite!
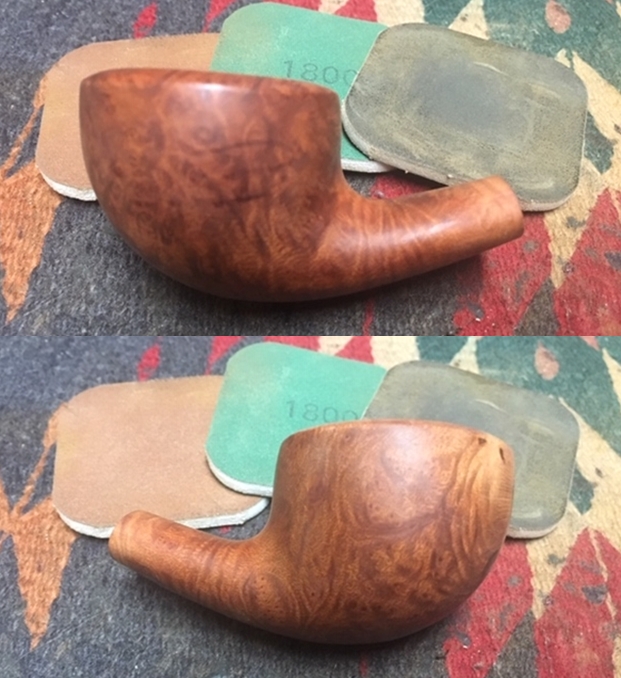
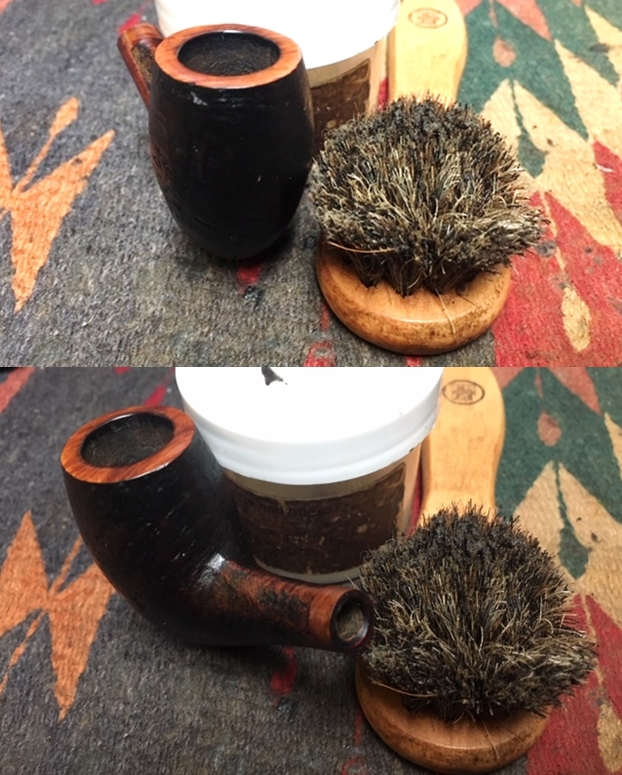
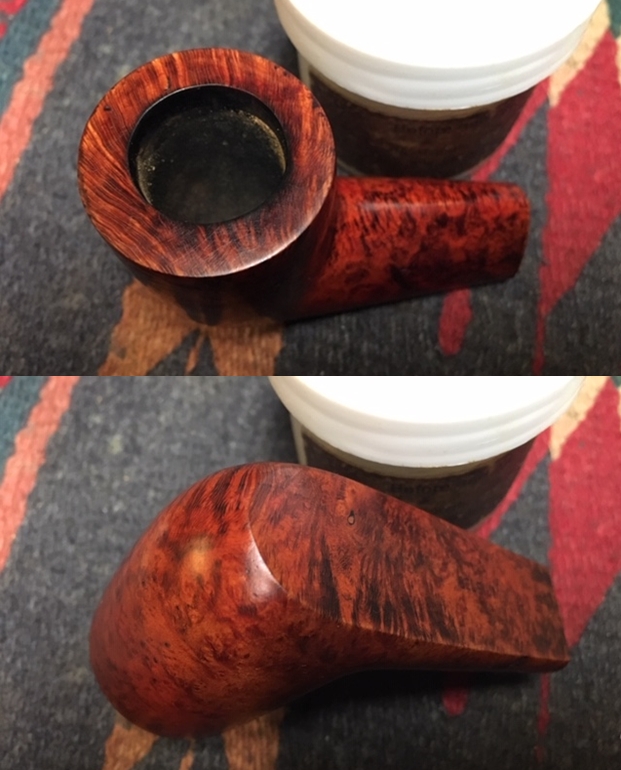
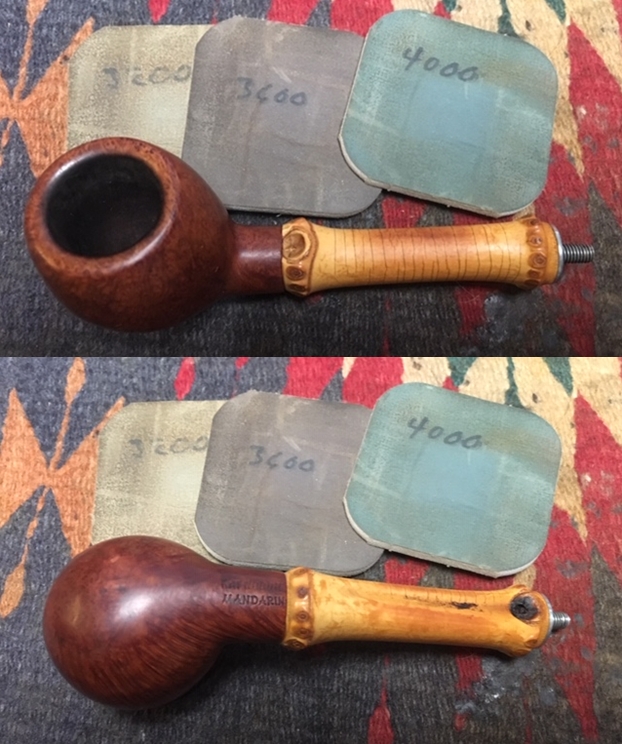
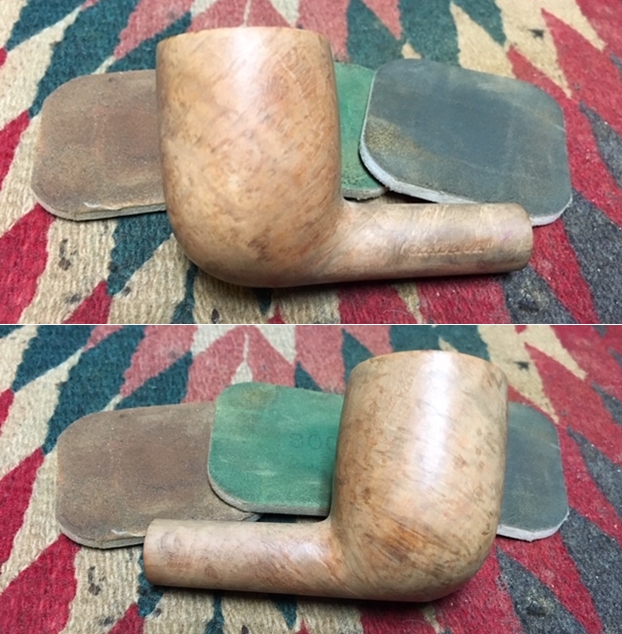
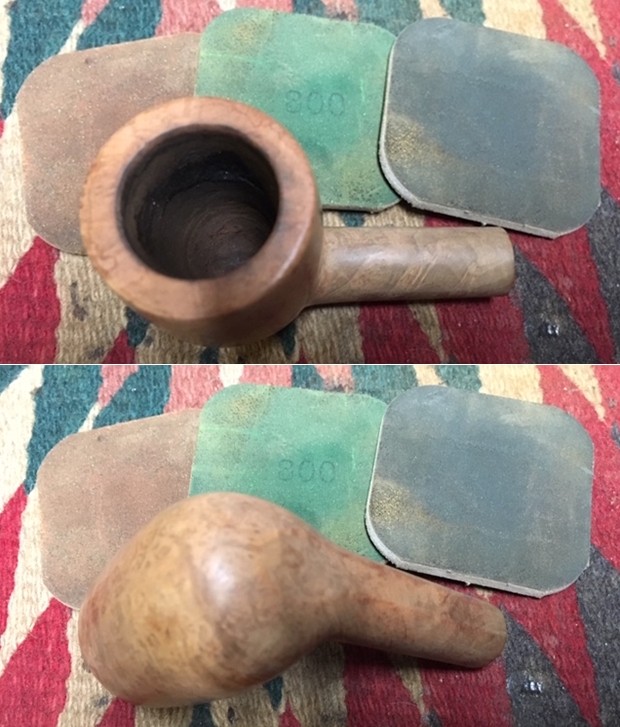
Turning now to the stummel, I use sanding sponges to clean the surface of the Dimpled Billiard removing minor cuts and nicks.  I first take some starting pictures then sand the stummel with a coarse sponge followed by medium and then, finish with a light grade sponge.  The sanding goes over the top of the rusticated dimples.  To get into and clean, sand and polish the dimples, later I will use the compounds and the Dremel to do this. 
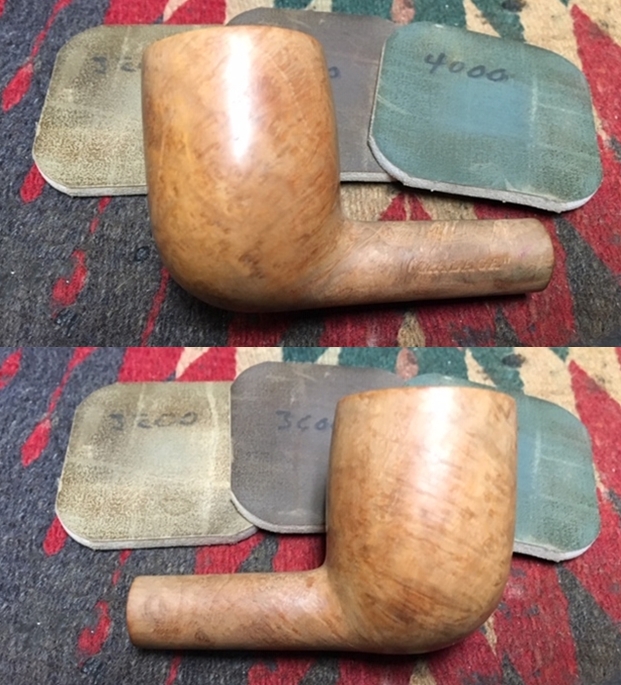
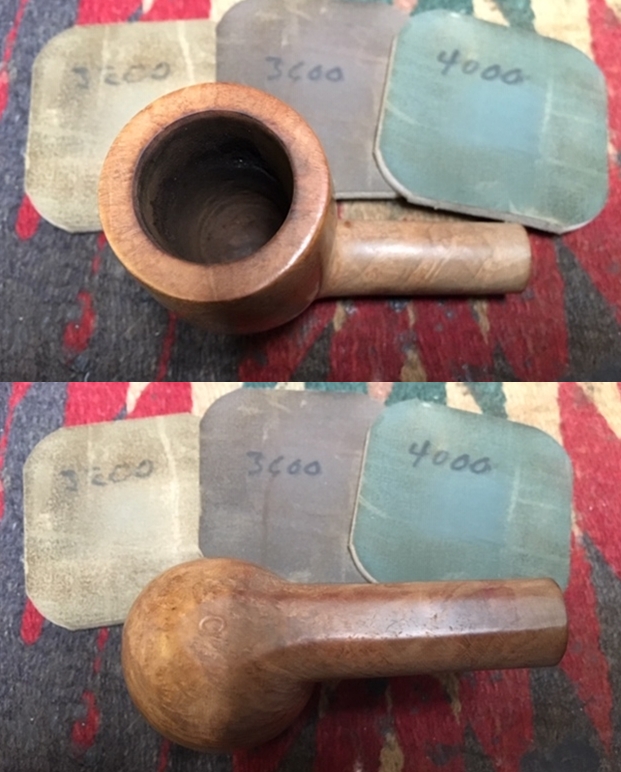
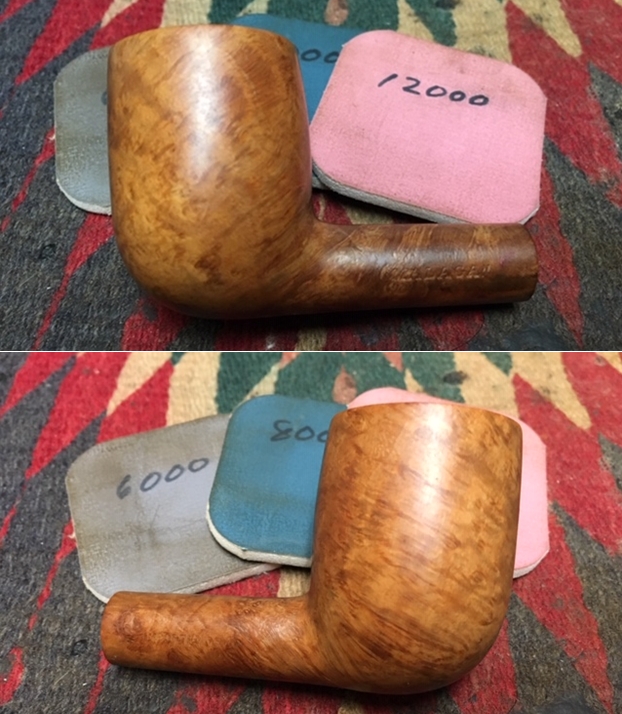
I then go directly to sanding with micromesh pads starting with wet sanding pads 1500 to 2400, then dry sanding with pads 3200 to 4000 and 6000 to 12000.  I enjoy watching the grain emerge during the micromesh process. Before going any further with the stummel polishing, I continue the internal cleaning using kosher salt and isopropyl 95% as I indicated earlier. I begin by forming a wick by stretching and twisting a cotton ball to insert into the mortise.  I then fill the bowl with kosher salt, which unlike iodized salt, does not leave an after taste.  I then place the stummel in an egg crate for stability and add isopropyl 95% to the bowl until it surfaces over the salt.  I wait a few minutes while the alcohol is absorbed and top it off once again.  I then set the stummel aside to soak for several hours. The soak did the job.  The discoloration of the salt and wick show the absorbing action of the salt and alcohol.  I toss the expended salt in the trash can, wipe the bowl out with a paper towel and blow through the mortise as well to dislodge remnant salt crystals.  I finish off by expending a few more alcohol wetted pipe cleaners and cotton buds to make sure all is clean, and it is.  Moving on. 
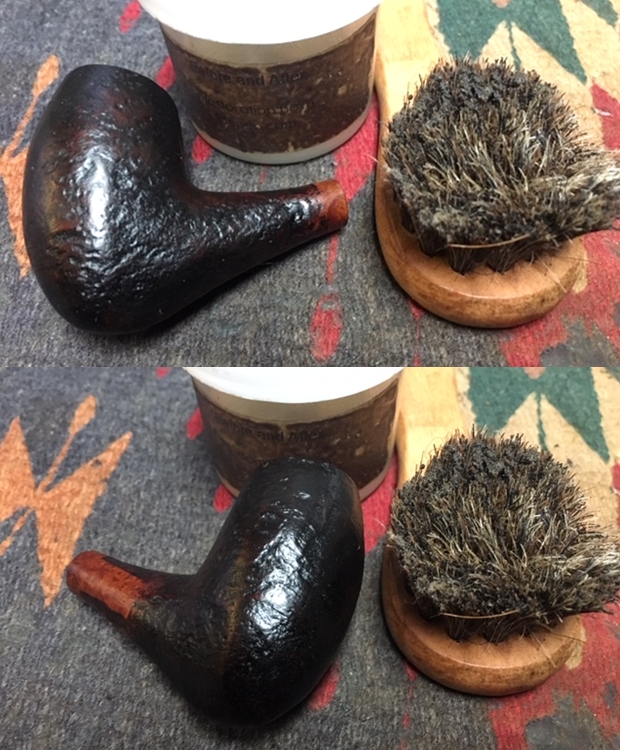
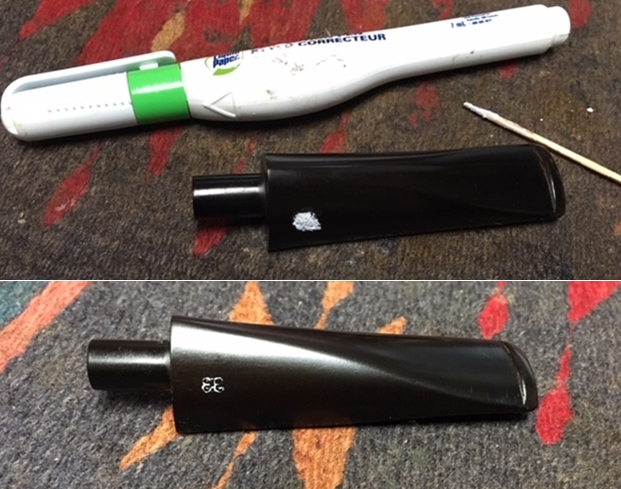
With Coleman’s agreement, I’m staying with the natural grain color and because of this I utilize Before & After Restoration Balm to condition the briar surface.  The Balm deepens and enriches what is already present in the grain and I like the subtle improved results of using it.  I put some Balm on my finger and rub it into the surface.  The Balm’s texture begins as a thinner oil-like thickness and then gradually thickens into a wax-like texture.  I work the Balm into the rusticated dimples as well. 
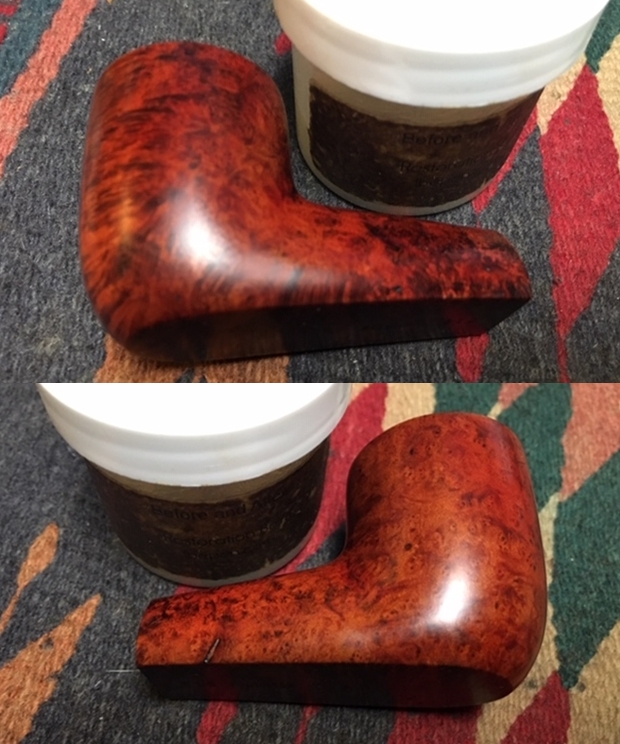
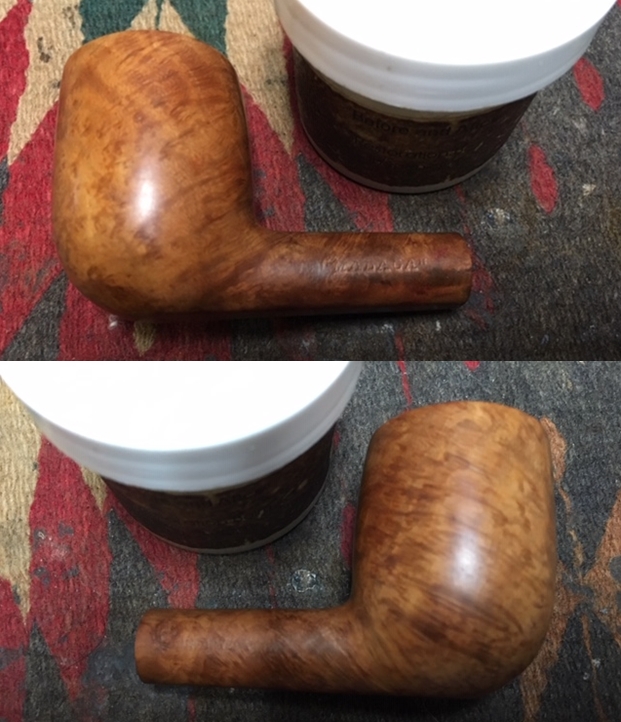
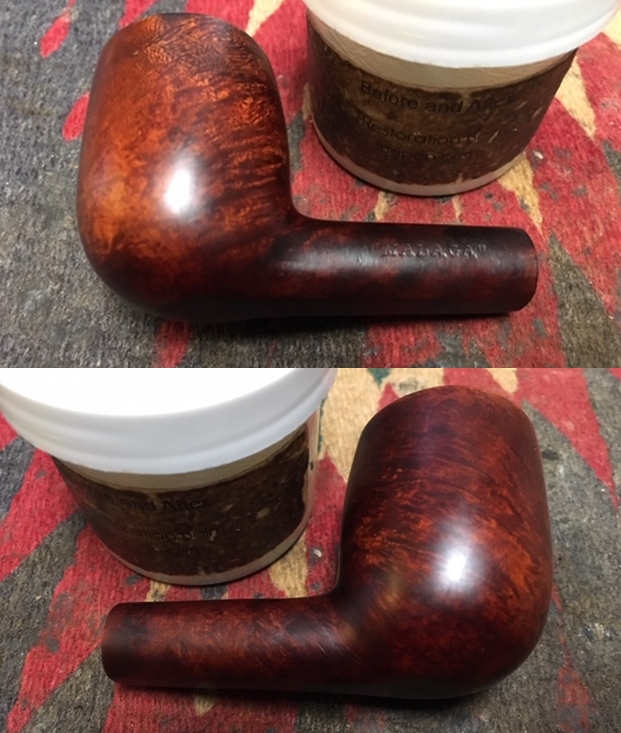
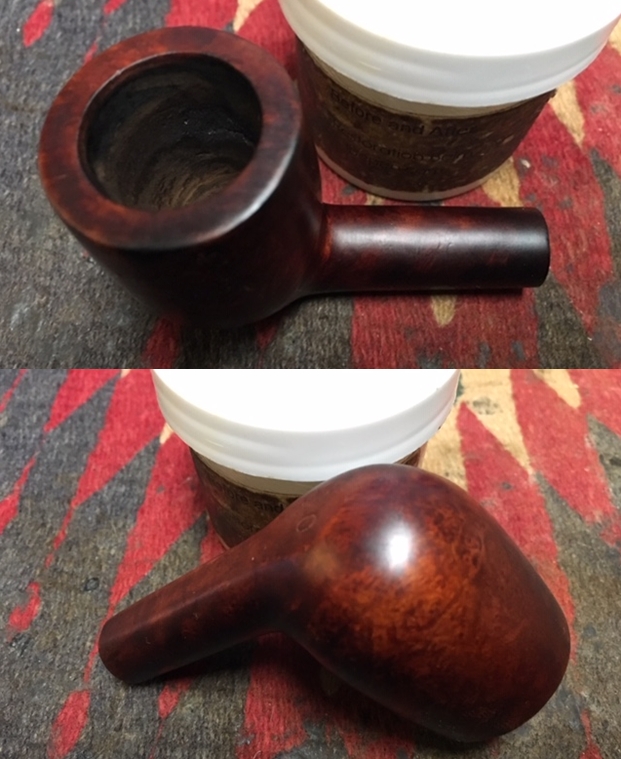
After fully covering the surface, I wait about 30 minutes and then wipe/buff the excess Balm. I use a toothpick also to make sure the dimples are not holding collected Balm.  A few ‘After’ pictures to compare.  It looks great! With the Balm applied, I mount a cotton cloth buffing wheel to the Dremel at 40% speed.  I then apply Blue Diamond compound to the stummel surface taking special care to work the compound into the rusticated dimples. The sanding processes do not get into the crevasses but pass over.  Using the smaller buffing wheel, I’m able to direct the compound into the crevasses.  I also apply Blue Diamond to the Churchwarden stem.  Its easier to keep the stem and stummel separate because of the size of stem and the rotating motion I use with the Dremel.  After completing application of the Blue Diamond, I apply carnauba wax to the stem and stummel using another cotton cloth buffing wheel and leaving the speed the same.  After completing application of the wax, I unite stem and stummel and give the newly born Churchwarden a rigorous hand buffing to raise the shine.

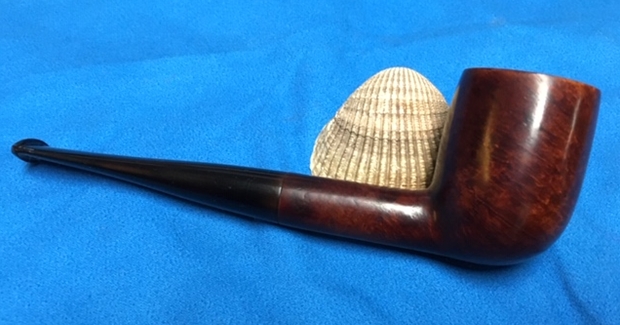
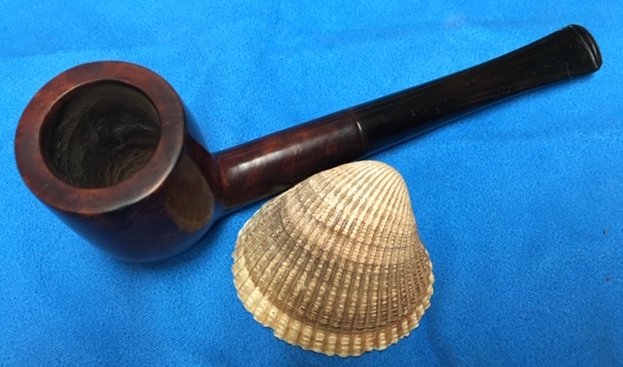
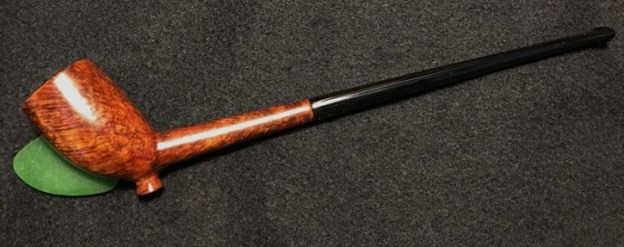
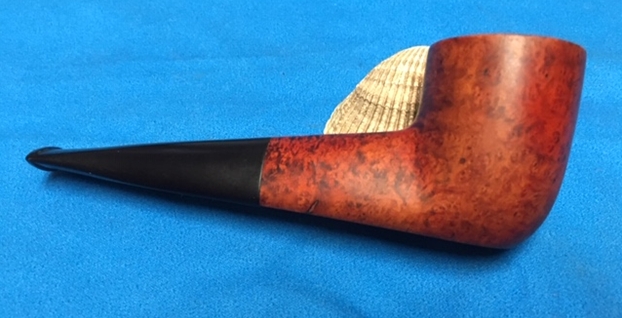
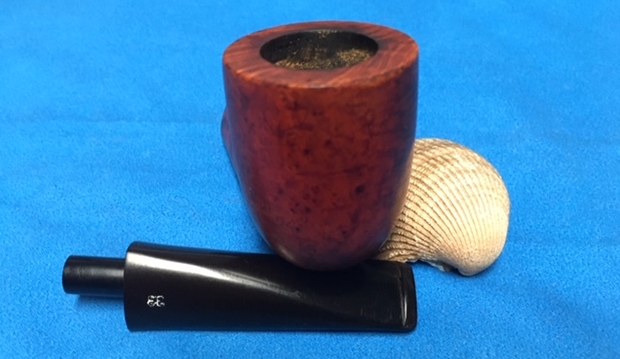
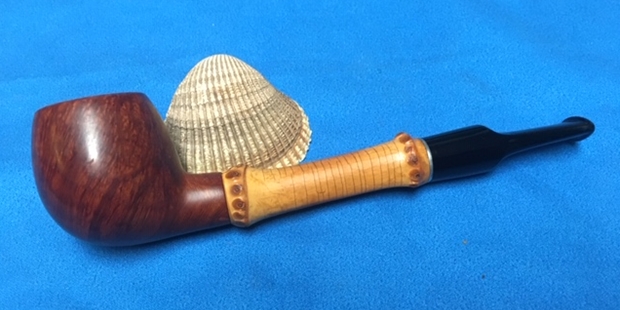
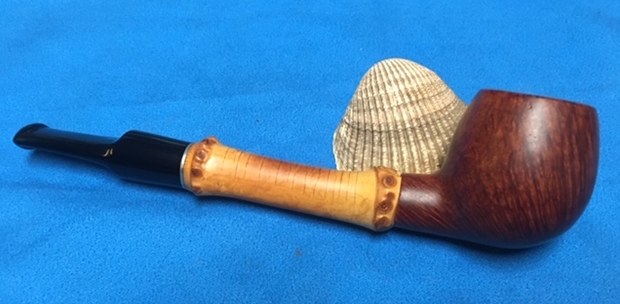
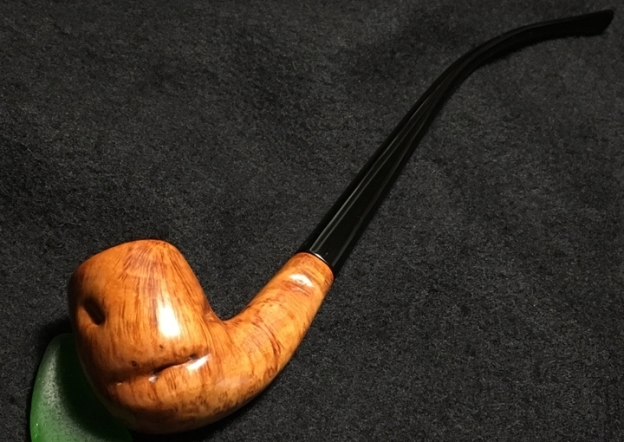
The fabrication of this Dimpled Billiard Churchwarden came out great.  I’m pleased.  The rusticated Dimpled Billiard has beautiful grain with a splay of grain spreading to the rim and much bird’s eye populating the heel of the stummel.  Often, rustication is used to hide blemishes in a lesser quality bowl, but this is not the case with this stummel.  The rusticated dimples are interesting shapes on a beautiful canvas of briar grain.  I believe Coleman will be pleased.  He commissioned this Dimpled Billiard Churchwarden and has the first opportunity to acquire it from The Pipe Steward Store.  This pipe benefits the Daughters of Bulgaria – women and girls who have been trafficked and sexually exploited.  Thanks for joining me!

Restemming and Restoring a Malaga Scoop


Blog by Steve Laug

Since I am already working on restemming pipes I figure I might as well fit a stem to a MALAGA bowl that Alex dropped by a while ago. It is an interestingly shaped piece and I really like the looks of it. MALAGA called this shape a scoop. The grain swirls around the bowl sides and shows some great cross grain on the rim top. It is a pretty clean bowl with a bit of darkening on the rim top and cake build up at the bottom of the bowl. The pipe is stamped on the underside of the shank horizontally with the stem shank junction and reads MALAGA. The finish on the pipe is very in great condition with a few dings and pits in the briar on the right front near the rim. It has the classic Malaga oil cured look and is a rich, natural brown colour. The stem was missing so I would need to fit and shape a new one for it. I went through my can of stems to find an oval stem that would work with this shape pipe. I picked a new stem blank that I thought showed some promise. I took photos of the pipe and the potential stem before working on it. The photos give a pretty clear picture of the shape of the pipe and its general condition when I received it.

For those of you who are unfamiliar with the brand, I am also including the link to a blog that I wrote that gives some of the history of the Malaga brand and the Malaga Pipe Shop in Royal Oak, Michigan in the USA. Here is the link – https://rebornpipes.com/tag/malaga-pipes/. That blog also includes links to a catalogue and the history of the pipemaker George Khoubesser. If you are interested to learn more, then I invite you to follow the link to get a feel for the brand and the pipemaker. I changed my habitual pattern of working on pipes with this one as the bowl was pretty clean. I would do the reaming later. I set up my cordless drill and drilled the airway in the tenon so that the guide on the tenon turner would fit. I put the PIMO tenon turner in the chuck and turned the tenon until it was the right diameter for the shank. I know many use a micrometer to set the tenon turner correctly but the way the tool is configured that has never worked for me. I always eyeball it and turn it in degrees. After each turning I check it in the shank. When I get close I stop and finish with sandpaper and files. Probably a bit of a troglodyte but hey, it works for me.Once I had the diameter so that the tenon was snug I put the stem in the shank and took photos of the pipe at this point. It is way for me to see if I like the proportion of the length of the shank and bowl with the length of the stem. I have gotten to this point on other pipes and pitched the stem in the can and turned a different stem. In this case I thought it would work very well. I would need to reduce the diameter of the saddle, remove the casting marks on the stem and give it a slight bend when I was finished. What do you think? I took some close up photos of the rim top and the fit of the stem to the shank to give you a clearer picture of where things stood at this point in the process. Incidentally, in the last photo below you can see the MALAGA stamping on the underside of the shank.I used the Dremel and sanding drum to take off the casting marks on the sides and button end of the stem. I also used the sanding drum to remove the majority of the excess stem material on the saddle. I hand sanded it with a file and 220 grit sandpaper to get the fit close to a smooth transition. I little a tea light candle and heated the stem to bend it to the angle I wanted to work with the bowl. I took photos of the stem after the bending to show what the pipe looked like at this point in the process. There was still a lot of fine tuning and shaping to do but the pipe was beginning to look complete. I liked the look of the new stem. Some of you may wonder why I sand the shank the bit that I do. My experience is that I can smooth out the transition this way. I know that others do it differently but this is my process. I continued to sand and shape the stem and fit it to the shank end. I beveled the mortise end a bit more than it was originally using a small half circle needle file. Once that was done I sanded the stem to smooth out the transition with the shank. The photos below show that it is getting closer to a fit. I took some close up photos of the fit of the stem to the shank at this point. It is getting better and better. I still need to do a few adjustments to the tenon to get a snug fit to the shank.I sanded the stem with 400 grit wet dry sand paper to polish out the scratches left behind by the files and 220 grit sandpaper.I polished the stem with micromesh sanding pads – wet sanding it with 1500-2400 grit pads and dry sanding with 3200-12000 grit pads. I wiped the stem down after each of the pads using Obsidian Oil. I polished it further with Before & After Pipe Stem Polish – both Fine and Extra Fine grits. I gave it another coat of Obsidian Oil and set it aside. With the stem fit and finished I set it aside to work on the bowl. The bowl was in decent condition other than some darkening on the top and two small pits on the right front of the bowl. There was also a little bit of cake in the bottom one third of the bowl. Whoever had reamed it did not take the conical bowl into their thoughts. The rest of the bowl was well reamed but the bottom portion was not. I reamed the bowl with a Savinelli Fitsall pipe knife to clean up the bottom part of the bowl. I filled in the two small pits with clear super glue and when the patches cured sanded them smooth with 400 grit sandpaper. Unfortunately I did not take a photo of that part. Ah well. It is easy to get caught up in the process and forget the photos… I apologize for that.I polished the briar with 2400-12000 grit micromesh sanding pads – wet sanding with 1500-2400 grit pads and dry sanding with 3200-12000 grit pads. I wiped the bowl down with a damp cloth after each pad. I found that with each successive grit of micromesh the grain stood out more and gave a shine to the pipe. I liked what I saw when I looked at it. I worked some Before & After Restoration Balm into the surface of the briar with my fingertips to clean, enliven and protect it. I let the balm sit for a little while and then buffed with a cotton cloth to raise the shine. The following photos show the bowl at this point in the restoration process. The bowl and the rim top look really good and the darkening is gone. The finish looks very good with the rich oil finish on the bowl and rim. I am very happy with the results. Now with both parts of the pipe finished, I polished stem with Blue Diamond polish on the buffing wheel. I gave the bowl and stem multiple coats of carnauba wax. I buffed the pipe with a clean buffing pad to raise the shine. I hand buffed it with a microfiber cloth to deepen the shine. The pipe polished up pretty nicely. The contrasting grain came alive with the buffing. The rich oil finish on the briar works well with the new, polished black vulcanite stem. The finished pipe is a beauty and feels great in the hand. Have a look at it with the photos below. The dimensions are Length: 5 ½ inches, Height: 1 1/2 inches, Outside diameter of the bowl: 1 ¾ inches, Chamber diameter: 9/16 of an inch. This one will be going back to Alex with the rest of his pipes that I am working on. Thanks for walking through the restoration and restemming with me on this nicely shaped MALAGA Scoop.

New Life for a Sad, Old Kriswill Bent Egg


Blog by Steve Laug

The next pipe in the queue is from a group of pipes that Paresh purchased from a rag picker in Mumbai, India. The fellow had found a large number of pipes as he was going through rubbish bins and contacted Paresh. This is a tired and worn looking Kriswill. I knew looking at it even before the stamping was checked that this was a Kriswill because there is something distinctive about the shapes. The pipe is stamped (though it is faint now from wear) Kriswill Hand Made in Denmark. The pipe was filthy and unusable. I think it was from the generation who smoked a pipe to death and then pitched it. The finish on the pipe is very dirty and the sandblast is almost worn smooth. There is a thick cake in the bowl and a lava overflow on the rim top. I can see some damage to the inner edge of the rim but because of the cake and tars it is hard to know what the inner edge looks like. The stem was broken at the tenon and there was a very strange set up keeping the pieces together. I took photos of the pipe before cleaning it. The photos give a pretty clear picture of the shape of the pipe and its general condition when I received it. At first glance I thought that the tenon was broken off in the shank but as I examined it I came to believe it was even worse. It looked like someone had glued something in the shank and Gerry-rigged a connection to the stem. The photo below shows what I saw. What is not clear in the photo was a piece of metal in the centre of the mortise area. It looked like a tube but when I tried to push air through the shank it was absolutely plugged.I was going to have to try to drill out the shank but before I did that I examined the shank and stem more closely. The stem had been hacked pretty seriously so that the diameter was not even close to the diameter of the shank. In the centre of the mortise the metal tube turned out to be a 2 inch long finishing nail. It appears that the nail was used to keep the stem in place in the shank. For what? I don’t have an answer for that as it was utterly unsmokable. Once I removed the nail with a pair of needle nose pliers I was able to blow air through the shank. It was at least clear. I used a drill bit slightly larger than the mess in the shank and carefully drilled the shank. It did not work to clear out the shank! However, it was clear what was there – it was a tube made of masking or painters tape! I took a pen knife and twisted it into the mortise and was able to pull the tube free of the shank. The last photo shows everything that had been in the shank to hold the stem in place on the shank. I could surmise from the length of the stem what I would need for a replacement stem. I went through my can of stems and found one that had the right sized tenon and was the same length and width as the broken stem. It was a saddle stem instead of a taper but I liked the look of it on the pipe. I pushed it in place and took the following photos. I would need to reduce the diameter of the saddle, bend the stem and do a general cleanup, but it was a keeper. I took a photo of the stamping on the shank to show that it reads Kriswill. Underneath it says Hand Made in Denmark but that stamping is faint and only readable in a bright light or with a lens.With the stem chosen I set it aside to work on the bowl. I really hate working on dirty pipes! I can’t say enough how much I appreciate my brother Jeff doing the lion’s share of the reaming and cleaning before I even work on pipes… It is these few that I have to clean up that make me thankful and realize how much work he does before I get them here to restore. Thanks Jeff. The bowl had a thick cake and a heavy overflow of lava. It was obviously someone’s favourite pipe.I reamed the bowl with a PipNet pipe reamer using the smallest cutting head. The bowl on these old Kriswill pipes is conical so the PipNet only goes so far down the inside. I reamed out the bowl as far as the reamer would reach and then used Savinelli Fitsall pipe knife to finish the project. I scraped the rim top with the pipe knife to remove the majority of the lava and could see that the rim edges and top were damaged with burn marks.To remove the damage to the top of the rim I topped it on a topping board with 220 grit sandpaper. I worked on it to remove the burned areas and the damage to the inner edge of the rim as much as possible. I am happy with how it turned out.I lightly beveled the inner edge of the rim with a folded piece of 220 grit sandpaper to give it a cleaner look. The look of the bowl at this point is far better than when I started the rim clean up. I will still need to polish the rim and match the stain to the shank end smooth portion. Fortunately for me this old Kriswill originally had a smooth rim top so it will look like new.I polished the topped bowl rim with 3200-12000 grit micromesh sanding pads. With each successive grit of micromesh the grain stood out more and gave a good finished look to the pipe. I liked what I saw when I looked at it. There was a little variation in stain colour between the rim top and the shank end so I decided to stain both to get a good blend. I used an Oak stain pen to match the colour of the shank and smooth spot where the stamping was. Once the stain had cured for that time I moved on to the next step in the process.It dawned on me at this point that I had been so intent on getting the plug out of the shank and topping the bowl that I forgot to clean out the shank! I normally do that right after reaming the bowl but forgot. It goes to show you that if you vary an habitual pattern even a bit you will leave steps out. I stopped the process and went back and cleaned out the shank and airway to the bowl with pipe cleaners, cotton swabs and isopropyl alcohol until the pipe was clean and smelled fresh.With the rim top and bowl polished and the shank and airway CLEAN, I worked some Before & After Restoration Balm into the surface of the briar with my fingertips to clean, enliven and protect it. I let the balm sit for a little while and then buffed with a cotton cloth to raise the shine. The following photos show the bowl at this point in the restoration process. The bowl and the rim top look really good and the darkening and lava are gone. The finish looks very good with the contrast between the rich, dark brown and the Oak stain on the rim and shank end. I am very happy with the results. With the bowl finished I set it aside and turned my attention to the stem. I used a file and a folded piece of 220 grit sandpaper to shape the diameter of the saddle portion of the stem to fit the diameter of the shank. It took a lot of filing and sanding to get it to this point but there is a lot of fine tuning work to do. The shank is not round but it is more of a vertical oval in shape so the stem will need to match it to have a seamless fit. It is a lot of hand shaping work to get the two to match. I sanded the scratches and the tooth marks on the stem with 220 grit sandpaper to bring the shank and saddle portion into line. I further sanded and shape it with 400 grit sandpaper to remove the scratches. This is the beginning of the polishing process on the stem. I wiped the stem down with Obsidian Oil and put it back in the shank to take progress photos. I polished the stem with micromesh sanding pads – wet sanding it with 1500-2400 grit pads and dry sanding it with 3200-12000 grit pads. I wiped the stem down with Obsidian Oil after each pad. I further polished it with Before & After Pipe Polish – both Fine and Extra Fine. I gave it a final coat of Obsidian Oil and set it aside to dry. This pipe has had quite a journey to this point in time and space. It somehow traveled from Denmark where it was made to Mumbai, India. There is was found abandoned, binned and found by a rag picker who then sold it to Paresh in another region of India. From Paresh it traveled to me in Vancouver, Canada. In April it will travel to Nepal with me and back Paresh in India. I only wish that it could tell its story. All I know is that I have extended its life of usefulness and given its purpose back as it was intended.

I polished stem with Blue Diamond polish on the buffing wheel. I gave the bowl multiple coats of Conservator’s Wax and the stem multiple coats of carnauba wax. I buffed the pipe with a clean buffing pad to raise the shine. I hand buffed it with a microfiber cloth to deepen the shine. The pipe polished up pretty nicely. The contrasting grain came alive with the buffing. The rich contrasting browns and black colouring works well with the new, polished black vulcanite stem. The finished pipe is a beauty and feels great in the hand. Have a look at it with the photos below. The dimensions are Length: 5 ½ inches, Height: 2 inches, Outside diameter of the bowl: 1 inches, Chamber diameter: 5/8 of an inch. I will be taking this pipe with me to India soon and giving it back to Paresh. Thanks for walking through the restoration with me on this battered and weary Kriswill.

The Largest Malaga Rusticated Billiard I have ever seen


Blog by Steve Laug

The next pipe in the queue is a rusticated Malaga Billiard that is the largest Malaga I have worked on. It is like a war club in my hands which are not tiny! The rustication is rough and chipped glass like. There is a smooth band around the shank end and on the underside it is a little wider to accommodate the MALAGA stamp in the briar. The stem is a marbled brown Lucite saddle bit that is quite nice with the reddish brown stain on the bowl and shank. This is another nice looking piece much like the rest of those in this 21 pipe Michigan pipe lot. Along with this Malaga there were two others that are very interesting Malaga shapes. The Malaga I am working on now is on the mat in front of the rack. It is the first pipe on the right and I have circled it in red to make it easy to identify. Jeff took some photos of the pipe when he received them to show the general condition of the pipe before he started his cleanup work. Like the rest of the pipes from the Michigan collection this pipe was dirty and well used. There was a thick cake in the bowl and lava overflowing onto the outer edge of the rim filling in the rustication. The inner edge of the bowl was hidden under the grime and lava coat so it was hard to know what was underneath in terms of damage. The rustication was like broken glass and the tactile feel is really interesting. It is not like any of the Malaga pipes that I have worked on. It is quite deep and rugged and the medium brown and red stains give the rustication depth and dimension. The stem is pearlized Lucite with swirling browns and copper hues that is quite interesting. There are deep tooth marks on both sides of the stem at the button edge and some wear on the button edge itself. The photos below tell the story and give a glimpse of the large, saddle stemmed billiard. Jeff took a close up photo of the bowl and rim to capture the condition of the pipe before he started his cleanup work. The rim top had some lava overflow and some darkening. Some of the rustication is filled in with lava toward the back of the bowl. There is also a general accumulation of dust and grime in the rustication. He also took a photo of the right side and bottom of the bowl and shank to show the interesting rough rustication that covers the pipe. The rugged rustication gives the pipe a tactile sense when held in the hand and should be interesting as the pipe warms up when smoked. The finish is very dirty but this is another beautiful pipe.Jeff took a photo to capture the stamping on the underside of the shank. The photo shows stamping MALAGA. The stamping does not have the quotation marks that I have seen on some of the pipes. The next two photos show the stem surface. There are tooth marks and chatter on both sides near the button. There are also some marks on the sharp edge of the button.I am also including the link to a blog that I wrote that gives some of the history of the Malaga brand and the Malaga Pipe Shop in Royal Oak, Michigan in the USA. I have written an earlier blog to give a little history of the Malaga Brand and the pipemaker, George Khoubesser. Here is the link – https://rebornpipes.com/tag/malaga-pipes/. That blog also includes links to a catalogue and the history of the pipemaker George Khoubesser. Follow the link to get a feel for the brand and the pipemaker.

Jeff reamed the bowl with a PipNet pipe reamer and followed up with a Savinelli Fitsall pipe knife to remove the cake. He scrubbed out the mortise and the airway in the shank and the stem with alcohol, cotton swabs and pipe cleaners. He scrubbed the exterior of the bowl, rim, shank and stem with a tooth brush and Murphy’s Oil Soap to remove the oils and tars on the rim and the grime on the finish of the bowl. He rinsed it under running water. He dried it off with a soft cloth. He was able to remove the lava build up on the rim top and you could see the damage to the flat surface of the rim and the inner edge on the right side and toward the front of the bowl. I took photos of the pipe to show its condition before I started my work on it. I took close up photos of the bowl and rim top as well as the stem. You can see the condition of the rim top and bowl in the first photo. Jeff was able to remove all of the tar and oils leaving behind a little darkening on the back side of the rim top. The inner and outer edge of the bowl was in excellent condition with no damage. The Lucite stem had tooth chatter and some tooth marks on the top and underside of the stem near and on the button surface.I took a photo of the stamping on the underside of the shank to show how good the condition is. The stamp is deep and legible. It clearly reads MALAGA without the quotation marks that are sometimes used around the stamp.I decided to address the darkening on the backside of the rim top first. I used a brass bristle wire brush to work over the rustication on the rim top. I was able to remove much of the darkening with the wire brush. The rim top looks significantly better after the brushing.I worked some Before & After Restoration Balm into the rusticated surface of the briar with my fingertips to clean, enliven and protect it. It took some time to really get it into the grooves and valleys of the rustication but I was able to work it in. I let the balm sit for a little wall and then buffed with a cotton cloth to raise the shine. The following photos show the bowl at this point in the restoration process. The reworked rim top looks really good and matches the colour of the rest of the pipe. I am very happy with the results. I set the bowl aside and worked on the stem. There were some tooth marks on the top and underside at the button that needed to be addressed. I also needed to do some work on the surface of the button on both sides. I filled the damaged areas in and build up the surface with clear super glue and set the stem aside until the repairs cured.When the repairs were cured, I sanded both sides smooth with 220 grit sandpaper and 400 grit sandpaper to blend the tooth chatter and the repair into the surface of the stem. As I sanded and reshaped the button and stem surface the repaired areas and the tooth chatter disappeared.I polished the acrylic stem with micromesh sanding pads – wet sanding with 1500-2400 grit sanding pads and dry sanding it with 3200-12000 grit sanding pads. I wiped it down after each sanding pad with a damp cloth. I polished it with Before & After Pipe Stem Polish and buffed it with a microfiber cloth. This is the first fully rusticated or “carved” finishes as Malaga called them, that I have worked on. I have worked on partially rusticated but never one with this kind of very cut glass like finish. It is extremely well done and it is a large pipe. The combination of stained rustication with the swirled Lucite stem is stunning. I polished stem with Blue Diamond polish on the buffing wheel. I gave the bowl multiple coats of Conservator’s Wax and the stem multiple coats of carnauba wax. I buffed the pipe with a clean buffing pad to raise the shine. I hand buffed it with a microfiber cloth to deepen the shine. The pipe polished up pretty nicely. The oil cured briar is very light weight and the red and brown stain colour works well with the polished variegated copper and brown acrylic stem. The finished pipe has a rich look that is quite catching. Have a look at it with the photos below. The shape, finish and flow of the pipe and stem are very well done. The dimensions are Length: 7 inches, Height: 2 3/8 inches, Outside diameter of the bowl: 1 3/4 inches, Chamber diameter: 15/16 of an inch. I will be putting this newly finished Malaga pipe on the rebornpipes store shortly if you are interested in adding it to your collection and trying out this brand. Thanks for walking through the restoration with me it was an interesting pipe to restore.

A Cutty Tavern Pipe – Recommissioning a Historical Classic as a Gift for a Steward of History


Blog by Dal Stanton

Tavern Pipe
By Suzie Baker

Summary and excerpts of the artist’s description:
Here the subject poses as an American Colonial man from 1776; he actually posed on Washington’s Birthday.  He has a ruddy complexion and piercing blue eyes. From my perspective, he is more interesting to paint than a golden-haired beauty.

He poses with a tavern pipe. This type of pipe was a communal pipe used in pubs in the 18th century. After each use, the pipe stem was cut away then replaced on the mantel for the next user. I chose a color scheme appropriate to the time period and drew inspiration from Rembrandt’s work in the direct gaze, dark background and loose handling of paint, especially in the clothing….

Let me first tell you the story about the commissioning of the Cutty Tavern Pipe now on my worktable and then I will tell you about the gifted artist I discovered in my research about tavern pipes, Suzie Baker, and her amazing offer to benefit the Daughters of Bulgaria with her ‘Tavern Pipe’.Living in Bulgaria, the opportunities to talk with our grown children (and growing grandchildren!) residing in the US, is a special treat.  My son, Jonathon, reached out to me on FaceTime with a special, ‘historical’ request.  Jonathon desired to commission a special ‘historical’ pipe as a gift for Andrew, a friend who was leaving his job as the assistant curator of the Dearborn Historical Museum – an American city in the state of Michigan that takes its history seriously.   Jonathon, while serving on the mayoral appointed Dearborn Historical Commission, befriended Andrew as Andrew fulfilled his duties as a curator for the museum tasked with safeguarding Dearborn’s history.

Today, Dearborn, a suburb of Detroit, is proud to be one of the most ethnically diverse cities in the world.  Yet, Dearborn’s history is predominantly shaped by the controversial industrialist and auto manufacturer, who called Dearborn his home, Henry Ford (1863-1947).

When Jonathan shared his desire to commission a pipe with some historicity as a gift for a CURATOR of a museum, and that museum was the Dearborn Historical Museum, I was anxious to rise to the challenge that that request presented.  I did a fast dictionary search on Google to see a working definition of ‘Curator’.  This is what I found:

Automobile manufacturer Henry Ford, left, and his son, Edsel, in one of their car showrooms in January 1928. (AP) from Washington Post article (link)

Curator:
a keeper or custodian of a museum or other collection.
“the curator of drawings at the National Gallery”
synonyms: custodian, keeper, conservator, guardian, caretaker, steward

I took special interest in the last word listed as a synonym of curator – ‘steward’, which speaks to my ‘Pipe Steward’ sentiments.  Understanding that we are not the owners ultimately but protecting and caring for that which belongs to others to pass it on.  I understand this as I handle pipes which are laden with their own histories revealed in the nomenclature, but often the history and legacies of that pipe’s steward(s) joins the pipe’s legacy moving together to the future.  As a curator, Andy participated in guarding history.  History by its very nature comes with a blend of beauty and goodness coalescing with ugliness and pain – each side of the pendulum is history which we guard so that we do not forget it and continue to learn from past triumphs and failures – even when it’s not comfortable.

So, the gauntlet was thrown: A Steward of History (Andrew the Curator) is celebrated for his service by the current president of the Dearborn Historical Commission (my son), who reaches out to The Pipe Steward (that’s Dal in Bulgaria) to commission a special pipe, with historical gravitas to adequately serve as an appropriate gift.  Jonathon asked for my recommendations, but relying on the Harry Potter principle in wand selection approach, I turn Jonathon loose

Keens Steakhouse reported to be the oldest pub/restaurant in NYC and that celebrates their history of clay cutty taven pipes and have a serious collection of clay pipes on display (Link from PipesMagazine.com).

looking through my virtual ‘Help Me!’ baskets in the For “Pipe Dreamers” Only! collection to discover which pipe would choose Andrew and let Jonathon know 😊.  After whittling the list down, one pipe did the choosing – the Cutty Tavern Pipe which I acquired from the Lot of 66 off the eBay auction block.  After Jonathon confirmed the commissioning, the first question that came to my mind, since I don’t know Andrew personally, was whether he is the kind of curator that enjoys a trip to the pub after a long day curating at the museum?  This was an important question for my historical research – how do you talk about Tavern Pipes without an appreciation for the natural and historical habitats from which Tavern Pipes have their genesis?  Thankfully, with a confident confirmation, Jonathan assured me that yes, Andrew would enjoy a pub.  With that settled, I began my research.

I found a short description of the Cutty shape on ThePipeGuys site to be a good summary and historical description of the Cutty Tavern Pipe.

Cutty

Tavern scene with a man smoking a pipe next to a barrel with a jug on top of it, his left foot resting on a bench. 1694 From the British Museum (Link)

There is no denying the resemblance that the Cutty bears to the clay tavern pipes of a bygone age. Delicately shaped, Cuttys typically have not an ounce of excess briar left in place. This delicacy of shaping necessitates the use of a special drill bit for the tobacco chamber, which tapers even more drastically than a Danish conical bit, and comes to a sharp point at its tip. A special honor is paid to this pipe, in that this type of conical bit is now called the “cutty bit”.

Notice, the ladies are not left out!
From Pinterist Pipe Smoker Group (link)

Many Cuttys still include the “spur” at the foot of the bowl, once again hearkening back to their clay ancestors, but while the spur of a clay pipe was the remnant of the manufacturing process, the briar versions are purely nostalgic. The bowl of the Cutty is heavily canted forward, which helps differentiate it from other long-shanked pipes like the Canadian. The Cutty may sometimes display a very unique stem, which is slim, slender, and round (almost like a straw). However, the majority of modern Cuttys now sport a tapered stem and come in many finishes.

Try simply googling ‘Cutty Tavern Pipe’ and 100s of images begin sharing different shards of the story and one feels like he’s in a time machine.  Of course, the briar descendants of the classic clay workhorse Cuttys of the 1800s and the early 1900s, claim this heritage as their own.

Elizabethans called a pipe a “little Ladell.”

TobaccoPipes.com adds this information in their ‘Complete Guide to Tobacco Pipe Shapes’:

As far as we can tell, the Cutty is the oldest pipe shape that is still available today.  

As early as the 16th century, pipe smokers would settle in at their favorite tavern and–if they had a high enough social status–would pull out a long clay pipe, almost always a Cutty shape.  This shape was common because it was easy to craft in the molds used for clay pipes (William Goldring, The Pipe Book: A History and How to:1973).  

In my digging into the Cutty clay pipe history, I discovered one very interesting and surprising article (at least to me) that a curator would appreciate.  The Colonial Williamsburg Foundation’s (Virginia, USA) website, History.org, published an article by Ivor Noël Hume entitled, “Hunting for a Little Ladle – Tobacco Pipes” (link).  The author describes how archeologist can learn much about different periods of Colonial America in Williamsburg, Virginia’s, history through the recovery of thousands of clay pipe fragments!  As we’ve already mentioned, hygienic concern is the predominant theory.  An excerpt from the author is enlightening:

There are thousands of pipe fragments found in Williamsburg. An early explanation for their ubiquity had it that in colonial-era taverns’ pipes passed from mouth to mouth, but that in the interests of hygiene the previously lip-gripped section was broken off and thrown away. There is no documentary support for that notion, but it is known that used pipes were placed in iron cradles and heat cleansed in bake ovens before being issued to the next round of smokers.

And then I came across this picture that was among 100s of others on the google ‘Tavern Pipe’ image search page results – and I paused.  I see a pipe man in an age gone by and I immediately know what he’s doing as a fellow-pipe man.  Yes, he’s smoking his beautifully shaped long Cutty Tavern Pipe, but he’s doing something else much more important – that his Cutty clay is helping him to do – reflection.  He’s looking out the window, or at the hearth with his eyes, but his heart and soul are elsewhere, seeking understanding or perhaps a much-needed answer.  It is not lost to me as well, that his waiting quill – while ready to move and inscribe on the parchment the sought-out knowledge or answer that his reflection is cultivating, is at rest.  For that moment, the quill waits for the hand’s movement from the heart’s command.

Every pipe man and woman know that smoking a pipe is more than smoking.  It’s a ritual that brings us into calm or fellowship and a slowed time for reflection as we seek to negotiate life and care for loved ones and friends.  The name of the painting I was lost in was simply ‘Tavern Pipe’.  I knew at that moment I wanted to include this painting in the writeup of this special Cutty Tavern Pipe for a special friend of my son – a museum curator would appreciate what I see.

In the next moment I was composing my email to the artist, Suzie Baker, after I clicked on the link taking me to her website where I found her contact information.  This is what I wrote:

Dear Ms. Baker,

I’m writing to you asking for permission to use the picture of your beautiful painting, Tavern Pipe, in a write up I am doing on the restoration of a briar wood Cutty Tavern Pipe.  I came across your www.suziebaker.com site while doing research on tavern pipes.  I will give full credit to your work and website when I cite the information. 

I am an artist of another kind.  You can see my website at www.ThePipeSteward.com.  I collect old, used and often discarded vintage pipes and restore them.  I then sell them world-wide and give the proceeds to the Daughters of Bulgaria – a work in Bulgaria helping women and girls who have been trafficked and sexually exploited.  My wife and I live and work in Bulgaria with the Daughters of Bulgaria.  The pipe restoration hobby is a personal way I try to make a difference by talking about this issue to primarily a men’s world – pipe smokers.  Each restoration has its own write-up which you can see at the website.  I will not use the picture of your painting without permission and if given, will, as I said, give you and your site full recognition.  As a pipe lover and one who enjoys a bowl now and then, your painting captures something of the spirit of those who enjoy, and yes, love not only the smoking of pipes, but the beauty of pipes as they showcase both beauty and design.  I call my work, The Pipe Steward, is because unlike cigarettes and cigars (which I do not like!) pipes are often heirlooms and are passed down from generation to generation.  They often carry with them the memories of those who had them before. 

Thank you for your consideration of this request. 

Best regards, 

Dal Stanton
The Pipe Steward

In the past I’ve written notes like this to individuals and pipe houses asking for information about pipes to aid research and I press the ‘send’ button with a very low expectation that this burst of electrons ever finding their way back to my inbox.  I was surprised when her reply arrived so quickly.  Here is what she said:

Hi Dal,

Thanks for the request and your service to those caught in trafficking, a daunting and worthy cause. 

Yes, I would be pleased for you to use my image in your write-up. In fact, this painting is still available so if the posting results in a sale, I will donate 25-30% of the sale back to your worthy cause. The price and details are listed on my sight in the info under the painting (as seen on a computer screen) or info tag on a Mobile device. 

I am on an airplane currently and about to take off. I can send you the image tomorrow. Please let me know what resolution you require. 

Blessings,

Suzie Baker OPA
Vice President, Oil Painters of America 


Well, as the president of the Daughters of Bulgaria Foundation, her generous offer was something I could not refuse as we work for the benefit of the Daughters.  I appreciated her response and offer.  After looking at her website, I was drawn to the “About Suzie Baker” tab – who is this person?  Not only is she an accomplished artist, wife and mother, but she recognizes that her talent is a gift and she uses this gift to give back to others – especially artists.  There’s much more on this page that describes the accomplishments of this artist who also desires to be a benefactress of women who have been trafficked and sexually exploited. Her ‘calling’ is similar to my own, as I seek to ‘give back’ specially to pipe men and women, the gift of restoring pipes that I am stewarding for a time, and at the same time, seeking to benefit the Daughters.  About Suzie Baker:

Giving Back

This artist also believes in giving back to the community of artists, and she is proud to serve as a Board Member with the Oil Painters of America. “Serving on the board with OPA is and will be a highlight of my career, primarily because of the opportunity it gives me to serve my fellow artists,” she says. “Being on the path of a working artist is a calling. I find helping others on their path a very satisfying pursuit.” She has also earned Signature Member status in numerous other prestigious art organizations: the American Impressionist Society, the

Click the picture for the Daughters!

National Oil and Acrylic Painters Society, the Laguna Plein Air Painters Association, the Outdoor Painters Society, the California Art Club, and American Women Artists.” – from Suzie Baker, Fine Artist at https://www.suziebaker.com/info/suzie

Pipe men and women, if you would like to add the ‘Tavern Pipe’ to your collection of pipes and artwork and help a good and needful cause at the same time, the Daughters of Bulgaria, click the image on the right which takes you to Suzie Baker’s site with a full description of the Tavern Pipe painting, and a higher resolution picture to view. Contact information for Suzie Baker is also included.  When you contact her, simply tell her that it’s for the Daughters.

This story has told you about the son, the curator and the artist.  Now, the story turns to the Cutty Tavern Pipe on my work table – the main character!  I was fascinated by the research I did that shed light on this unmarked Cutty.  All the before-mentioned descriptions are true of this 9-inch Cutty Tavern Pipe.  Here are pictures that show you what I’m seeing.     This pipe is the perfect gift for the curator!  One more bit of research that showcases the historical uniqueness of clay Cutty Tavern Pipes and its relations to its briar descendants.  The severely canted and uniquely shaped bowl comes to a point as it ties into the long, pencil thin shank and stem.  A very interesting diagram I discovered at CanadianArchaeology.com (link) of the National Historic Parks Branch of Canada, depicts the historical development of the clay pipe bowl and provides the corresponding dating for that particular style.  As I look at the diagram’s images and comparing them to our Cutty, it was fashioned after the clay Cuttys belonging to the period from 1820 to 1860.  The canting and the bowl width, along with the spur, now ornamental for the briar, all seem to align.  I have no way of dating the Cutty Tavern Pipe heading to Andrew, but its history and heritage wrap around it even in the absence of a verifiable nomenclature.

Armed now with a deeper and more comprehensive understanding of the Cutty Tavern Pipe on my table, I take a closer look at his condition.  The briar, somewhat subdued underneath the dirt and grime, is beautiful.  The surface itself shows that it has been well loved and used by a previous steward.  There are nicks and dents over the bowl surface as well as the shank. The pipe shows signs of wear but has been well-cared for.  I say that because, with a shank of only 7/16 inches wide at the stem joint, the fact that the shank hasn’t cracked at this very thin juncture is amazing!  A caution to the future steward, be careful with the stem mounting and removal!  The shank IS pencil thin.  Looking at the rim, there are some dents on the external lip and some significant lava flow over the backside of the rim.  The conical chamber has moderate cake build up which I will remove to provide the briar a fresh start.  The long pencil stem shows some oxidation and tooth chatter on the bit.  The button and slot look to be in good shape.To begin the restoration, using pipe cleaners dipped in isopropyl 95% and long shank brushes, I clean the internal airway of the pencil stem.  It was dirty.After soaking for several hours, I remove the stem and take a closeup shot to reveal the raised oxidation – the olive green layer is now to be removed.To remove the oxidation, I wet sand the stem using 600 grade paper.  Following the sanding, I apply a 0000-grade steel wool on the entire stem as well cleaning the surface further.  To begin the process of rejuvenating the vulcanite, I apply a mineral oil – paraffin oil, to the stem and put it aside to absorb.  It’s looking good!I begin the cleaning process of the stummel by reaming the chamber.  Because of the small, tapering chamber, I do not use my regular Pipnet Ream kit but instead go directly to using the Savinelli Fitsall tool and it does a stellar job.  It reaches very easily to the difficult areas at the floor of the chamber and negotiates well the angle of the conical bowl.  Using 240 grit paper around a Sharpie Pen, I sand the chamber to clean further the carbon cake.  Finally, I clean the carbon dust using a cotton pad wetted with isopropyl 95%.  After inspecting the chamber, I see no heating problems with cracks or fissures.  I move on. Next, to clean the external surface of the stummel I use undiluted Murphy’s Oil Soap with a cotton pad to scrub.  This does a great job.  I also utilize the straight edge of a pocket knife to gently scrape the lava crust from the rim and then use a brass wire brush to work on the burned area of the rim.  The cleaning well removes the finish on the stummel, but there remains a darkened area on the rim where there was scorching.  To complete the basic cleaning regimen, I use pipe cleaners and cotton buds to work on the internals of the mortise.  With the stem internal airway as dirty as it was, I am not surprised to find the mortise equally mucked up with tars and gunk.  After I put on surgical gloves, my first hurdle was to clear the entire airway.  The first pipe cleaners I plunged into the abyss would not push through the draft hole – something was blocking. After a few attempts, the pipe cleaner pushed old tobacco through, and it was finally cleared.  In addition to pipe cleaners and cotton buds dipped in alcohol, I use a long-wired shank brush wetted with alcohol to clean the airway.  A dental probe was also helpful reaching in and excavating the collected tars off the mortise walls.  To increase my cleaning leverage more, I use a drill bit almost the size of the airway, hand turning it as it moves up the airway, scraping the tars of the briar as it goes.  Finally, some headway is realized, and cotton buds begin to lighten.  I’m satisfied with the cleaning for now.With the workday ending, I continue the cleaning of the internals using a kosher salt and alcohol bath.  I first stretch and twist a cotton ball to form a ‘mortise wick’ that I insert into the long, narrow shank of the Cutty.  I use a slender painter’s brush to help force the cotton down the airway.  I then situate the stummel in an egg carton and fill the bowl with kosher salt.  Kosher salt doesn’t leave an aftertaste like iodized salt.  I then fill the bowl with isopropyl 95% until is surfaces over the salt.  I wait a few minutes as the alcohol recedes and then top it off.  I turn out the light to let the salt and alcohol do it job through the night. The next morning the soak has done the expected job.  The kosher salt and cotton wick are soiled after drawing out oils and tars from the internal cavity.  I empty the bowl of salt, wipe the chamber with a paper towel, use a shank brush and blow through the mortise to remove any left-over salt crystals.  To make sure the cleaning is complete, I expend a few more cotton buds and pipe cleaners and find great results. A refreshed pipe for the curator! Moving on!I look now at the rim.  With the dents I see on the outer lip and the scorched darkened briar on the inside of the rim lip, I decide to top the stummel lightly to remove most of the damage to the rim and to freshen the rim lines.  After placing 240 grade paper on a chopping board, with the stummel inverted, I rotate the stummel over the paper several times to top the stummel.  I check to make sure I’m remaining true and finish with a few more rotations. I change the paper on the board to 600 grade and rotate the inverted stummel a few more times to smooth the rim surface further following the coarser 240 grit.  Not all the darkened briar is removed, but I’m not willing to give up more of the rim’s briar.  I focus now on the internal lip of the rim and introduce a bevel to remove more of the darkened briar.  I first cut the bevel using a coarse 120 grade paper followed by 240, then 600.  With each grade of paper, I fold it into a tight roll and then pinch it against the inner rim with my thumb.  I work the rolls around the rim so at the end it is an even, consistent bevel.  I like the subtle softening of the internal bevel and it accomplishes sufficient removal of damaged briar.I move on to the stummel preparation.  As I identified above, I find some significant cuts and dents in the stummel, and especially in the narrow shank.  My guess is that the pipe was stored in a can with the stem inserted first.  The cuts in the shank look like injuries sustained as the shank rubbed against the can edge – my theory.   I take a few pictures to show this.  I decide to fully clean the briar surface and I use 240 grade sanding paper over the entire stummel followed by 470 grade paper.  I then wet sand the stummel using 600 grade paper.  The pictures show the progress. Next, I use sanding sponges to sand and smooth the surface more.  I start with a coarse sponge, then medium then finally, a light grade sponge.  The grain starts emerging during the sponge sanding process.  It looks good. While inspecting the shank afterwards, I notice the crevasse that remains in the shank.  I use a magnifying glass to take a closer look.  It doesn’t appear to be a trauma resulting in a crack but a gouge or cut.  To be on the safe side and for cosmetic reasons, after wiping the area with alcohol to clean it, I apply CA glue to it to seal it. After applying a drop of CA glue on the crevasse, I put the stummel aside giving time for the CA glue patch to cure.With the stummel on the side, I turn back to the stem and look at it again.  The tooth chatter that was evident before was fully removed during the earlier wet sanding with 600 grade paper and 0000 steel wool.  I decide to move now to the micromesh phase by first wet sanding with pads 1500 to 2400 and follow this by dry sanding with pads 3200 to 4000 and 6000 to 12000.  Between each set of 3 I apply Obsidian Oil to revitalize the vulcanite.  The pencil stem looks great! The CA glue patch applied to the crevasse on the shank has cured and is ready to be sanded down and blended.  Using 240 grit paper, I sand down the initial patch mound until it is flush with the briar surface.  Following this, I again use 600 grit paper to erase the 240 scratches and to smooth it out.  As before, I then apply each sanding sponge, starting with the coarse sponge, medium then light. I can still see the scar, but it is now sealed and smooth to the touch and blends in nicely.  A needed detour. With the repair finished, now I apply micromesh pads to the Cutty stummel.  First, I wet sand using pads 1500 to 2400.  Following I dry sand with pads 3200 to 4000 and 6000 to 12000.  The spur even gets its time in the sanding process! During the micromesh phase, I watch the grain emerge and it is beautiful, and see the Cutty bowl design more clearly.  The horizontal grain flanking both sides of the bowl run parallel with the shank.  The cant of the bowl is accented by the grain as the bowl seems to jut out with the grain.  The effect catches the eye.  Added to this is the bird’s eye grain that is on the fore and rear of the bowl.  Whoever turned this block of briar into the Cutty was insightful and could see what the lines would do with the canted Cutty angles.  The picture of the Comoy’s Blue Riband 347 Cutty below (link) has the same eye catching grain motif.  I found this picture of a Cutty as I was doing an online survey looking at the different hues that briar Cuttys come in generally.  Of course, you will find a spectrum of color from dark to light as you look at the googled image pages.  Yet, as I looked at 100s of pictures, what seemed to be resonating with me was the darker hues like the Comoy’s above depicts.  Of course, the clay Cutty is white, but the older ‘English’ classic feel was communicated more through the darker hues like this striking Comoy’s.  My decision was made, and after assembling my desktop staining tools, I mix together Fiebing’s Dark Brown Leather Dye 2 parts to 1 with Fiebing’s Saddle Tan Pro Dye in a shot glass.  After wiping the stummel with alcohol to clean it, I insert into the mortise two doubled pipe cleaners to serve as my handle.  I then heat the Cutty stummel with a hot air gun to open the briar helping it to be more receptive to the dyes.  Using a folded pipe cleaner as an applicator, I ‘wash’ parts of the stummel with the dye and then ‘flame’ it using a lit candle.  As an aniline dye, the alcohol combusts when it meets the flame and as the alcohol burns off in a ‘puff!’ it sets the dye pigment into the briar.  I methodically apply the dyes to the entire stummel flaming as I go. When thoroughly covered, I put the stummel inverted on a cork situated in a candle stick holder to rest through the night allowing the dye to settle.  I discovered that this period of resting is important as it helps guard against the newly applied stain to come off on the fingers later when the pipe is first put into service and the briar is heated for the first time.The next morning I’m ready to start ‘unwrapping’ the fired and dyed stummel.  The firing creates a crust on the surface which I initially remove with the use of a felt buffing wheel applying Tripoli compound.  I mount the felt buffing wheel onto the Dremel, set the speed at the lowest RPMs because I do not want to create too much friction and scorch the briar.I methodically work the felt wheel through the crust revealing the briar grain underneath the crust.  Throughout the process, I purge the felt wheel often as it collects the crusty fired dye.  I stage a picture (below) to show the contrast after the felt wheel applies Tripoli compound and has unwrapped a portion of the stummel revealing the stained grain beneath.  After I complete the initial unwrapping of the entire stummel, I change from a felt cloth buffing wheel to a cotton cloth wheel and increase the speed of the Dremel to 40% full power.  I then apply another round of Tripoli compound with the softer cotton wheel.  I discovered doing this after the felt wheel helps to angle in to the crook of the shank/bowl junction better, but it also removes more dye blotches revealing a sharper grain contrast.After completing the second round of Tripoli, I wipe the stummel with a cotton cloth wetted with alcohol.  This can lighten the finish if I choose to rub more aggressively but I don’t.  I’m satisfied with the color, but the wipe helps blend the finish further and remove excess dye.I follow the Tripoli compound by applying the finer Blue Diamond compound.  I mount another cotton cloth wheel to the Dremel, keep the speed at 40%, and apply the compound.  I apply it to both the stummel and the stem.  Since the stem is longer, it’s easier to keep them separated as I apply the compound.Following the Blue Diamond, another cotton cloth wheel is mounted, the speed remains the same and I apply Carnauba wax to both the stem and stummel.After completing the application of wax, I try to reunite the stem and stummel and discover that the tenon/mortise fit is too snug for comfort.  This often happens after internal cleaning and the briar is wet and that can expand it microscopically – enough that forcing the tenon into this pencil thin shank is a recipe for disaster – cracking a shank is not a fun thing to deal with! To remedy this, I wrap a piece of 600 grit paper around the tenon and sand it down until it fits more easily and snuggly.  This restoration has told an interesting story.  The Cutty Tavern Pipe looks great.  The dark brown finish and polishing regimen has resulted in a unique Cutty bowl drawing even more attention.  The Cutty Tavern Pipe’s lines are classic and harken back to a day gone by when these pipes were fashioned with clay and were held proudly by both those with means and the common man and woman who had gathered with friends to enjoy each other at the pub and a smoke.  A fitting gift for a curator of history and even more so, the commissioning of this pipe by my son, benefits the Daughters of Bulgaria – helping women and girls who have been trafficked and sexually exploited.  The unexpected turn in this story is the painting, ‘Tavern Pipe’, depicting the pipe man and his pipe – an accurate and telling image captured on canvas by the brush of a gifted artist, Suzie Baker, whose generosity is making available a percentage of the sale of this painting to the Daughters of Bulgaria.  Is there a pipe man or woman out there to bring the Tavern Pipe home benefiting the Daughters?  I hope so!  Thank you for joining me!


Rejuvenating a Ben Wade Hand Model London Made Billiard


Blog by Dal Stanton

This Ben Wade came to me a couple of years back when I landed, from the eBay auction block, what I have called the Lot of 66. It continues to yield nice collectable pipes. The finish on this Ben Wade is a rustic looking blasted finish which is eye catching with the detail and bowl shaping. It caught Todd’s eye in the For “Pipe Dreamers” Only! collection and is the last of 3 that he has commissioned. Here are pictures of the Ben Wade Hand Model now on my worktable: I’ve discovered through the reading I’ve done about the name ‘Ben Wade’ that it has an up and down history. The Pipedia article is helpful in simplifying the history in four helpful ‘eras’ which I’ve summarized from the Pipedia:

The Family era (1860 to 1962) – the heydays of the English name when the pipes were stamped Made in Leeds, England.

Charatan / Lane second (1962 to 1988) – When Herman G. Lane purchased the name, the transition from a higher quality pipe during the long Family Era transitioned exclusively to the fabrication of machine-made pipes. Lane moved the production from the Leeds factory (closed in 1965) to Charatan’s Prescott Street factory. Ben Wade became essentially lower quality series pipes produced in standard shapes. The pipes during this period were stamped, “Made in London, England” or dropping the “London” and stamped with “England” alone. After Lane died, in 1978 his heirs sold the Charatan and Ben Wade names to Dunhill, which left the production of Charatan/Ben wade at the Prescott Street factor. In 1988 production came to an end for Ben Wade when the Charatan’s Prescott Street factory closed.

Ben Wade turns Danish (1971-1989) – During this era Preben Holm, from Denmark, was in financial difficulties and Herman Lane and he went into partnership producing the Handmade and fancy pipes. These pipes were marked “Ben Wade Made in Denmark”. These pipes gained great popularity, especially as the were marketed in the US. After Lane’s death, Preben Holm, not the businessman, was in financial difficulties and reduced his workforce and production, but at his death in 1989, production of the Danish Preben Holm pipes came to an end.

Resurrection – (1998 to present) – Duncan Briars bought the Ben Wade name from Dunhill in 1998 and production of Ben Wade pipes restarted at the Walthamstow plant, sharing the same space where Dunhill pipes are produced and reportedly benefiting from the same quality of production. During this present era, the stamping on the pipes is: “Ben Wade, Made in London, England”The reason I went through this summary of Ben Wade’s morphing history is because in nothing I’ve read about Ben Wade (and I’m sure there’s more out there), I found no reference to a Ben Wade Hand Model with the COM, London Made. The stamping on the pipe before me is ‘Ben Wade’ [over] HAND MODEL [over] LONDON MADE. The saddle stem has the Ben Wade stamped on the upper side of the stem saddle. My first glance at the blasted finish made me wonder whether this Ben Wade came out during the ‘mystery’ Resurrection period in the Pipedia article. Here is the full text that made me wonder:

As said before Preben Holm’s death marked the third end of Ben Wade and for long years there were no Ben Wade pipes in the shops anymore. But then, all of a sudden they were back in the USA some years ago! Who made these pipes? A concrete manufacturer was not known at first.

The rumors spreading were considerable. Especially because these Ben Wades – originally all blasted and in deep black color – featured so perfect straight and / or ring-grain that they were almost suspicious in view of the prices. The supposition that “Mother Nature” had been given a leg up by means of rustication combined with subsequent blasting was evident as different sources confirmed.

Steve on rebornpipes refers to pipes as having a ‘blasticated’ finish. The process is blasting a rusticated pipe making it appear naturally blasted but the more perfect lines make it seem better than ‘mother nature’ as the Pipedia described. As I look at this Ben Wade, I wonder if it’s from that time period and the grain looks so good, is it blastication? I sent Steve the picture below and his verdict was not blastication, but a really nice looking blasted finish. Yet, I’m stumped by the COM marking. Here’s a close-up of the stummel, very nice natural 3-D blasted grain and not blastication. I sent out pictures of some pictures and the nomenclature to various pipe Facebook groups and the responses I did get, though they were anecdotal, pointed to an earlier period. Paul, from Pipe Smoker of America FB Group, said that he believed it was a Pre-78 and made in Charatan factory. He also said that these were some of his best smokers are London BWs. It sounds good to me!

As I look at the condition of this Ben Wade, the surface needs cleaning to see what the finish will do. The finish is dark and tired as I look at it. The chamber shows light cake buildup and the rim is darkened with some lava flow. The stem will need to be cleaned of the oxidation and the button is chewed some with bite compressions on both the upper and lower bit.

With a better knowledge of the Ben Wade Hand Model Billiard on my worktable, I begin by cleaning the stem airway with pipe cleaners wetted with alcohol and then add it to a bath of Before & After Deoxidizer along with other pipes and stems in the queue. After several hours, I fish out the Ben Wade’s stem and wipe it down with cotton pads wet with alcohol to remove the raised oxidation. The Deoxidizer did a great job.To begin to rejuvenate the stem, I apply a coat of paraffin oil (a mineral oil) to the vulcanite and then put it aside.Next, I go to work on the chamber using the Pipnet Reaming Kit. After putting paper towel down, I ream using 3 of the 4 blade heads available. I follow by fine-tuning with the Savinelli Fitsall tool and finish by sanding the chamber with 240 grit paper wrapped around a Sharpie Pen giving the briar a fresh start. I then wipe the chamber with a cotton pad and alcohol ridding it of leftover carbon dust. After inspecting the chamber, I see no heating or burning problems. I move on! The internals of the mortise and airway are next on the cleaning regimen. Using cotton buds and a few pipe cleaners, things clean up quickly. I also use a dental spatula and scrape the mortise wall and remove very little tars and oils. It’s nice when a stummel isn’t horrendously grungy! Moving on.Moving now to the external blasted finish, I use undiluted Murphy’s Oil Soap with a cotton pad to scrub. I’m wondering how strong the finish is – it appears a bit thin and the cleaning will reveal the answer. I also use a bristled tooth brush as well as a brass wire brush on the rim. After scrubbing, I take it to the sink and rinse the stummel with cool tap water without allowing water in the internals! The verdict is that the finish is worn and the scrubbing on the rim has left bare briar. With the day closing, I want to give the internals a further cleaning using kosher salt and alcohol as a soak. I create a wick from a cotton ball by pulling and twisting it. The wick serves to draw the tars and oils out. I then insert the wick down the mortise and airway with the help of a stiff wire. I then fill the bowl with kosher salt (which leaves no aftertaste) and after placing the stummel in an egg carton to keep it stable; I put isopropyl 95% into the chamber until it fills. I wait a few minutes and top off the alcohol once more. I turn out the light allowing the stummel to soak through the night. The next morning, I discover that the soak has not unearthed too much additional tars and oils from the internals of the pipe. This was confirmed after I followed with a few cotton buds and pipe cleaners dipped in alcohol. Cleaned!Turning my attention now to the Ben Wade stem, the Before & After Deoxidizer did a great job excising the oxidation from the vulcanite rubber compound. Now I focus on the bit and button repair which have some significant bite compressions. I take a closer look with a couple of pictures to mark the start of the repair. I start by painting the bit area with a Bic lighter to heat and expand the vulcanite. After doing this for some time I take comparison pictures to show the unsatisfactory progress. Comparing first:

Upper bit, before and after:Lower bit, before and after:The heating process made little progress. I now mix activated charcoal with CA glue to form a patch material and apply it to the tooth compressions and to the button lips – I’ll need to reshape the button. I first clean the stem area with isopropyl 95%. I then gradually mix thick CA glue with activated charcoal on an index card. I aim for a thickness of molasses so it’s thick enough to stay in place not run but will allow some manipulation once applied. On the first mixing, I mixed too much activated charcoal with the CA glue and got one of the chemical reactions where the mixture hardens instantly giving off an acrid smoke!! This has happened before. I need to apply the mixture before it thickens too much. The next mixtures work well. After applying patch material to both upper and lower I set the stem aside to allow the patch to cure. I turn my attention now to the Ben Wade Hand Model stummel. I like the rustic look of this stummel. What I also like about it is that there is a curving or narrowing in the shaping of the bowl about 2/3s up as it moves toward the rim. With the rough finish, rough is good and the surface reminds me of tree bark! With the stummel being dry and with a light blotchy look in the valleys of the blasted areas, I decide to add some paraffin oil to the briar to hydrate it. Doing this also allows me to get a sneak preview of what the briar will look like somewhat finished, I apply paraffin oil to the surface with a cotton pad. This moisturizes the briar and I like what I’m seeing. The only thing I’m not liking is that the scorched place on the back side of the rim is still evident even with the help of a darkened blend. The pictures show what I’m seeing. I decide to go back to an elbow grease methodology and focus cleaning on the rim with a brass wire brush and Murphy’s Oil Soap. This time Murphy’s has its way. I did do a lot of scrubbing and the rim surface shows the skinned lighter area on the rim where the cleaning was, but the scorched area was removed.To darken the rim to blend with the rest of the bowl, I use a cherry dye stick which matches pretty well and I color the rim as well as the edge of the rim – external and internal. This looks good and will blend in more as I polish.Next, to clean up the lower shank panel, I very quickly and lightly, run the area through the full regimen of 9 micromesh pads from 1500 to 12000 – dry sanding with each. I wasn’t worried about the nomenclature because it is deep and solid, and I sanded very lightly with the pads. This gently cleaned the smooth briar of minor nicks and scratches.I like the look of the finish and decide that it looks good just as it is. In order to deepen and enrich the natural grain, I apply Before & After Restoration Balm. I like this product that can be found at http://www.lbepen.com. I apply some of the Balm to my fingers and thoroughly work it into the briar surface – into the nooks and crannies of the richly blasted briar. After applying, I let the stummel sit for a few minutes – 10 or so, and then I wipe the stummel with a microfiber cloth to remove the excess Balm and to buff it up a bit. I take a picture during the ‘absorbing’ period.The patches on bit and button of the stem are now cured after several hours. I begin to remove the excess patch material on the upper bit using a flat needle file. I’m careful to establish the new inner lip of the button. As I filed to shape the new button lip, I discover a crevasse hidden below which is too severe simply to remove. There are other pockets on the button that don’t look too promising. It is normal in my experience, that its necessary to apply additional patch material to fill pockets and gaps that appear during filing and sanding.To address patching the button problems, this time I use a black CA glue to fill the crevasse and pockets and I apply an accelerator to quicken the curing process. Again, filing and shaping the upper button lip and this time better results are realized.I follow filing by sanding with 240 grit paper (which I forgot to add as a prop to this picture!) to erase the marks left by filing. As with the filing of the button, the finer 240 paper reveal a cluster of pockets in the center bit area in the patch. Again, I spot drop black CA glue to fill the pockets, apply an accelerator and file the excess then sand the bit area with 240 grit paper. The upper bit and button area look good. The same process is repeated on the lower bit and button. It too, looks good. With the bit repairs completed and with the repaired button shaped, I continue by wet sanding the entire stem with 600 grade paper. I’m careful to work around the BEN WADE stem stamp on the saddle. After wet sanding with 600 grit, I apply 0000 steel wool to stem. Finally, I wet scrub the stem with Magic Eraser. I’m satisfied with the progress. I move forward with the micromesh pad regimen wet sanding using pads 1500 to 2400 followed by dry sanding with pads 3200 to 4000 and 6000 to 12000. I follow each set of 3 pads with an application of Obsidian Oil which further rejuvenates the vulcanite. I like that vulcanite pop! The stem looks great. I try to reunite the stem and the stummel and as is the case sometimes, after cleaning the mortise, the briar inside can expand causing the fit with the tenon to become too tight. I do not want to force the stem and risk a cracked shank, so I gently ream the mortise with a half-rounded needle file. Then I gently sand the tenon by wrapping 600 grit paper around the tenon.This works and I am able then to reunite the stem with the stummel and mount a cotton cloth buffing wheel to the Dremel and set the speed at about 40% full power.  I apply Blue Diamond compound to the entire pipe.  I run the wheel along the grain of the blasting to bring out the contrasts of rough briar as well as to buff it up into a shine.  After completing the Blue Diamond, before applying wax, I freshen the Ben Wade white stem stamp.  I clean the area with alcohol and then I dab a bit of white acrylic paint over the stamping.  I then use a cotton pad to tamp the wet paint which draws off the excess paint and helps the paint to dry sooner. Then using a toothpick, I gently scrape off the excess paint leaving a refreshed BEN WADE stamp.  It looks nice and crisp.I then mount another cotton cloth buffing wheel onto the Dremel and apply carnauba wax to the stummel.  I increase the speed of the Dremel from my usual 40% up to about 50 to 60% full power.  I do this to create more heat with the friction of the wheel to encourage the wax to dissolve in the craggy blasted briar surface.  Waxing a rough surface can cause the wax to collect and not to absorb into the surface.  The added heat encourages this and as I look at the waxing action, it looks like it’s having the desired effect.  Nice!  After finishing the waxing process, I then give the stem and stummel a rigorous and substantial hand buffing to remove any excess wax and to raise the shine.

The blasted grain on this Ben Wade Hand Model is distinctive.  It looked so good I thought that it might be the blastification process, but it is the real deal.  The shaping of the bowl also adds to the rustic effect with it tightening near the top and then flaring out.  The blasted briar displays many hues of grain – very eye pleasing.  This is the third of three pipes that Todd commissioned, and he will have the first opportunity to acquire this Ben Wade Hand Model from The Pipe Steward Store.  These pipes benefit the work we do here in Bulgaria with the Daughters of Bulgaria working among women and girls who have been trafficked and sexually exploited.  Thank you for joining me!

Life for an interesting Triangle Shank Enrico Bocci Belgium 612


Blog by Steve Laug

The next pipe in the queue is an interesting triangular shaped billiard – I think that is what I would call it. It came to us in the lot that included the pipe cabinet and 21 pipes. There is a decided slope from the button to the junction of the bowl and shank. The bottom of the bowl and shank is flattened and broad so that it is a very stable sitter. It is a unique piece and like many of those in this lot it is a brand that I have not seen before. It is on the second shelf, the third pipe from the right in the photo below. I have circled it in red to make it easier to identify.The finish on the pipe is very dirty with an interesting orange and black contrasting stain. I look forward to seeing it cleaned. There is a thick cake in the bowl and a lava overflow on the rim top. I can see some damage to the outer edge of the rim but because of the cake and tars it is hard to know what the inner edge looks like. Jeff took photos of the pipe before cleaning it. The photos give a pretty clear picture of the shape of the pipe and its general condition when we received it. Jeff took some photos of the bowl/rim top and the sides and bottom of the bowl to give and idea of the condition and the shape. You can see the nicks on the back and front side of the outer edge of the rim. He also took photos of the stamping on the left and underside of the shank. The left side was clear and readable. It read Enrico Bocci in script over Marrone. On the underside it said Belgium followed by the shape number 612. The left side of the stem also had a stamped EB logo. The stem had some deep scratching in the surface ahead of the button and some small tooth marks next to the button. There was also wear on the sharp edge of the button.Enrico Bocci was a brand that I was unfamiliar with so I did some research on the web to see what I could learn about the brand and the maker. I turned first to Pipephil and found the first lead. As usual the site gives a great summary. It identified the maker as Enrico Bocci and the brand as Italian (http://www.pipephil.eu/logos/en/logo-e3.html). This did not match the Belgium stamping on the underside of the shank so more searching would be necessary. I have included a screen capture from Pipephil that gave the initial information on the brand. It seems that Bocci retired from pipe making in the 1980s so that helped to date the pipe that I am working on.I turned then to Pipedia to see what I could find out there (https://pipedia.org/wiki/Bocci). The brand was listed under the country of Belgium. Sadly there was not a lot of information. I have copied the information and included it below.

Enrico Bocci, presumed to be of Italian origin, primarily turned out machine made pipes. The better ones were pre-turned and finally shaped and finished by hand.

From that at least I found that the maker was of Italian origin (not hard with a name like that). I knew that the pipe I had in hand was Belgian made and made prior to 1980. I also could deduce from the listing being in the Belgian list of pipemakers that Bocci lived there. Armed with that information I turned to deal with the pipe on the table.

As usual Jeff does a lot of the clean up on the pipes that we buy. He does a great job. When I pick them up here or do repairs here in Canada I am reminded just how much work he does to get the pipes to the point they are when I open his box to work on them.

Jeff reamed the bowl with a PipNet pipe reamer and followed up with a Savinelli Fitsall pipe knife to remove the cake. He scrubbed out the mortise and the airway in the shank and the stem with alcohol, cotton swabs and pipe cleaners. He scrubbed the exterior of the bowl, rim, shank and stem with a tooth brush and Murphy’s Oil Soap to remove the oils and tars on the rim and the grime on the finish of the bowl of the pipe. He rinsed it off under running water. He dried it off with a soft cloth. He was able to remove most of the lava build up on the rim top of the pipe leaving behind some darkening and a clear view of the damage to the outer edge. I took photos of the pipe to show its condition before I started my work. I took a close up photo of the rim top to show the darkening on the top and the damage to the outer edge at both the back and the front. You can also see some nicks and marks on the surface of the rim top. The stem photos show the scratching I noted above that extends from the button forward about an inch. They also show the tooth marks and the wear on the button surface on both sides.I took photos of the stamping to document what it looked like at this point in our cleanup process. You can also see some of the fills in the bowl and shank.I decided to address the damage to the rim top and edges of the bowl first. I used a folded piece of 220 grit sandpaper to clean up the inner edge of the bowl first. Once that was complete, I topped the bowl on a topping board using 220 grit sandpaper to remove the damage along the top surface and minimize the damage to the outer edge of the bowl. It looks like I forgot to take a photo of the rim top at this point. I removed the damaged surface (a minimal topping). I worked over the outer edge with a 1500 grit micromesh sanding pad to smooth out the damage on the edges (the condition of the rim top can be seen in the third photo below). Once I finished that I polished the entire bowl and shank with micromesh sanding pads. I wet sanded it with 1500-2400 grit pads to clean up the rim and smooth out the bowl. There were shiny spots on the finish from what looked like a light varnish coat that needed to be removed as well. I decided to stain the rim top and touch up the spots on the bowl and shank that needed it with a Maple stain pen before proceeding with the rest of the polishing. This might seem odd but I have found that it can work to blend the colours better. I let the stain coat dry for about 30 minutes and worked on the stem. Once the stain had cured for that time I continued polishing the bowl.I continued to polish the bowl with 3200-12000 grit micromesh sanding pads. Each successive grit of micromesh made the grain stand out more and hid the fills better. The overall look of the bowl improved. With the rim top and bowl polished, I worked some Before & After Restoration Balm into the surface of the briar with my fingertips to clean, enliven and protect it. I let the balm sit for a little while and then buffed with a cotton cloth to raise the shine. The following photos show the bowl at this point in the restoration process. The bowl and the rim top look really good and the darkening and lava are gone. The finish looks good and though the fills are visible they are not as obnoxious looking as before. I am very happy with the results. With the bowl finished I set it aside and turned my attention to the stem. I sanded the scratches and the tooth marks on the stem and then filled it in with clear super glue. I set it aside to cure for about a half hour then smoothed out the fills with a needle file to dress up the sharp edge of the button. I sanded the repairs with 220 grit and 400 grit sandpaper to blend them into the surface. I polished the stem with micromesh sanding pads – wetsanding it with 1500-2400 grit pads and dry sanding it with 3200-12000 grit pads. I wiped the stem down with Obsidian Oil after each pad. I used some liquid paper or correction white out to touch up the stamping on the stem. I applied it with a tooth pick and when it had dried I buffed the excess off with a cotton pad.I further polished it with Before & After Pipe Polish – both Fine and Extra Fine. I gave it a final coat of Obsidian Oil and set it aside to dry.This interestingly shaped Enrico Bocci surprised me. When I first saw it I thought it was a Lorenzo pipe and expected a real mess under the stain and lacquer coat. It turned out I was wrong. I polished stem and the bowl with Blue Diamond polish on the buffing wheel. I gave the bowl and the stem multiple coats of carnauba wax. I buffed the pipe with a clean buffing pad to raise the shine. I hand buffed it with a microfiber cloth to deepen the shine. The pipe polished up pretty nicely. The contrasting grain came alive with the buffing. The rich contrasting orange/brown and black colour works well with the polished black vulcanite stem. The finished pipe is a beauty and feels great in the hand. Have a look at it with the photos below. The dimensions are Length: 5 ½ inches, Height: 1 ¾ inches, Outside diameter of the bowl: 1 1/2 inches, Chamber diameter: ¾ of an inch. I will be putting this triangular shanked billiard on the rebornpipes online store soon. It may well the kind of unique pipe you have been looking for so have a look. Thanks for walking through the restoration with me on this interestingly shaped Enrico Bocci.

New Life for a Pair of Kaywoodie Bamboo Shank Mandarins


Blog by Steve Laug

The next pair of pipes on the work table is another relatively new acquisition. The Mandarin with the acrylic stem comes from a collection Jeff and I purchased from Michigan. It included a pipe cabinet and 21 pipes that is pictured below. The second one came from a friend of Jeff’s who is always on the lookout for pipe he thinks we might be interested in the New York area. This one has the original stem. I have circled the first Mandarin in the photo below – third pipe from the left on the first shelf of the rack.In the last box Jeff sent me he included both of these pipes. Both have the bamboo shank, both have an apple shaped bowl. Both are stamped Kaywoodie Mandarin on the underside of the bowl. Both had threaded stems and a metal space at the end of the shank. The first pipe from the rack above had a thinner diameter bamboo shank while the second was thicker – both were two knuckle bamboo pieces. The first pipe had a black acrylic replacement stem with a saddle while the second one had the original tapered stem with the Kaywoodie Club in a white circle on the left side of the stem.

Both pipes were quite dirty which seems to be the case when working on pipes that were obviously someone’s favourite.  Jeff took photos of both pipes before his cleanup work. The first pipe from the Michigan collection is shown first. There was a thick cake in the bowl and lava overflowing onto the rim top. The inner and outer edges of the bowl looked very good. The stem had some tooth marks and chatter on both sides near the button and some tooth damage to the sharp edge and top of the button. The photos below show the first pipe. The next photo shows a close up of the bowl. You can see the thick cake in the bowl and the overflow of lava on the rim top. He also took photos of the bottom of the bowl to highlight the condition of the pipe. It had some great grain all around the bowl and some nicks. It was a dirty pipe and obviously well smoked. The bamboo shank extension had a nice patina and a crackle like look that had developed as the pipe was smoked.  The next photo shows the stamping on the underside of the shank. It is quite clear and legible.  Jeff also took a photo of the shank and the fit of the replacement stem to the shank end. It is well done and the alignment is very good.The close up photos of the stem show the tooth marks in the surface near the button and the damage to the button itself on both sides. The tooth marks and chatter were repairable and the button could be reshaped.The pipe from the New York purchase is shown second. There was a thin cake in the bowl and very little lava on the rim top. The inner and outer edges of the bowl looked very good. The original Kaywoodie vulcanite stem had some light tooth marks and chatter on both sides near the button and some light wear on the sharp edge of the top and the bottom of the button. The photos below show the second pipe. The next photo shows a close up of the bowl. You can see the cake in the bowl and the light burn marks on the right side of the inner edge of the rim top.  The second photo below shows the stamping on the underside of the bowl – clear and readable Kaywoodie Mandarin.The Kaywoodie Club logo looks great and the fit of the stem to the metal spacer on the shank end is very good.He took close up photos of the stem top and bottom at the button. You can see the tooth chatter on both sides and the slight wear to the sharp edge of the button. Generally the stem is in very good condition.Jeff reamed both bowls with a PipNet pipe reamer and followed up with a Savinelli Fitsall pipe knife to remove the cake. He scrubbed out each mortise and the airway in the shanks and the stems with alcohol, cotton swabs and pipe cleaners. He scrubbed the exteriors of the bowl, rim, shank and stem with a tooth brush and Murphy’s Oil Soap to remove the oils and tars on the rim and the grime on the finish of the bowl of each pipe and bamboo shank. He rinsed them under running water. He dried them off with a soft cloth. He was able to remove most of the lava build up on the rim top of the first pipe and the little bit oon the second one. I took photos of the pipes to show its condition before I started my work on them. The first one is the Mandarin with the acrylic stem. Here are the photos of the second pipe. I took close up photos of the bowl and rim top as well as the stem on each of the pipes. You can see the condition of the rim top and bowl in the first photo of each pipe. Jeff was able to remove almost all of the tar and oils but there was darkening and damage on the inner surface of the rim on the first pipe and the surface and inner edge of the second pipe. The acrylic stem on the first pipe had tooth chatter and some tooth marks on the top and underside of the stem near and on the button surface. The vulcanite stem on the second pipe had some chatter but otherwise was in very good condition. The first set of photos show the first acrylic stem Mandarin. The second set shows the original vulcanite stem Mandarin.

The first pipe.The second pipe.I wanted to confirm a possible date for both of these pipes. I turned to Pipephil to see what he had to say about the brand (http://www.pipephil.eu/logos/en/logo-kaywoodie-2.html). I have included a screen capture of the listing on the site. It appears to have been made between 1958-1967.I turned next to Pipedia to check out the Kaywoodie Collector’s Guide to see if I could get some more information on the Mandarin line. I found an interest monograph there called Notes on Kaywoodies Introduced between 1955 and 1968. It included reference to the Mandarin line. I include that in part below (https://pipedia.org/wiki/Collector%27s_Guide_to_Kaywoodie_Pipes). I have highlighted and underlined the Mandarin in the list below. Both of the pipes I am working on are the smooth versions.

NOTES ON KAYWOODIES INTRODUCED BETWEEN 1955 AND 1968

The material presented in this monograph is extracted from 1936, 1947, 1955, 1968-69, and four undated Kaywoodie catalogs. Based on a comparison of prices in the 1955 and 1968-69 catalogs, the four undated catalogs appear to span the period from the late 1950’s to the late 1960’s (i.e., after 1955 but before 1968). This section presents a brief summary of the Kaywoodie Pipes that appeared in these undated catalogs, but did not appear in either the 1955 or 1968-69 catalogs…

Here is a list of pipes from this time period.

…Hi-Bowl. Tall, tapered bowl in six shapes (see Table 5). Available in smooth or “rough” finish ($10).

Mandarin. Smooth or relief grain finish with burnished-bamboo shank ($10).

Setter. No shank, just a ridged hole for a slender, filter-free, push-bit. Available in “flat bottom” (hence, “Setter”) panel, billiard, and poker shapes. Smooth or textured finish ($10).

Tuckaway. The 1955 catalog shows a Drinkless Tuckaway that was simply a smaller version of other Kaywoodie styles. The Tuckaways of the 1955-1968 period had military mountings, filter-free see-thru bits, and were packaged in a leatherette case. Available in Standard, Relief Grain, and Super Grain grades ($6-$8, depending on grade). Miniatures. Two-inch miniature replicas of “their big brother”, complete with the Drinkless fitment and Synchro Stem. The catalogs show these as individually-cased pipes but multiple pipe sets were apparently available. Price: $5.

Miniatures. Two-inch miniature replicas of “their big brother”, complete with the Drinkless fitment and Synchro Stem. The catalogs show these as individually-cased pipes but multiple pipe sets were apparently available. Price: $5.

Colossal Super Grains. Available in three “oversize” shapes (see Section 3.2) in hand-carved or smooth finishes ($5).

Now I knew that both pipes came from this time period. They were made between 1955-1968. Somewhere along the way the first pipe had been repaired and given an acrylic stem (this was the Michigan pipe). The other pipe from the NY connection had the original stem and threaded tenon though the stinger apparatus had been clipped off.

I started by working on the rim top of both pipes. The first pipe had a more classic apple shaped rim that came to a rounded top curved into the bowl. The second one had a flat rim top that I suppose could have come from a restoration sometime in its life but I could not be sure of that.

To smooth out the damage on the rim of the first pipe I sanded out the burn damage and the nicks with a folded piece of 220 grit sandpaper. I sanded the inner edge of the rim and the rounded top to remove the damage.On the second pipe I used a folded piece of 220 grit sandpaper to give the inner edge of the rim a slight bevel to remove the burn marks and smooth out the rim top and outer edge.I polished the bowls and the rim top on both pipes with micromesh sanding pads – wet sanding with 1500-2400 grit pads and dry sanding with 3200-12000 grit pads. I wiped the surface down after each sanding pad with a damp cotton cloth.

The first pipe. The second pipe. With the rim top cleaned, polished and restored on both of the pipes I worked some Before & After Restoration Balm into the surface of the briar with my fingertips to clean, enliven and protect it. I worked it into the bamboo on both pipes as well to enliven it as well. It took some time to really get it into the grooves and valleys of the bamboo but I was able to work it in. I used a shoe brush to make sure it was deep in the grooves. I let the balm sit for a little while and then buffed with a cotton cloth to raise the shine. The following photos show the bowls at this point in the restoration process. The bowl and the rim top on both pipes look really good and the darkening and lava are gone. The grooves and patina on the bamboo also look really nice with the new finish. I am very happy with the results. (Hopefully by now you can tell which is which. If not the pipe with the threaded metal tenon sticking out is the one with the acrylic stem from the Michigan collection.)I set aside the bowls at this point and turned my attention to the stems. I started with the acrylic replacement stem from the Michigan collection. I sanded out the tooth marks on the button surfaces on both sides with a folded piece of 220 grit sandpaper. I sanded it with a folded piece of 400 grit sandpaper to sand out the scratches. Once I was finished the tooth marks and chatter were gone.As I finished the stem I noticed that the end of the stem had an unfinished slot – merely a round hole that comes standard on replacement stems. It needed to be shaped and a slot cut in the end. I used a series of needle files to cut open the slot and shape it. I still needed to sand the slot but it was starting to look good. I folded a piece of 220 grit sandpaper and sanded the edges of the button to further shape it. The photos tell the story. I moved onto the original Kaywoodie vulcanite stem from the New York find. I sanded out the tooth marks on the button surfaces on both sides with a folded piece of 220 grit sandpaper. I sanded it with a folded piece of 400 grit sandpaper to remove the scratches. Once I was finished the tooth marks and chatter were gone.I polished both stems with micromesh sanding pads – wet sanding with 1500-2400 grit sanding pads and dry sanding with 3200-12000 grit sanding pads. I wiped them down after each sanding pad with a damp cloth. I polished them with Before & After Pipe Stem Polish and wiped them down a last time with the damp cloth and some Obsidian Oil and set them aside to dry. This beautiful pair of Kaywoodie Mandarin Smooth Apples really are unique and special pipes. The bamboo shank and the smooth well grained bowls make them quite stunning. I have a pair of these in my own collection and they are great smoking pipes. The patina on the old bamboo is very nice. You have to figure at the earliest these pipes come from the mid to late 50s and early 60s and at the latest they come from 1968. That means that they may be 64 years old at the earliest and then at the latest 51 years old. Either way they are old pipes. They have a lot of life left in them that is for sure and will definitely outlive most of us. I polished the bowls and stems with Blue Diamond polish on the buffing wheel. I gave the bowls and stems multiple coats of carnauba wax. I buffed both pipes with a clean buffing pad to raise the shine. I hand buffed them with a microfiber cloth to deepen the shine. The pipes polished up pretty nicely. The rich grain shining through the medium brown stain came alive with the buffing. The rich contrasting brown colour works well with the polished black vulcanite stem. The finished pipes are beautiful and feel great in the hand. Have a look at them in the photos below. The dimensions of the first pipe with the replacement Lucite stem are Length: 6 inches, Height: 1 1/2 inches, Outside diameter of the bowl: 1 1/4 inches, Chamber diameter: ¾ of an inch. The dimensions of the second pipe with the original Kaywoodie vulcanite stem are Length: 6 inches, Height: 1 1/2 inches, Outside diameter of the bowl: 1 3/8 inches, Chamber diameter: ¾ of an inch. I will be putting both Mandarin pipes on the rebornpipes online store individually and they can be purchased individually or as a pair. The patina on the bamboo of both pipes is a bonus on these beauties. Thanks for walking through the restoration with me on this pair of oldtimers.

A Hard Ridden “Malaga” Billiard Made New


Blog by Steve Laug

I have mentioned several times in the blogs I have done on the Malaga pipes that I have restored for Alex that he is now collecting them in a focused manner. He has found some beautiful pieces that come from the Malaga Pipe Shop in Royal Oak, Michigan in the USA. The more I work on the brand the more I am impressed by the quality of the craftsmanship and beauty of the pipes that came from the shop. I have written an earlier blog to give a little history of the Malaga Brand if you are interested: https://rebornpipes.com/tag/malaga-pipes/. That blog also includes links to a catalogue and the history of the pipemaker George Khoubesser). Follow the link to get a feel for the brand and the pipemaker. If the pipes Alex has found have been beautiful, this one was not! It was a bleached and varnished mess. The stem did not fit in the shank and the feel of the pipe when I ran my fingers over it was ridged and bubbled. It was a strange feeling pipe. It is stamped on the left side of the shank with “MALAGA” and on the heel of the bowl with a 0. I have not seen the 0 stamp before so I am unclear of the meaning. All I know is that this pipe was going to be a hard one to make beautiful again. Here are some photos of it before I started. The varnish coat had protected the bowl from scratches and dents but it was rough feeling with its ridges – almost like it had been painted on with a brush. The rim top was dirty with some darkening around the surface and the inner edges of the bowl. The outer edge was clean. The bowl had a thick cake. The finish had some dark stains along the left side of the shank around the Malaga stamping. There were also some stains on the underside of the shank. It really was an odd pipe in many ways. The stem was quite oxidized and there were deep tooth marks on both sides near the button. The button surface was also marked. The stem did not seat in the shank. That led me to believe that the shank was lined with tars and oils.The stamping was hard to capture because of the painted on varnish but is clear and readable. It is stamped “MALAGA” on the left side. The 0 on the heel of the bowl is very clear.The varnish coat was so hard and impervious I decided to throw the bowl into an alcohol bath to soak overnight. I did not think it would work but thought it was worth a try. I closed up the container and called it a night.In the morning I removed the bowl from the bath. It had not done any damage to the thick coat of varnish or whatever… it was a hopeless endeavour so I decided to wait and deal with it later. I reamed the bowl with a PipNet reamer using three of the four cutting heads. I took the cake back to bare briar. I followed up with a Savinelli Fitsall pipe knife to scrape away the remnants of cake and clean up the walls of the bowl. I finished the reaming with a piece of dowel wrapped in 220 grit sandpaper and sanded the walls of the bowl. To remove the damage to the rim and the varnish coat I used a topping board with 220 grit sandpaper and worked the rim against the surface of the board in a circular motion to remove the damage. I used a folded piece of 220 grit sandpaper to smooth out the inner edge of the rim and to remove the darkening present there. I decided to go back to stripping off the painted coat on the bowl. I sanded it with 220 grit sandpaper to break the shiny surface of the topping. I wiped it down with acetone on a cotton pad and sanded more and repeated the process until the finish was gone. With the varnish/plastic coat removed I polished the bowl with micromesh sanding pads.  Wet sanded with 1500-24000 grit pads and dry sanded with 3200-12000 grit pipes. I wiped the briar down after each pad with a damp cotton pad to remove the sanding dust. The colour of the briar was uneven and the area around the stamping had some dark streaks that I could not remove. I worked on them with a corner of micromesh but I was thinking I would need to stain the bowl to take care of the issues. Before I went that far I decided to rub the bowl down with some Before & After Restoration Balm. I rubbed it into the briar and buffed it to see what showed up. I like the grain but I wanted to go for a darker brown to cover the stains on the shank. I was not happy with the overall look yet but decided to clean out the shank and the mortise. I scraped the mortise walls with a dental spatula to loosen the build up in the shank. I used cotton swabs, pipe cleaners and alcohol to remove the tars and oils that had built up in the  shank and kept the stem from seating against the shank end.  With the inside and outside clean it was time to stain the bowl. I heated the briar and then applied some Fiebing’s Light Brown stain to the briar. I flamed it and repeated the process until I was happy with the coverage on the bowl.I let the stain cure for several hours and worked on another pipe. Once the stain had set I wiped it down with isopropyl alcohol on cotton pads to remove the excess and make the stain more transparent. I polished the briar with micromesh sanding pads – wet sanding with 1500-2400 grit pads and dry sanding with 3200-12000 grit pads. I wiped the bowl down with a damp cloth to remove the sanding dust. I worked some Restoration Balm into the newly stained surface of the briar and it came alive. The following photos show the new look of the pipe. I buffed the pipe on the buffing wheel using Blue Diamond polish. It removed a little more of the darker stain and the grain really began to shine through more clearly. I set the bowl aside and addressed the issues with the stem. I sanded the surface of the stem with 220 grit sandpaper to remove as much of the oxidation as I could. I wiped down the surface of the stem with a damp cloth and cleaned out the tooth marks with cotton swabs. I filled in the tooth marks with black super glue and laid the stem aside to let the repairs cure. I turned to work on another pipe while the repair cured.Once the repairs had hardened and cured I used a needle file to sharpen the edge of the button and smooth out the repair on the stem. I sanded the stem repairs with 220 and 400 grit sand paper to blend the repair into the surface of the stem. It took a lot of sanding to smooth it out but the finished product looked a lot better than when I started. I wiped the stem down with Obsidian Oil and then cleaned the airway in the airway with pipe cleaners and alcohol. I was quite surprised by the lack of debris and grime in the airway.I polished the stem with micromesh sanding pads – 1500-2400 grit pads and dry sanding 3200-12000 grit pads. I wiped the stem down after each pad with Obsidian Oil. I polished it with Before & After Pipe Polish – Fine and Extra Fine. When I had finished it I wiped it down a final time and set it aside to dry. This Malaga Billiard came alive with the buffing. I polished the bowl and the stem with Blue Diamond polish on the buffing wheel. I gave the bowl and the stem multiple coats of carnauba wax. I buffed the pipe with a clean buffing pad to raise the shine. I hand buffed it with a microfiber cloth to deepen the shine. The pipe polished up pretty nicely. The various styles of grain shining through the finish on the bowl. The rich contrasting brown colour works well with the polished black vulcanite stem. The finished pipe is a beauty and feels great in the hand. Have a look at it with the photos below. The dimensions are Length: 5 3/4 inches, Height: 2 inches, Outside diameter of the bowl: 1 1/4 inches, Chamber diameter: 3/4 inch. I will be putting this I have a few more of Alex’s pipes to finish then this one will be heading back to him. I look forward to hearing what he thinks of the new look Thanks for walking through the restoration with me on this Malaga.


Todd’s Second Commission: A GBD New Era London England 9493 Pot with Distinction


Blog by Dal Stanton

This is the second of 3 pipes that Todd commissioned.  I saw this GBD New Era long shank Pot or possibly a wide bowled Lovat, on the eBay block and liked it immediately.  It has seen some serious wear and tear, but he is obviously well loved, and the grain….  Oh my, the vertical grain on the bowl of the Pot shape it distinctive and when cleaned up….  Dream!  Well, my bid was enough when the bell rang, and it didn’t remain in my collection, and Todd saw the potential in the For “Pipe Dreamers” Only! collection and now this GBD New Era is on my worktable.  These pictures take a closer look at the GBD New Era: The nomenclature on both sides of the shank are thin but legible.  On the left flank of the shank is ‘GBD’ encircled in the oval [over] ‘NEW ERA’.  The right side of the shank is stamped ‘LONDON ENGLAND’ [over] 9493, the shape number.  The stem bears the classic brass GBD rondel.

I like this A Brief History of GBD from Pipedia to remind me of the origins.

The company was founded in Paris France in the 19th century by Ganeval, Boundier and Donninger who were no longer associated with the company by the turn of the century. By the time they left the GBD name was well established and thus retained. In 1903 an additional factory was built in England and ran by Oppenheimer. The Paris factory moved to Saint-Claude in 1952. Since 1981 the majority of GBD pipes come from the English factory. At about that same time GBD merged with Comoys, since then all production for both GBD and Comoy comes from a single factory.

The dating of this New Era can be determined with certainty to be before the 1980s. The brass rondel on the stem and straight line “LONDON, ENGLAND” stamping of the nomenclature identify it as being made prior to the merger with Comoy’s in 1982 (or 1981). 

The GBD line, New Era, can be found in catalogs going back to the 1950s.  The example I found on Pipedia’s article on GBD are pages from Circa 1950s Oppenheimer Pipes Catalog, courtesy Václav Blahovec, which I’ve included.

The add to the right is from Pipedia’s discussion on GBD Model Information is credited to the 1961 GBD Flyer, courtesy  Chris Keene’s Pipe Pages, unfortunately now a defunct website.  So, the spread of possible dating for the GBD New Era Pot on my table could span from the 50 through the 70s.

The quality of the New Era line is toward the upper third of GBD lines, from what I read in the Pipedia article.  This last quote from Pipedia’s reprint of Pieces From My GBD Collection, by G.L. Pease (re-published here by permission), sums up well GBD pipes and what I believe is true of the GBD New ERA before me:

Since then, many GBDs have come, many have gone. I’ve tried to select exquisite examples for my collection – pipes that are exemplary in every regard. Not all old GBDs smoke wonderfully, but when they do, they sing. The French made ones, for some reason, seem particularly suited to Virginias. GBDs are not exactly hip. They’re not trendy. They’re not the high-grade pipes du jour. But, they are solid, classic pipes with a long history, and they can be subtly and sublimely beautiful. They can also often be had without sacrificing too much coin.

As I look at the GBD New Era Pot on my worktable, what stands out immediately are the dark blotches on the briar surface, especially on the long shank.  If these were on the bowl or the heel, I would be concerned about heating damage.  But on the shank, the issue is on the briar surface and hopefully cleaning will address it. The chamber has moderate cake build up and the rim shows some lava flow and scorching on the forward part of the rim, yet there is darkening around the entire inner circumference.Oh my, the short saddle stem is oxidized and mauled!  Looking at the bit (upper and lower below) the forensics are not difficult to decipher. One can discern the eye or canine tooth imprinted followed by the first premolar – especially on the upper side.  The lower side is not as distinct, yet the practice is revealed.  The former steward’s ‘hands free’ approach was to insert the entire flat part of the stem on the right side in his (or her?) mouth and clamp down using the stem as a palate to hold the pipe in place.  Hmmmm, deep breath.  Moving on.With a good understanding of the pipe on my worktable, I begin the restoration by cleaning the internal airway of the stem with several pipe cleaners wetted with isopropyl 95% and then I add the GBD’s mangled short saddle stem to a bath of Before & After Deoxidizer along with other pipes in the queue. After the stem soaks for several hours, I fish the GBD stem out of the Deoxidizer and after draining the Deoxidizer, I wipe the stem with cotton pads wetted with alcohol.  A good amount of oxidation is removed, and the stem looks good after cleaning it.To begin the revitalization of the vulcanite, I then hydrate the stem by applying paraffin oil (a mineral oil) to the stem – it absorbs it well.  I put the stem aside for the time.To begin the cleaning regimen of the GBD Pot stummel, I ream the chamber using the Pipnet Reaming Kit. The dimensions of the chamber live up to a grand Pot image – the chamber is 1 inch wide and 1 3/8 inches deep, plenty of room for a bit of tobacco!  After putting down paper towel to minimize cleanup, the width of the chamber causes me to skip the smallest blade head and I use the remaining 3 larger blade heads.  I then transition to scraping the walls further with the Savinelli Fitsall tool and finish the reaming by sanding the chamber with 240 grit paper wrapped around a sharpie pen to give leverage.  After wiping the chamber with a cotton pad and alcohol, I inspect the chamber, and everything looks great – no signs of heat damage.  Now a fresh start for the chamber. Now, turning to cleaning the external briar, I hope that the cleaning will address the large dark blotches on the surface.  I use undiluted Murphy’s Oil Soap and a cotton pad to do the job – and what a job it does! As I scrub with the cotton pad the grunge starts breaking up and eventually the black spots on the shank are removed!  I love Murphy’s Soap!  I work further on the inwardly sloped rim also using a brass wire brush.  This helps, but the rim still has some scorching darkness left.  The pictures show the great progress. Remaining on the cleaning regimen, I now address the internals of the stummel using cotton buds, pipe cleaners wetted with isopropyl 95%.  I also use shank brushes which are perfect for the longer shank of this GBD.  To quicken the process, I also scrape the mortise with a dental spatula.  In time, cotton buds started emerging much cleaner.  Later, I plan to also clean the internal further with a kosher salt and alcohol soak.With some fear and trembling, I study again the mauled saddle stem.  The Before & After Deoxidizer did a good job removing the oxidation.  My first assault on the stem damage will be to expand the stem’s surface to regain the multitude of compressions on the upper and lower bit. I take pictures to mark the starting point for comparison.  Then, using a Bic lighter I paint the vulcanite surface.  As it heats, it expands and hopefully reducing the severity of the compressions.  After one round of heating upper and lower bit several times, I take a picture for comparison.

Upper, before and after:Lower, before and after:Next, using 240 grit sanding paper, I sand the upper and lower bit to get a better understanding of the contours of the remaining damage after using the heating method.  As you can see in the pictures I take after sanding some, the compression areas are revealed more clearly.  I have found from experience is that using charcoal/CA glue as a patch on the vulcanite stem, the patch material needs to have enough depth in the compression to get a good hold.  I have found that patching a compression that is too shallow will not hold, but sometimes these compressions are too deep to sand!  For instance, I debate whether it is better to sand the two lesser upper compressions on the lower bit (second picture) and risk sanding and taking too much of the stem?  And going partially and changing your mind with the view to applying patch material, and then it’s too shallow!  I decide to apply patch material at this point and then sand and see how it comes out.I first wipe the stem with alcohol to clean the area. To form the patch material, I mix CA glue with activated charcoal.  I start with the upper stem side.  I put a small pile of charcoal on an index card and put a blob of thick CA glue next to it.  Then, using a toothpick I pull charcoal into the CA glue mixing it as more is added.  When it thickens to that of molasses, I use the toothpick to trowel the mixture to the compressions needing filling.  I use an accelerator to speed the curing time.  I do the same for the lower bit compressions.  To now begin removing the excess patch material to the upper bit, I use a flat needle file.  The pictures show the progression.After bringing the patch mound down to the surface, I then switch to sanding with 240 grit paper to remove the excess patch material totally.  In the second picture you still see the patches, but the patch is now flush with the stem surface.Remaining on the upper bit, I refresh the button using the flat needle file and follow with 240 grit paper erasing the file marks and fine tuning the button restoration.  The upper bit repair looks great.Now, starting on the lower bit, I do the same using the flat needle file to bring the patch mounds down close to the briar surface.Then, taking over with the 240 paper I sand away the excess patch material totally bring the patch flush with the vulcanite surface.  The second picture looks closer showing pitting in the patch.  This happens when air bubbles are trapped in the patch material and when they are sanded, they are exposed as pits.  I’ll address this later.Moving again to freshen the button lip I use the flat needle file and transition to 240 grade paper to erase the filing scratches and to smooth the stem.  I like the progress!To address the air pockets in the lower patch I first wipe the areas with a cotton pad and alcohol to clean it.  I then paint a fine layer of thin CA glue over the patch area with the CA glue filling the pockets.  After the glue cures, I then sand it with 240 paper.  The patch is patched, and I move on! Now addressing the entire stem, I wet sand using 600 grade paper followed by applying 0000 steel wool.To complete this phase of the stem restoration, I use Magic Eraser on the stem to cleanse it further and then I apply paraffin oil (a mineral oil) with a cotton pad to rejuvenate the vulcanite.  From where we started with this stem, its been through a lot! I put the stem aside.  This work day is ending and the last thing I do is to continue the cleaning of the stummel giving it a kosher salt and alcohol soak through the night.  I first fashion a ‘mortise wick’ by pulling and twisting a cotton ball.  I then stuff it into the mortise and airway with the aid of a stiff straight wire.  I then fill the bowl with kosher salt.  I use kosher salt because it doesn’t leave an aftertaste and the whole process, with the salt and alcohol, freshens the briar and it is much more pleasant for the new steward!  After putting the stummel in an egg crate for stability, I then fill the bowl with isopropyl 95% until it surfaces over the salt.  After a few minutes the alcohol recedes, and I follow by topping off the alcohol once more.  I then turn out the lights. The next morning, the kosher/alcohol soak had done the job.  Both salt and wick were discolored from the process of drawing out the residual tars and oils from the mortise and airway.  After tossing the expended salt I wipe the chamber with a paper towel, push shank brushes through the mortise and blow through the mortise.  To make sure all was cleaned, I utilized a few more cotton buds and a pipe cleaner wetted with isopropyl 95% to finish the cleaning.  Moving on.With the cleaning completed, I study the bowl and the grade of this block of briar is pushing up the New Era reputation stamped on its shank.  Who ever the pipe crafter was in the GBD factory in London was, cut the block beautifully.  The main orientation of the distinct straight grain is astonishingly vertical around most of the bowl.  Predictably, the heel and the rim show the striking results of the horizontal cuts that formed them – bird’s eye grain, the end or cross-section views of the vertical straight grain.  This presentation of bird’s eye carries through the shank as well.   After the cleaning of the surface, the heel already displays beautifully its patch of bird’s eye grain.  The rim’s damaged state at this point, masks the bird’s eye that I see faintly.  The challenge of the rim, but what also makes it attractive, is the tapered cant toward the chamber, so topping is out of the question.  The taper is also gently rounded.  The other thing I see is the thin finish.  The cleaning around the rim created a discoloration so that the upper bowl is lighter – and there’s a water line circling.  The pictures show the things I’m describing. The first thing I do is to wipe the stummel with isopropyl 95% to clean the older finish off so that I’m starting with a clean slate – as much as possible!  The alcohol did a great job, just what I wanted.  Interestingly, what I thought were water lines running around the circumference of the bowl were not caused by cleaning.  I discover that it is also part of the grain structure – fascinating.  With curiosity, I looked back at pictures from the eBay seller and yes, the line pattern was there!  The pictures below look at it again after the cleaning with alcohol. Next, I start addressing the rim damage and sanding.  My goal overall, is to remove the damage and tease out the bird’s eye on the rim so that it is more distinct.  The picture below shows that the bird’s eye is hidden for the most part.  To start conservatively, I use a coarse sanding sponge that will hug the contours of the rim and gently sand.  Let’s see what this does.  The first picture below shows the cleaning of the rim in general and you can still see a scorch mark on the forward rim (at 9 o’clock in the pictures).  The second picture is focusing more into this area and you can better see that the lower area is still darkened from burning.  I’m not satisfied with the results.  Becoming less conservative out of need, I use 240 grit paper and sand the rim – approaching it more like a bevel with the paper rolled and I press the paper with my thumb, conforming to the contours of the rim.  I leverage the fact that the rim is already canted and I simply go with it.  I do the hard work with the 240 sanding the entire rim and focusing on the lower circumference more to remove the charged, discolored briar. I follow the 240 with the same approach but with 600 grit paper.  Now I’m seeing what I want to see!  The briar is cleaner and more responsive.  We’re on the right track.After examining the briar surface of the entire bowl again, I see no fills needing attention, but I detect very small scratches and pitting through normal wear and tear of the years on this GBD.  To address this, I use a medium grade sanding sponge and work on the small imperfections on the briar surface.  After this, I utilize a light grade sanding sponge on the entire surface.  I’m very careful to avoid the thin nomenclature stamping on the shank flanks. I like working with sanding sponges and the results look good.The micromesh regimen is next.  First, I wet sand with pads 1500 to 2400, then dry sand with pads 3200 to 4000 and 6000 to 12000.  Throughout, I’m uber cautious to avoid the thin nomenclature stampings on the shank flanks until the last couple of pads, which I run lightly over the stampings to clean it.  I love the pop of the grain after the micromesh regimen.  This GBD New Era is a very nice pipe. I put the stummel aside for the time and turn now to the waiting, short GBD saddle stem.  I run through the normal micromesh regiment wet sanding with pads 1500 to 2400 and dry sanding with pads 3200 to 4000 and 6000 to 12000, applying Obsidian Oil after each set of 3, when it strikes me that this stem had looked like it was mauled by a dog…and now.  If one works hard enough putting the glare at the right angle, like I did in the pictures below, you can see the residual scaring on the vulcanite stem where the patches were applied, yet these for restored pipes are marks revealing that they’ve had rough spots, but this one will wear his scars proudly. While working on the stem, my mind considers the next steps of the restoration process.  The question is which direction to go with the finishing of the GBD New Era Pot stummel – or bowl – it truly can pack a lot of one’s favorite blend!   Leave the natural briar as it is now or apply a dye.  The guiding principle when restoring vintage pipes with distinctive nomenclature and age is to try as much as one can match the original color motif.  So, I looked for examples of New Era pipes.

While doing research on GBD New Era, I read the very interesting and helpful article reposted in Pipedia: Pieces From My GBD Collection, by G.L. Pease (re-published here by permission).  It’s a good read, I enjoyed it.  What was most helpful was the listing by GBD groups or lines of pipes that were part of G.L. Pease’s collection.  I eagerly looked and found his offerings for New Era.  Not only did he have New Era, but 4 beautiful long, round shank Pot shapes, shape number 9493 like the GBD that Todd has commissioned.  I cropped the picture below to focus on the patina of the 4 Pots and on mainly the smooth briars.  To me, all the pipes leverage toward a reddish hue even though in different shades.  The lower smooth Pot is redder, leaning toward Oxblood or burgundy.  The Pot on the top, is reddish but leaning more toward the browns.  After studying these New Era pipes, I remembered reading about the red leanings of the New Era line from Pipedia’s GBD Model Information. I clipped this description about New Era:This confirmed what I had observed.  The question remains, how to mix dyes and hit the right hue, or as close as one can manage?  As I’ve done before many times with Steve Laug (Rebornpipes) and Charles Lemon (DadsPipes) I reached out to Charles because I recently read one of his blogs, Stem Repairs and a General Freshening for a “Made by Millville” Full Bent, where he discussed his approach to staining.  It was helpful information, well worth reading.  My question to Charles was how he might approach the reddish hues and mixing dyes.  His answer was straightforward and helpful – trial and error!  Yep, I know how to do the latter part of that well.  He did say that he had had success mixing Fiebing’s Saddle Tan and Browns to achieve that general direction, and to mix and test to see how it looks. So, armed with Charles’ input, I went to work mixing the dyes. I ended up with what Charles calls a ‘wash’ – being more diluted (with alcohol with aniline dyes and water with water-based) it can be applied more times as needed to acquire an increasingly darker result.  This approach would necessitate that I improvise my usual approach to staining.  After mixing Saddle Tan and Light Brown, I diluted it with alcohol to lighten the wash.  I assemble my desktop dying components, and I am ready.  I first wipe the bowl down with alcohol to clean the surface.  Following this, I heat the stummel with a hot air gun to expand the briar resulting in it more effectively absorbing the dyes.  After heated, I apply the dye mixture to a portion of the stummel surface with a pipe cleaner that I had folded in half.  After applying the dye to a portion, I fired that portion by placing it quickly over the lit candle.  The flame immediately combusts the alcohol in dye and sets the dye pigment.  I do this several times to cover thoroughly the stummel surface.  After repeating the washing and firing process many times, the bowl has the right look, sufficiently dark that I think will hopefully point in the right direction! It’s time to turn out the lights letting the newly dyed stummel to rest and to set the dye.The new dye set through the night and has settled in.  Allowing this ‘rest’ time helps guard against new dye coming off on the hands during the first uses of the pipe when the bowl heats.  To unwrap the fired dye shell around the stummel I mount a felt cloth buffing wheel in the Dremel, setting the speed to the slowest to avoid scorching the wood.  Felt cloth is more abrasive than cotton.  Added to this, I apply Tripoli compound to ‘plow through’ the thick dye residue.  While applying the more abrasive compound, I purge the wheel often on the edge of the chopping block which is my work station.  Not pictured is that I follow the application of Tripoli with the felt buffing wheel with a cotton cloth buffing wheel and go around the stummel one more time applying Tripoli compound at an increased Dremel speed of about 40%.  This is to fine tune and make sure no dye clumps are left behind. Next, after rejoining the stem and stummel, I apply Blue Diamond compound using a cotton cloth buffing wheel at a 40% speed.  I apply compound to the entire pipe.  When finished I buff the pipe with a felt cloth to remove the residue compound dust.The final step is applying carnauba wax by mounting another cotton cloth wheel onto the Dremel, maintaining the same 40% speed and I apply the wax.  Following this, I use a microfiber cloth and give the pipe a final hand buffing.

This GBD New Era Pot has come a long way.  The stem was mauled and now it looks great.  The patches can be seen in the glare but from where we started….  The grain on this New Era is striking.  I love studying the vertical grain that is distinct and certainly a feast for the eyes.  There is no disappointment with the bird’s eye grain that was teased out so well by the compounds on the rim.  The bird’s eye is small, tight and subtle.  The heel view is equally a cornucopia of bird’s eye.  I think what makes this GBD shape so classically appealing is the (‘Lovat’) long shank stretching the look of the large Pot bowl, which has plenty of space for a slow enjoyable time of fellowship with one’s favorite blend.  Todd resides in the Big Apple as he practices law and this second pipe in the list of three he commissioned will fit well.  He has the first opportunity to acquire this GBD New Era Pot from The Pipe Steward Store.  As with all my pipes, this pipe benefits the work we do here in Bulgaria with the Daughters of Bulgaria – women and girls who have been trafficked and sexually exploited.  Thanks for joining me!