Tag Archives: Bowl – refinishing

Salvaging a Kaywoodie All Briar Rhodesian 50B with a Serious Issue


Blog by Steve Laug

I have reworked a lot of stems over the years – from cutting them back in my early days and reshaping a button on the gnawed and damaged end to rebuilding a chewed button with charcoal and super glue. I have fit stem blanks on shanks to replace damaged and what were at that time in my assessment, irreparable stems. Today I am more conservative and lean towards rebuilding the stem as best as I can. That being said there are even challenges to that work. The pipe on my worktable now is a challenge to my current bent. It is an All Briar Rhodesian. I have only refurbished one other All Briar pipe in the past – a beautiful LHS Purex Bullmoose. It was in excellent condition other than being dirty and worn. I had heard nightmare tales of gnawed and chewed all briar stems and what a pain they are to work on. However, until this pipe came to my attention in a recent pipe hunt with Jeff I had never seen such a badly gnawed briar stem up close. Jeff took photos of the pipe’s condition before he cleaned it up. I have included those photos in the first part of this blog.
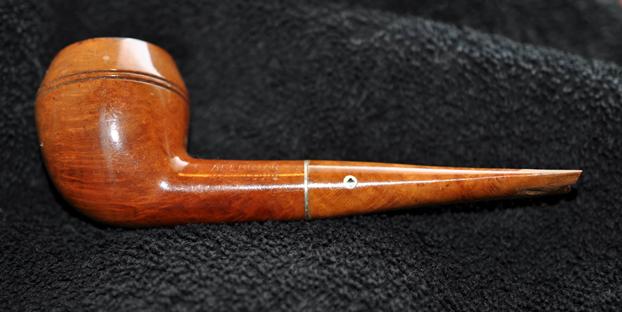
I have read a lot of information in the past on other Kaywoodie pipes I have worked on and spent time on the Kaywoodie Collectors Forum to help educated myself on the various lines and historical periods of Kaywoodie production. On Pipedia.org there is a helpful summary of the history of the brand that has been condensed in one place. It is called the Collectors Guide to Kaywoodie Pipes (https://pipedia.org/wiki/Collector%27s_Guide_to_Kaywoodie_Pipes). I found the All Briar line of pipes included in the section of the Guide for 1955. I quote here the pertinent sections with the references to the All Briar pipe underlined and highlighted in bold.

The line-up of pipes in the 1955 catalog (Table 3 below) was more extensive than in previous years. The catalog presented an expanded line of meerschaum pipes and introduced a 4-pipe set of Matched Grain Pipes, as well as several pipes with “special features”. The number of shapes available… was not substantially different from the number offered in the 1947 catalog…

The Twin-Bowl Kaywoodies were available in an all-meerschaum model (two removable inner bowls of meerschaum) and a meerschaum and Flame Grain model (outer bowl of flame grain briar and removable inner bowl of meerschaum). Other meerschaum pipes presented in the 1955 catalog included the Gourd Calabash; the Coral (“dimpled”) Meerschaum; the All Briar (briar bit) and Flame Grain pipes with inlaid meerschaum bowls; and the “Doctor’s” pipe…
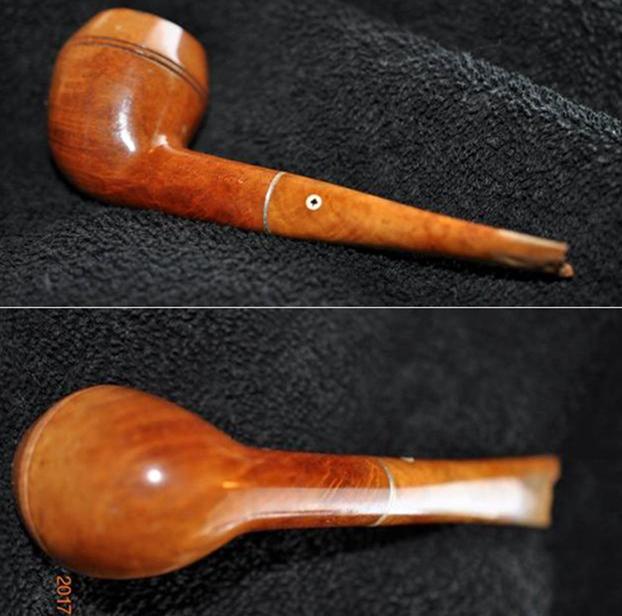
Included in the guide was a helpful list of pipe grades and prices. I have included the list below and noted the pipe I am working on by highlighting it in bold print and underlining the reference. It is in this list that I found confirmation that Kaywoodie made an All Briar with a meerschaum bowl insert and an All Briar without the meerschaum insert. The All Briar I am working on is not meerschaum lined. It is fascinating for me to see that the addition of a meerschaum bowl was only $2.50 in 1955.

Table 3. 1955 Kaywoodie Pipe Grades and Prices

    Meerschaum Character Pipes: $100.00

    Block: 15.00-50 (According to size)

    Meerschaum Twin Bowl: $35.00

    Meerschaum/Flame Grain Twin Bowl: $25.00

    Sandblasted “Doctor’s” Pipe: $25.00

    Centennial: $25.00

    Coral Meerschaum: $20.00-25 (According to size)

    Gourd Calabash: $15.00-25 (According to size)

    Ninety-Fiver: $20.00

    Oversize: $10.00-25(According to style and finish)

    Connoisseur: $15.00

    All Briar w/Meerschaum Inlaid Bowl: $12.50

    Flame Grain (Meerschaum Inlaid) $12.50

    Export Pipes: $5.00-15 (According to grade)

    All Briar (Briar Bit): $10.00

    Flame Grain: $10.00

    Fit Rite: $10.00

    Silhouette: $10.00

    Carburetor: $7.50

    Relief Grain: $7.50

    Chesterfield: $5.00-15 (According to grade)

    Chinrester: $5.00-10 (According to grade)

    Stembiter: $5.00-10 (According to grade)

    Streamliner: $4.00-10 (According to grade)

    Super Grain: $5.00

    Carved Super Grain: $5.00

    White Briar: $5.00

    Standard: $4.00

    Filter Plus: $4.00

    Drinkless pup: $3.50

    Drinkless Tuckaway: $3.50

    Drinkless In-Between: $3.50

    Two-Pipe Companion Setsb: $10.00-25 (According to grade)

    Matched Grain Set (4-Pipes): $50.00

    Matched Grain Set (7-Pipes): $125.00

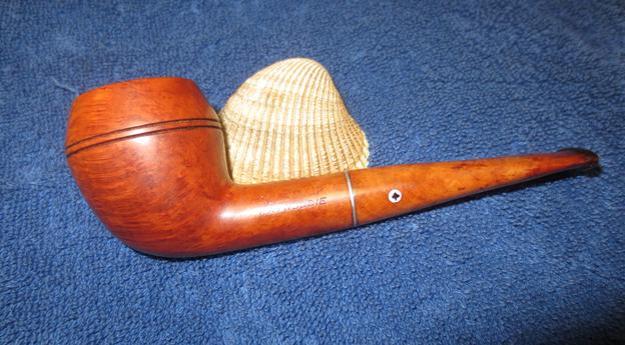
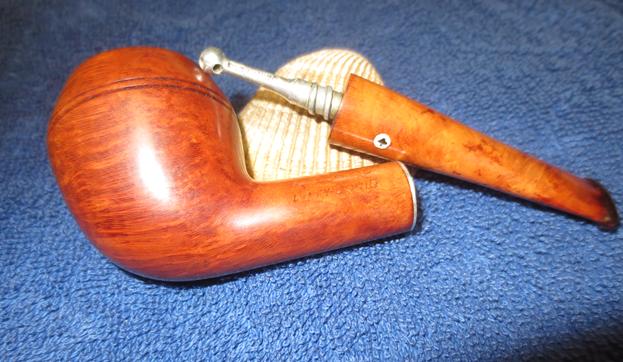
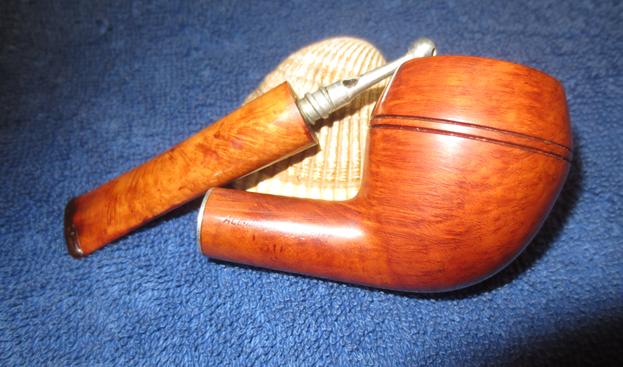
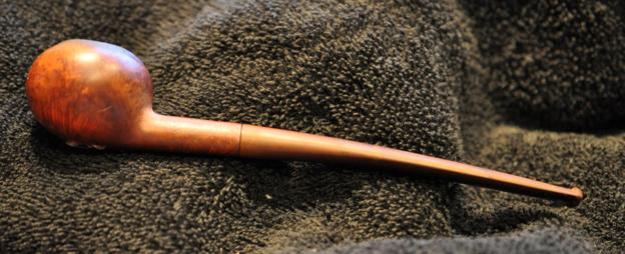
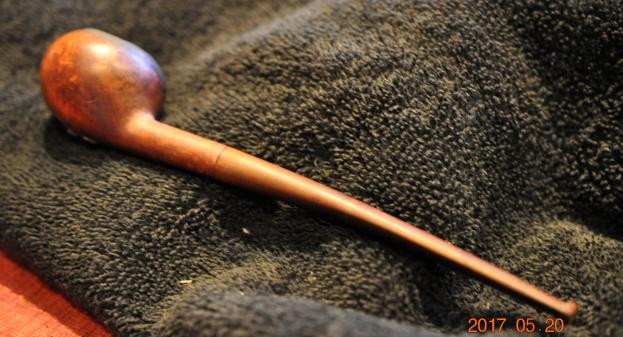
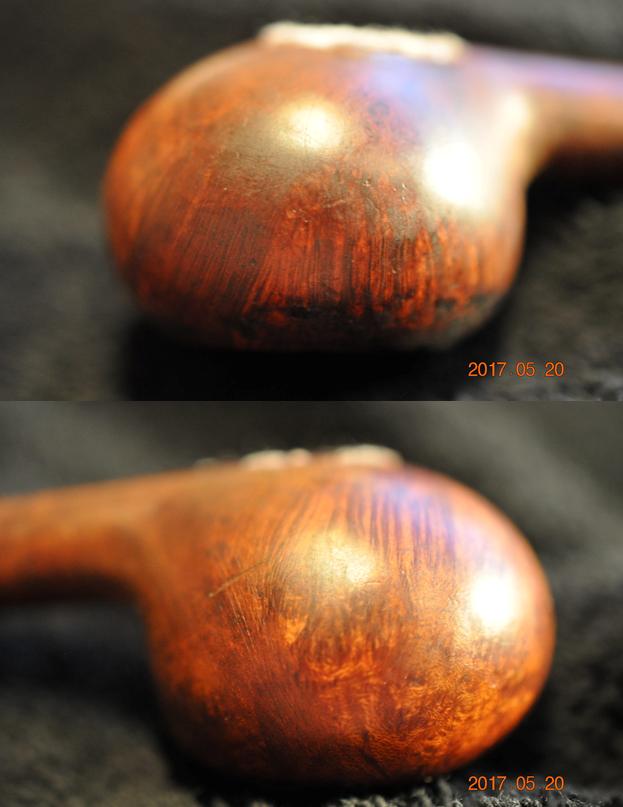
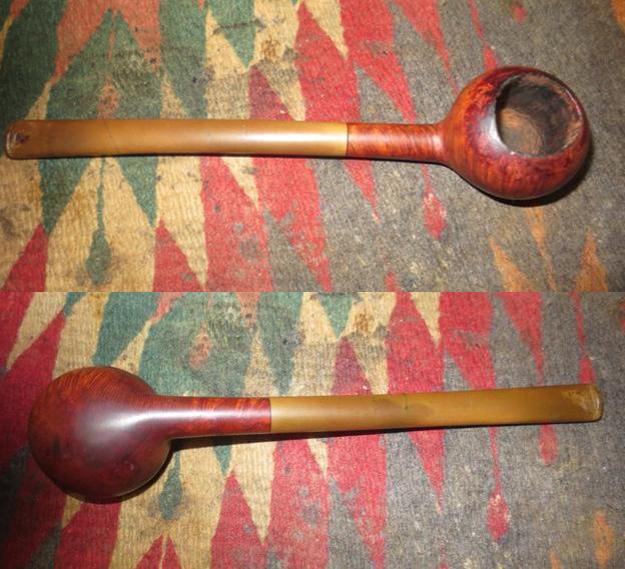
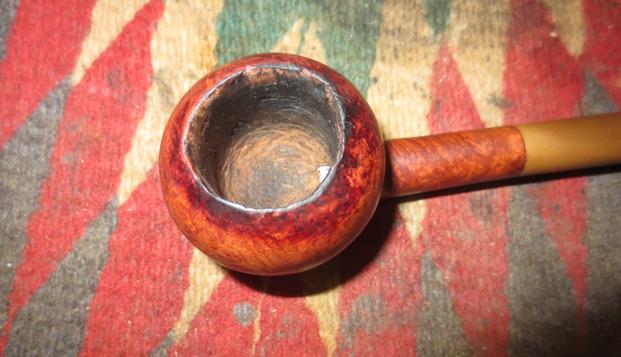
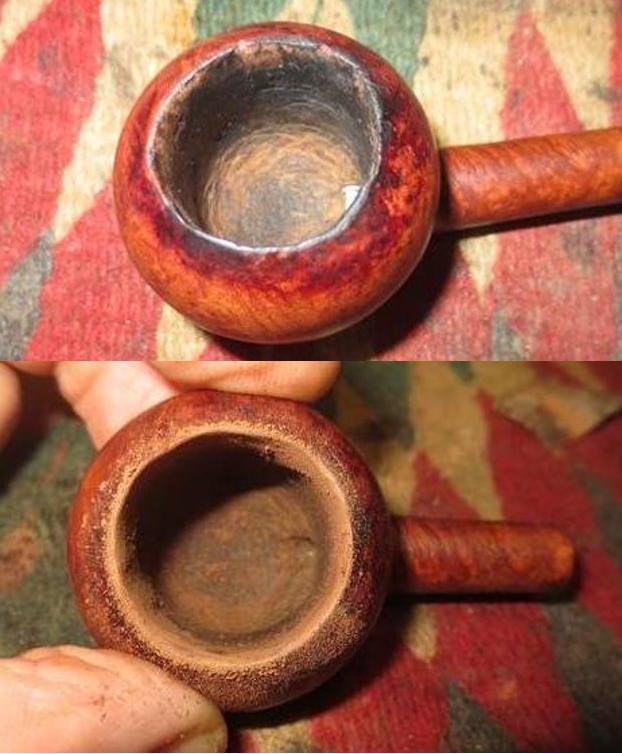
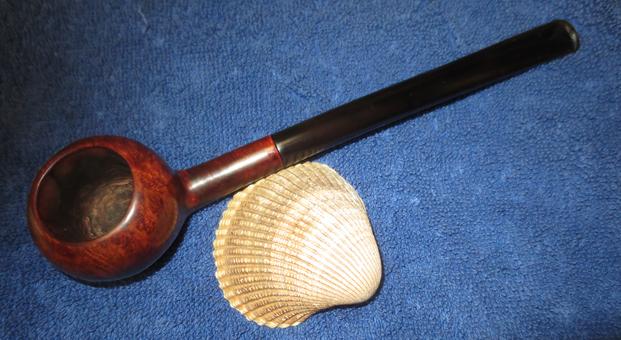
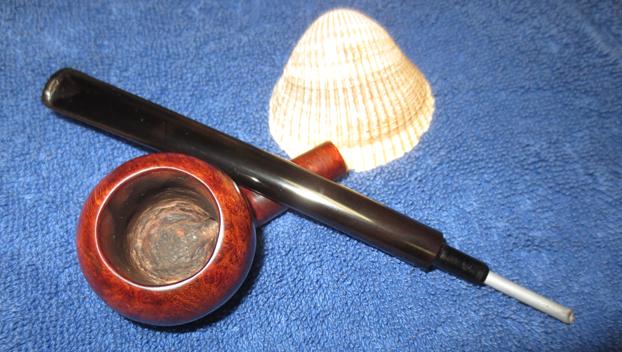
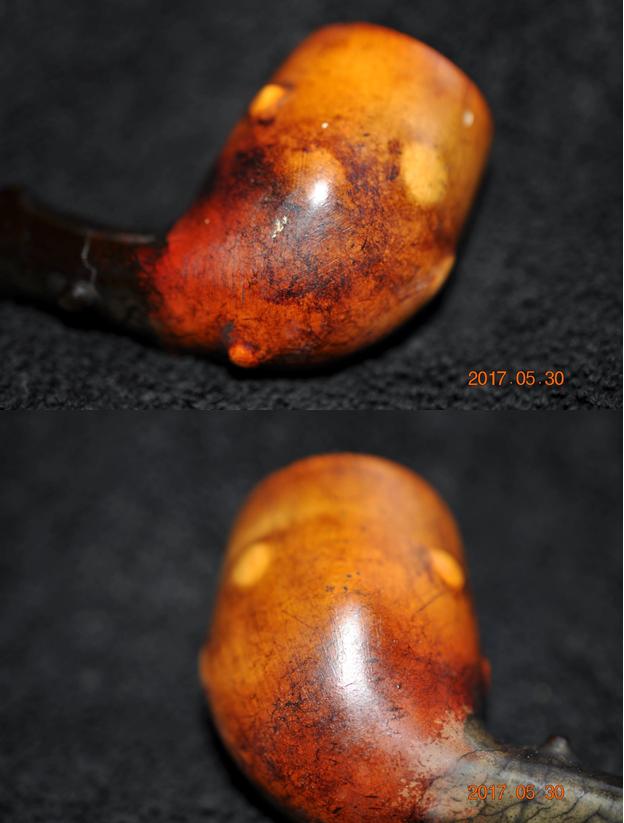
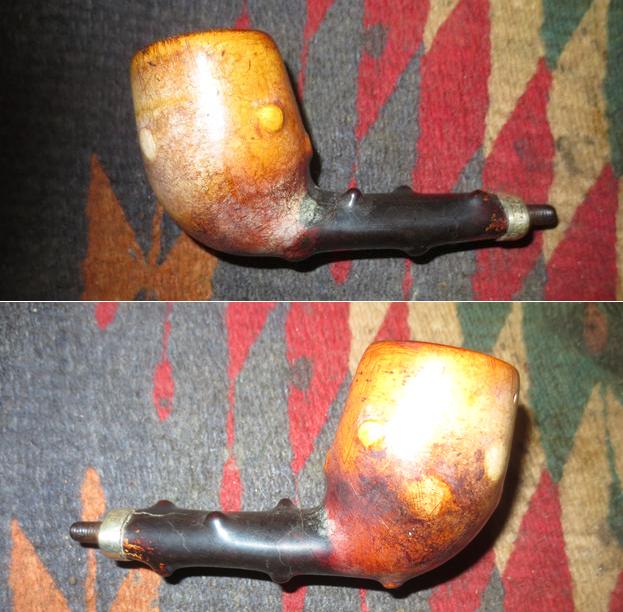
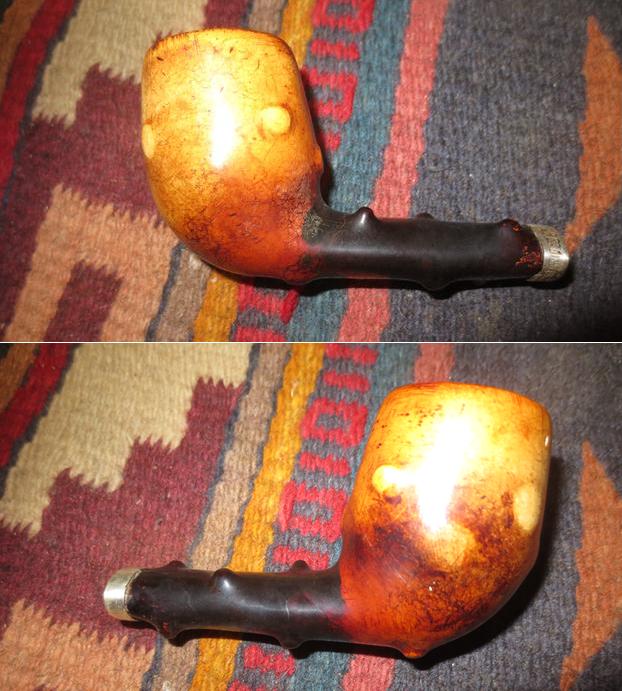
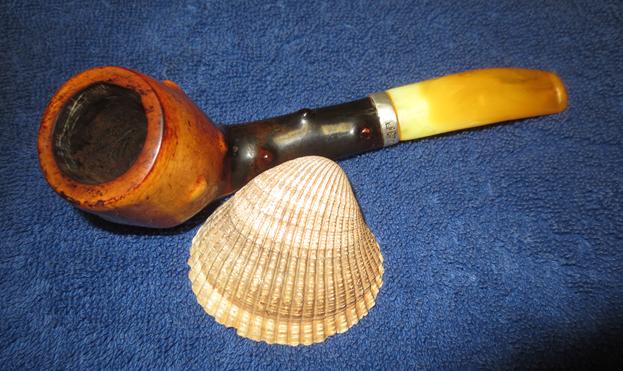
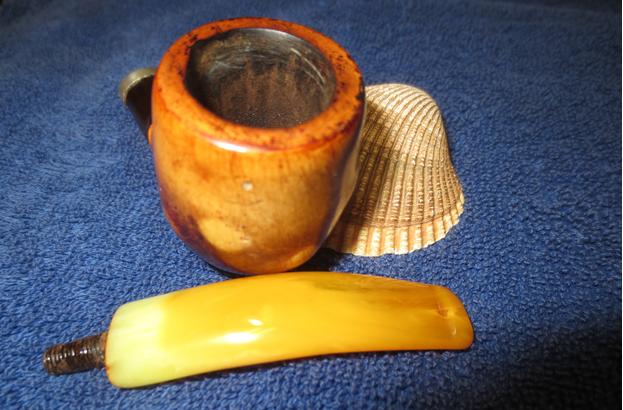
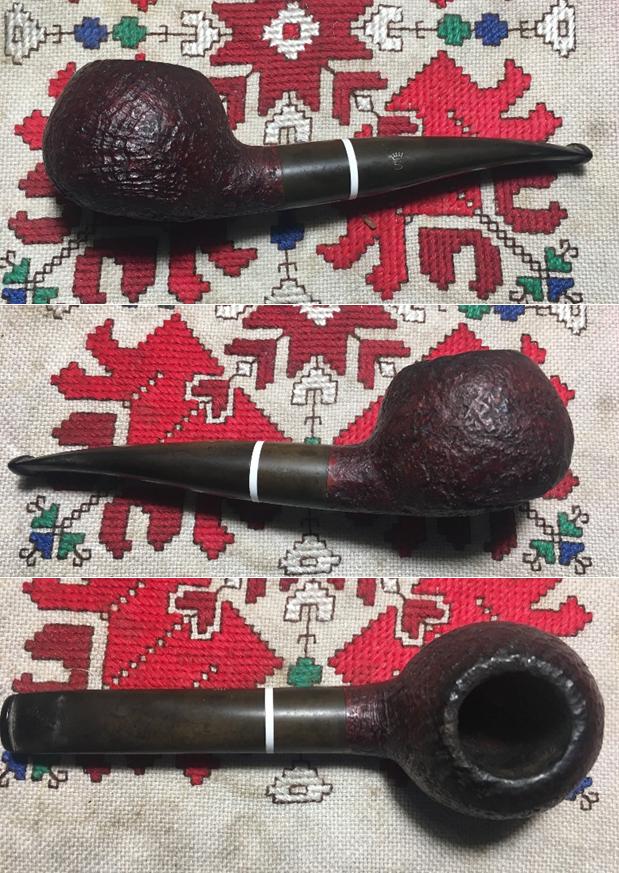
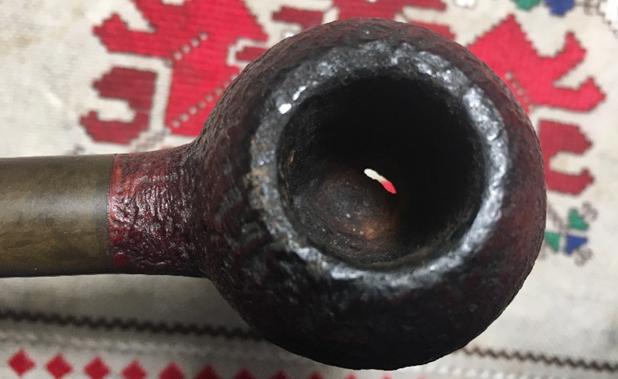
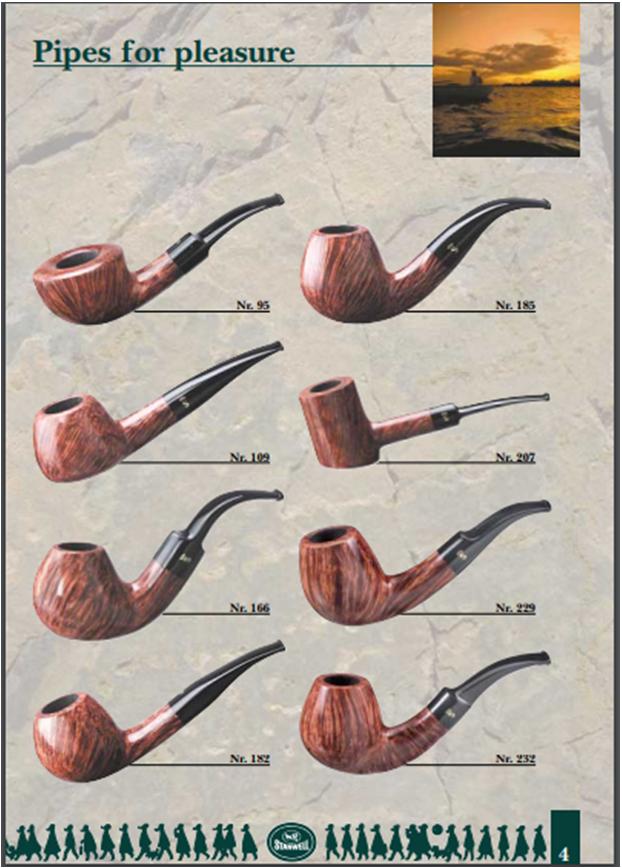
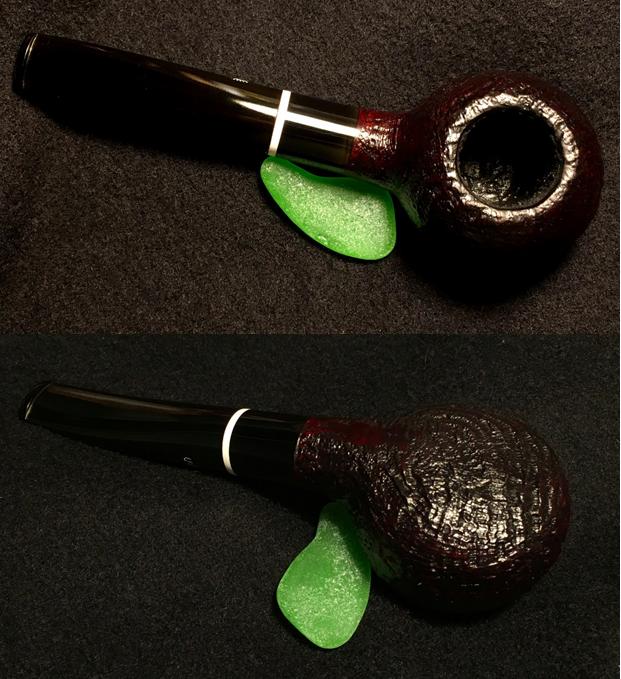
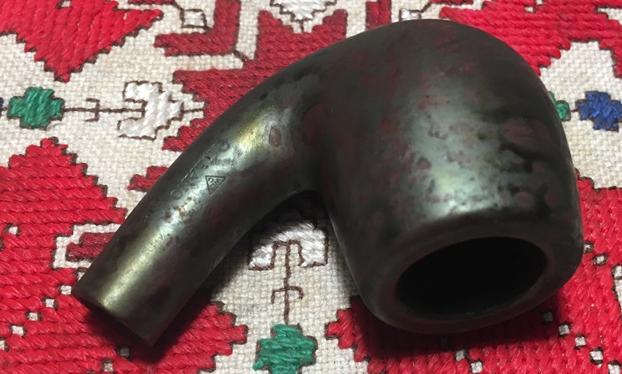
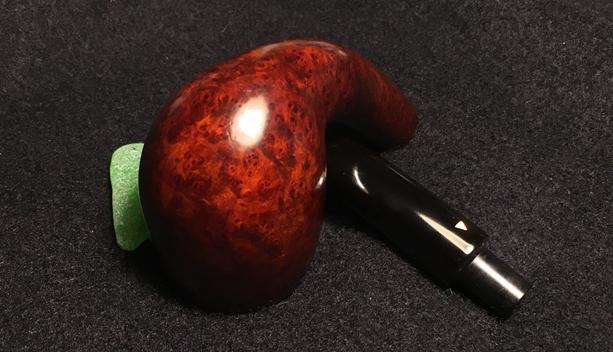
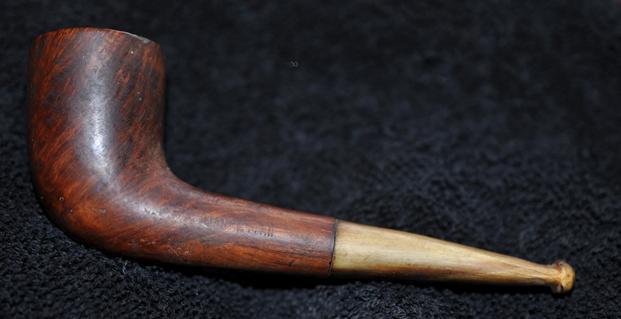
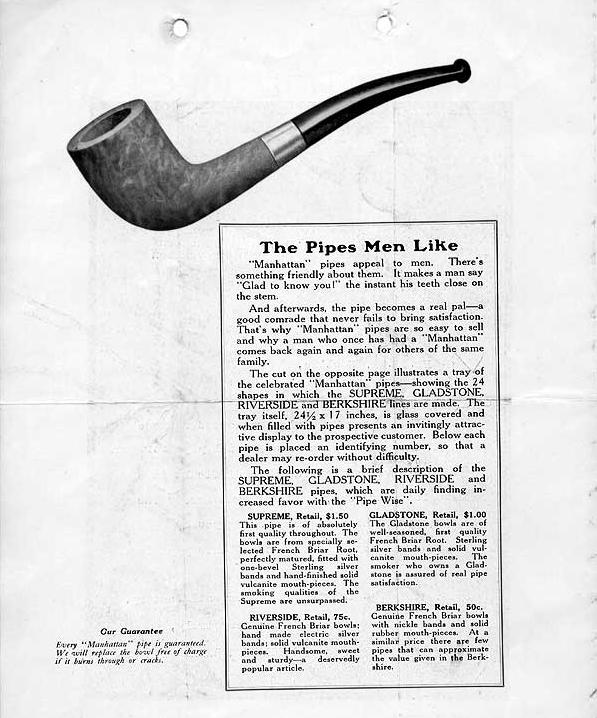
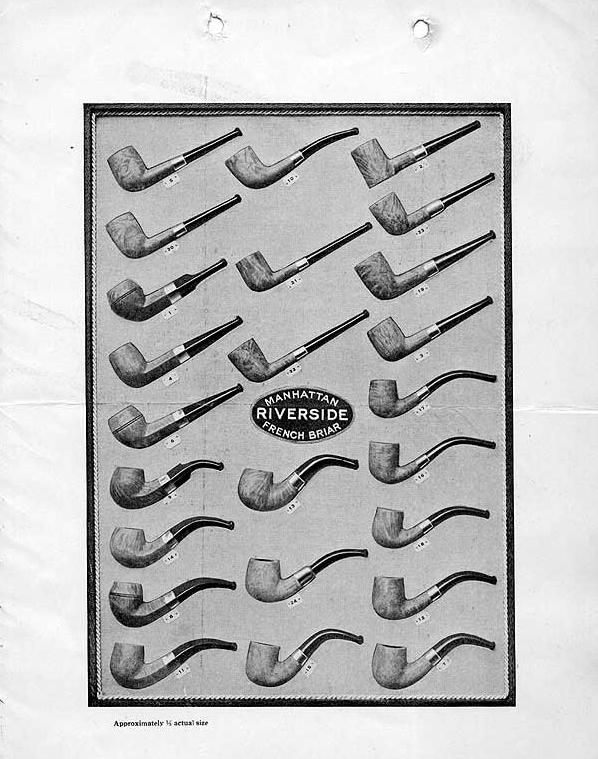
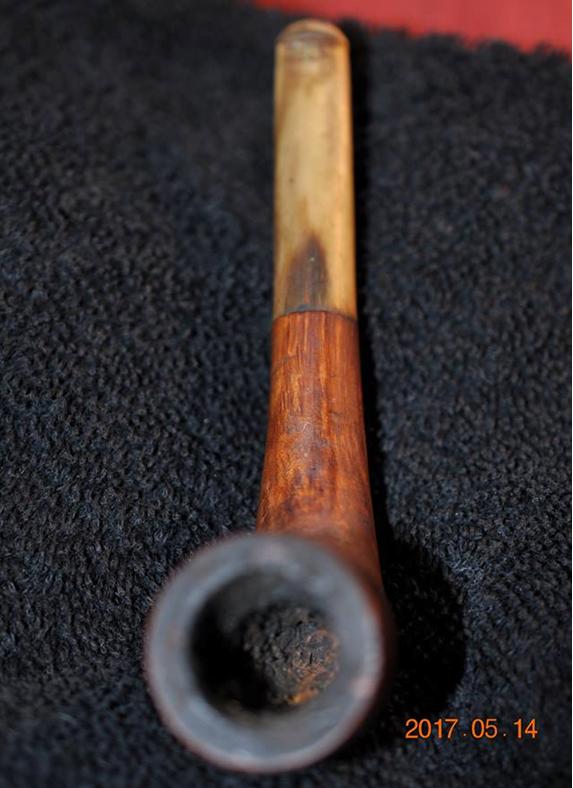
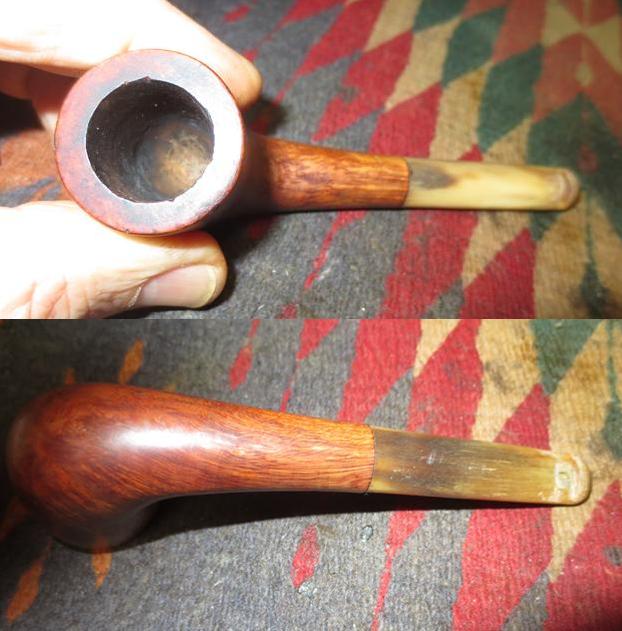
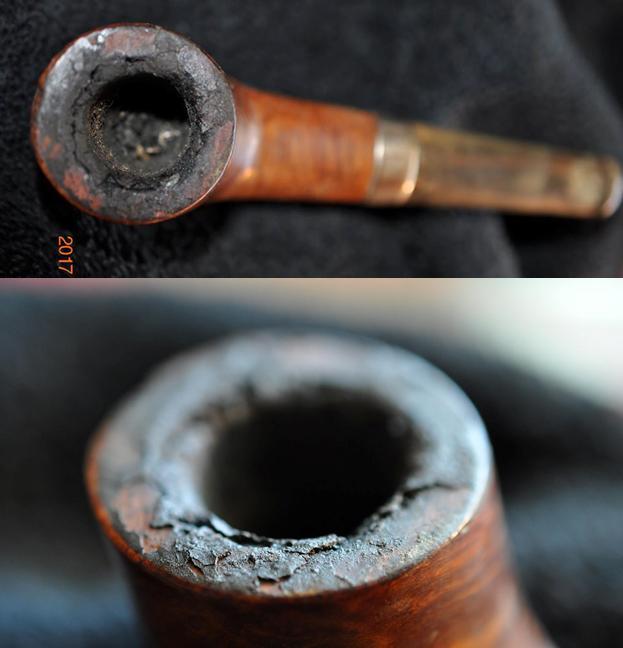
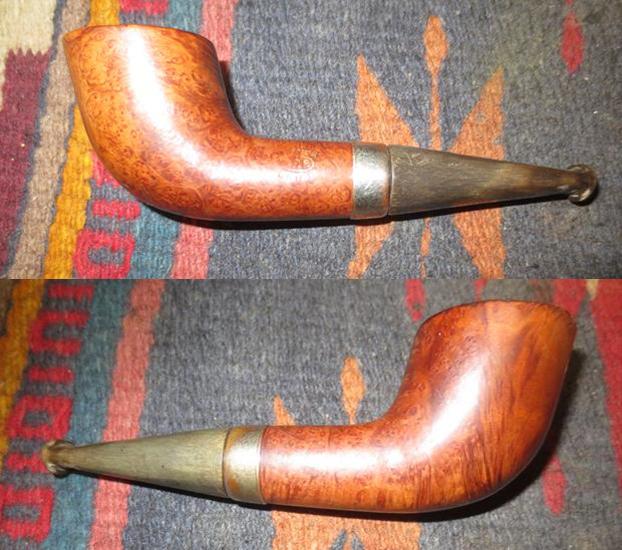
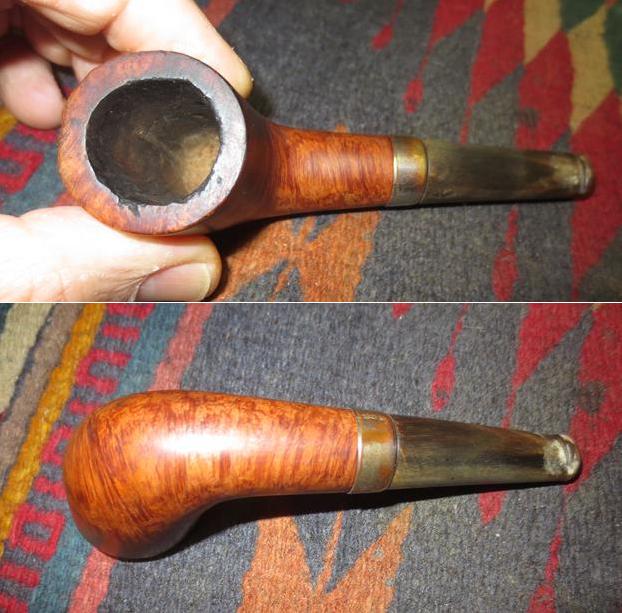
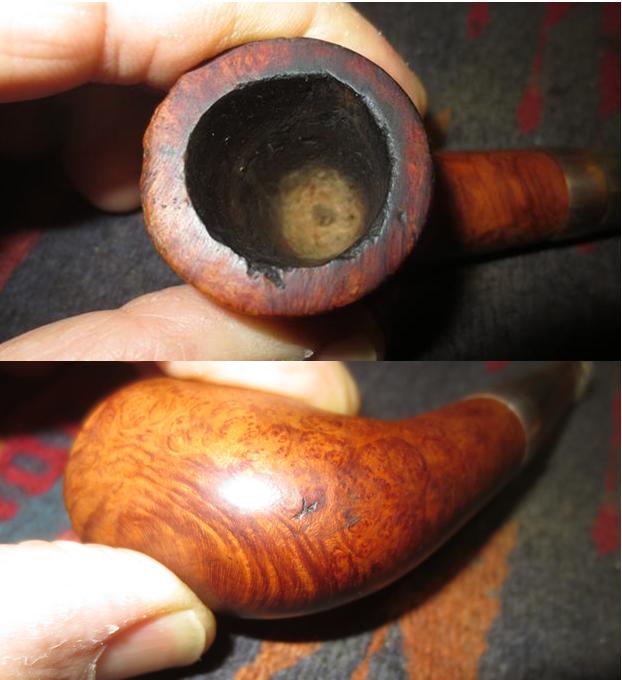
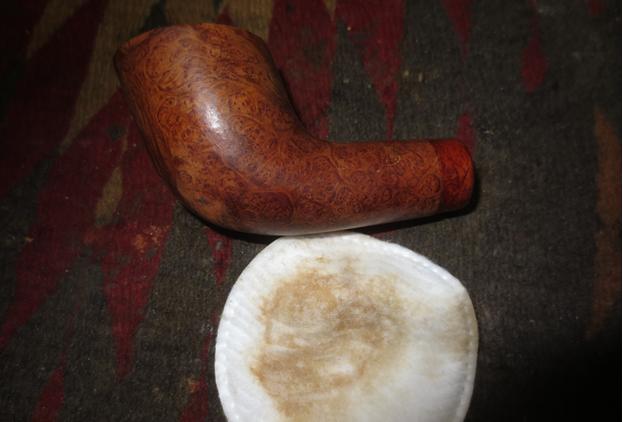
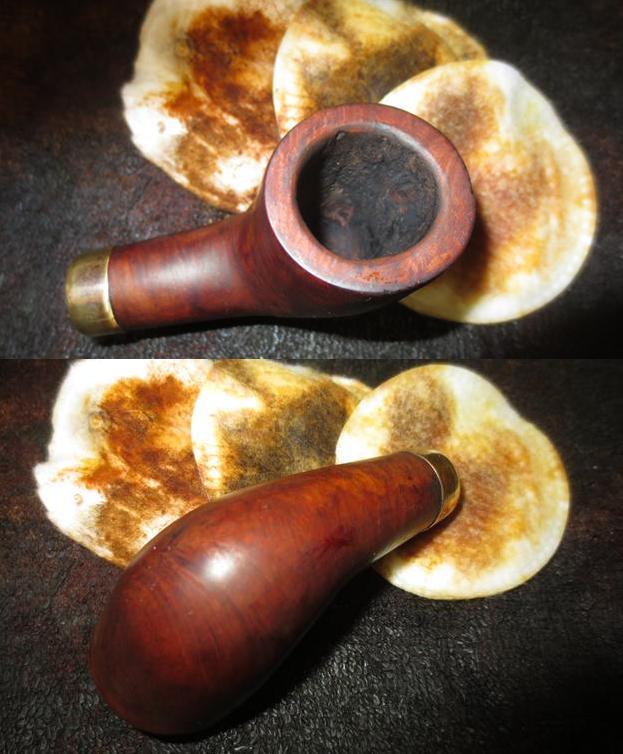
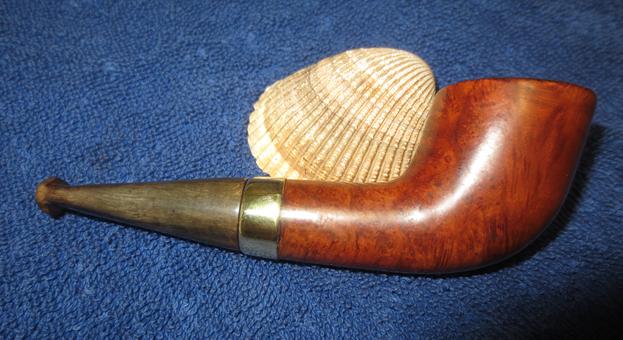
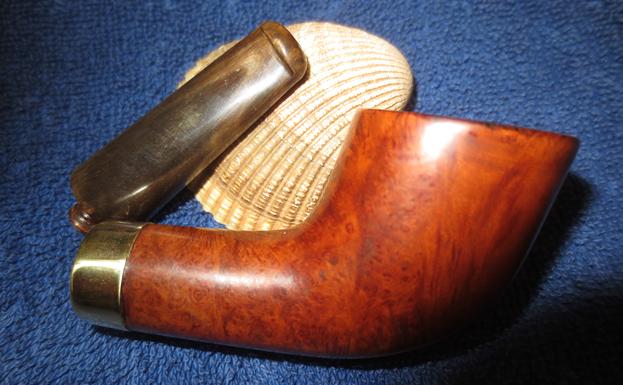
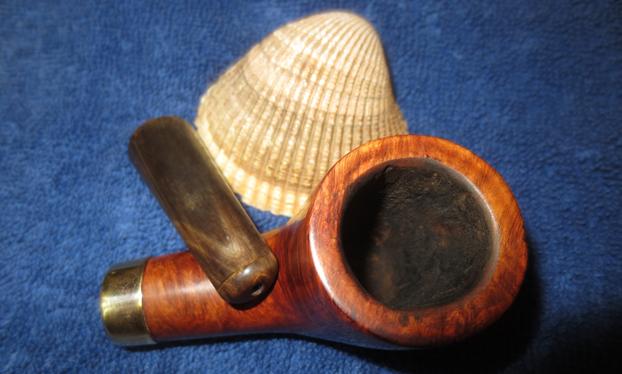
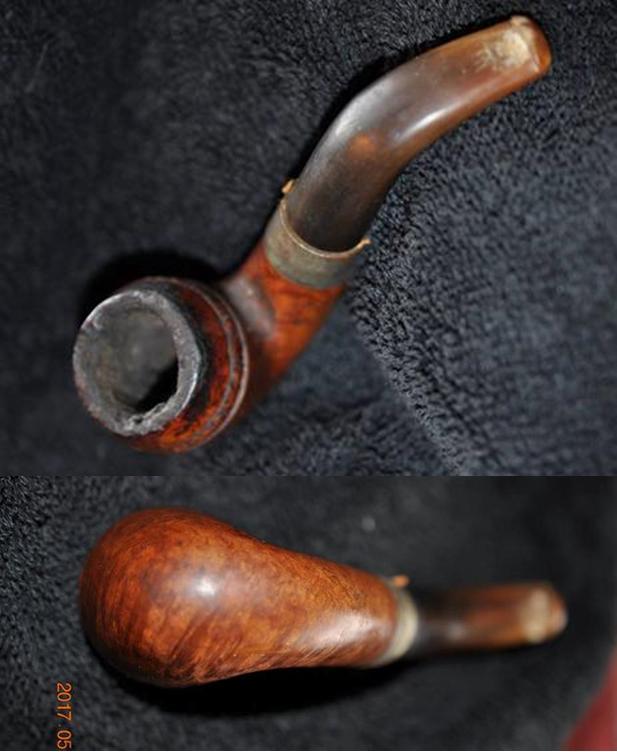
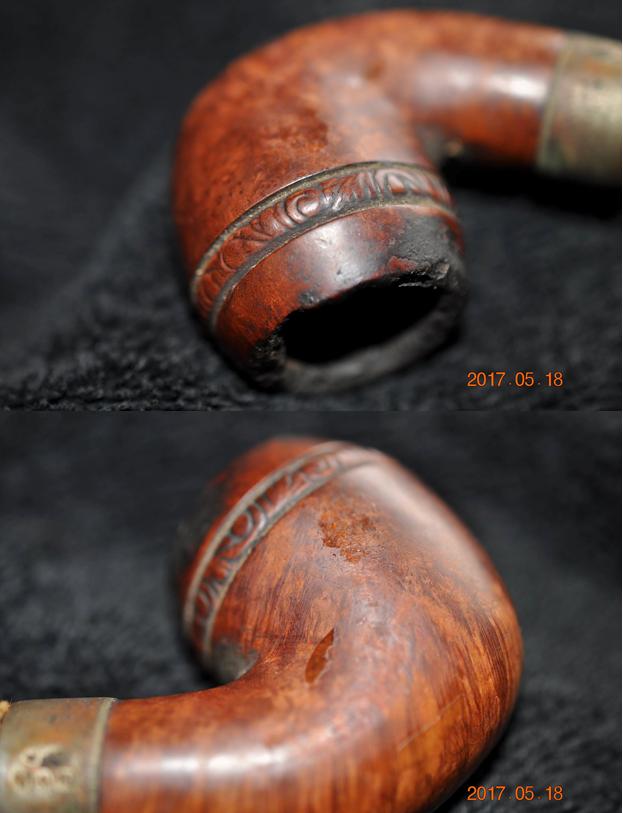
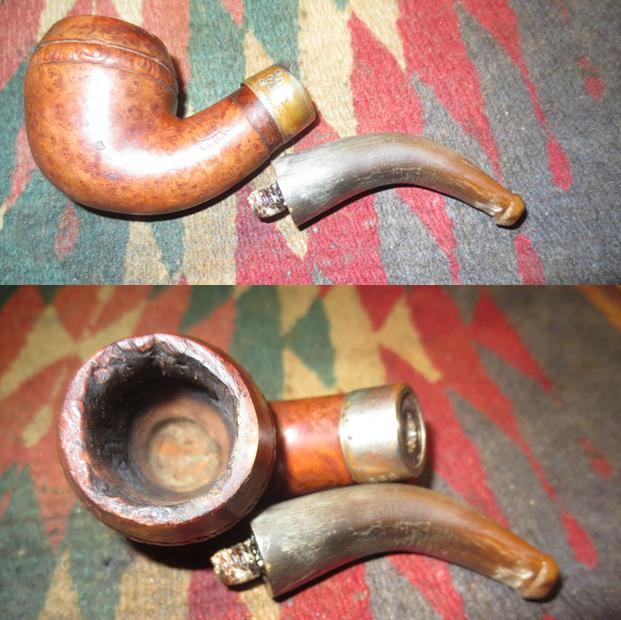
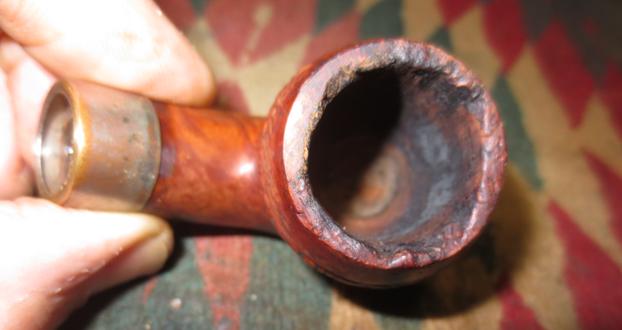
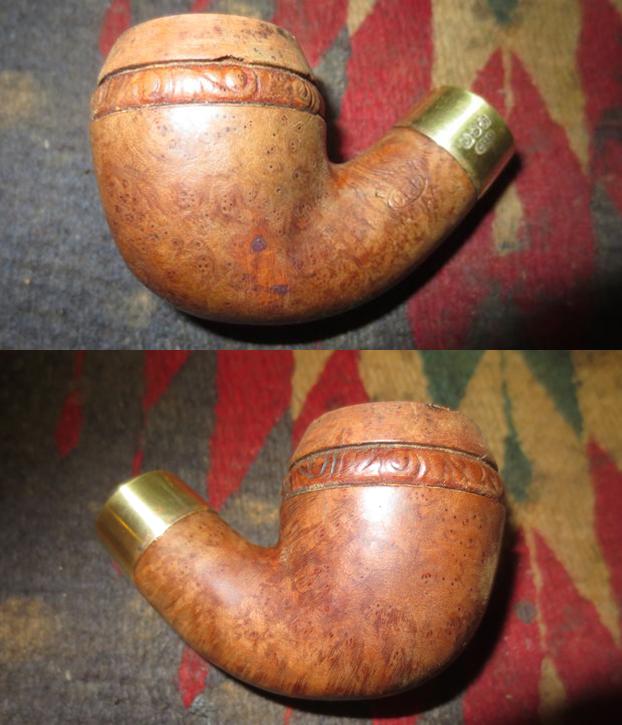
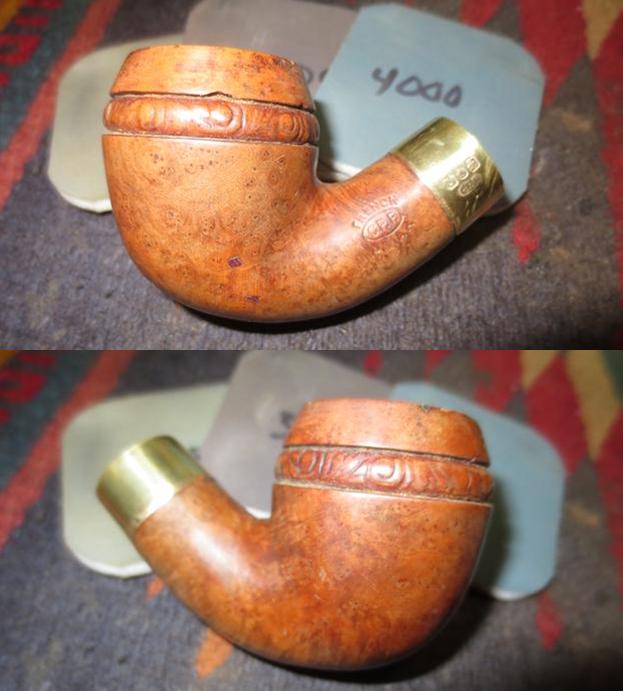
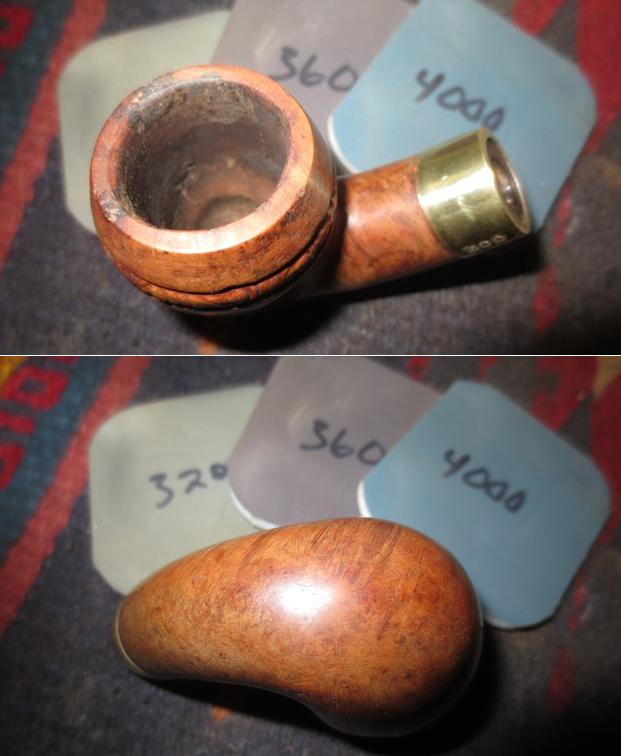
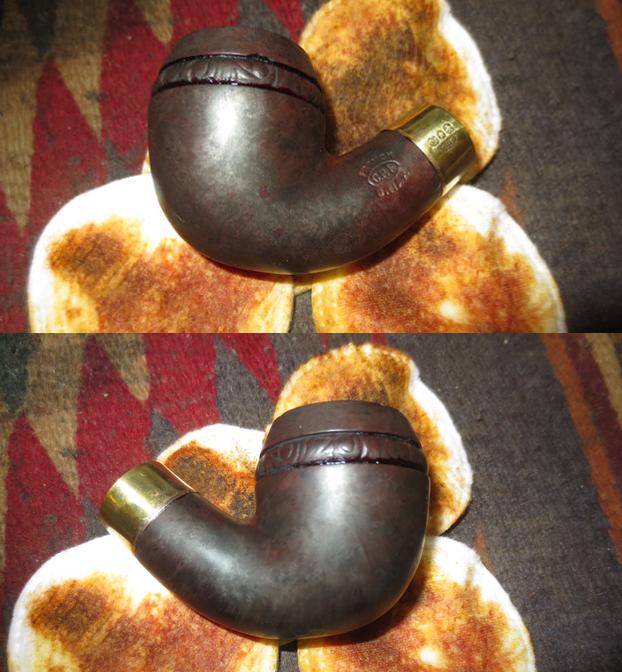
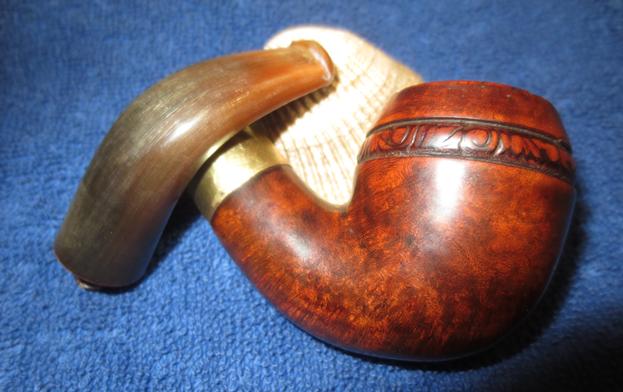
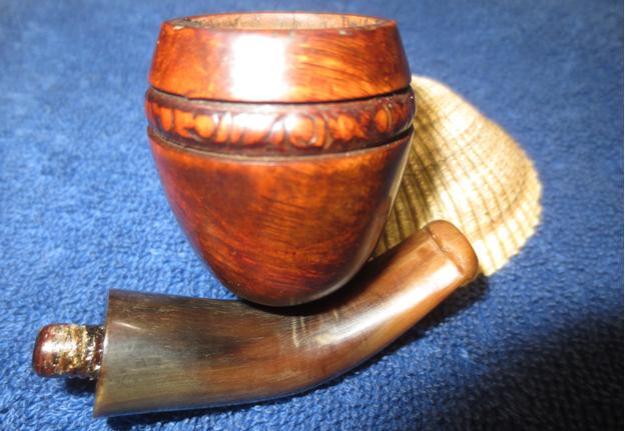
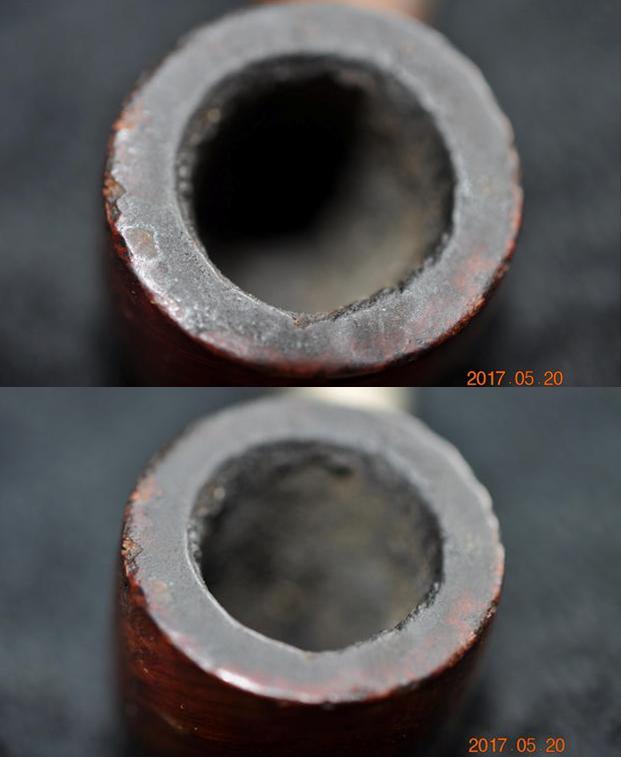
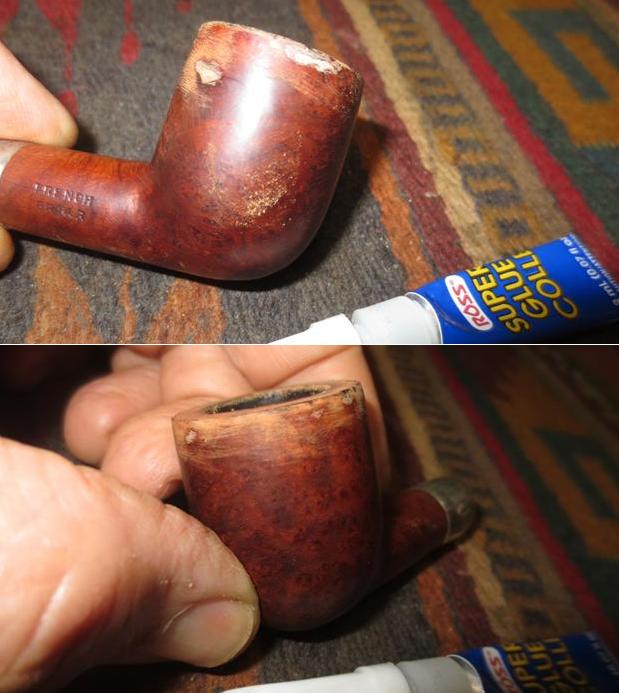
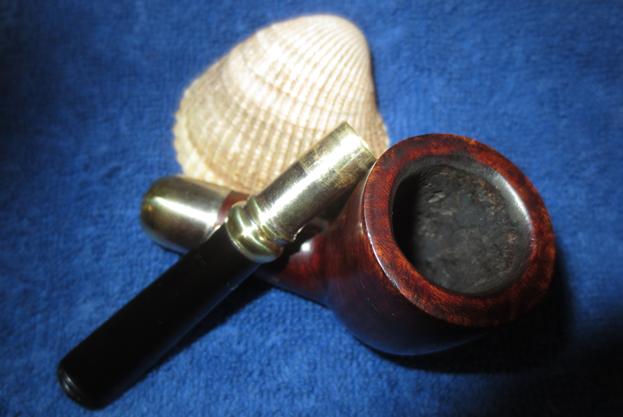
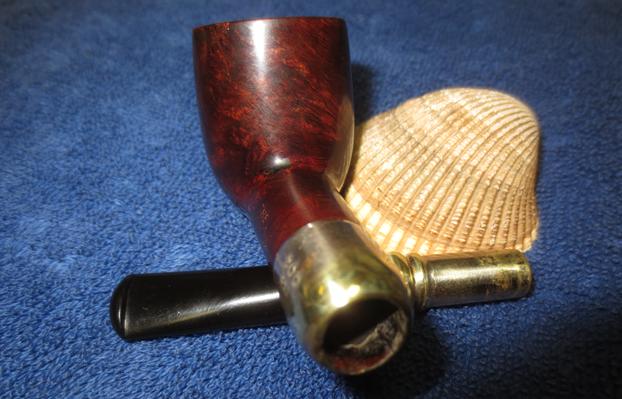
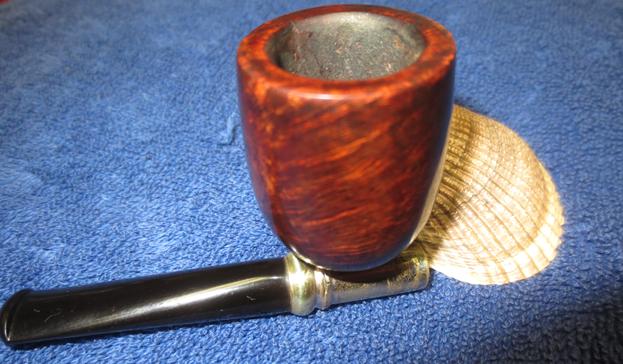
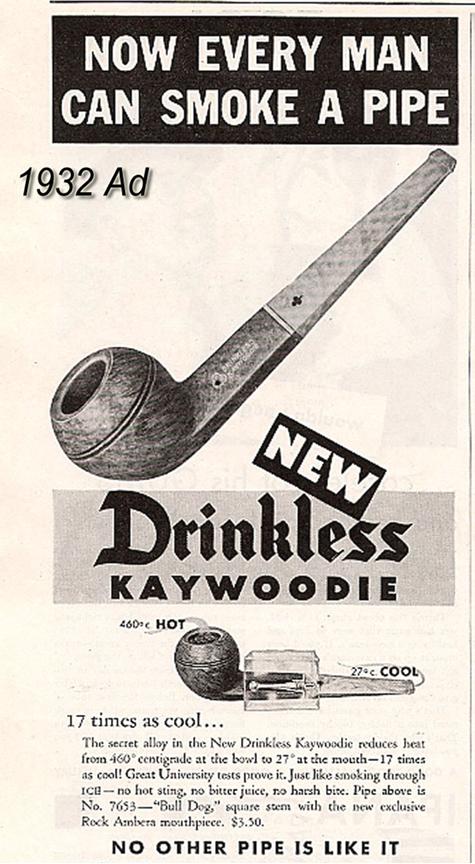
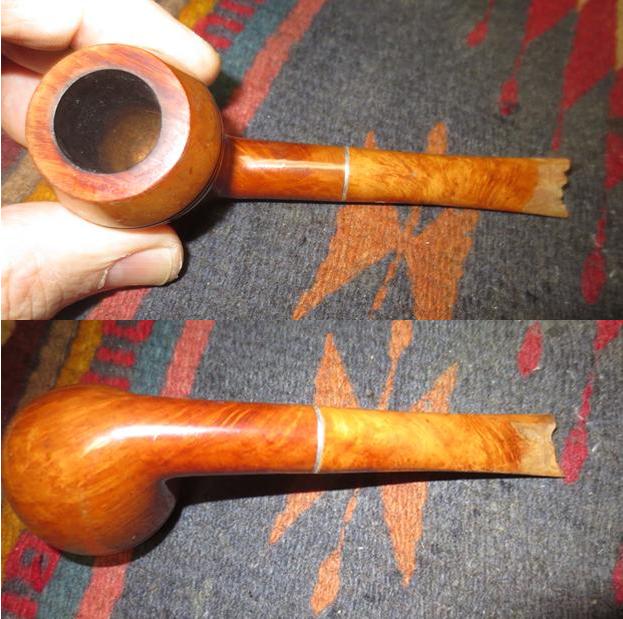
Further reading on Pipedia under the general listing for Kaywoodie Pipes provided me with a magazine advertisement that included the All Briar pipes. It is a great Father’s Day Ad and the bottom items in the ad show the All Briar line. I have included both the link and a copy of the ad for your reading pleasure (https://pipedia.org/wiki/Kaywoodie).
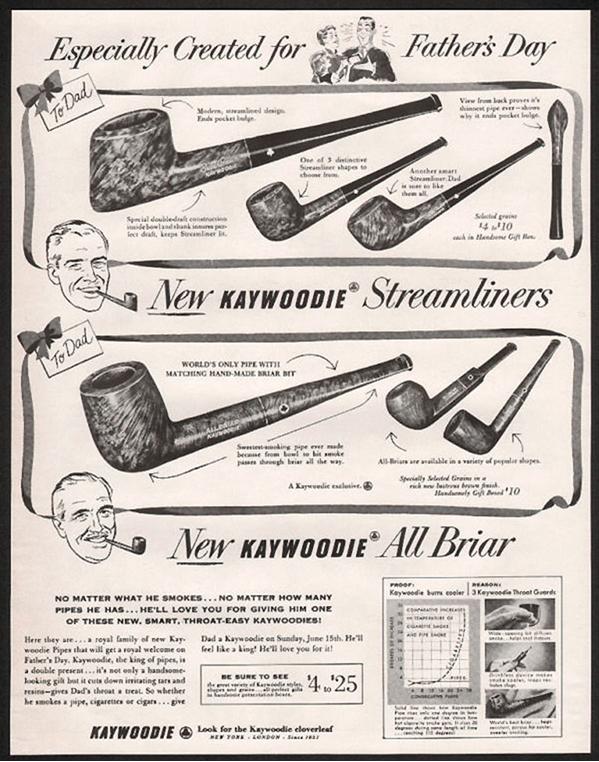
Jeff sent me some close up photos of the pipe so I could see what it looked like when he started his clean up. The bowl had a thick cake that had overflowed onto the rim top with a thick coat of lava. The two photos below give two different views to show the condition of the both. You can see the flaking lava on the rim and the hard cake in the bowl. This pipe had been smoked hard and was obviously someone’s favourite.
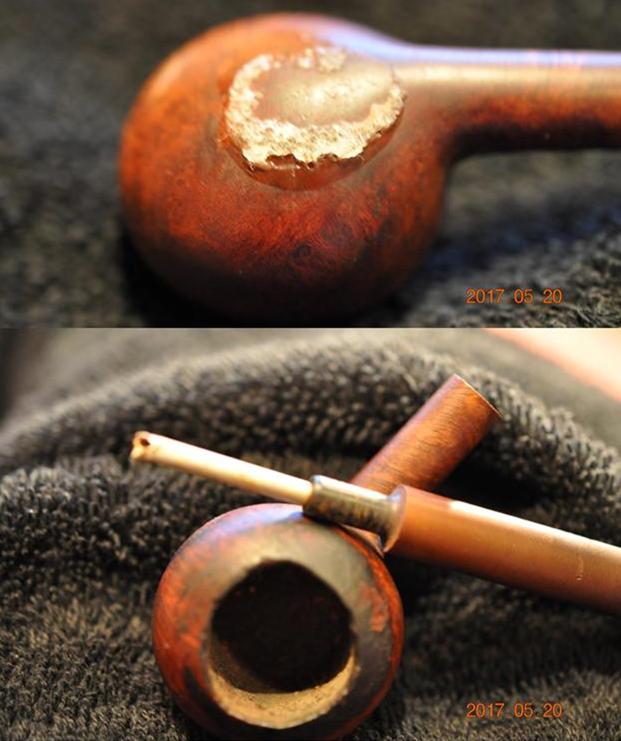
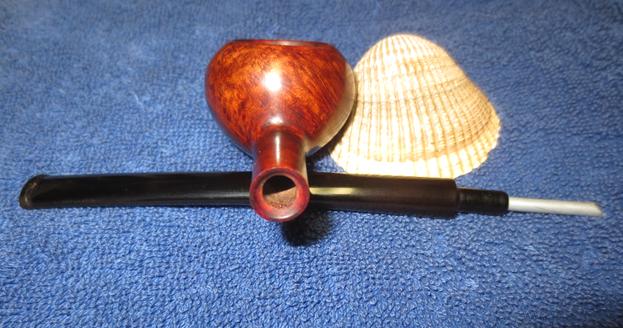
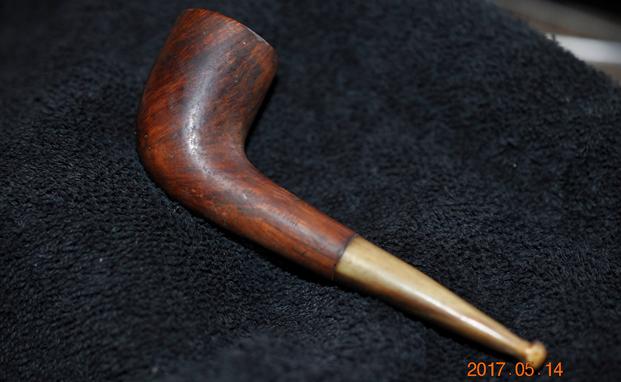
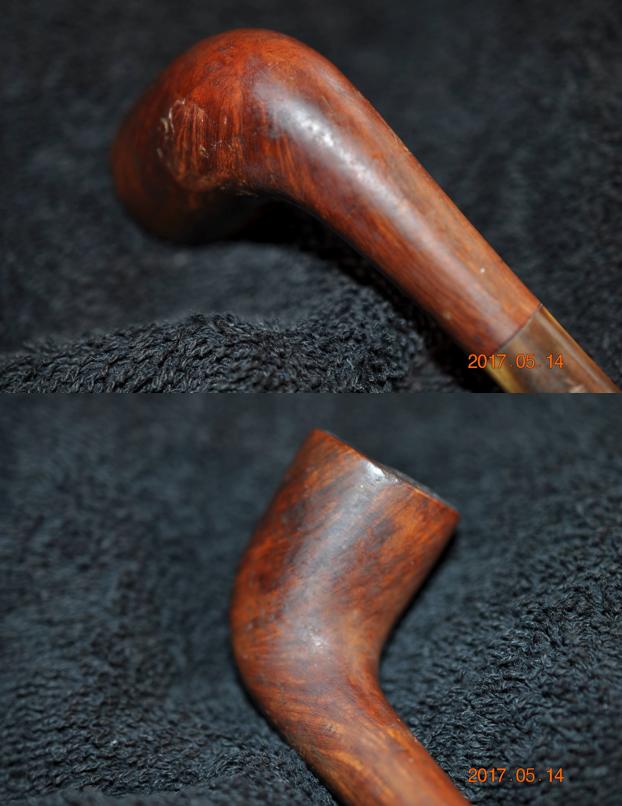
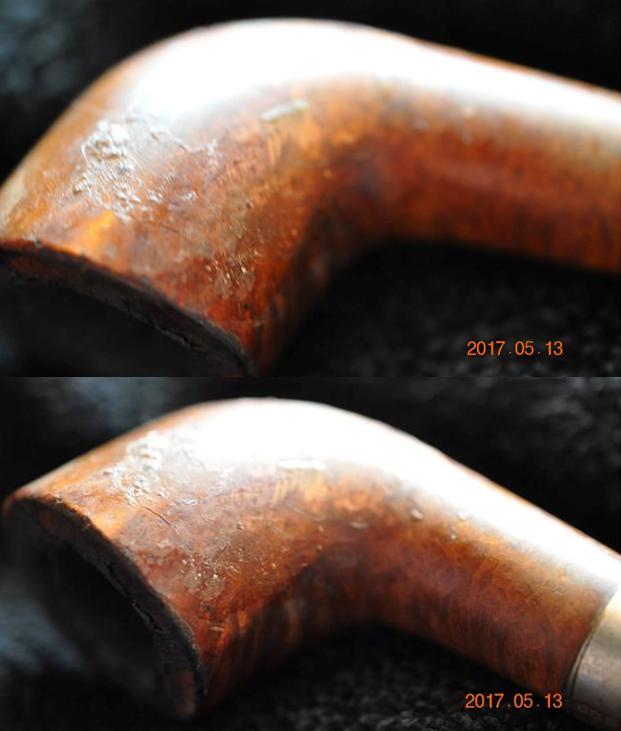
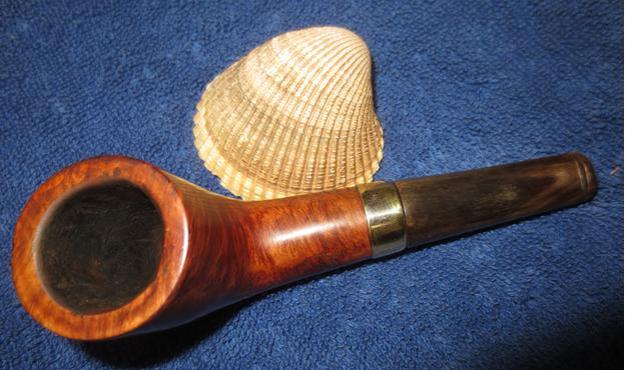
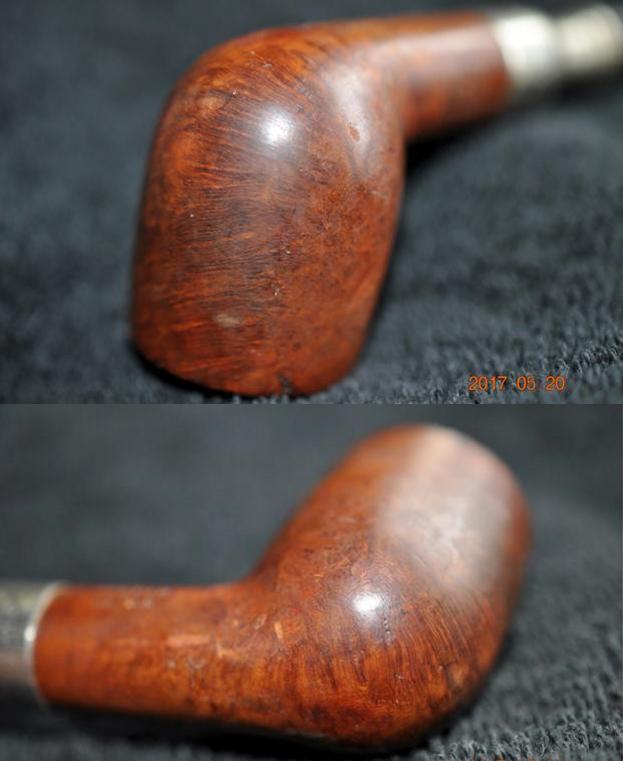
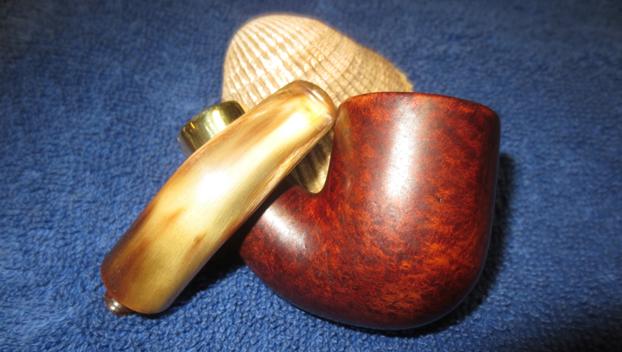
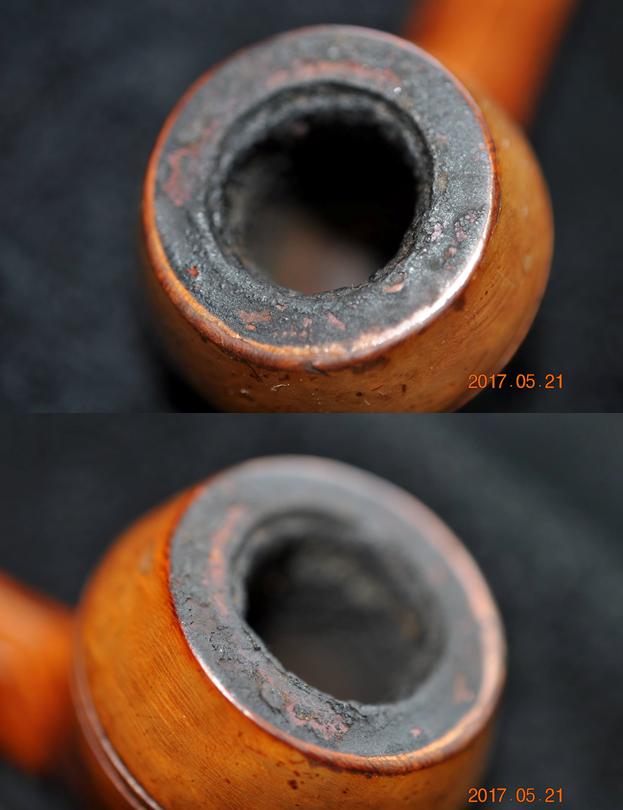
The finish on the bowl and shank was worn. There was a thick varnish coat that was peeling on the bowl sides and bottom that would take some work to remove.
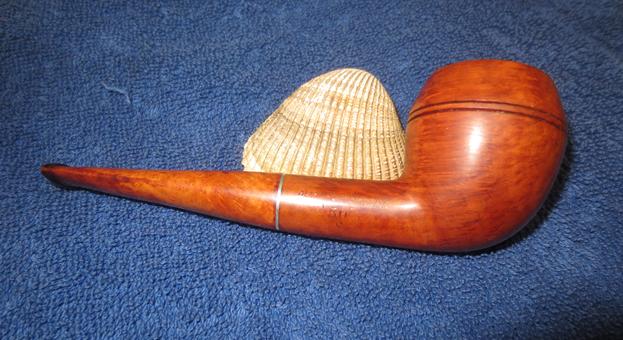
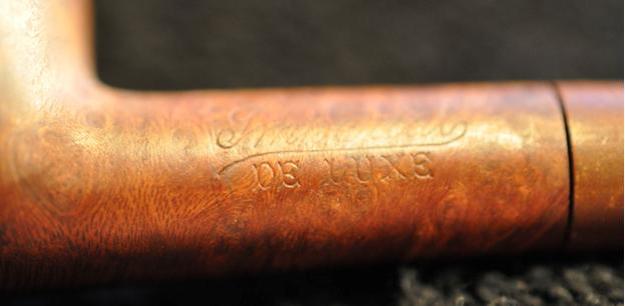
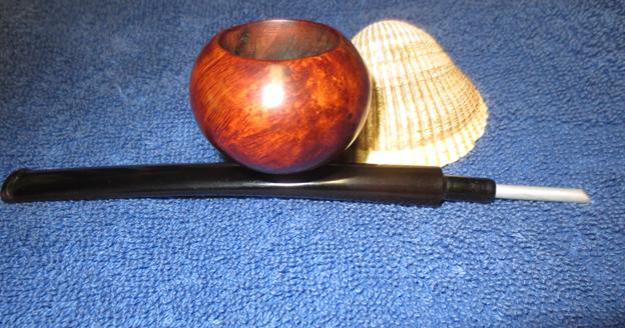
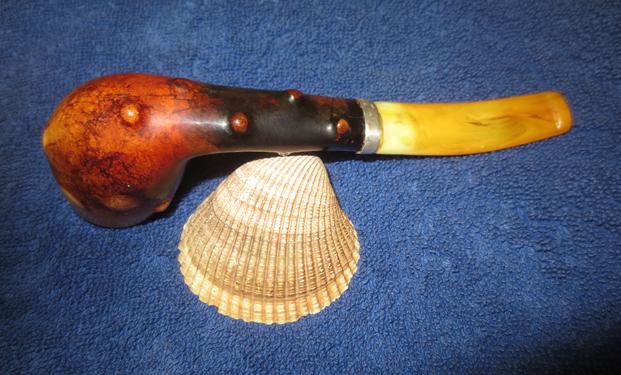
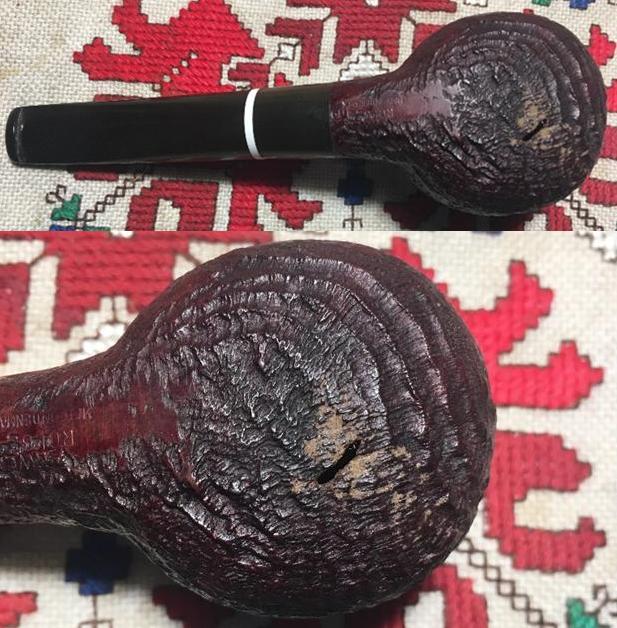
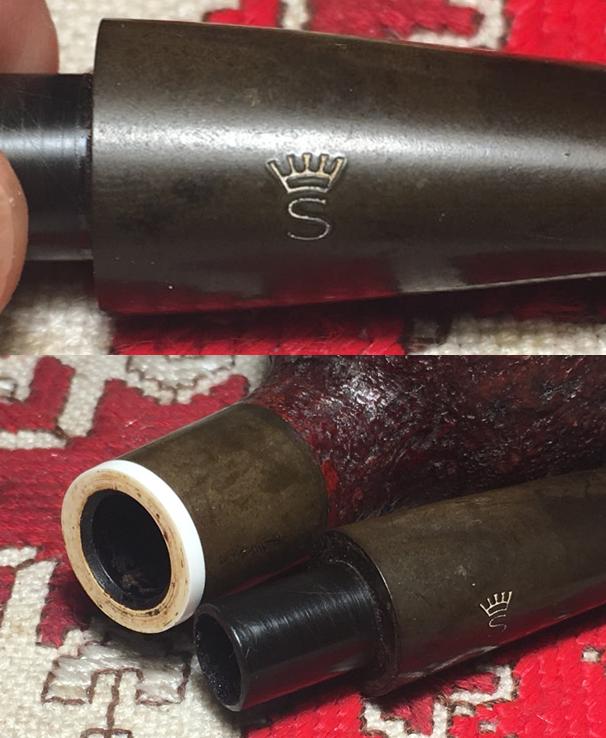
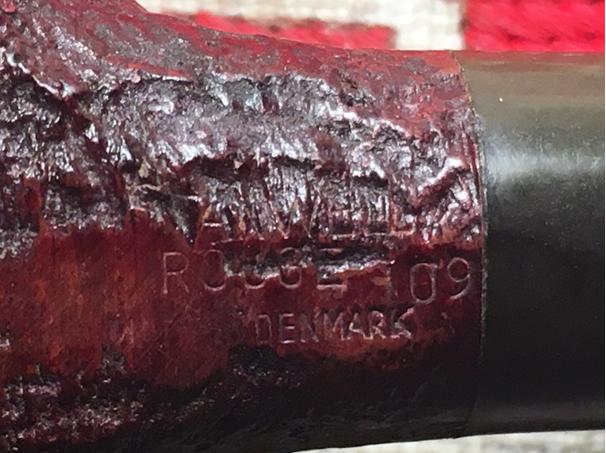
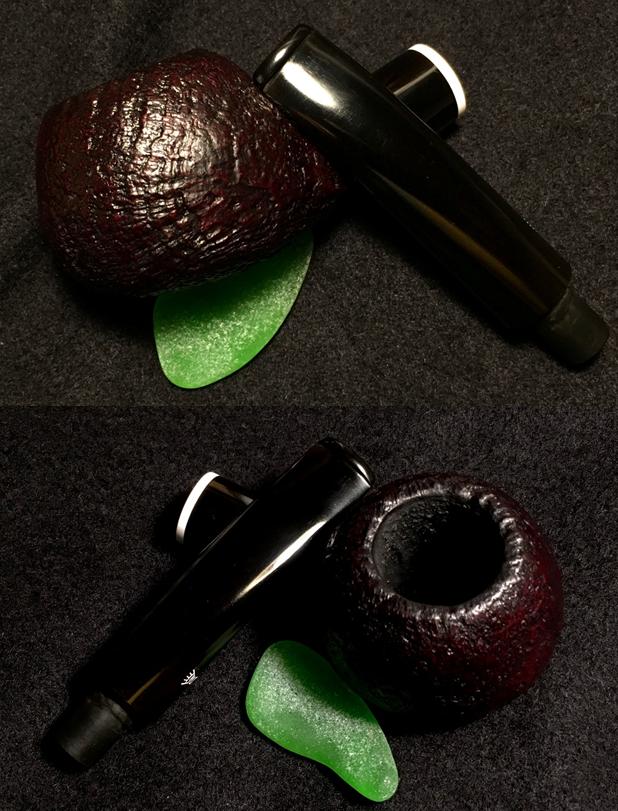
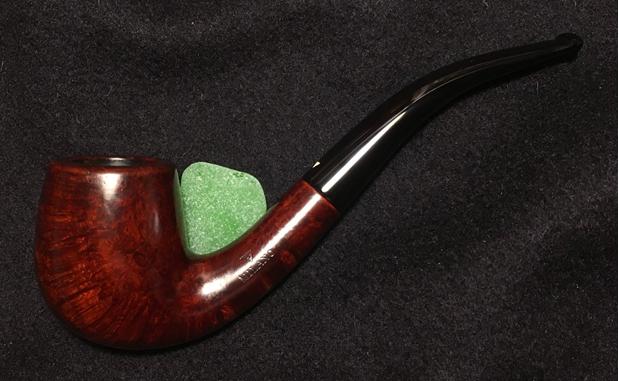
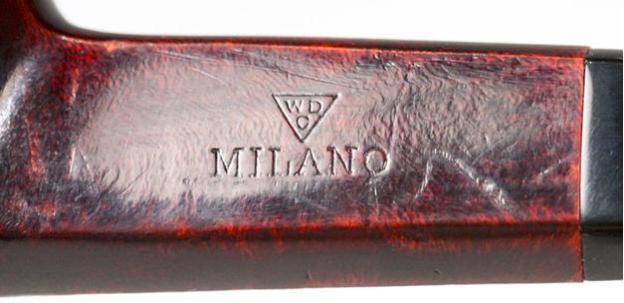
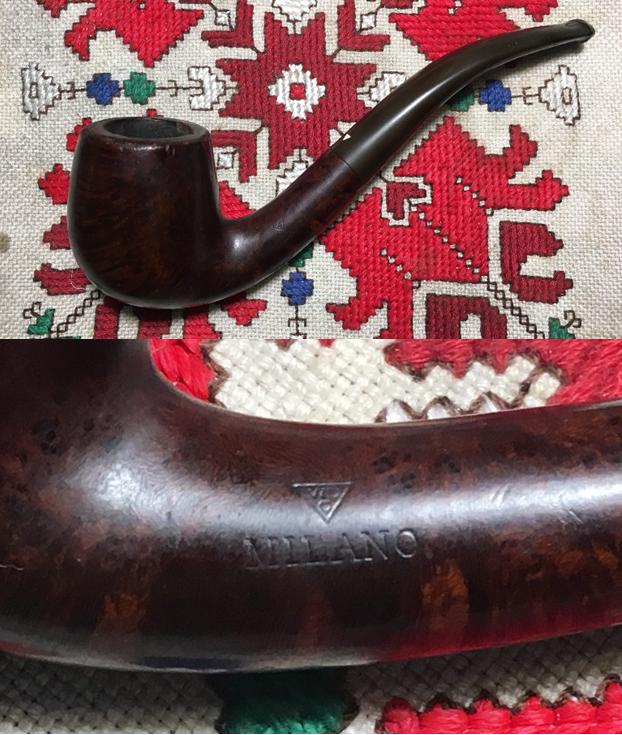
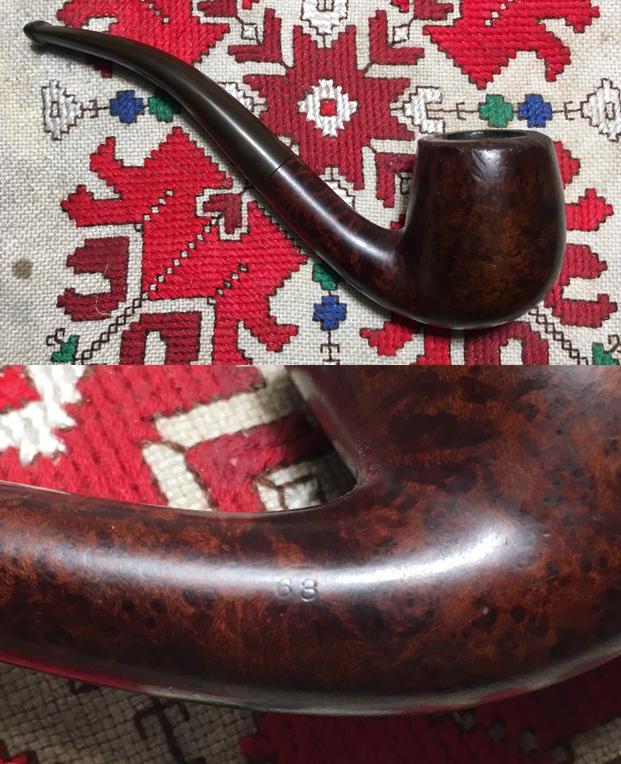
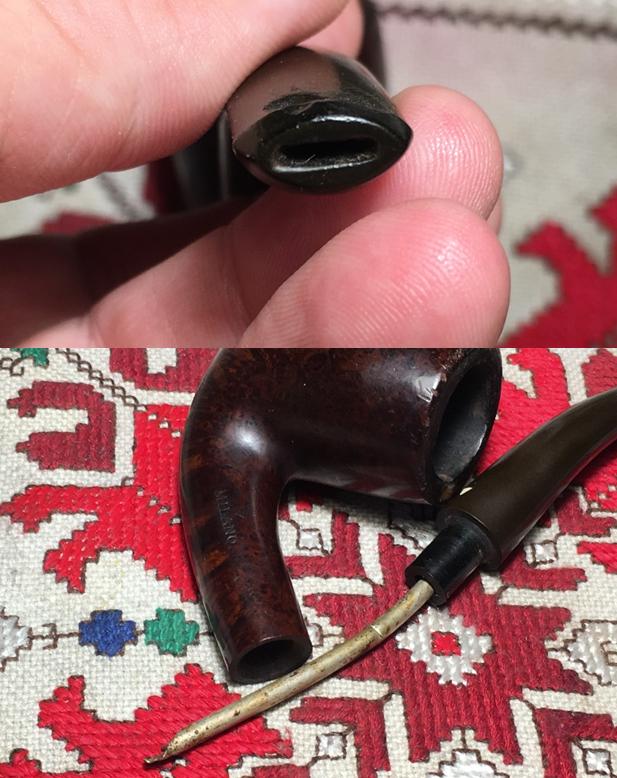
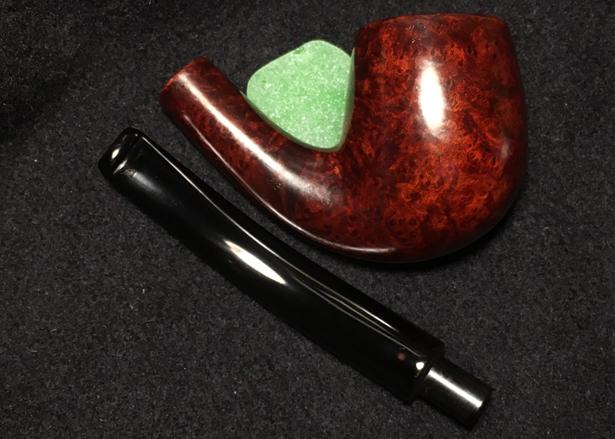
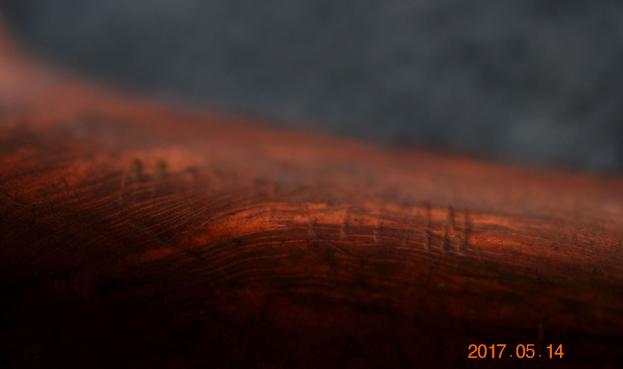
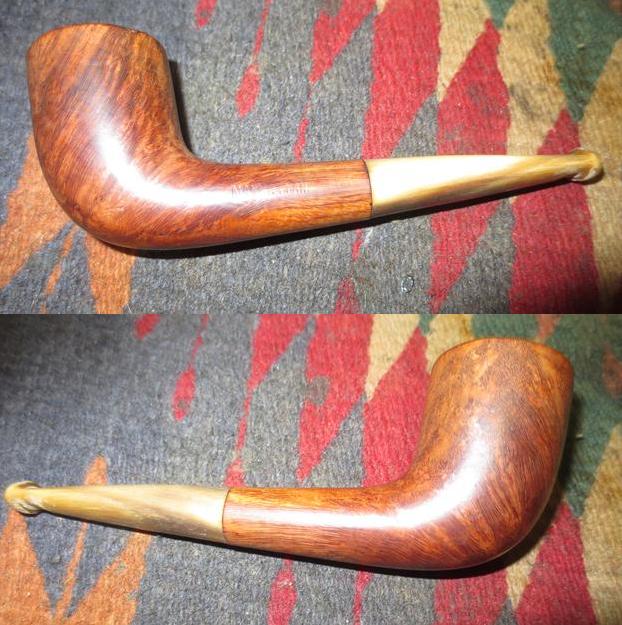
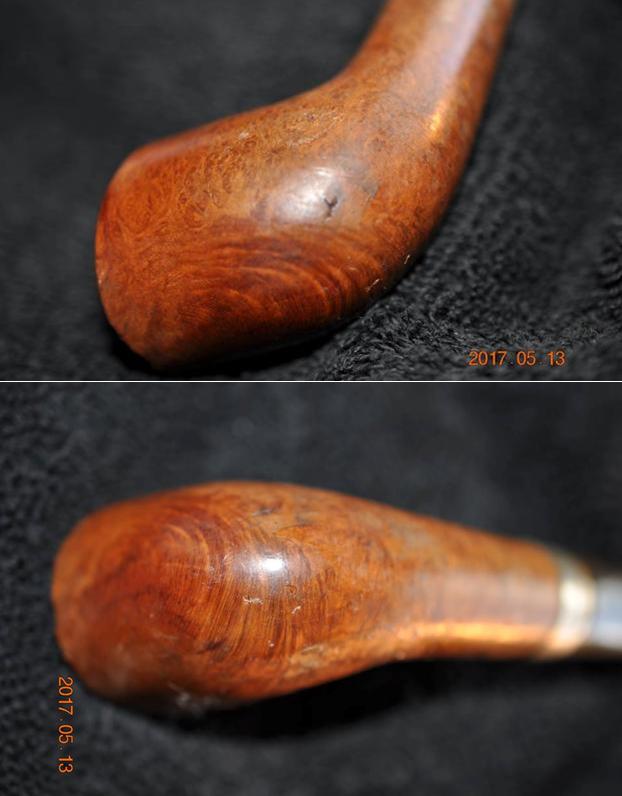
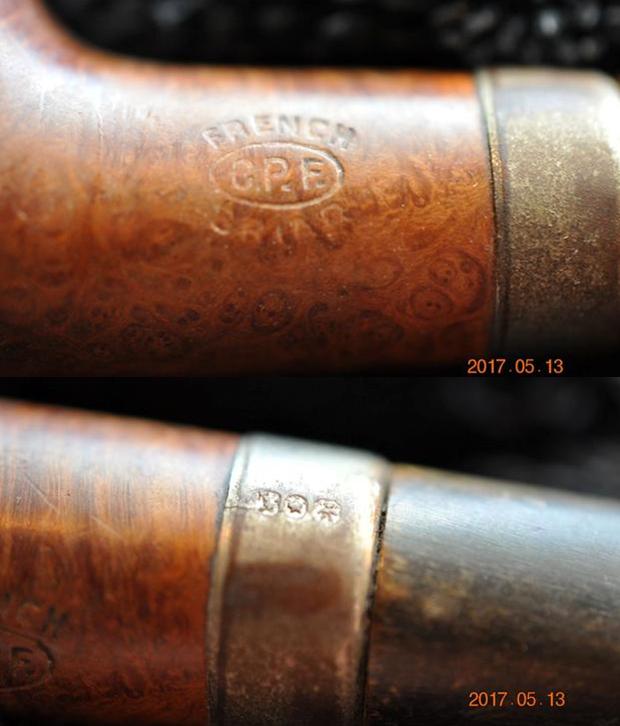
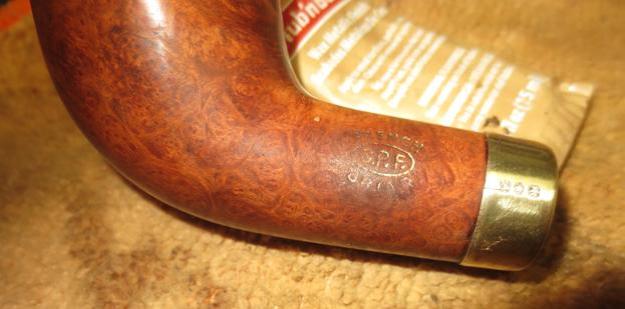
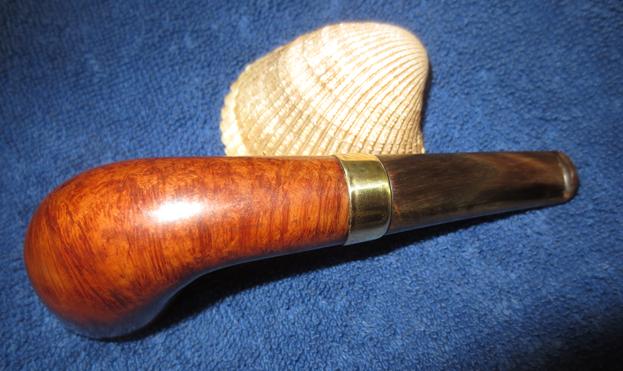
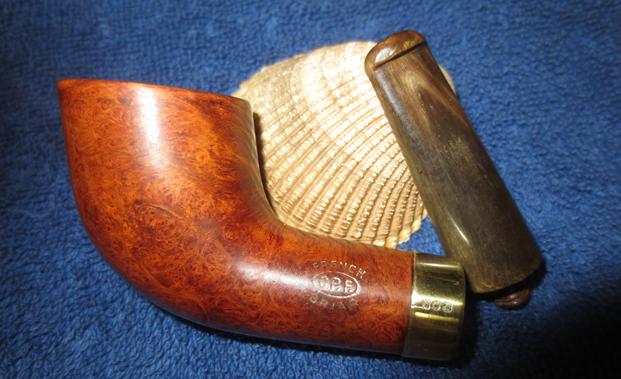
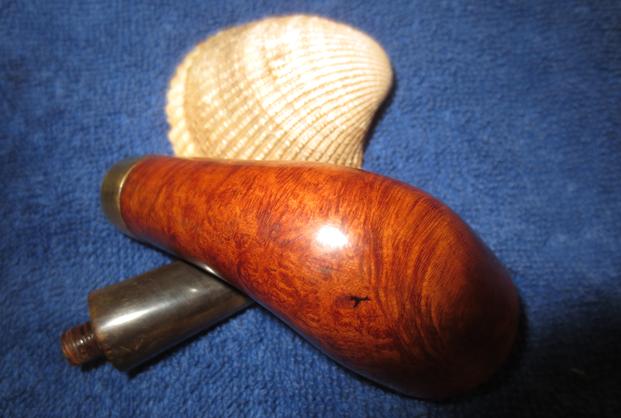
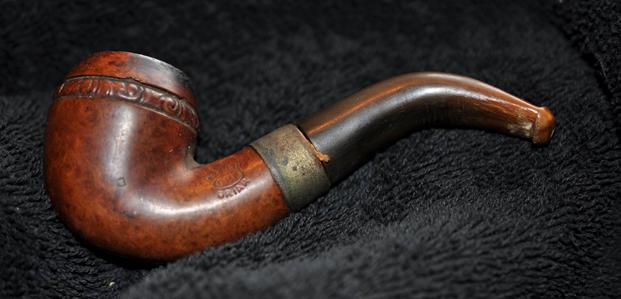
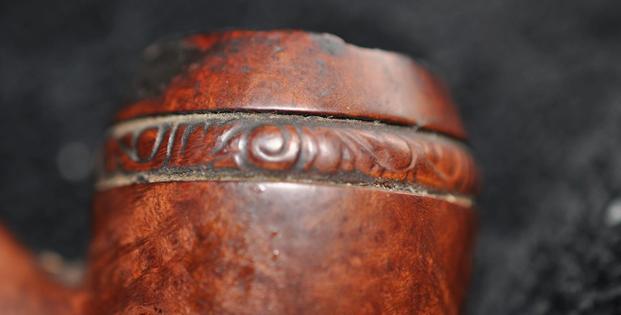
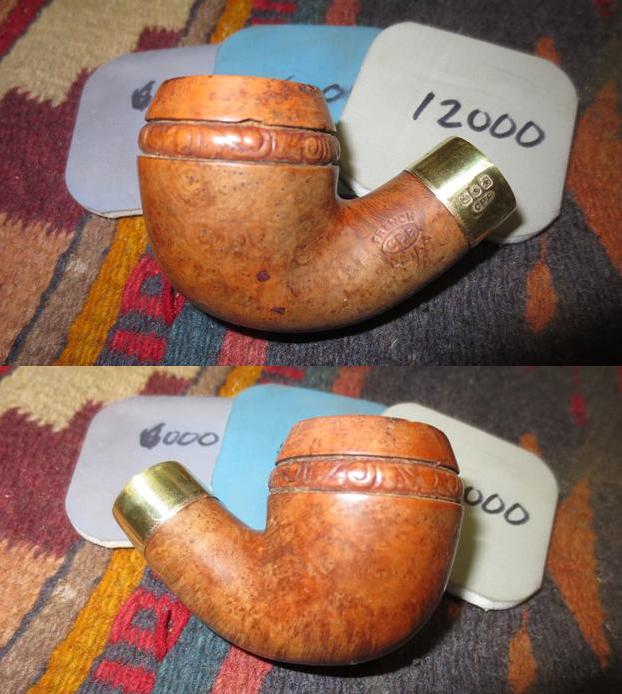
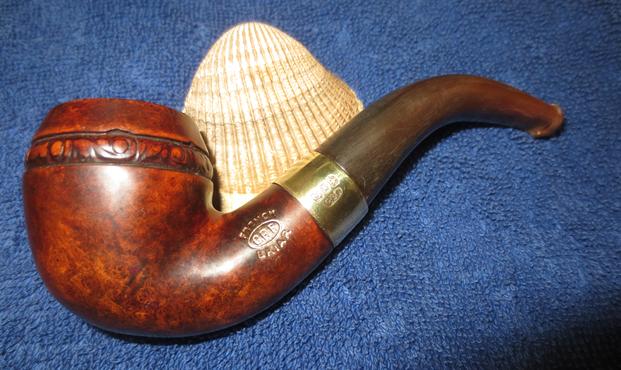
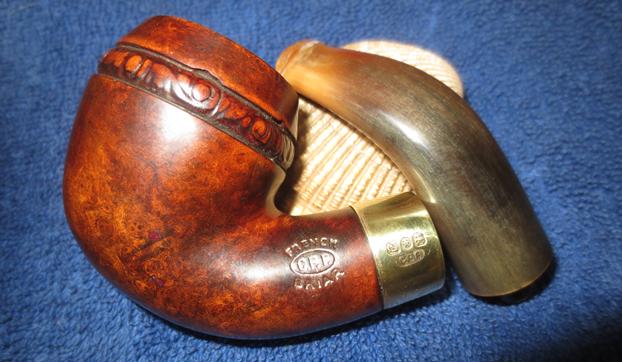
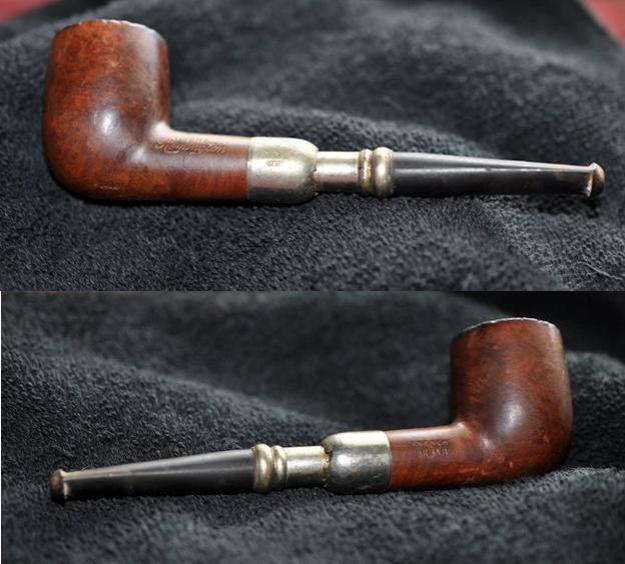
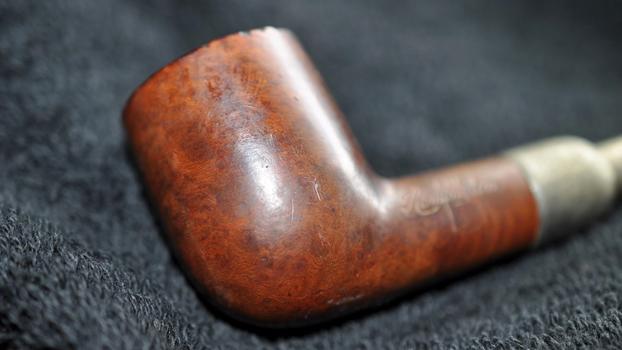
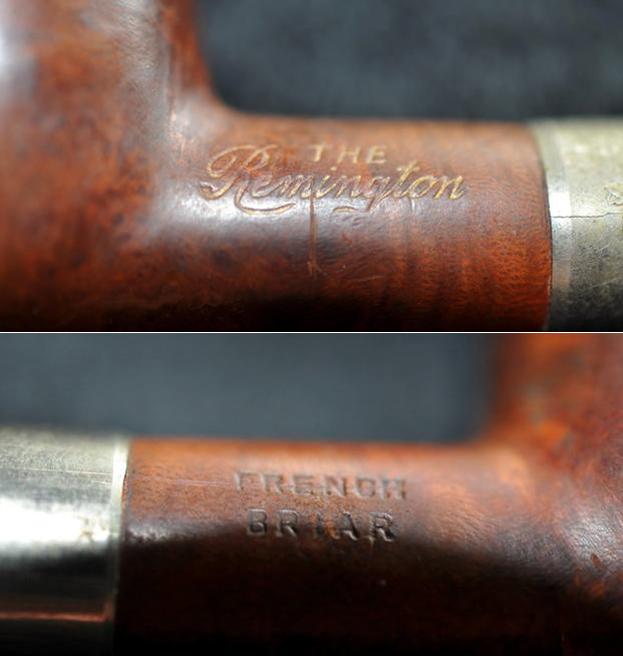
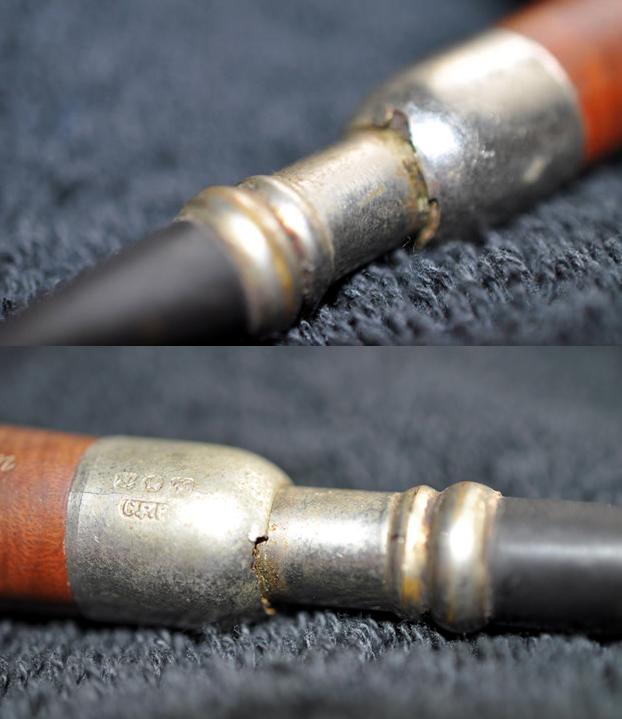
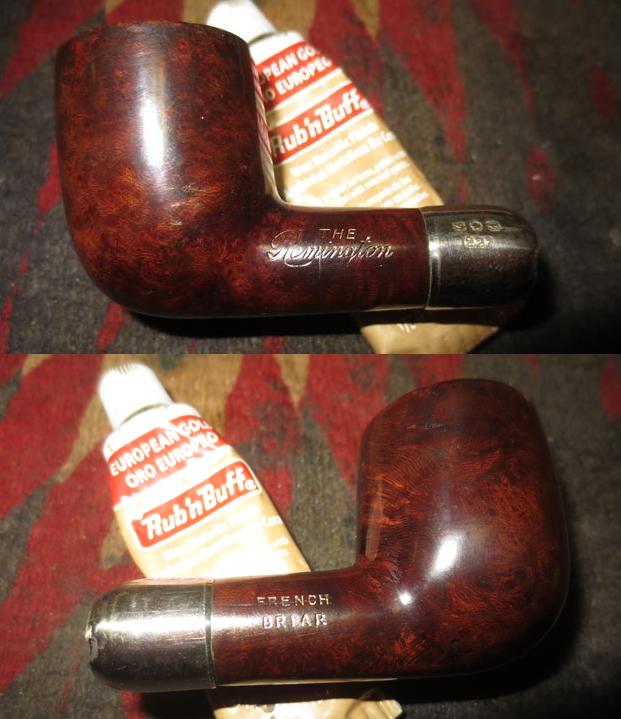
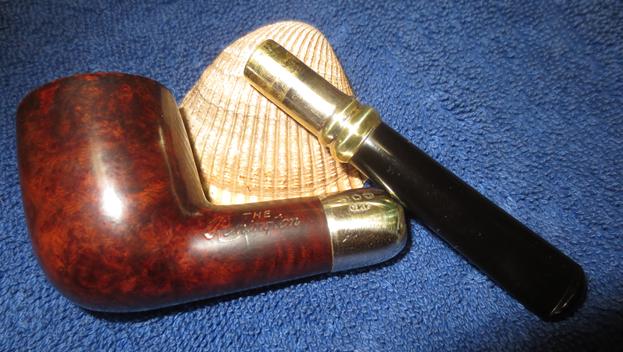
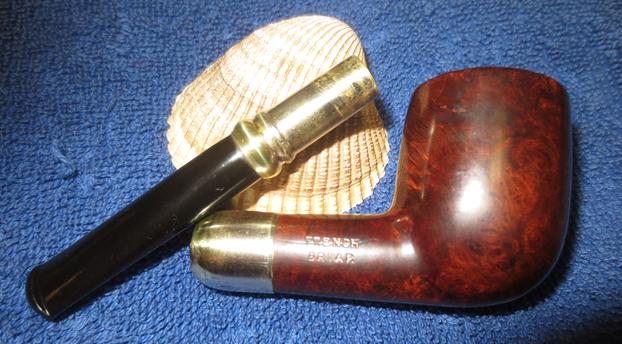
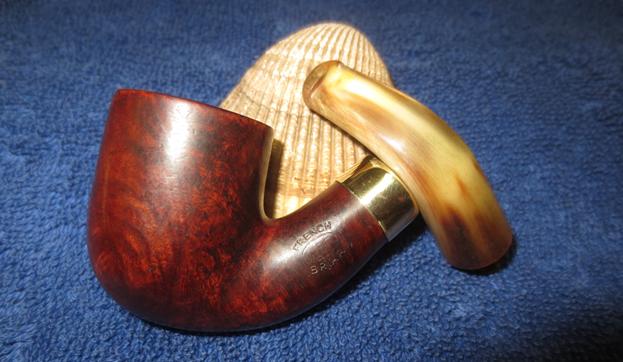
The stamping on both sides of the shake is faint but readable in the next photos. The pipe is stamped ALL BRIAR over Kaywoodie on the left side of the shank. On the right side it is stamped All Imported Briar over 50B (the shape number) and underneath that the letter C.
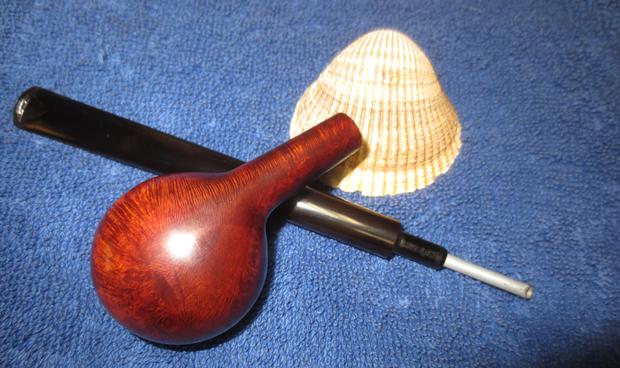
The all briar stem has an inlaid black cloverleaf in a white circle on the left side. It is in decent shape and should polish out nicely.
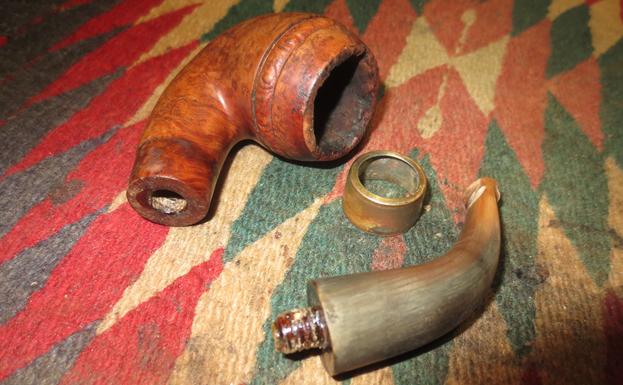
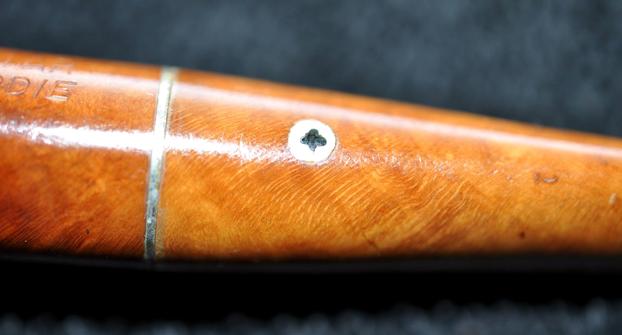
When it comes to the stem it is a serious issue. Making a new vulcanite stem for the pipe would certainly be an option but to me that would cause the pipe to lose its charm and detract from it being an All Briar pipe. I would need to do something different to bring it back to life or salvage it. It appeared to me that I had only one serious option on this pipe but I would make the final decision once it arrived.
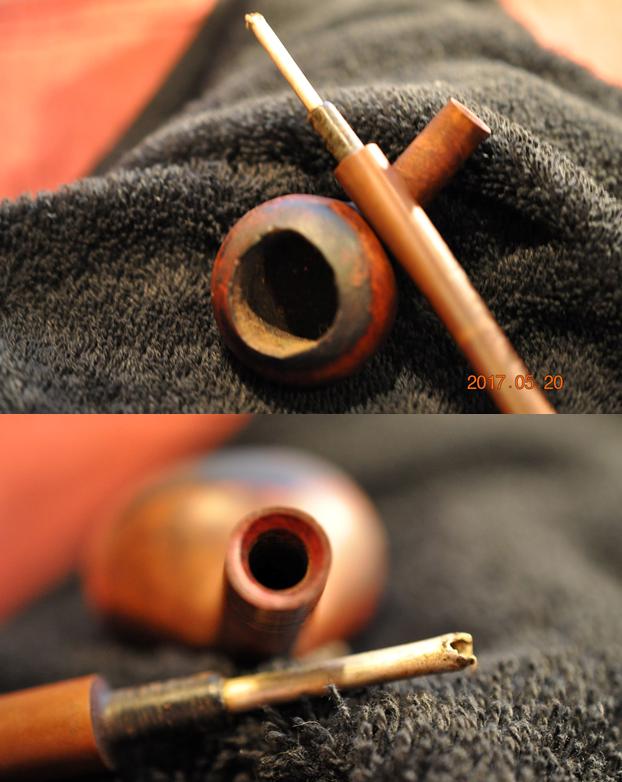
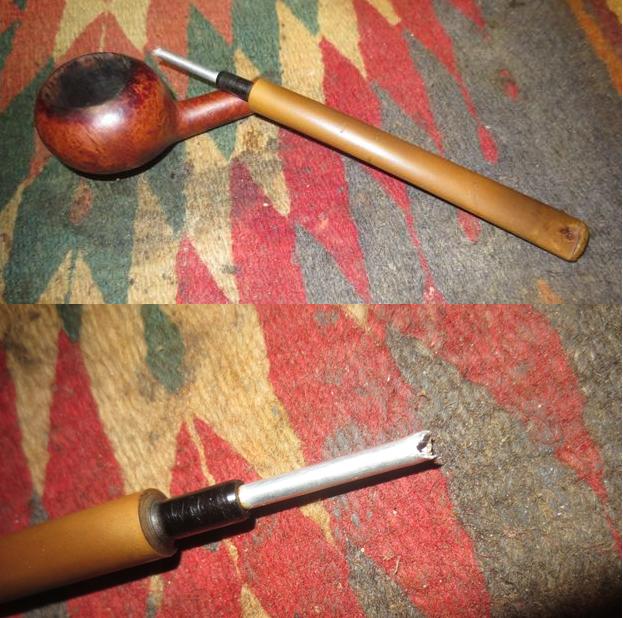
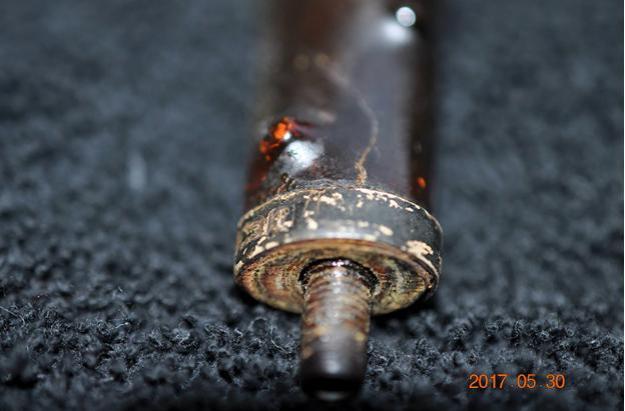
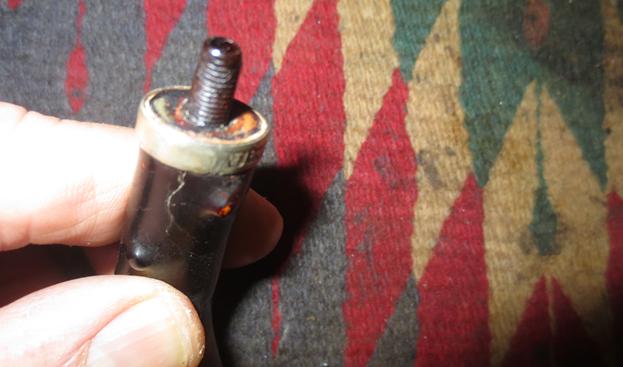
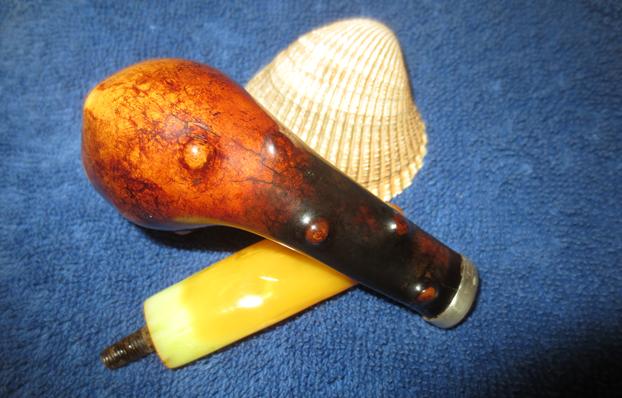
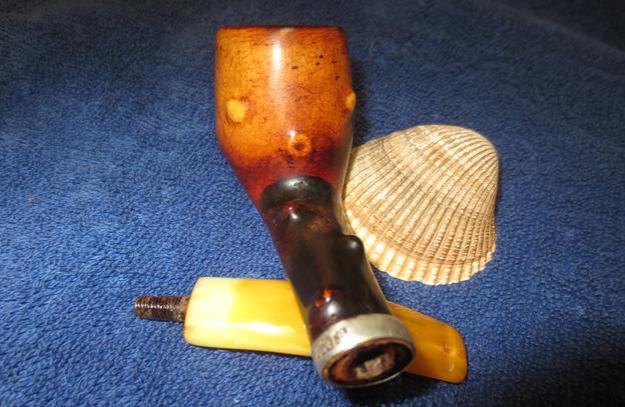
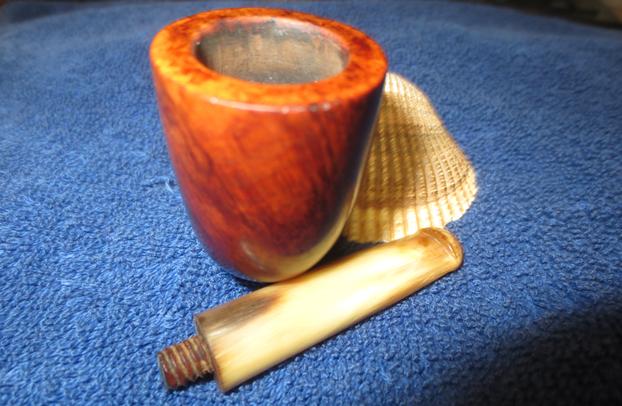
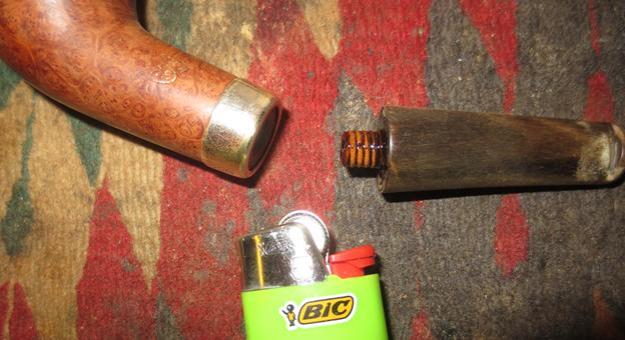
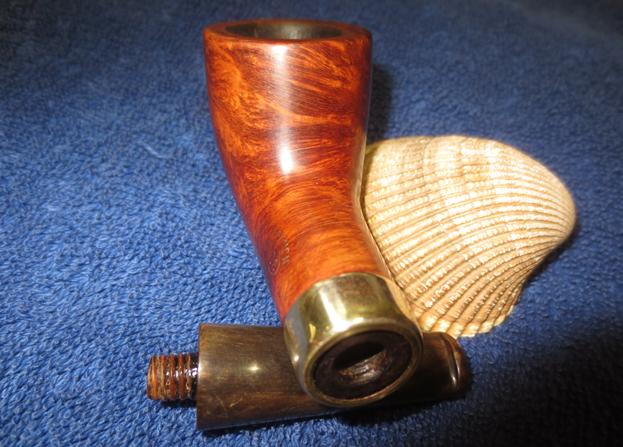
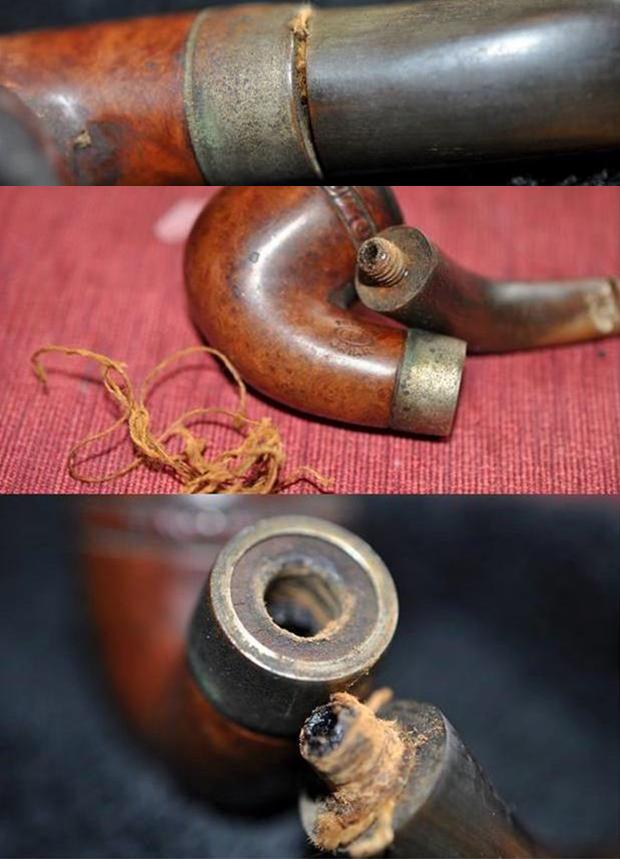
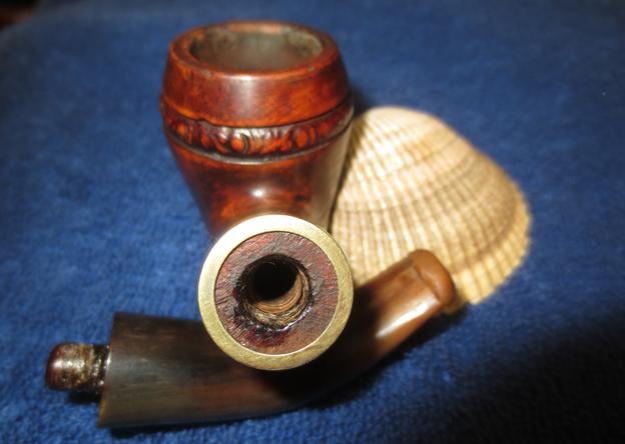
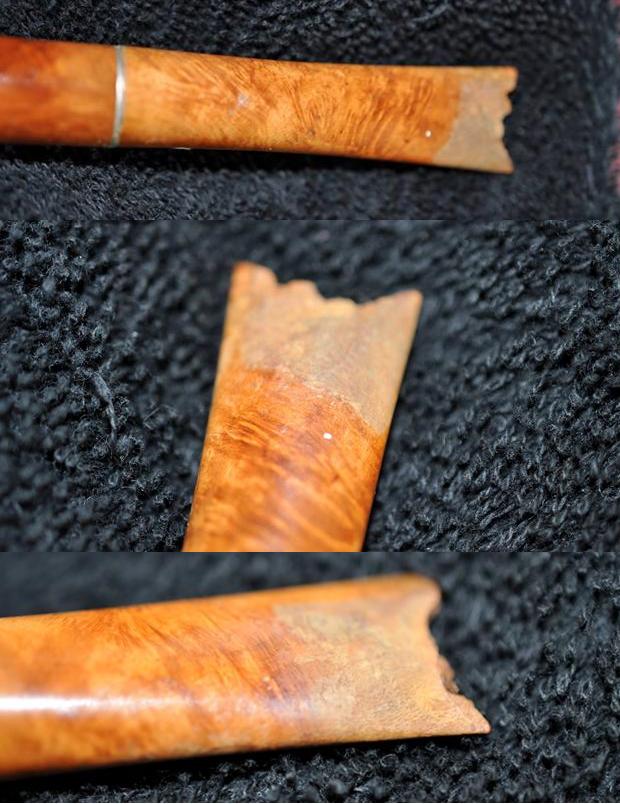
The stem had a screw in/threaded tenon with a four hole stinger. The stinger was stamped Drinkless as shown in the photo below. On Pipedia in the Kaywoodie article, there was a great advertisement for the Drinkless style of stinger so I have included that here as well. 
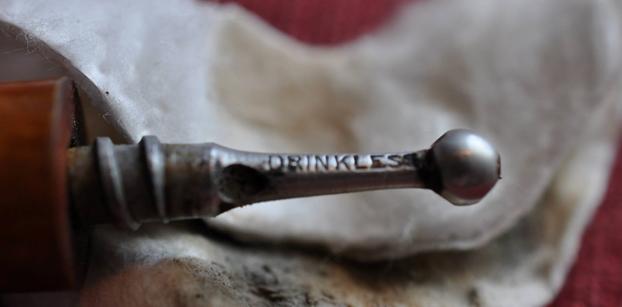
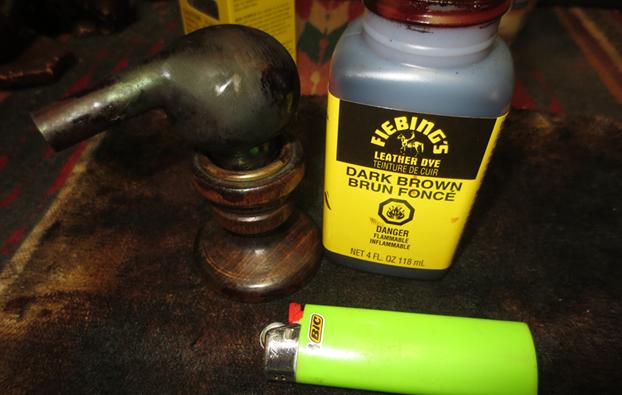
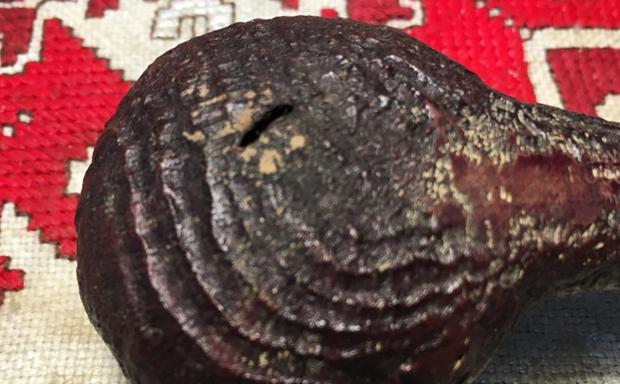
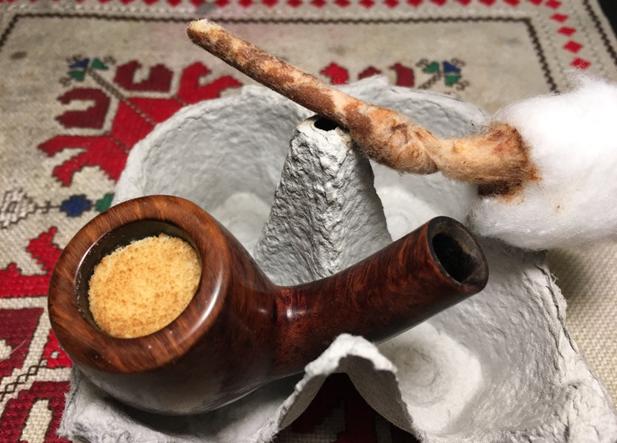
I decided to look on my other go to site – PipePhil (http://www.pipephil.eu/logos/en/logo-kaywoodie-1.html) to see what added information I might garner from his site. Under the Kaywoodie All Briar listing it said that the pipe had a twin-bore stem, meaning that instead of a slot in the button there were twin holes that formed a Y with the airway in the stem itself. The pipes were made between 1952 – 1955. It included a series of pictures of a typical briar Kaywoodie stem that showed a vertical hole near the button that was an innovation that they called Stembiter to prevent a stem biter from gnawing through the stem. Evidently, the pipe I am working on had that kind of set up on the mouthpiece as nothing is left of that portion of the stem. The Stembiter innovation came out in the early 1950s as well so now I had confirmation of the period when the pipe was made. I have included an advertisement for the Stembiter innovation following the photo below. I know that at present I will not be able to reproduce this feature on the stem when I rework it. 
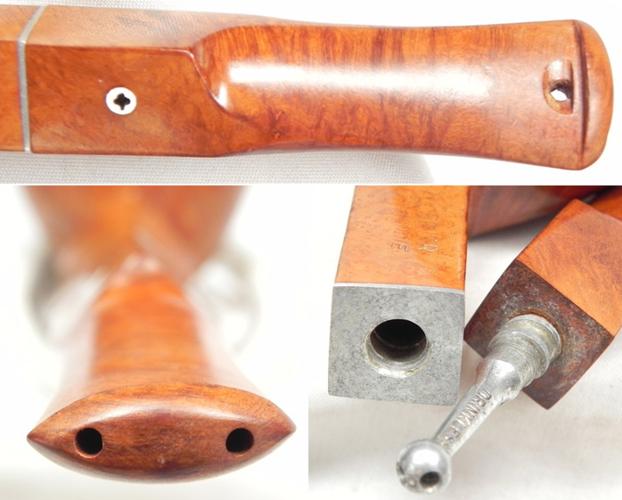
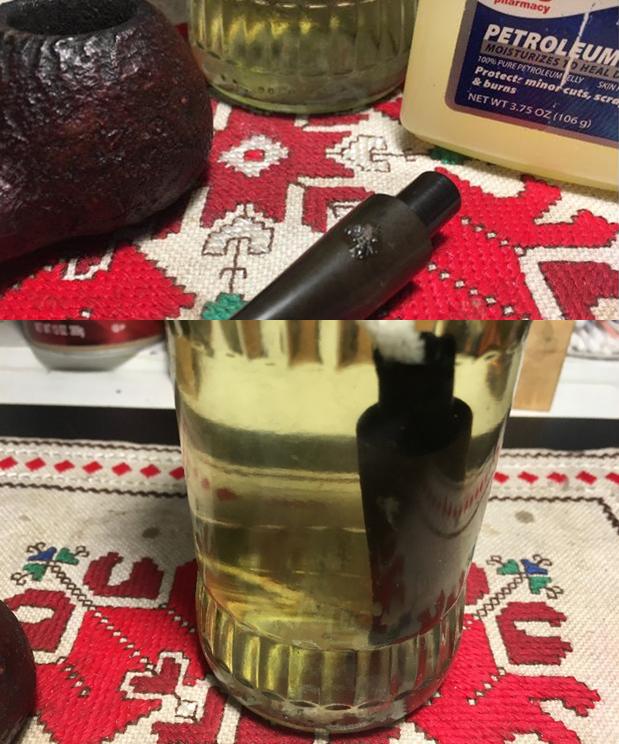
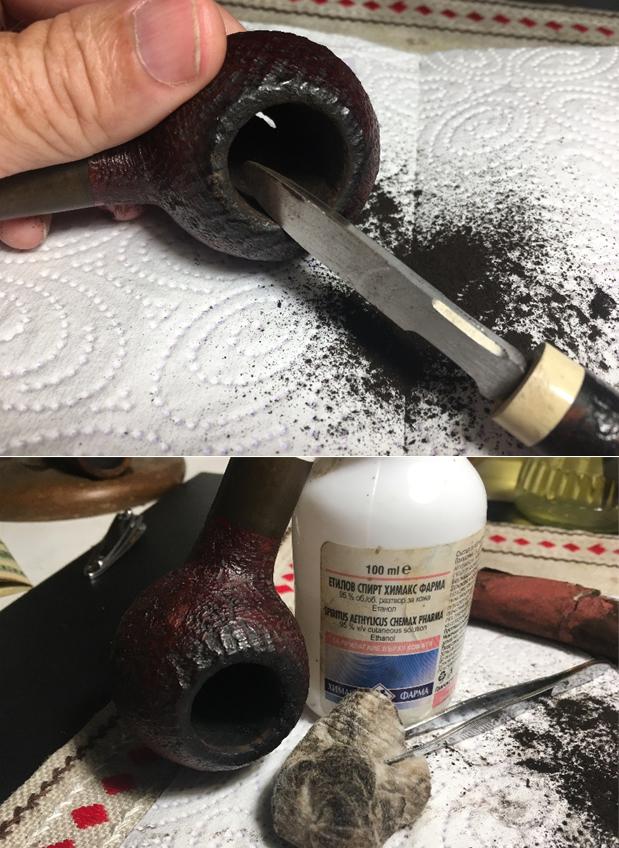
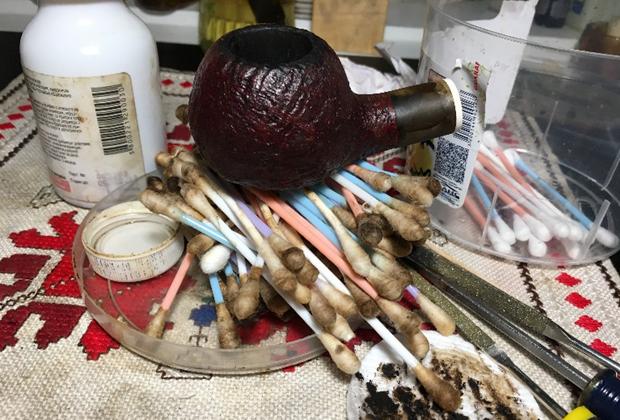
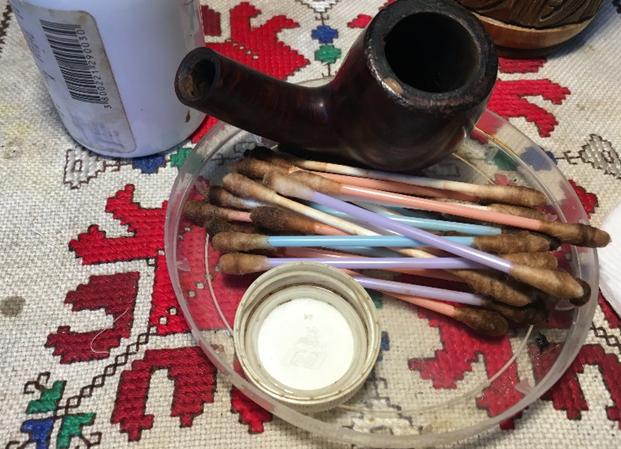
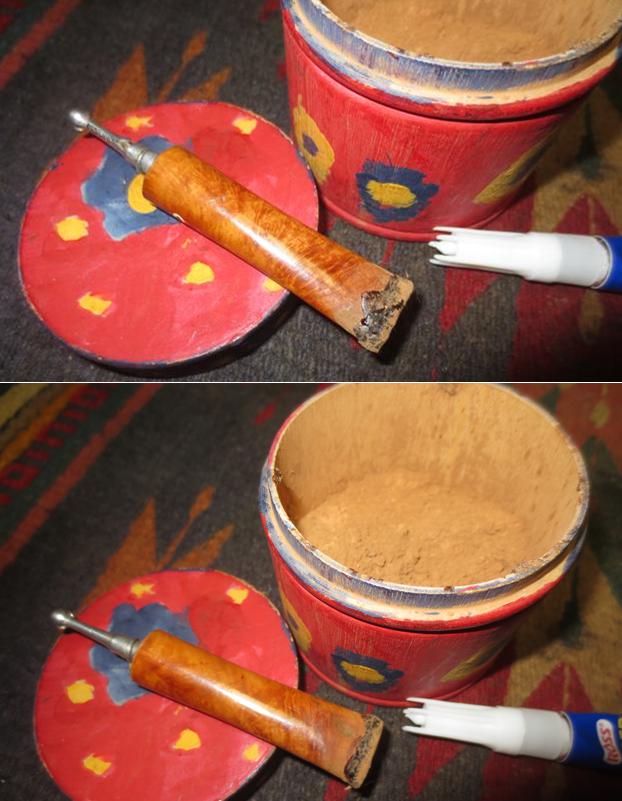
Jeff continued using his established process of thoroughly cleaning the pipes he sends to me. He did not vary in his procedure just because of the briar stem on this one. He reamed the bowl with a PipNet reamer and touched it up with a Savinelli Fitsall Pipe Knife. He scrubbed out the mortise and the airway in the shank and the stem with pipe cleaners, cotton swabs and alcohol and cleaned the exterior of the threaded tenon and four hole stinger with cotton swabs and alcohol. He scrubbed the exterior of the pipe with Murphy’s Oil Soap to remove the grime and grit on the bowl. Sadly it did not even touch the thick varnish coat on the bowl. He worked over the rim and removed the heavy lava overflow. He scrubbed it with a tooth brush and the oil soap until he removed the buildup. His cleaning of the top cut through the varnish coat on that part of the bowl. He cleaned up the gnawed end of the stem so that at least it would be clean when I began my work on it. I took photos of the pipe to show the condition it was in when it arrived in Vancouver. 
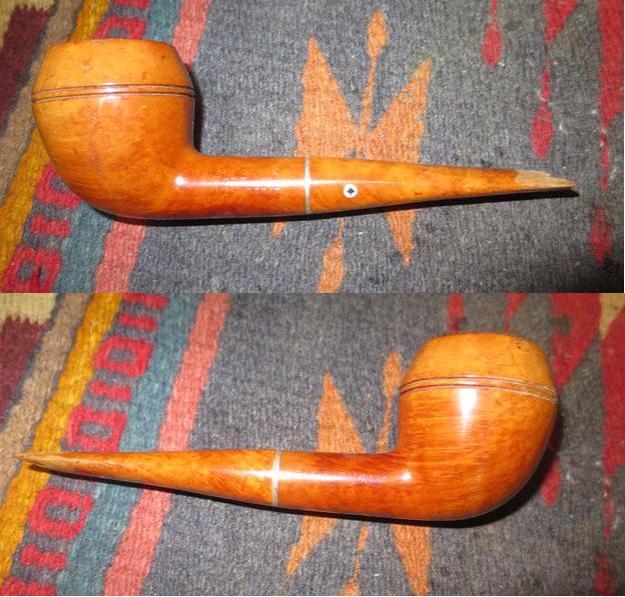
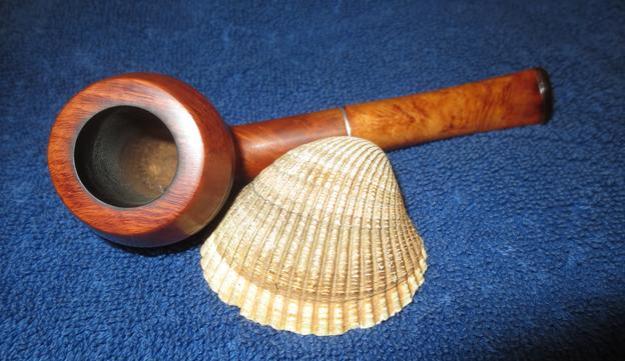
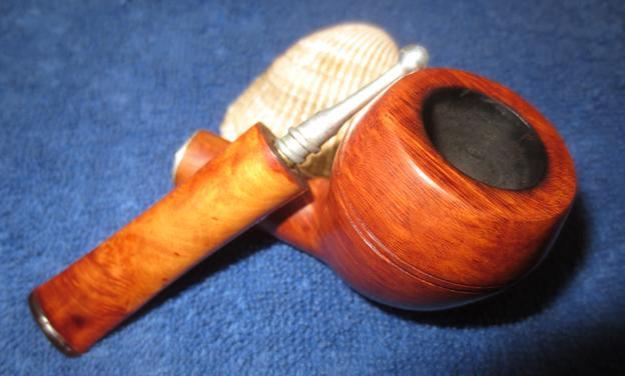
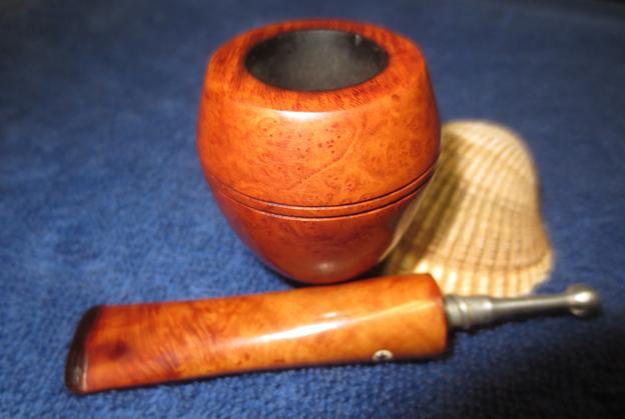
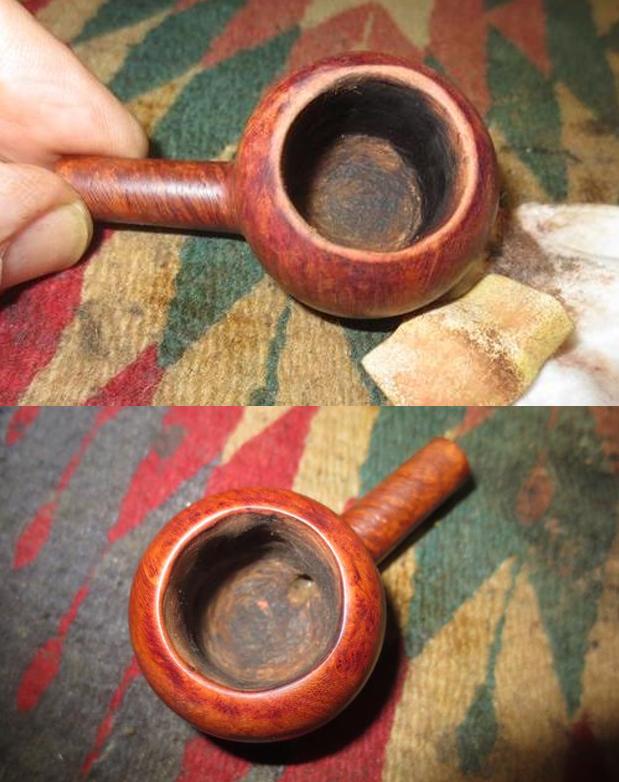
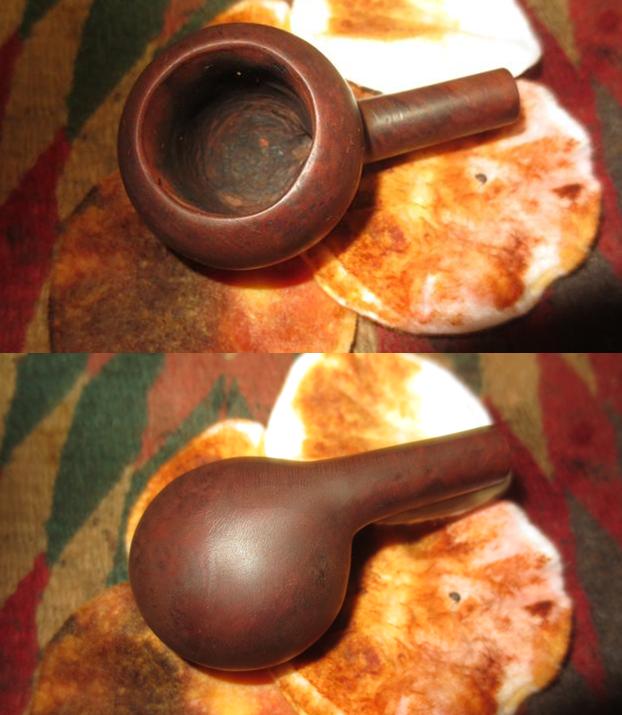
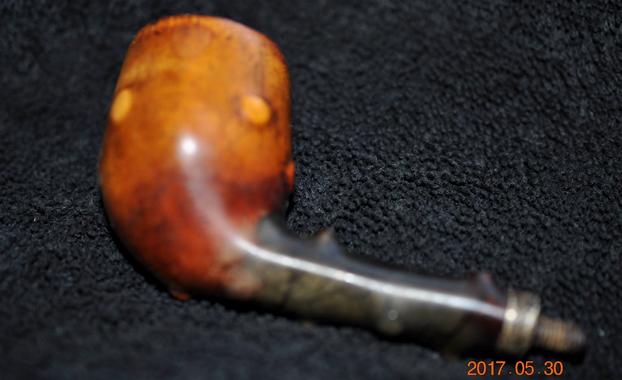
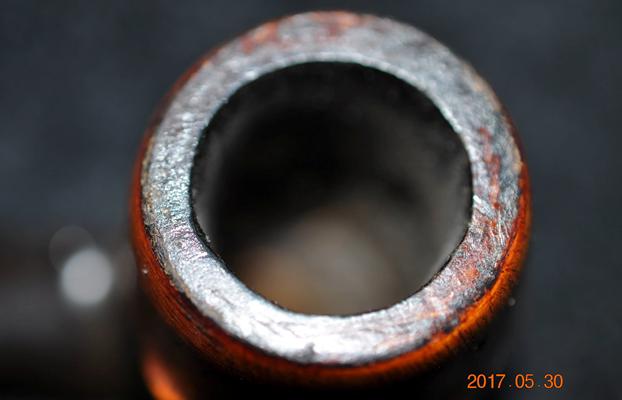
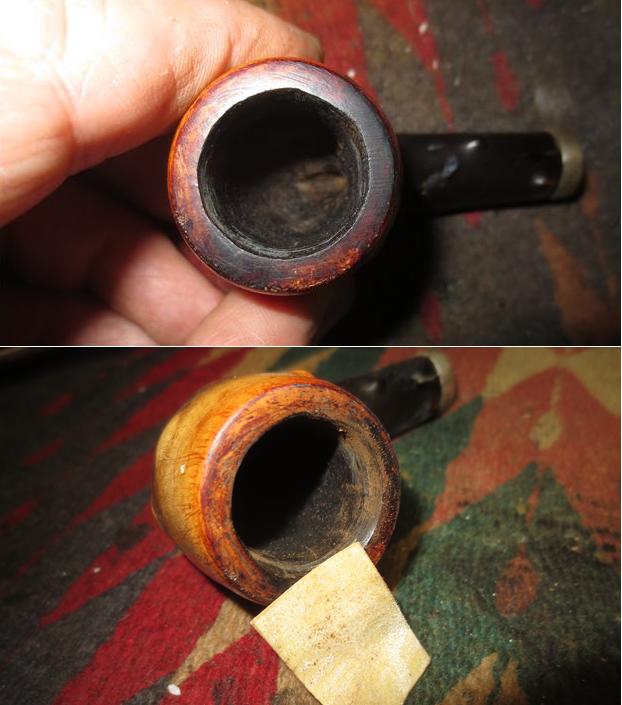
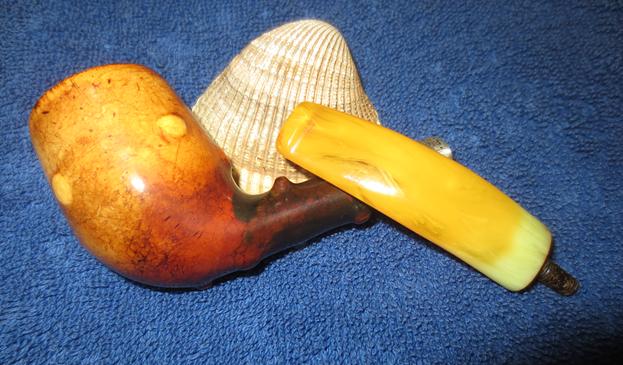
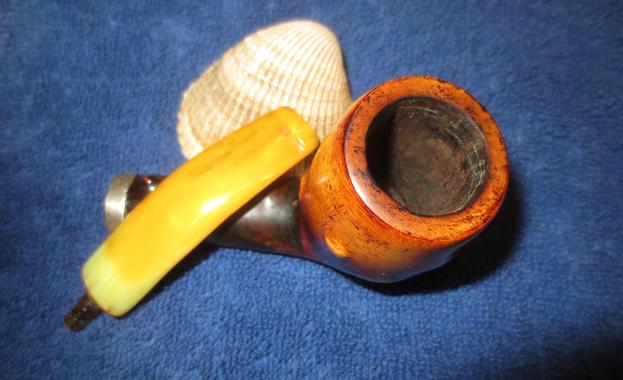
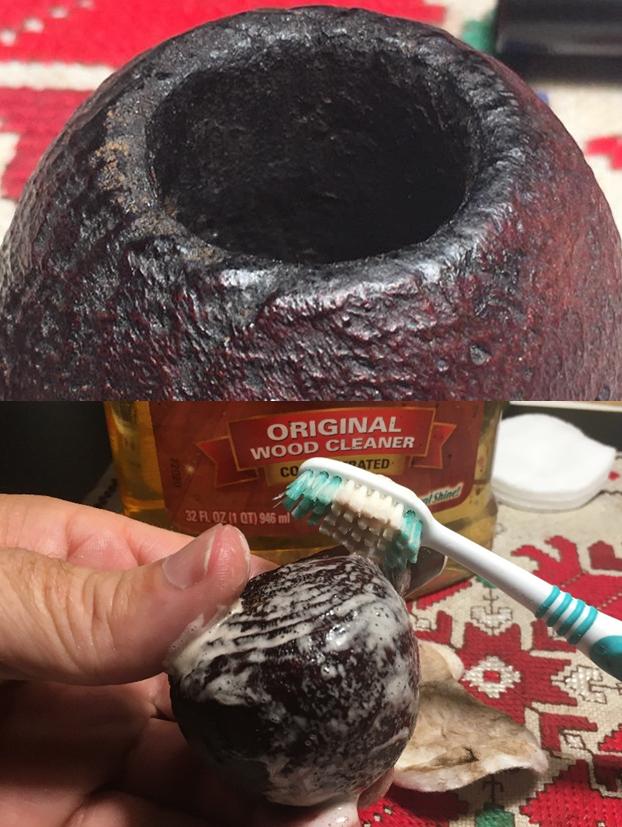
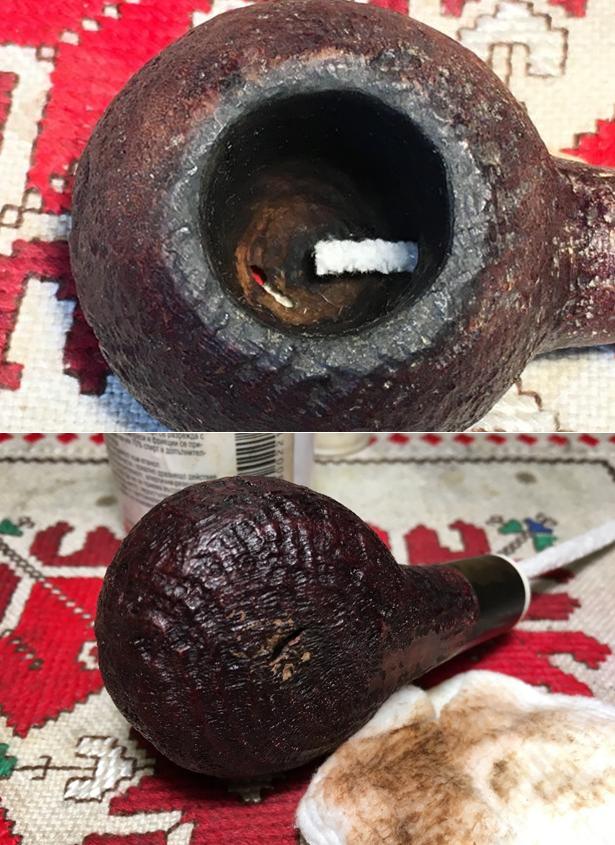
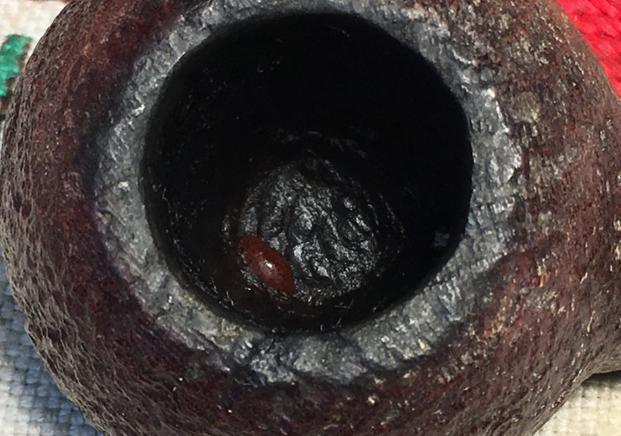
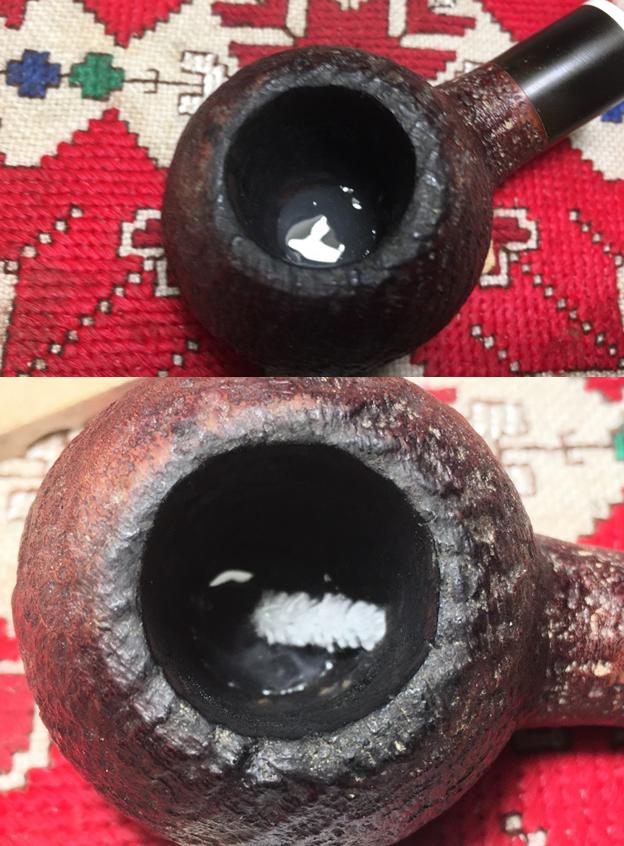
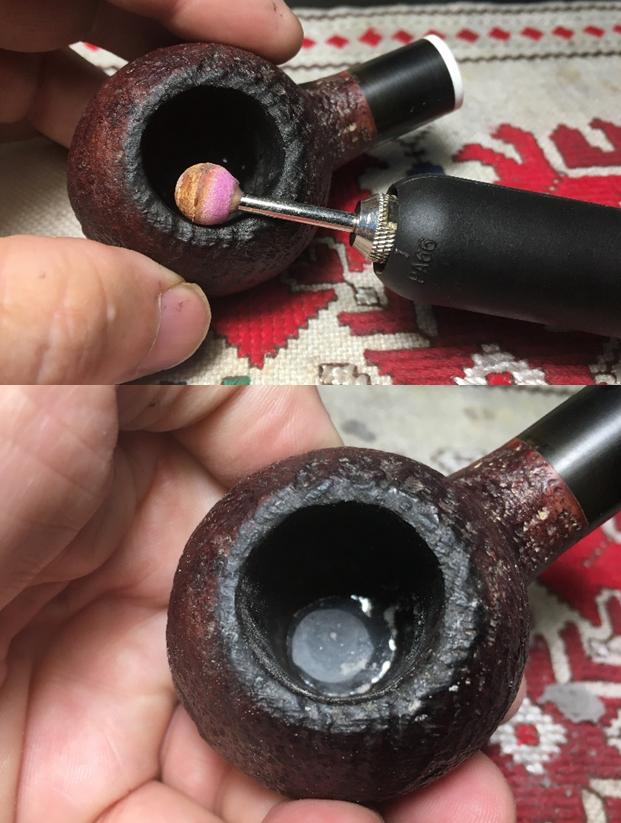
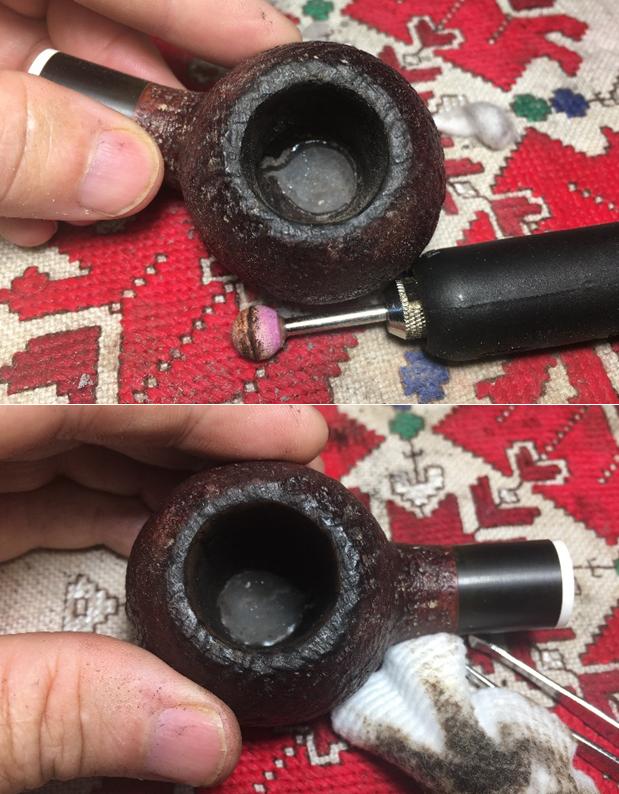
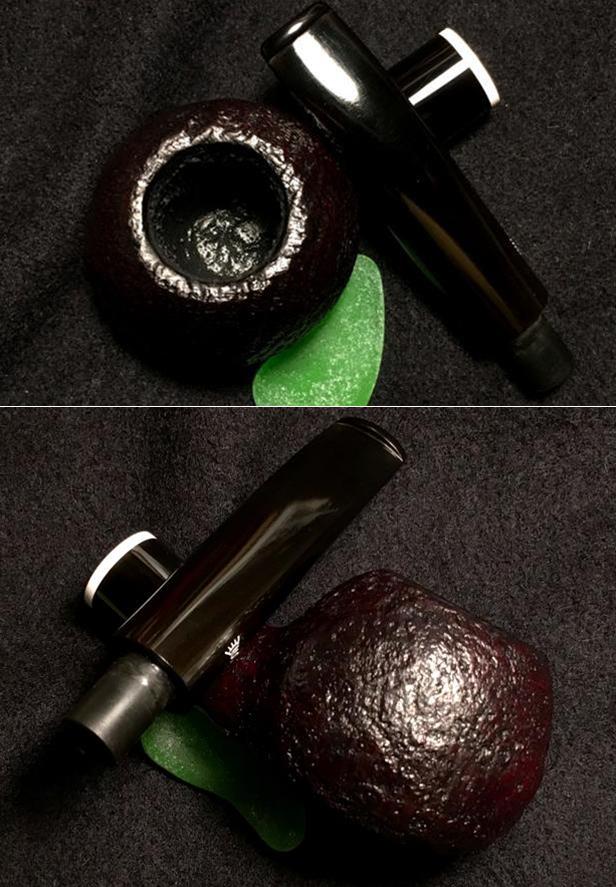
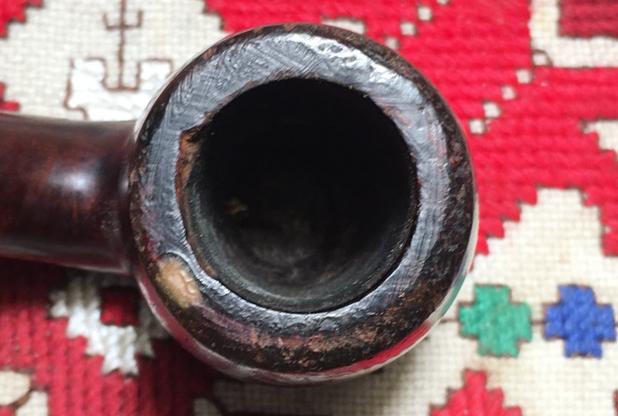
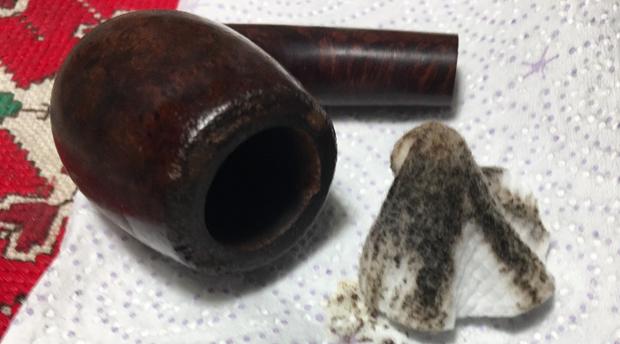
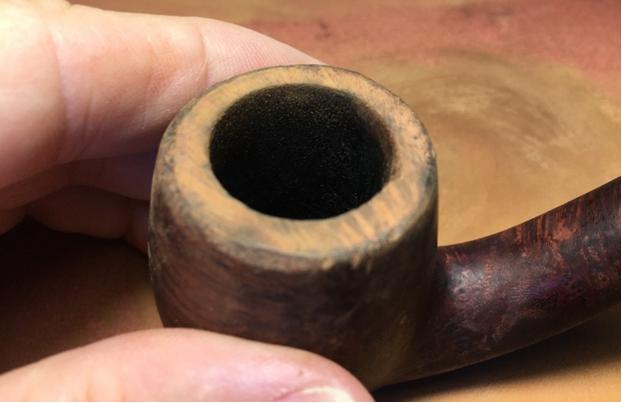
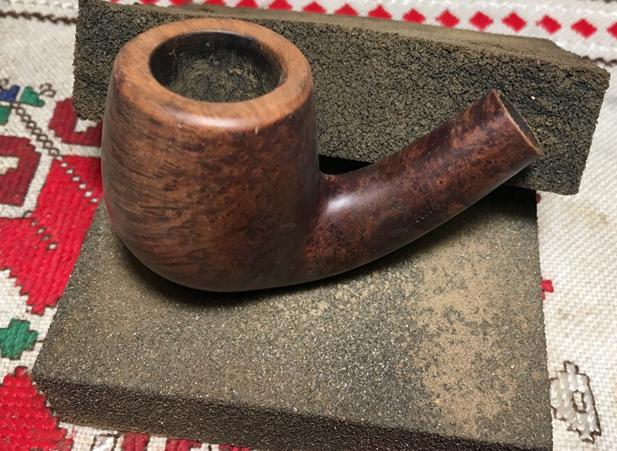
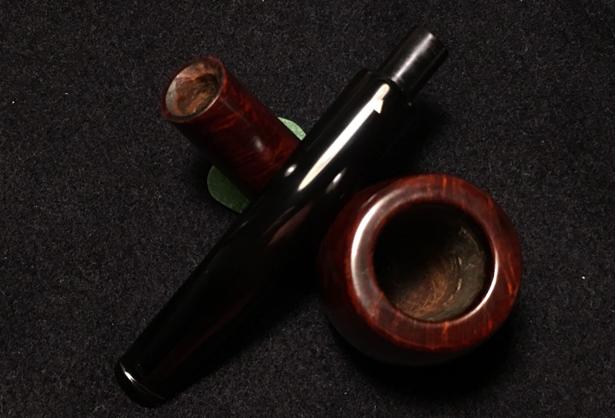
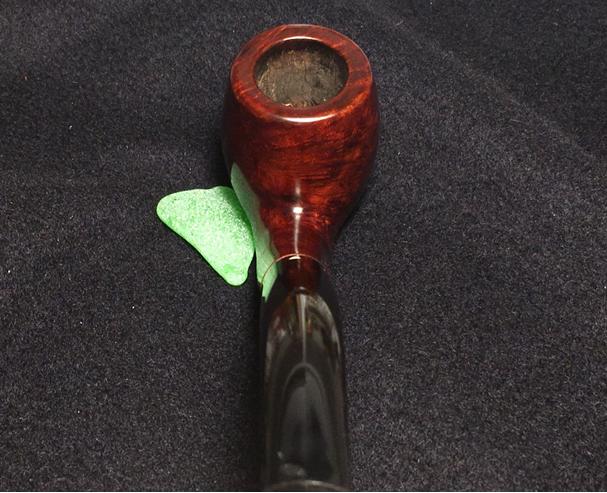
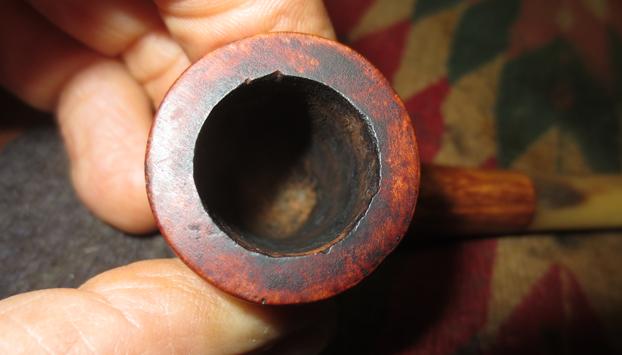
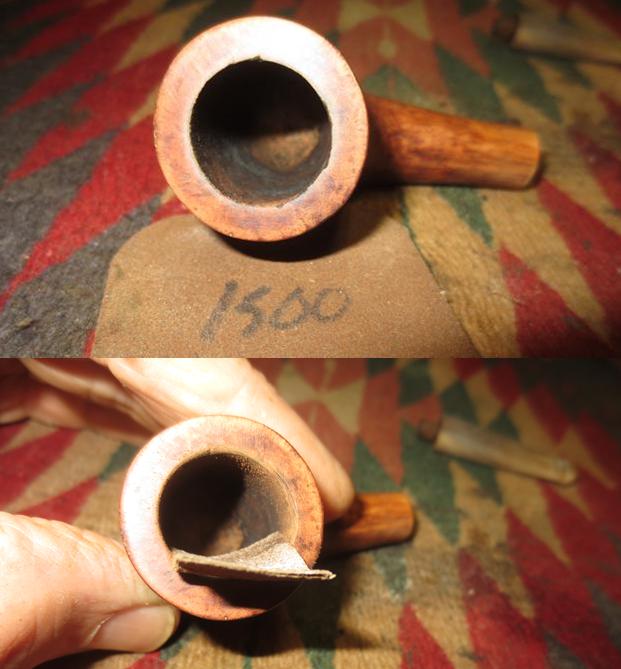
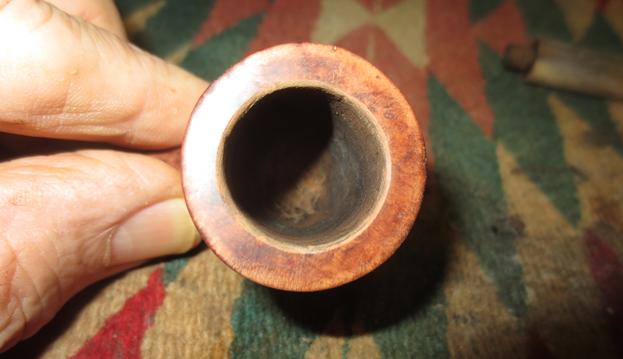
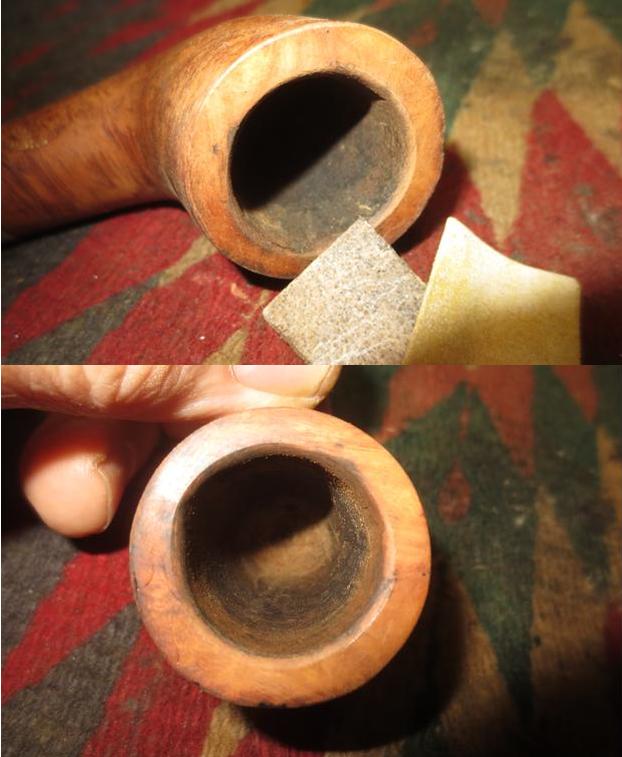
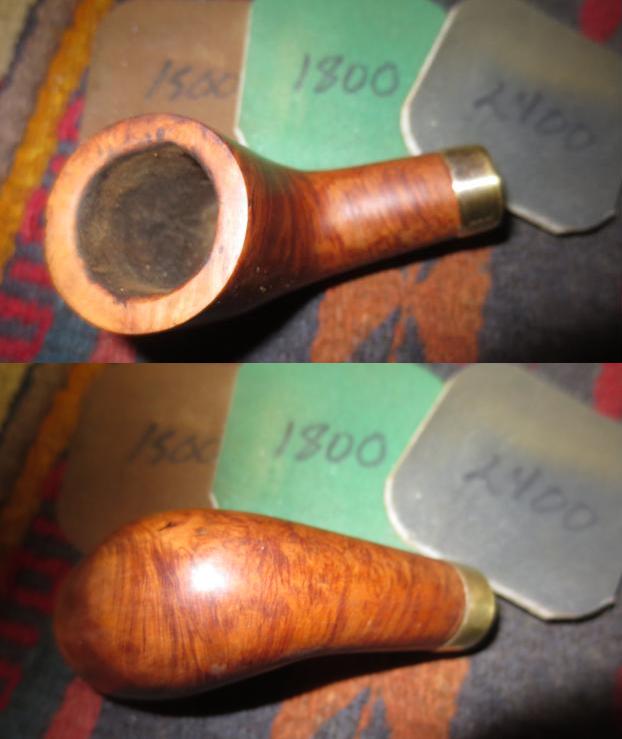
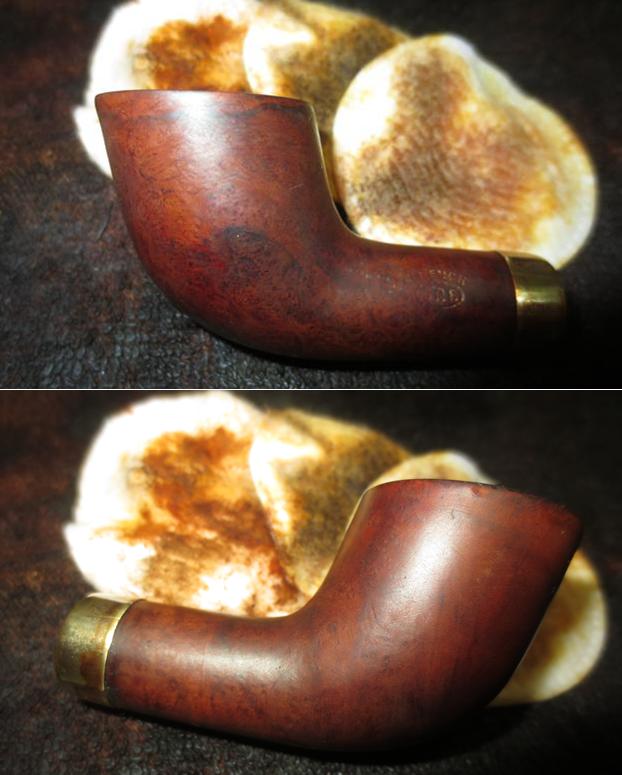
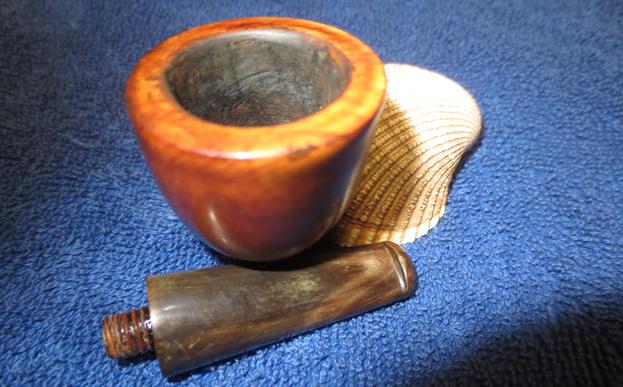
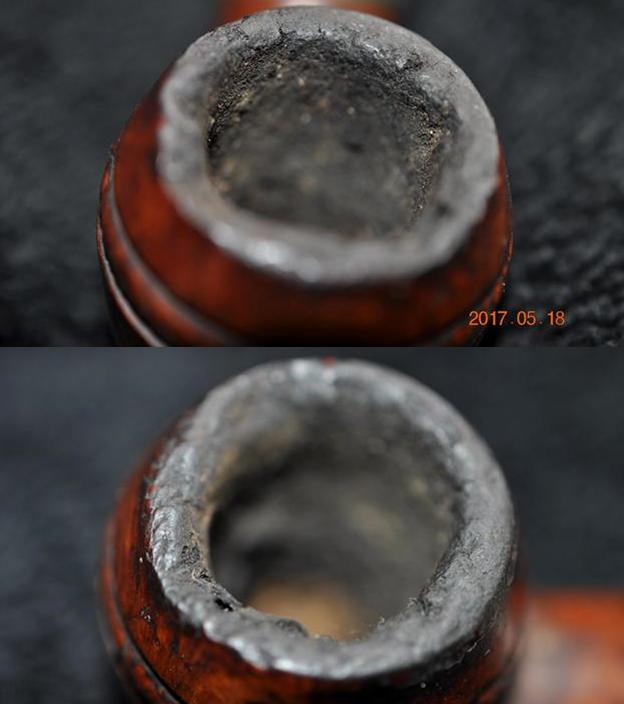
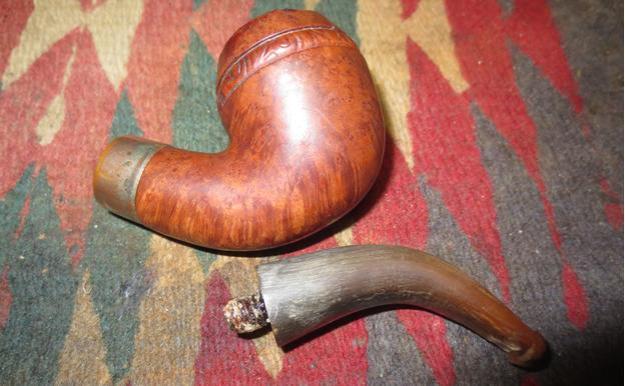
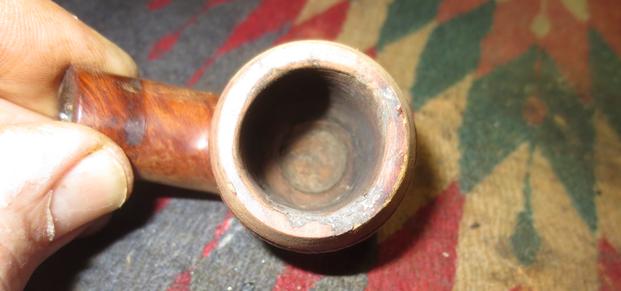
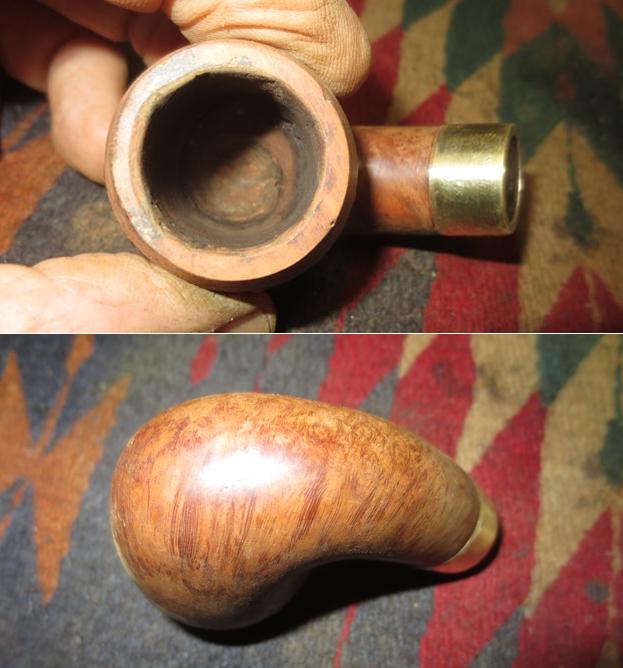
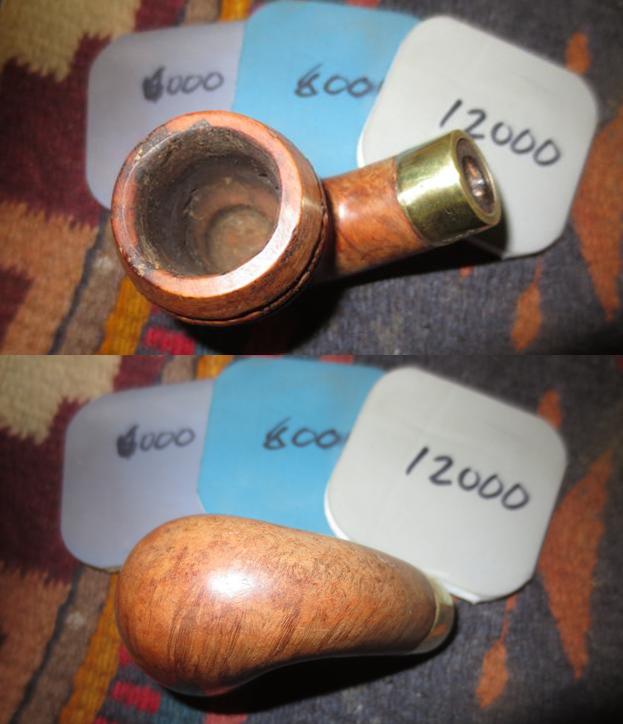
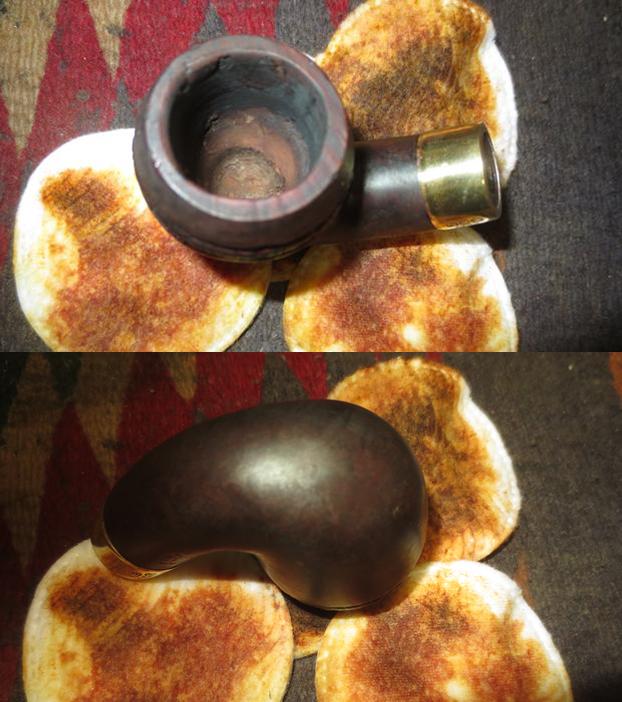
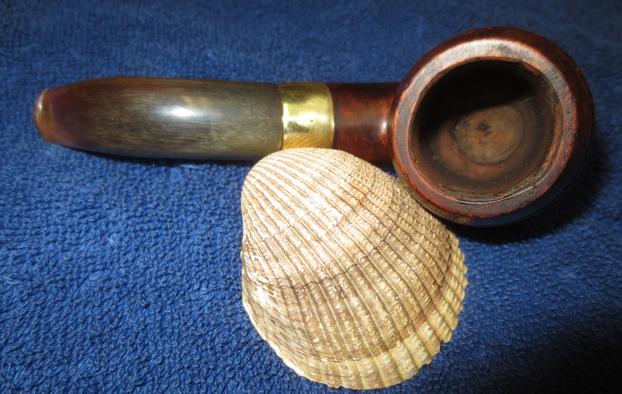
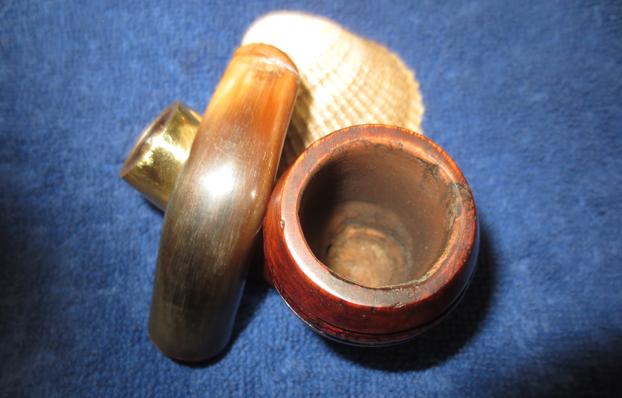
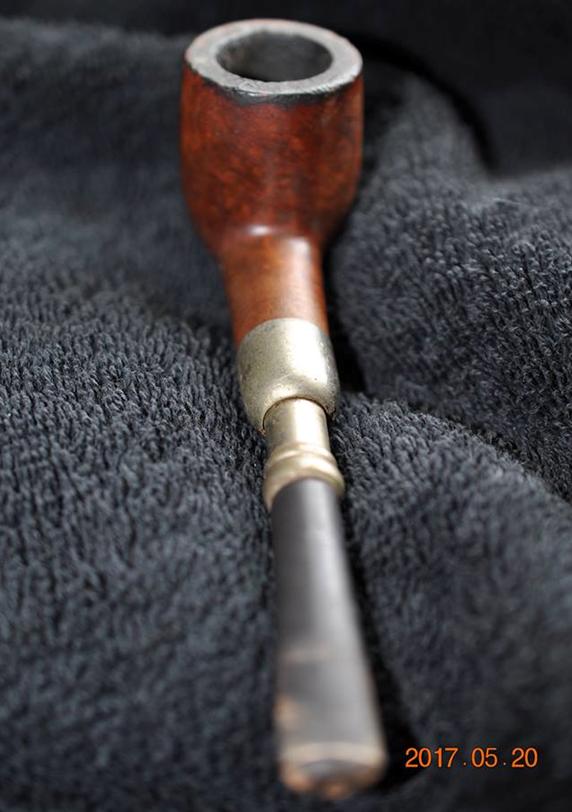
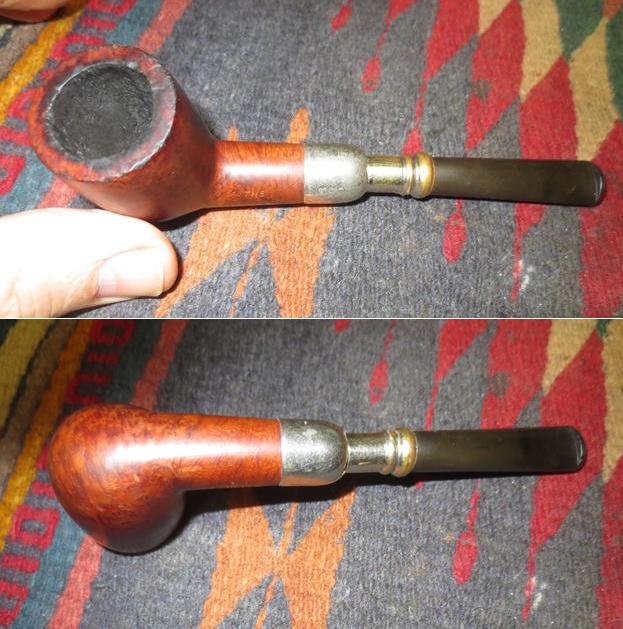
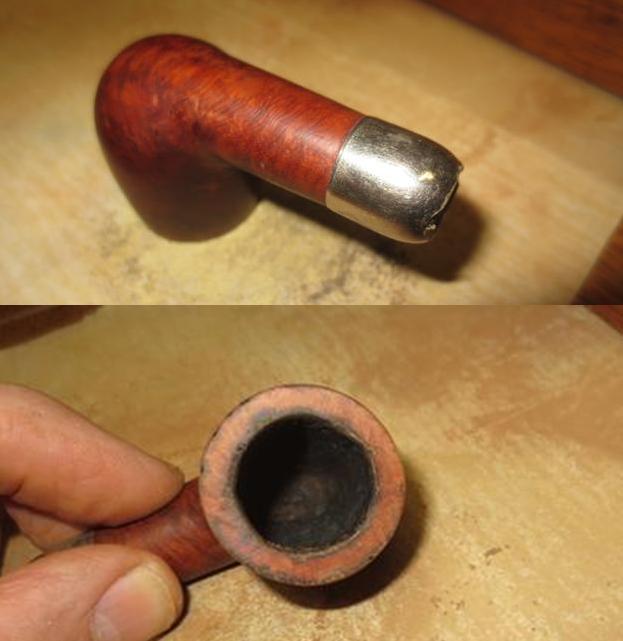
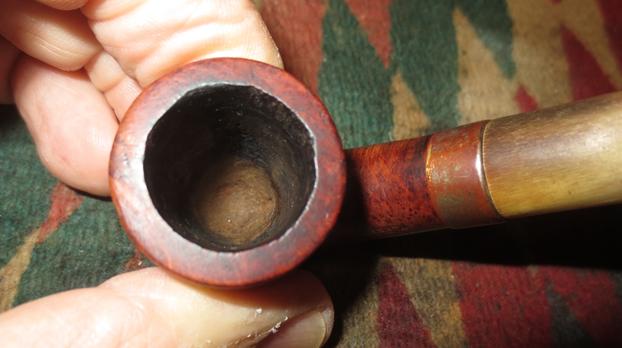
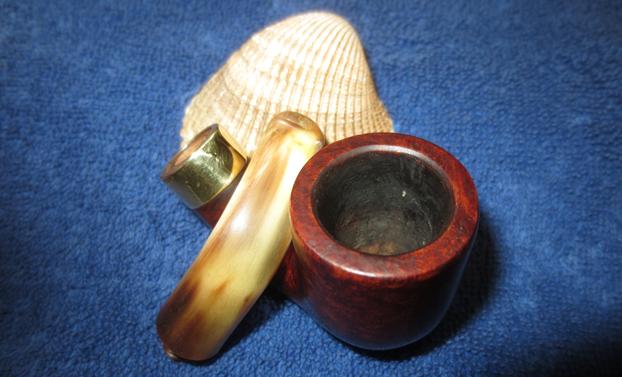
Jeff cleaned up the rim really well – the tars and buildup were gone and fortunately so was much of the varnish coat. There were just a few shiny spots on the rim that would need to go. The bowl had been reamed back to bare briar.
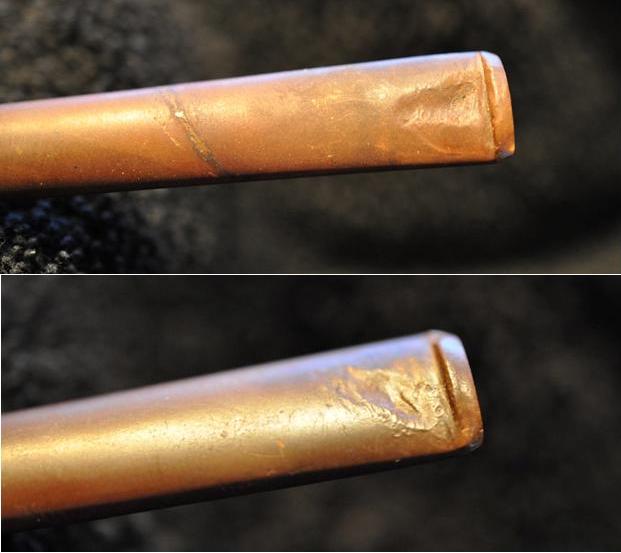
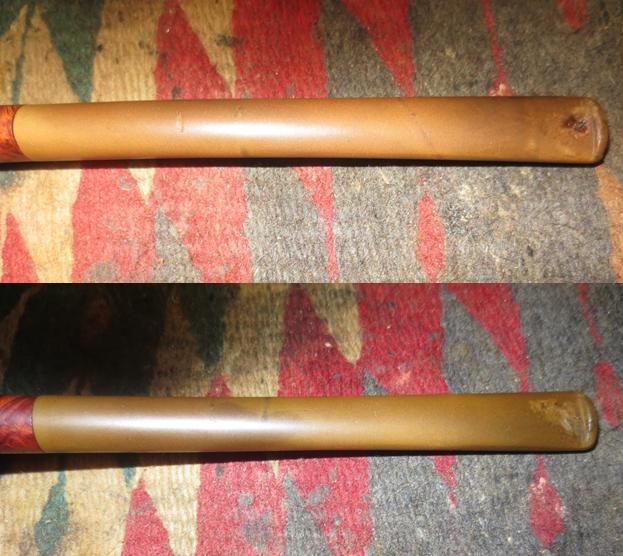
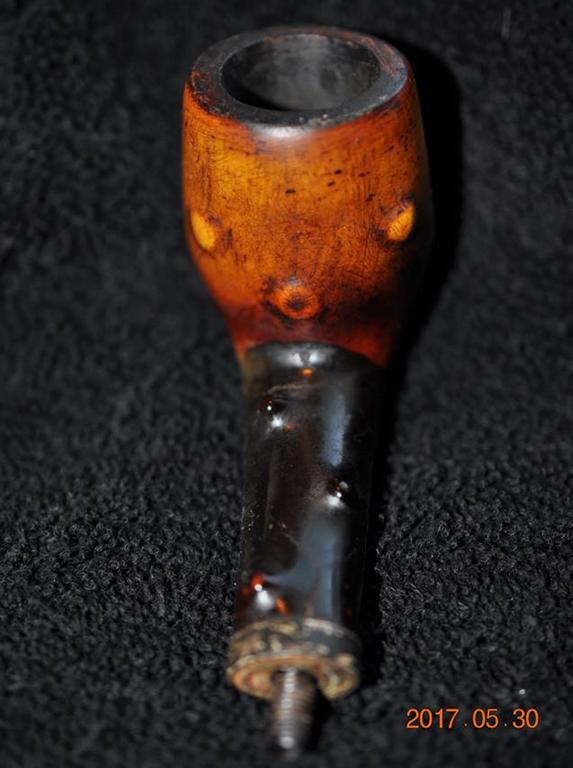
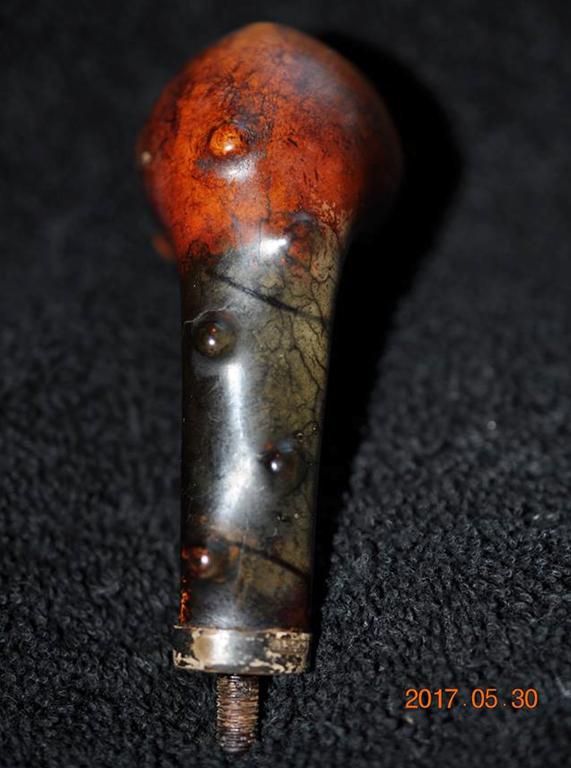
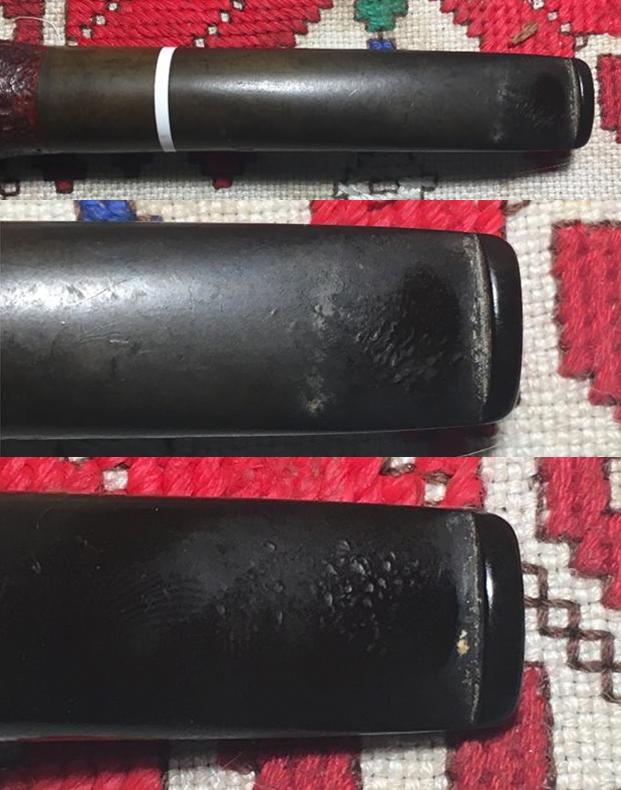
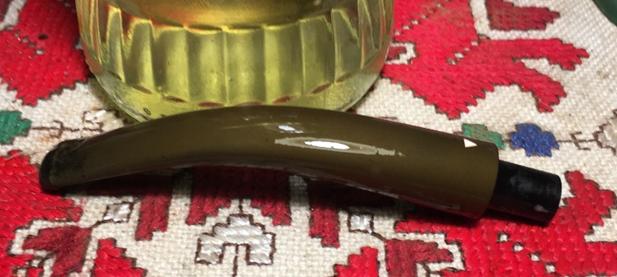
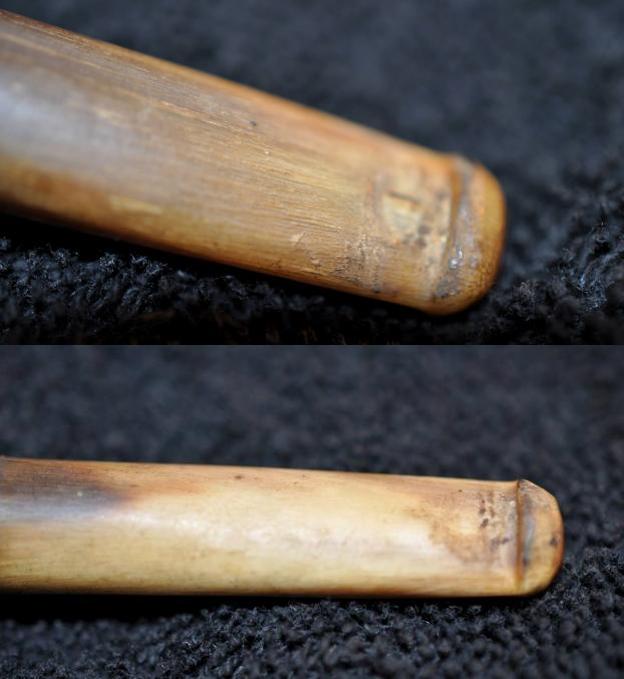
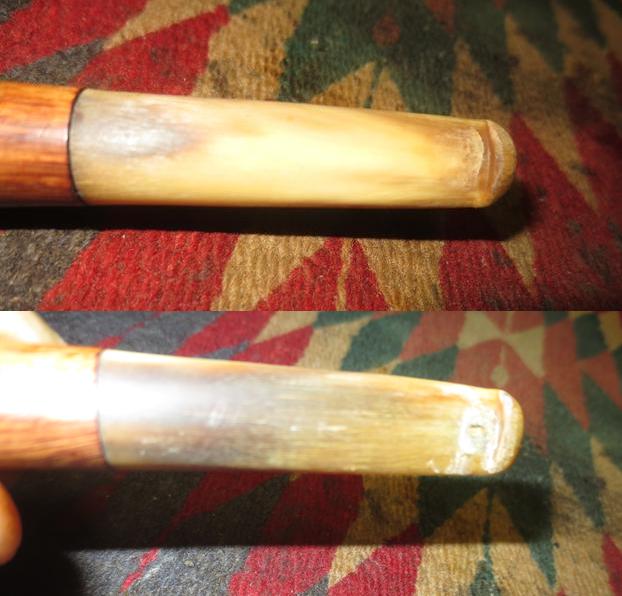
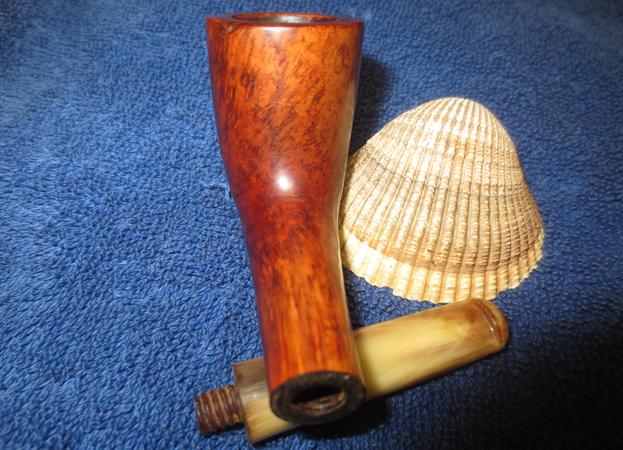
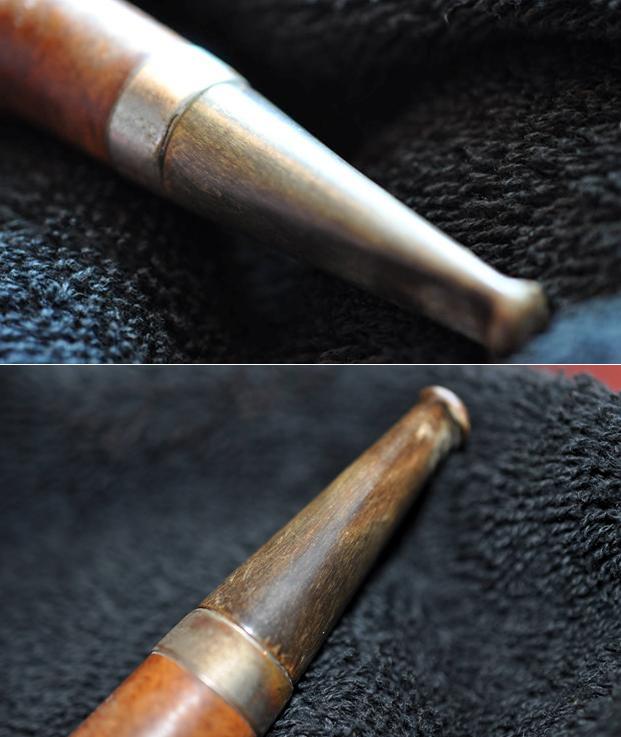
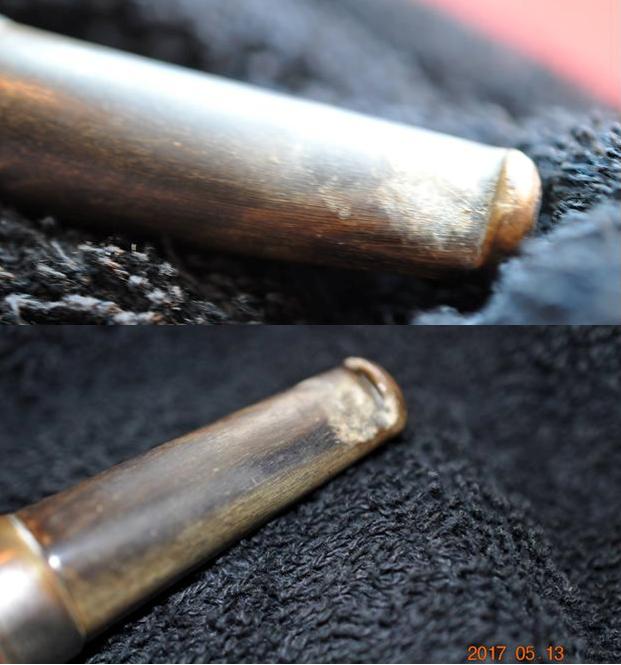
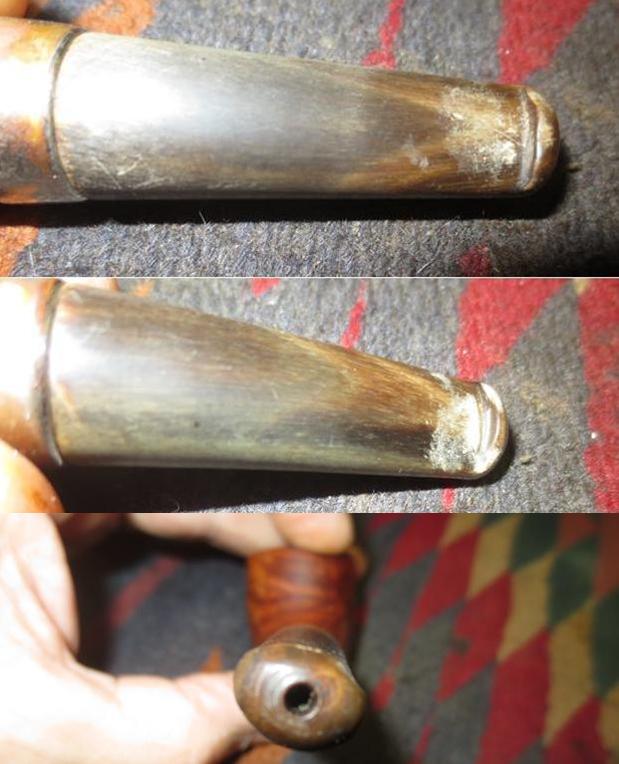
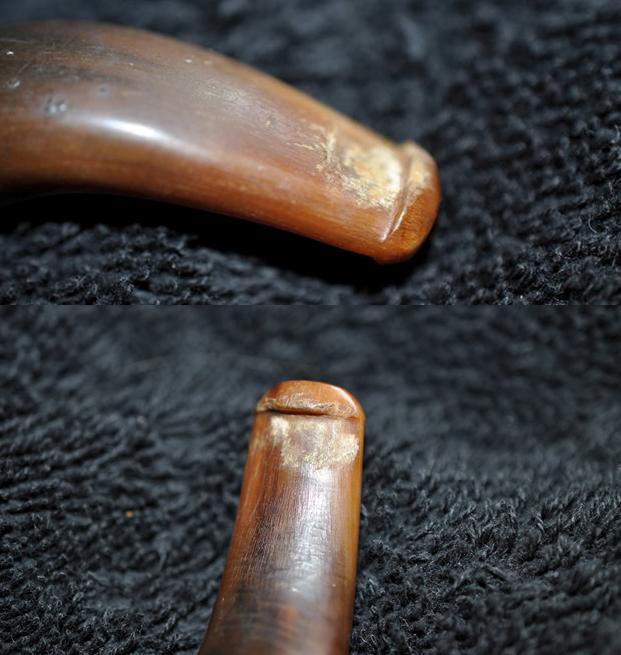
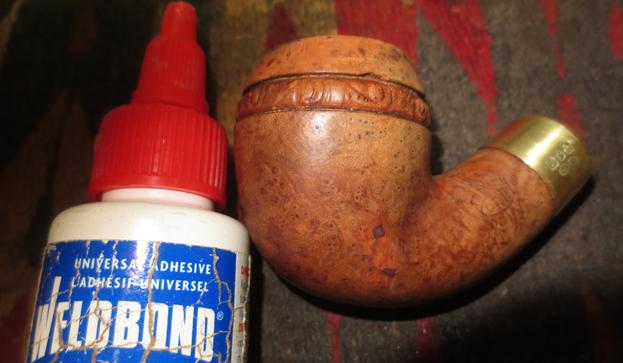
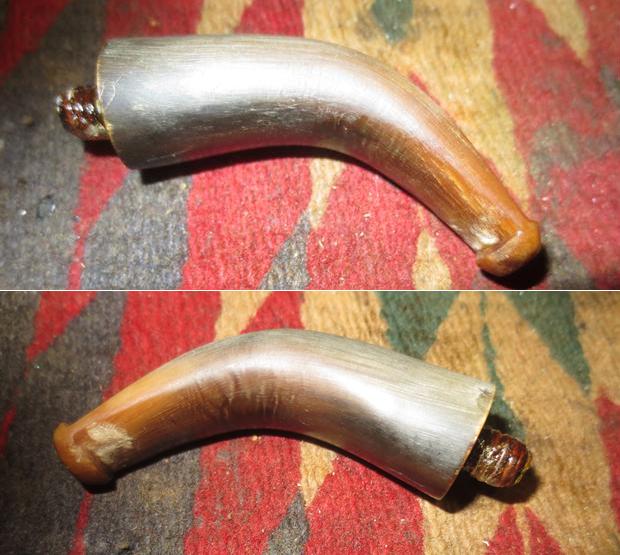
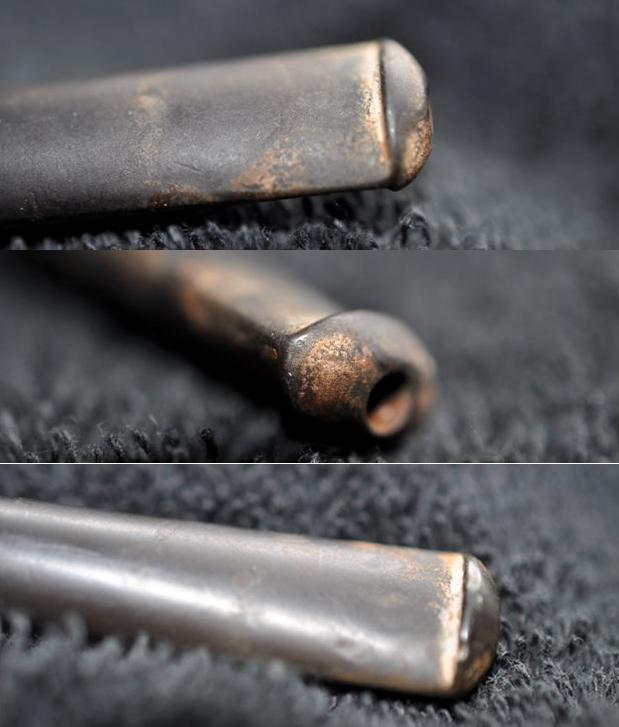
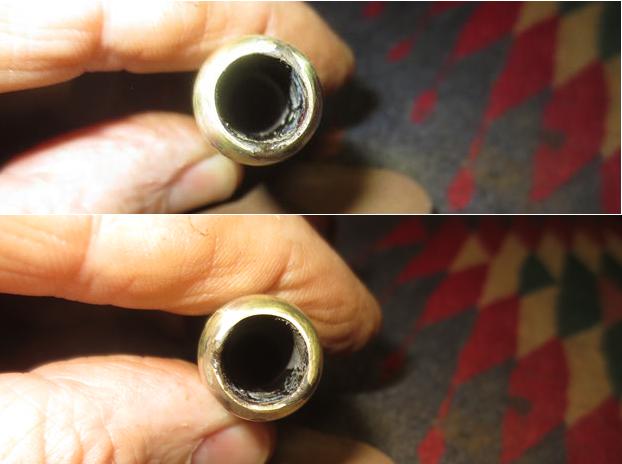
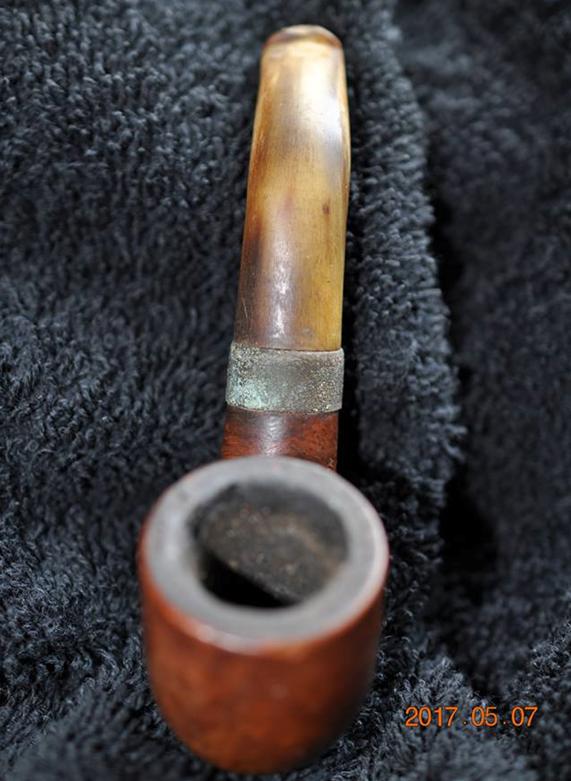
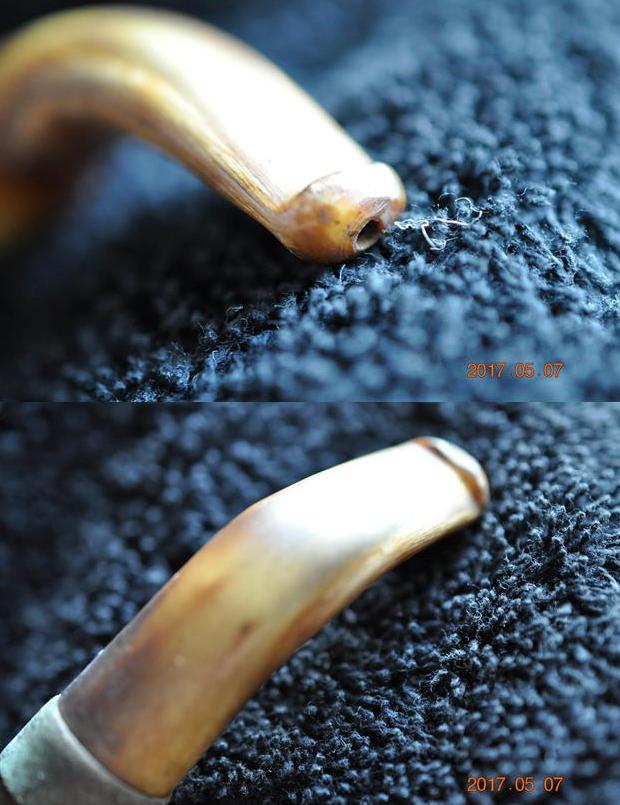
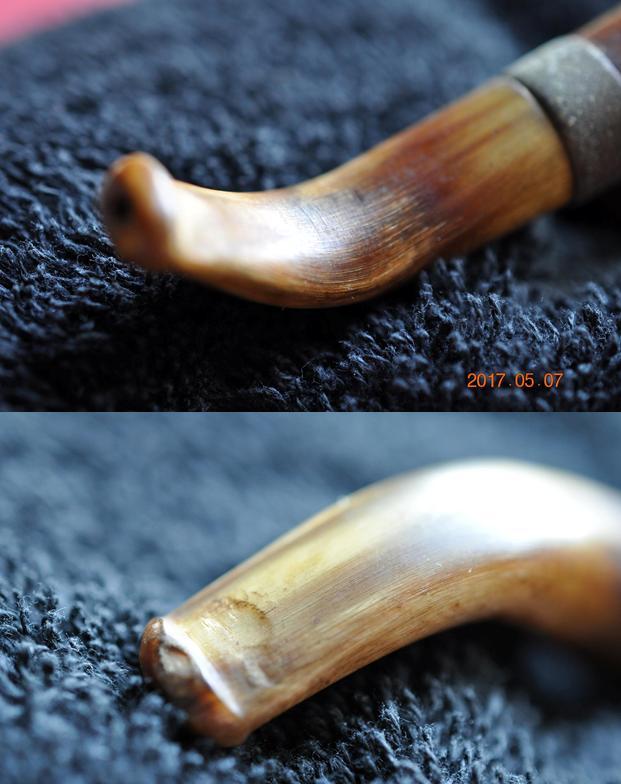
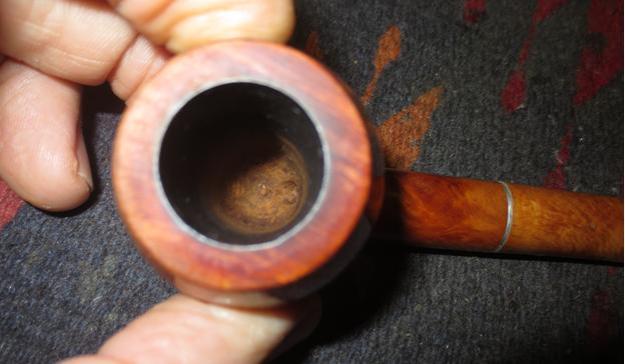
The stem while clean was an absolute disaster. It had been gnawed back through the stembite protection and the entire end of the stem was missing. I am guess that there was probably about 3/8 to ½ inch of the stem missing and the button was totally missing.
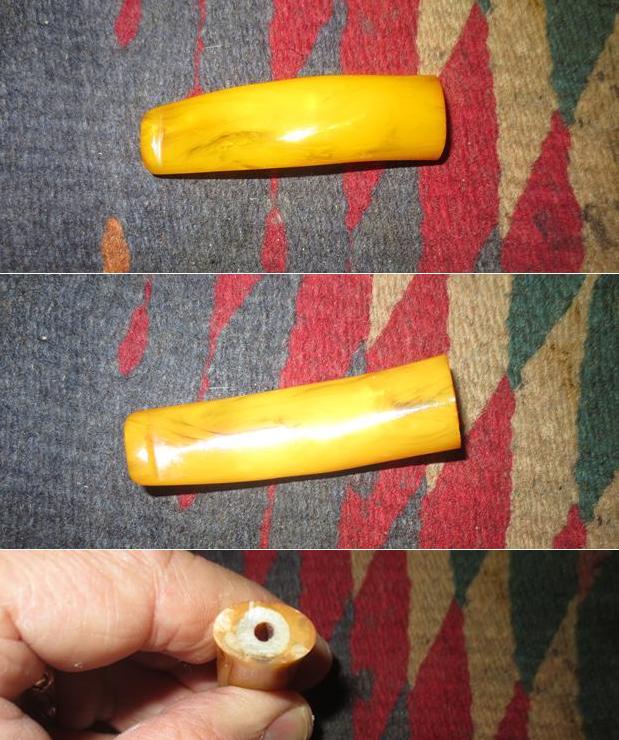
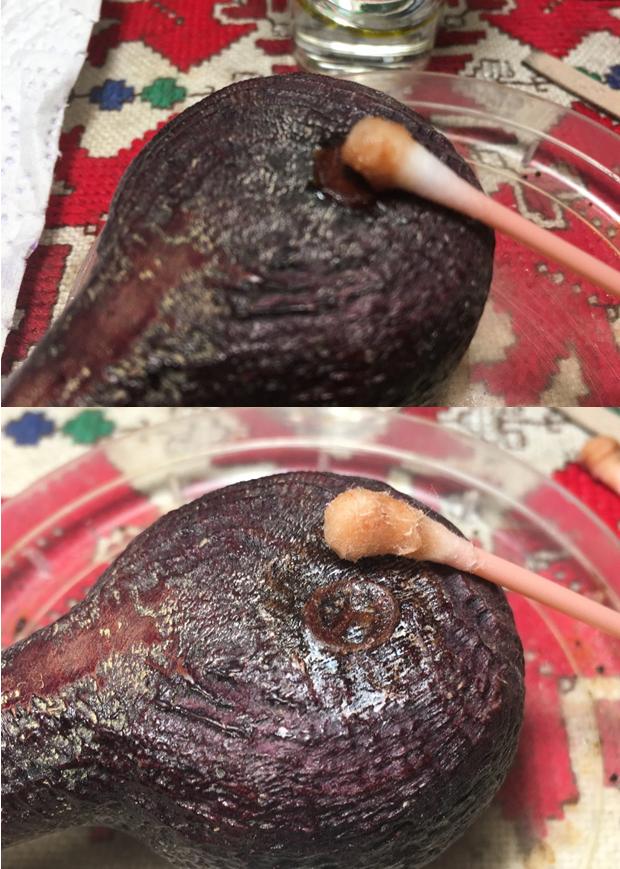
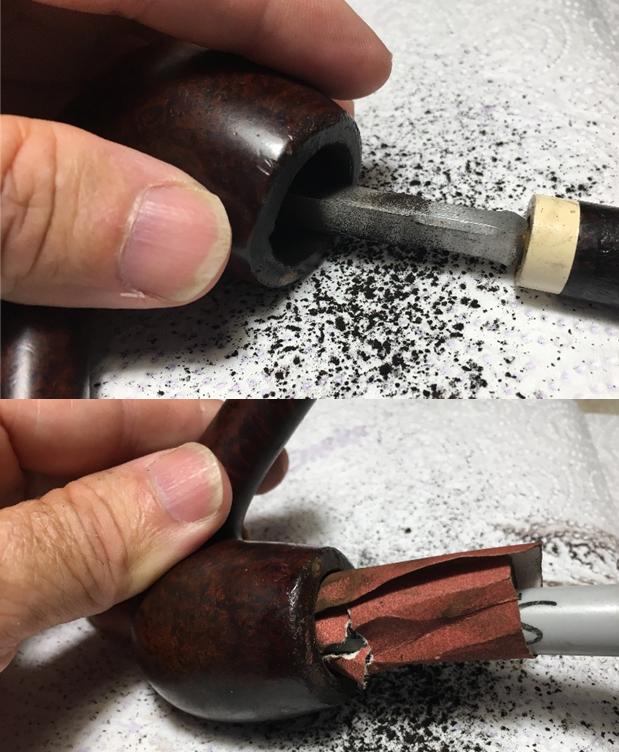
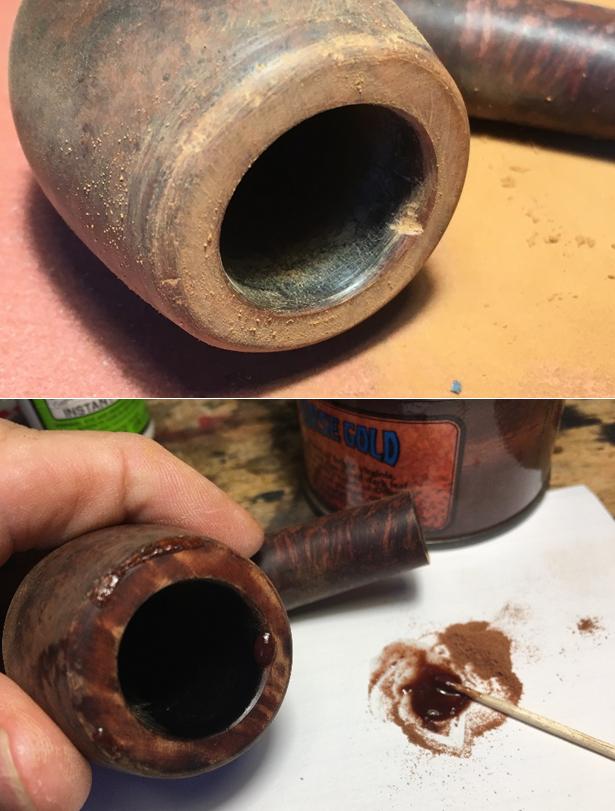
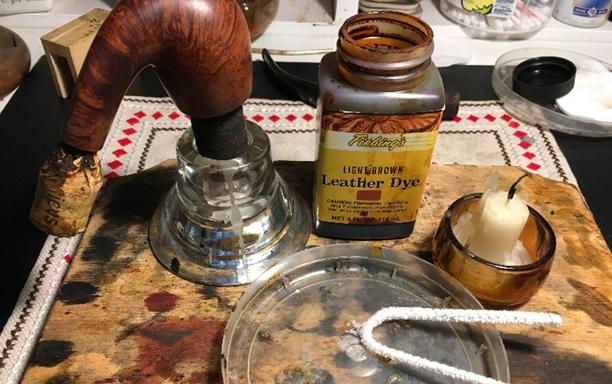
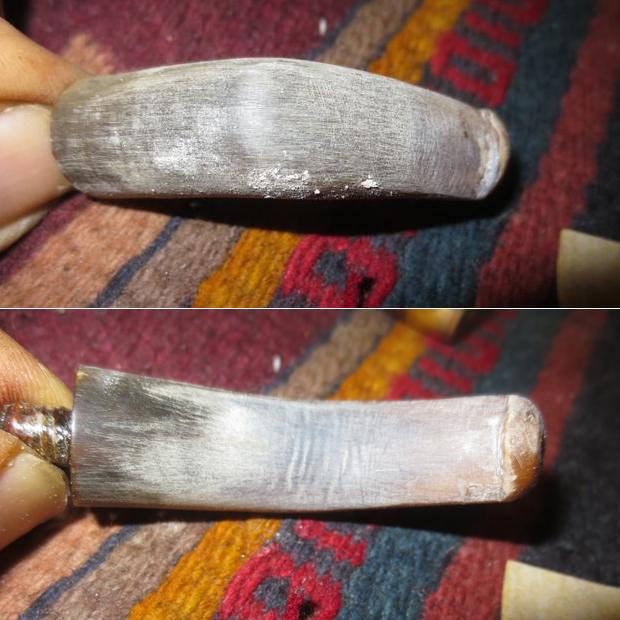
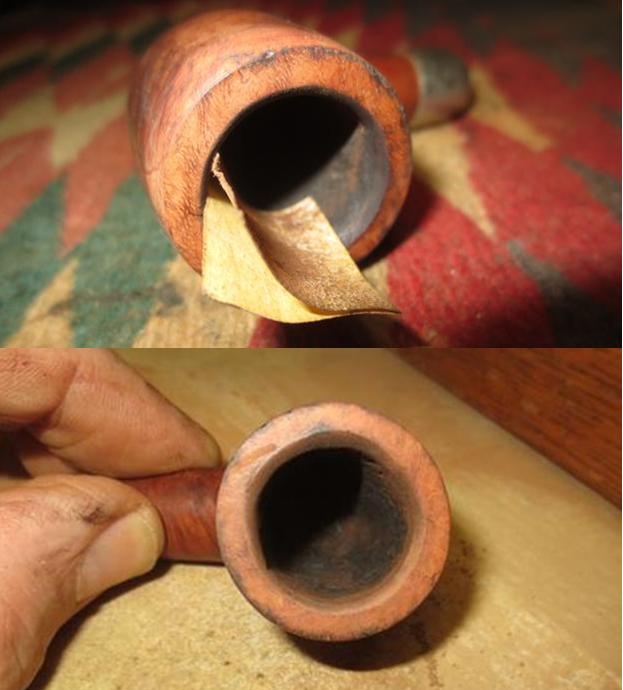
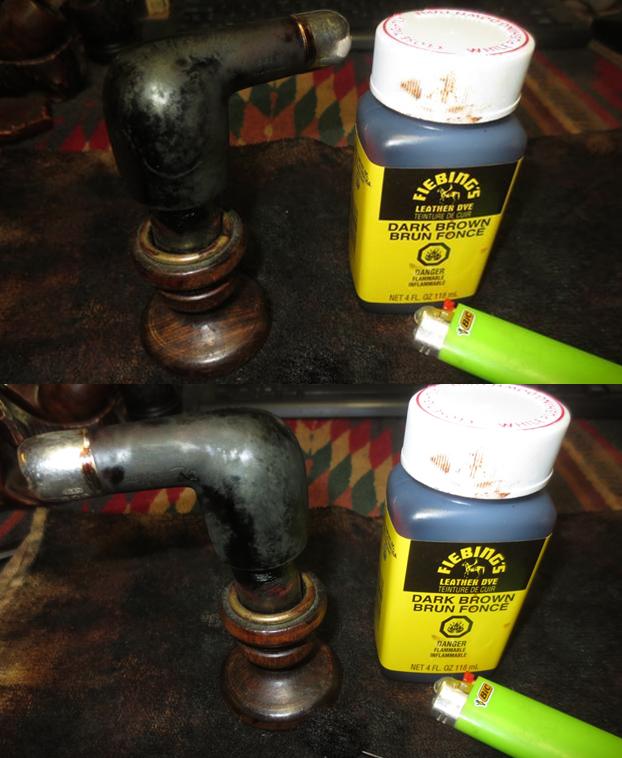
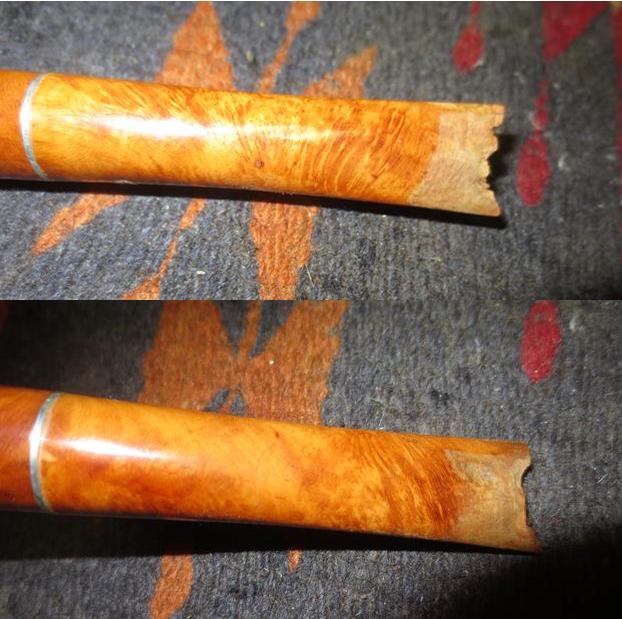
I started the restructuring work on the stem with a Dremel and a sanding drum. I took the damaged areas back until I had some solid briar to work with. I did not want to remove too much of the stem material. The twin airways in the stem were very close to the surface in the stem at this point so I would need to do something a little different from the standard recutting a new button on the existing material.
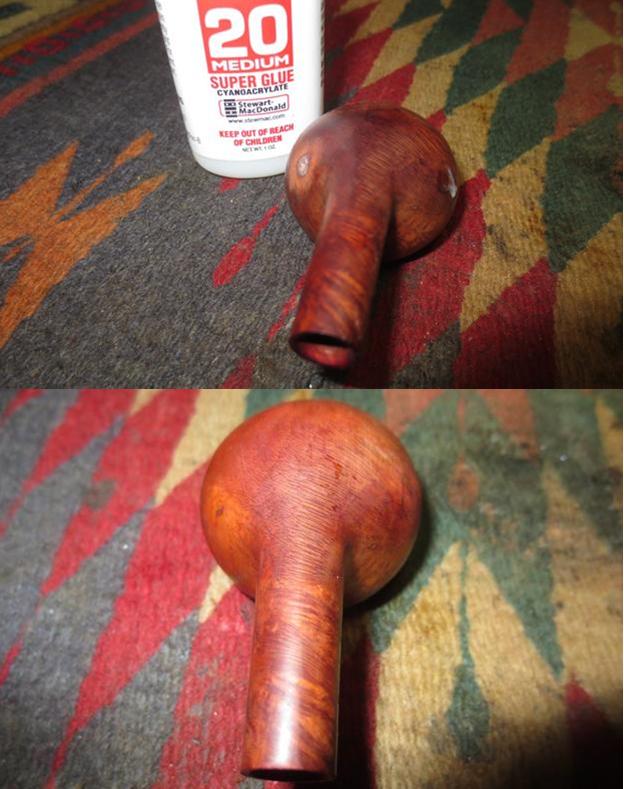
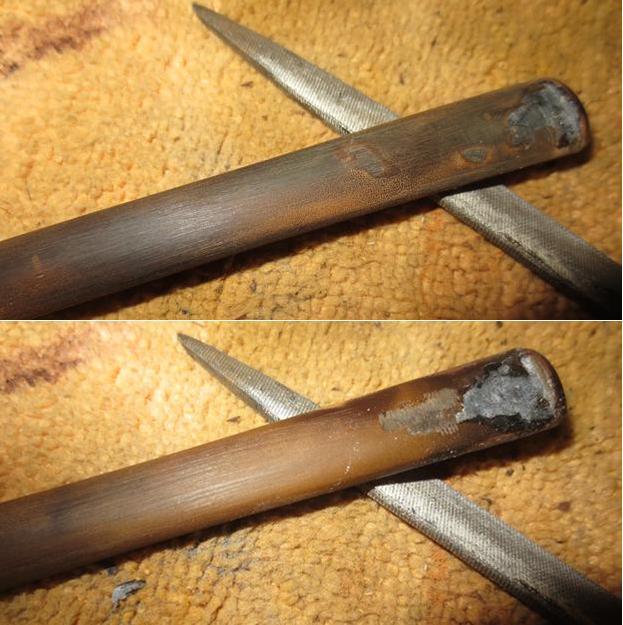
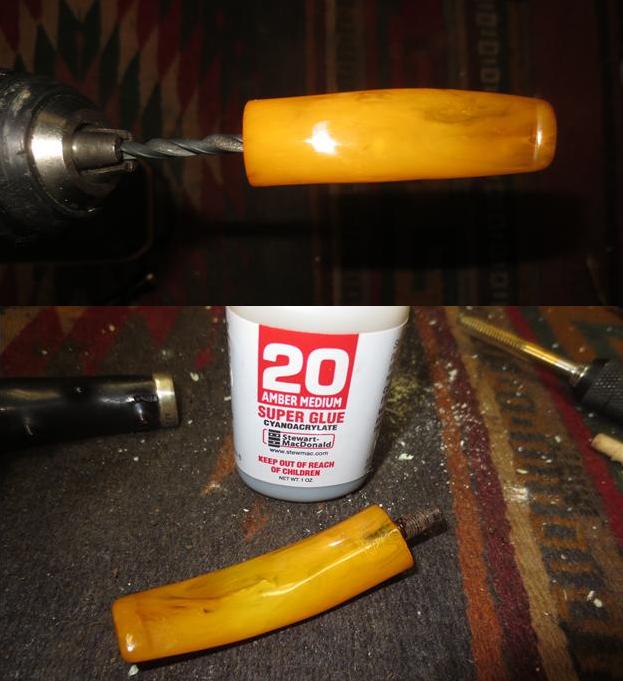
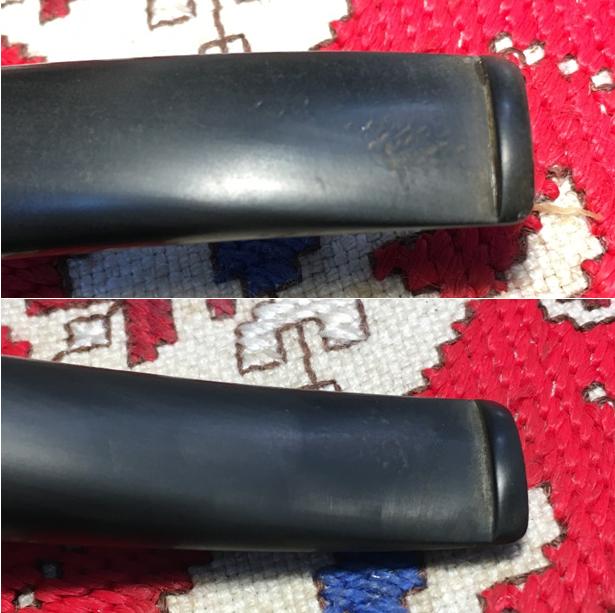
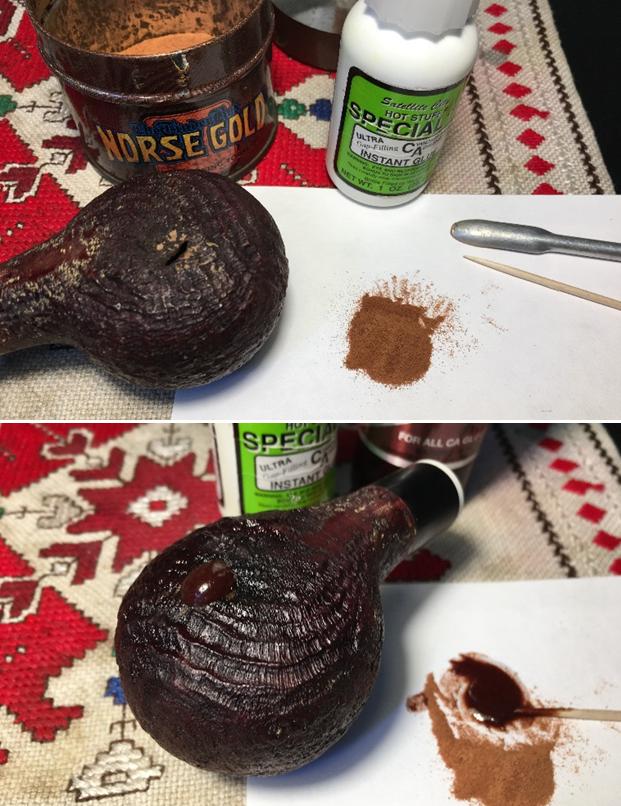
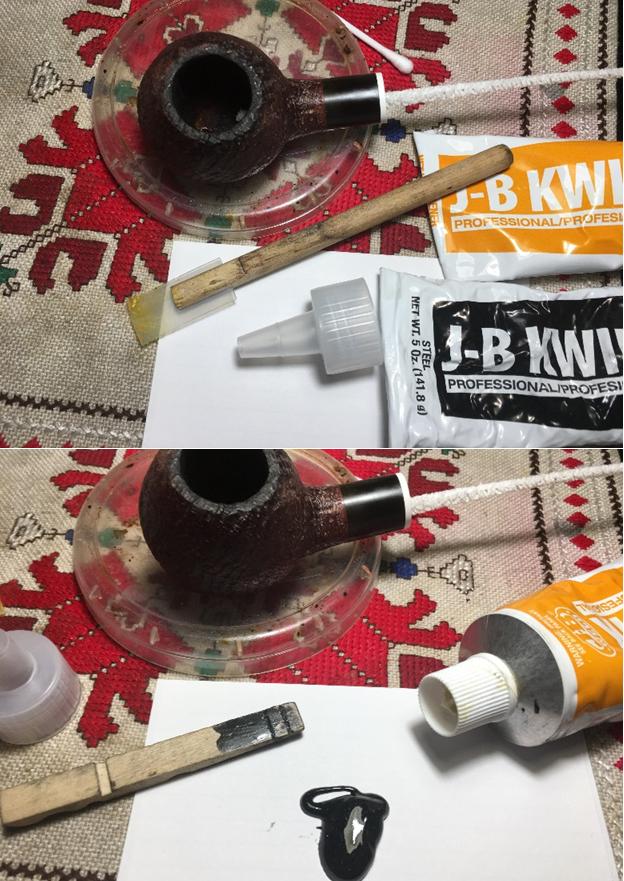
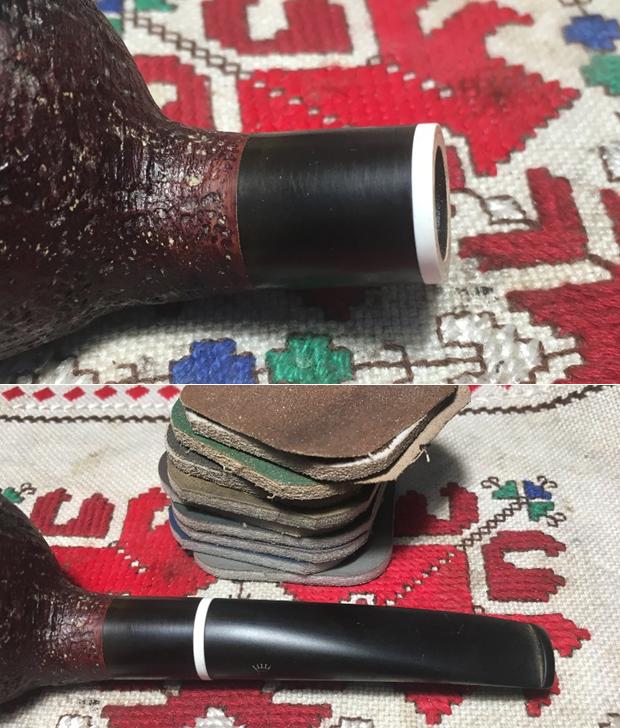
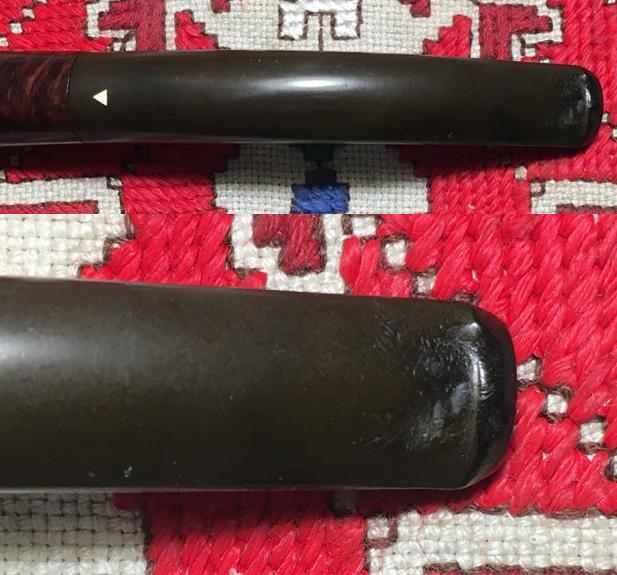
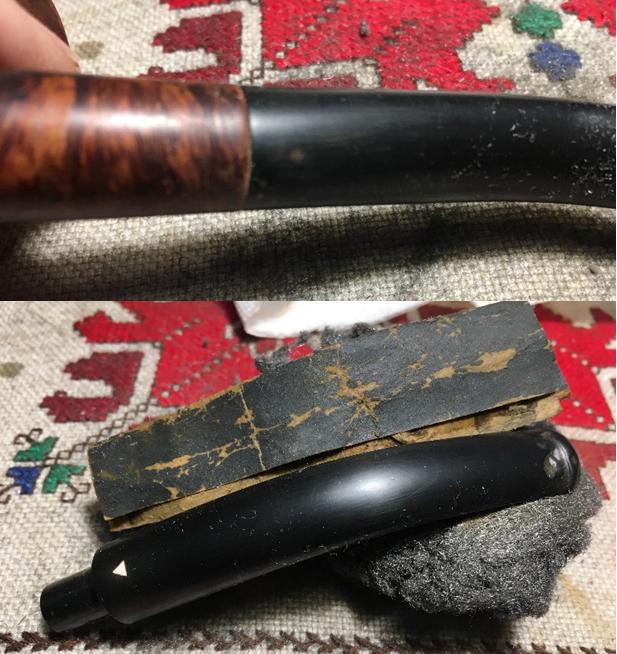
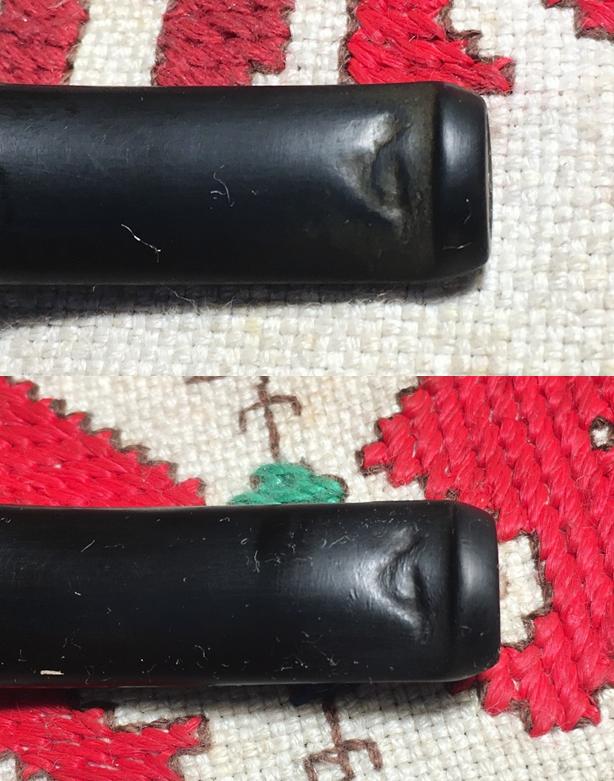
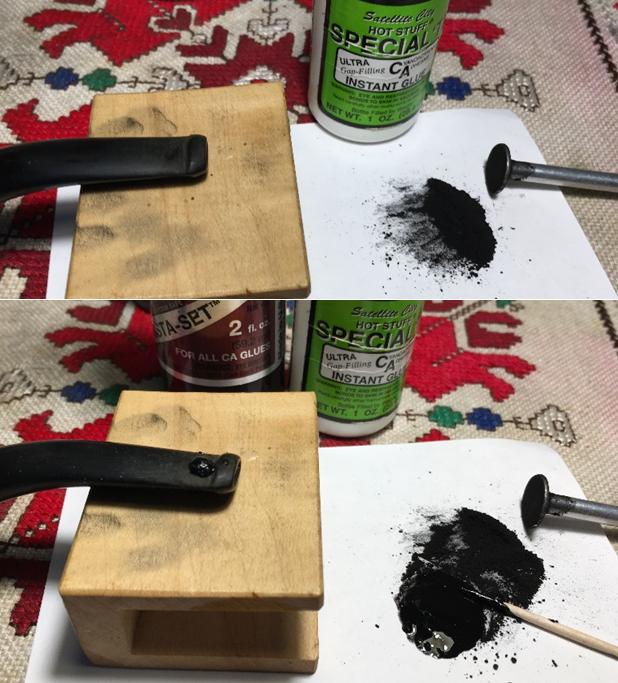
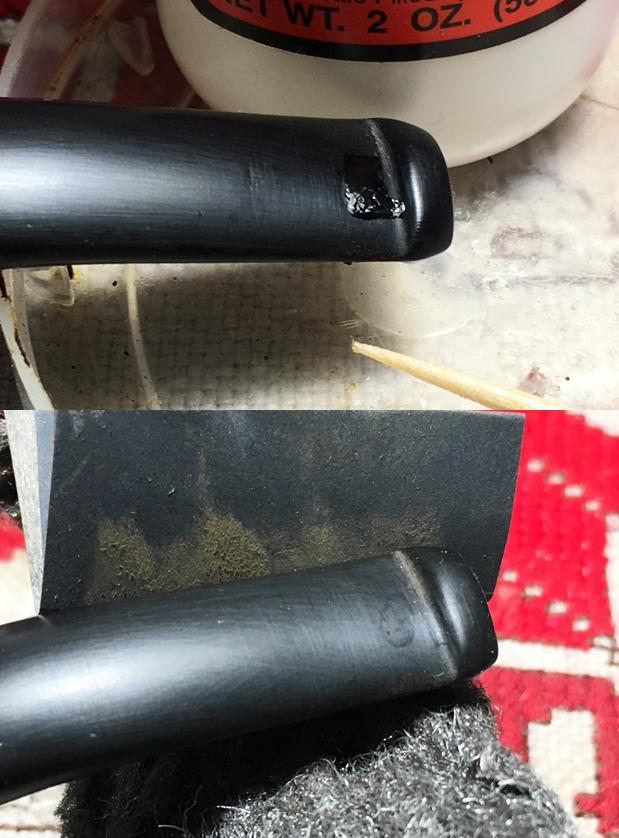
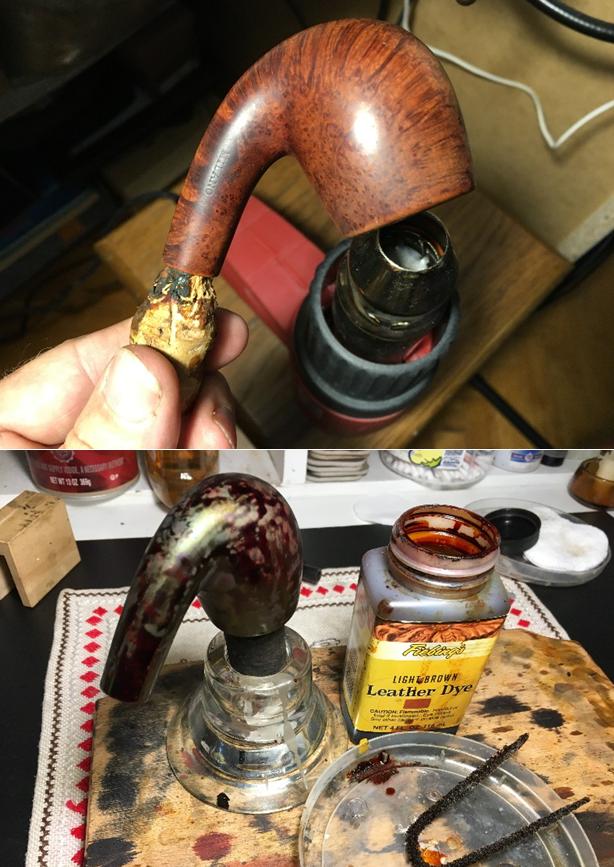
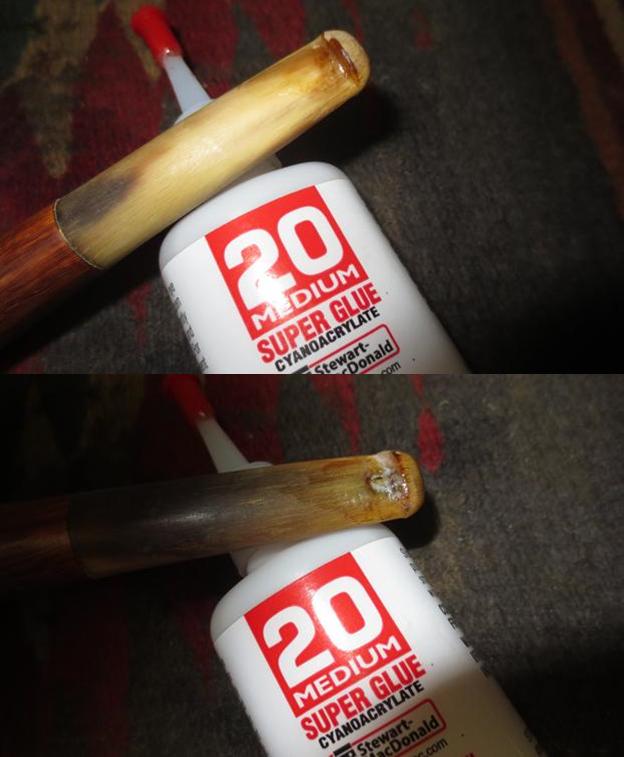
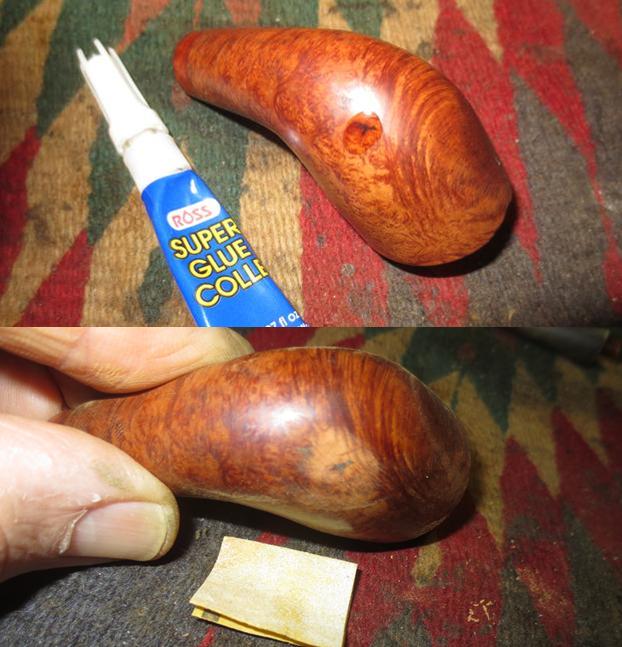
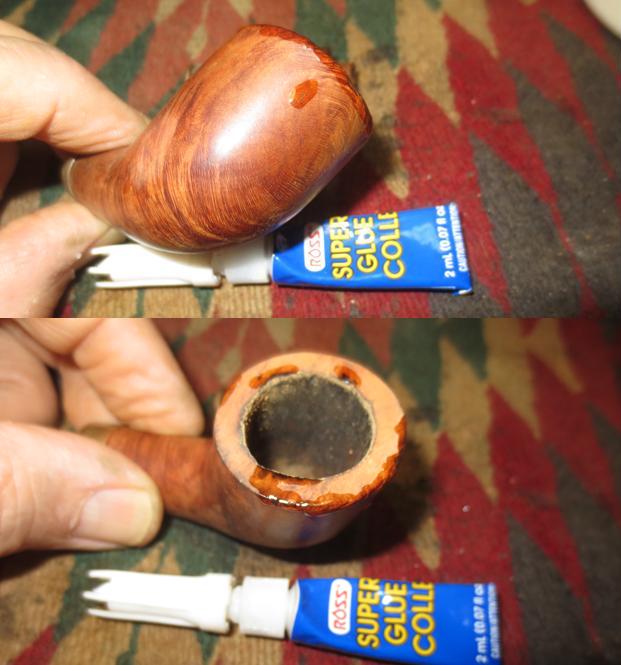
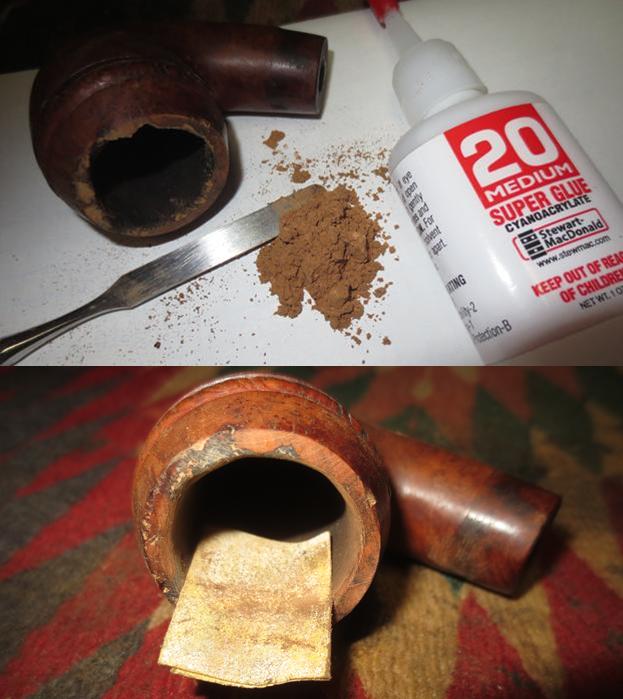
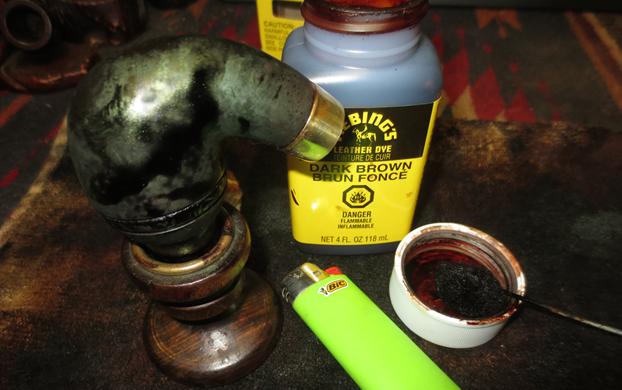
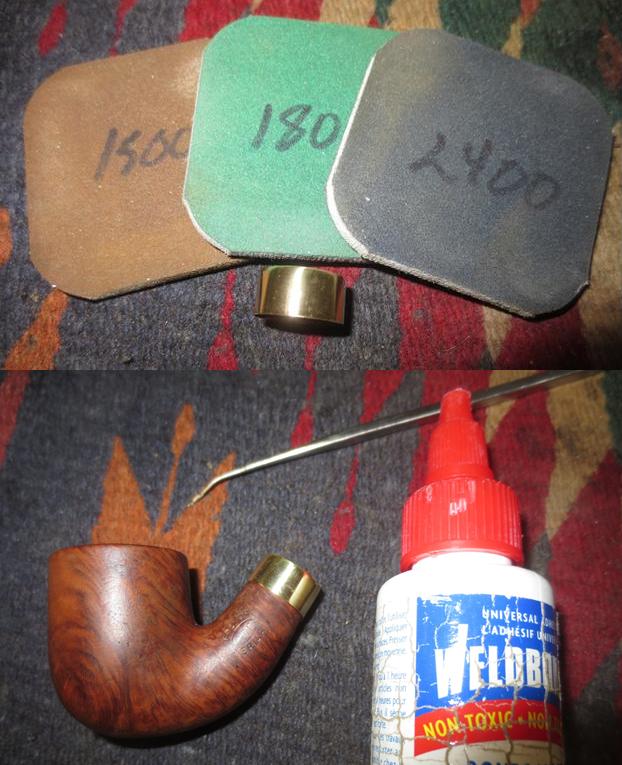
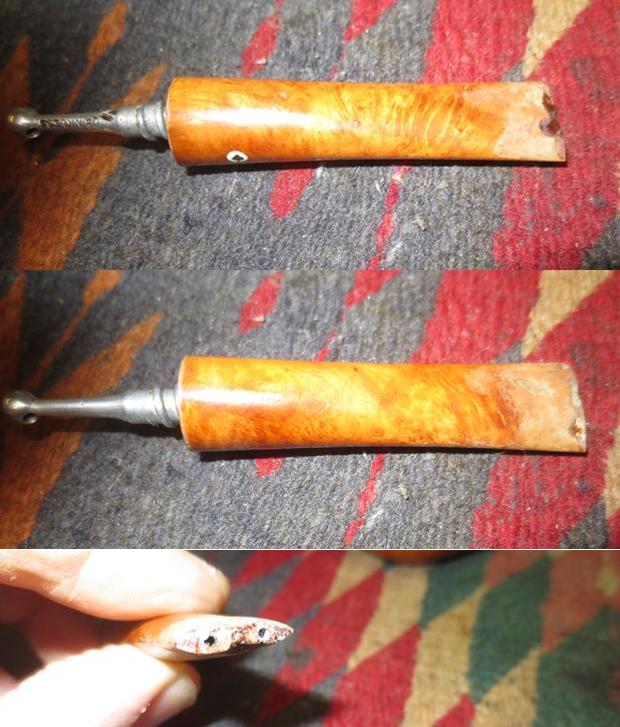
I started the rebuilding the end of the stem with clear super glue. I wanted to fill in the small divots in the surface of the stem on both sides and make the stem smooth and the end crisp. I built up the area where the new button would be with clear super glue first to stabilize the gnawed stem and begin with a solid edge. I put briar dust on top of the super glue and layered the dust and the glue until I had a workable portion on the stem surface. I needed enough of the new material to be able to reshape a button. In the second set of photos you can see the button area beginning to take shape. 
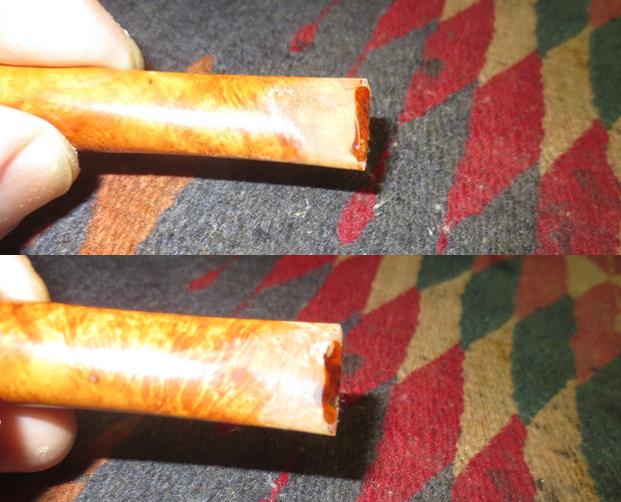
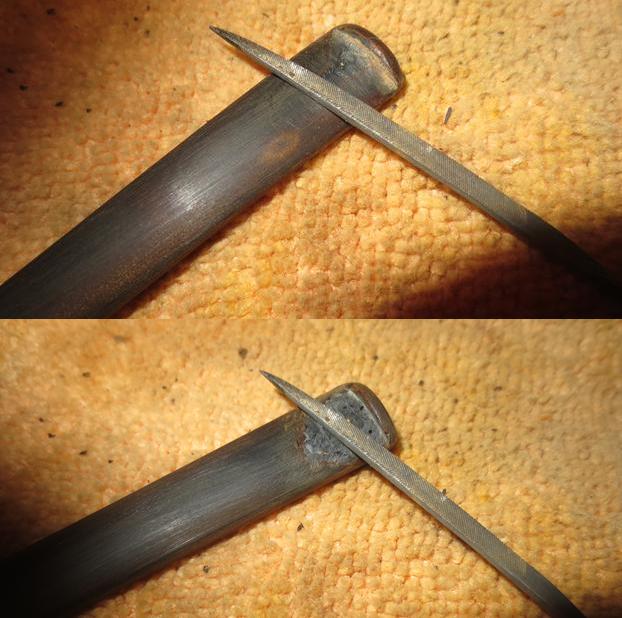
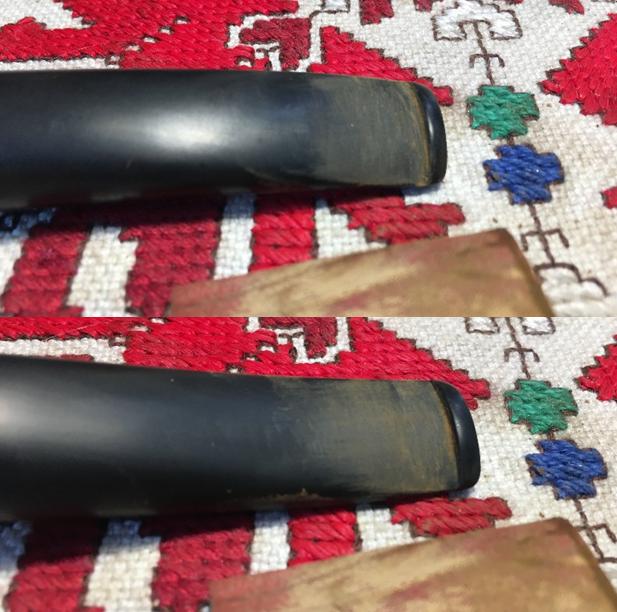
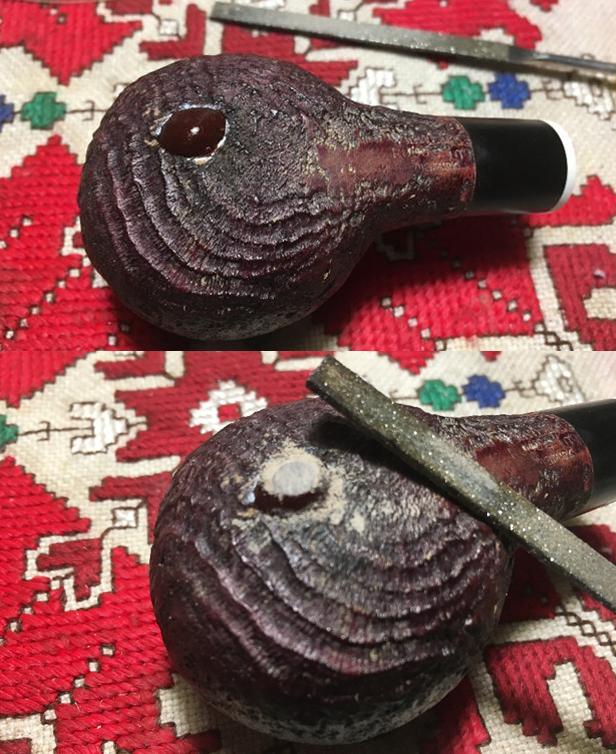
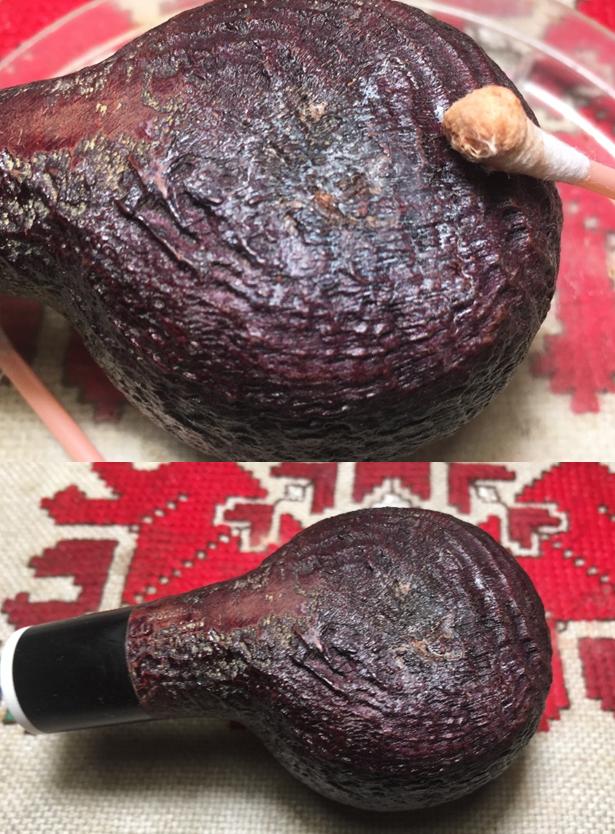
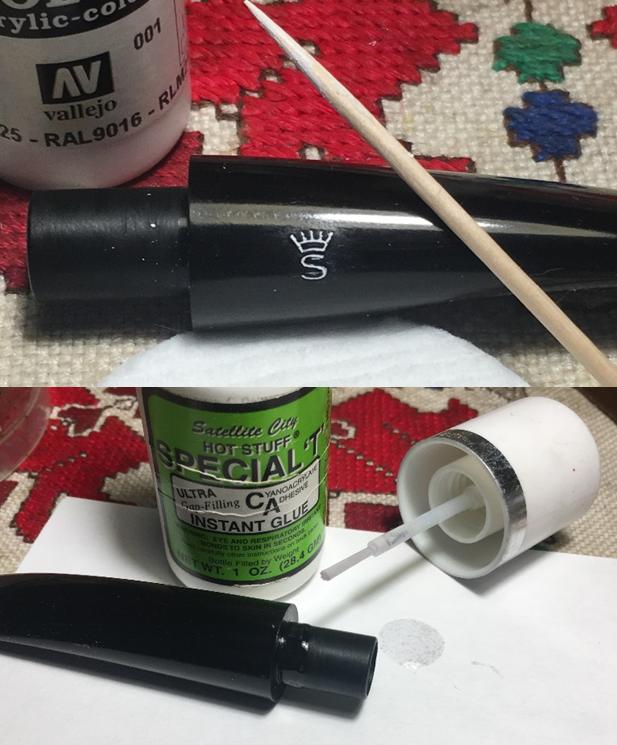
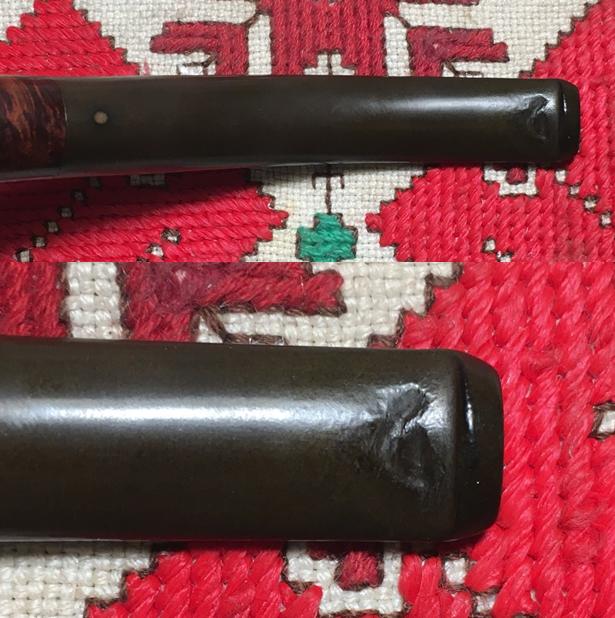
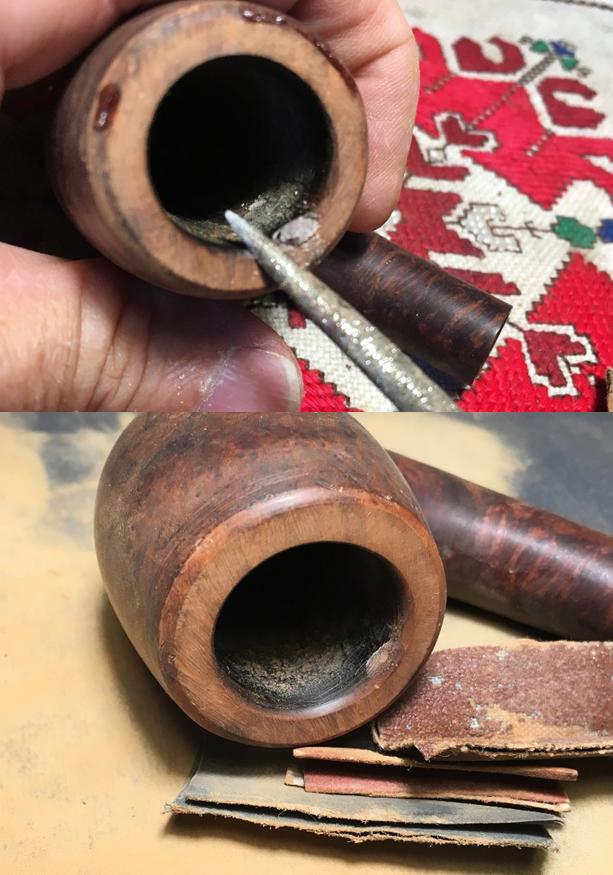
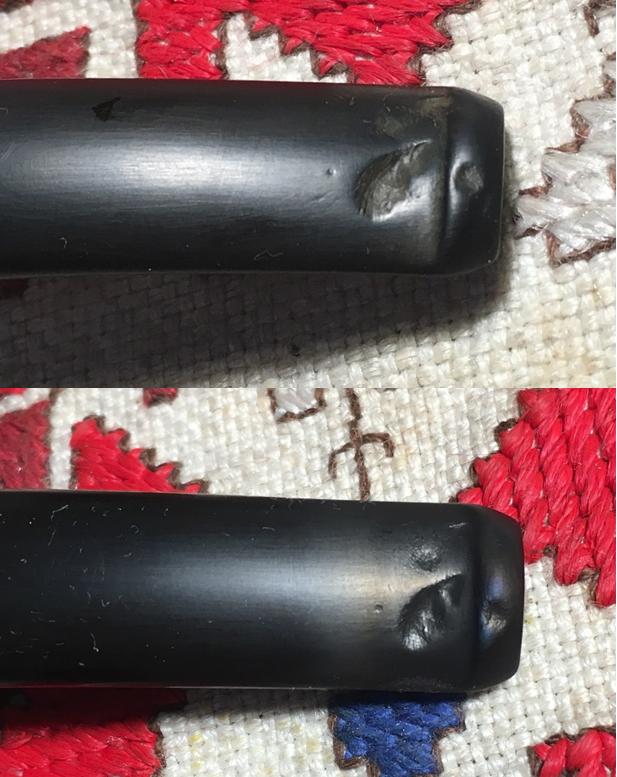
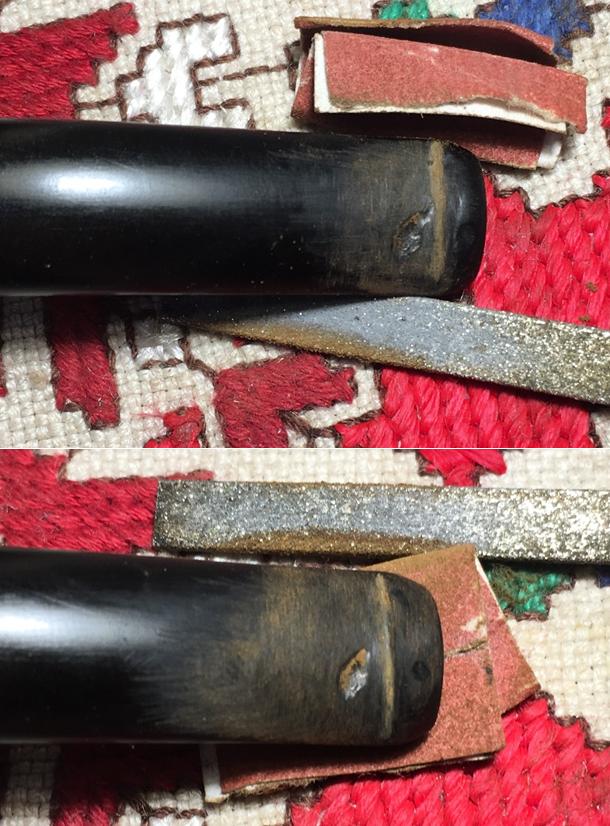
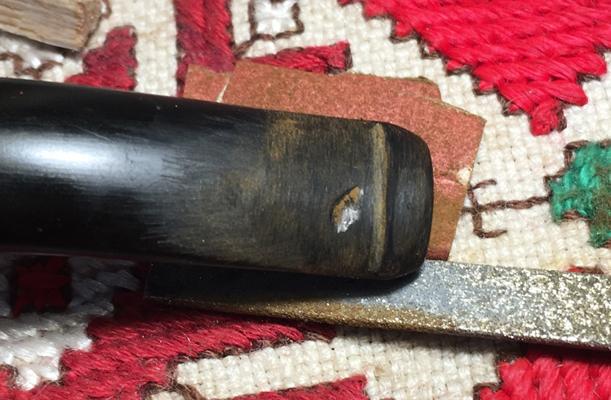
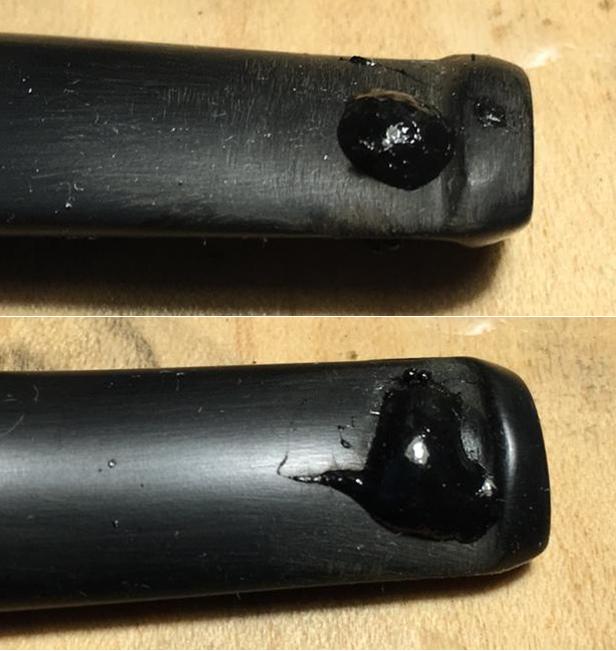
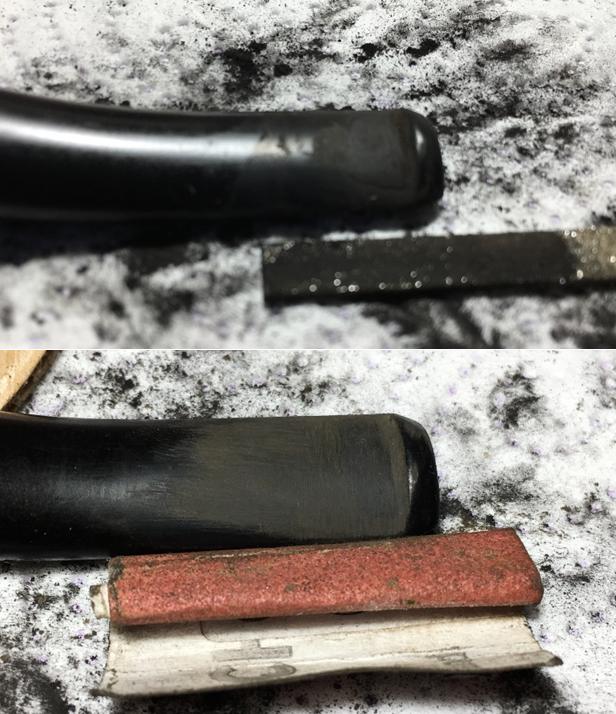
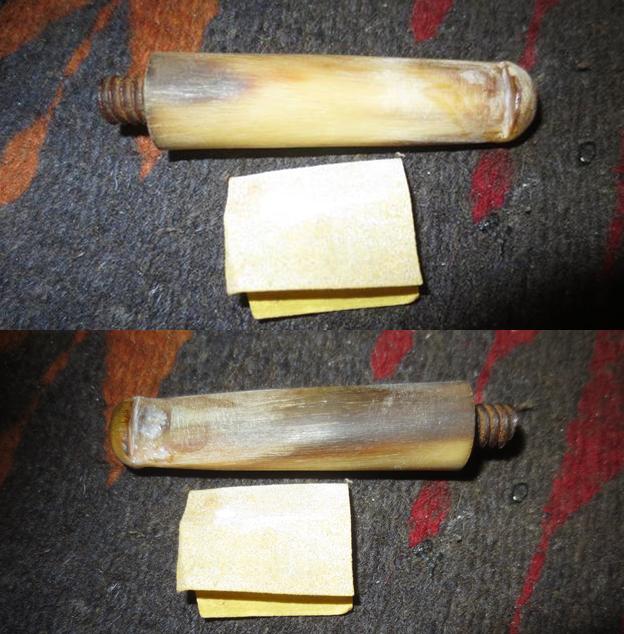
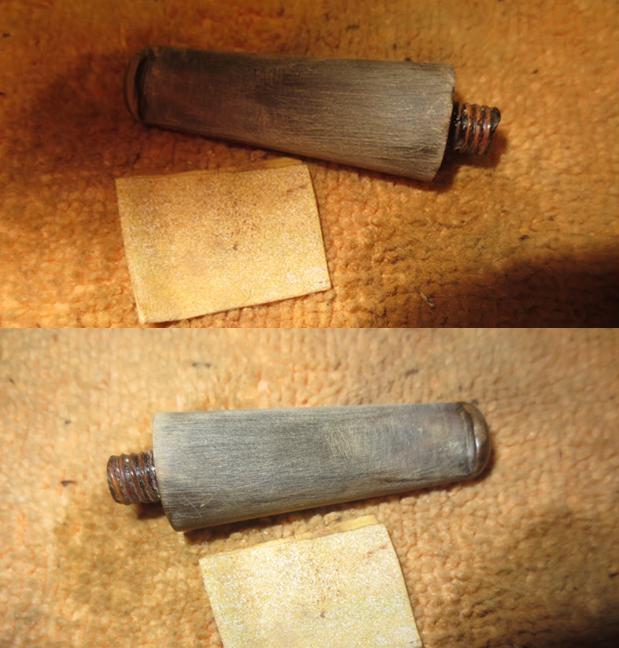
I used a needle file to recut the edge of the button and square it off with the surface of the stem. I wanted a sharp delineation from the button surface to the stem surface. I also reshaped the button surface as well with the files. The new button is beginning to be visible at this point.I filled in the air bubbles on top and underside surface of the button with clear super glue to make it smooth. I sanded the areas in front of the button on both sides of the stem with 220 grit super glue to blend it into the rest of the stem surface.
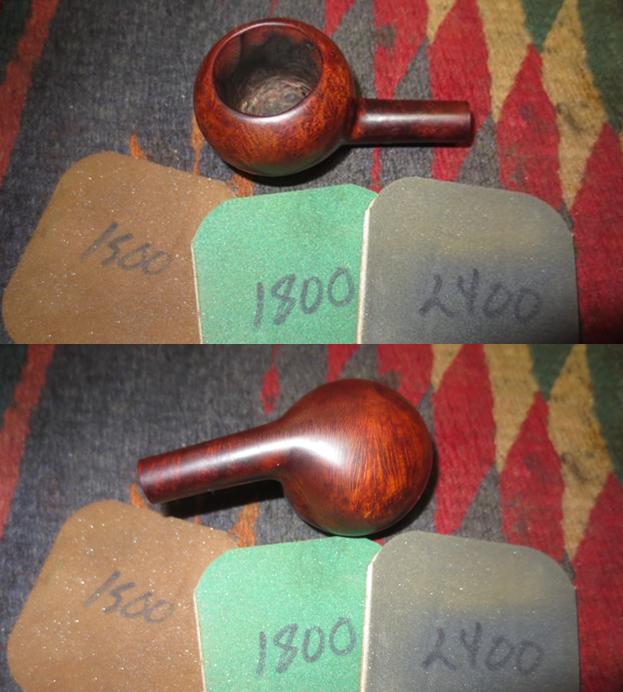
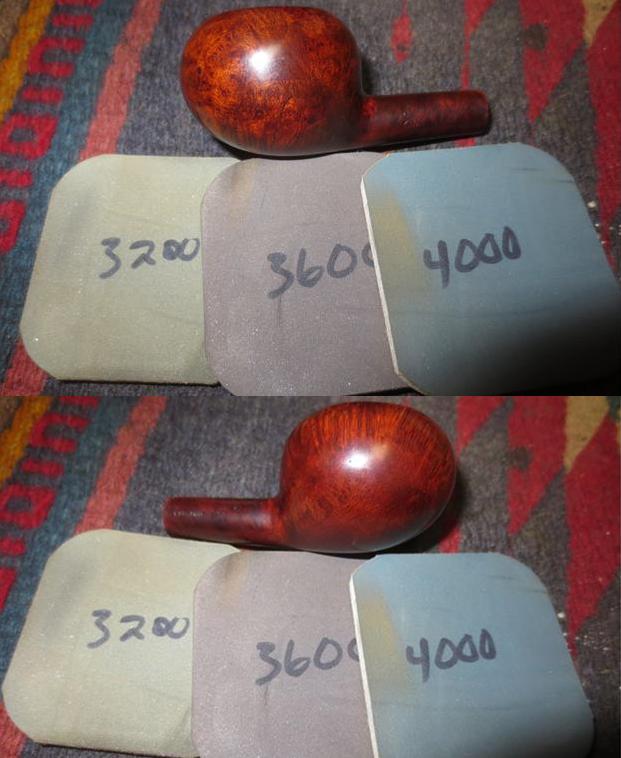
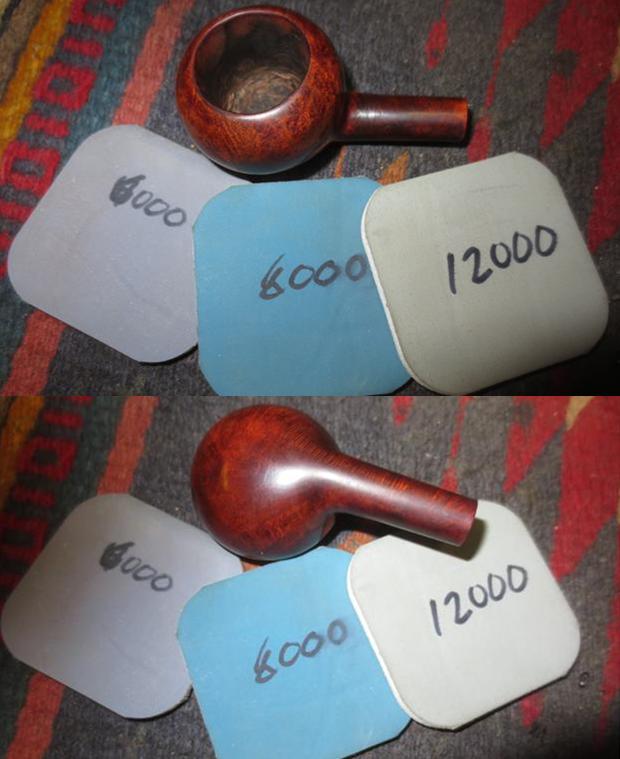
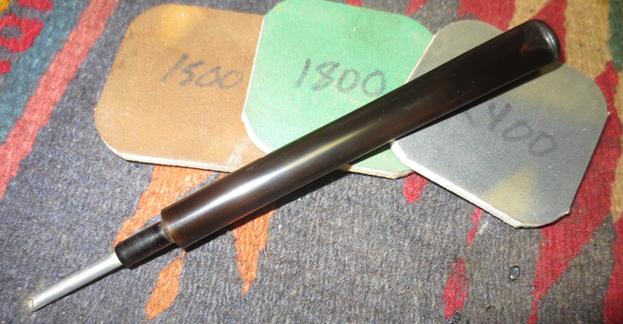
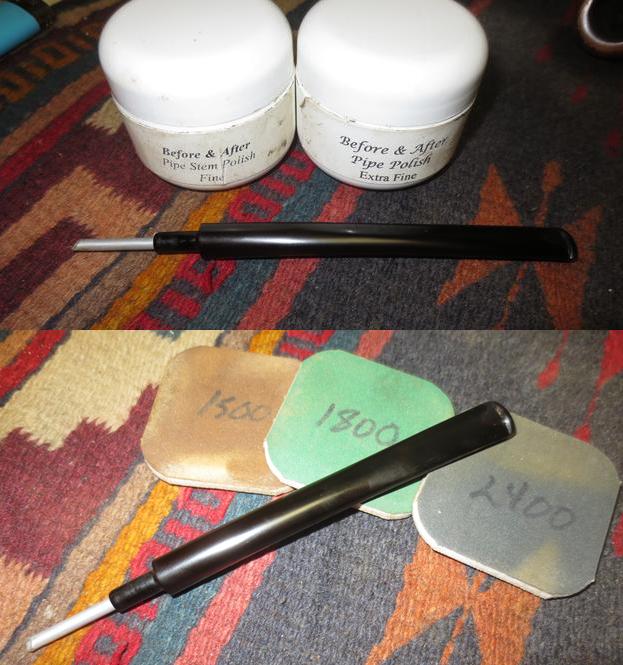
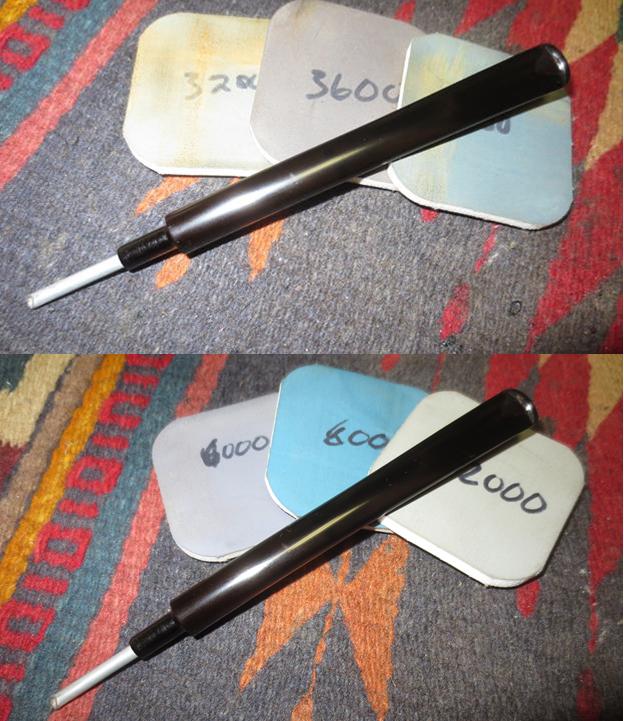
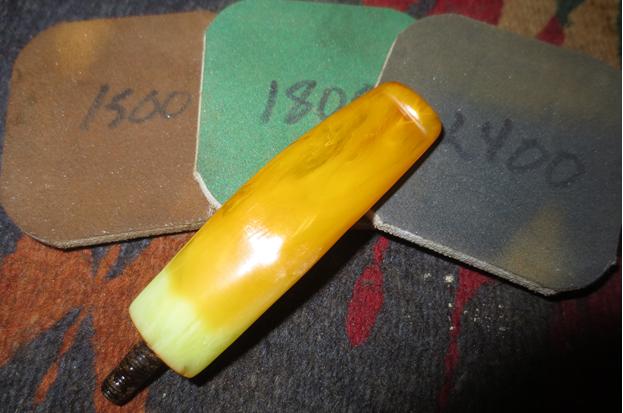
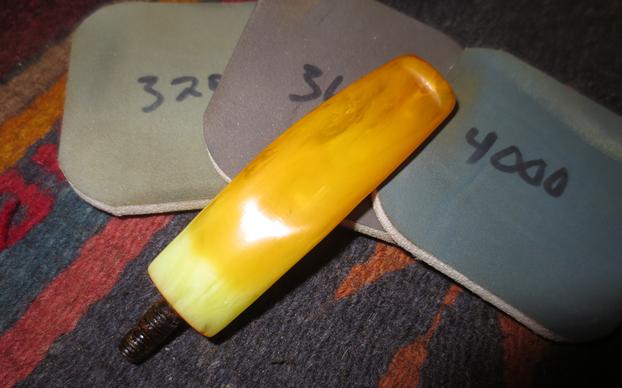
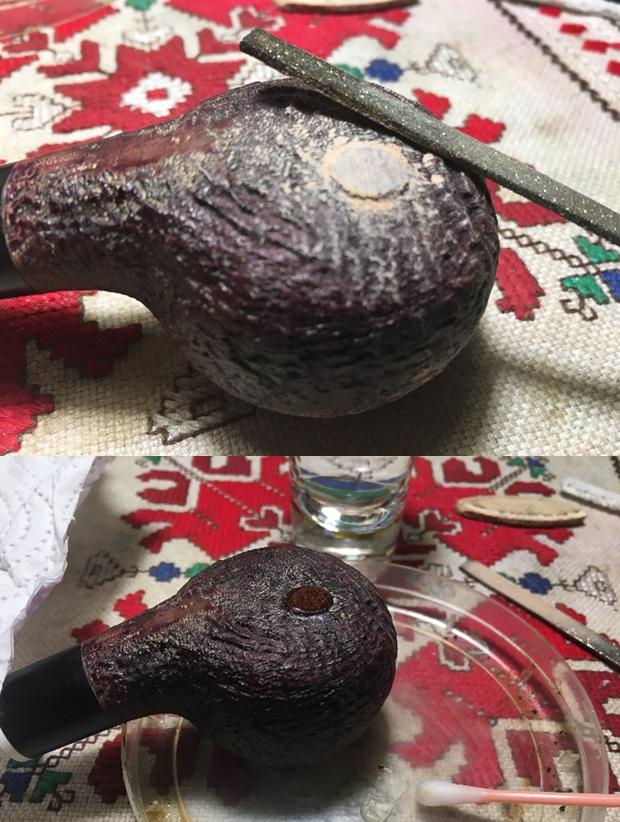
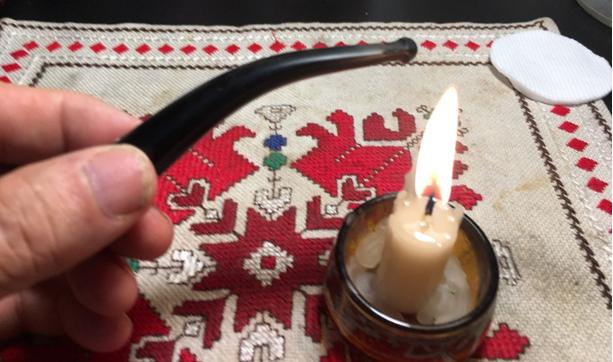
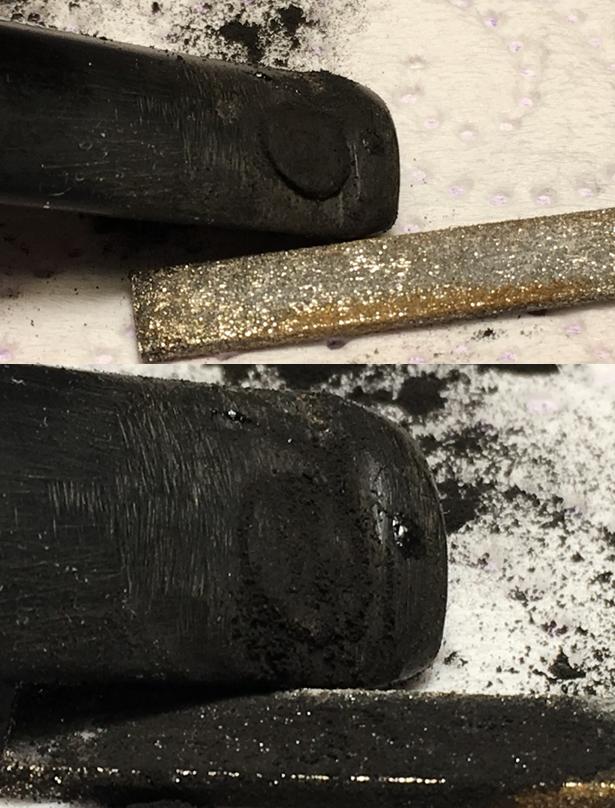
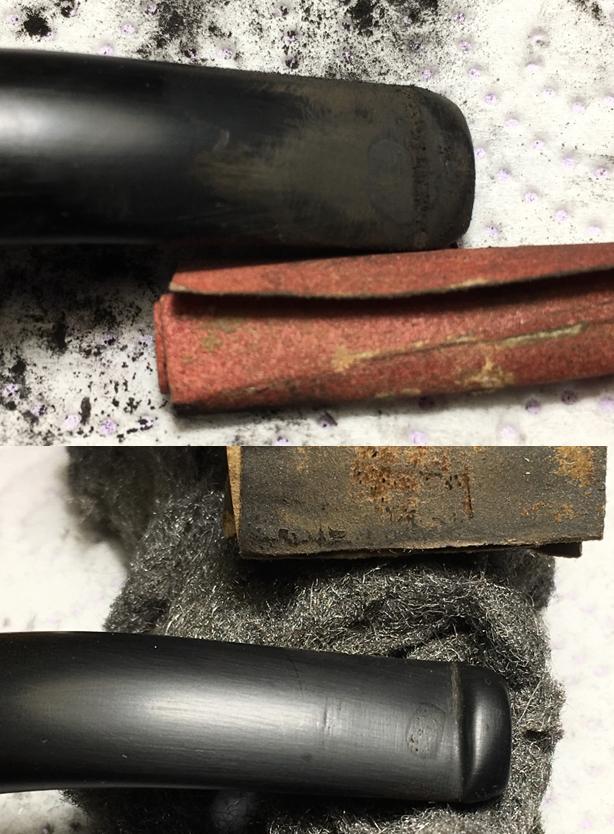
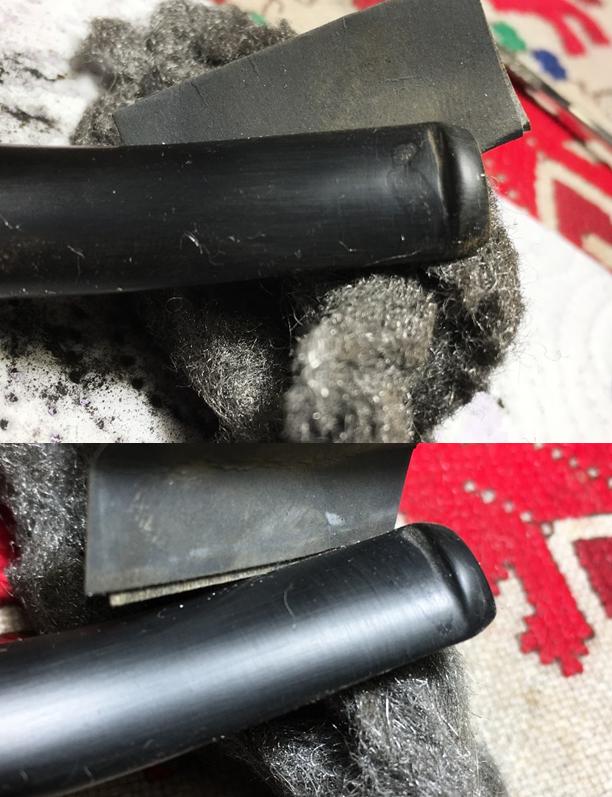
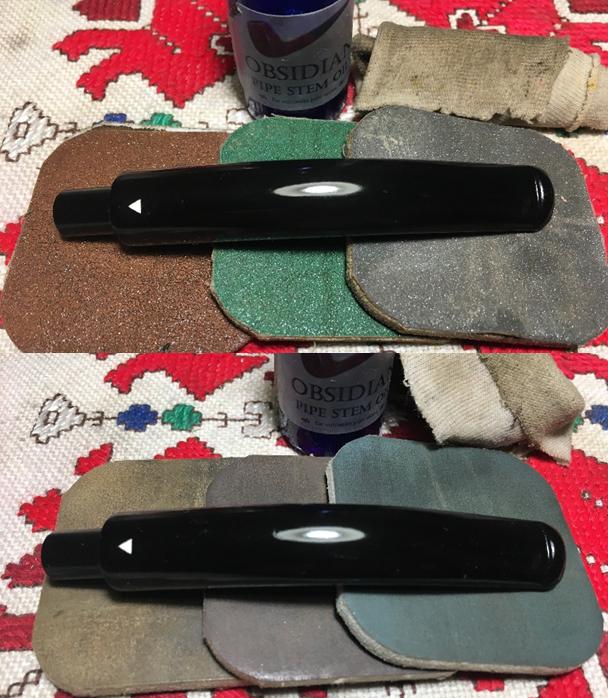
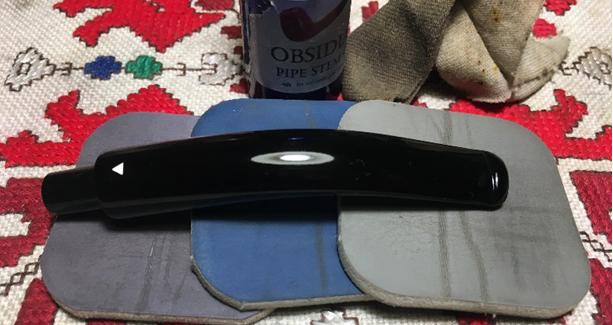
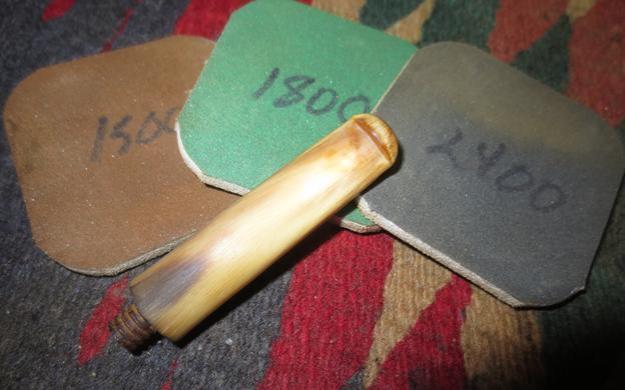
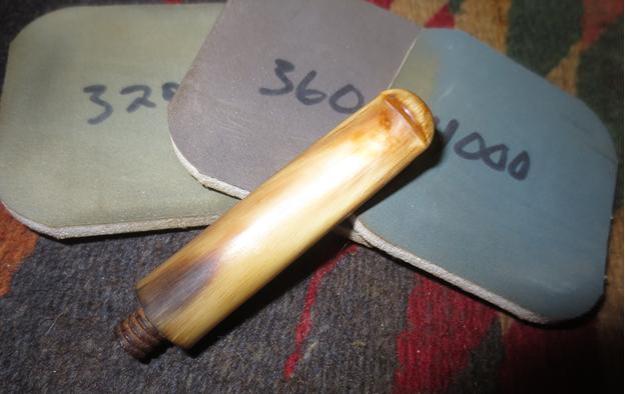
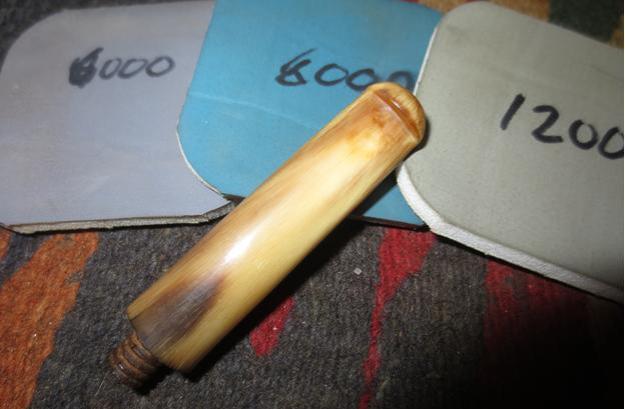
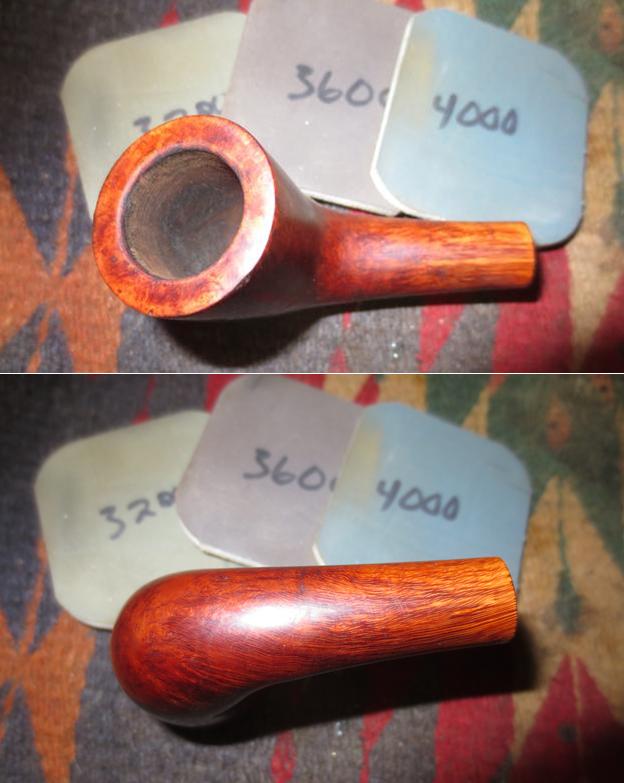
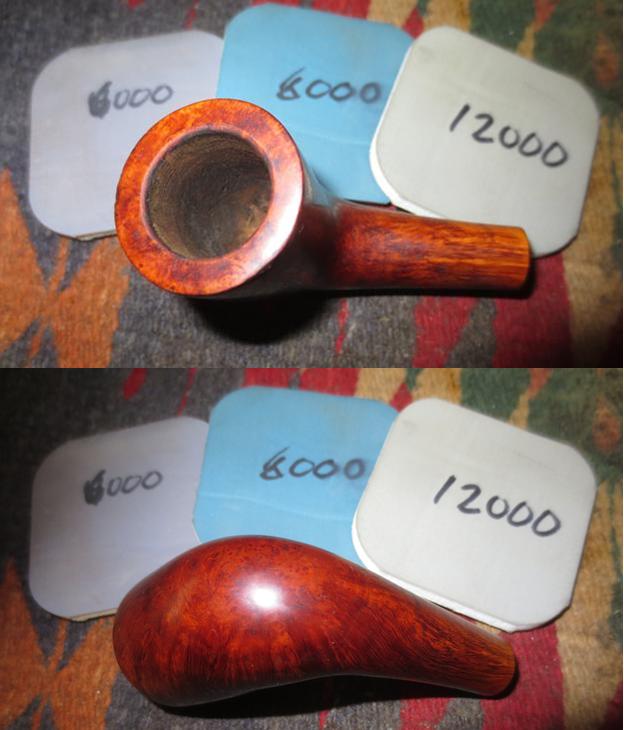
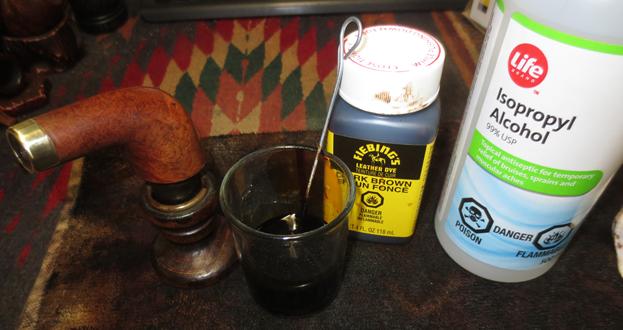
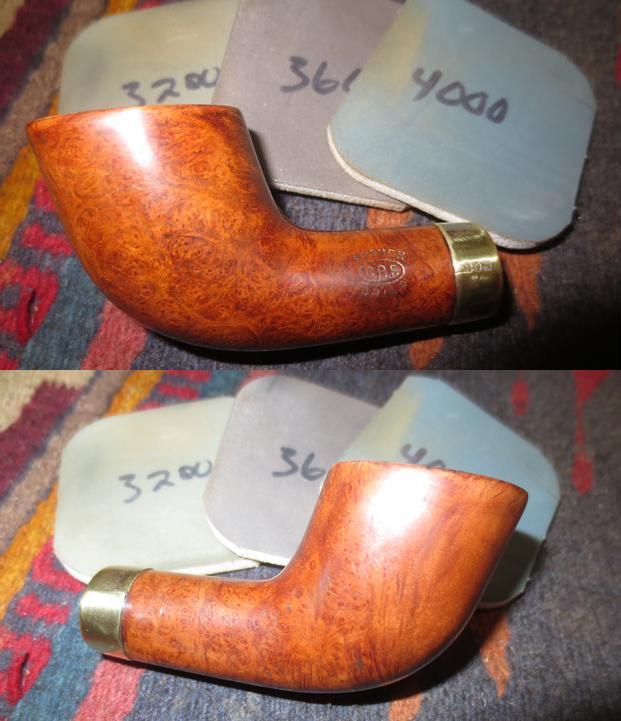
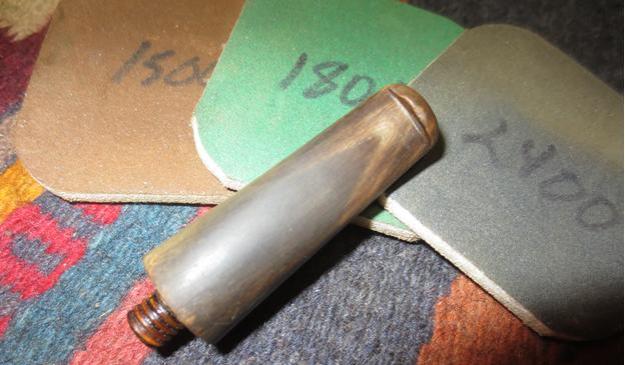
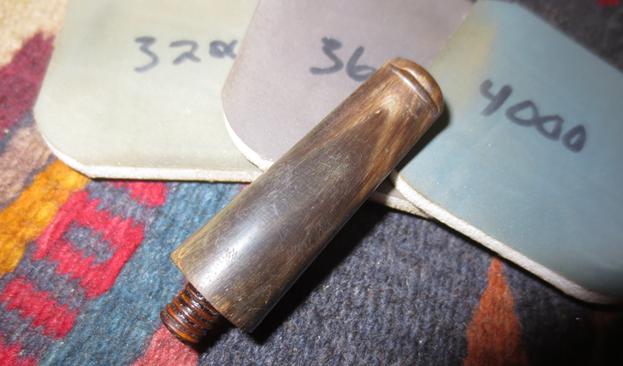
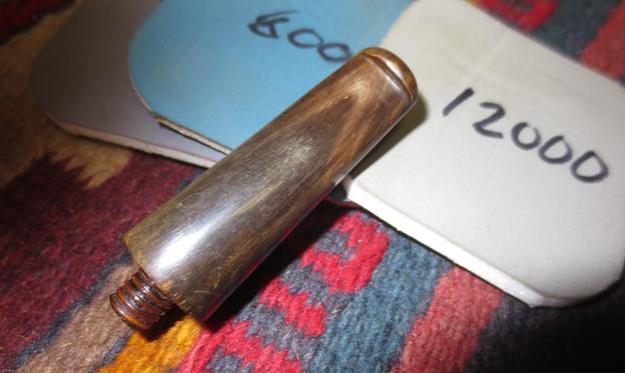
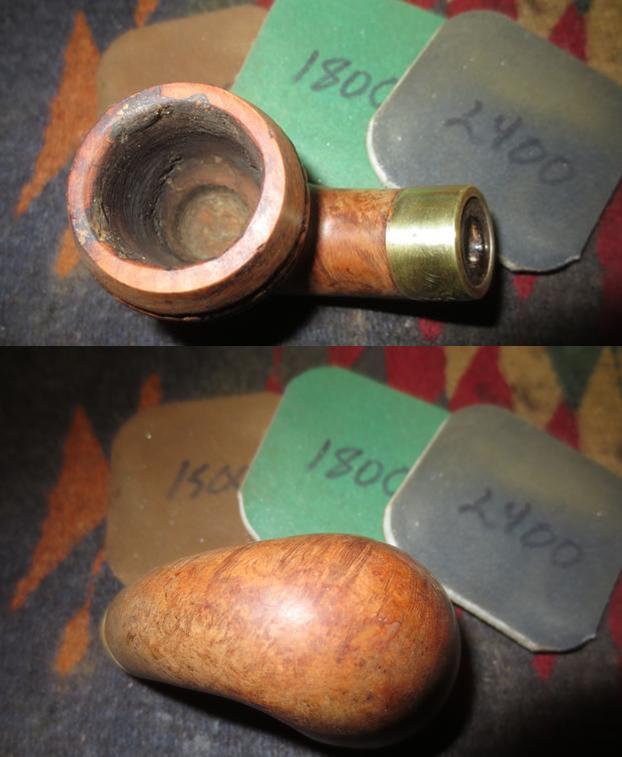
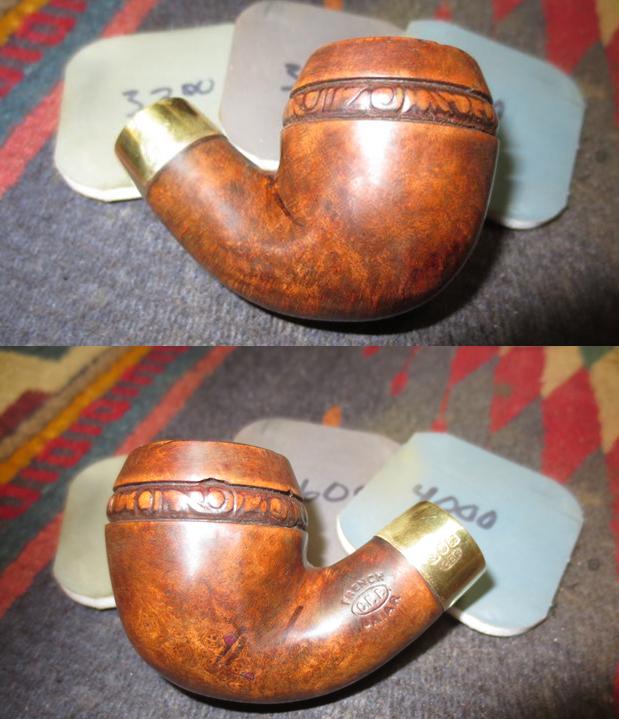
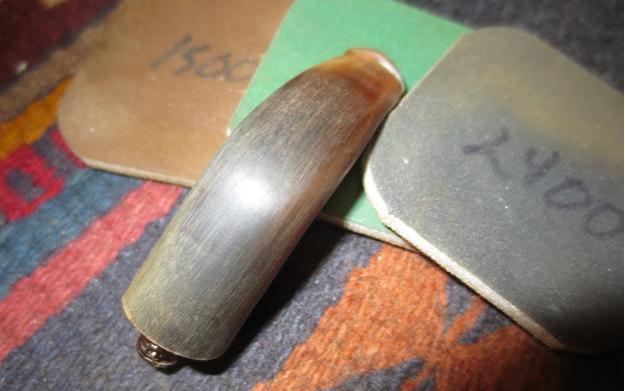
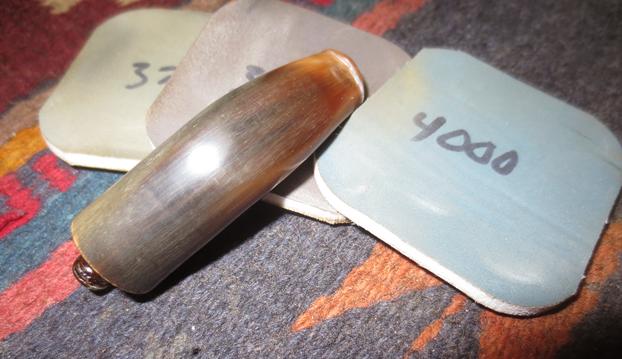
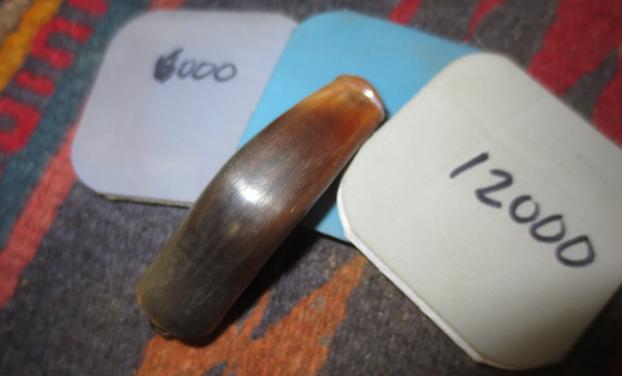
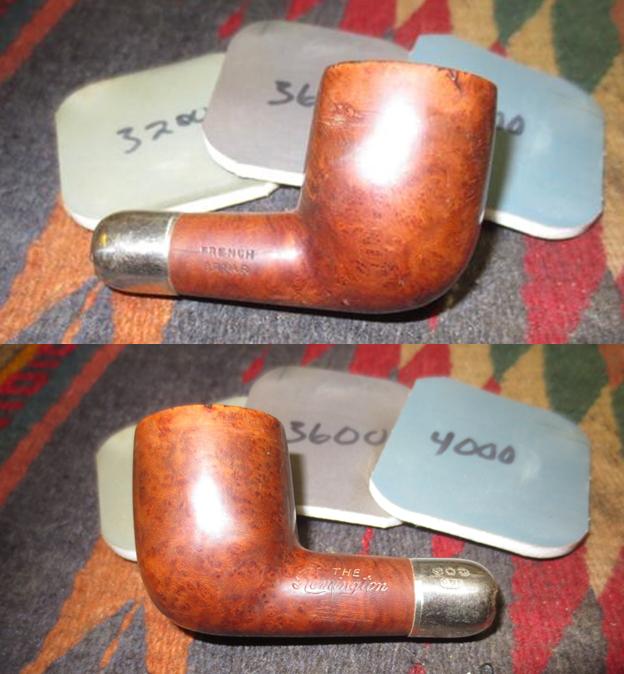
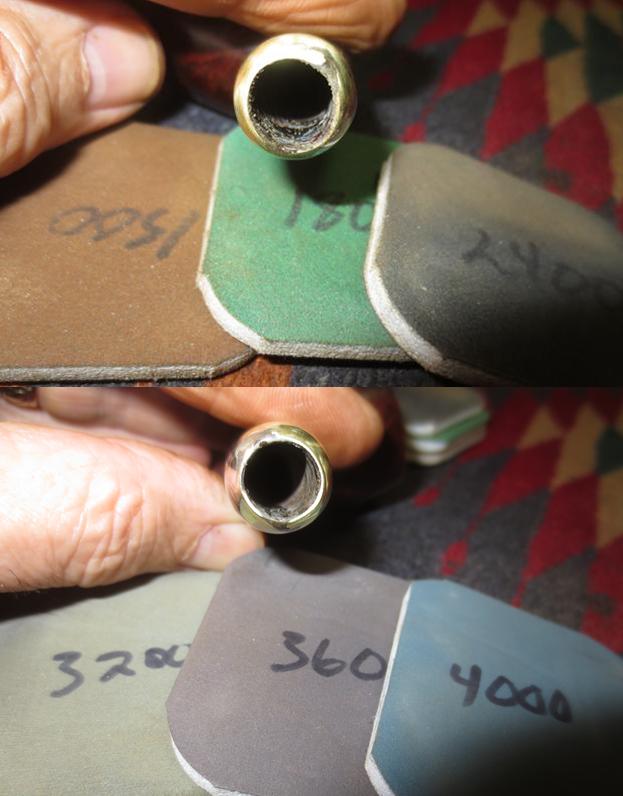
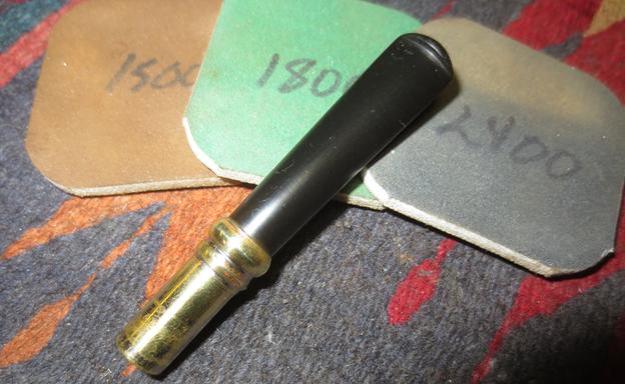
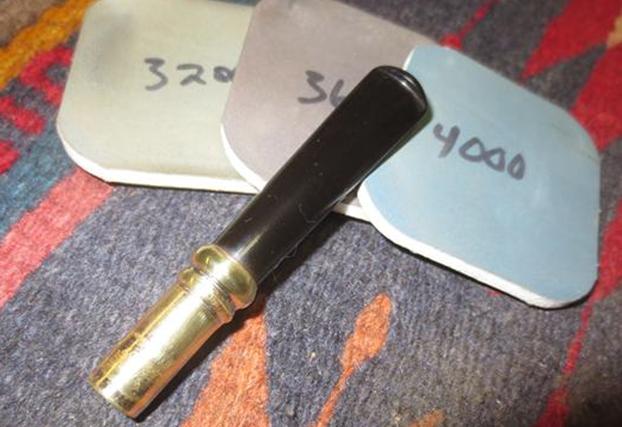
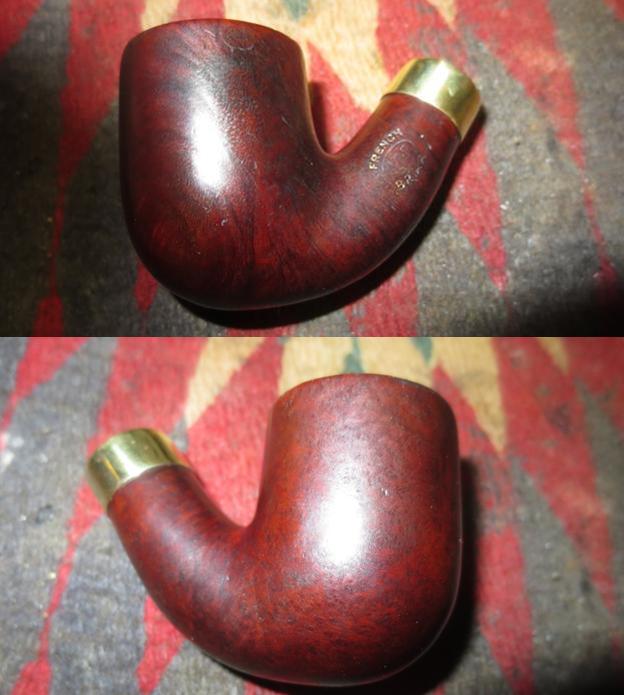
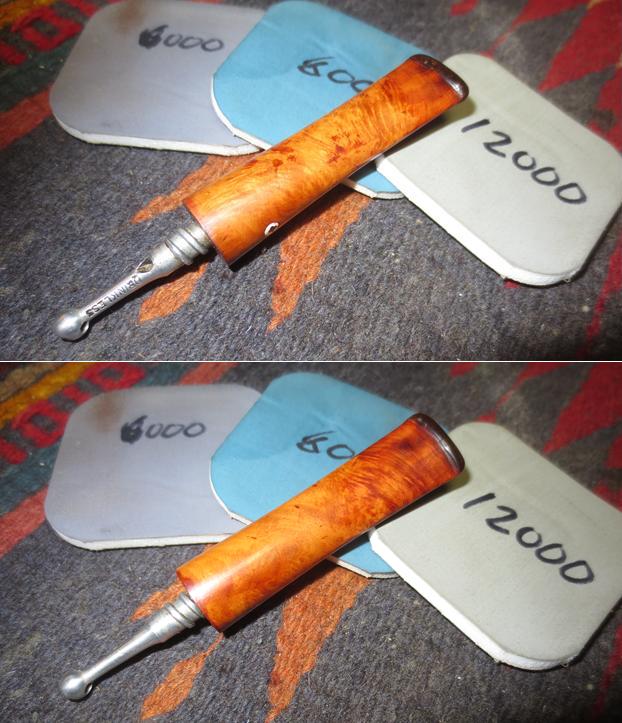
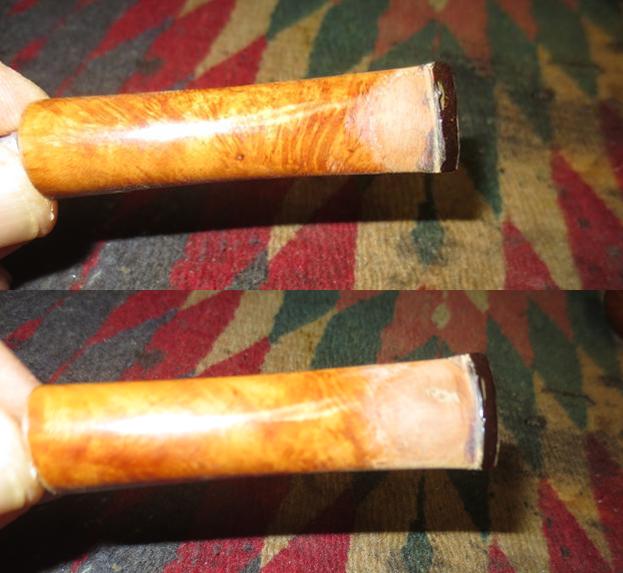
I used a needle file to open the twin bore airways and smooth them out. I began to polish the stem and button with micromesh sanding pads – wet sanding the button and stem area with 1500-2400 grit sanding pads. I wiped the stem down with a damp cotton pad to see what the progress looked like. I dry sanded with 3200-4000 grit pads and then stained the stem with a Medium Brown Stain pen. I finished polishing the stem with 6000-12000 grit pads and wiped it down after each grit pad to keep the work surface clean. While the button is definitely darker than the stem body at this point it is still looking pretty good in my opinion and it feels good in the mouth. 
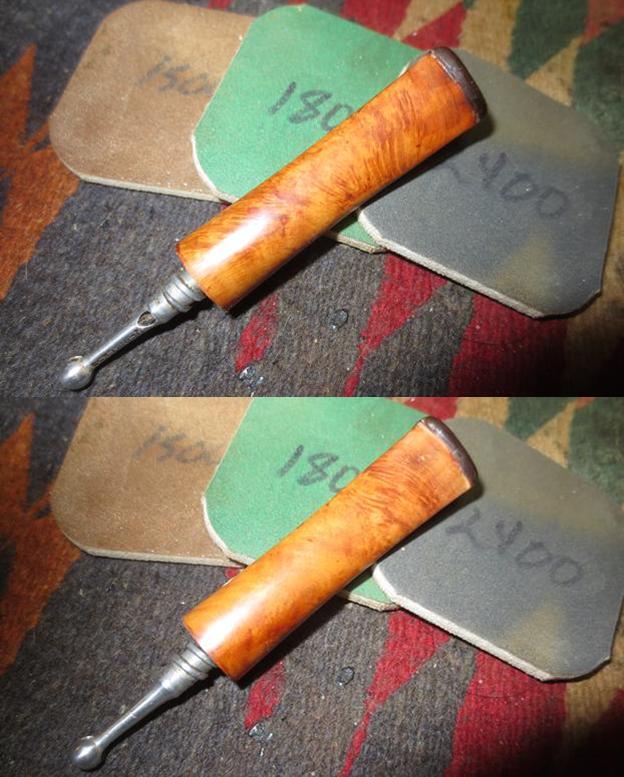
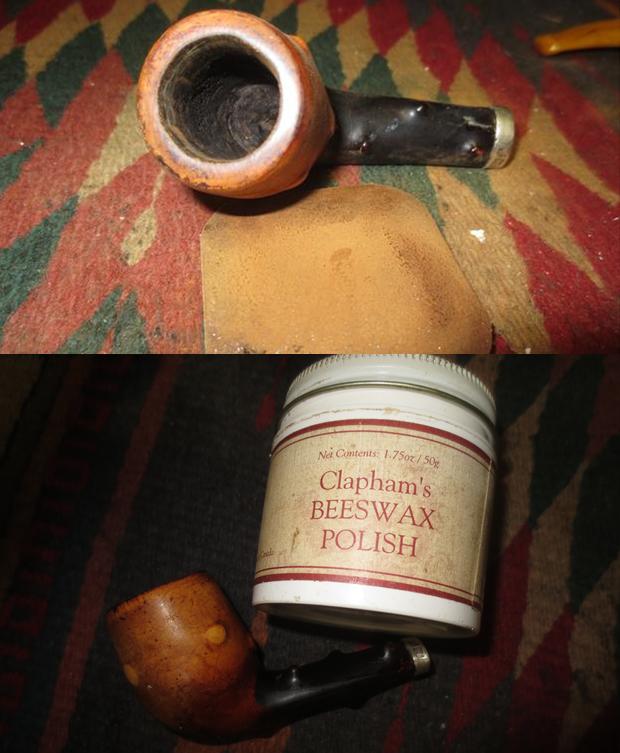
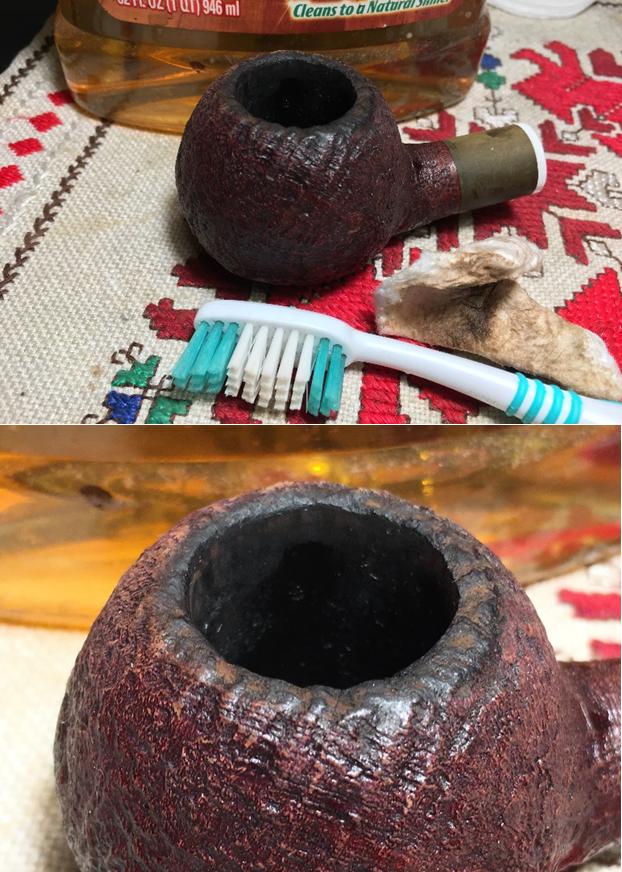
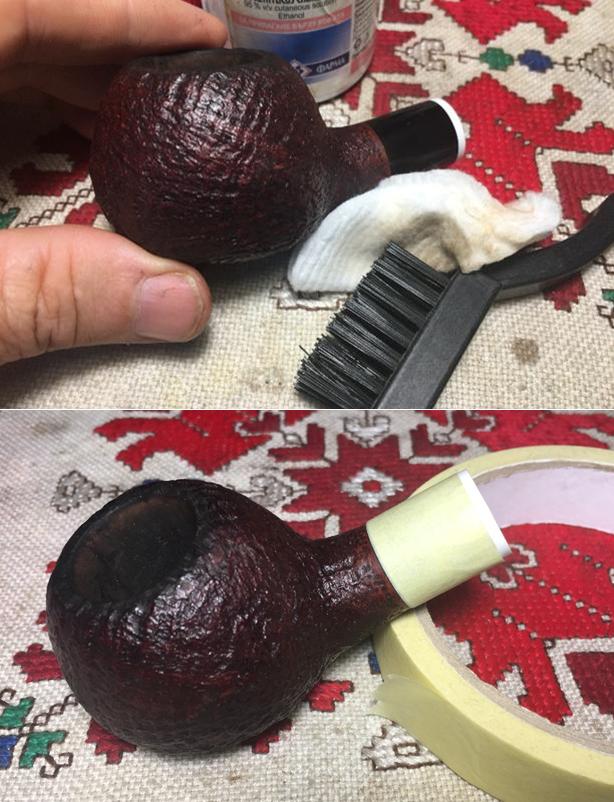
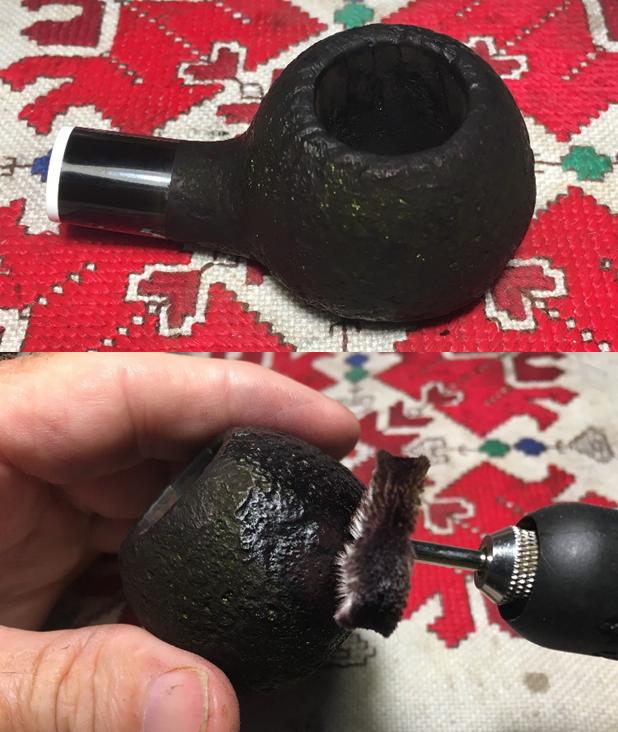
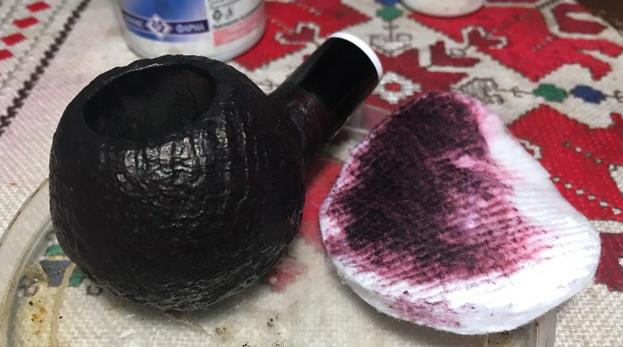
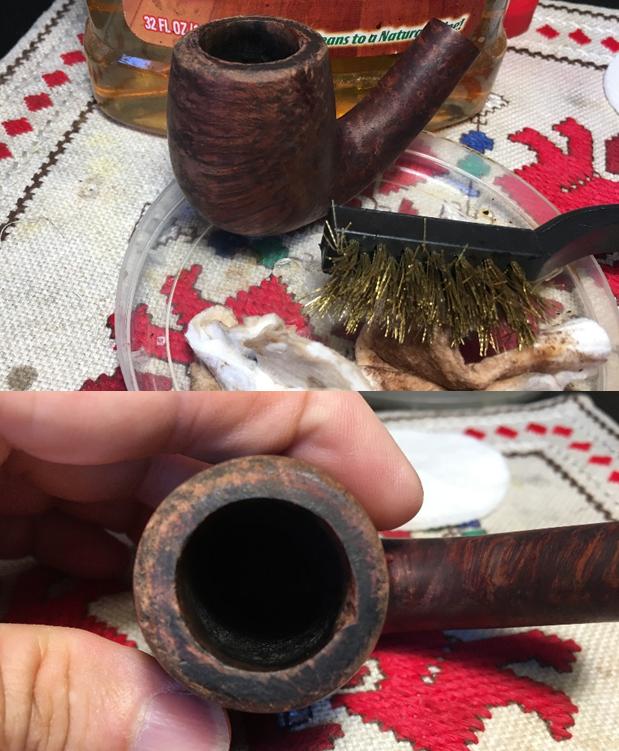
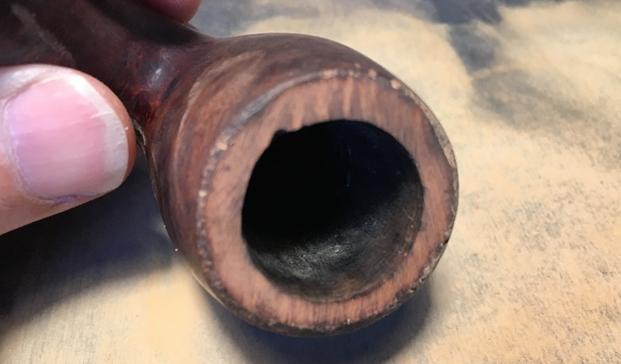
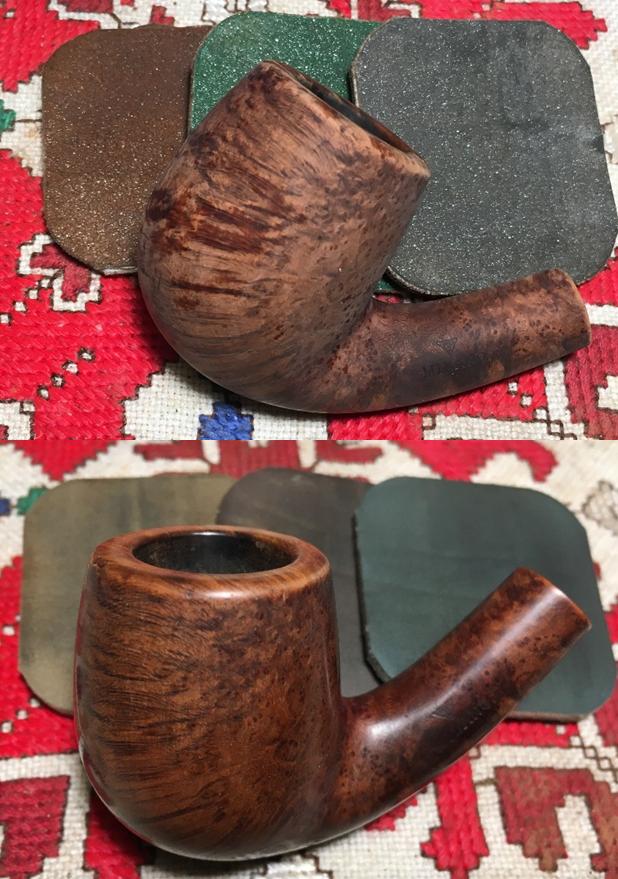
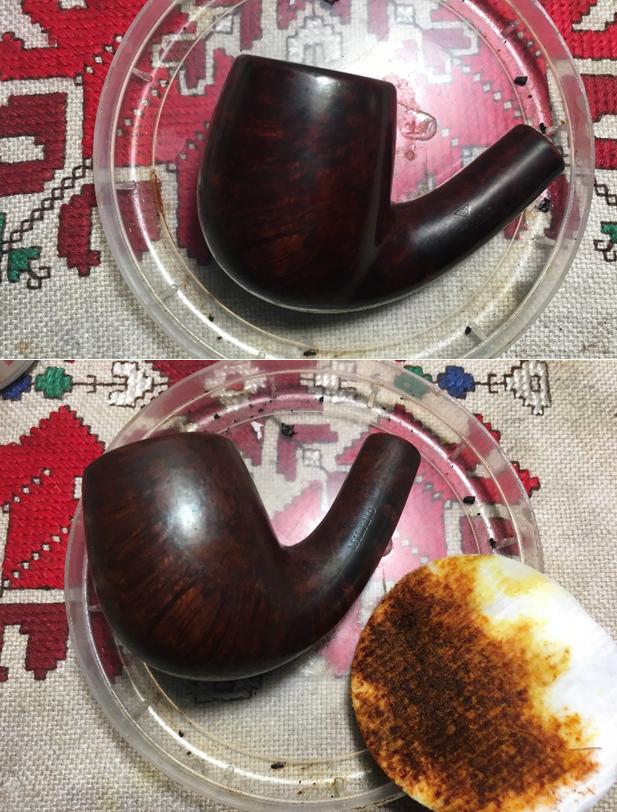
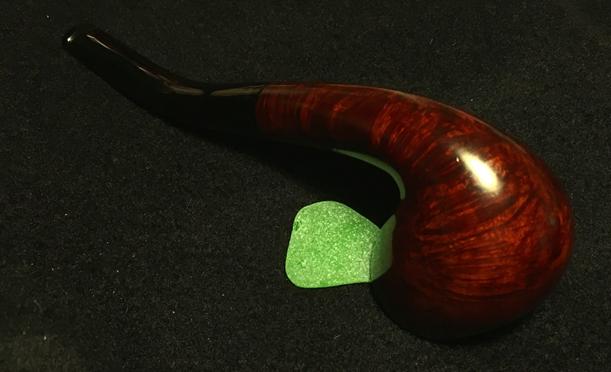
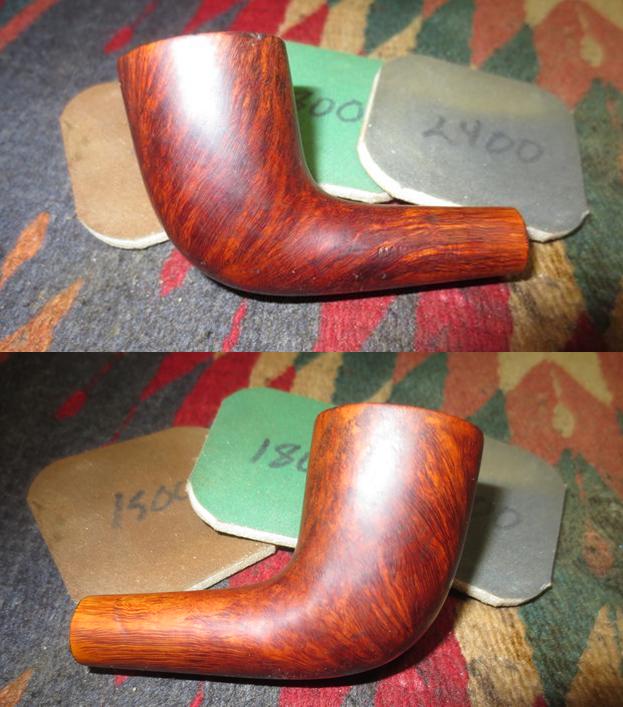
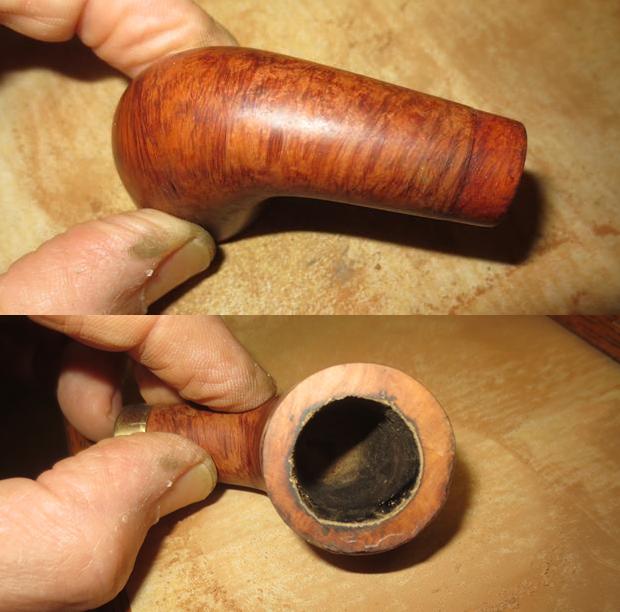
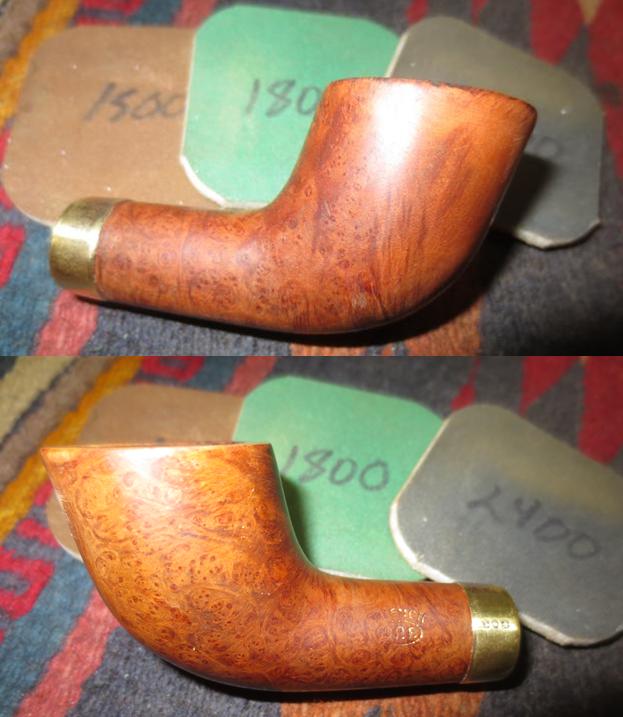
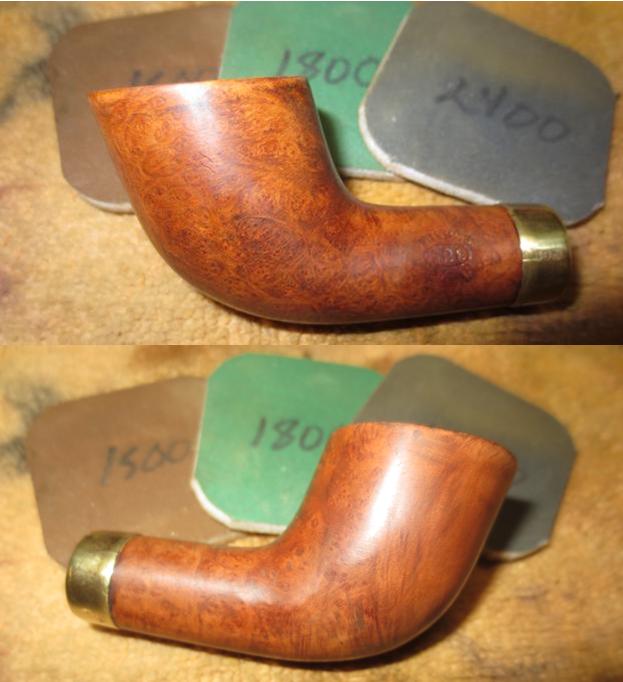
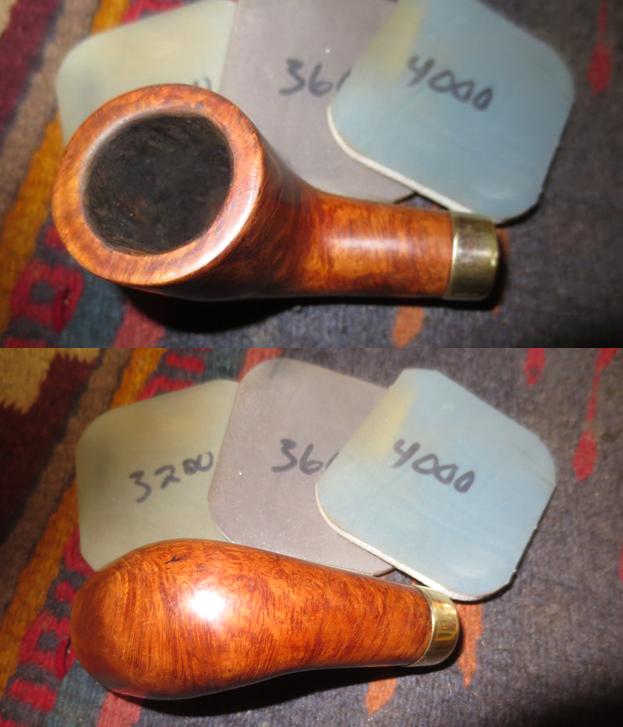
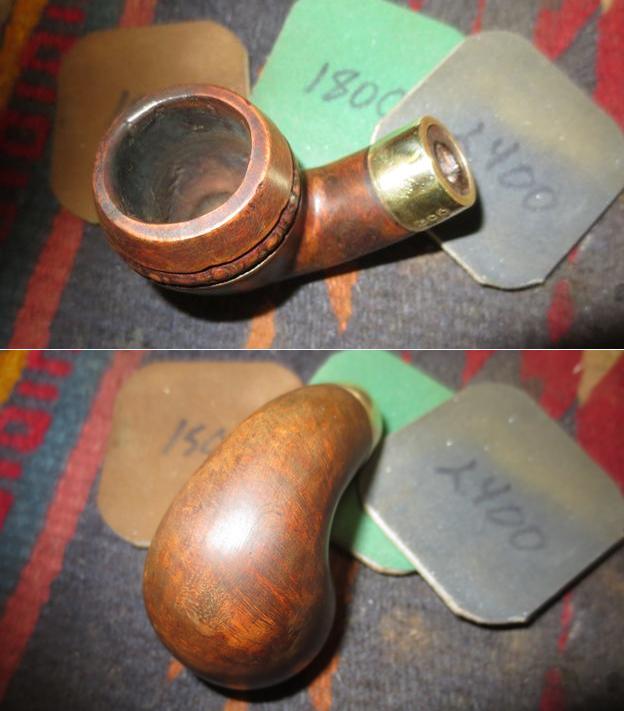
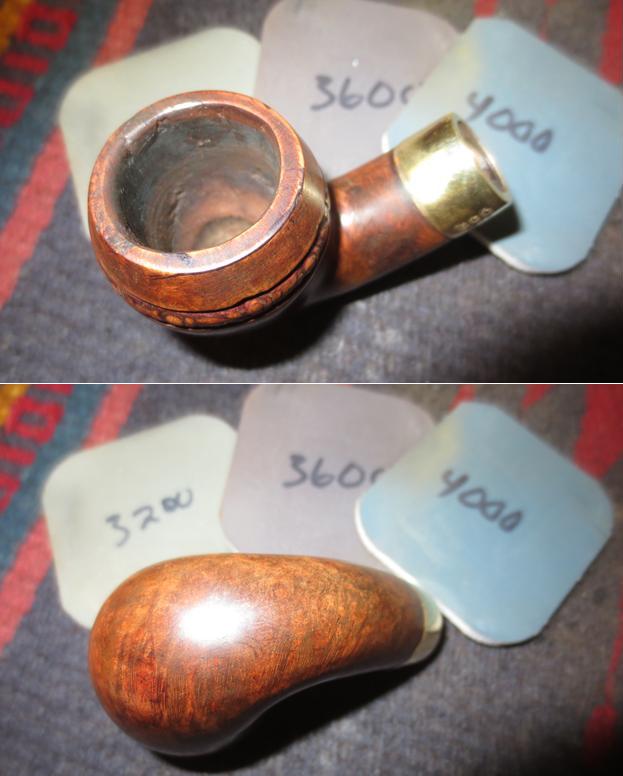
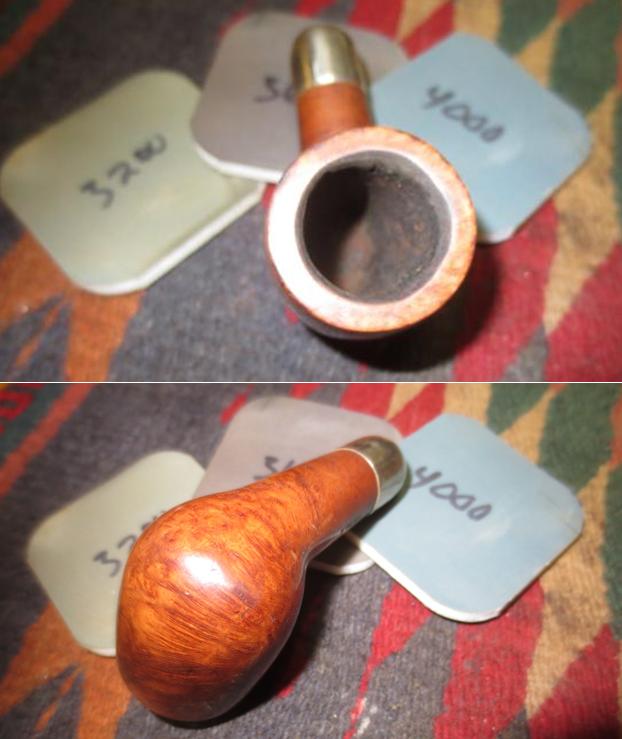
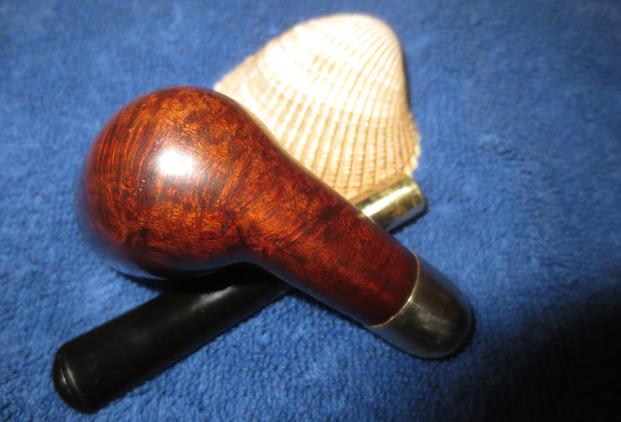
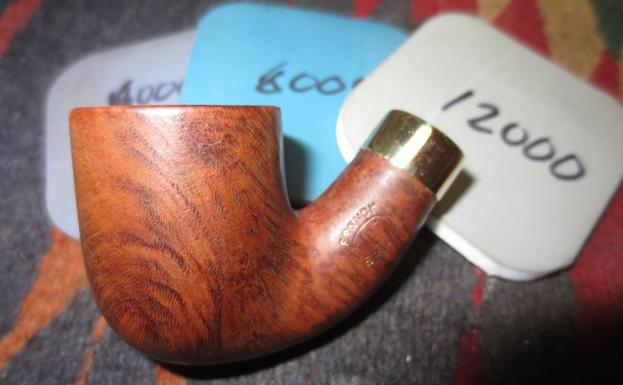
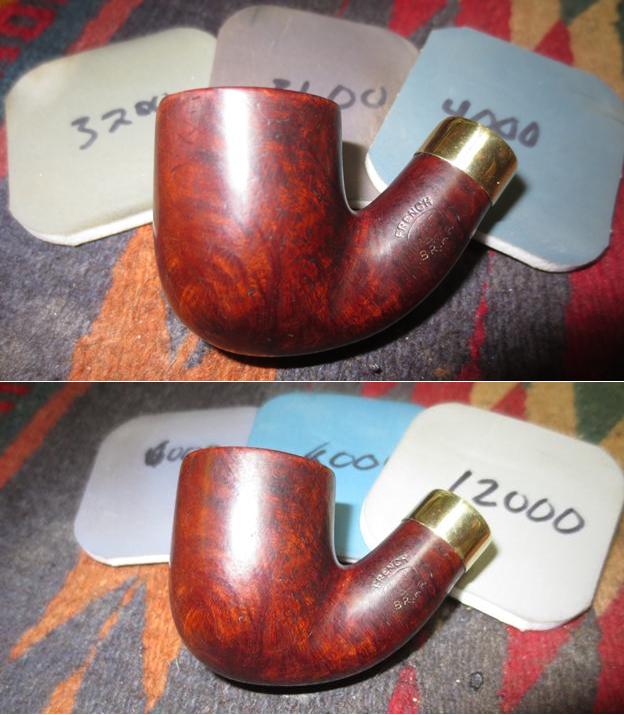
I sanded the bowl with 220 grit sandpaper to remove the varnish finish. It was spotty and peeling in places so it had to go. Once I had the finish removed I wiped the bowl down with acetone to remove any of the finish that remained. Then I used the same regimen to polish the bowl as I had used on the briar stem. I wet sanded it with 1500-2400 grit micromesh sanding pads and wiped it down with a damp cloth. I dry sanded it with 3200-12000 grit micromesh and wiped it down after each pad. Each grit pad brought more of the grain to light. There is a great mix of birdseye and cross grain on the bowl and shank. It is a beauty. I decided to not stain the bowl. The medium brown I put on the stem made the stem and bowl match so I was pleased with that. 
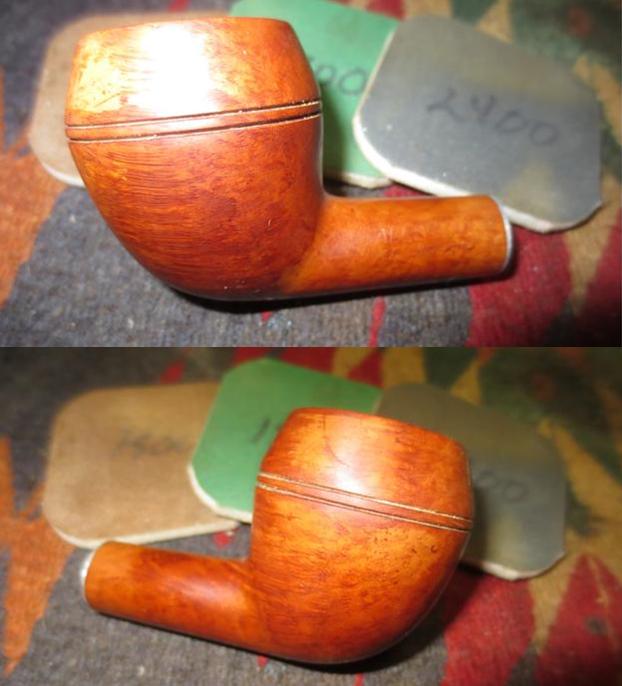
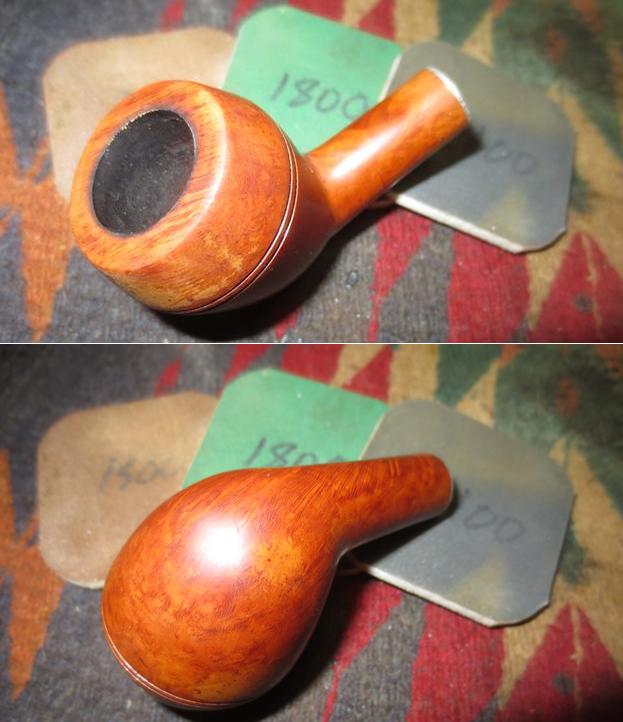
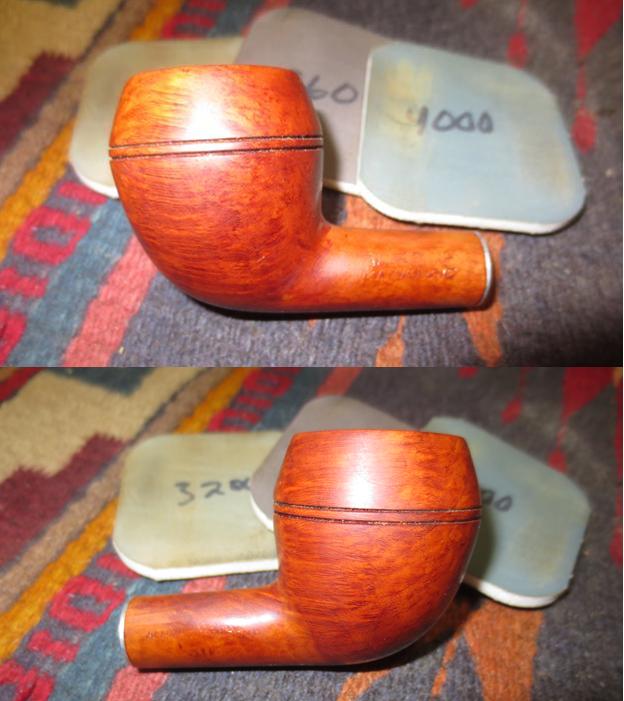
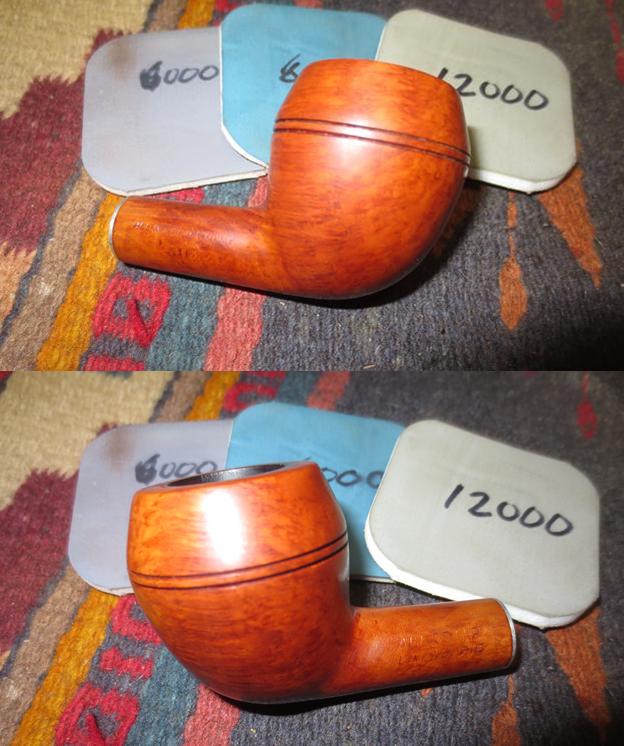
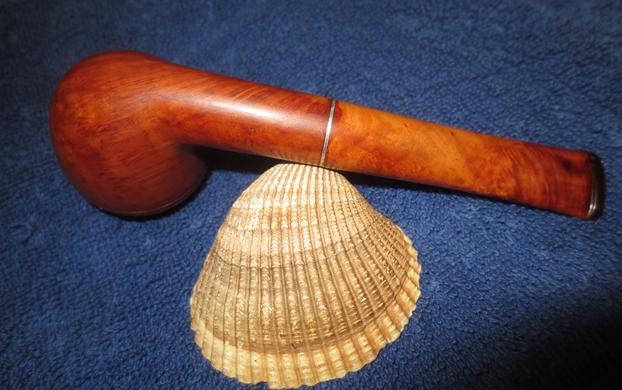
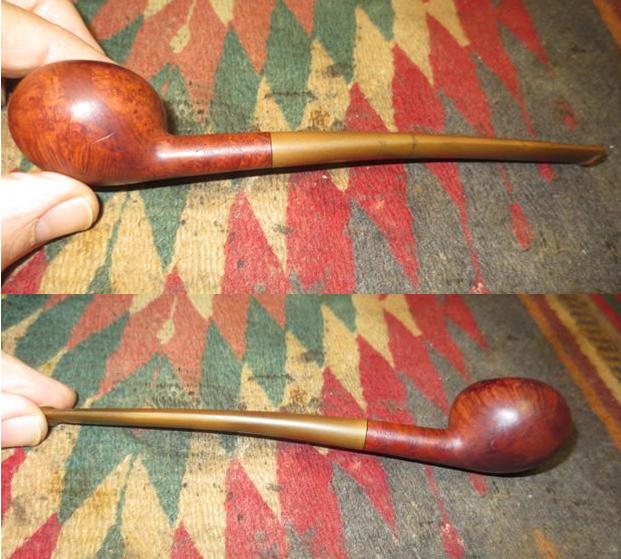
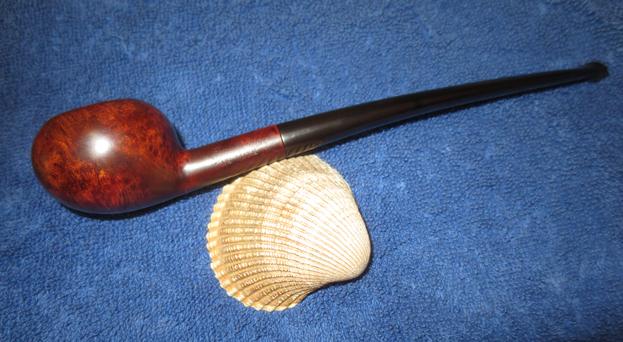
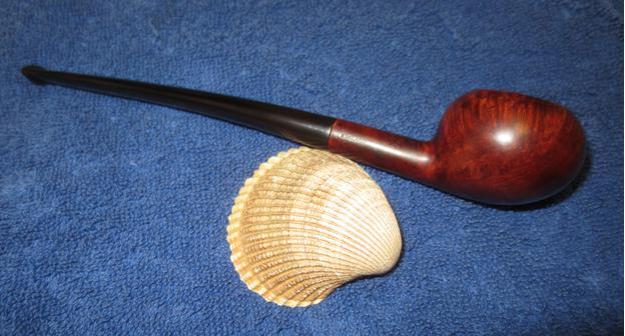
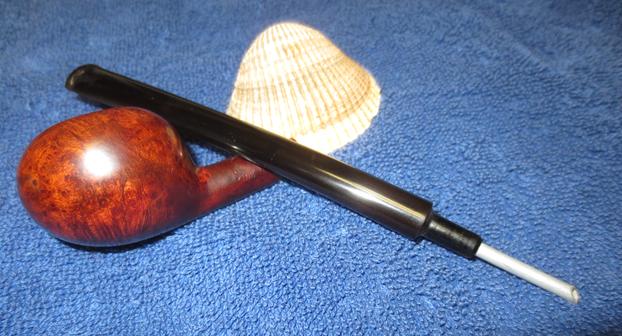
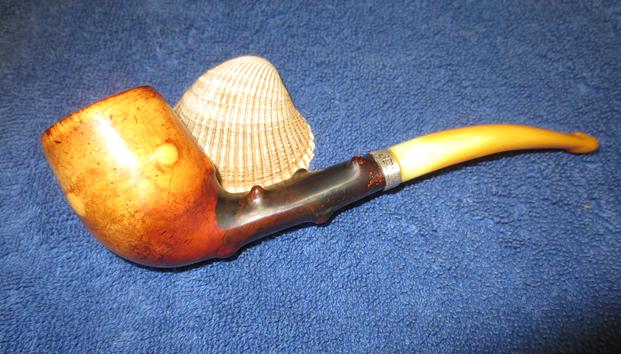
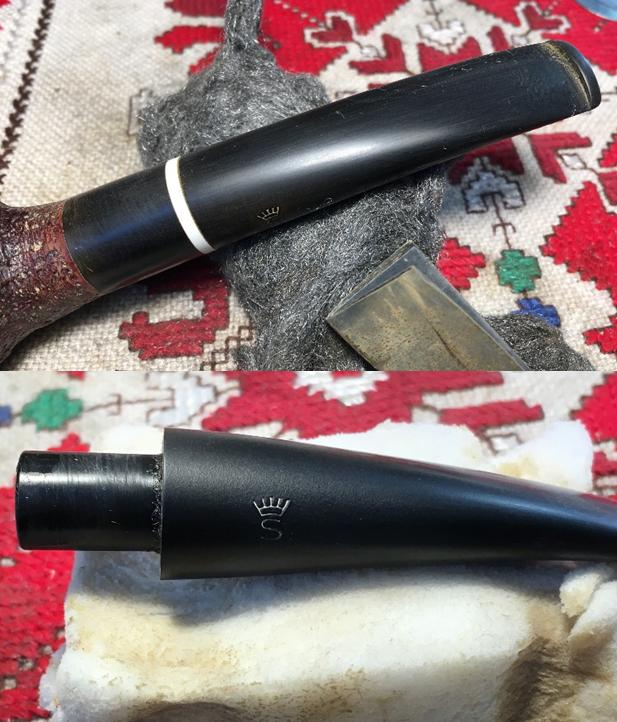
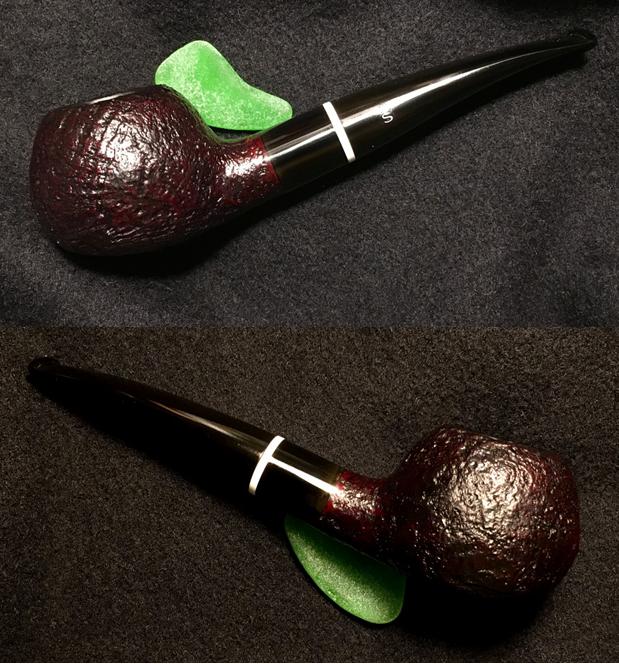
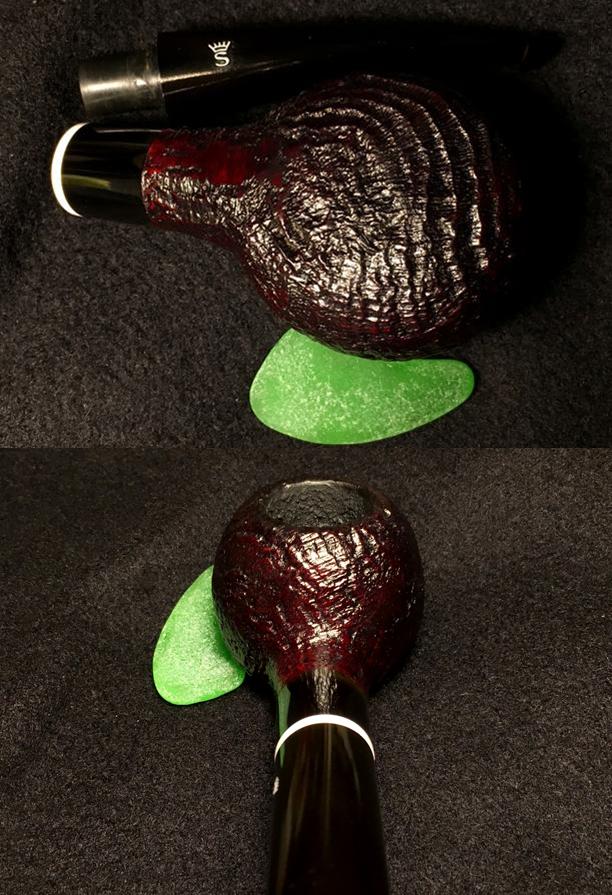
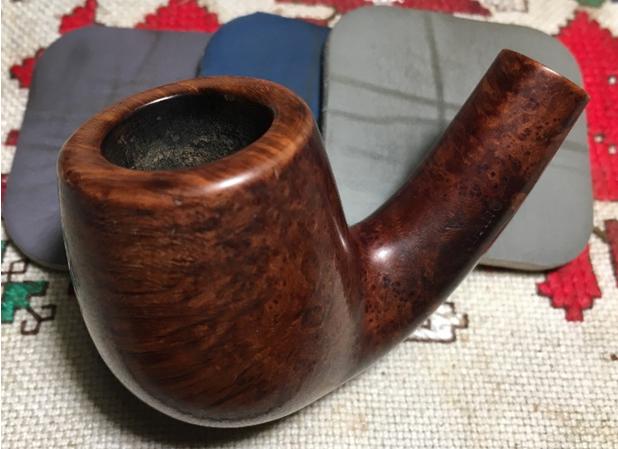
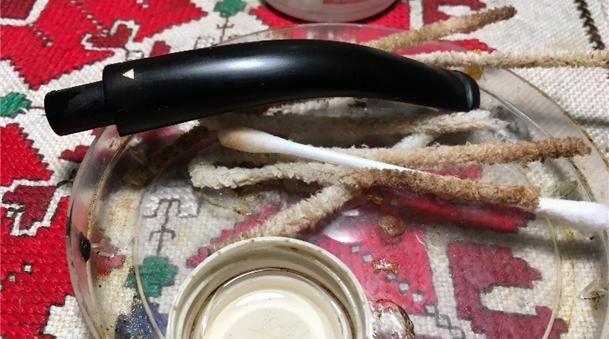
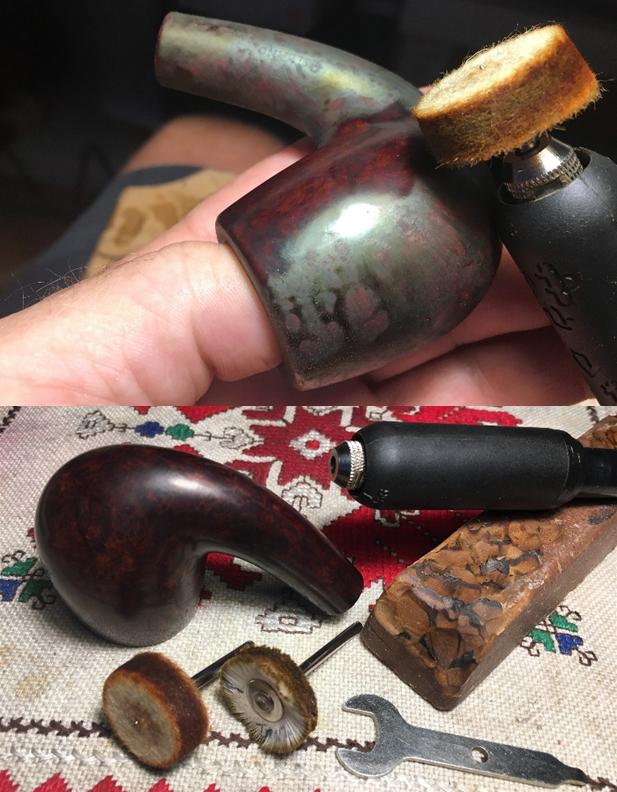
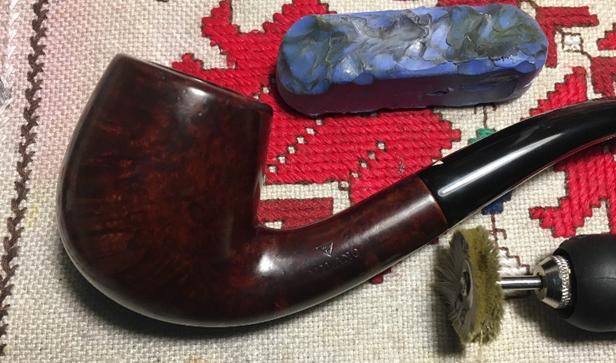
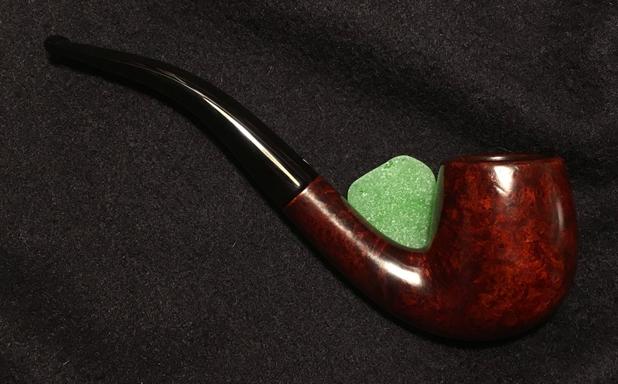
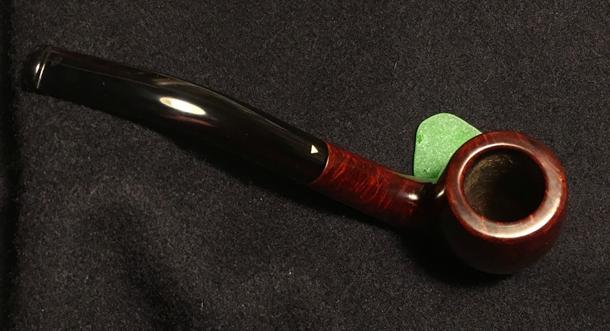
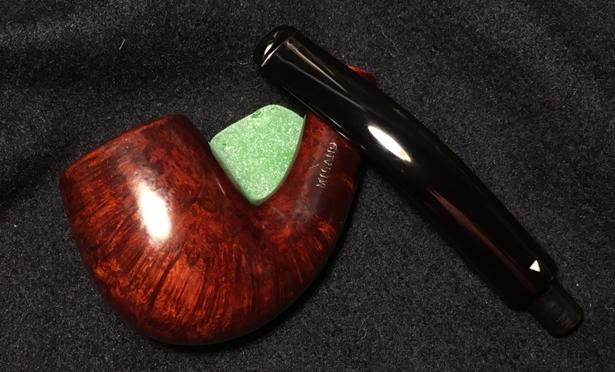
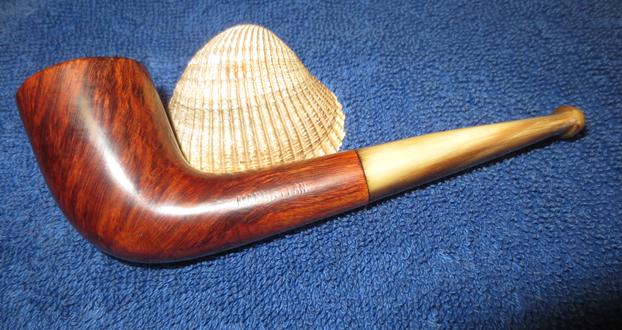
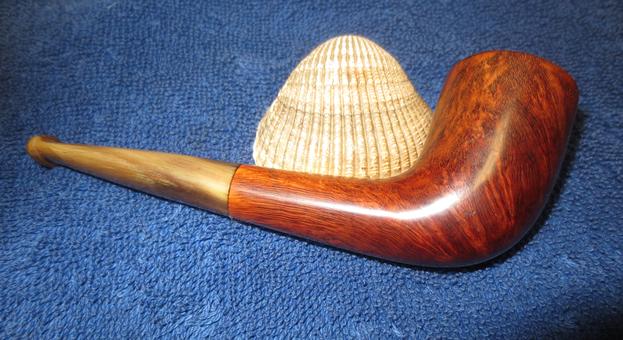
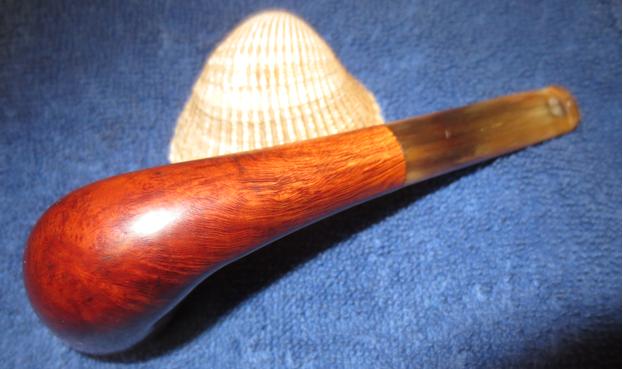
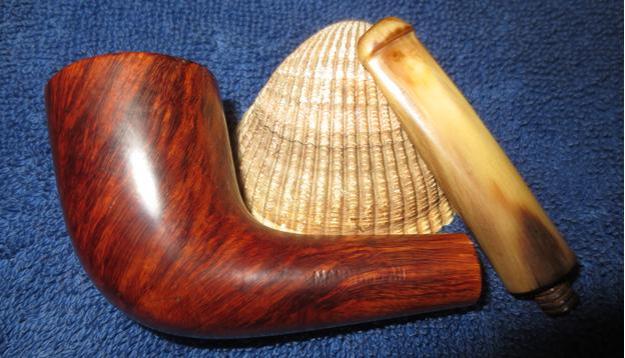
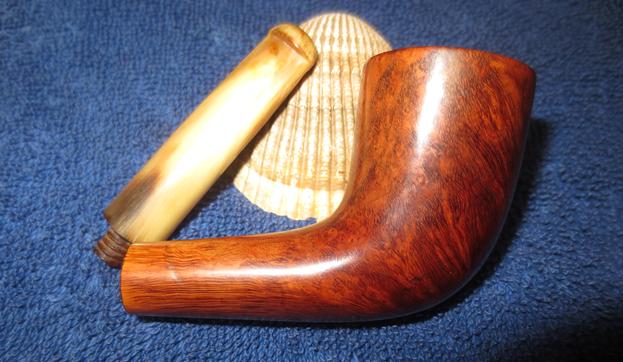
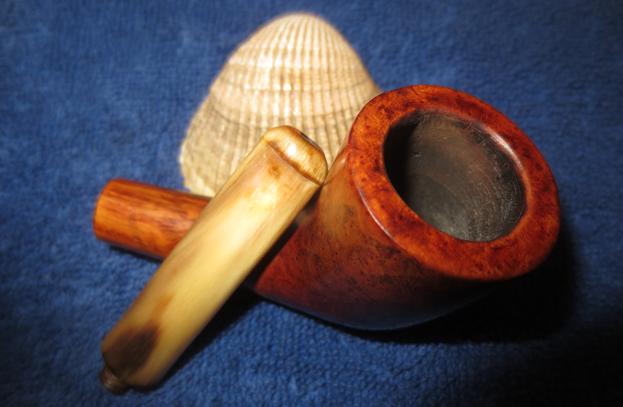
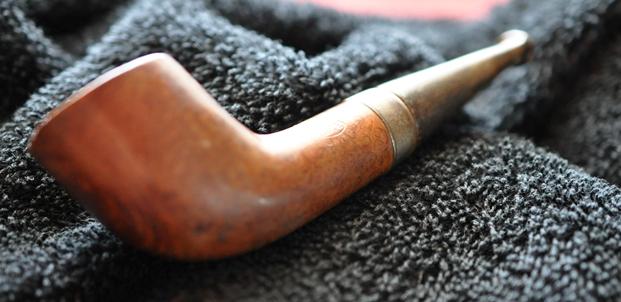
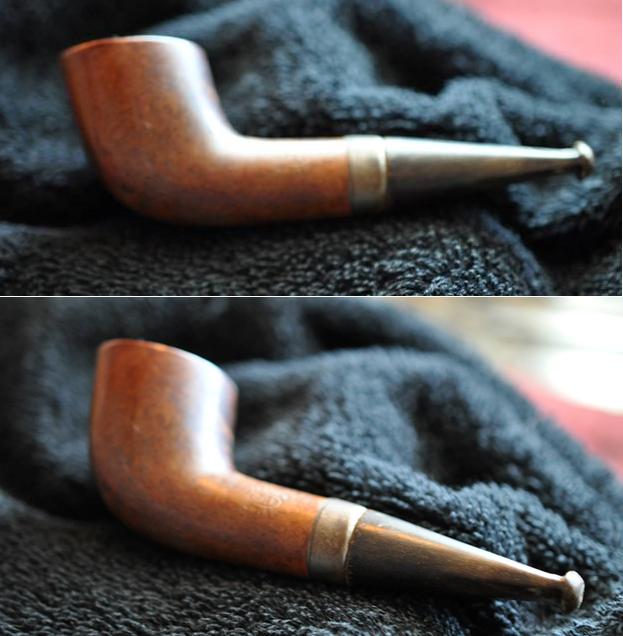
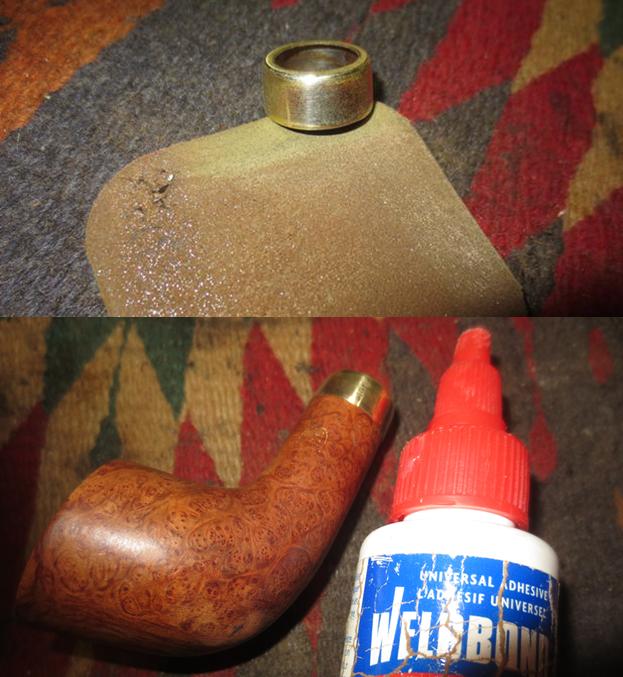
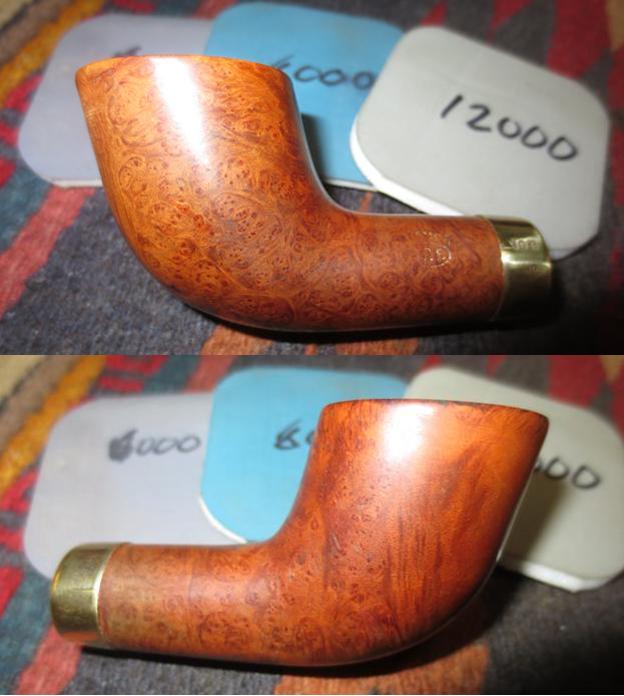
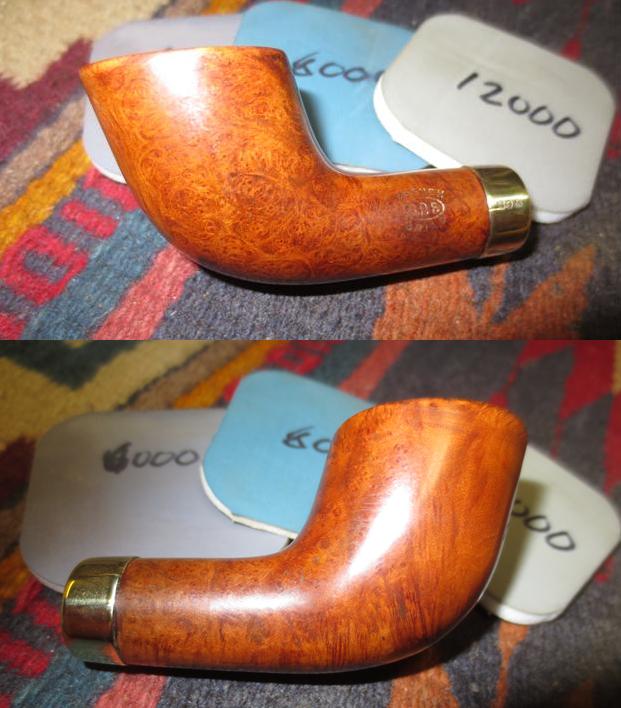
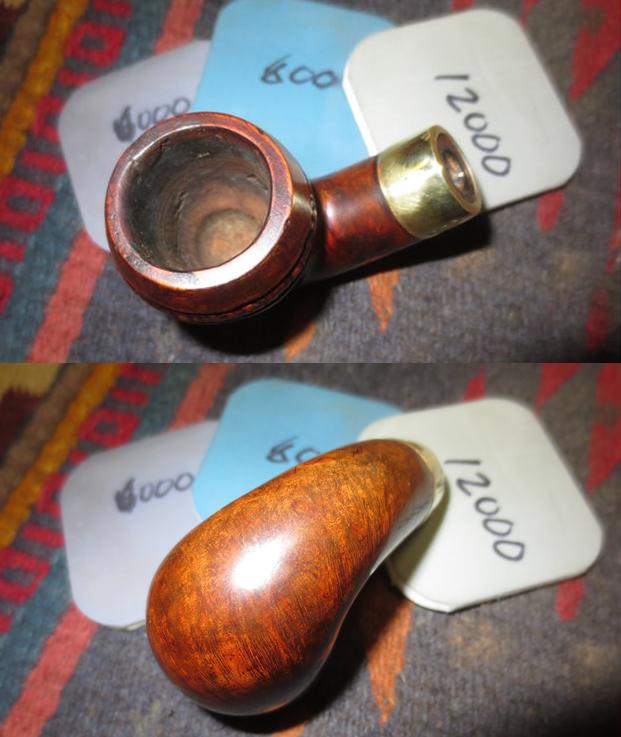
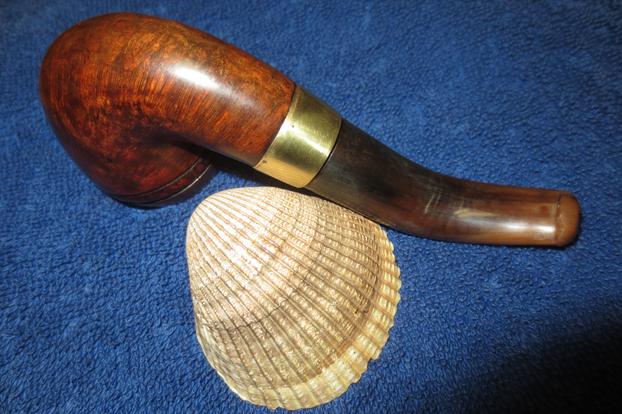
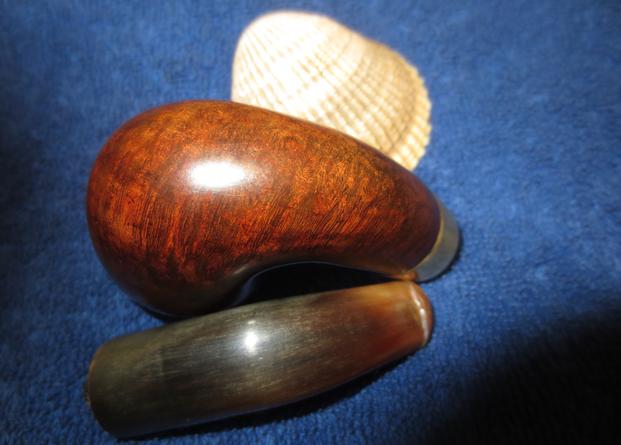
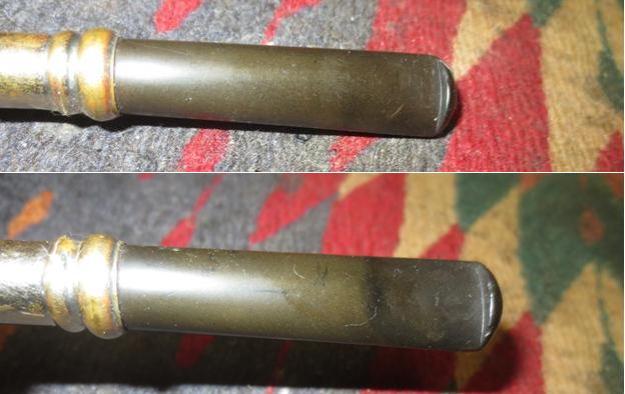
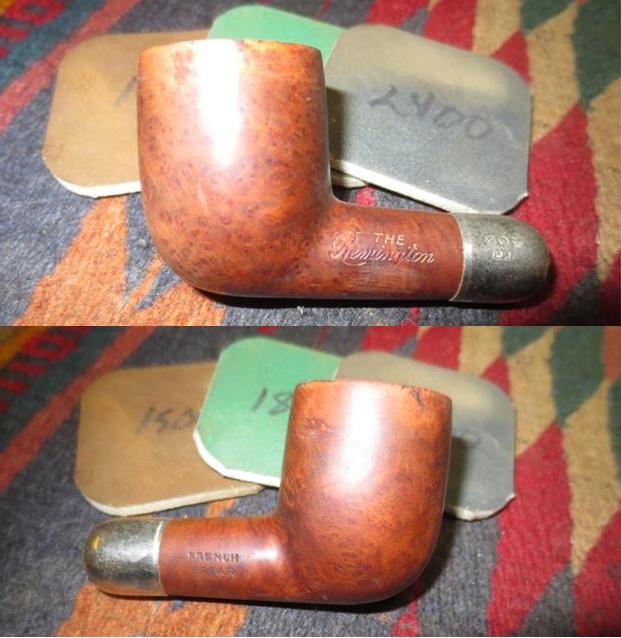
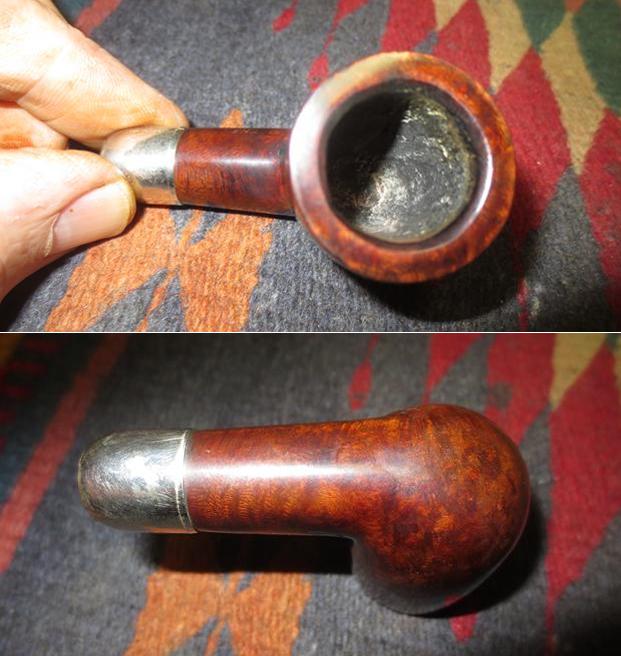
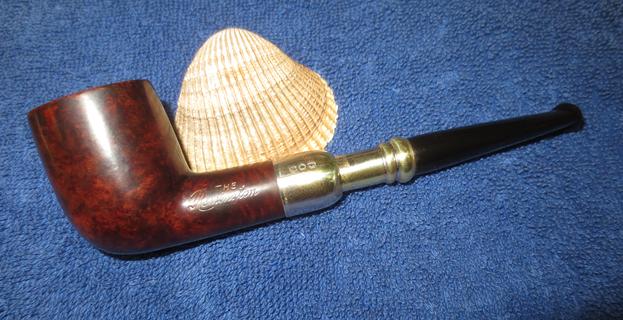
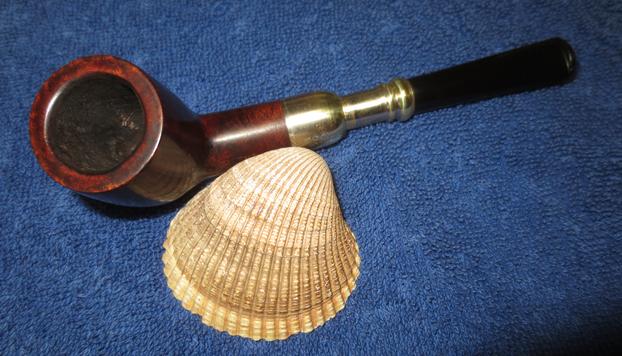
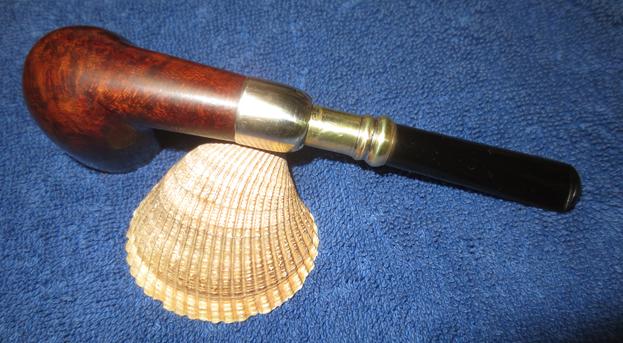
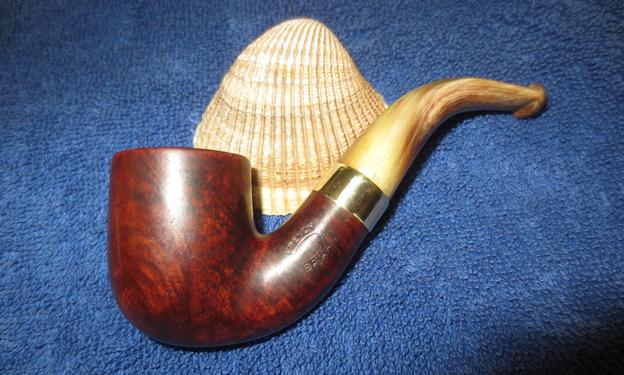
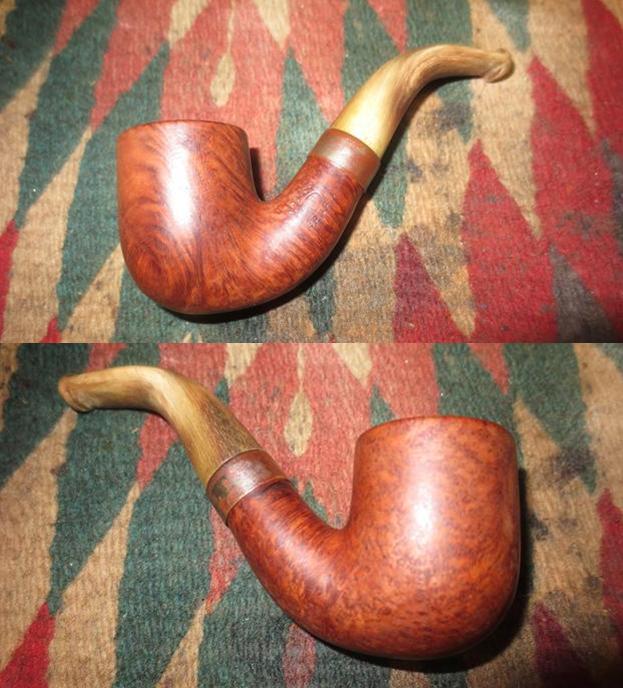
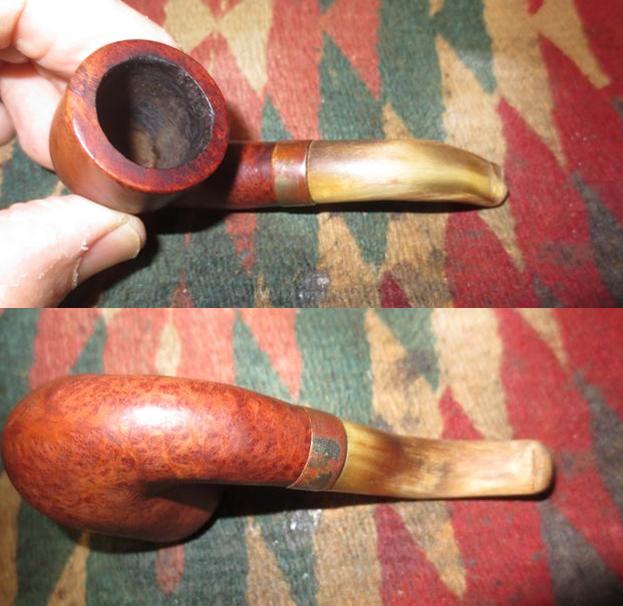
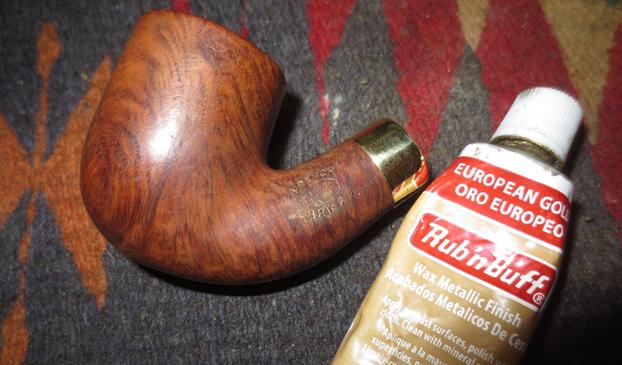
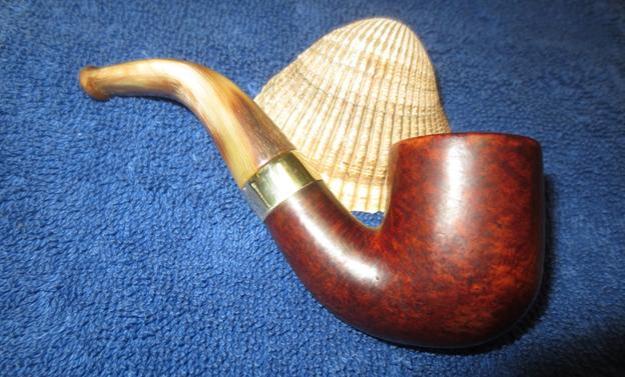
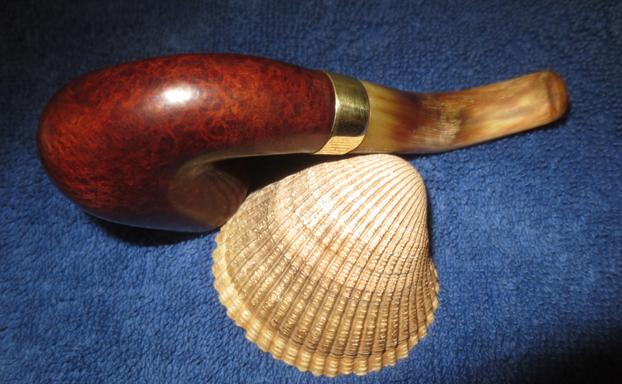
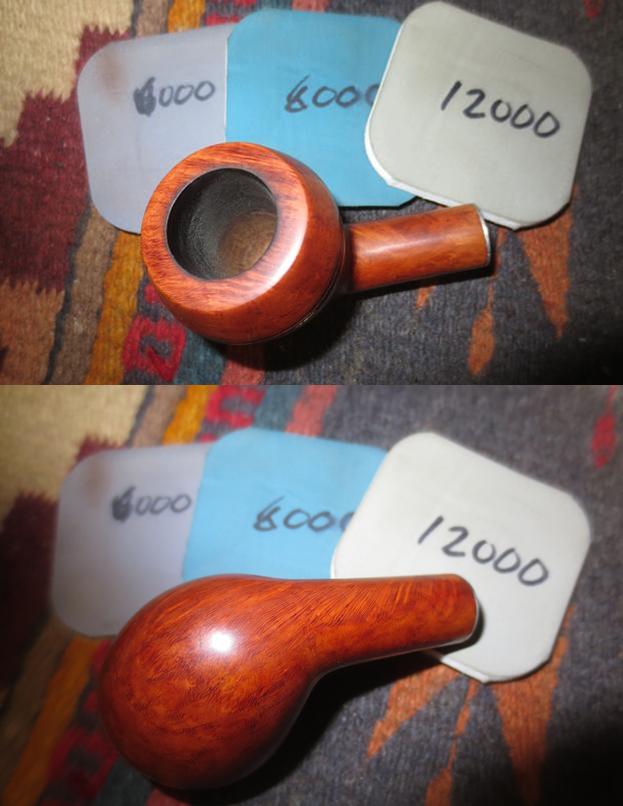
I put the stem in place on the bowl and buffed it with Blue Diamond to polish out any remaining scratches from my sanding and polishing. I gave the bowl and stem multiple coats of carnauba wax to protect it from damage and to preserve the briar. I buffed it with a clean buffing pad to polish the briar. I hand buffed it with a microfiber cloth to deepen the shine. The finished pipe is shown in the photos below. The repair and rebuilt button, though darker than the briar, works well and the pipe is fully functional again. The small amount of length I had to remove does not visibly change the overall look of the pipe. Thanks for walking with me through this restoration. It was one with challenges but it was a fun one to work on.


Restoring a Long Stem Mini Churchwarden Imperial 15 Prince


Blog by Steve Laug

The next pipe on the worktable is a mini churchwarden prince shaped pipe. It has a delicate look to it and is very lightweight. It is petite with a length of 6 ¾ inches, height of 1 1/8 inches, bowl diameter of 1 ½ inches and a chamber diameter of 7/8 inches. The pipe is stamped on the left side of the shank Imperial in script with a flourish underneath. Below the flourish it reads De Luxe. On the right side of the shank it is stamped Made in London over England with a shape number 15. The next photos of the pipe show what it looked like before my brother did his clean up work.The pipe was in rough shape. The finish was worn and crumbling. There were some small sandpits on the bottom left and right sides. The underside of the bowl had a spot of glue and the remnants of something that the pipe had been glued to. I wonder if it had not been in a display box of some sort before being liberated and sold. The bowl had a thick cake but the rim had an overflow of lava on the top and the inner edge was damaged to the point that the bowl was no longer in round. There was an inner tube extending into the bottom of the bowl. The original slant on the tube was ruined and the end of the tube was chewed and damaged. The stem was oxidized and there were deep tooth marks on the top and underside near the button. The underside tooth marks had a small hole that broke through into the airway in the stem. Jeff took some photos of the bowl and rim to show the condition of both. You can see the cake in the bowl and the lava overflow down the sides of the bowl from the surface of the rim. The fact that the bowl did not have a flat rip to but a rather rounded/thin rim top allowed the flow downward on the bowl.The next photo shows the bottom of the stummel and the thick glue/paper coat that is stuck to that part of the bowl. It appears to me that someone had the pipe stuck to some fibre board in a display case of pipe shapes. Possibly, it was a shadow box of “dad’s” or “grandpa’s” and this one was a centerpiece. Following that photo are three different pictures of the inner tube that sat in the bottom of the bowl. The end on these is usually slanted with the longer edge sitting on the bottom of the bowl and the shorter edge ending at the entrance of the airway into the bowl.The bowl has some amazing grain running up the sides of the bowl and I am sure that underneath the debris that is glued to the bottom there will be some nice bird’s eye grain. The finish was worn but the grain popping through the grime.The stamping was readable but it was faint. Care would need to be taken in the clean up so as not to damage it further.The stem had some issues – there were deep tooth marks on both sides from the button forward. On the topside there were nicks mid stem and near the shank/stem junction. The button also seemed worn and there was a possible crack on the underside mid button.I have read different bits of history on the Imperial pipes and trying to put them together is an interesting puzzle. From Pipes, Artisans and Trademarks, by Jose Manuel Lopés’ I found that t he Imperial Tobacco Co. (Imperial Tobacco Ltd.) was founded in 1901 through the merger of several British tobacco companies. In 1902 it went into partnership with the American Tobacco Company to found the British American Tobacco Company. This information was also cited on https://pipedia.org/wiki/Imperial_Tobacco_Co.

I looked further on Pipedia under The Civic Company https://pipedia.org/wiki/Civic. This lead came from a price list/catalogue that I had found in researching information on an earlier Imperial pipe I was working on. Here is the link https://rebornpipes.com/2014/05/11/civic-company-1921-trade-list/. The Pipedia article says Civic was formed in 1921out of the Imperial Tobacco Co. (Fancy Goods Department) Ltd which was located in Fulham Palace Road Hammersmith. The article went on to give a bit more information on the The Imperial Company itself. It repeat that it was formed in 1901 but that it was formed in response to an aggressive take over raid in Britain by American Tobacco and involved the pooling of tobacco retail outlets including closely related items such as briar pipes. Here is the additional information that was not included in Lopés’ – in 1902 Imperial purchased the Salmon & Gluckstein retail empire, which included a section that finished briar pipes, originally made in France, for sale in Britain. It was this unit that became the fancy goods department within Imperial and, ultimately in 1921, the Civic Company. In 1928 Civic was a key element in the merger with other producers and retailers that formed Cadogan Investments, which still trades today.

I did some further searching on Google to try to pin down more information on the brand. I found lots of repetitive information in bits and pieces but nothing that added to what I already knew. I did find confirmation of the above information in a discussion on the pipesmagazine online pipe forum. It contained no new information but it gave the same data I had quoted above.  http://pipesmagazine.com/forums/topic/need-help-to-identify-this-pipe-1.

Jeff has established his own process of thoroughly cleaning pipes for me and he did not vary in his procedure here. He reamed the bowl with a PipNet reamer and tidied it up with a Savinelli Fitsall Pipe Knife. He scrubbed out the mortise and the airway in the shank and the stem with pipe cleaners, cotton swabs and alcohol and cleaned the exterior of the threaded bone tenon with a cotton swab and alcohol. He scrubbed the exterior of the pipe with Murphy’s Oil Soap to remove the grime and grit on the bowl. The top took some special work because of the heavy lava overflow. He scrubbed it with a tooth brush and the oil soap until he removed the majority of the build up. There was still some minor buildup that would need to be dealt with when I worked on the out of round bowl. I took photos of the pipe to show the condition it was in when it arrived in Vancouver. The grain really was quite stunning. I took a close up photo of the rim top and bowl, to show how well he was able to remove the buildup around those areas and down the bowl sides.He had soaked the stem in OxyClean so when it arrived it was clean and the oxidation sat on the surface of the stem. The tooth marks were very evident.The damage to the inner tube was visible and it was ragged and torn. I would need to rework it to smooth things out and restore the angle.I used a Dremel and sanding drum on low speed to sand and shape the angled end of the inner tube and remove the damaged areas. I put a slot on the tube end to match other inner tubes I have on hand and fit the bottom of the bowl once the stem was in place.The next series of photos show the process of repairing the out of round bowl. I used a folded piece of 180 and 220 grit sandpaper to smooth out the inner edges of the bowl and repair the top edge. Once I sanded it smooth I wiped it down with a cotton pad and alcohol to clean off the sanding debris and darkening on the surface. There was still polishing to do but the major portion of the repair was finished. I repaired the two small sandpits on the bottom sides of the bowl with super glue and sanded them smooth with 220 grit sandpaper once the repairs had cured.With all the repairs and reshaping on the rim and bowl finished it was time to stain the pipe. I decided to use a dark brown aniline stain that I mixed 50/50 with isopropyl alcohol to make it more transparent. It will still have the dark stain in the grains but once I wipe it down and sand it with micromesh it will be a rich brown tranparent overcoat with dark highlights. I applied the stain with a dauber and flamed it with a lighter to set it in the briar. I repeated the process until I was pleased with the coverage on the bowl and shank.Once the stain dried I wiped the pipe down with alcohol on cotton pads to remove the thick topcoat and make the stain more transparent. It significantly lightens the colour at this point but the grain won’t stand out until I polish it with micromesh pads. I polished the briar, being careful around the stamping on the shank, with micromesh sanding pads – wet sanding with 1500-2400 grit pads and dry sanding with 3200-12000 grit pads. I wiped the bowl down after each girt with alcohol and cotton pads. With the bowl finished I directed my attention to the stem. I cleaned out the damaged areas with a dental pick and sandpaper and filled them in with black super glue. The photos below show the repairs on both sides of the stem. The third photo shows the repairs further up the topside of the stem.When the glue had cured I used a file to bring the thickness of the repairs down to the surface of the stem. I used to do all this with sandpaper but figured out that the file actually sped things up a bit. I sanded the stem surface and repairs with 180 grit sandpaper after the file to smooth out the surface and remove more of the oxidation. I would need to sand it with higher grits to remove the scratching but it was at least getting better. I used a needle file to reshape the edge of the button and the top and underside surfaces of the button. I sanded the repairs smooth with 220 grit sandpaper and then polished them with 1500-2400 grit micromesh sanding pads. I took a photo of the stem at that point in the process and the oxidation showed up clearly in the bright light of the flash. I poured the Before & After Stem Deoxidizer into a flat container and put the stem in to soak while I worked on other pipes. I removed it from the soak after about 2 hours and polished it with Before & After Pipe Polish. It looked much better than it did when I put it in the bath. I decided to continue polishing it with micromesh sanding pads. I wet sanded it with 1500-2400 grit pads and rubbed it down with Obsidian Oil. I dry sanded it with 3200-12000 grit pads and rubbed it down again with the oil after each pad. I gave it a final rub down with the oil and set it aside to dry. I polished the bowl and stem on the buffing wheel with Blue Diamond to take out the last minute scratches in the briar and vulcanite. I gave the bowl and stem multiple coats of carnauba wax and buffed it with a clean buffing pad to raise a shine. I hand buffed it with a microfibre cloth to deepen the shine. The finished pipe is shown in the photos below. The pipe looks far better than it did when I started. The bowl looks round, the finish looks far better and the repairs on the stem though visible up close blend in well with the black of the vulcanite stem. The aluminum inner tube is shine and smooth with the reshaped angle of the tube looks like it must have when it left the factory. Thanks for walking with me through this refurbishing it was a fun one to work on. Cheers.


Enlivening a Mysterious Old Knobby, Oval Shank Meer Bowl


Blog by Steve Laug

My brother Jeff, sent this old meerschaum to me from our virtual pipe hunt. It was certainly unique and would be an interesting pipe to fit with a new stem. It was meerschaum with no stamping or markings on the shank to help identify it properly. It had knobs all about the bowl and shank and there was a transition of colour from dark on the shank to lighter at the top of the bowl. The bowl was caked and there was an overflow of the cake to the rim top. It was dirty and worn looking. The threaded metal tenon was anchored tightly in the shank and would take some work to remove and possibly even then it would not come out. Jeff took photos of the bowl before he cleaned it up. The first three photos give an idea of the condition and the charm of the pipe to both of us. When he showed me the pipe in our Montana virtual pipe hunt I wanted to see if I could find a stem that would work with it. There was something about it that made me want to give it a new life. He took some close up photos of the rim top and the bowl that show the cake and the lava build up on the top. The bowl did not have too much cake but enough that it was hard see if the inner edge of the rim was still round and undamaged.Jeff also took photos of the sides of the bowl and the shank end to give an idea of the colouration of the bowl and show that variation of the colours up the shank and the bowl. The silver band was unreadable but it appeared that there were some hallmarks under the tarnish on the surface of the band. I could not wait to see what they told us. It really was a pretty interesting looking old pipe. Jeff cleaned up the pipe with his usual regimen of thoroughness. He reamed out the bowl carefully with a Savinelli Fitsall Pipe Knife and took it back as far as he dared. He scrubbed the exterior of the rim and bowl with Murphy’s Oil Soap and a tooth brush to remove as much of the grime and dirt of age from the surface. He scrubbed out the internals with pipe cleaners and alcohol until they came out clean. He polished the band with soft scrub and a cloth until the hallmarks were visible.

When it arrived I wanted to see if I could find out about the maker of the pipe and try to date it if possible. I had a feeling that the band on the shank may possibly give a clue as to its maker. On the left underside of the silver band it is stamped A.F. &Co. in an oval. Following that maker’s mark it is stamped with hallmarks – an anchor, a rampant lion and a cursive lower case “f”. The anchor hallmark tells me that the band was done in Birmingham, England. The rampant lion is the mark for .925 Sterling Silver. The “f” stamp had great promise in that it might well give me a date for the pipe (or at least the band).

I looked up the date hallmarks for Birmingham and copied the chart in the photo below. There were two likely candidates for a date that had the lower case “f” stamp. The first was 1803 in a shield cartouche and the second was 1905 in a square cartouche with rounded corners (I circled both options in red in the photo below). Under a bright light with a jeweler’s loupe I could see that the cartouche was square with rounded corners. Now I knew that the pipe was banded with a Sterling Silver band in Birmingham, England in 1905.Now I wanted to see what the stamp A.F. & Co. in an oval referred to. I turned to the internet and searched for A.F. &Co. I was led to a Dictionary of Tobacconists, Pipe Makers, Pipe Mounters and Silver Hallmarks (http://www.silvercollection.it/dictionarytobacconistA.html). There I found the stamping that was on the band of my pipe. The difference of course was the BBB Diamond logo on the one below. The A.F. & Co. in the chamfered rectangle was the same. The site identified the maker as Adolph Frankau & Co. LTD – London and Birmingham, England. I have worked on BBB pipes that had the same stamping on the band so I am wondering if there is not some link to BBB even for this old meerschaum. There could very well be a connection. They were known for their gold and silver works and had been founded in 1902.Now I knew not only the date but the company who did the silver work on the bowl. Amazing the information you can find with just a little bit of work. To me it is these kinds of details that give a restoration of an estate pipe depth and add colour to their story. It is these details that drive me forward in my restoration of the pipes I work on.

I took photos of the pipe when it arrived to give an idea of what it looked like before I started working on it further. Notice the small crack in the shank coming from under the band. I would need to repair that so it does not spread further.I had a stem in my can of stems that was Bakelite and had some age on it. It had a regular push tenon but had an orific button on the end. It was in excellent condition and it would work well with this old pipe. I sawed the tenon off with a hacksaw and used the Dremel and sanding drum to smooth out the remnants of the tenon.The airway was too small for the threaded tenon so I would need to drill it out and open it up. Before I did that I used a pair of pliers and carefully removed the tenon from the shank of the meerschaum bowl. I decided to repair the crack on the shank at the same time. I did it quickly and forgot to take photos. I cleaned the area and picked it clean with a dental pick. I used a black Sharpie Pen to colour in the crack so that it would not stick out through the repair. I filled in the crack with clear super glue and smoothed it out with a dental spatula. The clear glue let the colour underneath show through.I measured the diameter of the tenon and used a drill bit the same size to drill out the airway in the stem. I marked the depth of the tenon on the bit and hand turned it onto a stationary cordless drill. I drill the airways by hand with no power so as not to drill to deep or too quickly and damage the stem. I used a tap to thread the newly drilled airway and coated the tenon with amber super glue and twisted it in place in the stem. I checked the alignment to make sure that everything was straight and set the stem aside to let the glue cure.I turned my attention to the rim of the bowl. I used a folded piece of 220 grit sandpaper to smooth out the inner edge of the rim and bring the bowl back into round. I polished the top of the rim with micromesh sanding pads – wet sanding it with 1500-2400 grit pads. I wiped the rim down with a damp cotton pad. I gave the bowl and rim a thick coat of Clapham’s White Beeswax Polish and set the bowl aside until the wax dried. I hand buffed it with a microfiber cloth and took the following photos of the bowl at this point in the process. (Notice in the photo of the bowl rim and the top of the shank how well the repair blended in at the band.) I noticed in the photo of the rim top and bowl that there was still some light cake on the walls of the bowl. I used my Savinelli Fitsall Pipe Knife and cleaned up the remaining cake. The bowl was not smooth inside.With the bowl basically finished at this point I needed to work on the fit of the stem. I have learned in the past that sanding the older Bakelite often removes some of the patina and colour from the material. I decided to do so anyway to get a more flowing fit between the shank and the stem. I used a Dremel and sanding drum to remove the excess material from the top, bottom and sides of the stem and sanded the fresh areas with 220 grit sandpaper to smooth out the scratches. The colour did change slightly – it is funny in that the colour on the stem transitions much like the colour on the bowl. I am hoping that with use and time the sanded areas will darken and match the rest of the stem. I polished the stem with micromesh sanding pads – wet sanding with 1500-2400 grit pads and dry sanding with 3200-12000 grit pads. I rubbed the stem down after each pad with Obsidian Oil. I buffed the stem and bowl with Blue Diamond on the buffing wheel to get some shine in the meerschaum and the Bakelite. I gave the pipe multiple coats of carnauba wax to protect and help with colouration. I buffed the pipe with a clean buffing pad to raise the shine and hand buffed it with a microfiber cloth to deepen the shine. The finished pipe is shown in the photos below. I think it looks pretty good for its age. I am hoping that in my travels I will one day come across an oval amber stem to replace the Bakelite but until then this one will serve its purpose. Thanks for walking with me through the refurbishment of this 1905 pipe. I appreciate your reading my work. Cheers.

Burn through Repair – Salvage of a Worthy Stanwell Rouge 109 Sand Blasted Ball


Blog by Dal Stanton

Stephen, a friend visiting Bulgaria from Rainbow City, Alabama, and I were walking through the Antique Market in the shadow of Nevski Cathedral in center city Sofia, when I my roving ‘pipe eyes’ spied an unbelievably nice looking, hefty, handful of a sand blasted Ball or Apple shaped pipe waiting on a table gratuitously mixed with WWII paraphernalia, old Communist memorabilia, skeleton keys and an assortment of cork screws, lighters and want-a-be Rolex watches.  This pipe, though, was the real deal.  With Stephen by my side, I did my best not to lock my eyes on the prize.  Finally, after I gave serious non-interested examination of the seller’s other offerings, I picked up the pipe and gave it a cursory, equally, non-interested look over.  As I looked down into the chamber, I saw my opportunity.  There was daylight at the bottom of the chamber – a hole, my leverage for the negotiation.  A quintessential burn through.  With my index finger at the chamber floor, it was sharply wedged downwardly so that the wearing, digging and burning finally was more than the briar could handle.  Turning the pipe over in my hand I read the nomenclature stamped on the underside of the shank – STANWELL (barely visible in the blasted briar) [over] ROUGE 109 [over] MADE IN DENMARK.  The hefty sand blasted stummel received my initial attention, and then the vulcanite shank extension I had not seen too often.  I laughed after the seller gave me his opening volley.  At the end of the day, both Stephen and I were happy.  The deal struck for the Stanwell Rouge was very satisfactory given that the hole in the bottom of the pipe just would not go away no matter what the seller said.  As we headed to the Metro Subway, Stephen proposed that he become the next steward of the Stanwell after I tackled the burn through.  So, some time later, Stephen emailed me from Alabama, saying he was still interested in the Stanwell.  Now on my worktable here in Sofia, Bulgaria, the time has come to recommission him. Here are the pictures from my worktable.  I recalled that Steve had posted a blog by Bas Stevens, who, according to Steve, was one of the foremost authorities on Stanwell pipes (See: LINK HERE).  Bas Steven’s extensive list of Stanwell shape numbers and designers also included this Rouge’s shape 109, which is described as:  109. Flat, ball-shaped bowl, slightly bent, full mouthpiece.

I did searches on Rouge and I could not find a Stanwell listing for only ‘Rouge’ but ‘Royal Rouge’ was evident.  This BollitoPipe.it listing has for sale, a ‘Royal Rouge’ 109 which is a smooth version described with information that matches the ‘Rouge’ in dimension with the difference of the briar shank compared to the vulcanite extension on my Rouge. Pipedia’s site links to Stanwell catalogues shows this 2008 9mm catalogue listing the 109 shape (2nd down on left) with others.  Rouge simply means ‘Red’ in French which is a good description of what the Rouge’s sand blasted stummel formerly revealed, as the ‘Royal Rouge’ exemplifies above.  The Danish pipe company, Stanwell, according to Pipedia’s article closed its doors in 2009 ending an interesting chapter of pipe history as the only remaining pipe manufacturer in Scandinavia.  The ‘Stanwell’ name moved to Italy where pipes were produced bearing the name since 2010.  The ‘Made in Denmark’ on the Rouge indicates that it was produce pre-2010 before the closing.  With a better appreciation for the Stanwell Rouge 109 before me, the first thing I do in his recommissioning is to put the stem in an OxiClean bath after putting petroleum jelly on the Stanwell Crown stamping to protect it. Before I tackle the repair of the burn-through the stummel’s heel, I like working on clean pipes because it helps with the assessment of needs.  I start by carefully reaming the bowl to remove the light carbon build up.  I say, “careful” because the floor of the fire chamber is dangerously thin.  The last thing I want is the floor to drop through!  For the gentle approach, I use the Savinelli Pipe Knife and work the sides of the chamber without reaching too deeply.  Next, I take 240 grit paper wrapped around a Sharpie Pen and sand the chamber ridding it of more carbon and exposing fresh briar.  Finally, I wipe the chamber out with a cotton pad wetted with alcohol.  Using undiluted Murphy’s Oil soap, a cotton pad and a bristled tooth brush, I scrub the exterior of the sand blasted bowl working the brush well into the surface as well as the rim (pictured below) before starting the cleaning.  The surface had a good bit of grime.  The good news is the rim is in good shape – it still shows the blasted sculpting over it, though it is darkened. Now to the internals of the stummel – using pipe cleaners and cotton swabs and isopropyl 95%, I clean the internals.  Oh my.  This old boy I believe was like the old proverbial horse saying, ‘he’s been road hard and put up wet’!  There was no end to the gunk in the mortise.  I scraped it with straight edge files and small screw drivers, and with scads of cotton swabs – the effort was immense to clean the internals.  After some time, things would start to look up, I would scrape a bit more and it was like I was starting over.  Yet thankfully, eventually the tide turned.  The picture shows the aftermath.The stem has been soaking in the OxiClean bath and I take it out to reveal the raised oxidation on the stem.  The petroleum jelly is still intact covering the Stanwell stem Crown stamping, protecting it from the OxiClean process. I start by putting a disk between the stem and the shank to protect the stem from shouldering as I wet sand with 600 grade sanding paper to remove the raised oxidation.  Then, I had one of those ‘Duh!’ moments – the shank extension on the stummel is also vulcanite with a white acrylic divider.  Removing the disk, I treat the two together.  First, with the shank extension, I lightly use 240 grit sanding paper around the extension because it did not have the benefit of the OxiClean bath.  I do this to loosen the oxidation.  Then, with the shank and stem united I wet sand using the 600 grade paper, careful to protect the stem Crown stamping. With this completed, I look to the bit area with minor tooth chatter. Using 240 grit paper I sand the chatter out, following with 600 grit again, then finish off this phase of the stem’s polishing using 0000 grade steel wool over the entire shank and stem.  To try to remove any oxidation in the Stanwell Crown stem stamp, I use a MagicEraser sponge to apply a non-abrasive cleaner.  The pictures show the progress with the stem. With the stem completed up to the micromesh phase, I put it aside to focus on the stummel repairs.  I have been developing the plan since I first saw this incredibly desirable and redeemable Stanwell Rouge beckoning on the table in the Antique Market.  There are two main steps in the burn through repair.  The first is to patch the external presentation of the stummel using a putty created from CA glue and briar dust.  This patch will fill the hole leaving an external mound for eventual sanding and shaping aiming at blending with the sand blasted finish.  When the Briar Dust Putty is applied from the external side, there also will form an internal mounding as the putty presses through the hole.  This is good and desired.  This internal mound will form the primary internal encasing of the burn through area, which is extremely thin and therefore weakened.  This internal covering of Briar Putty will form the hole fill as well as the initial reinforcement of the chamber floor.  The second step is to augment this initial reinforcement internally by using JB Weld.  I first saw the use of this from Charles Lemon on Dad’s Pipes.  I will mix a batch of JB Weld and apply it on top of the patch area and rebuild and level the floor of the fire chamber, bringing the new floor almost up to the draft hole.  That is the theoretical plan – of course, the best laid plans are often…. You know the story 😊!

I begin by taking another close picture of the external hole area as well as the floor of the chamber, with a pipe cleaner inserted to mark the gap the new floor will need to fill.  This marks the starting point.  The second picture below does not reveal the depth, but I estimate a good, 3 to 4 mm between the hole and the draft hole level.  I clean the stummel external surface with a cotton pad wetted with alcohol.  The pictures show the prep. Using an index card, I mix briar dust and Hot Stuff Special ‘T’ CA Instant Glue (thicker) with a toothpick to form a putty.  I’m shooting for the thickness of molasses so that the putty will not run and spread but stay where I apply it.  When the putty reaches the viscosity I desire, I apply the putty to the hole pressing it through until I achieve sufficient mounding on the inside.  As I press the putty through with the toothpick, the putty spreads out a bit more than I desire.  I use an accelerator on the inside and outside to cure the putty more rapidly.  I take pictures to mark the completion of step one.  It will be tricky filing and sanding on the sand blasted surface, but not impossible with patience.  As I reflect further, a different approach that may have lessened the mounding on the external side would have been to apply the putty internally and pushed it through…. The approaches for smooth briar and blasted briar may not be the same! Next time. I’m back to the worktable after a day’s work and unfortunately, in the back of my mind the application of briar dust putty to the external surface as I did yesterday, has blossomed in my mind into a colossal blunder!  In my mind, I picture the way I should have done it and it was perfect – in my mind!  But, I have a salvage plan coming together, also in my mind and my hope is that my blunder might spare others from the same fate 😊.

Before I work on the salvage plan coming together in my mind, I will complete the floor build-up using JB Weld.  One of the difficulties that I’ve thought about is a delivery system – how to get the JB Weld mixture to the chamber floor where it’s needed and not smeared on chamber walls trying to place it.  I’ve come up with plan of using a plastic bottle nozzle as the delivery system – load the mixture in the nozzle and force it down with a dowel rod and cotton swab.  It looks like it should work. I also insert a pipe cleaner into the airway to protect the draft hole from being clogged by the JB Weld.  It also helps me know where the floor should be.  The mixture sets up in about 4 minutes after the Hardener and Steel are combined.  Thankfully, everything works as hoped.  I take pictures through the process. Regarding the external surface patch mound, I realize that with a sandblasted surface it will be very difficult to remove the entire patch mound by filing and sanding as is the method with smooth briar.  This will damage the blasted briar surface.  After doing research on the internet, I discover that acetone dissolves CA glue.  Acetone is the primary active ingredient in nail polish removers.  What I’m hoping is a salvage plan; I begin by filing the patch mound down as far as possible without impacting the surface briar terrain. I then apply acetone to the remaining patch mound with a cotton swab to dissolve the surface overflow of the patch.  I work the briar dust patch with the cotton swab and gradually the surface patch begins to loosen and dissolve.  I’m encouraged.  I continue patiently, allowing the acetone to set its own pace.  The putty patch dissolves toward the center and leaves ridges which I scrape with my fingernail.  At the end of the process, I am relieved – it works. Not only did it work, but the blending is incredible!  I cannot see where the hole was without very close scrutiny.  The blunder becomes a teachable moment and a bit more experience for future restorations!  The pictures tell the story and I’m thankful a disaster was averted with this Stanwell. The next day, after several hours of curing for the JB Weld, I look at the new rebuilt floor of the chamber.  I rub my finger over it and it, as expected, is flat.  I want to introduce a slightly bowled chamber bottom.  To do this I employ the round grinding stone attachment which I mount on the Dremel.  I will remove just enough of the JB Weld floor to create this bowl.  With the speed at 40%, I start in the center with a circular motion creating the initial rounding.  I gradually expand it outwardly by moving it in circular motions.  This works well.  Afterwards, I use 240 grit paper to sand it more and wipe the bowl out with a cotton pad and alcohol to clean the chamber.  Done.  Later, near the end of the project, I will coat the chamber with a mixture of activated charcoal dust and sour cream that will form a hard base for forming a new cake for the bowl.  Bowl repair officially complete.  Yes! Before I address the Rouge’s stummel finish, I continue the sanding and finishing of the vulcanite shank extension so it doesn’t get in the way. I reattach the stem and beginning with micromesh pads 1500 to 2400, I wet sand the extension and stem and then apply Obsidian Oil to the vulcanite.  At this point I realize that I have forgotten to clean the internals of the stem (again!).  Before moving on, I clean the airway and the 9mm filter bay – which really needed some cleaning.  With a ‘proof of cleaning’ picture taken, I follow by dry sanding the extension and stem with pads 3200 to 4000, then 6000 to 12000.  After each set of three, I apply Obsidian Oil to the stem and extension to revitalize the vulcanite.  While sanding, I notice that the stem is a bit loose in the mortise extension.  I will look at this later.  The stem and extension look good! Turning now to the Stanwell Rouge’s stummel, and it is evident that the historic color of this stout, blasted ball shape was in keeping with its namesake – red.  My sense is a deeper burgundy tone would fit well.  My plan is to use 2 parts Fiebing’s Oxblood Leather Dye with 1 part of Fiebing’s Black Leather Dye.  I want it on the darker side.  Let’s see what happens!  Taking a close look at the stummel, I probe around with the sharp dental tool and see that there’s bits of dust and residues in the crevices of the blasted texture of the briar.  I use a cotton pad and alcohol to clean the stummel, and I use a bristled brush as well to dislodge debris.  I then tightly wrap masking tape around the vulcanite extension so that the dye does not possibly impact it – in a note from Steve, he said that some vulcanite will absorb the stains, others not….  Better to be on the safe side.  I mix the dyes in a shot glass using a large dropper at 2 to 1, insert a cork in the shank as my handle – and then realize later that the shank extension works just fine as a handle.  I take a picture of the set-up.  I then warm the stummel with a hot air gun and then apply the 2 to 1 dye mixture to the stummel with a folded pipe cleaner.  I work the dye into the crevices – I want good coverage.  I then ‘fire’ the aniline dye and the alcohol immediately burns off and sets the dye pigment in the briar.  After a few minutes, I repeat the process and set the stummel aside to rest. With the stummel now resting, I want to freshen the Stanwell Crown stamp on the stem.  Using white acrylic paint, I dab a bit of paint over the Crown with a tooth pick.  After the paint sets well, I scrape the excess off gently with the flat edge of a toothpick which goes over the stamp patterns leaving color in the stamp.  It looks good.  I had noted that the stem was a bit loose when seated in the mortise.  As I slowly insert the stem into the mortise extension, it is properly snug until the very end – at home station.  The tightness is generated by the white acrylic divider garnishing the end of the extension.  This lets me know that the tenon has thinned only at the base – where it ties in to the stem.  I use Special ‘T’ CA glue and a manicure brush and paint a line around the circumference of the tenon base.  We’ll see if this tightens the stem a bit after the CA glue cures.  After several hours, I’m anxious to unwrap the fire crusted stummel.  With the surface being sand blasted, I use a softer cotton cloth buffing wheel on the Dremel instead of the felt wheel, that I use with smooth briar pipes.  The softer cotton wheel better navigates the textured blasted surface.  With the speed at 20%, I utilize Tripoli compound to remove the crusting and to begin the buffing process.  After a short time, I decide to up the speed to 40% and this works better with the cotton wheel.  I take a picture to show the unwrapping.  After completing with the Tripoli, I wipe the bowl down with a cotton pad and alcohol to blend the dye better.  Then, loading another cotton cloth wheel, I apply Blue Diamond compound to the stummel.  I am liking the very, very subtle oxblood reds tucked away in the contours of the 3-D grain of the sand blasted surface.  This was exactly the classic, smoking jacket effect I was aiming for.  I press on and after changing to another cotton cloth wheel, I apply carnauba wax to the stummel, shank extension and stem.   One last project.  I use a mixture of sour cream (or plain yogurt may be used) and activated charcoal powder to apply to the fire chamber wall.  When this mixture hardens, it provides a good foundation for a new carbon cake to grow – but the new steward needs to be gentle with this after the first few bowls, not scraping the chamber but simply using a folded over bristled pipe cleaner to rub the sides.  This will remove the needed leftovers but protect the walls.  Over time, a cake grows and life as usual!  After mixing the sour cream and charcoal powder to a non-running thickness (like mayonnaise), and inserting a pipe cleaner through the draft hole, using a pipe nail tool, I scoop the mixture into the bowl and spread it over the surface.  After spreading, I see that there is too much here and there as the mix thickened.  I would scoop a little out and spread again.  After it starts to dry, it is thicker.  It takes about 15 to 20 minutes for it to set totally.  I let it set for at least 24 hours before smoking the pipe.  The pictures show the progress.After the sour cream/charcoal powder mixture dries, I check the fit of the stem and shank extension after applying CA glue to tighten the fit.  The patch is too thick so I sand it down using 600 grade sanding paper until the stem slides into the mortise.  I fine tune the cleaning of the tenon and apply some Obsidian Oil to it.  I complete the restoration with a rigorous hand buffing using a microfiber cloth to bring out the striking shine of this Stanwell Rouge.

I thought I was facing disaster with the burn through repair when I mounded briar dust putty on the external surface with no way of removing it without damaging the sand blasted briar grain.  Yet, I was bailed out by acetone.  Now, as I look at this Stanwell Rouge, I can’t believe I could see daylight through it and that most people would pass it by as a loss.  I’m glad to have restored it for his new steward.  I’m pleased with the subtle red – burgundy tones in the finish.  The hefty Ball shape is a distinctive presence in the palm and the sand blasted grain stands out well.  This Stanwell Rouge 109, Made in Denmark, is ready to go.  All my restorations benefit the work we do here in Bulgaria with the Daughters of Bulgaria – women and girls who have been trafficked and sexually exploited.  Check out my blog, The Pipe Steward for more information about this, why I do what I do and other pipes I have for sale in the store!  Thanks for joining me!

A Lady’s Choice – WDC Milano Swan Neck Billiard


Blog by Dal Stanton

Is there a psychology in the choosing one makes when befriending a pipe?  A young Bulgarian lady, who also is a budding pipe lady, chose a pipe out of my ‘Help Me!’ baskets and boxes.  After looking at scores of hopeful candidates, there was only one – only one – that she held in her hands, looking at it and smiling. A beautiful, graceful, WDC Milano Swan Neck Billiard caught her attention, and it would seem, her affections.  Is there a psychology unfolding in the process, the evaluation, and the weighing of one pipe against another?  Or, is the process more like the lore of Harry Potter’s choice of one’s wand?  The young wizard does not choose the wand – the wand chooses his wizard.  Does the pipe do the choosing?

And is there any credence to the oft unspoken observation – do pipe stewards resemble their pipes like canine lovers sometimes uncannily resemble their 4-legged friends?  These observations come to my mind because intriguingly, the young lady who was claimed by the WDC Milano Swan Neck, shares, in some very remarkable ways, pleasing characteristics of this graceful pipe.

And then there is the ‘question’ of the ‘Pipe Lady’ more so than the ‘Pipe Man’.  A Pipe Lady lives closer to the social and cultural ‘edge’ when she takes her pipe in hand and enjoys a bowl of her favorite blend.  This picture I found somewhere on the internet (sorry, can’t cite!), I suspect would never be ascribed to Pipe Men.  Yet, a Pipe Lady looks at the three with a smile of agreement and a wink, while she is thinking, ‘You’ve got that one right!’This graceful, Milano Swan Neck stem comes from the William Demuth Company, established in 1862 – one of the oldest pipe manufacturing houses in the United States (Pipedia article).  The WDC Milano patent goes back to the 1920s with an example of the familiar WDC rhombus from the same WDC article in Pipedia (courtesy of Doug Valitchka).The eBay seller from Akron, Ohio, described the long dimensions of the Lady’s Choice WDC Milano:  Very graceful bent billiard! About 6″ long, bowl is 2″ tall, 1 3/8″ wide. ID 3/4″, depth 1 13/16″. From Pipedia’s WDC article, courtesy Doug Valitchka, a very nice example of what appears to be the same Swan Neck Billiard of the Milano line.From my worktable on the 10th floor of our flat here in Sofia, Bulgaria, I take these pictures to fill in the gaps. On the left side of the shank is stamped the traditional WDC rhombus [over] MILANO.  The right side is stamped the single shape number, ‘63’.  The chamber appears to have been cleaned to some degree and the carbon cake is very light.  The rim is sad.  It appears someone took a divot out of the internal lip trying to clean it or something.  The rim’s outer edge is beat up and I can see the vestiges of a bevel.  There is lava crusting as well on the rim surface and some hardened light stuff – the rim needs cleaning.  The stummel has few if any fills that I see – the grain of the tall bowl is impressive.  The stem has the WDC inlaid white triangle on the top.  Oxidation is present and the former steward was a clencher and chewer.  Both top and bottom of the bit shows deep bite dents.  The top button lip is dented.

The recommissioning of this Lady’s Choice WDC Milano Swan Neck Billiard, begins by putting the stem into the OxiClean bath to work on the oxidation.  The second thing I do is toss the tubing that was hanging in the tenon.  If it belonged to this pipe originally, something is missing as the airway diameter of the tenon is much larger than the tubing.  On an interesting note, there is a patent number stamped on the tubular stinger.  I looked it up in Google patent search but found nothing that had bearing on pipes (PAT. NO. 5861 / IX – I think).Next, after spreading paper towel to catch the carbon dust, I use the Savinelli Pipe Knife to remove the little carbon left.  I follow with sanding the chamber walls with a 240 piece of sanding paper wrapped around a Sharpie Pen. I then turn to cleaning the internals of the stummel using cotton swabs and pipe cleaners wetted with isopropyl 95%.  There’s a good bit of tar and oils in the mortise.  After some time, I decide to switch to a Kosher Salt and alcohol soak to finish off the internal cleaning and to freshen the stummel.Next, using undiluted Murphy’s Oil Soap I work on the external surface of the stummel and the rim with cotton pads.  I also use a brass bristled brush on the rim.  After the scrub, I rinse the stummel in cool tap water.  The condition of the rim becomes more evident.  I think I will be able to remove the large divot at 4 o’clock in the second picture below by creating an internal bevel on the rim after I lightly top it. I start with by topping the stummel using 240 grit paper.  I follow by creating an internal and external bevel around the rim.  After a few rounds of working on the bevels, I realize that the internal rim divot is too much for the bevel to erase.  I switch gears and mix some briar dust with thick CA glue and create a putty and fill the divot on the rim.  I spray it with an accelerator to shorten the curing time.  With a needle file, I file down the briar dust patch material until it’s almost flush with the briar.  I then use 240 and 600 grit sanding paper to blend the patch and finish the bevel on the internal and external edges of the rim.I then sand the stummel using a medium grade sanding sponge followed by a light grade sanding sponge.  I remove the minor nicks and scratches on the bowl surface.I then proceed to sand the bowl using micromesh pads 1500 to 2400, then 3200 to 4000, then finally, 6000 to 12000.  The process brings out the beautiful horizontal grain flows from the front of the bowl downward to encompass the heel.  Bird’s eye grain is sprinkled nicely on the stummel sides. With the day ending, I continue the cleaning and refreshing of the stummel internals using a Kosher Salt and alcohol soak.  I create a wick to insert into the shank/mortise by twisting and stretching a cotton ball.  I take a straight stiff wire to help stuff it deeply into the mortise.  With the stummel secured in the egg carton I fill the bowl with Kosher Salt (which leaves no iodine after taste) and give it a shank to displace the salt.  I then, using a large eye-dropper, put isopropyl 95% into the bowl until it surfaces over the salt.  I put it aside for the night.  The next morning, the salt and alcohol soak did the job well.  The salt had turned dark and pulling the wick out – the same was true of it.  I toss the expended salt and wick in the waste and wipe the bowl out removing leftover salt.  Then returning to the use of cotton swabs and alcohol, in only a few plunges down the mortise, the internals are clean.  Pictures show the cleaning process. The stem was soaking in an OxiClean bath to raise the oxidation from the vulcanite.  I take stem out of the bath and the oxidation was raised showing the normal olive-green color.  I then take 600 grit sanding paper and wet sand the stem to remove the oxidation and to work on the serious teeth clenching damage. After the 600 grit sanding, I give the stem a stiff buffing from 0000 grade steel wool.  Interestingly, I noticed it earlier but thought that it would go away with the OxiClean and sanding.  I see a small lighter (reddish?) dot on the underside of the stem (second picture below), almost below the WDC triangle mark but just off center.  I’m not expecting a ‘manmade’ mark there so I assume it’s a discoloration in the vulcanite.  I take a little 240 grit paper and go after it, but it remains for now.  Pictures show oxidation and post-oxidation sanding. The button area is in bad shape.  The former steward was a clencher par excellence.  Neither upper nor lower bit areas were spared.  The upper has deep bites and a ‘wedgy’ dent on the button lip.  The lower button lip is spared, but there is a ‘go to’ clench handle which is distinct.  I take pictures to mark the start. Focusing first on the topside, I use the heating method to see if I might hopefully tease out the concave dents.  Then the bottom-side.  Vulcanite, a form of rubber, amazingly will seek out its original disposition when heated as the rubber expands with the heat.  I light a candle and pass the bit-end of the stem over the flame in back and forth style.  I try not to cook the vulcanite, but simply heat it strategically.  After some time, using heat on upper and then lower, I take pictures to compare.  You can see the closing of the dents in the picture comparisons below.  I think there is a beneficial change, but there are still dents to repair.  Pictures 1 and 2 are before heating and after for the upper side.  Pictures 3 and 4 of the lower side – before heating and after.  I first use 240 grit paper on the upper bit.  I sand out as much as possible all the smaller dents. Through the years of clenching, the button lip has lost its distinction so using a flat needle file, I reintroduce the lip edge and then follow by sanding with 240 to erase file tracks and shape more.  I’m wondering if I can avoid having to rebuild the button lip.  I gently sand the upper button lip as well.  The tooth grip has turned into only a small dimple – good movement.  I sand gently to remove the dimple because I don’t want to lose too much button real estate.  The top looks great.  The only patch needed is the remaining large dent.  The topside filing, sanding and shaping progression is pictured below. Turning to the lower bit, again I use 240 grit sanding paper to sand out what can be removed and blended by sanding. The dent/clench configuration was minimized by sanding but I need to patch what remains of the surface damage.To prep the vulcanite for the patch work, I wipe down the upper and lower bit with a cotton pad wetted with alcohol.  I mix activated charcoal powder with Hot Stuff Special ‘T’ CA Instant Glue (extra thick) to form a putty which is like molasses in viscosity to apply to the damaged areas.  I use a tooth pick as my trowel and tamper and I apply more putty than needed – the patch mound allows me to file down gently to the surface of the stem to achieve a better blended patch.  I apply putty to the upper bit, and a dab on the small, remaining dimple on the button lip.  I spray it with accelerator to cure the putty.  I then do the same for the needed area on the lower bit.  The pictures show the patch progress. Using a flat needle file, I begin filing the patch mound on the upper bit until I’m very close to the vulcanite surface.  With the patch expanding closely to the button lip, I also utilize the flat needle file to separate and define the button lip.  When close to the surface, I switch to 240 grit paper to bring the patch flush with the vulcanite surface.  After I’ve blended as far as 240 paper will take me, I switch to 600 grit paper and then finally, 0000 steel wool which fine tunes the blending and each in turn erases the former’s scratch marks.  I take pictures along the way to document progress. At this point, not surprised, I see very small air pockets exposed on the patch area (see picture above).  Taking Hot Stuff CA Glue, thinner than the ‘T’ I used for the patch, I dip a toothpick into the glue opening to give a coat of CA glue on the toothpick.  With this wet glue, I paint the patch with a thin glaze of glue which fills the air pockets.  I give the glaze of glue a quick spray of accelerator to cure it.  I then take 600 grit paper followed by 0000 steel wool to blend and complete the upper bit patch work.  The micromesh sanding later will further blend the patches.Now, to the lower bit patch.  As before, I use the flat needle file initially, then 240, 600 and then 0000 grade steel wool working toward the vulcanite surface then blending.  Again, a few miniscule air pockets are revealed in the patch, and I repeat the same procedure as on the upper patch. Having been so focused on the button repairs, I almost forget (again) to clean the stem internal airway.  With pipe cleaners dipped in alcohol, I do that and it does not take long to clean.Putting the stem aside, I pick up the stummel.  I will use Fiebing’s Light Brown Leather Dye to add some unifying hues on this very attractive WDC Milano’s grain.  I like the lighter motif which is what the Milano’s picture included above courtesy of Doug Valitchka.  I wipe the stummel with a cotton pad wetted with isopropyl 95% to make sure it’s clean.  I then warm the stummel with the heat gun after inserting a whittled cork into the shank to serve as a handle.  After the bowl is warmed, helping the briar more effectively to absorb the dye, I apply the dye liberally using a folded over pipe cleaner.  After the stummel is covered, I fire the dye with a lit candle which ignites the alcohol in the dye and sets the pigment in the grain.  After a few minutes, I repeat the procedure concluding with firing.  I then put the stummel aside to rest. While the stummel rests, the stem is ready for the micromesh pad cycle.  I wet sand with pads 1500 to 2400, then dry sand with pads 3200 to 4000 then 6000 to 12000.  After each cycle, I apply Obsidian Oil to rejuvenate the vulcanite, and my how it likes it!  The pop of a newly restored stem is wonderful to behold! The next day, I’m home from work, and it’s time to ‘unwrap’ the stained and fired bowl.  I mount the felt buffing wheel on the Dremel, which provides more abrasion to the surface, helping to remove the crust.  I used Tripoli compound with the Dremel set at 20% speed – slow because I don’t want to generate too much friction. Using the Dremel’s adjustment wrench, I purge the old compound off the felt wheel to clean and soften it.  I work the felt buffing wheel applying the abrasive Tripoli compound over the stummel.  I am not able to reach the bend curve between the shank and the bowl with the felt wheel.  I change to a cotton cloth buffing wheel again, only dedicated to Tripoli compound.  Each compound has its own dedicated Dremel buffing wheels.  With the cotton cloth wheel, I’m able to reach into the harder to get places.  I run the wheel over the entire surface.  I take a picture showing the completion of the ‘unwrapping’.  One of the helpful aspects of aniline, or alcohol-based dyes, is the ability to wipe it with alcohol to lighten the application as well as blend the dye.  I want to lighten this WDC Milano so I wipe it down with cotton pad wetted with alcohol.  I take a picture before and after.  Immediately after wiping down the surface, the surface clouds with the alcohol.  Then I remove the alcohol wipe clouding effect with Blue Diamond compound, with a cotton cloth wheel mounted on the Dremel at 40% speed.  Following the Blue Diamond application, the true ‘after’ picture is taken.  I also reunite the stem with the stummel for the Blue Diamond buffing.  Well, the third picture below represents the lighter ‘after’ picture, but I don’t believe the picture does justice to what my eyes are seeing.  The lightening and blending of the surface hue is showing off the grains quite nicely.  I’m liking it!  I think this, “Lady’s Choice” is going to like her choice too! I give the pipe a hand buffing with a felt cloth, not so much to buff up the shine at this point but to remove the compound dust from the surface.  The compounds are abrasives and the dust is the residue left over.  After this, I mount the Dremel with a dedicated cotton cloth buffing wheel, leaving the speed at 40%, I apply the carnauba wax evenly over the stummel and stem.  I finish with a hefty hand buffing of the pipe with a microfiber cloth to raise the shine more.

This WDC Milano Swan Neck Billiard is a lady’s choice.  I hope she likes it.  It is an elegant pipe and showcases beautiful flowing grain.  I’m pleased with the button repair that blended very well – without knowing it’s there, most people would not see it.  The repaired rim also looks good – forming the beginning of the long elegant lines carried through to the swan neck stem.  Nice.  Each pipe I restore benefits the work we do with the Daughters of Bulgaria – helping women and girls who have been sexually exploited and trafficked.  For more information about this and pipes I have available, check out the store at The Pipe Steward.  Thanks for joining me! 

Another interesting piece of pipe history Manhattan Canted Dublin with a Horn Stem


Blog by Steve Laug

I have worked on at least two other pipes that I wrote about that bore the Manhattan stamp on the shank in the past few years. One of them was a cased, bent Bakelite Bulldog with a Lockrite Stem. It had a Bakelite Manhattan stamp on the left side of the shank. When I wrote that blog I could find no information on the brand. The second one was a cased Manhattan Bakelite Billiard. The shank and the case on this one both had the same identifying information. The inside cover of the case read Manhattan over French Briar over Bakelite. The shank read Manhattan De Luxe stamped on the left side. In researching the blog on that pipe, I found that a company in the US called the Manhattan Pipe Company made the pipe. There was no other information that I could find at that time.

We found the next Manhattan on the virtual pipe hunt that my brother and I did in Montana. It was an older pipe than the others I had worked on. It also had a horn stem. I would call it a canted Dublin shape (others may differ on that). It is a very lightweight pipe and was in fair condition. The finish was worn and peeling but the briar had very interesting straight/flame grain that flowed on an angle on both sides of the bowl and horizontally along the shank. The back and front of the bowl had a mix of birdseye and flame grain. I have included the photos that Jeff took of the pipe before he worked his magic on it. I thought it would be interesting to see if there was any new information online regarding the brand. Of course, I checked on the Pipes, Logos and Stampings – PipePhil’s site. There was a listing for Manhattan pipes but there was not any new information and what was there was inconclusive. I turned to Pipedia to see if there was a new article. I was surprised to find that there was one, I do not know if it was new or not, but I do not recall seeing it before. The article was called The Manhattan Briar Pipe Company. It is an interesting read so I have included the article in its entirety as well as the advertisement from 1913 that showed a Manhattan pipe. The interesting thing for me is that the pipe is the same shape and style as the one I have in hand. The difference of course is that mine does not have a silver band and there is a horn stem rather than a vulcanite stem.

1913 Manhattan Advertisement

The Manhattan Briar Pipe Co. was organized in October, 1902 by the American Tobacco Company, under an agreement with the owners of the Brunswick Briar Pipe Company, as a New York corporation. Its initial address was 111 5th Avenue, New York City, and the value of its stock in 1902 was $350,000.00. American Tobacco Company had itself been founded in 1890 by J. B. Duke through a merger between a number of U.S. tobacco companies, and was one of the original twelve members of the Dow Jones Industrial Average in 1896. It was commonly called the “Tobacco Trust”.

The majority of the stock in Manhattan Briar Pipe Company was immediately acquired by the American Tobacco Company after the company was organized, but the prior owners retained a controlling minority interest for some years. In October, 1906, however, the American Tobacco Company acquired the remaining shares of stock, and from that point on Manhattan Briar was the pipe making branch of American Tobacco. By 1911, however, American Tobacco had been dissolved in anti-trust litigation, and Manhattan Briar Pipe Co. became a separate concern.

Manhattan Briar Pipe Co. had started operations in 1905 in Jersey City, New Jersey, having taken on a lease for a ten year period in 1905, and maintained a factory at Marion, New Jersey, where the pipes were made. By 1913, former American Tobacco pipe department chair John Glossinger was the president of Manhattan Briar Pipe Company, and began a significant advertising push for high grade pipes, using the slogan “Don’t spoil good tobacco by using a poor pipe”. It appears from cases having appeared on the estate market that Manhattan also sold meerschaum pipes, most likely rebranded articles originally made by European craftsmen.

After the expiration of the Jersey City lease the Manhattan Briar Pipe Company maintained offices and a factory at 415-425 Greenpoint Avenue, Brooklyn, New York beginning in 1915, evidently under the direction of W. C. Bastian, who had been granted a patent for a chambered pipe stem otherwise seemingly identical to a Peterson P-Lip in 1910. An employee of the company, one J. Gianninoto, was granted a patent for a device meant to permit the emptying of a cuspidor without the mess in early 1918, and the company continues to be listed in local directories through 1921. In 1922 Manhattan Briar was purchased by S.M. Frank and merged into that company. https://pipedia.org/wiki/Manhattan_Briar_Pipe_Co.

Further digging led me to a link on the S.M. Frank Co. & Inc. history page. Reading through the history of the company I found that S.M. Frank not only purchased the Manhattan Briar Pipe Company but also purchased WDC or William DeMuth & Company – two of the older brands that I enjoy working on. Here is the relevant section from the link: In the year 1900 Sam Frank Sr. started his own business, selling pipes and other tobacco items. His original office was located at 20 W. 17th Street, NYC. He was also closely associated with the sales staff of Wm. DeMuth & Co., selling their line of pipes. It was at this time that Mr. Frank first met Ferdinand Feuerbach and formed what would be a lifelong friendship. Mr. Feuerbach started working for the DeMuth Company in 1897 and by 1903 had become the production manager. In 1919, when Mr. Frank needed an experienced pipe man to run his pipe factory, located at 168 Southern Blvd., in the Bronx, he persuaded his old friend Ferdinand to join him. Mr. Feuerbach is credited with developing DeMuth’s popular Royal DeMuth and Hesson Guard Milano pipelines. In 1922, when S. M. Frank purchased the Manhattan Briar Pipe Co. the company incorporated.  http://www.smfrankcoinc.com/home/?page_id=2

That link led me to me to some further information including an advertisement and a shape chart on Chris Keene’s Pipe Pages http://pipepages.com/mbpc2.htm. I have included them here with acknowledgement to Chris Keene. I always enjoy reading the old copy of these advertisements as they take me back to place where the pipe was an acceptable part of the life. Of course, this influx of information makes me wonder what I was looking for the last time I did a search for this brand. It seems some days you put in the right search parameters and hit the jackpot and other days the wrong ones leave you with nothing. I now knew more about the brand than I ever imagined when I began the hunt. I am pretty sure that my pipe was made in the era between 1900-1910. It is roughly from the same time period as the C.P.F. pipes that were in that lot.The bowl had a thick cake that had flowed out of the bowl and on the rim top. The inner edge of the rim appeared to be damaged but I would know more once I had it in hand. The next series of photos show the bowl from a variety of angles to show the condition of the finish and the grain around the bowl sides and bottom. The pipe was stamped on the left side of the shank MANHATTAN and there was no other stamping on the pipe.The horn stem was in decent condition with tooth chatter and marks on the top and underside near the button. There was also a small hole that was on the underside of the stem – it did not go all the way through the stem into the airway but it was present. The bone tenon was in good condition and the alignment of the stem to the shank was perfect.My brother Jeff has established his own process of thoroughly cleaning the pipes that he works on for me. This one was no exception, it was cleaned thoroughly. He reamed the bowl with a PipNet reamer and tidied it up with a Savinelli Fitsall Pipe Knife. He scrubbed out the mortise and the airway in the shank and the stem with pipe cleaners, cotton swabs and alcohol and cleaned the exterior of the threaded bone tenon with a cotton swab and alcohol. He scrubbed the exterior of the pipe with Murphy’s Oil Soap to remove the grime and grit on the bowl. He scrubbed the rim top with a tooth brush and the oil soap and was able to clean off the lava overflow. I took photos of the pipe to show the condition it was in when it arrived in Vancouver. The grain really was quite stunning. While the MANHATTAN stamp is legible on the left side of the shank it is quite faint. I took a close up photo of the bowl and rim top after my brother had clean it up. The rim top was in good condition, the bowl was clean but the inner edge of the bowl showed a lot of damage and looked like the same knife that had been used to ream the other pipes in this lot had done its work here as well.His clean up on the horn stem had revealed that the small hole I had noted on the photos above was indeed present and was a small separation between the fibres of the horn. Fortunately this is a simple repair but the repair always shows.Since the stem was clean, the repair was simple. I filled in the tooth dent on the top side of the stem near the button with clear super glue. I sprayed the repair with accelerator so that I could repair the split on the other side. I filled that split in with the same clear super glue, sprayed it with accelerator and took the following photos.I sanded the repaired areas with 220 grit sandpaper to smooth out the excess and blend it into the surface of the horn. I worked over the entire stem at the same time to smooth it out and remove some of the nicks and marks on the surface of the horn.Since I was already working on it, I decided to continue and polish the stem before moving on to the bowl. I polished it with micromesh sanding pads – wet sanding with 1500-2400 grit pads and dry sanding with 3200-12000 grit pads. I rubbed the stem down with Obsidian Oil after each pad to give more life to the horn. I gave it a final coat of oil after the last pad and set it aside to dry. The repair on the top of the stem disappeared into the horn while the larger split on the backside was smooth but more visible. I set the stem aside for its final polish on the buffing wheel once I finished the work on the bowl. I began by polishing the rim of the bowl with a 1500 grit micromesh pad. My purpose was to see if I could remove some of the darkening or if I would need to top the bowl. I was happy to see that the pad cleaned it up and no topping was necessary. I used a folded piece of 180 and 220 grit sandpaper to work over the inner edge of the rim and smooth out the rough spots. It did not take too much sanding to even things out and bring the bowl back into round. The next three photos show the process of the rim repair. I decided not to stain this pipe because the briar was so nice in its original form. I chose instead to polish the rim and bowl with micromesh sanding pads – wet sanding with 1500-2400 grit sanding pads and dry sanding with 3200-12000 grit pads. I wiped the bowl down with a damp cloth after each sanding pad to remove the sanding dust. The briar really began to shine as each successive grit of sanding pad was used. With the bowl finished, I put the pipe back together and took it to the buffing wheel. I buffed the bowl and stem with Blue Diamond, being careful not to damage the already faint stamping on the left side of the shank. I gave the pipe multiple coats of carnauba wax and buffed it with a clean buffing pad to raise a shine. I hand buffed it with a microfibre cloth to deepen the shine and give depth to the finish. The completed pipe is shown in the photos below. I love the way the rich striations of the stem play against the red of the buffed and polished briar. This is a beautiful pipe. Thanks for walking with me through the process.


A Small C.P.F. French Briar Horn captured my attention


Blog by Steve Laug

The next pipe I chose to work on from the lot of pipes my brother and I picked up on our virtual pipe hunt in Montana is another C.P.F. French Briar. This one is a classic horn shape with a chubby shank and a horn stem. It is delicate in terms of size (4 inches long and 1 ½ inches tall) but chunky feeling at the same time. Like the other banded pipes in this lot the band on the shank is loose and has turned so that the faux hall marks are on the other side. The finish is very dirty and the rim is damaged around the inner and outer edges. The horn stem is worn and there is tooth chatter on the top and underside of the stem near the button. The stem is overturned in the shank. The photos below show what it looked like before my brother did his clean up on it. If you would like to read about some of the others I have restored I have written about them in individual blogs. They include a CPF horn stem bulldog, a CPF French Briar bent billiard, a CPF Remington French Briar military mount billiard and a CPF French Briar Rhodesian. Just a reminder – CPF stands for Colossus Pipe Factory. The brand was made in the late 1880s and 1890s.Jeff took the above photos as well as the photos that follow to show the condition of the pipe before he cleaned it up. This sad little Horn comes from the same era as the other pipes in this find – the late 1880s – early 1890s. The finish was worn dirty but the grain underneath showed promise. There one large sandpit on the bottom left side of the bowl toward the front. The rim of the bowl and top edge of the pipe were in rough shape. The outer edge had been beat up pretty good by someone knocking their pipe out against something hard (if you are tempted to knock out your pipe on a railing or a garden rock please think twice before you do so). The inner edge of the rim appeared to be out of round and carved up by the same person who had used a knife to ream the others in this lot. There was a thick, crumbling cake buildup in the bowl and the lava from the bowl overflowed onto the damaged top of the rim. The band on the shank end was oxidized and the stamping on it was almost illegible. The horn stem had tooth marks on the top and underside near the button. Jeff took close up photos of the rim top to show how bad it looked before he started the cleanup. The thick cake and lava overflow on the rim filled in a lot of the damage. The full extent of the damage would be revealed once the cake was removed and the lava was cleaned.The next photos show the condition of the bowl sides and the flaking finish. The damage on the rim edge also can be seen in the pictures. The third picture shows the sandpit on the bottom left side of the bowl. You can also see the potential in the lovely grain that is peeking through the grime and flakes of old finish peeling off. The stamping on the left side of the shank is readable – it has the C.P.F. logo in an oval with the words French Briar above and below the oval. The stamping on Briar is fainter than the rest of the stamping. The silver band on the shank has the faux hallmark stamps that I have come to associate with C.P.F. pipes. The horn stem had some great looking striations and colour underneath the wear and tear. There was some tooth chatter and bite marks on both the top and underside at the button. I am very spoiled due to the excellent cleanup work that my brother Jeff does on these old pipes before I ever get them here in Vancouver. He has a pattern to his work and it rarely varies. Jeff thoroughly cleaned the pipe reaming the bowl with a PipNet reamer and tidying up with a Savinelli Fitsall Pipe Knife. He scrubbed out the mortise and the airway in the shank and the stem with pipe cleaners, cotton swabs and alcohol. He scrubbed the exterior of the pipe with Murphy’s Oil Soap to remove the grime and grit on the bowl. He scrubbed the rim top with a tooth brush and the oil soap. He scrubbed the band and stem at the same time to clean it. I took photos of the pipe to show the condition it was in when it arrived in Vancouver. I took a close up photo of the rim top and the sandpit on the lower left side. You can see the damage along the inner and out edges of the rim and the size and location of the sandpit in the photos. The general condition of the briar is rough though the grain patterns are promising.The horn stem is dry and lacklustre but it seems to be solid. There was no delamination happening along the sides or length of the stem and the tooth marks and chatter at the button were relatively minor. This horn stem was in the best condition of all of the horn stems I have worked on in this lot from Montana. The stem was overturned to the right due to wear on the mortise and the threaded bone tenon.I repaired the sandpit with a few drops of super glue and let it dry. Once the glue had dried I sanded the repair with 220 grit sandpaper to blend it into the surface of the briar.I topped the bowl on a topping board with 220 grit sandpaper to remove the damage and minimize the damage to inside and outside edges of the rim. I did not have to take off too much so I checked as I worked over the rim. Once I had the rim smooth I stopped sanding and wiped the bowl down with alcohol on cotton pads to clean off the dust from the surface. I filled in the nicks around the outer edges of the bowl with clear super glue. I carefully over filled the spots around the rim so that I could sand it smooth and leave a smooth flow to the rim. I sprayed the repairs with an accelerator so that I could sand it sooner. The next photos show the repair process and the end results.I gently topped the rim again on the topping board to smooth out the repairs on the rim top and sanded the outer edge of the bowl and inner edge of the bowl with 180 and 220 grit sandpaper. I was able to remove the excess repair material and smooth out the rim edges on both the inside and outside. The overall look was far better than when I started the restoration and it was minimally intrusive.I polished the band with a 1500 grit micromesh sanding pad to remove the tarnish and corrosion (I would use the other grits of micromesh pads later in the process to polish the band). Underneath the film and corrosion the band was gold in tint just like the other C.P.F. pipes that I have been restoring. I coated the shank end with white all-purpose glue and pressed the band in place. I aligned the faux hallmarks with the stamping on the shank. I wiped down the glue that squeezed out around the edge of the band before it dried so that it would not hamper staining the shank end when I was ready.I carefully heated the bone tenon with a Bic lighter, moving the flame constantly and not letting it get to hot. My purpose was to loosen the tenon and turn the stem straight once again. I repeated it several times and was able to get quite a bit of turn on the stem but not enough. I backed it off and let the glue in the stem harden again. I would need to come up with another method to address the worn threads in the mortise and on the tenon.I set the stem aside for a bit and turned my attention to polishing the briar in anticipation of staining it. I went through the full range of micromesh sanding pads – wet sanding with 1500-2400 grit pads and dry sanding with 3200-12000 grit pads. I wiped the bowl down with a damp cotton pad between pads. The pictures show the way the polishing brings the grain out on the bowl. I needed to stain it to blend the repairs into the rest of the bowl surface. The trick would be to stain it with light enough colour to highlight the grain and not mute it. I mixed 1 part of dark brown aniline stain with about 3 parts of isopropyl alcohol to make a medium brown wash for the bowl. I stirred it to get a good mix. I heated the briar and applied the mixture to the bowl. I flamed it and repeated the process until I was happy with the coverage on the bowl.Once the stain dried I wiped it down with alcohol and cotton pads to remove the excess and make it more transparent. I still found that the colour was too dark so I decided to polish it with micromesh sanding pads. I wet sanded with 1500-2400 grit pads and wiped it down with alcohol on cotton pads to remove the finish I had sanded free. I touched up the shallow gold stamping with Rub’n Buff European Gold using a cotton swab. I rubbed of the excess with a cotton pad. I finished polishing the bowl by dry sanding it with 3200-12000 grit pads. I wiped it down with alcohol after each pad to clean it. The pictures tell the story of the process and the end. With the bowl finished it was time to work on the stem. I sanded the tooth marks out and smoothed the flow of the stem with 220 grit sandpaper. I polished it with micromesh sanding pads – wetsanding with 1500-2400 grit pads and dry sanding with 3200-12000 grit pads. I rubbed the stem down with Obsidian Oil after each pad. After the last pad I gave it a final coat of oil and set it aside to dry. I painted the tenon with clear fingernail polish to build up the threads. I layered it on until the threads sat well in the mortise. I put the stem on the shank and it lined properly. I buffed the bowl and stem with Blue Diamond on the buffing wheel to polish out the scratches in those surfaces. I buffed the brass coloured band with Blue Diamond as well. I gave the pipe multiple coats of carnauba wax to protect the aged briar and the horn. The finished pipe is shown in the photos below. It is a beautiful piece of pipe history and I only wish it could tell its story so I could know a bit of its travels. Until such a time that pipes can talk I am left to my own imagination. Thanks for walking with me through the process of the restoration.

This Old CPF French Briar Rhodesian was in rough shape


Blog by Steve Laug

The next pipe I chose to work on from the lot of the lot of pipes my brother and I picked up on our virtual pipe hunt in Montana is another C.P.F. French Briar. This one is a Rhodesian shape with a chubby shank. It is an interesting shape and the carving around the band separating the cap from the body of the bowl. The band on the shank is loose and has turned so that the C.P.F. stamp on the band is on the other side. The finish is very dirty and the rim cap and top is heavily damaged. The horn stem is worn and there is tooth chatter on the top and underside of the stem near the button. There is a wrinkle in the horn on the underside mid stem. The stem looks like someone has either wrapped it or there is a gasket to keep it in place. The photos below show what it looked like before my brother did his clean up on it. If you would like to read about some of the others I have restored I have written about them in individual blogs. They include a CPF horn stem bulldog, a CPF French Briar bent billiard and a CPF Remington French Briar military mount billiard. (You can access them by clicking on the CPF Name above for a hyperlink to the blog). Just a reminder – CPF stands for Colossus Pipe Factory. The brand was made in the late 1880s and 1890s.Jeff took the above photo and the photos that follow to show the condition of the pipe before he cleaned it up. This sad little Rhodesian comes from the same era as the other pipes in this find – the late 1880s – early 1890s. If I thought the silver mount billiard was in bad shape this one was in worse condition than any of previous pipes I had worked on from this lot. It was worn and was in rough condition. The finish was worn off and appeared to be flaking in place. There were a lot of nicks, scratches around the outside of the bowl. The outside of the bowl was covered with grime, grit and was peeling. The rim of the bowl and top edge of the pipe were in abysmal condition. The rim had been knocked out on hard surfaces and burned. There were huge chunks missing all around the rim top. The front of the bowl was in worse condition than the back and sides. The height of the top cap was different all the way around. Once again there was a thick, crumbling cake buildup in the bowl and the lava from the bowl overflowed onto the damaged top of the rim. The band on the shank end was oxidized and the stamping on it was almost illegible. The horn stem had tooth marks on the top and underside near the button. There is a wrinkle in the horn on the underside mid stem.Jeff took close up photos of the rim top to show how bad it looked before he started the clean up. The thick cake and lava overflow on the rim filled in a lot of the damage. The full extent of the damage would be revealed once the cake was removed and the lava was cleaned. The third photo below shows the rim from one side and you can see the damage on that side. The next two photos show the condition of the bowl sides and the flaking finish. The damage on the rim edge also can be seen in the pictures.The stamping on the left side of the shank was readable – it had the C.P.F. logo in an oval with the words French Briar above and below the oval. The band on the shank end had the faux hallmark stamps that I was familiar with as well as the C.P.F. oval. The second photo shows something in between the shank and the stem. The first photo below shows the stem and the wrapping or gasket between the shank and stem. It is followed by photos that Jeff took when he removed the stem showing the wrapping – a thread of twine wrapped around the tenon to hold it in place in what appeared to be worn out threads in the mortise itself.The horn stem showed some tooth chatter, bite marks and what looked like wrinkles on the underside, but it was in better condition than the other previous horn stems I had worked on.Following his usual pattern, Jeff thoroughly cleaned the pipe. He reamed the bowl with a PipNet reamer and tidied up with a Savinelli Fitsall Pipe Knife. He scrubbed out the mortise and the airway in the shank and the stem with pipe cleaners, cotton swabs and alcohol. He scrubbed the exterior of the pipe with Murphy’s Oil Soap to remove the grime and grit on the bowl. He scrubbed the damaged rim top with a tooth brush and the oil soap. He scrubbed the band and stem at the same time to clean it. I took photos of the pipe to show the condition it was in when it arrived in Vancouver. You can see the damaged rim top and edges and the fill on the right side of the bowl. The condition of the briar is rough and the stem is oxidized. The band was loose so I removed it from the shank to clean it. I took a photo of the pipe parts.I took a close up photo of the rim top to show how great a job my brother did on it but also the extent of the damage that would need to be addressed in the repair.The stem was clean in decent shape. Very few tooth marks were on the top and bottom sides and those would be easy to deal with. The button was in excellent condition.I mixed a putty of super glue and briar dust to use for rebuilding the rim on the bowl and the top edge. The damage was quite significant so the repair would be extensive. I was hoping that it would work. Once it dried I topped the bowl on the topping board with 220 grit sandpaper and worked the inner edge with a folded piece of the same sandpaper. The repair came out quite well and gave me something to work with in the finished pipe. I polished the band with 1200-12000 grit micromesh sanding pads to remove the tarnish and corrosion from the surface. It worked really well and left behind a polished brass band. When I finished polishing the band I used an all purpose glue to glue it in place on the shank with the stampings aligned with those on the briar. I wiped down the bowl with alcohol on a cotton pad to remove the remaining sanding dust from the bowl and any grit that had accumulated in the carvings from my sanding. I polished the briar with micromesh sanding pads – wet sanding with 1500-2400 grit pads and dry sanding with 3200-12000 grit pads. I wiped the bowl down with a damp cotton pad to remove the dust after each set of pads. I stained the bowl with a dark brown aniline stain mixed with isopropyl alcohol in a 50/50 ratio. I flamed it and repeated the process until I was happy with the finish. I wiped the bowl down with cotton pads wetted with isopropyl to thin the stain and give it more transparency. When I finished that I buffed it with red Tripoli and sanded it down with 1500-12000 grit micromesh pads to polish it and give it the look that I was aiming for. The pictures tell the story. With the bowl done, except for the final buffing I turned my attention to the stem. The first thing I had to deal with was the worn threads in the mortise. I decided to fill in the threads on the tenon with super glue and make the stem a push stem. I could have removed the threaded tenon and inserted a new push tenon like those on meerschaum pipes but I wanted to keep the original look of the tenon and mortise so I figured that I could convert the stem to push status by simply building up the threads. I layered on clear super glue until I had the build up shown in the photos below. I still needed to sanded it smooth and reapply a final coat but you can see the process.I sanded out the tooth marks in the stem and worked on the “wrinkles” in the underside of the stem with 220 grit sandpaper until they were smooth. I worked on some of the marks at the tenon end of the stem at the same time as it seemed rough to touch.I polished the stem with micromesh sanding pads – wet sanding with 1500-2400 grit pads and dry sanding with 3200-12000 grit pads. I rubbed the stem down with Obsidian Oil after each pad to give the horn some needed oil to help with the dry feel that it had after over a hundred years of smoking. You can follow the development of the shine in the photos that follow. I love the feel and look of polished horn. There is nothing quite like it for translucency and feel. I had forgotten to touch up the gold leaf in the stamping on the shank up to this point so I applied some Rub ‘n Buff European Gold to the stamping with a cotton swab and rubbed off the excess. The stamping on this pipe was in excellent condition so it came out really readable.I buffed the pipe and stem with Blue Diamond on the buffing wheel to polish out the scratches that remained and to give it a shine. I was careful to avoid damaging the gold stamping on the shank. I gave the pipe multiple coats of carnauba wax to protect the horn and the briar. I buffed it with a clean buffing pad to raise the shine on the horn and the stem. I hand buffed it with a microfiber cloth to deepen the shine. The finished pipe is shown below. I am pretty happy how it came out considering what I started with. The rim and cap look the age of the pipe but the damage is gone and the pipe is ready for another 100 years. Thanks for going through the process with me on this challenging restoration.

Restoring another CPF French Briar – a Remington Silver Mount Billiard


Blog by Steve Laug

The next pipe I chose to work on from the lot of the lot of pipes my brother and I picked up on our virtual pipe hunt in Montana is a C.P.F. French Briar Silver Mount Billiard. It is a classic billiard shape, while the silver ferrule and cap on the stem end give it a feeling of elegance. The photos below show what it looked like before my brother did his clean up on it. It is another one from the lot of pipes my brother and I picked up on our virtual pipe hunt in Montana. I have written about several of the other CPF finds with the latest being a CPF horn stem bulldog and a CPF French Briar billiard. Just a reminder – CPF stands for Colossus Pipe Factory. The brand was made in the late 1880s and 1890s.Jeff took the above photos and those that follow to show the condition of the pipe before he cleaned it up. This little billiard comes from the same era as the other pipes in this find late 1880s – early 1890s. It was in worse condition in many ways than the previous pipes I had worked on from this lot. It was worn and was in rough condition. The finish was worn off and there were a lot of nicks, scratches around the outer rim of the bowl and top edge of the pipe. The outside of the bowl was covered with grime and grit. Once again there was a thick, crumbling cake buildup in the bowl and the lava from the bowl overflowed over the top of the rim. The damage to the outside of the rim made me think that the inner edge of the bowl was also damaged from the same kind of knife reaming. But I could not be certain until the cake was gone. The silver ferrule on the shank end was damaged and torn on end with what looked like small cracks in the silver. The tenon endcap was worn, scratched and some brass colour showed through the finish. The vulcanite stem had small tooth marks on the top and underside near the button and was oxidized.Jeff took the next two close up photos of the rim top and bowl. You can see the thick cake in the bowl and the chipped overflow on the rim top. The damage to the inside edge and the chips on the outer edge are visible under the cake. The next three photos show the grain under the dirty and damaged finish on the bowl sides. There are also scratches and nicks in the bowl and around the rim. The stamping on the sides of the shank was very readable. The left side read The Remington and the right side read French Briar. The silver ferrule is stamped with three faux hallmarks and the logo of C.P.F. in an oval. Some of the cracks and tears on the ferrule are also visible in the third photo. Jeff took photos of the condition and tears in the ferrule. It was in very rough shape and would take some work to repair and smooth out. But was it worth the effort. The bite marks, chatter and wear on the both the top and underside of the stem surface are visible in the next photos.Following his usual pattern, Jeff thoroughly cleaned the pipe. He reamed the bowl with a PipNet reamer and tidied up with a Savinelli Fitsall Pipe Knife. He scrubbed out the mortise and the airway in the shank and the stem with pipe cleaners, cotton swabs and alcohol. He scrubbed the exterior of the pipe with Murphy’s Oil Soap to remove the grime and grit on the bowl. He scrubbed the metal ferrule and stem end at the same time to clean it. I took photos of the pipe to show the condition it was in when it arrived in Vancouver. You can see the damaged rim top and edges and the fill on the right side of the bowl. The condition of the briar is rough and the stem is oxidized. Jeff had cleaned up the rim top and what was underneath was sad. The rim was chipped and damaged. The inner and outer edge of the bowl was badly damaged. The inner edge was out of round and the cuts in it seemed like they had been down when a previous owner had reamed the bowl with a knife. The outer edge was beat up with large chips and nicks going down the side of the bowl.The next photos of the stem and end cap show the brass shining through and the oxidation on the surface of both sides. The tooth marks and chatter are also visible. Fortunately they do not appear to be deep.I topped the bowl on the topping board using 220 grit sandpaper to remove the surface damage and clean up the edges from the top view. I did not have to top it too much to smooth out the rim. Topping the bowl also removed much of the damage to the edges as well.I used clear super glue and briar dust to repair the rough outer edge on the bowl top and the damaged fill on the back right side. I sanded the repairs smooth with 220 grit sandpaper to remove the excess repair and blend it into the surface of the briar.I sanded the repairs smooth and repaired the light bevel to the inner edge of the rim with a folded piece of 220 grit sandpaper to repair the damages to the inner edge.I polished the briar rim and the sides of the bowl with micromesh sanding pads – wet sanding with 1500-2400 grit and dry sanding with 3200-4000 grit pads. I wiped the bowl down after each pad with a damp cotton pad. The photos tell the story of the polishing process on the bowl. I heated the briar and stained it with dark brown aniline stain thinned by 50% with isopropyl alcohol. I flamed it to set it in the briar and repeated the process until the stain coverage was even all around the bowl.Once the stain had dried I wiped it down with isopropyl alcohol to thin the stain and make it more transparent. When I finished wiping it down I buffed it with red Tripoli to reduce the stain even more. The pictures that follow show the process of reducing the opacity of the stain. I touched up the gold leaf on the stamping using European Gold Rub’n Buff. I applied it with a cotton swab and rubbed off the excess with a cotton pad. The repaired stamping is shown in the next two photos.I decided to experiment with a repair to the tears in the ferrule using clear super glue. I had never tried this before but I had a hunch that the hardened glue would fill in the gaps and then I could sand it smooth. I applied the glue in layers until the edge was even with the end of the ferrule. I sanded the repairs after each application of glue until the surface of the repair matched the rest of the ferrule. While the glue is slightly visible it bound the tears together and I was able to sand it smooth and blend it into the silver. I polished the repair with micromesh sanding pads – wet sanding with1500-2400 grit pads and 3200-12000 grit pads. The following photos show the progress of the ferrule repair. With the bowl and ferrule restored and functional I turned my attention to the stem. I polished the metal end cap with Blue Diamond on the buffing wheel. I polished the vulcanite with micromesh sanding pads – wet sanding with 1500-2400 grit pads and dry sanding with 3200-12000 grit pads. I rubbed the stem down with Obsidian Oil after each pad and after the final pad I set it aside to dry. I buffed the pipe with Blue Diamond on the buffing wheel to polish the briar and the stem. I gave the bowl and stem multiple coats of carnauba wax and buffed it with a clean buffing pad to raise the shine on the pipe. I hand buffed it with a microfiber cloth to deepen the shine. The finished pipe is shown in the photos below. It has come a long way from the sad and damaged pipe that I started with when I began the restoration. What do you think? Was it worth the effort? Seems to me that it was more than worth it. Thanks for walking with me through this process.

Another Piece Pipe History – a Lovely CPF French Briar Bent Billiard


Blog by Steve Laug

The next pipe I brought to the work table was a little bent CPF French Briar billiard. The photos below shows what it looked like before my brother did his clean up on it. It is another one from the lot of pipes my brother and I picked up on our virtual pipe hunt in Montana. I have written about several of the other CPF finds with the latest being a nice little CPF horn stem bulldog. Just a reminder – CPF stands for Colossus Pipe Factory. The brand was made in the late 1880s and 1890s. This little bent billiard comes from the same era as the other pipes in this find. It was very worn and looked to be in rough condition. The finish was non-existent and there were a lot of nicks, scratches and grime on the surface all around the bowl. There was a thick, crumbling cake buildup in the bowl and it overflowed on to the top of the rim. It looked like the inner edge of the bowl was damaged from reaming with a knife but I could not be certain until the cake was gone. The gold band on the shank was so badly oxidized that it was impossible to see what was under the grime and sticky debris on it. The horn stem had tooth marks on the top and underside near the button and looked like it was delaminating along the edges and the bend on the underside. The horn was very dry. Jeff took some close up photos of the bowl and rim from the top. You can see the crumbling condition of the cake in the bowl and the thick overflow on the rim top. It was really hard to see the condition of the inner edge of the bowl.The grain underneath all of the grim on the sides of the bowl was really quite stunning, even through the debris, grime and buildup. The birdseye and cross grain stain out really well even through the dirty surface. The oxidation on the band was also heavy and very rough. It is hard to know what is underneath the corrosion.The stamping on the left side of the shank has the standard C.P.F. logo in an oval with French arched over the oval and Briar arched underneath. The stamping on the C.P.F. is fainter than the stamping on French Briar. The second photo shows the junction between the band and the horn stem. The horn looks rough and grainy.The next four photos show the stem from various angles. The first and second photos show what looks like delaminating on the left side near the button. The third and fourth photos show tooth marks on the top and underside of the stem at the button. The tooth marks on the top are deep. Jeff thoroughly cleaned the pipe. He reamed the bowl with a PipNet reamer and cleaned it up with a Savinelli Fitsall Pipe Knife. He scrubbed out the mortise and the airway in the shank and the stem. He scrubbed the exterior of the pipe with Murphy’s Oil Soap to remove the grime and grit on the bowl. He scrubbed the tenon with a tooth brush and removed the tars and oils. I took photos of the pipe to show the condition it was in when it arrived in Vancouver. I took a close up photo of the rim top to show the condition it was in after my brother had cleaned it up. It is amazing to me that he was able to remove the thick buildup on the rim top and the crumbling cake in the bowl and leave no debris behind. It was better than I had expected. The rough spots would be easy to sand out and smooth the ridges and bring it back to round. It appeared that the pipe had never been smoked to the bottom of the bowl as the bottom of the bowl is raw briar.The next two photos show the condition of both sides of the stem after the cleanup. Note the roughness on the underside of the stem and the tooth marks/chatter on both to top and the bottom near the button.You can see the oxidation on the band in the photos above. It is not clear what colour it is. The sticky grime was cleaned off but the oxidation would need to go. I sanded the band with 1500-2400 grit micromesh pads to remove all of the sticky substance and the oxidation on the surface. It came off really easily with some polishing. I glued the band in place on the shank with white glue and let it dry.I smoothed out the damage on the inner edge of the rim with 220 grit sandpaper and gave it a light bevel to minimize the damage. I stained the beveled edge on the bowl with a black Sharpie pen to blend it in with the inside walls of the bowl. I wet sanded the bowl and rim with 1500-2400 grit micromesh pads and dry sanded it with 3200-12000 grit pads.  I wiped it down with a damp cotton pad to remove the sanding grit. I polished the band while I worked on the bowl with the same grits of micromesh pads. The following photos showed the polishing on the briar. I touched up the gold leaf on the CPF French Briar logo with European Gold Rub’n Buff. I applied it with a cotton swab and wiped down the excess gold. The light of the flash showed more of the gold buff that needed to come off.I stained the bowl with a 50/50 mix of dark brown aniline stain and isopropyl alcohol. I applied the stain and flamed it with a lighter. I repeated the process until I felt the coverage was even. Once it dried I took some photos of the stained bowl. It is too dark to my liking but the coverage was even. I wiped the bowl down with alcohol on cotton pads to make it more transparent and let the grain show through. I polished the briar with micromesh sanding pads to further remove the stain and make the grain show through. The process of unveiling the grain is shown in the photos that follow.With the bowl finished I worked on the stem. I used some small drops of super glue to fill in the tooth marks on the stem surface and the button. Once the repairs had dried I sanded them smooth to blend them into the surface of the stem. I polished the stem with micromesh sanding pads. I wet sanded it with 1500-2400 grit pads and dry sanded it with 3200-12000 grit pads. I wiped the stem down after each pad with Obsidian Oil on a cotton cloth. I gave it a final coat after the last pad and set it aside to dry. I buffed the stem and bowl with Blue Diamond polish on the buffing wheel to polish it. I gave the stem and bowl multiple coats of carnauba wax. I buffed the waxed bowl and stem with a clean buffing pad to raise the shine. I hand buffed it with a microfiber cloth to deepen the shine. The finished pipe is shown in the photos that follow. The old timer looks really good and should have long years of life in it. I look forward to enjoying this pocket sized pipe. Thanks for walking with me through the process of the restoration.