The Alcohol Bath and New Life for a Brigham Acorn


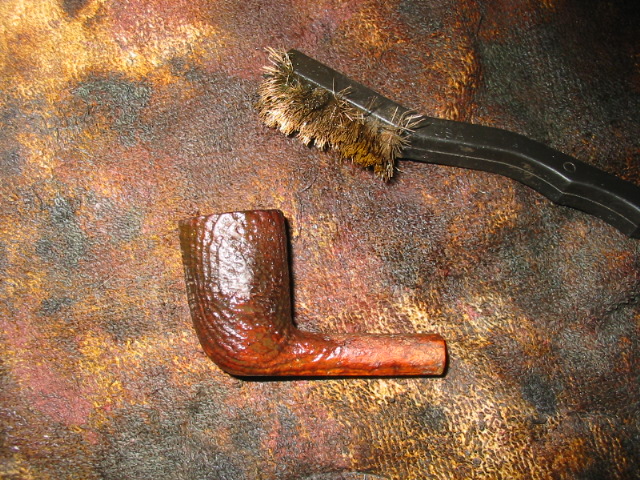
The work on this older Brigham 4 Dot Acorn gives a clear picture of how the alcohol bath can remove the grime and prepare the older worn pipe for a restain that brings it back to life. When I am dealing with this kind of wear and tear on the finish of an estate pipe, it is generally my opinion that it is easier to take the pipe back to an unfinished condition rather than try to work with the existing finish and have any hope of restoring it. It also is a shortcut method to remove the finish without the labour intensive sanding that would normally be required. I have a pint jar with a lid on it that I keep on my work bench that is full of isopropyl alcohol. It is now brown but I find that it works well in removing the finish but also it seems to add depth to the stains I use. I recycle the alcohol monthly by pouring it off slowly and rinsing and scrubbing away the sediment in the bottom of the bath. Thus it is always clear – just with a brown tint.

ImageImage

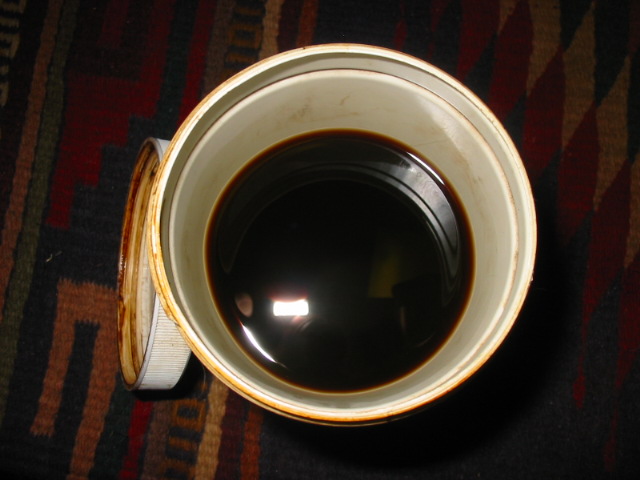
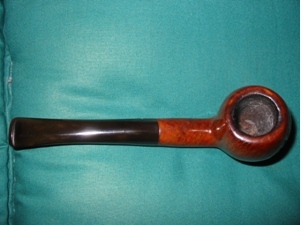
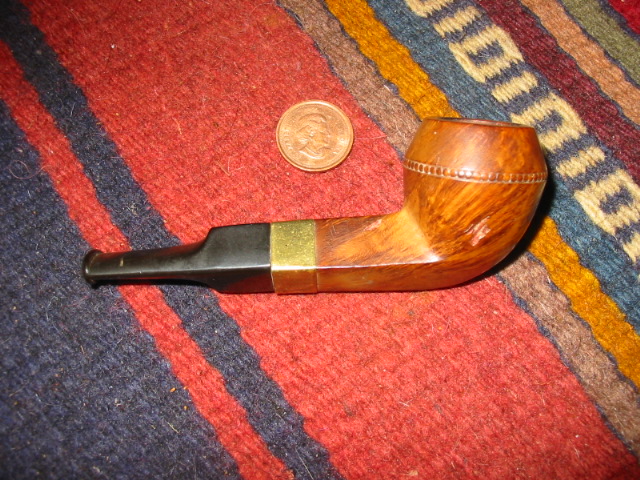
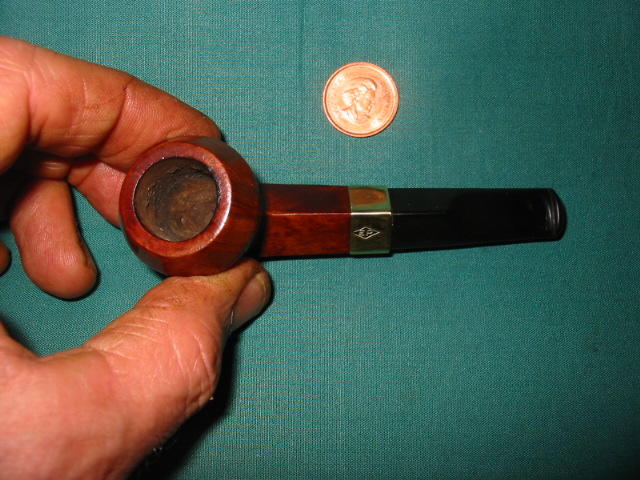
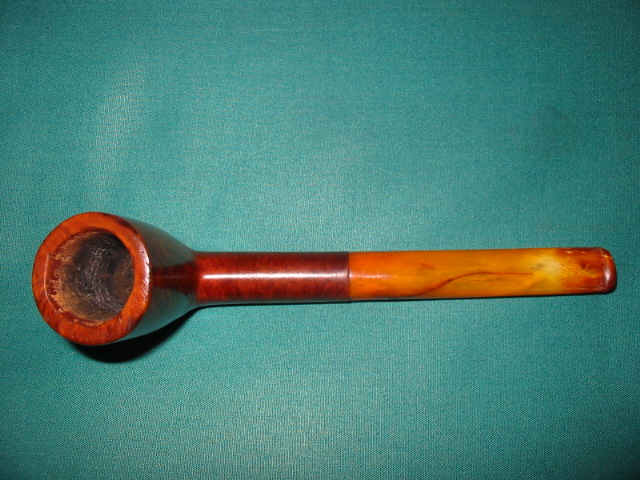
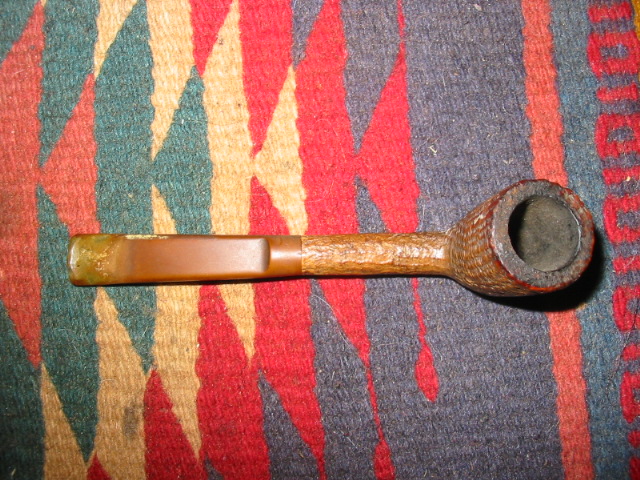
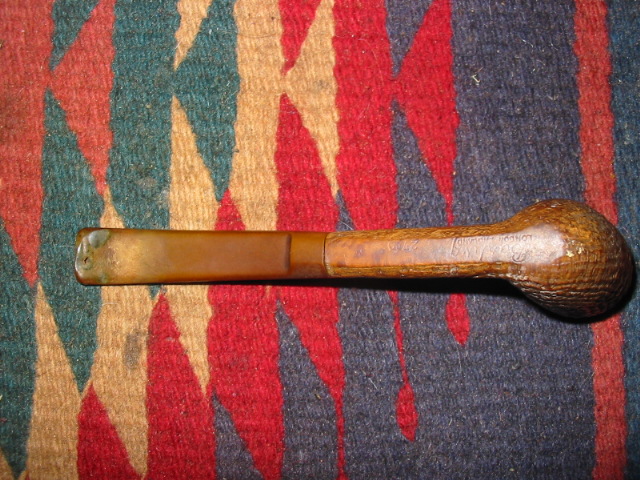
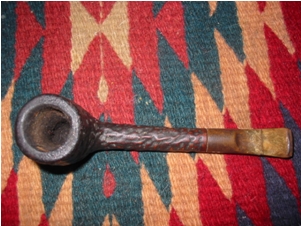
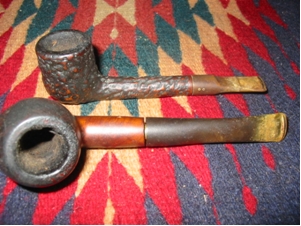
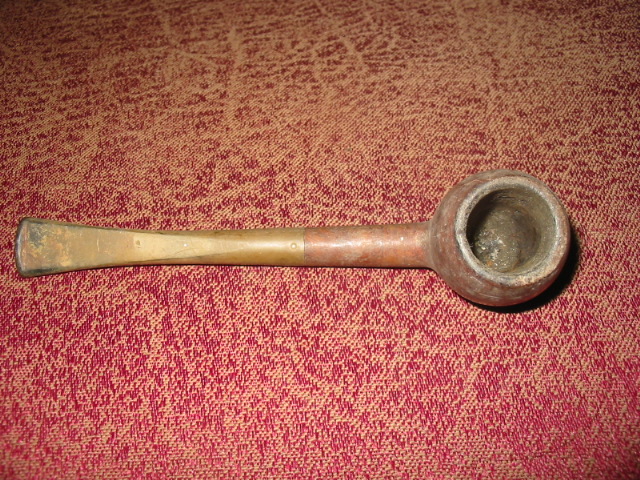
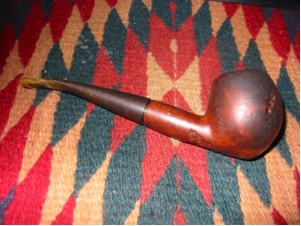
The pipe I am using to illustrate the process is a Brigham Acorn. It has the standard Brigham style rustication on the bottom edges and on the side of the bowl. It was used to give the pipe character and hide flaws in the briar on an otherwise nicely grained pipe. This one was in rough shape. The bowl was incredibly grimy inside and out. I reamed it and cleaned the bowl and shank. Then it went into an alcohol bath overnight so the alcohol would do its work cut the grime and dirt as well as any remaining finish.

ImageImageImage

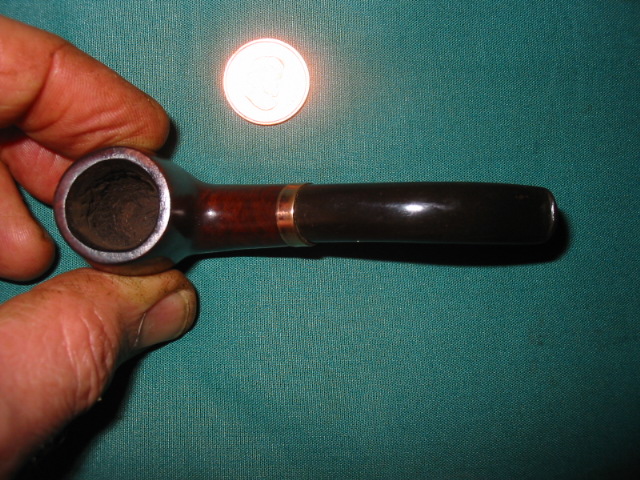
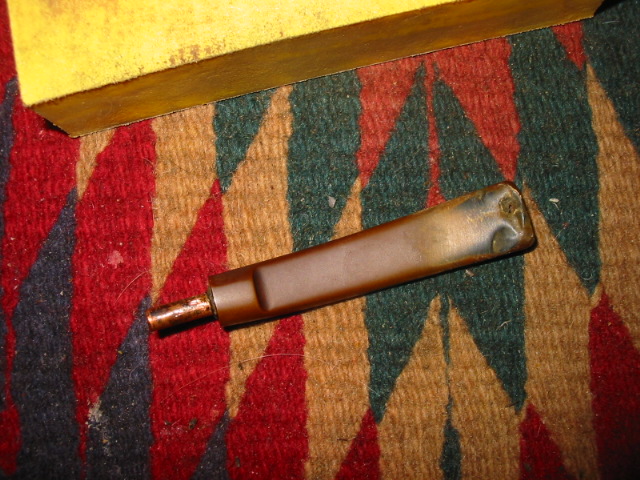
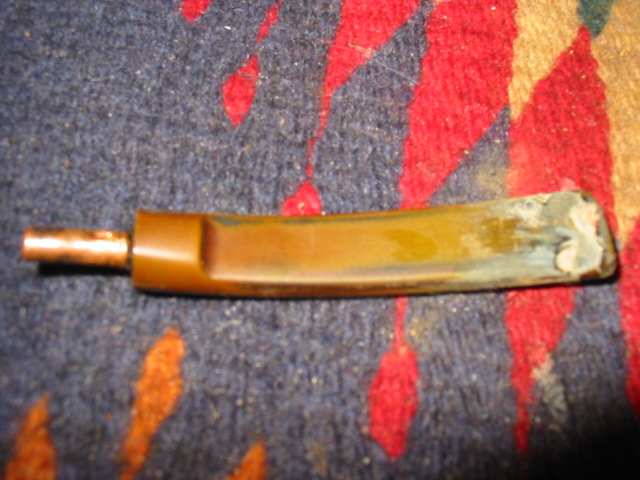
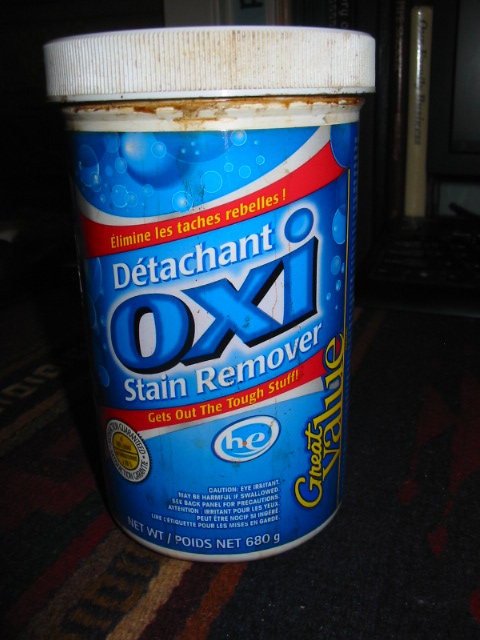
While the bowl was in the bath I turned my attention to the stem. From the pictures above you can see that the stem was another story. The first ¾ of an inch around the button was heavily caked with a lime like build up. I generally find this under stems that have used the softy bit to protect them from bites. Most folks who use them never remove them to clean them and this is the result. It is hard stuff to remove. I mixed a solution of Oxyclean and hot water – 1 scoop of the powder to a pint of water. I shook it and stirred it to get it dissolved and dropped the stem in it for several hours. I had other pipes to work on during the wait so it was not a problem. I find that the Oxyclean softens the oxidation and particularly this kind of lime scale. Once it is softened it is easily removed with the buffer and sandpapers.

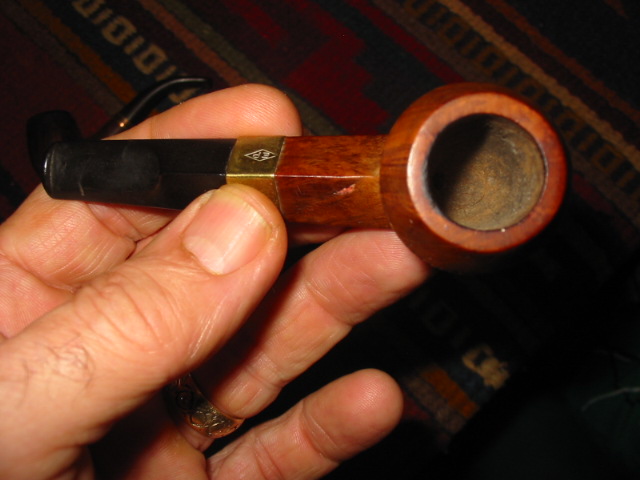
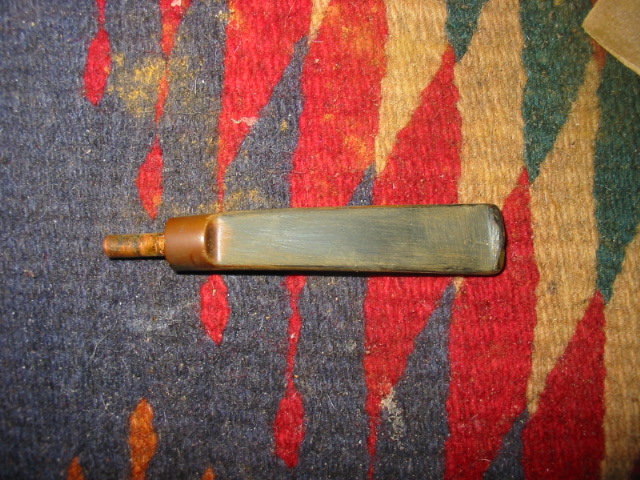
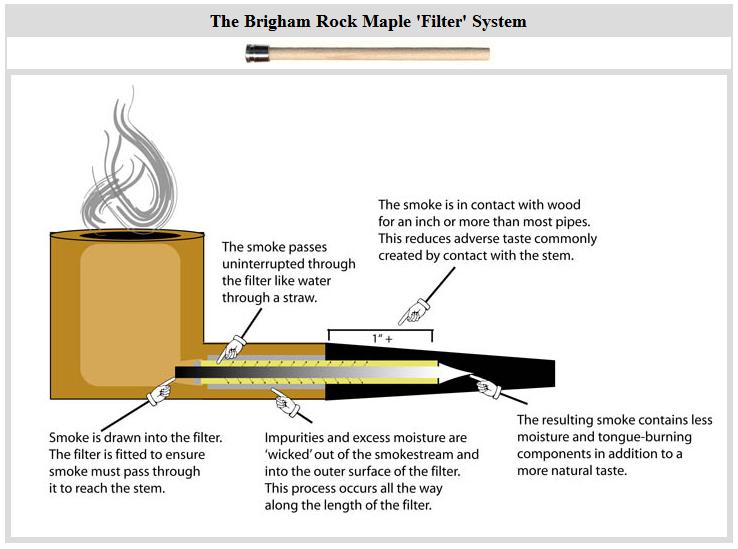
I took it from the wash and went to work on the inside of the stem. On a typical pipe this is an easy thing to do. But on a Brigham the tenon is the length of the shank and is made of aluminum. It is designed to hold the Brigham filter system which is a hard rock maple tube that fits in the tenon. 

Image

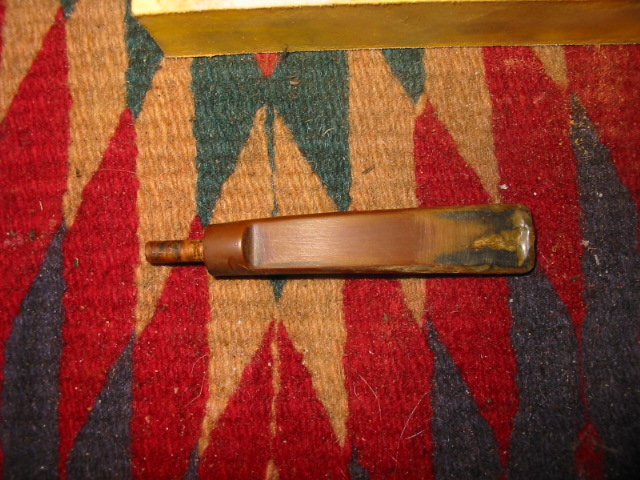
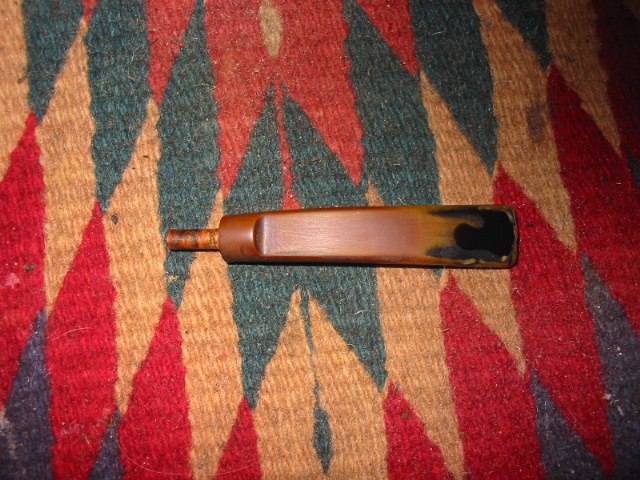
Where there was normally a Brigham filter in this pipe it was gone and the tars had built up to the point that the stem was closed off and did not fit all the way into the shank. It took a lot of pipe cleaners and alcohol to get it clean. The outside aluminum shank was sanded 0000 steel wool and with micromesh pads to remove the oxidation and darkening of the metal. The stem was sanded with my normal list of sandpapers – 240 grit to break up the oxidation on the surface, 400 and 600 grit wet dry sandpaper with water to finish removing the problem and then the micromesh pads – 1500 to 6000 grit to polish and shine the stem. Upon completion the stem was set aside to be buffed when the bowl was finished. 

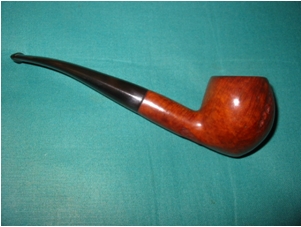
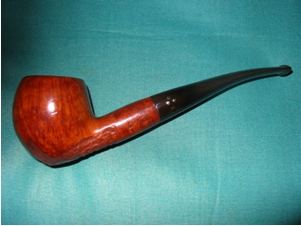
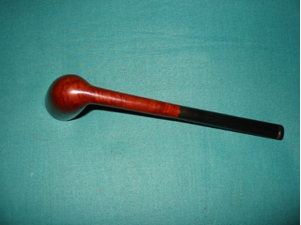
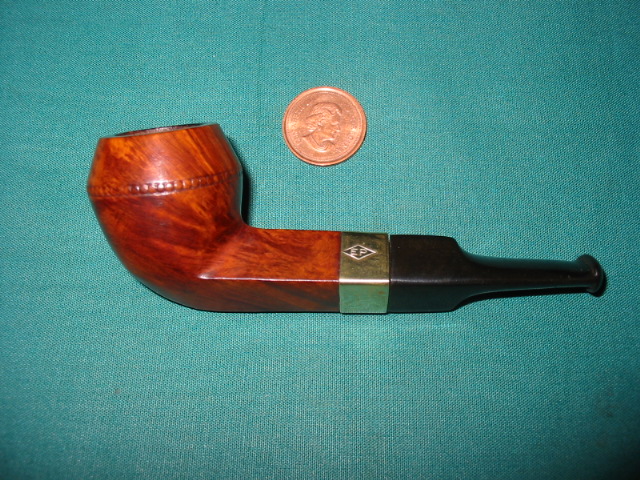
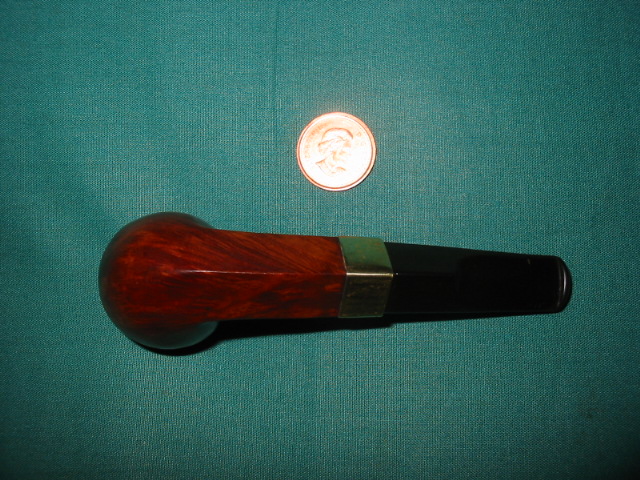
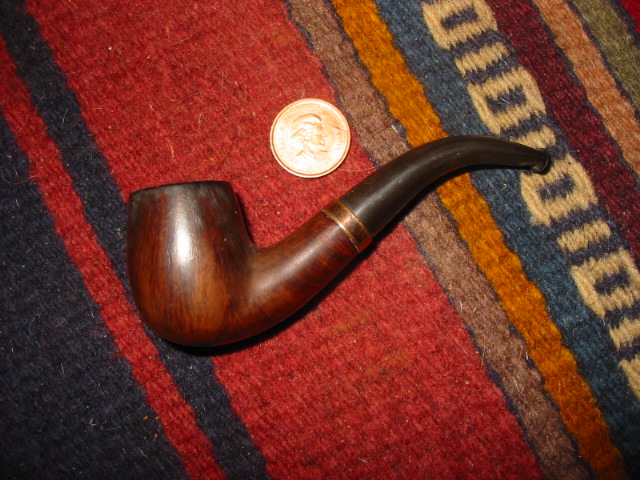
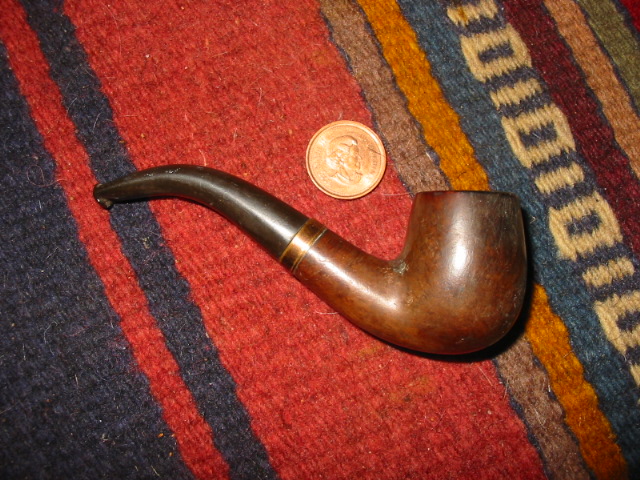
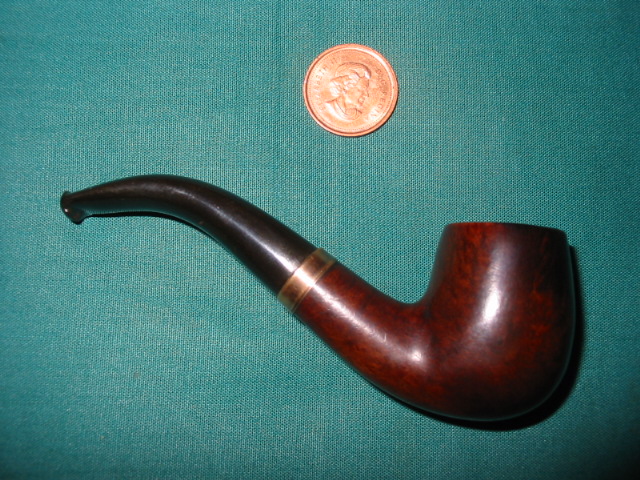
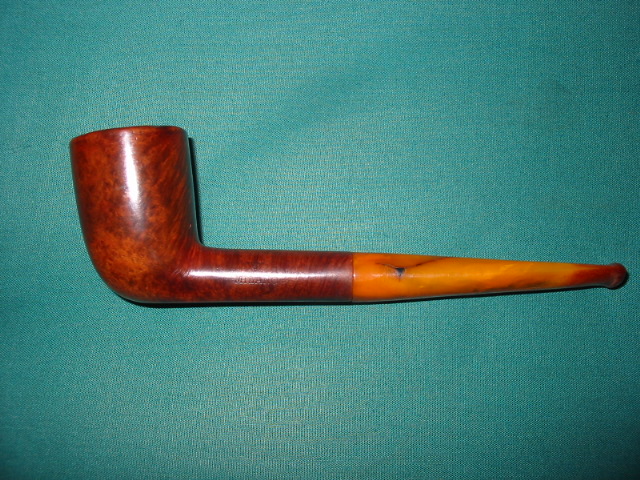
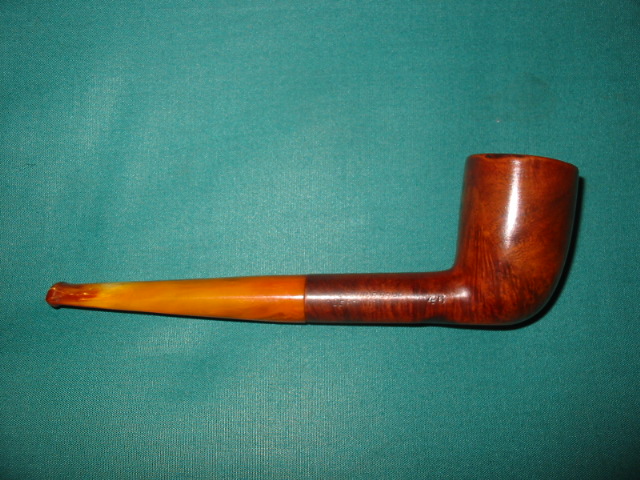
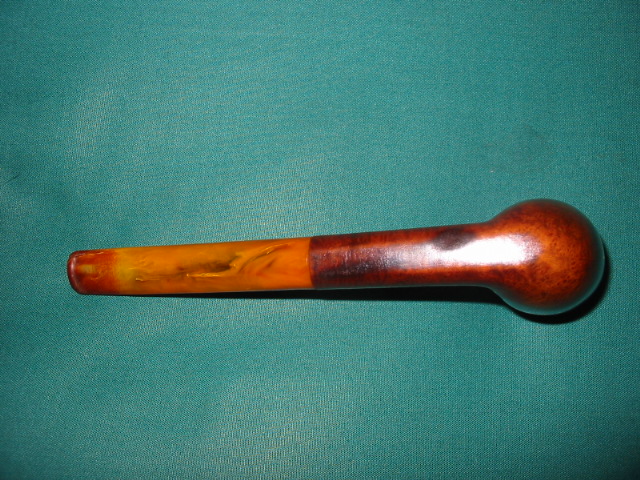
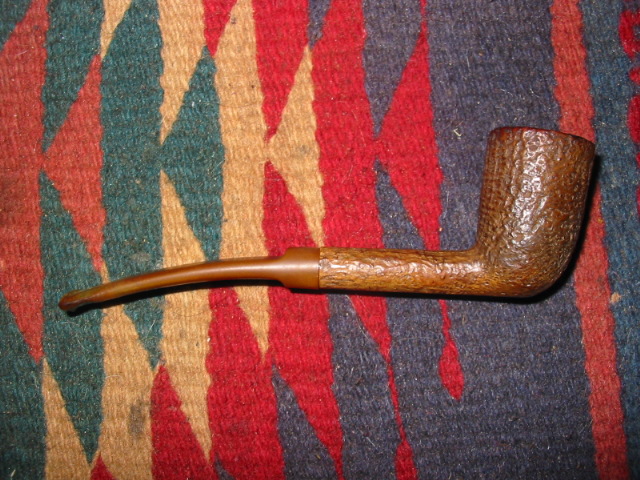
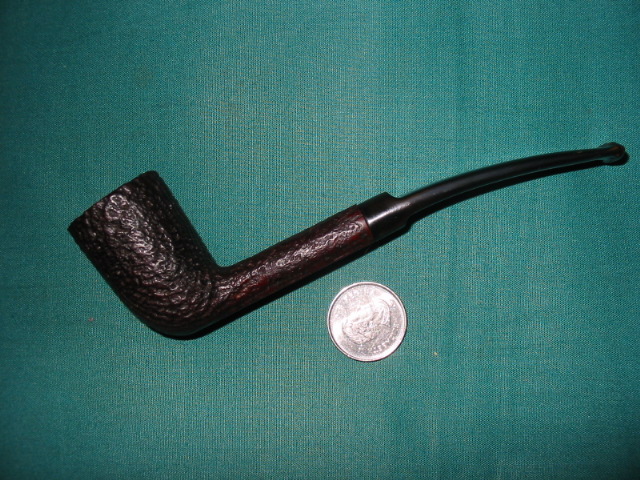
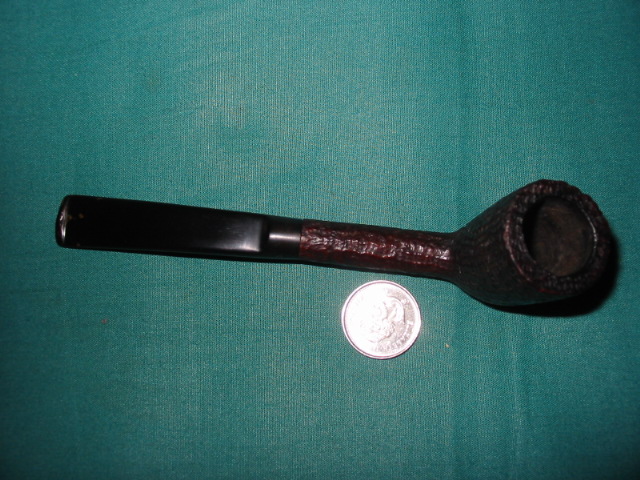
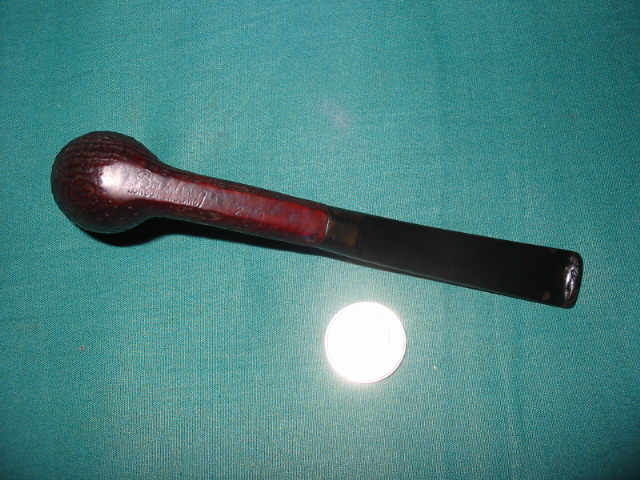
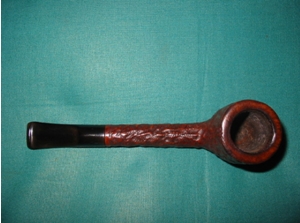
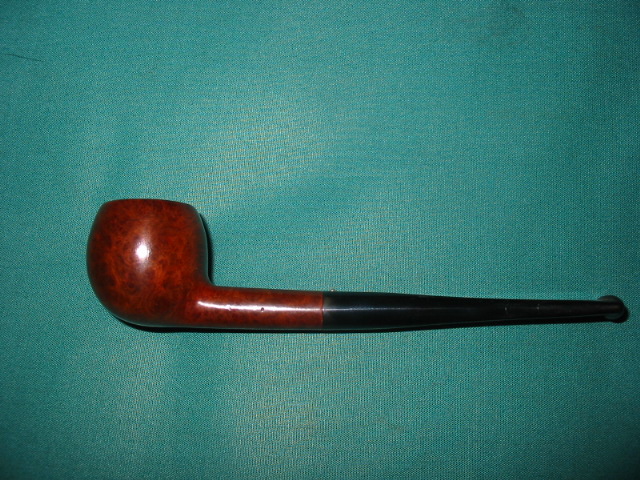
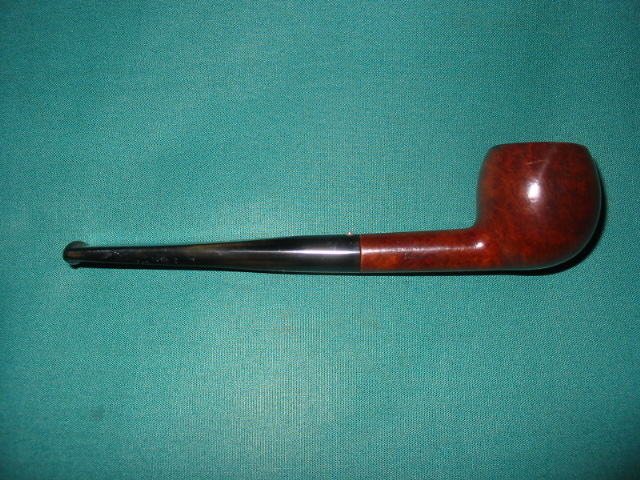
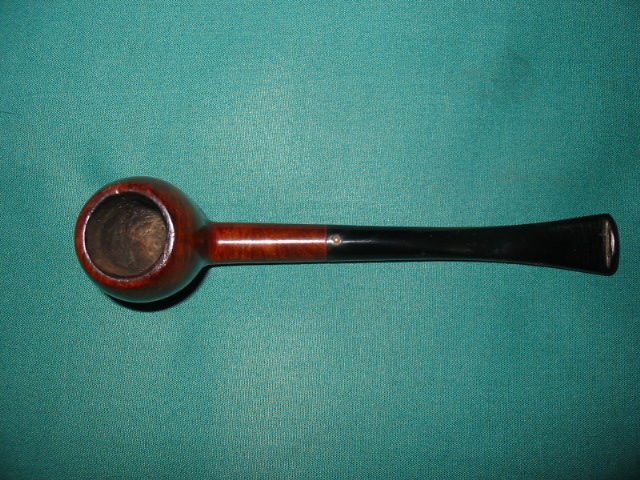
I removed the bowl from the alcohol bath the next morning. I dried it and looked it over for any remaining finish or grime. I wiped it down with a soft cotton cloth and some clean isopropyl then gave it a quick buff with Tripoli to smooth the surface. I took it back to my work table and restained it. For this one I used an oxblood or cherry stain, rubbed on and rubbed off several times until I got the colour I was looking for. I let it dry and then took it to the buffer to be polished with Tripoli and White Diamond. After that it was polished with a coat of carnauba wax. Here are some pictures of the finished pipe.

ImageImageImage


Refinished Rims and Touch-Ups


Blog by Alan Chestnutt

Alan, aka Castana on SF, posted this recently and I found it extremely helpful so I asked and received his permission to post it here as well. I am ordering some of these as I speak. Nicely done Alan. I look forward to gving them a try. They are available on Ebay and also on Amazon.

When restoring pipes, I nearly always like to refinish the rim. I think a nice clean sharp rim always sets a pipe off. As well as this it is just as easy to sand and refinish a rim as to try to remove tar and staining to the old rim. One of the problems though in refinishing a rim is trying to match the stain to the rest of the bowl. I always shied away from getting leather dyes, simply because you would need to be artist to be able to correctly mix all the differing shades.

I always remember my grandfather staining shoes and the smell of the dye always lingered in my brain. In more recent times that memory was triggered when smelling a sharpie marker, so my thoughts were that it must contain a similar alcohol based dye. I used a sharpie a few years ago to restain a black sandblast bowl and it worked a treat. “If only they were available in shades of brown” I thought to myself.

So while walking through a local discount store a few months ago, I spied furniture repair markers. Exactly what I had been thinking of.

Image

They come in 5 shades of brown plus black and cost £2 (about 3 bucks). I couldn’t wait to get home and try them. They are a chisel shape marker and apply a translucent stain exactly like an alcohol dye. Perfect! With the variety of shades a match can be made 99% of the time by application of a couple of coats or moving to the next darker shade. Simply cover the rim by wiping the marker over it and a few seconds later remove the excess with a soft cloth.

Image

A refinished Tilshead rim.

They are excellent for touch ups on other areas of the pipe and I often use them to just refinish the whole pipe to brighten up the grain. Needless to say I acquired a few more packs, but I have refinished literally hundreds of pipes and I am still on my first pack. Simple to use, no mess, a variety of shades and cheap. I class them as my best purchase ever for restoring pipes, so keep your eyes open for them. Available on eBay too, but at a premium.

Alan

The Everyman Pipe from the 1920’s Era


Blog by Steve Laug

This featherweight cutty shaped pipe came from the 1920’s or earlier. I bought it in a lot of that era pipes on EBay and it arrived as pictured below. It is stamped The Everyman Pipe on the left side of the shank and Made in England in a Circle and shape number 195 on the right. When this arrived in the package of the other old timers it was pretty grimy. The bowl needed serious cleaning and the rim was dented and had rough spots. It needed to be topped as steaming it would not raise the broken spots that came from tapping it out. When the surface of the wood is actually broken and not just dented steaming will not raise the grain significantly and the only repair I know is to sand it off and make it smooth and crisp again. The challenge then is to match the stain so the bowl and rim blend.

I reamed and cleaned the bowl and the airway in the shank. The pipe cleaners came out very dark and tarry at the beginning. I decided to use a drill bit the same size as the airway to clean out the gunk before going back to the pipe cleaners. I use a T handle to turn the bit into the shank by hand to remove the tars and open the airway again. I finished cleaning the shank with fluffy pipe cleaners and isopropyl alcohol until they came out clean. I wiped down the bowl with acetone to remove the old wax and the grime from the bowl and then used my topping method – a hard, flat board and an anchored piece of 240 grit sandpaper – and topped the rim. (I have since learned from someone that a good way of doing it is to anchor the sandpaper on a Masonite clipboard and sand the rim that way. It works great.)

Image

The stem needed the most work as it was a round tube of vulcanite. I wonder if it was not made to be like a clay tavern pipe. The previous owner had notched the top of the stem to make it easier to hold with his teeth and keep it from rolling. The notch was a fairly deep V cut that was only on the top of the stem. I used needle files to cut a new button on it and then my Dremel with a sanding drum to taper the stem back to the button. The original had a slight bend in the stem so I left that. The button I shaped for the stem is rounded and crowned to fit the orific airhole like those found on pipes of a similar age. After cutting the button and shaping it, the stem needed a lot of sanding to remove the scratches and oxidation. I used 240 grit sandpaper on the entirety to clean up the deeper scratches and remove the oxidation. I then progressed through the wet dry sandpapers and the micromesh pads until I had a good smooth finish on the stem and a good clean button.

Image

I set the stem aside and restained the rim and bowl to match what appeared to be the original colour of the pipe. I used an oxblood undercoat and a dark brown top coat to get the richness of the original finish. I coated the stem with Obsidian Oil and then inserted it in the shank. Once it was dry I took the pipe to the buffer and used the White Diamond to give it a final buff before giving it several coats of carnauba wax.

The pictures below show the finished pipe with its newly shaped and polished stem:

ImageImageImageImage

A Tiny Pair – Refurbishing and repairing an old couple


Blog by Steve Laug

This morning I decided to work on these two old timers – a little mini bulldog and a mini bent billiard. Both are old as is clear from the orific button on the stems and the shape of button on both (the round hole in a crowned surface of the button – see the photo below).

Image

The first is a no name bulldog with a gold band on it. It has EP on the band which I believe means Electro Plated. The stem was in pretty fair shape though the previous owner had cut a small groove in the stem about a 1/8 inch ahead of the button on the top and the bottom. The bowl was in pretty good shape though it was darkened near the band and there was a deep cut on the shank about mid way along toward the bowl and on the bowl side – both on the right side and visible below. The photo with a penny (1 cent piece) gives a good picture of the size of this little dog. The bowl was pretty clean so all I needed to do was wipe it out with a cotton swab and isopropyl alcohol. I did the same with the shank and the stem as well. It was pretty black and tarry on the inside of the stem and shank. I had to use a paper clip to break through the clog that was in the shank about mid way to the bowl and also in the stem.

ImageImageImage

I worked on the bowl and shank exterior with sand paper to remove the finish around the two cuts in that I was going to work on. I washed off the surface after sanding with acetone to clean off the briar dust and the remaining finish. Once it dried I decided to fill the cuts with clear super glue. The process is pretty straight forward – I drip a drop in both holes and lay it aside until it dries. Then I add another drop, lay it aside and repeat until the cut is filled. I find that the clear super glue is a great way to fill the cuts or pits as it allows the briar to show through clearly and once it is stained it virtually disappears. Once the super glue dried I sanded the spots with 240 grit sandpaper and then with 400 and 600 grit wet dry and water to smooth off the spots and remove any of the over flow around the spots. I want the super glue to fill only the spot and not carry over onto the clean briar so I sand it down level with the surface it is filling. I then sanded the entire bowl with micromesh pads from 1500-6000 grit and then wiped the bowl down with isopropyl alcohol on a soft cloth.

I then worked on the stem and sanded down the grooves to make the stem smooth once again. I used the same pattern of sanding – 240, 400, 600 grit sandpaper and micromesh – 1500, 1800, 2400, 3200, 4000 and 6000 grit. Once I had the grooves and the stem clean and pretty polished I took it to the buffer and used White Diamond on both the stem and bowl. I took it back to the work table and gave it a coat of Obsidian Oil and set the stem aside while I stained the bowl. I wanted to keep a lighter look to the bowl so I used some oxblood stain and wiped it on and off before it had time to dry. I gave it two coats and then flamed it. I buffed the bowl with White Diamond and then gave it a coat of carnauba wax. I also polished the band and gave it a coat of wax. Here is the finished pipe. The two cuts or pits have disappeared on the right side of the bowl (top picture).

ImageImageImageImage

I finished it and put it aside to work on the bent billiard. It was in a bit rougher shape than the bulldog. It is also a no name old timer with a gold band – very tarnished. The bowl was very grimy on the outside and the finish was cloudy and dark. The stem was grooved in the same manner as the bulldog – probably same owner making his own comfort bit to enable him to clench these little guys.

ImageImage

I scrubbed the bowl down with acetone on a cotton boll and removed the finish and the grime. The top was a bit dented so I gave it a very light topping and then sanded out the inside of the bowl and worked on the roundness of the inner rim as it was a bit out of round.  I used a small piece of sandpaper to bevel the edge enough to repair the roundness. I cleaned out the shank and the stem. This pipe was also clogged in both the stem and the shank so I use a paper clip in the shank and to open the end of the stem from each end. I then used small pipe cleaners soaked with alcohol until they came out clean. I set the bowl aside to work on the stem.

Image

The stem needed the same treatment as the one on the bulldog to remove the grooves from the previous owner. Fortunately on both pipes they were not very deep so it did not change the profile of the stem. I sanded the entirety of the stem down and used the same pattern of sandpaper and micromesh as above. I buffed this one with Tripoli before finishing with the micromesh. I gave it a coat of Obsidian Oil and set it aside to stain the bowl.

I cleaned the bowl exterior one last time and then stained it with oxblood stain – wipe on and wiped off pretty quickly several times to get good coverage. I polished the gold band with the highest grit micromesh pad (6000) and then gave the bowl and band a coat of wax by hand and once it dried buffed it by hand with a soft cloth. I put the stem back on and took it to the buffer and buffed the entirety with White Diamond followed by carnauba wax.

ImageImageImageImage

Here is a picture of the pair together so their diminutive size is clearly seen. They are incredibly light with group one sized bowls. They are clean and ready to smoke.

Image

Barling Garnet Grain Small Bent Billiard 2034 Given New Life


Blog by Steve Laug

I picked up this little Barling (transition era pipe so the Barling stamping is missing the “s” and is a script) in a lot I bought on EBay. It had a broken stem that was also chewed through on the end and not repairable. The tenon was still in the shank and was exceptionally tight. I put the bowl in the freezer for about 30 minutes and then used a screw to remove the broken piece from the shank. The key here is to not screw in the screw too much or you can crack the shank. I was able to easily pull it out as can be seen in picture 3. The finish on the bowl was rough on the top with tars and some denting. The sides of the bowl also had some denting. I cleaned the top of the bowl and removed the tars. I steamed the dents out of the top and bowl sides.

ImageImageImage

I wiped down the bowl with acetone to remove the grime and the waxes that were on the finish. When I had finished I inspected the shank area because the drilling was off a bit in the shank and the walls were thin near the top left. There were small hairline cracks that went through several places and spidered up to about a 1/8 inch into the length of the shank. I glued those and pressure fit a nickel band on the shank.

I turned the tenon on a recycled stem I had here and fit it on the pipe. I used my Dremel to remove the excess material where the diameter of the stem was greater than that of the pipe. I kept the broken stem near at hand to match the diameter, the flow of the stem and the shape. I used it as a bit of a template to shape the new stem. The three pictures below show the process of shaping the stem from Dremel to hand sanding with 240 grit sandpaper.

ImageImageImage

In the picture below I have finished the initial shaping with the sandpaper and have a good fit. You will notice the lightening of the shank below the band – that is part of the process of sanding to fit the band to the shank. I place the original stem below the pipe in the picture for comparison sake. It is a bit thinner in profile than the new one in this photo. I continued to sand the stem with 400 and 600 grit wet dry sandpaper and water to remove the remaining scratches and grooves that the 240 grit sandpaper left. Once I had them removed I proceeded to use the micromesh pads – 1500, 1800 and 2400 grit to sand the stem smooth. When I finished with those I buffed the stem with Tripoli and White Diamond and finished by returning to the micromesh pads -3200, 4000 and 6000 to polish it. One more trip to the buffer with White Diamond finished the polishing. I gave the stem a coat of Obsidian Oil and removed it and set it aside. It was time to work on the finish of the bowl.

Image

I used an oxblood aniline stain to match the stain to the original Garnet Grain colour. I have done this in the past and compared it to a very nice original Garnet Grain and the colour is a perfect match. Before staining I polished the bowl with the 3200 and 4000 micromesh pads avoiding the stamping on the pipe. I applied the stain with a cotton swab and then wiped it off, applied and wiped it off until I got the colour I wanted. I then flamed it and set it aside to dry. Once it was dry I put the stem on it and took it to the buffer and gave it a buff with White Diamond and carnauba wax.

In the first picture below I put the original stem in to show the damage to the underside near the button. I also put a 1 cent piece, a penny in to give perspective on the size of this diminutive billiard. I am very pleased with the overall look of the pipe. The finish came out as a perfect match to the original Garnet Grain colour.

ImageImageImageImage

Rebirth of a WDC Milano Dublin


This old WDC Milano was a challenge that I wanted to take on and see how it would turn out. In the pictures below you can see the state of the pipe when I received it. The stem was deeply darkened in the button area as well as scratched and marked with tooth chatter on the first inch of the stem. The bowl was badly caked – much of the cake had broken away in chunks and what remained was soft and crumbling. It also appeared to have been reamed with a pocket knife and had nicks and cuts around the inner edge of the rim and the resulting effect left the bowl way out of round. The finish was damaged and parts of the stain had rubbed away and what was left was underneath layers of black grime. The sides of the bowl and the bottom side of the shank both showed signs of having been laid in an ashtray and burned with a cigarette. The burn on the bowl side was not deep and would be easily addressed but the one on the shank was pretty deep. I would have to take out as much as possible without changing the integrity of the shape. That gives you a pretty clear assessment of the damages facing me as I decided to work on this old pipe.

ImageImage

I reamed and cleaned the bowl back to the bare wood in order to remove the crumbling and cracked soft cake in the bowl. My thinking was that a good clean surface would encourage the build-up of a proper cake. With a sharp knife I worked on the inner rim. I worked to get it evened out with the knife and then turned to a folded 1 inch piece of 240 grit sandpaper to smooth out the roughness of the inner rim and to bring it back as close as possible to being round. The roughness of the rim required topping to even it out as well. I used my normal procedure of sandpaper anchored on a solid flat hard surface and turning the bowl clockwise or counter clockwise into the sandpaper – exercising caution to keep the bowl flat on the surface and vertical in order to keep the rim flat and not slanted. To remove the burn mark on the bowl and on the shank took a little time. On the bowl side it was not deep so it only needed to be sanded to remove the damage. But on the shank I scraped until I got to hard wood and then sanded. Once I had solid briar under the burn I put the bowl in an alcohol bath to remove the grime and the remaining finish. I left it overnight to soak and turned my attention to the stem.

The stem has a steel tenon and insert that is the system in these old Milano pipes. It seems to be some sort of condensing chamber to collect the moisture generated in a smoke. In any case this one was filled with tars inside and coated with them on the outside. I cleaned it out with a shank brush, bristle pipe cleaners and then fluffy ones until they came out clean. The outside of the condenser I scrubbed with 0000 steel wool to polish and remove the grime and tars. The aluminum polished up nicely and the tenon looks like new. The Bakelite stem took a bit more work and creativity. I cleaned the inside of the stem scrubbing it with soft scrub and bristle cleaners. I was able to remove much of the interior stains. I sanded the exterior of the stem to remove the tooth chatter and external discolouration. I sanded it with 400 and 600 grit wet dry sandpaper and then the usual course of micromesh pads from 1500-6000 grit. I finished by buffing the stem with Tripoli, White Diamond and carnauba wax.

I put the stem aside and removed the bowl from the alcohol bath and dried it off. I sanded the bowl with 1500 and 1800 grit micromesh to remove any remaining finish. I also sanded it with 3200 and 4000 grit micromesh to polish the bowl. I restained it with an oxblood stain. I flamed the stain and then took the pipe to the buffer and buffed the pipe and stem with White Diamond and carnauba wax. Below are the pictures of the finished pipe.

ImageImageImageImage

Giving New Life to a Barling’s 2729 Fancy Bent Dublin from 1962


I picked up this old Barling’s shape 2729 in a lot I bought on EBay. From what I could find out about it on the internet it came out in 1962. You can see from the pictures the state it was in when it arrived. It was the kind of challenge I like to work on in these old estate pipes. There is a deep satisfaction in bringing them back to life and restoring them to a spot on the pipe rack and the weekly rotation. The finish was gone, though in the grooves of the blast there was some darker brown/red stain. The blast was obscured on the sides and rim by the grime that filled the valleys in it. The rim was intact and not beat up at all – just incredible dirty. The bowl had been lightly reamed and was still round!! The stem was well chewed with deep dents on the edges of the stem and deep dents in the top and bottom. There were also holes chewed through the stem on both the top and bottom as well. The oxidation was very heavy and deep. The Barling’s Cross was all but gone on the stem but under a bright light it was faintly visible so the stem was clearly the original.

ImageImageImage

I took the stem off the pipe to work on and placed the bowl in my alcohol bath for overnight. Before submerging it in the bath I wet it with alcohol and scrubbed it with a small brass tire brush that is readily available at most Wal-Mart stores or online through Amazon. I find that the soft brass does not damage the ridges and valleys on the blast finish but really loosens the grime when used with Isopropyl alcohol. I generally dip the bowl and then scrub it before leaving it to soak. When I remove it from the bath I scrub it once again and wash off the bowl with some fresh alcohol to remove any residual grime. Once the bowl was dry it was utterly lacking any finish. It was ready to restain. I set it aside and turned my attention to the stem.

Image

The stem was a mess on this pipe as I mentioned above. Below are four pictures of it after I soaked it in Oxyclean to soften the oxidation on the surface. The pictures show how reddish brown that oxidation was when I started. I sanded the surface to highlight the bite marks and holes in the stem. The stem was badly chewed and could have been a candidate for replacement but it was an original Barling’s stem so I wanted to see if I could save it and reuse it. I cleaned the surface and picked the grit and grime out of the holes with a dental pick. I washed the surface down with Isopropyl to give a good clean surface. The button was virtually chewed away and there was a fair sized hole on the underside of the stem. The tooth marks were very deep and there was not much to work with in lifting them with heat. This made them a candidate for a patch with black super glue.

ImageImageImageImage

The picture below shows the top of the stem with the black super glue fill in the bite marks and holes. The idea is to slowly fill them and build up the surface of the stem. I also continued to fill them until there was a good slope from the stem surface to the top of the button. Once it was dry my plan was to use needle files to recut the button.

Image

The next picture shows the glue after it has dried and I have done the initial sanding to smooth out the surface of the stem. I still have not recut the button at this point.

Image

The picture below shows the underside of the stem after the glue has dried and I have done the initial sanding on the stem. It is still pretty rough but the holes are filled and the button is built up. Note in this picture the very visible copper tenon on the stem. The previous owner must have broken the tenon and had it replace with this thin copper tubing. The tenon is very delicate on this stem so the copper is actually an interesting fix in terms of durability. I have never seen a repair like that. The tubing was scored and inserted into the stem and held with an epoxy. After the soak in Oxyclean it was loose so I removed it, cleaned it and since it was a good tight fitting tenon/mortise union so I decided to reuse it. It is a wonder that he did not put a copper band around the button end of the stem as well to repair the bite through and tooth marks.

Image

The next two pictures show the stem after sanding the stem surface smooth with 240 grit sandpaper. My purpose in using that grit is to get a clean surface to work with as I move to rework the button on the top and bottom of the stem. I had yet to work on the saddle of the stem in these pictures. I will often save that until the rest is finished.ImageImage

I failed to take pictures of recutting the button on the stem but you can see the new button in the finished pictures below. I cut and shaped it with a flat needle file and a wedge needle file. I like the clean angles of a new button so I was aiming for that with just a little wear to match the age of the pipe. I finished the sanding and polishing of the stem using 400 and 600 grit wet dry sandpaper and then used the normal list of micromesh sanding pads from 1500-6000 grit. I keep a bowl of water close by to dip both the paper and the pads in as I sand as I find it more effective in removing the scratches and remaining oxidation. Once the stem was finished I put it on the pipe bowl and gave it a buff with Tripoli and White Diamond to get a good sheen to the surface. I never buff a stem apart from a pipe as I do not want to damage the stem shank junction by rounding the clean edge of the stem. Once I finished I set it aside and went back to restain the bowl.

I did a bit of research (that is a part of the process I really like) to find out about the original finish and colour of stain used on this particular pipe. I learned that it was more of a reddish tone and really wanted to get close to that reddish brown colour on the finished pipe. I used some oxblood stain and a bit of medium brown stain (both aniline stains) and gave the bowl a coat of the brown first and then flamed it and buffed it. After that I gave it a coat of the oxblood stain and flamed it. I reinserted the stem and took it to the buffer and with a light touch buffed it with Tripoli and White Diamond. I did not want to soften the ridges of the blast but wanted to buff it enough to get a contrast in the stain.

I used some Obsidian Oil on the stem and then Halcyon II wax on the bowl. Once they dried I hand buffed the stem and the bowl with a soft cotton cloth. I added a coat of wax to the stem when it was finished as well. In the pictures below you can have a look at the finished pipe. I took pictures with a .10 cent piece/dime below the pipe to give an idea of the size. It is a dainty little pipe with a pencil shank. I hope to smoke it this week end and enjoy a nice bowl of aged 5100 in it.

ImageImageImageImage

Refurb on a Brigham 2 Dot Lovat


Blog by Steve Laug

I just finished refurbishing this Brigham 2 Dot Lovat that I picked up in the estate pipe rack at a local tobacconist. This one was a challenge, but I loved working on it. It has the standard Brigham style rustication. It was in rough shape. The bowl was incredibly grimy and needed a lot of work. The grime had filled in most of the rustication to the point that it looked worn out and smooth. I soaked and scrubbed it for about an hour using a brass white wall tire brush to scrub out the grime caked on the outside of the bowl. The inside of the bowl was so badly caked that I reamed it back to the wood. Once I had it reamed and the scrubbing of the outside finished I dropped it in the alcohol bath overnight and went to work on the stem.

ImageImageImage

The stem was another story. It was given a soak in OxyClean to soften the oxidation. I find that OxyClean does not remove the oxidation at all, but it does soften it and make working on it much simpler. After the Oxy soak I went to work on the inside of the stem. Where normally there was to be a Brigham filter in the long metal tenon this time it was gone and the tars had built up to the point that the stem was totally closed off. I tried to blow through it but could not get any air through. I used an awl or ice pick to open up the stem and the tenon. Then I worked on it with bristle pipe cleaners and a shank brush. It took a lot of pipe cleaners and alcohol to get it clean. Then the outside was sanded with 400 and 600 grit wet dry sandpaper followed by the run of micromesh sanding pads. Once it was clean and shiny I set it aside and turned my attention to the bowl.

I took the pipe bowl out of the alcohol bath and went to work on it. I used the brass brush one last time to clean off the remaining grime and then dried off the pipe. There was no finish left on the pipe so I restained it with a cherry stain. I reinserted the stem in the shank and took it to my buffer and polished the entirety with Tripoli and White Diamond, finishing with a coat of wax.

ImageImageImage

Every restoration has a beginning…. – Chuck, aka Desertpipe on SF


Chuck posted this on Smokers Forums and I thought it merited posting here as well. I asked him for permission to post and use his photos. I copied the exchange from his side in writing about his cleaning process. I include it here as it is helpful to see another refurbisher at work.

It is one thing to restore pipes for yourself, and then later on start giving them to friends. It is quite another to restore as an adjunct to working as a Tobacconist, in a Brick and Mortar Shop. I am slipping into that position, as my pipes have been well received in our Estate Pipe (sorry Ben) display case. I find myself challenged, and we will see, together, the outcome. Here is a trio of pipes that were they to show up in a group from eBay, would go directly to my “Someday Box”. They are caked heavily and there is damage beginning to the structure of the bowls. The briar is tar soaked to the point that grain is no longer visible, and the bits cannot go further into the shanks, nor be withdrawn in one pipe.

Stay tuned over this weekend, as I see what can be made of these three.

ImageImage

Mike….I have practiced on a number of pipes that were badly caked, actually a few were my Dad’s handed down, and I even purchased a few off eBay in that condition. I use my “Someday Pipes” to increase my skill level. I have acquired seven specialized tools that I use to vanquish this demon cake. And I examine closely for any existing damage, pointing it out to the customer and explaining a worst case ending to the attempted restoration.

And I sure hope in these three cases they end up resembling a pipe….

After carefully removing the bits from the shanks, I went to work on the cake. As Mike pointed out, one has to be very careful, as a pipe caked to this extent is almost assuredly suffering from some damage to the briar.

Special note – New Mexico Environmental has informed me that they plan to insist that I get the certification required for coal strip mining, if I plan to continue to bring back pipes in this condition…..

Stage one of the “Cleanup”….Bits soaked overnight in my magic solution and then steel wooled while still wet. Total bristle clean-out of the airway and the tenon area. Two solution scrubs of the briar and clean-out of the mortise…..now on to sanding and briar repair.

Image

I would have had these done Sunday evening, but with the temperature hovering around 100 degrees, we had a wide spread power outage on our side of the Mountain…..six hours later, we could check the update for fires, cool off and relax. The pipes had to wait….until now.

I did not restore the surface bite marks on the bits, as they were going back to the same owner. Leaving them as intact as they came to me, with no heavy sanding, allows him to retain much of the original thickness. Buffing them out and then resurfacing the finish has them looking good.

ImageImage

The customer had a funny response when he picked up his pipes today. He quietly picked them up, one at a time, and examined them for several minutes. He then looked up at me with a big smile on his face and said “Alright! What did you do with MY pipes?” Quiet for another minute, and then “They haven’t looked like this in 20 years.”

And then he paid his bill and added a tip to cover my lunch.

Refurb on a London Made Dainty Prince


This was a refurb I did last August while I was laid up with a couple of cracked ribs. I wanted to post it here because it gives a good idea of the process of refurbishing and taking grimy old pipes and bringing them back to life.

I am a bit laid up after a fall so I am sitting quietly in my shop instead of doing painting and trim on the house (original plan for the holidays). The great part of this is no guilt about not working on the house or yard. Because of that I am getting a bunch of old pipes I have in boxes cleaned up and finished.

The first one today (Aug. 1) is a nice little London Made Prince with a patented Flat Grip Stem. (I cannot remember who made these but I have had a few over the years). The stem is stamped Flat Grip and has a nice raised silver spot on the stem. The bowl is stamped London Made. It is a small pipe – 5 1/4 inches long but about a group one sized bowl.

From the pictures below you can see the state it was in after the reaming. I got into a groove and forgot to take pictures before I reamed it. But it was really dirty and caked – to the point that a pencil could not stand in the bowl. It always amazes me that in these small pipes, which hold very little tobacco any way, people let them get to the point where they hold even less tobacco. Just a few minutes of work and they would have had a clean bowl.

I reamed and cleaned the bowl and shank and put it in my alcohol bath for the morning. I have a pint jar filled with Isopropyl alcohol that serves as the bath for filthy bowls. In this case it sat in the bath for 3 hours before I got to work on it. It is a nice sized jar in that I can drop 4 or 5 bowls in it at the same time and work on the stems while they soak. Once it came out and dried I sanded the bowl all around and cleaned it once again to get any residual grime out. The airway was clogged so a paper clip took care of that and then a good scrub with a bristle pipe shank brush and repeated pipe cleaners. Once clean I stained it with a cherry stain that works with these old timers and brings out the colours of the briar. It was then buffed with Tripoli and White Diamond and waxed it with carnauba.

The stem was rough so I buffed and sanded and buffed and sanded and got the oxidation off and then sanded a bit more to get the teeth chatter off of the surface of the stem near the button. I always start with a 220 or 240 grit sandpaper in removing the oxidation and tooth chatter and then progress through 400 and 600 grit wet dry sandpaper before finishing the progress with micromesh sanding pads – 1500, 1800, 2400, 3200, 4000 and 6000 grit. Once the sanding is finished I took the pipe to the buffer for a final buff with White Diamond before polishing the whole pipe with carnauba wax.

Before shots: (I reamed out the cake prior to this photo set)

ImageImage

Photos of the finished pipe:

ImageImageImage