Tag Archives: waxing stems

Every restoration has a beginning…. – Chuck, aka Desertpipe on SF


Chuck posted this on Smokers Forums and I thought it merited posting here as well. I asked him for permission to post and use his photos. I copied the exchange from his side in writing about his cleaning process. I include it here as it is helpful to see another refurbisher at work.

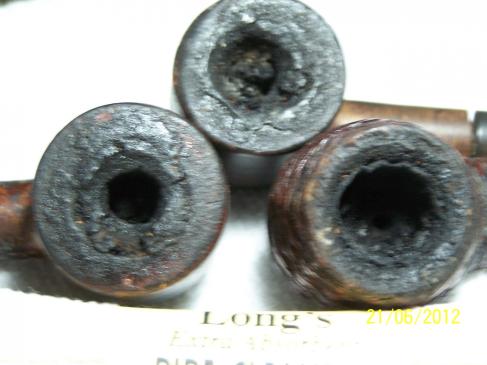
It is one thing to restore pipes for yourself, and then later on start giving them to friends. It is quite another to restore as an adjunct to working as a Tobacconist, in a Brick and Mortar Shop. I am slipping into that position, as my pipes have been well received in our Estate Pipe (sorry Ben) display case. I find myself challenged, and we will see, together, the outcome. Here is a trio of pipes that were they to show up in a group from eBay, would go directly to my “Someday Box”. They are caked heavily and there is damage beginning to the structure of the bowls. The briar is tar soaked to the point that grain is no longer visible, and the bits cannot go further into the shanks, nor be withdrawn in one pipe.

Stay tuned over this weekend, as I see what can be made of these three.

ImageImage

Mike….I have practiced on a number of pipes that were badly caked, actually a few were my Dad’s handed down, and I even purchased a few off eBay in that condition. I use my “Someday Pipes” to increase my skill level. I have acquired seven specialized tools that I use to vanquish this demon cake. And I examine closely for any existing damage, pointing it out to the customer and explaining a worst case ending to the attempted restoration.

And I sure hope in these three cases they end up resembling a pipe….

After carefully removing the bits from the shanks, I went to work on the cake. As Mike pointed out, one has to be very careful, as a pipe caked to this extent is almost assuredly suffering from some damage to the briar.

Special note – New Mexico Environmental has informed me that they plan to insist that I get the certification required for coal strip mining, if I plan to continue to bring back pipes in this condition…..

Stage one of the “Cleanup”….Bits soaked overnight in my magic solution and then steel wooled while still wet. Total bristle clean-out of the airway and the tenon area. Two solution scrubs of the briar and clean-out of the mortise…..now on to sanding and briar repair.

Image

I would have had these done Sunday evening, but with the temperature hovering around 100 degrees, we had a wide spread power outage on our side of the Mountain…..six hours later, we could check the update for fires, cool off and relax. The pipes had to wait….until now.

I did not restore the surface bite marks on the bits, as they were going back to the same owner. Leaving them as intact as they came to me, with no heavy sanding, allows him to retain much of the original thickness. Buffing them out and then resurfacing the finish has them looking good.

ImageImage

The customer had a funny response when he picked up his pipes today. He quietly picked them up, one at a time, and examined them for several minutes. He then looked up at me with a big smile on his face and said “Alright! What did you do with MY pipes?” Quiet for another minute, and then “They haven’t looked like this in 20 years.”

And then he paid his bill and added a tip to cover my lunch.

BBB Diamond shank billiard


Blog by Steve Laug

This older BBB Diamond Shank billiard was a pleasure to bring back to life. I love the older BBBs and this one has a place in my collection. It is only stamped BBB in the diamond on both the shank and the stem. There are no shape numbers of other features. I have no idea on what its age is but love the shape. The diamond shank and the way it flows into the bowl make it a unique among my BBB billiards. It is stained in a rich oxblood colour and it is a clean little pipe. When I picked it up off EBay it appeared to be pretty clean other than a bit of oxidation on the stem. Sure enough, when it arrived it was very clean. The bowl only needed a slight ream to be ready to smoke. I wiped down the outside of the bowl with a damp soft cloth dipped in Murphy’s Oil soap lightly so as not to disturb the finish but remove the grime. The top had some darkening and tar that came off easily with the Murphy’s Soap. I coated the bowl with several coats of carnauba wax and set it aside.

To deal with the oxidation on the stem I sanded it with 400 and 600 grit wet dry sandpaper dipped in water to give it a bite. I finished that with micromesh pads – 1500, 1800, 2400, 4000 and then I took it to the buffer for Tripoli and a bit of White Diamond before giving it several coats of carnauba wax. It has a wide open bowl and draw.

ImageImageImage

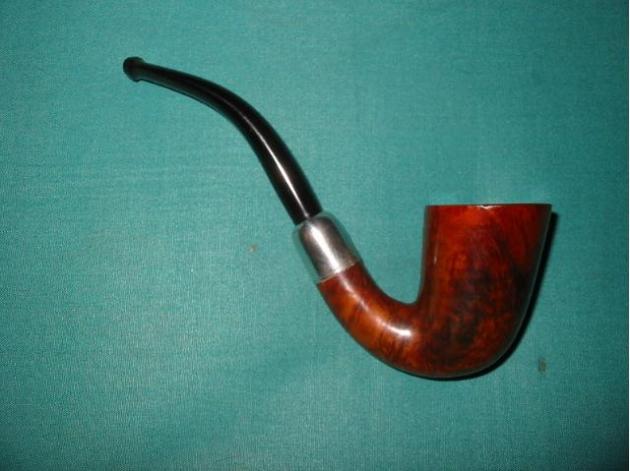
One of my favourite refurbs – 1919 BBB Bent Calabash


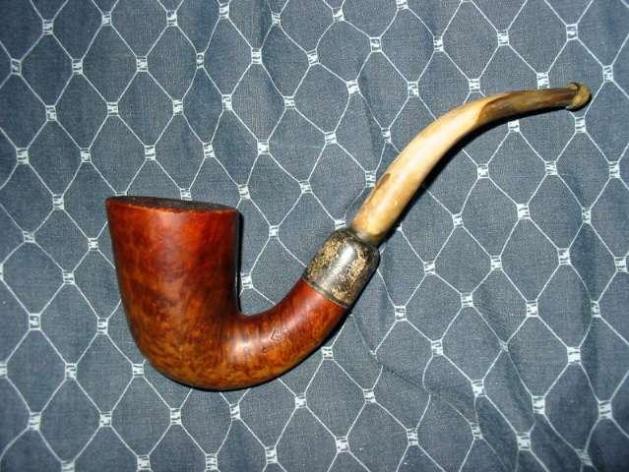
I was going through some old pictures on my hard drive the other day and found this one that I bought on EBay for a very reasonable price early in 2008. I finished refurbishing it in March of 2008. It was and is one of my favourites. You can see from the picture below what kind of shape it was in when I got it. In the pictures on EBay it looked worse than it does in the picture below. I opened the box when it arrive expecting far worse. I bid on it because I liked the shape of the pipe and I figured it would be a challenge.

The stem was oxidized to the brown white coloration that appears below. It almost appeared to be a horn stem – but it was not. When I removed it from the shank – which took a bit as it was stuck by the goop in the shank and the oxidation that portion was black. I put it in the freezer for a short period of time to cause some expansion and contraction in the stem that would loosen it from the shank. When I took it out of the freezer it was easily removed. I went to work on the inside of the stem with shank brushes and pipe cleaners, both bristle and fluffy dipped in alcohol. I worked on the stem until the cleaners came out white and clean.

I then mixed a batch Oxyclean and soaked it in the solution overnight to soften the oxidation. I find that the Oxyclean solution (warm water and a half scoop of Oxy in a pint jar) works wonders in softening the oxidation. It does not remove it but it made it easier to remove. Once I took it out of the solution the next morning to work on it I used 240 grit sandpaper to remove the oxidation. It worked well to take off the brownish white coating on the stem. Once that was finished it was a dull brown and I continued to work on it with the 400 grit wet dry sandpaper until it was a dull black. I then progressed to 600 grit wet dry sandpaper to further remove the grime. I used both of these sandpapers with water as I find it gives the grit more bite on the stem. I had not discovered micromesh at this time so I used 800 and 1000 grit sand paper and continued to sand the stem clean. By the time I used the 1200 grit wet dry sandpaper the stem was looking like new. I took it to my buffer and used the Tripoli and White Diamond to finish the job.

While the stem was soaking in the oxy I reamed and cleaned the pipe bowl and shank. I worked on it until the pipe cleaners came out clean. It took many bristle cleaners and many fluffy one to get it clean. I also used cotton swabs in the shank to remove the tars and build up there. I scrubbed the outside of the bowl and rim with Murphy’s Oil Soap to remove the grime and deep seated dirt on the bowl. After I finished the scrub and clean I put the bowl in a bath of Isopropyl alcohol to remove any remaining dirt and grime and the badly damaged finish on the bowl. That was the first night of my working on the pipe. I went to bed that evening with both the bowl and the stem soaking in their separate baths.

Image

The next morning I finished up the stem and set it aside as I described above. I turned my attention to the pipe bowl. I removed it from the alcohol bath and dried it off. I used a wet cloth and a butter knife heated over a flame to raise the dents in the outer rim of the pipe and the sides of the bowl. The process is quite simple. You wet a cloth, wring it out so it is not dripping wet yet still wet. Then fold it and put it over a dent. Heat the knife (I use our gas stove to do it but have also used an alcohol lamp). I then lay the flat blade of the knife on the dent. You will hear a hiss as the heat causes steam to rise from around the blade. The steam causes the dent to rise. I applied the blade repeatedly until the dents were minimized. Then I took it to my work table and used a flat board and a piece of sandpaper to top the pipe just enough to remove the remaining dents and damage. I do that on a flat surface to maintain the flatness of the rim without changing the angle. When that was finished I wiped down both the bowl and rim with an alcohol damp cloth to remove any residual sanding dust.

I then used an aniline stain, in this case medium brown as I had researched and found that the colour matched the colour of the pipe when it was new. I used the dauber that came with the stain and applied it to the rim and the body of the pipe. I started at the bottom of the bowl and worked my way up to the rim. The rim always the last part I do. Once it was completely covered with stain I ignited it with my lighter to set the stain. The process is called flaming the stain (at least that is what I call it.) I let it dry while I put a coat of wax on the stem.

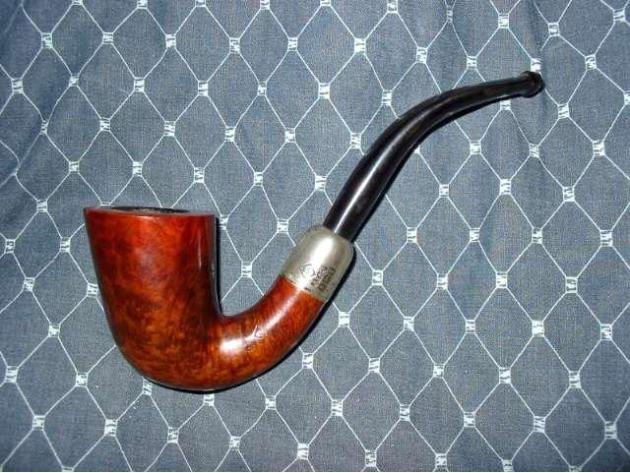
When the stain was dry I took the bowl to my buffer and gave it a buff with Tripoli and White Diamond to remove the top coat of the stain and the opacity of the stain. The result can be seen in the picture below. I also used some silver polishing compound applied with a soft cloth to remove the tarnish on the end cap. I finished that process with a silver polishing cloth to give it a good shine. When that was completed I gave the bowl and cap a good buff with carnauba wax then reinserted the stem and gave the entire pipe an extra coat of wax for a finish.

Image

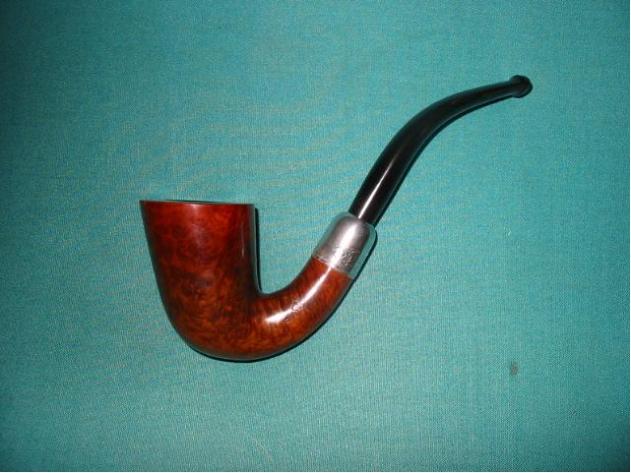
I still smoke it today and it delivers proudly! The last two pictures below show what the pipe looks like today after 4 years of use. It has developed a deep patina to the bowl and the warmth of the medium brown stain has mellowed into a richness that is really nice. Repeated waxings over the years have helped mellow the finish and also deepen the black of the vulcanite stem. This is one of my favourite old pipes. It truly is a reborn pipe. In 7 years it will be 100 years old. Some days I wish it could talk because I can’t even begin to imagine the stories it could tell.

ImageImage