Tag Archives: super glue

The Challenge Continues… Restoring a Vintage Era GBD


Blog by Paresh Deshpande

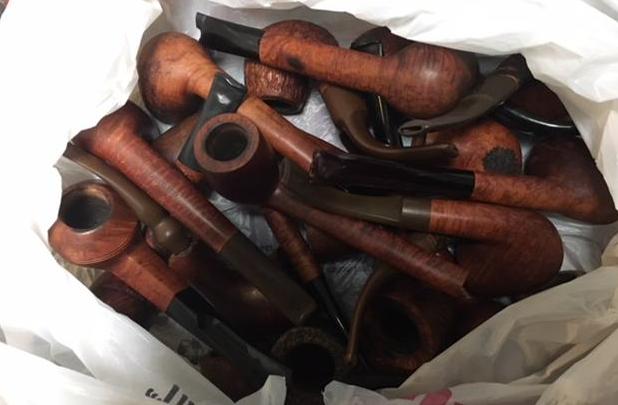
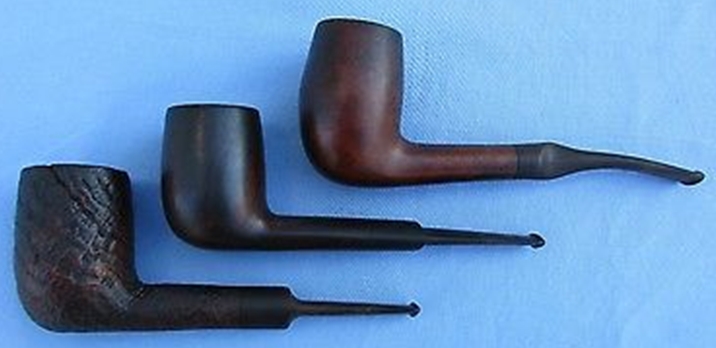
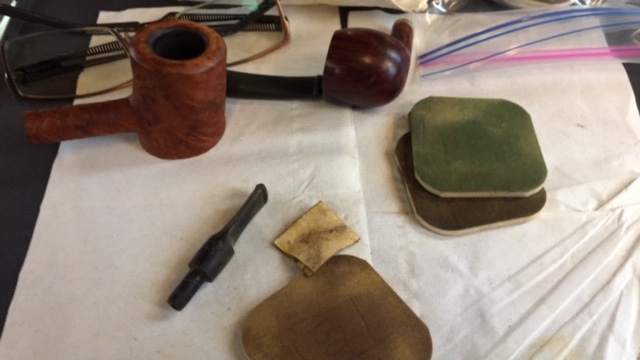
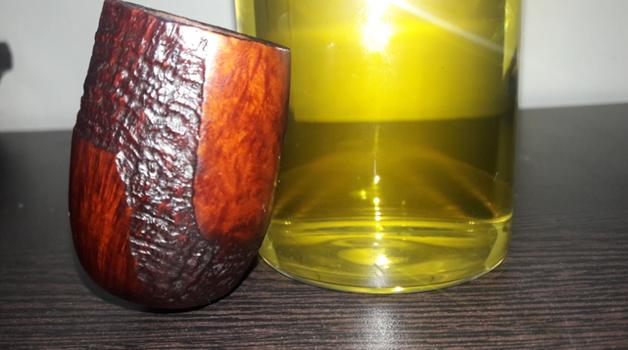
As I had remarked earlier in my write up on the late 1850s era FIRST CHOQUIN, A METZ (https://rebornpipes.com/2018/11/17/a-challenging-restoration-of-vintage-era-first-choquin-a-metz/),I could not contain my curiosity to open the third, and the last, box of my inherited pipes. In addition to the regular collection of Barlings, Charatans,Comoys and other assorted collection, I came across two pipes which caught my fancy!!!!!

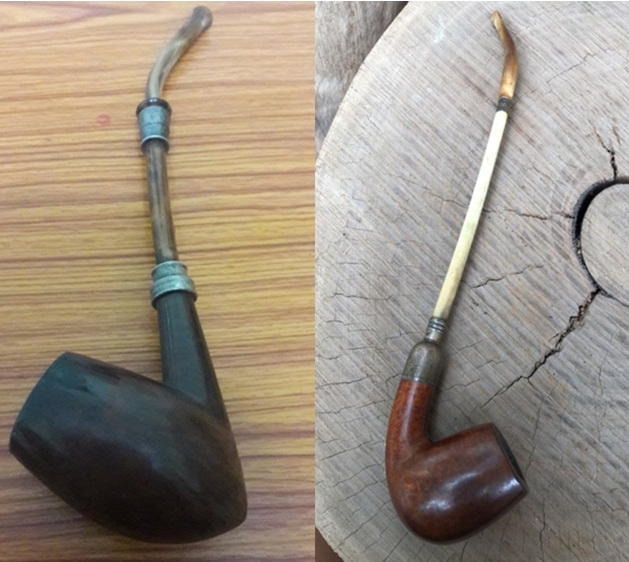
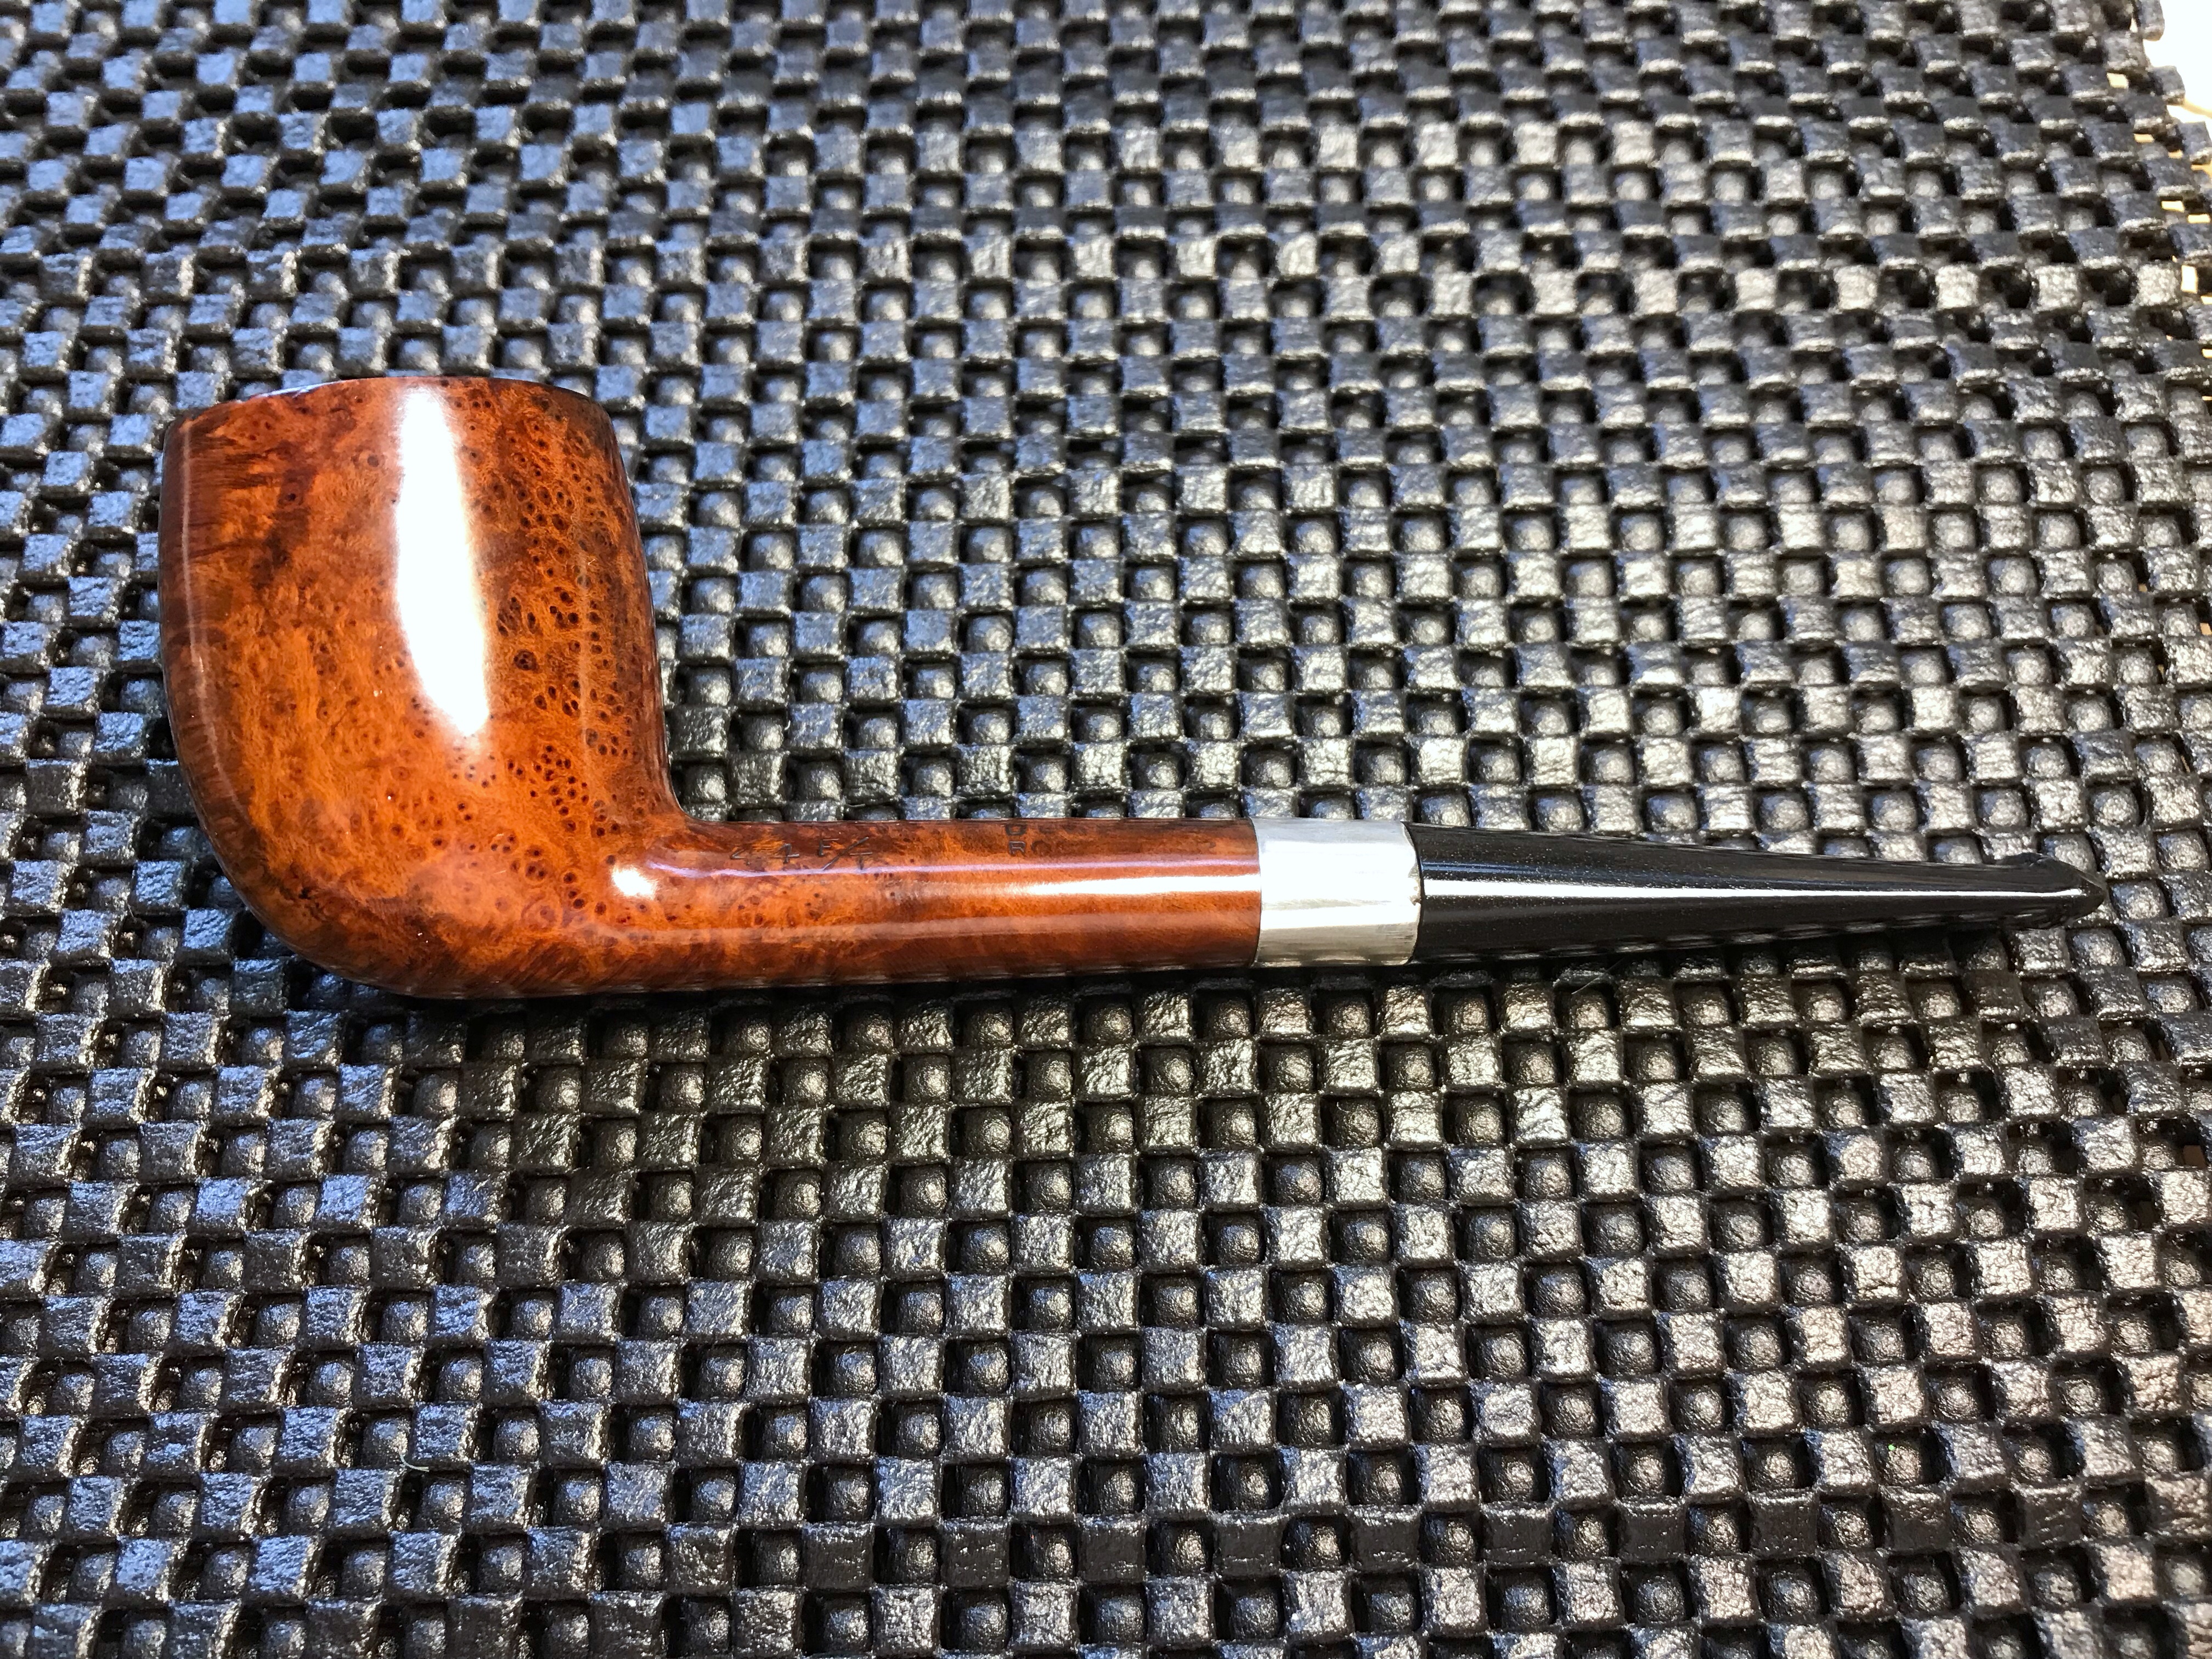
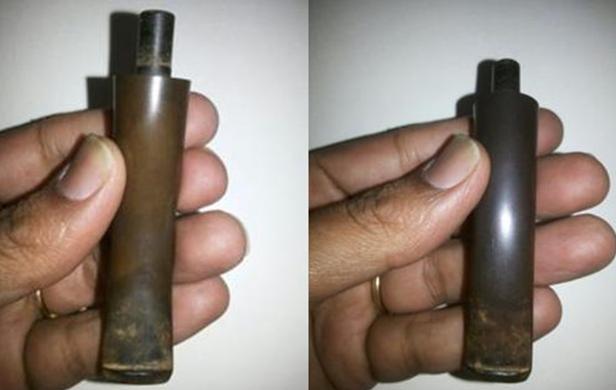
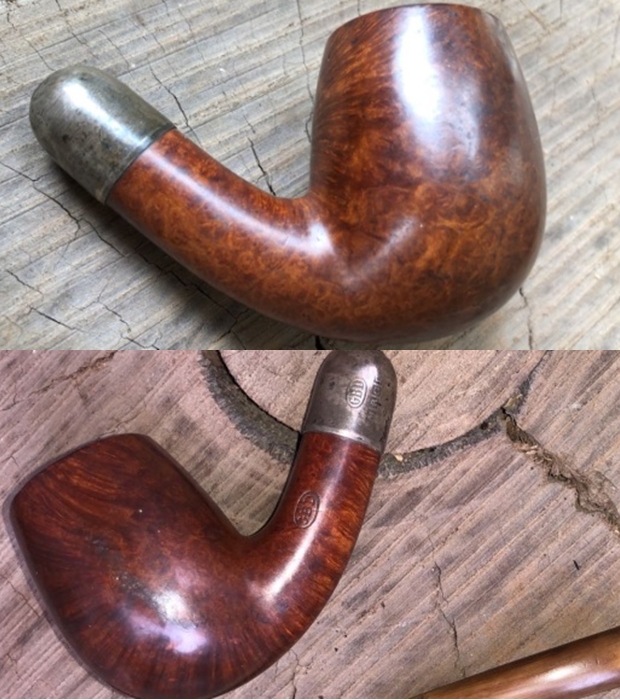
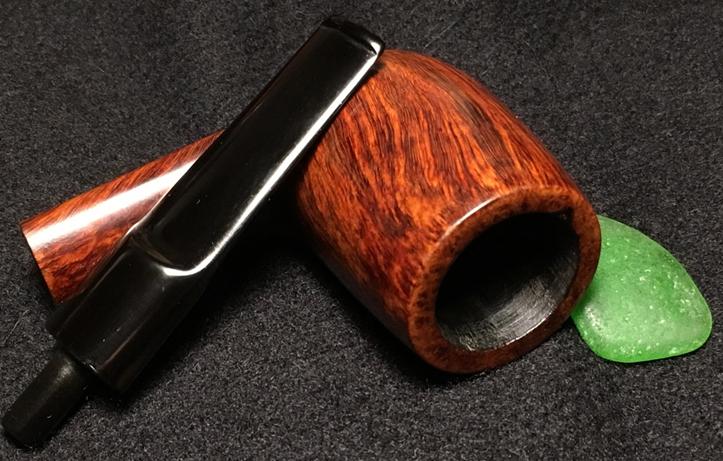
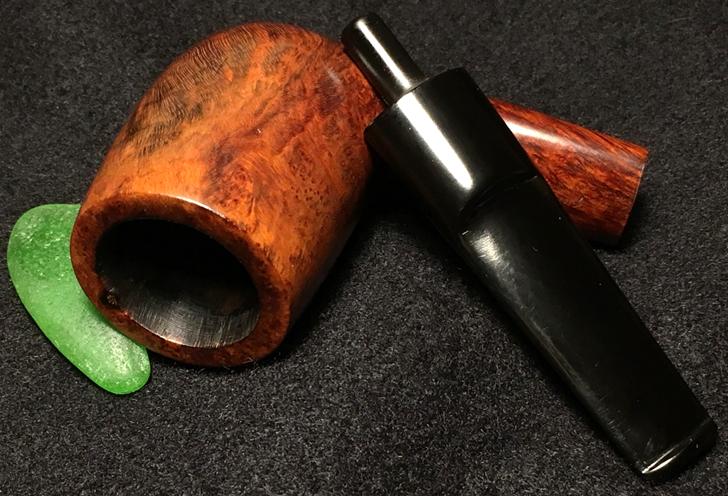
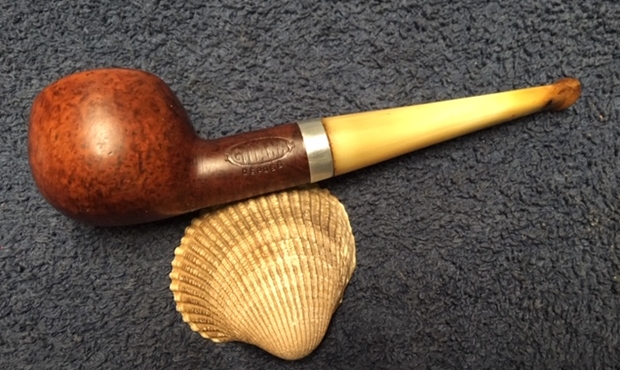
The pipe on the left bears a football stamp that reads “CHOQUIN” over “A METZ” and the one on the right side simply reads “GBD”  (there are other stampings on the silver ferrule, details of which will be highlighted when it comes up for restoration). Both of these pipes looked vintage and unique enough that I immediately Facetimed with Mr. Steve of rebornpipes. His admission that he is willing for a trade off with me for these two pipes was an indication enough for me to know and understand their uniqueness!!! Thus these two pipes moved to the top of my unorganized and chaotic list of restoration. 

Having now restored the CHOQUIN and experienced the challenges that these vintage pipes pose, I was faced with a dilemma of whether I should consider restoring the GBD or take a break and restore another unique and interesting pipe. Mr. Steve suggested the latter and hence I decided to undertake the restoration of the GBD amidst my hectic schedule.  

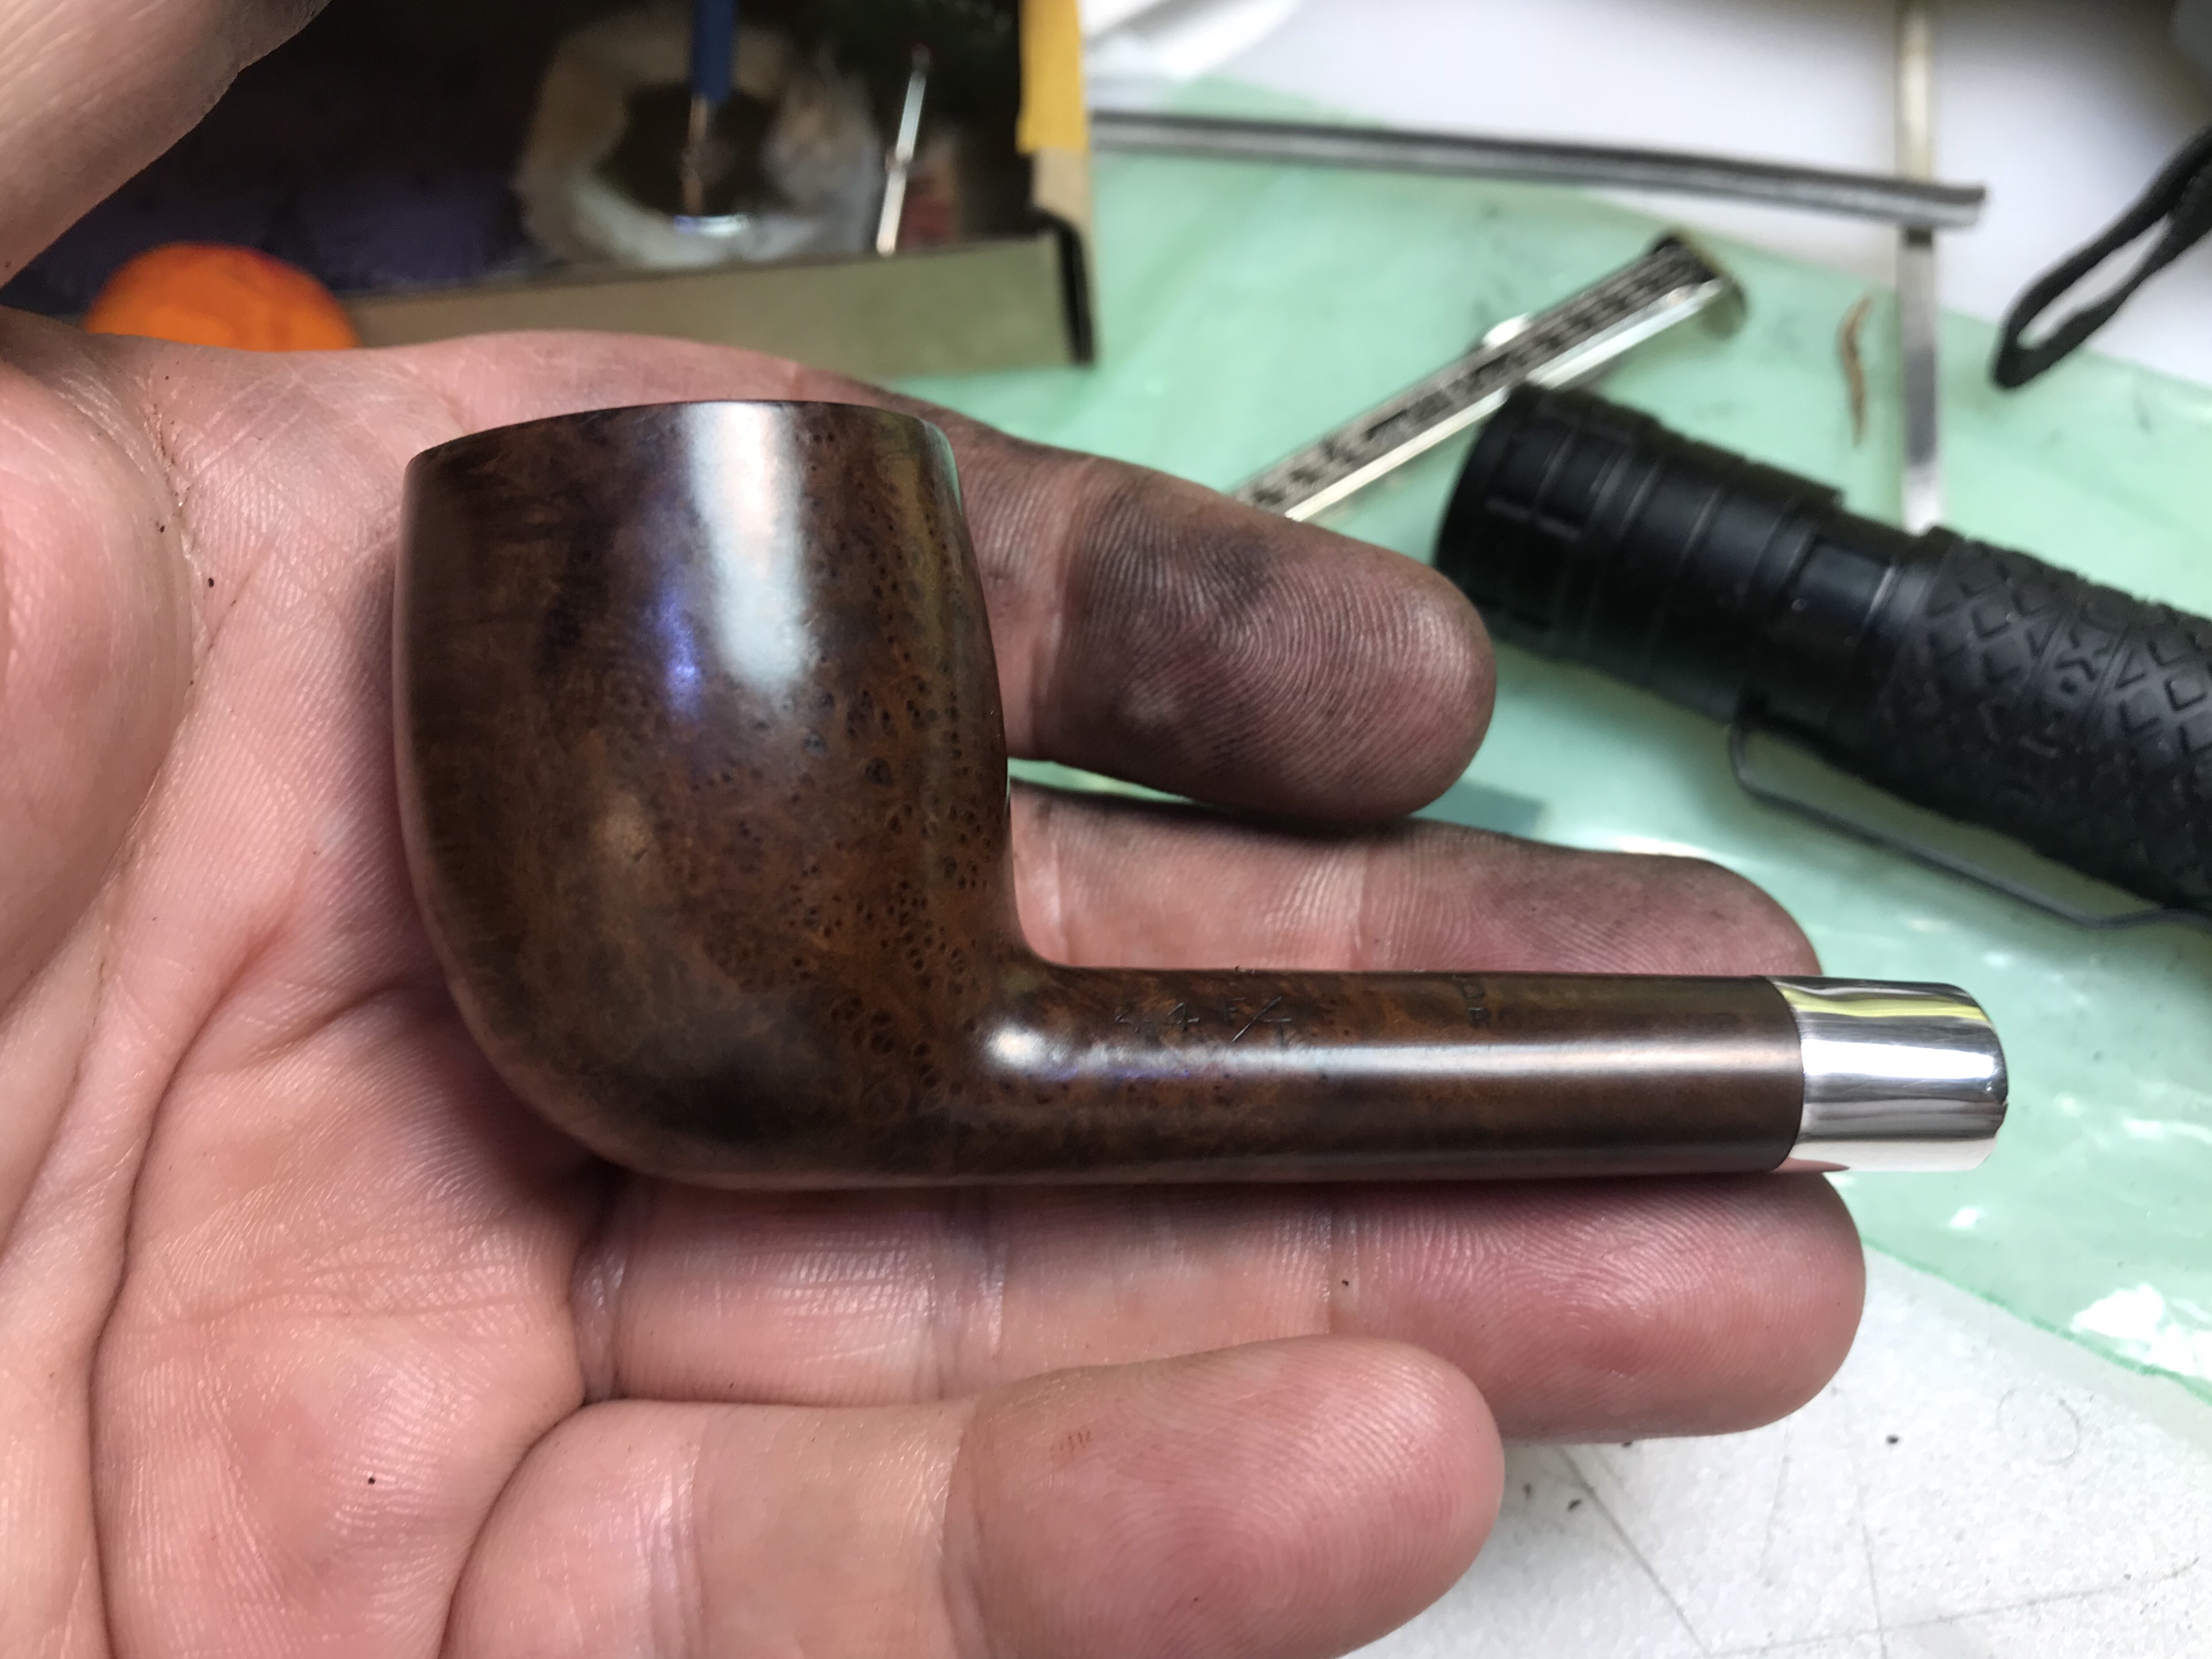
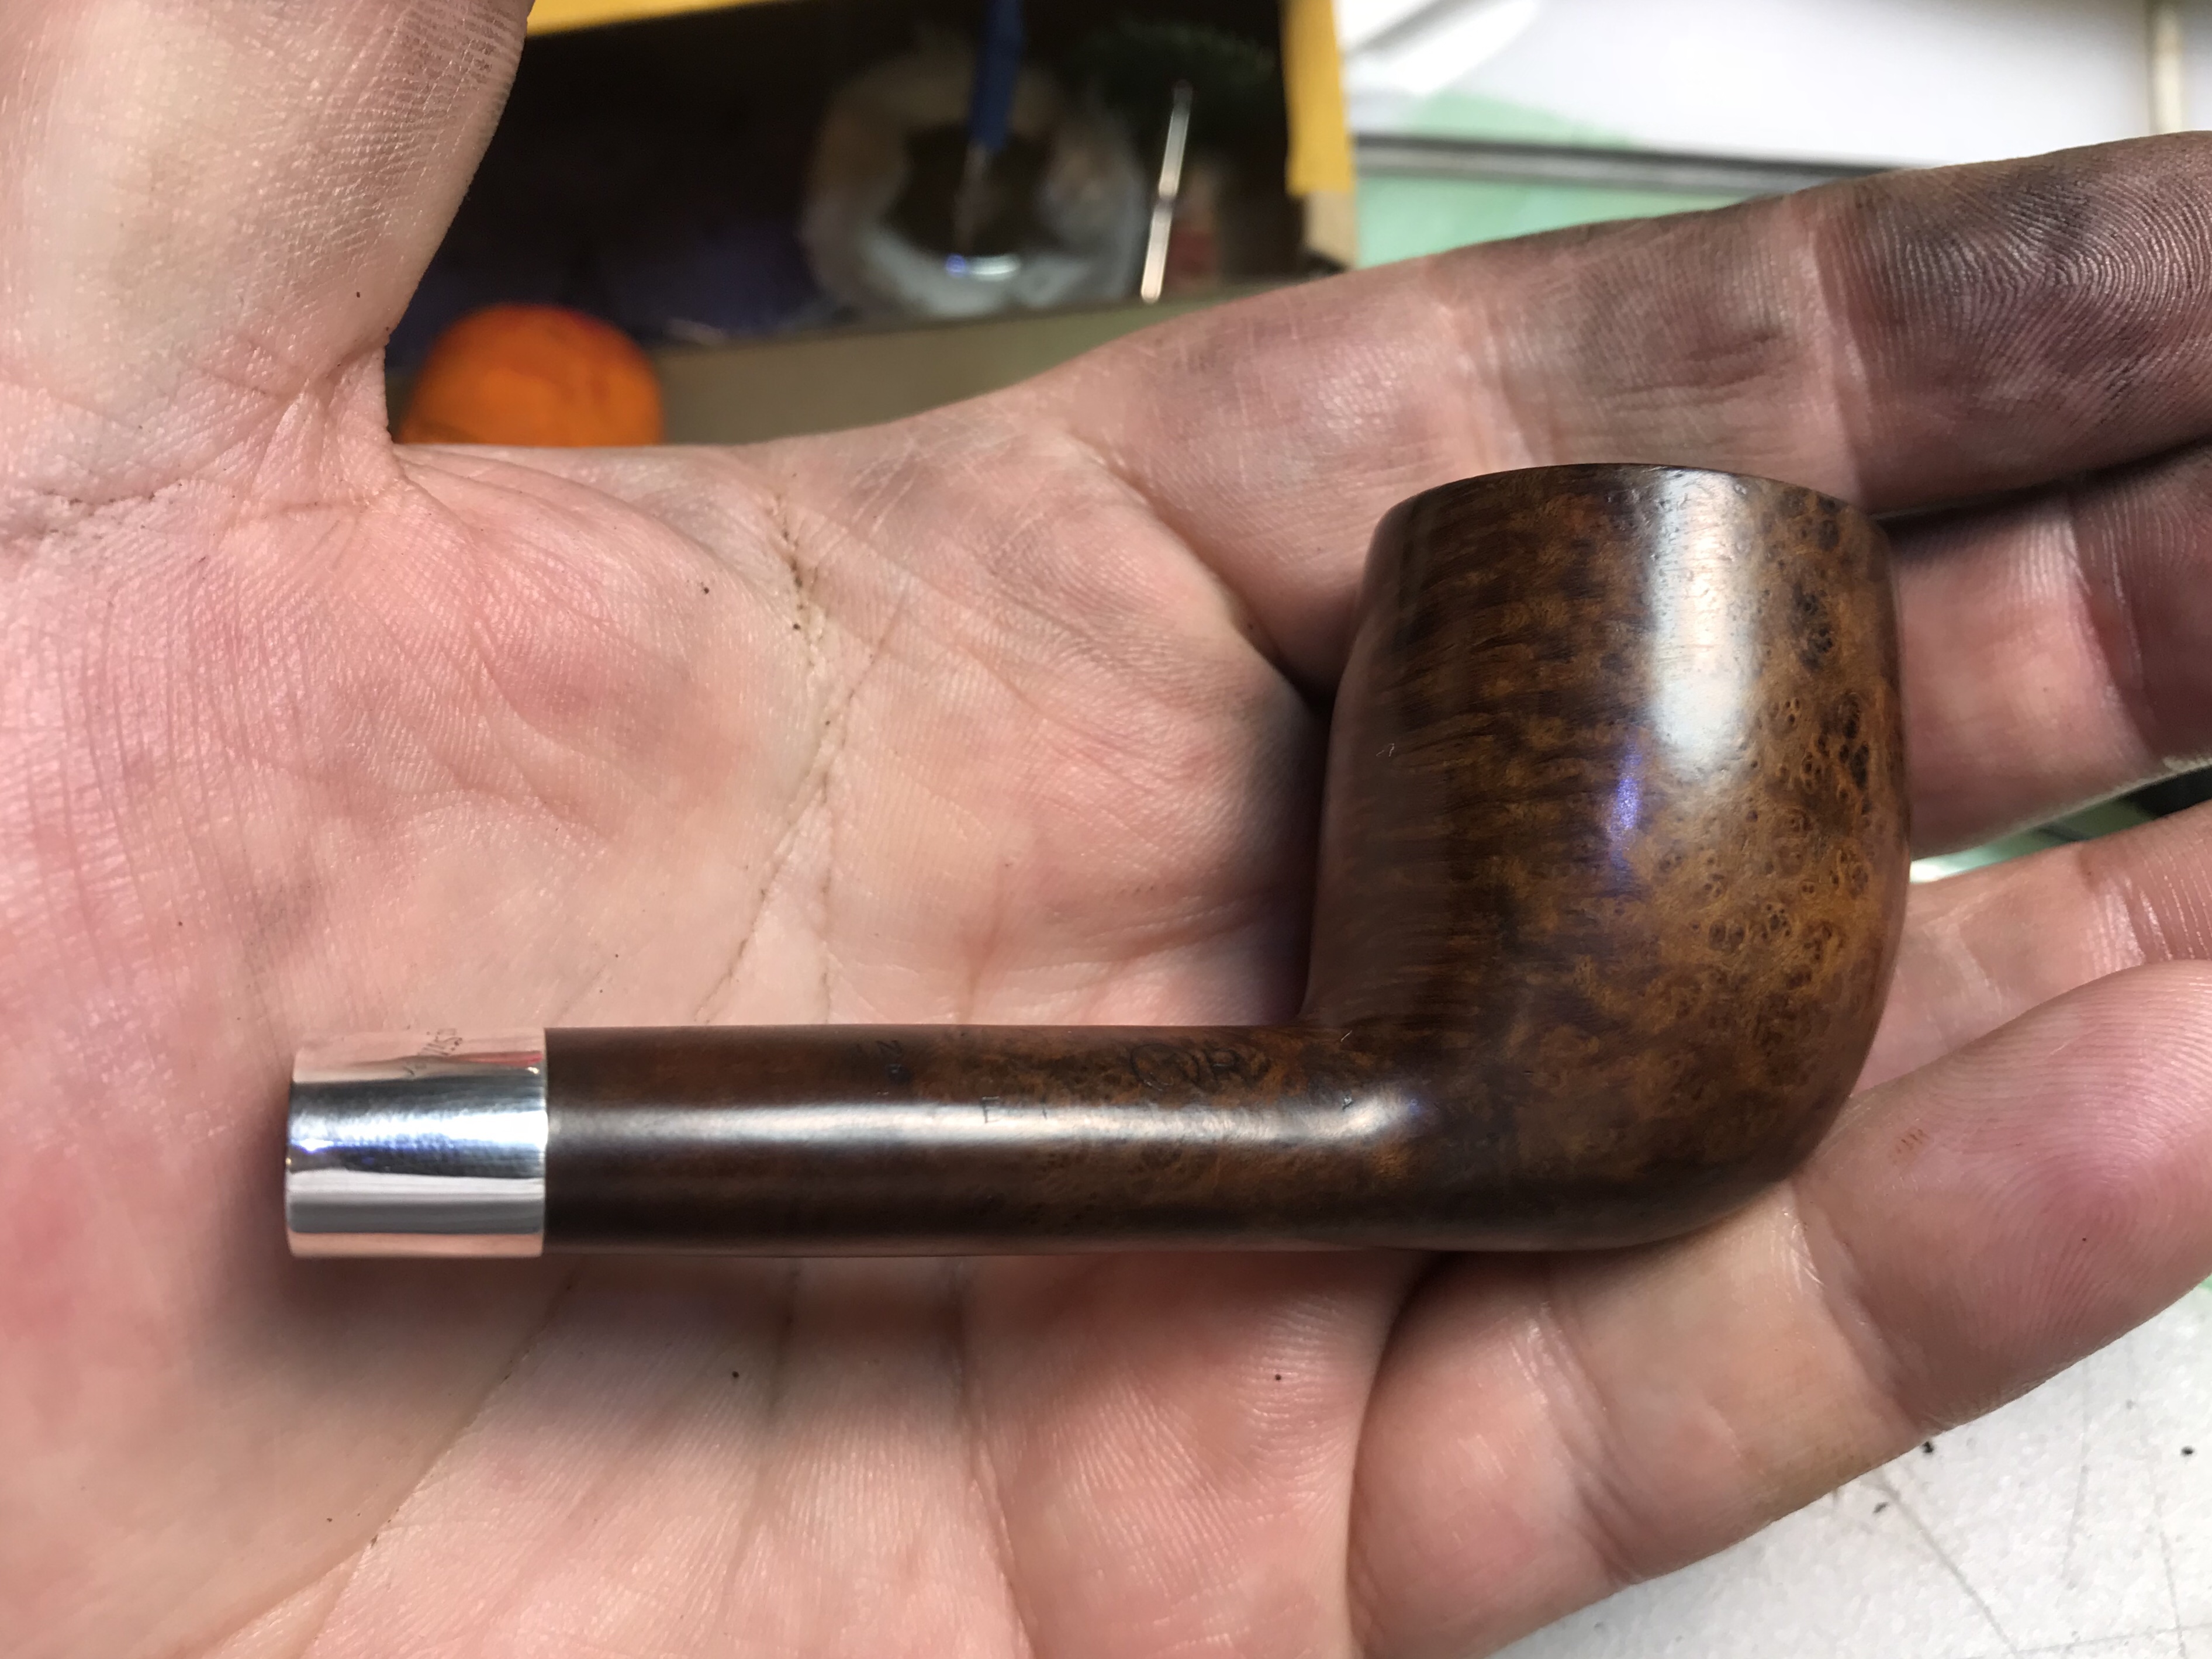
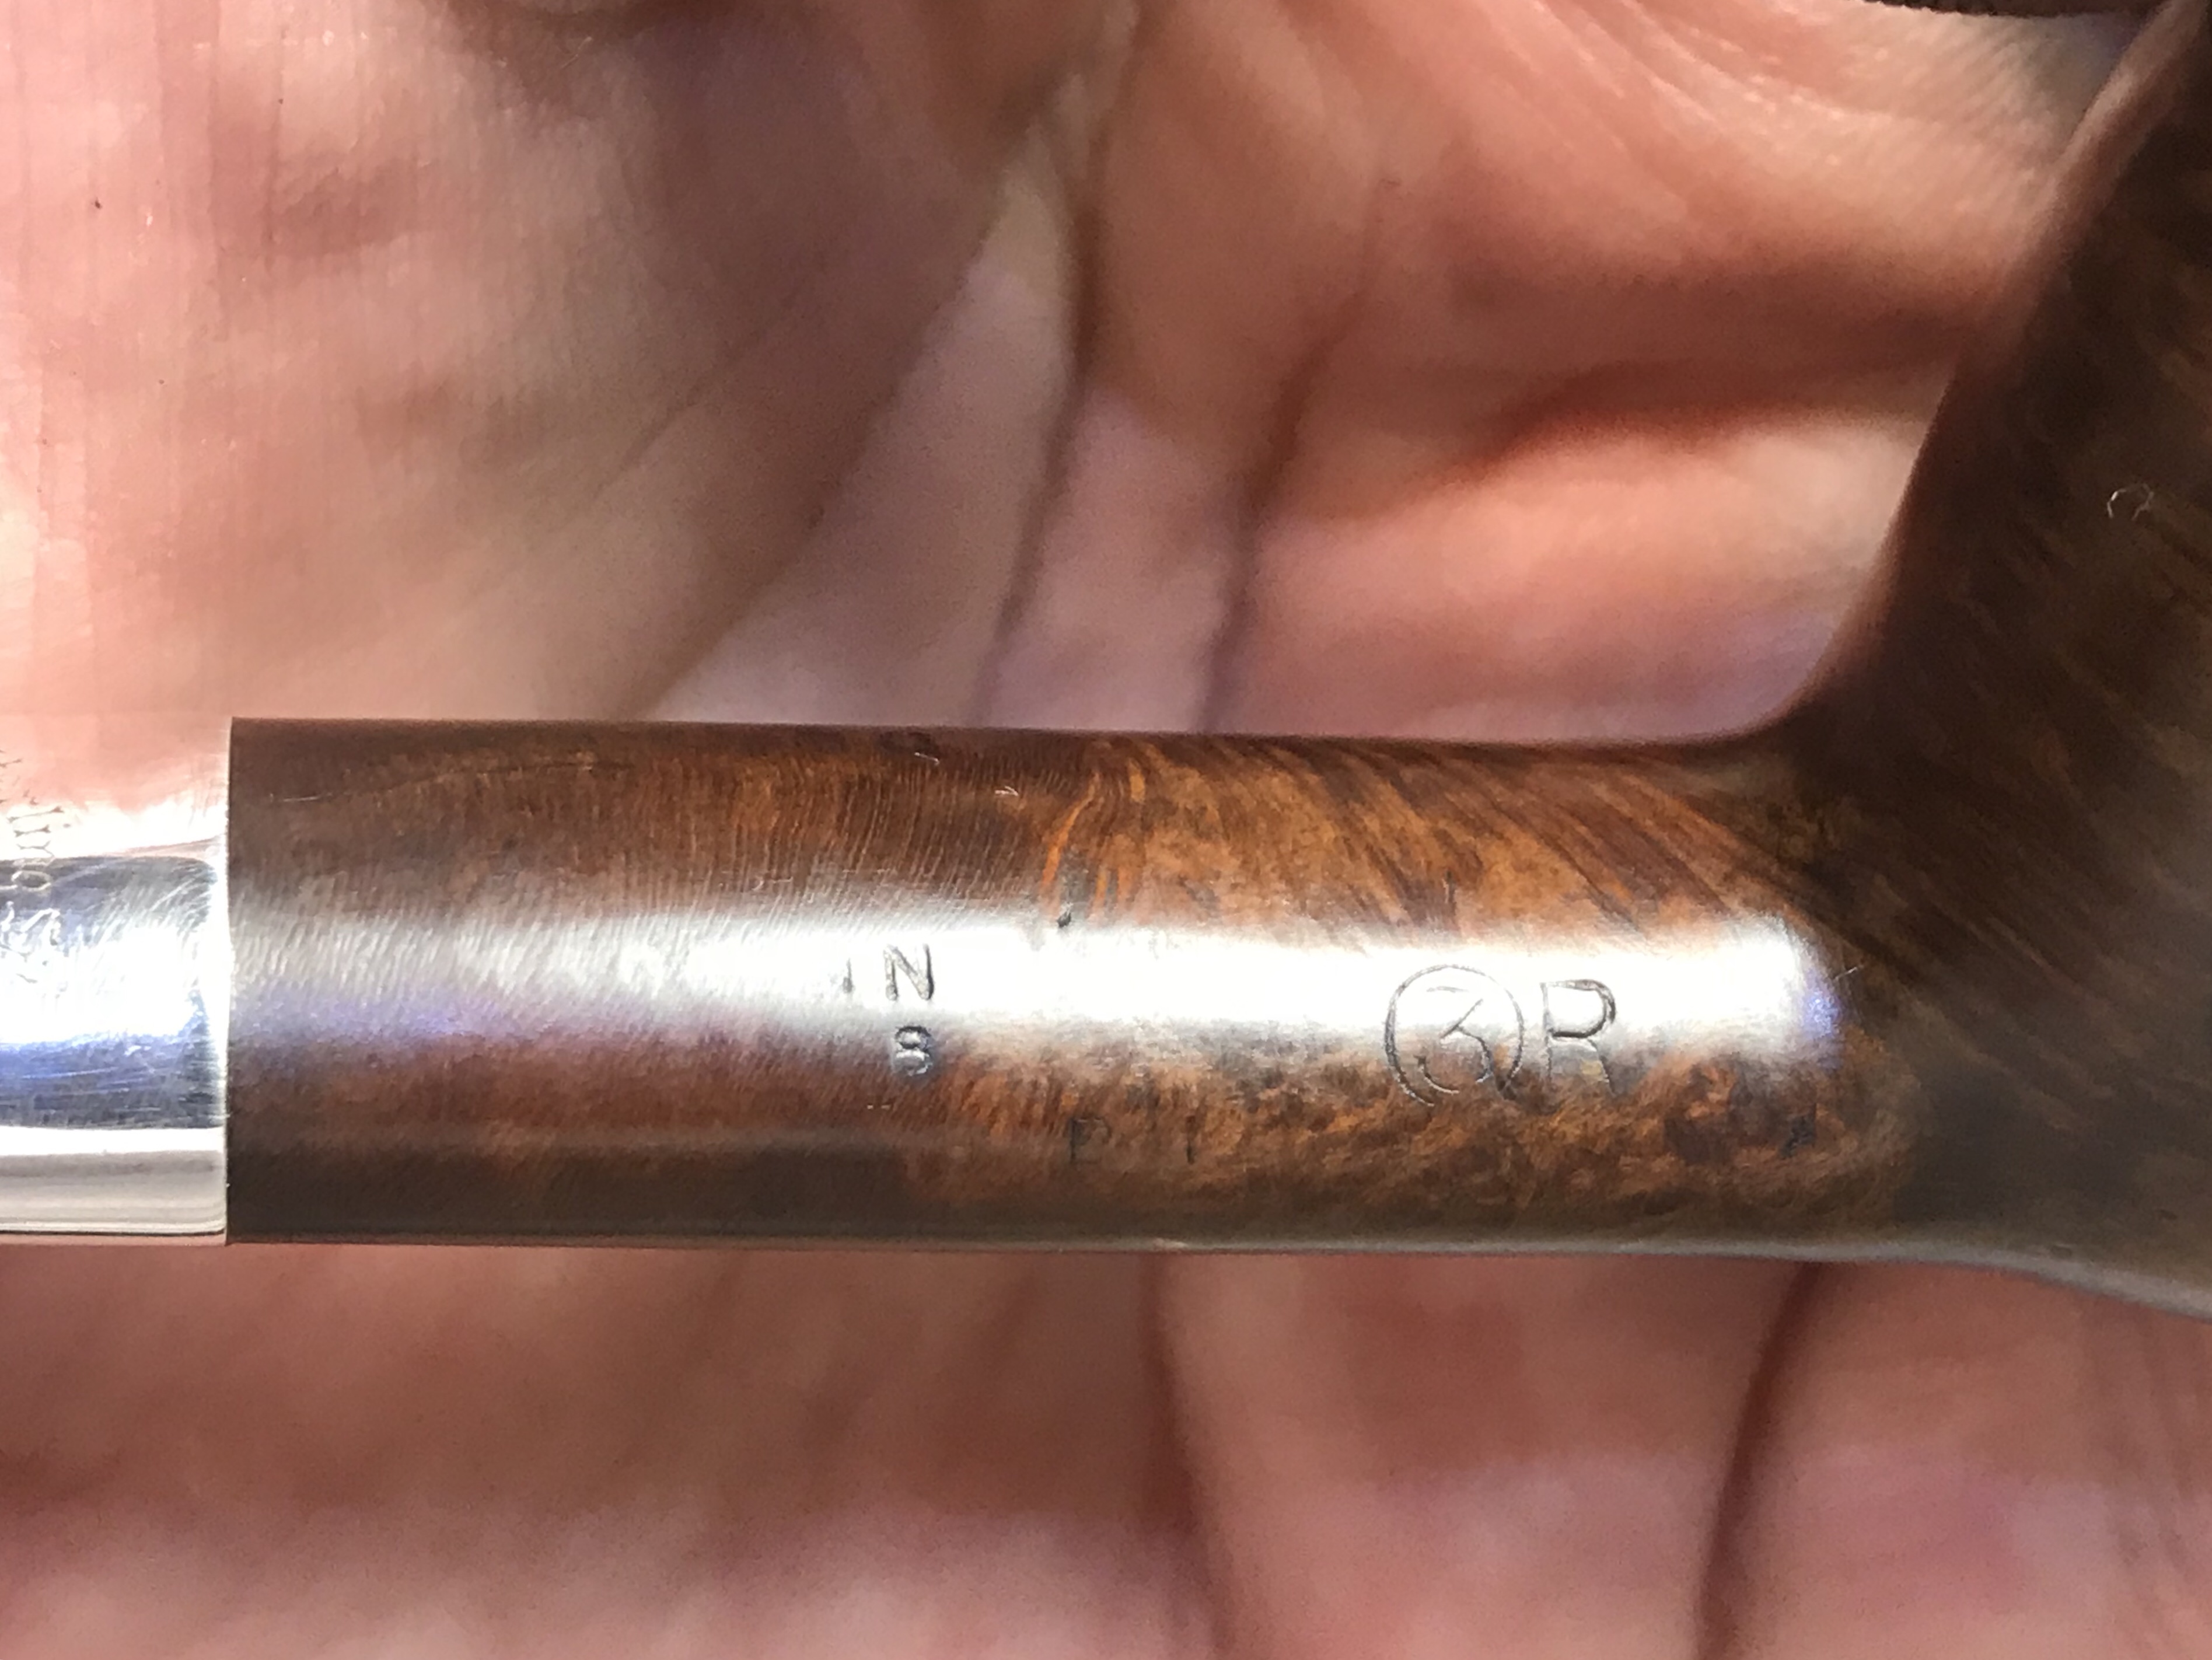
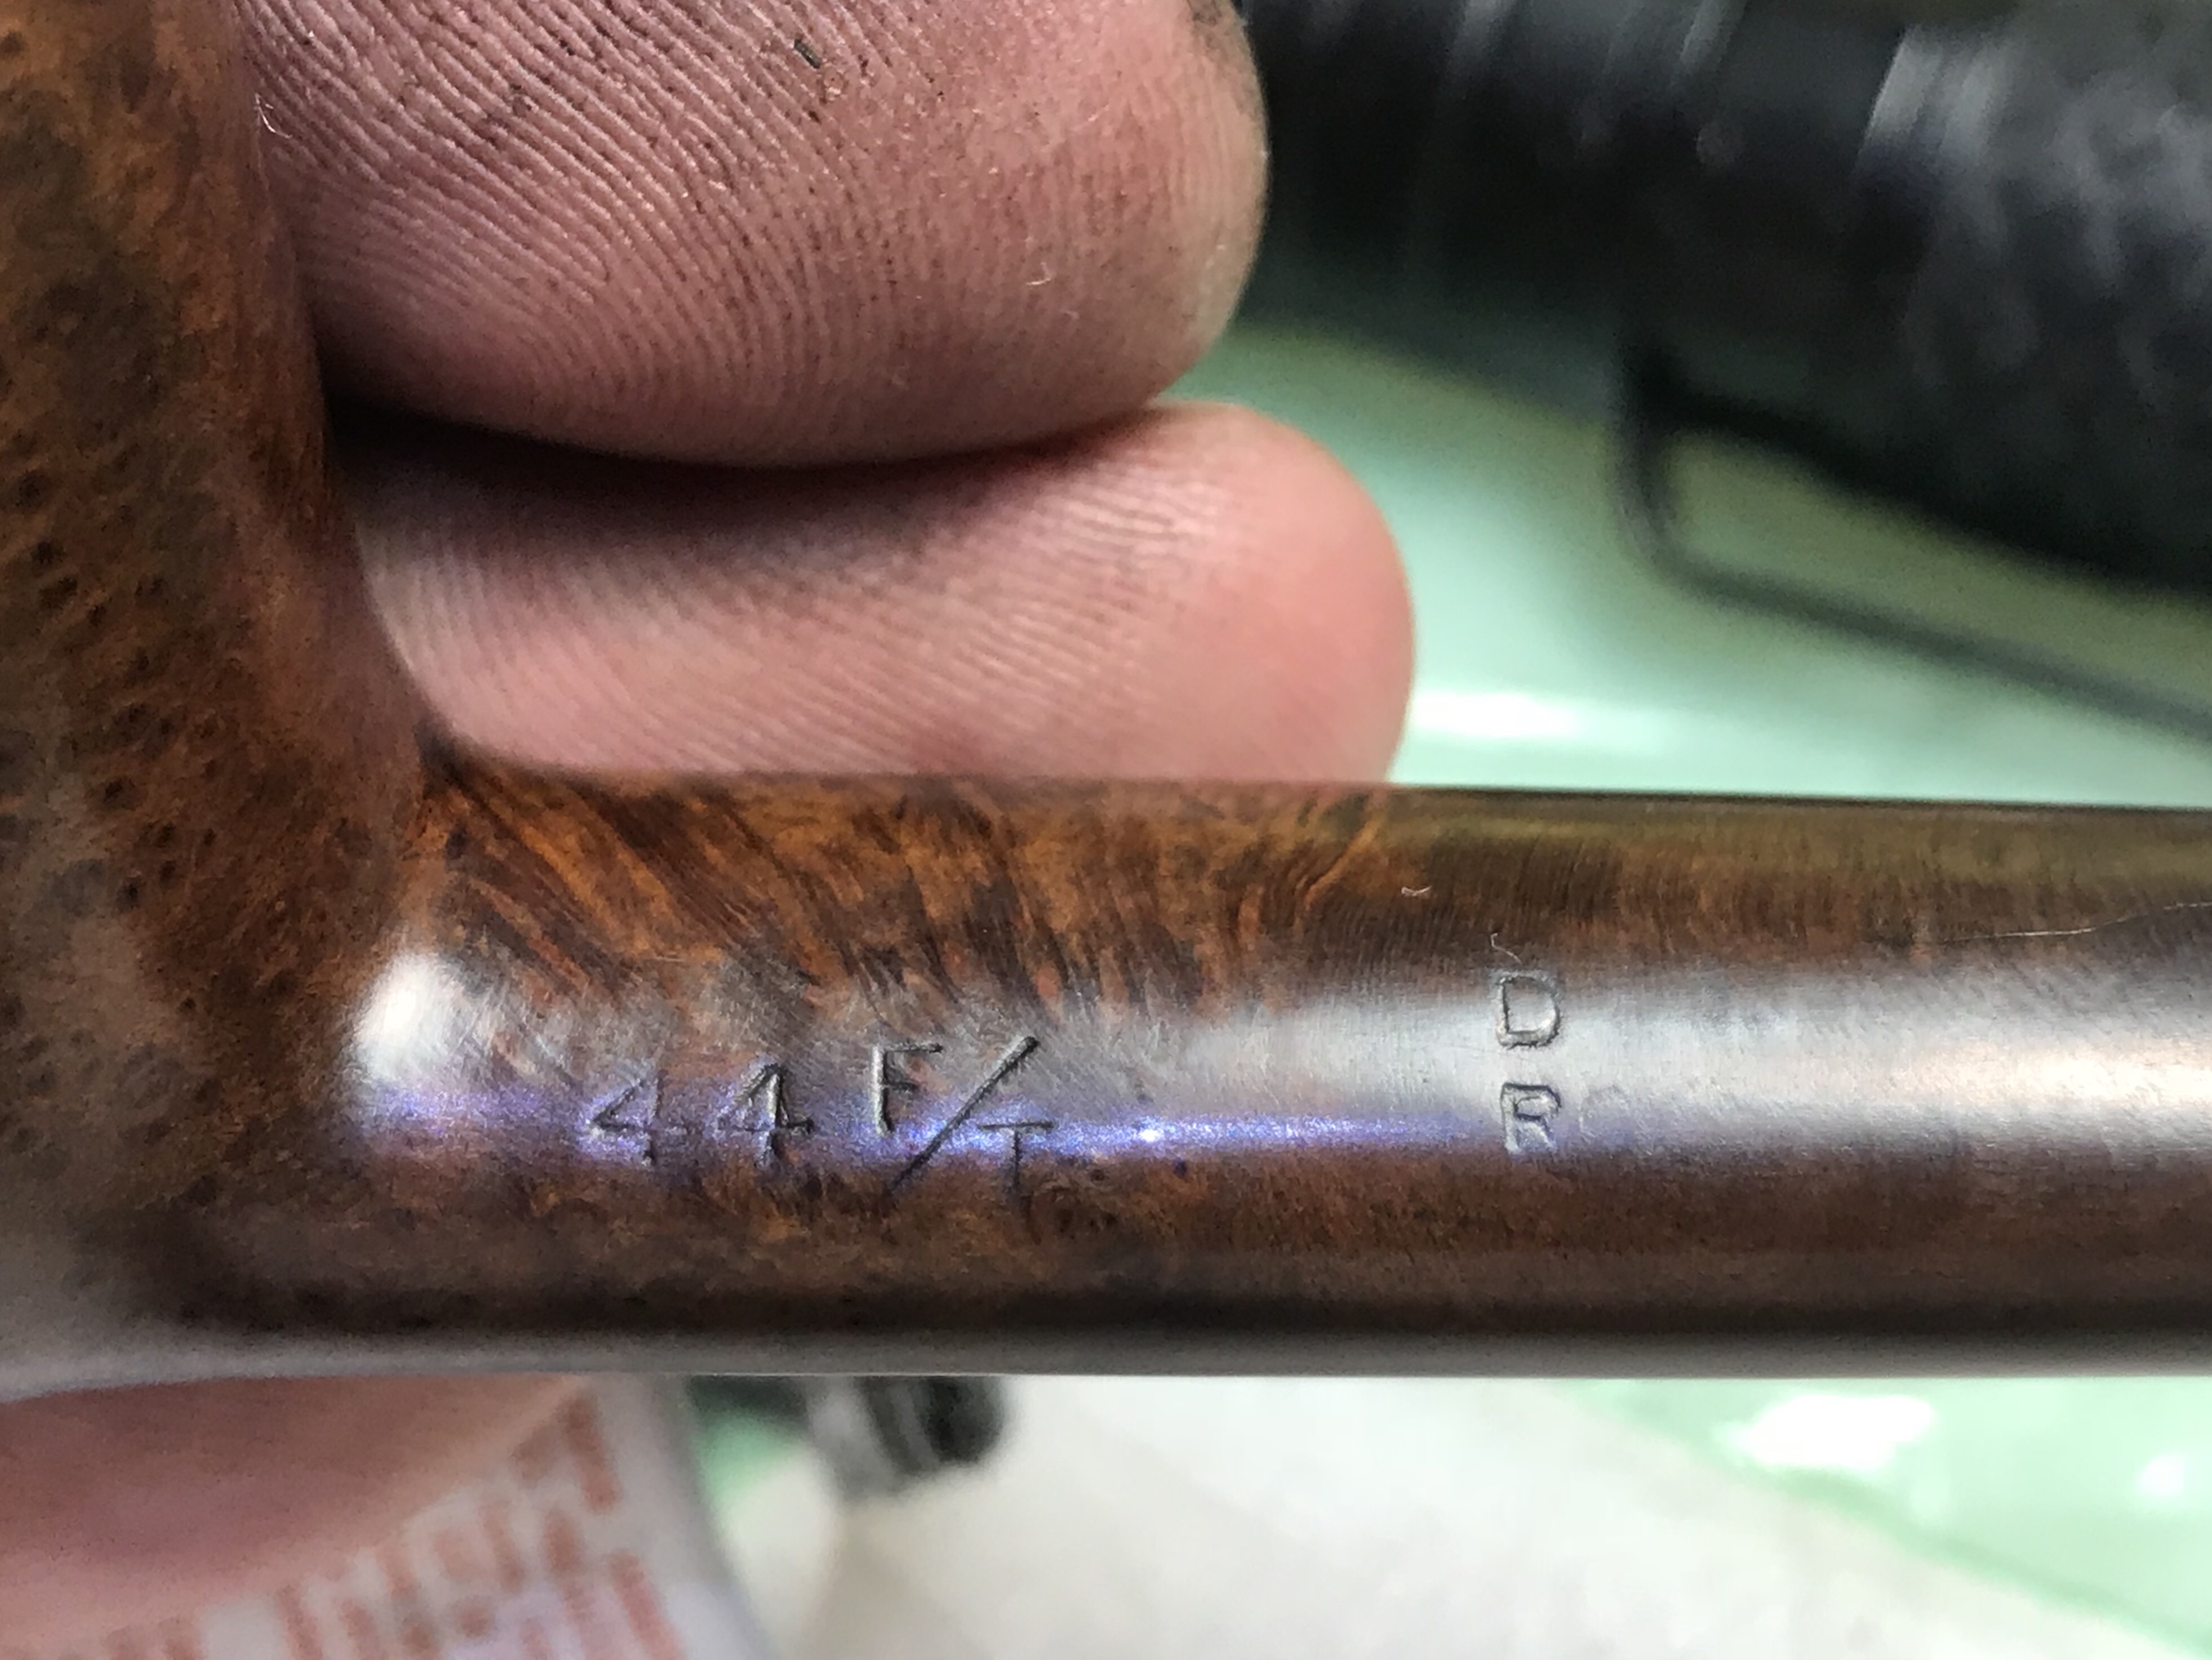
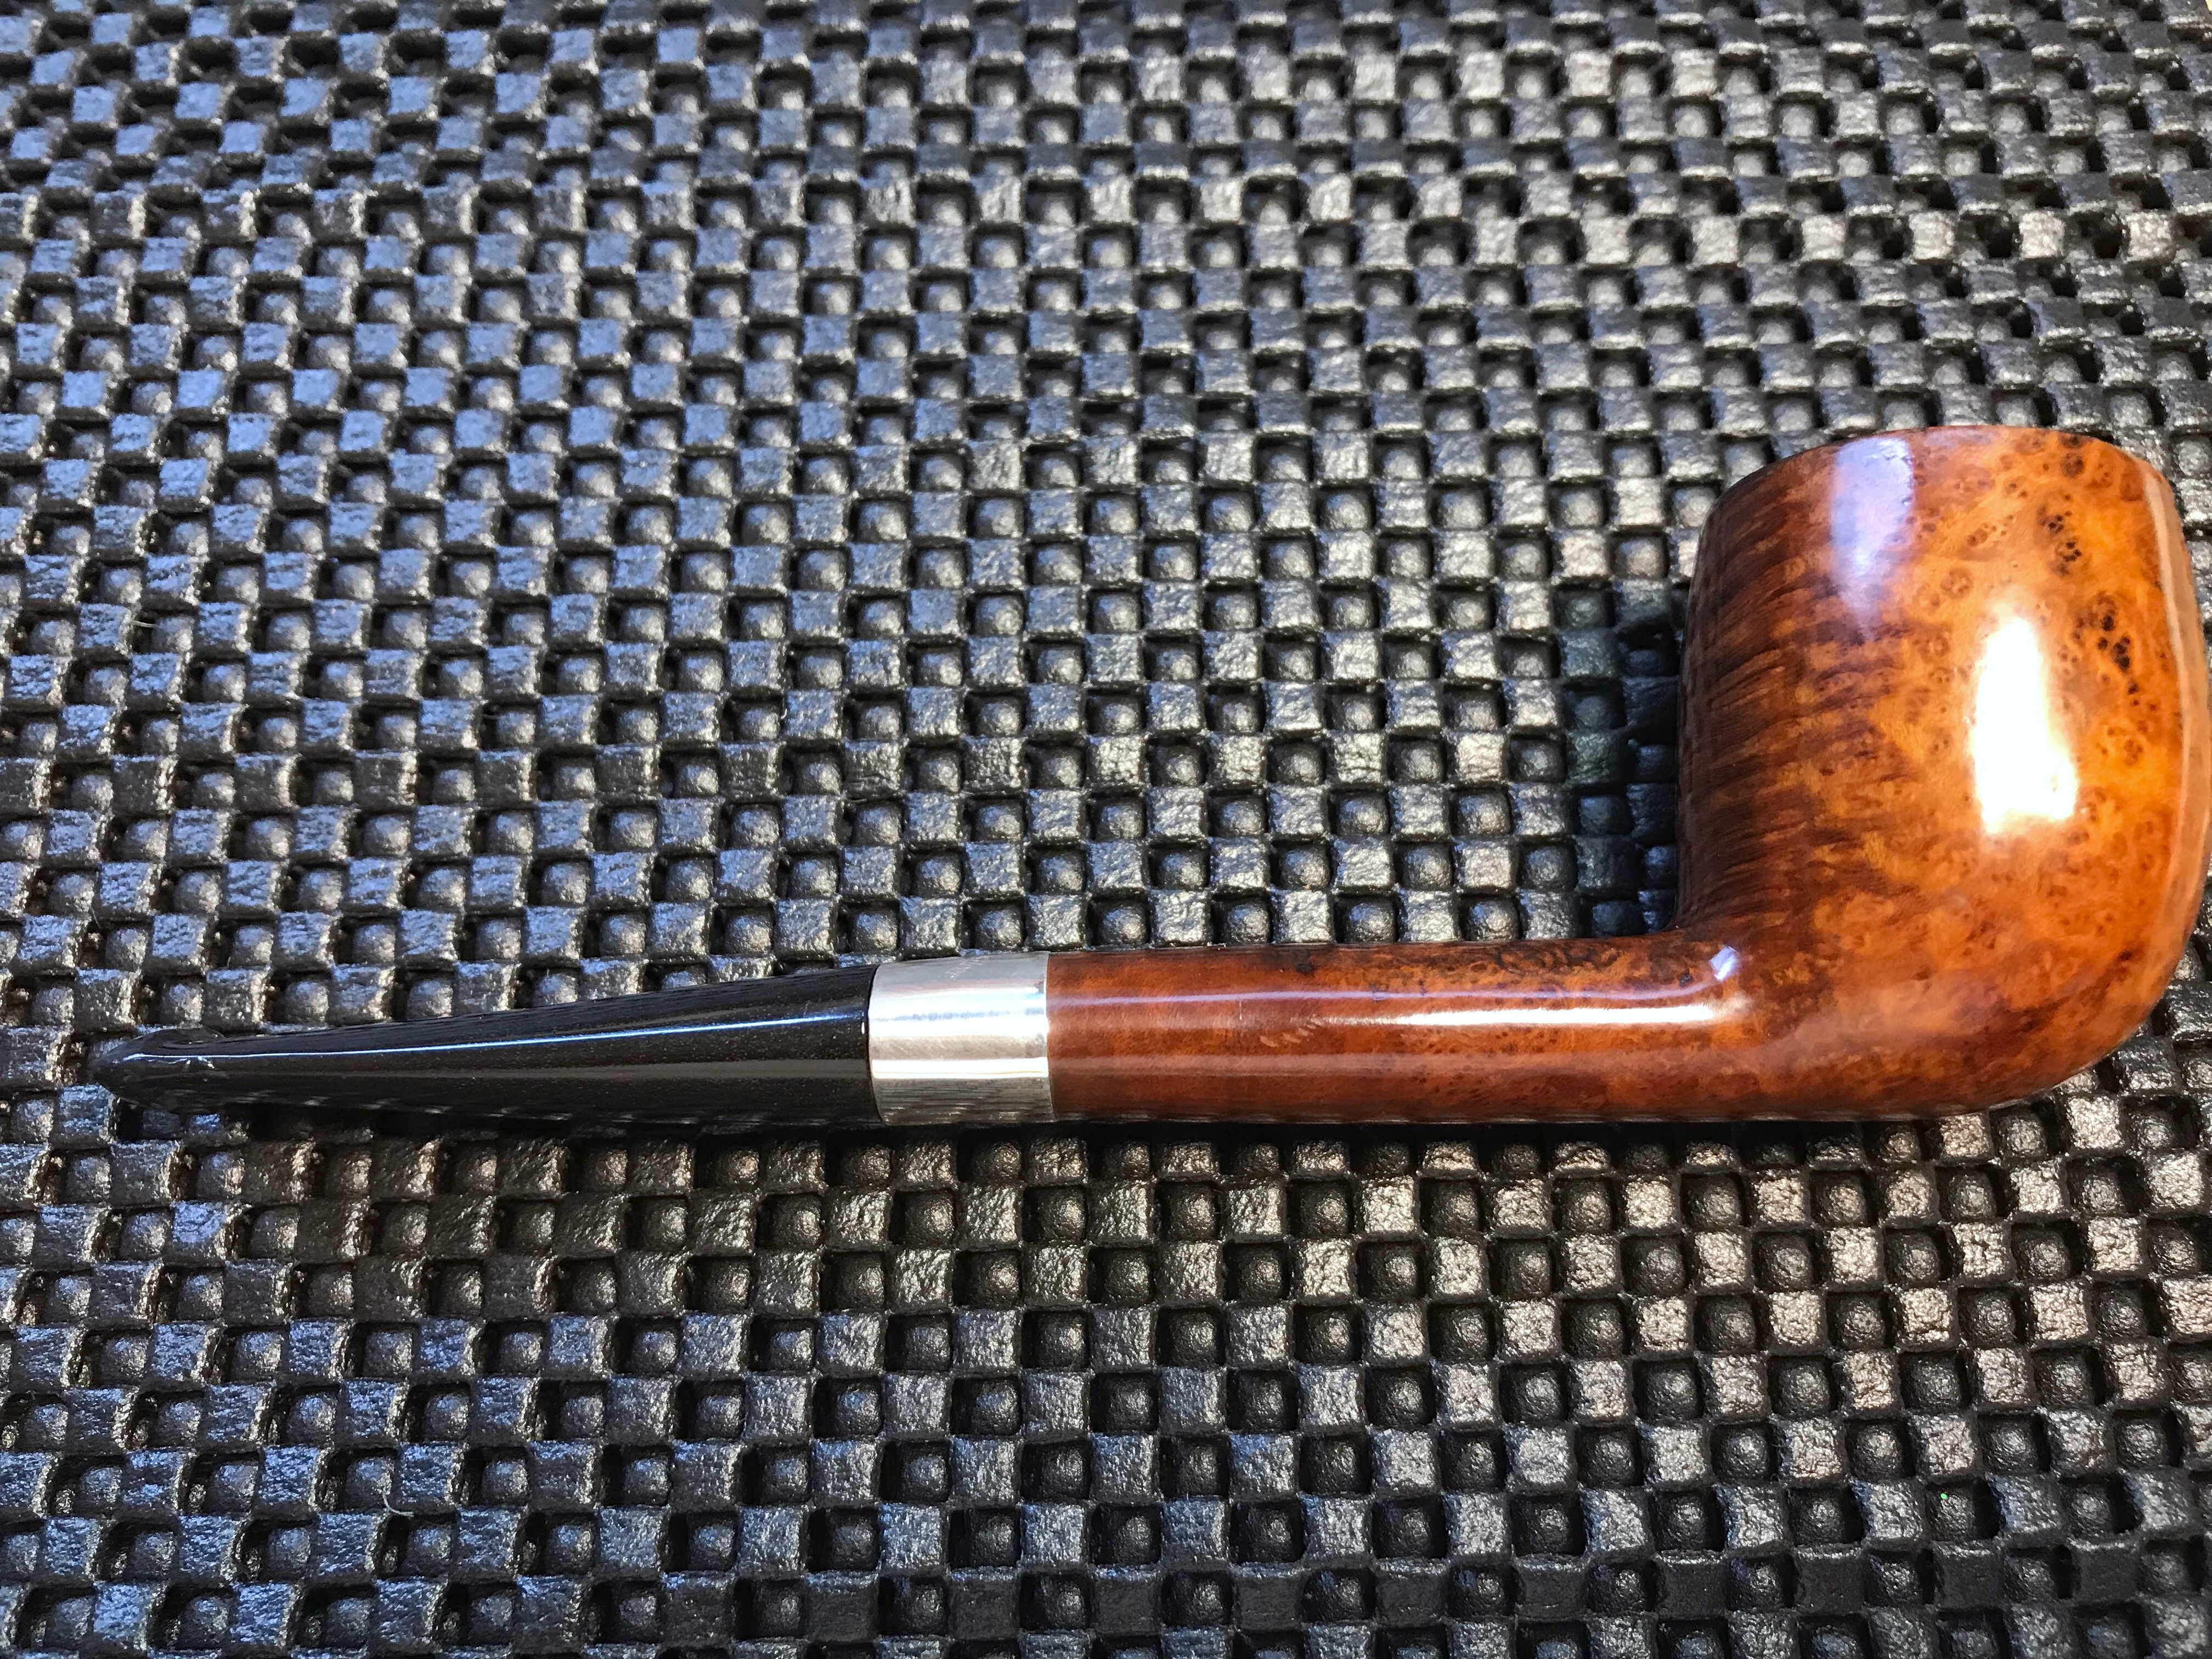
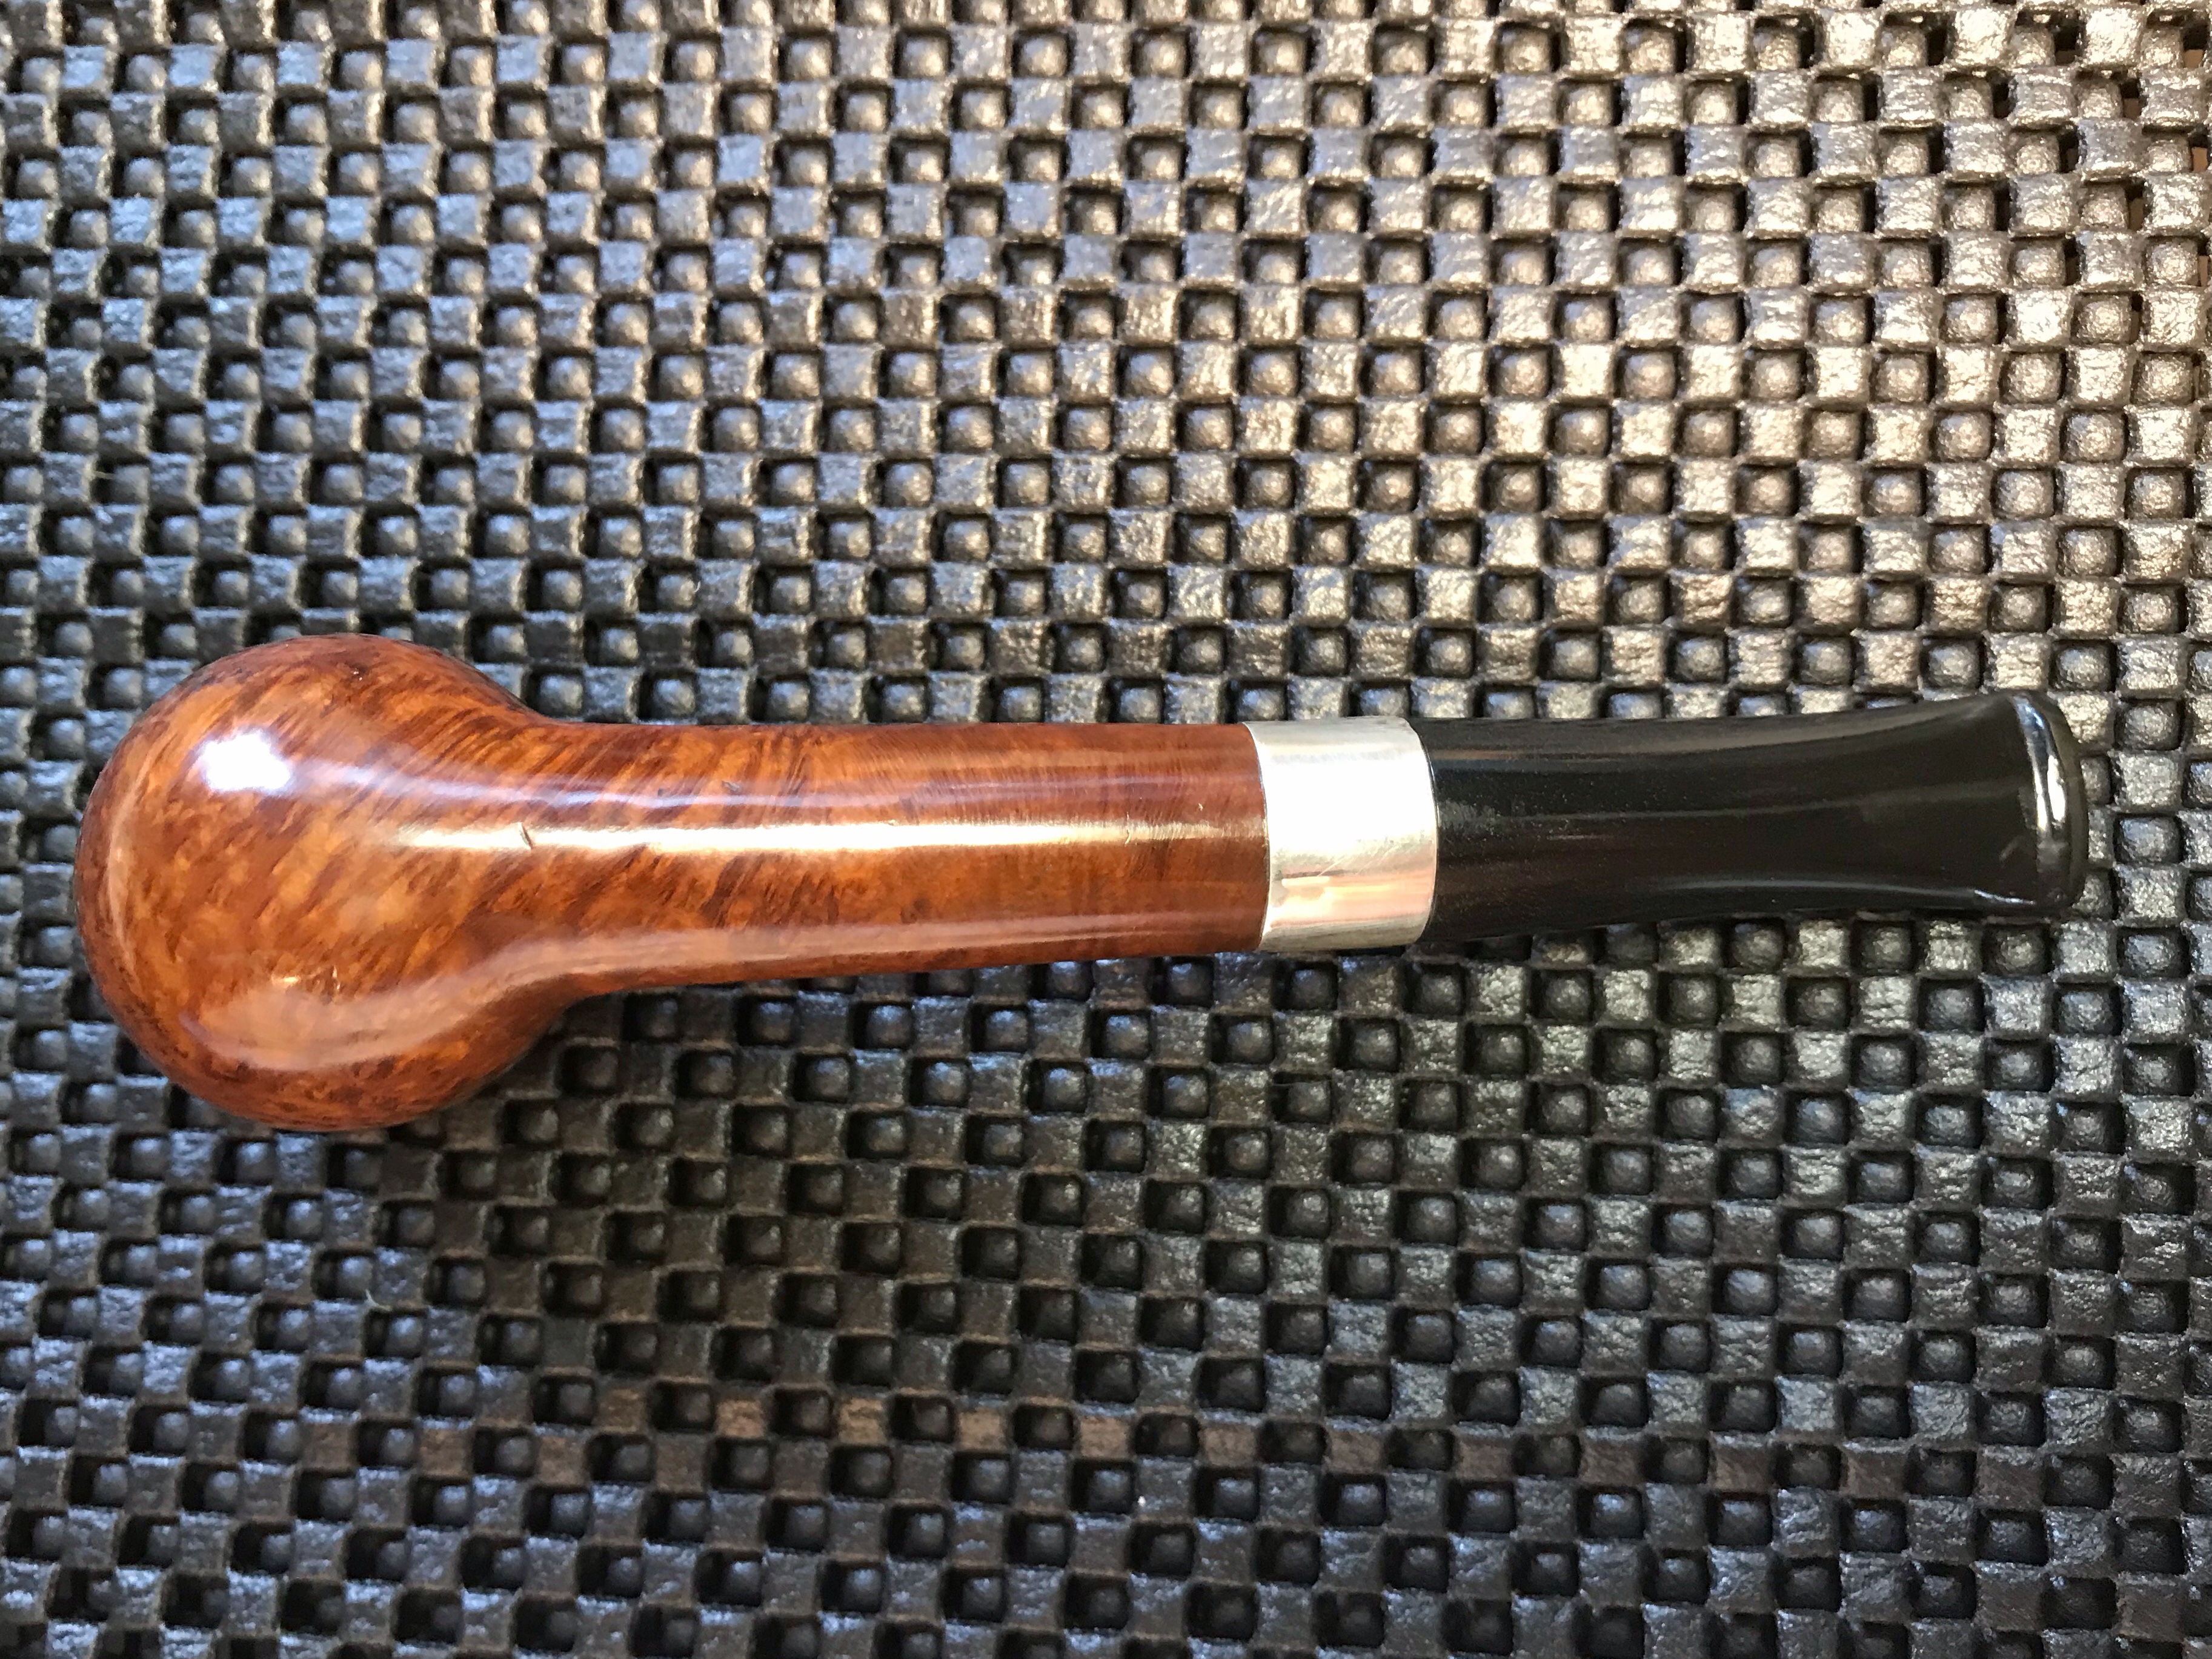
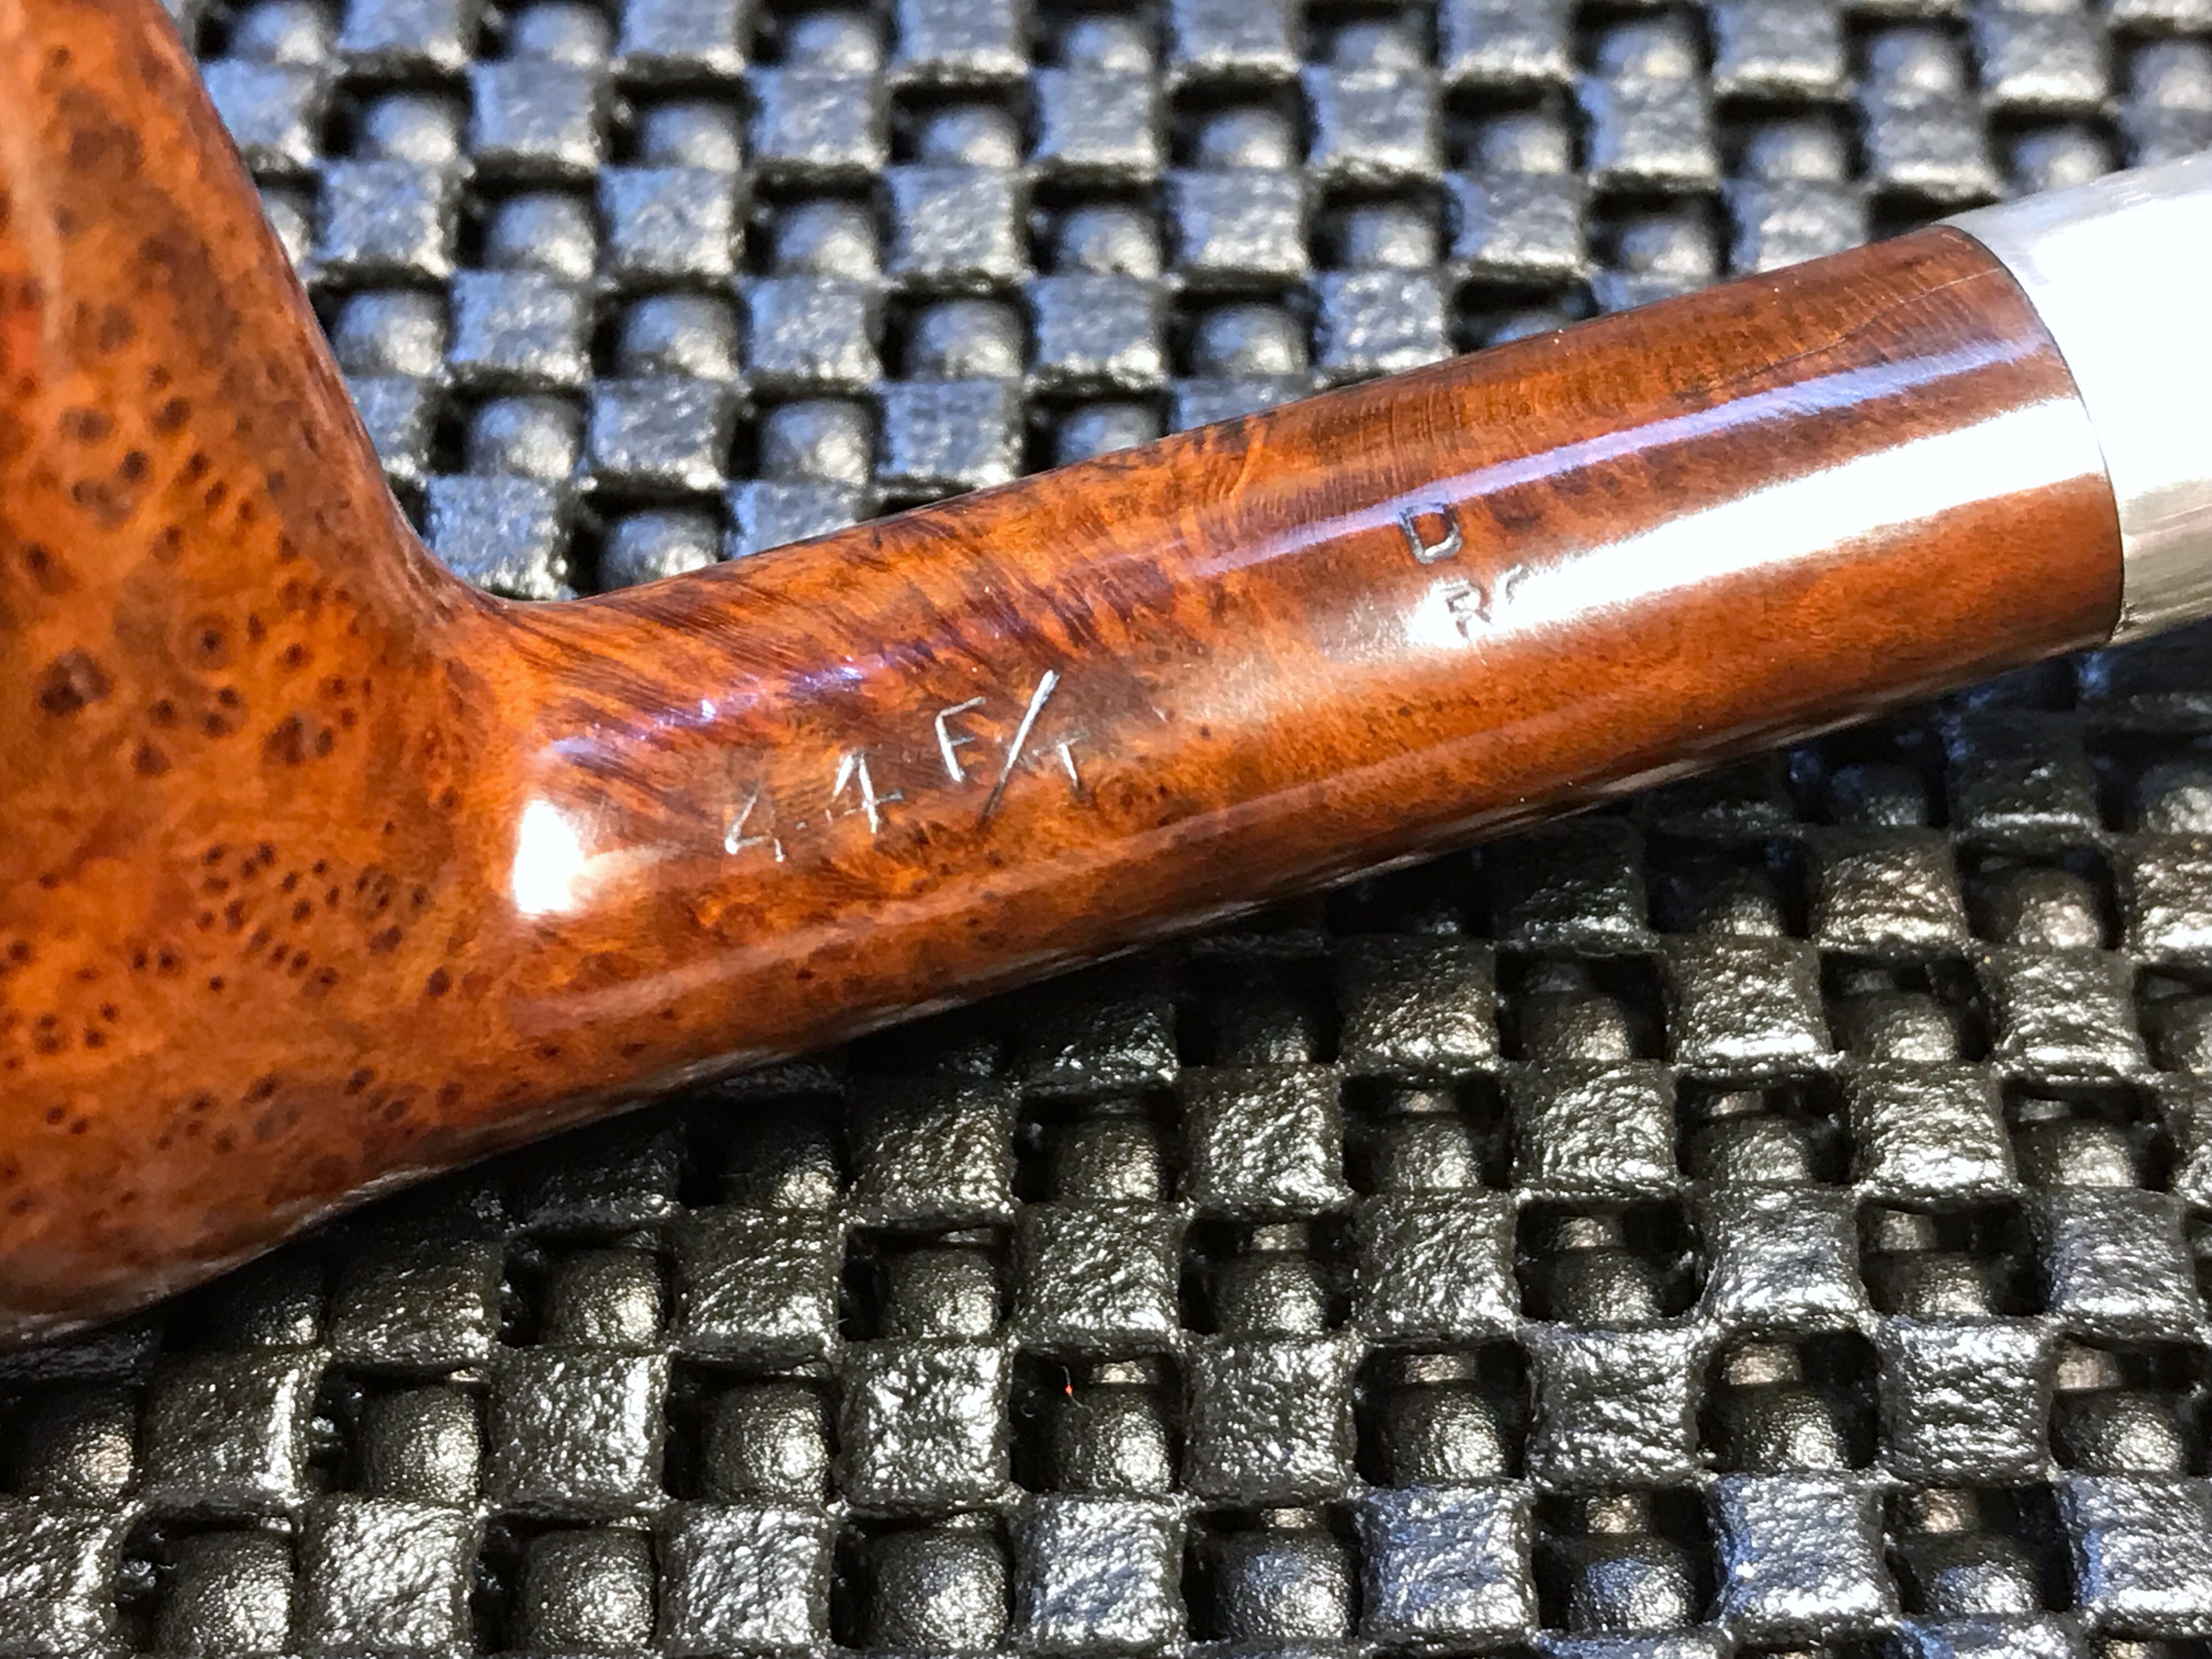
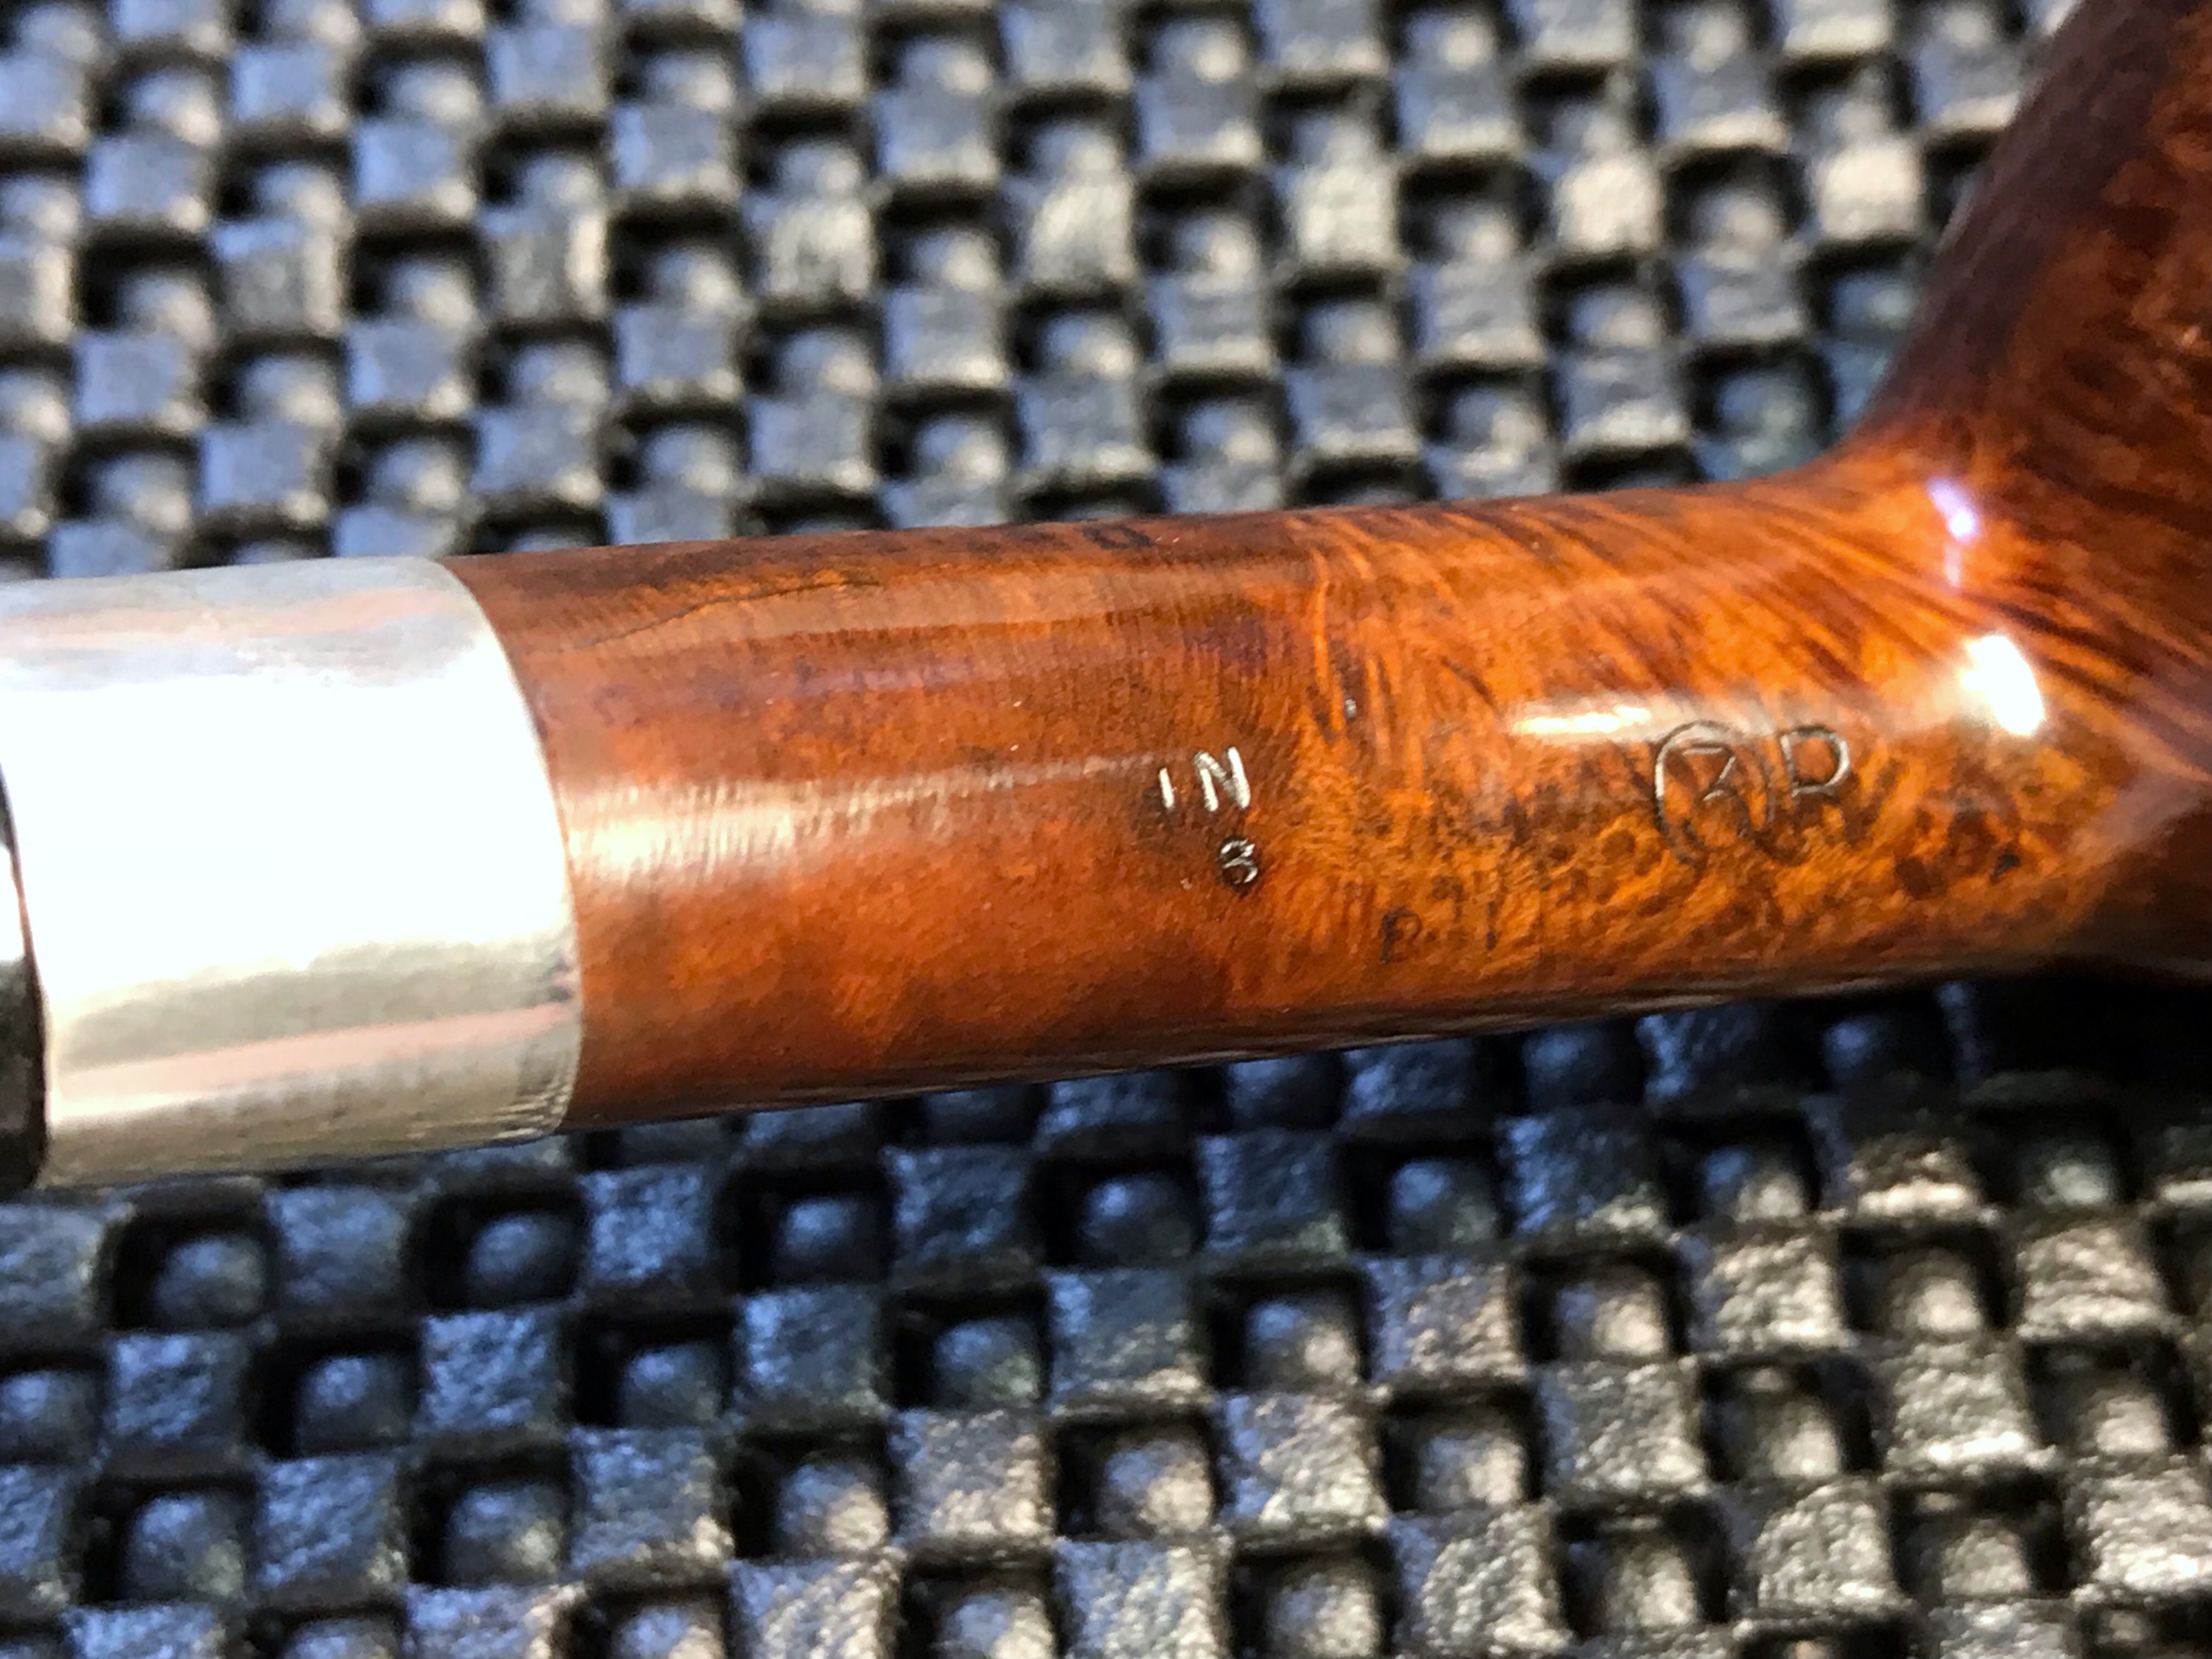
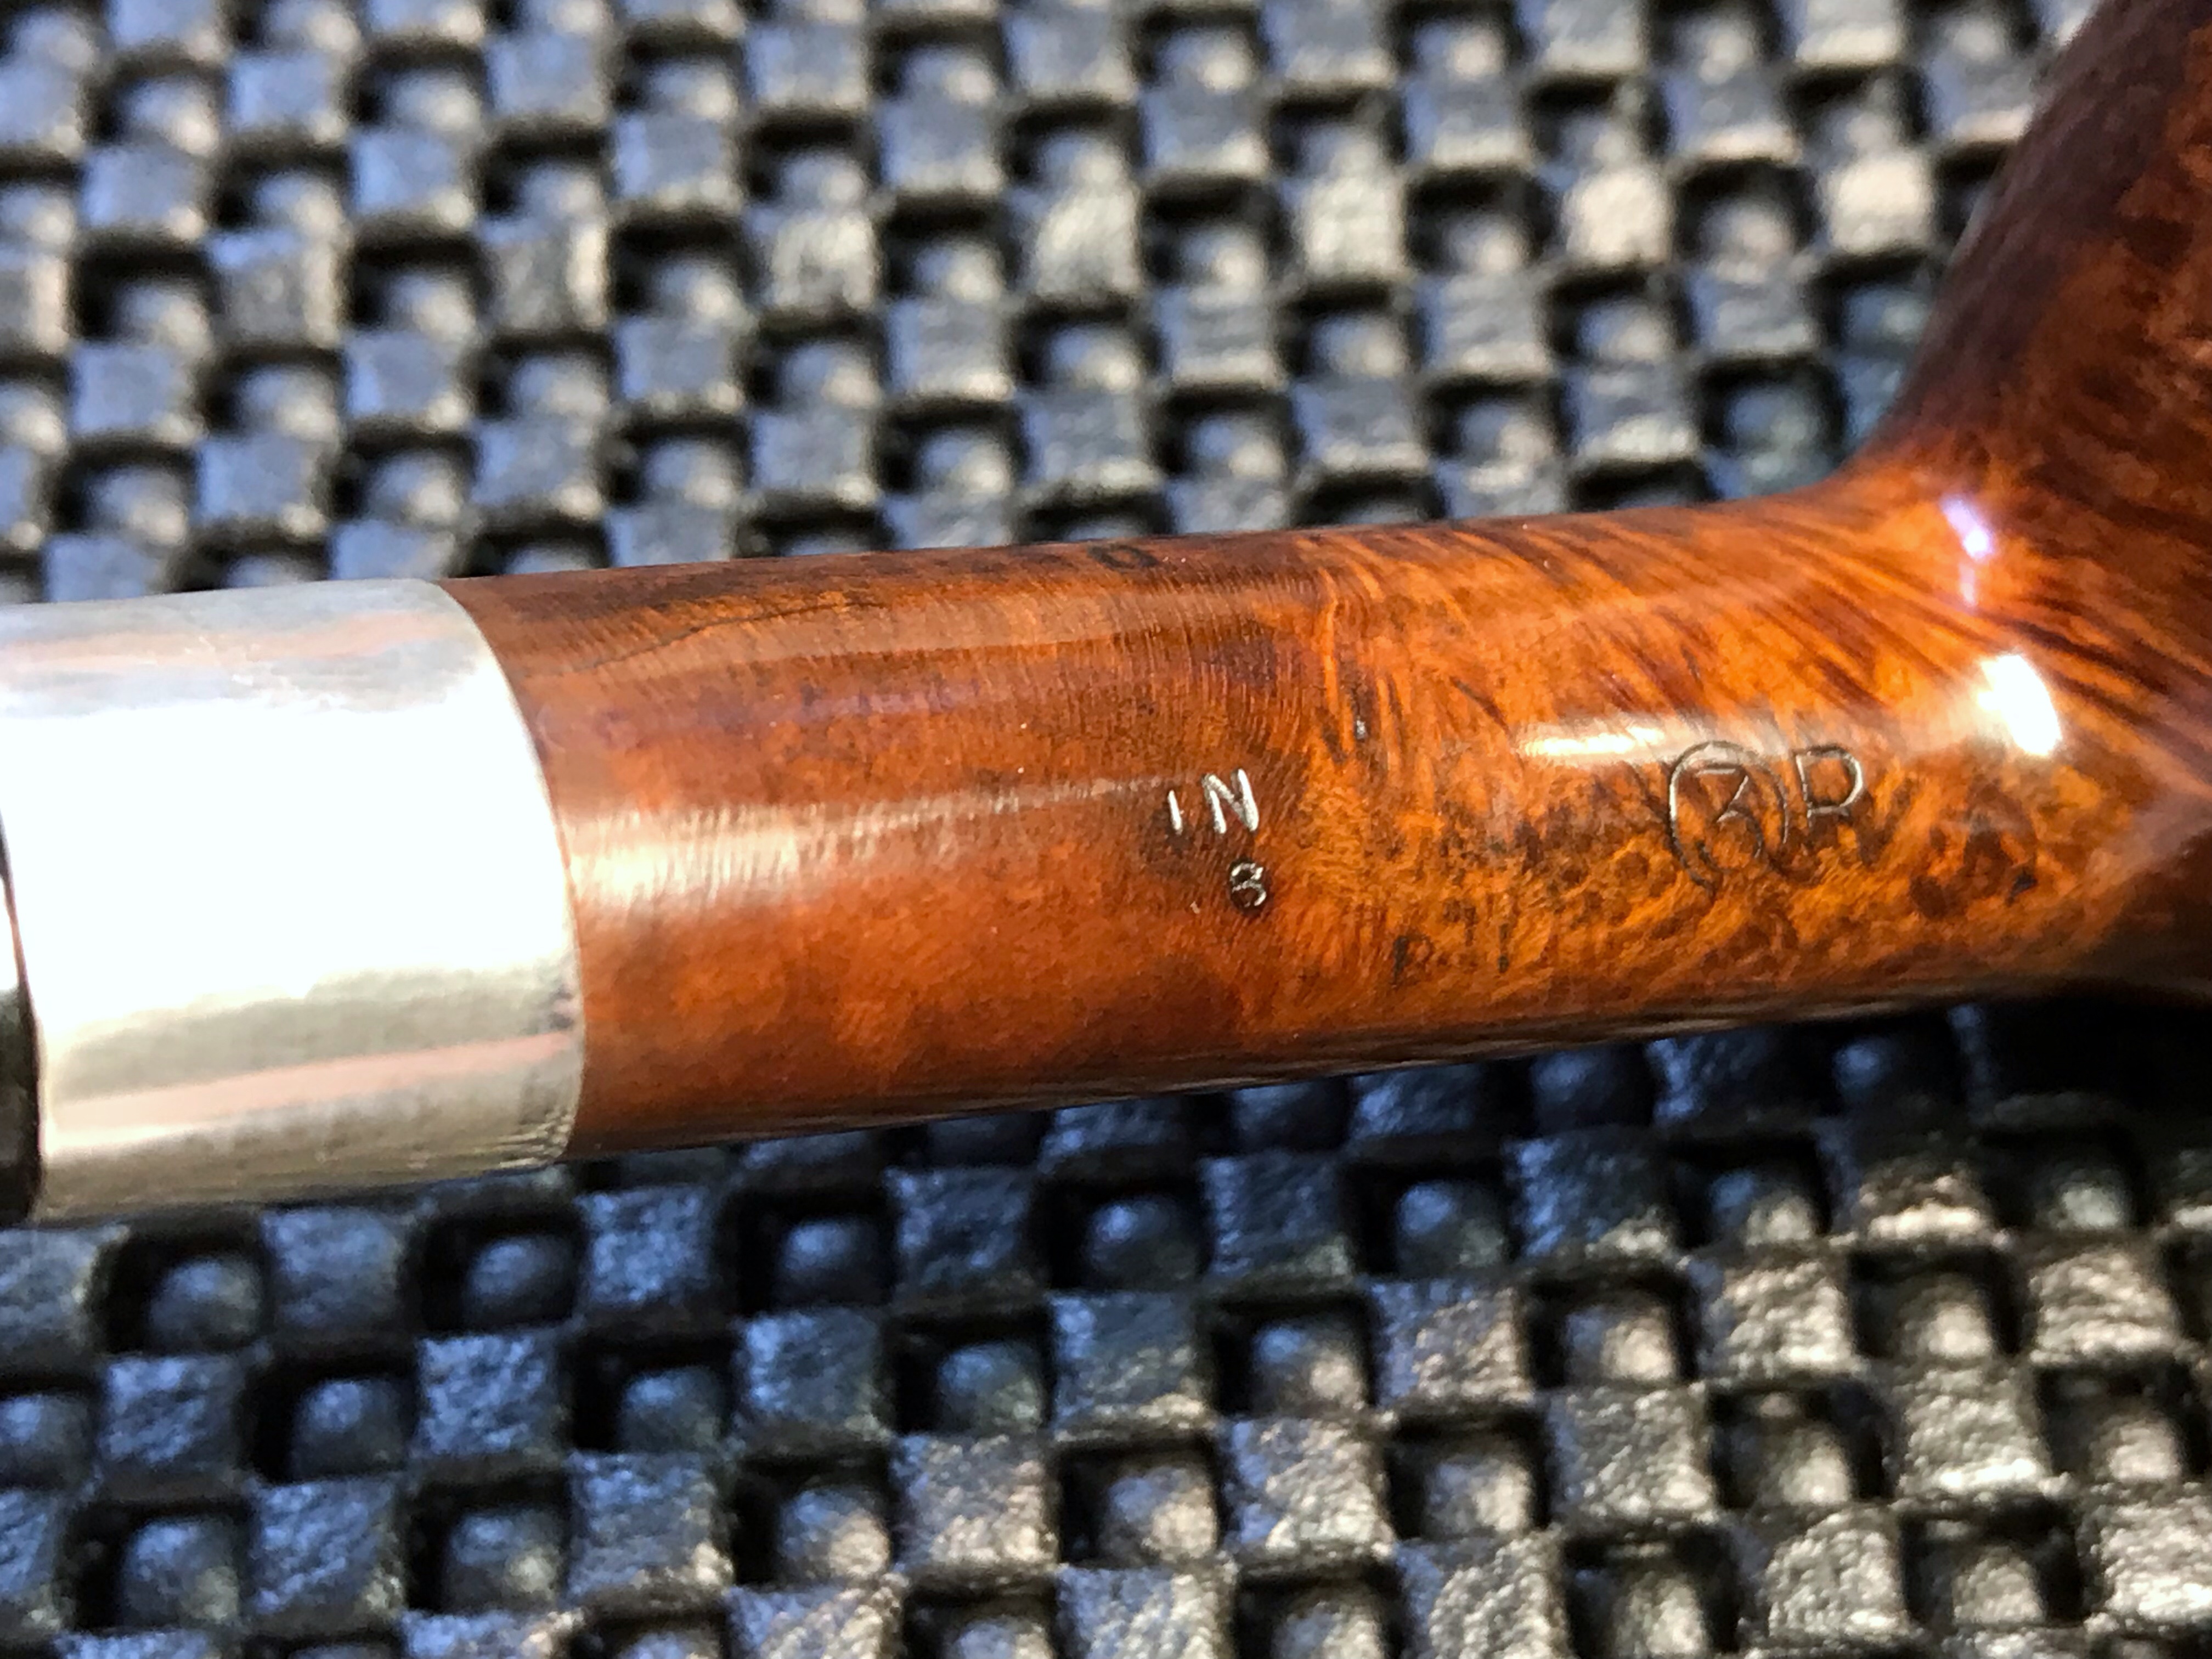
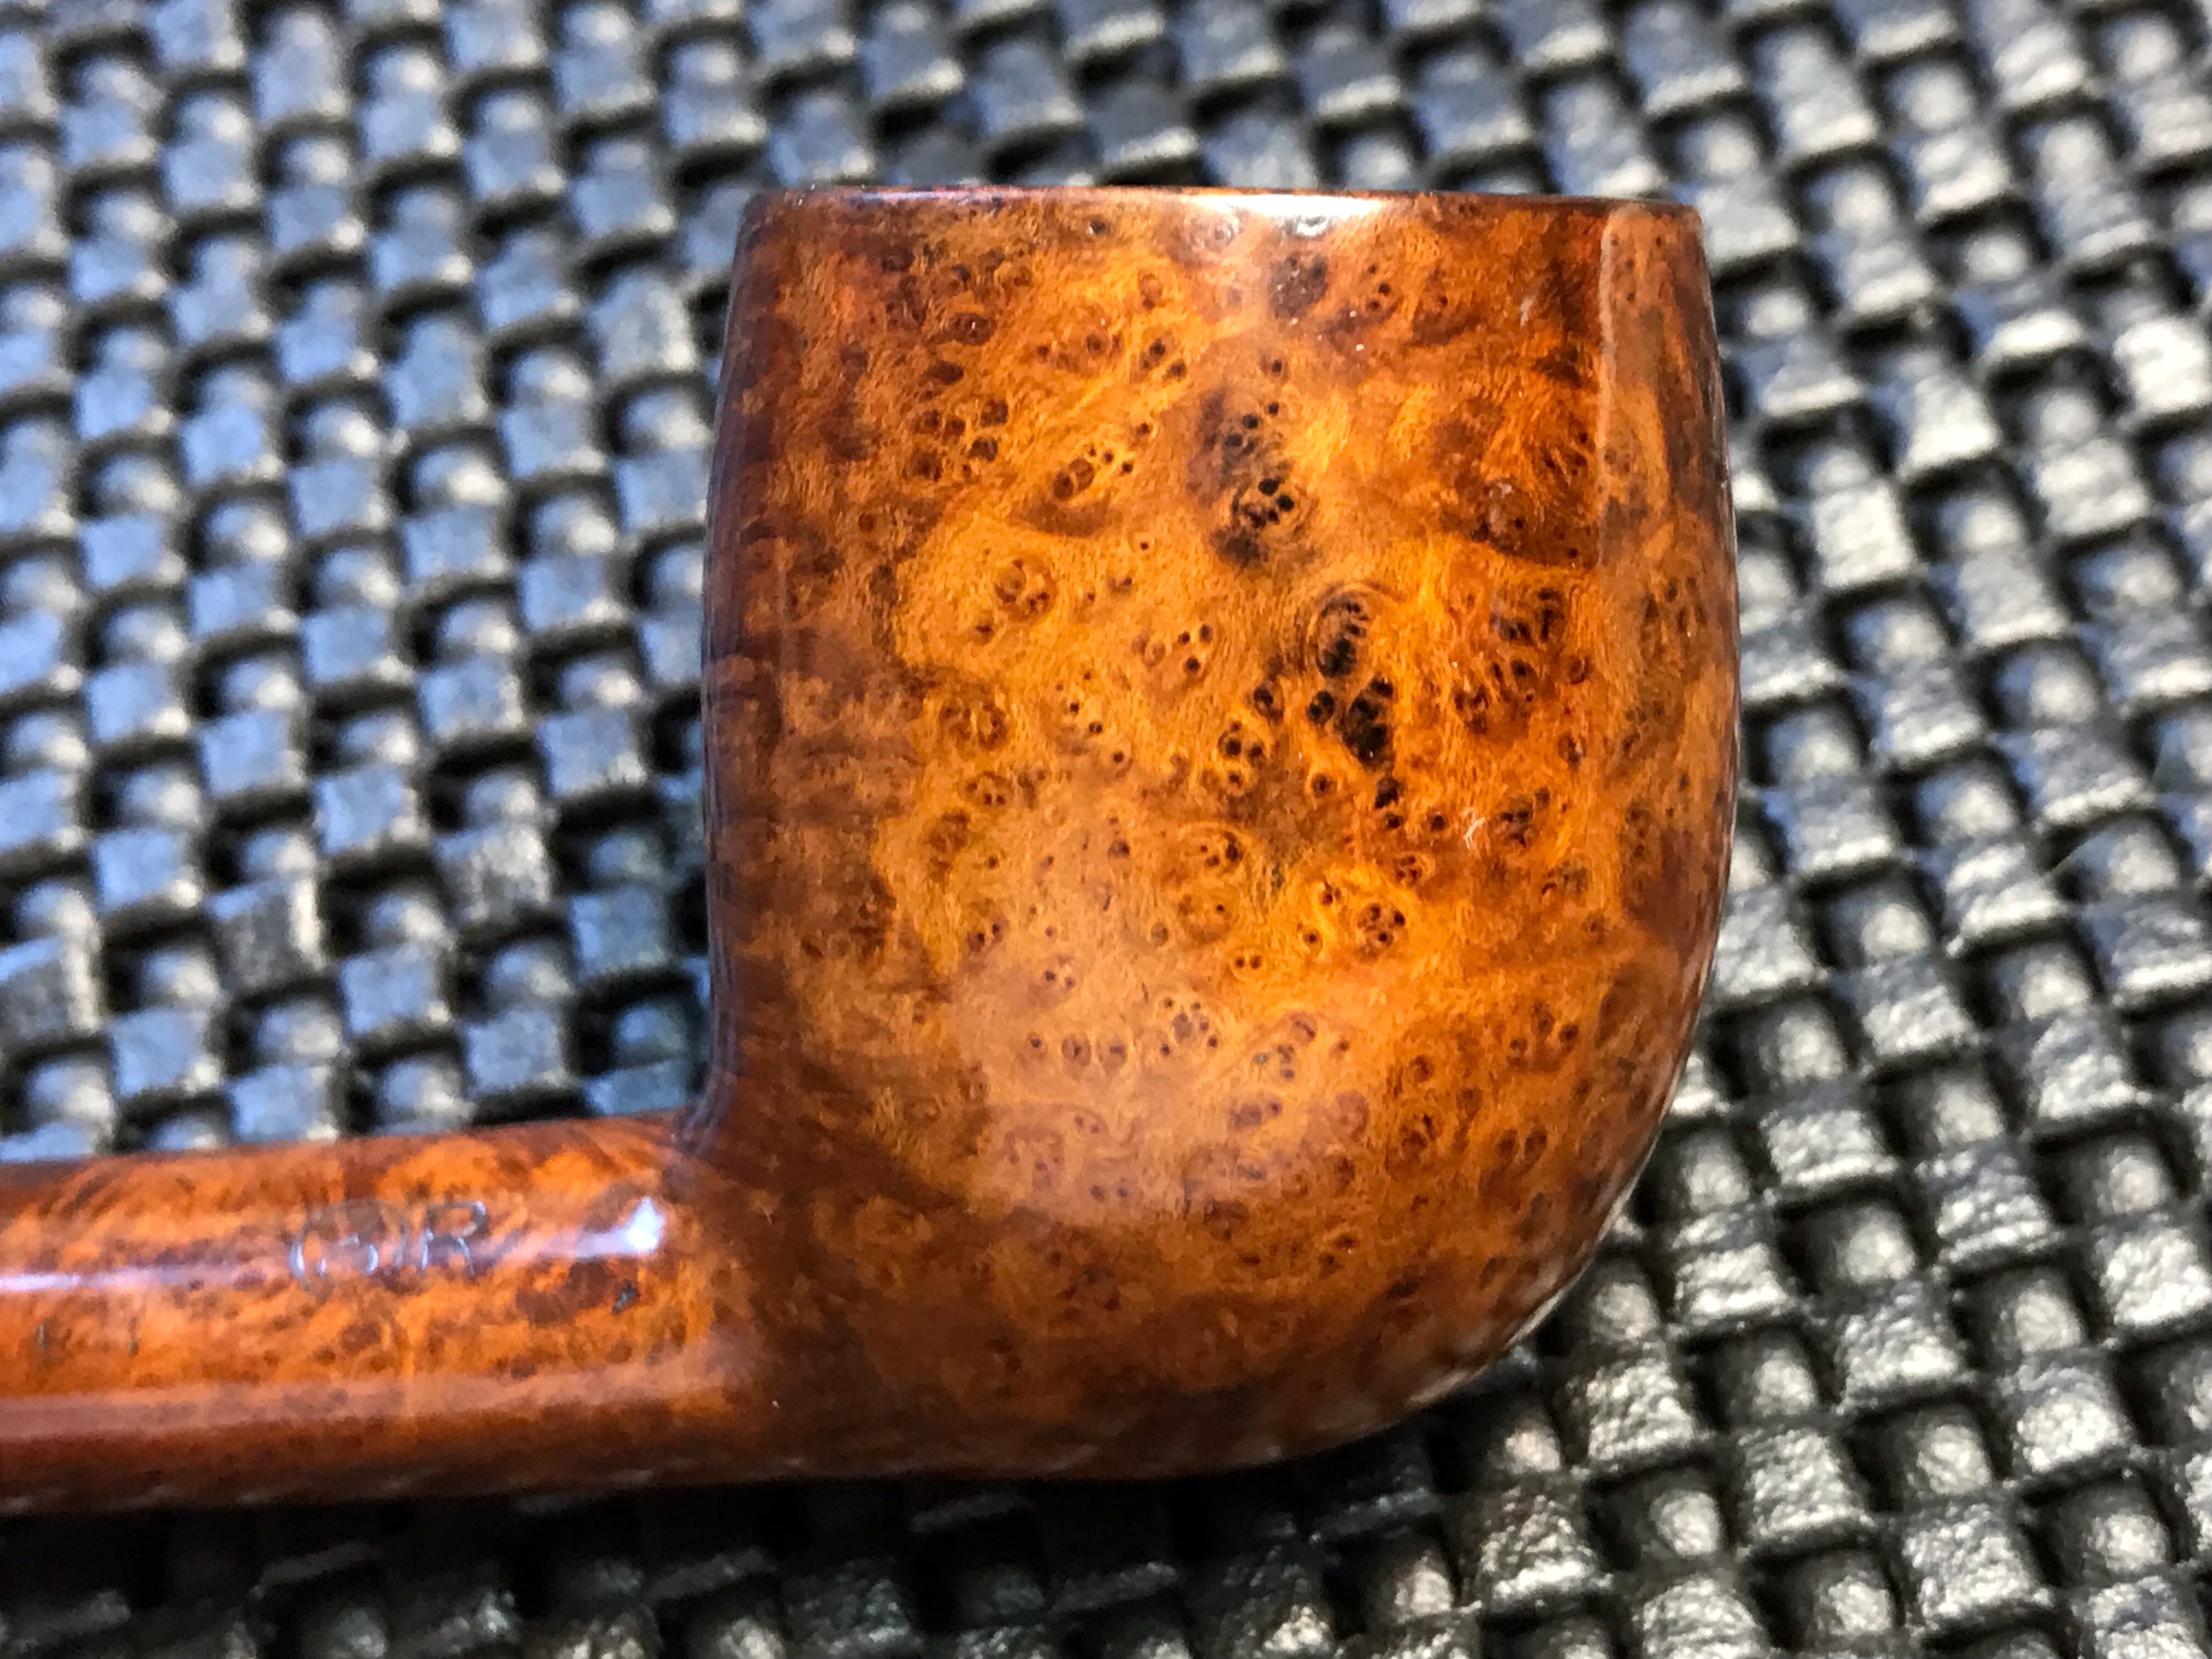
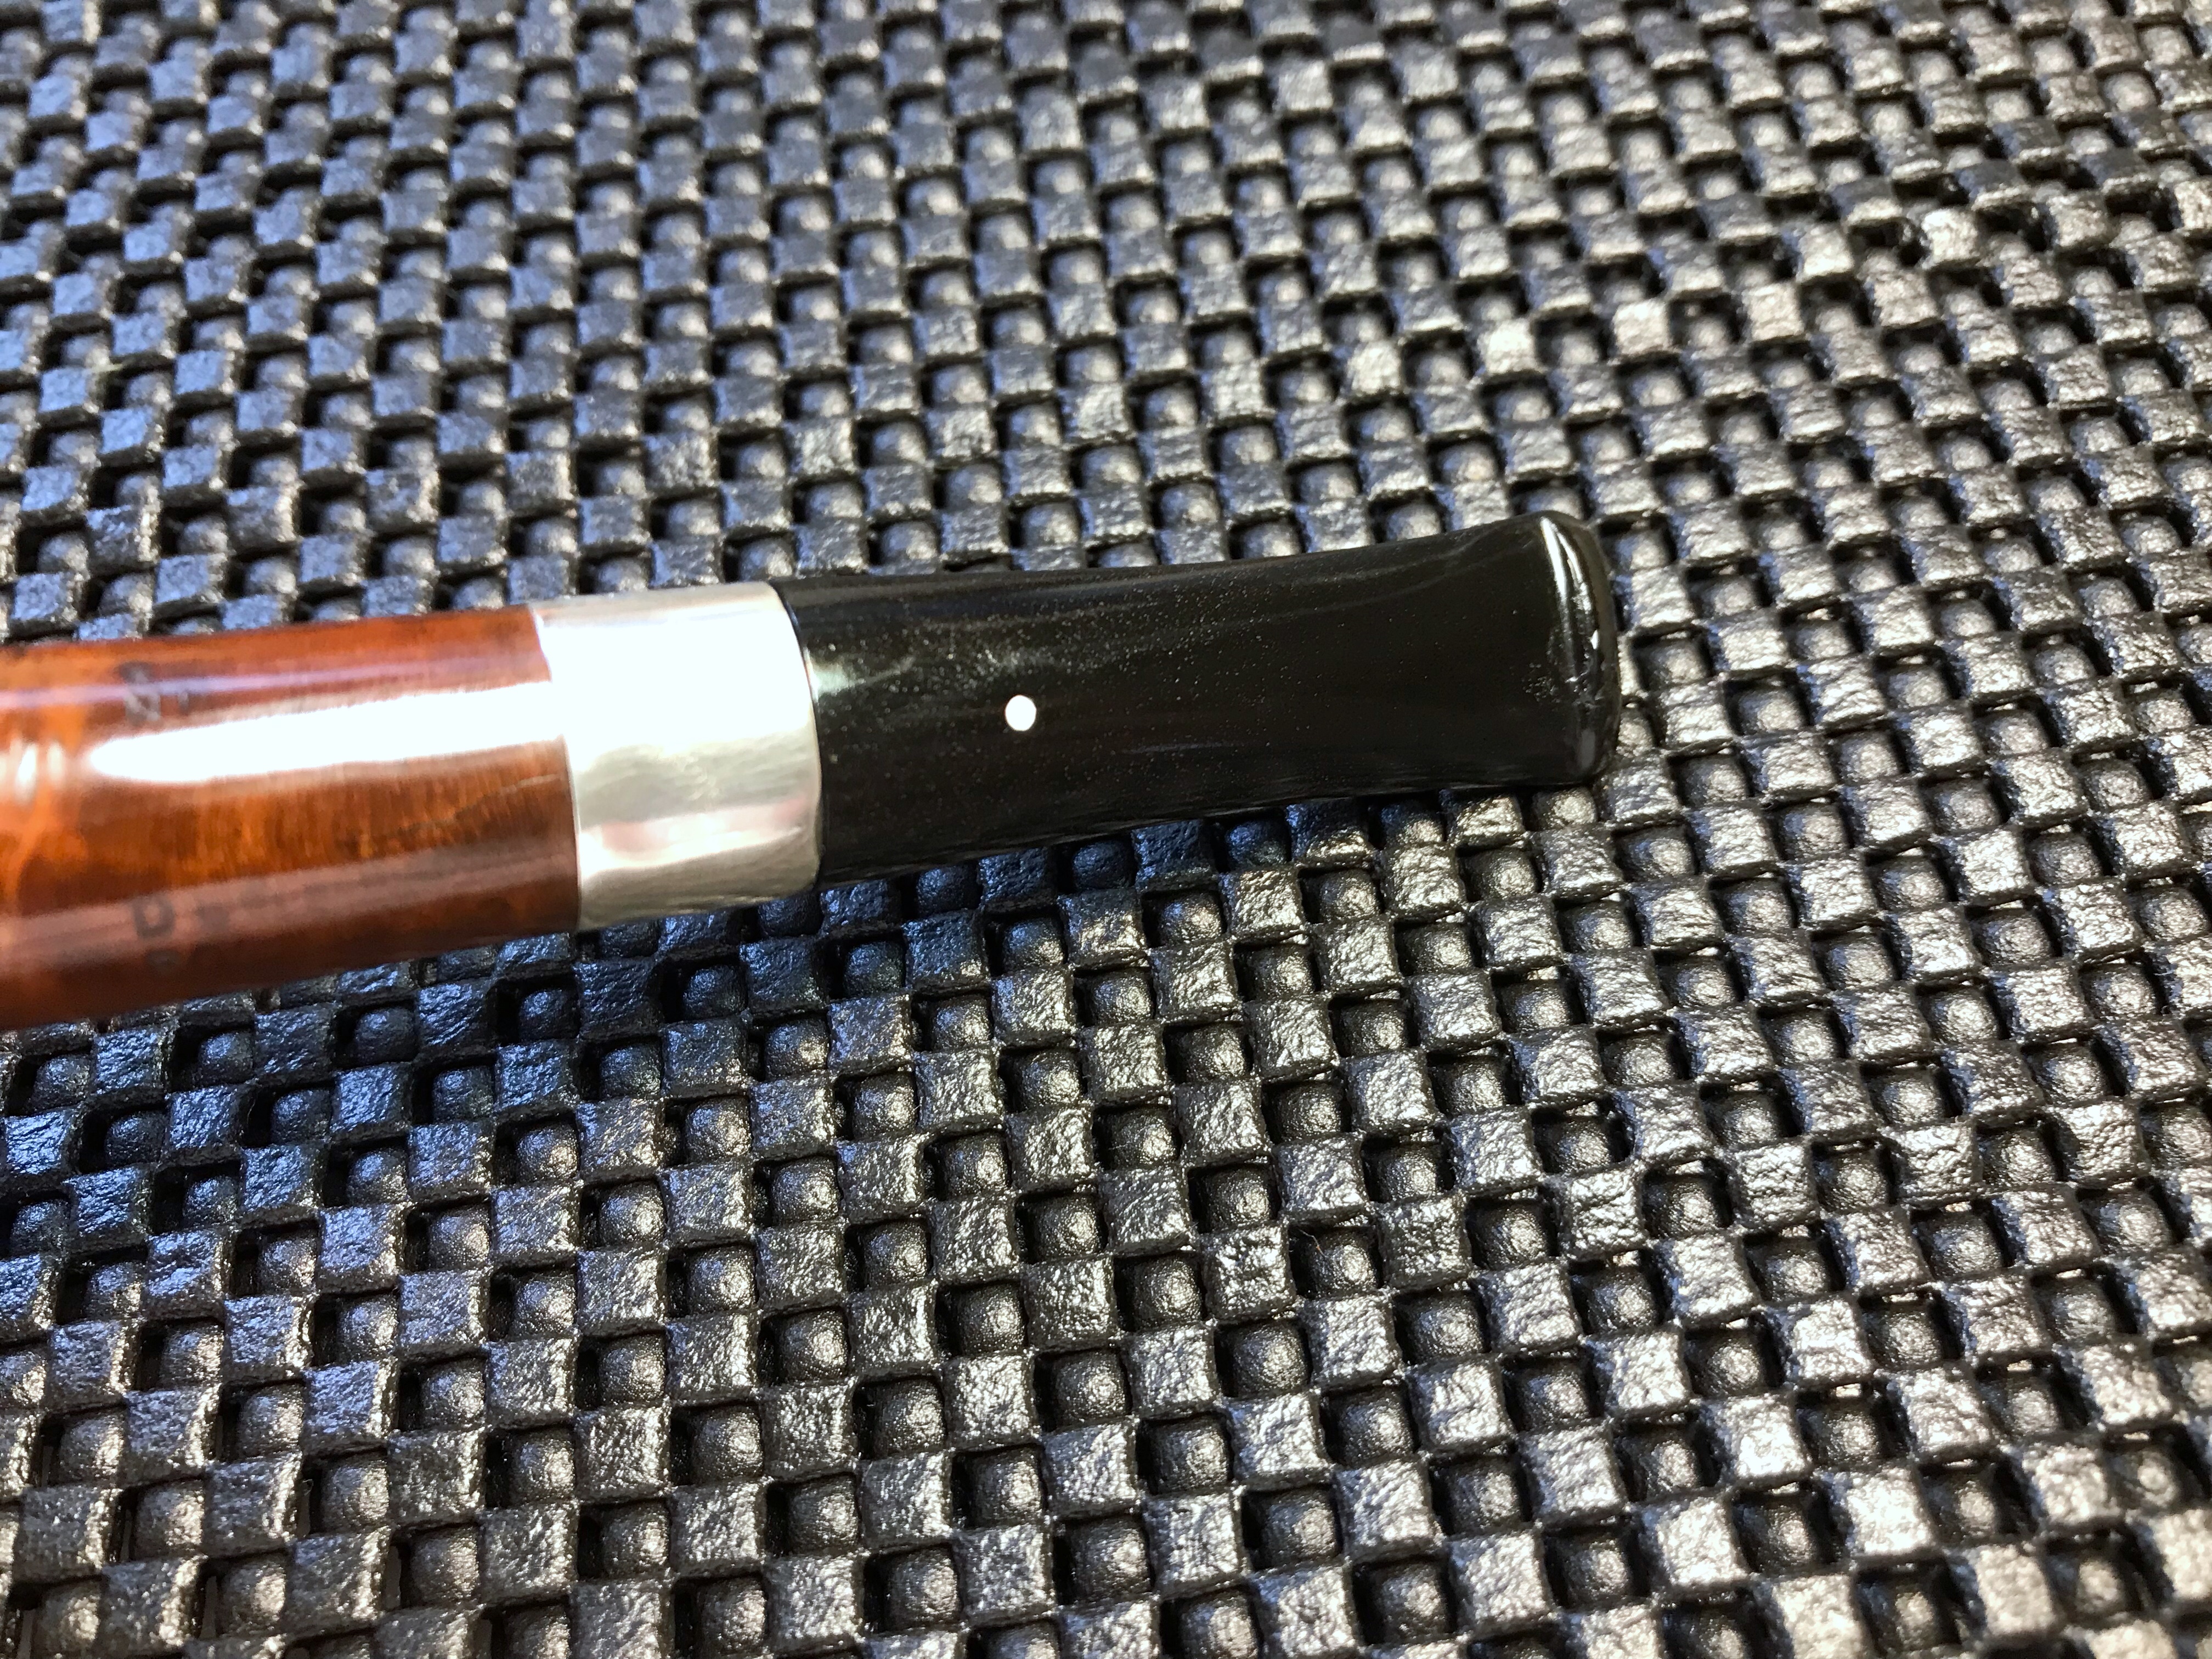
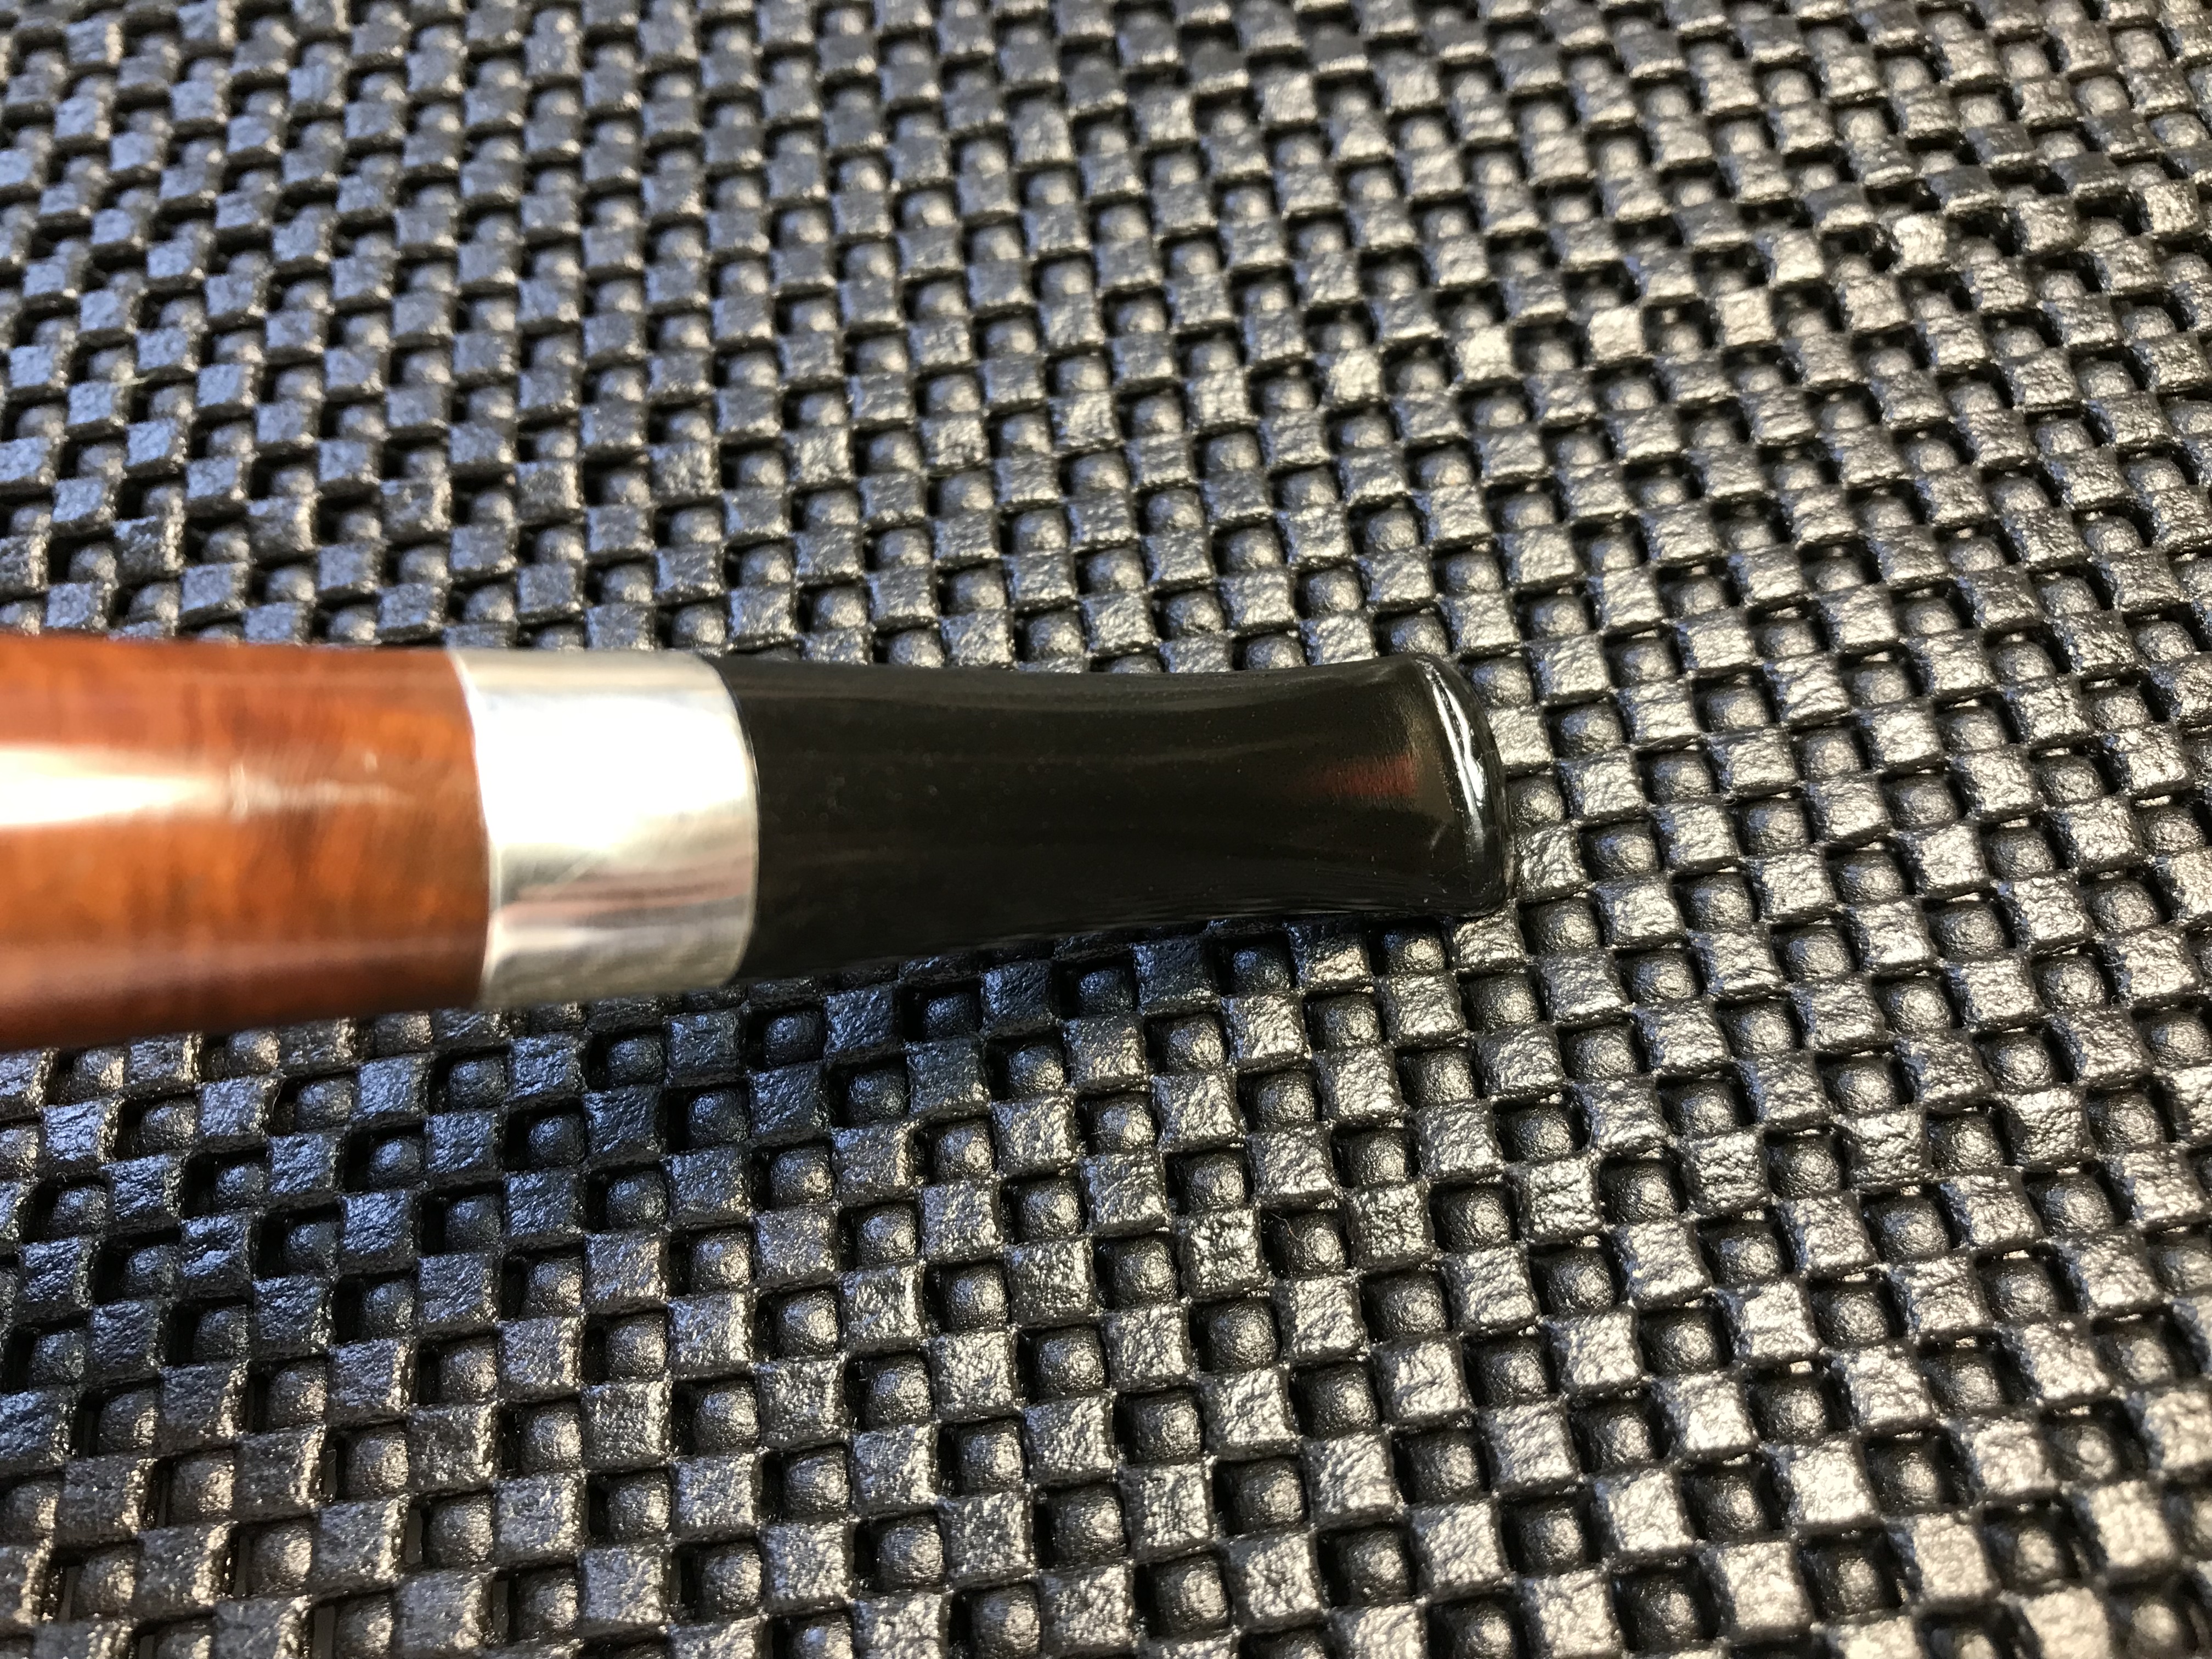
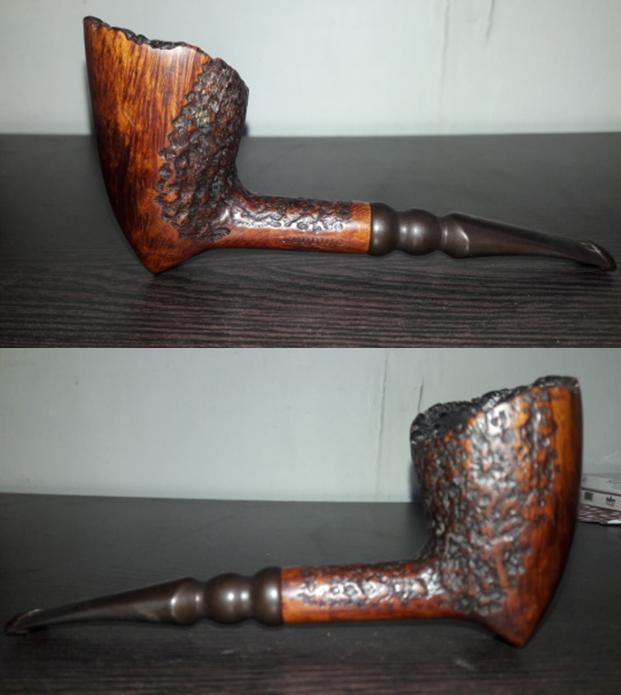
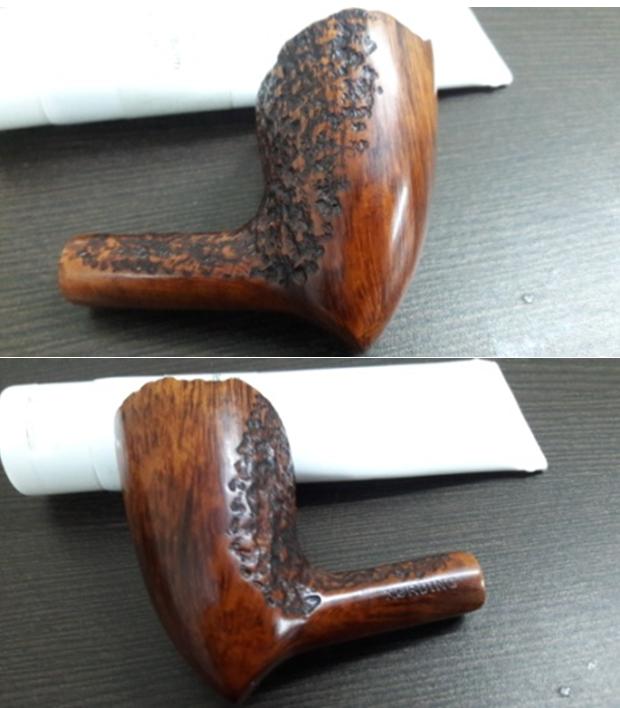
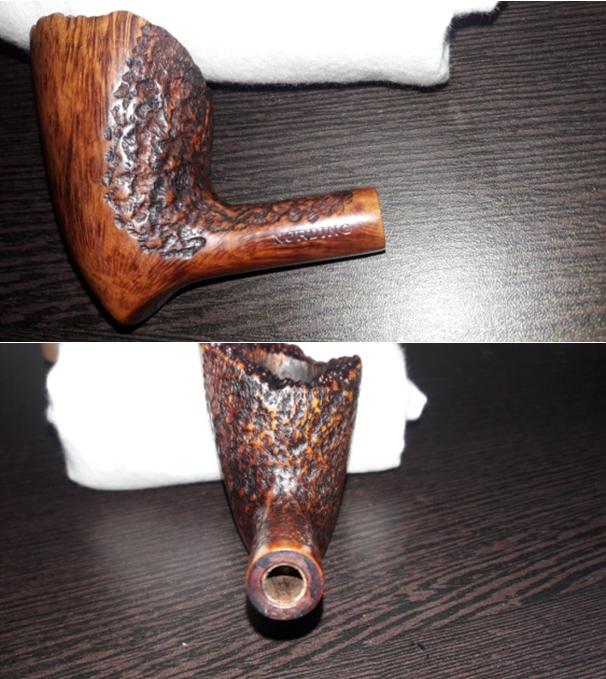
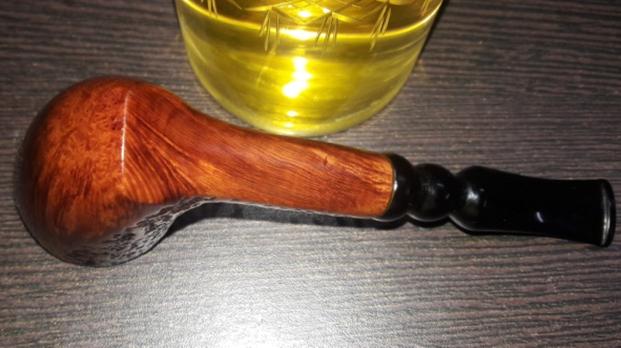
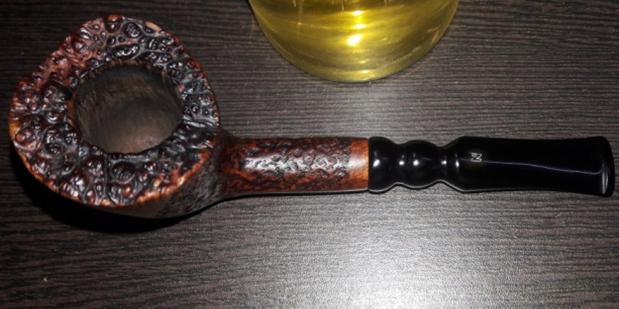
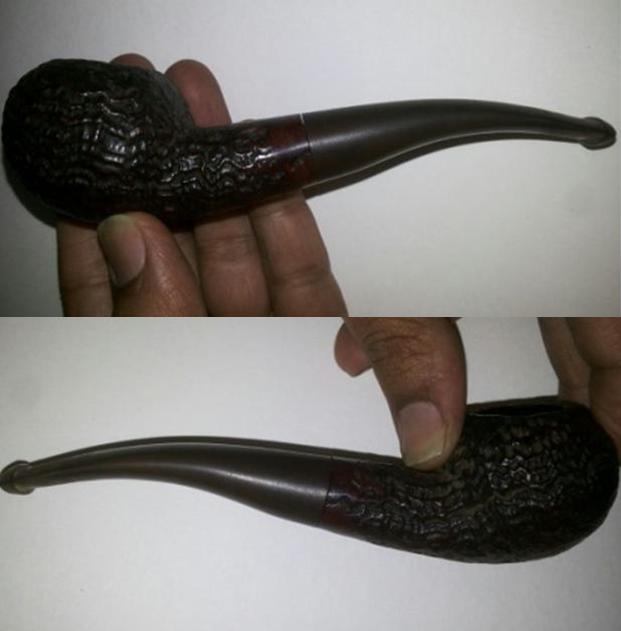
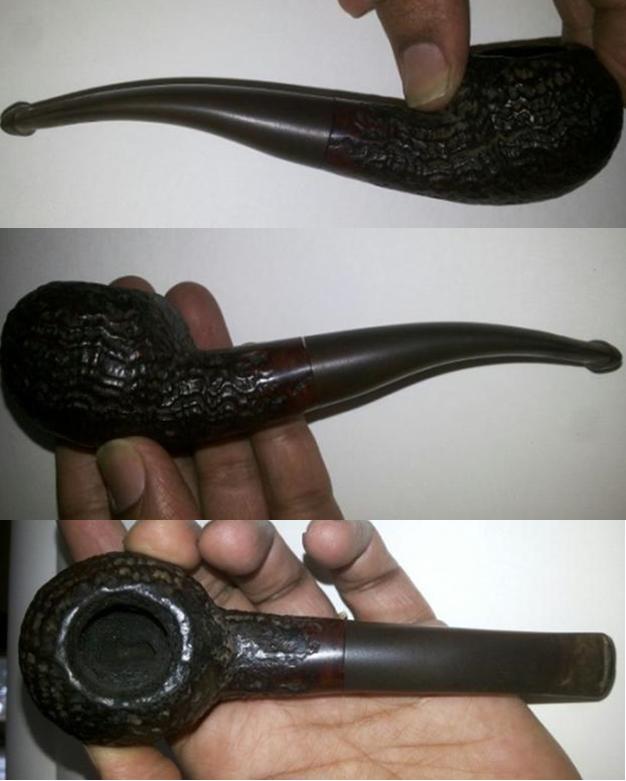
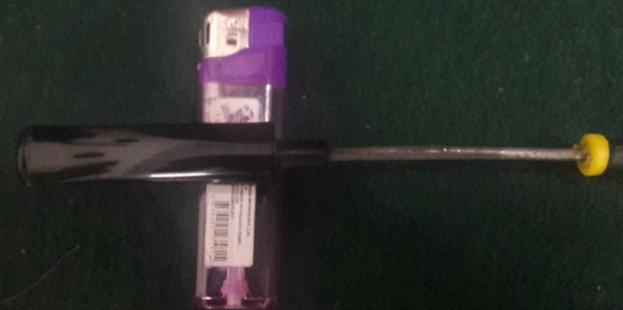
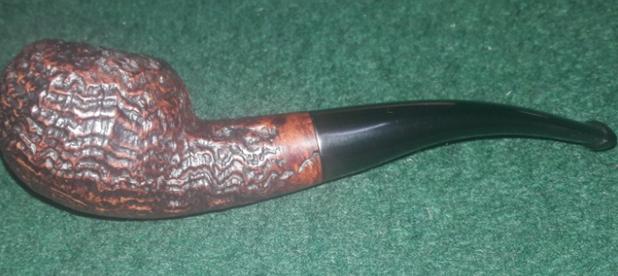
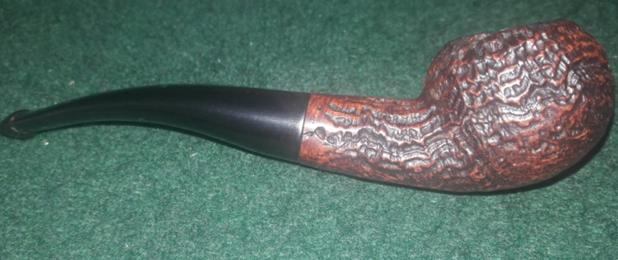
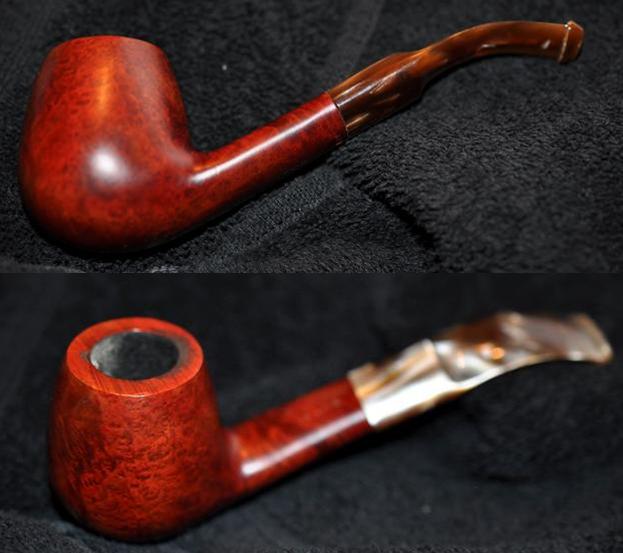
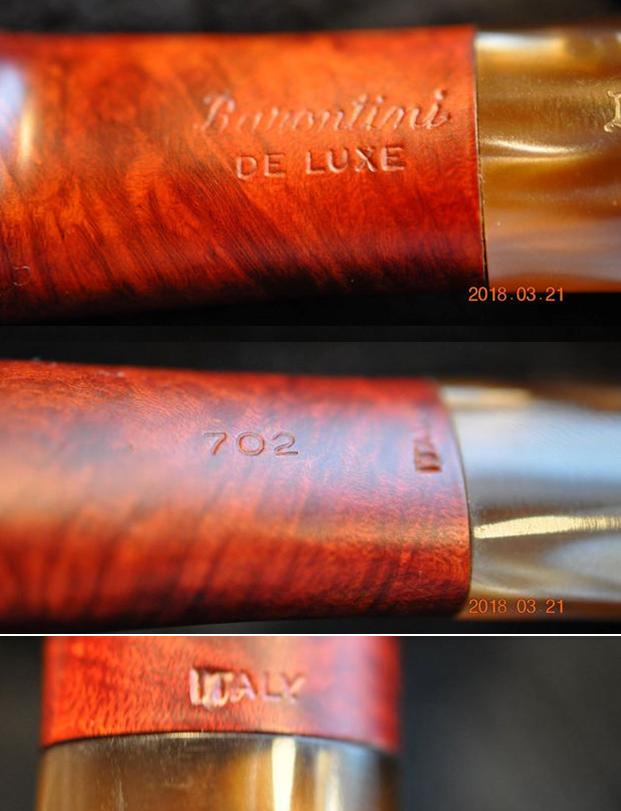
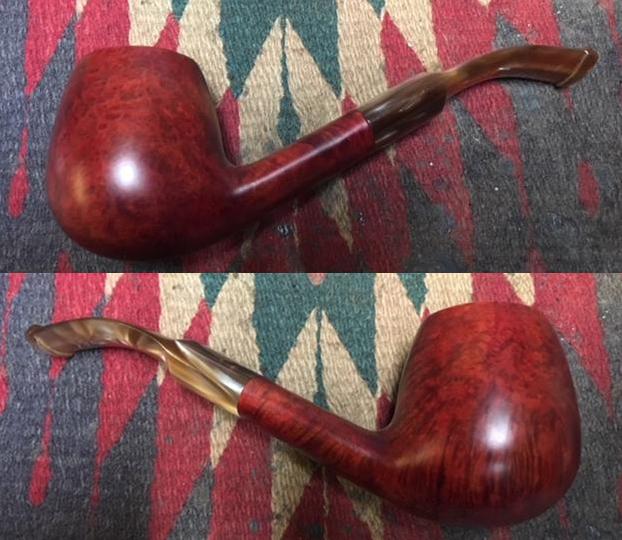
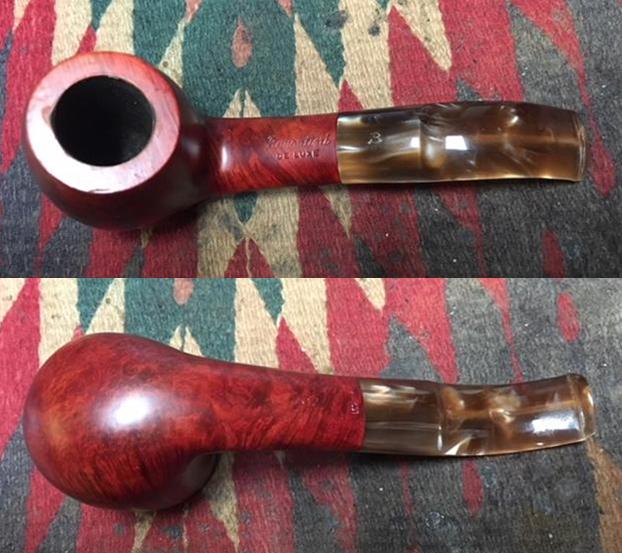
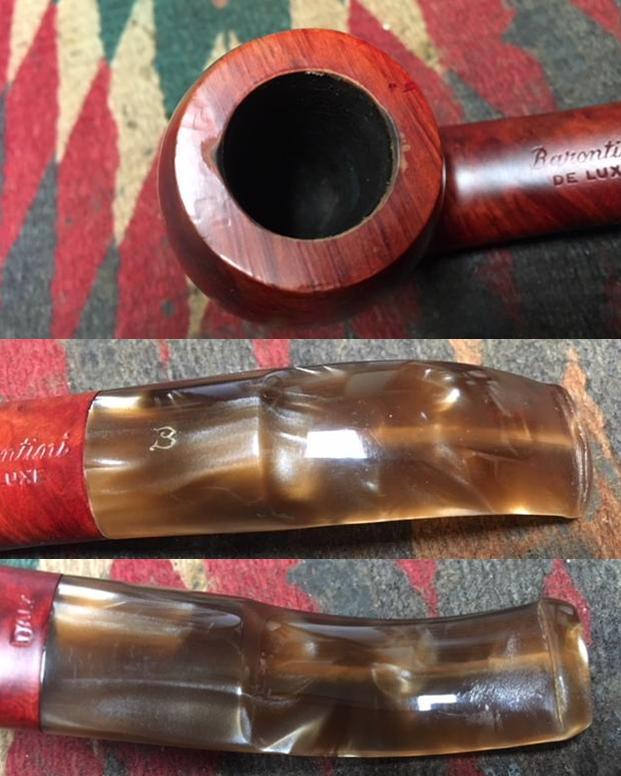
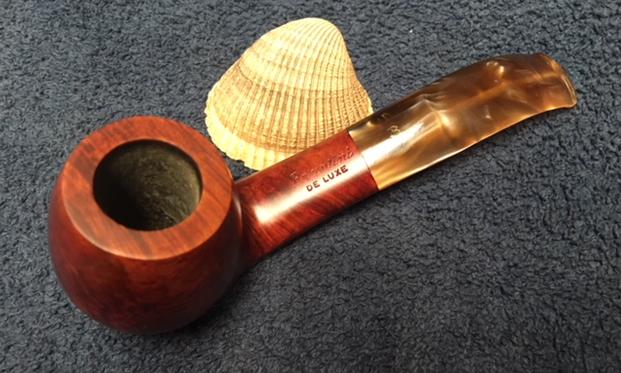
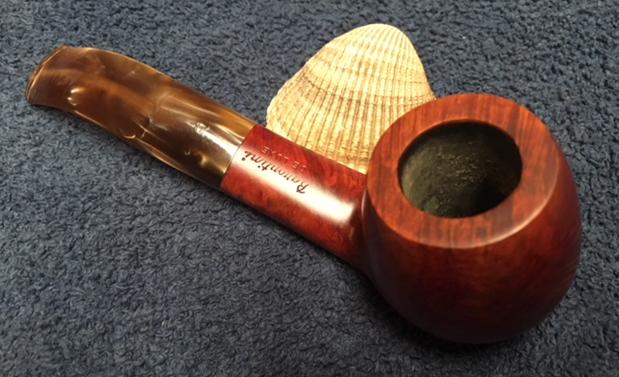
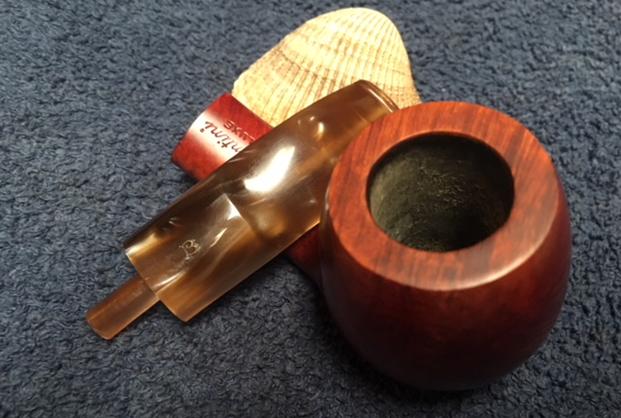
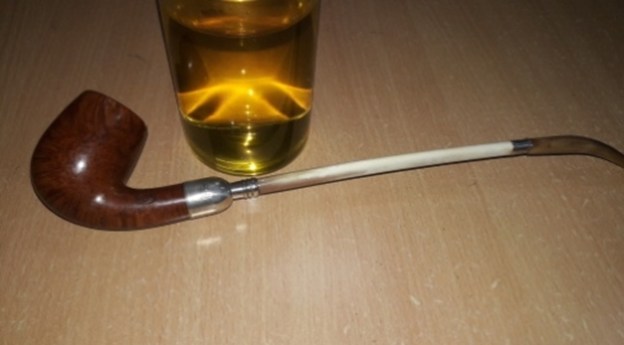
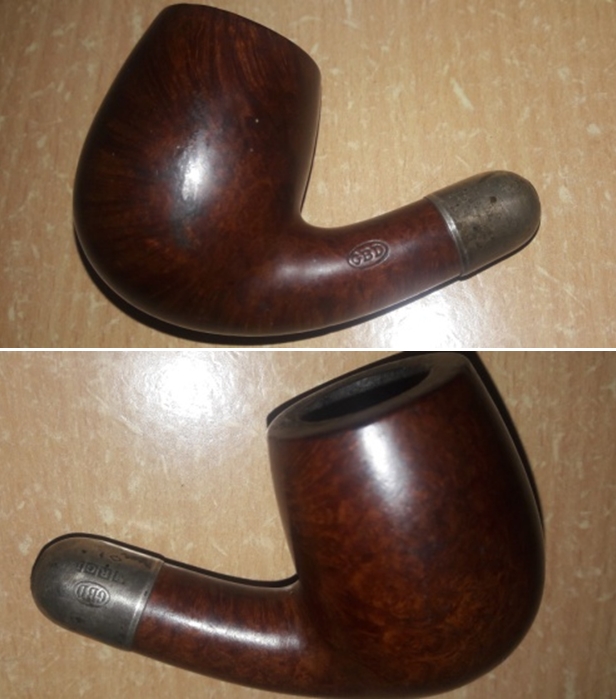
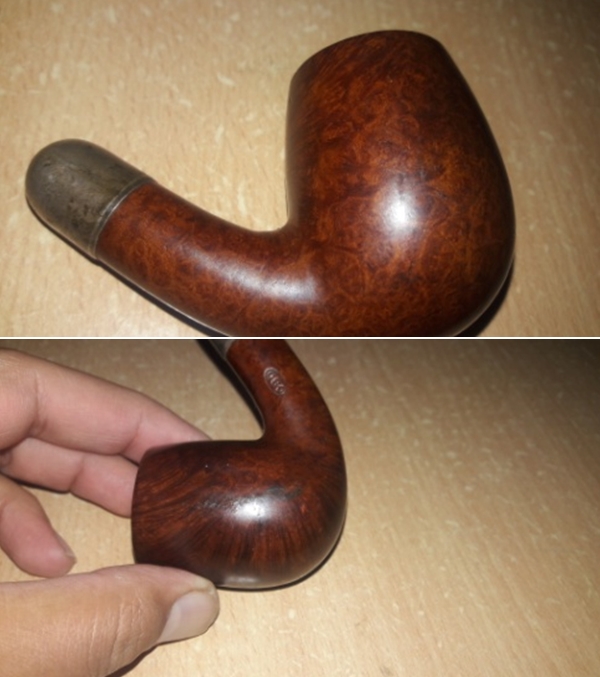
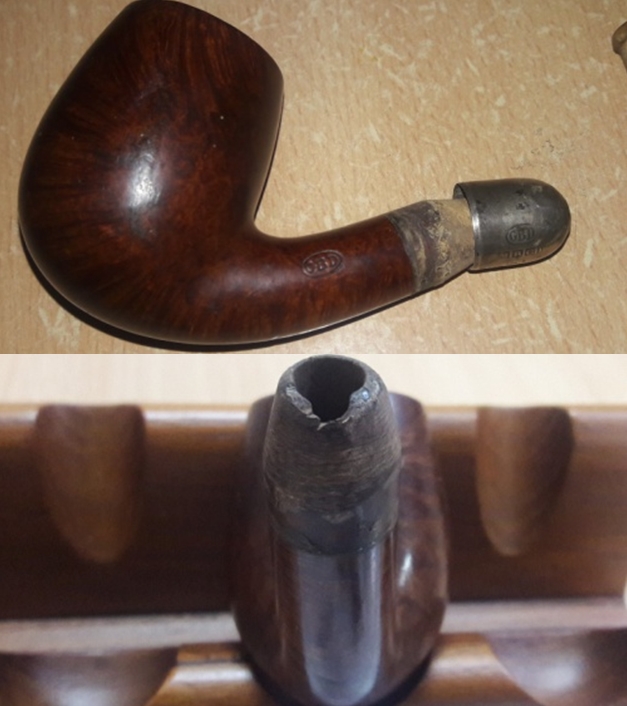
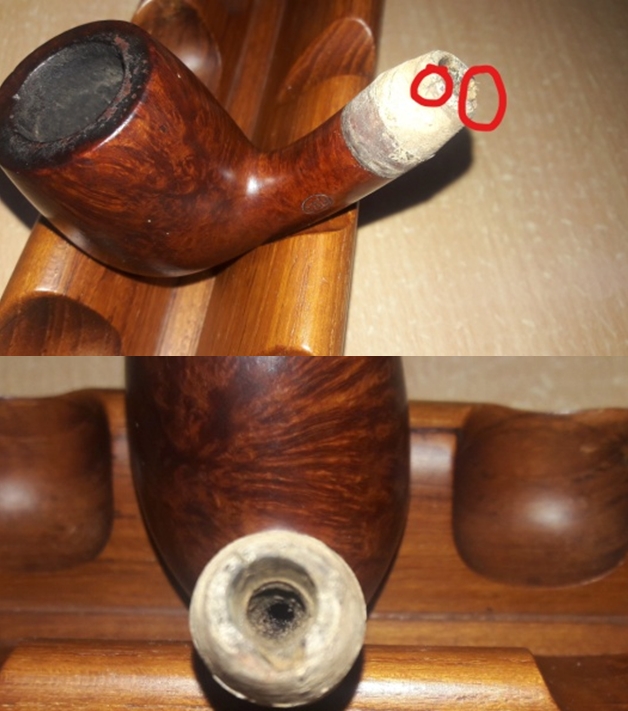
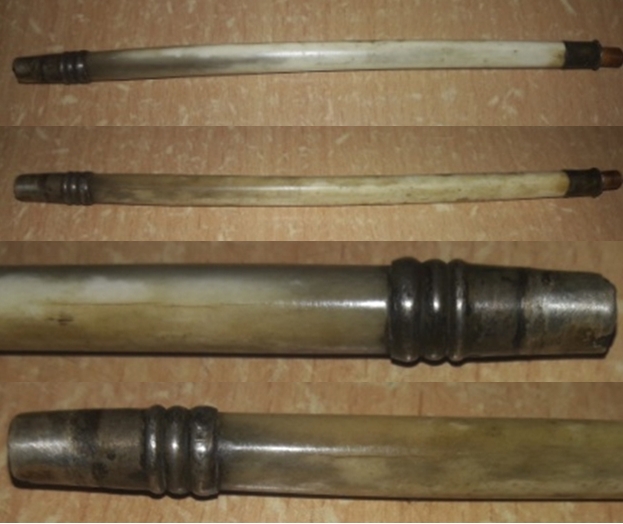
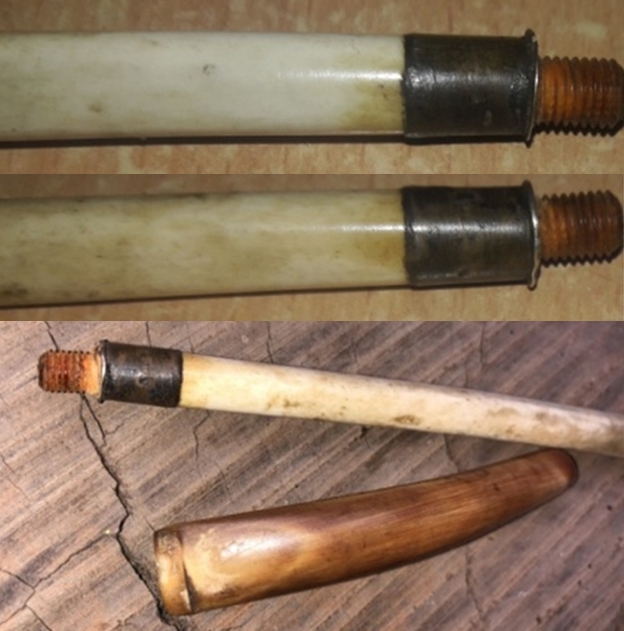
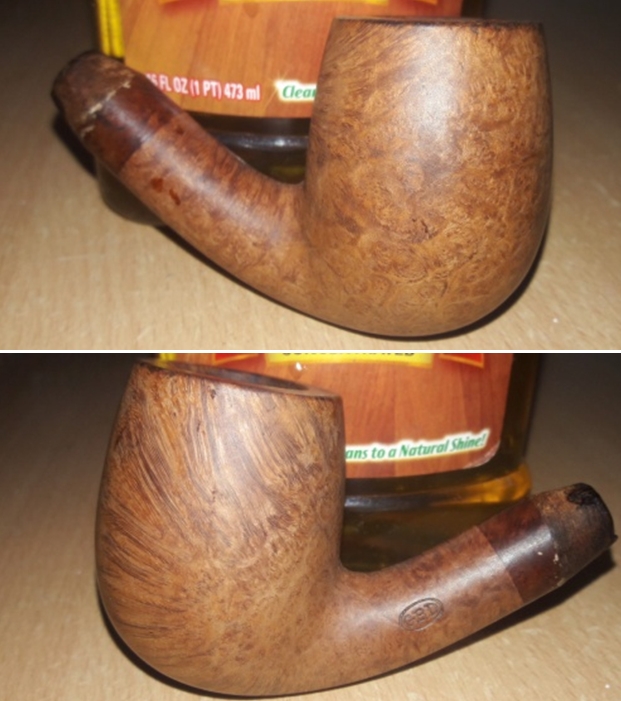
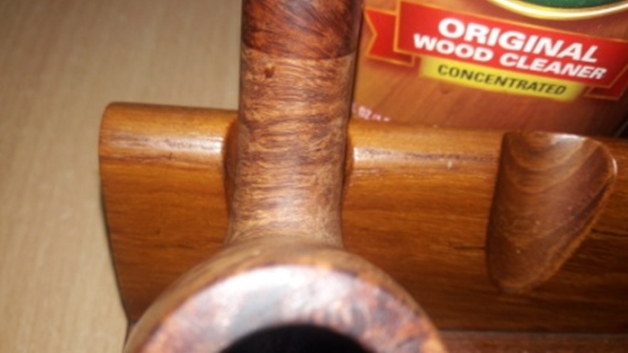
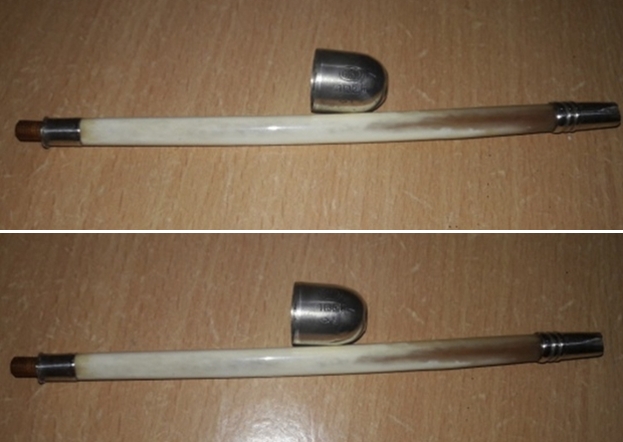
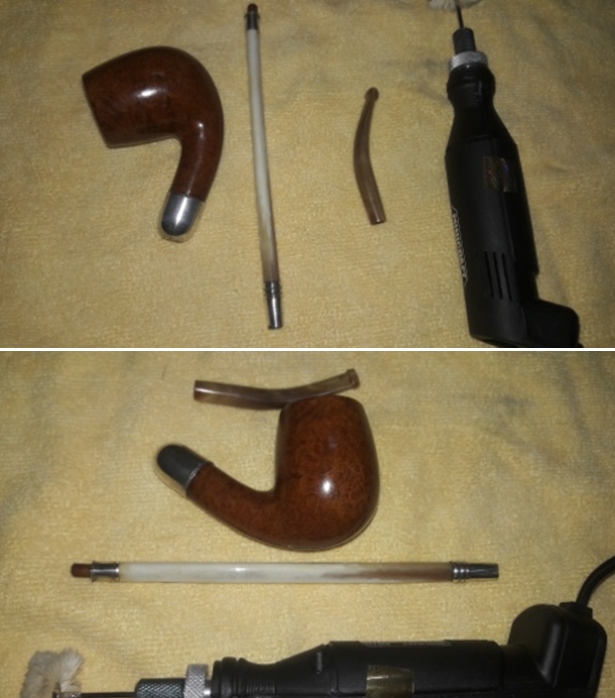
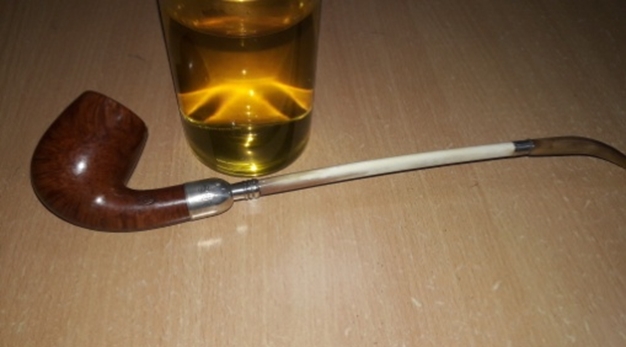
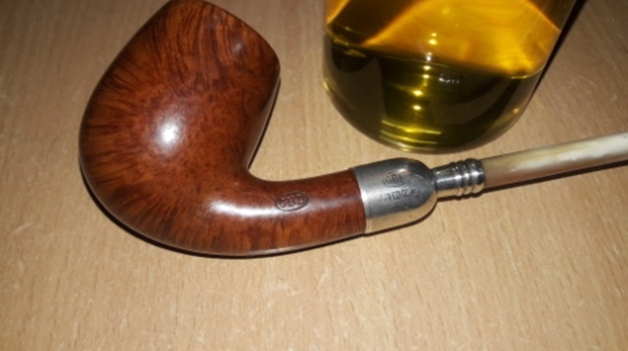
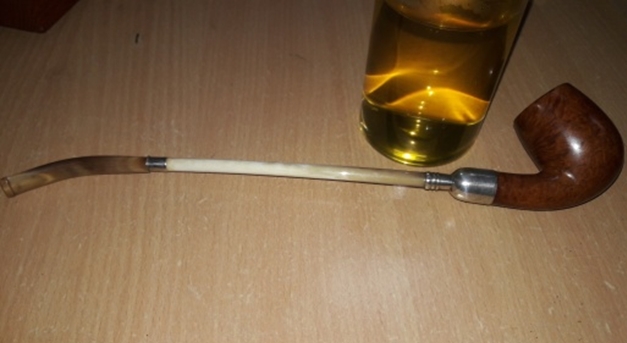
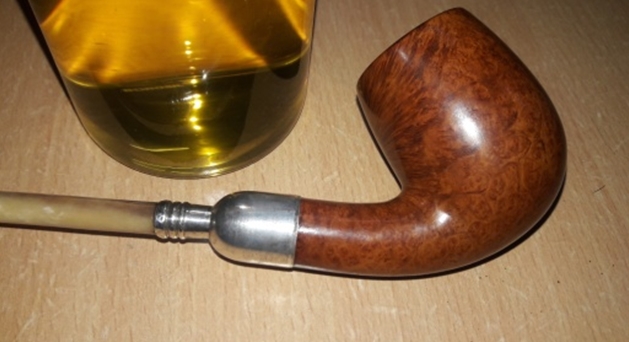
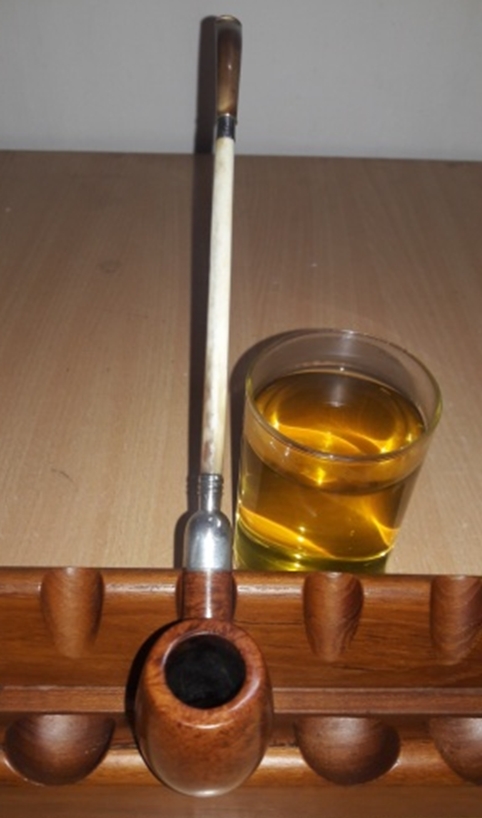
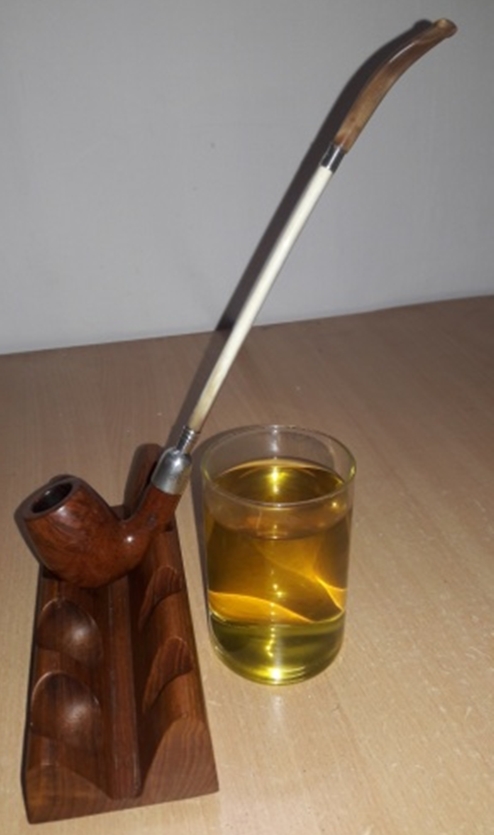
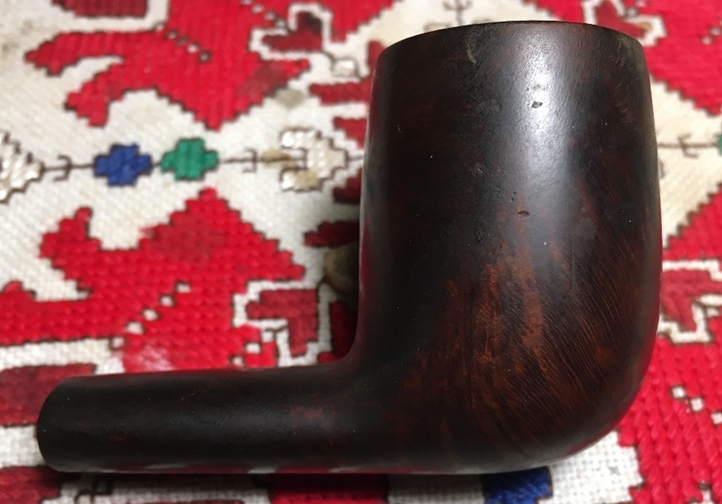
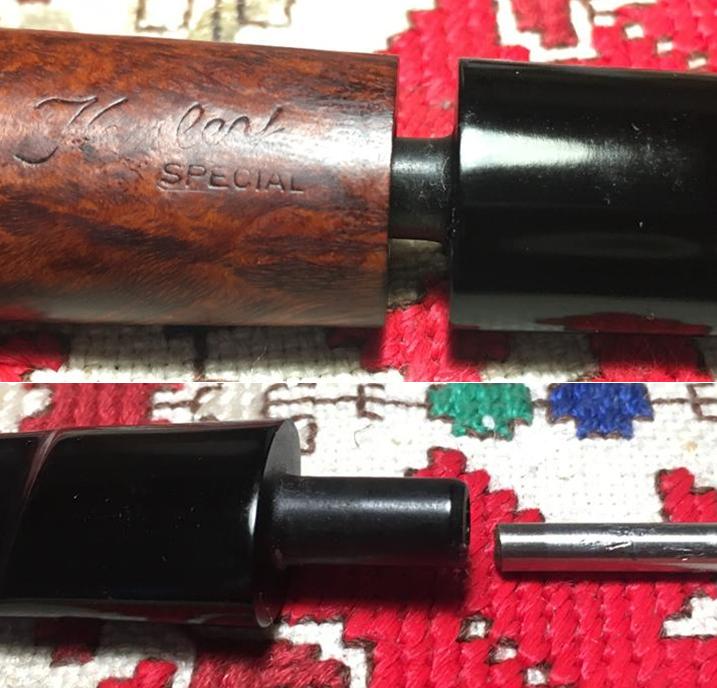
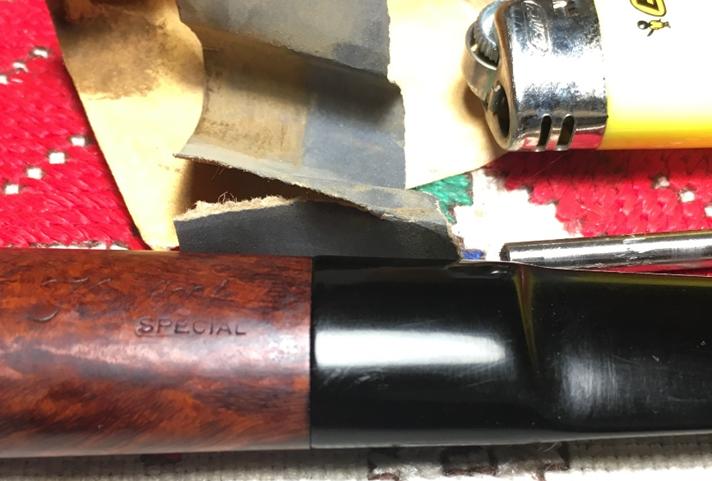
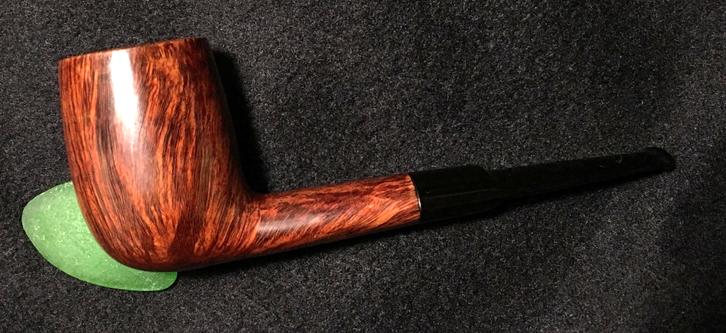
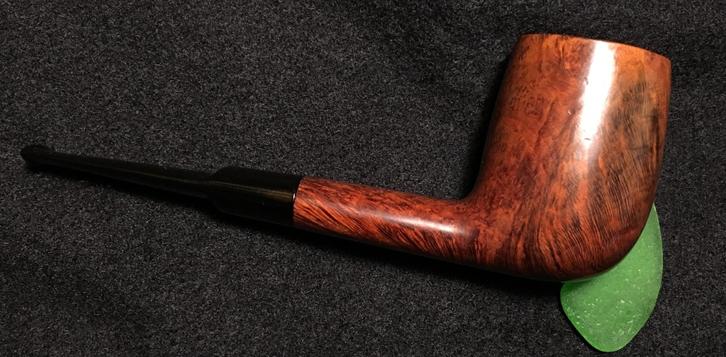
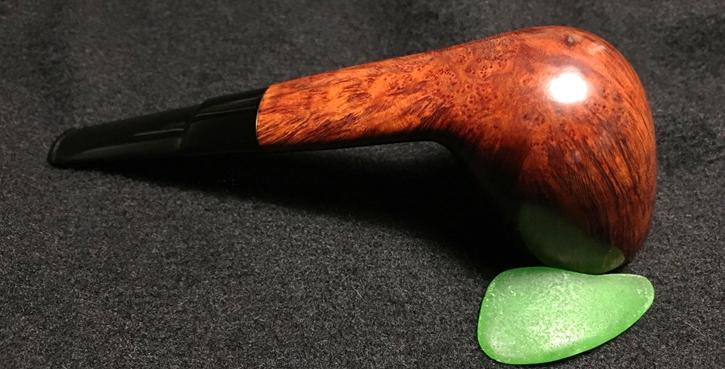
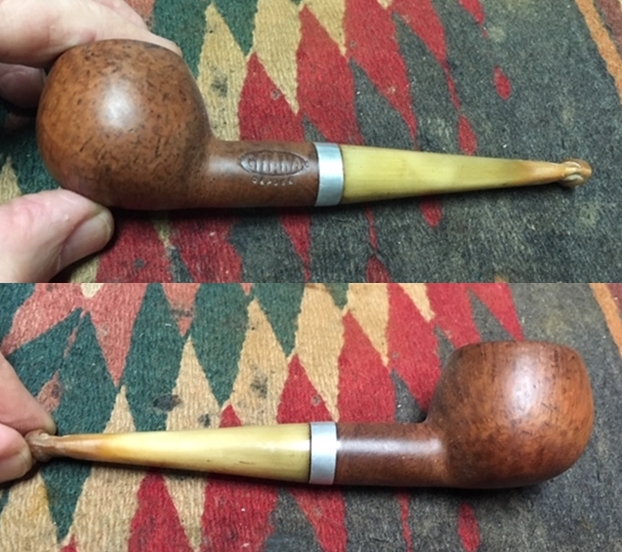
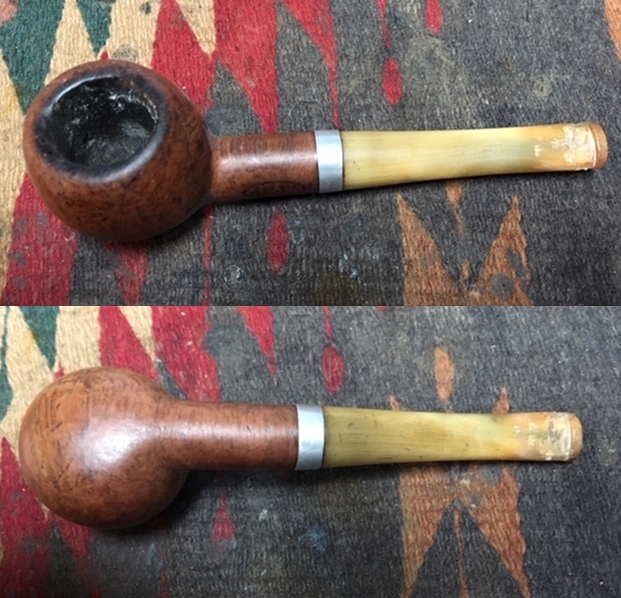
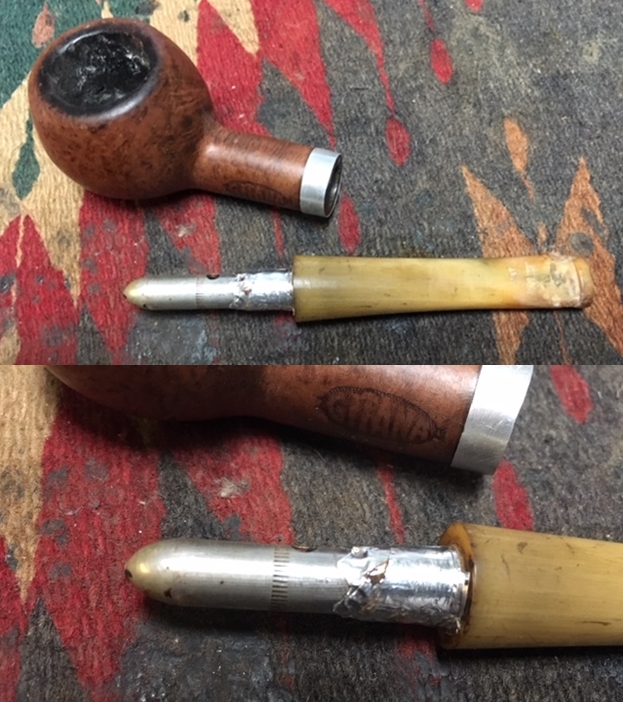
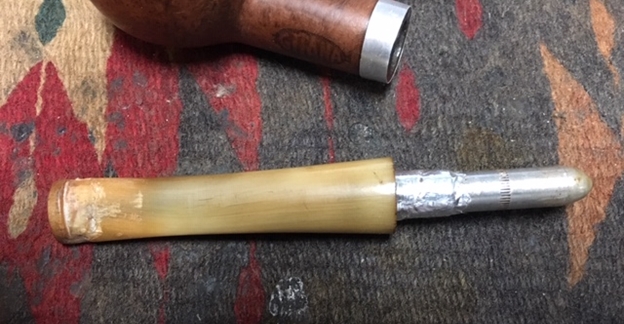
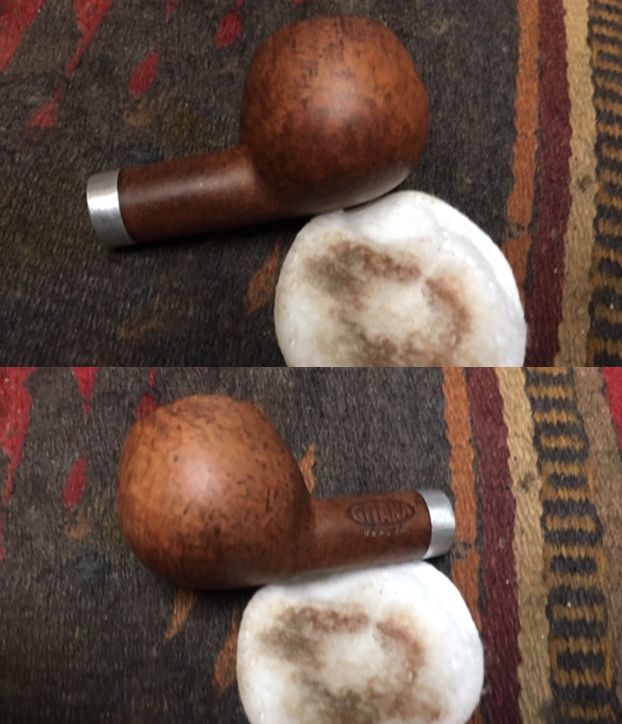
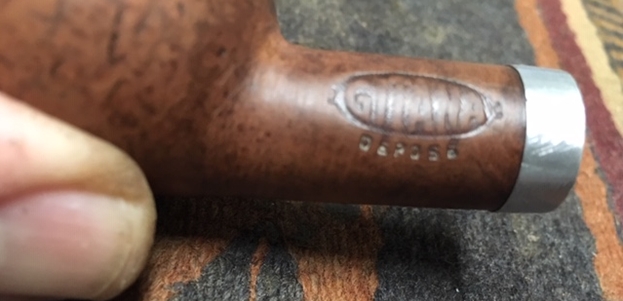
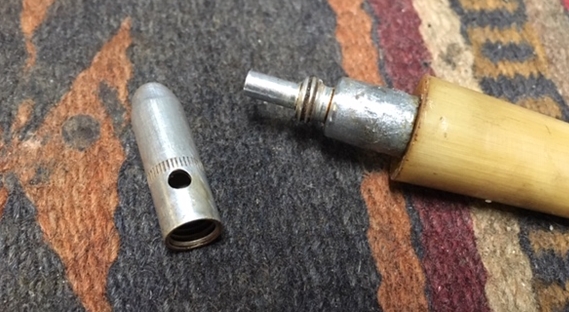
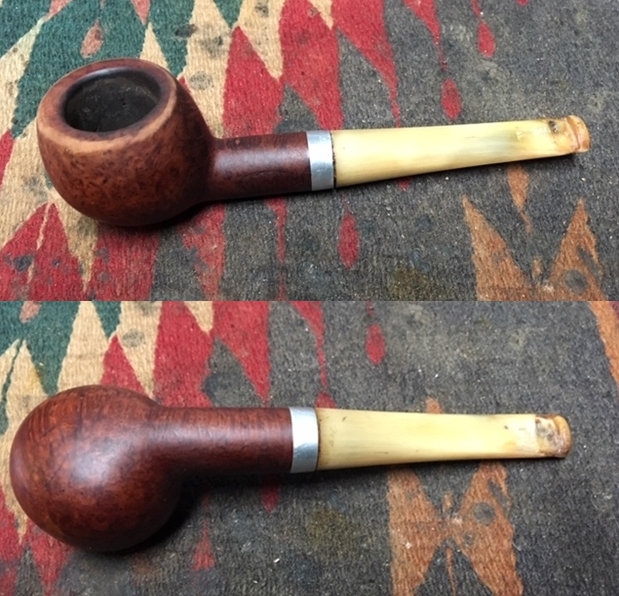
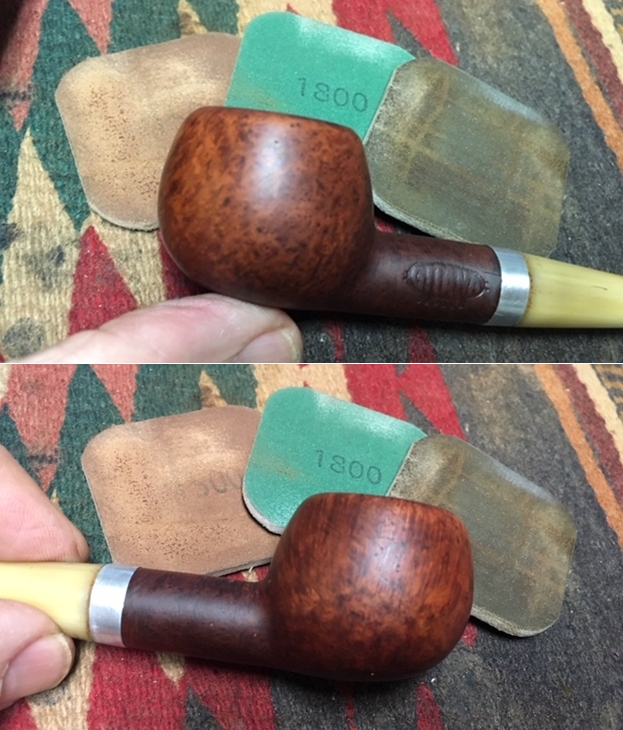
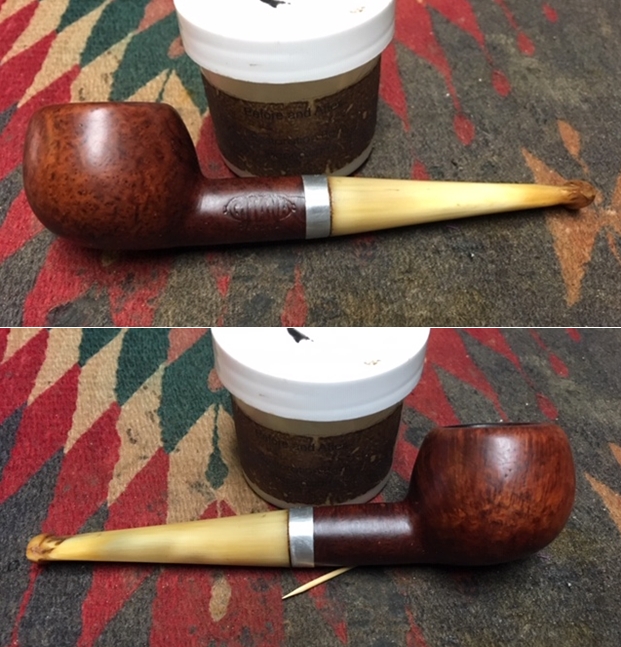
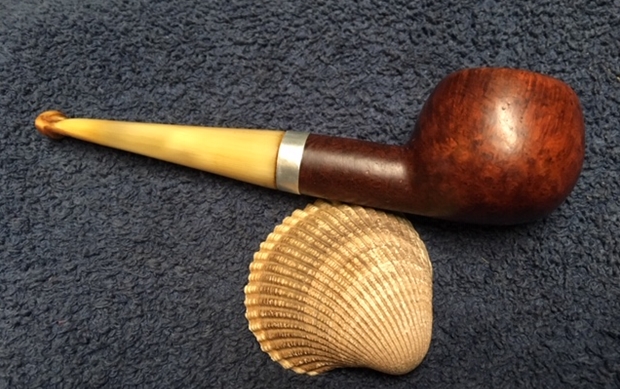
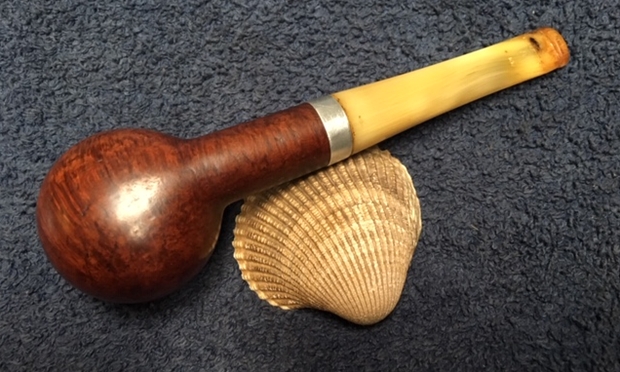
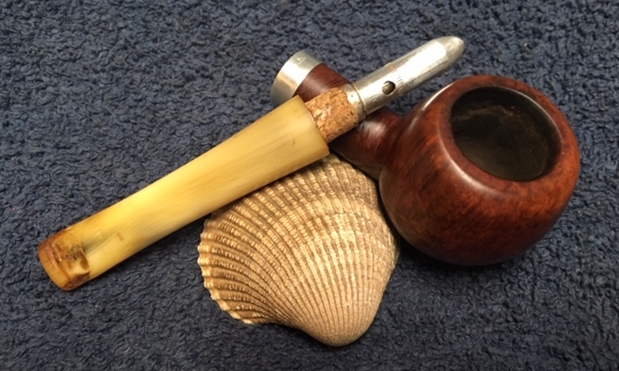
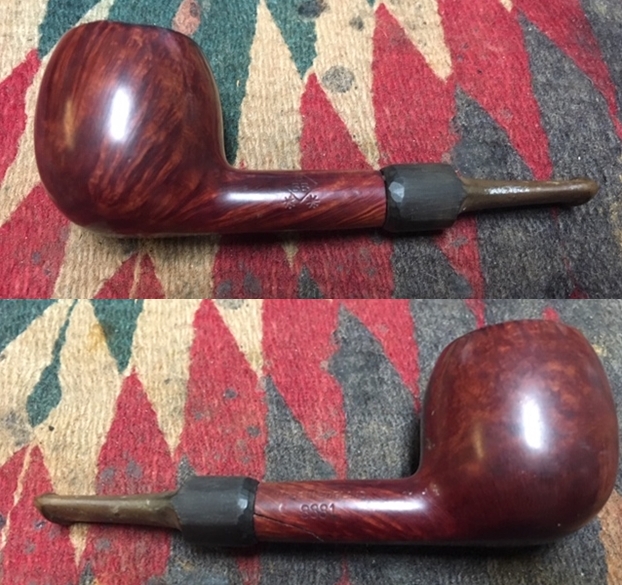
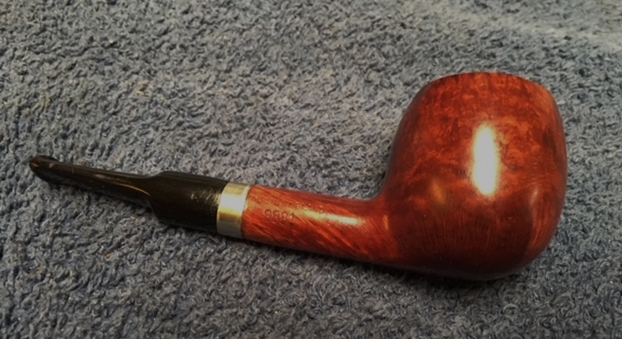
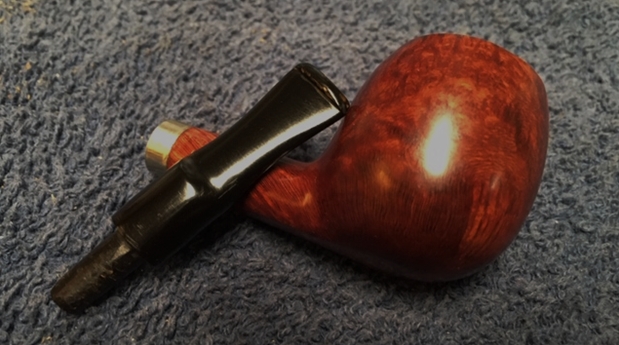
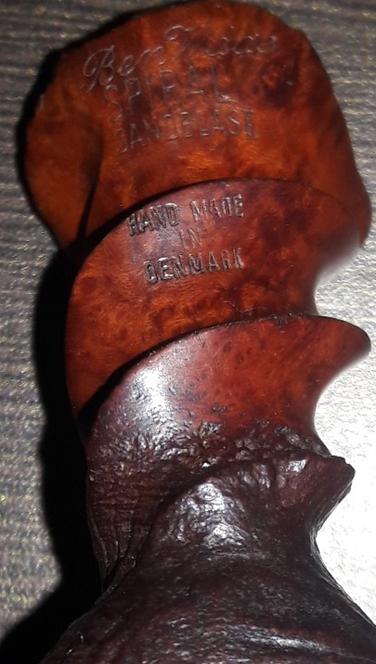
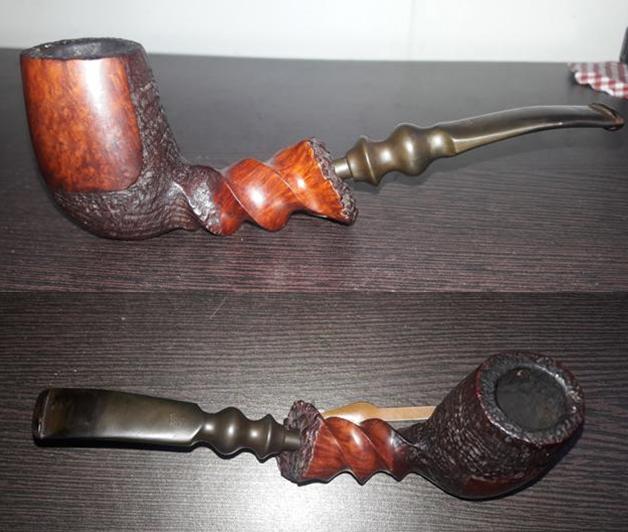
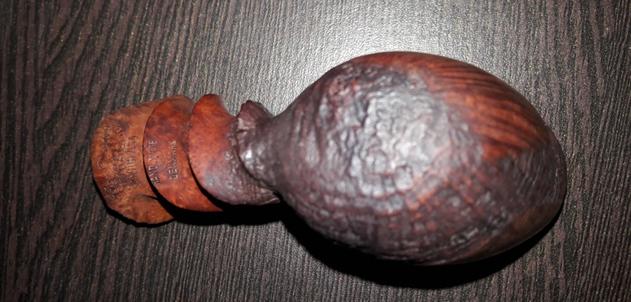
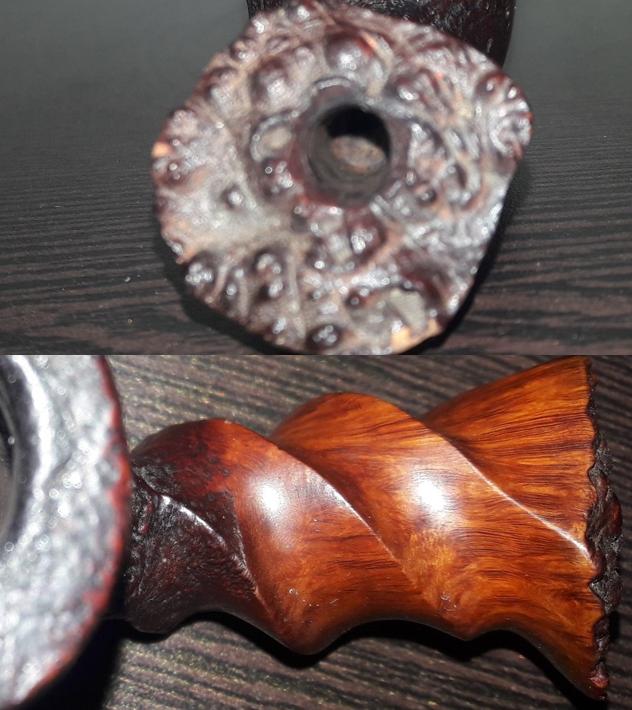
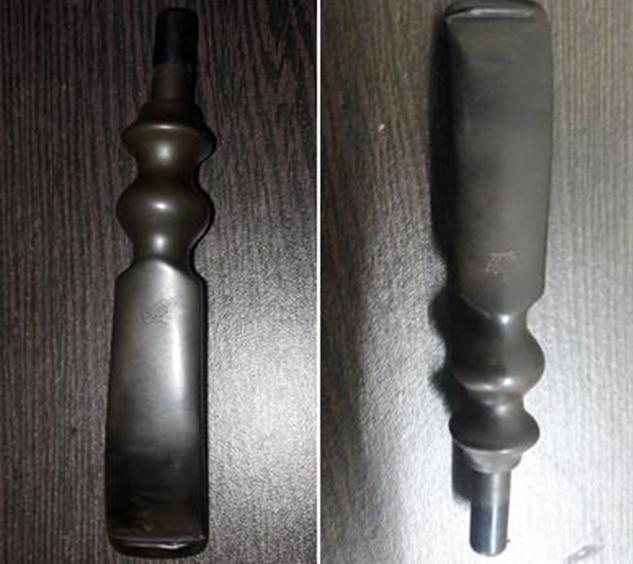
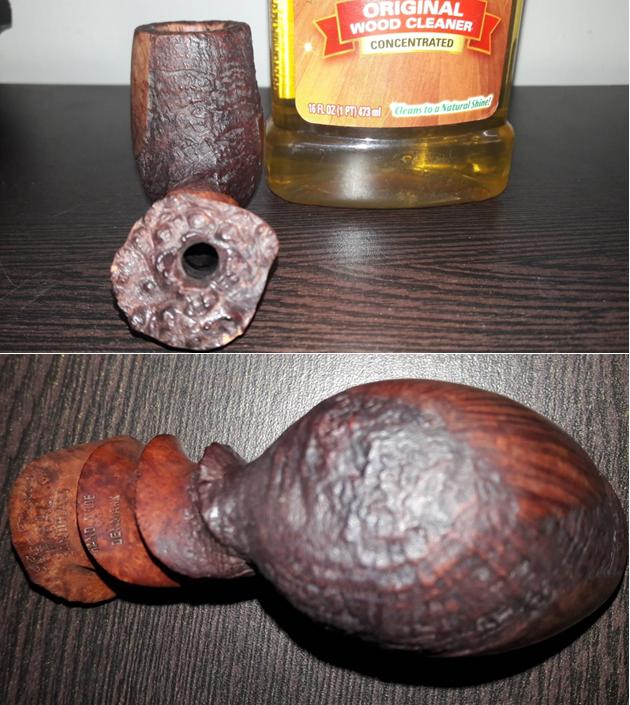
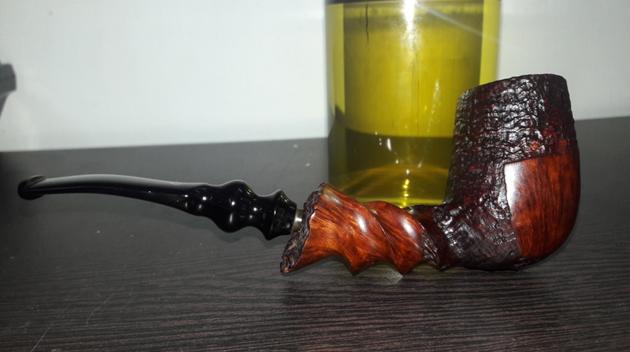
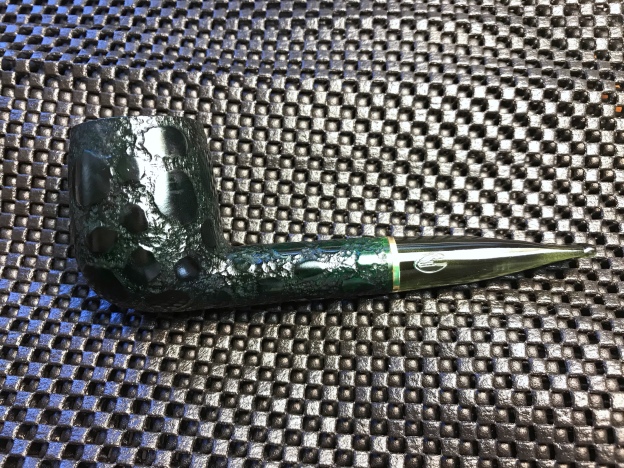
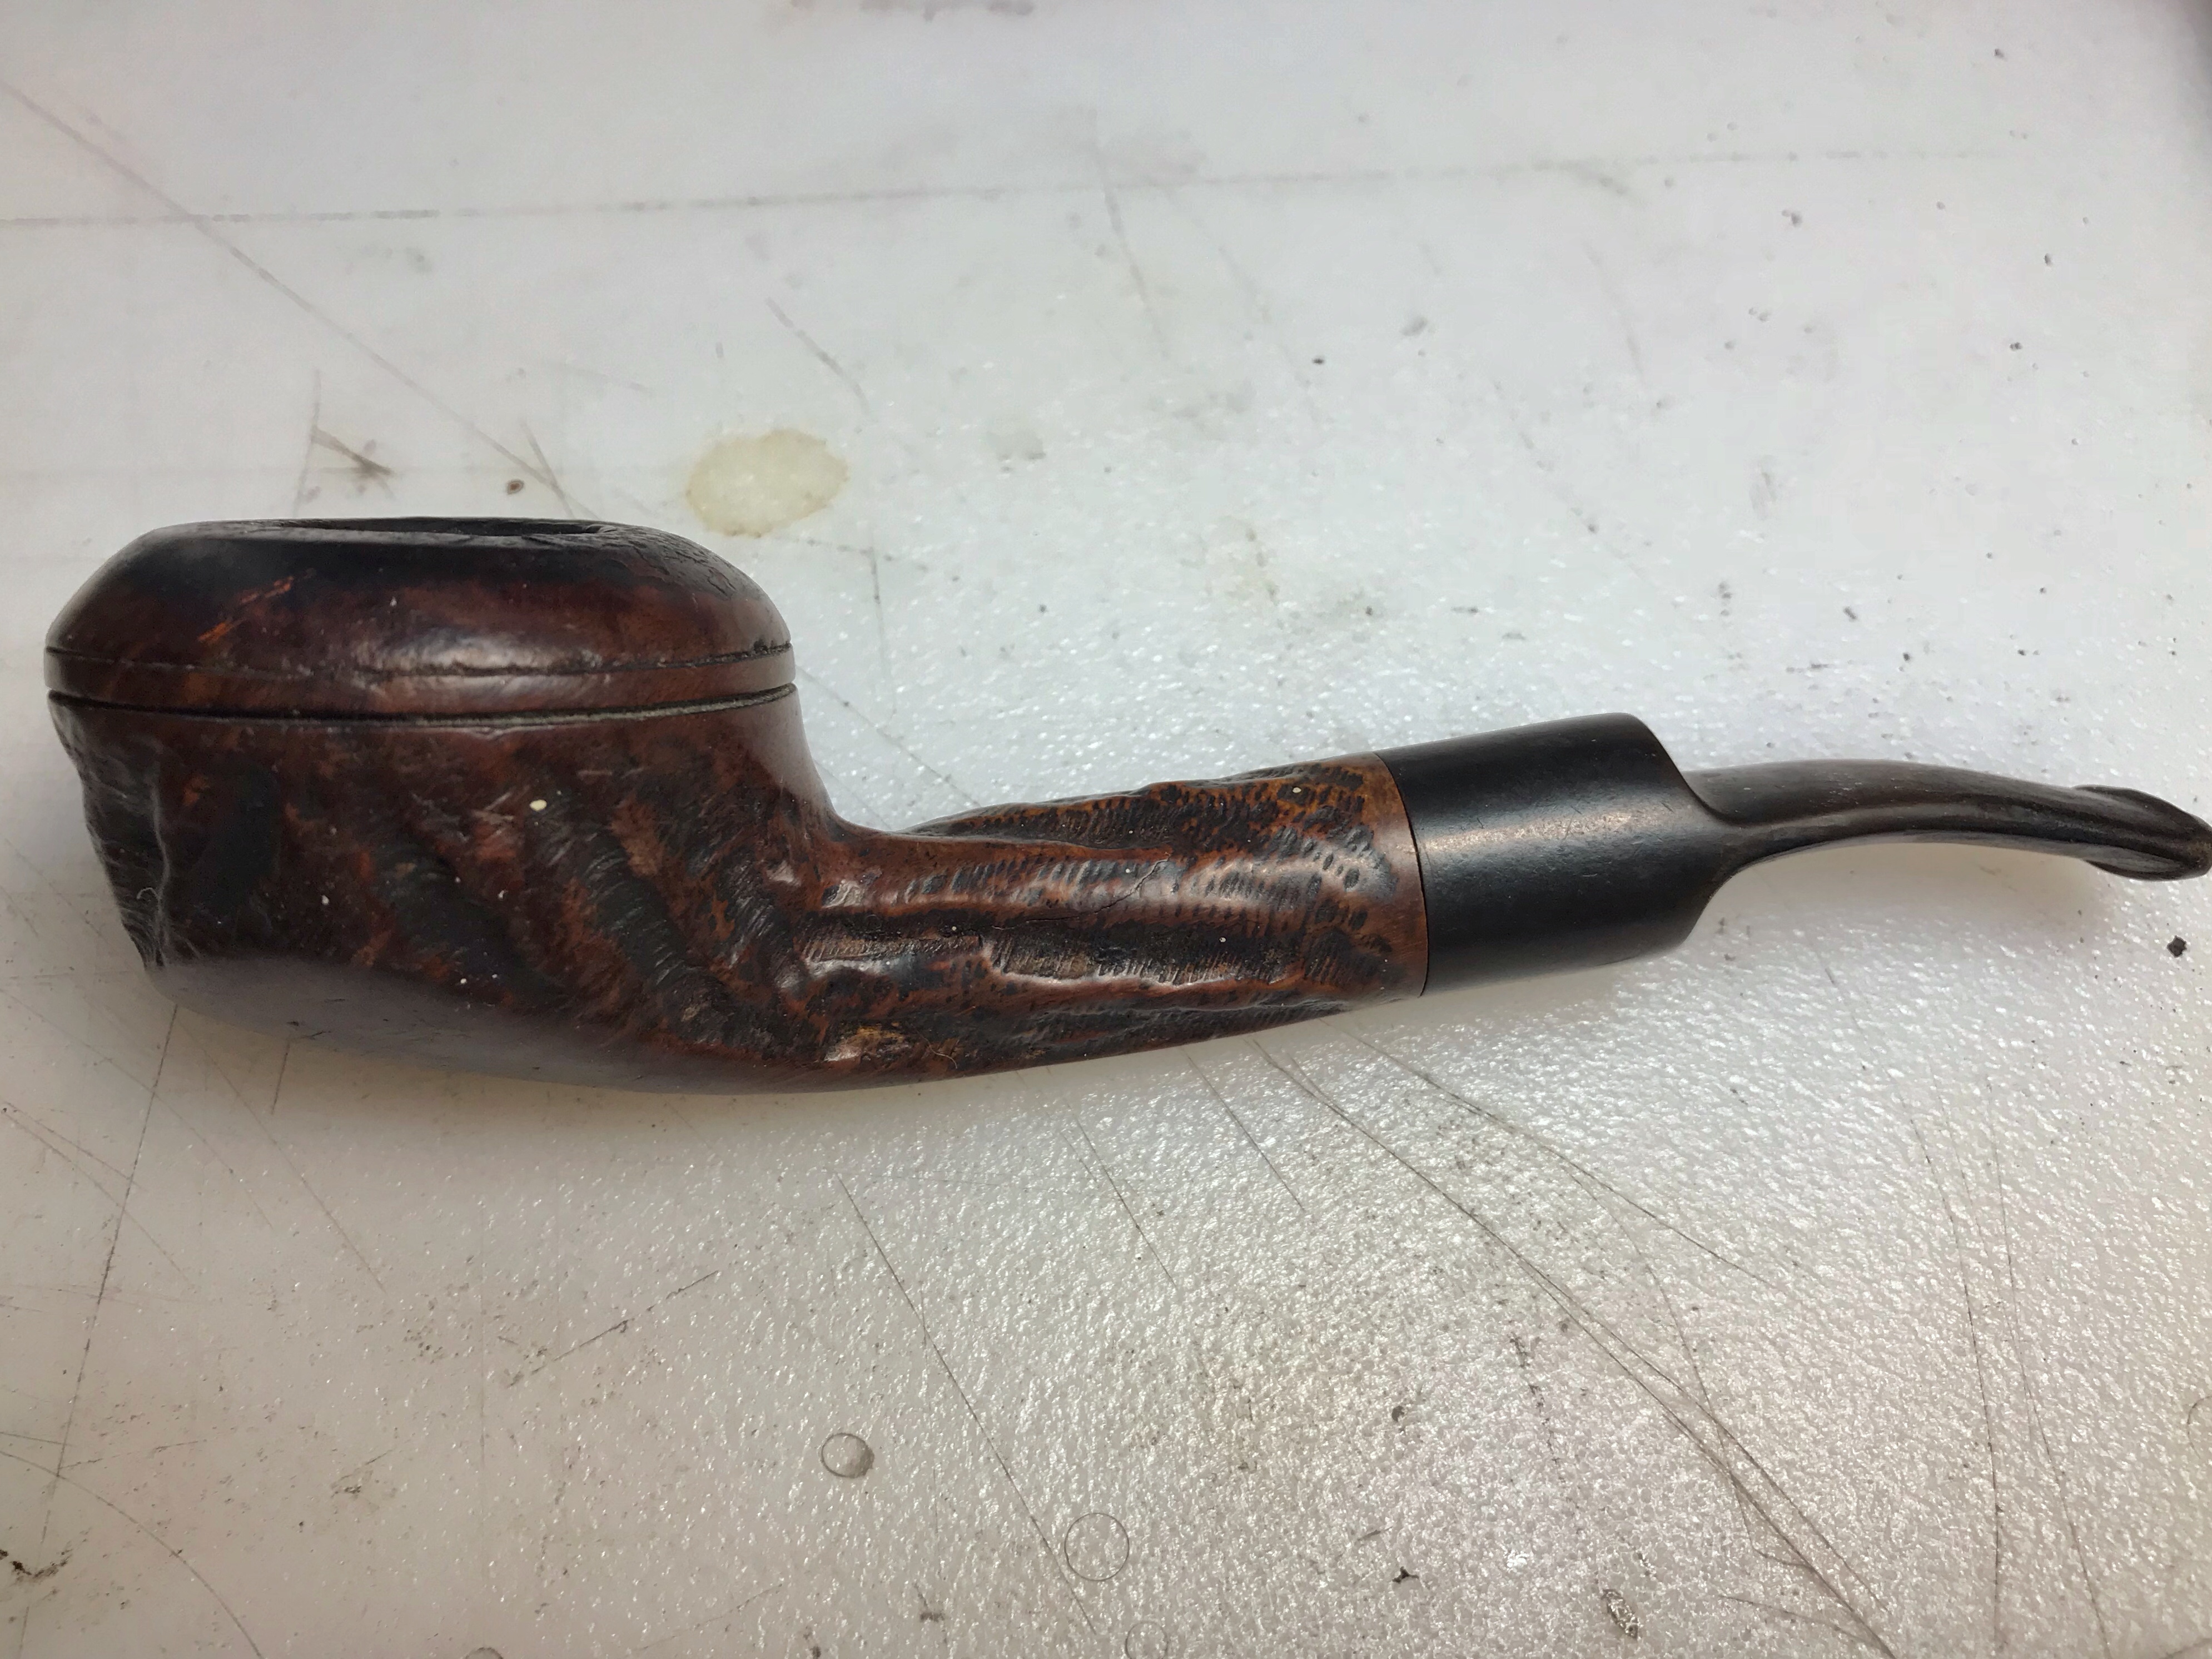
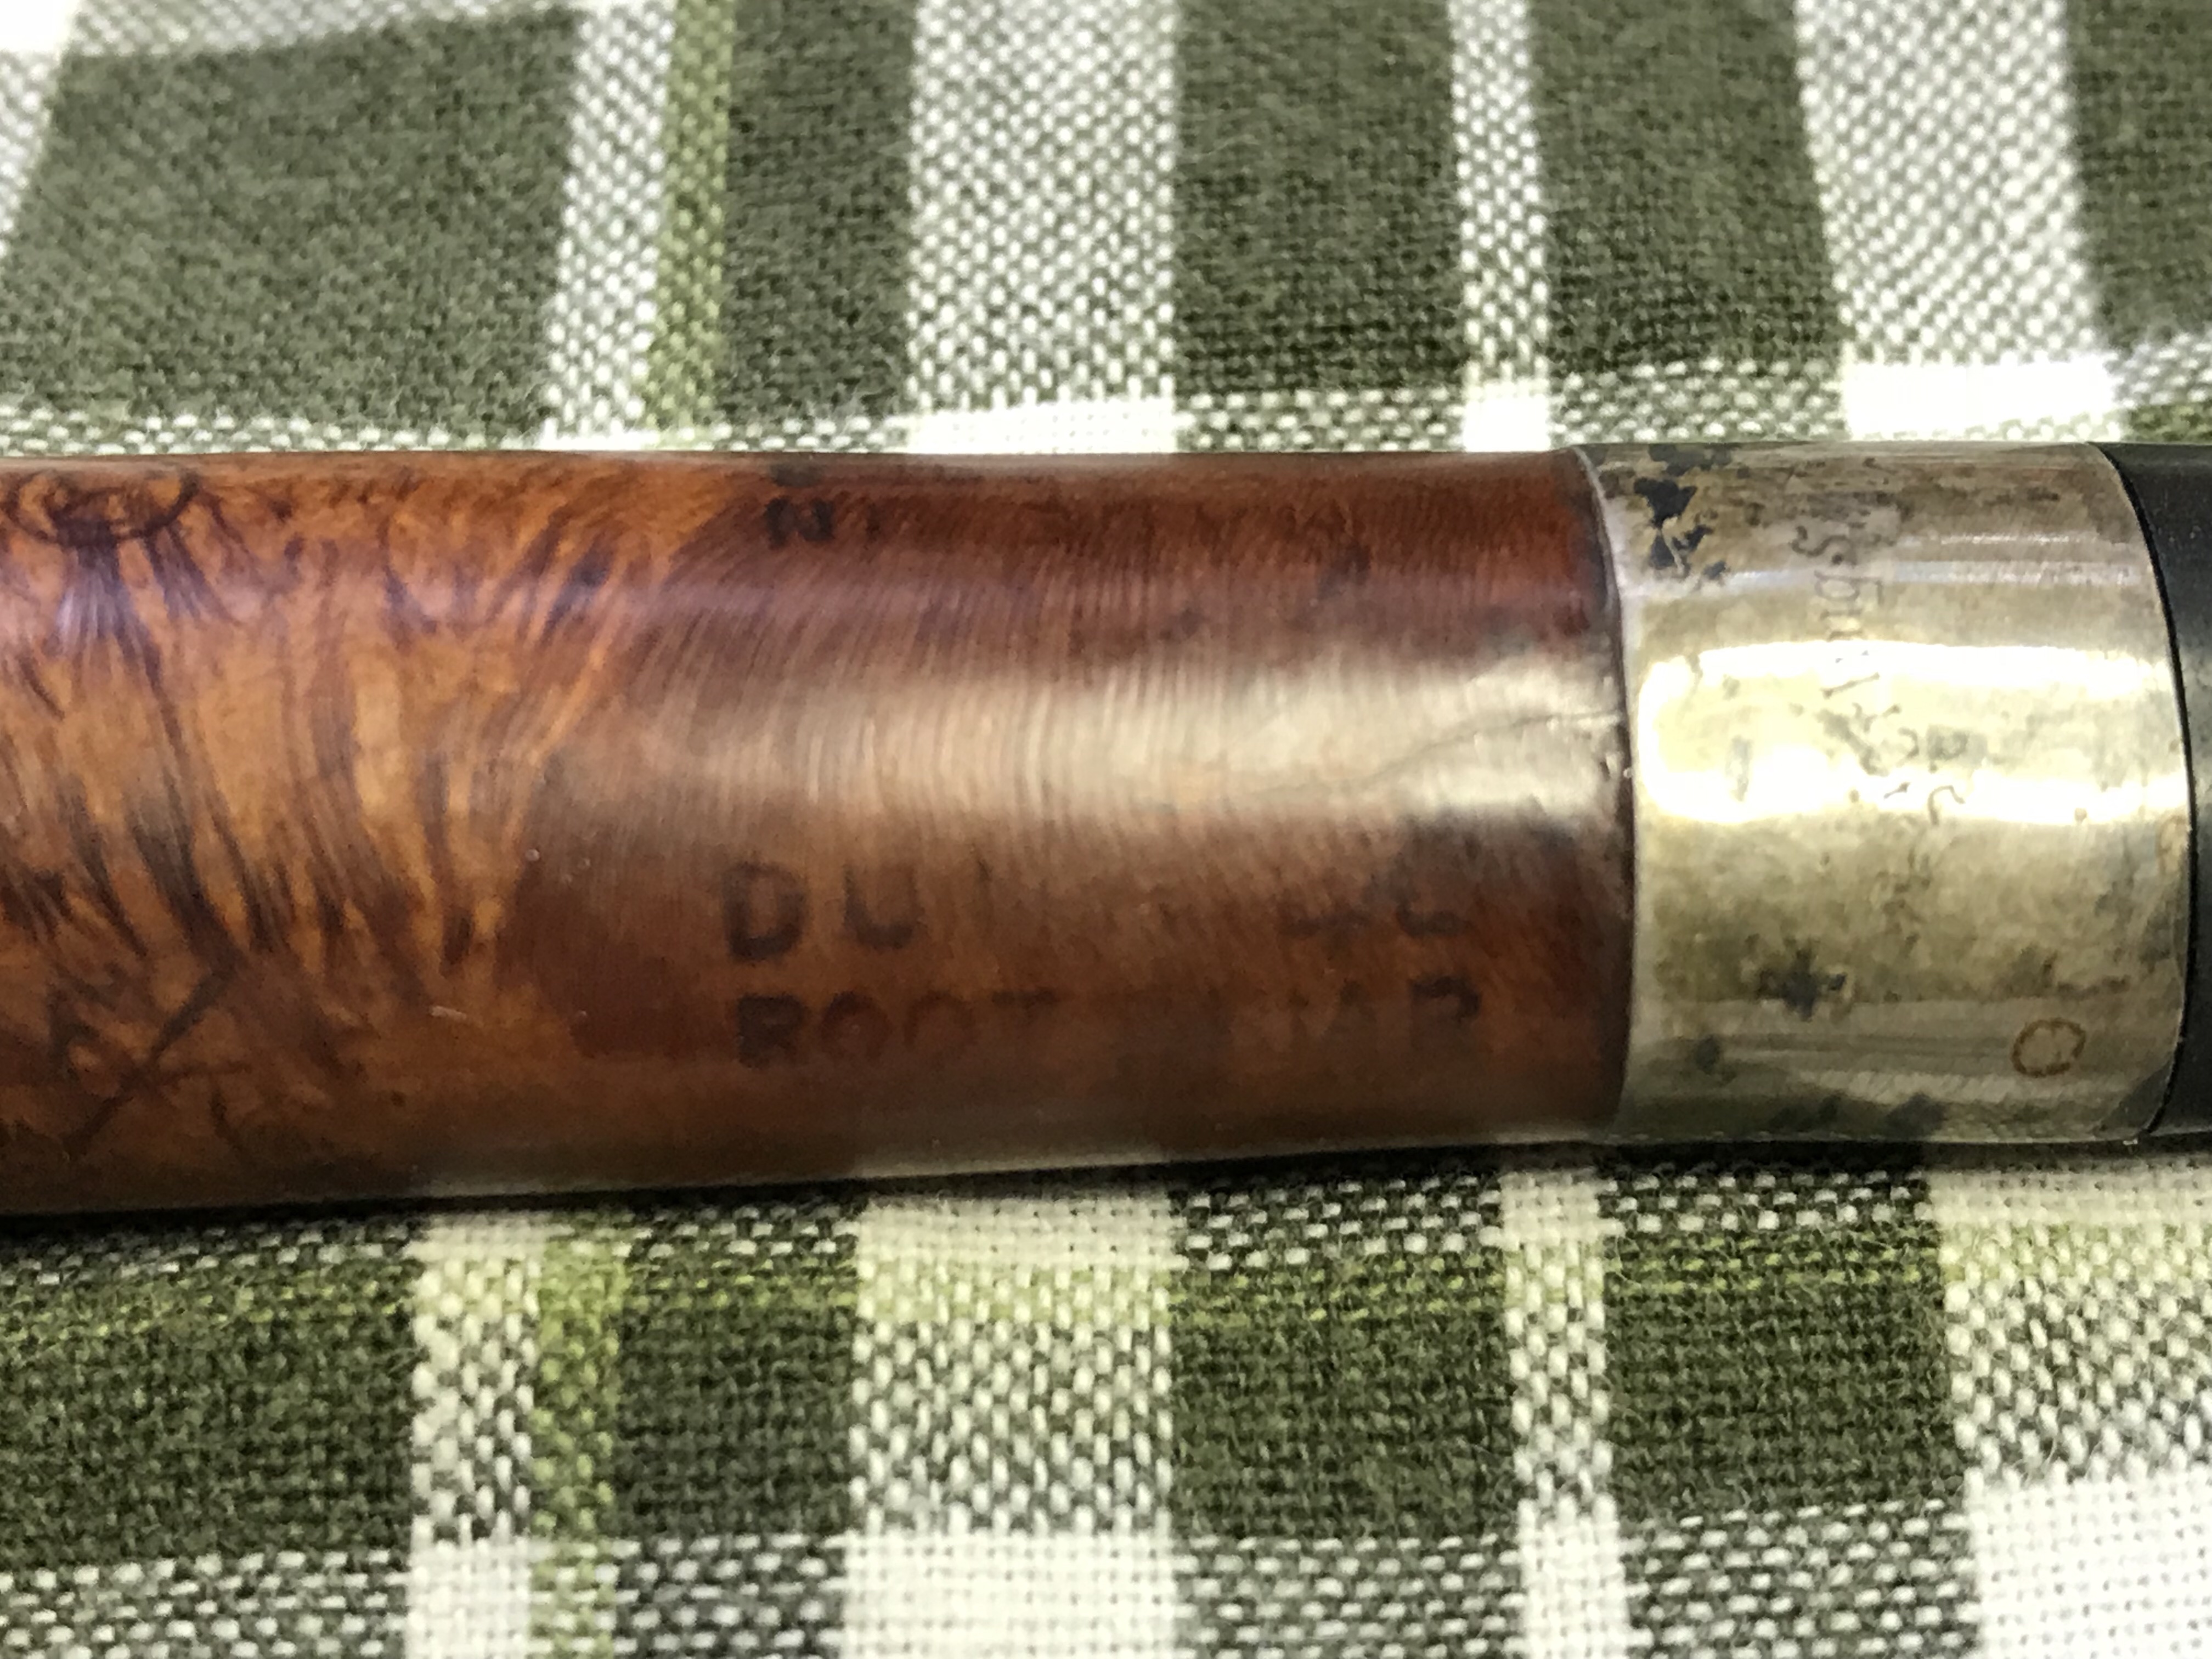
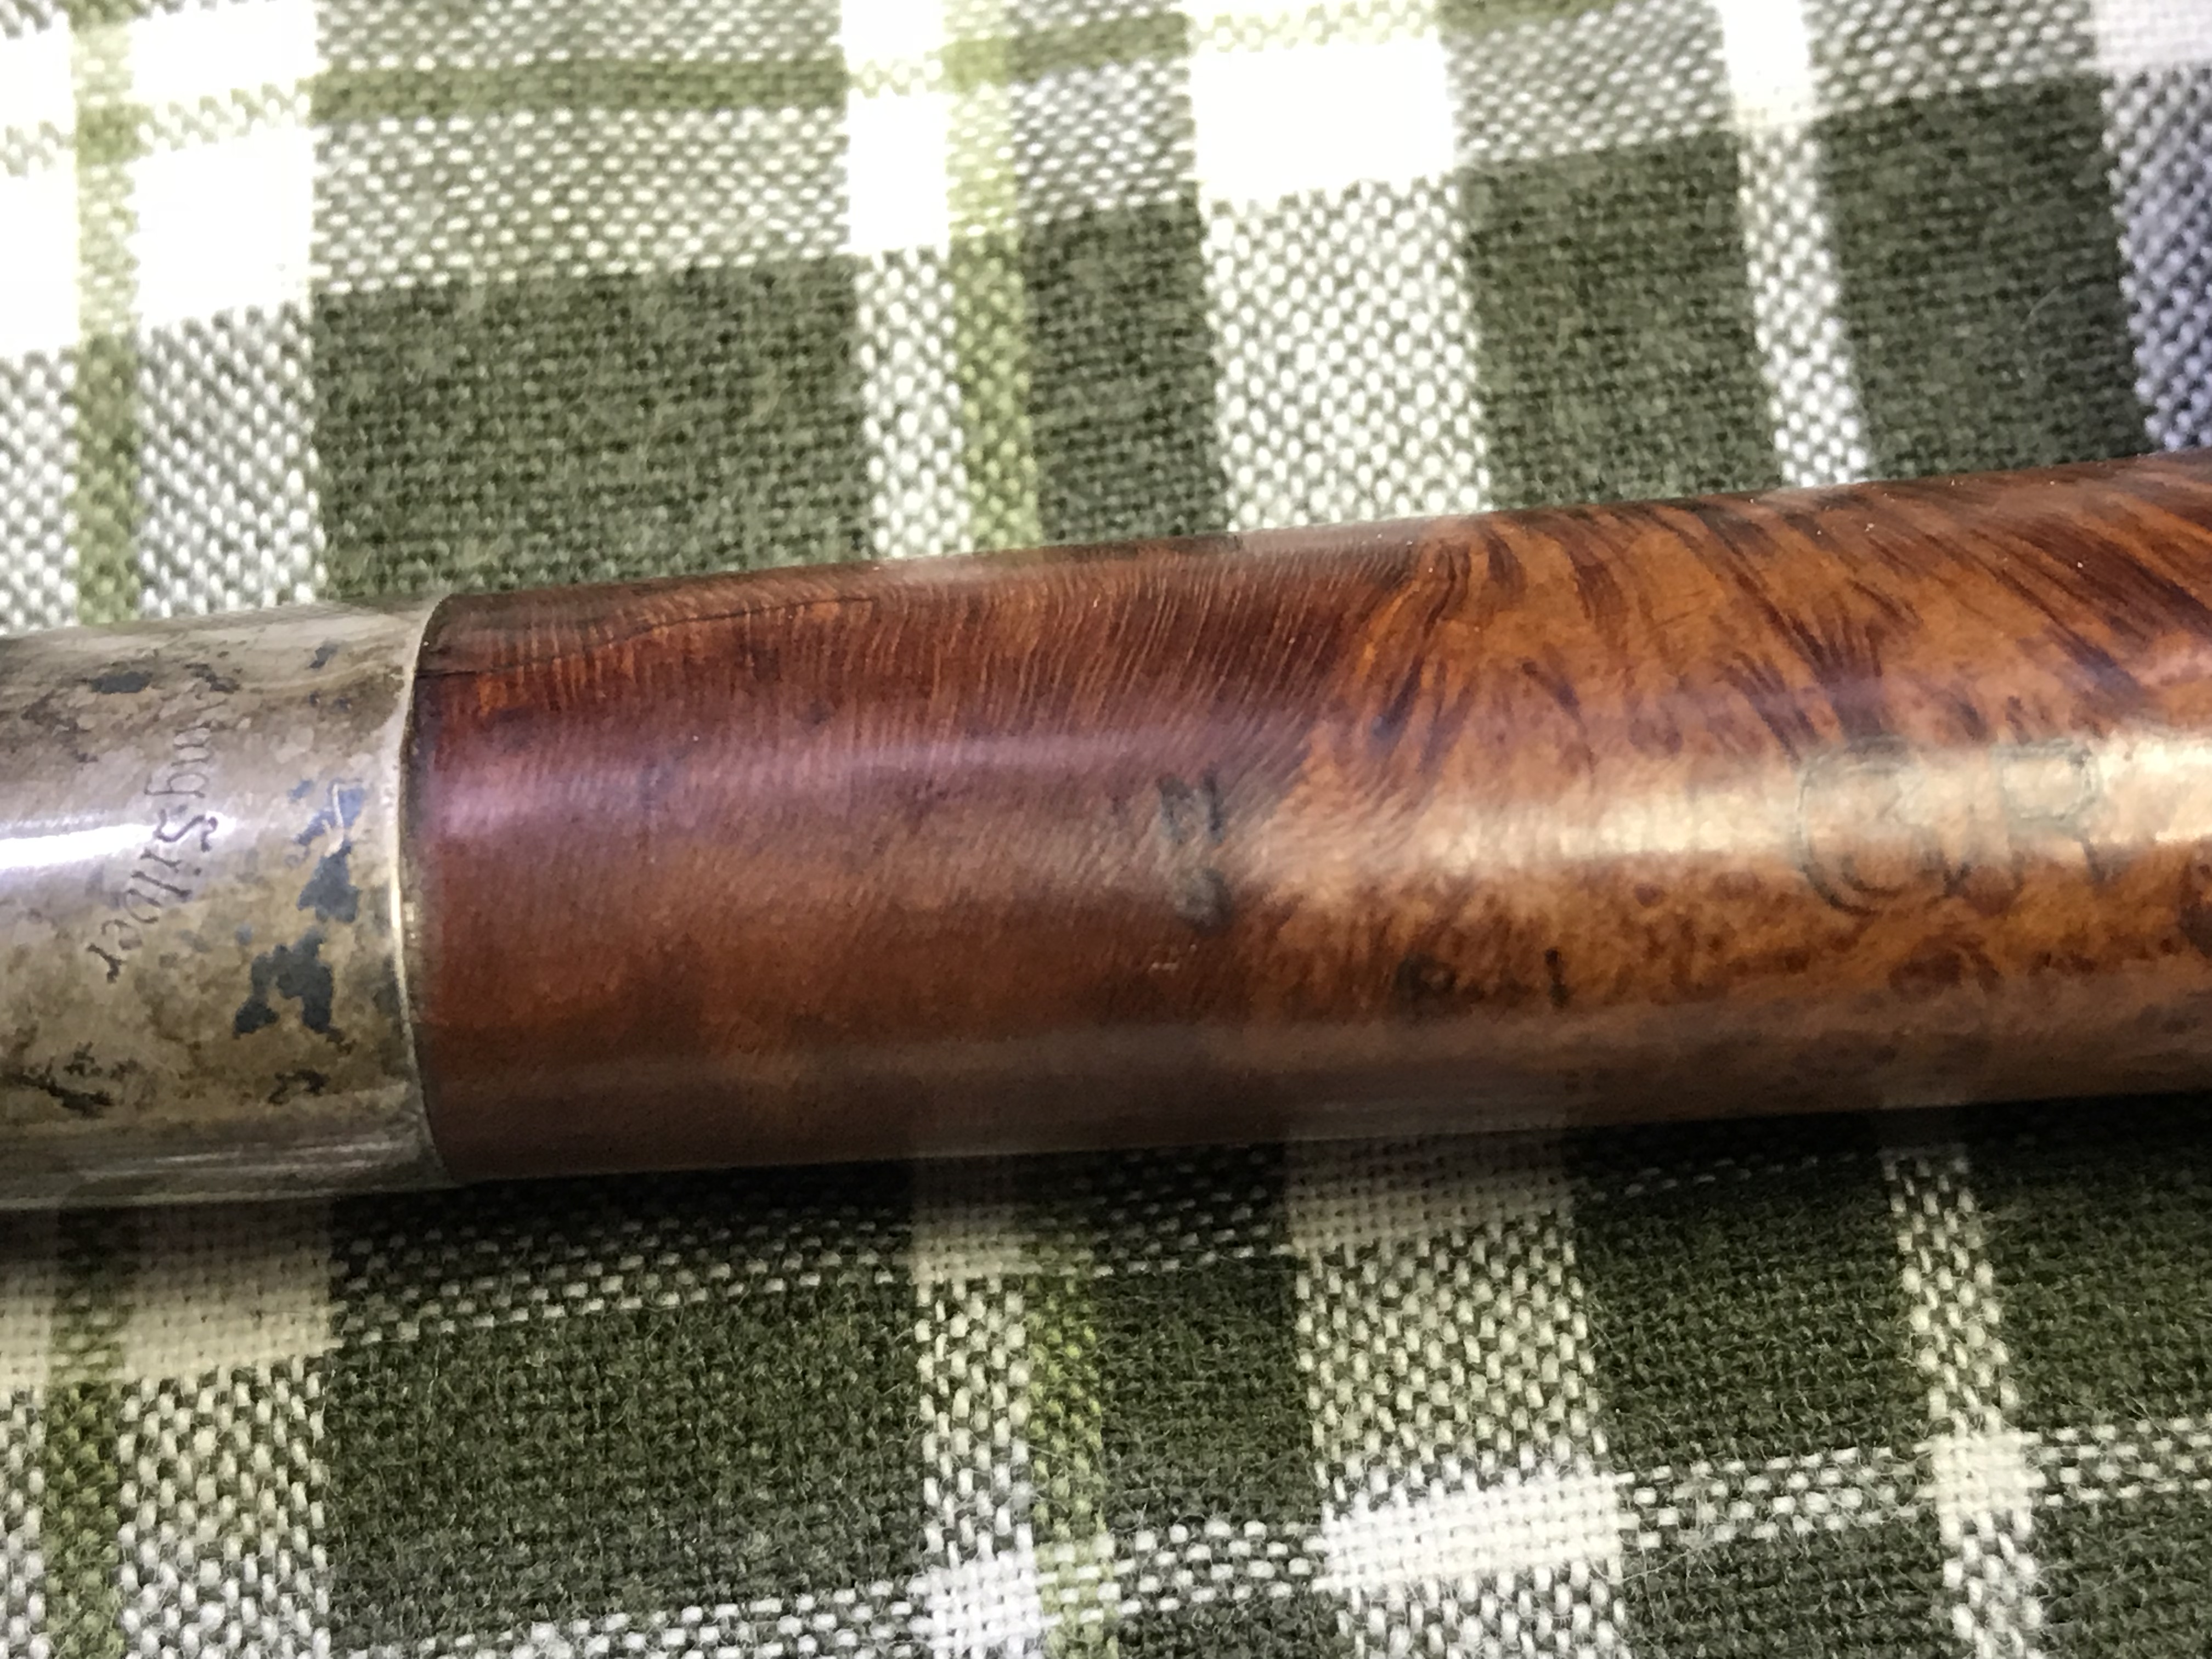
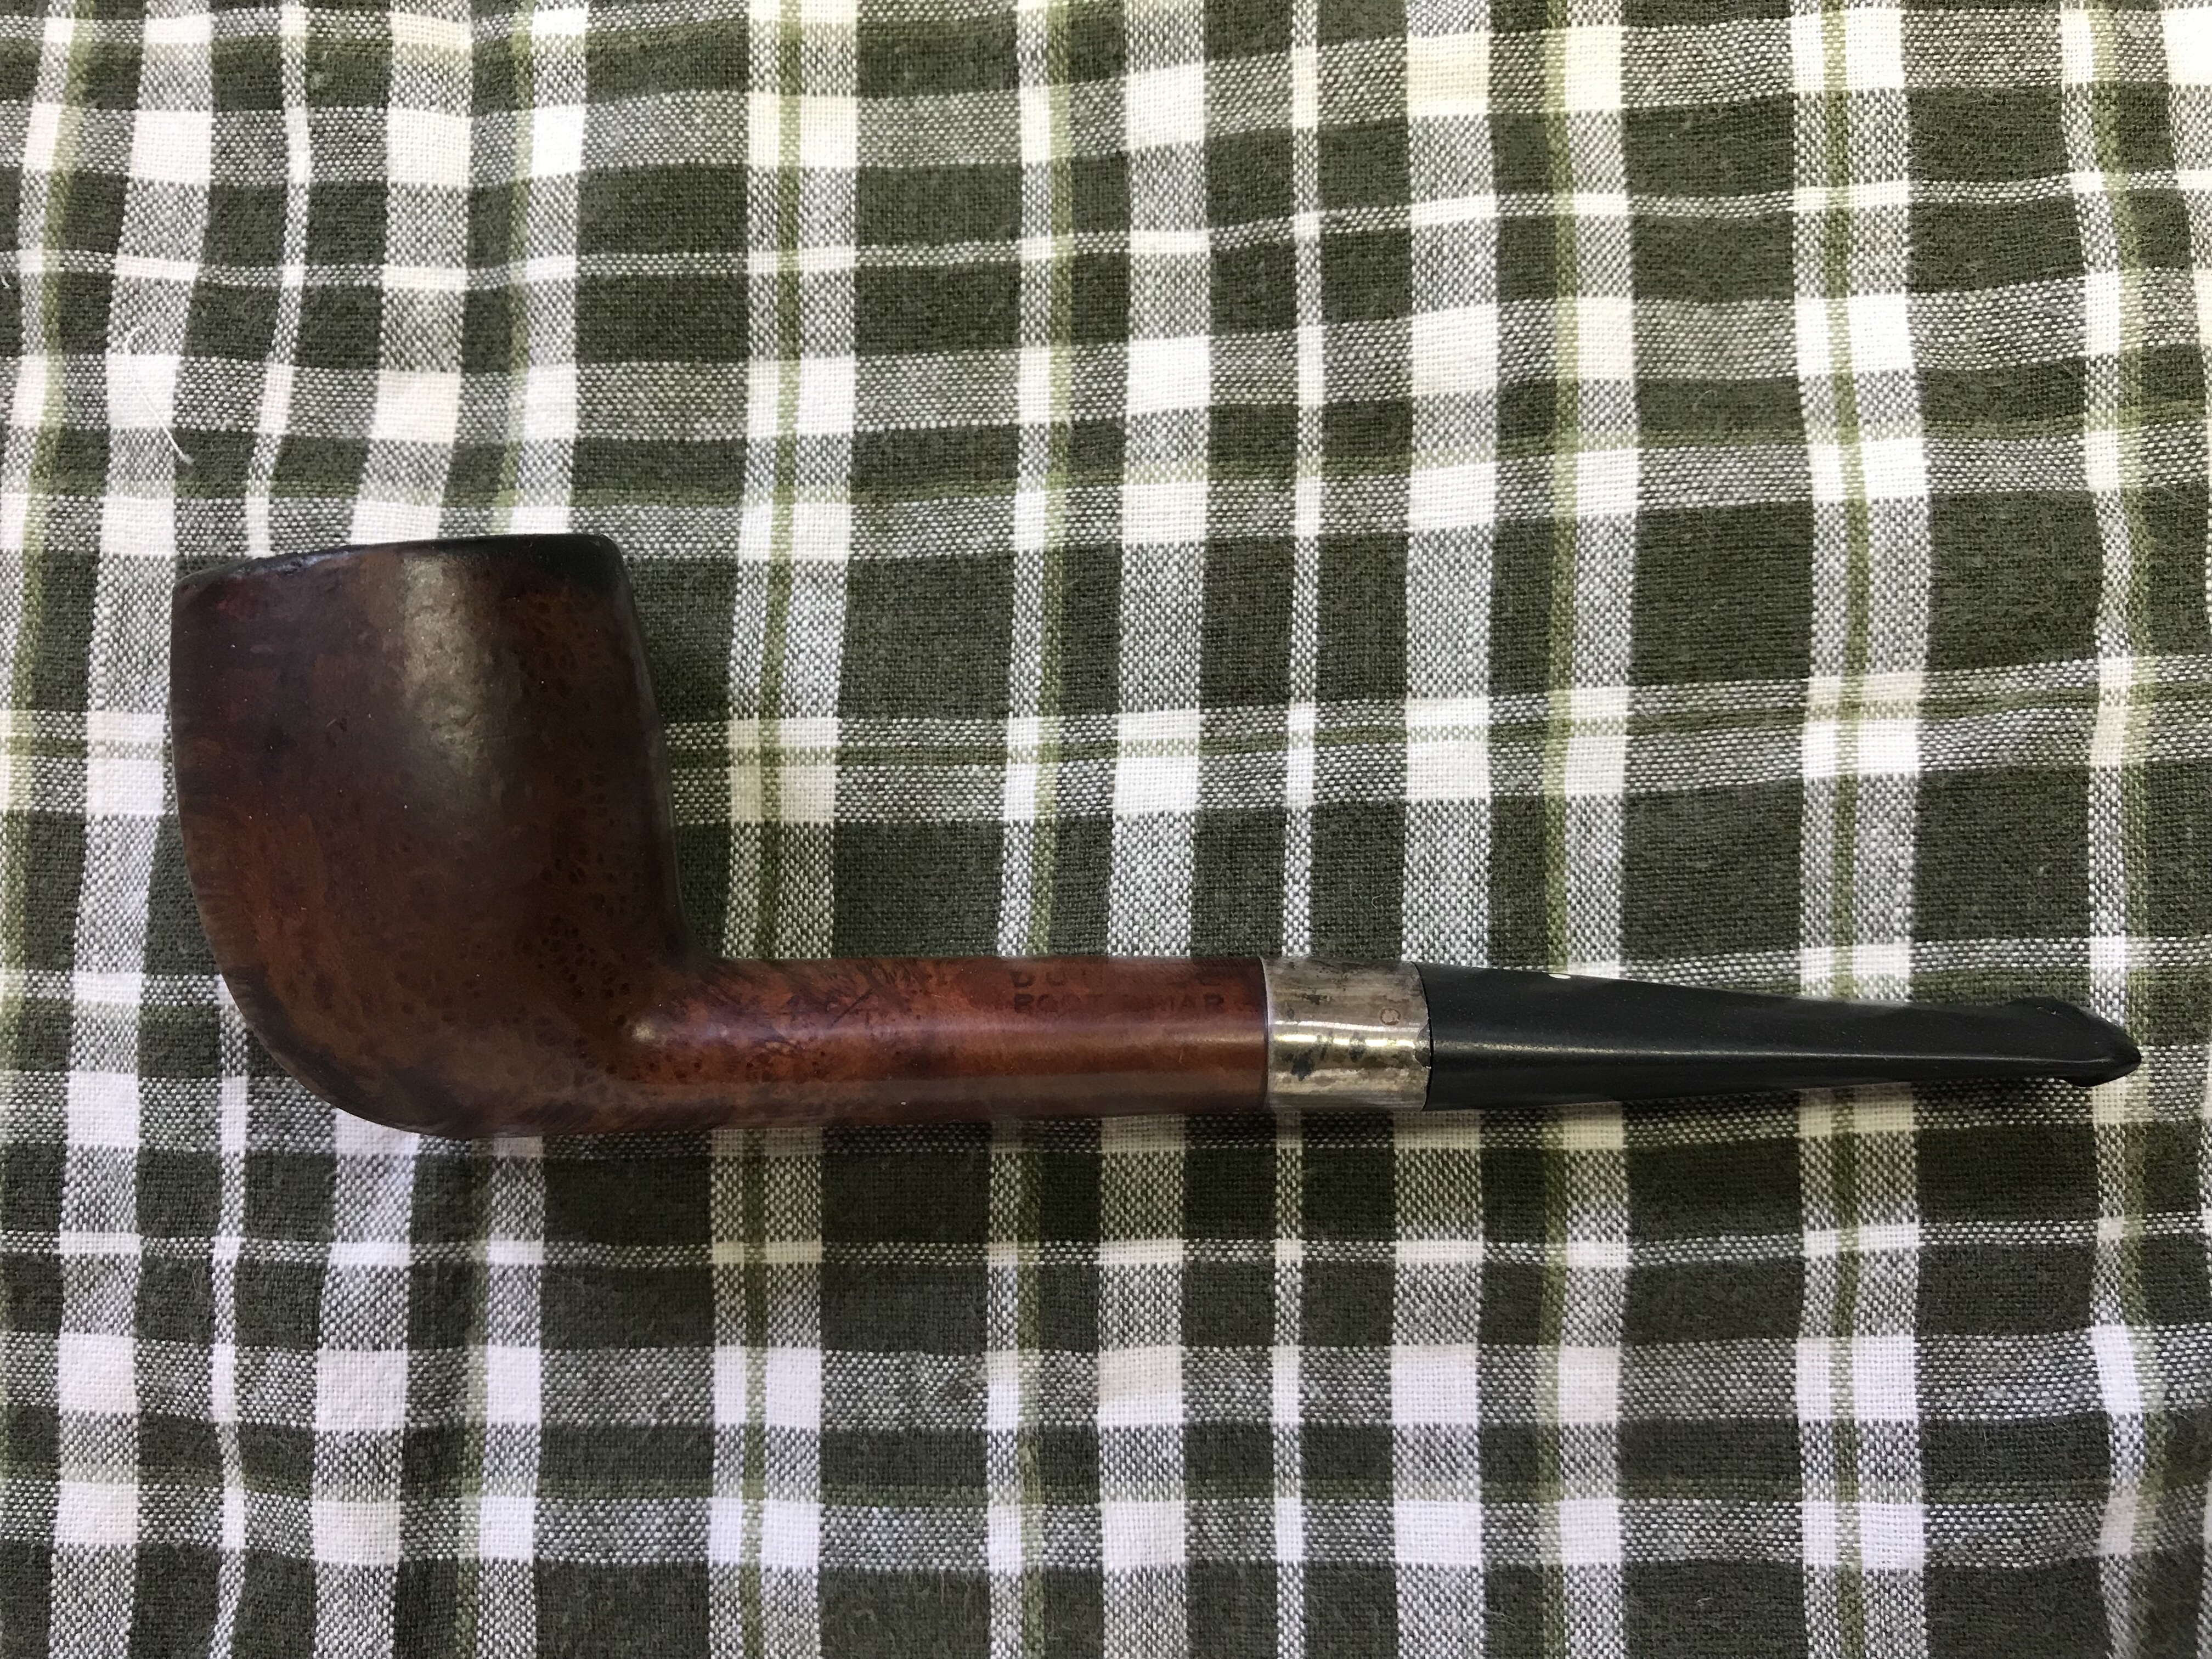
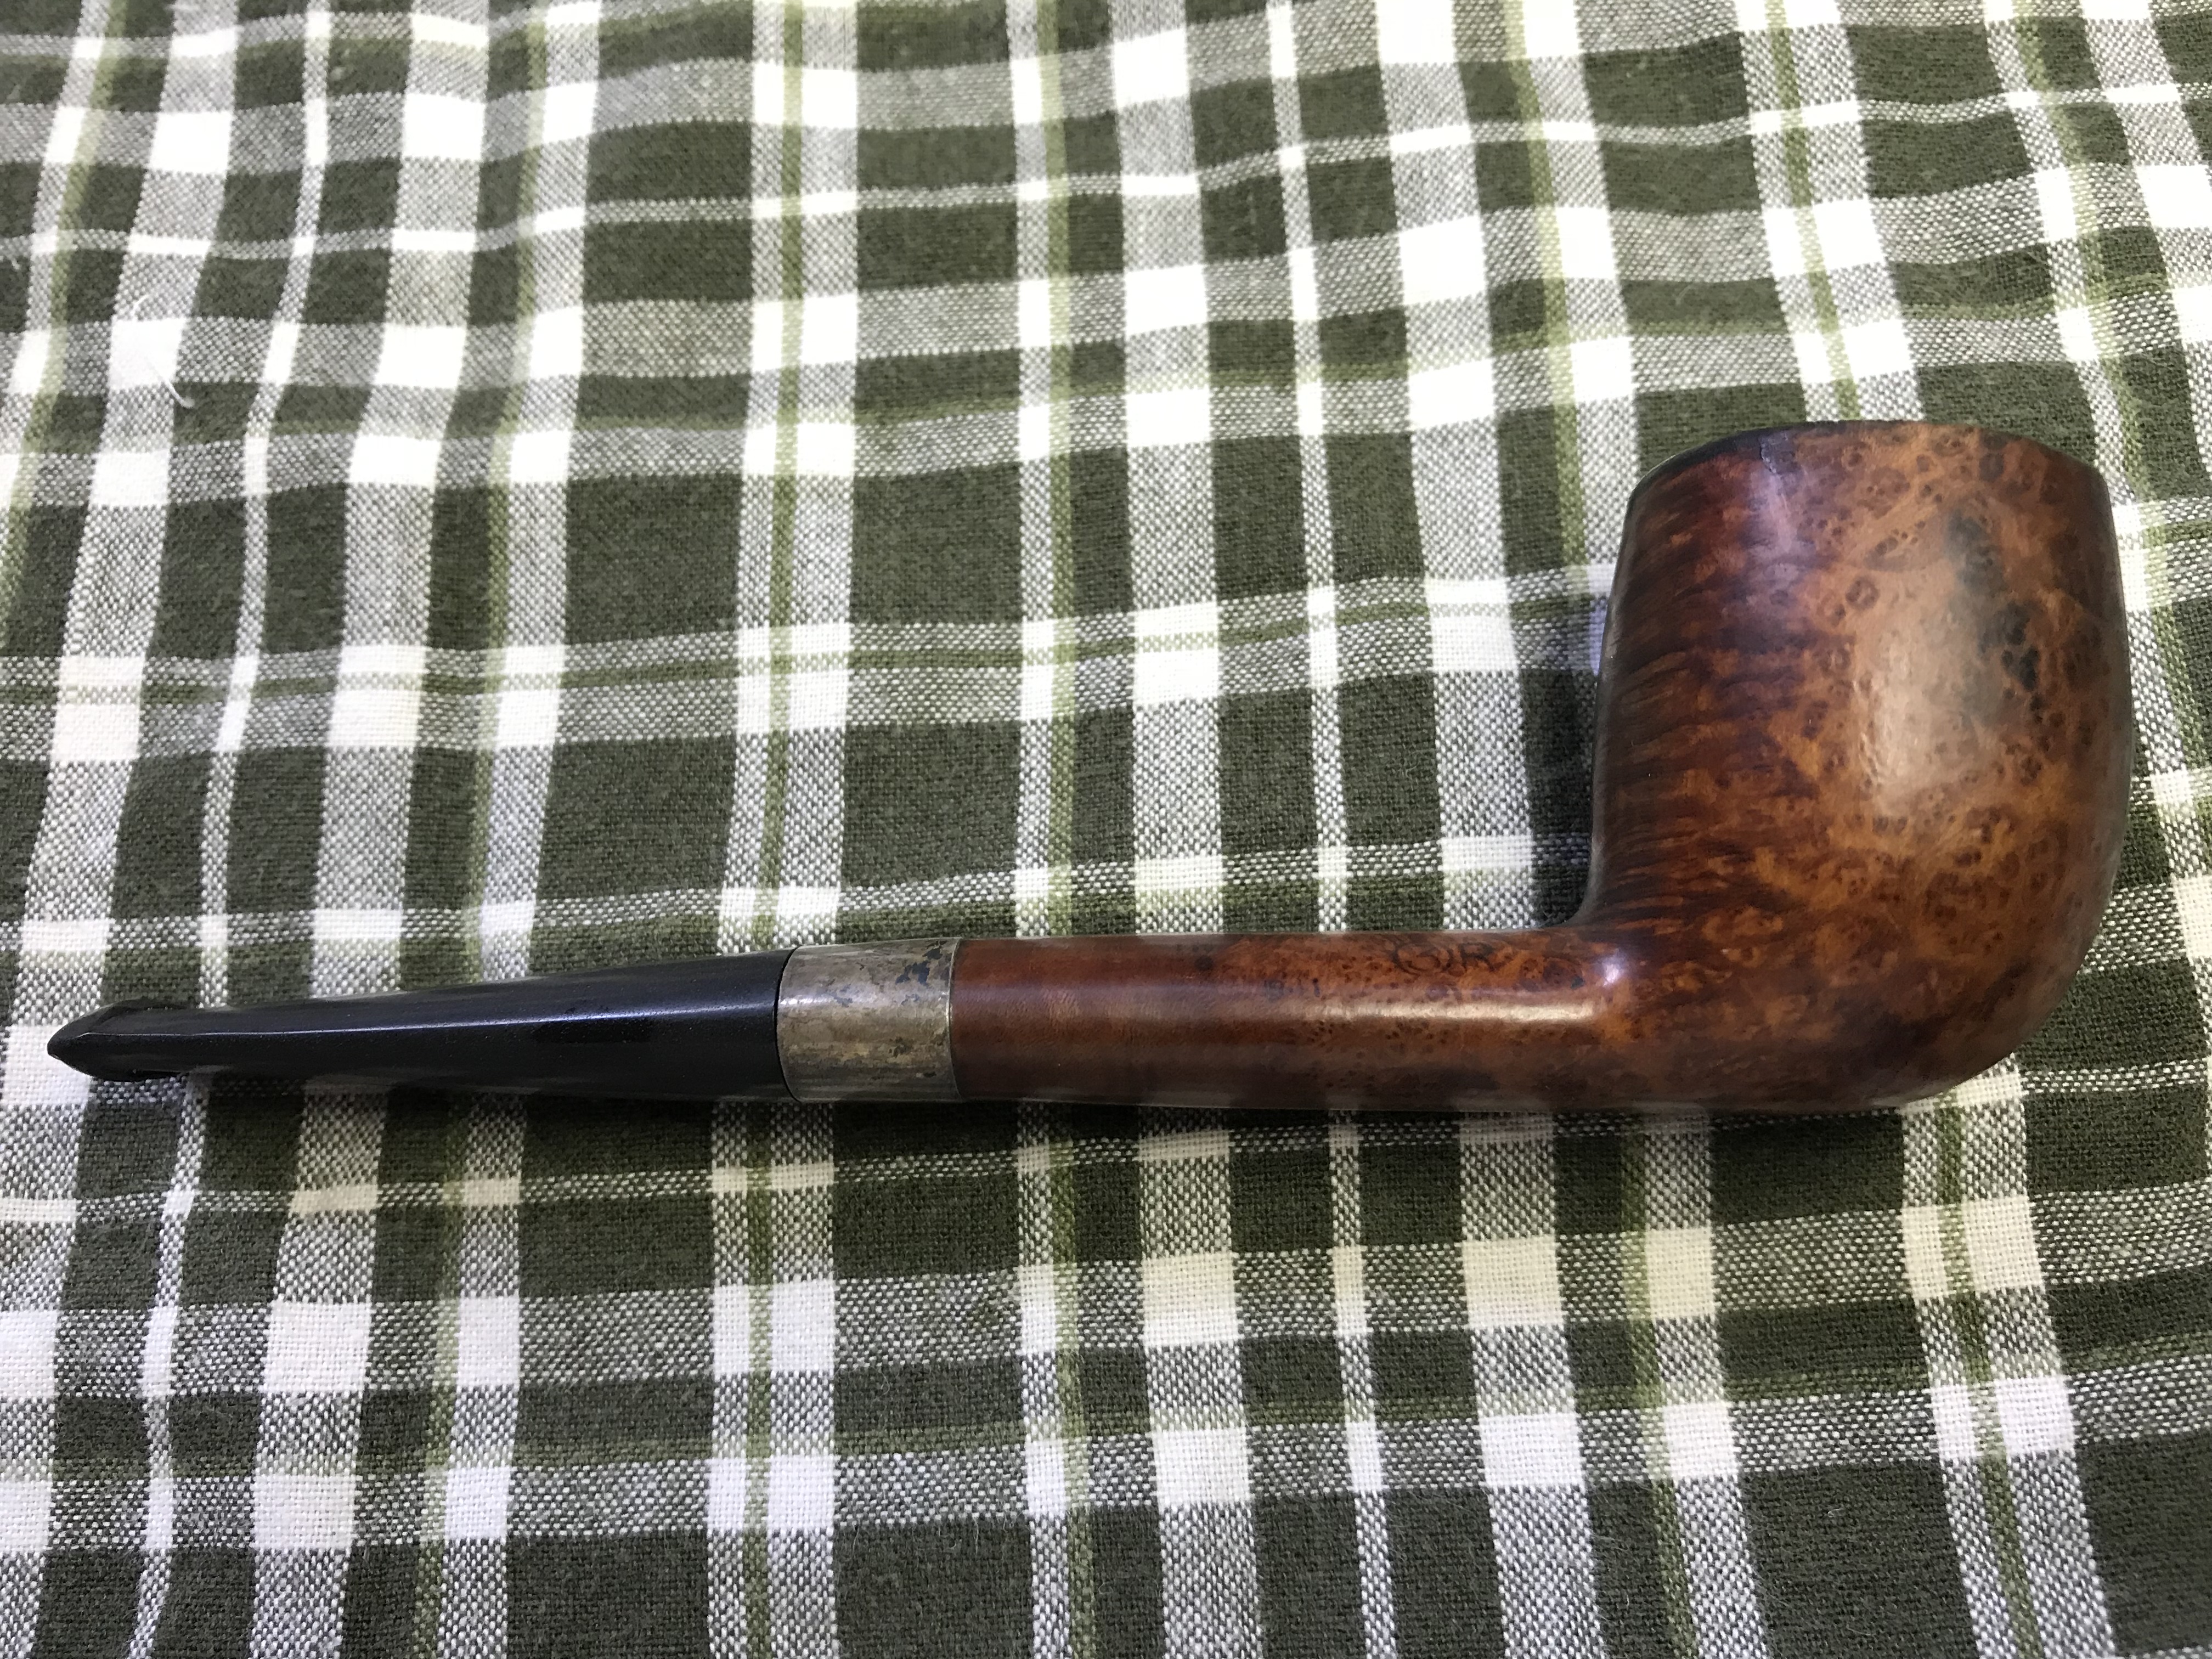
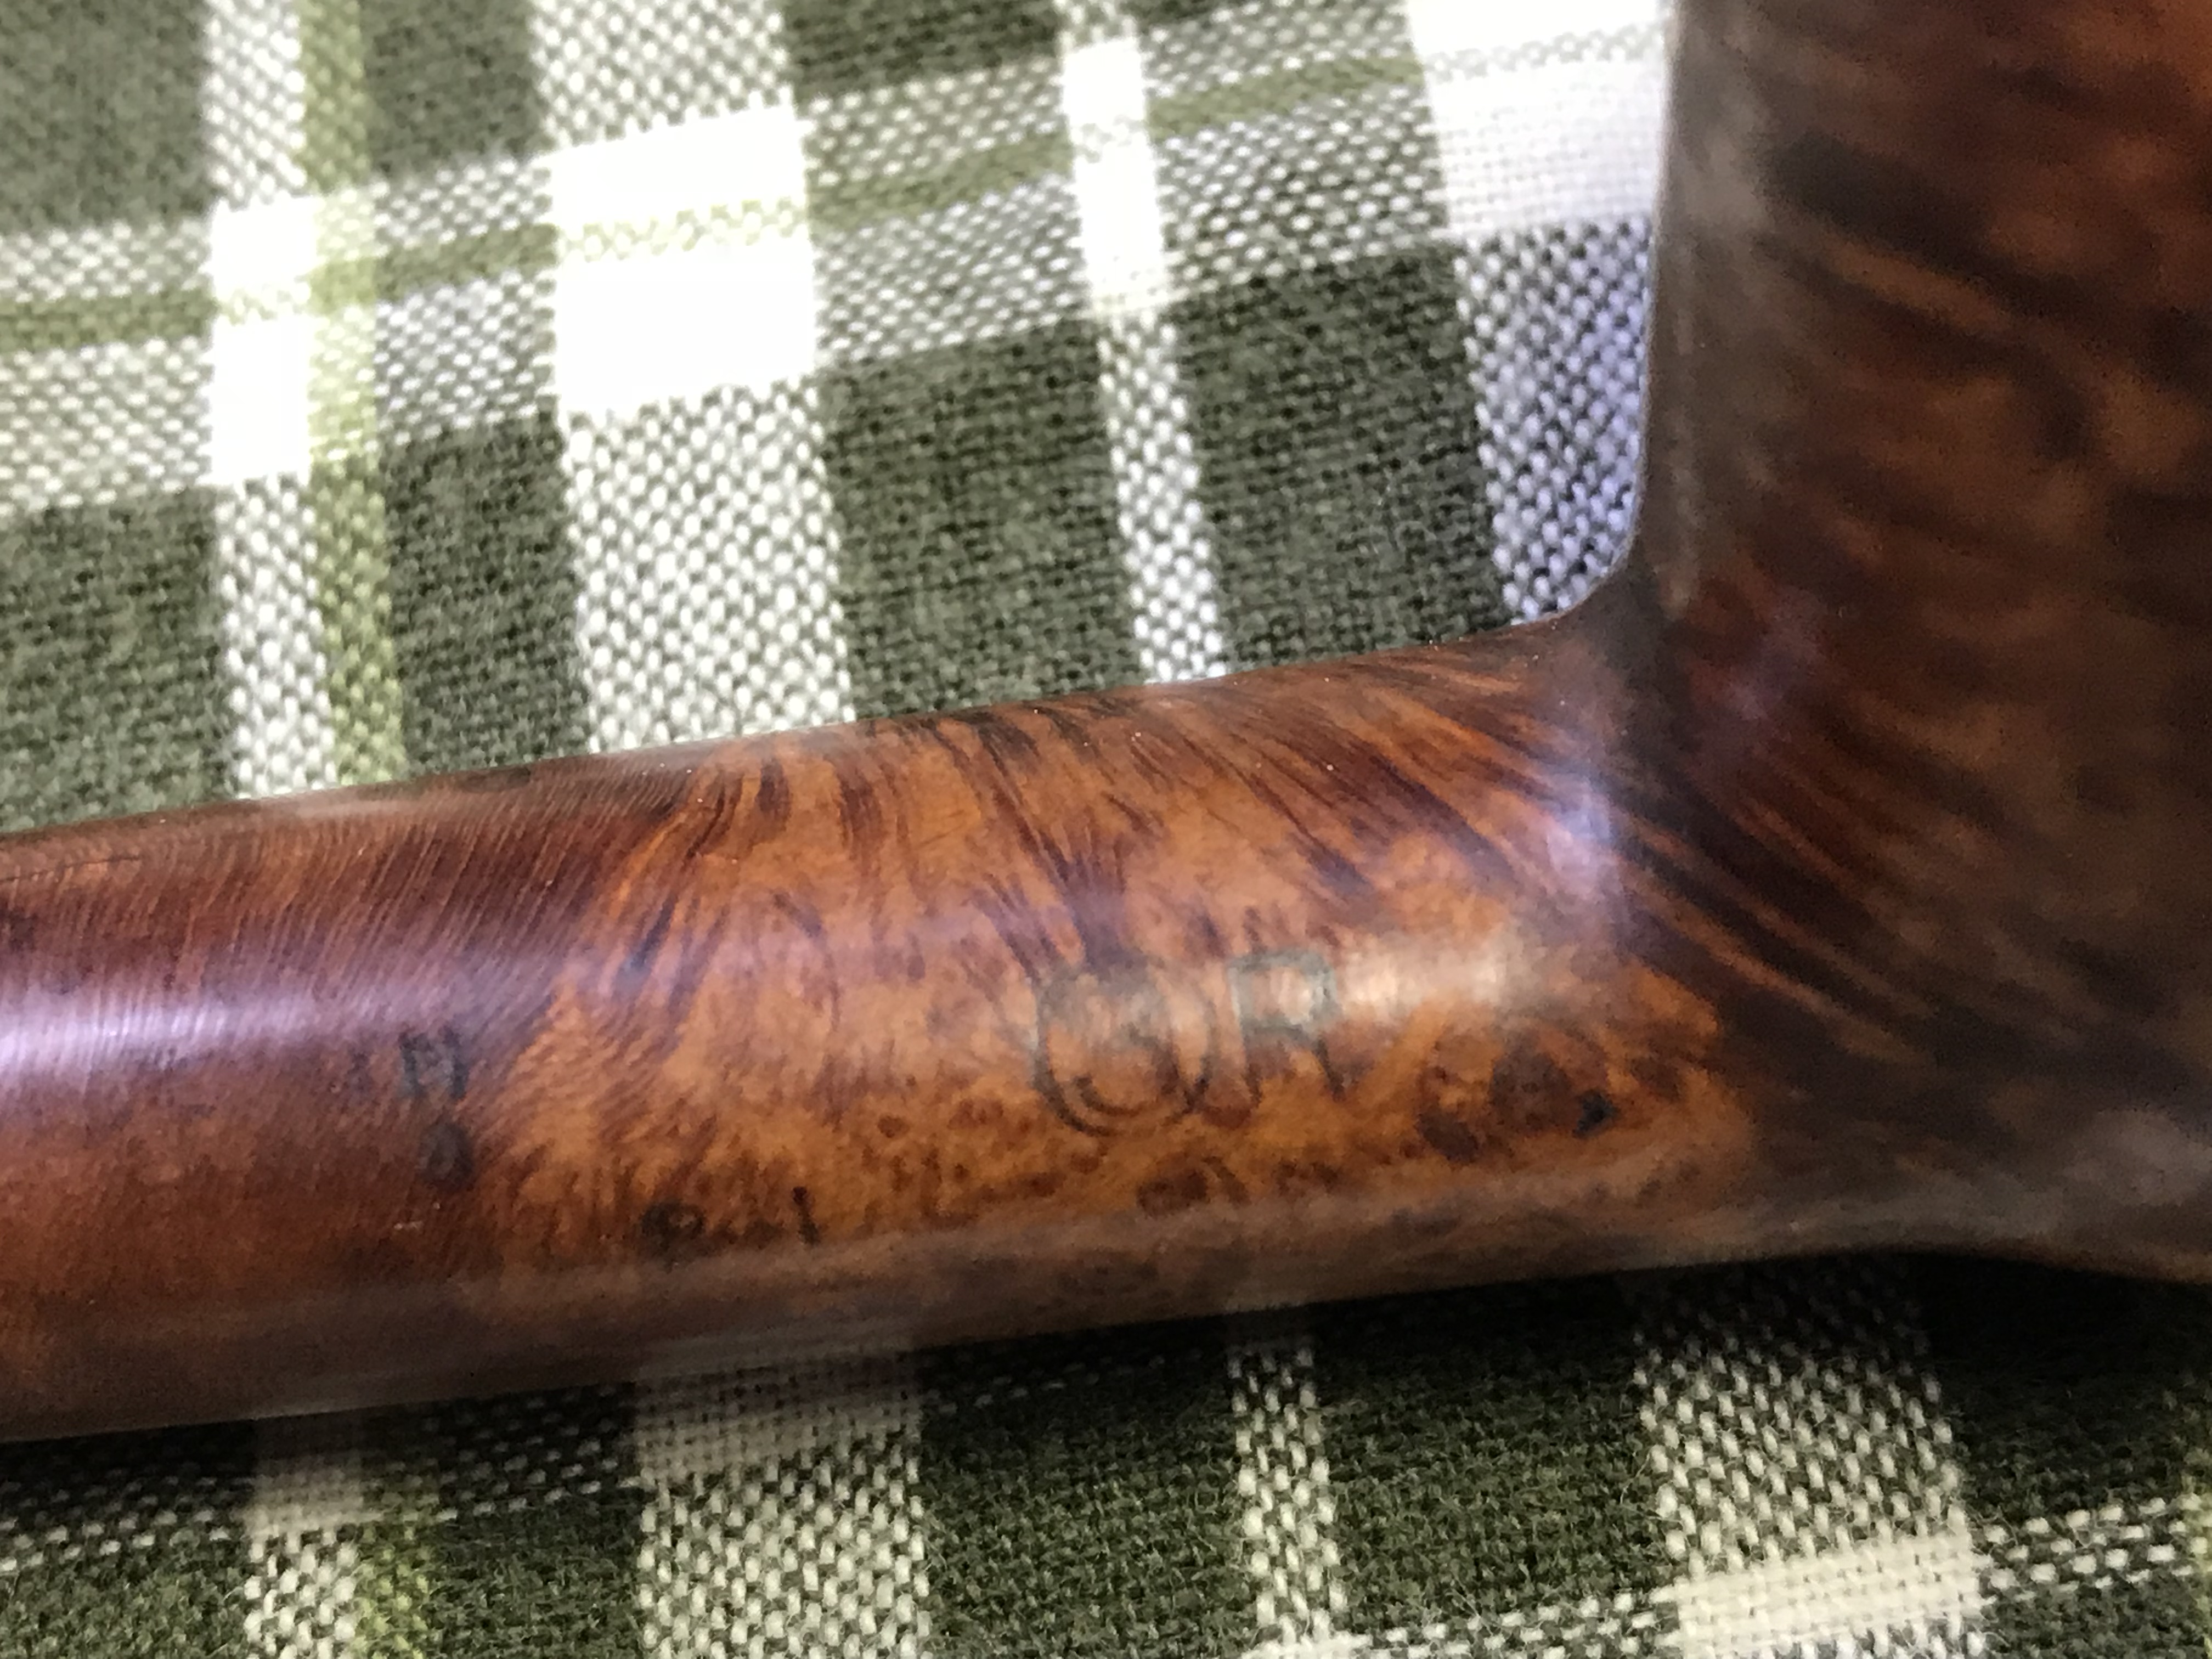
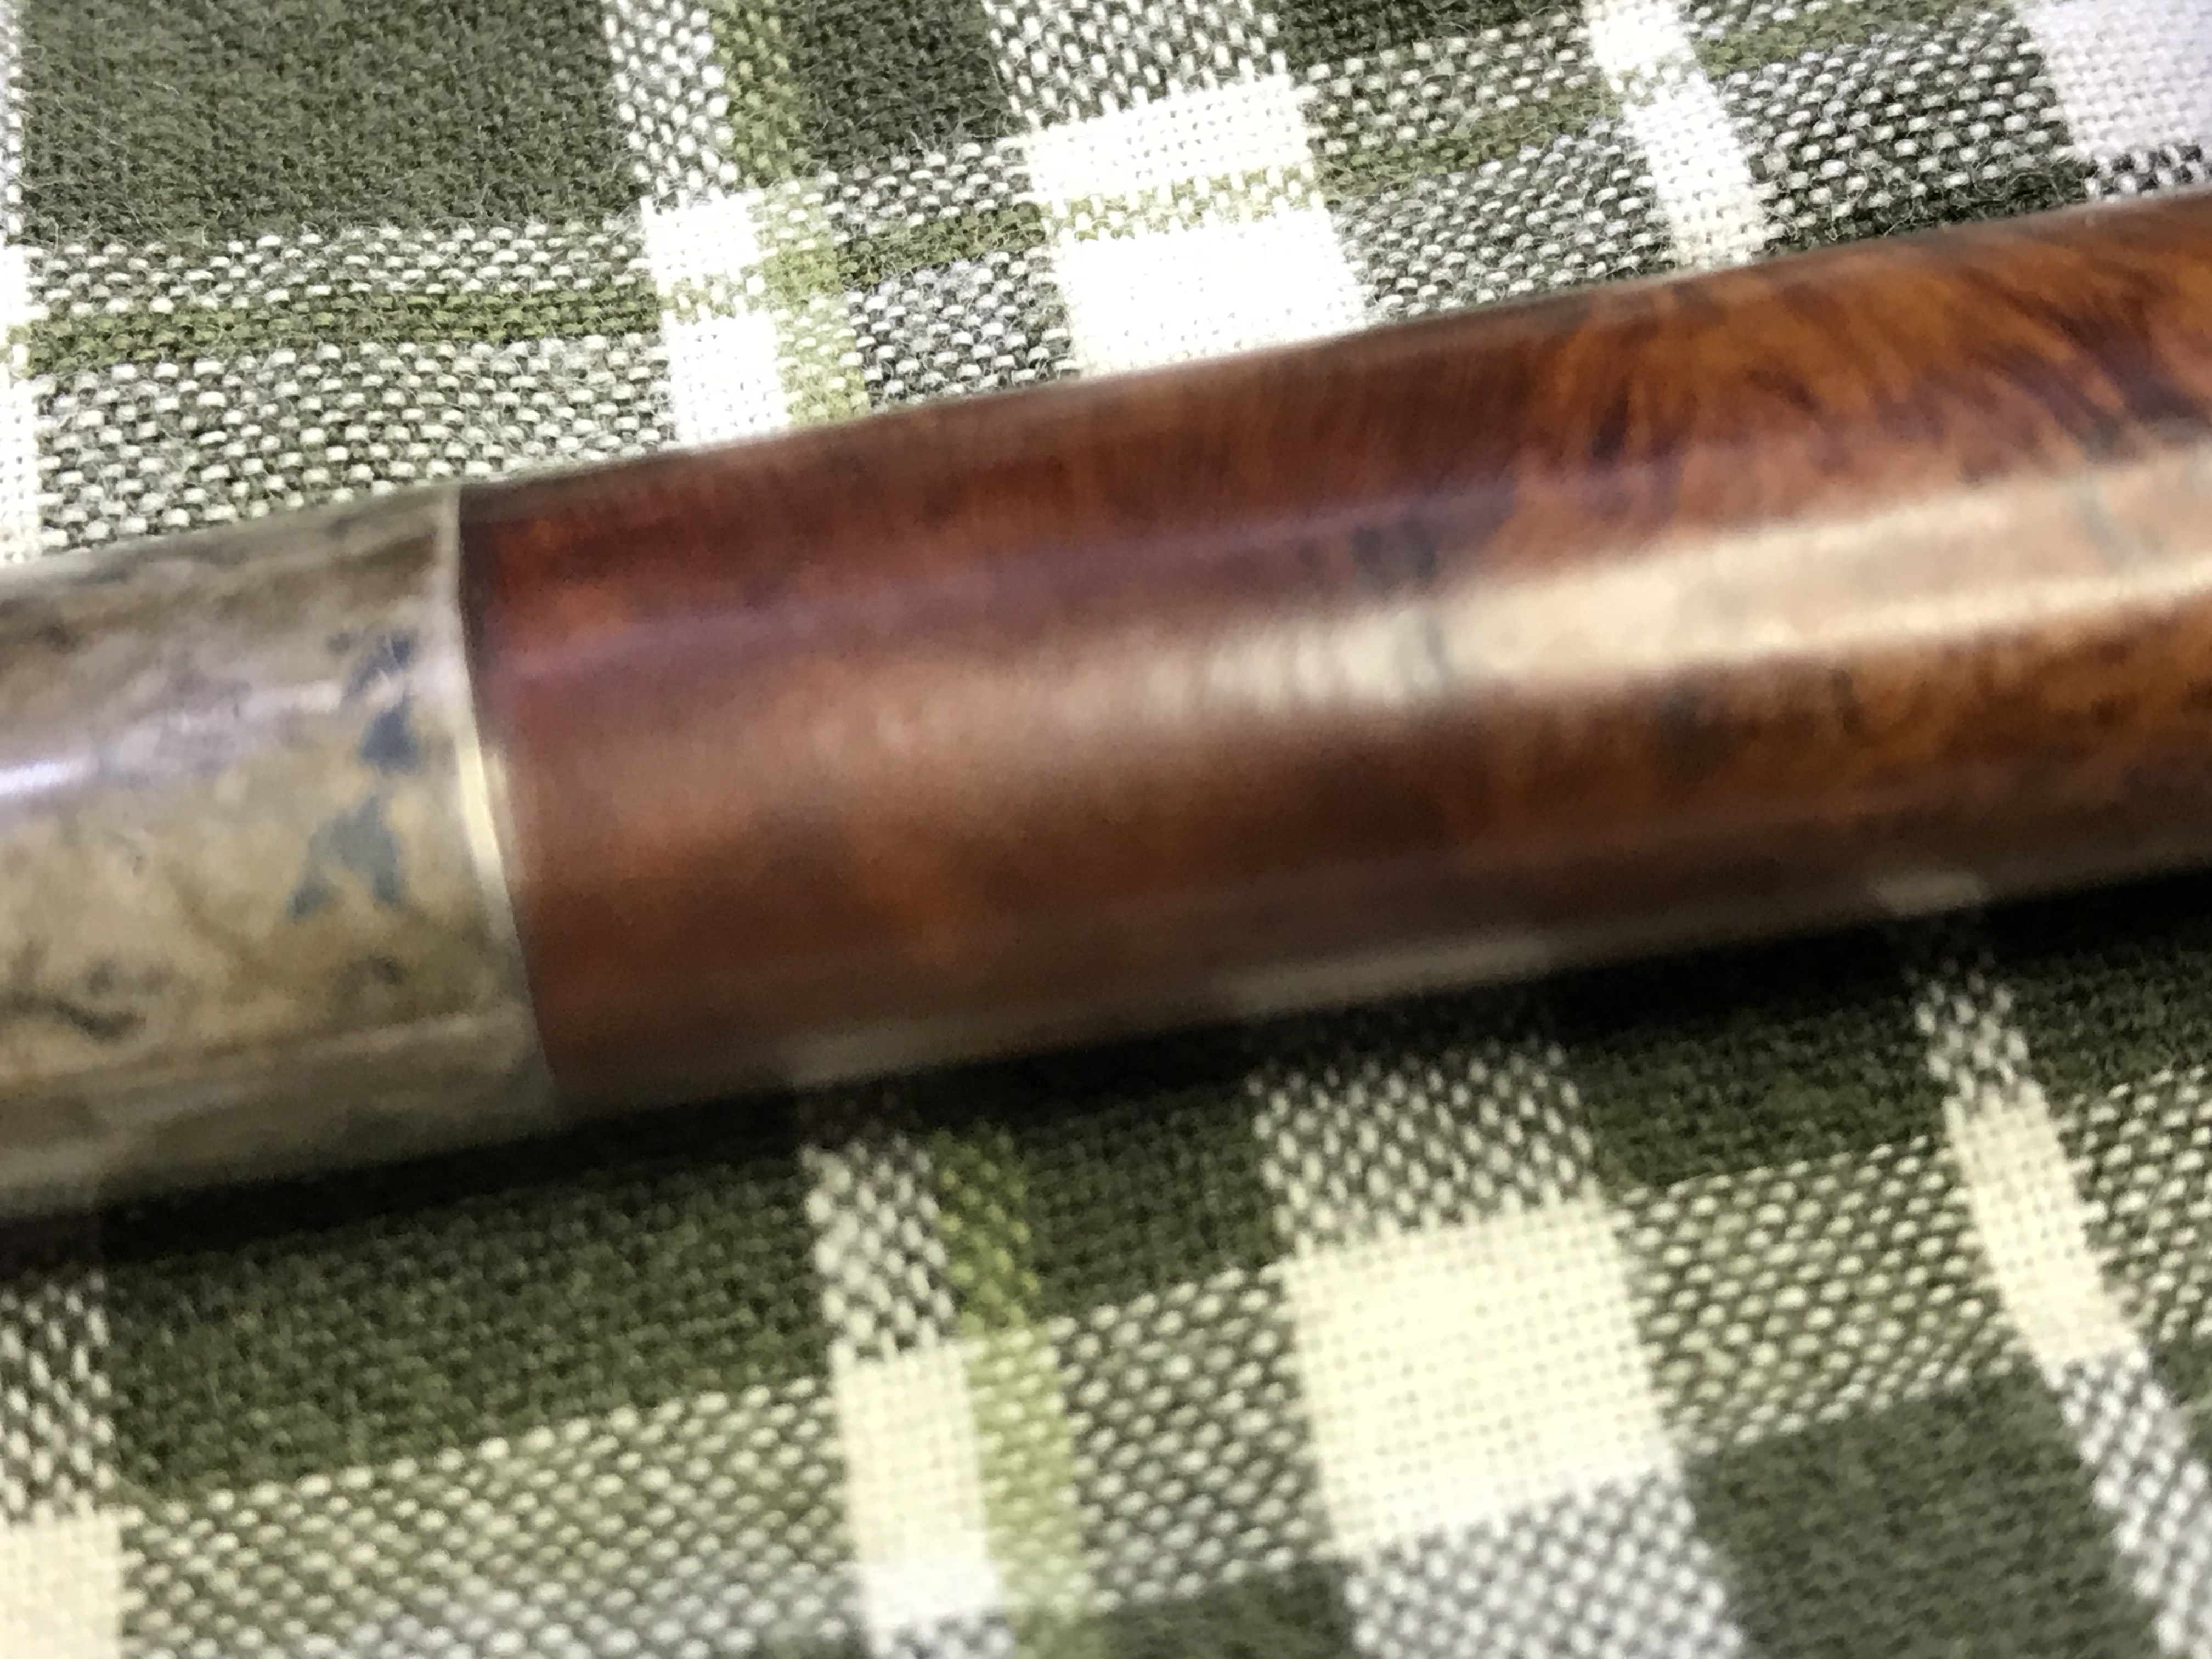
This GBD is a long and large pipe with a fairly large and deep smooth briar bowl and a steeply raking shank, the end of which is adorned by a sterling silver ferrule.The horn stem is connected with the shank by a long and hollow Albatross wing bone extension having sterling silver end caps at either end, most probably to strengthen it. The stem attaches itself to the wing bone extension by screw-in type tenon which is attached to this extension. The bowl is stamped on the left side of the shank as “GBD” in an oval encirclement and is the only stamping seen on the stummel. The Sterling silver ferrule at the shank end bears the oval stamp of “GBD” over “M R C LTD”,all in separate squares, over a rhombus which in all likelihood, enclosed the faded number “925” for Sterling silver. For its age, the stamping is crisp and clear.

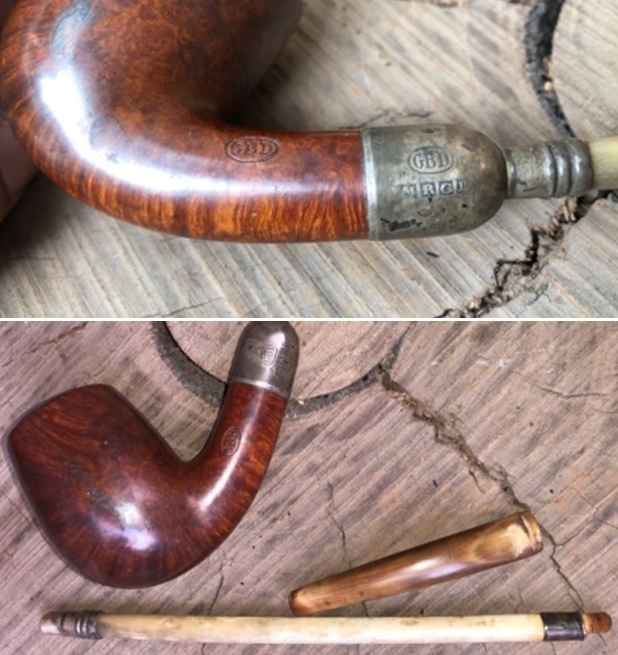
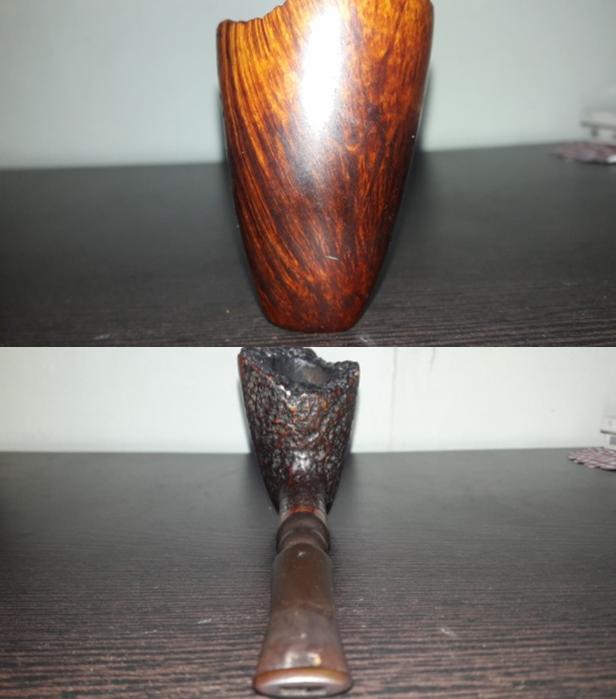
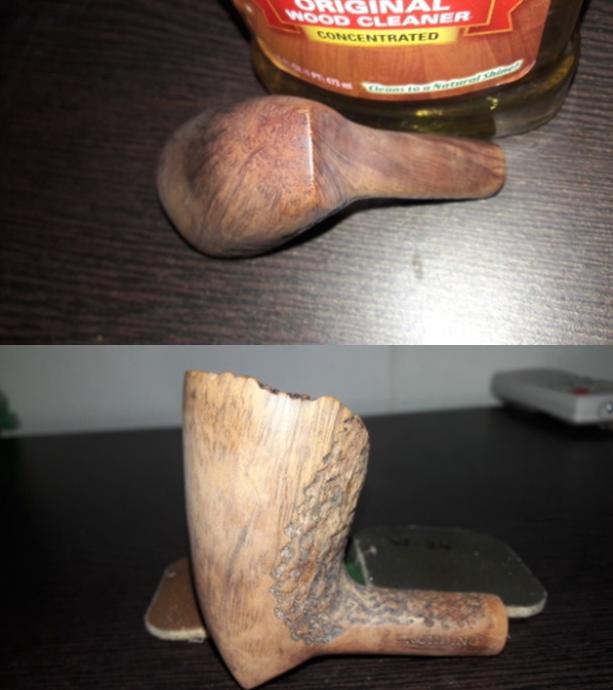
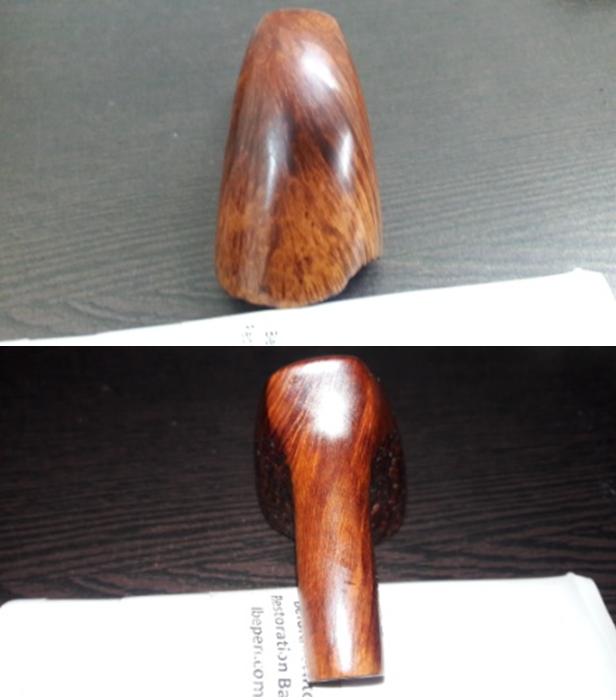
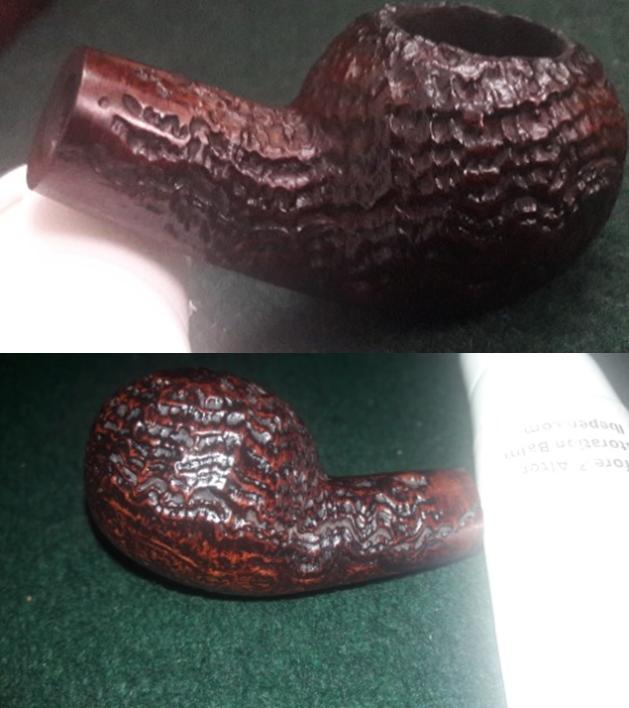
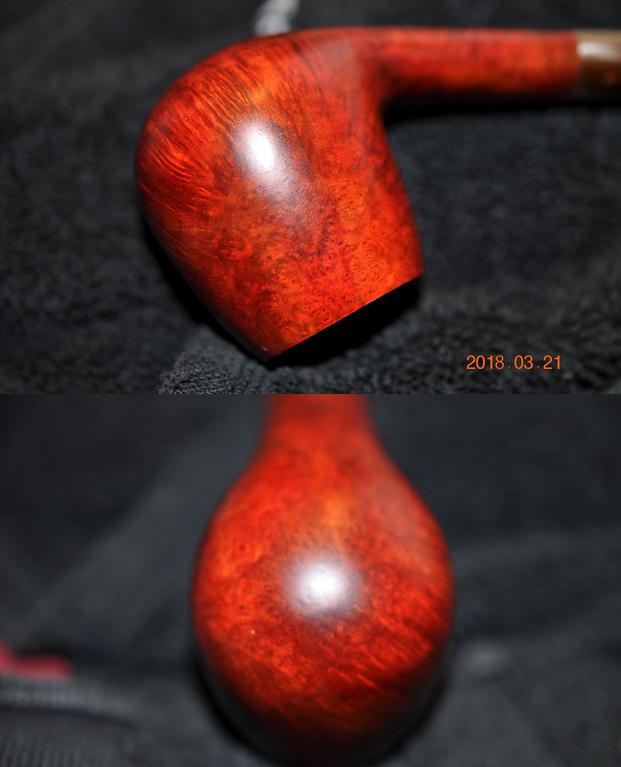
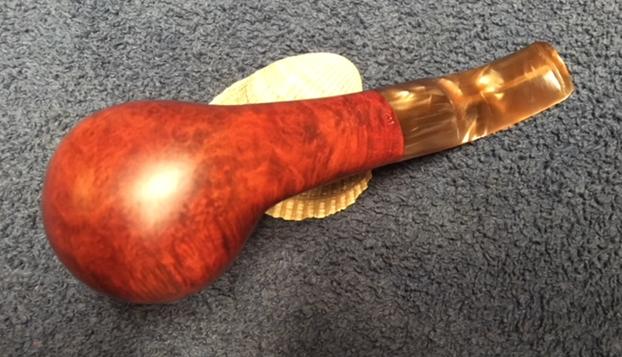
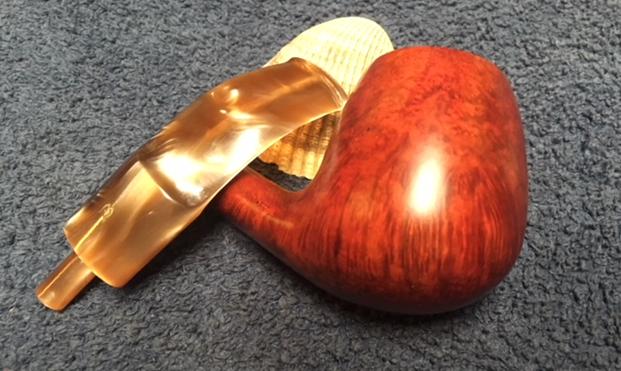
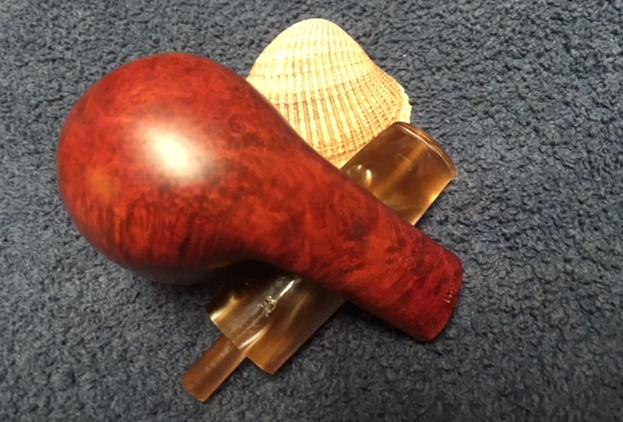
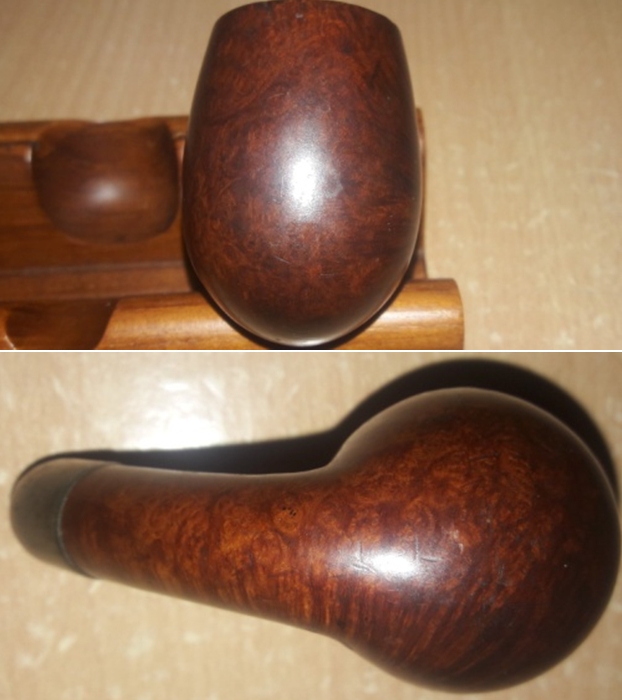
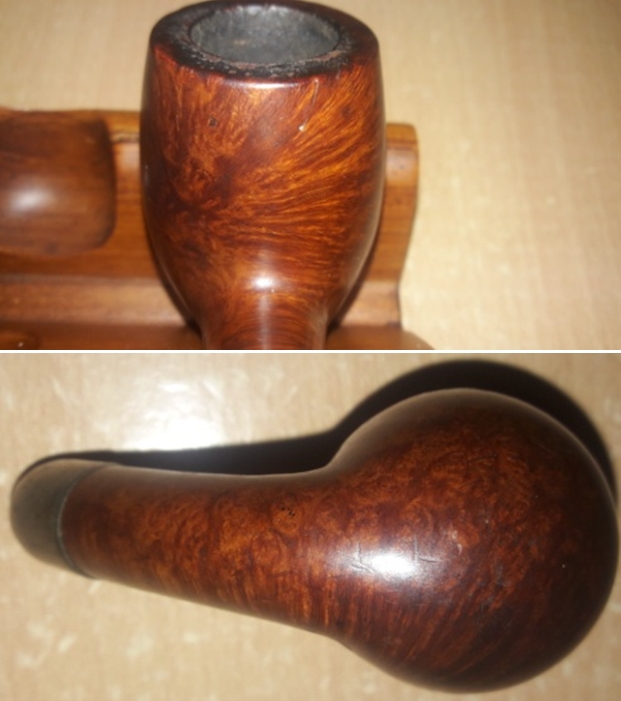
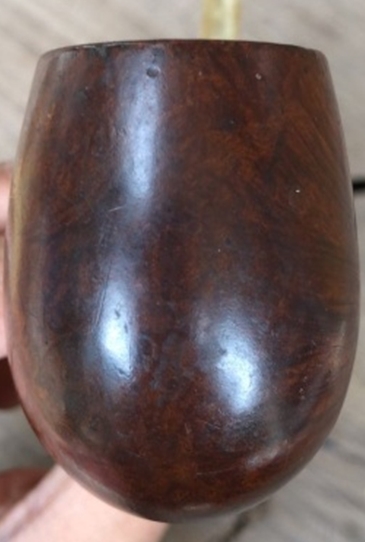
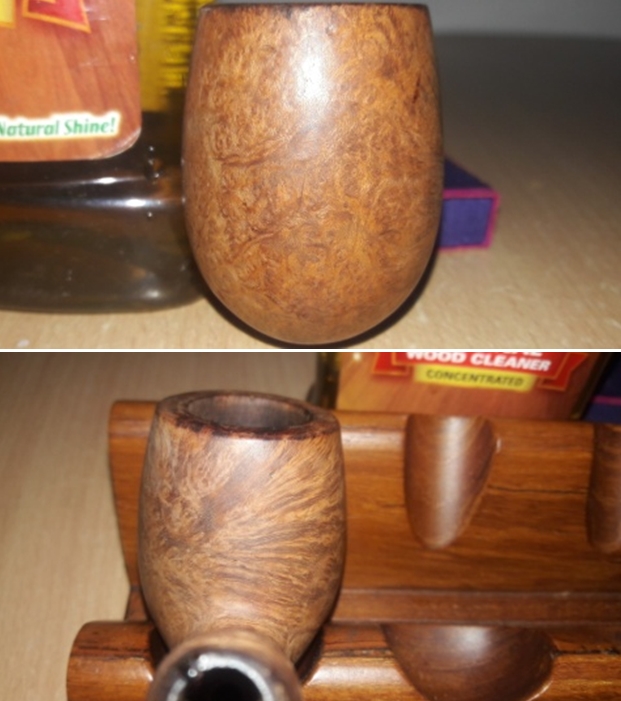
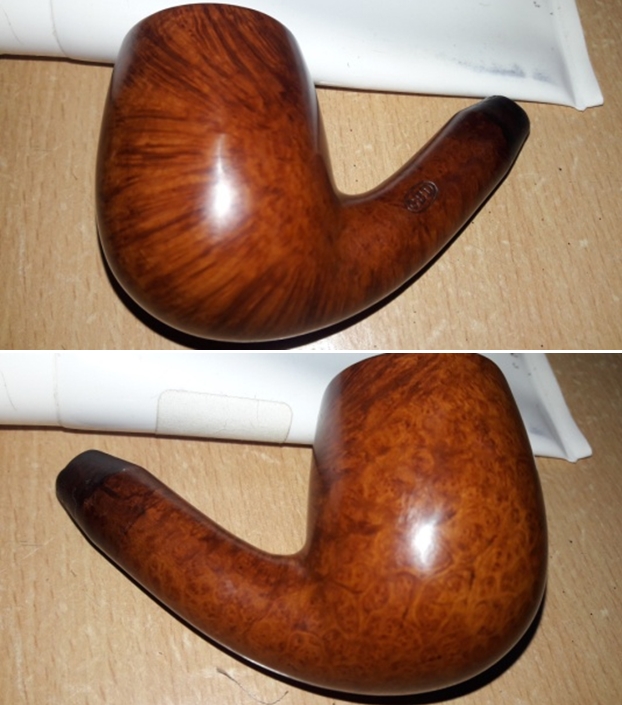
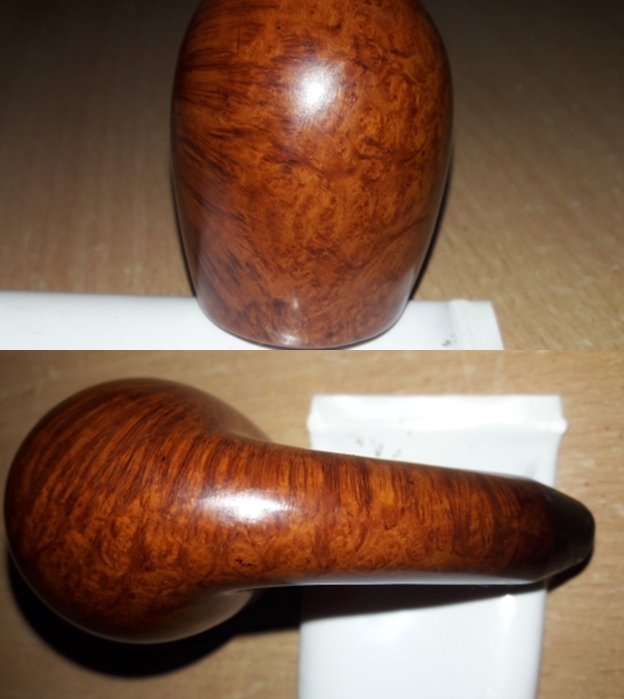
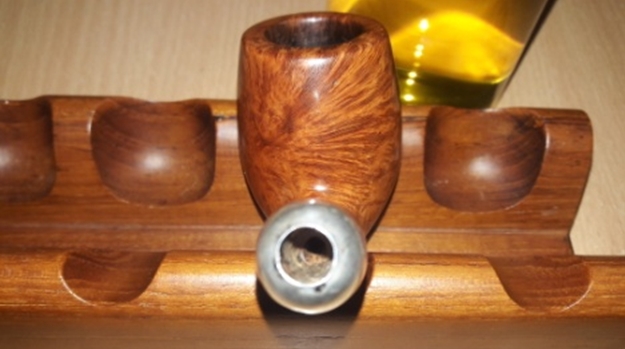
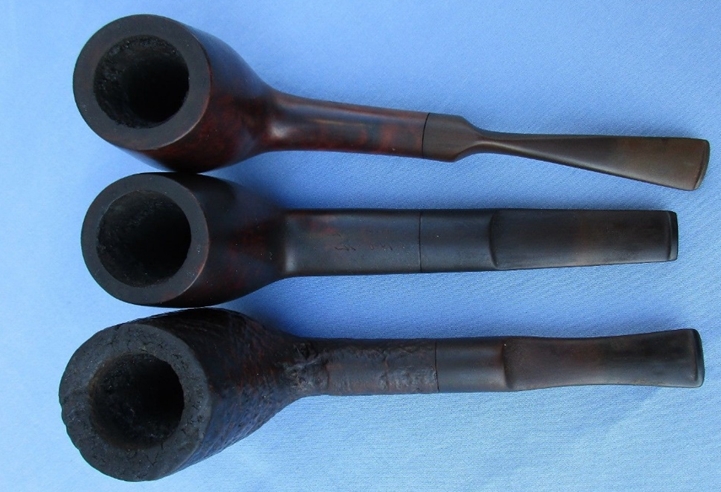
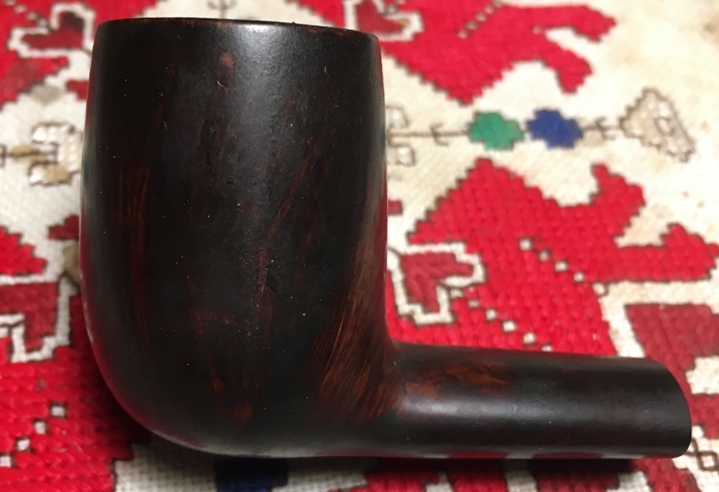
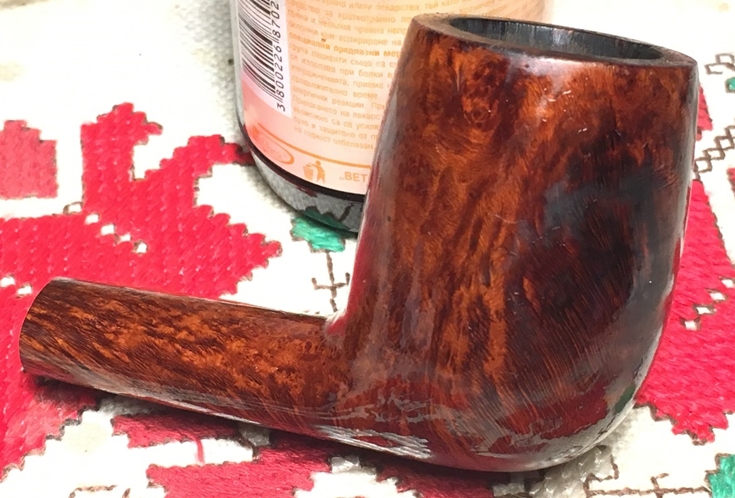
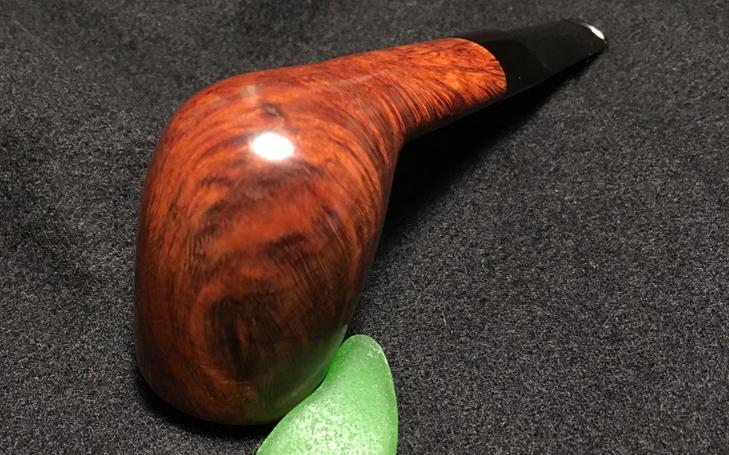
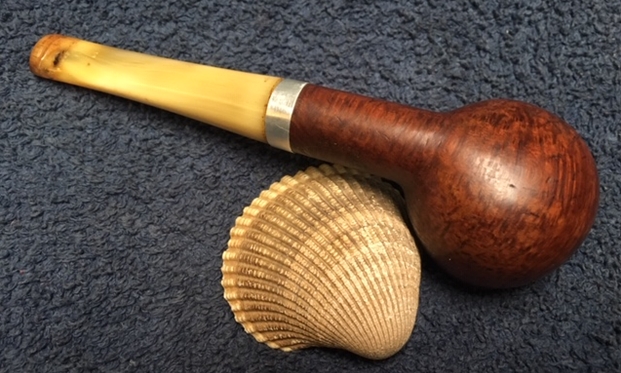
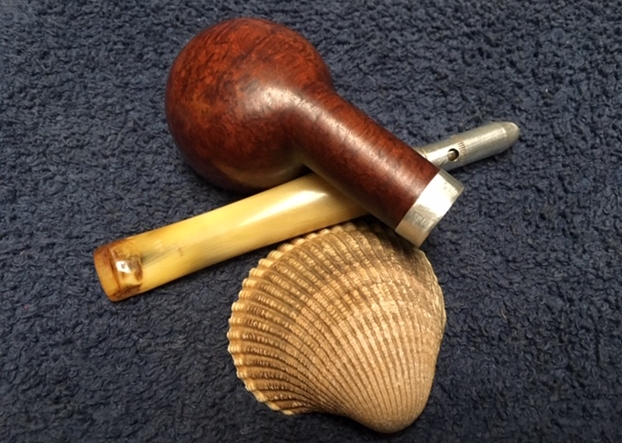
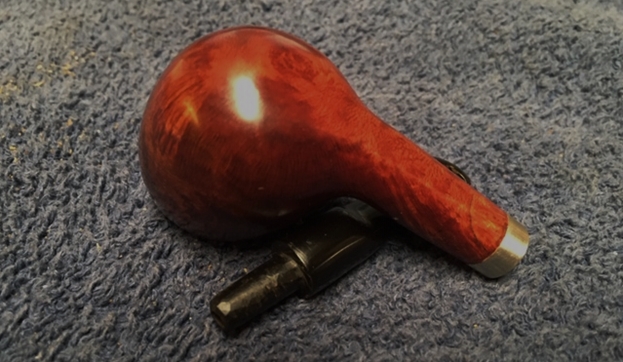
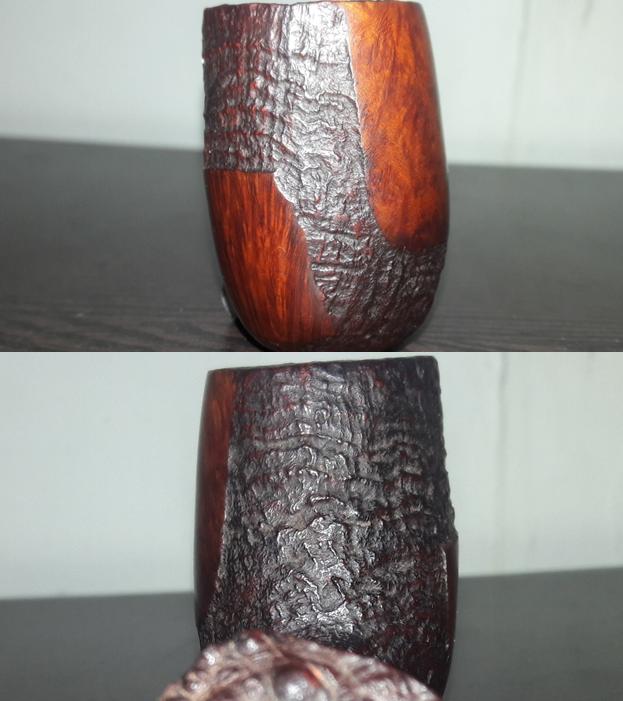
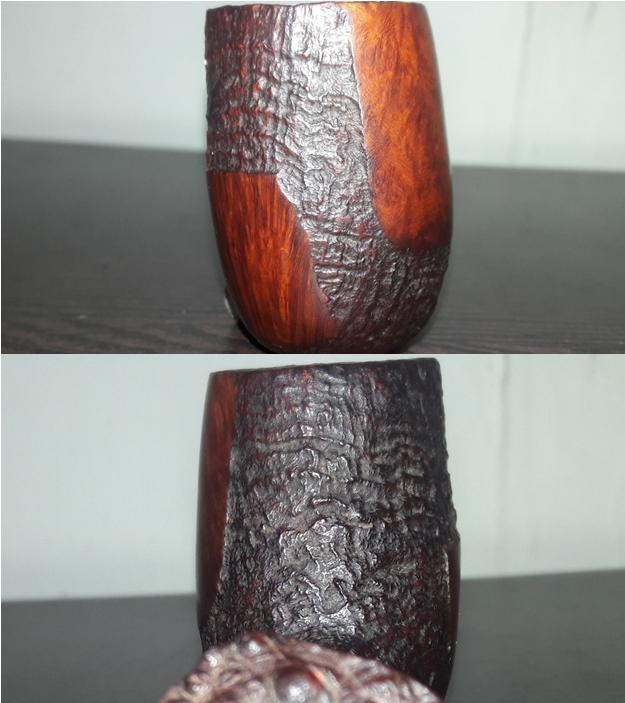
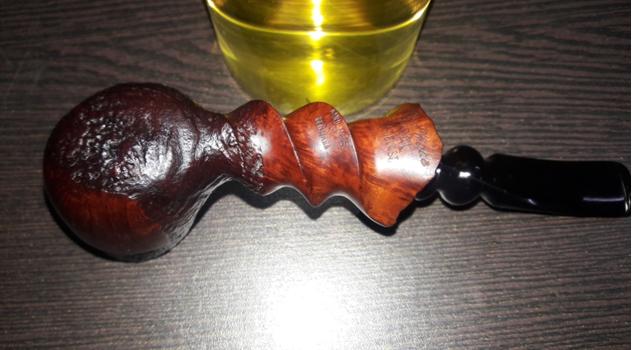
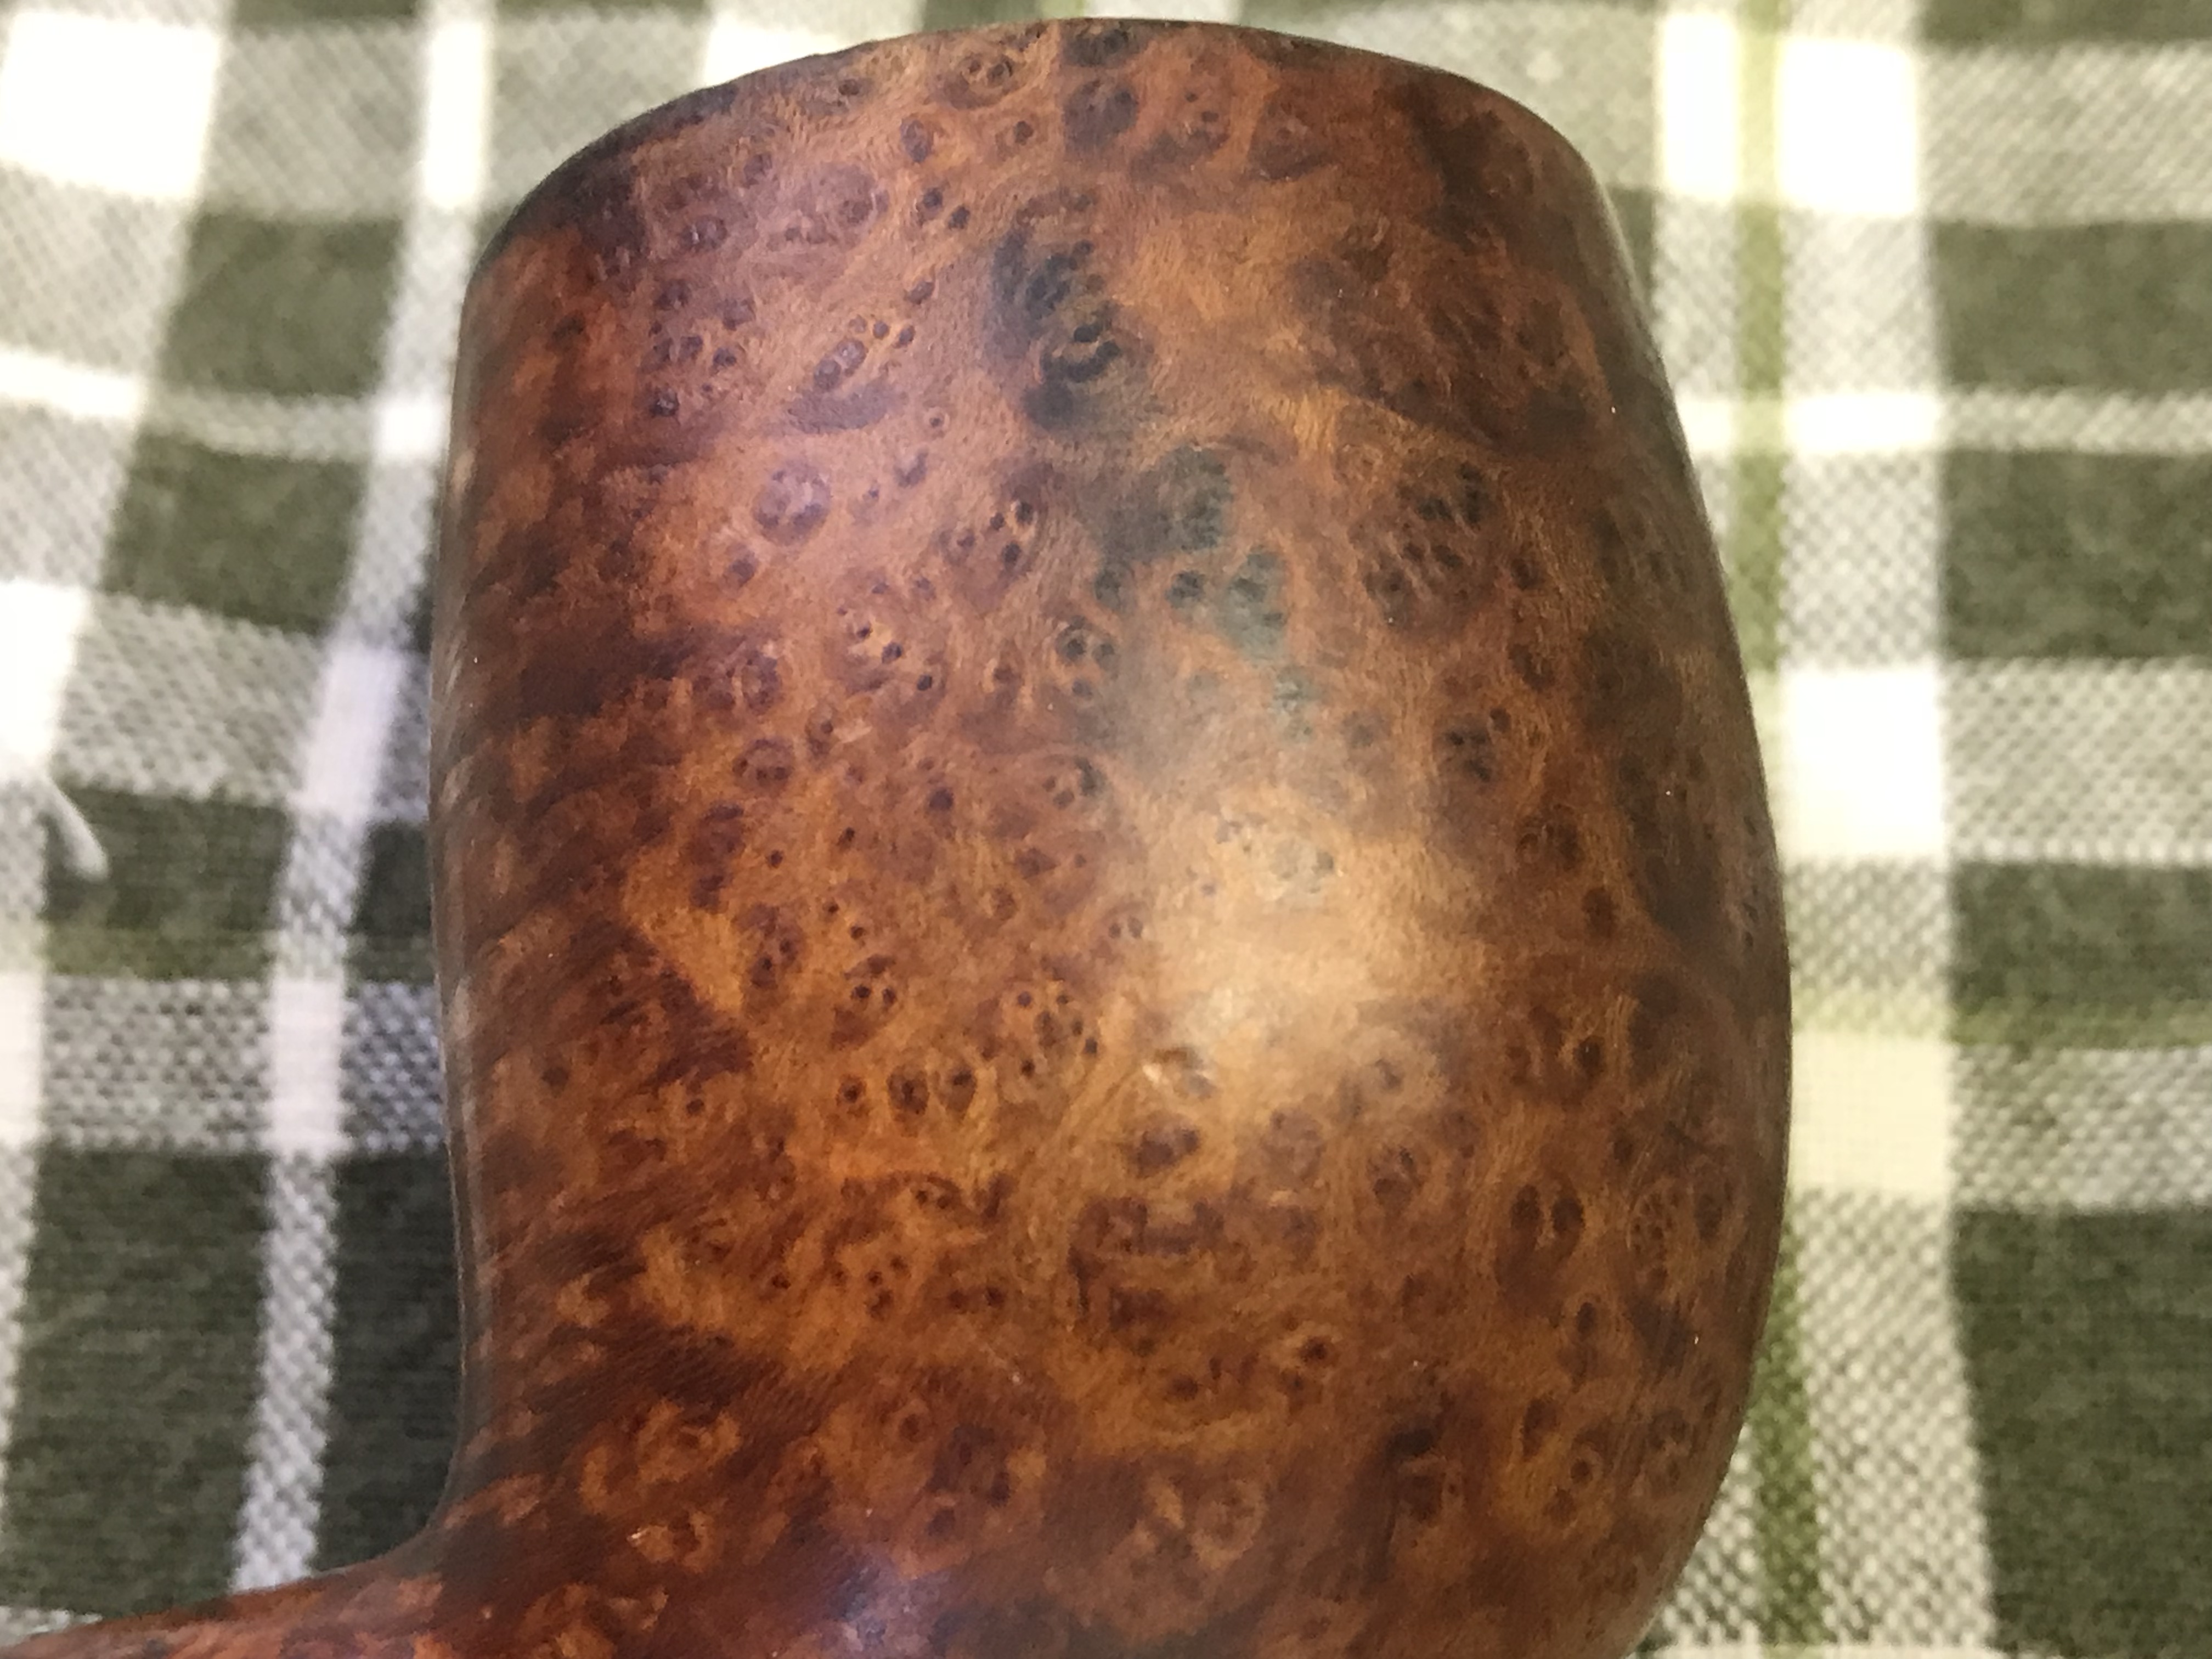
The large bowl shows beautiful, densely packed birdseye grain on the right side and extending to the front of the bowl,while a combination of tightly packed straight and cross grain adorns the left side and back of the bowl. The shank on the bottom surface appears to be divided into two exact halves, the right side with closely packed birdseye while the left side has tight straight grains. These grains on either side of the shank extend neatly in a straight line to the front of the bowl dividing the grains in symmetrical equal halves.

I searched Pipedia for information on this brand and this model in particular. Even though I could neither find any pictures or mention of this particular pipe that I was working on, I did find some important snippets of information which helped me making an intelligent guess as to the vintage of the pipe. I have reproduced the information that I had gleaned from Pipedia:

A HISTORY OF GBD

In 1850 three gentlemen got together in Paristo establish a firm dedicated to the fabrication of Meerschaum pipes – a courageous step in politically restless times. Ganneval probably came from the area of Saint-Claude where he had learned making wooden pipes. Bondier’s family obviously came from Paris and had immigrated in 1789 to Geneva. He himself had worked as a wood turner in the clay and china pipe industry in and around Saint-Claude making stem extensions etc. Donninger was an Austrian or Swiss and had worked in Vienna, the world’s center of the Meerschaum pipe. They agreed on the acronym GBD selecting the initials of their surnames.

There is a very simple explanation for GBD’s program to turn more”British”: GBD became a British company soon after the turn of the century! In 1902 Marechal and Ruchon sold GBD to A. Oppenheimer & Co.in London.

The business relation to GBD in Paris began as early as 1870. Being the most important customer in the English speaking world, Oppenheimer & Co. were designated as sole distributor for Great Britain, the USA and Canada in 1897.Especially Adolphe Oppenheimer had a burning interest in the pipe business, and Louis’ son James Adler shared that. He should play the most important role in the amicable merger of GBD. A. Marechal, Ruchon and Cie. in Paris was now Marechal, Ruchon & Co. Ltd. (see Marechal Ruchon & Cie. page) – a British firm with four directors: Adolphe Oppenheimer and James Adler had their seat in the head office in London while Auguste Marechal and Ferdinand Ruchon went on leading the GBD factory in the Rue des Balkan in Paris, which was considerably extended and modernised. Ruchon acted as CEO.

Marechal Ruchon & Cie. was a company owned by Auguste Marechal and Ferdinand Ruchon (“& Cie” is the french equivalent of “& Co”) which owned the GBD brand from the end of the 19th century until 1902 when they sold Marechal, Ruchon & Cie. to Oppenheimer Pipe,which in turn changed the name of the company to Marechal, Ruchon & Co., Ltd. Upon the creation of Cadogan, however, the brand was no more, remembered only in the name of the GBD Marcee pipes made until just after the Second World War.

Cadogan Investments Limited is a subsidiary of A. Oppenheimer& Co. Limited. It was formed by Oppenheimer Pipe in 1920 as a holding company for its many recent acquisitions, including BBB,Loewe & Co.,two pipe factories in St. Claude and others. It continued to acquire pipe brands and makers for decades, adding GBD and others to their marquee.

It is from the last two paragraphs above, that I can judge that this pipe was made somewhere between 1902 and 1920!!!!!!

INITIAL VISUAL INSPECTION

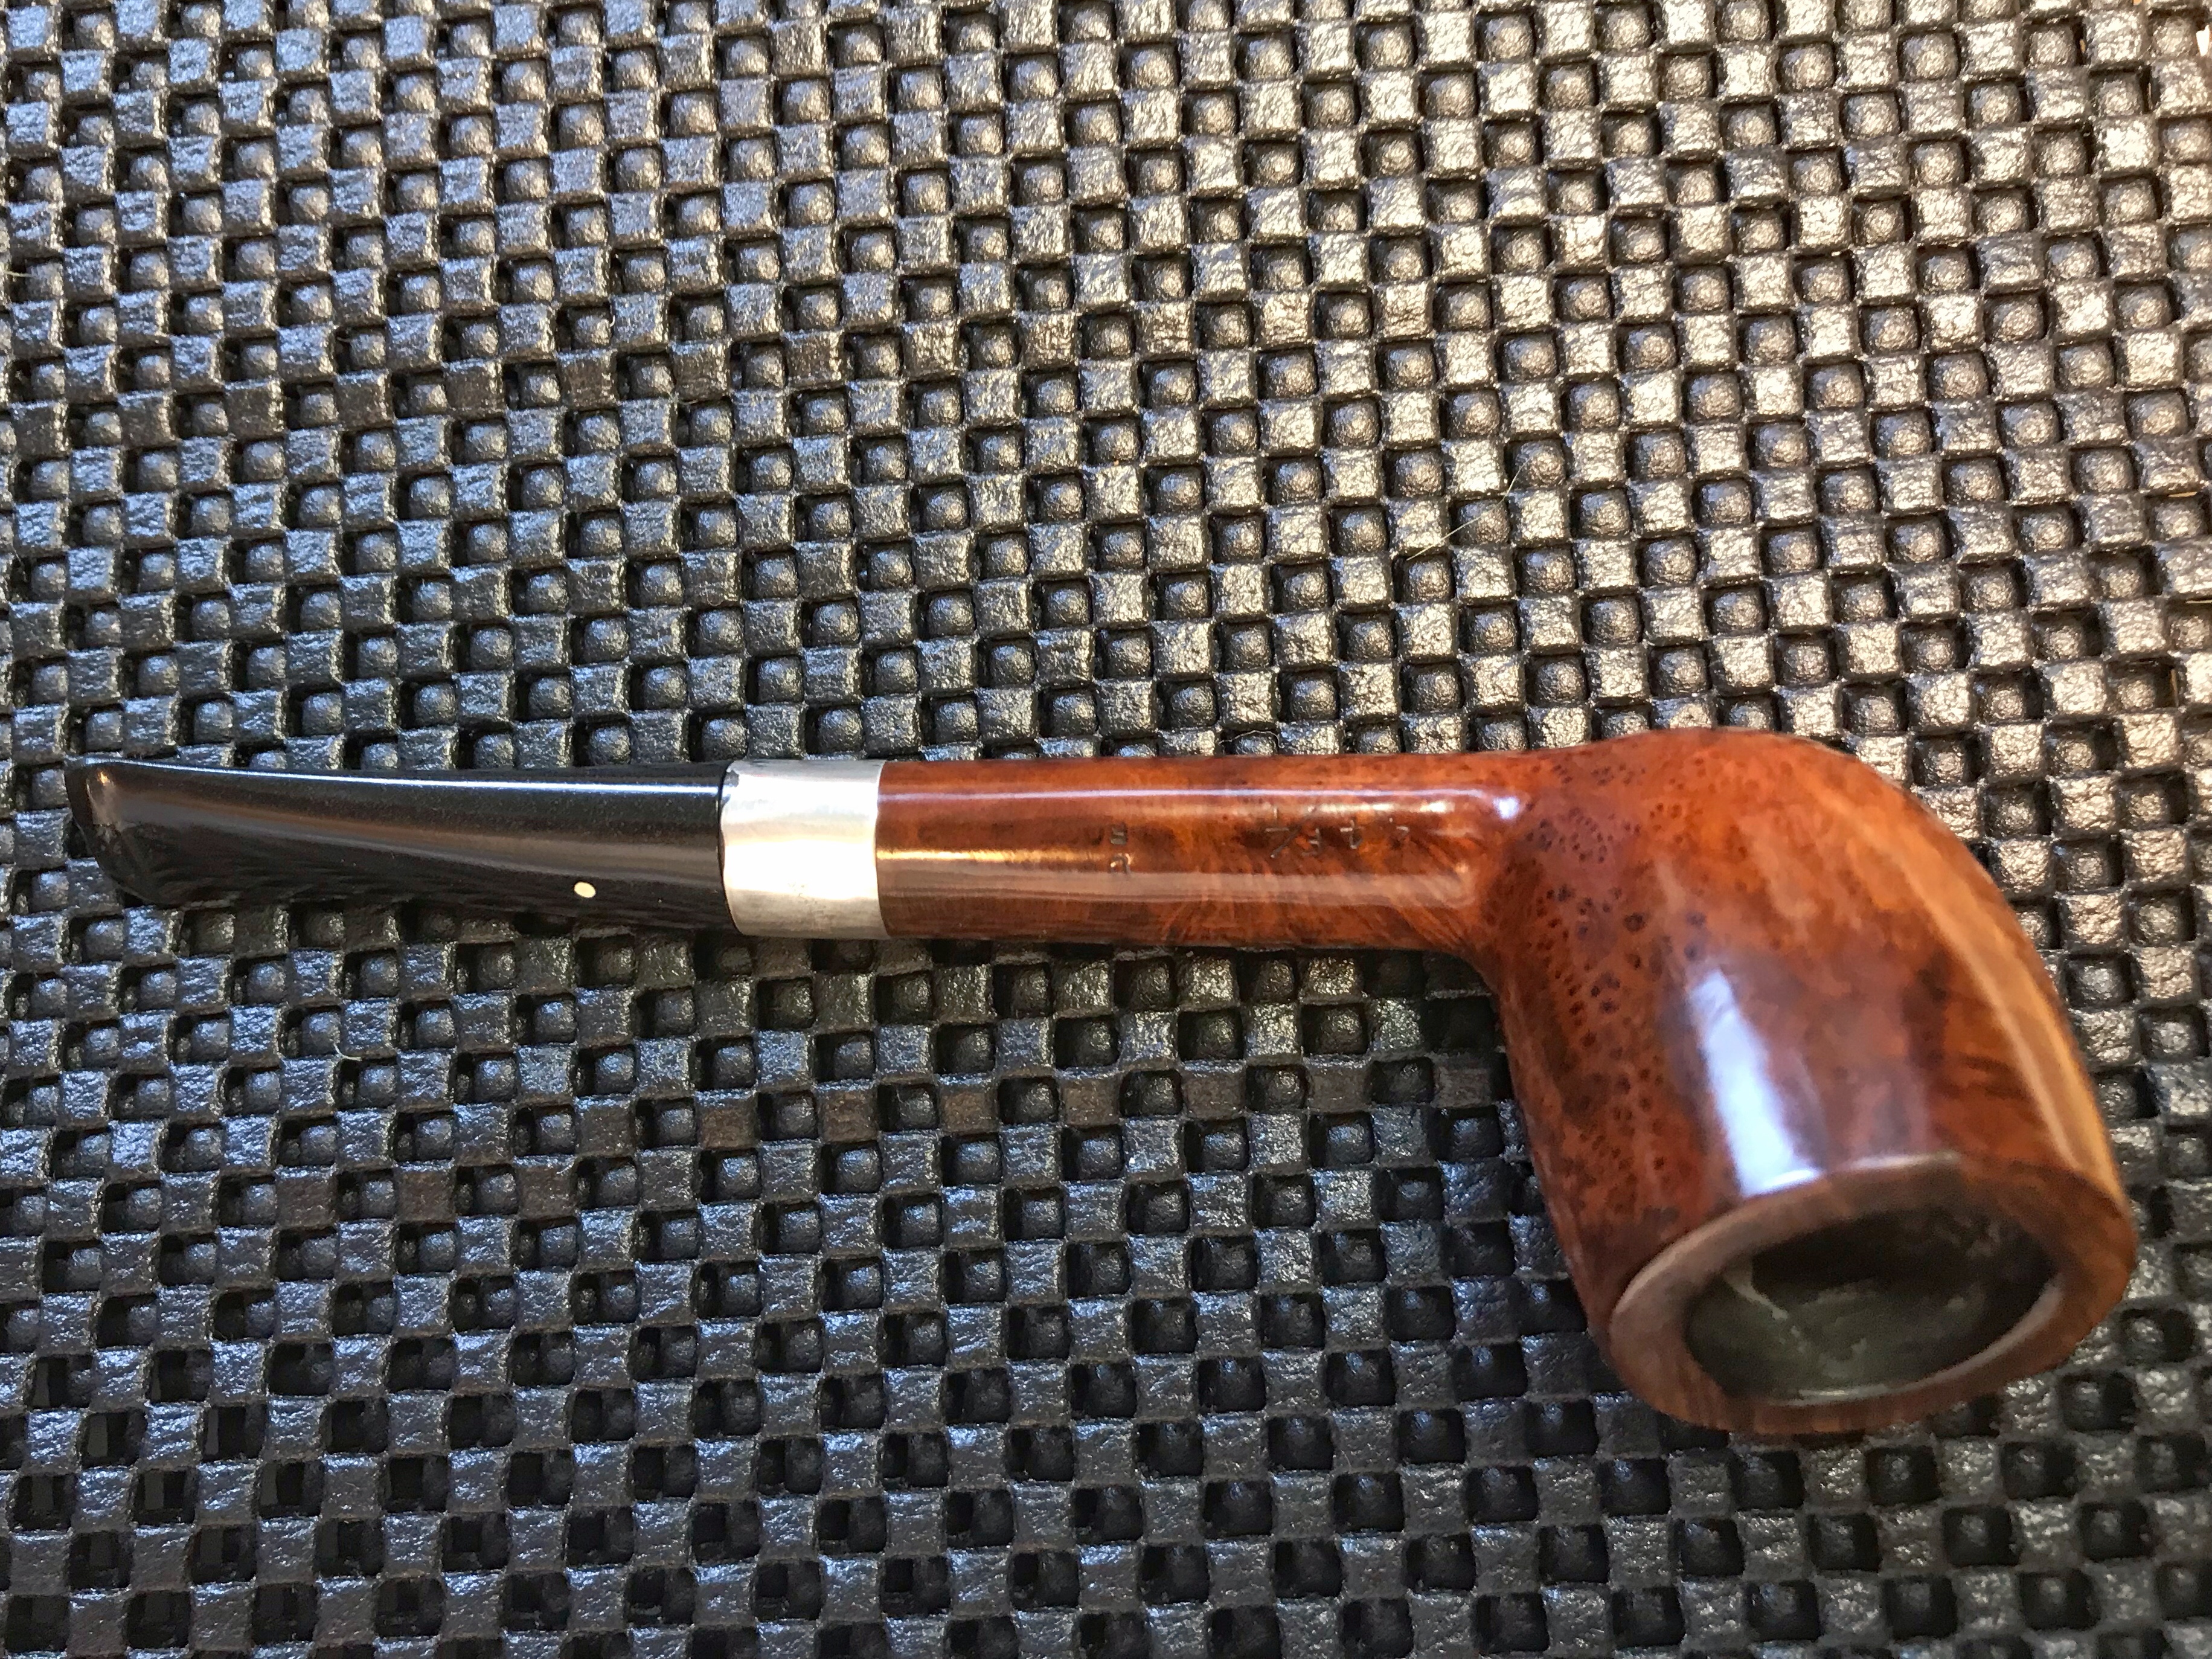
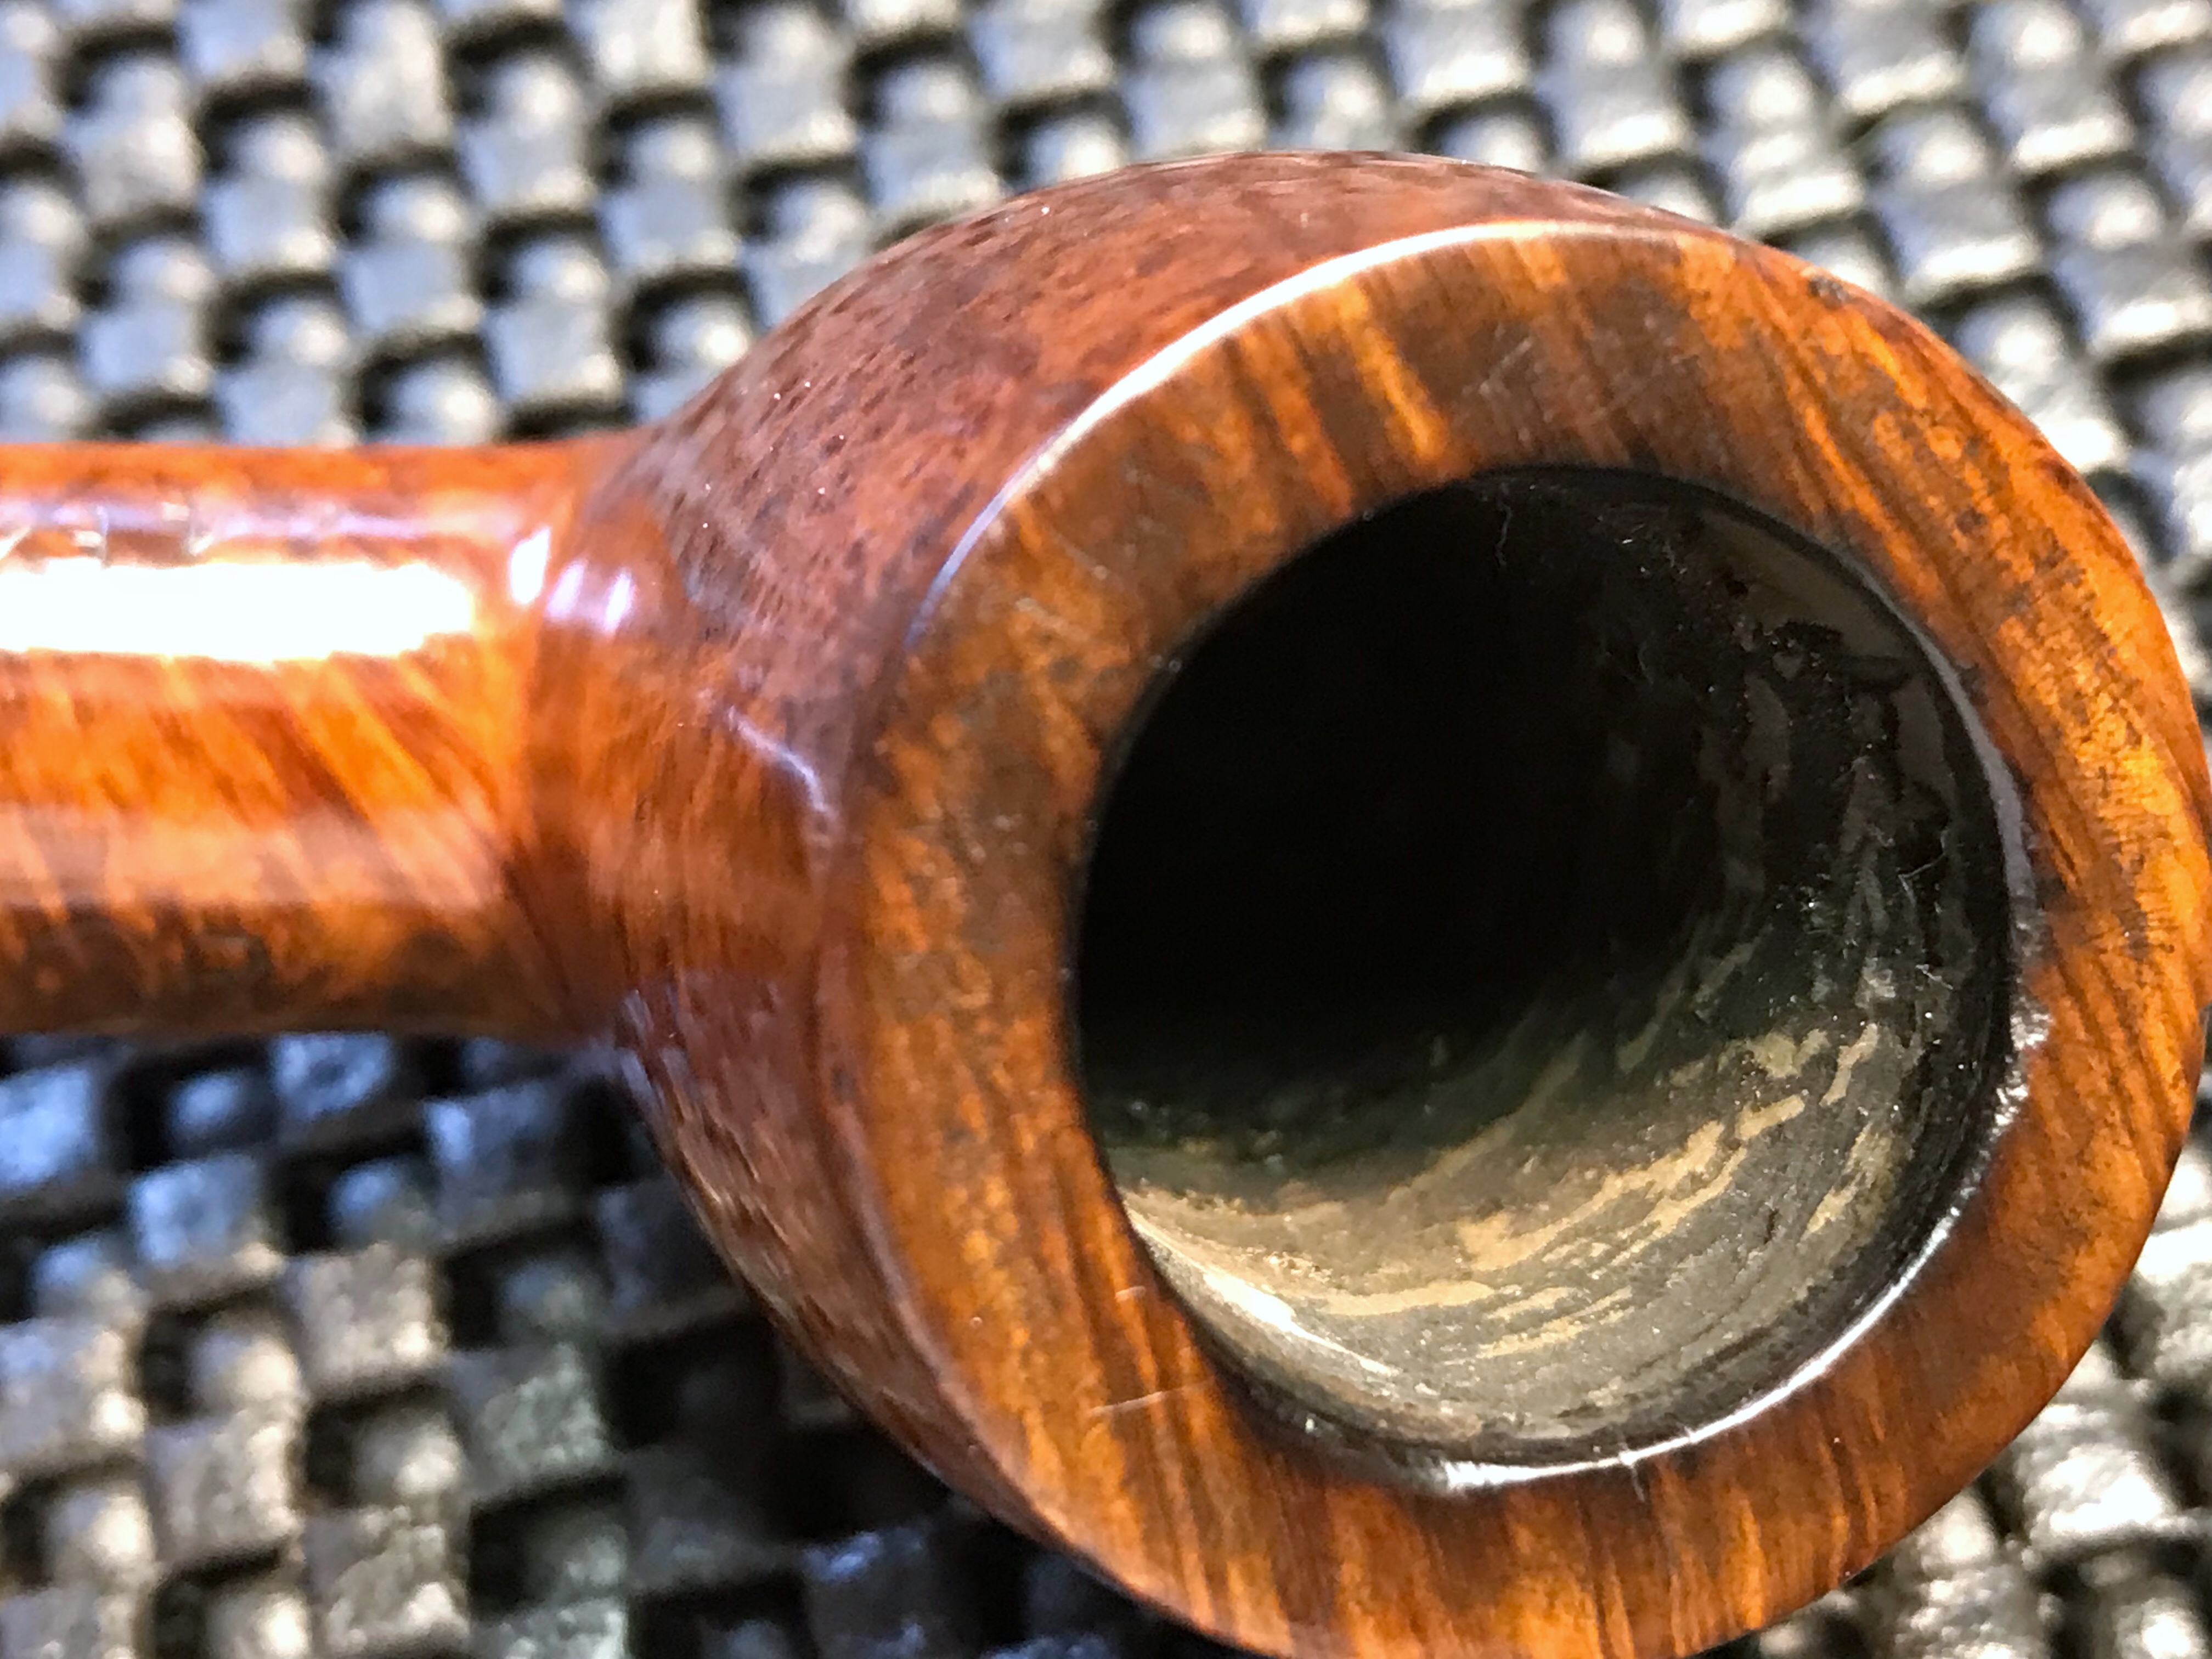
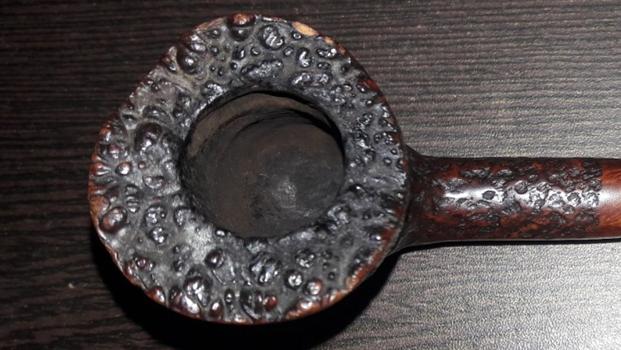
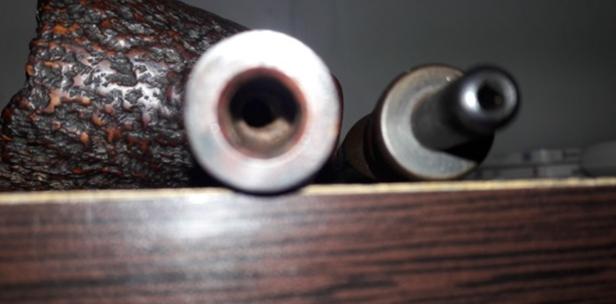
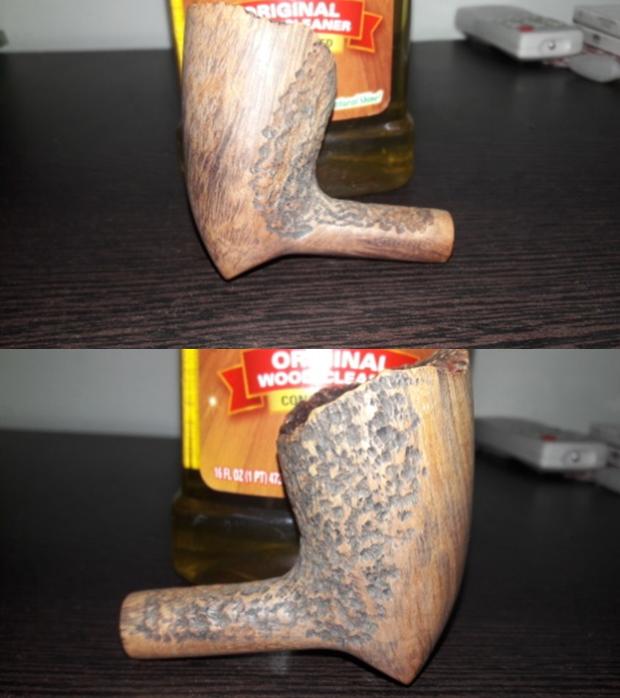
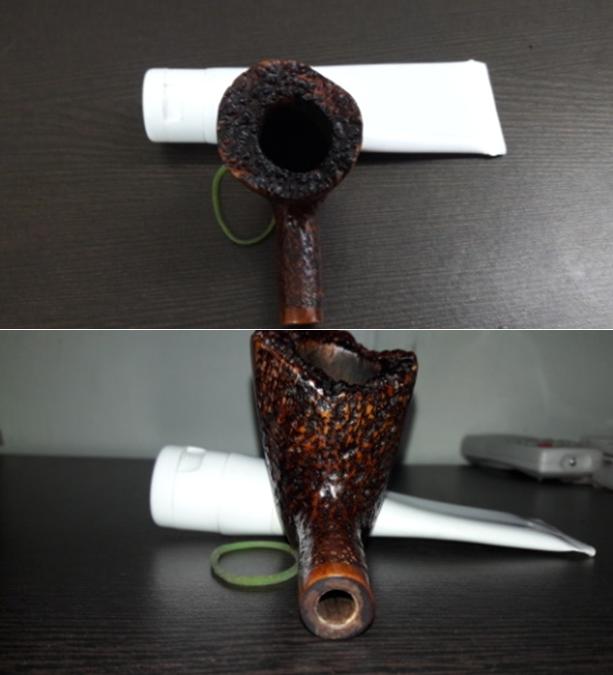
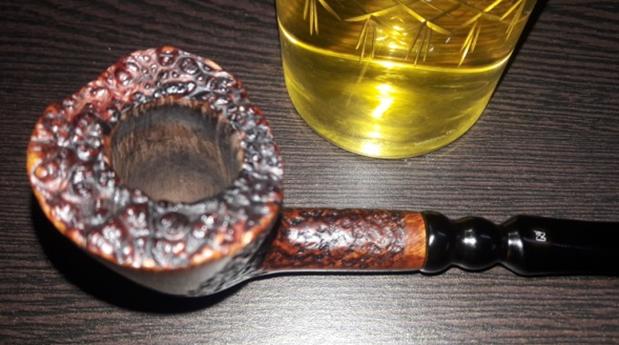
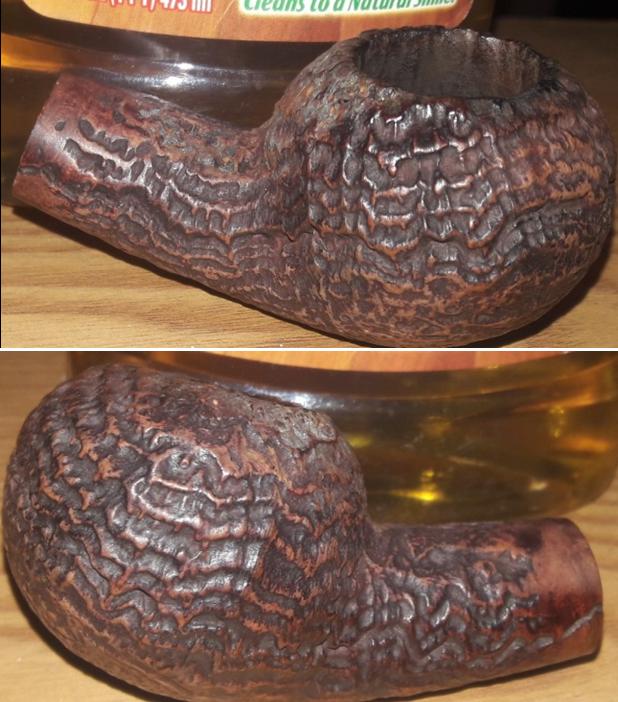
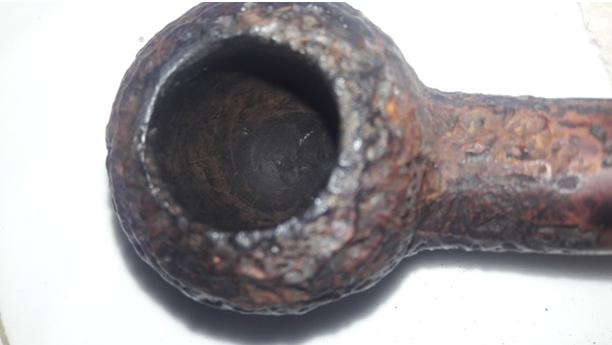
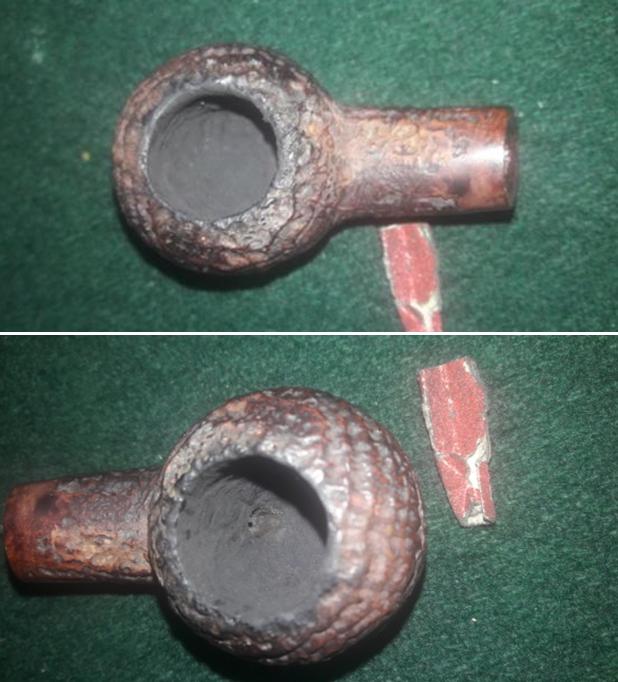
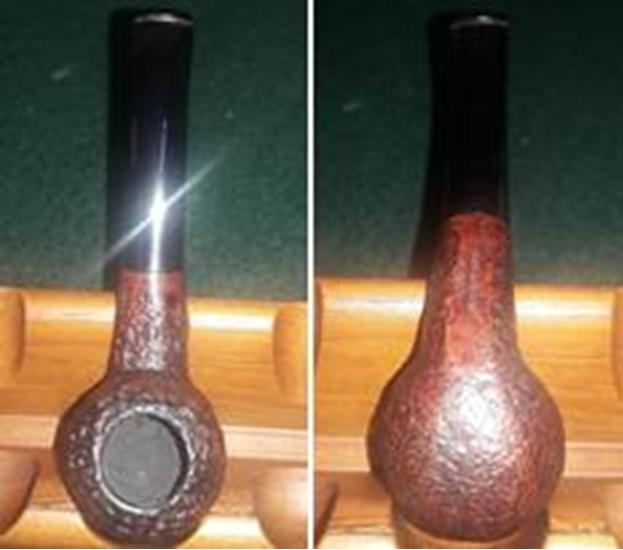
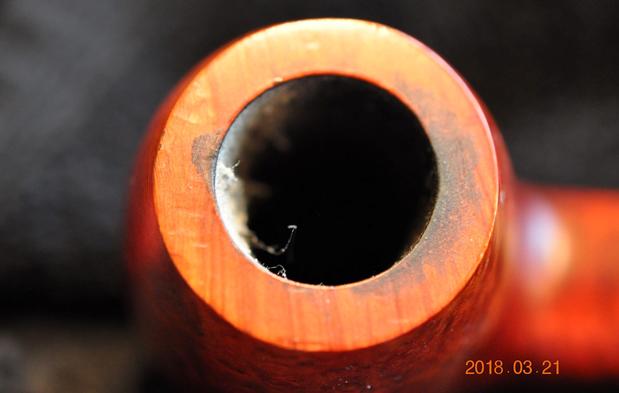
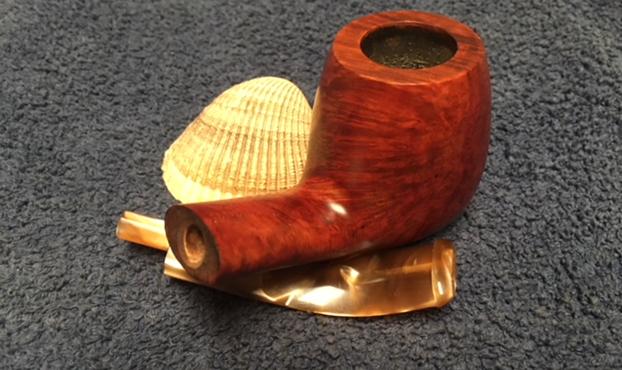
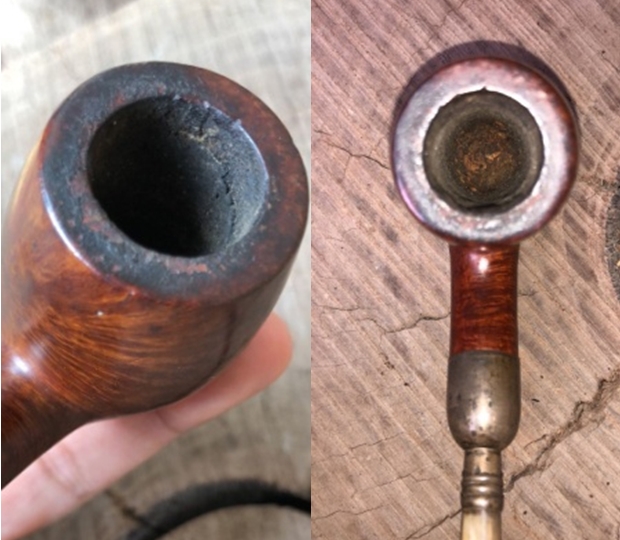
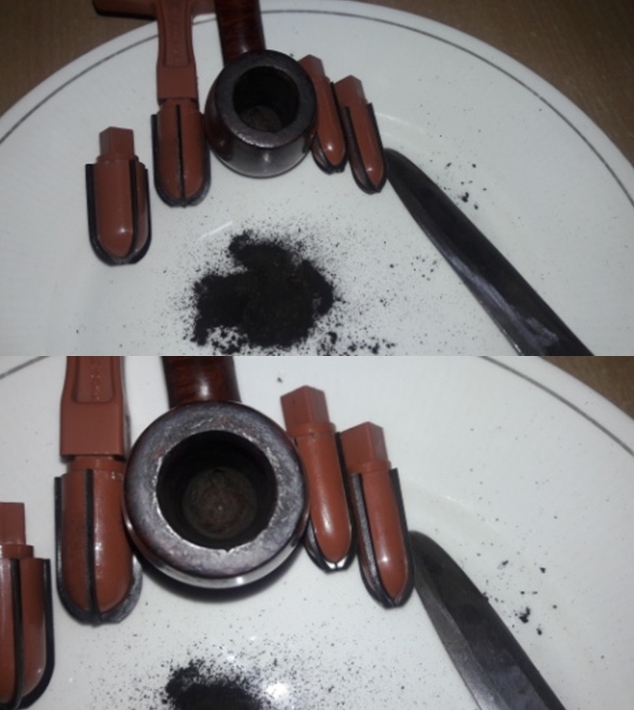
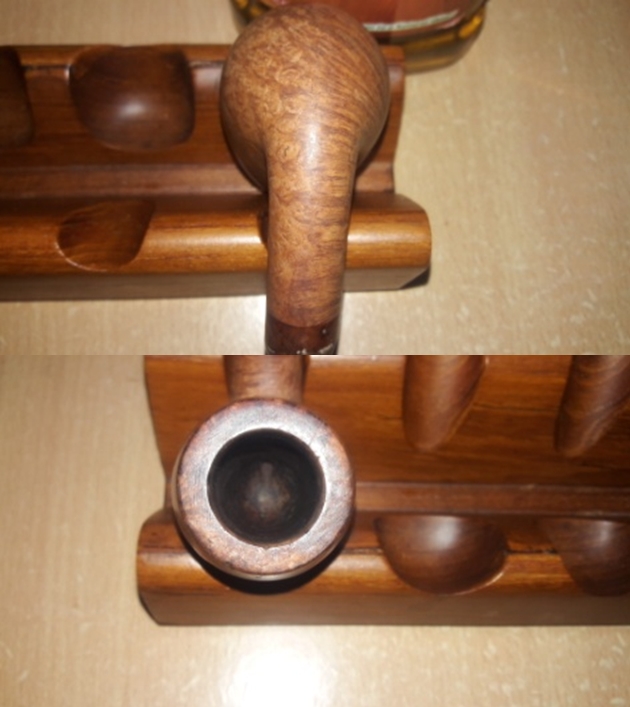
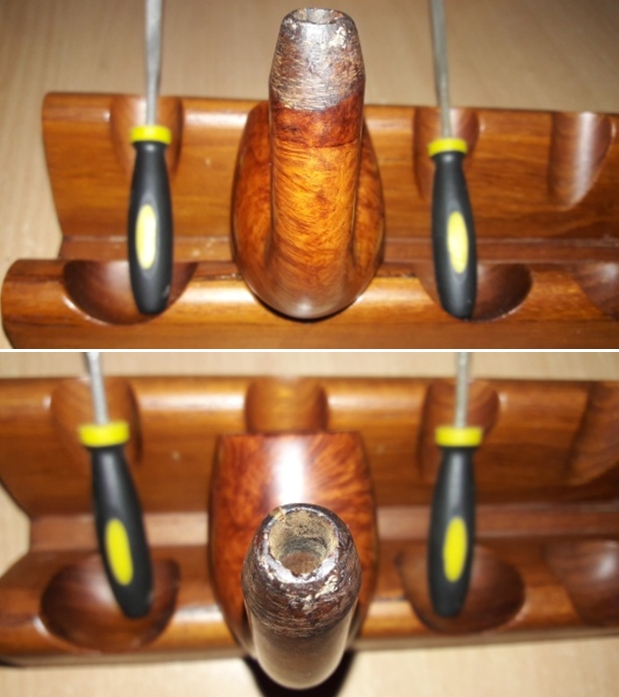
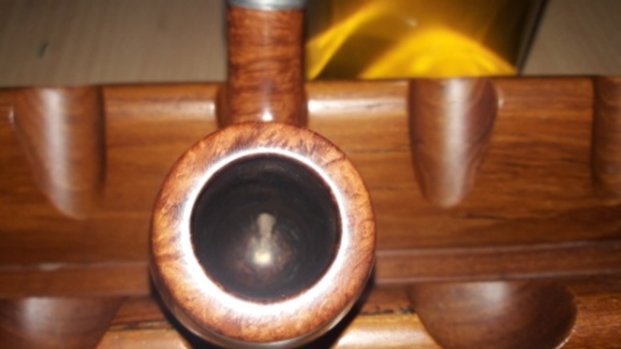
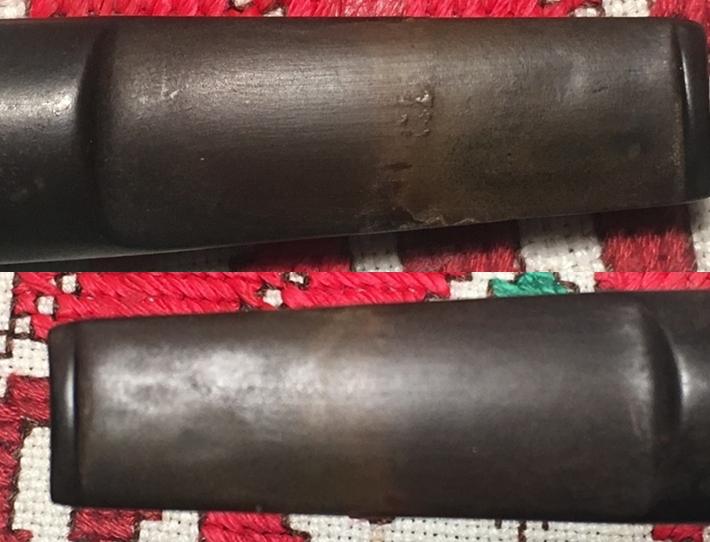
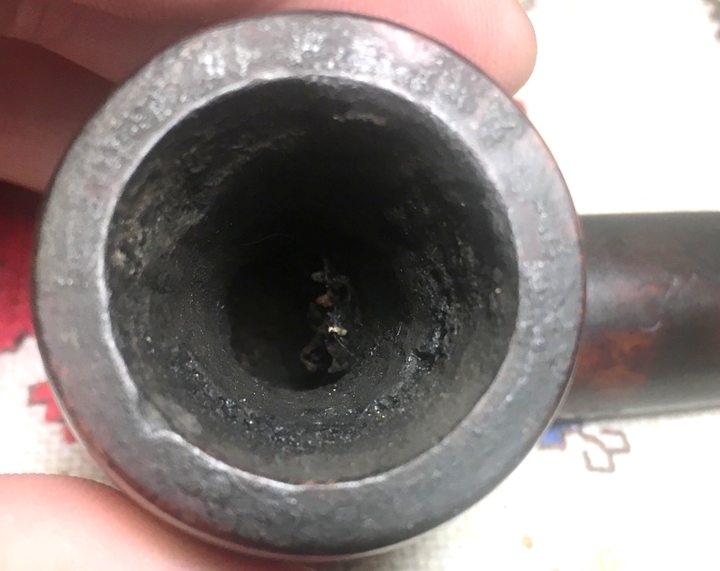
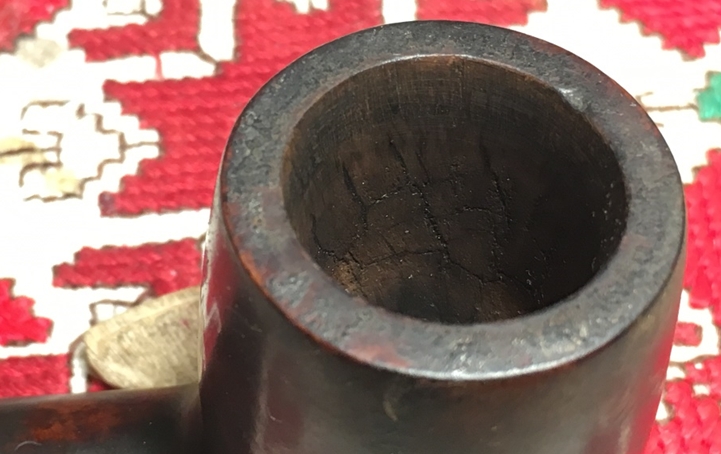
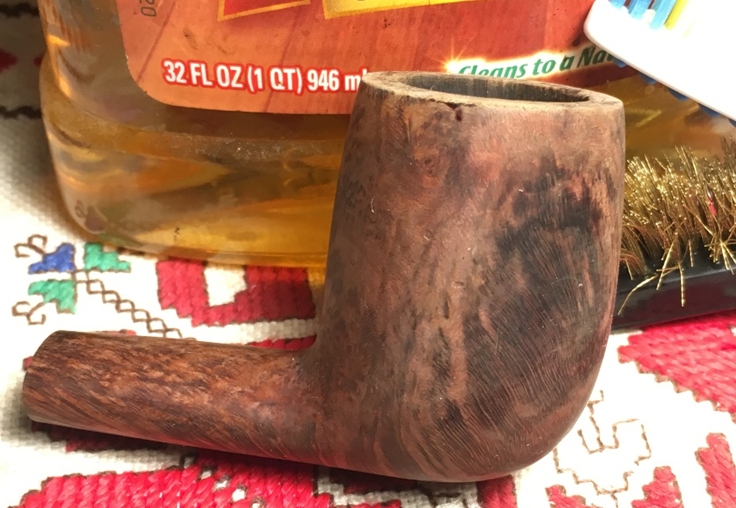
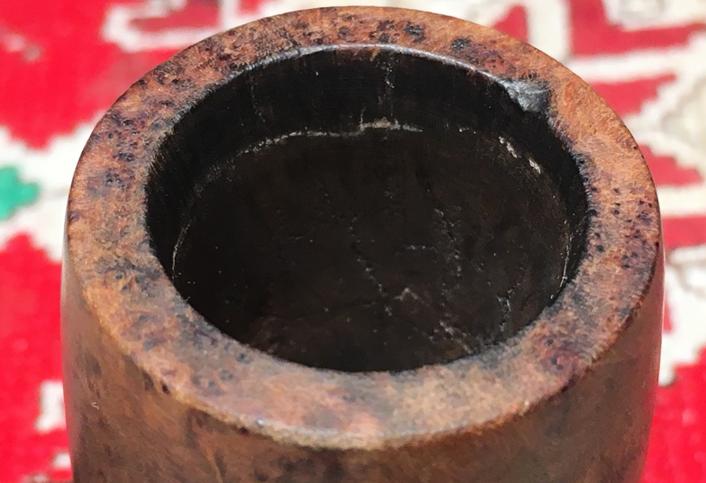
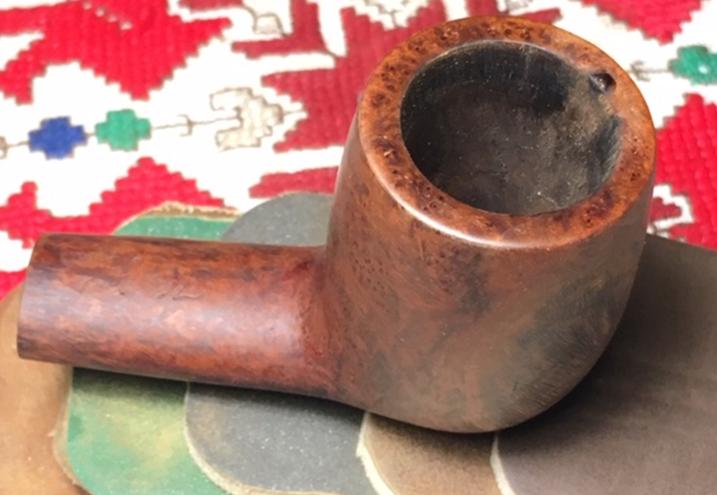
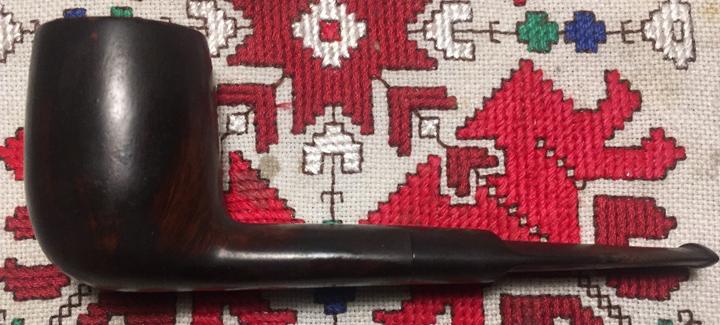
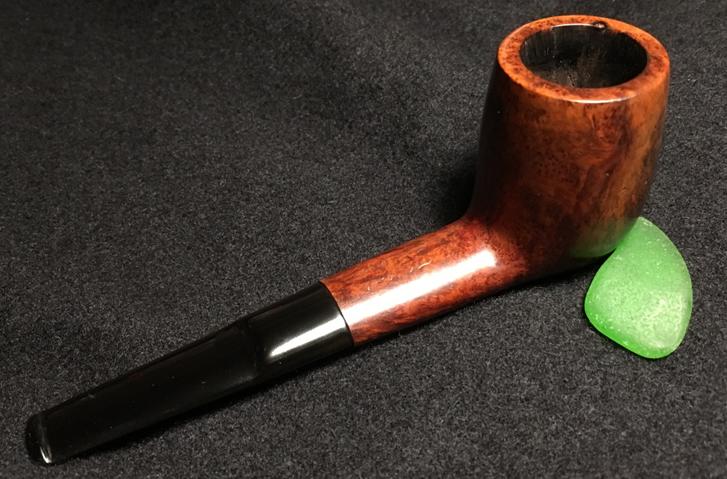
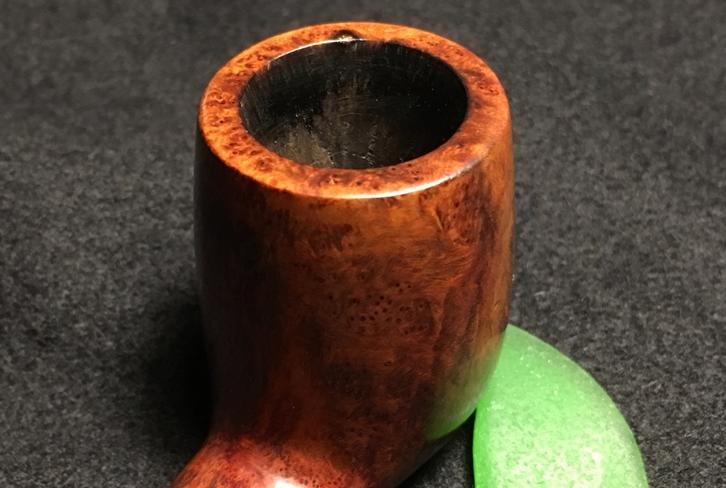
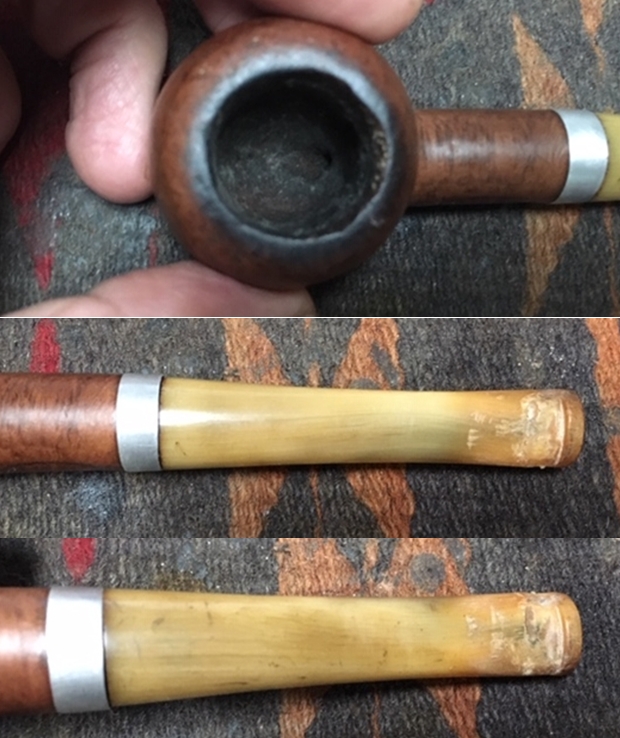
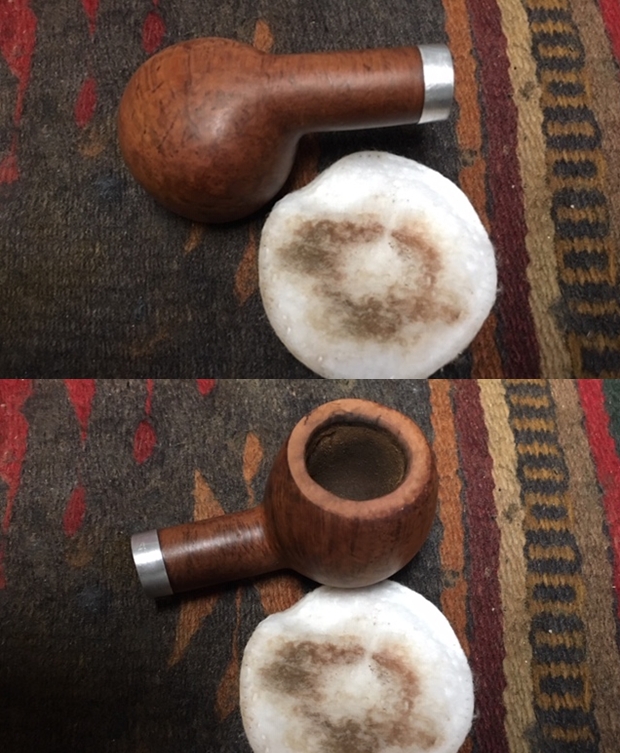
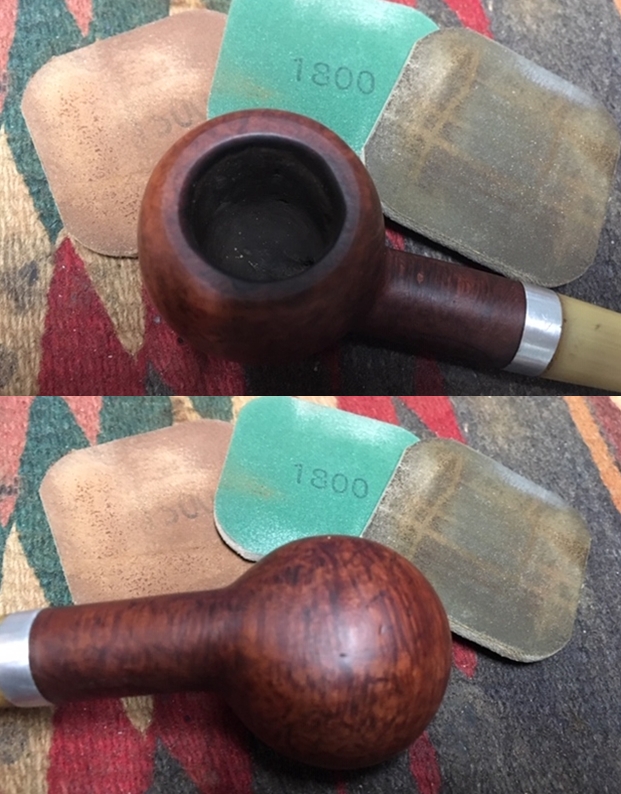
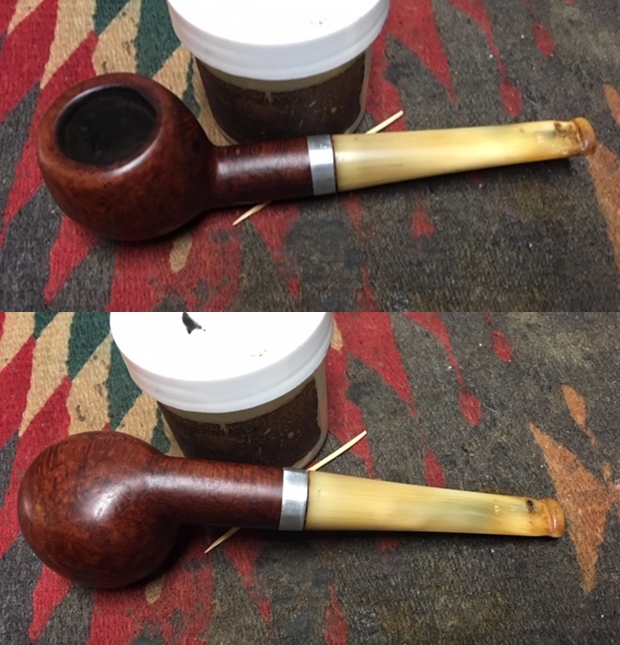
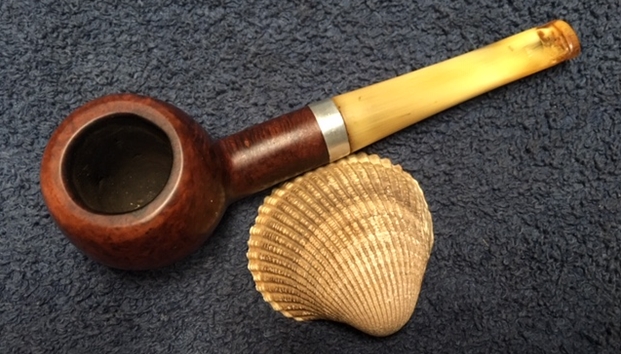
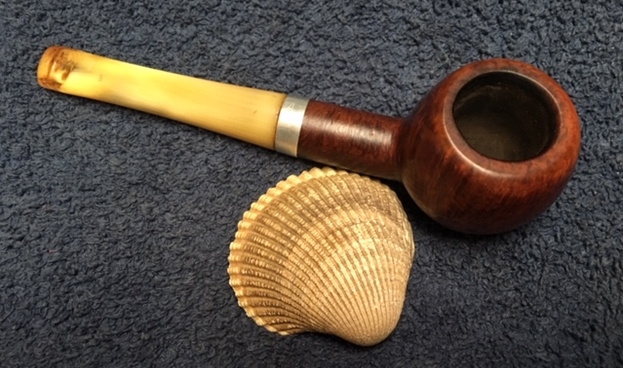
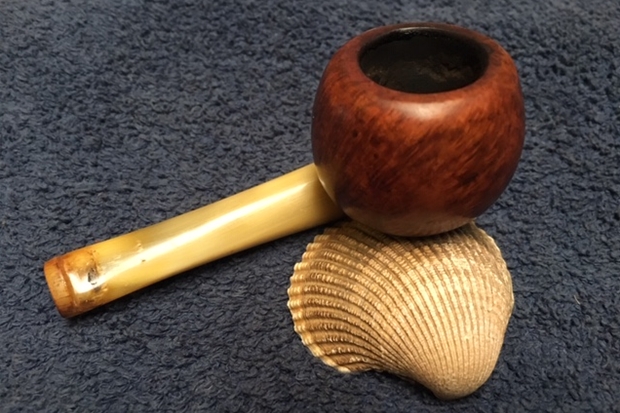
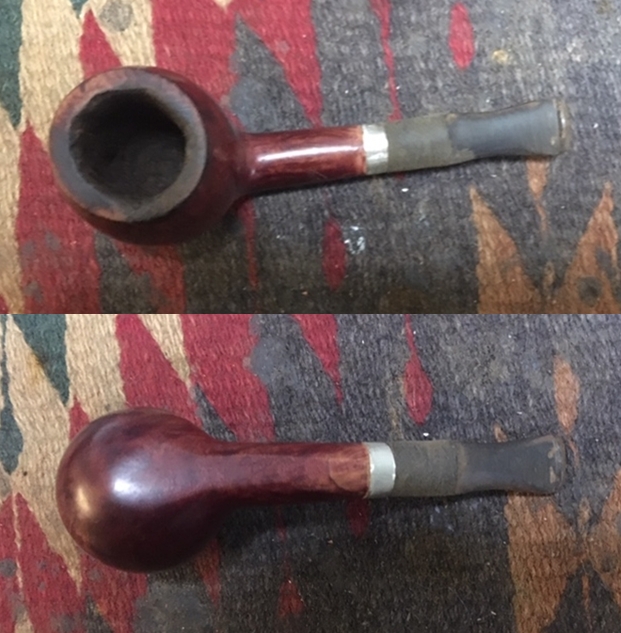
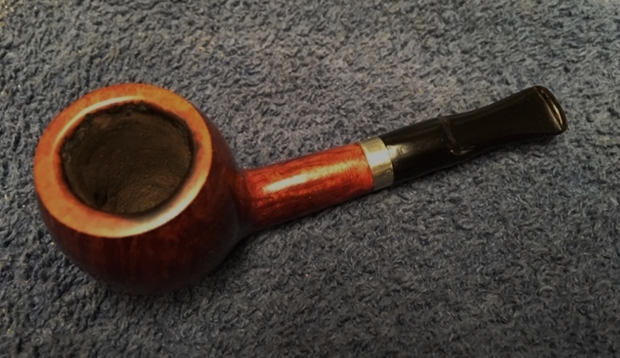
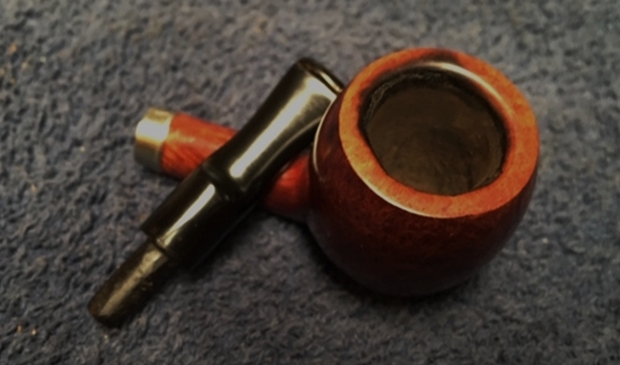
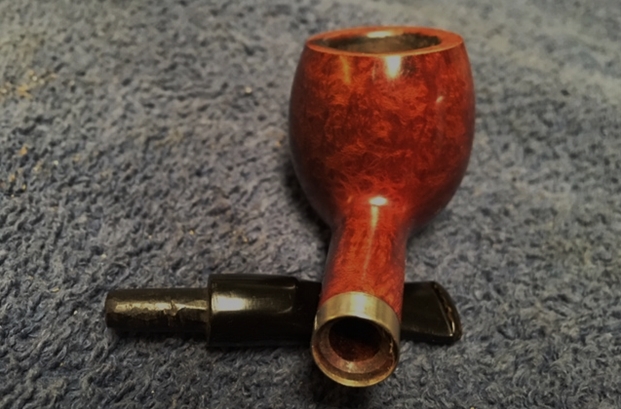
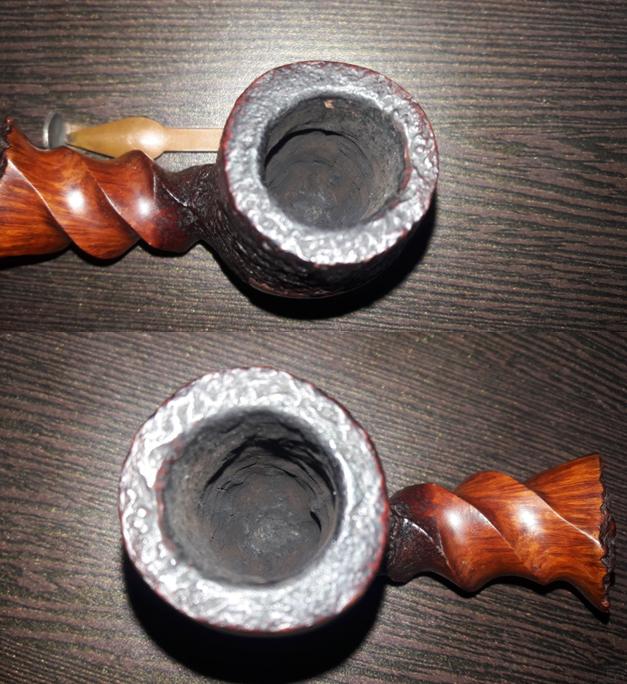
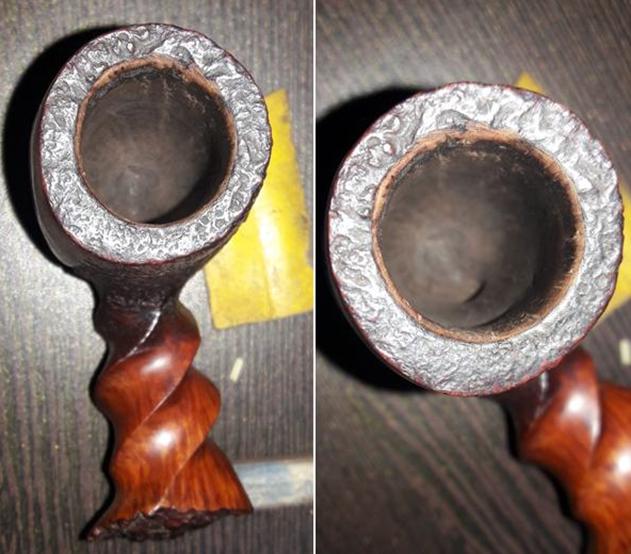
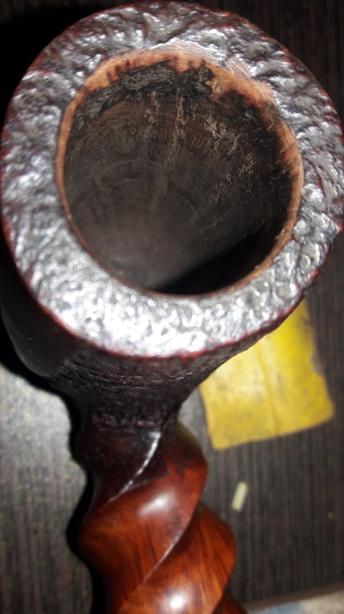
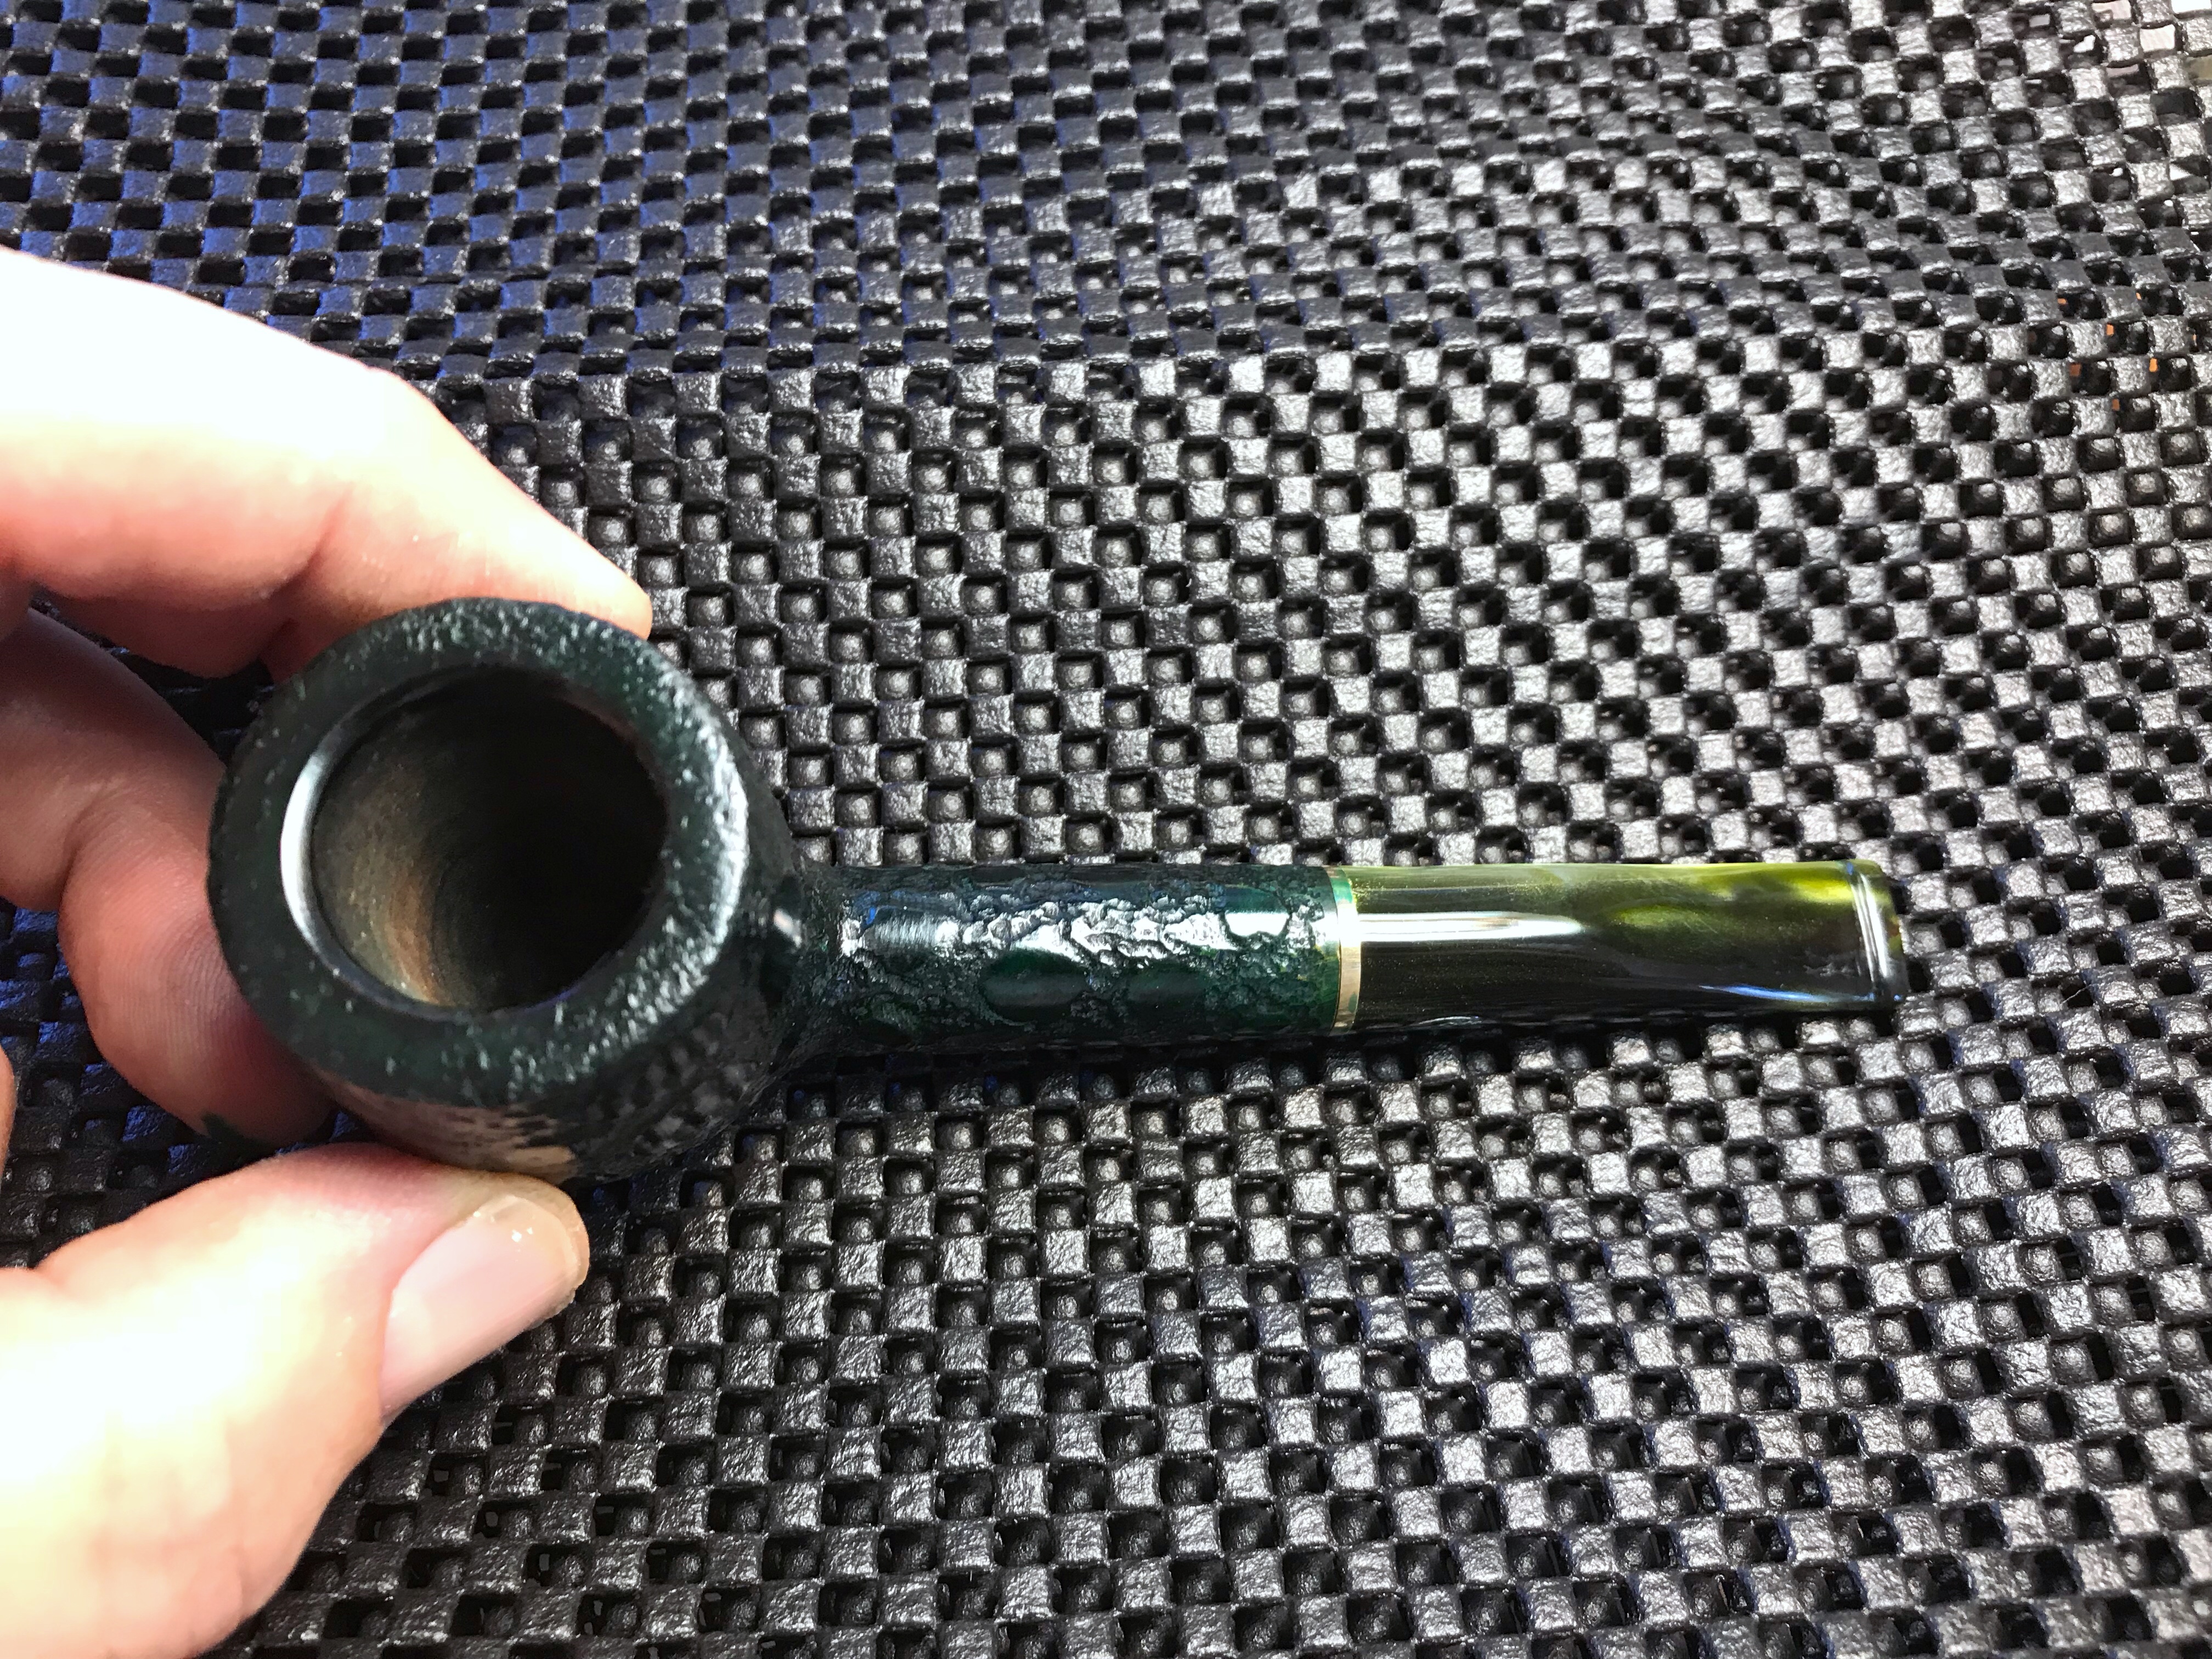
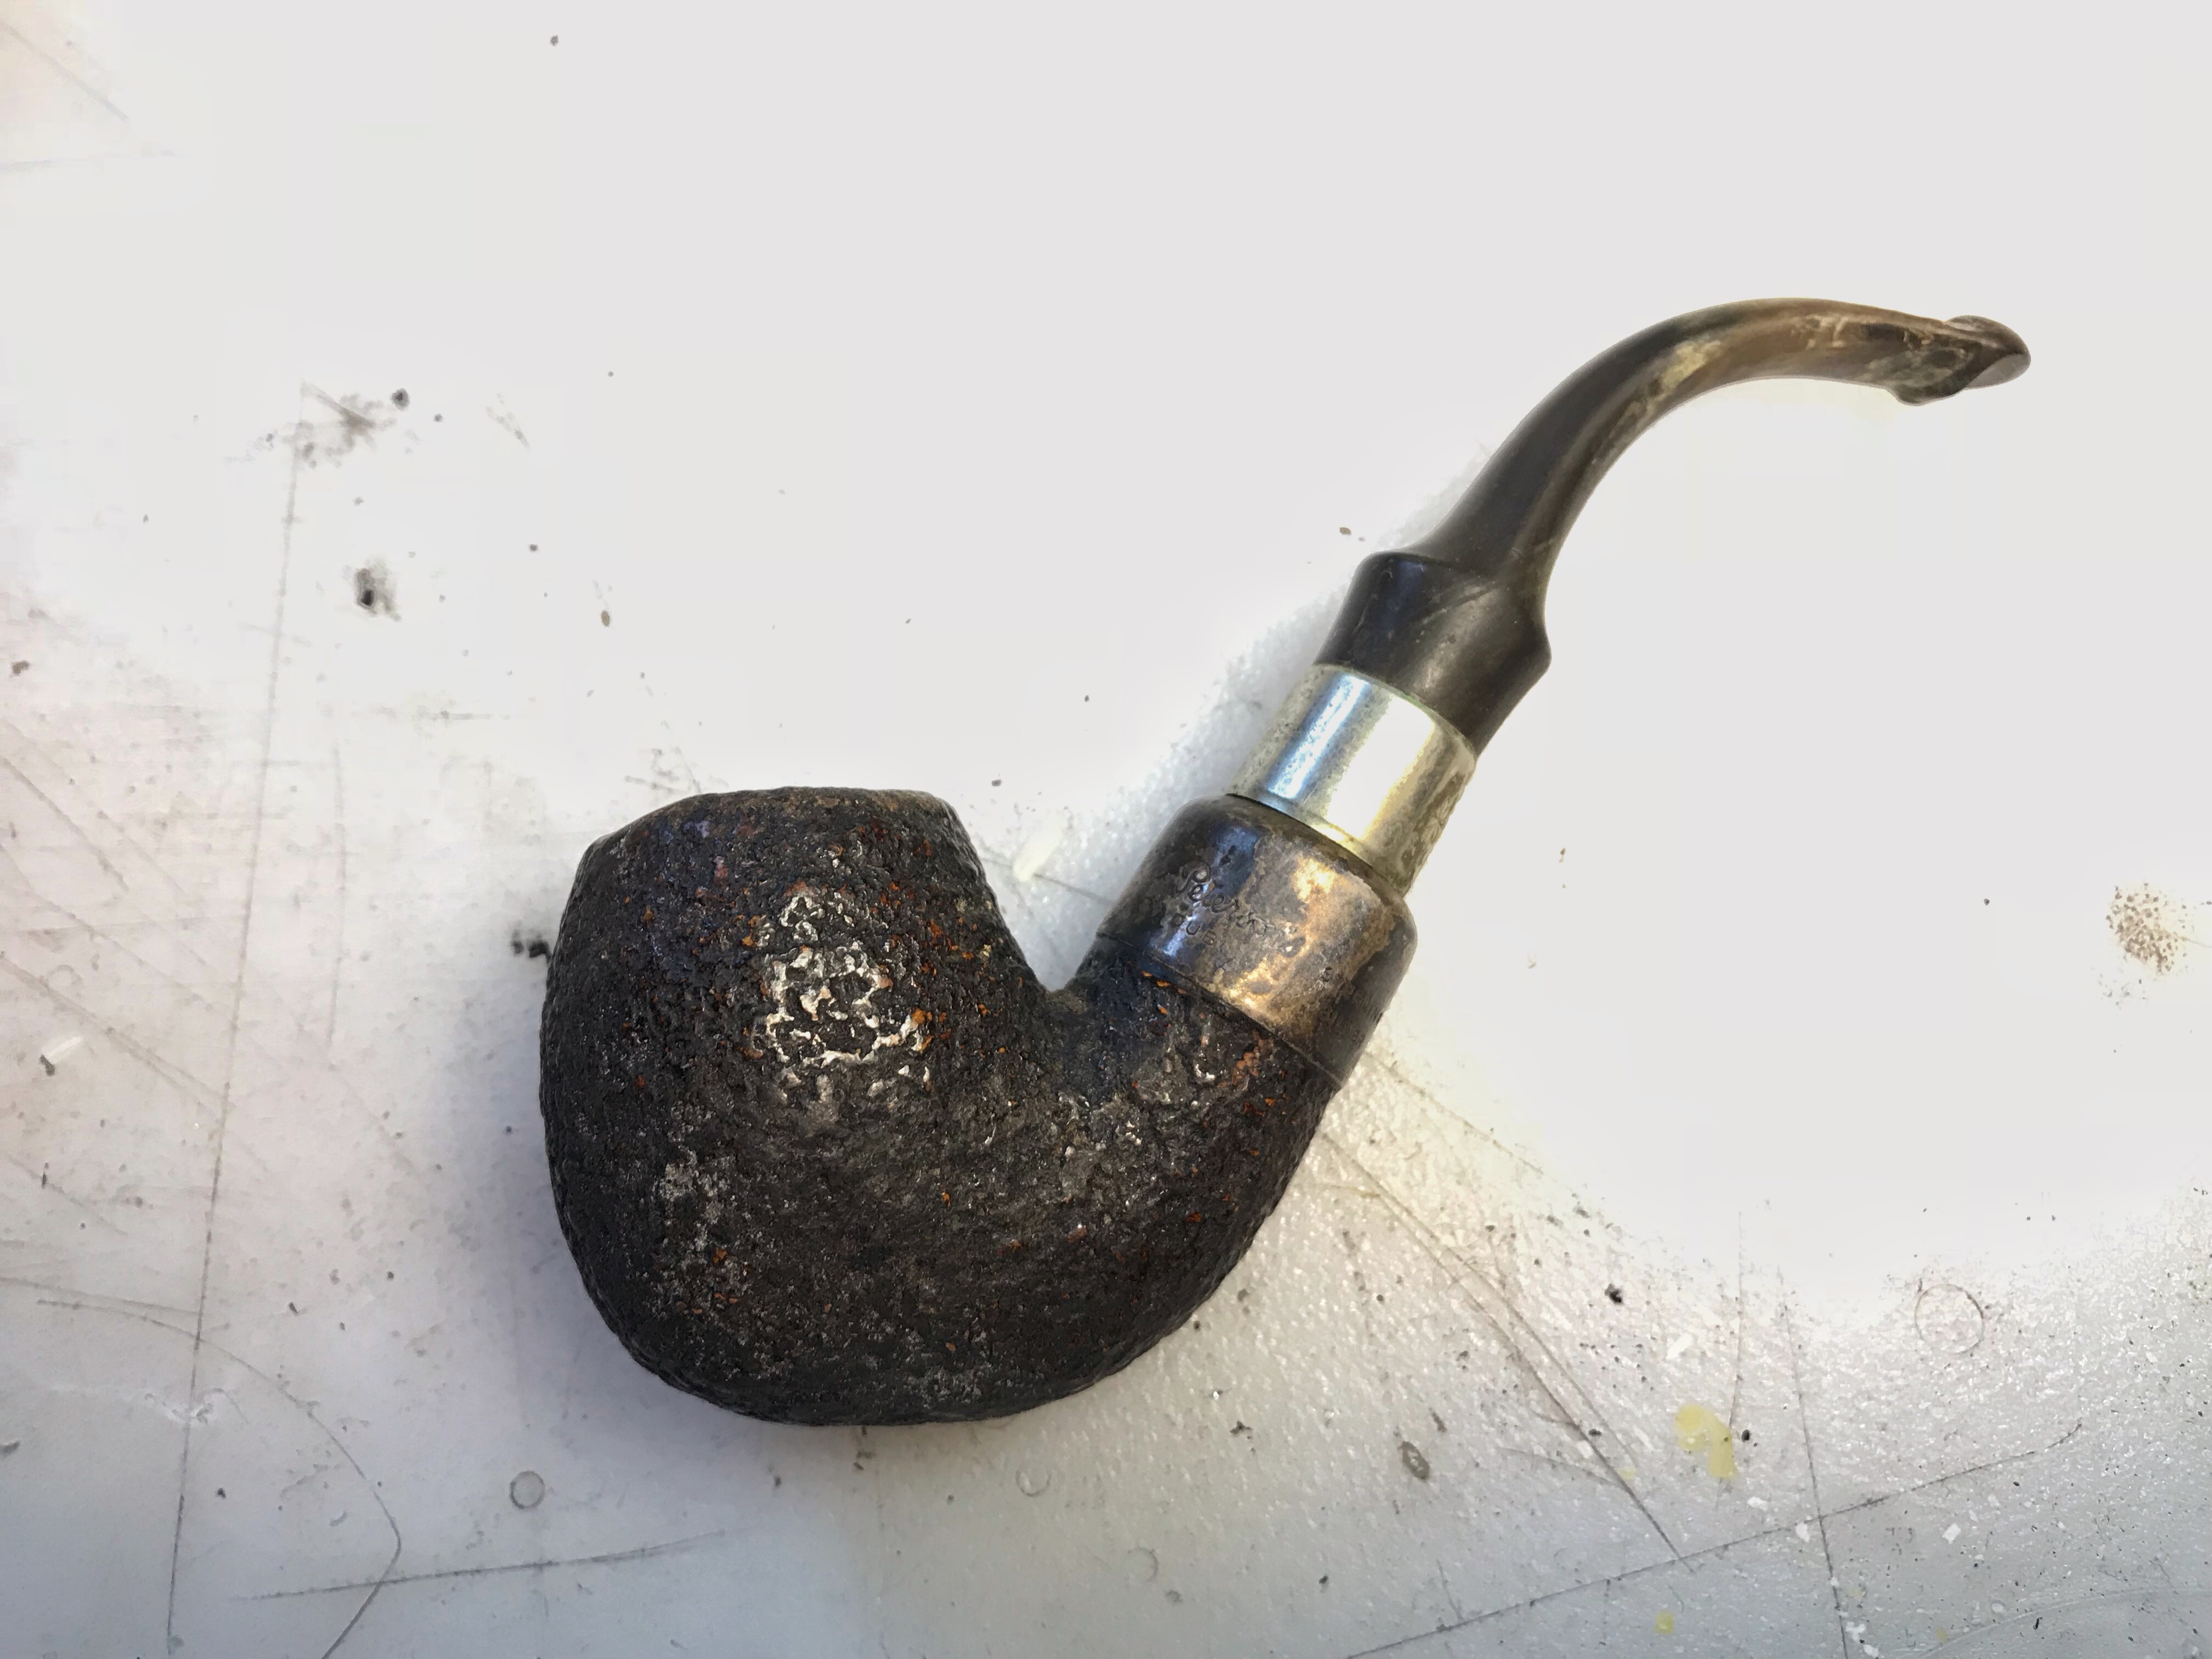
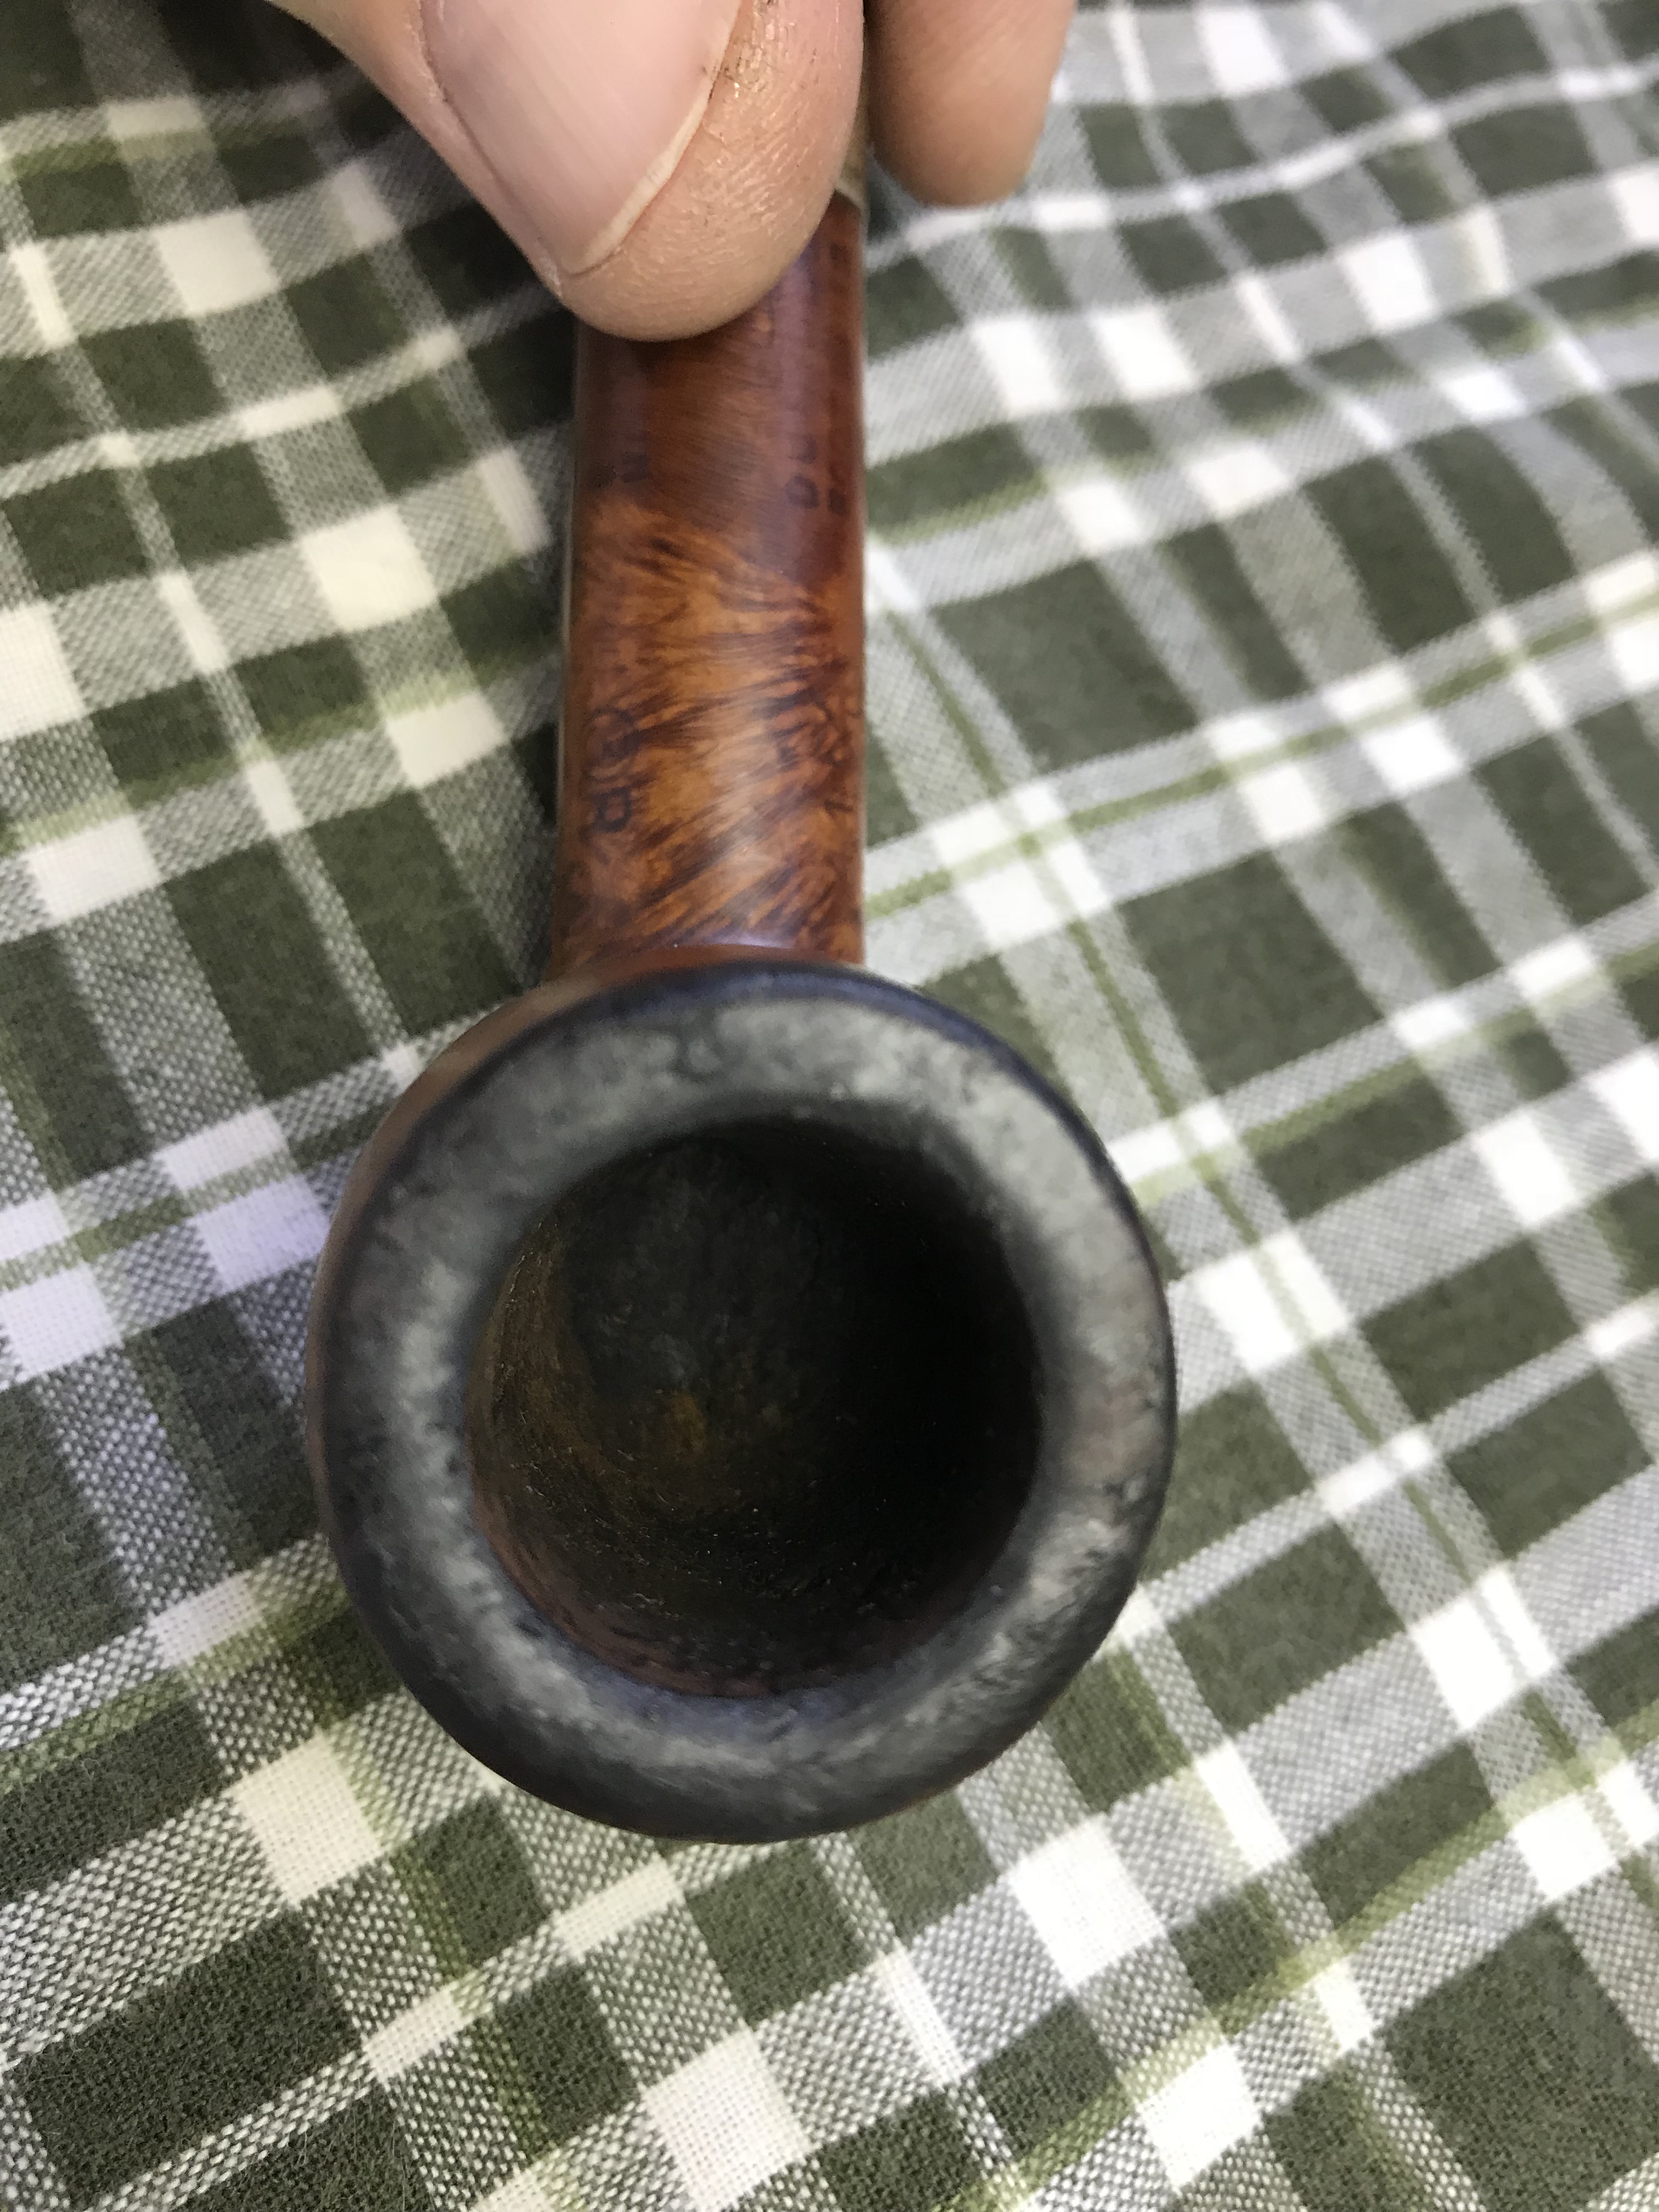
The large, deep chamber shows a decent amount of cake build up with overflow of tars and tobacco oils on the surface of the rim top. The condition of the inner walls of the chamber will be ascertained once the cake has been reamed back to the bare briar. The inner and outer edges of the rim show a few odd minute dings. Once I have scraped the lava overflow from the rim top, I shall decide on the method to tackle them and may even decide to let them be. I do not envisage any major surprises inside the chamber as the bowl feels solid to the touch from outside.Air flow is laborious and constricted through the shank and will improve once the internals are cleaned.

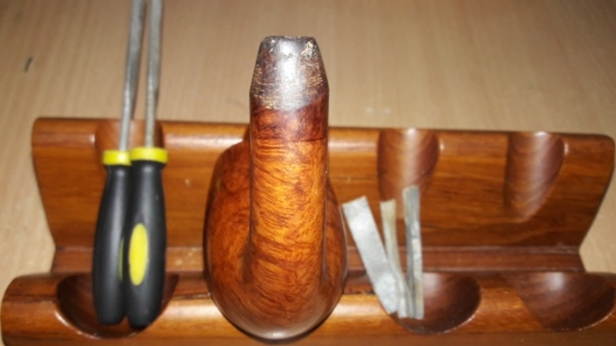
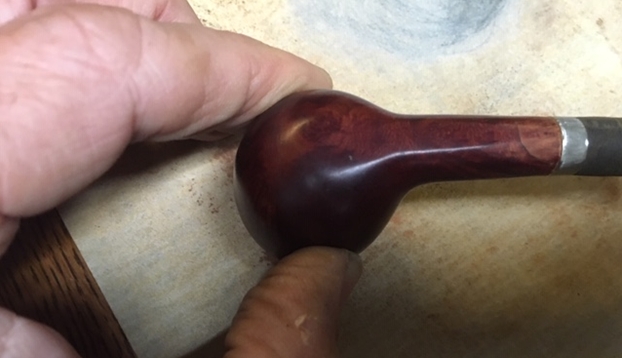
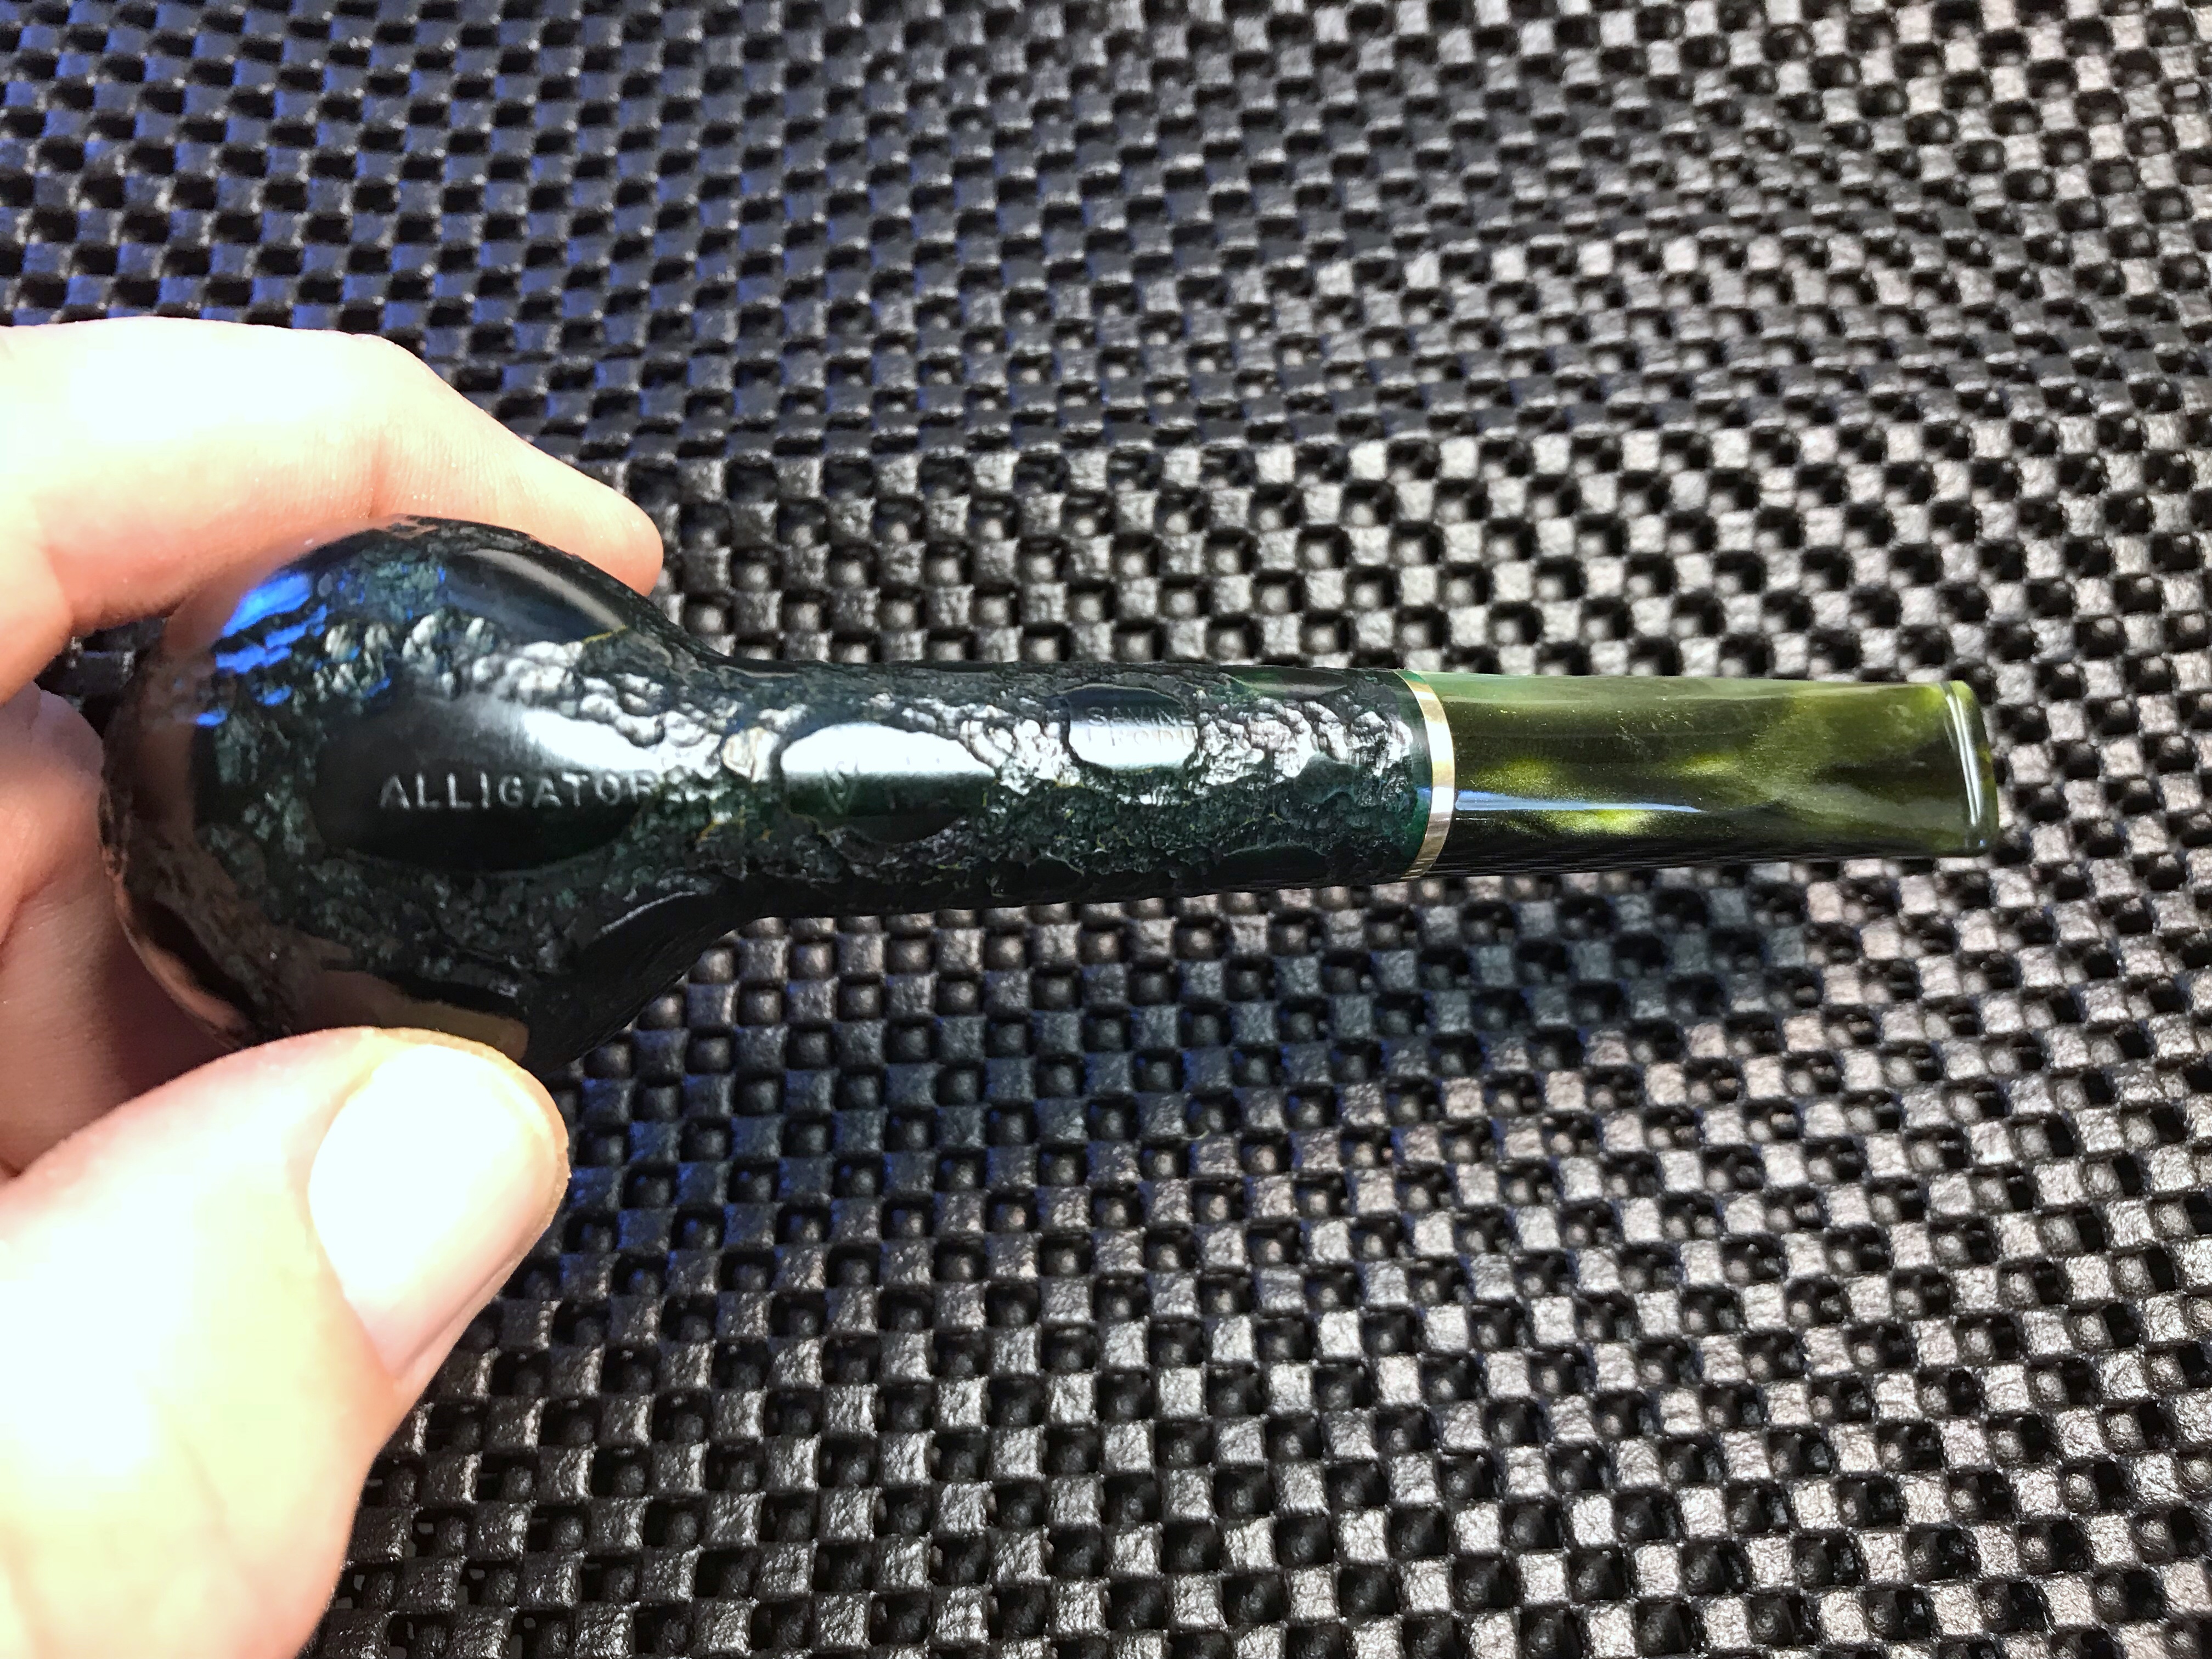
The surface of the stummel is covered in oils and tars from the overflowing lava and is sticky to the touch. There are a few dings to the surface of the stummel, more particularly near heel of the bowl and bottom surface of the shank. Should I address them by sanding, I am not sure, as I fear losing the patina during the abrasive process of sanding with sandpaper.

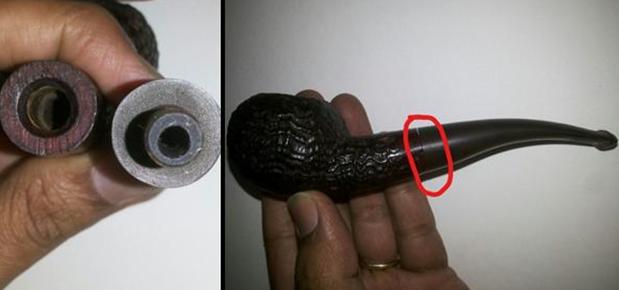
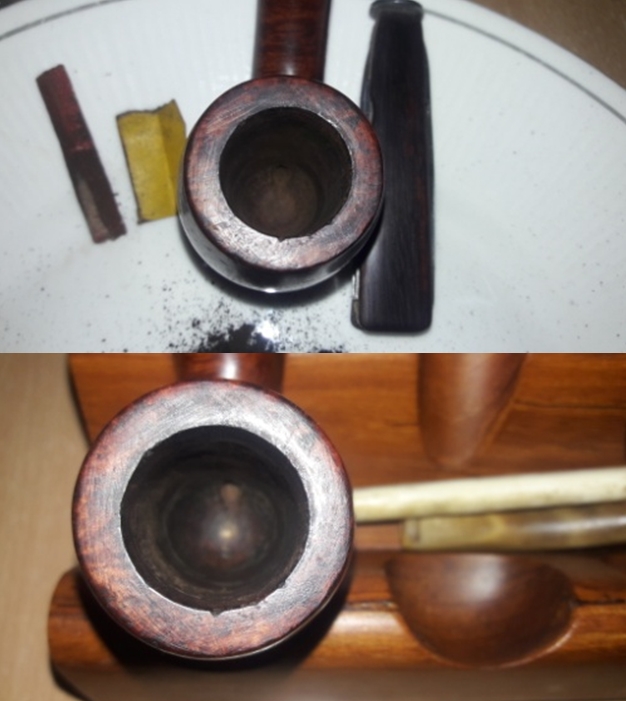
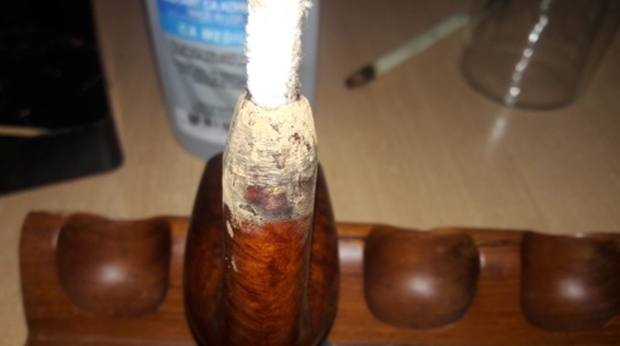
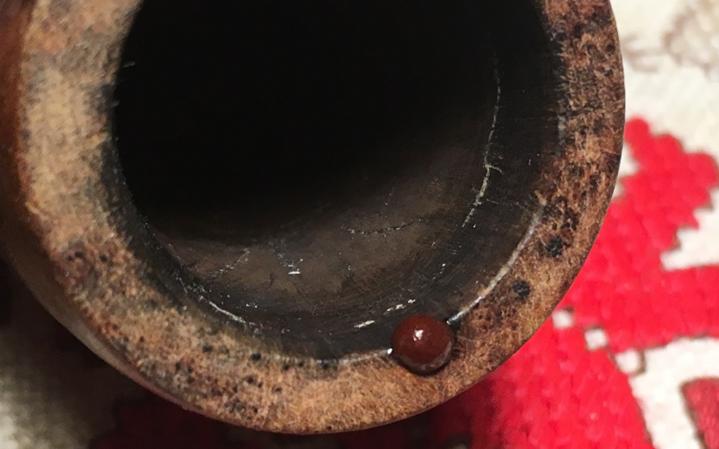
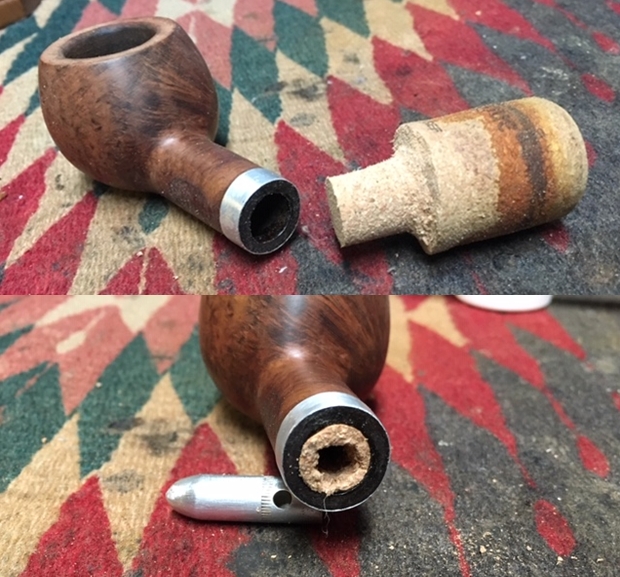
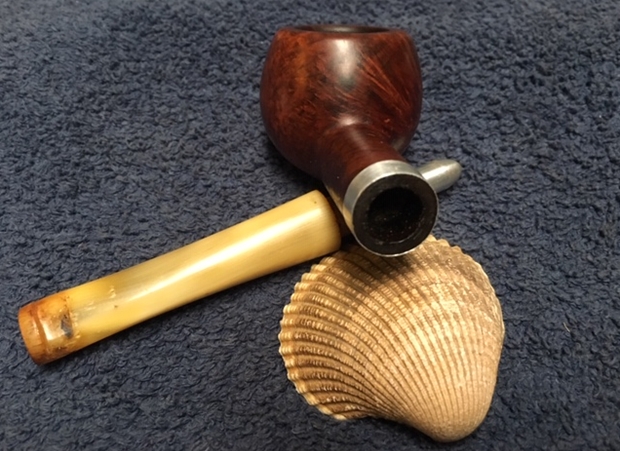
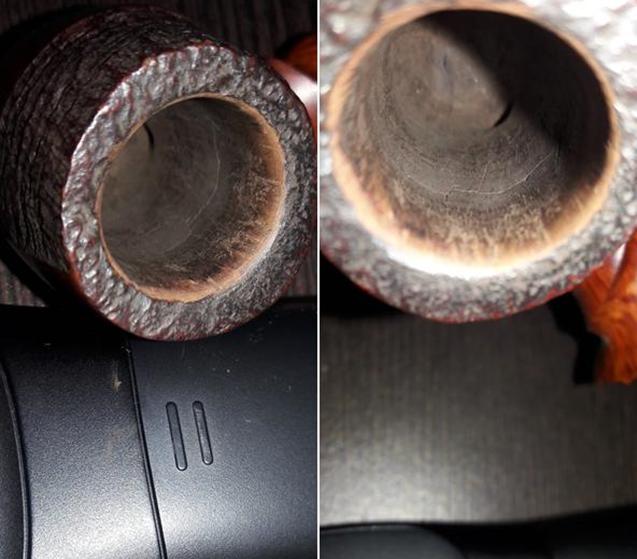
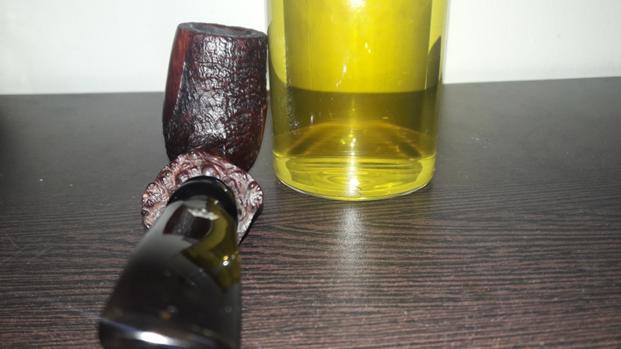
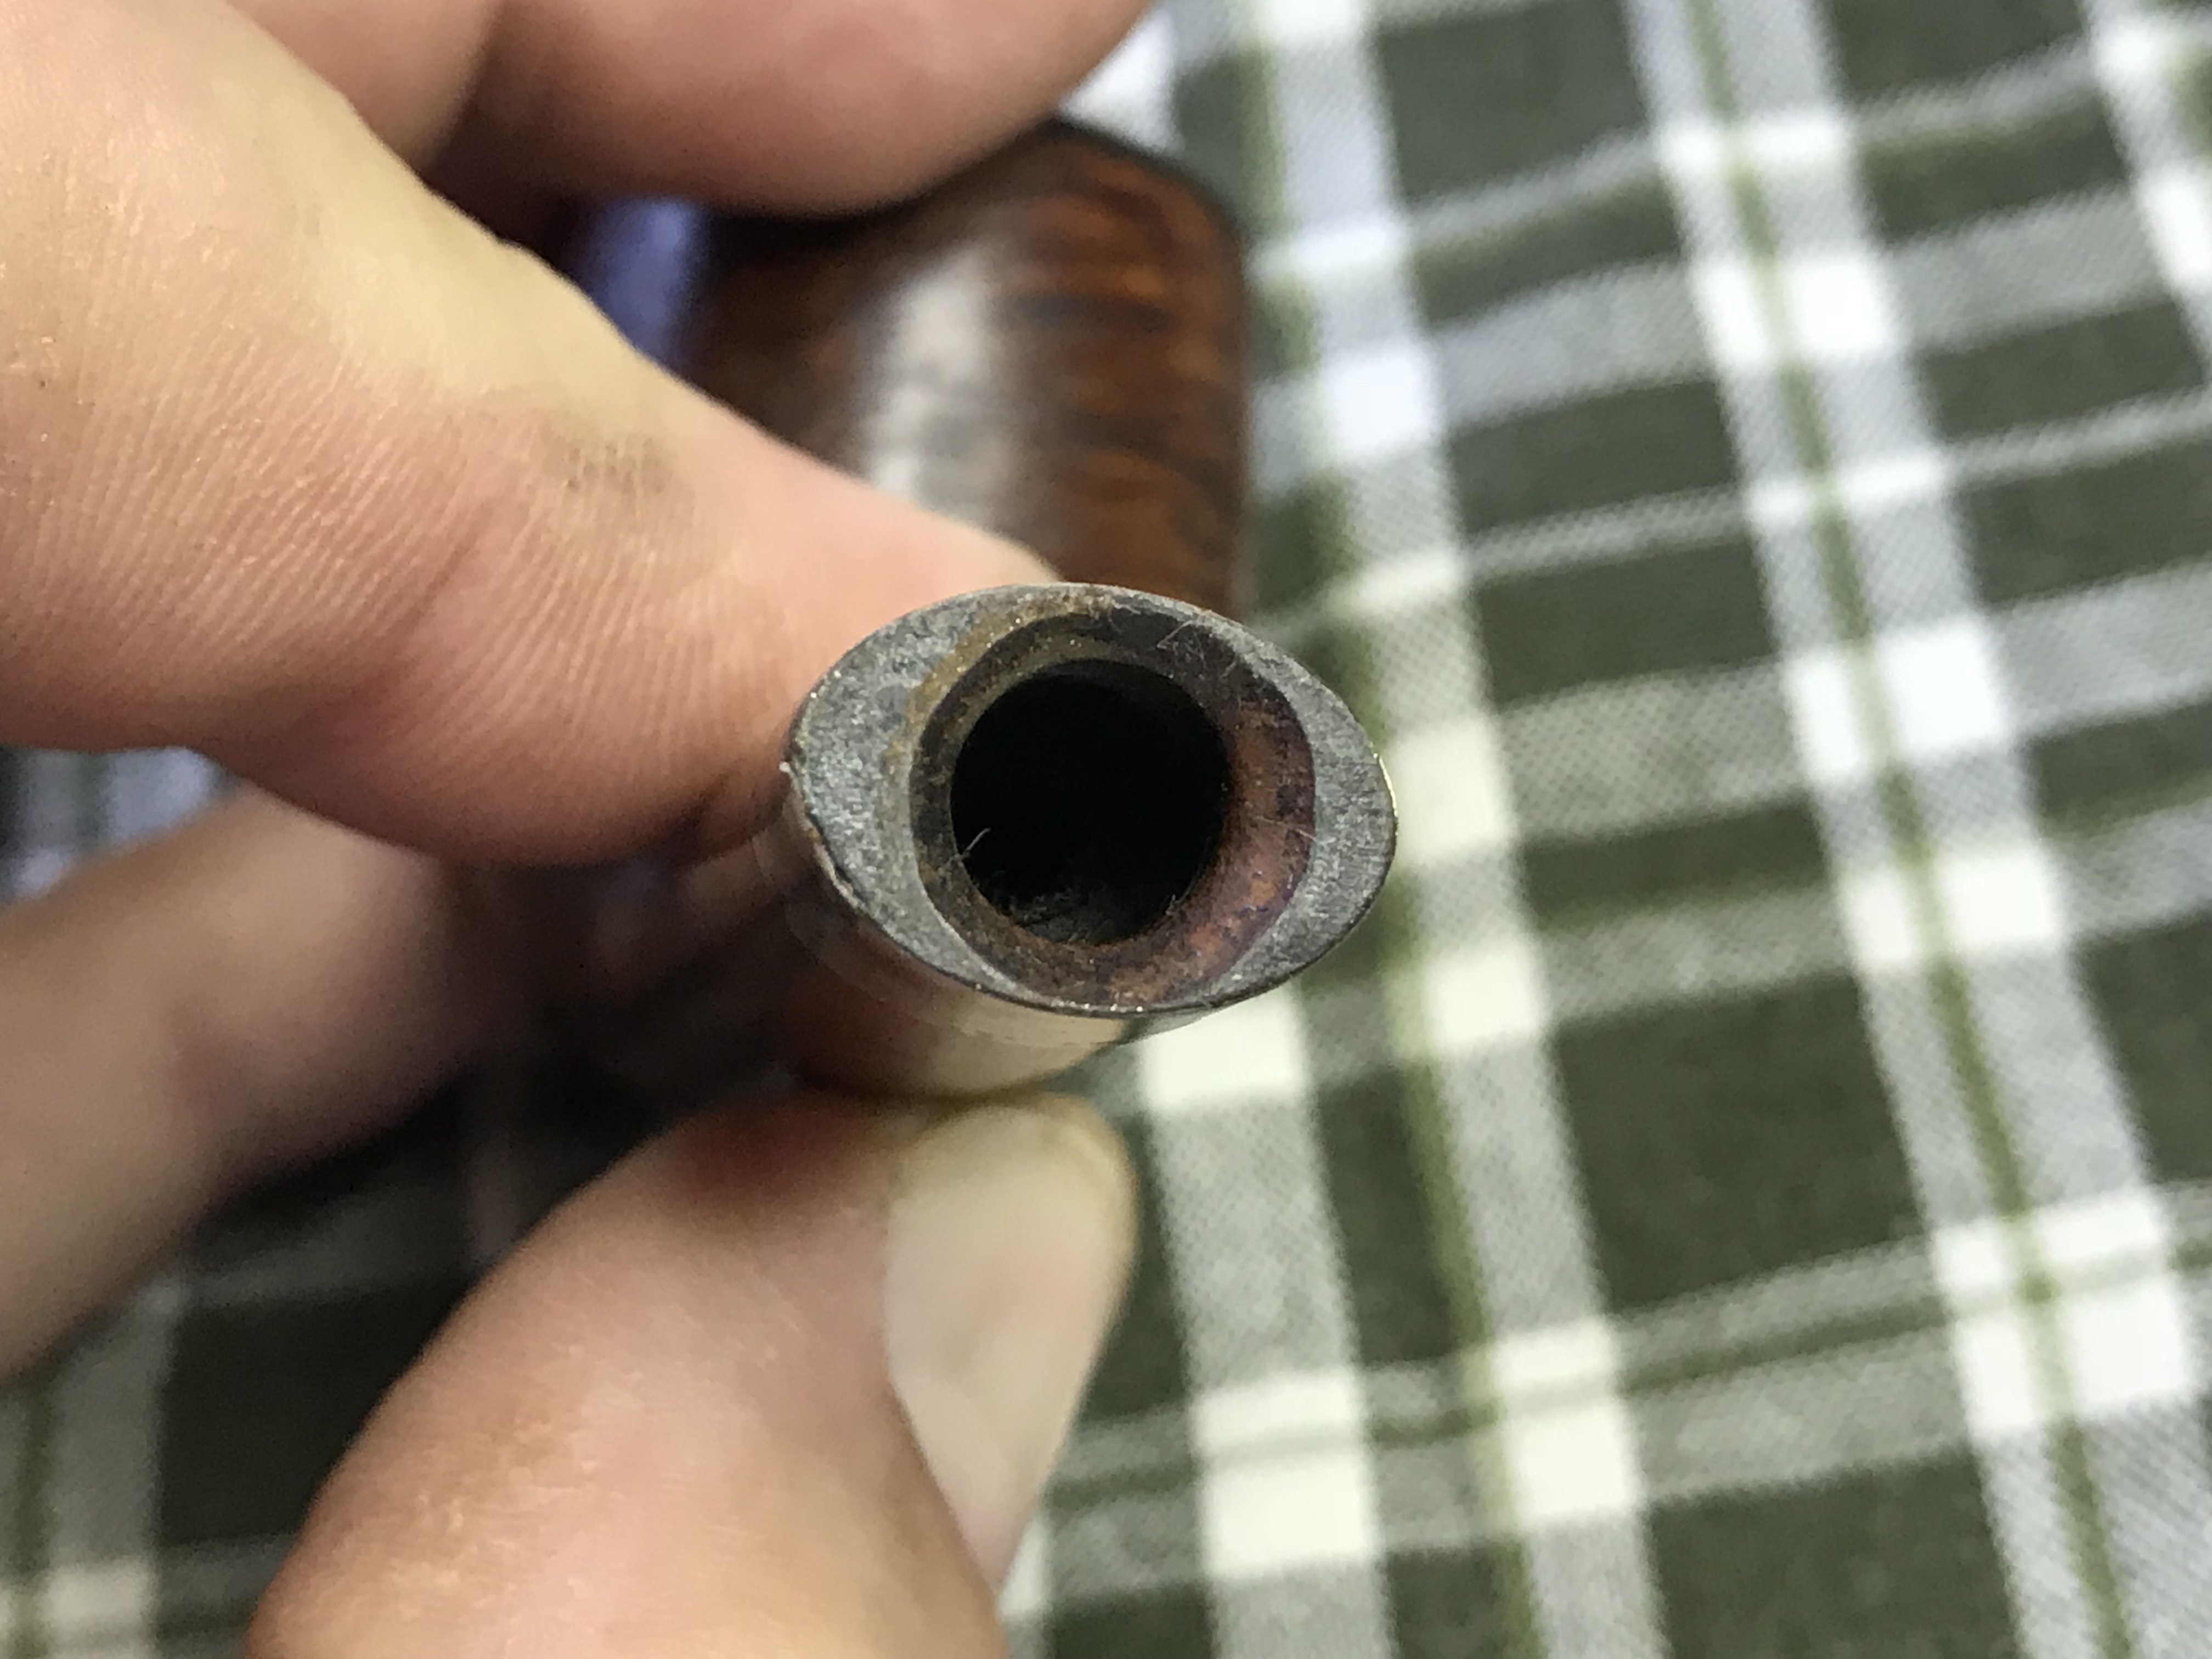
While I was handling the stummel, I realized that the sterling silver ferrule at the shank end had come loose. I removed the ferrule and what was revealed turned my stomach inside out. The glue was hard and dry and the briar had totally dried out and the shank end opening was uneven. I could even make out one small crack running down from the lip of the shank opening. Talk about challenges!!!! This will have to be addressed without fail.

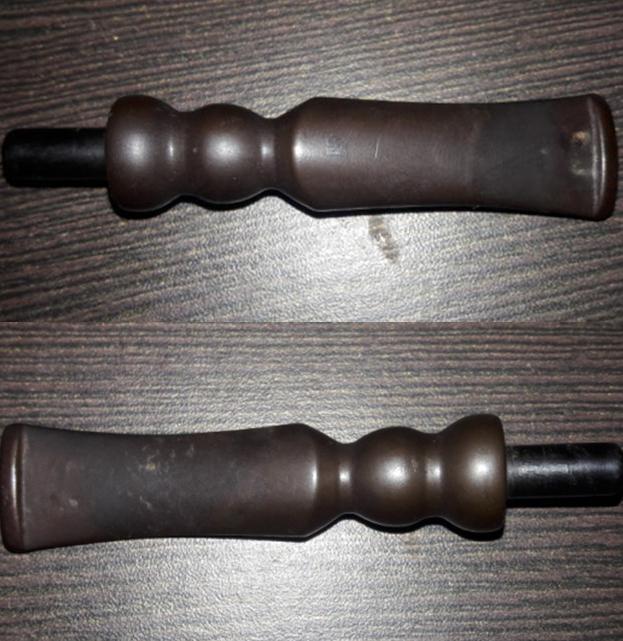
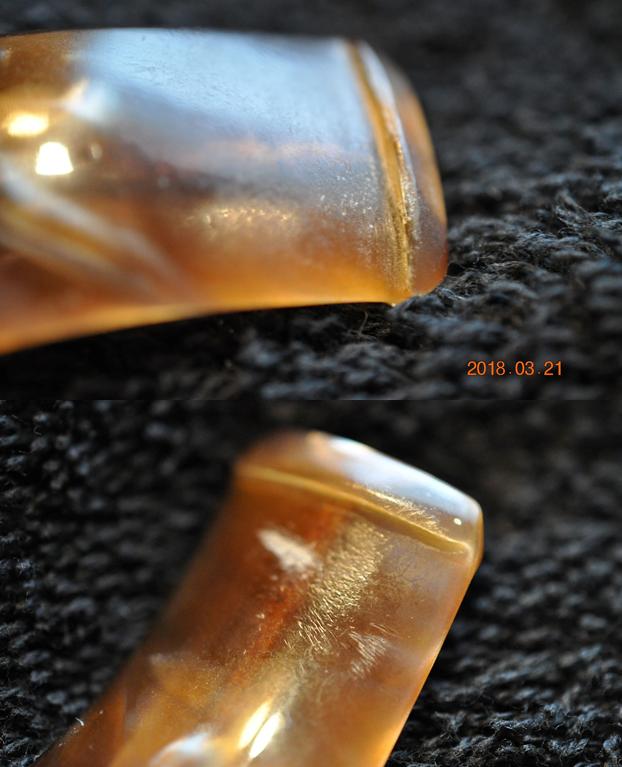
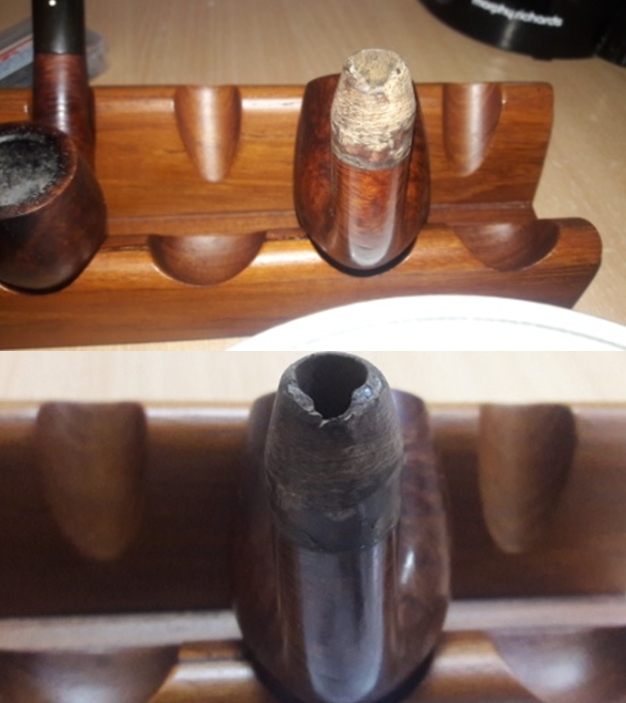
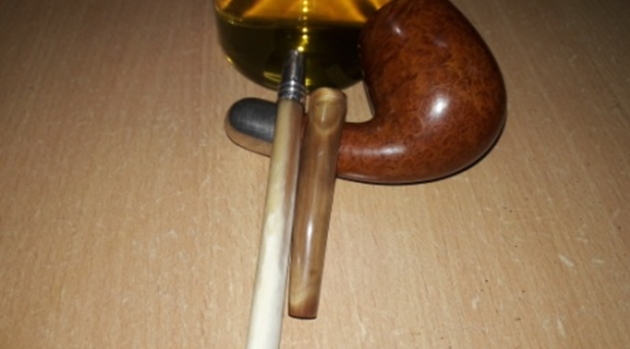
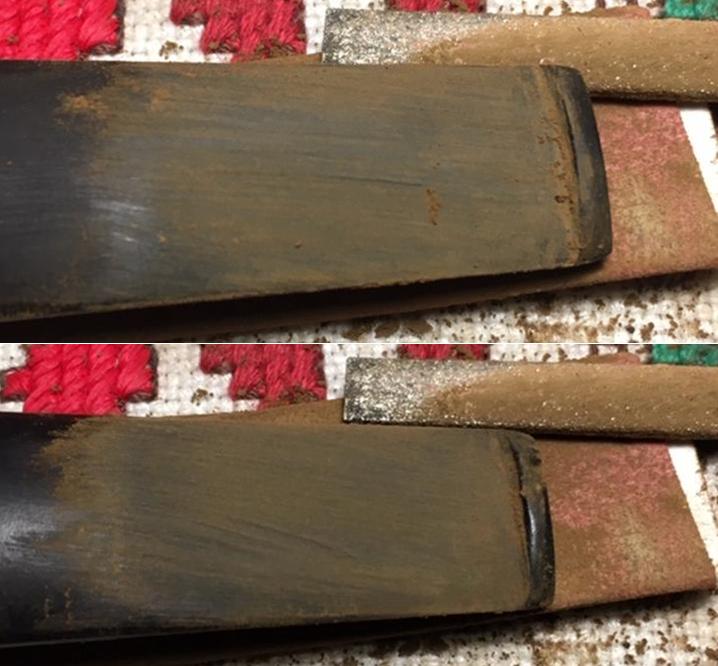
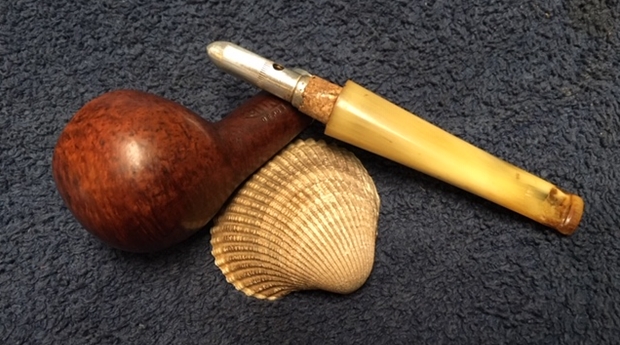
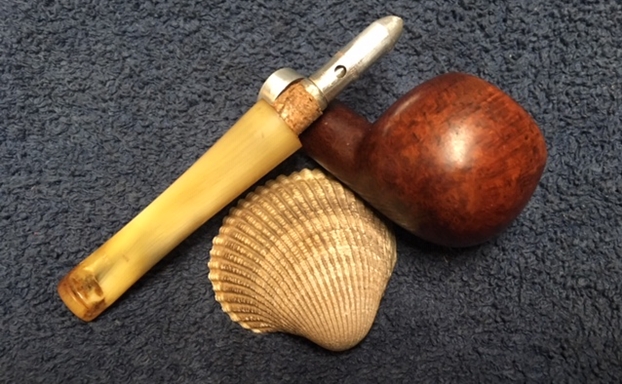
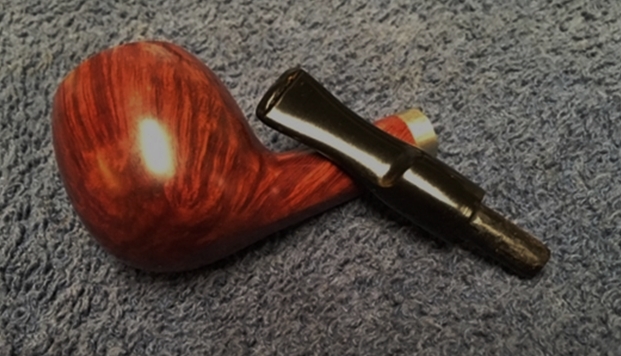
The Albatross wing bone extension is dirty and covered in dirt and grime. There are two superficial cracks on either side near the shank end. I        know these cracks are superficial as the bone surface around it is solid and without any give. These cracks will have to be addressed. The sterling silver end cap towards the tenon end has a flared out rim which is uneven. This causes the bone stem to sit unevenly on the rim. Air flow through the shank extension is clean and full.

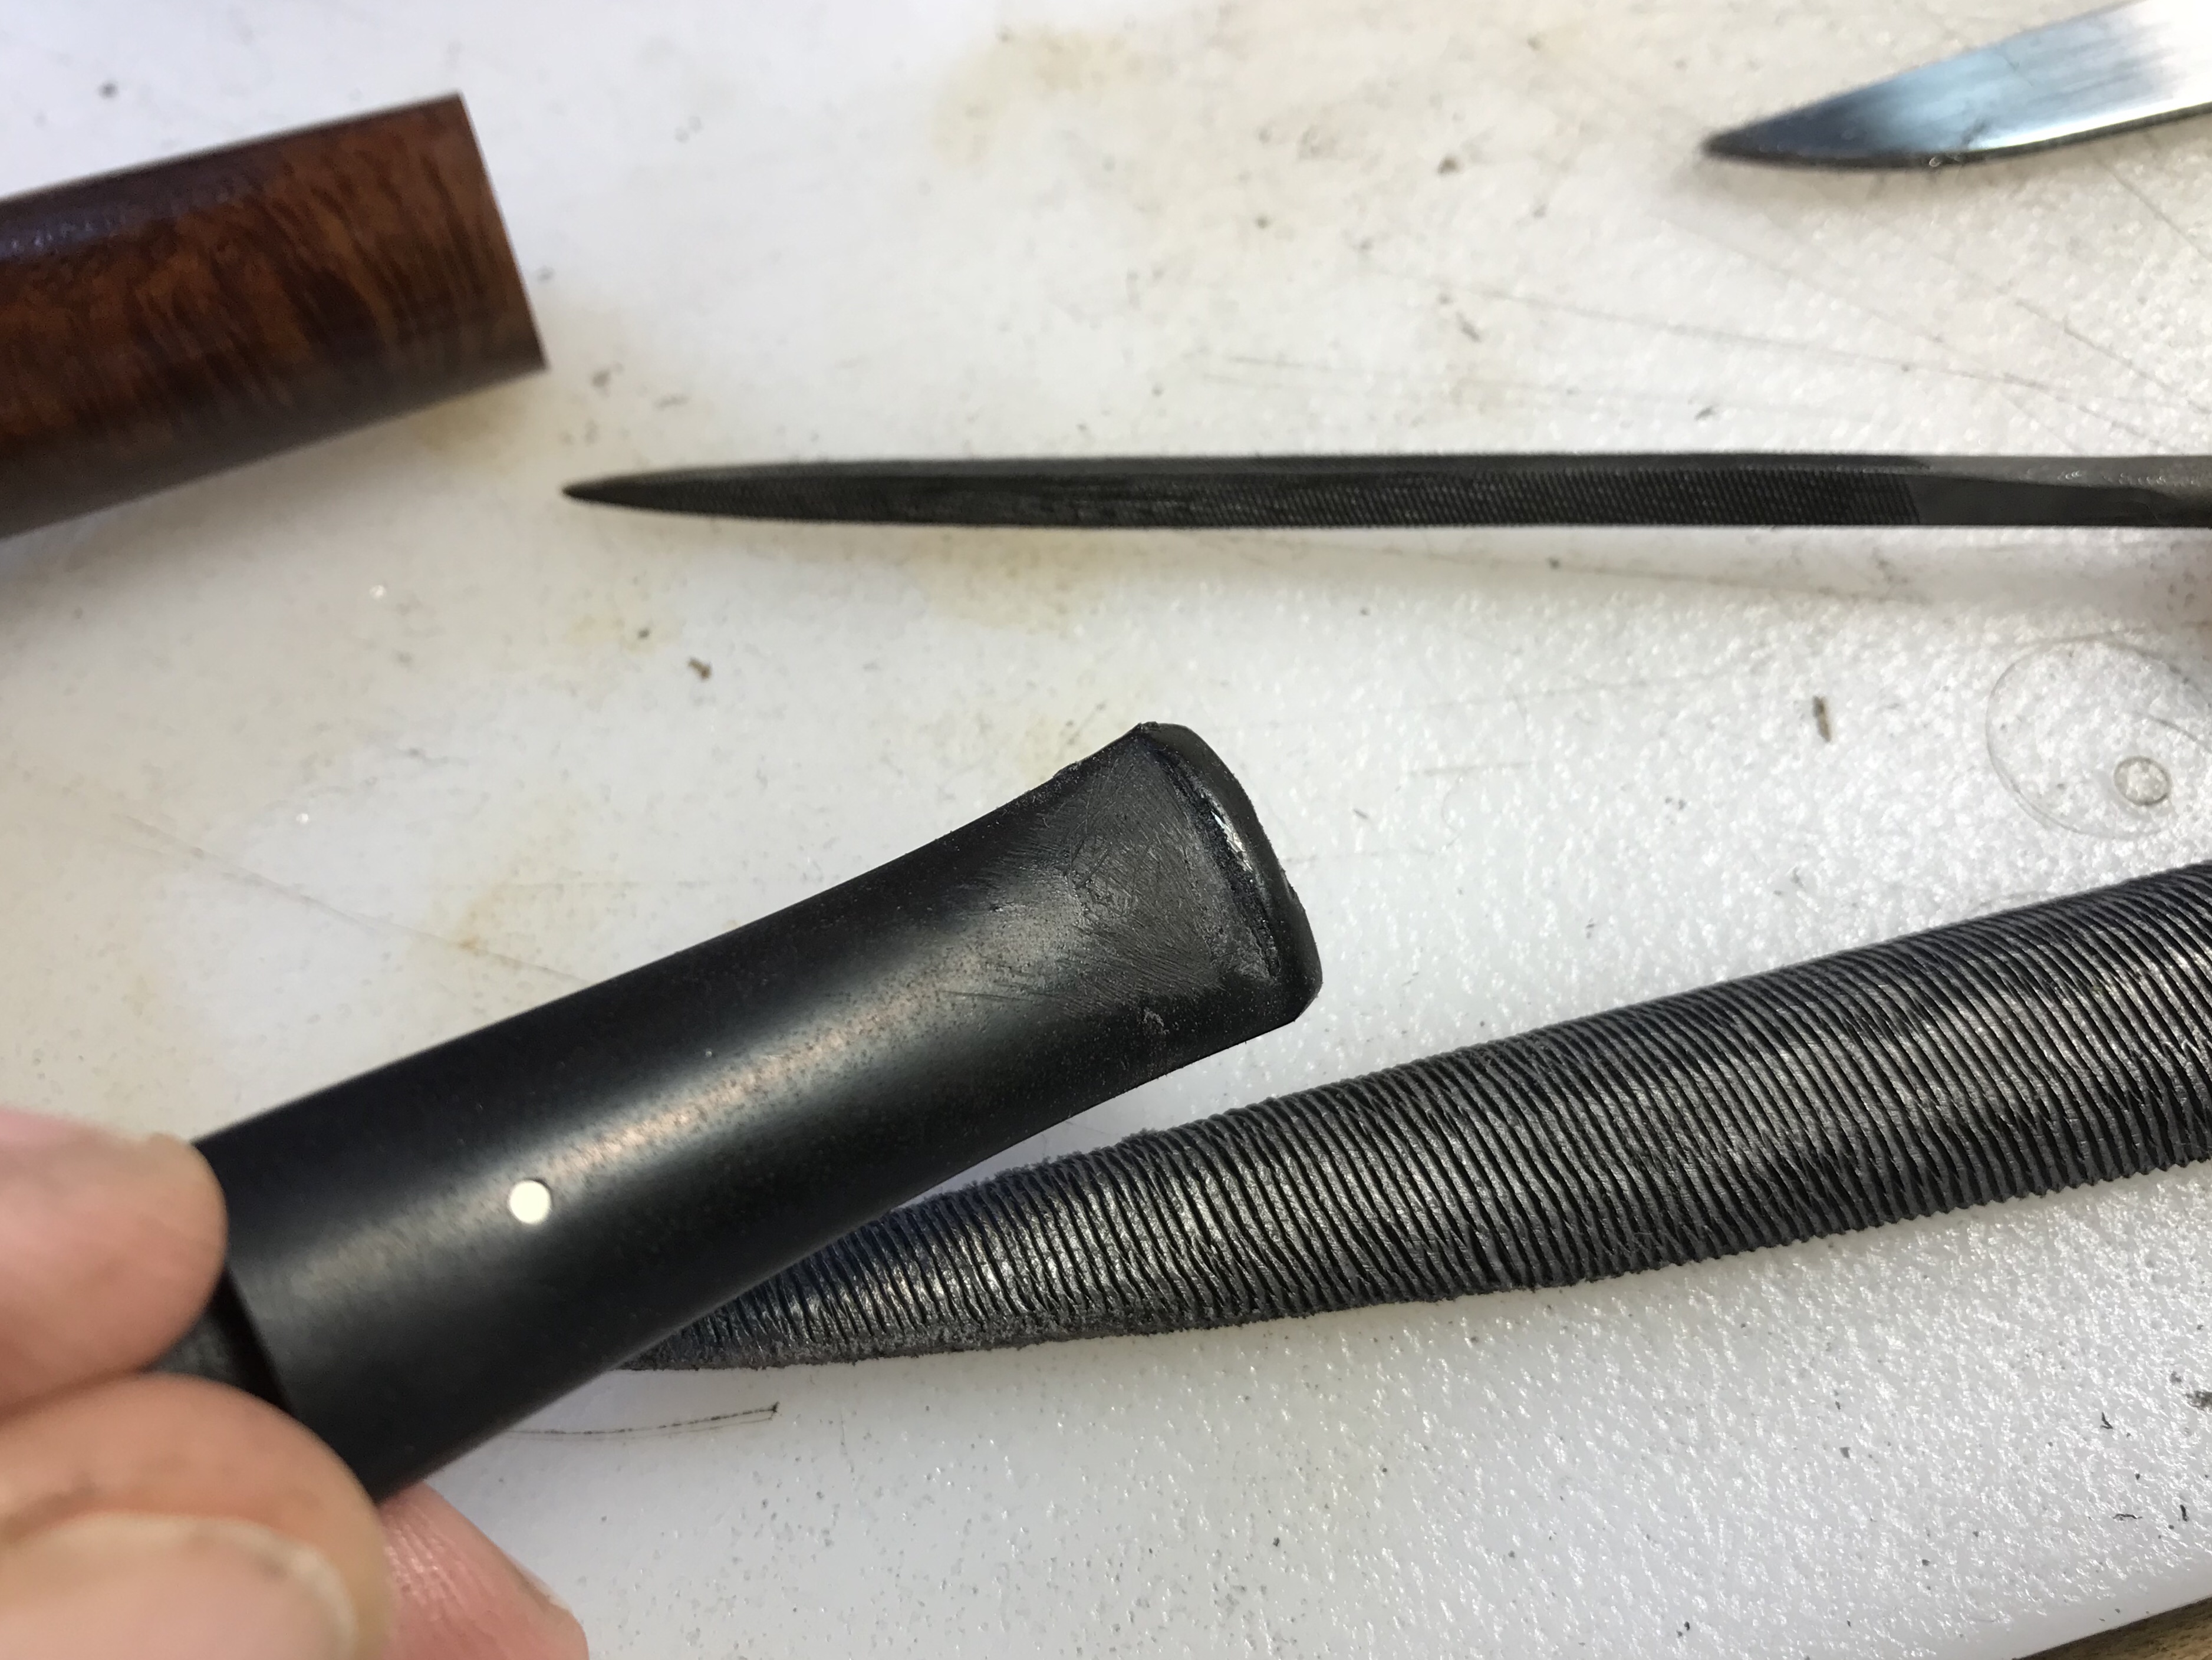
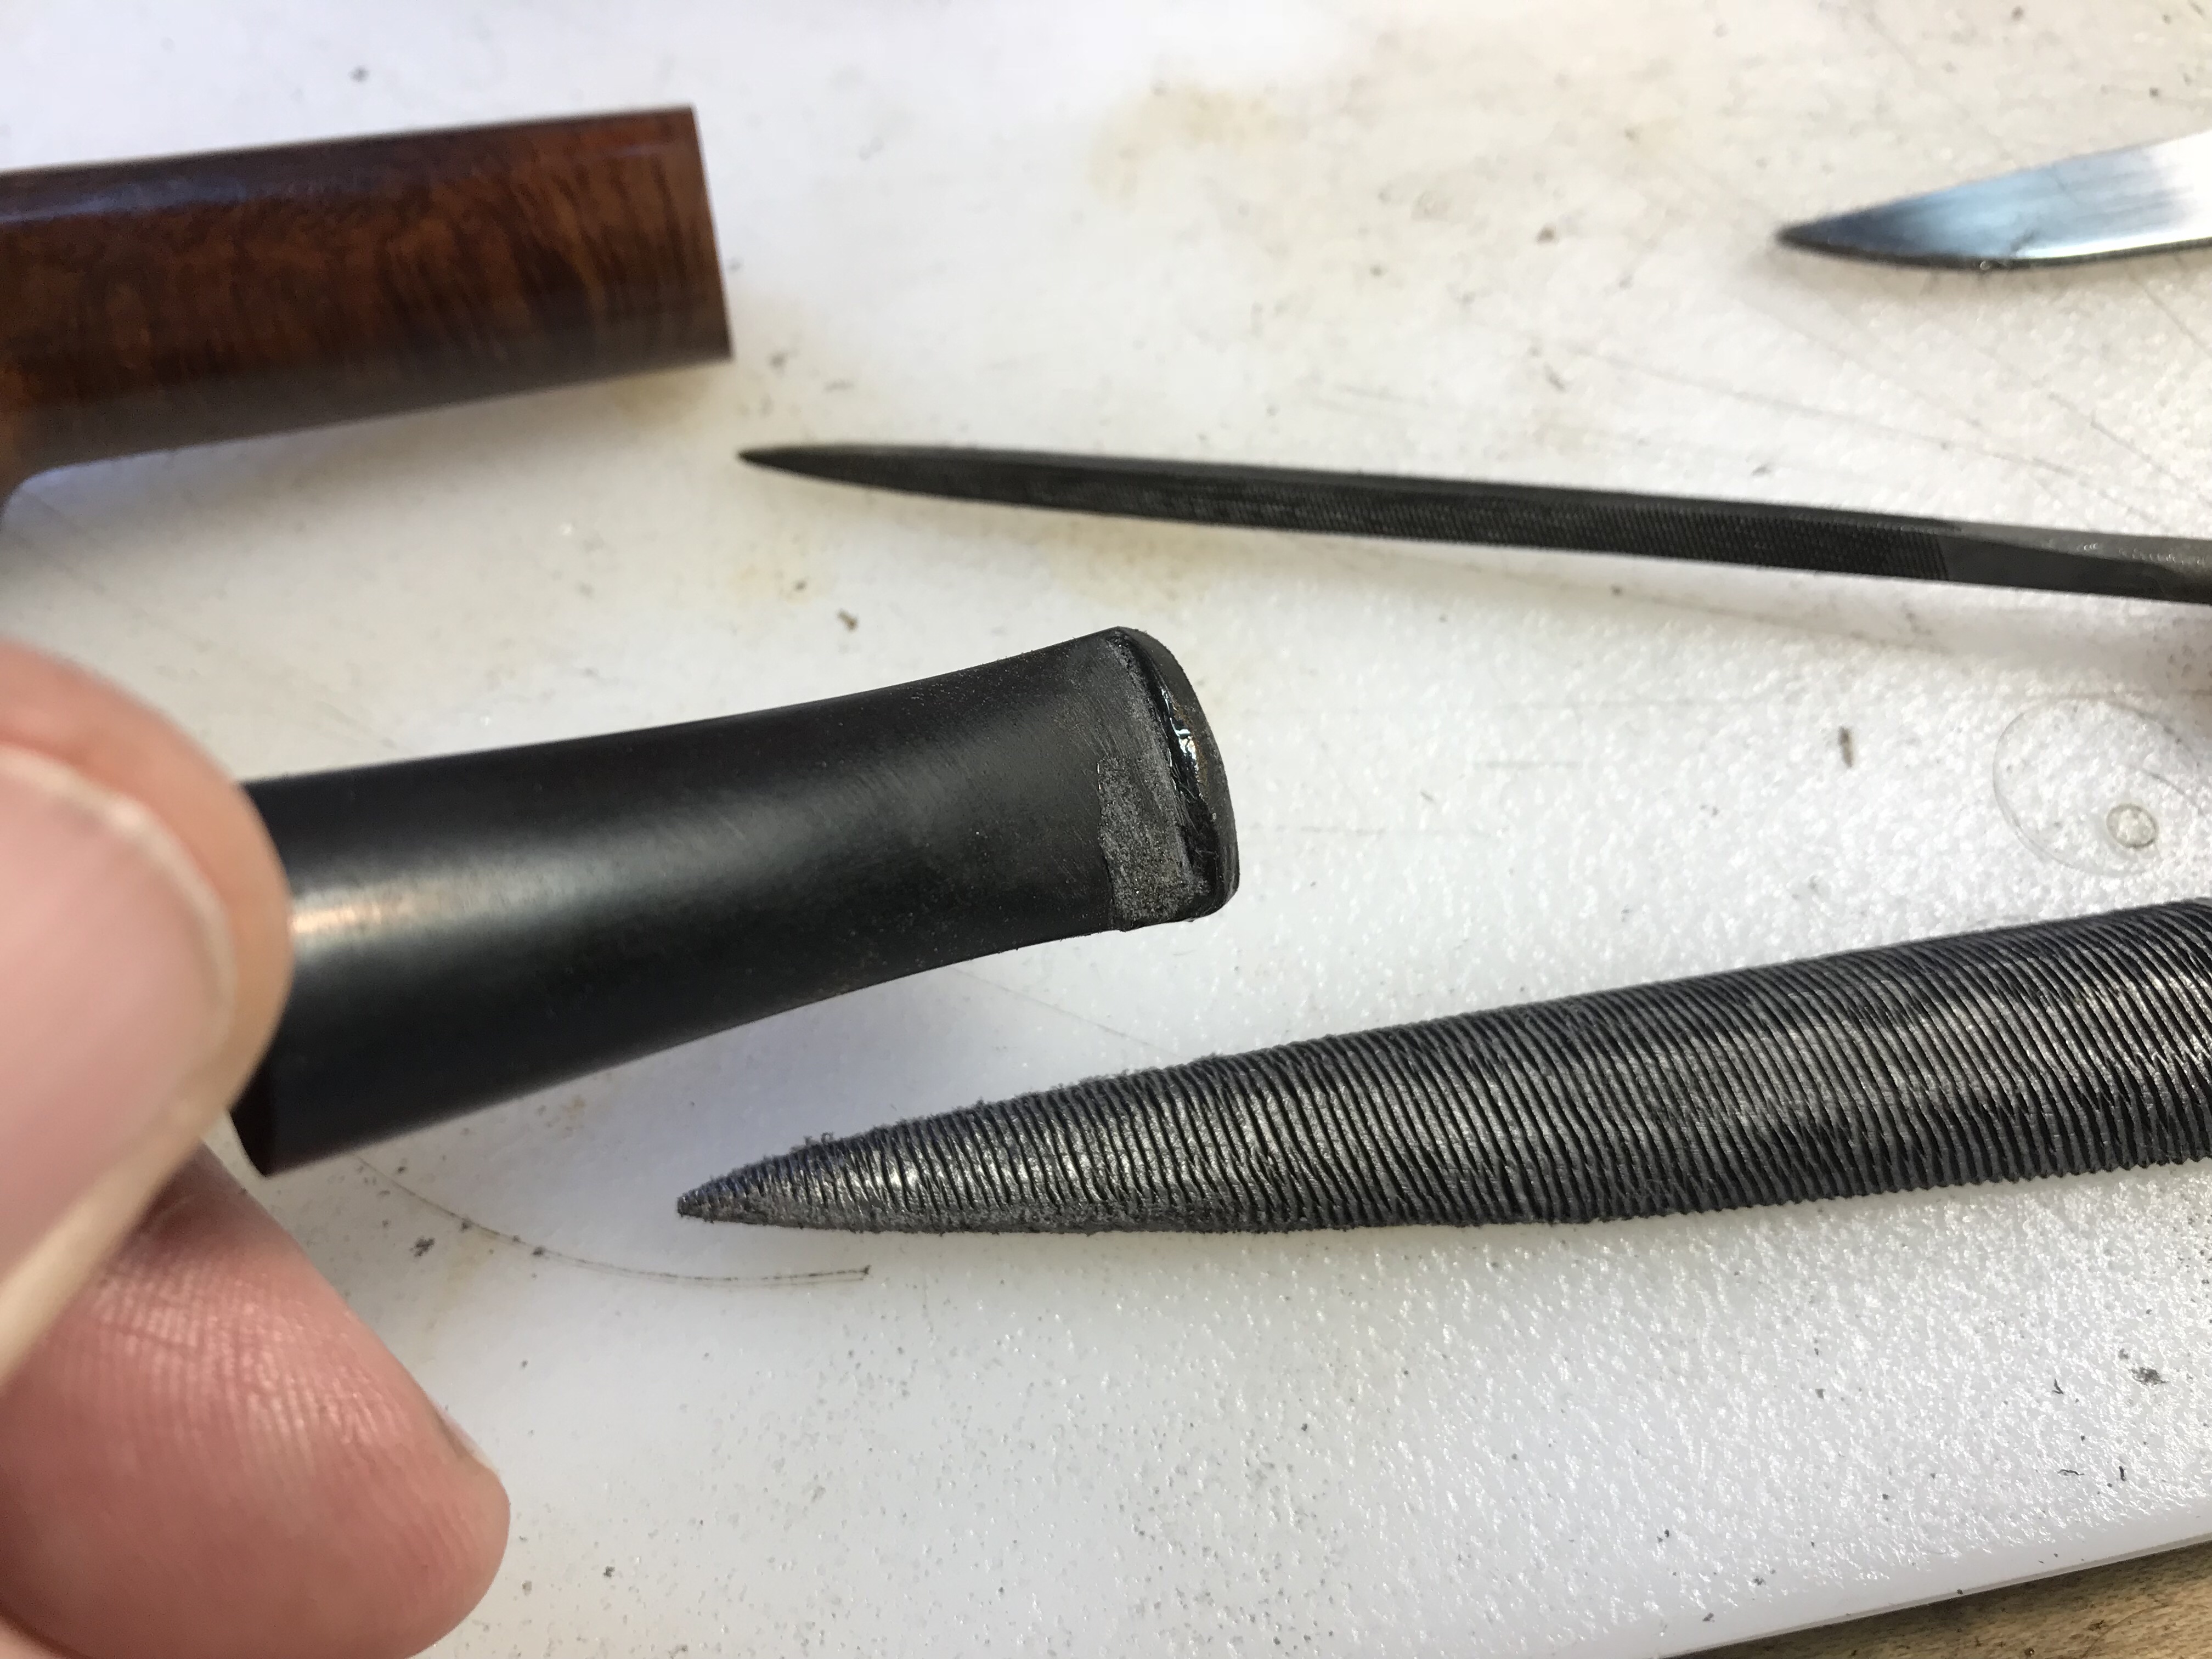
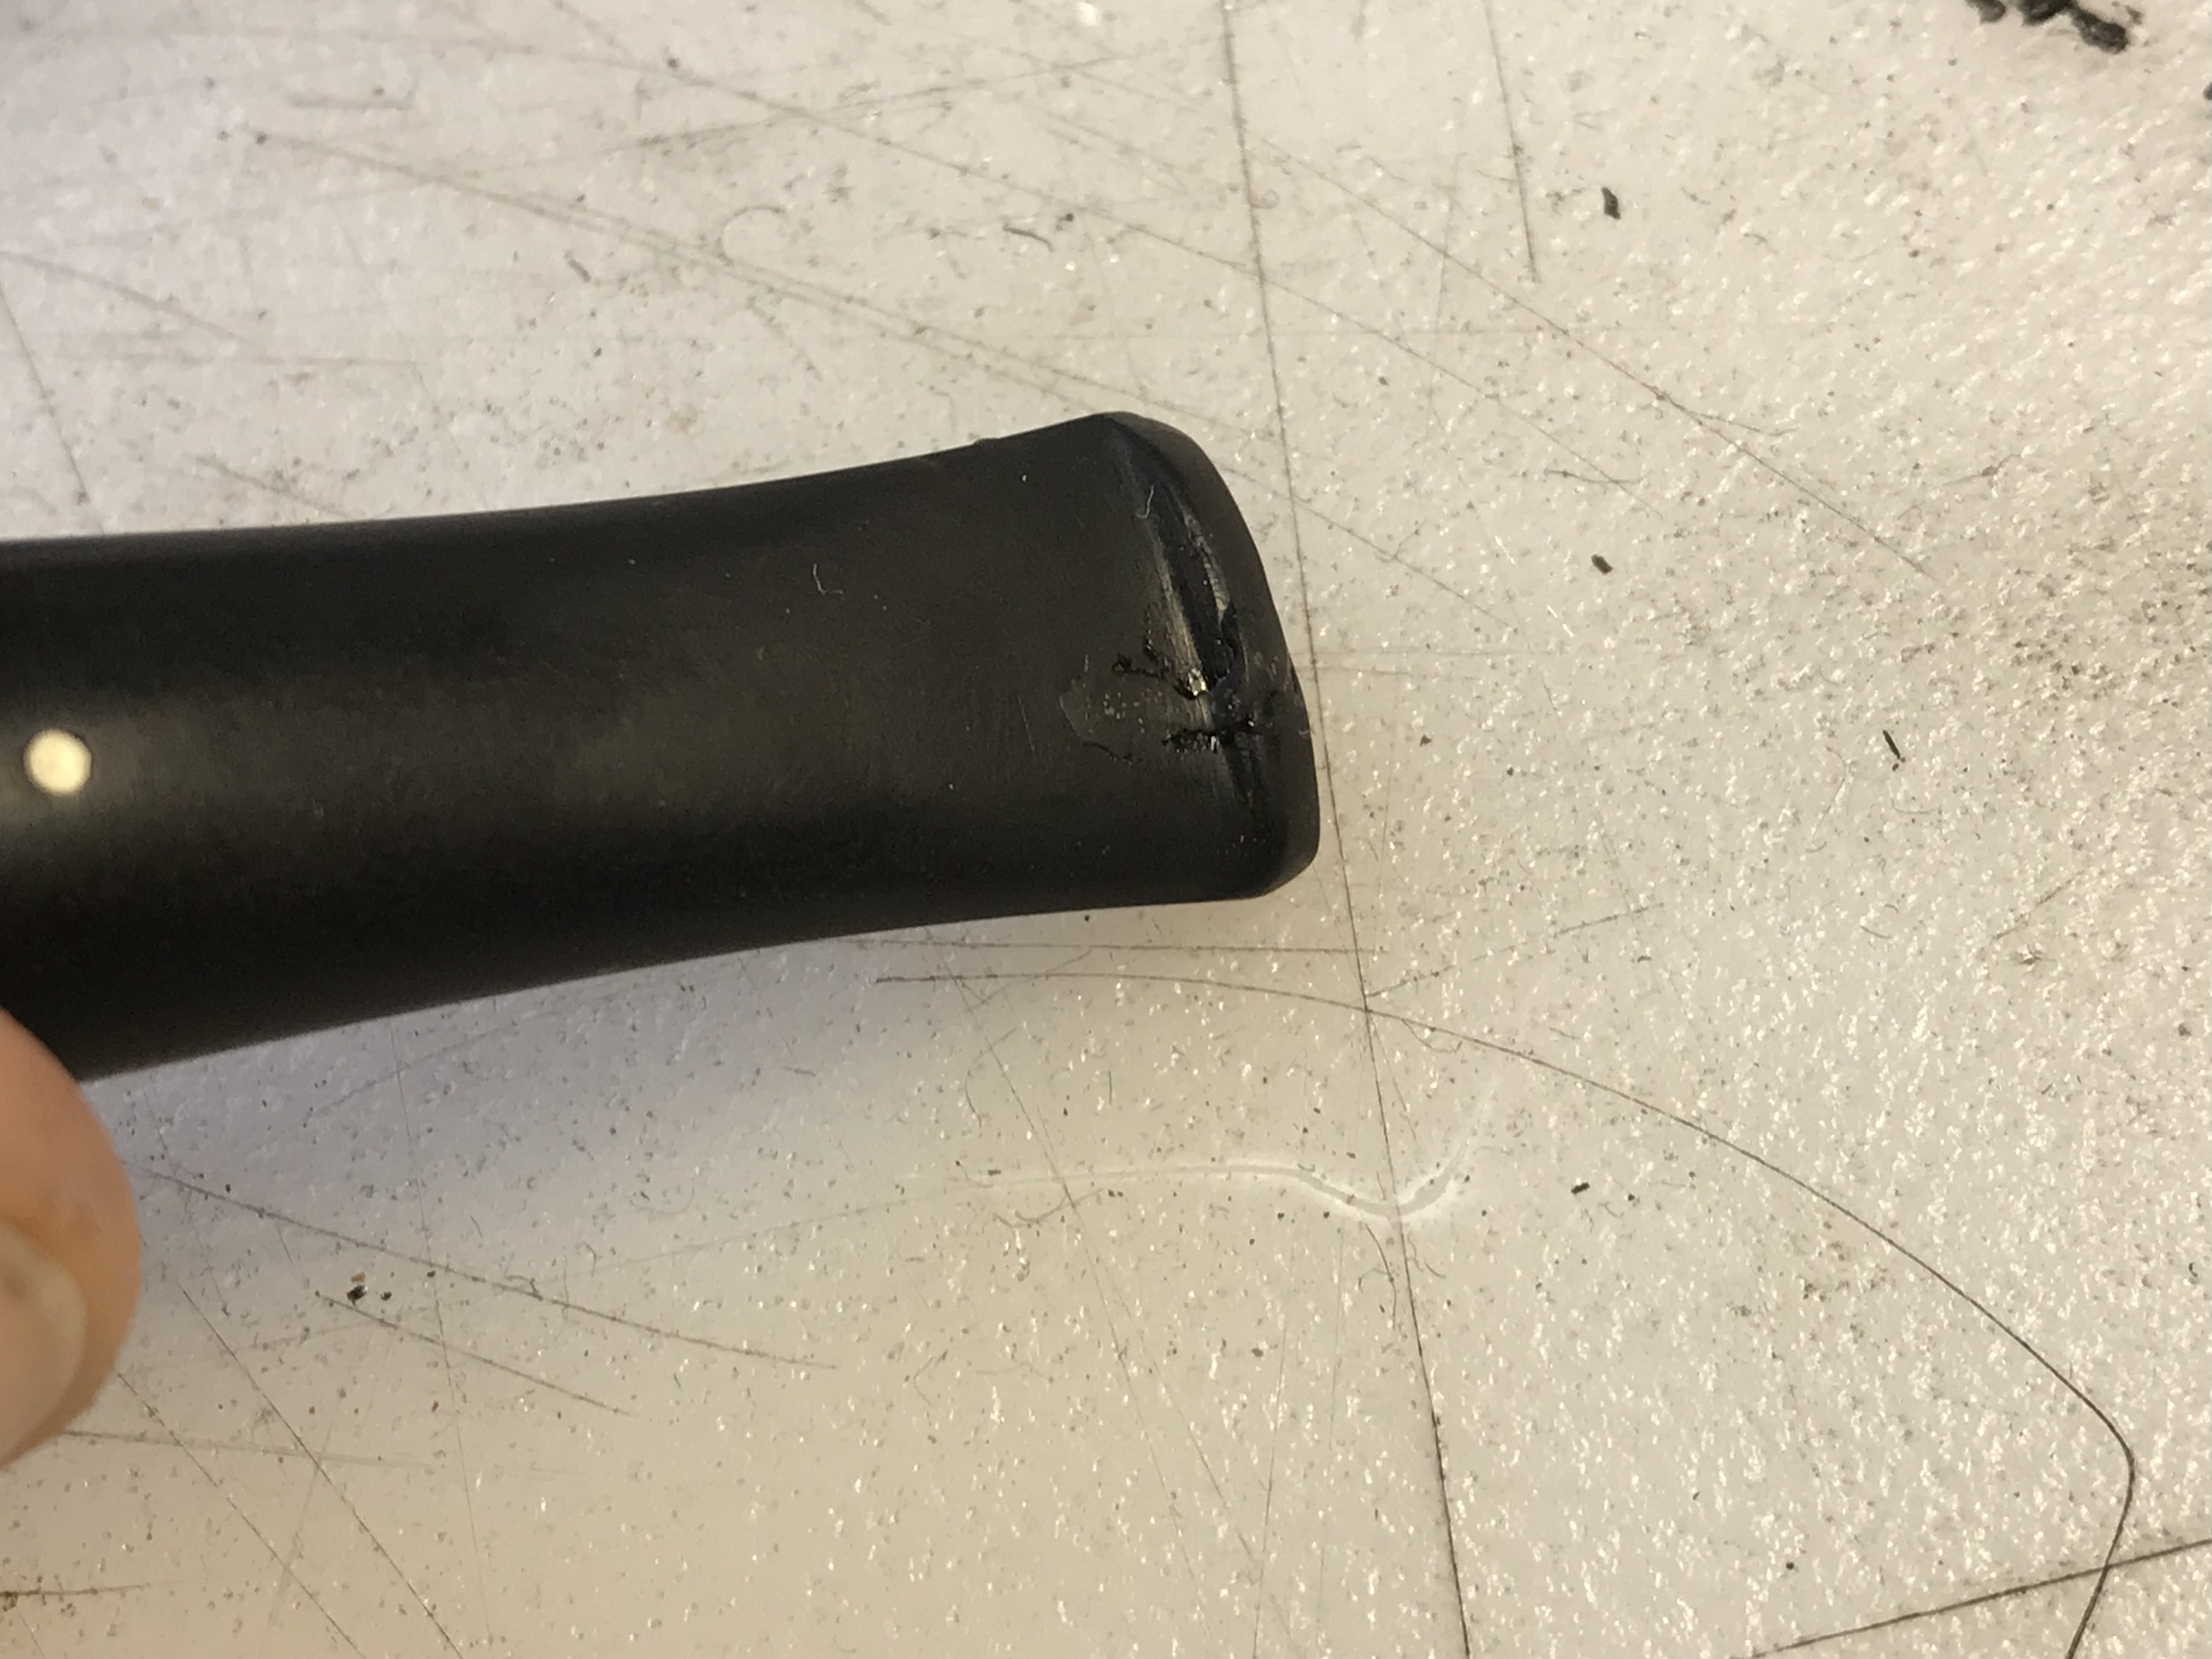
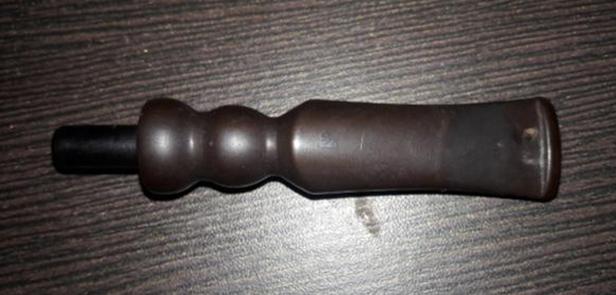
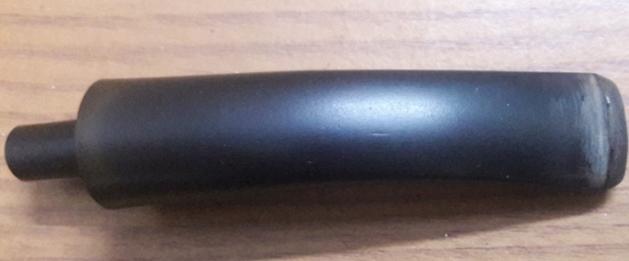
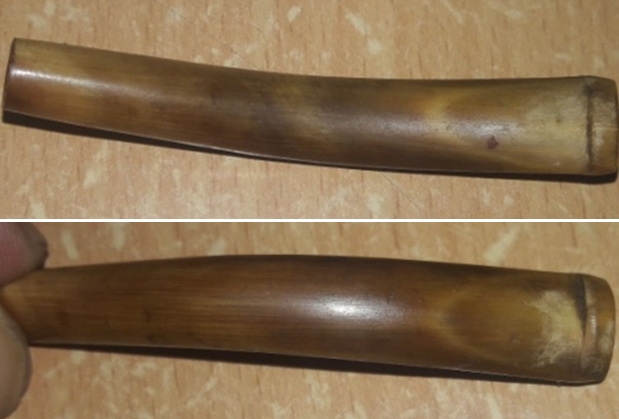
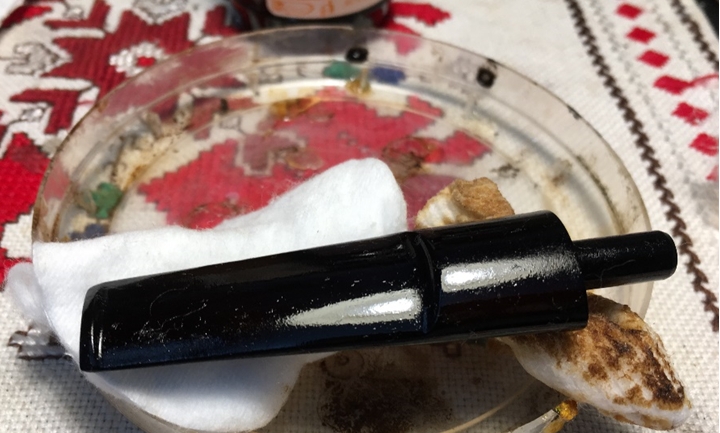
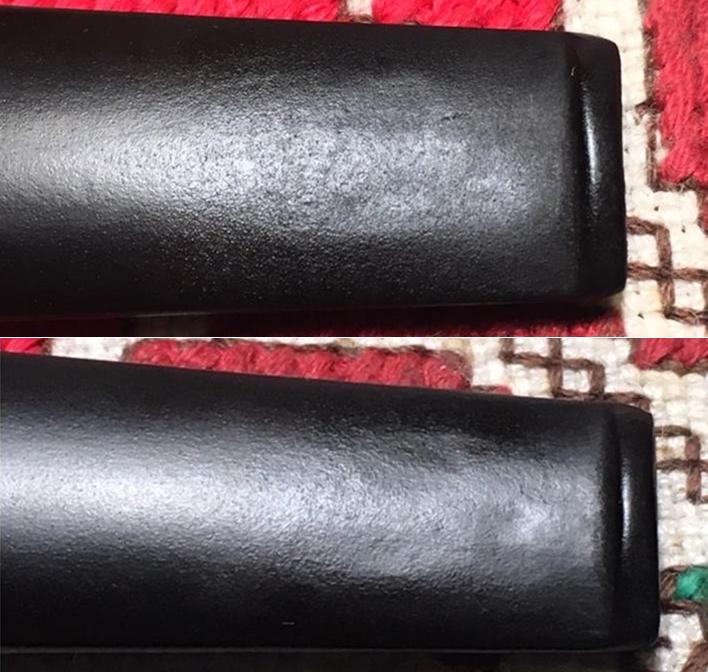
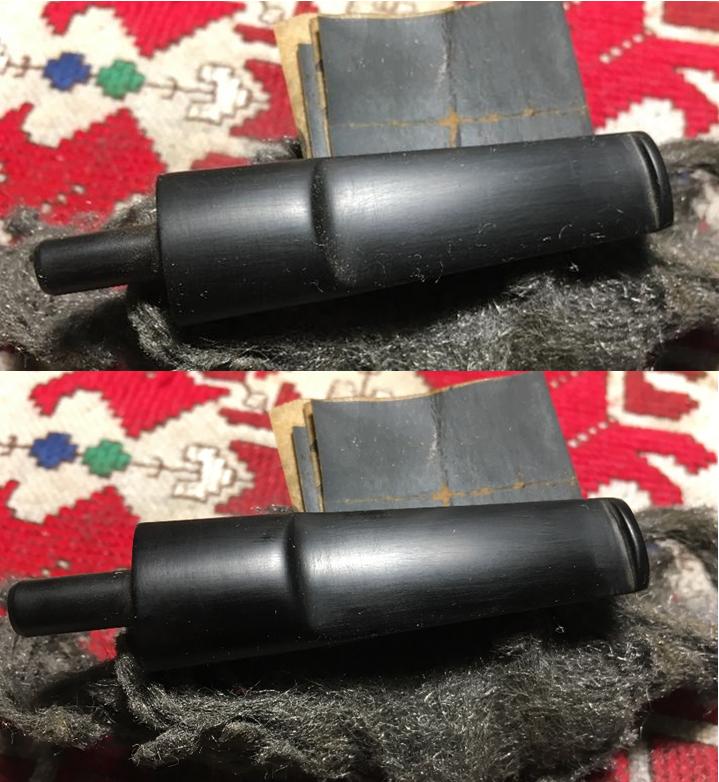
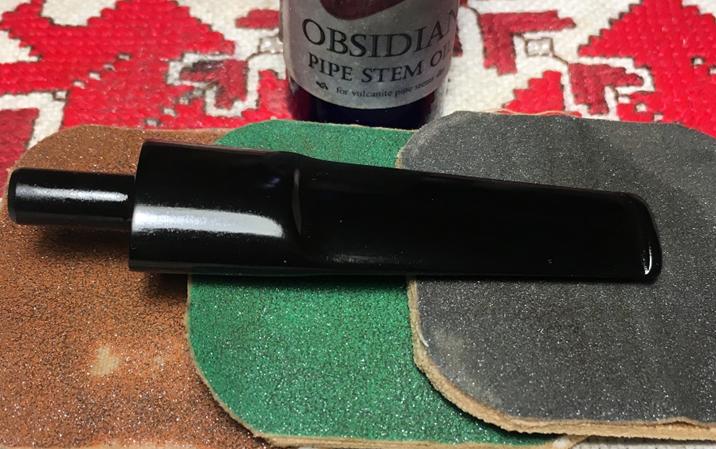
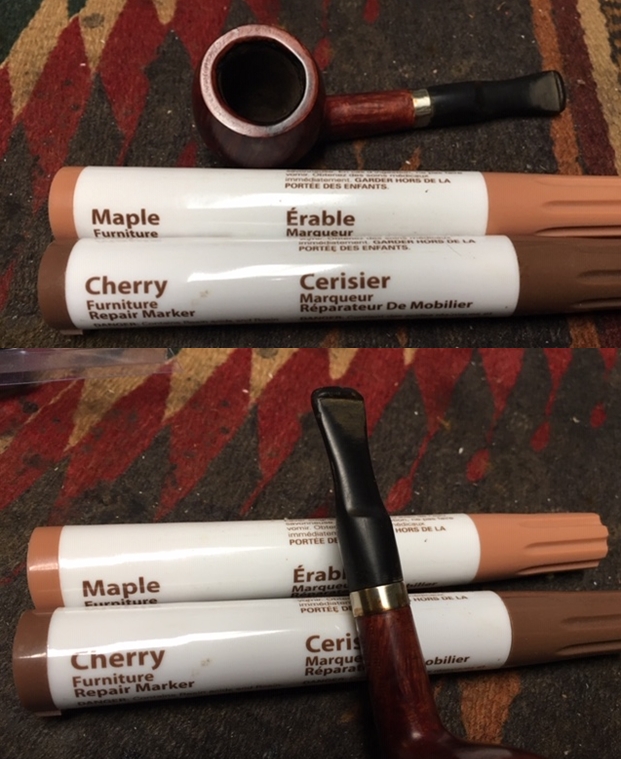
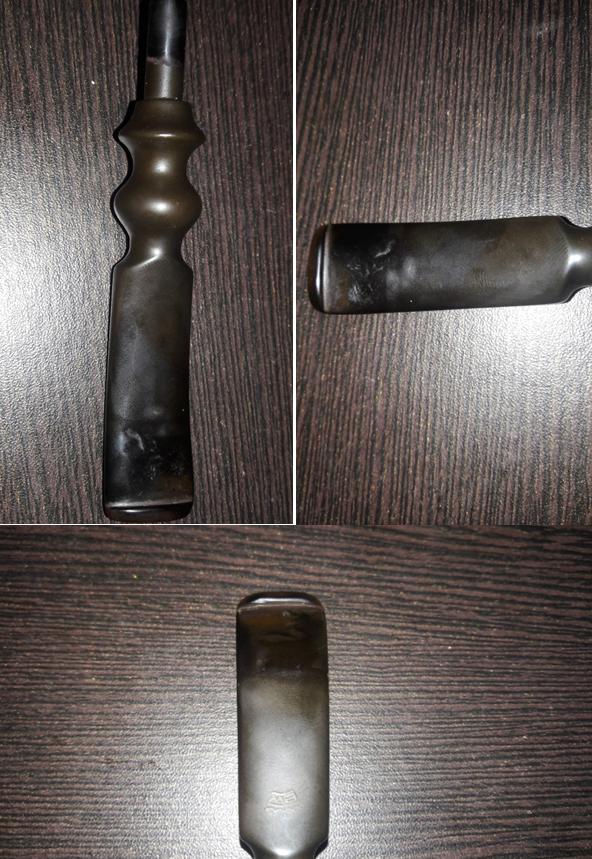
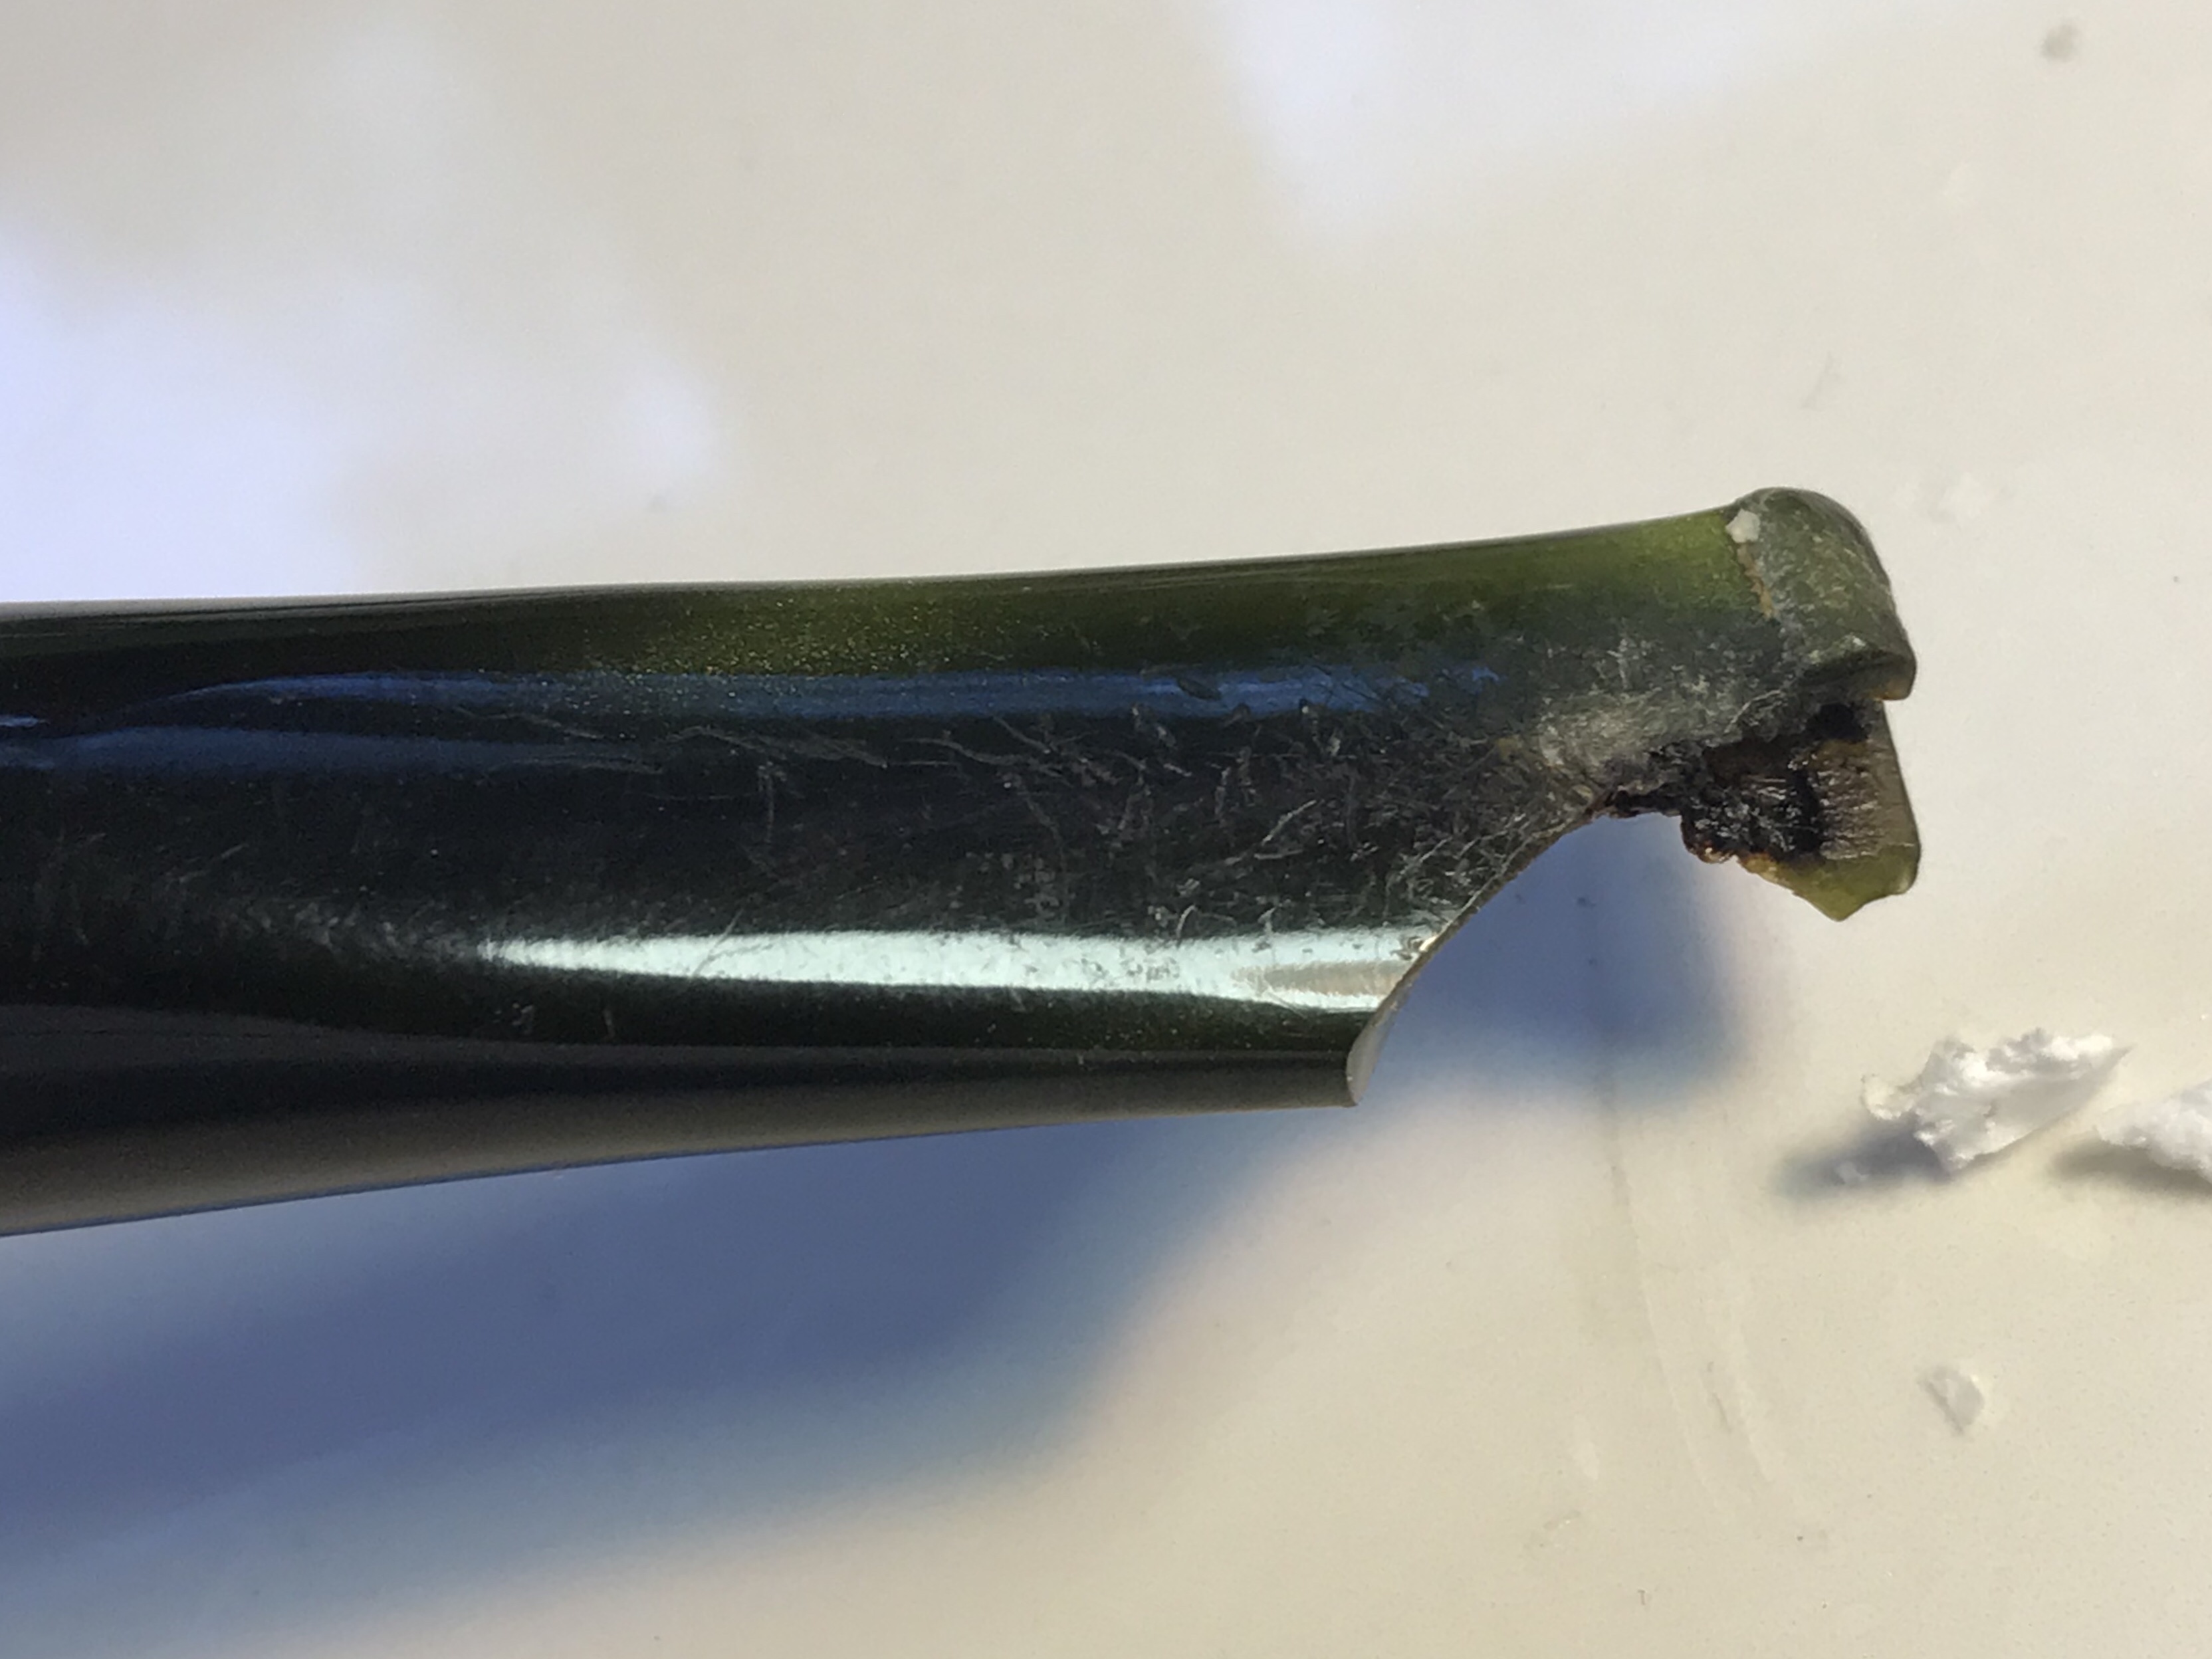
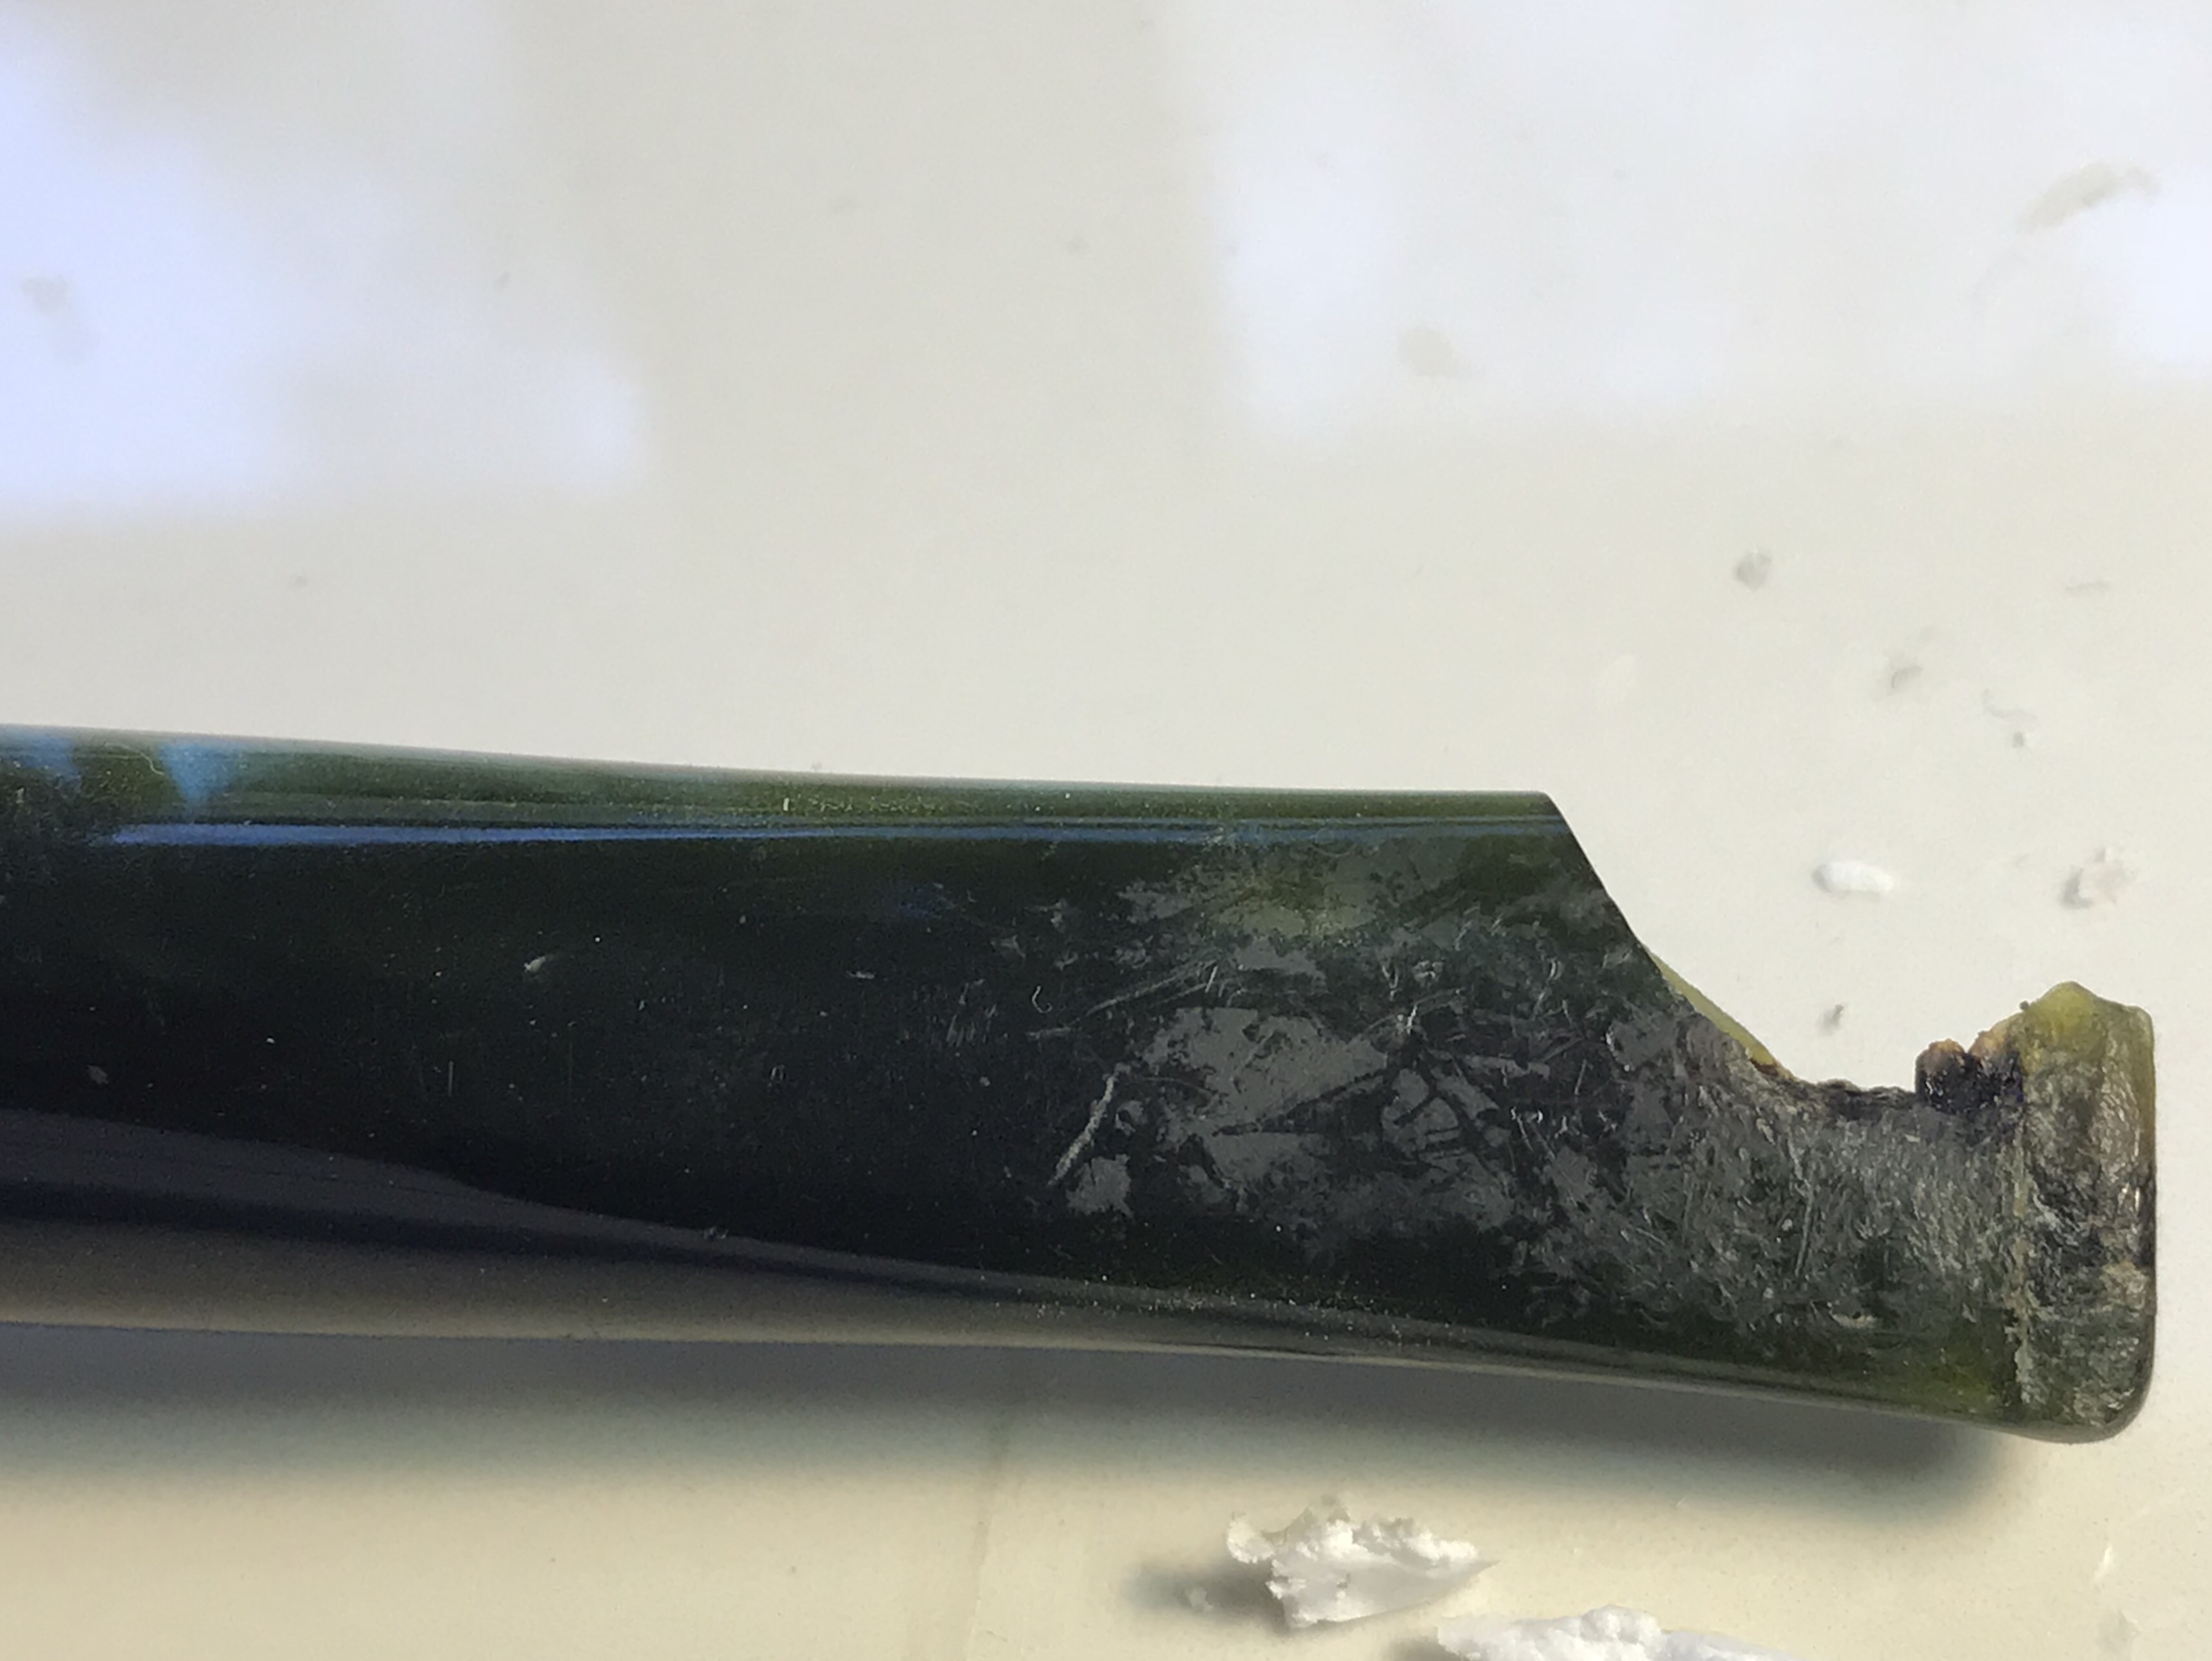
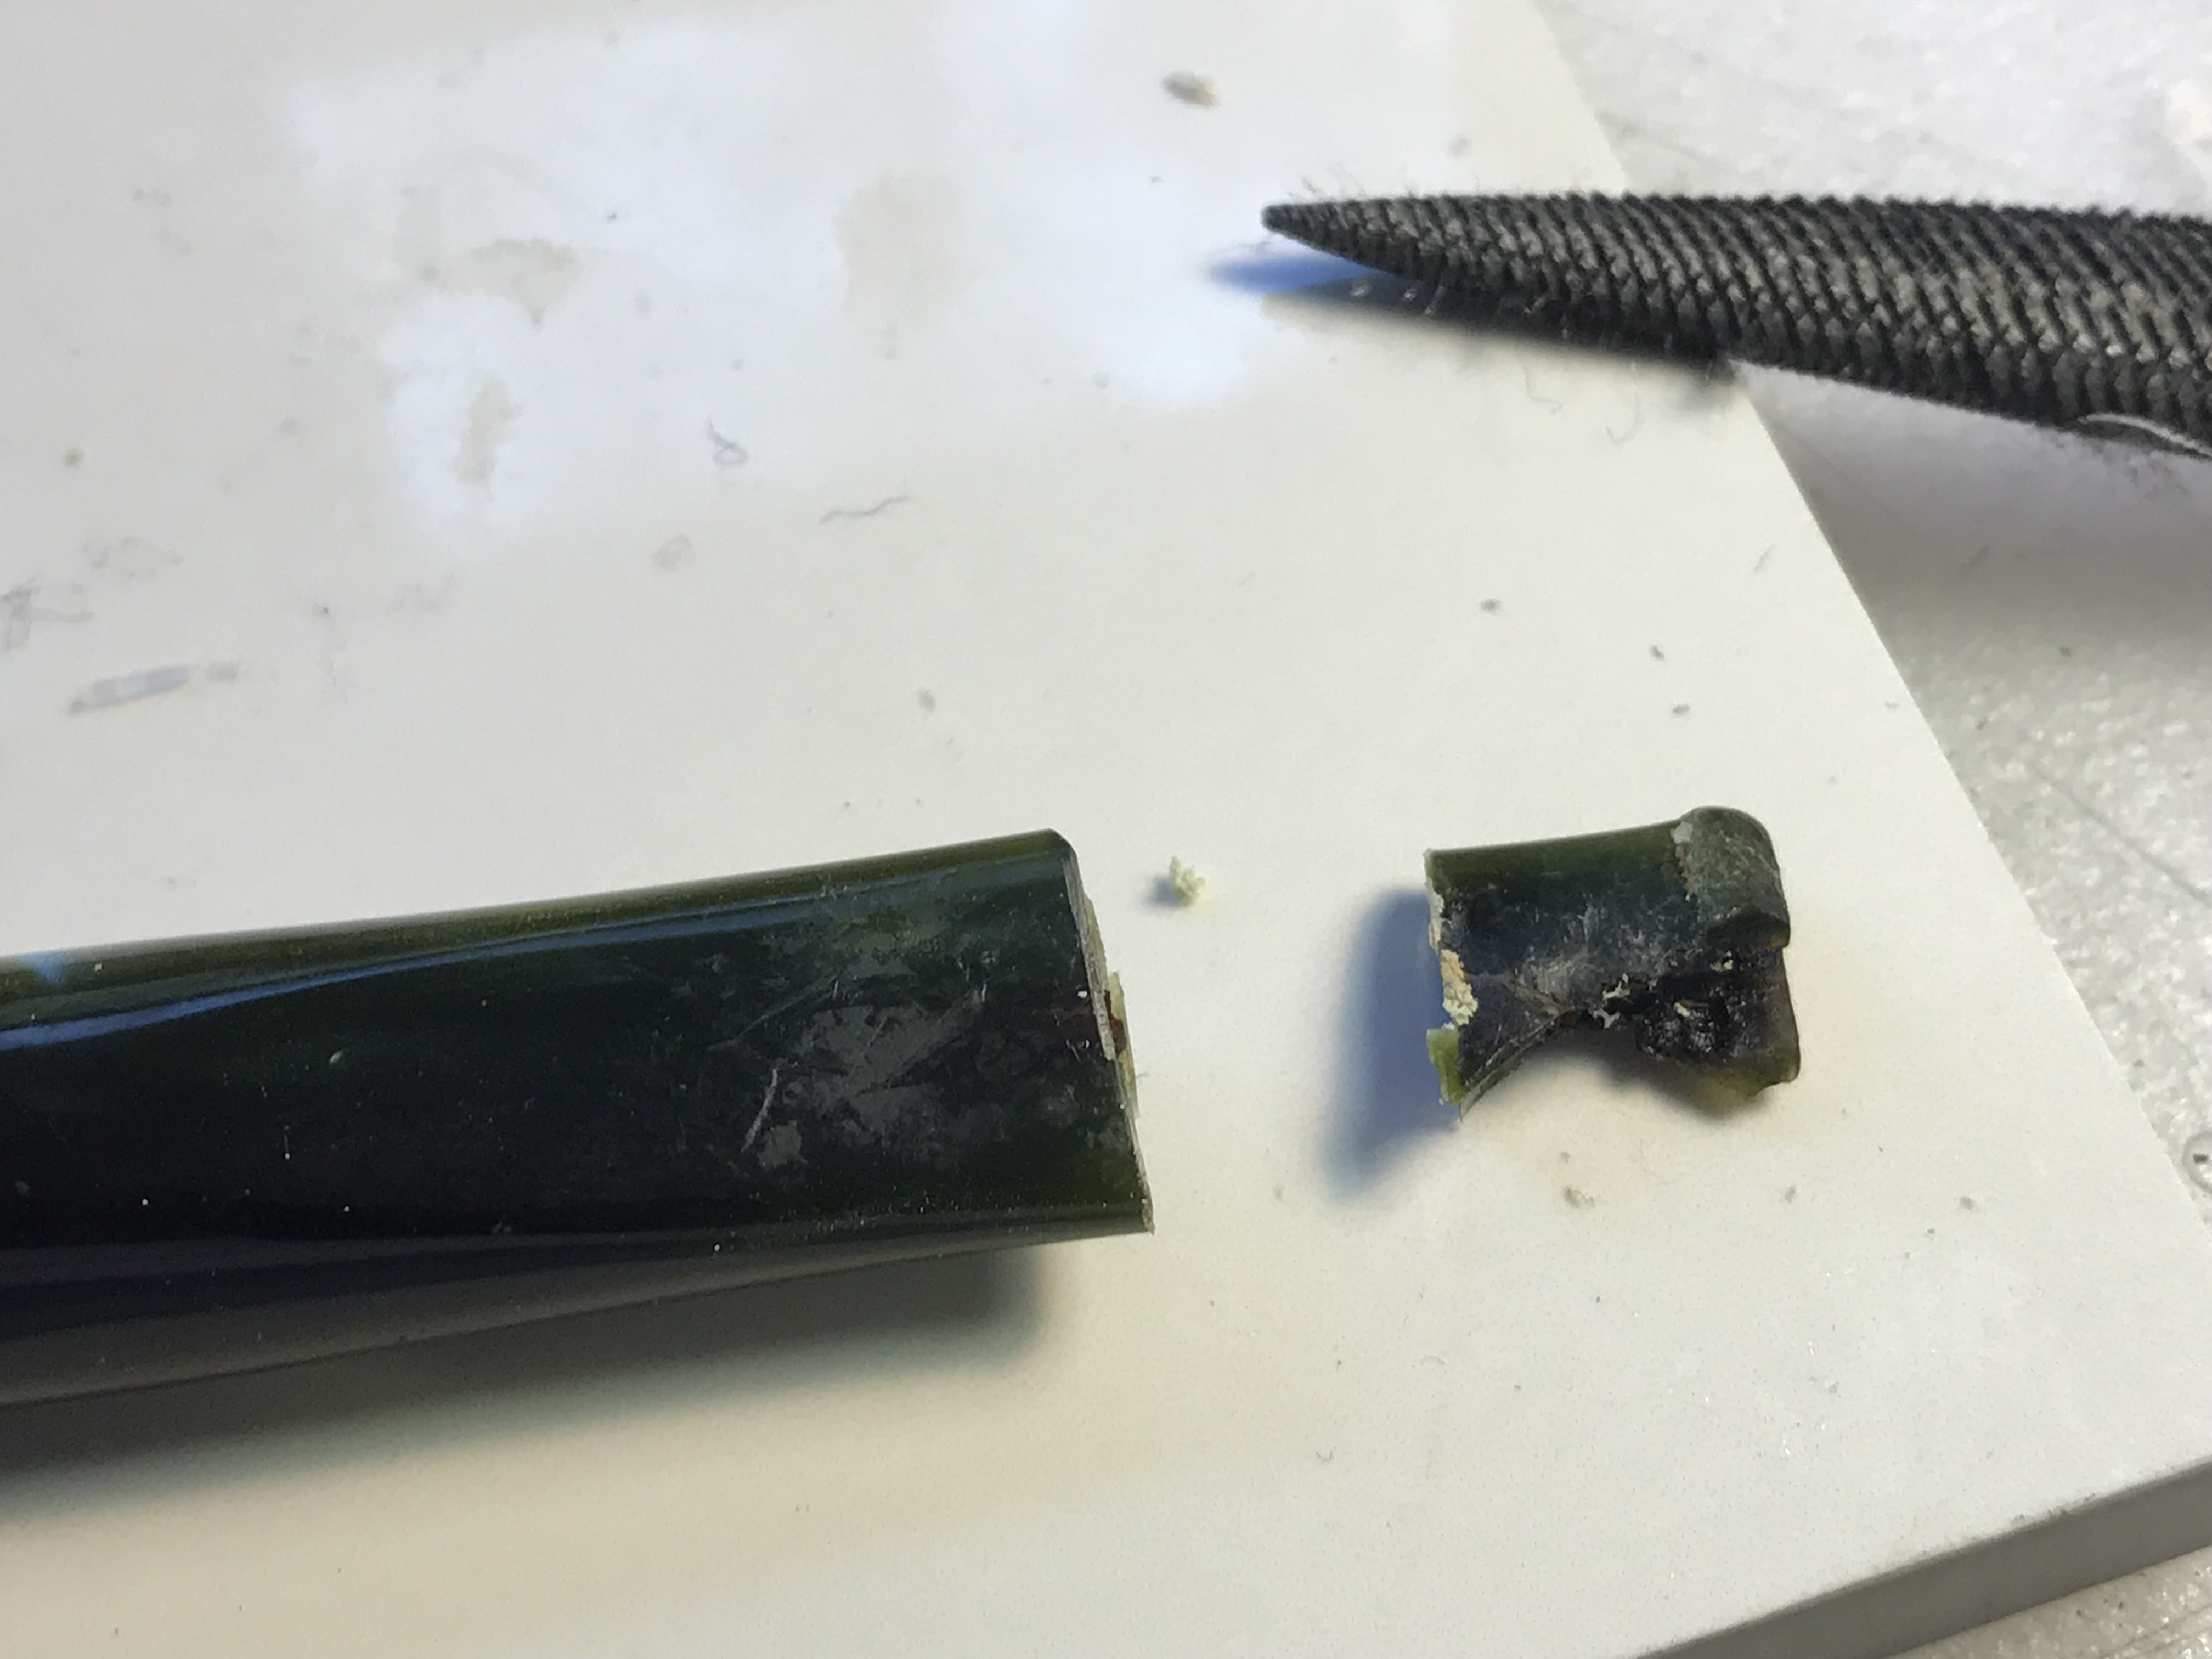
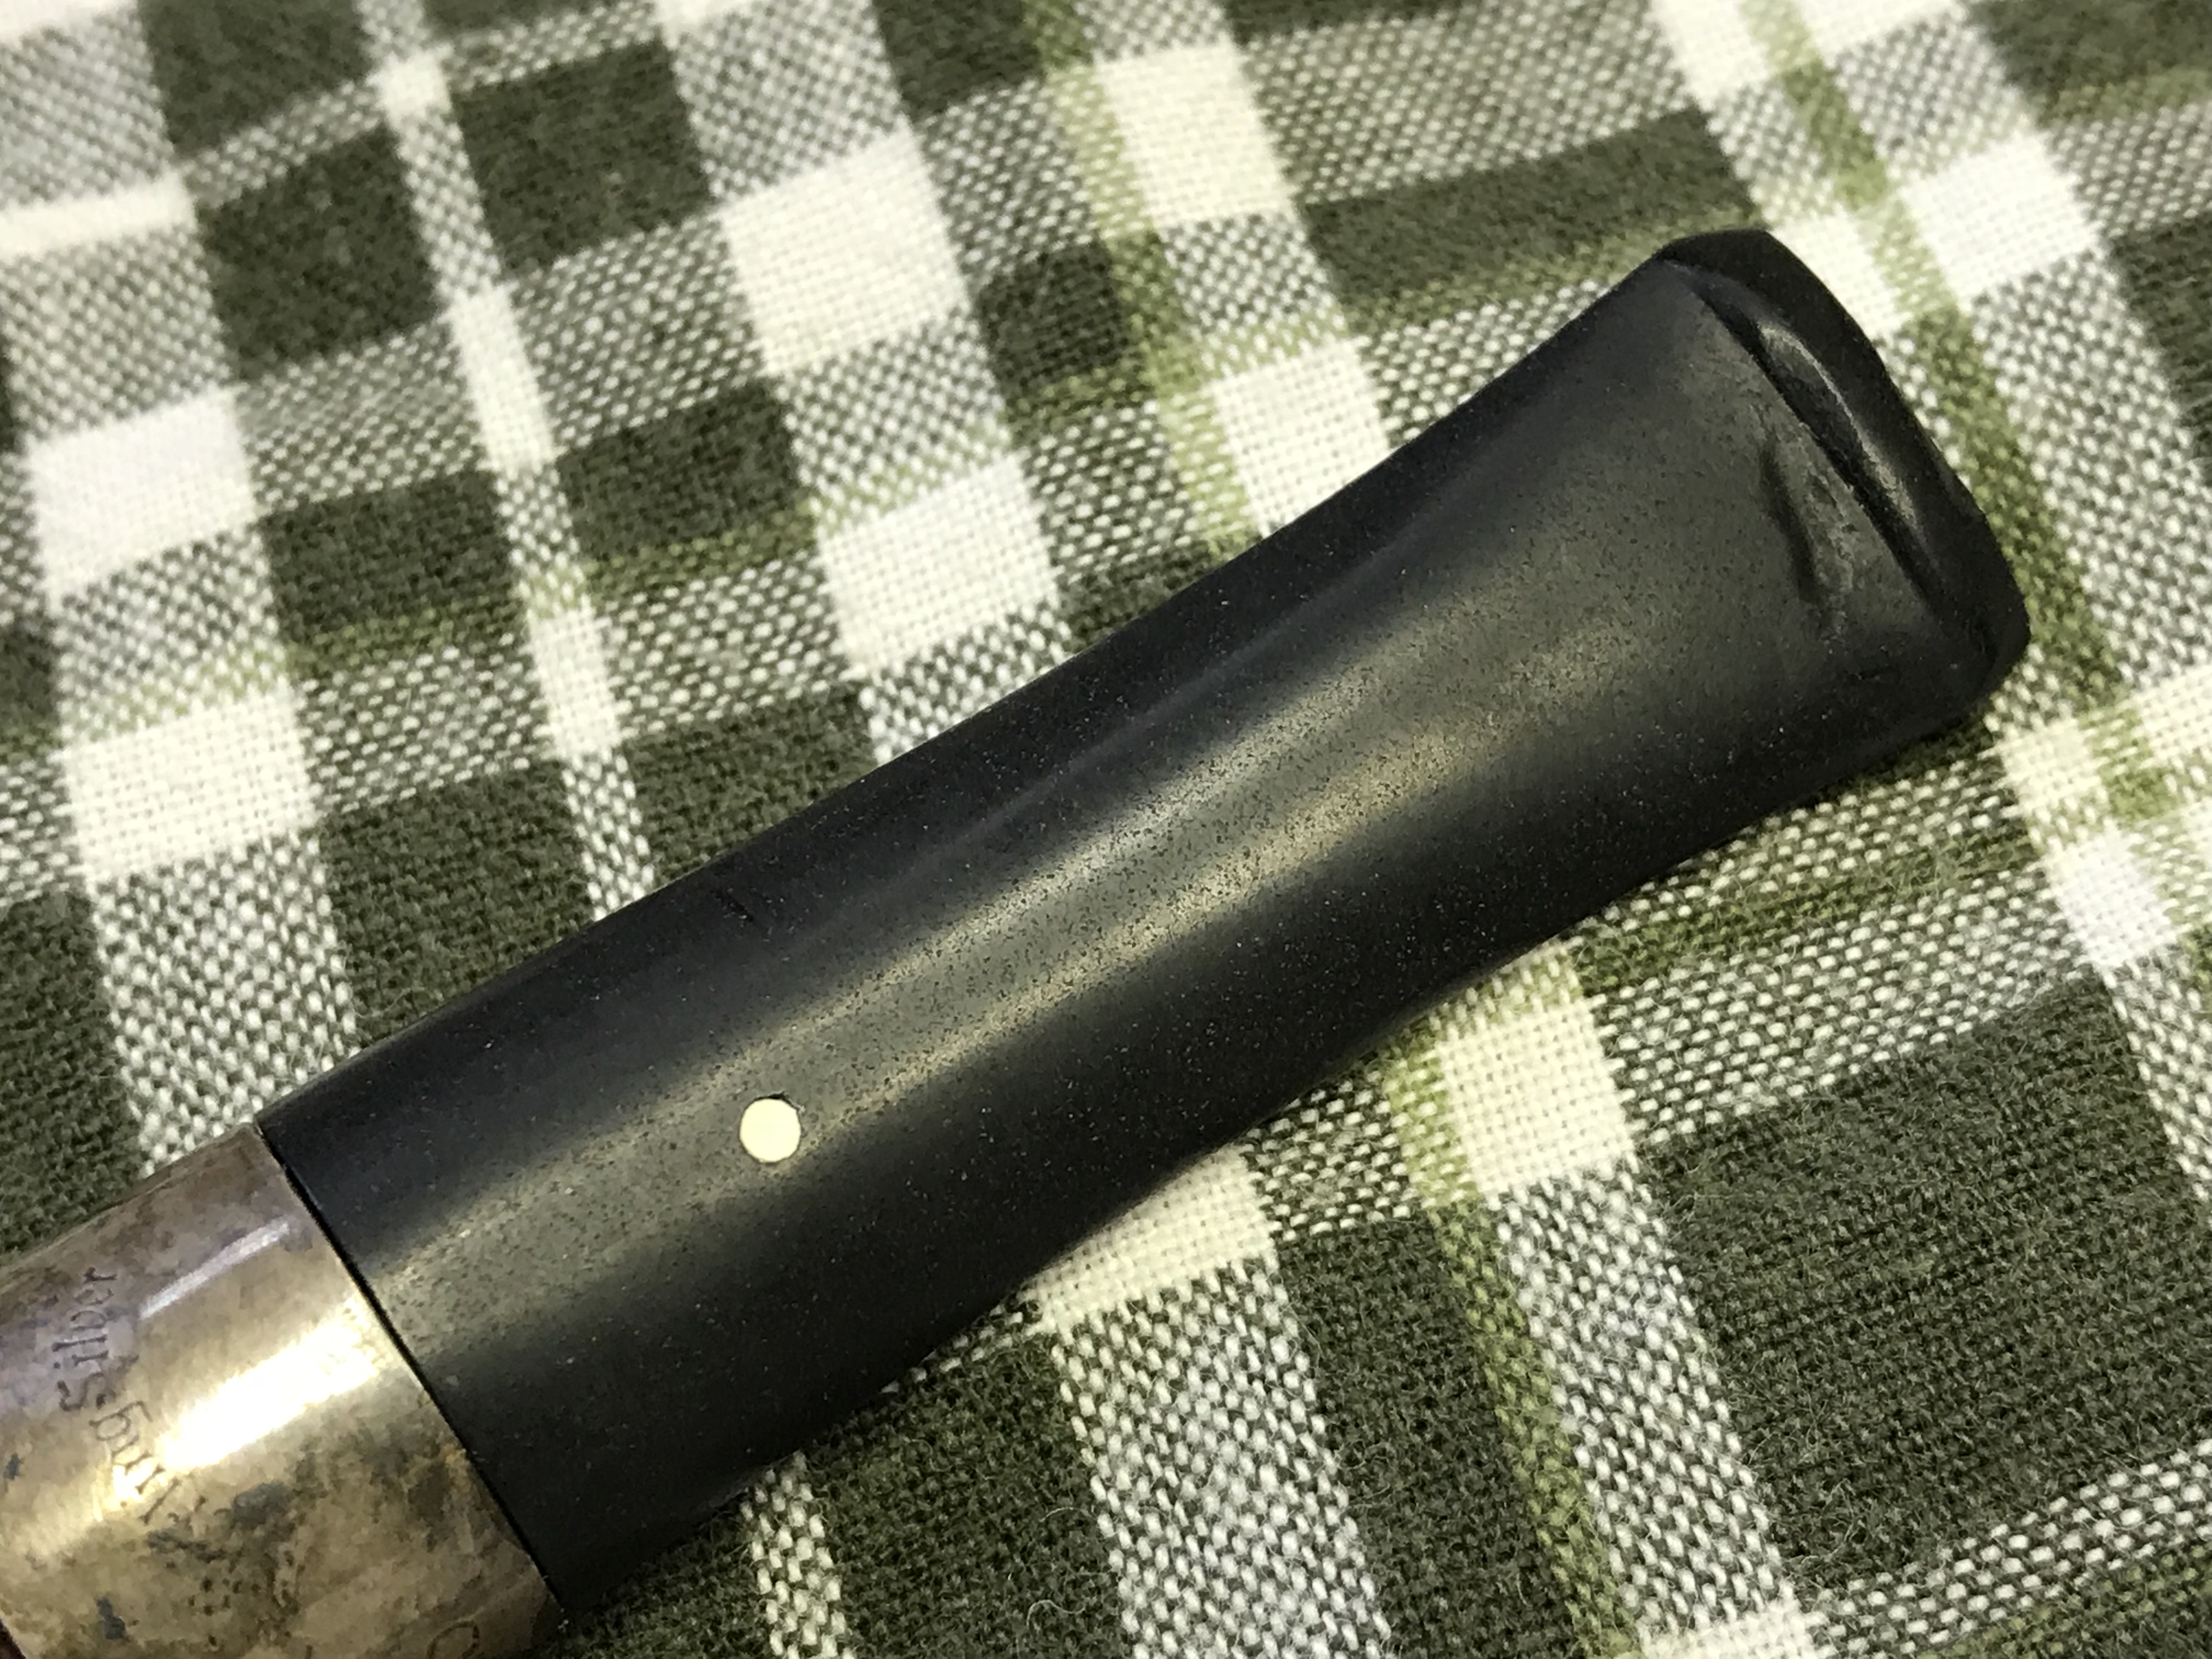
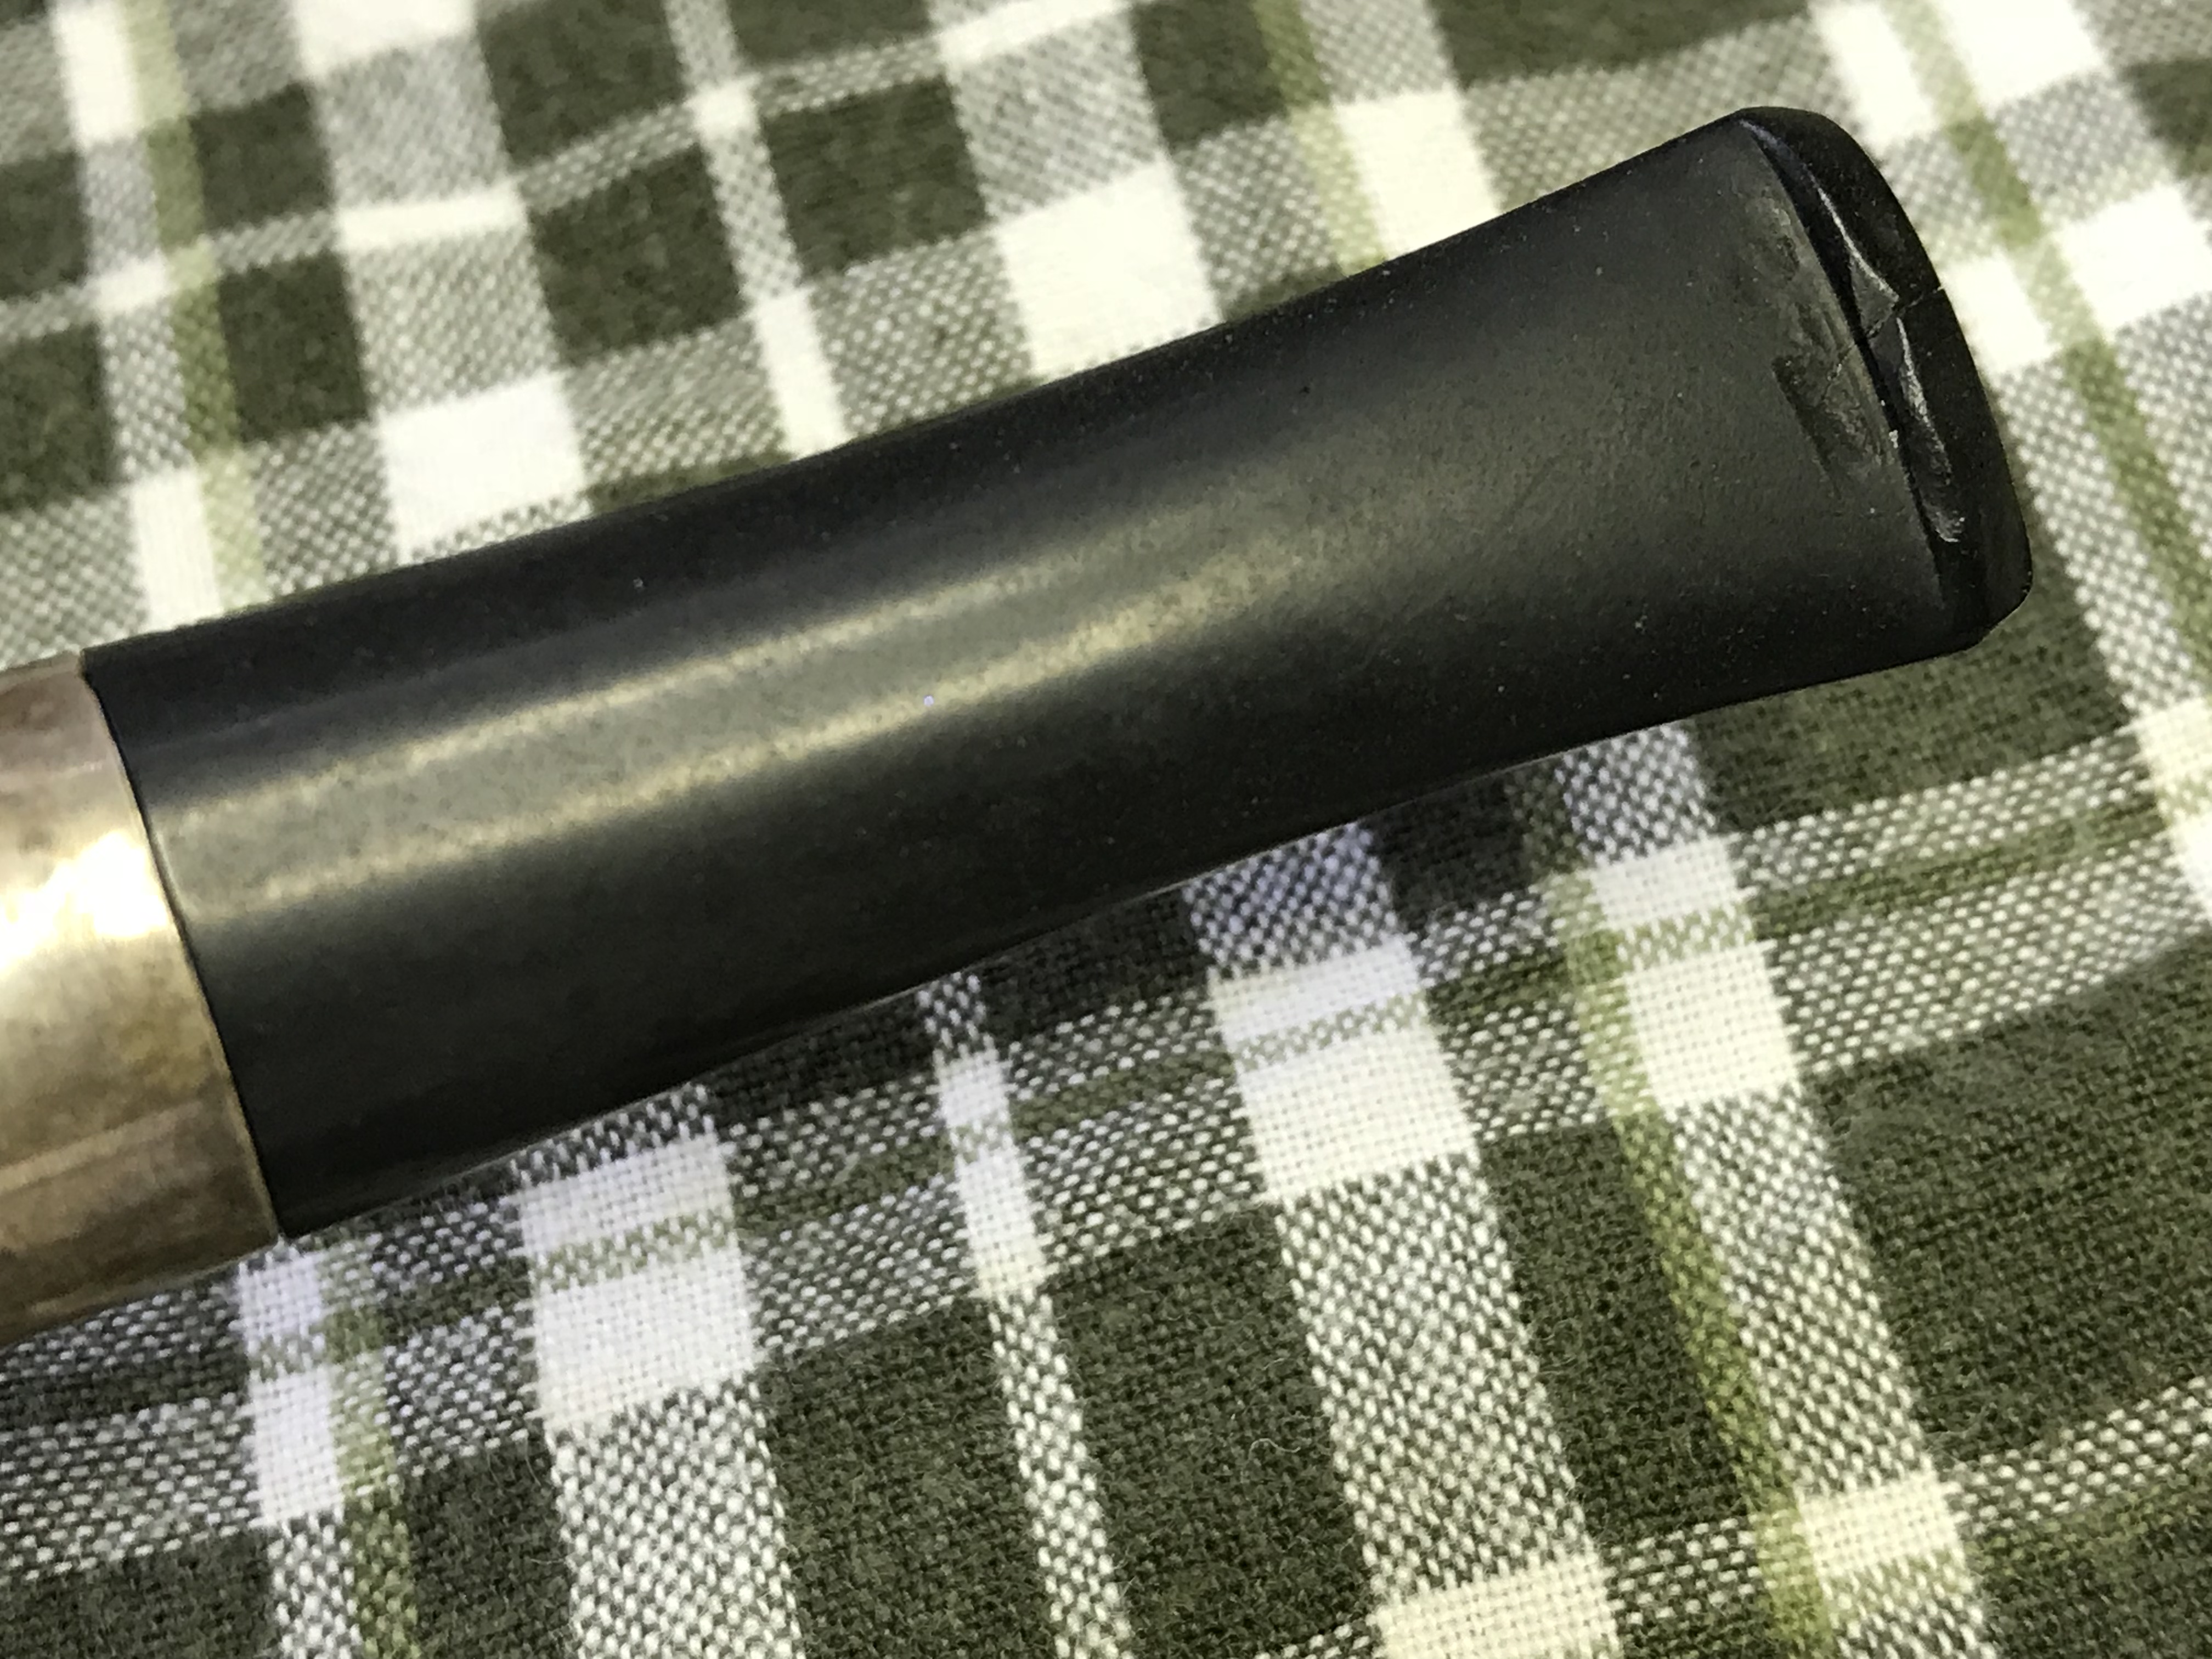
The horn stem shows some minor tooth chatter on both the top and underside, but more prominently on the top surface. This should be taken care of by sanding with a 220 or higher grade sand paper. All in all, the stem appears to be pretty solid. The edge of the lip on both upper and lower surface is slightly damaged and will need to be sharpened. Air flow through the stem is open and full.

The sterling silver ferrule and bone shank end caps are deeply oxidized and show the patina normal for its age. Once they are cleaned and shining they will add a class to this pipe.

THE PROCESS

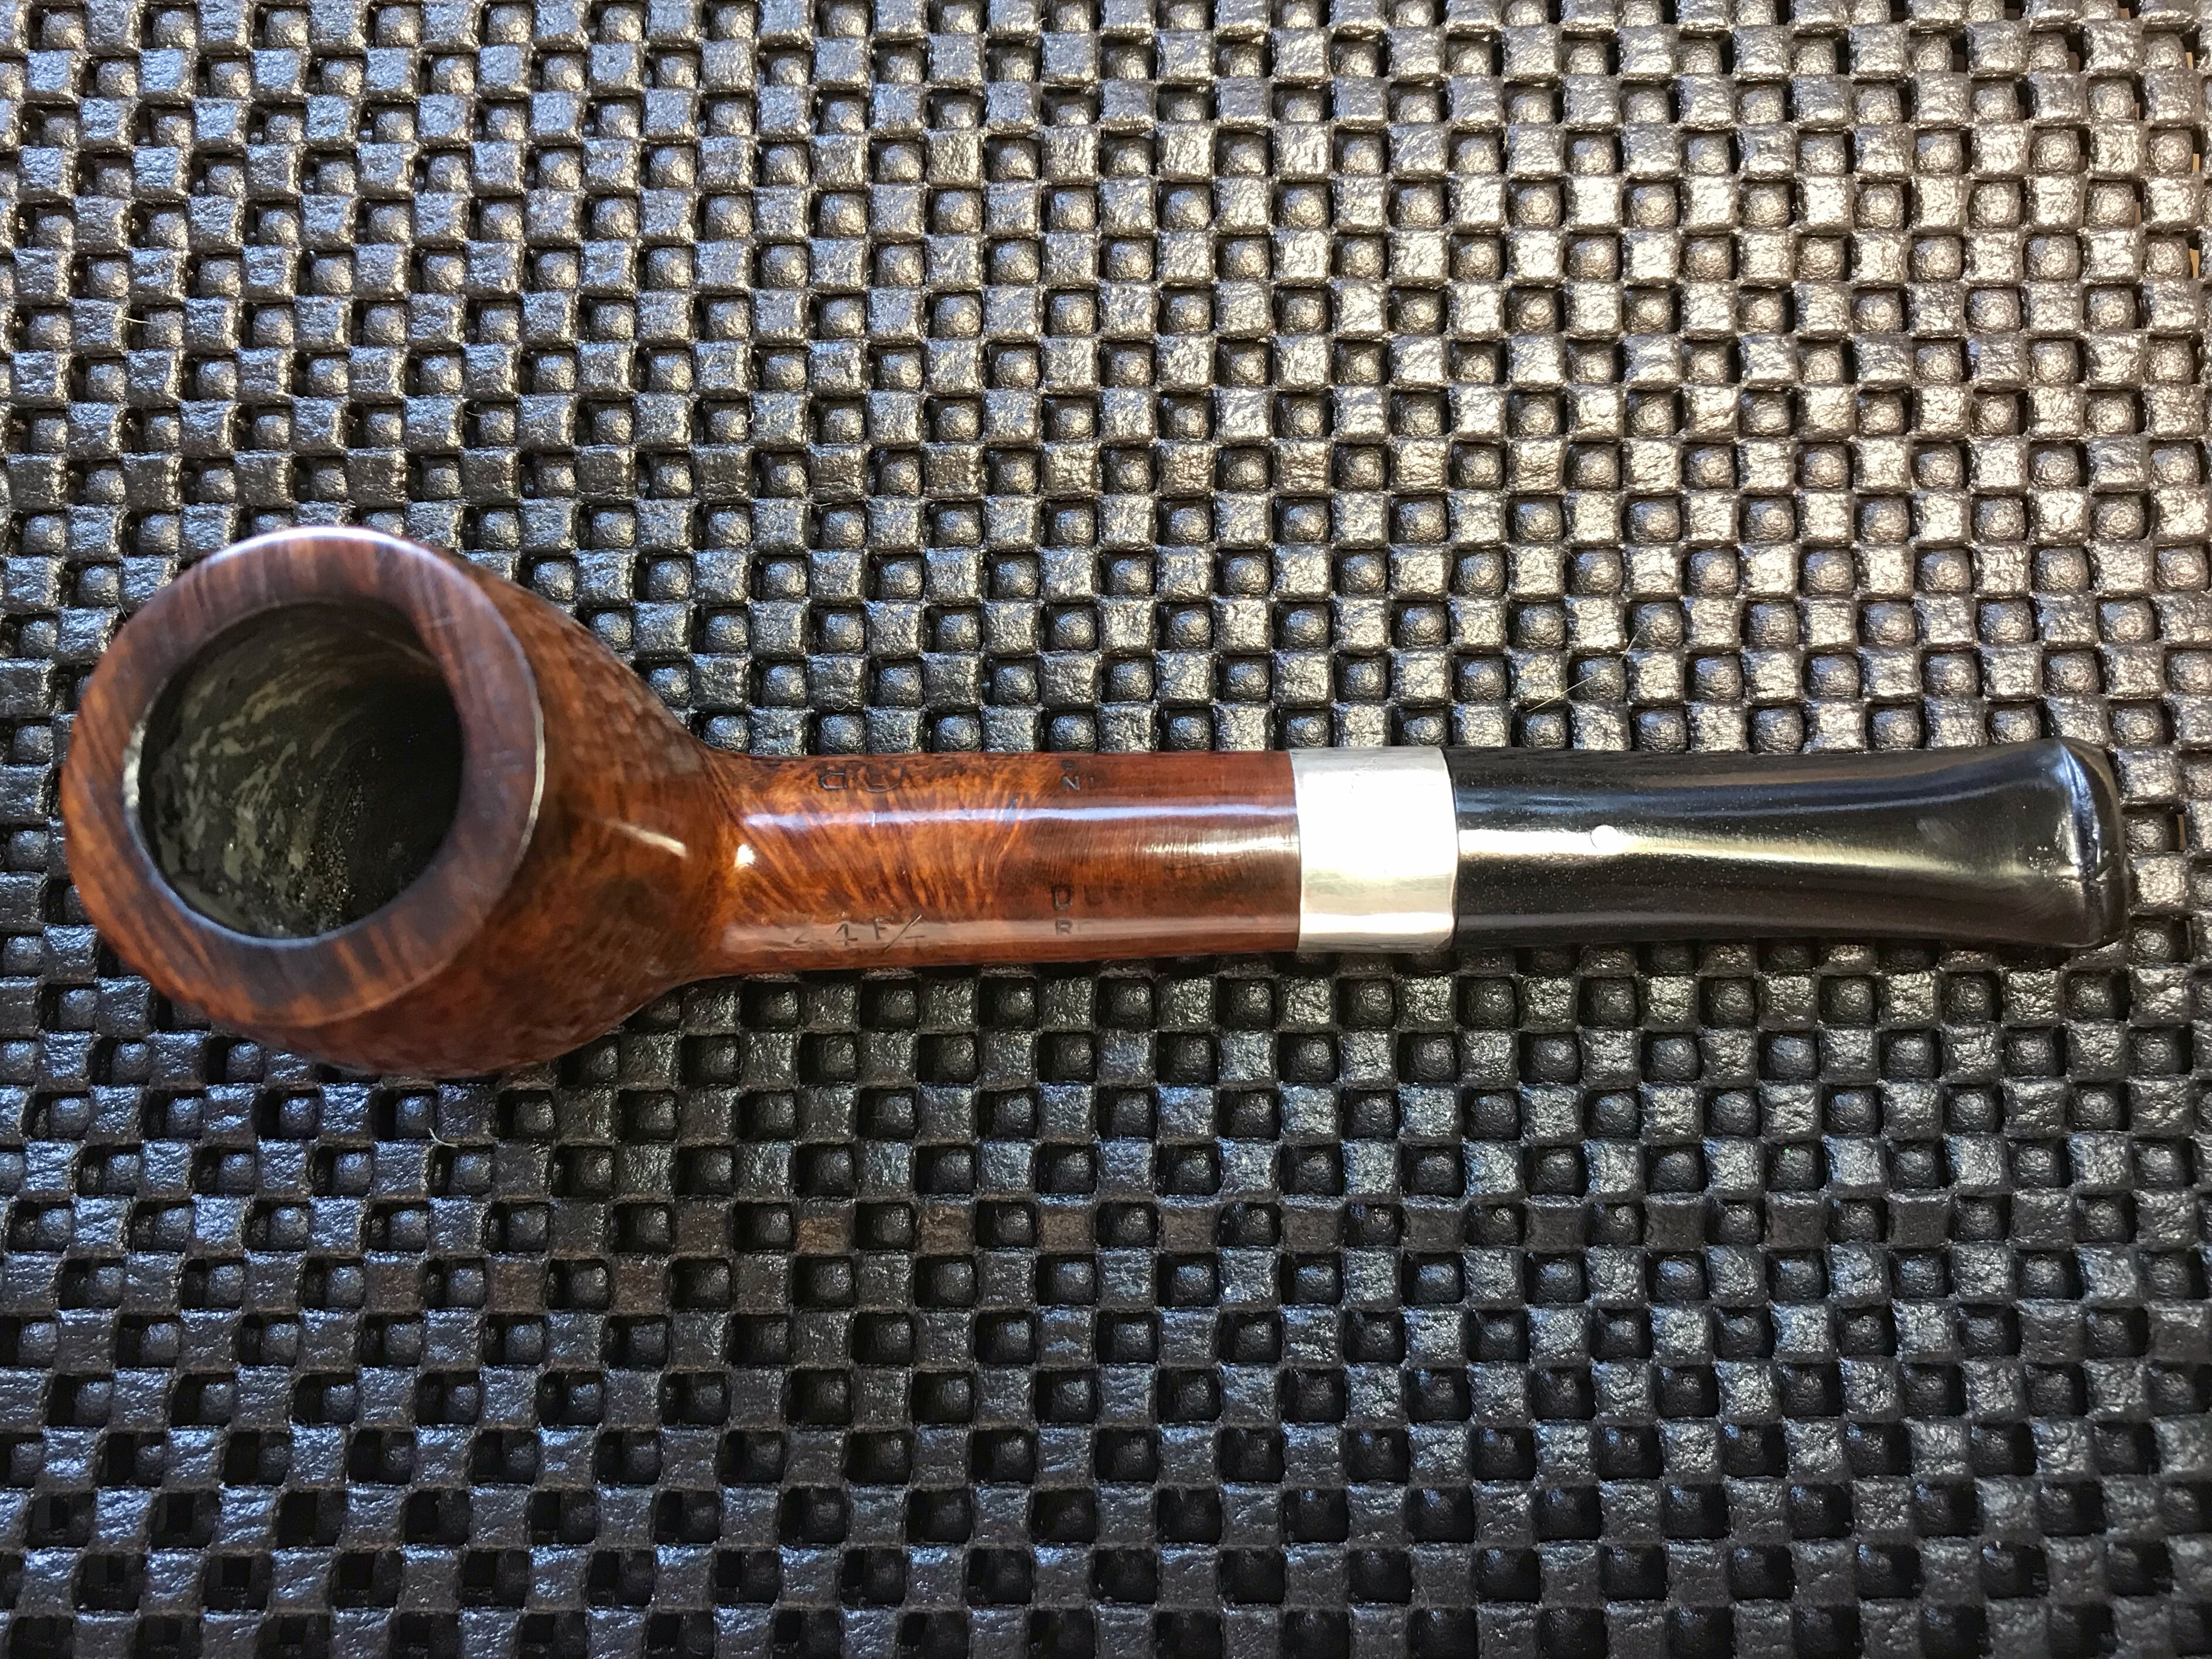
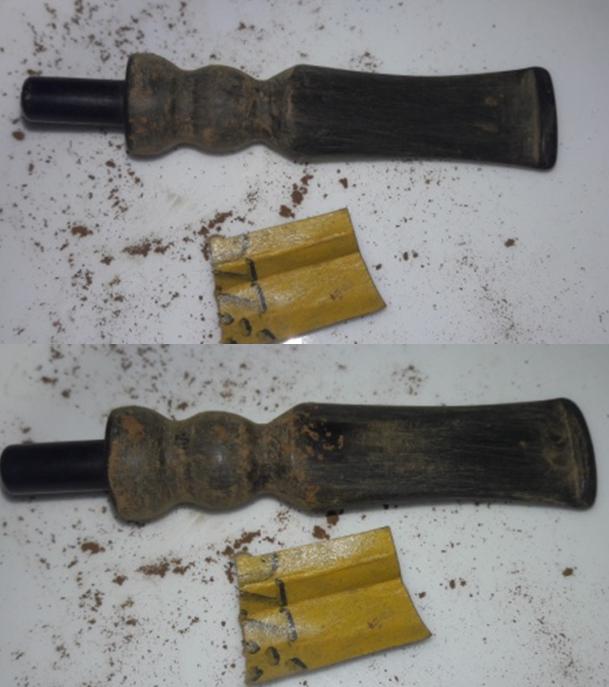
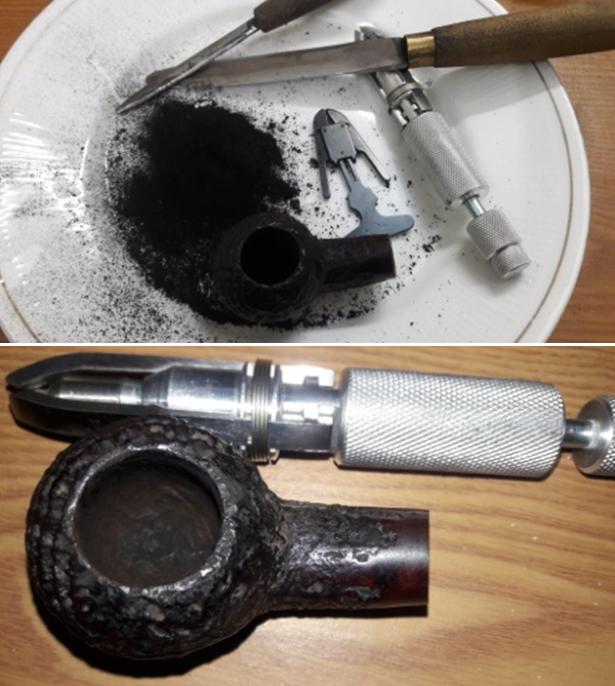
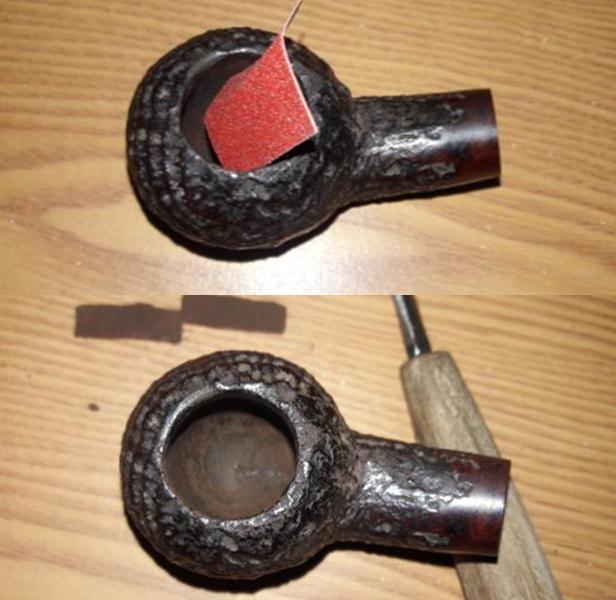
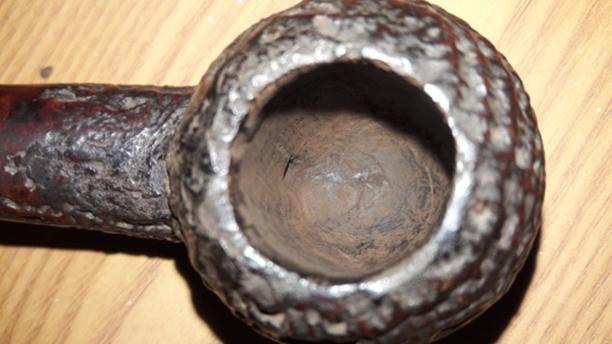
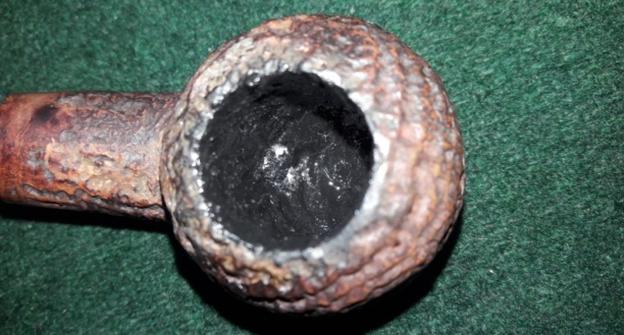
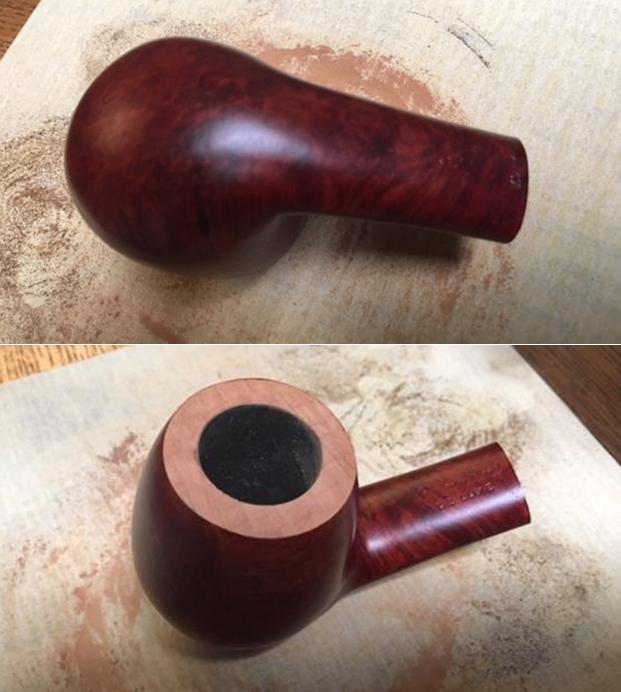
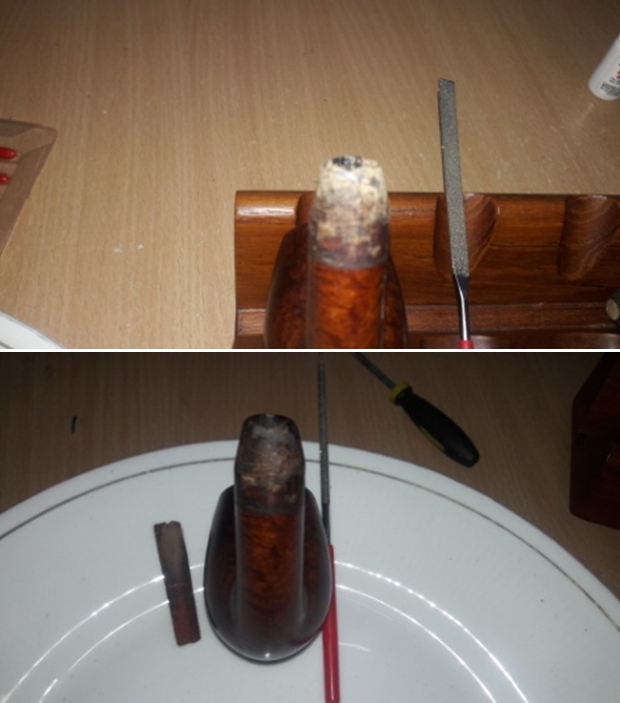
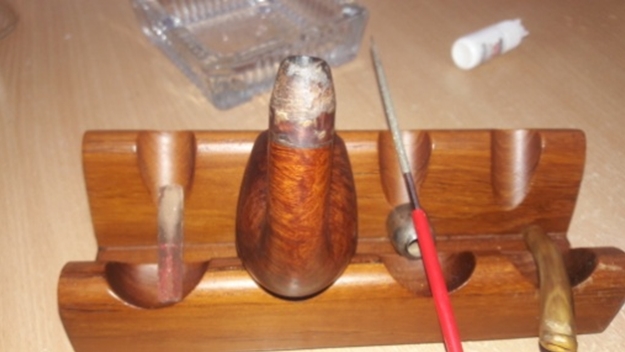
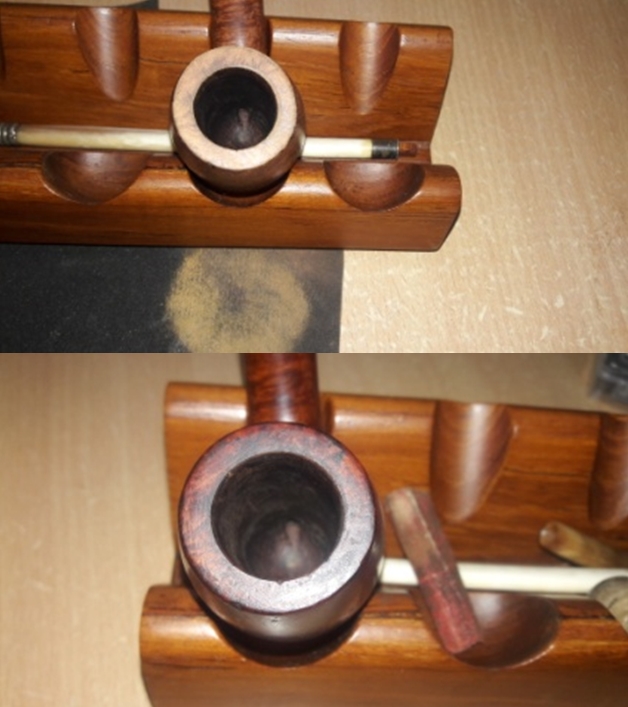
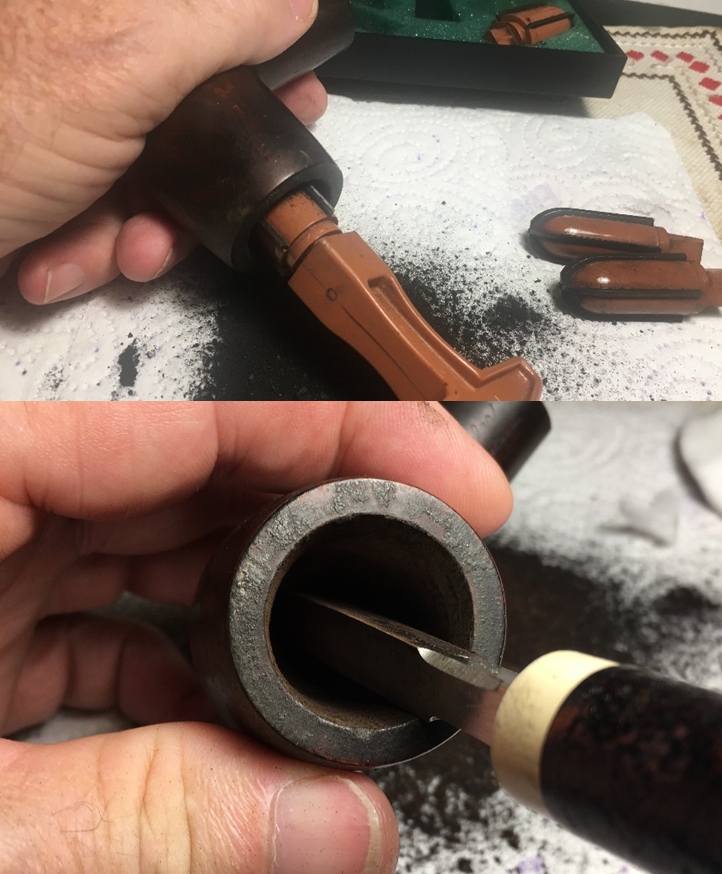
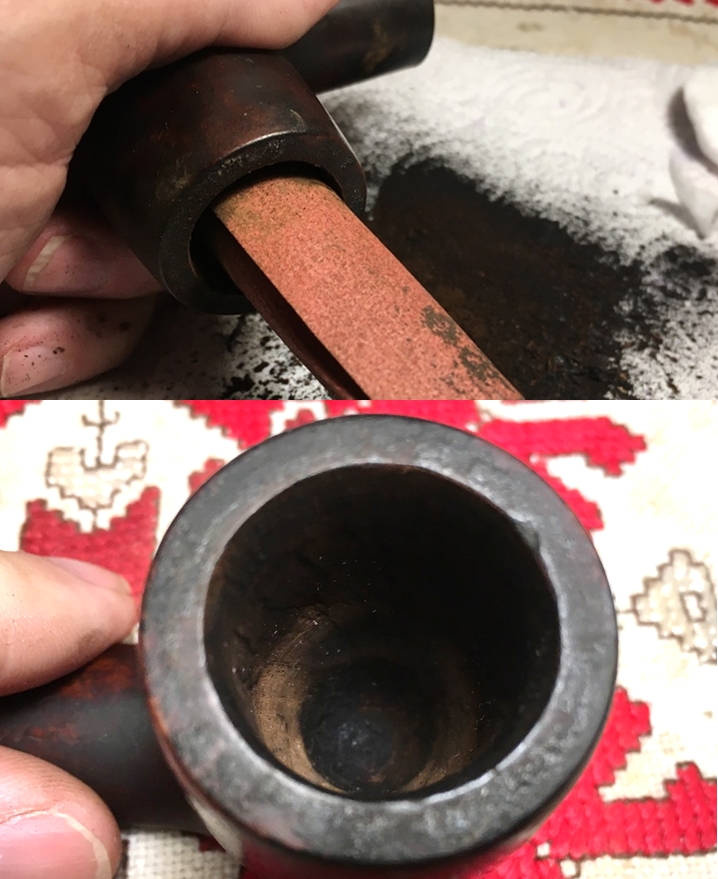
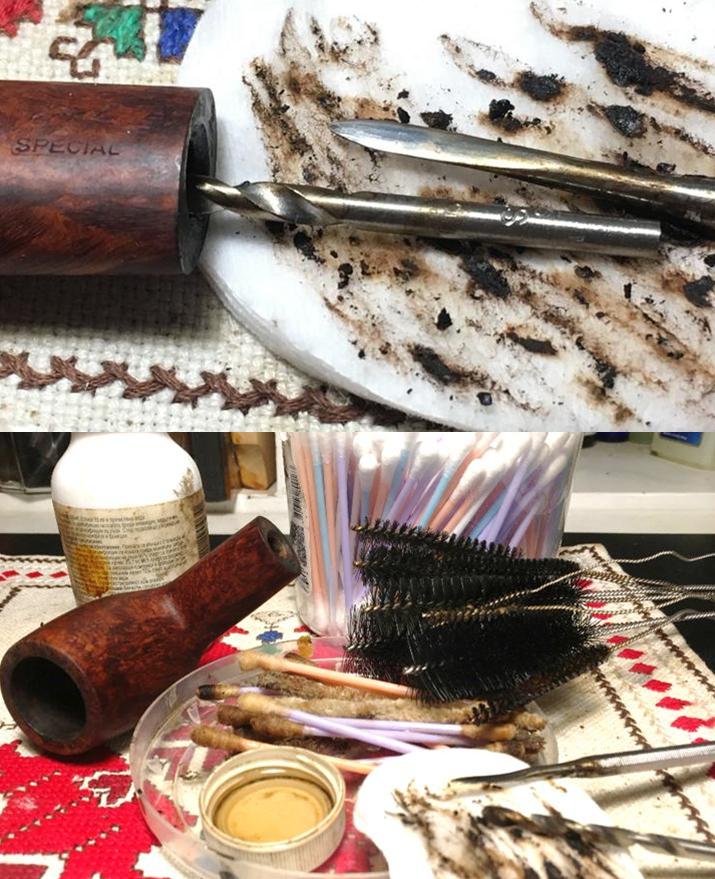
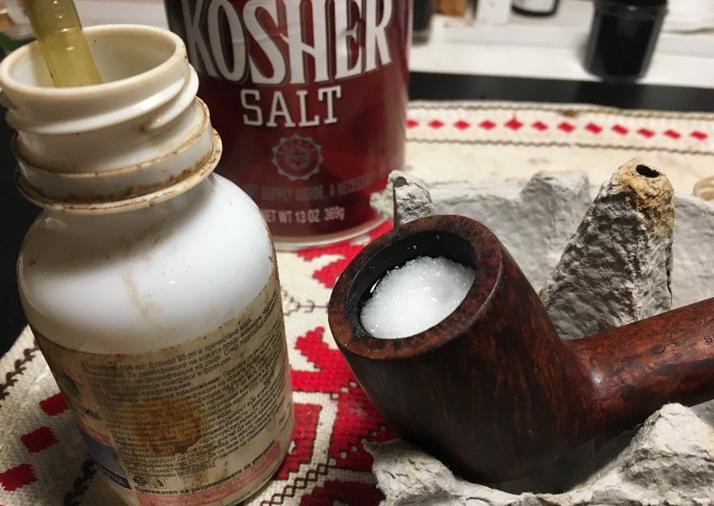
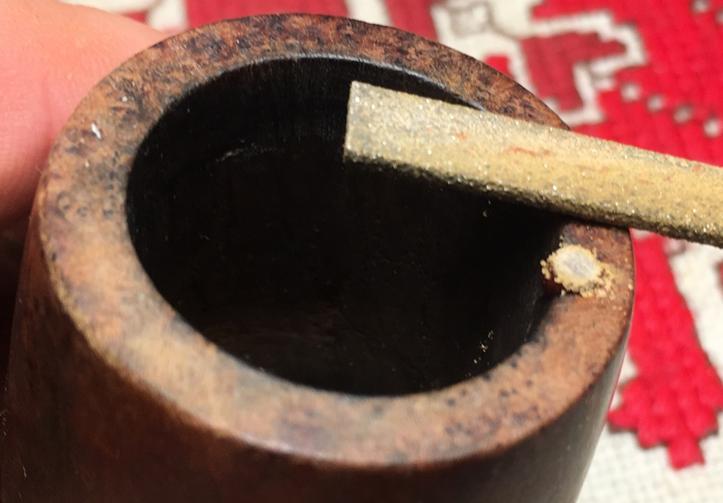
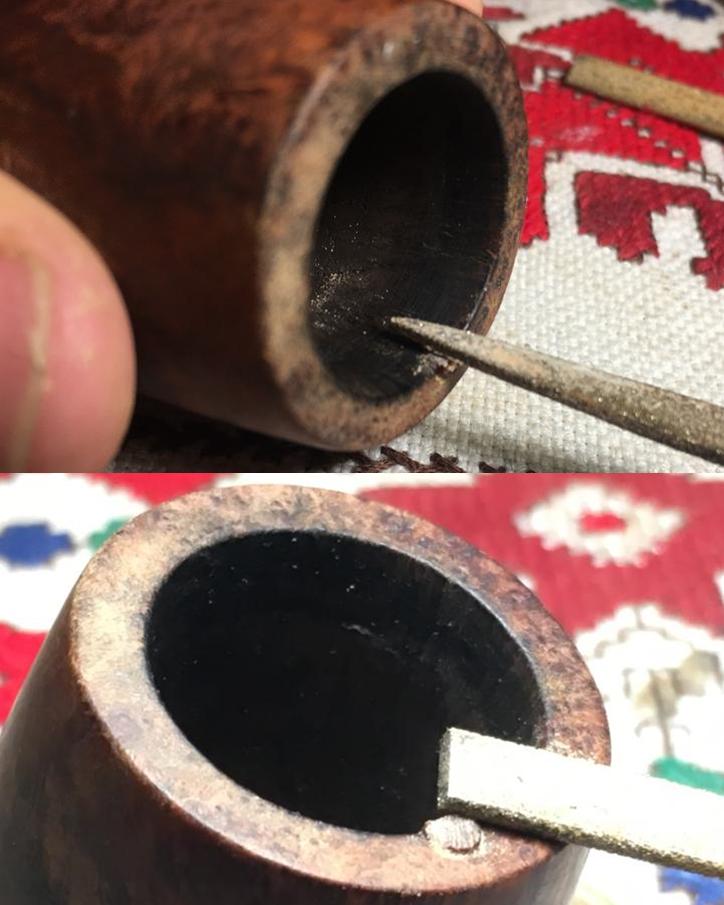
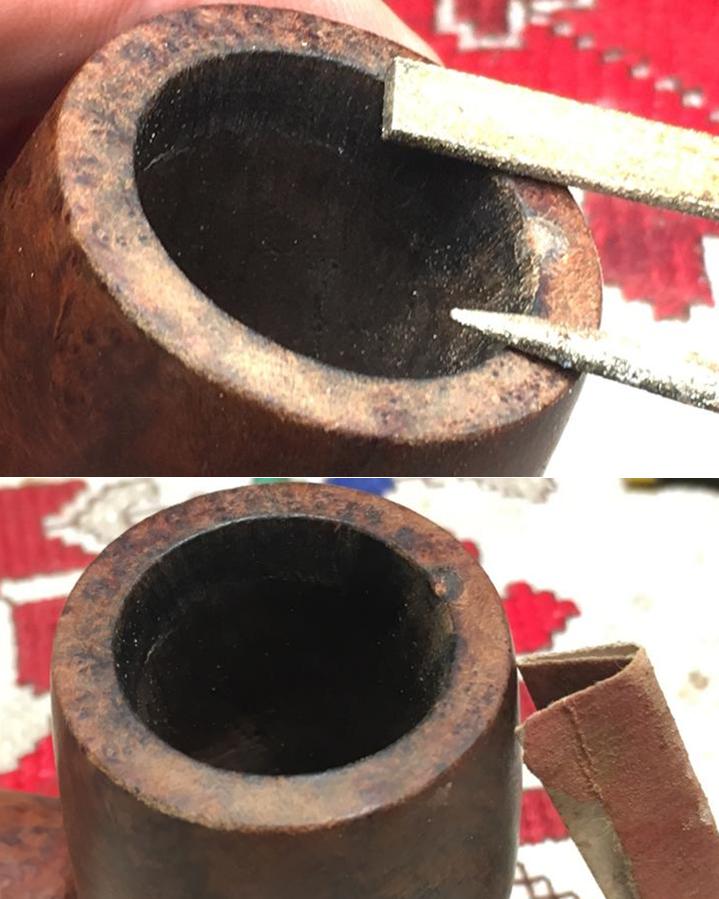
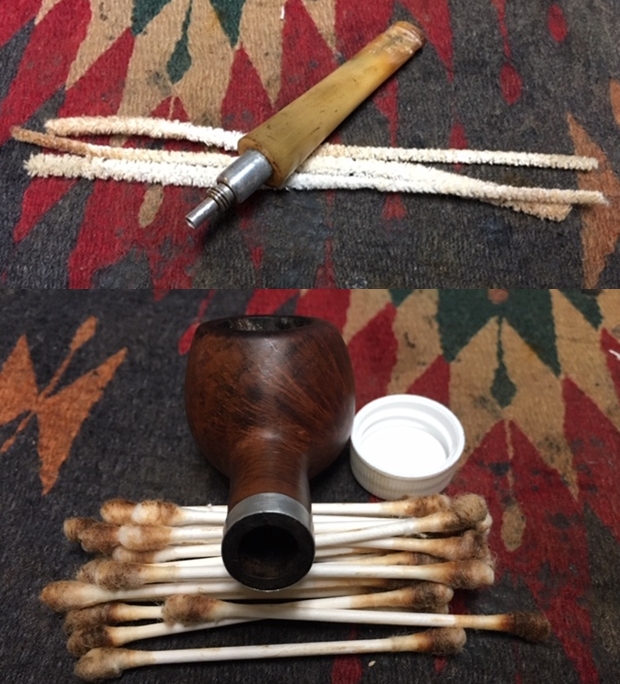
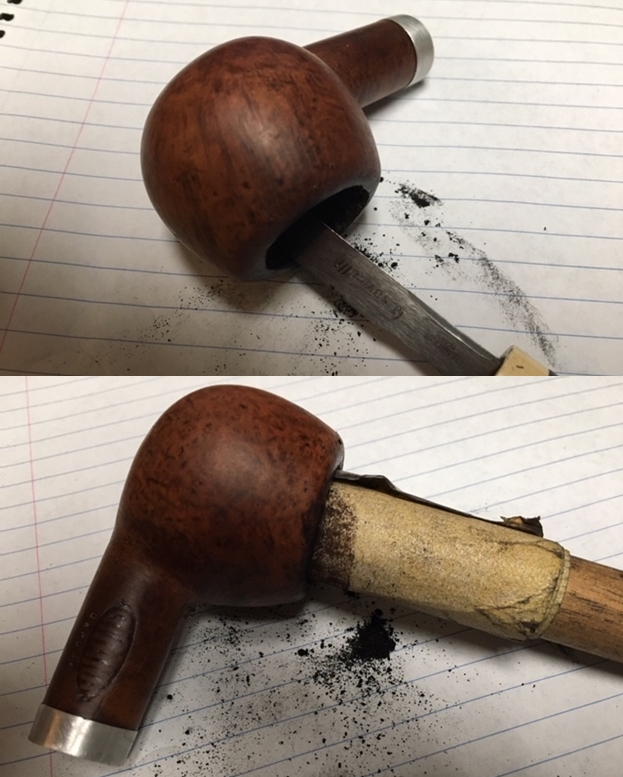
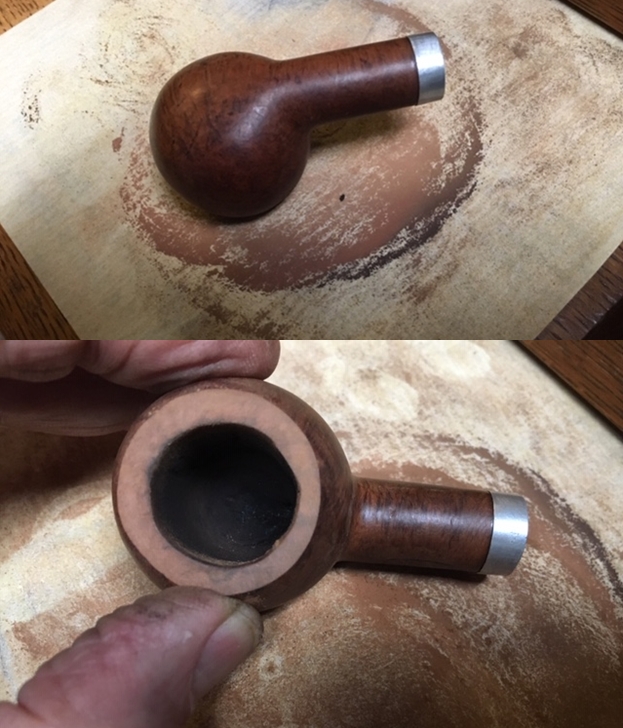
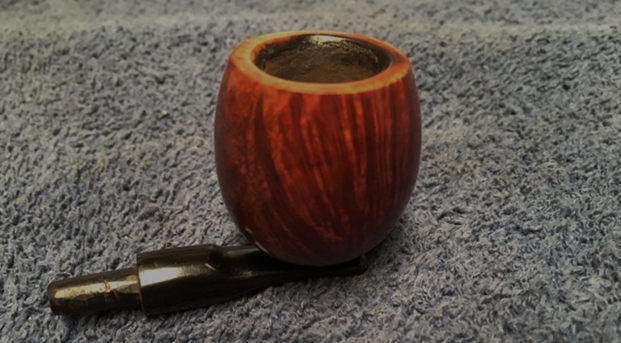
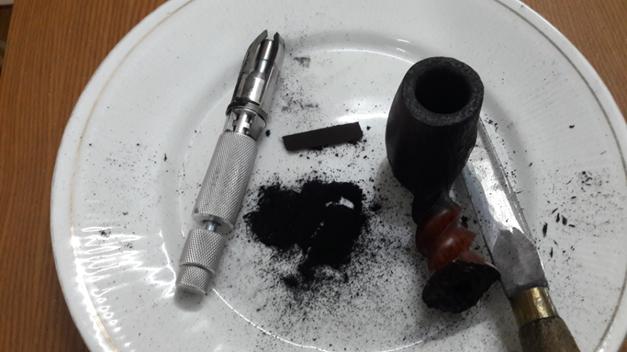
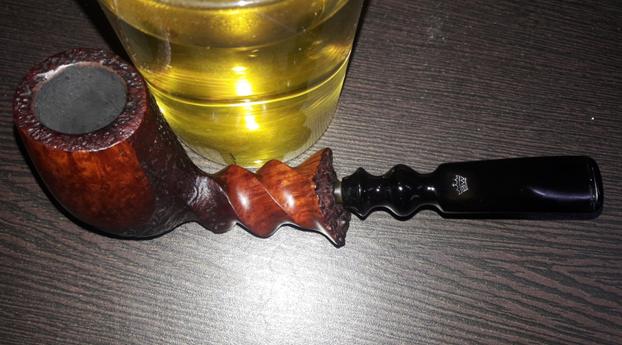
I started the process of restoration by reaming the chamber with size two of the PipNet reamer head and progressing through to size three. I followed up the reaming with scraping the remnants of the cake from the walls of the chamber and the rim top surface with my fabricated knife.Once the cake was reamed back to the bare briar, I used a 150 grit sand paper followed by 220 grit sand paper to remove all the traces of remaining cake and also to smooth the inner walls of the chamber surface. Finally, to remove the carbon dust, I wiped the chamber with a cotton pad wetted with isopropyl 99%. I gently scraped the rim top surface with a sharp knife. Removing all the cake from the chamber and rim top revealed that firstly, the rim was well rounded with no charring and only a minor chip and secondly, as I had anticipated,there was no damage to the inner walls of the chamber.

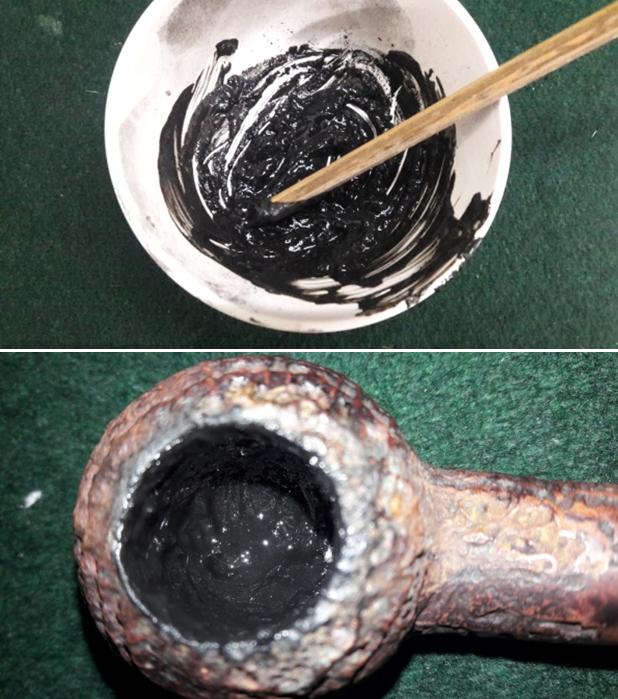
With 220 grit sand paper, I cleaned the internal and the external surfaces of the shank end opening, which until now was covered by the sterling silver ferrule, to remove all the carbon build-up, oils, tars,grime, dried briar wood and the dried glue. This process results in even more dried briar crumbling off, leaving behind a gaping hole. This needed to be restored as the damage is to that portion which supports the Albatross wing bone extension where it sits in to the shank. I conferred with Mr. Steve and it was decided to reconstruct the damaged portion by layering the gap with superglue and briar dust as the glue hardened immediately on coming in contact with the briar dust.

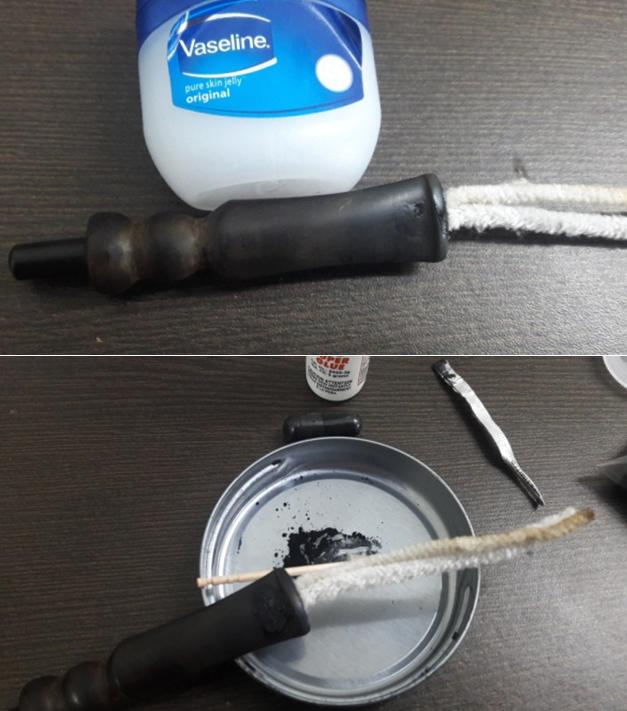
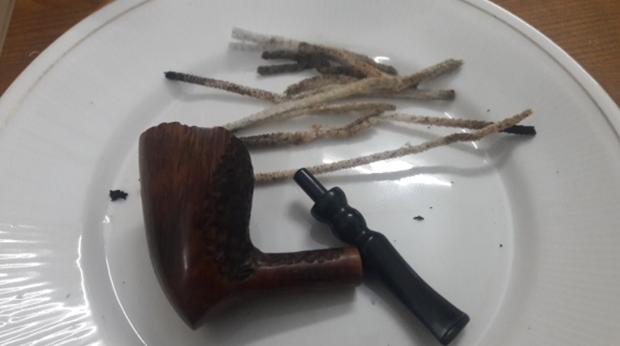
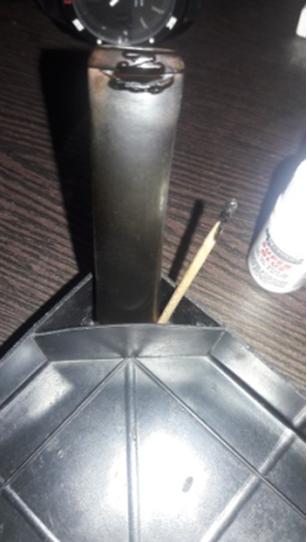
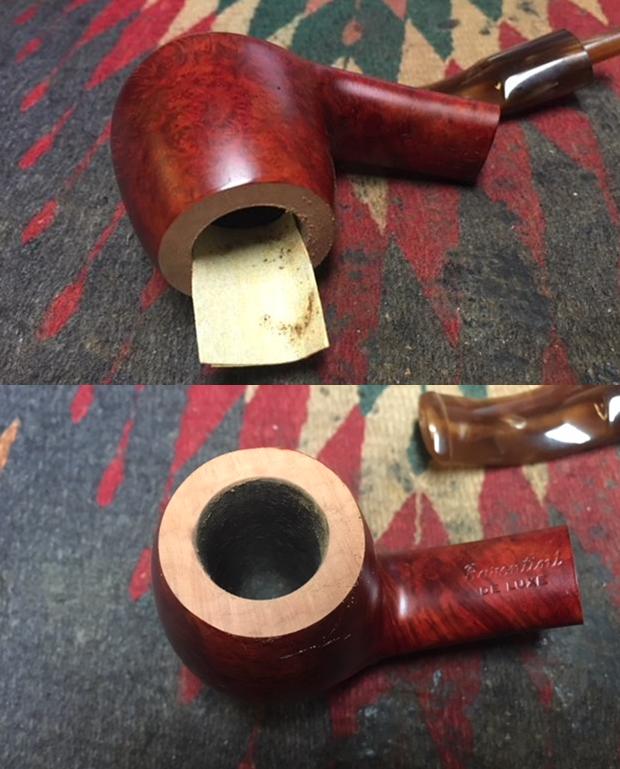
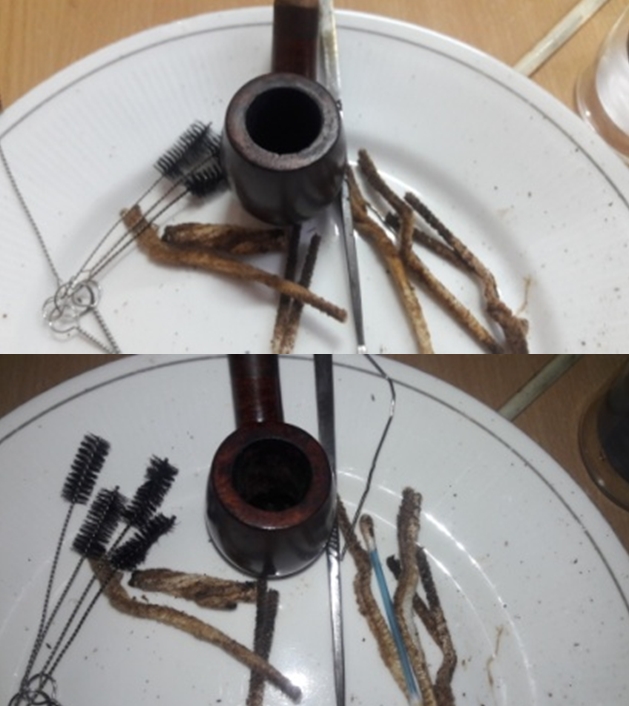
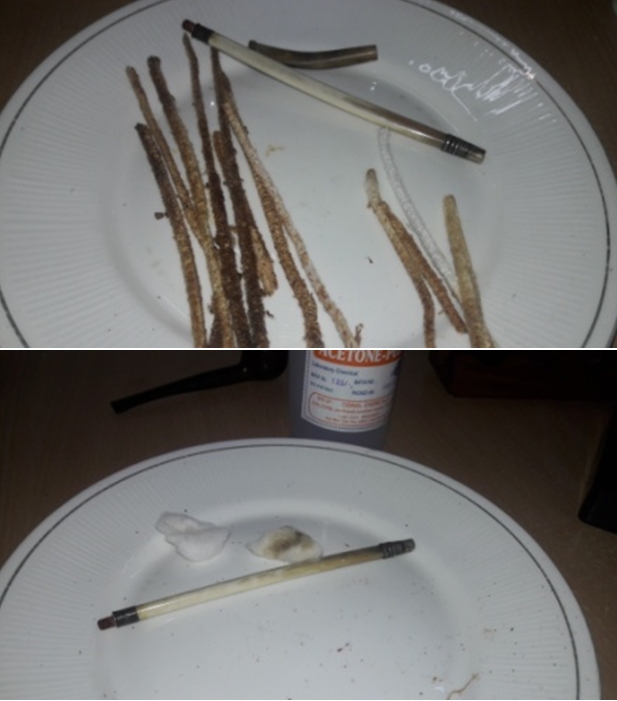
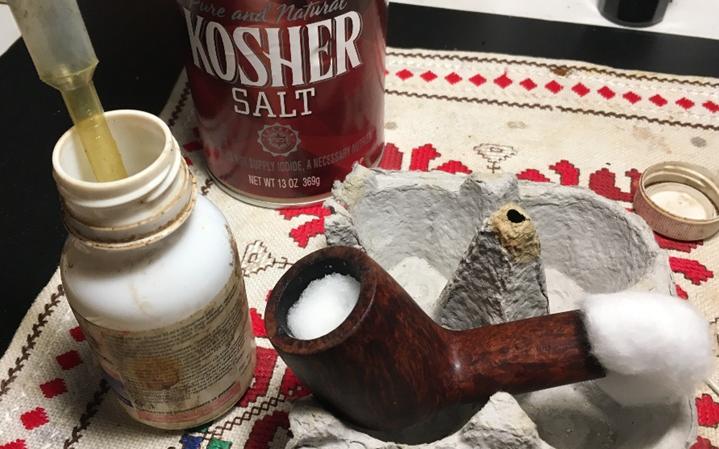
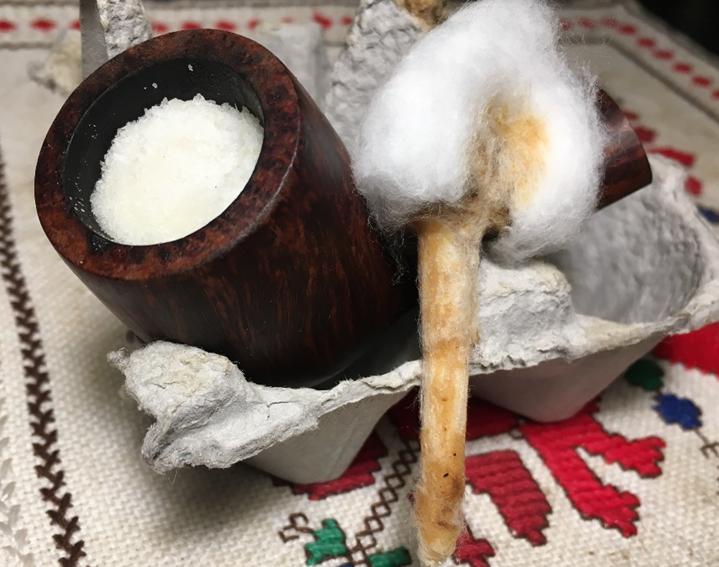
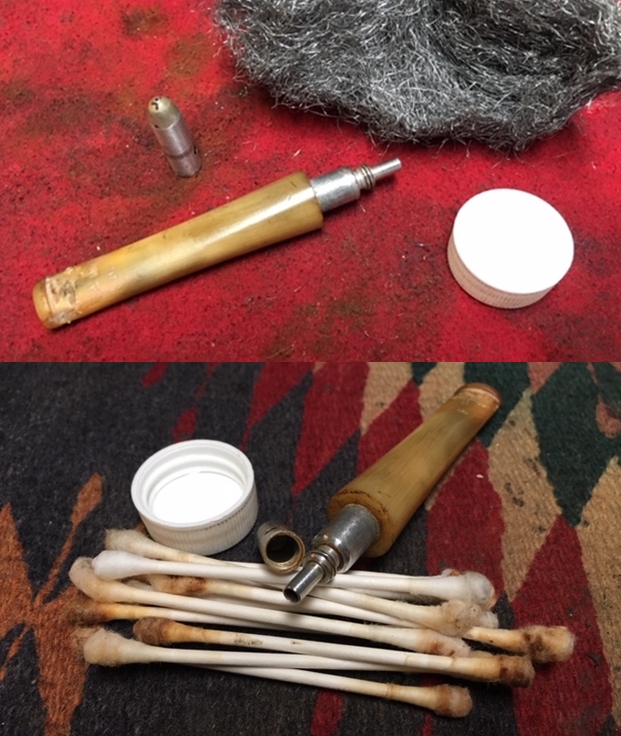
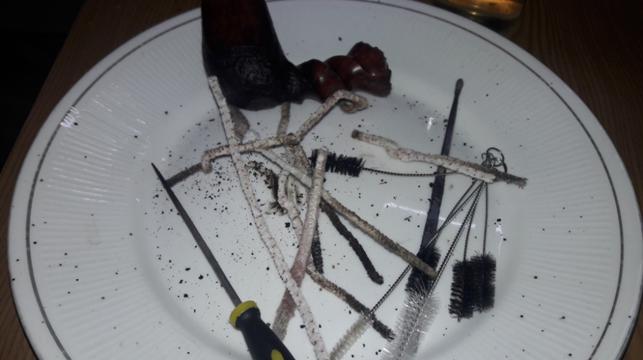
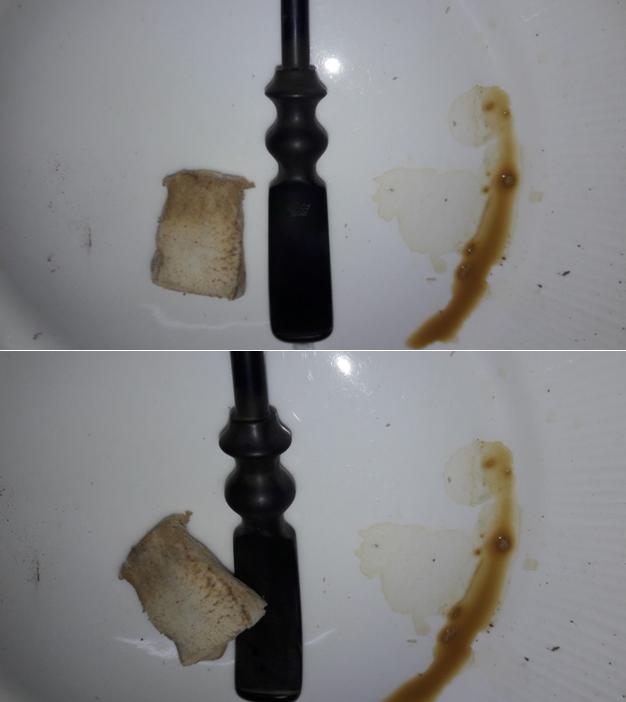
Before beginning the reconstruction of the broken shank end, I cleaned the internals of the shank, using hard bristled and regular pipe cleaners, q-tips, shank brushes, all generously dipped in isopropyl alcohol. The pipe cleaners would not pass through the mortise airway and the draught hole and so had to resort to more invasive methods. I straightened a paper clip and curving it, probed the insides of the mortise and the airway. After some efforts, I was able to dislodge the block. I scraped the inner walls of the mortise with a fabricated dental spatula. I gave a final cleaning with pipe cleaners dipped in isopropyl alcohol till the pipe cleaners came out, well, clean!!!  The heap of pipe cleaners and q-tips that are seen in these pictures are just the proverbial tip of the iceberg. I must have gone through an entire packet of 50 of both types of pipe cleaners, in addition to the q-tips and brush cleaning!!!!!

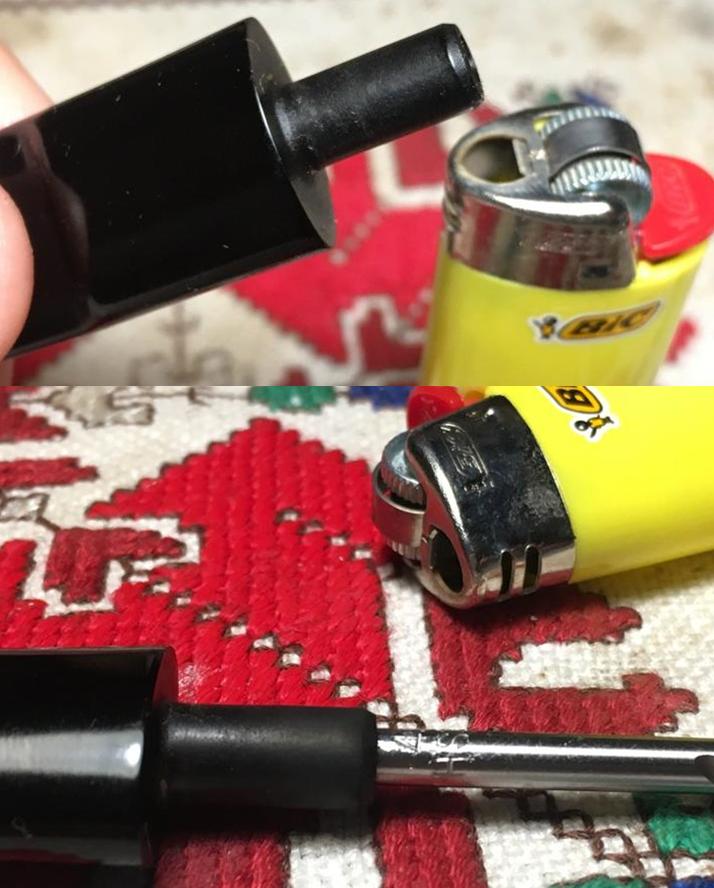
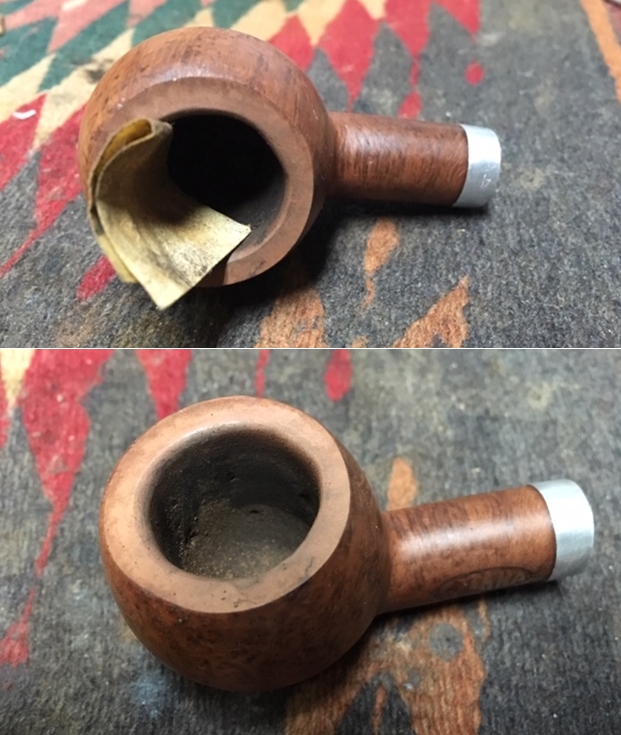
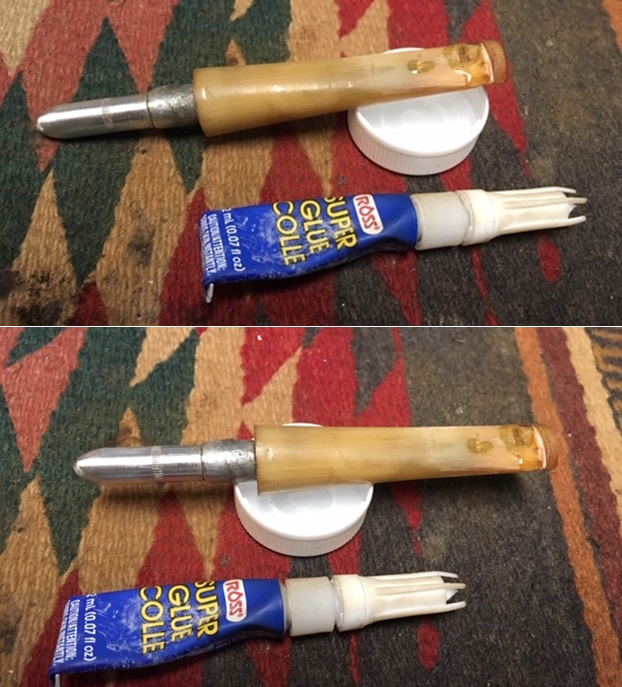
I, thereafter, began the process of reconstructing the broken portion of the shank end. I folded a pipe cleaner to fit snugly in to the opening of the shank end. Once I was satisfied with the fit, I smeared the pipe cleaner with Vaseline jelly and inserted it in to the opening.I applied first layer of superglue and pressed a little briar dust over it and let it set for a few minutes. This is followed by another layering and continued this process till I was satisfied with the reconstruction. I set the stummel aside overnight for the reconstruction to cure.

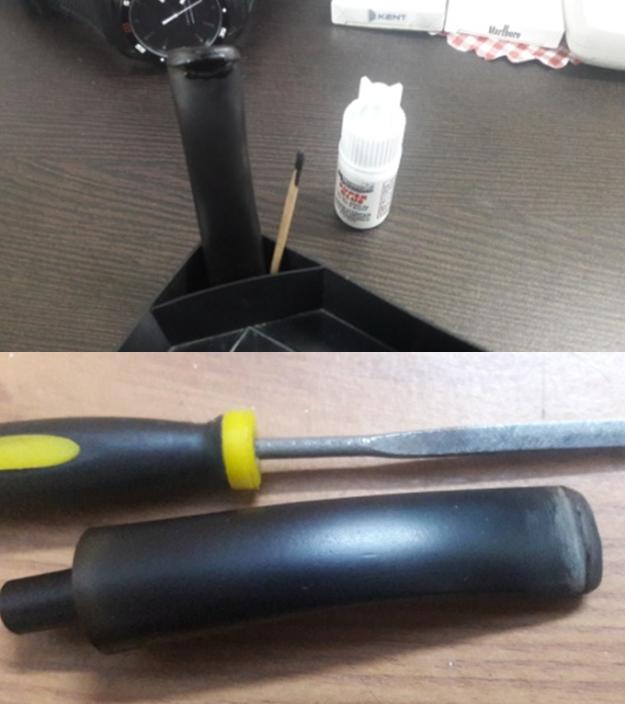
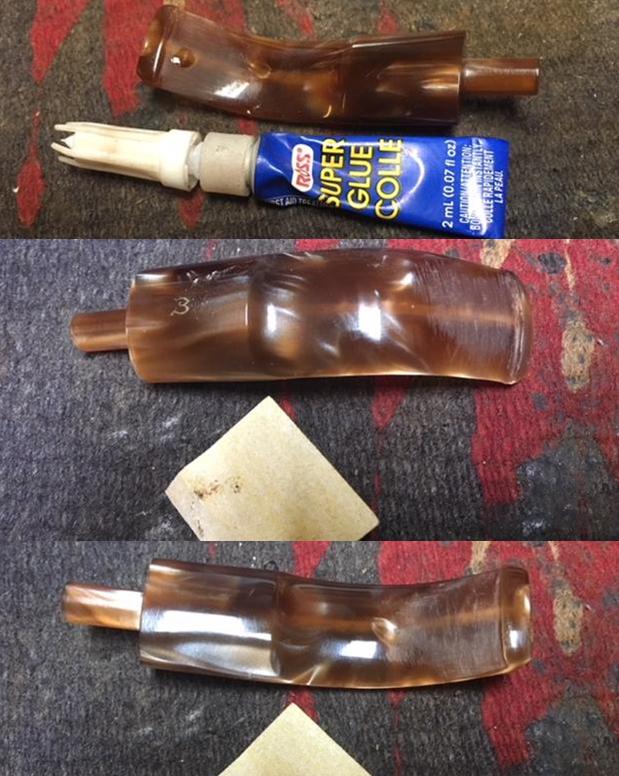
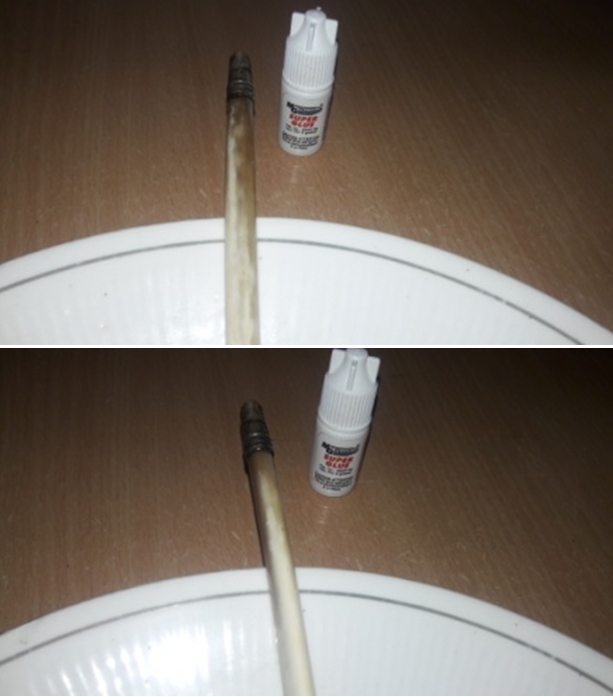
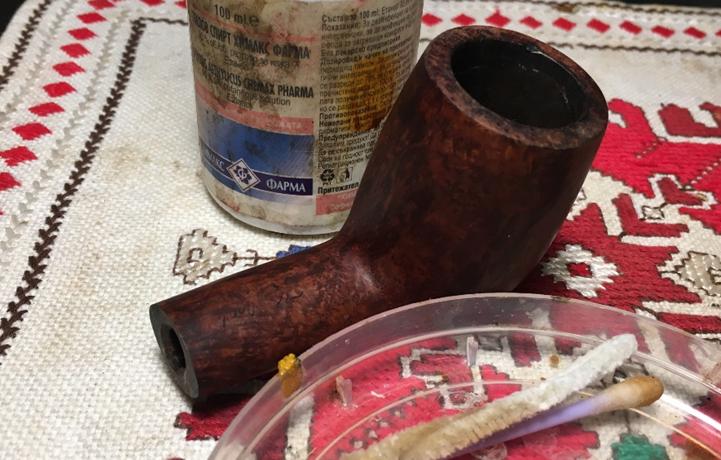
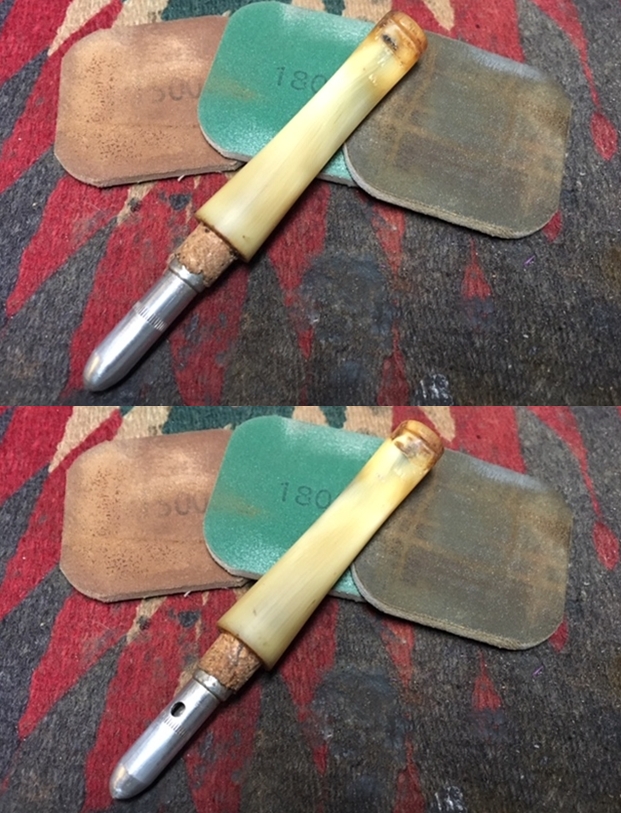
As the shank end reconstruction was curing, I initiated the repair and clean up of the Albatross wing bone extension and the horn bone stem. I cleaned the internals of the wing bone extension and the horn stem with bristled and normal pipe cleaners dipped in isopropyl alcohol.Once the internals were clean, I cleaned the external surface of the extension with cotton swabs dipped in Acetone and finely applied superglue over the superficial crack. This was done primarily to stabilize, strengthen and prevent further spreading of the superficial crack and obviate any chances of air escaping from these cracks in future. I set the wing bone extension to cure overnight along with the shank end repair.

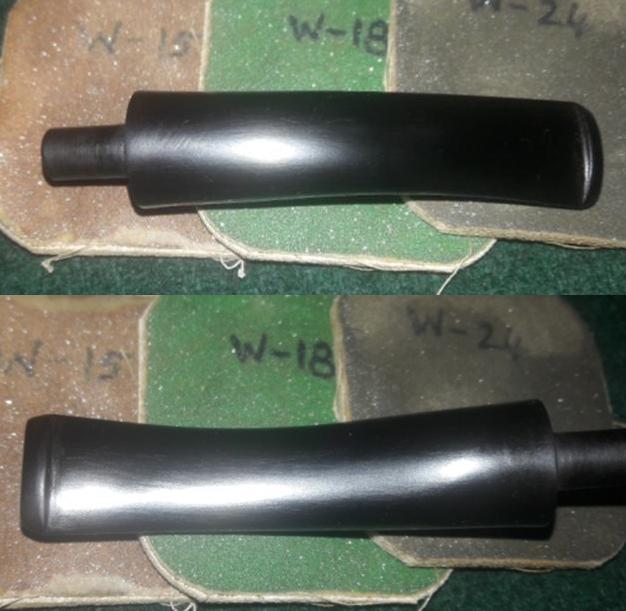
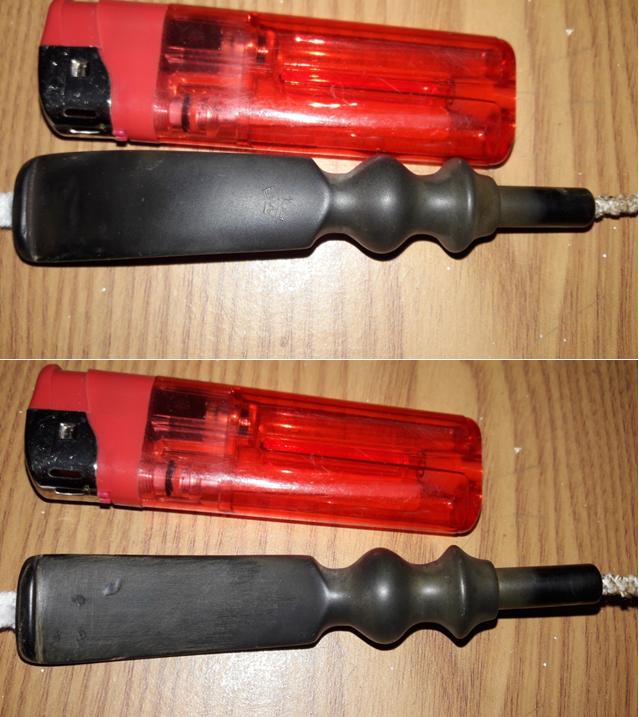
As I had remarked during my initial visual inspection, I felt that the tooth chatter on the lower and upper surface of the horn bone stem should be taken care with sanding it down with a 220 grit sandpaper. How wrong was I! After sanding the upper and lower surfaces of the horn stem, I realized that the tooth chatter was deeper than I had anticipated and would have to be addressed with a fill of clear superglue. And so I filled these tooth chatters with superglue and the stem too joined the ranks of the shank end repair and wing bone extension on the rack for curing overnight.

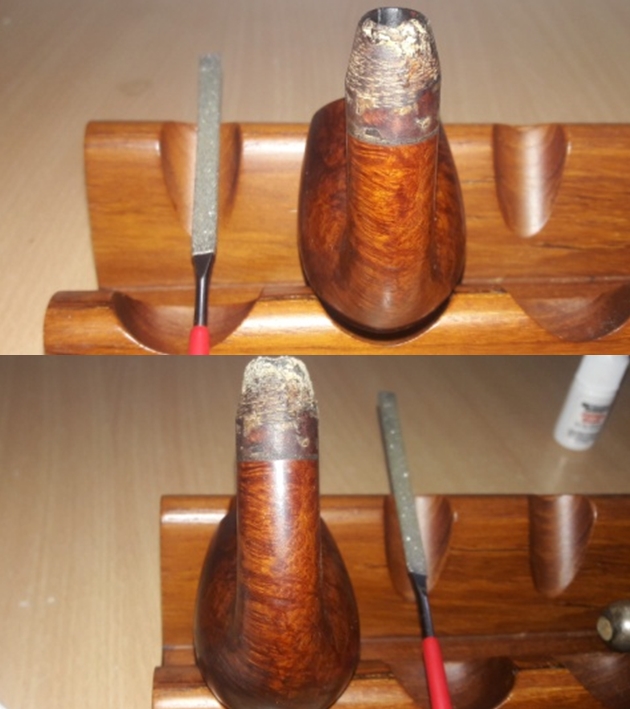
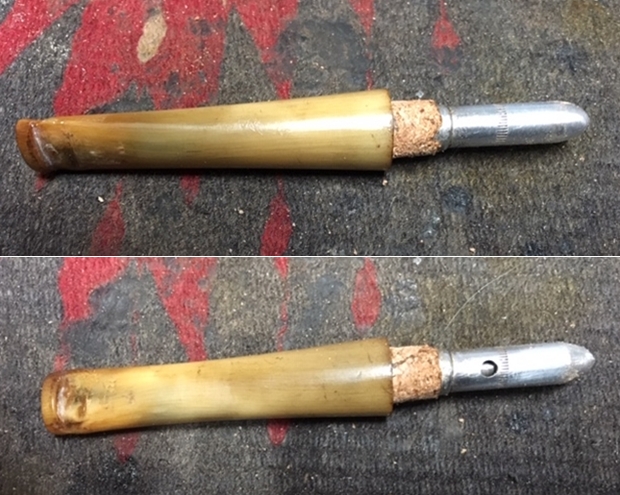
The next evening, after a hectic and tiring day in office, I decided to work on the shank end reconstruction. I filed the external repaired area with a flat head needle file and carefully matched the profile of the fill with that of the surrounding area so as not to adversely affect the fit of the ferrule at a later stage. I frequently checked the progress by fitting the ferrule over the shank end. I achieved a perfect profile match by sanding the shank end with a used 150 grit sand paper. Once the external profile was matched, I worked on the internal adjustment of the reconstruction to match the seating of the wing bone extension in to the mortise using a round needle file. I frequently checked the seating of the extension in to the mortise and making necessary adjustments by filing till I was able to achieve a perfect fit. To be honest, it was not as easy as it appears while reading it.The amount of time and concentration required cannot be described in words.

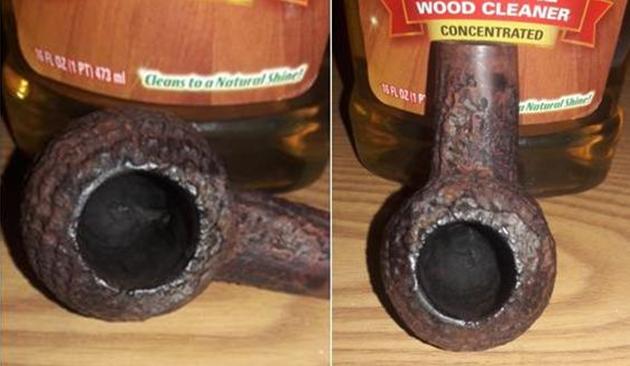
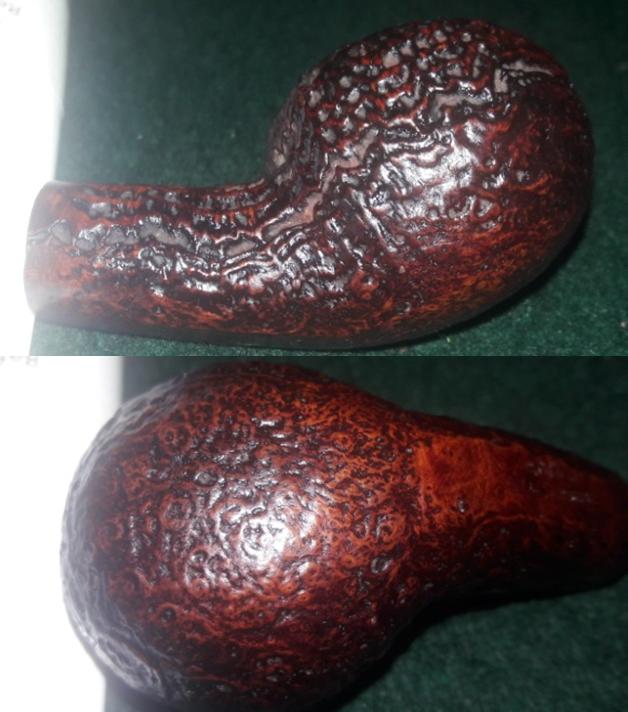
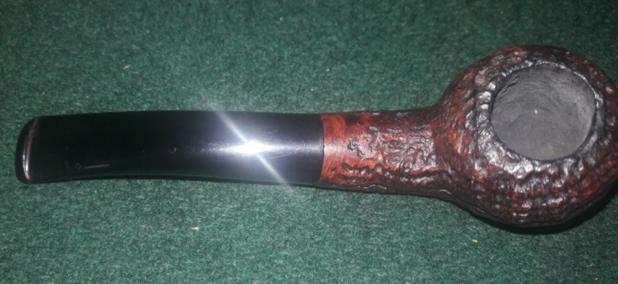
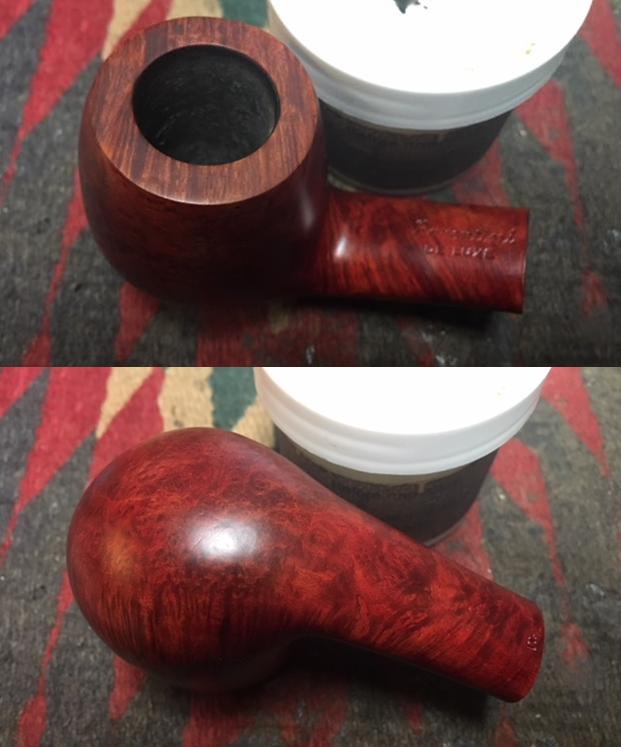
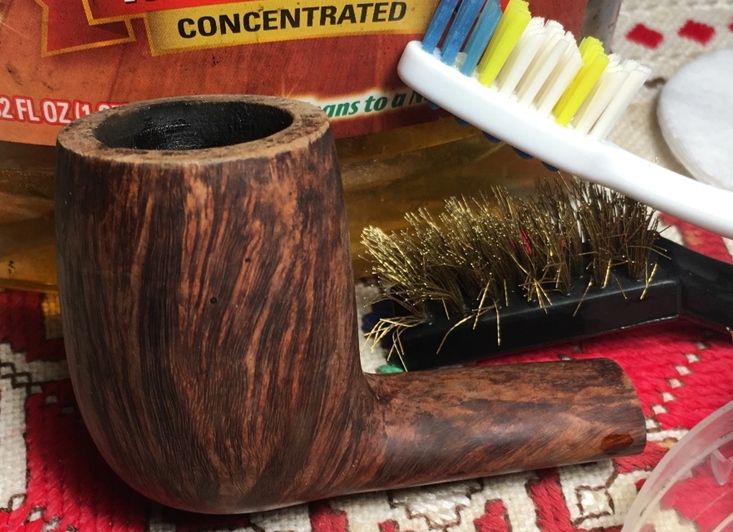
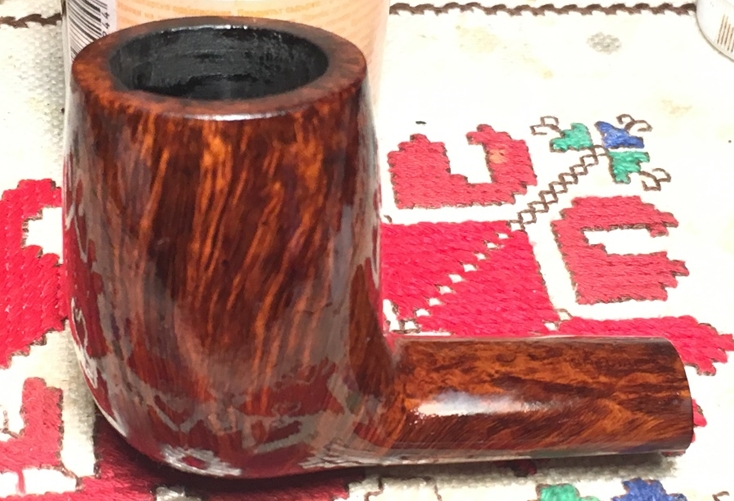
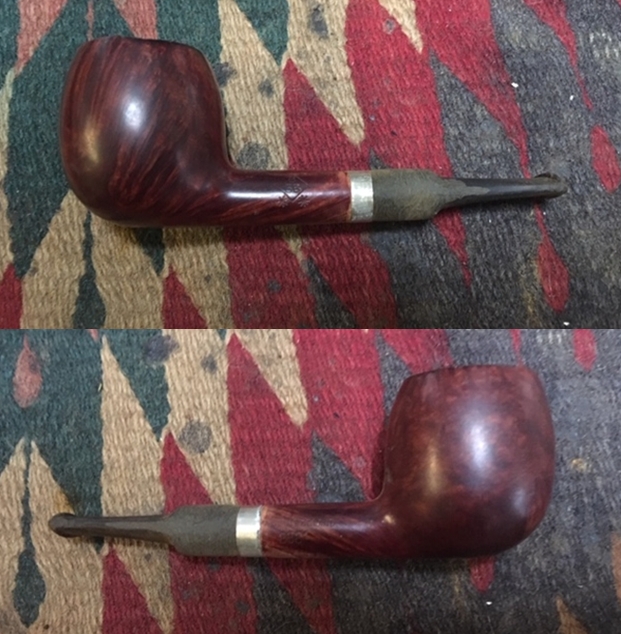
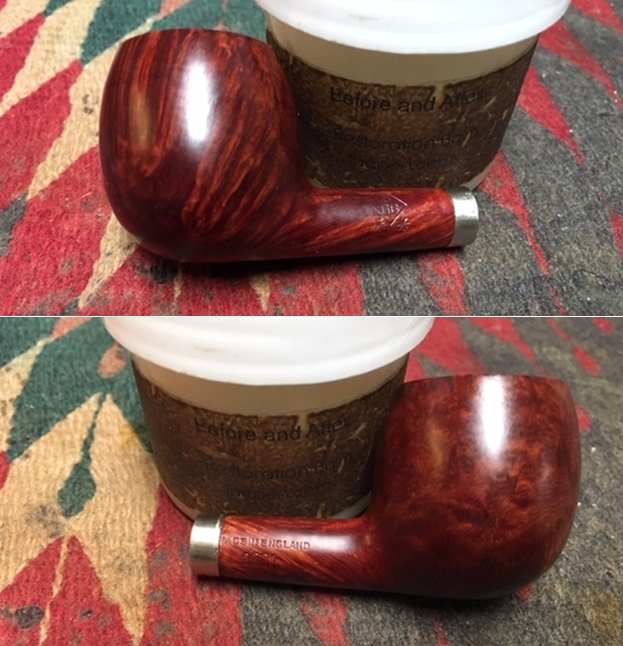
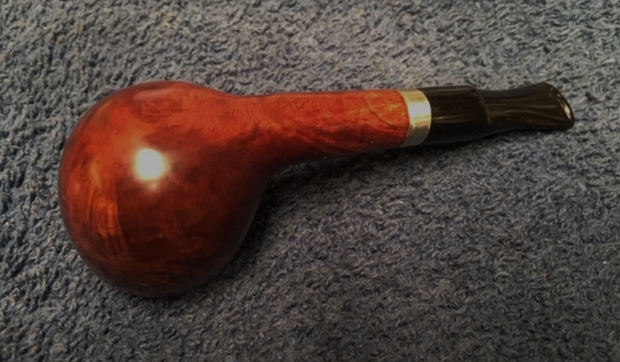
Staying on the stummel restoration, I cleaned the external surface of the stummel and the rim top surface with undiluted Murphy’s oil soap and a hard bristled toothbrush and rinsed it under running tap water, taking care that water does not enter the chamber and the mortise. I dried the stummel using paper towels and soft, absorbent cotton cloth and set it aside to dry out naturally. The beautiful grain really stands out at this stage with the symmetrical division of grains on the lower surface of the shank, more distinct and clear. It is easily one of the best grained pipes that I have in my collection. Somehow, I was not satisfied with the way the rim top surface had cleaned up and I again sought the advice of my mentor, Mr. Steve, and received his reply, in his peculiar style, as “I would”, that’s all he had remarked!!!!!!

And so my initial plan for not topping the rim top was shelved and I decided to carefully top the rim surface. This would also help to address the one single chip on the rim’s top surface and also to remove traces of lava overflow. I topped the rim surface with 220 grit sand paper.Though it is recommended to have a wooden board with the 220 grit sand paper firmly fixed over it, I just keep the sand paper on a flat table top, holding it firmly with my left hand and rotating the stummel rim top over it with my right hand. I have come to realize that this set up gives me lot more freedom of movement, better control and convenience of storage. The single chip was addressed to a great extent, but was still an eye sore. Using a folded 150 grits and paper pinched between my thumb and forefinger, I created a very light bevel to mask the chip. Though the bevel is not easily discernible, it helped address the issue of the chipped rim inner edge.

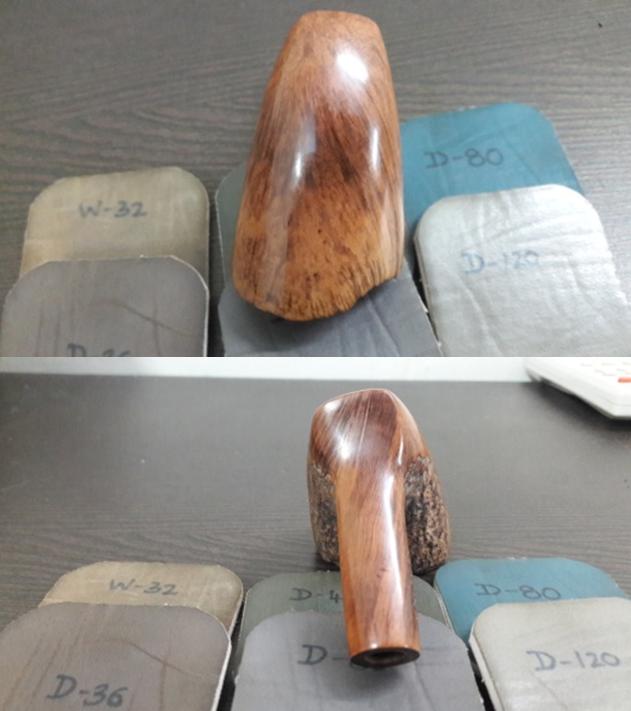
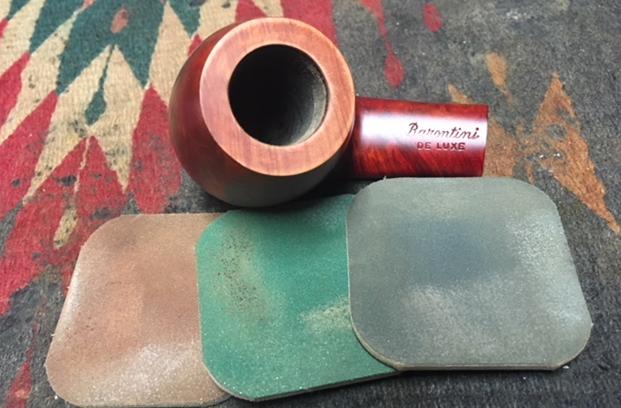
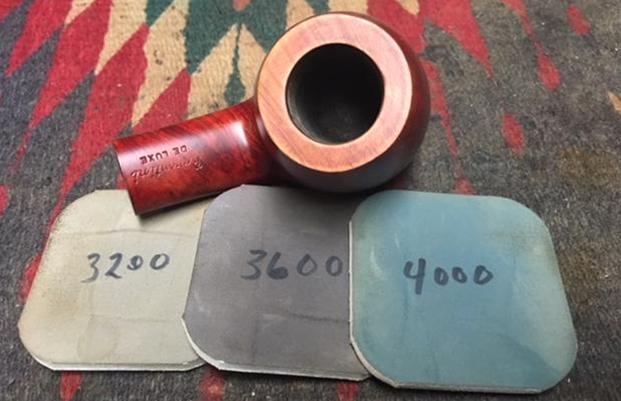
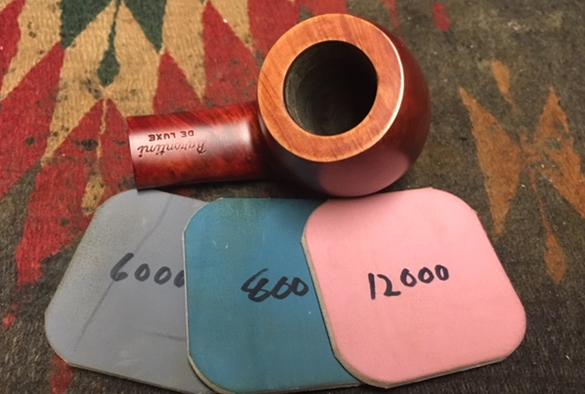
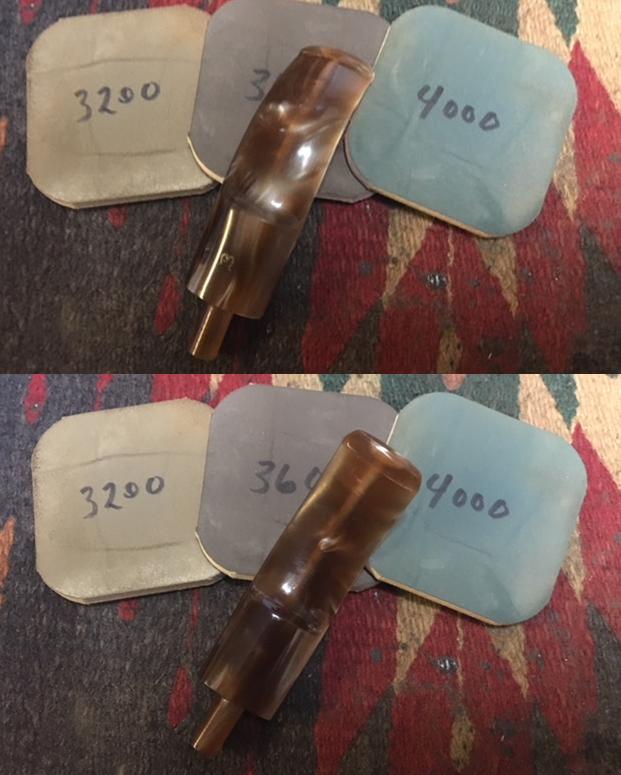
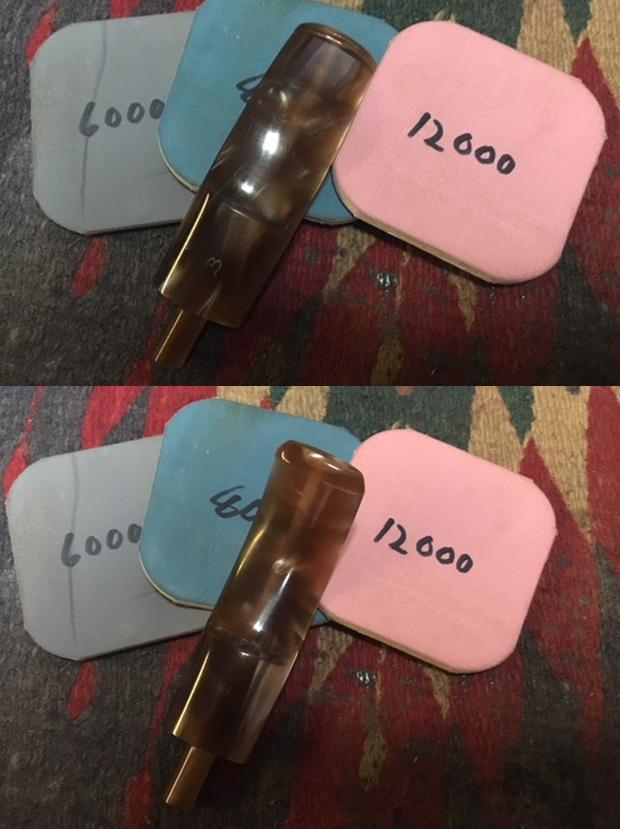
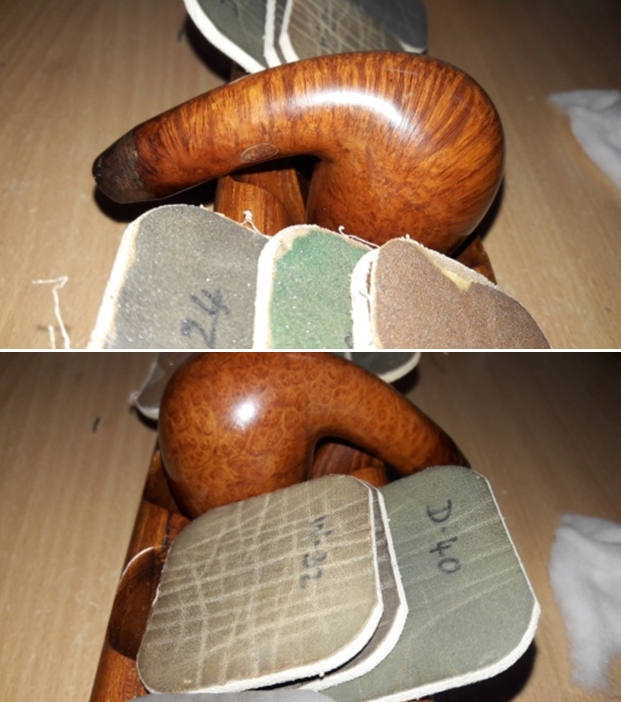
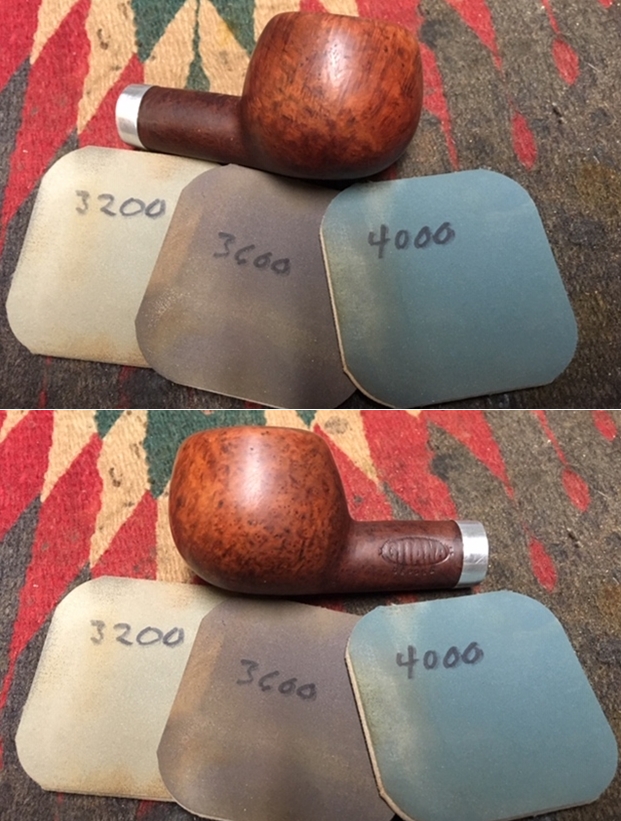
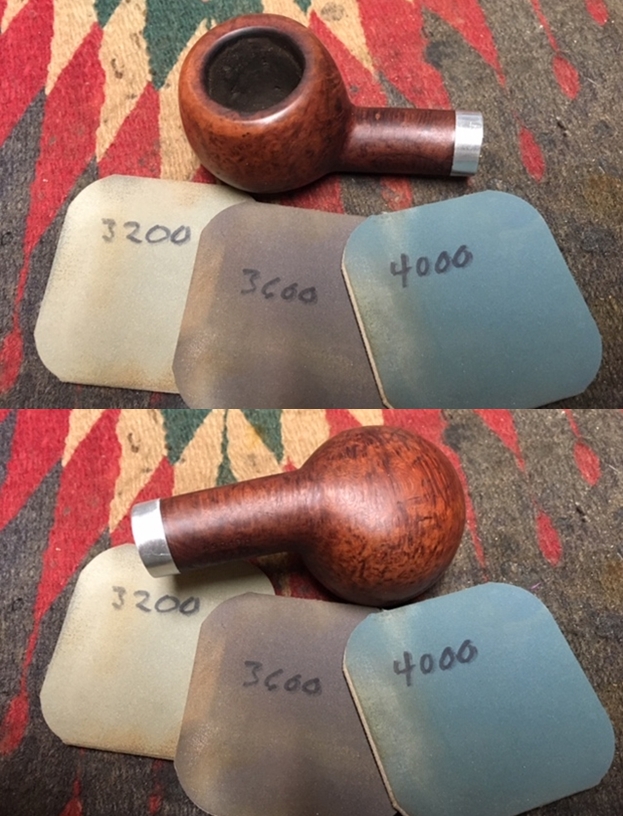
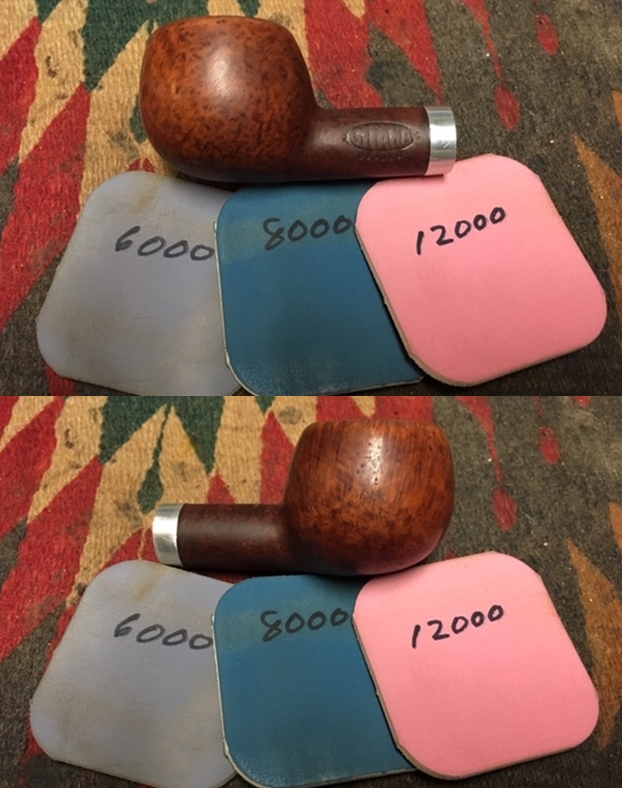
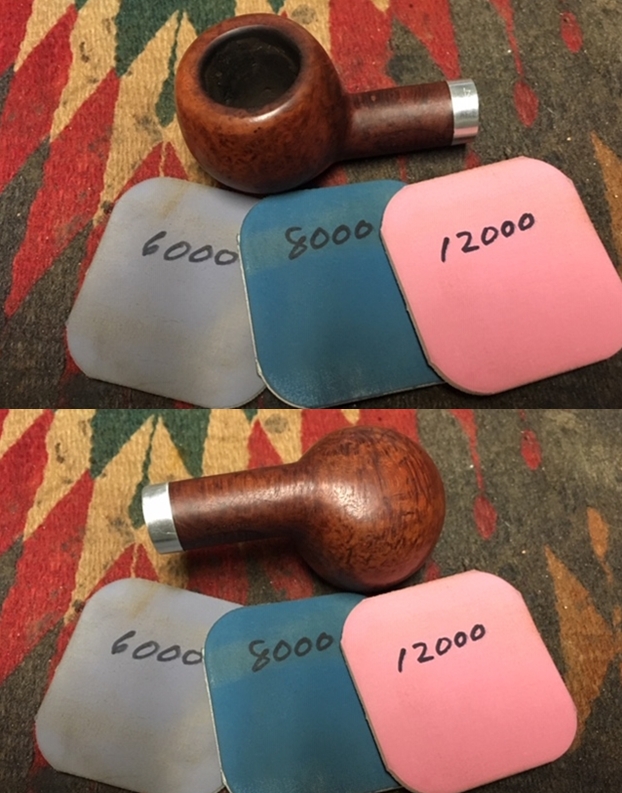
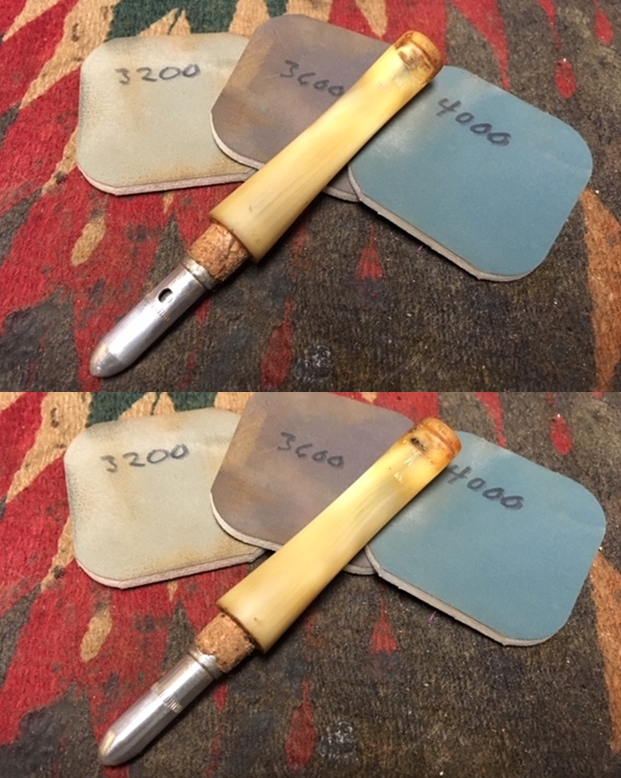
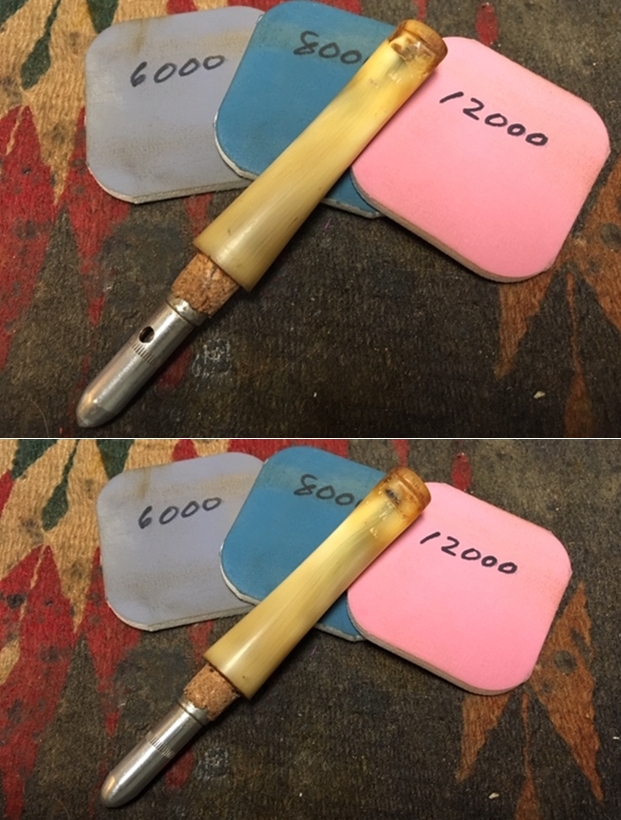
I followed it up by micromesh polishing pads,wet sanding with 1500 to 2400 grit pads. Again, I wiped the bowl with a moist cotton cloth after each pad. I used the 3200 to 12000 grit pads to dry sand the stummel to a nice shine. It was at this stage that DISASTER struck!!!!! The stummel slipped from hands and crashed to the ground, shattering the reconstructed shank end and sustain a big ding to the heel of the stummel. Oh my!!! What agony it would be to reconstruct,re-profile the exterior and readjust the seating of the extension in to the mortise. But at this stage of restoration, I was left with no recourse but to reconstruct.

 This time around, I slightly tweaked the process. I wound a cotton rag around the complete stummel, less area to be repaired, so that the glue and briar dust does not spill over rest of the stummel and create more work for me. I completely sanded the earlier reconstructed portion and applied a layer of superglue and let it cure for a few minutes. Once the glue had hardened, I applied second layer of super glue and pressed some briar dust over it. I repeated this process of layering till I had achieved a matching top surface. I applied a final layer of superglue over the complete reconstruction and set it aside to cure overnight.

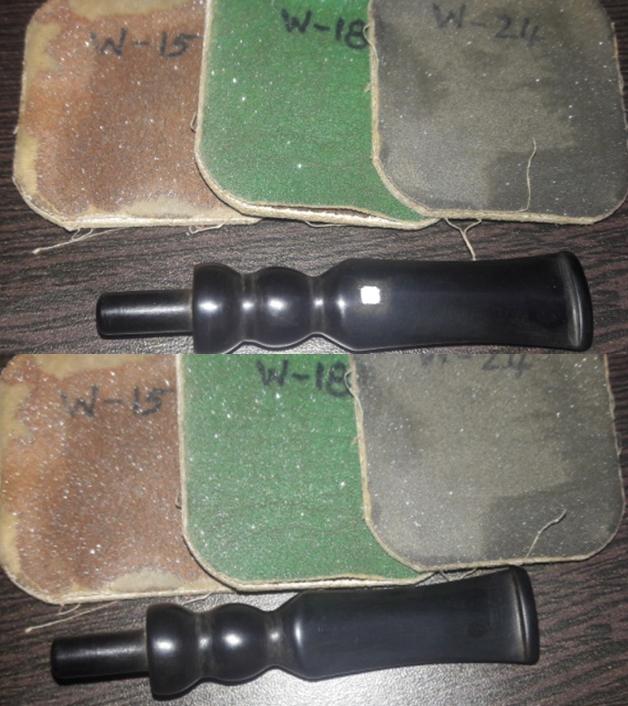
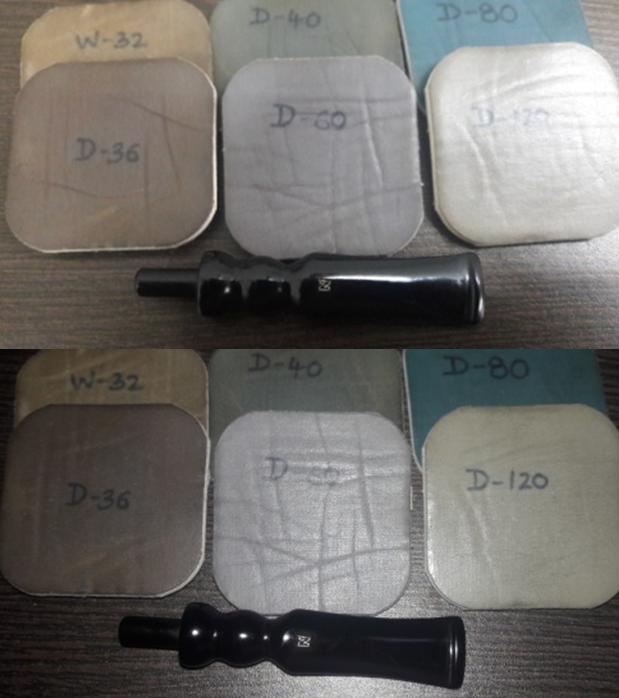
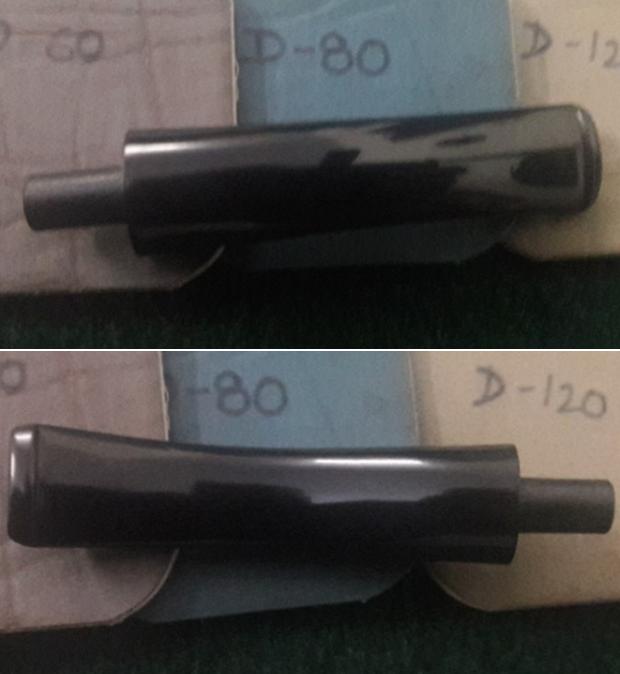
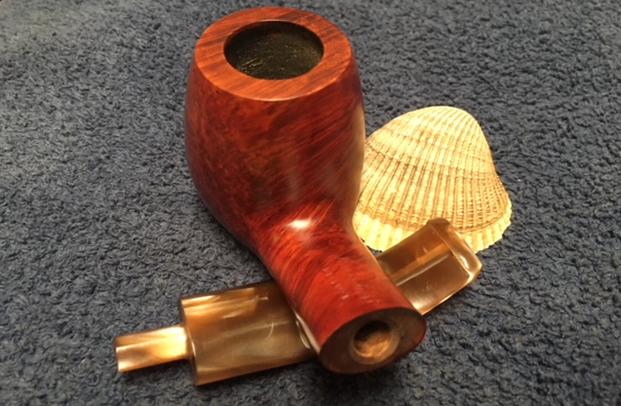
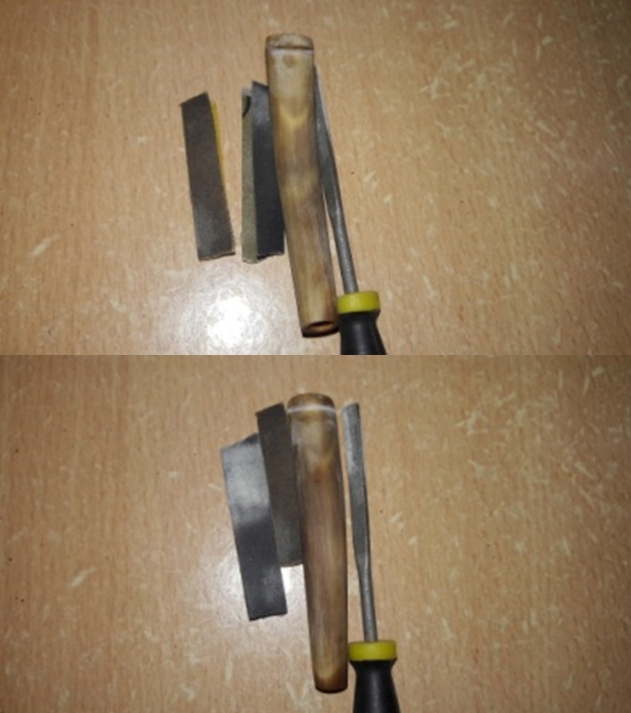
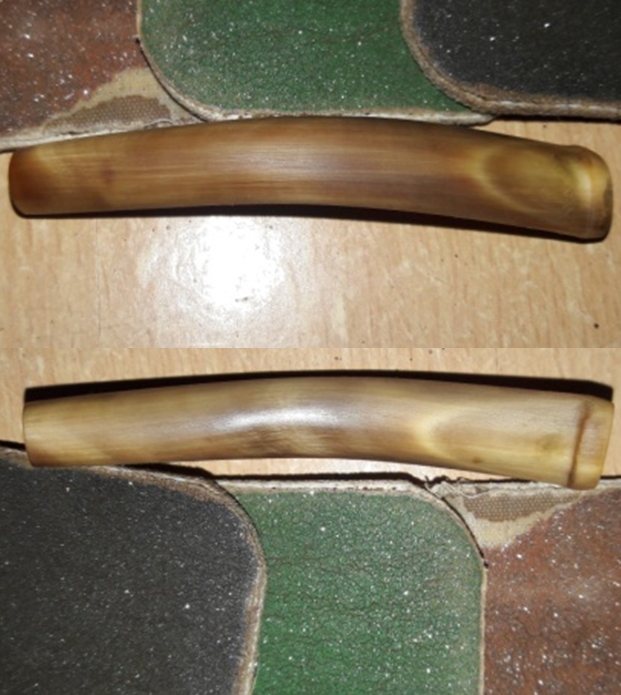
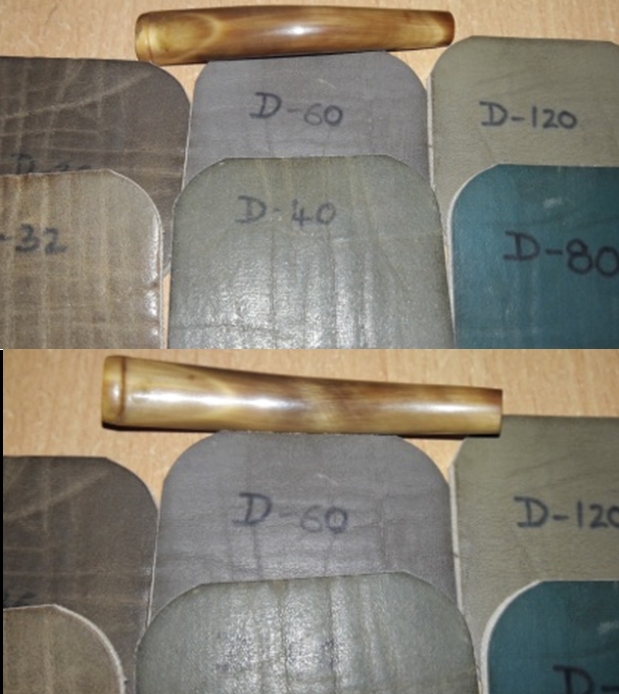
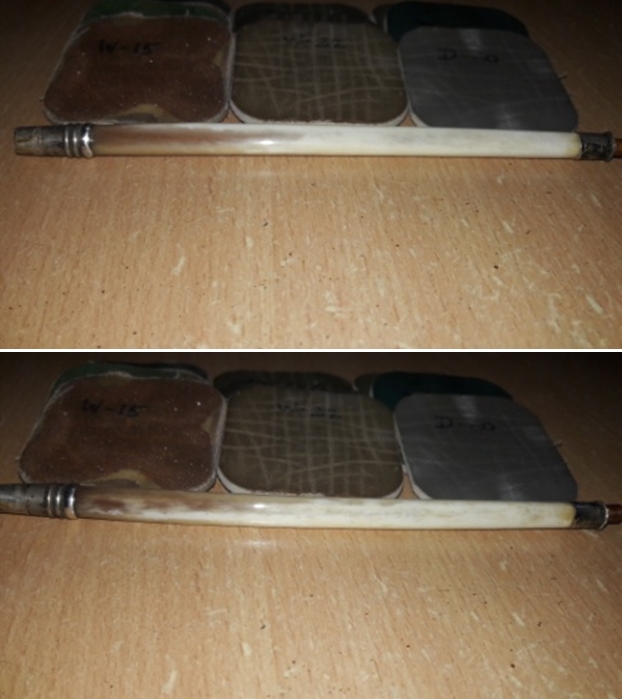
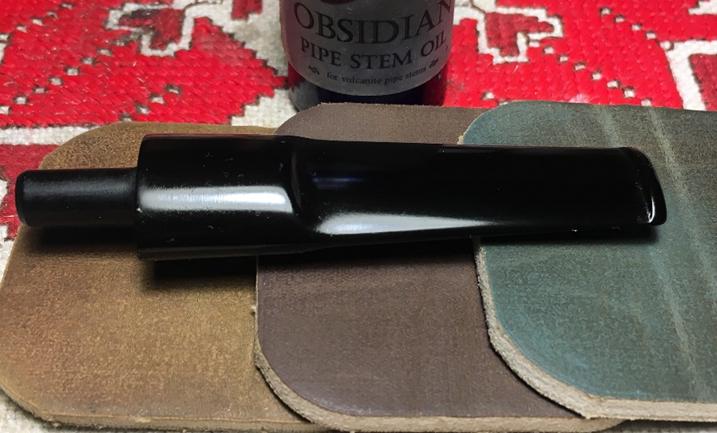
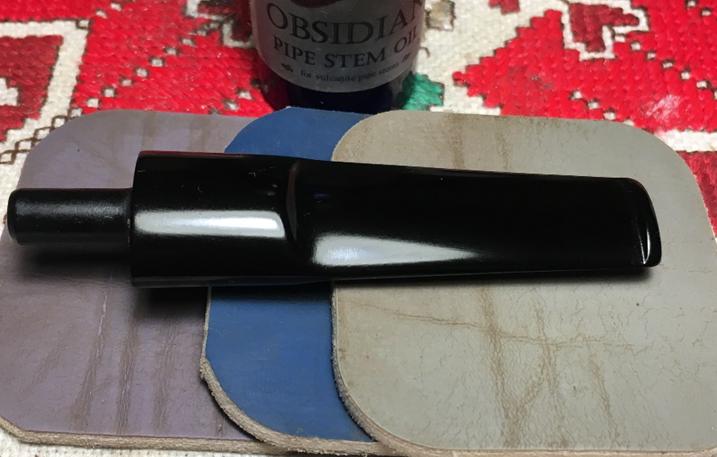
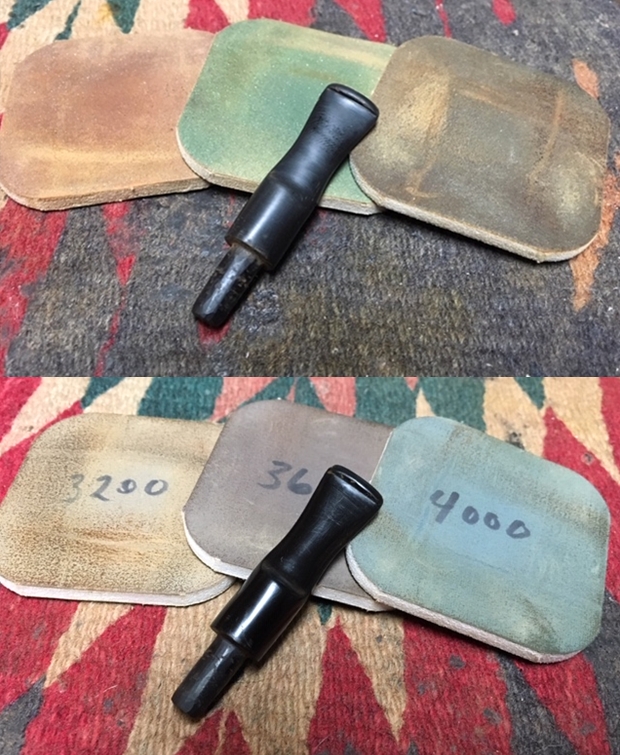
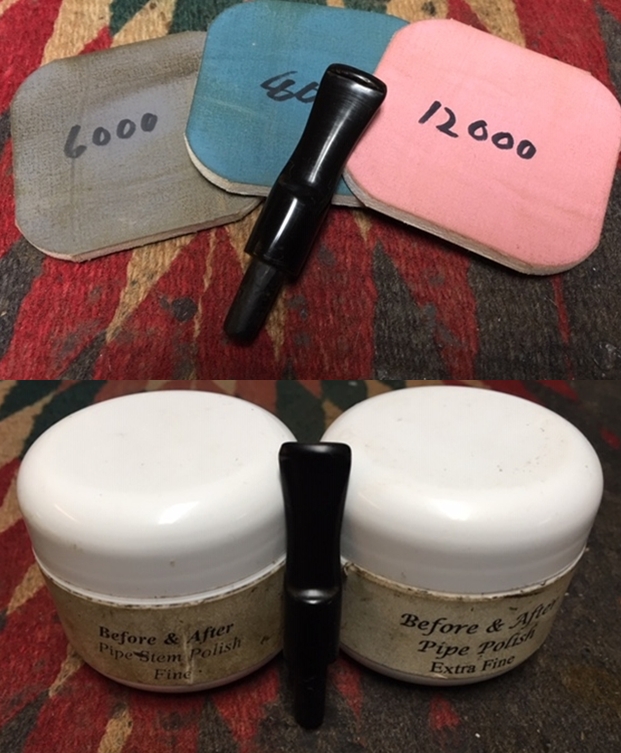
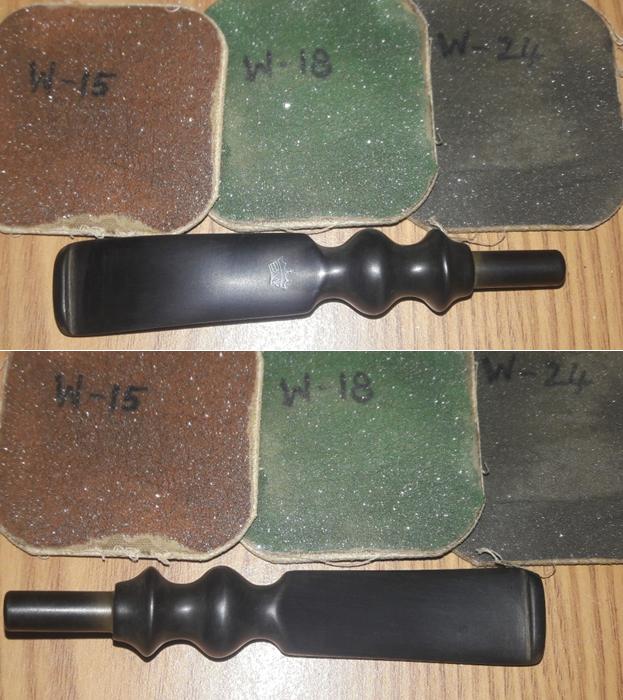
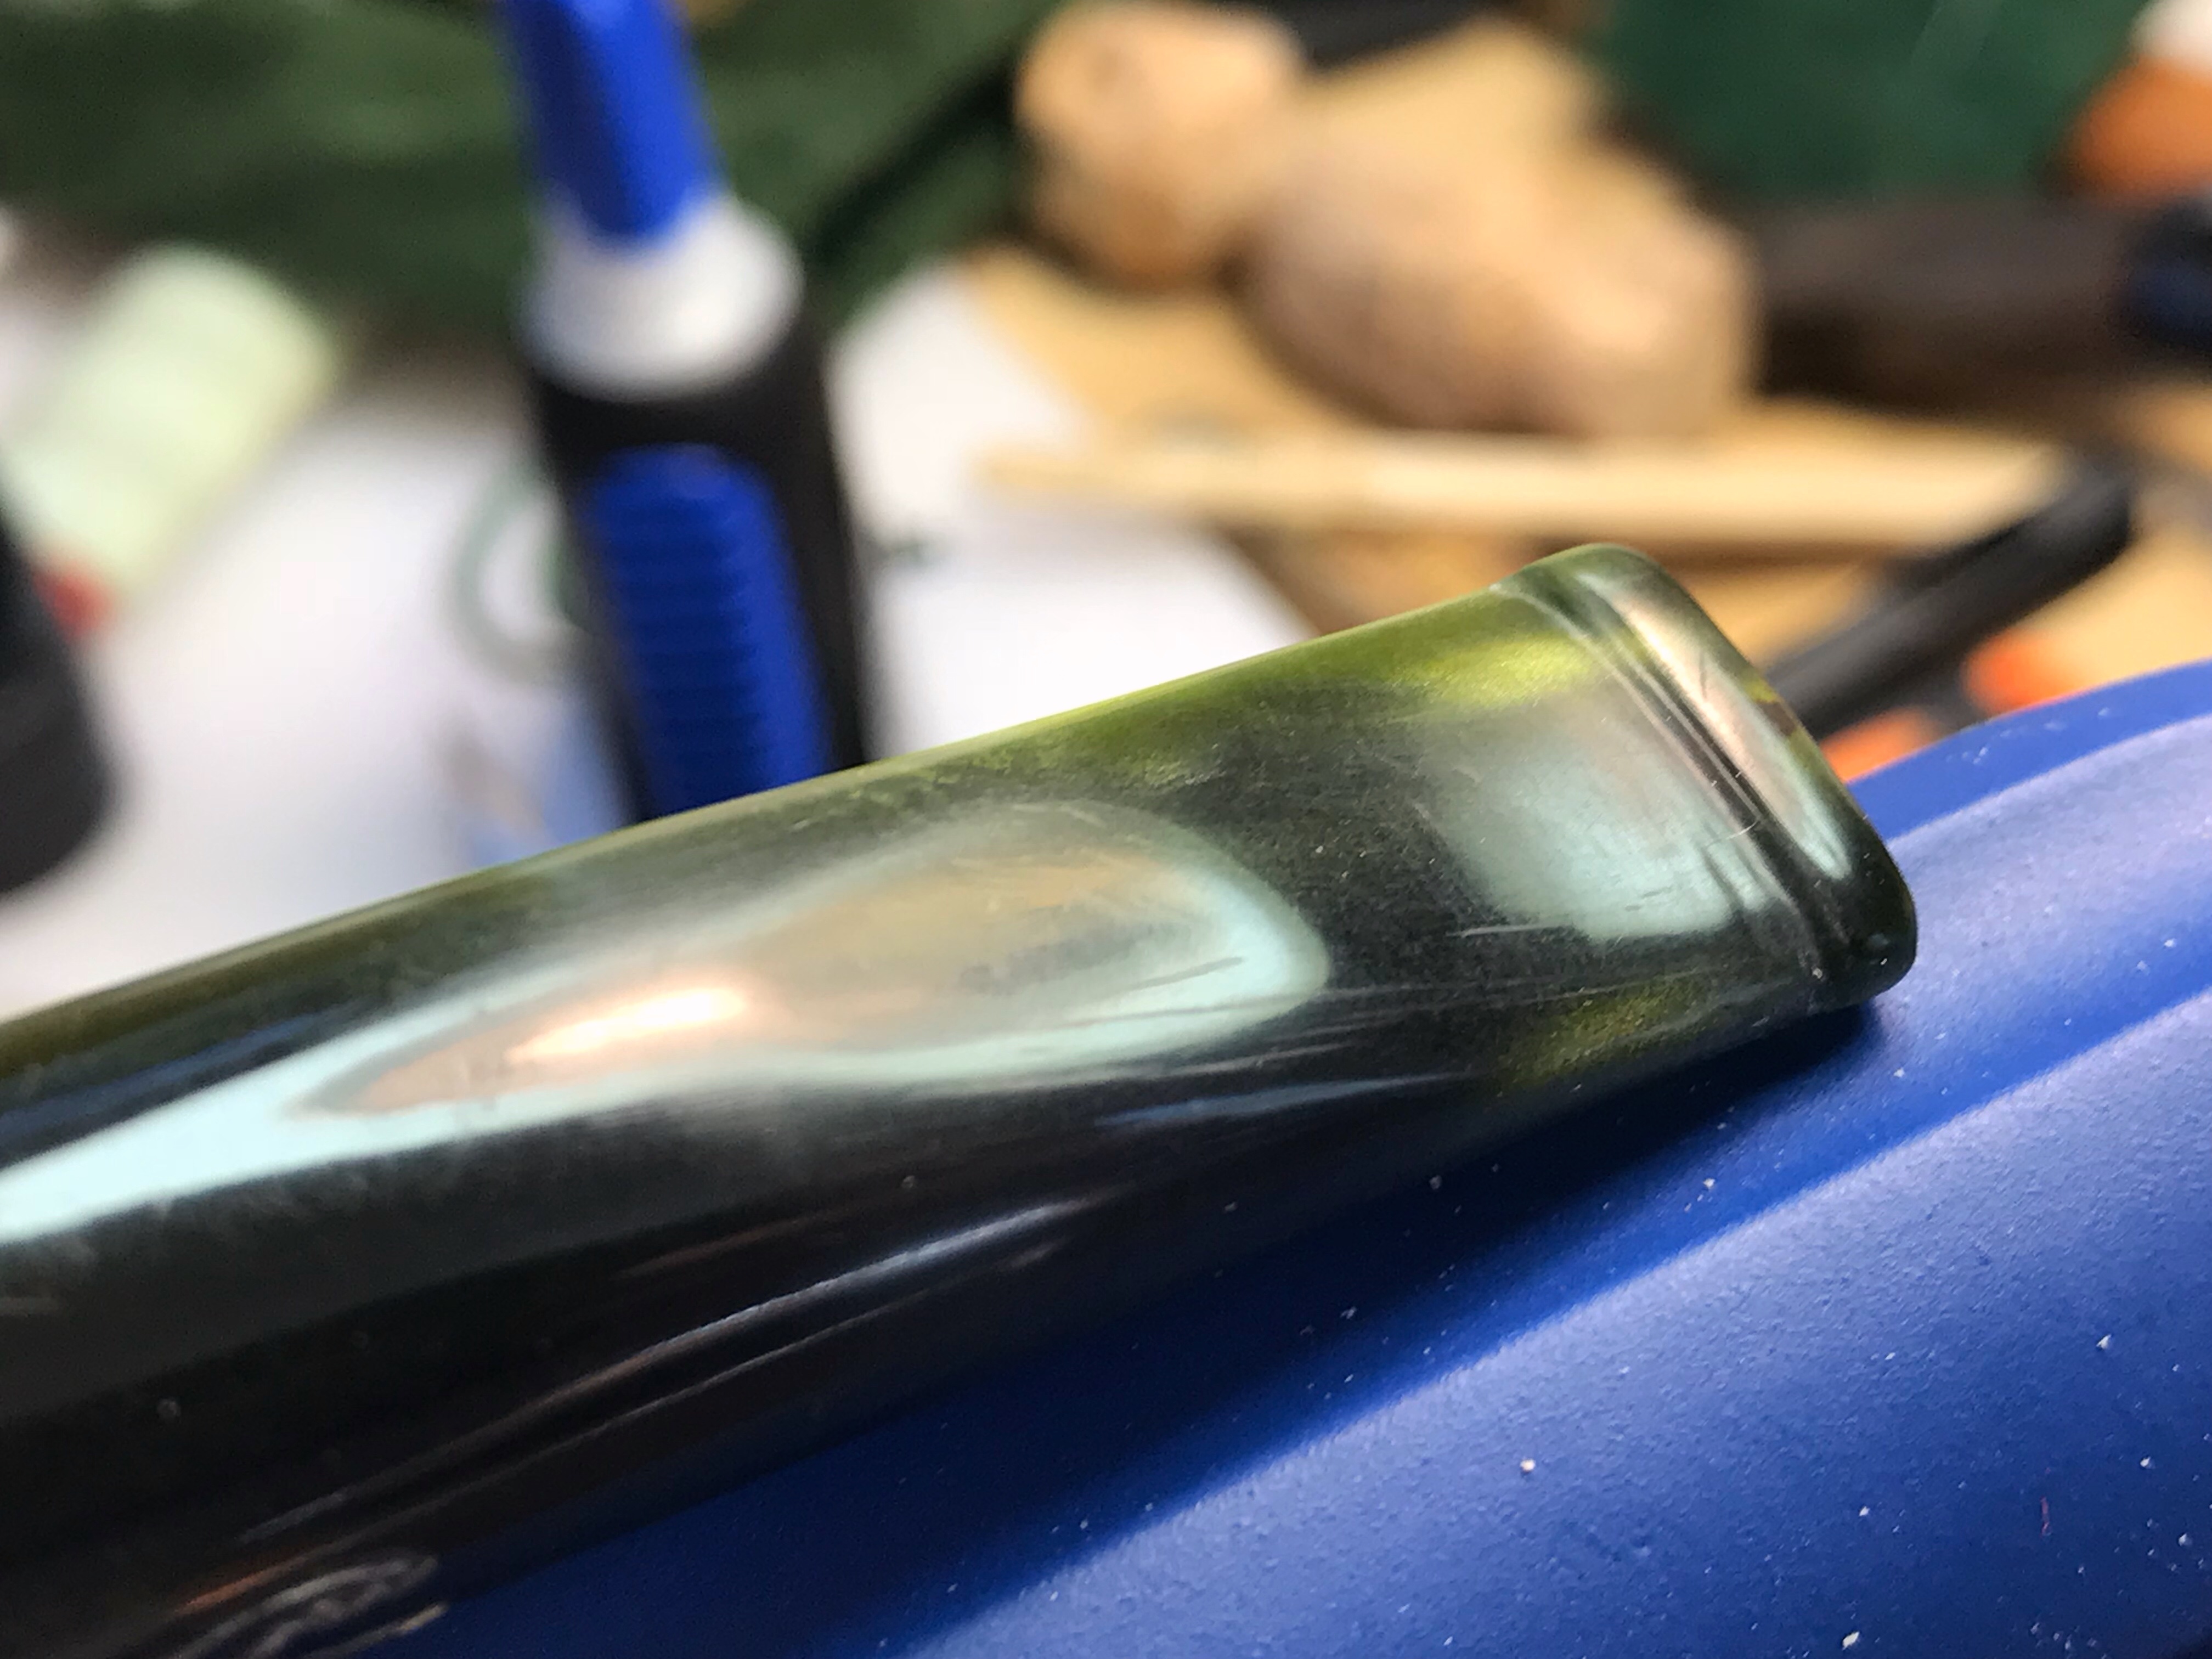
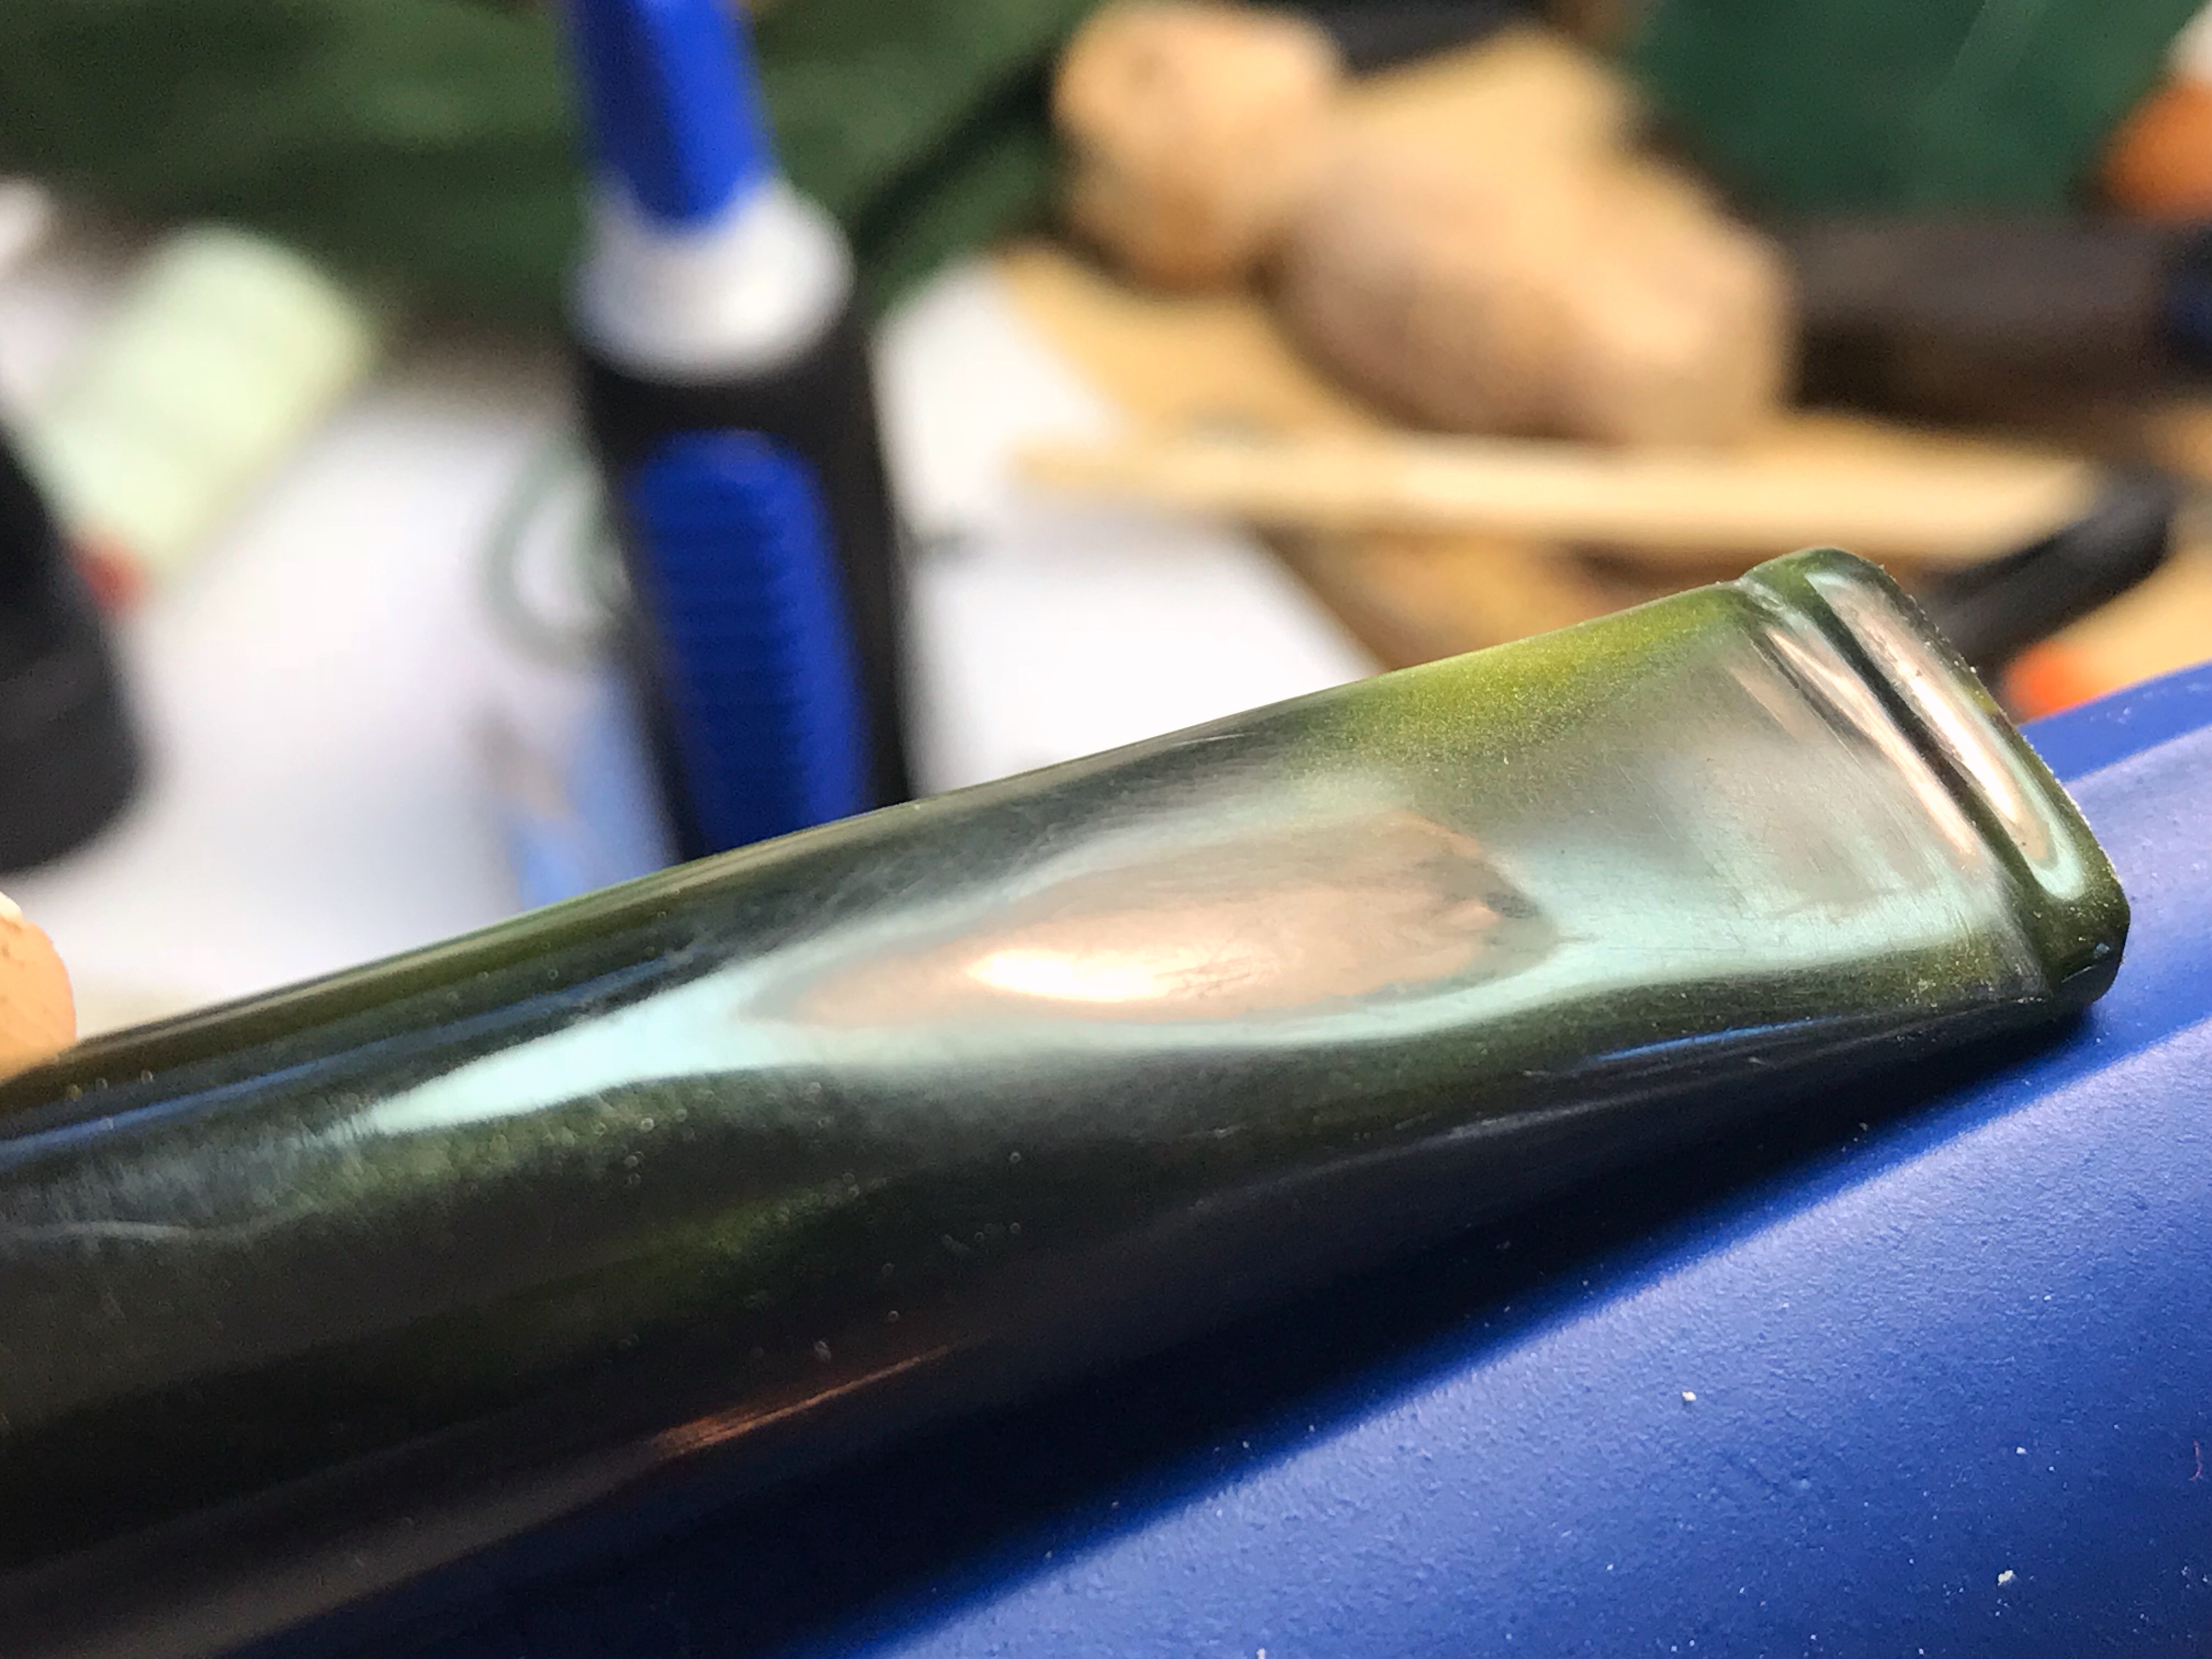
The next evening, I worked on the wing bone extension and the horn stem. I sanded the fills on the shank extension and the stem with a 220 grit sand paper. I sharpened the edges on the lip with the help of a flat head needle file and a folded piece of 220 grit sand paper. When the fills were matched with rest of the surface, I progressed to micromesh polishing, wet sanding with 1500 to 2400 grit pads and dry sanding with 3200 to 12000 grit pads. I wiped the shank extension and the stem with a moist cloth after every pad and rubbed a little extra virgin olive oil on the surface after every three pads. The Albatross wing bone extension and the horn stem is nice, smooth and clean. The wing bone extension has retained its natural coloration and there is nothing one can do anything about it. I finished the restoration of the wing bone extension by polishing the sterling silver end caps with cigar ash. At this stage, the entire assembly of the extension and screw-in type of bone stem looks beautiful, smooth, shiny and classic. I call it a day and decide to work on the stummel the next evening.

I start work on the stummel by filing the external surface with a flat head needle file and go through the entire process described earlier to match the exterior and internal surface with the sterling silver ferrule and seating of the Albatross wing bone extension respectively. I was extra careful this time around while working the stummel. You may find it amusing, but I sat on my double bed while I worked on the stummel!!!! Such a fright this incident had caused.

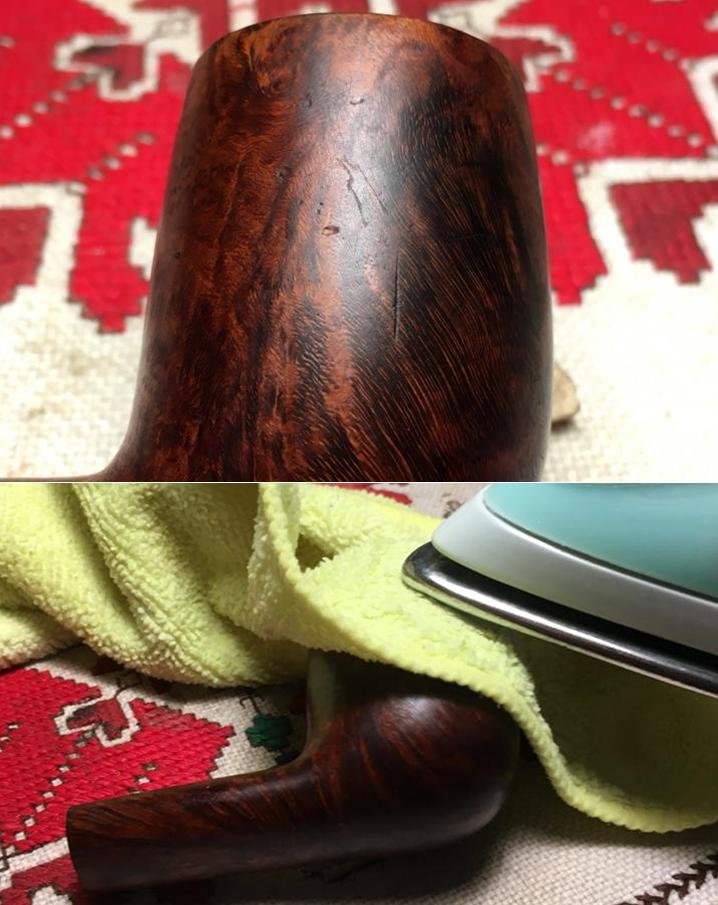
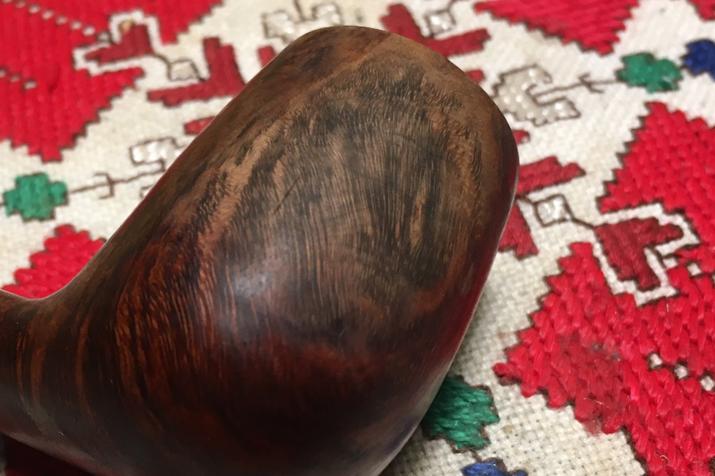
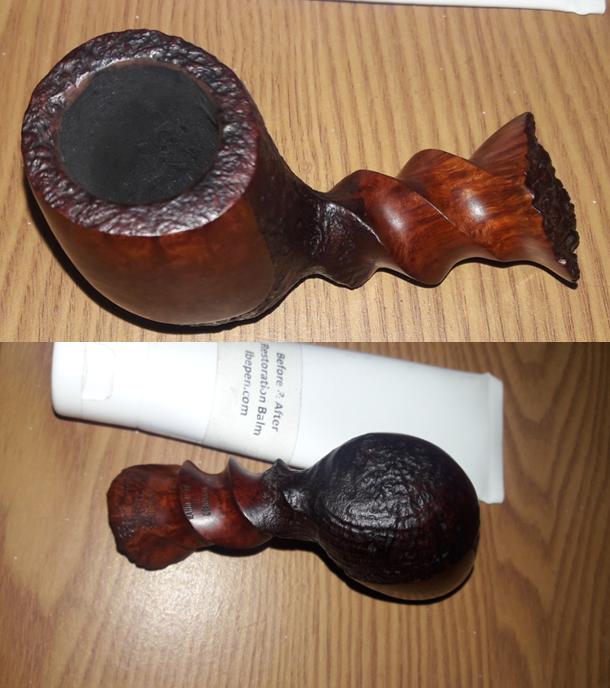
Then there was the issue of a dent near the heel in the stummel surface. Mr. Steve suggested adopting the steaming method to address this dent. Though theoretically I was well conversed with this method, I had never attempted it before and now to attempt it on a pipe of such vintage, beauty and value, had me in doubts. Added to this, I did not have any electric iron in my room as all the laundry, including ironing, is done by the washer man (I do enjoy certain privileges that come at my seniority in my organization). But seeing no other way out, I decided to give it a go. I improvised a bit and heated my trusted fabricated knife on a candle flame, soaked a thick Turkish hand towel and placed it on the dent. When I felt that the knife was sufficiently hot (well, I got it nicely hot!!!), placed it over the hand towel and over the dent. When there was a nice sizzling sound and a thick whiff of steam, I immediately removed the knife away from the surface and with a thumping heart, removed the hand towel to inspect the results, and boy was I pleased!!! The dent was reduced to nothing with the briar expanding nicely to lift the dent due to the steam, but it did leave behind a stark discoloration around the area. After a brief discussion with Mr. Steve and exchange of pictures, he suggested to rub some ‘Before and After’ balm in to the affected area to see if this would help in addressing the issue. Fortunately, it did!!!!Since I had attempted this steaming method for the first time, I was too preoccupied and missed out on taking pictures, my sincere apology to all those who were looking forward to these pictures.

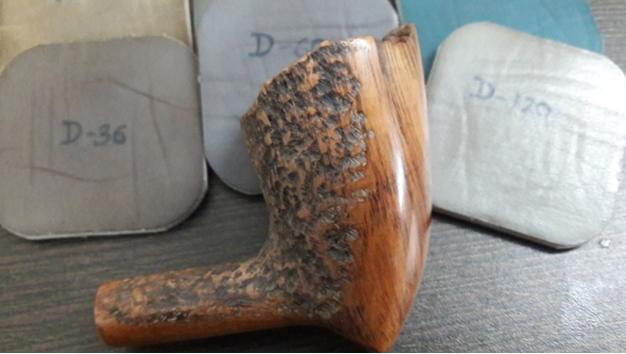
To match the repaired surface with the rest of the stummel, I went through the complete micromesh polish cycle again.

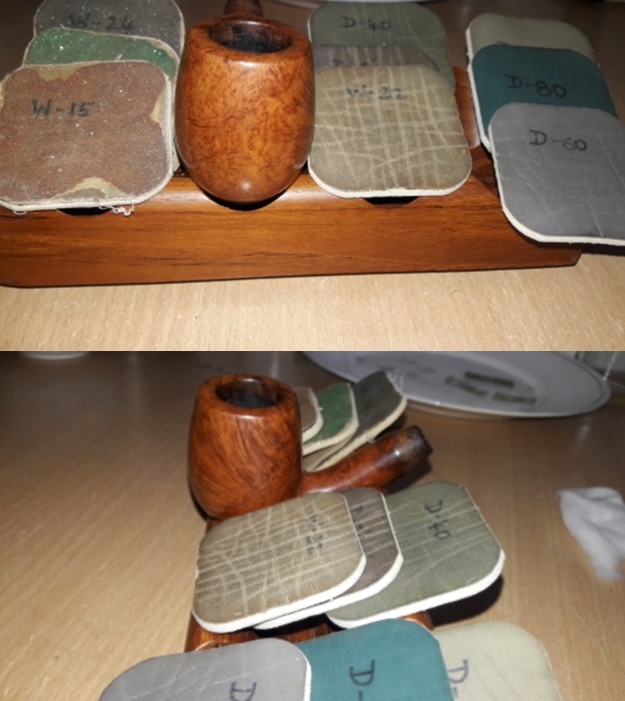
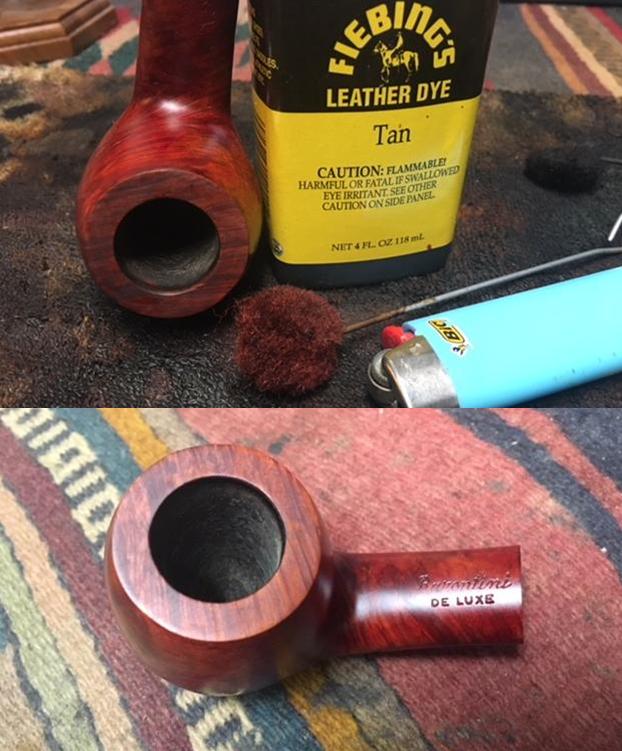
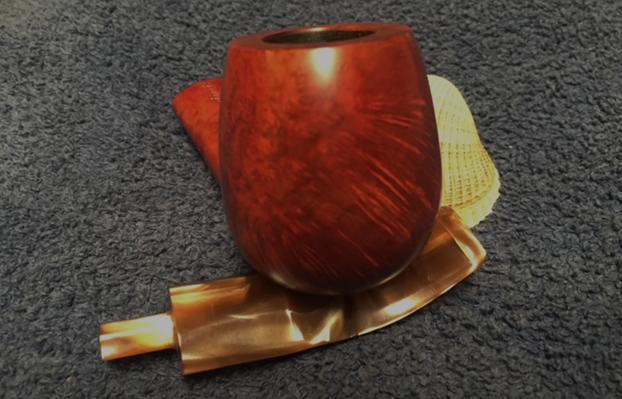
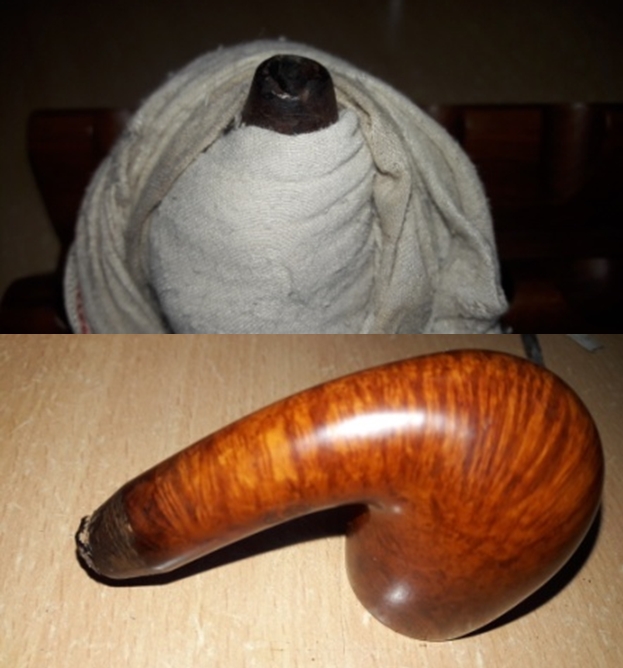
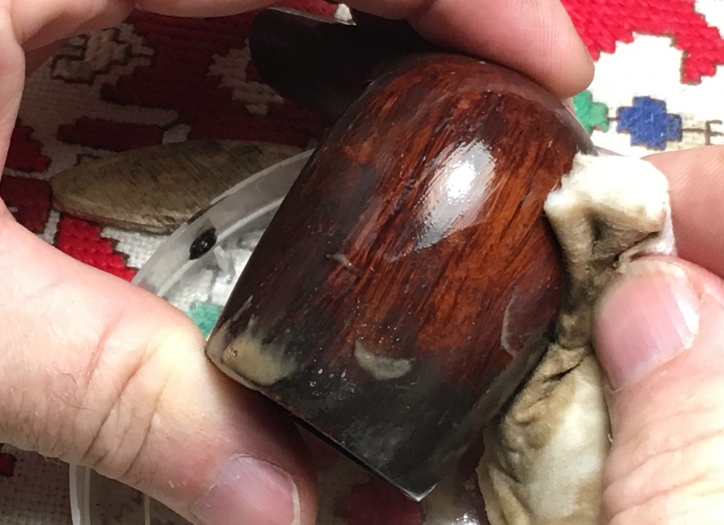
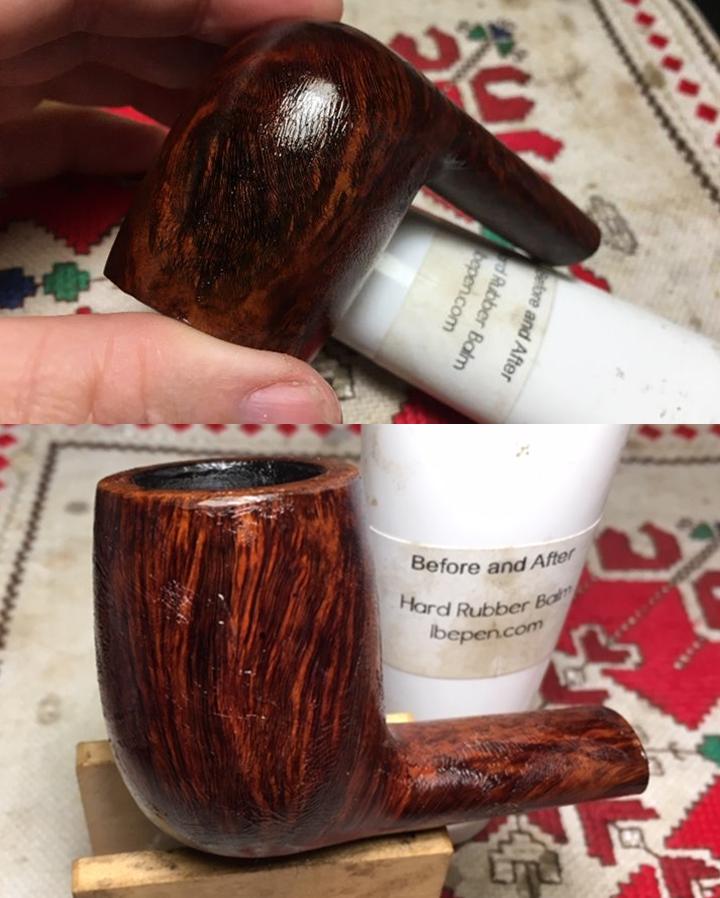
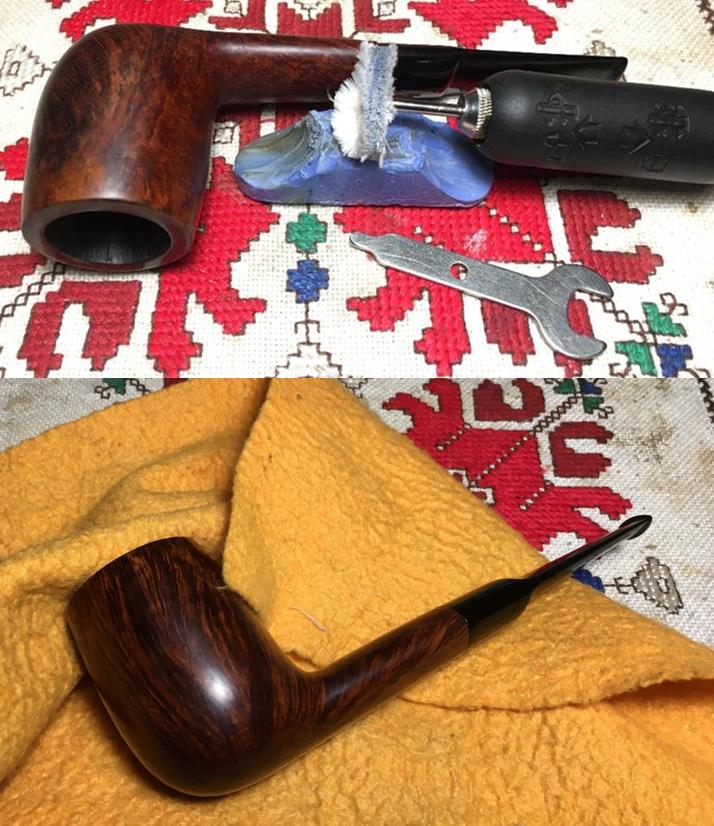
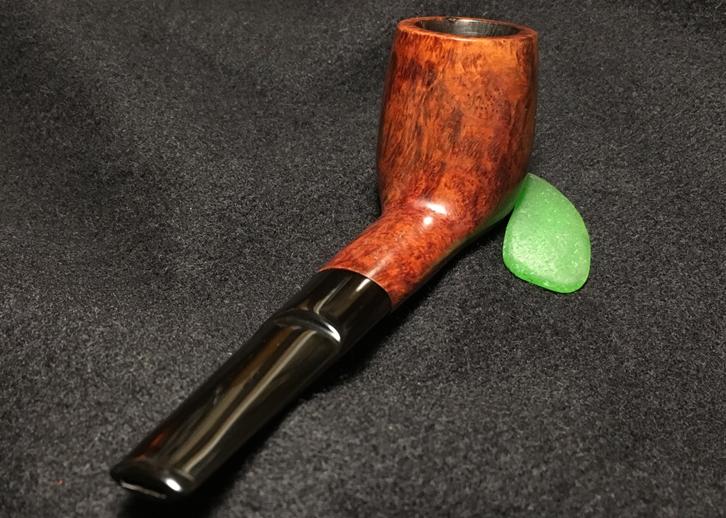
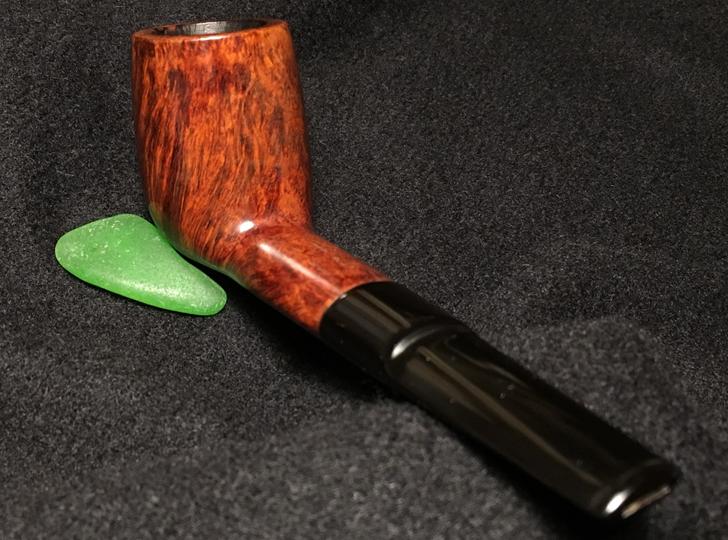
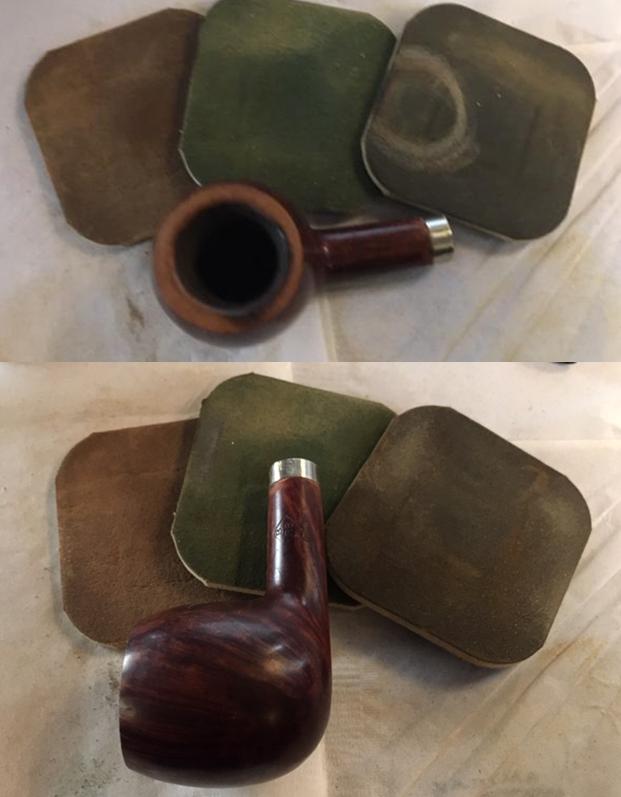
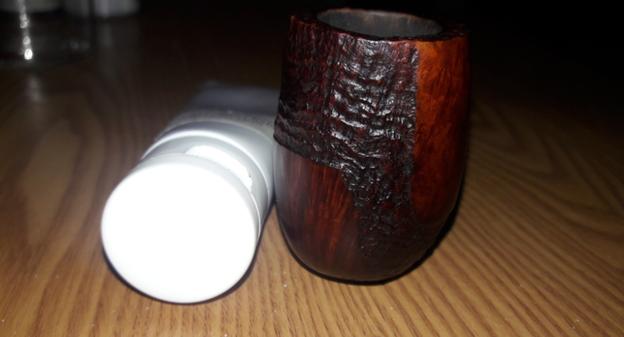
At the end of 12000 grit pad, I rubbed a little quantity of ‘Before and After’ restoration balm in to the stummel with my fingers and set it aside for 10-15 minutes while I polished the sterling silver ferrule. The transformation in the briar is amazing to say the least!!!!! I buffed the stummel with a soft cotton cloth. I finish this stage of restoration by re-attaching the nicely polished and shining sterling silver ferrule over the shank end using super glue.

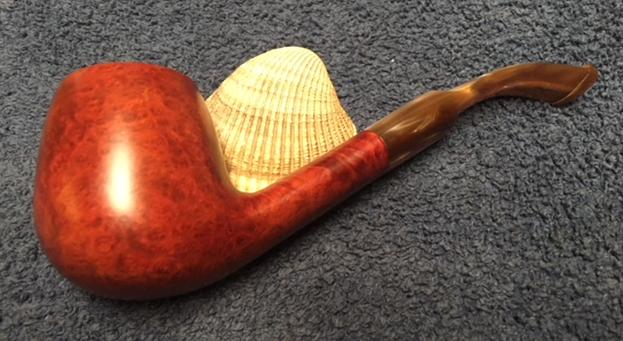
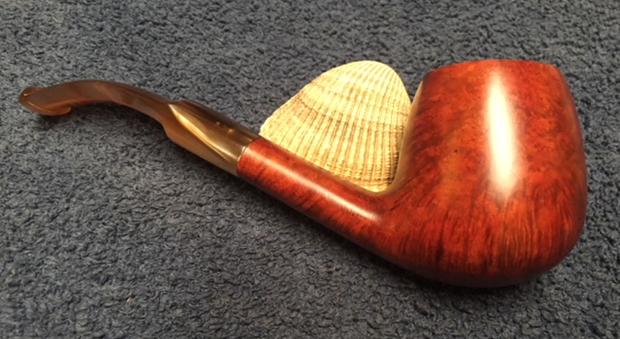
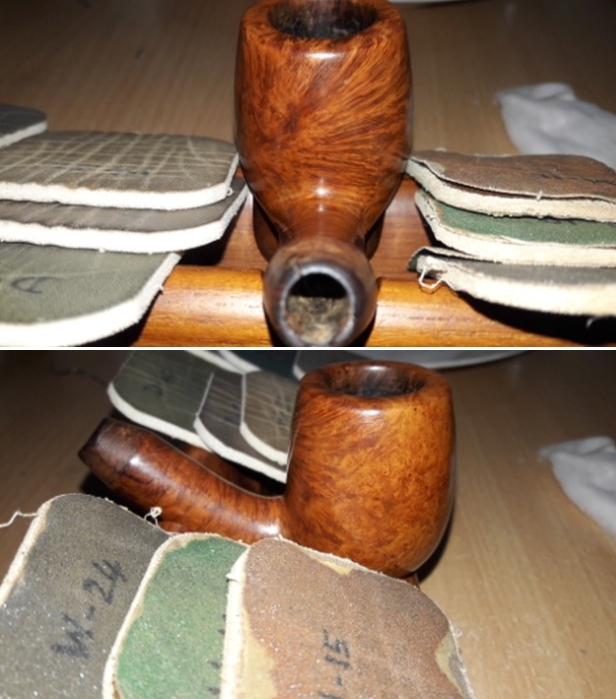
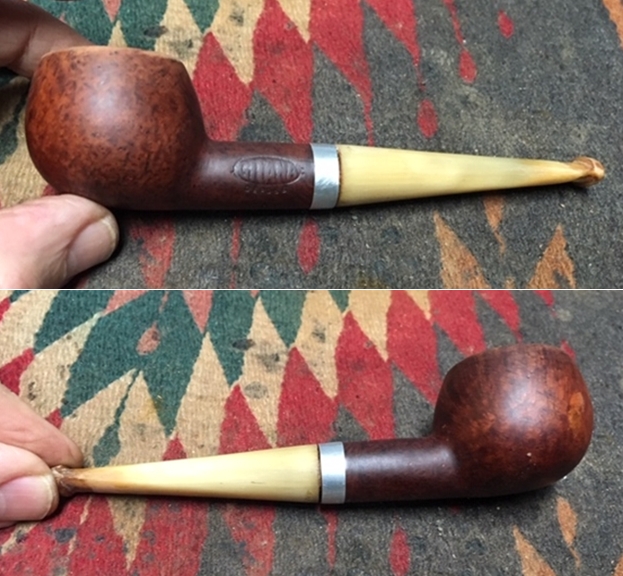
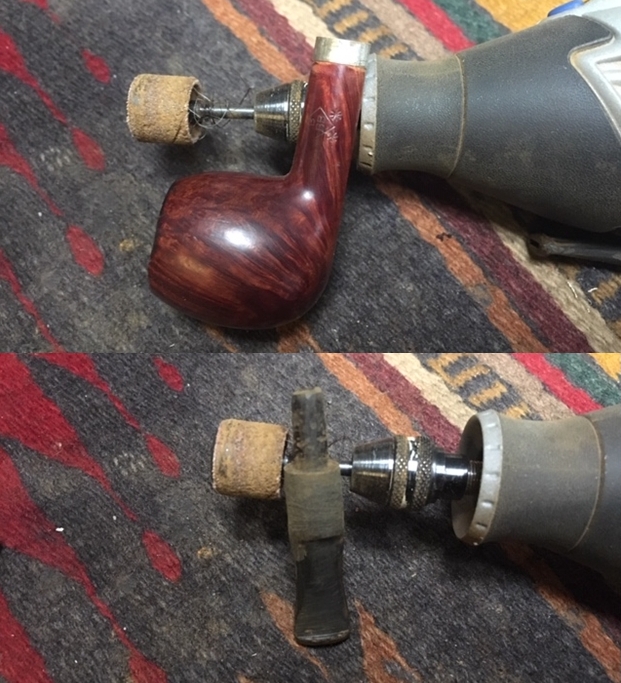
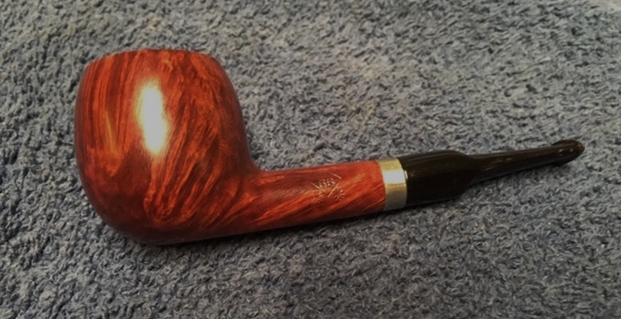
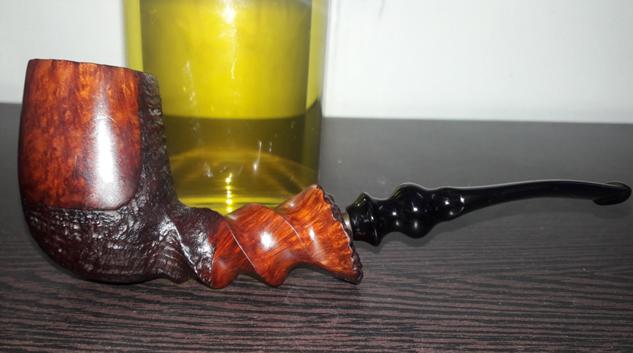
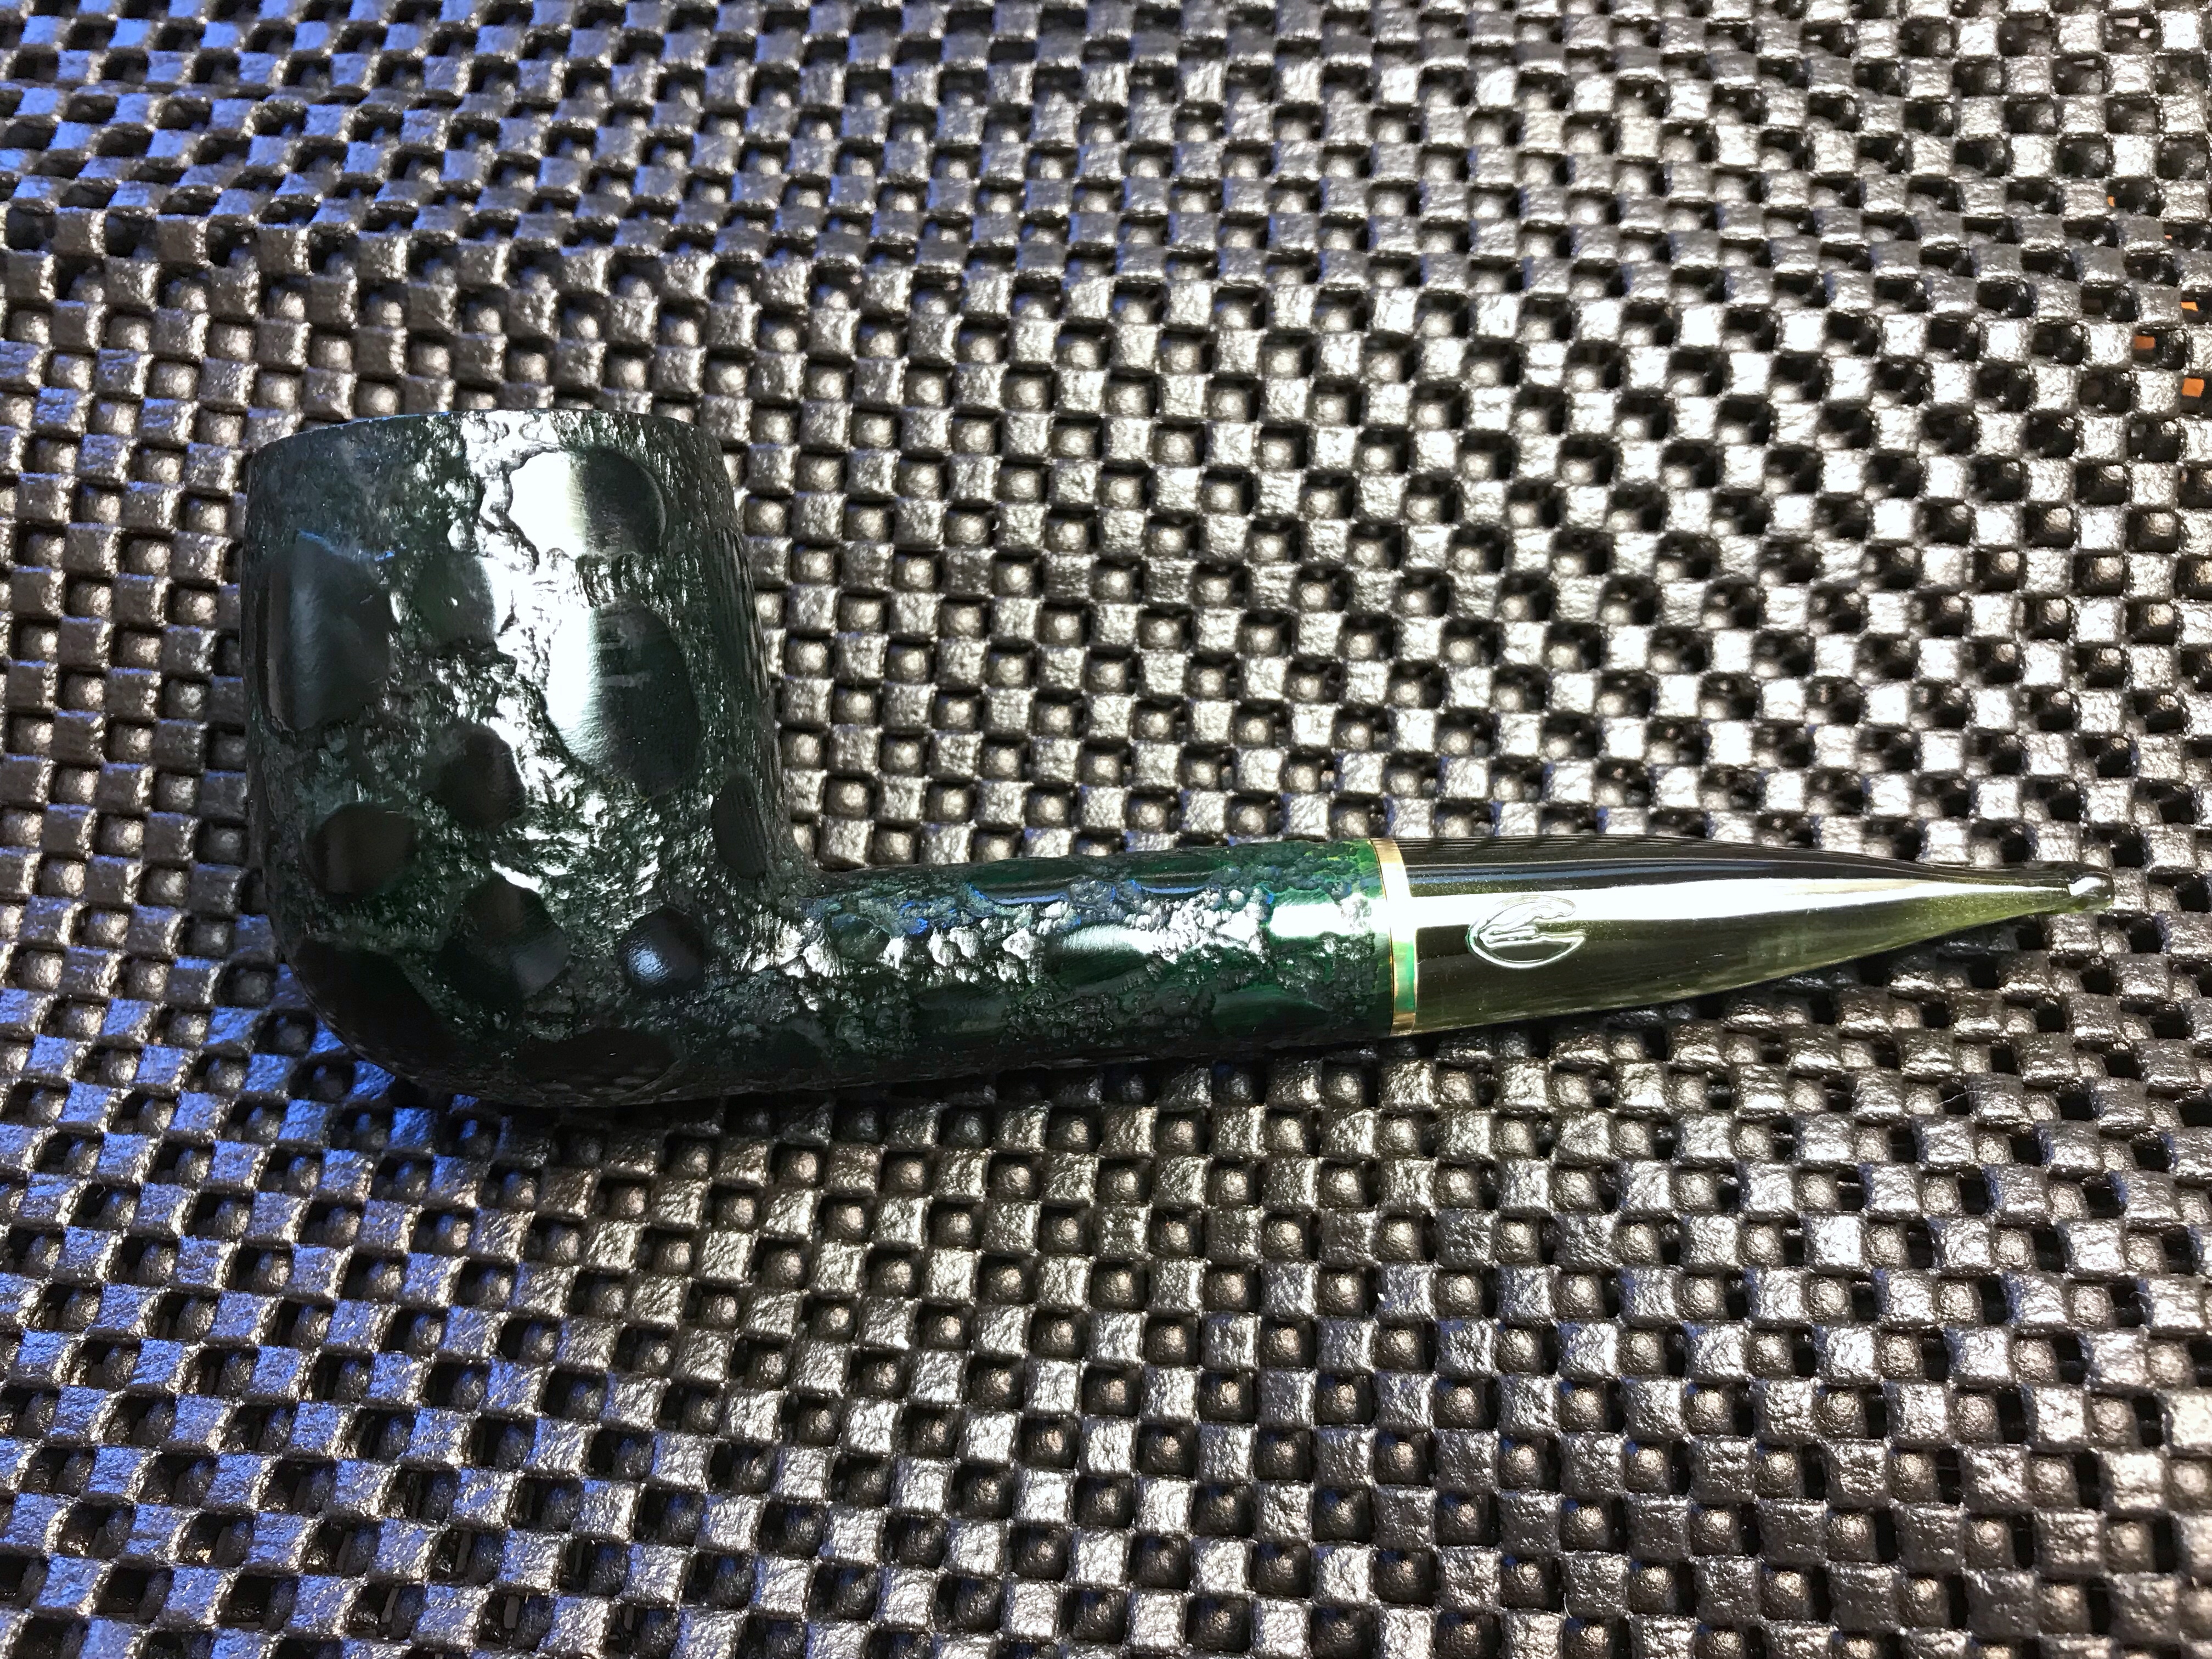
To finish the restoration, I mounted a cotton cloth buffing wheel to the Dremel (actually it is not the brand machine, but a local machine which is similar).  I set the speed at about 40% full power and applied White Diamond compound to the entire pipe.  Afterwards, I wiped/buffed the pipe with a soft cotton cloth to clear it of any leftover compound dust. I then mounted another cotton cloth wheel to the polishing machine,maintaining 40% speed and applied several coats of carnauba wax.

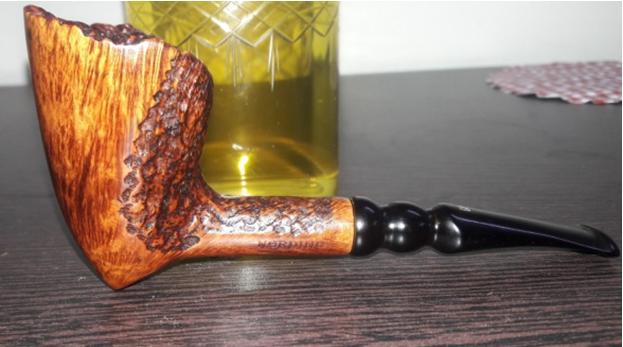
I finished the restoration by giving the entire pipe a rigorous hand buffing using a microfiber cloth to raise the shine further. The completed pipe looks lovely, fresh and vibrant. Thank you for having the patience to reach this far while reading the write up. Your comments are of utmost importance to me for improving my skills in restoration process as well as writing about it. Cheers!!!

PS. During the journey of restoring this beauty, my Guru and mentor, Mr. Steve was always around with his words of wisdom and encouragement to egg me on towards completing this project. It felt like he was holding my hand and helping me take my first baby steps around towards completing this restoration. Thank you once again, Mr. Steve.

Rescue of a Stately Stanwell Henley Special, Made in Denmark, Oval Shank Billiard


Blog by Dal Stanton

I have been looking forward to this project ever since I landed three Stanwell Henley Special pipes on the eBay block from a seller in Maryland.  The seller provided helpful information that only helped urged me to place a bid:

This auction is for three vintage Stanwell, Henley Line estate pipes from the 1950’s-60’s era. All are in good pre-owned condition. The stems are primarily free from teeth marks. The stems do have some fading. All of the stems fit snug and the wooden bowls are free from outstanding blemishes. As seen from top to bottom, the first pipe reads Henley Special #57, the second and third read Henley Special without any numbers seen. All of the pipes read Made in Denmark.

Since I started collecting and restoring pipes, I’ve grown in my appreciation for Danish made pipes.  They tend to be stout, well made pipes.  The stems are also interesting – the ‘pinched saddle’ fish tail is unique.  When I saw the 3 Henley Specials, I was attracted to the line-up but had never heard of ‘Henley’.  When I read the sellers description I was sold – I was especially drawn to the ‘Chimney’ on the top of the group below, sporting a pinched saddle fishtail stem.  The Stanwell Henley on my workbench now is the classic Oval Shank Billiard in the center.  Along with a Comoy’s Moorgate, Jim saw the Henley Special in the For ‘Pipe Dreamers’ Only! collection and commissioned him.  He saw what I also see in these classic Danish pipes.  As with frosting on the cake, this pipe benefits the Daughters of Bulgaria, our work here in Bulgaria helping women and girls who have been trafficked and sexually exploited.  The pictures show what I saw on eBay. Unfortunately, I cannot find much online regarding the Henley line.  Pipedia’s article on Stanwell pipes simply places the Henley Special line in the list of Stanwell second brands.  Pipephil.eu provided more information with a Henley much like the slightly bent, Chimney above with the characteristic bulging midsection, but with a blasted finish.  It also show a ‘H’ stem stamp.  If the Henley on my worktable had one, it is now long gone.The only information I found that gave any reference to dating is spurious at best. I found the following picture on Google images but the link to pipesmokersforum.com is now a dead end.  “Who made this pipe?”  I would have loved to read the thread that discussed the dating of the discontinued Stanwell second, Henley Special.  The picture puts a question mark in the late 50s.  Looking at all the 3 Henley Specials I acquired, the look and feel of them lends toward this dating, but…. This picture and the eBay seller’s description placing the pipes in the 50s or 60s are anecdotal, but seem to me to be accurate.  Oh, for the return of the now defunct, Chris’ Pages website, to look through the old catalogs! One very interesting find was a Stanwell Henley Special for sale in the listings of SmokingPipes.com in restored state – very nice.  It gives me an idea of what might be under the older, tired finish of all three Henleys in my collection.Taking a closer look at the Henley Special Oval Shank Billiard on my worktable, I take these pictures for a closer look. The nomenclature is found on the upper side of the oval shank.  A very thin, worn ‘Henley’ (in cursive script) [over] offset ‘SPECIAL’.  On the underside is the COM, ‘MADE IN DENMARK’. As with the other two Stanwell Henley pipes I acquired at the same time, the finish is extremely dark from years of grime and oil build up.  The uniformity of the darkened state of the pipes lends to a common period of manufacturing, which I’m guessing to be in the 1950s or 60s.  Even though I know it’s not an exact science, the feel of the pipes seems older.  I need first to clean the briar surface before I can see what is going on with the briar – the condition or even the look of the grain.  The oval saddle stem has oxidation, tooth chatter and dents which need attention.  The cake in the chamber is thick and will be removed to give the briar a fresh start.  The rim has significant lava flow and I detect a divot on the internal lip of the rim which needs attention.

To begin the restoration of this vintage Stanwell Henley Special Oval Shank Billiard, I run a pipe cleaner dipped in isopropyl 95% through the airway to clean it up.  I then add the oval saddle stem to a soak of Before & After Deoxidizer with other pipes and stems in the queue.  I leave it in the soak for several hours and fish it out, letting the Deoxidizer drain off the stem.  I then wipe the raised oxidation with cotton pads wetted with alcohol.  I follow the alcohol by wiping the stem with a pad wetted with light paraffin oil. Turning now to the bowl, I begin by reaming the chamber.  There is heavy cake in the chamber tightens as it descends in the chamber.  Using the Pipnet Reaming Kit, I start with the smallest of the 4 available blade heads.  After putting some paper towel on the table, I go to work.  I use 3 blade heads of the 4 and then transition to the Savinelli Fitsall Pipe Tool. With the Fitsall tool I continue scraping the chamber wall and fine-tuning the reaming and reaching to the difficult angles.  Then, wrapping 240 grade paper around a Sharpie Pen, I sand the chamber removing more carbon and revealing fresh briar.  To complete the chamber cleanup, I wipe it with a cotton pad and alcohol to clear the carbon dust.  With the carbon cake cleared, an inspection of the chamber reveals no problems with cracks or heat fissures. The pictures show the progress. Turning now to the external surface, I use undiluted Murphy’s Soap on cotton pads.  I’m anxious to see what the Murphy’s Soap does on this very dark, aged briar surface. As I use the cotton pad, I very quickly begin to see what beauty was waiting underneath.  I called my wife to take some pictures as I scrubbed the ancient layer of oils and tars that have cocooned the briar underneath.  I also use a bristled tooth brush and a brass wire brush on the rim.  My, oh my!  I’ve never seen a pipe clean up to such a pristine condition.  I rinse the bowl with tap water and literally marvel at what is in my hand.  The rim is still darkened a bit from lava flow, but the flame grain that dominates the bowl’s external surface is striking.  I take two pictures after the cleaning to mark the progress.  As I look at the stummel, I decide to hydrate the briar using light paraffin oil (mineral oil) which also gives me a sneak peek at a finished stummel.  The before and after pictures tell the story. Turning now to the internals of the stummel, I use cotton buds and pipe cleaners dipped in isopropyl 95% to clean the mortise and airway. I also utilize long shank brushes to save on pipe cleaners.  To loosen up the tars and oils, I employ a dental spatula to scrape the mortise wall and reach into the airway.  A drill bit effectively excavates crud out of the airway. To do this, I use a bit the size of the airway and hand turn the bit so that it proceeds down the airway.  The bit grabs the buildup and removes it.  After some time excavating and scraping, pipe cleaners and cotton buds start coming out clean.  The pictures show the tools and the progress.I continue the internal cleaning with a kosher salt and alcohol soak.  After twisting and stretching a cotton ball to form a wick, I stuff it down the mortise/airway to draw the oils and tars.  Following this, I fill the bowl with kosher salt (kosher salt has no residual after-taste as does iodized salt) and set it in an egg crate.  Using a large eye dropper, the bowl fills with isopropyl 95% until the alcohol surfaces over the salt.  After a few minutes the alcohol is absorbed, and I top off the alcohol and set the stummel aside for the night. The next morning, the soak did the work.  I toss the expended salt in the waste and wipe the bowl with paper towel to remove the salt.  I also use a shank brush in the chamber and down the mortise to remove any remaining salt.  Finally, I blow through the mortise.  To make sure all is clean, I finish by wetting a pipe cleaner and cotton bud with isopropyl 95% and running them through the mortise.  I declare the stummel to be cleaned. With the pipe cleaned, I look again at the stummel surface which almost appears to have been protected by the layer cocooning it.  My task will be to preserve the patina of the briar’s finish by not introducing sanding that will be too invasive and remove the aged surface.  I sent a note off to Steve of rebornpipes, just to make sure my plan received his concurrence before moving further with the Henley.  My plan is to first repair the divot on the inside of the rim lip, shown at the 2 o’clock position on the first picture below.  I could introduce an internal bevel to mask the divot, but I would rather salvage the rim real estate with this vintage pipe.  I make a patch of briar dust and thick CA glue and mix a small amount of putty with it.  After wiping the area with alcohol to clean it, I mix the CA glue and briar dust until it reaches the viscosity of molasses and apply the putty to the divot using a toothpick.  It takes very little.  I put the stummel aside to allow the patch to cure. With the patch curing, I look at the stem and take some close ups of the bit area.  The chatter is light with some bites.  I begin by using the flame method to raise the indentations in the vulcanite.  With a Bic lighter, I paint the button area.  The physics of vulcanite – a compound rubber, expands when heated.  The heating causes the bites and chatter to lessen in the intensity.  As I heat, it does lessen but is not fully removed.  I next use 240 grit paper and sand out the chatter and dents remaining.  I also use the flat needle file to redefine the button lips – upper and lower.  The pictures show the progress. Following the 240 paper and filing, I use 600 grade paper and wet sand the entire stem.  I follow this using 0000 steel wool to sand/buff the stem.  The pictures show the progress.Next, using micromesh pads 1500 to 2400, I wet sand the stem.  I follow by dry sanding using pads 3200 to 4000 and 6000 to 12000.  Between each set of 3 pads, I apply a coat of Obsidian Oil to the stem to revitalize the vulcanite.  The pictures show the progress of restoring that glossy pop.  I like it! With the stem drying, I look again to the stummel.  The briar dust patch is cured, and time to be file and sand the patch mound.  I use both a flat and a half-rounded needle file to gently and patiently file the patch mound on the top of the rim and on the inside lip.  I’m careful not to impact the surrounding rim briar.  After some time filing, I use a piece of 240 tightly rolled to finish the sanding, bringing the patch flush with the briar on the top and inside.  I chronicle the progress. Next, I gently clean the whole rim surface by lightly sanding it starting with micromesh pad 1500 and completing with pad 3600.  The rim looks good.To preserve the patina in the old finish, I’m willing to allow some scratches and dents to pass as badges of this Stanwell Henley’s past walk in life.  I did want to try raising some in an area where I identified a concentration of these.  I take a picture to show a closeup of the area.  I then take my wife’s iron (she always raises her eyebrows when I ask for permission and my response to her question regarding what use HER iron will be to the art of pipe restoration! 😊) and wet a rag with tap water and place the rag over the briar area to be addressed.  After the iron is heated, I place the iron over the rag which heats both water and wood creating a steaming effect on the dents and scratches.  The effect of the heating and moisture causes the briar to absorb the moisture and expand, helping to close the wounds.  This technique helped, but there remain some badges of the past for the Henley Special! Following this heating technique, I apply Before & After Restoration Balm to the entire briar surface working it in well.  I apply some to my fingers and massage the Balm into the briar.  The Balm begins with the texture of a light oil but thickens into a heavy wax as it is worked into the briar.  After the Balm absorbs for a few minutes I wipe it off the stummel surface with a microfiber cloth.  As I wipe, the Balm-treated surface loosens, and it becomes more of a buffing.  I like what the Before & After Restoration Balm does to bring out and enrich the briar. The water spot (above) disappeared as the Balm did its job.At this point, I rejoin the stummel and stem and often I find that the cleaning process has loosened the connection.  To remedy this, I choose a drill bit that is the next size larger than the bit easily fitting down the airway of the mortise. I heat the vulcanite of the tenon by painting it with a lit Bic lighter.  As the vulcanite heats, it becomes supple allowing me to work the drill bit into the tenon thus expanding the tenon’s diameter microscopically and securing a tighter fit for the tenon in the mortise.  The expansion worked so well, that I needed to loosen the tenon a bit using 470 and 600 grade papers and then 0000 steel wool.  The fit now is good. With the tenon now fitting the mortise snugly, I mount the Dremel with a cotton cloth buffing wheel, set the speed at about 40% full power and apply Blue Diamond to the entire pipe.  With this compound being the only abrasive, I’m applying to the bowl, I spend extra time working the compound over the briar.  The compound doesn’t remove the ‘badges’ I’ve left behind, but it buffs out the very fine lines in the briar surface creating that natural briar shine.   When I add wax to this natural shine, it’s like frosting on a cake!  After applying the Blue Diamond is complete, I hand buff the entire pipe with a felt cloth to remove the excess compound dust left behind before applying carnauba.I now mount another cotton cloth buffing wheel to the Dremel, maintaining the same speed, and apply a few coats of carnauba wax to the stem and stummel.  I finish the restoration by giving the pipe a rigorous hand buffing with a micromesh cloth which raises the gloss even more.

Oh my!  When Jim commissioned this Stanwell Henley from the For ‘Pipe Dreamers’ Only! collection, could he have possibly seen what was hidden in this stately Oval Shank Billiard, Made in Denmark?  The grain and patina are beautiful.  I called the pipe, ‘stately’.  It’s remarkable, how so much beauty is hidden underneath the surface appearance and neglect of years.  Yet, as the vertical, flame grain cascades upwardly to the rim, if one looks closely at the rim, revealed there are the small bird’s eye grains formed by the cut cross-sections of the vertical grain.  I’m pleased with the small, seemingly insignificant internal lip patch to the rim – it blends well and joins the ensemble without notice.  With the bowl’s striking grain revealed, the oval shank now compliments well as it flows to the saddle stem.  I fear I’m waxing too much at this point!  Jim has the first opportunity to acquire this 1950s or 60’s Stanwell Henley Special from The Pipe Steward Store and this benefits the work we do here in Bulgaria with the Daughters of Bulgaria – women and girls who have been trafficked and sexually exploited.  Lest we forget, I begin with a ‘before’ picture for the striking contrast. Thanks for joining me!


Restoring Life to a Early 20th Century Gitana Depose Apple


Blog by Steve Laug

I was going through boxes of old pipes here, sorting and getting them ready to sell as grab bags. In the process I came across this pipe. It is stamped Gitana in an oval with an L on the left of the oval and G on the right side of the oval. Underneath the oval stamp is the word Depose. There is a polished aluminum band on the end of the shank. The briar is quite nice with birdseye around the bowl. The stem is horn and has a lot of tooth damage next to the button on both sides. There are deep troughs carved by the teeth in the horn material on both sides. The rim had a lot of damage from burn marks and the inner edge had been damaged by reaming with a knife. There was a white waxy substance on the inside of the bowl from the edge down about a ½ inch. There was a light cake in the bowl and some light lava on the bowl top. I took a close up photo of the rim top to show the damage to the inner edge of the bowl from the reaming job. The cake on the bowl sides and the tarry oil on the rim top are also visible. The briar at the top is quite damaged and will take some work to remove the knife cuts and deep gouges in the briar. The stem is also shown with the chewed damage on both sides.  I removed the stem from the shank and was a bit surprised by the aluminum system that was inside. The tenon was aluminum and had a bullet shaped cap on the end of it. The cap had a hole in the top that allowed the smoke to be drawn through the airway in the stem. The previous own had wrapped the aluminum portion of the tenon with what looked like aluminum foil to build it up to fit tightly in the shank. The photos below show the tenon and the system. I was unfamiliar with the brand and was surprised by the tenon system. I did some searching online and could find nothing on the Gitana brand or the Gitana Depose brand. I did happen across a similar pipe on Smokingpipes.com. The writer who described the pipe for the site wrote the following which contained some really helpful information. I quote:

We were able to ascertain a little information about La Gitana, which was a French brand created by Chapel Frés…but this relic from the early 20th century still sports its original horn stem, coupled with a novel aluminum tenon arrangement that we can only assume is meant to trap moisture. Although we aren’t sure how well it achieves this, it does do quite well at looking like an old-school James Bond accessory. It fits securely within a cork-lined mortise, which many briars of this period tended to have. https://www.smokingpipes.com/pipes/estate/france/moreinfo.cfm?product_id=196840

From that I learned that the brand was called La Gitana. It was a French made pipe from a company called Chapel Frés. It was made in the early 20th century and the author had described the tenon system like the one I had.  I also learned that the mortise had originally been cork lined to facilitate holding the tenon snuggly in the shank. This was what was missing in the pipe I had and it had been replaced with the foil mess that is seen in the above photos.

Armed with the name Chapel Frés I looked on Pipedia under French Pipe Companies and found the brand there. It stated that it came from that factory and the brand had been founded in 1904 in Saint-Claude, France. Here is the link https://pipedia.org/wiki/Chapel_Fr%C3%A9s.

Armed with that information I started my cleanup of the stem. I scraped away the foil that was wrapped around the tenon. I examined the bullet shaped cap on the tenon and figured out that it unscrewed from the tenon. I cleaned the metal underneath alcohol, cotton swabs, pipe cleaners and steel wool. I cleaned out the airway in the shank at the same time. The tube in the end of the tenon looked clean. I used alcohol, cotton swabs and pipe cleaners to clean out the inside of the bullet cap. I cleaned out the walls in the shank with pipe cleaners, cotton swabs and alcohol. It was a very dirty pipe that once it was clean had an interesting look to it. I cleaned up the inside of the bowl with a Savinelli Fitsall Pipe Knife. I scraped the walls clean of the carbon build up. I sanded the walls of the bowl with a piece of dowel wrapped with 220 grit sandpaper.To remove the damage on the rim top I topped the bowl until the damaged areas were removed and the rim top was clean. I used a folded piece of sandpaper to smooth out the inner edge of the rim and bring it back to round as much as I could. I washed down the exterior of the bowl with acetone on a cotton pad to remove the finish and the grim on the briar. The pipe looked really good at this point. I needed to round down the outer edges to bring it back to the shape it was when I started but for now it was clean. I took a photo of the stamping on the left side of the shank. The stamping is quite readable and clear.The tenon had some sticky substance for the glue on the foil on the tenon end. The tenon and threads still needed more cleaning to remove the oils.I filled in the tooth marks and troughs in the surface of the horn with clear super glue. I set the stem aside to dry.I decided to try to fit a cork in the shank to line it as suggested above. I cut away some of the excess cork from a wine cork I had. I trimmed it down with a Dremel and sanding drum until the diameter was close to the inside of the shank. I drilled it out with a series of drill bits starting small and working my way up to one that was close to the size of the tenon. I sanded down the cork exterior until it was a fit in the shank. I pressed it in place in the shank.I used a needle file to thin down the inner walls of the cork lining. It needed to be very thin to allow the tenon to fit in the shank. I tried to put the tenon in the shank. The fit was still not right. The cork was too thick to allow a fit. I pulled it out of the shank and slid it over the tenon. I sanded it down with sandpaper and files until it was a good fit. I glued the cork on the tenon and let it dry. When it cured I rubbed the cork down with Vaseline to soften it and allow it to slide into the shank. The fit was very good. I took some photos to show what the pipe looked like at this point in the restoration (I had also started the shaping on the bowl top). I polished the briar with micromesh sanding pads – wet sanding it with 1500-2400 grit pads and dry sanding with 3200-12000 grit pads. I wiped it down with a clean cloth after each pad. The grain began to pop and really stand out. Once the glue repairs cured I sanded them with 220 grit sandpaper to smooth out the repairs. I sanded them to blend them into the surface of the horn. I polished the stem with micromesh sanding pads – wet sanding with 1500-2400 and dry sanding them with 3200-12000 grit pads. I wiped the stem down with Obsidian Oil after each pad. I gave it a final coat and let it dry. The following photos show both sides of the stem. I worked Before & After Restoration Balm into the briar and the horn stem with my fingertips to clean, enliven and protect the wood and the horn. I let the balm sit for about 20 minutes and buffed it off with a soft cotton cloth. I took photos of the pipe at this point in the process to show what the bowl and stem looked like. I am happy with the look of the pipe. I polished the bowl and stem with Blue Diamond to polish out the scratches in the briar and horn. I gave the bowl and the stem multiple coats of carnauba wax. I buffed the pipe with a clean buffing pad to raise the shine. I hand buffed it with a microfiber cloth to deepen the shine. The pipe polished up pretty nicely. The original patina on the bowl came alive with the buffing and worked well with the polished striated horn stem. The pipe has a rich look. The finished pipe is shown in the photos below. The shape, finish and flow of the pipe and stem work give the pipe a very classic look. The dimensions of the pipe are Length: 5 1/2 inches, Height: 1 1/2 inches, Outside diameter of the bowl: 1 1/2 inches, Chamber diameter: 3/4 of an inch. Thanks for reading this while I worked on it. It was interesting and unusual piece to restore and I really enjoyed the work.

A Tiny 2 Star BBB 8881 Apple/Globe Provided An Interesting Challenge


Blog by Steve Laug

When I spoke with a fellow here in Vancouver who had a pipe that he wanted me to fix it sounded like a simple repair. He said that it had a very loosely fitting stem. He asked if he could drop by to show it to me and see if I could fix it. From past experience I have learned to never jump to conclusions about what sounded like an easy repair. When he arrived he showed me his GBD Faux Spigot. It turned out to need far more work than just tightening a loose stem. I wrote about that restoration in a previous blog (https://rebornpipes.com/2018/11/03/redoing-a-poorly-restored-ebay-gbd-super-q-9436/). We talked about his GBD for a bit and he made the decision to have me do a restoration on it. Then he reached into his pocket and pulled out a small plastic bag with a little BBB 2 Star apple of globe shaped pipe. It was stamped BBB in a diamond on the left side of the shank with two ** – one on either side of the diamond. ON the right side it was stamped Made in England over the shape number 8881. He said that he had found it at his parents’ house and really no one there knew where it came from.

Here is what I saw. Starting with externals. The pipe was small – kind of a pocket pipe. The grain on the bowl was quite stunning – a mix of flame and birdseye all around the bowl and shank. The rim top was coated with a thick lava coat and it went into the bowl. The inner edge of the bowl was in rough shape having been hacked clean with a knife. There was a crack on the right side of the shank curving to the underside. It looked to me it was made by the poorly made stem being shoved into the shank. The stem was larger in diameter than the shank and had been rounded over with a file. There were deep bite marks on the surface ahead of the button on both sides. Moving to the internals. The end of the tenon was carved with a knife to make it fit the mortise in the small shank. The inside of the shank was dirty but less so than I expected. The inside of the bowl had a light cake but most of that was gone from the knife job that had left a wounded inner edge on the rim. Looking at the pipe I explained what I would have to do to bring it back to life and restore it to use. It would need, cleaning, reshaping on the rim, a band on the cracked shank that would leave the stamping readable, and a reworking of the stem to make it a fitting addition to the lovely briar of the bowl. The pipe was going to be a fun challenge. I took these photos to give you an idea of what I saw. The previous pipeman who had fit a new stem to an old favourite pipe had done a functional job but it looked rough. It was pretty clean on the inside so it was cared for. It must have been a great smoking pipe for him to fit a new stem and not give up on it when the previous one broke or was lost. It was smokable. I took a close up photo of the rim top to show the condition. It is hard to see but the rim top was not smooth. The lava build up was pretty thick and there were some deep nicks and chips in the flat top. The close up photos of the stem reveal the scratches in the vulcanite, the tooth marks and the worn and ill-defined button.  The oversized diameter – prettified to look nice is clear in the photos. I took photos from the side of the pipe to show the stamping on the shank and the prettified stem. In the second photo you can see the crack in the shank curving downward to the underside.I decided to address the cracked shank first. With the crack as large as it was and movable I did not want to further damage it when I worked on the stem and fit of the tenon. I knew that it needed to be banded but that would cover the stamping on the shank so adjustments would have to be made. I used a Dremel and sanding drum to reduce the size of the shank to fit the band I had chosen. I did not take of too much briar and I only damaged the M in Made In England as part of it would end up being covered by the band.I repaired the crack in the shank with super glue and pressure fit the band onto the shank to the point of the end of the sanded portion. I used a Dremel and sanding drum to cut back the band to the width that I wanted. Compare the photos above with the one below to see how much I took off of the band. I topped the band on a topping board with 220 grit sandpaper and smooth out the sharp edge with 1500 grit micromesh. I decided that since I was already working with the Dremel and sanding drum that I would take down the excess diameter on the stem as well. I reduced it to sit snugly against the band giving the pipe a classy look.I cleaned up around the inside edge of the band and edge on the shank with a folded piece of 2220 grit sandpaper to smooth things out and make the fit and transition smooth. I lightly sanded the blade portion of the stem and the area of the tooth marks next to the button with 220 grit sandpaper to remove the oxidation and clean it up. I fit the stem in the shank and took a photo of the pipe at this point in the process. It was beginning to look like a classic BBB to my eye. With the stem roughly fit to the shank it was time to address the bowl top. I topped it on a topping board with 220 grit sandpaper. At that point I called it a night. I had to catch a train down to the southern part of Washington from Vancouver in the morning so I thought I would bag up a couple of pipes I was working on and take them with me.I caught the train south from Vancouver, BC at 6:30am. Once we had our seats we were in for an 8 hour train ride. I figure it would be a good opportunity to work on these two pipes. You can see my work table in the photo below. I used the fold down table. It had a lip around it so I spread out a couple of napkins for the dust and went to work on the pipes.I started working on the BBB by addressing the damage to the inner edge of the rim. It was significant with cuts and burns. My topping worked had helped with the top damage and smoothed that out but I need to work on the rim edge. I used a folded piece of 220 grit sandpaper to smooth out the sharp edges and bring the bowl back to round. Once I had the rim as round as I could get it and smoothed out the damaged edge I polished it with micromesh sanding pads. I polished the bowl and the rim at the same time. I wet sanded with 1500-2400 grit micromesh sanding pads and dry sanded with 3200-12000 grit pads. I wiped the bowl down with a damp napkin after each pad. I touched up the stain around the front of the band and stained the rim top and inner edge with Maple and Cherry stain pens. Together the two stains matched the rest of the bowl.I rubbed down the briar with Before & After Restoration Balm. I worked it into the smooth surface of the briar with my fingertips to clean, enliven and protect it. I let the balm sit for a little wall and then buffed with a cotton cloth to raise the shine. The following photos show the bowl at this point in the restoration process. The rim matches well but still needs to be polished and buffed to raise a shine on it. I used a folded piece of 220 grit sandpaper to reshape the button and also to smooth out the marks left by the Dremel when reducing the diameter of the stem. I sanded the tooth marks near the button on each side of the stem to smooth them out.I polished the stem, tenon and metal work with micromesh sanding pads – wet sanding with 1500-2400 and dry sanding with 3200-12000 grit pads. I wiped the stem down with Obsidian Oil after each sanding pad. I was able to remove the damage on the tenon and polish out the dripping varnish on the metal adornment. The stem looked much better at this point in the process. I the polished stem and bowl with Blue Diamond to polish out the remaining small scratches and raise the shine. I gave the bowl and the stem several coats of carnauba wax and buffed the pipe with a clean buffing pad to raise the shine. I hand buffed it with a microfiber cloth to deepen the shine. The pipe polished up pretty nicely. This turned out to be a beautiful little pocket pipe in terms of shape and finish. The new nickel band adds a touch of class in my opinion and gives the pipe a new elegance. I look forward to hearing what the fellow who dropped it off for repair thinks of it once he has it in hand and is smoking it. The finished pipe is shown in the photos below. The dimensions are Length: 4 inches, Height: 1 3/8 inches, Outside diameter of the bowl: 1 inch, Chamber diameter: 3/4 of an inch. Thanks for walking through the restoration with me.

RESTORING A BEN WADE “SPIRAL”


Blog by Paresh Deshpande

The third of the four freehand pipes purchased on eBay and currently on my work table is the BEN WADE “SPIRAL”. This is a huge sized pipe and fills the hand nicely with its size, weight and heft. I was attracted to this pipe because of its size and the unique spiraled shank. Another factor was the fact that my inherited collection had quite a few numbers of Danish pipes like the Stanwells, Amphoras, Kriswells and SONs. Thus, when I first saw the pipe on eBay, the name Ben Wade sounded so British and when I read the description and the stampings of Made In Denmark, I was immediately interested and intrigued at the same time!!! I got this pipe fairly cheap and the excellent condition it was in when it arrived, further sweetened the deal. This appears to be a simple and straight forward cleaning job from the looks of it.

The stummel shows a combination of sandblasted and smooth surfaces. It shows smooth surface on the left side extending 2/3 way down from rim top towards the heel of the bowl and on the right side it extends from the base of the bowl to 1/3 way upwards towards the rim top.The shank has beautiful and evenly spaced 5 spirals, first half from the bowl end is sandblasted while the remaining half towards the shank end is smooth and bears the stampings “Ben Wade” over “SPIRAL” over “SANDBLAST” over “HAND MADE” over “IN” over “DENMARK”. These stampings are seen in the first and third spiral of the shank. The stem bears the Ben Wade logo of the initials in capital letters ensconced within a crown on the top surface of the stem near the tenon end. All the stampings are clear and crisp. There is some very interesting history on Ben Wade pipes which I got from pipedia.org. Some interesting snippets of information are reproduced below:-

The company was founded by Benjamin Wade in 1860 in Leeds, Yorkshire, where it was located for over a century. Ben Wade started as a pipe trader, but  in the 1860’s he established a workshop to produce briar pipes. The pipes were made in very many standard shapes – always extensively classic and “very British”. Many models tended to be of smaller dimensions. Ben Wade offered a very high standard of craftsmanship and quality without any fills. Thus the pipes were considered to be high grade and a major competitor to other famous English brands.

In the second World War the factory was destroyed by German air raids on Leeds. But the Ben Wade family decided to re-build it immediately after the war and pipe production was re-started soon and successfully linked to the fame from the pre-war years.

Before the second war Ben Wade clustered their offerings into three price points: “Ben Wade” included the higher end pipes (eg the Larnix, Super Grain, Selected Grain, etc), “BW” included the mid-level pipes (eg Statesman, Natural Grain, County, etc), and “BWL” were the least expensive (eg Hurlingham, Adelphi, Tense Grain). Champion was in the last group, and in the 1930s at least retailed for 2/6.

Ben Wade turns Danish

Young Copenhagen master pipemaker Preben Holm had made a meteoric career heading a pipe manufacture employing 45 people at the age of 22! But around the turn of 1970/71 he was in major financial difficulties. His US distributor, Snug Harbour Ltd. in New York City, left him in the lurch. Holm had three unpaid invoices on his desk and another large shipment was ready for the USA, when Snug Harbour’s manager told him on the phone that there was no money at all on the account to pay him.

So the Dane went to New York for an almost desparate search for a new distribution partner. He made contacts with Lane Ltd. and met Herman G. Lane in February 1971. Lane Ltd. had no interest in Holm’s serial pipes produced at that time but so much the more in the hand-carved freehands because the hype for Danish freehands and fancies in the States was still on its way to the climax then. The meeting resulted in an agreement to start cooperation. Lane insisted to improve the quality considerably and in return he assured to be able to sell essentially larger quantities.

Holm went back home to work on new samples with all-new designs and altered finishes for Lane. Both, Lane and Holm, agreed that it would be unwise to sell the pipes under Preben Holm’s name as long as Snug Harbour had a considerable stock of Preben Holm pipes and might sell them pipes at very low prices just to bring in some money.

So on Mr. Lane’s proposal it was determined to use the name Ben Wade belonging to Lane Ltd. Lane spend considerable amounts of money for advertising the new brand in the big magazines– the centerpiece being whole-page ads showing a very exclusive Seven Day’s Set.

The cooperation with Lane Ltd. proved to be an eminent business success for both partners. Within a very short time Ben Wade Handmade Denmark sold in much larger quantities and at higher prices than they had ever dreamed of. And the hype these freehands and fancy pipes caused went on unbroken long after Herman G. Lane deceased. Preben Holm – obviously much more brilliant in pipe making than in pipe business – was in major troubles again in 1986 and had to sack most of his staff. The Ben Wade production was significantly lowered but continued until his untimely death in June of 1989. Up to now Preben Holm made Ben Wade pipes are cult and highly sought for on the estate markets.

From the above information, I can say with some certainty that this line of pipes was made between the years 1971 to 1986.

INITIAL VISUAL INSPECTION
This Ben Wade has a huge size and fills the hand nicely and has a combination of smooth and sandblasted surfaces. The sandblasted areas are filled with dust and grime which can be easily seen in the crevices of the blast. The smooth surface is also covered in the tobacco oils and oils secreted by sweating palms giving it a dull and lackluster appearance. There are no blemishes in the briar of the stummel or the shank that can be seen. I surmise that a nice scrub with Murphy’s oil soap and a hard bristled toothbrush should suffice to clean the stummel and the shank. The rim top is sandblasted and is covered in overflow of lava, tars and grime. There is no apparent damage to the inner and outer edge of the rim that can be seen, like a charred rim or an out of round bowl or chips and dents. However, the condition will be ascertained once the chamber has been reamed and the overflow of lava is removed from the rim surface. The chamber shows uneven cake build up with a thicker build up at the bottom and progressively reducing towards the rim top. The condition of the walls will be ascertained once the chamber has been reamed and the cake has been taken down to the bare briar. However, the stummel feels solid to the touch with no soft briar anywhere which is indicative of the likelihood of a burnout or major heat fissures.The beautiful and unique spiral shank has crisp edges to the spirals and just needs to be cleaned for the straight grains to pop out in their complete splendor. The plateau shank end is filled with dirt, grime and will need to be cleaned. The airway in the shank shows a blockage during the blow test and should be an easy clean up.The high quality vulcanite fancy stem is oxidized and the “BW WITH CROWN” logo appears faded as it is covered in oxidation. This needs to be addressed and the preservation of the stem logo attempted.Deeper tooth chatter peppers both the upper and lower surfaces of the stem. However, the bite marks are more pronounced and numerous on the lower surface. I shall try to raise these to the surface by flaming with Bic lighter and the deeper ones will be filled with CA superglue. Buttons show light deformation due to bite marks and will need to be sharpened. It is interesting to observe that these tooth indentations are slightly more forward towards the tenon end rather than the button end!!! Probably, the huge size and the front heavy bowl necessitate clenching it forward for better balance.THE PROCESS
I started the restoration process by reaming the chamber with a Kleen Reem pipe reamer followed by scrapping the remaining cake from the chamber with my fabricated knife. The cake was hard and dry. I further removed the cake using a 220 grit sand paper and sanded the walls till the solid bare briar was reached. I wiped down the interiors of the chamber with a cotton swab dipped in alcohol to clean the chamber of all the carbon dust and inspect the inner wall condition. And there it was, a sight which every restorer, experienced or a novice silently prays is not seen…… the beginnings of a crack/ heat fissures!!!!! The following pictures show the extent of these fissures. I shall address this issue later after I have cleaned the stummel and the stem, both internally and externally. This was followed by cleaning the internals of the shank and the airway. I attempted to insert a hard bristled pipe cleaner dipped in isopropyl alcohol through the airway in the shank and realized that there was no give for the pipe cleaner half way through the mortise. The blockage called for a more aggressive method of cleaning!!! Using a fabricated (again…. I have modified and fabricated a number of tools which I find useful in my restoration processes as the sophisticated and designated tools are not easily available to me and those available are too expensive!!!) Dental spatula, I scraped all the grunge, oils and tars from the mortise. However, a pipe cleaner would still not pass through!! I shone a torch light in to the chamber and looking through the shank, I realized that the blockage was nearer to the draught hole as the light did not pass through. I addressed this issue by inserting a rounded needle file and dislodging the blockage. I further scrubbed the walls of the draught hole and the mortise with the rounded needle file. Once I was satisfied with the filing, I thoroughly cleaned the mortise and the airway using a shank brush, q-tips and pipe cleaners, all dipped in isopropyl alcohol, till the pipe cleaners and q-tips came out clean. I checked the draw and it was nice, smooth and full. With the insides of the stummel and shank cleaned and freshened up, I turned my attention to the exterior of the bowl. Using Murphy’s oil soap and a toothbrush, I cleaned the exterior of the bowl. I gave a very deliberate scrub to the bowl and into the rustications to remove all the dust, dirt and grime that had accumulated over the years. I purposefully avoided brass brush/ steel wool while cleaning so as not to damage the sandblast. Once the cleaning with the oil soap was done, I rinsed it under running tap water and wiped it dry with a soft cotton cloth. I took care that the water does not enter into the chamber and the shank. I wiped and dried the stummel with a paper napkin and a soft cotton cloth. The bowl now has a nice, beautiful, clean and robust look to it. I kept the bowl aside to dry out and turned my attention to the stem. Turning my attention to the stem, I cleaned the stem surface with Magic Clean sponge and followed it up by flaming the surface of the stem with the flame of a Bic lighter to raise the minor tooth chatter and bite marks to the surface. This was followed by the sanding with a 220 grit sand paper. This serves two purposes; firstly, it reduces the size of the fills as well as evens out the surface of the stem for the fill and secondly, it has been my experience that if the stem oxidation is removed before the fill, the end result is a nice black and shining finish and not the dirty brown spots wherever the stem has been filled. I followed it up with sanding the stem surface with a 600 grit sand paper. I spot filled the deeper bite marks with clear CA superglue and set it aside to cure overnight. I had covered the stem logo with a whitener in order to highlight the stem logo. The extent of highlight will depend on the depth remaining in the stamping. While the fills in the stem were curing, I decided to address the beginnings of the very minor issues of heat fissures in the chamber. I mixed an adequate quantity of pipe ash, activated charcoal with yogurt to form a thick slurry and applied it as evenly as possible all along the inner walls of the chamber. This too, was set aside to cure/ dry along with the stem.  The next day, once I was satisfied with the cure, using a flat head needle file, I sanded the fill to match it with the stem surface and also to sharpen the edges of the buttons on either surface. I further matched the fills and sharpened the buttons by sanding with 220, 600 and 800 grit sand paper. The stem was polished with micromesh pads, wet sanding with 1500 to 2400 grit pads followed by dry sanding with 3200 to 12000 grit pads. I rubbed a little extra virgin olive oil with my fingers in to the stem. After I was through with the last grit pad, I gave a final rub of extra virgin olive oil and set it aside to be absorbed by the stem. It had taken a couple of days for the coating of pipe mud to completely cure and dry out. I very lightly sanded the chamber coating with a 600 grit sand paper to even and smooth out the surface of the chamber.Once I was done with the chamber, I gave the external surface of the stummel a good clean up with a dry soft cloth to remove any dust/dirt that might have settled on the bowl overnight. Thereafter, I rubbed a small quantity of “Before and After Restoration Balm” into the bowl ensuring that it reaches the rustication also. I am truly amazed at the spread of this balm!  Just a small quantity quickly spreads and is sufficient to coat the entire bowl when rubbed with the fingers. The product was further rubbed into the rustication when buffed, using a horsehair shoe brush. I let it rest for a few minutes to let the balm work its magic on the briar. The transformation is amazing!! Once this was done, it was back to using muscle power to enhance the shine and beauty of the sandblast and the smooth surfaces by prolonged rubbing with a soft cloth followed by a microfiber cloth. I finished the pipe restoration by attaching the stem with the stummel and giving it a nice rub with a microfiber cloth. The pipe now has a nice and deep shine to it. The finished pipe is shown below. Thank you for sparing your valuable time in going through this write up.

Reworking a Chewed Savinelli Alligator Stem


I picked up this Savinelli Alligator from a life-long friend some time back, along with a meerschaum pipe. They both needed a good cleaning but they also needed major stem repair. My friend is a clencher, an understatement, to be sure, and had bitten through both stems. When I saw the pipes I asked him if an alligator had been smoking the Alligator! I have lost the “before” pictures on this one so I’ll have to describe the condition it was presented to me in.

I’ve found that pipes with green stain don’t seem to fair very well; all of them loose their color in my experience. This Alligator was no exception; it was a grimy natural color with only a hint of green in the rustication. The bowl was heavily caked with a crumbly vanilla cake and an overflow of lava on the rim. I did the normal clean up routine on it to get it ready for cosmetic work and stem repair.

The stem, as the photos show, had a sizable chunk missing. I had a few options that I considered. I thought about replacing the stem but that would mean sacrificing the original. It also was not an easy task to find a green lucite swirl that matched and was the right dimensions. I thought about trying to rebuild the end of the stem. I even ordered some epoxy pigment to color-match the repair. But it would be a huge repair and I wasn’t sure it would hold up.

After weighing my options I decided to cut off the damaged end, saving as much length as possible and cutting a new button. I used a Dremel cutoff wheel at 15k RMP to remove the end. I used a combination of files to thin and reshape the stem, cutting a new button in the process.

Once the button and stem were shaped to my satisfaction I began sanding and polishing it with wet/dry paper (220-grit) and the full range of micro mesh. I then polished the stem with Meguir’s ScratchX 2.0. The stem looked good; time for the stummel.

I cleaned the stummel with alcohol on a cotton pad to remove the left over grime and oils. Then I applied a couple of coats of Fiebimg’s green leather dye, making sure I had a nice even coat. I buffed the pipe with white diamond to remove the extra dye and set up the shine on the wood and stem. I then gave the pipe several coats of carnauba wax and a hand buff with a micro fiber cloth.

The Alligator still has some battle scars but my buddy can smoke it once again. Our local university’s colors are green and white, the reason he bought a green pipe. I’m happy to say his Marshall University Pipe will ready for service come Homecoming game day.

The Resurrection Special: Part 1


A few years back there was a thread on Pipes Magazine’s repair and restoration forum about three lots of pipes a member was giving away. The first lot was a very easy “beginner” lot, the second was slightly more challenging, and the last was called The Resurrection Special and had the most challenges. No information was given about the pipes or (as far as I recall) their issues.

The first two lots were spoken for fairly quickly but the third sat there, unloved, for a little while. After looking at the post for as long as I could stand I sent a PM to the original poster and said “I’ll bite; send them my way and I’ll see what I can do”.

When the long, medium sized box arrived on my doorstep I was excited to see what I had gotten myself into. I took them straight to the kitchen table (my wife wasn’t home so I could do that lol) and cut open the box. The contents were carefully packed in newspaper which held three bubble wrapped pipes. I was like a kid on Christmas morning getting ready to open each one!

The first pipe I opened was a lovely old Tracey Mincer Bulldog -type shape. I had seen photos of and read about Mincer’s different pipes but had never held or owned one yet.

The second pipe turned out to be a Peterson System pipe, my first both of this historic marquee and type. It was hallmarked 1973 and looked every day of it. I was a little intimidated by the work this one would take.

As I unwrapped the third pipe my mind was still on the Peterson and what a great pipe I hoped it would be after a lot of work went into it. The last pipe was just over medium in size I noted as the bubble wrap was peeled away. A silver band was the first thing to catch my attention, looking at the pipe upside down when it was finally out of its protective shroud.

I rolled the pipe over to look for it’s stamping. That’s when I saw it: A White Dot in the stem! “Surely not”, I thought to myself, “this can’t be a Dunhill, can it?” The nomenclature was very worn but readable enough to see it was a Dunhill. I immediately went to get my loupe to see what year the pipe was made, if possible. Looking it over under magnification I found two things I’d not yet seen: enough stamping to date the pipe and that the silver band was a repair for a cracked shank.

The discovery of the crack slowed me down a bit. I went to get a flashlight to inspect the pipe closer. The crack seemed to be well repaired with the band; that was a good find. But looking at the bowl I realized there was a pretty big crack in it, too. So much for my bit of relief … I decided to check the year of the pipe’s manufacture and leave the repair thoughts aside for now.

After a quick internet search I came up with a link to a Dunhill dating chart on Pipephil’s site. It took only a moment or so to find the results but it took a bit longer for the results to sink in. If I was reading everything right, this pipe dated to 1968, which is my birth year! I was giddy as a schoolgirl at this moment… and nervous as a cat at the same time.

At this point I had not worked on any pipe as (potentially) valuable as these. I also hadn’t tried to undertake any repairs as extensive as these looked to be. After a lot of debate, I finally decided to put the lot away until I’d tackled a few more repairs and had more experience under my belt and tools in my arsenal. Over time as I repaired and restored more pipes I began to raise my confidence levels. Each project I completed had as the goal getting me ready for the Resurrection Special lot.

About when I felt it was time to take on these challenges life threw a few curveballs at me, personal issues that put most of my hobby time on hold. Fast-forward a few years, it’s time to get to the Resurrection Special lot.

Looking more closely at the pipe when I unpacked it again I saw that much of my past inspection was correct: the shank repair and band were tight and holding well with no “feel” when I rubbed a fingernail over it, the pipe did date to 1968 as I thought, and the bowl would need work, though not as much as I thought. The pipe was very dirty, the rim being covered in a thick layer of lava. The stem had a little oxidation and some tooth dents. The silver band was tarnished.

I began with the rim; I had no idea of it’s condition under the lava and I wanted to see what I was dealing with. I used alcohol dipped cotton swabs to begin breaking down the thick layer. Once it was softened up some I used a knife-blade wax carving tool to scrape away the gunk. The rim was damaged under the lava, as I expected it to be; it would need to be topped. I decided here that I would take off as little wood as possible when I topped the bowl since I wanted to keep the shape as true as possible. I also decided that this wouldn’t be an attempt to make the pipe perfect; it (like me) had battle the scars of it’s life and I wanted to retain that character, too.

The bowl had been reamed before I received the pipe, most likely when the issue was discovered. What I had thought was a crack actually was heat fissures; they didn’t go all the way through the bowl. The outside of the bowl did have what appeared to be burns though; more on these in a bit.

I had read how Charles Lemon of Dad’s Pipes had done several successful bowl repairs with JBWeld and his own bowl coating. I messaged Charles and also looked up his article on bowl coating to try it myself. The recipe is simple: coat the bowl with maple syrup, fill it with activated charcoal powder, and wait for it to dry. (Actually there are a couple more steps, like putting a pipe cleaner in the stem, so make sure you read Charles’ article if you’re interested in trying this method.)

I mixed up some JBWeld and coated the area where the fissures were, using a toothpick to push the epoxy back into the cracks, after inserting a pipe cleaner in the shank through the air hole to keep it open. I used a pipe cleaner and my finger to smooth the repair out as well as I could. Then I sprinkled some activated charcoal powder on the wet repair and set the bowl aside for the epoxy to cure until the next day.

After the repair was dry I sanded it a little smoother with 220-grit paper. Unfortunately this took out most of the carbon I had applied so the full bowl coating would have to be done. But I waited until after all the work was completed to do that. I also topped the bowl to remove most of the rim damage using 220-grit paper.

While the bowl repair was curing I worked on the stem. I started with painting the stem with a Bic lighter to raise the dents as much as possible. 
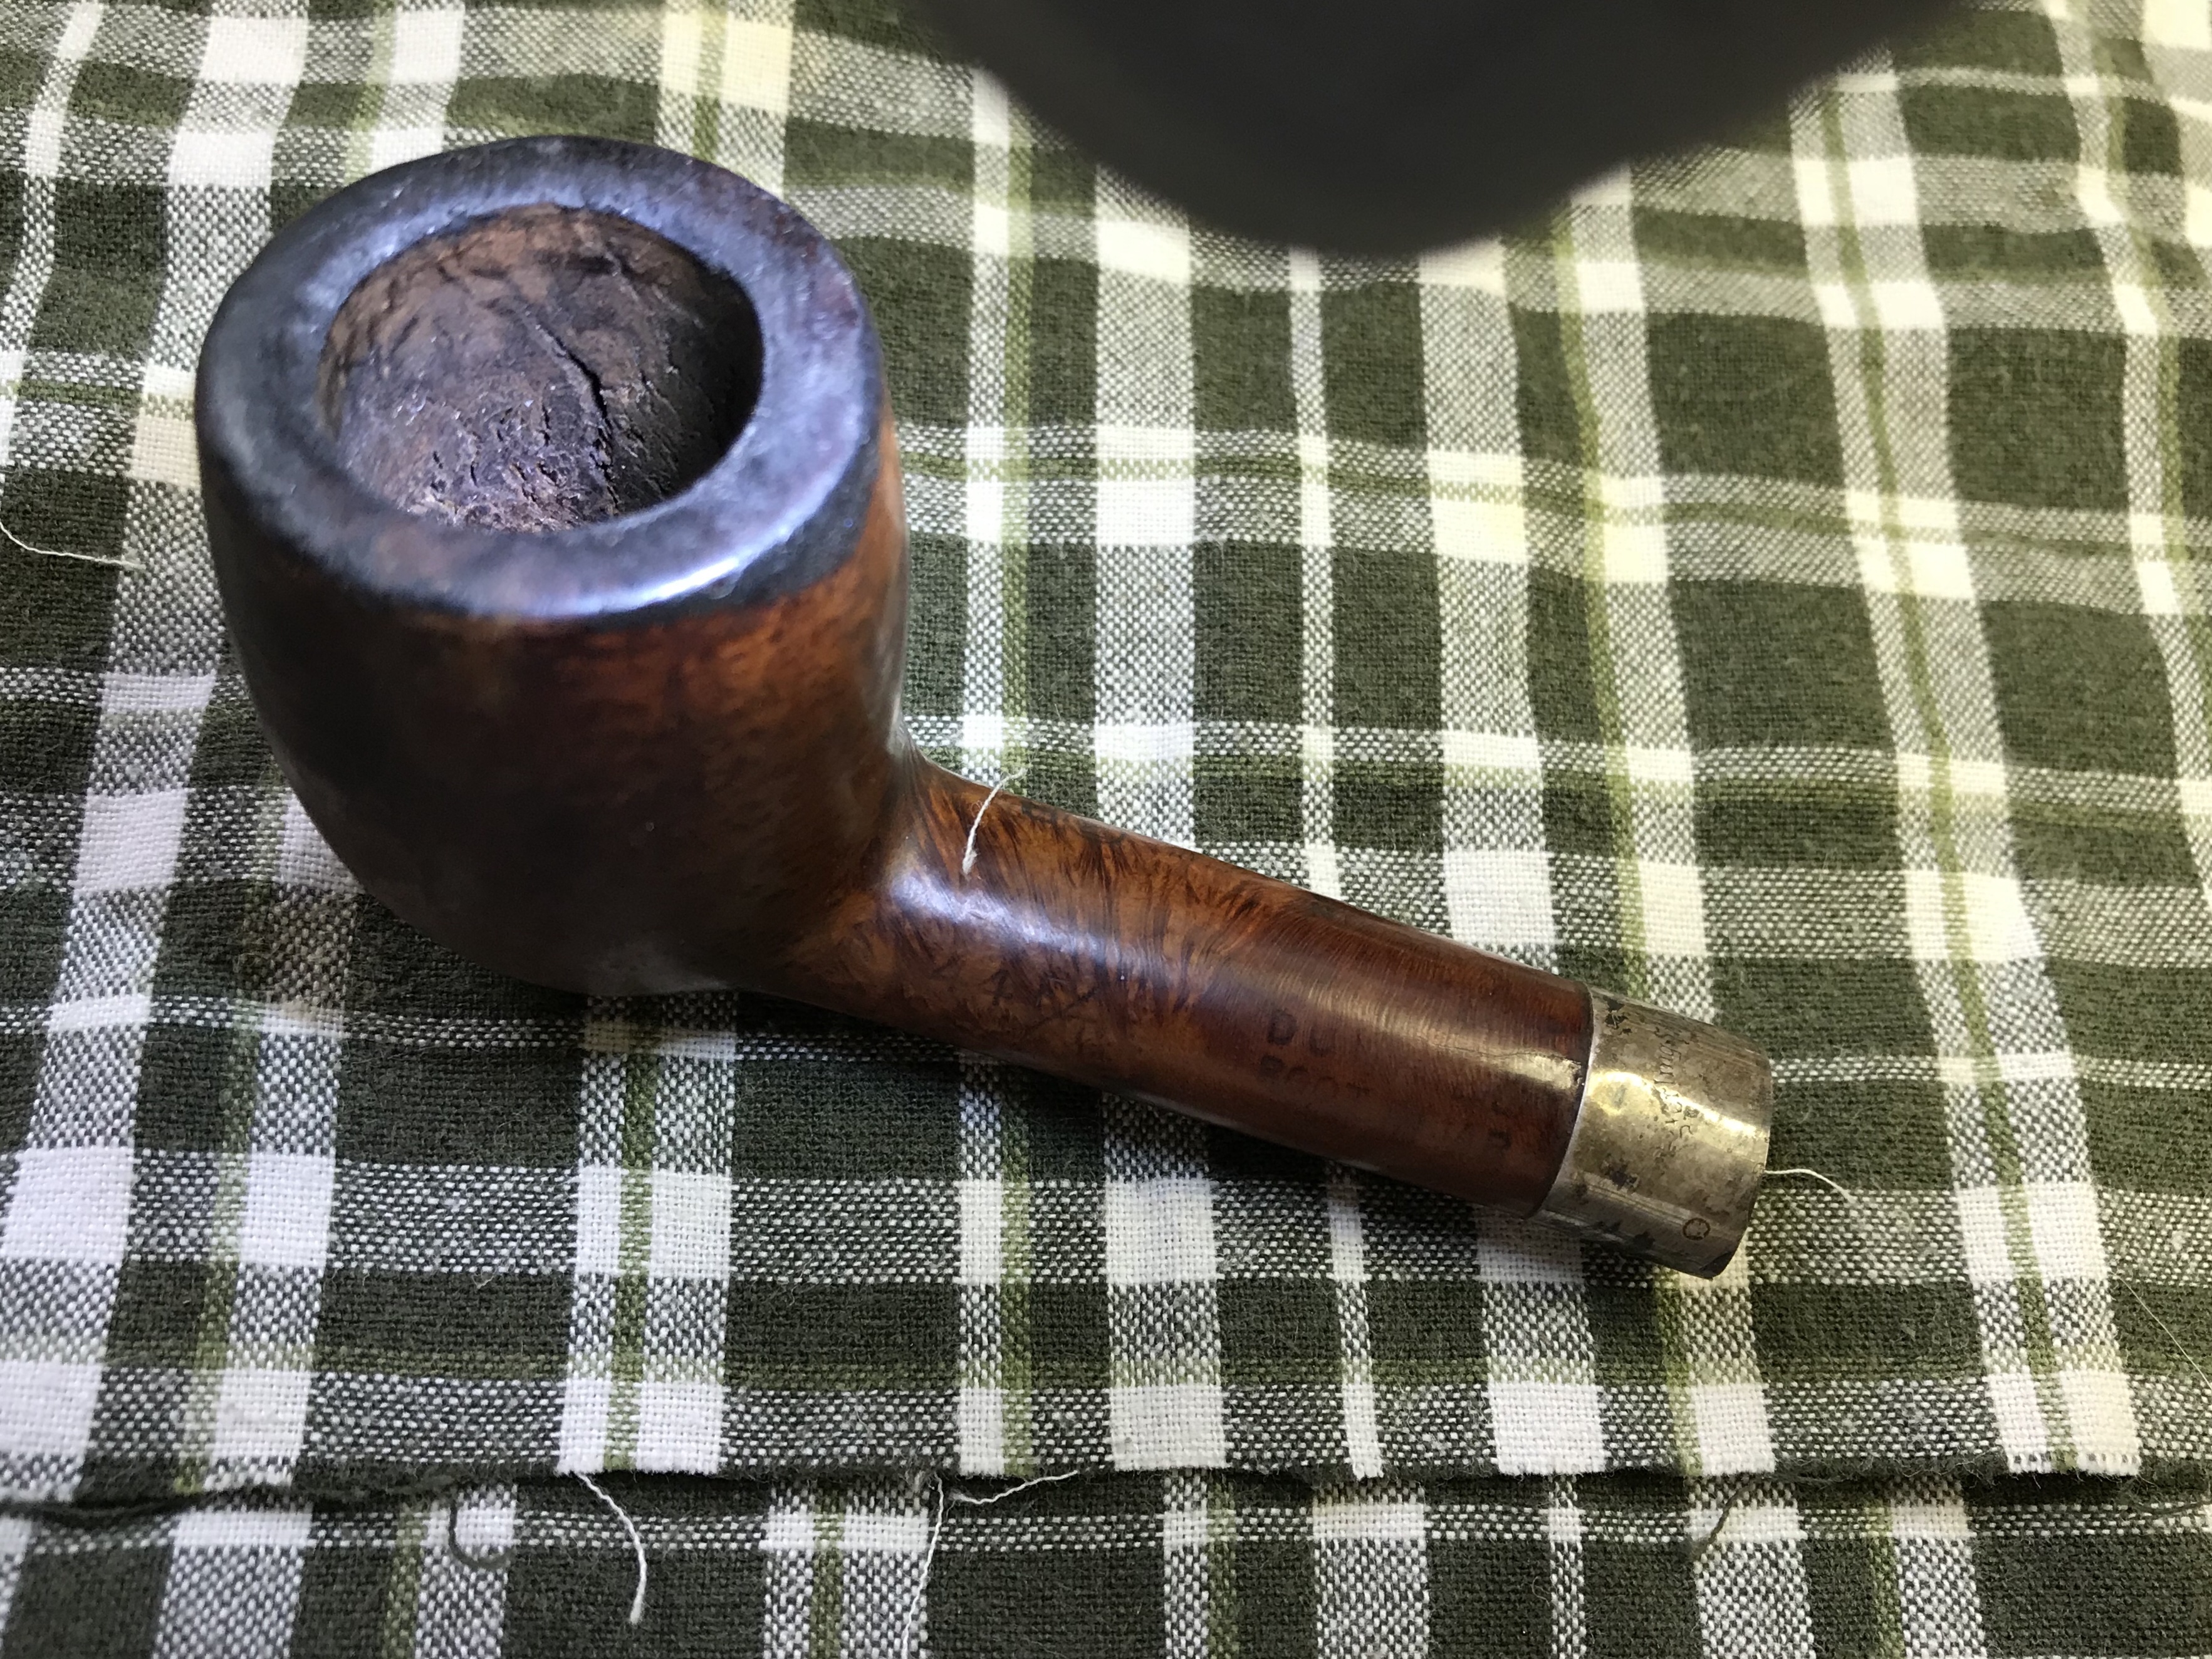
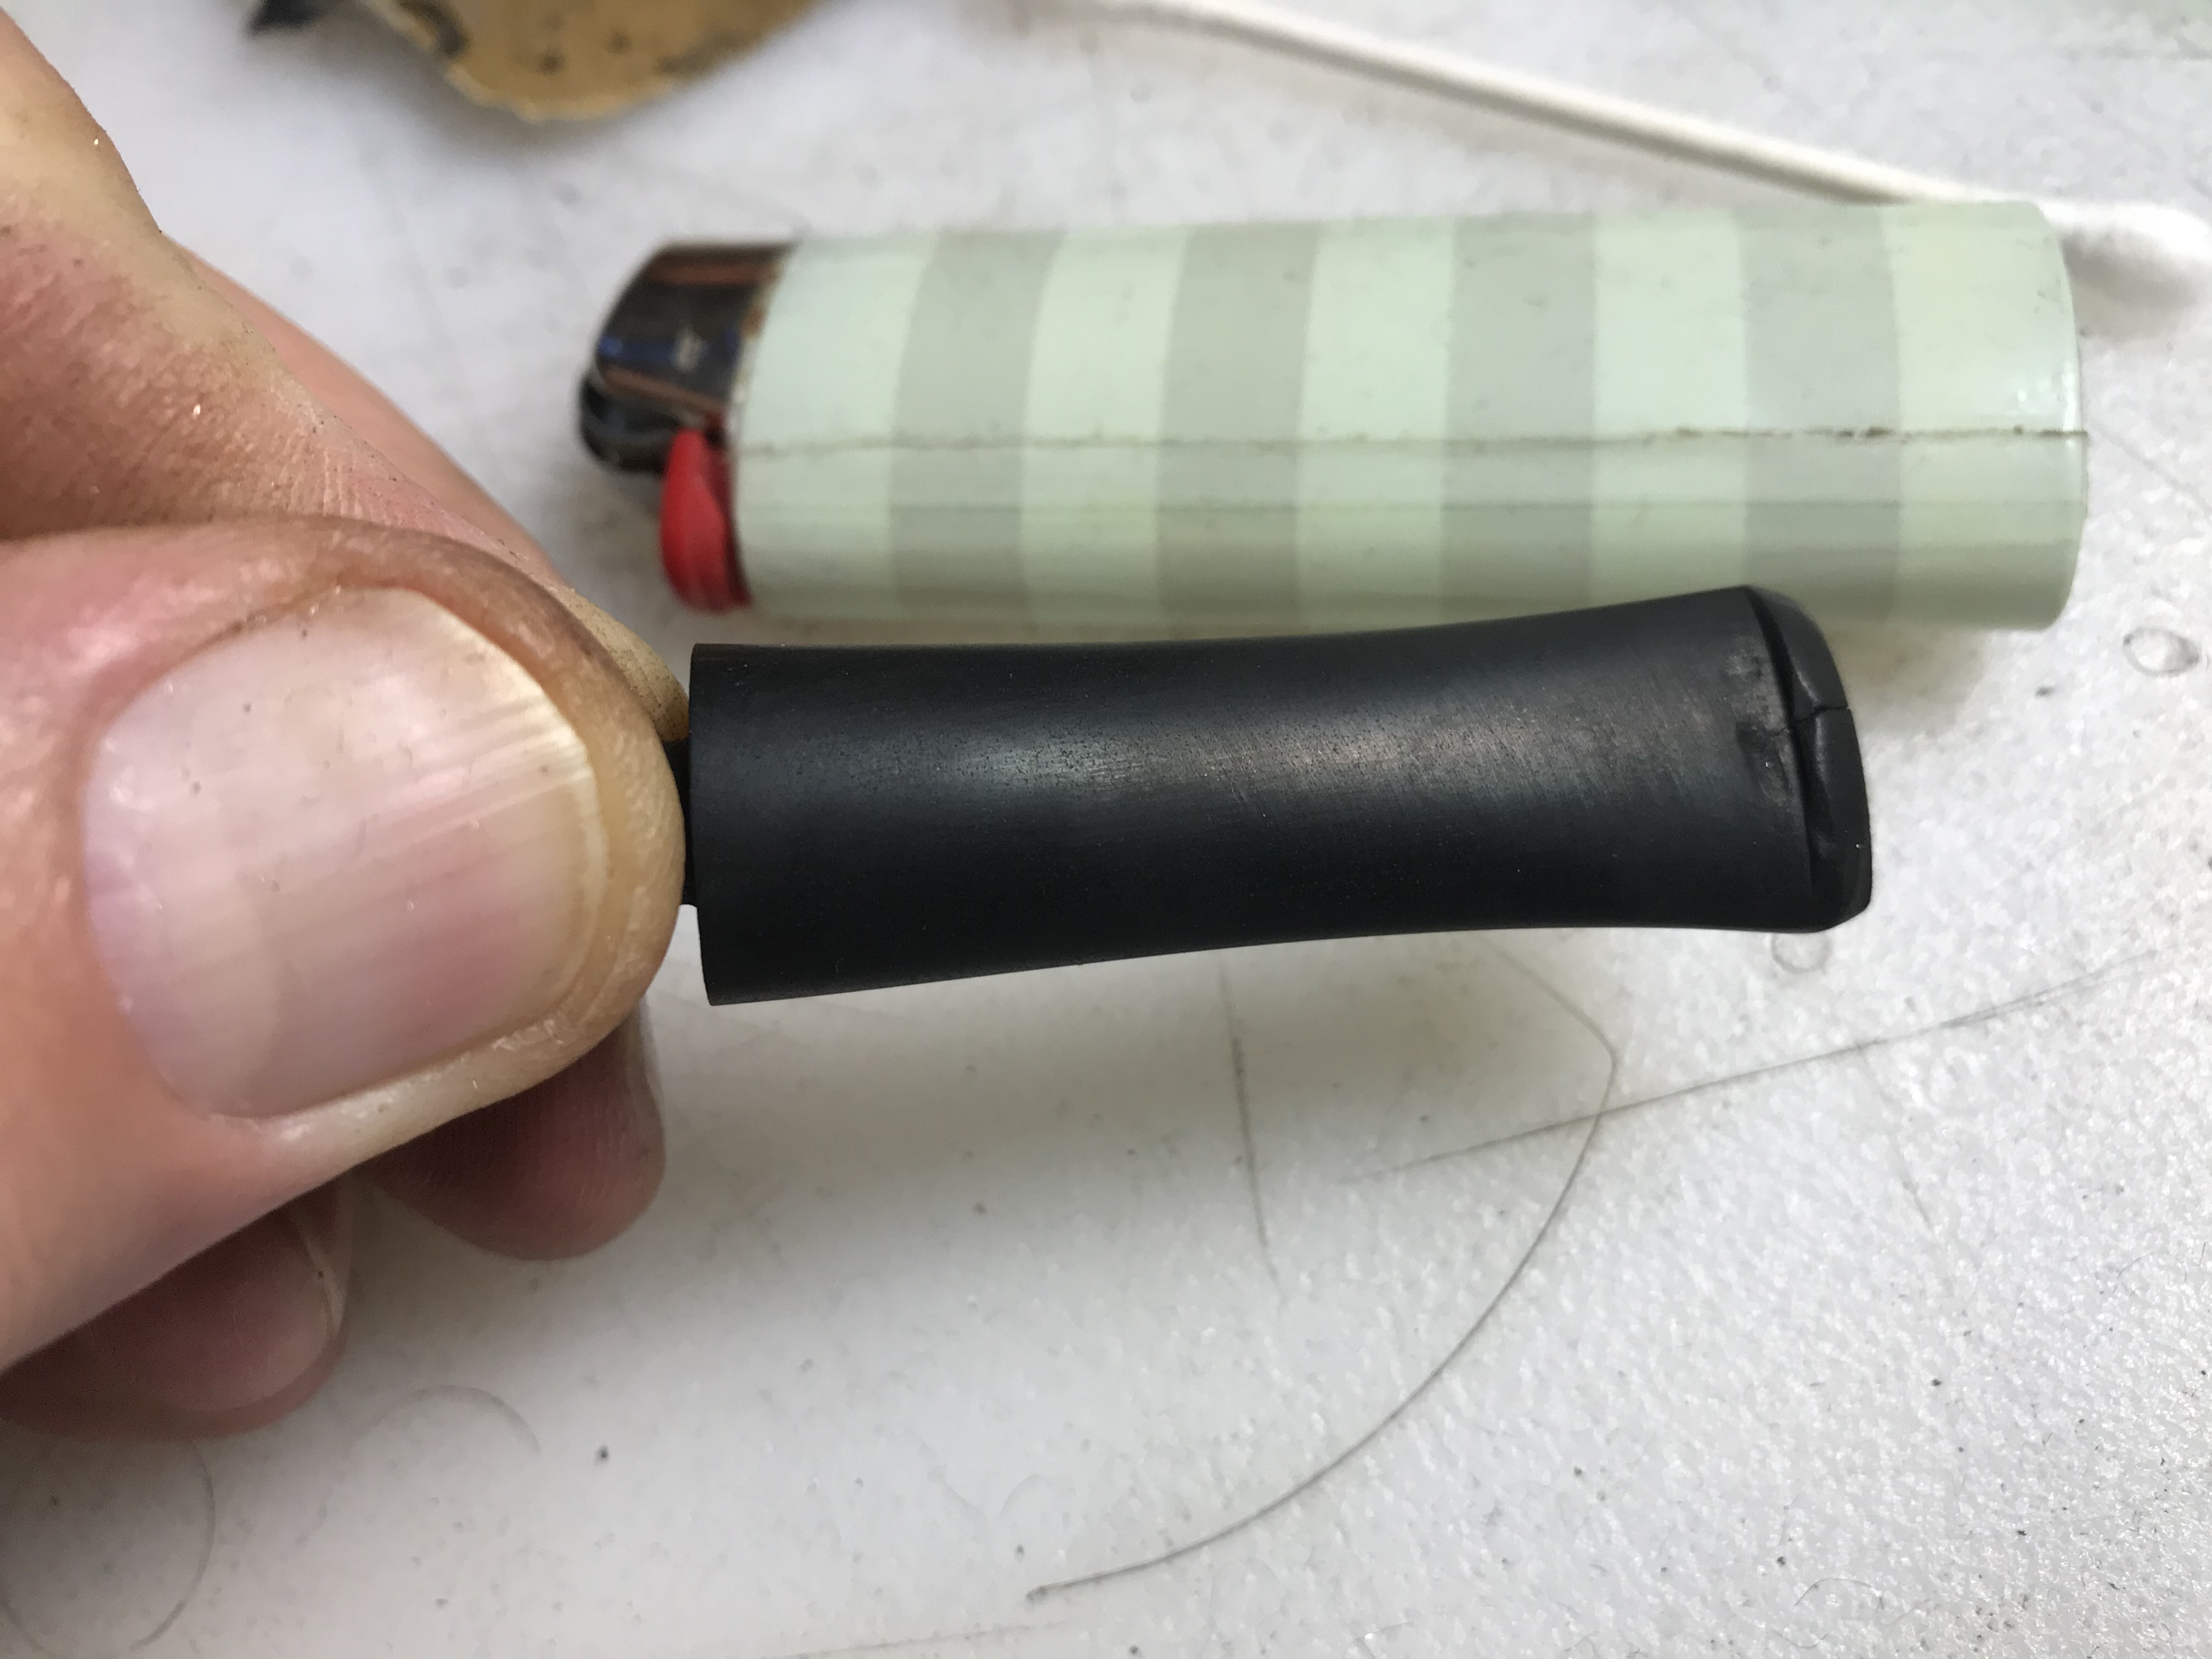
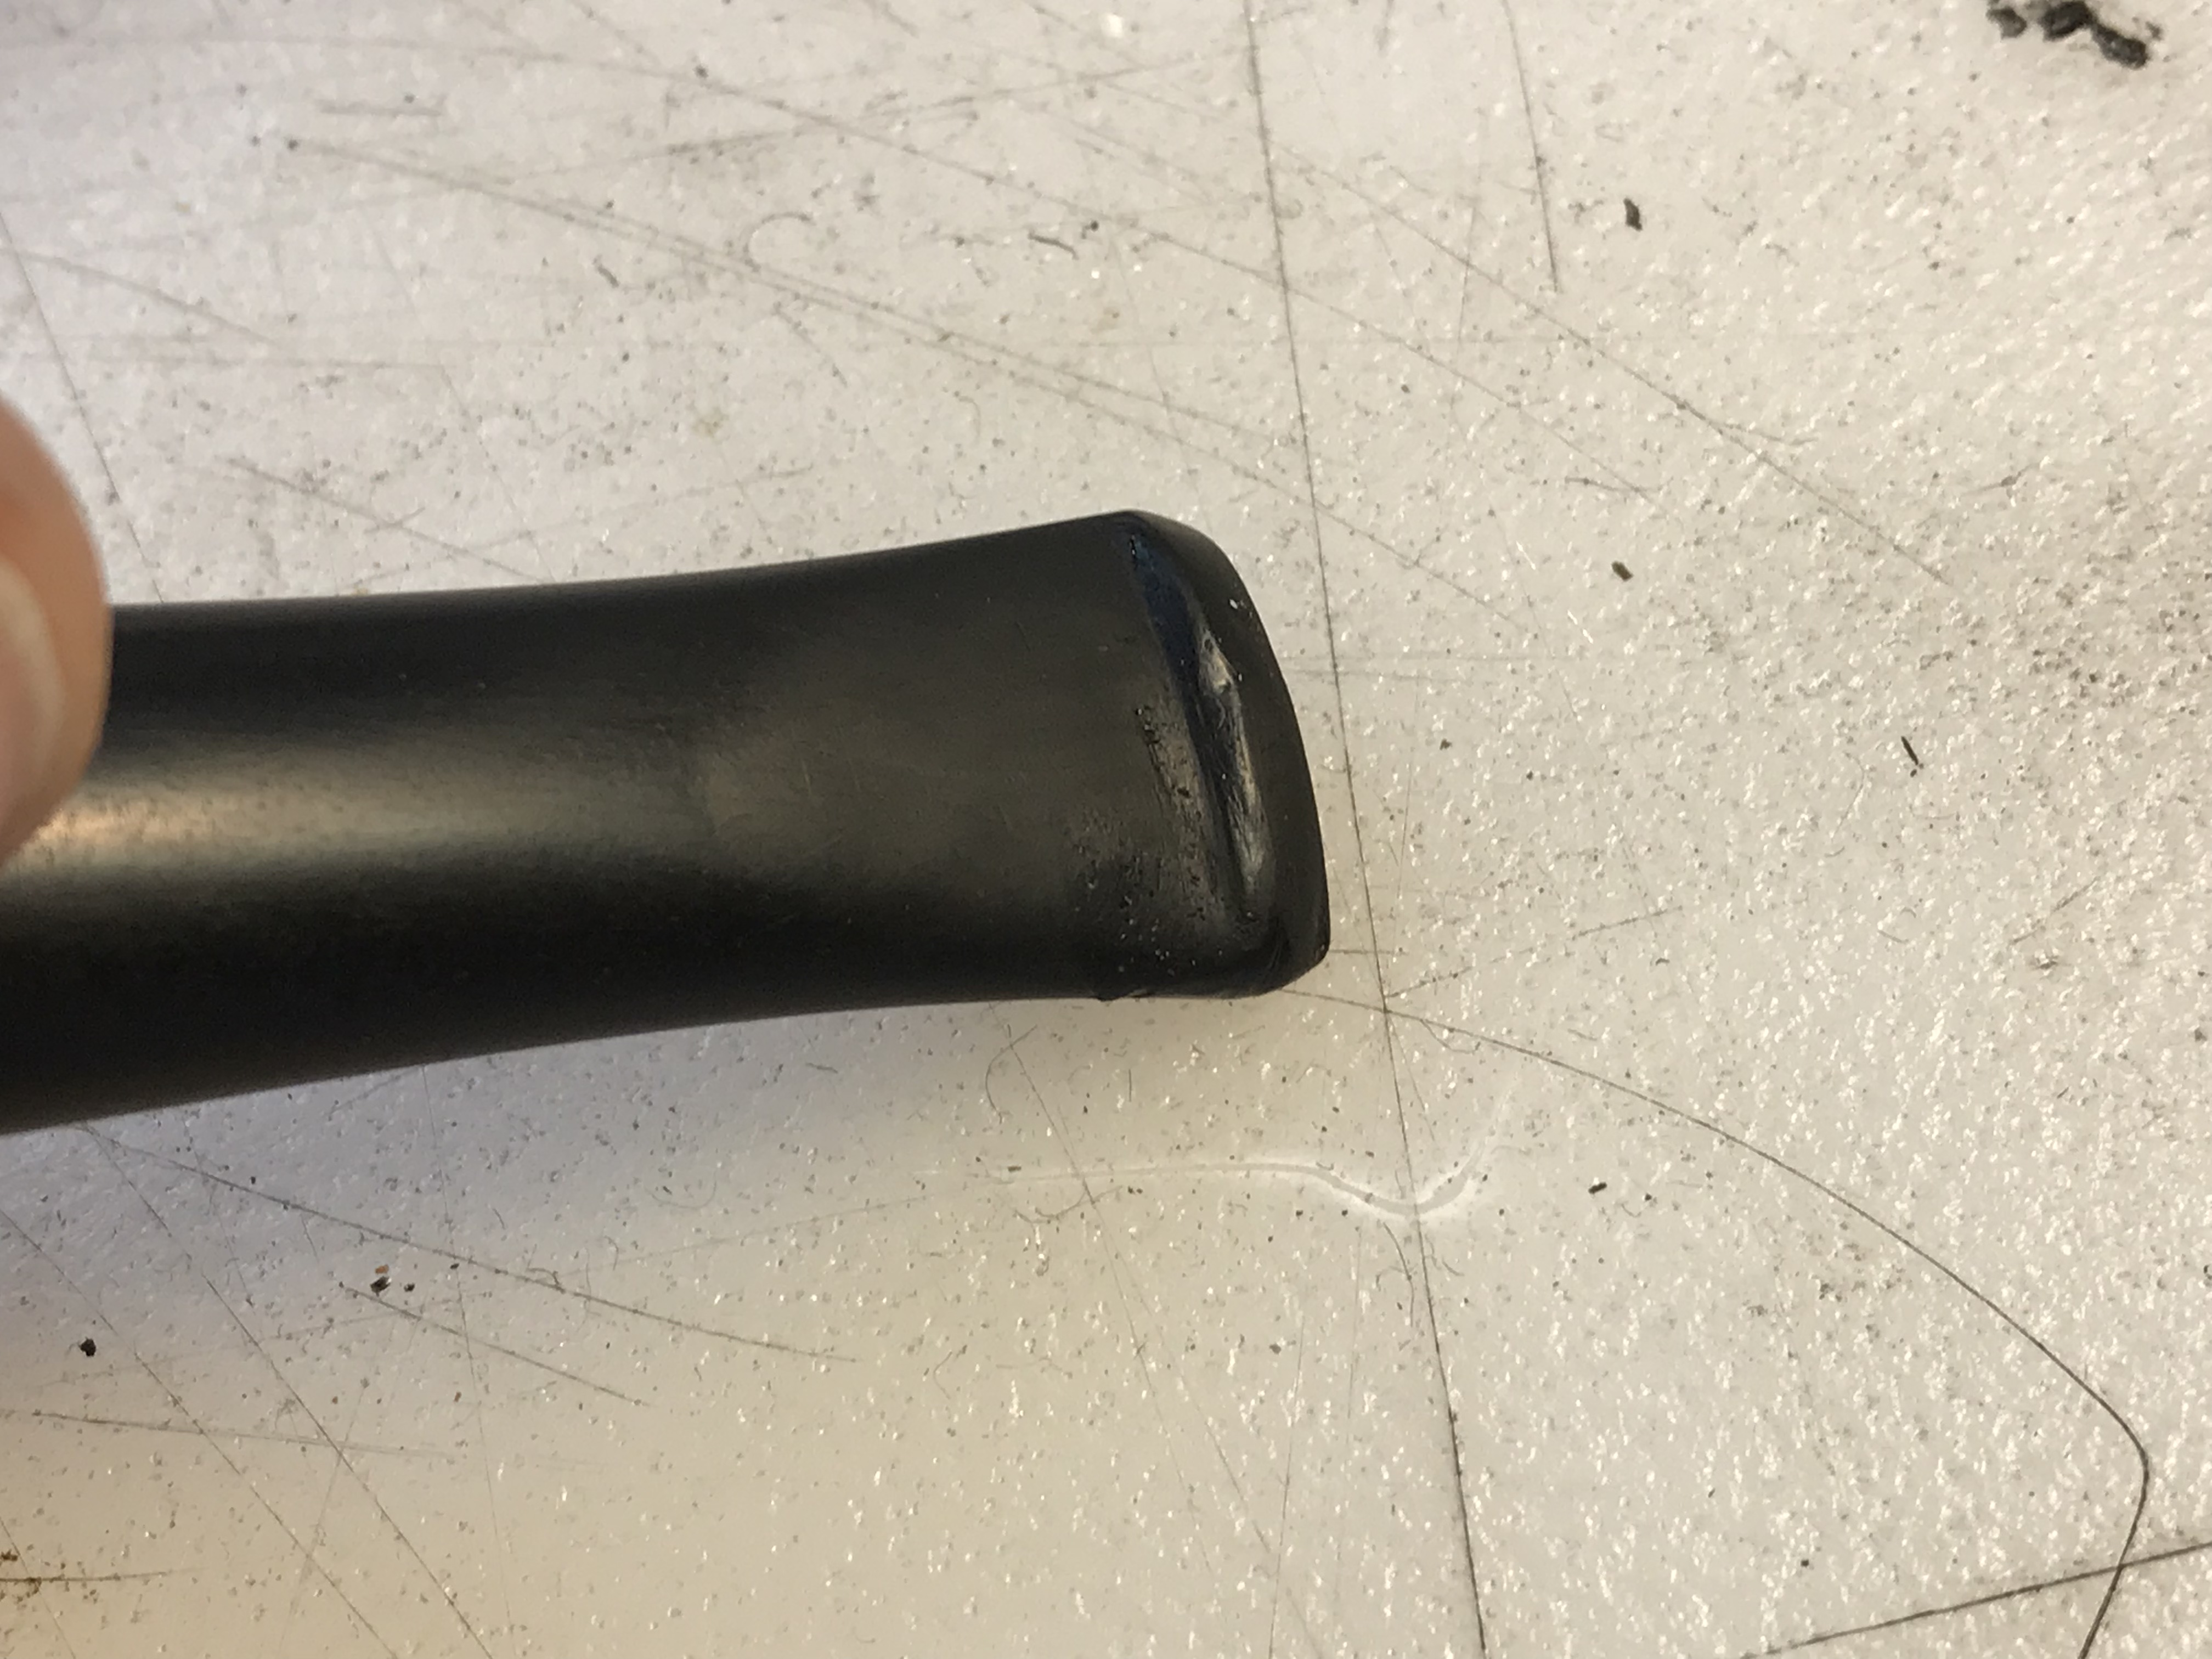
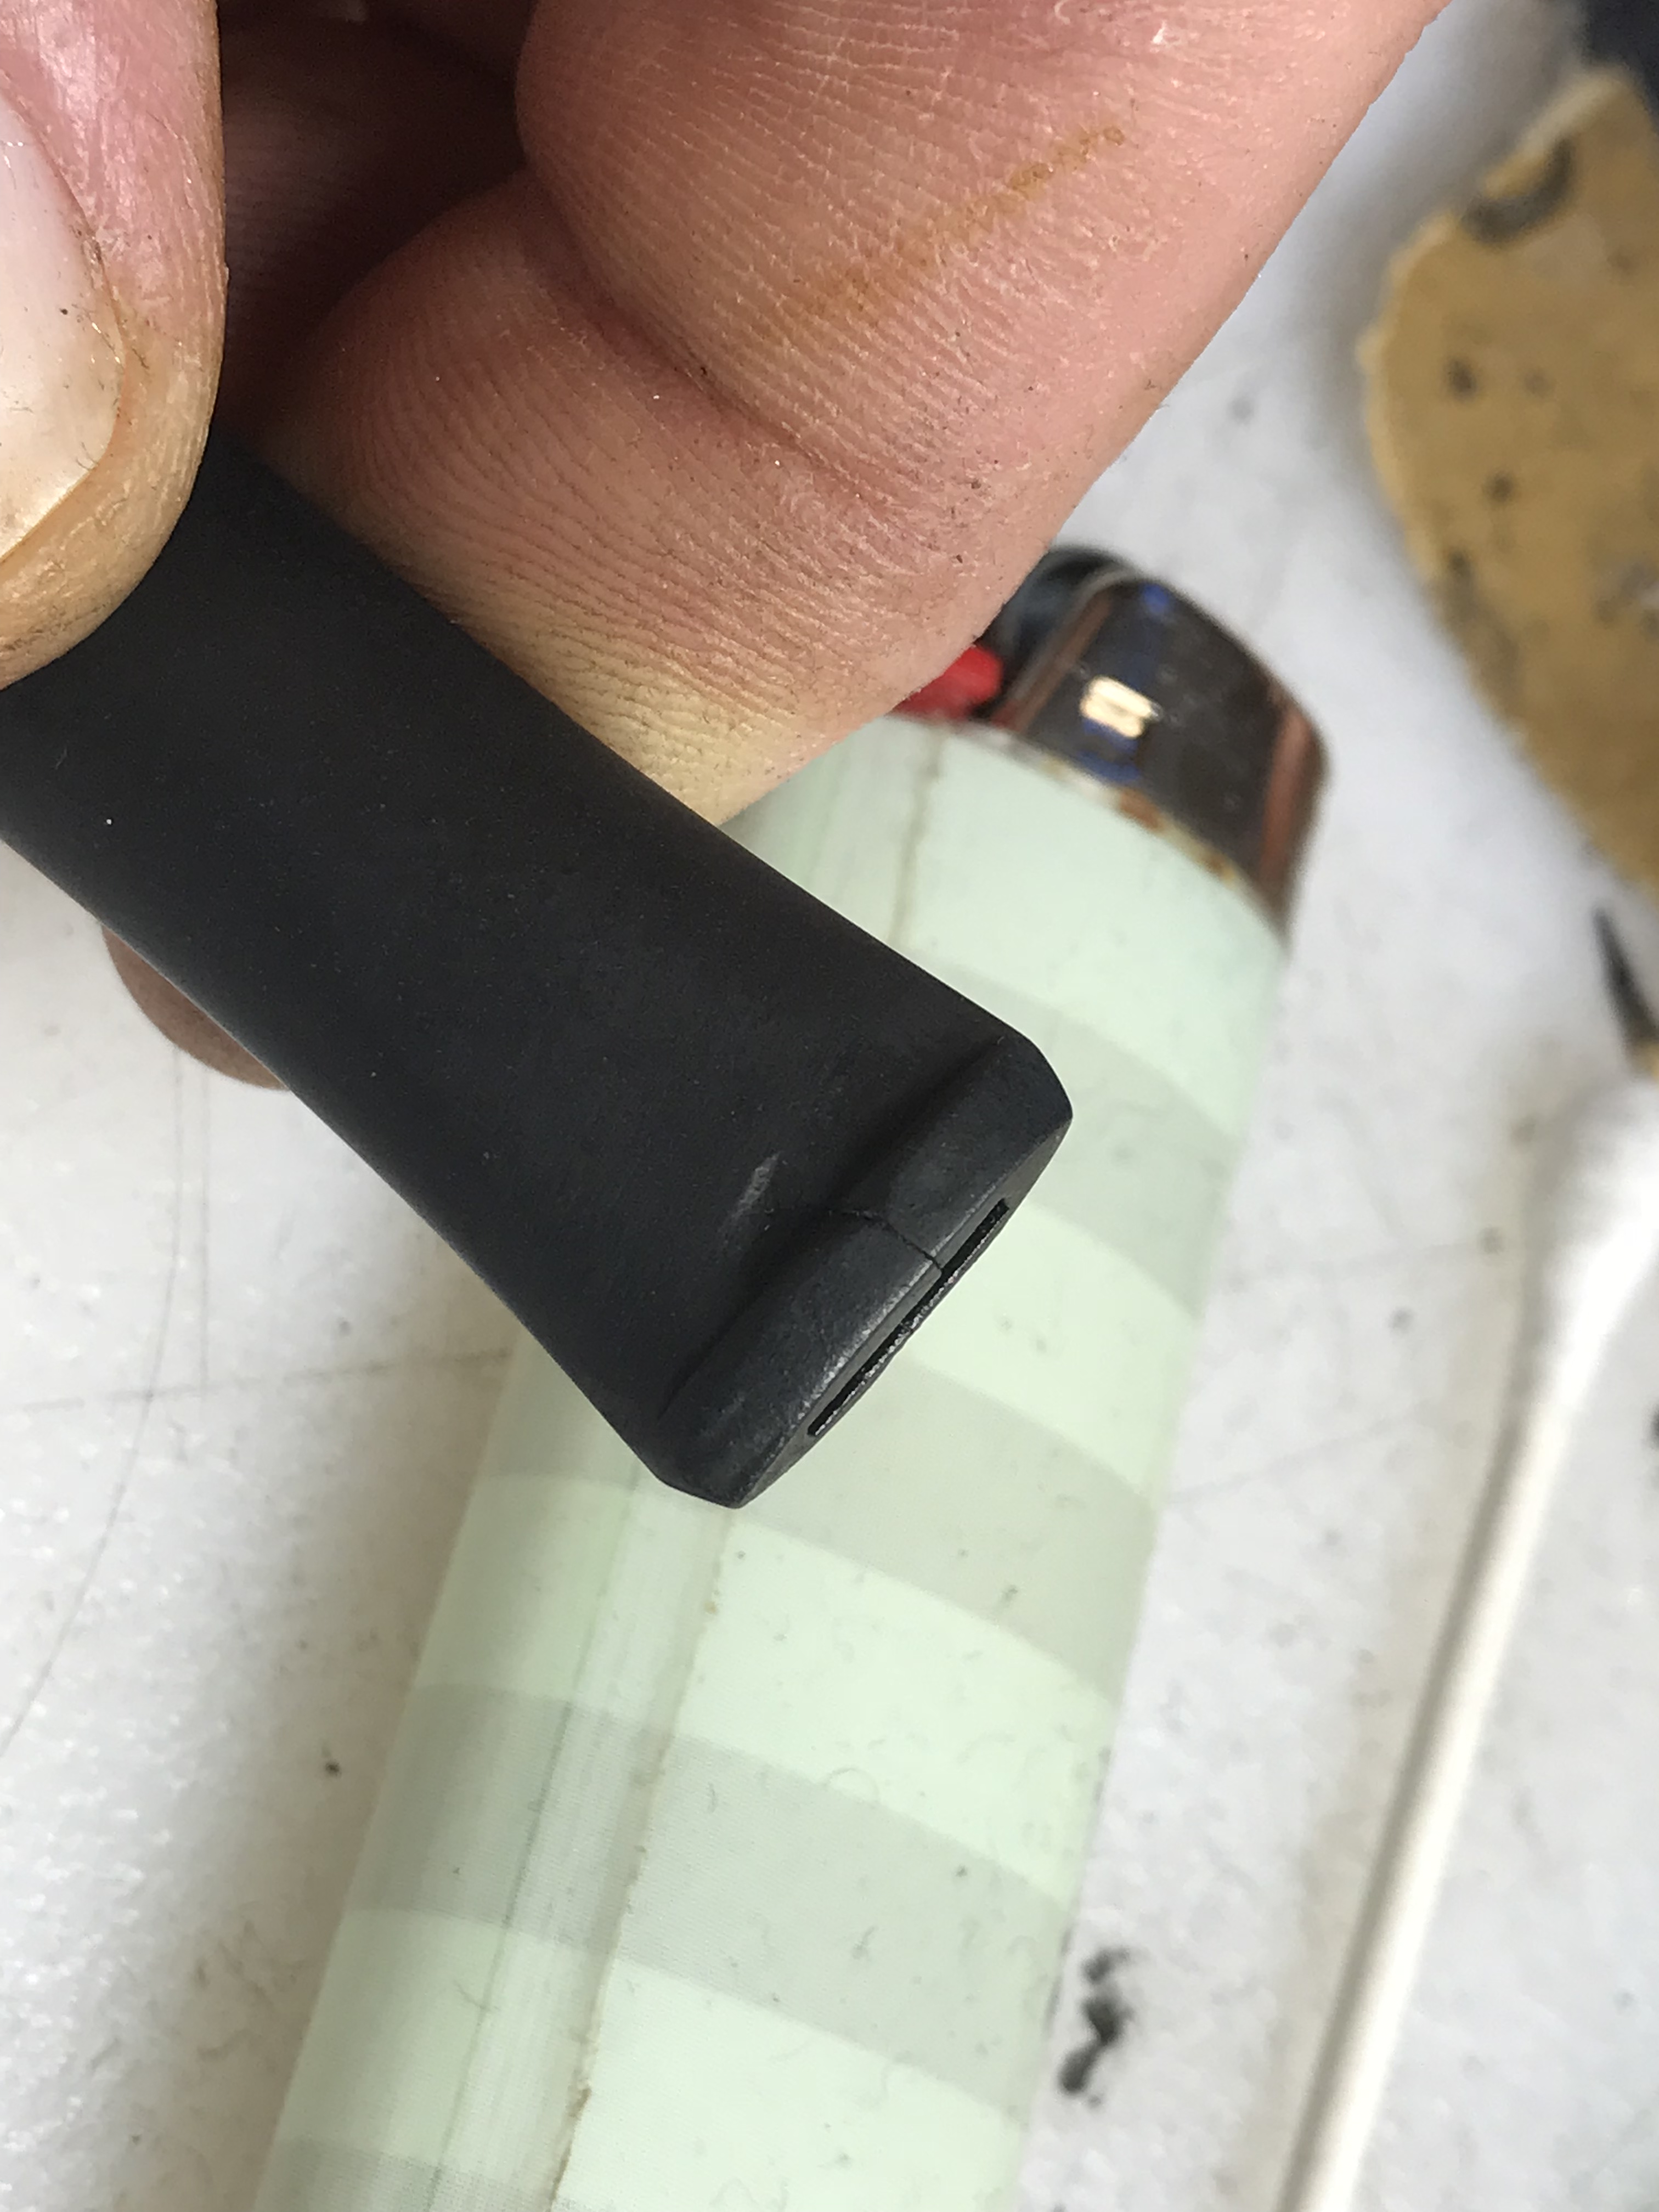
You can see in the photos that there were still significant dents after flaming the stem. A crack in the underside of the button also appeared after the flaming. I began filling the dents and repairing the crack/button with black CA glue at this point. The climate has been very humid here so the CA glue cured extremely slowly.

I worked on the stem in multiple sessions over a period of days to complete it due to the slow curing time. Multiple patch layers were applied and shaped with needle files, a vulcrylic file, and sandpaper until I had an acceptable repair.

The next step was to wet sand the stem with the full range of micro mesh pads. Then I used both the fine and extra-fine Before and After Stem Polish. I buffed the stem with blue compound using a 1″ cotton wheel on my Dremel at about 13k RMP. While the stem wasn’t “perfect” it was very improved, definitely something I could live with and what I thought would go well with my goal for this restoration. It was time to get back to the stummel now.

I cleaned the surface of the briar with cotton pads and alcohol, removing the grime covering its surface. I decided to see what the pipe would look like with a gentle sanding. With 400-grit wet/dry paper I began with the rim, sanding out the scratches from topping the bowl. I began to work around the bowl with the 400- grit paper and noticed the burn mark on the side of the heat fissures seemed to be lightening so I started working at that spot. In short order the burn was all but gone. Apparently it wasn’t a burn at all but some kind of stain on the briar. As I sanded the stummel I avoided the nomenclature, and effectively the entire shank. The stamping was already terribly weak and I was not going to make it worse.

Avoiding the stamping presented another challenge: Now the shank was a different color than the bowl. I didn’t want to re-stain the pipe so I applied Before and After Restoration Balm to the wood and set it aside to work its magic for a bit.

I was surprised how well the wood blended in color after I hand buffed the balm off. It was now uniformly darkened, even the topped rim.

I had an idea that had been in the back of my head for a little while that I wanted to try on this pipe. The nomenclature being so weak, I wanted to try to enhance it if I could. But I didn’t want to try to deepen the stamping or anything of that sort. What I decided to try was applying some Rub’N Buff ebony wax. This was a brand new idea (to me) and I really didn’t know if it would work or not.

I put a small amount of the ebony wax on the shank and spread it thinly over the entire shank, continuing to buff it with my thumb until the color went from opaque to translucent. I then applied a couple of coats to the rest of the pipe until I had even coverage.

I was really happy with the results. The color was even and highlighted the grain a bit. The stamping was also strengthened I think, much better than it had started out. While still not “strong” (I don’t think that can ever be restored) it was more readable.

I buffed the stummel with Tripoli and then white diamond, both using the Dremel and 1″ cotton wheels at about 13k RMP. I then put the stem back on the pipe and gave the entire pipe several coats of Carnuaba Wax, again with the Dremel and a 1″ cotton wheel at about 15k RPM. (I find the slightly faster speed does a far better job for the Carnuaba Wax.)

I’m still waiting for the bowl coating to cure so I’ve yet to christen the pipe. But I’m very happy with the results of this project. While it may not be a perfect specimen nor hold a lot of monetary value, to me it is a prize possession; my first Dunhill, and a birth-year Dunny to boot!

Restoring a Nording “Pick Axe” Freehand Pipe


Blog by Paresh Deshpande

I had just finished restoring a 1940s-1960s Kaywoodie Bent Billiard with a 4 holed stinger, also from my grandfather’s collection. I am always fascinated by “Free Hand” pipes. I feel these freehand shapes let the creativity and imaginations of a carver run riot without the bindings of the exacting demands of a classical shapes and finish.

Over a period of time, I have collected a number of freehand pipes during my not-so-long journey in to the pipe world and have realized that these freehand pipes invariably have a nice hand fit, sitting snugly in to the hands of the smoker with a nice heft to them. The most fascinating aspect of a freehand, I feel, is the carver’s desire to highlight the grains in the briar block and shape the pipe accordingly to highlight these grains.

I was fortunate to come across four estate freehand pipes, one Soren, one Ben Wade Spiral, one Nording #4 and one Nording Pick Axe shaped pipe. I discussed with my mentor and guide, Mr. Steve Laug, and after his approval on the aspects of collectability and the price point at which they were available, I purchased them about a year back!!!! Since then, these were waiting for me to work on and now that I feel slightly more confident in doing justice to these lovely pipes, I decided to work on them. The first of these pipes that is now on my work table is the Nording Pick Axe shaped freehand.

This beautiful pipe has the classical pick-axe shape with a plateau rim top. The stummel has a smooth surface with densely flame grains extending from the mid way on right side and extending mid way on left side while the remaining surface on the stummel has beautiful rustication. The smooth portions extend to the sides such that when held in the palm, all the fingers are holding the stummel along the smooth surface and one can admire the fine delicate rustications on the back while sipping your favorite tobacco. Blissful!!!!!!!!! Similarly, the top surface of the shank is rusticated extending half way through on either side while the bottom is smooth with straight grains extending from the tip of the axe towards the end of the shank.  The only stamping, “NORDING” in block capital letters, is seen on the smooth portion of the shank. The stamping is clear, crisp and easily readable. The fancy stem has a slight bent towards the lip and helps the pipe to balance straight on a table. There is the letter “N” in block capital letter, stamped on the top surface. But it is faint and hidden under the heavy oxidation.I searched the internet for detailed information on Nording pipes and this pipe shape in particular shape. Though I did not find anything particularly about this pipe, it was interesting to read how young Mr. Nording got in to the business of pipe making. It makes for a very interesting read. We must not forget to thank one Mr. Skovbo, who had a major contribution in introducing Mr. Nording in to this business!!!!!!  I have a couple of SON pipes in my grandfather’s collection which I will restore at a later date since I now know about the historical importance of these pipes!!!!!!!!!!! Here is the link for easy reference of those interested: https://pipedia.org/wiki/Nørding 

INITIAL VISUAL INSPECTION
The stummel is covered in dust, oils and grime giving a dull and lackluster appearance to the bowl. The rustications on the back of the stummel are, likewise, filled with dust, dirt and grime. This will need to be thoroughly cleaned. On close scrutiny, I saw some minor superficial dents and dings on the smooth surface. Will I address it or keep it as it is as a characteristic feature of this pipe’s past life? Hell yes, I will address it!!!!! I want it to be as perfect as I can make it for its next innings with me!!!!!! The chamber is clean with a very uneven and thin layer of cake. The plateau rim top is covered with overflow of lava. The inner rim edge is crisp, even and intact. The chamber is odorless and dry to the touch. The inner wall condition of the chamber will be ascertained once the chamber has been completely reamed. However, I foresee no issues at all as the bowl feels solid to the touch.The fancy stem is heavily oxidized with tooth chatter and bite marks on both surfaces and some calcification can be seen towards the lip. There is a significant damage to the lip end in the form of a bite through hole on the upper surface and some deep bite marks on both upper and lower surface of the stem. The airway in the stem is slightly blocked. These issues will have to be addressed. On close observation, the upper surface of the stem bears the stamp “N” in block capital letter. However, this stamp is very faint and covered in thick layer of oxidation. I will attempt to restore and save this stamp.The shank, mortise and the airway is relatively clean and will only need to be sanitized.THE PROCESS
The first step that I usually follow is the reaming of the bowl. However, in this project, since the only significant damage appreciated is to the stem and would be a time consuming process to repair, I started this restoration by addressing the stem first by sanding the stem surface with a 220 grit sand paper followed by 1500 grit micromesh pad. This serves two purposes. Firstly, it evens out the surface for a fresh fill during stem repairs and secondly, I have experienced that any fill in a stem repair turns distinctly brown after micromesh sanding if the oxidation from the stem surface was not removed prior to the application of the fill. Once I was through with the sanding, I wiped the stem clean with cotton pad dipped in isopropyl alcohol. This was followed by flaming both the surfaces of the stem with a Bic lighter, concentrating more around the hole on the upper surface and the deeper bite marks on the lower surface. This helps in raising all the tooth chatter and dents to the surface.I inserted a pipe cleaner coated with Vaseline in to the stem airway before applying the fill. This helps in preventing the fill from entering and blocking the airway. I prepared a mixture of superglue and activated charcoal and applied it as evenly as possible over the hole and deep bite marks and set it aside to cure for 48 hours since the climate here is very wet and humid. While the glue was curing, I worked on the stummel, reaming out the cake with a Kleen Reem reamer, followed by a pipe reaming knife that I had fabricated. I brought the cake down to the bare briar. To further remove any traces of old cake and smooth the inner walls of the chamber, I sanded the inner wall surface with a 220 grit sand paper. As observed during initial visual inspection, I had decided to remove all the dents and dings in the stummel. I cleaned the stummel with Murphy’s oil soap, paying special attention to the plateau rim which was scrubbed with 000 grade steel wool to remove all the overflow of lava. Thereafter I sanded the smooth surfaces of the bowl with a 220 grit sand paper. Once all the dings and dents were evened out and the surface made smooth, this was followed by micromesh polishing pads, wet sanding with 1500 to 2400 grit pads. Again, I wiped the bowl with a moist cotton cloth after each pad. Thankfully there were no fills in the stummel. Once I was through with the wet sanding pads, I used the 3200 to 12000 grit pads to dry sand the stummel to a nice shine. I set the stummel aside to let it dry out naturally. I rubbed some “Before and After Restoration” balm deeply in to the stummel with my fingers. This balm helps in rejuvenating and protecting the briar wood. The immediate and incredible transformation that takes place is a worthy reward for all the efforts!!! The mixed grain can now be clearly appreciated. I let the balm be absorbed by the briar for about 15-20 minutes and then polished it with a soft cotton cloth. The bowl now looks fresh and attractive with the grains popping out any which way you look at the briar. Turning my attention to the stem, using a flat head needle file I sanded out all the fills to match the surface of the stem. I further matched the fills by sanding it with a 220 grit sand paper. I had to spot fill clear superglue into small fills which were exposed during the sanding and repeat the entire process twice. To finish the stem I went through the complete set of micromesh pads, wet sanding with 1500 to 2400 pads and dry sanding with 3200 to 12000 grit pads. I wiped the stem with a cotton swab dipped in alcohol after each pad and rubbed olive oil into the stem after every three pads. The stem looks crisp, shiny and like new. Having addressed the “appearance” aspects of this beauty, I turned my attention to the “performance” aspects to ensure that this beauty smokes as well as it looks. I thoroughly cleaned the shank internals using shank brush, pipe cleaners, qtips and isopropyl alcohol. The stem airway was cleaned using regular pipe cleaners and also bristled ones dipped in alcohol. The airway is now clean and the draw is full and open.To complete the restoration, I rubbed a minute quantity of PARAGON WAX on the smooth stummel and the stem and HALCYON WAX II on the rusticated surface. After a few seconds, using muscle power and a microfiber cloth, I polished the entire pipe to a lovely shine. The finished pipe is shown below. This one shall soon find a place in my rotation. Thank you for your valuable time spent in reading this chronicle of my journey.

Tale of Two Somerset Brothers – Part 2


BENT RHODESIAN

Blog by Paresh Deshpande

I had finished the work on Somerset 8 Paneled Billiard and I was very pleased with the way it turned out. I have smoked this pipe and have to concede that it was one of the better smoking pipes in my current rotation, the draw is open and full and very smooth right up to the last morsel of tobacco. This is due to the perfect alignment of the draught hole, mortise and stem tenon. Very happy with this one, I must say!!!!!!

The sibling of the first Somerset Brother, now in my hand, is the Bent Rhodesian, and my favorite shape. The upper half of the bowl has beautiful wavy circular sandblast all round which extend to the round shank, while the bottom of the bowl has densely packed birdseye which is seen in the sandblast. Overall, this is one pipe with a beautiful sandblast patterns and as I have come to expect, the quality of the finish and vulcanite stem is par excellence. Like its paneled billiard sibling, this pipe too has a smooth and flat bottom surface and bears the only stampings seen on the pipe. It is stamped on the bottom as “SOMERSET” in a mild arch over “IMPORTED BRIAR” in straight line, all in capital letters. There is no other stamp on either shank or on the stem. The stummel and shank is stained with a very dark reddish/ maroon hue. The stem is high quality vulcanite without any stampings. As conceded in my write up on the Somerset Paneled Billiard, I have been unsuccessful in unearthing information about this brand and still remain a blind spot in my quest for knowledge on pipes. I sincerely request you to share any information you may have on this pipe.

INITIAL VISUAL INSPECTION
The sandblast on this pipe is covered in dirt, dust and grime and appears dull and lackluster. The bowl is heavily caked and there is overflow of lava on to the rim. This will have to be removed in order to ascertain the condition of the chamber walls. From my experience working on the paneled billiard, I won’t be surprised to find cracks and heat fissures on the walls of the chamber. There is a very strong sweet smell to the cake, which perhaps may vanish after the chamber has been cleaned.The mortise is filled with oils and tars and appears to be clogged. There is no free flow of air through the mortise. This will have to be cleaned. There is also a slight gap in the fitting between the stem and the shank. Maybe this will be resolved after a good cleaning of the mortise. The fitting of the stem in to the shank is very loose and just drops of when turned upside down.The stem is heavily oxidized and the edge of the lip on the top surface has been bitten out of shape. There is a bite mark close to the disfigured edge of the lip. These issues will have to be addressed.THE PROCESS
I reamed the bowl with a Kleen Reem pipe tool and with a knife; I further took the cake down to the briar. I have realized that the knife is best suited to remove the cake from the bottom of the chamber. As anticipated, the chamber walls did show the beginnings of a burn out!!!! With a 150 grit sand paper, the walls of the chamber were rid of all the remnants of the cake, presenting a clear picture of the extent of the damage. This pipe too had cracks at exactly same location as its sibling, though not as alarming. Since the pipe ash was still being collected, I cleaned the internals of this pipe with bristled and regular pipe cleaners dipped in isopropyl alcohol. Since the strong sweet smell did not diminish even after the cake had been removed, I decided to give it a salt and alcohol bath. I filled the bowl and shank with kosher salt up to just below the rim top and end of the shank respectively. I filled it up with isopropyl alcohol and set it aside over night to allow it to extract all the residual oils from the chamber and the shank. Next day, the salt and alcohol had done its job. I remove the darkened salts and clean the mortise with bristled pipe cleaners. I set it aside to dry. Once the internals were cleaned, I scrubbed the externals of the bowl with undiluted Murphy’s oil soap and dried it using paper towels and soft cotton cloth. I set it aside to dry. I cleaned the walls of the chamber with cotton pads dipped in isopropyl alcohol (since I was simultaneously working on the repair to the chamber of the Paneled Billiard, there is inescapable repetition of the process). Once cleaned, I inserted a folded pipe cleaner into the shank and up to the draught hole to prevent it from clogging. I made putty like paste of pipe ash and water. This paste was evenly applied to the entire inner surface of the chamber with a thin bamboo frond with shaved end to form a spatula, a bigger one at that, as compared to a regular one. I set it aside to dry out. The climate here being very wet and humid, it will take a long time to dry out.

The coating dried completely after about a week and I just gently scrapped the chamber with very light hands to check the layer. Alas, the complete coating just crumbled out leaving a very dry coat of ash through which all the cracks were easily discernible.

Fortunately, I had started collecting pipe ash and mixed it with yogurt. Using the same earlier method, I applied an even coat of pipe ash, yogurt and also added two capsules of activated charcoal. I set it aside to dry out, praying that the mixture bonds well and sticks to the walls of the chamber. A few days later, the mixture had completely cured and it did not crumble. The bonding appeared to be strong and durable. With a 400 grit sand paper, I sanded the inner walls very lightly to smooth the walls. Now the internal walls are looking solid and ready for duty again!!!! Once the issue of cracked chamber wall was addressed, I turned my attention back to the exterior of the stummel. I rubbed a small quantity of “Before and After Restoration Balm” in to briar and let it rest for a few minutes. The balm almost immediately works its magic and the briar now has a nice vibrant appearance. I further buff it with a horse hair shoe brush. Working the stem, with a Bic lighter, I flamed the surfaces of the stem to raise the tooth chatter and minor bite marks. To address the bite mark and repair the edge of the lip, I spot apply a drop of CA superglue and leave it over night to cure. The next evening, I shape the fill using flat head needle file and carve a crisp edge. To further blend in the fill, I sand the stem with a 220 grit sand paper. I sanded it down with 220, 400 and 800 grit sand paper. I wiped the stem with cotton pad dipped in alcohol to remove the resultant dust. I rubbed some extra virgin olive oil in to the stem and set it aside to be absorbed in to stem. I polished the stem with micromesh pads, wet sanding with 1500 to 2400 grit pads and dry sanding with 3200 to 12000. I rub a little extra virgin olive oil in to the stem after every three pads. I finish the polishing of the stem by rubbing a small quantity of Paragon wax and giving it a final polish with a soft cotton cloth. The stem is now nice, smooth and shiny. I cleaned the airway in the stem with pipe cleaners and alcohol. Here, I realized that the issue of loose stem was yet to be addressed. This issue was addressed by heating the tenon with a Bic lighter, constantly rotating the stem, till the tenon was slightly pliable. I gently pushed a rounded needle file in to the tenon to enlarge it and set it aside to cool down. Once cooled down, I wiped it clean with a cotton cloth soaked in cold water. I tried the fit, and the stem sat in the shank snugly, making all the right kind of noises. I was very pleased with the fit.To finish the pipe, I rubbed a small quantity of HALCYON II wax which is used for rusticated/ sandblasted surfaces and set it aside for a few moments. Thereafter I polished it with a horse hair shoe brush and a soft cotton cloth. These Somerset pipe are very well made and smoke fantastic. The quality of the vulcanite is high grade and feels good to clench. The finished pipe is shown below. Since the completion of this restoration, I have smoked this pipe and included it in my rotation. Believe you me, this pipe, like its sibling, smokes perfect with a nice, smooth draw right to the end. This leads me to think, is it only necessary to have Dunhill, Barling, Comoy’s etc, as fantastic smokers? Well, my personal experience with these two Somersets, is that while the above mentioned brands are excellent pipes, the lesser known ones do need to be looked at and not discarded outright!!!!!!!!!! Thanks for your patience and looking forward to inputs about this brand and the write up. Cheers…………


Kathy’s Dad’s Pipes – Restoring a Barontini De Luxe Brandy


Blog by Steve Laug

The next pipe on the work table is also from George Koch’s estate. It is a Barontini De Luxe Brandy shaped pipe with a quarter bend. The pipe was one of many that came to my brother and me in several shipments of pipes from George’s daughter Kathy. When Jeff got each box the pipes were well wrapped and packed. Jeff unwrapped them and took the following photo to give an idea of the volume of the pipes that we purchased. The Barontini came in mixed in a box of pipes much like the one below.In each of the previous blogs that I have written on the restoration of George’s pipes I have told his story. To me it is important to keep the story attached to the pipes that came from his collection. Each pipe I work on I remind myself of the man and in the work give a remembrance to the pipeman who owned these pipes. Having held a large number of his pipes in my hand and having a pretty good feel for the shapes, colour and stems that he liked, I can almost imagine George picking out each pipe in his collection at the Malaga shop in Michigan. I am including Kathy’s brief bio of her father and a photo of her Dad enjoying his “Malagas”. Here is George’s bio written by his daughter.

Dad was born in 1926 and lived almost all his life in Springfield, Illinois. He was the youngest son of German immigrants and started grade school knowing no English. His father was a coal miner who died when Dad was about seven and his sixteen year old brother quit school to go to work to support the family. There was not much money, but that doesn’t ruin a good childhood, and dad had a good one, working many odd jobs, as a newspaper carrier, at a dairy, and at the newspaper printing press among others.

He learned to fly even before he got his automobile driver’s license and carried his love of flying with him through life, recertifying his license in retirement and getting his instrumental license in his seventies and flying until he was grounded by the FAA in his early eighties due to their strict health requirements. (He was never happy with them about that.) He was in the Army Air Corps during World War II, trained to be a bomber, but the war ended before he was sent overseas. He ended service with them as a photographer and then earned his engineering degree from University of Illinois. He worked for Allis Chalmers manufacturing in Springfield until the early sixties, when he took a job at Massey Ferguson in Detroit, Michigan.

We lived in Livonia, and that’s where his love for Malaga pipes began. After a few years he returned to Allis Chalmers and we moved back to Springfield. I remember that when we went back to Michigan to visit friends, Dad had to go to the Malaga store and acquire a few new pipes. Many a year I wrote to Malaga and they picked out a pipe for me to purchase that I could give Dad for a Christmas or birthday present. He was always pleased. His favorites were the straight stemmed medium sized bowl pipes, but he liked them all. 

He had some other pipes, but the Malagas were his favorites. I remember him smoking them sitting in his easy chair after work, with feet up on the ledge by the fire burning in the fireplace.  Growing up it was my job to clean them and he liked the inner bowl and stem coated with Watkins vanilla, leaving a little of that liquid in the bowl to soak in when I put them back on the rack. Dad quit smoking later in life and so they’ve sat on the racks for many years unattended, a part of his area by his easy chair and fireplace. Dad passed when he was 89 years old and it finally is time for the pipes to move on. I’m very happy they are being restored by you and your brother and hope they find homes who enjoy them as much as Dad did. Thank-you for your care and interest. — Kathy, the oldest daughter

Each blog I have posted I thank Kathy for providing this beautiful tribute to her Dad. Jeff and I appreciate your trust in allowing us to clean and restore these pipes. We are also trusting that those of you who are reading this might carry on the legacy of her Dad’s pipes as they will be added to the rebornpipes store once they are finished.

The next the pipe is a nicely shaped Barontini Brandy with an acrylic stem. It has beautiful grain all around the bowl – straight, flame and birdseye that is highlighted by the rich reddish brown stain. The top of the bowl is had some burn marks and some damage. The stamping on the top side of the shank read Barontini over De Luxe. On the underside it has the shape number 702 and Italy at the shank/stem junction. The gold and brown, swirled, pearlized Lucite stem had light tooth dents and chatter on the top and the underside of the stem. The interior of the pipe was caked and had cobwebs. Jeff took these photos before he started the cleanup work on the pipe. Jeff took a close up photo of the bowl and rim to show the condition of the pipe before he started his cleanup work. The rim top had some light lava overflow and some darkening. There appeared to be some rim damage on the inner edge toward the front of the bowl. You can see the wear on the rim top, the cake and remnants of tobacco in the bowl. It also looks like there are some cobwebs in the bowl. The pipe is dirty but in good condition.  He also took photos of the sides and bottom of the bowl and shank from the side to show the grain on this pipe. The finish is very dirty but this is a beautiful pipe. Jeff took some photos to capture the stamping on the top and underside of the shank. The first photo shows the top side of the shank with the stamping Barontini De Luxe and the second shows the shape number 702 on the underside. The third photo shows the ITALY stamping on the underside near the stem. There is also a B stamped on the acrylic stem.The next two photos show the stem surface. There are tooth marks and chatter on both sides near the button. There is also some wear on the sharp edge of the button.I looked up some information on the brand on the Pipephil website to get a quick overview of the history (http://www.pipephil.eu/logos/en/logo-b2.html). I did a screen capture of the listing for the brand. The fascinating thing that I learned in this quick overview was the connection to the entire Barontini family and to other companies like Aldo Velani. It is interesting to see the breadth of the brand in the following screen capture. The  pipe I am working on it stamped like the third photo down – the Classica and the B on the stem is identical to that pipe’s stamping.Pipedia gives further history of the brand (https://pipedia.org/wiki/Barontini,_Ilio) under the listing for Ilio Barontini. I quote that article in full as it has the connection to the De Luxe pipe that I am working on.

Cesare Barontini, who was in charge of the Barontini company since 1955, helped his cousin Ilio Barontini to establish a pipe production of his own.

Ilio started to produce machine-made series pipes of the lower to the middle price categories. Fatly 80% of the pipes went to foreign countries, the bulk being produced for various private label brands. Some of the own lines like “de Luxe”, “Etna” or “Vesuvio” gained a certain popularity. Citation: “Next to excellent craftsmanship Ilio Barontini pipes offer a wood quality, that is almost unrivalled in this price category!”.

The pipes being around still there were some unconfirmed utterances that Ilio Barontini brand has been absorbed by Cesare Barontini or even Savinelli. Who knows?

Now I had some idea of the maker of this Barontini. It appears to be one of the machine made Barontinis in the De Luxe line. Fueled by that information it was time to get working on the pipe itself and see what I had to do with it.

Jeff had reamed the bowl with a PipNet pipe reamer and followed up with a Savinelli Fitsall pipe knife to remove the cake. He scrubbed out the mortise and the airway in the shank and the stem with alcohol, cotton swabs and pipe cleaners. He scrubbed the exterior of the bowl, rim, shank and stem with a tooth brush and Murphy’s Oil Soap to remove the oils and tars on the rim and the grime on the finish of the bowl. He rinsed it under running water. He dried it off with a soft cloth. The rim was thoroughly cleaned and the damaged areas were obvious. Without the grime the finish looked really good. The Lucite stem would need to be worked on but I really like the profile it cast. I took photos of the pipe to show its condition before I started my work on it.   I took close up photos of the bowl and rim top as well as the stem. You can see the condition of the rim top and bowl in the first photo. Jeff was able to remove all of the tar and oils but you can now see the damaged areas on the surface clearly. There are damaged spots on the front inner edge and the back inner edge. There are also some deep dents and nicks in the flat surface of the rim. The acrylic/Lucite stem had tooth chatter and some light tooth marks on the top and underside of the stem just ahead of the button. There was one deeper tooth mark on the underside near the button.I decided to address the damage to the rim top first. I topped the bowl on a topping board using 220 grit sandpaper. I removed the damaged surface of the rim and made it smooth once again.I used a folded piece of 220 grit sandpaper to smooth out the inner edge of the rim. The rim top is looking far better at this point.I polished the rim top with micromesh sanding pads – wet sanding with 1500-2400 grit pads and dry sanding with 3200-12000 grit pads. I wiped the rim off after each sanding pad to remove the dust. The rim really shone once it was polished. Once it was polished the rim was ready to be stained. I started by using stain pens. I used a Maple stain pen to match the colour of the bowl. It was the closest I could get to matching the bowl. Once it cured it was streaked and not quite a match. The first photo below shows the rim after the stain pen.I carefully wiped the rim down with some isopropyl alcohol to smooth out the stain. Once it was smooth I restained it with some Fiebing’s aniline stain. I used a tan coloured stain and flamed it once I had stained the rim. I repeated staining and flaming until the coverage on the rim matched the bowl sides. The second photo below shows the look of the rim after this staining. I rubbed down the briar with Before & After Restoration Balm. I worked it into the smooth surface of the briar with my fingertips to clean, enliven and protect it. I let the balm sit for a little wall and then buffed with a cotton cloth to raise the shine. The following photos show the bowl at this point in the restoration process. The rim matches well but still needs to be polished and buffed to raise a shine on it. There were some tooth marks and chatter on the top and more chatter and a deeper tooth mark on the underside of the acrylic stem at the button. I cleaned off the surface of the stem with alcohol and filled in the deep tooth mark with clear super glue. Once it cured, I sanded both sides smooth with 220 grit sandpaper to blend the tooth chatter and the repair into the surface of the stem. It did not take too much sanding to remove the marks and smooth out the stem surface. When it was sanded it was smooth and the marks were gone. I polished the acrylic stem with micromesh sanding pads – wet sanding with 1500-2400 grit sanding pads and dry sanding it with 3200-12000 grit sanding pads. I wiped it down after each sanding pad with a damp cloth. I the polished stem and bowl with Blue Diamond to polish out the remaining small scratches and raise the shine. I gave the bowl and the stem several coats of carnauba wax and buffed the pipe with a clean buffing pad to raise the shine. I hand buffed it with a microfiber cloth to deepen the shine. The pipe polished up pretty nicely. This turned out to be a beautiful pipe in terms of shape and finish. This is the thirteenth pipe that I am restoring from Kathy’s Dad’s collection. I am looking forward once again to hearing what Kathy thinks once she sees the finished pipe on the blog. The finished pipe is shown in the photos below. The dimensions are Length: 6 inches, Height: 2 inches, Outside diameter of the bowl: 1 3/8 inches, Chamber diameter: ¾ of an inch. Thanks for walking through the restoration with me as I worked over this Barontini Brandy from George’s estate. More will follow in a variety of brands, shapes and sizes. I will be adding it to the rebornpipes store shortly so if you are interested in adding it to your collection and carrying on the trust from her father send me an email or a message on Facebook. Thanks for looking.