Tag Archives: Stem repairs

New Life for a Comoy’s Sandblast Squat Straight Bulldog


Blog by Steve Laug

This Comoy’s Sandblast on my work table has a rugged, swirling sandblast finish with lots of nooks and crannies in the briar. It is a beauty! The straight Bulldog is clearly stamped on a smooth panel on the left underside of the diamond shank and reads Comoy’s [over] Sandblast. Underneath that it is stamped Made in London [over] England in two lines. There is no shape number stamped visibly though it could possibly be underneath the gold band. I received an email a few weeks ago from Alec,  a reader of the blog about the pipe. Here is what he wrote…

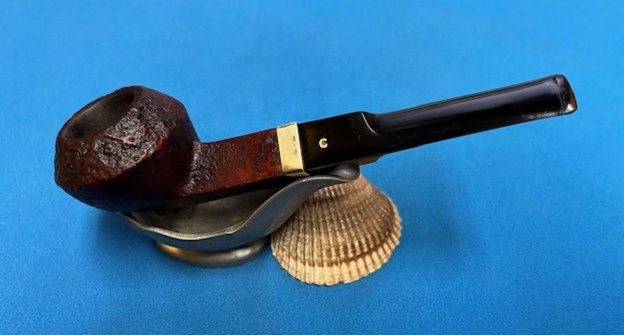
I have an old Comoy’s straight, sandblasted, squat bulldog pipe which I got from an antique store. From what I can tell, it is from the 60s or 70s, pre-Cadogan. The stem is vulcanite and has some deoxidization [sp]. I was wondering if you would be able to do some restoration work for me? I am not looking to sell it, but don’t have the time to go about doing it myself.

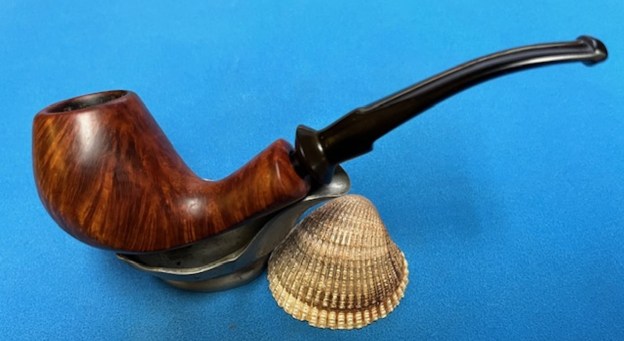
We wrote back and forth and he sent the pipe to me. It came yesterday and when I looked at it this morning this is what I saw. The valleys and ridges of the sandblasted grain showing through the grime and dirt are a mixture that leaves a rich texture. It had a rich dark and medium contrasting brown stain that does not look too bad. There was a moderate cake in the bowl with remnants of tobacco stuck on the walls. There was a light lava overflow in the blast on the rim. The edges of the rim and top are dirty but look pretty pristine under the grime. There was a scratched gold band on the shank end that upon examination showed a crack on the lower right underside. It was a beautiful pipe that was dirty and tired looking. The stem was oxidized and calcified with what appeared to be marks from a rubber Softee Bit toward the end. It had some tooth marks on the top and underside of the button. I took photos of the pipe before I started my cleanup work on it. I took photos of the bowl and rim top to show the cake in the bowl and the lava build up on the edges of the bowl. It was thick and hard but hopefully it had protected the rim and edges from damage. The edges look pretty good.
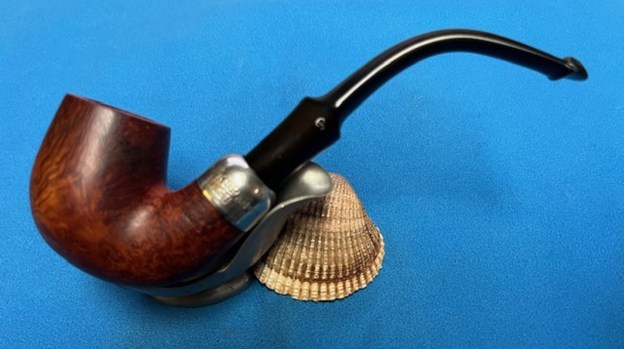
I took a photo of the stamping on the smooth panel on the underside of the shank. The stamping was readable as you can see from the photo below. It read Comoy’s [over] Sandblast and underneath Made in London [over] England.  The second photo shows the C logo on the left side of the saddle stem is formed by three circles working to make the C.  I removed the stem from the shank and took a photo of the pipe to give a sense of proportion. Before my work on the pipe began, I wanted to see where it fit in the Comoy’s timeline. I looked on Pipedia to pin down a date for the pipe. Since the pipe is stamped Made in London England I decided to use that to see what I could find. Pipedia has a great article on dating these pipes (https://pipedia.org/index.php?title=Comoy%27s_Dating_Guide#Made_in_London_England). I found the information below. I have highlighted the pertinent portion in red in the paragraph below. The stamping matches the pipe I am working on.

Appears in two versions. This is again stamped in two straight lines “MADE IN LONDON” on the top and “ENGLAND” beneath. It can be assumed that this stamp was first used in the export drive in the early 1950s. On a Bulldog Sandblast from the early 50s the Comoy name has slightly more fancy block letters with serifs and the apostrophe. (It seems that some grades carried different stamps, or at least that the stamping changed in different years for some grades.)] was used together with “MADE IN LONDON” over “ENGLAND”. There are no known examples of pre-WW II Comoy’s stamped in this way. The second version is the same as above but in a “rugby ball” shape. This shape is verified on Comoy´s “Extraordinaire” pipes.

From that I knew that I was working a Comoy’s Sandblast Bulldog Made in London England from the early 1950’s.

I have also included two catalogue pages from Pipedia as well to show the line for sale at several time periods in Comoy’s history (https://pipedia.org/wiki/Comoy%27s). The first page is from the 1922 Catalogue and the second one is from a later date. Read the description that highlights how they did their sandblasting combining heat and sand to bring out the grain. I started my work on the pipe by reaming the bowl. I reamed it back with a PipNet pipe reamer using the first two cutting heads to take off all of the cake back to bare briar. I cleaned up the reaming with a Savinelli Fitsall Pipe Knife and then sanded the bowl walls with 220 grit sandpaper wrapped around a piece of dowel. I cleaned out the interior of the pipe with pipe cleaners, cotton swabs and alcohol. It was not as dirty as I expected. I was able to remove all of the grime and tars that were in the mortise, shank and airway in the stem.I scrubbed the exterior of the bowl and shank with a tooth brush and undiluted Murphy’s Oil Soap. It looked surprisingly better and the dust and lava filling in the sandblast was gone. The pipe had a strong aromatic smell remaining in the bowl and shank even after cleaning thoroughly so I filled the bowl with cotton bolls and a cotton plug in the shank. I used an ear syringe to fill the bowl with 99% isopropyl alcohol to deghost it and remove the smell of the aromatic. I let it sit overnight. In the morning the cotton was dark with tars and oils. I removed it from the bowl and ran pipe cleaners and alcohol through it. I used some alcohol thinned light brown aniline stain as a wash on the briar. I applied it to the briar with a wood dauber and flamed it with a Bic lighter to set the stain in the wood. I set it aside to let the wash dry. I rubbed Before & After Restoration Balm on the pipe, working it into the grooves and deeper areas of the sandblast. The balm enlivens, cleans and protects the briar was it is worked into the finish. I let it sit for a short time and then buffed it off with a soft cloth. I took photos of the bowl to show the condition at this point. I set the bowl aside and turned my attention to the stem. I scrubbed the surface with Soft Scrub and cotton pads to remove some of the oxidation on the surface. While it worked it left behind some very deep oxidation. I “painted” the stem surface with a lighter flame and was able to raise them quite a bit. I cleaned up the stem end with 220 grit sandpaper and then filled in the remaining marks on the button edge and the surface with black CA glue. Once it cured, I used a file to shape the button edge and also smooth out the fill. I sanded the remaining marks with 220 grit sandpaper to blend them into the surface of the surrounding vulcanite. I started polishing the stem surface with 600 grit wet dry sandpaper. I polished the stem surface with micromesh sanding pads – wet sanding with 1500-2400 grit pads and dry sanding with 3200-12000 grit pads. I wiped it down with Obsidian Oil after each sanding pad. I finished polishing it with Before & After Pipe Stem Polish – both Fine and Extra Fine and buffed it off with a cotton cloth. I gave it a coat of Obsidian Oil to preserve and protect the stem.  
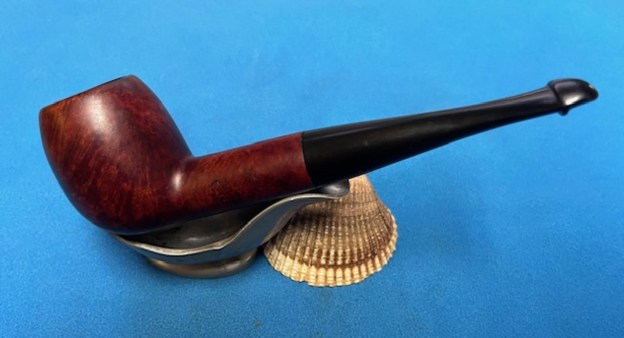
I put the stem back on the bowl and worked the pipe over on the buffing wheel using Blue Diamond to lightly polish both the bowl and the stem. I buffed the bowl and stem to raise the gloss on the briar and the vulcanite. I gave the bowl a lighter buff than I did on the stem to keep the polishing material from clogging the deep grooves of the blast. There is a little remaining oxidation around the C logo which I am leaving as I do not want to damage it. There was also some water damage (lightening) just ahead of the button on both sides that remains after much work! I gave the bowl multiple coats of Conservator’s Wax and gave the stem multiple coats of carnauba wax. I buffed the entire pipe with a clean buffing pad to raise the shine. I hand buffed it with a microfiber cloth to deepen the shine. The finished pipe is shown in the photos below. The contrasting brown stain – both medium and dark brown goes well with the rich black of the vulcanite stem. The dimensions of the pipe are: Length: 5 1/2 inches, Height: 1 3/4 inches, Outside Diameter: 1 1/4 inches, Diameter of the chamber: 3/4 inches. Now that the pipe is finished I will soon pack it up and mail it back to Alec. I know he is looking forward to loading it up and smoking it. Thanks for walking with me through the restoration.

As always, I encourage your questions and comments as you read the blog. Thanks to each of you who are reading this blog. Remember we are not pipe owners; we are pipe men and women who hold our pipes in trust until they pass on into the trust of those who follow us.

Re-stemming and Restoring a Danmore De Luxe Made in Denmark Scoop


Blog by Steve Laug

The next pipe I chose to work on came from a lot of 11 pipes I purchased from a lady in Regina, Saskatchewan. She had found them in a house she bought and wanted to know if I wanted them. We struck a deal, I paid for the pipes and shipping and the box arrived while I was traveling in Europe. In the box were 4 Stanwells, 1 Soren Freehand, 1 Calabash with a Briar Bowl, 1 Nording Freehand, 1 Italian Made Bertenetti, 1 Rhodesian with a banded cracked shank, 1 Danmore bowl, and 1 Brigham. I have restored the Nording, the snapped Stanwell, the Brigham and the Gourd Calabash with the briar bowl. There are blogs on each restoration available.The next pipe on the table is the scoop shaped bowl without a stem at the top of the photo above. It is stamped on the underside of the shank and reads Danmore [over] Made in Denmark. On the right side of the shank it is stamped De Luxe. There is no visible shape number stamped on the pipe. There was a thick cake in the bowl, cobwebs in the bottom and on the bowl walls and some remnants of tobacco. The airway was plugged and there was no draught on the pipe. There was a lava overflow on the rim top. The inner edges of the bowl were damaged and the outer edge had been knocked about and damaged on the front side. The finish was dirty and dusty and there was lava on the sides and heel of the bowl. The pipe did not come with a stem so I would have to go through my collection of stems here to find one that fit well. I took photos of the pipe before I started my cleanup work on it. I took a photo of the bowl and rim top to show the cake in the bowl and the lava build up and the damage on the edges of the bowl. The cake was thick and hard and I am hoping that at some level it protected the edges from damage. You can see the nicks in the inner edge and the damage on the rim top. I also took a photo of the shank end. You can see the tars and build up around the opening.I turned to Pipedia to read about the Danmore brand (https://pipedia.org/wiki/Danmore). There was a brief article there that I quote below.

Danmore was founded by Hans Sørensen in the early 1970s, and produced pipes from that time until the early 1980s, at one point having up to 30 employees. The pipes were sold in the first Dan Pipe catalog. In the early 1980’s, however, production ceased in Denmark due to labor costs, and the company’s production was outsourced to Italy and Spain, and they began to also make pipecleaners and smokers articles.

Sørensen focused on the pipecleaner side of the concern, and eventually bought a share in the factory in the Far East making them. Today the company, owned by Hans’ sons Jesper and Lars Sørensen, no longer makes pipes, and instead makes only pipe cleaners under the name Danmore Hobby Aps, selling only to hobby and craftshops in Denmark and Scandinavia.

Hans Sørensen passed away in 2012. The Sørensen family continues to own the trademarks for the use of the Danmore name in relation to pipes, matches, and tobacco.

There was also a shape chart on the site that I have included. The shape was a 3041 which I have drawn a red box around.With that I turned to work on the pipe. I went through my can of stems and found one that would work well with the bowl. It is a uniquely carved saddle stem with a twist of a freehand. I sanded the tenon now slightly to allow it to fit the shank. I put it in the shank and took photos of the pipe. I like the looks of the one I chose over the original! I set the stem aside and turned to the bowl clean up. I reamed the bowl with a PipNet pipe reamer using the second and the third cutting head to take the cake back to bare briar. I cleaned up the reaming with a Savinelli Fitsall Pipe Knife. I sanded the walls with a piece of 220 grit sandpaper wrapped around a dowel to smooth them out. I scrubbed the exterior of the briar with a tooth brush and undiluted Murphy’s Oil Soap. It looked much better and the dust and debris was gone. I dried it with a cotton towel. I scrubbed out the internals of the pipe with 99% isopropyl alcohol, pipe cleaners and cotton swabs. I cleaned out the airway in the stem as well. I worked on these areas repeatedly until the shank and the airway in all the parts was clean.I worked over the damage on the inner edge of the bowl and the rim top. I also smoothed out the damage on the outer edge with a folded piece of 220 grit sandpaper. It looked much better after I sanded the damaged areas smooth.I polished the briar with 1500-12000 grit micromesh sanding pads. I wiped it down with a damp cloth after each pad. The briar took on a deep shine that highlighted the grain. I worked some Before & After Restoration Balm into the surface of the briar with my fingertips to clean, enliven and protect the briar. I let the balm sit for 15 minutes and then buffed with a cotton cloth to raise the shine. The photos show the bowl at this point in the restoration process. With that done, the bowl was finished other than the final buffing. I set it aside and turned my attention to the stem. I “painted” the surface of the stem with the flame of a lighter to lift the tooth marks. I sanded out what remained with 220 grit sandpaper and started polishing the stem with 600 grit wet dry sandpaper. I polished the stem with micromesh sanding pads – wet sanding with 1500-12000 grit sanding pads. I wiped it down after each sanding pad with Obsidian Oil. I finished polishing the stem with Before & After Pipe Stem polish (both Fine and Extra Fine) then wiped the stem down with another coat of Obsidian Oil.I am excited to finish this restemmed Danmore De Luxe 3041 Made in Denmark Scoop. I put the pipe back together and buffed it with Blue Diamond on the buffing wheel. I gave the bowl and the stem multiple coats of carnauba wax. I buffed the pipe with a clean buffing pad to raise the shine and hand buffed it with microfiber cloth to deepen the shine. It is fun to see what the polished bowl looks like with the rusticated gourd and the polished black, fancy turned vulcanite stem was beautiful. This Danmore De Luxe 3041 Scoop is nice looking and the pipe feels great in my hand. It is light and well balanced. Have a look at it with the photos below. The dimensions are Length: 6 inches, Height: 1 ¾ inches, Outside diameter of the bowl: 1 inch, Chamber diameter: ¾ of an inch. The weight of the pipe is 1.66 ounces/48 grams. It is a beautiful pipe and one that I will be putting in the Danish Pipemaker Section on the rebornpipes store. Thanks for walking through the cleanup with me as I worked over this pipe.

As always, I encourage your questions and comments as you read the blog. Thanks to each of you who are reading this blog. Remember we are not pipe owners; we are pipe men and women who hold our pipes in trust until they pass on into the trust of those who follow us.

Restoring a BIG, Beautiful Charatan


Blog by Kenneth Lieblich

Next on the chopping block is a Lumberman-shaped Charatan, from the family of a local gentleman who had passed away. It’s great-looking pipe, with a large bowl and a long, lovely shank. The stem is a handsome saddle – not the “double comfort” version. I’m looking forward to getting this one fixed up and available for sale. On the top of the shank, it says “Charatan’s Make [over] London, England [over] Special”. Nothing on the left side of the shank, but on the right side it reads the shape number “4402 X”. On the stem, there was the traditional “CP” of the Charatan company. The Lumberman is a member of the Canadian family of pipe shapes, and this one is a real beauty. Let’s do some research and see what we find. First of all, a search of Charatan shape numbers provides this nugget:

“402 Outsize Lumberman”

And that fits this pipe to a T. Now let’s see if we can date this pipe. I went to Pipedia and found an excellent article on dating Charatans. Here are some relevant quotations for this pipe:

“From 1863 to 1960 the mouthpieces have a normal shape, saddle or tapered. From 1961 they use the ‘Double Comfort’ style still used today. By the way there are some saddle bits (without the double comfort) used in pipes that date after 1960 but these models are always characterized by a X (in the place of the DC) engraved after the shape number on the shank. This means that if a pipe has a tapered mouthpiece instead of a double comfort one, it is definitely a pre-Lane pipe before 1960. While if a pipe has a normal saddle bit stem, it could belong to every era. Nevertheless the pipe is pre 1961 if the shape code does not include an X, and is a pipe from after 1960 if the X is engraved.”

So this tells us that this pipe dates from after 1960. But there’s more!

“The CP logo on the stem is stamped in a different shape according the era it was used. Some differences are less obvious than others, however the glaring differences are detectable in 4 phases…. From 1961 to 1977 the CP logo is more pronounced and the C penetrates the P.”

So this tells us that this pipe dates from after 1960, but before 1977. And, again, there’s even more!

“Presence of the writing “CHARATAN’S MAKE LONDON ENGLAND” on 2 lines.”

This is the clincher. It confirms that this comes from the “First Lane era, 1961-1965”. After this date, that specific writing on the shank changes from 2 to 3 lines. So this pipe dates from approximately 60 years ago. One important note: from 1955 all the pipes imported into the USA (and presumably Canada?) by Lane has a stylized “L” (to indicate Lane’s proprietorship). This pipe does not have the stylized “L”, so was likely acquired in England. Here’s an image of the pipe in question, from a 1964 catalogue: On to the pipe itself. It arrived in fairly good shape – no major problems to report. Just needs some TLC and it will look fantastic. The stem has a few minor bite marks and a good bit of oxidation, but nothing serious. The stummel had a few very minor nicks on the bowl, plus there was a good amount of lava on the rim and some charring. Most of the stummel, however, was in excellent condition – especially for 60 years old. Time to get to work! The stem was first on my list. I wiped the outside down with Murphy’s Oil Soap on some cotton pads. I also took a BIC lighter and ‘painted’ the stem with its flame to lift the few bite marks and dents. Then I cleaned out the inside with pipe cleaners and isopropyl alcohol. It was minorly dirty and I only went through a few pipe cleaners. I then wiped down the stem with SoftScrub cleaner to remove surface oxidation. Once this process was done, the stem went for an overnight soak in the Pipe Stem Oxidation Remover. This allows me to clean the oxidation off in a couple of ways: by applying a mild cleaner to the surface and sanding the stem. The next day, I used SoftScrub again with some cotton rounds. After this, I used some acrylic paint to restore the logo on the stem. I painted the area carefully and let it fully set before proceeding. I built up the dents on the stem with black cyanoacrylate adhesive and let them fully cure. I then sanded the adhesive down with 220- and 400-grit sandpapers to meld seamlessly into the stem. I then used all nine Micromesh pads (1,500 through 12,000 grit) to bring out the stem’s lovely black lustre. I also used Obsidian Pipe Stem Oil in between each pad scrubbing. With the stem shiny and clean, I set it aside and moved on to the stummel. Firstly, I decided to ream out the bowl. I used the PipNet Reamer to remove the built-up cake and followed that with 220-grit sandpaper taped to a dowel to eliminate as much as I could. I took the chamber down to bare briar, as I wanted to ensure there were no hidden flaws in the wall. There were a few thin, wispy heat fissures inside the bowl, but nothing serious. That’s easily dealt with – later. I then proceeded to clean out the insides of the shank with Q-tips, pipe cleaners, and lemon-infused isopropyl alcohol. There was a bit of filth inside this stummel and it took a fair amount of cotton to get it clean. I followed that up by cleaning the insides with some dish soap and tube brushes. I decided to de-ghost the pipe to remove any lingering smells of the past. I thrust cotton balls into the bowl and the shank and saturated them with 99% isopropyl alcohol. I let the stummel sit overnight. This caused any remaining oils, tars and smells to leach out into the cotton. The bowl was nice and clean after this.Even though the nicks on the stummel were slight, I dug out my iron and a damp cloth to try to raise them. The hot and moist steam can often cause the wood to swell slightly and return to shape. This worked quite well, but alas, I forgot to take pictures.

I used cotton rounds and some Murphy’s Oil Soap to scrub the outside of the stummel. I decided it wasn’t necessary to top this pipe. I felt that I could remove the charring without removing any patina. I used a piece of machine steel to gently and carefully scrape away the lava on the rim, before using a toothbrush with Murphy’s to get rid of the rest. So, I opted for just the Micromesh pads to finish things up. Since the pipe was in such good condition, I only used the 3200-grit and up.I addressed the small fissures in the bowl, by coating the entire inside of the bowl with a mixture of activated charcoal and my wife’s homemade yoghurt. Once hardened, this provided a good, slightly rough surface for a new cake to build. I applied a light application of Before & After Restoration Balm. This stuff works wonders in bringing out the beauty of wood. I make use of the stuff in every restoration. Then it was off to the buffer. I used White Diamond and carnauba wax to make this pipe super spiffy.This Charatan looks amazing and is ready to be enjoyed by the next owner! I am pleased to announce that this pipe is for sale! If you are interested in acquiring it for your collection, please have a look in the British Pipemakers section of the store here on Steve’s website. You can also email me directly at kenneth@knightsofthepipe.com. The approximate dimensions of the pipe are as follows: length 6¼ in. (160 mm); height 2 in. (53 mm); bowl diameter 1⅝ in. (42 mm); chamber diameter 1 in. (24 mm). The weight of the pipe is 1¾ oz. (52 g). I hope you enjoyed reading the story of this pipe’s restoration as much as I did restoring it. If you are interested in more of my work, please follow me here on Steve’s website or send me an email. Thank you very much for reading and, as always, I welcome and encourage your comments.

Restoring a Republic Era Petersons “Kildare” 87 Apple


Blog by Steve Laug

The next pipe I have chosen is smooth finished Peterson’s “Kildare” Apple shaped pipe that had a very dirty/grimy finish but had some good looking grain around the bowl sides and shank. It came to us from an Antique Store on 10/20/2022 in Vancouver, Washington, USA. This Lightweight Apple was stamped on the left side of the shank and read Peterson’s [over] “Kildare”. It was stamped on the right side and read Made in the Republic of Ireland (three lines) followed by the number 87 near the shank/bowl junction. The pipe was in filthy condition when he brought it to the table. The finish was dirty with grime ground into the briar sides and rim. There was a thick cake in the bowl and a coat of lava on the rim top but the edges of the bowl. The inner edge of the bowl was thickly coated in lava and it was hard to know how the rim top and edges looked underneath. The stem was dirty with oxidation and calcification on it. There were tooth marks and chatter on the top and underside on and near the button and on the button edges as well. The P lip portion of the stem was bent downward putting the airway on the end of the stem. There was no “P” stamp logo on the taper stem. Jeff took photos of the pipe before his cleanup work. They tell the story and give a glimpse of the promise that we see in this pipe. Jeff took photos of the rim top and stem to show the general condition of the pipe. The bowl is thickly caked and the rim top has a lava coat flowing down the outside of the bowl and the inner edge. The finish on the bowl is rough but I will know more once it is cleaned up. The photos of the stem show the oxidation, calcification and the tooth marks and chatter on both sides near the button. The P-Lip has been heated and turned downward making the airway enter at the bend end! Jeff took some photos of the bowl sides and heel to show the amazing grain that is peeking out from underneath that overflow of lava and grime on the surface around this bowl. It is appears to have a nice looking pipe hidden underneath it all! He took photos of the sides of the shank to show the stamping. The stamping is faint but readable in the photos below and is as noted above. I am including the information from Pipedia’s article on Peterson pipes. It is a great read in terms of the history of the brand (https://pipedia.org/wiki/Peterson). I have included a bit of the pertinent history here.

1950 – 1989 The Republic Era – From 1950 to the present time, the stamp for this era is “Made in the Republic of Ireland” in a block format generally in three lines but two lines have been used with or without Republic being abbreviated.

During the 1950’s and 60’s the Kapp & Peterson Company was still in the ownership of the Kapp family. However, 1964 saw the retiral of the company Managing Director Frederick Henry (Harry) Kapp.

I turned to “The Peterson Pipe” by Mark Irwin and Gary Malmberg to get some background on the Peterson’s System Line. On page 314 it had the following information.

Kildare (1965-) First issue of line with matte-finish in Classic Range shapes, P-Lip and fishtail mouthpiece. Second issue C.1979 as Kildare Patch, with rusticated patches on pipe surface. Third issue 2010, matte-brown, P-Lip or fishtail mouthpiece, no band. Fourth issue 2011-, burgundy sandblast finish, nickel army mount, fishtail mouthpiece, exclusive to smokingpipes.com.

Judging from the description above I believe that I am working on a First Issue of the line in the time period of 1965-1979. It is a late Republic Era Classic Shaped pipe with a matte-finish and a P-Lip stem. Now it was time to work on the pipe.

With that information at hand I turned to work on the pipe itself. Jeff had thoroughly cleaned up the pipe. He reamed the pipe with a PipNet Pipe Reamer and cleaned up the remnants with a Savinelli Fitsall Pipe Knife.  He scrubbed the bowl with undiluted Murphy’s Oil Soap with a tooth brush. He rinsed it under running warm water to remove the soap and grime. There were portions of the bowl sides where the tars had stained the briar but it was clean! He cleaned out the inside of the shank and the airway in the stem with alcohol, cotton swabs and pipe cleaners. He scrubbed the exterior of the stem with Soft Scrub to remove as much of the oxidation and calcification as possible. He soaked the stem in Before & After Deoxidizer and rinsed it off with warm water. I took photos of the pipe once I started to work on it. I took some close-up photos of the rim top, bowl front and heel as well as the stem surface. I wanted to show what an amazing job Jeff did in the cleanup of the rim top. The rim top and inner edge had darkening and damage. There was damage to the inner edge on the front and back of the bowl. The bowl front and heel had some darkening from the tars staining the briar. I also took close up photos of the stem to show the condition of the vulcanite. It was quite clean and the light tooth marks on the stem ahead of the button that do not show up well. The button was also bent downward and the airway was at the stem end. One of the things I appreciate about Jeff’s cleanup is that he works to protect and preserve the nomenclature on the shank of the pipes that he works on. The stamping on this one was very faint to start with so I was worried that it would disappear altogether with the cleanup. He was not only able to preserve and maintain its condition in the process. I took some photos to show the clarity of the stamping. I have noticed that many restorers are not careful to protect the stamping in their cleaning process and often by the end of the restoration the nomenclature is almost destroyed. I would like to encourage all of us to be careful in our work to preserve this as it is a critical piece of pipe restoration! I took the stem off the shank and took a photo of the pipe. I decided to start my work on the pipe by cleaning up the rim top, inner edge of the bowl and the darkening on the front of the bowl. I worked over the edge with a folded piece of 220 grit sandpaper. I minimized the damage on the inner edge and rim top. It looked significantly better. I used a medium grit sanding sponge and 220 grit sandpaper to sand the darkening on the bowl front. It looked better but still was too dark to my liking. I mixed a batch of oxalic acid and wiped down the darkened areas to see if that method would lighten it more. Each step took more of the darkening away. I sanded it again with the sanding sponge and 220 grit sandpaper and finally it was as good as it would get. Some of the darkening remained but it was still a big improvement. I stained the bowl with a light brown aniline stain to try to cover and blend in the darkening on the rim top and front of the bowl. I applied the stain with a wool dauber and flamed it with a Bic lighter to set it in the grain. I set it aside to let the stain coat cure. I wiped the bowl down with alcohol on cotton pads to lighten the opaque stain and make it more transparent. I like the way the pipe looked at this point in the process. I still needed to use micromesh on it but it was looking better. I polished the briar with micromesh sanding pads – dry sanding it with 1500-12000 grit sanding pads. I wiped it down with a damp cloth after each sanding pad to remove the dust. The briar was really shining by the final pad. I rubbed the bowl and rim down with Before & After Restoration Balm. I worked it into the surface of the briar with my fingertips to clean, enliven and protect it. I let the balm sit for 10 minutes and then buffed with a cotton cloth to raise the shine. I really like watching the Balm do its magic and bring the briar alive. I set the bowl aside and turned my attention to the stem. Someone had heated the tip of the button and bent it down to bring the airway on the top of the P-lip down to form a straight opening in the stem end. I heated the tip with a heat gun and carefully bent it back up and straight once again. The airway opening is certainly closer to the original than it was when I started. A bit more shaping is going to be necessary but it is better. I polished the stem with micromesh sanding pads – wet sanding with 1500-12000 grit pads. I wiped the stem down after each sanding pad with Obsidian Oil. I polished it with Before & After Pipe Stem Polish – both Fine and Extra Fine. I gave it a coat of Obsidian Pipe Stem Oil. It works to protect the stem from oxidizing. I set it aside to dry.    Once again at this point in the restoration process I am excited to be on the homestretch. I look forward to the final look when the Republic Era Peterson’s “Kildare” 87 Apple with a taper stem is put back together, polished and waxed. I put the bowl and stem back together. I lightly polished the bowl and stem with Blue Diamond to polish out the scratches in the briar and the vulcanite. I gave the bowl and the stem multiple coats of carnauba wax. I buffed the pipe with a clean buffing pad to raise the shine. I hand buffed it with a microfiber cloth to deepen the shine. The pipe polished up pretty nicely. The depths of the rustication really pop with the wax and polish. The shiny black vulcanite stem is a beautiful contrast to the browns of the bowl and thick shank. This Republic Era Peterson’s “Kildare” 87 Apple was another challenging pipe to work on. It is a nice piece of briar that cleaned up really well. The pipe feels great in the hand will be better when warmed up while smoking. The finished pipe is shown in the photos below. The dimensions of the pipe are Length: 5 ½ inches, Height: 1 ¾ inches, Outside diameter of the bowl: 1 inch, Chamber diameter: ¾ of an inch. The weight of the pipe is 1.13 ounces/32 grams. I will be putting it on the rebornpipes store in the Irish Pipemakers Section if you would like to add it to your rack and carry on the previous pipeman’s legacy. This is an interesting estate to bring back to life.

As always, I encourage your questions and comments as you read the blog. Thanks to each of you who are reading this blog. Remember we are not pipe owners; we are pipe men and women who hold our pipes in trust until they pass on into the trust of those who follow us.

My Grandfather’s Apple


Blog by Kenneth Lieblich

Next on the chopping block is a personal pipe – and one that is staying in my collection. This pipe is a charming apple shape with a straight stem of what I assume is amberoid – and not real amber. I do not know where my grandfather acquired it (or under what circumstances), but I suppose it does not ultimately matter. My grandfather was an enthusiastic pipe smoker and he clearly enjoyed this one. I am definitely looking forward to cleaning this one up. It has a value well beyond dollars. As the photos show, this pipe has a stem that tapers towards the button. In addition to this, it also has an orific button. These two facts suggest a pipe from the pre-WW2 era. For more information on the orific button, take the time to read Steve’s interesting article on the subject. This type of button is a feature that apparently disappeared by the 1930s, but the metal tenon suggests a date that is more likely in the 1940s. The pipe’s markings read Racine de [over] Bruyere [over] Garantie (on the left side of the shank). Alas, there are no other markings to be found. As you may know, Racine de Bruyere Garantie means “Guaranteed Briar Root”. This indicates that the pipe almost certainly comes from St Claude, France, but gives no indication of who made it. As previously mentioned, I do not know the exact date of the pipe, but it is likely from the 1940s.Anyway, on to the pipe – and it’s a pipe that just makes you smile. There is something wholesome and comforting about the look of the pipe. I must admit, however, that I may be thinking of my grandfather more than the pipe!

This poor pipe was not without its issues. The stummel had the following problems: lava on the rim, charring to the rim, a bashed rim, plenty of cake in the bowl, a few substantial and ugly fills, and a tired, worn-out colour of wood. By the way, some of the strange “marks” on the bowl are, in fact, old bits of newspaper. After my grandfather died, the pipes were wrapped in newspaper and stuck in a box. The newspaper got wet at some point in the intervening years. Meanwhile, the stem had its own set of problems: major tooth marks and dents, a bite-through, and a filthy stinger. The stem was first on my list. The stinger actually screwed into the tenon – and it was being quite stubborn about coming out! I opted to warm the stinger with a heat gun and this provided just enough softening of the internal goo to allow me to pull it out. The stinger then went for a soak in some lemon-infused isopropyl alcohol. I let it set for several hours and then cleaned it off and it looked much improved. I then finished it with some 0000-grit steel wool, greased the threads with some petroleum jelly and moved on. I wiped down the outside of the stem with Murphy’s Oil Soap on some cotton pads. Then, I cleaned out the insides with pipe cleaners and isopropyl alcohol. As I mentioned earlier, I think this stem is made from amberoid. This is a synthetic of small pieces of amber, pressed together under great pressure and high heat.Now it was time to make a fix the damage. I tried desperately hard to clean the discoloration inside and outside the stem, but this met with limited success. I ended up filing the dents etc. with clean cyanoacrylate adhesive. I first plugged up the stem’s draught hole with a pipe cleaner coated in petroleum jelly. This ensured that any of the cyanoacrylate would not accidentally plug up the air passage in the stem. I then used a miniature file to shape the button and make it suitable for sanding. I then sanded the stem down with 220- and 400-grit sandpapers to meld seamlessly into the stem. This ensures that it keeps its shape and looks like it should. I then used all nine Micromesh pads (1,500 through 12,000 grit) on the stem to make look as much like amber as possible. I also used Obsidian Pipe Stem Oil in between each pad scrubbing. It is worth noting that a repair this big on a stem will never be invisible, but I was pleased with how the stem finished up. On to the stummel, and the usual cleaning procedures were in order for this pipe. I used the KleenReem to remove the built-up cake, and followed that with 220-grit sandpaper to remove as much as I could. I wanted to take the bowl down to bare briar to ensure there were no hidden flaws in the walls of the bowl. Fortunately, there were none. I then proceeded to clean out the insides of the shank with cotton swabs, pipe cleaners, and isopropyl alcohol. There was quite a bit of filth inside this stummel – it took many pipe cleaners et cetera to clean it out. Have a look at the photos – disgusting! I decided that a de-ghosting session would be a good idea. I thrust cotton balls into the bowl and the shank and saturated them with 99% isopropyl alcohol. I let the stummel sit overnight. This caused the oils, tars and smells to leach out into the cotton. The bowl was nice and clean after this. One interesting point of note is that the mortise on this pipe is lined with cork (another sign of the pipe’s age). This complicated the cleaning process, as I needed to ensure that the alcohol etc. didn’t degrade the cork. I worked carefully and it turned out alright.I followed that up by cleaning the insides with some Castile soap and tube brushes. I then moved on to cleaning the outside of the stummel with Murphy’s Oil Soap and some cotton pads. That removed the bits of aforementioned newspaper and any remaining dirt. I also soaked the rim in Murphy’s for a while, then used a toothbrush to loosen up the lava.There were several notable dents and nicks on the rim. Normally, I would top the pipe on a piece of 220-grit sandpaper. I didn’t do that this time because I wanted to maintain the rounded profile of the rim. I still used 220-grit sandpaper, but made sure to keep the look of the pipe.Having completed that, I was able to address the fills on the stummel. I used a dental tool to dig out the old, crumbly putty. I filled the divots with a mixture of cyanoacrylate adhesive and briar dust – then let it cure. Now, with the nicks filled, it was time to sand down the stummel. I used all nine Micromesh pads (1,500 through 12,000 grit) to sand everything smooth.After that, a light application of Before & After Restoration Balm brought out the best in the stummel’s grain. What a difference that made! I felt that this pipe really needed some colour for two reasons: some dark colour would contrast nicely with the orange of the stem and it would help obscure some of the dreadful fills. I applied Fiebing’s Cordovan Leather Dye with a cotton dauber. I flamed it with my Bic lighter, let it set, then coated it again with dye, flamed it again, and let that set too. I decided to let the pipe sit overnight. Upon the morrow, I used isopropyl alcohol to wipe down the pipe and remove excess stain. I am very happy with the results.Then it was off for a trip to the buffer. A dose of White Diamond and a few coats of carnauba wax were just what this pipe needed. The lovely shine made the wood look absolutely beautiful.This is a wonderfully crafted pipe and has a very elegant feel to it. It took a lot of work, but I am proud of it and the final product is (hopefully) worthy of my beloved grandfather’s memory. Obviously, this is one pipe that I am keeping for myself and adding to my collection. I am sure that I will be enjoying this one for many years to come. I hope you enjoyed reading the story of this pipe as much I as I did restoring it. The approximate dimensions of the pipe are as follows: length 5⅜ in. (136 mm); height 1⅝ in. (43 mm); bowl diameter 1⅜ in. (37 mm); chamber diameter ¾ in. (19 mm). The weight of the pipe is 1¼ oz. (40 g). If you are interested in more of my work, please follow me here on Steve’s website or email me directly at kenneth@knightsofthepipe.com. Thank you very much for reading and, as always, I welcome and encourage your comments.

New Life for a Peterson’s London & Dublin 86 Apple


Blog by Steve Laug

The next pipe I have chosen is smooth finished Peterson’s London& Dublin Apple shaped pipe that had a very dirty/grimy finish but had some good looking grain around the bowl sides and shank. It came to us from an Antique Store on 10/20/2022 in Vancouver, Washington, USA. This Lightweight Apple was stamped on the left side of the shank and read Peterson’s [over] London & Dublin. It was stamped on the right side near the shank/stem junction it is stamped with the shape number 86. The pipe was in filthy condition when he brought it to the table. The finish was dirty with grime ground into the briar sides and rim. There was a thick cake in the bowl and a coat of lava on the rim top but the edges of the bowl. The inner edge of the bowl was thickly coated in lava and it was hard to know how the rim top and edges looked underneath. The stem was dirty with oxidation and calcification on it. There were tooth marks and chatter on the top and underside on and near the button and on the button edges as well. There was no “P” stamp logo on the taper stem. Jeff took photos of the pipe before his cleanup work. They tell the story and give a glimpse of the promise that we see in this pipe. Jeff took photos of the rim top and stem to show the general condition of the pipe. The bowl is caked and the rim top has a lava coat and the inner edge of the bowl is rough and shows knife damage. The photos of the stem show tooth marks and chatter on both sides near the button. Jeff took some photos of the bowl sides and heel to show the amazing grain that was around this bowl. It is a nice looking pipe. He took photos of the sides of the shank to show the stamping. The stamping is readable in the photos below and is as noted above.I have restored a few Peterson’s Dublin & London in the past so I turned to my blog to have a look at the background information that I included in those blogs. I found the following link to a one of those pipes (https://rebornpipes.com/2021/02/24/restoring-a-made-in-ireland-petersons-dublin-london-999-rhodesian/). I also am including the background information I had gathered on the line from the previous blog. I quote:

I am including the link to the Pipedia’s article on Peterson pipes. It is a great read in terms of the history of the brand (https://pipedia.org/wiki/Peterson).

I turned to “The Peterson Pipe” by Mark Irwin and Gary Malmberg to get some background on the Peterson’s Dublin & London Pipe. On page 298 it had the following information.

Dublin & London (c1940-97, 2016-) First mentioned in a 1940 brochure, but probably not widely distributed until ’45, Dublin & London was the highest quality line (aside from the Supreme, introduced in ’53) until about ’86. P-lip or fishtail mouthpiece, polished finish, although sandblast described in ’70 Iwan Ries & Co. catalog. COMs include MADE IN over IRELAND (1940-80) and MADE IN THE over REPUBLIC over OF IRELAND (c1980-97)…

…London & Dublin – English made version of the Dublin & London, made in Peterson’s English factory until it closed in 1962. Classic Range shapes were not as a rule banded and no genuinely hallmarked specimens of the pipes with this model name have been documentd. Rare examples may be additionally stamped Natural. COM on all pipes is LONDON MADE over ENGLAND. Mouthpiece maybe stamped P.

Judging from the description above, the pipe I am working on is stamped with the stamp noted in red above. It does not have a COM stamp or if it did it has been buffed out. The London & Dublin stamp identifies the pipe as an English made version of the Dublin & London. Now it was time to work on the pipe.

Jeff had done a great job cleaning up the pipe as usual. He reamed the pipe with a PipNet reamer and cut back the cake back to the bare briar. He cleaned up the walls with a Savinelli Fitsall Pipe Knife. He scrubbed the interior of the bowl and shank with pipe cleaners, cotton swabs and alcohol to remove the tars and oils. He scrubbed the exterior of the pipe with Murphy’s Oil Soap and a tooth brush to remove the grime from the finish. He worked on the rim top lava and the darkened spots with the soap and tooth brush. He scrubbed the inside of the stem with alcohol and pipe cleaners. He scrubbed the exterior with Soft Scrub and then soaked it in Briarville Pipe Stem Deoxidizer. He washed it off with warm water to remove the Deoxidizer. The pipe looked far better when it arrived. I took close up photos of the rim top and also of the stem surface. I wanted to show how well it had cleaned up. The rim top had some looked quite good and the inner edge had some darkening and damage. It should clean up really well. I also took close up photos of the stem to show the tooth marks on the surface near the button on both sides and on the button itself.I took photos of the stamping on the sides of the shank. You can see that it is stamped as noted above. It is clear and readable. I removed the stem and took a photo of the pipe to have a look at the parts and overall look. I decided to address the damage on the rim top and the inner edge of the bowl first. I used a folded piece of 220 grit sandpaper to smooth out the damage and bring the bowl back to round. I polished the bowl and shank with micromesh sanding pads – dry sanding with 1500-12000 grit pads. I wiped down the bowl after each pad with a damp cloth to remove the sanding debris. I worked some Before & After Restoration Balm into the surface of the bowl and shank with my fingertips to clean, enliven and protect the briar. I let the balm sit for 15 minutes and then buffed with a cotton cloth to raise the shine. The photos show the bowl at this point in the restoration process. I set the bowl aside and “painted” the stem surface with the flame of a “Bic” lighter to lift the tooth marks. I was able to raise them some but not completely. I filled in the remaining marks on the button edge and the surface with black CA glue. Once it cured I used a file to shape the button edge and also smooth out the fill. I sanded the remaining marks with 220 grit sandpaper to blend them into the surface of the surrounding vulcanite. I started polishing the stem surface with 600 grit wet dry sandpaper. I polished the stem with micromesh sanding pads – wet sanding with 1500-12000 grit sanding pads. I wiped it down after each sanding pad with Obsidian Oil. I finished polishing it with Before & After Pipe Stem Polish – both Fine and Extra Fine and buffed it off with a cotton cloth. I gave it a coat of Obsidian Oil to preserve and protect the stem.I am excited to finish this English Peterson’s London & Dublin, Apple 86. I put the pipe back together and buffed it with Blue Diamond on the buffing wheel. I gave the bowl and the stem multiple coats of carnauba wax. I hand buffed the pipe with a clean buffing pad to raise the shine. It is fun to see what the polished bowl looks like with beautiful mixed grain all around it. Added to that the polished black vulcanite stem combined with the bowl and brass band on the shank and made a stunning pipe. This smooth Classic Older Peterson’s London & Dublin English Made Apple 86 is great looking and the pipe feels great in my hand. It is light and well balanced. Have a look at it with the photos below. The dimensions are Length: 5 ¼ inches, Height: 1 ½ inches, Outside diameter of the bowl: 1 inch, Chamber diameter: ¾ of an inch. The weight of the pipe is 34grams/1.20oz. It is a beautiful pipe that I will soon be putting on the rebornpipes store in the Irish Pipe Makers Section. If you are interested in adding it to your collection send me an email or a message. Thanks for walking through the restoration with me as I worked over this pipe. Thanks to each of you who are reading this blog.

As always, I encourage your questions and comments as you read the blog. Thanks to each of you who are reading this blog. Remember we are not pipe owners; we are pipe men and women who hold our pipes in trust until they pass on into the trust of those who follow us.

Restoring a Budapest Purchase – A Tatu Pipe 1126 Freehand


Blog by Steve Laug

When I was traveling for work I was in Budapest, Hungary I visited the Gallwitz Pipe Shop. It is a shop I have visited several times in the past. I wrote about my first visit to various Budapest Pipe shops including Gallwitz back in 2015 (https://rebornpipes.com/2015/09/30/my-how-things-change-reflections-on-pipe-smoking-while-visiting-budapest/). When I visited it this time I spent time with the current owner and proprietor of the shop, Viktor Zollner (the grandson of the last Gallwitz owner). We had a great visit talking about the current state of pipes and pipe repair in Hungary since I had visited in 2015. Viktor had carved many pipes but was currently focusing his attention on pipe repair and estate pipes. He said that he loves the challenge of pipe and stem repair more than pipe carving – just as I do. He brought out some boxes and bags of estate pipes for me to look over and there were some real beauties that I have not seen before among them. We talked about repairs and cleaning of pipes and stems. One of the pipes that he had not worked on yet was a freehand that he said was a Tatu Pipe. It caught my attention enough that I laid it aside while looking at the others he brought out. It was stamped with two pipes toward the front of the smooth panel on the underside. That was followed by the stamping 1126 [over] Tatu Pipe. It was a large freehand pipe in a mushroom shape. It had a smooth rim and a sandblast bowl finish. There was a bit of plateau on the rim top toward the front of the bowl. There as also what looked like a boxwood shank extension. It was light and a contrast with the briar. The shank end had a brass circle to re-enforce the mortise of end of the shank. There was what appeared to be a burn mark on the bottom front of the bowl toward the bottom. I examined it but it was not clear if it was a burn mark on the briar or the beginning of a burn through. The bowl had a thick cake around the bowl and some lava overflow and darkening on the inner edge, heavier toward the back of the bowl. The stem was lightly oxidized and had light tooth marks and chatter on both sides ahead of the button. I took photos of the pipe when I got back to the flat we had rented in Budapest. I took some photos of the bowl, rim top and the stem. The details of the rim top and inner edge were as noted in the description above. The stem also shows the condition as noted in the above.I took a photo of the stamping. It was faint but readable with a lens and read as noted above.I also took a photo of the burn damage on the front lower part of the bowl. It was hard to tell whether it was the beginning of a burn out or burn damage on the briar from setting it in an ashtray.  I decided to take a calculated risk and purchase the pipe. I would more once I had cleaned it up.Before I started my work on the pipe I really wanted to know about the brand. It was a brand I was not overly familiar with and wanted to gather background information. I did a Google search to see if there was anything under the Tatu Pipe stamp. The first site that came up was for a pipe for sale on smokingpipes.com. I quote from there below as it pointed toward more information for me (https://www.smokingpipes.com/pipes/estate/japan/moreinfo.cfm?product_id=143673). It was description of a particular freehand pipe but the background information included was very helpful in giving me clues to move ahead.

Japanese Estates: Tatu Pipe by Tetsuo Tajima (Unsmoked) Tobacco Pipe

Tajima-san made his US debut at the 2011 CPCC, and his work impressed enough, that both European and American dealers were all but slapping each other’s hands, in an effort to acquire his briars. Up until the end of 2004, Tatsuo worked as film and graphic designer, but 2005 found him committing his time to learning pipe carving and his mentor was none other than Shizuo Arita. If memory serves, this Tajima oceanic denizen was carved in 2012, and it remains unsmoked to this very minute. Novel shape, solid grain, and best held with the ever-reliable finger-crook method.

From that clue I turned to the Tatu pipe information on Pipephil’s site to get some more history and background on the brand (http://www.pipephil.eu/logos/en/logo-t2.html#tatupipe). I have included a screen capture of the information that was included there along with a photo of the pipe maker, Tatsuo Tajima and some sidebar information below. It also helped give me information on the stamping on the pipe. Artisan: Tatsuo Tajima (born 1955) formerly was a film and graphic designer. He started making pipes in 2005.

Since the pipe I had bore the stamp 1126 which I could now interpret to refer to the year the pipe was made (11=2011) and the 26 indicates the manufacture rank in that year (rank 26). That was a significant piece of information on the pipe. I now knew the date of the carving was 2011 and that this was the 26th pipe of the year.

I turned then to Pipepedia and looked in the Japanese Pipe Makers section under the name Tajima (https://pipedia.org/wiki/Tajima) and found some more information as well as other pipes that he had carved with similar design features. I quote below.

Tatsuo Tajima, born in 1955, native of Tokyo. His previous life was a well decorated Film and Graphic Designer. Since 2007, as fate says under the guidance of Shizuo Arita and Shigeyoshi Yanagihara embark on pipe crafting as a second career.

Drawing from other genre of smoking culture such as shisha and similar paraphernalia he makes you wonder and reconsider what smoking pipe actually is about. At most part, he would say the experience, the quality of smoke (moisture, flavour, and temperature) while using something that we can appreciate aesthetically. His work set boundaries free and invite smokers to be more universal and uniting at one point: on the flavour of tobacco and the experience of drawing a smoke.

For inspiration, he goes to the same park most of the time. He picks up elements of nature that he saw interesting. “Nature is different everytime we visit.” says Tatsuo-san. It is alive. Some days, even hours, leaning more towards the sun. It might be blooming, or fallen to the ground. There are movement.

Not only a naturalist in approach but artificial landscape and man-made creation also inspire him. NASA space shuttle to construction site digging gave him inspiration. I just called it simply being a Japanese and their fascination of robots and mechanical wonders. If his pipe is a painting, his expression would be Dali kind of surrealism.

Capturing nature in his own way, it could often be more realistic as a result.

Often you will see his combination of modernism and retro being executed with Wabi-sabi aesthetic. Also, behind that artistic styling and unique structure, he is always on the exploration on the new experience of smoking, when possible contribute to the health aspect. Such as the use of reverse calabash and longer shank to decrease moisture and cool down the smoke due to longer travel.

In life, he drinks tea throughout the year, warm Oolong Tea in winter and cold Mugicha in summer. He drinks no alcohol. By all means, I have tried with both tea or alcohol, and his pipes still smokes like a dream. He is also in touch almost on a daily basis with a retired senior pipemaker, Shigeyoshi Yanagihara.

Tatsuo Tajima, currently resides in Tokyo, lives quite close with his teacher and friend, Yanagihara-san. His current pipe production is about 60 pipes a year.

I then turned to Pipes2smoke where Maxim Engel currently sells Tatsuo Tajima’s pipes for further information (https://pipes2smoke.com/collections/tatsuo-tajima). I quote from that site below.

Tatsuo Tajima, (“Tatu”) was born in 1955 in Tokyo. He originally worked as a film and graphic designer and contributed large-scale image displays mainly for feature films and for such events as Tsukuba Expo ’85, Nara Silk Road Expo ’87, and Design Expo Nagoya ’89 as well as for museums such as Edo-Tokyo Museum. From ’93 onwards, with the general shift to digital media, he focused on multimedia titles and graphics as a graphic designer. He has received numerous awards from such competitions as Opel Design Contests, Epson Imaging Contests, and Victor Video Festivals.

From 2005 onward, Tatu committed himself to pipe making under the guidance of Shizuo Arita and Shigeyoshi Yanagihara. In 2009 he made his debut as a full time pipe artist at Amanoya in Setagaya, Tokyo. 

He had his first US exposure in 2011 at the Chicago Pipe Show. Every Tatu pipe shows the Japanese pipe aesthetic with its mix of curved and straight lines & at times asymmetry flowing into a harmonious whole. And always with the famous Japanese attention to detail.

If you would like to see more of Tatsuo Tajima’s work have a look at his Instagram site (https://www.instagram.com/tatupipe/). He does some fascinating work.

Now it was time to work on restoring this interesting Japanese Freehand. I decided to evaluate the damage to the front of the sandblast bowl. I wanted to know if it was the beginning of a burn out in the briar or if it had come from it having been set on a live coat in an ash tray. I examined the interior of the bowl and could find no obvious damage on the walls. I would know more once I had reamed and cleaned the bowl. I worked on the exterior of the finish with a brass bristle wire brush. I wanted to know if the damage was surface or only on the top of the finish. The brass brush revealed that it was not too deep. It appears that there was a flaw in the briar – a sandpit in blast. I circled the area with a red line in the second photo below.I filled in the sandpit with briar dust and clear CA glue. I used the brass bristle wire brush after the repair had cured to remove the excess repair and also rework the sandblast finish. It looks very good though there is some darkening around the spot. Once I knew that there was a sandpit/flaw and had repaired it I turned to more deeply examine the walls of the bowl to see if there were any checking or burns on the bowl walls or heel in the surrounding interior area behind the flaw. I reamed the bowl with a PipNet piper reamer to remove the thick cake on the walls. I cleaned up the reaming with a Savinelli Fitsall Pipe knife to remove the remaining cake on the walls. I sanded the bowl walls with 220 grit sandpaper wrapped around a dowel. I wiped the bowl out with a damp cloth to remove the dust and debris. I examined the bowl walls and they were smooth and wihtout checking or burn damage on the wall behind the mark on the outside of the bowl. I cleaned up the darkening and the burn damage to the rim edge and the top with a folded piece of 220 grit sandpaper. Once I had finished it looked much better.I scrubbed the exterior of the bowl with a tooth brush and undiluted Murphy’s Oil Soap and warm water to remove the grime in the sandblast finish. When I cleaned it the shank extension was loose but the pipe looked much better. I cleaned out the inside of the shank extension, shank and the stem with pipe cleaners, cotton swabs and 99% isopropyl alcohol. It was really filthy so with a bit of work the pipe smelled much better.I reglued the shank extension to the shank with Weld Bond all purpose glue. I applied it to both smooth ends of the shank and extension with a tooth pick and pressed it onto the tube that held it in place on the shank. I aligned the sharp edge of the extension with the sharp edges of the shank and press it in place until the glue cured. I stained the bowl with a light brown aniline stain to blend in the burn marks on the exterior of the front lower sandblast bowl. I felt that it would blend in the damaged area with the rest of the sandblast on the bowl. I applied it with a dauber and then flamed it to set it in the finish. Once the stain had cured I worked some Before & After Restoration Balm into the briar with my fingertips and a horsehair shoe brush. I wanted to make sure that it was in the deep grooves of the sandblast. I also worked it into the smooth shank extension with my fingertips. I let it sit and do its magic for 15 minutes then buffed it off with a soft cotton cloth. The pipe looked much better and the burn marks were blended into the surface with the stem. I set the bowl aside and “painted” the stem surface with the flame of a “Bic” lighter to lift the tooth marks. I was able to raise them some but not completely. I filled in the remaining marks on the button edge and the surface with black CA glue. Once it cured, I used a file to shape the button edge and also smooth out the fill. I sanded the remaining marks with 220 grit sandpaper to blend them into the surface of the surrounding vulcanite. I started polishing the stem surface with 600 grit wet dry sandpaper. I polished the stem with micromesh sanding pads – wet sanding with 1500-12000 grit sanding pads. I wiped it down after each sanding pad with Obsidian Oil. I finished polishing it with Before & After Pipe Stem Polish – both Fine and Extra Fine and buffed it off with a cotton cloth. I gave it a coat of Obsidian Oil to preserve and protect the stem. I am excited to finish this Japanese Tatu Pipe by Tetsuo Tajima. I put the pipe back together and buffed it with Blue Diamond on the buffing wheel. I gave the bowl multiple coats of Conservator’s Wax and the stem multiple coats of carnauba wax. I hand buffed the pipe with a clean buffing pad to raise the shine. It is fun to see what the polished bowl looks like with beautiful mixed grain all around it. The polished black vulcanite stem combined with the bowl made a stunning pipe. This smooth Japanese Made Tatu Pipe 1126 Freehand is great looking and the pipe feels great in my hand. It is light and well balanced. Have a look at it with the photos below. The dimensions are Length: 6 ½ inches, Height: 1 ¾ inches, Outside diameter of the bowl: 2 ¼ inches wide x 2 ¾ inches long, Chamber diameter: ¾ of an inch. The weight of the pipe is 57 grams/2.01 ounces. It is a beautiful pipe that I will hang onto for awhile to enjoy. One day I may add it to the rebornpipes store. Thanks for walking through the restoration with me as I worked over this pipe. Thanks to each of you who are reading this blog.

As always, I encourage your questions and comments as you read the blog. Thanks to each of you who are reading this blog. Remember we are not pipe owners; we are pipe men and women who hold our pipes in trust until they pass on into the trust of those who follow us.

Refreshing a Peterson’s System Standard Smooth Made in the Republic of Ireland 312


Blog by Steve Laug

The next pipe on the work table is Rusticated Peterson’s System pipe that we purchased from and estate in Plano, Texas, USA on 03/30/2022. It was stamped Peterson’s System Standard on left side of the shank and reads Peterson’s [over] System [over] Standard. On the right side it reads Made in the Republic of Ireland (in three lines) [over] the shape number 312. It has nice grain around the bowl and shank that has oils, debris and grime ground into the finish. There was a thick cake in the bowl with remnants of tobacco stuck on the walls. There was a lava overflow on the rim top that was heavier toward the back side. The top and edges of the rim were well hidden under the tars and lava. There was a very beautiful pipe underneath all of the buildup of years of use. The nickel ferrule on the shank end was oxidized and is stamped on the top and left side K&P [over] three hallmarks – a harp, a wolf hound and a tower. That is followed by Petersons. It small dents in the nickel ferrule on the right side. The vulcanite stem is a Peterson’s style P-Lip with a “P” logo on the left side of the saddle stem. It was oxidized and calcified toward the end with some tooth chatter. There were also some tooth marks on both sides of the stem ahead of the button. Jeff took photos of the pipe before he started his cleanup work on it. Jeff took photos of the bowl and rim top to show the thick, hard cake in the bowl with remnants of tobacco stuck on the walls of the bowl. There was a lava build up on the top of the rim and the edges of the bowl. The rim top looked pretty good but it was hard to know for sure if there was damage under the thick lava. Only clean up would tell the full story. Jeff took photos of the top and underside of the stem showing the tooth chatter, scratching and oxidation on the stem surface and wear on the edges of the button. Jeff took photos of the sides and heel of the bowl to show the condition of the finish. You can see the grime in finish around the sides of the bowl and shank. Even under the dirt and debris of the years it looked very good. Jeff took photos of the stamping on the sides of shank. The stamping was readable as you can see from the photos. It read as noted above. The nickel ferrule on the shank end is stamped on the top and left side K&P Peterson’s over three Peterson marks. I have included the information on the shape number on this pipe that I picked up on researching the previous pipes. This is the second of two Peterson’s System Standard pipes in Bob’s collection marked with the 312 shape number. I have included a page from a Petersons Catalogue that I have on rebornpipes (https://rebornpipes.com/tag/peterson-hallmark-chart/). I have put a red box around the 312 shown in the catalogue page shown below. That should give a clear picture of the size and shape of the pipe. I am also including the information from Pipedia’s article on Peterson pipes. It is a great read in terms of the history of the brand (https://pipedia.org/wiki/Peterson). I have included a bit of the pertinent history here.

1950 – 1989 The Republic Era  – From 1950 to the present time, the stamp for this era is “Made in the Republic of Ireland” in a block format generally in three lines but two lines have been used with or without Republic being abbreviated.

During the 1950’s and 60’s the Kapp & Peterson company was still in the ownership of the Kapp family. However 1964 saw the retiral of the company Managing Director Frederick Henry(Harry) Kapp.

Pipedia also included a section of information on the System pipes including a diagram of the systems look (https://pipedia.org/wiki/Peterson#Republic_Era_Pipes). I quote a section of the article in part and include a link to another article on Pipedia on the System pipe.

The Peterson System pipes are the standard bearers of the Peterson pipe family, famous for the excellent smoking pleasure they provide. Often imitated but never equaled, the Peterson System smokes dry, cool and sweet, thanks to the scientific effectiveness of the original design. The heart of the System is the unique graduated bore in the mouthpiece. This makes the suction applied by the smoker 15 times weaker by the time it reaches the tobacco chamber. The result is that all the moisture flows into the reservoir and, thus cannot reach the smoker’s mouth. The Peterson Lip further enhances the effectiveness of the graduated bore by directing the flow of smoke upwards and away from the tongue. This achieves a uniquely even distribution of smoke and virtually eliminates any chance of tonguebite or bitterness. Furthermore, the shape is contoured so that the tongue rests comfortably in the depression under the opening. Each “PLip” mouthpiece is made from Vulcanite. For the Peterson System pipes to work properly, the stem/tenon has to have an extension, the tip of which will pass by the draft hole from the bowl and into the sump. Upon the smoker drawing in smoke, this extension then directs the smoke down and around the sump to dispense a lot of the moisture before the smoke enters the extension and stem. On the System Standards and other less expensive systems, this extension with be made of Vulcanite turned integrally with the stem. On the more expensive System pipes this extension will be made of metal which screws into the Vulcanite stem. This extension on the earlier pipes will be of brass and the newer pipes will be of aluminium. Most smokers not knowing this function of the metal extension, assumes that it is a condenser/stinger and will remove it as they do with the metal condensers of Kaywoodie, etc. Should you have a System pipe with this metal extension, do not remove it for it will make the System function properly and give you a dryer smoke (https://pipedia.org/wiki/A_closer_look_at_the_famous_Peterson_Standard_System_Pipe).

With that information in hand I knew what I was dealing with in terms of the stamping and the age of this pipe. I knew from the information that the pipe was made during the Republic Era between 1950 and 1989. My guess is that the pipes is a 1960s era System pipe. Now it was time to work on the pipe.

Jeff cleaned this filthy pipe with his usual clean up process. This one was a real mess and I did not know what to expect when I unwrapped it from his box. He reamed it with a PipNet pipe reamer and cleaned up the reaming with a Savinelli Fitsall Pipe Knife. He scrubbed out the internals with alcohol, pipe cleaners and cotton swabs until the pipe was clean. He scrubbed the exterior of the bowl with Murphy’s Oil Soap and a tooth brush to remove the grime and grit on the briar and the lava on the rim top. The finish looks very good with great looking grain around the bowl and shank. Jeff soaked the stem in Briarville’s Pipe Stem Deoxidizer to remove the oxidation on the vulcanite. When the pipe arrived here in Vancouver for the second stop of its restoration tour I was amazed it looked so good. The stem showed some damage on the button edge and surface. The bonus was that the tenon had a brass chimney in the end that was correct for this pipe. I took some close-up photos of the rim top and also of the stem surface. I wanted to show what an amazing job Jeff did in the cleanup of the rim top. The rim top and inner edge had darkening and damage. There was damage to the inner edge on the back of the bowl. I also took close up photos of the stem to show the condition of the vulcanite. It was quite clean and the tooth marks and damage to the button edge and stem surface is visible in the photos below.One of the things I appreciate about Jeff’s cleanup is that he works to protect and preserve the nomenclature on the shank of the pipes that he works on. He was able to preserve and maintain its condition in the process. I took some photos to show the clarity of the stamping. I have noticed that many restorers are not careful to protect the stamping in their cleaning process and often by the end of the restoration the nomenclature is almost destroyed. I would like to encourage all of us to be careful in our work to preserve this as it is a critical piece of pipe restoration! I took the stem off the shank and took a photo of the pipe. I decided to start my work on the pipe by cleaning up the rim top and inner edge of the bowl. I started by working over the edge and the rim top with a folded piece of 220 grit sandpaper. I minimized the damage on the inner edge and rim top. It looked significantly better. I polished the briar with micromesh sanding pads – dry sanding it with 1500-12000 grit sanding pads. I wiped it down with a damp cloth after each sanding pad to remove the dust. The briar was really shining by the final pad. I rubbed the bowl and rim down with Before & After Restoration Balm. I worked it into the surface of the briar with my fingertips to clean, enliven and protect it. I let the balm sit for 10 minutes and then buffed with a cotton cloth to raise the shine. I really like watching the Balm do its magic and bring the briar alive. I polished the nickel ferrule with a jewellers cloth to remove the remaining tarnish and to protect the surface from further tarnishing. The shine was quite nice. I set the bowl aside and turned my attention to the stem. There were several issues that I needed to deal with to secure a good fit. The brass chimney was stuck in the tenon and I could not remove it. I heated the chimney with a lighter and was finally able to unscrew it from the stem end. I cleaned out the threaded area on the stem and the threads on the chimney and greased it with Vaseline. I screwed it back in the stem.The fit of the stem in the shank was canted to the left and the brass chimney hit against the wall of the mortise. As I examined it I saw that the drilling in the shank was more worn on the right side than the left. I smoothed out the walls of the left side of the shank with small half circle needle files. I also sanded the right side of the stem to adjust the seat in the shank. Once I had completed the process the fit was perfect in the shank.I fit the stem in the shank and the adjustments straightened out the cant of the stem. I took photos of it to show the new fit in the shank.I rebuilt the top edge of the button with black CA glue. I filled in the tooth marks on the top and underside of the stem. Once the repair hardened/cured I used a small file to reshape the edge of the button and flatten the repairs. I reshaped the top of the button with the file at the same time. I sanded the repairs with 220 grit sandpaper to blend them into the surface of the vulcanite. I started polishing the stem with 600 grit wet dry sandpaper to further smooth it out. I touched up the “P” logo on the left side of the saddle stem with white acrylic fingernail polish. I let it dry then I polished off the excess with a worn 1500 grit micromesh sanding pad. Once the excess was removed the stamp looked much better. There were some weak spots on the leg and tail of the “P” stamp.I polished the stem with micromesh sanding pads – wet sanding with 1500-12000 grit pads. I wiped the stem down after each sanding pad with Obsidian Oil. I polished it with Before & After Pipe Stem Polish – both Fine and Extra Fine. I gave it a coat of Obsidian Pipe Stem Oil. It works to protect the stem from oxidizing. I set it aside to dry. Once again at this point in the restoration process I am excited to be on the homestretch. I look forward to the final look when the Republic Era Peterson’s System Standard 312 is put back together, polished and waxed. I put the bowl and stem back together. I lightly polished the bowl and the stem with Blue Diamond. I gave the bowl and the stem multiple coats of carnauba wax. I buffed the pipe with a clean buffing pad to raise the shine. I hand buffed it with a microfiber cloth to deepen the shine. The pipe polished up pretty nicely. The grain really pops with the wax and polish. The shiny black vulcanite stem is a beautiful contrast to the browns of the bowl and thick shank and nickel ferrule. This Republic Era Peterson’s System Standard 312 Bent Billiard was another fun pipe to work on. It really is a quite stunning piece of briar whose shape follows the flow of the briar. The pipe feels great in the hand will be better when warmed up while smoking. The finished pipe is shown in the photos below. The dimensions of the pipe are Length: 5 ½ inches, Height: 1 ¾ inches, Outside diameter of the bowl: 1 ¼ inches, Chamber diameter: ¾ of an inch. The weight of the pipe is 2.01 ounces/57 grams. I will be putting it on the rebornpipes store in the Irish Pipemakers Section if you would like to add it to your rack and carry on the previous pipeman’s legacy. This is an interesting estate to bring back to life.

As always, I encourage your questions and comments as you read the blog. Thanks to each of you who are reading this blog. Remember we are not pipe owners; we are pipe men and women who hold our pipes in trust until they pass on into the trust of those who follow us.

New Life for a Peterson’s Kapet Republic of Ireland 106 Billiard


Blog by Steve Laug

The next pipe on the work table is Peterson’s Large Straight Billiard pipe that we purchased from and our connection in Copenhagen, Denmark on 04/11/2023. It was stamped Peterson’s [over] Kapet on the left side of the shank. On the right it is stamped Made in the Republic of Ireland (in three lines) followed by the shape number 106. It is a large Billiard that has a smooth finish with great grain around the bowl and shank that is covered with a lot of oils, debris and grime. There was a thick cake in the bowl with remnants of tobacco stuck on the walls. There was a heavy lava overflow on the rim top and edges. The top and edges of the rim were well hidden under the tars and lava. There was a very beautiful pipe underneath all of the buildup of years of use. The stem was a Peterson’s style P-Lip taper stem with a “P” logo on the left side. It was oxidized and calcified toward the end with some tooth marks and chatter on both sides ahead of the button. Jeff took photos of the pipe before he started his cleanup work on it. Jeff took photos of the bowl and rim top to show the thick, hard cake in the bowl with remnants of tobacco stuck on the walls of the bowl. There was a lava build up on the top of the rim and the edges of the bowl. The rim top looked pretty good but it was hard to know for sure if there was damage under the thick lava. Only clean up would tell the full story. Jeff took photos of the top and underside of the stem showing the tooth marks, chatter, calcification and oxidation on the stem surface on both sides of the stem. Jeff took photos of the sides and heel of the bowl to show the condition of the finish. You can see the grime around the sides of the bowl and shank. Even under the dirt and debris of the years it looked very good. Jeff took photos of the stamping on the sides of the shank. The stamping was readable as you can see from the photos. It read as noted above.

I am including the link to the Pipedia’s article on Peterson pipes. It is a great read in terms of the history of the brand (https://pipedia.org/wiki/Peterson). There was a short note toward the bottom of the page about the series. It is definitely referring to the newer line that came out later. I quote:

I turned to Pipedia (https://pipedia.org/wiki/Peterson) to first pin down a date that the pipe was made. I knew that the Made in the Republic of Ireland stamp would give me that. I quote:

As usual when trying to get accurate facts in regard to Peterson history, something will jump up and get in the way. They are missing many of their records. The following is the best that we can do for a guide to the myriad markings during the period 1922–1949. Prior to 1920 it was rare for a country of origin to be stamped on the pipe, just Peterson’s Dublin on the band. After 1921/22, if it is stamped “MADE IN IRELAND” and the “Made in” is stacked over “Ireland” or “MADE IN EIRE” or several other forms, it was made between 1922 and 1938. A considerable number of Peterson pipes were stamped “Irish Free State”. From about 1930 to 1949, most of the pipes (those which were stamped) were stamped “Made in Ireland”.” If the stamp reads “MADE IN IRELAND” in a circle, the pipe was made between 1939 and 1948. These are all “Pre-Republic” pipes. I can tell you that the mark “Irish Free State” was adopted in 1922; and replaced by “Eire” in 1937 and then by “Republic of Ireland” in 1949.

That gave me a date for the pipe – it was made after 1949 as can be proved by the Made in the Republic of Ireland stamp on the right side of the shank.

I turned to “The Peterson Pipe” by Mark Irwin and Gary Malmberg to get some background on the Peterson’s Kapet Line. On page 305 it had the following information.

Kapet (1925-87) Line first described in 1925 brochure and featured in occasional catalogs through 1987. Early specimens will be stamped IRISH over FREE STATE. Described in 1937 catalog as available in dark plum or natural finish. Featured an aluminum “inner tube” or stinger until 1945.  Mid-century specimens may be stamped Made In over Ireland. Specimens from 1970 on may have mounts with hallmarks.

Judging from the Made in the Republic of Ireland stamp, the pipe I am working on is probably made after 1949. Those dates work also for the Kapet information above. The stem the “P” emblem on the stem side but no inner tube.

Jeff had cleaned it thoroughly. He had reamed it with a PipNet reamer and cleaned that up with a Savinelli Fitsall Pipe Knife. He had scrubbed the exterior of the briar with undiluted Murphy’s Oil Soap. He removed the shiny coat on the briar with acetone on cotton pads. He cleaned out the interior of the shank, sump and airway in the shank and stem with alcohol, pipe cleaners and cotton swabs. He scrubbed the stem with Soft Scrub to remove the oxidation and calcification on the surface. He soaked it in Briarville’s Pipe Stem Deoxidizer to remove the oxidation. He removed it from the Deoxidizer and rinsed it off with warm water. I took some photos of the pipe before I started my part of the work.  I took some close up photos of the rim top and also of the stem surface. I wanted to show what an amazing job Jeff did in the cleanup of the rim top. The rim top and inner edge had darkening and damage. There was damage to the inner edge on the back of the bowl. The rim top is clean but in nicked and scratched. I also took close up photos of the stem to show the condition of the vulcanite. It was quite clean and the tooth marks on ahead of the button are present but hard to see in the photos.Once again I have to comment on what I appreciate about Jeff’s cleanup is that he works to protect and preserve the nomenclature on the shank of the pipes that he works on. The stamping on this one was very faint to start with so I was worried that it would disappear altogether with the cleanup. He was not only able to preserve and maintain its condition in the process. I took some photos to show the clarity of the stamping. I have noticed that many restorers are not careful to protect the stamping in their cleaning process and often by the end of the restoration the nomenclature is almost destroyed. I would like to encourage all of us to be careful in our work to preserve this as it is a critical piece of pipe restoration! I took the stem off the shank and took a photo of the pipe. I decided to start my work on the pipe by cleaning up the rim top and inner edge of the bowl. I started by working over the edge and the rim top with a folded piece of 220 grit sandpaper. I minimized the damage on the inner edge and rim top. It looked significantly better. I polished the briar with micromesh sanding pads – dry sanding it with 1500-12000 grit sanding pads. I wiped it down with a damp cloth after each sanding pad to remove the dust. The briar was really shining by the final pad. I rubbed the bowl and rim down with Before & After Restoration Balm. I worked it into the surface of the briar with my fingertips to clean, enliven and protect it. I let the balm sit for 10 minutes and then buffed with a cotton cloth to raise the shine. I really like watching the Balm do its magic and bring the briar alive. I set the bowl aside and turned my attention to the stem. I “painted” the tooth marks with the flame of a Bic lighter to try and lift the marks. I was able to lift them slightly. I filled in the marks that remained on the stem with clear CA glue and set it aside to cure. Once cured I used a file to flattened the repairs and redefine the button edge. I sanded the stem with 220 grit sandpaper to further blend in the repairs. I polished it with 600 grit wet dry sandpaper. I touched up the “P” logo on the left side of the saddle stem with white acrylic fingernail polish. I let it dry then I polished off the excess with a worn 1500 grit micromesh sanding pad. Once the excess was removed the stamp looked much better. There were some weak spots on the leg and tail of the “P” stamp.I polished the stem with micromesh sanding pads – wet sanding with 1500-12000 grit pads. I wiped the stem down after each sanding pad with Obsidian Oil. I polished it with Before & After Pipe Stem Polish – both Fine and Extra Fine. I gave it a coat of Obsidian Pipe Stem Oil. It works to protect the stem from oxidizing. I set it aside to dry. I always am excited to finish working on a pipe. This Made in the Republic of Ireland Peterson’s Kapet Straight Billiard is no exception. I put the pipe back together and buffed it with Blue Diamond on the buffing wheel. I gave the bowl and the stem multiple coats of carnauba wax. I buffed the pipe with a clean buffing pad to raise the shine and hand buffed it with a microfibre cloth to deepen the shine. It is fun to see what the bowl looks like with the black vulcanite taper stem. This Classic looking Peterson’s Kapet Smooth Billiard feels great in my hand. It is light and well balanced. Have a look at it with the photos below. The dimensions are Length: 6 inches, Height: 2 inches, Outside diameter of the bowl: 1 ¼ inches, Chamber diameter: ¾ of an inch. The weight of the pipe is 53 grams/1.87 of an ounce. I will be putting it on the rebornpipes store shortly in the Irish Pipe Makers Section if you are interested in it. Thanks for walking through the restoration with me as I worked over this pipe. Thanks to each of you who are reading this blog.

As always, I encourage your questions and comments as you read the blog. Thanks to each of you who are reading this blog. Remember we are not pipe owners; we are pipe men and women who hold our pipes in trust until they pass on into the trust of those who follow us.

Fresh Life for a Republic Era Killarney Red 65 Bent Billiard


Blog by Steve Laug

The next pipe on the work table is smaller cherry red Peterson’s Bent Billiard pipe that we purchased from and our connection in Copenhagen, Denmark on 01/26/2023. It was stamped Killarney in script on the left side of the shank. On the right it is stamped “A Peterson’s Product” [over] Made in the Rep of Ireland (in two lines) [over] the shape number 65 near the bowl/shank junction. It has a smooth, shiny red finish with great grain around the bowl and shank that is covered with a lot of oils, debris and grime. There was a thick cake in the bowl with remnants of tobacco stuck on the walls. There was a lava overflow on the rim top and edges. The top and edges of the rim were well hidden under the tars and lava. It appeared that there was a beautiful pipe underneath all of the buildup of years of use. The stem was a Peterson’s style Fishtail stem that did not fit fully against the shank. There was a gap and the stem would not fit snug. It was oxidized and calcified toward the end with some tooth marks and chatter. The button edges were quite clean. Jeff took photos of the pipe before he started his cleanup work on it. Jeff took photos of the bowl and rim top to show the thick, hard cake in the bowl with remnants of tobacco stuck on the walls of the bowl. There was a lava build up on the top of the rim and the edges of the bowl. The rim top looked pretty good but it was hard to know for sure if there was damage under the thick lava. Only clean up would tell the full story. Jeff took photos of the top and underside of the stem showing the tooth chatter, scratching, calcification and oxidation on the stem surface and wear on the edges of the button. Jeff took photos of the sides and heel of the bowl to show the condition of the finish. You can see the grime around the sides of the bowl and shank. Even under the dirt and debris of the years it looked very good. Jeff took photos of the stamping on the sides of the shank. The stamping was readable as you can see from the photos. It read as noted above. I am including the information from Pipedia’s article on Peterson pipes. It is a great read in terms of the history of the brand (https://pipedia.org/wiki/Peterson).

I turned to “The Peterson Pipe” by Mark Irwin and Gary Malmberg to get some background on the Kilarney Pipe. On page 306 it had the following information on the pipe.

Kilarney (1949-) Entry line with smooth finish and P-Lip mouthpiece. May have either a K or P stamped on the mouthpiece; may have aluminum singer (not to be confused with the tenon extension tube found on straight System pipes). 1949-c.1957 examples made for the US market may have any of the following COM stamps: MADE IN IRELAND (forming a circle), “A PETERSON’S PRODUCT” over MADE IN IRELAND or LONDON MADE over ENGLAND. Some early specimens stamped KILLARNEY over NATURAL (a higher grade) have MADE IN IRELAND (forming a circle). Examples c. 1986-90 feature a nickel band, which was replaced in ’91 with a shank extension of nickel band with black acrylic inlay. Fishtail  mouthpiece from ’86 although P-Lip is sometimes seen. For the current German market, the Killarney is stamped CONNEMARA

I knew that I was dealing with a pipe made 1991 due to the stamping on the shank and the shank extension of a nickel band with black acrylic inlay. It has the “P” stamp on the stem side and a P-lip mouthpiece. Now it was time to work on the pipe.

Jeff had done a great job cleaning up the pipe as usual. He reamed the pipe with a PipNet reamer and cut back the cake back to the bare briar. He cleaned up the walls with a Savinelli Fitsall Pipe Knife. He scrubbed the interior of the bowl and shank with pipe cleaners, cotton swabs and alcohol to remove the tars and oils. He scrubbed the exterior of the pipe with Murphy’s Oil Soap and a tooth brush to remove the grime from the finish. He worked on the rim top lava and darkening with the soap and tooth brush. He scrubbed the inside of the stem with alcohol and pipe cleaners. He scrubbed the exterior with Soft Scrub and then soaked it in Briarville’s Pipe Stem Deoxidizer. He washed it off with warm water to remove the Deoxidizer. The pipe looked far better when it arrived. I took some close up photos of the rim top and also of the stem surface. I wanted to show what an amazing job Jeff did in the cleanup of the rim top. The rim top and inner edge had some slight darkening on the top. The edges of the bowl looked very good. I also took close up photos of the stem to show the condition of the vulcanite. It was quite clean and there were light tooth marks on the button and on the stem.One of the things I appreciate about Jeff’s cleanup is that he works to protect and preserve the nomenclature on the shank of the pipes that he works on. The stamping on this one was very faint to start with so I was worried that it would disappear altogether with the cleanup. He was not only able to preserve and maintain its condition in the process. I took some photos to show the clarity of the stamping. I have noticed that many restorers are not careful to protect the stamping in their cleaning process and often by the end of the restoration the nomenclature is almost destroyed. I would like to encourage all of us to be careful in our work to preserve this as it is a critical piece of pipe restoration! I took the stem off the shank and took a photo of the pipe. I polished the rim top and edges of the bowl with micromesh sanding pads – dry sanding it with 1500-12000 grit sanding pads. I wiped it down with a damp cloth after each sanding pad to remove the dust. The briar was really shining by the final pad. I rubbed the bowl and rim down with Before & After Restoration Balm. I worked it into the surface of the briar with my fingertips to clean, enliven and protect it. I let the balm sit for 10 minutes and then buffed with a cotton cloth to raise the shine. I really like watching the Balm do its magic and bring the briar alive. I set the bowl aside and turned my attention to the stem. I “painted” the stem with the flame of a Bic lighter to lift the tooth marks. I was able to lift all but two – one on the top and one on the underside. I filled those in with clear CA glue. I sanded the repairs with 220 grit sandpaper. I started the polishing with 600 grit wet dry sandpaper. I touched up the “P” logo on the left side of the saddle stem with white acrylic fingernail polish. I let it dry then I polished off the excess with a worn 1500 grit micromesh sanding pad. Once the excess was removed the stamp looked much better. There were some weak spots on the leg and tail of the “P” stamp.I polished the stem with micromesh sanding pads – wet sanding with 1500-12000 grit pads. I wiped the stem down after each sanding pad with Obsidian Oil. I polished it with Before & After Pipe Stem Polish – both Fine and Extra Fine. I gave it a coat of Obsidian Pipe Stem Oil. It works to protect the stem from oxidizing. I set it aside to dry.Once again at this point in the restoration process I am excited to be on the homestretch. I look forward to the final look when the “A Peterson’s Product” Killarney 65 Bent Billiard with a taper stem is put back together, polished and waxed. I put the bowl and stem back together. I lightly polished the bowl and stem with Blue Diamond to polish out the scratches in the briar and the vulcanite. I gave the bowl and the stem multiple coats of carnauba wax. I buffed the pipe with a clean buffing pad to raise the shine. I hand buffed it with a microfiber cloth to deepen the shine. The pipe polished up pretty nicely. The depths of the rustication really pop with the wax and polish. The shiny black vulcanite stem is a beautiful contrast to the browns of the bowl and thick shank. This Republic Era Peterson’s Killarney 65 Bent Billiard was another fun pipe to work on. It really is a quite stunning piece of briar whose shape follows the flow of the briar. The pipe feels great in the hand will be better when warmed up while smoking. The finished pipe is shown in the photos below. The dimensions of the pipe are Length: 5 inches, Height: 1 ½ inches, Outside diameter of the bowl: 1 1/8 inches, Chamber diameter: ¾ of an inch. The weight of the pipe is 1.09 ounces/31 grams. I will be putting it on the rebornpipes store in the Irish Pipemakers Section if you would like to add it to your rack and carry on the previous pipeman’s legacy.

As always, I encourage your questions and comments as you read the blog. Thanks to each of you who are reading this blog. Remember we are not pipe owners; we are pipe men and women who hold our pipes in trust until they pass on into the trust of those who follow us.