Tag Archives: Peterson Republic Era Pipes

Fresh Life for a Petersons System Standard 312


Blog by Steve Laug

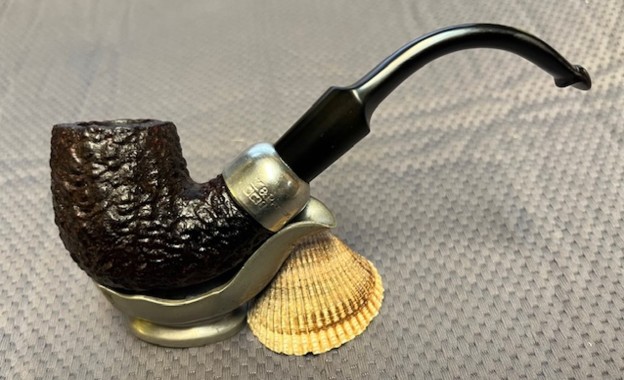
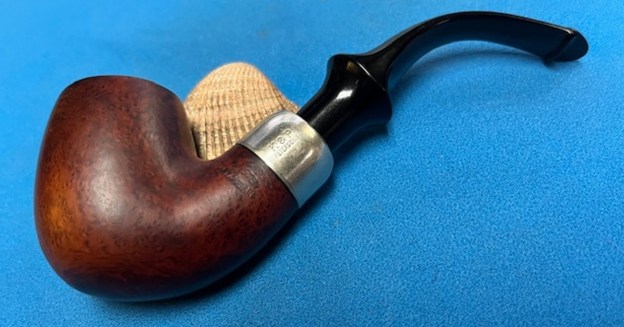
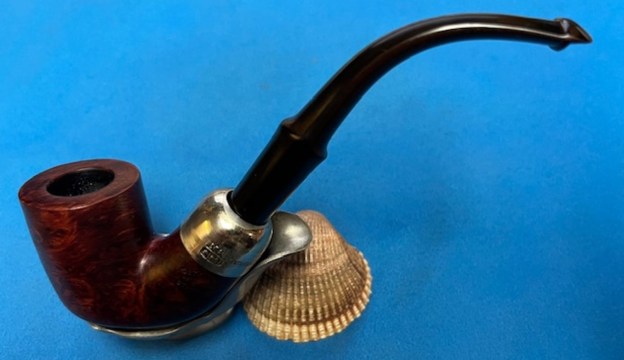
The next pipe on the work table is a lovely Peterson’s style System Standard pipe. We purchased it from our contact in Copenhagen, Denmark on 01/08/2024. It is a classic Peterson’s System Standard pipe. It has a sandblast, rich brown stained bowl that really highlights the grain in the briar. The bowl is dirty with grime in the finish. There is a moderate cake in the bowl and a light lava overflow on the rim top and edges. The stamping on the pipe is clear and readable and on the underside of the bowl and shank. It reads Peterson’s [arched over] System [over] Standard. Following that it reads Made in the Republic of Ireland (three lines). Underneath both and centered in the smooth panel is the shape number 312. The nickel ferrule is stamped K& P [over] three Makers Marks – a shamrock, a wolfhound and tower with no doorway. To the right of that it is stamped Peterson’s. The stem is unstamped and is lightly oxidized, calcified and has tooth chatter and marks on both sides ahead of the P-lip button. Jeff took photos of the pipe before he started his cleanup. Jeff took photos of the rim top and stem to show the general condition of the pipe. The bowl is moderately caked and the rim top and edges have a light coat of lava overflowing on to them. The stem is lightly oxidized, calcified and has tooth chatter and tooth marks on the top and underside near the button. Jeff took photos of the bowl sides and heel to show the condition of the finish around this bowl. It has a rugged sandblast that is quite nice and shows the underlying grain well. He took photos of the stamping on the heel of the bowl and underside of the shank. You can see that it is clear and reads as noted above. The stamping on the nickel ferrule is also clear. I am including the information from Pipedia’s article on Peterson pipes. It is a great read in terms of the history of the brand (https://pipedia.org/wiki/Peterson). I have included a bit of the pertinent history here.

1950 – 1989 The Republic Era – From 1950 to the present time, the stamp for this era is “Made in the Republic of Ireland” in a block format generally in three lines but two lines have been used with or without Republic being abbreviated.

During the 1950’s and 60’s the Kapp & Peterson company was still in the ownership of the Kapp family. However 1964 saw the retiral of the company Managing Director Frederick Henry(Harry) Kapp.

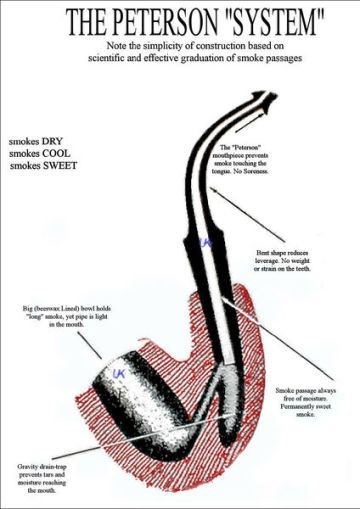
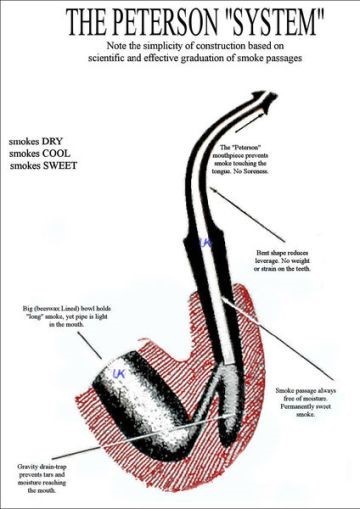
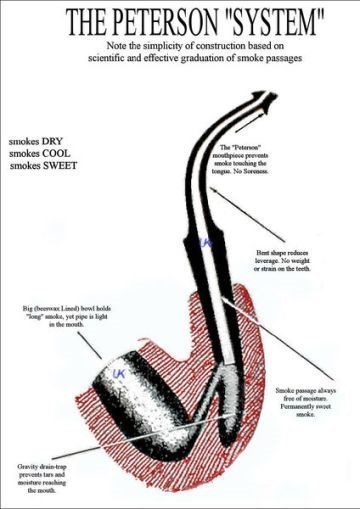
Pipedia also included a section of information on the System pipes including a diagram of the systems look (https://pipedia.org/wiki/Peterson#Republic_Era_Pipes). I quote a section of the article in part and include a link to another article on Pipedia on the System pipe.

The Peterson System pipes are the standard bearers of the Peterson pipe family, famous for the excellent smoking pleasure they provide. Often imitated but never equaled, the Peterson System smokes dry, cool and sweet, thanks to the scientific effectiveness of the original design. The heart of the System is the unique graduated bore in the mouthpiece. This makes the suction applied by the smoker 15 times weaker by the time it reaches the tobacco chamber. The result is that all the moisture flows into the reservoir and, thus cannot reach the smoker’s mouth. The Peterson Lip further enhances the effectiveness of the graduated bore by directing the flow of smoke upwards and away from the tongue. This achieves a uniquely even distribution of smoke and virtually eliminates any chance of tonguebite or bitterness. Furthermore, the shape is contoured so that the tongue rests comfortably in the depression under the opening. Each “PLip” mouthpiece is made from Vulcanite. For the Peterson System pipes to work properly, the stem/tenon has to have an extension, the tip of which will pass by the draft hole from the bowl and into the sump. Upon the smoker drawing in smoke, this extension then directs the smoke down and around the sump to dispense a lot of the moisture before the smoke enters the extension and stem. On the System Standards and other less expensive systems, this extension with be made of Vulcanite turned integrally with the stem. On the more expensive System pipes this extension will be made of metal which screws into the Vulcanite stem. This extension on the earlier pipes will be of brass and the newer pipes will be of aluminium. Most smokers not knowing this function of the metal extension, assumes that it is a condenser/stinger and will remove it as they do with the metal condensers of Kaywoodie, etc. Should you have a System pipe with this metal extension, do not remove it for it will make the System function properly and give you a dryer smoke (https://pipedia.org/wiki/A_closer_look_at_the_famous_Peterson_Standard_System_Pipe).

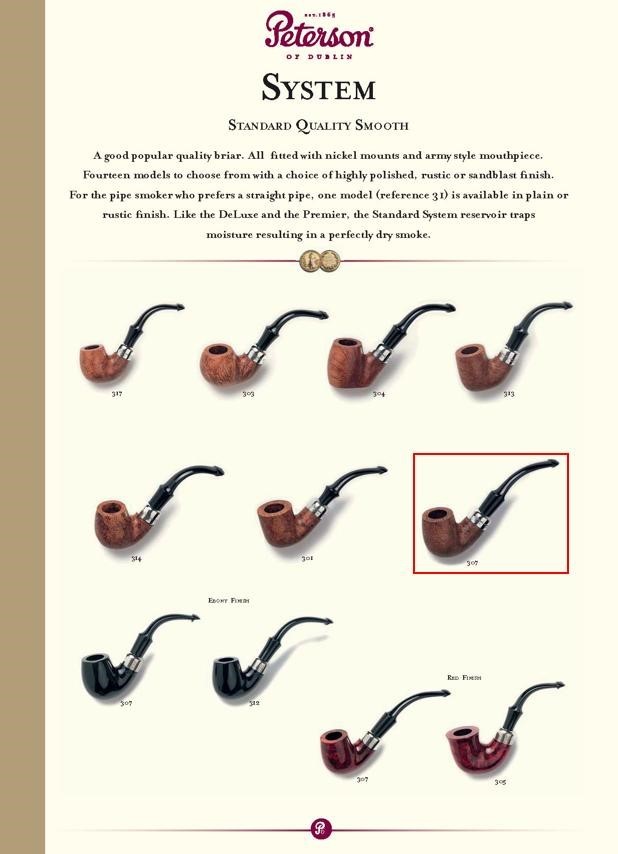
I have included the information on the shape number on this pipe that I picked up on researching previous pipes. I have included a page from a Petersons Catalogue that I have on rebornpipes (https://rebornpipes.com/tag/peterson-hallmark-chart/). I have put a red oval around the 312 shown in the catalogue page shown below. That should give a clear picture of the size and shape of the pipe.I knew that I was dealing with a Republic Era pipe made between 1950-1989. It was a Sandblast Peterson’s System Standard 312 Bent Billiard with an interesting blast finish. The bowl was stained with a combination of brown stains. Now it was time to work on the pipe.

Jeff had cleaned it thoroughly. He had reamed it with a PipNet reamer and cleaned that up with a Savinelli Fitsall Pipe Knife. He had scrubbed the exterior of the briar with undiluted Murphy’s Oil Soap. He cleaned out the interior of the shank, sump and airway in the shank and stem with alcohol, pipe cleaners and cotton swabs. He scrubbed the stem with Soft Scrub to remove the oxidation and calcification on the surface. He soaked it in Before & After Deoxidizer to remove the oxidation. He removed it from the Deoxidizer and rinsed it off with warm water. I took some photos of the pipe before I started my part of the work. I took some close up photos of the rim top and also of the stem surface. I wanted to show what an amazing job Jeff did in the cleanup of the rim top. The rim top was and inner edge were in excellent condition. I also took close up photos of the stem to show the condition of the vulcanite. It was in excellent condition with light tooth marks and chatter on the stem ahead of the button on both sides.One of the things I appreciate about Jeff’s cleanup is that he works to protect and preserve the nomenclature on the shank of the pipes that he works on. The stamping on this one was very faint to start with so I was worried that it would disappear altogether with the cleanup. I took some photos to show the stamping. I have noticed that many restorers are not careful to protect the stamping in their cleaning process and often by the end of the restoration the nomenclature is almost destroyed. I would like to encourage all of us to be careful in our work to preserve this as it is a critical piece of pipe restoration! I took the stem off the shank and took a photo of the pipe to capture the look of the pipe as a whole.The pipe bowl was very clean and the sandblast looked great. I rubbed the bowl and rim down with Before & After Restoration Balm. I worked it into the sandblast surface of the briar with my fingertips and a horse hair shoe brush to clean, enliven and protect it. I let the balm sit for 10 minutes and then buffed with a cotton cloth to raise the shine. I really like watching the Balm do its magic and bring the briar alive. With briar polished with the Restoration Balm I moved onto the metal. I polished the nickel ferrule with a jeweller’s cloth to raise the shine and to protect it from further oxidation. I sanded the stem down with 320-3500 grit sanding pads to remove the tooth chatter and marks on the stem surface. I wiped it down after each sanding pad with damp cloth to remove the grime from sanding.I polished the stem with micromesh sanding pads – wet sanding with 1500-12000 grit pads. I wiped the stem down after each sanding pad with Obsidian Oil. I polished it with Before & After Pipe Stem Polish – both Fine and Extra Fine. I gave it a coat of Obsidian Pipe Stem Oil. It works to protect the stem from oxidizing. I set it aside to dry. Once again at this point in the restoration process I am excited to be on the homestretch. I look forward to the final look when the Republic Era Sandblast Peterson’s System Standard 312 is put back together, polished and waxed. I put the bowl and stem back together. I lightly polished the bowl and the replacement stem with Blue Diamond. I gave the bowl and the newly fit stem multiple coats of carnauba wax. I buffed the pipe with a clean buffing pad to raise the shine. I hand buffed it with a microfiber cloth to deepen the shine. The pipe polished up pretty nicely. The depths of the sandblast really pop with the wax and polish. The shiny new black vulcanite stem is a beautiful contrast to the browns of the bowl and thick shank and Nickel ferrule. This Republic Era Peterson’s System Standard 312 Bent Billiard was another fun pipe to work on. It really is a quite stunning piece of briar whose shape follows the flow of the briar. The pipe feels great in the hand will be better when warmed up while smoking. The finished pipe is shown in the photos below. The dimensions of the pipe are Length: 6 inches, Height: 1 ¾ inches, Outside diameter of the bowl: 1 ¼ inches, Chamber diameter: ¾ of an inch. The weight of the pipe is 1.94 ounces/55 grams. I will be putting it on the rebornpipes store in the Irish Pipemakers Section if you would like to add it to your rack and carry on the previous pipeman’s legacy. This is an interesting estate to bring back to life.

As always, I encourage your questions and comments as you read the blog. Thanks to each of you who are reading this blog. Remember we are not pipe owners; we are pipe men and women who hold our pipes in trust until they pass on into the trust of those who follow us.

Restoring a Peterson’s Sherlock Holmes Baker Street Rusticated Bulldog with a fishtail stem


Blog by Steve Laug

The next pipe that I am working on came from an estate sale in Oregon City, Oregon, USA we purchased on 03/21/24. It was very dirty and was a reddish, brown coloured pipe when it started. The finish around the bowl was dirty and had hand oils ground into the rustication and the beads and twin rings around the bowl cap. The bowl had a moderate cake and a thick coat of lava onto the rustication on the rim top and edges of the bowl. The fishtail stem was acrylic and was very dirty and had tooth marks on both sides ahead of the button. There was not a silver inset P logo on the stem sides. The fit of the stem to the shank is very well done so I am assuming that it is either an original fishtail from Peterson or a well-made replacement stem. Either way it is a real beauty. The pipe is stamped on the left underside of the diamond shank and read Peterson’s [over] Sherlock Holmes. That is followed by Made in the Republic of Ireland (in three lines). There is a Sterling Silver band on the shank end that is stamped with the Sherlock Holmes Series Logo – the outline bust of Sherlock with Peterson ‘s arched above and Sterling Silver arched below. It is clean but oxidized. Jeff took photos of the pipe so I could have a sense of what it looked like before he started his work on it. Jeff took photos of the bowl and rim top to show the thick, hard cake in the bowl with remnants of tobacco stuck on the walls of the bowl. There was a lava build up on the rusticated top of the rim and the edges of the bowl. The rim top looked pretty good but it was hard to know for sure if there was damage under the thick lava. Only clean up would tell the full story. Jeff took photos of the top and underside of the fishtail stem showing the tooth chatter, scratching and oxidation on the stem surface and wear on the edges of the button. Jeff took photos of the sides and heel of the bowl to show the condition of the finish. You can see the grime in the rustication around the sides of the bowl and shank. The twin cap rings with the bead work in the middle is quite stunning. Even under the dirt and debris of the years it looked very good. Jeff took photos of the stamping on the left underside of the diamond shank. The stamping was faint in spots but readable as you can see from the photos. It read as noted above. The Sterling Silver Band is stamped as noted above and is very readable under the oxidation.  I wanted to know more about the Peterson’s Sherlock Holmes Line so I turned to the Pipedia article on the line and read it carefully to see where this pipe fit in the line of pipes making up the line. (https://pipedia.org/wiki/Peterson#1950_-_1989_The_Republic_Era). I quote what I found out below.

1987 saw the introduction and Issue of the first Sherlock Holmes ‘Original’ Series of pipes. The Sherlock Holmes series is probably the most successful series of pipes ever introduced by Peterson in terms of numbers. It was first issued to honour Sir Arthur Conan Doyle’s famous fictitious detective character, Sherlock Holmes. Holmes is perhaps the most famous pipe smoking character in fiction…

The Sherlock Holmes Series: Probably the most popular and successful series of pipes ever produced by Peterson. Including the Meerschaum version of the seven day sets. Both briar and Meers can be purchased either as individual pipes or complete seven day sets and stands. Expect to pay around $250 for briars and $300 for individual Meerschaums. The Adventures of Sherlock Holmes runs around $1000 for a 4 pipe boxed set. Complete 7 day sets and stands can be up to $1500 – $2000.

At this point I knew that the original line was introduced in 1987. I did not know the sequence of pipes after the Original first pipe. More work was necessary. So, I followed the links included to another article call the Pete Sherlockiana Group. There was photo there of the full collection of various Sherlock Holmes lines that were issue. I have included the link and the information include with the group photo that shown of the collection below.

Here is the link (https://pipedia.org/wiki/File:Pete_SherlockianaGroup.JPG). The description under the photo read as found below:

Sherlockiana Group, which includes: The ‘Original’ 7 day set w/stand, The ‘Return’ 7day set w/stand, The Meerschaum 7 day set w/stand, The ‘Adventures of’ 4 pipe collection, and Various ‘Silver Specials’. I still wanted to know where it fit in the order of release so I did a bit more digging into the pipe. I wanted to know the name of the pipe and what line of the Sherlock Holmes series it was in when it was released. I Googled and came across a link to an advertising brochure on Smokingpipes.com. (https://www.smokingpipes.com/smokingpipesblog/single.cfm/post/closer-look-petersons-sherlock-holmes-pipes-infographic). I have included it below. From that I knew that I was dealing with a Pipe from the Original release of the line from 1987, 1989-1991. It was called a Baker Street after the home address of Sherlock Holmes 221B Baker Street. It was basically a tall, straight Bulldog.

I also found a link to a chart on Tobaccopipes.com that was an exploration the Sherlock Series. Here is the link (https://www.tobaccopipes.com/blog/exploring-the-peterson-sherlock-holmes-series/). Each name on the original list on the site can be clicked on for a description of the pipe that is named.I clicked on the Baker Street name in the chart above and it took me to the following link and information (https://www.tobaccopipes.com/blog/exploring-the-peterson-sherlock-holmes-series/#baker_street). It states that the pipe was in the Original Collection and came out between 1989-1991.The text below the photos reads as follows:

Between 1989 and 1991, six more Peterson Sherlock Holmes Pipes would be added to the range, each named for a significant aspect of the Holmes legacy. Baker Street of cours reference the London address of the detective, 221B Baker Street. In the Baker Street shape we have a stout, flinty Bulldog. The ridges are sharp and muscular. The bold underside brings to mind the vee-bottom hull of a ship, sound and sturdy. The bowl sits up straight from  strong heel, widening up toward the two fine bead lines , where it then tapers in toward the rim. The stem briefly adopts the broadness of the shank before a quick narrowing to the bit. An interesting aspect of this shape is the softer appearance from above with less say from it chiseled lines and more input from the round P-lip.

With that information in hand I knew what I was dealing with in terms of the stamping and the age of this pipe. I knew from the information that the pipe was made during the Republic Era between 1950 and 1989. The Baker Street pipe came out as part of the Original Sherlock Holmes Series and was specifically made between 1989 and 1991. Now it was time to work on the pipe.

Jeff cleaned this filthy pipe with his usual clean up process. This one was a real mess and I did not know what to expect when I unwrapped it from his box. He reamed it with a PipNet pipe reamer and cleaned up the reaming with a Savinelli Fitsall Pipe Knife. He scrubbed out the internals with alcohol, pipe cleaners, shank brushes and cotton swabs until the pipe was clean. He scrubbed the exterior of the bowl with Murphy’s Oil Soap and a tooth brush to remove the grime and grit on the briar and the lava on the rim top. The finish looks very good with great looking grain showing through the deep rustication around the bowl and shank. Jeff soaked the stem in Briarville’s Pipe Stem Deoxidizer to remove the debris on the acrylic surface. When the pipe arrived here in Vancouver for the second stop of its restoration tour I was amazed it looked so good. I took some close up photos of the rim top and also of the stem surface. I wanted to show what an amazing job Jeff did in the cleanup of the rim top. The rim top was and inner edge were in excellent condition. I also took close up photos of the stem to show the condition of the acrylic. It was quite clean other than the light tooth marks and chatter on both sides of the stem ahead of the button.One of the things I appreciate about Jeff’s cleanup is that he works to protect and preserve the nomenclature on the shank of the pipes that he works on. The stamping on this one was faint in spots to start with so I was worried that it would disappear altogether with the cleanup. He was able to preserve and maintain its condition in the process. I took some photos to show the clarity of the stamping. I have noticed that many restorers are not careful to protect the stamping in their cleaning process and often by the end of the restoration the nomenclature is almost destroyed. I would like to encourage all of us to be careful in our work to preserve this as it is a critical piece of pipe restoration! I took the stem off the shank and took a photo of the pipe. I decided to start my work on the pipe by restaining the rustication on the rim top. I touched it up with a Walnut Stain Pen to blend it into the rest of the rustication around the bowl and shank. The photo shows the look at this point.I rubbed the bowl and rim down with Before & After Restoration Balm. I worked it into the rusticated surface of the briar with my fingertips and a horse hair shoe brush to clean, enliven and protect it. I let the balm sit for 10 minutes and then buffed with a cotton cloth to raise the shine. I really like watching the Balm do its magic and bring the briar alive. I wiped down the Sterling Silver shank band with a jeweller’s cloth to remove the tarnish and also to preserve and protect the silver. It looks much better with the shine. I set the bowl aside and turned my attention to the stem. I sanded the surface of the acrylic stem with 320-3500 grit sanding pads to remove the light tooth marks on the top and underside near the button. It looked much better once I finished it.I polished the stem with micromesh sanding pads – wet sanding with 1500-12000 grit pads. I wiped the stem down after each sanding pad with Obsidian Oil. I polished it with Before & After Pipe Stem Polish – both Fine and Extra Fine. I gave it a coat of Obsidian Pipe Stem Oil. It works to protect the stem from oxidizing. I set it aside to dry. I am excited to be on the homestretch and look forward to seeing the Republic Era Sherlock Holmes Baker Street Straight Bulldog put back together, polished and waxed. I put the bowl and stem back together and lightly polished the bowl and stem with Blue Diamond to polish them. I gave the bowl multiple coats of Conservator’s Wax and the stem multiple coats of carnauba wax. I buffed the pipe on the wheel with a clean buffing pad to raise the shine. I hand buffed it with a microfiber cloth to deepen the shine. The depths of the rustication really pop with the wax and polish. The shiny black acrylic stem is a beautiful contrast to the red and browns of the bowl, thick shank and Sterling Silver Band. This Peterson’s Sherlock Holmes Baker Street Bulldog was a fun pipe to work on. The pipe is tactile in the hand and should feel great as it is warmed up when smoking. The finished pipe is shown in the photos below. The dimensions of the pipe are Length: 6 inches, Height: 2 inches, Outside diameter of the bowl: 1 ¼ inches, Chamber diameter: ¾ of an inch. The weight of the pipe is 1.94 ounces/ 55 grams. I am hanging onto the pipe to enjoy looking at it and possibly firing up a bowl. Not sure if I will hang on to so one day it may end up on the store in the Irish Pipemakers Section if I choose to pass it on. I am a Sherlock Holmes reader and this kind of gives me pause.

As always, I encourage your questions and comments as you read the blog. Thanks to each of you who are reading this blog. Remember we are not pipe owners; we are pipe men and women who hold our pipes in trust until they pass on into the trust of those who follow us.

Breathing Fresh Life into a Peterson’s System Standard 307 Rusticated


Blog by Steve Laug

The next pipe on the work table is Rusticated Peterson’s System pipe that we purchased from our contact in Copenhagen, Denmark on 01/08/2024. It was stamped Peterson’s System Standard on the underside side of the shank in a smooth panel. It was stamped Peterson’s [arched over] System [over] Standard. That is followed by Made in the Republic of Ireland (in three lines). After that stamping is the shape number 307. It has a rugged, tactile rustication around the bowl and shank that is filled with a lot of oils, debris and grime. There was a thick cake in the bowl with remnants of tobacco stuck on the walls. There was a lava overflow on the rim top that was heavier toward the back side. The top and edges of the rim were well hidden under the tars and lava. There was a very beautiful pipe underneath all of the buildup of years of use. The nickel ferrule on the shank end was oxidized and is stamped on the left side K&P [over] three faux hallmarks. That is followed by Peterson’s. It is not dented or damaged. The stem was oxidized and calcified toward the end with some tooth chatter and marks ahead of the button on both sides. Jeff took photos of the pipe before he started his cleanup work on it. Jeff took photos of the bowl and rim top to show the thick, hard cake in the bowl with remnants of tobacco stuck on the walls of the bowl. There was a lava build up on the top of the rim and the edges of the bowl. The rim top looked pretty good but it was hard to know for sure if there was damage under the thick lava. Only clean up would tell the full story. Jeff took photos of the top and underside of the stem showing the tooth chatter, scratching and oxidation on the stem surface and wear on the edges of the button. Jeff took photos of the sides and heel of the bowl to show the condition of the finish. You can see the grime in the rustication around the sides of the bowl and shank. Even under the dirt and debris of the years it looked very good. Jeff took photos of the stamping on the underside of the bowl and shank. The stamping was faint but readable as you can see from the photos. It read as noted above. The nickel ferrule on the shank end is stamped on the left side K&P Peterson’s over three Peterson marks used on nickel ferrules.I have included the information on the shape number on this pipe that I picked up on researching the previous pipes with the 307 shape number. I have included a page from a Petersons Catalogue that I have on rebornpipes (https://rebornpipes.com/tag/peterson-hallmark-chart/). I have put a red box around the 307 shown in the catalogue page shown below. That should give a clear picture of the size and shape of the pipe.I am also including the information from Pipedia’s article on Peterson pipes. It is a great read in terms of the history of the brand (https://pipedia.org/wiki/Peterson). I have included a bit of the pertinent history here.

1950 – 1989 The Republic Era  – From 1950 to the present time, the stamp for this era is “Made in the Republic of Ireland” in a block format generally in three lines but two lines have been used with or without Republic being abbreviated.

During the 1950’s and 60’s the Kapp & Peterson company was still in the ownership of the Kapp family. However 1964 saw the retiral of the company Managing Director Frederick Henry(Harry) Kapp.

Pipedia also included a section of information on the System pipes including a diagram of the systems look (https://pipedia.org/wiki/Peterson#Republic_Era_Pipes). I quote a section of the article in part and include a link to another article on Pipedia on the System pipe.

The Peterson System pipes are the standard bearers of the Peterson pipe family, famous for the excellent smoking pleasure they provide. Often imitated but never equaled, the Peterson System smokes dry, cool and sweet, thanks to the scientific effectiveness of the original design. The heart of the System is the unique graduated bore in the mouthpiece. This makes the suction applied by the smoker 15 times weaker by the time it reaches the tobacco chamber. The result is that all the moisture flows into the reservoir and, thus cannot reach the smoker’s mouth. The Peterson Lip further enhances the effectiveness of the graduated bore by directing the flow of smoke upwards and away from the tongue. This achieves a uniquely even distribution of smoke and virtually eliminates any chance of tonguebite or bitterness. Furthermore, the shape is contoured so that the tongue rests comfortably in the depression under the opening. Each “PLip” mouthpiece is made from Vulcanite. For the Peterson System pipes to work properly, the stem/tenon has to have an extension, the tip of which will pass by the draft hole from the bowl and into the sump. Upon the smoker drawing in smoke, this extension then directs the smoke down and around the sump to dispense a lot of the moisture before the smoke enters the extension and stem. On the System Standards and other less expensive systems, this extension with be made of Vulcanite turned integrally with the stem. On the more expensive System pipes this extension will be made of metal which screws into the Vulcanite stem. This extension on the earlier pipes will be of brass and the newer pipes will be of aluminium. Most smokers not knowing this function of the metal extension, assumes that it is a condenser/stinger and will remove it as they do with the metal condensers of Kaywoodie, etc. Should you have a System pipe with this metal extension, do not remove it for it will make the System function properly and give you a dryer smoke (https://pipedia.org/wiki/A_closer_look_at_the_famous_Peterson_Standard_System_Pipe).

With that information in hand I knew what I was dealing with in terms of the stamping and the age of this pipe. I knew from the information that the pipe was made during the Republic Era between 1950 and 1989. My guess is that the pipes is a 1960s era System pipe. Now it was time to work on the pipe.

Jeff cleaned this filthy pipe with his usual clean up process. This one was a real mess and I did not know what to expect when I unwrapped it from his box. He reamed it with a PipNet pipe reamer and cleaned up the reaming with a Savinelli Fitsall Pipe Knife. He scrubbed out the internals with alcohol, pipe cleaners, shank brushes and cotton swabs until the pipe was clean. He scrubbed the exterior of the bowl with Murphy’s Oil Soap and a tooth brush to remove the grime and grit on the briar and the lava on the rim top. The finish looks very good with great looking grain around the bowl and shank. Jeff soaked the stem in Briarville’s Pipe Stem Deoxidizer to remove the oxidation on the vulcanite. When the pipe arrived here in Vancouver for the second stop of its restoration tour I was amazed it looked so good. I took some close up photos of the rim top and also of the stem surface. I wanted to show what an amazing job Jeff did in the cleanup of the rim top. The rim top was and inner edge were in excellent condition. I also took close up photos of the stem to show the condition of the vulcanite. It was quite clean other than some slight oxidation at the edges of the button. There were tooth marks and chatter on both sides of the stem ahead of the button.One of the things I appreciate about Jeff’s cleanup is that he works to protect and preserve the nomenclature on the shank of the pipes that he works on. The stamping on this one was faint to start with so I was worried that it would disappear altogether with the cleanup. He was not only able to preserve and maintain its condition in the process. I took some photos to show the clarity of the stamping. I have noticed that many restorers are not careful to protect the stamping in their cleaning process and often by the end of the restoration the nomenclature is almost destroyed. I would like to encourage all of us to be careful in our work to preserve this as it is a critical piece of pipe restoration! I took the stem off the shank and took a photo of the pipe.I decided to start my work on the pipe by cleaning up the debris left in the rustication on the rim top. I worked it over with a brass bristle wire brush to remove the crud in the finish. The photo shows the progress.I rubbed the bowl and rim down with Before & After Restoration Balm. I worked it into the rusticated surface of the briar with my fingertips and a horse hair shoe brush to clean, enliven and protect it. I let the balm sit for 10 minutes and then buffed with a cotton cloth to raise the shine. I really like watching the Balm do its magic and bring the briar alive. With briar polished with the Restoration Balm I moved onto the metal. I polished the nickel ferrule with a jeweller’s cloth to raise the shine and to protect the ferrule from further oxidation. I set the bowl aside to address the issues with the stem. I painted the surface of the stem with the flame of a lighter to lift them. I was able to lift them quite a bit. I filled in the remaining tooth marks with clear CA glue. Once it had cured I used a file to smooth out the repairs and blend them into the surface. I sanded repairs with 220 grit sandpaper. I sanded the stem with 320-3500 grit sanding pads to remove the oxidation that remained in the vulcanite and also the light tooth marks on the top and underside near the button. It looked much better once I finished it.I polished the stem with micromesh sanding pads – wet sanding with 1500-12000 grit pads. I wiped the stem down after each sanding pad with Obsidian Oil. I polished it with Before & After Pipe Stem Polish – both Fine and Extra Fine. I gave it a coat of Obsidian Pipe Stem Oil. It works to protect the stem from oxidizing. I set it aside to dry. Once again at this point in the restoration process I am excited to be on the homestretch. I look forward to the final look when the Republic Era Rusticated Peterson System 307 is put back together, polished and waxed. I put the bowl and stem back together. I lightly polished the bowl and stem with Blue Diamond to polish out the scratches in the briar and the vulcanite. I gave the bowl multiple coats of Conservator’s Wax and the stem multiple coats of carnauba wax. I buffed the pipe with a clean buffing pad to raise the shine. I hand buffed it with a microfiber cloth to deepen the shine. The pipe polished up pretty nicely. The depths of the rustication really pop with the wax and polish. The shiny black vulcanite stem is a beautiful contrast to the browns of the bowl and thick shank and nickel ferrule. This Peterson’s System Standard 307 Bent Billiard was another fun pipe to work on. It really is a quite stunning piece of briar whose shape follows the flow of the briar. The pipe is tactile in the hand and should feel great as it is warmed up when smoking. The finished pipe is shown in the photos below. The dimensions of the pipe are Length: 6 inches, Height: 2 inches, Outside diameter of the bowl: 1 ¼ inches, Chamber diameter: ¾ of an inch. The weight of the pipe is 2.19 ounces/62 grams. I will be putting it on the rebornpipes store in the Irish Pipemakers Section if you would like to add it to your rack and carry on the previous pipeman’s legacy. This is an interesting estate to bring back to life.

As always, I encourage your questions and comments as you read the blog. Thanks to each of you who are reading this blog. Remember we are not pipe owners; we are pipe men and women who hold our pipes in trust until they pass on into the trust of those who follow us.

Restoring a Peterson’s Republic Era Kildare 86 Taper Stem Apple


Blog by Steve Laug

The next pipe on the table came to us from somewhere neither Jeff or I remember. I can tell you though that it has been sitting here for a long time. That happens a lot when I am working through a country in my boxes. This the last of the current Peterson Pipes that I have to work on at the moment (no worries as there are more coming). It is a beautifully grained Peterson’s “Kildare” 86 Apple. The shape follows the grain around the bowl which is a combination of cross grain and birdseye. The finish was clean and the pipe had been reamed in the past so I am pretty sure it has been through Jeff’s clean up. The pipe is stamped on the left side of the shank and reads Peterson’s [over] “Kildare”. On the right side of the shank Made in the Republic of Ireland (three lines) followed by the shape number 86. The stamping is clear and readable on both sides. The stem was quite clean though there were light tooth marks and chatter on the stem near the button on both sides. There was the no Peterson’s “P” on the taper stem. I took photos of the pipe before I started my work on it. I took photos of the rim top and stem to show the general condition of the pipe. The bowl has been cleaned but the rim top and the inner edge have some darkening. The finish on the bowl is quite clean. The photos of the stem show the oxidation, calcification and light tooth marks and chatter on both sides near the button. The P-Lip button and edges look good.I took photos of the sides of the shank to show the stamping. The stamping is faint but readable in the photos below and is as noted above. I also removed the stem from the shank and took a photo of the parts of the pipe to give a clear picture of what I see here. I am including the information from Pipedia’s article on Peterson pipes. It is a great read in terms of the history of the brand (https://pipedia.org/wiki/Peterson). I have included a bit of the pertinent history here.

1950 – 1989 The Republic Era – From 1950 to the present time, the stamp for this era is “Made in the Republic of Ireland” in a block format generally in three lines but two lines have been used with or without Republic being abbreviated.

During the 1950’s and 60’s the Kapp & Peterson Company was still in the ownership of the Kapp family. However, 1964 saw the retiral of the company Managing Director Frederick Henry (Harry) Kapp.

I turned to “The Peterson Pipe” by Mark Irwin and Gary Malmberg to get some background on the Peterson’s System Line. On page 314 it had the following information.

Kildare (1965-) First issue of line with matte-finish in Classic Range shapes, P-Lip and fishtail mouthpiece. Second issue C.1979 as Kildare Patch, with rusticated patches on pipe surface. Third issue 2010, matte-brown, P-Lip or fishtail mouthpiece, no band. Fourth issue 2011-, burgundy sandblast finish, nickel army mount, fishtail mouthpiece, exclusive to smokingpipes.com.

Judging from the description above I believe that I am working on a First Issue of the line in the time period of 1965-1979. It is a late Republic Era Classic Shaped pipe with a matte-finish and a P-Lip stem. Now it was time to work on the pipe.

With that information at hand I turned to work on the pipe itself. I used a folded piece of 220 grit sandpaper to smooth out the inner edge and the rim top. It looked much better.I polished it with micromesh sanding pads – dry sanding with 1500-12000 grit sanding pads. I wiped it down with a damp cloth to remove the dust on the surface. I did not need to restain the rim top and edge because with polishing the match is very good. I rubbed the bowl down with Before & After Restoration Balm. I worked it into the surface of the bowl sides and shank with my fingertips. The product works to clean, enliven and protect the briar. I let the balm sit for a little while and then buffed with a cotton cloth to raise the shine. I set the bowl aside and turned my attention to the stem. I sanded it smooth with 220 grit sandpaper. I started polishing it with 600 grit wet dry sandpaper.I polished the stem with micromesh sanding pads – wet sanding with 1500-12000 grit pads. I wiped the stem down after each sanding pad with Obsidian Oil. I polished it with Before & After Pipe Stem Polish – both Fine and Extra Fine. I gave it a coat of Obsidian Pipe Stem Oil. It works to protect the stem from oxidizing. I set it aside to dry. Once again at this point in the restoration process I am excited to be on the homestretch. I look forward to the final look when the Republic Era Peterson’s “Kildare” 86 Apple with a saddle stem is put back together, polished and waxed. I put the bowl and stem back together. I lightly polished the bowl and stem with Blue Diamond to polish out the scratches in the briar and the vulcanite. I gave the bowl and the stem multiple coats of carnauba wax. I buffed the pipe with a clean buffing pad to raise the shine. I hand buffed it with a microfiber cloth to deepen the shine. The pipe polished up pretty nicely. The grain really pops with the wax and polish. The shiny black vulcanite stem is a beautiful contrast to the browns of the bowl and thick shank. This Republic Era Peterson’s “Kildare” 86 Apple was another fun pipe to work on. It is a nice piece of briar that cleaned up really well. The pipe feels great in the hand will be better when warmed up while smoking. The finished pipe is shown in the photos below. The dimensions of the pipe are Length: 5 ½ inches, Height: 1 ½ inches, Outside diameter of the bowl: 1 inch, Chamber diameter: ¾ of an inch. The weight of the pipe is 1.09 ounces/31 grams. I will be putting it on the rebornpipes store in the Irish Pipemakers Section if you would like to add it to your rack and carry on the previous pipeman’s legacy. This is an interesting estate to bring back to life.

As always, I encourage your questions and comments as you read the blog. Thanks to each of you who are reading this blog. Remember we are not pipe owners; we are pipe men and women who hold our pipes in trust until they pass on into the trust of those who follow us.

Restoring a Republic Era Petersons “Kildare” 87S Apple with a Saddle Stem


Blog by Steve Laug

The next pipe I have chosen is smooth finished Peterson’s “Kildare” Apple shaped pipe that had a very dirty/grimy finish but had some good-looking grain around the bowl sides and shank. Both Jeff and I have no memory of where we picked up this pipe. Was it a trade or a pipe hunt find? Could easily have been either one. This Lightweight Apple was stamped on the left side of the shank and read Peterson’s [over] “Kildare”. It was stamped on the right side and read Made in the Republic of Ireland (three lines) followed by the number 87S (faint but present) near the shank/bowl junction. I believe the “S” is for the saddle stem designation. The pipe was filthy when I brought it to the table. There was grime ground into the briar sides and rim. There was a minimal cake in the bowl but there was still a coat of lava on the rim top but the edges of the bowl. The inner edge of the bowl was thickly coated in lava and it was hard to know how the rim top and edges looked underneath. The stem was dirty with oxidation and calcification on it. There were light tooth marks and chatter on the top and underside on and near the button. There was a light “P” stamp logo on left side of the saddle stem. I took photos of the pipe before my cleanup work. They tell the story and give a glimpse of the promise that we see in this pipe. I took photos of the rim top and stem to show the general condition of the pipe. The bowl has been but the rim top has a lava coat flowing down the outside of the bowl and the inner edge. The finish on the bowl is rough around the outer edge but I will know more once it is cleaned up. The photos of the stem show the oxidation, calcification and light tooth marks and chatter on both sides near the button. The P-Lip button and edges look good.I took photos of the sides of the shank to show the stamping. The stamping is faint but readable in the photos below and is as noted above. There is a “P” logo stamp on the left side of the saddle stem. It is faint but I am hoping that I can bring it back with white acrylic. I also removed the stem from the shank and took a photo of the parts of the pipe to give a clear picture of what I see here. I am including the information from Pipedia’s article on Peterson pipes. It is a great read in terms of the history of the brand (https://pipedia.org/wiki/Peterson). I have included a bit of the pertinent history here.

1950 – 1989 The Republic Era – From 1950 to the present time, the stamp for this era is “Made in the Republic of Ireland” in a block format generally in three lines but two lines have been used with or without Republic being abbreviated.

During the 1950’s and 60’s the Kapp & Peterson Company was still in the ownership of the Kapp family. However, 1964 saw the retiral of the company Managing Director Frederick Henry (Harry) Kapp.

I turned to “The Peterson Pipe” by Mark Irwin and Gary Malmberg to get some background on the Peterson’s System Line. On page 314 it had the following information.

Kildare (1965-) First issue of line with matte-finish in Classic Range shapes, P-Lip and fishtail mouthpiece. Second issue C.1979 as Kildare Patch, with rusticated patches on pipe surface. Third issue 2010, matte-brown, P-Lip or fishtail mouthpiece, no band. Fourth issue 2011-, burgundy sandblast finish, nickel army mount, fishtail mouthpiece, exclusive to smokingpipes.com.

Judging from the description above I believe that I am working on a First Issue of the line in the time period of 1965-1979. It is a late Republic Era Classic Shaped pipe with a matte-finish and a P-Lip stem. Now it was time to work on the pipe.

With that information at hand I turned to work on the pipe itself. Jeff had thoroughly cleaned up the pipe. He reamed the pipe with a PipNet Pipe Reamer and cleaned up the remnants with a Savinelli Fitsall Pipe Knife. I scrubbed the bowl with undiluted Murphy’s Oil Soap and a tooth brush. I rinsed it under running warm water to remove the soap and grime. The bowl was much cleaner though there were many small nicks and divots in the surface of the briar – but it was clean! I used a half wooden ball and a piece of 220 grit sandpaper to bevel and clean up the rim top. I also used a folded piece of 220 grit sandpaper to smooth out the outer edge as well and give a slight curved or crown rim top look. I filled in the many nicks and divots in the bowl surface with clear CA glue. Once it cured I smoothed them out with a medium and a fine sanding sponge. Once finished it looked much better. I cleaned out the inside of the shank and the airway in the stem with alcohol, cotton swabs and pipe cleaners. Many pipe cleaners later the airways were clear and the smell much better.I polished it with micromesh sanding pads – dry sanding with 1500-12000 grit sanding pads. I wiped it down with a damp cloth to remove the dust on the surface. I did not need to restain the rim top and edge because with polishing the match is very good. I rubbed the bowl down with Before & After Restoration Balm. I worked it into the surface of the bowl sides and shank with my fingertips. The product works to clean, enliven and protect the briar. I let the balm sit for a little while and then buffed with a cotton cloth to raise the shine. I set the bowl aside and turned my attention to the stem. I scrubbed the exterior of the stem with Soft Scrub to remove as much of the oxidation and calcification as possible. It certainly is improved!In the photos above you can see roughening on the top of the stem surface. I cleaned up the surface and there was some pitting in the surface on both sides. I filled in the pitted surface with clear CA glue. Once it cured I flattened it out with a small file and sanded it smooth with 220 grit sandpaper. I started polishing it with 600 grit wet dry sandpaper. I touched up the “P” stamp on the left side of the saddle with some white acrylic fingernail polish. Once it cured I used a worn 1500 grit micromesh pad to polish off the excess material. The stamp is faint in the vulcanite so it is quite hard to see clearly.I polished the stem with micromesh sanding pads – wet sanding with 1500-12000 grit pads. I wiped the stem down after each sanding pad with Obsidian Oil. I polished it with Before & After Pipe Stem Polish – both Fine and Extra Fine. I gave it a coat of Obsidian Pipe Stem Oil. It works to protect the stem from oxidizing. I set it aside to dry. NOTE: When I was buffing the pipe I notice a scratch on the left side the shank above the stamping that looked like a crack in the shank… I was a bit frustrated so I stopped buffing and checked it out and was relieved to see under bright light that it was a scratch and not a crack. I also removed the stem and checked the mortise end and there was no crack! I tried steaming the scratch out and was able to improve it but it is still present. There is also a small on the underside of the stem… irritating but part of the pipe’s story.

I am excited to be on the homestretch. I look forward to the final look when the Republic Era Peterson’s “Kildare” 87S Apple with a saddle stem is put back together, polished and waxed. I put the bowl and stem back together. I lightly polished the bowl and stem with Blue Diamond to polish out the scratches in the briar and the vulcanite. I gave the bowl and the stem multiple coats of carnauba wax. I buffed the pipe with a clean buffing pad to raise the shine. I hand buffed it with a microfiber cloth to deepen the shine. The pipe polished up pretty nicely. The grain really pops with the wax and polish. The shiny black vulcanite stem is a beautiful contrast to the browns of the bowl and thick shank. This Republic Era Peterson’s “Kildare” 87S Apple was another challenging pipe to work on. It is a nice piece of briar that cleaned up really well. The pipe feels great in the hand will be better when warmed up while smoking. The finished pipe is shown in the photos below. The dimensions of the pipe are Length: 5 ½ inches, Height: 1 ¾ inches, Outside diameter of the bowl: 1 inch, Chamber diameter: ¾ of an inch. The weight of the pipe is 1.13 ounces/32 grams. I will be putting it on the rebornpipes store in the Irish Pipemakers Section if you would like to add it to your rack and carry on the previous pipeman’s legacy. This is an interesting estate to bring back to life.

As always, I encourage your questions and comments as you read the blog. Thanks to each of you who are reading this blog. Remember we are not pipe owners; we are pipe men and women who hold our pipes in trust until they pass on into the trust of those who follow us.

Restoring a Republic Era Peterson’s System Standard 307 Bent Billiard


Blog by Steve Laug

The next pipe on the work table is Smooth Peterson’s System pipe that we purchased somewhere along the way. Neither Jeff or I remember where we picked it up. It is an interesting system pipe with some light road rash on the right side of the bowl and a chip out of the outer edge of the bowl on the right side. It was stamped Peterson’s [arched over] System [arched over] Standard on the left side of the shank. It is a bit faint but it is readable. On the right side it is stamped Made in the Republic of Ireland (in three lines) [over] the shape number 307. The nickel ferrule on the shank end was oxidized and is stamped on the left side K&P [over] Petersons. Jeff had cleaned and reamed the bowl somewhere along the way and the finish is very clean. The top and edges of the rim were clean but showed some damage. The inner edge was out of round and the outer edge had a chip on the right side. The stem was the wrong stem for the pipe. It was not a Peterson’s style P-Lip but rather a Wellington style with the airway exiting on the end of the stem. Jeff had cleaned it up as well and it did not look too bad. I would need to restem it with a proper stem. I took photos before I started working on it today. I took a photo of the bowl and rim top to show the condition of the bowl and the top of the rim and the edges of the bowl. The rim top had darkening and damage and the inner edge was out of round. The outer edge on the right side showed a chip. I took photos of the stem it came with as well. You can see the tooth chatter and marks on the stem surface and wear on the edges of the button. You can also see the exit of the airway on the stem end rather than the to of the P-lip.I took photos of the stamping on the side of the shank. The stamping was faint but readable as you can see from the photos. It read as noted above. The nickel ferrule on the shank end is stamped on the top and left side K&P [over] Petersons. I took the stem off the shank and took a photo of the parts. You can see how the stem is definitely not a Peterson’s P-Lip. I have included the information on the shape number on this pipe that I picked up on researching the previous pipes. It is a large looking 307 System Standard. I have included a page from a Petersons Catalogue that I have on rebornpipes (https://rebornpipes.com/tag/peterson-hallmark-chart/). I have put a red box around the 307 shown in the catalogue page shown below. That should give a clear picture of the size and shape of the pipe. I am also including the information from Pipedia’s article on Peterson pipes. It is a great read in terms of the history of the brand (https://pipedia.org/wiki/Peterson). I have included a bit of the pertinent history here.

1950 – 1989 The Republic Era  – From 1950 to the present time, the stamp for this era is “Made in the Republic of Ireland” in a block format generally in three lines but two lines have been used with or without Republic being abbreviated.

During the 1950’s and 60’s the Kapp & Peterson company was still in the ownership of the Kapp family. However 1964 saw the retiral of the company Managing Director Frederick Henry(Harry) Kapp.

Pipedia also included a section of information on the System pipes including a diagram of the systems look (https://pipedia.org/wiki/Peterson#Republic_Era_Pipes). I quote a section of the article in part and include a link to another article on Pipedia on the System pipe.

The Peterson System pipes are the standard bearers of the Peterson pipe family, famous for the excellent smoking pleasure they provide. Often imitated but never equaled, the Peterson System smokes dry, cool and sweet, thanks to the scientific effectiveness of the original design. The heart of the System is the unique graduated bore in the mouthpiece. This makes the suction applied by the smoker 15 times weaker by the time it reaches the tobacco chamber. The result is that all the moisture flows into the reservoir and, thus cannot reach the smoker’s mouth. The Peterson Lip further enhances the effectiveness of the graduated bore by directing the flow of smoke upwards and away from the tongue. This achieves a uniquely even distribution of smoke and virtually eliminates any chance of tonguebite or bitterness. Furthermore, the shape is contoured so that the tongue rests comfortably in the depression under the opening. Each “PLip” mouthpiece is made from Vulcanite. For the Peterson System pipes to work properly, the stem/tenon has to have an extension, the tip of which will pass by the draft hole from the bowl and into the sump. Upon the smoker drawing in smoke, this extension then directs the smoke down and around the sump to dispense a lot of the moisture before the smoke enters the extension and stem. On the System Standards and other less expensive systems, this extension with be made of Vulcanite turned integrally with the stem. On the more expensive System pipes this extension will be made of metal which screws into the Vulcanite stem. This extension on the earlier pipes will be of brass and the newer pipes will be of aluminium. Most smokers not knowing this function of the metal extension, assumes that it is a condenser/stinger and will remove it as they do with the metal condensers of Kaywoodie, etc. Should you have a System pipe with this metal extension, do not remove it for it will make the System function properly and give you a dryer smoke (https://pipedia.org/wiki/A_closer_look_at_the_famous_Peterson_Standard_System_Pipe).

With that information in hand I knew what I was dealing with in terms of the stamping and the age of this pipe. I knew from the information that the pipe was made during the Republic Era between 1950 and 1989. My guess is that the pipes is a 1960s era System pipe. Now it was time to work on the pipe.

I removed the incorrect stem and replaced it with a correct P-Lip stem for a 307 that I had here in my box of stems. It has a little larger flare than I remembered but it still fit better and looked very good. I took photos of the pipe with the new stem. I worked over the rim top and the inner and outer edge of the bowl with a folded piece of 220 grit sandpaper. I was able to smooth out the damage on the inner edge and remove the nicks on the top surface. The outer edge looked better though I left one nick on the right outer edge as a part of the story of the pipe.I polished the briar with micromesh sanding pads – dry sanding it with 1500-12000 git sanding pads. I wanted remove as many of the light scratches in the briar as I could. I wiped it down with a damp cloth after each sanding pad. I worked some Before & After Restoration Balm into the surface of the briar with my fingertips to clean, enliven and protect the briar. I let the balm sit for 15 minutes and then buffed with a cotton cloth to raise the shine. The photos show the bowl at this point in the restoration process. With briar polished with the Restoration Balm I moved onto the metal. I polished the nickel ferrule with a jewellers cloth to raise the shine and to protect the ferrule from further oxidation. I took photos of the new stem before I put it in the shank. It is a new stem so it is quite shiny. It will look great on the pipe.I am excited to be on the homestretch. I look forward to the final look when the Republic Era Peterson System Standard 307 is put back together, polished and waxed. I put the bowl and the new stem back together. I polished the bowl and stem with Blue Diamond to polish the briar and the vulcanite. I gave the bowl and the stem multiple coats of carnauba wax. I buffed the pipe with a clean buffing pad to raise the shine. I hand buffed it with a microfiber cloth to deepen the shine. The pipe polished up pretty nicely. Grain stands out nicely as do the marks of the pipe journey. The shiny black vulcanite stem is a beautiful contrast to the browns of the bowl and thick shank and nickel ferrule. This Peterson’s System Standard 307 Bent Billiard was another fun pipe to work on. It really is a quite stunning piece of briar whose shape follows the flow of the briar. The pipe is tactile in the hand and should feel great as it is warmed up when smoking. The finished pipe is shown in the photos below. The dimensions of the pipe are Length: 6 inches, Height: 2 inches, Outside diameter of the bowl: 1 ¼ inches, Chamber diameter: 7/8 of an inch. The weight of the pipe is 2.47 ounces/71 grams. I will be putting it on the rebornpipes store in the Irish Pipemakers Section if you would like to add it to your rack and carry on the previous pipeman’s legacy. This is an interesting estate to bring back to life.

As always, I encourage your questions and comments as you read the blog. Thanks to each of you who are reading this blog. Remember we are not pipe owners; we are pipe men and women who hold our pipes in trust until they pass on into the trust of those who follow us.

Restoring a Republic Era Peterson’s System Standard 309 Bent Billiard


Blog by Steve Laug

A few weeks ago, I received an email from a customer, Ted about some pipe work for him. He had three pipes that he said needed different things and offered to send some photos. He also sent a second email with a description of what each pipe needed. I have included that email and the photos he sent below.

Peterson 309 needs stem restoration and bowl cleaned out. Rhodesian needs full restoration – my English teacher from high school gave it to me a little over two years ago. The Comoy’s Canadian needs a new bit I broke it… I have finished the Comoy’s Restem and the restoration of the Andre pipe. This third pipe is stamped on the left side of the shank and read Peterson’s [arched over] System [arched over] Standard. On the right side it is stamped Made in the Republic of Ireland (three lines) and next to that is the shape number 309. The nickel ferrule is stamped K&P Peterson over the three common hallmarks on System pipes with Nickel ferrules – a shamrock, a wolf hound, and a tower. There was a moderate cake in the bowl with lava on the rim top. The finish was in decent condition but there was a varnish coat that was spotty. There was dirt and debris ground into the finish on the bowl sides and around the edges of the rim. Under the grime is a coat of varnish that was spotty and worn. The nickel ferrule is oxidized and dirty. The stem was oxidized and there were light tooth marks and chatter on both sides of the stem. I took photos of the pipe before I started work on it. I took a close-up photo of the bowl and rim top to show the cake in the bowl. The rim top shows some lava on the smooth finish. The inner edge is quite dirty and is covered with a coat of lava but the outer edges of the bowl looked good. The stem photos show the oxidation and the light tooth marks and chatter next to the button.I took a photo of the stamping on the pipe. It is stamped on both sides and reads as noted above. It was clear and readable as noted above. The stamping on the ferrule is also very clear and readable. I removed the stem from the shank and took a photo of the pipe parts to give a sense of proportion of the pipe. It is quite nice. I am including the information from Pipedia’s article on Peterson pipes. It is a great read in terms of the history of the brand (https://pipedia.org/wiki/Peterson). I have included a bit of the pertinent history here.

1950 – 1989 The Republic Era – From 1950 to the present time, the stamp for this era is “Made in the Republic of Ireland” in a block format generally in three lines but two lines have been used with or without Republic being abbreviated.

During the 1950’s and 60’s the Kapp & Peterson company was still in the ownership of the Kapp family. However 1964 saw the retiral of the company Managing Director Frederick Henry(Harry) Kapp.

Pipedia also included a section of information on the System pipes including a diagram of the systems look (https://pipedia.org/wiki/Peterson#Republic_Era_Pipes). I quote a section of the article in part and include a link to another article on Pipedia on the System pipe.

The Peterson System pipes are the standard bearers of the Peterson pipe family, famous for the excellent smoking pleasure they provide. Often imitated but never equaled, the Peterson System smokes dry, cool and sweet, thanks to the scientific effectiveness of the original design. The heart of the System is the unique graduated bore in the mouthpiece. This makes the suction applied by the smoker 15 times weaker by the time it reaches the tobacco chamber. The result is that all the moisture flows into the reservoir and, thus cannot reach the smoker’s mouth. The Peterson Lip further enhances the effectiveness of the graduated bore by directing the flow of smoke upwards and away from the tongue. This achieves a uniquely even distribution of smoke and virtually eliminates any chance of tonguebite or bitterness. Furthermore, the shape is contoured so that the tongue rests comfortably in the depression under the opening. Each “PLip” mouthpiece is made from Vulcanite. For the Peterson System pipes to work properly, the stem/tenon has to have an extension, the tip of which will pass by the draft hole from the bowl and into the sump. Upon the smoker drawing in smoke, this extension then directs the smoke down and around the sump to dispense a lot of the moisture before the smoke enters the extension and stem. On the System Standards and other less expensive systems, this extension with be made of Vulcanite turned integrally with the stem. On the more expensive System pipes this extension will be made of metal which screws into the Vulcanite stem. This extension on the earlier pipes will be of brass and the newer pipes will be of aluminum. Most smokers not knowing this function of the metal extension, assumes that it is a condenser/stinger and will remove it as they do with the metal condensers of Kaywoodie, etc. Should you have a System pipe with this metal extension, do not remove it for it will make the System function properly and give you a dryer smoke (https://pipedia.org/wiki/A_closer_look_at_the_famous_Peterson_Standard_System_Pipe).

I have included the information on the shape number on this pipe that I picked up on researching the previous pipes. I have included a page from a Petersons Catalogue that I have on rebornpipes (https://rebornpipes.com/tag/peterson-hallmark-chart/). There is no shape 309 shown in the catalogue page of rusticated shaped shown below. I wonder if it is an older or a newer shape. But I am uncertain of that. I knew that I was dealing with a Republic Era pipe made between 1950-1989. It was a Peterson’s System Standard 309 Bent Billiard with a great rustication. The bowl was stained with a combination of reddish-brown stains. Now it was time to work on the pipe.

I started my work on the pipe by reaming the bowl with a PipNet reamer to remove the cake from the bowl and take it back to bare briar. I cleaned up the remnants with a Savinelli Fitsall Pipe Knife. I sanded the bowl walls with a piece of 220 grit sandpaper. The bowl was very clean. I removed the shiny varnish coat and grime with a cotton pad and acetone. Once it was finished it looked much better. I worked on the rim top and the bowl edges with a piece of 220 grit sandpaper and a worn 1550 grit micromesh sanding pad to remove the tars and oil damage.I scrubbed the exterior of the briar with a tooth brush and undiluted Murphy’s Oil Soap. I rinsed it off with warm water to remove the grime and soap. It looked much better and the dust and debris was gone. I dried it with a cotton towel. I scrubbed out the internals of the pipe with 99% isopropyl alcohol, pipe cleaners and cotton swabs. I cleaned out the airway in the stem as well. I worked on these areas repeatedly until the shank and the airway in all the parts was clean.I polished the smooth briar with micromesh sanding pads – dry sanding with 1500-12000 grit sanding pads. I wiped it down with a damp cloth after each pad. The bowl began to take on a rich shine. Between the 2440 grit pad and the 3200 grit pad, I stained the rim top with both a Maple and a Cherry stain pen. It was a close match to the rest of the bowl. With the remaining micromesh and the buffing it would be a good match. I worked some Before & After Restoration Balm into the surface of the briar with my fingertips to clean, enliven and protect the briar. I let the balm sit for 15 minutes and then buffed with a cotton cloth to raise the shine. The photos show the bowl at this point in the restoration process. I polished the nickel ferrule on the shank end with a jewellers cloth to remove the tarnish, polish the nickel and protect it from further tarnish. It looks very good. With that done, the bowl was finished other than the final buffing. I set it aside and turned my attention to the stem. I worked on the oxidation on the stem with Soft Scrub Cleanser. I worked it into the vulcanite with a cotton pad and was able to remove much of the oxidation.  I polished the stem with micromesh sanding pads – wet sanding with 1500-12000 grit sanding pads. I wiped it down after each sanding pad with Obsidian Oil. I finished polishing the stem with Before & After Pipe Stem polish (both Fine and Extra Fine) then wiped the stem down with another coat of Obsidian Oil.Once again at this point in the restoration process I am excited to be on the homestretch. I look forward to the final look when the Smooth Peterson System Standard 309 is put back together, polished and waxed. I put the bowl and stem back together. I lightly polished the bowl and stem with Blue Diamond to polish out the scratches in the briar and the vulcanite. I gave the bowl and the stem multiple coats of carnauba wax. I buffed the pipe with a clean buffing pad to raise the shine. I hand buffed it with a microfiber cloth to deepen the shine. The pipe polished up pretty nicely. The depths of the rustication really pop with the wax and polish. The shiny black vulcanite stem is a beautiful contrast to the browns of the bowl and thick shank and nickel ferrule. This Republic Era Peterson’s System Standard 309 Bent Billiard was another fun pipe to work on. It really is a quite stunning piece of briar whose shape follows the flow of the briar. The pipe feels great in the hand will be better when warmed up while smoking. The finished pipe is shown in the photos below. The dimensions of the pipe are Length: 6 inches, Height: 2 inches, Outside diameter of the bowl: 1 ¼ inches, Chamber diameter: ¾ of an inch. The weight of the pipe is 1.80 ounces/51 grams. It is the last of the three pipes that were sent to me by Ted for refurbishing. Now that it is complete I will be boxing up the threesome and sending them back to him. I am sure he will enjoy them and build even more memories with them. This was another interesting estate to bring back to life.

As always, I encourage your questions and comments as you read the blog. Thanks to each of you who are reading this blog. Remember we are not pipe owners; we are pipe men and women who hold our pipes in trust until they pass on into the trust of those who follow us. 

Restoring a Republic Era Petersons “Kildare” 87 Apple


Blog by Steve Laug

The next pipe I have chosen is smooth finished Peterson’s “Kildare” Apple shaped pipe that had a very dirty/grimy finish but had some good looking grain around the bowl sides and shank. It came to us from an Antique Store on 10/20/2022 in Vancouver, Washington, USA. This Lightweight Apple was stamped on the left side of the shank and read Peterson’s [over] “Kildare”. It was stamped on the right side and read Made in the Republic of Ireland (three lines) followed by the number 87 near the shank/bowl junction. The pipe was in filthy condition when he brought it to the table. The finish was dirty with grime ground into the briar sides and rim. There was a thick cake in the bowl and a coat of lava on the rim top but the edges of the bowl. The inner edge of the bowl was thickly coated in lava and it was hard to know how the rim top and edges looked underneath. The stem was dirty with oxidation and calcification on it. There were tooth marks and chatter on the top and underside on and near the button and on the button edges as well. The P lip portion of the stem was bent downward putting the airway on the end of the stem. There was no “P” stamp logo on the taper stem. Jeff took photos of the pipe before his cleanup work. They tell the story and give a glimpse of the promise that we see in this pipe. Jeff took photos of the rim top and stem to show the general condition of the pipe. The bowl is thickly caked and the rim top has a lava coat flowing down the outside of the bowl and the inner edge. The finish on the bowl is rough but I will know more once it is cleaned up. The photos of the stem show the oxidation, calcification and the tooth marks and chatter on both sides near the button. The P-Lip has been heated and turned downward making the airway enter at the bend end! Jeff took some photos of the bowl sides and heel to show the amazing grain that is peeking out from underneath that overflow of lava and grime on the surface around this bowl. It is appears to have a nice looking pipe hidden underneath it all! He took photos of the sides of the shank to show the stamping. The stamping is faint but readable in the photos below and is as noted above. I am including the information from Pipedia’s article on Peterson pipes. It is a great read in terms of the history of the brand (https://pipedia.org/wiki/Peterson). I have included a bit of the pertinent history here.

1950 – 1989 The Republic Era – From 1950 to the present time, the stamp for this era is “Made in the Republic of Ireland” in a block format generally in three lines but two lines have been used with or without Republic being abbreviated.

During the 1950’s and 60’s the Kapp & Peterson Company was still in the ownership of the Kapp family. However, 1964 saw the retiral of the company Managing Director Frederick Henry (Harry) Kapp.

I turned to “The Peterson Pipe” by Mark Irwin and Gary Malmberg to get some background on the Peterson’s System Line. On page 314 it had the following information.

Kildare (1965-) First issue of line with matte-finish in Classic Range shapes, P-Lip and fishtail mouthpiece. Second issue C.1979 as Kildare Patch, with rusticated patches on pipe surface. Third issue 2010, matte-brown, P-Lip or fishtail mouthpiece, no band. Fourth issue 2011-, burgundy sandblast finish, nickel army mount, fishtail mouthpiece, exclusive to smokingpipes.com.

Judging from the description above I believe that I am working on a First Issue of the line in the time period of 1965-1979. It is a late Republic Era Classic Shaped pipe with a matte-finish and a P-Lip stem. Now it was time to work on the pipe.

With that information at hand I turned to work on the pipe itself. Jeff had thoroughly cleaned up the pipe. He reamed the pipe with a PipNet Pipe Reamer and cleaned up the remnants with a Savinelli Fitsall Pipe Knife.  He scrubbed the bowl with undiluted Murphy’s Oil Soap with a tooth brush. He rinsed it under running warm water to remove the soap and grime. There were portions of the bowl sides where the tars had stained the briar but it was clean! He cleaned out the inside of the shank and the airway in the stem with alcohol, cotton swabs and pipe cleaners. He scrubbed the exterior of the stem with Soft Scrub to remove as much of the oxidation and calcification as possible. He soaked the stem in Before & After Deoxidizer and rinsed it off with warm water. I took photos of the pipe once I started to work on it. I took some close-up photos of the rim top, bowl front and heel as well as the stem surface. I wanted to show what an amazing job Jeff did in the cleanup of the rim top. The rim top and inner edge had darkening and damage. There was damage to the inner edge on the front and back of the bowl. The bowl front and heel had some darkening from the tars staining the briar. I also took close up photos of the stem to show the condition of the vulcanite. It was quite clean and the light tooth marks on the stem ahead of the button that do not show up well. The button was also bent downward and the airway was at the stem end. One of the things I appreciate about Jeff’s cleanup is that he works to protect and preserve the nomenclature on the shank of the pipes that he works on. The stamping on this one was very faint to start with so I was worried that it would disappear altogether with the cleanup. He was not only able to preserve and maintain its condition in the process. I took some photos to show the clarity of the stamping. I have noticed that many restorers are not careful to protect the stamping in their cleaning process and often by the end of the restoration the nomenclature is almost destroyed. I would like to encourage all of us to be careful in our work to preserve this as it is a critical piece of pipe restoration! I took the stem off the shank and took a photo of the pipe. I decided to start my work on the pipe by cleaning up the rim top, inner edge of the bowl and the darkening on the front of the bowl. I worked over the edge with a folded piece of 220 grit sandpaper. I minimized the damage on the inner edge and rim top. It looked significantly better. I used a medium grit sanding sponge and 220 grit sandpaper to sand the darkening on the bowl front. It looked better but still was too dark to my liking. I mixed a batch of oxalic acid and wiped down the darkened areas to see if that method would lighten it more. Each step took more of the darkening away. I sanded it again with the sanding sponge and 220 grit sandpaper and finally it was as good as it would get. Some of the darkening remained but it was still a big improvement. I stained the bowl with a light brown aniline stain to try to cover and blend in the darkening on the rim top and front of the bowl. I applied the stain with a wool dauber and flamed it with a Bic lighter to set it in the grain. I set it aside to let the stain coat cure. I wiped the bowl down with alcohol on cotton pads to lighten the opaque stain and make it more transparent. I like the way the pipe looked at this point in the process. I still needed to use micromesh on it but it was looking better. I polished the briar with micromesh sanding pads – dry sanding it with 1500-12000 grit sanding pads. I wiped it down with a damp cloth after each sanding pad to remove the dust. The briar was really shining by the final pad. I rubbed the bowl and rim down with Before & After Restoration Balm. I worked it into the surface of the briar with my fingertips to clean, enliven and protect it. I let the balm sit for 10 minutes and then buffed with a cotton cloth to raise the shine. I really like watching the Balm do its magic and bring the briar alive. I set the bowl aside and turned my attention to the stem. Someone had heated the tip of the button and bent it down to bring the airway on the top of the P-lip down to form a straight opening in the stem end. I heated the tip with a heat gun and carefully bent it back up and straight once again. The airway opening is certainly closer to the original than it was when I started. A bit more shaping is going to be necessary but it is better. I polished the stem with micromesh sanding pads – wet sanding with 1500-12000 grit pads. I wiped the stem down after each sanding pad with Obsidian Oil. I polished it with Before & After Pipe Stem Polish – both Fine and Extra Fine. I gave it a coat of Obsidian Pipe Stem Oil. It works to protect the stem from oxidizing. I set it aside to dry.    Once again at this point in the restoration process I am excited to be on the homestretch. I look forward to the final look when the Republic Era Peterson’s “Kildare” 87 Apple with a taper stem is put back together, polished and waxed. I put the bowl and stem back together. I lightly polished the bowl and stem with Blue Diamond to polish out the scratches in the briar and the vulcanite. I gave the bowl and the stem multiple coats of carnauba wax. I buffed the pipe with a clean buffing pad to raise the shine. I hand buffed it with a microfiber cloth to deepen the shine. The pipe polished up pretty nicely. The depths of the rustication really pop with the wax and polish. The shiny black vulcanite stem is a beautiful contrast to the browns of the bowl and thick shank. This Republic Era Peterson’s “Kildare” 87 Apple was another challenging pipe to work on. It is a nice piece of briar that cleaned up really well. The pipe feels great in the hand will be better when warmed up while smoking. The finished pipe is shown in the photos below. The dimensions of the pipe are Length: 5 ½ inches, Height: 1 ¾ inches, Outside diameter of the bowl: 1 inch, Chamber diameter: ¾ of an inch. The weight of the pipe is 1.13 ounces/32 grams. I will be putting it on the rebornpipes store in the Irish Pipemakers Section if you would like to add it to your rack and carry on the previous pipeman’s legacy. This is an interesting estate to bring back to life.

As always, I encourage your questions and comments as you read the blog. Thanks to each of you who are reading this blog. Remember we are not pipe owners; we are pipe men and women who hold our pipes in trust until they pass on into the trust of those who follow us.

Refreshing a Peterson’s System Standard Smooth Made in the Republic of Ireland 312


Blog by Steve Laug

The next pipe on the work table is Rusticated Peterson’s System pipe that we purchased from and estate in Plano, Texas, USA on 03/30/2022. It was stamped Peterson’s System Standard on left side of the shank and reads Peterson’s [over] System [over] Standard. On the right side it reads Made in the Republic of Ireland (in three lines) [over] the shape number 312. It has nice grain around the bowl and shank that has oils, debris and grime ground into the finish. There was a thick cake in the bowl with remnants of tobacco stuck on the walls. There was a lava overflow on the rim top that was heavier toward the back side. The top and edges of the rim were well hidden under the tars and lava. There was a very beautiful pipe underneath all of the buildup of years of use. The nickel ferrule on the shank end was oxidized and is stamped on the top and left side K&P [over] three hallmarks – a harp, a wolf hound and a tower. That is followed by Petersons. It small dents in the nickel ferrule on the right side. The vulcanite stem is a Peterson’s style P-Lip with a “P” logo on the left side of the saddle stem. It was oxidized and calcified toward the end with some tooth chatter. There were also some tooth marks on both sides of the stem ahead of the button. Jeff took photos of the pipe before he started his cleanup work on it. Jeff took photos of the bowl and rim top to show the thick, hard cake in the bowl with remnants of tobacco stuck on the walls of the bowl. There was a lava build up on the top of the rim and the edges of the bowl. The rim top looked pretty good but it was hard to know for sure if there was damage under the thick lava. Only clean up would tell the full story. Jeff took photos of the top and underside of the stem showing the tooth chatter, scratching and oxidation on the stem surface and wear on the edges of the button. Jeff took photos of the sides and heel of the bowl to show the condition of the finish. You can see the grime in finish around the sides of the bowl and shank. Even under the dirt and debris of the years it looked very good. Jeff took photos of the stamping on the sides of shank. The stamping was readable as you can see from the photos. It read as noted above. The nickel ferrule on the shank end is stamped on the top and left side K&P Peterson’s over three Peterson marks. I have included the information on the shape number on this pipe that I picked up on researching the previous pipes. This is the second of two Peterson’s System Standard pipes in Bob’s collection marked with the 312 shape number. I have included a page from a Petersons Catalogue that I have on rebornpipes (https://rebornpipes.com/tag/peterson-hallmark-chart/). I have put a red box around the 312 shown in the catalogue page shown below. That should give a clear picture of the size and shape of the pipe. I am also including the information from Pipedia’s article on Peterson pipes. It is a great read in terms of the history of the brand (https://pipedia.org/wiki/Peterson). I have included a bit of the pertinent history here.

1950 – 1989 The Republic Era  – From 1950 to the present time, the stamp for this era is “Made in the Republic of Ireland” in a block format generally in three lines but two lines have been used with or without Republic being abbreviated.

During the 1950’s and 60’s the Kapp & Peterson company was still in the ownership of the Kapp family. However 1964 saw the retiral of the company Managing Director Frederick Henry(Harry) Kapp.

Pipedia also included a section of information on the System pipes including a diagram of the systems look (https://pipedia.org/wiki/Peterson#Republic_Era_Pipes). I quote a section of the article in part and include a link to another article on Pipedia on the System pipe.

The Peterson System pipes are the standard bearers of the Peterson pipe family, famous for the excellent smoking pleasure they provide. Often imitated but never equaled, the Peterson System smokes dry, cool and sweet, thanks to the scientific effectiveness of the original design. The heart of the System is the unique graduated bore in the mouthpiece. This makes the suction applied by the smoker 15 times weaker by the time it reaches the tobacco chamber. The result is that all the moisture flows into the reservoir and, thus cannot reach the smoker’s mouth. The Peterson Lip further enhances the effectiveness of the graduated bore by directing the flow of smoke upwards and away from the tongue. This achieves a uniquely even distribution of smoke and virtually eliminates any chance of tonguebite or bitterness. Furthermore, the shape is contoured so that the tongue rests comfortably in the depression under the opening. Each “PLip” mouthpiece is made from Vulcanite. For the Peterson System pipes to work properly, the stem/tenon has to have an extension, the tip of which will pass by the draft hole from the bowl and into the sump. Upon the smoker drawing in smoke, this extension then directs the smoke down and around the sump to dispense a lot of the moisture before the smoke enters the extension and stem. On the System Standards and other less expensive systems, this extension with be made of Vulcanite turned integrally with the stem. On the more expensive System pipes this extension will be made of metal which screws into the Vulcanite stem. This extension on the earlier pipes will be of brass and the newer pipes will be of aluminium. Most smokers not knowing this function of the metal extension, assumes that it is a condenser/stinger and will remove it as they do with the metal condensers of Kaywoodie, etc. Should you have a System pipe with this metal extension, do not remove it for it will make the System function properly and give you a dryer smoke (https://pipedia.org/wiki/A_closer_look_at_the_famous_Peterson_Standard_System_Pipe).

With that information in hand I knew what I was dealing with in terms of the stamping and the age of this pipe. I knew from the information that the pipe was made during the Republic Era between 1950 and 1989. My guess is that the pipes is a 1960s era System pipe. Now it was time to work on the pipe.

Jeff cleaned this filthy pipe with his usual clean up process. This one was a real mess and I did not know what to expect when I unwrapped it from his box. He reamed it with a PipNet pipe reamer and cleaned up the reaming with a Savinelli Fitsall Pipe Knife. He scrubbed out the internals with alcohol, pipe cleaners and cotton swabs until the pipe was clean. He scrubbed the exterior of the bowl with Murphy’s Oil Soap and a tooth brush to remove the grime and grit on the briar and the lava on the rim top. The finish looks very good with great looking grain around the bowl and shank. Jeff soaked the stem in Briarville’s Pipe Stem Deoxidizer to remove the oxidation on the vulcanite. When the pipe arrived here in Vancouver for the second stop of its restoration tour I was amazed it looked so good. The stem showed some damage on the button edge and surface. The bonus was that the tenon had a brass chimney in the end that was correct for this pipe. I took some close-up photos of the rim top and also of the stem surface. I wanted to show what an amazing job Jeff did in the cleanup of the rim top. The rim top and inner edge had darkening and damage. There was damage to the inner edge on the back of the bowl. I also took close up photos of the stem to show the condition of the vulcanite. It was quite clean and the tooth marks and damage to the button edge and stem surface is visible in the photos below.One of the things I appreciate about Jeff’s cleanup is that he works to protect and preserve the nomenclature on the shank of the pipes that he works on. He was able to preserve and maintain its condition in the process. I took some photos to show the clarity of the stamping. I have noticed that many restorers are not careful to protect the stamping in their cleaning process and often by the end of the restoration the nomenclature is almost destroyed. I would like to encourage all of us to be careful in our work to preserve this as it is a critical piece of pipe restoration! I took the stem off the shank and took a photo of the pipe. I decided to start my work on the pipe by cleaning up the rim top and inner edge of the bowl. I started by working over the edge and the rim top with a folded piece of 220 grit sandpaper. I minimized the damage on the inner edge and rim top. It looked significantly better. I polished the briar with micromesh sanding pads – dry sanding it with 1500-12000 grit sanding pads. I wiped it down with a damp cloth after each sanding pad to remove the dust. The briar was really shining by the final pad. I rubbed the bowl and rim down with Before & After Restoration Balm. I worked it into the surface of the briar with my fingertips to clean, enliven and protect it. I let the balm sit for 10 minutes and then buffed with a cotton cloth to raise the shine. I really like watching the Balm do its magic and bring the briar alive. I polished the nickel ferrule with a jewellers cloth to remove the remaining tarnish and to protect the surface from further tarnishing. The shine was quite nice. I set the bowl aside and turned my attention to the stem. There were several issues that I needed to deal with to secure a good fit. The brass chimney was stuck in the tenon and I could not remove it. I heated the chimney with a lighter and was finally able to unscrew it from the stem end. I cleaned out the threaded area on the stem and the threads on the chimney and greased it with Vaseline. I screwed it back in the stem.The fit of the stem in the shank was canted to the left and the brass chimney hit against the wall of the mortise. As I examined it I saw that the drilling in the shank was more worn on the right side than the left. I smoothed out the walls of the left side of the shank with small half circle needle files. I also sanded the right side of the stem to adjust the seat in the shank. Once I had completed the process the fit was perfect in the shank.I fit the stem in the shank and the adjustments straightened out the cant of the stem. I took photos of it to show the new fit in the shank.I rebuilt the top edge of the button with black CA glue. I filled in the tooth marks on the top and underside of the stem. Once the repair hardened/cured I used a small file to reshape the edge of the button and flatten the repairs. I reshaped the top of the button with the file at the same time. I sanded the repairs with 220 grit sandpaper to blend them into the surface of the vulcanite. I started polishing the stem with 600 grit wet dry sandpaper to further smooth it out. I touched up the “P” logo on the left side of the saddle stem with white acrylic fingernail polish. I let it dry then I polished off the excess with a worn 1500 grit micromesh sanding pad. Once the excess was removed the stamp looked much better. There were some weak spots on the leg and tail of the “P” stamp.I polished the stem with micromesh sanding pads – wet sanding with 1500-12000 grit pads. I wiped the stem down after each sanding pad with Obsidian Oil. I polished it with Before & After Pipe Stem Polish – both Fine and Extra Fine. I gave it a coat of Obsidian Pipe Stem Oil. It works to protect the stem from oxidizing. I set it aside to dry. Once again at this point in the restoration process I am excited to be on the homestretch. I look forward to the final look when the Republic Era Peterson’s System Standard 312 is put back together, polished and waxed. I put the bowl and stem back together. I lightly polished the bowl and the stem with Blue Diamond. I gave the bowl and the stem multiple coats of carnauba wax. I buffed the pipe with a clean buffing pad to raise the shine. I hand buffed it with a microfiber cloth to deepen the shine. The pipe polished up pretty nicely. The grain really pops with the wax and polish. The shiny black vulcanite stem is a beautiful contrast to the browns of the bowl and thick shank and nickel ferrule. This Republic Era Peterson’s System Standard 312 Bent Billiard was another fun pipe to work on. It really is a quite stunning piece of briar whose shape follows the flow of the briar. The pipe feels great in the hand will be better when warmed up while smoking. The finished pipe is shown in the photos below. The dimensions of the pipe are Length: 5 ½ inches, Height: 1 ¾ inches, Outside diameter of the bowl: 1 ¼ inches, Chamber diameter: ¾ of an inch. The weight of the pipe is 2.01 ounces/57 grams. I will be putting it on the rebornpipes store in the Irish Pipemakers Section if you would like to add it to your rack and carry on the previous pipeman’s legacy. This is an interesting estate to bring back to life.

As always, I encourage your questions and comments as you read the blog. Thanks to each of you who are reading this blog. Remember we are not pipe owners; we are pipe men and women who hold our pipes in trust until they pass on into the trust of those who follow us.

Peterson’s “Kildare” Special HG Republic of Ireland 10 Canadian


Blog by Steve Laug

The next pipe on the work table is Peterson’s Large Canadian pipe that we purchased from and our connection in Copenhagen, Denmark on 03/30/2022. It was stamped Peterson’s [over] “Kildare”[over] Special on the topside of the shank. On the right it is stamped with the shape number 10. On the underside it is stamped with a large interlocked HG [followed by] Made in the Republic of Ireland (in three lines). It is a large Canadian that has a smooth finish with great grain around the bowl and shank that is covered with a lot of oils, debris and grime. There was a thick cake in the bowl with remnants of tobacco stuck on the walls. There was a heavy lava overflow on the rim top and edges. The top and edges of the rim were well hidden under the tars and lava. There was a very beautiful pipe underneath all of the buildup of years of use. The stem was a Peterson’s style Fishtail stem. It was oxidized and calcified toward the end with some deep tooth marks and chatter. There was wear on the edge of the button that would need to be dealt with. Jeff took photos of the pipe before he started his cleanup work on it. Jeff took photos of the bowl and rim top to show the thick, hard cake in the bowl with remnants of tobacco stuck on the walls of the bowl. There was a lava build up on the top of the rim and the edges of the bowl. The rim top looked pretty good but it was hard to know for sure if there was damage under the thick lava. Only clean up would tell the full story. Jeff took photos of the top and underside of the stem showing the tooth chatter, scratching, calcification and oxidation on the stem surface and wear on the edges of the button. Jeff took photos of the sides and heel of the bowl to show the condition of the finish. You can see the grime around the sides of the bowl and shank. Even under the dirt and debris of the years it looked very good. Jeff took photos of the stamping on the sides of the shank. The stamping was readable as you can see from the photos. It read as noted above. I turned first to “The Peterson’s Pipe” by Mark Irwin and Gary Malmberg to see what it had to say on the “Kildare” line. On page 306 it says:

Kildare (1965-) First issue of the line with matte-finish in Classic Range shapes. P-lip and fishtail mouthpiece. Second issue c.1979 as Kildare Patch, with rusticated patches on the pipe surface. Third issue 2010, matte brown, P-lip or fishtail mouthpiece, no band. Fourth issue 2011-burgundy sandblast finish, nickel army mount, fishtail mouthpiece, exclusive to Smokingpipes.com.

I wrote to Mark Irwin and asked where I could find information on the GH stamp on this particular pipe. I quote his response below.

Hi Steve, the answer is on p. 300 of your Peterson book: “GH Retailer’s Monogram.” The SPECIAL stamp indicates that this pipe was made specially for George Huber of Munich, who had other Peterson pipes made expressly for their shop. Best, Mark

I turned to page 300 of  “The Peterson’s Pipe” by Mark Irwin and Gary Malmberg as noted by him and found a great paragraph on the stamping. I quote in full.

GH Retailer’s Monogram (c. 1960s) George Huber of Munich, Germany, a Peterson distributor and retailer for decades, stamped their monogram on pipes sold in their store, G overlaid on H. Peterson shared in the 1988 commemoration of Huber’s 125th year in business by producing a special pipe with a sterling rim cap, stamped HUBER over CELEBRATION.

The pipe I have is one that bears that monogram but does not appear to have ever had the sterling rim cap and was not stamped HUBER over CELEBRATION. With that information I turned my attention to working on the pipe.

Jeff had cleaned it thoroughly. He had reamed it with a PipNet reamer and cleaned that up with a Savinelli Fitsall Pipe Knife. He had scrubbed the exterior of the briar with undiluted Murphy’s Oil Soap. He removed the shiny coat on the briar with acetone on cotton pads. He cleaned out the interior of the shank, sump and airway in the shank and stem with alcohol, pipe cleaners and cotton swabs. He scrubbed the stem with Soft Scrub to remove the oxidation and calcification on the surface. He soaked it in Briarville’s Pipe Stem Deoxidizer to remove the oxidation. He removed it from the Deoxidizer and rinsed it off with warm water. I took some photos of the pipe before I started my part of the work. I took some close up photos of the rim top and also of the stem surface. I wanted to show what an amazing job Jeff did in the cleanup of the rim top. The rim top and inner edge had darkening and damage. There was damage to the inner edge on the front and back of the bowl. The rim top is clean but in rough condition. I also took close up photos of the stem to show the condition of the vulcanite. It was quite clean and the large and deep tooth marks on the button and on the stem ahead of the button were very visible in the photos.One of the things I appreciate about Jeff’s cleanup is that he works to protect and preserve the nomenclature on the shank of the pipes that he works on. The stamping on this one was very faint to start with so I was worried that it would disappear altogether with the cleanup. He was not only able to preserve and maintain its condition in the process. I took some photos to show the clarity of the stamping. I have noticed that many restorers are not careful to protect the stamping in their cleaning process and often by the end of the restoration the nomenclature is almost destroyed. I would like to encourage all of us to be careful in our work to preserve this as it is a critical piece of pipe restoration! I took the stem off the shank and took a photo of the pipe. I decided to start my work on the pipe by cleaning up the rim top and inner edge of the bowl. I started by working over the edge with a folded piece of 220 grit sandpaper. I then topped the bowl on a topping board with 220 grit sandpaper. I finished the work with a wooden ball and sandpaper to give the inner edge a slight bevel. Using these methods, I minimized the damage on the inner edge and rim top. It looked significantly better. I touched up the stain on the rim top with a Cherry stain pen. It matched the stain on the rest of the bowl perfectly and once buffed it would blend in very well.I polished the briar with micromesh sanding pads – dry sanding it with 1500-12000 grit sanding pads. I wiped it down with a damp cloth after each sanding pad to remove the dust. The briar was really shining by the final pad. I rubbed the bowl and rim down with Before & After Restoration Balm. I worked it into the surface of the briar with my fingertips to clean, enliven and protect it. I let the balm sit for 10 minutes and then buffed with a cotton cloth to raise the shine. I really like watching the Balm do its magic and bring the briar alive. I set the bowl aside and turned my attention to the stem. I “painted” the tooth marks with the flame of a Bic lighter to try and lift the marks. I was able to lift them slightly. I filled in the deep marks on the stem with Black Rubberized CA glue and set it aside to cure. Once cured I used a file to flattened the repairs and redefine the button edge. I sanded the stem with 220 grit sandpaper to further blend in the repairs. I polished it with 600 grit wet dry sandpaper. I touched up the “P” logo on the left side of the saddle stem with white acrylic fingernail polish. I let it dry then I polished off the excess with a worn 1500 grit micromesh sanding pad. Once the excess was removed the stamp looked much better. There were some weak spots on the leg and tail of the “P” stamp.I polished the stem with micromesh sanding pads – wet sanding with 1500-12000 grit pads. I wiped the stem down after each sanding pad with Obsidian Oil. I polished it with Before & After Pipe Stem Polish – both Fine and Extra Fine. I gave it a coat of Obsidian Pipe Stem Oil. It works to protect the stem from oxidizing. I set it aside to dry.  Once again at this point in the restoration process I am excited to be on the homestretch. I look forward to the final look when the Peterson’s “Kildare” Special 10 Canadian with a taper stem is put back together, polished and waxed. I put the bowl and stem back together. I lightly polished the bowl and stem with Blue Diamond to polish out the scratches in the briar and the vulcanite. I gave the bowl and the stem multiple coats of carnauba wax. I buffed the pipe with a clean buffing pad to raise the shine. I hand buffed it with a microfiber cloth to deepen the shine. The pipe polished up pretty nicely. The depths of the rustication really pop with the wax and polish. The shiny black vulcanite stem is a beautiful contrast to the browns of the bowl and thick shank. This Republic Era Peterson’s “Kildare” 10 Canadian was another fun pipe to work on. It really is a quite stunning piece of briar whose shape follows the flow of the briar. The pipe feels great in the hand will be better when warmed up while smoking. The finished pipe is shown in the photos below. The dimensions of the pipe are Length: 6 inches, Height: 2 inches, Outside diameter of the bowl: 1 3/8 inches, Chamber diameter: 7/8 of an inch. The weight of the pipe is 1.80 ounces/51 grams. I will be putting it on the rebornpipes store in the Irish Pipemakers Section if you would like to add it to your rack and carry on the previous pipeman’s legacy. This is an interesting estate to bring back to life.

As always, I encourage your questions and comments as you read the blog. Thanks to each of you who are reading this blog. Remember we are not pipe owners; we are pipe men and women who hold our pipes in trust until they pass on into the trust of those who follow us.