Tag Archives: sanding a stem

How about a Danish for Breakfast?


Blog by Kenneth Lieblich

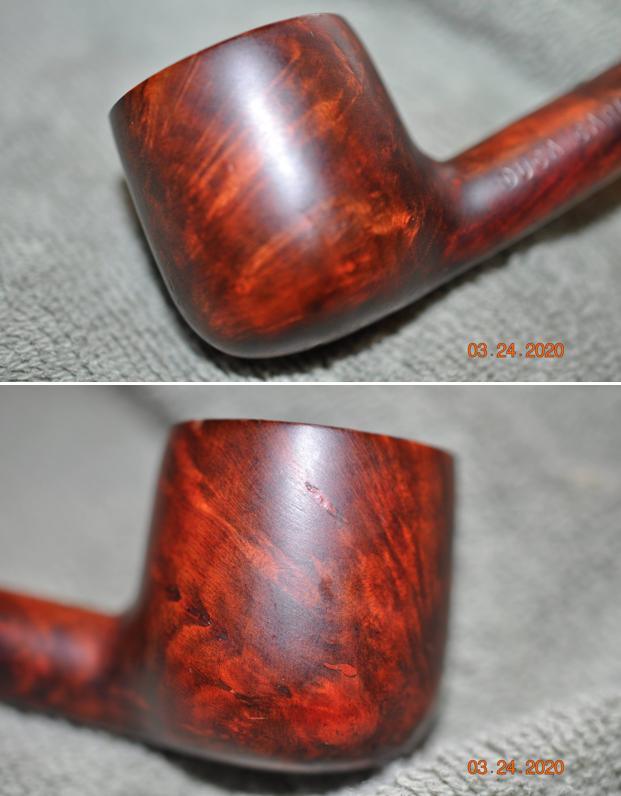
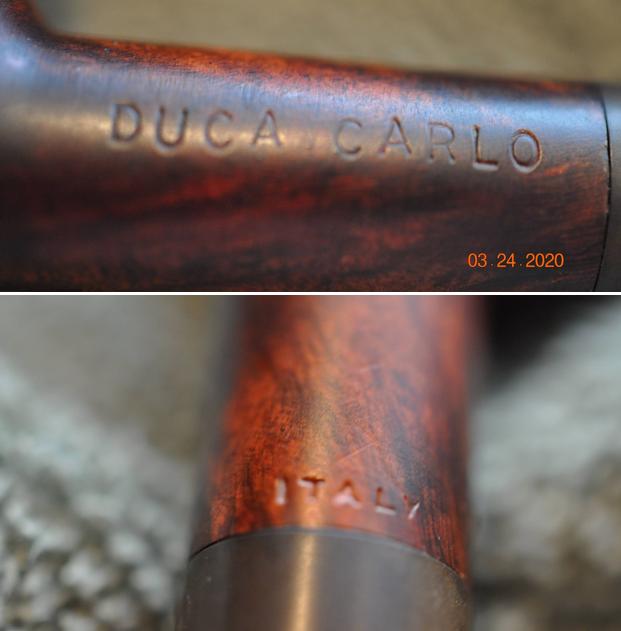
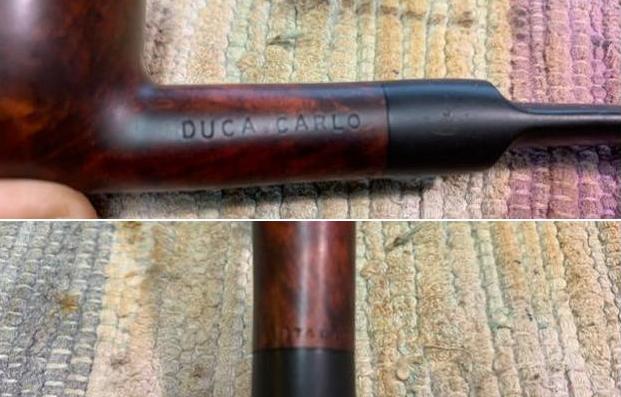
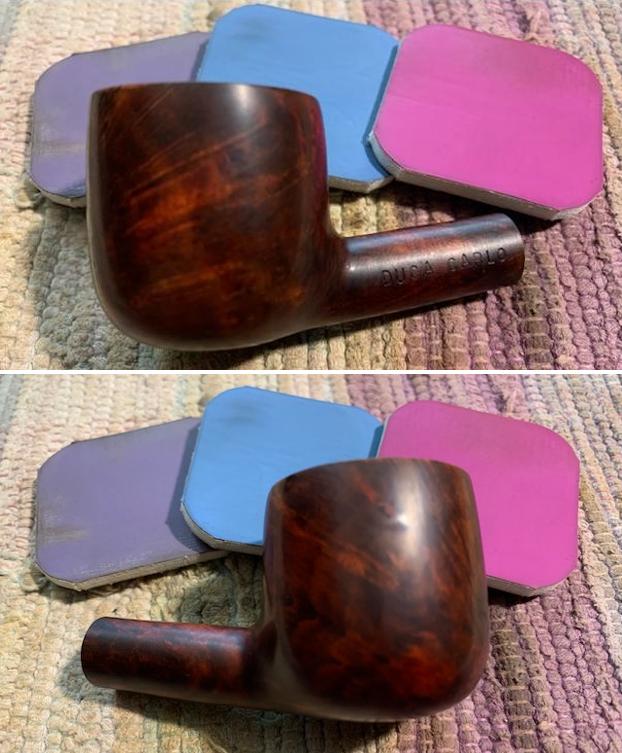
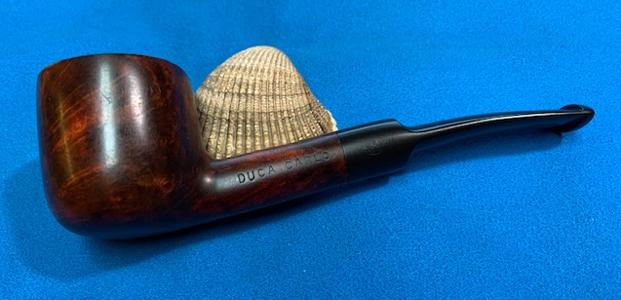
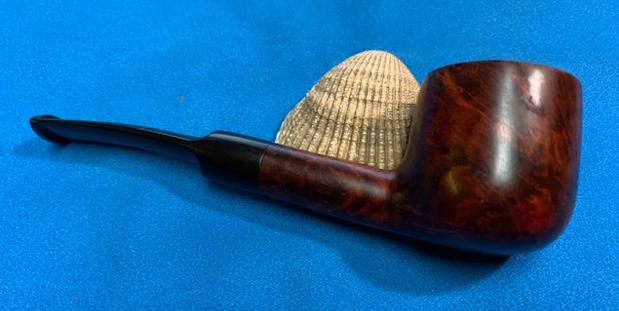
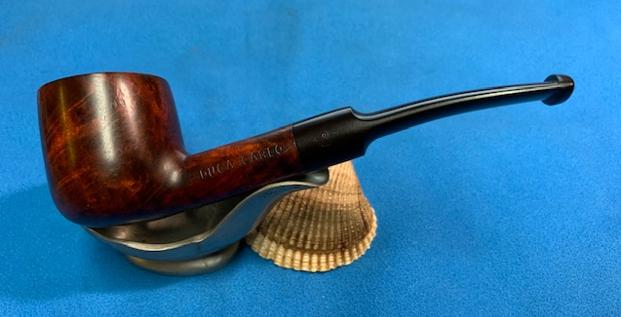
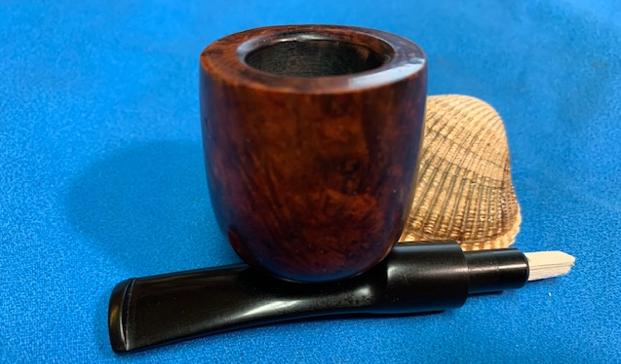
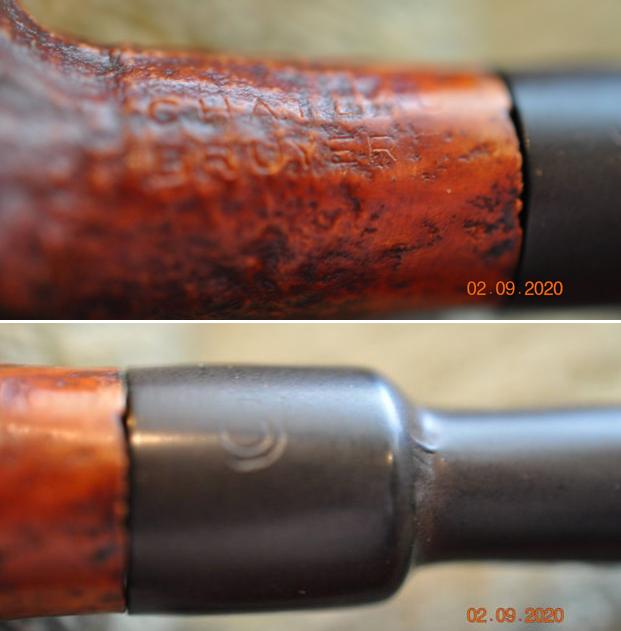
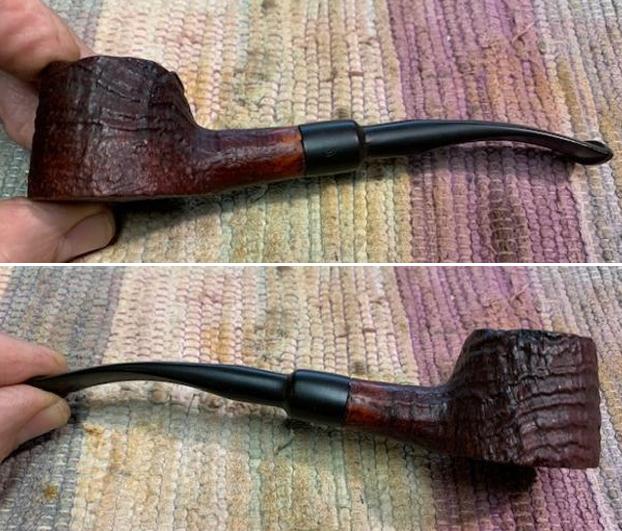
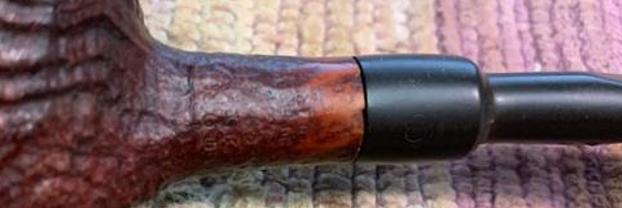
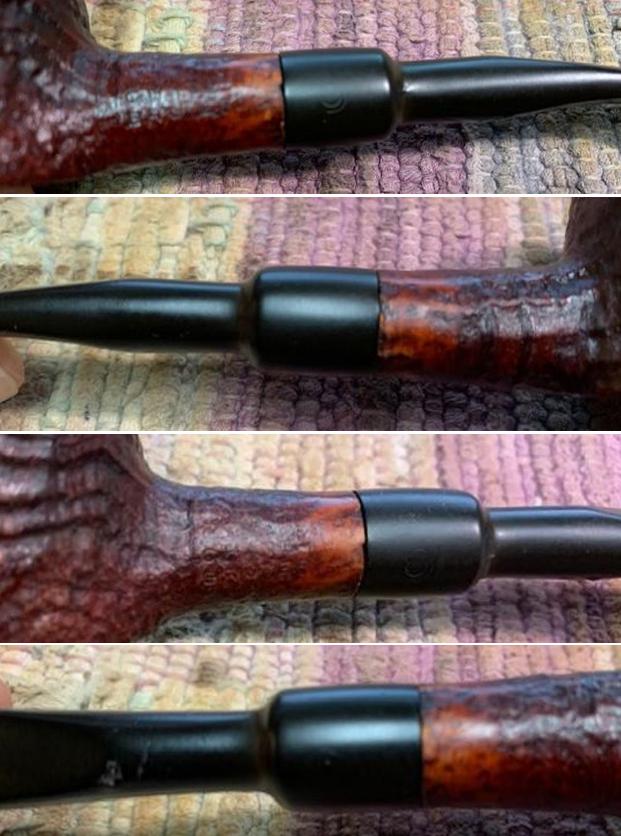
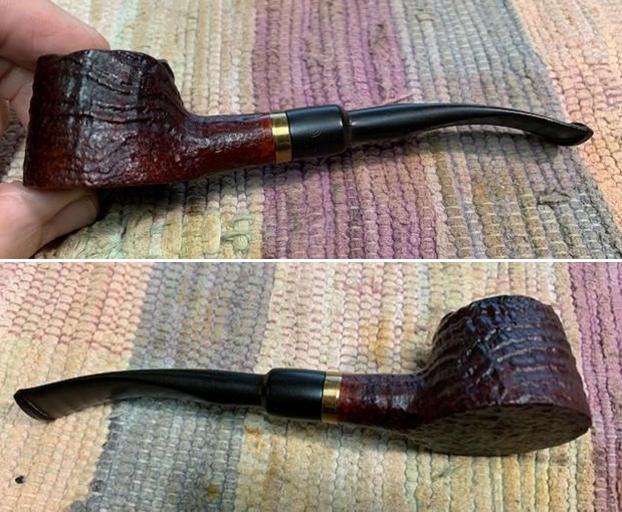
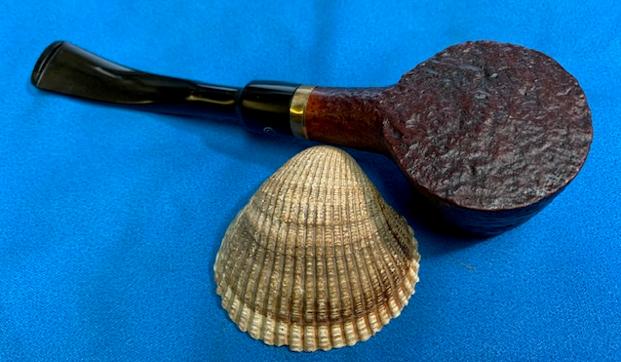
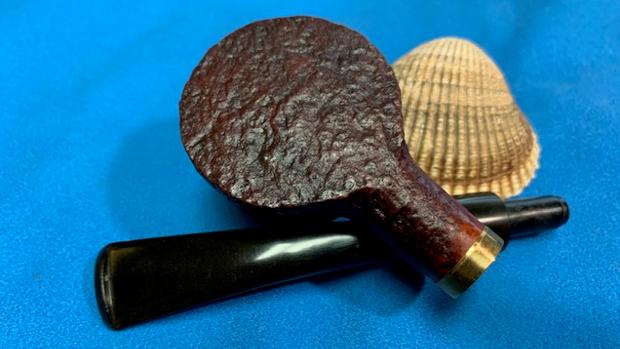
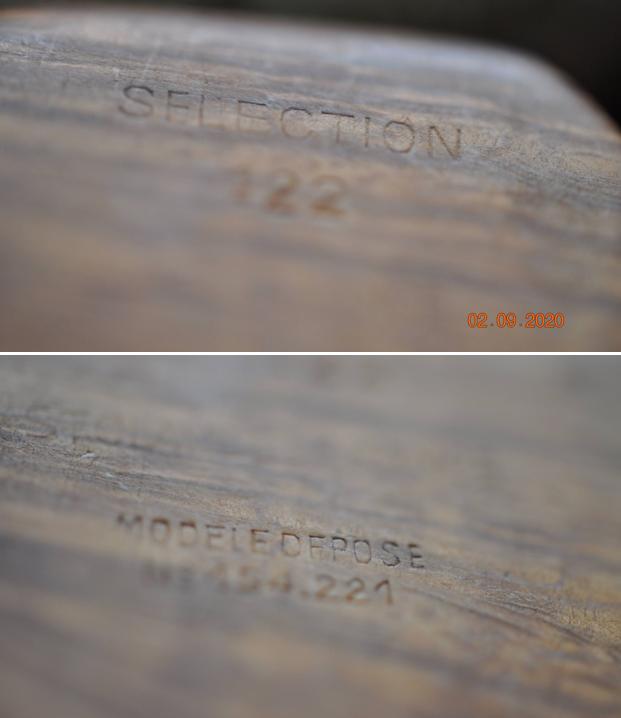
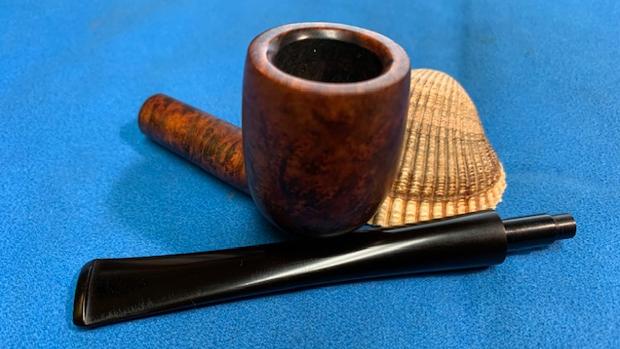
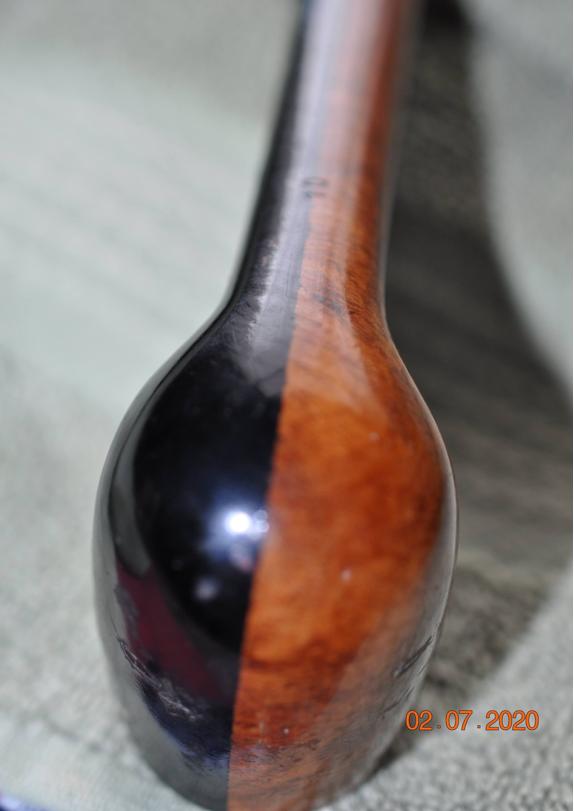
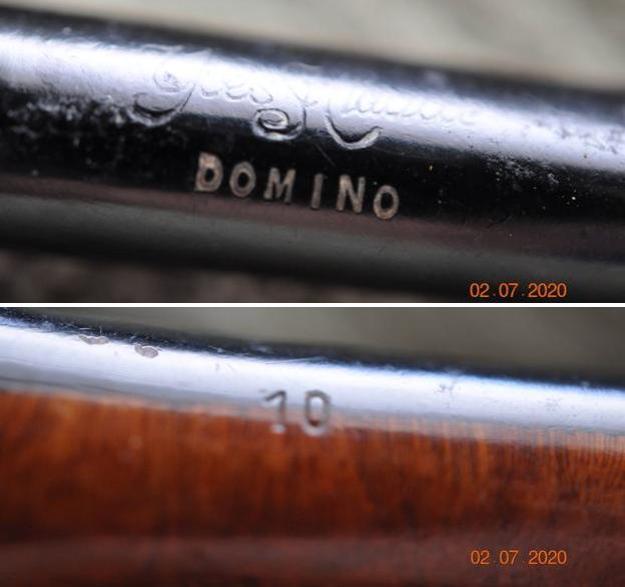
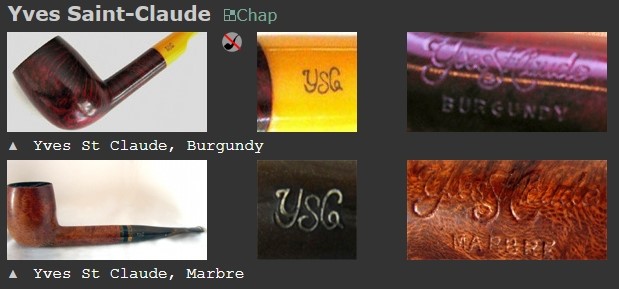
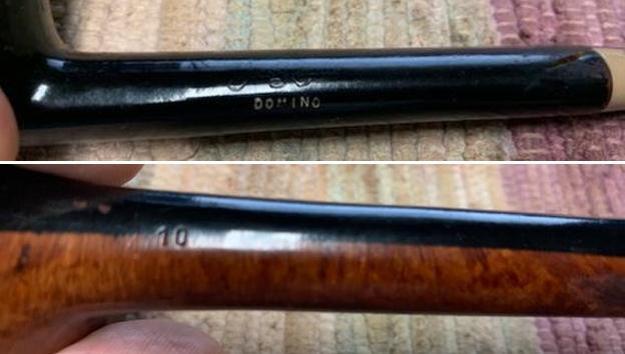
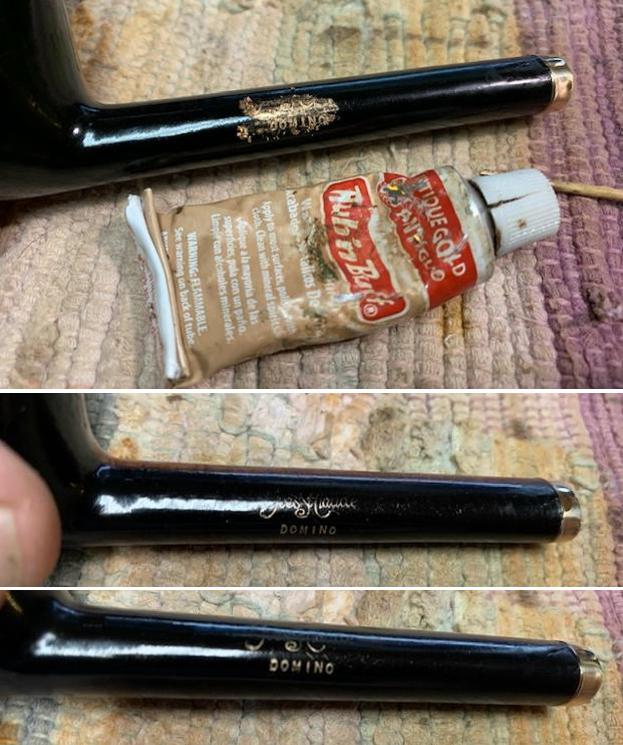
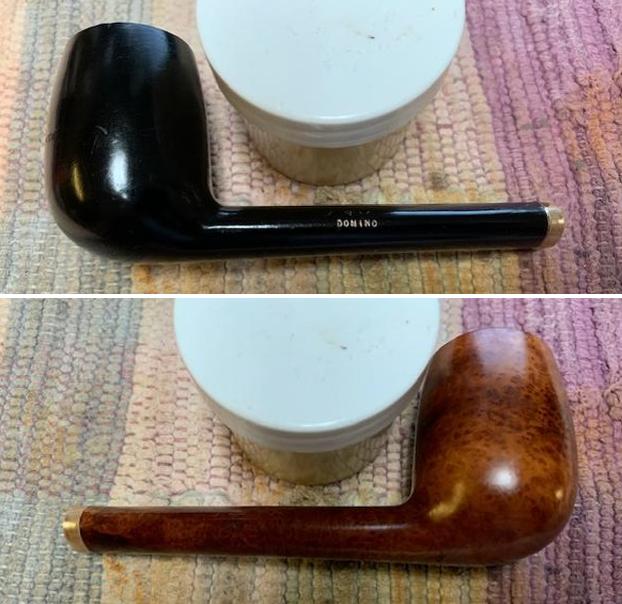
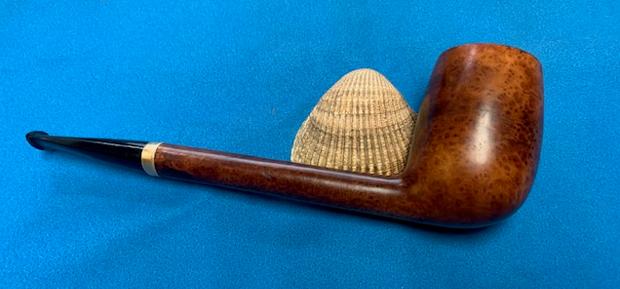
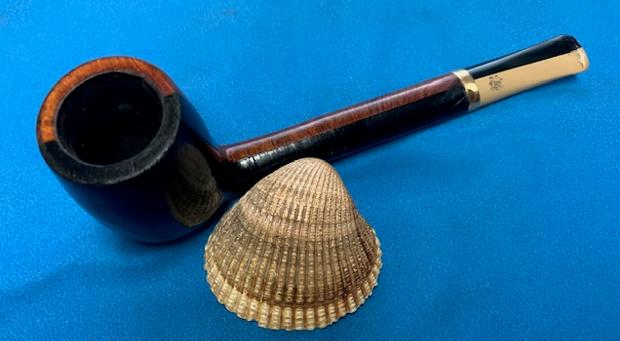
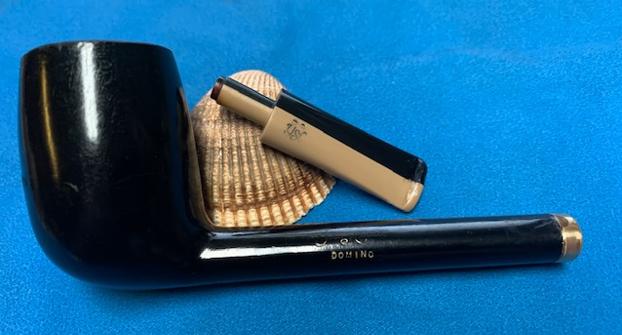
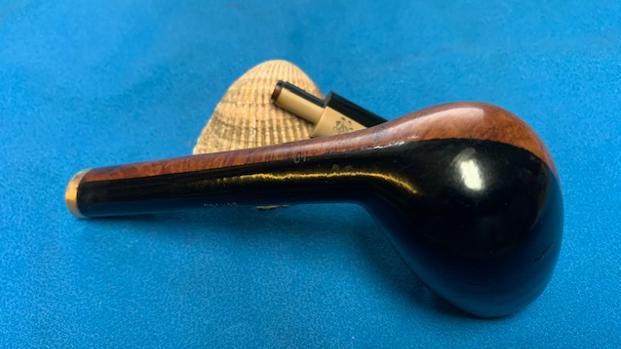
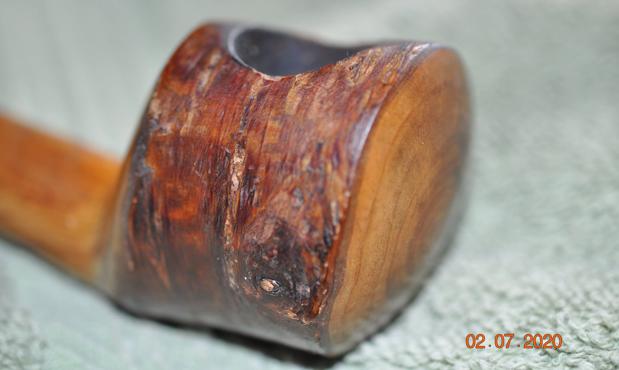
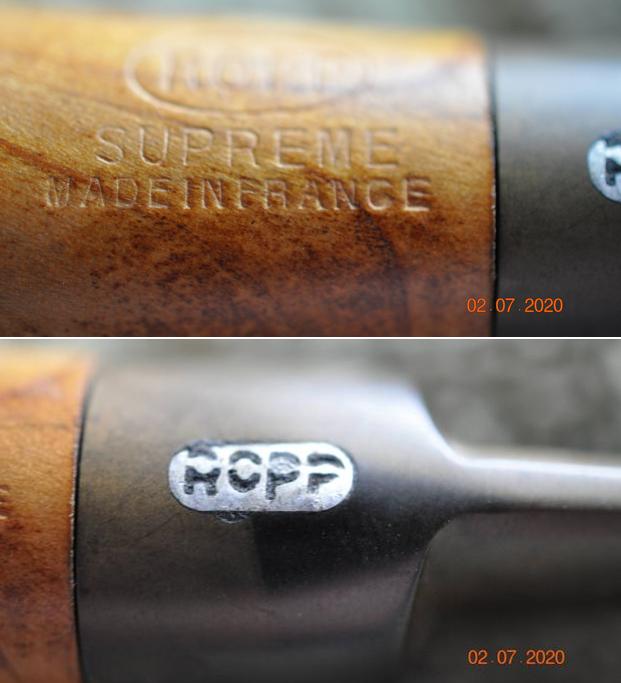
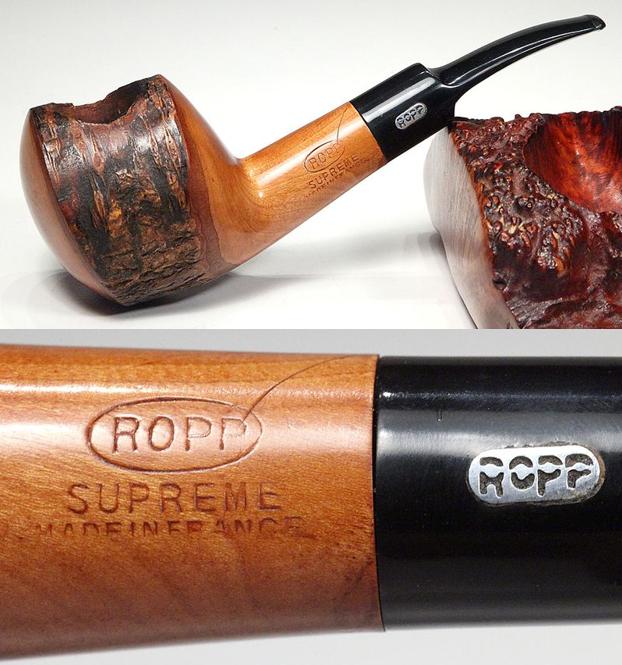
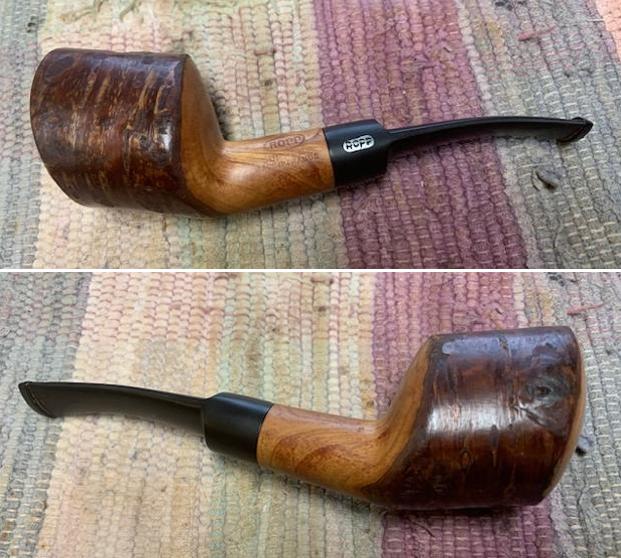
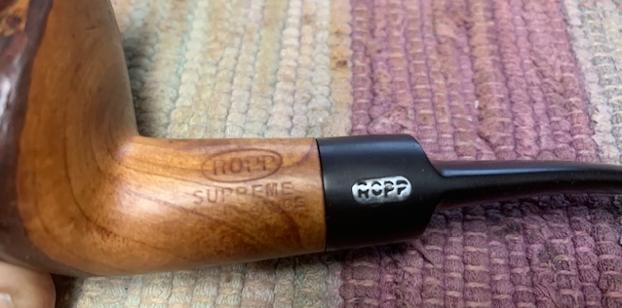
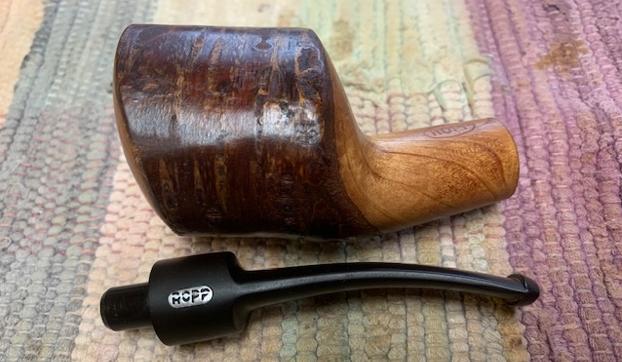
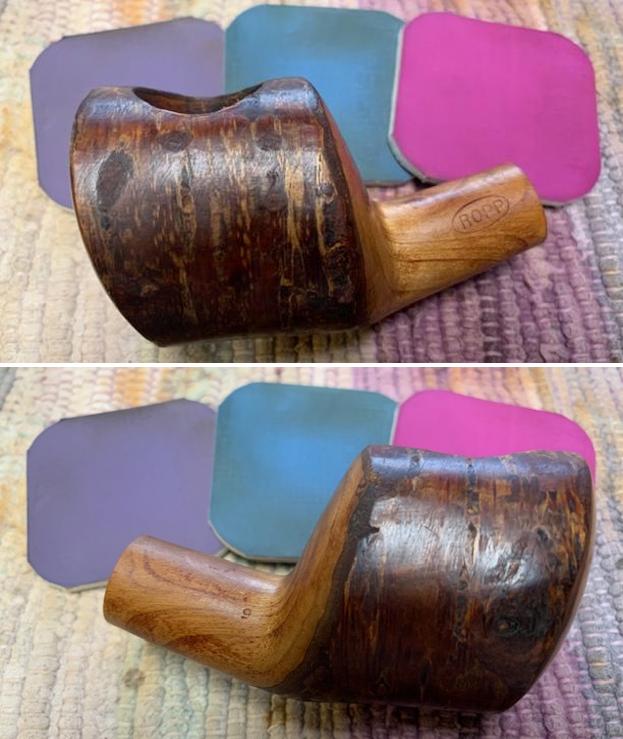
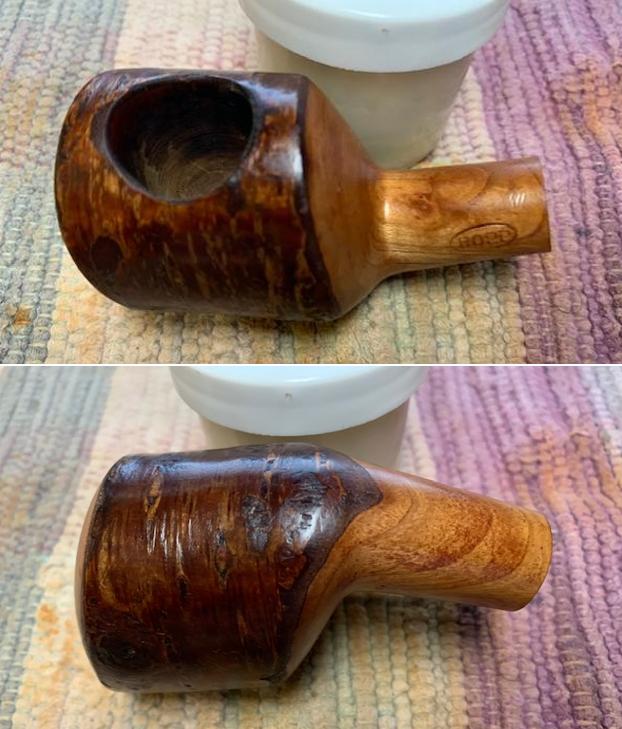
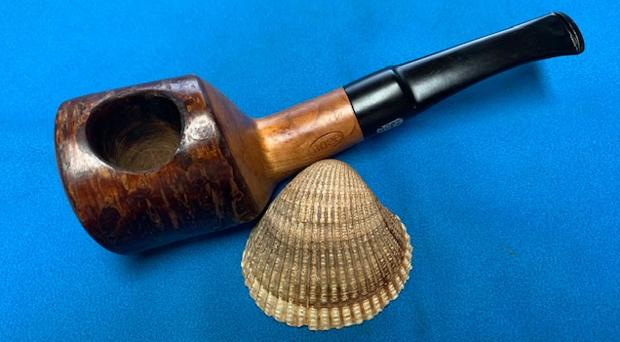
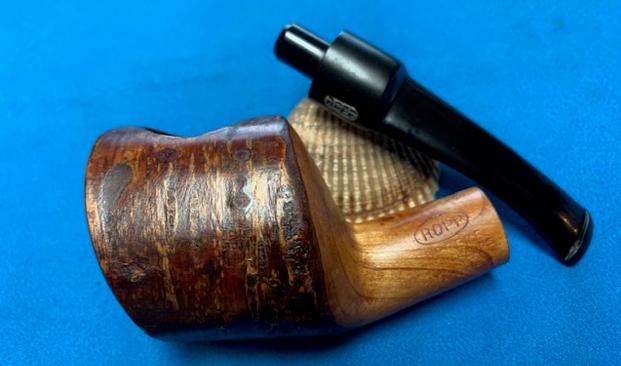
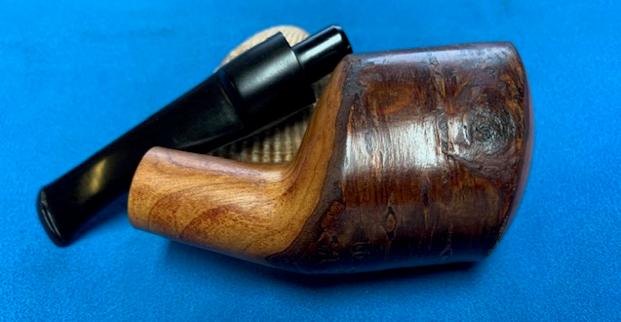
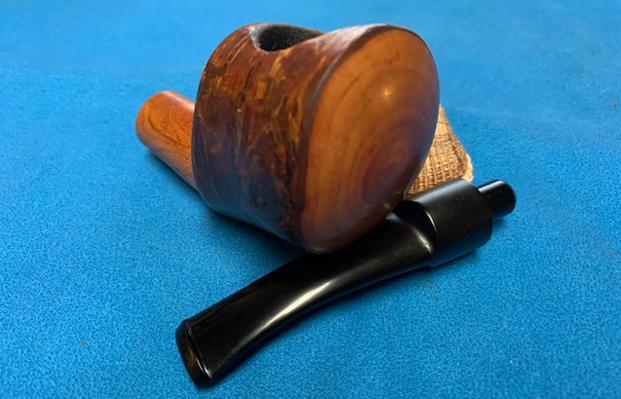
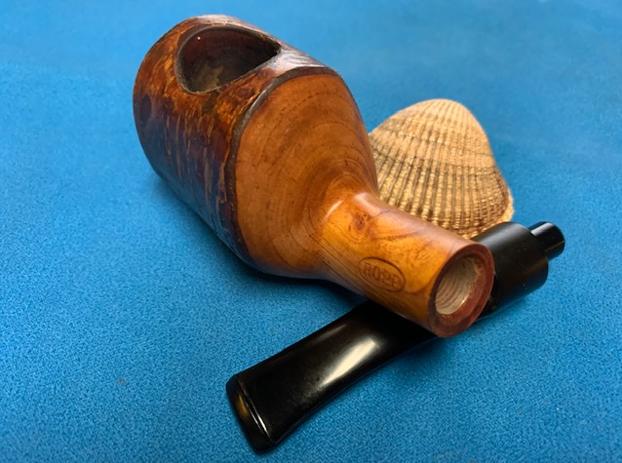
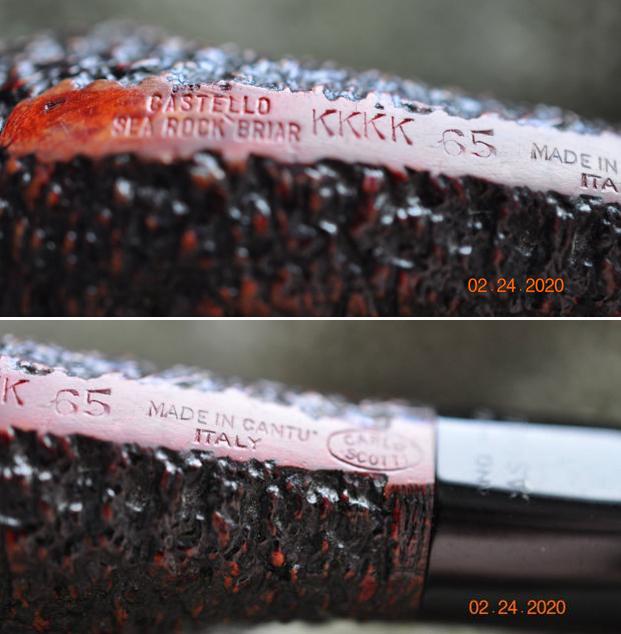
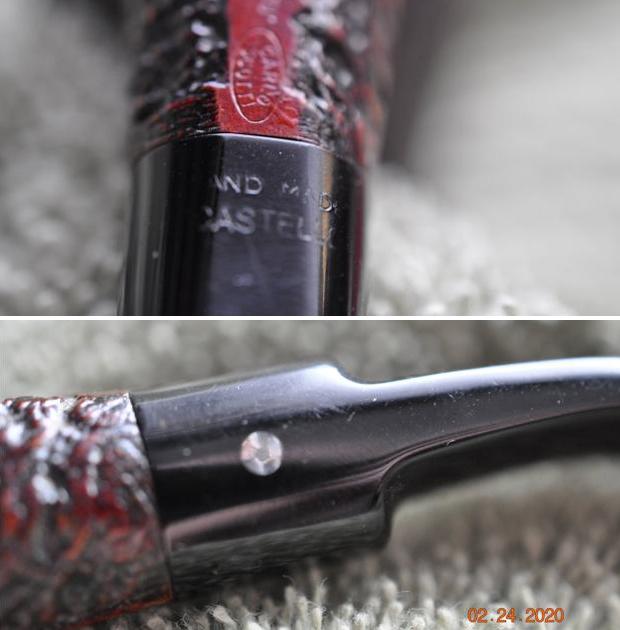
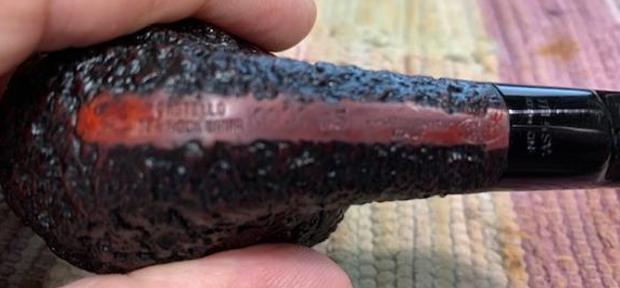
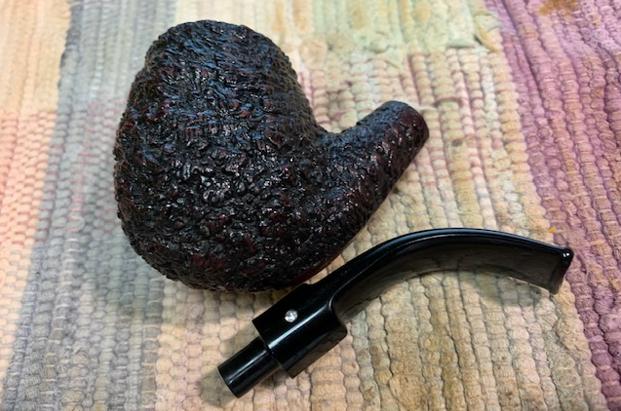
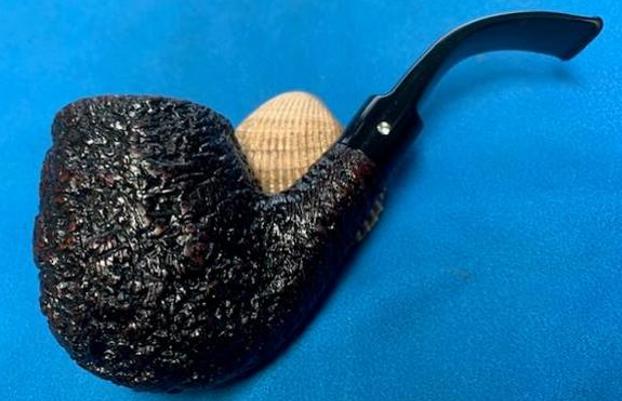
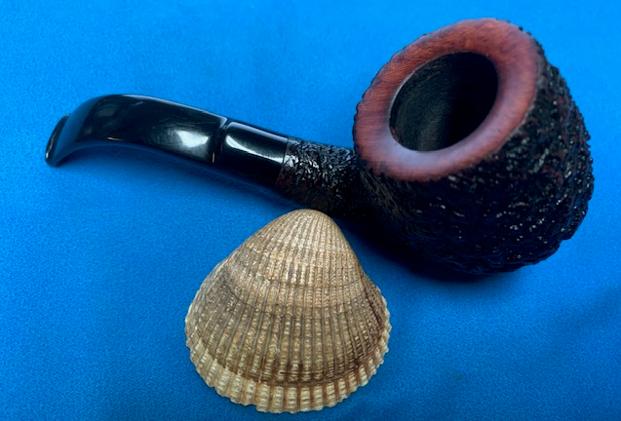
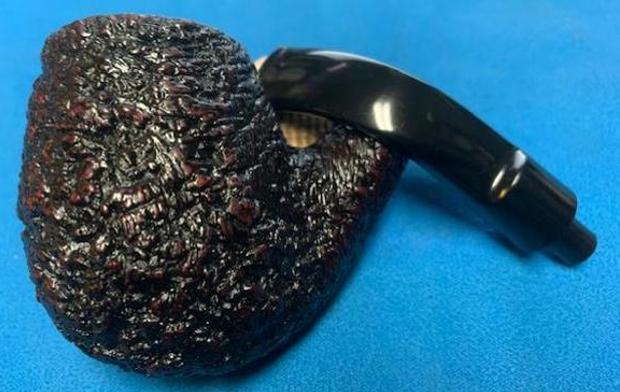
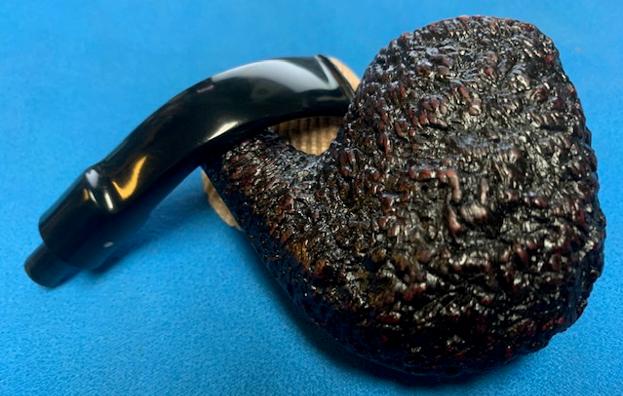
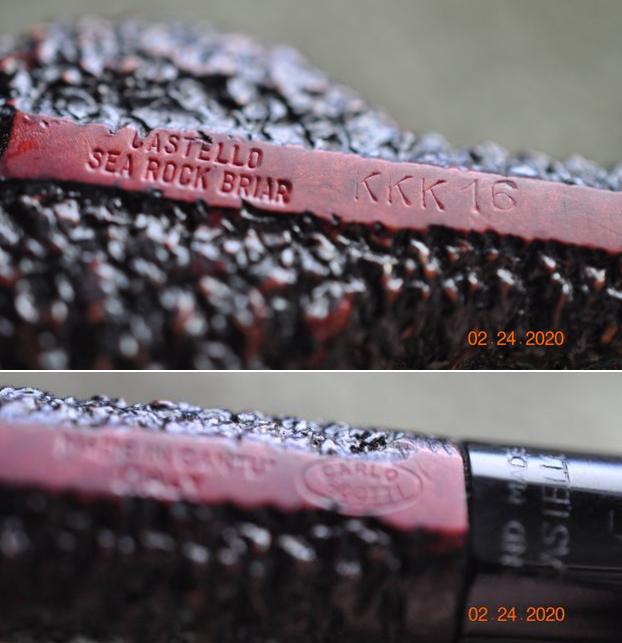
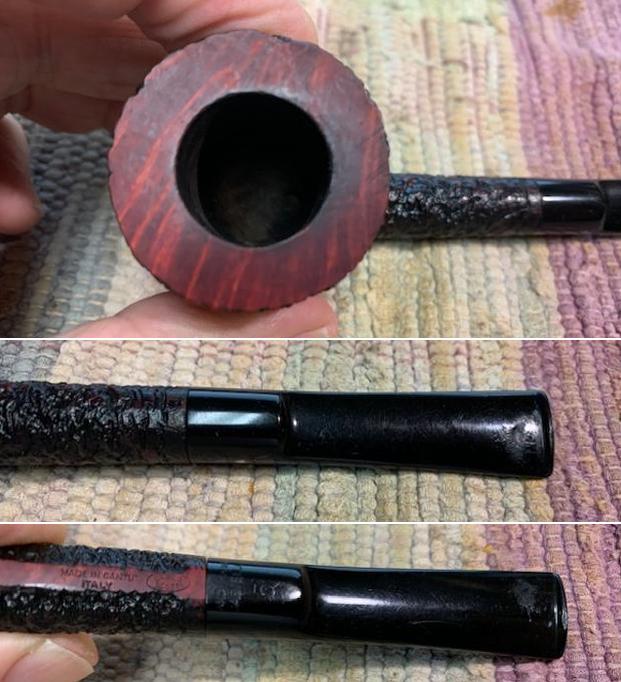
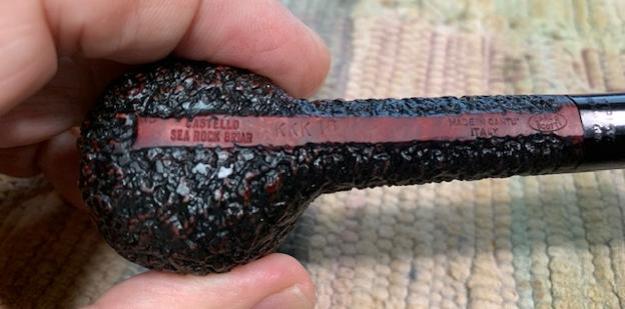
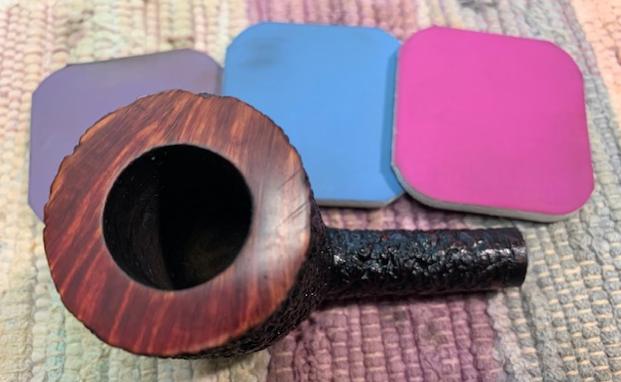
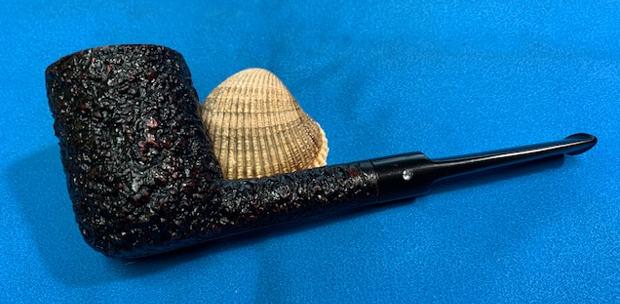
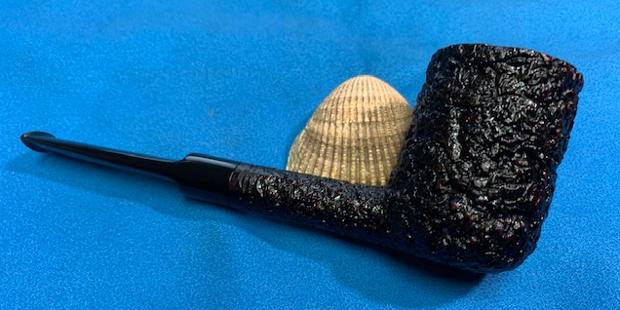
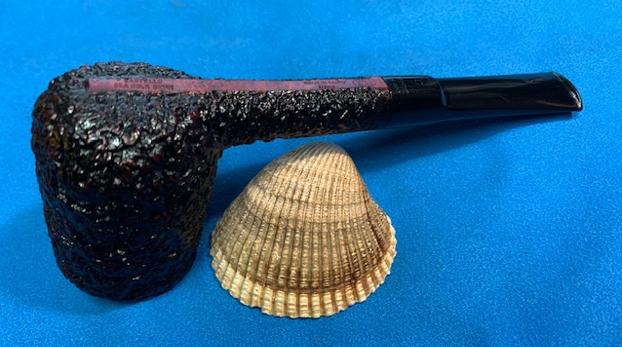
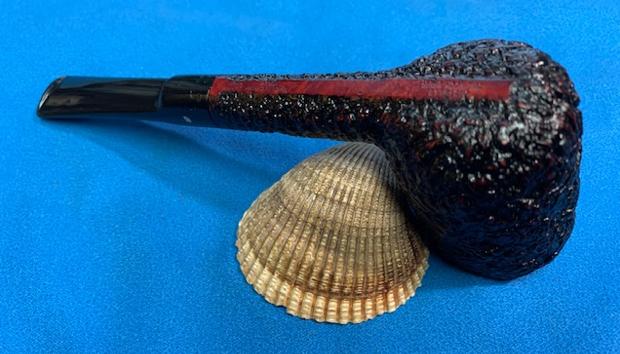
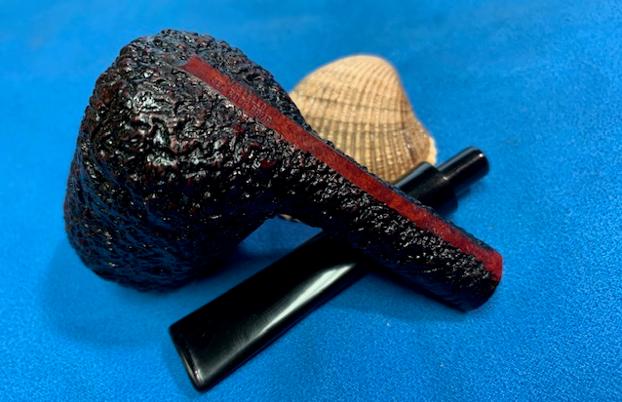
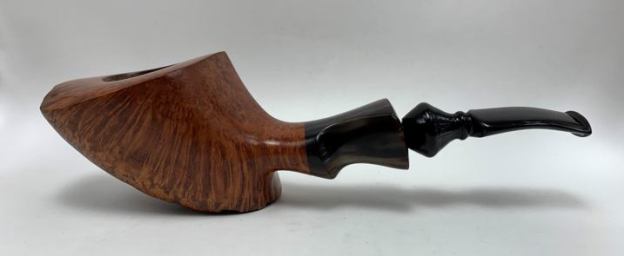
This spectacular pipe came in a lot of freehand pipes that I bought recently. It seemed to me that I needed to restore a Danish freehand pipe in order to earn my pipe-restoring stripes, so-to-speak. The pipe is absolutely beautiful and a superb example of Danish pipe-making craftsmanship. But right at the start, I want to apologize for the dearth of photographs in this post. I guess I was so delighted at the prospect of working on this pipe that I occasionally forgot to capture the moment on camera.The pipe is a Danish freehand pipe by the esteemed pipemaker, Bjørn Thurmann. The gorgeous briar wood transitions seamlessly into the horn ferrule. It really makes an impression. I am not able to date the pipe, as the photo shows all of the markings to be seen. Thurmann passed away a few years ago, but his company, Thurmann Piber, is still well known in Copenhagen for the fine quality of his work. The reference book, Scandinavian Pipemakers by Jan Andersson, provides us with a nice overview of his background and work. I will quote a bit of it here:

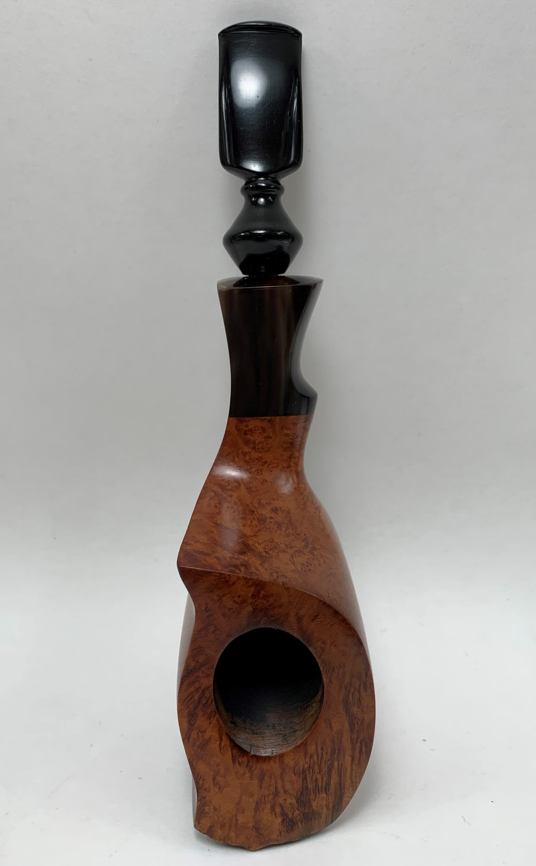
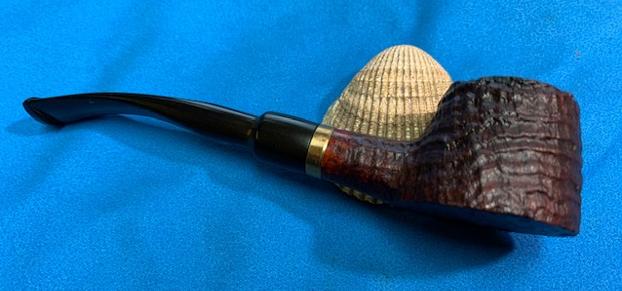
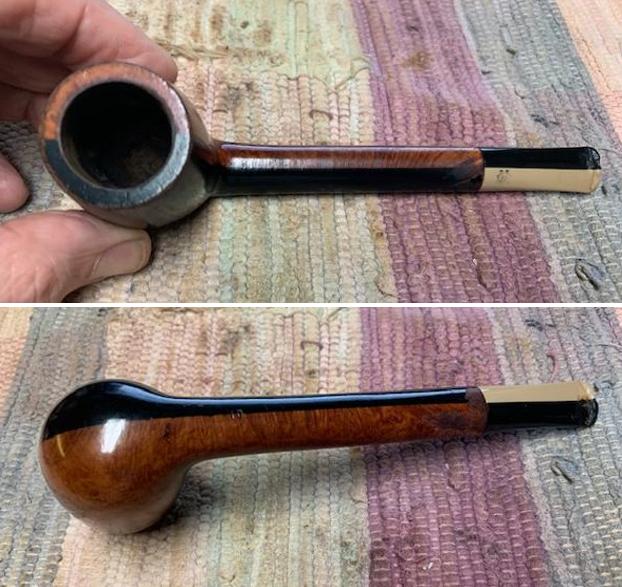
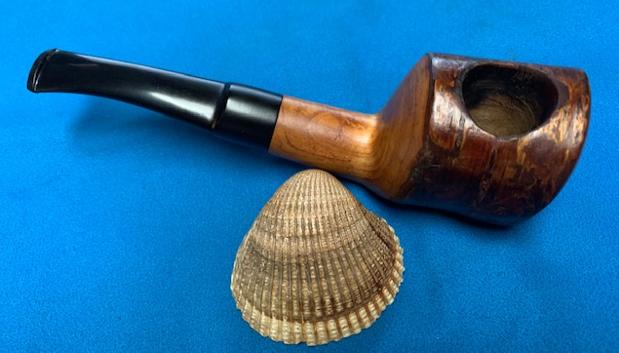
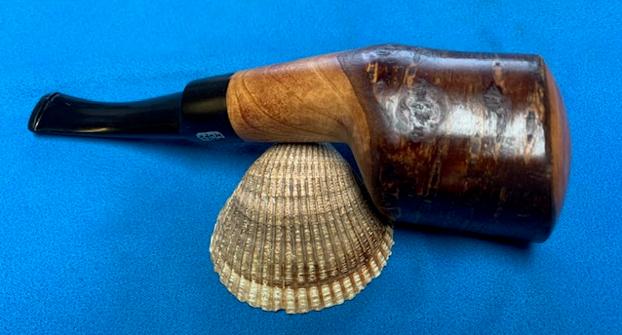
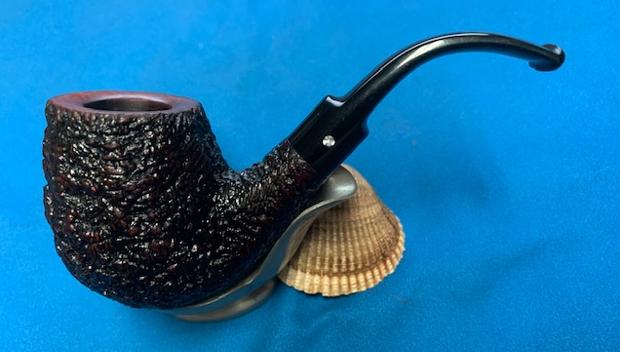
Bjørn Thurmann was born in 1946 – some would say, born into the tobacco trade. In 1953, his parents opened a pipe shop in central Copenhagen and Bjørn helped them there from the beginning, mainly by sorting pipes. Initially, the pipes were bought from a firm called Larsen & Stigart, but eventually they decided to start their own production.

Bjørn’s parents thought that their son ought to widen his views and get some international experience, so, in 1968, he was sent to London to work in different tobacconists shops, a period of learning that ended at Dunhill’s famous shop on Duke Street. After returning home, he almost immediately received an offer to work for Iwan Ries & Co. in Chicago, an offer that was hard to resist, so off he went.

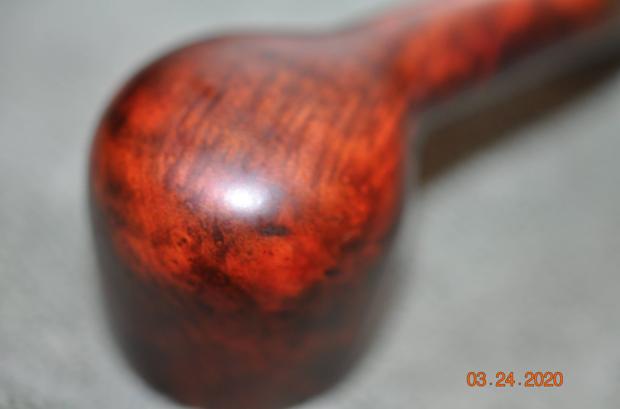
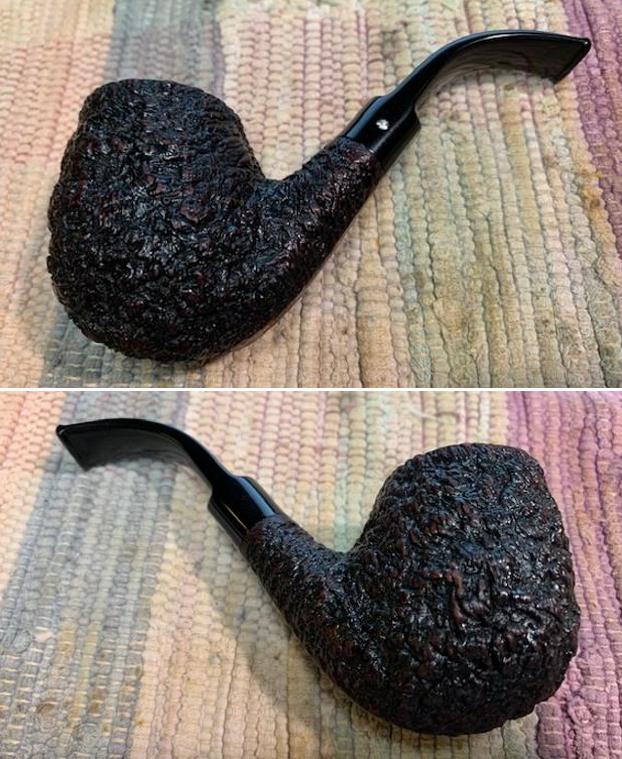
In 1976, Bjørn established himself as an independent pipemaker, and since then he has had shops in several places in Copenhagen. Bjørn has also written a book called Pibemagerens Handbog (The Pipemakers Handbook), which tells how to make pipes using simple tools most people have at home.
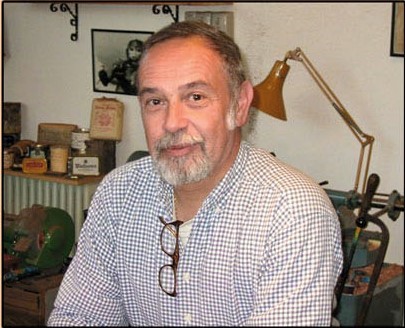
Clearly, Thurmann was a vastly experienced and talented pipe man. I am delighted to be able to work on a pipe like this. One can not only see, but also feel, the quality of the briar. 
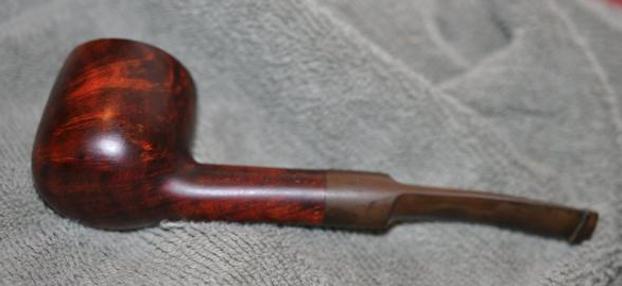
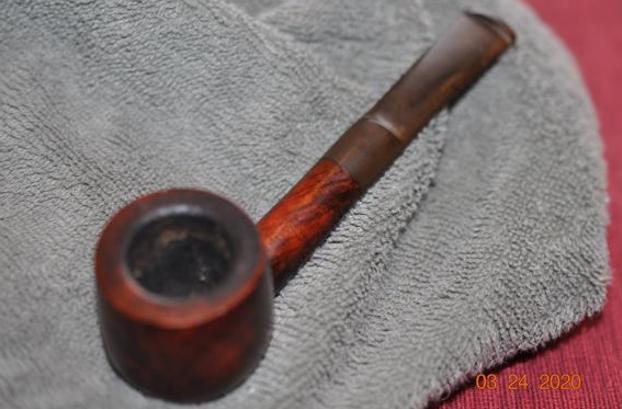
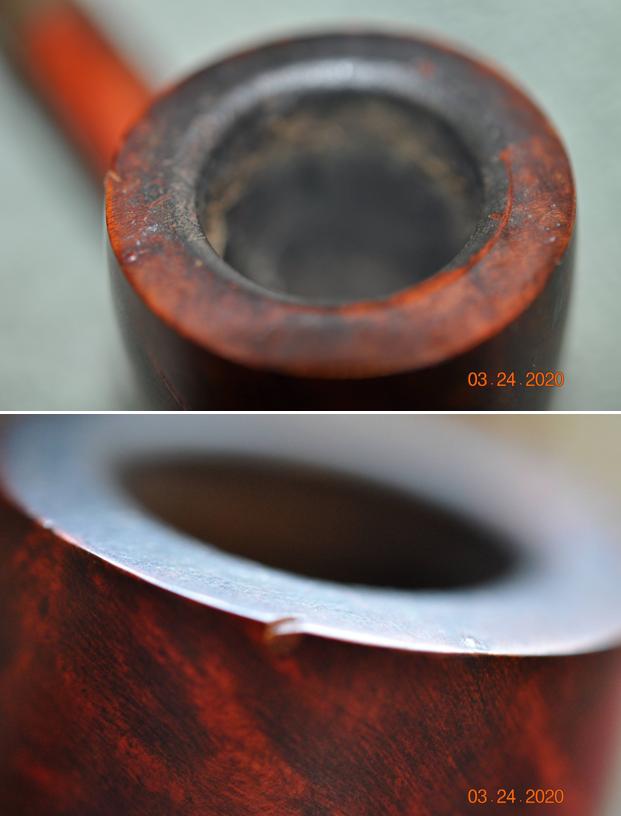
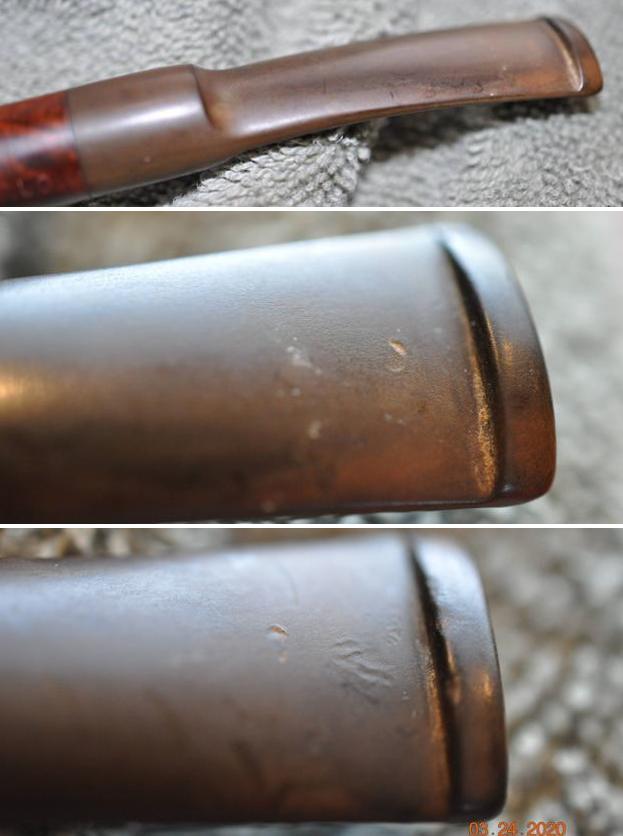
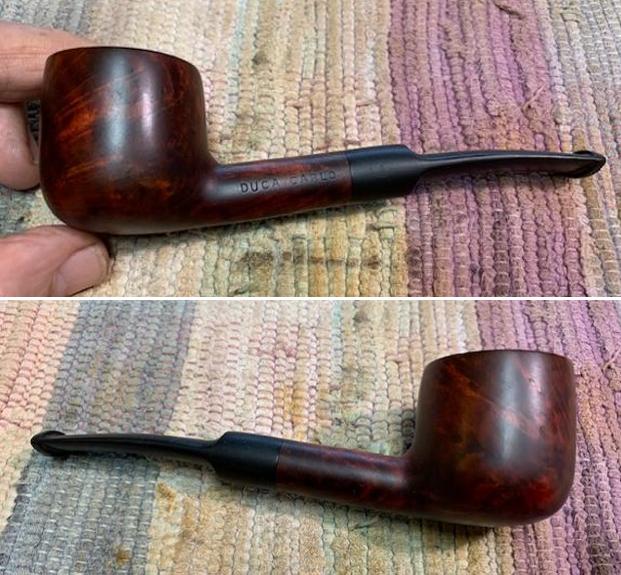
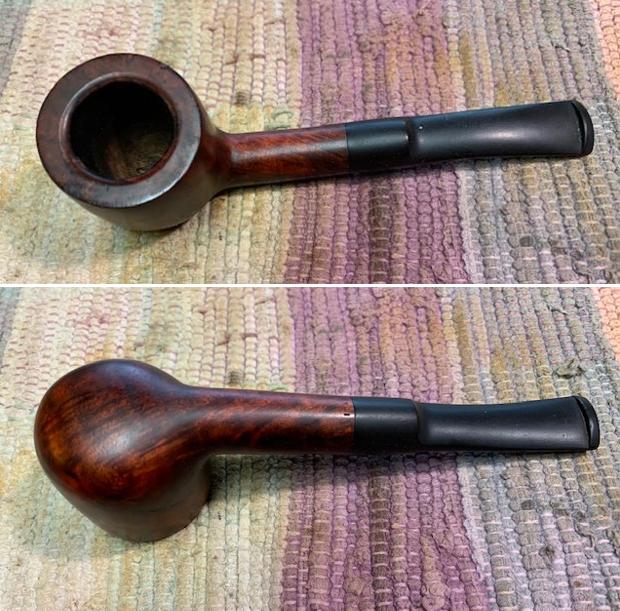
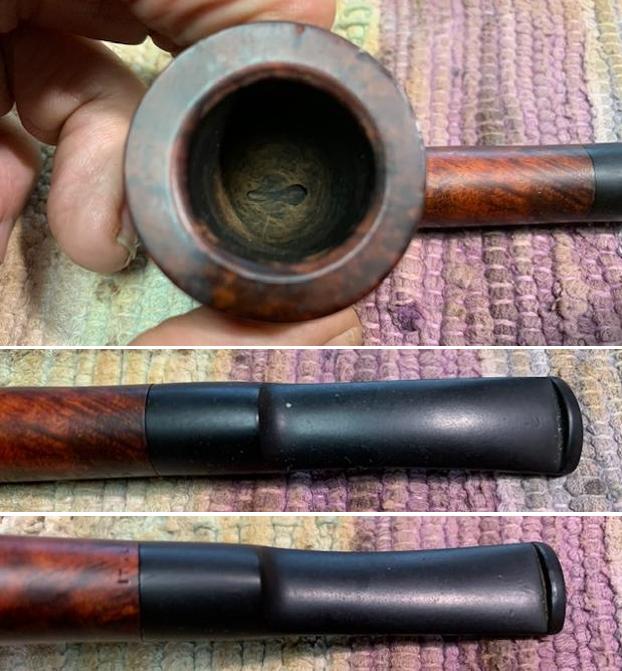
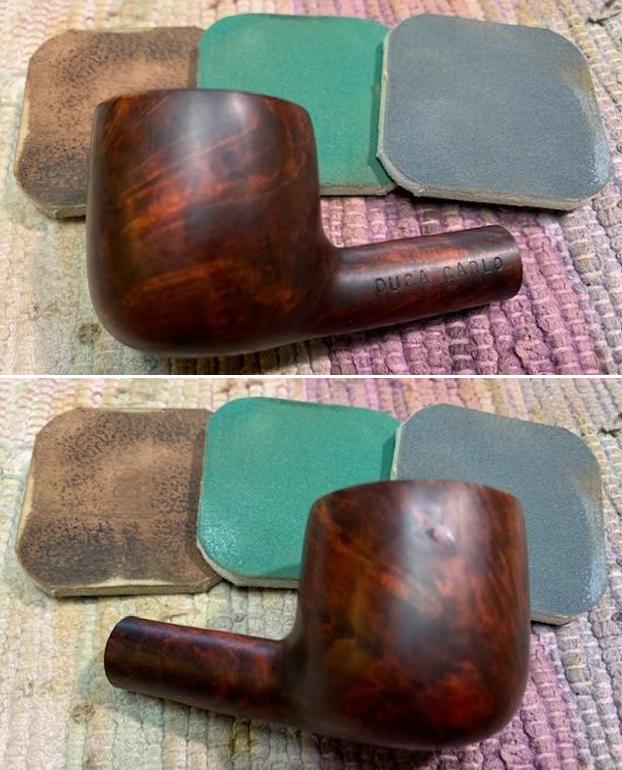
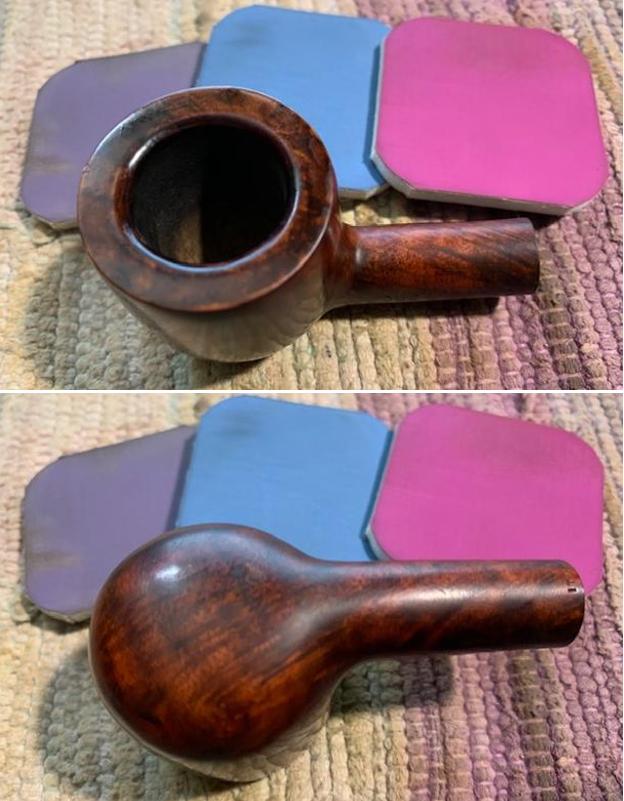
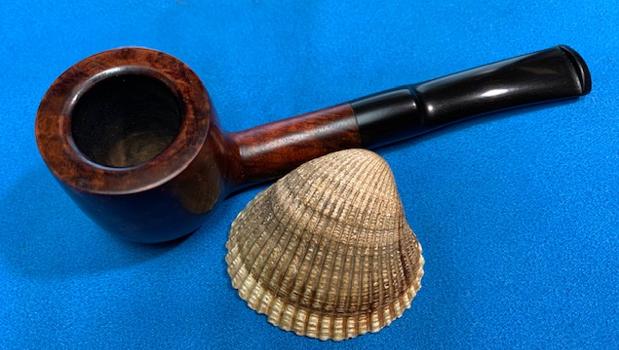
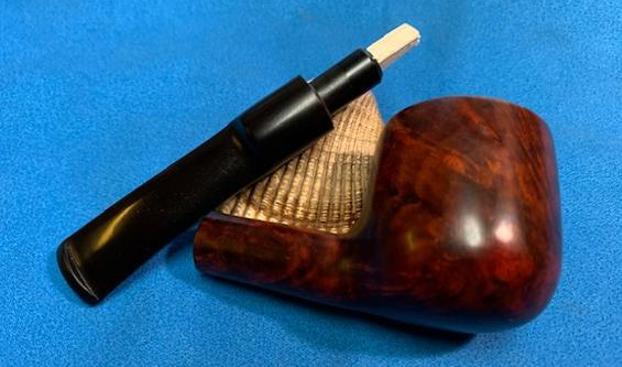
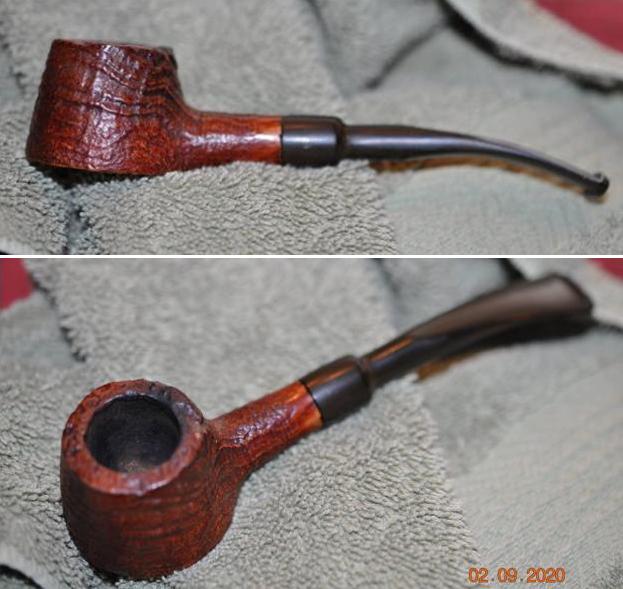
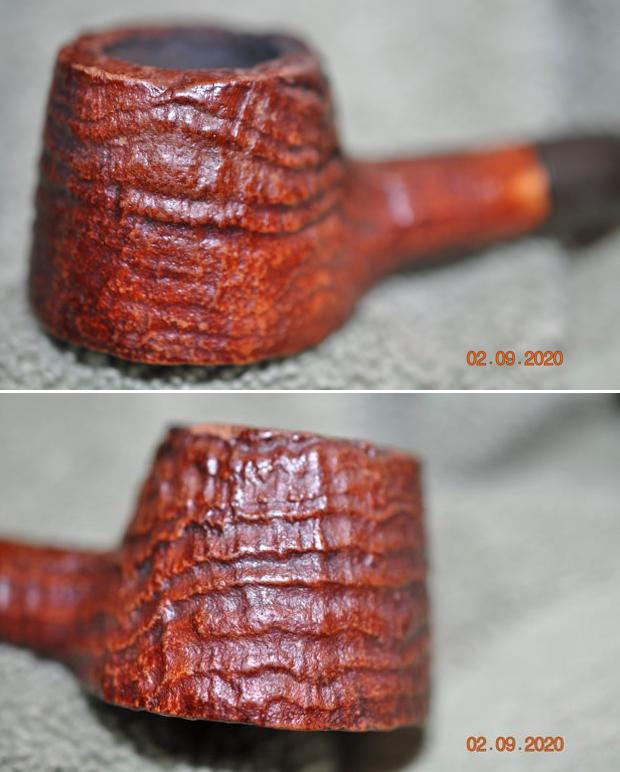
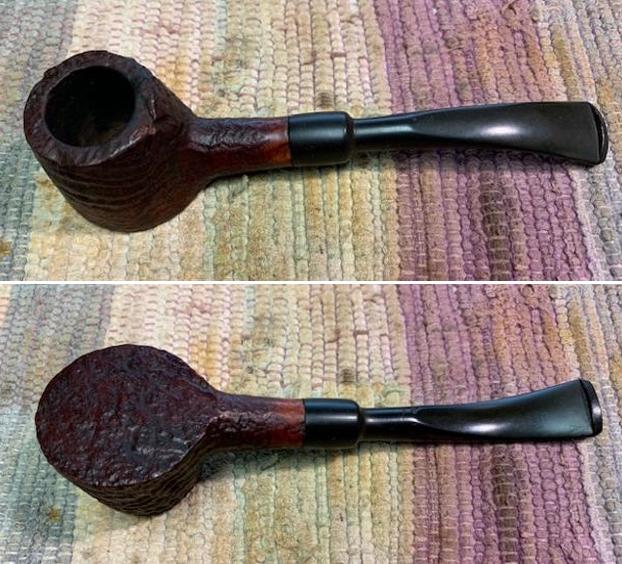
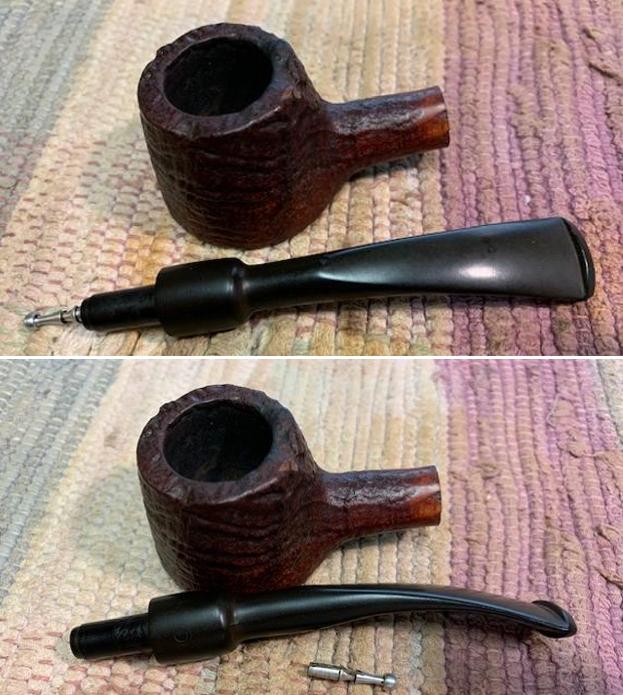
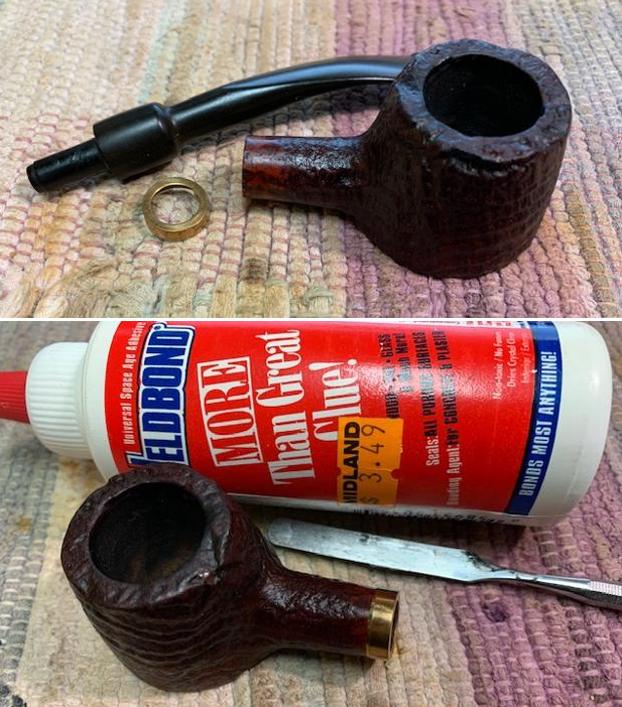
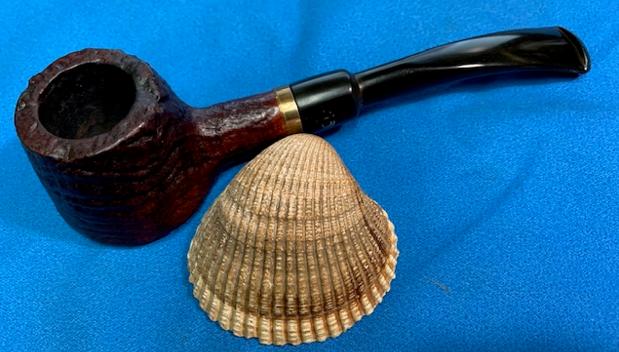
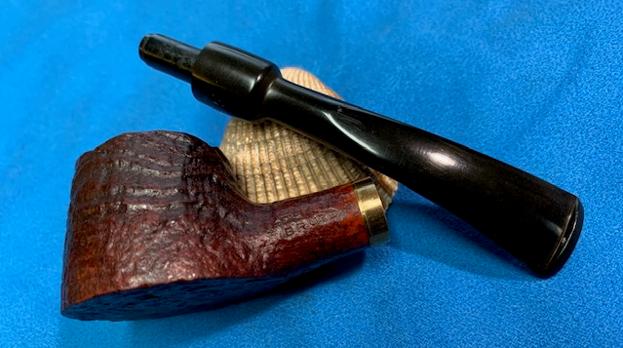
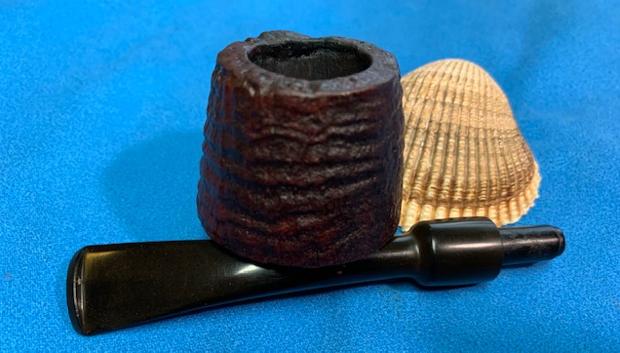
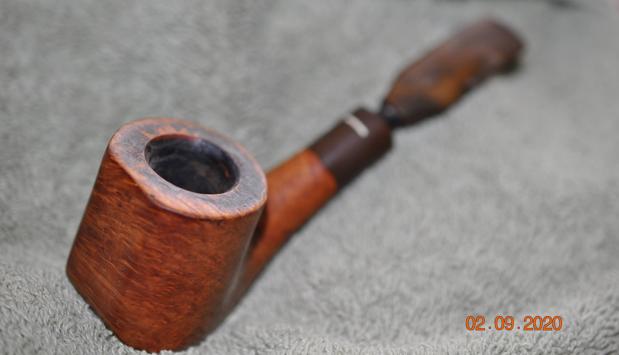
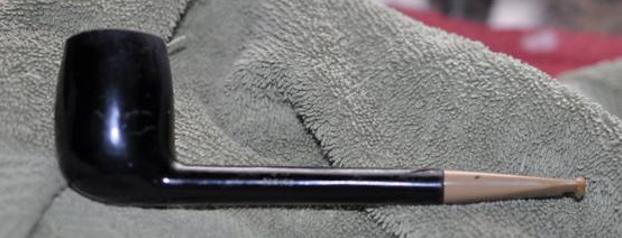
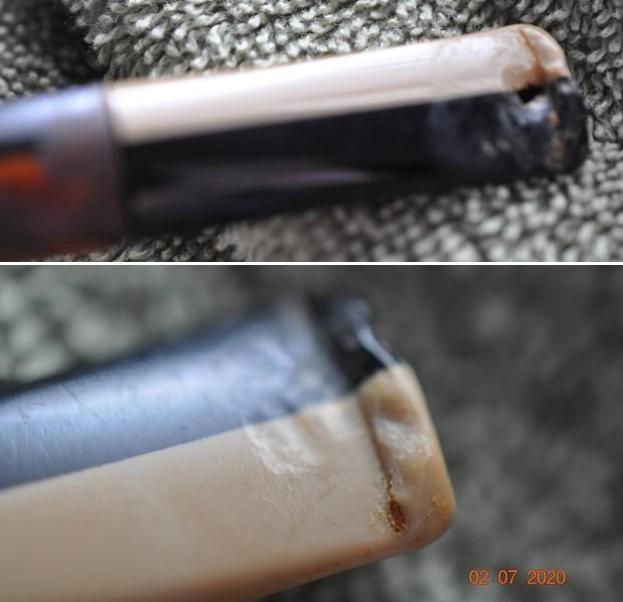
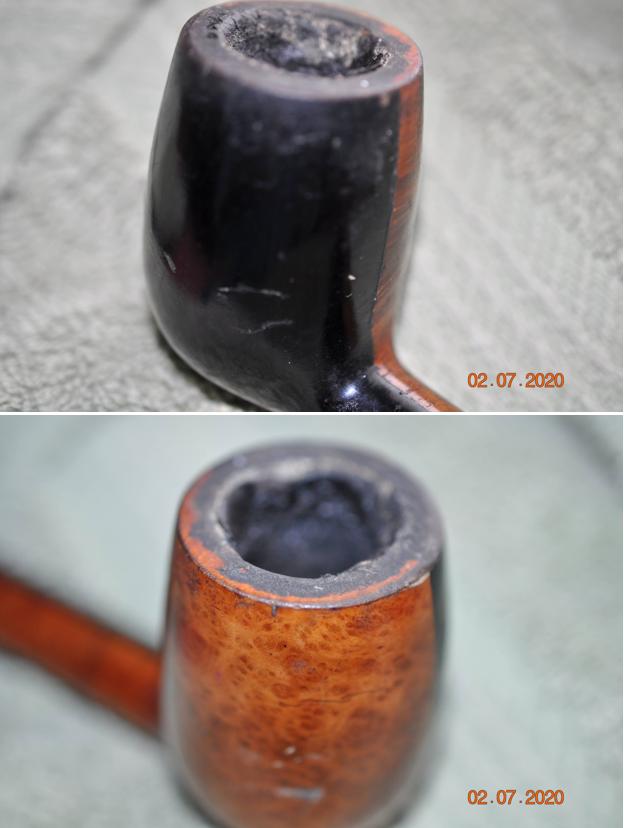
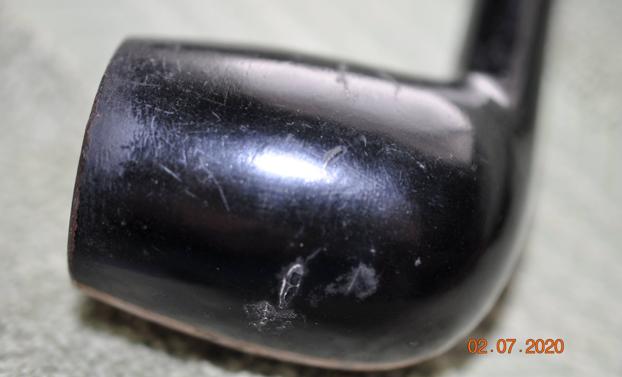
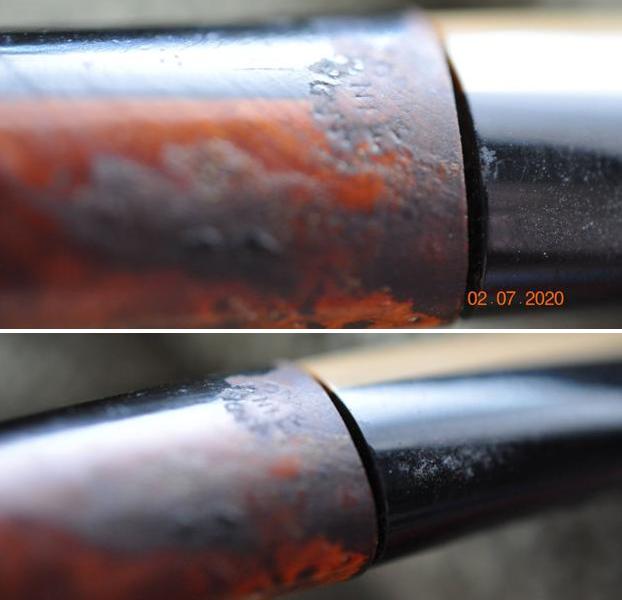
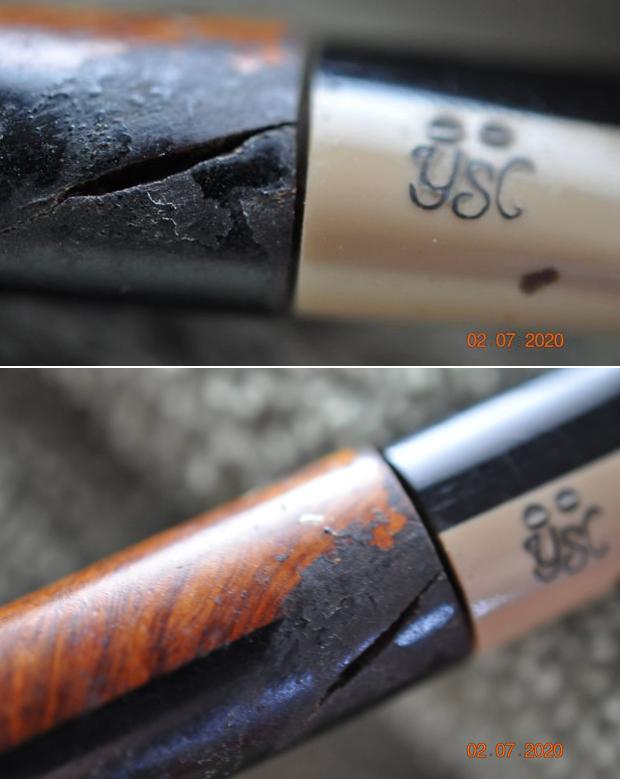
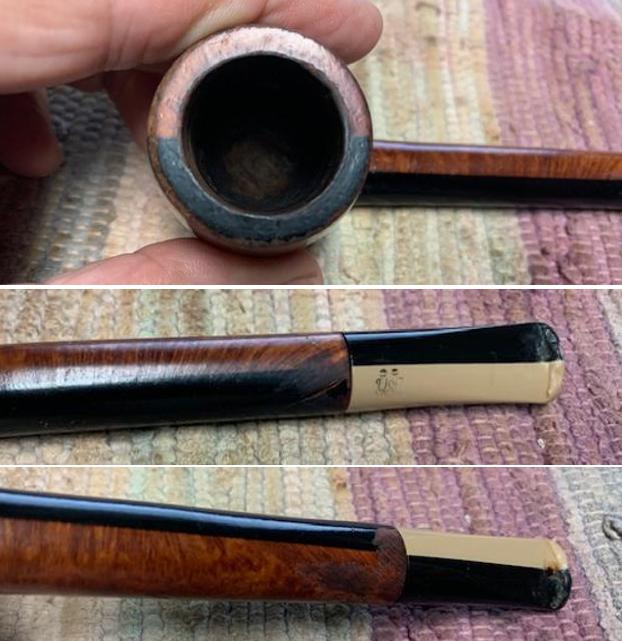
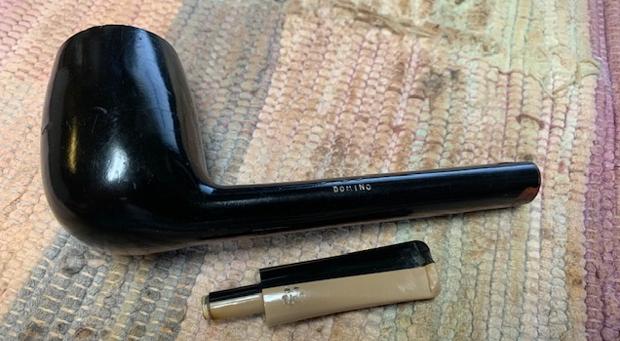
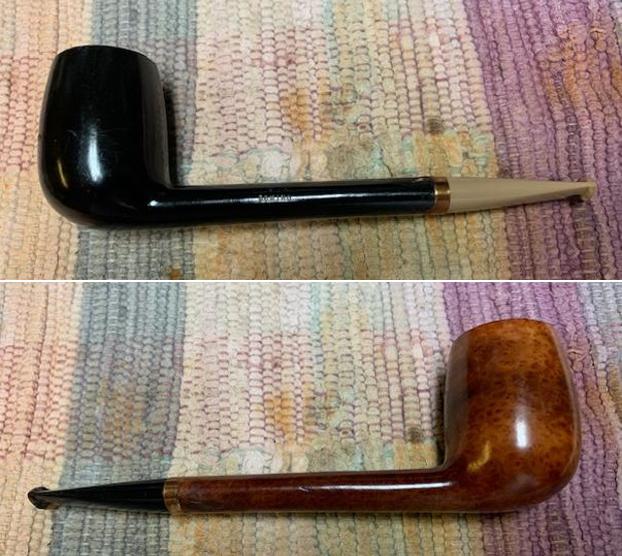
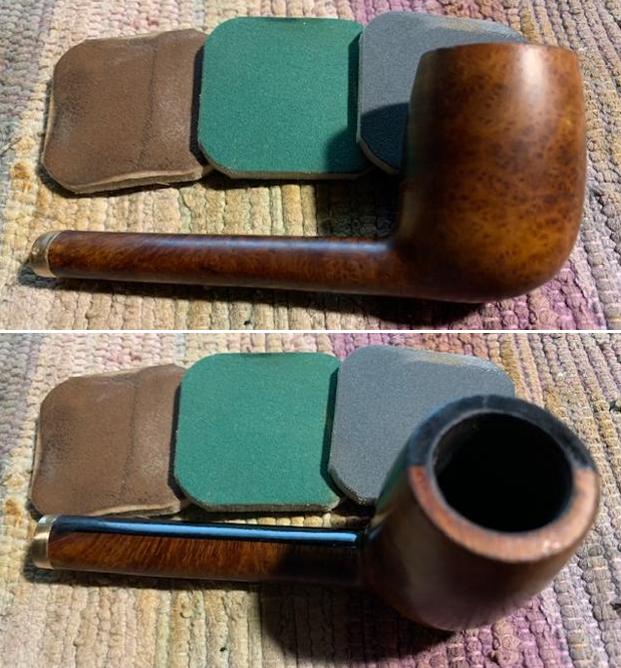
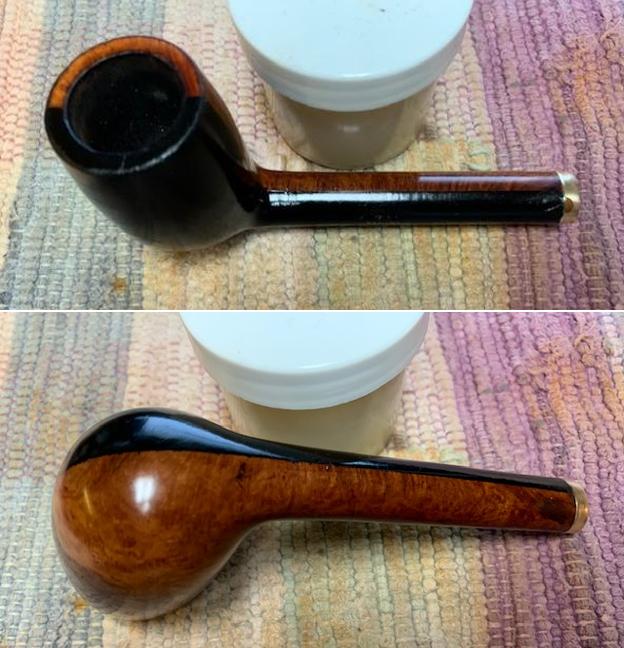
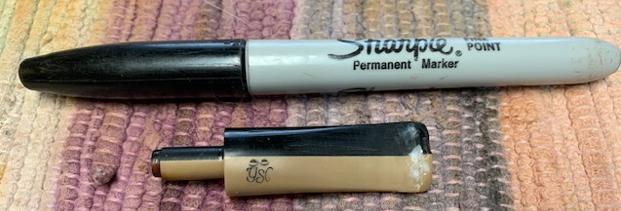
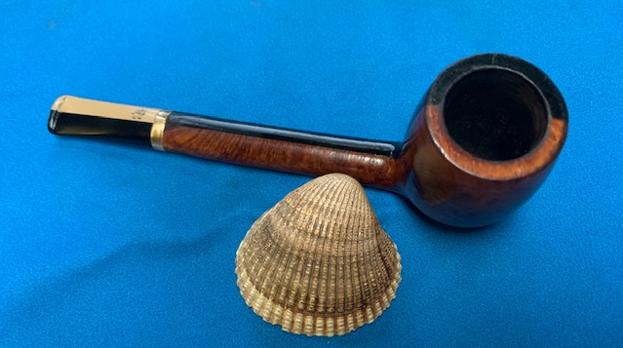
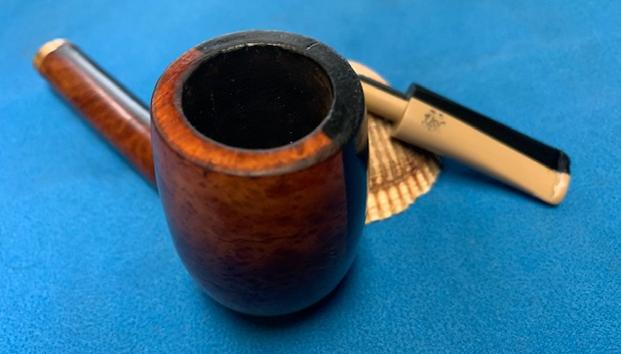
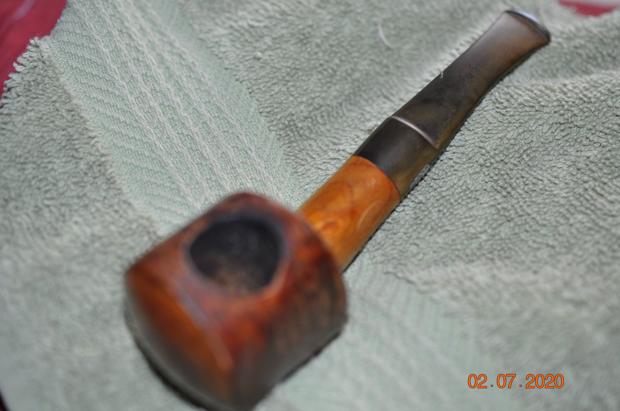
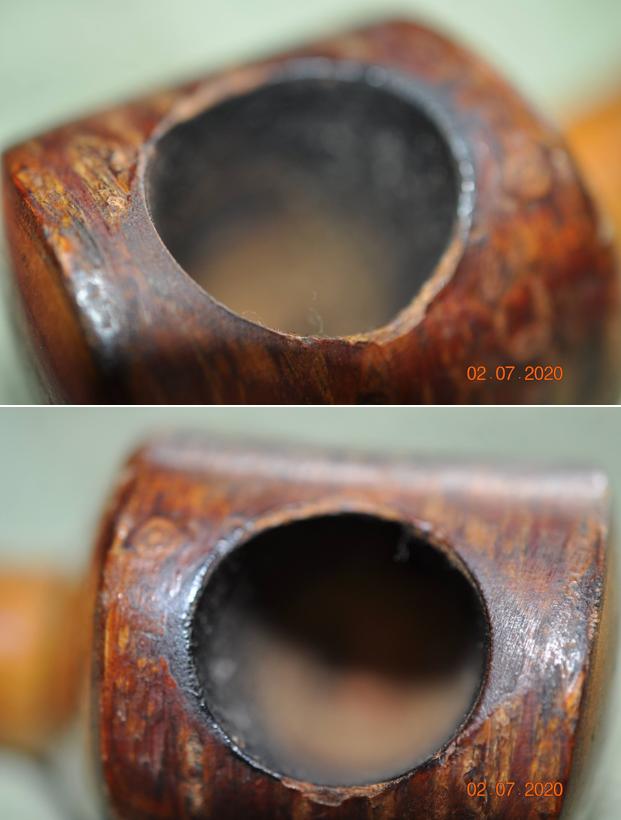
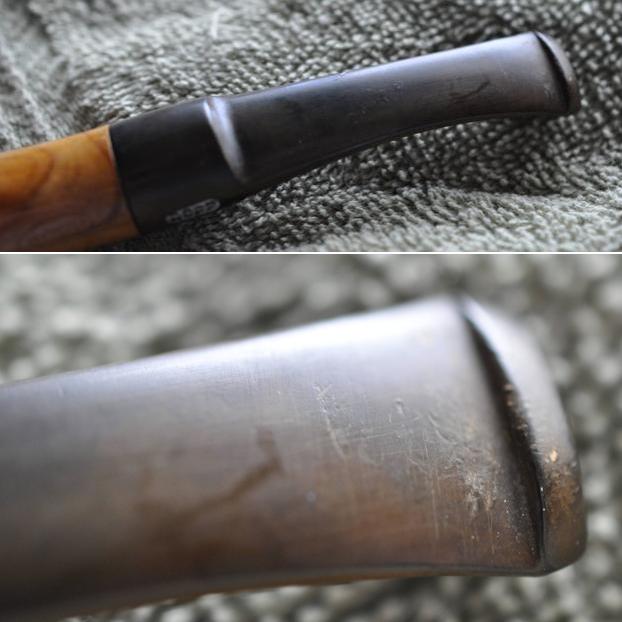
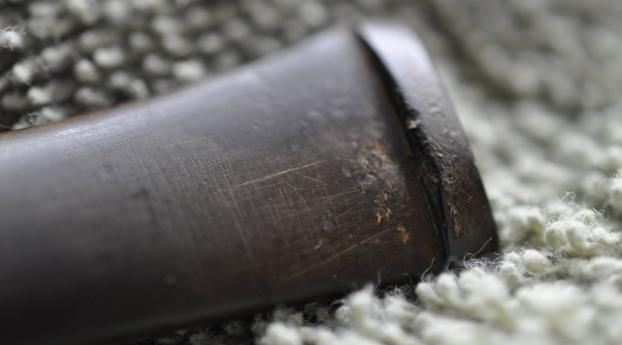
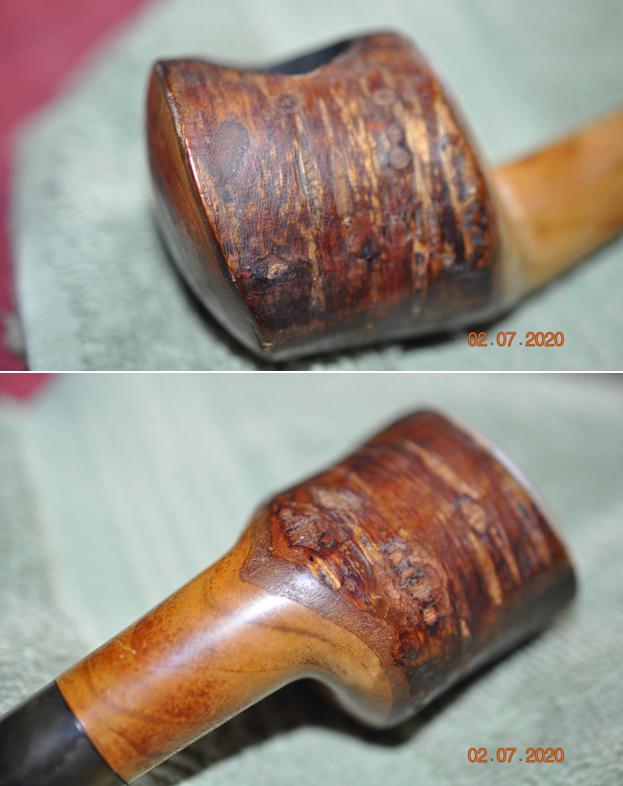
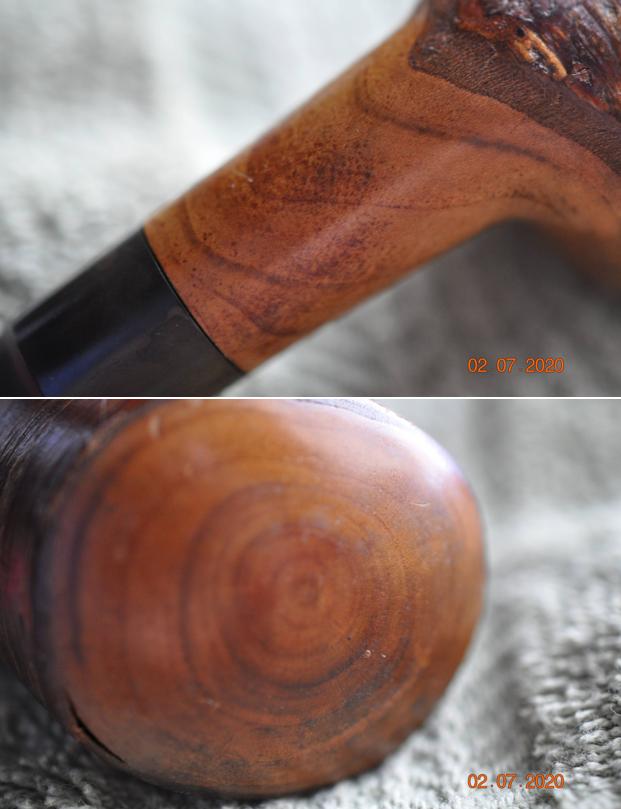
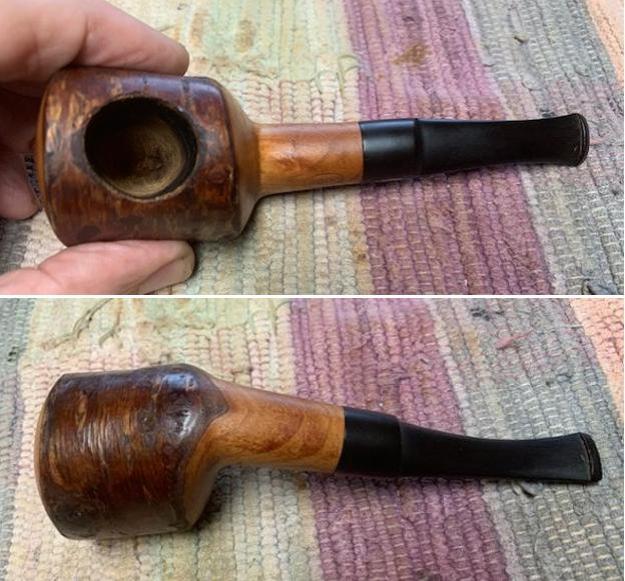
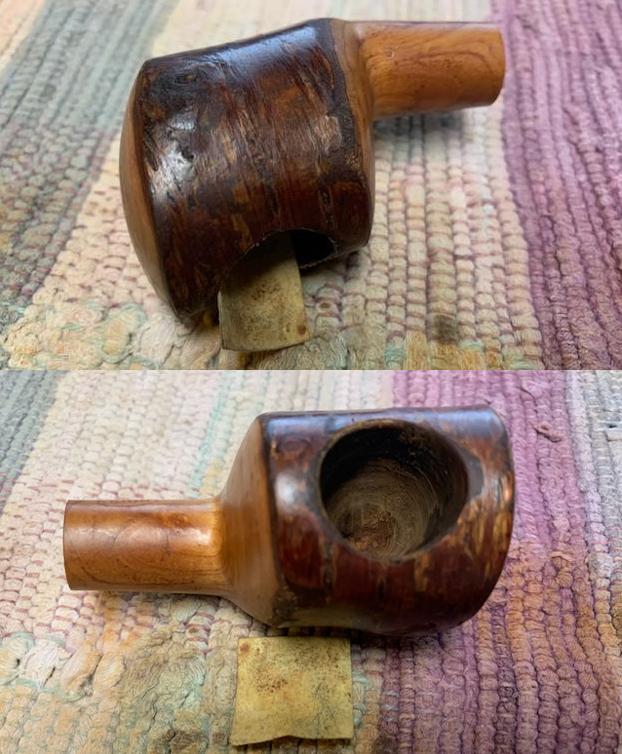
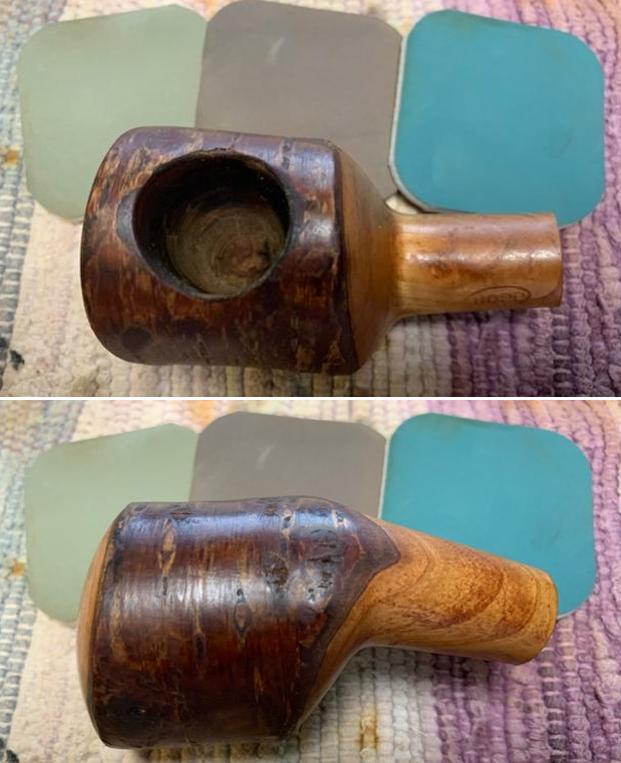
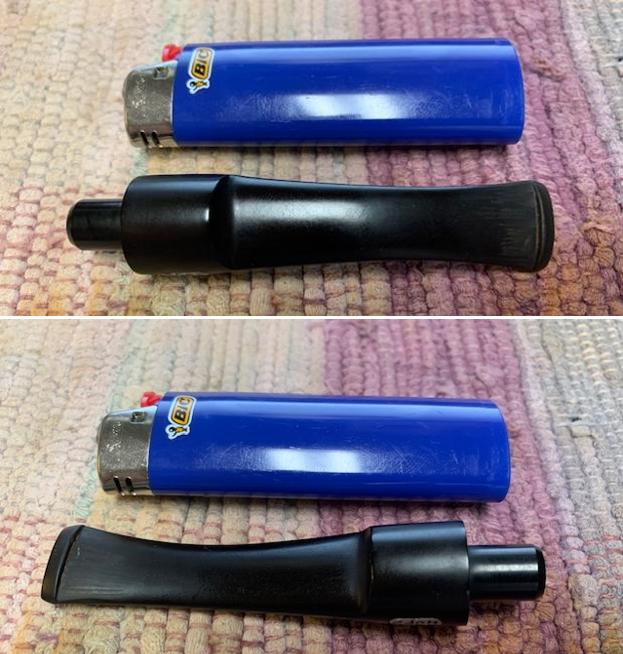
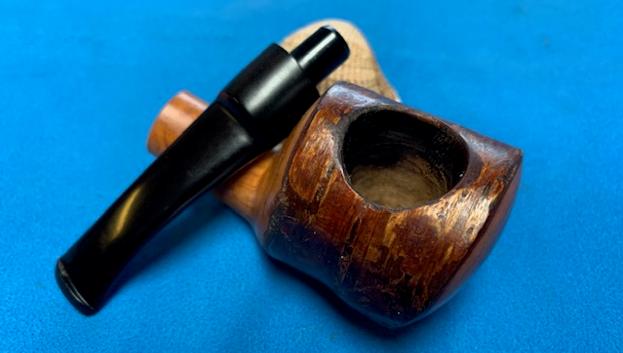
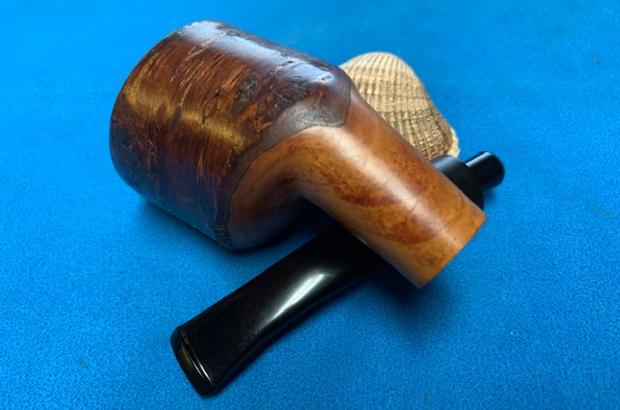
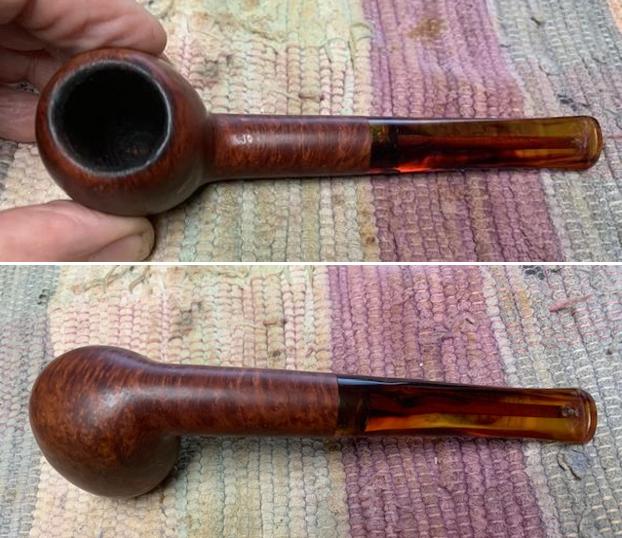
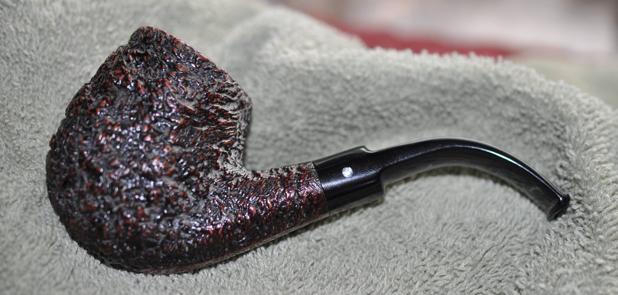
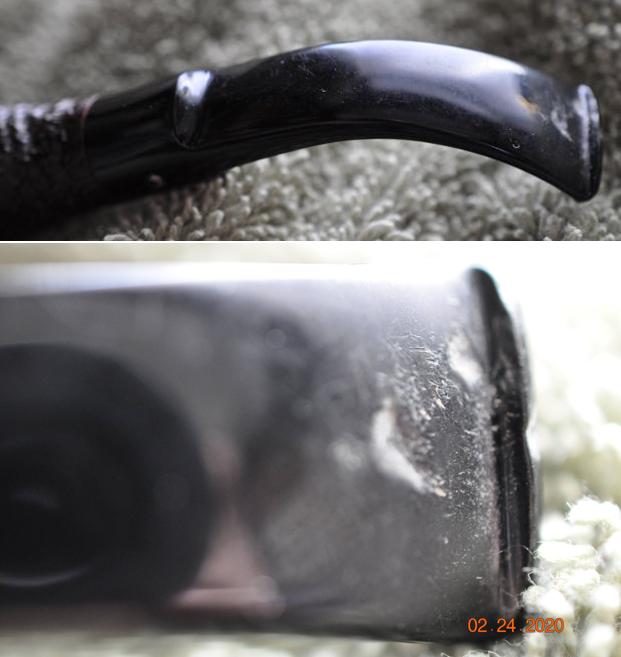
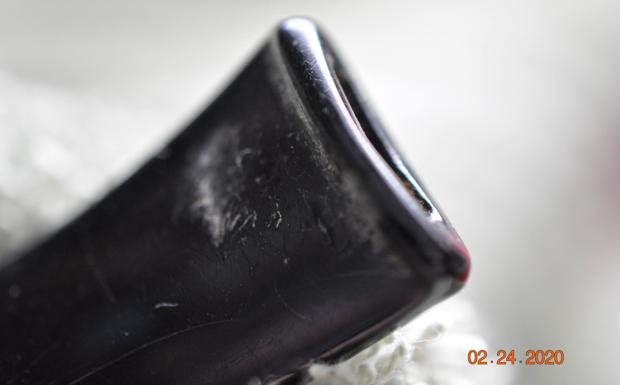
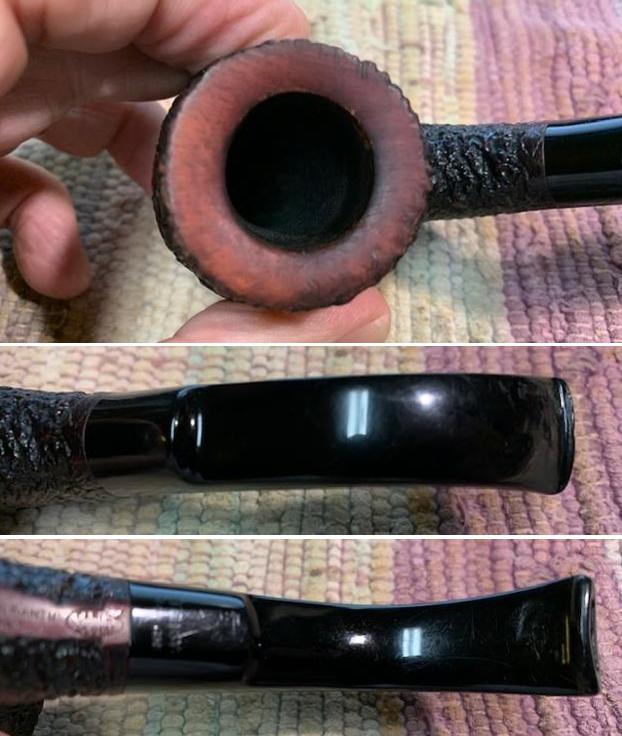
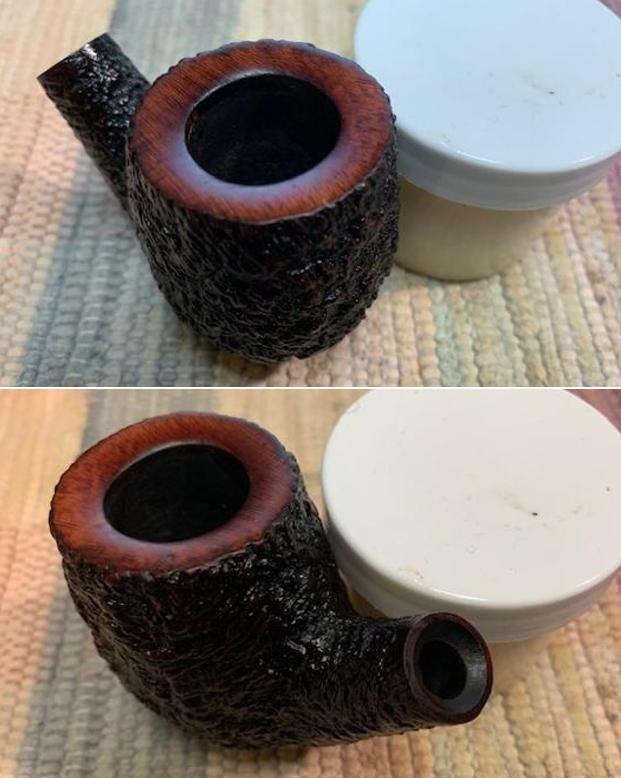
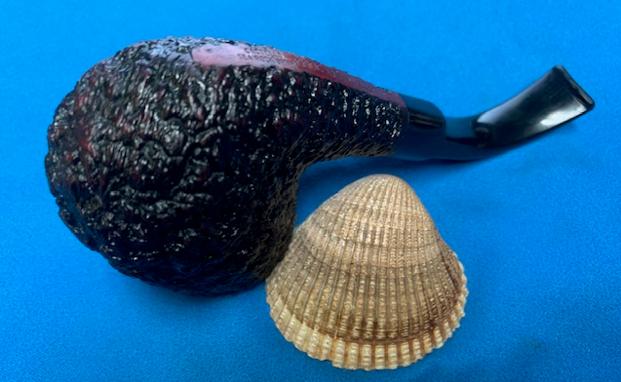
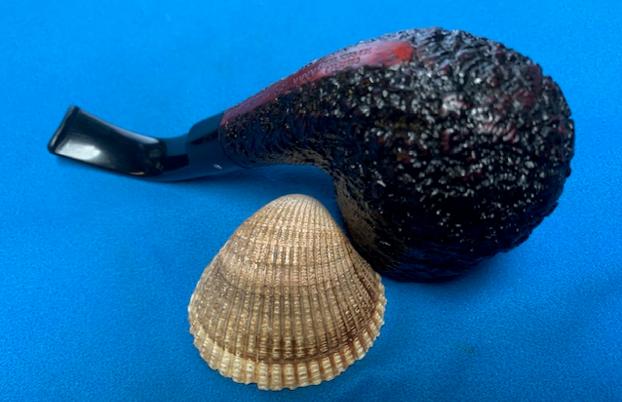
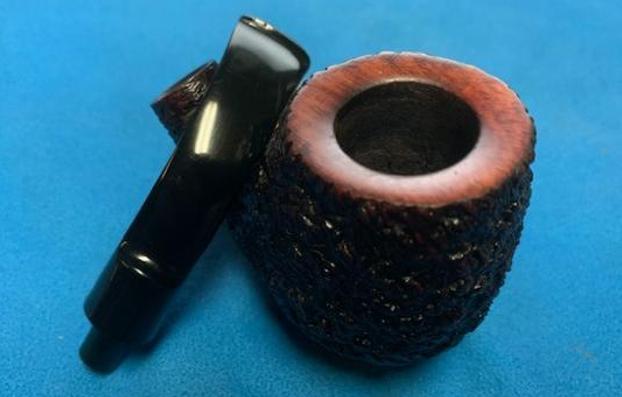
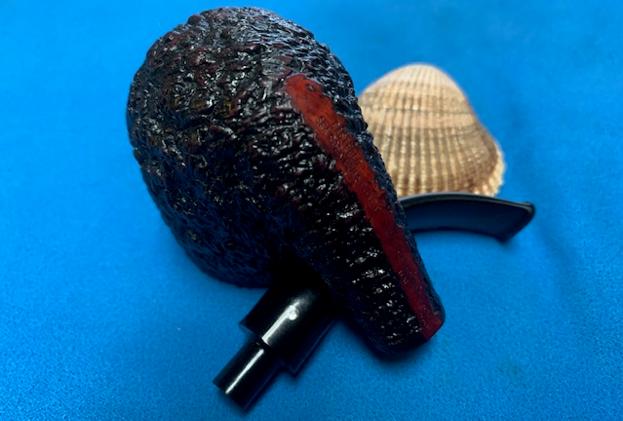
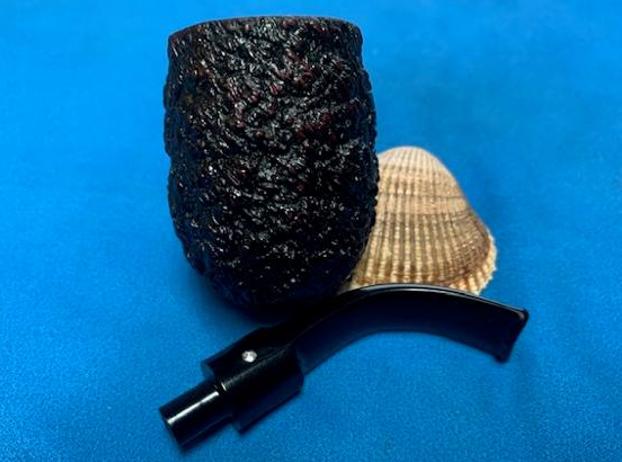
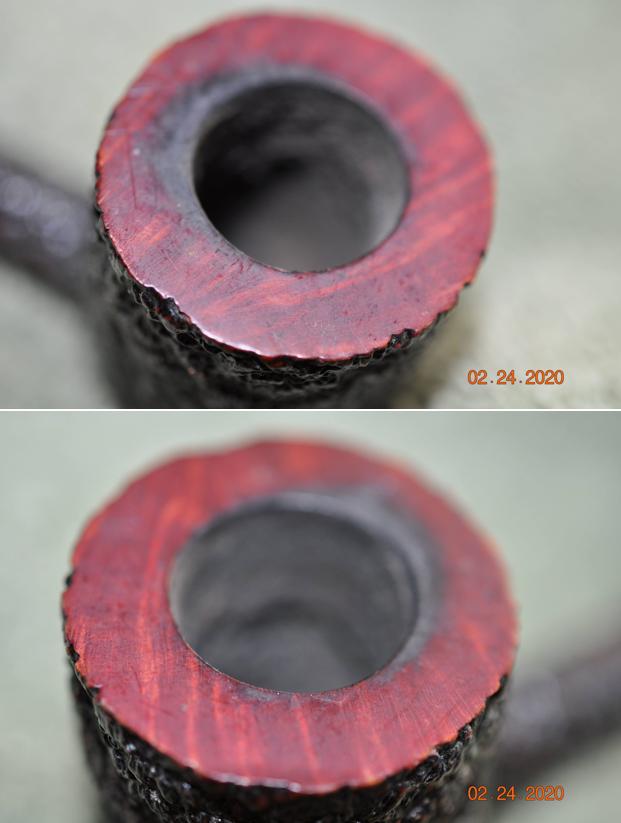
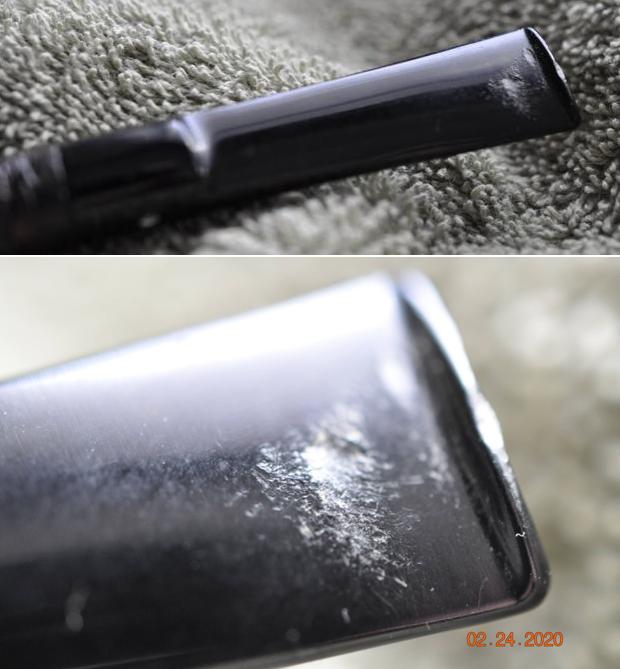
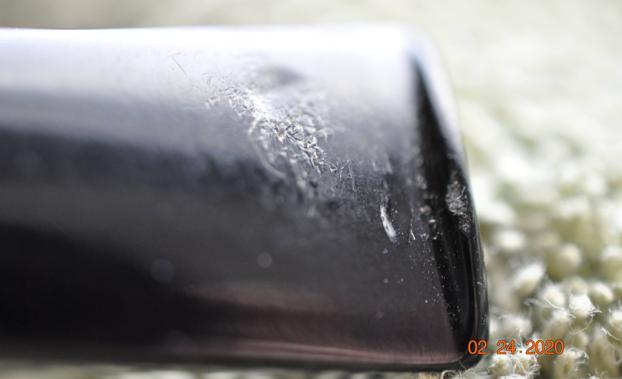
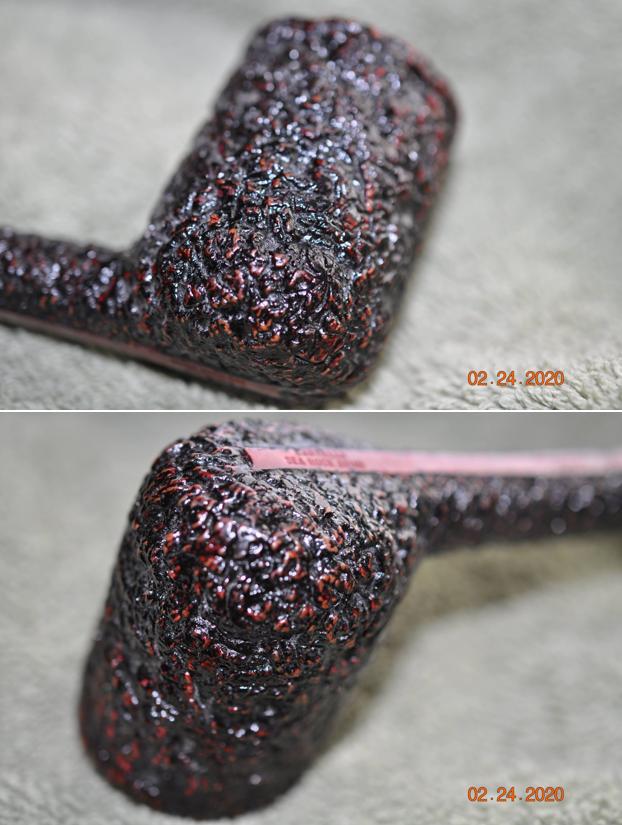
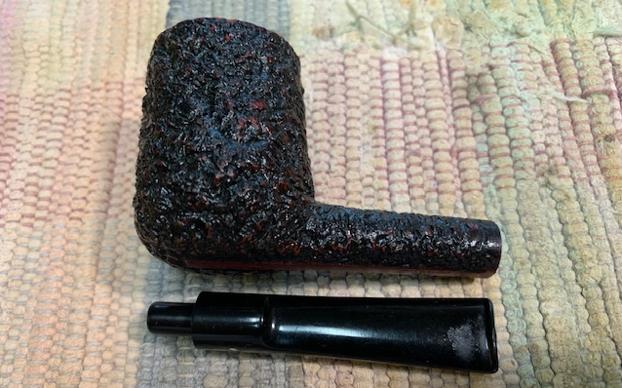
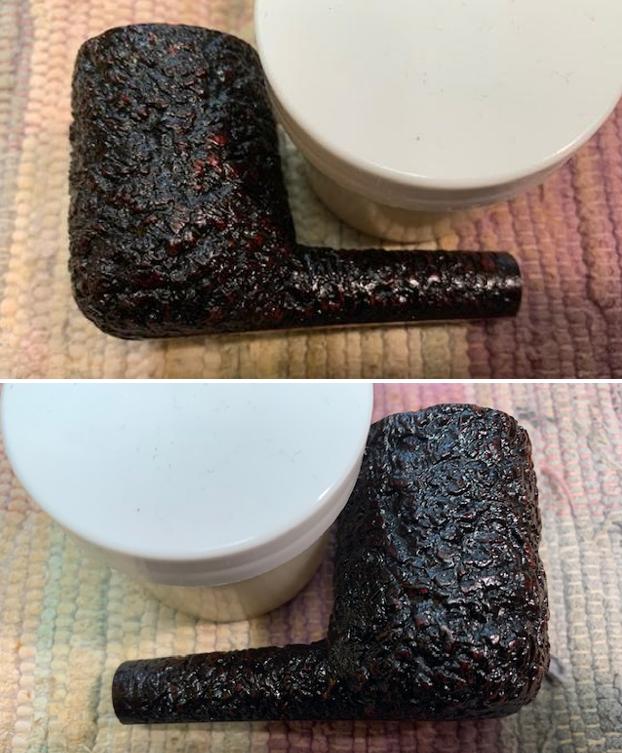
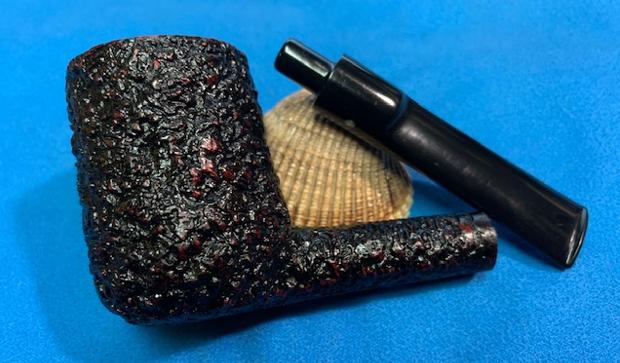
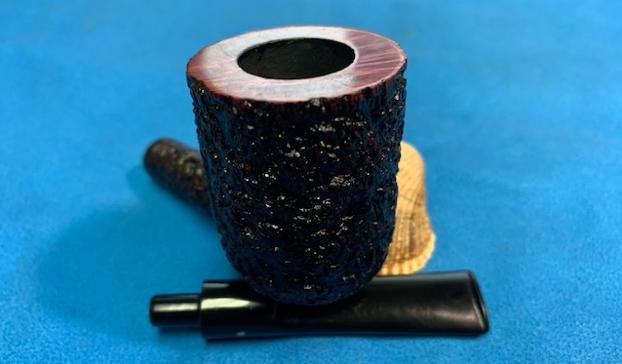
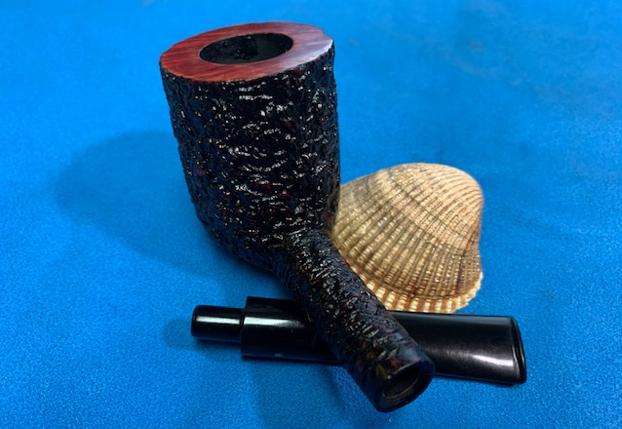
First of all, I am pleased to report that the stummel of this pipe was in good condition. There was some burning around the rim and there was a small nick along one edge of the rim and another small nick on the top of the rim. Otherwise, the wood just needed to be made a bit more spiffy. Meanwhile, the stem needed some attention. It showed signs of oxidation and had been well chewed. 
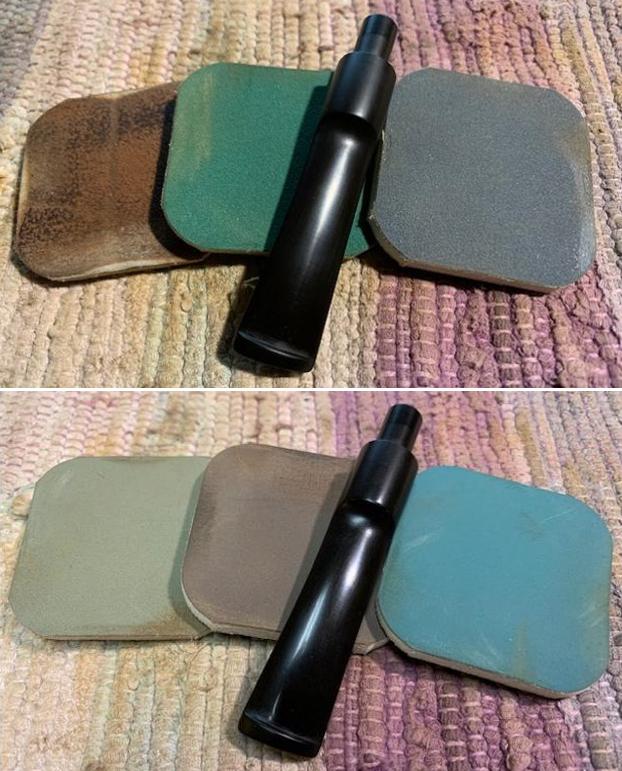
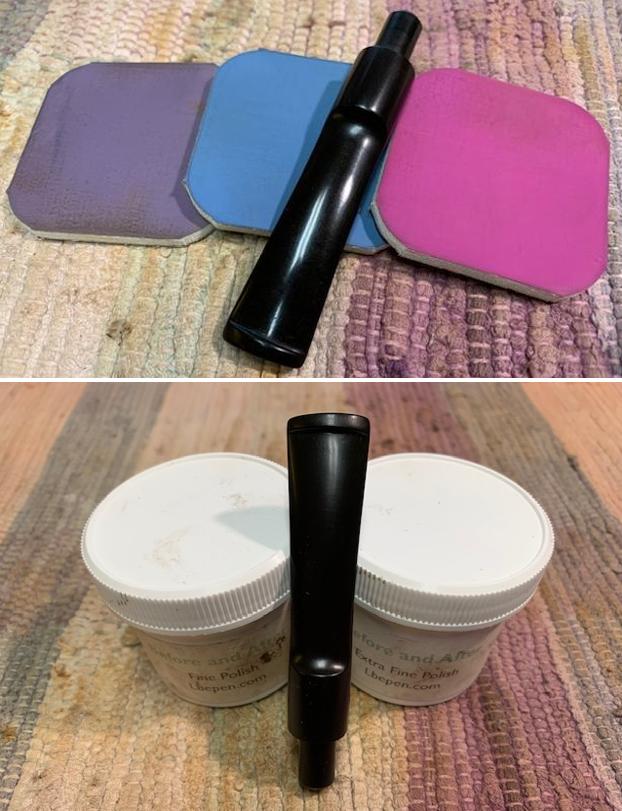
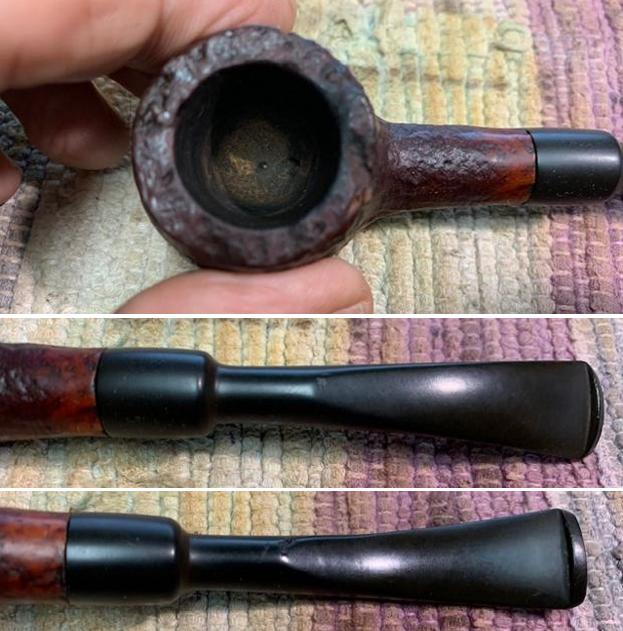
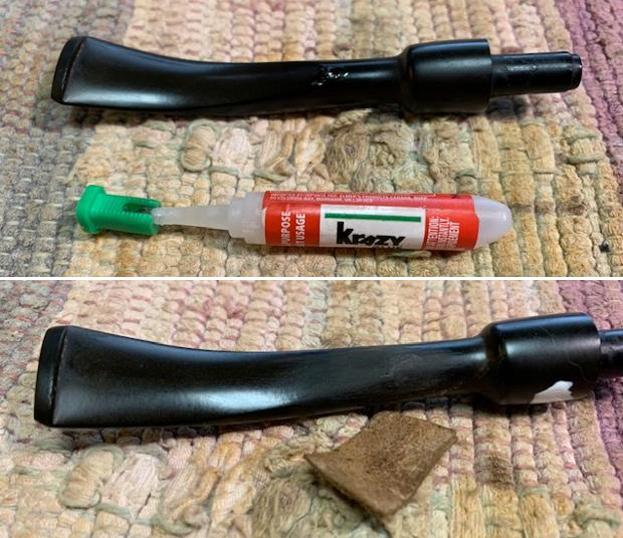
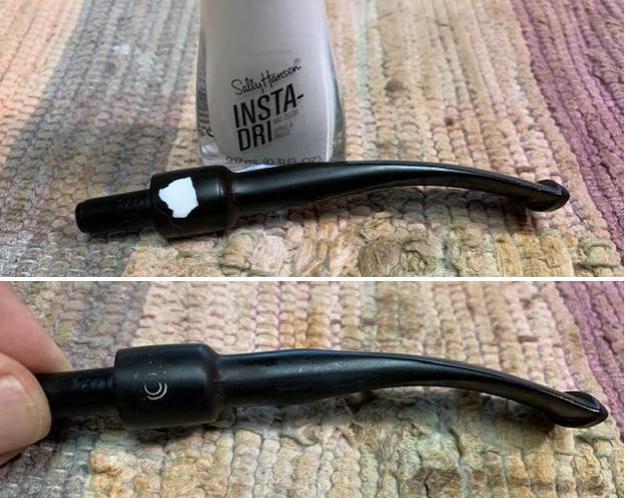
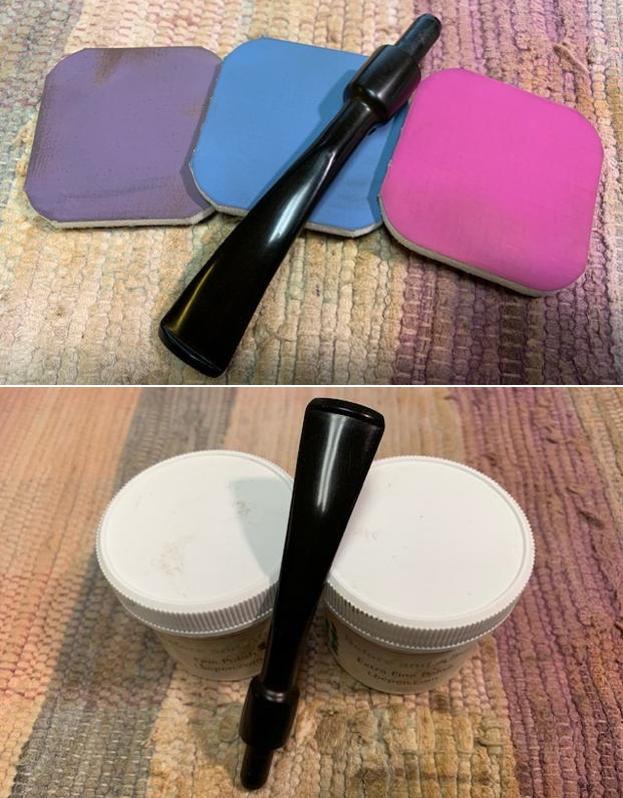
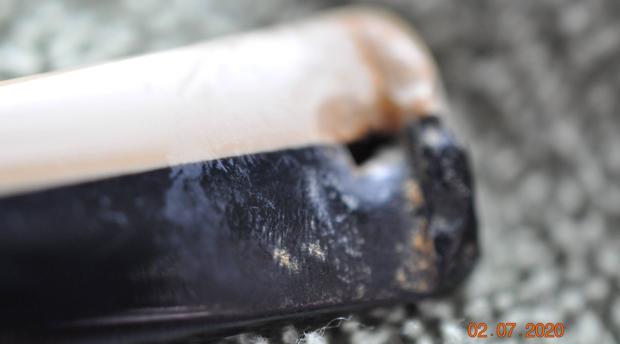
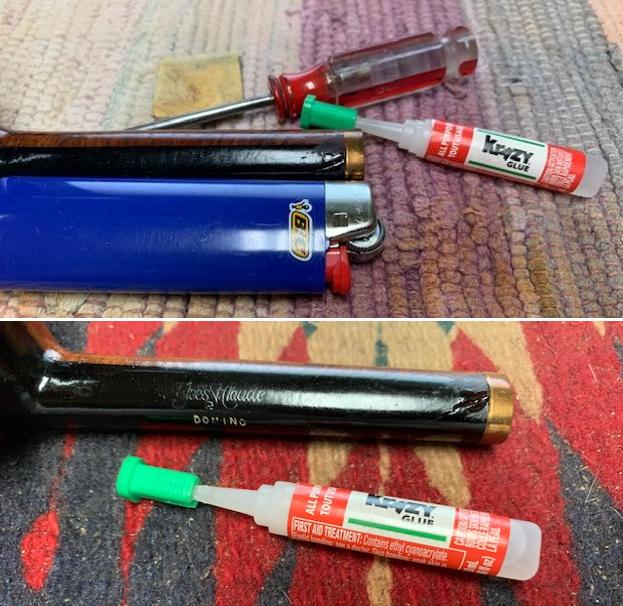
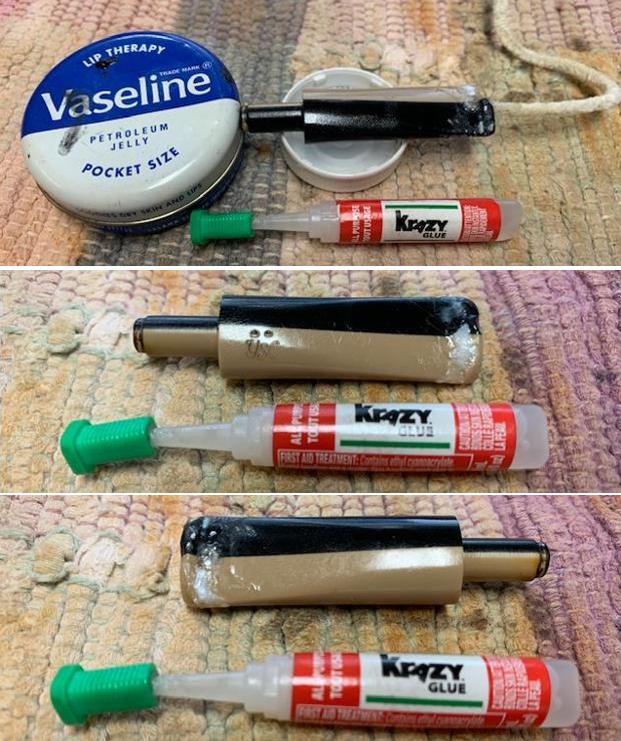
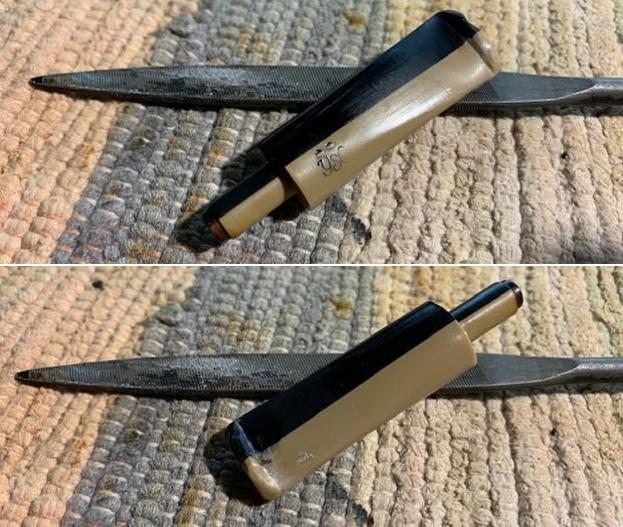
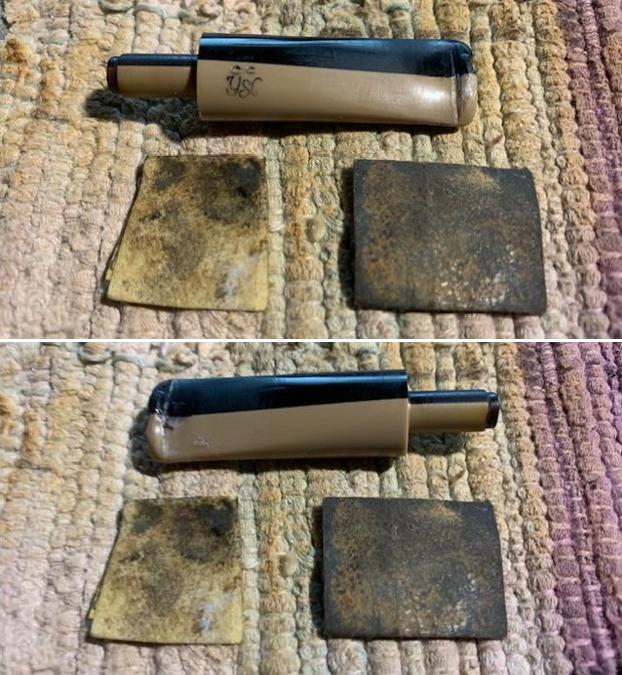
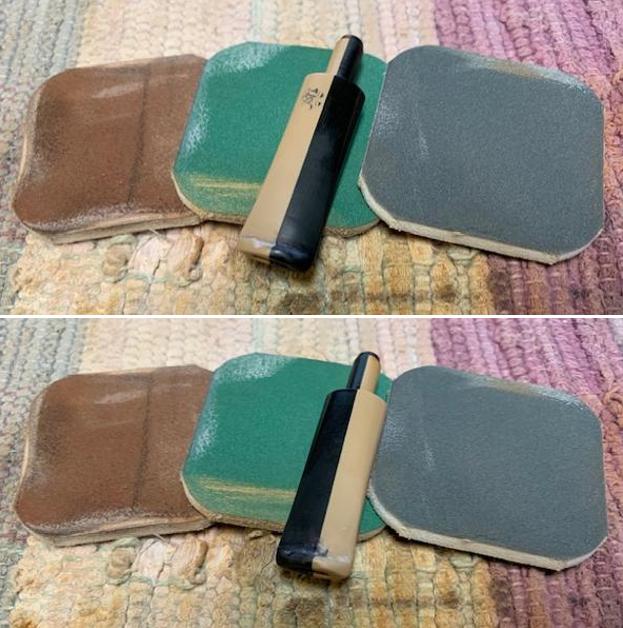
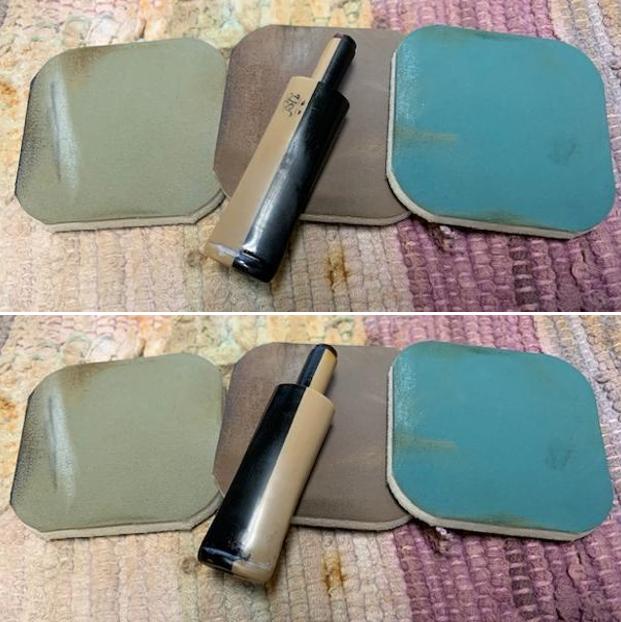
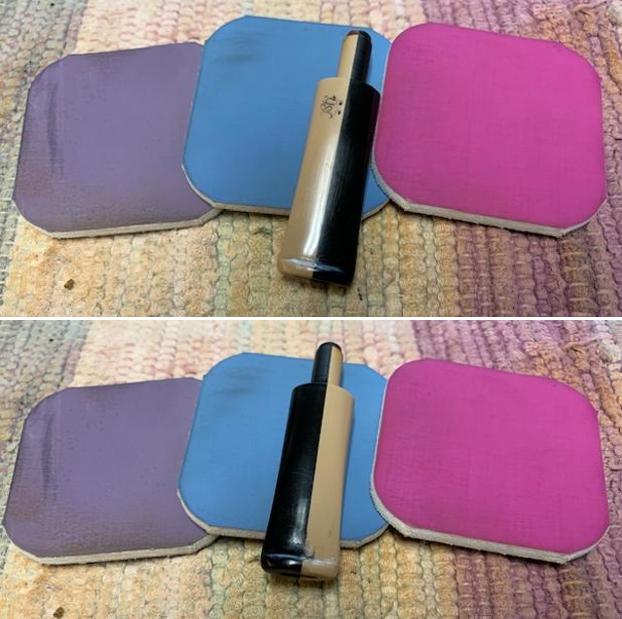
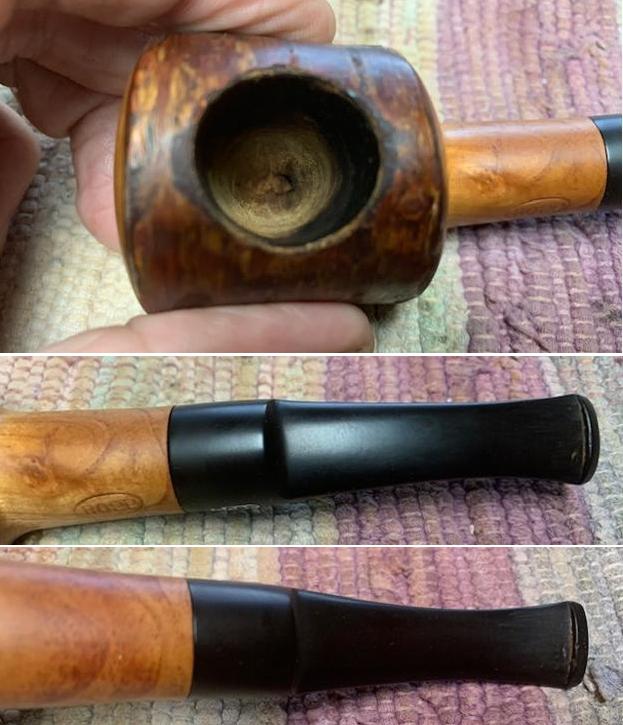
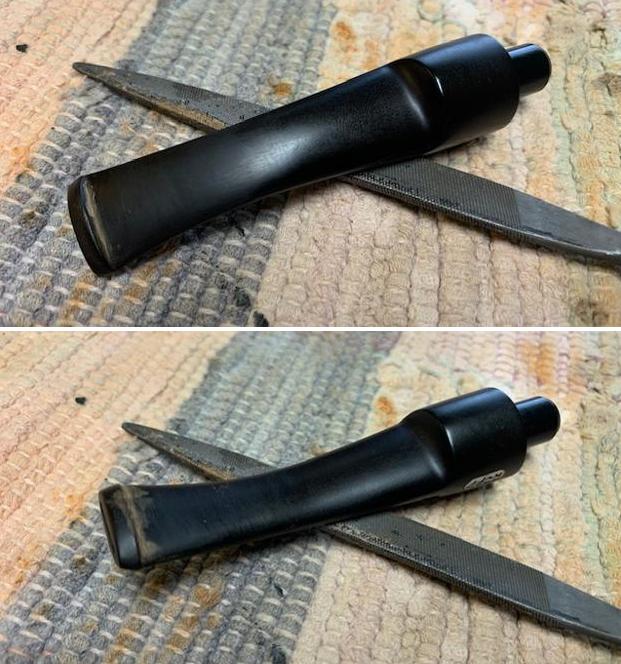
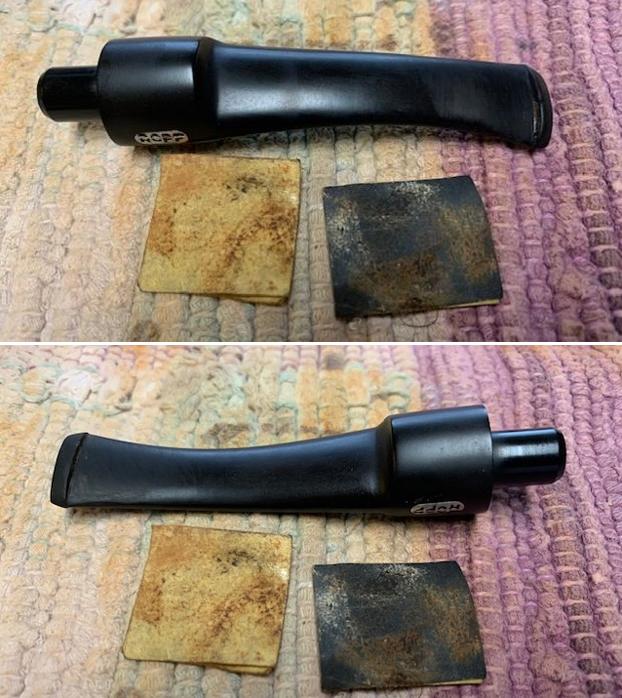
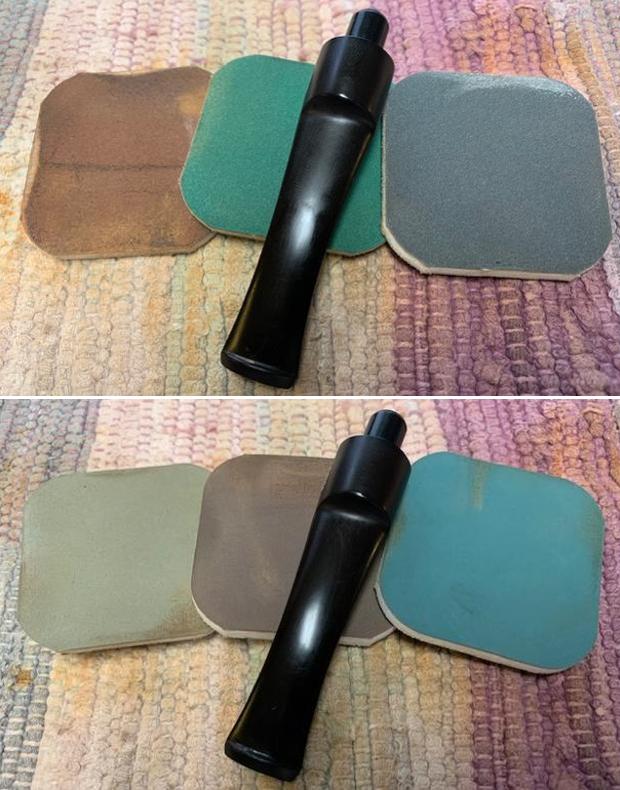
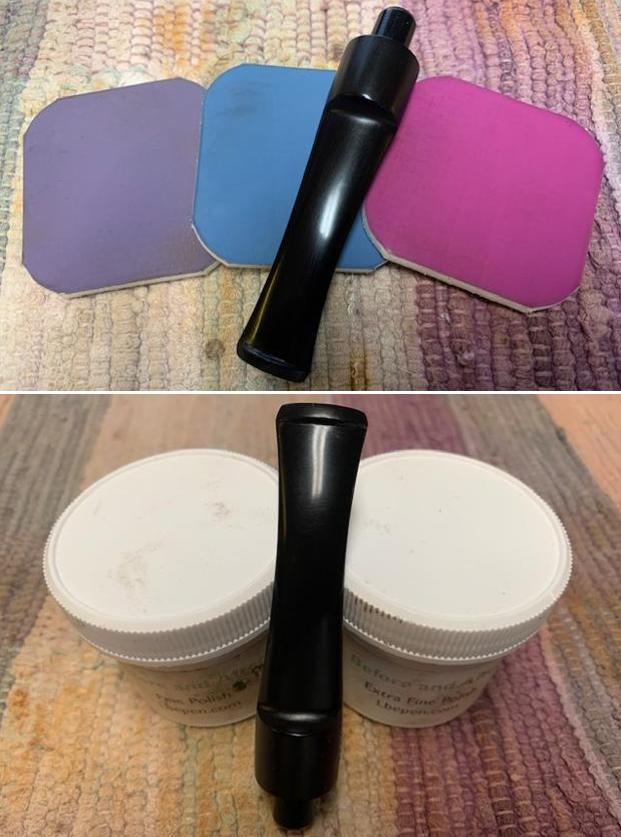
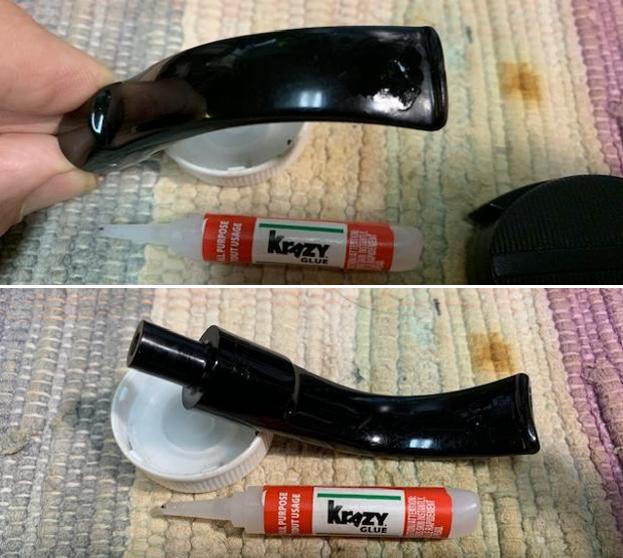
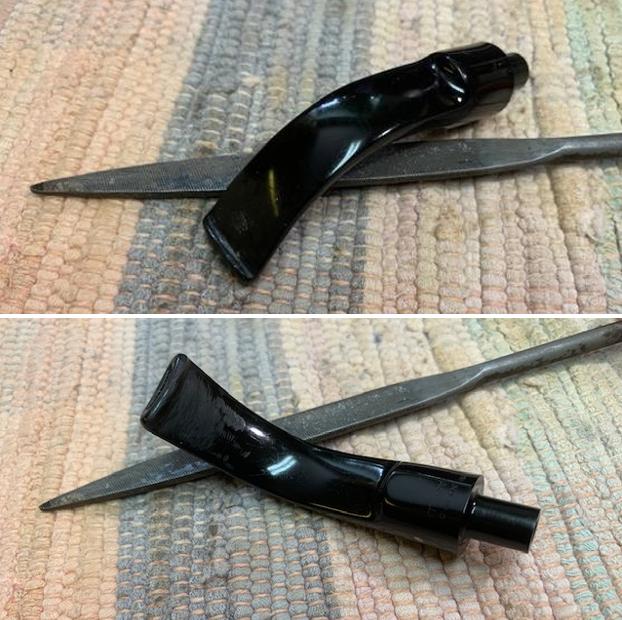
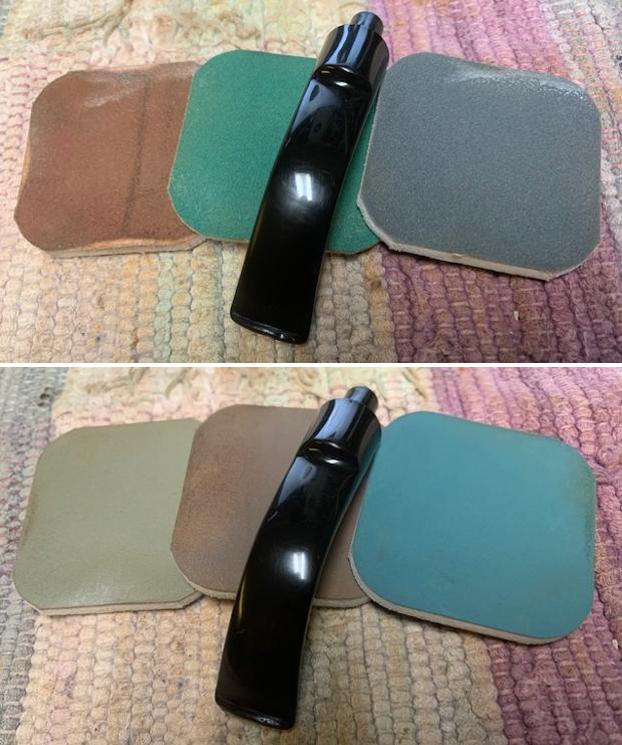
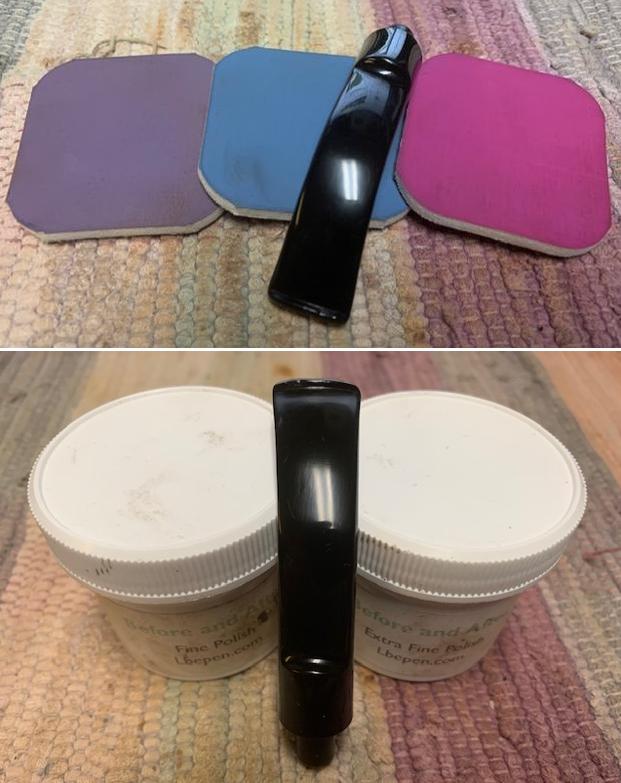
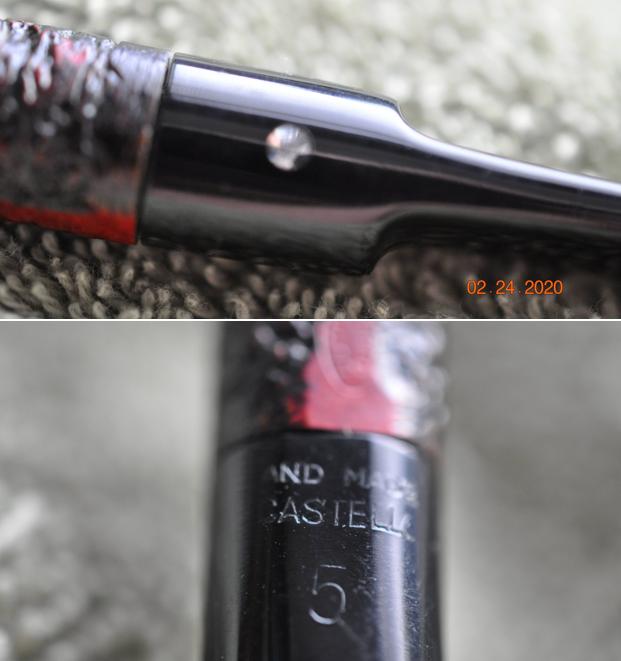
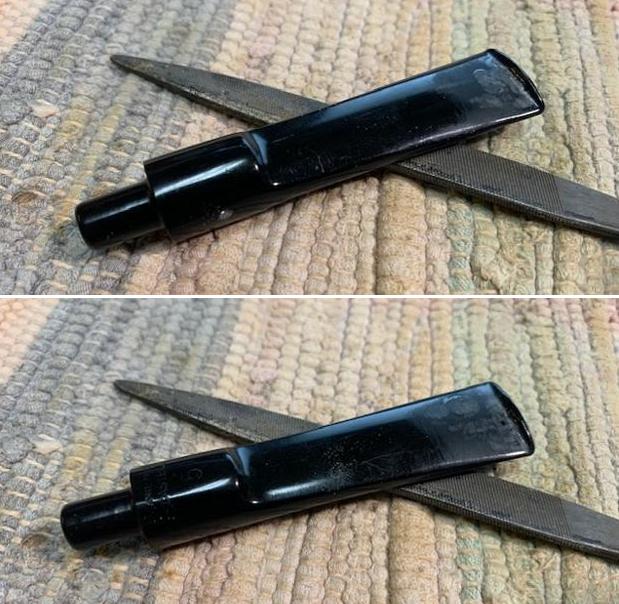
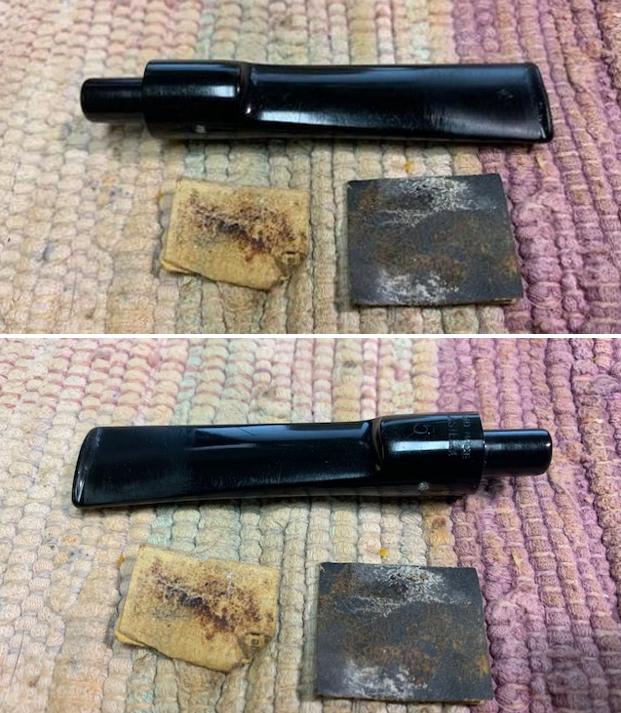
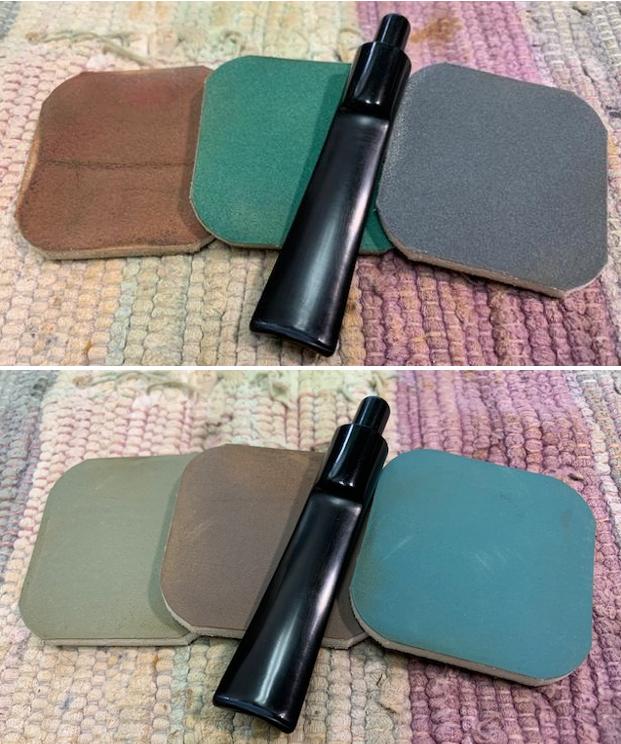
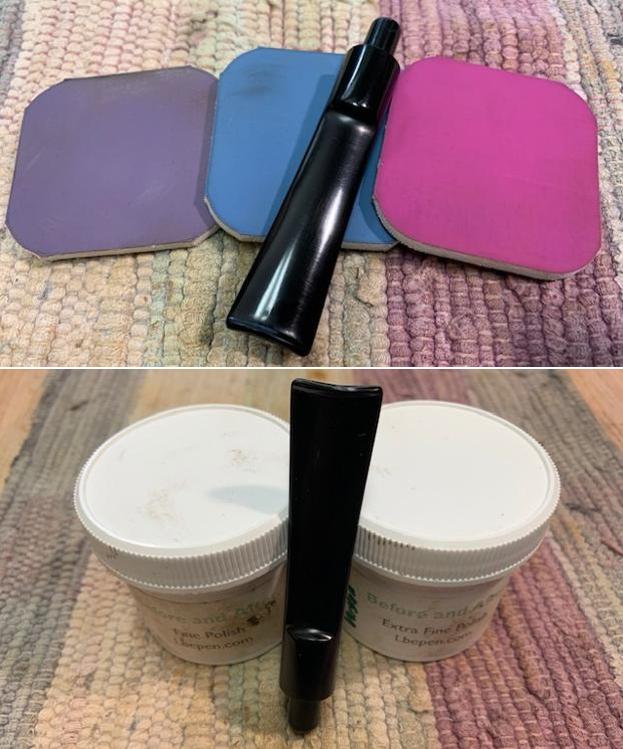
The stem was first on my list. I took a BIC lighter and ‘painted’ the stem with its flame in order to lift the tooth marks. This was only slightly successful in raising the dents. Then, I cleaned out the insides of the stem with pipe cleaners and isopropyl alcohol. Once this process was done, the stem went for an overnight soak in the Before & After Hard Rubber Deoxidizer. The following day, I cleaned all of the de-oxidizing sludge off with alcohol, pipe cleaners, et cetera. The oxidation had migrated to the surface and would be fairly straightforward to remove. I scrubbed vigorously with SoftScrub to remove the leftover oxidation. Before I moved on to the Micromesh pads, I built up both dents and the squashed button on the stem with cyanoacrylate adhesive and let them fully cure. I used my miniature files to do a proper cutting of the new button – this ensures that it keeps its shape and looks like it should. I then sanded it down with 220-, 400-, and 600-grit sandpapers to meld seamlessly into the stem. I did the same to the remaining tooth marks. I then used all nine Micromesh pads (1,500 through 12,000 grit) to bring out the lovely black lustre on the stem. I also used Obsidian Pipe Stem Oil in between each pad scrubbing.
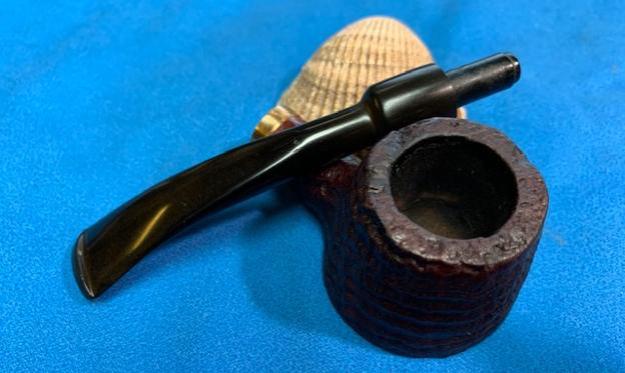
On to the stummel, and the usual cleaning procedures were in order for this pipe. I used both the PipNet Reamer and the KleenReem to remove the built-up cake and take the bowl down to bare briar, as I wanted to ensure there were no hidden flaws in the walls of the bowl. Fortunately, there were none. I then proceeded to clean out the insides of the shank with Q-tips, pipe cleaners, and isopropyl alcohol. There was some nastiness inside this stummel, but fortunately not too much – it only took a handful of pipe cleaners etc. to sort that out. I followed that up by cleaning the insides with some dish soap and tube brushes. I then moved on to cleaning the outside of the stummel with Murphy’s Oil Soap and some cotton pads. That removed any latent dirt. 
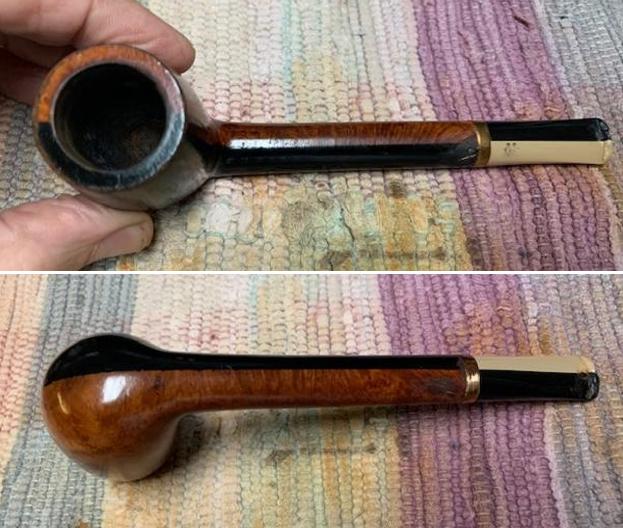
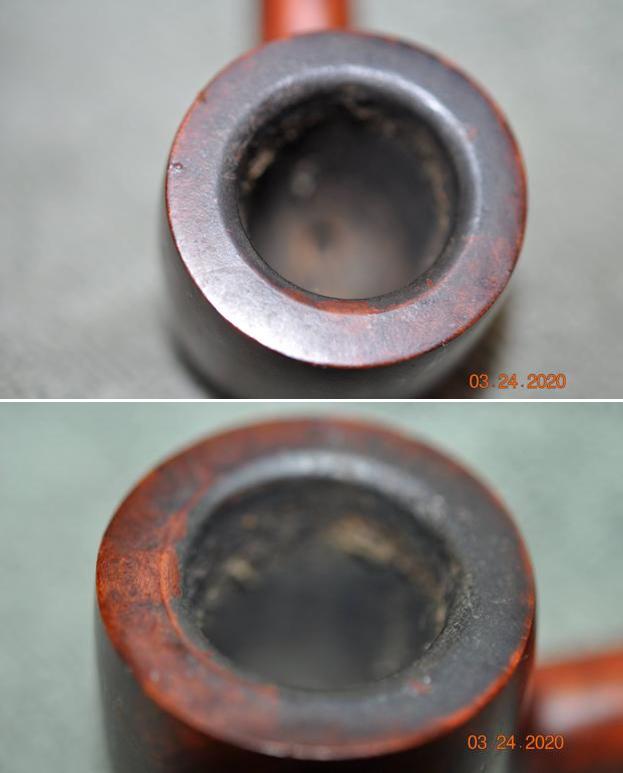
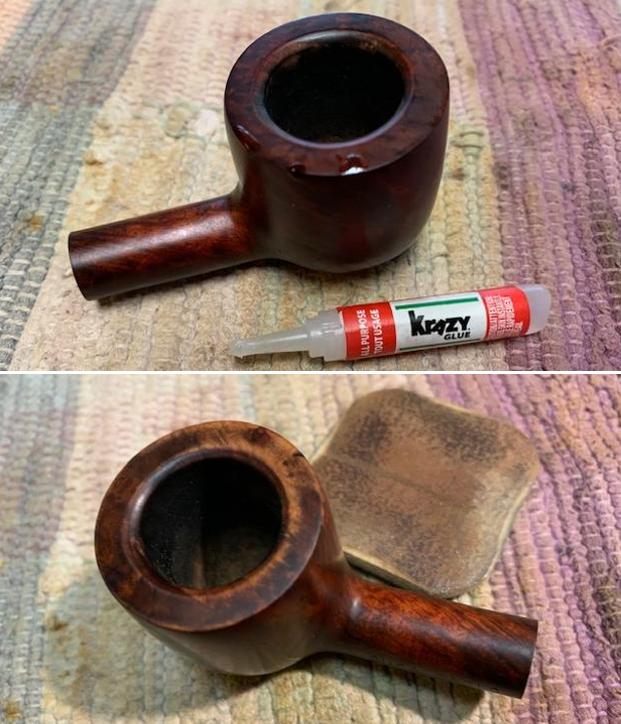
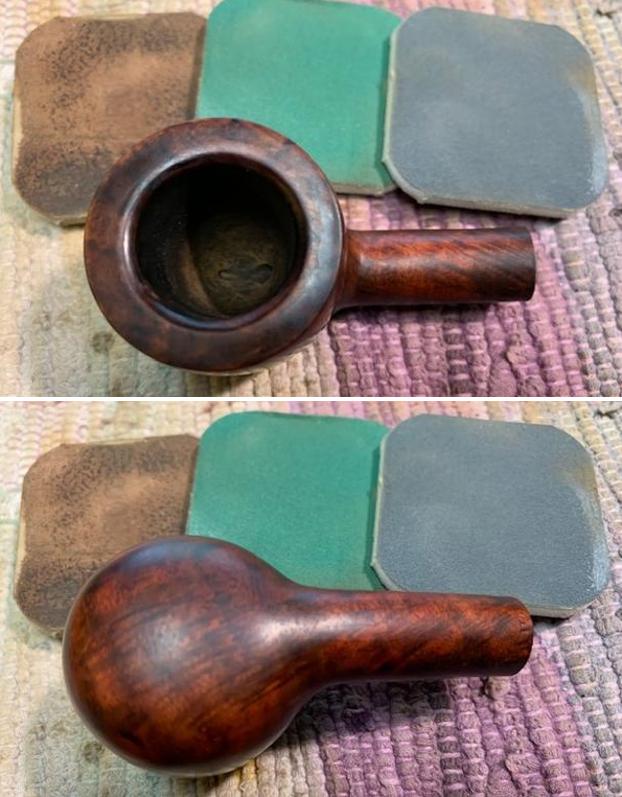
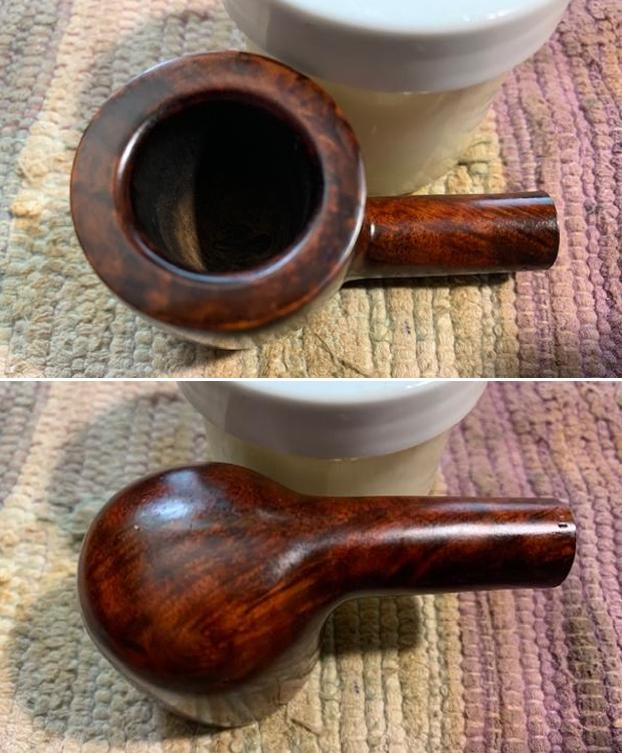
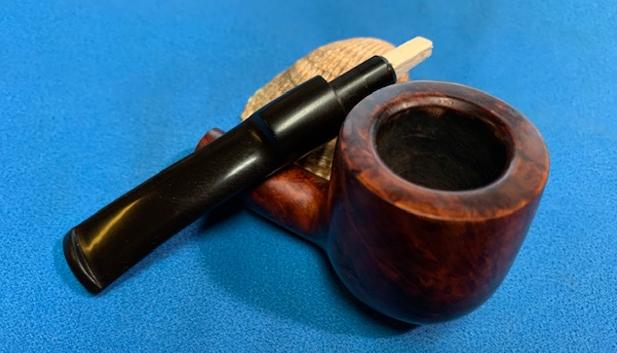
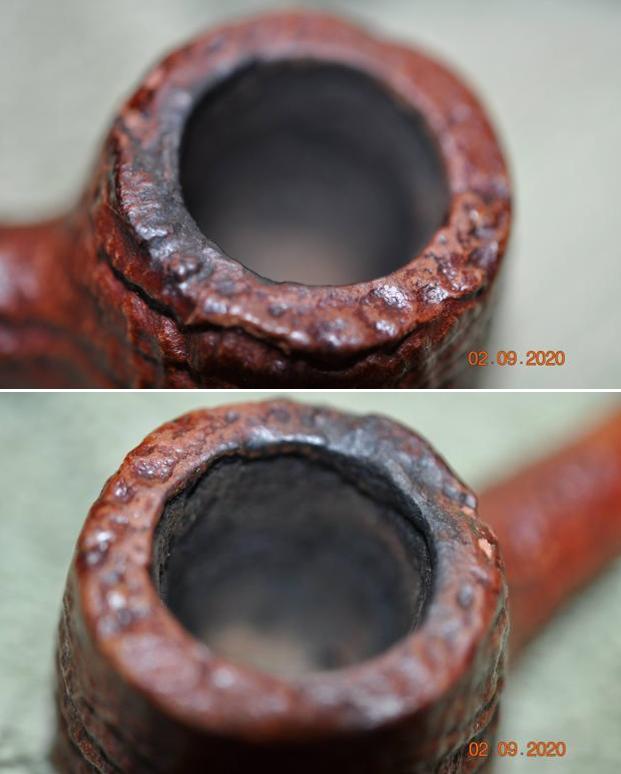
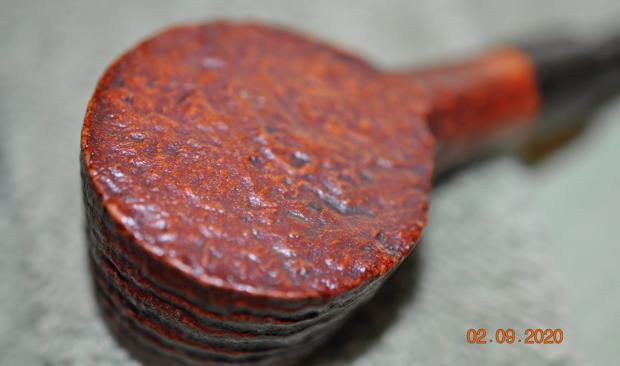
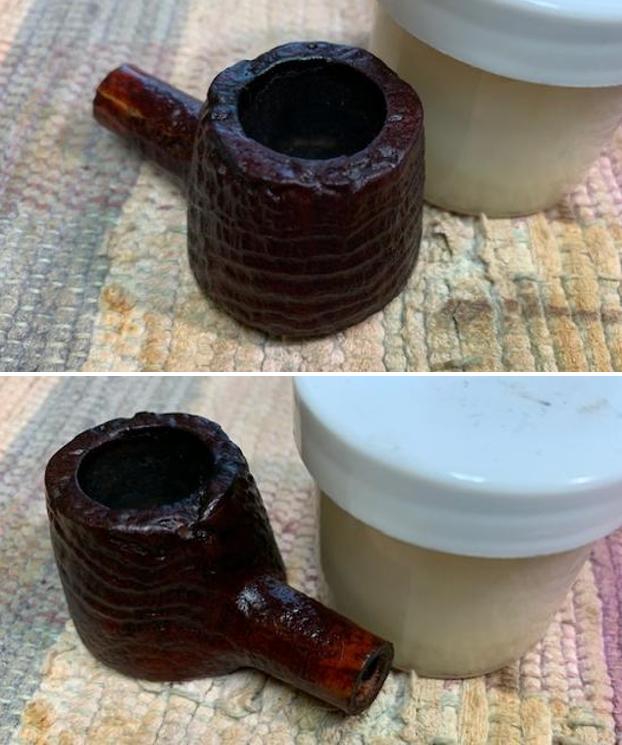
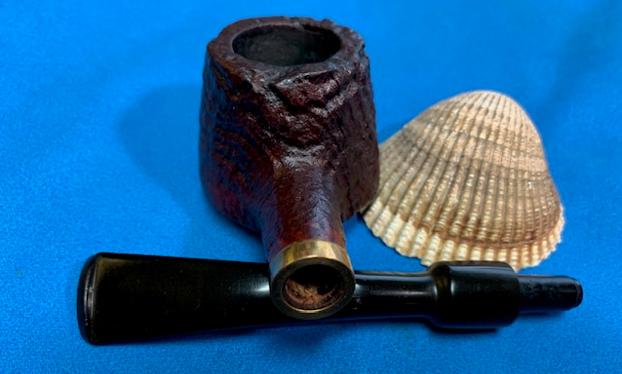
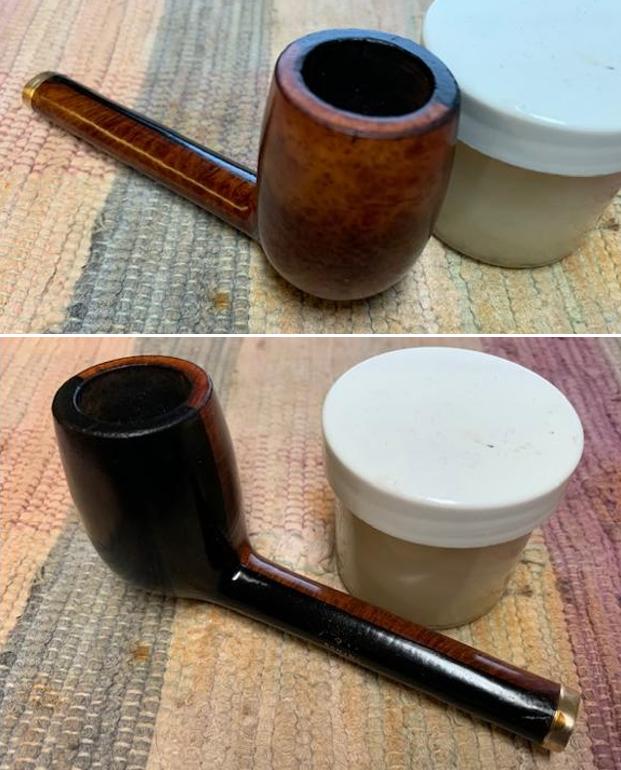
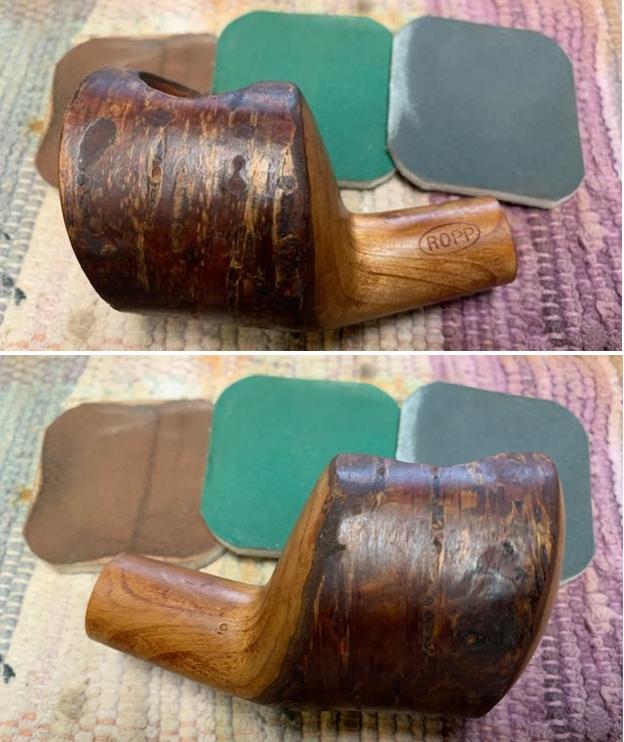
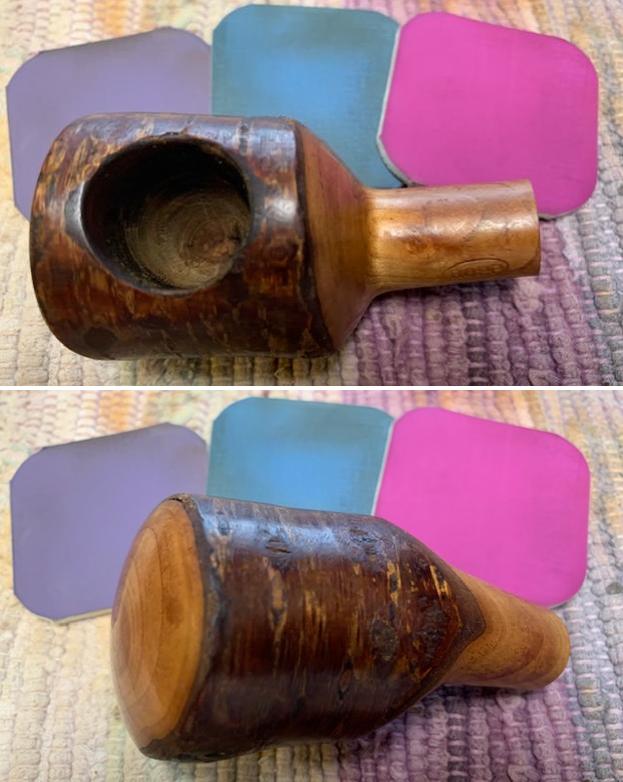
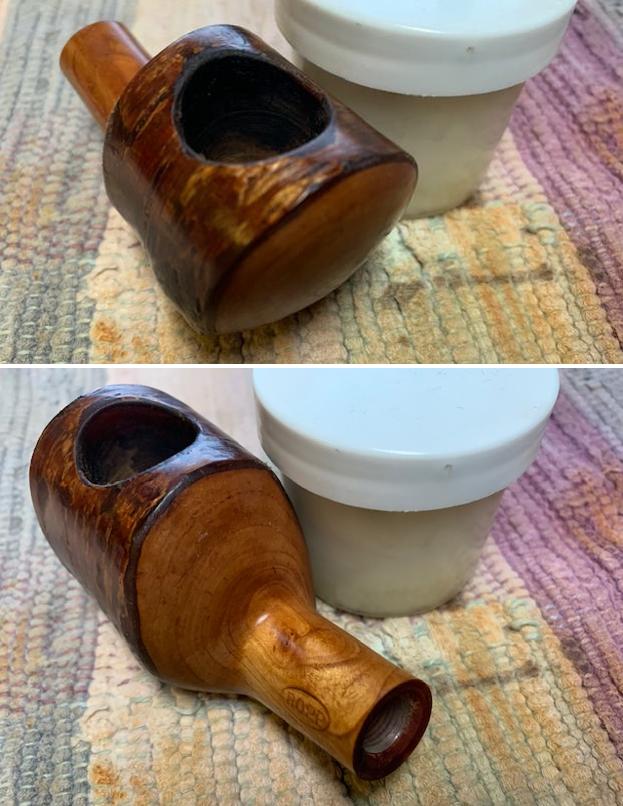
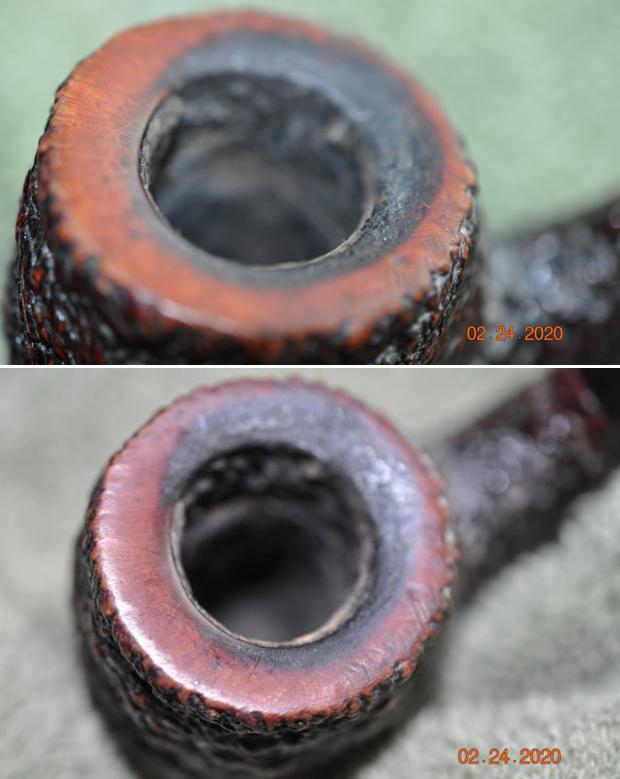
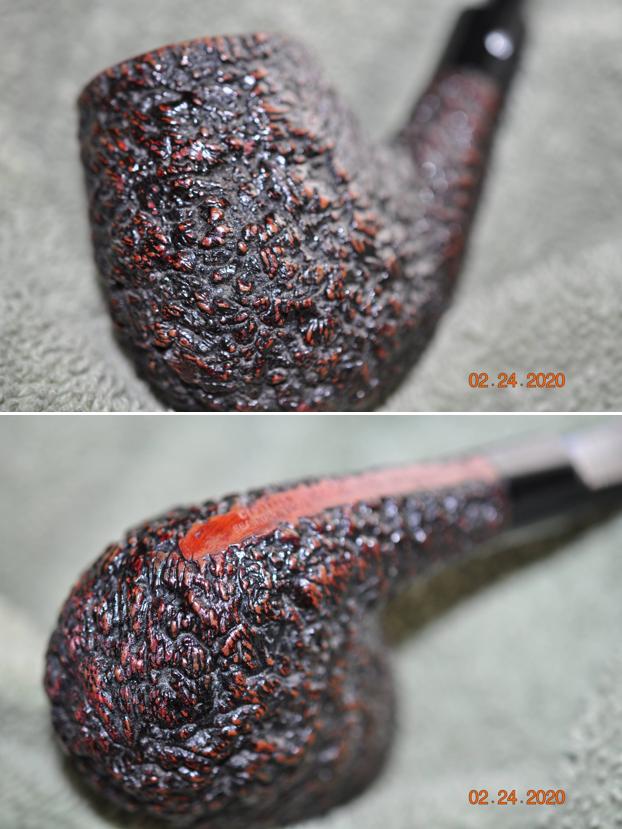
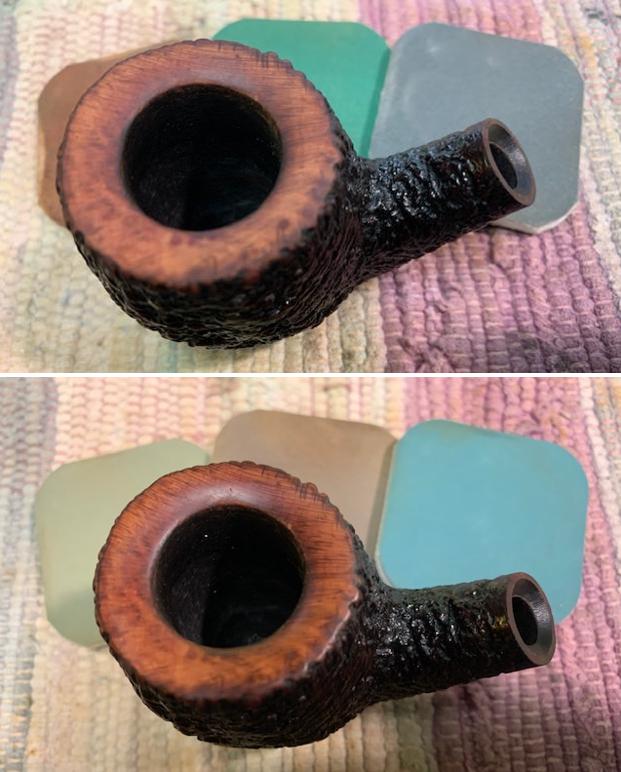
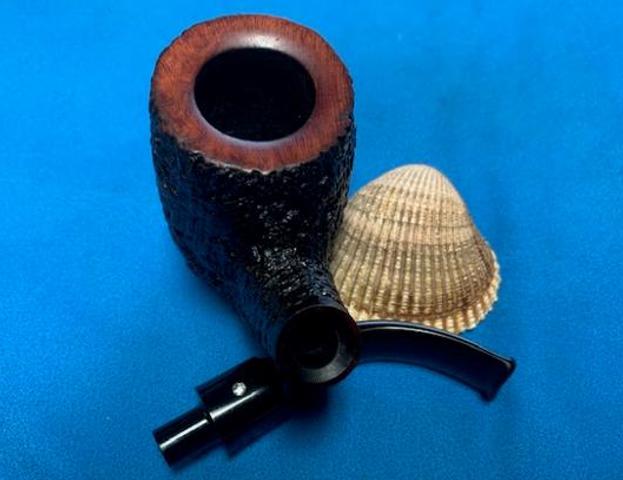
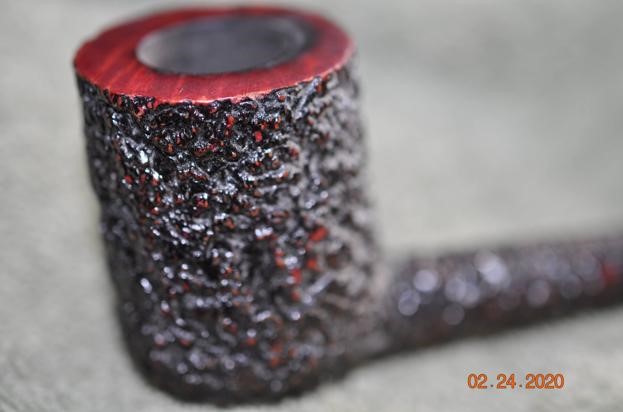
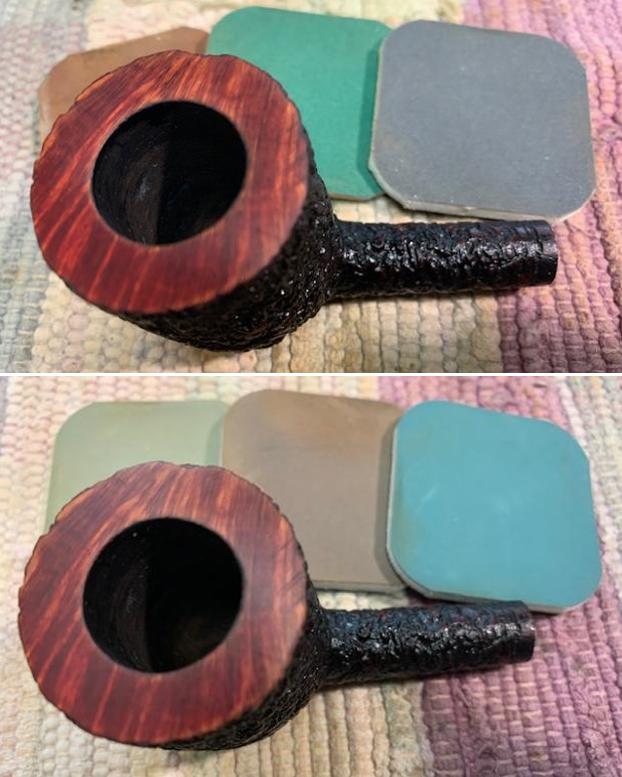
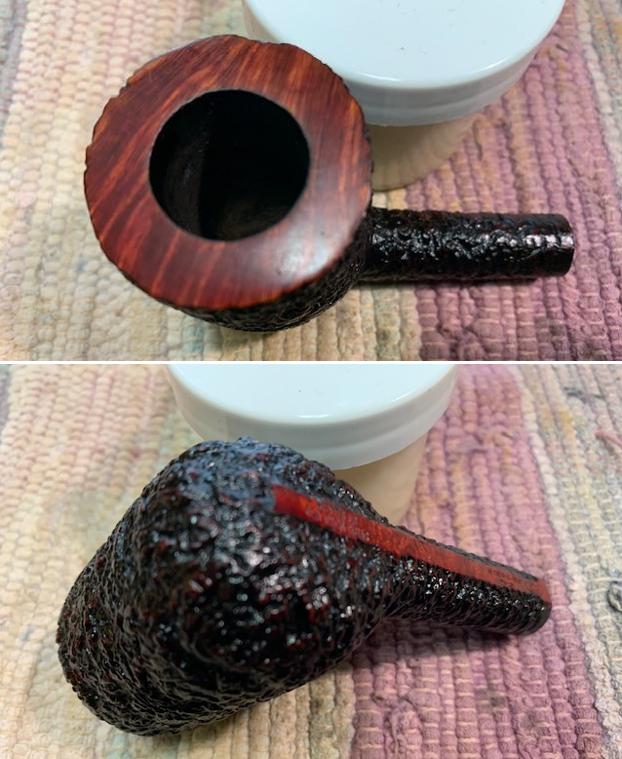
As I mentioned earlier, there were some small burn marks on the rim of the stummel that also needed to be addressed. A lot of this was removed by the Murphy’s. For the burns that remained, I took some oxalic acid on a Q-tip and rubbed and rubbed. As you will see, the treatment worked very well and the rim is much improved. I completed this part by gently sanding the rim edge to remove the roughness that remained.
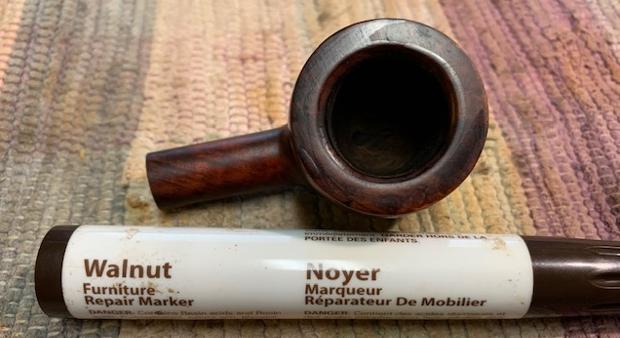
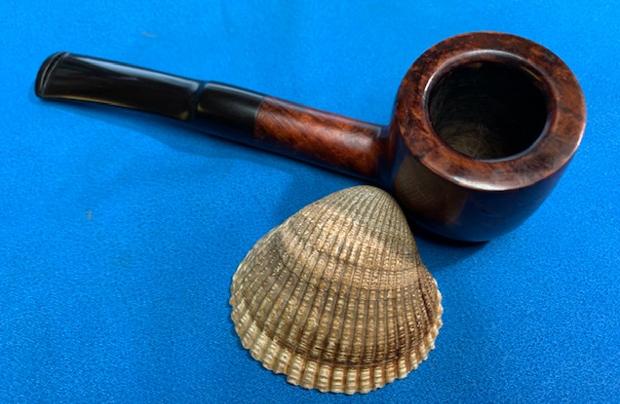
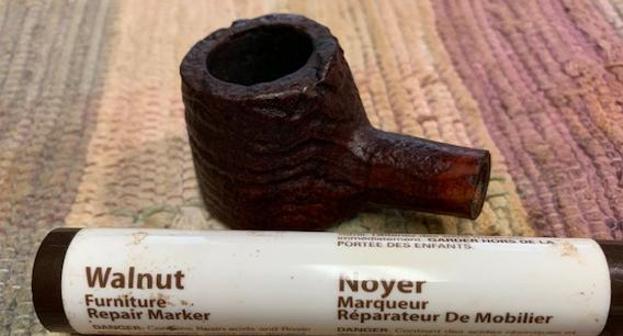
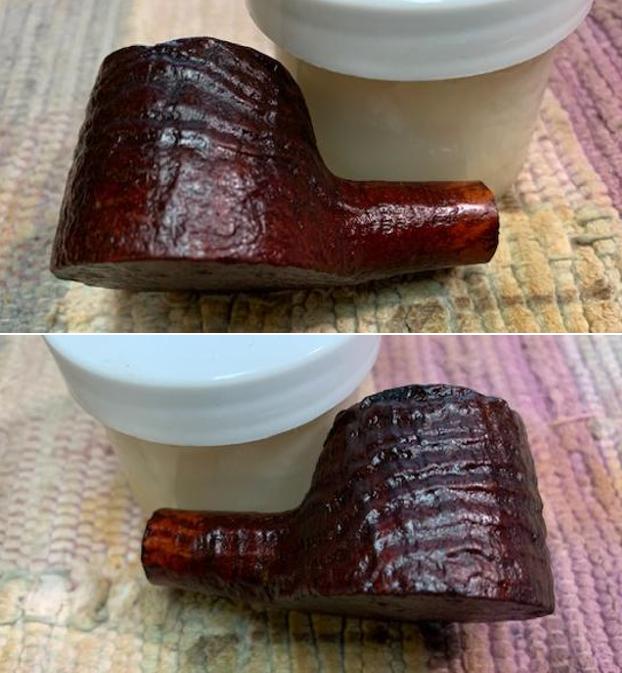
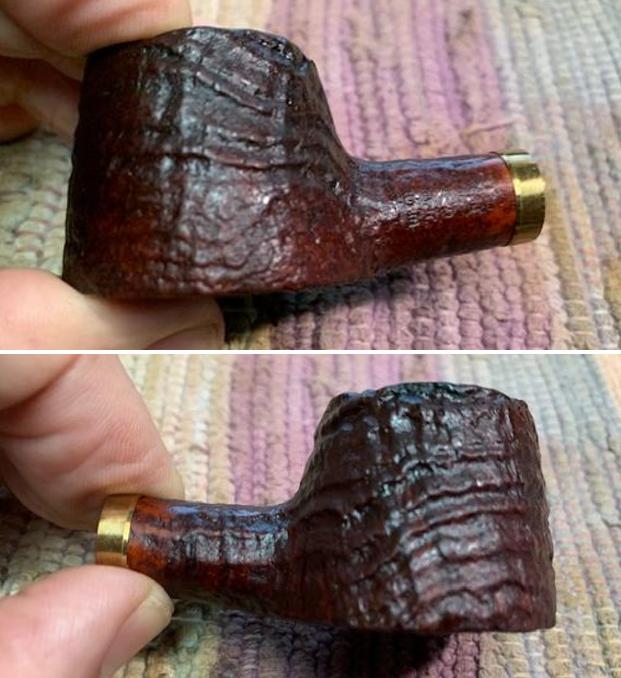
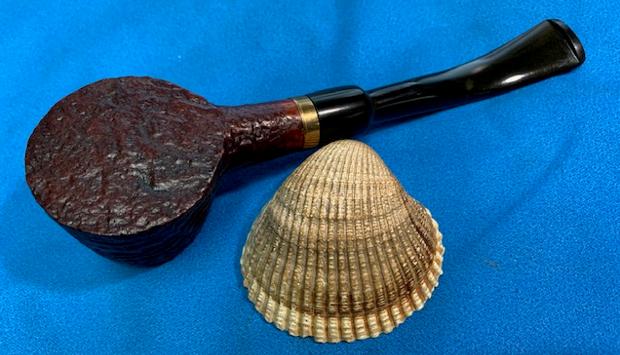
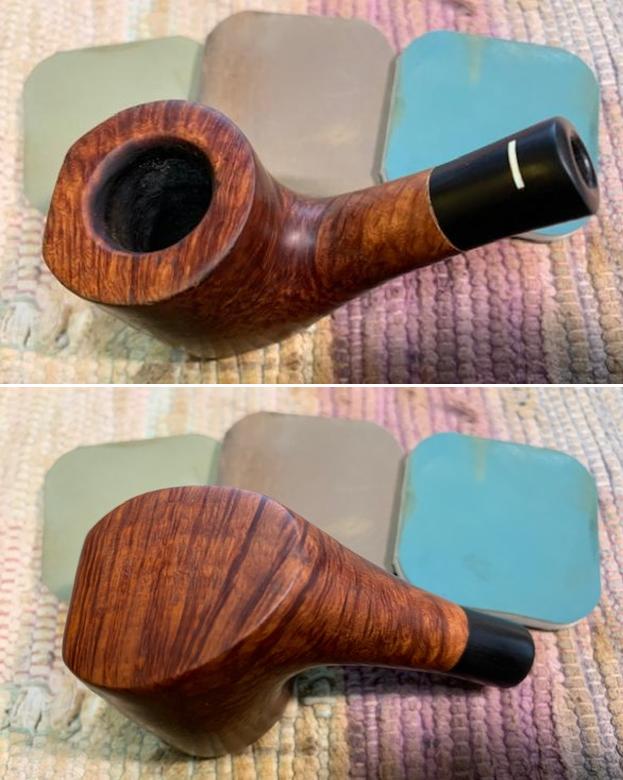
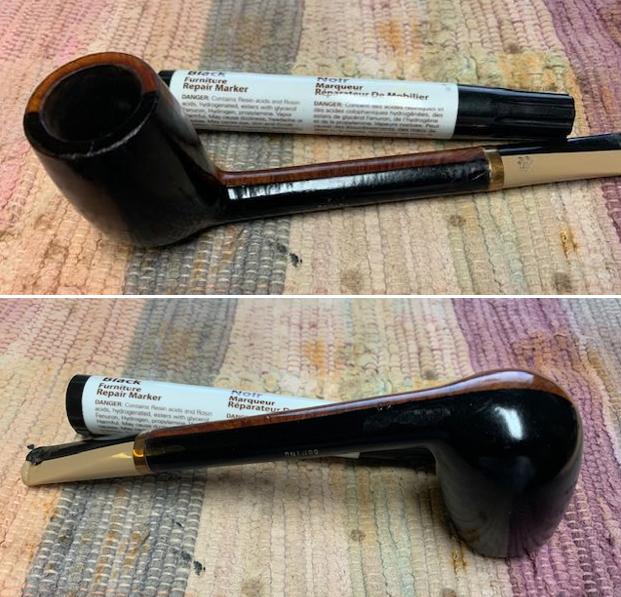
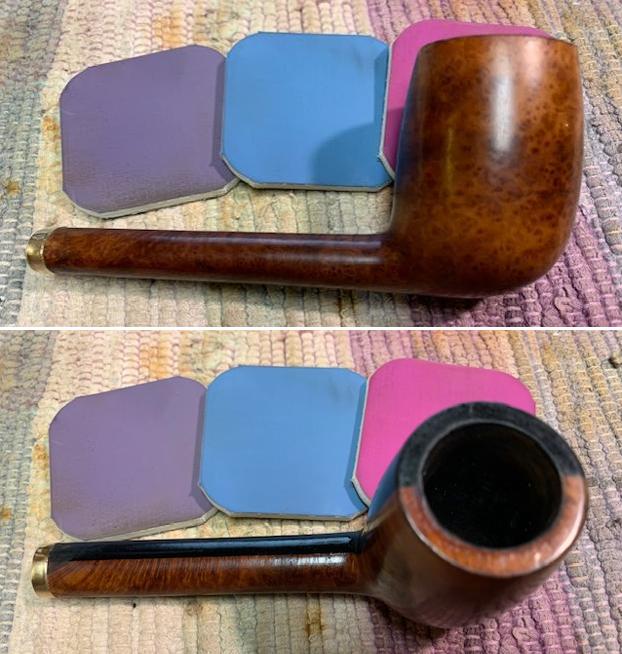
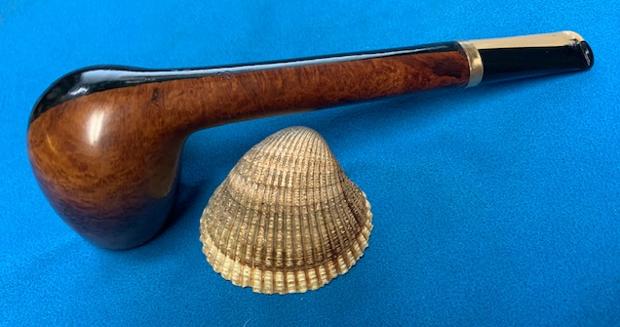
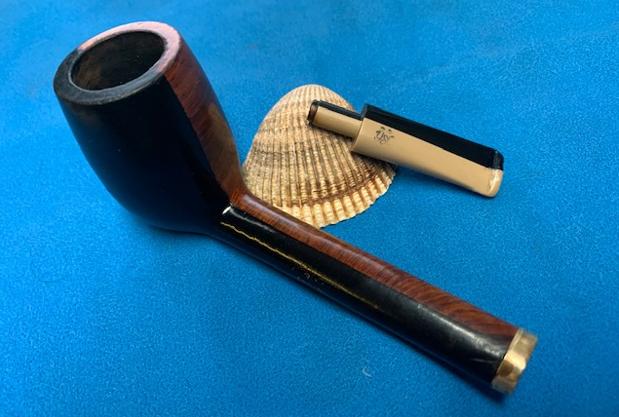
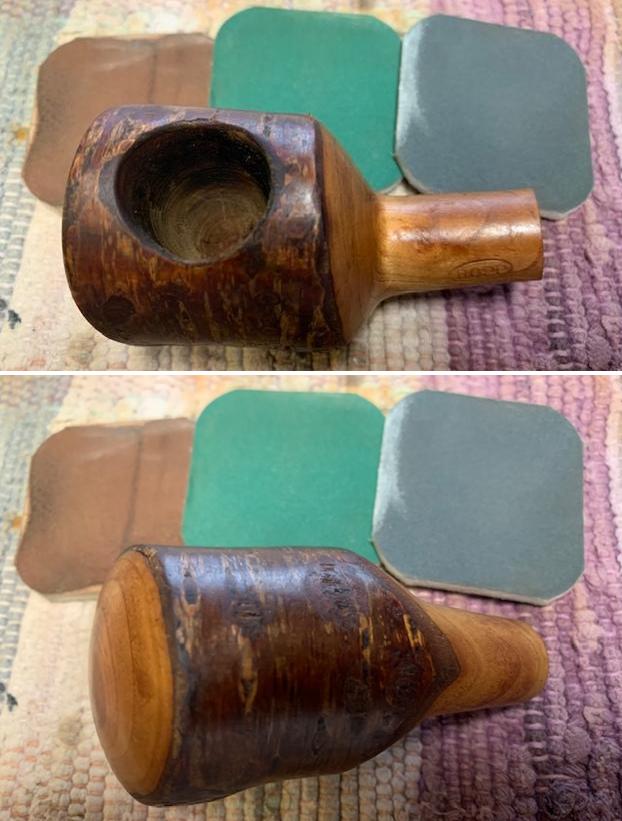
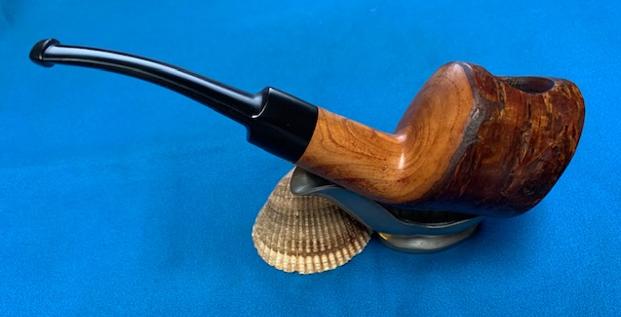
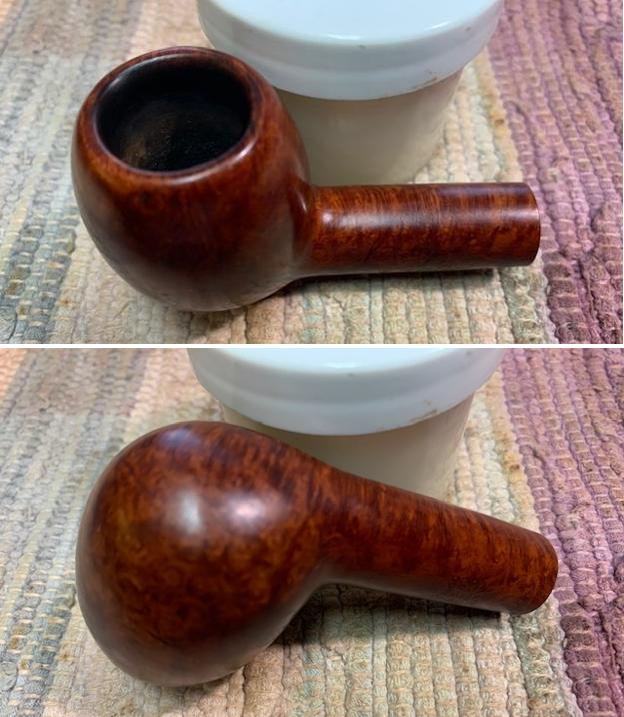
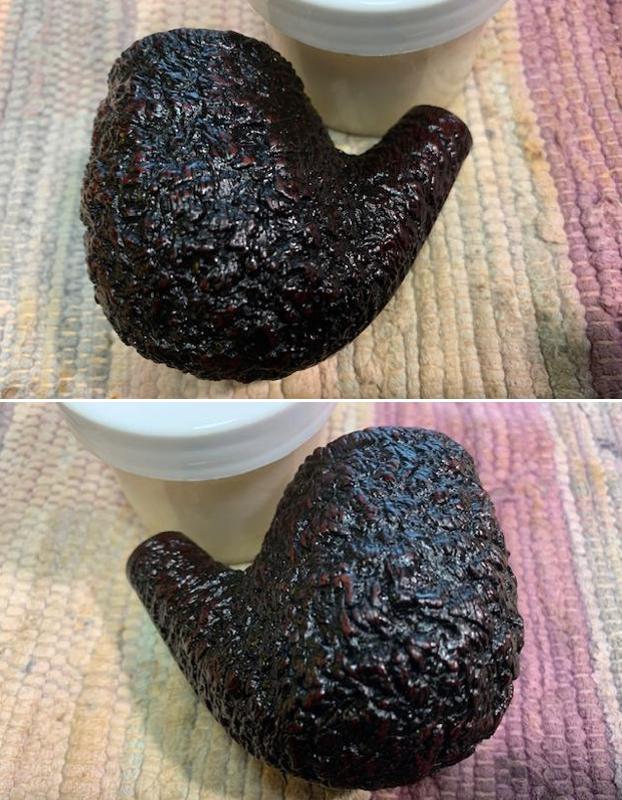
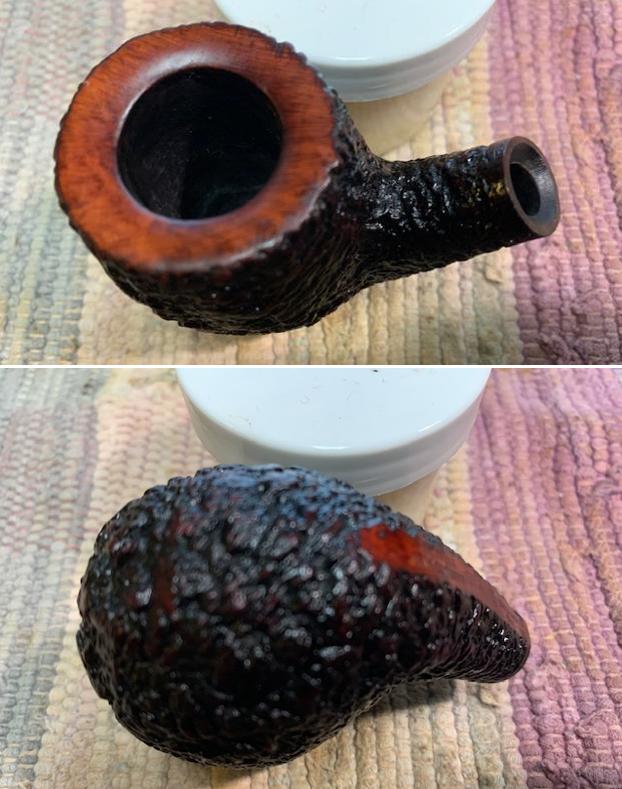
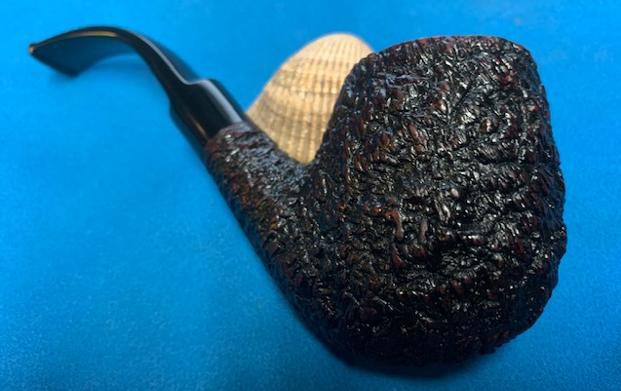
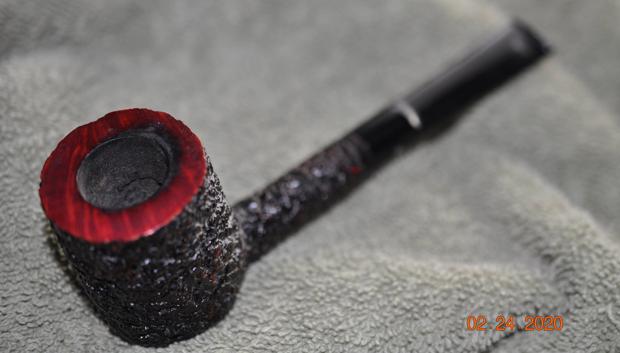
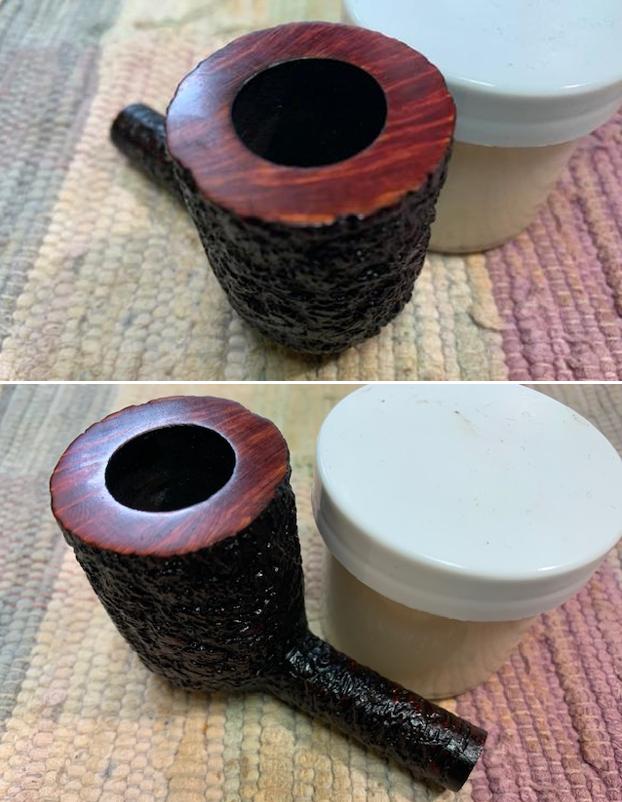
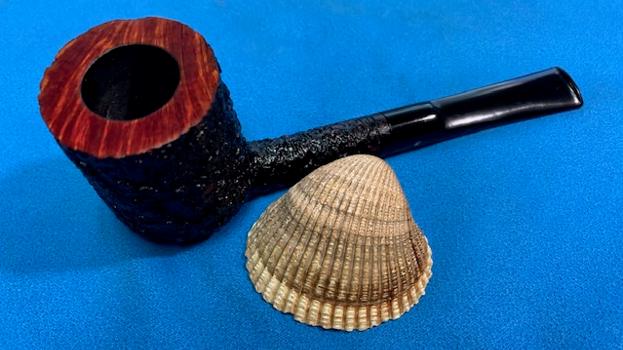
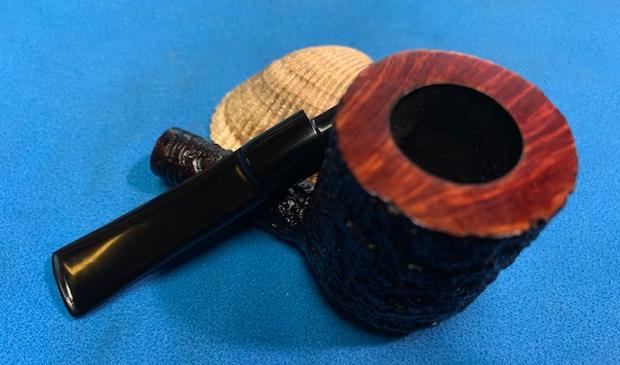
Then I addressed the two nicks on the rim – both were relatively straightforward. The first one required a touch of light sanding with the Micromesh pads and then the merest bit of stain with one of my furniture pens. Looks fantastic now. The other nick was solved by filling it with cyanoacrylate adhesive and letting it fully cure. After this, the entire stummel was treated to a rub-down with all nine Micromesh pads (1,500 through 12,000 grit). A light application of Before & After Restoration Balm brought out the best in the stummel’s grain. There is some beautiful wood on this Danish pipe! 
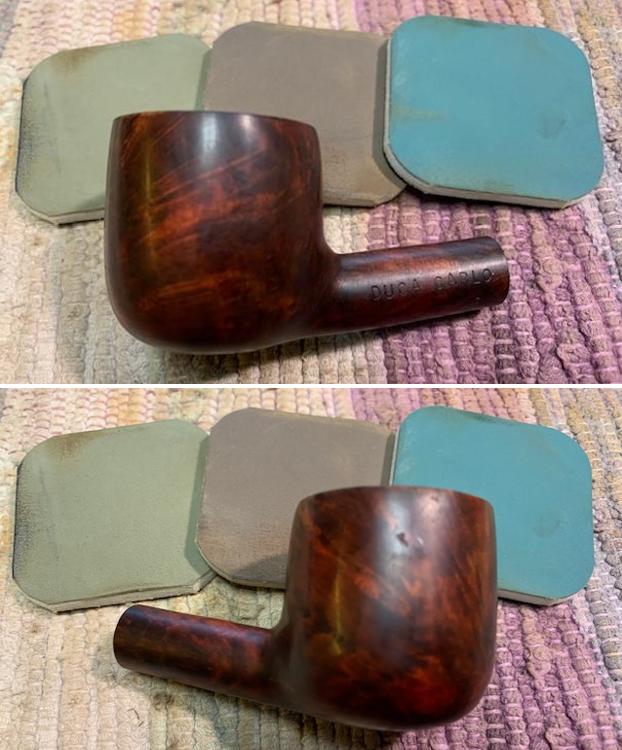
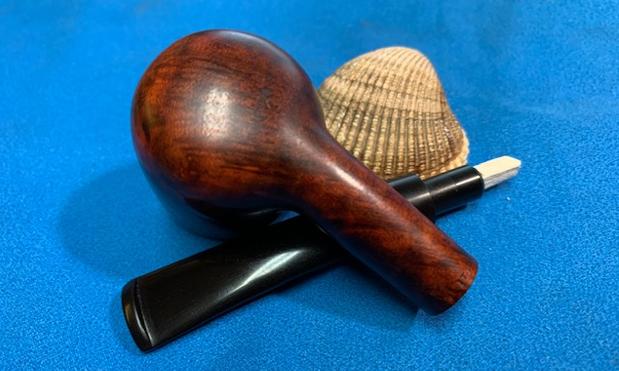
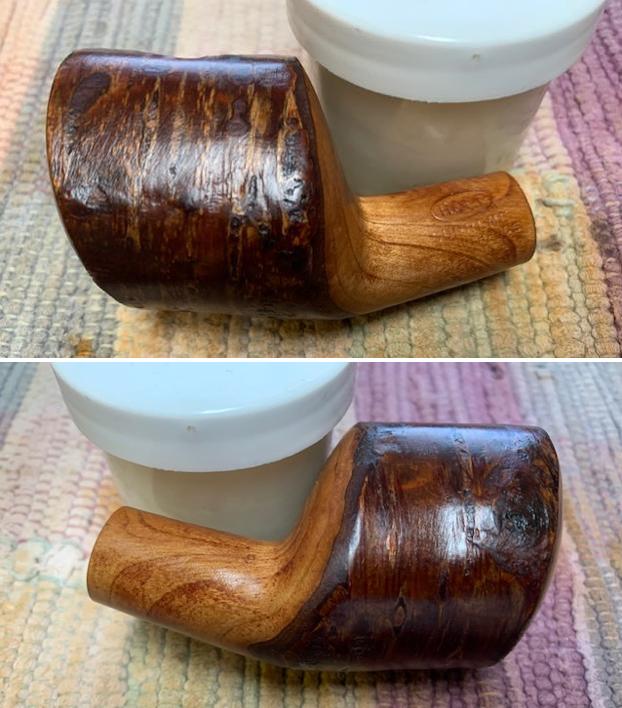
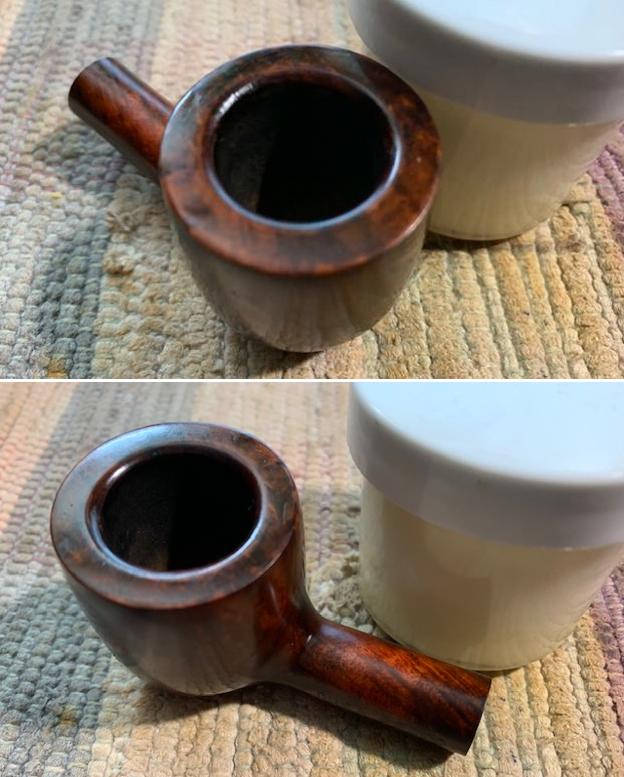
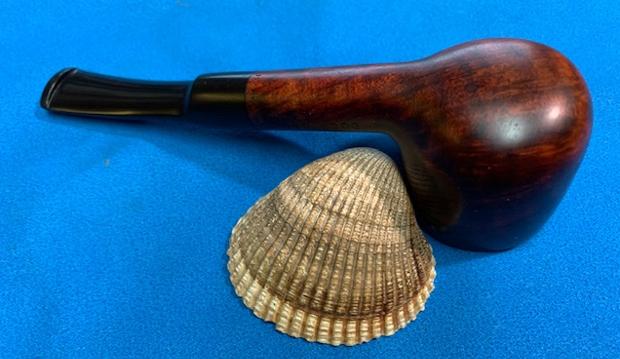
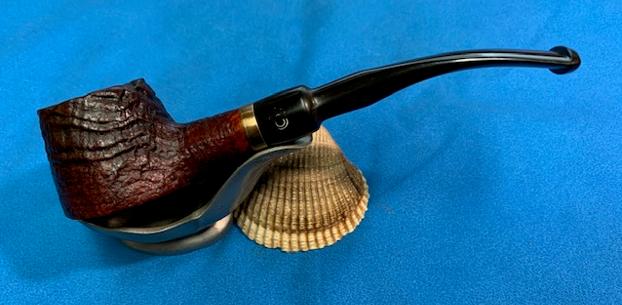
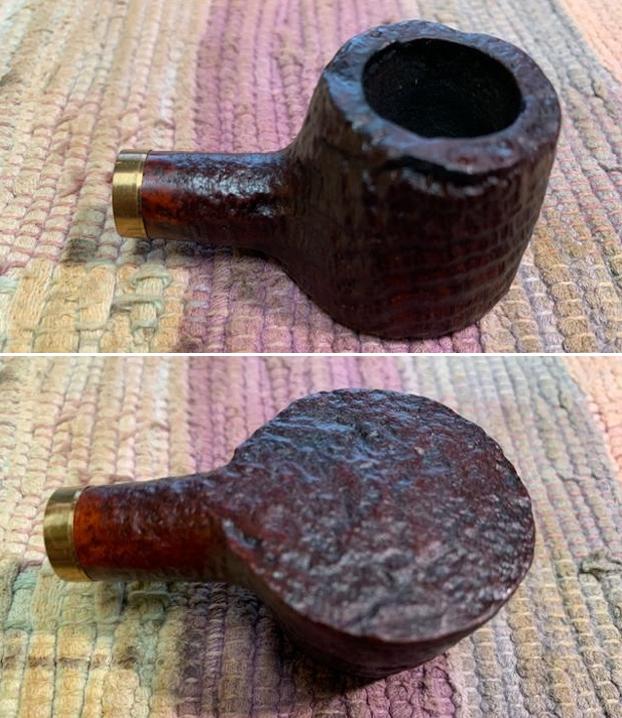
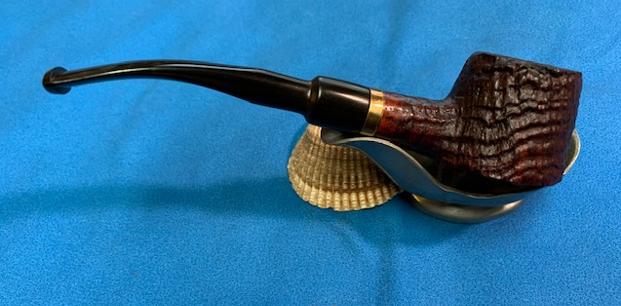
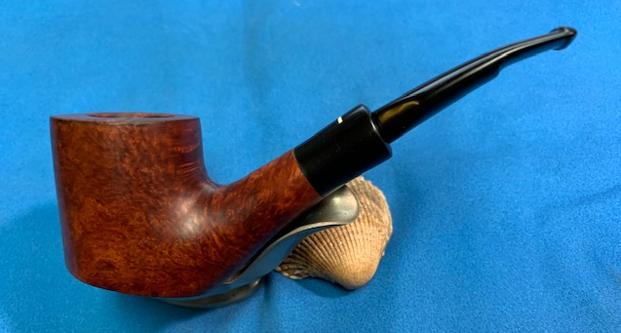
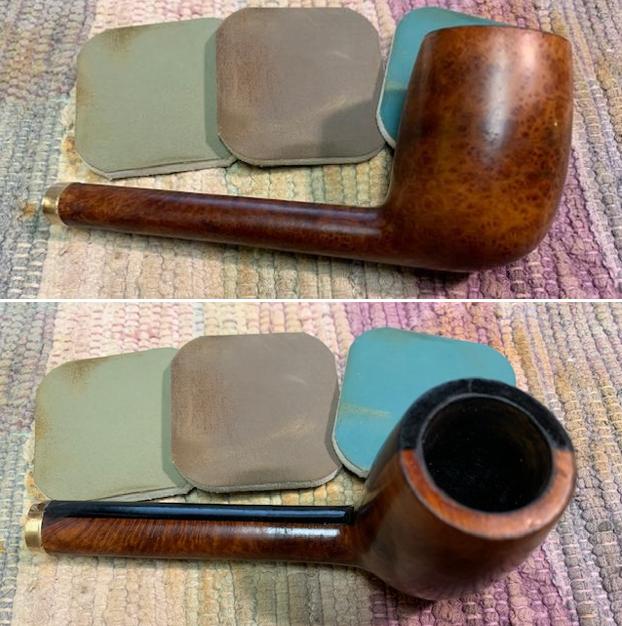
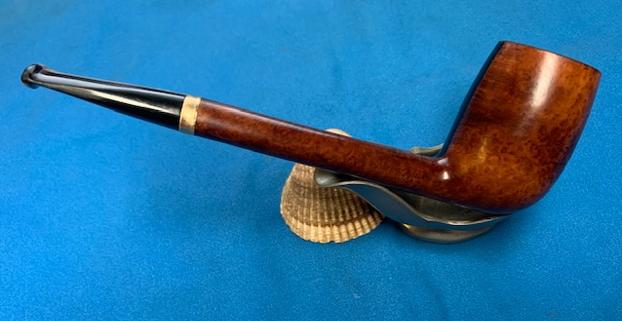
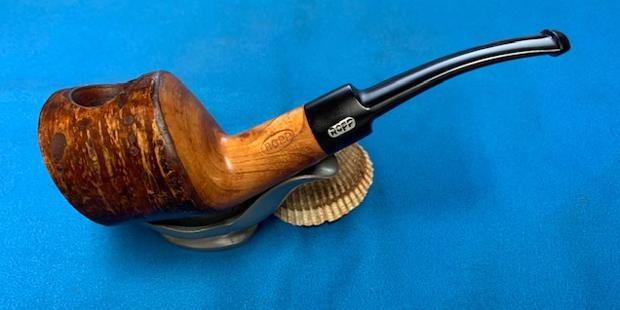
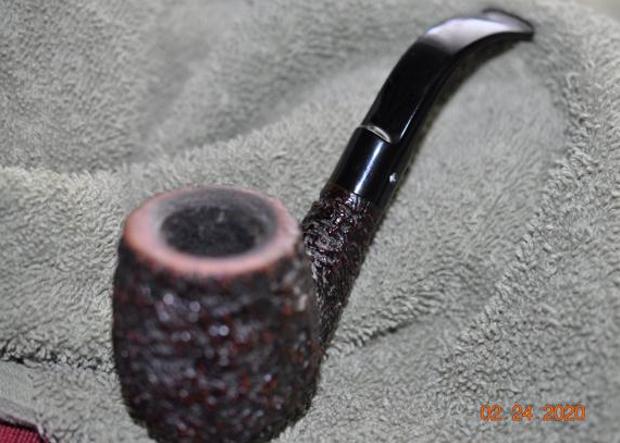
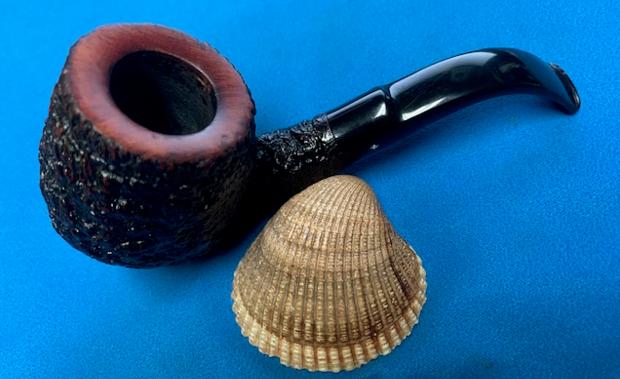
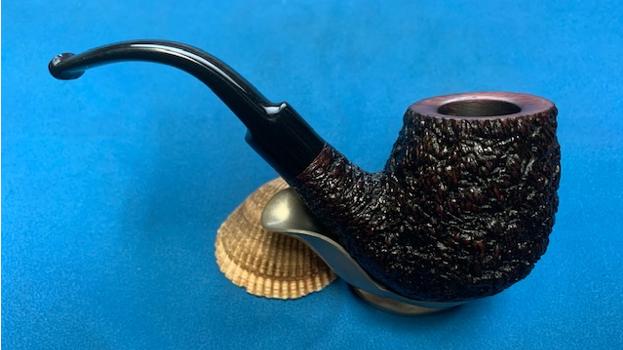
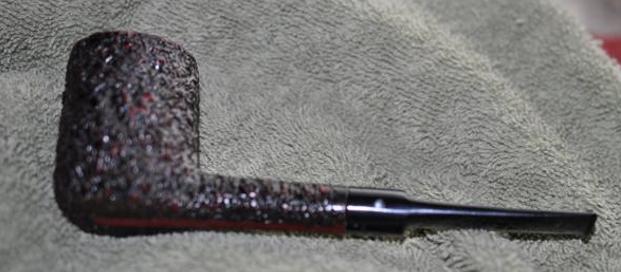
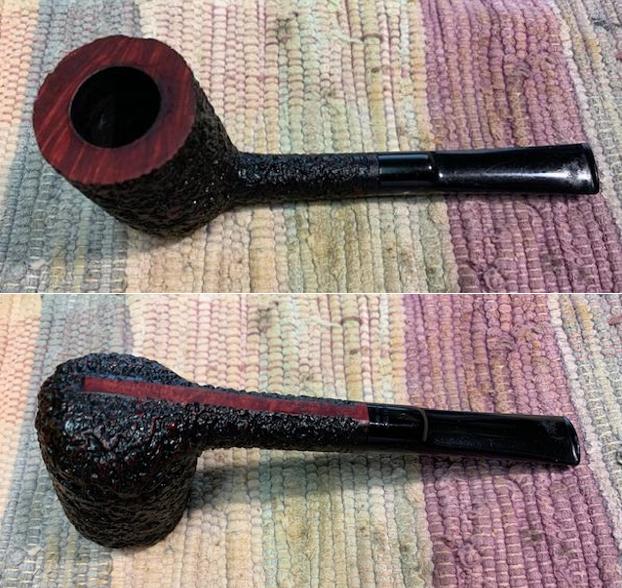
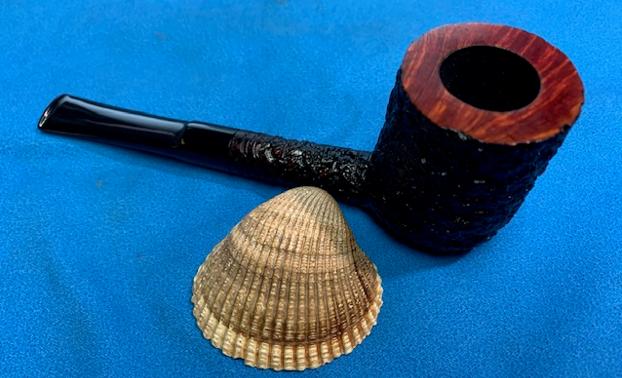
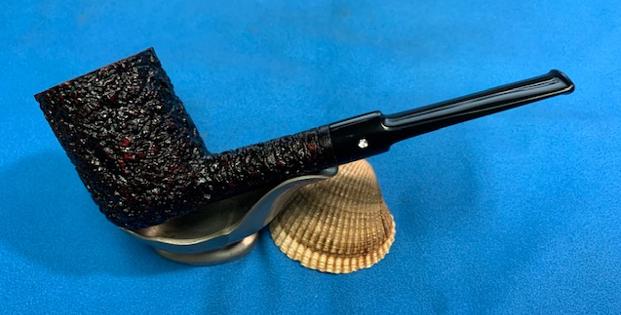
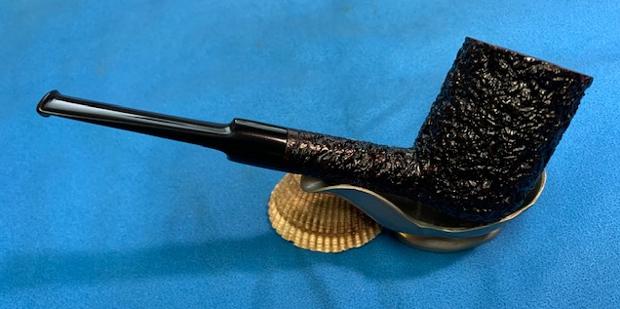
Now it was off for a trip to the buffer. A dose of White Diamond and a few coats of carnauba wax were just what this pipe needed. I had to be especially careful with the bench polisher, since the sharp edges had a tendency to catch on the buffing wheels. I have to admit, this did put my heart in my throat a few times!

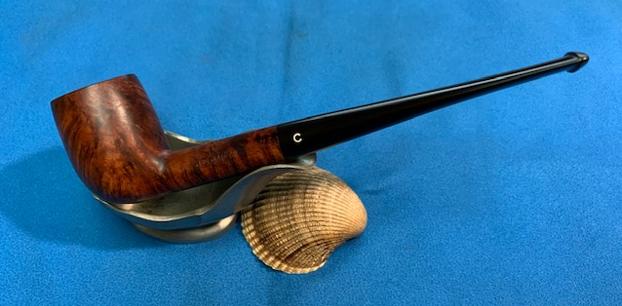
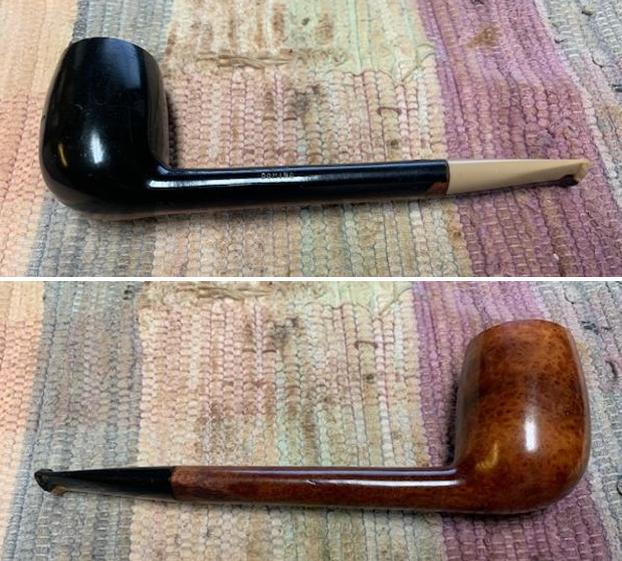
This pipe was a delight from the start and its beauty only increased through the restoration process. Finally, I am pleased to announce that this pipe is for sale! If you are interested in acquiring it for your collection, please have a look in the ‘Danish’ pipe section of the store here on Steve’s website. You can also email me directly at kenneth@knightsofthepipe.com. The approximate dimensions of the pipe are as follows: length 180 mm; height 55 mm; bowl diameter 55 × 39 mm; chamber diameter 25 × 21 mm. The mass of the pipe is 77 grams. Thank you very much for reading and, as always, I welcome and encourage your comments.

Breathing Life into this Savinelli Made Duca Carlo Pot


Blog by Steve Laug

This July long weekend has been a bit of rest and relaxation for me as I have been able to take time in the basement at my work table and deal with pipes that have been piling up in the boxes around the table. I have posted two I have worked on already – both French Made – a Butz-Choquin Optima and a Chatham Volcano. They were interesting pipes because of the shape and style. This one was more of a relaxed restoration because it was a classic shape and did not present too many challenges. Jeff purchased this pipe from an antique mall Logan, Utah, USA. It had an interesting fire-like finish on it that reminded me of molten lava. The bowl was classic Pot shaped. There was a thick cake in bowl and lava on the rim top. There were nicks around the out edge of the rim  on the right side. There were several fills around the bowl sides. The finish was filthy with grit and grime ground into the surface of the briar. The pipe is stamped on the left side of the shank DUCA CARLO and on the underside across the shank just below the shank/stem union it was stamped ITALY. I remembered that the pipe was a Savinelli made pipe but I could not remember how it was connected. I would need to check the blog. The stem was oxidized and had light tooth marks and chatter on both sides at the stem. Jeff took photos of the pipe before he started his clean up work. I like to have an idea of how the pipe was smoked before we got it and what the bowl and rim top looked like. Jeff always takes some photos of the bowl and rim from various angles to show what it looked like. He also captured the nicked right outer edge. The stem looked very good under the oxidation. He took photos of the sides and heel of the bowl to give a sense of the grain on the pipe. You can also see the fills on the right side of the bowl. The next two photos show the stamping on the left side and underside of the shank. It is clear and readable as noted above.I did a quick scan of the rebornpipes blog and found a link to the Duca Carlo pipe that Dal Stanton had restored (https://thepipesteward.com/2021/05/04/liberating-the-grain-of-a-candy-apple-finish-a-savinelli-duca-carlo-poker-of-italy/). I always appreciate the research that Dal does when he works on pipes because it is what I like doing when I am restoring the pipes on my table. I quote from the portion of the blog that gives the background information on the brand. (Thanks Dal for the leg work on this one!)

Whenever I work on a pipe, I’m always interested to know something of the pipe.  My first stop at Pipedia reveals that the Duca Carlo is a second of Savinelli, the well-known Italian pipe manufacturer.Savinelli’s history as an Italian pipe maker goes back to 1876 – a rich history and tradition which can be read in Pipedia’s Savinelli article.  The Duca Carlo is listed in the main Savinelli article within an extensive listing of “Savinelli made sub-brands, seconds & order productions”.  The Duca (Duke) Carlo is listed with the Duca di Milano and Duca di Paolo giving the impression that Savinelli produced these as special lines commemorating these historical figures.  With a quick internet search brings me to a Wikipedia article.  Duca Carlo reveals an interesting story of a child that died of smallpox at age 3 (See: Carlo, Duke of Calabria):

Carlo of Naples and Sicily (ItalianCarlo Tito Francesco Giuseppe; 4 January 1775 – 17 December 1778) was Duke of Calabria as heir to Naples and Sicily. Born at the Caserta Palace near Naples, he was known as the Duke of Calabria at birth as the heir apparent to his father’s throne. His mother was a daughter of Empress Maria Theresa and thus sister of Marie Antoinette.

A member of the House of Bourbon, he was a prince of Naples and Sicily by birth. He was the hereditary prince of Naples. His birth allowed his mother to have a place in the Council of State, pursuant to his parents’ marriage contract.

Carlo died of smallpox[1] aged 3. Six of his younger siblings would die of smallpox also: Princess Maria Anna (in 1780), Prince Giuseppe (in 1783), Prince Gennaro (in 1789), Prince Carlo Gennaro (also in 1789), Princess Maria Clotilde (in 1792) and Princess Maria Enricheta (also in 1792).  He was buried at the Church of Santa Chiara in Naples.

The only other reference to the Duca series in the Savinelli Pipedia article comes from a photo that does not mention a name, but the stem stamping is clearly from the Duca series of pipes listed.  No dating on the picture can be seen.The Savinelli Duca line is confirmed by my next stop. Pipephil (http://pipephil.eu/logos/en/logo-d9.html) gives two examples of Savinelli Ducas – a Duca Carlo and Duca Eraldo.  Consistent between each example is the crown stem stamping.Armed with the information that I had gleaned from Dal’s blog, I turned my attention to the pipe itself. Jeff had done a great cleanup on the pipe. He reamed the bowl with a PipNet pipe reamer and followed up with a Savinelli Fitsall pipe knife to remove the cake. He scrubbed out the mortise and the airway in the shank and the stem with alcohol, cotton swabs and pipe cleaners. He scrubbed the bowl exterior with a tooth brush and Murphy’s Oil Soap to remove the grime on the finish of the bowl and the lava from the rim top. He rinsed it under running water. One of the benefits of this scrub is that it also tends to lift some of the scratches and nicks in the surface of the briar. He dried it off with a soft cloth. He cleaned the internals and externals of the stem with alcohol, pipe cleaners and cotton swabs. He soaked the stem in Briarville’s Pipe Stem Deoxidizer and rinsed it off with warm water and cleaned out the airway in the stem with alcohol. When I received it the pipe looked very good. I took a photo of the rim top and stem to show the condition. The rim top and the inner edge of the bowl were in good condition. There were some nicks on the right outer edge of the bowl but otherwise it looked good. The stem was vulcanite and there were some tooth marks and chatter on both sides ahead of the button. The stem is made for a 6mm filter or a Savinelli Balsa Filter System.The stamping on the pipe is clear and readable as noted above. There are the remnants of the crown stamp on the left side of the saddle stem.I removed the stem from the shank and took a photo of the pipe to give a sense of the whole. I started my work on this pipe by addressing the nicks along the edges. I filled them in with a clear CA glue and set them aside to cure. Once cured I blended them into the surrounding briar with a 1500 grit micromesh sanding pad. I touched up the rim top with a Walnut stain pen to blend it into the surrounding briar. I would probably need to do a bit more work on it but I liked what I saw. I sanded the bowl with micromesh sanding pads, dry sanding with 1500-12000 grit sanding pads and wiping it down with damp cloth after each sanding pad. As I worked through the cycle of pads the shine developed with each change of pad. The pipe looks very good. I rubbed the bowl and shank down with Before & After Restoration Balm. I worked it into the surface of the bowl sides and shank with my fingertips to clean, enliven and protect the briar. I let the balm sit for 10 minutes, then buffed with a cotton cloth to raise the shine. The Balm did its magic and the grain stood out on the briar. I set the bowl aside and turned my attention to the stem. I polished it with micromesh sanding pads – 1500-12000 grit pads. I wiped it down with Obsidian Oil after each sanding pad. I used Before & After Pipe Polish – both Fine and Extra Fine to further polish the stem. The photos below show the polished stem. I fit the stem with a Savineli 6mm Balsa System filter. The fit was perfect and the draw seems remarkably open. This Savinelli Made Duca Carlo Italian Pot with a vulcanite saddle stem is a great looking pipe now that it has been restored. The rich browns and blacks of the contrasting stains came alive with the polishing and waxing. I put the stem back on the bowl and carefully buffed the pipe with Blue Diamond on the buffing wheel using a light touch on the briar. I gave the bowl and the stem multiple coats of carnauba wax on the buffing wheel and followed that by buffing the entire pipe with a clean buffing pad. I hand buffed the pipe with a microfiber cloth to deepen the shine. The finished Duca Carlo Pot is a beauty and fits nicely in the hand and looks very good. Give the finished pipe a look in the photos below. The dimensions of the pipe are Length: 5 ¾ inches, Height: 1 ½ inches, Outside diameter of the bowl: 1 ½ inches, Chamber diameter: 7/8 of an inch. The weight of the pipe is 1.31oz./37grams. This beauty will be going on the rebornpipes store in the Italian Pipe Makers section. Let me know if you are interested in adding it to your collection. Thanks for reading this blog and my reflections on the pipe while I worked on it. There are many more to come!

A Mystery Pipe that turned out to be a Chatham Bruyere Flat Bottom Volcano


Blog by Steve Laug

The next pipe that I chose to work on is a bit of a mystery pipe that Jeff and I picked up but have no real memory of when or where. It is a sandblast volcano pipe that has a flat bottom making it a sitter. The pipe was coated in a heavy coat of varnish that made it shiny and a mess. There was a chip on rear outer edge of the bowl. It was stamped on the underside of the shank and reads CHA…[over] Bruyere. The finish was dirty and tired but had a great sandblast with grain that. The bowl had a moderate cake inside and a lava overflow and darkening on the back rim edge and top. The vulcanite stem was oxidized and had light tooth chatter and marks on the stem near the button on both sides. It had a white circle C stamp on the left side of the stem. It had a great shape to it and the blast was well done. Jeff took photos of the pipe before his cleanup. He took photos of the rim top to show the condition of the top and edges of the bowl. The cake in the bowl, the lava on the back side of the rim top and the wear on the outer edges are visible. The stem had light tooth marks and chatter on both sides ahead of the button. Jeff took the stem off the pipe and took some photos of the stinger apparatus in the tenon and the look of the shank end and mortise.He took photos of the sides and heel of the bowl to show the sandblast around the bowl and the condition of the pipe. It is a very unique looking pipe. You can also see the peeling and chipping varnish coat on the bowl sides. He took photos of the stamping on the underside of the shank and also of the Circle C stamp on the left side of the saddle stem. It is clear and readable as noted above.I turned first to Pipephil’s site to have a look at what was listed there in terms of pipes with stamping starting with a CHA… I wanted to see if I could decipher the mystery of the brand on this pipe. I scrolled through the list of pipes beginning with those three letters to see if any stood out as possible candidates. There were so many options and nothing stood out. Then it dawned on me that there was also a circle C stamp on the left side of the saddle stem. Perhaps with those two pieces in place I could connect the dots and find the brand. Then it was clear that I was dealing with a CHATAM Pipe. I did a screen capture of the section and have included it below (http://pipephil.eu/logos/en/logo-c4.html). I turned to Pipedia to see what I could learn. There was nothing that I could find listed there so I was limited to the information on Pipephil’s site.

I knew that I was dealing with a Chatham pipe. It was stamped Chatham Bruyere on the underside of the shank. The Circle C stamp on the left side of the saddle was also the piece that gave me the link to the brand. Knowing that I had the background I needed for the brand and it was time to work on the pipe itself.

As usual Jeff had done an cleanup on the pipe. He reamed the bowl with a PipNet pipe reamer and followed up with a Savinelli Fitsall pipe knife to remove the cake. He scrubbed out the mortise and the airway in the shank and the stem with alcohol, cotton swabs and pipe cleaners. He scrubbed the exterior of the bowl, rim, shank and stem with a tooth brush and acetone to cut through the varnish coat on the finish. Once it was cleaned off the finish he scrubbed the bowl with a tooth brush and Murphy’s Oil Soap to remove the remaining grime on the finish of the bowl. He rinsed it under running water. One of the benefits of this scrub is that it also tends to lift some of the scratches and nicks in the surface of the briar. He dried it off with a soft cloth. He cleaned the internals and externals of the stem with alcohol, pipe cleaners and cotton swabs. He soaked the stem in Briarville’s Pipe Stem Deoxidizer and rinsed it off with warm water and cleaned out the airway in the stem with alcohol. When I received it the pipe looked very good.  I took a photo of the rim top and stem to show the condition. The rim top and the inner edge of the bowl were in good condition. There were some nicks on the back outer edge of the bowl but otherwise it looked good. The stem was vulcanite and there were some tooth marks and chatter on both sides ahead of the button.The stamping on the pipe is well hidden in the sandblast of the pipe. If you look at the photo below carefully you will see the stamping as noted above. I removed the stem from the shank and took a photo of the pipe to give a sense of the whole. The first photo shows the stinger in the tenon and the second shows the stinger removed.I started working on the pipe by touching up the chipped area on the back outer edge of the rim top. The chipped area was not large and it could be blended in well with the surrounding sandblast. I stained it with a walnut stain pen and it looked good. I rubbed the bowl and shank down with Before & After Restoration Balm. I worked it into the surface of the bowl sides and shank with my fingertips to clean, enliven and protect the briar. I rubbed it into the vulcanite shank extension to we what it would do. I let the balm sit for 10 minutes, then buffed with a cotton cloth to raise the shine. I studied look of the bowl and shank and it appeared to me that the shank had been sanded down as there was a swale or dip between the shank end and the end of the blast. I put the stem back on the shank and took a few photos. The gap between the shank and the stem was also uneven. The more I looked the more I knew that it would look good with a thin band and the band would take care of the swale in the sanded part and the unevenness of the shank/stem joint.The photos show the variation in the diameter of the shank and the poor fit of the stem. I was more convinced than ever than the band was a good option. I went through my bands and found one that was a perfect fit. It was going to be a cosmetic band rather than one to repair a cracked shank. I used a dental spatula to put a ring of all purpose glue on the shank end. I pressed the band into place and I liked the looks of it. I took photos of the looks of the banded shank.I put the stem in place and took a photo of the new look of the pipe. I was liking what I saw as I look it over. I set the bowl aside and turned my attention to the stem. There was a large chip out of the stem on the right underside of the stem. I filled it in with clear CA glue and set it aside to cure. Once the repair had hardened I sanded it smooth with 220 grit sandpaper to blend it into the stem surface.I touched up the stamp on the left side of the saddle stem with White Acrylic fingernail polish. I pressed it into the stamp with a tooth pick. Once it cured I polished off the excess with a 1500 grit micromesh pads. The stamping was too faint on the top portion of the C and the Circle to hold the acrylic but it is visible in person.I polished the stem with micromesh sanding pads – 1500-12000 grit pads. I wiped it down with Obsidian Oil after each sanding pad. I used Before & After Pipe Polish – both Fine and Extra Fine to further polish the stem. The photos below show the polished stem. This sandblasted finish on this French Made Chatham Bruyere is beautiful. The volcano shape on the bowl and the flat bottom worked well to make it a great sitter that could be stationed next to a mug of coffee or a favourite drink while you work. The mixture of rich brown stains looked amazing and with the polishing it really came alive with buffing and waxing. I put the stem back on the shank and carefully buffed the pipe with Blue Diamond on the buffing wheel using a light touch on the briar. I gave the bowl multiple coats of Conservator’s Wax and the stem multiple coats of carnauba wax on the buffing wheel. I buffed the pipe with a clean buffing pad to raise the shine. I hand buffed the pipe with a microfiber cloth to deepen the shine. The finished Chatham Bruyere Volcano Sitter is a beauty and feels great in the hand and looks very good. Give the finished pipe a look in the photos below. The dimensions of the pipe are Length: 5 ¾ inches, Height: 1 ¼ inches, Outside diameter of the bowl: 1 ¼ inches, Chamber diameter: ¾ of an inch.The weight of the pipe is 1.20 ounces/34 grams. This pipe will soon be on the French Pipe Makers section of the rebornpipes store if you are interested in adding it to your rack. Thanks for reading this blog and my reflections on the pipe while I worked on it. There are many more to come!

A Butz-Choquin Optimal 122 sitter that can sit flat on the heel or on the bowl front


Blog by Steve Laug

The next pipe that I chose to work on is an interesting looking short pipe that Jeff and I picked up this pipe in 2019 from an antique mall in Airdrie, Alberta. We finally got around to cleaning it up a year later and restoring it two years later. That is what happens when you have a lot of pipes to work on around you every day. It has a flat bottom making it a sitter. It also was flattened on the front of the bowl which allows the smoker to stand it on the front as well. The pipe was stamped on the flat front of the bowl and reads Optimal [over] Butz-Choquin [over] des.J. Colombo. On the heel of the bowl it is stamped: Selection [over] 122 [over] Made in France [over] Modele Depose [over] No.154221. The finish was dirty and tired looking but had some great grain poking through the grime. The bowl had a thick cake inside and a lava overflow on the rim edges and top. The vulcanite shank extension was oxidized and the glue anchoring it to the shank end had dried and it come loose. It had a white bar inlay going horizontally across the top.  The short, stubby vulcanite saddle stem was oxidized and had tooth marks and chatter on both sides near the button. Jeff took photos of the pipe before his cleanup. He took photos of the rim top to show the condition of the top and edges of the bowl. The thick cake in the bowl, the lava on the rim top and the wear on the edges are visible. The stem had light tooth marks and chatter on both sides ahead of the button. Jeff took photos of the shank extension removed from the shank  and also the stem removed from the extension.He took photos of the sides and heel of the bowl to show the grain around the bowl and the condition of the pipe. It is a very unique looking pipe. He took photos of the stamping on the front and heel of the bowl. It is clear and readable as noted above. I turned first to Pipephil’s site to have a look at what was listed there and did a screen capture of the section (http://www.pipephil.eu/logos/en/logo-butzchoquin.html). In the side bar of the listing on the Optimal I found that pipes that were stamped like the one I was working on with des. J. Colomo dated from the 1960s and were designed by Joe Colombo. There was a photo of the designer on the site that gave an good look at the designer. It was a nice plus to be able to connect the stamping to the man who had designed the pipe.

I turned to Pipedia (https://pipedia.org/wiki/Butz-Choquin) to see what I could learn. I found a great read on the history of the brand but nothing on the specific Optimal brand.

I knew that I was dealing with a pipe that was designed by Joe Colombo and was made in the 1960s. He had designed some unique looking pipes and I was fortunate to be working on this unusual sitter. Knowing that I had a new appreciation for the brand and it was time to work on the pipe itself.

As usual Jeff had done a thorough cleanup on the pipe. He reamed the bowl with a PipNet pipe reamer and followed up with a Savinelli Fitsall pipe knife to remove the cake. He scrubbed out the mortise and the airway in the shank and the stem with alcohol, cotton swabs and pipe cleaners. He scrubbed the exterior of the bowl, rim, shank and stem with a tooth brush and Murphy’s Oil Soap to remove the oils and tars on the rim and the grime on the finish of the bowl. He rinsed it under running water. One of the benefits of this scrub is that it also tends to lift some of the scratches and nicks in the surface of the briar. He dried it off with a soft cloth. He cleaned the internals and externals of the stem with alcohol, pipe cleaners and cotton swabs. He soaked the stem in Briarville’s Pipe Stem Deoxidizer and rinsed it off with warm water and cleaned out the airway in the stem with alcohol. When I received it the pipe looked very good.  I took a photo of the rim top and stem to show the condition. The rim top and the inner edge of the bowl were in good condition. There were some nicks on the inner edge of the bowl and some nicks in the rim top but otherwise it looked good. The shank extension was loose and would need to be reglued. The stem was vulcanite and there were some tooth marks and chatter on both sides ahead of the button.The stamping on the front of the bowl and the heel are clear and readable as noted above.I removed the stem from the shank and took a photo of the pipe to give a sense of the whole. It is a unique looking Canadian and I am looking forward to seeing what I can do with it.I started working on the pipe by reattaching the shank extension to the shank. I painted the shank extension tenon with white all purpose glue and aligned the part in the shank. I pressed it home in the shank end and wiped off the excess glue that squeezed out. I set it aside for the glue to cure.During their separation the shank somehow was slightly larger in diameter than the extension. It was not a huge difference but it was bothersome to me. I sanded shank and the extension to remove the excess on the shank itself. I used a folded piece of 220 to smooth out the transition. It took a bit of work but it was finally suitable. I worked over the damage on the rim top and on the inside of the rim edge with a folded piece of 220 grit sandpaper. With a bit of effort the rim top and edge were in good order.I sanded the bowl and vulcanite shank extension with micromesh sanding pads, dry sanding with 1500-12000 grit sanding pads and wiping it down with damp cloth after each sanding pad. As I worked through the cycle of pads the shine developed with each change of pad. The pipe looks very good.I rubbed the bowl and shank down with Before & After Restoration Balm. I worked it into the surface of the bowl sides and shank with my fingertips to clean, enliven and protect the briar. I rubbed it into the vulcanite shank extension to we what it would do. I let the balm sit for 10 minutes, then buffed with a cotton cloth to raise the shine. The Balm did its magic and the grain stood out on the briar and the vulcanite shank extension took on a rich shine. I set the bowl aside and turned my attention to the stem. I heated the stem with the flame of a lighter until the vulcanite softened. Once it was soft I bent it so that it was like the bend in the one in the photo from Pipephil’s site.I sanded the stem surface with 220 grit sandpaper blend in the tooth marks and scratches into the surrounding surface of the stem and started polishing the stem with 400 grit wet dry sandpaper. I polished the stem with micromesh sanding pads – 1500-12000 grit pads. I wiped it down with Obsidian Oil after each sanding pad. I used Before & After Pipe Polish – both Fine and Extra Fine to further polish the stem. The photos below show the polished stem. This smooth finished Butz-Choquin Optimal Selection 122 Sitter designed by Joe Columbo with a flat heel and flat bowl front on which it could be laid or stood on a flat top. The rich medium brown finish looked amazing and with the polishing it really came alive with buffing and waxing. I put the stem back in the shank extension on the bowl and carefully buffed the pipe with Blue Diamond on the buffing wheel using a light touch on the briar. I gave the bowl and the stem multiple coats of carnauba wax on the buffing wheel. I buffed the pipe with a clean buffing pad to raise the shine. I hand buffed the pipe with a microfiber cloth to deepen the shine. The finished Butz-Choquin Optimal Sitter is a beauty and feels great in the hand and looks very good. Give the finished pipe a look in the photos below. The dimensions of the pipe are Length: 5 inches, Height: 1 ¾ inches, Outside diameter of the bowl: 1 ½ inches, Chamber diameter: ¾ of an inch.The weight of the pipe is 2.12 ounces/60 grams. This pipe will soon be on the French Pipe Makers section of the rebornpipes store if you are interested in adding it to your rack. Thanks for reading this blog and my reflections on the pipe while I worked on it. There are many more to come!

A Tale of the Rebirth of a Comoy’s Tradition 206 Long Billiard


Blog by Steve Laug

The next pipe on the work table came to us from an online auction Hatboro, Pennsylvania, USA. It is a nice looking long shank billiard in a classic British and Comoy’s shape. The pipe is stamped on the left side of the shank and reads Comoy’s [over]Tradition. On the right side is the shape number 206 near the bowl/shank union followed by the circular COM stamp Made in London [over] England. It is a beautiful mixed grained Comoy’s small billiard that really is a pipe of Pipe Smoking History. The finish had a lot of grime ground into the smooth finish on the bowl and some darkening around the sides of the bowl. The bowl had a heavy cake there was an overflow of thick lava on the top of the rim and on the inner bevel of the bowl. It was hard to know what the rim top and inner edge of the bowl looked like under the grime. The stem was oxidized and there were a lot of tooth marks and chatter on both sides ahead of the button. There was a three part inlaid C on the left of the taper stem. The pipe had promise but it was very dirty. Jeff took photos of the pipe before he started his cleanup work.    He took photos of the rim top to show the condition of the top and edges of the bowl. It is a heavily smoked pipe with a lot of build up and tar. The lava overflow on the inner bevel of the rim is also quite think. The stem was heavily oxidized and had light tooth marks and chatter on both sides ahead of the button. He took photos of the sides and heel of the bowl to show the grain around the bowl and the condition of the pipe. It is going to be a great looking pipe.     He took photos of the stamping on the left side of the shank. It is clear and readable as noted above. He did not take a photo of the shape number and COM stamp on the right side.He also took photos of the 3 part C insert on the left side of the taper stem.  I looked on Pipephil’s site for information on the Comoy’s Tradition and found the following information I have included a screen capture (http://www.pipephil.eu/logos/en/logo-comoy.html). It has the three part C which dated it to 1946 and following. The stamping is the same as the one I am working on. I turned to the article on Pipedia about dating Comoy’s pipes but the style of the stamping (https://pipedia.org/index.php?title=Comoy%27s_Dating_Guide#1917_to_the_end_of_the_1930.27s_.28at_least_1938.29). I have include the section in the screen capture below that date this pipe to the 1950s.

Now the Comoy’s stamp can be found in three variants in the 1950s

  1. A simple block-letter style without serifs but with the C larger than the other letters and the apostrophe before the “S”.
  2. A return to the slightly more fancy block letters with serifs and the apostrophe. (It seems that some grades carried different stamps, or at least that the stamping changed in different years for some grades.)
  3. A simple block-letter style without serifs and without the apostrophe and with the “C” the same size as the rest of the letters. This stamp was probably not used very long.
  4. A simple block-letter style without serifs but with the apostrophe before the “S” and with the “C” the same size as the rest of the letters.

Inlaid “C”

C” was first inlaid in the side of the mouthpiece around 1919. This was a complex inlay needing three drillings. First, a round white inlay was inserted, then the centre of the white was drilled out, and a smaller round black inlay was inserted. Finally, another drilling was made to remove the open part of the “C,” and an even smaller black inlay was inserted. This inlaid “C,” known as the “three-piece C,” was continued until the Cadogan era in the 1980s. However, the “C” in the 1920s and early 30s is much thinner and more delicate than the one post-WW II.

That article gave me some helpful information regarding the pipe that I was working on. I knew that the stamping and logos identified the pipe as having been made in following WW2 and from what I can see from the above information it is a 1950s era pipe.

Reminded of the above information on the Comoy’s Tradition line it was now time to turn to the pipe itself and do my part of the work. As usual Jeff had done a thorough cleanup on the pipe. He reamed the bowl with a PipNet pipe reamer and followed up with a Savinelli Fitsall pipe knife to remove the cake. He scrubbed out the mortise and the airway in the shank and the stem with alcohol, cotton swabs and pipe cleaners. He scrubbed the exterior of the bowl, rim, shank and stem with a tooth brush and Murphy’s Oil Soap to remove the oils and tars on the rim and the grime on the finish of the bowl. He rinsed it under running water. One of the benefits of this scrub is that it also tends to lift some of the scratches and nicks in the surface of the briar. He dried it off with a soft cloth. He cleaned the internals and externals of the stem with alcohol, pipe cleaners and cotton swabs. He soaked the stem in Briarville’s Pipe Stem Deoxidizer and rinsed it off with warm water and cleaned out the airway in the stem with alcohol. When it arrived here the pipe looked good.    I took a photo of the rim top and stem to show the condition. The rim top and the beveled inner edge of the bowl were in excellent condition. The long vulcanite taper stem looked good and the oxidation was gone. There were light tooth marks and chatter on both sides ahead of the button.I took photos of the stamping on both sides of the shank. They read as noted above. I also included a photo of the 3 part C logo on the left side of the taper stem.     I removed the stem and took a photo of the pipe to give a sense of the whole. It is a nicely grained and well shaped billiard. Once the stem was off you can see the step down tenon that was on these older Comoy’s pipes.I polished the bowl and the rim top, sides and shank with micromesh sanding pads – wet sanding with 1500-12000 grit pads and wiping it down after each pad with a damp cloth. I carefully avoided the stamping on the shank so as not to damage the stamping. I rubbed the bowl and shank down with Before & After Restoration Balm. I worked it into the surface of the bowl sides and shank with my fingertips to clean, enliven and protect the briar. I let the balm sit for a little while and then buffed with a cotton cloth to raise the shine.     I set aside the bowl and turned my attention to the stem. I sanded the remaining repairs with 220 grit sandpaper to further blend it into the stem surface. I started polishing it with 400 grit wet dry sandpaper.         I polished the vulcanite stem with micromesh sanding pads – 1500-12000 grit pads. I wiped it down with a damp cloth after each sanding pad. I used Before & After Pipe Polish – both Fine and Extra Fine to further polish the stem.     This 50s era Comoy’s Tradition 206 Long Billiard with a vulcanite taper stem is a great looking pipe now that it has been restored. The rich browns and blacks of the contrasting stains came alive with the polishing and waxing. I put the stem back on the bowl and carefully buffed the pipe with Blue Diamond on the buffing wheel using a light touch on the briar. I gave the bowl and the stem multiple coats of carnauba wax on the buffing wheel and followed that by buffing the entire pipe with a clean buffing pad. I hand buffed the pipe with a microfiber cloth to deepen the shine. The finished Comoy’s Tradition Billiard is a beauty and fits nicely in the hand and looks very good. Give the finished pipe a look in the photos below. The dimensions of the pipe are Length: 6 inches, Height: 1 ½ inches, Outside diameter of the bowl: 1 ¼ inches, Chamber diameter: ¾ of an inch. The weight of the pipe is .95oz./27grams. This beauty will be going on the rebornpipes store in the British Pipe Makers section. Let me know if you are interested in adding it to your collection. Thanks for reading this blog and my reflections on the pipe while I worked on it. There are many more to come!

New Life for an Yves St. Claude Domino 10 Canadian


Blog by Steve Laug

The next pipe on the work table came to us from an online auction in 2020 from Meridian, Idaho, USA. It is a unique looking smooth Canadian unlike any pipe that I have seen or worked on in the past. The left side of the pipe was a dress black and the right side being medium brown stained briar. The stem is also tan on the left side and black on the right side. It had a mix of nice grain around the right side of the bowl and shank. The finish was a bit rough in that the bowl had nicks in the left side and there was a large crack on the top left of the shank that had spread open. There was grime on the surface of the briar. This pipe is stamped on the left side of the shank and reads Yves St. Claude [over] Domino in gold stamping. On the underside of shank it has the shape number 10 and just ahead of the stem/shank union it was stamped with a Made in France circular COM stamp. The bowl had a thick cake and a thick coat of lava had overflowed onto the rim top. It was a dirty pipe. There was a stylized YSC stamped on the top left side of the stem. There were some tooth marks and chatter on both sides of the stem near the button. There was a bite through next to the button on the underside of the stem. The button surface itself was misshapen. Jeff took photos of the pipe before his cleanup. He took photos of the rim top to show the condition of the top and edges of the bowl. It is a beautiful lightly smoked pipe with a carbonized bowl coating. The stem had light tooth marks and chatter on both sides ahead of the button. He took photos of the sides and heel of the bowl to show the grain around the bowl and the condition of the pipe. It is a very unique looking pipe. He took photos of the stamping on the sides of the shank. It is clear and readable as noted above. He also took photos of the YSC stamp on the left top side of the taper stem. The next photos show that large wide open crack in the shank on the top side (primarily in the black half of the shank). There was a lot of tar and oil seepage in that area as can be seen in the next two photos. I turned first to a blog I had written on the restoration of previous YSC pipe that I received (https://rebornpipes.com/2020/04/23/next-on-the-table-an-yves-st-claude-marbre-75-bulldog/). I quote what I learned about the brand in that blog below.

In the previous blog that I cited above I had found several references to Yves Grenard, trained in Comoy’s England factory, purchasing the Chacom plant in St. Claude. He managed the factory and it passed on to his son afterward. I am pretty certain that this Yves St. Claude pipes was made by Chacom in France with the stamping bearing Yves name.

I turned back to Pipephil’s site to have a look at what was listed there and did a screen capture of the section (http://www.pipephil.eu/logos/en/logo-y.html).I turned to Pipedia and in the listing of French Brands and Maker I found a connection of the brand to Chapuis-Comoy and that the YSC brand was made primarily for Tinder Box (https://pipedia.org/wiki/French_Pipe_Brands_%26_Makers_U_-_Z). I followed that up by turning to the Chapuis-Comoy article from Pipedia (https://pipedia.org/wiki/Chapuis-Comoy).

French factory, in St. Claude. It began with Francois Comoy who, in 1825, was making pipes in boxwood and other types, as well as in clay, for the armies of Napoleon. In 1856, the Comoy factory was the first to produce briar bowls at St. Claude. In 1870, Francois’s grandson, Henri Comoy (1850-1924) was taken prisoner in Switzerland whilst serving in the French army during the Franco-Prussian war, where he found his cousins, the Chapuis. This meeting produced the idea of an association, which only became a reality in 1922, with the creation of Chapuis-Comoy. After Henri’s death, his sons Paul and Adrien, took over the company with the support of their cousins, Emile and Louis Chapuis Sr., and in 1928 they created the Chacom brand.

In 1932, due to the economic crisis at Saint-Claude, the factory merged with La Bruyère, adopting that name, and becoming one of the biggest pipe companies in the world, with 450 workers. Louis Chapuis Jr., joined the company in 1938 and Pierre Comoy in 1947. The name Chapuis-Comoy returned in 1957 (125 workers), due to the success of the Chacom brand in France. In 1971, the London factory (see Comoy’s) became independent, and Yves Grenard, second cousin to Pierre, took over Saint-Claude, and is still running it. Between 1987 and 2001, the factory, which employed over 40 people, joined the Cuty-Fort Enterprises SA holding and, in 1994, included the Ropp brand it its catalog.

Reminded about the Chacom connection for the YSC brand it was now time to turn to the pipe itself and do my part of the work. As usual Jeff had done a thorough cleanup on the pipe. He reamed the bowl with a PipNet pipe reamer and followed up with a Savinelli Fitsall pipe knife to remove the cake. He scrubbed out the mortise and the airway in the shank and the stem with alcohol, cotton swabs and pipe cleaners. He scrubbed the exterior of the bowl, rim, shank and stem with a tooth brush and Murphy’s Oil Soap to remove the oils and tars on the rim and the grime on the finish of the bowl. He was also able to get rid of the tarry build up on the outside and inside of the cracked shank. He rinsed it under running water. One of the benefits of this scrub is that it also tends to lift some of the scratches and nicks in the surface of the briar. He dried it off with a soft cloth. He cleaned the internals and externals of the stem with alcohol, pipe cleaners and cotton swabs. He soaked the stem in Briarville’s Pipe Stem Deoxidizer and rinsed it off with warm water and cleaned out the airway in the stem with alcohol. Other than the small nicks and the cracked shank the pipe looked good.   I took a photo of the rim top and stem to show the condition. The rim top and the inner edge of the bowl were in good condition. The divided colour on it made it a difficult rim to top or change so I would have to look at other options. The stem could be acrylic but I am uncertain. The heavy tooth chatter and marks on both sides ahead of the button and on the button edges as well as the bite through will make the cleanup and repair of the stem problematic and complicated. The stamping on the left side and underside of the shank is clear and readable as noted above. The COM stamp is damaged from the poorly done repairs to the cracked shank.     I removed the stem from the shank and took a photo of the pipe to give a sense of the whole. It is a unique looking Canadian and I am looking forward to seeing what I can do with it.I started working on the pipe by addressing the cracked shank. Unfortunately the tars and oils had stained the natural briar shank with dark spots on the top and underside where the colours came together. I squeezed the crack together and heated a thin brass band with the flame of a lighter and pressed in place on the shank end. The fit was very tight and it pulled the crack together tightly. I filled in the crack with clear CA glue and briar dust to build it up and make it even with the rest of the shank.    I put the stem on the shank to see what the pipe would look like with the addition of the band. I have to say that I really like the dressy look of the pipe with the band!  I used a black stain pen to touch up the damaged areas on both top and underside of the shank to help blend in the repair. It looks much better in the photos below even though there is still along ways to go.   To remove the shiny varnish coat on the smooth briar side of the bowl and shank I sanded it with micromesh sanding pads, dry sanding with 1500-12000 grit sanding pads and wiping it down with damp cloth after each sanding pad. I decided to leave the dress black side alone preferring to leave the small nicks on the bowl surface rather than trying to match them to the black of the bowl finish.   I touched up the gold stamping with Rub’n Buff Antique Gold. I rubbed it on to the stamp on the briar with my finger tip and worked it in to the stamp with a tooth pick. I buffed it off with a soft cloth. The stamp is readable and clear.    I rubbed the bowl and shank down with Before & After Restoration Balm. I worked it into the surface of the bowl sides and shank with my fingertips to clean, enliven and protect the briar. I let the balm sit for a little while and then buffed with a cotton cloth to raise the shine. The Balm did its magic and the grain stood out on the natural finished part and the dress black portion look shiny and nice.  I set the bowl aside and worked on the stem. I greased a pipe cleaner with Vaseline and inserted it in the stem below the bit through. Once I had it situated I had a decision to make. The bite through was centered on the underside of the stem surface evenly split between tan and black. I decided to do the repair with clear CA glue hoping that it would pick up the colour of the underlying material. In the best case scenarios it works very well. In this case it went a bit crazy. The repairs cured over both areas in a milky white colour! Fortunately I overfilled the repairs so I was hoping that once I filled them and sanded them the repair would at least be less noticeable.   While the repair hardened I used a black Sharpie Pen to restain the YSC stamp on the top of the taper stem. It was in the tan area so I was hesitant but did it anyway. Once I had it in place I sanded the stem surface with 1500 grit micromesh to remove the excess stain and it cam out really well.I used a small file to reshape the button, cut the sharp edge and flatten out the repairs. It worked amazingly well. The topside was perfect and the bit through was far better than I expected. I sanded the repaired areas with 220 grit sandpaper blend them into the surrounding surface of the stem and started polishing the stem with 400 grit wet dry sandpaper.  I polished the stem with micromesh sanding pads – 1500-12000 grit pads. I wiped it down with Obsidian Oil after each sanding pad. I used Before & After Pipe Polish – both Fine and Extra Fine to further polish the stem. The photo below shows the polished stem. You can see that the top repair came out very well. The repair on the underside is better than it was when I started but you can clearly see the repair.     This nice smooth finished Yves St. Claude Domino 10 Canadian with a black and tan taper stem even with the visible repairs and banded shank still is a great looking pipe. The rich medium brown finish on the right half of the pipe and the dress black finish on the left half works well with the split black and tan stem. The briar is clean and really came alive. The rich natural finish gave the grain on the right side a sense of depth with the polishing and waxing. The painted dress black left side also looks good. The repairs on the stem are solid yet visible on the underside due to the dual colour of the stem (I have yet to figure out a tan colour fill). I put the stem back on the bowl and carefully buffed the pipe with Blue Diamond on the buffing wheel using a light touch on the briar. I gave the bowl and the stem multiple coats of carnauba wax on the buffing wheel. I buffed the pipe with a clean buffing pad to raise the shine. I hand buffed the pipe with a microfiber cloth to deepen the shine. The finished YSC Domino Canadian is a beauty and feels great in the hand and looks very good. Give the finished pipe a look in the photos below. The dimensions of the pipe are Length: 6 ½ inches, Height: 2 inches, Outside diameter of the bowl: 1 ¼ inches, Chamber diameter: ¾ of an inch.The weight of the pipe is 1.69 ounces/48 grams. This pipe will soon be on the French Pipe Makers section of the rebornpipes store if you are interested in adding it to your rack. Thanks for reading this blog and my reflections on the pipe while I worked on it. There are many more to come!

New Life for an older Ropp Supreme 9 Cherrywood Billiard


Blog by Steve Laug

For a guy who has never really liked Ropp Cherrywood pipes I have had a lot of them over the years. I have had full bents, half bents, billiards but never one quite like this one. Jeff picked this pipe up at an antique store in Idaho Falls, Idaho, USA. It is kind of a 1/8 bent billiard with a smooth shank and a smooth oval shaped panel on the front and rear of the bowl. The right and left side, top and bottom of the bowl were left with the bark in place. You can see the knot holes in the bowl where branches were snipped off. The bark around the bowl sides is in decent condition as is the bottom of the bowl. The rim top has some damage on the inner edge of the rim on both the front and the back. There was a cake in the top half of the bowl and the bottom half was pristine and still not blackened. The pipe is stamped on the left side of the shank and reads Ropp in an oval [over] Supreme [over] Made in France. On the left side it bears the shape number 9. The stem is vulcanite with the silver Ropp oval on the left side of the saddle. It is oxidized and has light tooth chatter  and marks on both sides near the button. Jeff took these photos before he started his clean up work. Jeff took photos of the rim edges and top to show the damage that was there. It would take a bit of work to smooth out the edge and clean it up but it was not to bad. He took photos of the stem surface as well to show the condition as noted above. Jeff took photos of the bowl sides, heel and front  of the bowl and the shank to give a sense of the condition of the bark around the sides of the pipe. It is a unique one. You can see where the branches had been lopped off on both sides. He took a photo of the stamping on the left side of the shank and the inset Ropp oval logo on the left side of the stem. Both are readable and clear as noted above.I turned to Pipephil (http://pipephil.eu/logos/en/logo-ropp.html) to get a bit more background on the brand before I did my work on the pipe. No matter how many I have worked on I seem to forget the history of the cherrywood pipes. I quote:

Brand created by Eugène-Léon Ropp (1830 – 1907) and continued throughout 3 generations. “GBA Synergie” run by Bernard Amiel (†2008) bought back Ropp in 1988 and owned it until 1991.The company was taken over by Cuty-Fort Entreprises (Chacom, Vuillard, Jean Lacroix…) in 1994.

I have also included a screen capture of a Cherry wood pipe. The one I am working on is significantly different that this but it has he bark left on the pipe as noted below.I turned to Pipedia for a bit more detailed history of the brand (https://pipedia.org/wiki/Ropp). I quote below.

Eugène-Léon Ropp (1830 – 1907) had acquired a patent for a cherrywood pipe (wild cherry, lat.: Prunus avium) in 1869. In 1870 he established a workshop to manufacture such pipes in Büssingen (Bussang, Vosges mountains). Around 1893 the business moved into the former mill of Sicard (part of the community of Baume-les-Dames – Département Doubs, Upper Burgundy – from 1895 on).

The pipes were a big success in the export as well. Shortly before 1914 Ropp designated A. Frankau & Co. (BBB) in to be the exclusive distributor in the UK and it’s colonies.

Probably in 1917 a workshop in Saint-Claude in the Rue du Plan du Moulin 8 was acquired to start the fabrication of briar pipes. In 1923 a small building in the environment of Saint-Claude, serving as a workshop for polishing, was added.

Even though cherrywood pipes were the mainstay of Ropp until the company finally closed down in September 1991. The company was taken over by Cuty-Fort Entreprises (Chacom, Jeantet, Vuillard, Jean Lacroix…) in 1994.

There was also a photo of the Ropp Supreme pipe that was remarkably like the one that I was working on. I have included that  photo as well as the photo of the stamping below.Reminded about the background on the Ropp Family and their Cherrywood pipe it was now time to turn to the pipe itself and do my part of the work. As usual Jeff had done a thorough cleanup on the pipe. He reamed the bowl with a PipNet pipe reamer and followed up with a Savinelli Fitsall pipe knife to remove the cake. He scrubbed out the mortise and the airway in the shank and the stem with alcohol, cotton swabs and pipe cleaners. He scrubbed the exterior of the bowl, rim, shank and stem with a tooth brush and Murphy’s Oil Soap to remove the oils and tars on the rim and the grime on the finish of the bowl. He rinsed it under running water. He dried it off with a soft cloth. He cleaned the internals and externals of the stem with alcohol, pipe cleaners and cotton swabs. He scrubbed the exterior of the stem with Soft Scrub and a cotton pad. Once finished he soaked the stem in Briarville’s Pipe Stem Deoxidizer and rinsed it off with warm water and cleaned out the airway in the stem with alcohol. Other than the damaged rim top the pipe looked good. I took a photo of the rim top and stem to show the condition. The rim top and the inner edge of the bowl had some damage and darkening on the front and the back of the bowl. The vulcanite saddle stem had light tooth chatter and marks on both sides ahead of the button.The stamping on the side of the shank is clear and readable as noted above.I removed the stem from the shank and took a photo of the pipe to give a sense of the whole. It is a nice looking billiard with a slight bend in great condition. I started working on the pipe by addressing the damage to the rim edges and top with a folded piece of 220 grit sandpaper. I gave it a very slight bevel to smooth out the edges and give it a clean look.I polished the bark and clean cherrywood with micromesh sanding pads, dry sanding with 1500-12000 grit sanding pads and wiping it down with an damp cloth after each sanding pad. I rubbed the bowl and shank down with Before & After Restoration Balm. I worked it into the surface of the bowl sides and shank both (smooth and bark covered) with my fingertips to clean, enliven and protect the briar. I let the balm sit for about 10 minutes then buffed it with a cotton cloth to raise the shine. The Balm did its magic and the grain stood out.    I set the bowl aside and worked on the stem. I “painted” the stem surface with the flame of a lighter to lift the tooth marks. I worked very well. I used a small file to sharpen the edge of the button and remove the light chatter on the edge. I sanded out the remnants of tooth marks with 220 grit sandpaper and started polishing the stem with 400 grit wet dry sandpaper. I polished the vulcanite stem with micromesh sanding pads – 1500-12000 grit pads. I wiped it down with Obsidian Oil after each sanding pad. I used Before & After Pipe Polish – both Fine and Extra Fine to further polish the stem. The photo below shows the polished stem. This nice Cherrywood finished ROPP Supreme Made in France 9 Billiard with a black vulcanite saddle stem is a great looking pipe. The rugged bark finish on the sides highlights the grain on the cherrywood bowl front and back side and shank. The black saddle stem works really well with the pipe as a whole. The wood is clean and really came alive. The rich medium brown of the wood gave the grain a sense of depth with the polishing and waxing. The grain really popped. I put the stem back on the bowl and carefully buffed the pipe with Blue Diamond on the buffing wheel using a light touch on the briar. I gave the bowl and the stem multiple coats of carnauba wax on the buffing wheel. I buffed the pipe with a clean buffing pad to raise the shine. I hand buffed the pipe with a microfiber cloth to deepen the shine. The finished ROPP Supreme Cherrywood is a beauty and feels great in the hand and looks very good. Give the finished pipe a look in the photos below. The dimensions of the pipe are Length: 6 inches, Height: 2 inches, Outside diameter of the bowl: 1 ½ inches wide by 1 ¾ inches long, Chamber diameter: ¾ of an inch. The weight of the pipe is 2.29 ounces/65 grams Thanks for reading this blog and my reflections on the pipe while I worked on it. There are many more to come!

Restoring a Butz-Choquin C’est bon 1689 Apple with an amber acrylic stem


Blog by Steve Laug

The next pipe on the table – a Butz-Choquin Apple with a smooth finish purchased from Mandy Valsinger about a year ago when she was closing her husband’s estate. It came to us from Australia. The shape of the bowl is an apple with an acrylic stem. The pipe was in overall good condition but was very tired and dirty. It is stamped on the left side of the shank and reads Butz-Choquin at an angle [over] C’est bon. On the right side of the shank it is stamped St. Claude France [over] the number 1689. The finish was dull and lifeless and a little dirty from sitting around. There was a thick cake in the bowl and an overflow of lava on the rim top toward the back. There were scratches around the sides of the bowl where it appeared that the pipe had been dropped. The amber acrylic stem had a deep tooth marks on both sides with a bit through on the underside ahead of the button. The BC logo inset in black acrylic and set on the left side of the taper stem. Jeff took the following photos before he started his cleanup work on the pipe. Jeff took close-up photos of the bowl and rim top from various angles to capture the condition of the bowl and rim top edges. You can see the cake in the bowl and the lava on the inner of the rim and the top at the back of the bowl. The photos of the stem show the general condition of the stem. He took the stem out of the shank and revealed a Delrin tenon with a lot of tars and oils on on the end of the tenon.He took photos of the sides and heel of the bowl to show condition of the briar. You can see the swirls of grain in the smooth bowl – both birdseye and cross grain around the sides and shank. There are scratches on the right side of the bowl. The stamping is very clear on both sides of the pipe. The third photo shows the BC inlay on the left side of the taper stem.I turned to Pipedia (https://pipedia.org/wiki/Butz-Choquin) and found a great read of the history of the brand. I did find a shape chart however, that had the 1689 shape. I have included that below.Now it was time to look at it up close and personal. Jeff had great job in cleaning up this BC C’est bon Apple. He had reamed the bowl with a PipNet Pipe Reamer and cleaned up the remnants with a Savinelli Fitsall Pipe Knife. He took the cake back to bare briar so we could check the walls for damage and also see the condition of the inner edge of the rim. He scrubbed the exterior of the bowl with Murphy’s Oil Soap and a tooth brush to remove the grime on the bowl and rim and was able to remove much of the grime and dirt. He cleaned out the interior of the bowl and shank with pipe cleaners, cotton swabs and alcohol until they came out clean. The rim top looked much better. The bowl looked very good. He cleaned the stem with Soft Scrub to remove the grime on the interior and the exterior and rinsed it off with warm water to remove the product. He cleaned out the airway with alcohol, cotton swabs and pipe cleaners. I took some photos of the pipe as I saw it. To show how clean the rim top and stem really was I took a close-up photo of the rim and stem. The bowl was clean and cake free. The rim top is quite clean the inner and outer edges were darkened. The surface and the button edge of the stem had tooth marks and chatter on the top near the button on both sides. What I thought was a hole all the way through the stem on the underside turned out not to be that deep.I took some photos of the stamping on the sides of the shank. It is clear and readable as noted above.I removed the stem from the shank and took a photo of the pipe from the left side to give a clear picture of the beauty of this particular pipe.I turned to Pipephil (http://pipephil.eu/logos/en/logo-butzchoquin.html) and found the C’est bon pipe shown below. I did a screen capture of the of the listing and have included it below.I started working on the pipe by dealing with the damage and darkening to the rim top and inner edge of the bowl. I sanded it with 220 grit sandpaper to remove the damage.I used to some clear CA glue to fill in the deep scratches on the right side of the bowl. Once the repairs cured I sanded them smooth with a folded piece of 220 grit sandpaper. I started polishing the areas of the repair with 400 grit wet dry sandpaper. I stained the sanded area with a Maple Stain pen. I polished the briar with micromesh sanding pads – dry sanding with 1500-12000 grit pads. I wiped the bowl down after each sanding pad with a damp cloth to remove the dust and debris. The began to take on a deep shine. I worked some Before & After Restoration Balm into the surface of the bowl with my finger tips. The product is incredible and the way it brings the grain to the fore is unique. It works to clean, protect and invigorate the wood. I greased a pipe cleaner with Vaseline and inserted it in the button. I did not see the hole going through the stem but I put a pipe cleaner in just in case there was. I then built up the tooth marks and chatter on both sides with clear CA glue. I used a small file to reshape the button edge on both side and smooth out the repairs. I then sanded the repaired areas with 220 grit sandpaper until they were smooth and blended it into the surrounding acrylic. I started the polishing with a 400 grit wet dry sandpaper. I polished the stem with micromesh sanding pads – wet sanding it 1500-12000 pads. I wiped it down with a damp cloth to remove the dust and polishing debris. I polished it with Before  After Pipe Polish – both Fine and Extra Fine. I gave it a final coat of Obsidian Oil and set it aside to dry. I am really happy with the way that this Butz-Choquin C’est bon Apple with an Amber Acrylic Stem turned out. It really is a great looking pipe with character. The rich brown stains gave the grain a sense of depth with the polishing and waxing. The grain really popped. I put the stem back on the bowl and carefully buffed the pipe with Blue Diamond on the buffing wheel using a light touch. I gave the bowl and the acrylic stem multiple coats of carnauba wax on the buffing wheel. I buffed the pipe with a clean buffing pad to raise the shine. I hand buffed the pipe with a microfiber cloth to deepen the shine. The finished Butz-Choquin C’est bon Apple really is a beauty and feels great in the hand and looks very good. Give the finished pipe a look in the photos below. The dimensions of the pipe are Length: 5 ¾ inches, Height: 1 ¾ inches, Outside diameter of the bowl: 1 inches, Chamber diameter: ¾ of an inch. The weight of the pipe is 44 grams/1.55 oz. The pipe will be going on the rebornpipes store soon. It will be in the section on French Pipe Makers if you would like to add it to your collection.Thanks for reading this blog and my reflections on the pipe while I worked on it. It was a fun one to work on!

This Castello Sea Rock Briar KKKK 65 Ticks All of My Boxes


Blog by Steve Laug

It is another hot day in Vancouver with just some afternoon meetings. After a long week I decided to take bit of time this morning for myself. It is hot enough that I went to the cool of the basement to work on pipes. The next pipe on the table is another one that came to us from the auction in Gonzales, Louisiana, USA. The first one, a Castello Sea Rock Briar KKK16 Billiard, I cleaned up and wrote a blog about yesterday (https://rebornpipes.com/2021/06/24/i-really-love-these-castello-sea-rock-briar-pipes-a-sea-rock-briar-kkk16/). This next one is a Castello Sea Rock Briar and it is what Castello calls a Bent Billiard shape though to me it is like a bent egg. It is a pipe that I like so well that I am cleaning it up for myself. It is stamped on the smooth shank bottom and reads Castello [over] Sea Rock Briar followed by KKKK65. That is followed by Made in Cantu [over] Italy followed by an oval containing the name Carlo Scotti next to the stem shank union. The Castello “diamond” inset is on the left side of the saddle stem letting me know this was a pipe made for US import. On the underside of the stem it is stamped Hand Made [over] Castello with no number. The bowl had a heavy cake and there was thick lava overflow on back top side and inner edge. It was hard to know if there was burn damage on the smooth rim top because of the lava but after cleaning it we would know for sure. The rusticated finish was pretty dirty with dust and grime when we got it but still showed promise. The acrylic stem had deep tooth marks and chatter on both sides near the button. The edges of the button were also marked. Jeff took the following photos of the pipe before he worked his magic on them. The pipe must have been a terrific smoker because the bowl was so heavily caked with the thick lava flowing over the rim top. In its condition it was going to take some work to clean out that bowl and be able to see what the rim looked like underneath the layer of lava. The acrylic/Lucite stem was in good condition other than the deep tooth marks and chatter on both sides of the stem just ahead of the button and on the button surface itself. The rest of the bowl looked dirty but the photos give an idea of what Jeff saw before his cleanup revealed the condition of the pipe. The next photos try to capture the stamping on the flat panel on the underside of the shank. It read as I have noted above. The stem also bears a Hand Made Castello stamp on the underside. Jeff cleaned the pipe with his usual regime that many who read this probably have memorized. He reamed the bowl with a PipNet pipe reamer and cleaned up the remnants with a Savinelli Fitsall Pipe Knife. He scrubbed the internals of the bowl, shank and stem with alcohol, cotton swabs and pipe cleaners. He scrubbed the exterior with Murphy’s Oil Soap to clean off the dust and grime on the rusticated Sea Rock finish. The smooth rim top looked very good under the thick lava coat. The inside of the bowl itself looked great. He scrubbed the stem with Soft Scrub cleanser to remove the grime and grit. The stem was in great shape other than the tooth marks on both sides. It really is a beautiful looking rusticated pipe. I took photos of the pipe when it arrived here. I took some close up photos of the rim top, bowl and stem to show what they looked like after Jeff’s cleanup. It is a startling difference. The rim top looks very good. The stem also looks very good.I took a photo of the stamping on the underside of the shank and the stem. It is clear and readable as noted above.I removed the stem from the shank and took a photo of the pipe to show the proportions of the bowl/shank and the stem length. I cannot seem to retain the details on Castello pipes in my head for long for some reason. The stamping on them – Castello and the Carlo Scotti stamp were things that I wanted to makes sure I understand before I began to work on the pipe. I turned to Pipephil’s site to get a quick summary (http://www.pipephil.eu/logos/en/logo-castello.html). I quote:

Castello PIPA CASTELLO di Carlo Scotti & C. was founded in 1947 by Carlo Scotti (†1988). Franco Coppo (AKA “Kino”) who married Carlo Scotti’s daughter Savina, manages (2012) the corporate since 1985.

The site also gave a good summary of the grading and sizes of the pipes. I quote that in full.

Sizes (ascending):

1K to 4K, G (Giant) and GG (Extra large)

Rusticated grading: SEA ROCK, OLD SEA ROCK, NATURAL VIRGIN,

Sandblasted grading: ANTIQUARI, OLD ANTIQUARI

Smooth grading (ascending): TRADEMARK, CASTELLO, COLLECTION

Other stampings: Great Line (Non-standard or freestyle) Fiammata (Straight grain)

Production (2012): ~4000 pipes / year

I also found a note on the page that the Rhinestone logo was originally on pipes for the US market. It is occasionally used now.

I turned then to Pipedia for more information on the brand (https://pipedia.org/wiki/Castello). The majority of the information was what was already quoted above in abbreviated form. However there was a link to an article by Bob Hamlin that gave some interesting bits of information that I found helpful (http://www.pipes.org/BURST/FORMATTED/196.016.html). I quote in part from that article.

SEA ROCK [Carved Black or dark brown]:  This is the lowest grade of the Castello line and is the most common in the USA.  Sea Rocks are produced by taking a smooth bowl that has not been “final finished” and surface carving the finish with tools. This “carved” finish is then evened out using a steel wire brush, stained and then waxed. The Natural Vergin carved finish is left unstained and unwaxed as a rule, although we have seen waxed and partially waxed “Vergins”.

All carved Castello pipes are graded by the number of K’s that are stamped on each piece and are K-graded by SIZE.  1K is the smallest and fairly rare, 2K is small to medium, with 3K or 4K being the most common and ranges from medium to medium large. Large pieces are stamped “G” for giant and extra large pieces are stamped “GG” for double giant.  In addition to the number of K’s on a carved Sea Rock piece the shape number is almost always added.  As a rule a Sea Rock Castello is stained Black, although recently there have been quite a few coming in stained deep brown and still stamped “Sea Rock”.  American Logo’d Sea Rocks are all priced the same to the consumer, although most are 2 or 3 K’ed models.  G/GG models are charged at a higher price on American pieces and are basically the same as their European counterparts.

The Castello Sea Rock briar I was working on had the 4Ks of a Medium Large sized pipe. It definitely was made for the American Market with the Rhinestone in the stem. It had the black/dark brown finish. The 4K stamp told me that it came out in the late 1960s onward and was a mid-large sized pipe from that time period. The number 65 makes it a Bent Billiard.

I decided to work on the stem first and try to remove and repair the tooth marks on both sides of the acrylic stem. Since acrylic does not have “memory” like vulcanite I did not try painting the stem surface. I sanded down the chatter in preparation for repairing the tooth marks. I filled in the tooth marks with clear CA glue. Once the repairs cured I used a small file to flatten them out and recut the sharp edge of the button. To blend in the repairs I sanded the stem with 220 grit sandpaper and started the polishing with 400 grit wet dry sandpaper. I polished the stem with 1500-12000 grit pads. I dry sanded it with the pads and wiped it down with a damp cloth after each sanding pad. I finished polishing the stem with Before & After Pipe Polish – both Fine and Extra Fine polishes. I wiped the stem down with a damp cotton pad afterwards and buffed it with a soft microfiber cloth. I set the stem aside and turned my attention to the bowl. I polished the smooth rim top with micromesh sanding pads -1500-12000 grit pads. I wiped the rim top down with a damp cloth between each sanding pad. The rim top began to really shine. I worked some Before & After Restoration Balm into the rusticated Sea Rock finish on the bowl and the rim top. I worked it into the surface of the briar with my fingertips and a horsehair shoe brush to clean, enliven and protect the wood. Once the bowl was covered with the balm I let it sit for about 20 minutes and buffed it off with a soft cotton cloth and the shoe brush. I polished it with a microfiber cloth. I took photos of the pipe at this point in the process to show what the bowl looked like at this point. I put the bowl and stem back together on this beautiful Castello Sea Rock Briar KKKK 65 Bent Billiard. I polished the stem with Blue Diamond to polish out the scratches in the Lucite. I gave the bowl multiple coats of Conservator’s Wax and the stem multiple coats of carnauba wax. I buffed the pipe with a clean buffing pad to raise the shine. I hand buffed it with a microfiber cloth to deepen the shine. The pipe polished up pretty nicely. The contrast of the blacks and dark browns of the briar with the polished black acrylic/Lucite is quite stunning. The dark, coral like rustication around the bowl and shank is quite remarkable and gives the pipe an incredible tactile presence that only improves as it heated from a smoke. The finished pipe is shown in the photos below. The dimensions of the pipe are Length: 5 inches, Height: 2 ¼ inches, Outside diameter of the bowl: 1 ½ inches, Chamber diameter: ¾ of an inch. The pipe weighs 67grams/2.36oz. This is a beauty that will be staying with me as it ticks off all the boxes of a Castello that I have been watching out for. Thanks for walking through the restoration with me. I always enjoy working on Castello pipes. Cheers.

I really love these Castello Sea Rock Briar pipes – a Sea Rock Briar KKK16


Blog by Steve Laug

It has been a long hot day in Vancouver with lots of meetings and work all day. It is hot enough that once I quit for the day I decided to go to the cool of the basement and work on pipes. The next pipe on the table came to us from an auction in Gonzales, Louisiana, USA.  It is a Castello Sea Rock Briar and it is a Billiard shape to – both pluses in my book. It is stamped on the smooth heel of the bowl and the shank bottom and reads Castello [over] Sea Rock Briar followed by KKK16. That is followed by Made in Cantu [over] Italy followed by an oval containing the name Carlo Scotti next to the stem shank union. The Castello “diamond” inset is on the left side of the tapered stem letting me know this was a pipe made for US import. On the underside of the stem it is stamped Hand Made [over] Castello [over] 5. The bowl had a moderated cake in it and there was lava overflow back top side and inner edge. It was hard to know if there was burn damage on the smooth rim top because of the lava but after cleaning it we would know for sure. The rusticated finish was pretty dirty with dust and grime when we got it but still showed promise. The acrylic stem had deep tooth marks, scratching and chatter on both sides near the button. The edges of the button were also marked. Jeff took the following photos of the pipe before he worked his magic on them. The pipe must have been a terrific smoker because the bowl was moderately caked with lava flowing over the rim top. In its condition it was going to take some work to clean out that bowl and be able to see what the rim looked like underneath the layer of lava. The acrylic/Lucite stem was in good condition other than the tooth chatter and marks in the top and underside of the stem just ahead of the button. The rest of the bowl looked dirty but the photos give an idea of what Jeff saw before his cleanup revealed the condition of the pipe. The next photos try to capture the stamping on the flat panel on the underside of the shank. It read as I have noted above. The stem also bears a Hand Made Castello 5 stamp on the underside.   Jeff cleaned the pipe with his usual regime that many who read this probably have memorized. He reamed the bowl with a PipNet pipe reamer and cleaned up the remnants with a Savinelli Fitsall Pipe Knife. He scrubbed the internals of the bowl, shank and stem with alcohol, cotton swabs and pipe cleaners. He scrubbed the exterior with Murphy’s Oil Soap to clean off the dust and grime on the rusticated Sea Rock finish. The smooth rim top looked very good under the thick lava coat. The inside of the bowl itself looked great. The stem was in great shape other than the tooth marks on both sides. It really is a beautiful looking rusticated pipe. I took photos of the pipe when it arrived here. I took some close up photos of the rim top, bowl and stem to show what they looked like after Jeff’s cleanup. It is a startling difference. The rim top looks very good. The stem also looks very good.I took a photo of the stamping on the underside of the shank and the stem. It is clear and readable as noted above. I removed the stem from the shank and took a photo of the pipe to show the proportions of the bowl/shank and the stem length.I cannot seem to retain the details on Castello pipes in my head for long for some reason. The stamping on them – Castello and the Carlo Scotti stamp were things that I wanted to makes sure I understand before I began to work on the pipe. I turned to Pipephil’s site to get a quick summary (http://www.pipephil.eu/logos/en/logo-castello.html). I quote:

Castello PIPA CASTELLO di Carlo Scotti & C. was founded in 1947 by Carlo Scotti (†1988). Franco Coppo (AKA “Kino”) who married Carlo Scotti’s daughter Savina, manages (2012) the corporate since 1985.

The site also gave a good summary of the grading and sizes of the pipes. I quote that in full.

Sizes (ascending):

1K to 4K, G (Giant) and GG (Extra large)

Rusticated grading: SEA ROCK, OLD SEA ROCK, NATURAL VIRGIN,

Sandblasted grading: ANTIQUARI, OLD ANTIQUARI

Smooth grading (ascending): TRADEMARK, CASTELLO, COLLECTION

Other stampings: Great Line (Non-standard or freestyle) Fiammata (Straight grain)

Production (2012): ~4000 pipes / year

I also found a note on the page that the Rhinestone logo was originally on pipes for the US market. It is occasionally used now.

I turned then to Pipedia for more information on the brand (https://pipedia.org/wiki/Castello). The majority of the information was what was already quoted above in abbreviated form. However there was a link to an article by Bob Hamlin that gave some interesting bits of information that I found helpful (http://www.pipes.org/BURST/FORMATTED/196.016.html). I quote in part from that article.

SEA ROCK [Carved Black or dark brown]:  This is the lowest grade of the Castello line and is the most common in the USA.  Sea Rocks are produced by taking a smooth bowl that has not been “final finished” and surface carving the finish with tools. This “carved” finish is then evened out using a steel wire brush, stained and then waxed. The Natural Vergin carved finish is left unstained and unwaxed as a rule, although we have seen waxed and partially waxed “Vergins”.

All carved Castello pipes are graded by the number of K’s that are stamped on each piece and are K-graded by SIZE.  1K is the smallest and fairly rare, 2K is small to medium, with 3K or 4K being the most common and ranges from medium to medium large. Large pieces are stamped “G” for giant and extra large pieces are stamped “GG” for double giant.  In addition to the number of K’s on a carved Sea Rock piece the shape number is almost always added.  As a rule a Sea Rock Castello is stained Black, although recently there have been quite a few coming in stained deep brown and still stamped “Sea Rock”.  American Logo’d Sea Rocks are all priced the same to the consumer, although most are 2 or 3 K’ed models.  G/GG models are charged at a higher price on American pieces and are basically the same as their European counterparts.

The Castello Sea Rock briar I was working on had the 3K’s of a Medium sized pipe. It definitely was made for the American Market with the Rhinestone in the stem. It had the dark brown finish. The shape number still needed to be determined.

Pipedia also gave a link to Mike’s Briar Blues site for help in dating and determining shapes (http://www.briarblues.com/castello.htm). I quote a section on the shape numbers.

Shape numbers. Shape numbers are all 2 digits. A 2 in front indicates a “fancy” interpretation, a 3 in front means that the carving is somehow unique. I don’t know when the change was made, but currently, a π symbol is used instead of the 3xx. I’ve only seen this on Sea Rocks, but that doesn’t mean anything…

Now I had more information to work with. The Castello Sea Rock in my hands 3K graded. That told me that it came out in the late 1960s onward. The 3K stamp makes it a mid-sized pipe from that time period. The number 16 makes it a straight shank billiard.

I decided to work on the stem first and try to remove and repair the tooth marks on both sides of the acrylic stem. Since acrylic does not have “memory” like vulcanite I did not try painting the stem surface. I sanded down the chatter in preparation for repairing the tooth marks. I filled in the tooth marks with clear CA glue. Once the repairs cured I used a small file to flatten them out and recut the sharp edge of the button. To blend in the repairs I sanded the stem with 220 grit sandpaper and started the polishing with 400 grit wet dry sandpaper.   I polished the stem with 1500-12000 grit pads. I dry sanded it with the pads and wiped it down with a damp cloth after each sanding pad. I finished polishing the stem with Before & After Pipe Polish – both Fine and Extra Fine polishes. I wiped the stem down with a damp cotton pad afterwards and buffed it with a soft microfiber cloth. I set the stem aside and turned my attention to the bowl. I polished the smooth rim top with micromesh sanding pads -1500-12000 grit pads. I wiped the rim top down with a damp cloth between each sanding pad. The rim top began to really shine. I worked some Before & After Restoration Balm into the rusticated Sea Rock finish on the bowl and the rim top. I worked it into the surface of the briar with my fingertips and a horsehair shoe brush to clean, enliven and protect the wood. Once the bowl was covered with the balm I let it sit for about 20 minutes and buffed it off with a soft cotton cloth and the shoe brush. I polished it with a microfiber cloth. I took photos of the pipe at this point in the process to show what the bowl looked like at this point. I put the bowl and stem back together on this beautiful Castello Sea Rock Briar KKK16 Billiard. I polished the stem with Blue Diamond to polish out the scratches in the Lucite. I gave the bowl multiple coats of Conservator’s Wax and the stem multiple coats of carnauba wax. I buffed the pipe with a clean buffing pad to raise the shine. I hand buffed it with a microfiber cloth to deepen the shine. The pipe polished up pretty nicely. The contrast of the blacks and dark browns of the briar with the polished black acrylic/Lucite is quite stunning. The dark and coral like rustication around the bowl and shank is quite remarkable and gives the pipe an incredible tactile presence that only improve as it heated from a smoke. The finished pipe is shown in the photos below. The dimensions of the pipe are Length: 5 ¾ inches, Height: 2 inches, Outside diameter of the bowl: 1 ½ inches, Chamber diameter: ¾ of an inch. The pipe weighs 53grams/1.87oz. This is a beauty that will be going on the Italian Pipe Makers section of the rebornpipes online store. Let me know if you want it. Thanks for walking through the restoration with me. I always enjoy working on Castello pipes. Cheers.