Tag Archives: repairing tooth marks

Cleaning up a Bruyere Garantie Pocket Pipe with a Horn Stem


Blog by Steve Laug

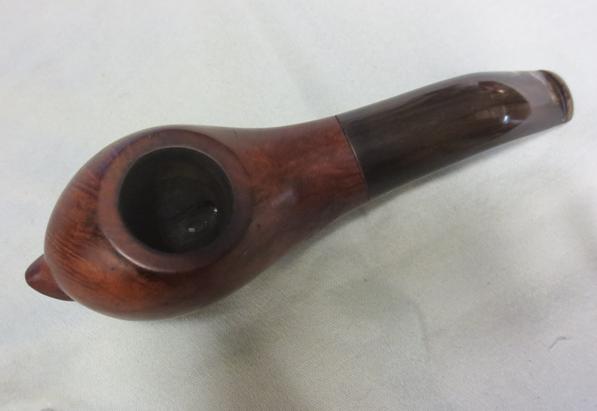
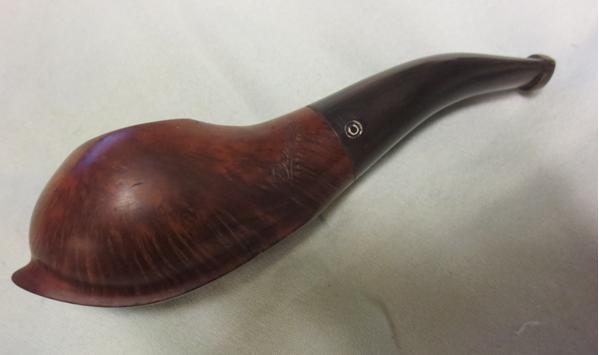
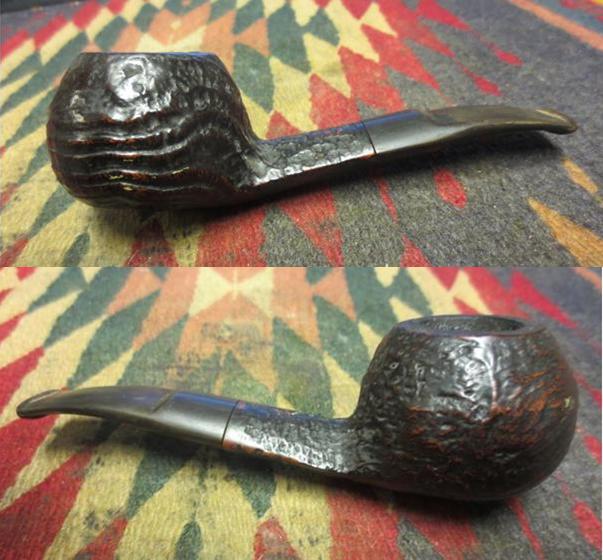
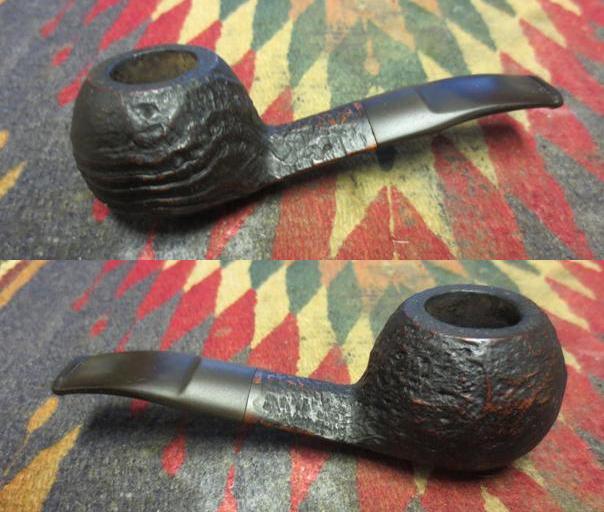
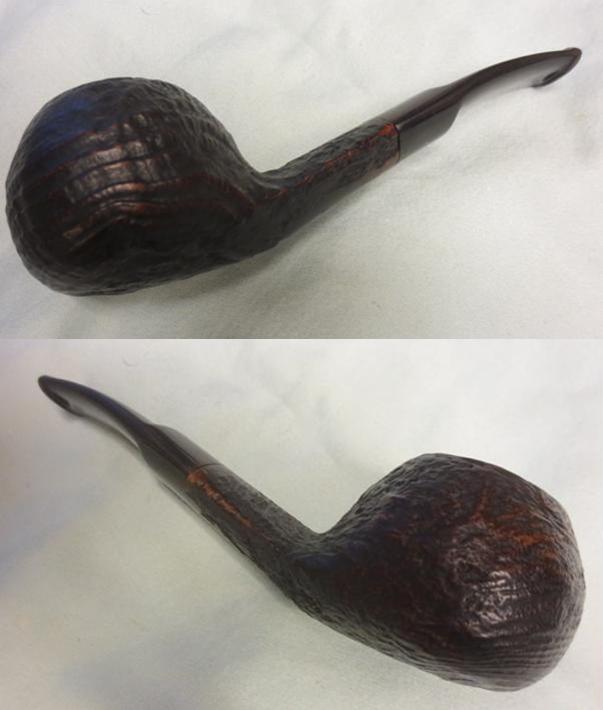
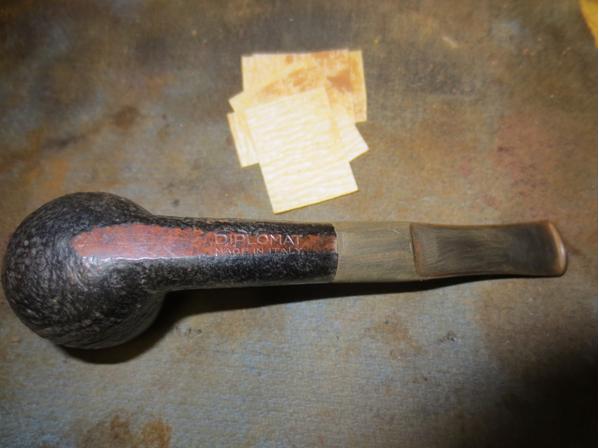
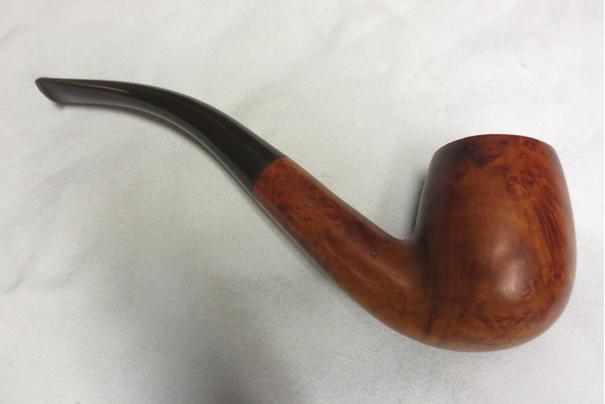
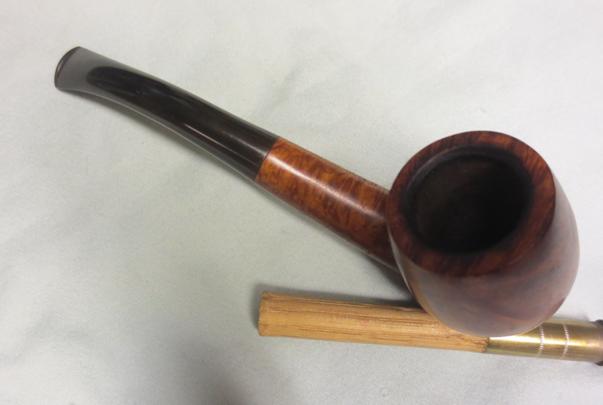
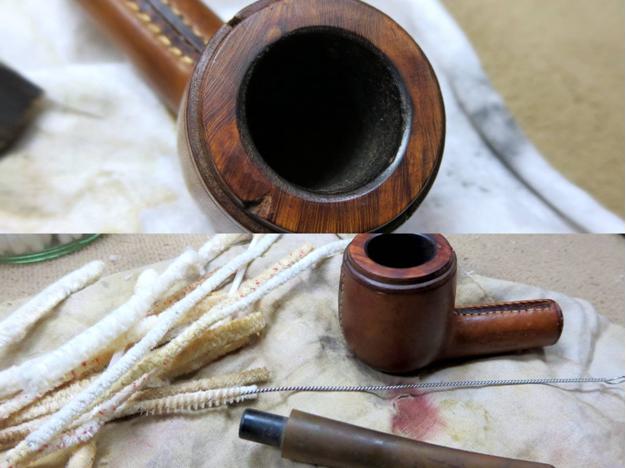
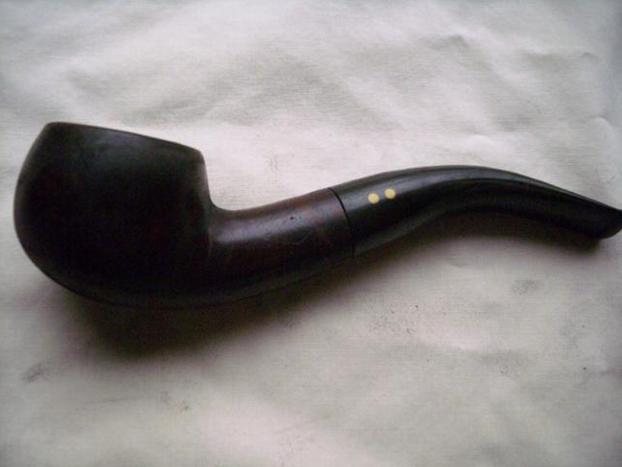
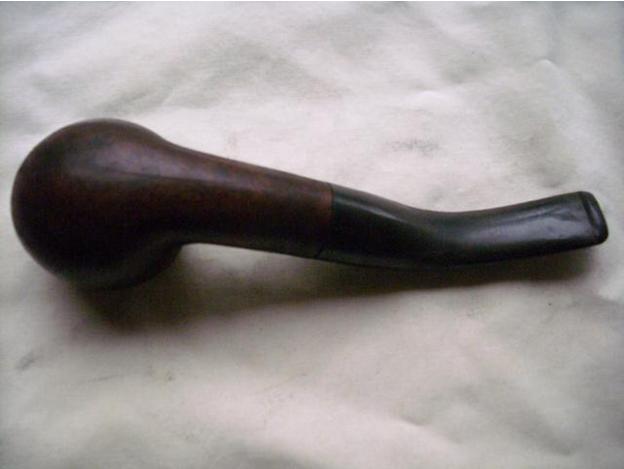
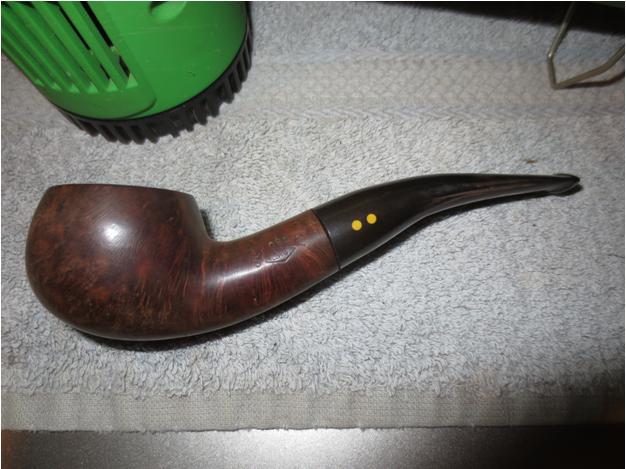
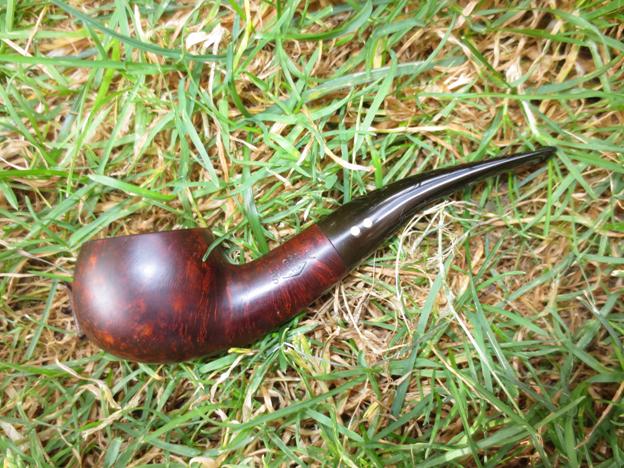
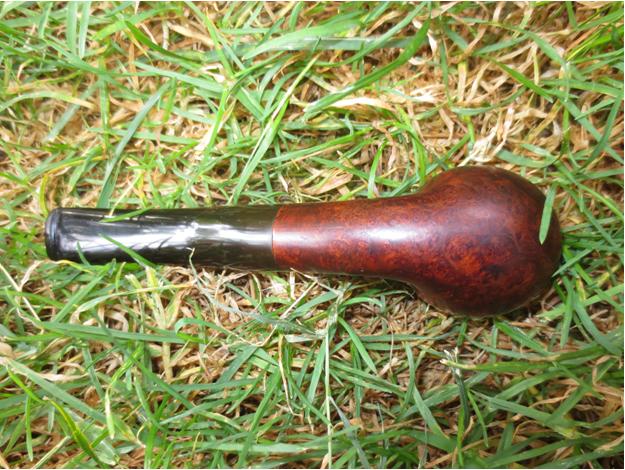
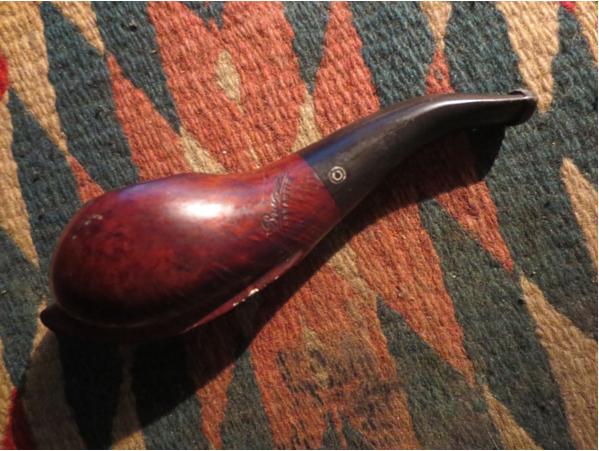
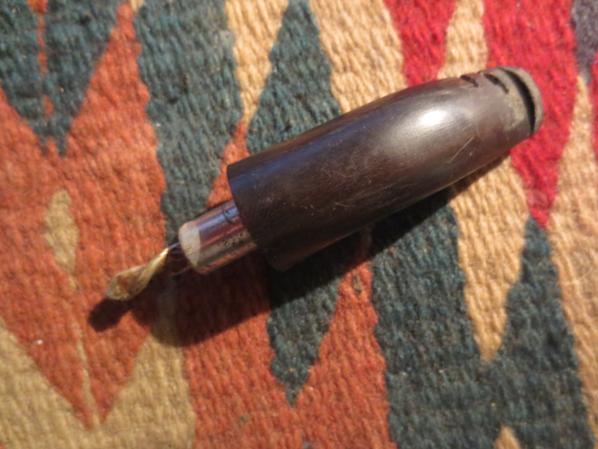
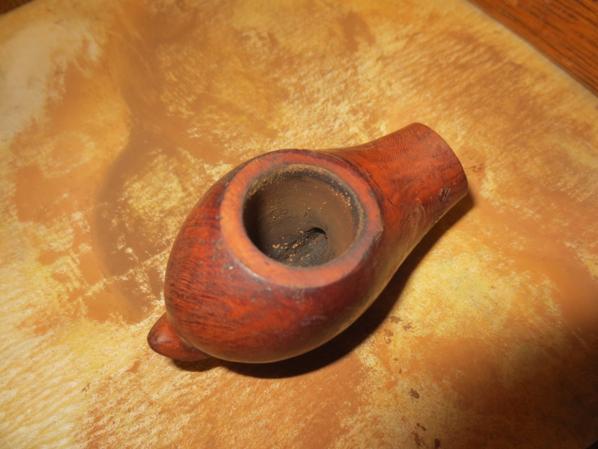
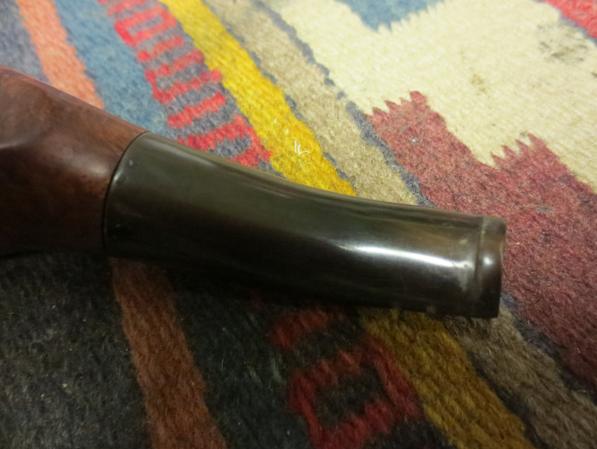
This pipe reminds me of the Mokin Pocket Pipe that Anthony restored and wrote about in an earlier blog. When I saw it on eBay I put a bid in and actually won it. The pipe needed a lot of work. From the photo it looked as if it had a thick coat of varnish or some shiny topping. That would need to go. The finish was spotty and appeared to have some flecks of paint on the top and on the skate at the bottom of the bowl. The rim was darkened and hard to tell whether it was burned or just tarry. The bowl was slightly out of round but it also had a cake that would need to be reamed out before addressing the out of round inner wall of the rim.The stamping was clear and distinct and read Bruyere Garantie on the left side of the shank. The stem had a double circle on the left side. The stem also appeared to be horn. There were two deep cuts on the right side of the stem near the button that would need work and with those marks I was sure there were other issues. The first two photos are the ones included in the seller’s description of the pipe on eBay. I had no idea what the other side or bottom of the bowl or stem looked like or if there would be more issues that would need to be addressed.Bruyere1

Bruyere2 
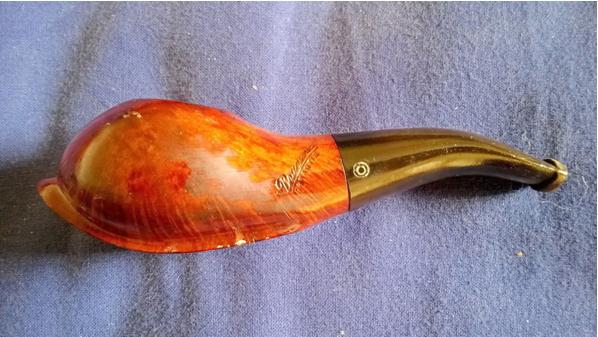
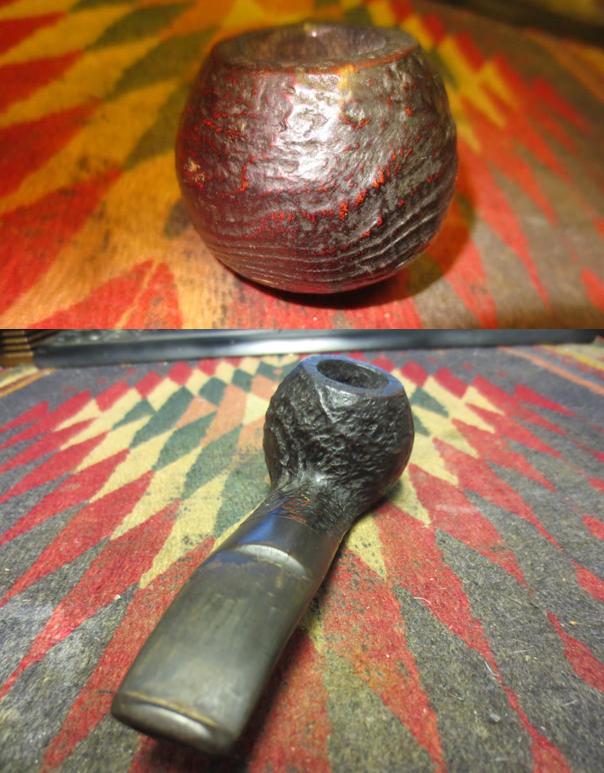
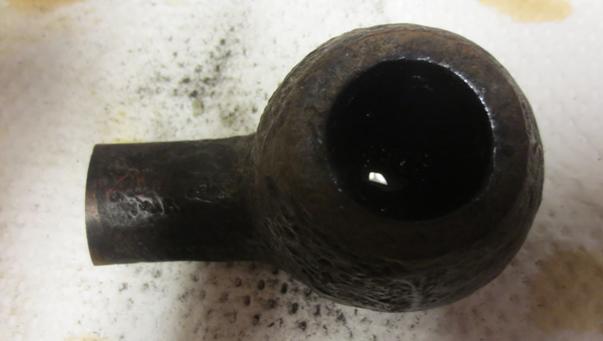
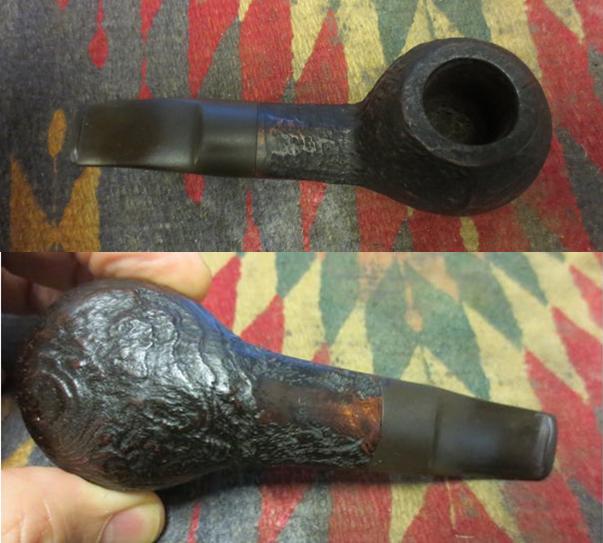
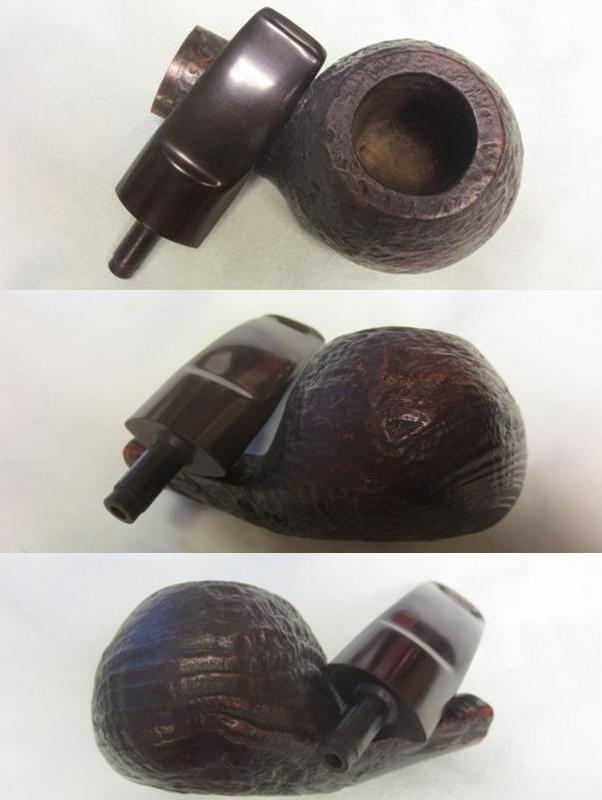
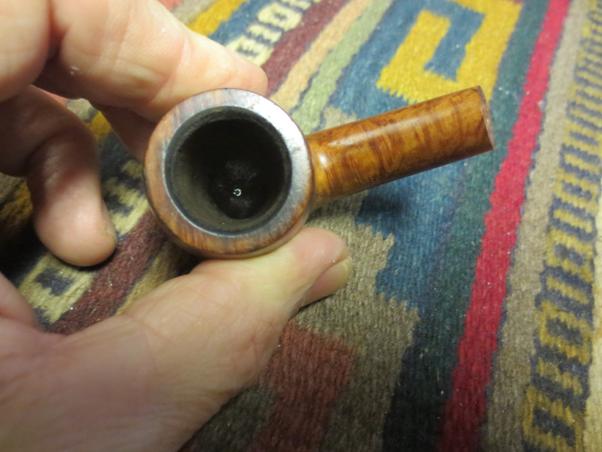
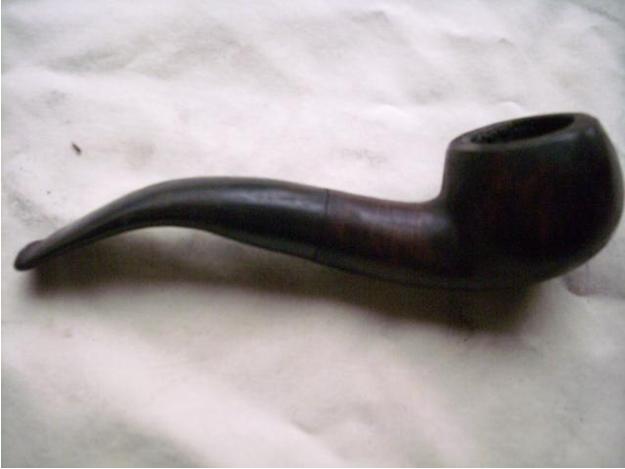
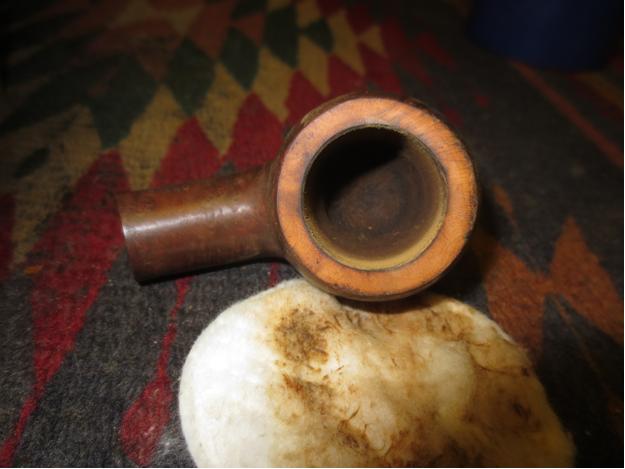
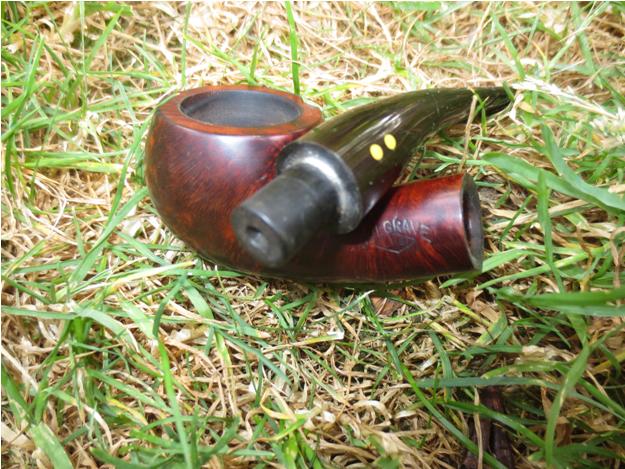
When the pipe arrived I was both encouraged by what I saw and concerned by several other issues that had not been shown in the photos above. The encouraging thing was that there was no shiny coat of varnish or lacquer on the bowl. All that was present was a very dirty, grimy natural finish that seemed to have a reddish-brown colouring to it. The concerns involved the fills on the underside of the bowl. What had appeared to be paint flecks on the skate at the bottom turned out to be part of the fill on the bottom and a missing piece of briar. The bowl was indeed caked and the cake was crumbling and uneven. Looking at it initially I wondered if there would not be burned spots in the walls of the bowl once the cake was removed. The inner edge of the rim was also more damaged than I had expected from the seller’s photo. The cuts in the stem were dangerously close to the airway but fortunately had not broken through. The fact that the airway was unharmed was a small miracle given the depth of the cuts. The fact that they angled probably save the airway from damage. On the underside of the stem there were also large chips missing from the stem at the shank stem union. It appeared that someone had tried to pry the stem away from the shank rather than twisting it off. There was also tooth chatter on the top and underside of the stem near the button. The button however was clean and sharp as was the slot in the in the end of the button. The stem had some beautiful striations of colour that I had not seen in the photos and I looked forward to seeing if I could bring them out.Bruyere3

Bruyere4

Bruyere5

Bruyere6 
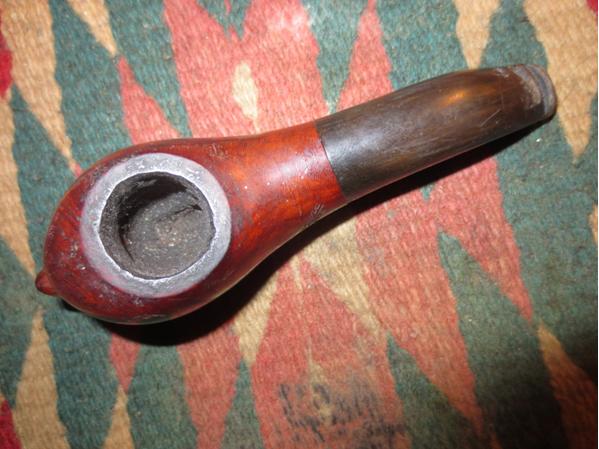
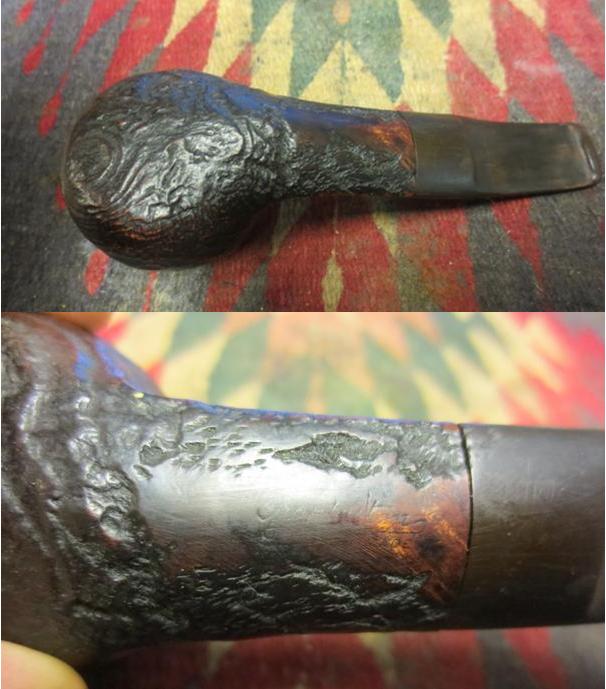
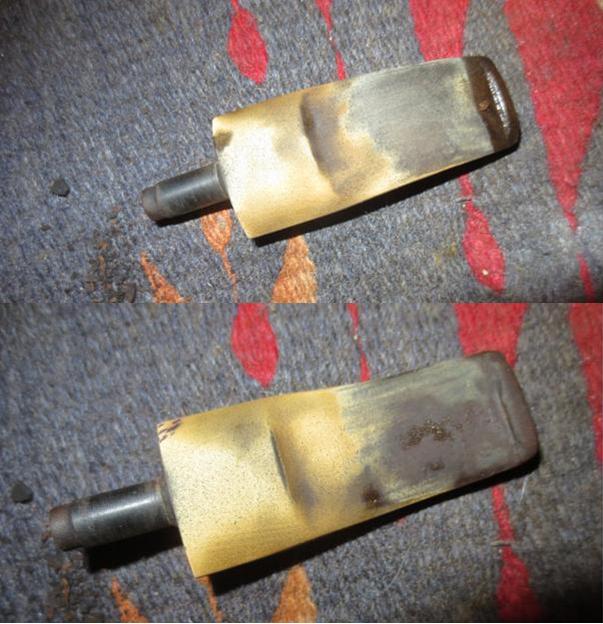
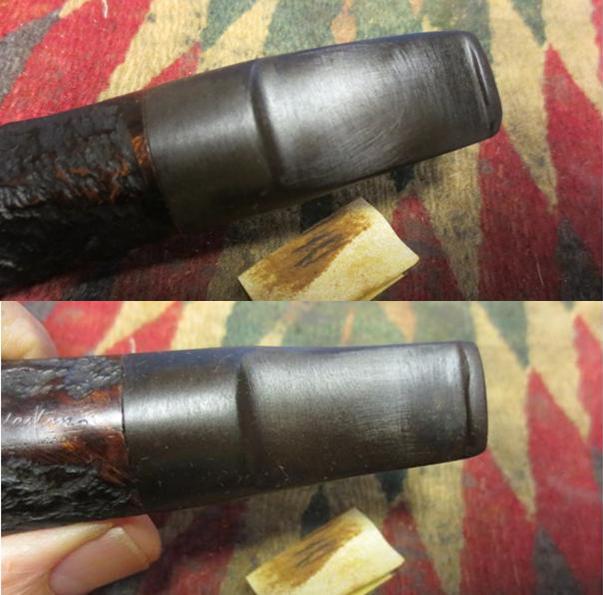
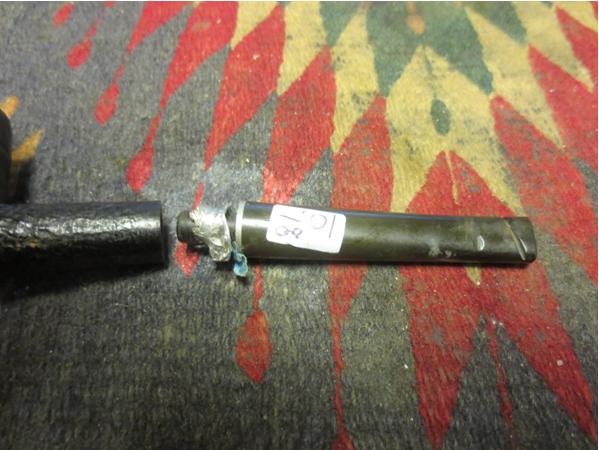
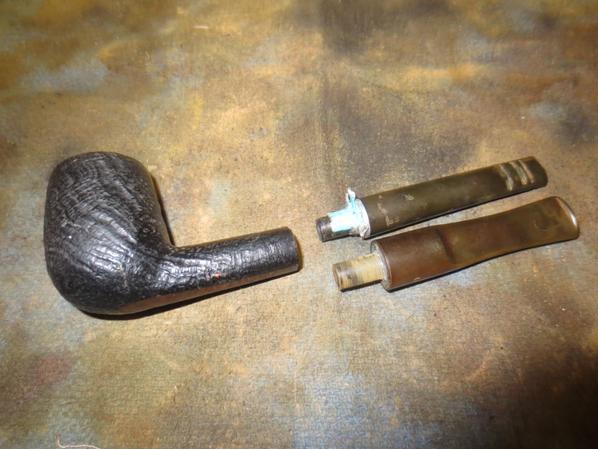
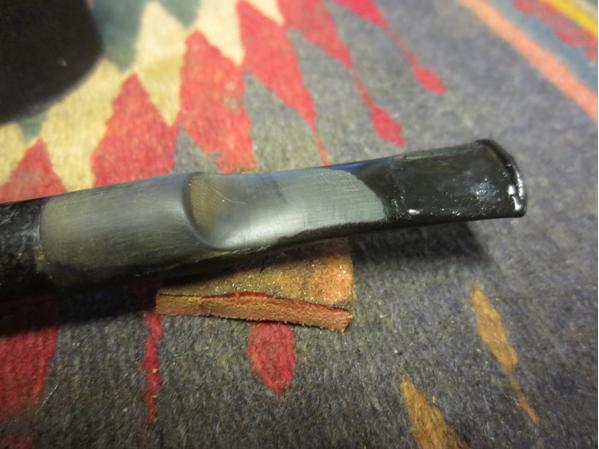
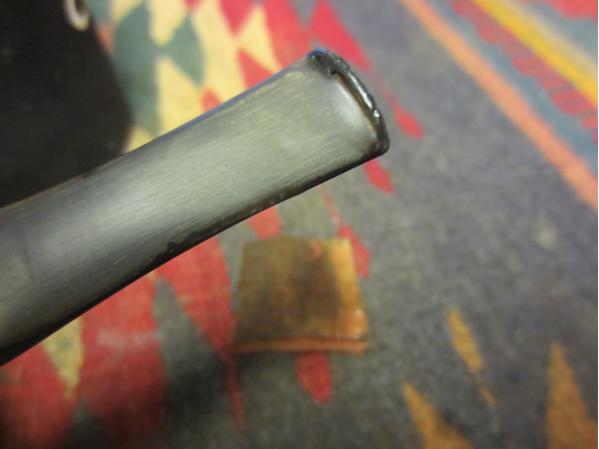
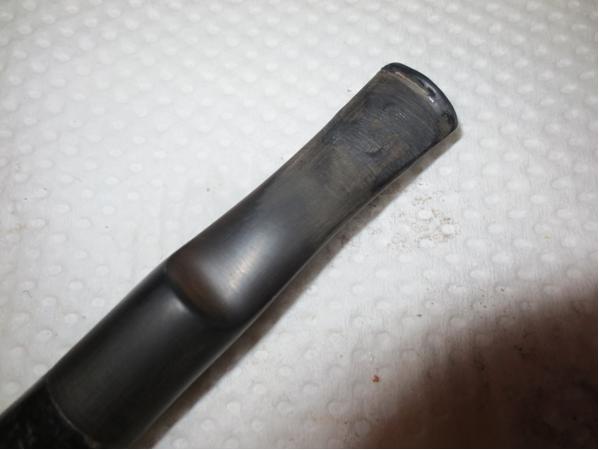
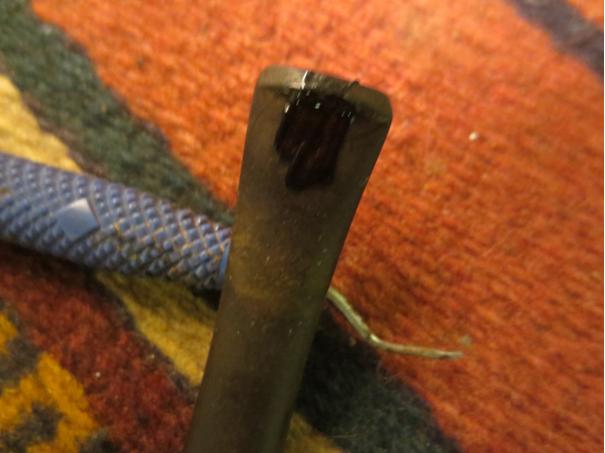
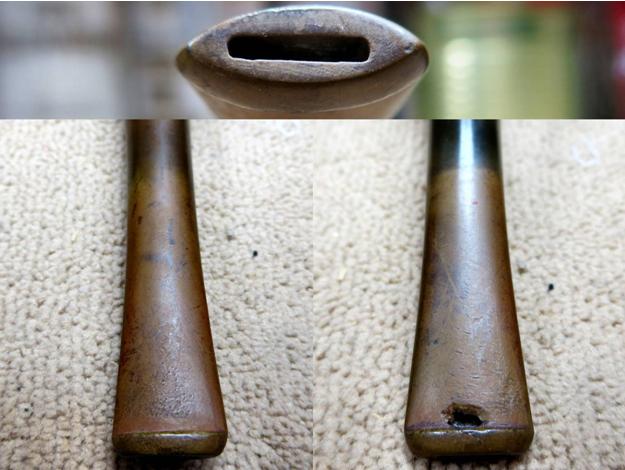
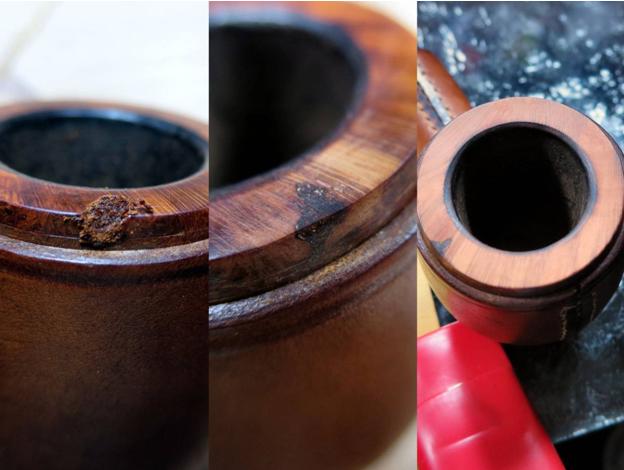
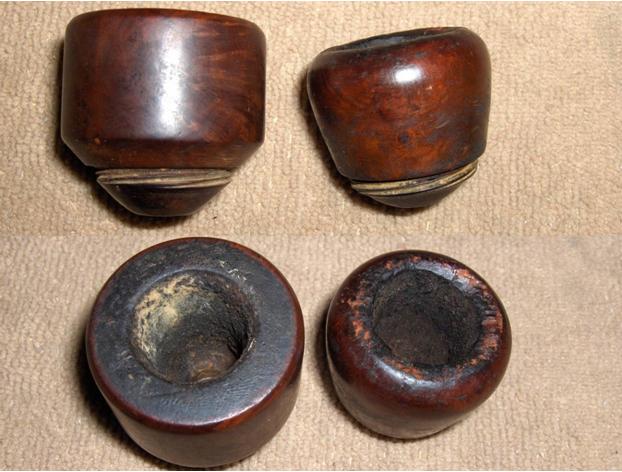
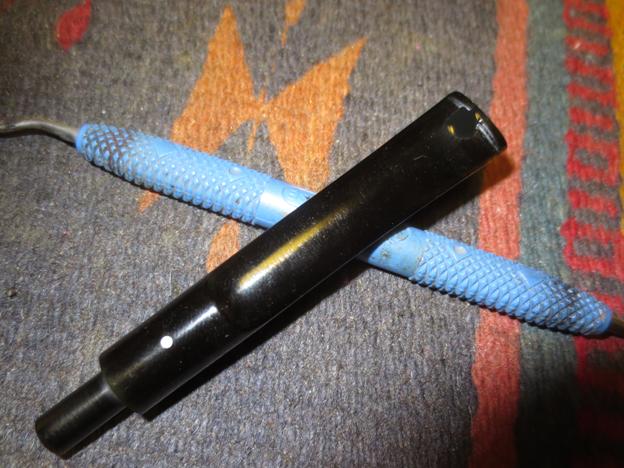
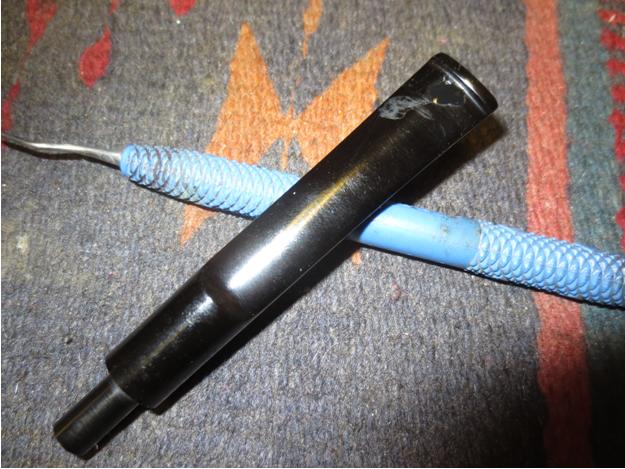
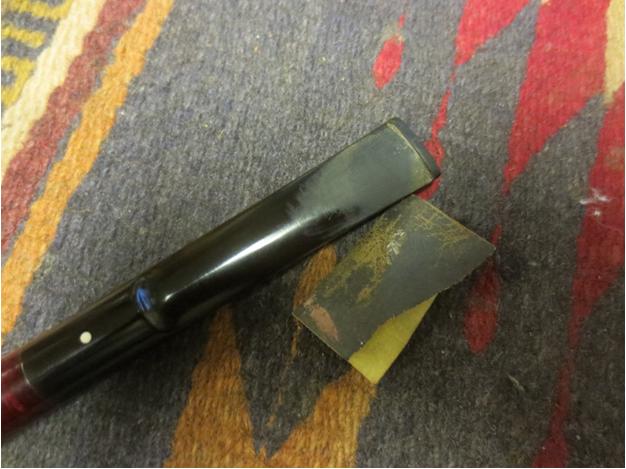
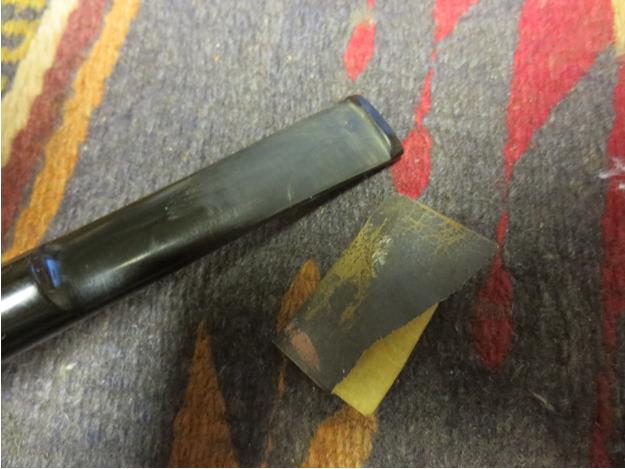
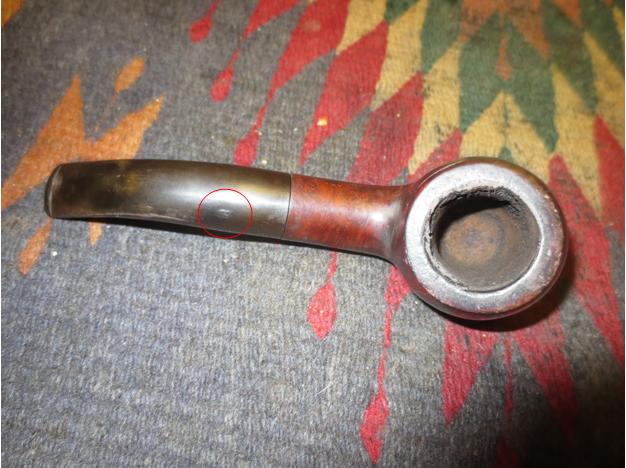
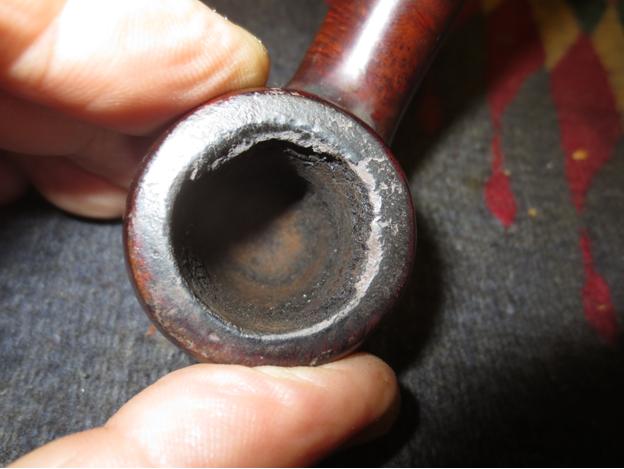
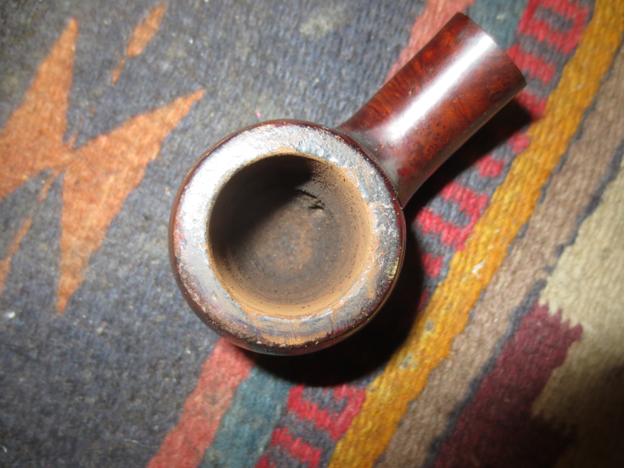
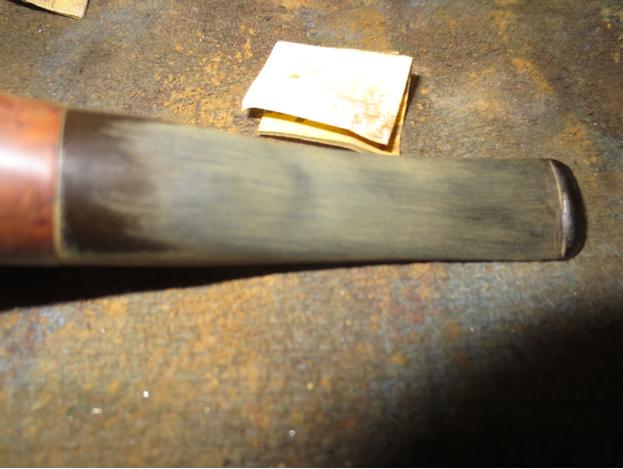
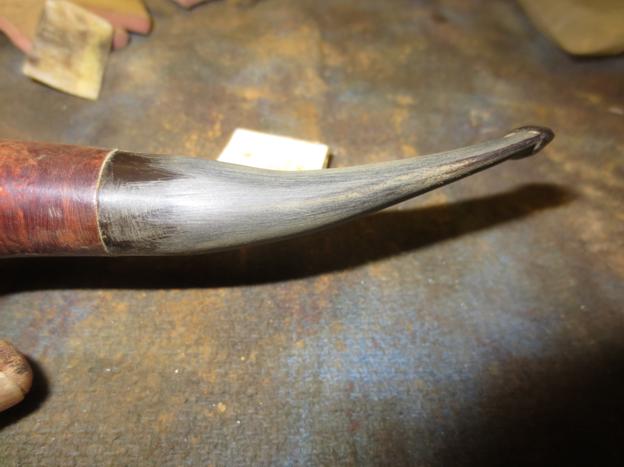
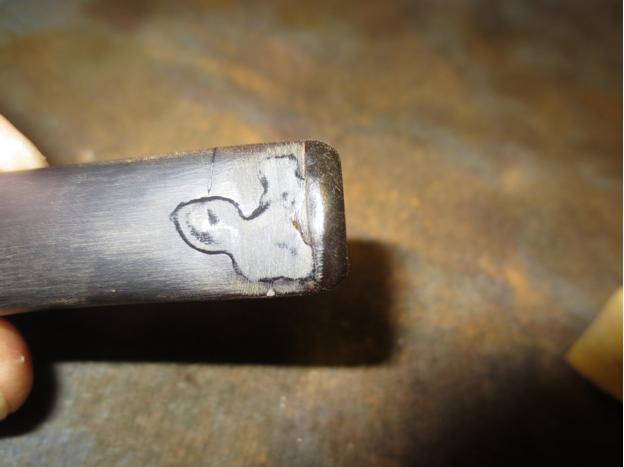
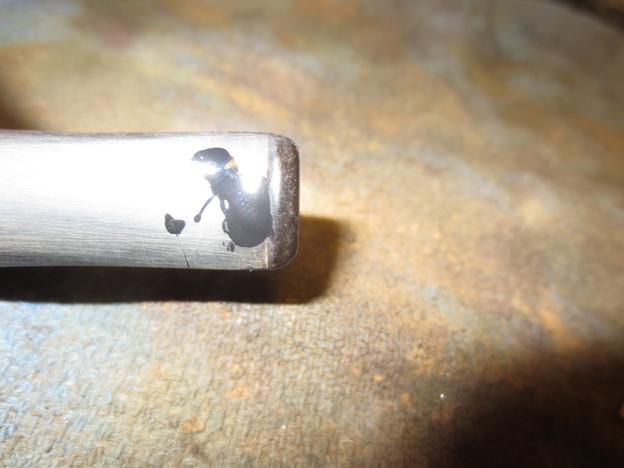
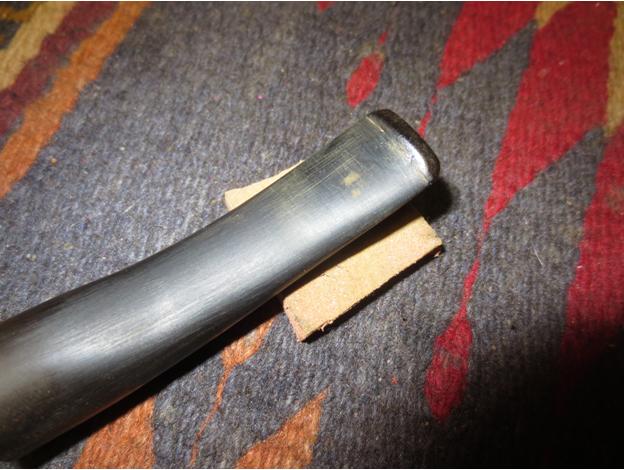
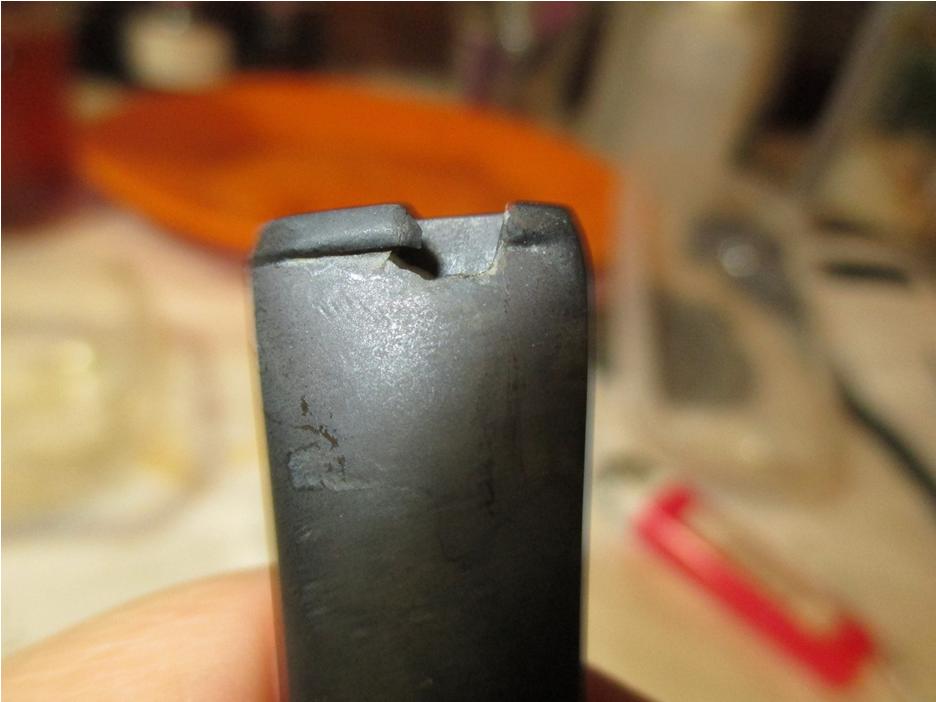
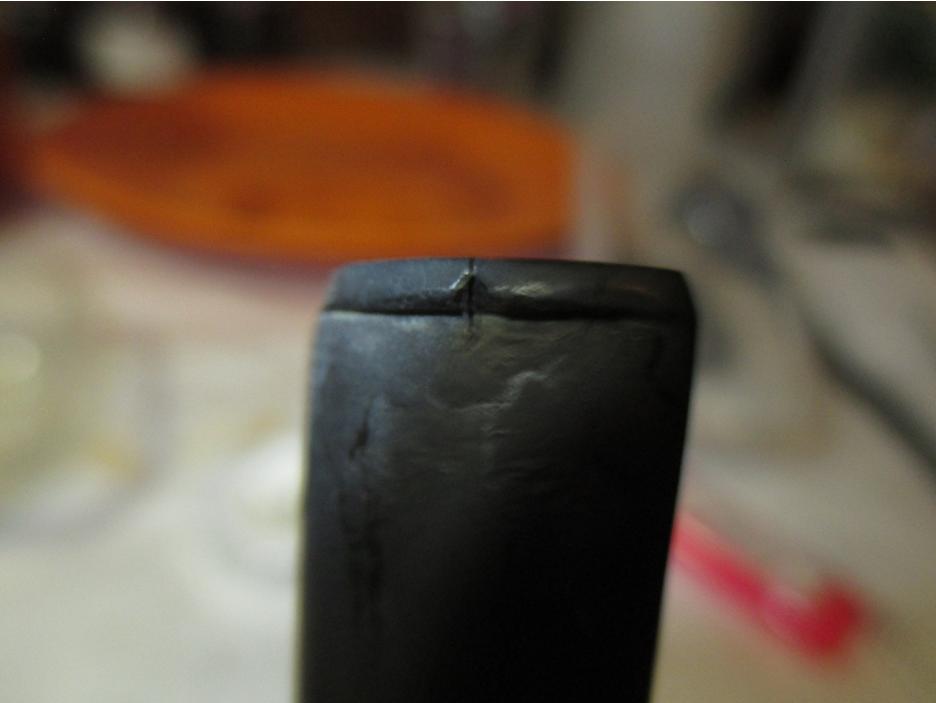
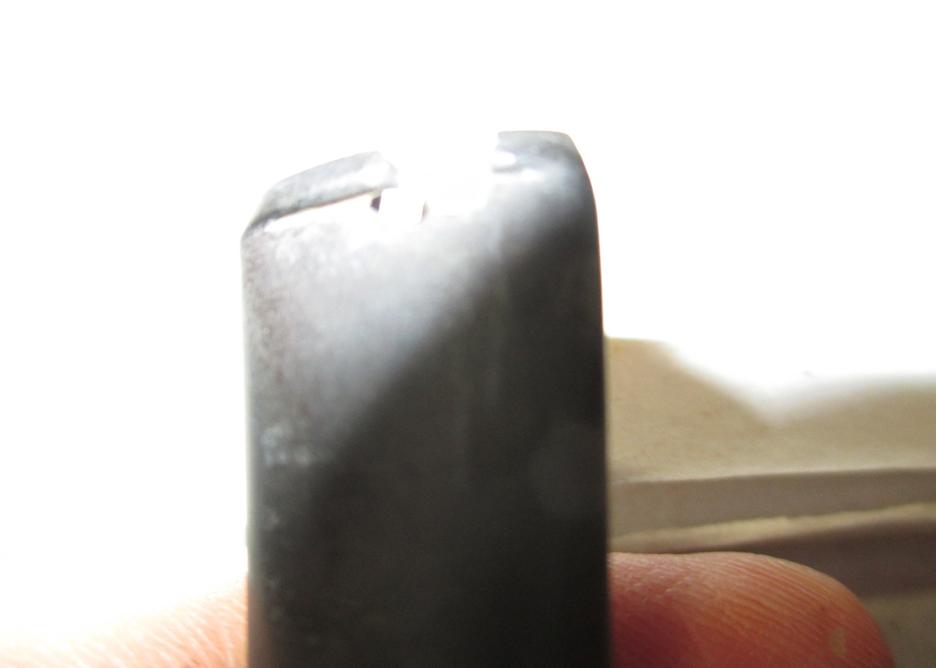
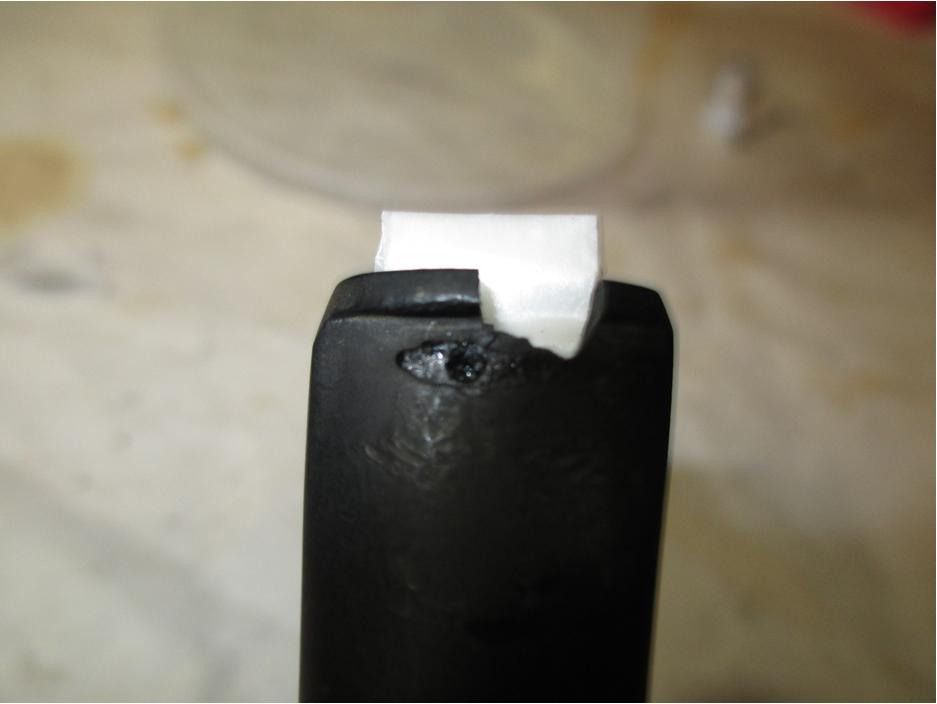
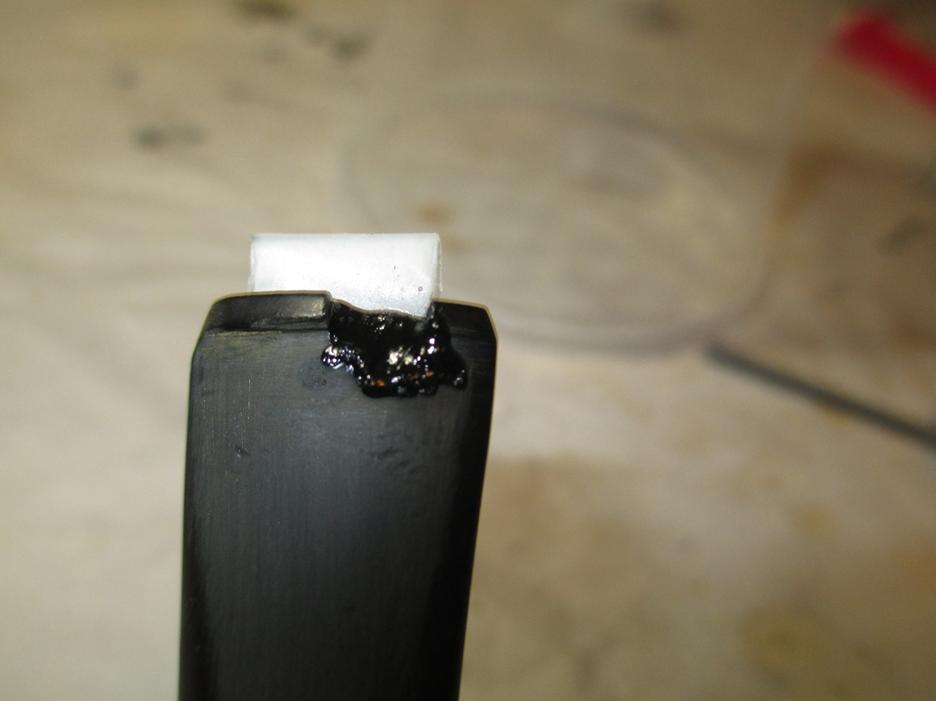
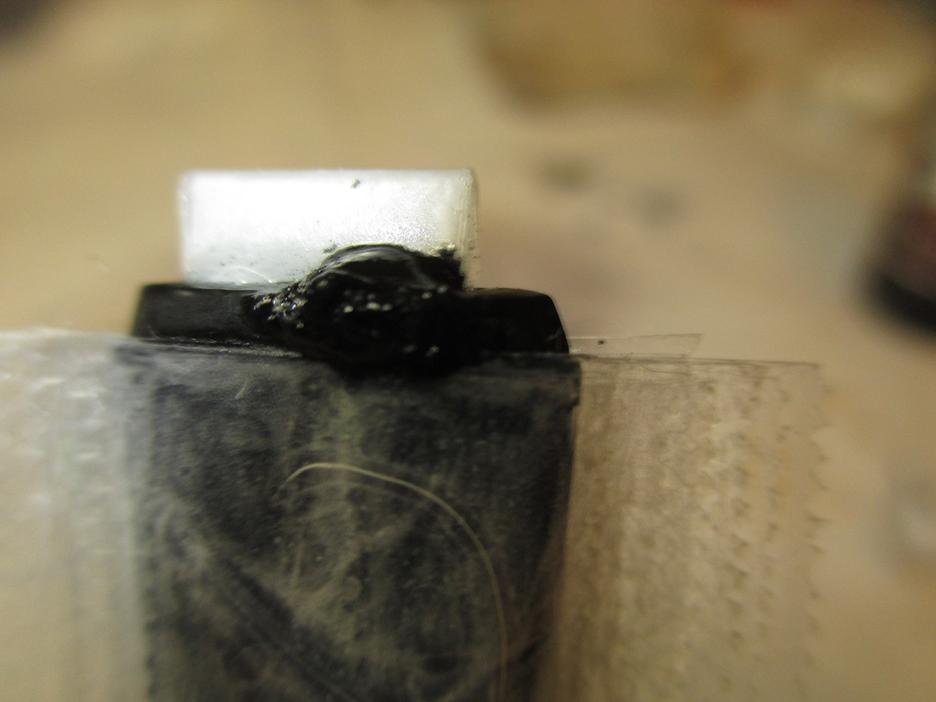
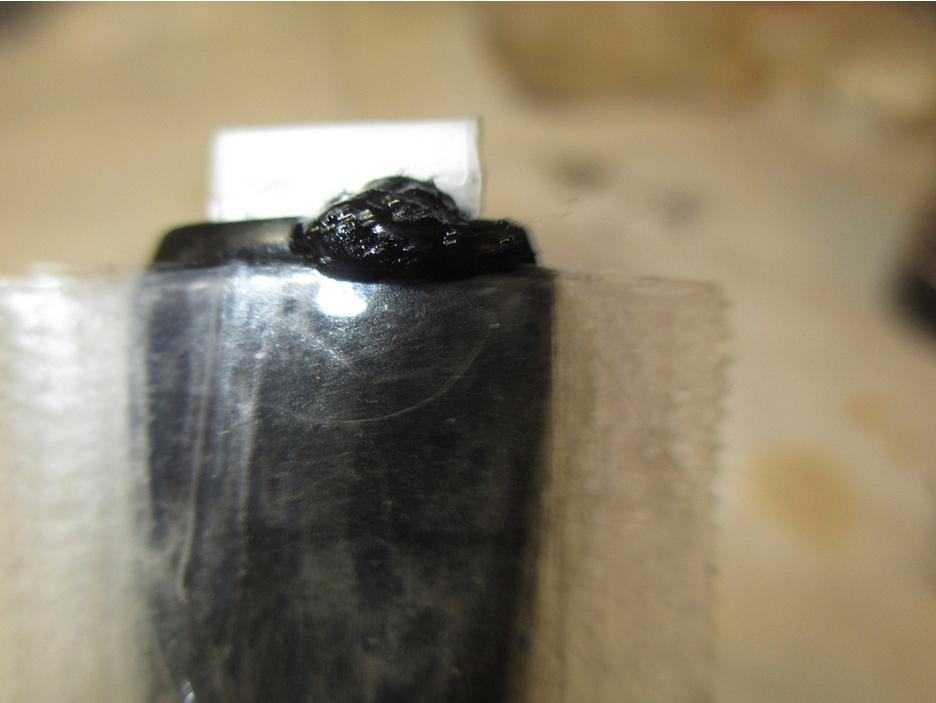
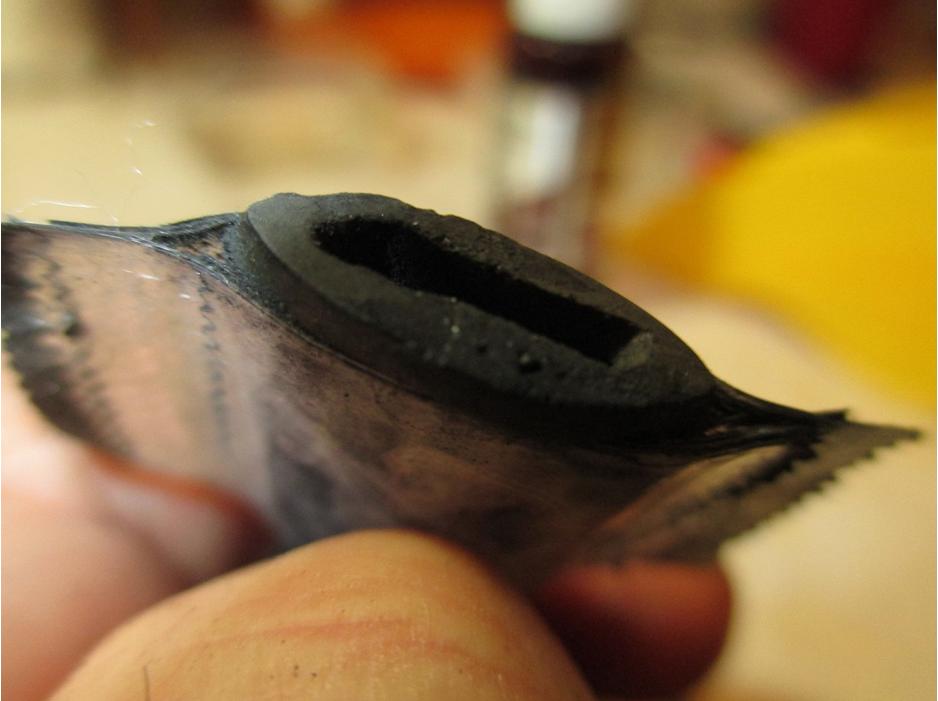
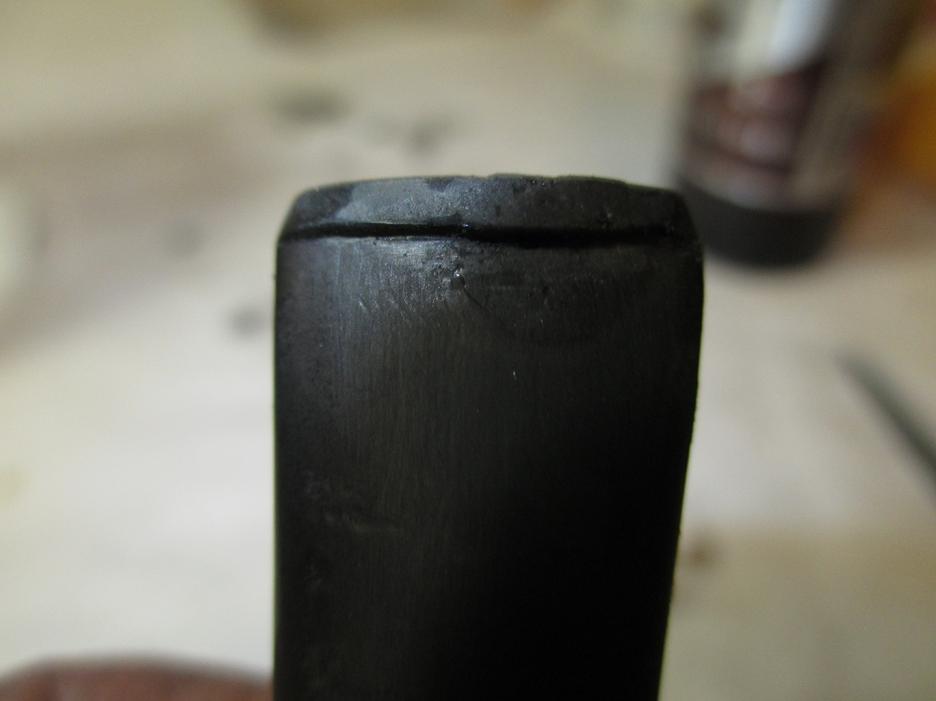
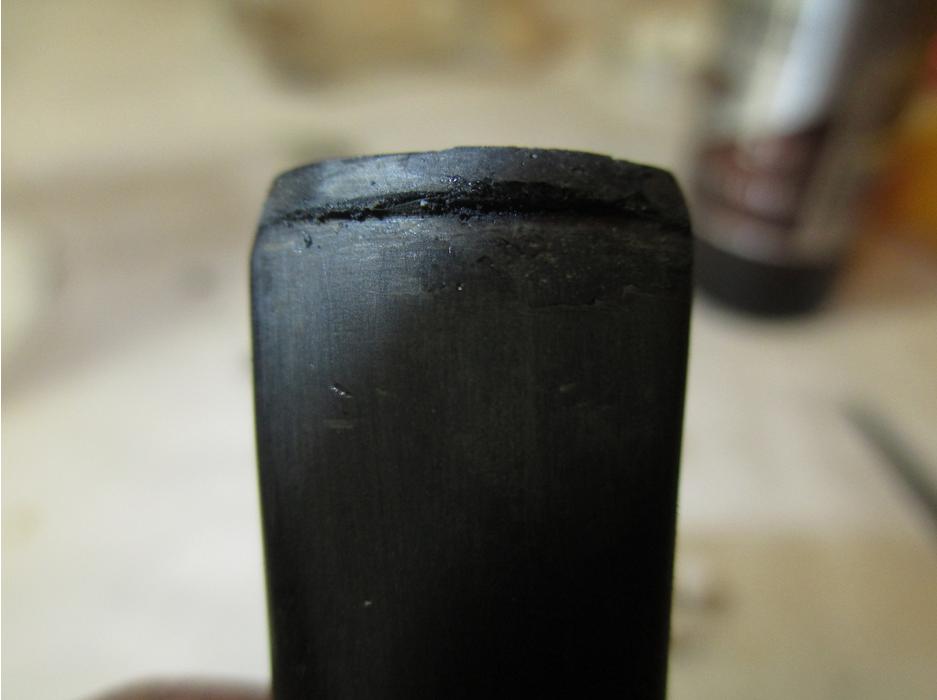
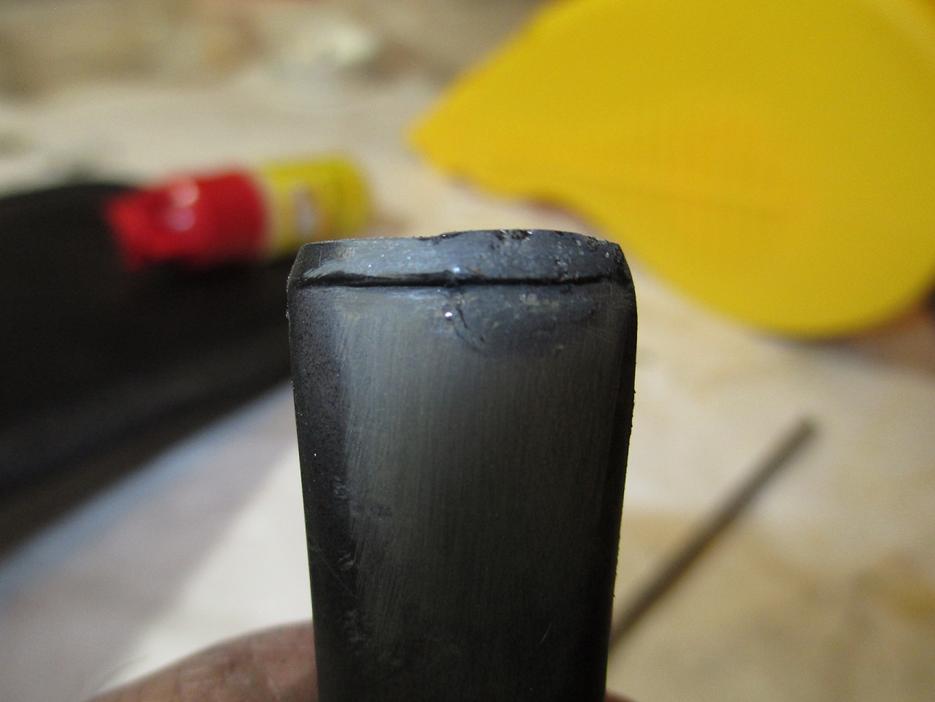
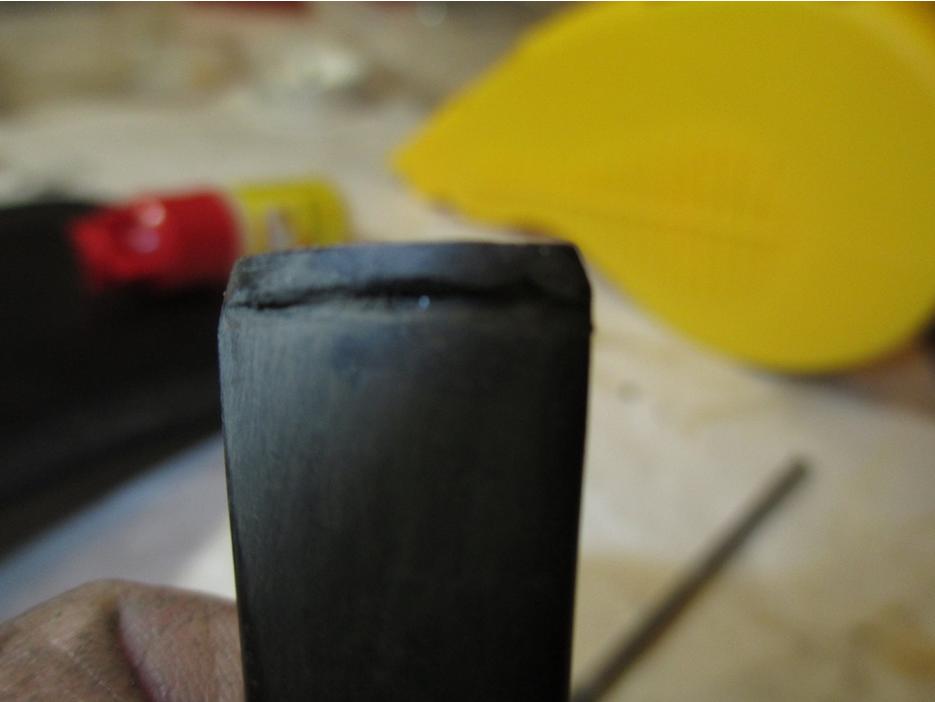
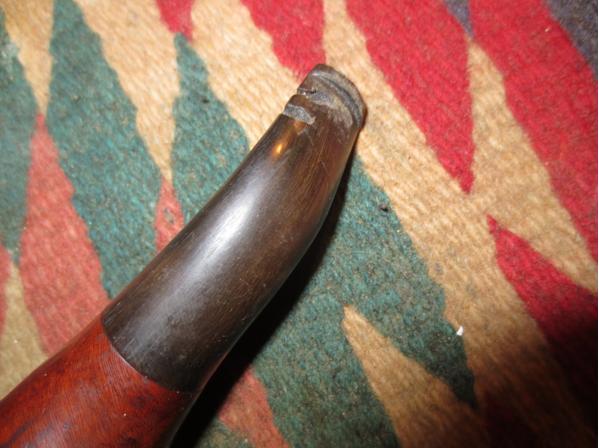
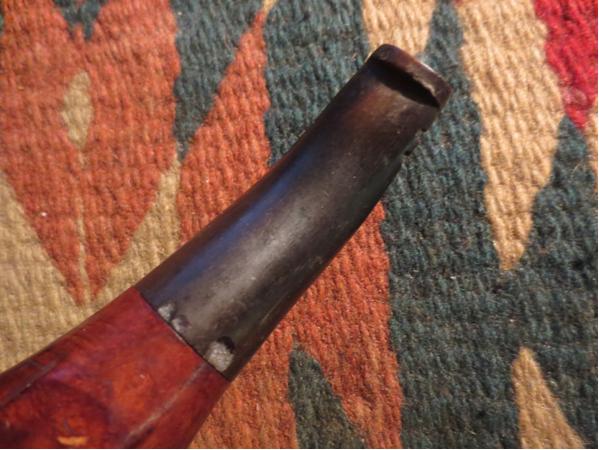
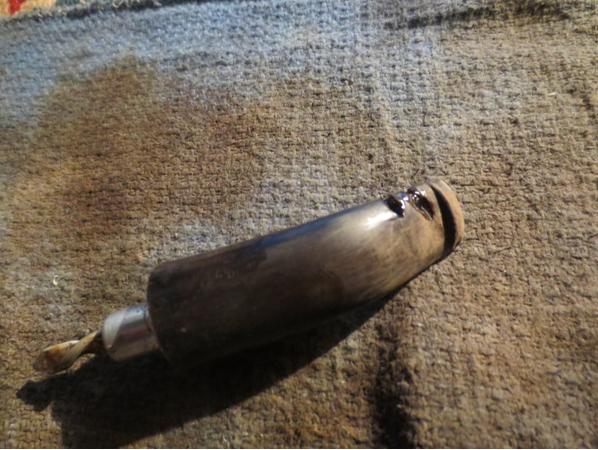
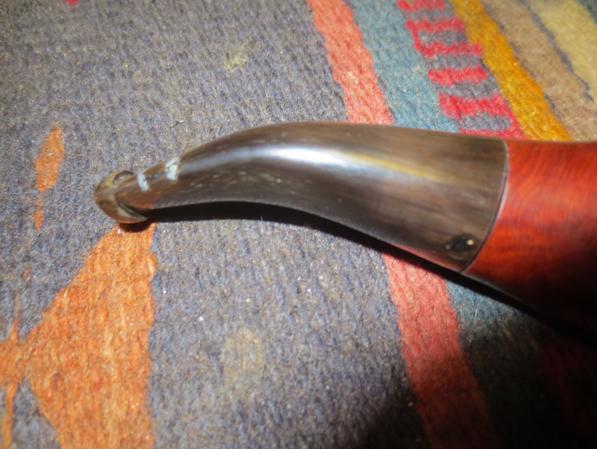
I took some close up photos of the damage to the rim and the stem. The first photo below shows the damage to the inner edge of the rim and the crumbling cake in the bowl. Looking closely at the top of the photo and the bottom of the bowl you can see the cause for my concern regarding the potential burn out damage. The second and third photos below show the cuts in the stem and the missing chips. You can see how close the cut closest to the button came to the airway in that photo.Bruyere7

Bruyere8

Bruyere9 
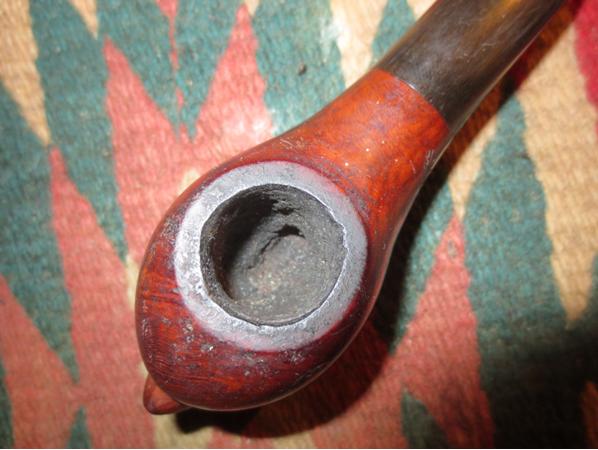
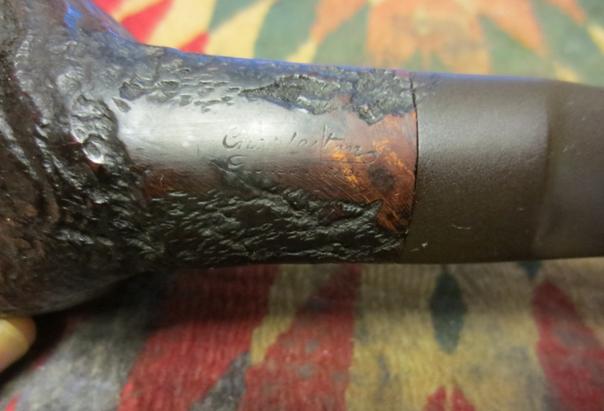
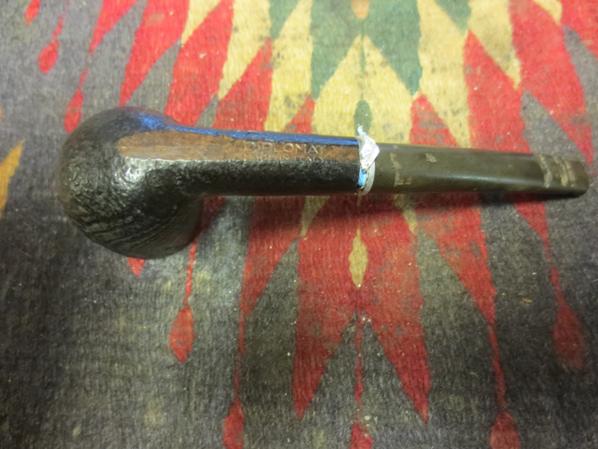
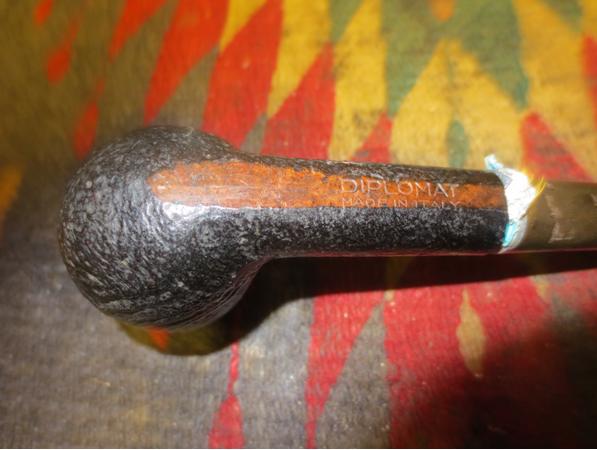
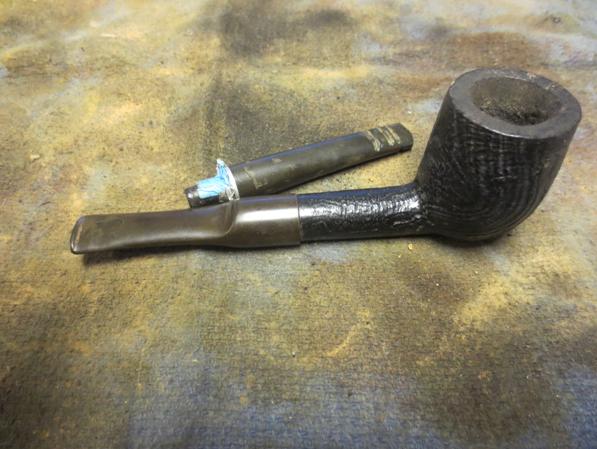
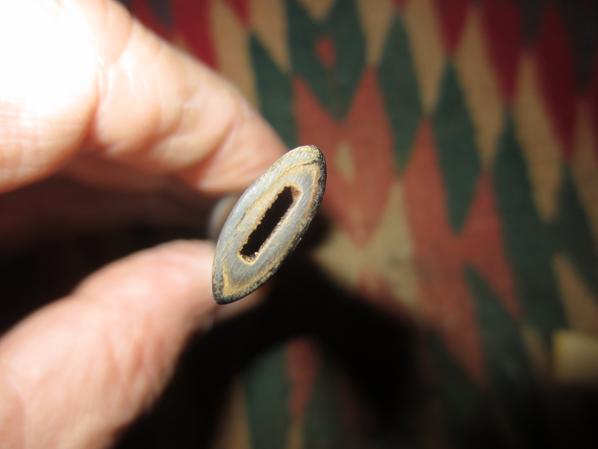
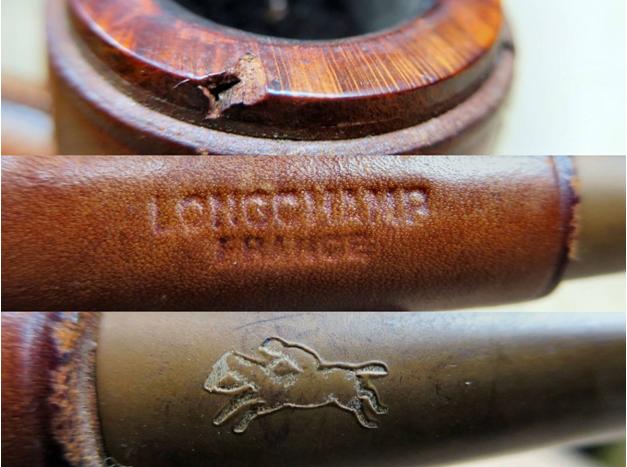
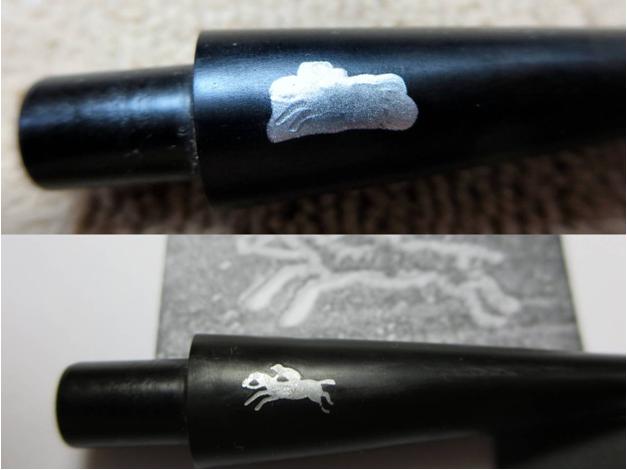
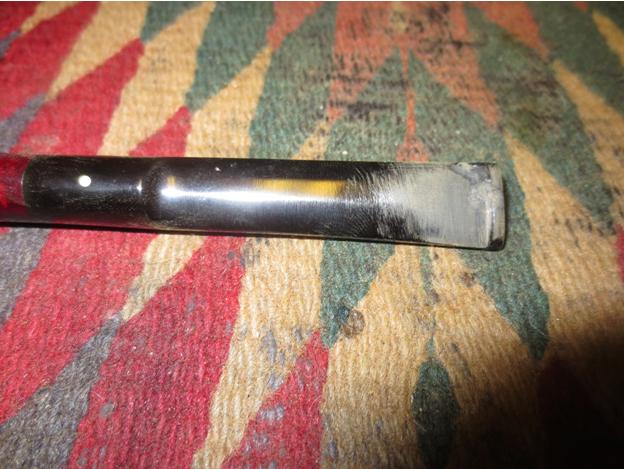
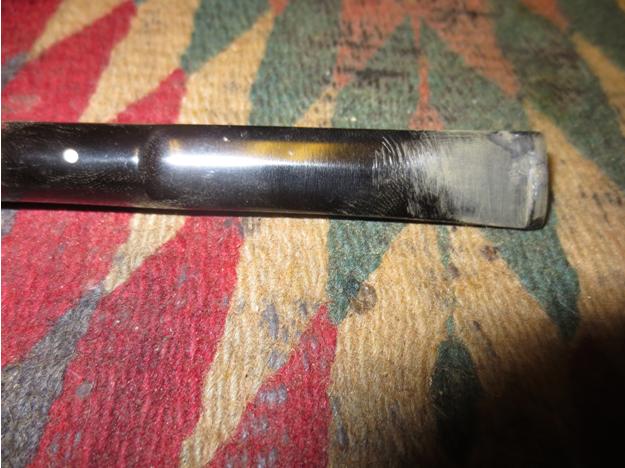
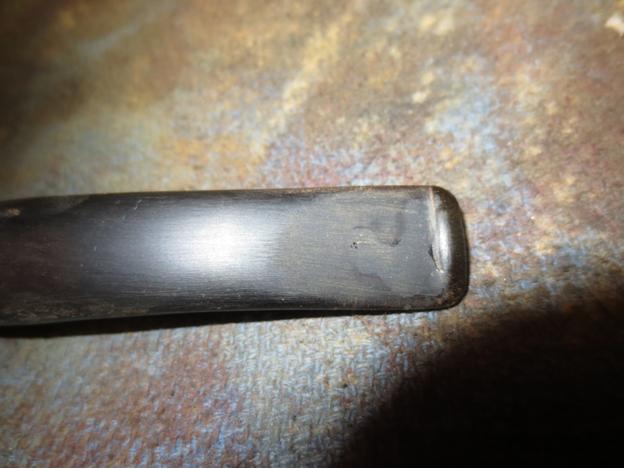
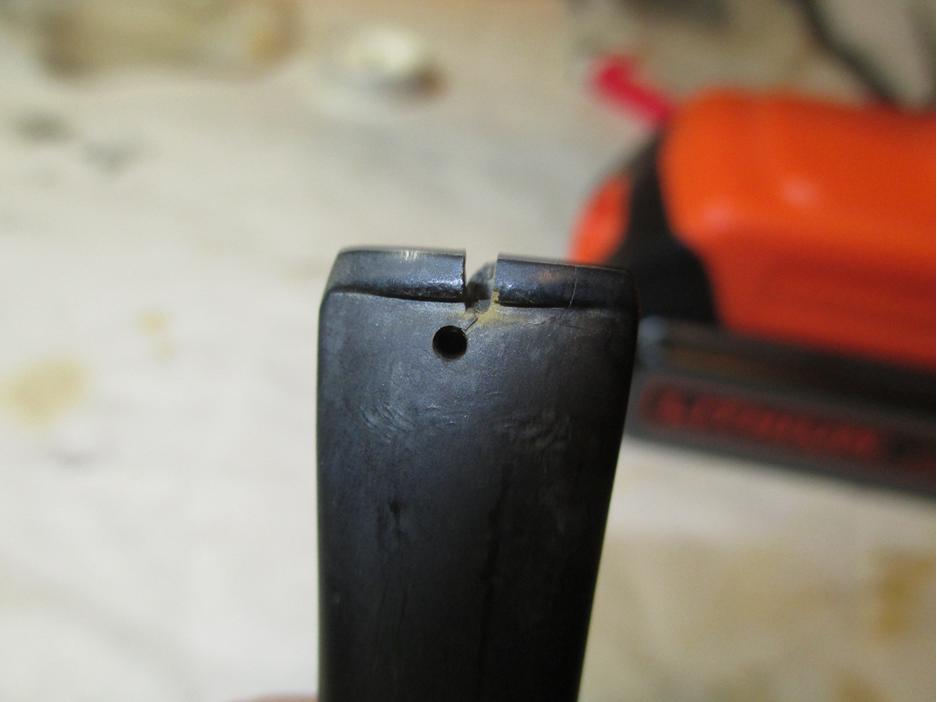
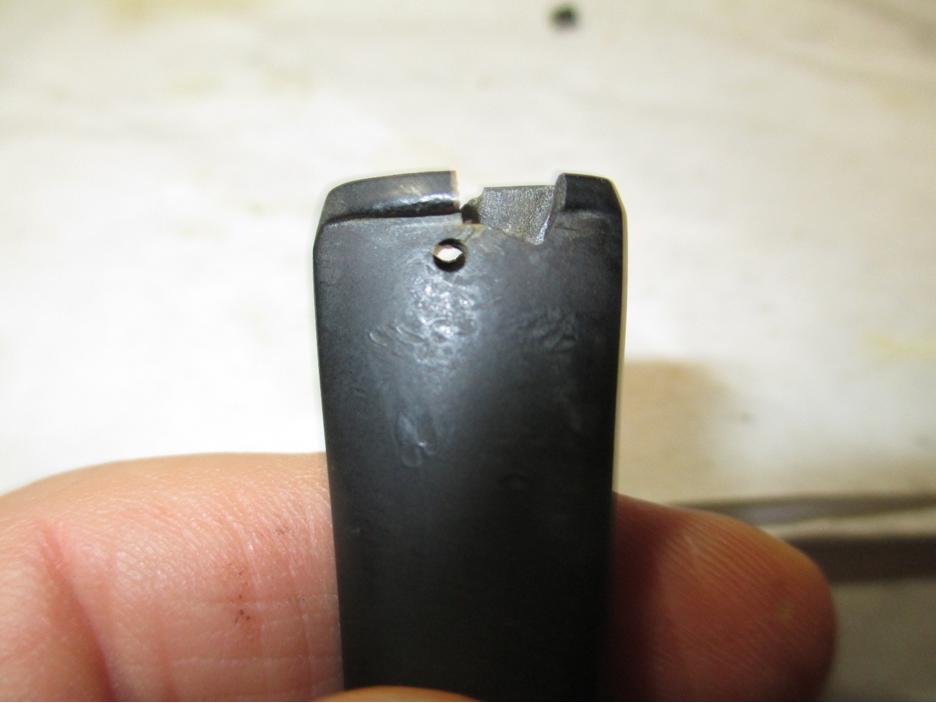
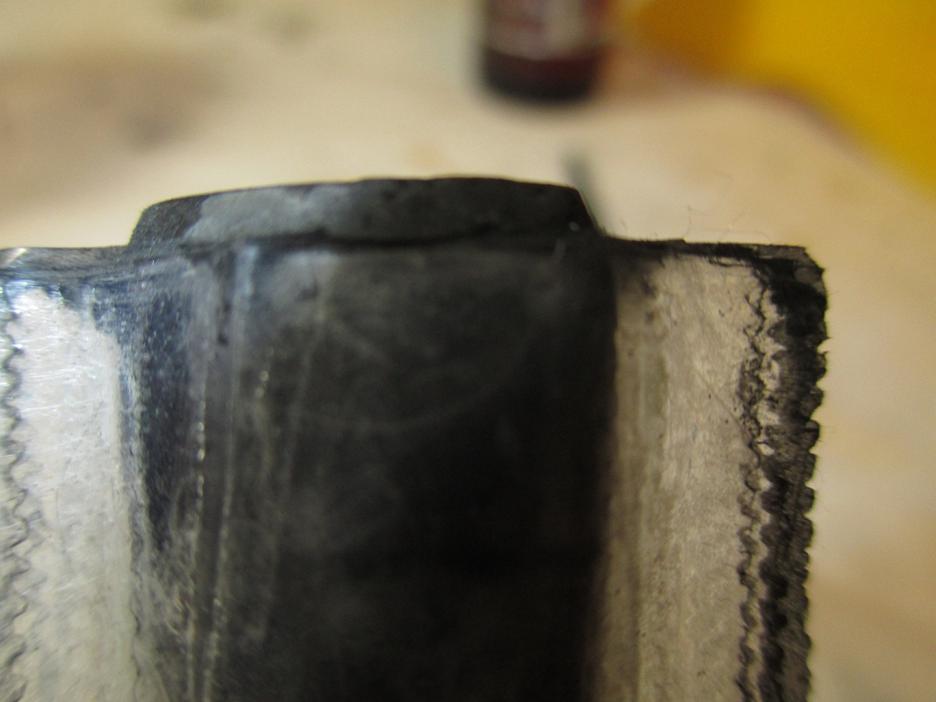
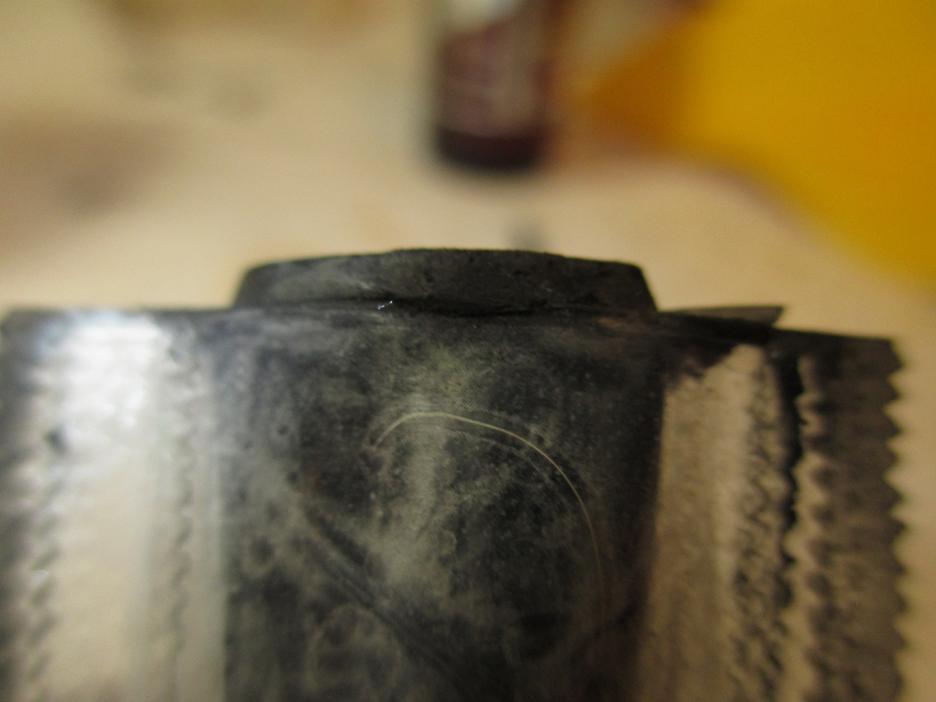
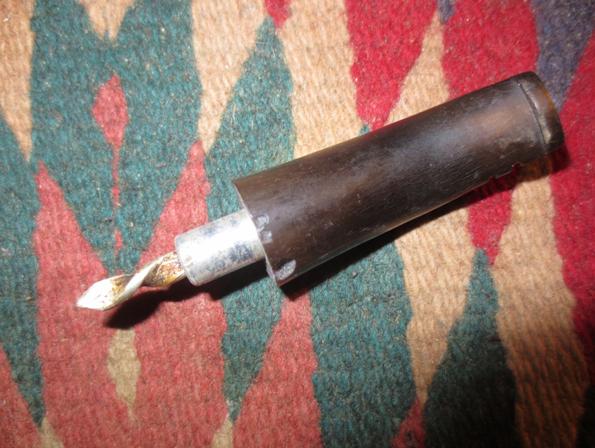
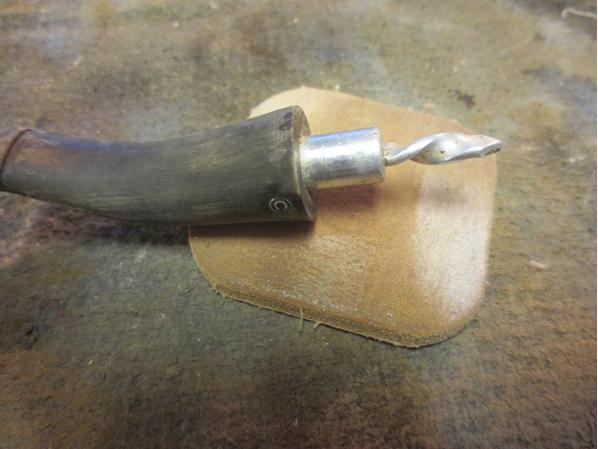
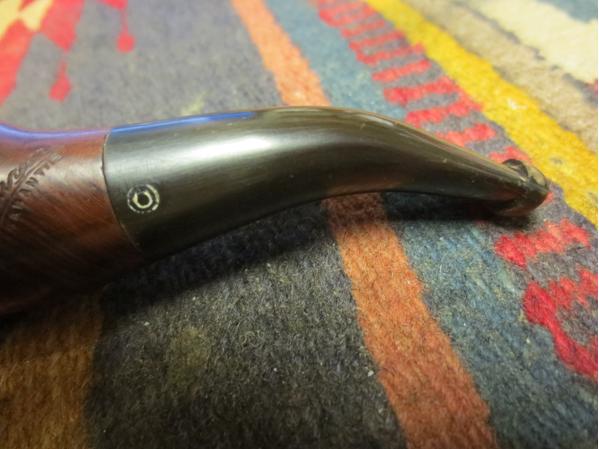
The next photo shows the stamping on the side of the shank and the logo on the stem. It is hard to see but much of the depth of the stamping on the stem is gone so restoring that with new white colouring will not be possible.Bruyere10 
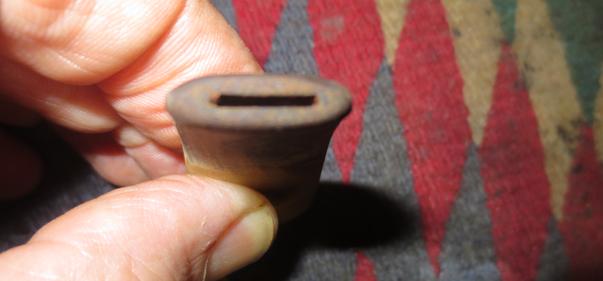
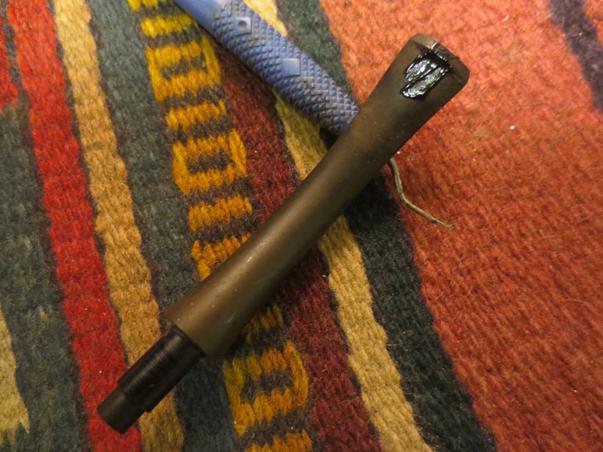
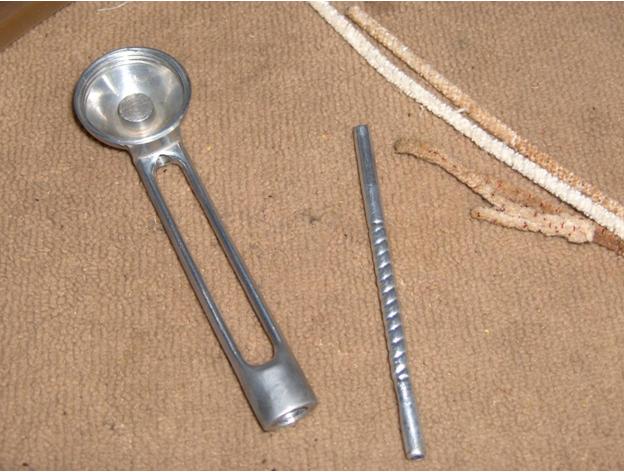
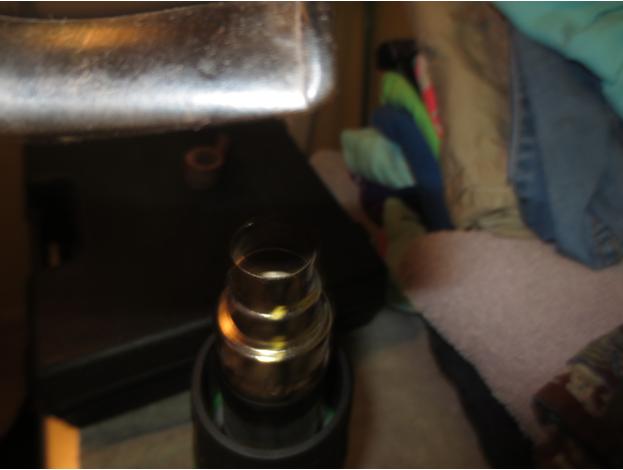
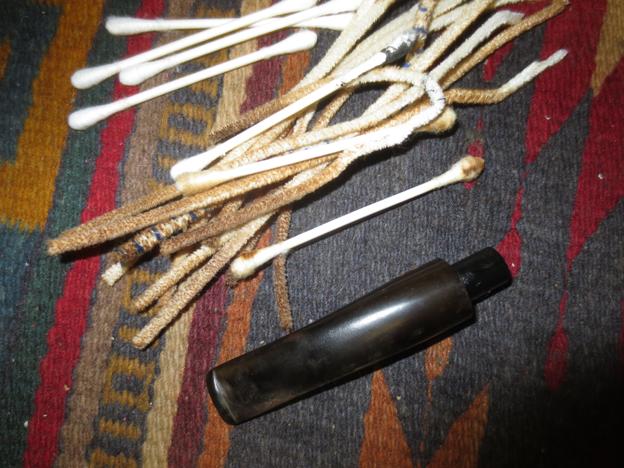
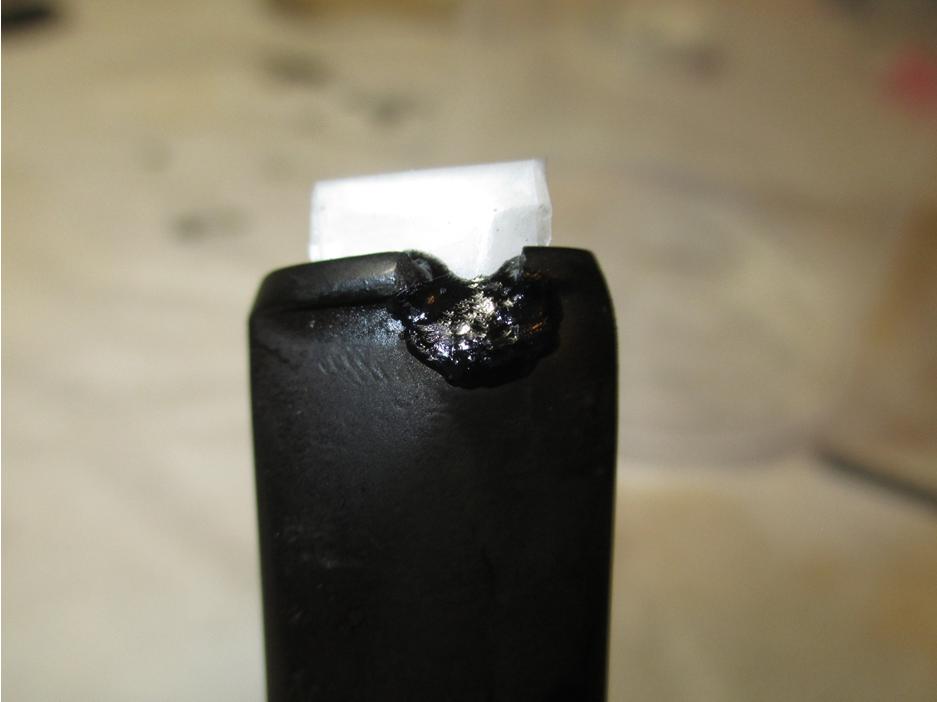
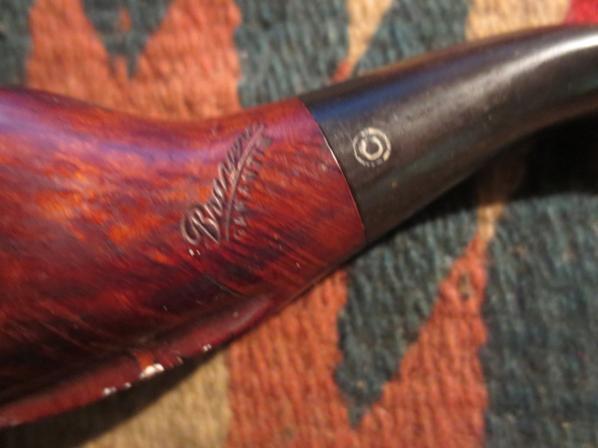
When I removed the stem the tenon was inset aluminum and there was a stinger apparatus in place. It was a twisted piece that had a slot in the top for the airflow that followed the twist to the airway. It was stuck in the tenon and would need to be loosened before I could properly clean out the airway in the stem. I included some extra photos of the stem to show the cuts and chips from a different angle.Bruyere11

Bruyere12

Bruyere13 
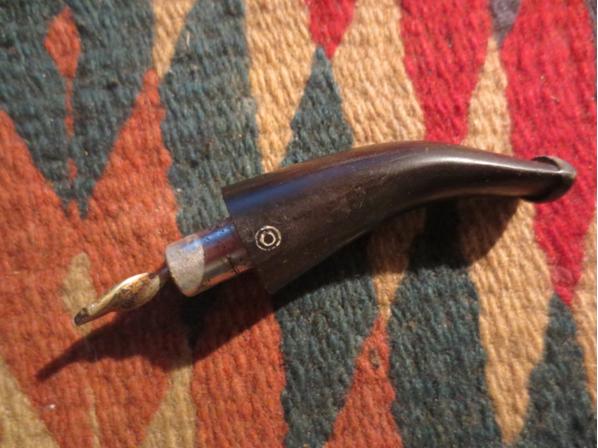
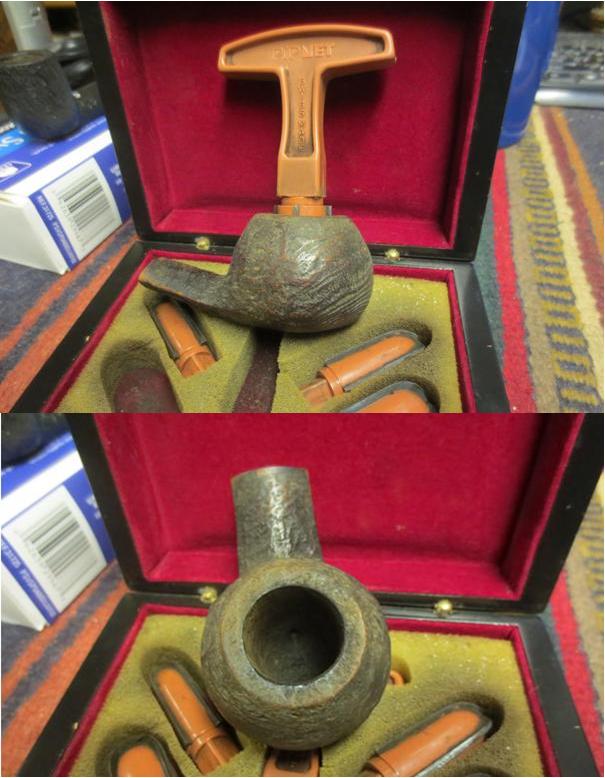
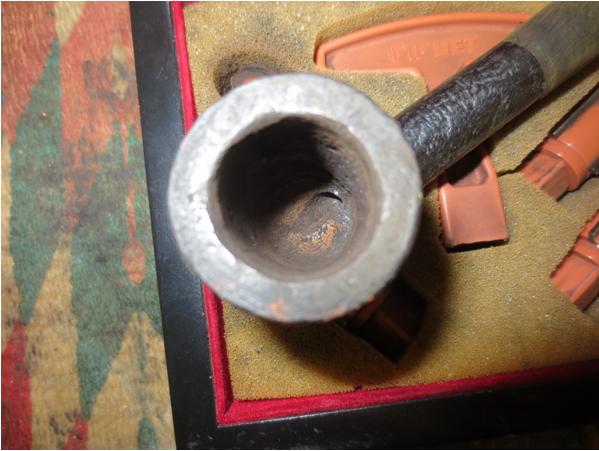
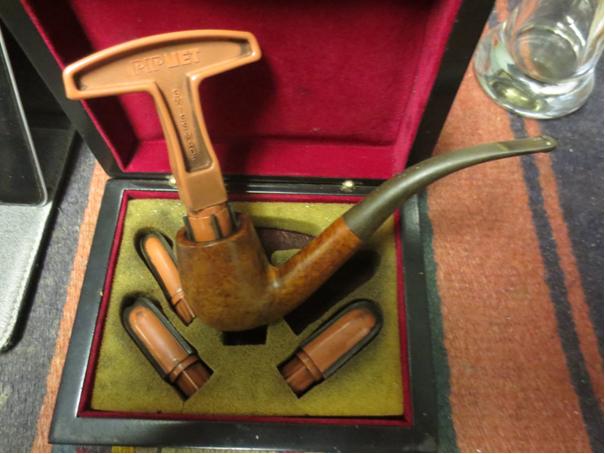
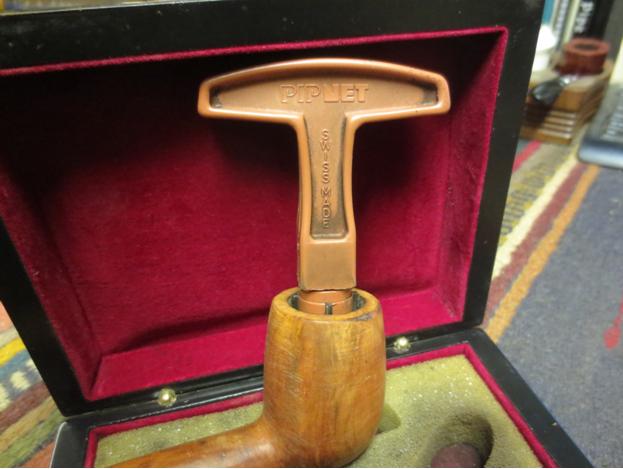
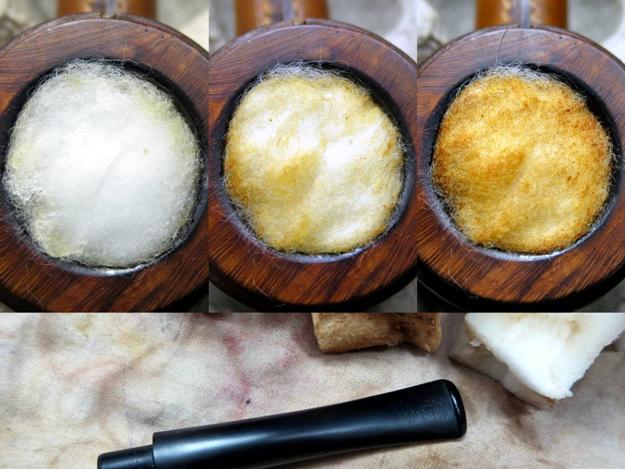
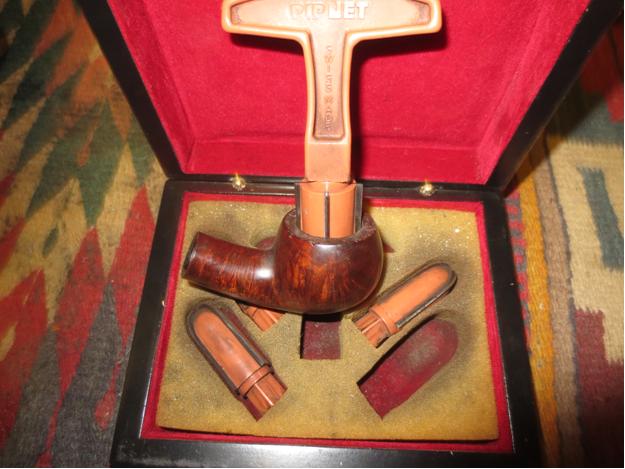
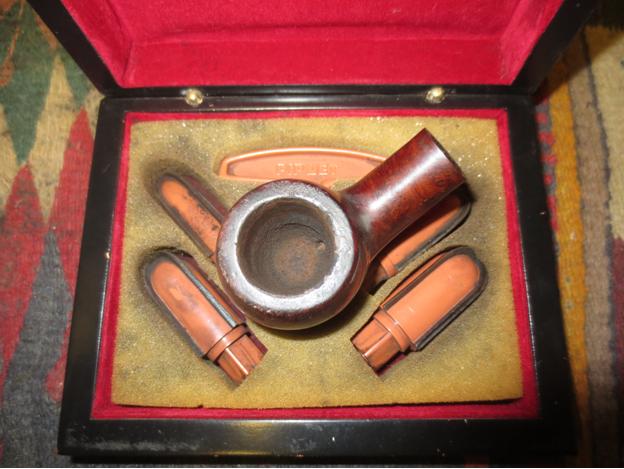
I reamed the bowl with a PipNet reamer. I started with the smallest cutting head and cleaned things up with it first. I then used the second cutting head which was pretty close to the diameter of the bowl. I cut the cake back to nothing so that I could examine the interior walls of the bowl. I was pleasantly surprised to find that once the cake was gone the interior walls of the bowl were solid and there was no burning.Bruyere14

Bruyere15 
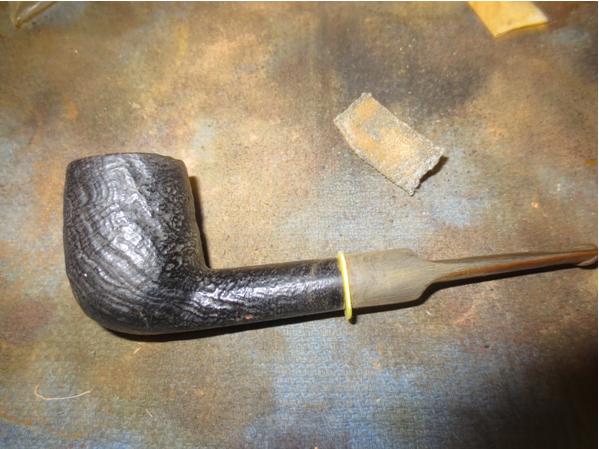
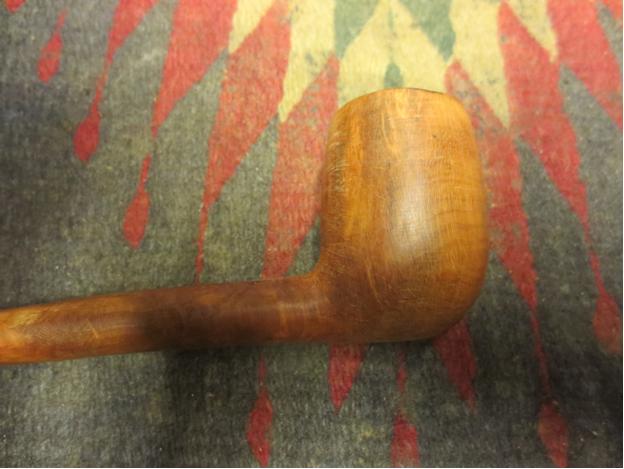
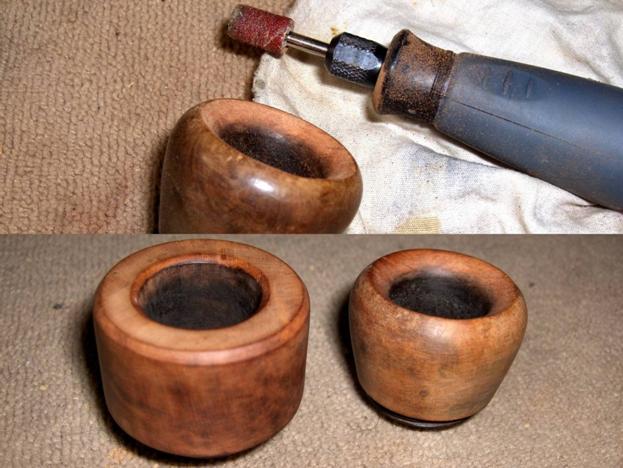
I worked on the out of round bowl with a folded piece of sandpaper to smooth out the damaged areas and bring it back to as close to round as I could get it. I then topped the bowl on my topping board to smooth out the rim and clean up the damage on the surface. I will often do this just to bring the damage on the inner edge of the rim closer to the top so that I can smooth it out further with sandpaper.Bruyere16

Bruyere17

Bruyere18 
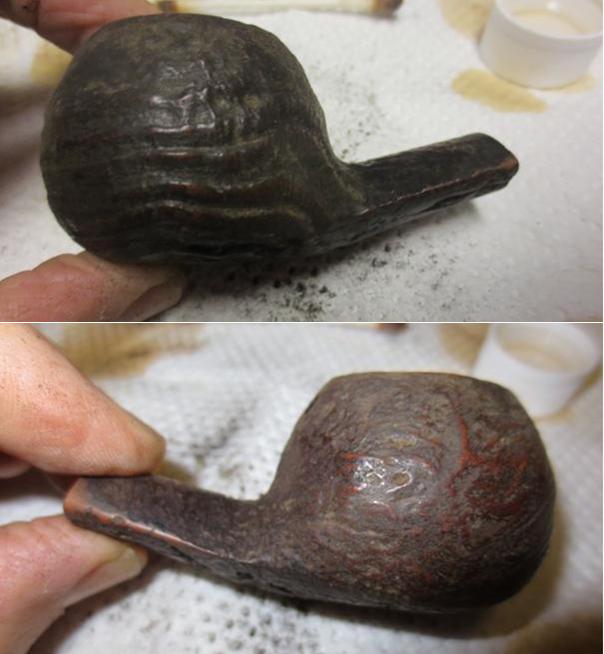
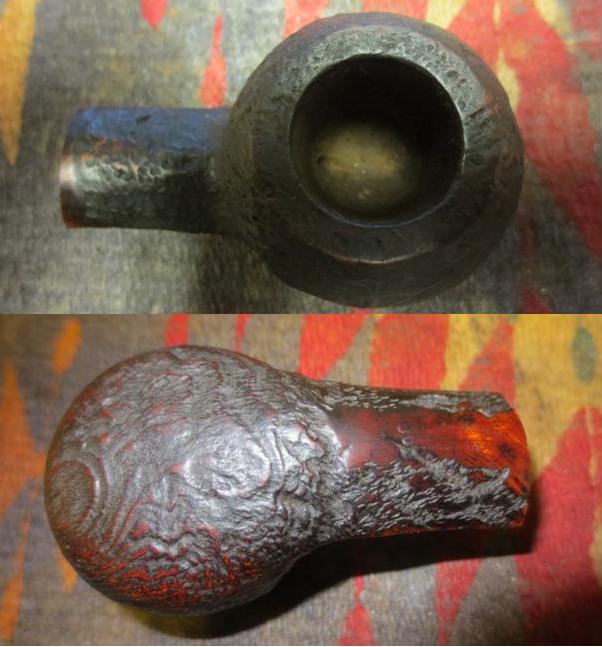
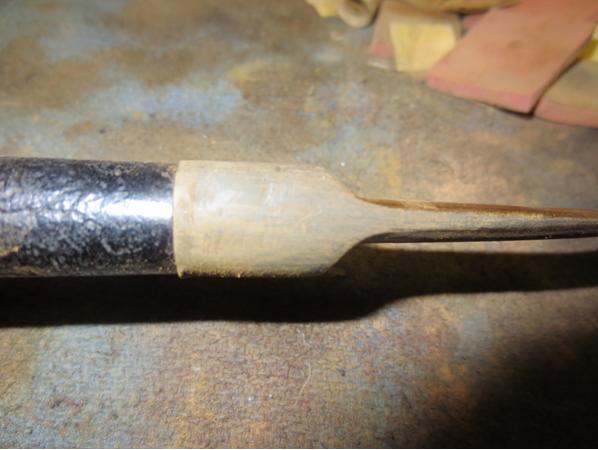
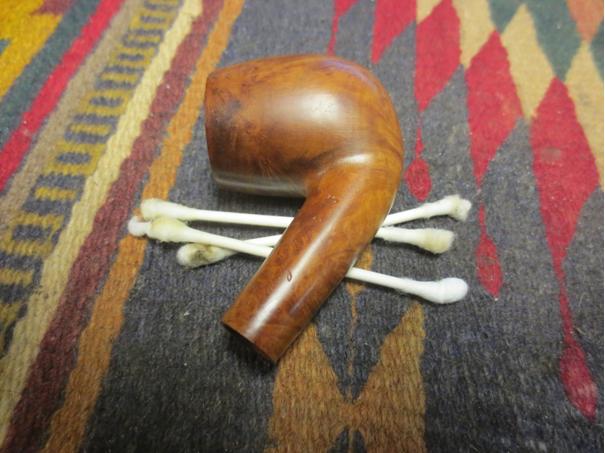
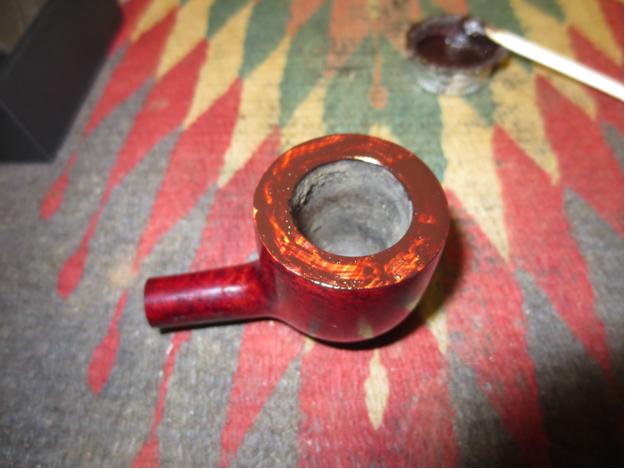
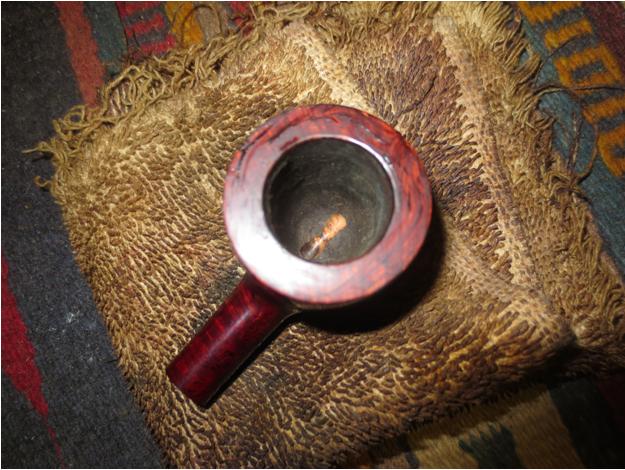
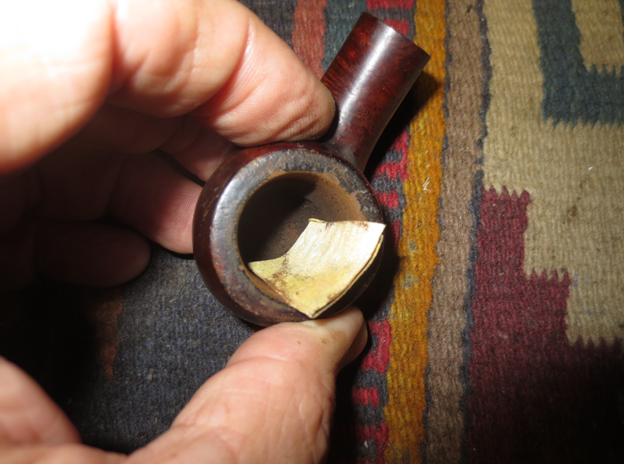
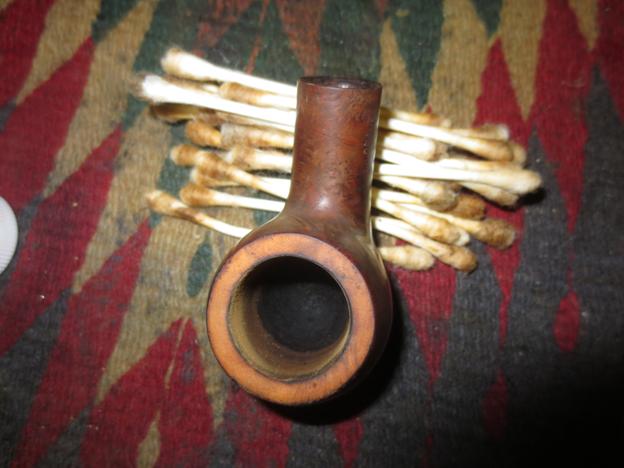
I wiped down the bowl with acetone on a cotton pad to remove the grime and the remnants of the finish. There appeared to be some damage to the front of the bowl that I wanted to have a closer look at once the bowl was cleaned up.Bruyere19 
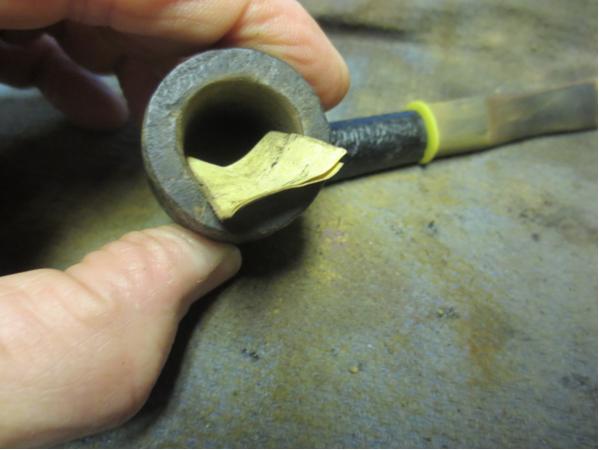
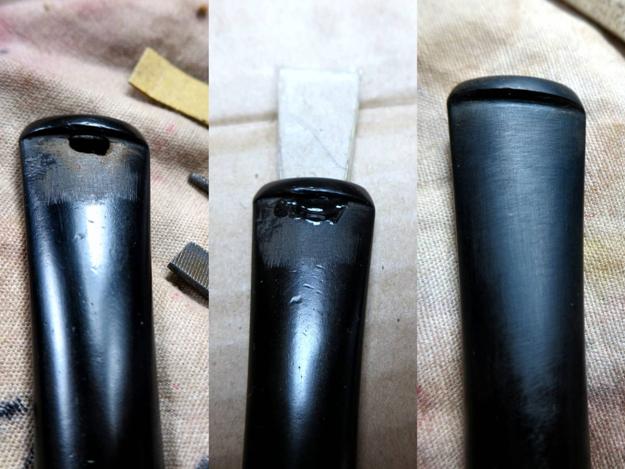
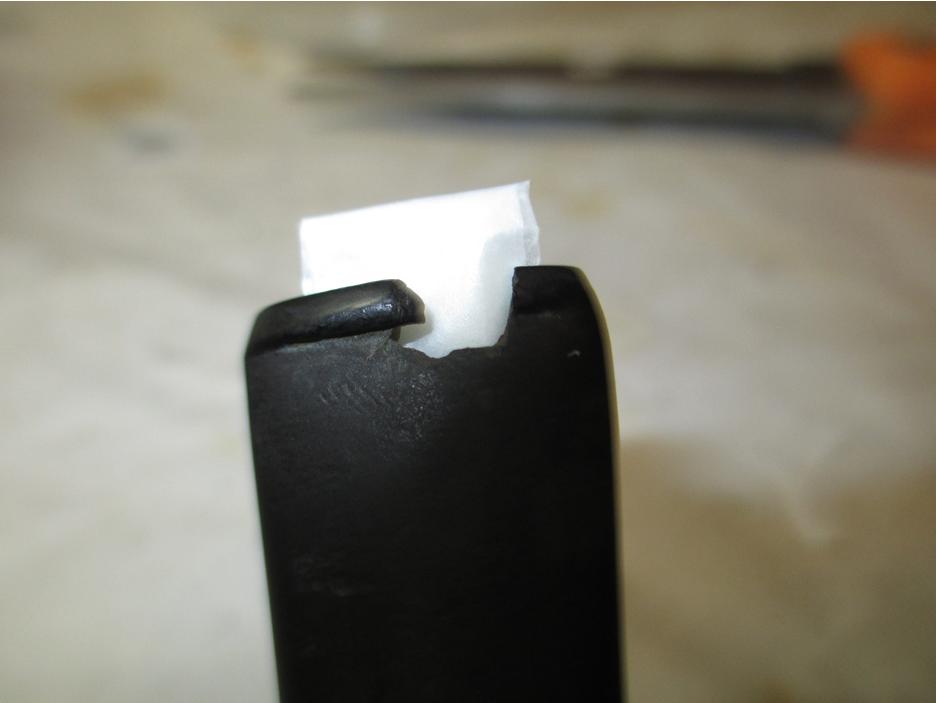
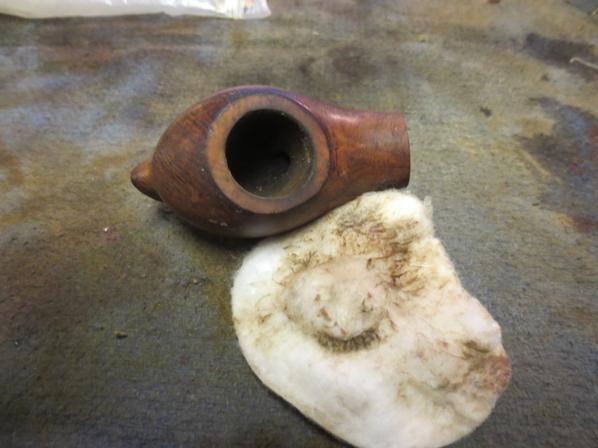
I wiped down the horn stem with cotton pads and some alcohol to clean up the surface so that I could begin the repairs. I debated on whether to use black super glue or clear super glue for the repairs to the chipped areas but decided to go with the clear hoping that once it dried the colour would come through the repair and blend it into the horn better. I layered the repair to the chipped areas on the underside and the cuts on top side of the stem. I wanted each layer to dry before I added another layer of glue.Bruyere20

Bruyere21

Bruyere22 
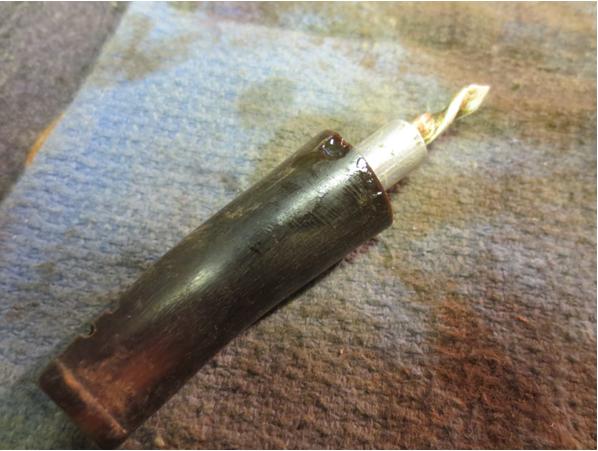
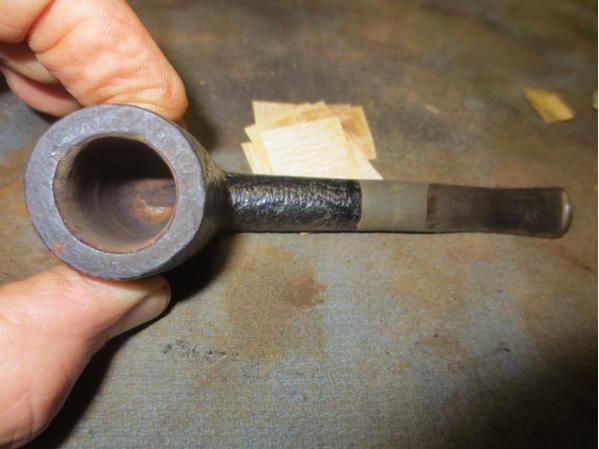
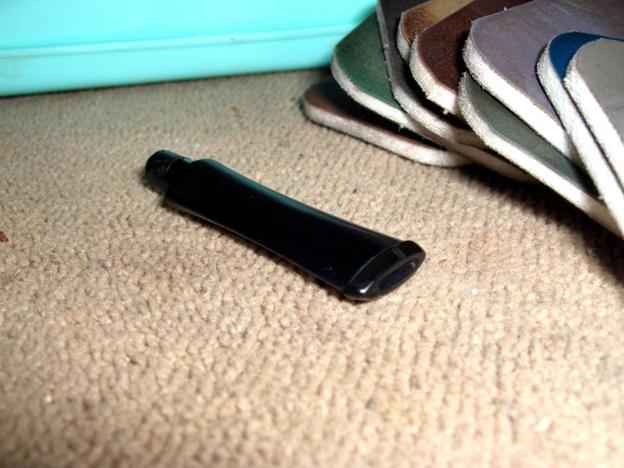
After many layers of glue I was disappointed that glue did not cure clear but rather had a cloudy white appearance. The fills on the cut areas dried hard but looked like two white slashes. I was hoping that as I polished the stem these would blend in a bit more. The fills in the chips were a mixed bag. The smaller ones dried perfectly and blended in well. The larger divot was also white. I cleaned that area once again and added a drop of black superglue to the top of the repair to see if I could hide it better.Bruyere23

Bruyere24 
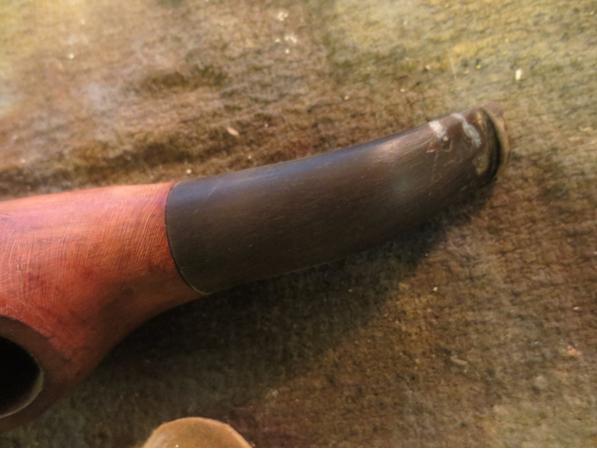
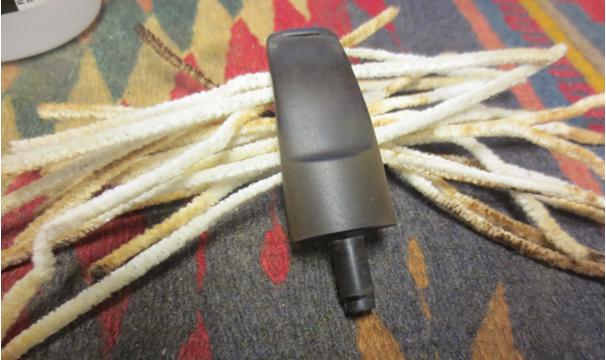
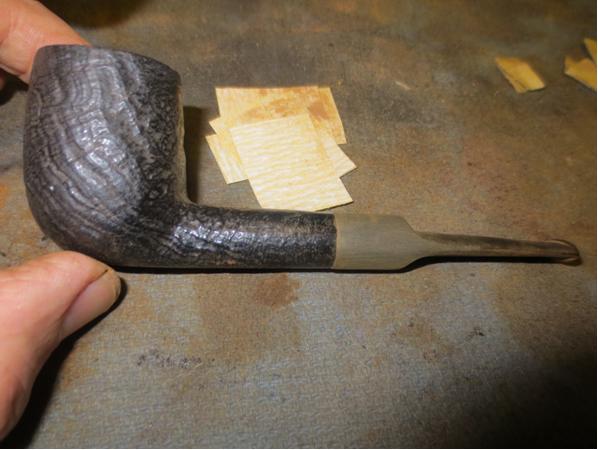
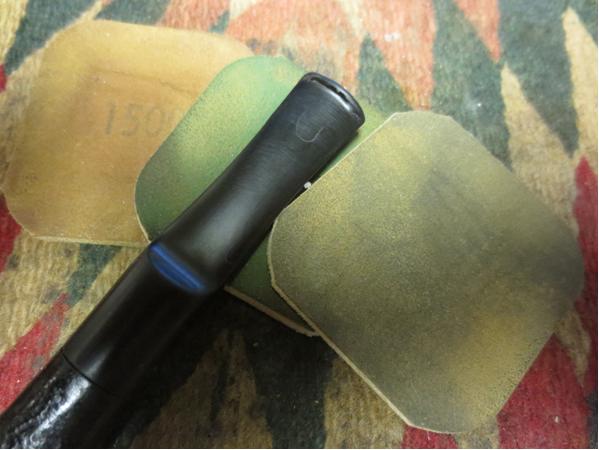
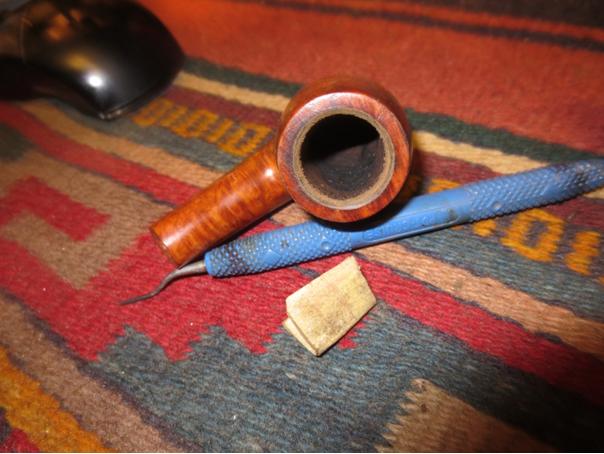
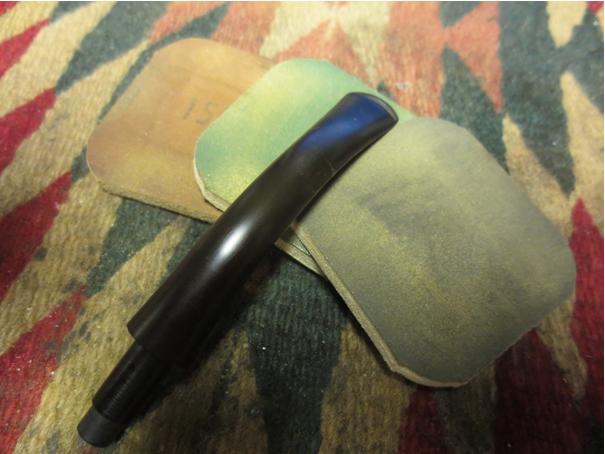
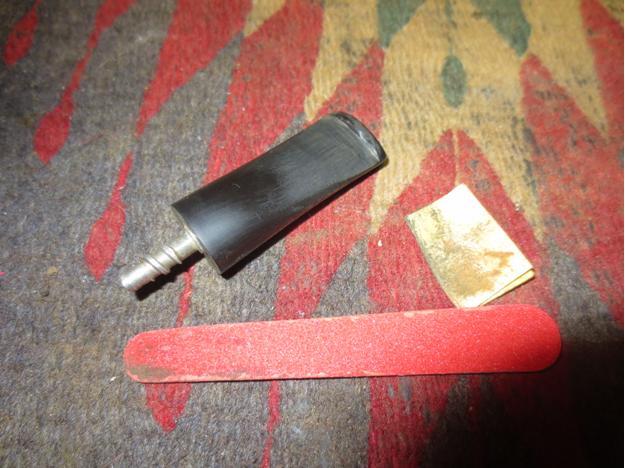
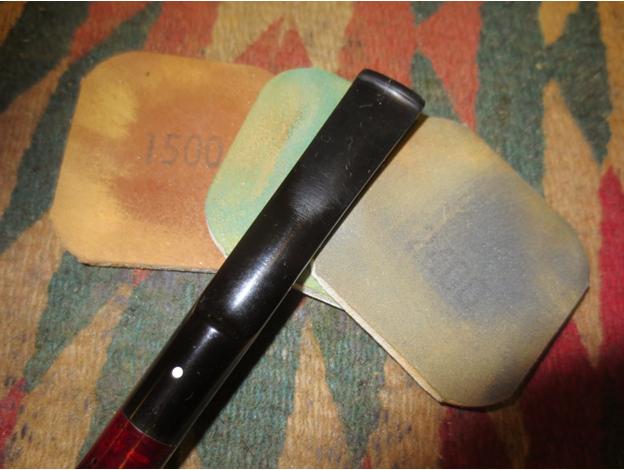
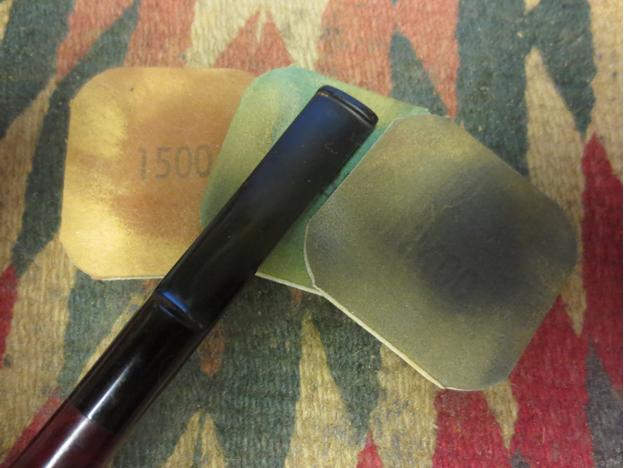
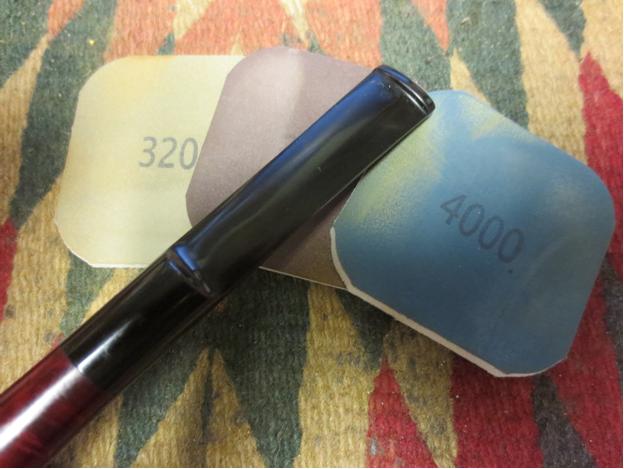
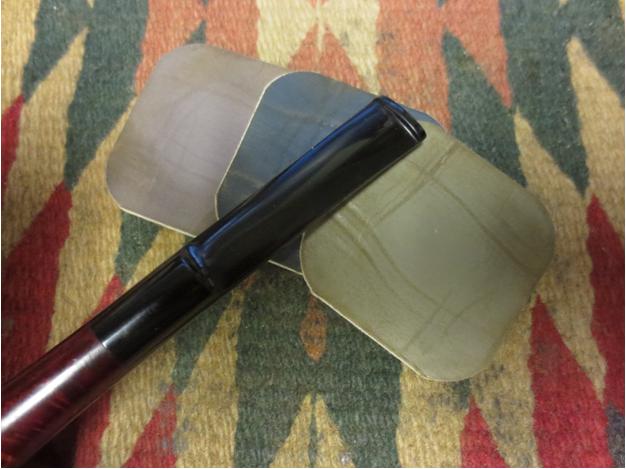
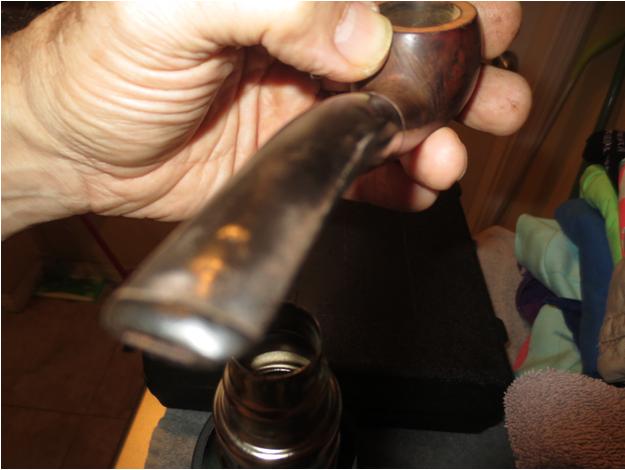
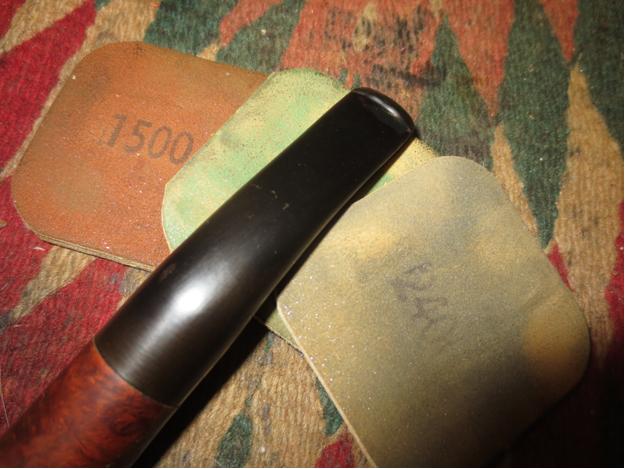
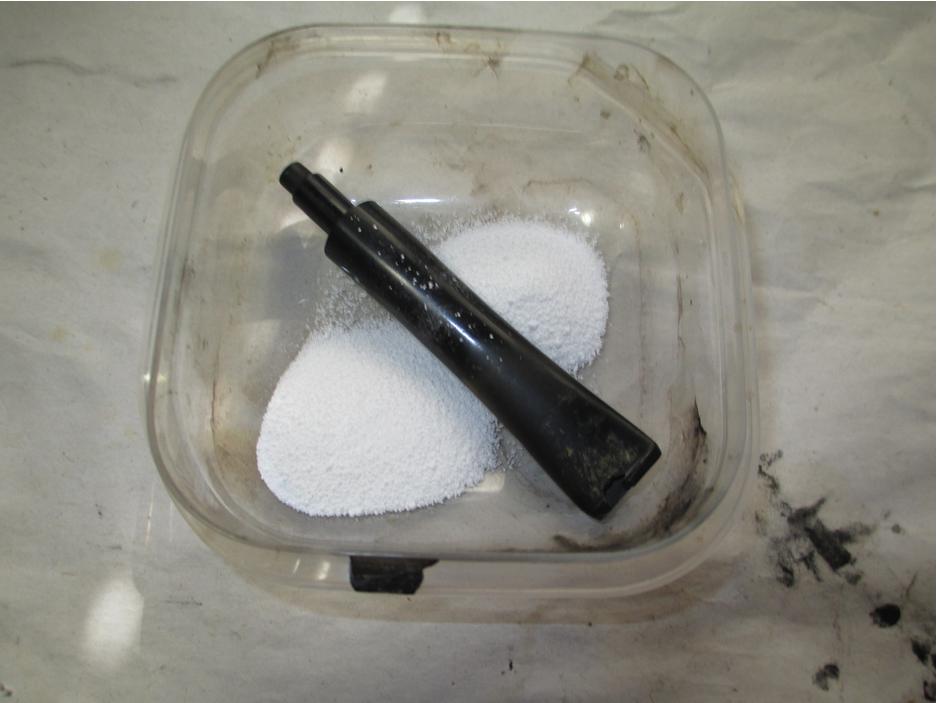
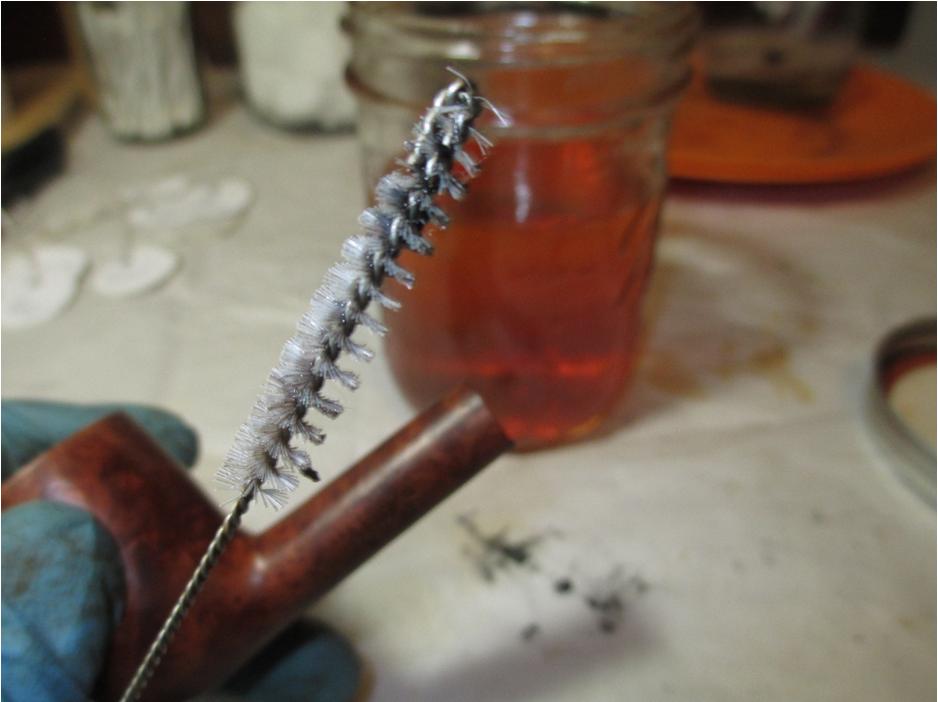
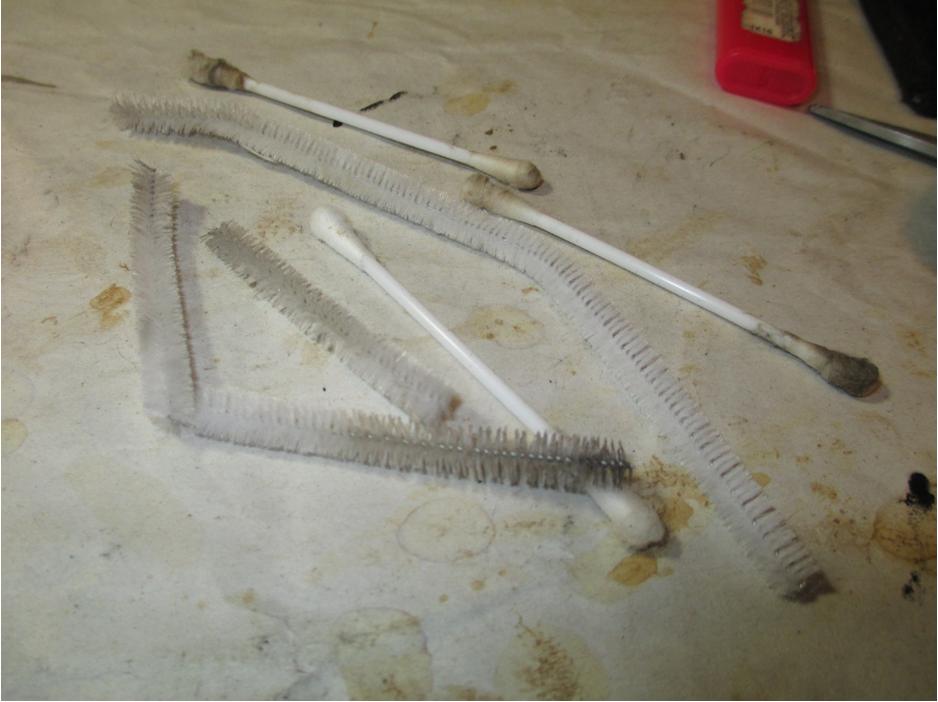
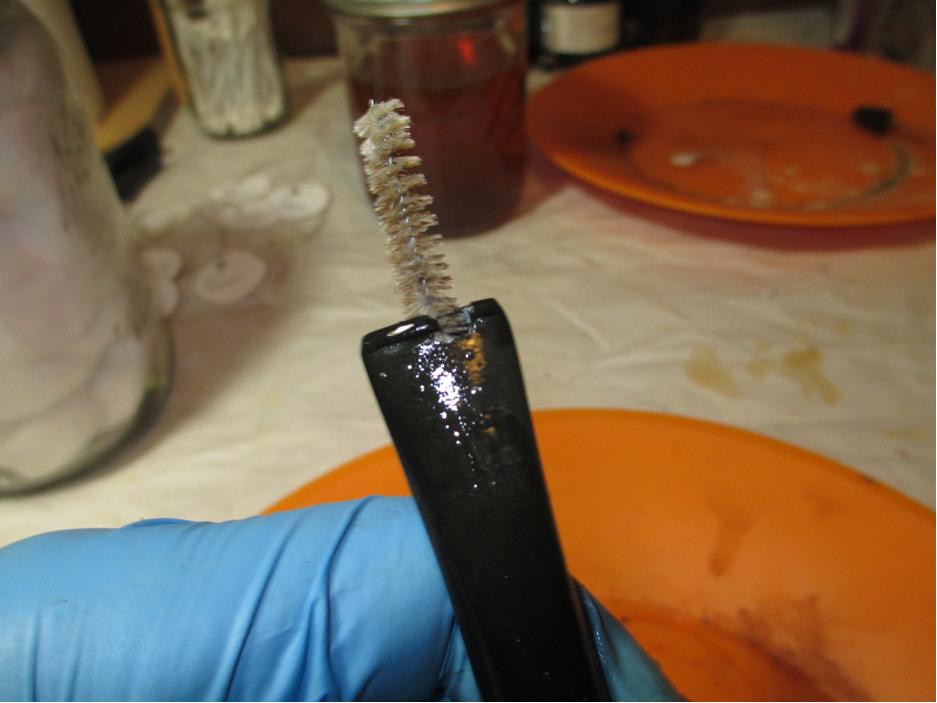
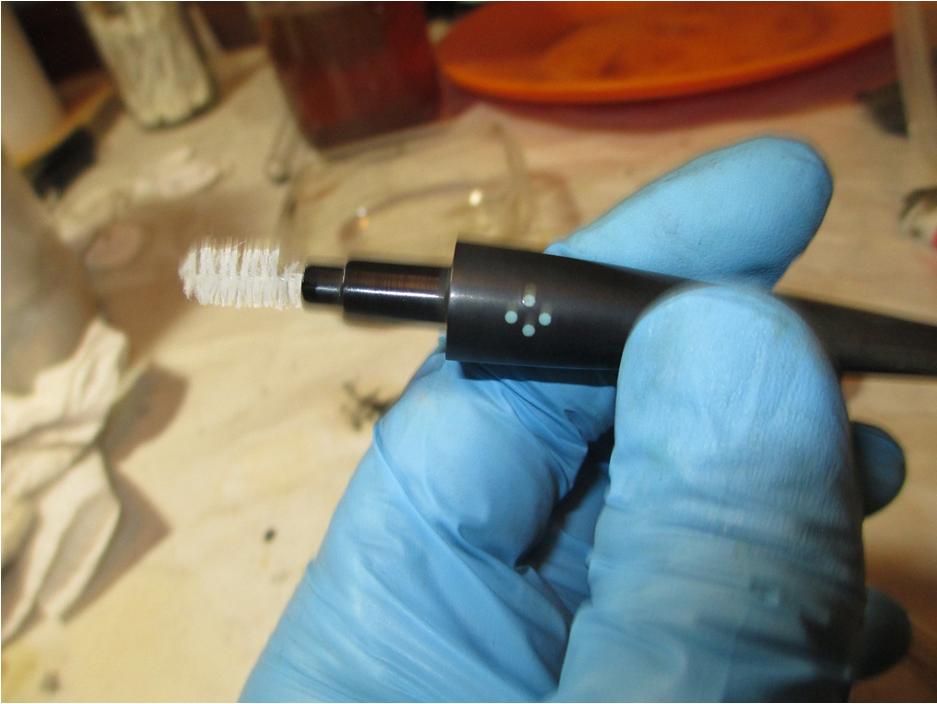
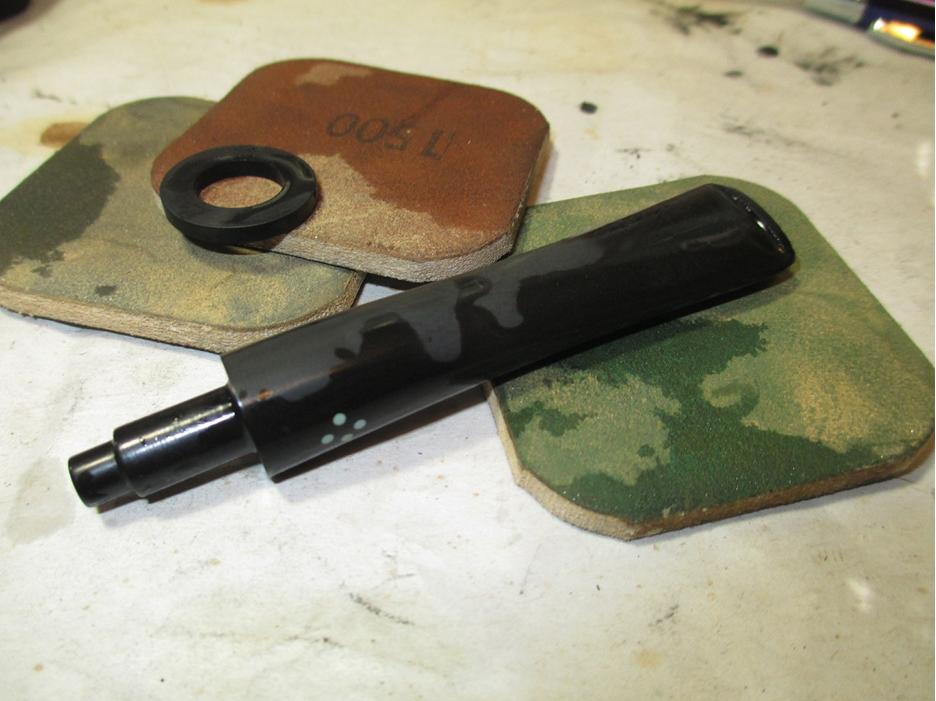
I sanded the bowl and stem with 220 grit sandpaper and then medium and fine grit sanding sponges to clean up the repairs and the scratches in the briar. I carefully avoided the area of the stamping and the logo so as not to harm them. I also cleaned up the stinger and was able to remove it from the tenon. It was threaded and after cleaning up the joint I was able to unscrew it and clean it and airway of the stem. I wet sanded the bowl and stem with a 1500 grit micromesh sanding pad. The striations of colour are beginning to show on the stem and the bowl is looking far better than when I started.Bruyere25

Bruyere26

Bruyere27 
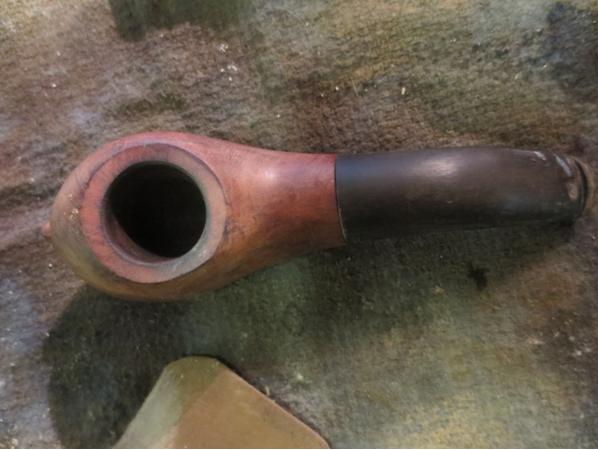
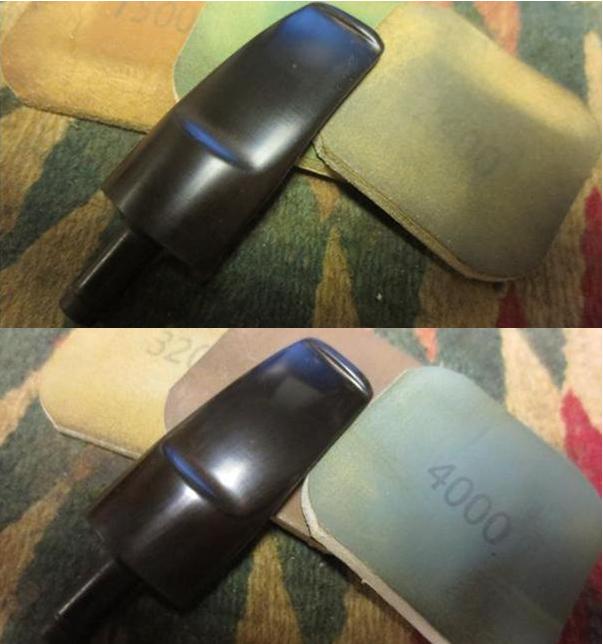
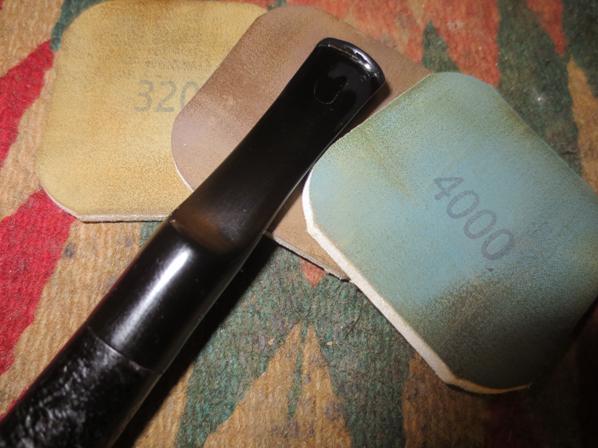
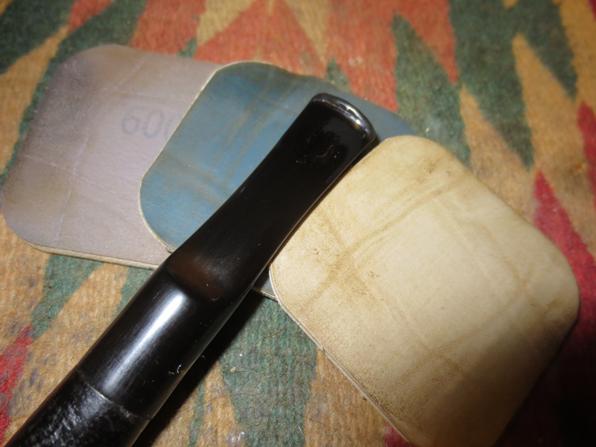
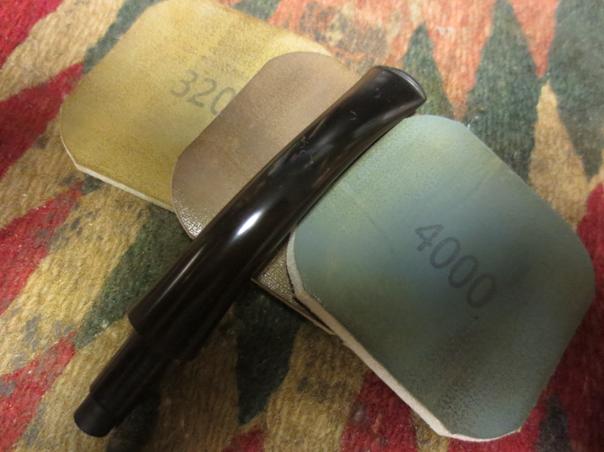
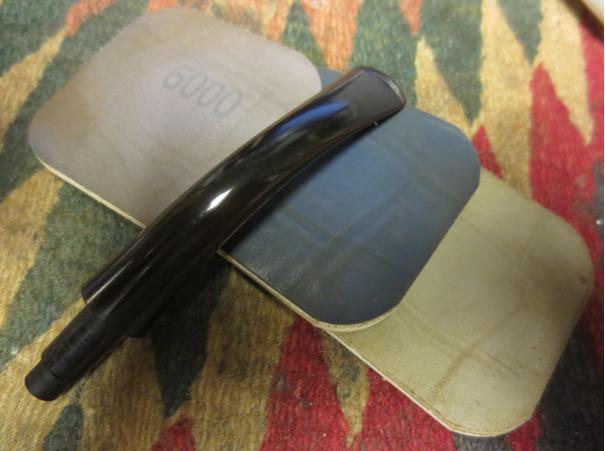
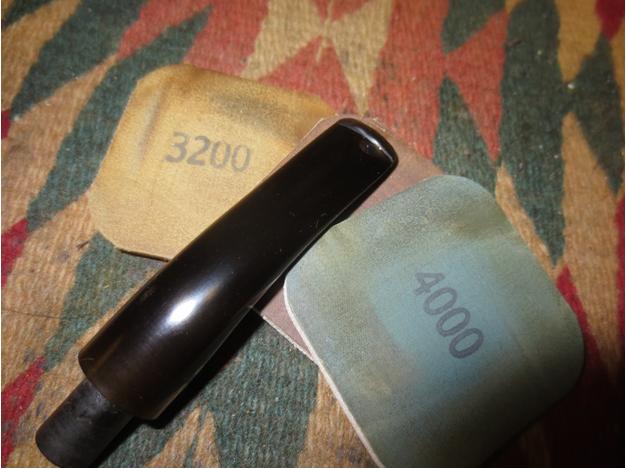
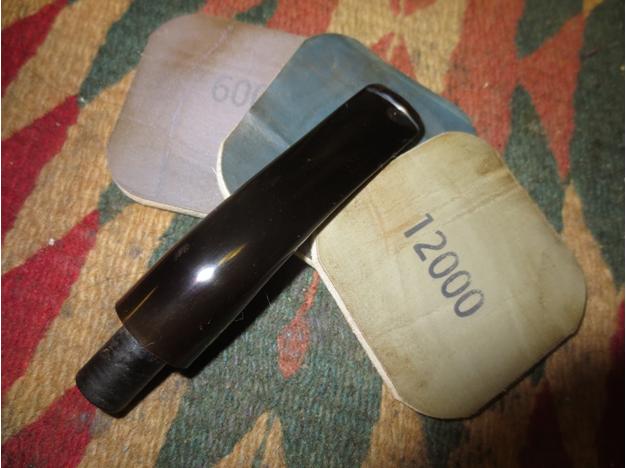
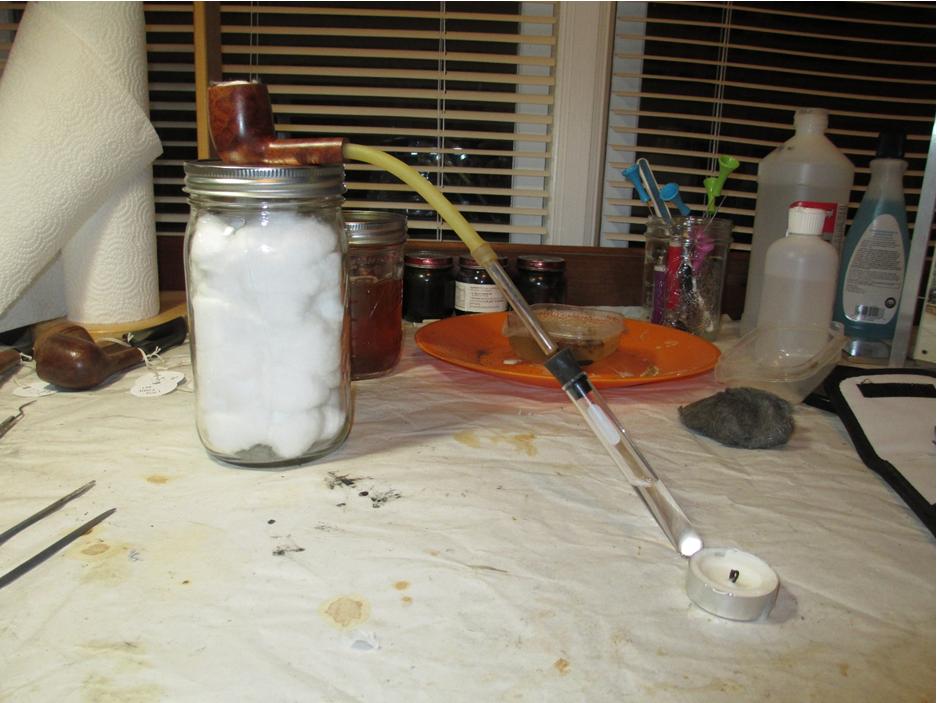
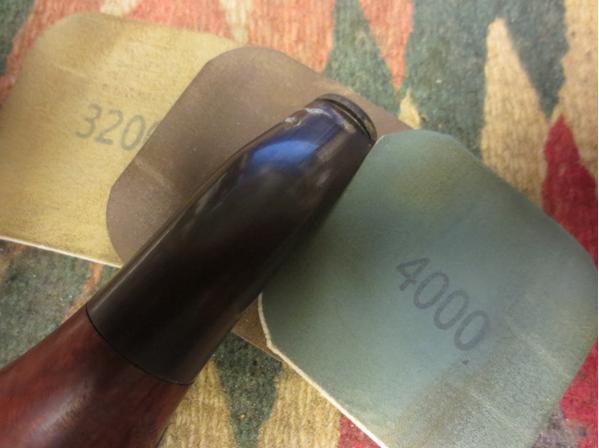
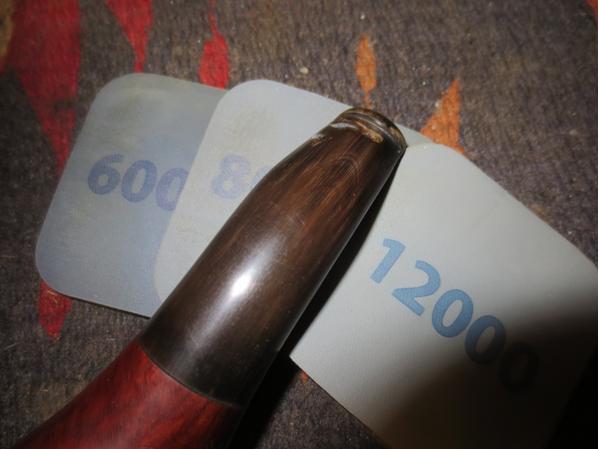
I wiped the stem down with a light wipe of alcohol to remove the sanding dust and then continued to wet sand it with 1500-2400 grit micromesh pads. I rubbed it down with Obsidian Oil and then dry sanded with 3200-4000 grit pads. I rubbed it down again with the oil and then finished sanding it with 6000-12000 grit pads. I gave it a final coat of Obsidian Oil and let it dry.Bruyere28

Bruyere29

Bruyere30 
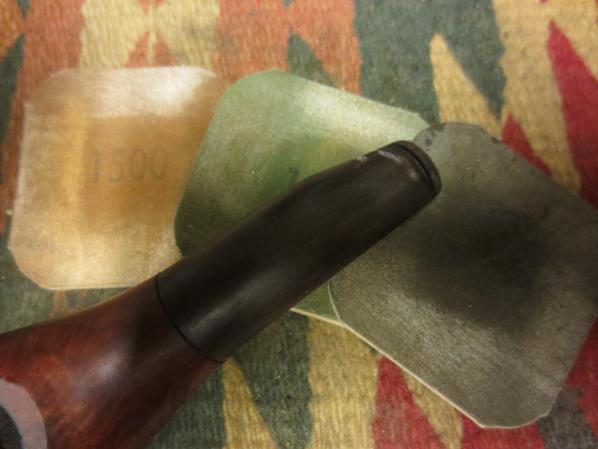
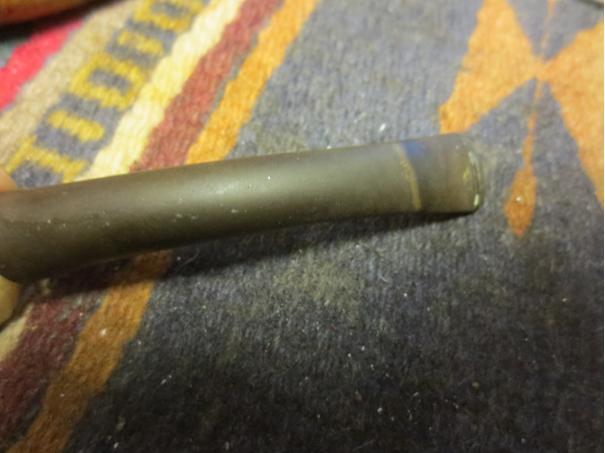
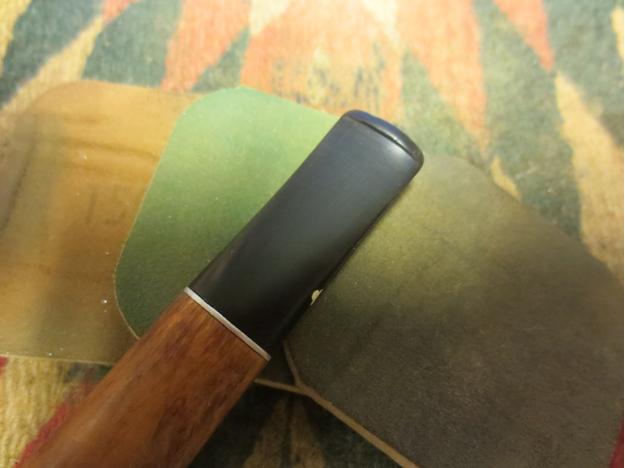
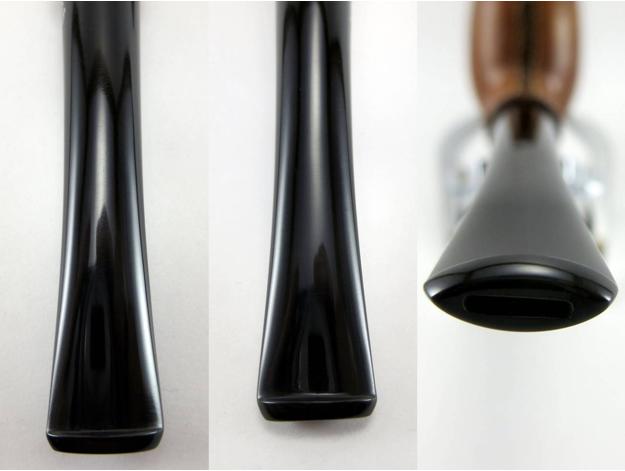
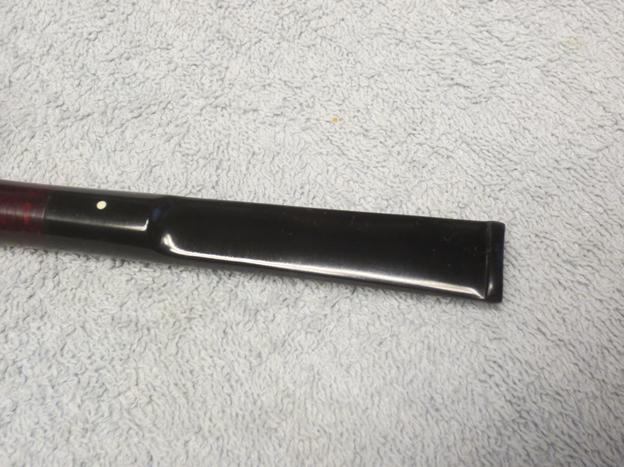
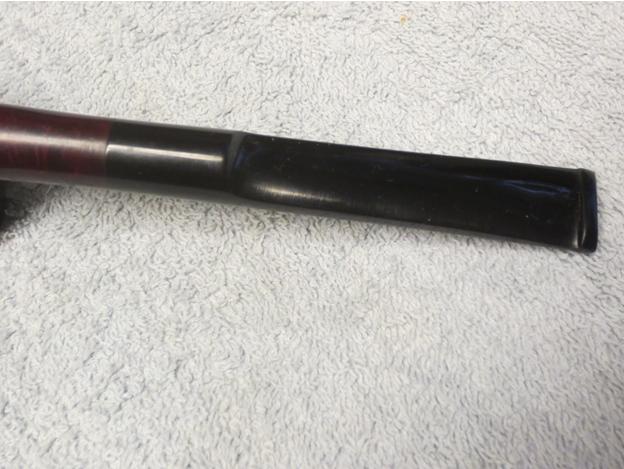
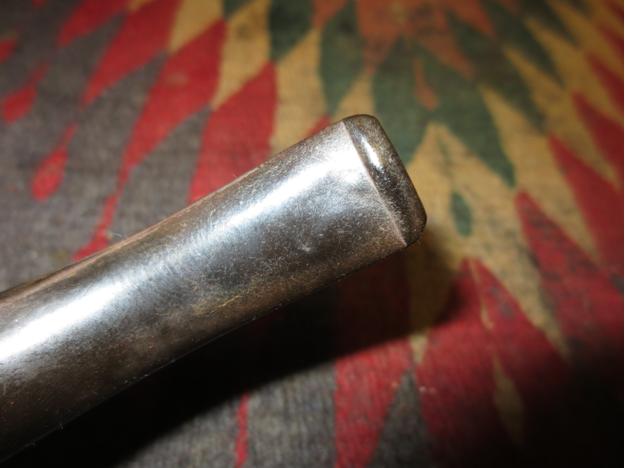
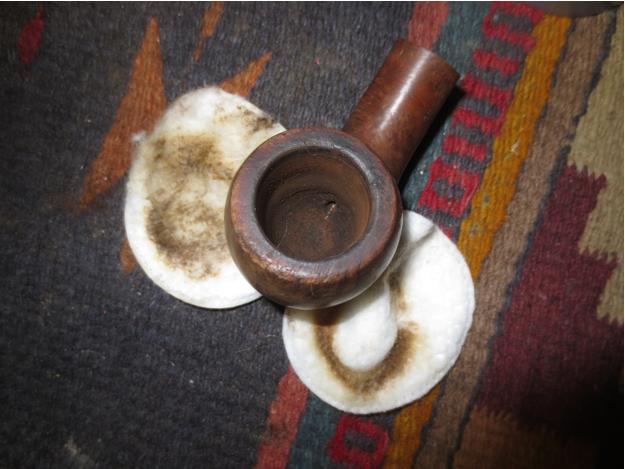
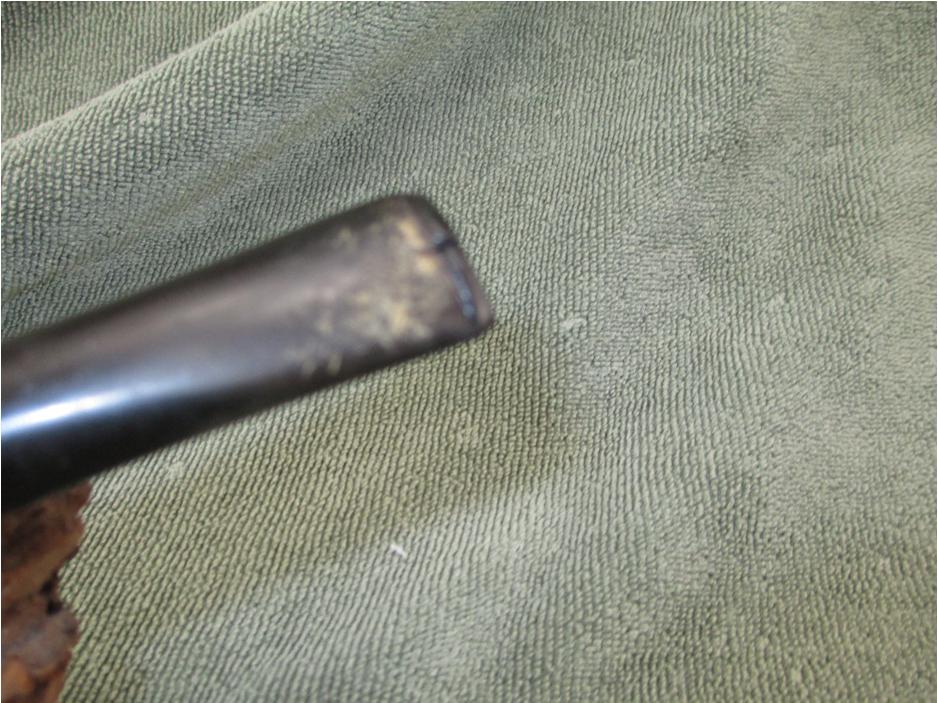
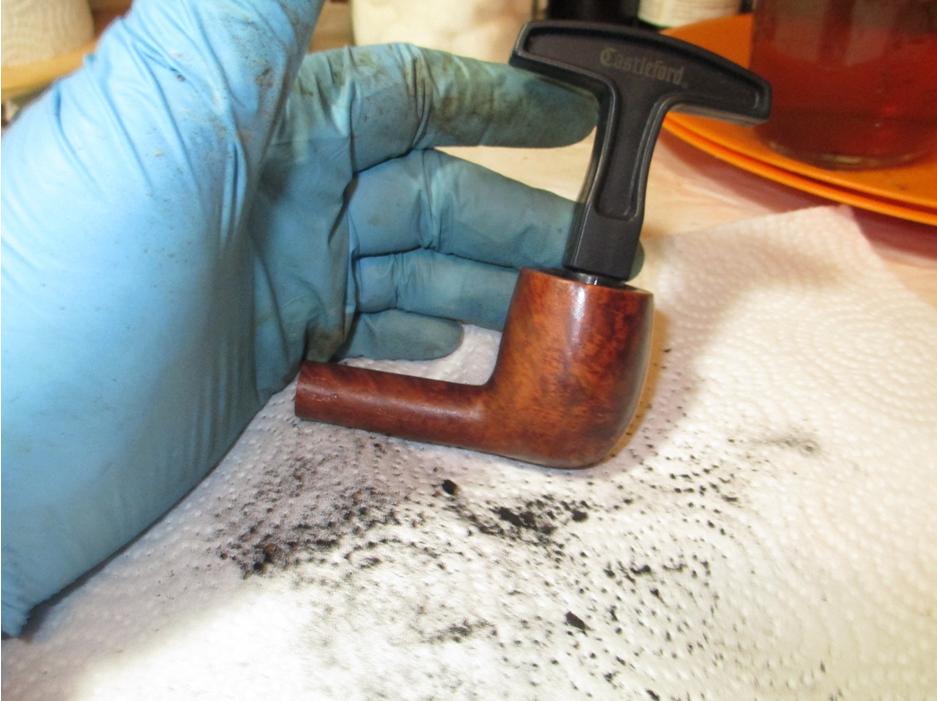
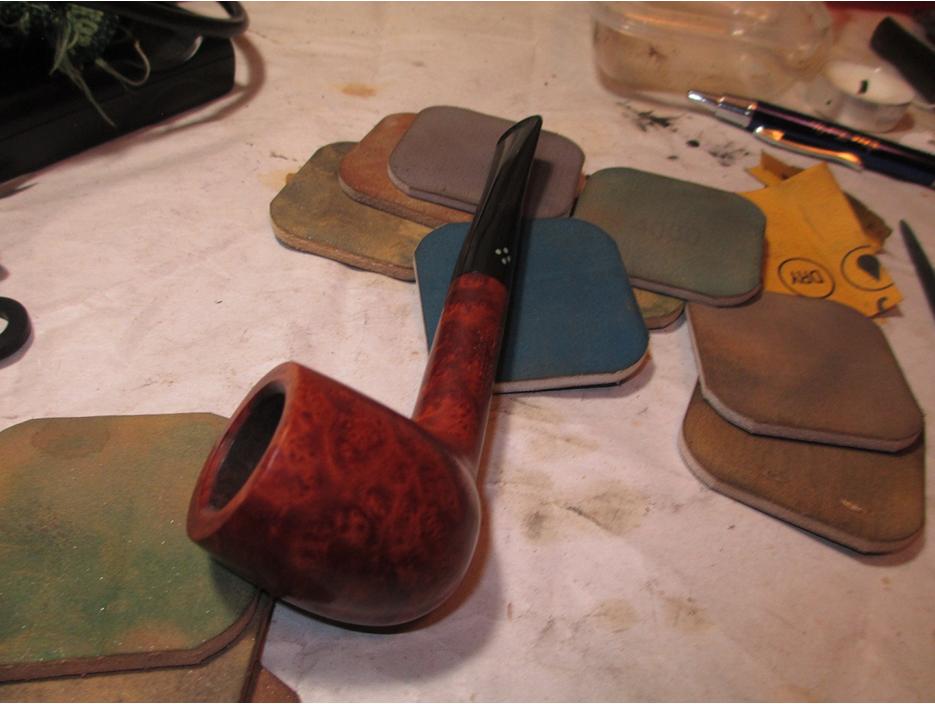
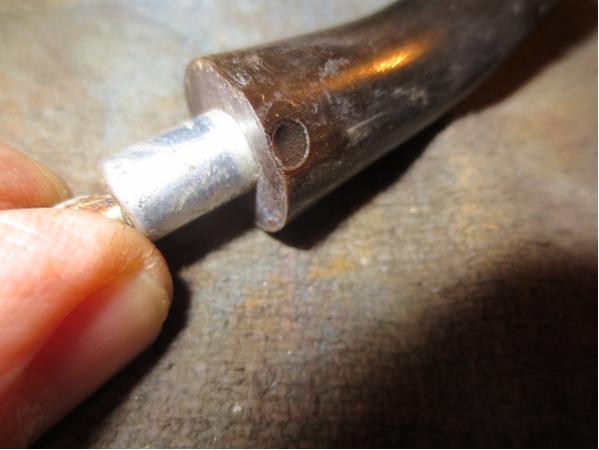
I buffed the bowl and stem with White Diamond and Blue Diamond on the wheel. I then cave the bowl and stem multiple coats of carnauba wax and buffed it with a clean buffing pad. I hand buffed the stem and the bowl with a microfibre cloth. The first photos below are of the polished stem. You can see the repairs from the cuts. For some reason the glue dried white – even though it is clear. I did a patch on the chip on the underside with black super glue and it does not quite match… ah the frustrations of repairs. This one is staying with me so I will not mind as the stem is now smooth and polished. The cuts and the chips are repaired and are smooth to the touch. The fit of the stem to the shank is good with no missing stem parts.Bruyere32

Bruyere33

Bruyere34

Bruyere35 
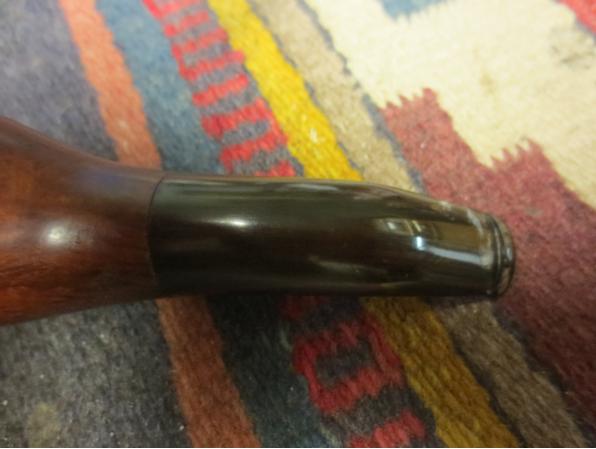
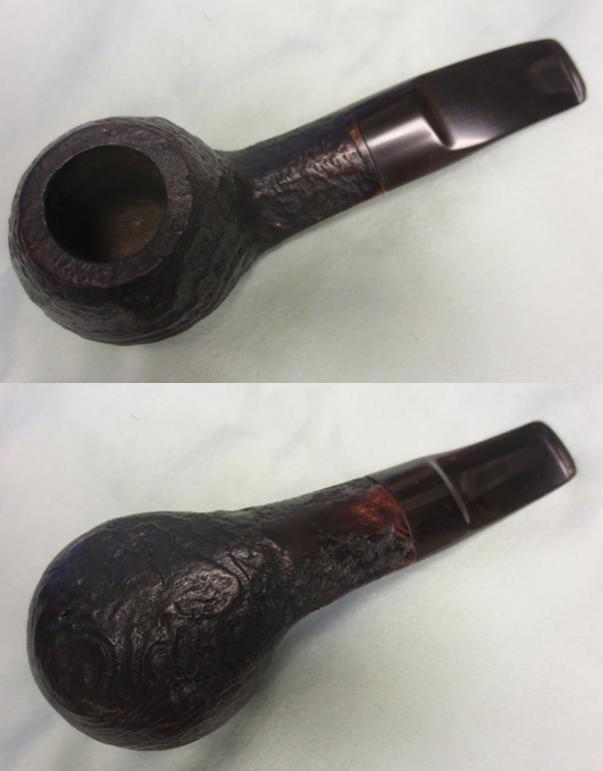
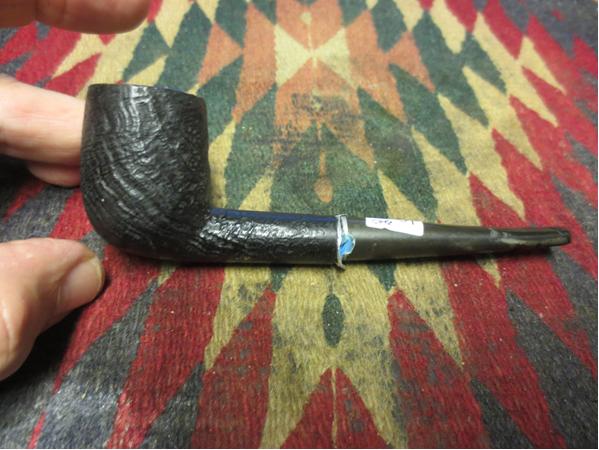
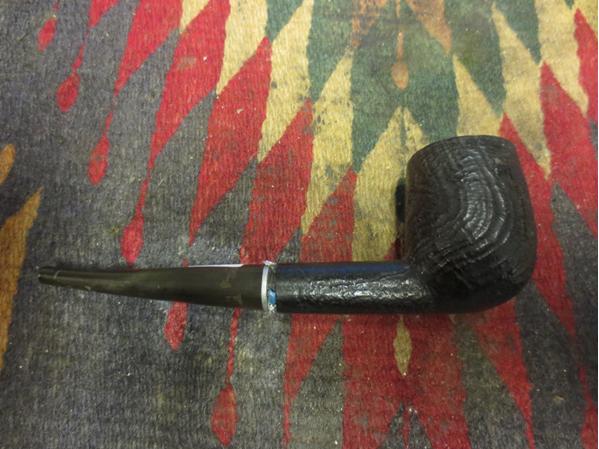
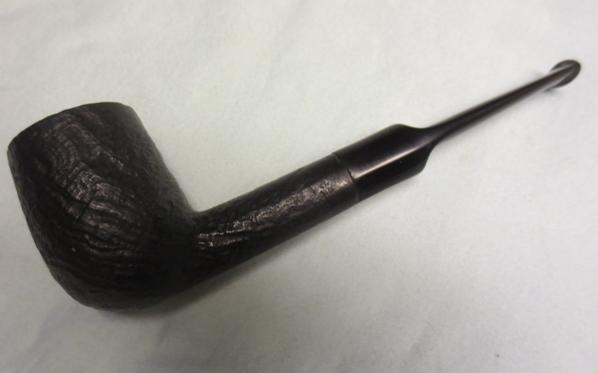
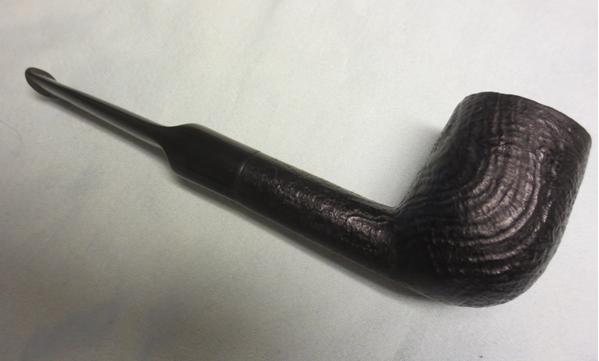
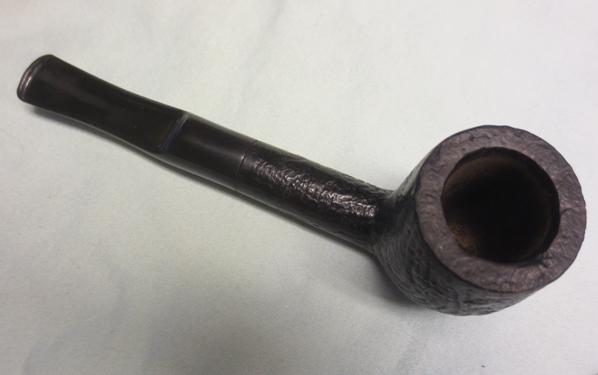
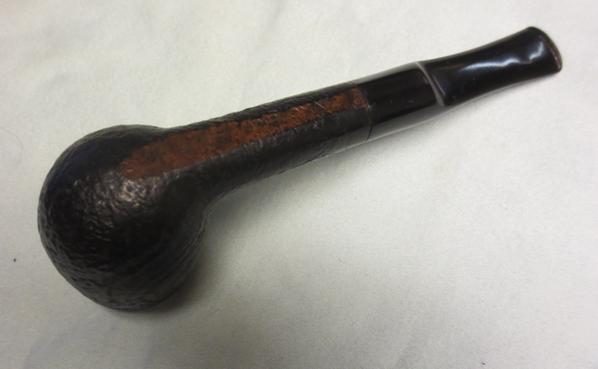
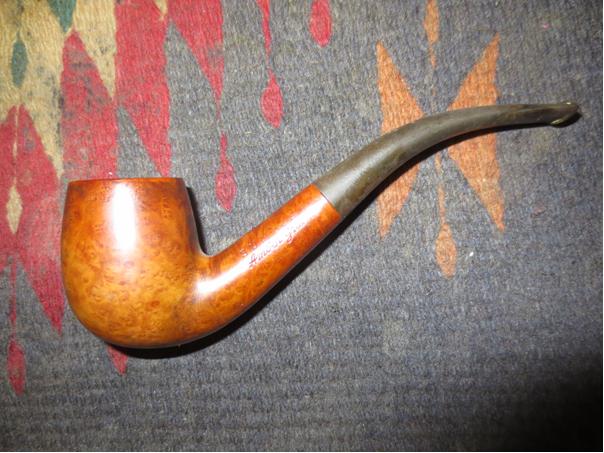
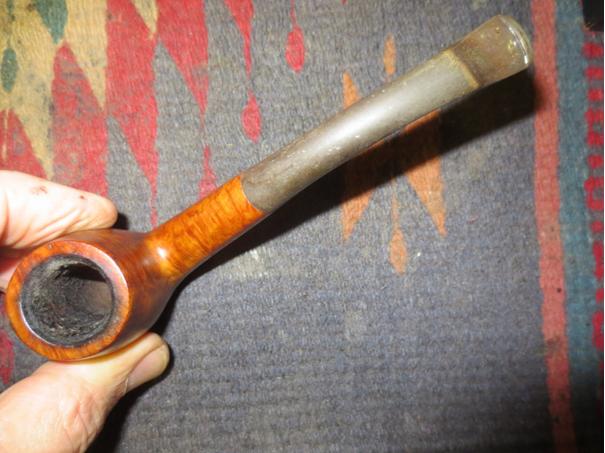
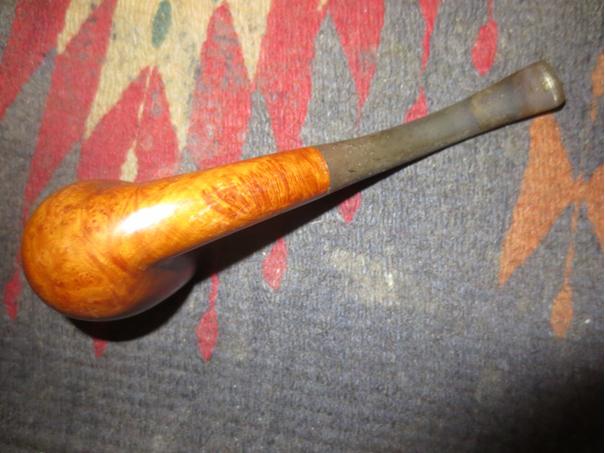
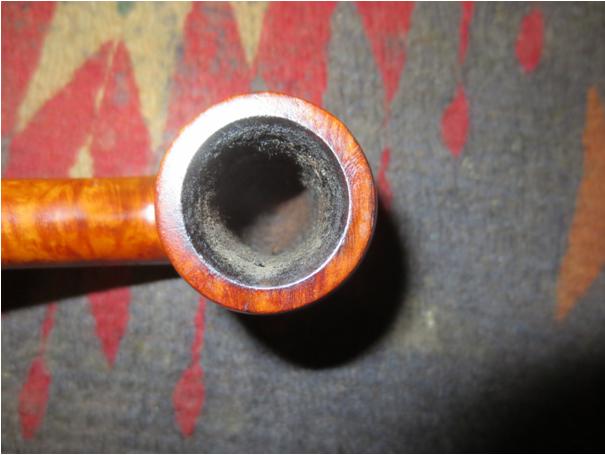
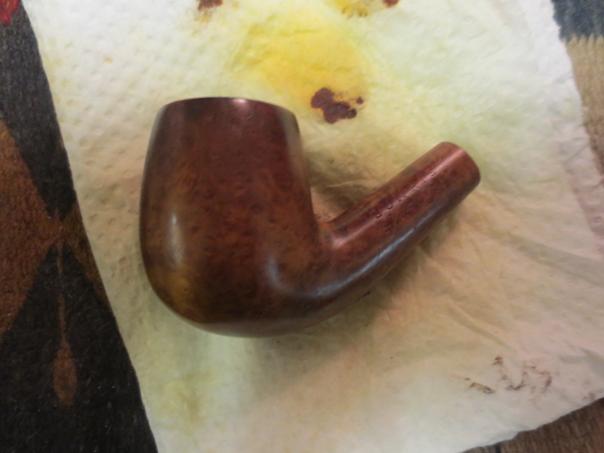
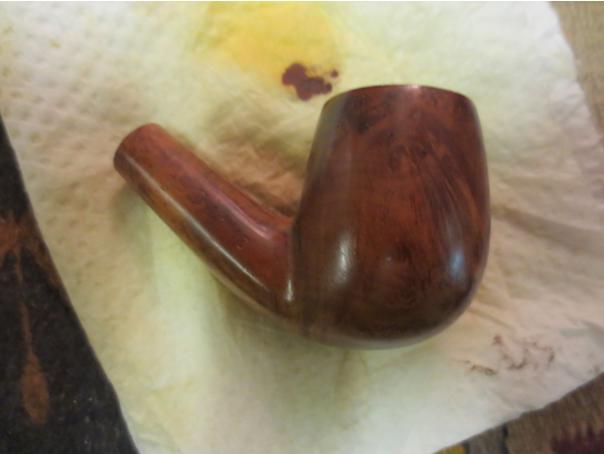
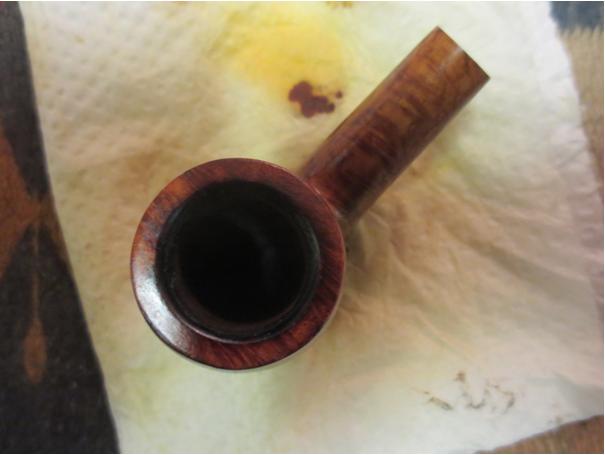
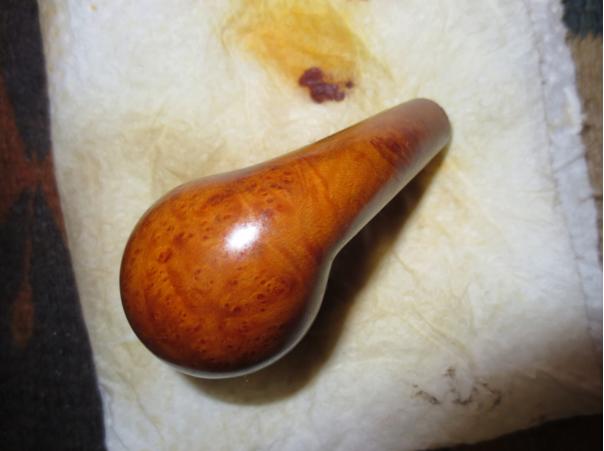
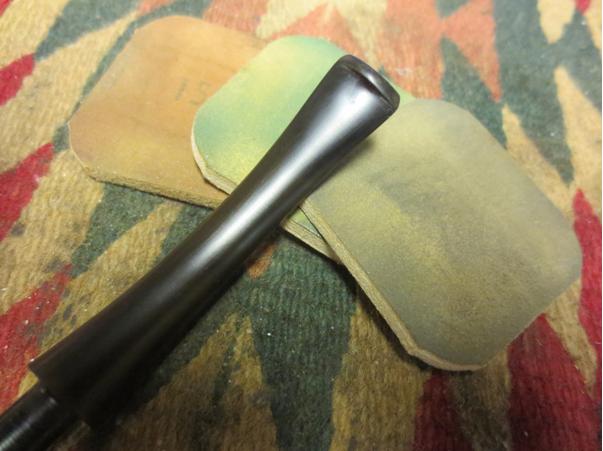
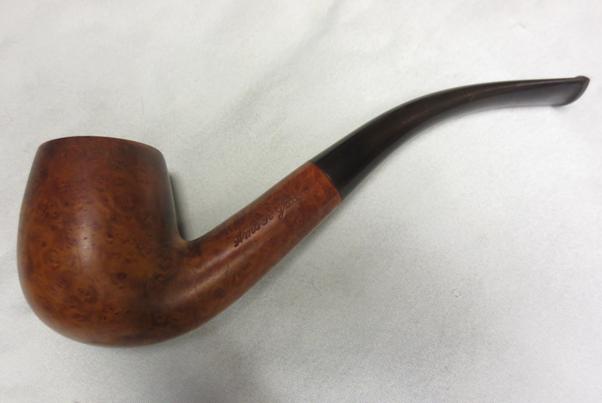
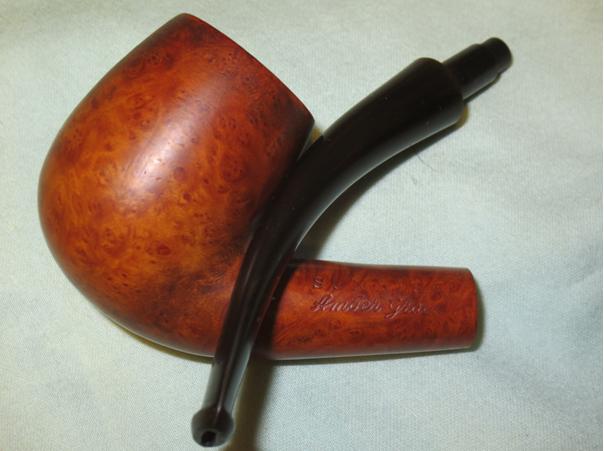
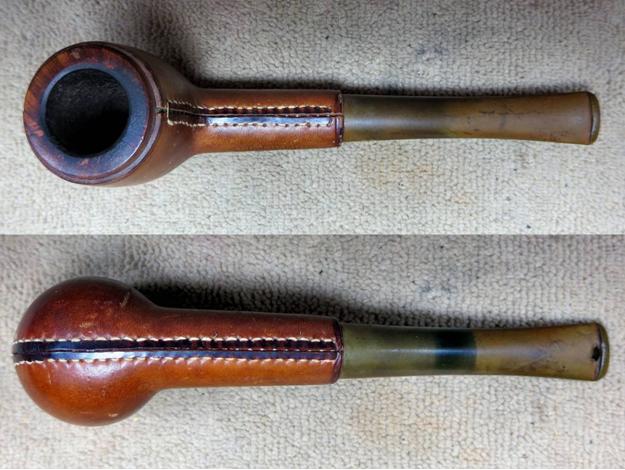
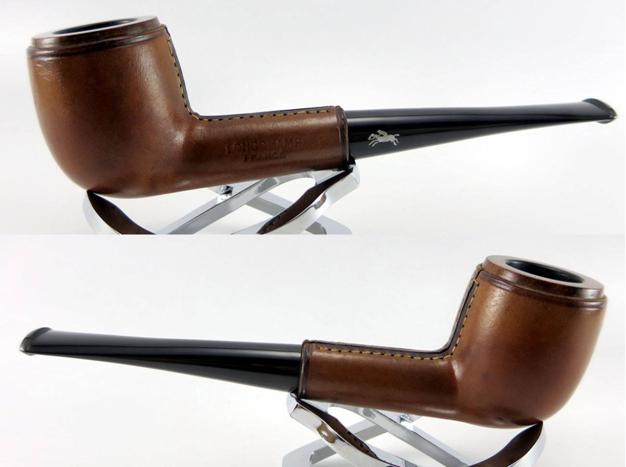
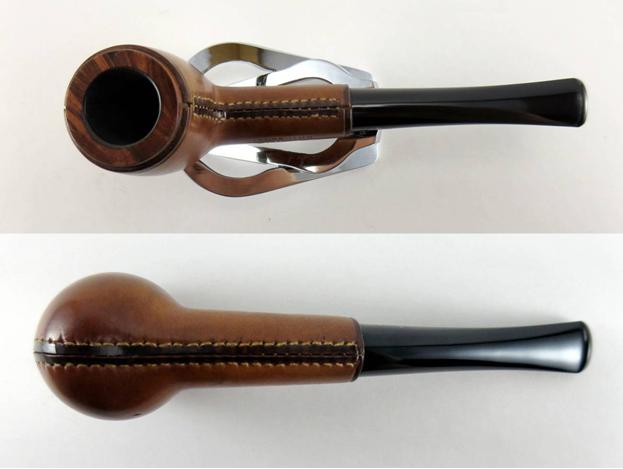
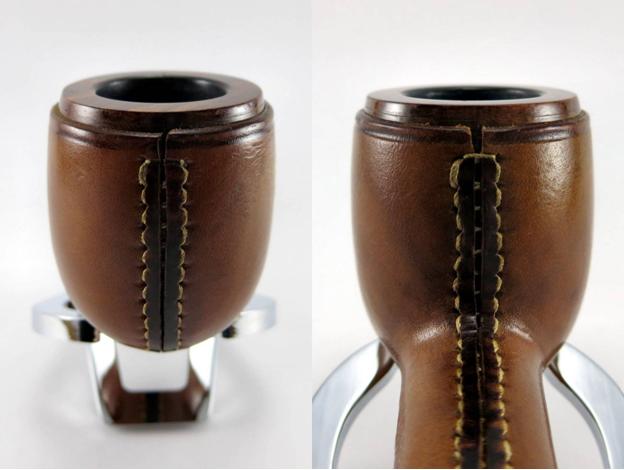
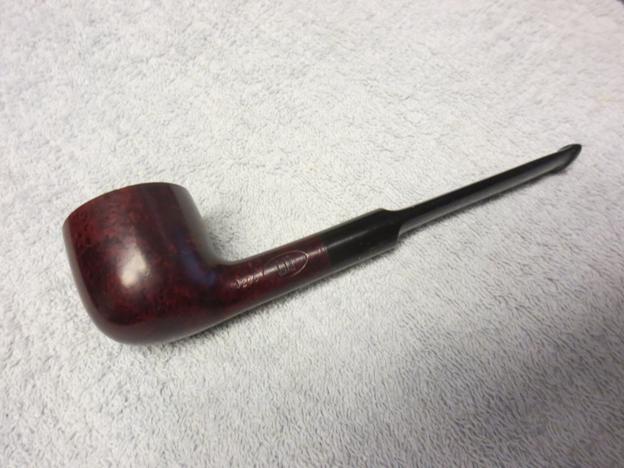
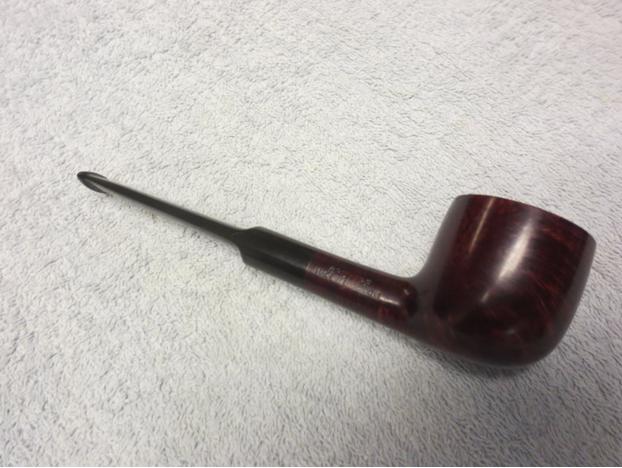
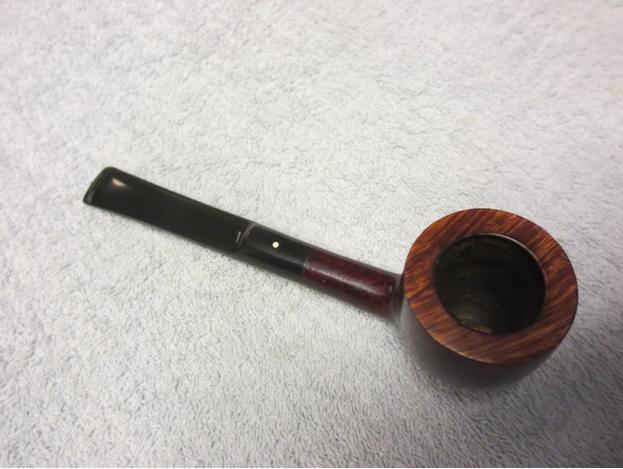
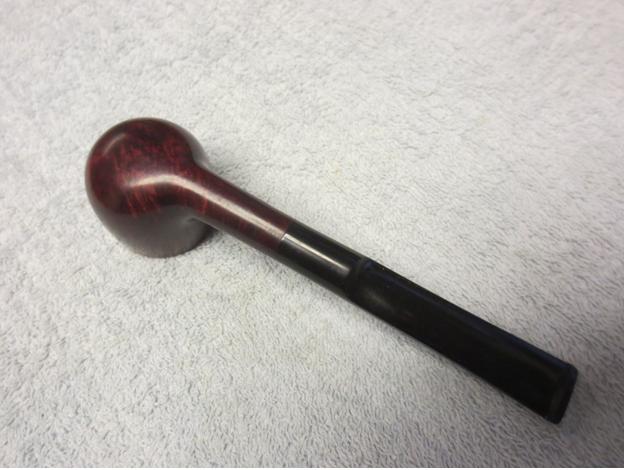
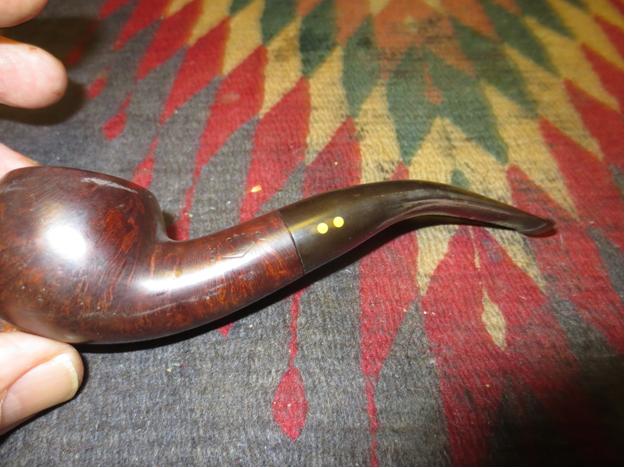
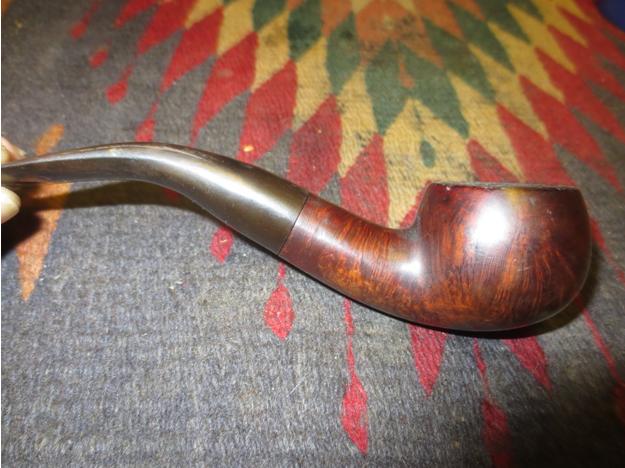
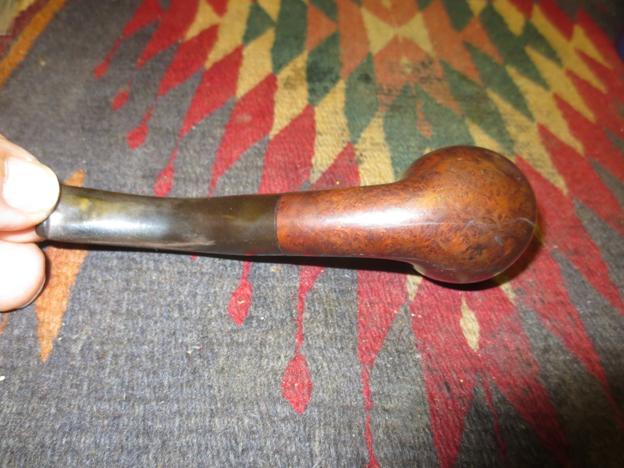
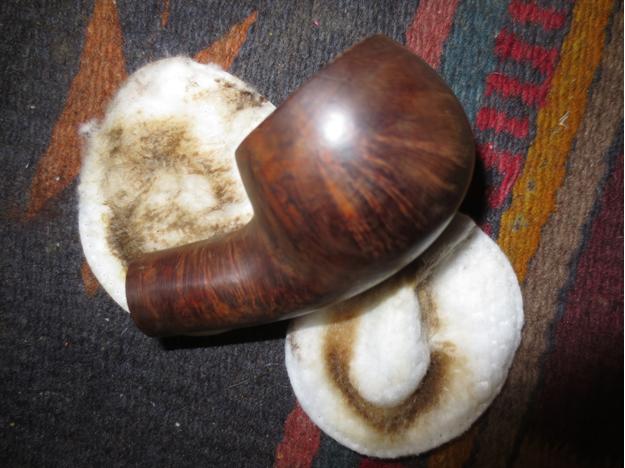
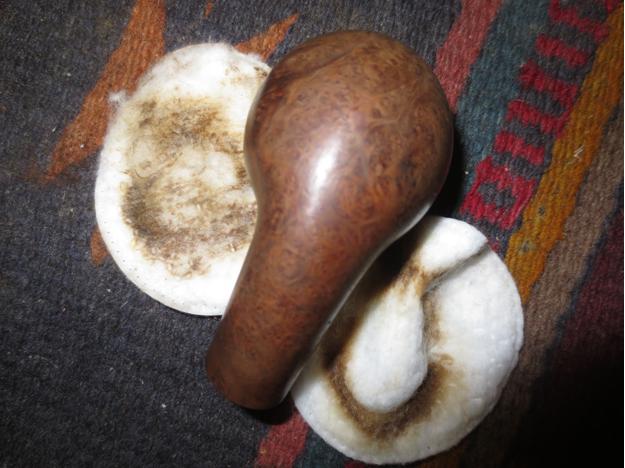
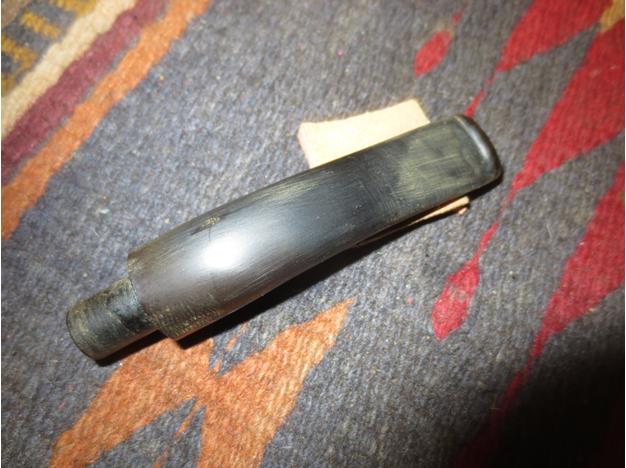
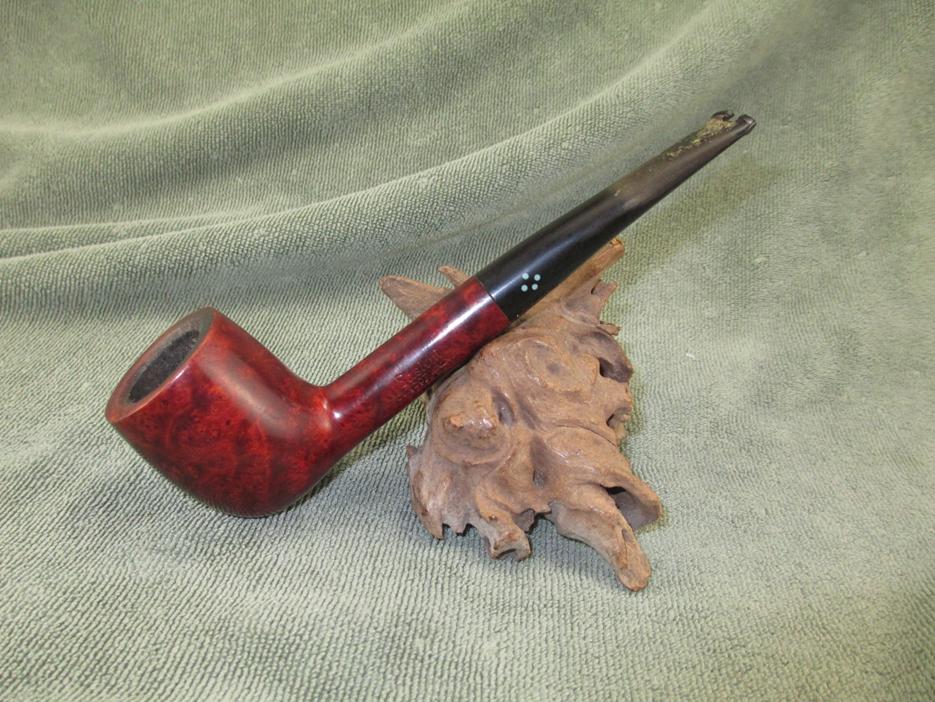
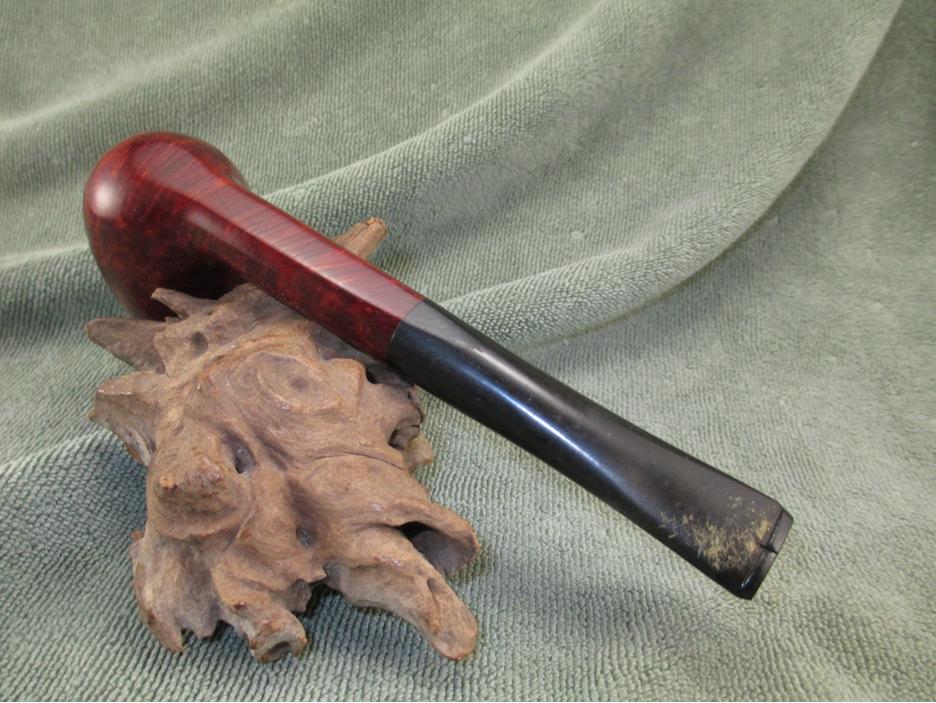
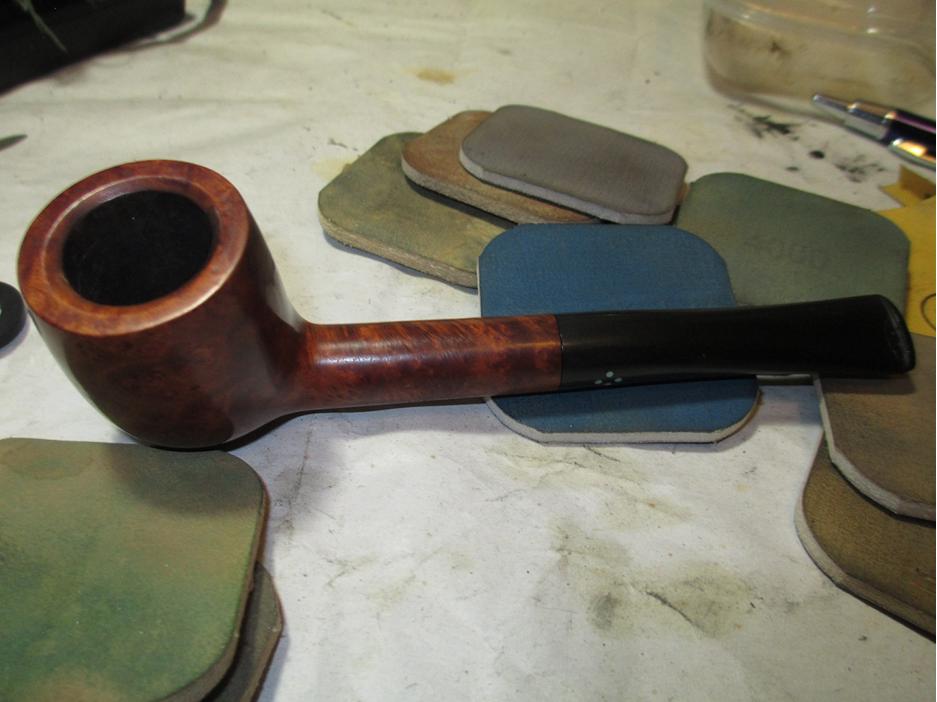
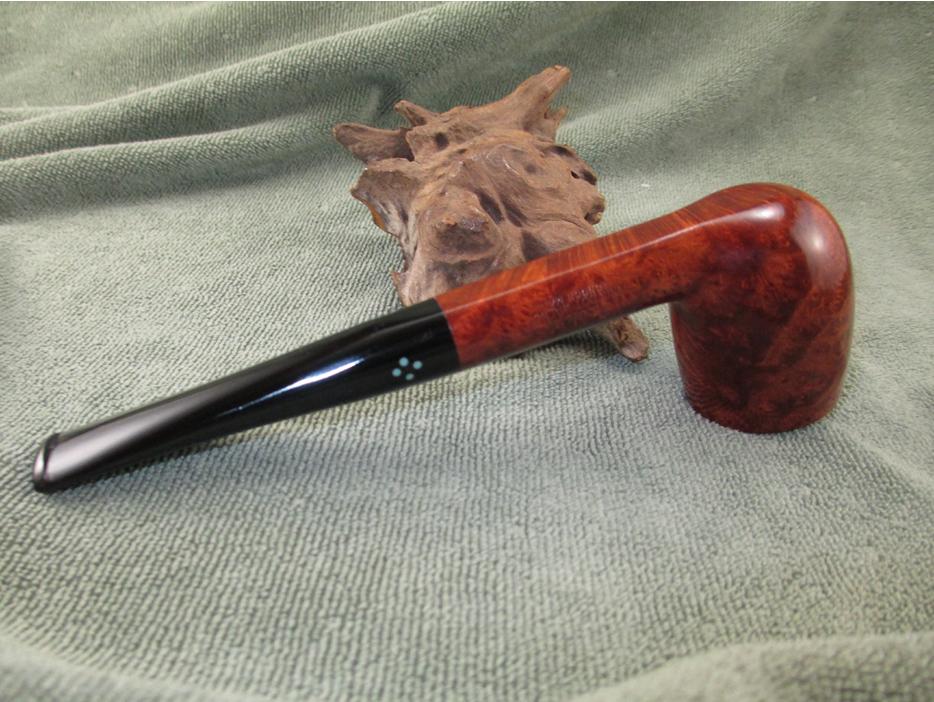
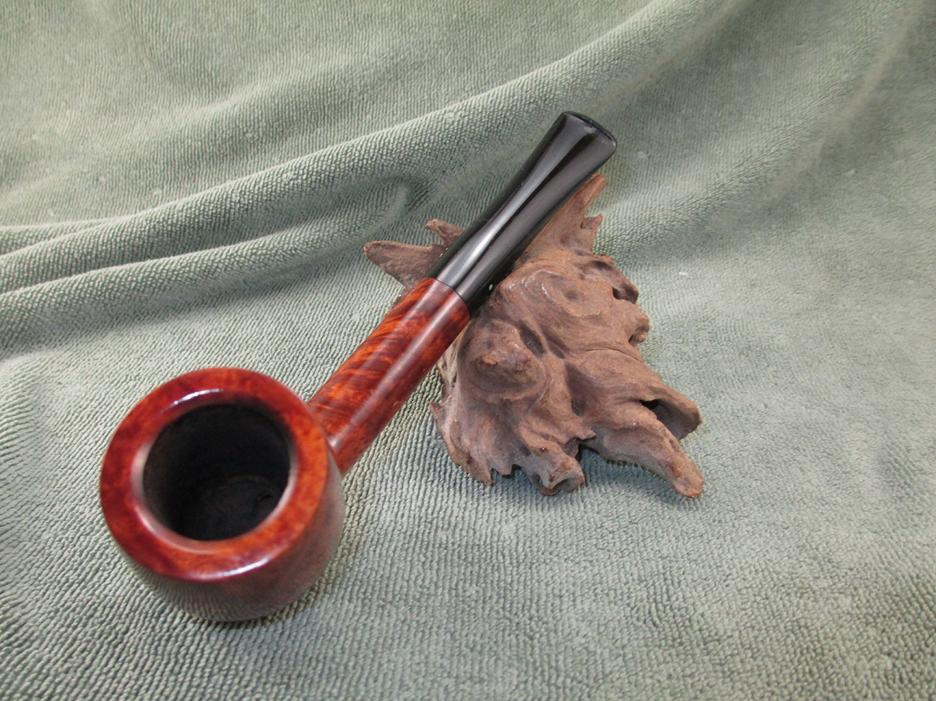
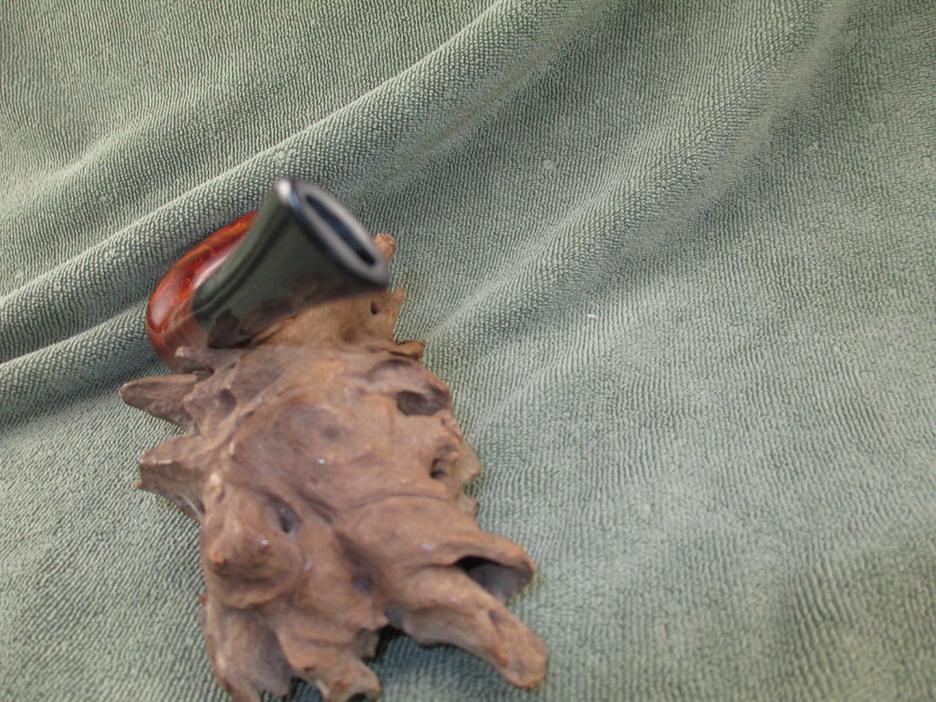
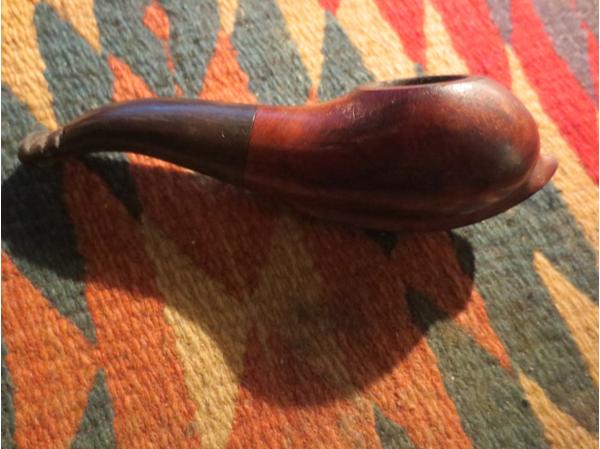
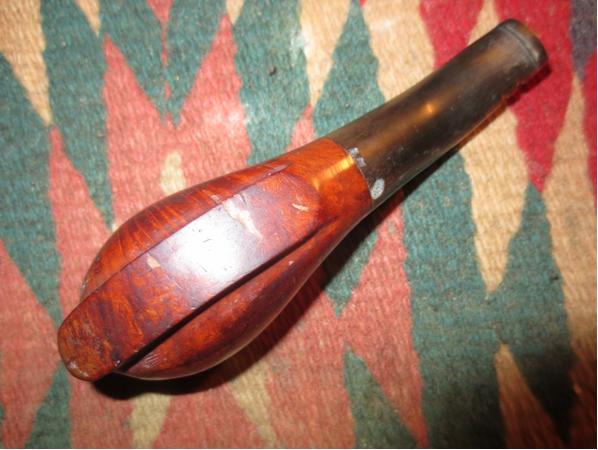
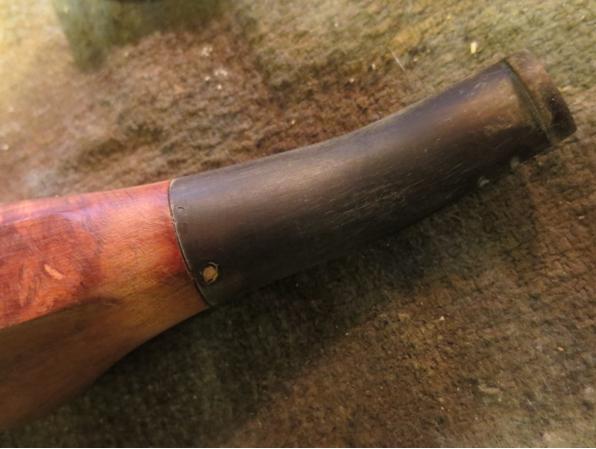
The final four photos show the finished pipe. The bowl polished up very nicely with just carnauba wax. The polished stem shows the striations that are one of my favourite parts of horn as a stem material. The deep shine is a bonus.Bruyere36

Bruyere37

Bruyere38

Bruyere39

Cleaning up a London Made Charleston Banker


Blog by Steve Laug

When I saw this pipe on Ebay I decided to bid on it. I had bought from this English sell a few times in the past and he generally has some great older pipes. He had listed this one as a Criterion London Made pipe. I had looked and found that Criterion was made by Comoy’s. He described it as a 1/8th bent sandblasted prince. To me it is almost a Banker shape. The bowl is quite large and the oval shank ends with a saddle bit. It is 5 inches (12.75cms) long and the bowl height is 1.5 inches (3.75cms). He described it as lightly smoked, and in very good condition and as usual his description was perfect. He said that the markings on the bottom of shank were very faint and read Criterion over London Made. When the pipe arrived I looked at the faint stamping with a lens and a bright light and it actually reads: Charleston in script over block script LONDON MADE. I had not heard of Charleston pipes before so I did a bit of research and found the brand listed in Who Made That Pipe. It was listed as being made by Sydney Charleston Ltd. London, England. The first two photos are the ones provided by the seller on Ebay.Charleston1 When the pipe arrived I took it to the work table and took a few photos of the state of the pipe before I began to work on it. It was in pretty decent shape. The finish was dirty and the rim had dirt on it. The bowl had a cake build up. The stem was oxidized with a few small tooth marks on the top and bottom of the stem near the button. The slot was virtually plugged so I could not get a pipe cleaner through it to clean the inside.Charleston2

Charleston3

Charleston4

Charleston5 I took the pipe apart and put the bowl in an alcohol bath to soften the hard cake and the stem into an Oxyclean bath to soften the oxidation on the stem. I left them to soak overnight.Charleston6 When I took the bowl out in the morning I scrubbed it with a brass bristle whitewall tire brush to clean out the grooves in the blast on the bowl and the rim. I was able to remove all of the build up and grime from the ridges and grooves.Charleston7

Charleston8 I wiped out the bowl with a cotton swab and then reamed it with a PipNet reamer to remove the cake. The bath had softened the cake so it came out very easily.Charleston9 I took the stem out of the Oxyclean bath and the oxidation had all come to the surface. It was soft and would be easier to remove.Charleston10 I used a dental pick to clean out the slot and then a pipe cleaner to make sure the edges of the Y were wide open to further clean it.Charleston11 I scrubbed down the bowl and stem with a Mr. Clean Magic Eraser and gave the bowl a light rub down with olive oil. I took the following photos. There was progress to be seen.Charleston12

Charleston13 The cleaning and oil seemed to make the stamping more legible. In the photo below you can see the Charleston with a curled line under it and the London Made stamping underneath the line.Charleston14 I cleaned out the bowl, shank and stem with pipe cleaners, cotton swabs and alcohol. It was incredibly dirty. I would need to use the retort to really clean it.Charleston15

Charleston16 I sanded the stem with 220 grit sandpaper and worked out the tooth marks on the top and underside near the button.Charleston17 I set up the retort and held the tube over the flame to boil the alcohol through the stem and bowl. I ran three test tubes of alcohol through the pipe before it came out clean. The fourth bowl came through with clear.Charleston18

Charleston19 I took the cotton ball out of the bowl, wiped out the bowl with a cotton swab and ran pipe cleaners through the stem and shank to remove any moisture and final debris. The pipe smelled fresh and clean and the interior was clear.Charleston20

Charleston21 I worked on the stem with a medium and a fine grit sanding sponge and then wet sanded with 1500-2400 grit micromesh sanding pads. I rubbed the stem down with Obsidian Oil before dry sanding with 3200-4000 grit pads. I gave it another rub down with oil and then finished sanding with 6000-12000 grit pads. I gave it a final rub down of Obsidian Oil and let it dry.Charleston22

Charleston23 I buffed the pipe with White Diamond and Blue Diamond on the buffing wheel and then gave it multiple coats of carnauba wax. I then buffed it with a clean flannel buff and a final hand buff with a microfibre cloth. The finished pipe is shown in the photos below. It is fresh and ready to smoke. I intend to fire up a bowl today!

Thanks for looking.Charleston24

Charleston25

Charleston26

A Simple Elegance: Cleaning, Restemming and Restoring a Diplomat Billiard


Blog by Steve Laug

On my recent Lethbridge trip I found the Diplomat pipe at an Antique Fair. It is a nice sandblast billiard with a dark undercoat and a brown over stain. The bowl was in decent shape. The sandblast was deep and quite beautiful to look at. The nooks and crannies caused in the process made for an interesting feel in the hand as well. The stain had worn off in spots on the sides of the bowl and along the outer edges of the rim. The finish was also generally dull and lifeless. The surface of the rim was dirty with tars and oils. The inner edge was slightly damaged and would need to be worked on. There was a thick cake around the middle of the bowl and light at bottom and on top. The stem was one that somebody had Gerry-rigged to fit. It was smaller in diameter and the tenon was too small. The previous owner had wrapped the tenon with thread and then with aluminum foil and pressed it into the shank. The stem had also been hacked up to repair a damaged button and grooves had been carved on the top and bottom sides of the stem to make it a dental bit.Dip1

Dip2

Dip3

Dip4

Dip5 I took close-up photos of the top of the bowl and the underside of the shank to give a clear picture of the state of the inner edge of the rim and the stamping on the pipe.Dip6

Dip7 The next two photos show the stem that came with the pipe and the “fancy” work that had been down to make it fit the shank and create grooves on the top and underside that would allow the pipe to be held in the mouth behind dentures.Dip8

Dip9 My first task was to go through my stem can and see if I could find a better stem for this pipe. I did not have a tapered stem that would readily fit but I did have a saddle stem that would look good after shaping and fitting it to the shank.Dip10 I lightly sanded the tenon to get a snug fit in the shank and pushed the new stem home to have a look at the fit. The stem would need to be sanded to bring the diameter at the stem/shank union down to match the shank. I took a few photos to see what the pipe looked like with this new stem.Dip10

Dip11

Dip12

Dip13 I used a Dremel with a sanding drum to carefully reduce the diameter of the saddle portion of the stem. I have found that I can roughly shape the stem to fit better and then finish by hand sanding it (photo 1). Once I had the rough shape I sanded it with a coarse emery paper to remove the gouges and scratches left behind by the sanding drum (photo 2). I slipped a plastic washer on the tenon and put the stem back in place. I sanded it with 180 and 220 grit sandpaper to further shape it and remove the scratches (photo 3).Dip15

Dip16

Dip17 With the basic fit correct and only needing to fine tune it and polish the stem I decided to ream the bowl. I used a PipNet reamer and took the cake back to bare wood.Dip18

Dip19 I cleaned out the inside of the shank and stem with pipe cleaners, cotton swabs and alcohol. Once it was clean I worked on the inner edge of the rim. I sanded it and reshaped it to make it smooth and round once again using a folded piece of 220 grit sandpaper.Dip20

Dip21

Dip22 I sanded the stem some more with 220 grit sandpaper and flattened the bottom side to match the flat bottom of the shank. The next set of three photos show the fit and shape of the stem at this point.Dip23

Dip24

Dip25 The button was quite thin and I decided to build it up with black superglue. I also could see a repair that had been done on the stem before I used it so I worked on that to further blend it into the stem surface.Dip26 When the glue dried I sanded it with 220 grit sandpaper to feather it into the surface of the rest of the stem and also worked on shaping the button. In the second photo below you can see the end view of the built-up and reshaped button.Dip27

Dip28 I sanded the stem and button with a medium and a fine grit sanding sponge to remove the scratches and blend in the patches. I then wet sanded the stem with 1500-2400 grit micromesh sanding pads and then rubbed the stem down with Obsidian Oil. I dry sanded with 3200-4000 grit pads and rubbed it down again with oil. I finished by sanding it with 6000-12000 grit pads and gave the stem a final coat of Obsidian Oil. I set it aside until the oil was dry.Dip29

Dip30

Dip31

Dip32 I touched up the worn spots on the finish of the bowl with a dark brown stain pen and a black permanent marker and then buffed the bowl and stem with White Diamond on the wheel. I buffed it again with Blue Diamond and then gave the pipe multiple coats of carnauba wax. I polished it with a clean flannel buff and then hand buff with a microfibre cloth. The finished pipe is shown in the photos below. I like the looks of the saddle stem and the deep sandblast finish. The pipe has an understated elegance about it that I like.

Thanks for looking.Dip33

Dip34

Dip35

Dip36

Dip37

Refreshing a Delicate Comoy’s Made Sunrise Amber Grain Bent Billiard


Blog by Steve Laug

The last pipe that came to me in the Smokers Forum Donation Sale was a beautifully shaped little Sunrise Amber Grain Bent Billiard. The shape and the feel of this little pipe are very delicate. It is almost a bent pencil shank – in fact I am not sure how much thinner it would have to be to actually be called a pencil shank. The pipe is 5.5 inches long, 1.75 inches tall with a small bowl with a chamber diameter of .75 inches. It is stamped Sunrise over Amber Grain on the left side of the shank. On the right it is stamped Vintage Briar and shaped number 13. On the underside of the shank next to the stem junction it is stamped France. The Sunrise line was made by Comoy’s as is identified also by the shape number. As it was made in France it does not have the familiar Com stamp that appears on British made Comoy’s.

This pipe was in decent shape in terms of the exterior finish. There were no dents or dings in the surface of the bowl or shank. The stamping was light on the right side of the shank and the Sunrise stamp was lighter than the Amber Grain stamp. I would have to be careful in the clean up not to damage these already light stamps. The stem was oxidized and there was a small bite through with a crack going toward the button on the underside of the stem.Comoy1

Comoy2

Comoy3

Comoy4 The rim was in great shape with some light scratching. The inner bevel was still present and darkened but there was no damage to it. The bowl was still in round. There was a rough cake in the bowl that was uneven and would need to be removed.Comoy5 I reamed the bowl with the PipNet reamer to take the cake back to the bare wood.Comoy6

Comoy7

Comoy8 I cleaned out the shank with pipe cleaners, cotton swabs and alcohol. It was amazingly clean. I am guessing that the previous owner cleaned this one up before setting it aside.Comoy9 I cleaned out the bowl and lightly sanded the bevel on the inner edge of the rim to remove the light build-up that was present there.Comoy10 I wiped the bowl down with a cotton pad and some alcohol and then gave it a light coat of olive oil. I buffed it on the buffer to give it a shine. It has some great grain on the bottom of the bowl and the left side. The grain on the front of the bowl and the right side is mixed with a few bald areas. The sides of the shank are full of birdseye grain and the top and bottom are cross grained.Comoy11

Comoy12

Comoy13

Comoy14 The stem was oxidized and the underside bite through and small crack needed to be addressed.Comoy15

Comoy16

Comoy17 I picked the debris out of the crack and bite through and examined it with a lens. It was clear that the bite through was very small and that the crack ended at the bite through and went back to the button. The bite through effectively stopped the crack from spreading forward along the stem. I wiped the stem down with acetone on a cotton pad to clean it up. I then spread some black super glue on the crack and bite through with the tip of a dental pick. I set the stem aside to cure for about an hour.Comoy18

Comoy19 Once the super glue had cured I sanded the repair and the rest of the stem with 220 grit sandpaper to both remove the oxidation and to blend the patch into the surface of the stem. I sanded with a medium and fine grit sanding sponge to further remove the scratches and oxidation.Comoy20 I wet sanded the stem with 1500-2400 grit micromesh pads and rubbed stem down with Obsidian Oil. I dry sanded with 3200-4000 grit pads and then buffed it with White Diamond on the buffing wheel. I gave it another coat of oil and then sanded with 6000-12000 grit pads. I gave it a final coat of Obsidian Oil and let it dry.Comoy20

Comoy21

Comoy22

Comoy23 I buffed the pipe with Blue Diamond polish on the wheel and then gave the bowl and stem multiple coats of carnauba wax. I polished it with a clean flannel buff and then hand buffed it with a microfibre cloth. The finished pipe is shown in the photos below. Thanks for looking.Comoy24

Comoy25

Comoy26

Comoy27

Comoy28

A Tale of an Ugly Duckling & His Virtually Invisible Swandom


Blog by Steve Laug

All of you are probably familiar with the tale of the ugly duckling. The poor bird hatched from a clutch of duck eggs that came out gangling and very unducklike. His appearance left much to be desired when he walked beside his siblings toward the pond following his “mom’. He was always laughed at and misunderstood. He sat with his head down in shame at how much he did not fit. Each day passed and the down of the ducklings was replaced by feathers. This went on until one day the duckling looked at his reflection in the pond and found that he was not a duck at all but a regal and majestic swan. He had always been a swan inside but the fact of his swandom was not visible to any who beheld him. Instead they saw what they wanted in the misfit duckling and wrote him off as ugly. They never once saw the swan inside until it came out in all of its glory. This tale really captures the pipe that I worked on next.

I have had a really rough older Canadian pipe sitting in the refurb box for a long time now. I have taken it out of the box and looked it over time and again but never took the step of cleaning it up. I have no idea who the maker of this old pipe is but it is a rough piece of wood. I say wood because it is clearly not briar. It is lighter and the grain pattern is quite different from briar. It has a Kaywoodie mortise insert and a Kaywoodie stem that has the stinger clipped off. I don’t know if it came that way or some creative soul made it happen. The wood was roughened and not sanded smooth. It looked as if it was rough shaped with a file or wood rasp and then just smoked. Somewhere along the way someone had put a coat of shiny urethane over the entire pipe. The shine hid none of the flaws but actually accentuated them. It had a significant fissure near the shank bowl joint on the left side that needed attention. The roughened finish had file marks going in every direction. The effect was a mess for a finish. The stem had some cardboard or thread pushed on to the threaded tenon that allowed the stem to line up correctly. I cut off the cardboard or thread washer and the stem was seriously overclocked. The bowl had a cake in it that was crumbly and uneven. The interior edge of the rim was not too badly out of round. The outer edges would need some work to smooth out before I could see if they were in round.Canada1

Canada2

Canada3

Canada4 I took some close-up photos of the bowl and the shank to give more of an idea of the kind of finish that the pipe had when I started. You can see the file marks and lines going in every which direction that were left behind in the initial shaping of the pipe. The overall look was very rustic and actually quite ugly. It was truly an ugly pipe. The beautiful Canadian that resided below the ugly exterior was virtually invisible. It would easily been put up there with “folk art” in terms of the rustic and rough finish to the pipe. Yet there was something about that seemed like raw charm that shone through the mess that sat on my table. This evening when I took it out I took more time to sit and look at it for a while before beginning to work on it. The more I looked at it the more I have to tell you that the second thoughts I was having almost caused me to put off working this old timer and just burying it in the box. I really was unsure whether I could do anything with it or that it would even be worth doing the work. I was not convinced that what I had when I was finished would be worth the time and energy that would go into reworking it.Canada5

Canada6

Canada7

Canada8

Canada9 I cleaned off the debris (cardboard or thread) that was on the tenon and then heated the tenon with a lighter to reclock the stem. I heated the metal carefully keeping the flame away from the vulcanite stem. It did not take long before the heat softened the glue that held the tenon in the stem and I was able to turn the stem back into the shank and twist it until it lined up correctly.Canada10

Canada11 I lightly sanded the bowl surface and then stopped to ream it with a PipNet reamer. I decided to take the cake completely out of the bowl so that I could check for cracks in the walls of the bowl.Canada12

Canada13 With the bowl reamed out I turned my attention to the finish on the exterior. I sanded the bowl and shank with emery paper and with 180 grit sandpaper to remove the roughness of the finish and to sand out the file marks. I wanted to sand the bowl and shank smooth to address the generally poor appearance of the pipe. It took quite a bit of sanding to even start to make a difference in the surface of the pipe. I also sanded it with a rough sanding block to smooth out more of the scratches. I filled the flaw at the union of the shank and bowl on the left side with clear super glue and briar dust. I sanded that repair smooth with 220 grit sandpaper to blend it into the surface of the pipe. There was a dark spot on the outer right edge of the rim that did not seem like a burn. I had the appearance of a stain. It was hard and did not affect the shape of the bowl edge so I left it. I lightly topped the bowl to clean up and flatten out the rim surface.

The more I sanded the grain began to come through the smoother finish of the pipe. It was clearly not briar. My guess is that it is Mountain Laurel or Manzanita. Once I get it sanded smooth and get a better look at the grain and colour I will be able to give a better assessment. The good thing was that a nicely shaped Canadian was emerging from the rough cut pipe that I started with. The shape was well executed and once I finished sanding and smoothing things out this alternative wood Canadian would look really good. My initial reticence gave way to curiosity to see what would emerge when the sanding was finished. You can see for yourself in the next set of photos below what is coming out as it is sanded.Canada14

Canada15

Canada16

Canada17 I continued sanding with 220 grit sandpaper and worked on the shank bowl junction. There were some deep cuts and file marks there that needed to be addressed. I sanded until the surface was smooth to touch. There were still a lot of scratches in the wood but the surface was getting smoother. I sanded it with a coarse and a medium grit sanding block to flatten out the shank and to smooth out the bowl sides, bottom and rim. I used a black permanent mark to cover the fill and line it up with the grain at that point. Once I sanded it more and blended it into the grain of the shank it would become less visible than it is in the photos below. I sanded more with the sanding blocks and then gave the pipe a light coat of olive oil to see what the grain would look like when I was finished. The wood had a red hue to it and some nice looking grain. There is a lot more sanding that needs to be done at this point but it is progressing.Canada18

Canada19

Canada20

Canada21 I have included a few more close-up photos to show the progress of the sanding on the surface of the bowl and shank. There is some nice looking grain coming through in the photos of the bowl sides and shank.Canada22

Canada23 At this point I sanded the bowl and shank with micromesh sanding pads and the oil to give me some traction while sanding. I find that the oil allows the micromesh to cut more deeply and work more effectively. I sanded with older 1500-2400 grit micromesh pads that I reserve for working with oil sanding. Unfortunately I got into the flow of things and did not take photos of this part of the process.

Once I had finished sanding the bowl to this point I worked on the stem. The same file marks went across and the length of the stem. There were gouges and marks and two deep tooth marks near the crease on both the top and bottom of the stem. The next two photos show the scratches and the tooth marks.Canada24

Canada25 I used an emery board to sand out the scratches and the tooth marks. I was able to remove most of the scratches and gouges with the board and then sanded the stem with 220 grit sandpaper to remove some of the deeper scratches and blend in the board marks. I also used the topping board to even out the end of the clipped stinger so that it was not rough.Canada26 The tooth mark on the top needed to be repaired. I cleaned up the sanded area and then filled the remaining tooth mark with clear super glue.Canada27 When the glue dried I used the emery board and the 220 grit sandpaper to blend in the repair with the surface of the stem.Canada28 Once the scratches and marks were gone and the patch smoothed into the surface I went on to wet sand the stem with 1500-2400 grit micromesh sanding pads. I rubbed the stem down with Obsidian Oil and then dry sanded with 3200-4000 grit pads before giving the stem another coat of oil. I finished with 6000-12000 grit pads and then a final coat of Obsidian Oil. I let it dry before taking the pipe to the buffer.Canada29

Canada30

Canada31 I sanded the bowl and shank down with all of the grits of micromesh sanding pads from 1500-12000 grit. By the time I was finished the scratches were virtually gone. The repair on the shank/bowl junction though showing is smooth to the touch. The ugly duckling had become a swan. The Canadian hidden beneath the file marks and rough finish gave way to the beauty of the alternative wood. The finished pipe was truly a thing of beauty.

I buffed the pipe and stem with Blue Diamond Polish on the wheel. I worked it until the remaining scratches disappeared. I gave the bowl and stem several coats of carnauba wax and then buffed the pipe with a soft flannel buff. I finished by hand buffing it with a microfibre cloth. The finished pipe is shown in the photos below. The change in appearance is significant and the feel in the hand is much better. I am still pretty convinced the pipe is Mountain Laurel but could be convinced otherwise if some of you know. Thanks for looking.Canada32

Canada33

Canada34

Canada35

Canada36

Canada37

Get Me to the Church on Time: Restoring a Longchamp Billiard


Blog by Anthony Cook

I was browsing through Reddit’s /r/PipeTobacco sub-forum when I saw a post from a member looking for someone who could restore an old, leather-wrapped Longchamp pipe. He wanted it in time for his wedding day, which was a couple of weeks away. I could see in the accompanying photos that the pipe had a chip out of the rim and a bite through on the stem, but otherwise it appeared to be in good condition and both the leather and stitching looked solid. So, I contacted him and offered to take care of it.
The pipe arrived at my door a while later. I was happy to see that there were no hidden “gotchas” and the condition of the pipe was pretty much as it had appeared in the photos.

Here are a few photos of the pipe on arrival:Bride1

Bride2

Bride3

Bride4 Notice in the image below that the stem has almost no tooth chatter despite the massive bite through. What’s up with that? Weird.Bride5 The next image shows some detail photos of the stamping and the rim damage on the pipe.Bride6 The pipe needed to be cleaned up before I tackled any of the damage. This is my “getting to know you” time with the pipes that I work on. I learn a lot about the pipe as I’m cleaning it and I often discover things that I hadn’t noticed previously.

I used a very lightly damp rag to remove the tar and soot from the rim. It came away easily. You can see some light spots on the rim in the photos above. I had been afraid that they were fills (that would be a nightmare), but they turned out to be… something else. Whatever it was, it came off with the rest of the grime and I could see that the rim was in good condition other than the noted chip.

Then, I cleaned out the interior of the stem and stummel with a few cotton swabs, pipe cleaners, a shank brush and some isopropyl alcohol. The pipe was already pretty clean. So, it didn’t take much work.Bride7 I then gave the pipe a retort just to be sure and another quick scrub to remove anything that the retort had left behind.Bride8 To prevent any lingering tobacco ghosts, I stuffed cotton balls into the chamber and used a dropper to drip in alcohol until they were saturated. I then sat the stummel aside overnight to let the cotton balls and alcohol do their job. The image below shows a photo of the bowl just after adding the alcohol, another taken about three hours later, and another at about twelve hours (just before I removed the cotton).

Meanwhile, the stem had been soaking in a bath of Oxyclean and warm water. I removed it from the bath and scrubbed it with cubes cut from a Magic Eraser until all of the yellow-brown oxidation was gone and the stem was restored to a satin-black finish.Bride9 Using needle files, I cleaned up the edges of the bite through hole to remove any loose material and scored the surrounding surface to prep for the patch. Then, I inserted a wedge of thin cardboard wrapped in clear tape through the slot making sure that it completely covered the bottom of the hole. I applied several thin layers of black CA glue over the hole. I allowed each layer to dry and lightly sanded with 220-grit paper between layers to give the next one a good surface to bite into. The patch was ready to be blended in when it was slightly higher than the surrounding surface. I used needle files to carve a sharp transition at the back of the button and sanded back the patch and much of the tooth chatter with 220-grit paper.Bride10 I followed that with 320-grit and 400-grit paper to further smooth the surface, and then I lightly sanded the entire stem (carefully avoiding the logo impression) with 600-grit paper.

I wanted to repaint the stem logo to give the pipe a more complete look. So, I used a silver leaf paint pen to paint over the logo and fill the impression with paint. Once it was dry, I carefully sanded the paint from the raised surfaces with 1200-grit paper leaving behind only what was left in the impression. Some of the impression had been worn away until it was nearly level with the surrounding surface. So, I had to try to shape those by hand using a printed photo reference of the logo.Bride11 I lightly sanded the rest of the stem with 1200-grit paper, and then polished with Micro-Mesh pads 1500-grit to 12000-grit. Somehow, I forgot to get a shot of the completed stem, but you can see it in the photos of the finished pipe.

The stem was finished. So, it was time to take care of the stummel. I filled the chip in the rim with briar dust and CA glue, let it dry, and then sanded the patch back with 220-grit paper. It’s just about impossible not to sand away some of the surface surrounding a patch. So, there was a very slight depression in the patched area. To even the rim out, I lightly topped the bowl, first with 220-grit, and then with 320-grit paper.Bride12 To bring the color back and blend the patch, I applied Fiebing’s dark brown dye to the rim with a cotton swab, flamed it, and sanded the rim with 400-grit and 600-grit paper. Then I stained with medium brown and sanded with 1200-grit. I polished the rim with Micro-Mesh pads 1500-grit through 2400-grit before giving the rim a final buckskin stain, and then polished with the remaining Micro-Mesh grits. Again, I forgot to get photos of any of this. Sometimes, you just get caught up in the work, you know?

All that was left to do to get this pipe ready for the wedding day was to spiffy up the leather a bit. I used a hairdryer set to high heat and low flow to heat the leather and raise the dents. I used my fingers to knead and stretch the leather around the deeper ones to help lift them. Then, I used Fiebing’s buckskin dye to restain the scratches and a small tear on the right side of the bowl. The tear itself was then patched with a bit of leather glue. Finally, I used Fiebing’s 4 Way Care to clean and condition the leather wrapping before burnishing the ends of the leather and edging the seams.Bride13 The pipe work as finished and it was ready to be sent back for the big day. Here are a few photos of the finished pipe:Bride14

Bride15

Bride16

Bride17 Thanks for looking and CONGRATULATIONS, NATE!!!

First in Flight: Refurbishing and Restemming a Falcon #4


Blog by Anthony Cook

I had never smoked a metal pipe before, but I was curious. I liked the idea of interchangeable bowls, especially when dealing with stronger and “ghostlier” blends (I’m looking at you, Lakelands). So, when this Falcon #4 showed up on eBay I put in a low bid that luckily turned out to be the winning one. I knew from the seller’s photos that the pipe was going to need a bit of work to get it into shape, but I was still in for a few surprises.

When it arrived, I could see that the aluminum frame was in good shape. There were several small dents and scratches, but nothing that would affect the smoking qualities of the pipe. The nylon stem (or, “bit” in Falconese), however, must have really suited someone’s taste because had been chewed so badly that it was crushed and the airway was almost completely closed. The larger, pot-shaped bowl was in fair condition with some tar build-up and a few scratches on the rim, but the smaller Dublin/apple-shaped bowl was charred and almost beaten to death around the rim. Luckily, the threads on both bowls were still in good shape and they would screw tightly to the frame.

Here are a few photos of the pipe as it was when it arrived:Falcon1

Falcon2

Falcon3 The first order of business was to remove the stem, since there was no way that it would work in its condition. Thankfully, Al (upshallfan) offered to send me another one that was in better shape. Removing a Falcon stem is easier said than done though. They’re intended to be a permanent part of the pipe.

I turned to the forums in the hope of finding someone who had done it before and had developed a reliable removal method. I received several suggestions and tried them all with no luck. In desperation, I decided to try to heat the stem in boiling water. I knew from past experience that nylon would blister and burn all too easily when exposed to high heat, but I thought that this method might heat the stem slowly and gently enough to avoid that risk. Surprisingly, it worked like a charm! After about 20 minutes of submerging the stem in boiling water, not only was I able to remove the stem, but the aluminum smoke tube came out as well. That would make cleaning and polishing the frame much easier.Falcon4 After soaking the frame in alcohol for about 30 minutes, I cleaned out the interior. Without a doubt, this was the easiest cleanup job that I have ever done on a pipe. That’s not to say that it wasn’t dirty. This was obviously a well smoked pipe, but the grime came away easily from the nonporous aluminum. It took only three pipe cleaners (two for the airway and another folded one to scrub the cup) and an old toothbrush (for the threads) to completely clean the frame.Falcon5 The bowls were next on my to-do list. I reamed them both back to bare wood so that I could see what I was dealing with, and then I placed them in a jar of isopropyl alcohol to soften the build up on the rim and strip the finish. An hour or so later, I removed them and used a soft cloth to scrub away the remaining finish and grime.

I set up my topping surface to sand out the scratches on the rim of the larger bowl and level the uneven rim of the smaller one. I lightly topped the larger bowl first with 220-grit paper, and then with 320-grit until the scratches were gone. I started to top the smaller on the smaller one, but the condition of the rim was so bad that chunks of it began to fall out as I worked. I could see that was going to be a losing battle and decided that if I couldn’t beat ‘em, I’d join ‘em.

I used a Dremel with a sanding drum to bevel the inner rim of the smaller bowl back as far as the deepest gouge. I was only doing some rough shaping at that point to create the general depth and angle of the bevel. Then, I used 220-grit and 320-grit paper to clean things up and further refine the shape. After that, I lightly sanded the surface of both bowls with 220-grit and 320-grit paper to remove most of the scratches and dings.Falcon6 Once the heavy lifting was complete on the bowl cosmetics, I turned my attention back to the stem. The stem that Al had sent me was in much better shape than the original, but it was still badly chewed. It also wouldn’t pass a cleaner, which seems to be an issue with Falcon pipes in general. They make thinner cleaners specifically for Falcons, but I don’t like the idea of having to buy something else just to overcome a design flaw. So, I decided to try an experiment to see if I couldn’t open up the airway and remove much of the chatter all in one shot.

I had noticed earlier that the boiling water had not only loosened the original stem, but it also appeared to raise the dents to some degree. It wasn’t enough to save it, but I found it surprising all the same since I’d had no luck lifting dents in nylon with heat previously. I thought I’d try it again with the replacement stem. I rigged up a simple suspension mechanism with some string, a hex nut, and a wooden spoon, and then put the stem into a pot of boiling water. After nearly about 40 minutes of being submerged, there was some slight improvement but not enough to make much difference. So, I called an end to the experiment and decided that the method wasn’t worth the effort. I have a suspicion that there was some harm done to the stem with this method however, and I’ll talk more on that later.Falcon7 The constriction in the airway extended about ¼” behind the button. So, I decided to drill the airway out from the slot end. The airway was so tight that I had to start cutting through with a 3/64” bit and work my way up to a 3/32” bit. I tested the draw and it was good, and then I tested with a cleaner and it would pass, but it still needed a bit of force to get through the tight area. The stem wouldn’t take a larger bit, however, and I had to be satisfied with what I had. I finished up the work on the airway by cleaning up the slot and giving it a slight funnel with some sandpaper, needle files, and sanding needles.

In the photo below, you can see one of the drill bits chucked into a Dremel, but I never actually used the motor. That would likely have been a disaster. Instead, I used the Dremel to stabilize the bit while I turned the stem over it.Falcon8 The mechanics of the stem had been addressed and it was time to start working on the cosmetics. I used a course, flat needle file to score the surface of the stem, applied black CA glue to the indentations, and sanded it back with 220-grit paper once it was dry. Then, I began to rebuild the button. I wrapped clear tape around the area behind the button to create a sharp edge and applied more CA to the button to build up the surface. I used 220-grit paper to sand the CA back and start shaping the button after it had completely dried. When the shape was vaguely buttonish, I began to clean the edges and remove more chatter from the stem, first with 320-grit, and then with 400-grit paper.Falcon9 I lightly sanded the entire surface of the stem with 600-grit and 1200-grit paper to smooth it out and remove the seams and molding artifacts from the sides. Then, I polished the stem with Micro-Mesh pads 1500-grit through 12000-grit and used a drop of mineral oil to lubricate the stem between every three grits.

Remember when I mentioned something about the heat of the boiling water doing harm to the stem? This is where that comes into play. I had noticed that the stem felt different under the paper as I was sanding it. The higher the grit, the more noticeable it became. The surface felt normal to the touch, but it kind of grabbed at the sandpaper and pads and gave some resistance as they slid across, almost like it was gummy. It was unlike any nylon stem that I had ever worked with before and I believe that submerging it in boiling water changed the surface in some way. I’m just making a guess, of course, but in the end I wasn’t able to achieve the level of glossy shine that I had with previous nylon stems and I doubt that I’ll be trying the boiling method again. You can see the finished stem in the photo below.Falcon10 The stem was out of the way. So, it was time to get back to the bowls and start wrapping this pipe up. I wanted each bowl to have a slightly different color. So, I used a heat gun to heat the briar and open the grain, and then applied a 3:1 mix of isopropyl alcohol and Fiebing’s dark brown dye to the larger bowl and the same ratio with mahogany dye to the smaller bowl. After hand buffing with a soft cloth and sanding the surface of both bowls with 400-grit and 600-grit paper to remove most of the dye except for what was in the grain, I gave the larger bowl a medium brown stain and the smaller one an oxblood stain using the same ratio of stain to thinner as before. Then, I hand buffed again and sanded each bowl with 1200-grit and gave them both a light Tripoli buff. Both bowls received one final stain; buckskin for the larger one and British tan for the smaller. They were hand buffed again to remove the excess stain, and then polished with Micro-Mesh pads 3200-grit to 12000-grit.

Before reassembling the pipe, I polished the frame with Semichrome polish and buffed the stem and bowls with White Diamond compound on the buffer. I put everything back together (it went easily) and applied several coats of carnauba wax with the buffer. Finally, I applied a bowl coating to both bowls to give them some protection until they could build a little cake. You can see the completed pipe in the photos below.Falcon11

Falcon12

Falcon13

Falcon14 And here are a couple of shots of the other bowl…Falcon15 I’m still not happy with the stem on this one and I’m sure that I’ll be replacing it sometime in the future when there aren’t other pipes that need attention. For now, though, it serves its purpose well. I’ll admit that I was a little skeptical of the metal pipe concept, but this pipe smokes wonderfully and I can see many more Falcon bowls and a few more metal pipes in my future. Thanks for checking it out!

Repairing a stem on a beautiful little Dunhill Bruyere 3206 Pot


Blog by Steve Laug

On the work table at the moment is a beautiful little Dunhill Bruyere pot. It had some serious gnaw marks on the stem. There were tooth dents that were deep on the top and the bottom sides of the stem. Fortunately they did not penetrate the airway. The pipe is in great shape. The finish was in excellent shape. The rim was clean but had been lightened quite a bit. It had hardly been smoked so I am wondering if somewhere along the way it had been used as a prop and the individual had just bitten down hard!

I removed the stem from the bowl and gave the rim a quick clean and then a coat of an opaque aniline based oxblood stain that matches the Bruyere finish. I flamed it and set it aside to dry while I turned my attention to the damaged stem (unfortunately I was in grand rush to work on the stem and the pipe and forgot to take photos of the pipe when I received it. Instead you will have to trust the descriptions and look through the repairs).Dun1

Dun2 I used a dental pick to clean out the debris in the deep dents and the crack along the edge of the button. I used the heat gun to raise the dents as much as possible but sadly they were of the nature that the heat did not do much to raise them. I then wiped down the dents and crack with alcohol to remove any debris in the area to be repaired. I filled in the dents on both sides of the stem with black super glue. You can see in the next two photos the bubble of super glue next to the edge of the button. I decided to let it cure rather than use an accelerator so I set it aside to do so.Dun3

Dun4 Once the repair had cured (several hours later) I sanded the patches with 220 grit sand paper to blend them into the surface of the stem. I sanded the repair to the button as well to blend it in without changing the profile of the end of the stem.Dun5

Dun6 I sanded it with a medium and a fine grit sanding sponge to minimize the scratches left behind by the sandpaper and to further blend in the repair. I used a needle file to sharpen the edge of the button and then sanded it with 400 grit wet dry sandpaper and a little bit of water. You can see from the next two photos that the patches are blending into the stem nicely.Dun8

Dun9 I moved on to wet sanding the stem with 1500-2400 grit micromesh sanding pads. The scratches are disappearing and the patches are blending in to the point that if you did not know where they are you would not see them. I rubbed the stem down with Obsidian Oil before going further with the micromesh pads.Dun10

Dun11 I wet sanded the repairs with 3200-4000 grit micromesh pads to further blend in the repaired areas. I spent extra time working on the repair to the small crack on the top of the button. I wanted that spot to blend in well and be smooth to the touch.Dun12

Dun13 The repair to the top of the button and along the top side of the button needed a little more work to get them to be less visible and more blended. The repair on the underside was really looking good. I cleaned up the repair on the button and then used some clear super glue applied with the tip of a dental pick. Once it cured I sanded it with 220 grit sandpaper and then the same set of wet dry sandpaper and micromesh pads that I commented on above. Finally the repair blended well.Dun14

Dun15 I buffed it with Blue Diamond and gave it several coats of carnauba wax. I buffed it with a clean flannel buff and then hand buffed it with a microfibre cloth.Dun16

Dun17 The finished pipe is shown below. The darkening of the stain on the rim and the repaired stem are finished and the pipe is almost ready to send back to the owner.Dun18

Dun19

Dun20

Dun21

Breathing New Life into an LHS Sulgrave


Blog by Steve Laug

I have become a fan of older LHS pipes and restored quite a few of them lately. I am always on the lookout for different LHS lines that I have not seen. Recently I picked up this LHS Sulgrave from a fellow on the Dr. Grabow Collectors Forum for $15. It is a line that I had not heard of before. He described it as a lightly smoked briar pipe. When I saw it I wanted it as it was my kind of shape. Never sure what to call this shape – bent banker, squat apple – not sure but I like it. He gave the following description in the sale listing. The shank is stamped Purex Sulgrave arched over LHS in a Diamond on the left side. The stem has two light coloured dots on the left side. The pipe is 5 1/8 inches long from the bottom of bowl to end of bit. The bowl chamber diameter is 7/8 inch and bowl depth is 1 1/4 inch. There is light caking in bowl. There is light tooth wear on end of the stem near the button. It has normal wear and tear (dings, oxidation and scratches) for an estate pipe. Nice overall shape and condition. Here are the photos that he included when I emailed him for details.LHS1

LHS2

LHS3

LHS4 When the pipe arrived I was not disappointed. The shape was perfect. The description was accurate and the only variation that I could see was that the stamping did not include PUREX on the shank. Not a big deal in my book. The bowl was unevenly caked and appeared to have been reamed. The back side of the bowl had a thicker portion of cake that gave the inside wall on the back side an uneven and out of round look. I was pretty certain that with a good reaming and a light sanding the rim would look better. The stem was over bent and there was a slight crease on the underside of the bend. There was a coat of wax or some kind of coating on the stem and bowl. The stem was oxidized. In the first photo below you can see slight imperfection in the vulcanite stem. I have circled it to highlight it in the photo below. It is not a hole or worn spot, it is actually a thread of cord in the rubber. Its presence gives some idea of the date of manufacture as recycled rubber was used in WWII pipes.LHS5

LHS6

LHS7

LHS8 The stem also had a lot of tooth dents and chatter along both top and bottom with some very deep marks on both. I tried to capture them in the next two close-up photos but they are still not very clear. The odd thing was that the dents went up the stem over an inch. The slot in the button was not centred and appeared to have left the factory that way. The dents were deep enough that I was concerned regarding the thinness of the stem surface over the airway. The mortise and airway in the shank were dirty and the end of the mortise was chipped away. It looked as if there had originally been a stinger in the tenon but it was no longer with the pipe.LHS9

LHS10 I also have included the next close-up photo of the rim and the bowl interior to show the cake that gave the bowl an out of round appearance.LHS11 I reamed the bowl with a PipNet pipe reamer using the largest cutting head. I took the cake back to bare wood to even out the inner edge of the bowl. I wanted to get rid of the cake so that I could smooth out the edge.LHS12

LHS13 I folded a piece of 220 grit sandpaper to smooth out inner edge. It took a little effort remove the inner edge damage and clean up the roundness of the bowl.LHS14

LHS15 I wiped down the bowl with acetone on cotton pads to remove the tars and the wax coat on the briar. With them removed the outer edge of the bowl showed damage as well. The bowl had been knocked about on the front edge particularly. The grain on this pipe was lovely.LHS16

LHS17

LHS18

LHS19 To minimize the outer edge damage I topped the bowl with 220 grit sandpaper on a topping board. I sanded it to remove the damage to the top of the bowl and clean up the outer edge of the bowl.LHS20

LHS21 I cleaned out the shank and the bowl with pipe cleaners, cotton swabs and alcohol to remove the grime inside. It took quite a few of both to clean out the shank but finally they came out clean.LHS22 I heated the stem with a heat gun to try and lift some of the dents to the surface and to also take out some of the bend. I also wanted to smooth out the sharpness of the bend on the bottom side.LHS23

LHS24

LHS25 I cleaned out the airway in the stem with pipe cleaners, cotton swabs and alcohol.LHS26 The heat had raised most of the dents significantly. The ones that were left in the stem needed to be sanded out and then filled to take care of them. I used 220 grit sandpaper to smooth out the surface. I also worked on the curve on the underside of the stem to make it less sharp looking.LHS27

LHS28

LHS29

LHS30 The dents in the stem needed to be filled to bring the surface back to smooth flowing condition. I used a black super glue to fill the surface and set the stem aside to dry for several hours. Once dry, I sanded the fills with 220 grit sandpaper and then used a medium and a fine grit sanding sponge to feather them into the surface of the stem.LHS31

LHS32

LHS33

LHS34

LHS35

LHS36 I used a needle file to clean up and sharpen the edge of the button and give it more definition. I sanded the sharp edge with sandpaper and then sanded it with micromesh sanding pads. I wet sanded the stem with 1500-2400 grit micromesh pads and dry sanded with 3200-12,000 grit pads. I rubbed the stem down with Obsidian Oil between each set of three pads and then let it dry after sanding with a 12,000 grit pad.LHS37

LHS38

LHS39 I buffed the pipe with White Diamond and Blue Diamond on the buffing wheel to polish and remove the slight remnants of oxidation that had come to the surface. I gave it multiple coats of carnauba wax and buffed it with a clean flannel buffing pad. I brought it back to the table and hand buffed it with a microfibre cloth. The finished pipe is shown in the photos below.LHS40

LHS41

LHS42

LHS43

LHS44

LHS45

LHS46

Dave’s Four Dot Sasieni


Blog by Andrew Selking

I’ve been out of touch for the past few months, between moving, home renovation, and finding a new job my free time has been limited. Dave is sneaky though, he sent a picture of a pipe he bought and asked me if I thought I could fix it. Of course I said yes. Here is the pipe as it looked upon arrival. There is an obvious chunk missing from the button, but there is also a small crack on the other side of the stem. That was uglier than it looks.Dave1

Dave2

Dave3

Dave4

Dave5

Dave6

Dave7

Dave8

Dave9 I did my normal procedure of cleaning the inside of the pipe first. Dave was kind of worried about how the alcohol might affect the finish, so I used new alcohol and only left the bowl in for about 45 minutes. I soaked the stem in an Oxyclean bath.Dave10

Dave11

Dave12 The tar on the rim came right off after removal from the alcohol bath. Next I reamed the pipe using my Castleford reamer, used a brush on the inside of the shank, followed by a retort of the bowl. As I suspected the pipe was pretty clean.Dave13

Dave14

Dave15

Dave16

Dave17 Before dumping out the Oxyclean, I ran a pipe cleaner through the stem. It was not too dirty. I followed that by a retort and more pipe cleaners. That was the easy part, the fun was about to begin.Dave18

Dave19

Dave20

Dave21 As you can see the missing chunk is a problem. The crack on the other side looked like it could keep going, so I drilled a hole to stop it. You might notice a slight micro crack to left of the main crack. Turns out there was a chunk of vulcanite hanging on like a loose tooth. Of course it came out very easily, leaving a stem that was missing most of the button on both sides.Dave22

Dave23

Dave24

Dave25

Dave26

Dave27

Dave28 The first thing I do when building a new stem is fit some rolled up wax paper inside the stem. I’ve found that the CA glue does not stick to it and it helps give shape to the inside of the stem. I use ground charcoal (which I purchased at the pet store and ran through a coffee grinder and sifter) and CA glue. I started by filling in the hole that I drilled to stop the crack. Once I had that filled in and sanded smooth, I started building up the stem below the button. I forgot to mention that I use CA accelerator throughout the process. I find that you can work the glue within 2 to 3 minutes instead of having to wait overnight.Dave35

Dave36

Dave37

Dave38

Dave39

Dave40

Dave41

Dave42

Dave43

Dave44

Dave45 Once the stem was repaired, I put layers of clear tape on the stem under the button to serve as a form for the glue. Once the tape was even with the button, I started adding CA glue and charcoal. I put a small amount of charcoal on the bottom of a plastic cup, add a drop or two of CA glue and mix it with a push pin. I use the push pin to add the material to the stem, followed by a few drops of accelerator. Once the material is built up, I start to sand and file it into shape. I use needle files and 400 grit sand paper. This gets me to the final step, which is addressing the micro pits.Dave46

Dave47

Dave48

Dave49

Dave50

Dave51

Dave52

Dave53

Dave54

Dave55

Dave56

Dave57

Dave58 I filled the micro pits with a mixture of CA and charcoal, but used much less charcoal than before. I used 400 grit sandpaper and needle files to get the final shape. I then used 1500-2400 grit micro mesh with water to smooth it all out. Since the bowl was in nice condition and I wanted to preserve the finish, I started polishing with 3200 grit micro mesh. I used a progression of 3200-12,000 grit micro mesh on both the bowl and the stem. Here is what it looked like once it was ready for the buffer.Dave59

Dave60

Dave61

Dave62 I polished the stem using my rotary tool with a felt pad and white diamond, followed by carnauba wax. My rotary tool has variable speed and I use the lowest setting. I used white diamond and carnauba wax on the bowl with the buffing wheel. Here is what the pipe looked like when I finished. This is my second repair of this type. My ultimate goal is to do repairs that look like the original. Thanks for looking.Dave63

Dave64

Dave65

Dave66

Dave67

Dave68