Blog by Anthony Cook
I was browsing through Reddit’s /r/PipeTobacco sub-forum when I saw a post from a member looking for someone who could restore an old, leather-wrapped Longchamp pipe. He wanted it in time for his wedding day, which was a couple of weeks away. I could see in the accompanying photos that the pipe had a chip out of the rim and a bite through on the stem, but otherwise it appeared to be in good condition and both the leather and stitching looked solid. So, I contacted him and offered to take care of it.
The pipe arrived at my door a while later. I was happy to see that there were no hidden “gotchas” and the condition of the pipe was pretty much as it had appeared in the photos.
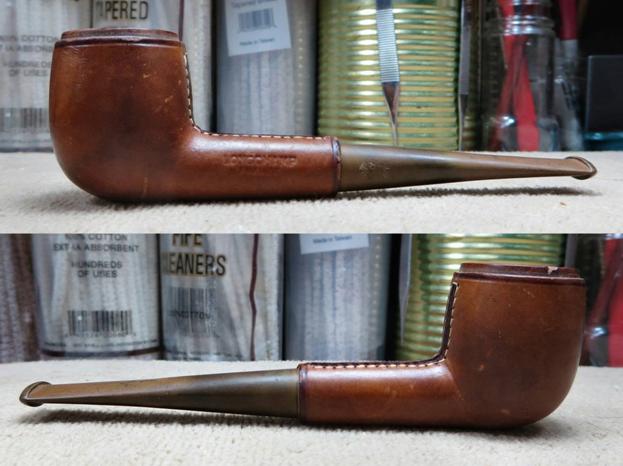
Here are a few photos of the pipe on arrival:
 Notice in the image below that the stem has almost no tooth chatter despite the massive bite through. What’s up with that? Weird.
 The next image shows some detail photos of the stamping and the rim damage on the pipe.
 The pipe needed to be cleaned up before I tackled any of the damage. This is my “getting to know you” time with the pipes that I work on. I learn a lot about the pipe as I’m cleaning it and I often discover things that I hadn’t noticed previously.
I used a very lightly damp rag to remove the tar and soot from the rim. It came away easily. You can see some light spots on the rim in the photos above. I had been afraid that they were fills (that would be a nightmare), but they turned out to be… something else. Whatever it was, it came off with the rest of the grime and I could see that the rim was in good condition other than the noted chip.
Then, I cleaned out the interior of the stem and stummel with a few cotton swabs, pipe cleaners, a shank brush and some isopropyl alcohol. The pipe was already pretty clean. So, it didn’t take much work. I then gave the pipe a retort just to be sure and another quick scrub to remove anything that the retort had left behind.
 To prevent any lingering tobacco ghosts, I stuffed cotton balls into the chamber and used a dropper to drip in alcohol until they were saturated. I then sat the stummel aside overnight to let the cotton balls and alcohol do their job. The image below shows a photo of the bowl just after adding the alcohol, another taken about three hours later, and another at about twelve hours (just before I removed the cotton).
Meanwhile, the stem had been soaking in a bath of Oxyclean and warm water. I removed it from the bath and scrubbed it with cubes cut from a Magic Eraser until all of the yellow-brown oxidation was gone and the stem was restored to a satin-black finish. Using needle files, I cleaned up the edges of the bite through hole to remove any loose material and scored the surrounding surface to prep for the patch. Then, I inserted a wedge of thin cardboard wrapped in clear tape through the slot making sure that it completely covered the bottom of the hole. I applied several thin layers of black CA glue over the hole. I allowed each layer to dry and lightly sanded with 220-grit paper between layers to give the next one a good surface to bite into. The patch was ready to be blended in when it was slightly higher than the surrounding surface. I used needle files to carve a sharp transition at the back of the button and sanded back the patch and much of the tooth chatter with 220-grit paper.
 I followed that with 320-grit and 400-grit paper to further smooth the surface, and then I lightly sanded the entire stem (carefully avoiding the logo impression) with 600-grit paper.
I wanted to repaint the stem logo to give the pipe a more complete look. So, I used a silver leaf paint pen to paint over the logo and fill the impression with paint. Once it was dry, I carefully sanded the paint from the raised surfaces with 1200-grit paper leaving behind only what was left in the impression. Some of the impression had been worn away until it was nearly level with the surrounding surface. So, I had to try to shape those by hand using a printed photo reference of the logo. I lightly sanded the rest of the stem with 1200-grit paper, and then polished with Micro-Mesh pads 1500-grit to 12000-grit. Somehow, I forgot to get a shot of the completed stem, but you can see it in the photos of the finished pipe.
The stem was finished. So, it was time to take care of the stummel. I filled the chip in the rim with briar dust and CA glue, let it dry, and then sanded the patch back with 220-grit paper. It’s just about impossible not to sand away some of the surface surrounding a patch. So, there was a very slight depression in the patched area. To even the rim out, I lightly topped the bowl, first with 220-grit, and then with 320-grit paper. To bring the color back and blend the patch, I applied Fiebing’s dark brown dye to the rim with a cotton swab, flamed it, and sanded the rim with 400-grit and 600-grit paper. Then I stained with medium brown and sanded with 1200-grit. I polished the rim with Micro-Mesh pads 1500-grit through 2400-grit before giving the rim a final buckskin stain, and then polished with the remaining Micro-Mesh grits. Again, I forgot to get photos of any of this. Sometimes, you just get caught up in the work, you know?
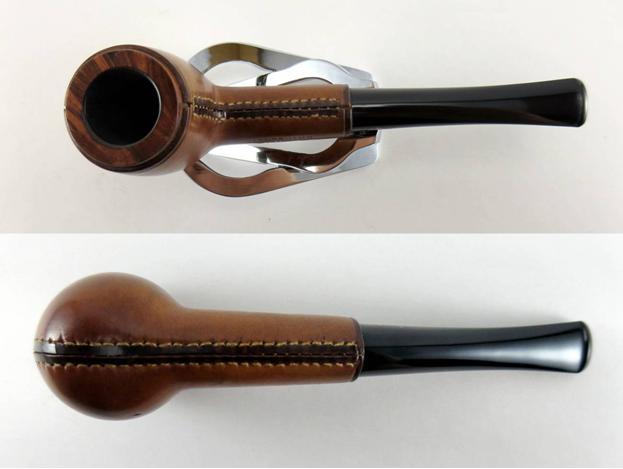
All that was left to do to get this pipe ready for the wedding day was to spiffy up the leather a bit. I used a hairdryer set to high heat and low flow to heat the leather and raise the dents. I used my fingers to knead and stretch the leather around the deeper ones to help lift them. Then, I used Fiebing’s buckskin dye to restain the scratches and a small tear on the right side of the bowl. The tear itself was then patched with a bit of leather glue. Finally, I used Fiebing’s 4 Way Care to clean and condition the leather wrapping before burnishing the ends of the leather and edging the seams. The pipe work as finished and it was ready to be sent back for the big day. Here are a few photos of the finished pipe:


how did you restore the leather without discoloring the stitching?
LikeLike
Bernie I clean the leather with saddle soap and good success
LikeLike
Leather? Wood? And tobacco? The perfect trifecta. Nice work all around, Anthony. That pipe is just gorgeous.
LikeLike
Thanks, JDD! It was a fun one.
LikeLike
Very impressed with this restoration. The stem repair is invisible and the leather reconditioning was superb. Excellent job!
LikeLike
Thanks, Al!
LikeLike
That black CA glue is a winner, Steve. I’m going to have to put an order in for some! I’ve never restored a leather-wrapped pipe. Thanks for all the great tips in this post.
LikeLike
The briar is usually covered up by the leather for a reason, but they feel very comfortable in the hand. Longchamp also made some wrapped in pony fur. That’s a little too creepy for my taste.
LikeLiked by 1 person