Tag Archives: repairing tooth marks

Underneath the Grime lay a beautiful Royal Guard 504


Blog by Steve Laug

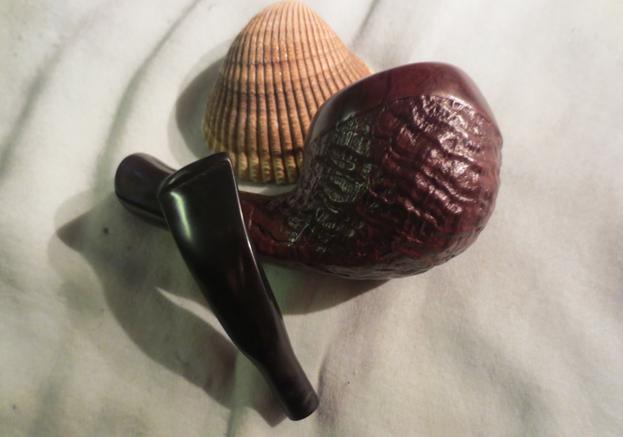
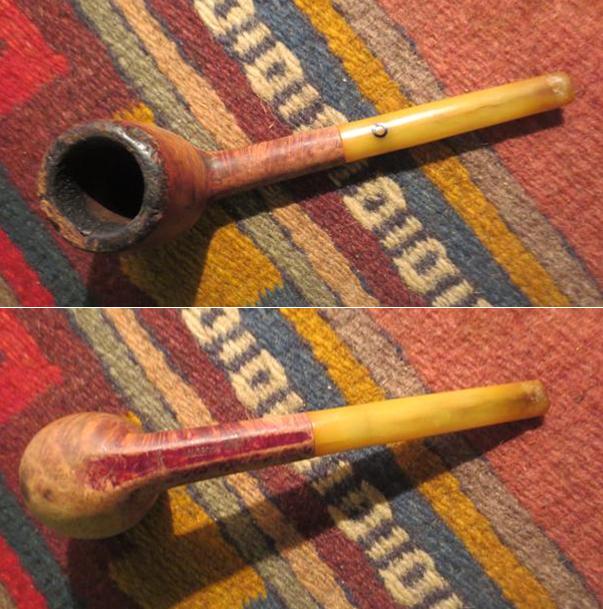
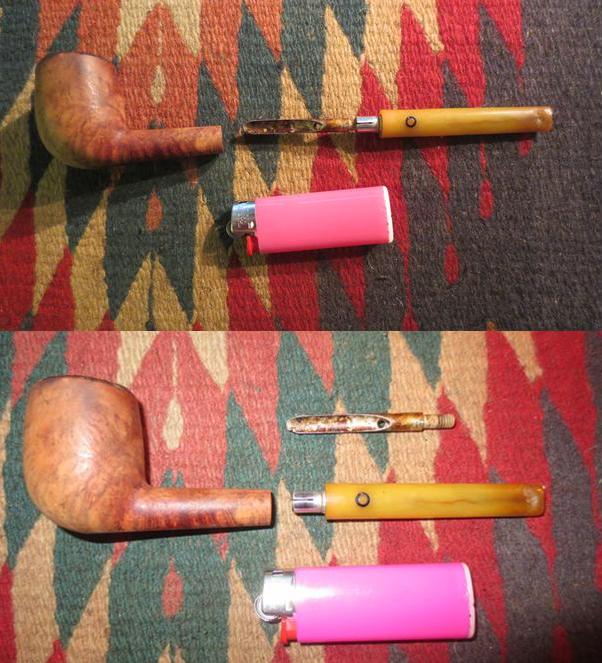
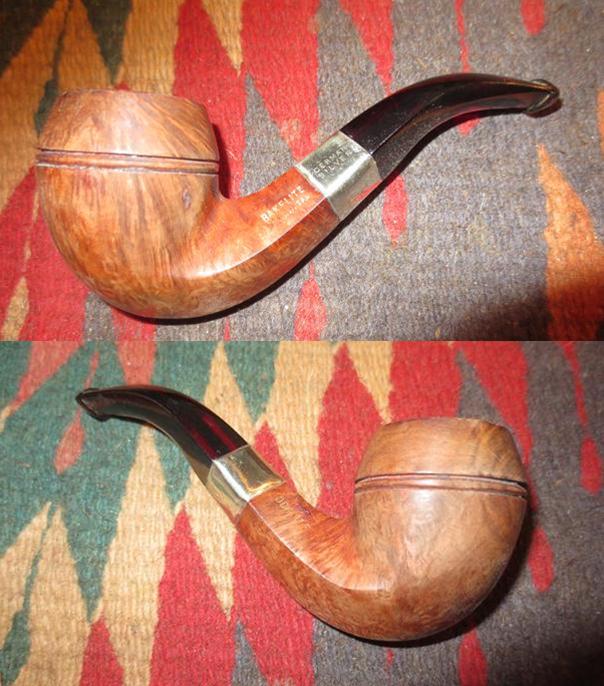
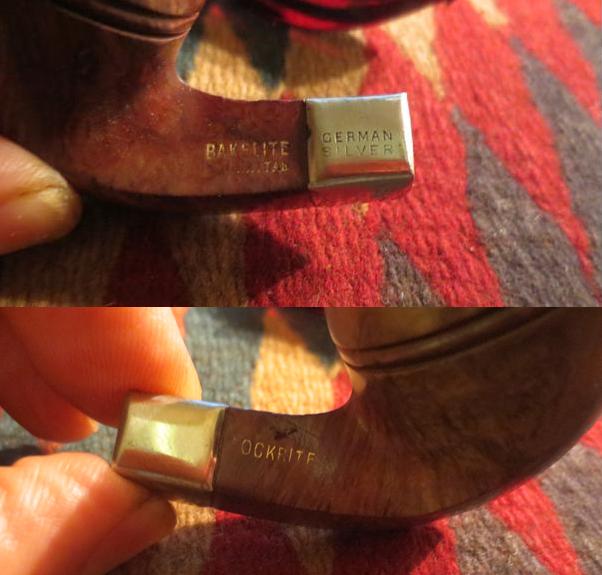
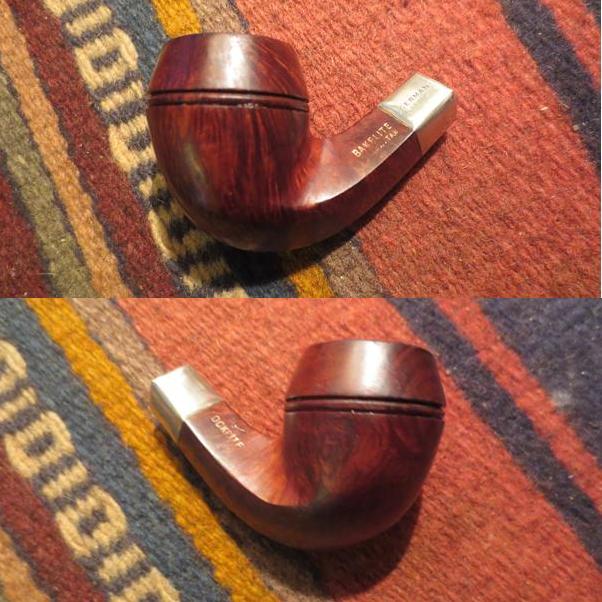
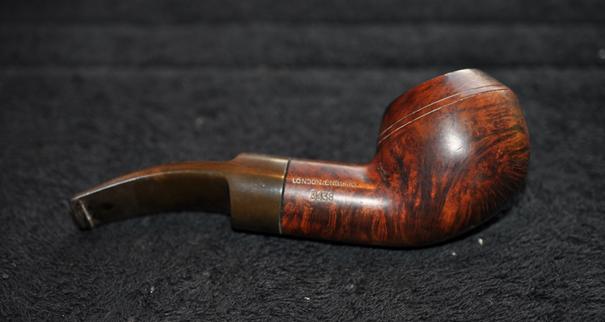
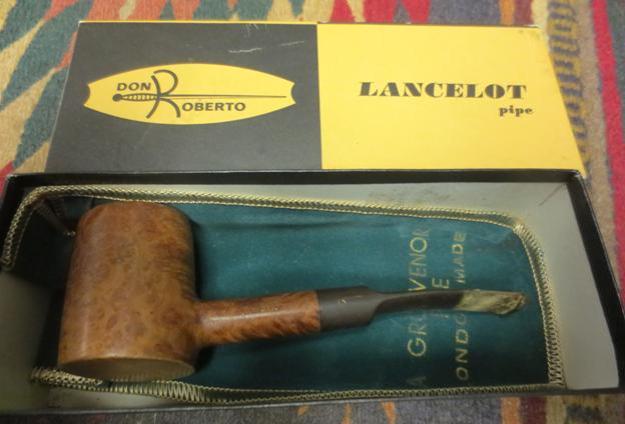
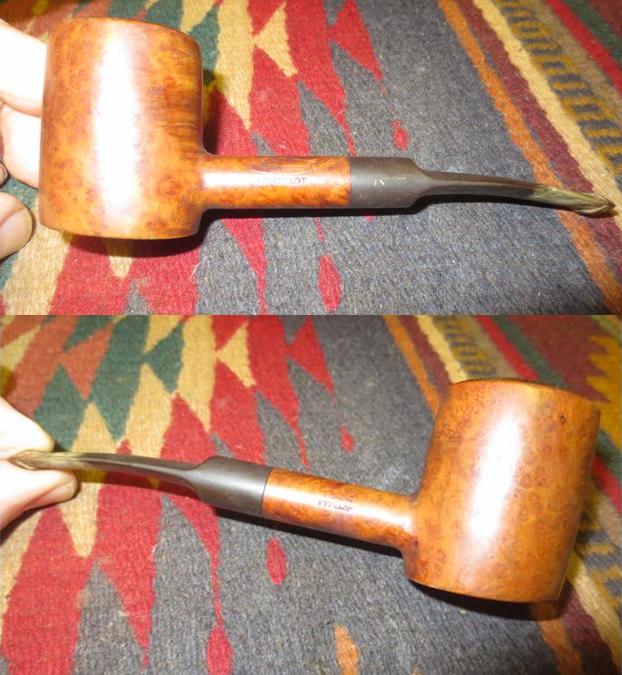
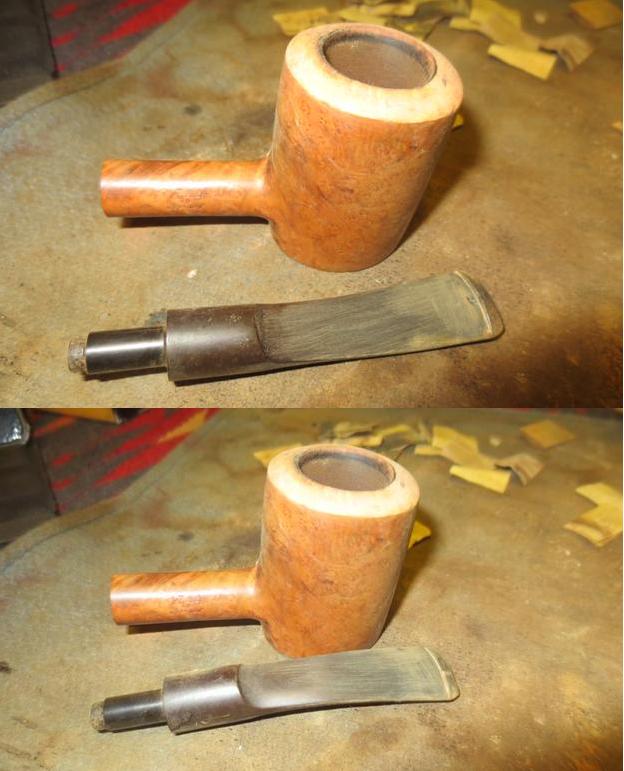
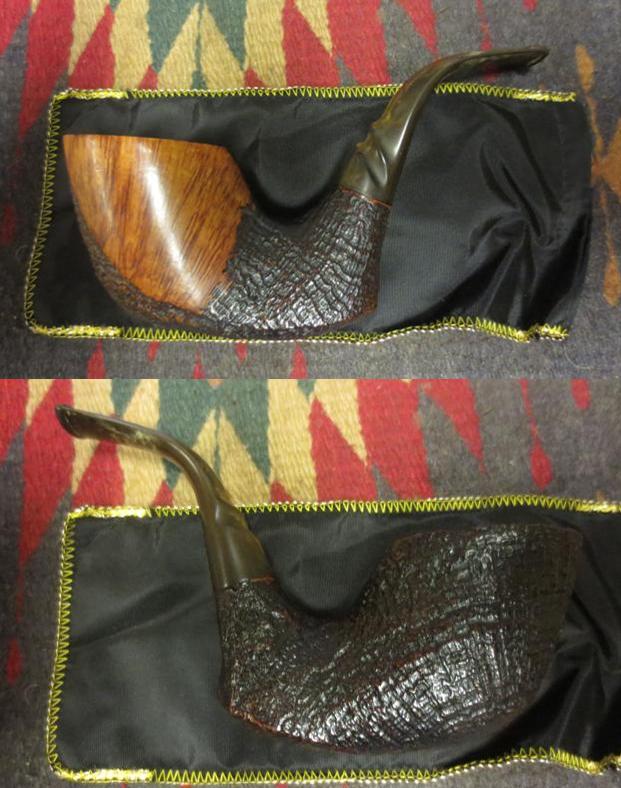
I have a box of pipes from a friend in Dawson Creek to clean up. In trade for a few restorations he was the one who gave me the Preben Holm Pair. I asked him to prioritize which pipes he wanted me to tackle first. Number one on his list was a Stanwell made Royal Guard 504 that combines smooth and sandblast areas into the finish. It was in rough shape. The finish was dirty and worn with the brown top coat worn down. The vulcanite shank extension was oxidized and the RG stamp on the left side was faded. The bowl was thickly caked and the lava overflow on the top of the bowl was also very thick. I was a bit concerned that underneath the cake I would find burn. You can never tell – sometimes a thick cake protects the rim top and sometimes it hides a lot of rim damage. Once I got into the cleanup I would be able to tell better with this one. The stem was lightly oxidized and there was tooth chatter and bite marks on the top and the bottom sides near the button. The top edge of the button had a small dent as well. The deepest tooth mark was on the topside of the stem and would need to be repaired. But even under all the grime I could see that this pipe would be a thing of beauty once it was finished.RG1 RG2
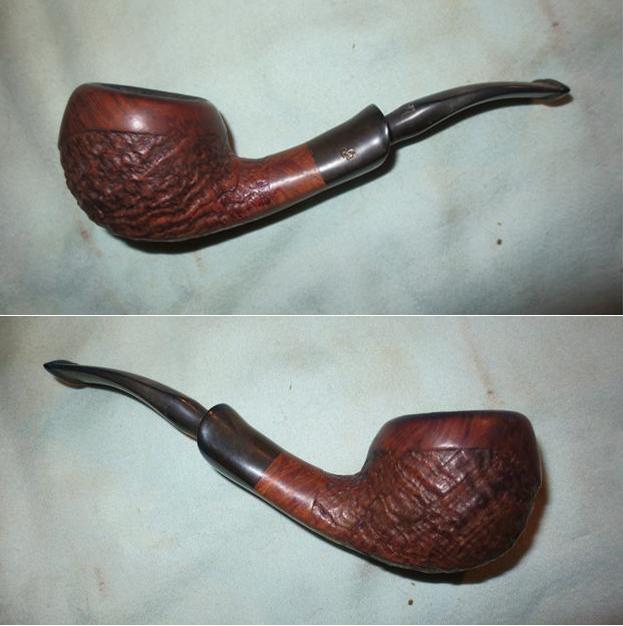
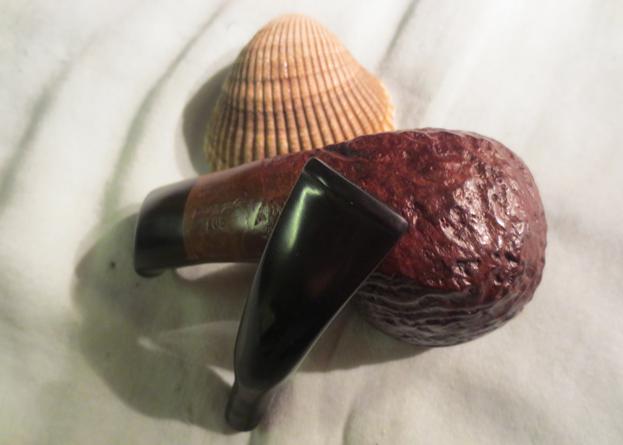
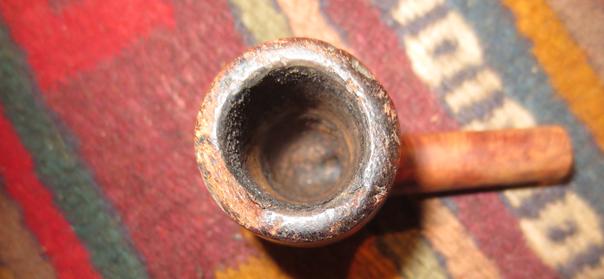
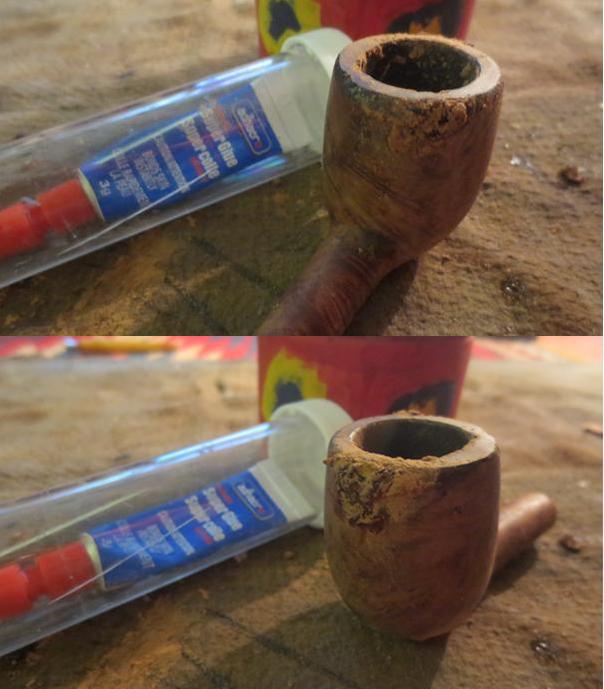
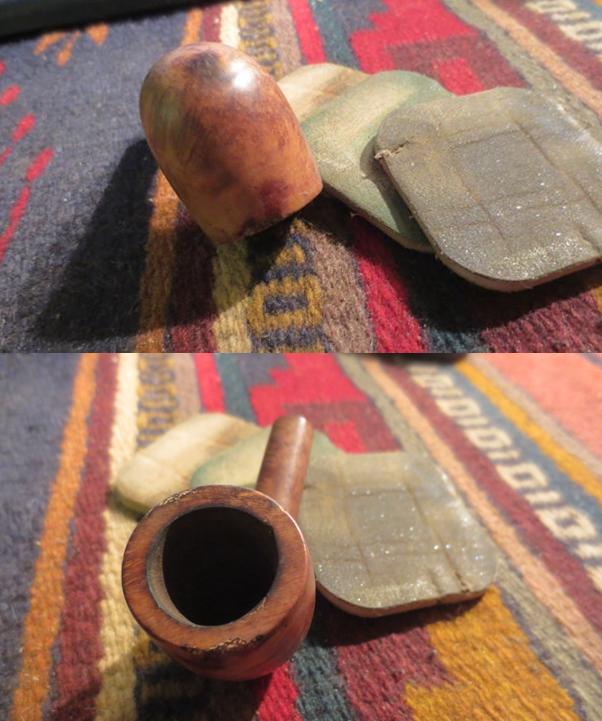
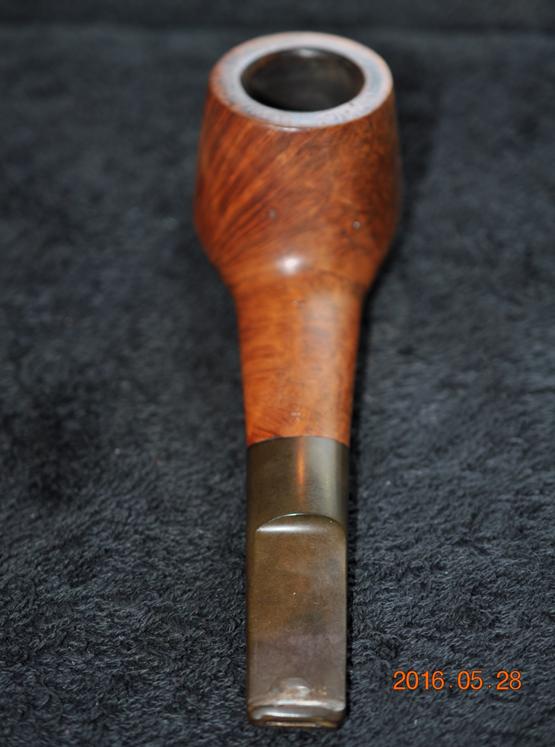
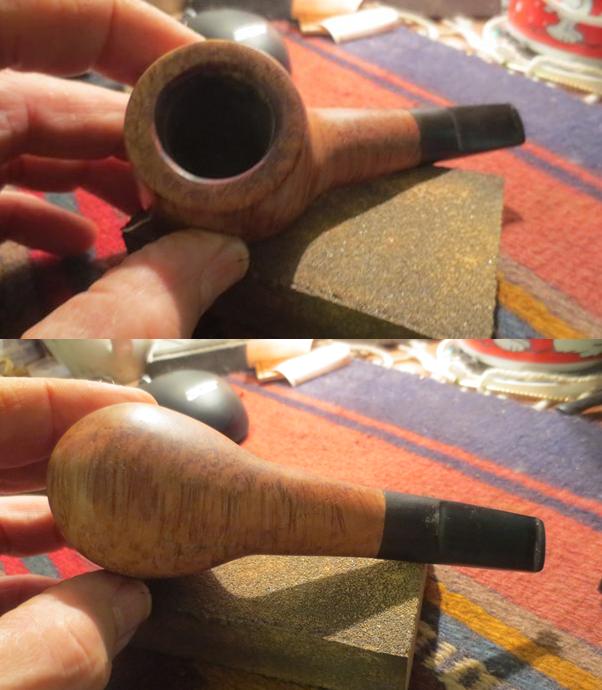
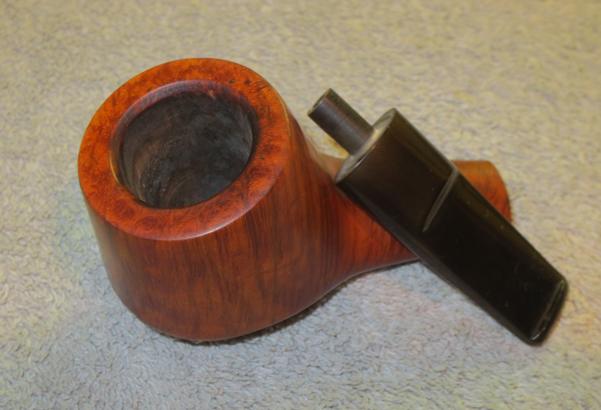
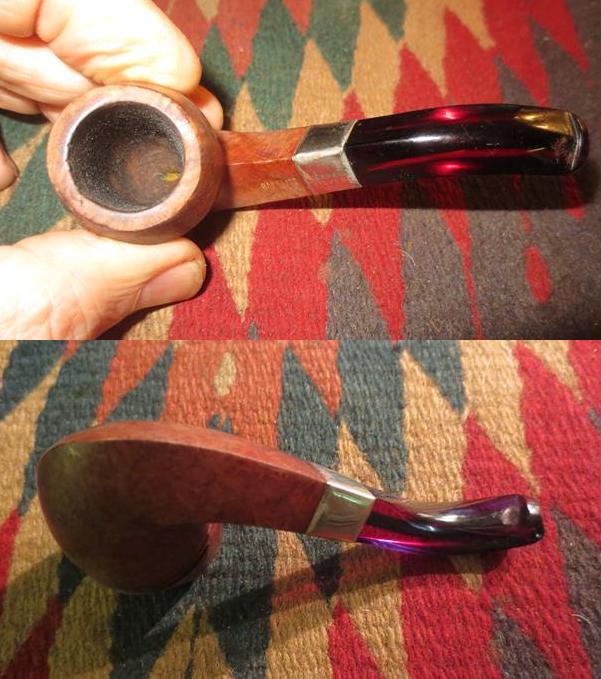
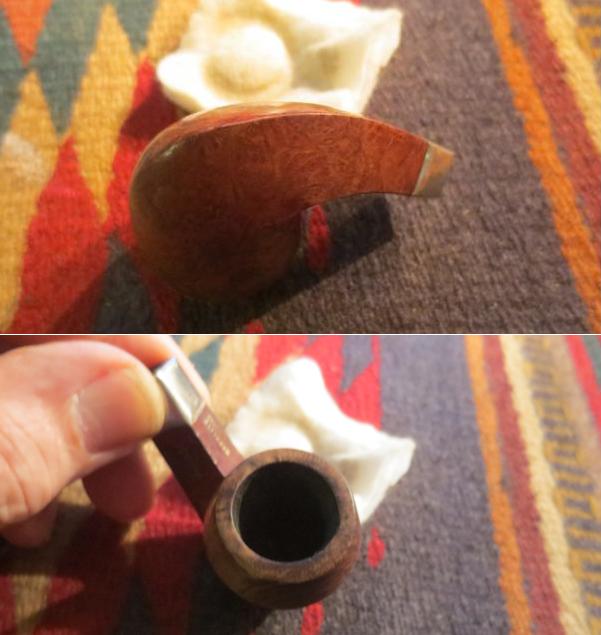
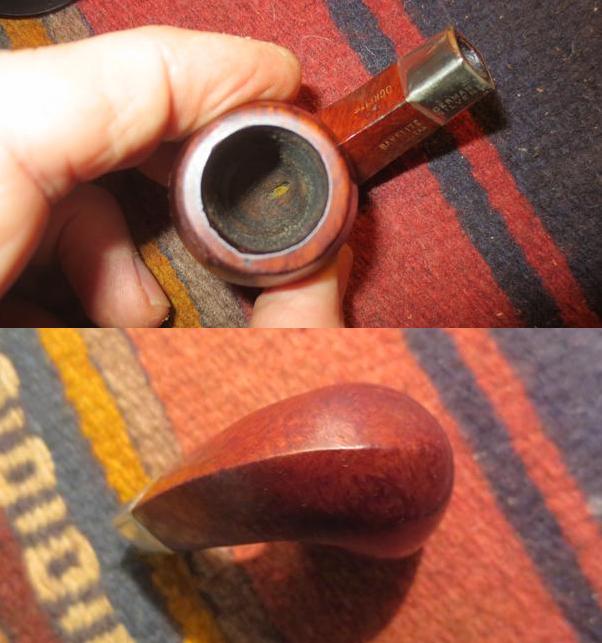
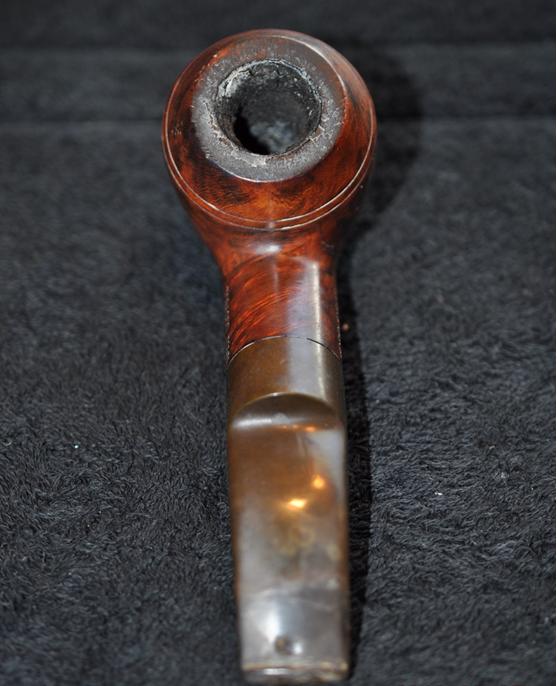
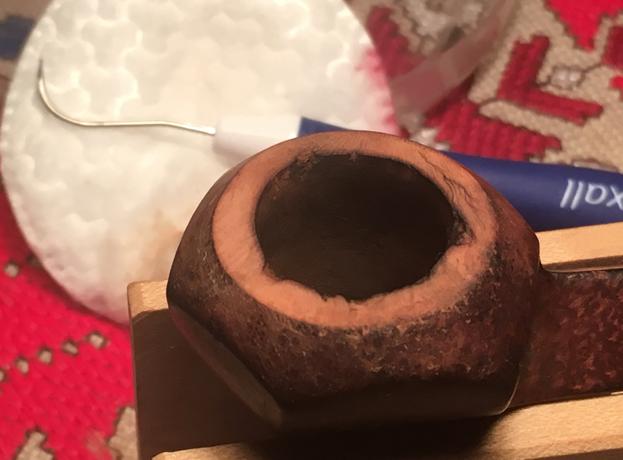
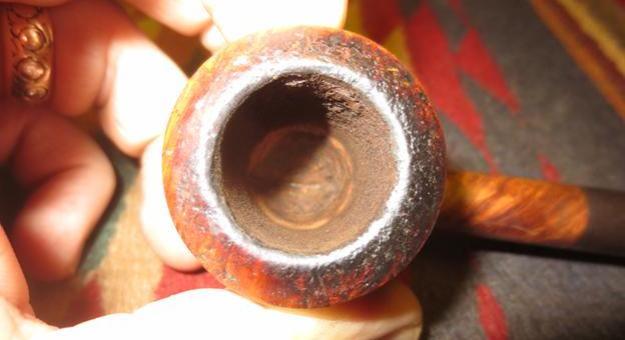
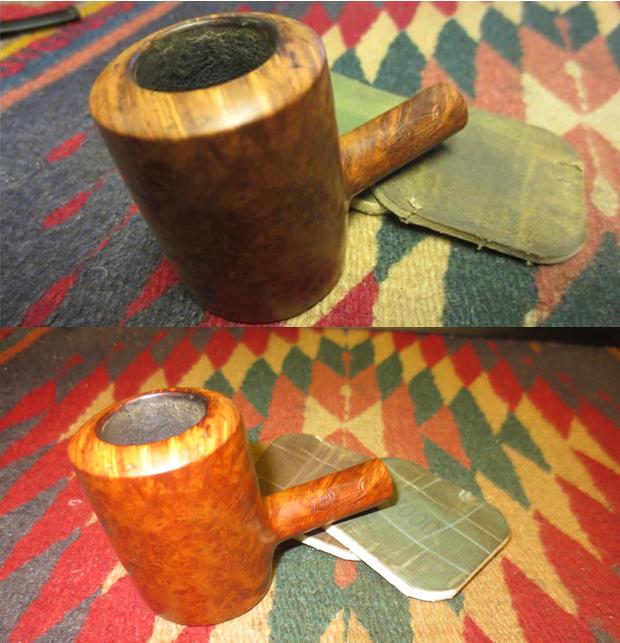
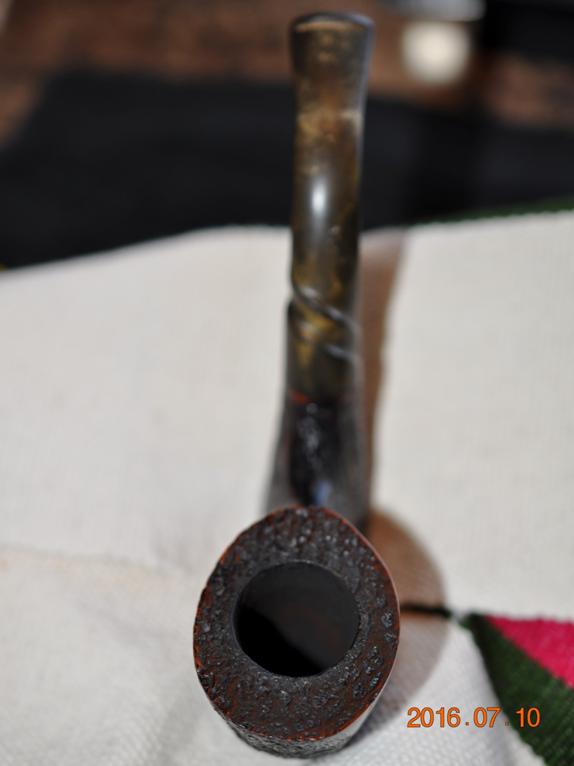
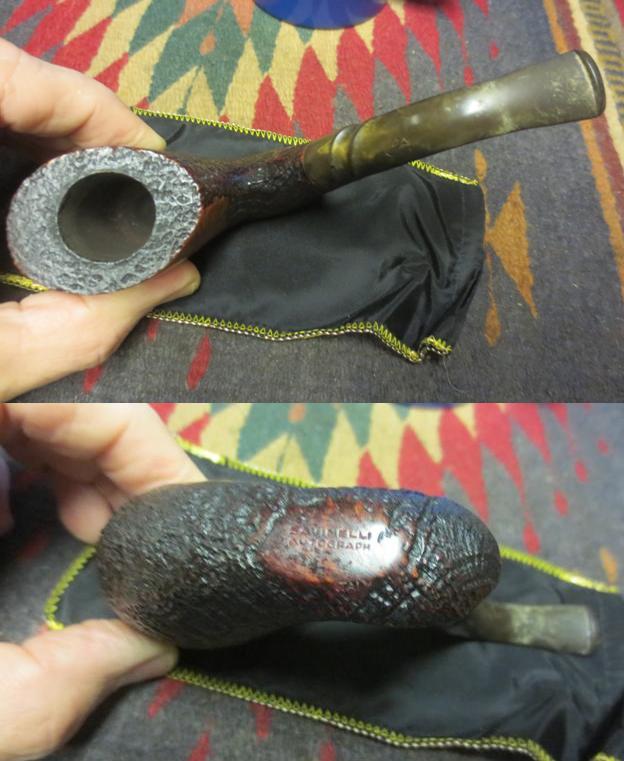
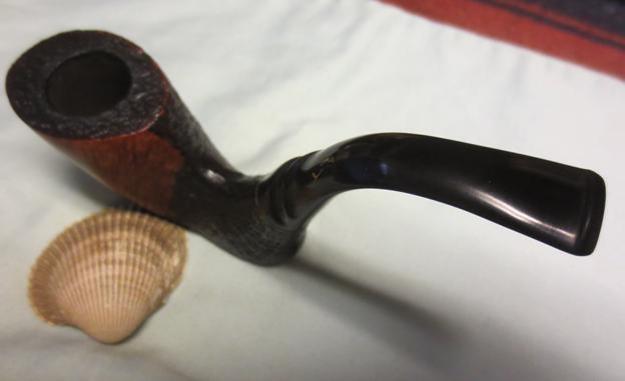
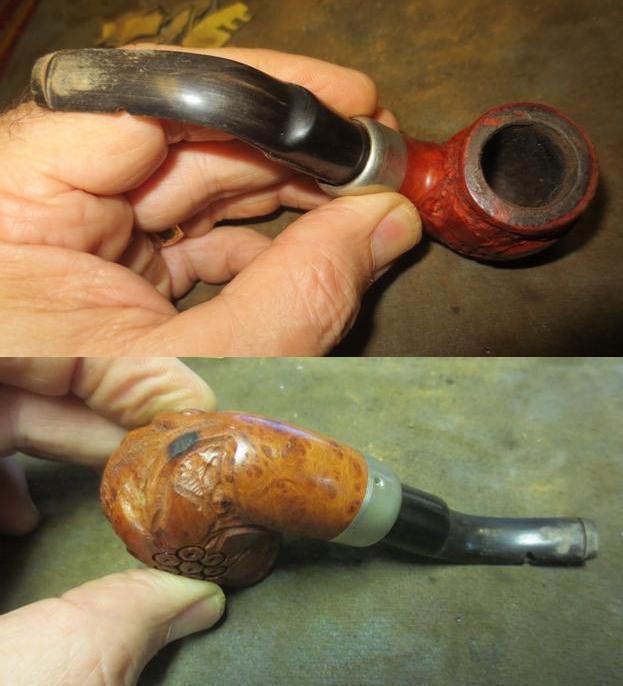
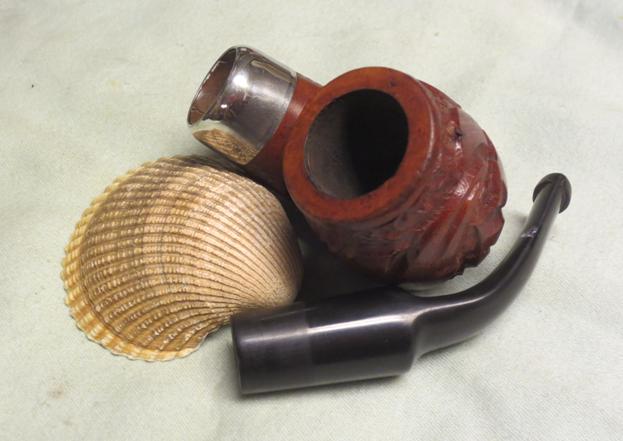
I took a closeup photo of the rim to show how thick the cake was in the bowl and the extent of the overflow on the rim. It was very thick and quite hard.RG3
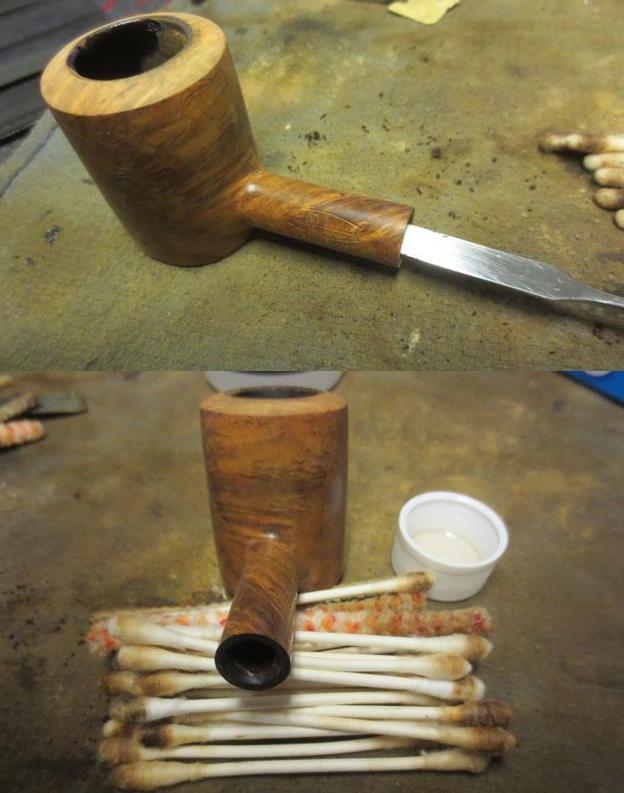
I reamed the bowl with the first three cutting heads on the PipNet reamer and then cleaned it up more with the Savinelli Pipe Knife. The amount of carbon that came out of the bowl was amazing.RG4
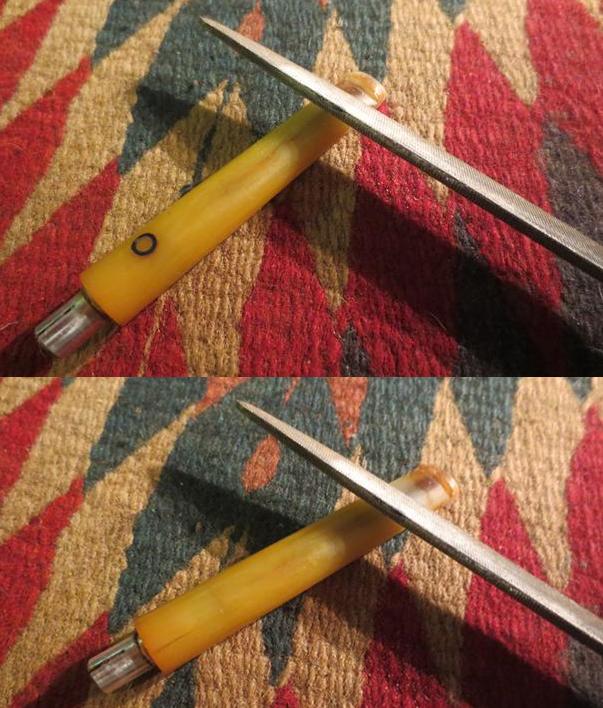
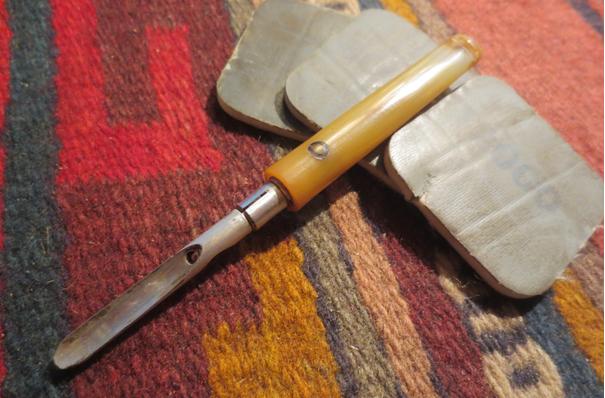
I used a pen knife with a thin stiff blade to carefully scrape off the buildup on the rim. It was pretty thick and hard so I slowly and carefully flaked it off with the knife.RG5I scrubbed the bowl and rim with acetone on a cotton pad and was able to remove the grime and the buildup of wax and oils in the grooves of the sandblast.RG6
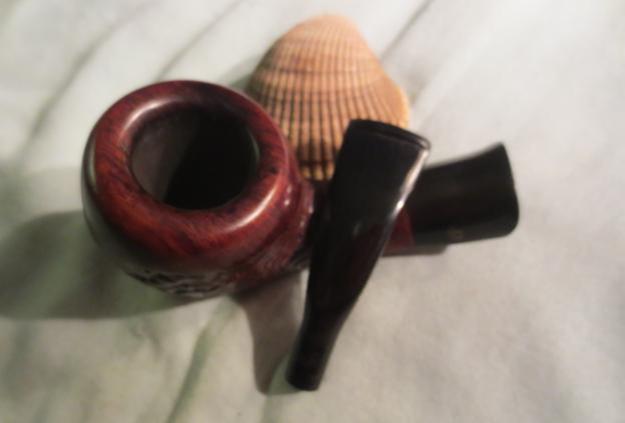
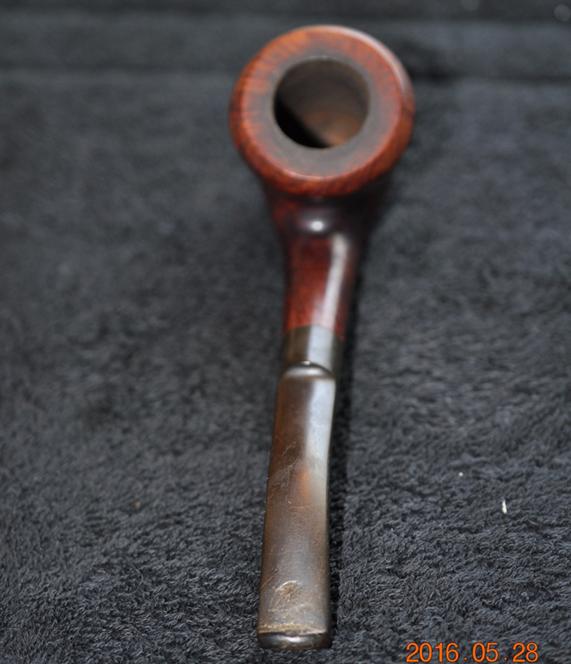
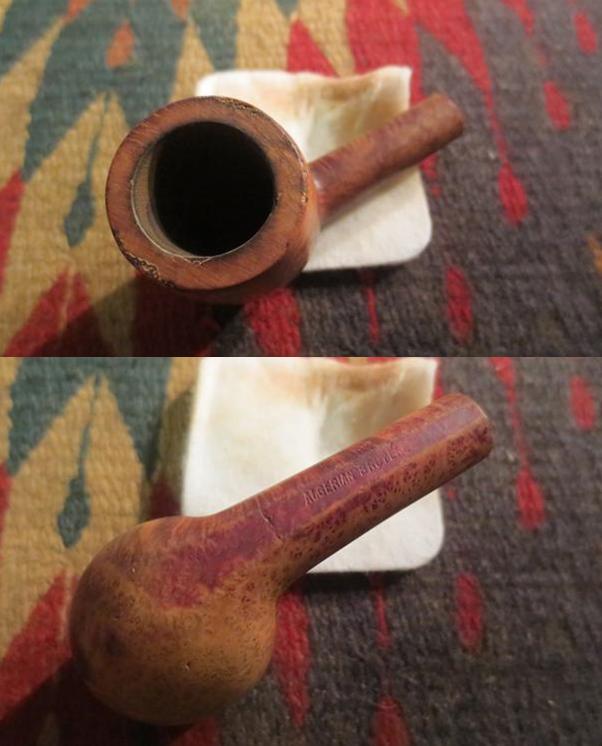
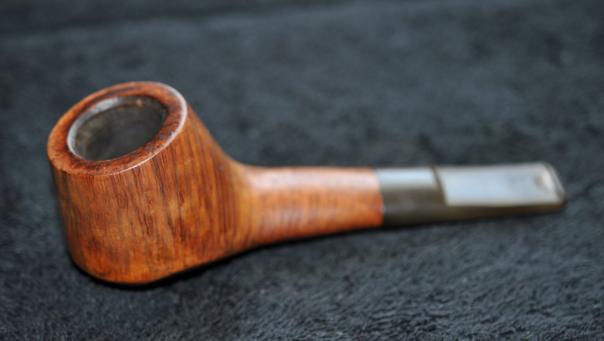
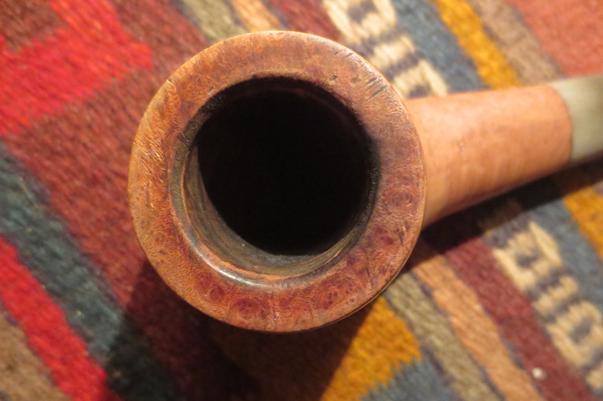
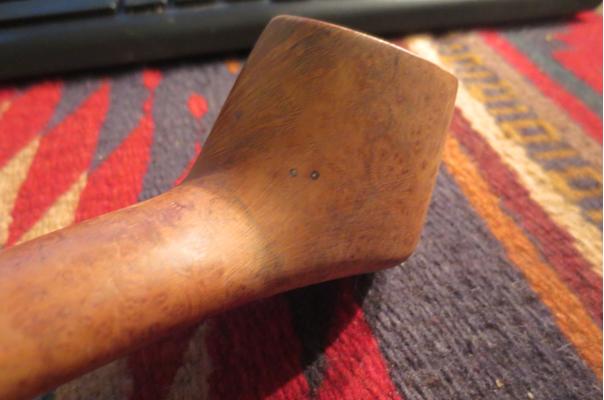
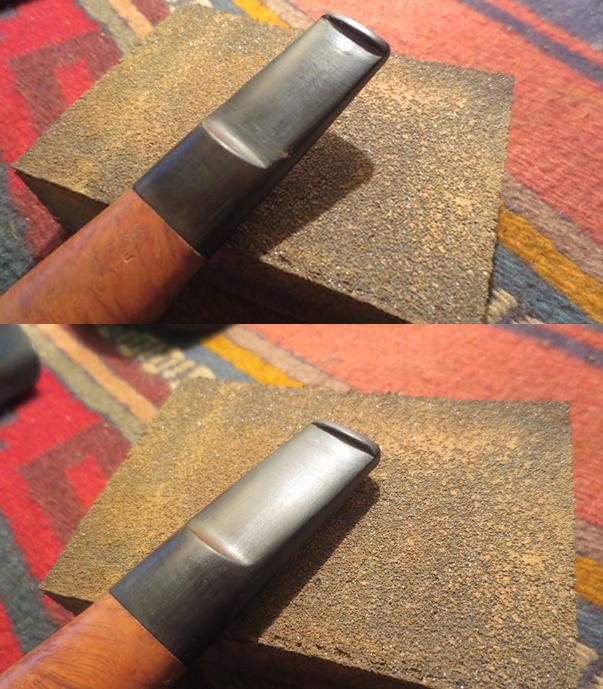
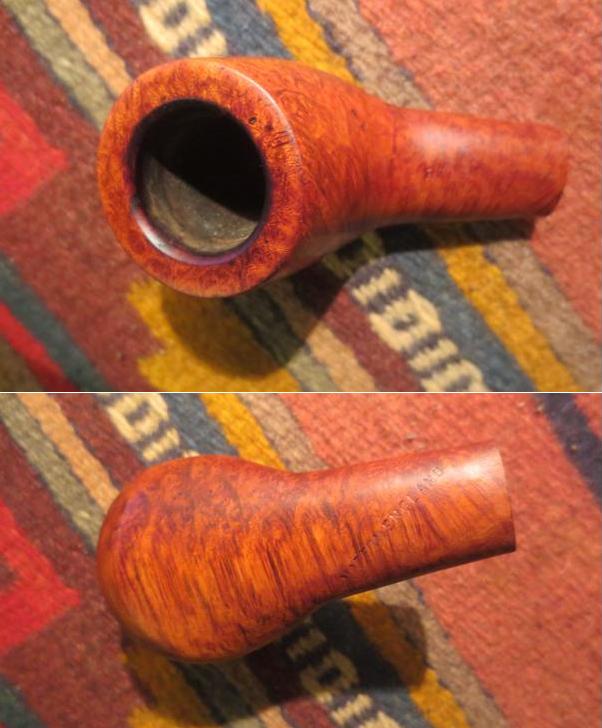
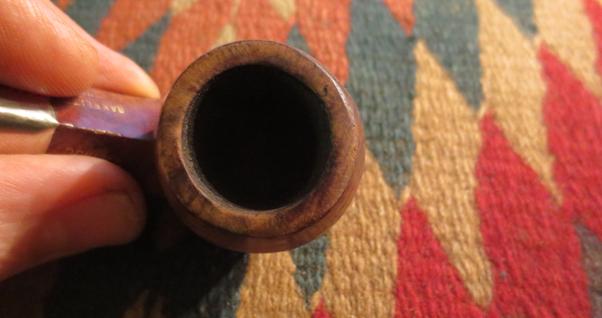
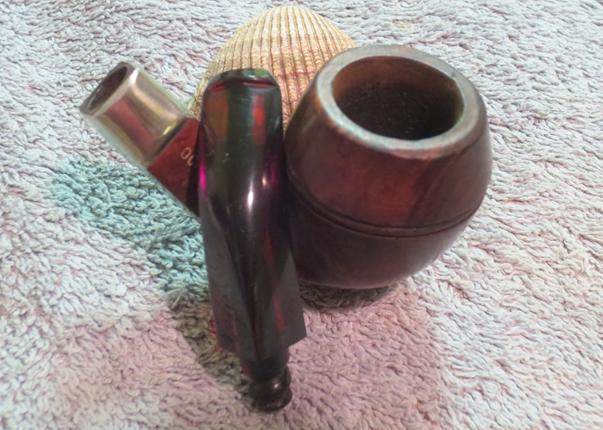
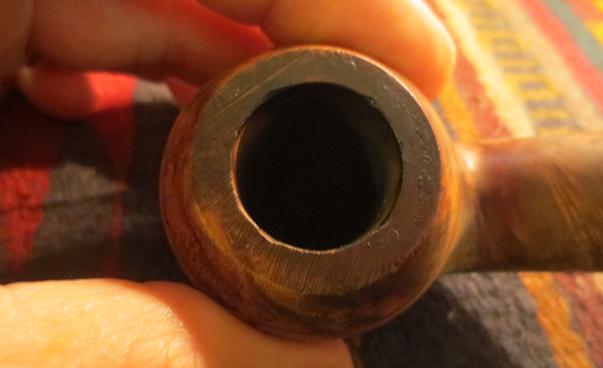
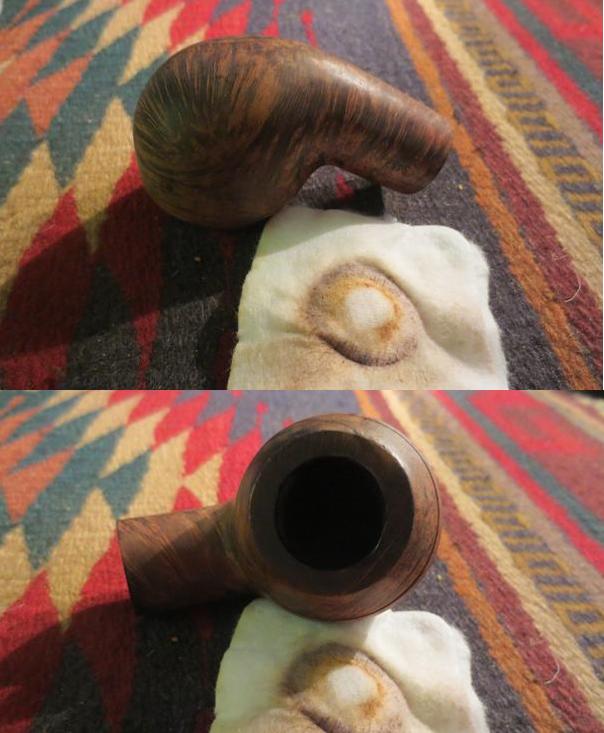
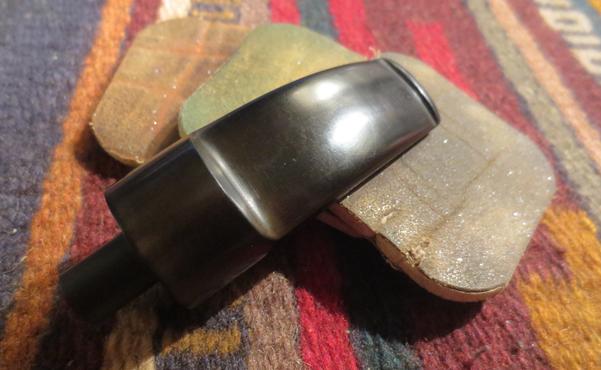
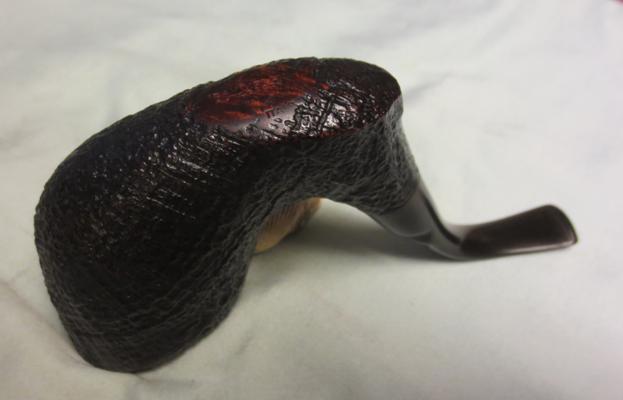
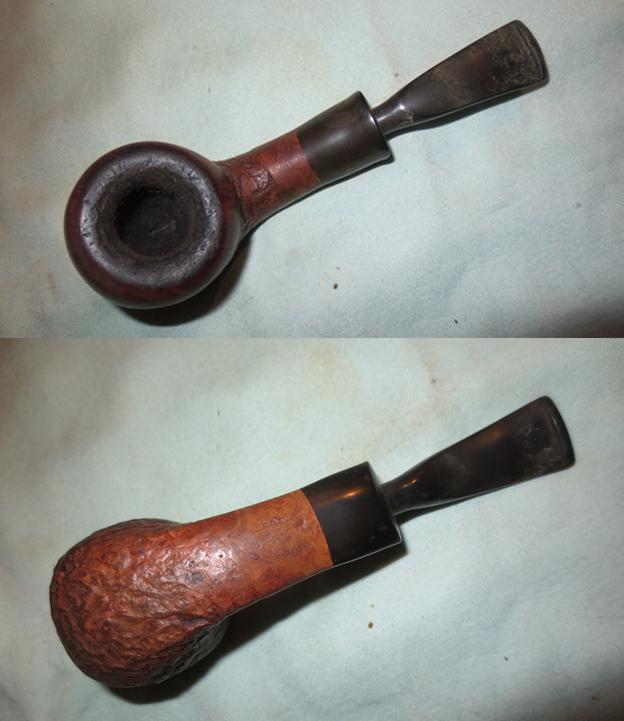
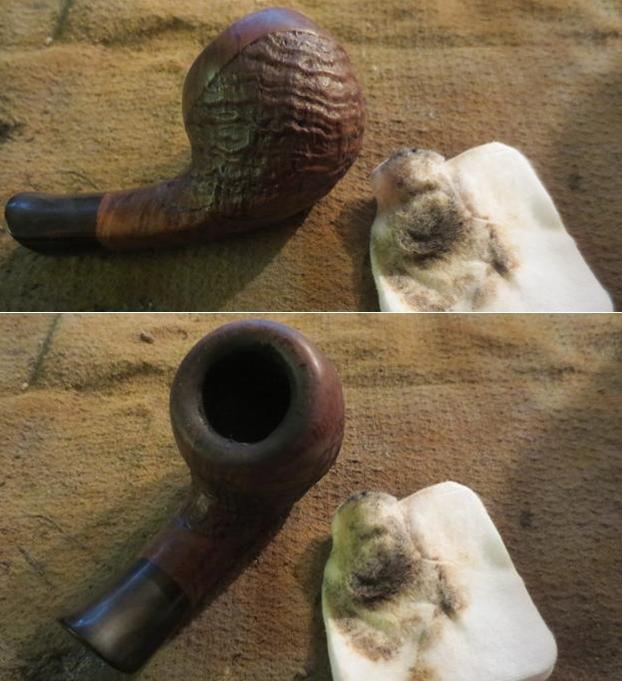
There were some scratches and nicks in the curved top of the rim that needed to be sanded out. I also sanded the inner bevel on the rim. I used 180 and 220 grit sandpaper to remove most of the damaged areas. The photo below shows the rim after quite a bit of work. There was still more sanding to do at this point.RG7
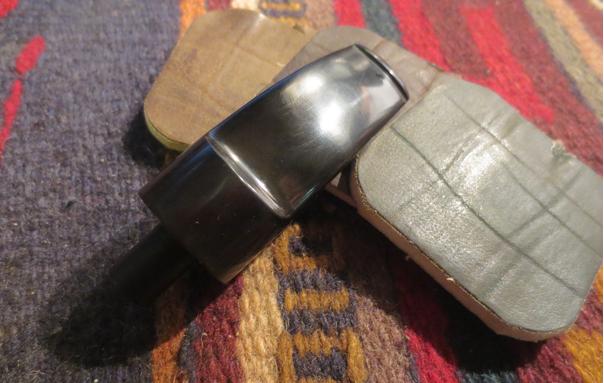
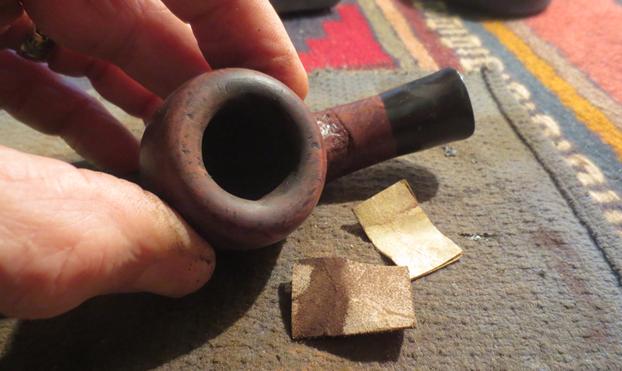
I did some more work on the rim with sandpaper and on the inner edge of the rim with the Savinelli Pipe Knife and was able to smooth out some more of the damage.RG8
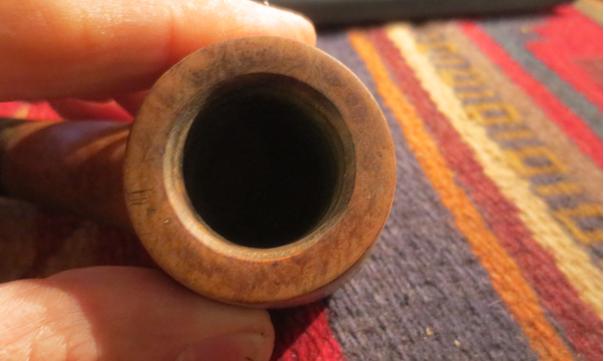
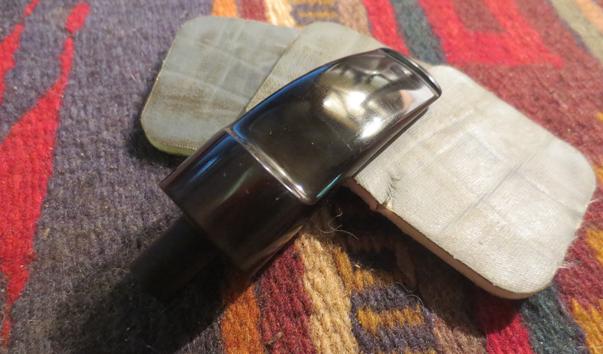
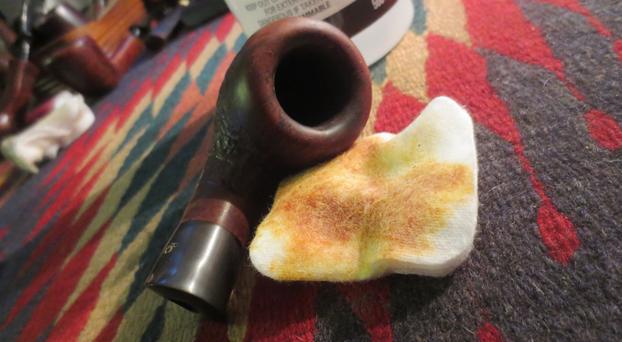
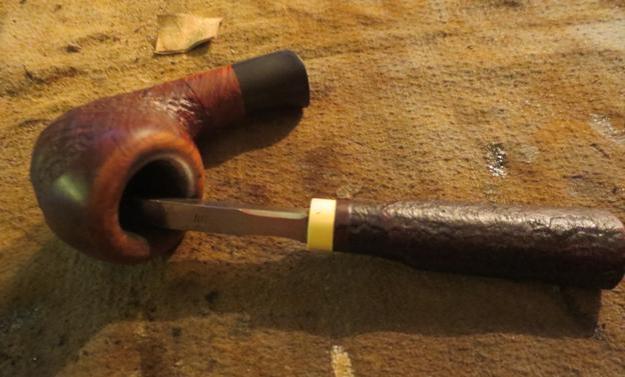
I wiped down the inner edge of the bowl and the rim with alcohol to see where I stood with the rim resurfacing. It was starting to look really good.RG9
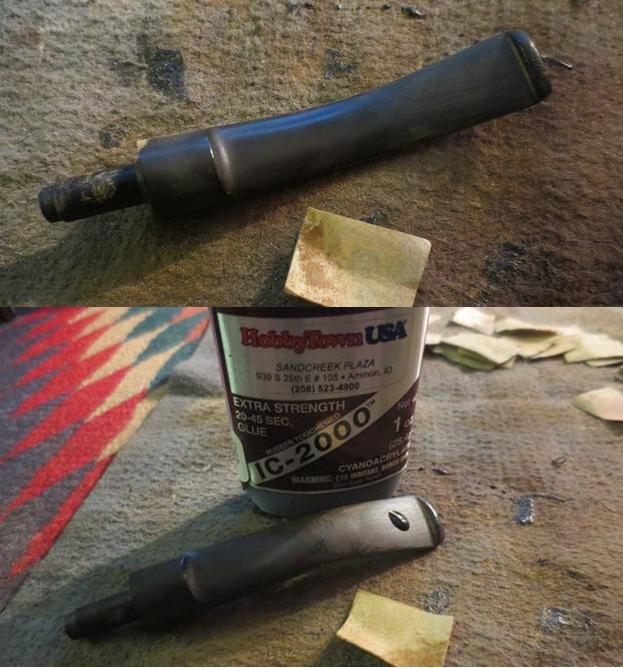
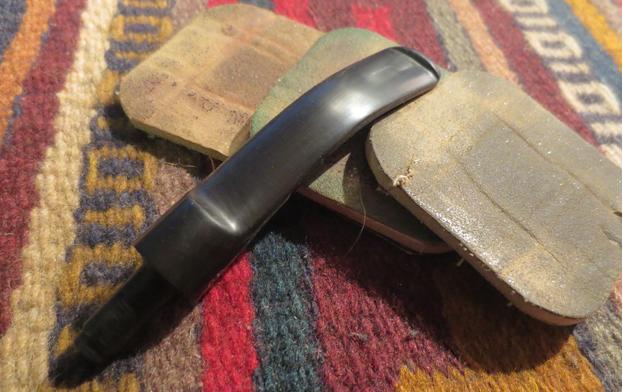
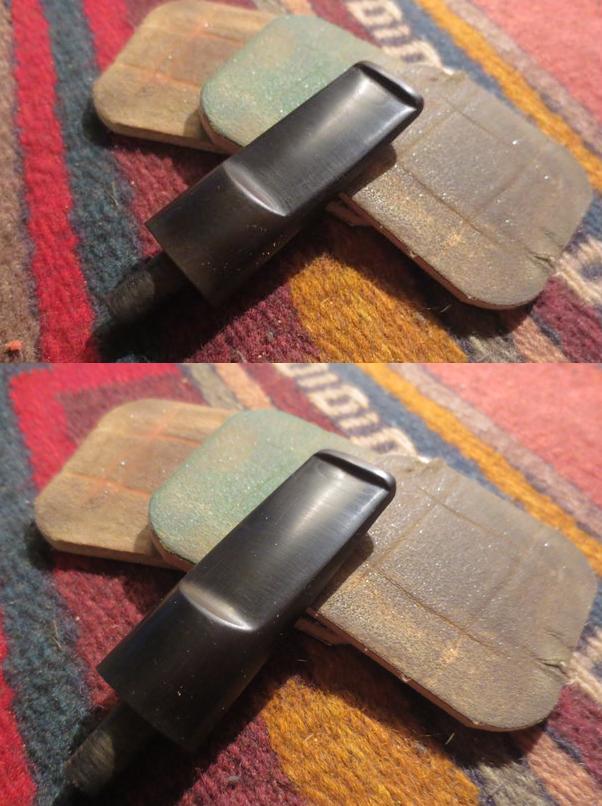
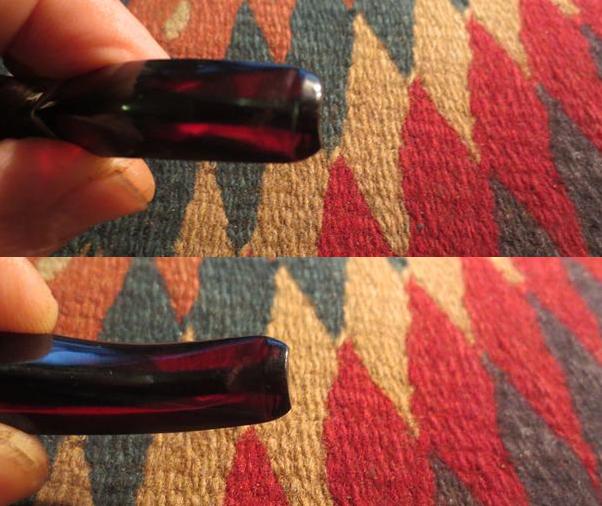
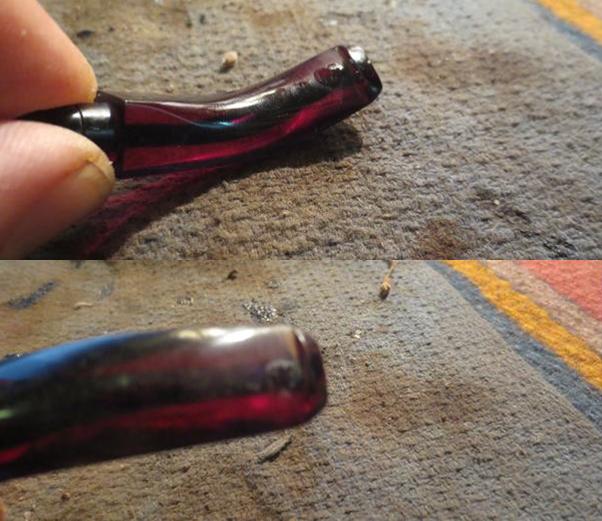
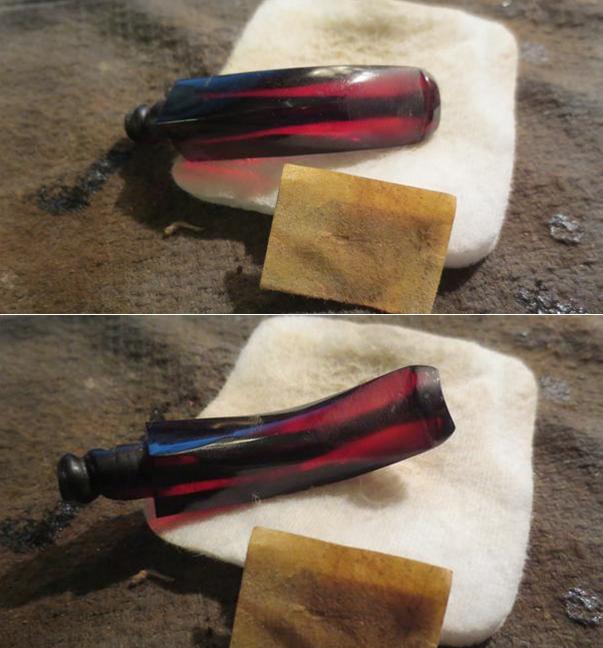
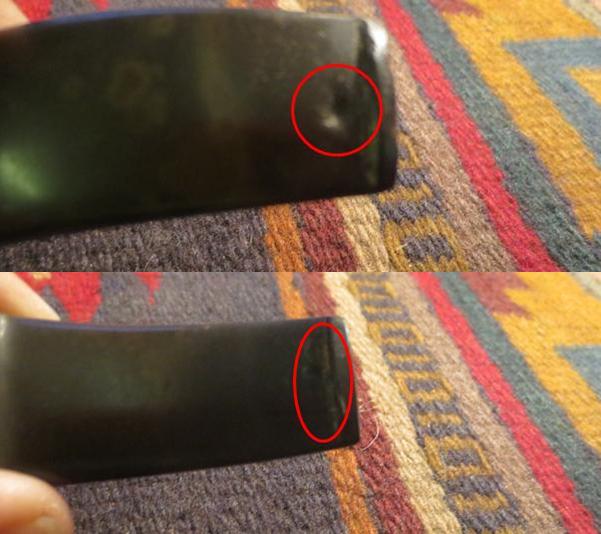
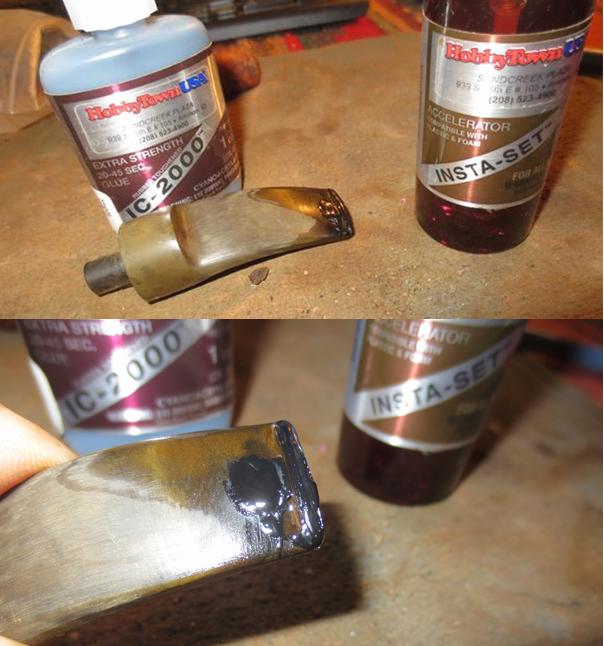
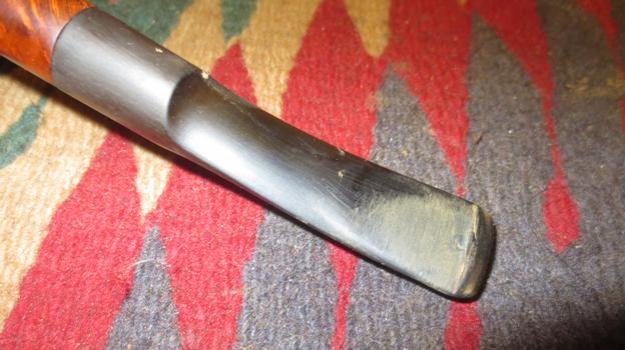
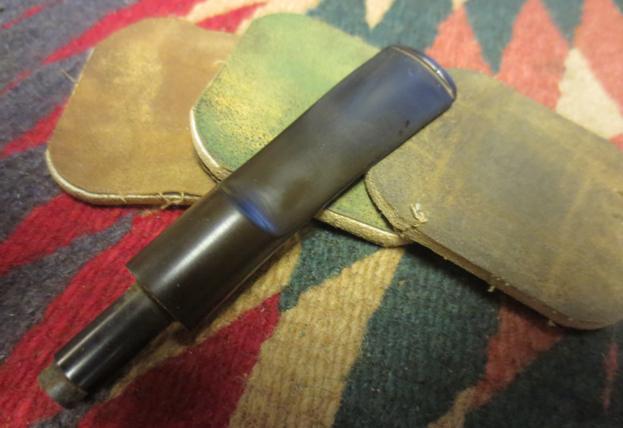
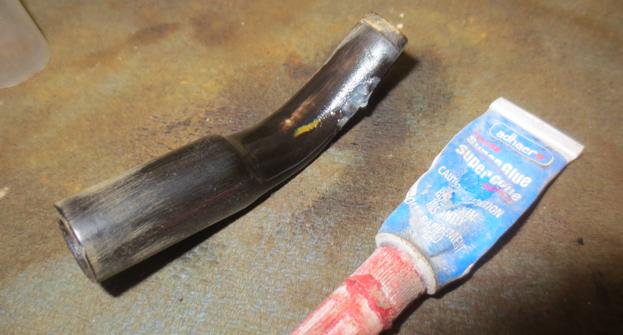
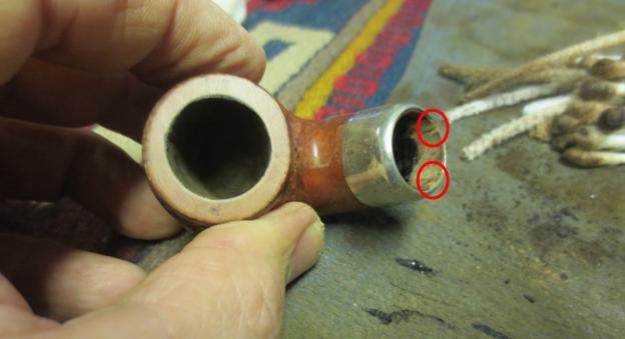
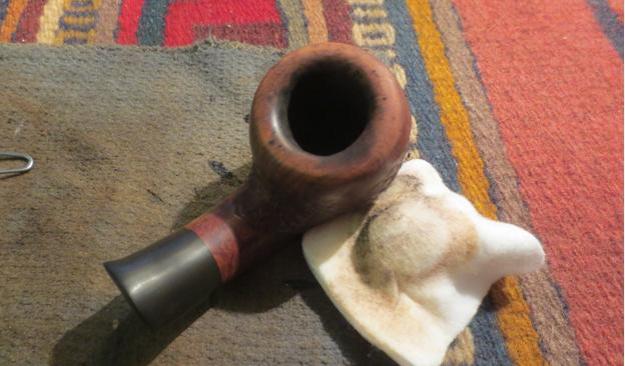
I used black super glue to repair the deep tooth mark on the top side of the stem. When it dried I sanded it and filed it smooth the surface of the stem.RG10
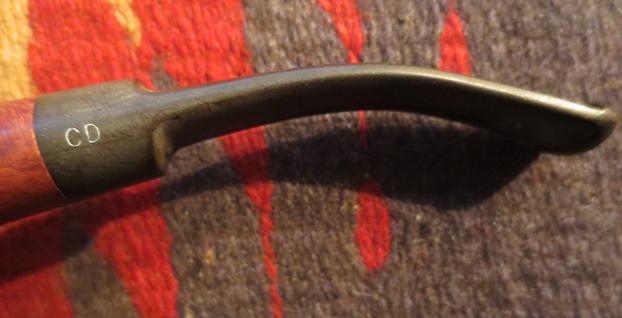
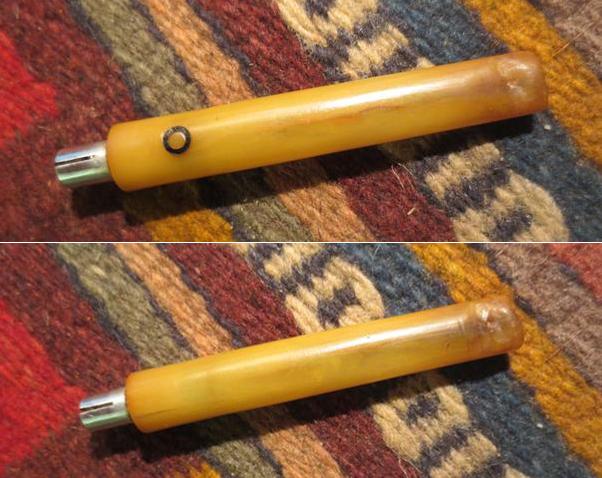
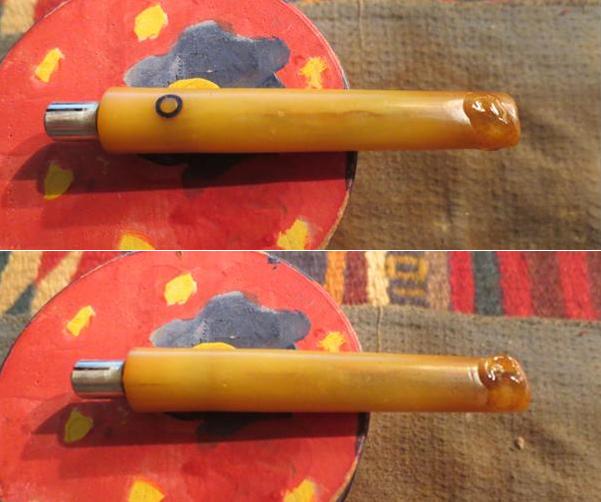
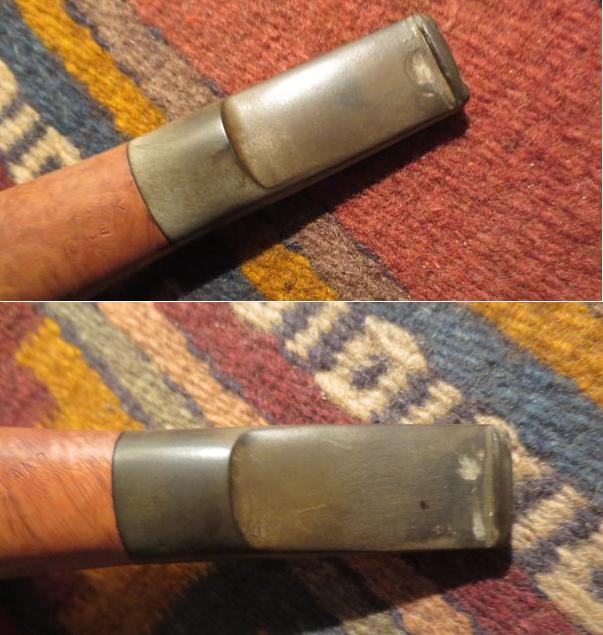
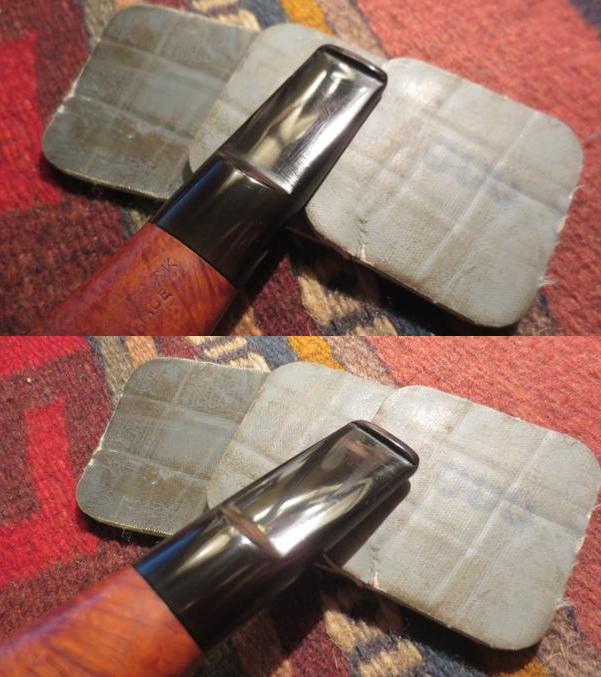
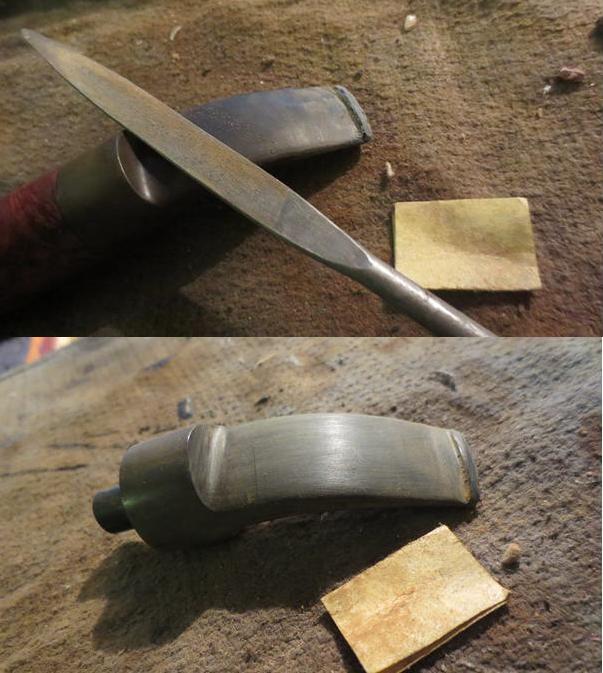
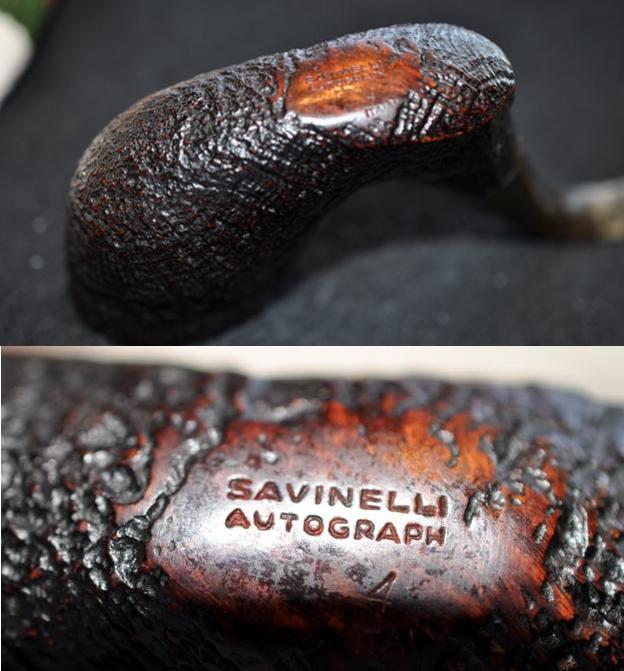
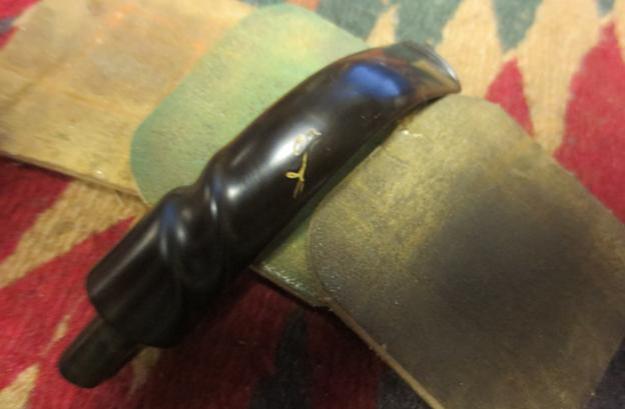
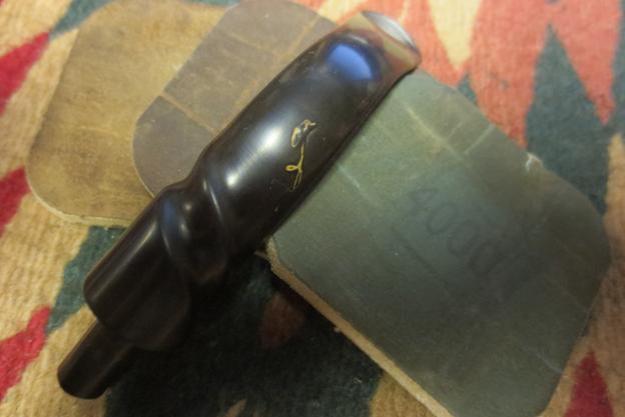
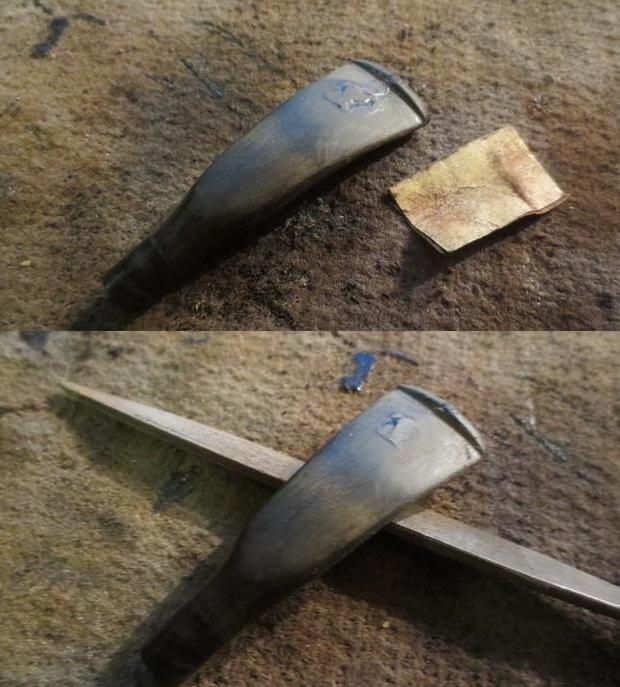
I sanded the shank extension with micromesh sanding pads. I wet sanded it with 1500-2400 grit pads and dry sanded it with 3200-6000 grit pads. I rubbed it down with Obsidian Oil. I used some European Gold Rub n’ Buff on the stamping on the stem to refresh it.RG11
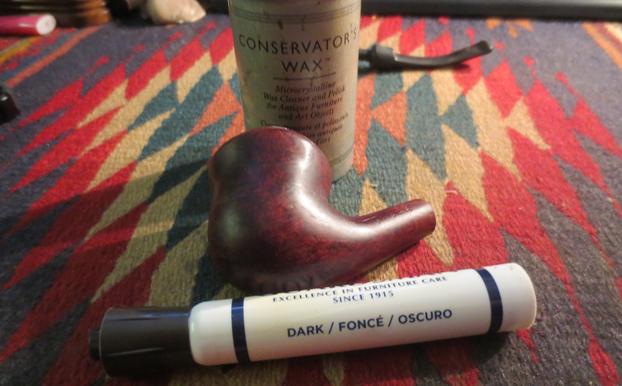
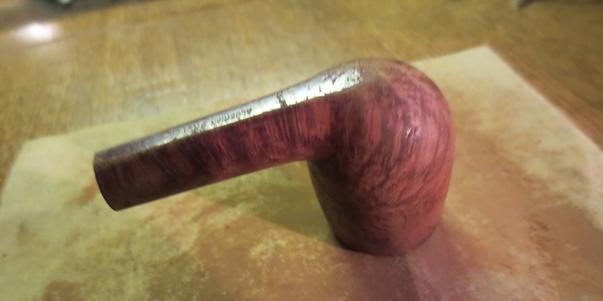
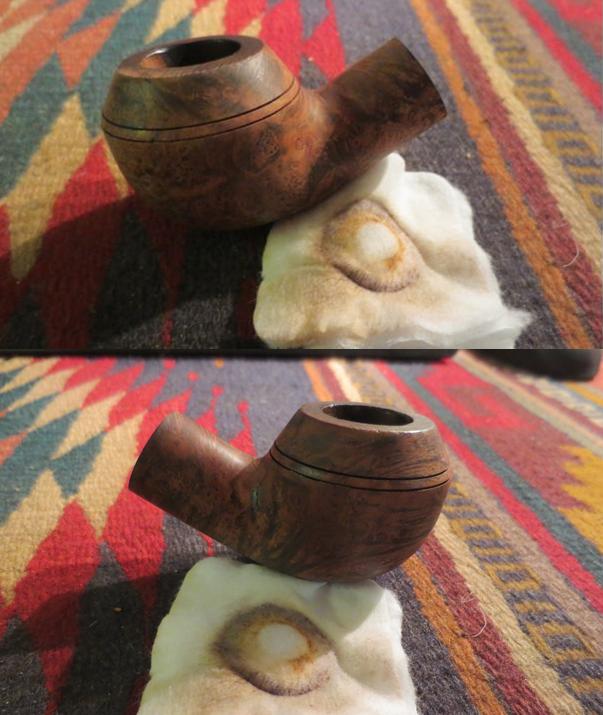
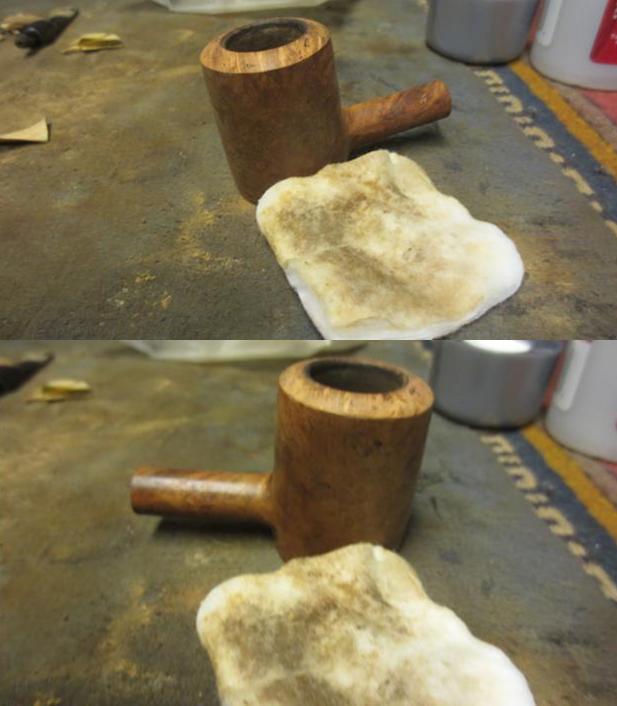
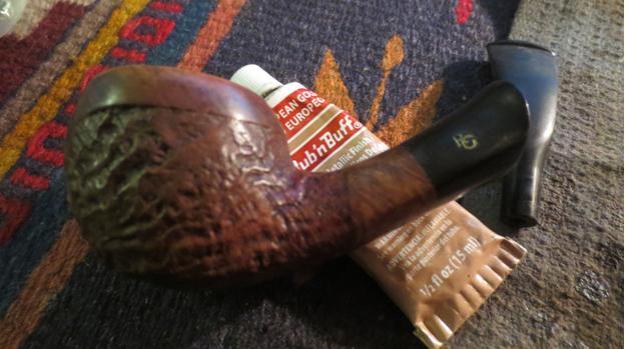
I restained the bowl with a dark brown aniline stain cut by 50% with alcohol. I applied the stain and flamed it with a lighter. I repeated the process until I was satisfied with the coverage.RG12
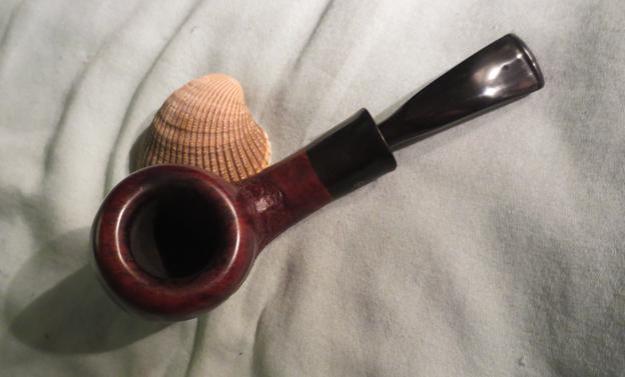
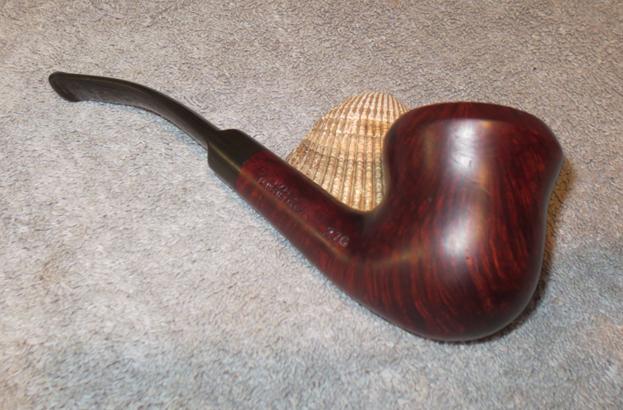
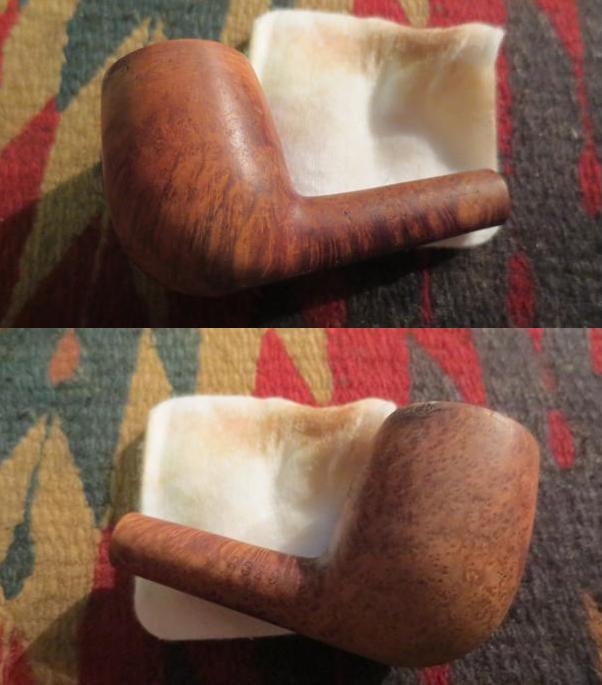
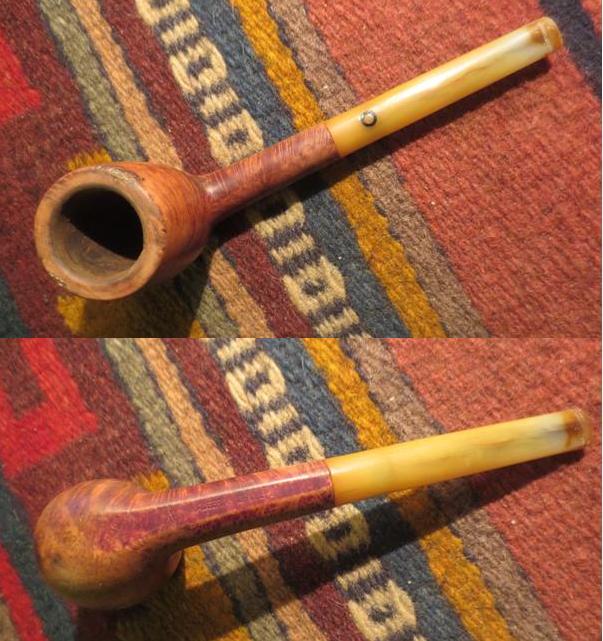
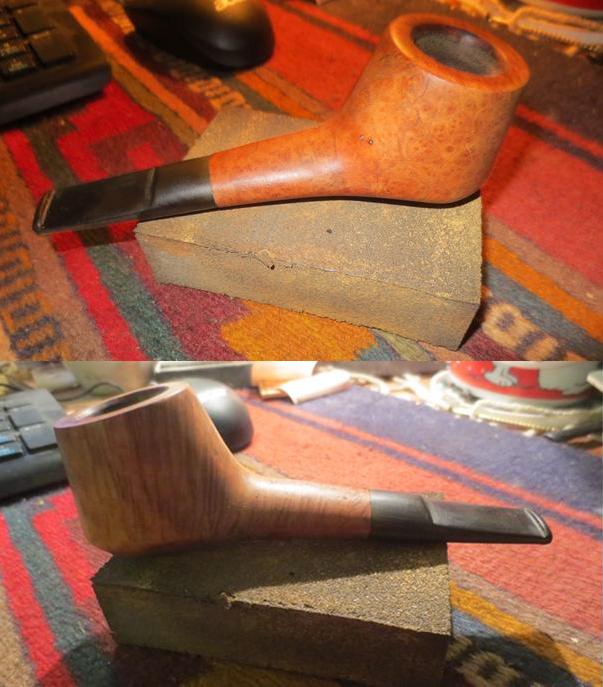
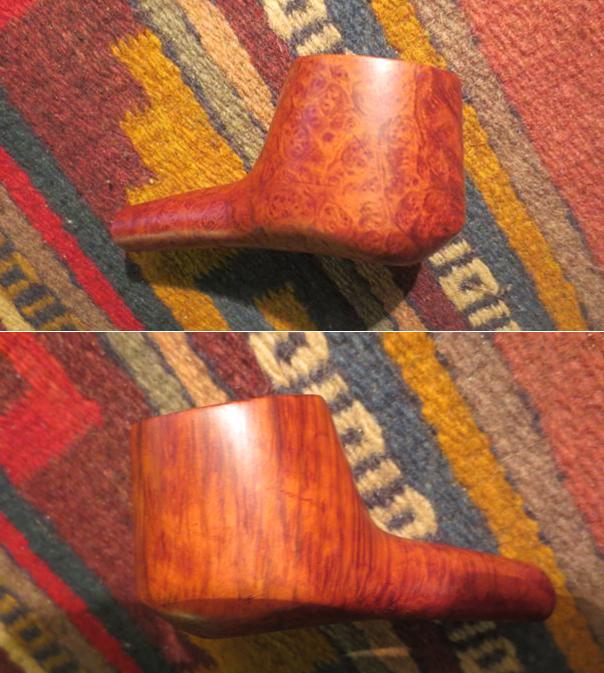
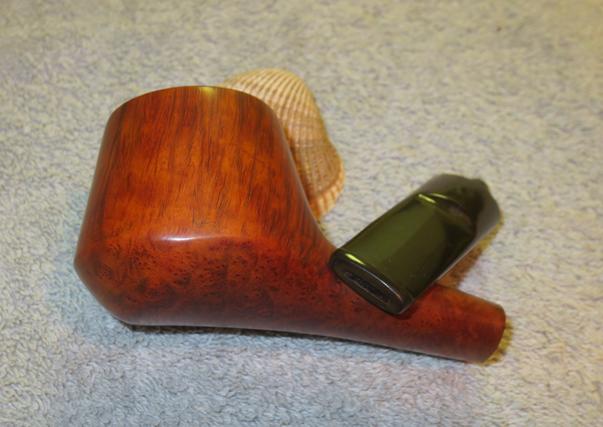
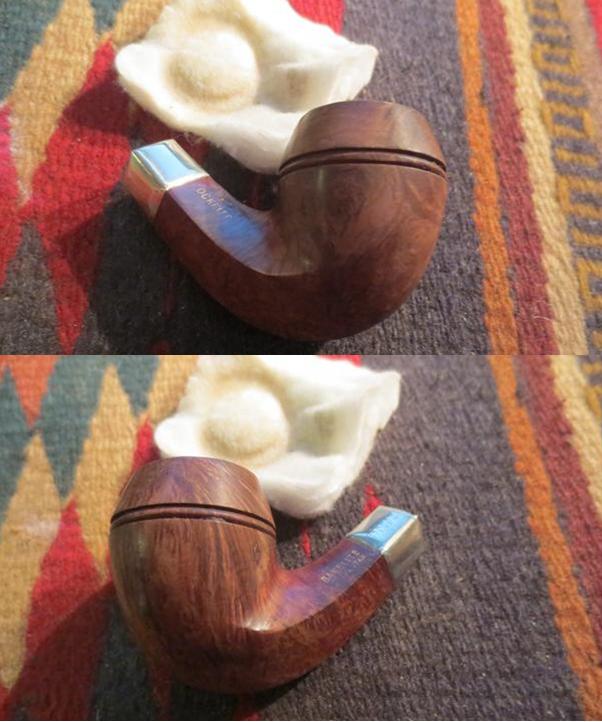
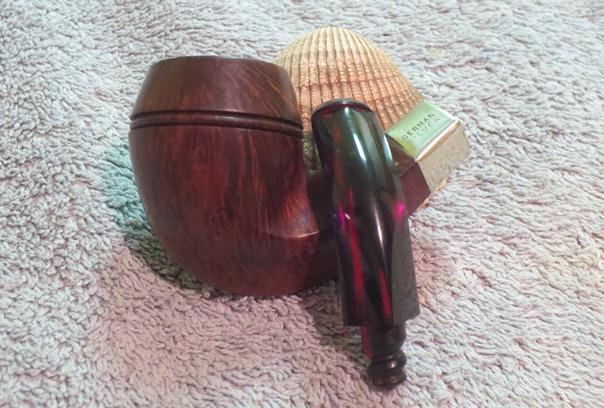
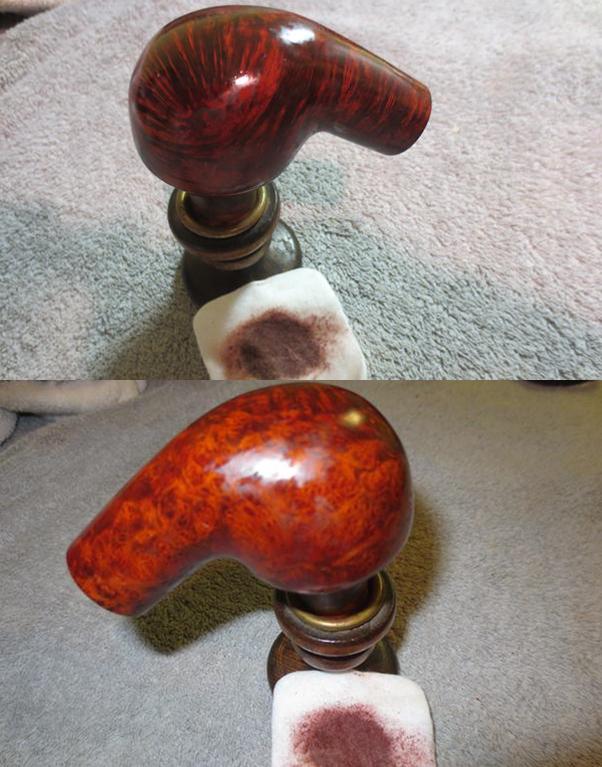
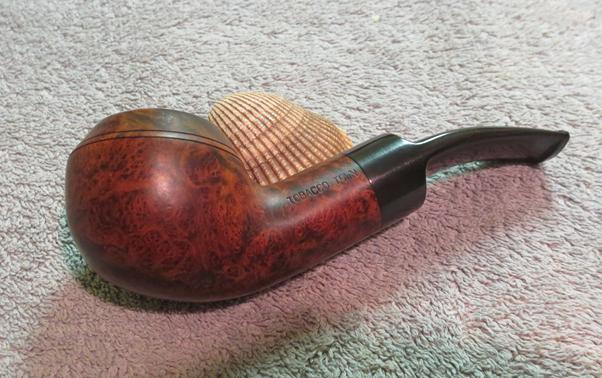
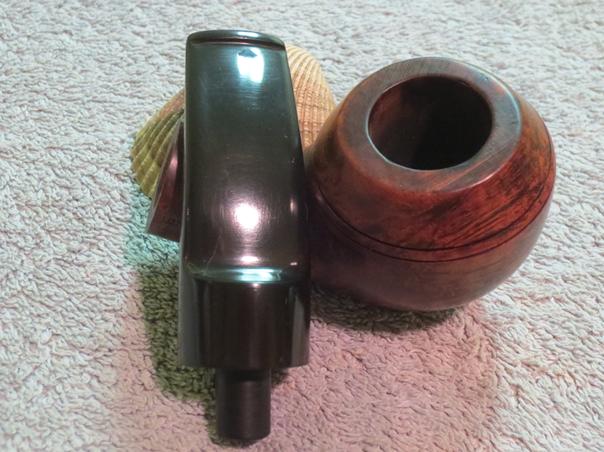
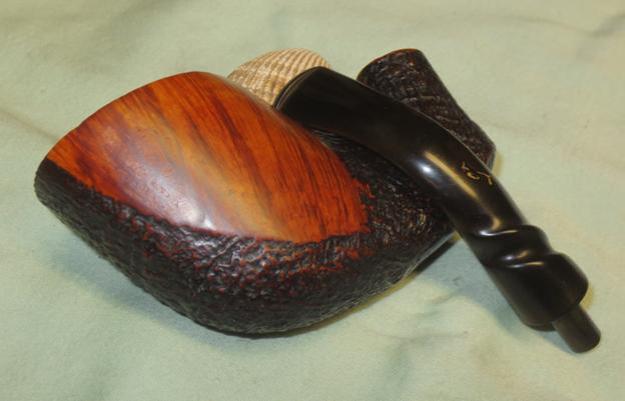
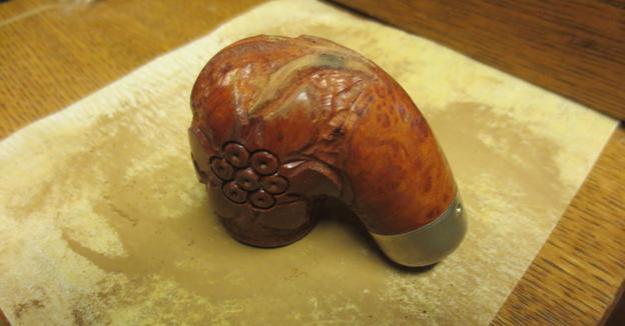
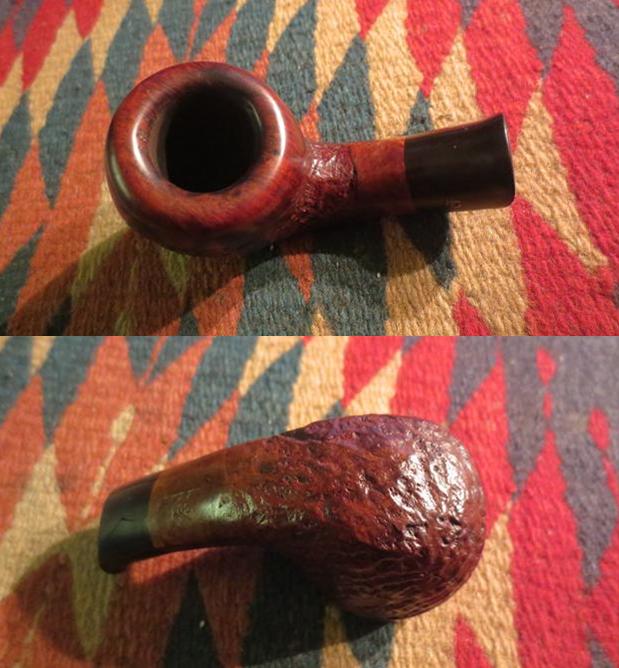
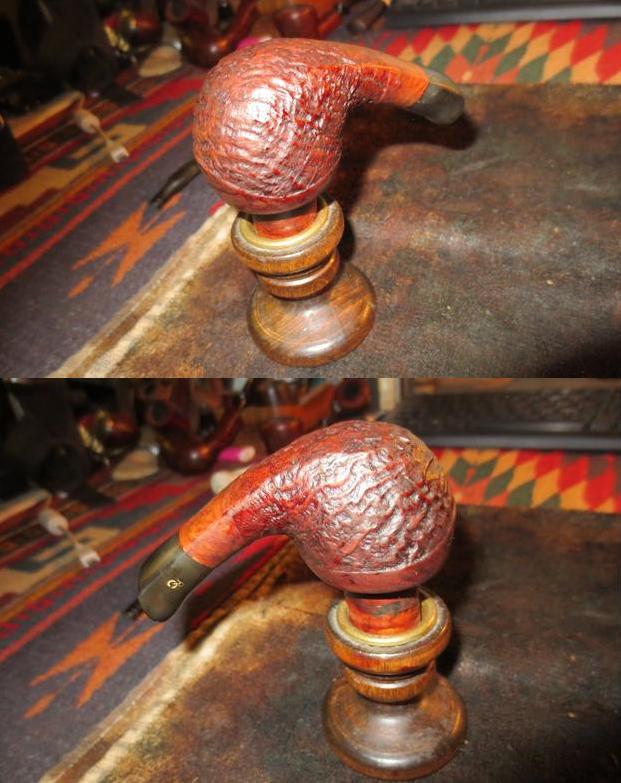
I wiped the bowl down with isopropyl alcohol to even the stain coat and make it more transparent. The combination of grains in the sandblast and underneath is beautiful.RG13 RG14
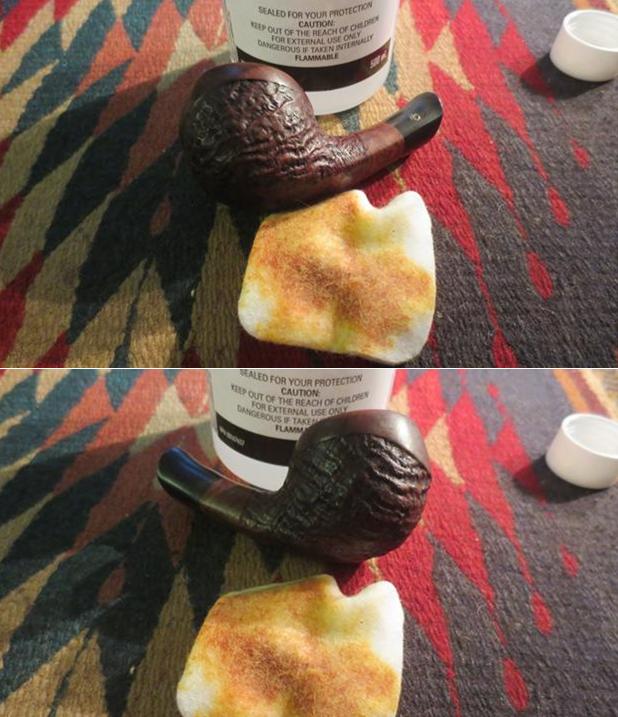
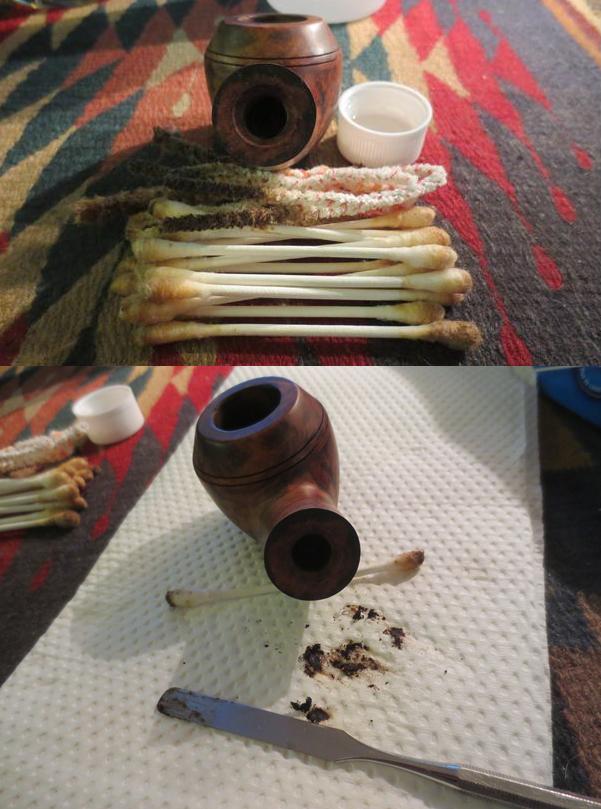
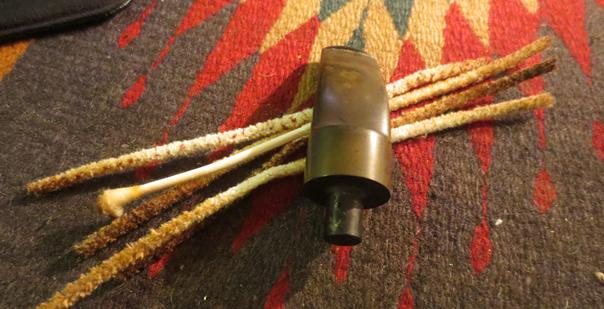
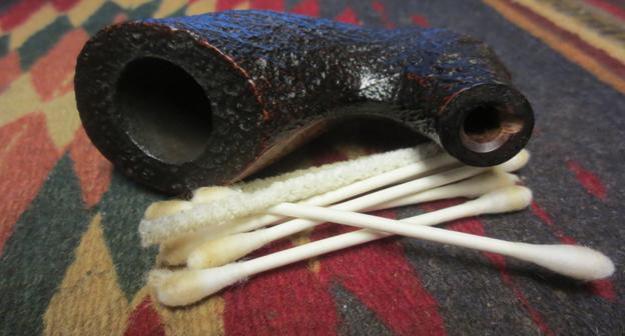
I scrubbed out the internals with alcohol, pipe cleaners and cotton swabs until the airways in the shank and the stem and the mortise in the shank were clean.RG15
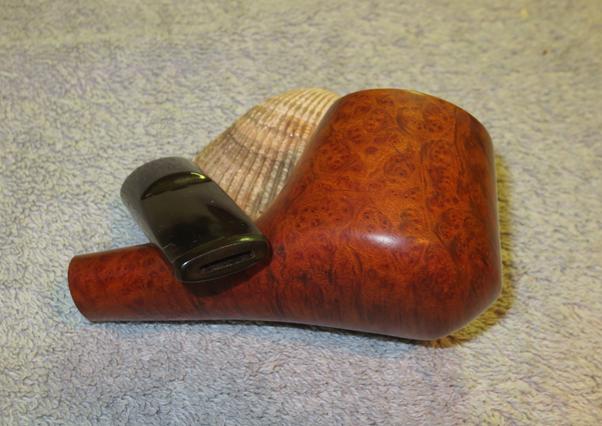
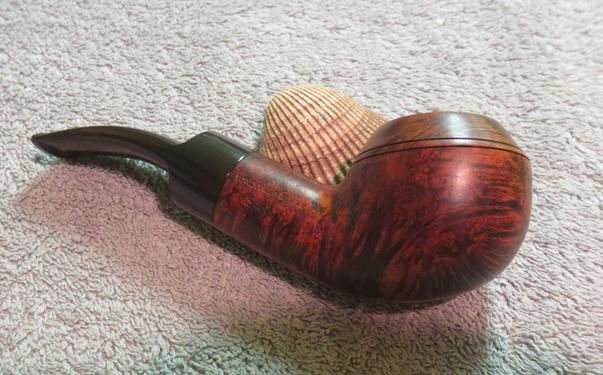
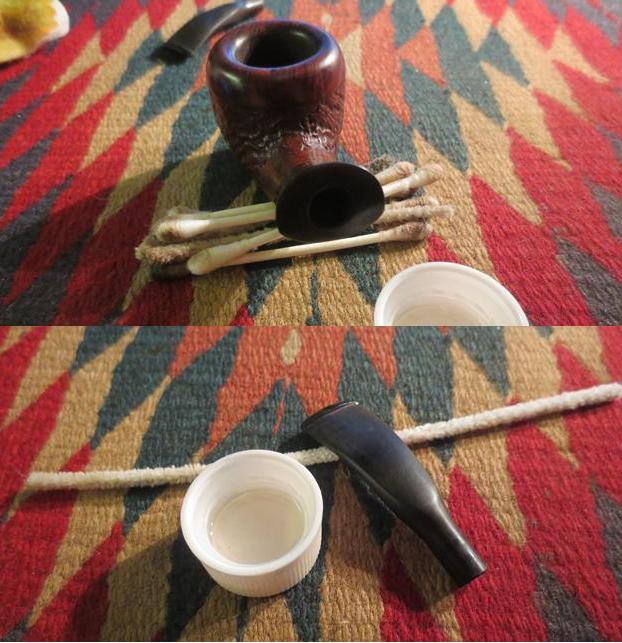
I buffed bowl with Blue Diamond on the buffing wheel and then gave it multiple coats of carnauba wax. I buffed it with a clean buffing pad to raise the shine.RG16 RG17
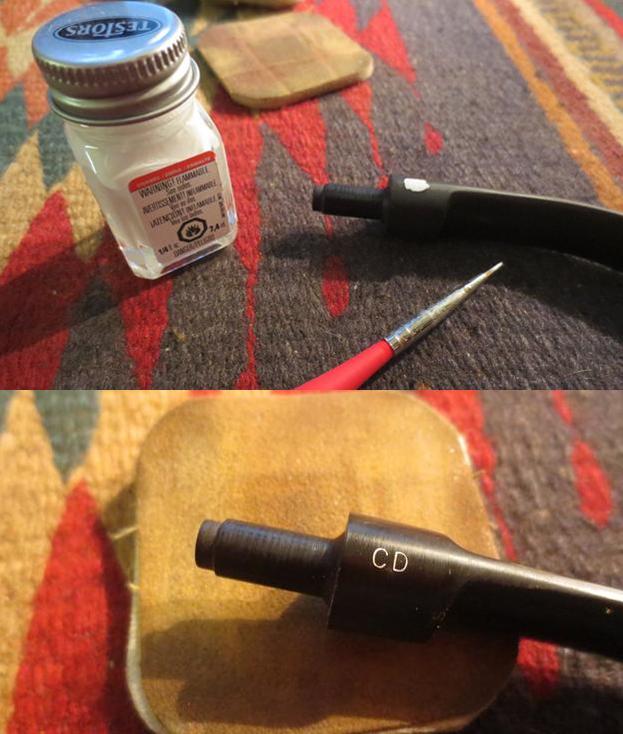
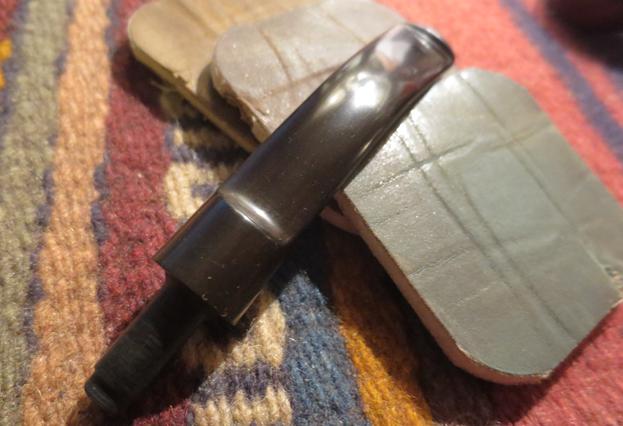
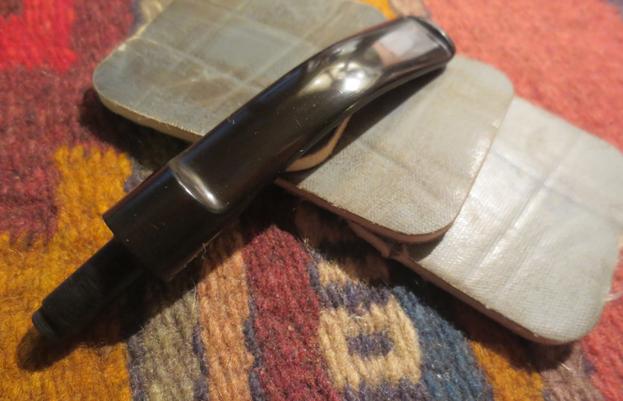
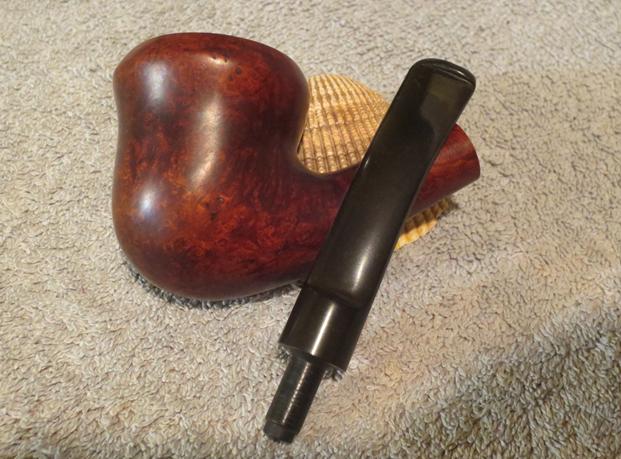
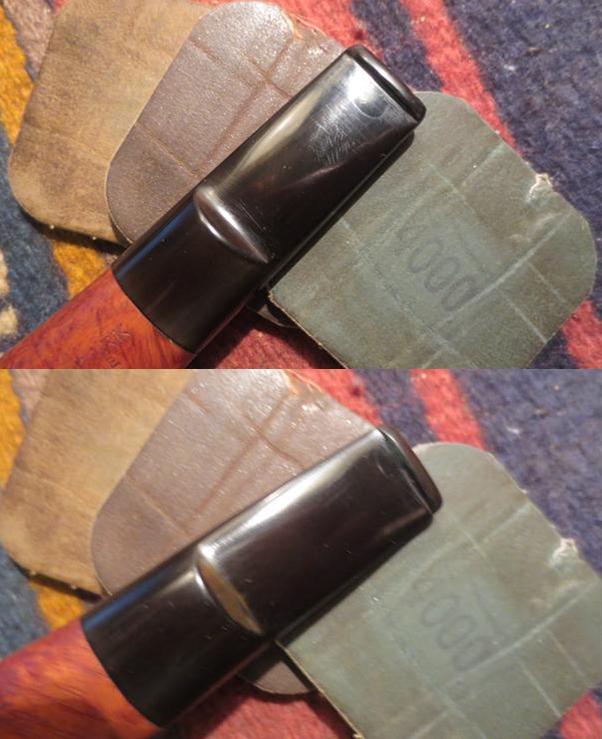
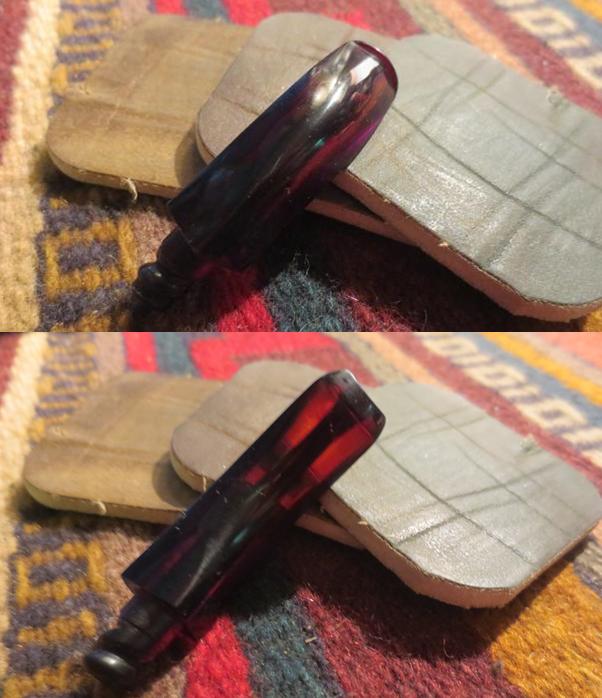
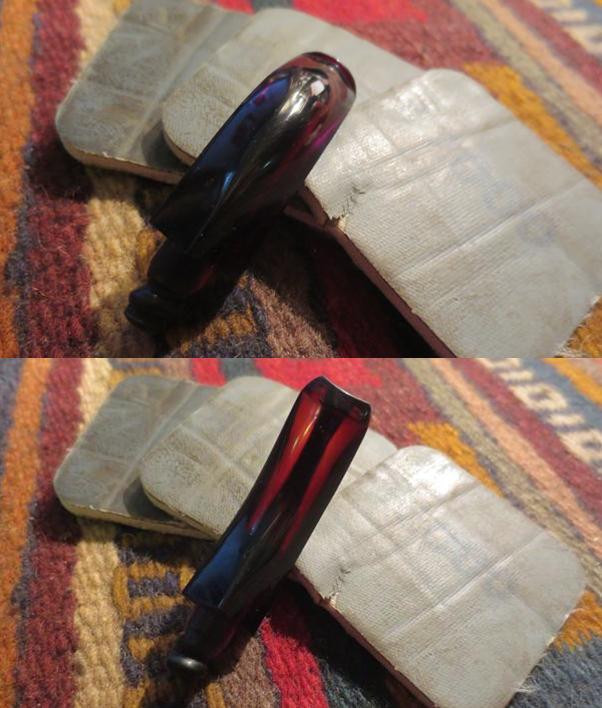
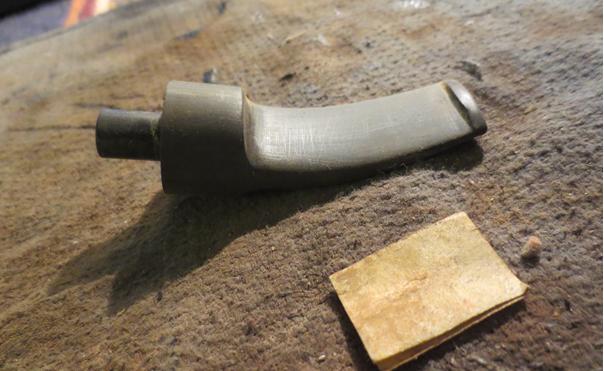
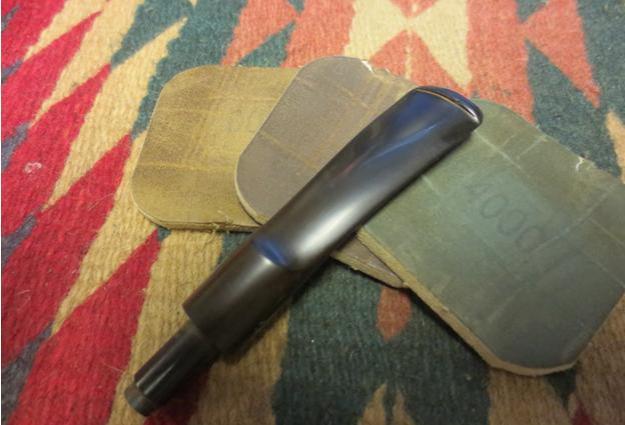
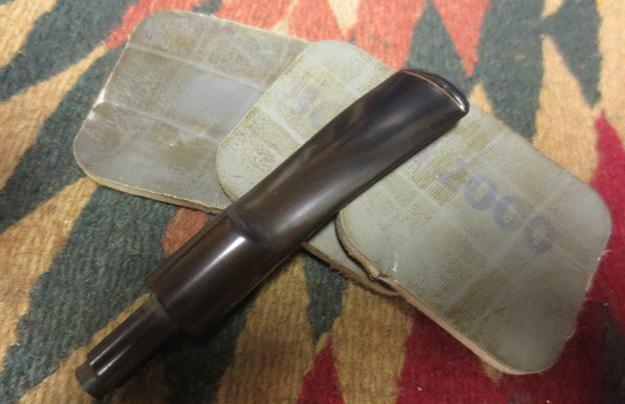
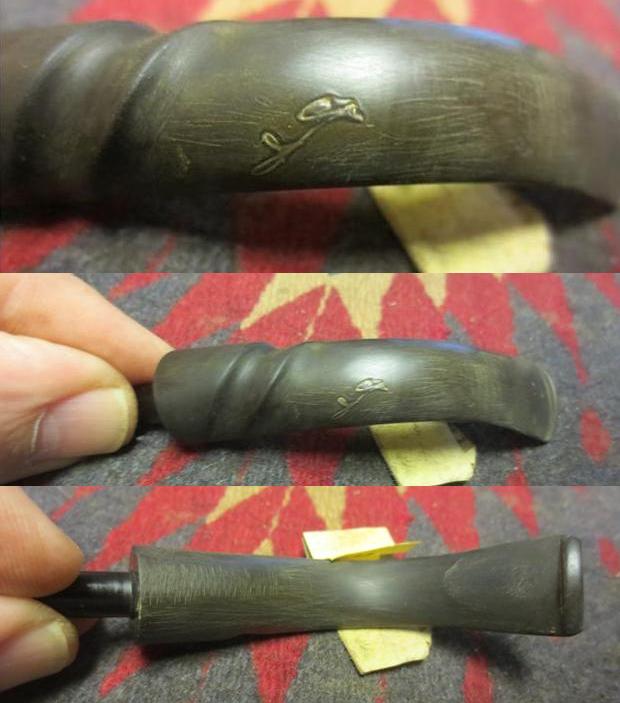
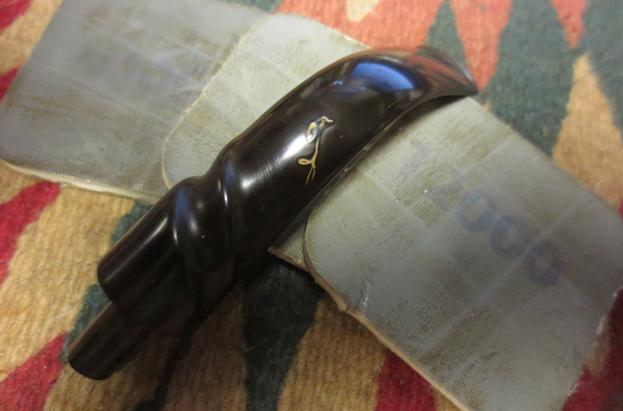
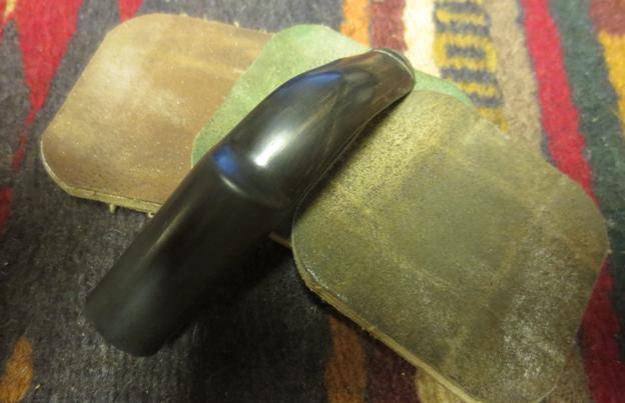
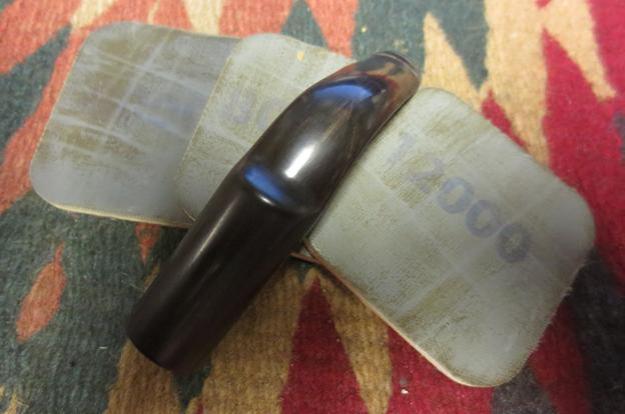
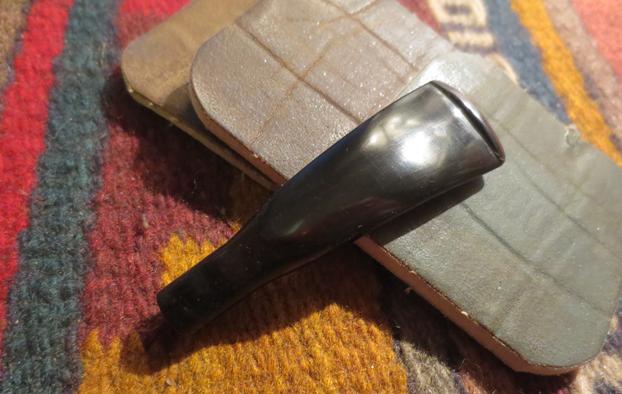
Once I had the repair smoothed out and blended into the surface of the stem top I polished the stem with micromesh sanding pads. I wet sanded it with 1500-2400 grit pads and dry sanded it with 3200-12000 grit pads. I rubbed the stem down with Obsidian Oil after each set of three pads. Once I had finished I set the stem aside to dry.RG18 RG19
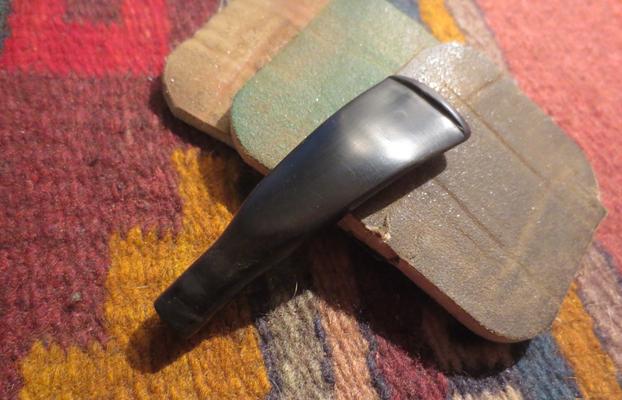
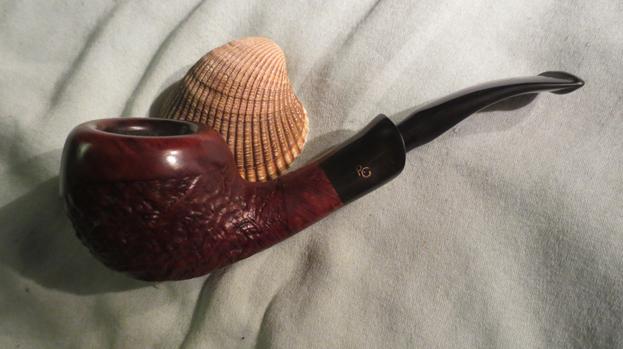
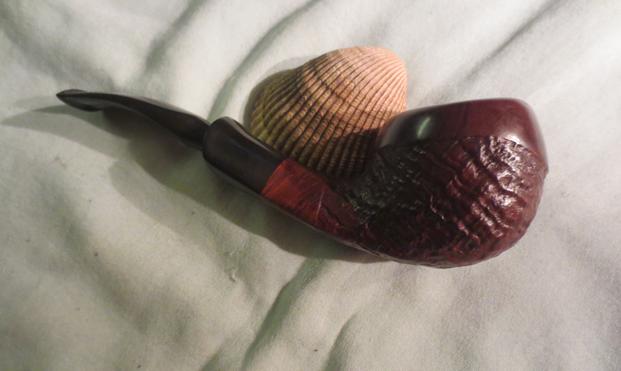
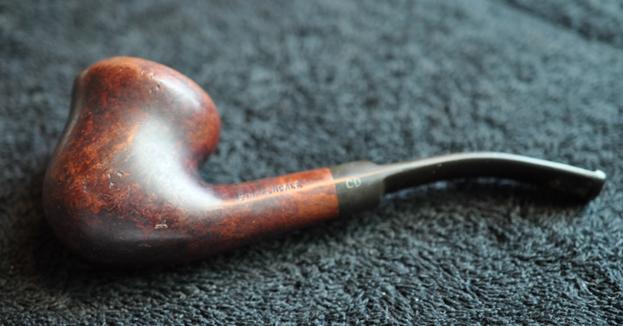
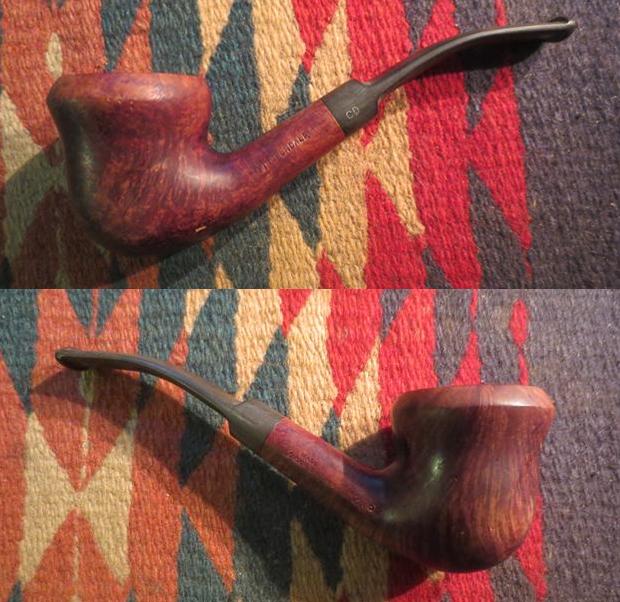
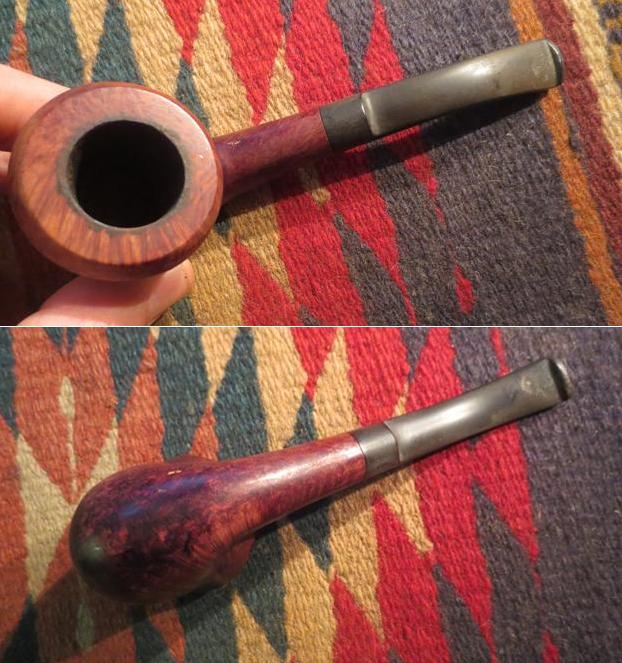
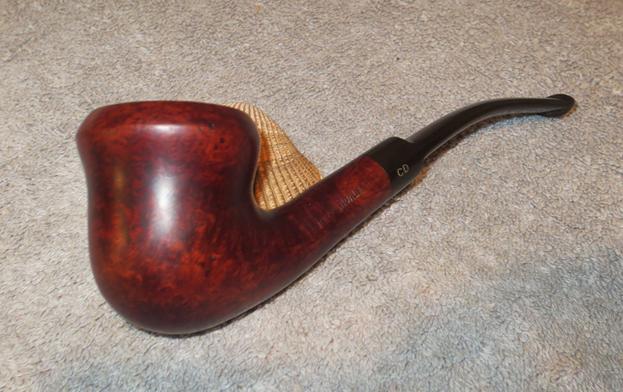
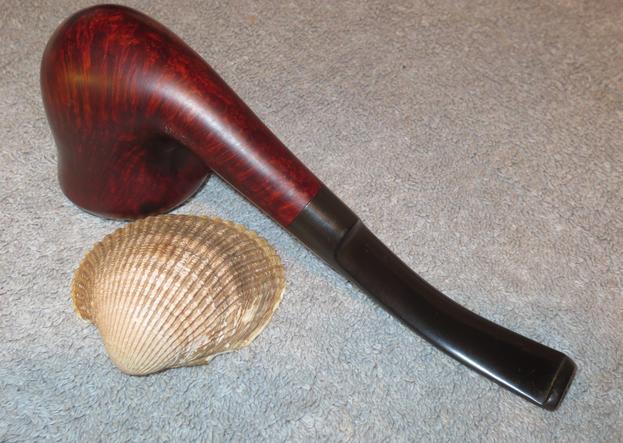
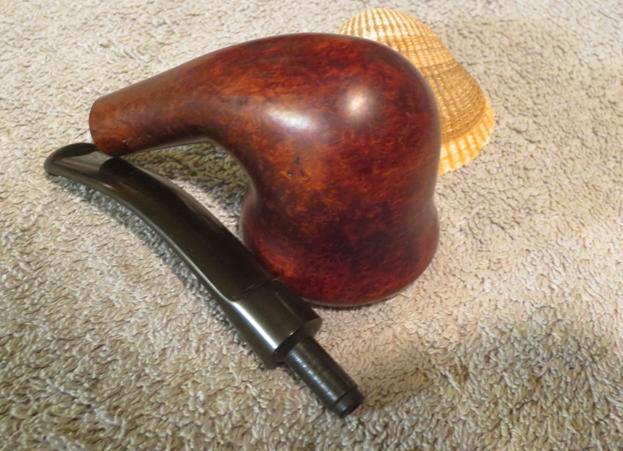
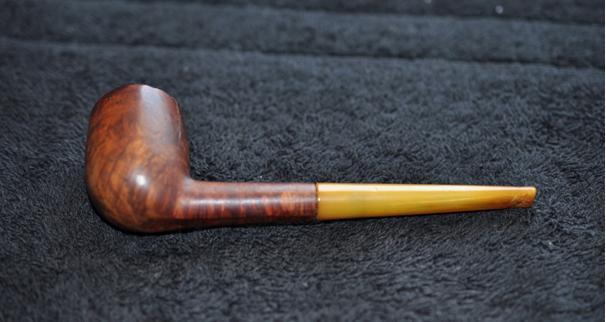
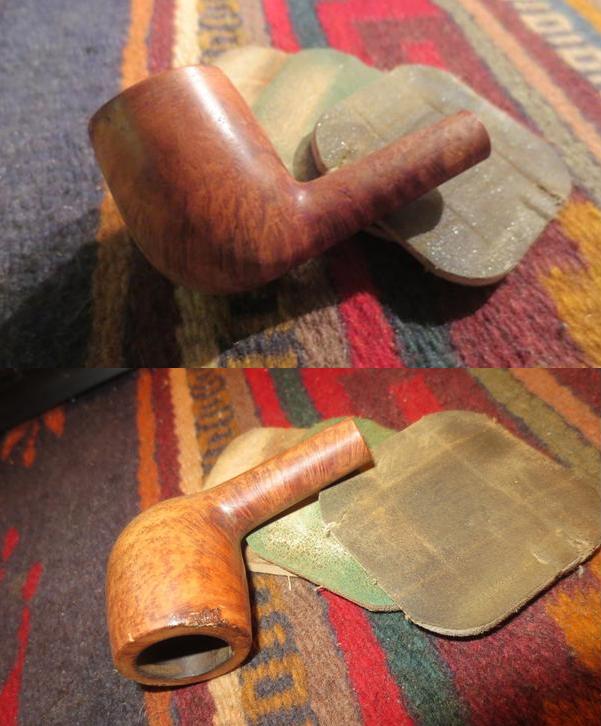
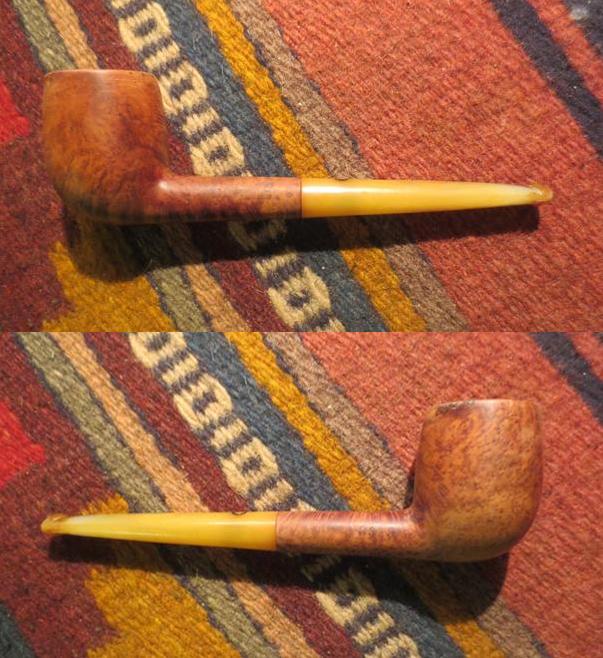
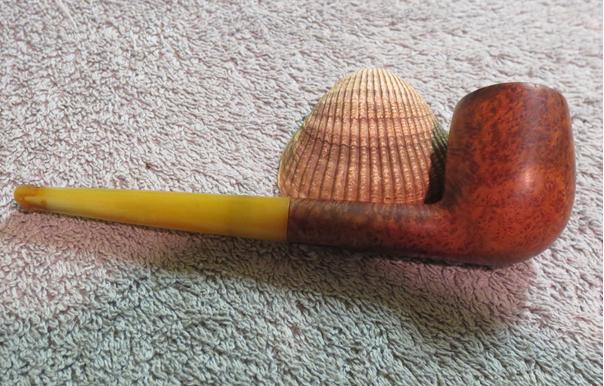
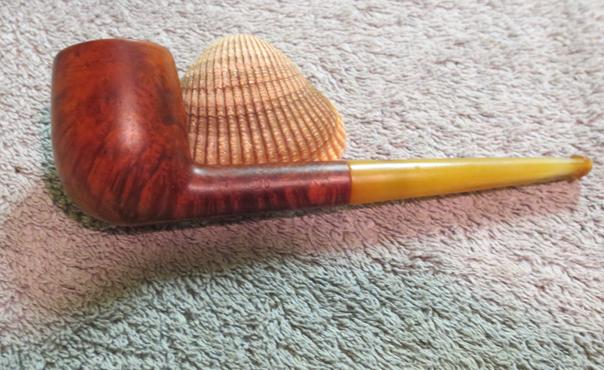
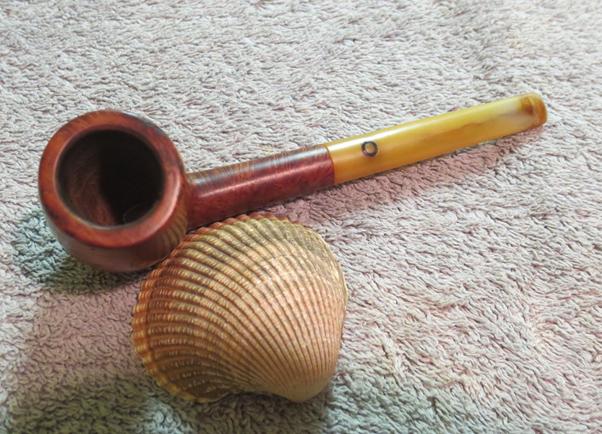
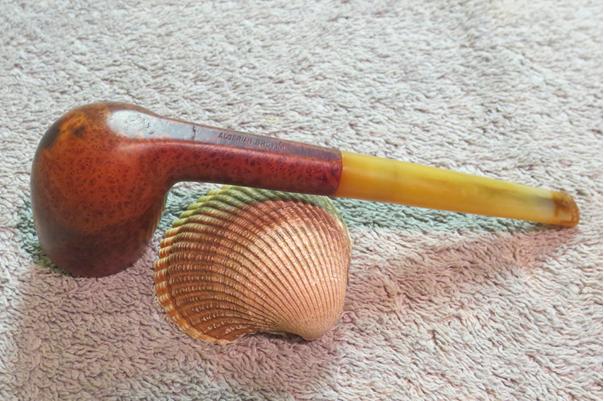
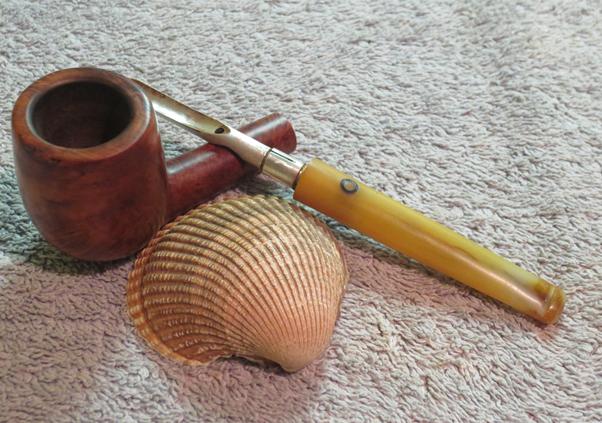
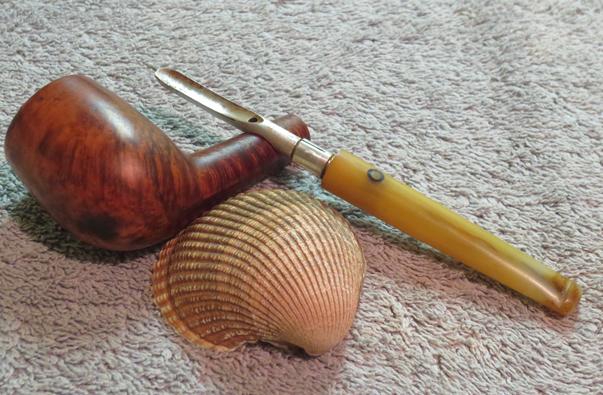
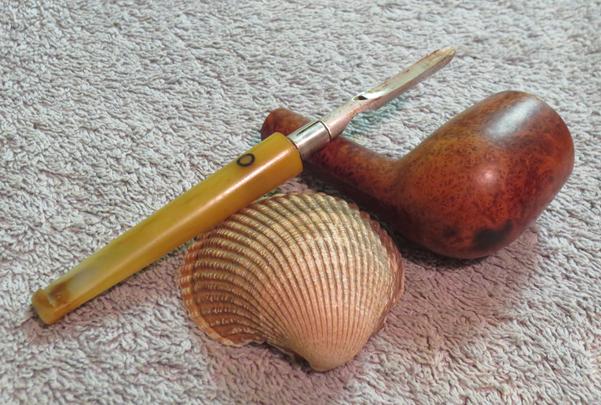
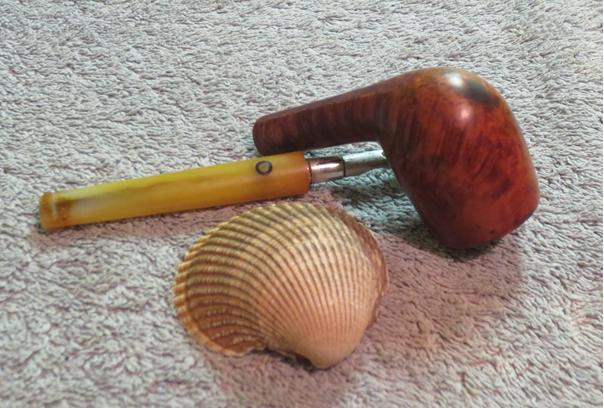
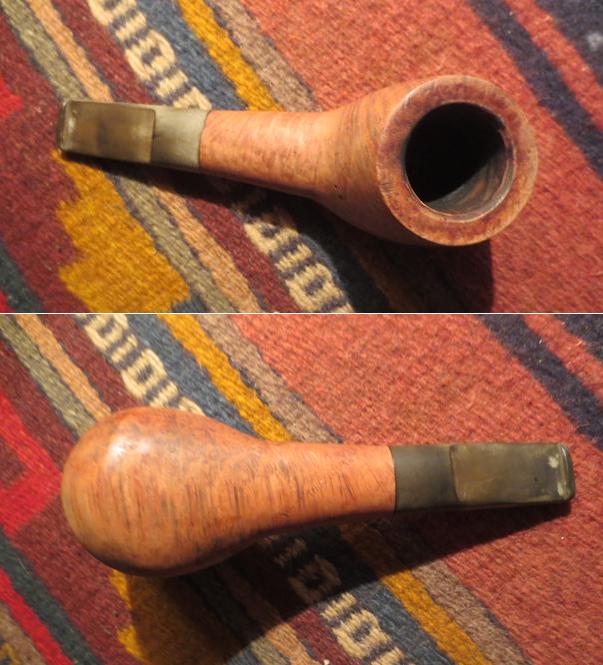
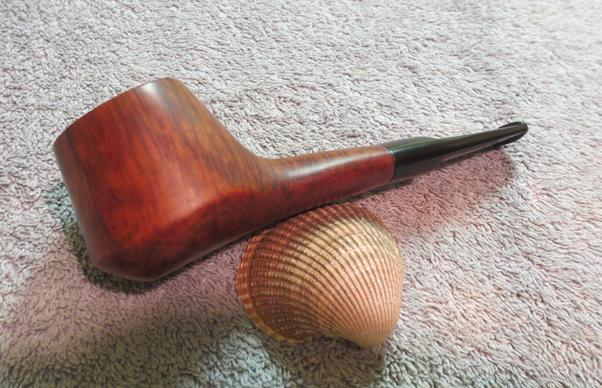
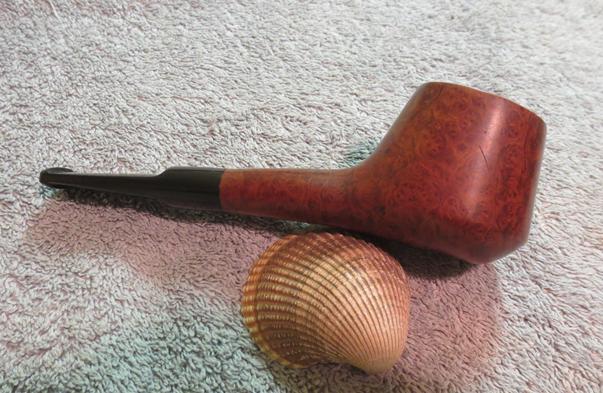
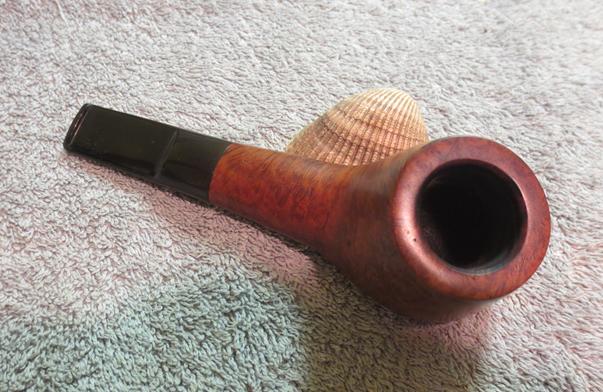
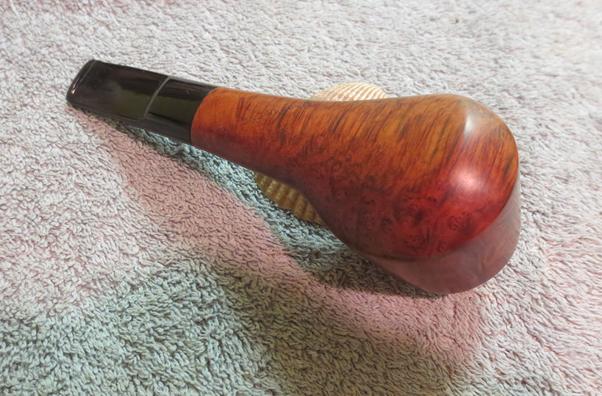
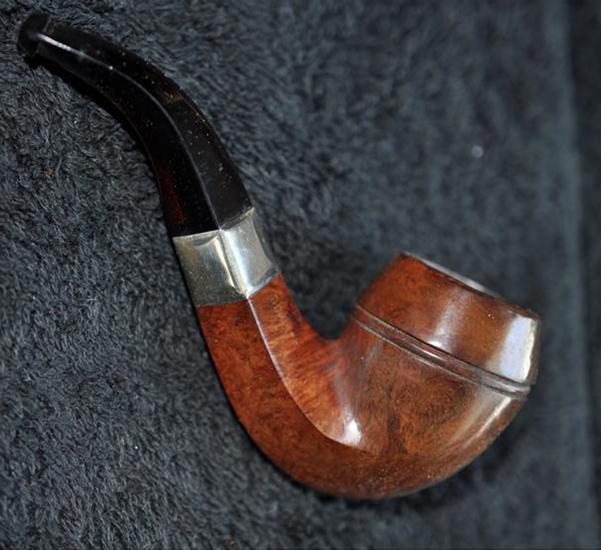
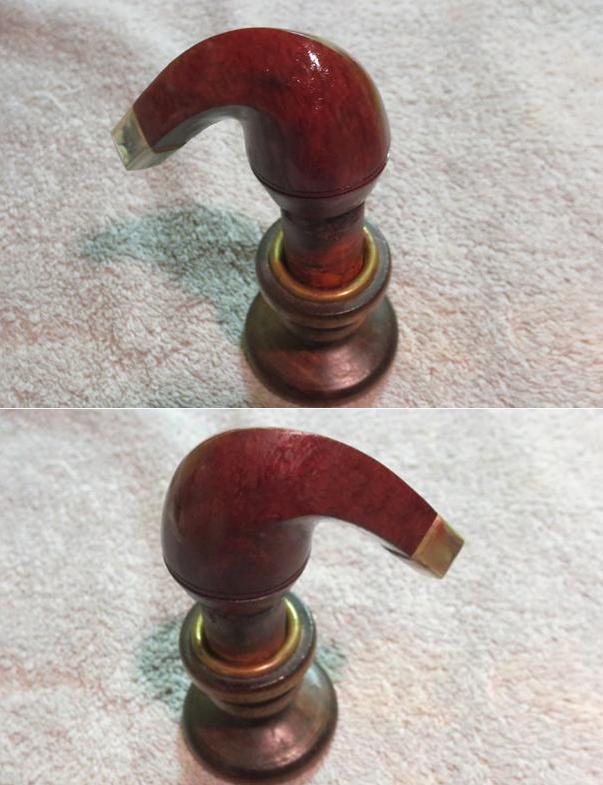
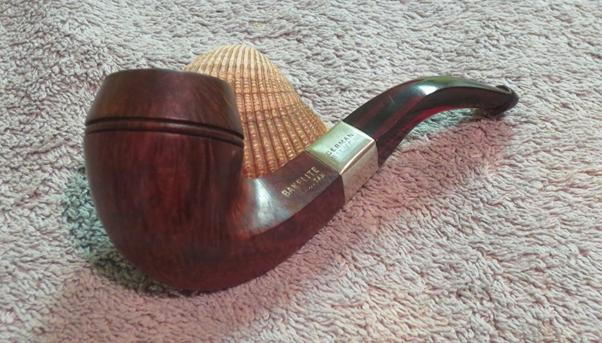
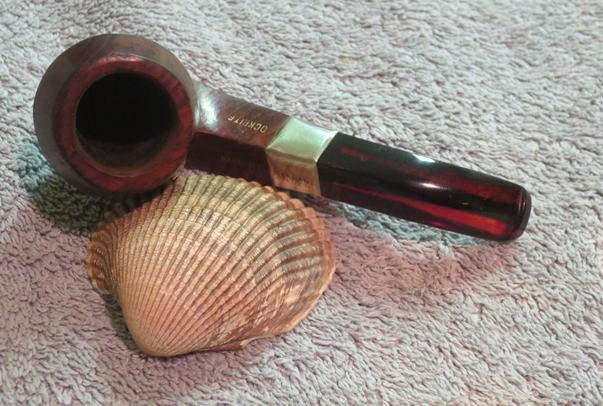
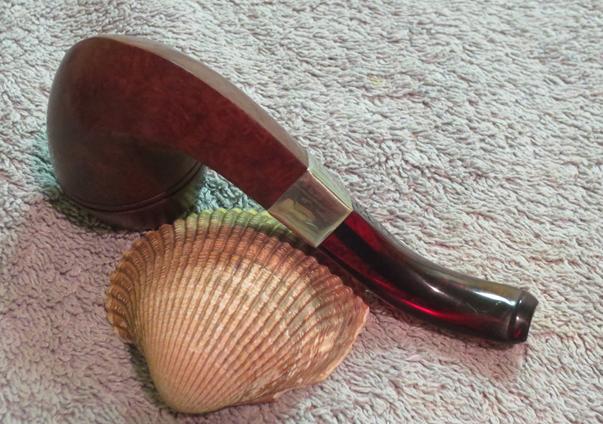
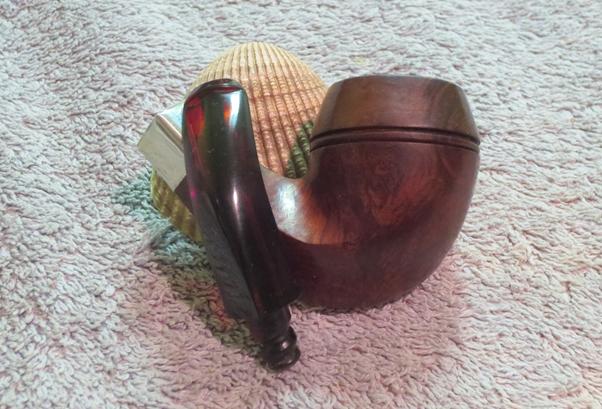
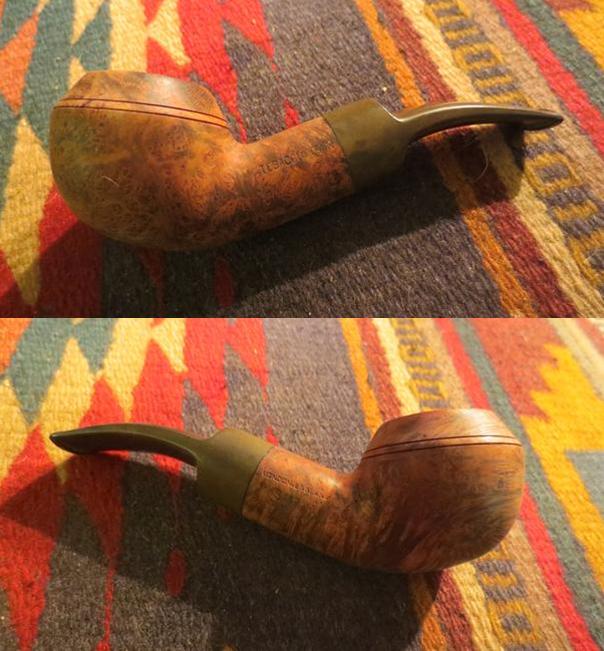
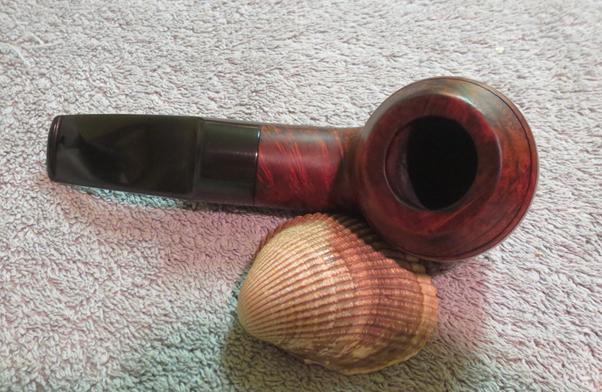
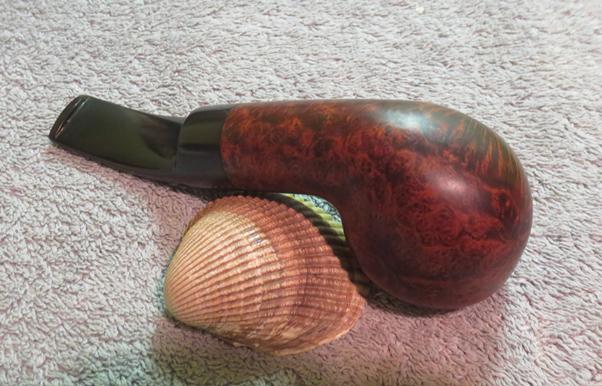
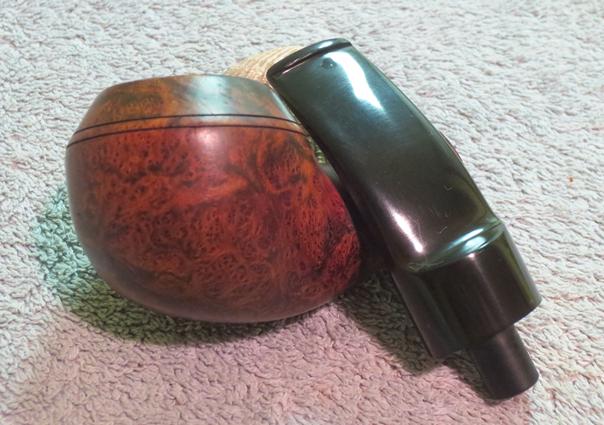
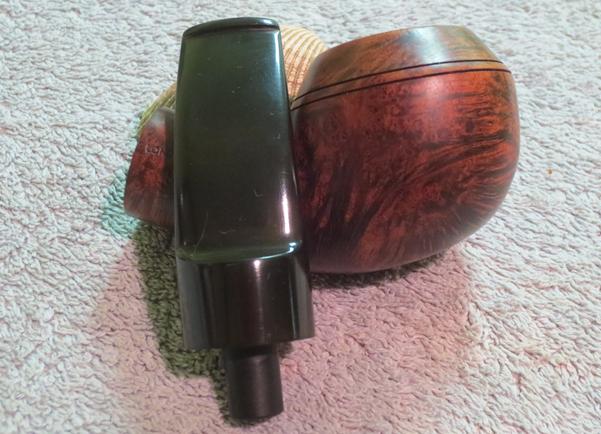
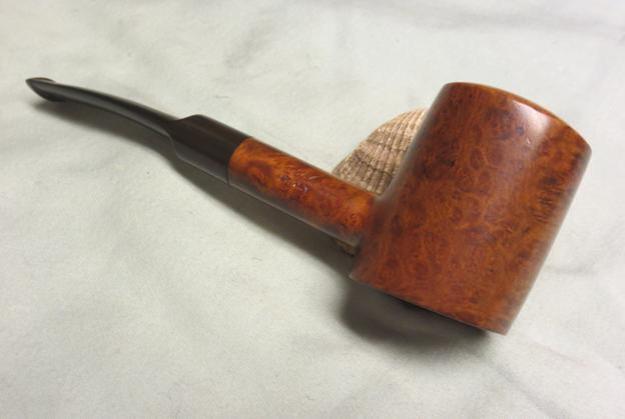
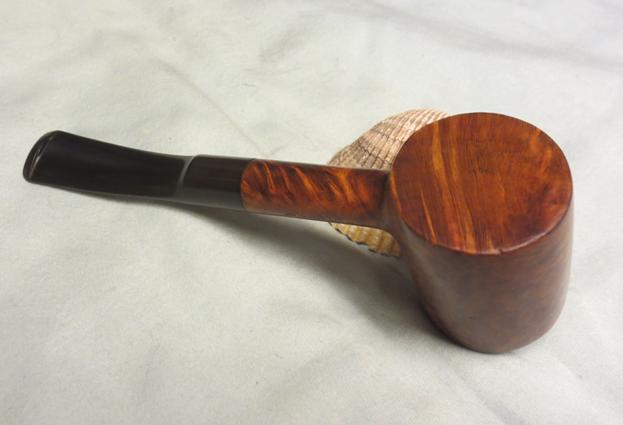
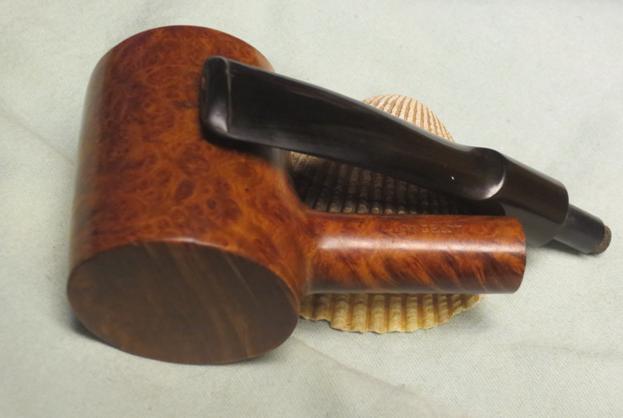
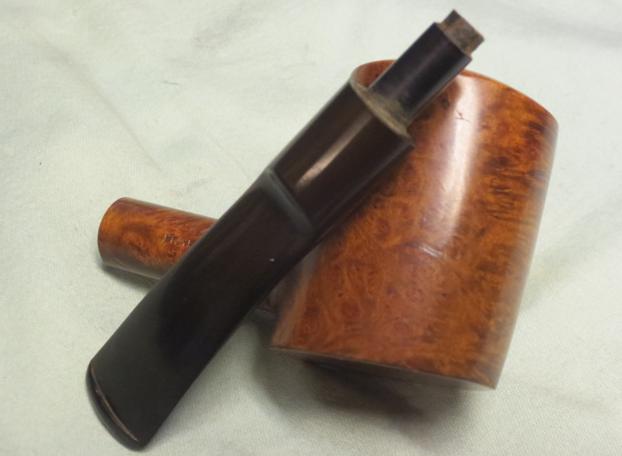
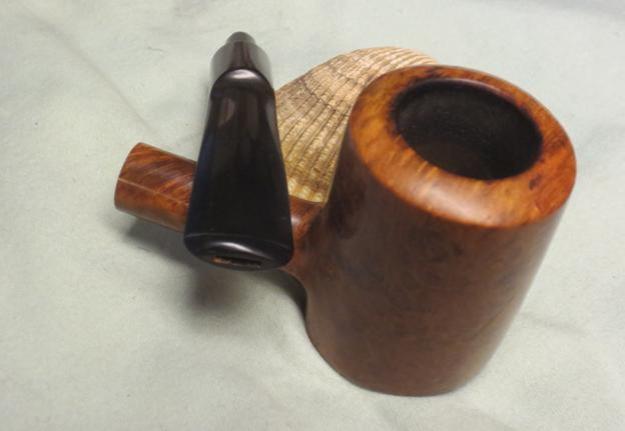
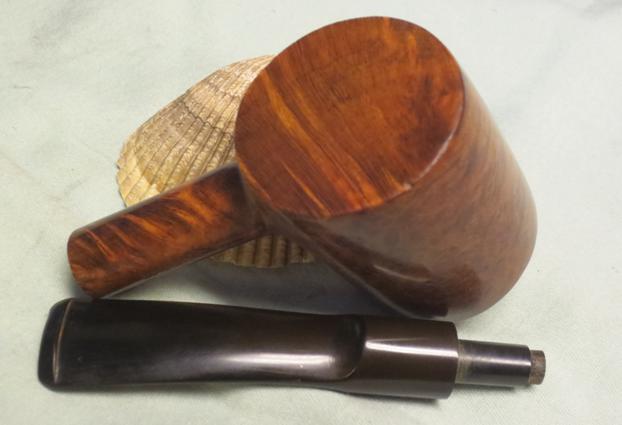
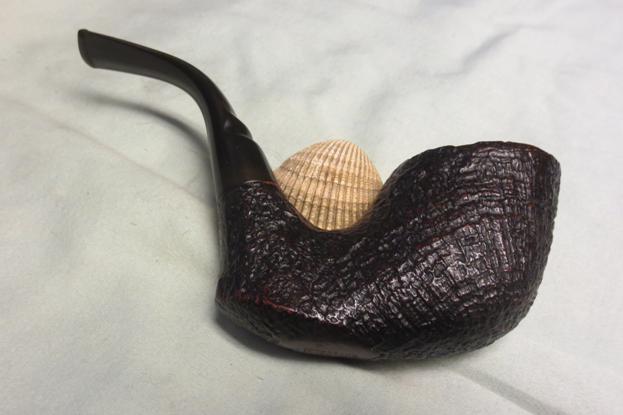
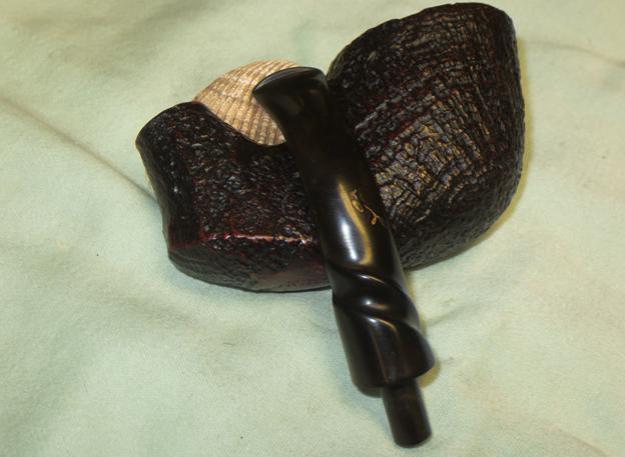
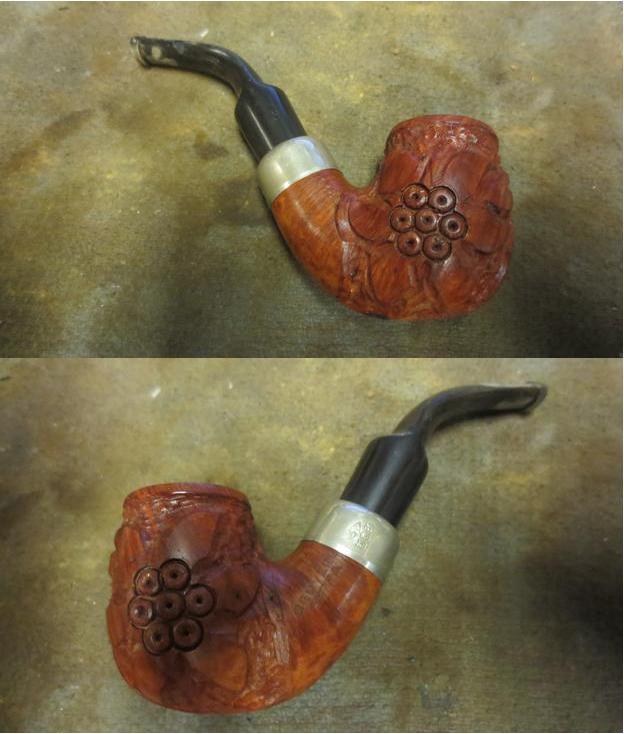
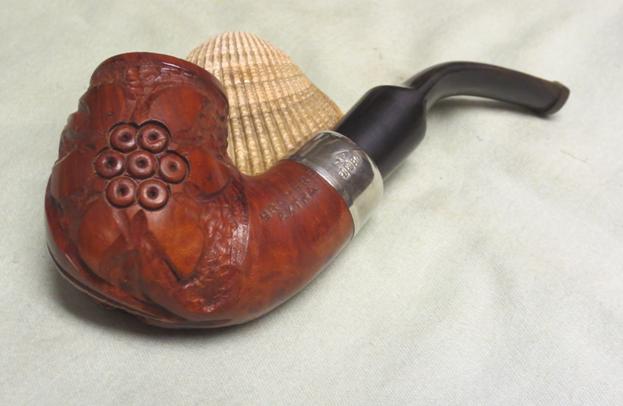
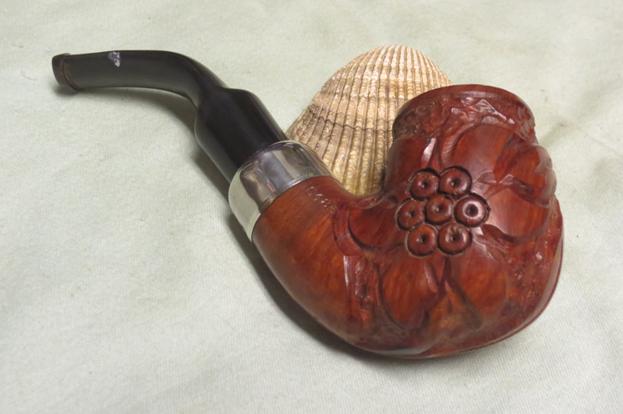
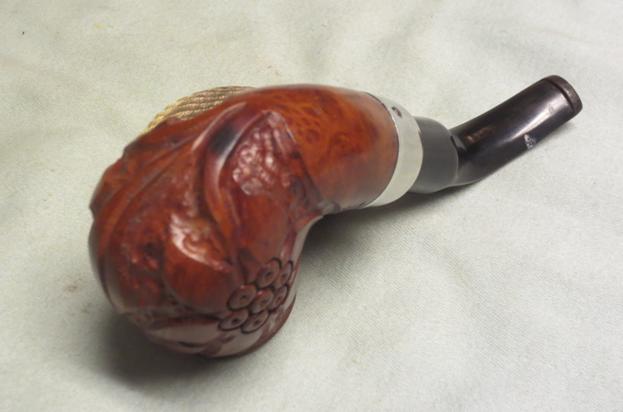
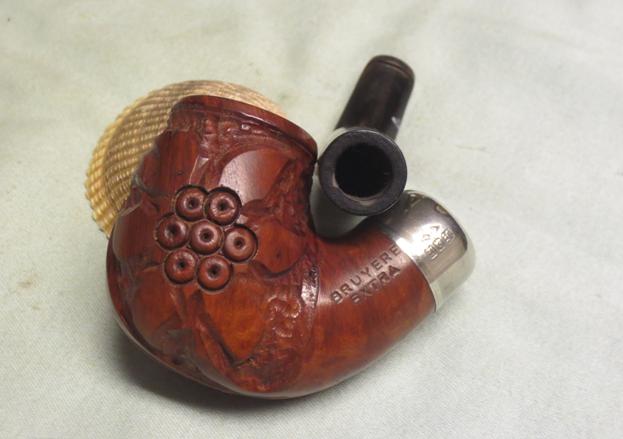
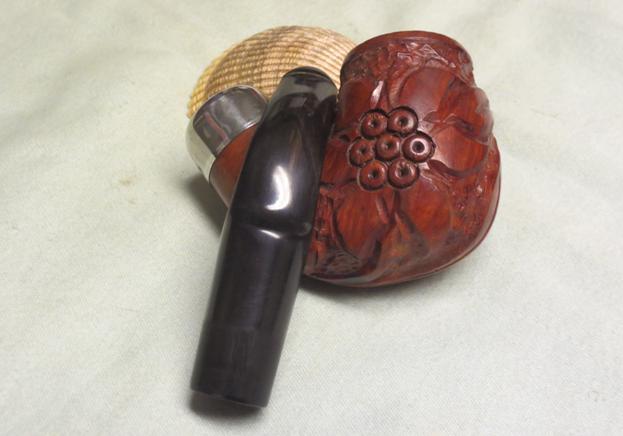
I forgot to take a photo of the stem after sanding it with the 6000-12000 grit pads. I took the pipe to the buffer and buffed the stem with Blue Diamond and then gave the pipe multiple coats of carnauba wax. I buffed it with a clean buffing pad and with a microfibre cloth to deepen the shine. The finished pipe is shown in the photos below. I am hoping the pipe man in Dawson Creek likes the new look to this old pipe. It is truly a beauty. Thanks for looking.RG20 RG21 RG22 RG23 RG24 RG25 RG26 RG27

Breathing new life into a Chippendale 276 Cauldron made by Charatan


Blog by Steve Laug

My brother sent me this interesting old pipe to clean up and restore. He included some photos of what it looked like when he received it from the eBay seller. The stain colour was really nice and showed the contrast to highlight the grain. There were some nicks and dents in the briar on the bowl sides and bottom. The rim had a thin lava coat on the top. The inner and outer edges were in excellent condition. The bowl was darkened with a light cake on the bowl sides. The bottom quarter of the bowl was still light unsmoked, undarkened briar. The bowl seems to have never been smoked to the bottom. The stem was lightly oxidized with tooth marks and chatter on both the top and the bottom sides near the button. The stamping on the side of the stem was readable but looked like it was worn.Chip2 Chip3Chip1This unusual old pipe is stamped on the left side of the shank with the block letters CHIPPENDALE. On the right side it is stamped Made in over London England and a shape number 276. On the saddle portion on the left side of the stem it bears a CD stamp. I looked for the brand on the pipephil site and found that the brand was listed there with photos of stamping identical to the one that I had. I have included the photo of the stampings courtesy of pipephil’s site.

I did some more research at the pipephil site did not give any information regarding the maker. I looked in one of my go to references, Who Made That Pipe and found that the Chippendale brand was made by Ben Wade in London. I use WMTP regularly and one of the limitations of the book is that it gives no other information. In the back of my head I had a memory of a link between Ben Wade and Charatan. That sent me on a further hunt.Chip4Further research lead me to an article on Pipedia entitled Dating of Charatans by Fabio Ferrara. The article definitively links the Chippendale pipes to Charatan. I quote from the section on Pipedia entitled Identification of Fifth Era Pipes in full with the information the Chippendale stamping highlighted in bold and underlined. Here is the link: https://pipedia.org/wiki/Dating_of_Charatans

Identification of a fifth era pipe (First Dunhill era, 1977-1981)

Dunhill finally acquired Lane Ltd. in April 1976. To be honest this era should begin that year, however to clarify matters, knowing that during the first months everything changed in the production, I assume the beginning of this era to be 1977.

The characteristics of this era are close to the previous one, except for the absence of the LANE symbol (approx. ending of 1980).

In this very first period Dunhill didn’t change the production site and the original methods, making plans for the future, and the real revolution took place in 1982.

You may come across a pipe of the ‘old generation’, it is important to note that if the DC has been added later, it is often out of line with the shape code.

The Belvedere series is sold as a special, named the Chippendale brand, exclusively for Tinderbox.

1) The mouthpiece is frequently double comfort, rarely saddle without the double comfort, never tapered. If the stem is not a double comfort but a saddle one, it is characterized by the letter X on the right of the shape code (e.g. 2502X), naturally in this case the letters DC are not displayed.

2) In the CP logo, the C enters the P (until approx. 1980).

3) Absence of £ on the shank (from the end of 1980 approx., this is because during the first period Dunhill kept the £, as Lane Ltd was property of Dunhill that could use its trademark).

4) Presence of the letter DC just after the shape number (e.g. 2502 DC) or of the letter X only if the stem is not a double comfort one.

5) Presence of the writing “Made by Hand – In – City of London” (until 1979).

6) The pipes marked Chippendale are just a Belevedere series, On the mouthpiece, instead of the CP they display CD.

From the above information it appears that the Chippendale stamping was put on pipes that were made Charatan and sold by Tinderbox in the US. They are essentially Charatan Belvedere series pipes. Now that I knew that it was time to work on the pipe. I took the next four photos to show what the pipe looked like after my brother cleaned it up with his usual thoroughness and I received it here in Vancouver.Chip5 Chip6I took some close up photos of the rim and the stem to show the condition of both. The rim is very clean except for a light build up on the front and the back side of the rim top. The photos of the stem show the tooth chatter on both sides and a deep tooth mark on the top side and underside of the stem.chip8 chip9I also took a close up photo of the stamping on the stem. The logo is a CD instead of the CP for Charatan just as was noted in the research. It was faint so it would need to be touched up after the stem was cleaned.Chip10I ran some cotton swabs and alcohol through the shank and the mortise. It was very clean as my brother had done a great job cleaning it. I ran some pipe cleaners through the stem. The slot in the button had some hardened tars in it. I picked the slot open with a dental pick before cleaning the inside of the stem.Chip11There were some deep nicks and divots in the surface of the briar on the front and the left side of the bowl. I filled them with drops of clear super glue.CHip12Once it dried I sanded the repairs even with the surface of the briar using 220 grit sandpaper. I then sanded it with 1500-2400 grit micromesh sanding pads.Chip13I touched up the sanded repairs with a dark brown stain touch up pen. I gave the bowl two coats of Conservator’s Wax. When it dried I buffed the bowl by hand.Chip14I sanded the stem with 220 grit sandpaper. I was able to remove the tooth chatter and the tooth mark on the underside of the stem. I also sanded the rest of the underside to remove the oxidation. I sanded the topside tooth marks. I was able to remove the tooth chatter but the deep tooth mark needed to be repaired. I cleaned the tooth mark with a cotton swab and alcohol and then filled it with black super glue.Chip15I painted the logo on the stem with a white acrylic paint and a small paint brush. I sanded the excess paint off the side of the stem and left the paint in the stamping.Chip16I polished the briar with micromesh sanding pads – wet sanding with 1500-2400 grit pads and dry sanding with 3200-12000 grit pads. I wiped the bowl down with a light coat of olive oil and hand polished it.Chip17 Chip18I polished the stem after sanding it with 220 grit sandpaper with micromesh sanding pads – wet sanding it with 1500-2400 grit pads and dry sanding with 3200-12000 grit pads. I rubbed it down with Obsidian Oil between each set of three pads. When I finished sanding with the 12000 grit pad I gave it a final coat of oil and set it aside to dry.Chip19 Chip20 Chip21I buffed the stem and bowl with Blue Diamond on the buffing wheel to polish it. I gave the bowl and the stem multiple coats of carnauba wax and buffed it with a clean buffing pad to raise the shine. I hand buffed it with a microfibre cloth. The finished pipe is shown in the photos below. To me it has the look of a Charatan and with the history I found it turns out it is one. The pipe was made for Tinderbox to be sold in the US. This one is available to anyone who wants to add it to their rack. Send me a message or an email to slaug@uniserve.com. Thanks for looking.Chip22 Chip23 Chip24 Chip25 Chip26 Chip27 Chip28 Chip29

A Reborn KBB Yello-Bole 2329 Billiard


Blog by Steve Laug

I really like older KBB Yello-Bole pipes. The initial look of this one as it is seen in the first two photos confirms that. There is something about the grain, the briar that is used and the natural patina that comes with years of use that draw me to them. The yellow stem with the inset circle is attractive as well. The Yello-Bole spade stinger that extends into the bowl bottom does not restrict the draw. I had hopes that this one would be in decent shape when my brother sent me the photos below. He had mentioned that the rim was in rough shape and the stem had a lot of bite and tooth marks but the photos did not clearly show that to me.Bowl Bowl1He did his usual stellar job in cleaning up the bowl and stem. The briar and the internals were clean when it arrived. Only then did I see the extent of the rim damage to this one. If you look carefully at the photos you can see how rough the rim top and sides are. You can also see the deep tooth marks on the yellow stem. The stamping on the pipe read KBB in the usual cloverleaf on the left side of the shank with Yello-Bole next to that. The shape number 2329 was on the right side of the shank. All stamping was faint but legible with a lens.Bowl2 Bowl3I took the stem off the bowl and found that the stinger was stuck in the tenon. On these older Yello-Boles the stinger is often threaded rather than pressure fit. I heated the stinger with a lighter and soon I was able to unscrew it from the tenon using some needle nose pliers.Bowl4I took close up photos of the rim and the tooth marks on both sides of the stem. The first photo below shows the extensive damage to the top of the rim. It looked as if the pipe had been used as a hammer. The rough spot on the front of the bowl went down quite far down the outside edge of the bowl. On the back right side of the bowl there was also a deep nick down the side of the bowl. The bowl would need to be topped but the depth of the gouges made it necessary to think of other options along with topping.Bowl5The top and bottom sides of the stem next to the button were imposing. The stem had been deeply gnawed on by the previous pipe smoker. The dents were deep and extensive across both sides of the stem almost obliterating the button from view.Bowl6This was one of those hard ones. The stamping is faint and the amount of work necessary to bring it back to life was questionable. But I decided I liked the look of it enough to go for it. I topped the bowl on the topping board to smooth out the top surface of the rim. This still left a lot of work to do on the gouges down the front and back sides of the bowl. I pressed briar dust into the gouges on the side and top of the bowl and put some clear super glue on top of the briar dust. I put more briar dust on top of the glue to fill in the gouges.Bowl7 Bowl8I filled in the deep tooth marks on both sides of the stem and set it on a small wooden lid to dry. I knew that in sanding the stem after the repairs I would lose some of the rich golden colour but the stem would actually be very usable.Bowl10Once the repair dry I used a needle file to recut the button and flatten the repairs to the surface of the stem.Bowl11I cleaned out the airway in the stem and in the shank with pipe cleaners, cotton swabs and alcohol. You can also see the lightning of the yellow stem at the repair.Bowl12I polished the stem with micromesh sanding pads – wet sanding with 1500-2400 grit pads and dry sanding with 3200-12000 grit pads. I rubbed the stem down with Obsidian Oil after each set of three pads. With the final rub down with oil I set the stem aside to dry.Bowl13 Bowl14 Bowl15I wiped the bowl down with acetone on cotton pads to clean off the remnants of the finish. There was still some finish and varnish on the underside of the shank that needed to be removed. I was careful to not wash off the repairs as the acetone will dissolve the super glue patches.Bowl16Interestingly the bottom of the shank is stamped Algerian Briar. There appears to be a crack or repair on the underside of the shank but it is not it is merely a large scratch that I was able to sand out.Bowl17I polished the briar bowl with micromesh sanding pads – wet sanding it with 1500-2400 and dry sanding it with 3200-12000. Each successive grit of micromesh pads raised the level of shine on the bowl.Bowl18 Bowl19After polishing it with the micromesh pads I took some photos to show the state of the bowl.Bowl20 Bowl21I touched up the stain with a medium brown stain pen on the repaired areas on the rim to blend them into the surface of the briar. I buffed the pipe and stem with Blue Diamond on the buffing wheel and then gave the pipe multiple coats of carnauba wax. I buffed it with a clean buffing pad and then buffed it by hand with a microfibre cloth to deepen the shine. The finished pipe is shown in the photos below. I chose to leave the darkened spot on the bottom of the bowl. I sanded it and found that it was more of stain than a burn mark. The wood is solid in that spot and there is no sign of burn through inside the bowl. Thanks for looking.Bowl22 Bowl23 Bowl24 Bowl25 Bowl26 Bowl27 Bowl28 Bowl29

I love the shape of this Comoy’s Regent’s Park London Made Canted Volcano


Blog by Steve Laug

This pipe takes advantage of the grain to the maximum. The shape has flame, mixed and stunning birdseye on the sides, top and bottom of both the bowl and the shank. This is another of the pipes that my brother Jeff found. The stamping is faint but readable with a lens. It is stamped on top of the shank with the words Regent’s Park over London Made. On the underside of the shank stamped diagonally from front to back it reads Made in England. From the photos that Jeff set me the pipe was in decent shape. The finish was spotty and dirty. The rim was clean and undamaged with a light and spotty lava coat. Comoy1The stem was lightly oxidized and there was a deep and large tooth mark on the top side near the button. I have learned that there is usually a match to that on the underside of the stem. The canted volcano shape is very nice. In the photo below it appears that there were some small pin prick fills on the back side of the bowl just above the shank.Comoy2From what I can find online the pipe is made by Comoy’s. They made the Hyde Park brand and it appears they also made the Regent’s Park brand – both which are Comoy’s seconds and are named after London Parks. I found this Comoy’s Shape Chart on-line which shows the pipe as a Modern 625. I have circled it in red – it is shown on the bottom of the right column, last pipe.Comoy3As usual now, my brother did a stellar job cleaning up the pipe before he sent it to me. He reamed it and scrubbed the exterior with Murphy’s Oil Soap so the finish was very clean. He cleaned out the internals as well. The pipe was ready for me to work on the finish and stem repairs when I received it. The next four photos show what the pipe looked like when it arrived to my work table.Comoy4 Comoy5I took a close up photo of the rim to show the slight damage – almost cut marks on the top of the rim surface. The inner and outer edge of the rim is fairly undamaged though so it will not take much to clean up this rim. I also took close up photos of the stem to show the large bite/tooth marks on the top and bottom sides near the button.Comoy6 Comoy7I cleaned up the tooth marks with sandpaper, a dental pick and alcohol. I filled in the deep dents with black super glue and let it cure. I forgot to take photos of the repairs before I sanded them out. Once the glue had cured I sanded both sides of the stem with 220 grit sandpaper to smooth out the repair to match the surface of the rest of the stem.Comoy8I also filled the pin holes in the back side of the bowl with clear super glue and briar dust. Again I forgot to take a photo of the glue and dust mixture. Once it dried I sanded the bowl with 220 grit sandpaper and blended the repairs into the surface of the briar. The surface was smooth to touch .Comoy9I sanded the slash marks on the rim with 220 grit sandpaper to minimize them. It did not take too much sanding to remove them. I also sanded the inner beveled edge of the rim to clean it up and remove the darkening.Comoy10I sanded the bowl and rim with a medium and a fine grit sanding block. I worked to remove the scratching left behind by the 220 grit sandpaper. I carefully avoided the areas on the shank that held the already faint stamping.Comoy11 Comoy12I sanded the stem with the sanding block as well.Comoy13I wet sanded the stem with 1500-2400 grit micromesh sanding pads and rubbed it down with Obsidian Oil. I dry sanded it with 3200-4000 grit pads and gave it another coat of oil. I finished sanding it with 6000-12000 grit pads, gave it a final coat of Obsidian Oil and set it aside to dry.Comoy14There were some scratches on the top of the stem. I would need to work on them some more at this point.Comoy14a Comoy14bOnce I buffed the stem with Blue Diamond the scratches would be blended into the stem surface. I gave the bowl a coat of Danish Oil and Cherry Stain to highlight the red of the briar. I set it aside to dry for about twenty minutes.Comoy15I wiped the bowl off with a soft cloth and hand buffed it lightly to get a clear picture of the finish and the grain on the bowl.Comoy16 Comoy17I polished the bowl and stem with Blue Diamond on the buffing wheel. I buffed out the scratches in the stem and the briar. I gave the bowl and stem multiple coats of carnauba wax to protect it. I buffed it with a clean buffing wheel to raise the shine. I hand buffed the pipe with a microfibre cloth to deepen the shine. The finished pipe is shown in the photos below.Comoy19 Comoy20 Comoy21 Comoy22 Comoy23 Comoy24 Comoy25

A Cased Bakelite Manhattan with a Lockrite Stem


Blog by Steve Laug

I am always on the lookout for older CPF or WDC cased pipes. I bid on them when I get the chance and I used to win many more of them than I do now. They seem to have not only become more popular than they used to be but are also commanding higher prices. I was showing my brother some of them and asked him to keep an eye for them as well. He came across this little cased pipe. It looks like both the CPF and the WDC pipes and probably comes from the same era. The case has a label that reads Bakelite on it and it sits in the lid of the case over the stem. The pipe itself is stamped BAKELITE over MANHATTAN on the left side of the shank and is filled with a gold foil or paint. The right side of the stem also has a gold foil stamp that reads LOCKRITE. The band on the shank is stamped GERMAN SILVER.Bake1The pipe appeared to be barely used. There was some darkening on the rim and some light cake on the top part of the bowl. The bottom of the bowl was like new. The finish was dirty and the varnish coat had some wear and tear. The gold leaf stamping on the shank was worn on the second line on the left side. The German Silver band was lightly tarnished and had some scratches. The Bakelite stem had deep tooth marks on the top and underside of the stem at the button. The Lockrite stamping on the right side of the shank referred to the newly designed tenon system that took care of the perpetual over clocking that occurred with a bone tenon.Bake2My brother Jeff scrubbed the surface of bowl being careful around the gold stamping on the shank. He cleaned out the bowl and the mortise areas and the airway in the stem. When he sent it to me it was very clean. I took photos of the pipe when it arrived to my work table. The first two photos show the case and the first view of the pipe when I opened it.Bake3I lifted it from the case and took a photo of the pipe looking down at it from the top. The rim looks excellent from this view.Bake4The next four photos show the pipe apart from the case. The finish is clean but the twin rings around the bowl cap are dirty. The silver is lightly tarnished and the gold stamping is light on the left and the right sides. You can see the tooth mark on the stem in the last photo of the underside of the pipe and stem.Bake5 Bake6I took a close up photos of the rim and the stem to show the state of both. The rim looked very good though there was some scratching. The stem had deep tooth marks on both sides though it was hard to capture them with the deep red of the Bakelite stem.Bake7 Bake8I took a photo of the newly designed Lockrite tenon on this pipe. It is extremely well designed and worked well to keep the stem aligned with the shank.Bake9The next two photos show the stamping on the shank. The left side reads BAKELITE over MANHATTAN as mentioned above and the right side reads LOCKRITE.Bake10I wiped down the bowl and shank with acetone and cotton pads to remove the remnants of varnish. I was careful to not damage the gold stamping.Bake11 Bake12I used the dental pick to clean out the tooth marks and wiped the stem down with an alcohol dampened cotton pad. I filled the tooth marks with clear super glue.Bake13Once the glue dried I sanded the surface of the repairs with 220 grit sandpaper to smooth out the repairs to match the surface of the Bakelite stem.Bake14With the tooth marks repaired and smoothed out it was time to polish the stem with micromesh sanding pads. I wet sanded the stem with 1500-2400 grit sanding pads and rubbed it down with Obsidian Oil. I dry sanded with 3200-4000 grit pads and gave it another coat of oil. I finished sanding it with 6000-12000 grit pads and gave it a final coat of Obsidian Oil. I set the stem aside to dry.Bake15 Bake16 Bake17I stained the bowl with a Danish Oil and Cherry stain. I let it dry for about 20 minutes before rubbing the bowl down with a soft cloth.Bake18After rubbing it down with a soft cloth I took the following photos of the bowl. The grain on this one is also very pretty. Some of these older pipes were made of really nice briar.Bake19 Bake20I waxed the bowl twice with Conservator’s Wax and hand buffed it once it had dried. I polished the German Silver band with 6000-12000 grit micromesh sanding pads and also with a jeweler’s silver polishing cloth.Bake21I lightly buffed the bowl and stem with Blue Diamond on the wheel. You have to be careful buffing the Bakelite as the heat of the buffer will melt the stem and make more work for you. I gave the bowl and stem several coats of carnauba wax and lightly buffed it with a clean buffing pad to raise the shine. I hand buffed it with a microfibre cloth to deepen the shine. The finished pipe is shown in the photos below. It is really a beauty. Thanks for looking.Bake22 Bake23 Bake24 Bake25 Bake26 Bake27 Bake28

A 9438 Rhodesian Stamped Tobacco Town


Blog by Steve Laug

This is one of my favourite pipe shapes – the classic GBD 9438. There is just something about the way the lines flow and the way the pipe sits in the hand that make this an all-time favourite from me. This one is somewhat unique in that though it bears the London England over 9438 stamp on the right side of the shank on the left side it is stamped Tobacco Town. The stem bears no GBD roundel but it is definitely the original stem. The finish is dark and the briar has some amazing grain. Tobacco Town is a chain of tobacco shops in the Northwestern United States and it also is the name of a few shops across the Southwest and the Midwest. Here is a link to the shops in Portland, Oregon:  http://tobaccotown.com/. I think that because of the wide use of the name that identifying the shop that had this line of pipes made for them by GBD will not be possible. The two photos below show the pipe as it was when my brother received it.GBD1The rim had a heavy tar buildup with the cake overflowing the bowl onto the rim top. The twin rings around the cap on the bowl also were filled with dust and debris. The stem was oxidized and there were some deep tooth marks on the top and underside near the button. The topside of the button was worn thinner than the underside and there were some tooth marks on it as well.GBD2My brother Jeff has developed his own cleaning regimen that really delivers a clean pipe to me. By the time I receive it the bowl has been reamed and the finish scrubbed clean with no dirt or debris in the rings. The stem was clean and the damaged areas very visible. The rim top was free of the lava overflow but still was slightly darkened. The next set of four photos show what the pipe looked like when I started working on it.GBD3 GBD4Before I began my work I took a close up photo of the rim top and the bite marks on the top and bottom of the stem near the button. The rim had the majority of the tars removed but under the bright light I could see some residual stubborn bits. The inner edge of the rim also had some damage from what looked like someone’s reaming the bowl with a knife. I have circled the bite marks in the photos of the stem surfaces with a red circle to clearly identify the issues there.GBD5 GBD6I scrubbed the exterior of the bowl and the rim with acetone on cotton pads to try to remove more of the residue on the rim and to remove some of the darker spots of stain on the bowl. I wanted the grain to really stand out.GBD7 GBD8I worked on minimizing the damage to the inner edge of the rim by sanding it with a folded piece of 220 grit sandpaper.GBD9I decided to lightly top the bowl to remove the stubborn residue that remained and to lighten the smoke darkened rim at the back of the bowl.GBD10I noticed that the inside of the shank had been stained with the same brown stain as the exterior of the bowl so I scrubbed it out with cotton swabs, pipe cleaners and alcohol. I was able to remove the stain. As I scrubbed it I notice that against the end of the mortise there were still some tars that kept coming out with the cotton swabs. I used a dental spatula to scrape the end of the mortise to remove these hardened tars. They are visible on the paper towel in the second photo below. I followed that up by swabbing out the mortise with cotton swabs and alcohol. I also scrubbed the airway in the stem. There was some debris trapped in the slot in the button that I worked out with a dental pick.GBD11 GBD12I wiped the exterior of the stem down with alcohol on a cotton pad and worked on the tooth dents to make sure the surface was clean. I used a dental pick to apply the black super glue to the dents on both sides of the stem and sprayed the glue with accelerator. I followed up with applying a second layer of the glue to fill in the air bubbles on the surface that seem to always follow using the accelerator and set the stem aside to dry.GBD13When the glue had cured I used a flat blade needle file to smooth out the patch to the surface of the stem and to recut and reshape the button. I sanded the repair with 220 grit sandpaper and then refiled it with the needle file.GBD14 GBD16I polished the stem with micromesh sanding pads using my normal routine – wet sanding with 1500-2400 grit pads and dry sanding with 3200-12000 grit pads. I rubbed the stem down between each set of three pads with Obsidian Oil. I gave the stem a final coat of oil and set it aside to dry.GBD17 GBD18 GBD19I rubbed the bowl down with Watco Danish Oil with Cherry stain and let it dry for about 30 minutes. After 30 minutes I rubbed the bowl down with a soft flannel cloth.GBD20I buffed the bowl and the stem with Blue Diamond on the buffing wheel and then gave the pipe multiple coats of carnauba wax. I buffed it with a clean buffing pad to raise the shine. I hand buffed it with a microfibre cloth to deepen the shine. This is one of my favourite shaped both in terms of the shape and the hand feel of the bowl. The red colours that are highlighted by the cherry stain show the grain beautifully. Thanks for looking.GBD22 GBD23 GBD24 GBD25 GBD26 GBD27 GBD28


A First Horn Stem on a Throw Away Pipe


Blog by Dal Stanton

On a recent pipe foraging expedition at the Antique Market near Nevski Cathedral in the heart of downtown Sofia, Bulgaria, I saw this pipe on one of the tables I was methodically scanning.  It was a sad scene but a survivor.  It was a petite (5.25”) hexagonal paneled shape pipe with a diamond shank banded and it was beat up.  What got my attention through the sorry state of affairs was the stem.  The vendor made sure I knew that the stem was bone – at least that’s what I thought he said as he hyped the great deal before me in Bulgarian.  I have yet to collect a ‘bone’ stem pipe, if that is indeed what it is, of any variety so I decided to start the bargaining dance.  He also said it was from Greece, which I could not determine by looking at the faint markings stamped in the right side of the shank, Extra over Bruyere.  Five euros was the opening volley – about 10BGN or $5.70 – not high stakes.  After getting permission from the vendor to take the stem off to get a better look I tried a few gentle twists and it wouldn’t budge.  Without pause, I handed it back to the vendor not wanting to break it and sealing the deal by default, “You broke it, you own it.”  After twisting and pulling and pouring water on it, he also could not remove the stem –  which was to my favor.  We struck a deal at 7 BGN ($4) and I gave him a 10 Leva bill.  Without proper change he asked nearby vendors for help and received none.  I dug further in my pockets and produced two 2BGN bills – 4 Leva total small stuff.  I held the 10 and the pair of 2s in each hand and shrugging my shoulders and he took the pair of 2s and the deal was sealed – about $2.30 for the ‘bone’ stem pipe.  I thanked him for the discount, but made a mental note to pay the vendor the additional 3BGN on a future visit – a good vendor friend can be achieved!  At home I took pictures of my $2.30 acquisition and promptly dropped the pipe into an alcohol bath to decontaminate it and hopefully loosen the stem.  I wasn’t sure if the stem was simply inserted with a straight tenon or if the stem screwed into the mortise.  Hopefully, this would all become clear after the bath got a chance to soften the cemented crud – which was in great supply.  The pictures I took when I was home tell the story.Horn1 Horn2 Horn3 Horn4 Horn5 HORN6 Horn7 Horn8 Horn9The alcohol bath did the trick and I was able to remove the stem and get a look at the internals.  Looking down the mortise, there was a solid wall of hardened tar muck that closed access to the bowl.  The airway of the stem was also blocked by crud.  The rim still showed lava flow and tar caked on the top, but I could see the rim and the damage done to it as well as to the bowl.  I decide to have a second alcohol bath to loosen things up further and to clean up the rim to better assess how to proceed.

With question in my mind about the true nature of the stem, I sent some pictures of the stem to Steve with the question, “Horn or Bone?”  His guess was that it is horn because of the tooth chatter on it.  He also referenced his recent post, A Ropp La Montagnarde Deposee 298 Horn-Cherrywood-Briar and a helpful essay (My Process for Repairing and Polishing Horn Stems) to give me input on working with horn stems.  He did say that he had never seen a horn stem spliced like this one.  I’ve included that picture (4th) he referenced below – interesting factoid.  While the pipe got its second alcohol bath I read the essay on repairing and polishing horn stems.Horn10 Horn11 Horn12 Horn13Well, that was gross.  The second bath finished, I take the stem and start to push bristled pipe cleaners dipped in isopropyl 95% through the airway from the tenon toward the button.  As I push, from the button air hole oozed what looked like a seal brown loaf of lava gunk toothpaste – nasty, nasty stuff.  But I guess, the ooze of magna putridum was good news as the airway was in the process of being reconquered.  After many pipe cleaners, bristled and smooth, the stem starts coming clean.  I put the stem aside and I grab the stummel from the bath and work on the mortise attacking the tar gunk blockage.  After many Q-tips and pipe cleaners dipped in alcohol, it too is reclaimed.  I’m thankful that Q-tips are plentiful in Bulgaria.  Taking a brass bristle brush which will not scratch the wood surface further, I work on the rim to remove the lava and thick oil/gunk buildup.  I finish by working the stummel surface with a toothbrush and cotton pads.  The pictures show the progress (I’m on the 10th floor balcony and notice that the sun goes down on my labors!) and I take a close up of the rim to assess how to tackle it.Horn14 Horn15 Horn16 Horn17 Horn18

Before working on the rim, I need to ream the bowl to bring it down to the briar.  The cake is very light.  After I get my Pipnet reaming kit out and ready the smallest blade, I realize that the bowl is too small and the blade would only impact the very top area of the chamber.  Then I think of the Savinelli Pipe Knife that I snagged on eBay a week ago that my son-in-law will be bringing to Bulgaria in a few weeks when he and our daughter visit from Denver!  My Winchester pocket knife will have to do the job.  To avoid cutting into the chamber wall I reverse the blade angle to scrape it over the wall.  It works pretty well as I work the blade down into the bowl which is more conical coming to a point at the bottom than oval shaped.  I follow the Winchester by sanding the chamber wall with 120 grit sanding paper rolled up then finishing with 240 grit.  I want the bowl to be as clean and smooth as I can get it.Horn19 Horn20 Horn21Returning to the work table the next day after work, I’ve had some time to think about the rim repair.  I take another close up shot after finishing the reaming and sanding the bowl to see where I am.  The stummel reminds me a bit of a bulldog shape with the cap of the bowl rising from the panels.  The challenge is that the rim is pretty chewed up and there isn’t a whole lot of wood to work with on the cap!  I decide to establish a thin rim by topping the bowl, just enough to establish a ring, then fudge on the inside by cutting a bevel to remove the damage and on the outside sand to round up to the rim’s ring hopefully removing the damage and leaving a balanced stummel.  This is the plan. I use 240 grit sanding paper on a chop block as a topping table.  I rotate the stummel on the table very conservatively, checking the progress after every few rotations.  I’m careful to keep the rim level!  The pictures show the progress.  The last picture below shows the result.  I do not want to take more briar off at this point.  A rim is established but with significant incursions on the inside of the rim at 2, 7 and 11 o’clock with smaller cuts at 8 and 10.  An inside bevel should take care of the 8 and 10 o’clock damage but will not fully eradicate the larger injuries to this rim. Horn22 Horn23 Horn24 Horn25In order to fill in the deep crevices I decide to mix a thick putty of briar dust and super glue. I prepare the rim by first cleaning it thoroughly with alcohol and a cotton pad getting rid of residue left over from the topping and using the dental pick to clean out any loose stuff stuck in crevices.  I want a good bond to form to fill crevices but also to form an even resistance on the inner rim when I cut the bevel later.  I use toothpicks to apply the briar dust putty to the cuts and bruises.  I decide to apply it to the small wounds too and then put the stummel aside to allow the putty to cure overnight.  I hope this approach works!Horn26 Horn27 Horn28With the super glue on the work table, I take the horn stem and look at it more closely.  I read the essay Steve wrote especially for working with horn stems and understand that the approach is not as aggressive as working with vulcanite or Lucite stems.  The goal is to repair surface areas that are broken and can splinter and become porous and treat the entire stem surface with polish and waxes to harden and smooth the surface.  There is tooth chatter above and below the bit, with some opening of the horn surface.  I also identify minuscule holes on the edge of the bit.  There was also a crack that ran between the two ‘bonded’ parts of the stem.  I have no idea whether cracks in horn stems will ‘creep’ but following the general principle of closing up the surface area, I decide to apply some super glue to the crack at least to seal it.  I start with 240 grit sanding paper by mildly sanding above and below the bit addressing the chatter and open, porous area.  I sand lightly not trying to totally remove the open areas but preparing it for a super glue patch to fill it in and close it.  After sanding, I apply super glue to the bit area making sure to fill the porous, softer surface.  Super glue was also applied to the small holes on the edge of the stem as well as to the crack.  The pictures show the progress.HORN29 Horn30 Horn31 Horn32 Horn33 Horn34With the super glue cured after sitting overnight, I use 240 grit sanding paper to bring the bump of the super glue patch down to the stem surface level. I gingerly use the flat square corner of the needle file to cut into the super glue to redefine the button lip.  My goal is to blend the patch with the horn stem so I feather the sanding outward toward the stem.  You can still see the darker patch but it should blend more as I polish the horn stem.  While I smooth out the super glue patch to fill in the crack on the splice line I also detect a small ridge along one side of the stem where the bonding between the two horn pieces come together.  I sand that down with 240 grit paper as well.  My goal is a smooth hardened horn surface.  Pictures show patches on the top and bottom.Horn35 Horn36With Steve’s essay on horn stem repair informing my steps, I use medium and fine grit sanding sponges on the entire stem.  I want to feather the patches with the rest of the stem surface with the goal that transitions from super glue patches to the horn surface are not detected either by touch or with the tongue on the button area. I’m pleased with the blending I see as the marks from the 240 grit paper disappear – even the crack (first picture center bottom) at the horn splice point is less visible.Horn37 Horn38Now I polishing the horn stem with the normal cycles of micromesh sanding pads. I wet sand using 1500 to 2400 pads and follow with a hearty application of Obsidian Oil.  The horn absorbs the oil readily.  After the first micromesh cycle, I noticed that what I had been calling a ‘crack’ at the splice joint had almost disappeared.  Perhaps the wound was not a crack but a sharp cut into the horn.  Either way, the polishing process was going well.  I also polish the metal tennon with the 1500-2400 pads to clean and shine it.  Next I dry sand using 3200 to 4000 and again apply Obsidian Oil.  Again, using 6000 to 24000 micromesh pads I dry sand and then apply a final coating of Obsidian Oil and put the stem aside to dry.  The blending looks good – even though the patch areas are visible, with the blending and polishing the patches now have more of a natural horn look.  The pictures show the micromesh progress.Horn39 Horn40 Horn41The stummel has had ample time for the briar dust super glue putty patches to the rim to cure.  I take a close up of the cured rim patches to mark the progress and then use 240 grit sanding paper to strategically take the briar dust patches down to the rim surface level.  I want to remove the mounds before returning the stummel to the topping table outside on the balcony for a few more rotations on 240 grit paper just to make sure the plateau is flat.Horn42 Horn43 Horn44Now I cut a bevel inside the rim to address the rim damage and to finish smoothing out the briar dust super glue patches.  I use a tightly rolled piece of 120 grit sanding paper to establish the bevel by gradually rotating the bowl in my hand while sanding to achieve a gradual uniform bevel.  Then, with the bevel cut, I use 240 grit paper, again tightly rolled to present a harder surface to the wood, to finish it.  The rim repair looks good.  The three main patched areas are barely visible and blending well.Horn45Now to the external surface of the stummel.  I remove the metal band and apply Murphy’s Wood Soap with a cotton pad to see to remove any leftover tars and oils on the surface.  The cap of the bowl shows the most damage.  At the top of the picture above you can see pitting in the briar.  I use medium and fine grade sanding sponges to work the pitting out of the cap around the circumference of the rim.  Satisfied, I decide not to stain but to restore the original stained surface – I like the color and the grain is promising.  I begin working on the stummel with micromesh sanding pads beginning by wet sanding using 1500 to 2400. Following this, dry sanding 3200 to 6000, then 6000 to 12000.  This little pipe is starting to pop.Horn46 Horn47 Horn48 Horn49 Horn50After remounting the metal band and attaching the horn stem, I complete the polishing with the Dremel wheels by applying Blue Diamond to stem and stummel with a felt Dremel buffing wheel.  I’m careful to work the horn stem lightly so I don’t overheat the surface and cause splintering or an opening of the surface.  Following the Blue Diamond, stem and stubble receive several coats of carnauba wax with a cotton cloth wheel.  Finally, I give a Dremel wheel buff with a clean cotton cloth wheel.  To raise the shine of the horn and briar, I give the pipe a vigorous buffing with a microfiber cloth.

I’m very surprised how well this little pipe cleaned and polished up.  The rim repair was daunting but amazingly the briar dust patches are practically invisible and blend well with the natural grain movement.  My first horn stem repair looks good from where I sit.  I’m not sure who smokes a pipe this small but someone did before I received it and I’m happy to return it to service.  I couldn’t resist a ‘before and after’ shot to start things.  Thanks for joining me!Horn51 Horn52 Horn53 Horn54 Horn55 Horn56 Horn57 Horn58 Horn59


Rejuvenating a Don Roberto Cherrywood 1344


Blog by Steve Laug

When Jeff and his wife took a trip to Southern California he could not stay away from the antique shops and looking for pipes. He found quite a few that will over the months show up on the blog after refurbishing. The one I chose to work on next came in a box with the Don Roberto logo and name on it. It is labeled a Lancelot pipe. On the end of the box it reads Don Roberto Lancelot over 9489 which immediately made me think of the GBD numbering system and Italy which threw me off from my GBD assumption. I had looked at the pipe a few months back when he sent it to me for restoring but had put in the refurbishing bin and forgotten what was in the box.Don1I took the box out of the bin of pipes awaiting restoration and brought it to my work table. I opened the box and found myself looking at a Cherrywood or a Poker shaped pipe. It was sitting on top of a pipe sock that did not look original.Don2I took the pipe out of the box to have a look at it. The finish originally must have been virgin or oil finished. The stamping on the pipe was interesting – on the left side of the shank it was stamped with the logo like the one on the box, Don Roberto separated by at sword over Lancelot. On the right side of the shank it was stamped 1344 over Italy. There was something familiar to me about the shape and the shape number so I looked it up and found it on my GBD shape chart. 1344 was the number for a GBD Poker so the number and shape matched. The mystery to me was the Italy stamp. How does that fit into the picture? The stem also had a worn Don Roberto and sword logo on the left side of the saddle.Don3The rim was in bad shape. It looked as if it had been knocked out on concrete. The entire crowned surface of the rim was covered with road rash – stippling left behind from the concrete. There was also some tars and oil on top of the damage. The inner edge of the bowl looked to be in round and undamaged and the inner bevel looked to be in good condition. There was a groove carved on the bottom of the bowl and part way up the front side. Probably it was cause by aggressive cleaning with pipe cleaners over the years but I cannot be sure. The stem had a heavy coat of calcification on the end and the button hiding quite a bit of tooth damage and tooth marks.Don4I took a close up photo of the rim top to more adequately show the damage to the crowned surface. The light cake in the bowl is also visible in the photo.Don5I sanded the crowned rim with a folded piece of 220 grit sandpaper to preserve the crown and not flatten it on a topping board. Care must be taken to keep the angle of the curve and the line around the top of the bowl sides equal. I sanded until I removed damage to the bowl top. I wiped down the bowl with acetone to remove the grime and the wax on the briar. The photo below shows the bowl top before I sanded out the scratches.Don6The next photos show the bowl after the scrubbing with acetone.Don7 Don8I sanded the rim some more with the folded 220 grit sandpaper and also worked on removing the calcification on the stem. It took a lot of sanding to get the rim smoothed out and also to remove the buildup on the stem.Don9 Don10There were a lot of tars and oils lining the walls of the mortise. I used a dental spatula to scrape the walls before scrubbing the mortise with pipe cleaners, cotton swabs and alcohol.Don11I scrubbed the airway in the stem with pipe cleaners and alcohol. As I cleaned it a small reducing ring popped out of the tenon. I have never figured out why people put these constrictors inside o the tenon but this one had one. It is shown in the second photo below. I used the spatula to scrape away the buildup on the stepped down area on the end of the tenon.Don12I used a drop of black super glue to repair a deep tooth mark on the underside of the stem near the button and also to repair a tooth mark in the surface of the top side of the button. I sanded the patch with 220 grit sandpaper to smooth it out and blend it into the surface of the stem.Don13I wet sanded the stem with 1500-2400 grit micromesh sanding pads and gave the stem a rubdown with Obsidian Oil. I dry sanded with 3200-4000 and 6000-12000 grit pads and gave the stem a coat of oil between each set of three. I gave it a final rubdown of Obsidian Oil and set the stem aside to dry.Don14 Don15 Don16I wet sanded the bowl and crowned rim with 1500-2400 grit micromesh sanding pads and dry sanded it with 3200-12000 grit pads. The polishing with the micromesh really made the grain stand out. The pipe is well laid out to follow the grain. The sides of the bowl are covered with birdseye grain that wraps around to the front and back to perfectly aligned cross grain. The top and bottom of the bowl as well as the shank all have cross grain as well. I cannot find a fill in the briar – it is one great looking piece of briar.Don17I buffed the bowl and stem with Blue Diamond on the wheel and then gave it multiple coats of carnauba wax. I buffed it with a clean buffing pad and then by hand with a microfibre cloth. The finished pipe is shown in the photos below. The layout of the grain with the shape of the pipe is exceptionally well done. Look at the stunning grain around the bowl. Thanks for looking. Don18 Don19 Don20 Don21 Don22 Don23 Don24 Don25

Cleaning up a Unique Savinelli Autograph Grade 4


Blog by Steve Laug

My brother found this Savinelli Autograph on a trip through Nebraska. He picked it up in an antique shop. It was in very good shape with a light cake in the bowl. It is a large pipe that is sandblasted on three sides of the bowl and the shank. The sandblast finish was very clean and the smooth portion was also smooth and undamaged. The Pipes and Cigars website http://www.pipesandcigars.com/pipes/73592/savinelli-autograph-pipes/ says that:

“Savinelli Autographs are as individual as your fingerprints. Each is the dream of an expert pipe maker realized in briar and personally selected by Giancarlo Savinelli. Every Autograph is 100% ‘Hand made’ using only the highest grade of Sardinian and Corsican Briar Plateau blocks. Well grained briar, worthy of becoming an Autograph is rare and therefore, these beautiful masterpieces are very limited and coveted by pipe smokers worldwide. Truly an achievement to be treasured, Autographs are available in smooth, paneled, sandblasted brown or black.” The Autograph my brother found is a paneled version.

On the Savinelli website it says this about the Autographs:

This rare, unique and irreplaceable pipe is shaped from the raw material following the grain and the “fiammatura” (“flame”), which Mother Nature has put at our disposal, according to the artistic mood of our master craftsmen. The wood is natural and the shape is unique for each piece. The name “Autograph” was created from the handwritten signature of Achille Savinelli Senior printed on the mouthpiece.” 

“These pipes are graded according to very strict parameters: the 0 (zero) category goes from 000, an outstanding masterpiece, to 00 and then 0. The grading then goes down to 8, 6, 5, 4 and 3.” The one my brother found is stamped with a 4 thus it is a 4 Grade pipe.

The Savinelli website went on to confirm that the Autograph are available as ‘Panel’ pipes which have both a smooth and a sandblasted part or are completely sandblasted. http://www.savinelli.it/en/autograph-lisciaAuto1The rim was dirty but undamaged. The inner and out edge was in perfect shape. The stem was oxidized and had some tooth marks on the top and bottom sides near the button.Auto2There was a smooth spot on the underside of the bowl and shank that is stamped Savinelli Autograph over the number 4 over Italy. The finish was a little dirty on the bottom of the shank and would need to be scrubbed off. The first photo below shows the underside of the bowl and the shank. The second photo shows the stamping on the pipe. The third photo shows the state of the stem.Auto3 Auto4My brother is doing all of the initial cleanup work for me. He reamed the bowl and cleaned up the rim and the shank. He scrubbed out the internals in the shank and the stem. He scrubbed the stem with Murphy’s Oil Soap to remove the stickiness and some of the surface grime on the stem. When I received the pipe it was in very good shape. The finish was very clean. The bowl and the rim were cleaned. The stem had some oxidation and there were tooth marks on the top and underside of the stem.Auto5 Auto6I took a close up photo of the rim to give a clear view of the cleanup Jeff had done for me. He is doing some excellent work preparing the pipes before I get them. I can’t thank him enough as it saves me a lot of time and work.Auto7I quickly swabbed out the mortise and airways in the shank and in the stem with pipe cleaners, cotton swabs and alcohol. It did not take too much work to clear out the sanding dust and debris from my work on the pipe.Auto8The stem had the autograph of Achille Savinelli Senior printed on the mouthpiece. It was faded and worn and the gold colour in the stamp had disappeared. I cleaned off the oxidation with 220 grit sandpaper being careful around the autograph. I rubbed it down with some Obsidian Oil and used Rub n’ Buff Antique Gold to fill in stamped area on the stem. I rubbed it in place with a soft cloth.Auto9 Auto10I was able to sand out the tooth chatter on the underside of the stem with the 220 grit sandpaper. There were several deeper tooth marks on the top side. I patched them with a drop of black super glue. I let it harden over night and sanded it smooth to blend into the surface of the stem.Auto10aWith the stem cleaned and repaired I just needed to polish it. I wet sanded it with 1500-2400 grit micromesh sanding pads to begin to polish it and remove the remaining oxidation. I worked carefully around the signature so as not to damage it. I rubbed the stem down with Obsidian Oil. I dry sanded it with 3200-12000 grit pads using the Obsidian Oil between each set of three pads. I gave it a final rubdown and let it day.Auto11 Auto12 Auto13I buffed the stem with Blue Diamond on the buffing wheel and gave the stem multiple coats of carnauba wax. I hand waxed the bowl with Conservator’s Wax and buffed the bowl and stem with a clean buffing pad. I hand buffed the pipe with a microfibre cloth to deepen the shine. The finished Autograph is shown in the photos below. It is a unique and stunning pipe made in a shape that is unique to this particular pipe. The combination of smooth and sandblast finish works well on this panel version of the Autograph. The finished pipe is shown in the photos below. If any of you are interested in adding this one to your rack let me know. I am sure we can make a deal. Thanks for looking.Auto14 Auto15 Auto16 Auto17 Auto18 Auto19 Auto20 Auto21

Restoring an Old Bruyere Extra Floral Carved Bent Billiard


Blog by Steve Laug

This interesting old pipe is unique in many ways. The first and most obvious is the floral pattern carved on the bowl sides and bottom. It is well carved and the petals and the leaves flow around the bowl. They sit against a rusticated finish in the gaps of the leaves and around the top of the bowl. There was one burn spot on the bottom of the shank where it looked as if the pipe had been set down in an ashtray and was burned. The second visible uniqueness is the horn stem with the orific button on the end. It had a little damage on the right edge of the stem but it was fixable. The third unique feature was not visible until I removed the stem. The stem had a large chamber in the saddle portion as did the shank. There were also two tubes at the end of the mortise and a collecting chamber or sump. The pipe was in pretty decent shape for its age. I can only hope that when I reach that age, if I am still around I will look as good.Bru1My brother Jeff had reamed the bowl and done the initial clean up. He had scrubbed the surface of the bowl and the shank. It is great that he is doing that part of the job for me as it speeds up the process that I do in the restoration. The rim had some hard cake built up on the surface. There was a burn spot on the bottom of the shank that is visible in the second photo below.Bru2I took some close up photos of the areas that needed work. The first photo shows the burned spot. Fortunately the burn had not softened the wood too much. It was hard when I probed it with a dental pick. The second photo shows the hard cake on the rim. It is quite thick but the rim appears to be undamaged and the inner and out edges of the rim are in great shape. The third photo shows the damaged portion of the right edge of the stem. I have seen these often on horn stems and have always wondered if it was not damage done by a worm eating the horn.Bru3I took several more close up photos. The first photo shows the two inner tubes that enter the bowl in two spots at the bowl bottom. It is a twin bore airway. The second photo shows the stamping on the left side of the shank – it reads Bruyere Extra. The right side of the shank is stamped with the shape number 6185. The band has three hallmarks and EP in a diamond. The hallmarks are letters, each in a car-touche. My guess is that these signify the maker.B

The letters are JBF and look like the ones I have pictured to the left.

Bru4The inside edge of the briar was thin in several spots. The two that were the most problematic can be seen on the bottom edges of the shank on the right side of the photo below. I have circled the two spots in red. The top one was missing a wedge of briar and the bottom was a half circle of briar. Both were repairable with briar dust and wood glue.Bru5I decided to work on the stem repair first. I cleaned the area on the horn with alcohol and a cotton swab and then filled it in with clear super glue. For some reason this time around the repair turned white. That has never happened for me. Generally the glue dries clear and the underlying colour of the horn shines through. I set the stem aside to let the glue cure.Bru6The tars and oils were almost petrified on the top of the rim. I had soaked the rim with alcohol to try to soften them with no success. I decided that the best option was to lightly top the bowl until the hard tars were gone. I used a topping board and 220 grit sandpaper to remove the buildup. I sanded the burned area on the bottom of the shank at the same time to remove the surface damage to the briar. I sanded it until the briar was darkened but solid.Bru7Once the rim was clean I sanded it with 1500-3200 grit micromesh sanding pads to smooth out the scratches left behind by the topping of the bowl. I scrubbed out the sump and the open mortise with cotton swabs and alcohol until it was clean. I cleaned out the twin bore tubes with pipe cleaners and alcohol. I used an all purpose wood glue and briar dust to build up the two spots on the inside of the shank and sanded them smooth. They are circled in red in the photo below.Bru8I sanded the repair to the horn with 220 grit sandpaper and sanded the tooth marks and chatter on the top and bottom of the stem until it was smooth. I cleaned out the chamber in the stem with pipe cleaners, cotton swabs and alcohol until it was clean. I had to do two full cleanings remove the tars in the chamber. The first photo below shows the stem after the first cleaning. The second photo shows the second cleaning. It took a lot of cotton swabs to clean out the chamber. I don’t like to boil hot alcohol through horn stems with the retort as I do not want to damage the stem.Bru9With the inside of the stem clean I sanded the exterior with micromesh sanding pads. I wet sanded it with 1500-2400 grit pads and rubbed it down with Obsidian Oil. I dry sanded it with 3200-4000 grit pads and gave it another coat of oil. I finished sanding it with 6000-12000 grit pads and gave it a final coat of Obsidian Oil.Bru10 Bru11 Bru12I polished the Electro-Plated silver end cap with silver polish to remove the tarnish and restore the shine. I stained the rim with a light brown stain touch up pen to match the colour of the rest of the bowl.Bru13I gave the bowl several coats of Conservators Wax and hand buffed it with a shoe brush. I buffed the stem with Blue Diamond on the wheel and then gave the bowl and stem several coats of carnauba. I had a light touch on the bowl so it did not clog up the carvings. I buffed the pipe with a clean buffing pad to shine it and then hand buffed it with a microfibre cloth. The finished pipe is shown in the photos below. Have any of you seen a pipe with plumbing like this one? Do you recognize the hallmarks or the brand or shape number? Let me know as I am curious. Thanks for looking.Bru14 Bru15 Bru16 Bru17 Bru18 Bru19 Bru20 Bru21