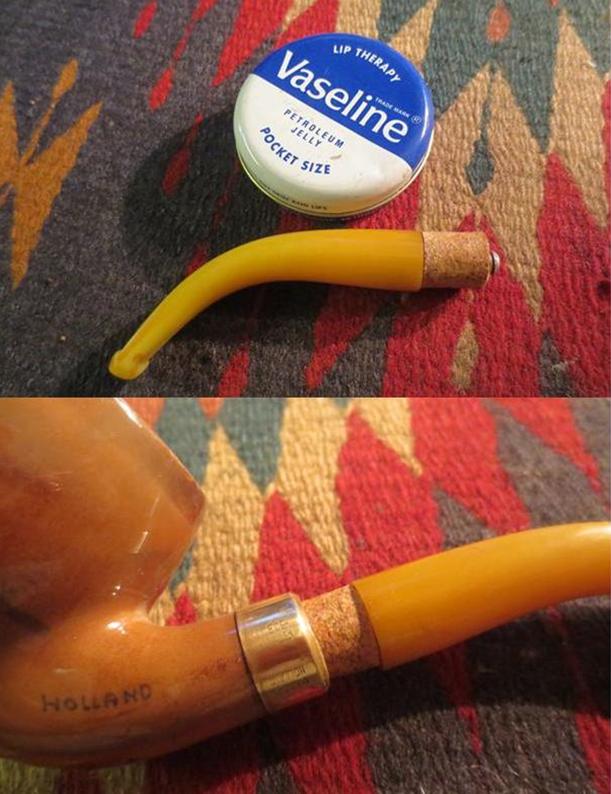
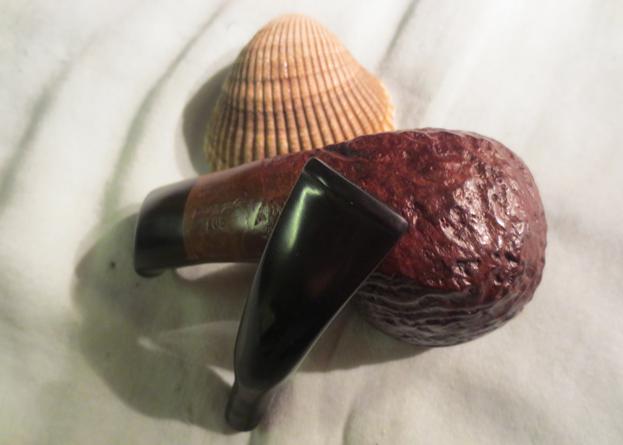
Tag Archives: removing tooth marks

Restoring a Long Diamond Shank Aldo Velani Grande 39


Blog by Steve Laug

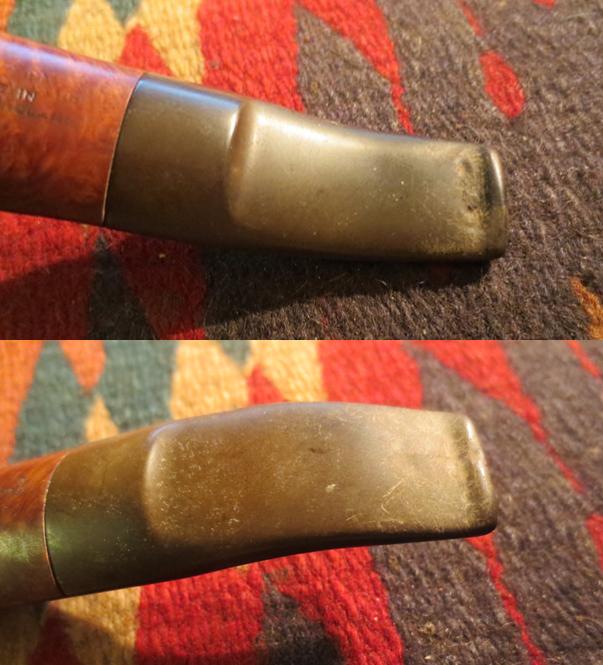
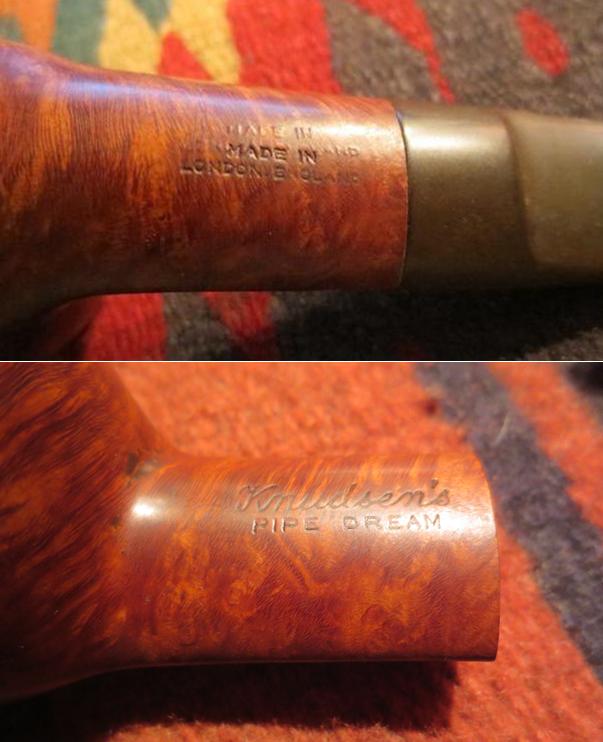
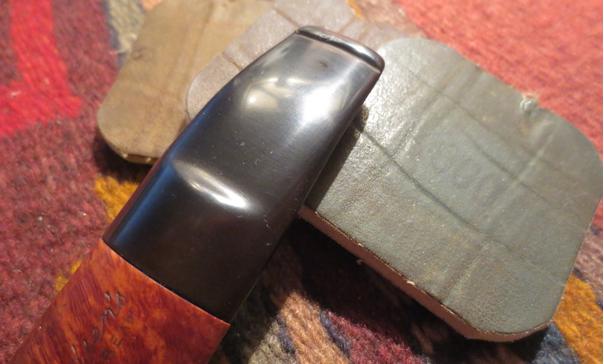
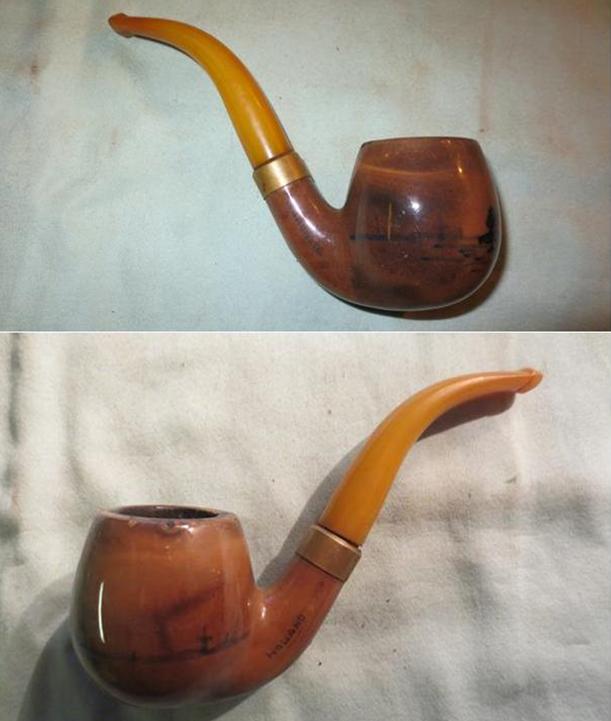
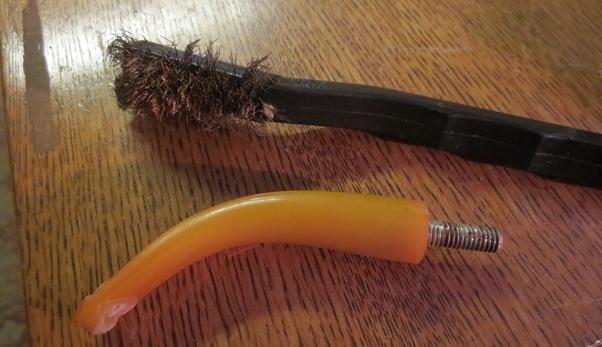
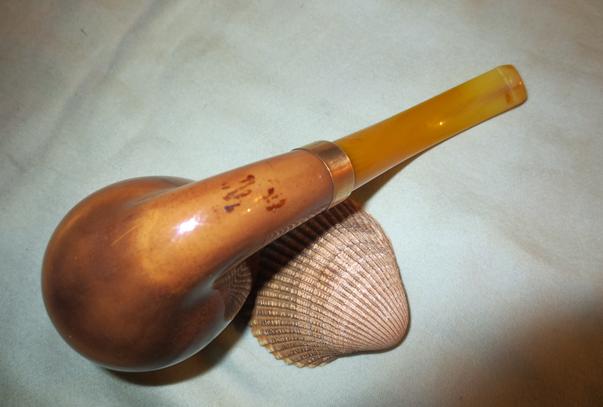
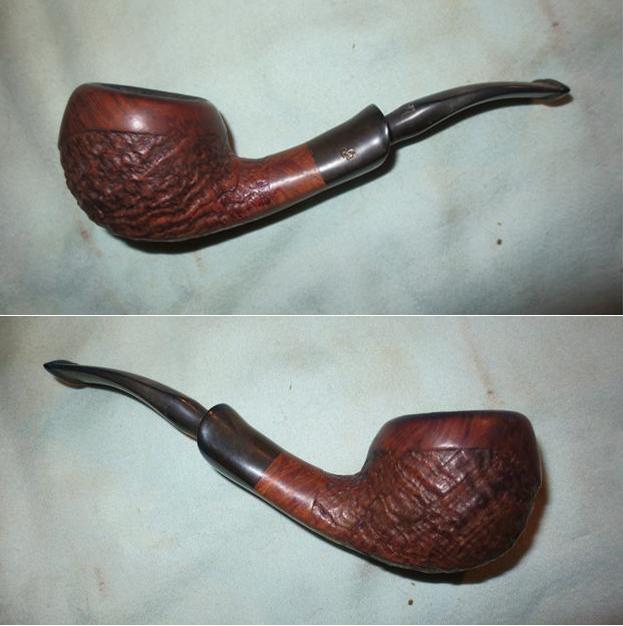
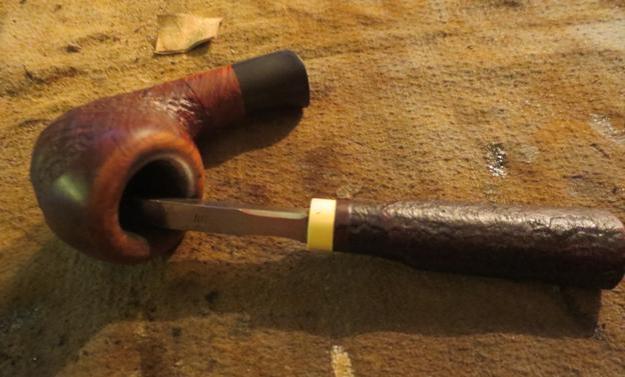
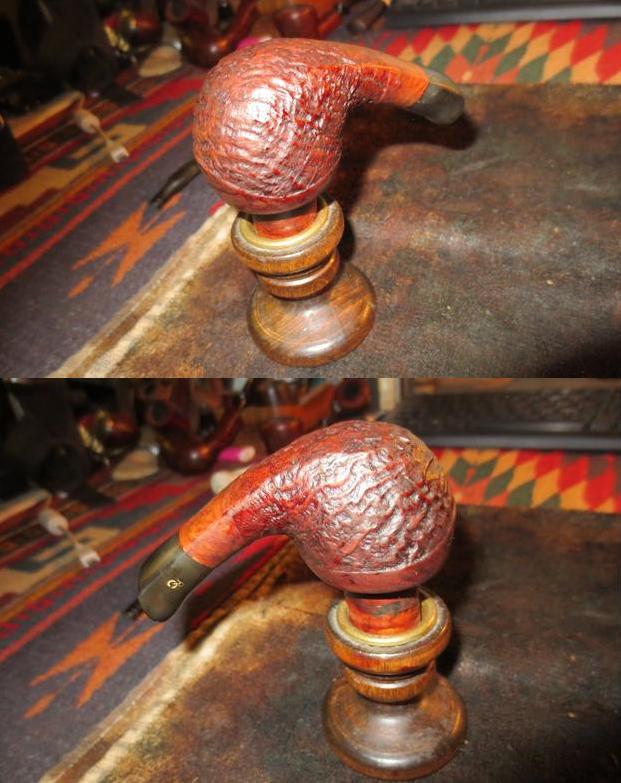
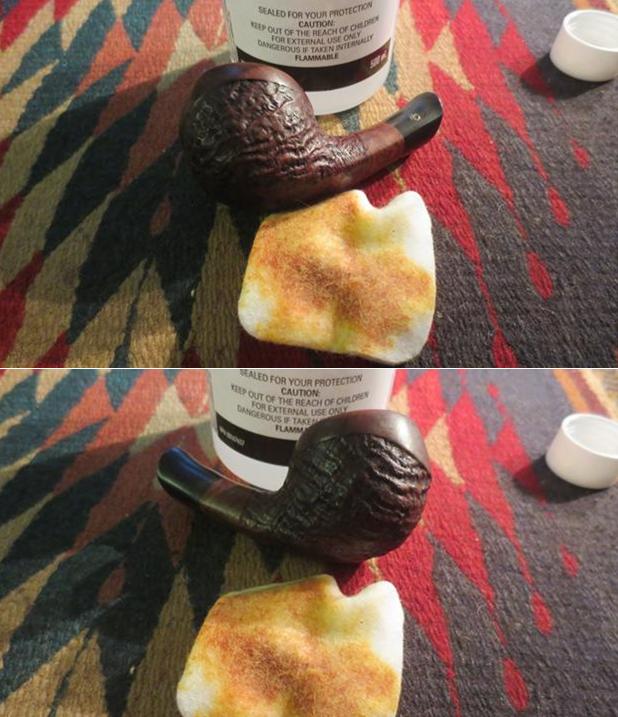
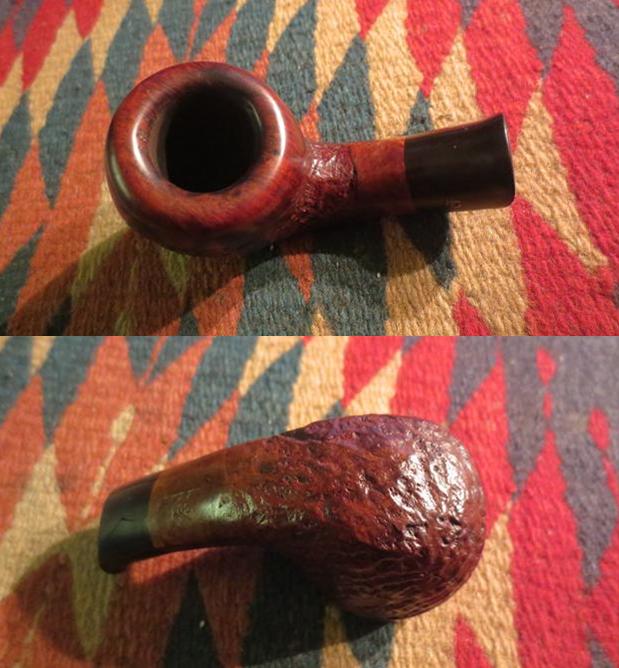
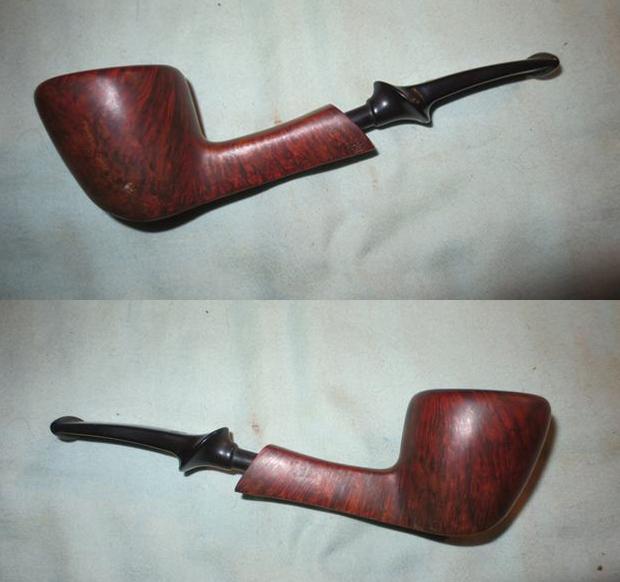
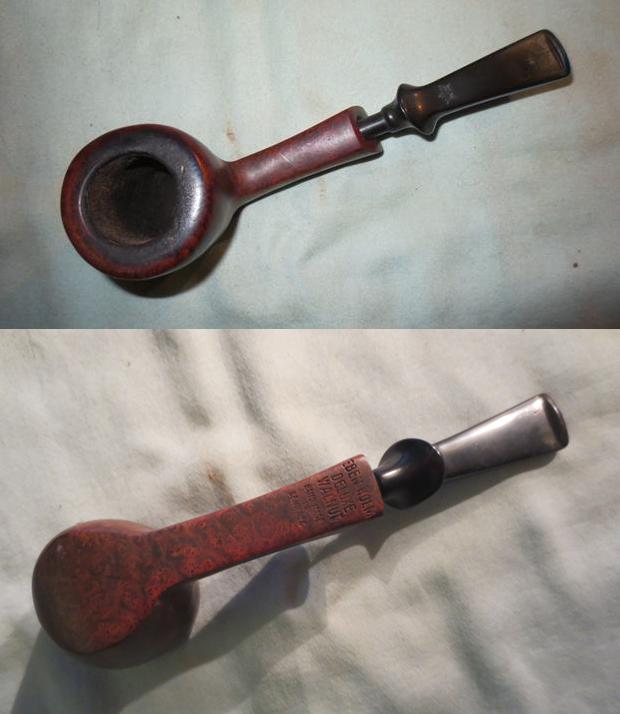
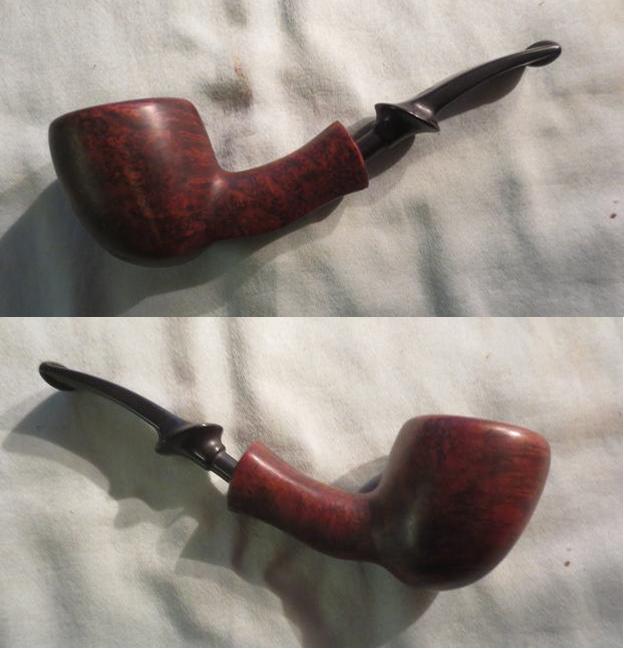
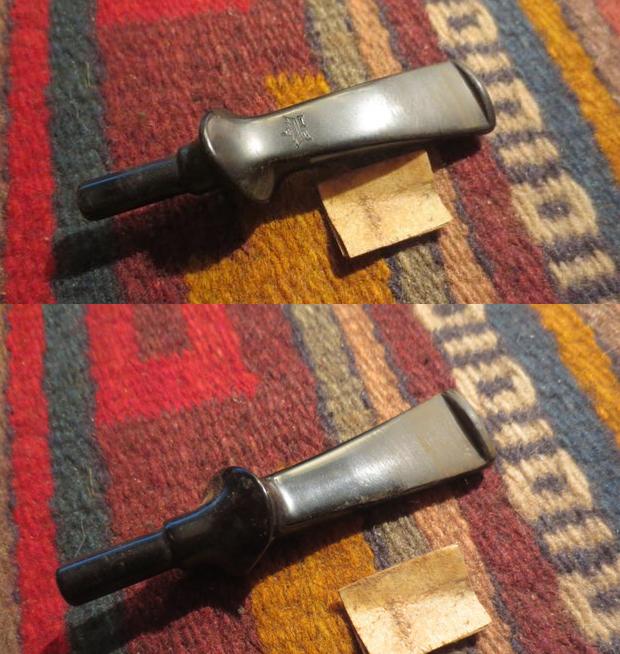
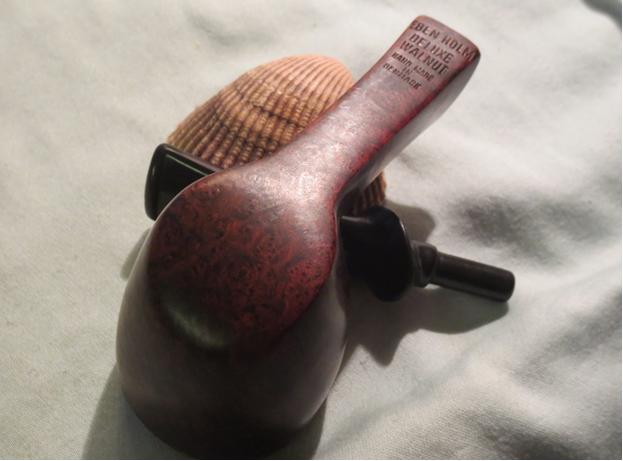
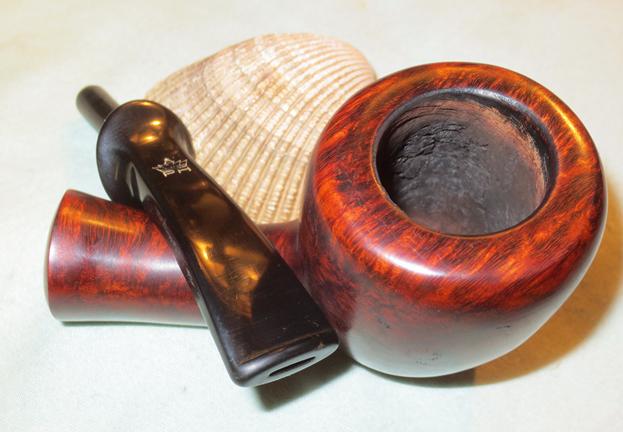
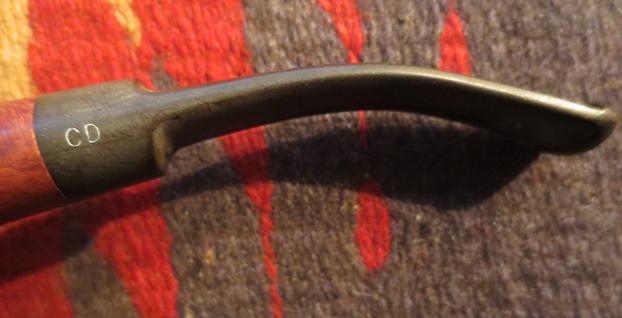
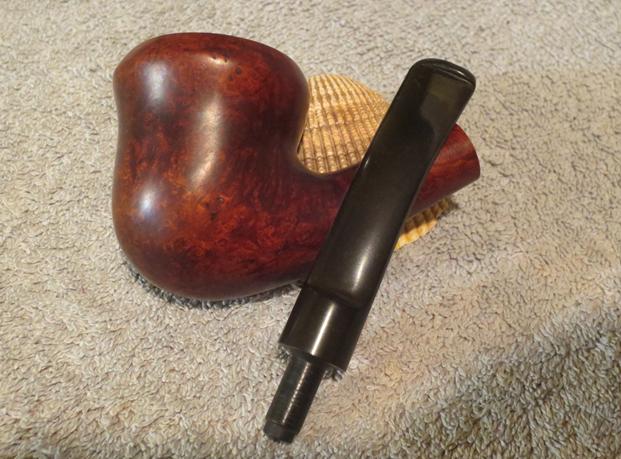
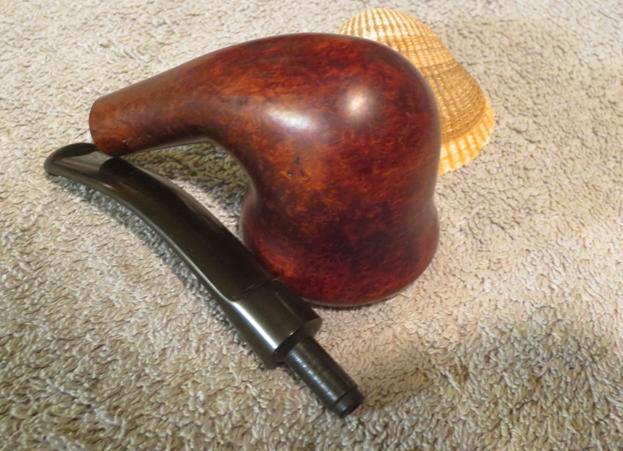
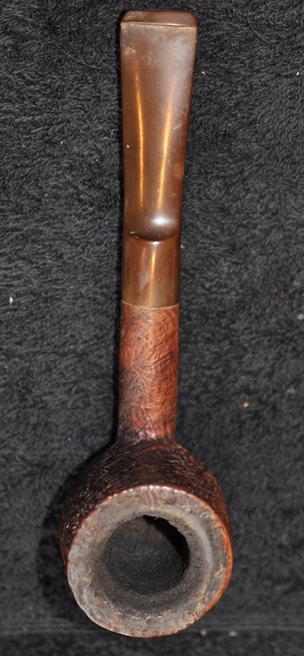
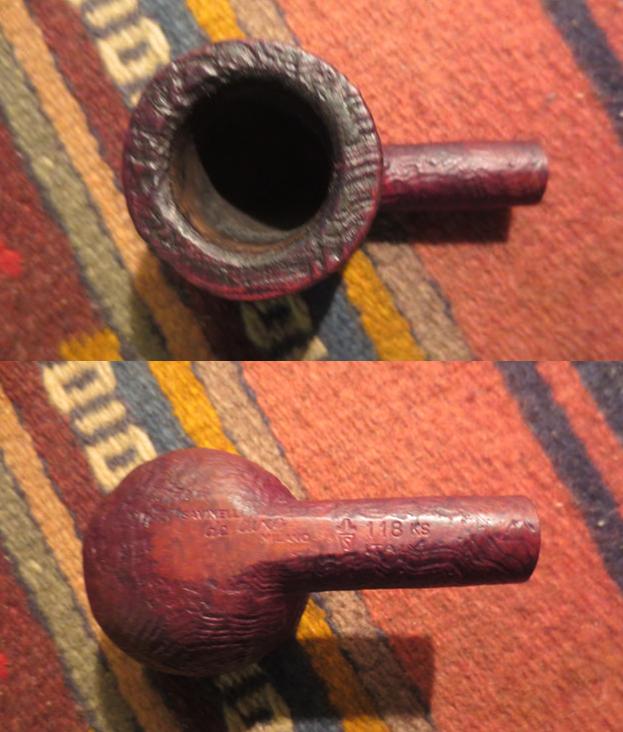
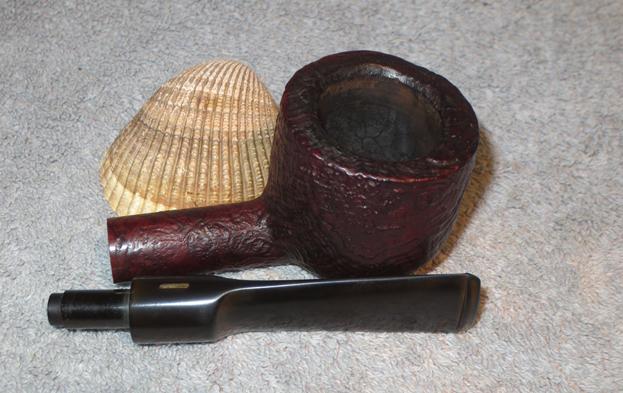
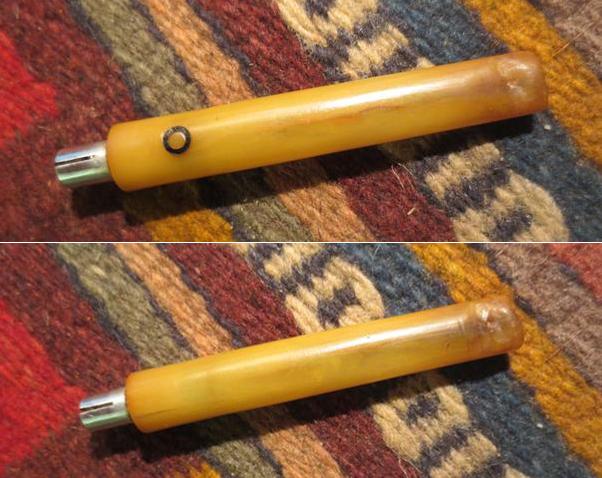
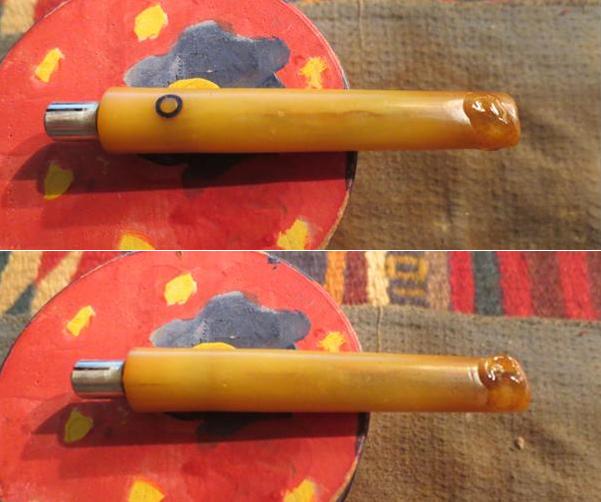
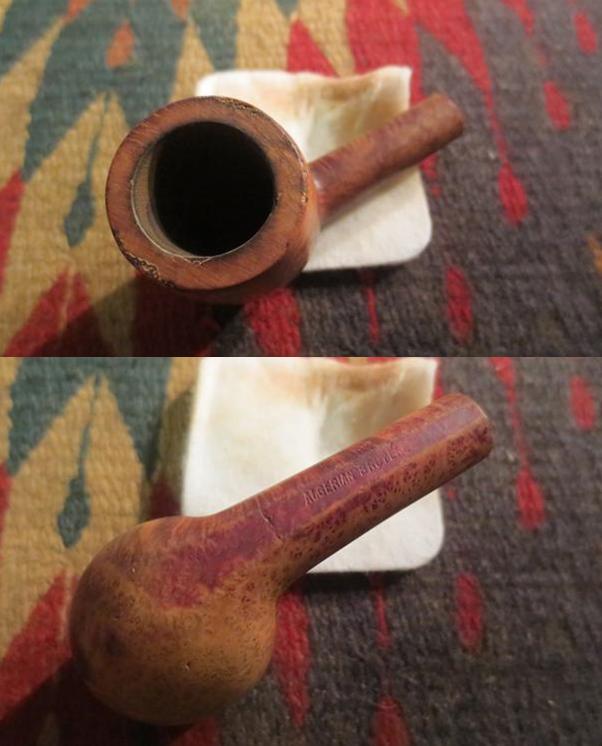
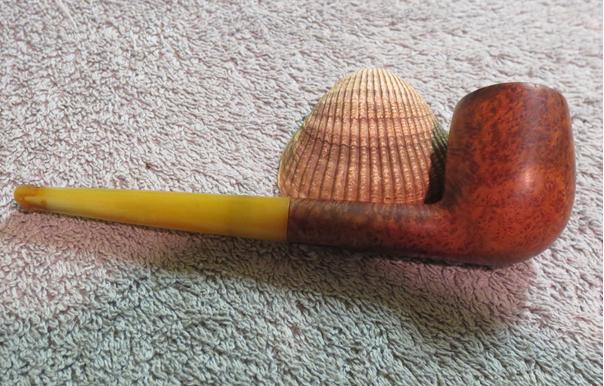
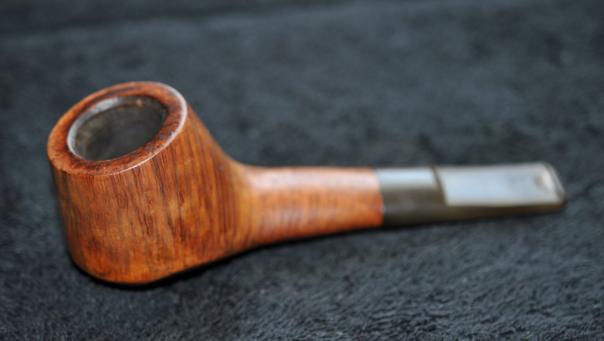
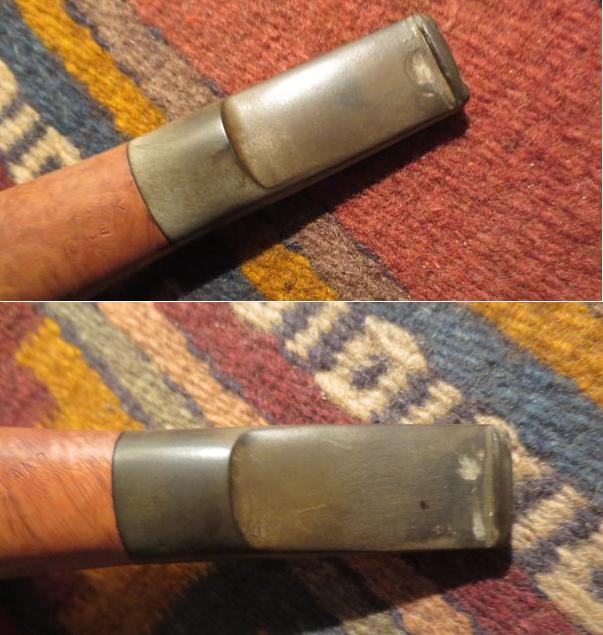
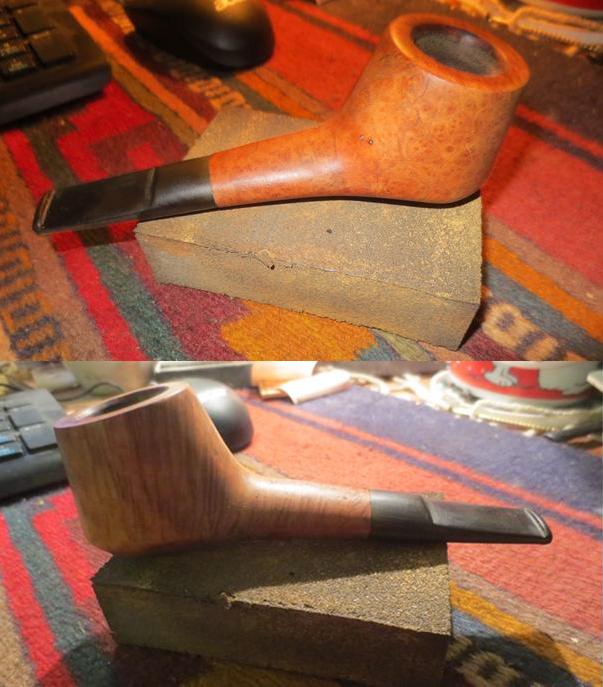
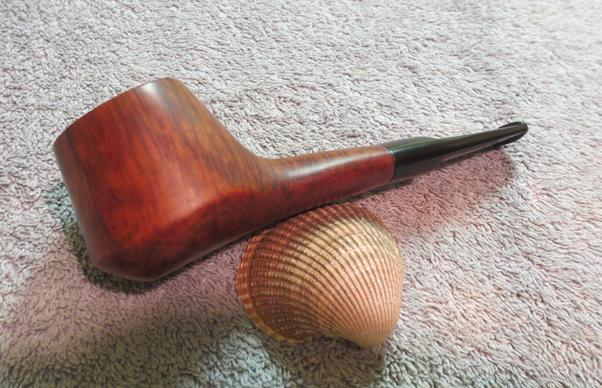
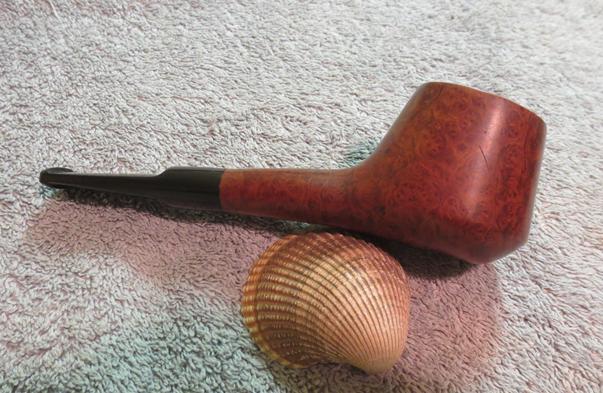
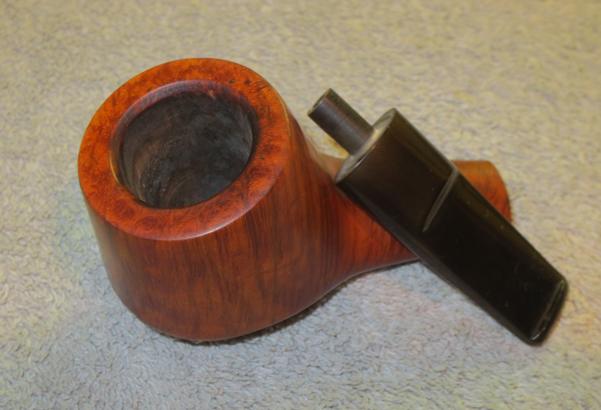
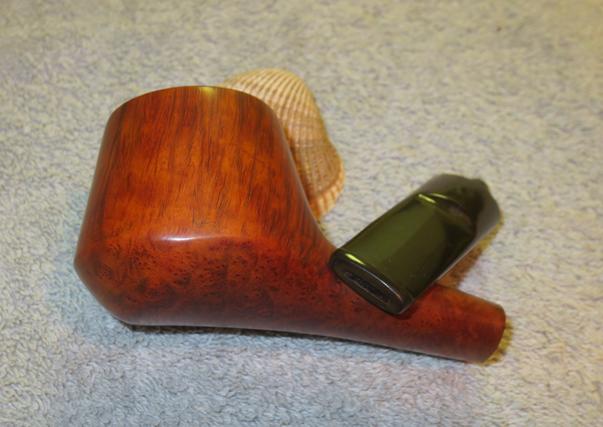
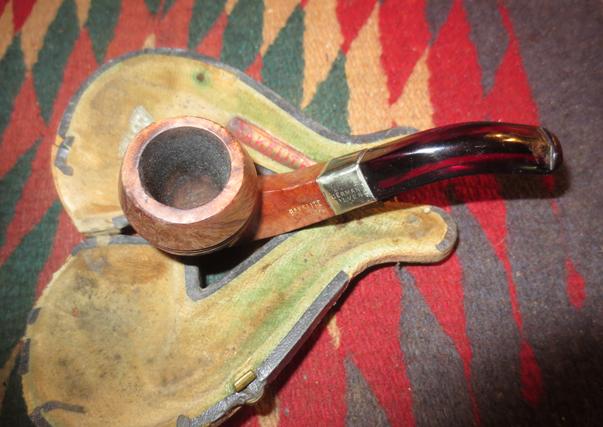
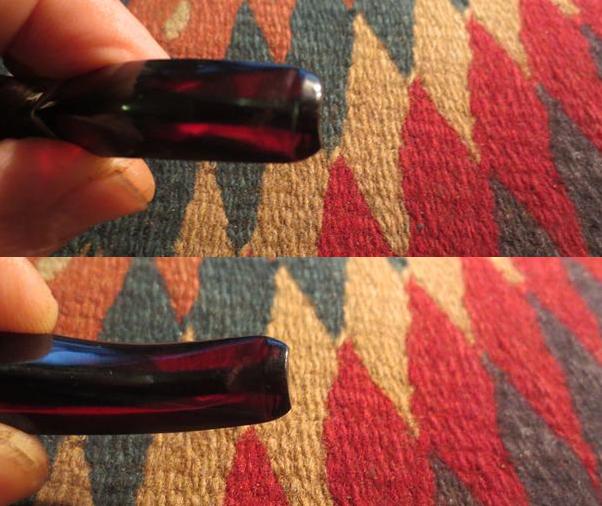
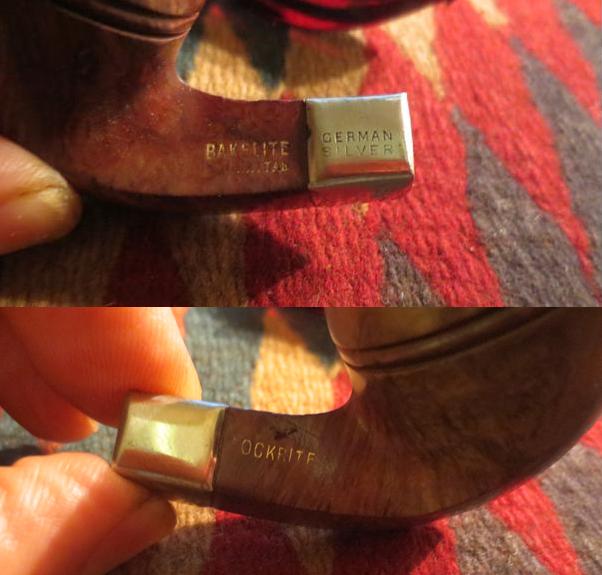
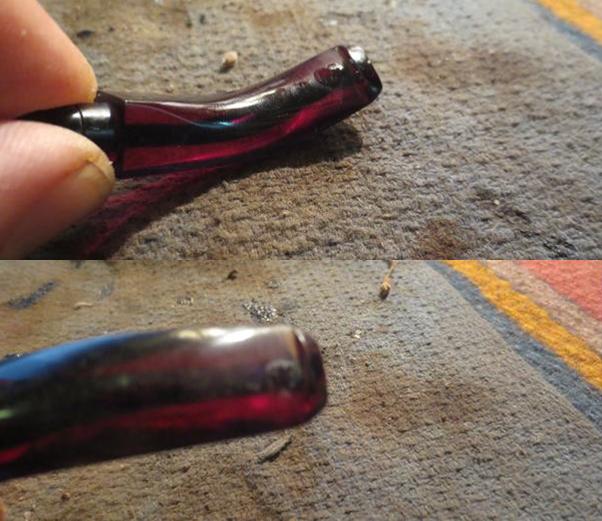
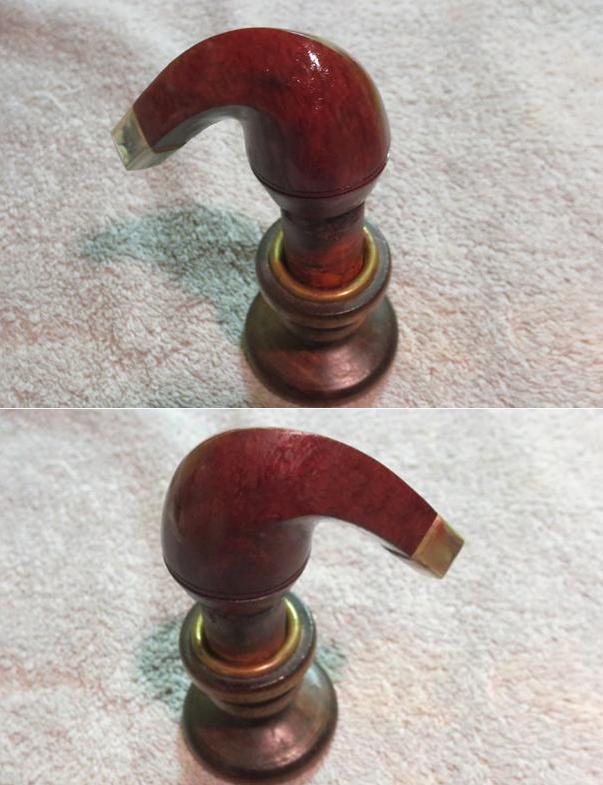
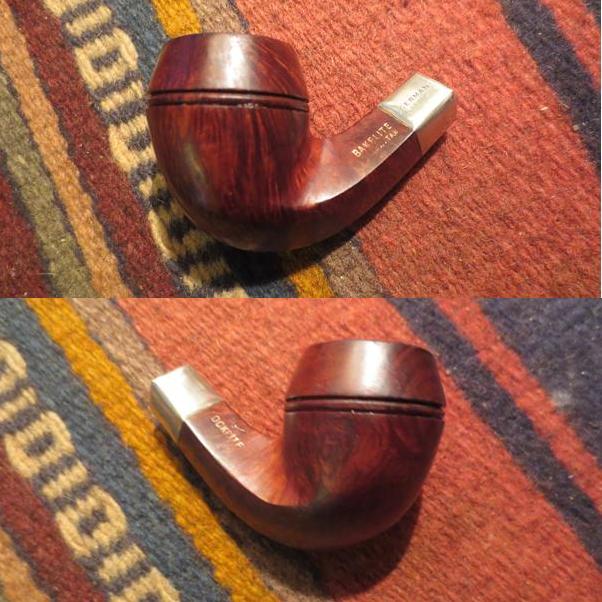
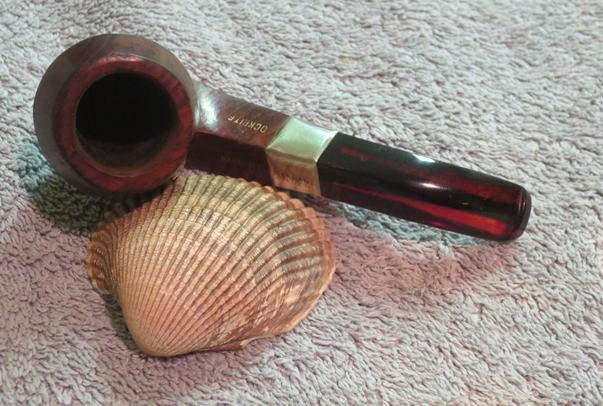
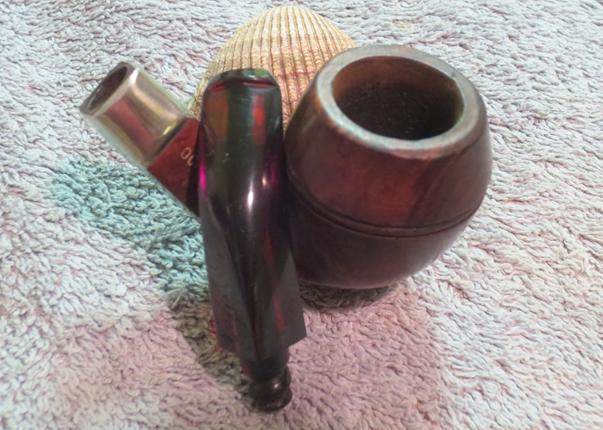
This pipe came to me through my brother. I am not sure if it was one of his eBay finds or his pipe hunting adventures. Either way it is a unique and unusual pipe. It has a long diamond shaped shank ending in a tapered diamond shaped stem with a slash of briar inserted into the Lucite. The bowl is a variation on a Dublin shape with the diamond shape of the underside of the shank carrying through to the bottom of the bowl. The rim had been obviously tapped out on some hard surface and the top and the outer edges of the rim had nicks and dents. Somewhere along the way someone had cracked the shank and put on a poorly installed Sterling silver band. The stem had some slight tooth chatter on the top and the bottom near the button and there were several small tooth marks on the underside.aldo1It is stamped Aldo Velani Grande on the left side of the shank. The centre portion of the top line of the stamp is faint. It is stamped on the right underside of the shank with the shape number 39. There was no other stamping on the shank. The stem bore an AV stamp that had originally been gold in colour but had faded. In the second photo below you can see the glue from the band oozing out onto the shank. It was that way all the way around. Someone had carelessly used the glue and not cleaned up the overflow. You can also see that the stem does not fit properly against the shank end.aldo2
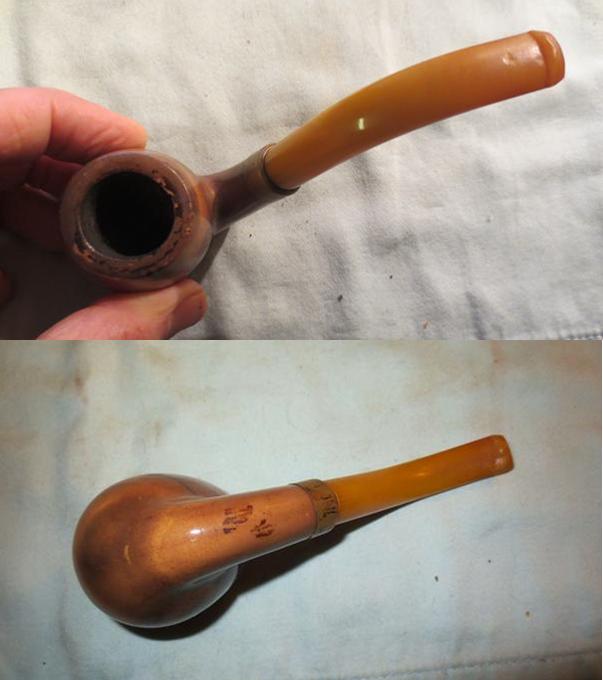
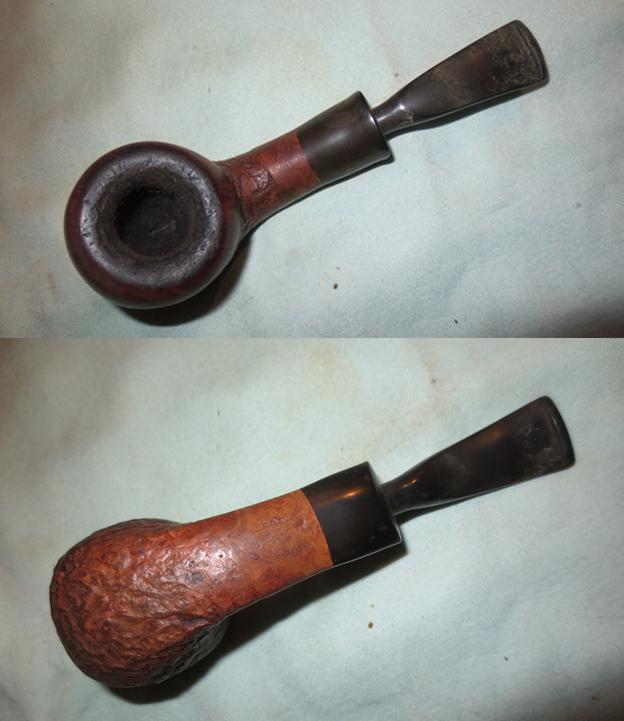
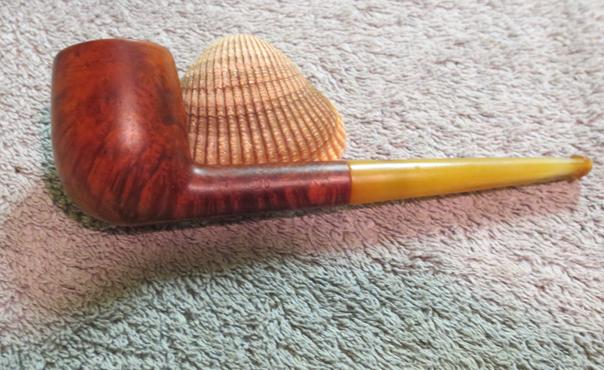
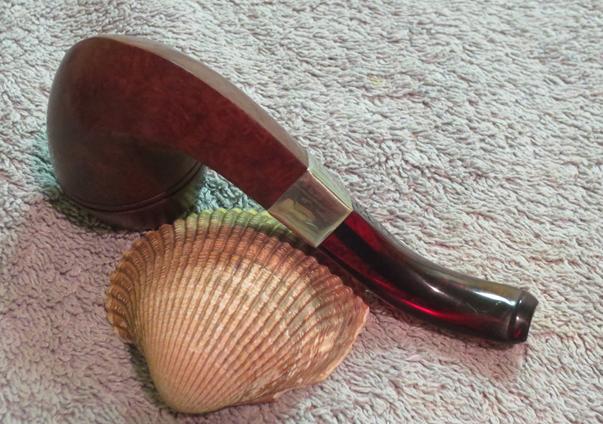
The stem listed to downward and to the left side of the shank and was crooked. Once I pulled the stem out I could see that the tenon was no longer straight.aldo3
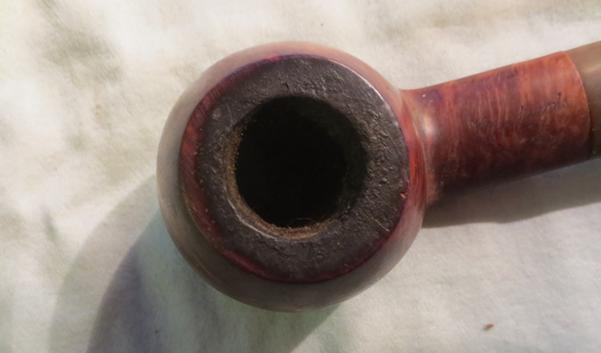
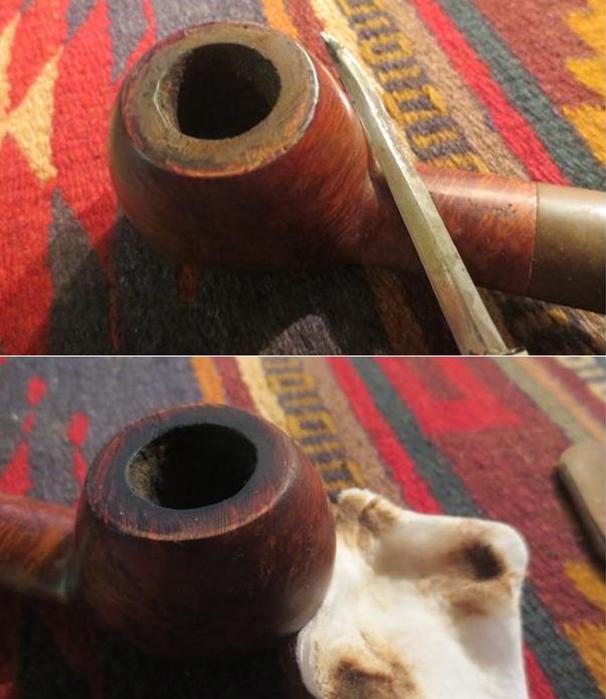
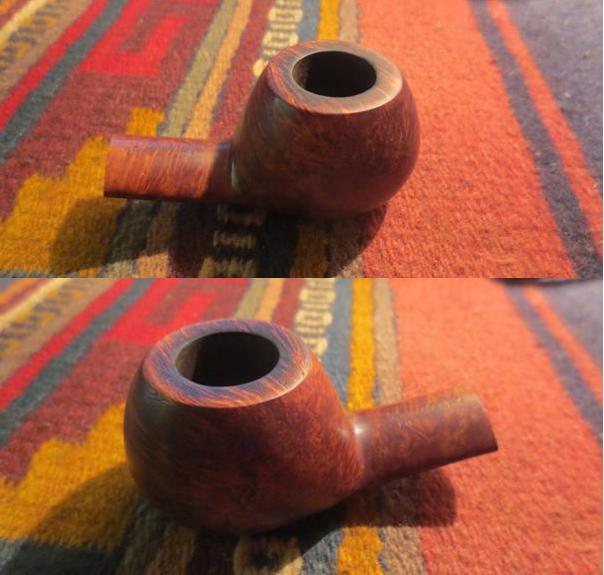
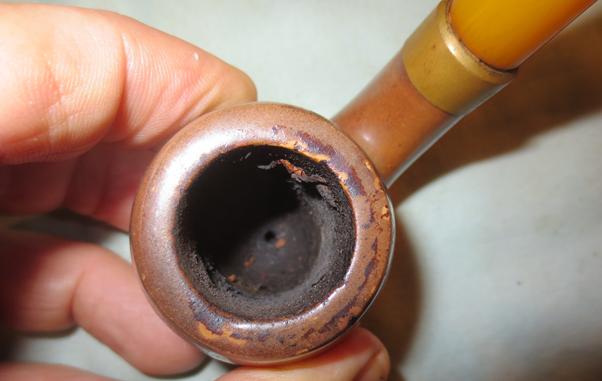
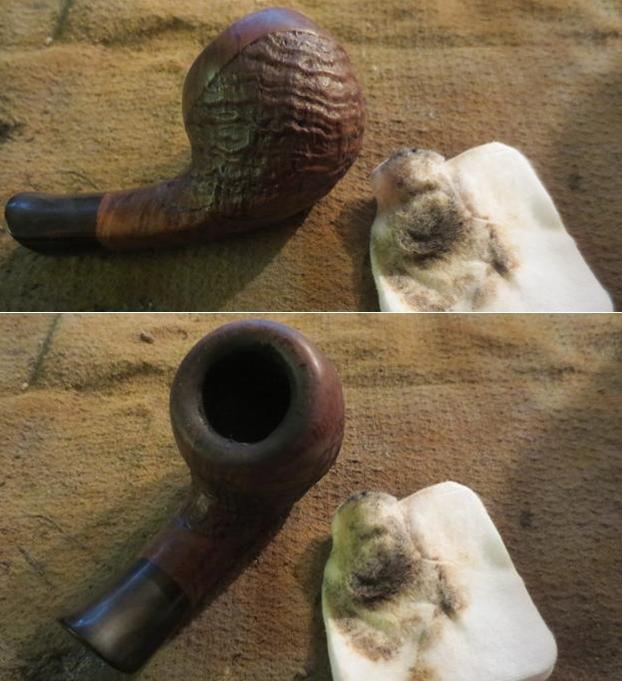
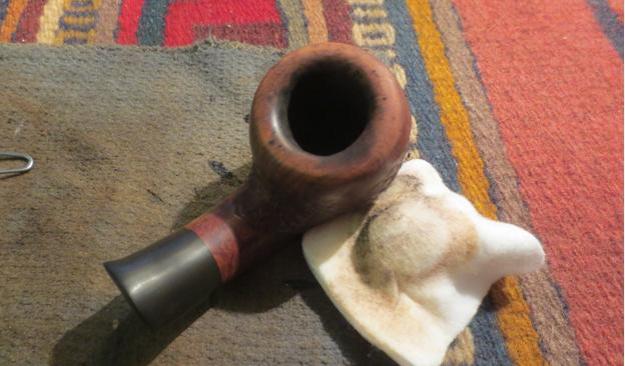
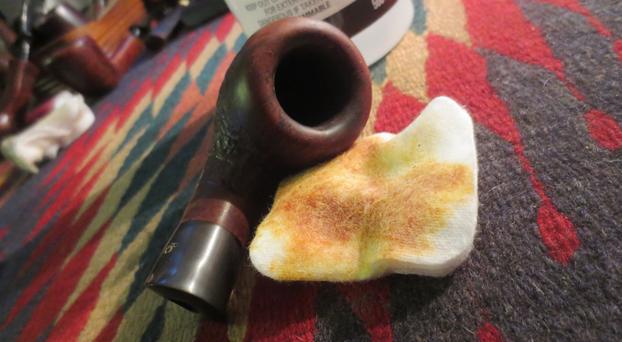
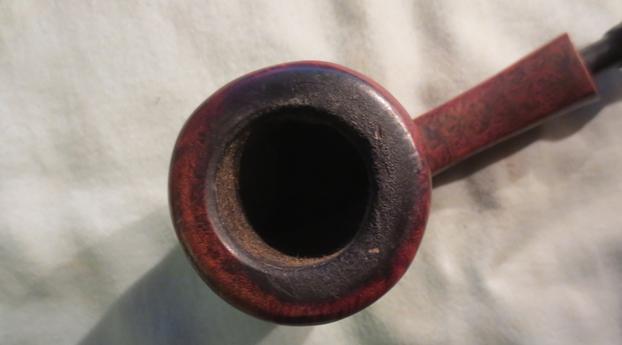
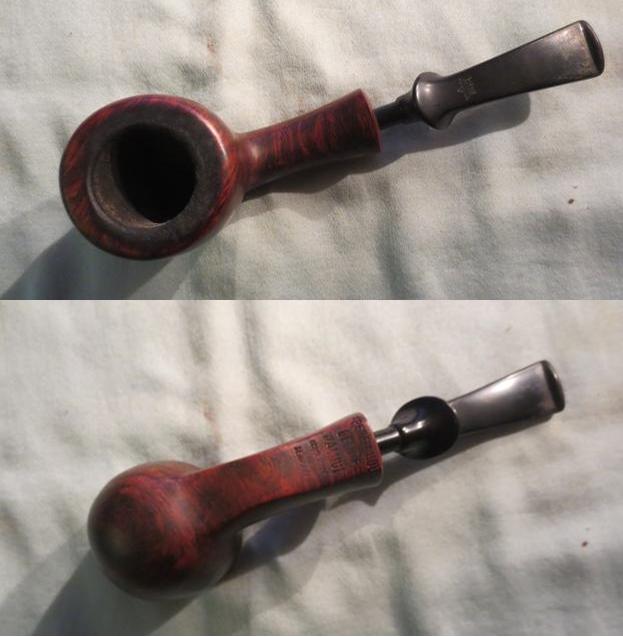
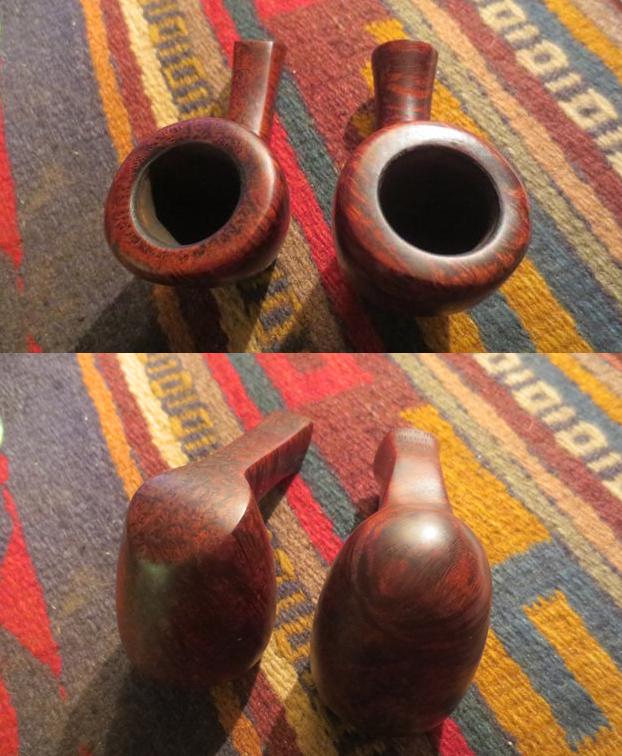
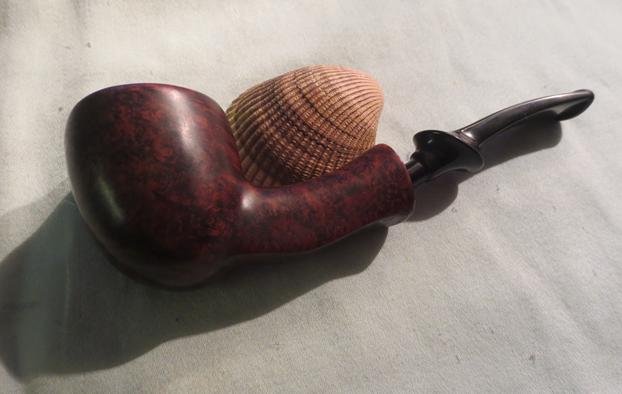
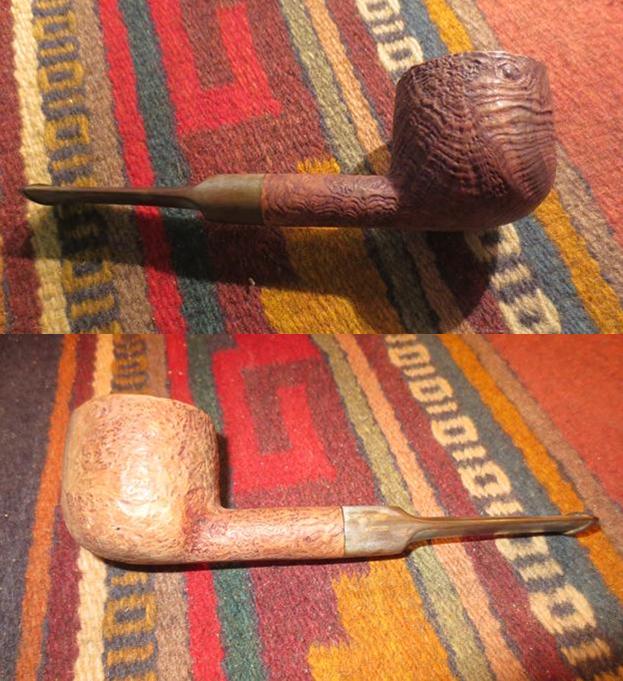
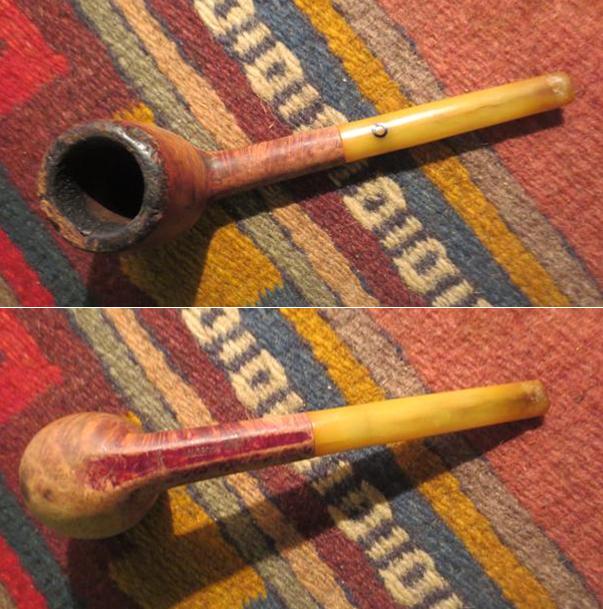
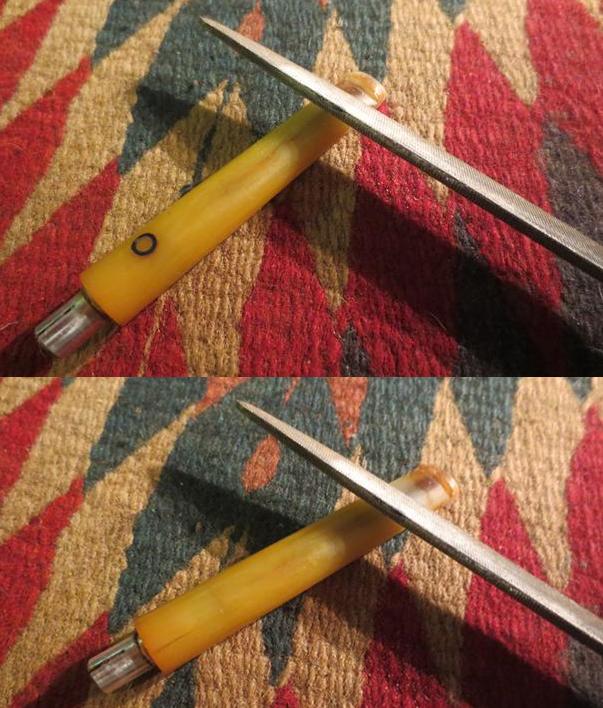
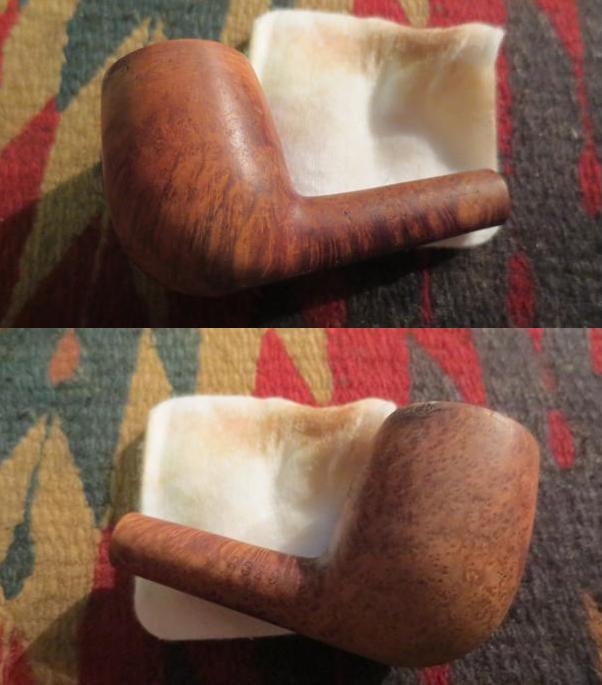
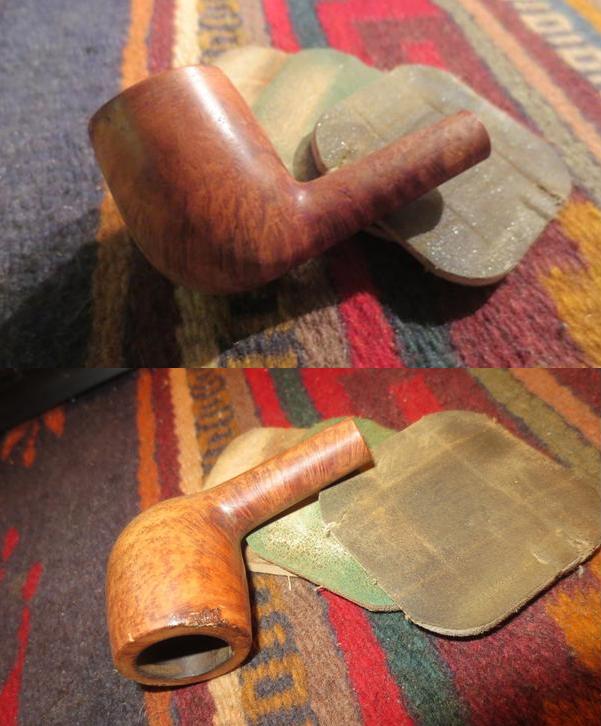
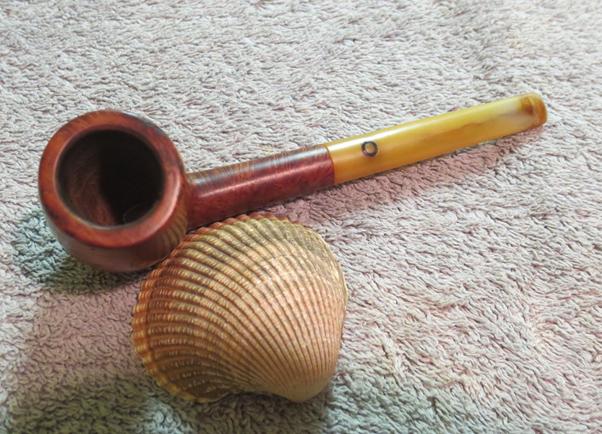
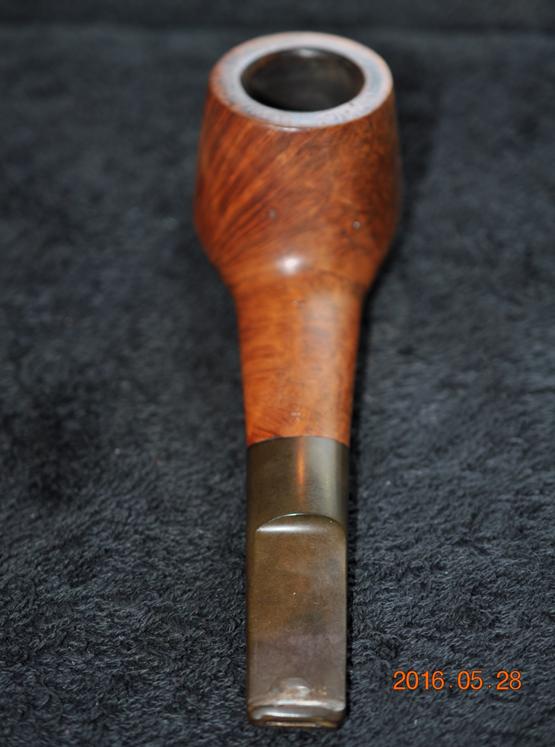
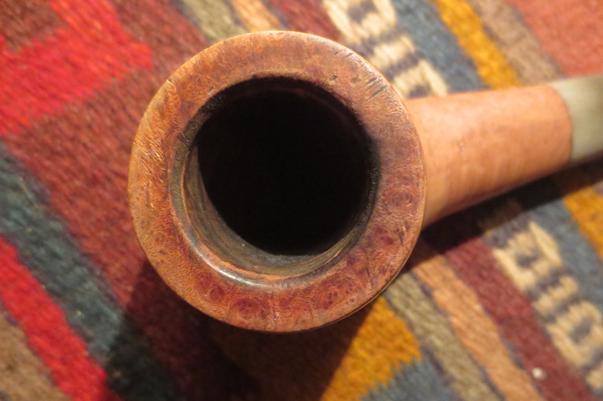
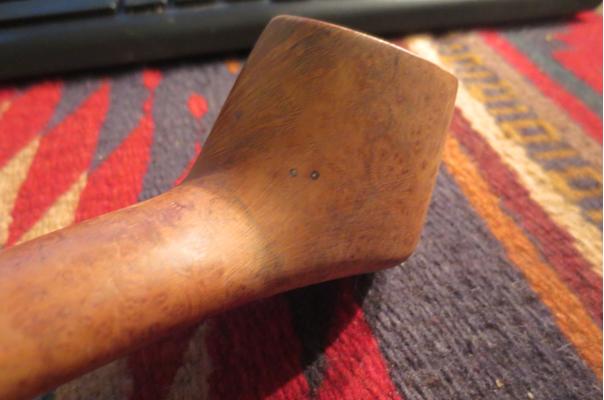
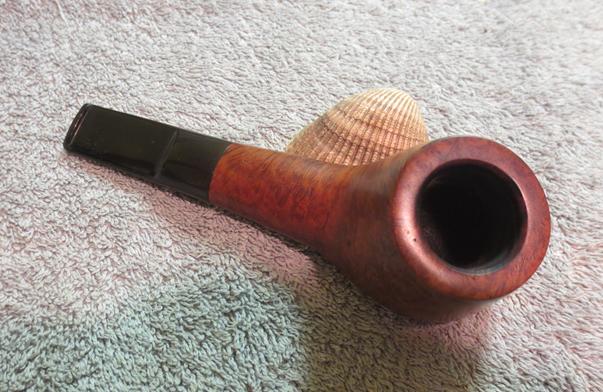
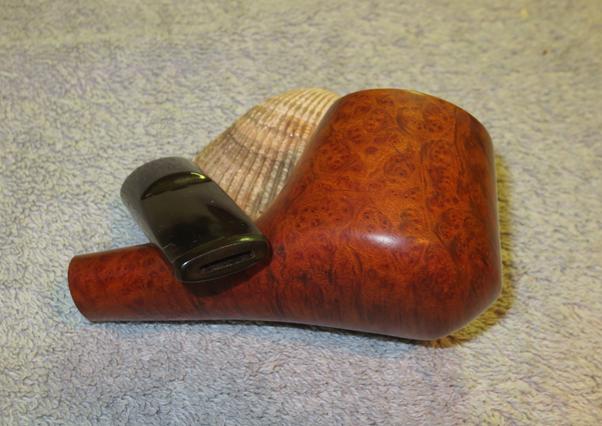
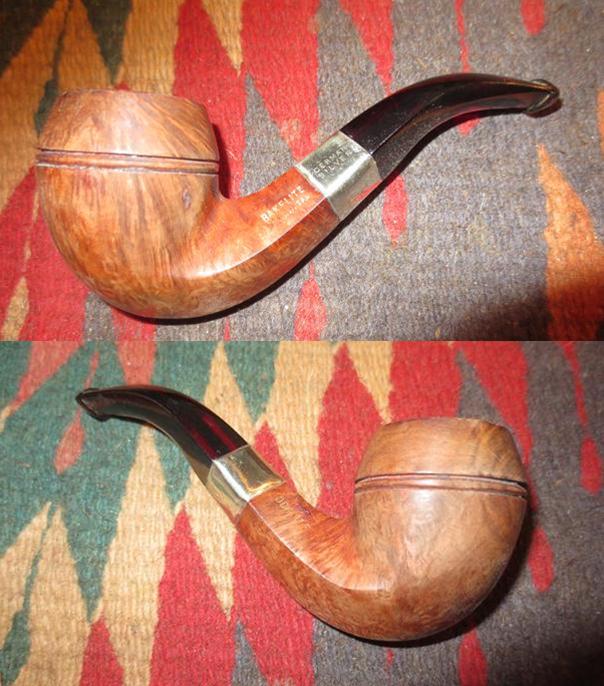
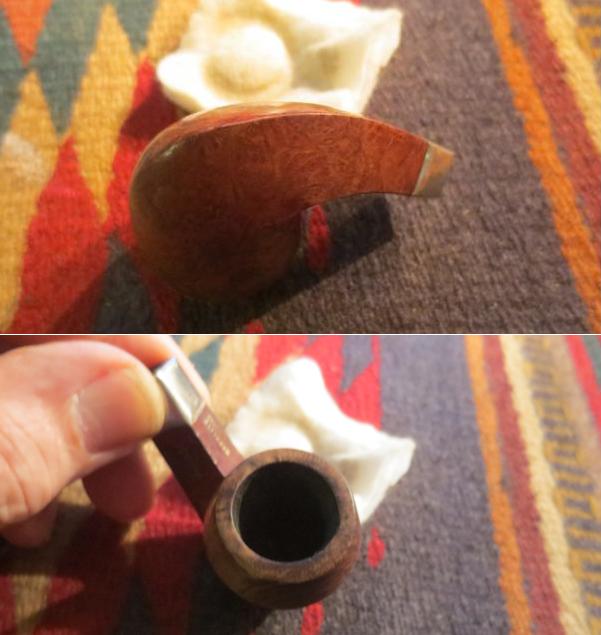
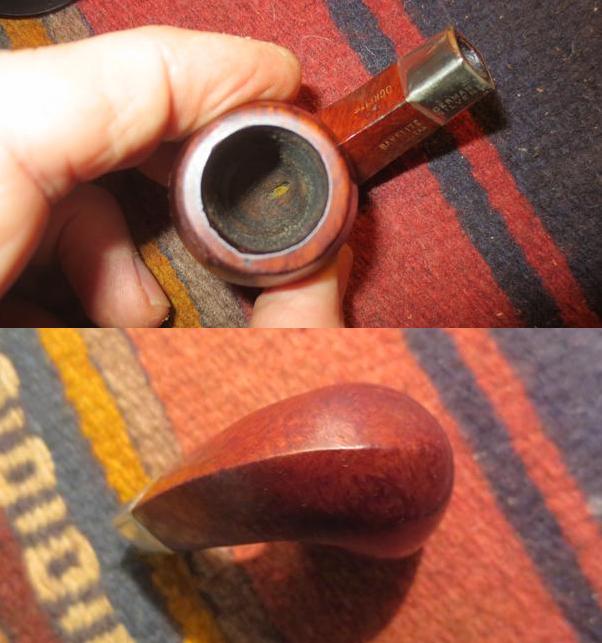
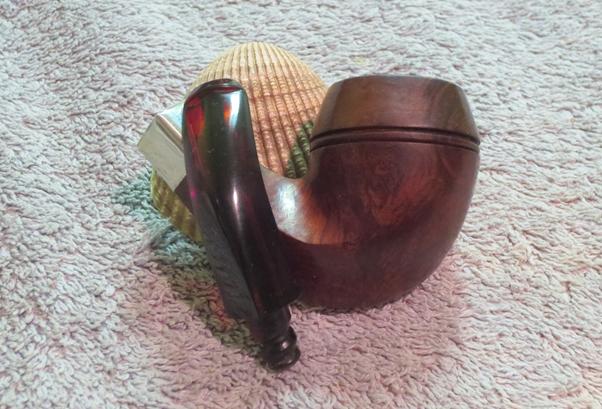
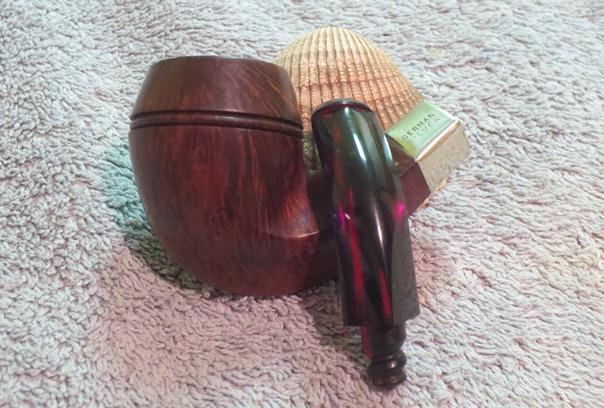
The next two photos show the top of the rim and the bottom of the bowl respectively. You can see the light cake and the rounding of the outer edges of the rim in the first photo. The underside of the pipe looked pristine. The finish was dirty and a bit spotty.

aldo4
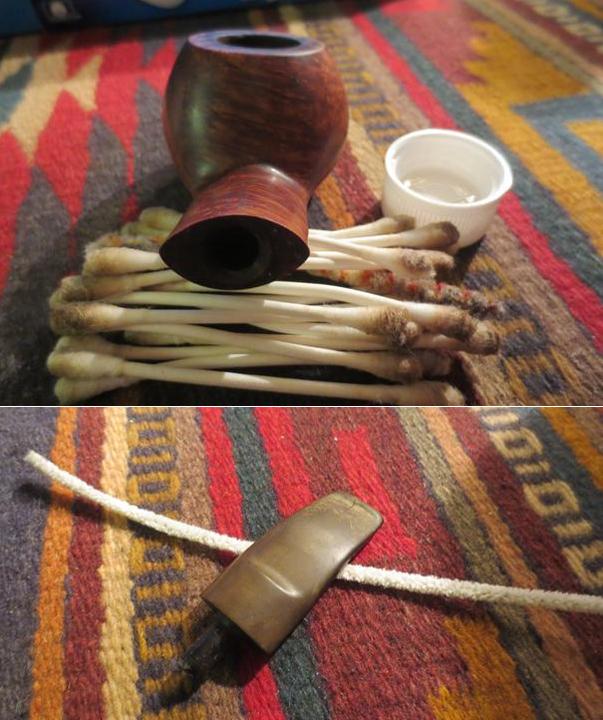
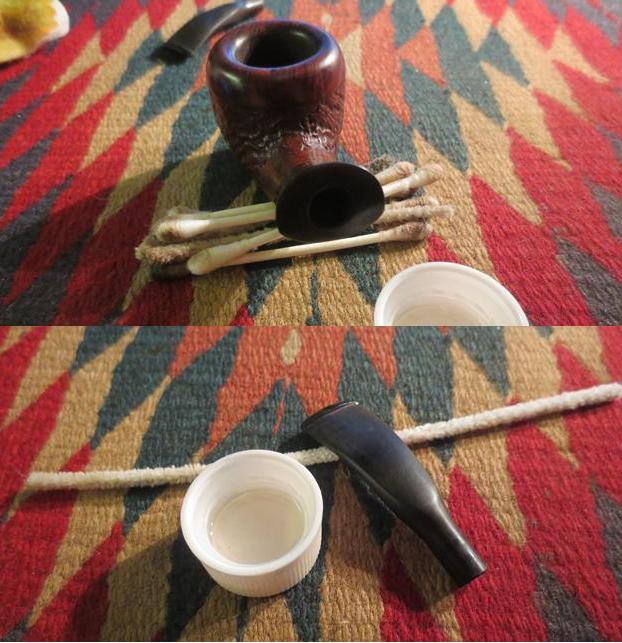
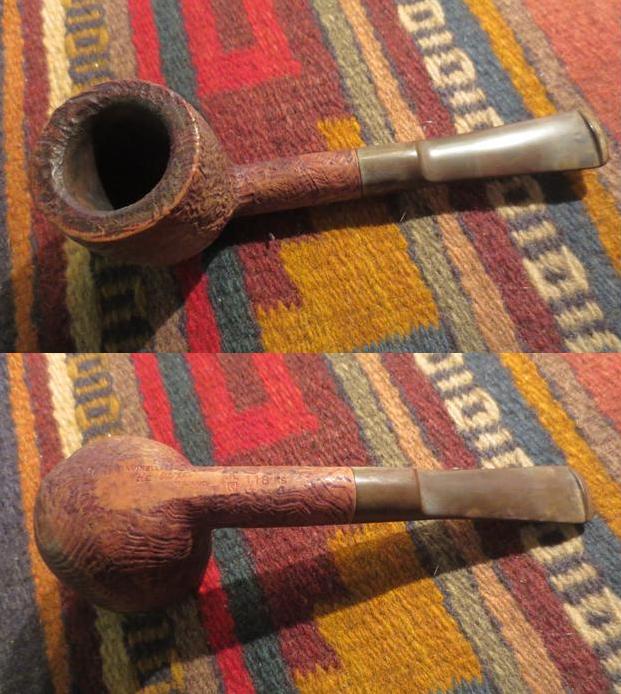
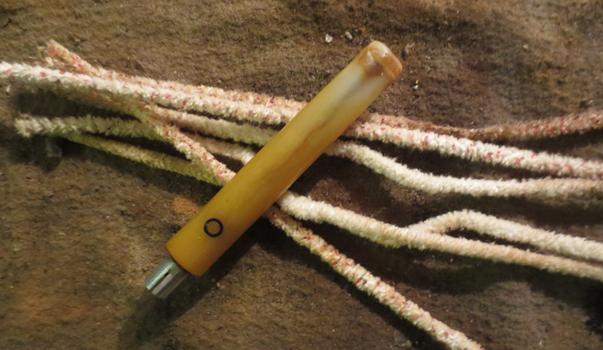
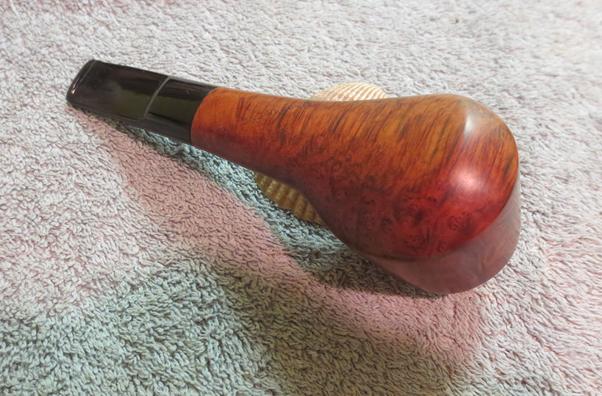
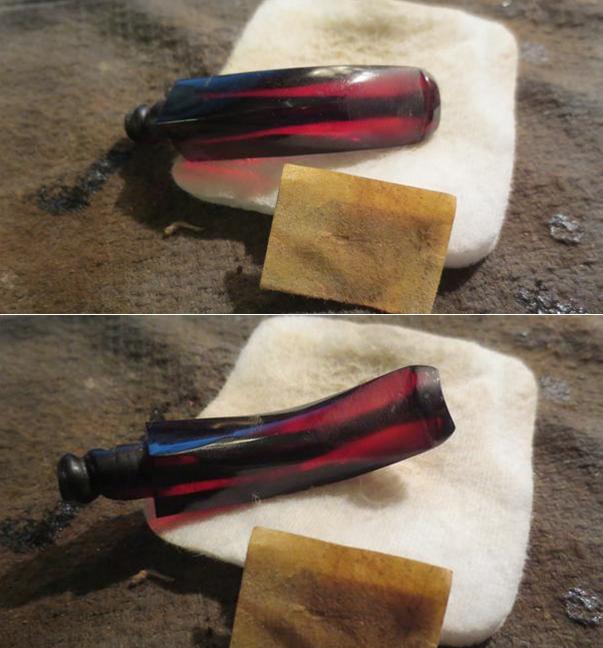
My brother, Jeff cleaned up the pipe. He scrubbed out the internals and the external of the pipe. When it arrived in Canada it was very clean and the finish had basically been removed. I am really growing to like having these pipes arrive cleaned and ready to restore. Thanks Jeff!aldo4a aldo4b
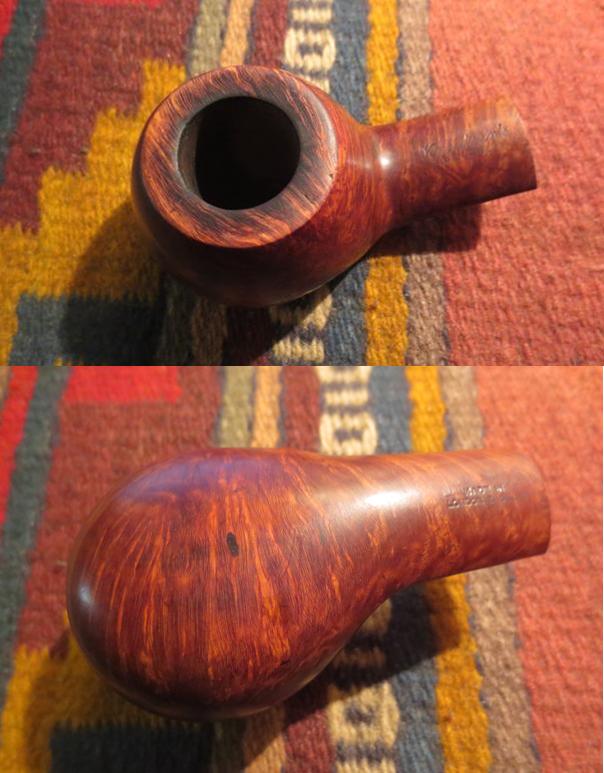
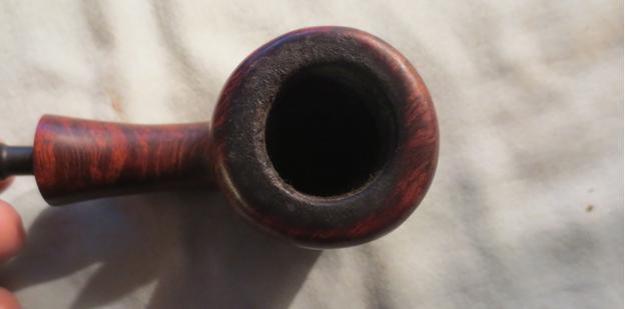
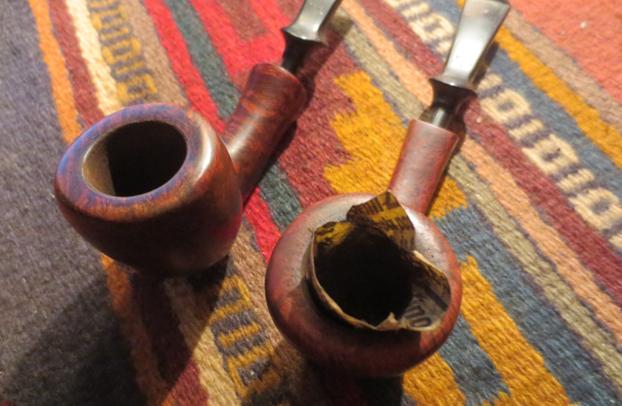
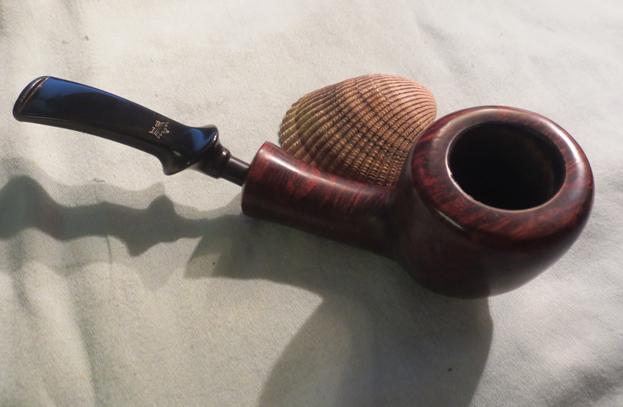
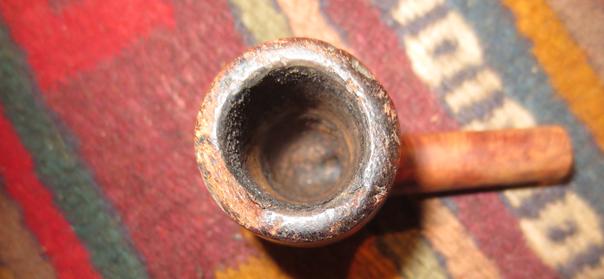
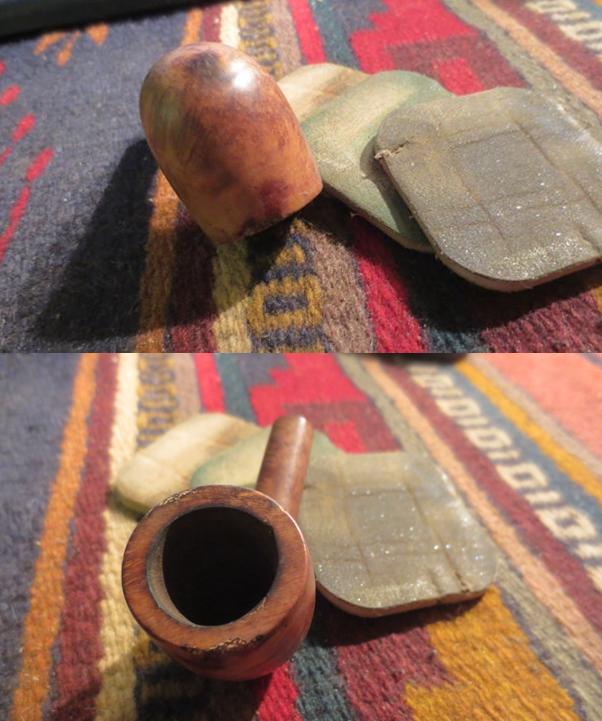
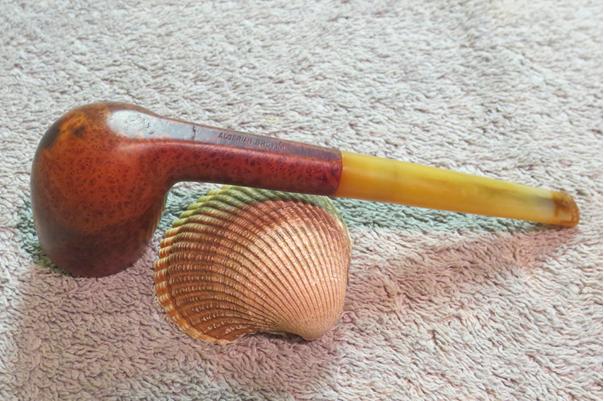
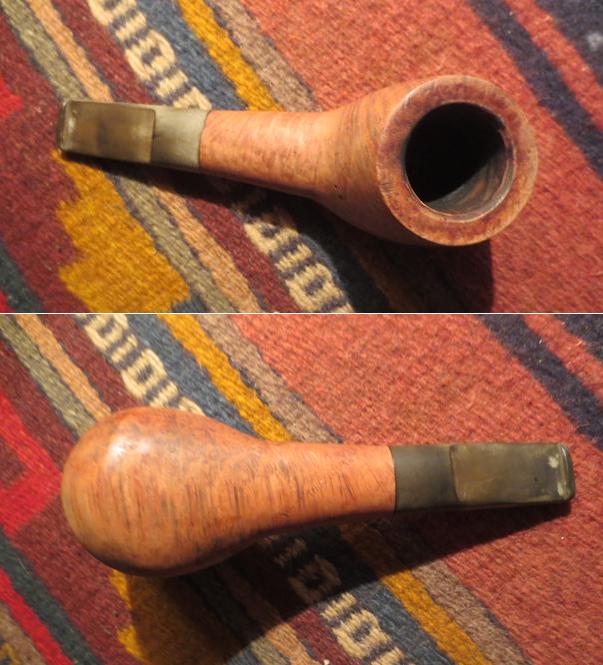
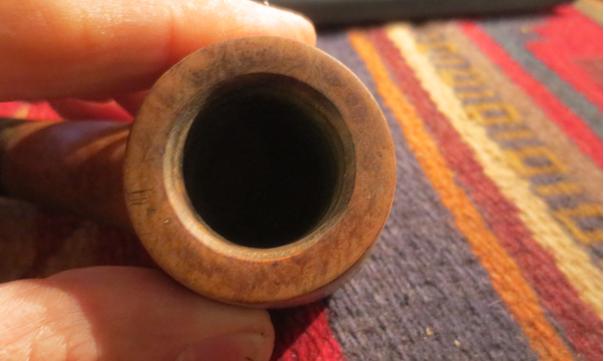
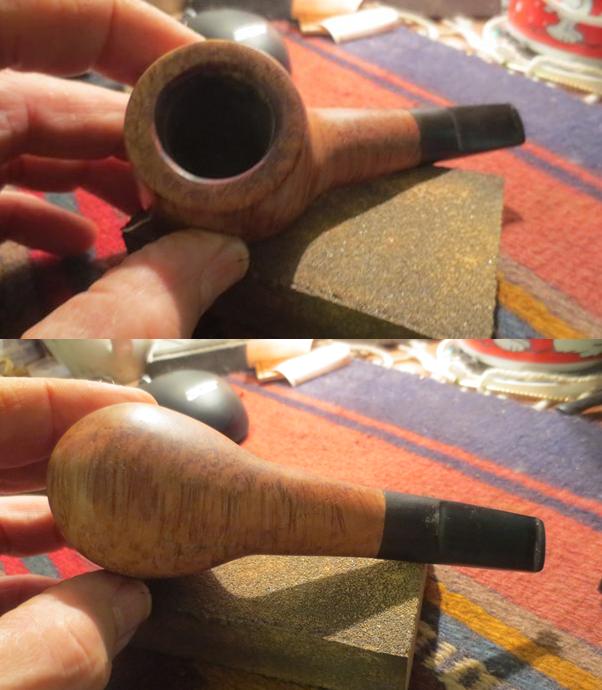
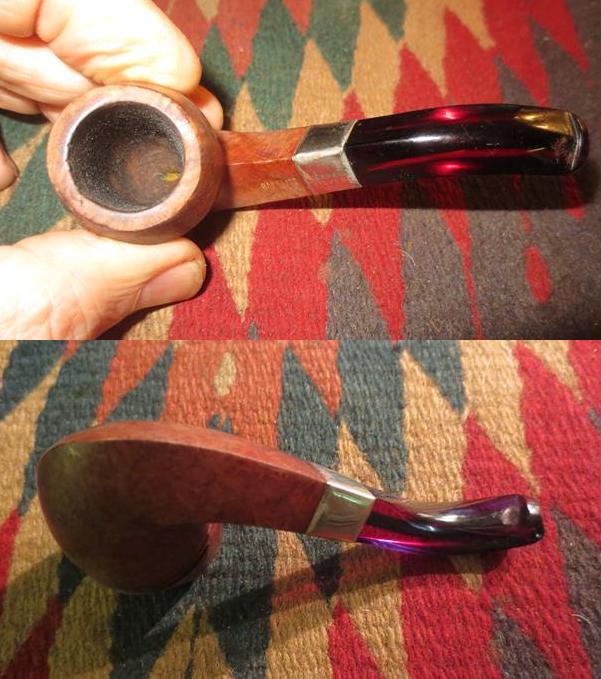
The next photo shows the rim after he had cleaned up the surface. There was a burn mark on the front edge of the rim that would need to be addressed. You can clearly see all the nicks and chips in the rim edges in this photo.aldo4c
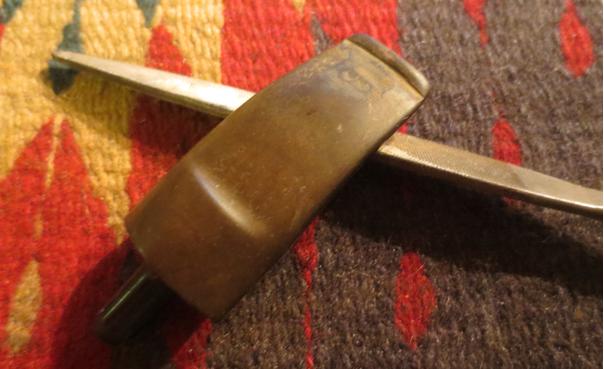
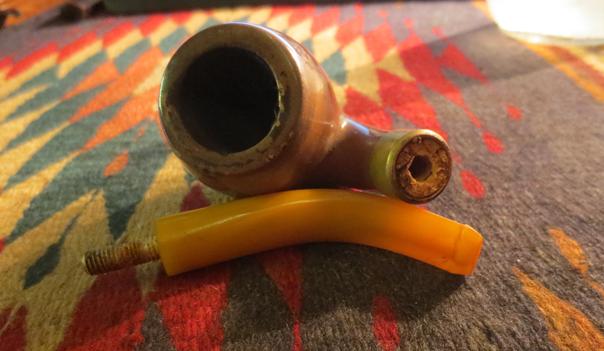
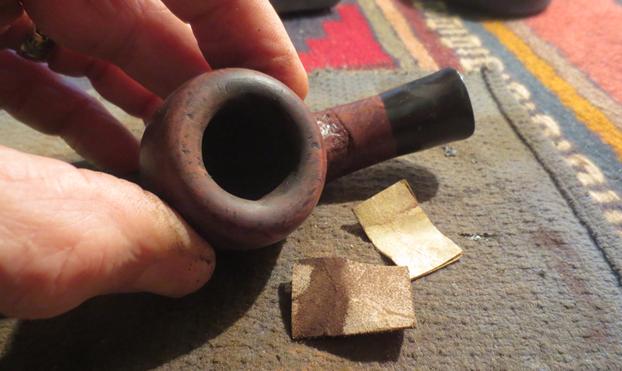
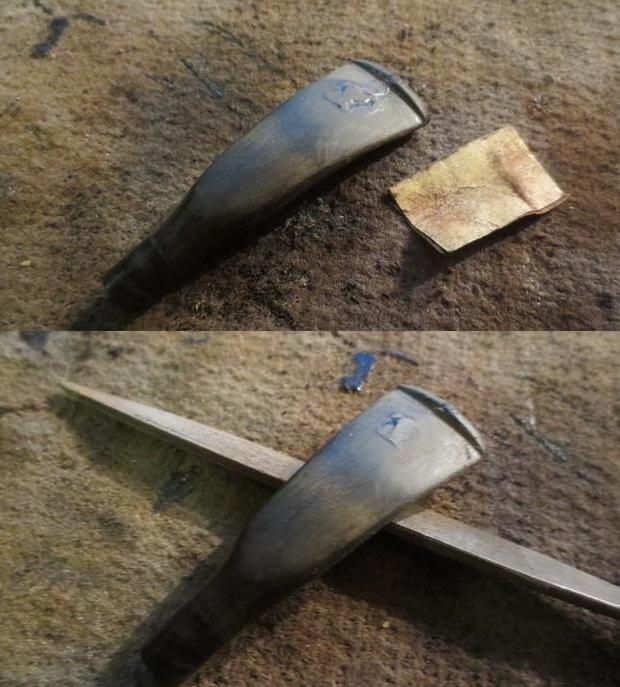
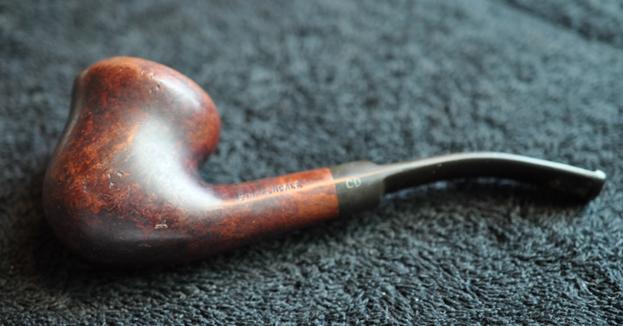
Once I removed the stem the band fell off in my hands. I could see the band covered a sloppy crack repair. Though the repair held and the crack was sealed there was a lot of glue. I am not sure whether it was for the crack or for the band. Either way it was over kill. The glue had hardened and somewhere along the way the silver band had picked up the ridges and valleys of the hard glue underneath.aldo4d
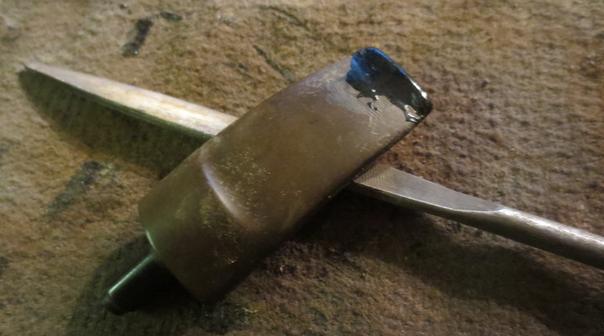
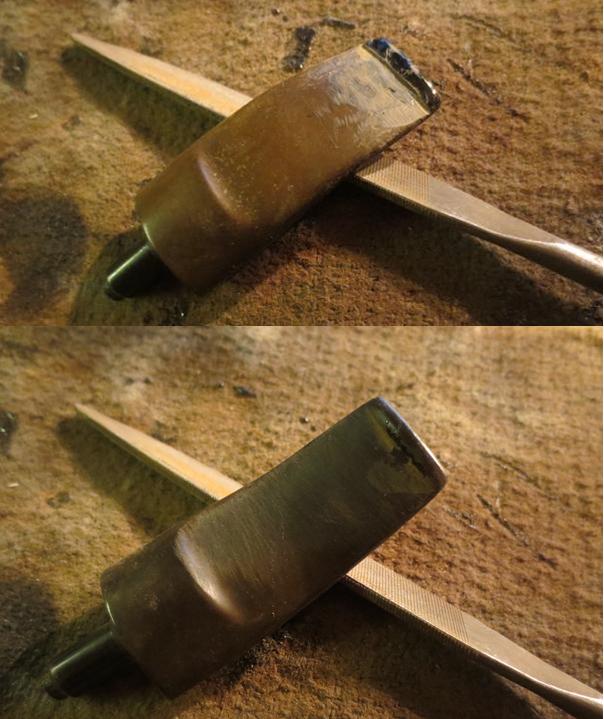
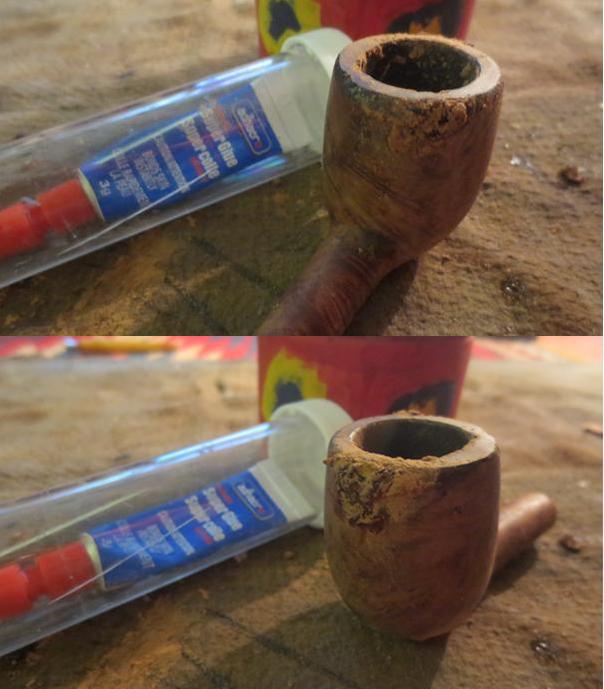
I sanded the glue until it was smooth on the shank end. I squared up the band and made the angular corner of the diamond shape more sharp. I smoothed out the dents in the band as much as possible from the inside of the band. I slid band on the shank and used a small ball-peen hammer to carefully tap the band flatter from the outside. I was able to remove much of the damage to the silver band with this process. I used a small bit of glue to hold the band snug on the shank.aldo4e
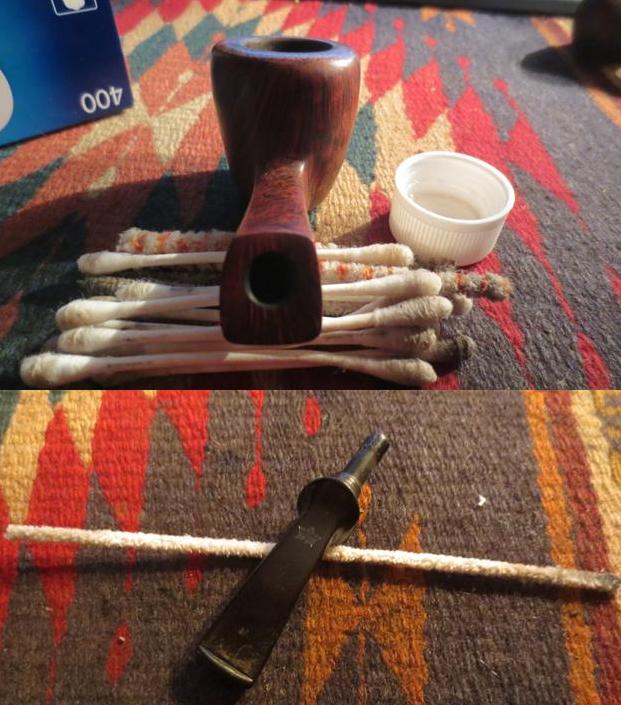
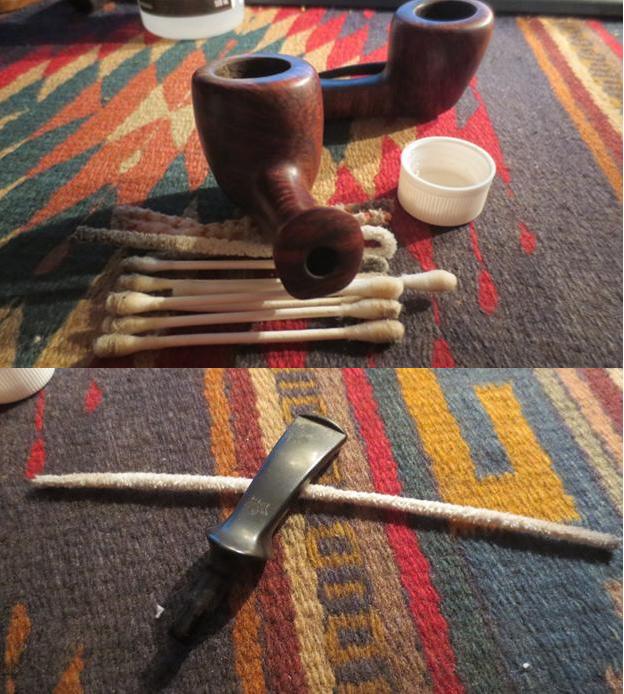
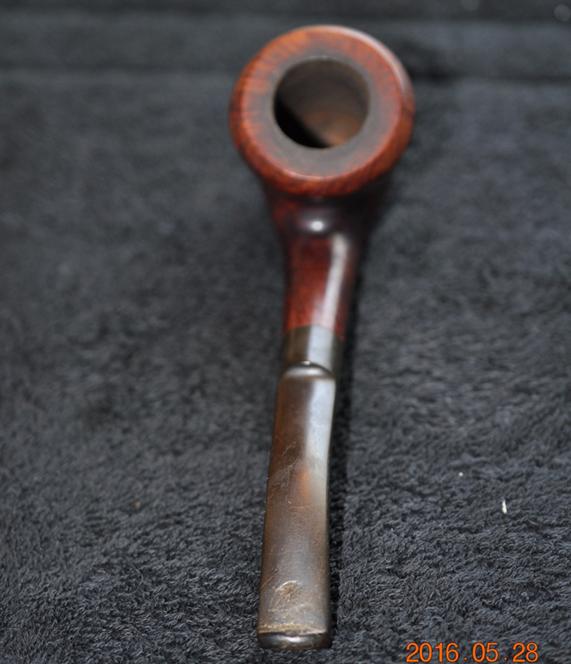
To take care of the rim damage and to reduce the damage to the outer edge of the rim I topped the bowl on a topping board with 220 grit sandpaper. I sanded until the edge was clean and then worked on the outer edge of the rim with sandpaper. In the second photo below you can see the area where the burn has affected the outer edge at the front of the bowl.aldo5
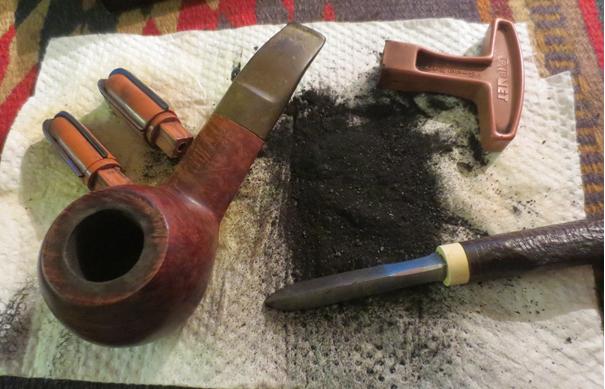
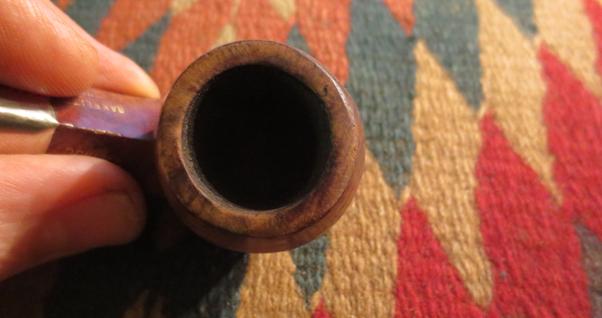
I wrapped a KleenReem pipe reamer with 220 grit sandpaper and used it to sand the interior of the bowl and clean up the inner edge of the rim.aldo6
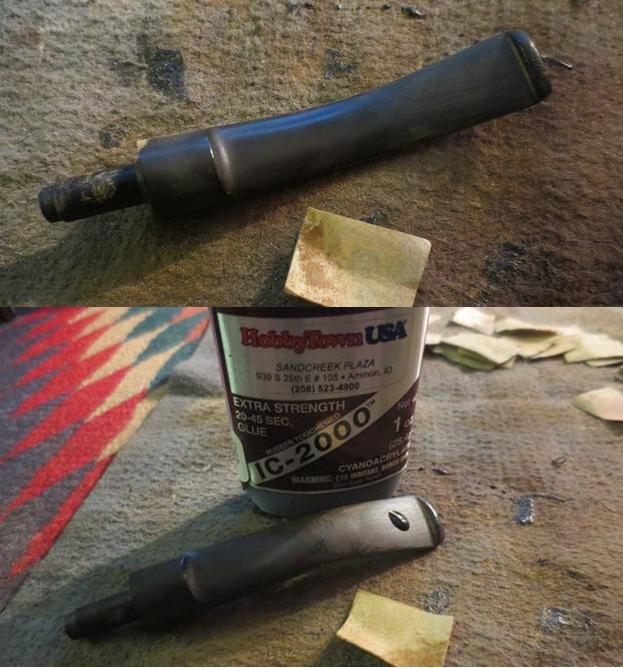
On the right side of the bowl there were two larger chips in the outer edge. I used crazy glue and briar dust to fill in the divots. Once the repair dried I sanded it with 220 grit sandpaper to reshape it.aldo7
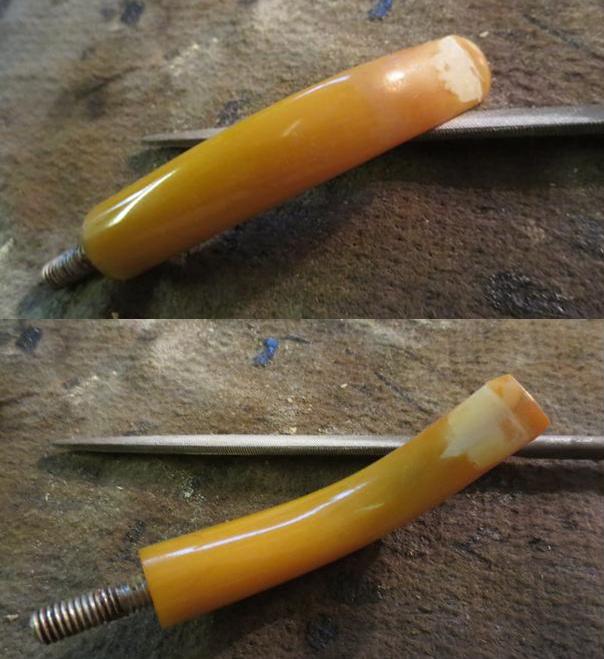
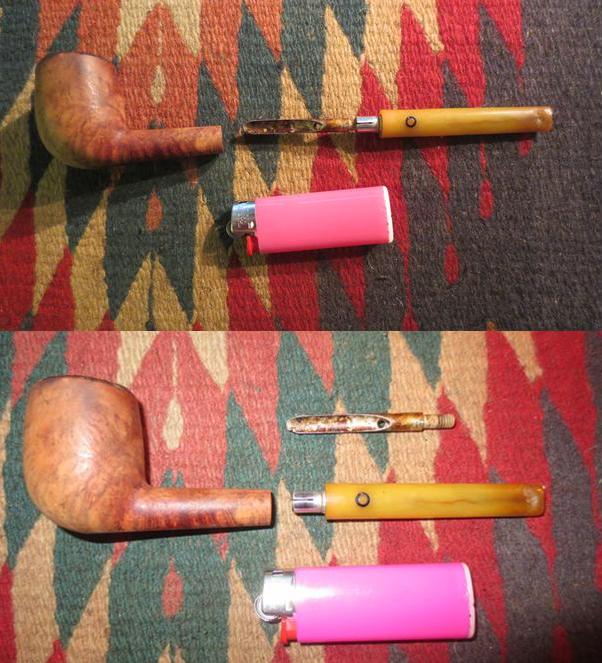
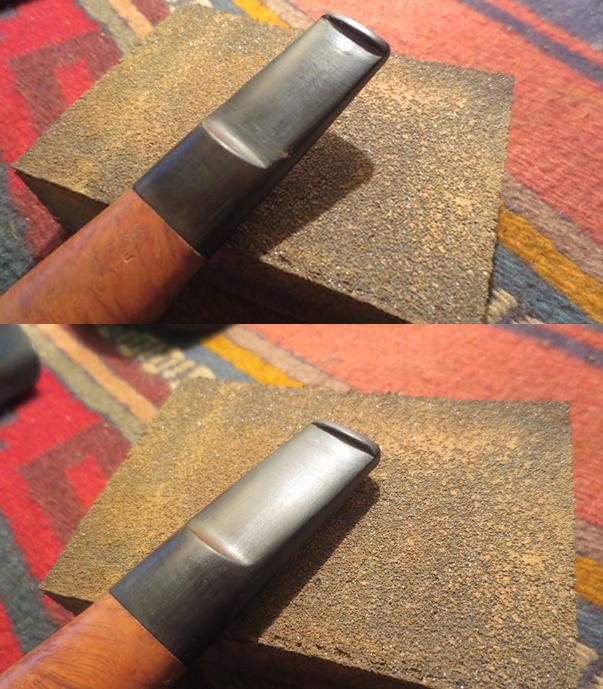
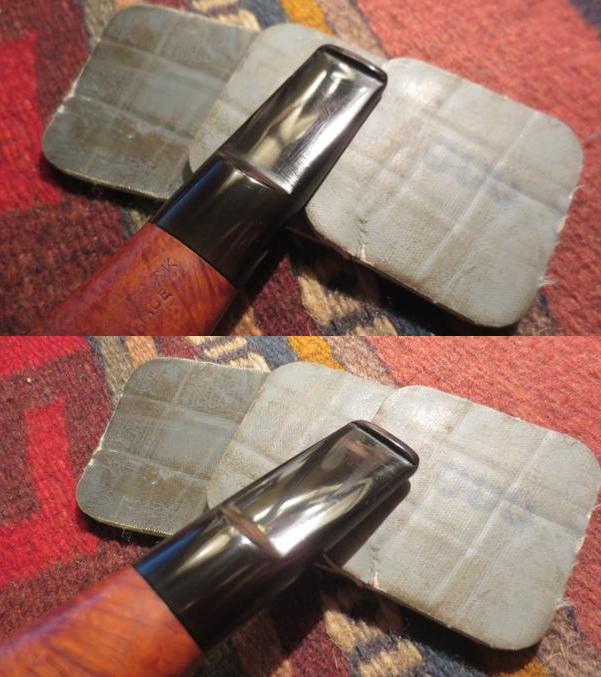
I heated the tenon with a Bic lighter until the tenon was flexible and then carefully inserted it into the mortise and aligned it with the shank. I held it in place until the tenon cooled. That repaired the fit of the stem to the shank.aldo8
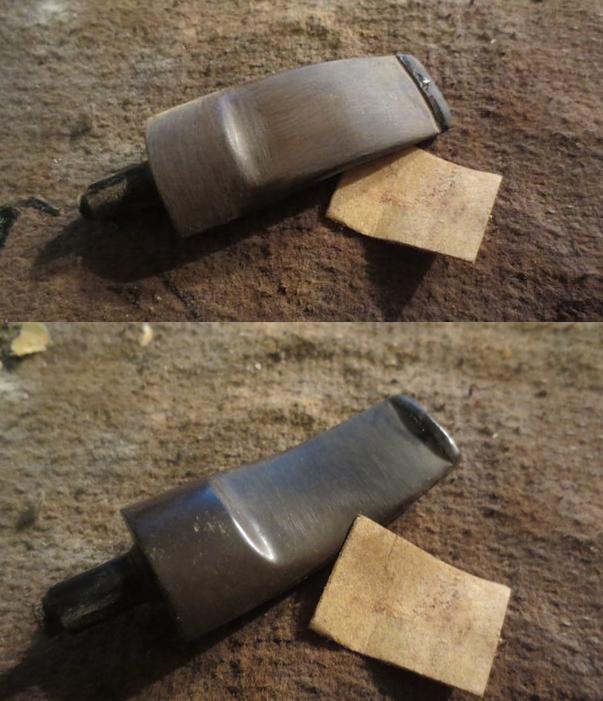
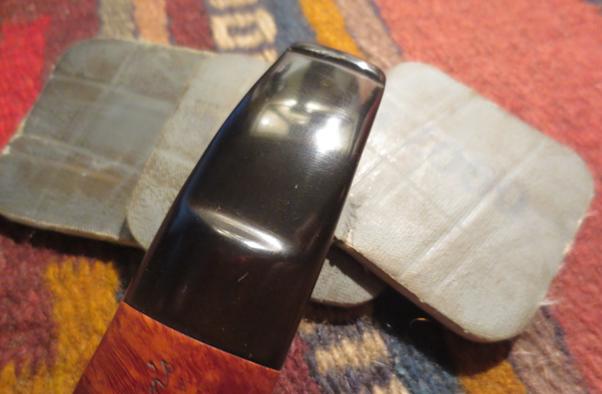
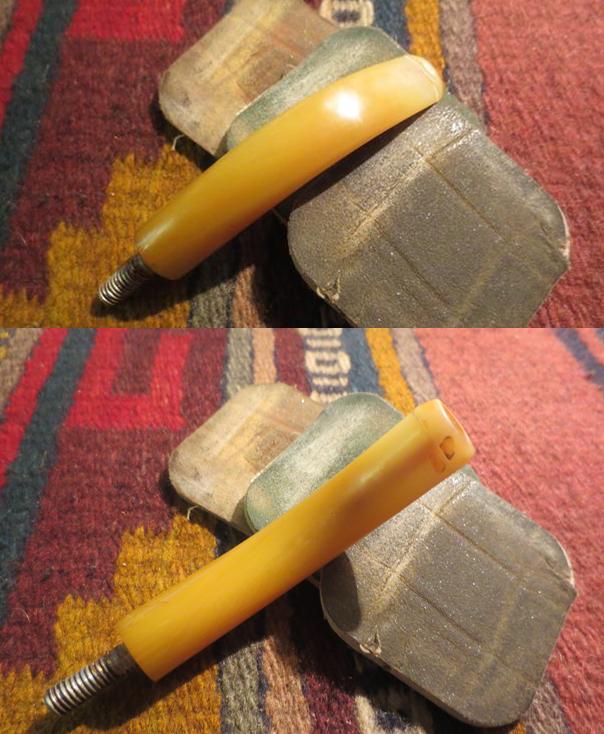
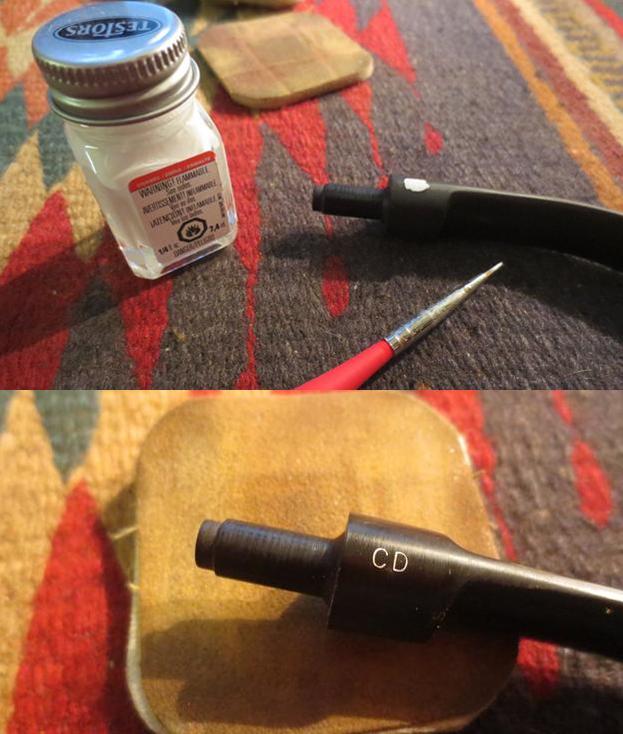
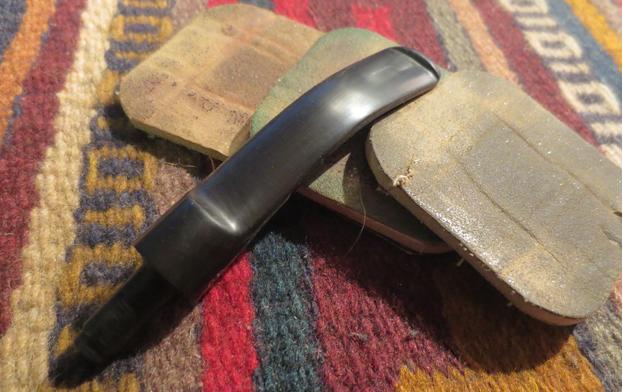
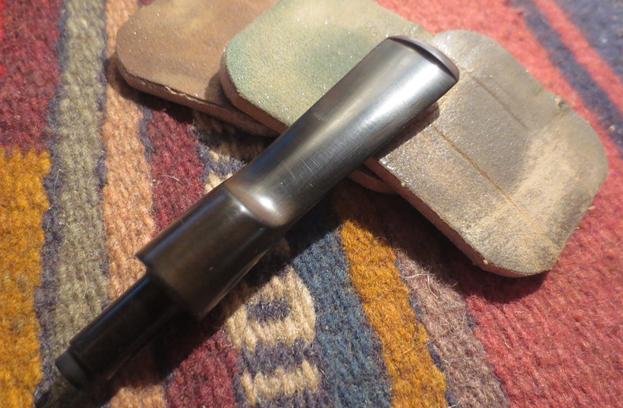
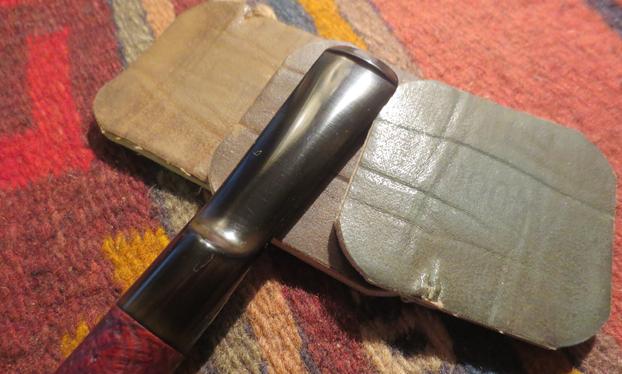
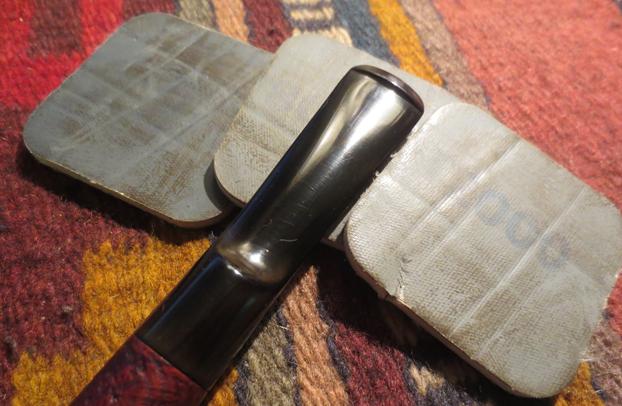
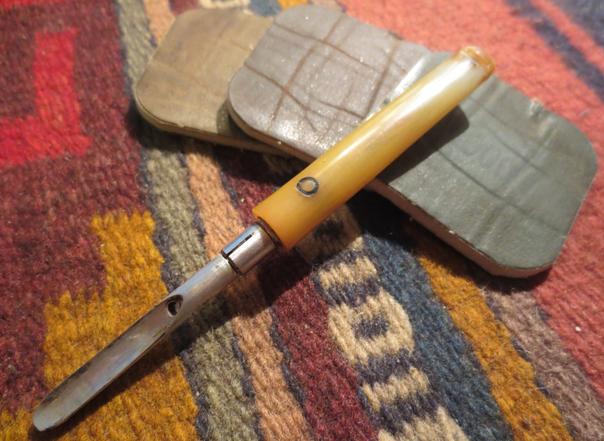
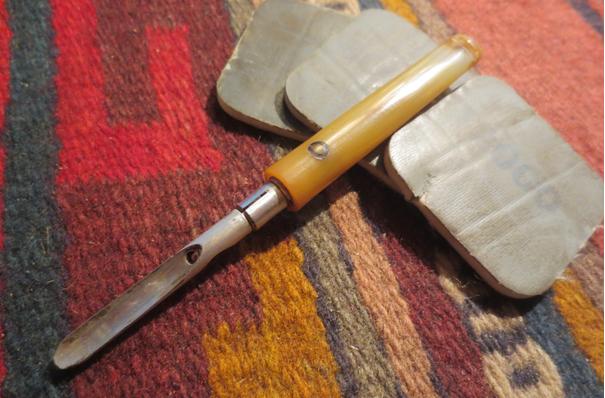
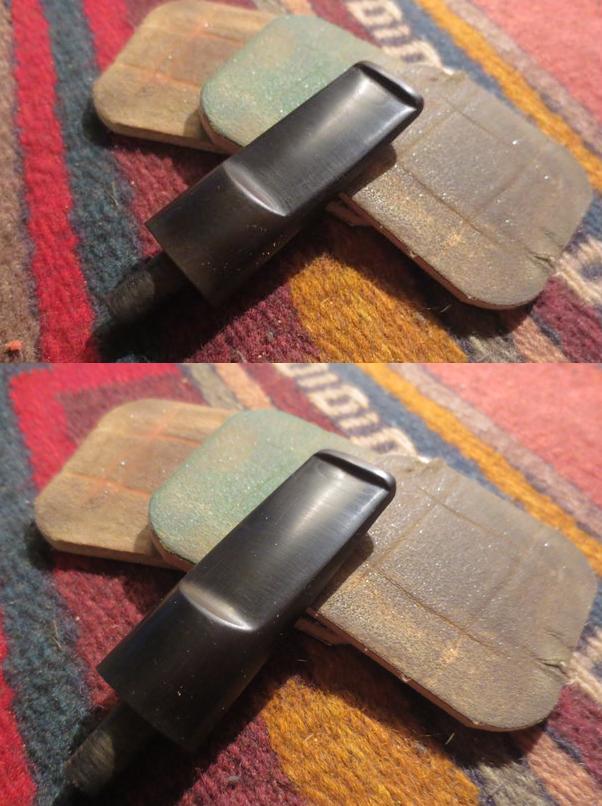
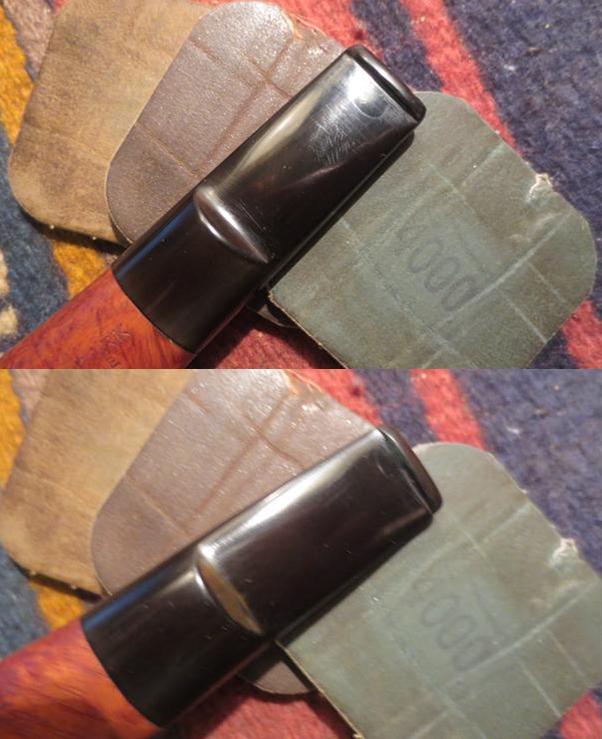
Since I was working on the stem I decided to finish polishing it. I sanded out the tooth marks and tooth chatter with 220 grit sandpaper. I polished it by wet sanding with 1500-2400 grit micromesh sanding pads. I dry sanded it with 3200-12000 pads. I wiped the stem down with a damp cloth. Once the pipe was finished I would buff the stem and pipe together.aldo9 aldo11 aldo12
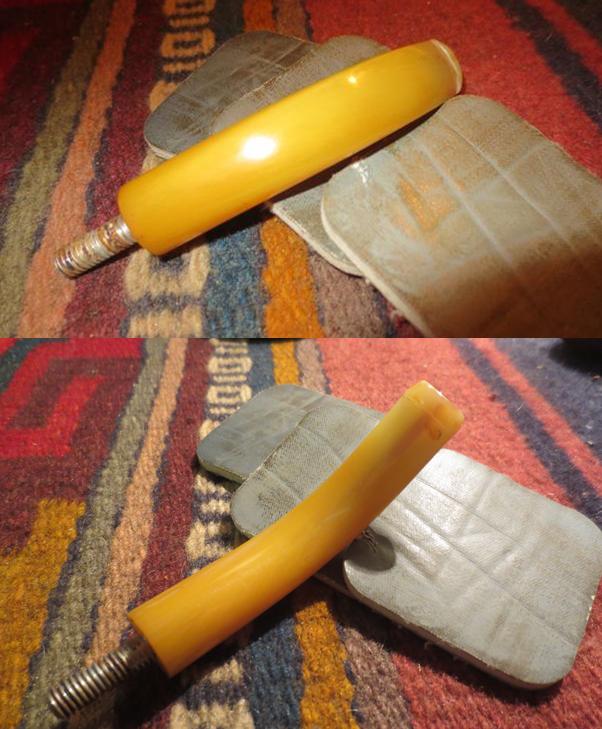
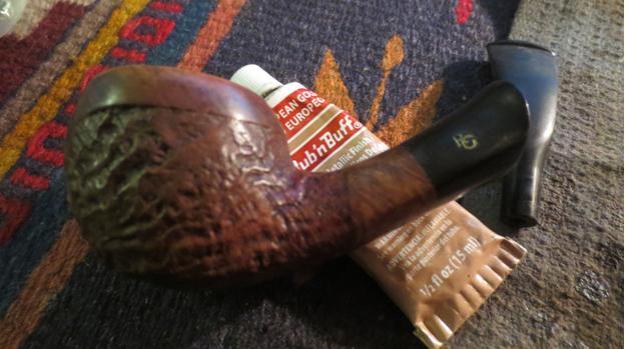
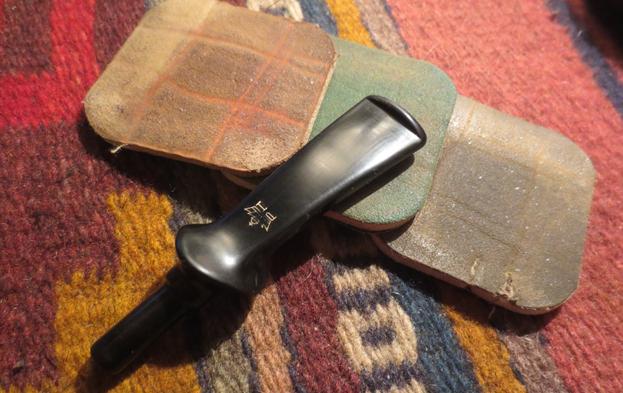
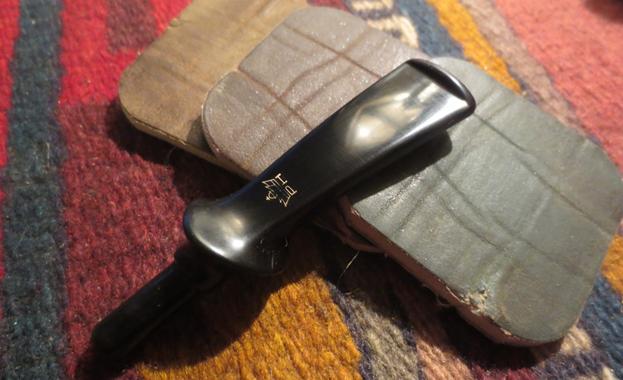
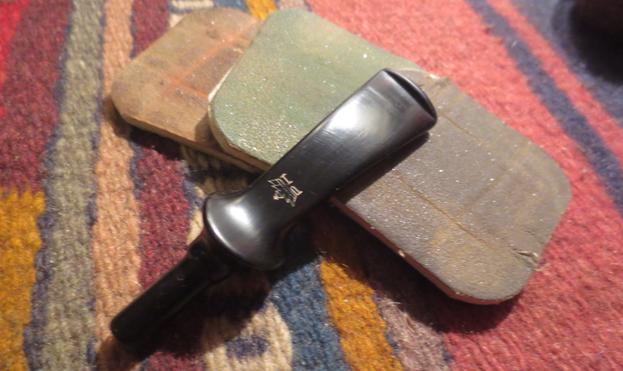
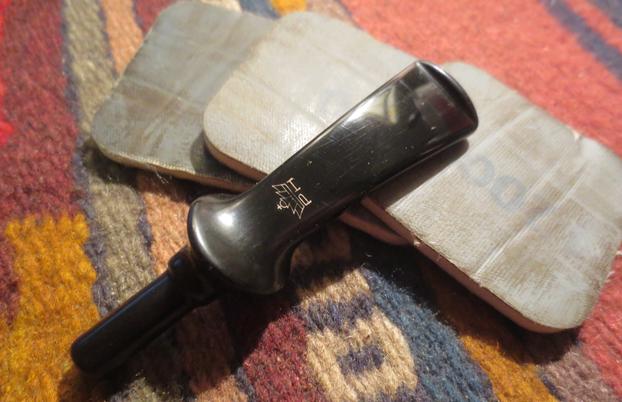
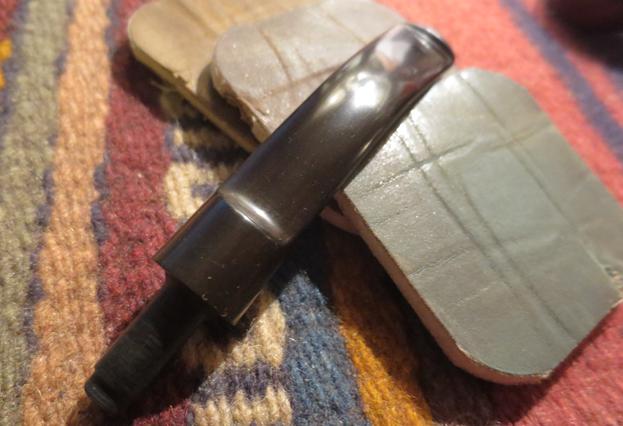
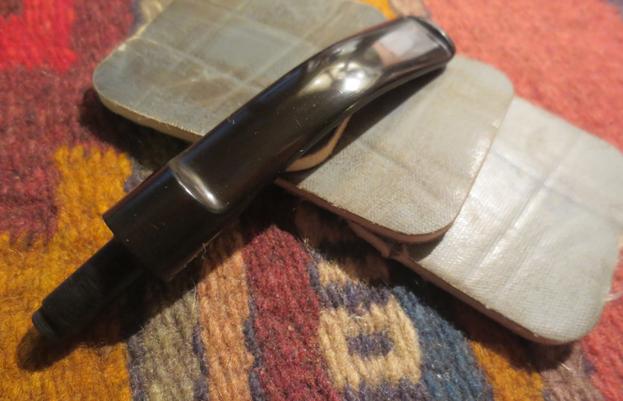
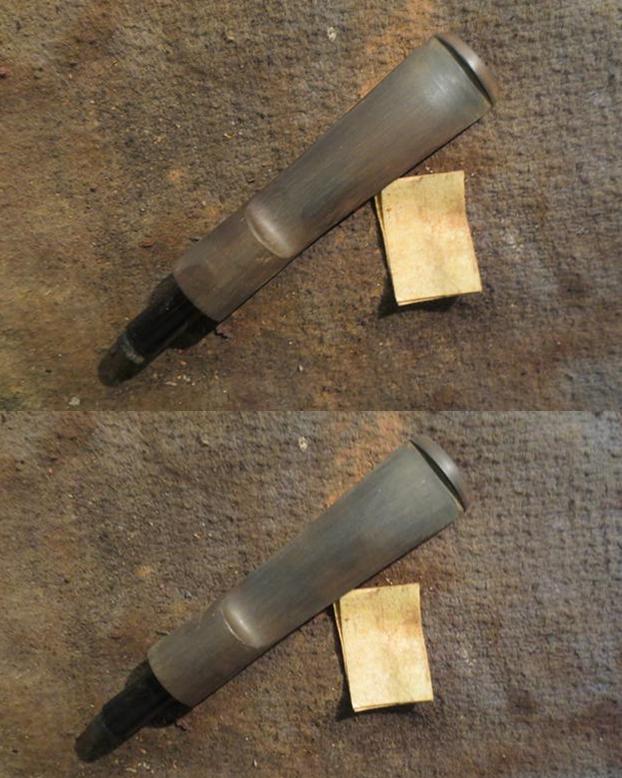
I used European Gold Rub n’ Buff to touch up the AV stamp on the side of the stem and hand buffed the stem.aldo13
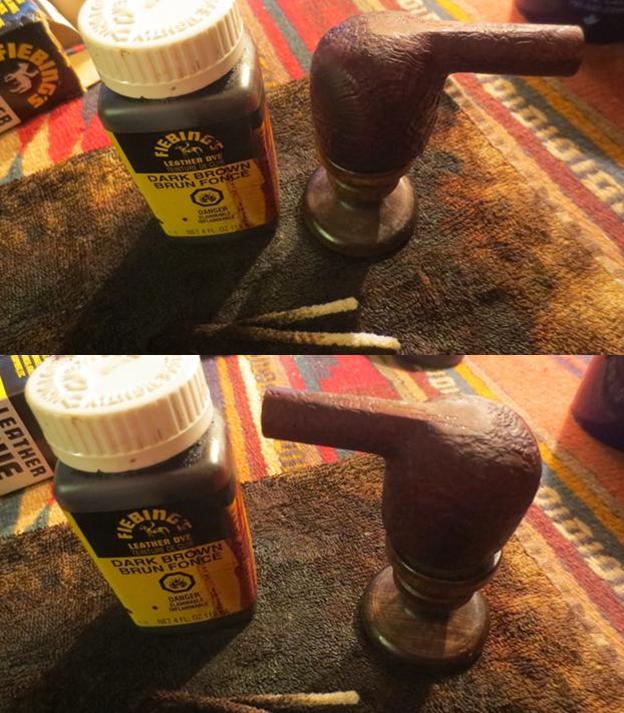
I stained the bowl with a dark brown aniline stain cut by 50% with isopropyl alcohol. I flamed it and repeated the process until I got an even coverage.aldo14
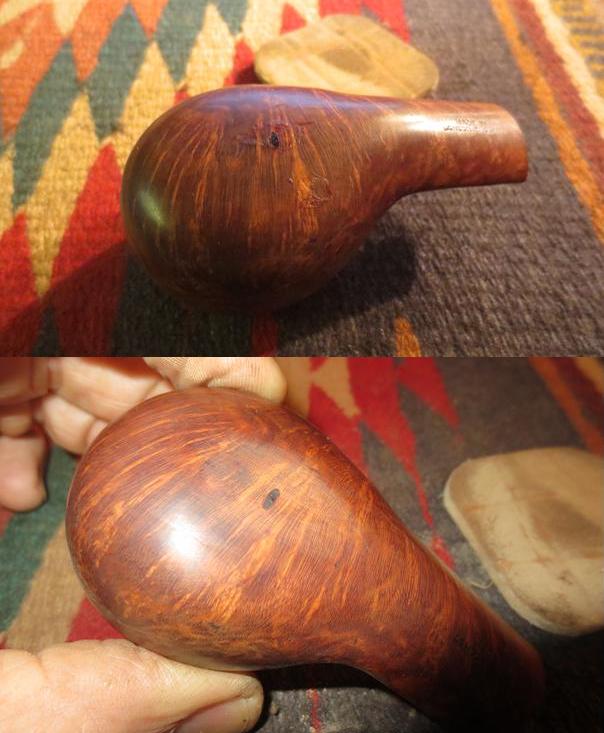
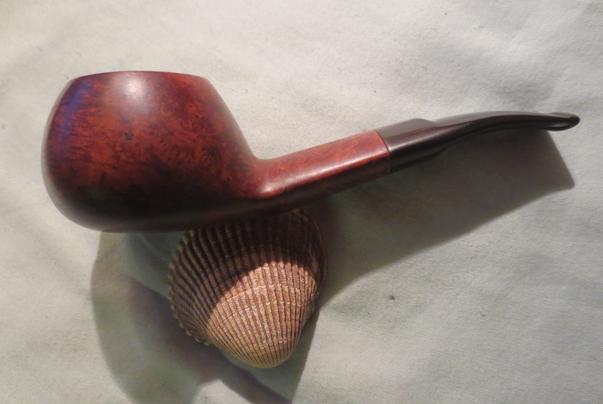
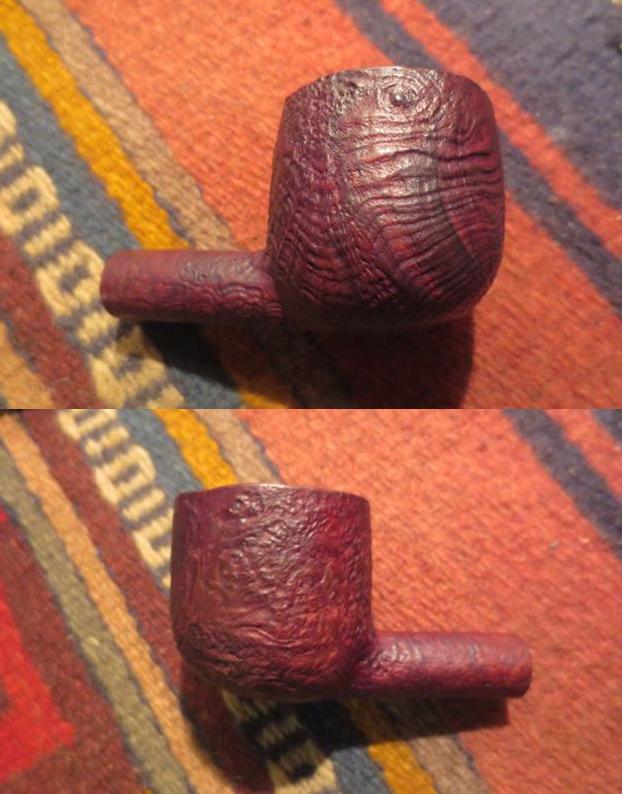
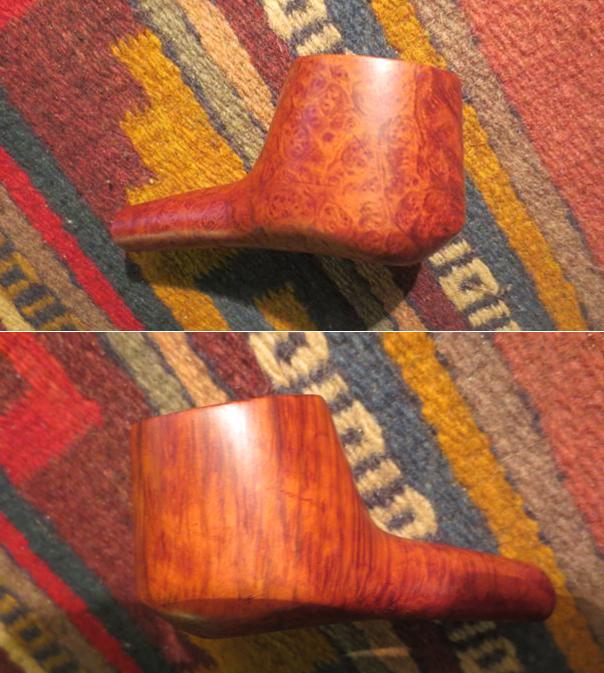
I took the next set of photos to show the bowl after the stain had dried. It was too opaque for me and hid the grain on the pipe but I would deal with that in the morning. I set the pipe aside of the night and let the stain dry.aldo15 aldo16
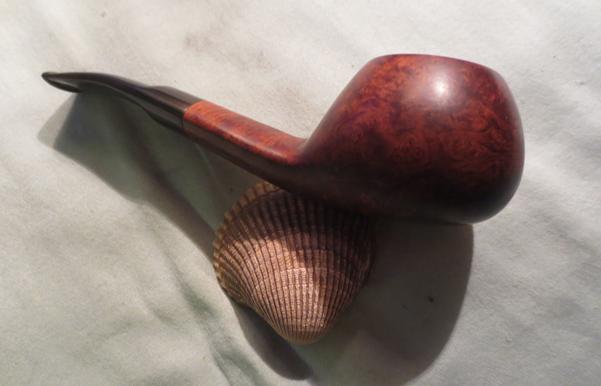
In the morning I wiped the bowl down with alcohol on a cotton pad to thin the stain coat and make the grain stand out.aldo17 aldo18
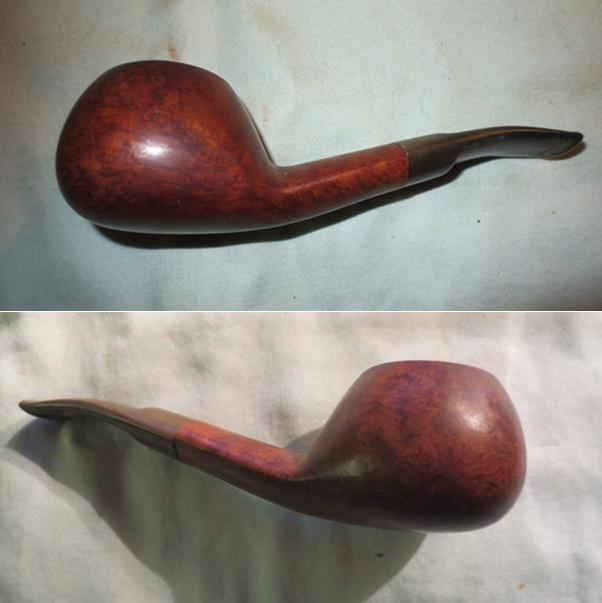
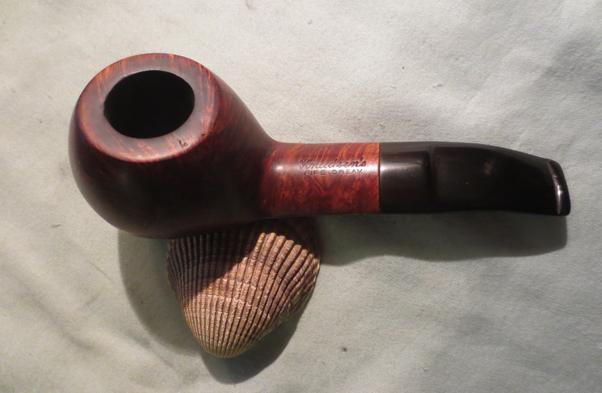
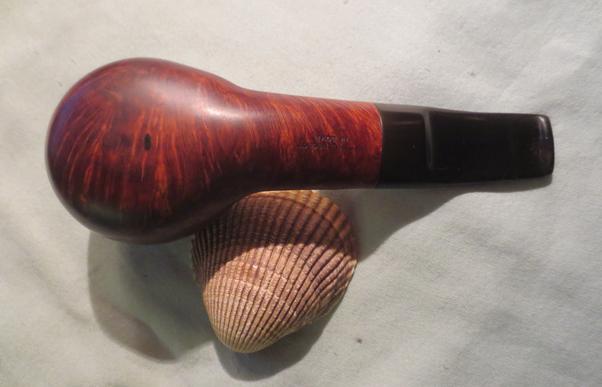
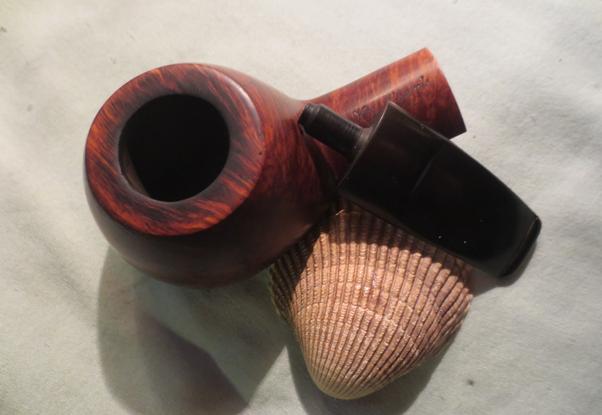
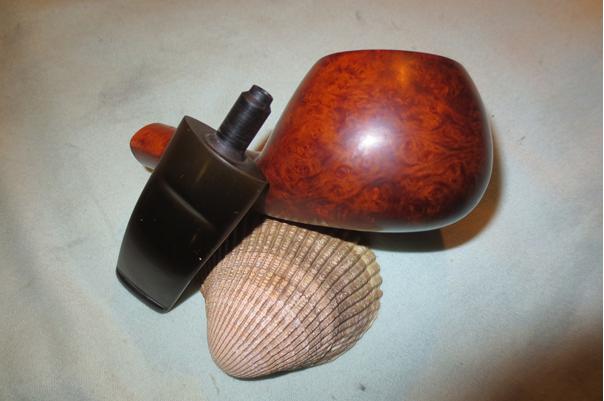
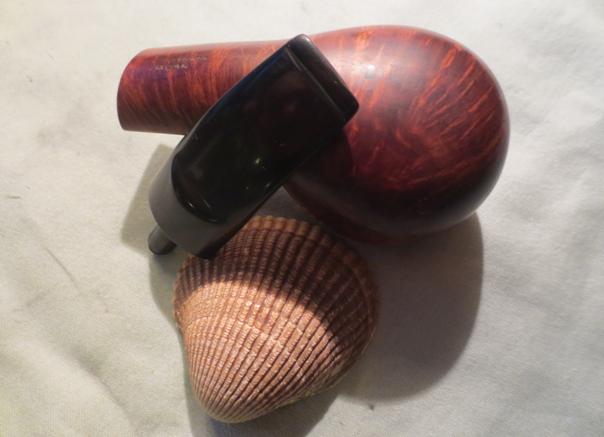
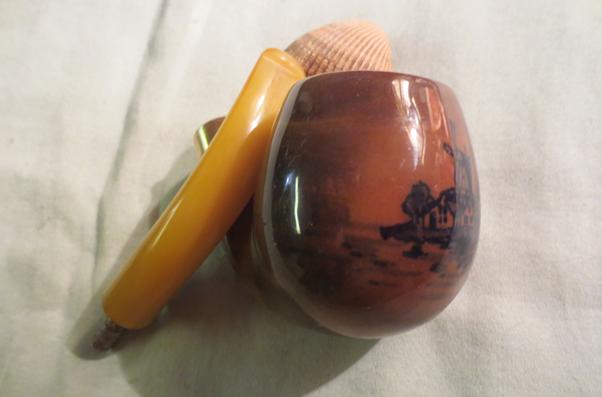
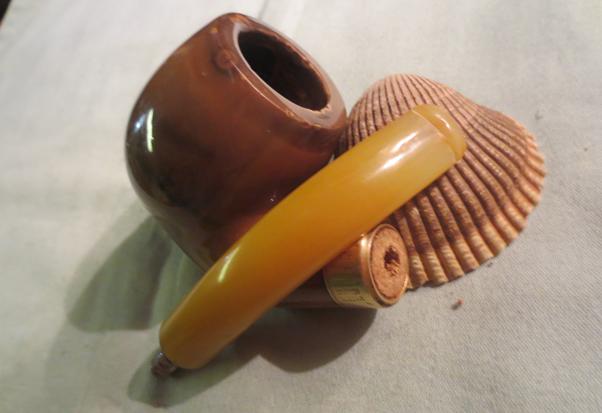
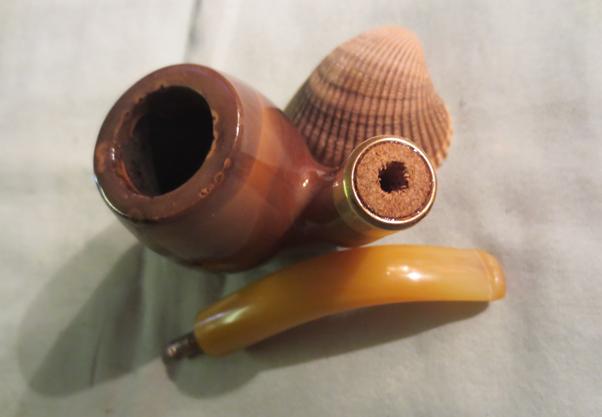
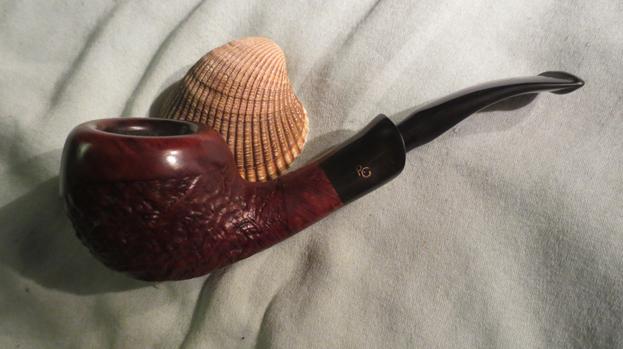
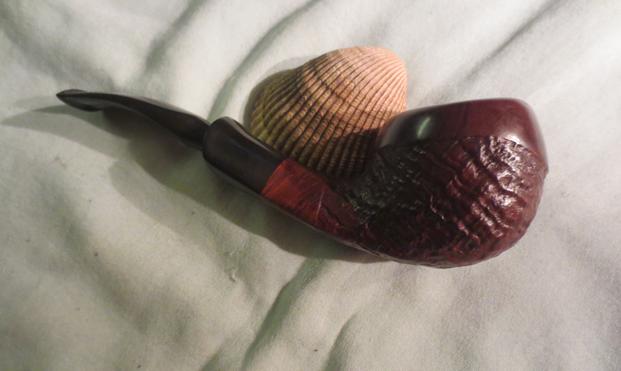
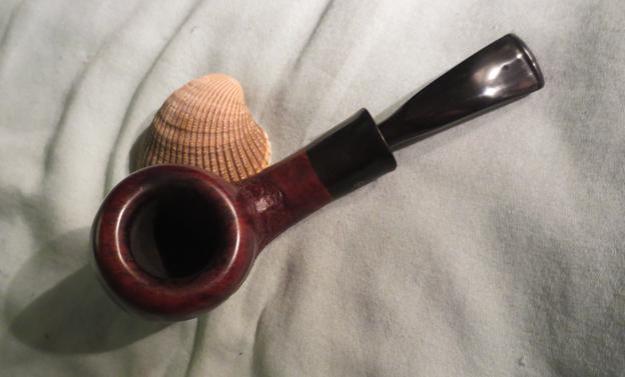
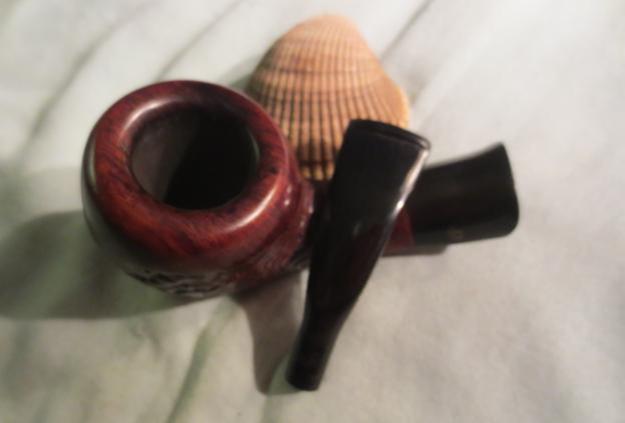
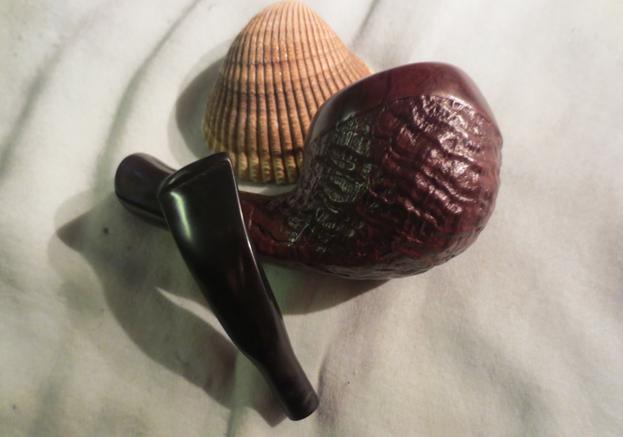
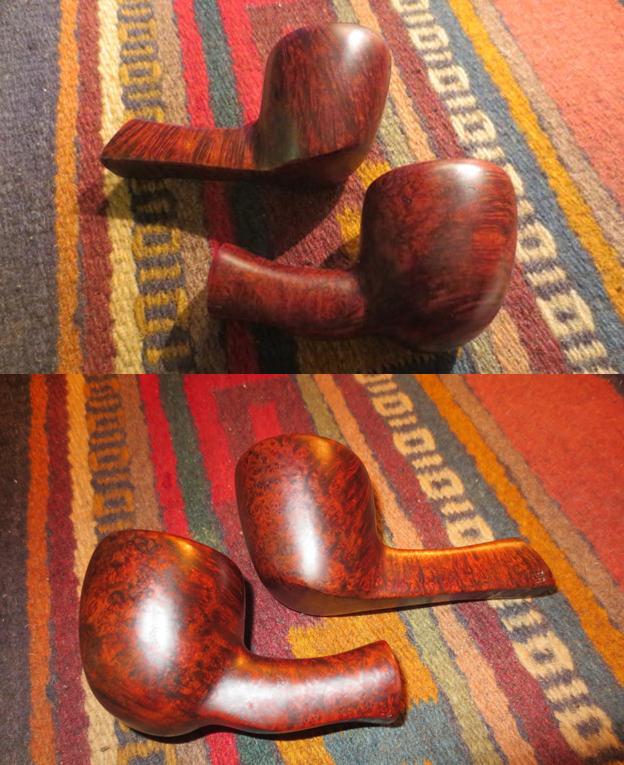
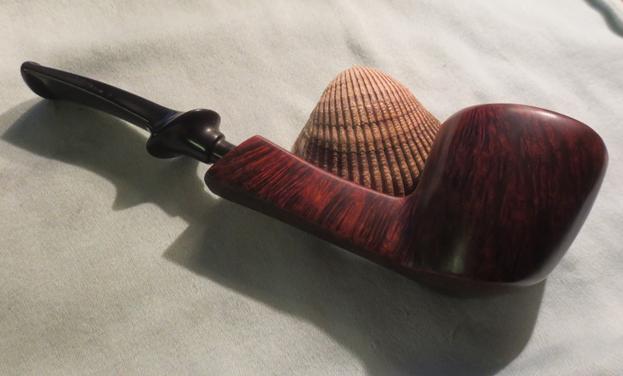
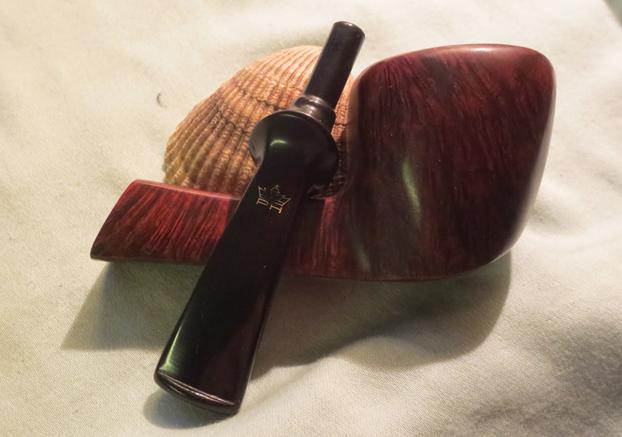
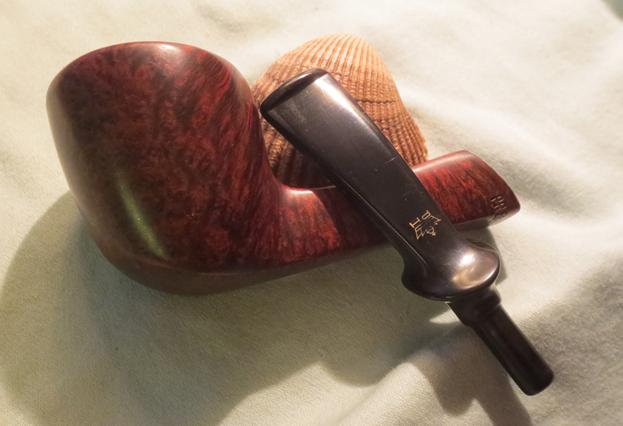
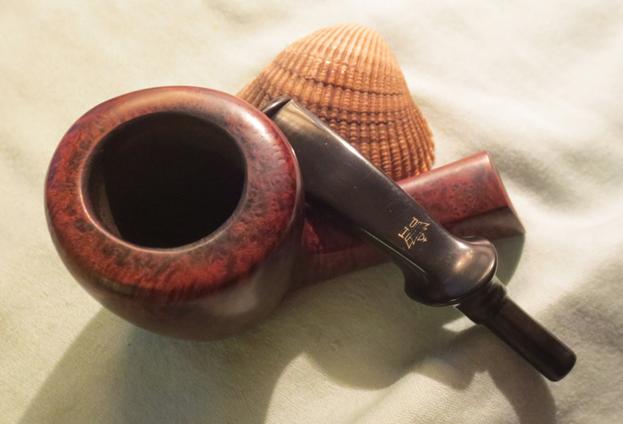
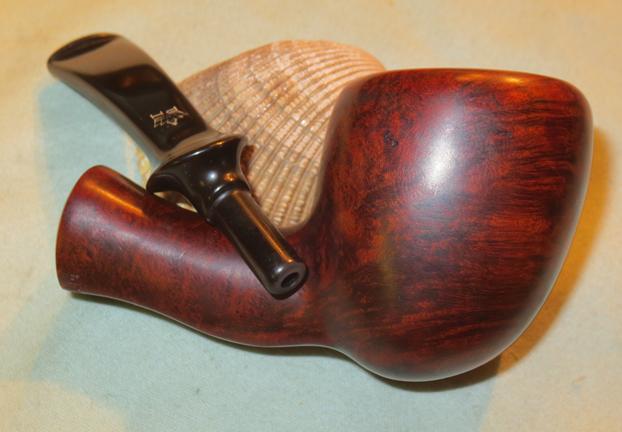
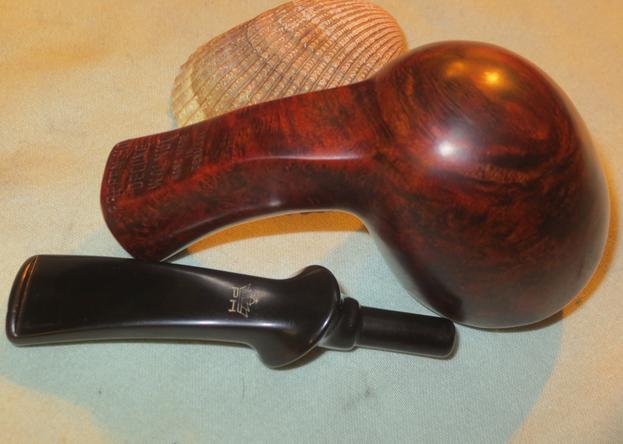
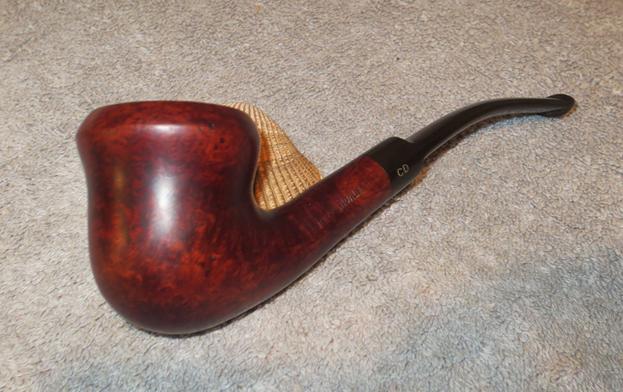
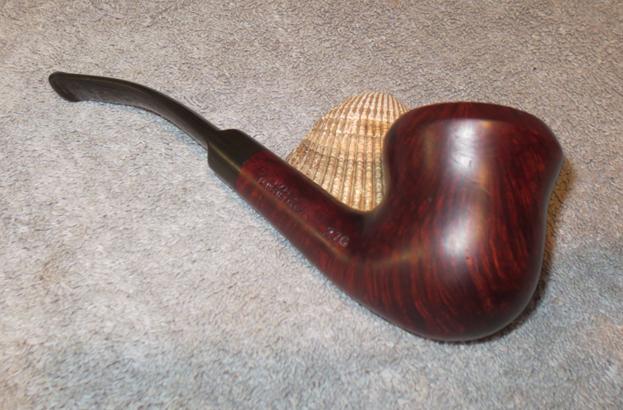
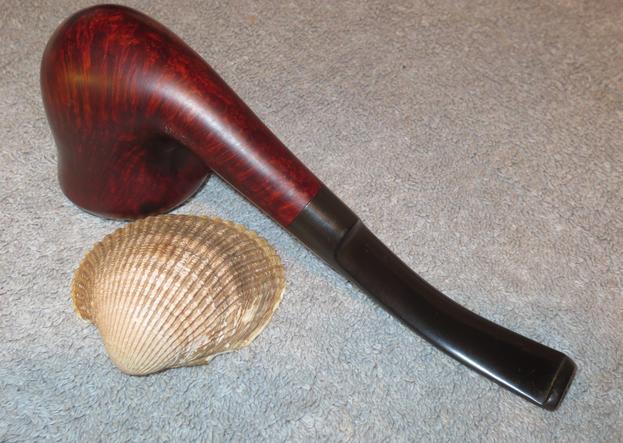
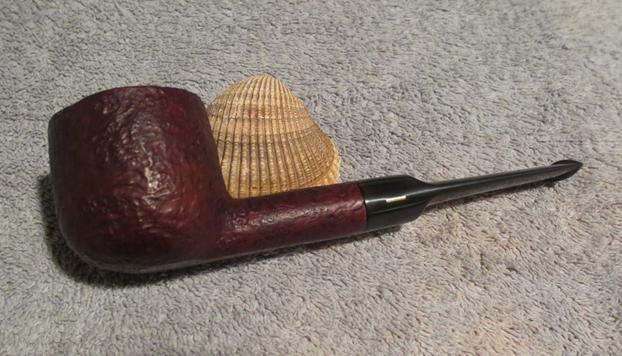
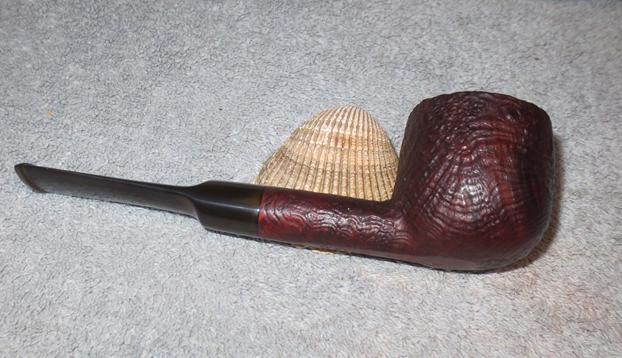
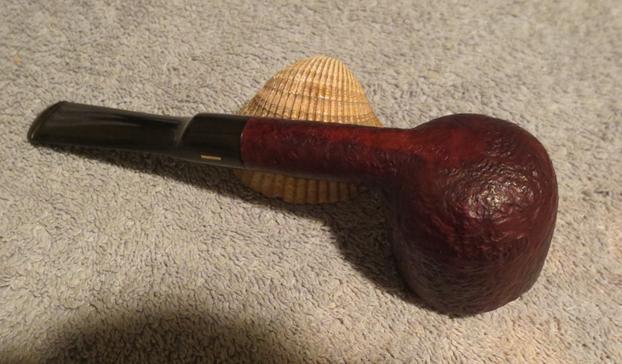
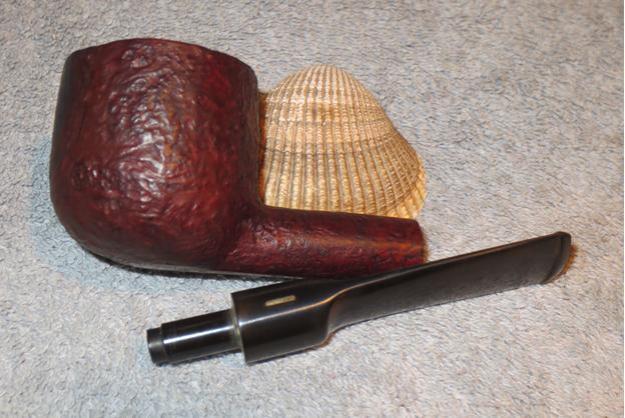
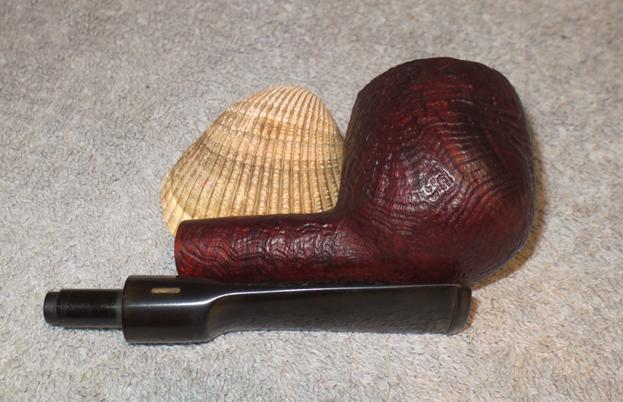
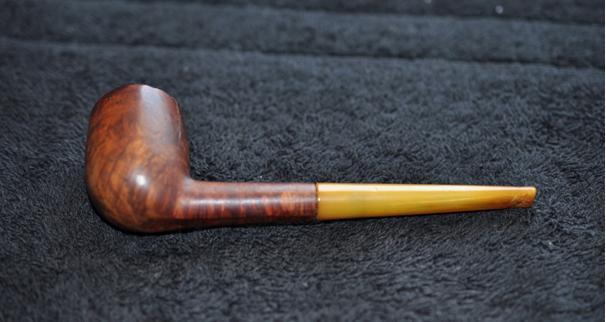
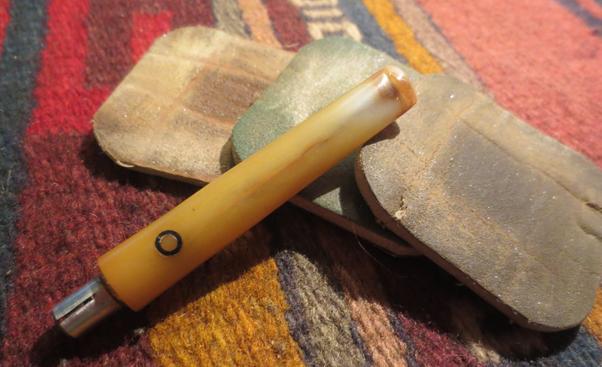
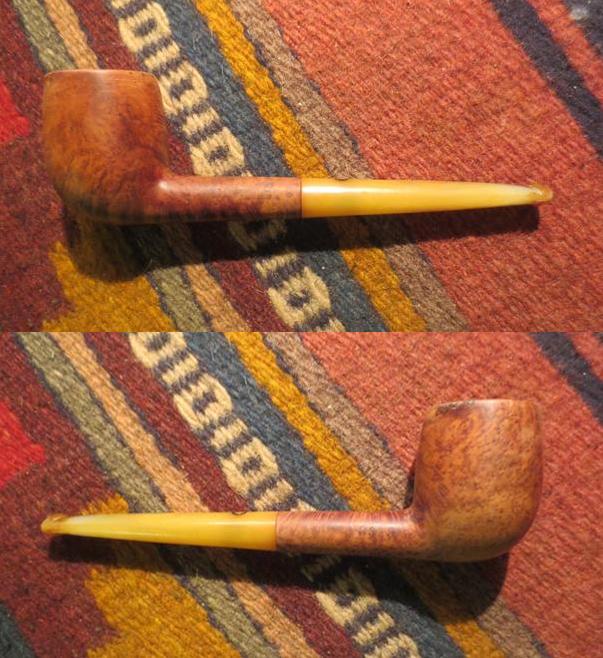
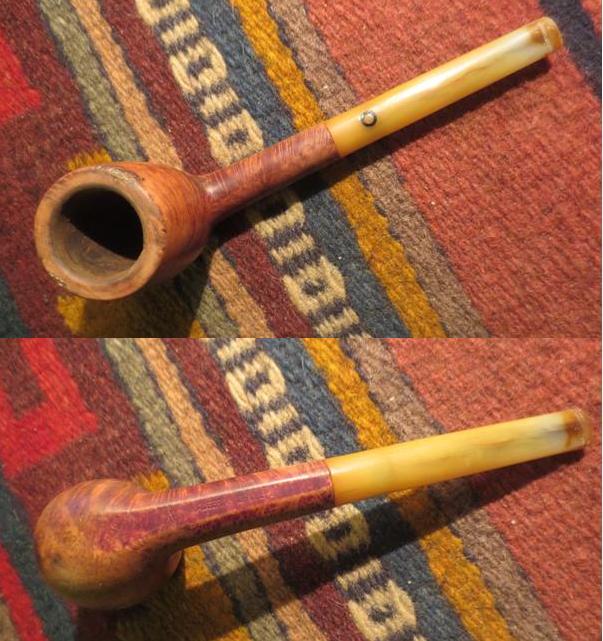
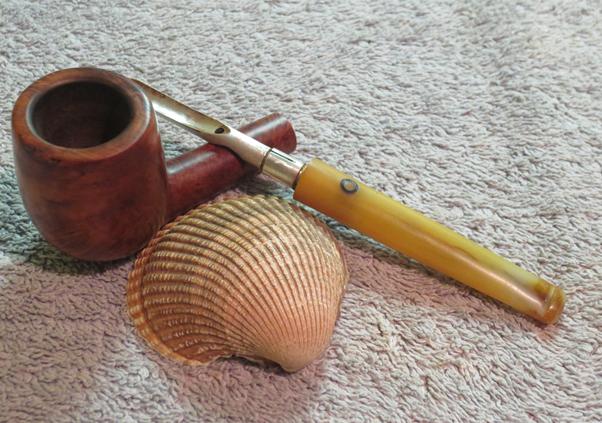
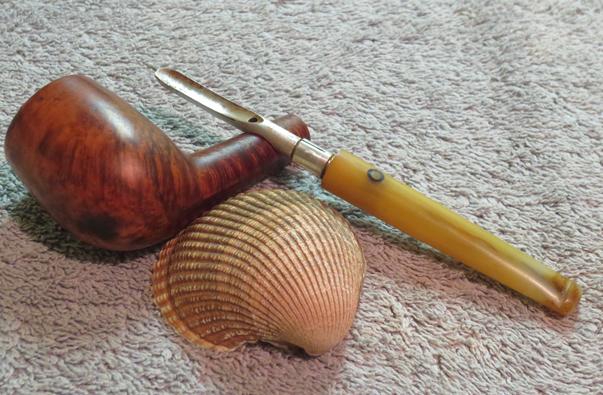
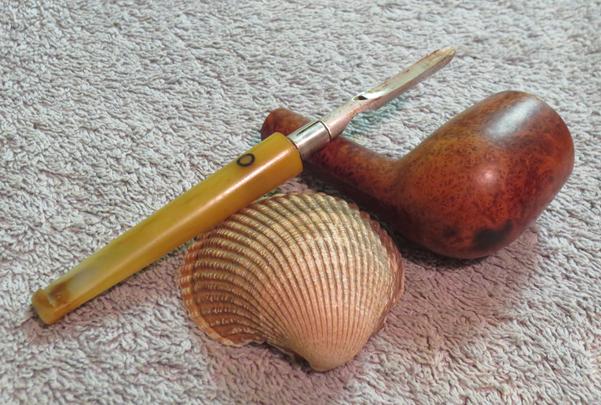
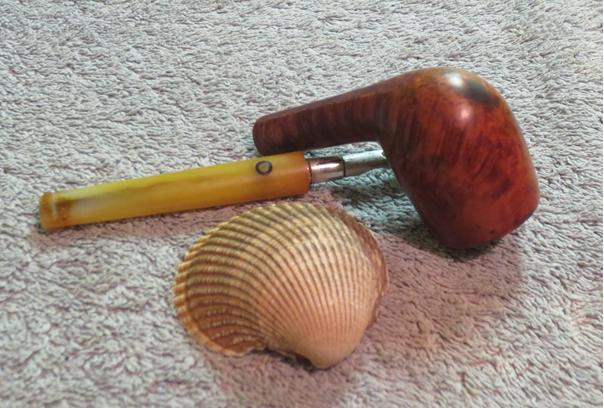
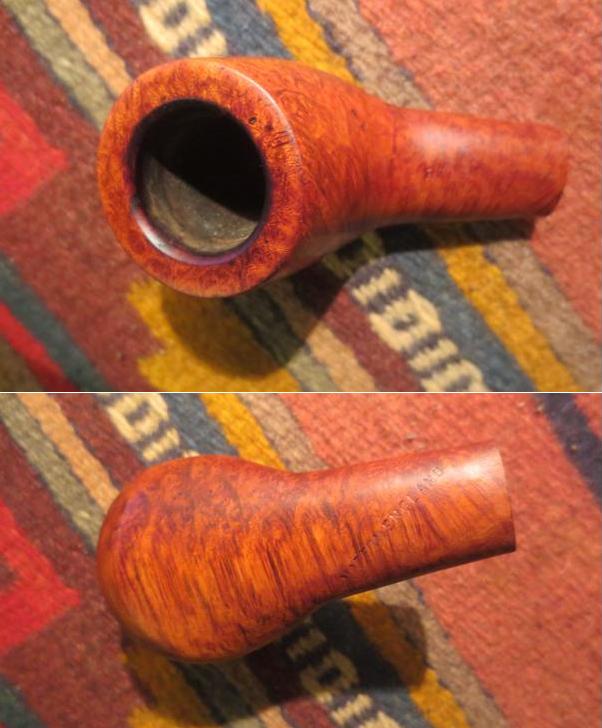
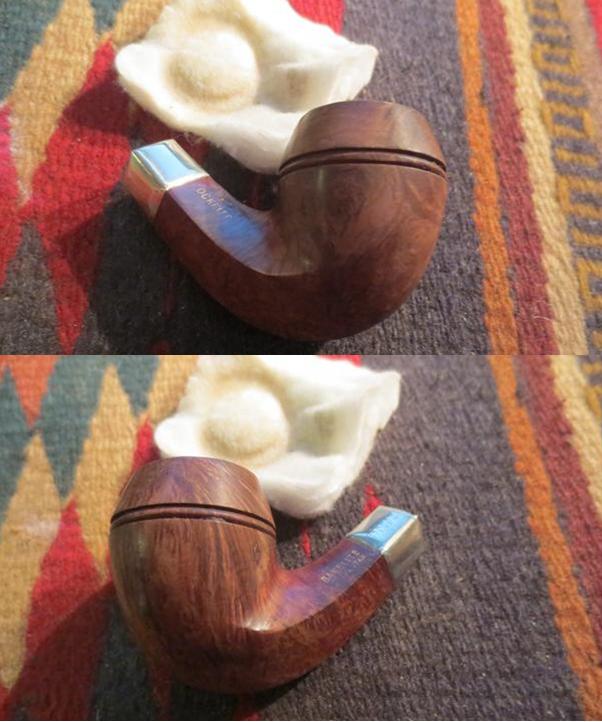
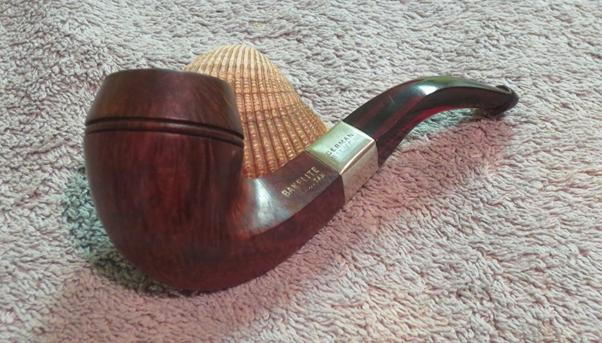
With the stain looking good and the stem finished I buffed the pipe with Blue Diamond on the buffing wheel and gave it multiple coats of carnauba wax. I buffed it with a clean buffing pad to raise the shine and then by hand with a microfibre cloth. The finished pipe is shown in the pictures below. It is a beautiful pipe. It is ready for whoever wants to add it to their rack. Send me a message or an email at slaug@uniserve.com if you are interested in this beauty. Thanks for looking.aldo19 aldo20 aldo21 aldo22 aldo23 aldo24 aldo25 aldo26 aldo27


Charatan Made Knudsen’s Pipe Dream Oval Shank Banker brought back to life


Blog by Steve Laug

This great looking Banker shaped pipe is another one from the pipe man up in Dawson Creek, British Columbia. I am not sure if it was also one of his Grand dad’s pipes but it definitely has some age. It is stamped Knudsen’s Pipe Dream on top of the shank and Made in London England on the underside. From my research I am pretty confident that the pipe was made by Charatan as the shape is on their shape charts. However, it does not have the Banker shape number. I took the photos below to give an idea of the shape and the condition of the pipe when it arrived at my work table. The first thing that stood out to me is that there is a lot of promise under the grime – the birdseye grain and cross grain are peaking through. There was one fill on the underside of the bowl that was chipped but otherwise tight in the sandpit. The finish appears to be really good under the grime with no dings or dents in the briar. There was a thick cake in the bowl that runs like lava runs over the rim of the bowl. It is hard to know for sure if there is damage to the rim underneath the thick cake. The stamping is readable and the Made in London England stamp on the underside of the shank appears to have been done twice though one of them is quite faint and slightly above the other. The stem is worn and has deep tooth marks on the top and bottom sides and the button is worn. I was looking forward to working on this pipe.

I did some digging to see if I could find anything out about the brand stamp on the top of the shank. I found that there is a Knudsen’s Pipe Dream Pipe Shop in Regina, Saskatchewan. The address and phone number is as follows: 4621 Rae St, Regina SK S4S 6K6, Phone: 306-585-1616. There was also a Knudsen’s Pipe Dream sandblasted Dublin that had sold on the smokingpipes.com website. The web address and link to the pipe is https://www.smokingpipes.com/pipes/estate/england/moreinfo.cfm?product_id=132697. They list it as an English made pipe. To me it also looks like a Charatan shape.bank1 bank2I found this page from a Charatan Catalogue online. The link said that it was Charatan even though the page does not say so. I have circled the Banker shape in red in the picture below. It is in the middle column at the top of the page. The shape would thus be a 2651.bank16I took a close up photo of the rim top to show the thickness of the cake on the rim and in the bowl. You can see why it is hard to assess what is going on with the inside of the bowl and the rim from this photo. A lot of work will need to be done before I can actually know the condition of the bowl and the rim.bank3I also took close up photos of the stem showing the bite and tooth marks on the top and bottom near the button.bank4I wanted to photograph the stamping as well. You can see the faint double stamping of Made in London England in the first photo and you can clearly see the name Knudsen’s Pipe Dream in the second photo.bank5I scraped the rim with a sharp pen knife to scrape off the thick buildup. I generally do this to try to preserve the stain coat on the rim. In this case I also wanted to see if there was damage under the cake on the rim top before I topped the bowl. Once I had it scraped off I wiped it down with alcohol on a cotton pad.bank6I reamed the bowl with the PipeNet reamer and the Savinelli Pipe Knife and took the cake back to bare briar. I wanted to assess damage to the interior wall of the bowl. Thankfully there was none this time around.bank7I repaired the chipped fill and the deep nick on the underside of the bowl with clear superglue. I did not use briar dust this time as neither repair was deep. I lightly sanded the spot with 220 grit sandpaper and then with 1500-2400 grit micromesh sanding pads.bank8

I cleaned out the mortise and airways in the bowl and stem with pipe cleaners, cotton swabs and alcohol until they were clean.bank9I needed to repair the small groove (looks like a crack but does not go through the surface) in the button and on the surface of the stem as well as the tooth marks but before I could do that I needed to redefine the button edges. I used a needle file to recut the sharp edge and smooth out the ridges and bumps on the stem. With the file I was able to smooth out the groove on the button surface and the stem. With this done it was clear that there was not a crack. I wiped the stem down with alcohol and then built up the damaged areas with black super glue. I also repaired the spots on the underside of the stem with the black super glue.bank10 bank11When the glue had cured I filed the repairs back until they were even with the surface of the stem. I also recut the edge following the path I had previously cut.bank12I sanded the repaired areas and the entire stem with 220 grit sandpaper to smooth out the surface and to remove the oxidation.bank13I wiped down the bowl with a light coat of olive oil to make the grain stand out and to see if there was any glaring light spots that needed to be touched up with a stain pen. It looked good. Once I polished and waxed the bowl I think it would be good to go. The photos below show the bowl at this point in the process. It really is a beautiful piece of briar.bank14 bank15I polished the repaired stem with micromesh sanding pads – wet sanding with 1500-2400 grit pads and dry sanding with 3200-12000 grit pads. I tried something new this time to try to defeat the frustrating oxidation on the stem. Instead of wet sanding with water I wet the stem with a light coat of olive oil and sanded it with the pads. It worked really well to cut through the oxidation. I wiped the stem dry after wet sanding and dry sanded without the oil. The finished shine is deep.bank17 bank18 bank19I buffed the bowl and stem with Blue Diamond on the buffing wheel to raise the shine. I gave it multiple coats of carnauba wax and buffed it with a clean buffing wheel. I hand buffed it with a microfibre cloth. I am hoping Steve enjoys this one. It is one beautiful old pipe. It helps that it carries a family story with it. Thanks for looking.bank20 bank21 bank22 bank23 bank24 bank25 bank26 bank27

Restoring a Well-Aged Double Walled Ceramic Baronite Pipe


Blog by Steve Laug

Steve, a pipe man in Northern British Columbia who sent me this old Baronite pipe said it belonged to his grandfather. That makes sense to me looking at the patina on this old double walled ceramic pipe. It is darkened with age like a well cured meerschaum. I have cleaned up quite a few of these but I have not seen one darkened to this degree. It is basically a bent apple shaped pipe with a windmill and canal scene on the front of the bowl wrapping slightly onto each side. On the left side of the shank it reads Holland and on the right side Baronite. I had a memory of the Baronite stamping referring to a line of pipes from a Dutch company called GoedeWaagen. I looked it up on Pipedia: https://pipedia.org/wiki/GoedeWaagen. I found the following information that confirms that the Baronite was a line of Double Walled Ceramic pipes produced by GoedeWaagen. I quote the short article in full:

Dirck GoedeWaagen became a master pipemaker on January 1, 1779 and took on his first assistant the following month. Soon after Dirck’s grandson fell in love with and married a girl from the illustrious De Jong family, legendary in the ceramic pipemakers guild in Gouda. He built a workshop in the Keizerstraat in Gouda, which continued for two generations until his grandsom Abraham GoedeWaagen moved the company to a new location.

In 1853, Pieter Goedewaagen purchased his father-in-law’s factory “De Star”, which becomes the basis of the modern GoedeWaagen company. In approximately 1880, Abraham’s grandson Aart GoedeWaagen persuaded his father Pieter to expand the business with an eye towards more models of pipes, and P. GoedeWaagen & Sons was founded in response. Within ten years the firm had hundreds of models and P. GoedeWaagen & Son was exporting pipes around the globe.

GoedeWaagen continued to make pipes, but also began acquiring other ceramics firms, including ‘De Distel’ in 1923, and in so doing acquiring the expertise to make decorated ceramics other than clay pipes. It is at this time that the company is granted a Royal charter and by the 1930’s Royal Goedewaagen is one of the top names in dutch ceramics.

While Goedewaagen pipes were originally traditional and figural clays, after the invention of the double walled clay pipe by Zenith, also a Gouda company, Goedewaagen began producing pipes in that commonly seen style, which they marketed as The Baronite Pipe, advertised for its clean smoking and health benefits. Since the company’s bankruptcy in 1982, however, they have made only the occasional souvenir pipe, including a line commemorating Holland’s monarchs.

I have no idea when this pipe was made but at least we now know who made it and where it was made. The stem is yellow Bakelite with a threaded metal tenon. I don’t know if that is original but it is in excellent shape. It is screwed into a cork insert in the shank of the pipe. It had deep tooth marks on the top and bottom sides near the button and into the top of the button edges. The bowl in this case had a fairly thick cake of carbon built up inside. The exterior of the bowl had a lot of dirt and debris stuck to the surface of the bowl and shank. The pipe reeked of strong tobacco. The rim seemed to have some spots of either damage or flaws from the original manufacture. There was also some tar buildup on the rim top. The brass band on the shank was oxidized and dull. Overall it was a dirty pipe in need of TLC.delft1 delft2I took this close up photo of the interior of the bowl and the rim. Note the airway at the bottom of the bowl that drops into the inner space between the two ceramic walls. The rim is also dirty with tar. In the second photo I removed the stem and you can see the crumbling cork insert.delft3 delft4I sanded the top of the bowl with a 1500 grit micromesh sanding pad to remove the tar and buildup without damaging the glaze on the ceramic. I reamed the bowl with a Savinelli Pipe Knife to scrape the cake back to the bare ceramic walls. Just a note – ceramic bowls like meerschaum bowls should be wiped out after each smoke to make sure that a cake does not build up in the bowl.delft5 delft6I pulled the cork insert out of the shank and it was dry and deteriorated. I wanted to try to rejuvenate the cork but it was too far gone and crumbled in my hands. A new cork could have been purchased from a pharmaceutical supply but I have always cut and shaped my own cork inserts for these from old wine corks. I cut a piece of cork the same thickness as the insert.delft7I traced the diameter of the old insert on the new piece of cork and cut off the excess with a sharp pen knife.  I shaped it with a Dremel and sanding drum until it was round. I twisted the cork onto a drill bit the sized of the tenon.delft8I sanded the diameter of the insert with the Dremel and sanding drum until the diameter was the same as the old insert and could be compressed into the shank of the pipe. In the photo below you can still see a slight ridge in the middle of the cork. I would need to smooth that out before I inserted it in the shank.delft9I scrubbed out the shank and the airway in the stem with pipe cleaners, cotton swabs and alcohol. I was able to get a lot of the grime and grit out of the shank. I was not able to clean in the airspace between the walls using this method.delft10I remembered reading somewhere that you could rinse out the inside of the shank and the airspace with water. I ran warm water in the shank and plugged the bowl with my thumb and vigorously shook the bowl. The warm water loosened the buildup in the airspace and soon chunks of dark tar fell out of the shank. I continued to shake and rinse the bowl until the water came out clean. The pipe began to smell fresh again.delft11Before I left for work this morning I repaired the deep tooth marks on the stem with clear super glue and let the stem cure all day. When I got home I cleaned the threads on the metal tenon with a brass bristle brush to remove the rust and oils that had accumulated there as well.delft12I filed the patches on the stem and recut the edges of the button and took the repairs down until they were even with the surface of the Bakelite stem.delft13I sanded the patched areas of the stem with 220 grit sandpaper and reshaped the button as well. The surface of the patch blended in on both sides of the stem. There is a slight problem in sanding the yellow Bakelite stem in that the sanded areas are lighter than the rest of the stem. Polishing the stem will minimize this but it is definitely lighter. To me a smooth stem is far better than a rough, tooth marked stem so I am willing to live with the slightly lighter stem at that point. I have also found that as the pipe is used the colour eventually blends in.delft14I polished the stem with 1500-12000 grit micromesh sanding pads – wet sanding with 1500-2400 grit pads and dry sanding with 3200-12000 grit pads. I rubbed the stem down with Obsidian Oil between each set of three pads. I am pretty sure that it does nothing for the Bakelite but it does give the micromesh pads more bite and add to the quality of the polishing.delft15 delft16 delft17With the stem polished it was time to twist the cork insert onto the tenon. I have inserted them directly into the shank before but find that this method works easier and keeps the cork from breaking in the process of inserting it.delft18Before I inserted it into the shank I rubbed the cork down with Vaseline Petroleum Jelly to soften the cork and make it easier to slip into the shank. Once the cork was greased I carefully pushed it into the shank.delft19I hand buffed the bowl and stem with Conservator’s Wax and a soft microfibre cloth to polish it and give it a shine. I was able to clean off the grime and leave behind the rich reddish-brown patina on the bowl. I polished the brass band with 6000-12000 grit micromesh sanding pads. I waxed it as well. The finished pipe is shown in the photos below. It is ready for another long life of enjoyment. It looks and smells great. The polishing of the stem minimised the lightning of the yellow so that it almost is unnoticeable. I am hoping that Steve enjoys his grand dad’s pipe and lets his mind travel to the times he remembers him smoking it. Cheers. Thanks for looking.delft20 delft21 delft22 delft23 delft24 delft25 delft26 delft27


Underneath the Grime lay a beautiful Royal Guard 504


Blog by Steve Laug

I have a box of pipes from a friend in Dawson Creek to clean up. In trade for a few restorations he was the one who gave me the Preben Holm Pair. I asked him to prioritize which pipes he wanted me to tackle first. Number one on his list was a Stanwell made Royal Guard 504 that combines smooth and sandblast areas into the finish. It was in rough shape. The finish was dirty and worn with the brown top coat worn down. The vulcanite shank extension was oxidized and the RG stamp on the left side was faded. The bowl was thickly caked and the lava overflow on the top of the bowl was also very thick. I was a bit concerned that underneath the cake I would find burn. You can never tell – sometimes a thick cake protects the rim top and sometimes it hides a lot of rim damage. Once I got into the cleanup I would be able to tell better with this one. The stem was lightly oxidized and there was tooth chatter and bite marks on the top and the bottom sides near the button. The top edge of the button had a small dent as well. The deepest tooth mark was on the topside of the stem and would need to be repaired. But even under all the grime I could see that this pipe would be a thing of beauty once it was finished.RG1 RG2I took a closeup photo of the rim to show how thick the cake was in the bowl and the extent of the overflow on the rim. It was very thick and quite hard.RG3I reamed the bowl with the first three cutting heads on the PipNet reamer and then cleaned it up more with the Savinelli Pipe Knife. The amount of carbon that came out of the bowl was amazing.RG4I used a pen knife with a thin stiff blade to carefully scrape off the buildup on the rim. It was pretty thick and hard so I slowly and carefully flaked it off with the knife.RG5I scrubbed the bowl and rim with acetone on a cotton pad and was able to remove the grime and the buildup of wax and oils in the grooves of the sandblast.RG6There were some scratches and nicks in the curved top of the rim that needed to be sanded out. I also sanded the inner bevel on the rim. I used 180 and 220 grit sandpaper to remove most of the damaged areas. The photo below shows the rim after quite a bit of work. There was still more sanding to do at this point.RG7I did some more work on the rim with sandpaper and on the inner edge of the rim with the Savinelli Pipe Knife and was able to smooth out some more of the damage.RG8I wiped down the inner edge of the bowl and the rim with alcohol to see where I stood with the rim resurfacing. It was starting to look really good.RG9I used black super glue to repair the deep tooth mark on the top side of the stem. When it dried I sanded it and filed it smooth the surface of the stem.RG10I sanded the shank extension with micromesh sanding pads. I wet sanded it with 1500-2400 grit pads and dry sanded it with 3200-6000 grit pads. I rubbed it down with Obsidian Oil. I used some European Gold Rub n’ Buff on the stamping on the stem to refresh it.RG11I restained the bowl with a dark brown aniline stain cut by 50% with alcohol. I applied the stain and flamed it with a lighter. I repeated the process until I was satisfied with the coverage.RG12I wiped the bowl down with isopropyl alcohol to even the stain coat and make it more transparent. The combination of grains in the sandblast and underneath is beautiful.RG13 RG14I scrubbed out the internals with alcohol, pipe cleaners and cotton swabs until the airways in the shank and the stem and the mortise in the shank were clean.RG15I buffed bowl with Blue Diamond on the buffing wheel and then gave it multiple coats of carnauba wax. I buffed it with a clean buffing pad to raise the shine.RG16 RG17Once I had the repair smoothed out and blended into the surface of the stem top I polished the stem with micromesh sanding pads. I wet sanded it with 1500-2400 grit pads and dry sanded it with 3200-12000 grit pads. I rubbed the stem down with Obsidian Oil after each set of three pads. Once I had finished I set the stem aside to dry.RG18 RG19I forgot to take a photo of the stem after sanding it with the 6000-12000 grit pads. I took the pipe to the buffer and buffed the stem with Blue Diamond and then gave the pipe multiple coats of carnauba wax. I buffed it with a clean buffing pad and with a microfibre cloth to deepen the shine. The finished pipe is shown in the photos below. I am hoping the pipe man in Dawson Creek likes the new look to this old pipe. It is truly a beauty. Thanks for looking.RG20 RG21 RG22 RG23 RG24 RG25 RG26 RG27

Restoring a Pair of Preben Holm Deluxe Walnut Pipes


Blog by Steve Laug

I picked up this pair in a trade for a pipe I was selling plus some restoration work credit. They are really an interesting pair of Preben Holm pipes. I have no idea of the age or where they fall in the line of Preben’s pipes but I liked the look of the two of them. Both of them are stamped Preben Holm over Deluxe Walnut over Hand Made in Denmark on the underside of the shank. Both had a matte finish dark reddish-brown stain with identical stems. Both pipes were sitters.

The first of them was a square long shanked Dublin freehand with rounded outer edges to the bowl. The grain looked quite good on the briar but it was dirty. The rim had some heavy cake buildup on it and the bowl was thickly caked. The stamping on the underside of the shank was very sharp and clear. The stem was lightly oxidized and there was lots of tooth chatter and tooth marks on the top and bottom sides near the button. The crown logo with the PH below it on the stem was faint but legible. Here are some pictures of the first pipe when it arrived.Deluxe1 Deluxe2I took a close up photo of the bowl rim to give you a clear picture of what the rim and the cake looked like. It would take some careful scrubbing to remove the build up without damaging the finish.Deluxe3The second of the pair had a more rounded edge semi-square shank and was also a more squat Dublin freehand with rounded outer edges to the bowl. The grain on the briar looked just as good as that on the first and was just as dirty. The rim on this one also had some heavy cake buildup on it and the bowl was thickly caked. The stamping on the underside of the shank was very sharp and clear. The stem was lightly oxidized and there was lots of tooth chatter and tooth marks on the top and bottom sides near the button. The crown logo on the stem was faint but legible. Here are some pictures of the second pipe when it arrived.Deluxe4 Deluxe5I took a close up photo of the bowl rim to give you a clear picture of what the rim and the cake looked like. It would take some careful scrubbing to remove the build up without damaging the finish.Deluxe6I reamed both pipe with a PipNet pipe reamer starting with the smallest cutting head and working up to the third head. I cleaned up the transitions with a Savinelli Pipe Knife.Deluxe7I scraped the tarry build up on the rims of the pipes with a pen knife I used for that. It is sharp and thin so with it I can carefully scrape the cake off the rim. I wiped the rims down with alcohol on cotton pads.Deluxe8I sanded the inside of the bowls with a rolled piece of sandpaper around my index finger. I was able to smooth out the inside of both of the bowls.Deluxe9I scrubbed out the mortises and airways in the bowls and stems with alcohol, cotton swabs and pipe cleaners.Deluxe10 Deluxe11I sanded the tooth chatter and tooth marks on both sides of both stems. All the marks were identical on both pipe stems so I am guessing that they belonged to the same smoker. The first two photos are of the first pipe’s stem and the next two are from the second pipe.Deluxe12 Deluxe13I used a small brush and some white acrylic paint to touch up the crowns on the top of each stem.Deluxe14I waxed both bowls and buffed them on the buffing wheel. The photos below show the bowls after the cleanup and buffing.Deluxe15 Deluxe16 Deluxe17I polished the stem on the first pipe with micromesh sanding pads – wet sanding it with 1500-2400 grit pads and dry sanding it with 3200-12000 grit pads. I rubbed down the stem with Obsidian Oil between each set of three pads. When I got through with the 12000 grit pads I gave it another coat of oil and set it aside to dry.Deluxe18 Deluxe19 Deluxe20I repeated the polishing practice spelled out above on the second stem. The photos below show the progress of the work.Deluxe21 Deluxe22 Deluxe23I buffed the pipes with Blue Diamond on the wheel and gave them both multiple coats of carnauba wax. I buffed it with a clean buffing pad to raise the shine. I hand buffed it with a microfibre cloth. The finished pipes are shown in the photos below. These two came out looking really nice. The shape and the finish of both are eye catching. Thanks for looking.Deluxe24 Deluxe25 Deluxe26 Deluxe27 Deluxe28 Deluxe29 Deluxe30 Deluxe31 Deluxe32 Deluxe33 Deluxe34 Deluxe35 Deluxe36 Deluxe37 Deluxe38 Deluxe39

Breathing new life into a Chippendale 276 Cauldron made by Charatan


Blog by Steve Laug

My brother sent me this interesting old pipe to clean up and restore. He included some photos of what it looked like when he received it from the eBay seller. The stain colour was really nice and showed the contrast to highlight the grain. There were some nicks and dents in the briar on the bowl sides and bottom. The rim had a thin lava coat on the top. The inner and outer edges were in excellent condition. The bowl was darkened with a light cake on the bowl sides. The bottom quarter of the bowl was still light unsmoked, undarkened briar. The bowl seems to have never been smoked to the bottom. The stem was lightly oxidized with tooth marks and chatter on both the top and the bottom sides near the button. The stamping on the side of the stem was readable but looked like it was worn.Chip2 Chip3Chip1This unusual old pipe is stamped on the left side of the shank with the block letters CHIPPENDALE. On the right side it is stamped Made in over London England and a shape number 276. On the saddle portion on the left side of the stem it bears a CD stamp. I looked for the brand on the pipephil site and found that the brand was listed there with photos of stamping identical to the one that I had. I have included the photo of the stampings courtesy of pipephil’s site.

I did some more research at the pipephil site did not give any information regarding the maker. I looked in one of my go to references, Who Made That Pipe and found that the Chippendale brand was made by Ben Wade in London. I use WMTP regularly and one of the limitations of the book is that it gives no other information. In the back of my head I had a memory of a link between Ben Wade and Charatan. That sent me on a further hunt.Chip4Further research lead me to an article on Pipedia entitled Dating of Charatans by Fabio Ferrara. The article definitively links the Chippendale pipes to Charatan. I quote from the section on Pipedia entitled Identification of Fifth Era Pipes in full with the information the Chippendale stamping highlighted in bold and underlined. Here is the link: https://pipedia.org/wiki/Dating_of_Charatans

Identification of a fifth era pipe (First Dunhill era, 1977-1981)

Dunhill finally acquired Lane Ltd. in April 1976. To be honest this era should begin that year, however to clarify matters, knowing that during the first months everything changed in the production, I assume the beginning of this era to be 1977.

The characteristics of this era are close to the previous one, except for the absence of the LANE symbol (approx. ending of 1980).

In this very first period Dunhill didn’t change the production site and the original methods, making plans for the future, and the real revolution took place in 1982.

You may come across a pipe of the ‘old generation’, it is important to note that if the DC has been added later, it is often out of line with the shape code.

The Belvedere series is sold as a special, named the Chippendale brand, exclusively for Tinderbox.

1) The mouthpiece is frequently double comfort, rarely saddle without the double comfort, never tapered. If the stem is not a double comfort but a saddle one, it is characterized by the letter X on the right of the shape code (e.g. 2502X), naturally in this case the letters DC are not displayed.

2) In the CP logo, the C enters the P (until approx. 1980).

3) Absence of £ on the shank (from the end of 1980 approx., this is because during the first period Dunhill kept the £, as Lane Ltd was property of Dunhill that could use its trademark).

4) Presence of the letter DC just after the shape number (e.g. 2502 DC) or of the letter X only if the stem is not a double comfort one.

5) Presence of the writing “Made by Hand – In – City of London” (until 1979).

6) The pipes marked Chippendale are just a Belevedere series, On the mouthpiece, instead of the CP they display CD.

From the above information it appears that the Chippendale stamping was put on pipes that were made Charatan and sold by Tinderbox in the US. They are essentially Charatan Belvedere series pipes. Now that I knew that it was time to work on the pipe. I took the next four photos to show what the pipe looked like after my brother cleaned it up with his usual thoroughness and I received it here in Vancouver.Chip5 Chip6I took some close up photos of the rim and the stem to show the condition of both. The rim is very clean except for a light build up on the front and the back side of the rim top. The photos of the stem show the tooth chatter on both sides and a deep tooth mark on the top side and underside of the stem.chip8 chip9I also took a close up photo of the stamping on the stem. The logo is a CD instead of the CP for Charatan just as was noted in the research. It was faint so it would need to be touched up after the stem was cleaned.Chip10I ran some cotton swabs and alcohol through the shank and the mortise. It was very clean as my brother had done a great job cleaning it. I ran some pipe cleaners through the stem. The slot in the button had some hardened tars in it. I picked the slot open with a dental pick before cleaning the inside of the stem.Chip11There were some deep nicks and divots in the surface of the briar on the front and the left side of the bowl. I filled them with drops of clear super glue.CHip12Once it dried I sanded the repairs even with the surface of the briar using 220 grit sandpaper. I then sanded it with 1500-2400 grit micromesh sanding pads.Chip13I touched up the sanded repairs with a dark brown stain touch up pen. I gave the bowl two coats of Conservator’s Wax. When it dried I buffed the bowl by hand.Chip14I sanded the stem with 220 grit sandpaper. I was able to remove the tooth chatter and the tooth mark on the underside of the stem. I also sanded the rest of the underside to remove the oxidation. I sanded the topside tooth marks. I was able to remove the tooth chatter but the deep tooth mark needed to be repaired. I cleaned the tooth mark with a cotton swab and alcohol and then filled it with black super glue.Chip15I painted the logo on the stem with a white acrylic paint and a small paint brush. I sanded the excess paint off the side of the stem and left the paint in the stamping.Chip16I polished the briar with micromesh sanding pads – wet sanding with 1500-2400 grit pads and dry sanding with 3200-12000 grit pads. I wiped the bowl down with a light coat of olive oil and hand polished it.Chip17 Chip18I polished the stem after sanding it with 220 grit sandpaper with micromesh sanding pads – wet sanding it with 1500-2400 grit pads and dry sanding with 3200-12000 grit pads. I rubbed it down with Obsidian Oil between each set of three pads. When I finished sanding with the 12000 grit pad I gave it a final coat of oil and set it aside to dry.Chip19 Chip20 Chip21I buffed the stem and bowl with Blue Diamond on the buffing wheel to polish it. I gave the bowl and the stem multiple coats of carnauba wax and buffed it with a clean buffing pad to raise the shine. I hand buffed it with a microfibre cloth. The finished pipe is shown in the photos below. To me it has the look of a Charatan and with the history I found it turns out it is one. The pipe was made for Tinderbox to be sold in the US. This one is available to anyone who wants to add it to their rack. Send me a message or an email to slaug@uniserve.com. Thanks for looking.Chip22 Chip23 Chip24 Chip25 Chip26 Chip27 Chip28 Chip29

Revitalizing a Savinelli de luxe Milano 118KS


Blog by Steve Laug

Sav1This pipe came to me from my brother. I am not sure if he found it in one of his antique shop forays between Idaho and Nebraska or on a recent trip to California or even if he found it on eBay. It really doesn’t matter in the long run where it came from. Though sometimes I wish that the pipes I cleaned up could talk and tell their stories. It was obviously a favourite of the pipeman who owned it. It was well smoked but not broken down. The pipe is stamped on the smooth underside of the bowl and the shank with clear and distinct markings. On the bottom of the bowl it reads Savinelli over de luxe over Milano. Next to that it was stamped with the Savinelli Shield logo and the shape number 118KS. Under that is stamped Italy. It is a standard Pot shaped pipe with a large bowl that is one inch in diameter.

The sandblast shown on the pipe in these photos is stunning. Even under the tar, oils and dirt the pipe is quite beautiful. The bowl had a fairly thick cake that had overflowed onto the rim and filled in the grooves. The dust and dirt had filled many of the grooves of the blast on the sides of the bowl and the shank. The stem was oxidized but was high quality vulcanite. In the photos below it is inserted upside down with the brass/gold bar that generally was on the left side of the saddle was turned to the right side. There was some tooth chatter on the top and bottom sides of the stem. On the top side of the stem (which was turned upside down) there was a deep tooth mark.

My brother took these three photos before he cleaned up the pipe. He reamed it with a PipNet reamer to rid the bowl of the cake and scrubbed the exterior with Murphy’s Oil Soap to remove the tars and grime. He cleaned out the airway in the shank, the mortise and the stem airway and removed all of the tar that had collected there.Sav2When the pipe arrived it was spotless. The sandblast really stood out with clarity as can be seen in the next set of four photos. The ring grain, the birdseye and even the flame grain showed but there was also an under grain that shown through that was beautiful as well.Sav3 Sav4I took some close up photos of the pipe. The first shows the stamping on the bottom of the bowl. You can see the clear markings on the pipe and how they stand out on the flat smooth bottom of the bowl and the shank. The second photo shows the rim. There was still light dust and grit in the grooves of the rim.Sav5I also took some close up photos of the stem. I turned it right side up and the tooth mark on the topside near the button is visible in the first photo below. The underside of the stem showed some tooth chatter. Both sides are oxidized.Sav6I used a brass bristle brush to clean out the debris from the grooves in the rim top. It did not take much but once finished the rim was not as dark. I ran a couple of cotton swabs and alcohol through the shank and it was very clean.Sav7I wiped the bowl down with acetone on a cotton pad to remove dust from the bowl surface in preparation for staining the bowl. I applied some dark brown stain thinned by 50% with isopropyl alcohol using a folded pipe cleaner. I flamed the stain and then repeated the process.Sav8I hand buffed the bowl with a microfibre cloth to raise a shine. The next four photos show the bowl after the initial hand buffing. The grain really stands out clearly in these photos.Sav9 Sav10I sanded out the bite marks with 220 grit sandpaper. Thankfully they were not as deep as I thought and were easily removed. I sanded the oxidation as well and gave the stem a general workover.Sav11I polished the stem with micromesh sanding pads – wet sanding it with 1500-2400 grit pads and dry sanding with 3200-12000 grit pads. I rubbed the stem down with Obsidian Oil after each set of three pads. I gave the stem a final rubdown with the oil after sanding with the 12000 grit pad and set it aside to dry.Sav12 Sav13 Sav14

I buffed the bowl and stem with Blue Diamond on the buffing wheel to polish it. I used a light touch on the bowl so as not to get the polish stuck in the grooves of the sandblast. The stem took some work to polish off some of the stubborn oxidation at the shank stem union. I polished the stem with multiple coats of carnauba wax a buffed it with a clean buffing pad. I hand waxed the bowl with Conservator’s Wax and buffed the bowl with a clean buffing pad. I hand buffed the pipe and stem with a microfibre cloth to deepen the shine. The finished pipe is shown in the photos that follow. It is a great looking pipe with an amazing sandblast finish that is worth taking the time to look at. Thanks for looking.Sav15 Sav16 Sav17 Sav18 Sav19 Sav20 Sav21

A Reborn KBB Yello-Bole 2329 Billiard


Blog by Steve Laug

I really like older KBB Yello-Bole pipes. The initial look of this one as it is seen in the first two photos confirms that. There is something about the grain, the briar that is used and the natural patina that comes with years of use that draw me to them. The yellow stem with the inset circle is attractive as well. The Yello-Bole spade stinger that extends into the bowl bottom does not restrict the draw. I had hopes that this one would be in decent shape when my brother sent me the photos below. He had mentioned that the rim was in rough shape and the stem had a lot of bite and tooth marks but the photos did not clearly show that to me.Bowl Bowl1He did his usual stellar job in cleaning up the bowl and stem. The briar and the internals were clean when it arrived. Only then did I see the extent of the rim damage to this one. If you look carefully at the photos you can see how rough the rim top and sides are. You can also see the deep tooth marks on the yellow stem. The stamping on the pipe read KBB in the usual cloverleaf on the left side of the shank with Yello-Bole next to that. The shape number 2329 was on the right side of the shank. All stamping was faint but legible with a lens.Bowl2 Bowl3I took the stem off the bowl and found that the stinger was stuck in the tenon. On these older Yello-Boles the stinger is often threaded rather than pressure fit. I heated the stinger with a lighter and soon I was able to unscrew it from the tenon using some needle nose pliers.Bowl4I took close up photos of the rim and the tooth marks on both sides of the stem. The first photo below shows the extensive damage to the top of the rim. It looked as if the pipe had been used as a hammer. The rough spot on the front of the bowl went down quite far down the outside edge of the bowl. On the back right side of the bowl there was also a deep nick down the side of the bowl. The bowl would need to be topped but the depth of the gouges made it necessary to think of other options along with topping.Bowl5The top and bottom sides of the stem next to the button were imposing. The stem had been deeply gnawed on by the previous pipe smoker. The dents were deep and extensive across both sides of the stem almost obliterating the button from view.Bowl6This was one of those hard ones. The stamping is faint and the amount of work necessary to bring it back to life was questionable. But I decided I liked the look of it enough to go for it. I topped the bowl on the topping board to smooth out the top surface of the rim. This still left a lot of work to do on the gouges down the front and back sides of the bowl. I pressed briar dust into the gouges on the side and top of the bowl and put some clear super glue on top of the briar dust. I put more briar dust on top of the glue to fill in the gouges.Bowl7 Bowl8I filled in the deep tooth marks on both sides of the stem and set it on a small wooden lid to dry. I knew that in sanding the stem after the repairs I would lose some of the rich golden colour but the stem would actually be very usable.Bowl10Once the repair dry I used a needle file to recut the button and flatten the repairs to the surface of the stem.Bowl11I cleaned out the airway in the stem and in the shank with pipe cleaners, cotton swabs and alcohol. You can also see the lightning of the yellow stem at the repair.Bowl12I polished the stem with micromesh sanding pads – wet sanding with 1500-2400 grit pads and dry sanding with 3200-12000 grit pads. I rubbed the stem down with Obsidian Oil after each set of three pads. With the final rub down with oil I set the stem aside to dry.Bowl13 Bowl14 Bowl15I wiped the bowl down with acetone on cotton pads to clean off the remnants of the finish. There was still some finish and varnish on the underside of the shank that needed to be removed. I was careful to not wash off the repairs as the acetone will dissolve the super glue patches.Bowl16Interestingly the bottom of the shank is stamped Algerian Briar. There appears to be a crack or repair on the underside of the shank but it is not it is merely a large scratch that I was able to sand out.Bowl17I polished the briar bowl with micromesh sanding pads – wet sanding it with 1500-2400 and dry sanding it with 3200-12000. Each successive grit of micromesh pads raised the level of shine on the bowl.Bowl18 Bowl19After polishing it with the micromesh pads I took some photos to show the state of the bowl.Bowl20 Bowl21I touched up the stain with a medium brown stain pen on the repaired areas on the rim to blend them into the surface of the briar. I buffed the pipe and stem with Blue Diamond on the buffing wheel and then gave the pipe multiple coats of carnauba wax. I buffed it with a clean buffing pad and then buffed it by hand with a microfibre cloth to deepen the shine. The finished pipe is shown in the photos below. I chose to leave the darkened spot on the bottom of the bowl. I sanded it and found that it was more of stain than a burn mark. The wood is solid in that spot and there is no sign of burn through inside the bowl. Thanks for looking.Bowl22 Bowl23 Bowl24 Bowl25 Bowl26 Bowl27 Bowl28 Bowl29

I love the shape of this Comoy’s Regent’s Park London Made Canted Volcano


Blog by Steve Laug

This pipe takes advantage of the grain to the maximum. The shape has flame, mixed and stunning birdseye on the sides, top and bottom of both the bowl and the shank. This is another of the pipes that my brother Jeff found. The stamping is faint but readable with a lens. It is stamped on top of the shank with the words Regent’s Park over London Made. On the underside of the shank stamped diagonally from front to back it reads Made in England. From the photos that Jeff set me the pipe was in decent shape. The finish was spotty and dirty. The rim was clean and undamaged with a light and spotty lava coat. Comoy1The stem was lightly oxidized and there was a deep and large tooth mark on the top side near the button. I have learned that there is usually a match to that on the underside of the stem. The canted volcano shape is very nice. In the photo below it appears that there were some small pin prick fills on the back side of the bowl just above the shank.Comoy2From what I can find online the pipe is made by Comoy’s. They made the Hyde Park brand and it appears they also made the Regent’s Park brand – both which are Comoy’s seconds and are named after London Parks. I found this Comoy’s Shape Chart on-line which shows the pipe as a Modern 625. I have circled it in red – it is shown on the bottom of the right column, last pipe.Comoy3As usual now, my brother did a stellar job cleaning up the pipe before he sent it to me. He reamed it and scrubbed the exterior with Murphy’s Oil Soap so the finish was very clean. He cleaned out the internals as well. The pipe was ready for me to work on the finish and stem repairs when I received it. The next four photos show what the pipe looked like when it arrived to my work table.Comoy4 Comoy5I took a close up photo of the rim to show the slight damage – almost cut marks on the top of the rim surface. The inner and outer edge of the rim is fairly undamaged though so it will not take much to clean up this rim. I also took close up photos of the stem to show the large bite/tooth marks on the top and bottom sides near the button.Comoy6 Comoy7I cleaned up the tooth marks with sandpaper, a dental pick and alcohol. I filled in the deep dents with black super glue and let it cure. I forgot to take photos of the repairs before I sanded them out. Once the glue had cured I sanded both sides of the stem with 220 grit sandpaper to smooth out the repair to match the surface of the rest of the stem.Comoy8I also filled the pin holes in the back side of the bowl with clear super glue and briar dust. Again I forgot to take a photo of the glue and dust mixture. Once it dried I sanded the bowl with 220 grit sandpaper and blended the repairs into the surface of the briar. The surface was smooth to touch .Comoy9I sanded the slash marks on the rim with 220 grit sandpaper to minimize them. It did not take too much sanding to remove them. I also sanded the inner beveled edge of the rim to clean it up and remove the darkening.Comoy10I sanded the bowl and rim with a medium and a fine grit sanding block. I worked to remove the scratching left behind by the 220 grit sandpaper. I carefully avoided the areas on the shank that held the already faint stamping.Comoy11 Comoy12I sanded the stem with the sanding block as well.Comoy13I wet sanded the stem with 1500-2400 grit micromesh sanding pads and rubbed it down with Obsidian Oil. I dry sanded it with 3200-4000 grit pads and gave it another coat of oil. I finished sanding it with 6000-12000 grit pads, gave it a final coat of Obsidian Oil and set it aside to dry.Comoy14There were some scratches on the top of the stem. I would need to work on them some more at this point.Comoy14a Comoy14bOnce I buffed the stem with Blue Diamond the scratches would be blended into the stem surface. I gave the bowl a coat of Danish Oil and Cherry Stain to highlight the red of the briar. I set it aside to dry for about twenty minutes.Comoy15I wiped the bowl off with a soft cloth and hand buffed it lightly to get a clear picture of the finish and the grain on the bowl.Comoy16 Comoy17I polished the bowl and stem with Blue Diamond on the buffing wheel. I buffed out the scratches in the stem and the briar. I gave the bowl and stem multiple coats of carnauba wax to protect it. I buffed it with a clean buffing wheel to raise the shine. I hand buffed the pipe with a microfibre cloth to deepen the shine. The finished pipe is shown in the photos below.Comoy19 Comoy20 Comoy21 Comoy22 Comoy23 Comoy24 Comoy25

A Cased Bakelite Manhattan with a Lockrite Stem


Blog by Steve Laug

I am always on the lookout for older CPF or WDC cased pipes. I bid on them when I get the chance and I used to win many more of them than I do now. They seem to have not only become more popular than they used to be but are also commanding higher prices. I was showing my brother some of them and asked him to keep an eye for them as well. He came across this little cased pipe. It looks like both the CPF and the WDC pipes and probably comes from the same era. The case has a label that reads Bakelite on it and it sits in the lid of the case over the stem. The pipe itself is stamped BAKELITE over MANHATTAN on the left side of the shank and is filled with a gold foil or paint. The right side of the stem also has a gold foil stamp that reads LOCKRITE. The band on the shank is stamped GERMAN SILVER.Bake1The pipe appeared to be barely used. There was some darkening on the rim and some light cake on the top part of the bowl. The bottom of the bowl was like new. The finish was dirty and the varnish coat had some wear and tear. The gold leaf stamping on the shank was worn on the second line on the left side. The German Silver band was lightly tarnished and had some scratches. The Bakelite stem had deep tooth marks on the top and underside of the stem at the button. The Lockrite stamping on the right side of the shank referred to the newly designed tenon system that took care of the perpetual over clocking that occurred with a bone tenon.Bake2My brother Jeff scrubbed the surface of bowl being careful around the gold stamping on the shank. He cleaned out the bowl and the mortise areas and the airway in the stem. When he sent it to me it was very clean. I took photos of the pipe when it arrived to my work table. The first two photos show the case and the first view of the pipe when I opened it.Bake3I lifted it from the case and took a photo of the pipe looking down at it from the top. The rim looks excellent from this view.Bake4The next four photos show the pipe apart from the case. The finish is clean but the twin rings around the bowl cap are dirty. The silver is lightly tarnished and the gold stamping is light on the left and the right sides. You can see the tooth mark on the stem in the last photo of the underside of the pipe and stem.Bake5 Bake6I took a close up photos of the rim and the stem to show the state of both. The rim looked very good though there was some scratching. The stem had deep tooth marks on both sides though it was hard to capture them with the deep red of the Bakelite stem.Bake7 Bake8I took a photo of the newly designed Lockrite tenon on this pipe. It is extremely well designed and worked well to keep the stem aligned with the shank.Bake9The next two photos show the stamping on the shank. The left side reads BAKELITE over MANHATTAN as mentioned above and the right side reads LOCKRITE.Bake10I wiped down the bowl and shank with acetone and cotton pads to remove the remnants of varnish. I was careful to not damage the gold stamping.Bake11 Bake12I used the dental pick to clean out the tooth marks and wiped the stem down with an alcohol dampened cotton pad. I filled the tooth marks with clear super glue.Bake13Once the glue dried I sanded the surface of the repairs with 220 grit sandpaper to smooth out the repairs to match the surface of the Bakelite stem.Bake14With the tooth marks repaired and smoothed out it was time to polish the stem with micromesh sanding pads. I wet sanded the stem with 1500-2400 grit sanding pads and rubbed it down with Obsidian Oil. I dry sanded with 3200-4000 grit pads and gave it another coat of oil. I finished sanding it with 6000-12000 grit pads and gave it a final coat of Obsidian Oil. I set the stem aside to dry.Bake15 Bake16 Bake17I stained the bowl with a Danish Oil and Cherry stain. I let it dry for about 20 minutes before rubbing the bowl down with a soft cloth.Bake18After rubbing it down with a soft cloth I took the following photos of the bowl. The grain on this one is also very pretty. Some of these older pipes were made of really nice briar.Bake19 Bake20I waxed the bowl twice with Conservator’s Wax and hand buffed it once it had dried. I polished the German Silver band with 6000-12000 grit micromesh sanding pads and also with a jeweler’s silver polishing cloth.Bake21I lightly buffed the bowl and stem with Blue Diamond on the wheel. You have to be careful buffing the Bakelite as the heat of the buffer will melt the stem and make more work for you. I gave the bowl and stem several coats of carnauba wax and lightly buffed it with a clean buffing pad to raise the shine. I hand buffed it with a microfibre cloth to deepen the shine. The finished pipe is shown in the photos below. It is really a beauty. Thanks for looking.Bake22 Bake23 Bake24 Bake25 Bake26 Bake27 Bake28