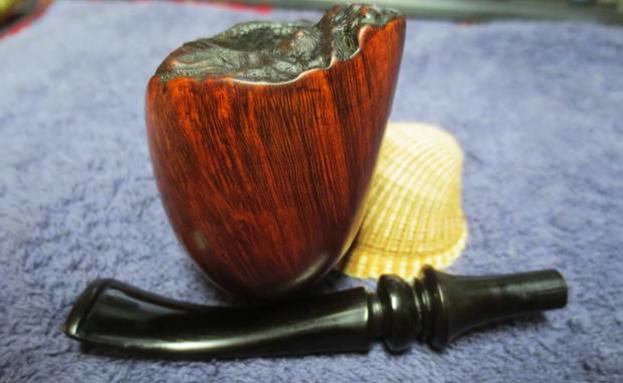
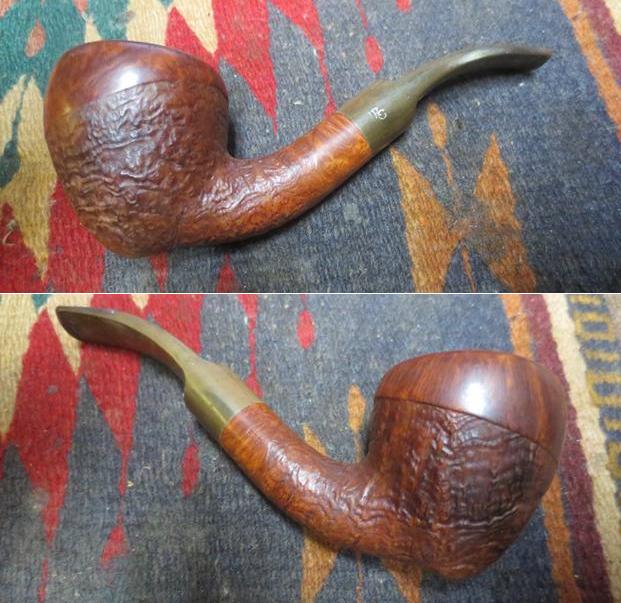
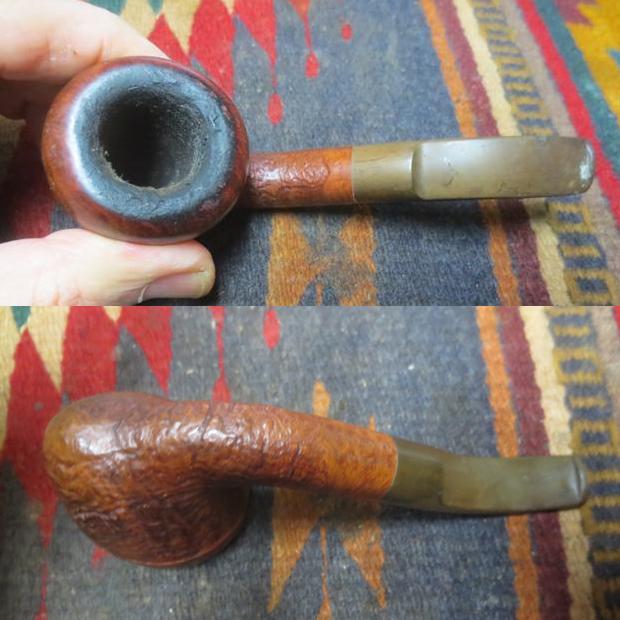
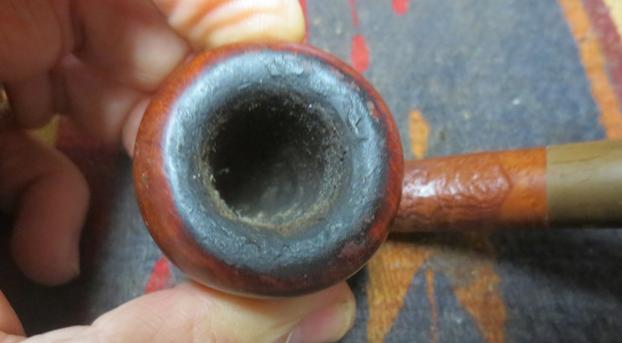
Tag Archives: removing oxidation

One Seriously Frustrating Refurb – a Broken Down Hilson Fantasia 206 Dublin


Blog by Steve Laug

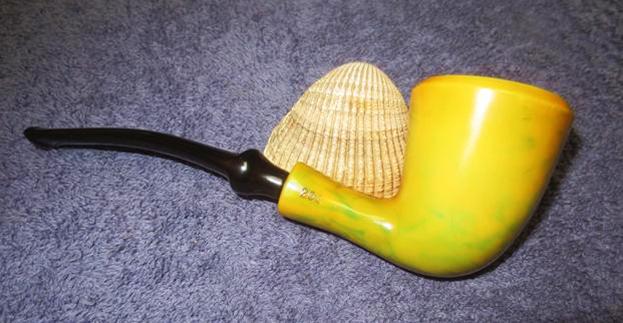
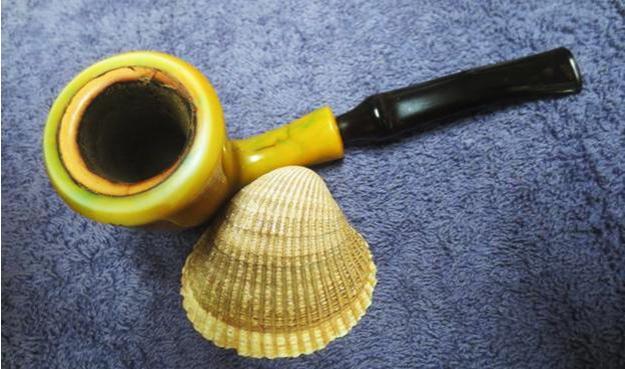
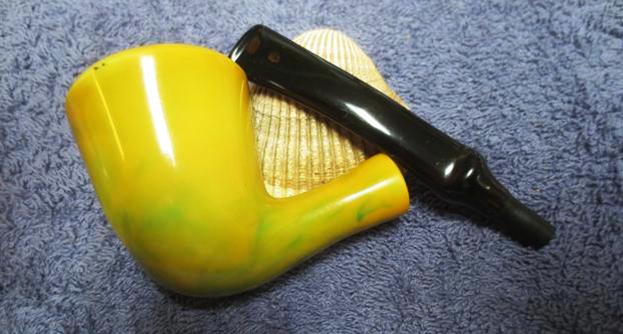
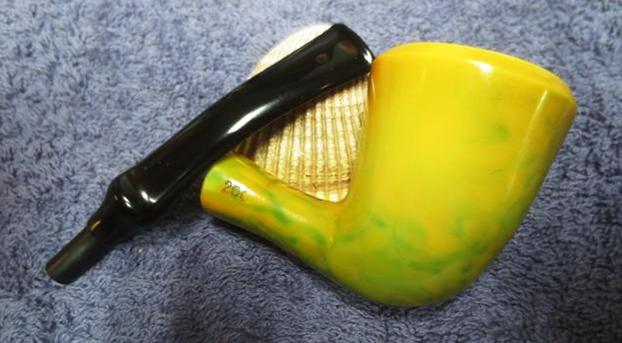
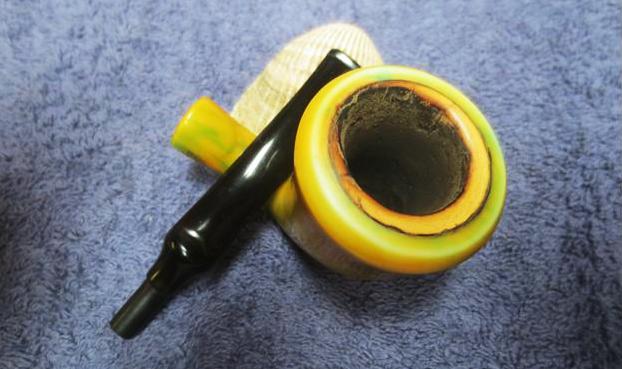
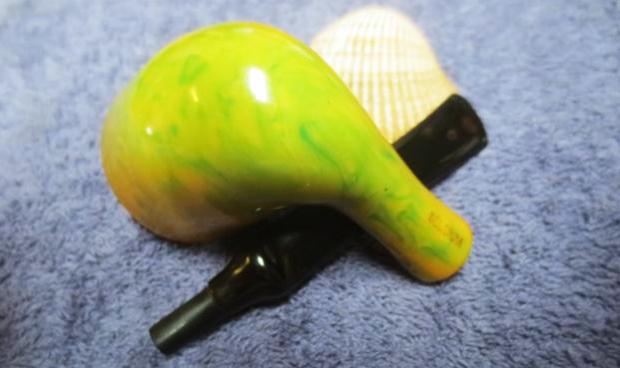
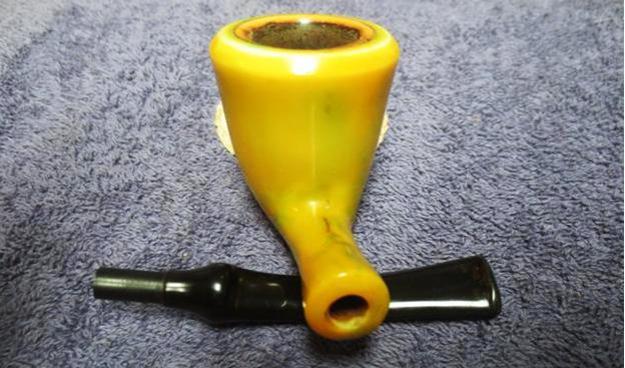
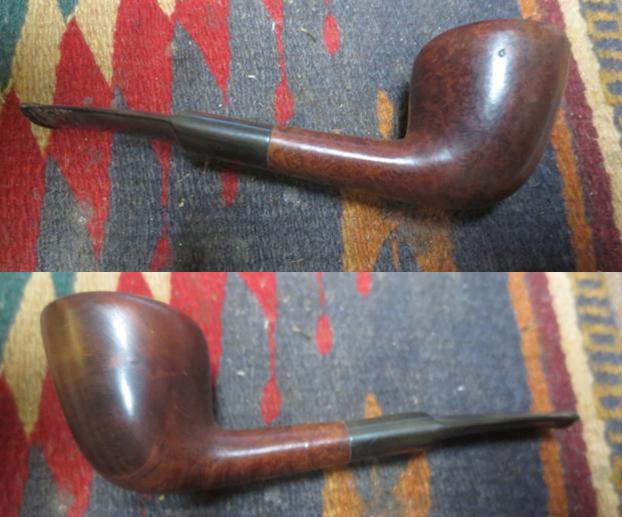
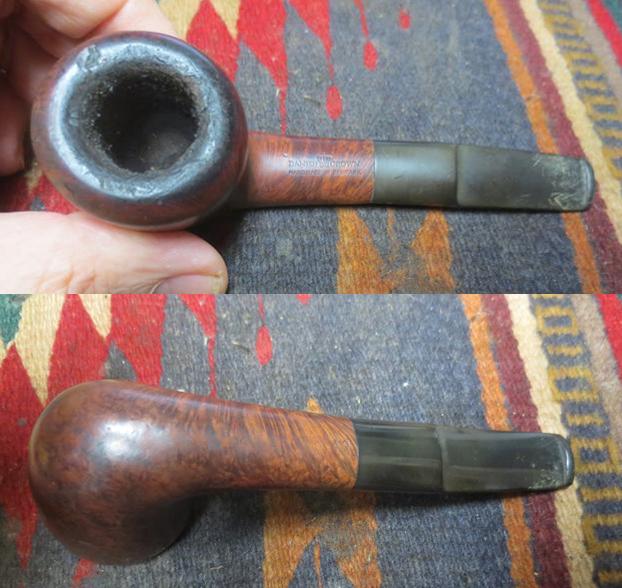
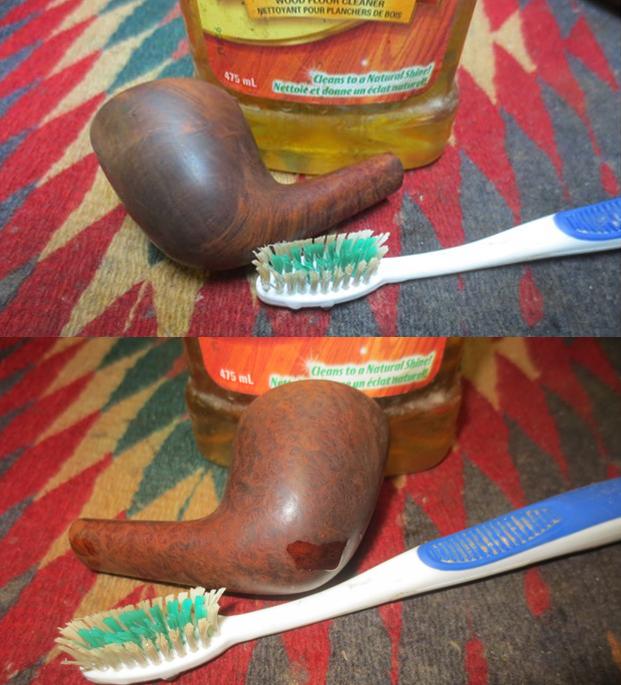
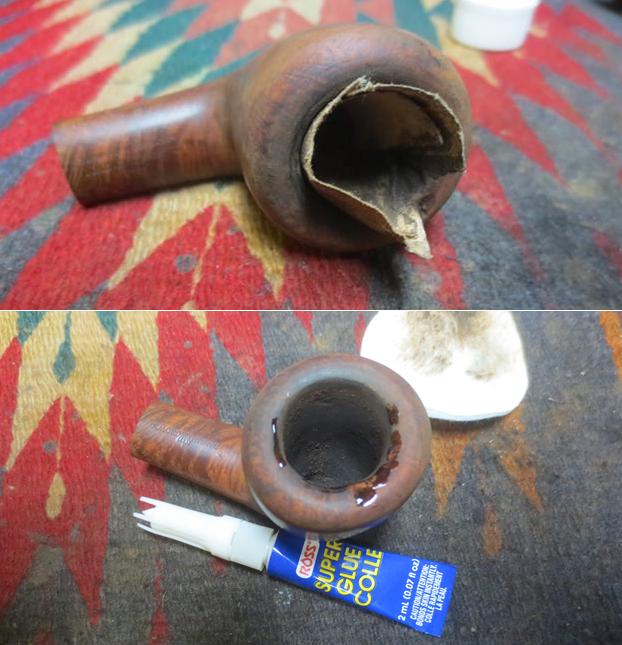
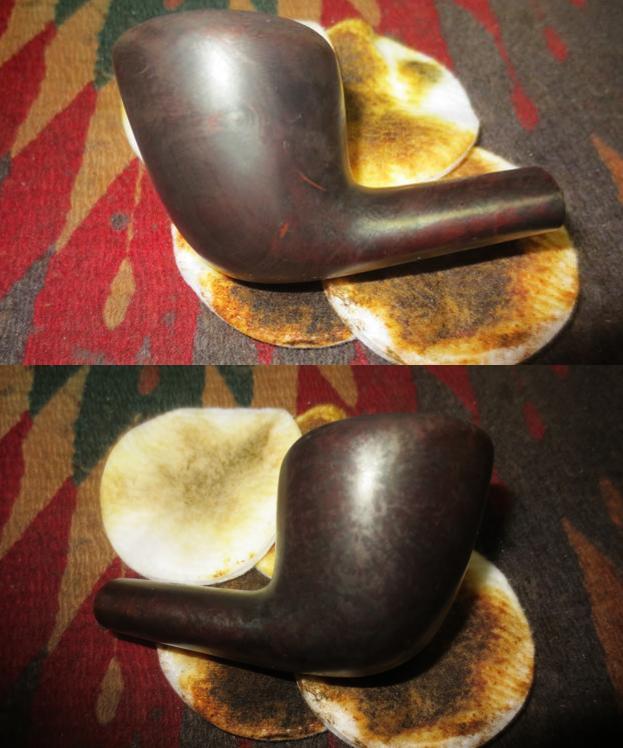
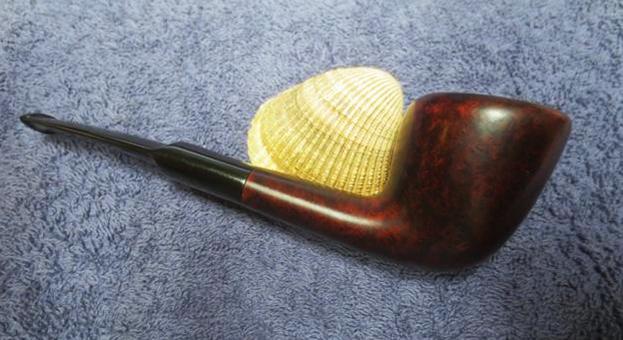
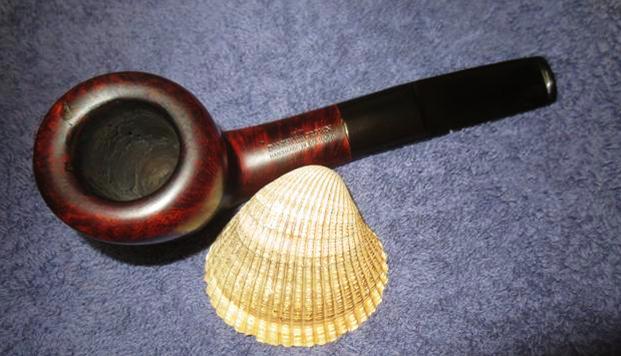
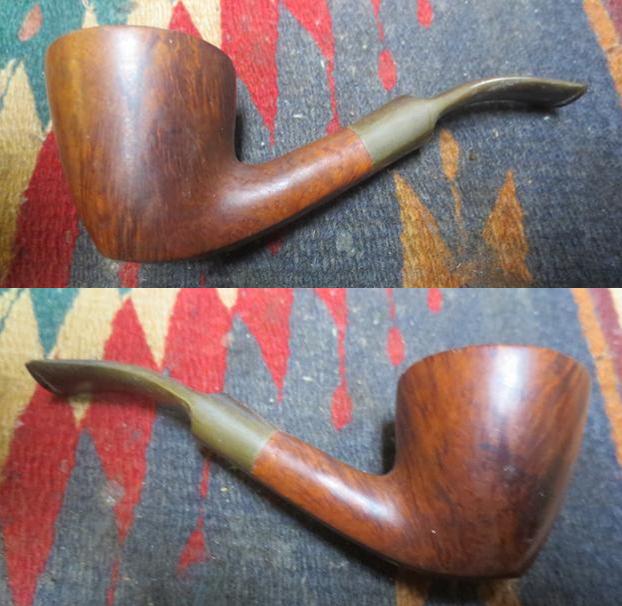
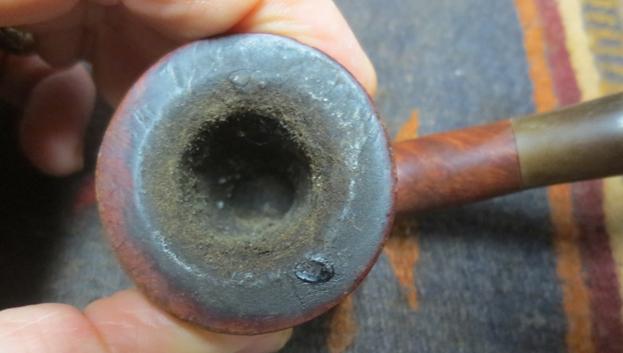
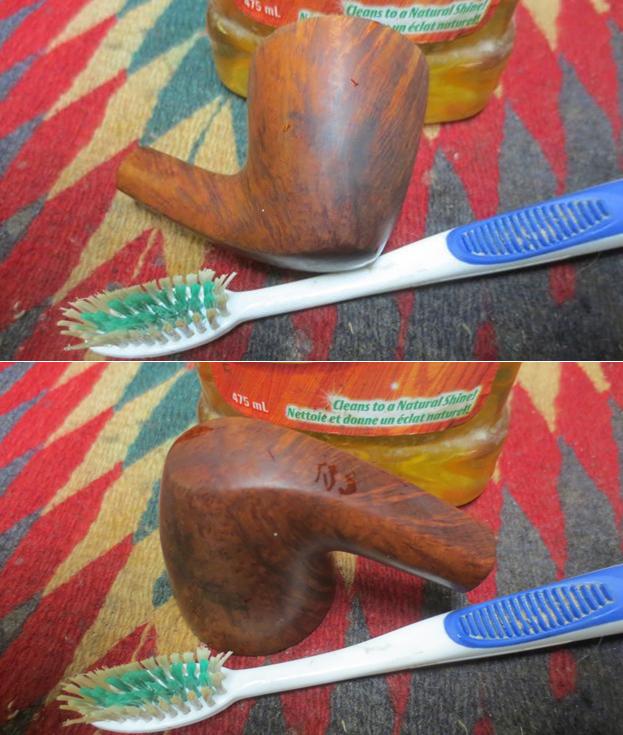
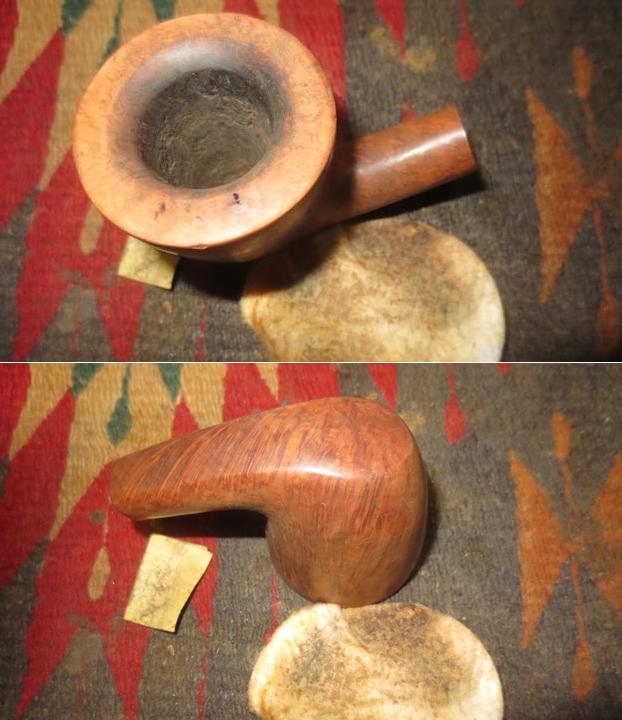
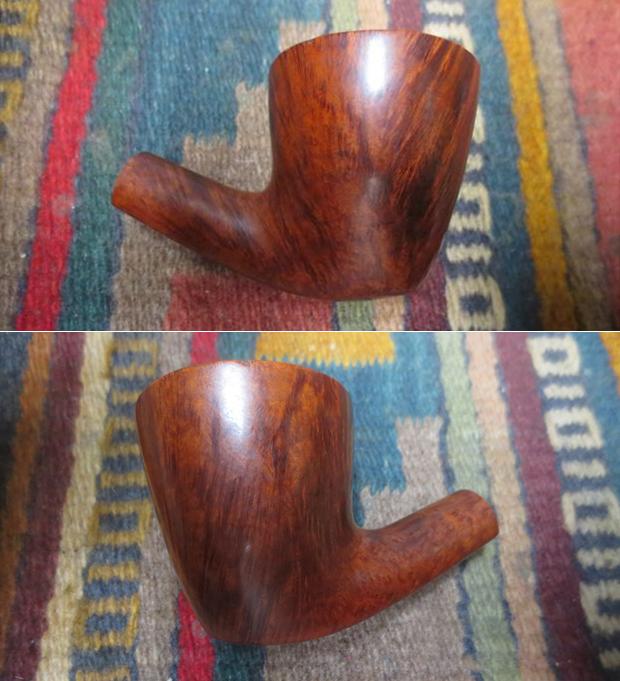
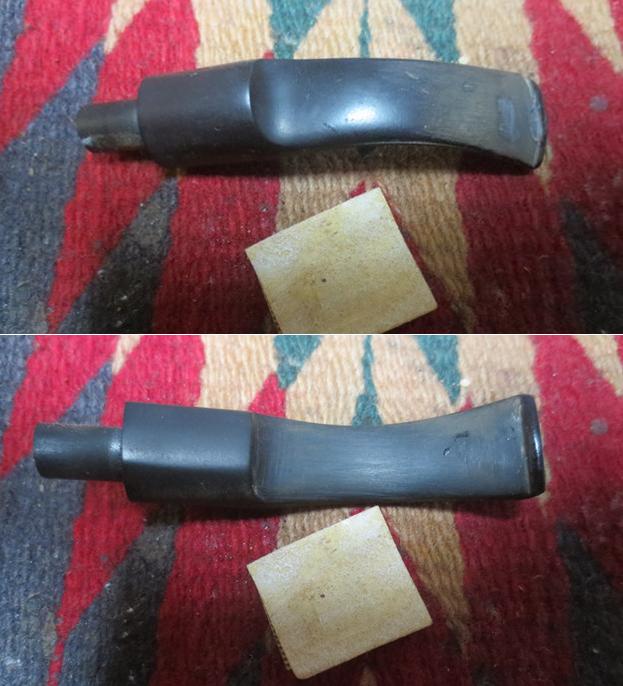
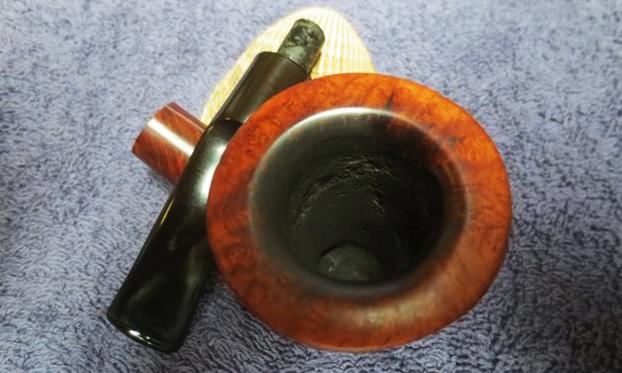
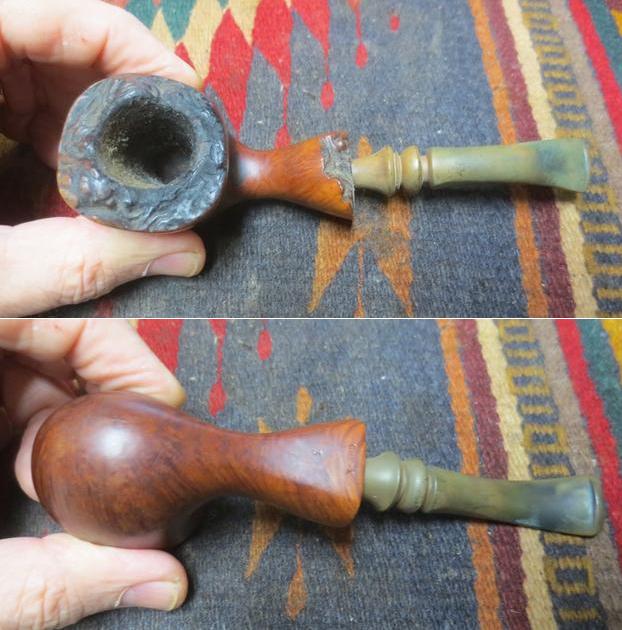
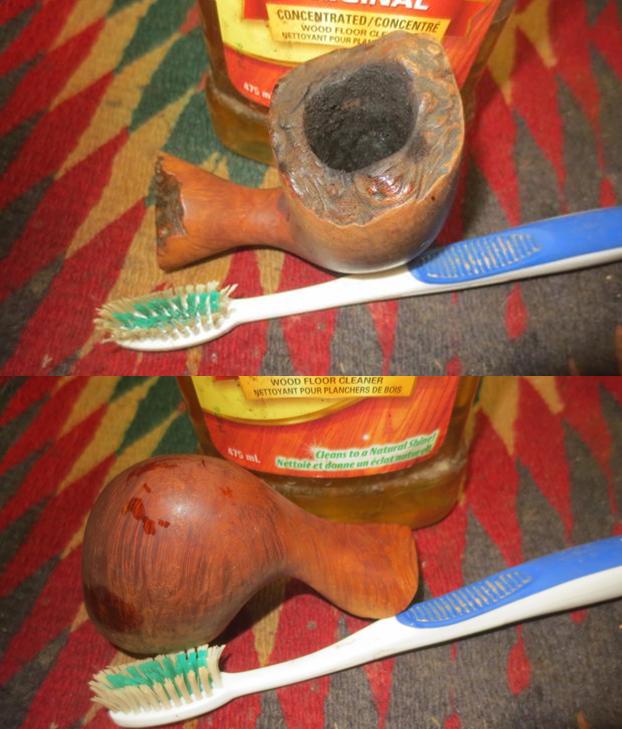
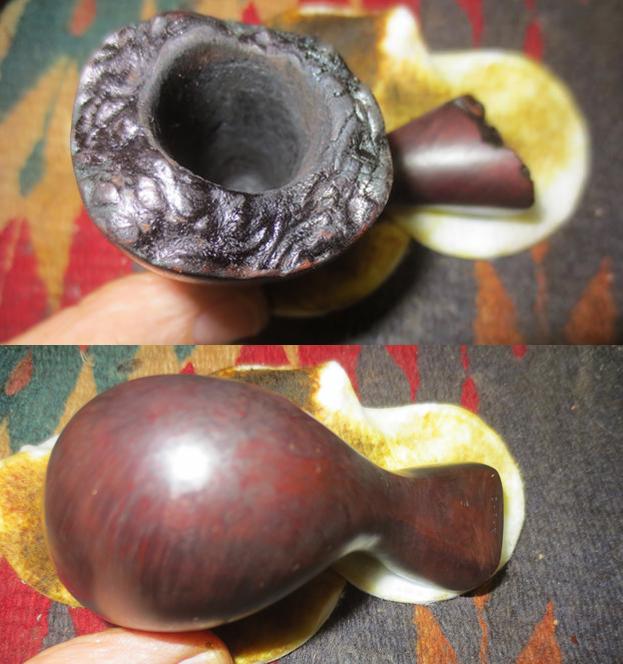
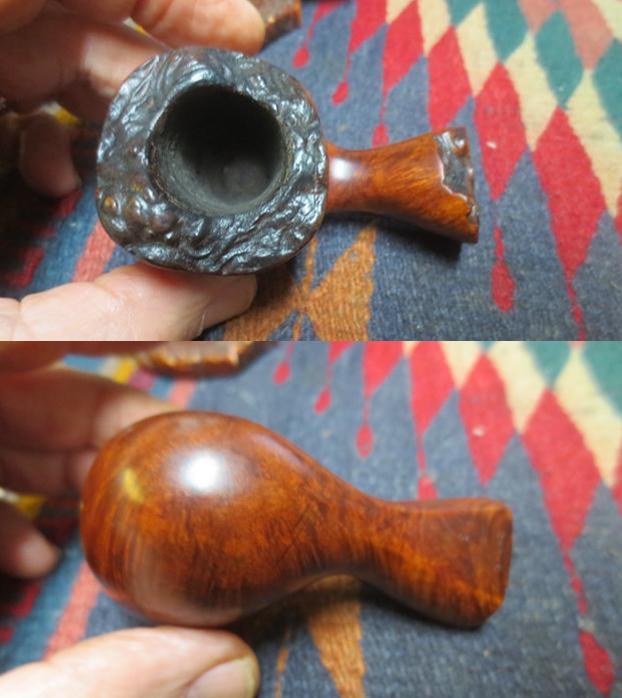
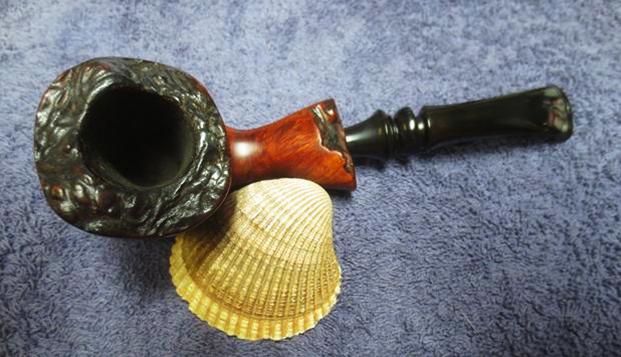
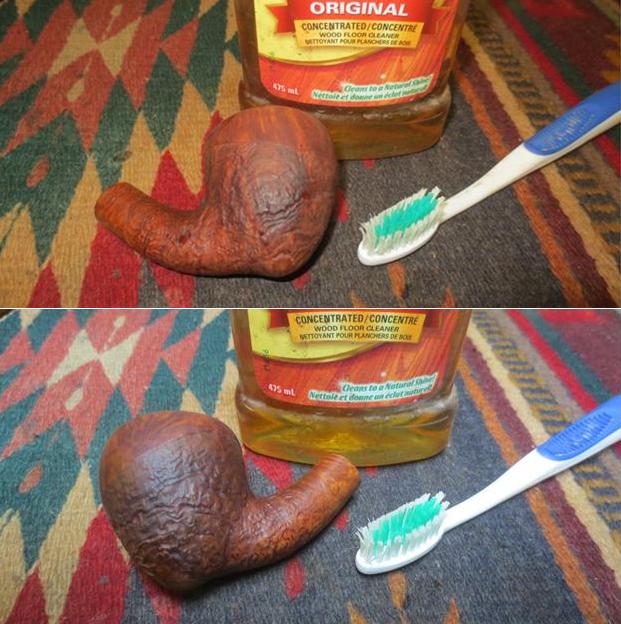
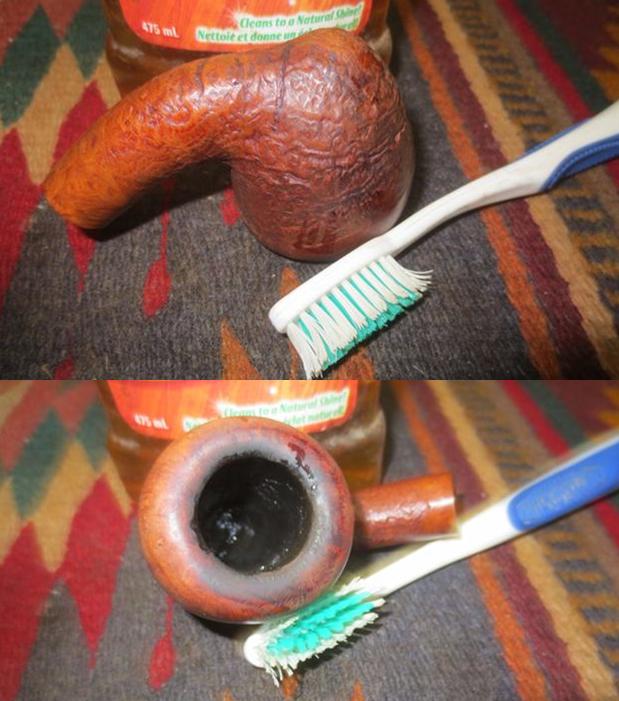
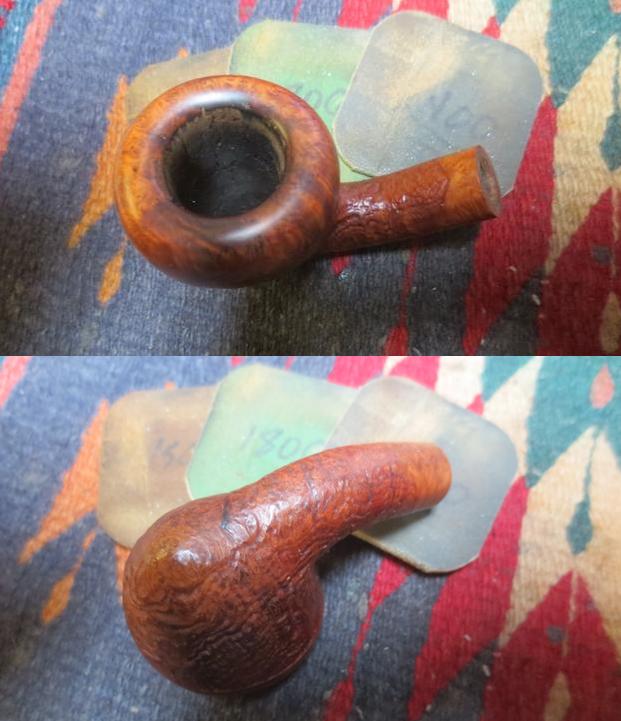
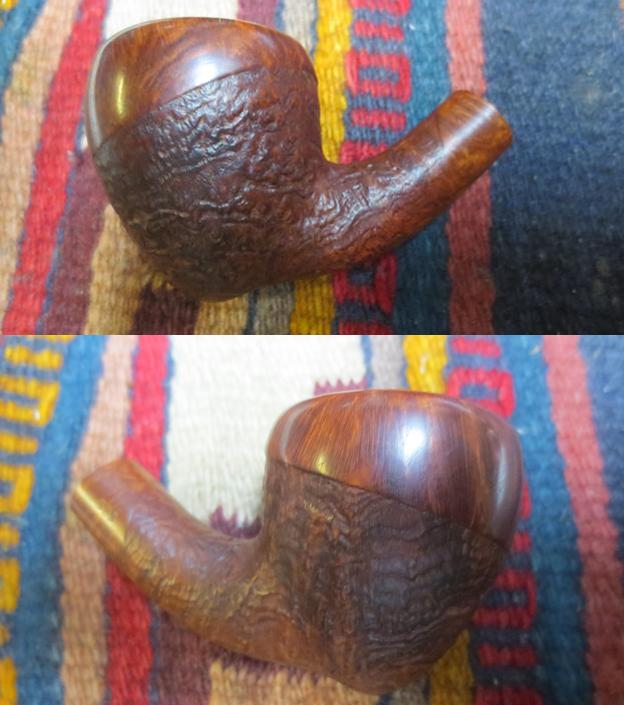
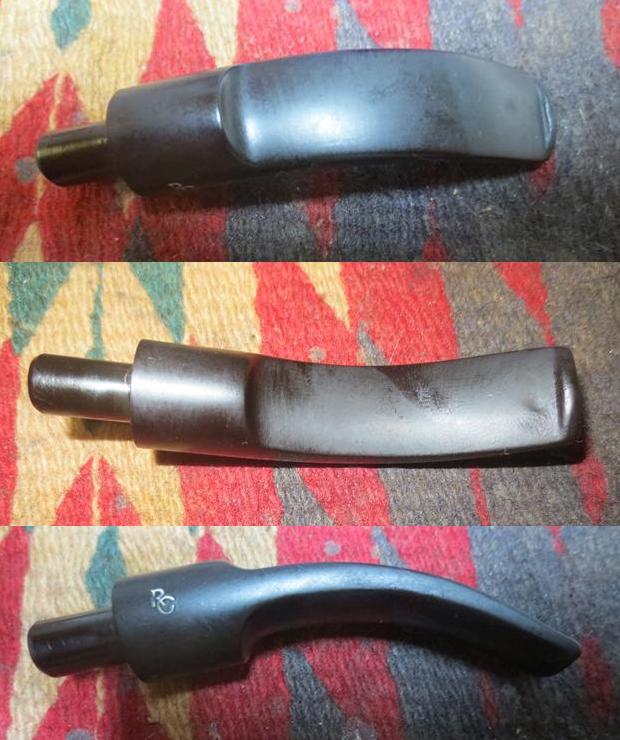
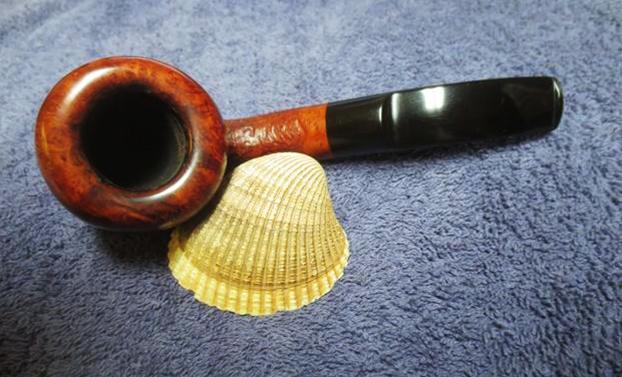
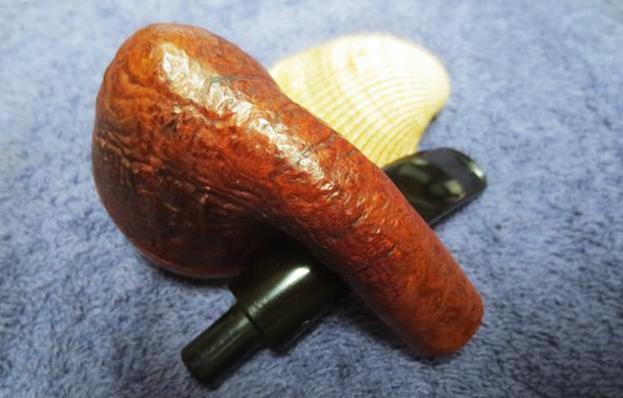
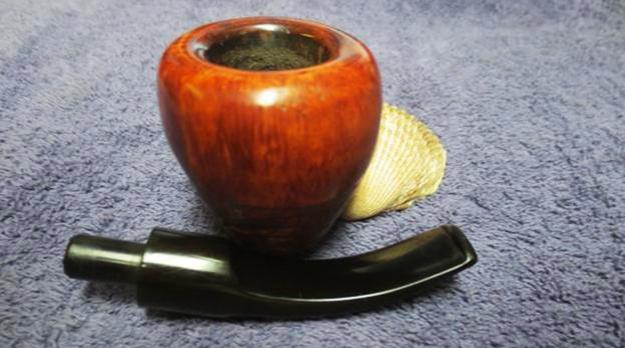
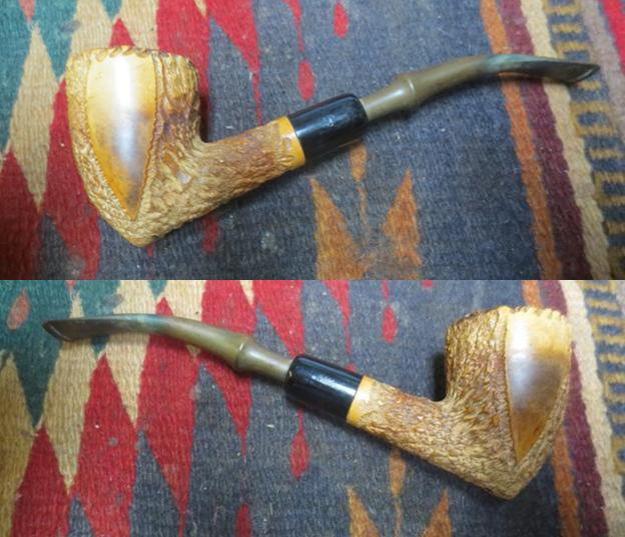
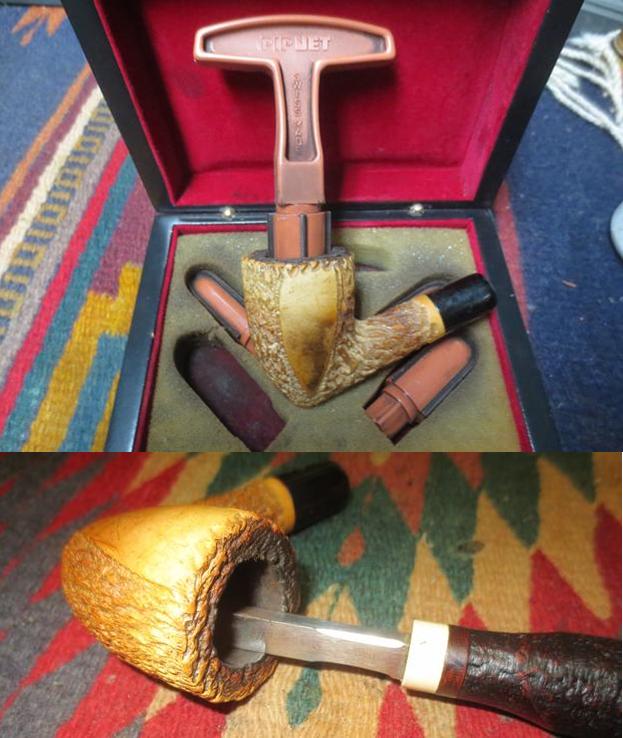
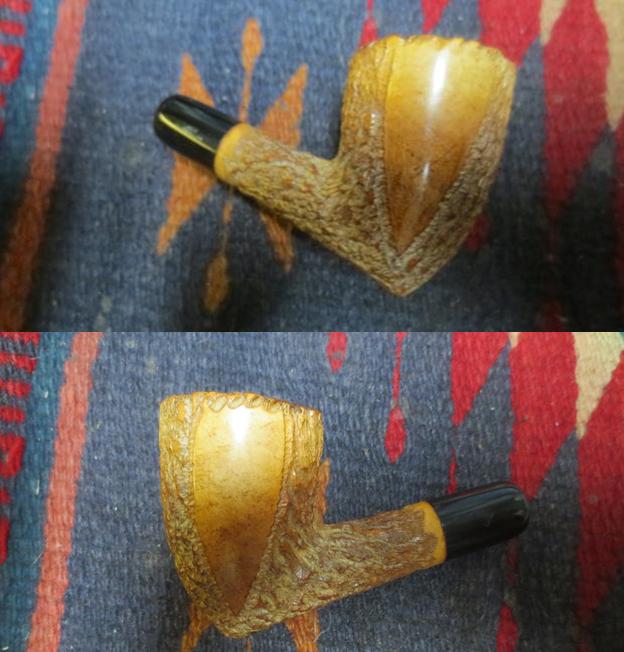
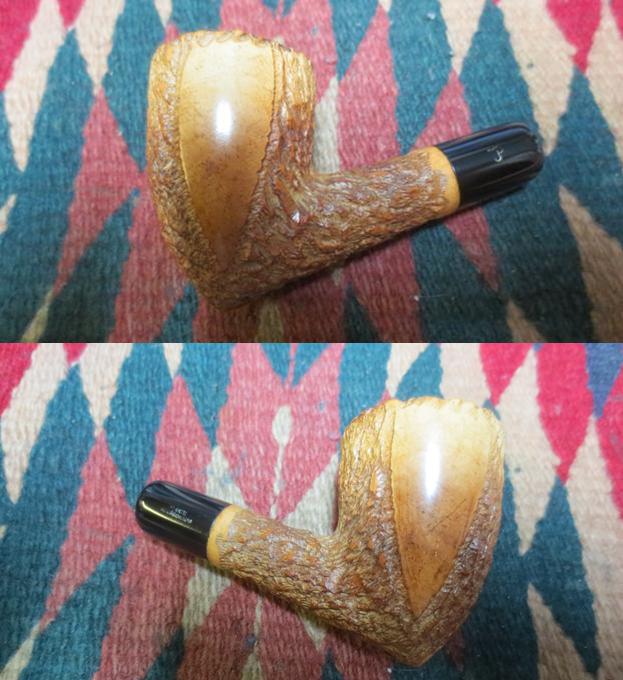
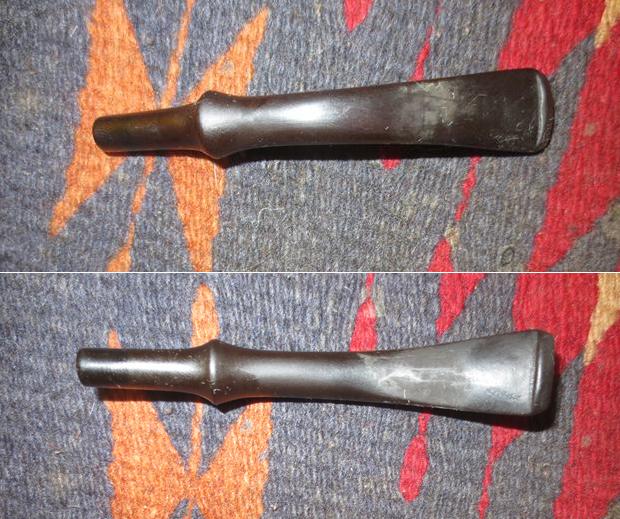
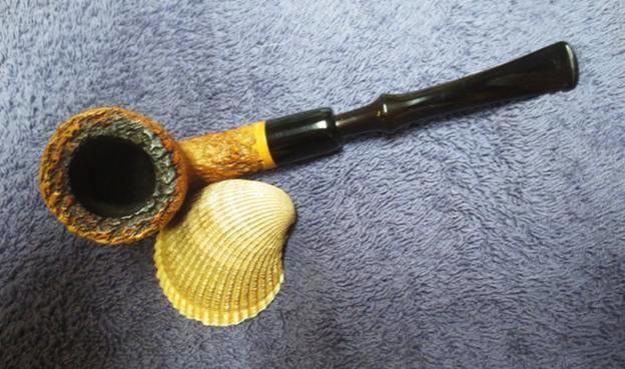
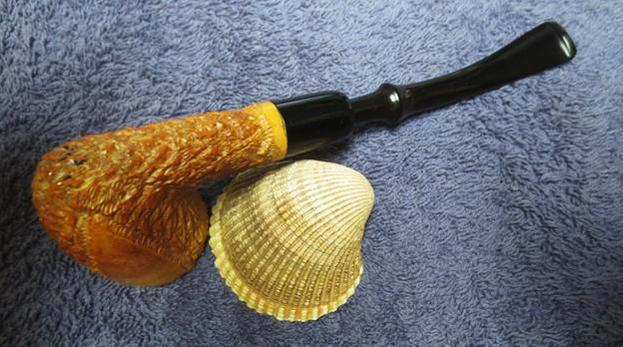
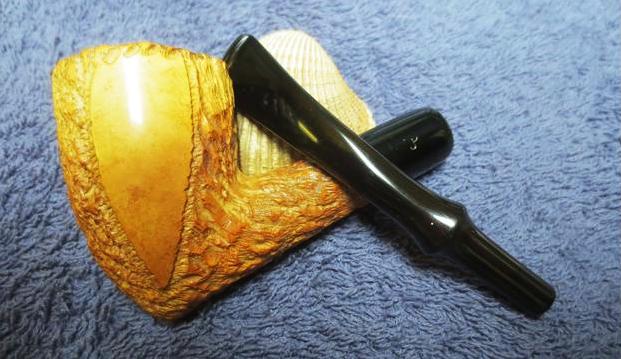
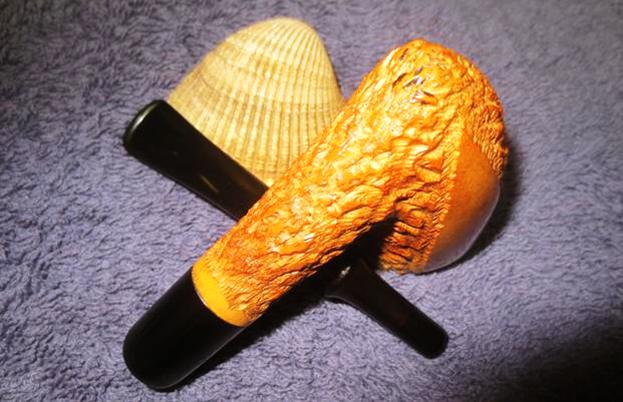
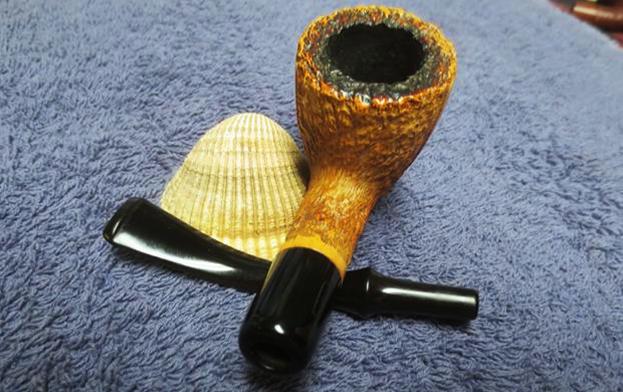
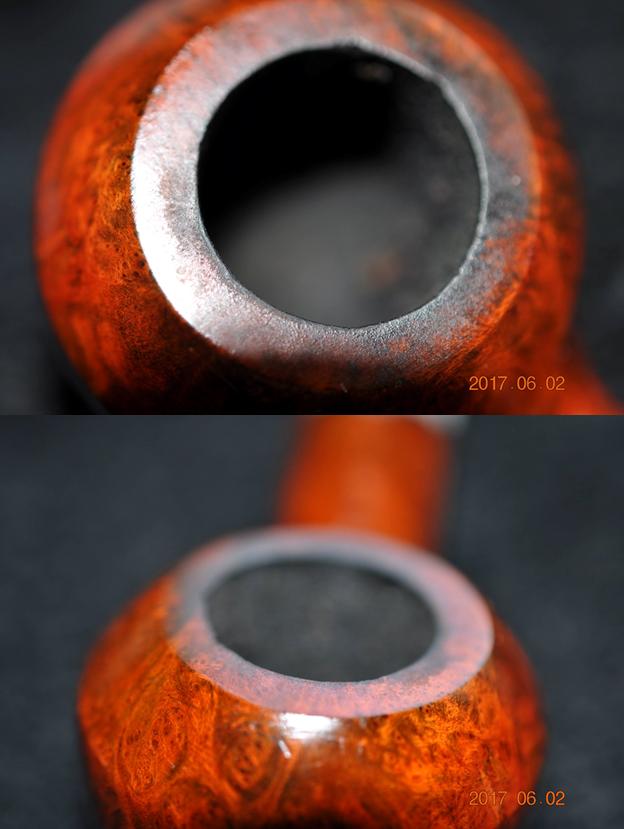
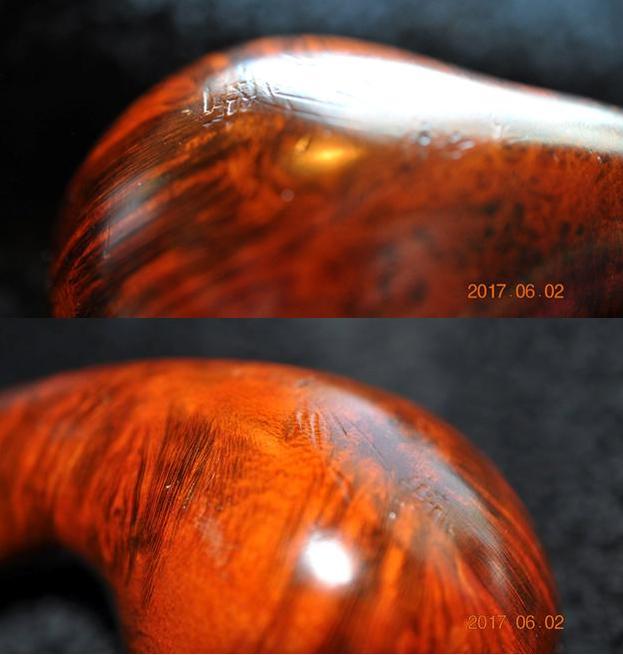
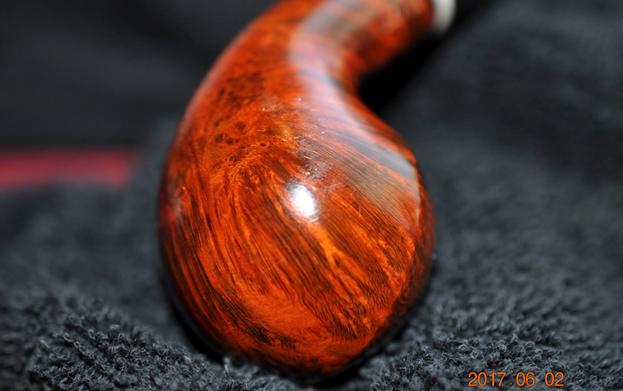
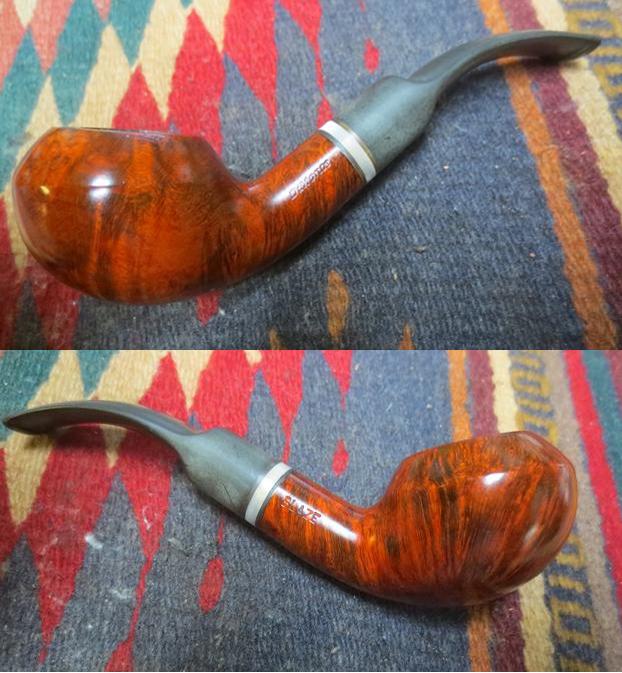
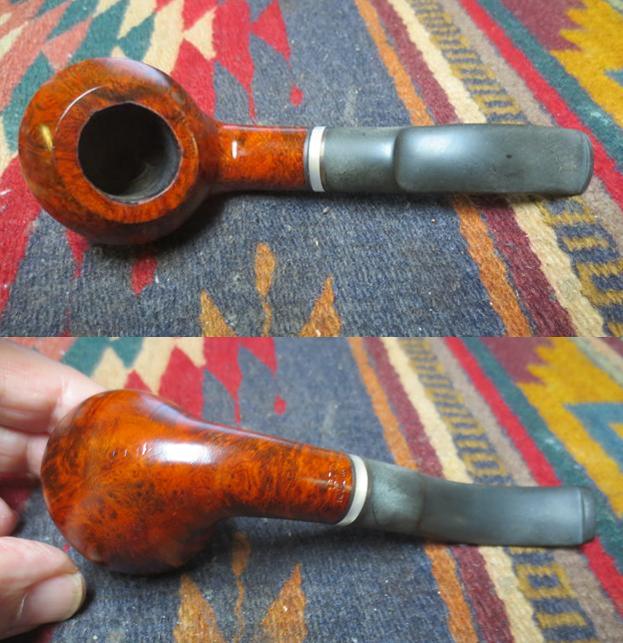
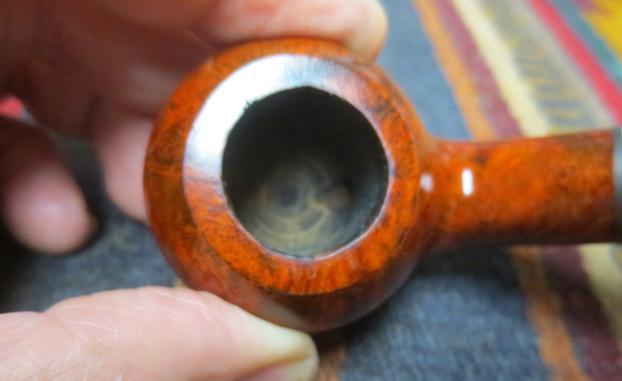
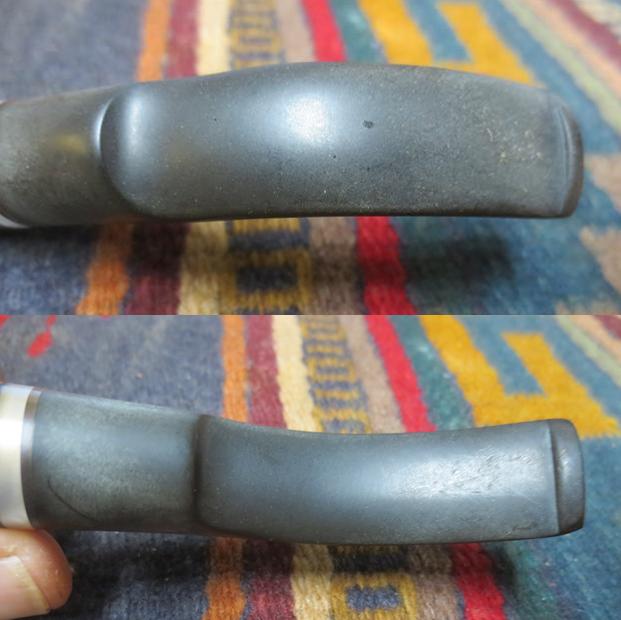
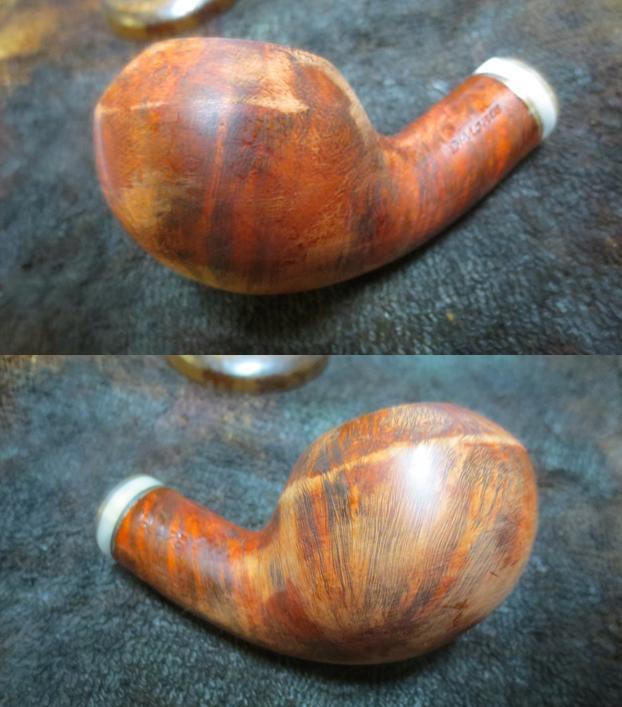
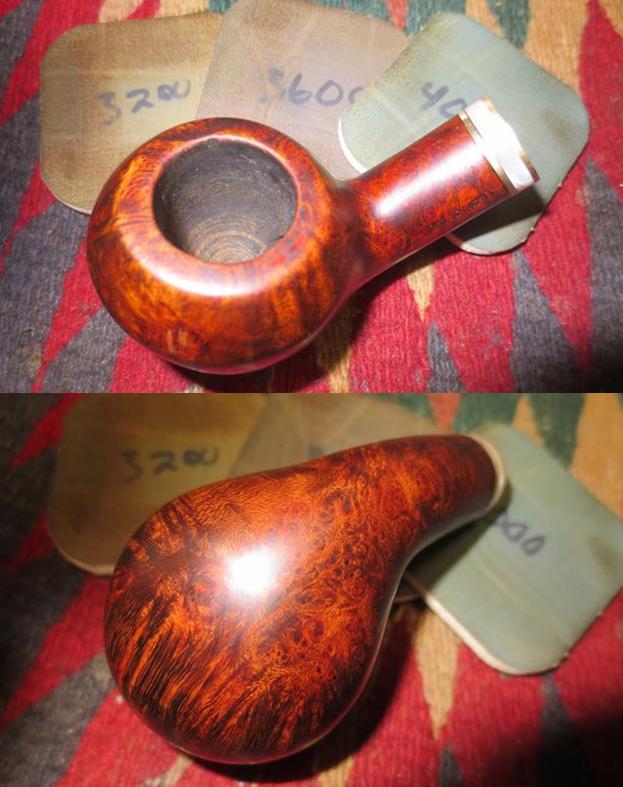
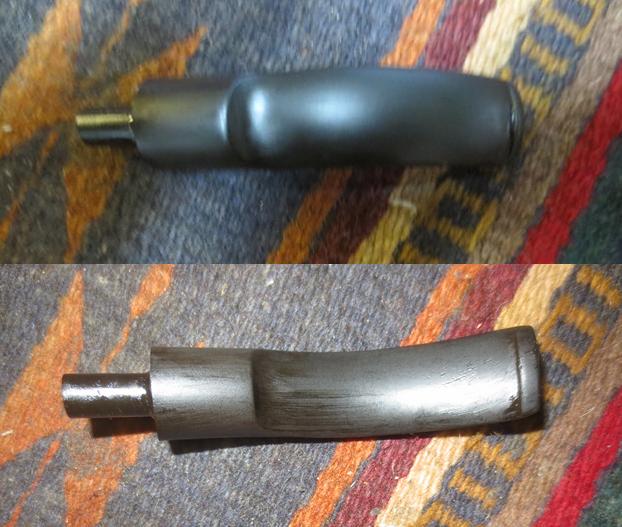
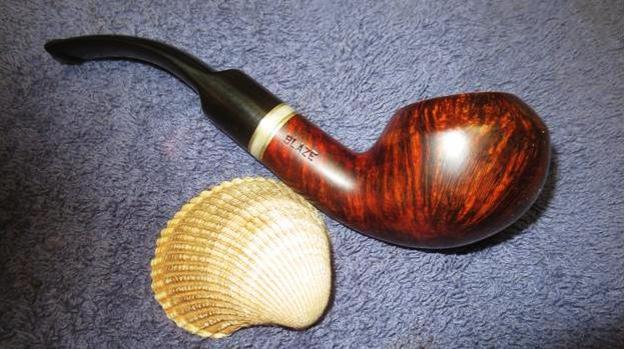
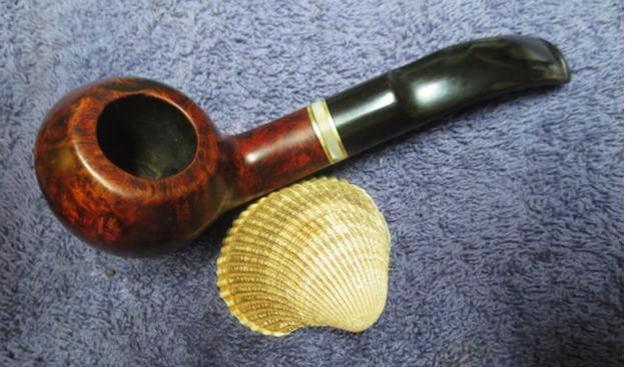
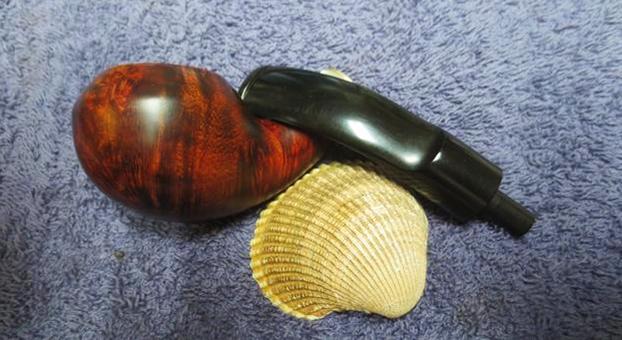
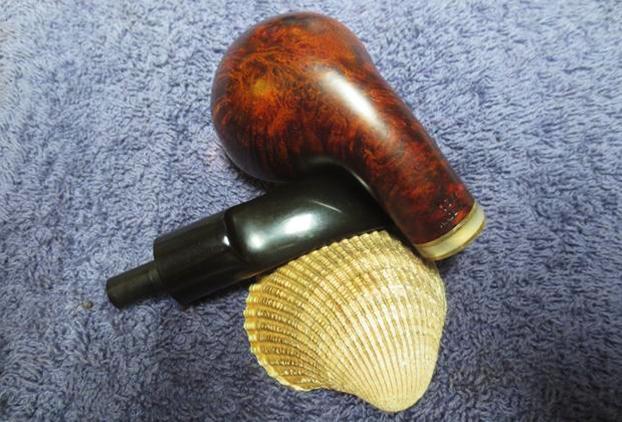
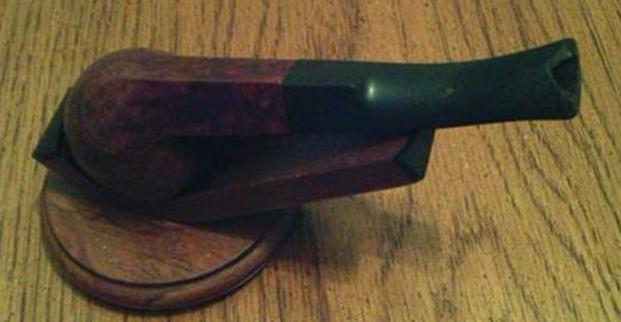
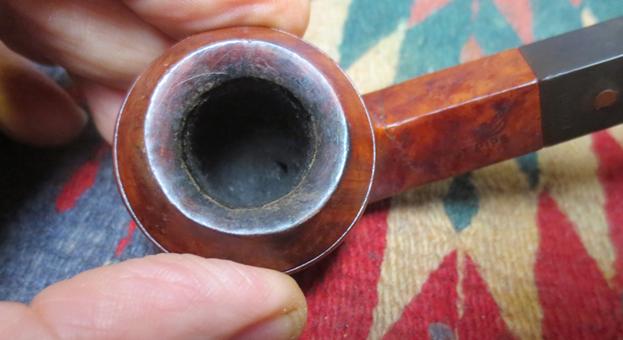
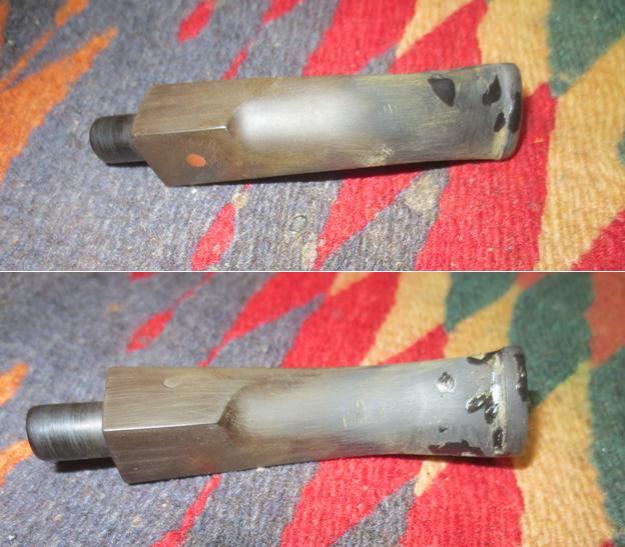
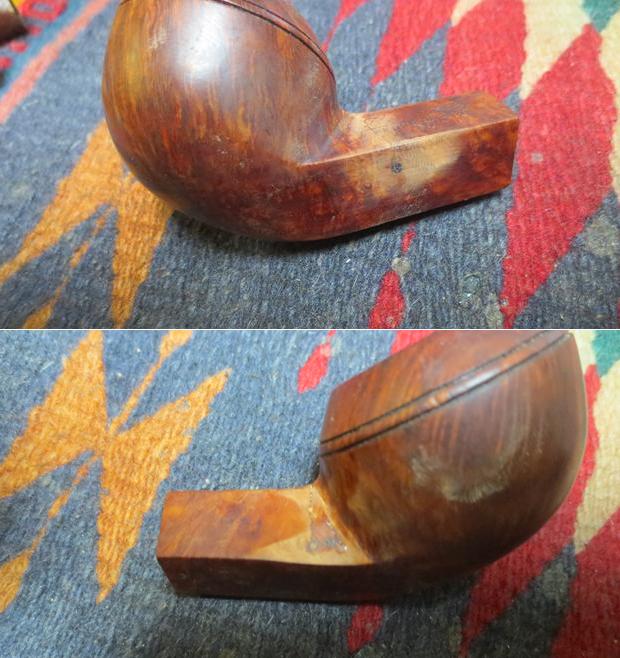
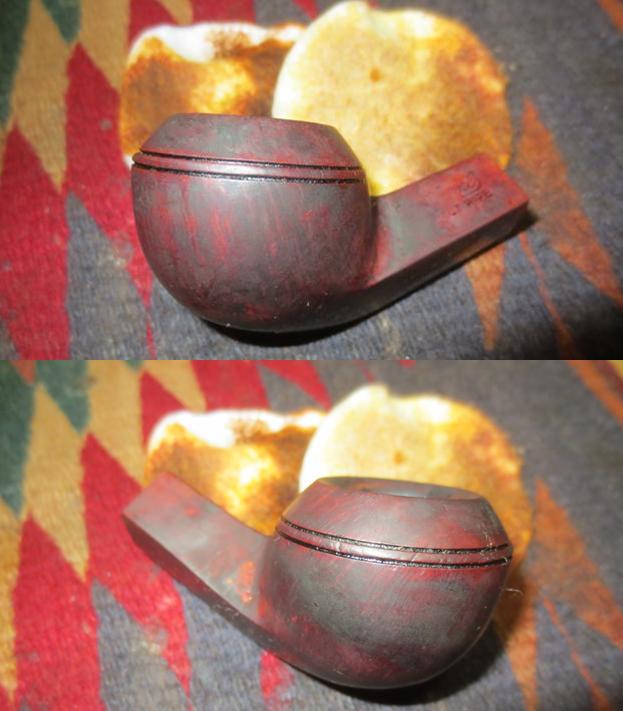
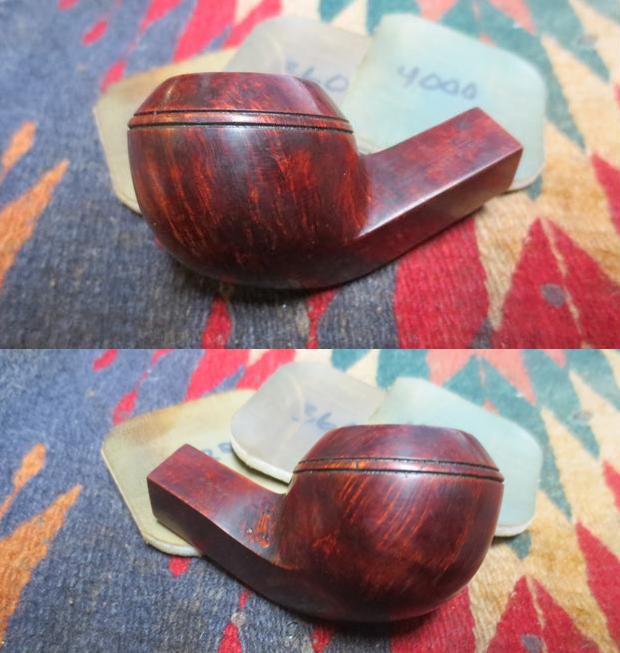
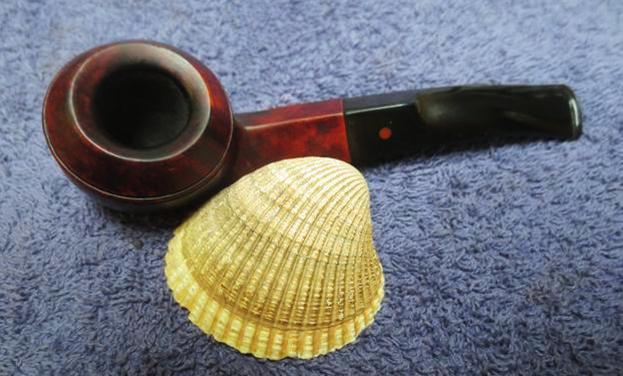
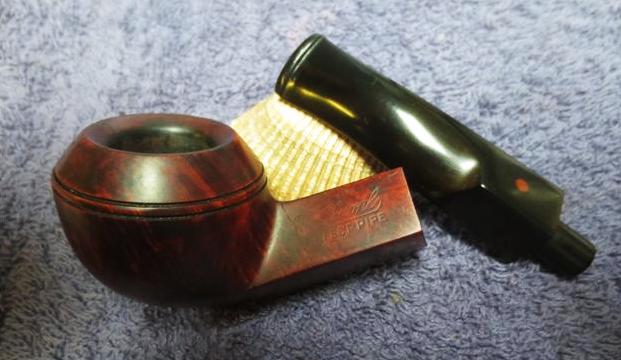
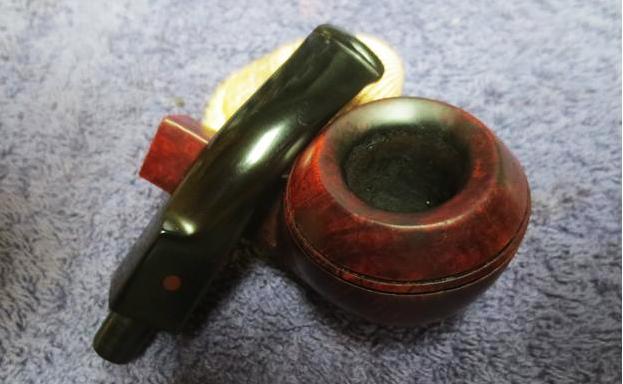
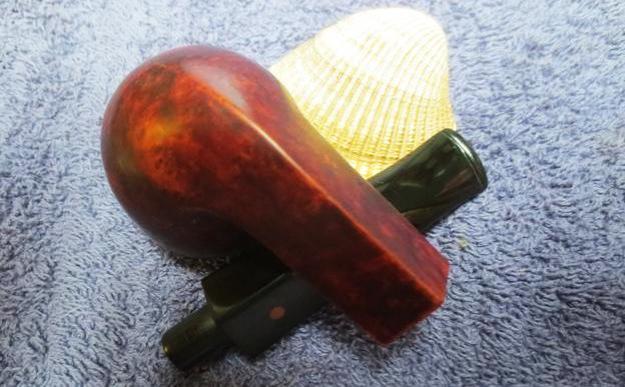
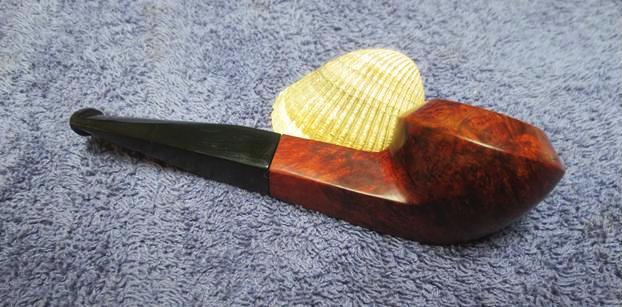
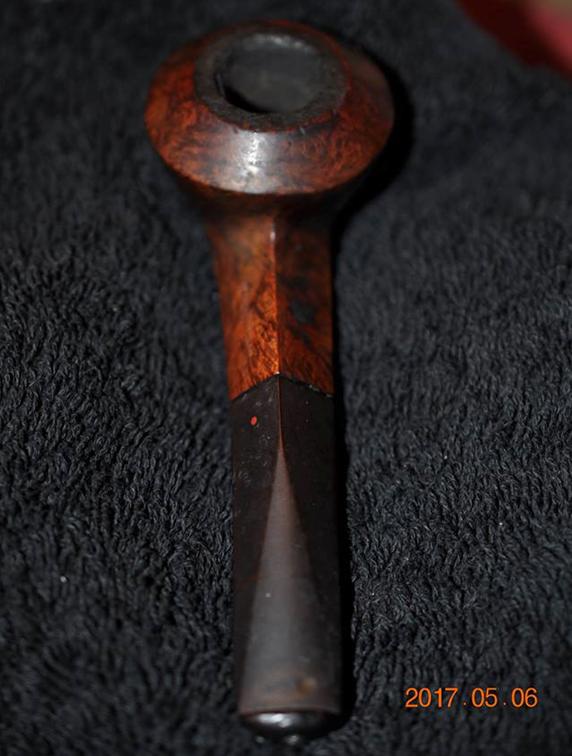
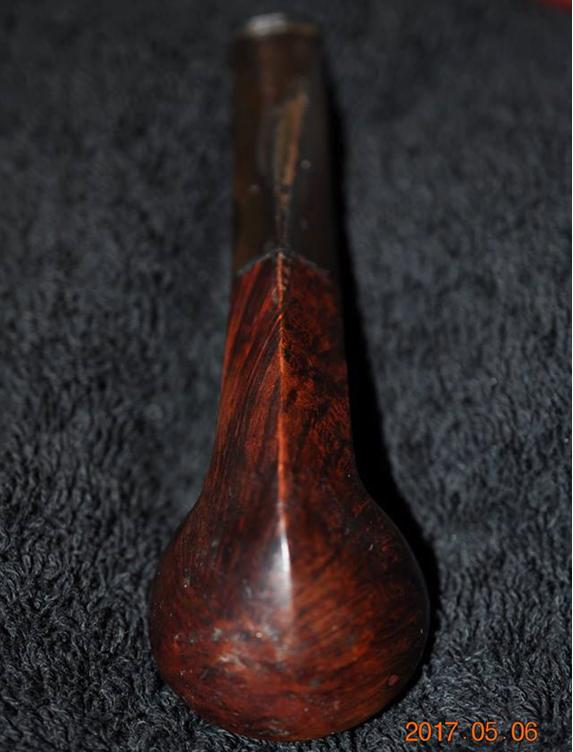
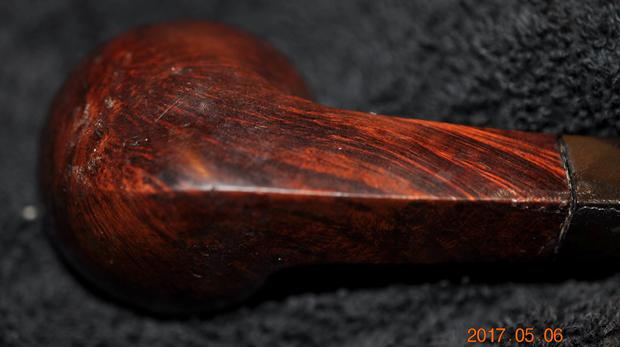
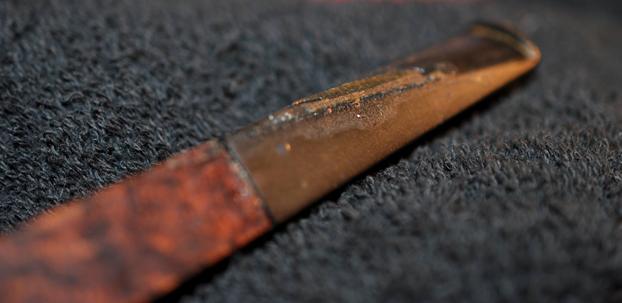
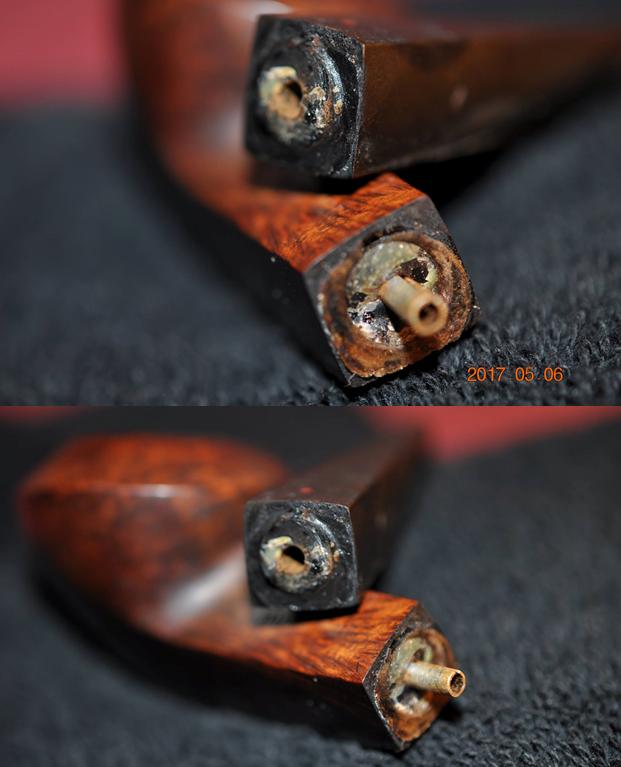
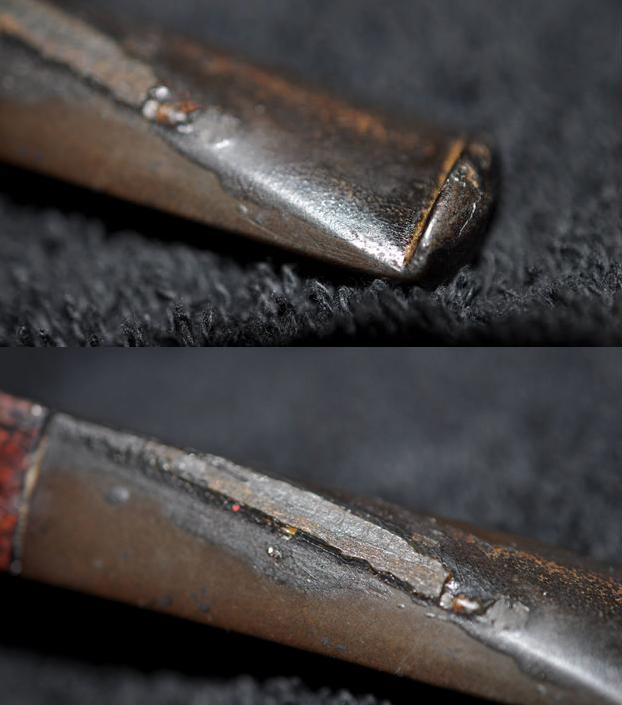
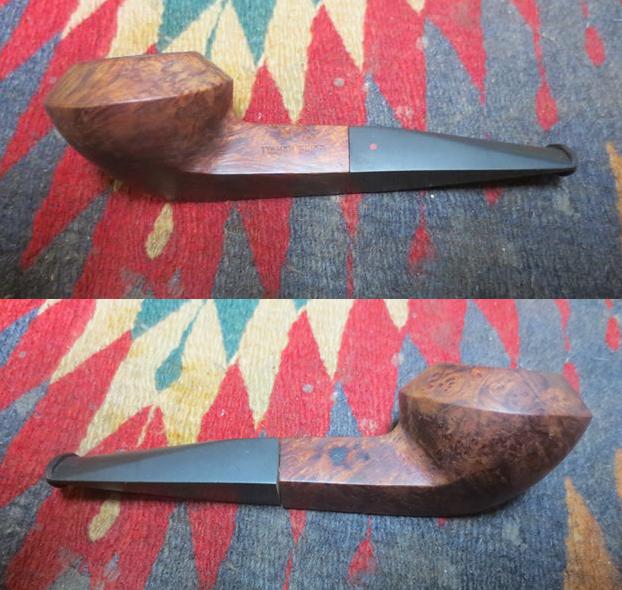
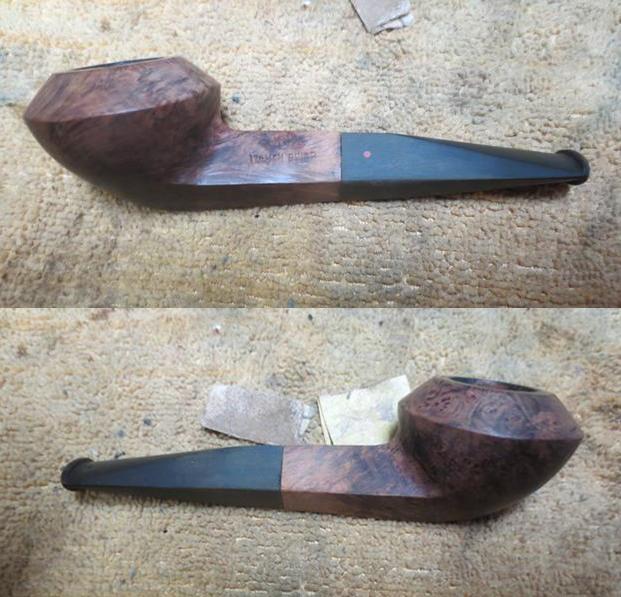
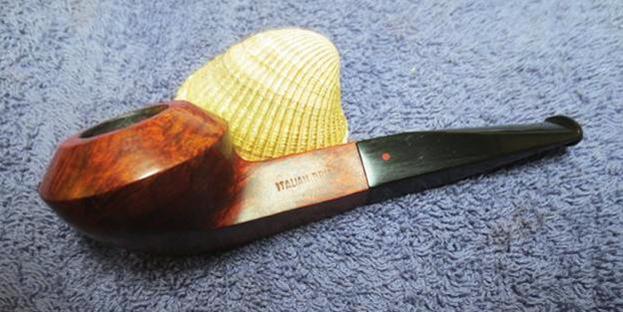
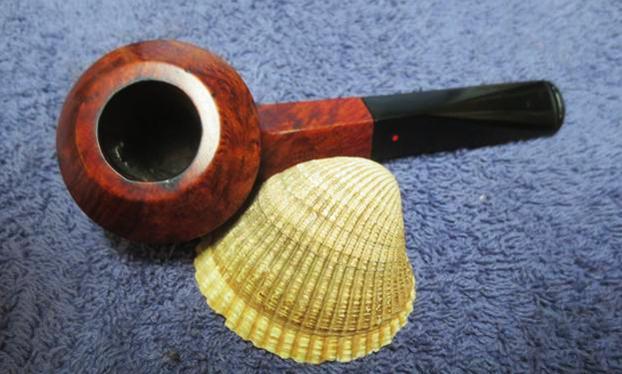
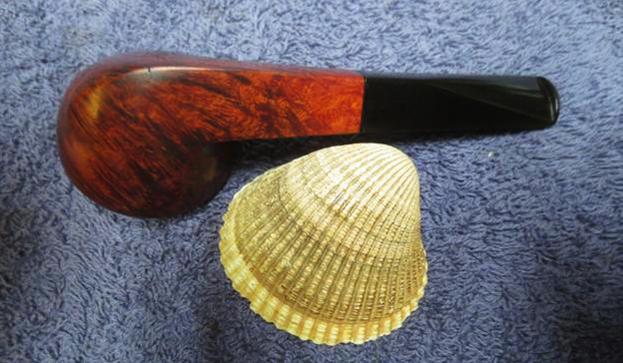
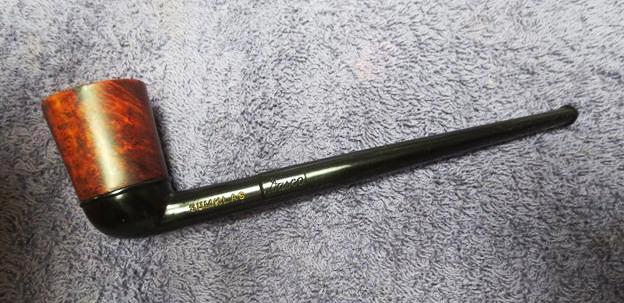
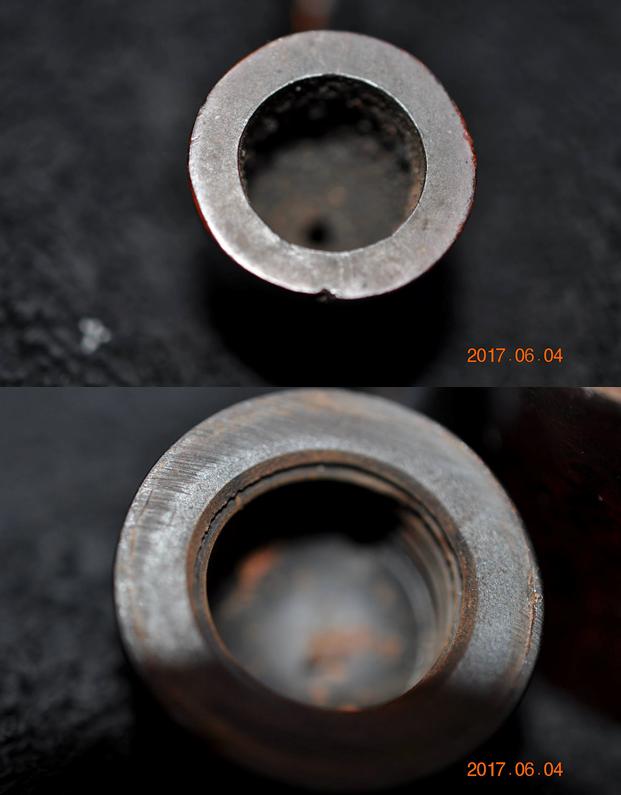
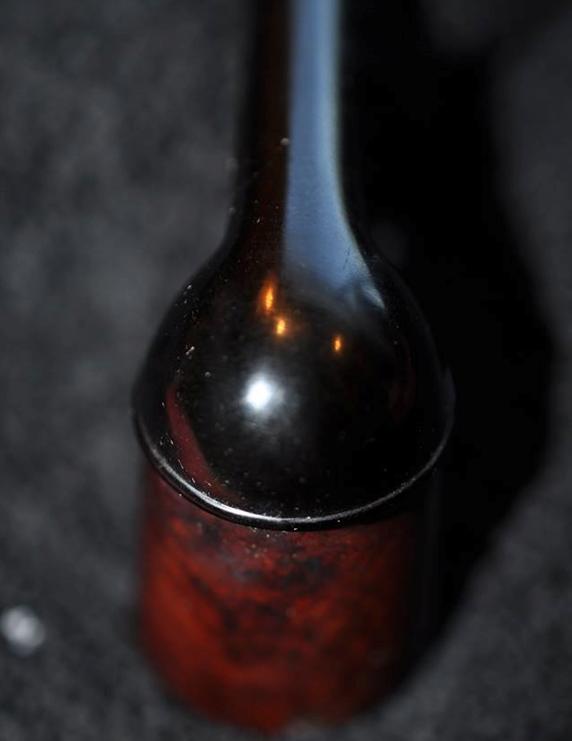
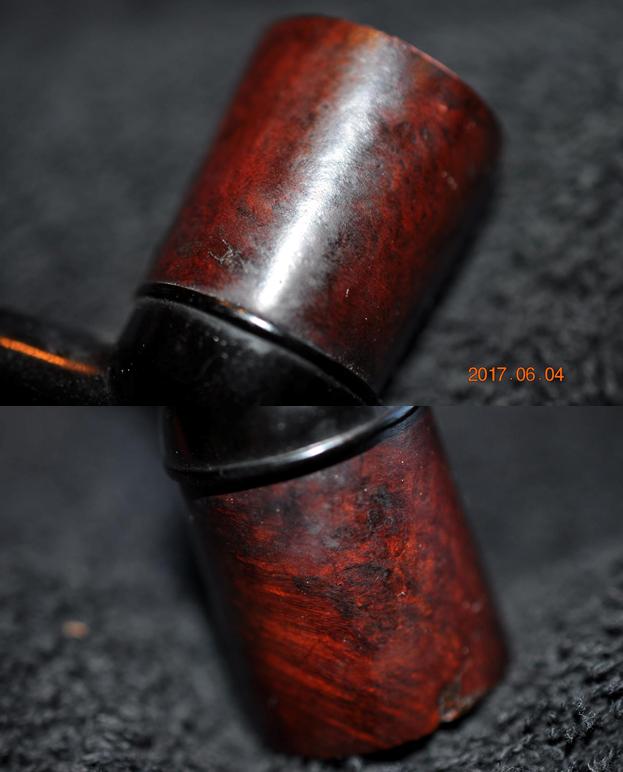
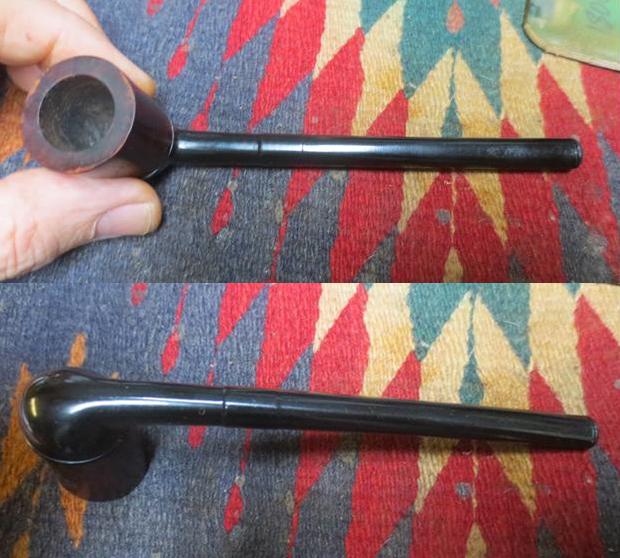
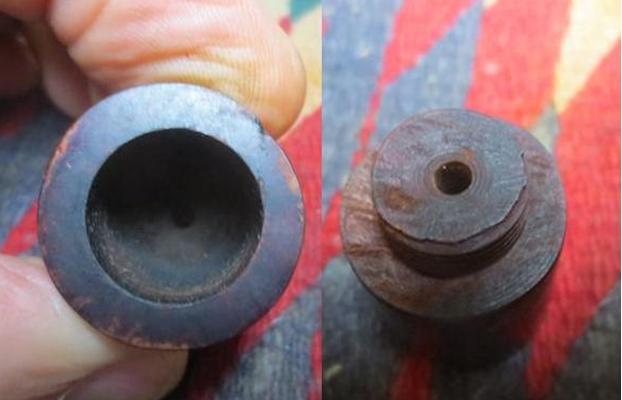
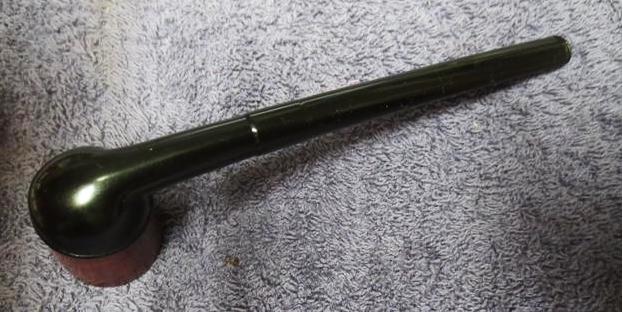
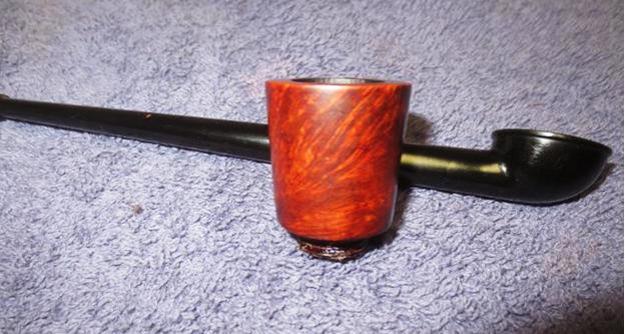
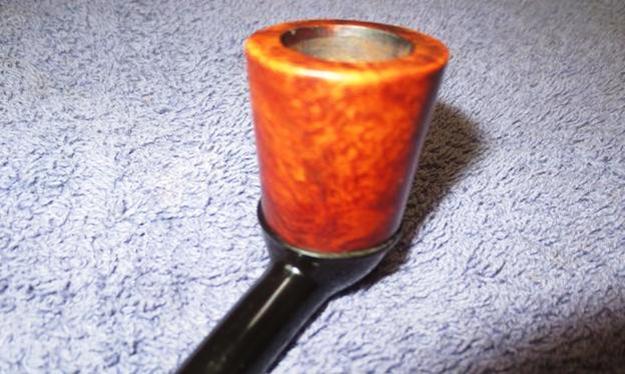
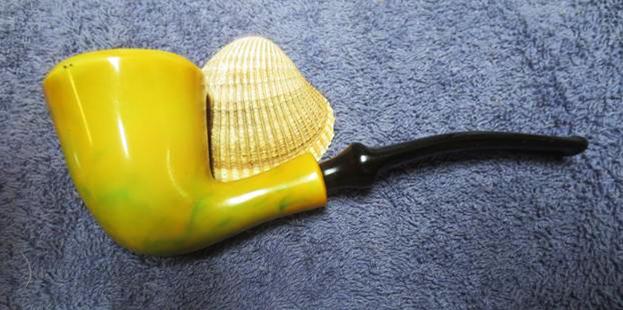
The last of Steve’s pipes the remained for me to work on was a Hilson Fantasia. It is a Dublin shaped pipe made of resin with a meerschaum insert. It has a yellow coloured bowl and shank with swirls of green that are scattered throughout the pipe. When Steve sent me the box of pipes to work on I told him this one was not worth the effort to clean it up. It was in really rough shape on both the stem and the bowl insert. But in the end I decided to clean it and the Pipe just so he could see what these resin bowl pipes were like. I have cleaned a few of these up over the years that have almost psychedelic patterns in the resin. They are really a product of the 60s and 70s in my opinion. I took the following photos of the pipe before I started the clean up to show the general condition and give you some idea why I said the pipe was not worth cleaning up. The pipe really was in rough condition. The meerschaum bowl was not readily identifiable and there was major damage to the rim top. There chunks of the inner bowl missing from the top at the back edge of the bowl. There was a seriously thick cake in the bowl that was fuzzy with dust and debris. The outer resin bowl was covered with a layer of lava. The stem would not fit in the shank the way it was supposed to which signaled that the shank was cake with about as much debris and the bowl. The stem was oxidized and there were tooth marks on both the top and the underside at the button. The button itself was worn away and no longer clearly defined. The outer resin bowl was in pretty good shape with no deep scratches or gouges. 
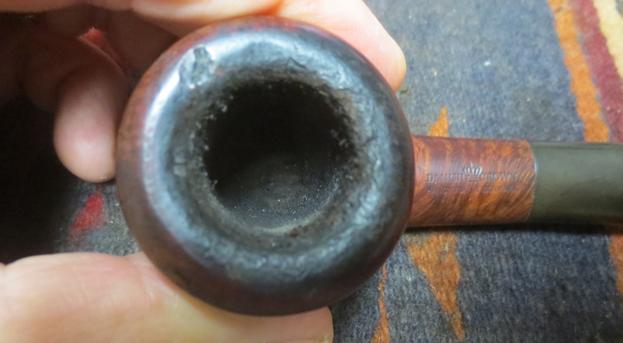
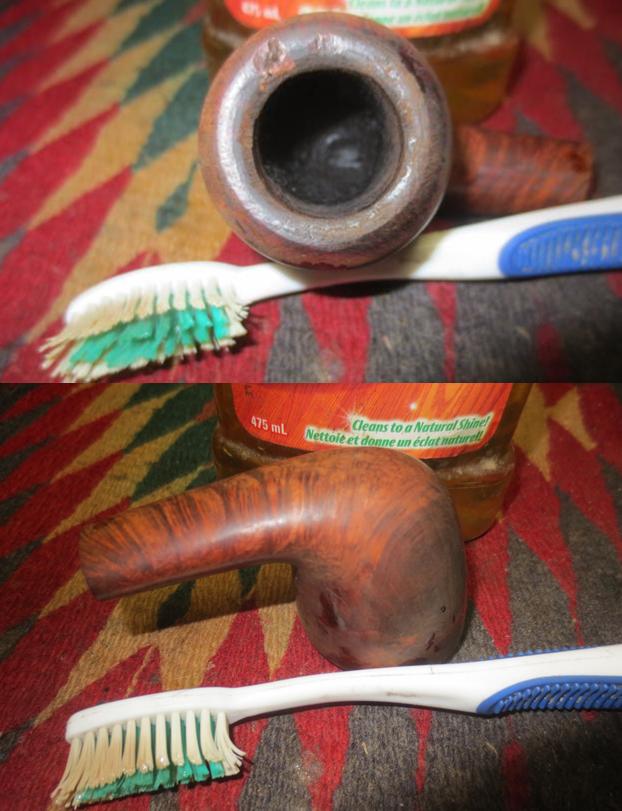
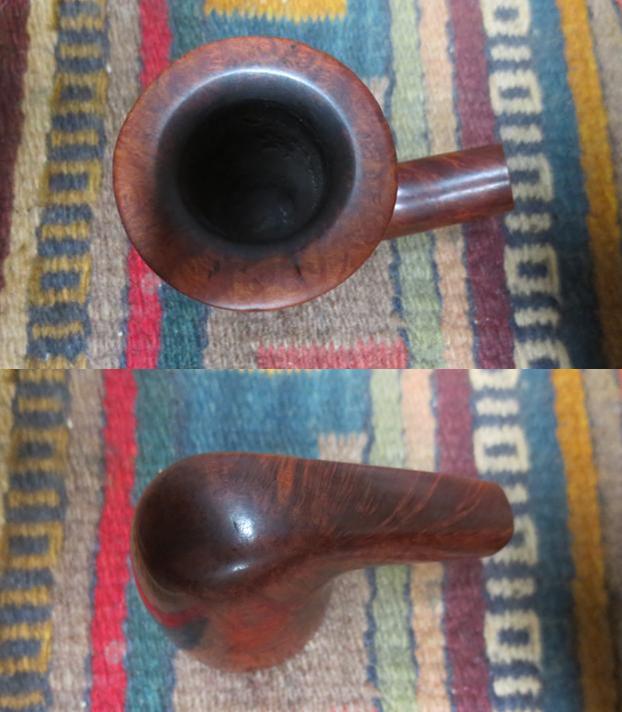
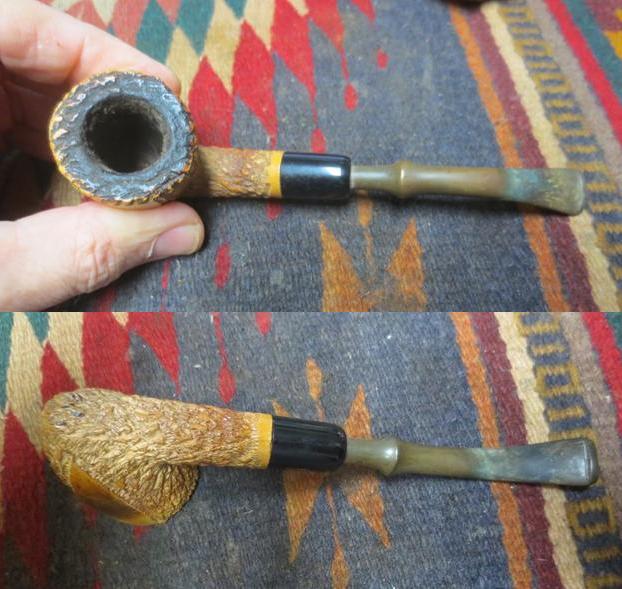
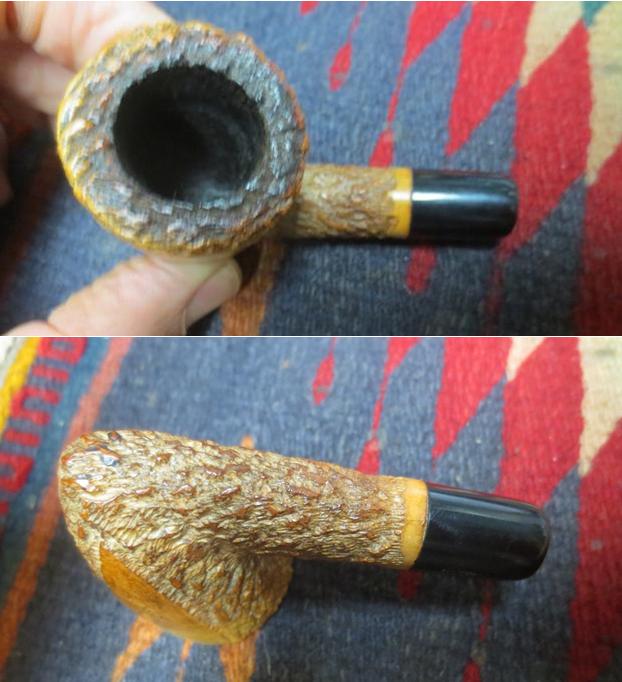
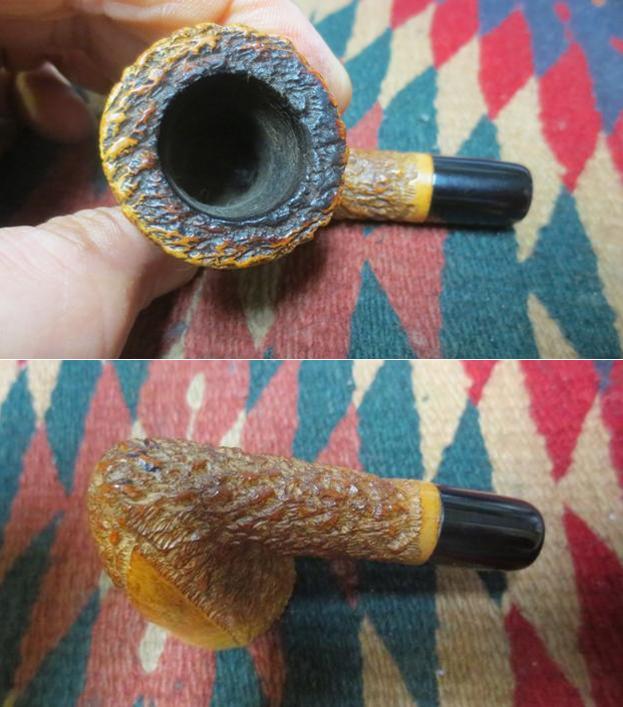
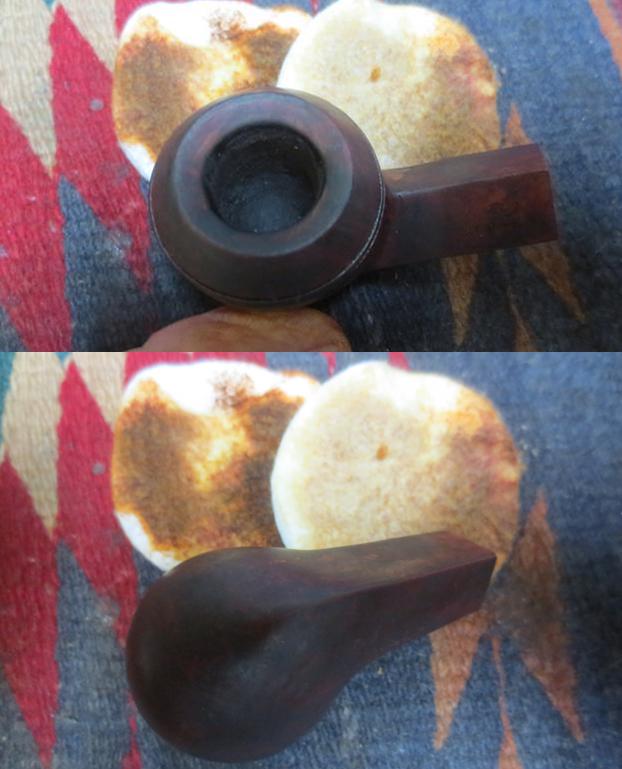
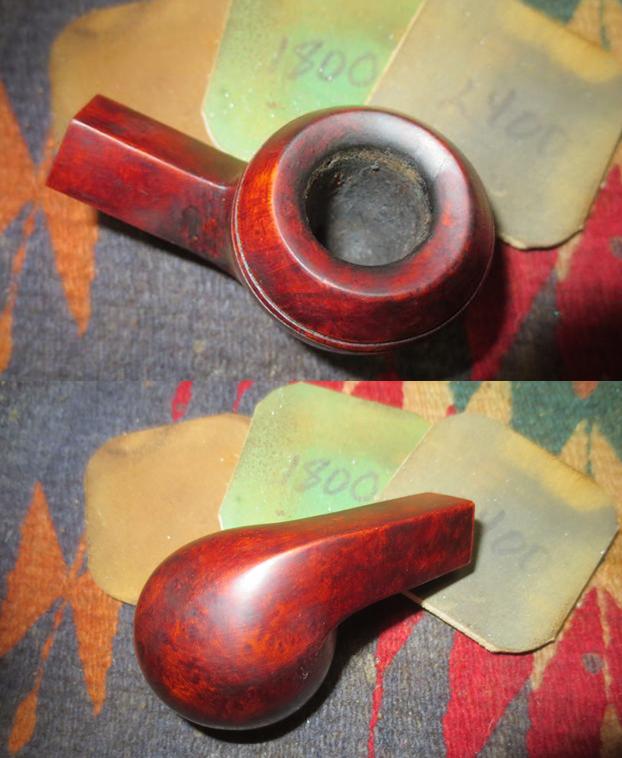
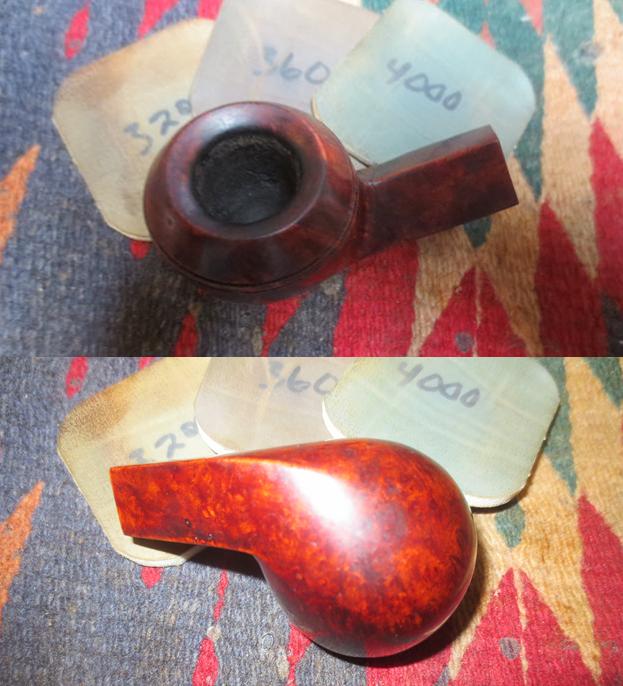
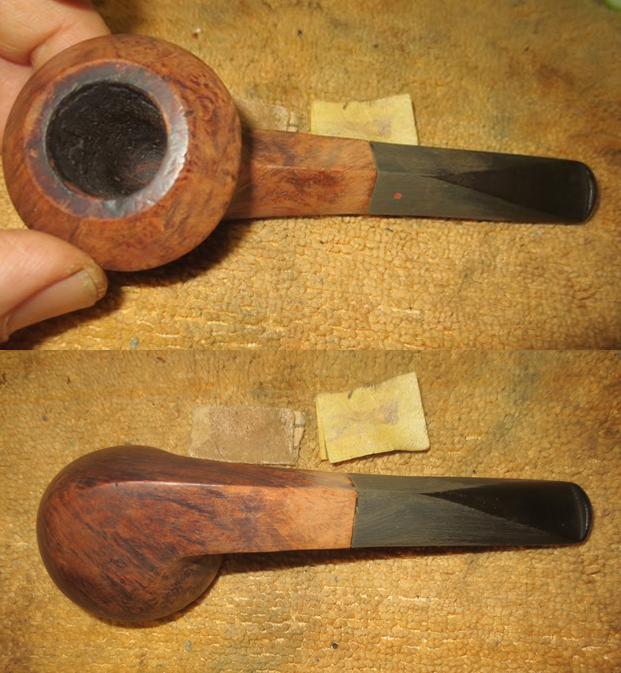
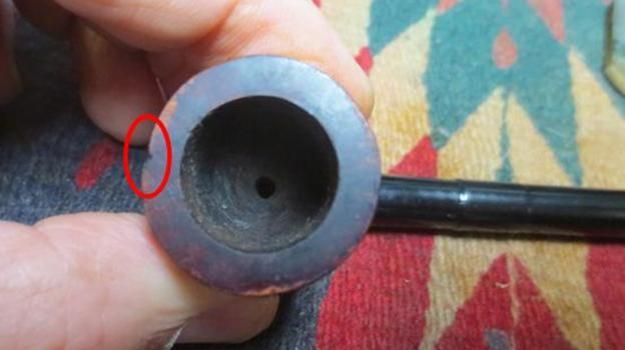
I was hoping that once I reamed the bowl it would be intact lower down. I was basing that hope on the fact that Hilson used block meerschaum and not pressed meerschaum for their bowls. That made the quality of the lining far better and I have rarely seen a Hilson meerschaum lining cracked or broken.
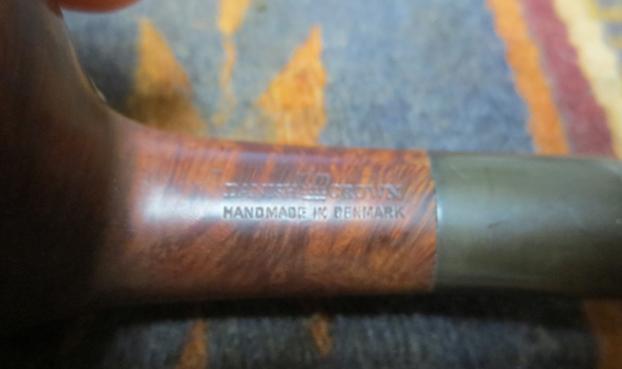
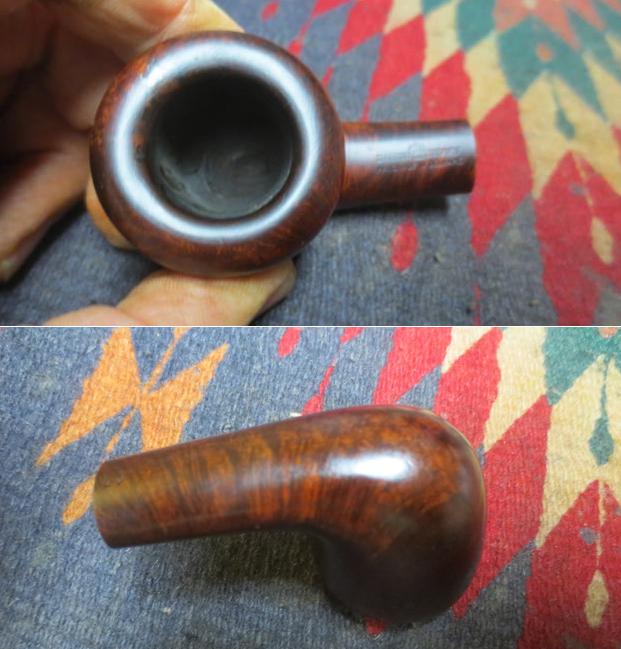
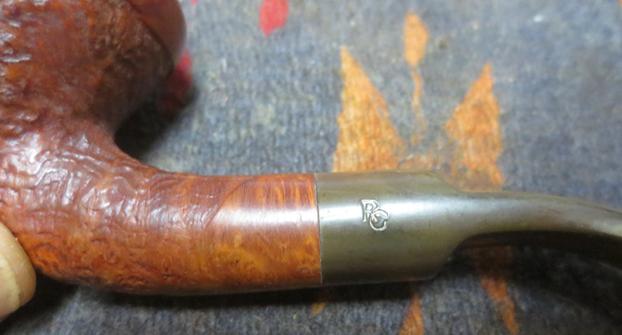
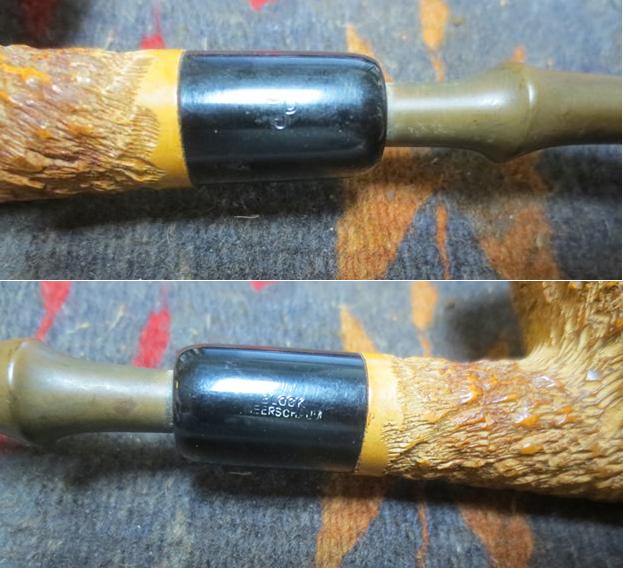
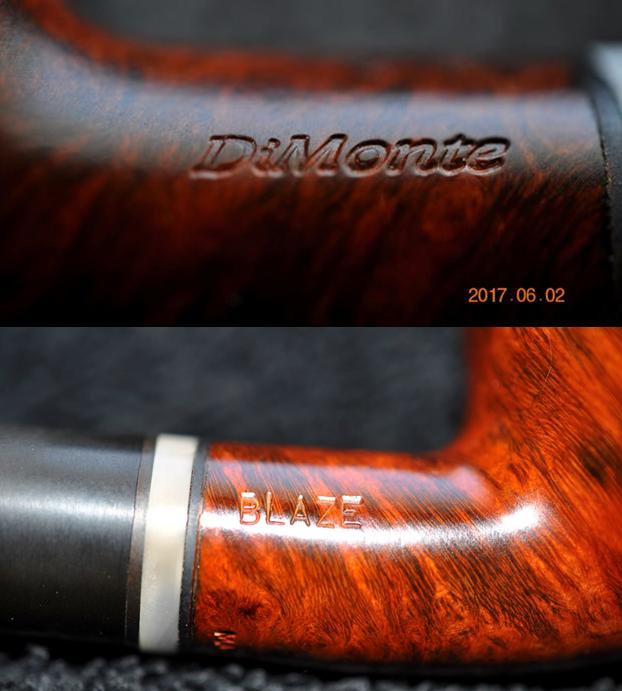
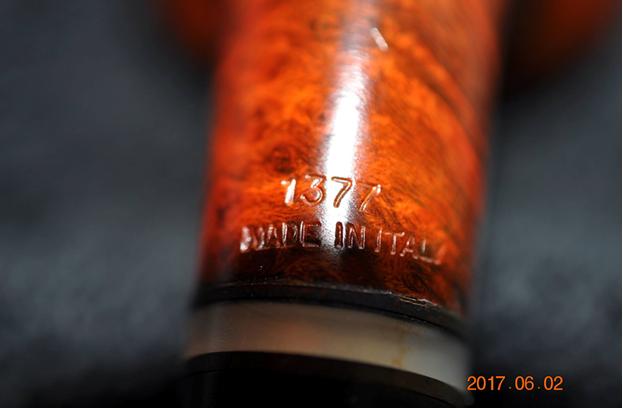
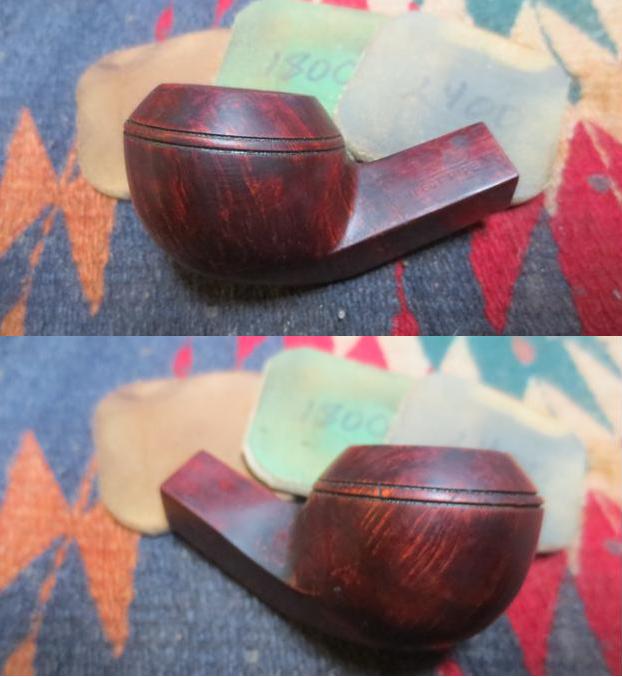
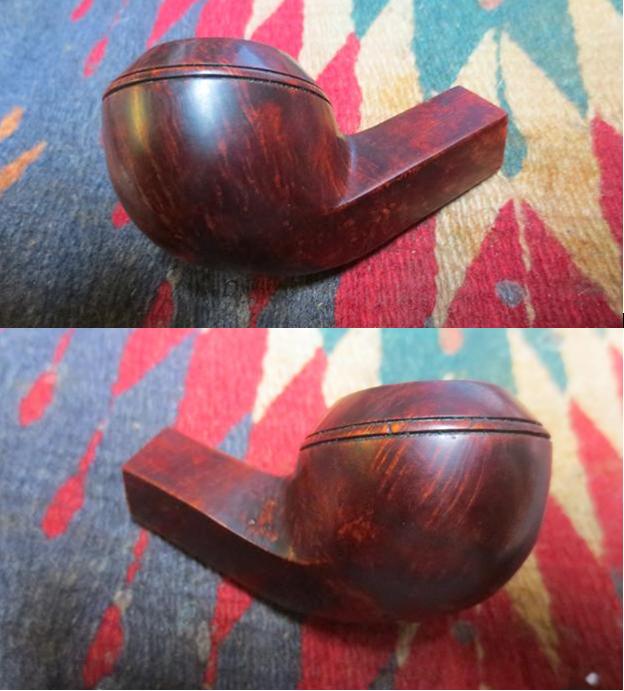
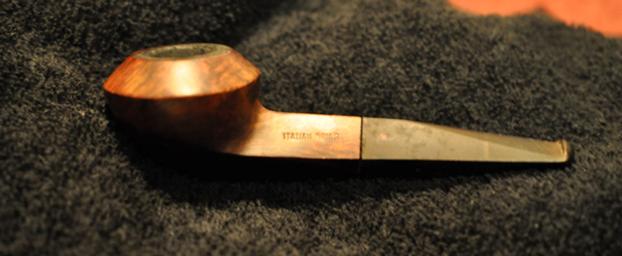
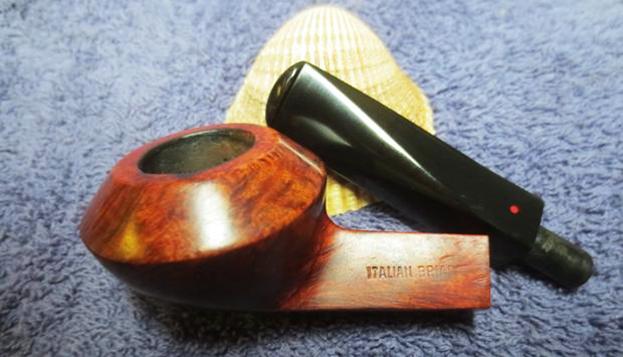
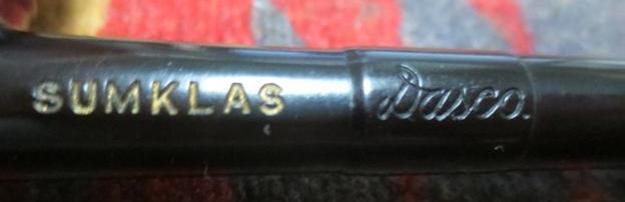
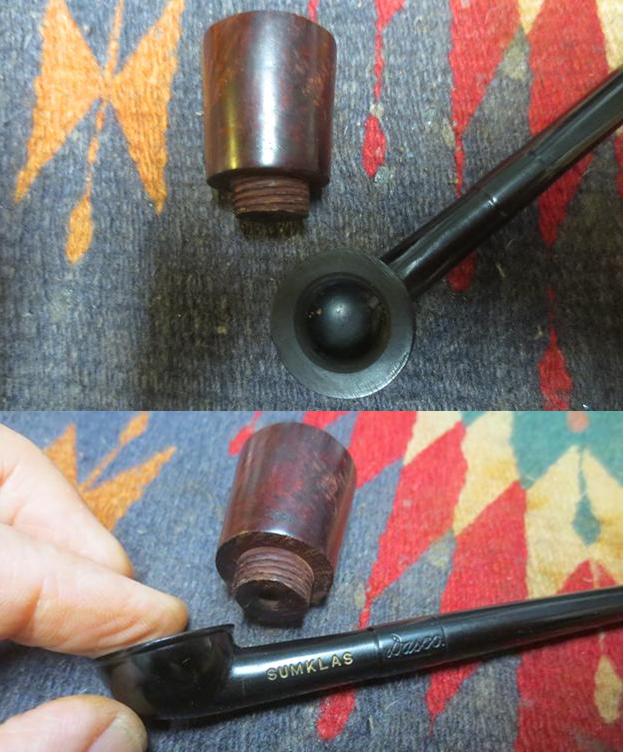
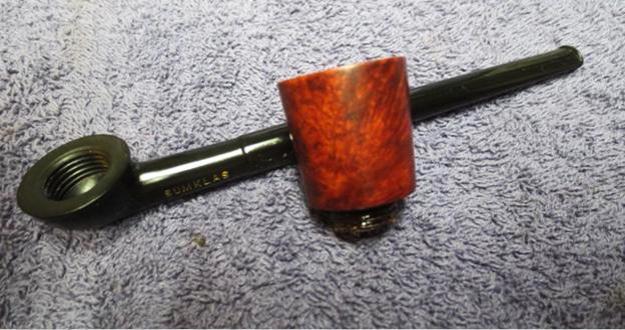
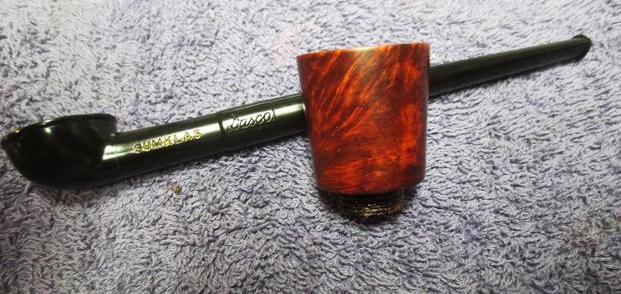
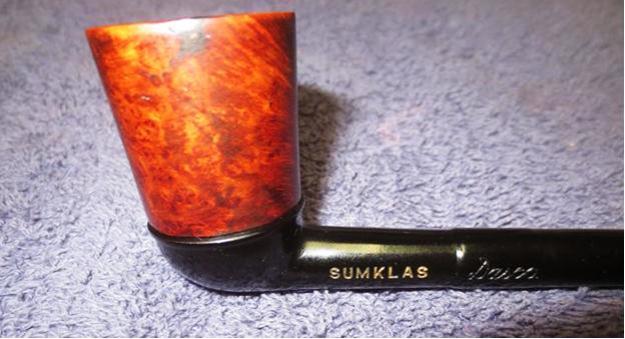
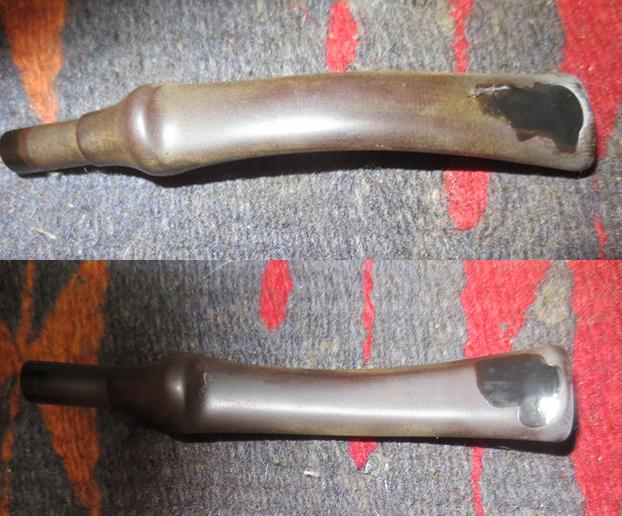
The next two photos show the stamping on the pipe. On the underside of the shank it is stamped Belgium and on the right side it is stamped with the shape number 206. The normal stamping on the stem was long gone. So it no longer read Hilson Fantasia. For the identity I am going with the stamping that is visible, the shape and material of the pipe for calling it a Hilson Fantasia.
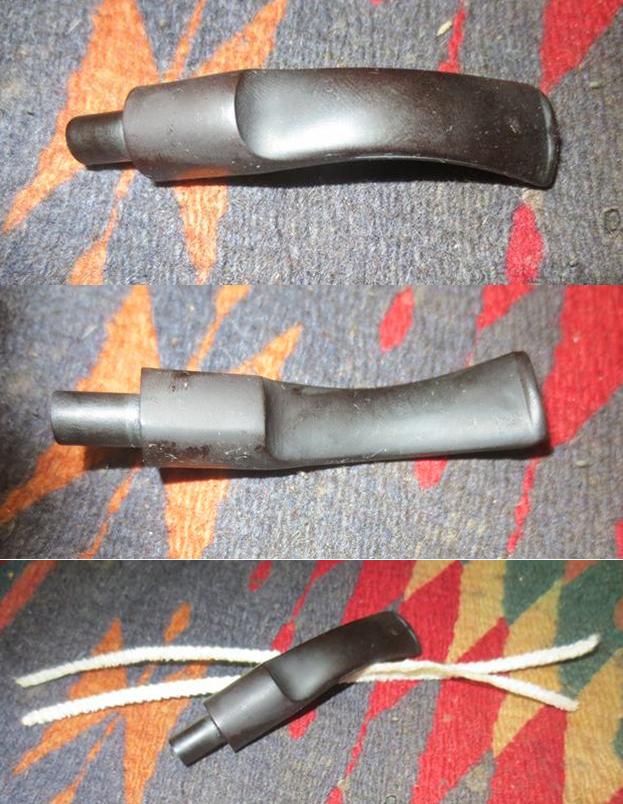
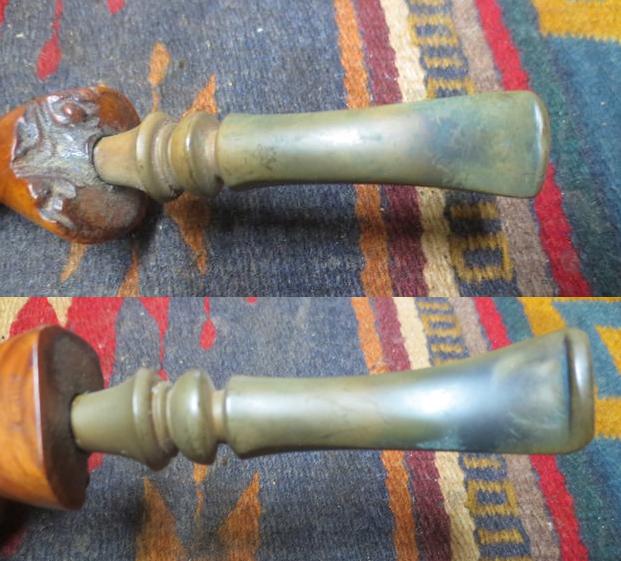
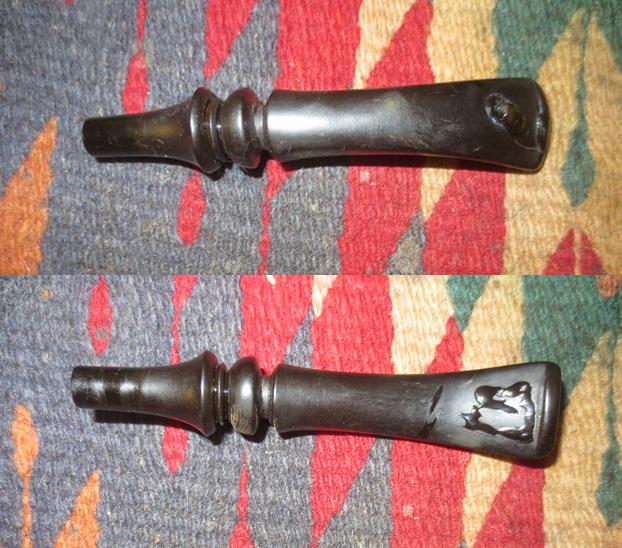
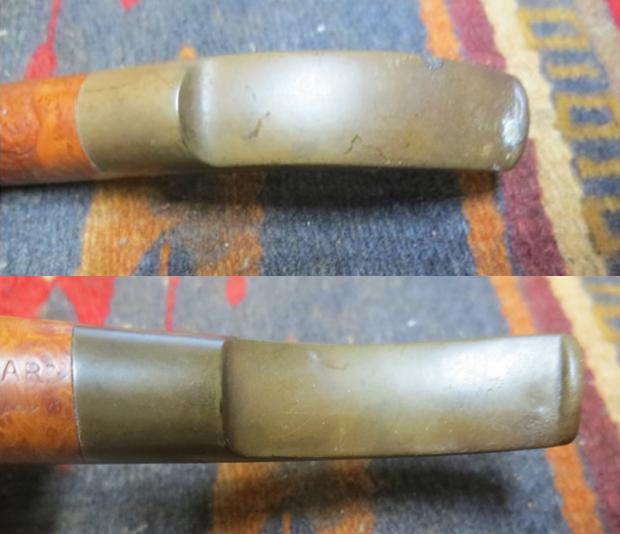
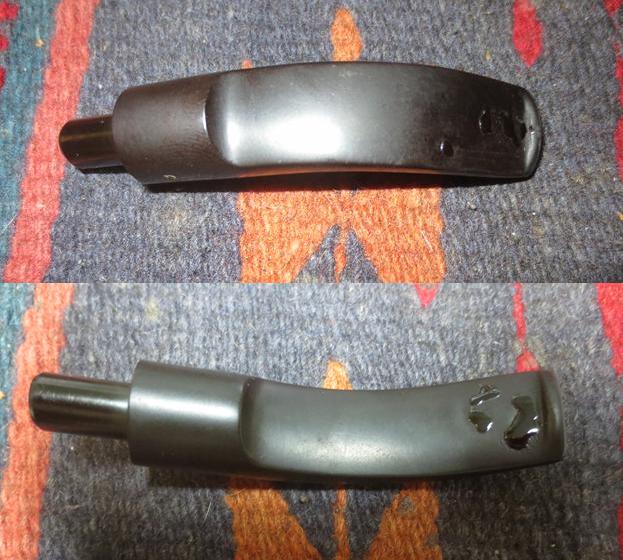
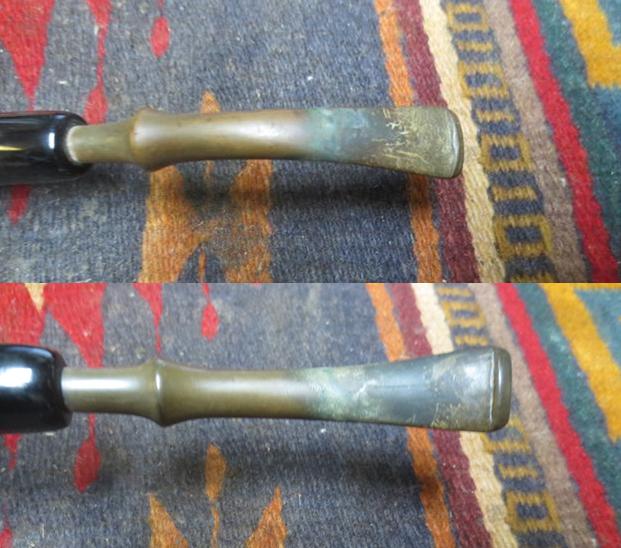
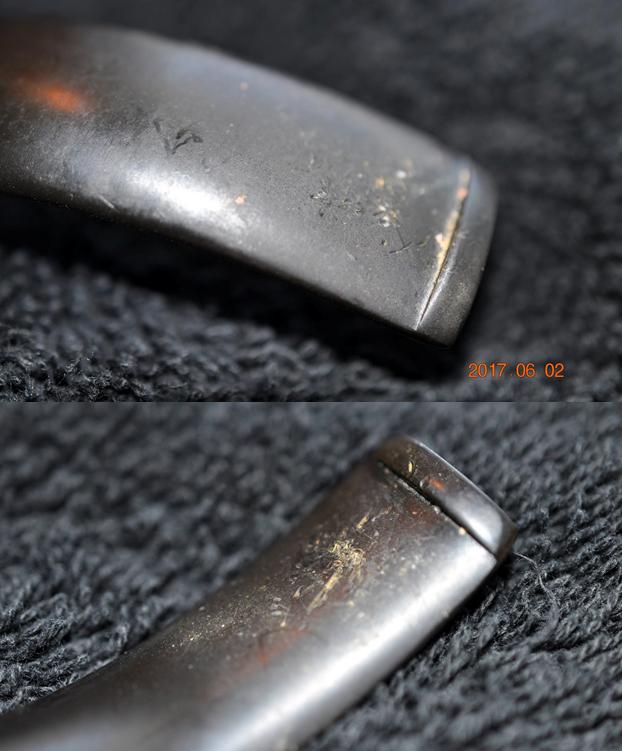
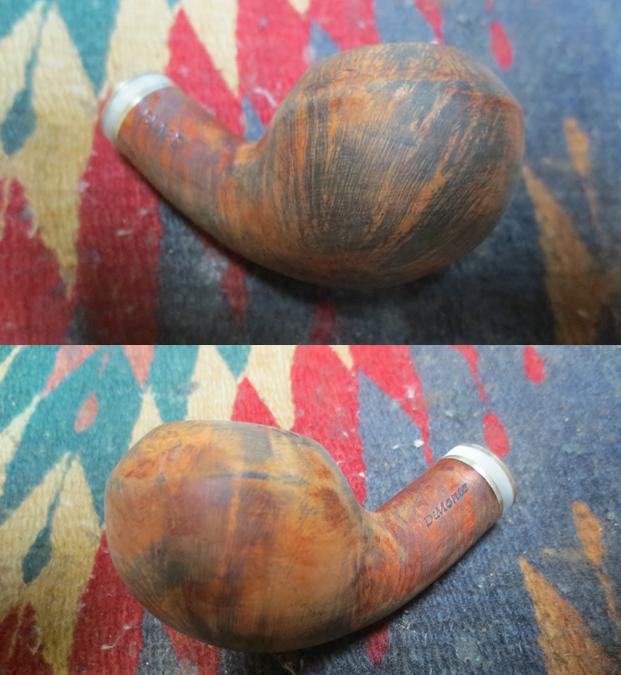
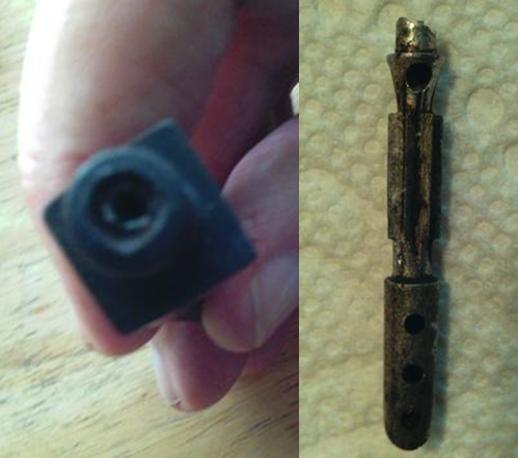
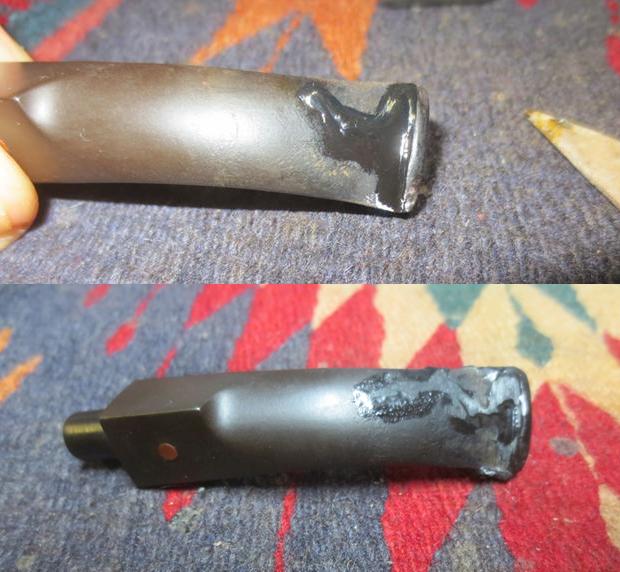
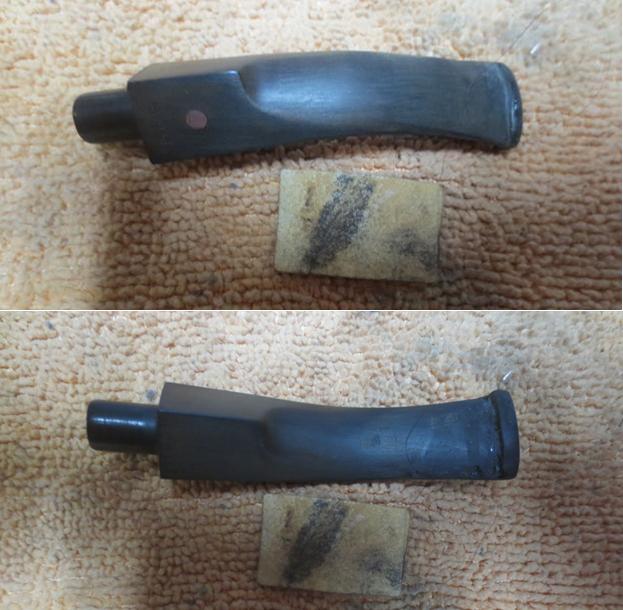
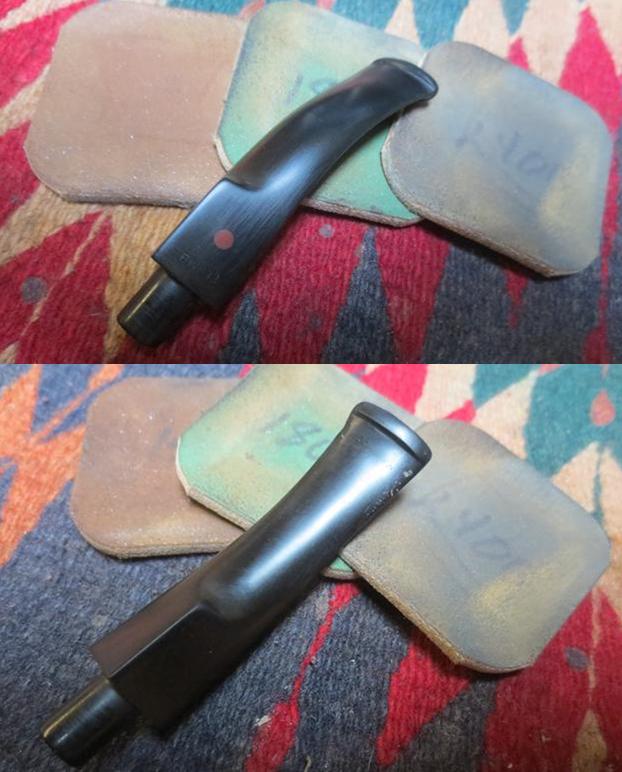
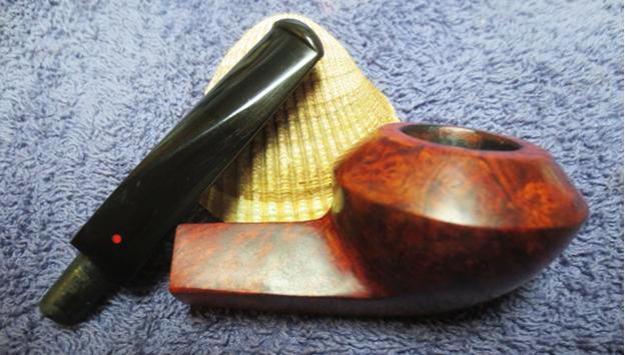
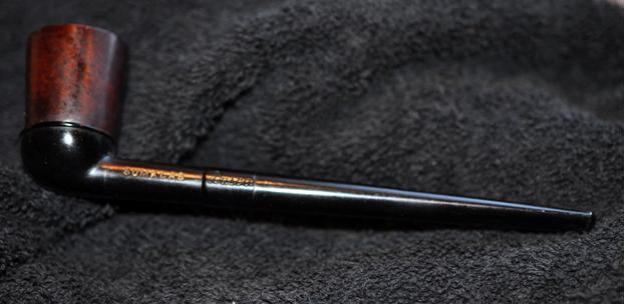
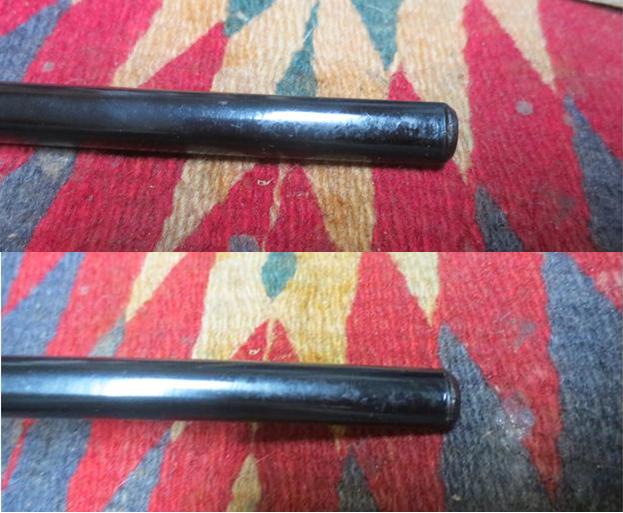
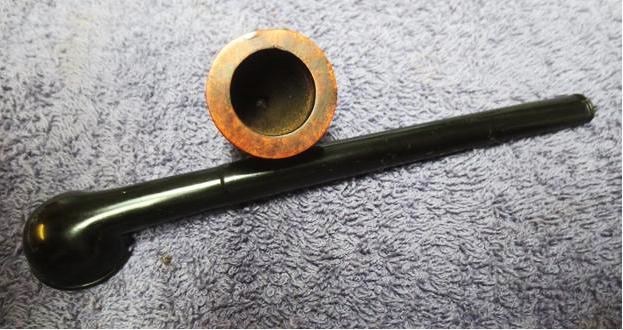
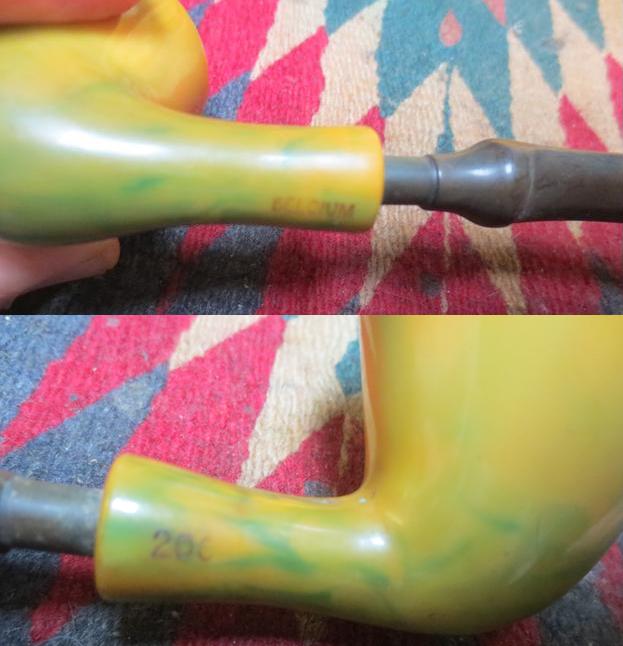
The photos of the stem show the condition of the oxidation and tooth marks on the surface as well as the worn condition of the button.
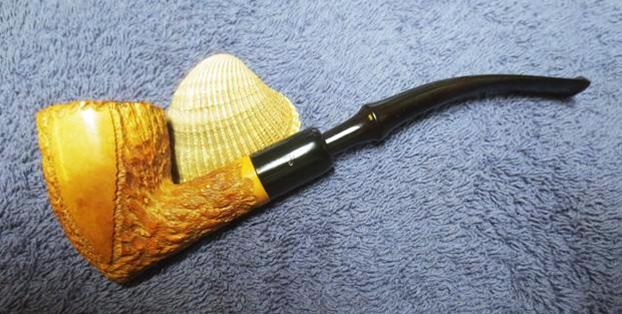
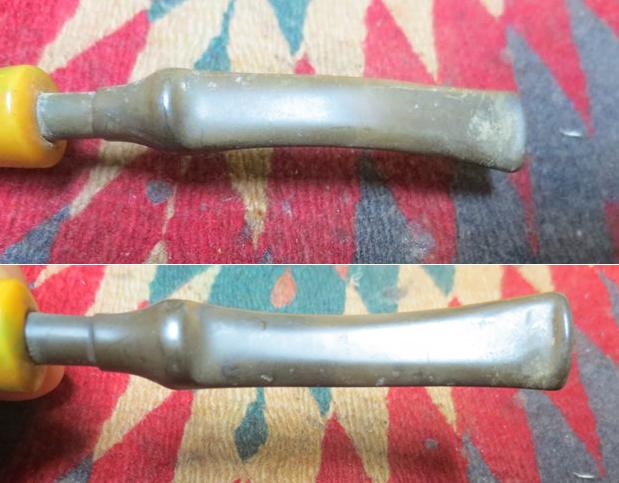
I had previously researched the Hilson Fantasia for a blog I already did on a previous restoration. (https://rebornpipes.com/2016/07/05/is-it-really-a-plastic-smoking-pipe-what-is-a-hilson-fantasia/) On that blog I wrote of what I had found out about the brand. I had learned that the Hilson Fantasia was made in Belgium as this one was stamped. It originally came out as a meerschaum lined pipe with an outer bowl made of a new material that they called pipenite. From what I can find out about the material they call pipenite, it was a specially designed polyester resin. It was light weight and fairly indestructible. The block meerschaum insert was something that Hilson turned into a specialty. I had found a catalogue page on Chris’ Pipe pages, http://pipepages.com/hilson.htm that confirmed my guess regarding the 60s/70s look of the pipe. I have once again included a catalogue page from a 1962 Wally Frank Catalogue that was on the pipepages site. The write up on the Hilson Fantasia is entertaining to read in terms of the sales pitch that is delivered.
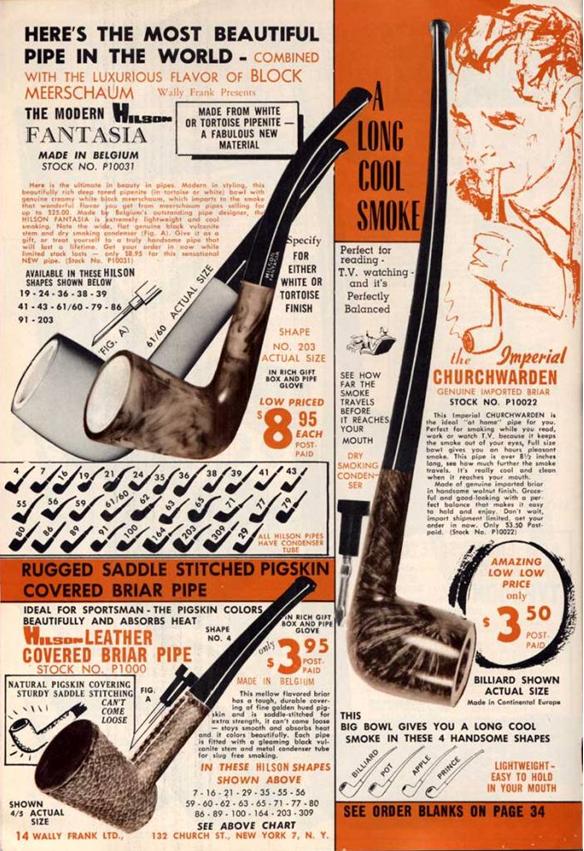
I have also written about some of the history of the brand on a previous blog on Hilson Double Ecume pipes. If you are interested in reading about the history of the brand click on the following link: https://wordpress.com/post/rebornpipes.com/40547. In addition the following link on the Estervals Pipe House website gives a good summary of the history of the brand for those of you who want to read more: http://www.tecon-gmbh.de/info_pages.php?pages_id=70.

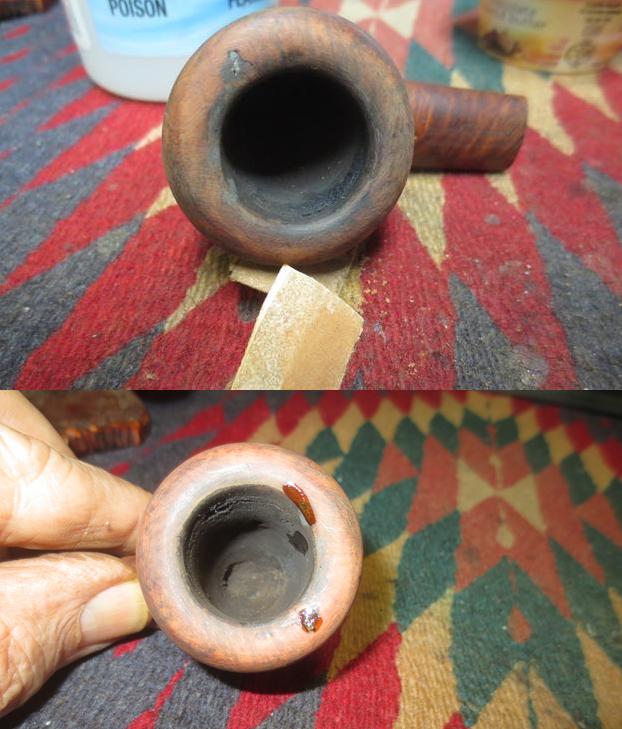
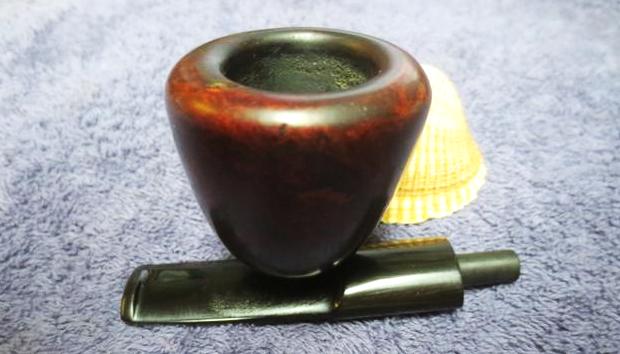
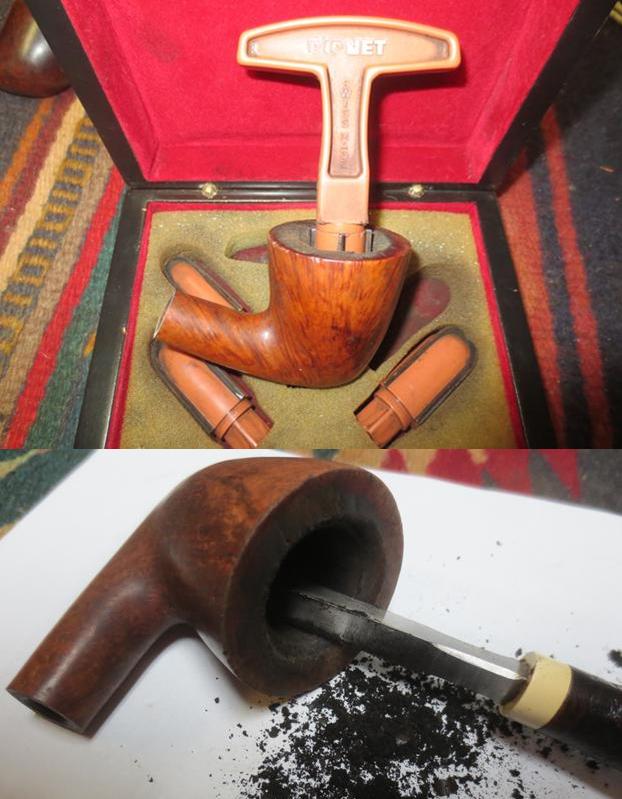
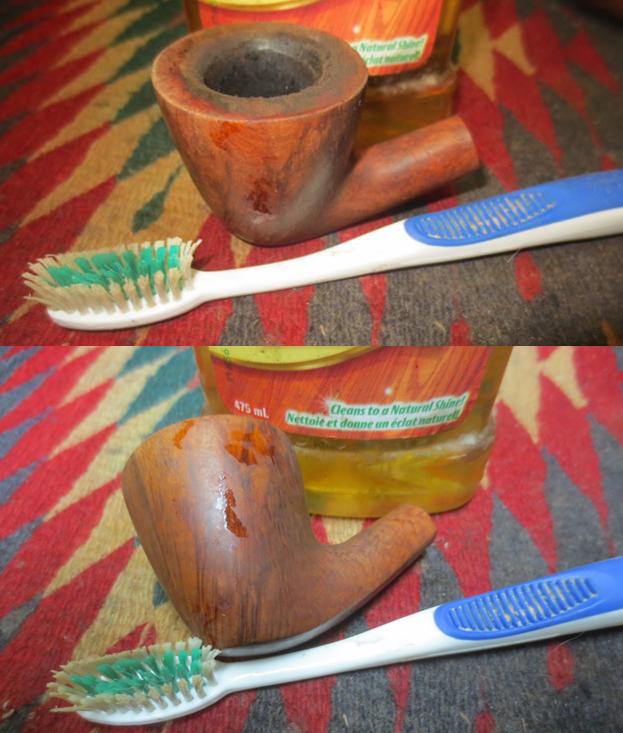
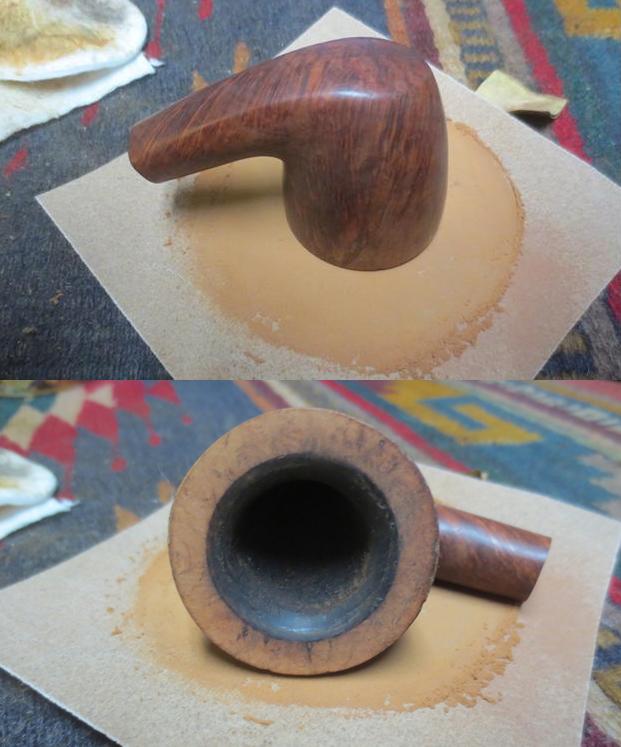
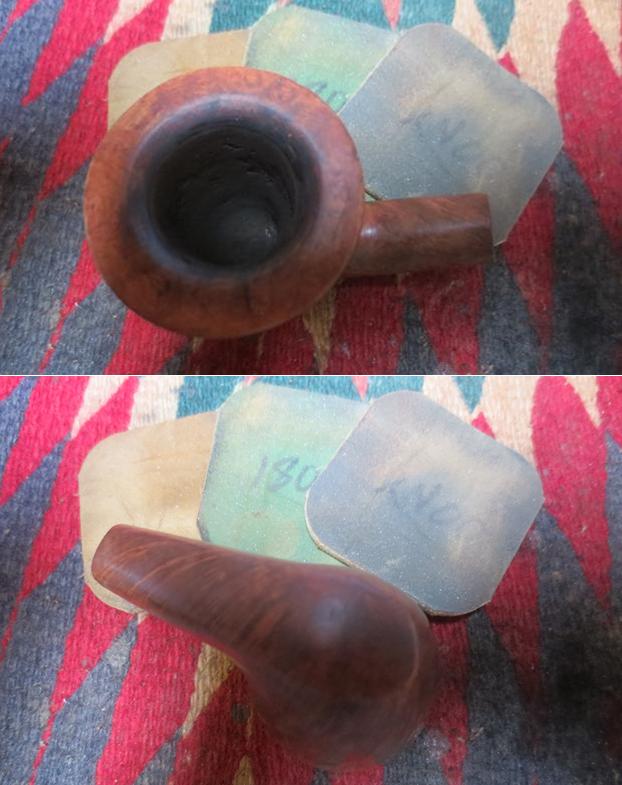
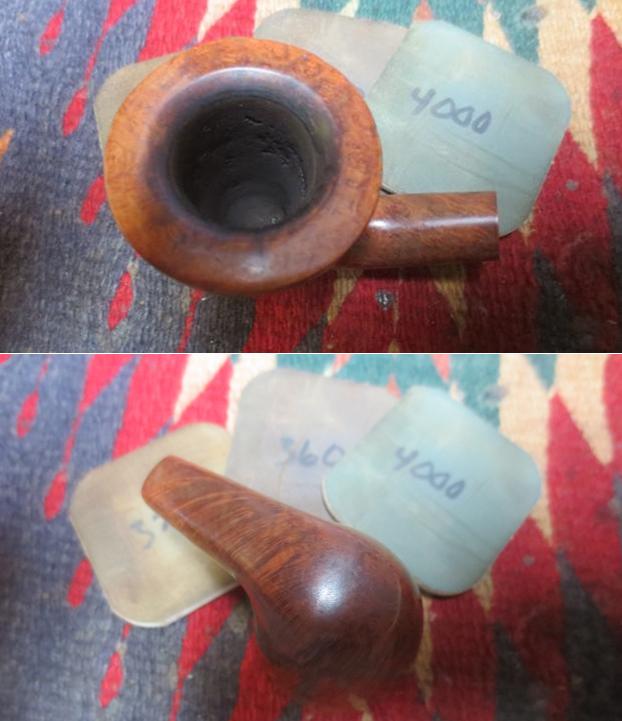
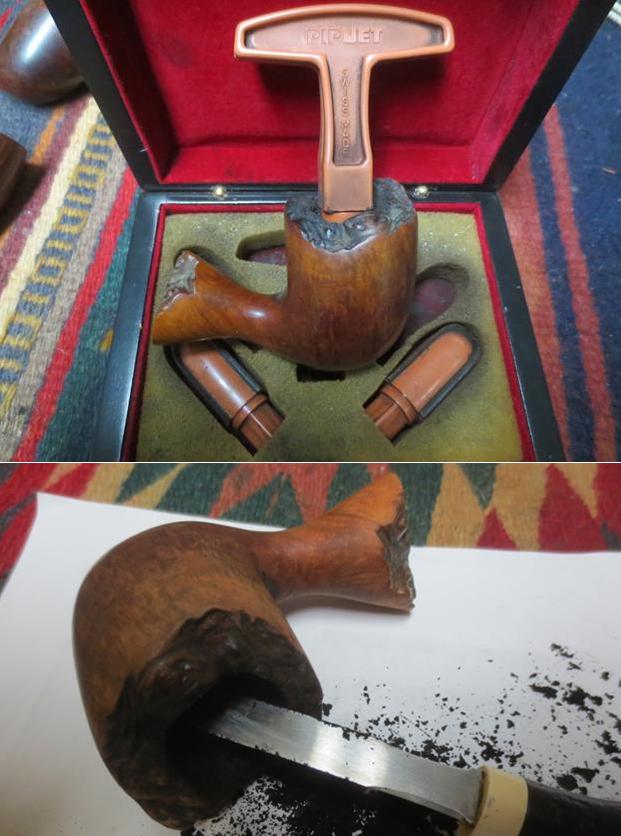
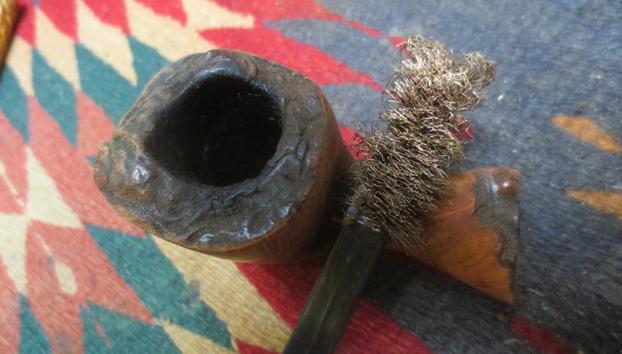
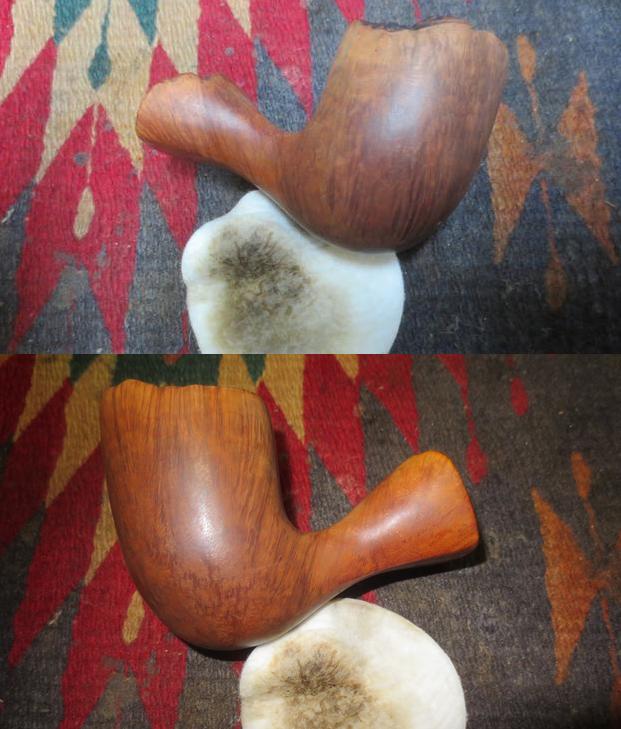
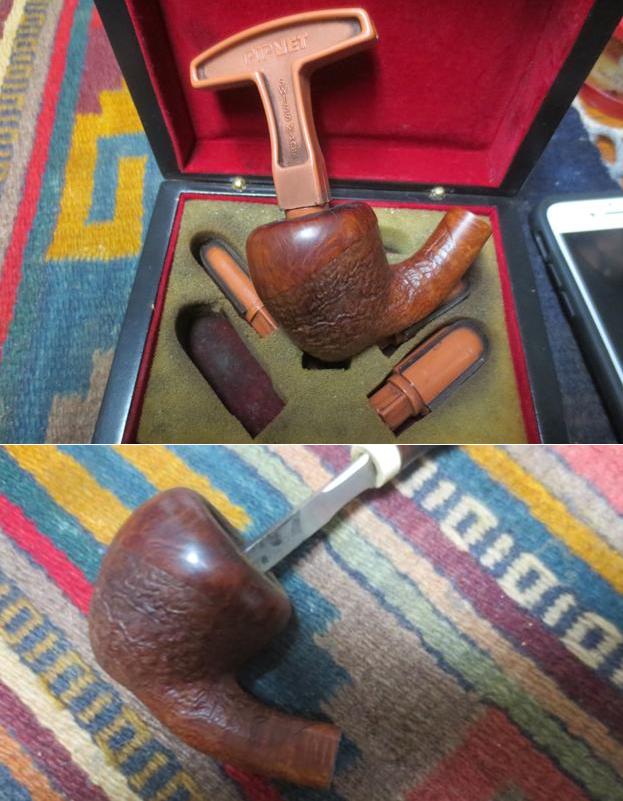
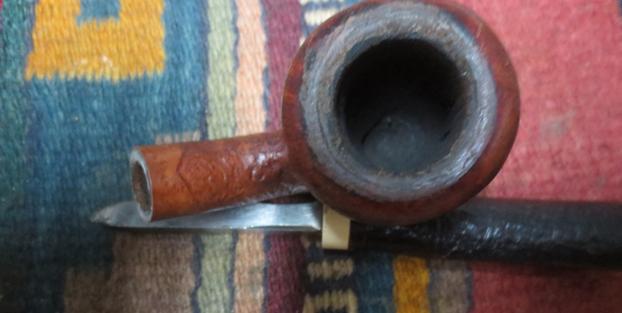
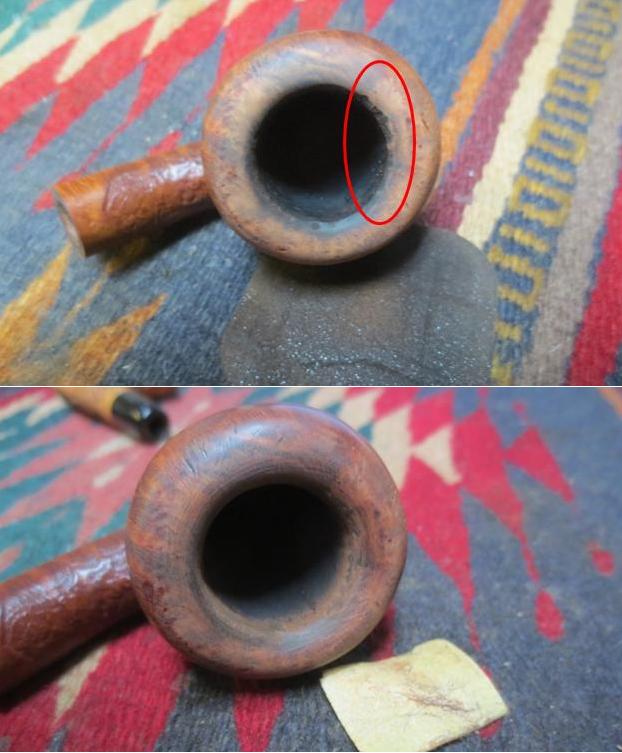
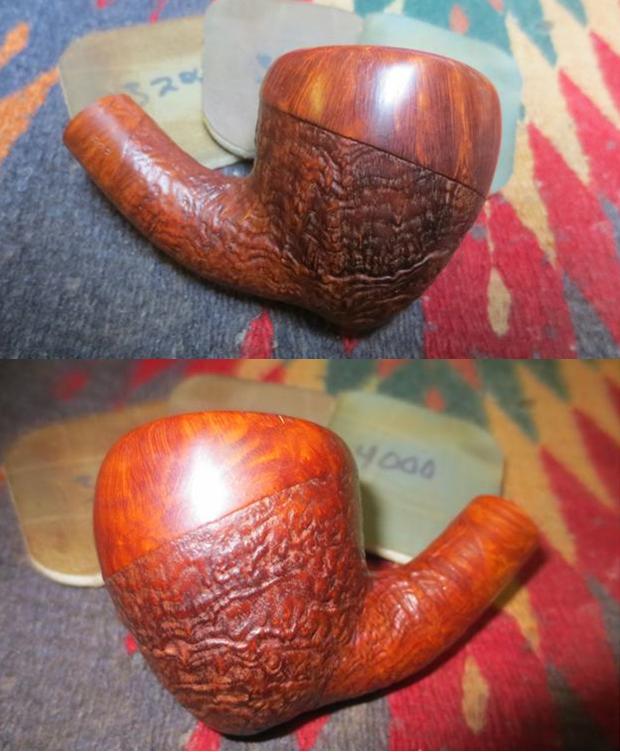
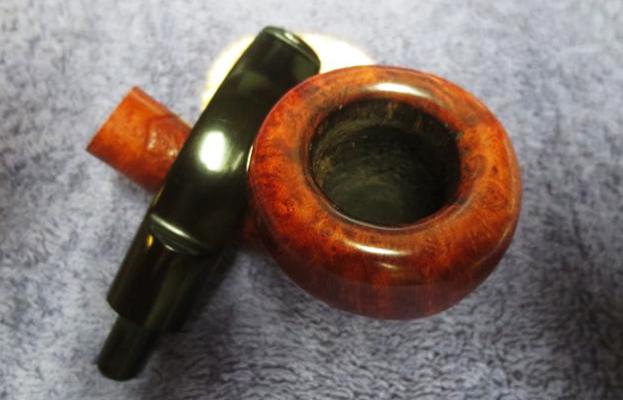
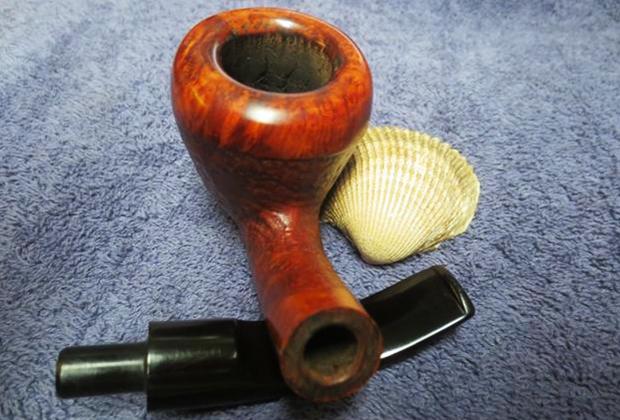
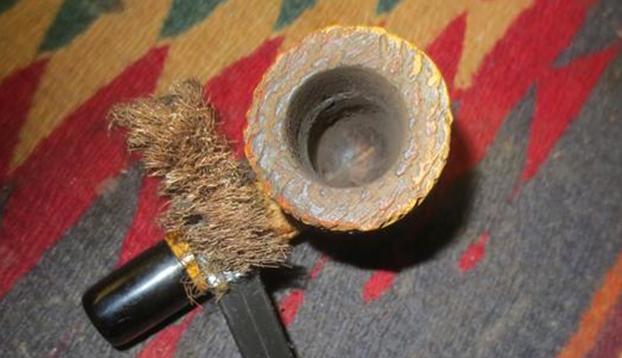
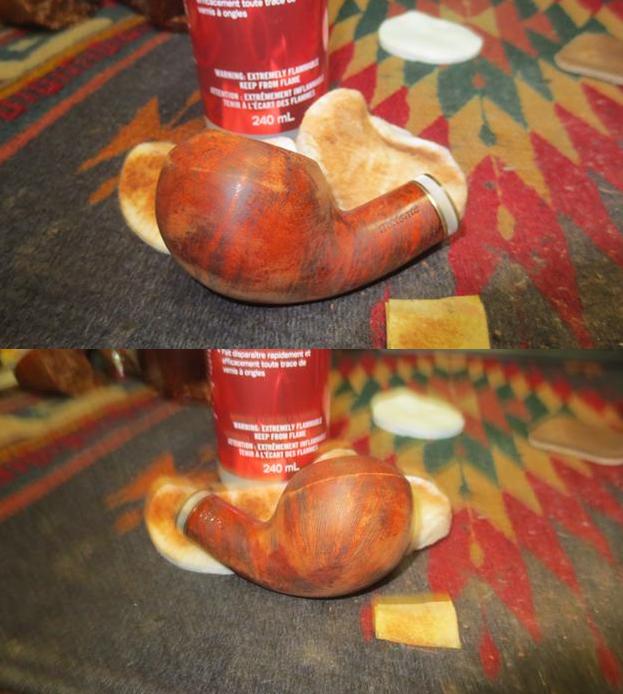
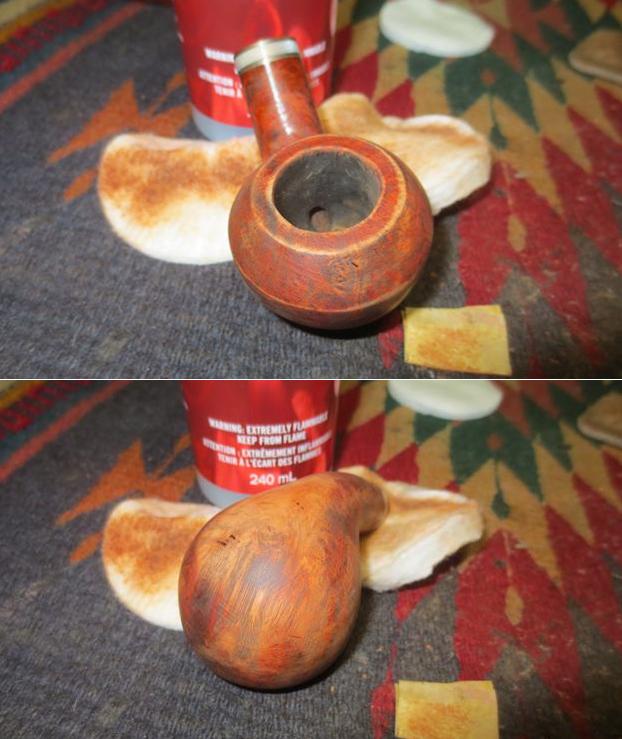
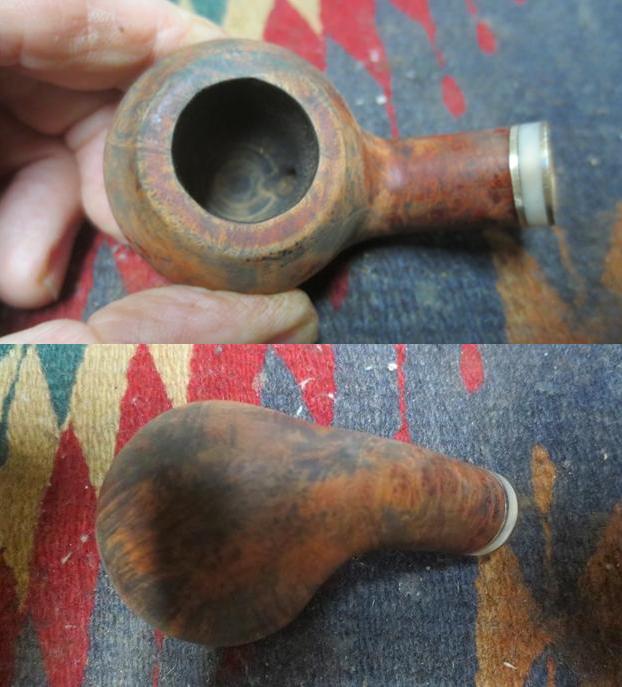
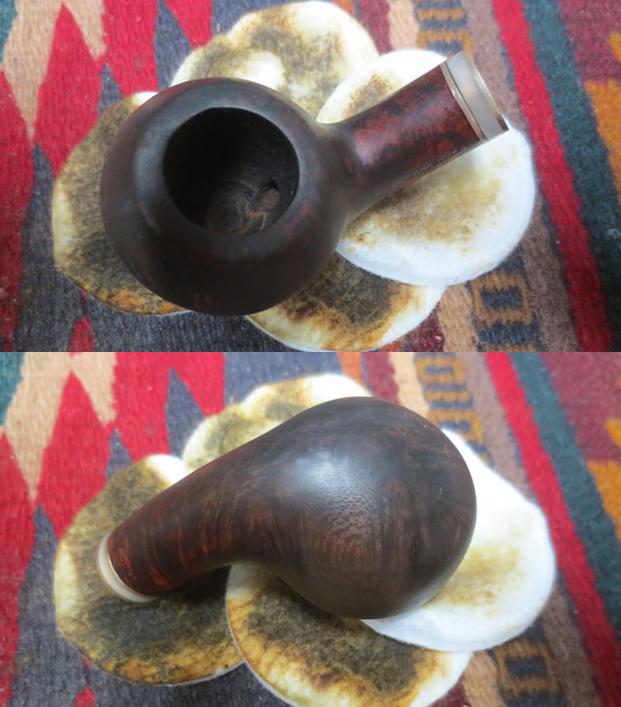
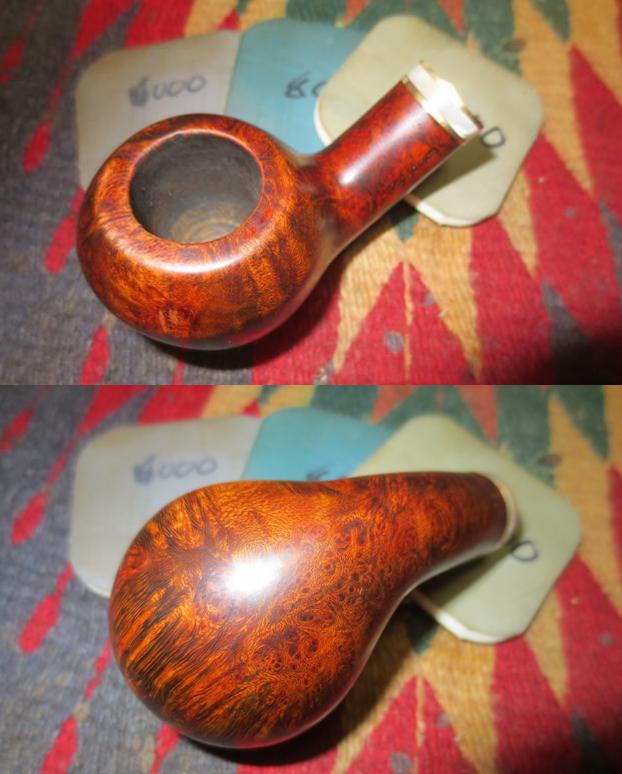
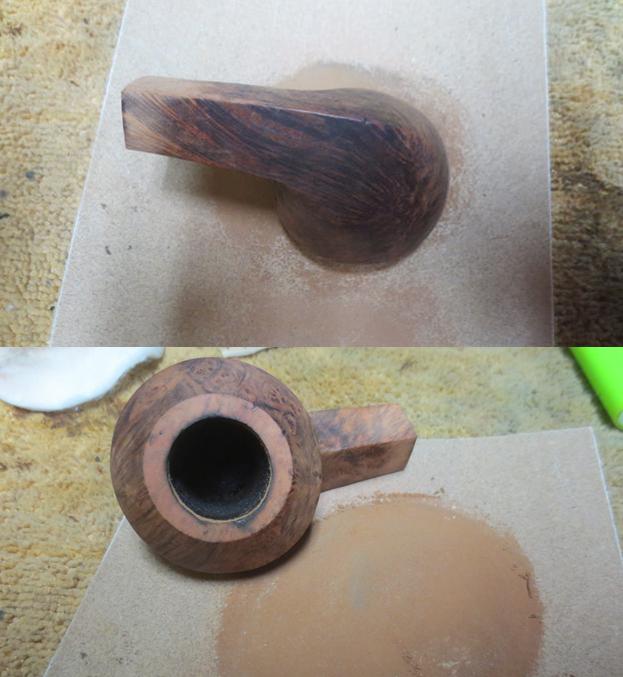
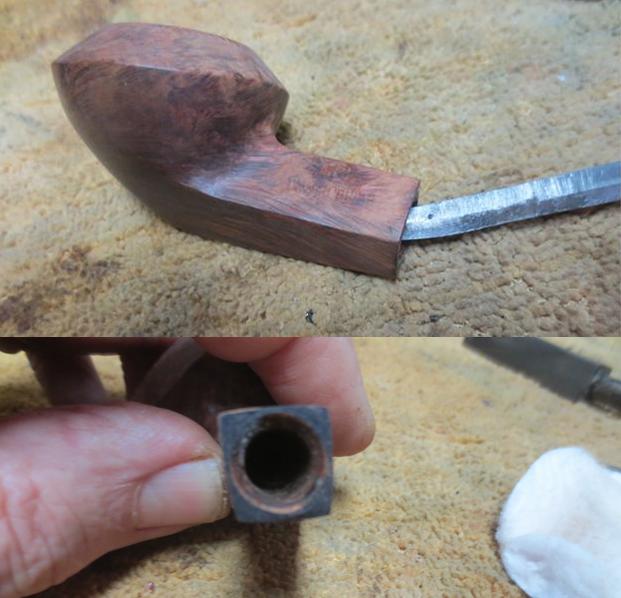
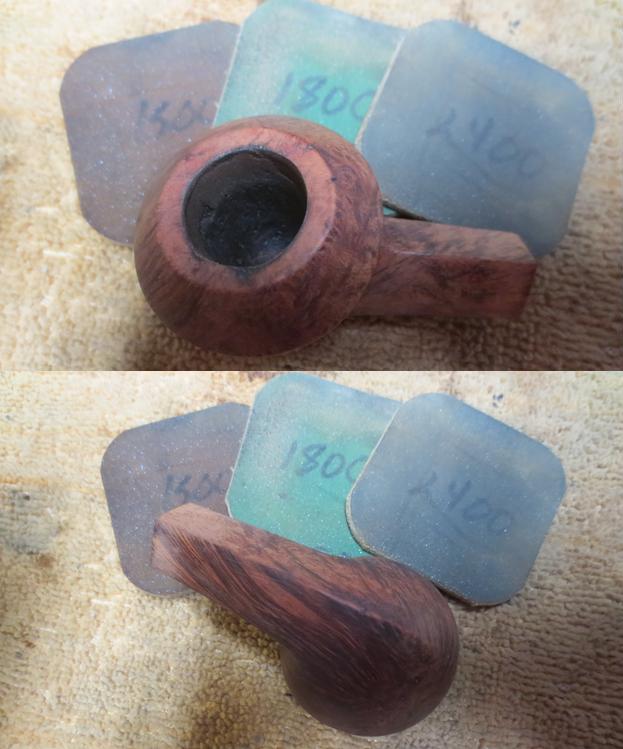
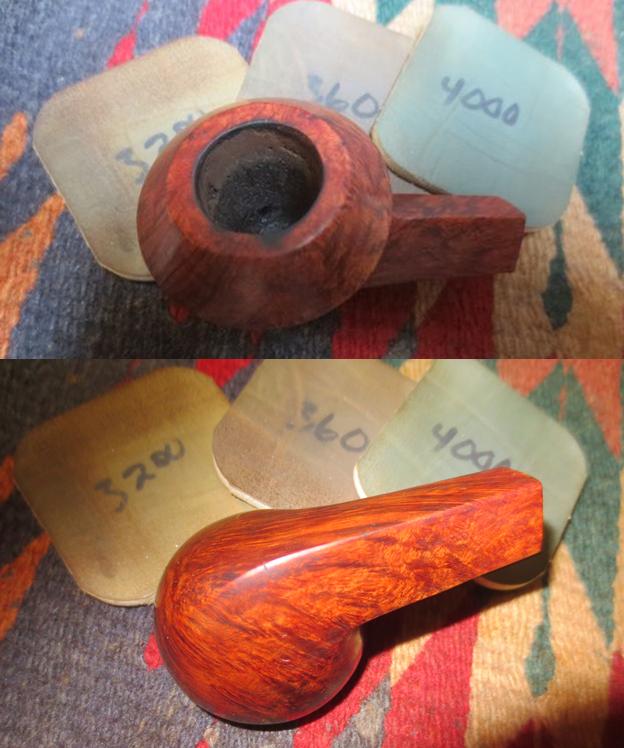
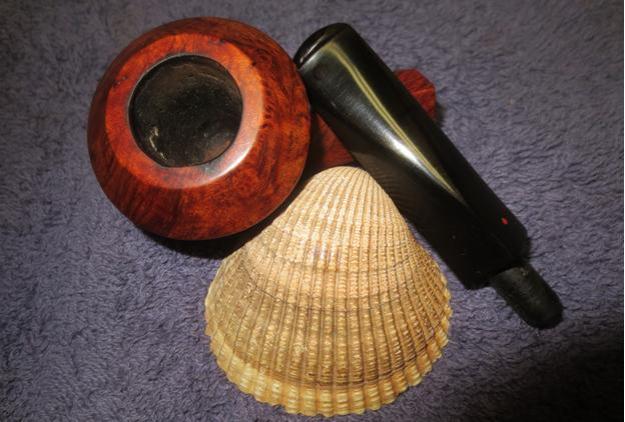
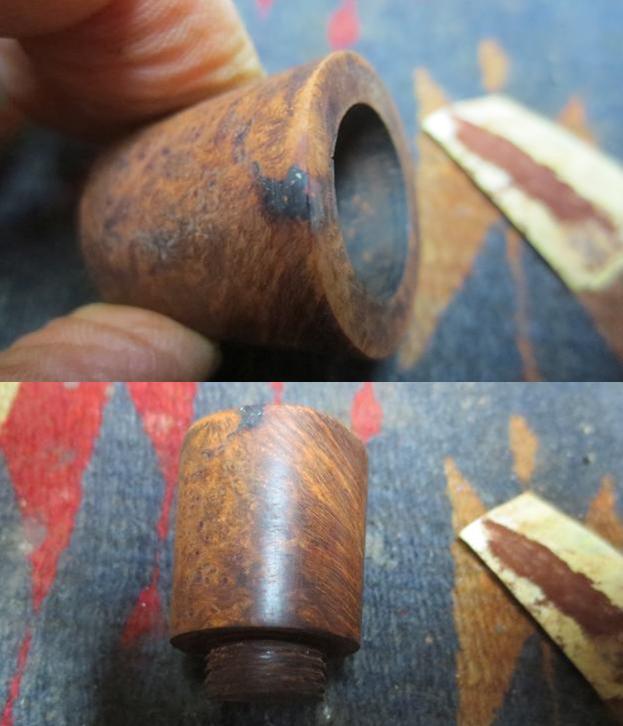
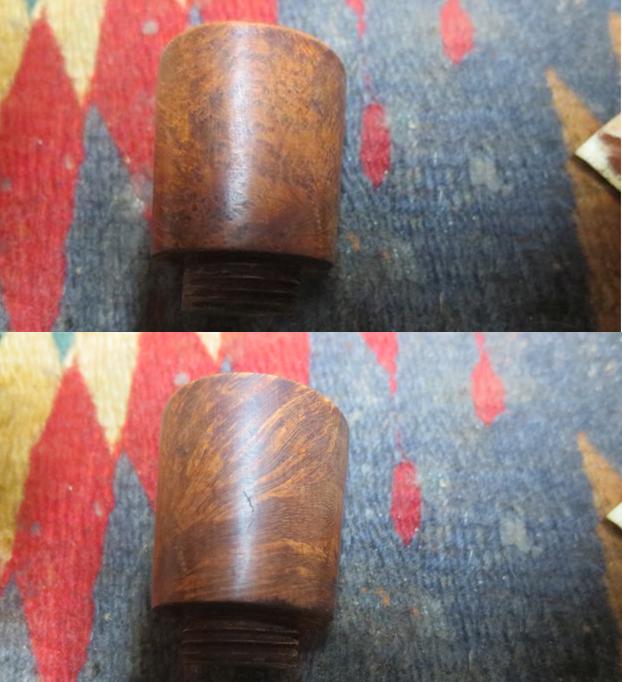
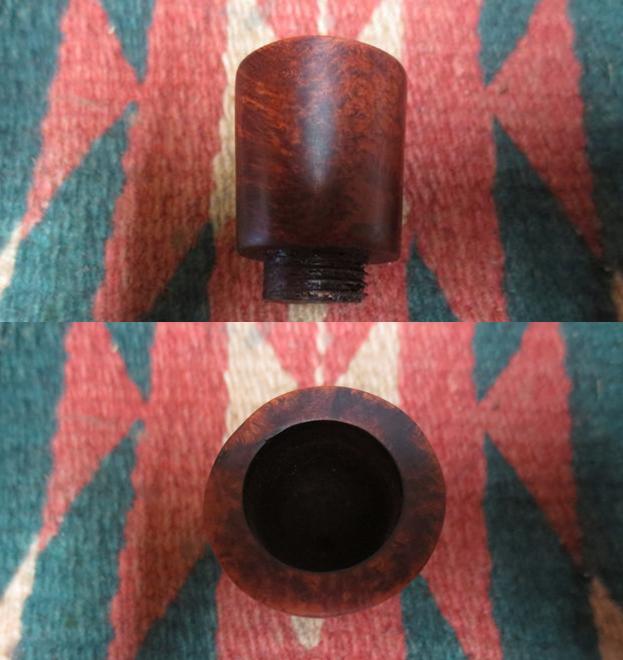
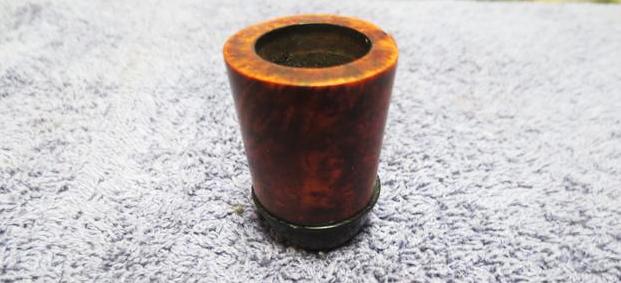
Now for the cleanup of the Fantasia! I carefully reamed the bowl with the smallest cutting head of the PipNet pipe reamer and cleaned up the inside of the bowl with a Savinelli Fitsall Pipe knife. I say carefully because I did not want to damage the meerschaum insert in the bowl but I wanted to remove the rock hard cake in the bowl.
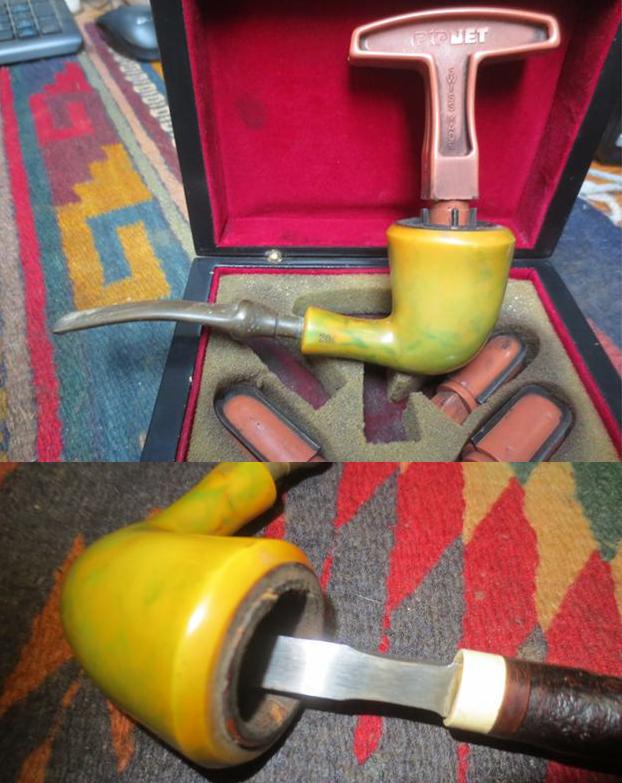
I topped the bowl carefully using a medium and a fine grit sanding pad. I wanted to smooth out the surface of the rim and remove the lava that was on top. I wanted to remove the lip of lava that had formed on the top of the bowl. The second photo below shows the cleaned rim top and also the damage that was very evident at the back edge of the bowl and around the sides. 
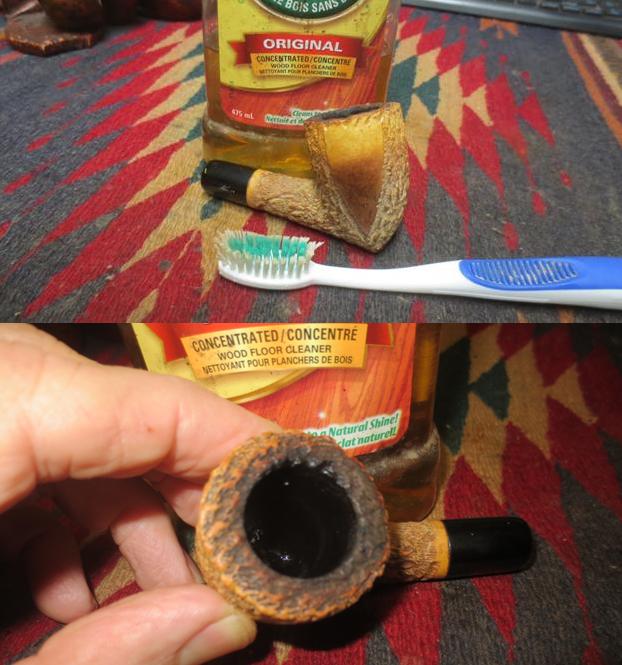
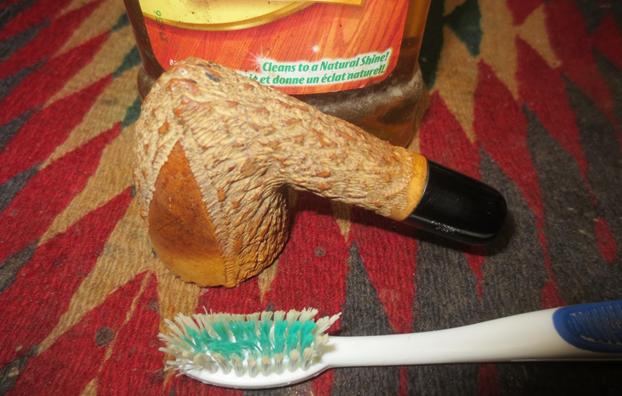
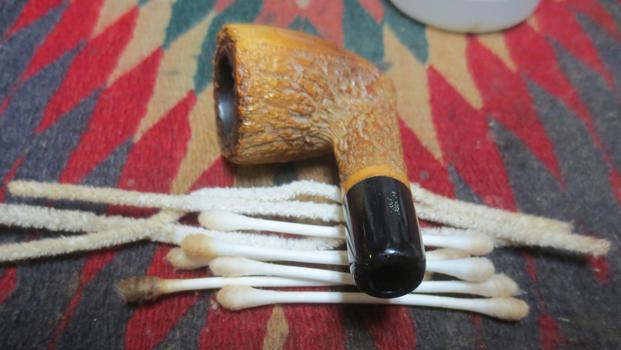
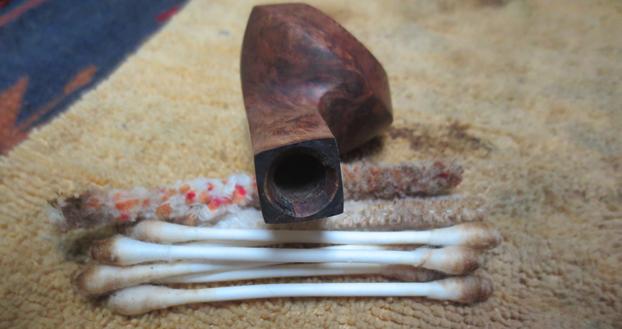
I cleaned out the shank of the pipe with a thin pen knife to scrape away the hardened tars that lined the inside walls. I followed that with a sanding stick and many pipe cleaners, cotton swabs and alcohol before the shank was clean.
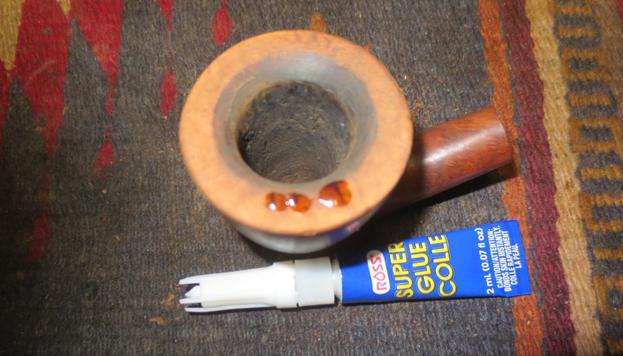
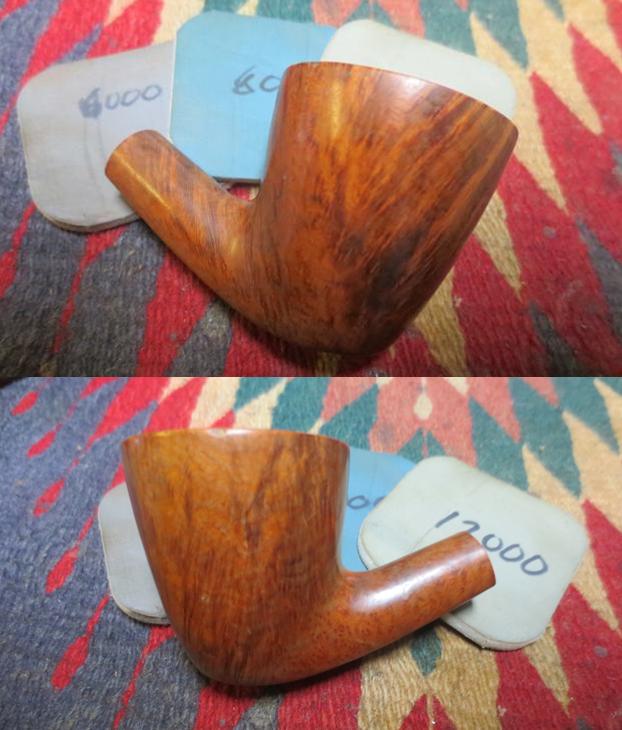
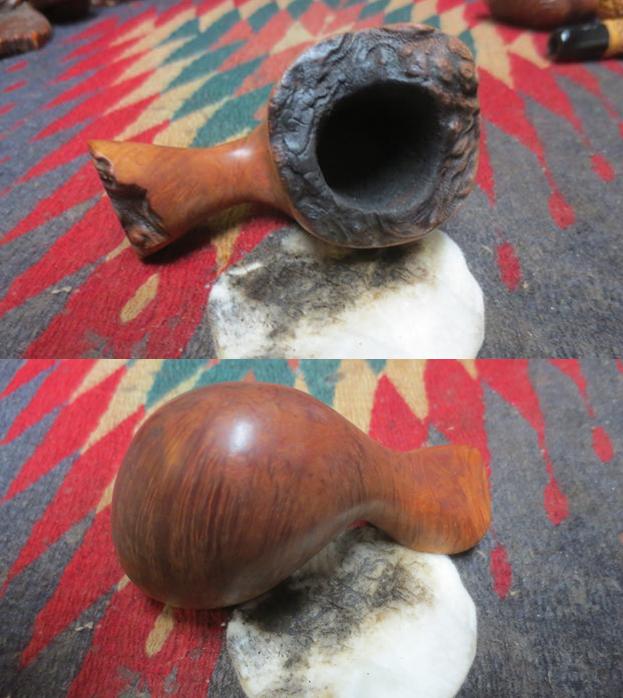
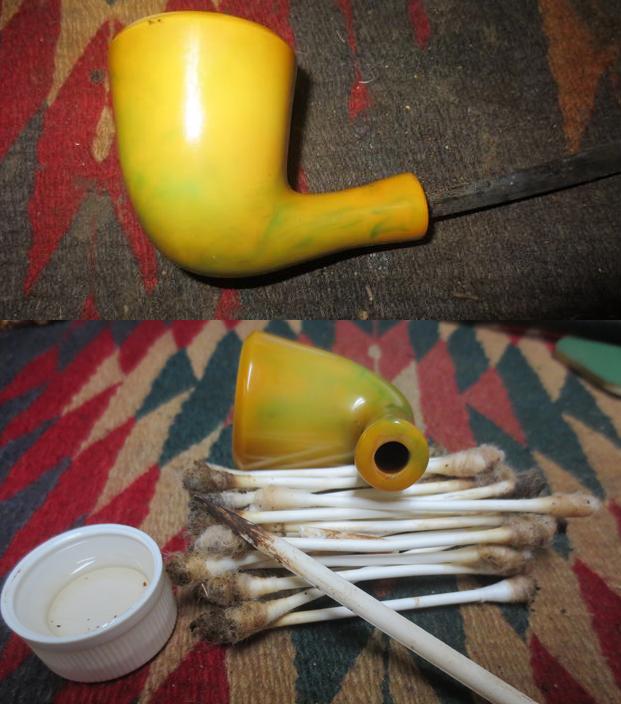
The inner edge of the bowl was pitted and uneven so I sanded it with a piece of 220 grit sandpaper to smooth it out and to clean up the damaged area at the back of the bowl. It was not perfect but it looked better than when I started.
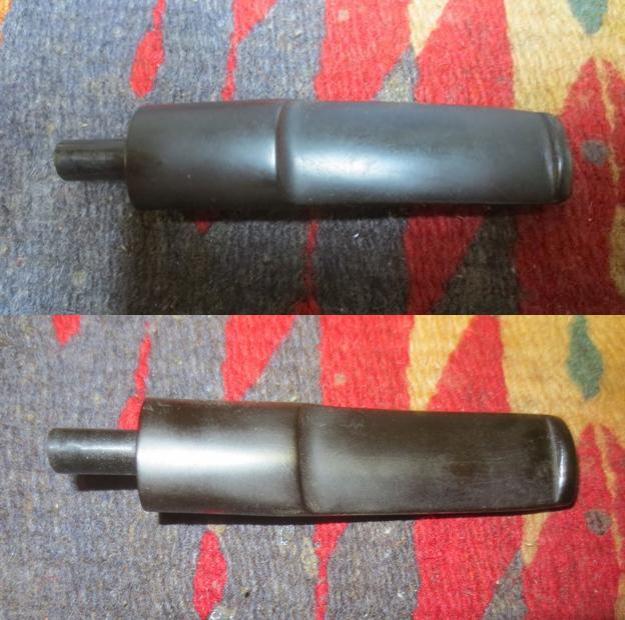
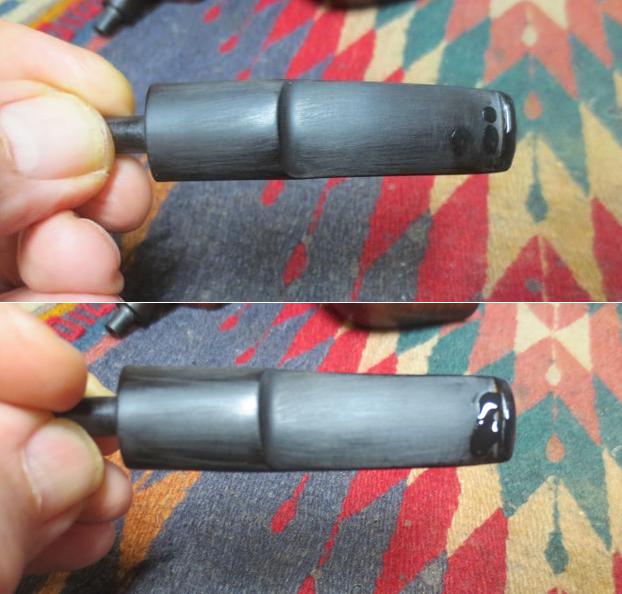
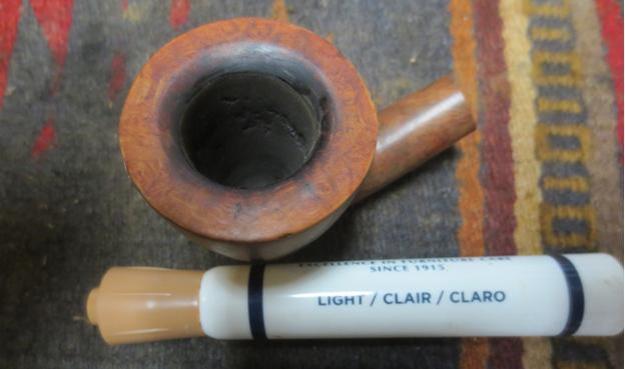
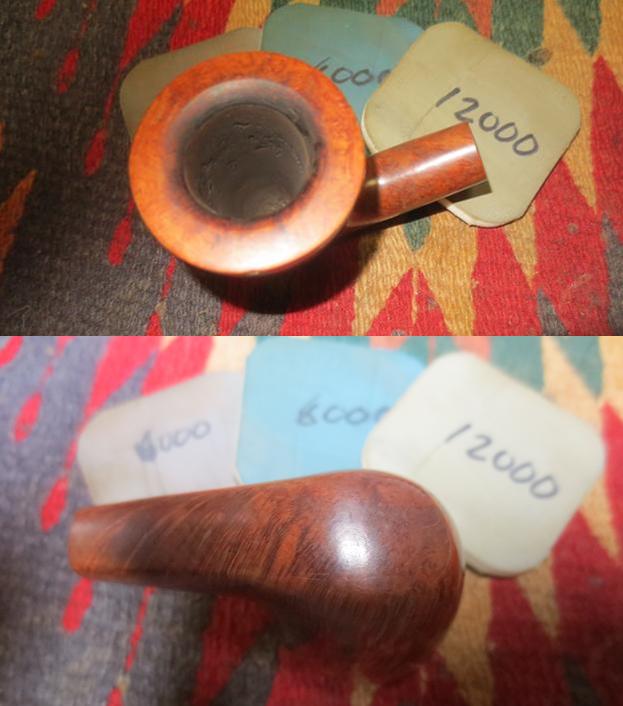
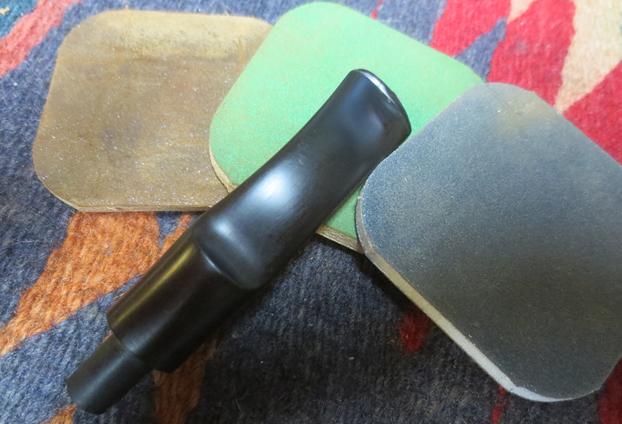
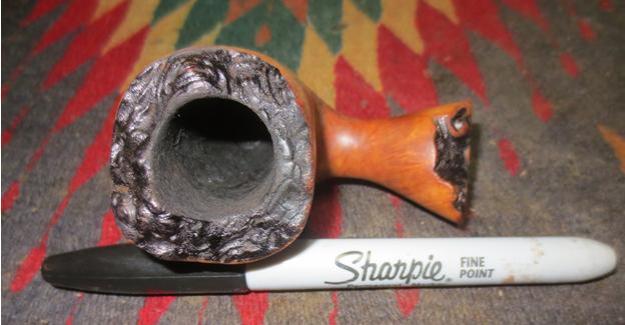
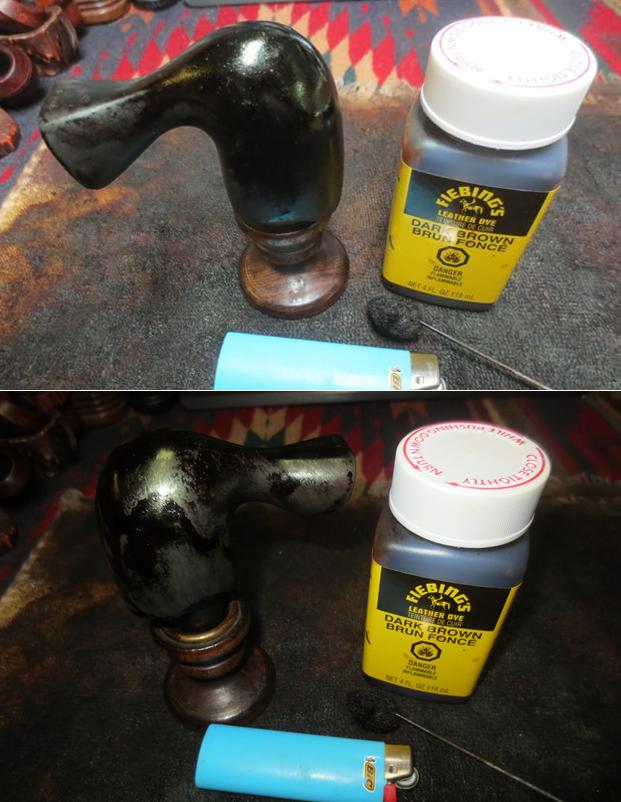
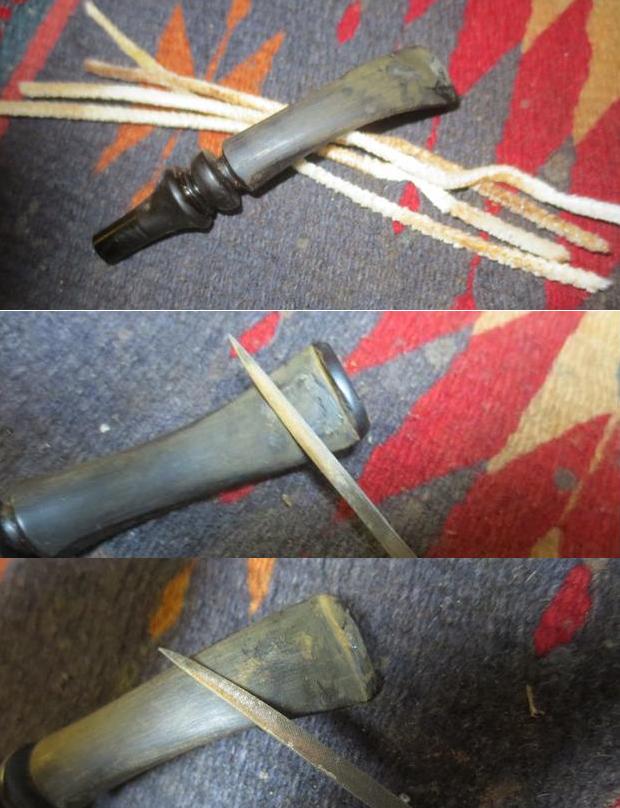
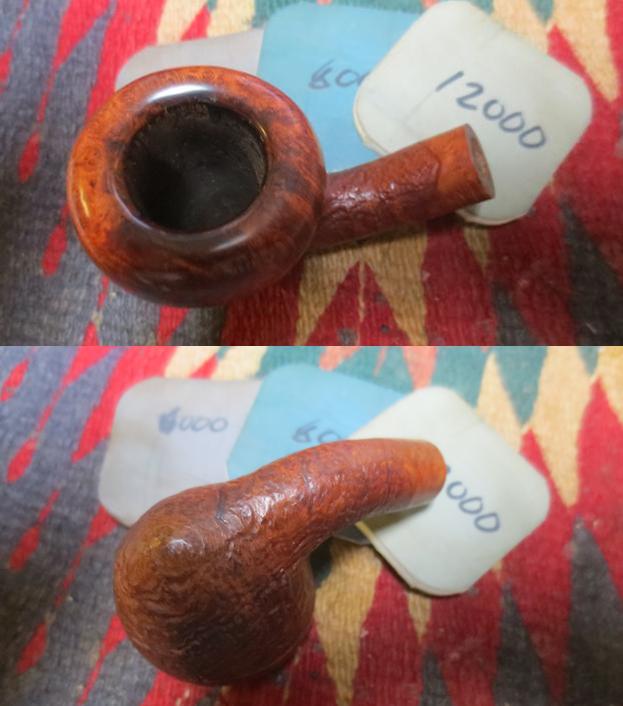
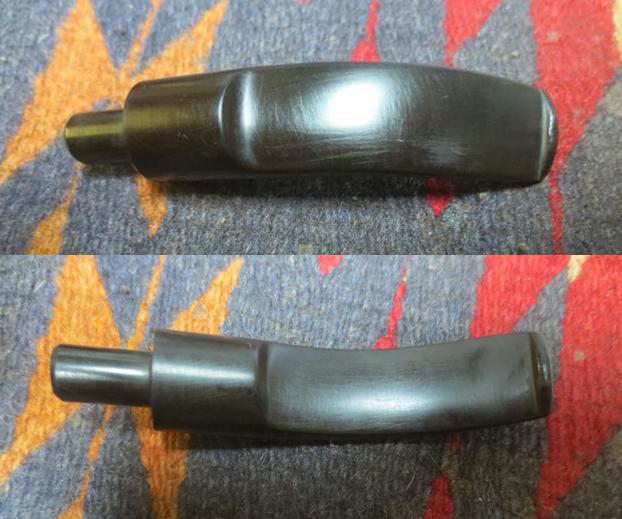
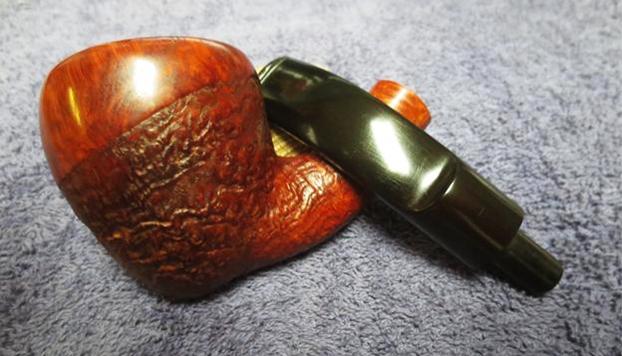
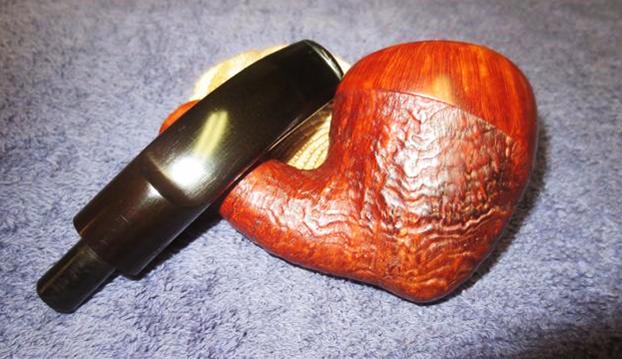
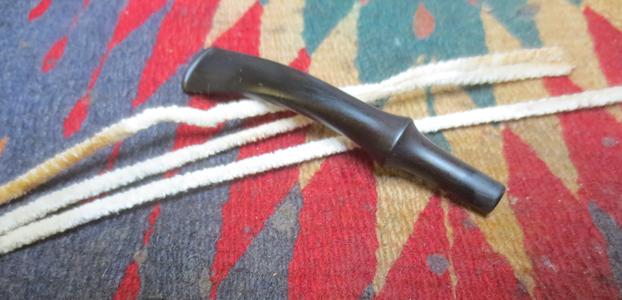
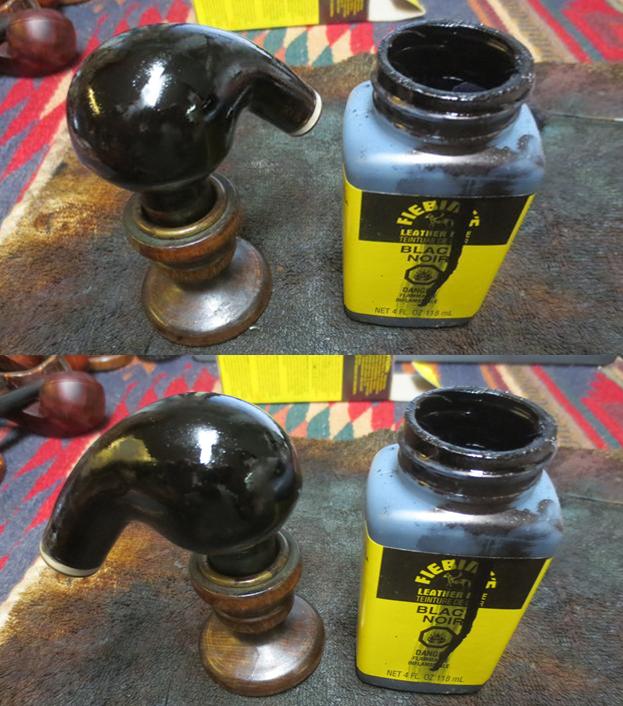
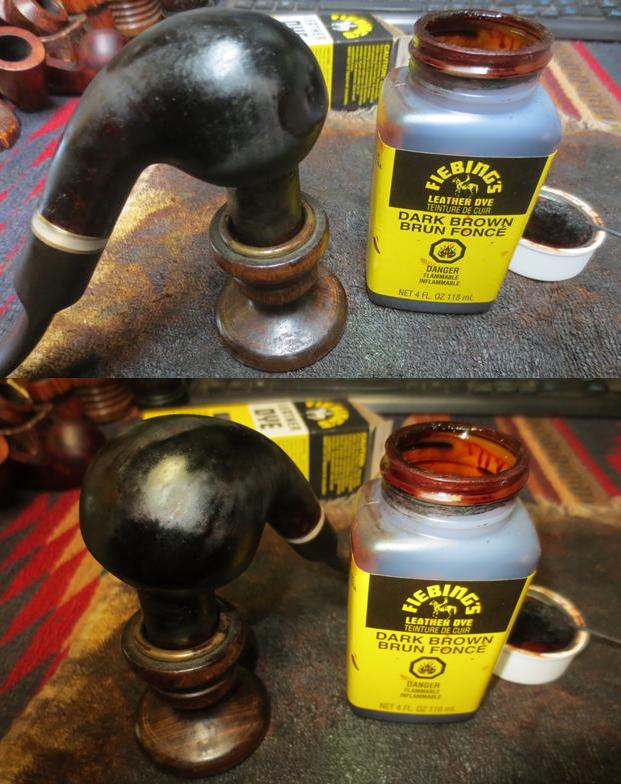
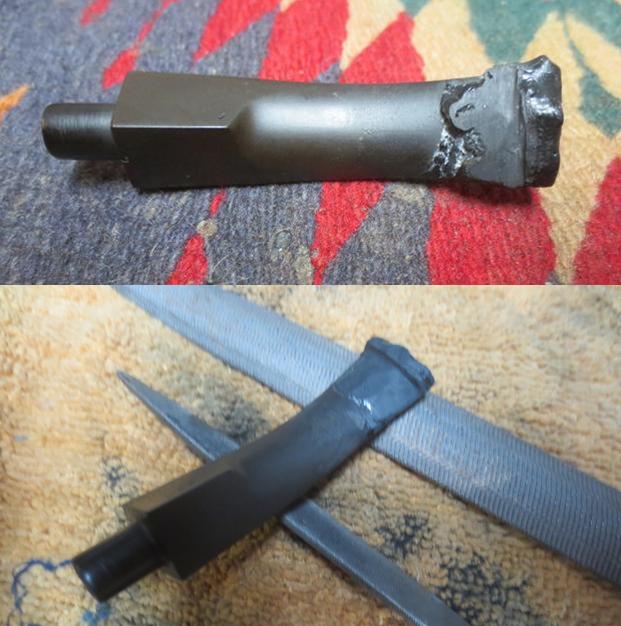
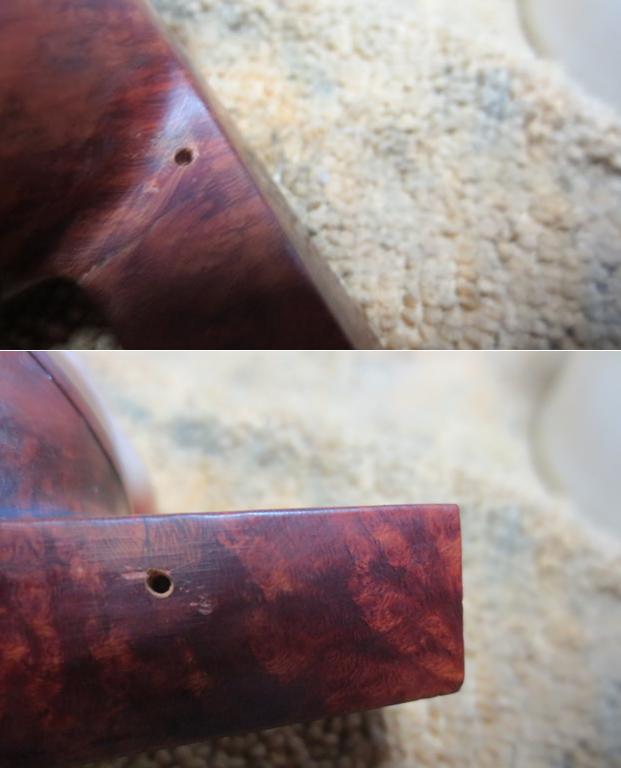
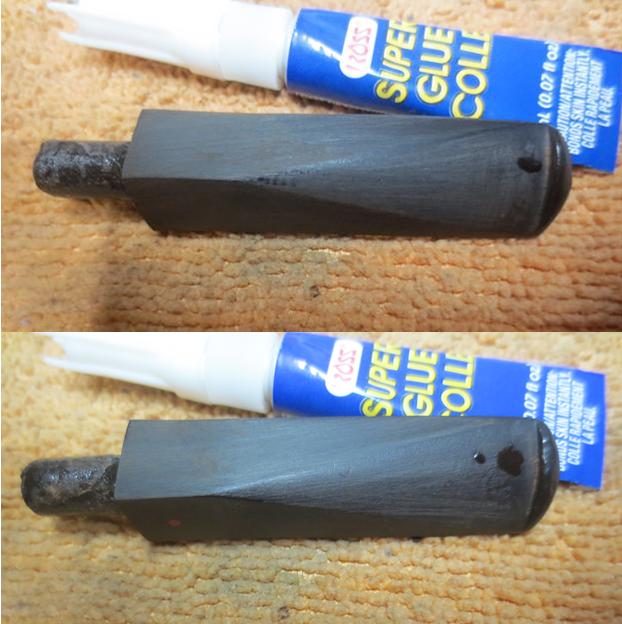
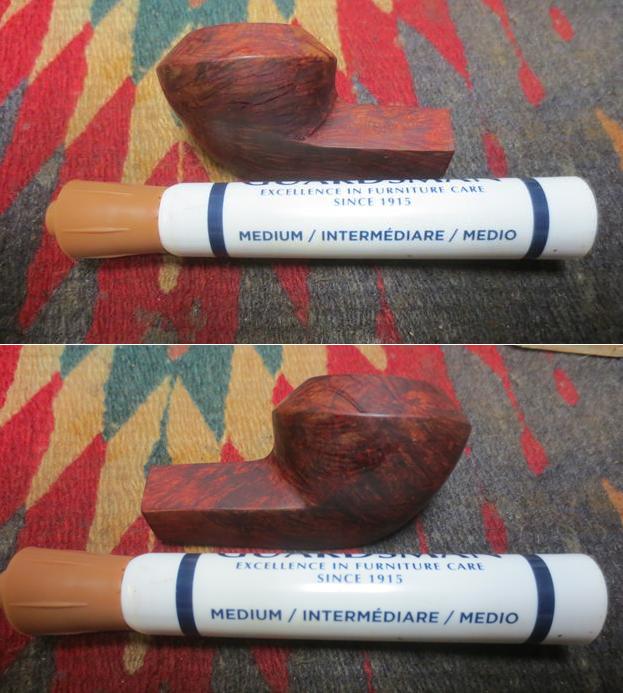
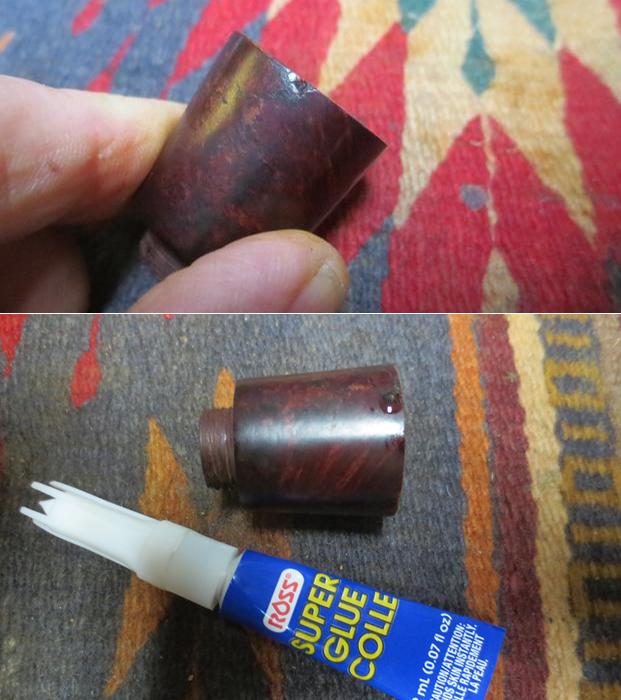
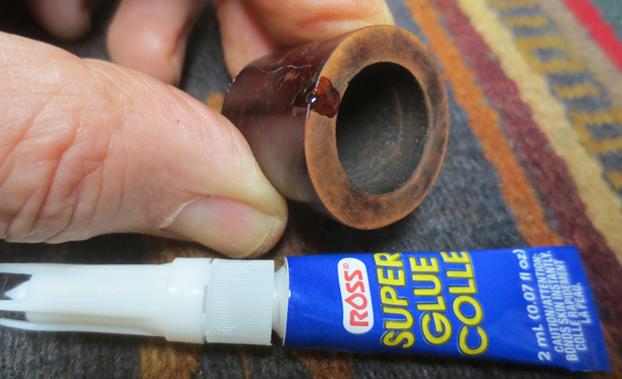
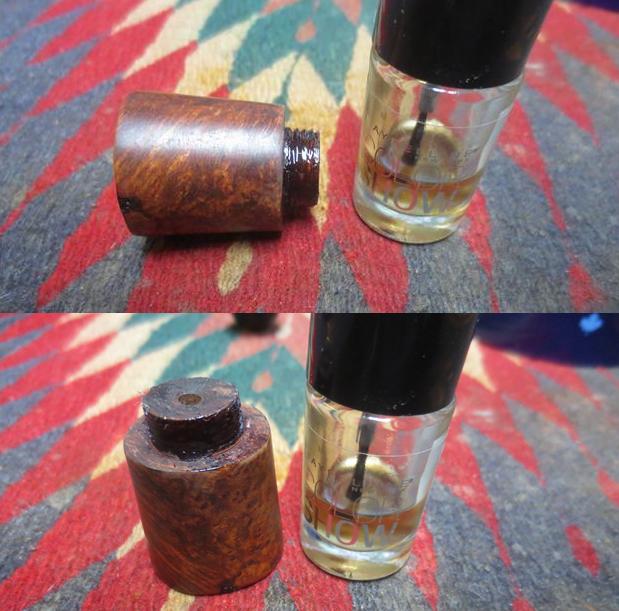
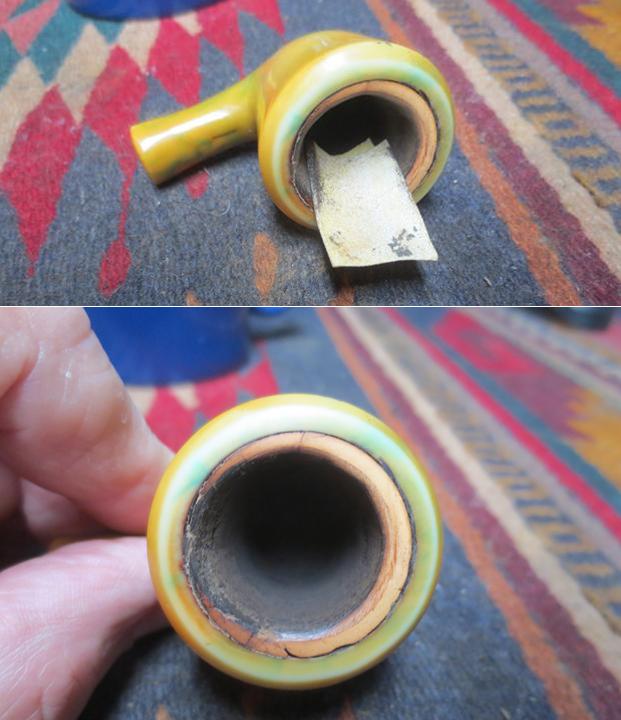
I took the stem out of the Before & After Pipe Stem Deoxidizer and wiped it down with a cotton pad. I cleaned out the inside of the stem with pipe cleaners and alcohol to remove the left over deoxidizer. The photos below show that it removed most of the oxidation but there were some stubborn spots left. The tooth dents are also very clear in the next photos of the stem. I wiped the stem down with alcohol and filled in the dents with a black super glue. I set the stem aside to let the repairs cure. 
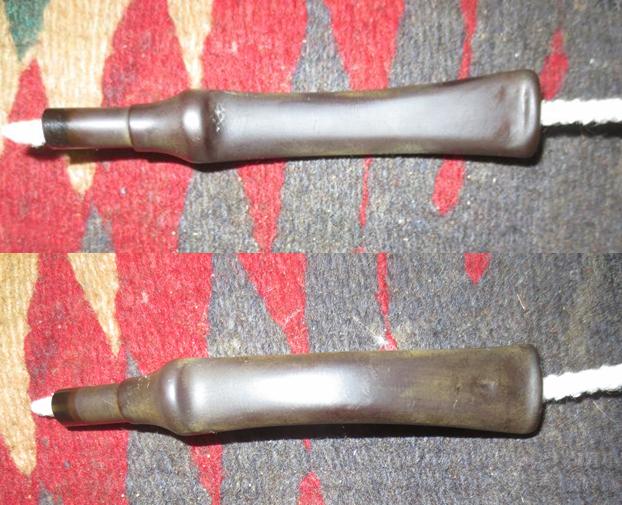
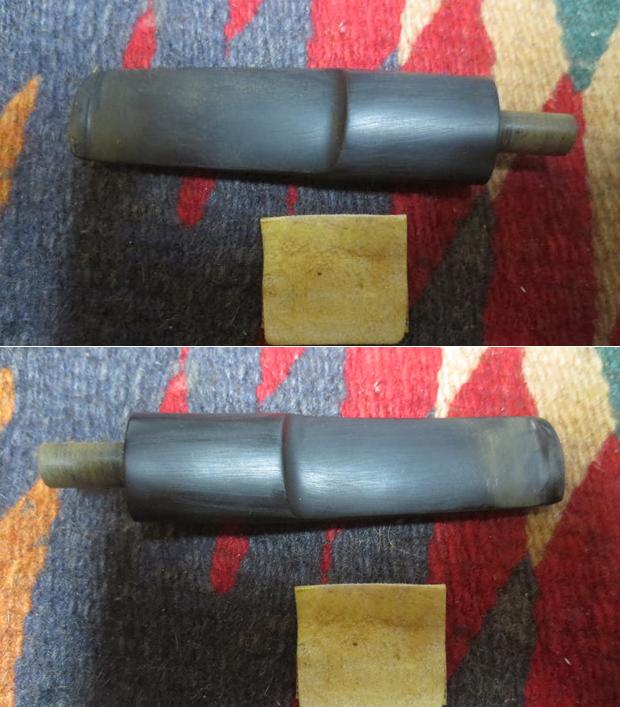
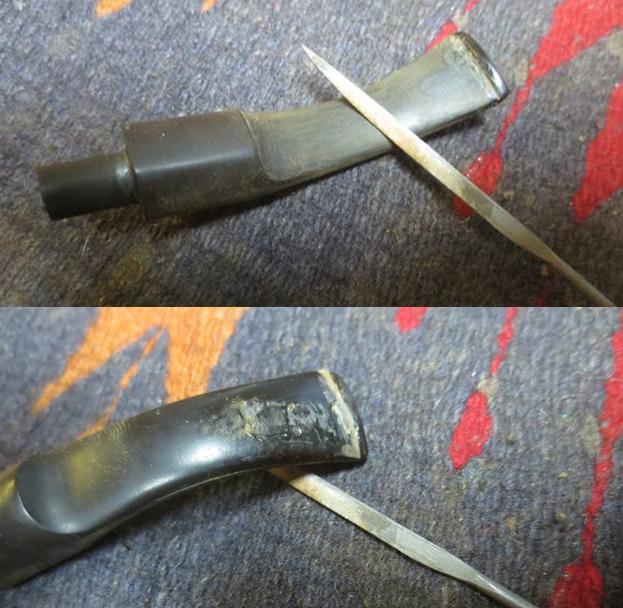
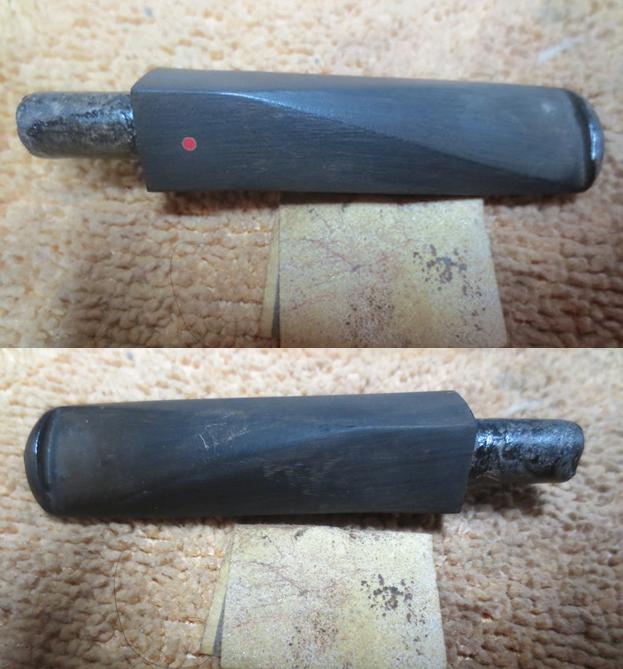
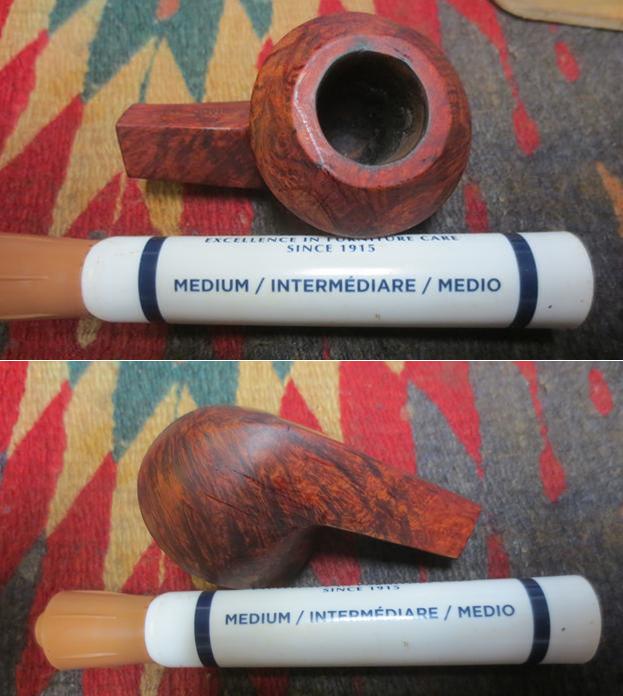
When the glue had cured I worked on the fit of the stem in the shank. The tenon was still too big for the stem to sit properly in the shank so I sanded it down with 220 grit sandpaper. There were some high spots on the tenon that needed to be rounded out and cleaned up. Once that was completed the stem fit perfectly.
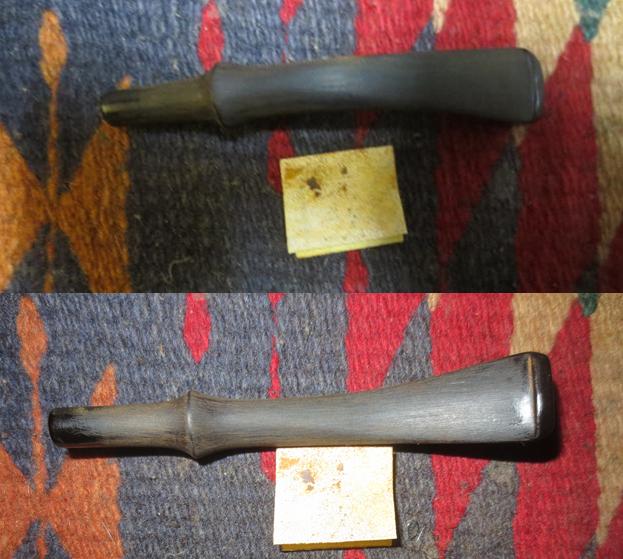
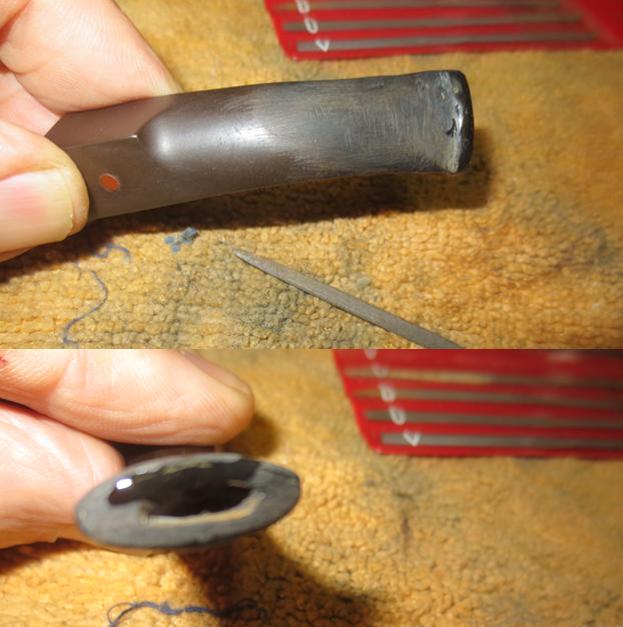
Once the fit of the stem was correct, I turned to work on the stem itself. I wanted to blend the patched areas into the surface of the stem and also recut and redefine the button with needle files. I used a knife-edge needle file to redefine the sharp edge of the button and give it form. I also used it to flatten out the repaired areas on both sides of the stem.
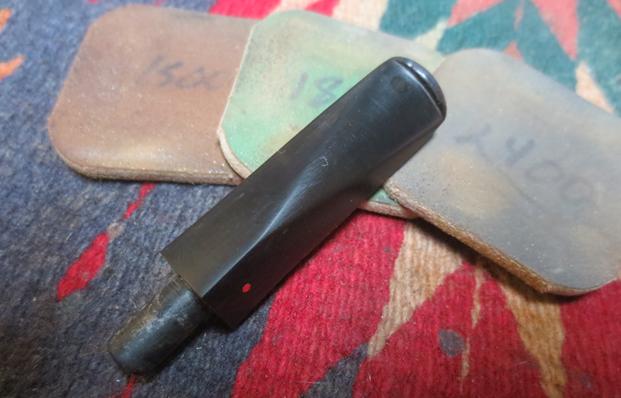
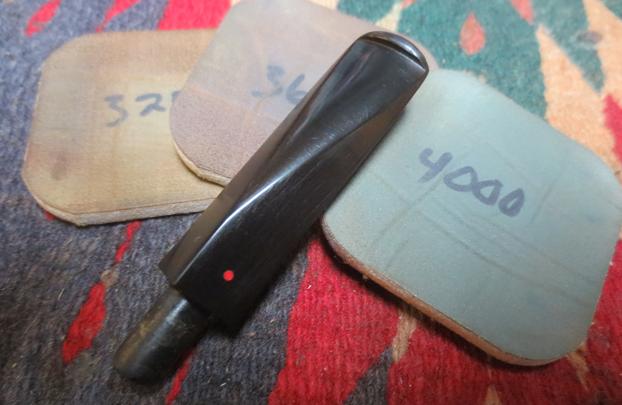
I smoothed out the repairs with 220 grit sandpaper and worked to blend them into the surface of the stem. I was a little concerned in that the repairs seemed to look almost red against the surface of the still oxidized vulcanite. I would have to work that to see if I could blend it in more. At worse the repairs will show but the pipe will be smokable.
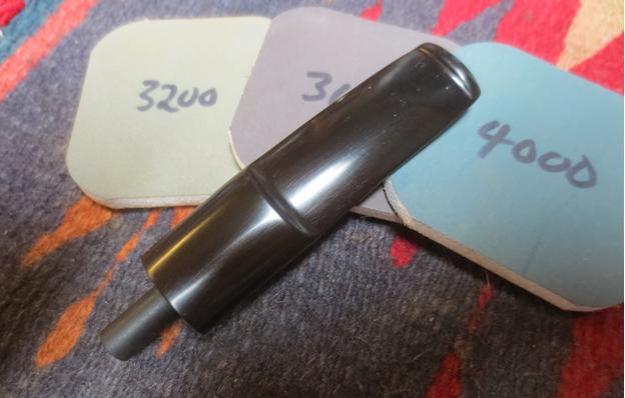
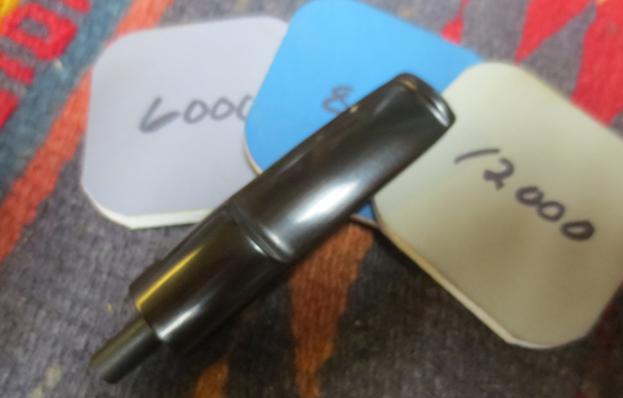
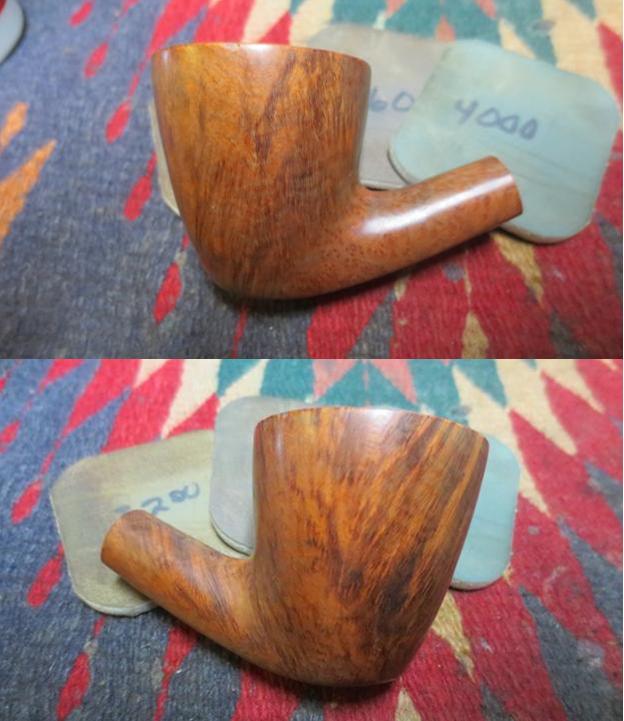
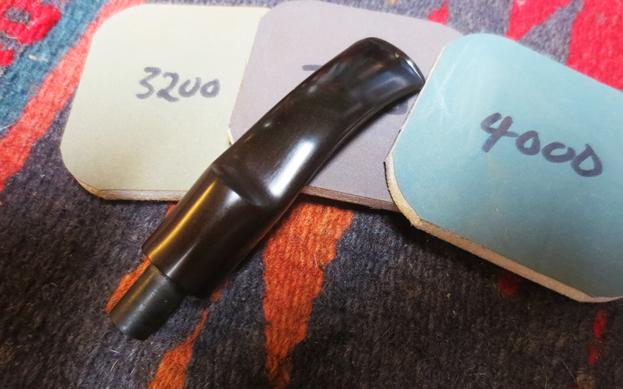
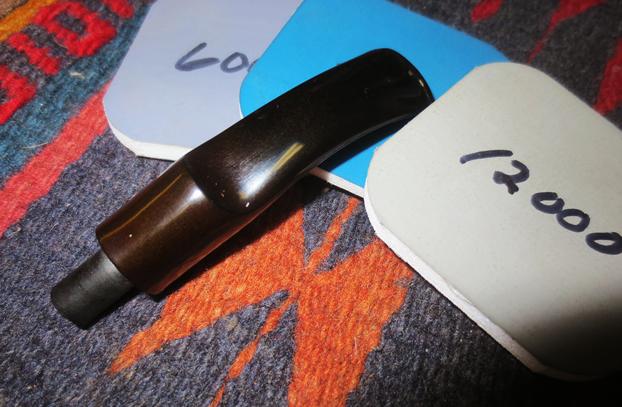
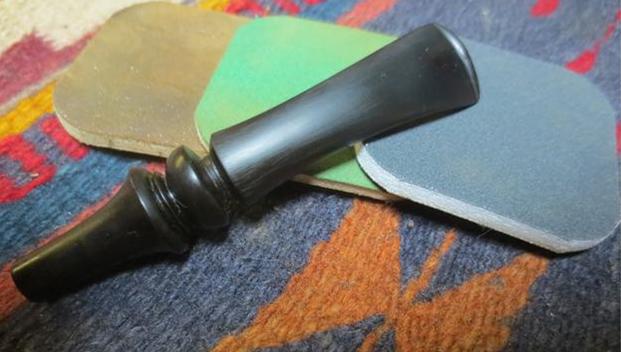
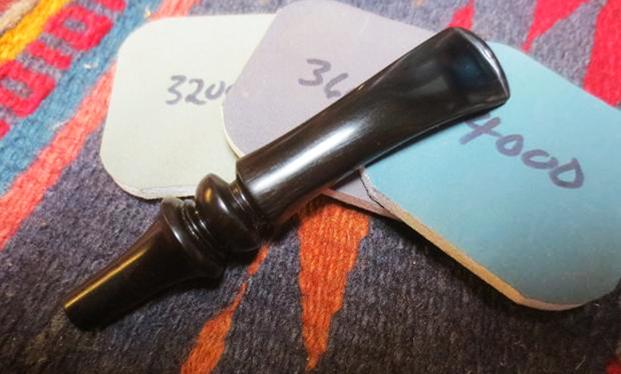
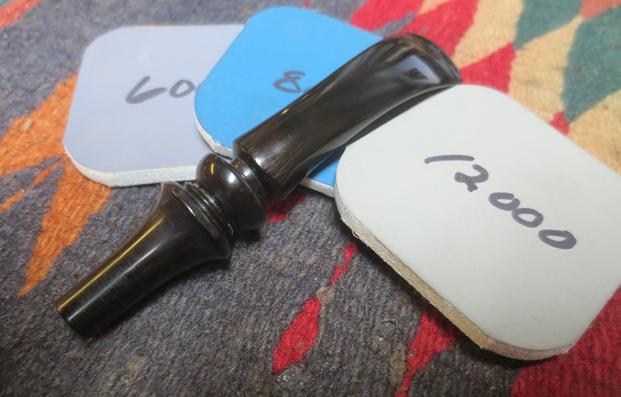
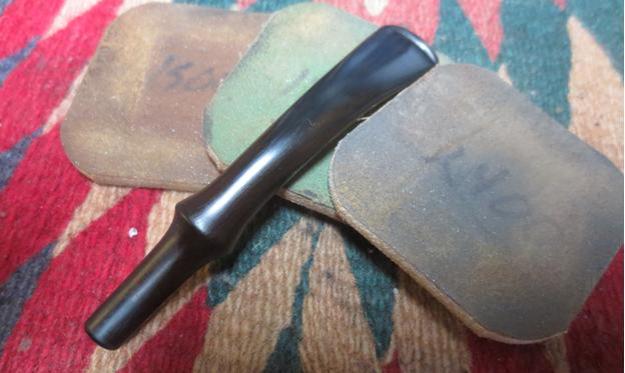
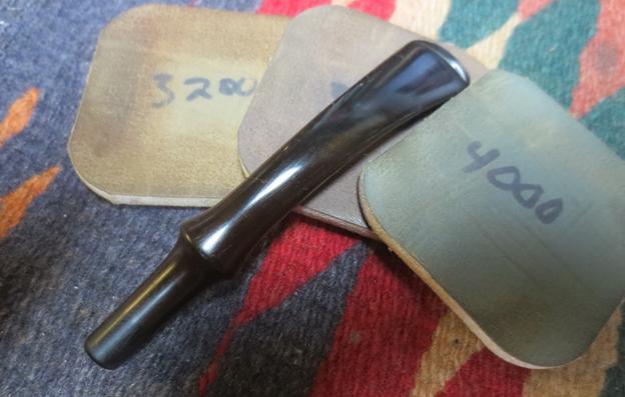
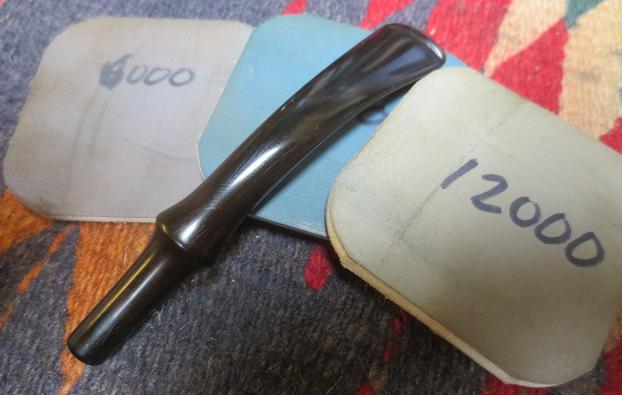
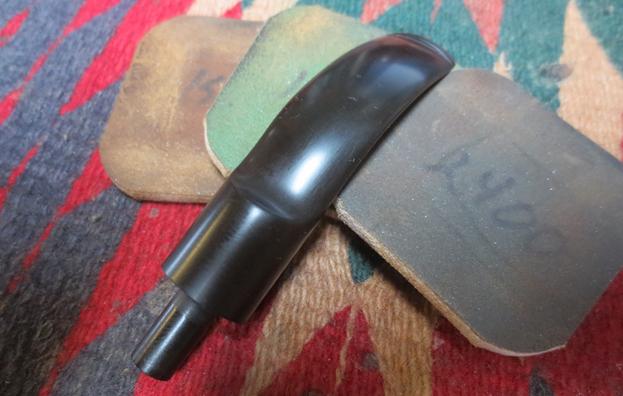
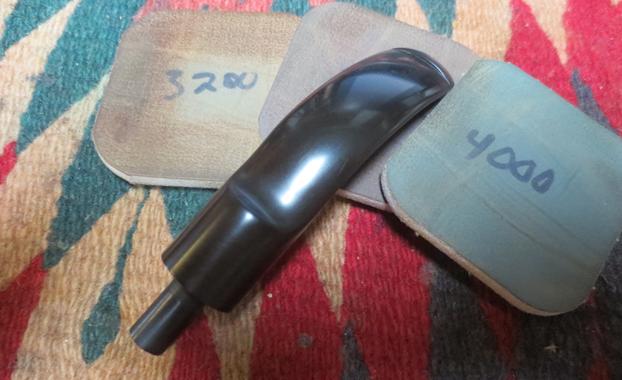
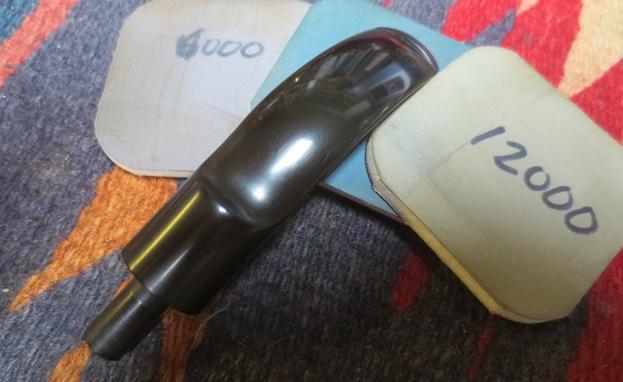
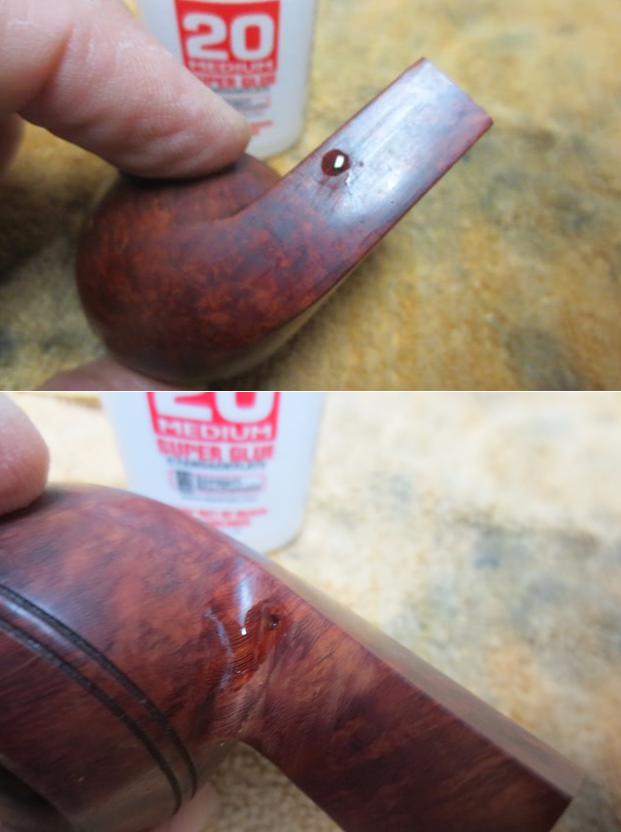
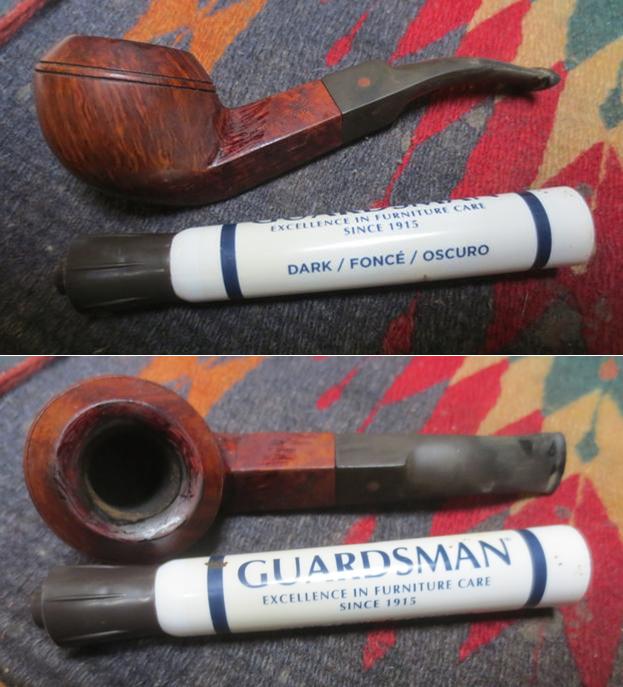
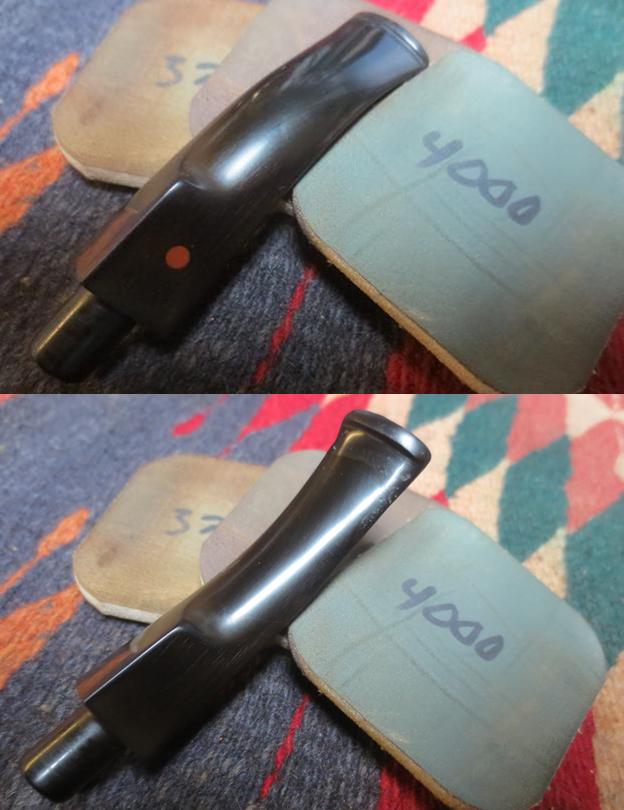
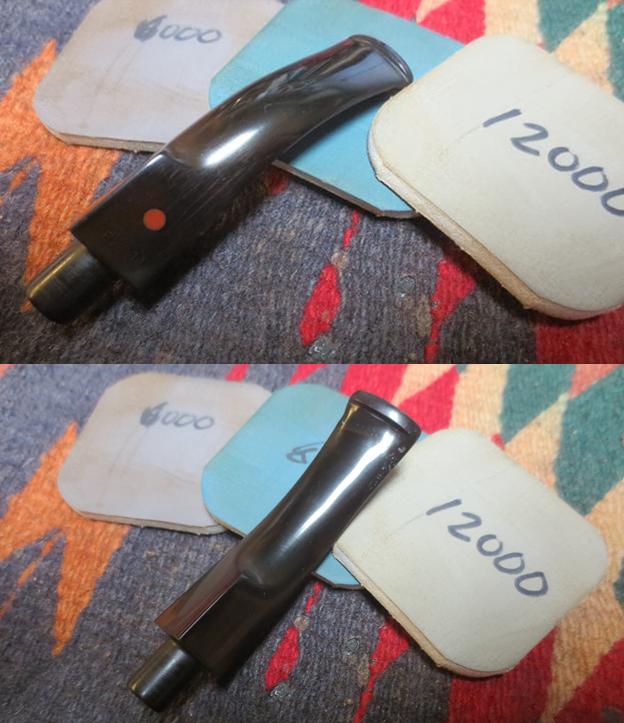
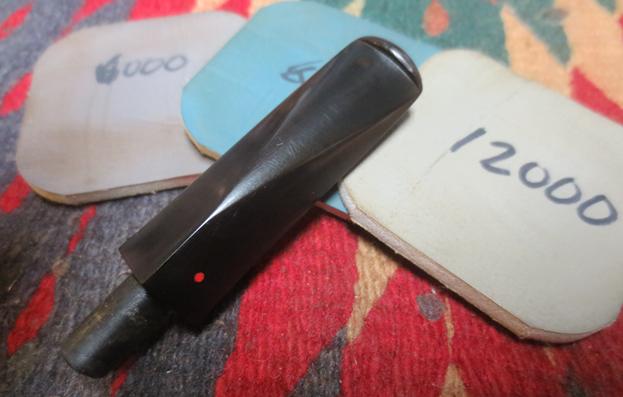
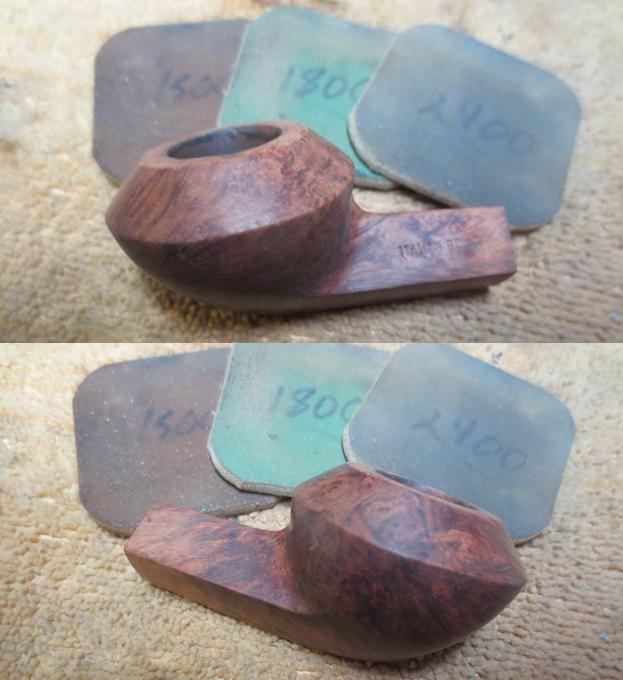
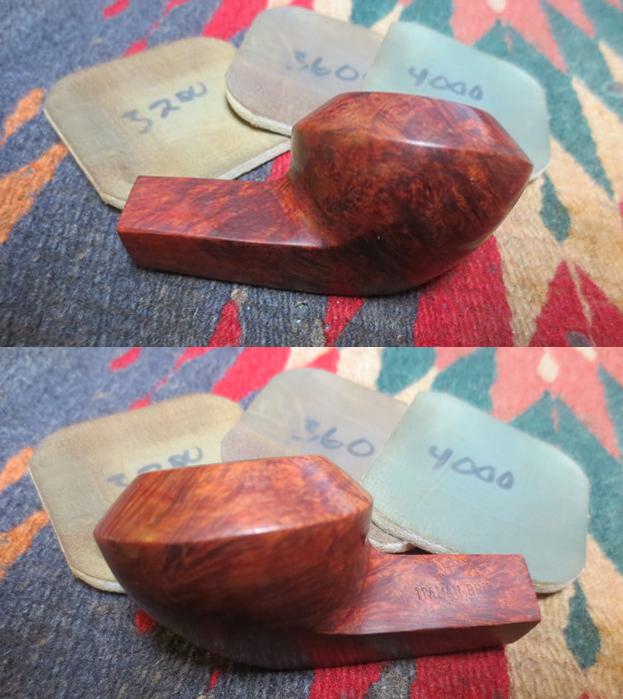
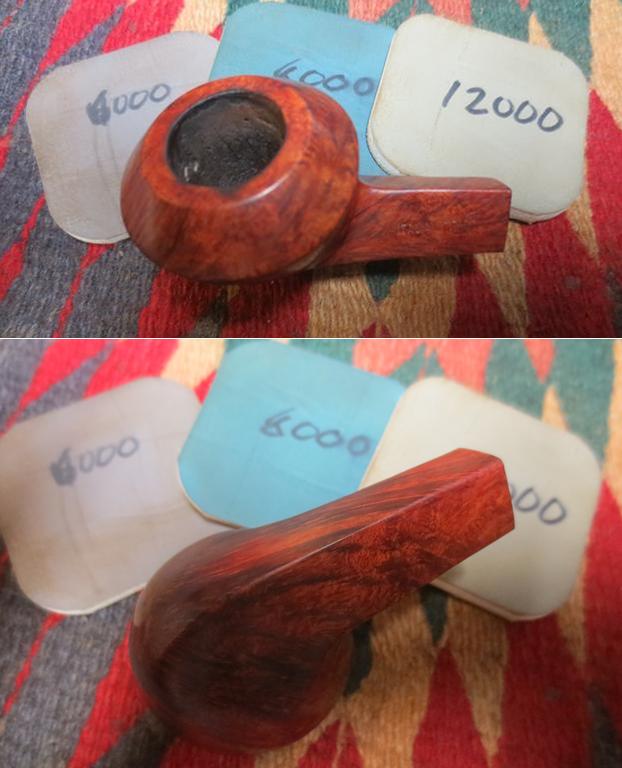
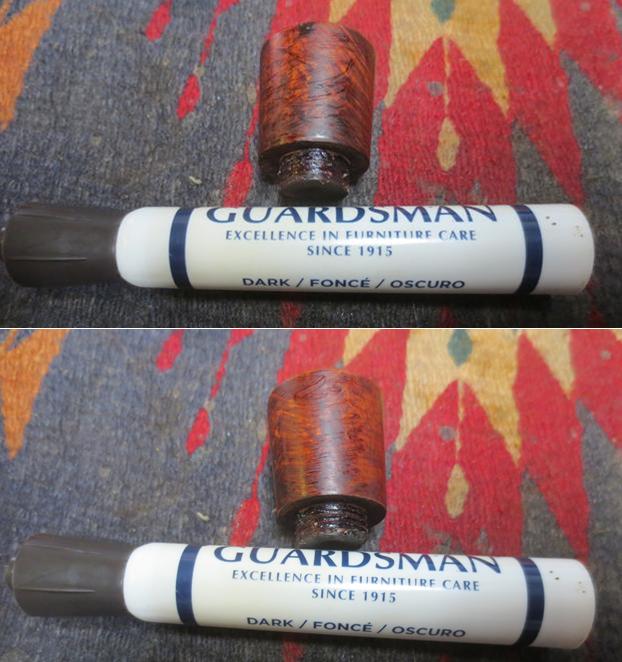
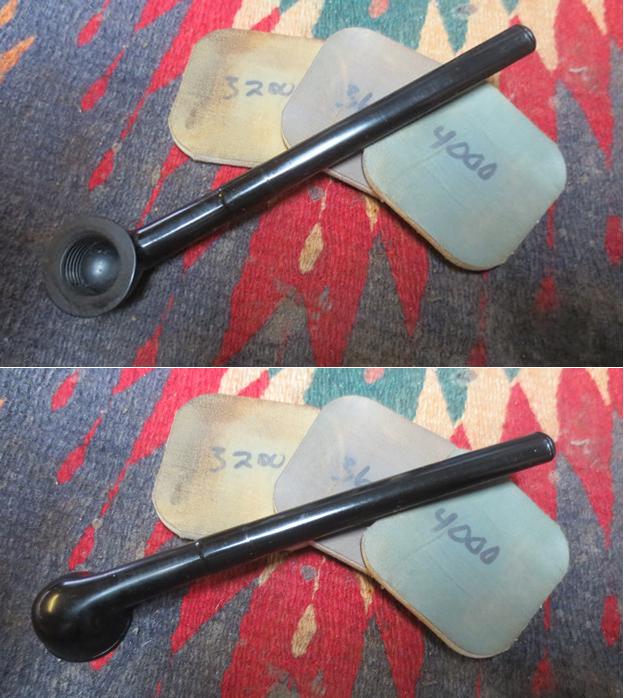
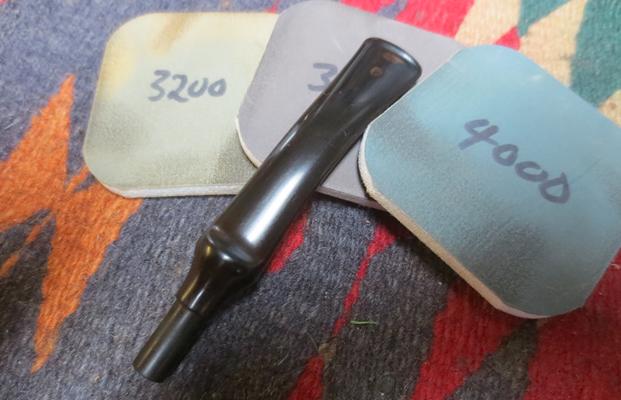
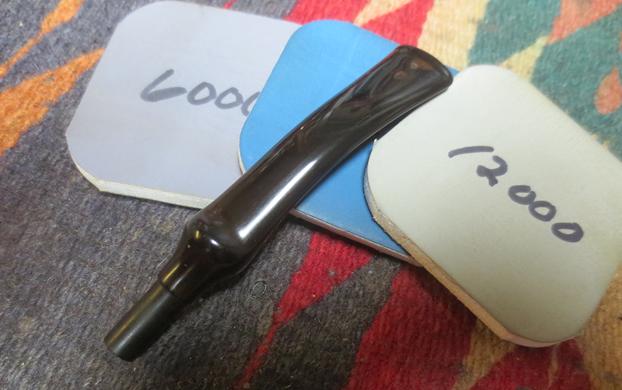
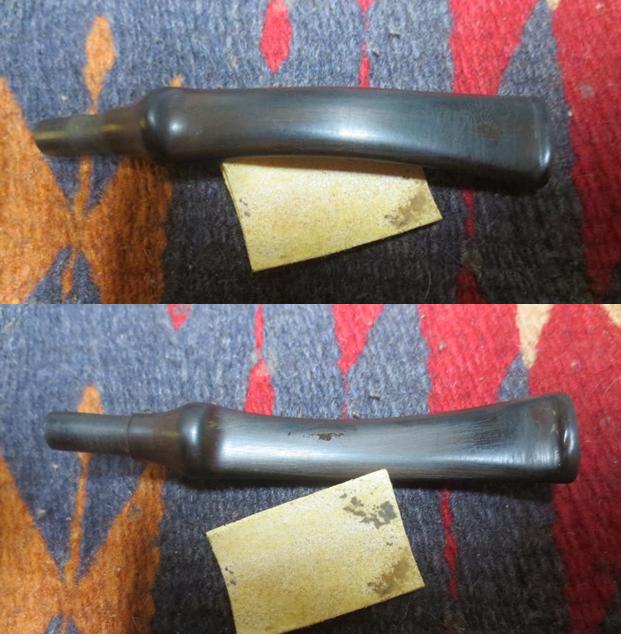
Now the frustration heightened – I really should have listened to my initial thoughts on this pipe. It was not worth working on. But I did not listen and now one of the reasons became more apparent. I polished the stem with micromesh sanding pads. The more I polished them the more the two repaired spots on the top of the stem showed a red colour. I have never had that happen before. I cleaned the stems before patching them with alcohol and dried them off. I used black super glue for the repairs, like I have many times before. Yet this time the repairs show a red tint. I have no idea what is going on with this repair. Fortunately it is one that I am calling finished. It was just a quick clean up on a badly damaged pipe. The stem is functionally very good just those spots are irritating. I used micromesh sanding pads to polish the stem – wet sanding with 1500-2400 grit pads and dry sanding with 3200-12000 grit pads. I rubbed the stem down with Obsidian Oil after each pad and set it aside to dry after the 12000 grit pad. 
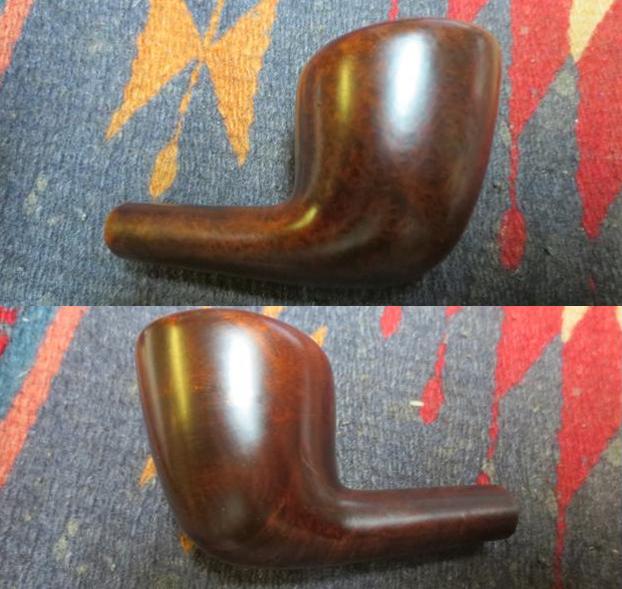
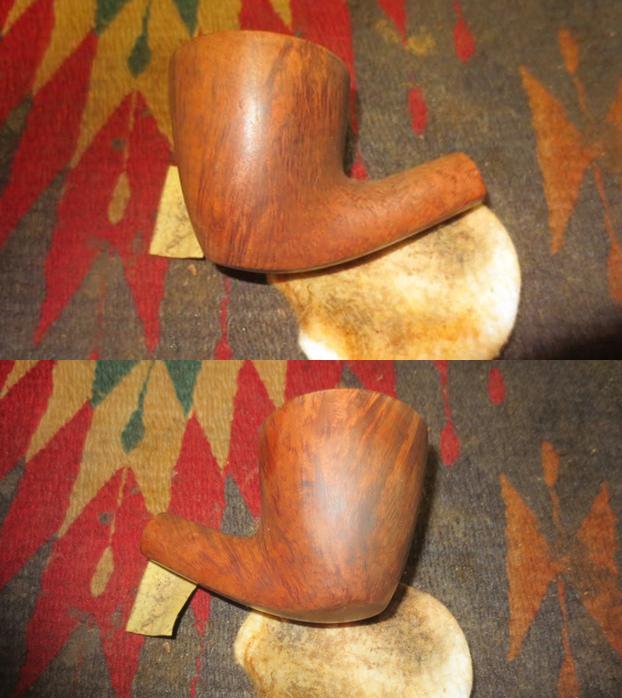
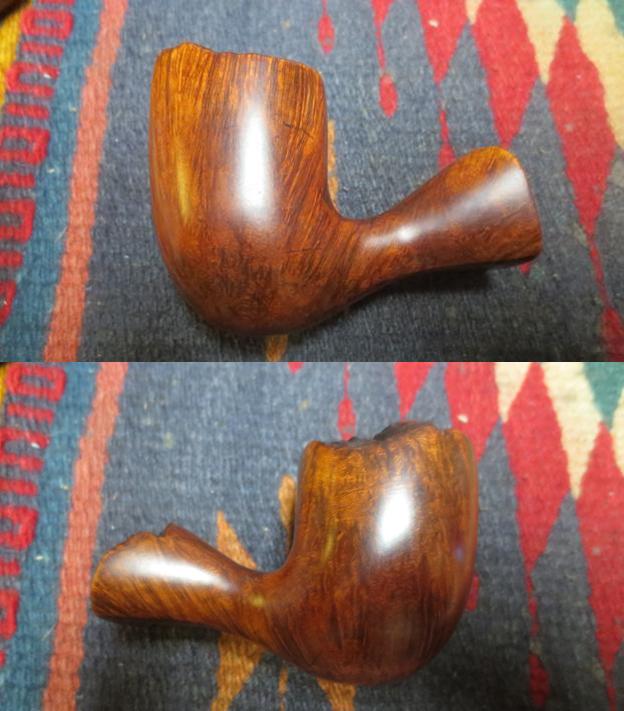
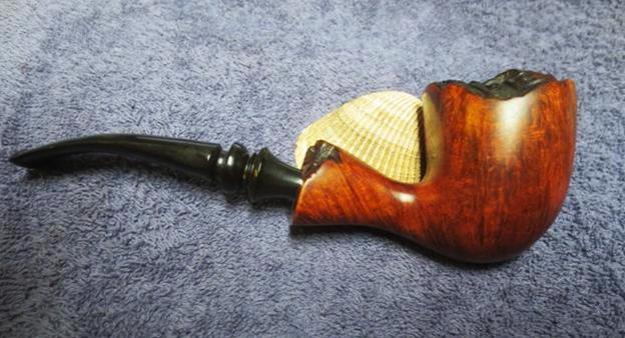
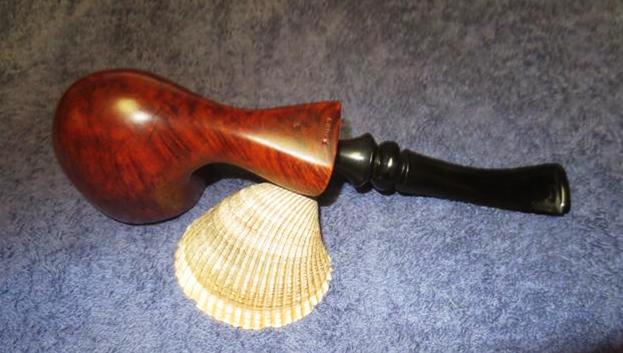
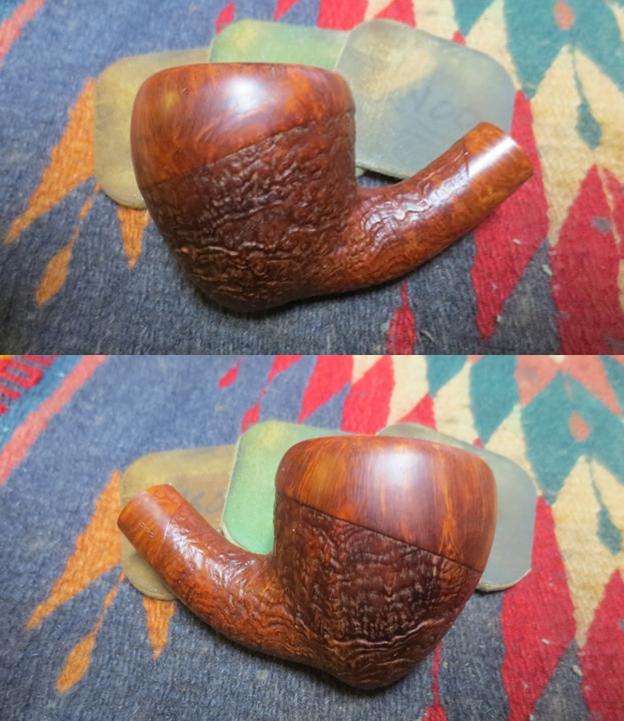
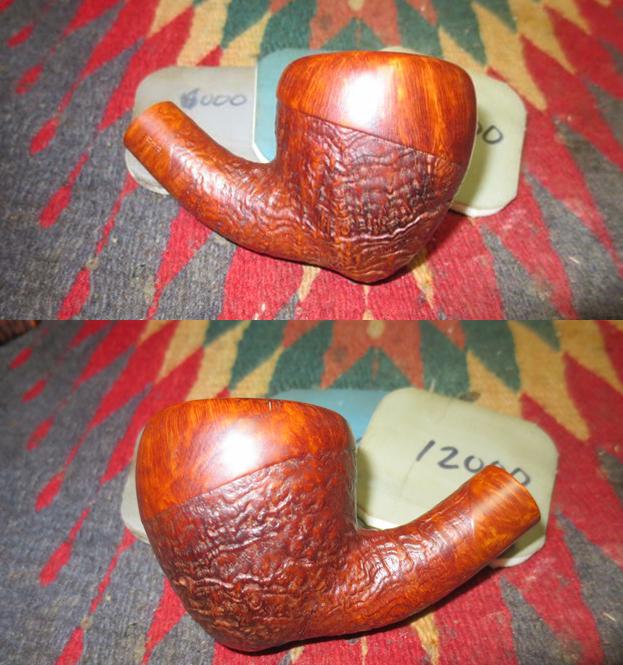
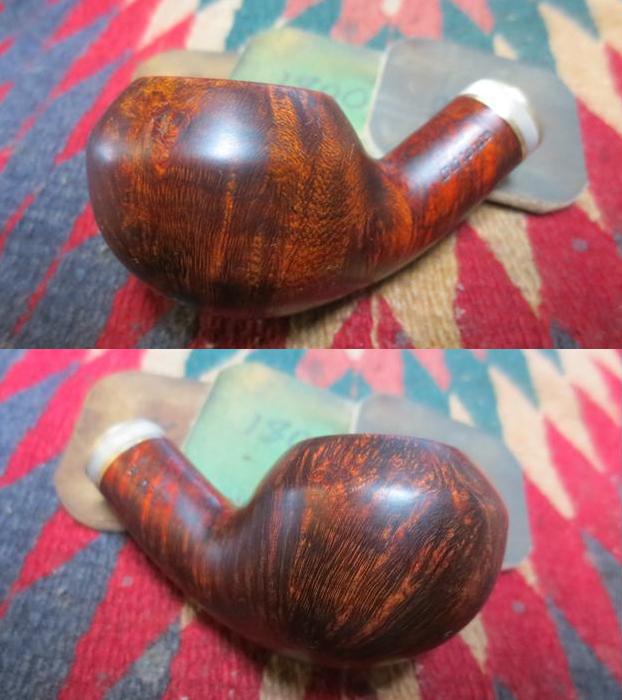
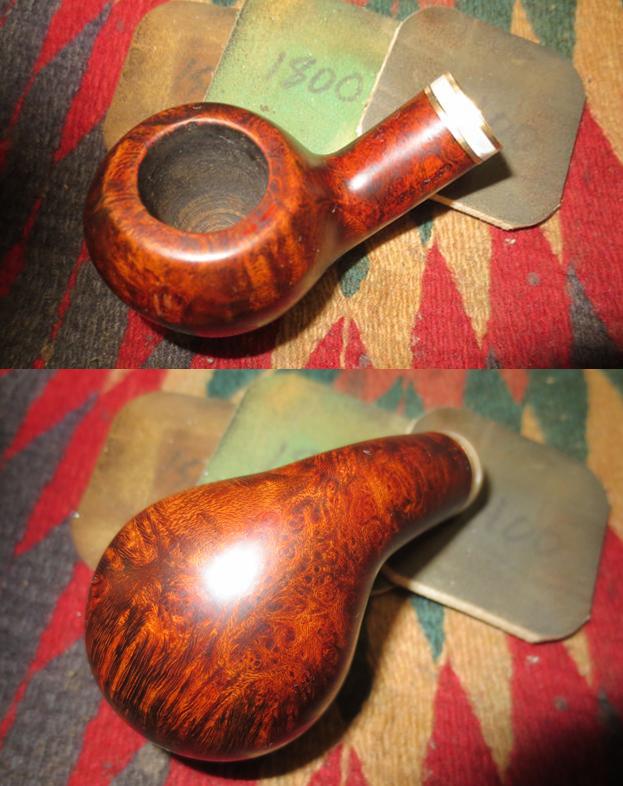
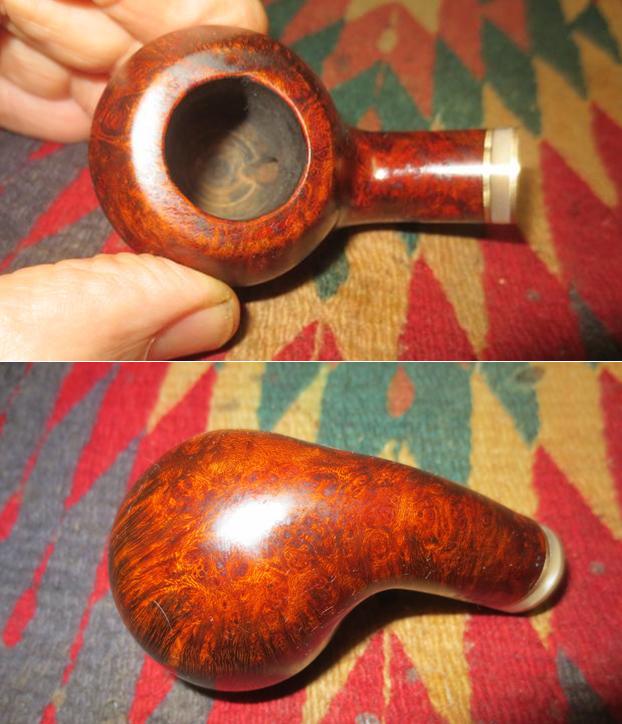
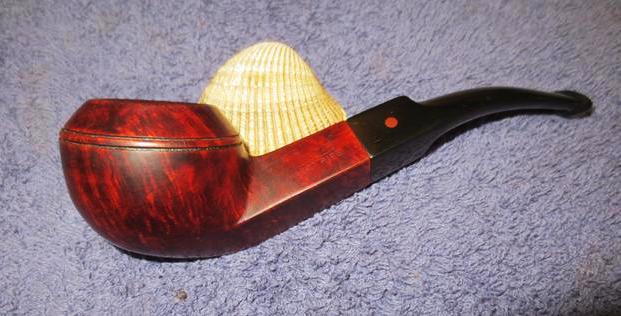
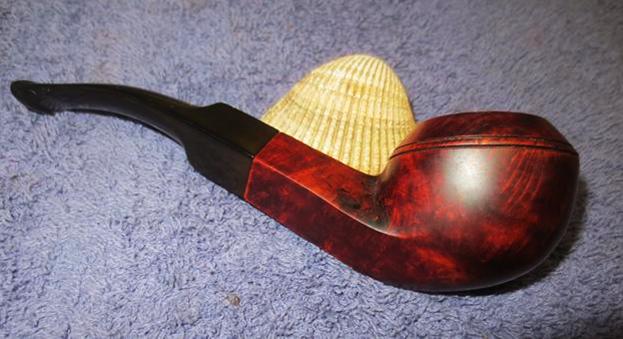
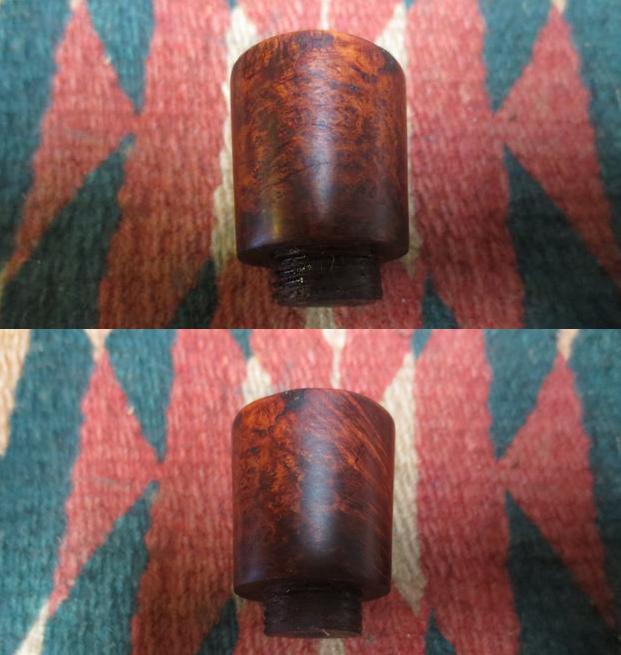
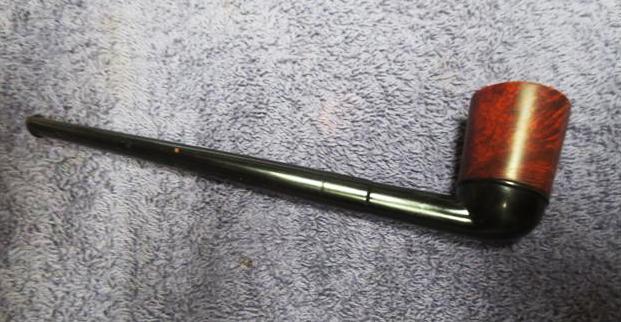
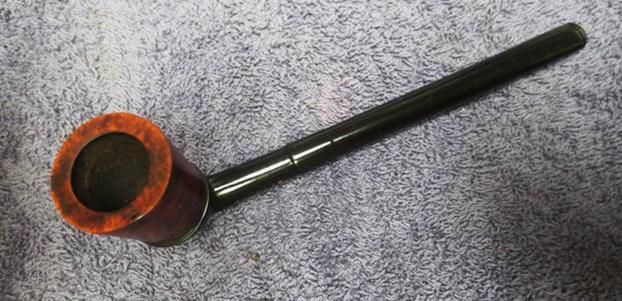
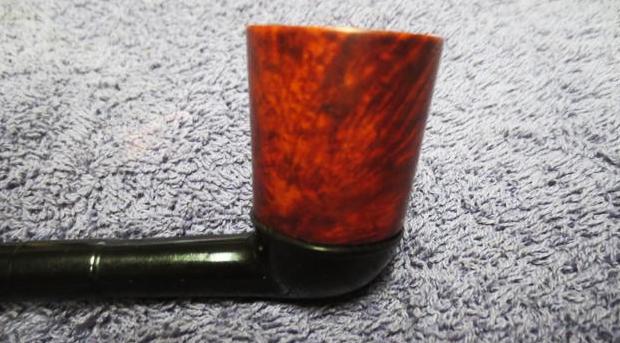
I was irritated with the way the pipe looked – both bowl and stem. They were ragged looking still and even though they were better they were not what I like to see in a finished pipe. I was finished though as I decided that more work would not improve the damaged pipe. I buffed the bowl and stem with Blue Diamond on the buffing wheel. I hoped that the buffing might blend the repairs into the surface of the stem. While they certainly looked better they still showed. The overall look of the pipe was much better than when I started. The damage to the back side top edge of the meerschaum bowl liner was significant but the pipe was still able to be smoked. It was clean and would certainly make a workable yard pipe. I have boxed the pipe with the rest of Steve’s pipes and have them packed and ready to send to Dawson Creek. I am hoping he enjoys the lot and gives them a good workout in the days ahead. Thanks for looking.


A Damaged Danish Crown 49 Oval shank Dublin Given New Life


Blog by Steve Laug

This Danish Crown was the last of the pipes Steve and I had discussed restoring from the box he sent my way. He had sent it to me to chip away at in my spare time. I have been working away at them a few at a time for a few months now. On the weekend I decided it was time to finish the remainder of the box. I pulled out five of the remaining seven pipes and worked on all of them (the last two are nothing spectacular but I may just clean them up anyway so I can send him the entire batch cleaned and usable). The pipe looked like a Stanwell make to me but a little research told me that it was a Kriswill, made by Kriswork Briar Trading, in Kolding (Denmark). The company started about 1955 and went bankrupt in the late 70s. They had a line of seconds (pipes with fills and flaws that were still usable) which included the Danish Crown. This pipe was stamped on the topside of the shank with the name Danish Crown over Handmade in Denmark. On the underside of the shank is the shape number 49 at the shank/stem junction. The stamping on the pipe is probably the most readable of the entire batch of pipes. I took photos before cleaning the pipe.The bowl is heavily caked and there is a thick overflow of tars and cake onto the rim top almost obscuring the inner edge of the rim. There was a large chipped area on the front right of the rim top as well as more dings and dents around the rim top. The finish on the bowl was worn and dirty. The stem has a lot of tooth marks and chatter. There was also oxidation on the stem. I took photos of the pipe before I started the restoration. I took a close up photo of the rim top and bowl. You can see from the photo how thick the cake was and the amount of lava over flow on the rim top. The damage to the rim is at the 9:00 and 11:00 o’clock position in the photo below.The stamping on the shank is very readable. In person, it is clearer than it appears in the photo below. The next two photos of the stem show oxidation on the whole stem and tooth chatter and marks on the top and underside of the stem near the button.I put the stem in the Before & After Pipe Stem Deoxidizer bath to soak with the other stems from Steve’s pipes. While they soaked I worked on the five bowls that went with them. The stems soaked over a period of 24 hours.I reamed the bowl with a PipNet Reamer starting with the smallest cutting head and working my way up to the third head, which was the same size as the bowl. I cleaned up the reaming with a Savinelli Fitsall Pipe Knife. I took the cake back to bare briar. I scraped the rim with a sharp penknife to clean up the lava buildup on the rim top. I scraped it until the rim was debris free.I scrubbed the exterior of the bowl and shank with Murphy’s Oil Soap and scrubbed the rim top and the bevel with a tooth brush. I picked the damaged areas clean with a dental pick to remove the buildup deep in the rough spots on the rim. I rinsed the bowl under running water and continued to scrub it until it was clean. I used a rolled piece of sandpaper wrapped around my finger to sand out the inside of the bowl. The bowl walls were a little rough on this one so it was going to take some work to smooth things out. I wiped down the damage on the rim top with a cotton swab and alcohol and filled them in with briar dust and clear super glue.When the repairs had hardened I sanded the rim top and edges with 220 grit sandpaper to begin the process of blending them into the briar. With the rim top repair and the discovery of many small fills around the bowl sides and the bowl/shank junction, I decided to use a darker stain on this pipe than the other ones. I stained it with a dark brown aniline stain and flamed it to set it in the grain of the briar. I repeated the process until I was happy with the coverage.When the stain had dried, I wiped the bowl down with alcohol on a cotton pad to remove the excess and blend the colours to a rich dark brown that allowed some of the grain to show through. Unfortunately, it also allowed the fills to show. More work needed to be done to take care of that issue. I used a dark brown stain pen and a Sharpie pen to colour over the fill areas. I used the dark brown aniline stain dauber to put over the top of the colouring I had done. I flamed the aniline stain spots with my lighter to set the stain in them. I lightly buffed the bowl with Blue Diamond on the buffing wheel. I was careful when buffing around the repaired area on the top of the bowl and the fills that I had darkened. I gave the bowl several coats of carnauba wax and buffed it with a clean buffing pad to raise a shine. I am happy with the look of the bowl at this point. The grain shows through nicely and the fills and repairs blend in pretty well. I set the bowl aside and turned my attention to the stem. I removed it from the Before & After Pipe Stem Deoxidizer bath and dried it off. I ran a pipe cleaner through the airway to remove the Deoxidizer that was on the inside of the stem. I used alcohol to clean out the airway in the stem. It came out of the bath pretty clean of oxidation. The tooth marks and chatter showed up clearly on both sides near the button.I lightly sanded the stem with 220 grit sandpaper to remove the tooth chatter and filled in the deeper tooth marks with black super glue. The largest mark was on the underside of the stem.Once the glue dried I sanded the repairs with 220 grit sandpaper to blend them into the surface of the stem.I polished the stem with micromesh sanding pads – wet sanding with 1500-2400 grit pads and dry sanding with 3200-12000 grit pads. I rubbed the stem down with Obsidian Oil after each pad. After the 12000 grit pad I gave it another coat of oil and set it aside to dry. I put the stem on the bowl and buffed the pipe with Blue Diamond on the buffing wheel. I used a light touch on the areas that were repaired. I gave the bowl several coats of carnauba wax and buffed the pipe with a clean buffing pad to raise the shine. I hand buffed it with a microfibre cloth to deepen the shine. The finished pipe is shown in the photos below. It is the fifth of this batch of five pipes that I have restored for Steve. It is a well-made Kriswill pipe. I think Steve will really like this last addition to his rack. Steve, if you are reading this I hope you enjoy this beauty. It will be on its way to you very soon. Thanks for looking.

A Sad Old Danish Sovereign 330 Bent Dublin Made New


Blog by Steve Laug

This old Stanwell looking Dublin was in the box of pipes that came from my friend Steve in Dawson Creek. It is one of the batch he sent for me to chip away at in my spare time. Today was the day for that chipping away to happen. I pulled out five of the remaining seven pipes and worked on all of them today. The pipe is stamped on the underside of the shank with the shape number 330 over Danish Sovereign over Made in Denmark. The stamping on the pipe is faint.  The bowl is heavily caked and there is a thick overflow of tars and cake onto the rim top almost obscuring the beveled inner edge of the rim. The finish on the bowl is worn and dirty. There is paint on the surface of the briar on the left side. The stem has a lot of tooth marks and chatter. There is also oxidation on the stem. I took photos of the pipe before I started the restoration. The next photo is a close up of the rim top. The cake was thick but the worst part was the heavy overflow onto the rim. It was impossible at this point to know the condition of the rim and edge of the bowl because of the mess covering it all.The stem was worn and had tooth dents and chatter on both sides near the button. The button itself was worn down and the edges almost indistinct from the rest of the stem surface.I put the stem in the Before & After Pipe Stem Deoxidizer bath to soak with the other stems from Steve’s pipes. While they soaked I worked on the five bowls that went with them.I reamed the bowl with a PipNet Reamer starting with the smallest cutting head and working my way up to the second head which was the same size as the bowl. I cleaned up the reaming with a Savinelli Fitsall Pipe Knife. I took the cake back to bare briar. I scraped the rim with a sharp pen knife to clean up the lava buildup on the rim top. I scraped it until the rim was debris free.I scrubbed the exterior of the bowl and shank with Murphy’s Oil Soap and scrubbed the rim top and the bevel with a tooth brush. I rinsed the bowl under running water and continued to scrub it until it was clean and the bevel was clearly defined. After removing all of the lava on the rim there was quite a bit of rim damage on top. To remove the damage on the outer rim edge I decided to lightly top the bowl on a topping board with 220 grit sandpaper. I took a photo of the process and of the top once I had finished it.There were three sandpits or fills in the top of the bowl. I sanded the bevel on the inner edge of the rim to remove some of the burn damage. I repaired the fills with clear super glue. When the repairs dried I sanded them smooth with 220 grit sandpaper to blend them into the surface of the rim top. I sanded the outer edge and the beveled inner edge of the bowl some more to clean them up. I wiped the bowl down with alcohol to remove remnants of the finish and the grime on the bowl. I stained the rim top and inner bevel with a light brown stain pen to blend it into the rest of the bowl. I gave the repair areas a little heavier coat of the stain to try to blend them in better.I polished the bowl with micromesh sanding pads – wet sanding with 1500-2400 grit pads and dry sanding with 3200-12000 grit pads. I wiped the bowl down with a damp cotton pad to remove the sanding grit. I scrubbed out the airway in the shank and mortise with pipe cleaners, cotton swabs and alcohol. It was pretty dirty. I probably should have cleaned it earlier but totally got caught up in working on the top of the rim.I decided to give the bowl several coats of Danish Oil with Cherry stain to give it a contrast coat. The cherry stain highlighted the grain on the bowl and gave the pipe a rich look.I buffed the bowl with a clean buffing pad to raise the shine and gave it a light coat of carnauba wax. The photos show the new look of the bowl. The grain pops and the bowl is ready once I get the stem finished. With the bowl finished I set it aside and turned my attention to the stem. I took it out of the Before & After Pipe Stem Deoxidizer bath and dry it off. I ran a pipe cleaner through the airway to remove the Deoxidizer that was on the inside of the stem. I used alcohol to clean out the airway in the stem.I wiped down the stem a cotton pad and alcohol to remove any film or debris on the surface of the stem that would get in the way of the repairs. I filled in the tooth marks and deeper dents with clear super glue. When the glue dried I sanded it with 220 grit sandpaper and used a needle file to clean up the sharp edge of the button. I cleaned up the file marks and blended the repairs into the surface of the stem with 220 grit sandpaper. I polished the stem with micromesh sanding pads – wet sanding with 1500-2400 grit pads (I opened a new package for this pipe) and dry sanding with 3200-12000 grit pads. I rubbed the stem down with Obsidian Oil after each pad. After the 12000 grit pad I gave it another coat of oil and set it aside to dry. The last photo below has a brown tint that I cannot get rid of but in natural light the stem is shiny black. I put the stem on the bowl and buffed the pipe with Blue Diamond on the buffing wheel. I gave the bowl several coats of carnauba wax and buffed the pipe with a clean buffing pad to raise the shine. I hand buffed it with a microfibre cloth to deepen the shine. The finished pipe is shown in the photos below. It is the fourth of this batch of five pipes that I have restored for Steve. It is very obviously a Stanwell made pipe – everything from the shape to the look of the stem and shank says Stanwell. I think Steve will really like this latest addition to his rack. Steve, if you are reading this I hope you enjoy this beauty. It will be on its way to you very soon. Thanks for looking.

Breathing New Life into a CHP-X3 Freehand


Blog by Steve Laug

This old freehand was in the box of pipes that came from my friend Steve in Dawson Creek. It is one of the lot he sent for me to chip away at in my spare time. Today was the day for that chipping away to happen. I pulled out five of the remaining seven pipes and worked on all of them today. This one reminds me of a 70s era freehand. It is a lot like one of the old ones that I had years ago. It is stamped on the underside of the shank next to the stem shank junction with the letters CHP-X over the number 3. It is a large freehand with a chair leg style stem. The bowl is heavily caked and there is overflow of tars and cake onto the plateau of the rim top. The plateau on the top side of the shank is also filled with grime and grit. The finish on the bowl is worn and dirty. I it was originally a virgin finish or if not possibly oiled. The stem is oxidized and has light tooth chatter. From my research this pipe was made in the United States by Michael Kabik before 1973. It was named after Chuck Holiday who was a pipe maker that Kabik bought his shop from. The photos show the condition of the pipe before I began the restoration work. The cake in the bowl and the heavy coat of lava overflowing onto the plateau top of the rim are shown in the close up photo below. It is really a mess at this point.The stem was heavily oxidized and the button on the top side of the stem was worn. There were tooth marks and tooth chatter on both sides of the stem near the button. The grooves of the chair leg stem were very oxidized.I put the stem in the Before & After Pipe Stem Deoxidizer bath to soak with the other stems from Steve’s pipes. While they soaked I worked on the five bowls that went with them.I reamed the bowl with a PipNet Reamer starting with the smallest cutting head and working my way up to the second head which was the same size as the bowl. I cleaned up the reaming with a Savinelli Fitsall Pipe Knife. I took the cake back to bare briar. I used a brass bristle brush to clean up the lava buildup on the rim top. I scrubbed the rim until it was debris free. I scrubbed the exterior of the bowl and shank with Murphy’s Oil Soap and scrubbed the plateau top on the rim and the end of the shank using a tooth brush. I rinsed the bowl under running water and continued to scrub it until it was clean and the plateau was clearly defined. I wiped the bowl and plateau down with alcohol on a cotton pad in preparation for staining the plateau. I use a black Sharpie Pen to colour in the valleys and crevices in the plateau and leave the high spots lighter. I don’t worry too much about staining them as I will buff the top and remove the stain from the high spots before I am finished. To me the briar looked lifeless and the natural colour did not do justice to the beautiful grain that was present on the bowl. I decided to stain it with a dark brown aniline stain and flame it to set it in the briar. I repeated the process until I had an even coverage around the smooth portions of the pipe bowl. I left the plateau areas untouched by the dark brown stain.After the stain had dried for about 30 minutes I wiped the bowl down with alcohol on cotton pads to remove some of the heaviness of the brown and make the colour a bit more transparent. I still need to do a lot more but this was the start of the process. I sanded the smooth portions of the bowl with a medium and a fine grit sanding sponge and followed that with 1500-2400 grit micromesh sanding pads. I wiped the bowl down with alcohol on a cotton pad after each stage of the sanding process. The photos below show the bowl beginning to come to life. To give the grain the kind of pop I wanted and to really set off the dark lines of the straight grain I decided to rub the bowl down with several coats of Danish Oil with Cherry stain. I apply the stain with a cotton pad and rubbed it down over the entire surface of the bowl including the plateau areas. I wanted the reds to penetrate into the nooks and crannies of the plateau to give the surface some flashes of colour and contrast. I buffed it on the wheel and took the following photos to show the condition of the bowl at this point in the process. I took the stem out of the Before & After Pipe Stem Deoxidizer bath and wiped it off with a clean paper towel. The first two photos below show the stem after the 24 hour soak. The stem was very clean and the tooth dents. a potential hairline crack and marks are shown in the photos below. These dents were deep enough that I chose to fill them with clear super glue and set the stem aside to let the repairs cure. The third and fourth photos show the repairs on both surfaces of the stem. When the repair dried I sanded the stem with 220 grit sandpaper to flatten out the glue and blend it into the surface of the vulcanite. I cleaned out the airway and slot in the stem with pipe cleaners and alcohol. There was some Before & After Pipe Stem Deoxidizer from the bath in the airway and debris and tars in it as well. The pipe cleaners took care of that fairly quickly. I used a needle file to recut the sharp edge of the button. During the filing and clean up I noticed what looked like a small crack in the top of the stem. I would keep an eye on it as I cleaned things up and repair it if indeed it is a crack.I sanded the stem surface with 220 grit sandpaper to smooth out the repaired areas and blend it into the surface of the stem. I reshaped the button at the same time. There still appeared to be a small crack on the top left side near the button. It was a very tiny hairline crack and was tight so I filled it in with clear super glue and sanded it smooth.I polished the stem with micromesh sanding pads – wet sanding with 1500-2400 grit pads (I opened a new package for this pipe) and dry sanding with 3200-12000 grit pads. I rubbed the stem down with Obsidian Oil after each pad. After the 12000 grit pad I gave it another coat of oil and set it aside to dry. I put the stem on the bowl and buffed the pipe with Blue Diamond on the buffing wheel. I gave the bowl several coats of carnauba wax and buffed the pipe with a clean buffing pad to raise the shine. I hand buffed it with a microfibre cloth to deepen the shine. The finished pipe is shown in the photos below. It is the third of pipe that I have restored for Steve from this last batch. It is an interesting freehand with some nice grain on it. The stem repair to the hairline crack looks pretty good and should hold up well. I will be putting an extra stem in the package for Steve as well. I think he is going to love this one. Steve, if you are reading this I hope you enjoy this beauty. It will be on its way to you very soon. Thanks for looking.

Reclaiming a Stanwell Royal Guard Bent Acorn for the Next Generation


Blog by Steve Laug

I am on a bit of a roll working on pipes from my friend Steve in Dawson Creek. He sent me a batch of pipes a while back to work on, sort of chip away at when I had some time. This time the pipe on the table is a Stanwell made Royal Guard 523 that combines smooth and sandblast areas into the finish. It is stamped on the underside of the shank in a smooth portion with the words ROYAL GUARD over Made in Denmark. On the left side of the shank it is stamped with the shape number 523. The finish was dirty and worn with the brown top coat worn and faded. There are smooth areas on the bowl top around the rim and almost drips down the sides of the bowl. The bowl was thickly caked and the lava overflow on the top of the bowl was also very thick. I was a bit concerned that underneath the cake I would find burn. You can never tell – sometimes a thick cake protects the rim top and sometimes it hides a lot of rim damage. Once I got into the cleanup I would be able to tell better with this one. The stem was oxidized and there were tooth chatter and bite marks on the top and the bottom sides near the button. The RG stamp on the left side of the stem was still readable. Under the grime I could see really interesting grain peeking through. I took photos of the pipe before I started working on to record its condition.

This is the second RG that I have cleaned up and restored for Steve. If you are interested in reading about it, here is the blog post on the other one. https://rebornpipes.com/tag/royal-guard-pipes/  I took a photo of the top of the bowl to show the thick cake filling the bowl and the heavy outflow of lava on the rim of the bowl. I really like the Stanwell crowned rims. The gentle roll of the rim top over the outer edge into the sides of the pipe and over the inner edge into the bowl is really nicely done. I was hoping that this one would clean up nicely. The second photo below shows the side of the shank and the RG stamp on the side of the stem. I removed the stem and put it in the Before & After Pipe Stem Deoxidizer bath with the other stems I was working on for Steve. I would let them do their work while I worked on the bowls of the pipes. By the time I had finished the bowls the stem would be ready.I reamed the bowl with a PipNet Reamer starting with the smallest cutting head and working my way up to the third head which was the same size as the bowl. I cleaned up the reaming with a Savinelli Fitsall Pipe Knife. I scraped the cake back to bare briar. I used the edge of the Savinelli knife to scrape off the lava on the rim top and edge. I scrubbed the exterior of the bowl with a tooth brush and Murphy’s Oil Soap. I scrubbed until I had cleaned out the grime from the sandblast portions of the bowl. I scrubbed the rim top repeatedly until I had removed the remaining buildup there. I rinsed it under running water. I continue to scrub it in the running water until I was happy with the way it looked. I wet sanded the rim top with a 1500 grit micromesh sanding pad to further remove the remaining lava on the surface. Sanding it also revealed some damage to the beveled inner rim edge that would need to be taken care of before I was finished. I circled the damaged area in red in the photo below. I sanded the damaged edge and reshaped the bevel with a folded piece of 220 grit sandpaper.I polished the smooth portions of the briar with micromesh sanding pads. I wet sanded with 1500-2400 grit pads and wiped the bowl down with a damp cloth after each pad. I dry sanded with 3200-4000 grit pads and again wiped it down with a damp pad after each pad. The photos below show the progressive shine that is coming to the surface of the smooth portions of the bowl. After polishing it with the 4000 grit micromesh and looking at the picture above I saw some damaged spots on the inner edge of the rim that needed more attention. I sanded the inner bevel some more with 220 grit sandpaper to remove the damaged spots that were revealed. When they were gone I reworked it with the 1500-4000 grit micromesh pads before moving on to the final three (6000-12000) grit pads. I lightly buffed the bowl with Blue Diamond on the buffing wheel to raise the shine. I buffed it lightly as I did not want to have the buffing compound build up in the sandblast finish. I gave the pipe several coats of Conservator’s Wax and buffed it with a clean buffing pad on the buffing wheel. I hand buffed it with a microfibre cloth to deepen the shine. The photos below show the bowl at this point in the process. I took the stem out of the Before & After Pipe Stem Deoxidizer bath and wiped it off with a clean towel. The first three photos below show the stem after the 24 hour soak. The stem was very clean and the RG stamping on the left side of the saddle stem looked very good. The tooth dents and marks are shown in the photos below. These dents were deep enough that I chose to fill them with clear super glue and set the stem aside to let the repairs cure. I used a needle file to sharpen the edges of the button on the stem surface on both sides. I also filed down the repairs until they were close to the surface of the stem. Afterward, I sanded the repaired areas on the stem with 220 grit sandpaper to blend them into the surface of the vulcanite. I also sanded the rest of the stem to remove the remaining oxidation. I wiped the stem down with Obsidian Oil to get a clear picture of where I was at with the stem repairs at this point. The stamping on the original stem was gold in colour so I touched up the stamping on the left side of the saddle stem with Rub’n Buff European Gold and a cotton swab. I wiped off the excess material with the end of a cotton swab and a cotton pad.I polished the stem with micromesh sanding pads – wet sanding with 1500-2400 grit pads and dry sanding it with 3200-12000 grit pads. I wiped the stem down after each pad with Obsidian Oil to enliven the rubber and also give some bite to the micromesh pads. After sanding it with the 12000 grit pad I gave it a final coat of oil and set it aside to dry. I put the stem on the bowl and buffed the pipe with Blue Diamond on the buffing wheel. I used a light touch on the sandblast portions of the bowl and a bit heavier on the smooth parts. I gave the bowl several coats of Conservator’s Wax and the stem several coats of carnauba and buffed the pipe with a clean buffing pad to raise the shine. I hand buffed it with a microfibre cloth to deepen the shine. The finished pipe is shown in the photos below. It is the second Stanwell made Royal Guard pipe that I have restored for Steve. It is light weight and comfortable in the hand and the mouth. I think he is going to love this one as much as he does the other one. Steve, if you are reading this I hope you enjoy this beauty. It will be on its way to you very soon. Thanks for looking.

Restoring a Pioneer Block Meerschaum Acorn


Blog by Steve Laug

My friend Steve in Dawson Creek, B.C. sent me a batch of pipes to work on, sort of chip away at when I had some time. Today I had a bit of free time as it is finally raining in Vancouver after 80+ days of no rain. It is cool and comfortable, just the kind of weather that I enjoy. It is also a perfect day for working on Steve’s pipes. The first one I chose to tackle was a Pioneer Rusticated Meerschaum with an acrylic shank extension and stem. There are two smooth panels – one on each side of the bowl. It has a faux plateau on the rim and I think was designed as a bit of freehand. Probably from the 60s or 70s in terms of style but I may be wrong about that. The rustication is very dirty and the rim has heavy overflow of tars and cake that came out the thickly caked bowl. There is a stamped cursive P on the left side of the shank extension and Block Meerschaum stamped on the right side of the shank extension. Both are faded. The stem is also very dirty, oxidized and has tooth chatter. I took some photos of the pipe before I started to work on it to record what it looked like before I started. I wanted to refresh my memory about Pioneer Block Meerschaum pipes so I did a quick Google search and found a catalogue for Pioneer on Chris’ Pipe Pages. Have a look. I have included the back and front cover of the catalogue. The inside can be read on the link below. http://pipepages.com/1pioneer2.html I took a close up photo of the bowl and rim top to show the condition of the rim and the bowl. The cake and the lava were very thick. The finish was dirty. I took photos of the shank extension to try to capture the stamping in the acrylic. The next two photos show the oxidation and tooth chatter on both sides of the stem. It was almost green and there were some oxidation mid stem that looked like oxidized copper. It was almost blue green in colour.I am working on five of Steve’s pipes right now so I put the stems in the Before & After Pipe Stem Deoxidizer and left them to soak while I worked on the bowl.I reamed the bowl with a PipNet pipe reamer starting with the smallest cutting head and working my way up to the third cutting head. I followed that by cleaning back the remaining cake with a Savinelli Fitsall Pipe Knife. I cut the cake back to the meerschaum walls of the bowl. I used a brass bristle wire brush to dry brush the surface of the rim. It cleans off the buildup of lava and gives me a clean surface to scrub with the rest of the bowl. I scrubbed the exterior of the bowl with a tooth brush and Murphy’s Oil Soap. I scrubbed until all of the grime was loose and rinsed it under running water. I continue to scrub it in the running water until I was happy with the way it looked. I dried off the bowl and took some pictures of what it looked like at this point in the process. I cleaned out the mortise and the airway in the shank with pipe cleaners, cotton swabs and alcohol. It took a bit of work as the airway in the shank was really narrow from all of the built up tars and oils. I was able to remove all of the debris.I polished the acrylic shank extension with Obsidian Oil and dried it off. Once it had dried completely I used the Rub’n Buff European Gold to touch up the stamping on the extension.I rubbed several coats of Clapham’s Beeswax into the rusticated finish. I buffed it with a shoe brush between each coat. After the last coat of the wax I buffed it with a clean buffing pad. I hand buffed it with a microfiber cloth. I took the stem out of the Before & After Pipe Stem Deoxidizer bath and wiped it off with a clean towel. The first two photos below show the stem after the 24 hour soak. The majority of the oxidation is gone off the stem. There was some deep oxidation mid stem on both sides where the green area was on the original stem photos. I sanded the stem with 220 grit sandpaper to remove the tooth marks and chatter on both sides of the stem and the oxidation mid stem. I rubbed down the stem with Obsidian Oil to remove the dust. I cleaned out the inside of the stem with alcohol and pipe cleaners to remove any debris and the remaining Before & After Pipe Stem Deoxidizer that had gone inside during the bath.I polished the stem with micromesh sanding pads – wet sanding it with 1500-2400 grit pads and dry sanding it with 3200-12000 grit pads. I wiped the stem down after each sanding pad with Obsidian Oil. After the final 12000 grit pad I gave it a last coat of oil and set it aside to dry. I buffed the stem with Red Tripoli and worked over the parts of the stem that still showed some of the oxidation. I buffed until the stem was clean working over the middle and the tenon end. I buffed again with Blue Diamond polish on the wheel to polish up the vulcanite. I gave the stem multiple coats of carnauba wax and buffed it with a clean buffing wheel. I buffed the bowl with the clean buffing wheel as well to give the bowl a shine. I hand buffed the stem and bowl with a microfiber cloth to deepen the shine. The finished pipe is shown in the photos below. It is a nice older Pioneer. It is light weight and comfortable in the hand and the mouth. I think my friend Steve in Dawson Creek is going to love this one. Steve,if you are reading this I hope you enjoy this beauty. It will be on its way to you very soon. Thanks for looking.

Cleaning up Another Italian Made DiMonte Blaze 1377 Rhodesian


Blog by Steve Laug

Before I restored DiMonte Classica earlier this year I knew nothing about the DiMonte brand. I wrote about the restoration on a previous blog if you are interested in reading about this previous pipe (https://rebornpipes.com/2017/05/11/a-beautiful-italian-hand-made-dimonte-classica-991/). When I saw that pipe my first thought was that it was an Italian Hand Made pipe somewhere between Savinelli and Castello. The quality of the craftsmanship and the hand made stem and briar work made me think that it was more toward the Castello side of the scale. It was a beautiful pipe. If I had found this one first I would have thought differently. It came to me with a heavy coat of Varathane on the bowl and shank. The craftsmanship was average to medium but it was not high end. This pipe had the looks of a machine made pipe which was certainly different from the previous DiMonte. The pipe was stamped DiMonte on the left side of the shank and Blaze on the right side. On the underside at the shank stem junction it was stamped with the shape number 1377 over Made in Italy.The pipe had some charm, don’t get me wrong but it was nothing like the previous DiMonte. The slick topcoat of “plastic” did nothing for me. It was bubbled on spots on the rim top and the cap or the Rhodesian. The bottom of the bowl looked like it had been used for a hammer. The inner edge of the rim showed damage from poor reaming and rim top both showed darkening. The outer edge looked relatively good other than the bubbly plastic top coat. The stem was lightly oxidized and there were light tooth marks and chatter on both sides of the stem near the button. The mother of pearl and brass band on the shank added some charm to the pipe.Along with the above two photos, Jeff took photos of the rim top and edges. The bowl was lightly caked as can be seen in the photo. The top of the rim did not have the common lava buildup but it had a blistered looking finish. Around the edge of the cap there were a lot of nicks.The next three photos show the beat up bottom of the bowl. It is what I mentioned above about the pipe being used as a hammer. There were deep gouges and scratches in the finish. The scratches and nicks went up the front and both sides of the bowl. Those combined with the blistering top of the rim and the bubbles along the sides of the cap meant that I was going to need to strip down the finish on this bowl and rework the damaged areas. The next photos show the condition of the shank – actually the best part of the pipe at this point. The stamping is very clear and readable. It will need to be protected when I strip the finish of the pipe. The next photos show the condition of the stem with all of the light tooth marks and chatter on both sides. Fortunately, none of marks were deep and should easily sand out when I polish the stem.I decided to include some my findings regarding the brand that were on the previous blog for ease of reference. I had found a link to a post on alt.smokers.pipes that was a response to a fellow who posted a question about the brand. I have included the link to the thread as well as the informative response regarding the history of the brand and its place of origin. Here is the link: https://pipesmokersforum.com/community/threads/info-on-this-pipe-brand.20964/

Hello Pappy, here’s a bit of information that I found from an alt.smokers.pipes post in 02/10/2003 that reads:

DiMonte was originally Arlington Briar Works, a pipe factory in New York. It went out of the pipe-making business, and sold off its machinery, I think in the 1970s. Maybe later. Mark Tinsky could probably give you an accurate date on when, if that is of concern.

Recently (2003), the family has decided to get back into pipes, and has been having them made under contract in Italy and importing them. The few I have seen so far seem to be good value for the money, but nothing to rave about. I have one. Wood is good, combustion chamber and shank both properly drilled, good quality mouthpiece. Some of the digits in the nomenclature look as if stamped by a dyslexic (and perhaps were — upside down 8, other minor things), and the finishing touch in fine details was not apparent in all instances.

If you find one and like it, I would expect it to be a good smoker. But if you worry about nit-picks, examine the pipe carefully before buying. You might find some…

One more comment: The old pipes from Arlington Briar Works that I have picked up at estate sales have been of lesser quality wood and a touch on the small side, but craftsmanship and attention to detail was great. The new pipes from Italy have better wood, size is generally larger (better, for me), but attention to detail is not always what it might be. As smokers, I rate the newer ones higher, because wood is so important, but in fit and finish things ain’t what they used to be…”

It appears when Arlington attempted to re-enter the pipe market, they contracted with an unknown Italian outfit, who manufactured these pipes under the DiMonte label. However, Arlington once again soon went out of business.

However, I’m sure there must be some knowledgeable pipers here that may have more information for you. Hope this helps you a smidge more…

This DiMonte Blaze Rhodesian came to me clean and ready to restore. Jeff had reamed the bowl and scrubbed out the mortise and the airways in the shank and stem with alcohol, cotton swabs and pipe cleaners. He scrubbed and scraped the rim top with the edge of the Savinelli Fitsall Pipe Knife. He scrubbed the exterior of the pipe with Murphy’s Oil Soap and a tooth brush. He rinsed it with running water to remove the grime and the soap. He soaked the stem in an OxyClean bath to remove the oxidation. It raised the oxidation to the surface of the stem. I took photos of the pipe before I started restoring it. One of the most frustrating things for me in pipe restoration is bowls that have been coated with a thick coat of Varathane and that is what was covering the briar. The brass and white acrylic band on the shank added a nice touch but I could hardly see if for the shiny plastic coat over the surface of the briar. I took a photo of the bowl and the rim top to show the condition of the pipe. The bowl was very clean. The rim surface was clean of the darkening though the blistering of the finish was still very present.I took photos of both sides of the stem to show the condition of the stem. There was tooth chatter on both sides of the stem and some pits in the vulcanite surface. The oxidation was on the surface of the stem. I took the stem off the pipe and put it in the Before & After Pipe Stem Deoxidizer to soak for 24 hours.I tried wiping the briar down with acetone and it did not even dent the plastic finish. I sanded the surface of the briar with 220 grit sandpaper to break the plastic finish. Once it was broken I wiped the bowl down with the acetone and it began to break through the Varathane/plastic coat on the bowl. I continued to sand the bowl with 220 grit sandpaper and wipe the bowl down to try to remove the finish from the bowl. It was a very thick coat of finish that covered the bowl. It was taking a lot of time to remove the thick top coat but I was intent on making it happen. The next photos show the bowl after the top coat is finally gone. I sanded out the scratches and marks on the sides and bottom of the bowl. I filled in the deepest gouges with clear super glue and when it dried sanded the repairs to blend them into the surface of the briar. I sanded the bowl with 1500-2400 grit micromesh sanding pads to remove some of the scratching. I would work more with that after staining. I wiped the bowl down a final time with the acetone on cotton pads to remove any remnants of the remaining finish. I stained the bowl with a black aniline stain and flamed it to set it in the briar. I repeated the process until the coverage was well set.I wiped the briar down with alcohol on cotton pads to remove the excess stain on the briar. I was able to remove the top coat of stain leaving behind the black in the grain of the briar. I sanded the bowl with a medium grit sanding pad. I used a folded piece of 220 grit sandpaper to clean up the inner edge of the bowl and minimize the damage. The photos that follow show the bowl after the sanding and washing with alcohol. With the black stain removed I wiped the bowl down one more time with alcohol and gave it the next coat of contrast stain. I used a dark brown aniline based stain and flamed it with a lighter to set it in the surface of the briar. I repeated the process until the coverage around the bowl was even and I was satisfied with how it looked. I let the stain set for 30 minutes before moving on with the process.I wiped the bowl down with alcohol on cotton pads to remove the excess brown stain and make it more transparent. I wanted the grain to pop through the finish. The black undercoat would come through in dark contrast to the rest of the browns on the bowl. With the grain showing through it was time to polish the briar with micromesh sanding pads. I wet sanded the bowl with 1500-2400 grit pads and dry sanded with 3200-12000 grit pads. After each pad I wiped the bowl down with a damp cloth to remove the sanding dust and stain powder. Once I finished polishing it with the 12000 grit micromesh pad and wiped it down with a damp cloth I dried it off in preparation for the finish coat of stain. I gave the bowl several coats of Danish Oil with a Cherry stain. I applied the stain with cotton pads and rubbed it into the finish of the briar. I buffed it with a soft flannel pad to smooth out the finish. It added the touch of red that I wanted to the briar and bring out some of the colour in the grain.  I hand buffed the bowl with a microfiber cloth to polish the newly applied Danish Oil finish. I took the following photos of the pipe at this point in the process. It is looking the way I was hoping it would when I stripped off the plastic coat. It is a nice piece of briar with a mix of grains around the bowl and shank.  All that remained was to give it a final buff with Blue Diamond on the buffing wheel and then wax it with multiple coats of carnauba wax. The finish would really shine when the wax was buffed with a clean buffing pad. I set the bowl aside to dry overnight and took the stem out of the Before & After Pipe Stem Deoxidizer Bath. I wiped it down with a dry cloth to remove the Deoxidizer and rubbed it down with some Obsidian Oil to see where things stood. The stem looked good with most of the oxidation removed. The photos below show the stem after it was removed from the bath. I sanded the stem with 220 grit sandpaper to remove the tooth chatter and pitting on both sides near the button and sanded the rest of the stem to remove the residual oxidation.I polished the stem with micromesh sanding pads – wet sanding it with 1500-2400 grit pads and dry sanding with 3200-12000 grit pads. I rubbed the stem down with Obsidian Oil after each pad and when I finished sanding with the 12000 grit pad I gave it a final coat of oil and set it aside. I figured that while the bowl and the stem dried I would call it a night and pick it up in the morning. In the morning I picked up where I had left off the night before. I buffed the bowl and stem with Blue Diamond on the buffing wheel and then gave the entire pipe several coats of carnauba wax. I buffed it with a clean buffing pad to raise the shine. I hand buffed it with a microfiber cloth. The finished pipe looks far better than it did when I began. It no longer has that thick plastic coat and the blistering is gone from the bowl surface. The stem shines and the briar looks amazing to me with the contrast stains of black, dark brown and cherry. It really works well with the grain. The dimensions of the pipe are; Length: 6 inches, Height: 1 ½ inches, Bowl diameter: 1 ¾ inches, Chamber diameter: ¾ inches. This one is going on the rebornpipes store soon. It will make a nice addition to someone’s collection. If you are interested in adding it to your rack contact me at slaug@uniserve.com or send me a message. Thanks for looking.


Repairing a Cracked Shank and a Chipped Stem on a Dr. Plumb Bulldog


Blog by Steve Laug

I received a short email from a reader of the blog about a Dr. Plumb Bulldog that he had that needed a bit of work. He wanted to know if I would be willing to work on it for him. He said that there were some issues with the pipe that he wanted me to try my hand at repairing. He said that the shank had a crack, the stem had a broken stinger end lodged in the airway and the button was broken off on the underside of the stem. I wrote back and asked him to send me some photos of the pipe so I could see what he was speaking about regarding the pipe. He sent the first photo to give me an idea of the overall look of the pipe. Looking at it I have to say that it is a classic GBD shaped bent Bulldog and it had nice grain. He sent a photo of the crack at the bowl/shank junction and noted that he had glued it but was not happy with the way it looked. The photo only shows the crack on the left side of the stem but it was also on the right side. He wanted me to clean it up and stabilize it so that it would not crack any further. That should not be too much of an issue.He sent along a photo of the rim top showed that the outer edge of the bowl had some small nicks in it that needed to be cleaned up. The surface of the beveled rim had some lava overflow and was darkened in several places around the top and the inner edge of the bowl. It was hard to tell for certain from the photos but there was probably some wear on the top and inner edges. The next photo he included showed the stem. Not only was it oxidized with a nice greenish brown colour but there was the “little issue” shown on the underside of the stem. There was a large chunk of vulcanite missing from the button and extended down into the surface of the stem. It appeared to be broken off and I wonder if had not happened when attempting to drill out the broken stinger. I am not sure but I have seen that kind of damage done with a drill bit on other stems in the past. The other possibility is less likely but could have happened, while inserting a thick pipe cleaner the button had cracked and come off.The final two photos pin point the second issue that he was having with the pipe. The metal stinger threaded into the tenon that comes on all Dr. Plumb pipes had been broken off with the threaded portion of it stuck in the tenon and extending part of the way up the stem. His photos included a tenon end shot and a photo of the broken stinger by itself. You can see the ragged edge of the end that would have sat flush against the end of the tenon.Once I saw the photos, I wrote back and told him to send the pipe up to Canada and I would see what I could do with the issues on the pipe. He packed it up and sent it off to me. It did not take too long for it to arrive here in Vancouver. I unpacked it from the mailing envelope it came in and had a look at it. It was even a better looking little Bulldog in person. There were a few small fills on the shank. The largest of the fills was on the right side of the shank right at the junction of the stem and bowl. The crack went through and around the fill. The pipe was stamped faintly on the left side of the shank with the script Dr. Plumb over Perfect Pipe and on the right side it was faintly stamped Made in England and the shape number 134. The stamping was only readable under a bright light. The shank was dirty and the airway in the bowl was tarry and dirty from the buildup around the stinger apparatus. The airway in the stem was dirty and partially blocked by the broken stinger. I took photos of the pipe when I received it so I would have a base to show the progress once I had finished. The third photo shows the damaged stem and I have circled the missing chunk of vulcanite in red. I took a close up photo of the rim top to show the darkening to the rim and the debris that was built up on the top. There was some damage to the inner edge of the rim that would need to be smoothed out.I took some photos of the stem to show the oxidation and the damaged area on the underside at the button.I made a wedge out of cardboard and cellophane tape and pushed it into the slot in the button to provide a base for the repair. I mixed charcoal powder with black super glue and built up the missing chunk. I removed the wedge and slid a greased pipe cleaner into the slot and built up the area on the end of the button. I filled in the deep tooth marks on the top side of the stem with the mixture. I filed the repair on the underside of the stem with a rasp and a file to begin to shape the button edge and blend the repair into the surface of the stem. I shaped the button with the files as well to begin to shape it in a classic football shape to match the top half of the stem. The photos show the progress of the shaping. Once I had the levels on the surface correct I wiped the stem down and could see the tiny air bubbles in the repair. I filled them in with clear super glue and let them cure. Once the repairs had cured I used needle files to reshape the button and slot in the end of the stem. There were a few more air bubbles that showed up as I reshaped the button. Once they dried I sanded repaired spots. I used the files to cut the sharp edge of the button. When the spots dried I sanded the surface of the stem with 220 grit sandpaper to smooth out the repaired areas and blend them into the rest of the stem. I set the stem aside for awhile and worked on the bowl. I wiped down the area around the crack in the shank and drilled small microdrill bit holes in the end of each of them. I fount that on the right side there was a third trail of crack so I drilled it as well. I filled in the drill holes with clear super glue. I layered in the glue to a bubble and let it dry. Once the glue had dried I sanded the length of each crack in the shank and the repaired holes as well until they were smooth. I sanded the beveled rim top to smooth out the damage and clean up the surface. I worked over the inner edge with sandpaper to smooth out the damaged areas.I used a dark brown stain pen to touch up the repaired and sanded areas on the shank and on the beveled rim top. I cleaned out the inside of the shank and mortise with cotton swabs, pipe cleaners and alcohol until the shank was clean and all of the oils and tars were removed.I stained the bowl and shank with a dark brown aniline stain. I flamed the stain to set it in the briar and repeated the process until the coverage around the bowl was even. I wiped down the briar with alcohol on cotton pads to make it more transparent. After wiping it down the grain shone through the stain coat. I think that once it is polished it would be a beautiful finish for this Dr. Plumb. Polishing the stem was a harder prospect and took more work than the bowl. The sanding and polishing process repeatedly revealed new air bubbles in the newly built up underside of the stem and button. I sanded and added drops of clear super glue to take care of each air bubble. It was tedious but it paid off. I polished the stem with micromesh sanding pads – wet sanding with 1500-2400 grit pads and wiping down the stem after each pad with Obsidian Oil. I checked for new air bubbles and then went on to dry sand it with 3200-4000 grit pads. I gave it a coat of oil after each one and then finished polishing it with 6000-12000 grit pads. I repeated the oil after each pad and after the 12000 grit pad I set the stem aside to dry. I put the stem back on the bowl and buffed the pipe with Blue Diamond. I kept a light touch in buffing the underside of the stem and button as I did not want to do any harm to the repair. I buffed the repairs on the shank normally and the rest of the pipe the same way. I gave the bowl and stem multiple coats of carnauba wax and buffed it with a clean buffing pad to raise the shine in the briar and vulcanite. I hand buffed it with a microfiber cloth to deepen the shine. The pipe is almost ready to go back to the pipe man who sent it to me. It will go out later this week after I do a last minute check up on the entire pipe. I want it to go back to him in good condition. Thanks for walking with me through this repair and restoration project.

Replacing a Broken Tenon & Restoring an Old Italian Bulldog


Blog by Steve Laug

I am just about finished cleaning up and restoring the pipes my brother and I picked up on our Virtual Pipe Hunt in Montana. The next pipe that I brought to my work table was from that hunt. I think I may have two or three left two work on but this is one that I have picked up and put back several times since they arrived in Vancouver. As I mentioned in my last blog I have written several blogs about that hunt as it was one of those once it a life time finds. It contained a lot of late 1890s and early 1900 era pipes. These included C.P.F., W.D.C. and some no name pipes from the same era. Again if you are interested in reading about any of the restorations, a quick search on the blog for “Virtual Pipe Hunt” will give you the links to a blog about the hunt and to other pipes that were included. This particular little Bulldog shaped pipe had something about it that caught my eye. It combined some interesting grain (birdseye, swirled and cross grain) on the bowl and a diamond shaped taper stem with an orific button. The finish was worn and the stem was glued onto the shank. At this point in the process the stem would not move as the glue held it tightly in place. The top of the shank was stamped ITALIAN BRIAR in block print and no other stamping on the pipe on either side. The stem had a red dot on the left top side of the diamond. There were tooth marks and the stem was really dirty with an overflow of glue that was on both sides. My brother took photos of the pipe before he started the cleanup process.The next two photos show the pipe from the top side and the underside of the pipe. The topside shows the wear and tear to the finish. There were a lot of scratches and nicks in the briar and a cake in the bowl with lava overflow on the rim top. The underside of the bowl showed the nicks and scratches that went down both sides and the bottom of the bowl and shank. He took some photos of the rim top and bowl. Both photos show the thick cake in the bowl and a thick lava coat on the rim top. It is hard to know if there was any damage to the inner edge of the bowl or on the top surface of the rim.The close up of the underside of the bowl and shank shows the glue buildup in the gap between the shank and the stem.The stem looked like it was in rough shape. There were some peeling flakes on the surface of the stem. They could either be glue or damage to the stem.I was really surprised that my brother was able to get the stem off the shank. It turned out that the broken tenon was glued in the shank and a piece of inner tube was glued into the broken tenon. About an inch of the tube extended beyond the shank and the stem fit on the tube. The glue was painted onto the end of the shank and the end of the stem and the two parts were held together until the glue set. Jeff used some acetone to eat through the glue in the gap between the stem and the shank and was able to pry the pieces apart.The next photos show the damaged stem. It looked like the repair had also included painting the surface of the stem with glue. The glue had bubbled, cracked and peeled leaving behind a messy chipped finish. The orific button on the rounded stem end was in good shape. It appeared that the glue mixture had protected the stem from a lot of tooth marks and chatter. Jeff did his usual thorough cleanup of the pipe. I am coming to expect nothing less when he sends me pipes that have gone through his cleaning process. He reamed the bowl with a PipNet reamer, scraped the bowl and the rim top with a Savinelli Fitsall Pipe Knife to clear off the lava build up. He cleaned out the internals in the airway in the shank as much as possible with the broken glued in tenon in the way. He used alcohol, cotton swabs and pipe cleaners. He cleaned out the airway in the stem with alcohol and pipe cleaners. He scrubbed the exterior of the briar and the stem with Murphy’s Oil Soap and a tooth brush to remove all of the grime on the briar and the hardened, chipped glue on the finish of the stem. He rinsed the parts under running water and dried it with a soft cloth. He soaked the stem in OxyClean to clean off the glue on the surface. When the pipe arrived in Vancouver it looked different than it did when we picked it up in Montana. I forgot to take photos of the pipe before I started on it because I was excited to pull the broken tenon from the shank. You can see the clean bowl and stem in the photos.

I put a drill bit in the chuck of my cordless drill and turned the bowl as the bit went into the airway on the broken tenon. I used one that was slightly larger than the airway and worked my way up to the one in the second photo. Some of the tenon crumbled away and the remainder stuck on the drill bit. I pulled it out of the shank and that part of the process was complete. The shank was clear. I used a Dremel and sanding drum to smooth out the broken edges of the tenon on the end of the stem. I smoothed it out until the broken tenon was smooth against the end of the stem. I put a drill bit in the chuck of my cordless drill and turned the stem onto the bit to open the airway for the new threaded Delrin tenon. I increased the size of the bit until it was the same size as the threaded tenon end. I cleaned up the newly drilled airway with a dental burr on the Dremel.I took the stem back to the work table and took pictures of the process of inserting the new tenon in the stem. The photos show the progress. I turned the tenon into the stem and put glue on the final few threads and use a pair of pliers to turn it into the stem until it was seated against the flush end. I put the stem in the shank and took some photos. The alignment is always a little off when the stem is first inserted. In this case the fit against the shank was perfect. The sides on the old stem and shank were just a little bit off. The left and top side aligned almost perfectly but the right and underside of the stem need some minor adjustments to fit properly. I sanded the stem/shank connection with 220 grit sandpaper to smooth out the transition and make it smooth to touch. I wiped the bowl down with acetone on a cotton pad to remove the remaining finish from the bowl. When I was finished I took photos of the fit and it was looking really good. I topped the bowl with 220 grit sandpaper on a topping board. I topped it until the surface was smooth and the damaged areas were removed. I used a folded piece of sandpaper to smooth out the inner edge of the bowl.I sanded the stem surface to remove the scratches and damage to the flat sides of the diamond and also the flat angle to the button. I wiped the stem down with alcohol on a cotton pad and removed the debris left behind by the sanding. I filled in the tooth marks with clear super glue and when the glue dried I sanded the repairs smooth with 220 grit sandpaper. I put some clear super glue on the tenon to build it up so that the fit in the shank would not be too loose. When the glue dried I sanded the surface of the tenon until it was smooth. I polished the stem with micromesh sanding pads – wet sanding it with 1500-2400 grit pads and dry sanding it with 3200-12000 grit pads. I rubbed the stem down with Obsidian Oil after each pad and after the final pad I gave it a final coat of oil. I set it aside to let it dry. I scraped out the inside of the mortise with a pen knife to remove the glue build up on the walls. I cleaned up the bevel with the blade of the knife at the same time to make sure that it did not interfere with the fit of the stem against the shank. I cleaned out the airway and mortise with pipe cleaners, cotton swabs and alcohol to remove the debris that remained once I pulled the old tenon. It took a few pipe cleaners and swabs but it did not take too long to clean it up. I polished the briar with micromesh sanding pads – wet sanding it with 1500-2400 grit sanding pads.  I worked around the stamping so I would not damage it in the process. I decided to stain the bowl with a medium brown stain pen rather than my regular aniline stain. I covered the sanded rim top, bowl sides and the shank with the stain. I continued to polish the bowl with micromesh sanding pads – dry sanding it with 3200-12000 grit sanding pads. I wiped it down after each pad with a damp cotton pad. The briar began to really shine as I worked through the micromesh sanding pads. I put the stem back on the bowl and buffed it with a carnauba wax buffing pad. I gave the stem and bowl multiple coats of wax. I buffed the completed pipe with a clean buffing pad to raise the shine. I hand buffed the pipe with a microfibre cloth to deepen the polish. The finished pipe is shown in the photos below. It turned out to be a pretty pipe. The black vulcanite stem with the red dot works well with the reddish colour of the briar. The grain stands out well with the colours of the stain. I like the look of finished pipe a lot. This one will probably stay in my own collection. Thanks for following along with me on this refurbishing journey.

Restoring an odd Daseo/Dasco Bakelite Pipe with a Removable Bowl


Blog by Steve Laug

When I took this old case out of the box my brother Jeff sent me I could not remember what was inside. Looking at it I was kind of thinking that it might hold an older meerschaum billiard or an old amber stemmed briar billiard. I just could not remember what was in the old case when it arrived. I wrote Jeff and asked him to send me the pictures of the old pipe before he cleaned it up. He also was surprised I think when he opened the case as we have worked on so many pipes I am sure he had forgotten what was in this case. I present the case as it looked when he started working on the old pipe that it contained. What do you think could be inside? Don’t want to guess? That’s okay move onto the photos that follow once he opened the case. It certainly was not what I expected. Okay, no more suspense. Here is what we saw when he opened the case. I suppose your response was similar to ours. “What is that?” we exclaimed in surprise. Inside the old case was no older meerschaum or briar. There was no amber stem. There was only an odd looking pipe with a Bakelite base, shank and stem as a single unit with a screw on briar bowl. It was odd looking and strangely delicate. It was very light weight and different.It was stamped on the left side of the shank with the words SUMKLAS in gold filigree. On what would be a band if it was separated from the shank was also stamped Dasco or Daseo in script. There were no other markings on the pipe. I was unfamiliar with the brand whether it was a SUMKLAS or a Dasco/Daseo pipe. I could find no information on the brand in any of my usual online or book resources. I found a link on the Smoking Metal site to a Daseo  http://www.smokingmetal.co.uk/pipe.php?page=513. It is a three part Bakelite Bent pipe that is made of the same black Bakelite as the one I am working on. It has a similar threaded base on the bowl and a poorly rounded outer edge of the bowl as well. So I am not sure if the pipe is a Daseo or a Dasco. I have included a photo of the stamping on the pipe below. Have a look and see what you think. The script name and the curl at the top of the lower case c or e make either option possible. The pipe remains a bit of a mystery unless one of you who are reading this blog can shed any light on it. Jeff took the pipe out of the case and took photos of it to show what it looked like from a variety of angles. The finish on the briar was badly worn with a lot scratches and nicks in the surface of the wood. The rim top had some lava and there was a cake in the bowl. There was one large nick on the front of the bowl at the outer edge of the rim. The stem and base were dirty and scratched but no real issues. There was light tooth chatter at the button on both sides of the stem. Jeff took a close up photo of the rim top and bowl to show the condition. In the photo the nick out of the rim edge can be seen on the front of the bowl. The light cake in the bowl and the lava on the rim is also visible in the first photo. He unscrewed the bowl from the base and took a photo of the base to show what it looked like inside. The threads were in great shape and the base was dirty with oils, tars and dust. The bottom side of the base unit looked very good – a bit of polishing would shine it up. The next photos show the condition of the briar bowl. Note the nicks and scratches as well as the peeling finish on the bowl. There is some nice grain peeking through the old finish.I kept both of the follow photos of the threads on the bottom of the bowl to show the wear and tear on the briar threads. It appears that the bowl had been overturned several times and one side the threads were almost worn smooth.Jeff did a great job of cleaning this old-timer. He reamed the bowl and scrubbed the bowl and base unit with Murphy’s Oil Soap and a tooth brush. He rinsed it under running water. The internals were cleaned out with cotton swabs, pipe cleaners and alcohol. The inside of the base was scrubbed out with alcohol and cotton swabs. When it arrived here in Vancouver I had forgotten what was in the old case. When I opened it I was surprised a second time. I took photos of the pipe before I started working on it give an idea of what needed to be repaired and restored. When I took it out of the case and looked at it the pipe reminded me a lot of an older Swedish pipe that I had restored. That particular pipe was a Bromma Dollar that I restored. The link to the blog is https://rebornpipes.com/…/cleaning-up-a-swedish-bromma…/ I have included a photo of the Bromma here for comparison. It also has a base/stem single unit with a briar screw on bowl. The Dasco/Daseo is older I think and it is certainly more elegantly proportioned than the Bromma but you can see the similarities between the two pipes. I took a close up photo of the rim top and bowl to show the nick toward the front of the bowl as I am holding it in my hand. I have circled it in red to highlight it for you.The stem had tooth chatter on both the top and underside near the button. The button was the older style rounded cap with an orific opening in the end. Overall the stem and base unit were in excellent condition.I took the bowl off the base and took some photos of the parts of the pipe. It is a pretty straight forward design with no systems or sumps. Just a screw on briar bowl and a Bakelite base unit.I took photos of the bowl top and bottom – it is in decent condition. The bottom of the bowl has some nicks in the edge of the threads.I repaired the nick/missing chunk of briar on the side of the bowl (front/side) with clear superglue. I cleaned out the area with a cotton swab and alcohol and then dried it off. I filled it in with clear superglue in layers to build it up even with the rim top surface and the bowl side surface. I sanded the repair with 220 grit sandpaper to smooth it out even with the top of the bowl and the side. I wanted it to be unidentifiable once the bowl was stained. I sanded off the rest of the finish while I was at it. There were bubbles and crackling in the finish. Once the old damaged finish was removed there was some interesting cross grain and birdseye grain around the bowl. Before staining the bowl I “painted” the thread on the bottom of the bowl with clear fingernail polish to build them up for a better fit on the base. Without the added thickness to the threads the bowl overturned and no longer aligned with the edges of the base.I cleaned up the excess fingernail polish on the base of the bowl bottom with a cotton swab and acetone. Then it was time to stain the bowl. I decided to keep things simple and stain the bowl with a Guardsman Dark Brown stain pen. It is simple, mess free but it is also transparent and will allow the grain to show through when buffed. I covered the bowl with the stain pen and repeated until the coverage was what I wanted.I put the bowl on the end of my finger and buffed it with Blue Diamond on the buffing wheel to spread out the stain and even the coverage on the bowl. It gave the bowl a nice medium brown colour and allowed the grain to shine through. I buffed it with several coats of carnauba wax and buffed it with a clean buffing pad to raise the shine. I set the finished bowl aside and worked on the base/stem unit. I polished it with micromesh sanding pads – wet sanding with 1500-2400 grit pads and dry sanding with 3200-12000 grit pads. I wiped the base/stem unit down after each pad with some Obsidian Oil. I have used it on Bakelite before and like how it worked. I gave it a final coat of the oil after the last pad and set it aside to dry. I screwed the stem back on the base and the alignment was perfect now. The repaired area was on the left side of the pipe rather than the front. It blended in pretty well. I buffed the whole pipe carefully with carnauba wax and a clean buffing pad to raise the shine. I hand buffed the pipe with a microfibre cloth to deepen the shine. The finished pipe is shown in the photos that follow. It is a nice light weight pipe that has a unique look and potentially a bit of history. Some of the information on similar pipes dated it in the mid to late 1920s. There is no way of knowing for sure but the orific button and the gold lettering on the shank would fit that time period. It is unique that is for sure. Thanks for looking.