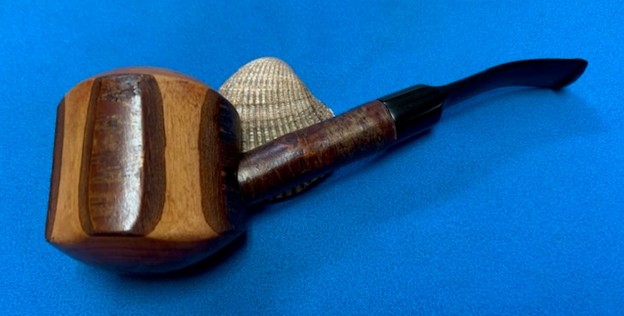
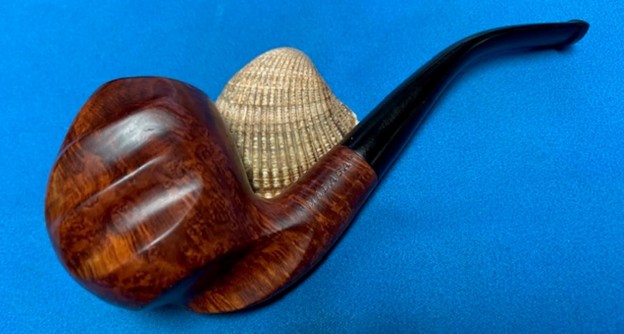
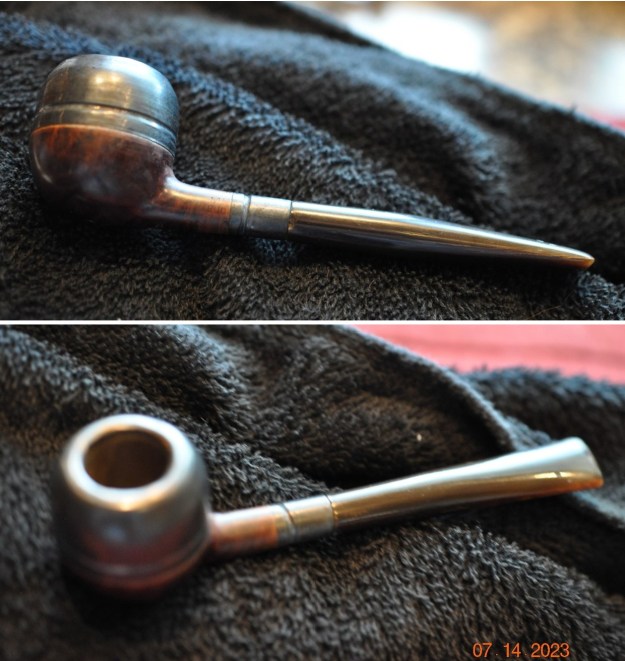
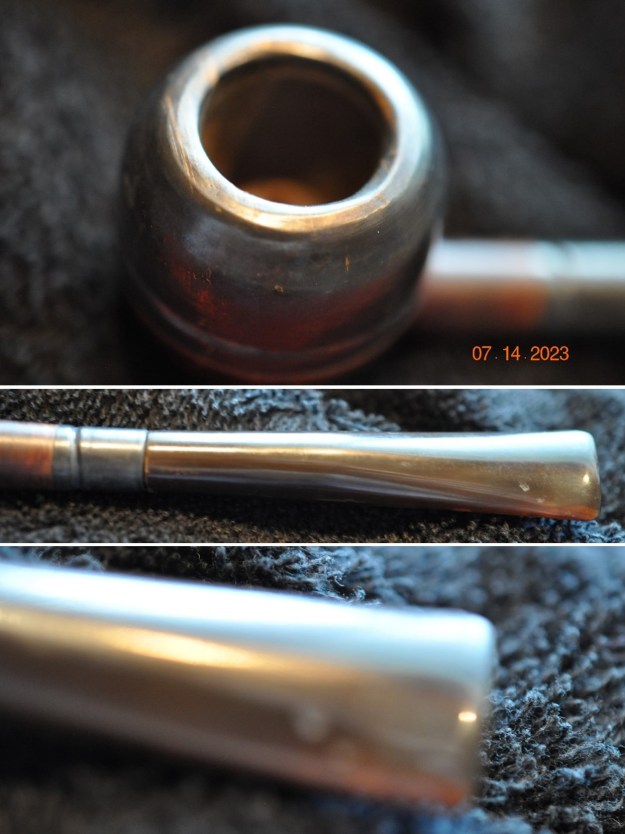
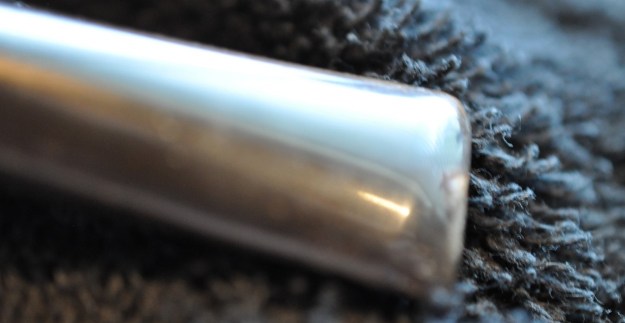
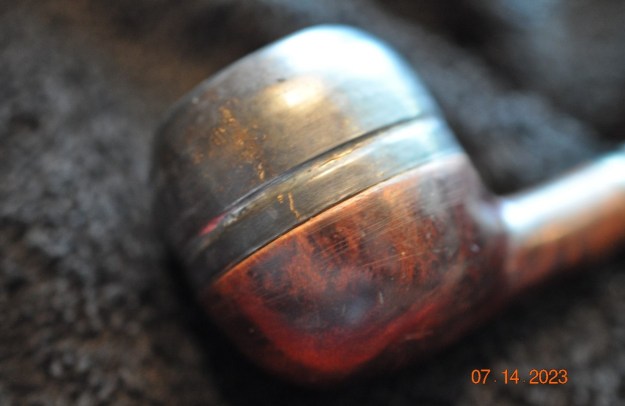
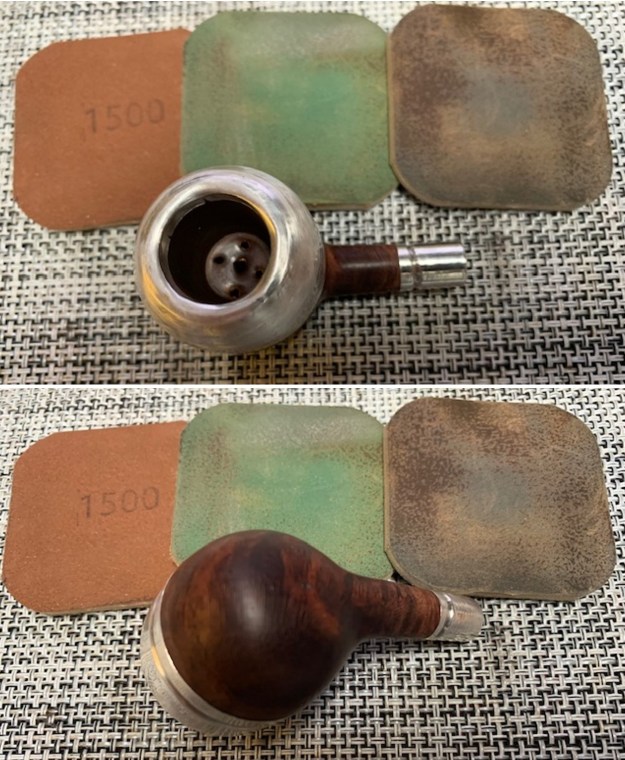
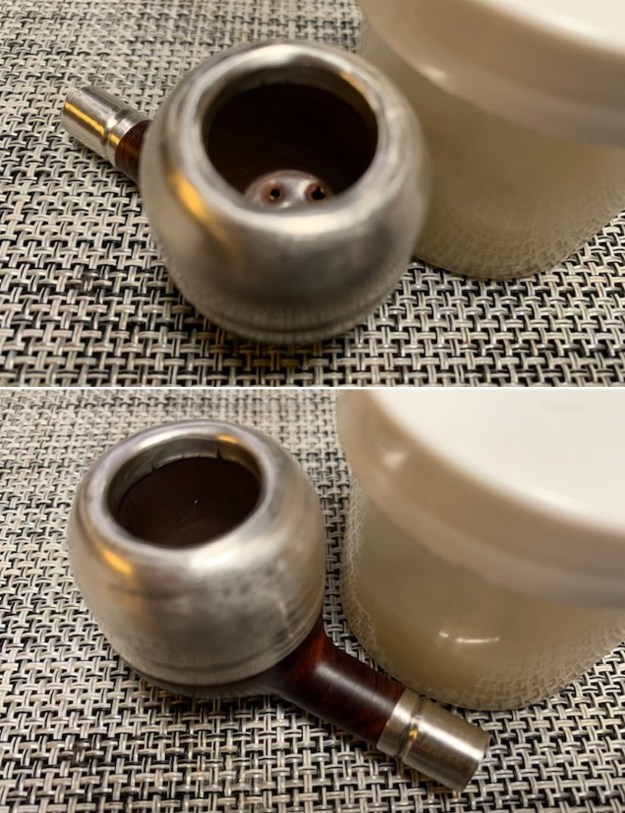
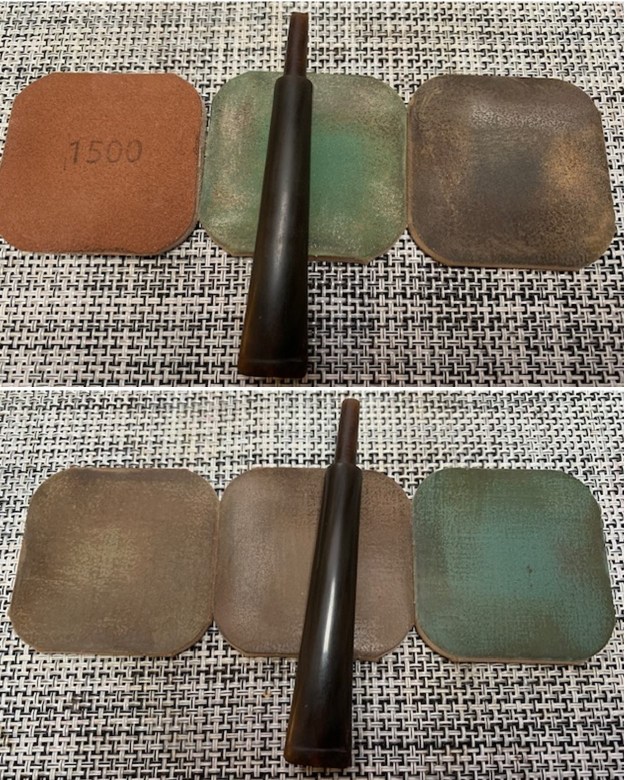
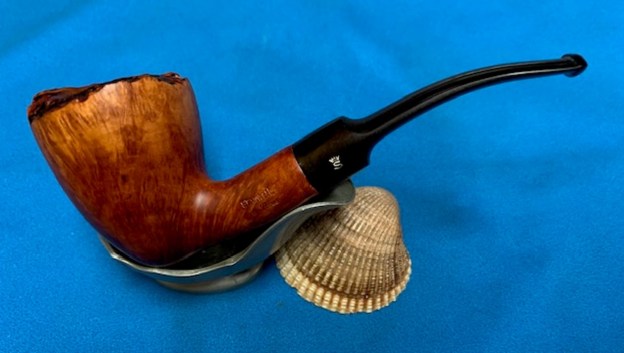
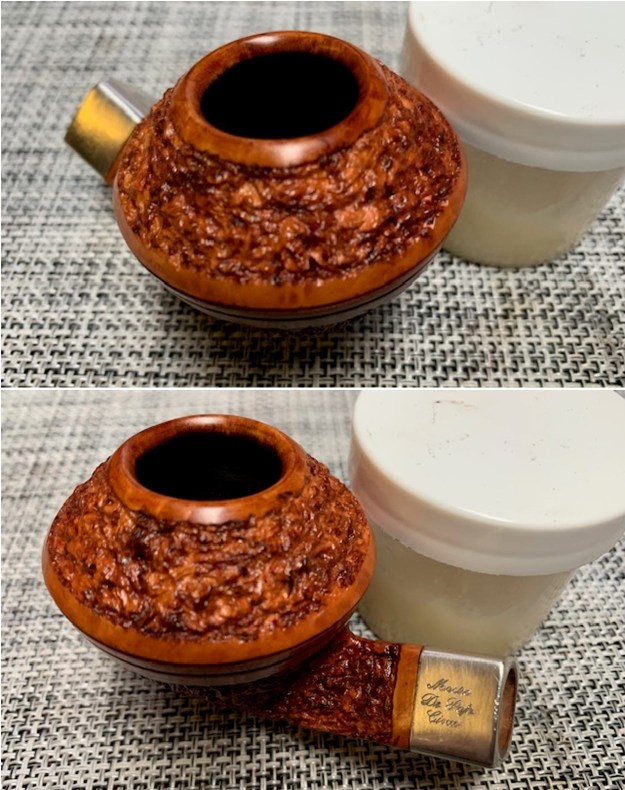
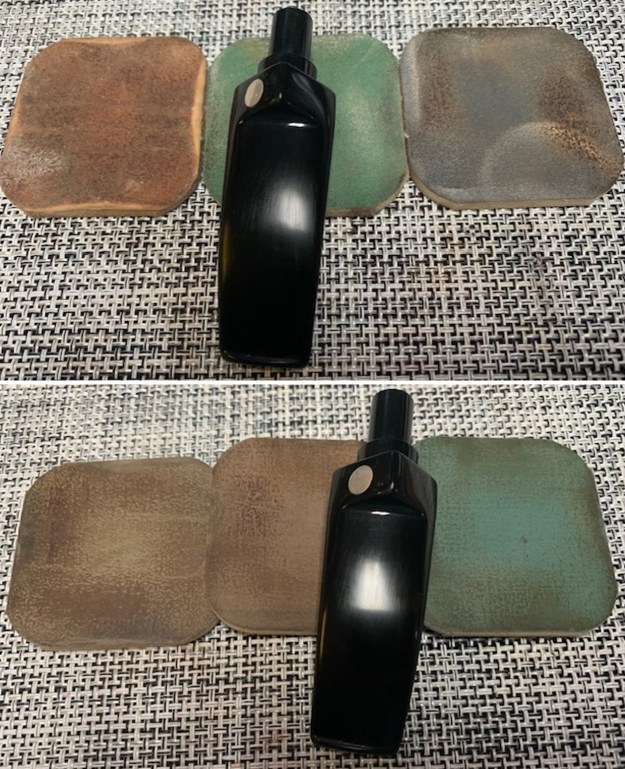
The next pipe on the work table is an elegantly shaped Dublin/Freehand. It came to us from an auction out of Glendale, Arizona, USA on 06/13/2020. The finish had a combination of smooth and two rusticated patches – one on the right side mid bowl and other on the back mid bowl. The top of the bowl is smooth and round. The shank underside is stamped Karl Erik over Hand Made in Denmark over 11. The bowl had grime and oils ground into the sides. There was a thick cake in the bowl and a light lava overflow and grime on the inner edge and rim top. There was a small mark on the inner edge on the left side toward the back of the bowl. The fancy, turned saddle stem was oxidized and there was tooth chatter on both sides near the button. Jeff took photos of the pipe before he started his clean up.The next photo shows the rim top and the bowl. You can see the cake in the bowl and the light overflow of lava on the flat rim top. The inner edge of the bowl looks smooth and shows some darkening and nicks. The photos of the stem show the oxidation and calcification on the stem. There are also light tooth marks and chatter on both sides near the button.Jeff took pictures of the bowl from various angles to show the condition and the overall look of the pipe. It was a beauty and elegant underneath the grime.The underside of the shank is stamped Karl Erik over Hand Made in Denmark. Underneath that is the number 11. It is clear and readable.Jeff had thoroughly cleaned up the pipe. He reamed the pipe with a PipNet Pipe Reamer and cleaned up the remnants with a Savinelli Fitsall Pipe Knife. He scrubbed the bowl with undiluted Murphy’s Oil Soap with a tooth brush. He rinsed it under running warm water to remove the soap and grime. He cleaned out the inside of the shank and the airway in the stem with alcohol, cotton swabs and pipe cleaners. He scrubbed the exterior of the stem with Soft Scrub to remove as much of the oxidation and calcification as possible. He soaked the stem in Briarville’s Pipe Stem Deoxidizer and rinsed it off with warm water. I took photos of the pipe once I started to work on it. I took some photos of the rim top and stem. The rim top and bowl looked good. The cake and lava overflow were gone but the rim top and the inner edge showed some nicks and darkening. The closeup photos of the stem shows that it is a much cleaner and looks good. The light tooth marks and chatter were still present on both sides.I took a photo of the stamping on the left side of the shank to show the condition after the cleanup. It was very readable and undamaged. I took the stem off the shank and took a photo of the pipe to give a sense of the proportions of the pipe. I started my restoration work on this pipe by addressing the darkening around the inner edge of the bowl and rim top. I used a folded piece of 220 grit sandpaper to clean up the inner edge and the rim top. The finished rim top looked very good.I started my polishing regimen on the bowl. I used nine micromesh sanding pads and dry sanded the bowl with 1500-12000 grit pads. I wiped the bowl down with a damp cloth after each pad. The bowl really shines by the final three pads.I worked some Before & After Restoration Balm into the surface of the briar with my fingertips to clean, enliven and protect it. I let the balm sit for a little while and then buffed with a cotton cloth to raise the shine. The photos show the bowl at this point in the restoration process. I set the bowl aside and turned to the stem. I polished out the tooth chatter and marks on the stem with micromesh sanding pads – dry sanding with 1500-12000 grit sanding pads. I wiped them down after each sanding pad with a cloth containing some Obsidian Oil.I finished polishing it with Before & After Pipe Stem Polish – both Fine and Extra Fine and buffed it off with a cotton cloth. I gave it a coat of Obsidian Oil to preserve and protect the stem. I don’t know how many times I have said this but I love it when I come to the end of a restoration and all of the parts come together and the pipe looks better than when we started the cleanup process. I put the stem back on the Karl Erik Handmade in Denmark 11 Freehand Dublin and buffed the pipe with Blue Diamond on the buffing wheel. I carefully avoided the stamping on the shank sides during the process. I gave the bowl and stem multiple coats of carnauba wax on the buffing wheel and followed that by buffing it with a clean buffing pad on the buffer. I hand buffed the pipe with a microfiber cloth to deepen the shine. The finished pipe is a real stunning example of a Danish Karl Erik Handmade 11 Freehand. Once again, the grain and the way the shape follows the grain is amazing. Give the finish pipe a look in the photos below. I can only tell you that it is much prettier in person than the photos capture. The dimensions of the pipe are Length: 5 ¾ inches, Height: 2 inches, Outside diameter of the bowl: 1 ½ inches, Chamber diameter: 1 inch. The weight of the pipe is 1.38 ounces/40grams. Thanks for walking through the restoration with me as I worked over another beautiful pipe. I will be putting this one on the rebornpipes store in the Danish Pipemakers Section. Let me know if you are interested in adding it to your collection. Thanks for your time.
As always, I encourage your questions and comments as you read the blog. Thanks to each of you who are reading this blog. Remember we are not pipe owners; we are pipe men and women who hold our pipes in trust until they pass on into the trust of those who follow us.
Two of my daughters and I enjoy visiting our local Flea Market. They look for a lot of different things and I keep an eye out for pipes. Not long ago we were there and the girls found their things and I found these two Cherrywood Pipes – one is marked Royal Cherry [over] Made in France (top pipe in the photo below) and the other is marked Ropp in an oval [over] Deluxe [over] France [over] 804. Both are in good condition and both are without their stems. Here is what the pipes looked like when I brought them home.After finishing the Royal Cherry Cherrywood I turned my attention to the Ropp bowl. The octagonal bowl had strips of bark on four of the panels and smooth cherry stripped of the bark on the other four panels. The rim top and the heel of the bowl were stripped of bark and were smooth cherry wood. The shank is a cherry wood branch that has been threaded and screwed into the back side of the bowl. The bark on the shank is undamaged and looks good. The bowl and shank have been given a coat of varnish or shellac as it is smooth and shiny. The bowl has been smoked and there is a light cake in the bowl with some darkening and light lava on the bevelled inner edge of the bowl. The heel of the bowl is also smooth. It is stamped Ropp in an oval [over] De Luxe [over] France [over] 804. There was no stem that came with the pipe so one would need to be fit to the shank.I took a photo of the rim top to show the darkening and lava on the bevel and the light cake in the bowl. The shape of the bowl is well done and looks very good.I took a photo of the stamping on the heel of the bowl. It is clear and readable as noted above.I found a stem in my collection that would fit the shank but it would need to be bent to follow the flow of the shank and bowl. It was used and had some tooth marks in both sides of the stem ahead of the button.I reamed the bowl to take the cake back to bare walls. I used a Savinelli Fitsall Pipe Knife and scraped it clean. I sanded the walls of the bowl smooth with 220 grit sandpaper wrapped around a piece of dowel. The walls of the bowl were smooth and undamaged.I cleaned out the shank airway and mortise with alcohol, cotton swabs and pipe cleaners. I did the same with the airway in the new stem. The pipe was clean when I was finished.I cleaned up the bevelled rim top with a folded piece of 220 grit sandpaper to remove the light lava and the darkening. It came off very well and looked much better.I polished the smooth portions of the cherry with micromesh sanding pads – 1500-12000 grit pads. I dry sanded the wood and then wiped it down with a damp cloth. The polishing work progressively brought a shine to the pipe. It looked really amazing – the combination of bark and smooth portions of the cherrywood. It is a beauty! I rubbed the bowl down with Before & After Restoration Balm. I worked it into the finish with my fingertips. The product works to clean, preserve and protect the wood. I let it sit and absorb for 10 minutes. I buffed it off with a soft cloth and then gave it a rigorous buff to raise the shine. It looks good at this point.I set the bowl aside and turned to address the stem. I heated the stem with the flame of a Bic lighter to soften the vulcanite and bend it to match the curves of the bowl and shank. Once it was soft I bent it and it looks much better. I took photos of the stem surface to show the deep tooth marks on the surface of the stem. I painted the surface of the tooth marks with a lighter flame. I was able to lift them considerably. I filled in what remained with black CA glue. I set it aside to allow them to cure.Once the repair had cured I flattened out the repair with small file to blend it into the stem surface. I sanded it smooth with a folded piece of 220 grit sandpaper. I started the polishing on the stem with a piece of 600 grit sandpaper. I wiped it down with Obsidian Oil and set it aside. I polished the stem with 1500-12000 grit micromesh sanding pads – I dry sanded the chatter on the stem surfaces on both sides and the diameter of the saddle portion of the stem. I wiped it down with Obsidian Oil on a cloth after the sanding pads. Once finished it looked very good.I finished the hand polishing of the stem with Before & After Pipe Polish – both the Fine and Extra Fine polishes. I gave it a final coat of Obsidian oil and set it aside to dry. I am really happy with the way that this restemmed Ropp De Luxe 804 Cherrywood Pipe turned out. It is a nice looking pipe with a great shape and finished with bark on the bowl sides and shank and the rim top and heel of the bowl are smooth. The vulcanite saddle stem turned out very nice. The polished stem works well with the Cherrywood finish. The wood really came alive with the buffing. The bark finish gave the pipe a sense of depth with the polishing and waxing. I put the stem back on the bowl and carefully buffed the pipe with Blue Diamond on the buffing wheel using a light touch on the wood. I gave the bowl multiple coats of Conservator’s Wax and the stem multiple coats of carnauba wax on the buffing wheel. I buffed the pipe with a clean buffing pad to raise the shine. I hand buffed the pipe with a microfiber cloth to deepen the shine. The finished Ropp De Luxe 804 Bent Cherrywood really is a beauty and feels great in the hand and looks very good. Give the finished pipe a look in the photos below. The dimensions of the pipe are Length: 6 ½ inches, Height: 2 inches, Outside diameter of the bowl: 1 ¾ inches, Chamber diameter: ¾ of an inch. The weight of the pipe is 64 grams/ 2.26 ounces. I will be putting the pipe on the rebornpipes store in the French Pipemakers Section. If you would like to add it to your collection let me know. Thanks for reading this blog and my reflections on the pipe while I worked on it. It was a fun one to work on!
As always, I encourage your questions and comments as you read the blog. Thanks to each of you who are reading this blog. Remember we are not pipe owners; we are pipe men and women who hold our pipes in trust until they pass on into the trust of those who follow us.
Two of my daughters and I enjoy visiting our local Flea Market. They look for a lot of different things and I keep an eye out for pipes. Not long ago we were there and the girls found their things and I found these two Cherrywood Pipes – one is marked Royal Cherry [over] Made in France (top pipe in the photo below) and the other is marked Ropp in an oval [over] Deluxe [over] France [over] 804. Both are in good condition and both are without their stems. Here is what the pipes looked like when I brought them home.I decided to work on the Royal Cherry pipe first. The bowl was covered with uninterrupted bark and seemed to have a varnish coat as there is a shiny coat on the bowl, rim top and the heel. The shank is a branch that has been threaded and screwed into the back side of the bowl. The top end of the shank is slightly tapered behind a branch nodule. The shank is not varnished or shiny. The rim top was smooth and there is a pointed nose on the front of the bowl. It has a split in it on the top that has been filled with putty. The bowl is unsmoked but there is some darkening on front inner edge of the bowl. The heel of the bowl is also smooth. It is stamped Royal Cherry [over] Made in France. There was some sticky substance on the heel from a price sticker. I took a photo of the rim top to show the clean and unsmoked bowl. You can also see the putty fill in the rim top on the pointed nose of the bowl. It is solid and smooth to the touch.I took a photo of the stamping on the heel of the bowl. It is clear and readable under the sticky substance left behind by a price tag.I found a stem that would fit the shank but it would need to be bent to follow the flow of the shank and bowl. I also put a band in the photo but ended up not using it.I touched up the shank end on the shank with a Cherry stain pen so that the smooth portion would match the stain on the smooth rim top and heel of the bowl.I heated the stem with the flame of a Bic lighter to soften the vulcanite and bend it to match the curves of the bowl and shank. Once it was soft I bent it and it looks much better.I sanded the diameter of the saddle portion to match the diameter of the shank. I used a folded piece of 220 grit sandpaper to reduce it to match the shank. I started the polishing with 600 grit wet dry sandpaper.I polished the stem with 1500-12000 grit micromesh sanding pads – I dry sanded the chatter on the stem surfaces on both sides and the diameter of the saddle portion of the stem. I wiped it down with Obsidian Oil on a cloth after the sanding pads. Once finished it looked very good.I finished the hand polishing of the stem with Before & After Pipe Polish – both the Fine and Extra Fine polishes. I gave it a final coat of Obsidian oil and set it aside to dry. I am really happy with the way that this restemmed, unsmokedRoyal Cherry Bent Cherrywood Pipe turned out. It is a nice looking pipe with a great shape and finished with bark on the bowl sides and shank and the rim top and heel of the bowl are smooth. The vulcanite saddle stem turned out very nice. The polished stem works well with the Cherrywood finish. The wood really came alive with the buffing. The bark finish gave the pipe a sense of depth with the polishing and waxing. I put the stem back on the bowl and carefully buffed the pipe with Blue Diamond on the buffing wheel using a light touch on the wood. I gave the bowl multiple coats of Conservator’s Wax and the stem multiple coats of carnauba wax on the buffing wheel. I buffed the pipe with a clean buffing pad to raise the shine. I hand buffed the pipe with a microfiber cloth to deepen the shine. The finished Royal Cherry Bent Cherrywood really is a beauty and feels great in the hand and looks very good. Give the finished pipe a look in the photos below. The dimensions of the pipe are Length: 6 inches, Height: 2 inches, Outside diameter of the bowl: 1 ½ inches, Chamber diameter: ¾ of an inch. The weight of the pipe is 51 grams/ 1.80 ounces. I will be putting the pipe on the rebornpipes store in the French Pipemakers Section. If you would like to add it to your collection let me know. Thanks for reading this blog and my reflections on the pipe while I worked on it. It was a fun one to work on!
As always, I encourage your questions and comments as you read the blog. Thanks to each of you who are reading this blog. Remember we are not pipe owners; we are pipe men and women who hold our pipes in trust until they pass on into the trust of those who follow us.
I decided I needed a change of pace in my restoration/clean up work. I went through my pipes waiting in the queue and chose pone from a group of four pipes that were given to us by a woman in Columbus, Ohio, USA. It had belonged to her Grandfather who lived from 1882 to 1977. There were four pipes that she sent us from his estate – the metal bowled apple, a cased meerschaum with a broken shank and an amber stem, a Whitehall rusticated apple and a BBB Glokar Fraternity Pipe.Even though I generally pass on Whitehall pipes I decided to work on this one because it came with a great back story. The older pipe man who had used it obviously had enjoyed it beyond measure. Since he passed away in 1977 I knew that the pipe was much earlier than that. It was well smoked, reamed with a knife. And it had continued to be smoked even after the shank crack. I am guessing from the marks on the stem that the crack happened when he tried to remove the stem with a pair of pliers. The stamp on the left side of the shank read Whitehall 1B [over] Imported Briar. The pipe was dirty and well used. The finish had deep grime ground into the rustication around the bowl. The bowl had tobacco debris in it and a very thick cake overflowing as lava onto the rim top. The rim top looked to be in rough condition with damage from reaming and burns particularly on the back side of the edge and top. The stem was vulcanite and fit the cracked shank well. It had oxidation, calcification and deep gouges from pliers just behind the saddle. There were light tooth marks and chatter on both sides ahead of the button. Jeff took photos of the pipe before he started his cleanup work.Jeff took photos of the rim top and bowl to show the condition. You can see the thick cake int eh bowl and the lava coat on the top of the rim. The inner edge of the bowl is a mess and very out of round. It was obviously her grandfather’s favourite pipe even though some of his others were nicer. The vulcanite saddle stem was oxidized, calcified and had deep nicks at the saddle end from what appeared to be pliers. It too was going to take some work.Jeff took photos of the cracked shank to show the condition of the crack. He also took photos of the damage to the stem surface just behind the saddle on both sides where it looks like the stem was twisted with pliers.Jeff took photos of the sides and heel of the bowl to show the composition of the pipe. The combination of smooth and rustication is quite nice. There are Custom-bilt like channels from top to bottom of the bowl and horizontal rustication around the bowl between the channels. The rim top and top half of the bowl are smooth. The shank has horizontal rustication all around leaving a smooth panel on the left side for the stamping. It is quite nice looking.He took a photo of the stamping on the smooth panel on the left side of the shank. You can see that it is readable as noted above.I knew that there was a connection between Block Brothers Tobacco and Whitehall as I have had pipe coupons in boxes of Kentucky Club tobacco but I wanted to verify that and get the details. I turned to the listing on Pipedia for Whitehall and read it (https://pipedia.org/wiki/Whitehall). I quote from the site below.
Whitehall pipes are frequently misunderstood to be a model rather than an actual pipe company, which has led collectors to mistakenly ascribe their manufacture to Civic and Ben Wade (Who Made That Pipe; Wilczak & Colwell, 1997). In fact, Whitehall refers to the pipe company (not a model), which itself produced models such as the Hialeah, Jumbos, London Hall, and Thermofilter. The history of the Whitehall Pipe Co., Inc. (Richmond Hill, NY), is a complicated one, involving several parent companies and subsidiaries including Whitehall Products, Inc. (Helmetta, NJ), The Bloch Bros. Tobacco Co. (Wheeling, WV), Helme Products, Inc., apparently all subsidiaries of Culbro Corp. (owner also of General Cigar). The “Imported Briar” stamp on many of the pipes, and the unmistakable Whitehall logo bearing resemblance to the American-made tobaccos of that brand strongly suggest that these are products made for the Whitehall Pipe Co., Inc., an American company. There is furthermore no evidence that Civic or Ben Wade outsourced any manufactory of pipes to Italy; nor did Ben Wade manufacture pipes with aluminum screw tenons, paper filter inserts and molded acrylic stems. For irrefutable proof that the American company Whitehall Pipe Co., Ltd., was, in fact, responsible for these brands, one need only consult the University of California, San Francisco “Truth Tobacco Archives” which clearly links these brands to the company (see image below) [on the Pipedia site]…
When the pipe arrived in Vancouver it was very clean. The briar and stem were spotless. The vulcanite stem looked much better and you can see the gouges in the top and underside behind the saddle. The crack in the shank was also very clean and ready to repair. Jeff had reamed the bowl with a Pipenet Pipe Reamer and cleaned up the bowl walls with a Savinelli Fitsall Pipe Knife. He scrubbed the airway in the stem and shank with pipe cleaners, cotton swabs and alcohol. He scrubbed the exterior of the bowl and shank with Murphy’s Oil Soap (undiluted) and a tooth brush. He rinsed the exterior with warm running water and dried. He polished the briar and stem with a small drop of olive oil. The pipe really looked very good. It was going to be a fun one to work on for my part. I took photos of the pipe when I brought it to the table for my work. This is what I saw.I took photos of the bowl and the rim top to show the condition. It is clean and the damage is quite extensive. The bowl is very clean and there were nicks, burn damage and cuts all around the inner edge and top. The bowl was out of round due to the damage. The crack on the top left of the shank is also visible in the photo below. The vulcanite stem is clean and the damage visible at the blade where it joins the saddle portion. The button and stem surface ahead of the button is clean and undamaged. I took a photo of the left shank side to capture the stamping on the briar. It is faint but it is still readable. I took a photo of the bowl and shank separated to show the condition of the pipe. It really is a great looking pipe.I started my work on the pipe by addressing the cracked shank. I smoothed out the end of the shank so that the band would fit smoothly and not be hampered by the rustication. I used the Dremel and a sanding drum to get it prepared for the band. I heated the band and pressed it onto the shank end. It fit well and bound the crack tightly together. With the shank repair complete I turned to address the issues with the rim top and edge. I started by smoothing out some of the damage with a folded piece of 220 grit sandpaper. I topped the bowl on a topping board with 220 grit sandpaper to flatten on the damage on the rim top. I used a wooden ball and a piece of sandpaper to give the rim edge an inward bevel and smooth out the top. It looked much better!I filled in the damaged back inner edge of the bowl with clear CA glue and briar dust. The edge was damaged but it did not go deeply into the bowl. I sanded out the inside of the edge with a piece of 220 sandpaper wrapped around a dowel. I smoothed out the rim top with a folded piece of 220 grit sandpaper and bevelled the rim a bit more with the sandpaper. I stained the rim top with a Maple Stain Pen to match the smooth portions of the bowl. It was looking good. I polished the briar with micromesh sanding pads – 1500-12000 grit pads. I dry sanded the briar and then progressively brought a shine to the pipe. It looked really amazing – the combination of rustic and smooth portions of the briar. It is a beauty! I rubbed the bowl down with Before & After Restoration Balm. I worked it into the finish with my fingertips and a shoe brush. The product works to clean, preserve and protect the briar. I let it sit and absorb for 10 minutes. I buffed it off with a soft cloth and then gave it a rigorous buff to raise the shine. It looks good at this point.I filled in the gouges in the stem surface on both sides by the saddle with black CA rubberized glue. Once it cured I sanded it smooth with 220 grit sandpaper and started polishing it with 600 grit wet dry sandpaper.I polished out the scratches left behind by the sandpaper on the stem surface with micromesh sanding pads – dry sanding with 1500-12000 grit sanding pads. I wiped it down with Obsidian Oil on a cloth after the sanding pads.I finished the hand polishing of the stem with Before & After Pipe Polish – both the Fine and Extra Fine polishes. I gave it a final coat of Obsidian oil and set it aside to dry. I am really happy with the way that this Whitehall Rusticated Imported Briar 1B Apple turned out. It really is a beautiful looking pipe with a great shape and smooth finished on the upper half of the bowl and rusticated on the lower portion of the bowl and shank. The vulcanite saddle stem turned out very nice. The polished stem works well with the briar both the smooth and rusticated finish. The briar really came alive with the buffing. The rich brown stains of the finish gave the pipe a sense of depth with the polishing and waxing. I put the stem back on the bowl and carefully buffed the pipe with Blue Diamond on the buffing wheel using a light touch on the briar. I gave the bowl multiple coats of Conservator’s Wax and the stem multiple coats of carnauba wax on the buffing wheel. I buffed the pipe with a clean buffing pad to raise the shine. I hand buffed the pipe with a microfiber cloth to deepen the shine. The finished Whitehall Rusticated Saddle Stem Apple really is a beauty and feels great in the hand and looks very good. Give the finished pipe a look in the photos below. The dimensions of the pipe are Length: 5 inches, Height: 1 ½ inches, Outside diameter of the bowl: 1 ¼ inches, Chamber diameter: ¾ of an inch. The weight of the pipe is 27 grams/ .95 ounces. I will be putting the pipe on the rebornpipes store in the American Pipemakers Section. If you would like to add it to your collection let me know. Thanks for reading this blog and my reflections on the pipe while I worked on it. It was a fun one to work on!
As always, I encourage your questions and comments as you read the blog. Thanks to each of you who are reading this blog. Remember we are not pipe owners; we are pipe men and women who hold our pipes in trust until they pass on into the trust of those who follow us.
Jeff and I have been picking up Malaga pipes for a very long time. It does not seem that long ago that we picked them up for $4 – $5USD each. We purchased an estate of more than 30+ Malaga pipes. It was not long before the brand had our attention. The pipes are very well made and all are oil cured with a “secret” recipe and process.
The next pipe on the table is a “Malaga” pipe that is made in a shape that I would define as a Twisted Bent Egg. We picked it up from a seller on eBay in Bristol, Indiana, USA. It has some great cross and birdseye grain and a tapered vulcanite bent stem. The grain around the bowl and shank combined with the stem make it a stunning pipe. The carver did a great job of uniquely shaping the pipe to follow the grain on the briar. The twists and turns in the bowl are well done and almost seem to be carved for fingers to fit against the bowl either left or right handed. The bowl had a thick cake that overflowed with lava onto the rim and there were scratches and nicks on the top and edges under the grime. The sides of the bowl and shank are very dirty with grime and oils from prolonged use. The stamping on the left side of the shank read “MALAGA” in quotations. On the right side it is stamped in script and reads CUSTOM CARVED. The vulcanite stem had light tooth dents and chatter on the top and the underside of the stem. The button was worn on both sides. Jeff took these photos before he started the cleanup work on the pipe.Jeff took a closeup photo of the bowl and rim to capture the condition of the pipe before he started his cleanup work. The rim top had some lava overflow and darkening on the back of the bowl. There are nicks around the inner outer edges of the bowl and rim top. The stem is oxidized and dirty and there is tooth marks (dents) and chatter on the button edges and surfaces ahead of the button. The shank was too dirty for the stem to fit snugly and it looks like it is poorly fit. I will know more once I have it in hand.He also took photos of the sides and bottom of the bowl and shank to show the beautiful grain around the bowl. The photos show the general condition of the bowl and wear on the finish. It is very dirty but this is another beautiful pipe.Jeff took a photo to capture the stamping on the shank. The photos show the stamping “MALAGA” on the left side of the shank and CUSTOM CARVED on the right side. The stamping is very readable.I am including the link to a blog that I wrote that gives some of the history of the Malaga brand and the Malaga Pipe Shop in Royal Oak, Michigan in the USA. I have written an earlier blog to give a little history of the Malaga Brand and the pipemaker, George Khoubesser. Here is the link – (https://rebornpipes.com/2013/02/09/george-khoubesser-and-malaga-pipes/). That blog also includes a catalogue and the history of the pipemaker George Khoubesser. Follow the link to get a feel for the brand and the pipemaker.
Jeff reamed the bowl with a PipNet pipe reamer and followed up with a Savinelli Fitsall pipe knife to remove the cake. He scrubbed out the mortise and the airway in the shank and the stem with alcohol, cotton swabs and pipe cleaners. He scrubbed the exterior of the bowl, rim, shank and stem with a tooth brush and Murphy’s Oil Soap to remove the oils and tars on the rim and the grime on the finish of the bowl. He rinsed it under running water. He dried it off with a soft cloth. He was able to remove the lava build up on the rim top and the flat surface of the rim looked very good. The inner edge of the rim has some serious burn damage on the front inner edge. The outer edge looked very good. He soaked the stem in Before & After Deoxidizer and rinsed it with hot water. I took photos of the pipe to show its condition before I started my work on it. Note that I will need to bend the stem slightly to fit the bend of the shank. I took close up photos of the bowl and rim top as well as the stem. You can see the condition of the rim top and bowl in the first photo. Jeff was able to remove all of the tar and oils but you can now see the on the rim top and edges. The vulcanite stem had tooth chatter on both sides near and on the button surface.I took a photo of the stamping on the shank to show how good the condition is. It shows the “MALAGA” stamp on the left side and CUSTOM CARVED on the right side. The stamping is very legible. I took a photo of the pipe with the stem removed to give a clear picture of the character of the pipe.I started my work on the pipe by addressing the darkening on the inner edge of the bowl and the scratching and nicks on the rim top. It looked much better than when I started.I polished the rim top and the briar with micromesh sanding pads. I wet sanded the bowl with 1500-2400 grit sanding pads to prepare the rim top for staining. I wiped the bowl down after each pad with a damp cloth to remove the sanding dust.I worked some Before & After Restoration Balm into the surface of the briar with my fingertips to clean, enliven and protect it. I let the balm sit for a little while and then buffed with a cotton cloth to raise the shine. The following photos show the bowl at this point in the restoration process. I am very happy with the results. I turned to the stem to address the issues on the surface of both sides at the button. I painted the surface of the stem with the flame of a lighter to lift the tooth marks from the surface. I was able to lift them to some degree but they would need to be repaired. I also heated the stem with the flame to soften the vulcanite and bend the stem to match the angles on the bowl.I filled in the tooth marks in the top and underside of the stem with black rubberized CA glue. I set it aside to cure. Once it cured I use a small file to flatten the repairs and blend them into the stem surface. I sanded the stem surface with 220 grit sandpaper to flatten the repairs and blend them into the surface. I started the polishing with 600 grit wet dry sandpaper. I also cleaned up the tenon for a better fit to the shank.I polished the stem with micromesh sanding pads – wet sanding with 1500-2400 grit pads and dry sanding with 3200-12000 grit pads. I wiped the stem down after each pad with Obsidian Oil. I finished the hand polishing of the stem with Before & After Pipe Polish – both the Fine and Extra Fine polishes. I gave it a final coat of Obsidian oil and set it aside to dry.This Malaga Custom Carved Twisted Fluted/twisted Bent Egg with a vulcanite tapered stem turned out to be a real beauty. It has great grain around the bowl and the carver really maximized that with the shape of the pipe. Everything about the pipe – the shape of the bowl, the thin flat rim top and the cut of the briar work well to highlight the grain around the bowl sides. I polished stem and the bowl with Blue Diamond polish on the buffing wheel and the grain just popped and came alive. I gave the bowl and the stem multiple coats of carnauba wax. I buffed the pipe with a clean buffing pad to raise the shine. I hand buffed it with a microfiber cloth to deepen the shine. The pipe polished up pretty nicely. The grain took on life with the buffing. The rich oil cured colour works well with the polished vulcanite stem. The finished Malaga Custom Carved Fluted Bent Egg has a rich look that is quite catching. Have a look at it with the photos below. The shape, finish and flow of the pipe and stem are very well done. The dimensions are Length: 6 inches, Height: 2 inches, Outside diameter of the bowl: 1 ¼ inches, Chamber diameter: ¾ of an inch. I will be adding the pipe to the rebornpipes store in the American Pipemakers Section shortly. If you are interested in adding this pipe to your rack send me an email or message on Facebook. Thanks for walking through the restoration with me as I worked over another estate pipe.
As always, I encourage your questions and comments as you read the blog. Thanks to each of you who are reading this blog. Remember we are not pipe owners; we are pipe men and women who hold our pipes in trust until they pass on into the trust of those who follow us.
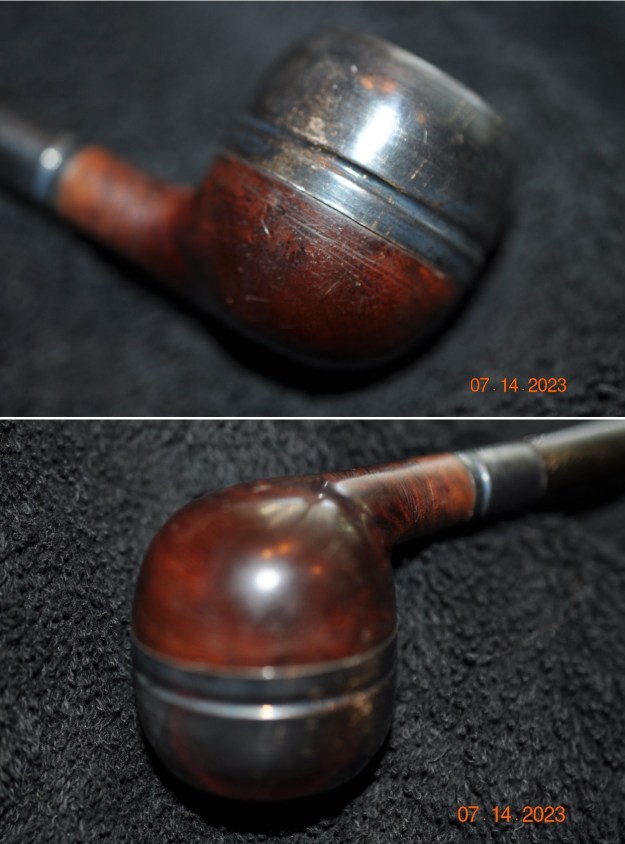
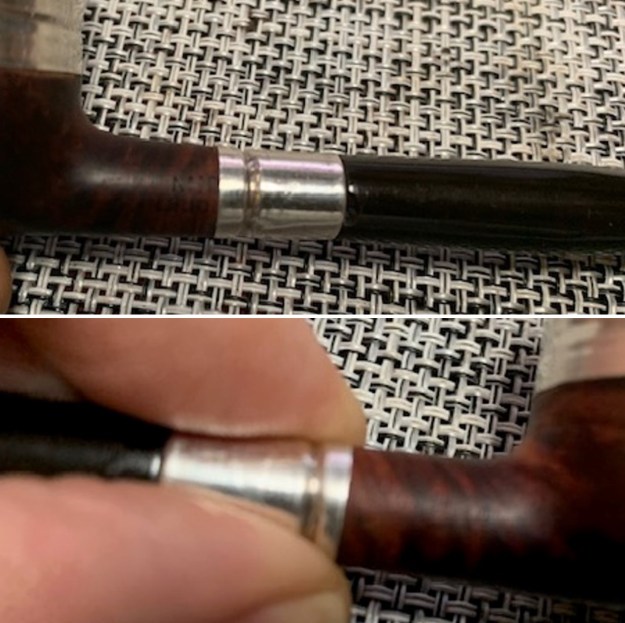
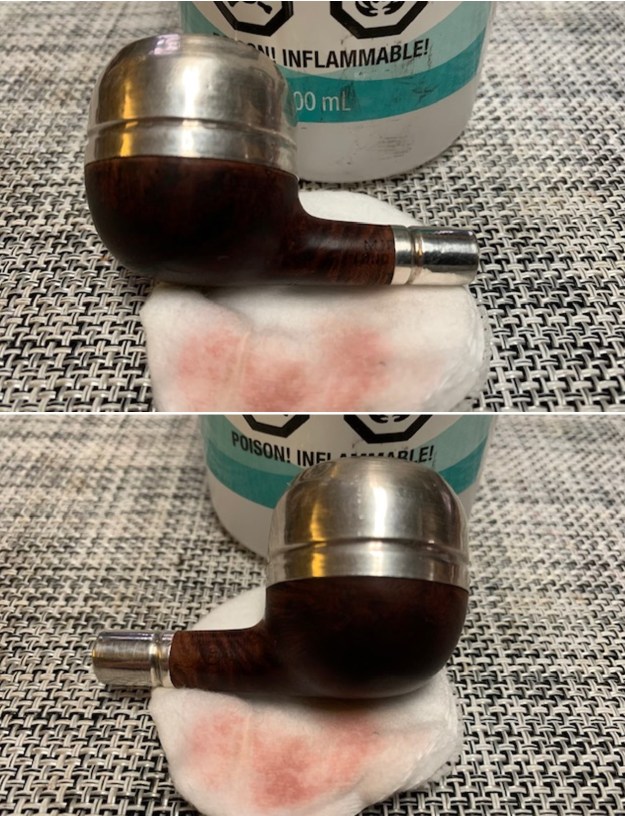
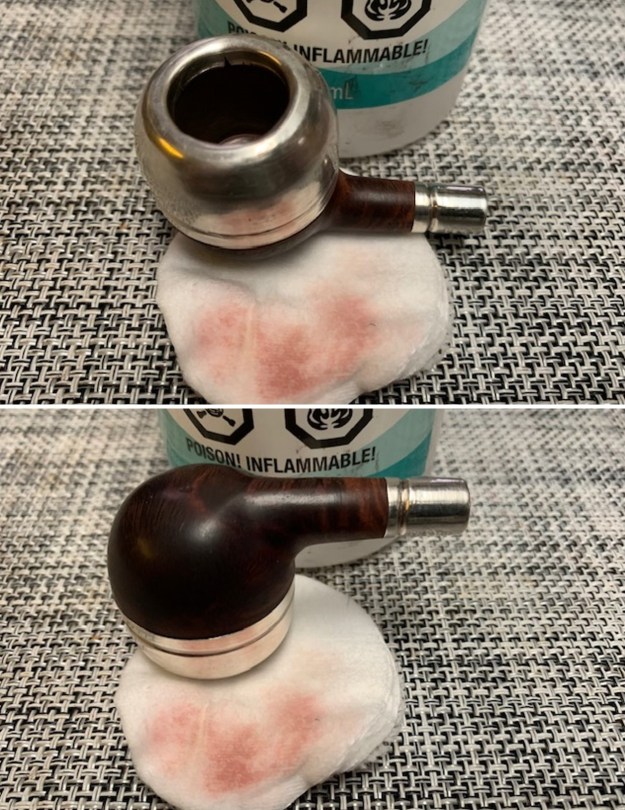
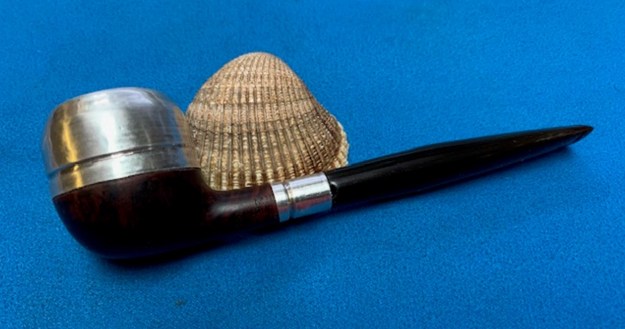
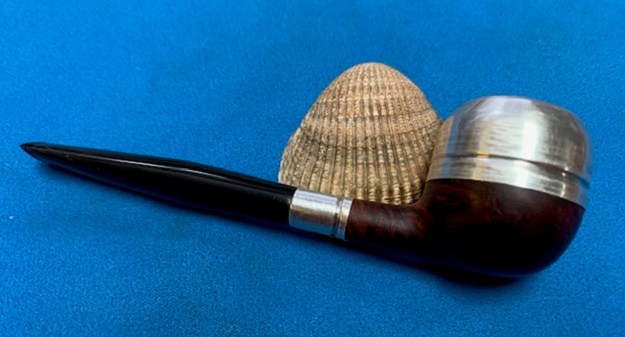
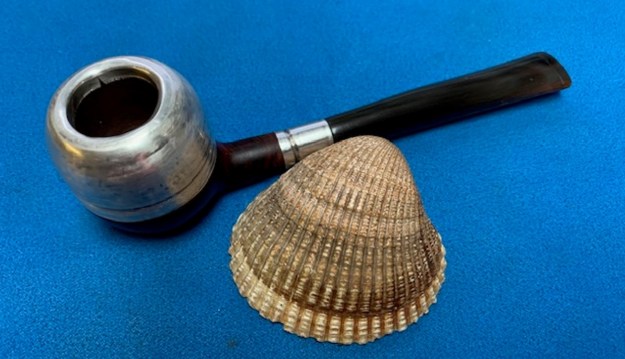
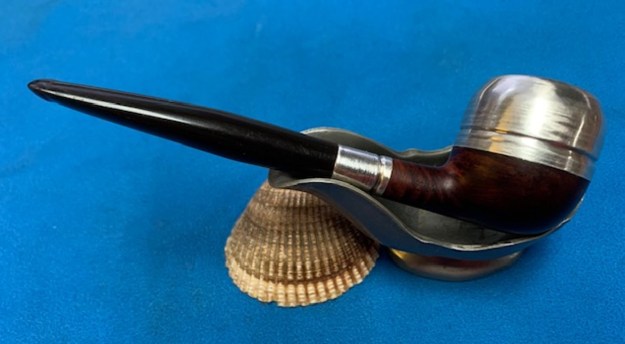
I decided I needed a change of pace in my restoration/clean up work. I went through my pipes waiting in the queue and chose pone from a group of four pipes that were given to us by a woman in Columbus, Ohio, USA. It had belonged to her Grandfather who lived from 1882 to 1977. There were four pipes that she sent us from his estate – the metal bowled apple, a cased meerschaum with a broken shank and an amber stem, a Whitehall rusticated apple and a BBB Glokar Fraternity Pipe.I chose the metal cap one because it seemed to call out to me with a voice of mystery. It is a very unique pipe with a briar base and silver rim cap. There seems to be a metal bowl insert under the inside lip of the cap. The bowl has five holes in the bottom of the bowl. The pipe has a silver ferrule on the shank end. It covers some of the stamping on the shank but what remains is readable. The partial stamp on the left side of the shank read… MID [over] LOND….The rest is covered by the ferrule. The stamp on the right side read BK4. The pipe was dirty and well used. The finish on the bowl was spotty showing damage to the varnish coat. The bowl had tobacco debris in it but little cake. The silver cap and ferrule were very tarnished. The stem was dark horn and there were some nicks in the edge where it sat against the ferrule. There was no button on the stem but was tapered down to a orific opening in the end of the stem. Jeff took photos of the pipe before he started his cleanup work.Jeff took photos of the rim top and bowl to show the condition. You can see the tarnish on the silver and some scratching in the rim top. The bowl is almost copper coloured but it is not entirely clear at this point. The horn stem is quite clean and polished. There were scratches on the button end of the stem and some nicks on the shank end.Jeff took photos of the sides and heel of the bowl to show the composition of the pipe. You can see the damage to the varnish and the tarnish on the silver rim cap. He took photos of the stamping on the shank sides. You can see what is readable and what has been cut off by the placement of the ferrule on both sides. It is clear and reads as noted above.He took a photo of the chip out the end of the tenon end of the stem where it is inserted into the silver ferrule.When the pipe arrived in Vancouver it was very clean. The briar, the metal bowl insert and the rim cap/top and silver ferrule were spotless and shiny. The silver shone in both places. The horn stem looked very good. There was a small chipped area where it fit in the ferrule but otherwise it was clean and tooth marks and chatter were absent. He had cleaned out the bowl, base and the airway in the stem and shank with pipe cleaners, cotton swabs and alcohol. He scrubbed the exterior of the bowl and shank with Murphy’s Oil Soap (undiluted) and a tooth brush. He rinsed the exterior with warm running water and dried. He polished the silver, bowl and stem with a small drop of olive oil. The pipe really looked very good. It was going to be a fun one to work on for my part. I took photos of the pipe when I brought it to the table for my work.I took photos of the bowl and the polished metal insert and cap. It is clean and it is beautiful silver work. The bowl is very clean and there are small dents and nicks in the surface of the rim cap and bowl sides. The horn stem is in great condition. It is fascinating to me that there were no button edges but the stem just ran flush to the end. There were no tooth marks or chatter on the stem surface on either side. I tried to take photos of the shank sides to capture the stamping on the briar. It is faint but it is still readable. I took a photo of the bowl and shank separated to show the condition of the pipe. It really is a great looking pipe.I started my work on the pipe by wiping down the briar with alcohol and a cotton pad. I was able to remove the spotty remnants of the finish from the bowl. I was able to remove all of the remnants of the varnish and it really looked much better without it. The grain shown through really nicely. With the polished silver the briar looks really good!I polished the briar with micromesh sanding pads – 1500-12000 grit pads. I dry sanded the briar and then progressively brought a shine to the pipe. It looked really amazing – the combination of the silver and reddish briar. It is a beauty! I rubbed the bowl down with Before & After Restoration Balm. I worked it into the finish with my fingertips. The product works to clean, preserve and protect the briar. I let it sit and absorb for 10 minutes. I buffed it off with a soft cloth and then gave it a rigorous buff to raise the shine. It looks good at this point.I set the bowl aside and turned my attention to the stem. I decided to give the stem a thinner profile and give it a button. I used needle files to shape the stem surface and give it a thin button. I like the new look for the stem.I sanded the filed areas and the area at the top of the stem near the tenon. I sanded it smooth with 220 grit sandpaper. I started the polishing of the stem by sanding it with 600 grit wet dry sandpaper. It is starting to look much better.I polished out the chatter and marks on the stem surface with micromesh sanding pads – dry sanding with 1500-12000 grit sanding pads. I wiped it down with Obsidian Oil on a cloth after the sanding pads.I finished the hand polishing of the stem with Before & After Pipe Polish – both the Fine and Extra Fine polishes. I gave it a final coat of Obsidian oil and set it aside to dry.I am really happy with the way that this Mystery Metal Insert Bowl with a Silver Cap and Ferrule and a Horn stem turned out. It really is a beautiful looking pipe with a great shape and smooth finished on the lower half of the bowl and silver rim cap. The original horn taper stem is really nice. The polished dark horn stem works well with the briar and the silver cap and ferrule. The briar really came alive with the buffing. The rich brown stains of the finish gave the pipe a sense of depth with the polishing and waxing. I put the stem back on the bowl and carefully buffed the pipe with Blue Diamond on the buffing wheel using a light touch on the briar. I gave the bowl and the stem multiple coats of carnauba wax on the buffing wheel. I buffed the pipe with a clean buffing pad to raise the shine. I hand buffed the pipe with a microfiber cloth to deepen the shine. The finished Silver Capped Mid…London BK4 Apple really is a beauty and feels great in the hand and looks very good. Give the finished pipe a look in the photos below. The dimensions of the pipe are Length: 5 inches, Height: 1 ½ inches, Outside diameter of the bowl: 1 ¼ inches, Chamber diameter: ¾ of an inch. The weight of the pipe is 31 grams/ 1.09 ounces. The pipe will be staying with me and joining my collection of older pipes. The horn stem, silver ferrule and rim cap look great with older dark briar. Thanks for reading this blog and my reflections on the pipe while I worked on it. It was a fun one to work on!
As always, I encourage your questions and comments as you read the blog. Thanks to each of you who are reading this blog. Remember we are not pipe owners; we are pipe men and women who hold our pipes in trust until they pass on into the trust of those who follow us.
Earlier in July I received an email from Peter, a fellow in California regarding a pipe repair he needed. He wrote as follows.
Hi, I’m just wondering if you can repair a Stanwell pipe for me? The stem broke off inside the pipe. Thanks for your time, Peter.
I wrote him back asking for photos so I could have a look at it. I figured he meant that the tenon snapped off inside the shank but I wanted to be certain. He replied
Thanks so much for your very fast response. Pictures are below. Best wishes, PeterWe chatted back and forth a bit and Peter decided to send the pipe to me. I received it yesterday and here is what I saw once I unwrapped it. The photos tell the story but here is my review of it. The finish was dirty and worn. The bowl had a thick cake and there was lava buildup flowing along the inner edge and into the plateau on the rim top. The stem was snapped off leaving the tenon in the shank. Fortunately, there was no damage to the shank itself. It did not have any cracks in the sides. The shank end showed a lot of tar buildup. The tenon was still in the shank. The snap at the stem was fairly clean and would just need to be flattened. The stem itself showed a lot of oxidation, calcification and light tooth marks and chatter on both sides ahead of the button. The pipe was stamped on the left side and read Stanwell [over] de Luxe. I could not see any other stamping on the shank. There was a gold crown S on the left side of the saddle stem. This was going to be fun to bring back to life.I decided to begin working on the pipe by trying to pull the broken tenon with my usual methods. I put the bowl in the freezer for 30 minutes, then inserted a screw into the airway in the shank. I wiggled the screw and tried to break it free. It was no use. I used a qtip to dribble alcohol around the edges of the broken tenon in the shank. I repeated that several times and let it sit. I was still unable to remove the broken tenon in the shank. It was stuck and nothing seemed to loosen it. With the tenon being stuck in the shank I stepped up the process and drilled it out. I started with a drill bit slightly larger than the airway. I have had good success in drilling and in the process having the tenon come out on the drill bit. In this case I worked through four drill bits until I used one that was slightly small than the mortise. I then scraped out the remainder of the bits of vulcanite in the shank with a small pen knife until the walls were clear. I took a photo of the pipe at this point in the process – the tenon drilled out, a replacement tenon and the stem. Now it is ready for the next part of my work.I set the stem and tenon aside so that I could work on the bowl and shank. I reamed the bowl with a PipNet pipe reamer. I took the cake back to bare walls so I could check out the walls for damage or checking. It looked very good. I scraped out the remnants of the cake with a Savinelli Fitsall Pipe Knife and then sanded it with a piece of 220 grit sandpaper wrapped around a piece of dowel to smooth out the walls of the bowl.I worked on the buildup in the plateau surface of the rim top with a brass bristle wire brush. I was able to remove the heaviest part of the lava in the grooves of the plateau surface. It looked better but would need to be scrubbed. I scrubbed the exterior of the bowl with a tooth brush and undiluted Murphy’s Oil Soap. I scoured the surface of the briar and rinsed and repeated the process until the bowl was clean and the rim top looking very good.I cleaned up the darkening on the smooth bevelled portion of the inner rim edge next. I used a folded piece of 220 grit sandpaper to remove the damage and also smooth it out. I touched up the deep grooves in the plateau with a black Sharpie pen. The rim top and edge look very good.I polished the smooth rim top portions and the exterior of the pipe with micromesh sanding pads – dry sanding with 1500-12000 grit sanding pads. I wiped the bowl down after each sanding pad with a damp cloth to remove the sanding dust and debris. By the last pad it was looking very good with a shine in the briar that highlights the grain. I cleaned out the shank and mortise with alcohol, cotton swabs and pipe cleaners. I wanted to remove the oils and tars so that I would have a clean surface for the new tenon that I was fitting in the shank. It cleaned up and certainly smelled better once cleaned.I worked some Before & After Restoration Balm into the surface of the briar with my fingertips and a horsehair shoe brush to get into the plateau top. The product works to clean, preserve and protect the briar. I let it sit and work into the briar for 10 minutes then wiped it off with a cotton cloth. I buffed the briar with a clean cloth. The bowl is starting to look beautiful and there is a shine developing.At this point the bowl was finished until I finished with the new tenon insertion. I set the bowl aside and took a photo of the new tenon and the tools for reducing the diameter to fit in the shank. I used the Dremel and a sanding drum to reduce the diameter. I cleaned up the work with a file and then 220 grit sandpaper to get it to a point where the tenon fit in the shank.I put the stem in a bath of Briarville’s Pipe Stem Deoxidizer and set it aside while I worked on the tenon fit. I left it in the bath for three hours and then removed it and rubbed off the bath with a paper towel. The surface of the stem looked significantly better at this point. The oxidation was greatly reduced, the calcification was gone and the stem showed improvement. The tooth marks would still need to be worked on but there was progress.I cleaned out the airway in the stem with pipe cleaners and alcohol the drilled the airway to match the diameter of the new tenon insertion. I started with a drill bit the same size as the airway and gradually increased the bit size until it matched the outside diameter of the tenon. I took a photo of the newly drilled end of the stem. I cleaned up the airway once again in preparation for gluing the new tenon in place. I wiped the tenon end down with black CA glue and then aligned the tenon and the mortise. I pressed the tenon in place in the stem and set it aside to cure. Once it cured I took a photo of the stem and new tenon with the bowl before putting them back together.Once the glue cured I fit the stem in the shank. As seems to be very usual when I do this kind of thing the fit against the shank was not perfect. I would need to shape the stem and shank to make the fit and flow perfect. I took photos of the pipe at this point. The fit is not far off but just enough to be noticeable in the photos on the top and underside and slightly on the right and left sides.I sanded the shank and the stem to match and make the transition smooth all the way around the junction. I used 220 grit sandpaper and sanded it in place on the shank. I had to remove briar and vulcanite on the sides of the shank according to the transition. When finished it looked much better.I polished the sanded areas with micromesh sanding pads to make them smooth. I used an Oak stain pen to touch up the sanded areas and blend them into the rest of the bowl and shank. It blends in very well.I rubbed it down once again with Before & After Restoration Balm. I worked it into the surface of the briar and let it sit for 10 minutes then buffed it off with a soft cloth. I polished the bowl with a cotton cloth and set it aside.I set the bowl aside and turned my attention to finishing the work on the stem. I “painted” the stem surface with the flame of a lighter to lift the tooth marks. I was able to lift them significantly. I filled in what remained with black CA glue. Once the repair cured I used files to smooth out the surface of the repair. I sanded it with 220 grit sandpaper to blend them into the surface of the stem. I started the polishing of the stem with 600 grit wet dry sandpaper.I polished the stem with micromesh sanding pads – dry sanding with 1500-12000 grit pads. I wiped the stem down after each sanding pad with Obsidian Oil.I finished polishing the stem with Before & After Pipe Stem Polish – Fine and Extra Fine. I rubbed it into the surface of the stem and buffed it off with a cloth and buffed it to a shine. I am really happy with the way that this Stanwell Danish Made de Luxe Freehand turned out. It really is a beautiful looking pipe with a great shape and smooth finished bowl and plateau on the rim top. The original vulcanite saddle stem is cleaned up nicely. The polished black of the stem works well with the briar and the plateau portions. The briar really came alive with the buffing. The rich brown stains of the finish gave the pipe a sense of depth with the polishing and waxing. I put the stem back on the bowl and carefully buffed the pipe with Blue Diamond on the buffing wheel using a light touch on the briar. I gave the bowl and the stem multiple coats of carnauba wax on the buffing wheel. I buffed the pipe with a clean buffing pad to raise the shine. I hand buffed the pipe with a microfiber cloth to deepen the shine. The finished Stanwell de Luxe really is a beauty and feels great in the hand and looks very good. Give the finished pipe a look in the photos below. The dimensions of the pipe are Length: 6 inches, Height: 2 ¼ inches, Outside diameter of the bowl: 1 ¾ inches, Chamber diameter: ¾ of an inch. The weight of the pipe is 56 grams/1.98 oz. The pipe will be going back to Peter very soon. I look forward to hearing what he thinks about it. Thanks for reading this blog and my reflections on the pipe while I worked on it. It was a fun one to work on!
As always, I encourage your questions and comments as you read the blog. Thanks to each of you who are reading this blog. Remember we are not pipe owners; we are pipe men and women who hold our pipes in trust until they pass on into the trust of those who follow us.
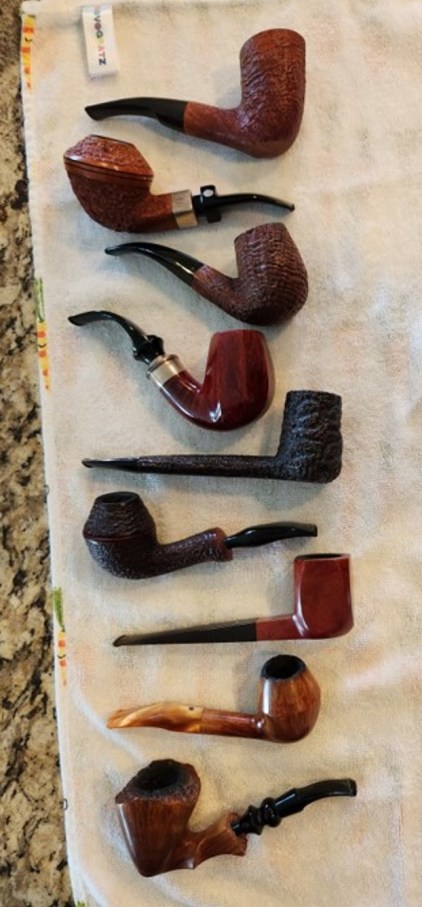
A few weeks ago I was contacted from a fellow in Montana who was selling his pipes as they had not been used for quite a few years. I asked him for a picture and he sent me the one to the left. It included the following brands (from the top to the bottom of the photo): Savinelli Autograph 5 Freehand, Mastro de Paja Ciocco 0C Bulldog, Mastro de Paja Media 1B Bent Billiard, Ser Jacopo Delecta Octagonal Bent Billiard, Caminetto Business KS 118 Canadian, Radici Rind Rhodesian, Dunhill Bruyere ODA 836 Panel Billiard, Barontini Straight Grain B3 Freehand and a Ben Wade Martinique Hand Made in Denmark Freehand.
Almost all of them were higher end pipes and all were hand made pipes. They were a mix of finishes – smooth, sandblast and also rusticated. They were a mix of shapes as well and the majority of them were Italian Made other than the Dunhill and the Ben Wade Martinique. They were beautiful pipes and after exchanging quite a few photos of the pipes from various angles to get a sense of what was there we struck a deal. We sent him the payment and the pipes arrived in Idaho a few days after I left for Vancouver.
Jeff cleaned them all and this week I received them in Vancouver. I am impressed with the way they cleaned up and the beauty of the brands. They truly are some beautiful pipes. I just need to put the final touches on each of them and address minor issues on the bowl rims and the stems and they should be good to go. I am really looking forward to working on each of them in the days ahead.
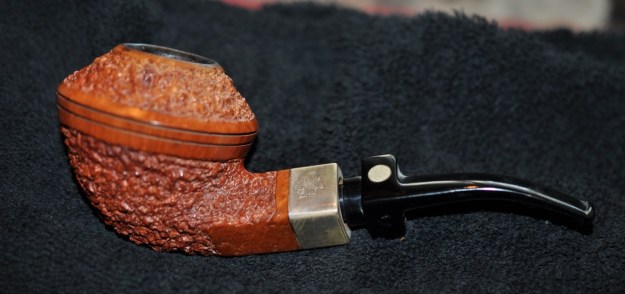
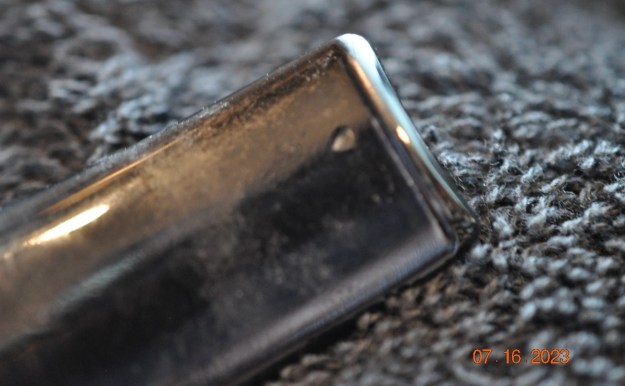
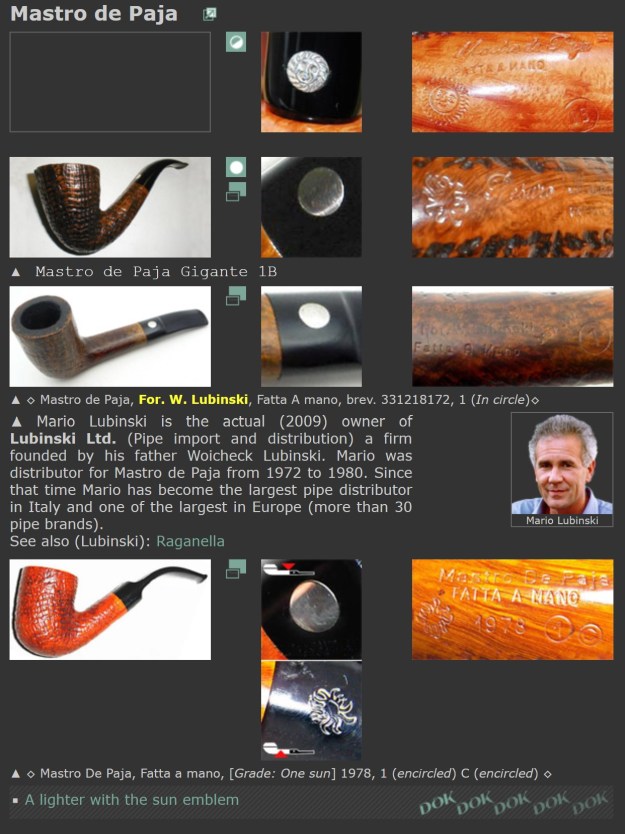
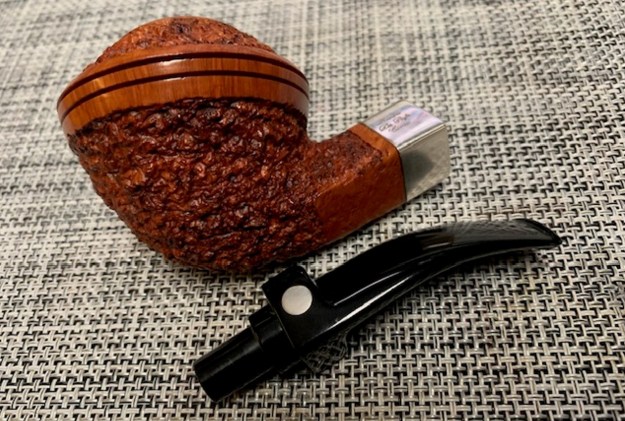
This evening after work I decided to continue working on the lot. I chose to work on the rusticated Mastro de Paja Pesaro Ciocco Gigante 0C Large Bulldog. It has a classic Large Bent Bulldog shape with an Italian twist. The rustication is extremely rugged and tactile. The crowned rim top, the briar around the twin rings on the cap are smooth. There is also a smooth band around the shank end just ahead of a silver ferrule. The pipe is stamped on a smooth panel on the left underside of the diamond shank. It has a sun logo that is followed by Mastro de Paja [over] Fatta A Mano (made by hand). Under that it is Persaro [over] Ciocco. Next that just in front of the ferrule is stamped with a 0C in a circle [over] Gigante. The silver ferrule is stamped on the top left side and reads Mastro [over] De Paja [over] Ciocco. There is a Mastro de Paja metal circular disc logo is on top left side of the stem and on the left underside it is stamped with the sun logo. The stamping is clear and readable. The finish was very dirty with grime ground into the grooves of the rustication. The bowl had a thick cake and the crowned rim top/inner edge had a thick coat of lava flowing up from the bowl. The inner edge of the bowl was covered with a thick cake so it was hard to know its condition with certainty. The stem is black acrylic fancy saddle stem and was dirty with tooth marks and chatter on both sides ahead of the button. Jeff took photos of the pipe before he started his clean up work on it.Jeff took photos of the bowl and rim top to show what they looked like before the clean up. You can see the thick cake in the bowl overflowing on the inner edge/crowned rim top. He also took some photos of the stem to show the condition of both sides. You can see the tooth marks and chatter on the top and underside next to the button.The photos of the sides and heel of the bowl show the deep rusticated finish around the bowl and shank. The stain adds depth finish on the pipe. Even under the grime it is a real beauty.The stamping on the underside of the shank and on the silver ferrule is shown in the photos below. It is clear and readable as noted above. There is also a stamping reading Italia on the lower right side on the smooth band on the shank end ahead of the silver. Before moving on to the clean up I wanted to build my knowledge of background on the brand. I have looked at them quite often and perhaps worked on a few in past years but I have no memory of the brand. I turned first to Pipephil’s site (http://www.pipephil.eu/logos/en/logo-m3.html). I have included a screen capture of the information on the site as well as some side bars notes below the photo. The last pipe pictured shows the circle 1B stamp as well as the one Sun logo which is noted as the grading stamp. That was information it did not have before.Brand founded in 1972 by Giancarlo Guidi. He left it for Ser Jacopo in 1982. Alberto Montini became the owner of the brand in 1995. Production (2010): ~ 5000 pipes/year. Seconds: Calibano, Montini,
Mastro de Paja are formed by the expert and highly capable hands of craftsmen – famous pipes with the unmistakable sun brand, known and appreciated by connoisseurs throughout the world. Unique and inimitable because they are unrepeatable encounter of precious Mediterranean briars, with the sensitivity of the craftsman who, using art and inspiration, models them individually. And, in the modelling process, brings to light the most concealed and valuable qualities of the briar. Varied designs, original lines and a deriberately (sic) limited productions make Mastro de Paja pipes objects destined for the most demanding and refined collectionists. Beautiful and loved, they are also excellent pipes because they are worked with care by those who know them: a successful synthesis of formal beauty and functionality. Rigorous controls and selections give Mastro de Paja pipes, right from the first smoke, that rounded taste which is then maintained intact for the whole of its long and extraordinary life.
The site also had a video entitled “How to make a Smoking Pipe by Hand – Mastro de Paja”. I have included the youtube link as well as the code for embedding.
I turned to Pipedia for more information on the brand (https://pipedia.org/wiki/Mastro_de_Paja). The site is full of information on the brand and the philosophy behind the carving of the hand made pipes. I am including the information on the site listed as the Elite Collection that listed the stamping information. I have highlighted pertinent information on this particular pipe in red in the list below.
Mastro de Paja “ELITE COLLECTION”
It is the production of pipes made entirely by hand, even they are unique but of regular production.
On all “Mastro de Paja” pipes you can see fire stamped all the information for tracing the value of each creation.
RUSTICATED
0B: Completely rusticated
0B Unica: Completely rusticated with some smooth sections
SANDBLASTED
1B: Dark brown or black sandblasted
1B + 1 Sun: Light brown sandblasted
PARTIALLY RUSTICATED
2D: Smooth with small sections rusticated
2D + 1 Sun: Smooth straight grain with small sections rusticated
SMOOTH WITH COLORED FINISH
Ruber: Smooth with red stain
Castanea: Smooth with brown stain
3A: Smooth with brown-orange stain
3A + 1 Sun: Smooth good grain with brown-orange stain
3A + 2 Sun: Smooth straight grain with brown-orange stain
SMOOTH WITH NATURAL FINISH
3B: Smooth with a good grain and a natural finish
3B + 1 Sun: Smooth excellent grain with natural finish
3B + 2 Sun: Perfect grain
3C: Good grain
3C + 1 Sun: Excellent grain
3C + 2 Sun: Perfect grain
F: Straight grain
F + 1 Sun: Good straight grain
F + 2 Sun: Excellent straight grain
F + 3 Sun: Perfect straight grain
Sometimes “Mastro de Paja Pipes” are enhanched with sterling silver, gold, precious stones and/or fine wood and are further classified and fire stamped on each pipe.
Stamp “P” : “Personal” with fine ornamentation.
Stamp “N” : “Normal” with basic sterling silver.
Stamp “L” : “Lavorata” with more complex sterling silver.
Stamp “S” : “Special” with elaborate sterling silver and specially worked.
Stamp “G” : “Gold” with special gold ornamentation.
Media : Medium size pipe
Gigante: Giant pipe
From that information I knew that the pipe I was working on was a Rusticated Pipe and a Sun which made it a completely rusticated. It also is stamped Gigante which makes it a Giant pipe. It is a beauty and now it is time tolook at it up close and personal.
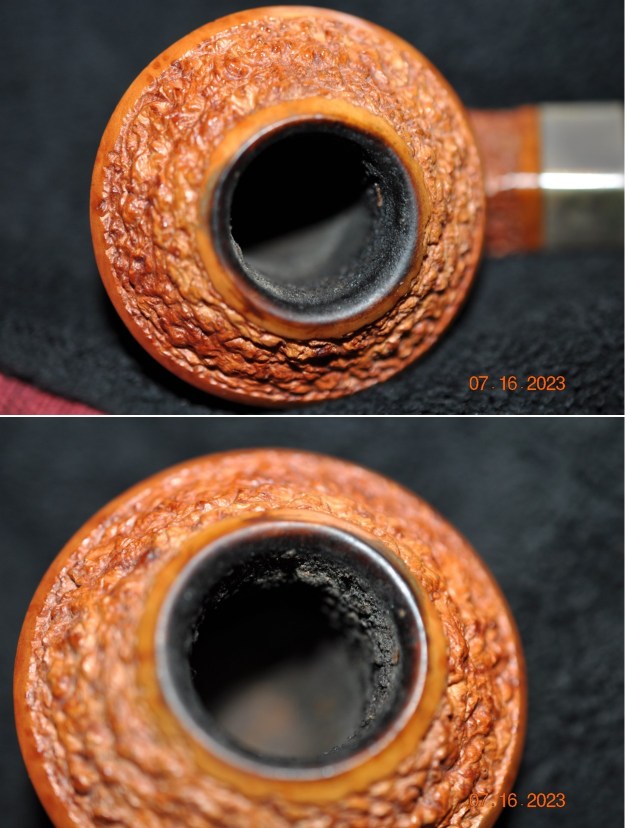
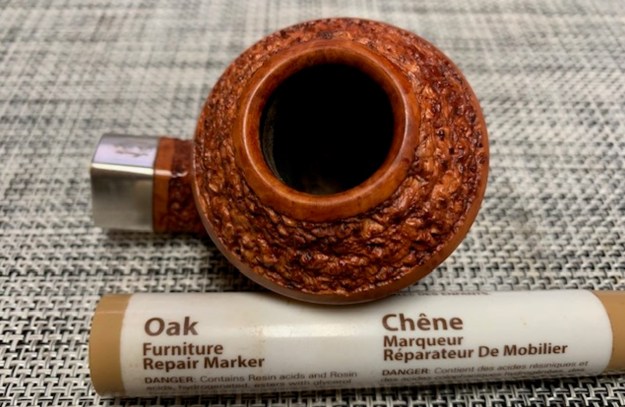
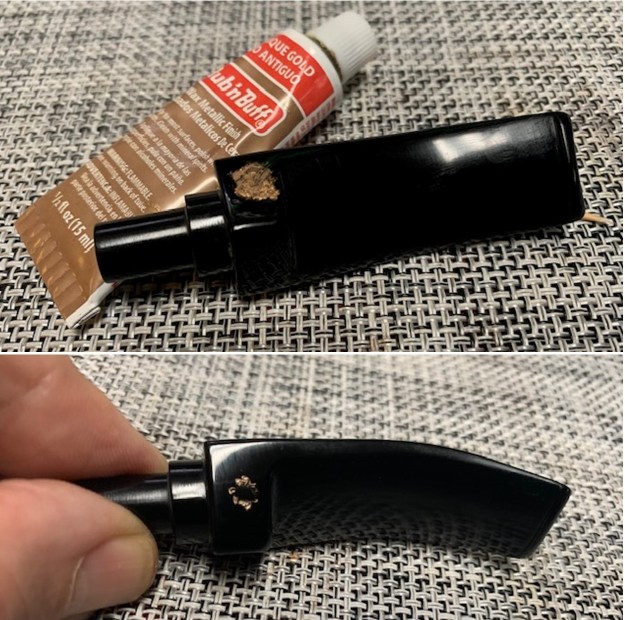
Jeff had done an amazing job in removing all of the cake and the lava on the rim top. He had reamed the bowl with a PipNet Pipe Reamer and cleaned up the remnants with a Savinelli Fitsall Pipe Knife. He took the cake back to bare briar so we could check the walls for damage. He scrubbed the exterior of the bowl with Murphy’s Oil Soap and a tooth brush to remove the grime on the bowl and rim and was able to remove the lava and dirt. He cleaned out the interior of the bowl and shank with pipe cleaners, cotton swabs and alcohol until they came out clean. He cleaned the stem with Soft Scrub to remove the grime on the exterior and cleaned out the airway with alcohol, cotton swabs and pipe cleaners. I took photos of the pipe before I started my part of the restoration. I took close up photos of both the rim top and the stem. Jeff had been able to get the grime and lava off of the rim top and it looked good. There was some burn damage and darkening on the right front of the crowned rim top and beveled inner edge. The stem looked very clean. The tooth marks and chatter were predominantly near the button. They should be easy to remove. The stamping on the left underside of the diamond shank was readable as noted above. The stamping on the silver ferrule is also very readable as noted. I also took a photo with the stem removed to give an idea of the perspective and design of the pipe.I started my work on the pipe by addressing the burn damage and darkening on the right front of the rim top with a folded piece of 220 grit sandpaper. Fortunately the burn damage was not deep but mainly surface. I was ale to remove and minimize it without changing the shape of the rim top. I also worked on the darkening on the inner bevel and removed it as well. I polished it with 1200-3200 micromesh sanding pads and then restained the rim top and edge with a Oak Stain Pen to match the rest of the bowl. Over all the rim top and edges looked much better.The bowl and shank were very clean and the rim top finished. I worked some Before & After Restoration Balm into the finish of the bowl and shank with my fingers and a horsehair shoe brush. I want the product to go deep into the finish because it works to clean, enliven and protect the briar. Once I was confident that it was deeply worked into the finish I wiped it off and buffed it with a soft cloth to polish it. The pipe really began to have a rich shine. I took some photos of the bowl at this point to mark the progress in the restoration. The rusticated finish on the pipe is beautiful and shows depth in the photos below.I set the bowl aside and turned to work on the stem. I filled in the deep tooth marks with black CA glue and set it aside to cure. Once cured I flattened them out with a small file and then sanded the smooth with 220 grit sandpaper. I started polishing it with 600 grit wet dry sandpaper.I touched up the Sun logo on the left underside of the diamond shaped stem with some Rub’n Buff Antique Gold. It picks up the Sun shaped stamp very well. I polished the acrylic stem with micromesh sanding pads – wet sanding it with 1500-12000 grit pads. I wiped it down with Obsidian Oil after each sanding pad because I find that the oil provides a great surface for polishing with the micromesh pads.I finished polishing it with Before & After Pipe Polish – both the Fine and Extra Fine polishes. I gave it a final coat of oil and set it aside to dry. This Mastro de Paja Pesaro Ciocco Gigante Rusticated 0C Bent Bulldog is a real beauty with a deep and tactile rustication and a silver ferrule. I put the bowl and stem back together again and buffed the bowl and the stem with Blue Diamond on the buffing wheel. I used a soft touch on the bowl so as not to fill it in with the polishing product. I gave the bowl several coats of Conservator’s Wax and the stem several coats of carnauba wax. I carefully buffed the entire pipe with a clean buffing pad to raise the shine. I polished the silver ferrule with a jewelers cloth to protect and shine. I finished buffing with a microfiber cloth to deepen the shine. The finished pipe looks very good. It is comfortable and light weight. The finished Mastro de Paja Ciocco Gigante Bent Bulldog is shown in the photos below. The dimensions of the pipe are Length: 6 inches, Height: 2 ½ inches, Outside diameter of the bowl: 1 ¼ inches, Chamber diameter: ¾ of an inch. The weight of the pipe is 78 grams/2.75 ounces. This great looking rusticated Bulldog turned out very well. It should be a great pipe. It will be going on the rebornpipes store in the Italian Pipemakers Section shortly if you are interested in adding it to your collection. Email me at slaug@uniserve.com
As always, I encourage your questions and comments as you read the blog. Thanks to each of you who are reading this blog. Remember we are not pipe owners; we are pipe men and women who hold our pipes in trust until they pass on into the trust of those who follow us.
Another hot day in Vancouver so I decided to go to the basement and work on another one that was purchased on 01/26/2023 in a lot of pipes that came to us from Copenhagen, Denmark. It included a group of Danish Made Stanwell pipes that are quite beautiful. The grain around the bowl and shank of this Bulldog has a mix of cross, birdseye and flame grain. The pipe is stamped on the left underside of the diamond shank and reads STANWELL 32 [over] Maron [over] Made in Denmark. The pipe was a well used pipe when Jeff received it. There was dust and grime ground into the finish. It is finished in the warm stain of the Maron finish, with some nice grain around the bowl and shank under the dirt. The bowl was moderately caked and there was an overflow of lava on the rim top. The inner edge shows some darkening around the bowl and on the rim top. There is a band on the shank. It has two brass bands with an orange piece of acrylic sandwiched between them both. The stem is acrylic and was dirty with light tooth marks and chatter on both sides ahead of the button and on the button itself. There is no brass/gold crown S logo inlaid on the left side of the saddle stem. Jeff took photos of the pipe before he started his clean up work on it.Jeff took photos of the bowl and rim top to show what they looked like before the clean up. You can see the darkening and light lava on the inner edge and top of the rim. He also took some photos of the stem to show the condition of both sides. You can see the light marks on the top and underside next to the button.The photos of the sides and heel of the bowl show the grain around the bowl and shank. The stain adds depth finish on the pipe. Even under the grime it is a real beauty.The stamping on the lower left side the diamond shank is shown in the photo below. It is clear and readable as noted above. Jeff had cleaned up the pipe with his usual penchant for thoroughness. He reamed the pipe with a PipNet Pipe Reamer and cleaned up the remnants with a Savinelli Fitsall Pipe Knife. He scrubbed the bowl with undiluted Murphy’s Oil Soap with a tooth brush. He rinsed it under running warm water to remove the soap and grime. He cleaned out the inside of the shank and the airway in the stem with alcohol, cotton swabs and pipe cleaners. He soaked the stem in Before & After Deoxidizer and rinsed it off with warm water. It came in Stanwell Pipe Sock. I removed it from the sock and took photos of the pipe once I received it. I took close up photos of both the rim top and the stem. Jeff had been able to get the grime and lava off of the rim top and it looked pretty incredible. There was some darkening and marks on the rim top on the right side and the back of the bowl. The stem looked very clean. The tooth marks and chatter were minimal and should be easy to remove.The stamping on the shank side was readable as noted above. I also took a photo with the stem removed to give an idea of the perspective and design of the pipe.I started my work on the pipe by addressing the damage to the inner edge and the rim top with a folded piece of 220 grit sandpaper to bring the edge back into round and it looked much better. Over all the rim top and edges looked much better. Now it was time to do my work on the pipe. I polished the bowl and rim top with micromesh sanding pads using 1500-12000 grit sanding pads and wiping it down after each sanding pad with a damp cloth to remove the sanding dust and debris.I worked some Before & After Restoration Balm into the finish of the bowl and shank with my fingers. I want the product to go deep into the finish because it works to clean, enliven and protect the briar. Once I was confident that it was deeply worked into the finish I wiped it off and buffed it with a soft cloth to polish it. The pipe really began to have a rich shine. I took some photos of the bowl at this point to mark the progress in the restoration. The grain really stands out on the pipe in the photos below.I set the bowl aside and turned to work on the stem. I polished the acrylic stem with micromesh sanding pads – wet sanding it with 1500-12000 grit pads. I wiped it down with Obsidian Oil after each sanding pad.I polished it with Before & After Pipe Polish – both the Fine and Extra Fine polishes. I gave it a final coat of oil and set it aside to dry. This Stanwell Maron 32 Straight Bulldog with an acrylic taper stem is a great looking pipe now that it has been restored. The beautiful finish really highlights the grain and the polished finish is stunning. The triple layer brass and orange acrylic shank extension is also a great addition. I put the stem back on the bowl and carefully buffed the pipe with Blue Diamond on the buffing wheel. I gave the bowl and the stem multiple coats of carnauba wax on the buffing wheel and followed that by buffing the entire pipe with a clean buffing pad. I hand buffed the pipe with a microfiber cloth to deepen the shine. The finished Stanwell Maron Bulldog fits nicely in the hand and feels great. Give the finished pipe a look in the photos below. The dimensions of the pipe are Length: 5 inches, Height: 1 ¾ inches, Outside diameter of the bowl: 1 ¼ inches, Chamber diameter: ¾ of an inch. The weight of the pipe is 38 grams /1.34 ounces. I will be adding the pipe to the Danish Pipe Makers Section of the rebornpipes store. If you are interested in purchasing this pipe send me a message or an email. Thanks for reading this blog and my reflections on the pipe while I worked on it.
As always, I encourage your questions and comments as you read the blog. Thanks to each of you who are reading this blog. Remember we are not pipe owners; we are pipe men and women who hold our pipes in trust until they pass on into the trust of those who follow us.
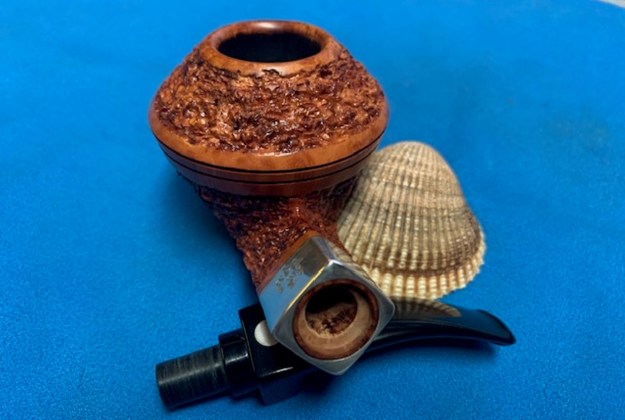
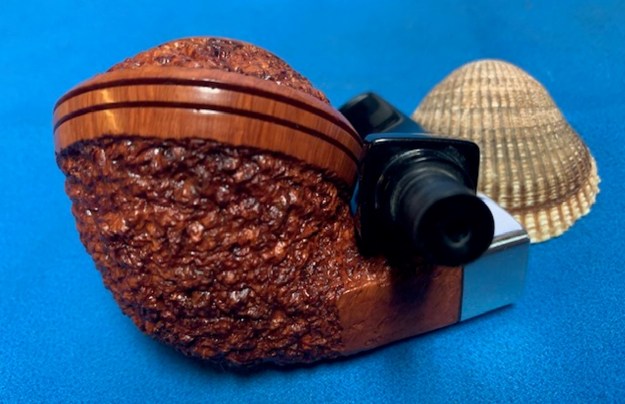
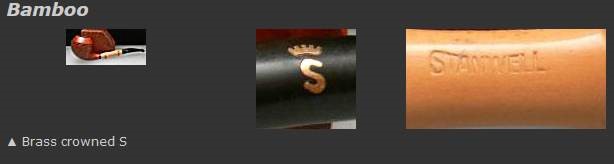
It is a hot day here in Vancouver so I decided to head to the basement where it is cool and work on another pipe. This one was purchased on 11/14/2022 in a lot of pipes that came to us from a seller in Copenhagen, Denmark. It included a group of Stanwell Bamboo pipe that are quite beautiful, combining a briar bowl, a bamboo shank and in this case an acrylic stem. The pipe is a nice looking pot shape. The grain around the bowl and short briar portion of the shank has a mix of cross and birdseye grain. The pipe is stamped on the left side of the bamboo and reads STANWELL vertically between the knuckles. The pipe was a well used pipe when Jeff received it. Someone had given it a coat of varnish so it was quite shiny but there was grime underneath. The mixture of brown stains highlights some beautiful grain under the dirt. The bowl had been reamed and it was clean. There was some darkening and some nicks on the crowned rim top and one burn mark on the left rear. The inner edge had some darkening and some nicks around the edges. The outer edge on the front of the bowl had been damaged and someone had repaired it somewhere along the journey. It had been sanded smooth and changed the profile of the crowned rim at that point. I would need to rework that area. The stem is acrylic and was dirty with some deep tooth marks on both sides ahead of the button and on the button itself. There is a brass/gold crown S logo inlaid on the left side of the taper stem. I took photos of the pipe before I started the clean up work on it.I took photos of the bowl and rim top to show what they looked like before the clean up. You can see the darkening on the inner edge and top of the rim. It is hard to see but there is damage that is well hidden at this point on the front outer edge of the bowl. I took some of the stem to show the condition of both sides. You can see the deep tooth marks on the top and underside next to the button. They will take some work.The photos of the sides and heel of the bowl show the uniquely stained grain around the bowl and shank. The mixture of black and brown stains adds depth finish on the pipe. Even under the grime it is a real beauty. The two knuckle bamboo shank has a nice patina on it that will only get better with time. It had a black acrylic spacer between the shank and the bamboo and the stem and the bamboo.The stamping on the left side the bamboo is shown in the photo below. It is clear and readable as noted above. It also shows the gold crown S on the stem side. I removed the stem from the shank and took a photo of the pipe to show the flow and cut o the pipe. It is a beauty.I turned to several of the previous blogs that I have written on other Stanwell Bamboos that I have restored. I have included the information from those blogs on the line. I turned to Pipephil to get a quick review of the brand (http://pipephil.eu/logos/en/logo-stanwell.html). The Brass Crowned S inlaid logo on the stem is shown in the photo below. I have included a screen capture of the brand info there.I then turned to Pipedia (https://pipedia.org/wiki/Stanwell) for more information. The article is great and gives a lot of history on the brand. There were also links to catalogues at the bottom of the page. I am including a page from a catalogue on the site below that gives a bit of a glimpse into the brand. Here is the link (http://www.axeljeske.de/Pfeifen/Stanwell_Amager.pdf). The catalogue page gives a great description of the Bamboo line. It reads as follows: Top quality bowls perfectly fitted with porous bamboo shanks for casual elegance.
Armed with that information about the pipe it was time to work on the pipe. I scraped out the cake remnants with a Savinelli Fitsall Pipe Knife and sanded the bowl walls with 220 grit sandpaper wrapped around a piece of dowel. I scrubbed out the internals with 99% isopropyl alcohol, cotton swabs and pipe cleaners to remove the oils and tars. While the pipe was fairly clean I was able to remove the remaining oils. I started my work on the pipe by addressing the damage to the inner edge and the rim top with a folded piece of 220 grit sandpaper to bring the edge back into round and it looked much better. I worked over the burn mark on the back left outer edge and top and smoothed it out. I also worked on the previously repaired damage to the front of the bowl outer edge. It had been knocked against something hard and then smoothed out. I reshaped the crown on the outer edge of the bowl. Over all the rim top and edges looked much better.In order to clean up the grime under the varnish coat on the bowl I washed it down with acetone on a cotton pad. I was able to remove the shiny coat and remove the grime in the finish. Once the shiny coat was gone the pipe cleaned up very well. The photos below show the look of the pipe once it was cleaned.I polished the briar with micromesh sanding pads – dry sanding with 1500-12000 grit pads. I wiped the bowl down after each pad to remove the grit. The bowl began to take on a rich shine. It is a beauty.I rubbed the bowl down with Before & After Restoration Balm. I worked it into the briar with my finger tips and into the bamboo with a horsehair shoe brush. I let it sit for 10 minutes and the Balm did its magic. It enlivens, cleans and preserves the briar. It certainly brought this bowl back to life. I buffed it off with a clean cloth and took the following photos.I set the stem aside and turned my attention to the stem. The acrylic stem had deep tooth marks on both sides ahead of the button. Heat would not lift them so they would need to be filled in with black rubberized CA glue. I filled them in and spread the repair with a dental spatula. Once the repair cured I used a small file to recut the button edge and to flatten out the repairs. I used 220 grit sandpaper to blend them into the stem surface and started the polishing with 600 grit wet dry sandpaper.I polished the stem with micromesh sanding pads – 1500-12000 grit pads. I wiped it down with a damp cloth after each sanding pad. I used Before & After Pipe Polish – both Fine and Extra Fine to further polish the stem.I polished it with Before & After Pipe Polish – both the Fine and Extra Fine polishes. I gave it a final coat of oil and set it aside to dry.This Stanwell Bamboo Pot with an acrylic taper stem is a great looking pipe now that it has been restored. The beautiful finish really highlights the grain and the polished finish is stunning. I put the stem back on the bowl and carefully buffed the pipe with Blue Diamond on the buffing wheel. I gave the bowl and the stem multiple coats of carnauba wax on the buffing wheel and followed that by buffing the entire pipe with a clean buffing pad. I hand buffed the pipe with a microfiber cloth to deepen the shine. The finished Stanwell Bamboo Pot fits nicely in the hand and feels great. Give the finished pipe a look in the photos below. The dimensions of the pipe are Length: 5 ½ inches, Height: 1 ½ inches, Outside diameter of the bowl: 1 ¼ inches, Chamber diameter: ¾ of an inch. The weight of the pipe is 37 grams /1.31 ounces. I will be adding the pipe to the Danish Pipe Makers Section of the rebornpipes store. If you are interested in purchasing this pipe send me a message or an email. Thanks for reading this blog and my reflections on the pipe while I worked on it.

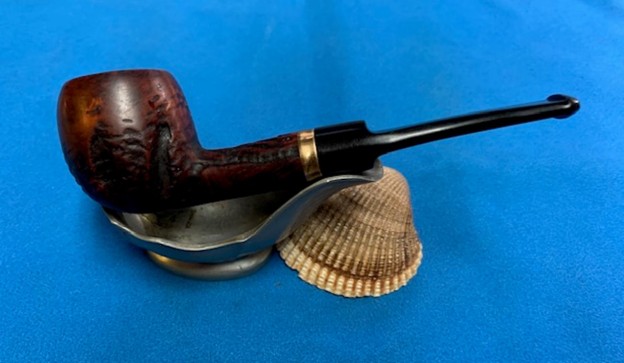
 The next photo shows the rim top and the bowl. You can see the cake in the bowl and the light overflow of lava on the flat rim top. The inner edge of the bowl looks smooth and shows some darkening and nicks. The photos of the stem show the oxidation and calcification on the stem. There are also light tooth marks and chatter on both sides near the button.

 Jeff took pictures of the bowl from various angles to show the condition and the overall look of the pipe. It was a beauty and elegant underneath the grime.
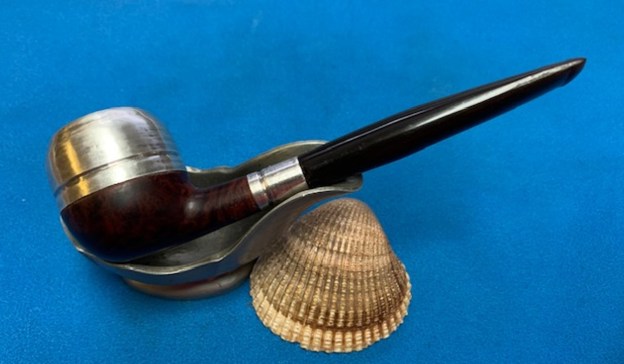
 The underside of the shank is stamped Karl Erik over Hand Made in Denmark. Underneath that is the number 11. It is clear and readable.
 Jeff had thoroughly cleaned up the pipe. He reamed the pipe with a PipNet Pipe Reamer and cleaned up the remnants with a Savinelli Fitsall Pipe Knife. He scrubbed the bowl with undiluted Murphy’s Oil Soap with a tooth brush. He rinsed it under running warm water to remove the soap and grime. He cleaned out the inside of the shank and the airway in the stem with alcohol, cotton swabs and pipe cleaners. He scrubbed the exterior of the stem with Soft Scrub to remove as much of the oxidation and calcification as possible. He soaked the stem in Briarville’s Pipe Stem Deoxidizer and rinsed it off with warm water. I took photos of the pipe once I started to work on it.
 I took some photos of the rim top and stem. The rim top and bowl looked good. The cake and lava overflow were gone but the rim top and the inner edge showed some nicks and darkening. The closeup photos of the stem shows that it is a much cleaner and looks good. The light tooth marks and chatter were still present on both sides.
 I took a photo of the stamping on the left side of the shank to show the condition after the cleanup. It was very readable and undamaged. I took the stem off the shank and took a photo of the pipe to give a sense of the proportions of the pipe.
  I started my restoration work on this pipe by addressing the darkening around the inner edge of the bowl and rim top. I used a folded piece of 220 grit sandpaper to clean up the inner edge and the rim top. The finished rim top looked very good.
 I started my polishing regimen on the bowl. I used nine micromesh sanding pads and dry sanded the bowl with 1500-12000 grit pads. I wiped the bowl down with a damp cloth after each pad. The bowl really shines by the final three pads.


 I worked some Before & After Restoration Balm into the surface of the briar with my fingertips to clean, enliven and protect it. I let the balm sit for a little while and then buffed with a cotton cloth to raise the shine. The photos show the bowl at this point in the restoration process.

 I set the bowl aside and turned to the stem. I polished out the tooth chatter and marks on the stem with micromesh sanding pads – dry sanding with 1500-12000 grit sanding pads. I wiped them down after each sanding pad with a cloth containing some Obsidian Oil.
 I finished polishing it with Before & After Pipe Stem Polish – both Fine and Extra Fine and buffed it off with a cotton cloth. I gave it a coat of Obsidian Oil to preserve and protect the stem.
  I don’t know how many times I have said this but I love it when I come to the end of a restoration and all of the parts come together and the pipe looks better than when we started the cleanup process. I put the stem back on the Karl Erik Handmade in Denmark 11 Freehand Dublin and buffed the pipe with Blue Diamond on the buffing wheel. I carefully avoided the stamping on the shank sides during the process. I gave the bowl and stem multiple coats of carnauba wax on the buffing wheel and followed that by buffing it with a clean buffing pad on the buffer. I hand buffed the pipe with a microfiber cloth to deepen the shine. The finished pipe is a real stunning example of a Danish Karl Erik Handmade 11 Freehand. Once again, the grain and the way the shape follows the grain is amazing. Give the finish pipe a look in the photos below. I can only tell you that it is much prettier in person than the photos capture. The dimensions of the pipe are Length: 5 ¾ inches, Height: 2 inches, Outside diameter of the bowl: 1 ½ inches, Chamber diameter: 1 inch. The weight of the pipe is 1.38 ounces/40grams. Thanks for walking through the restoration with me as I worked over another beautiful pipe. I will be putting this one on the rebornpipes store in the Danish Pipemakers Section. Let me know if you are interested in adding it to your collection. Thanks for your time.