Tag Archives: fitting a stem

Breathing New Life into a Republic Era Petersons Mark Twain


Blog by Steve Laug

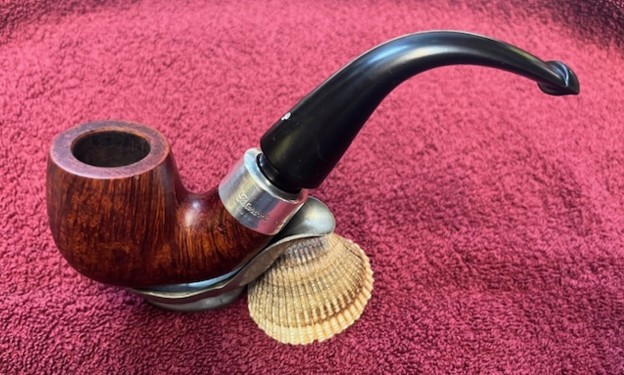
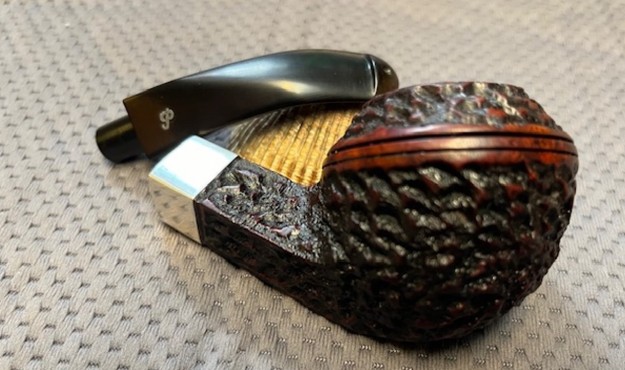
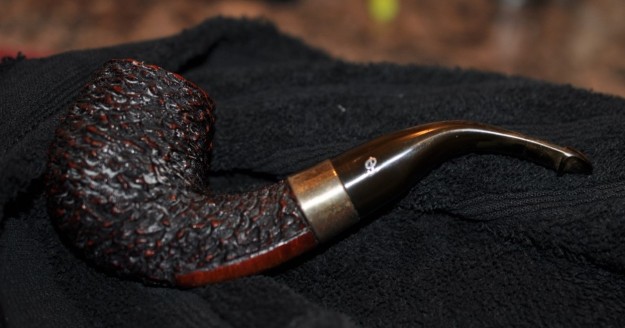
The next pipe on the work table is a lovely Peterson’s style briar pipe. We purchased it from a seller in Spring Branch, Texas, USA on 02/29/2024. It is a classic Peterson’s De Luxe style Bent Billiard. It has a smooth, rich brown stained bowl that really highlights the stunning grain in the briar. The bowl is dirty with grime in the finish. There is a moderate cake in the bowl and a heavy lava overflow on the rim top and edges. The stamping on the pipe is clear and readable and on the left side it reads Peterson’s [over] Mark Twain. On the right side it reads Made in the Republic of Ireland (three lines). The Sterling Silver Ferrule is stamped Peterson’s [over] Dublin followed by Sterling [over] Silver and three hallmarks. The stem had a P logo stamped on the topside of the taper. It is oxidized, calcified and has light tooth chatter and marks on both sides ahead of the P-lip button. Mark Twain has always been one of my favourite authors. I love his wit and style of humour. The fact that this is a classic Mark Twain pipe is part of the fascination of working on pipes for me. I have seen only a few of these from the line so this is going to be a pleasure to work on. Jeff took photos of the pipe before he started his cleanup. 
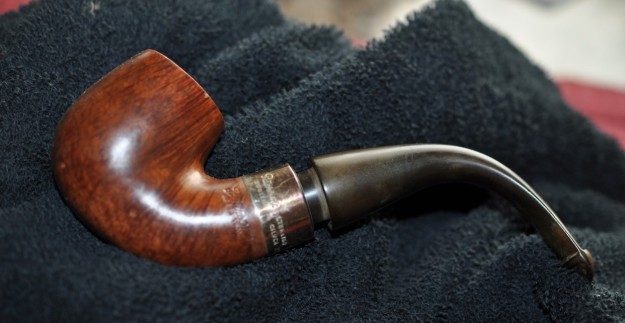
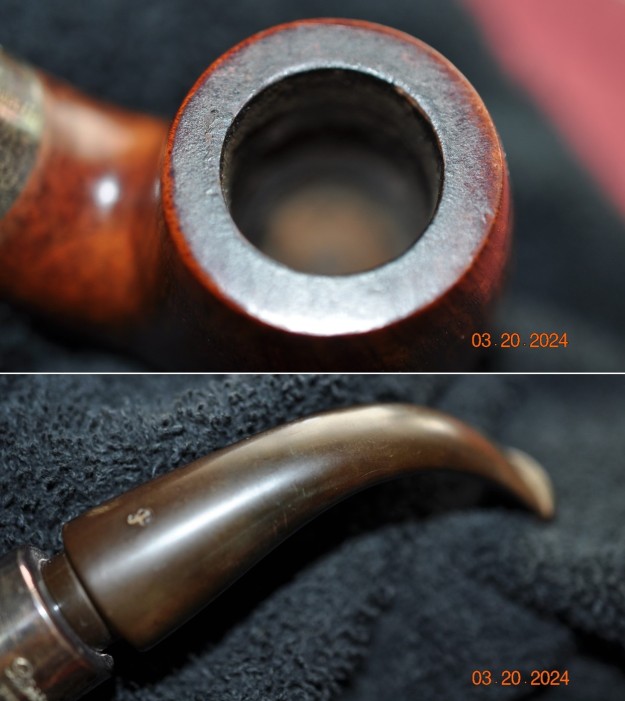
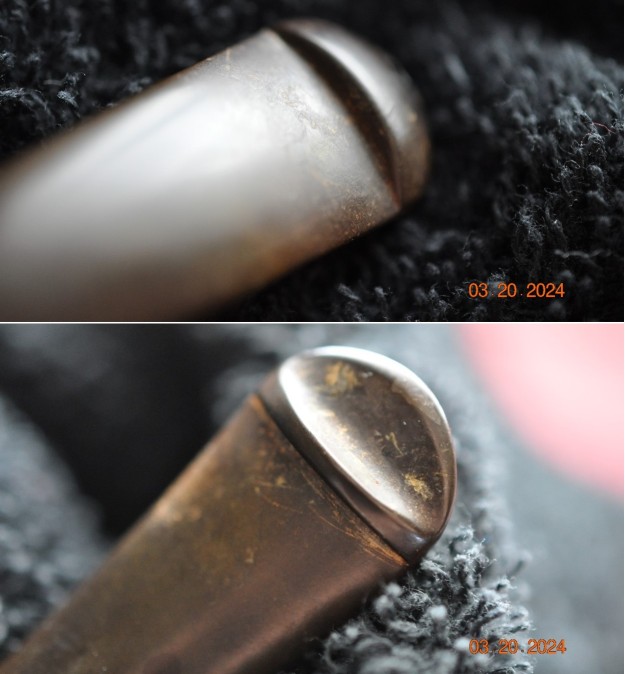
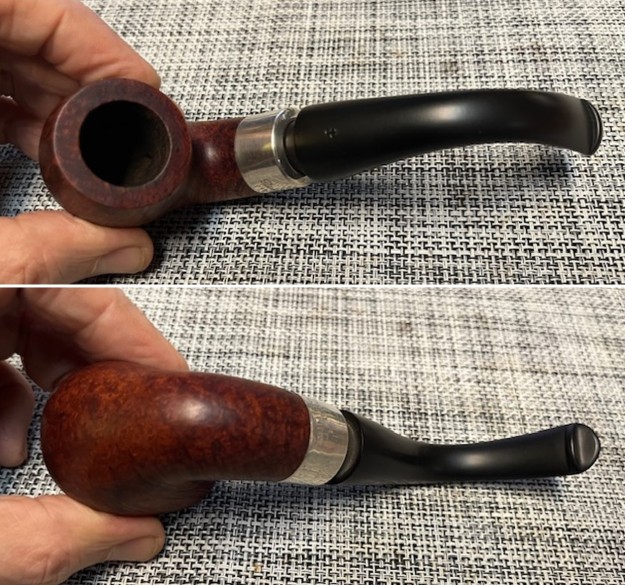
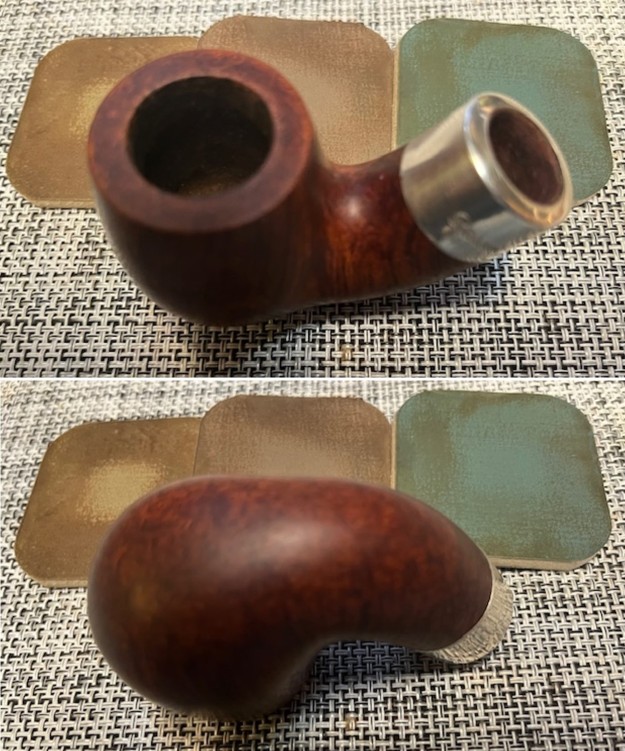
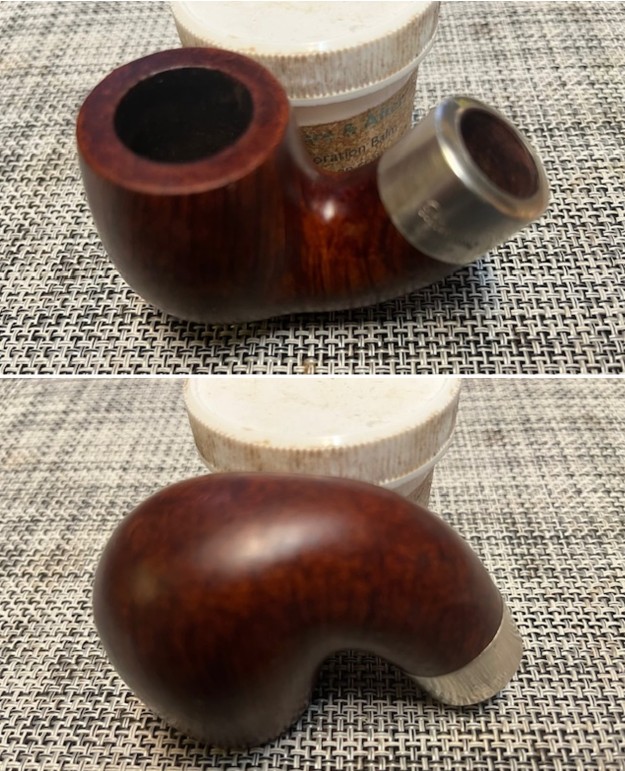
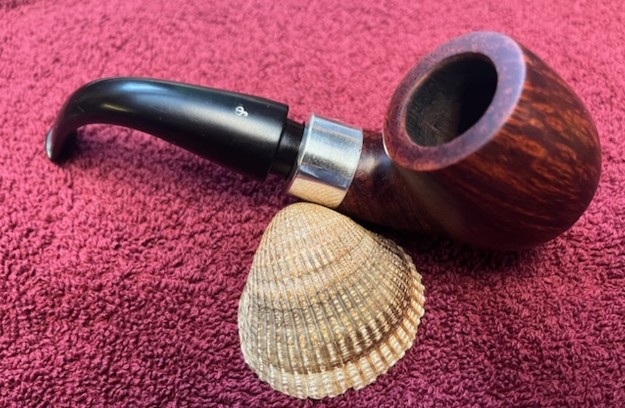
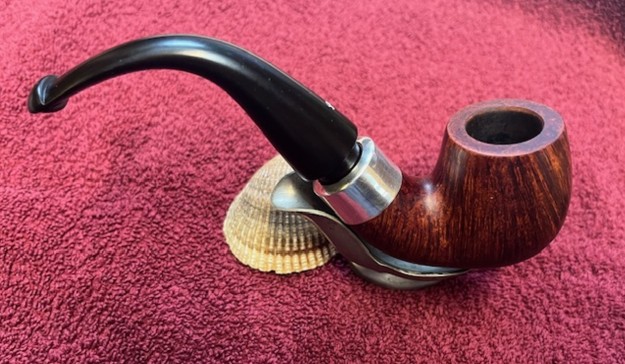
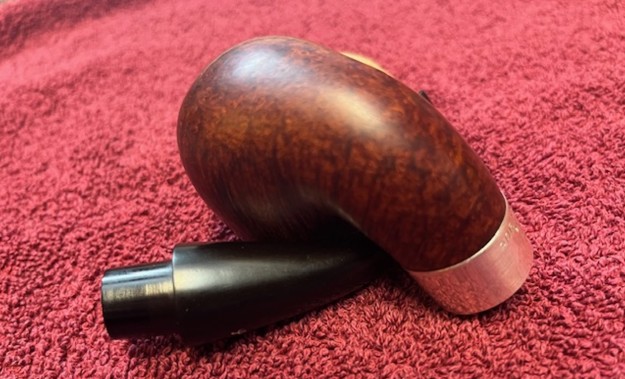
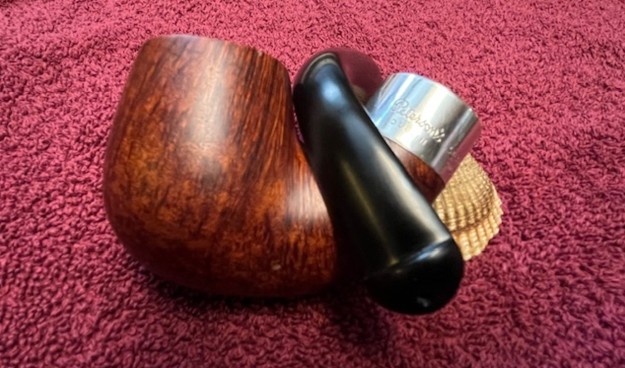
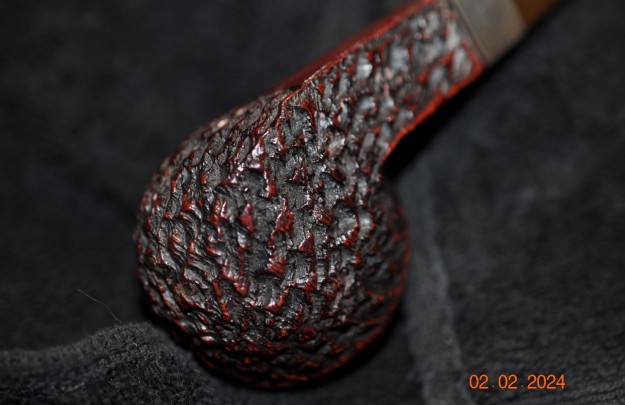
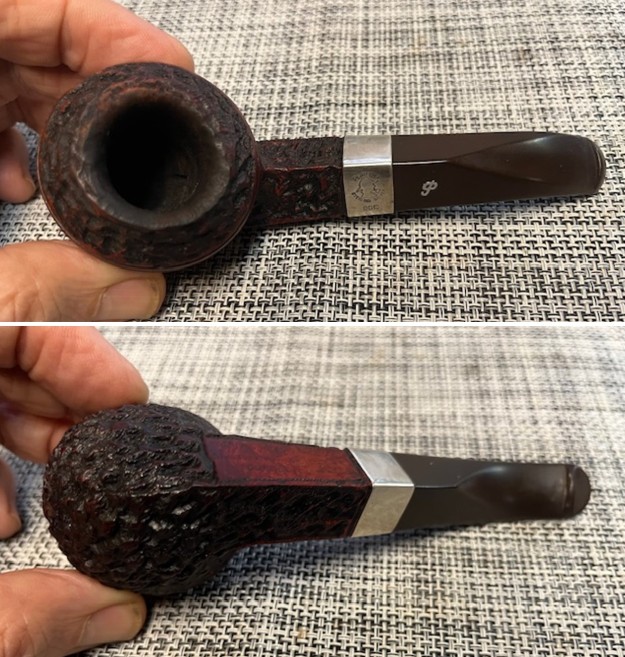
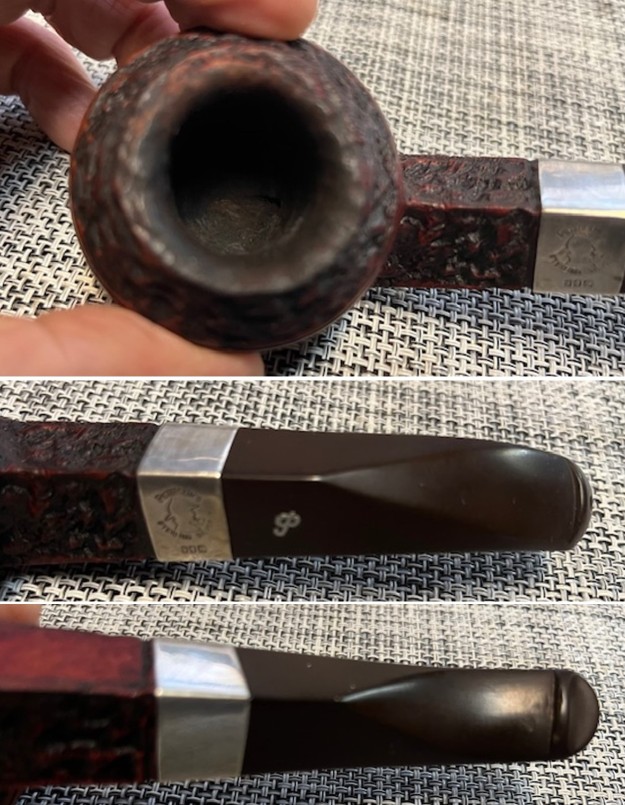
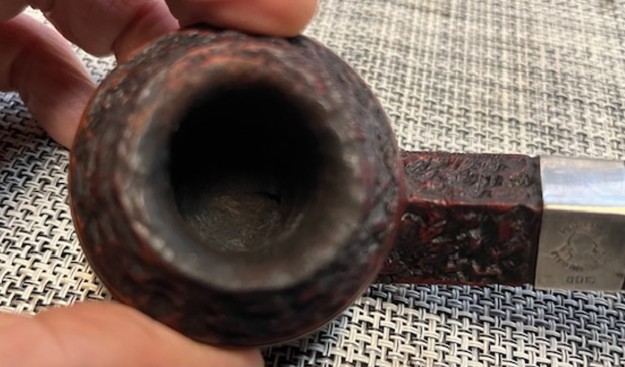
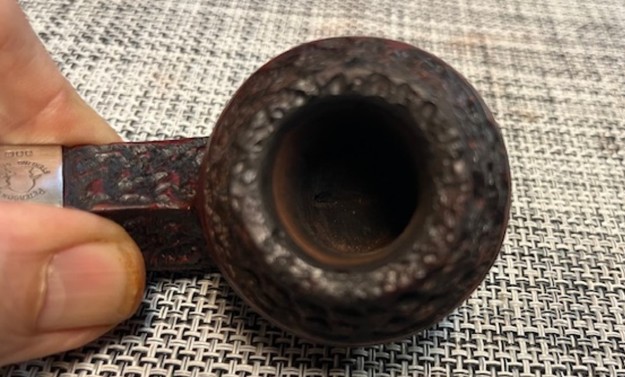
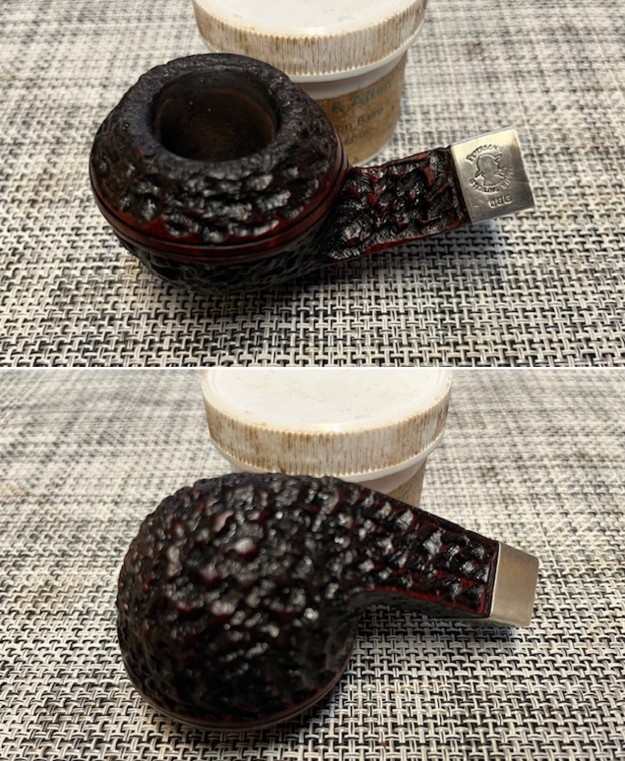
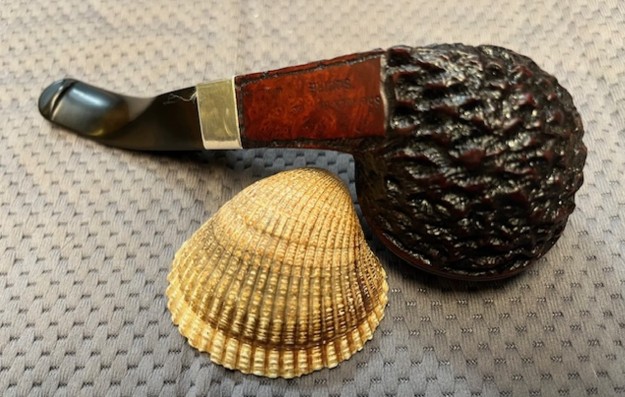
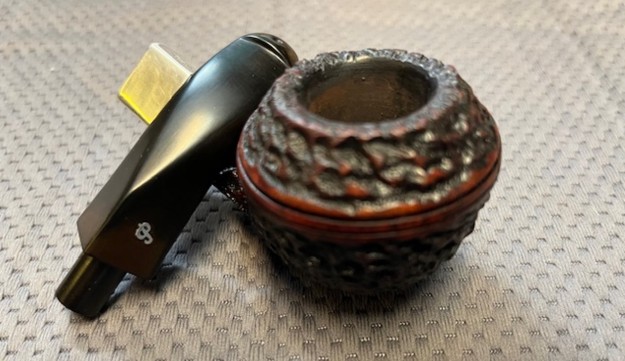
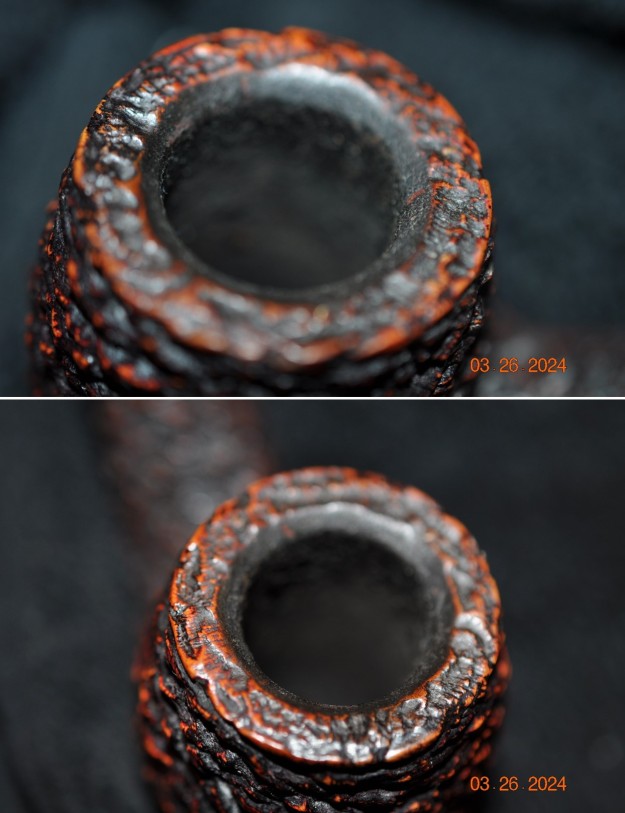
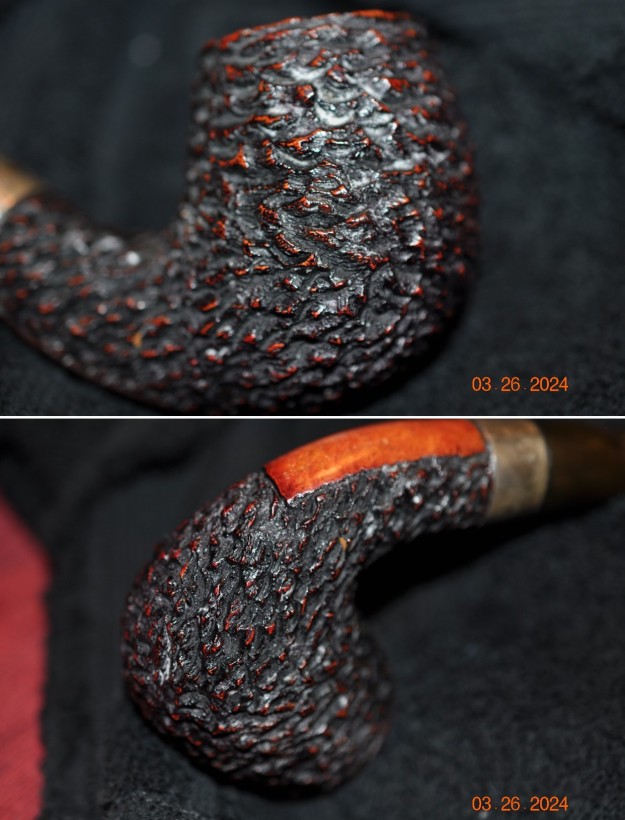
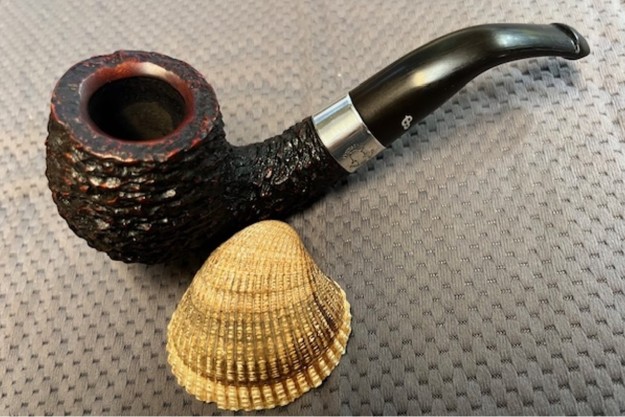
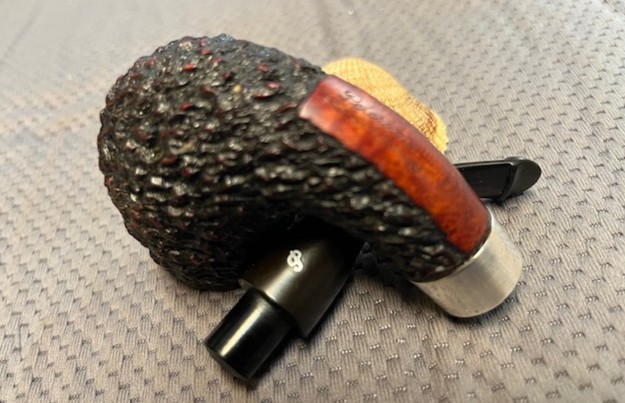
Jeff took photos of the rim top and stem to show the general condition of the pipe. The bowl is moderately caked and the rim top and edges have a heavy coat of lava overflowing on to them. The stem is oxidized, calcified and has light tooth chatter and tooth marks on the top and underside near the button. The “P” logo stamp on the top of the stem is faded and dirty. 
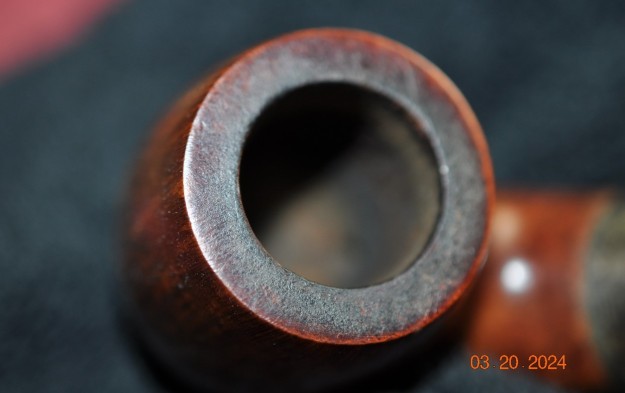
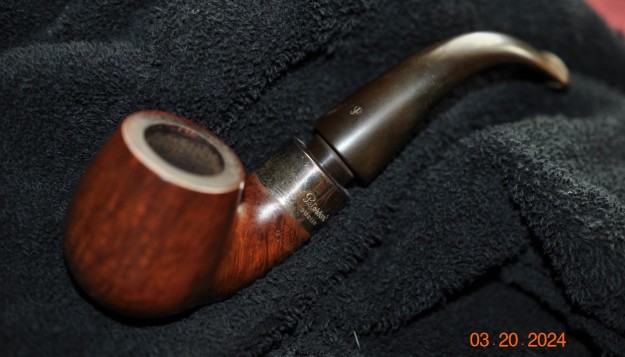
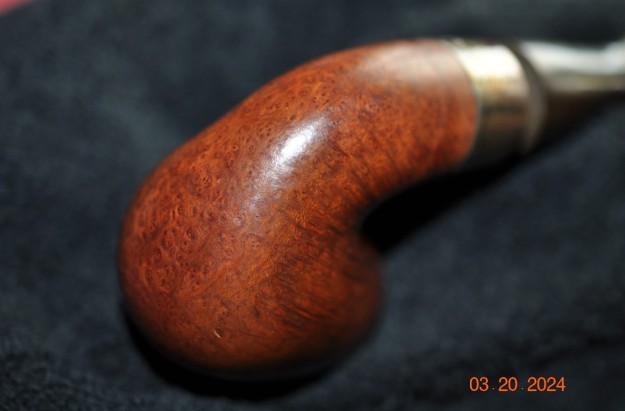
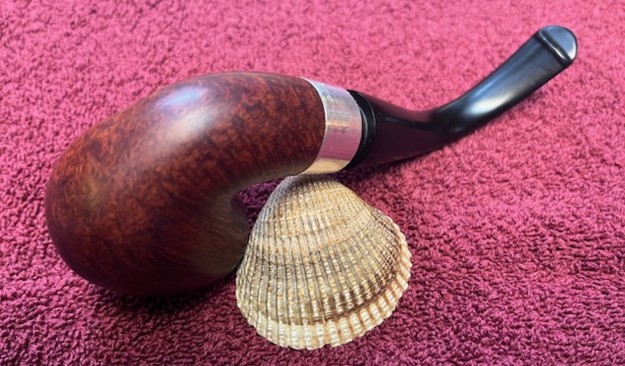
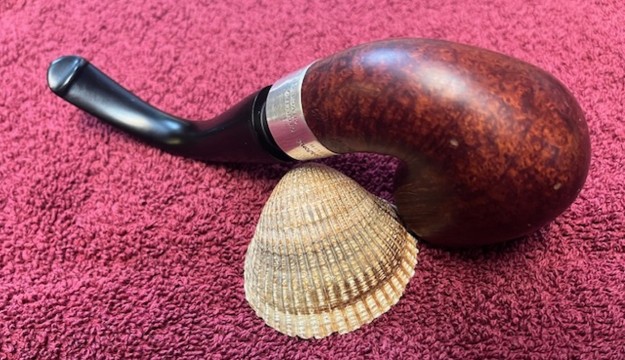
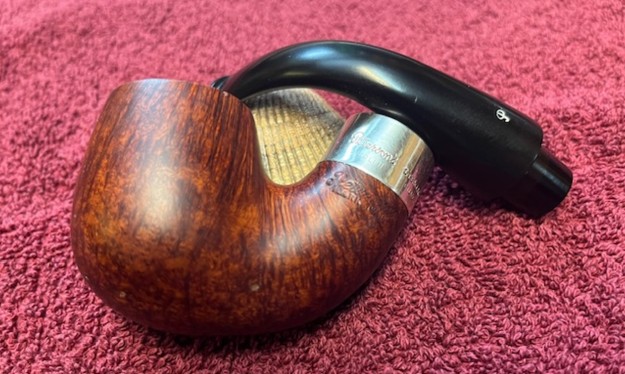
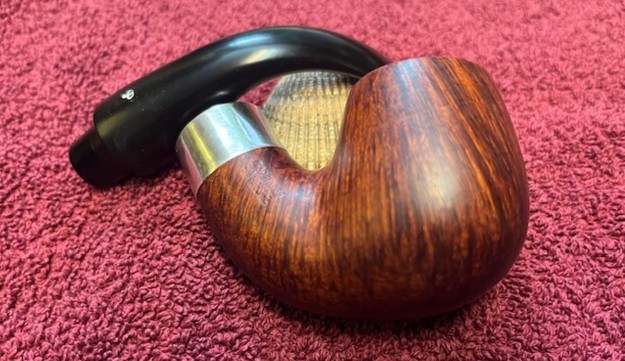
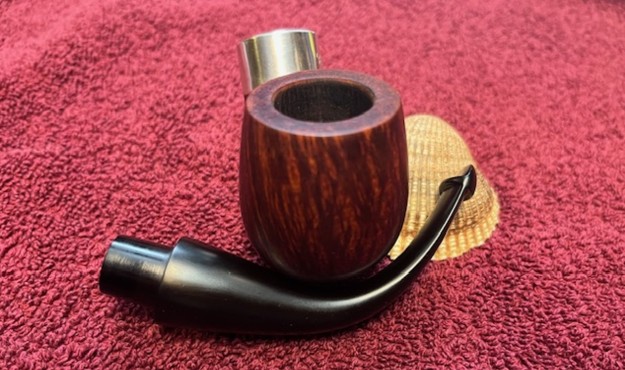
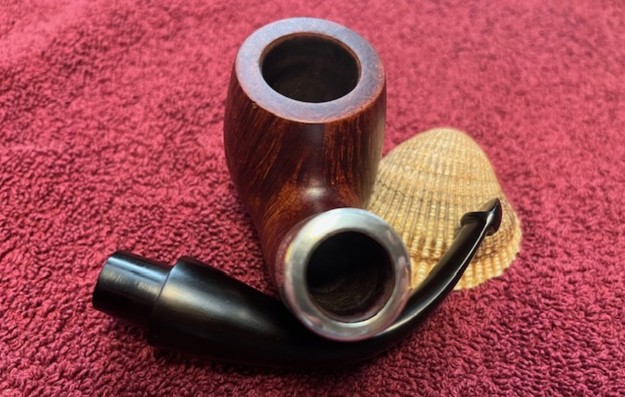
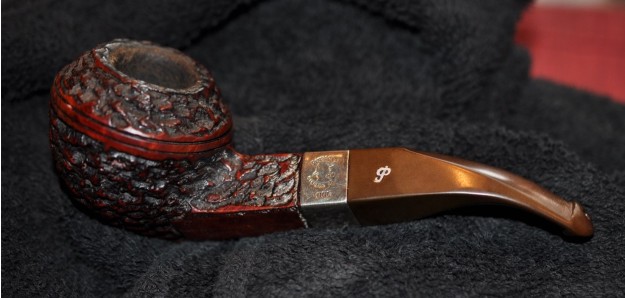
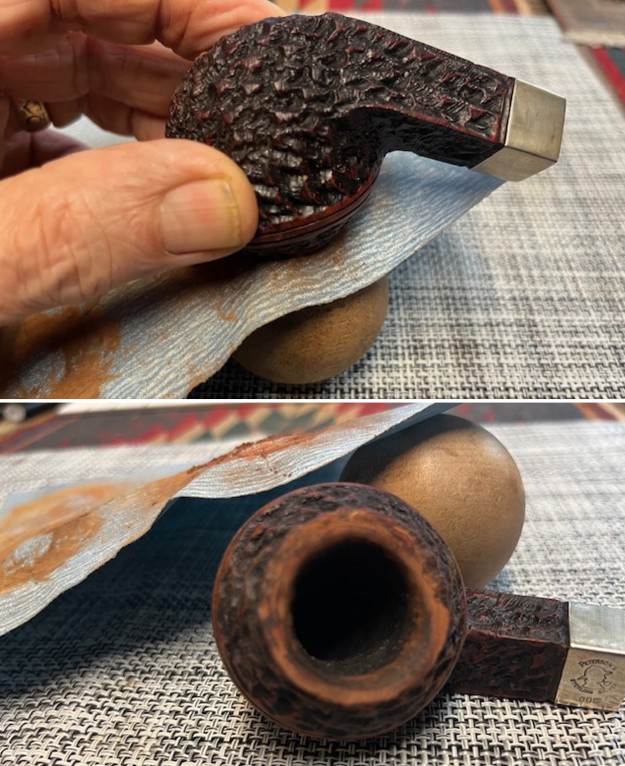
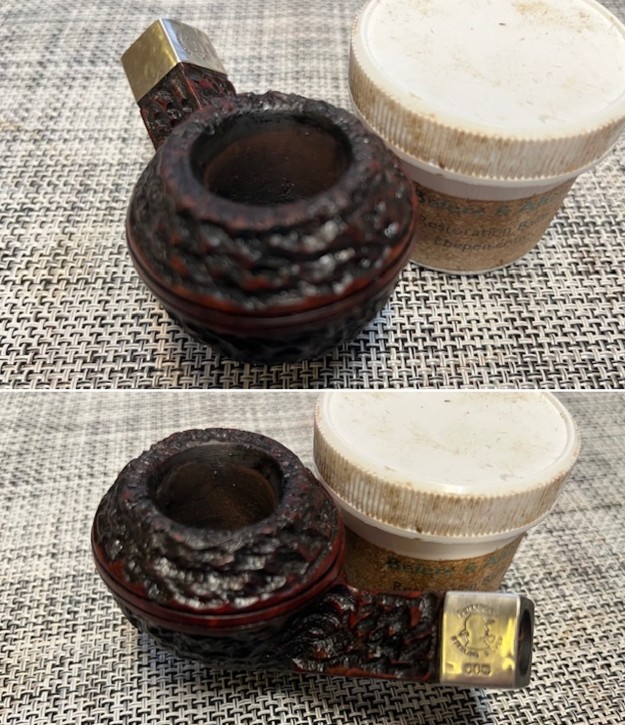
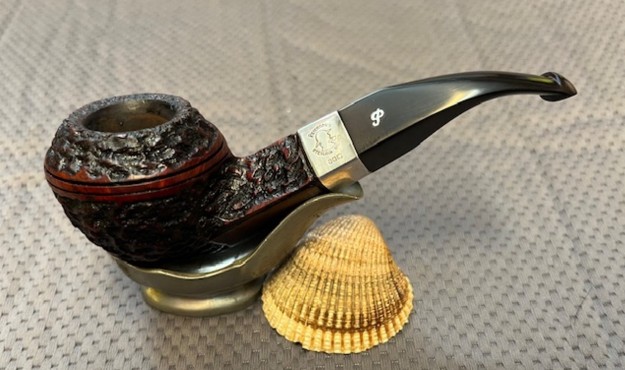
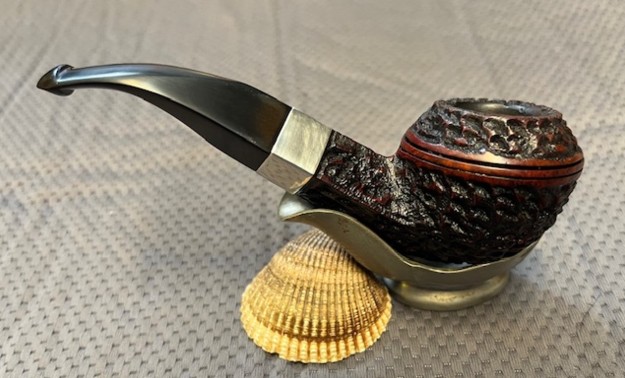
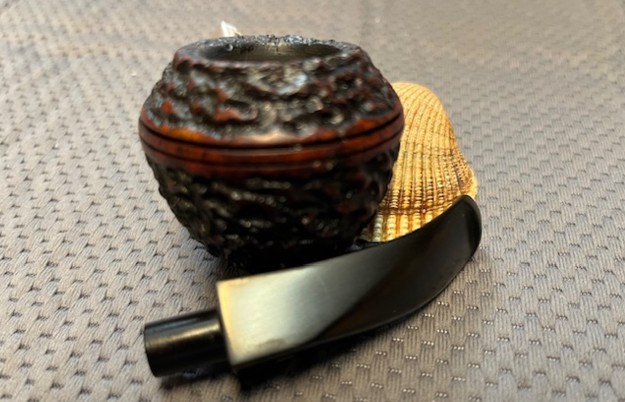
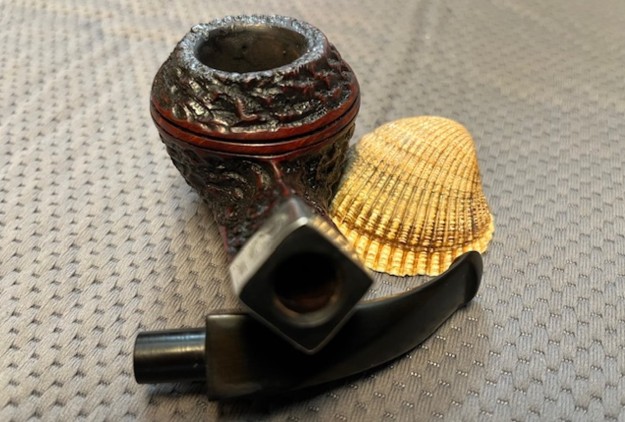
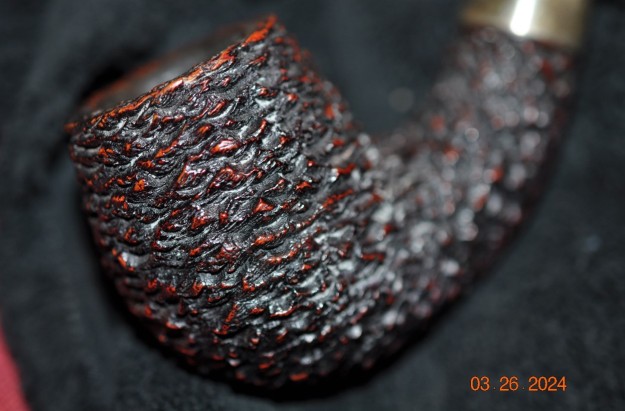
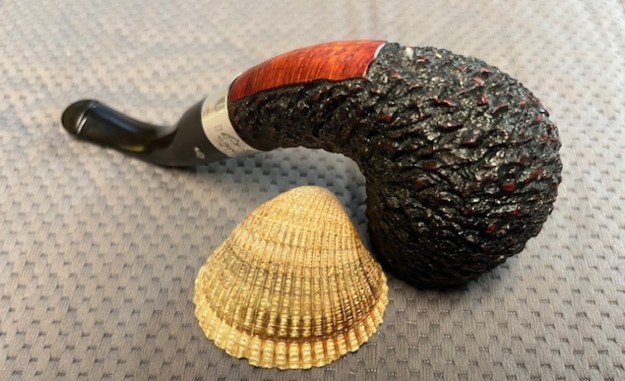
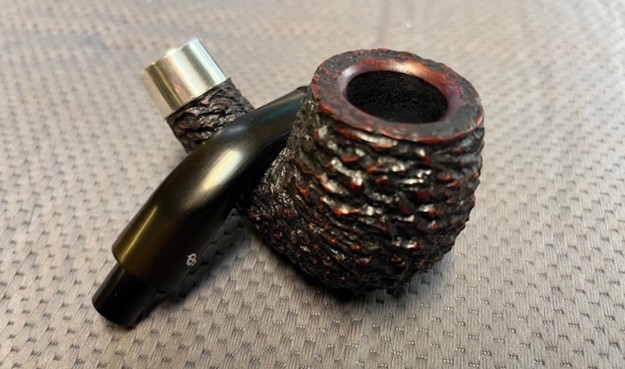
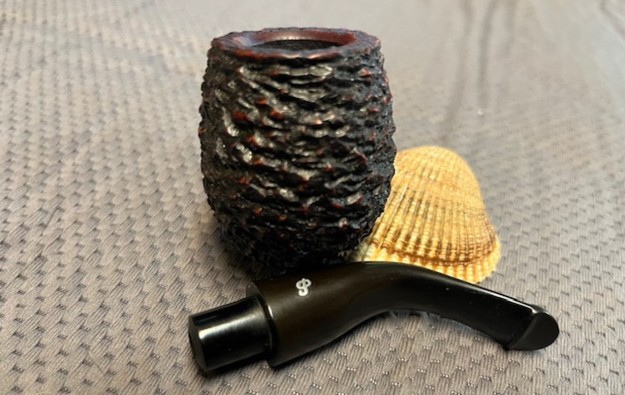
Jeff took photos of the bowl sides and heel to show the condition of the finish around this bowl. It has some great straight grain on the sides and birdseye on the top and heel. The silver ferrule is oxidized and dirty. 
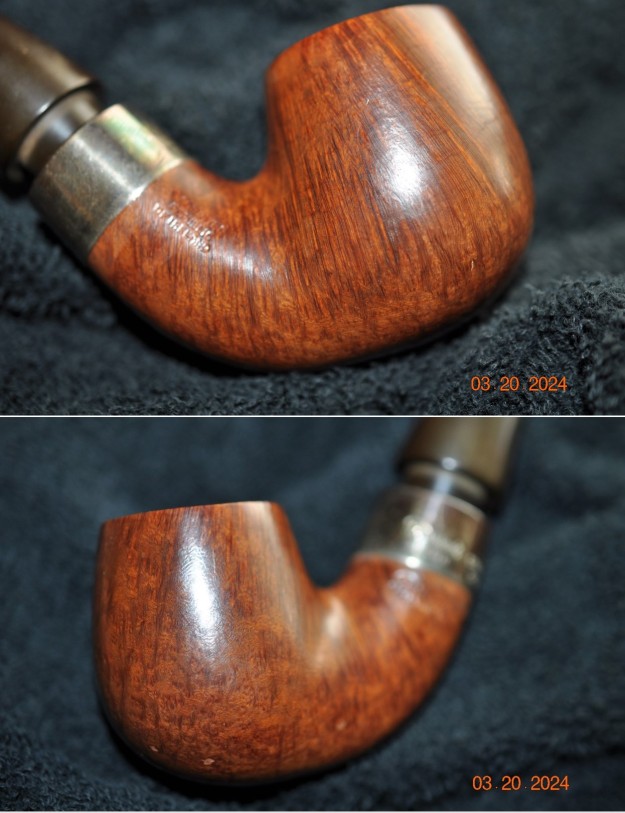
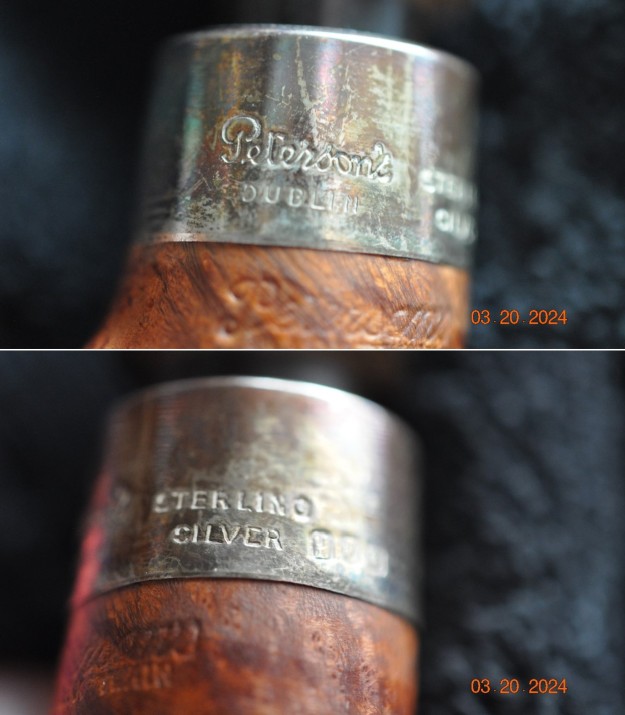
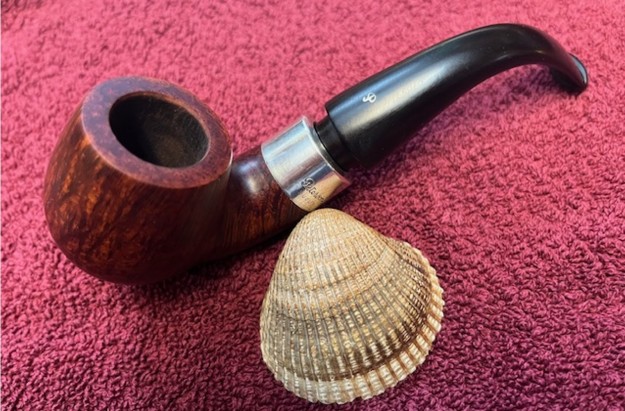
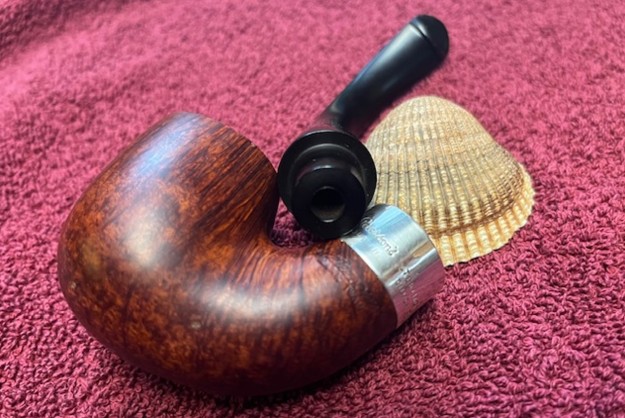
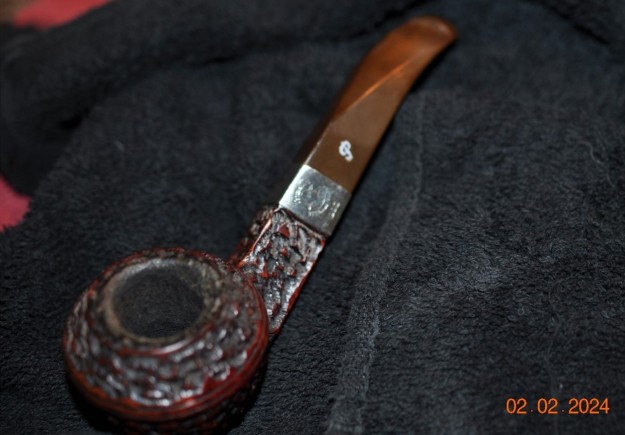
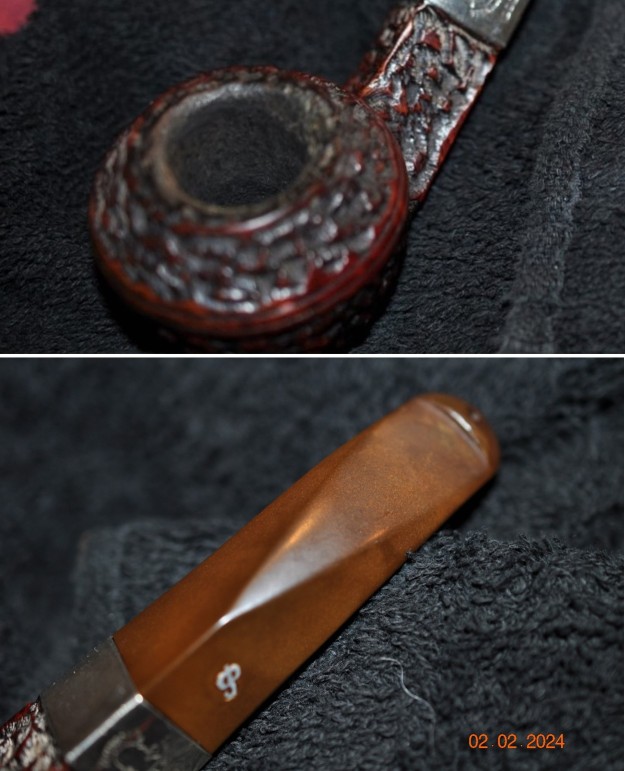
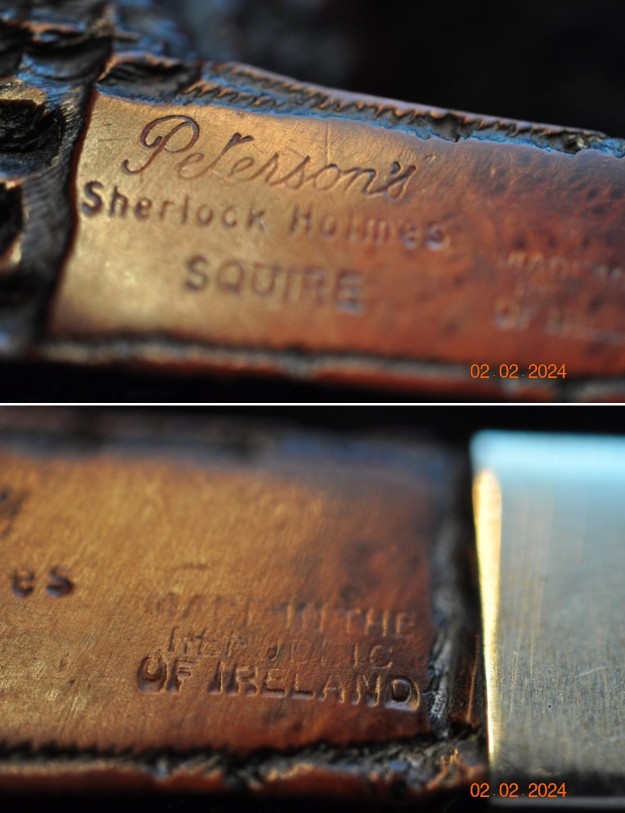
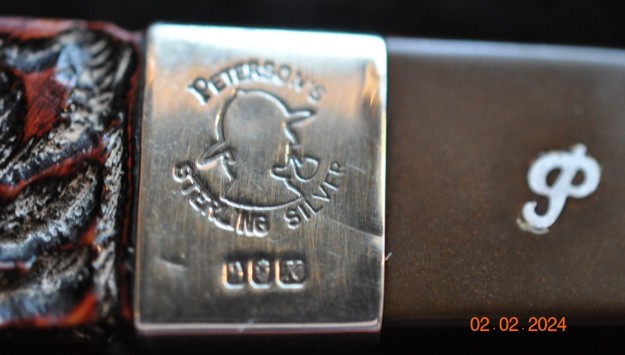
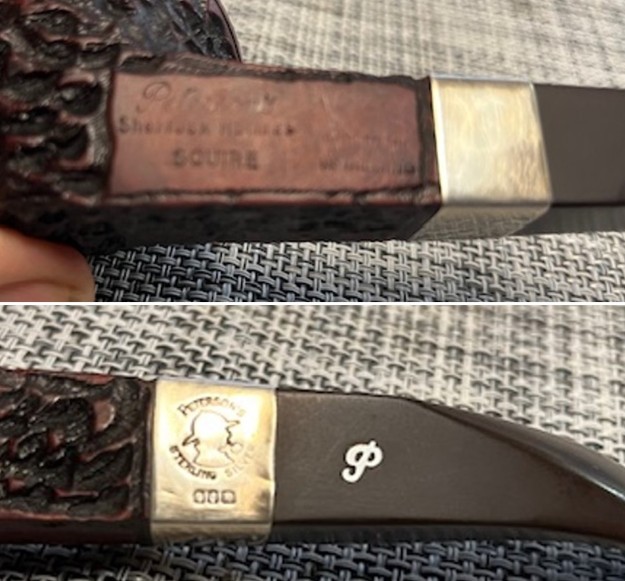
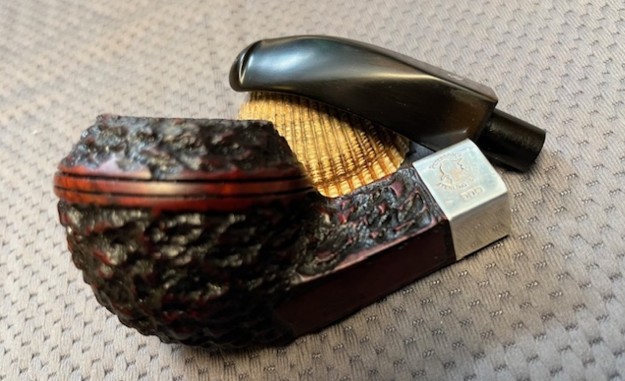
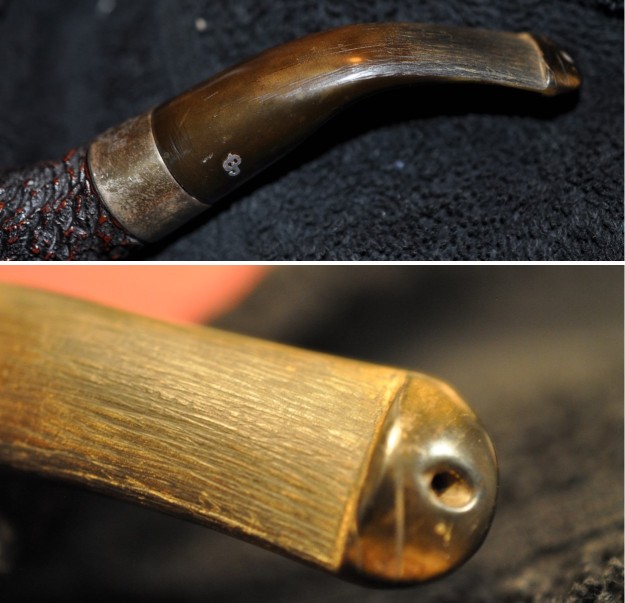
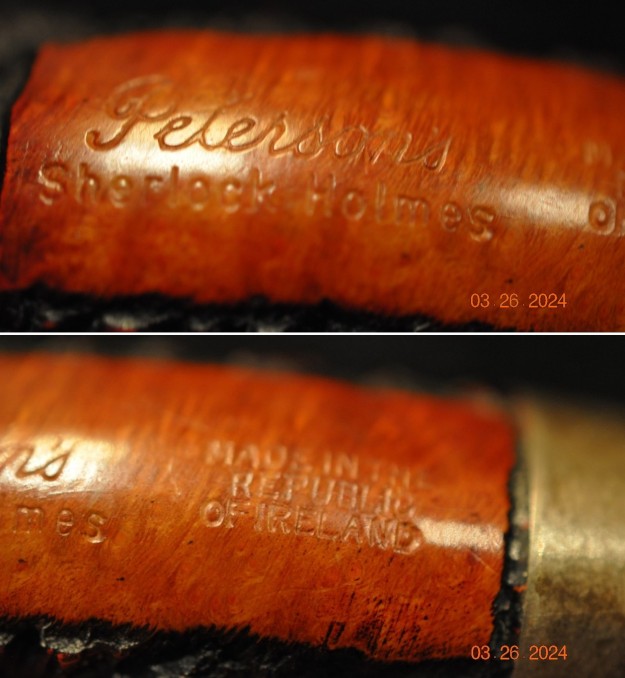
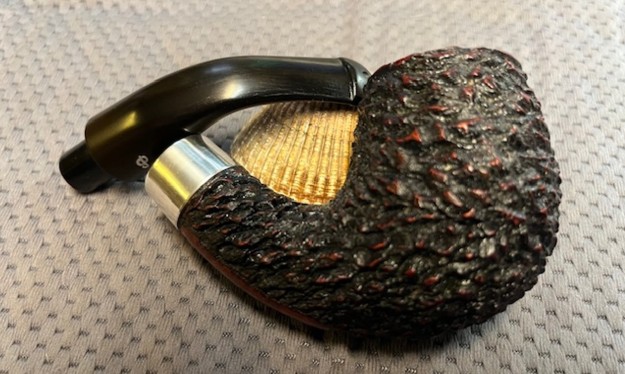
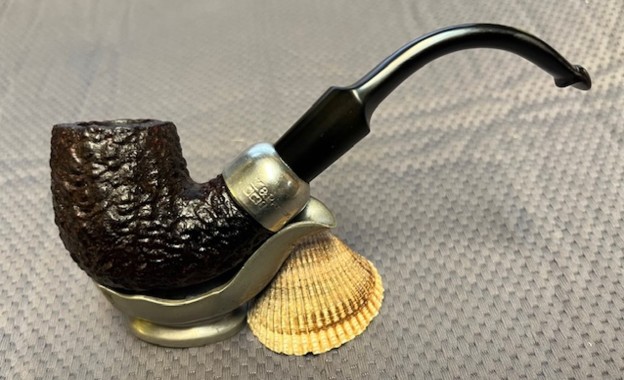
He took photos of the stamping on the shank sides. You can see that it is clear and reads as noted above. He also captured the stamping on the sterling silver ferrule on the shank end. It is also very clear and reads as noted. The P logo is faded but readable on the topside of the stem. 
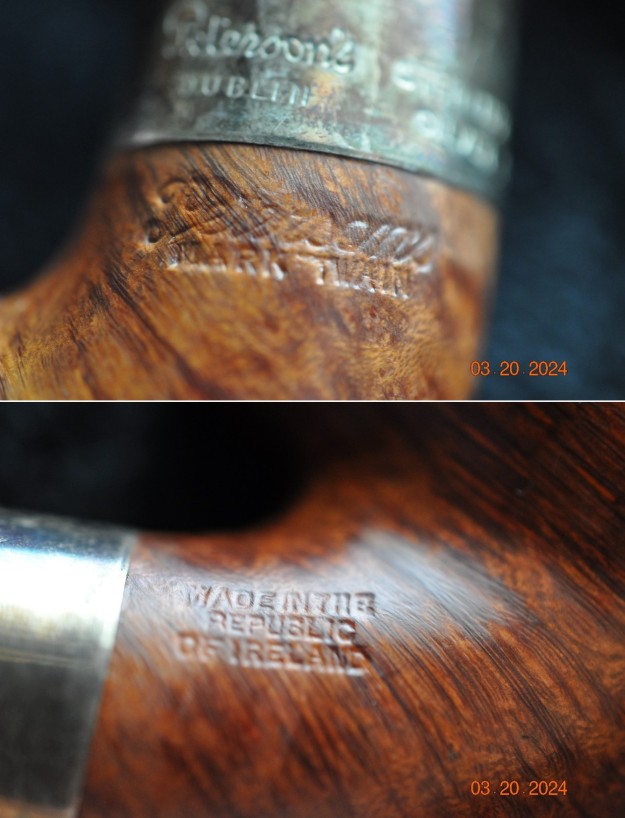
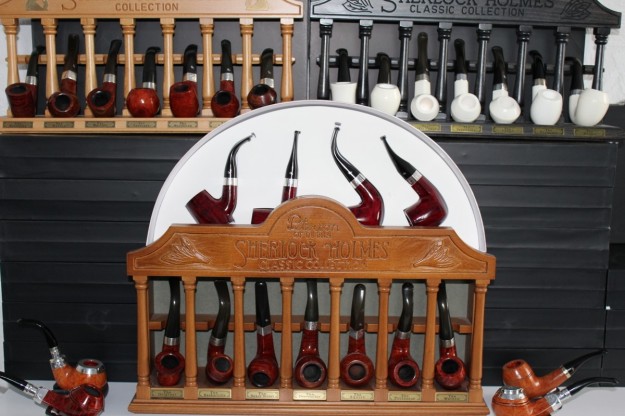
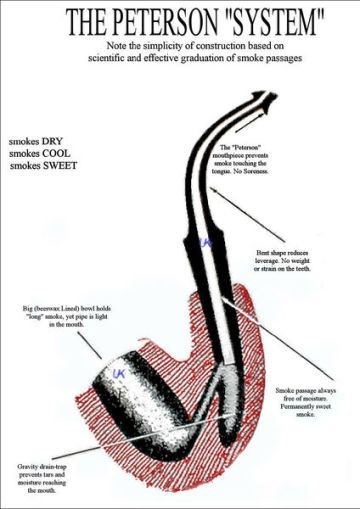
As is my habit before I start working on a particular pipe I want to know more about the pipe and the line. I turned to Pipephil (http://pipephil.eu/logos/en/logo-peterson-ser.html) to get a quick overview of the Mark Twain pipe. I have included a screen capture of the pertinent section below. 
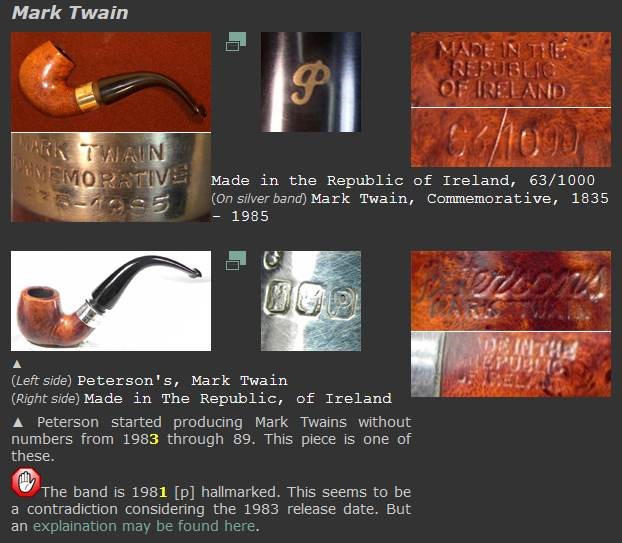
When I clicked on the photo of the second pipe above it took me to a photo of the hallmarks that looked identical to the ones on the pipe I am working on. It made me question the date mark and dig further. The note below the photo said, “Peterson Mark Twain (not from the two numbered editions). That photo has a red arrow pointing to the P date stamp. Now to dig a little deeper.The band on the pipe I am working on has the three hallmarks noted in the photo above. They are as follows. The first is Hibernia seated, arm on a harp (for the country of manufacture – Ireland). Next to that is a Crowned Harp designating the sterling quality. Finally, it is followed by the date stamp which in this case is Celtic style capital T. I have included information on the hallmarks below:
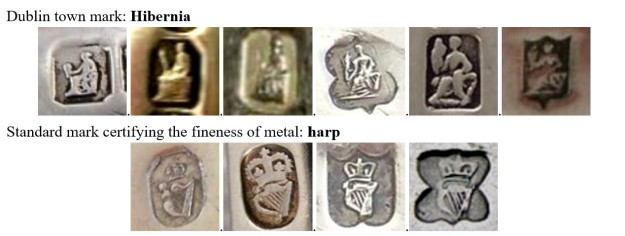
Date letters of Assay Office Dublin
Twenty letters of the alphabet of different fonts together with the shape of the escutcheon identify the year in which the piece was verified by the assay office. I have circled the matching letter T in the chart below which dates the pipe as a 1984.
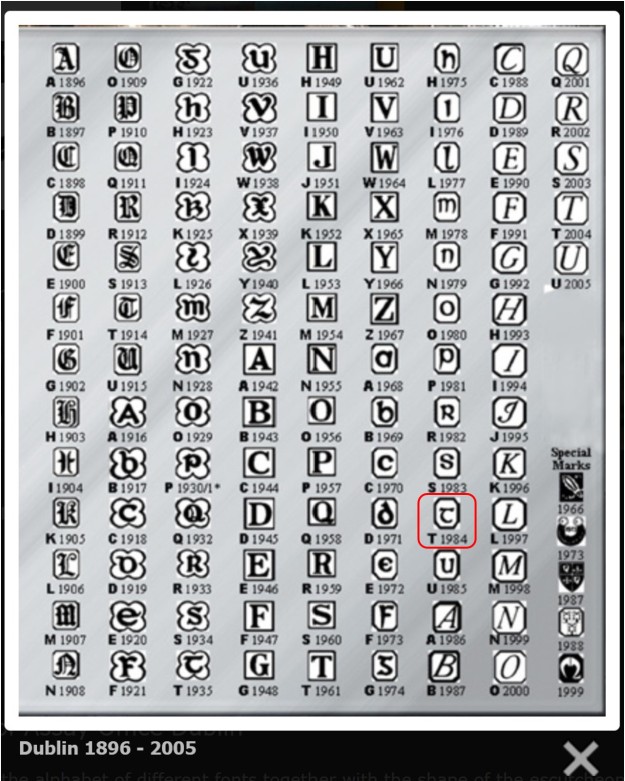
I turned to Pipedia and there was nothing specific about that stamping. I am including the link to the Pipedia’s article on Peterson pipes. It is a great read in terms of the history of the brand (https://pipedia.org/wiki/Peterson).

I turned then to the definitive pipe book, The Peterson Pipe by Mark Irwin and Gary Malmberg to find more information on the pipe and the stamping on it. I turned first to the short entries and on page 308 found the following information.

Mark Twain (1981-) System pipe design copied from a photograph of Samuel L. Clemens’s pipe held at the Mark Twain Boyhood Home and Museum in Hannibal, Missouri. Arguably Peterson’s most famous and widely known commemorative, it was first introduced as a limited edition 400 numbered pipes in 1981 and offered in smooth and rusticated finishes to this day. Based on shape 14 from 1906 catalog…

There was also a note to turn to another chapter for further information. There is a section in the book on page 174-176 on the Mark Twain variations. There on page 176 in a paragraph entitled, “The Mark Twain System” I found some helpful information which I quote below.

The Mark Twain System. Usually known as the De Luxe, 2400 unnumbered pipes were originally released in 1981 with the hallmark P, and available in smooth as well as rusticated finishes. It is stamped PETERSON’S in script over Mark Twain on the obverse of the shank. The front side of the mouthpiece is stamped with a white P. The pipe retailed for $75 in a red oversized gift box and sometimes included a reproduction of the John Adams etching. De Luxe Quality models were released several times over the years, with later documented examples bearing hallmarks from 1982, 1984-1987, 1990-1991, 1994 and 1997.

This section was extremely helpful in that it described the pipe I was working on to a T. So, I knew that the pipe was a Mark Twain System known as the De Luxe. It was one of 2400 pipes that were released in 1981 with the hallmark on the silver ferrule – exactly like the one I was working on. Since my pipe was dated to 1984 I knew it was part of the original run of pipes as noted in the last paragraph above.

Lastly, I remembered that the late Jim Lilley had written a very interesting piece on Mark Twain pipes on Pipedia. I quickly turned to that article to read through it again. I highly recommend that you take time to read it as it is full of great information and is a fascinating read  (https://pipedia.org/wiki/A_Closer_Look_at_the_Mark_Twain_Original_and_New_Pipes). I have included a pertinent portion of the article and a portrait of Mark Twain and his pipe below.

Peterson started production of the Mark Twain Series in 1980 with a numbered production run from 1 – 400. Then again in 1981 with a numbered production run from 1 – 1000. In 1983, Peterson started producing Mark Twains without numbers, (except the 1985 limited Gold issue), until about 1989. However, they must have had another production run later as there is evidence of Mark Twains with 1998 silver marked bands.

The pipes are typically large, full bents, with P-lip tapered stems, and a hallmarked silver collar. They are akin in quality to Deluxe System pipes, and as such, are also available in the smooth, sandblast, and rustic finishes. The Mark Twains have legendary high-quality smoking, with good draw and excellent with Virginia and flake blends.
Cost/Value: $250 – $1000 plus, depending on which series and precious metal finish. The originals are regularly available on eBay and with offerings hotly contested at auction.

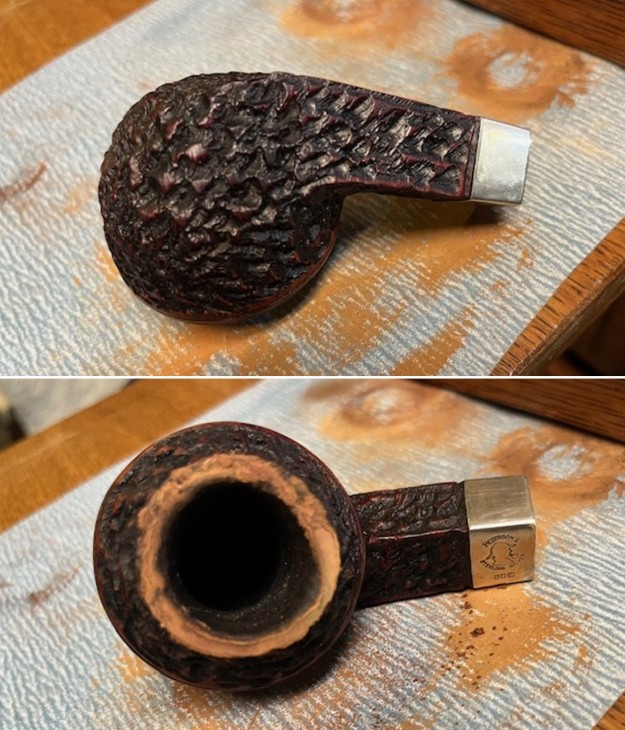
Now it was time to work on the pipe. Jeff had done a great job cleaning up the pipe as usual. He reamed the pipe with a PipNet reamer and cut back the cake back to the bare briar. He cleaned up the walls with a Savinelli Fitsall Pipe Knife. He scrubbed the interior of the bowl and shank with pipe cleaners, cotton swabs, shank brushes and alcohol to remove the tars and oils. He scrubbed the exterior of the pipe with Murphy’s Oil Soap and a tooth brush to remove the grime from the finish. He worked on the rim top lava and darkening with the soap and tooth brush. It looked much better. The silver ferrule looked better and the tarnish was reduced. He soaked the stem in Briarville’s Pipe Stem Deoxidizer and rinsed it off with warm water. When the pipe arrived here this week I took photos of it so you can see what I see. It is a beautiful pipe. 
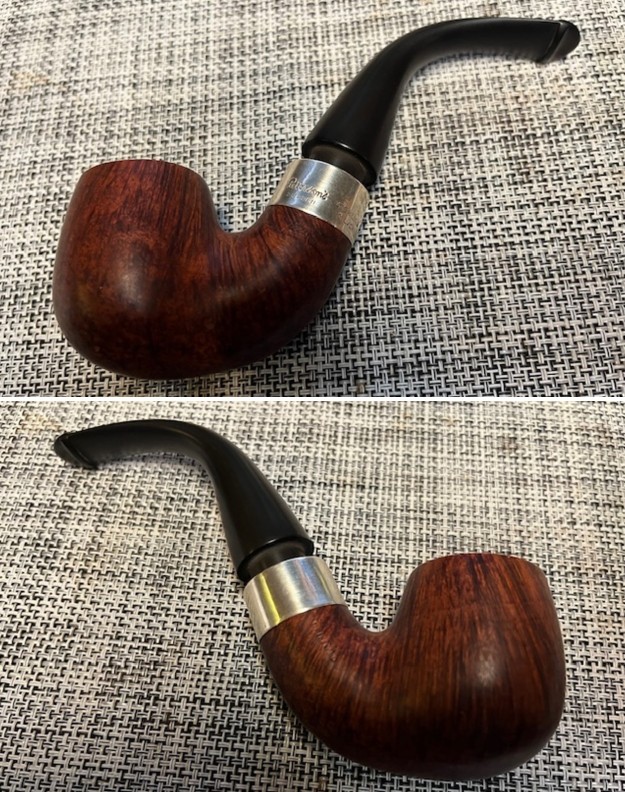
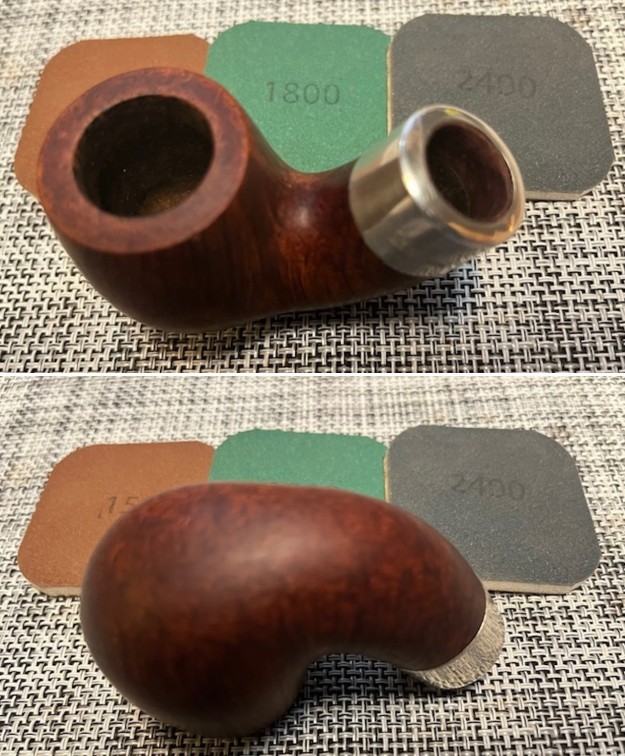
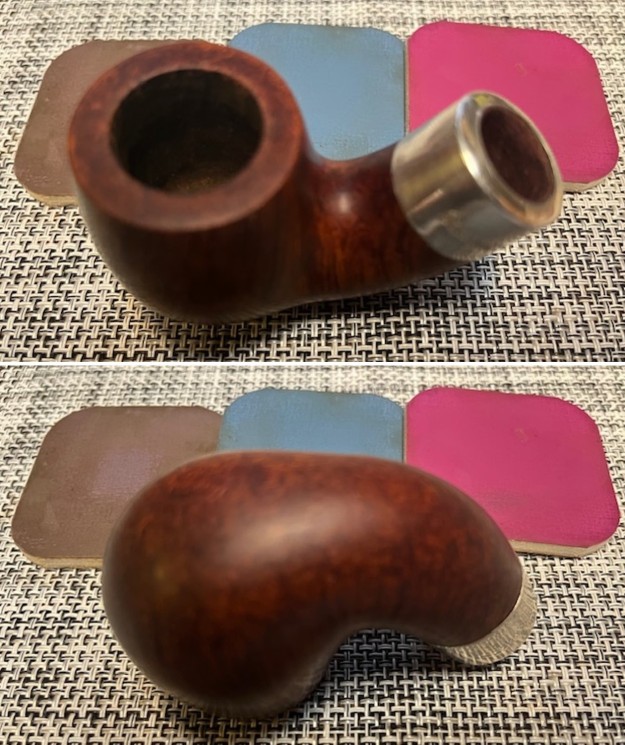
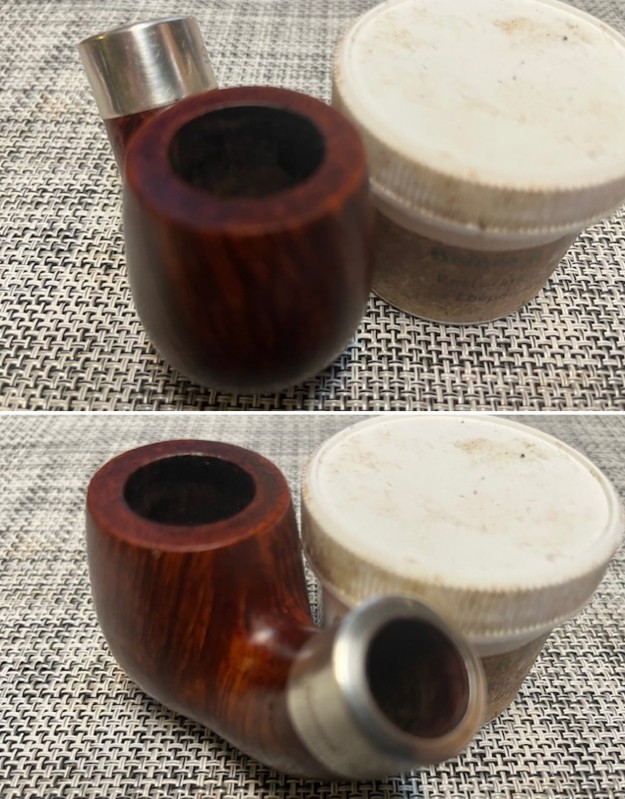
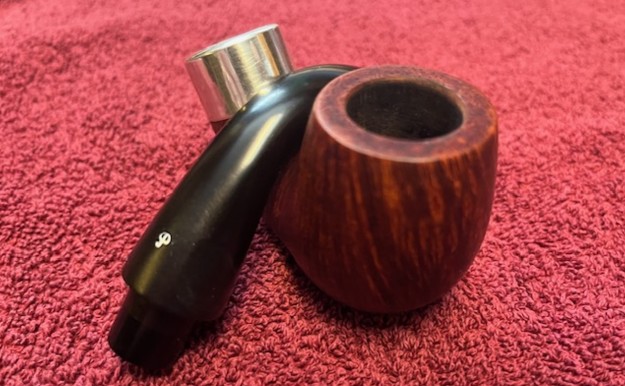
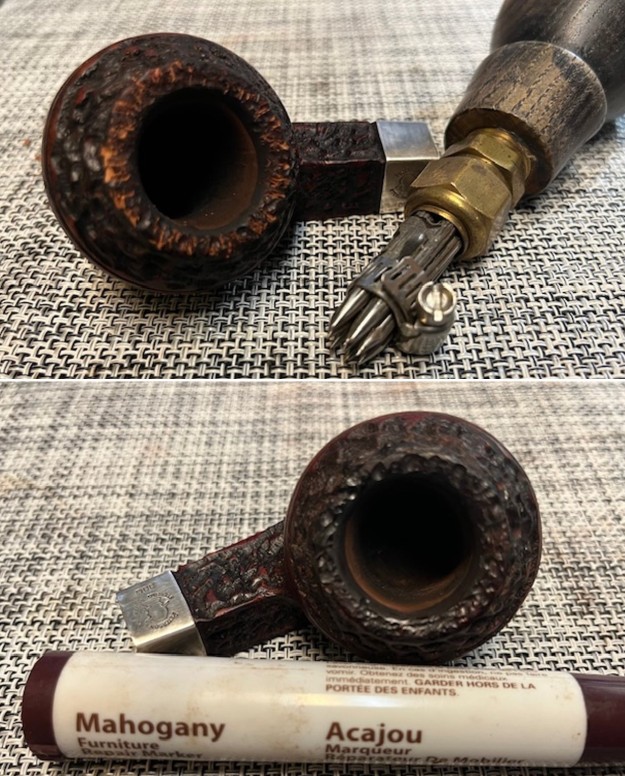
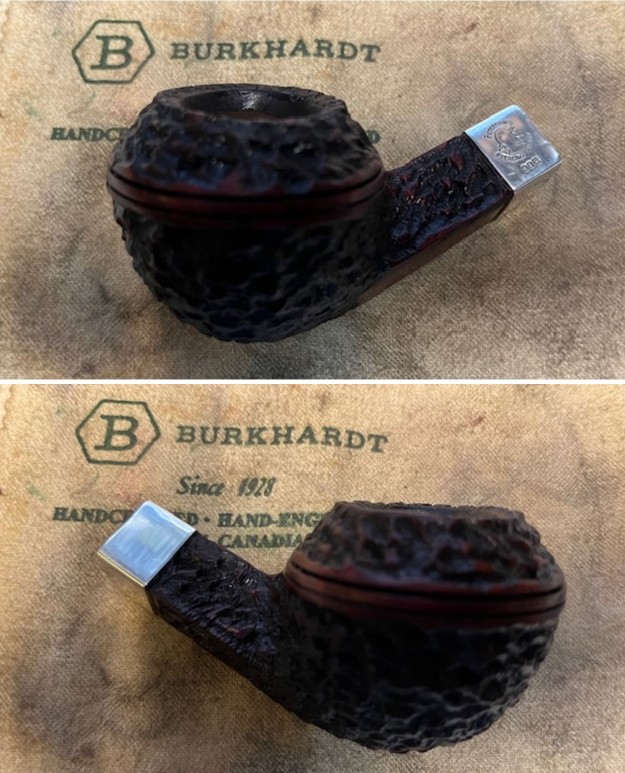
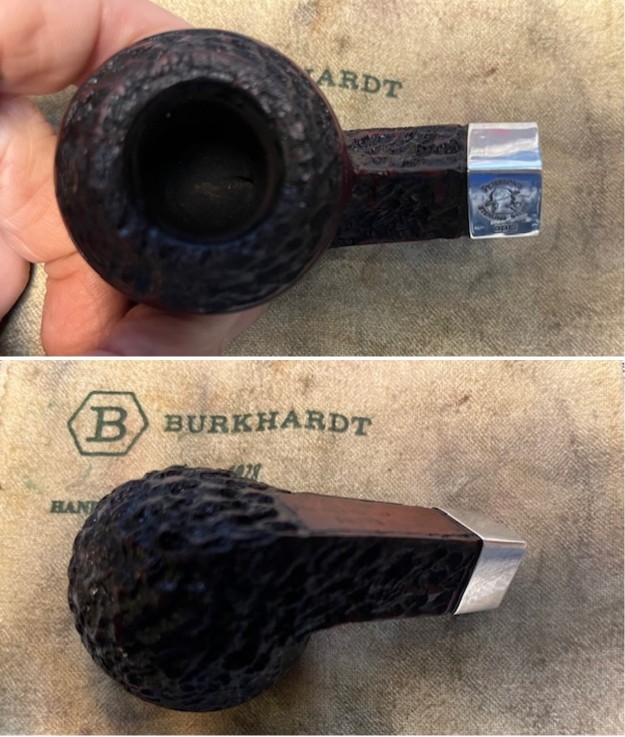
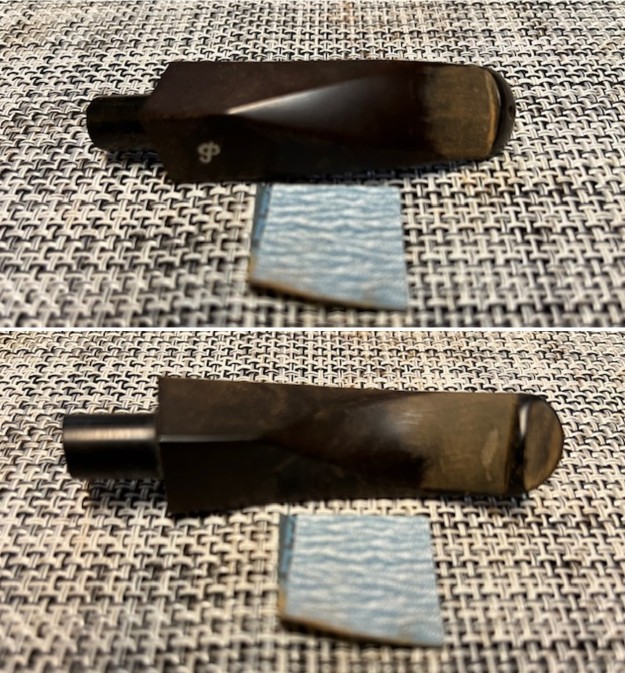
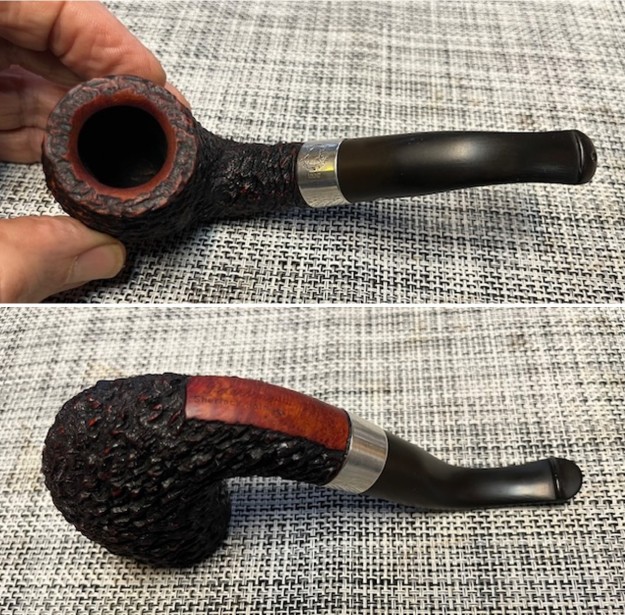
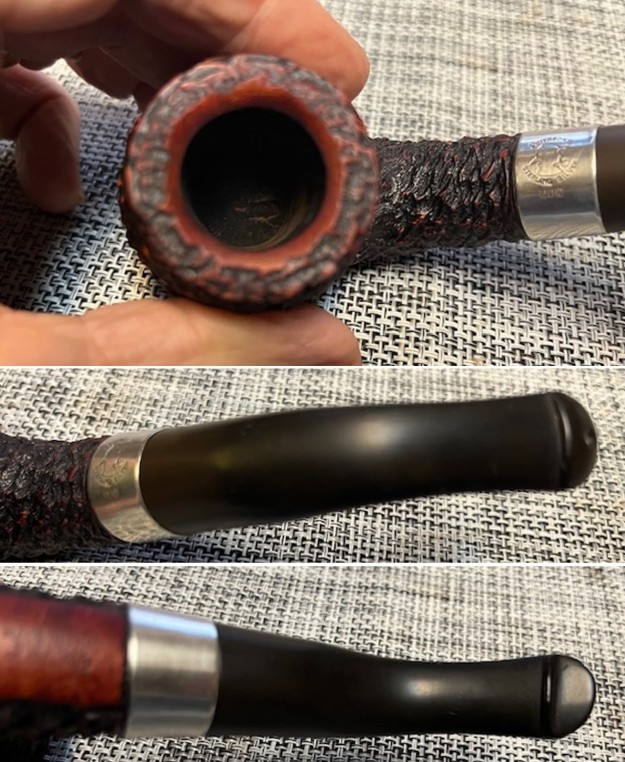
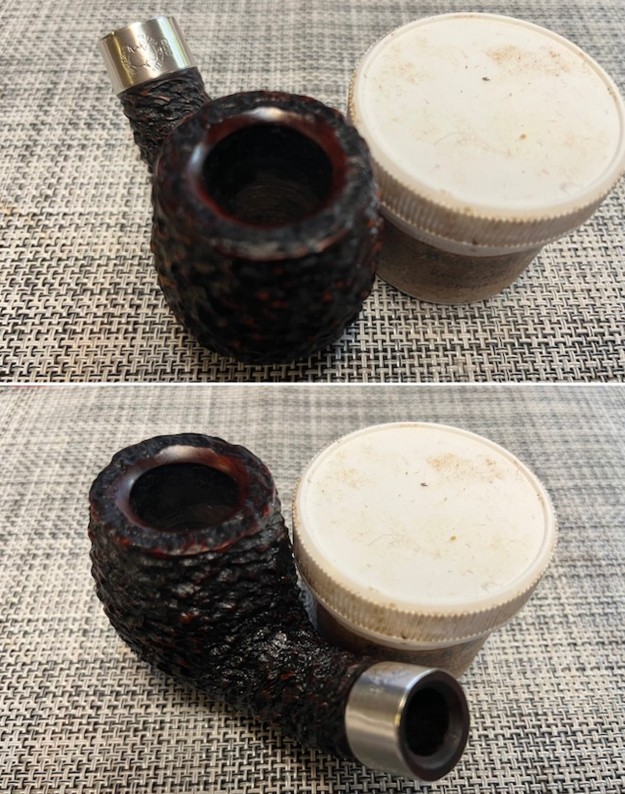
I took some close up photos of the rim top and also of the stem surface. I wanted to show how well it had cleaned up. The rim top and edges looked very good. It should polish up really well. I also took photos of the stem to show the condition. The tooth marks and chatter are present but hard to see in the photos which is good. It means that none of them are too deep. The stem was clear of oxidation.
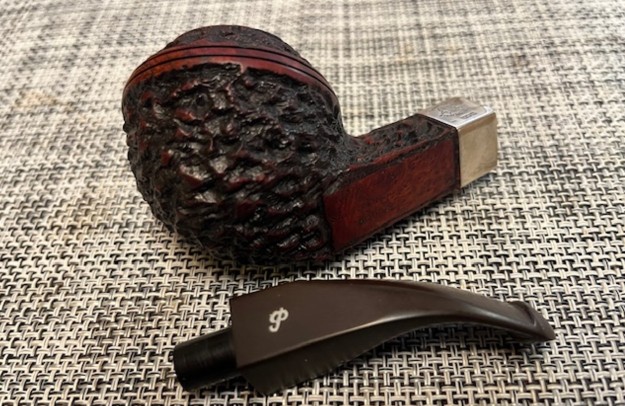
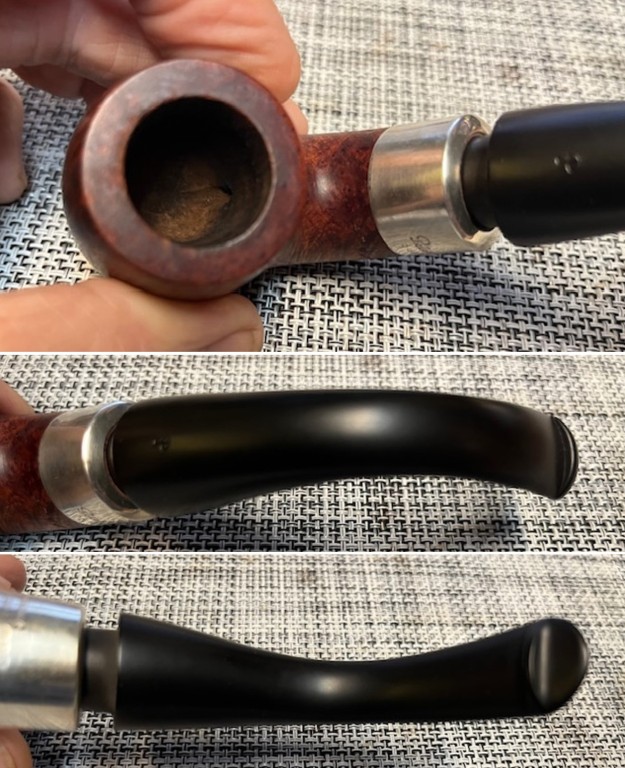
I took photos of the stamping on the sides of the shank. You can see that it is stamped as noted above. It is clear and readable. I removed the stem and took a photo of the pipe to have a look at the parts and overall look. The new stem looked really good with the bowl. 
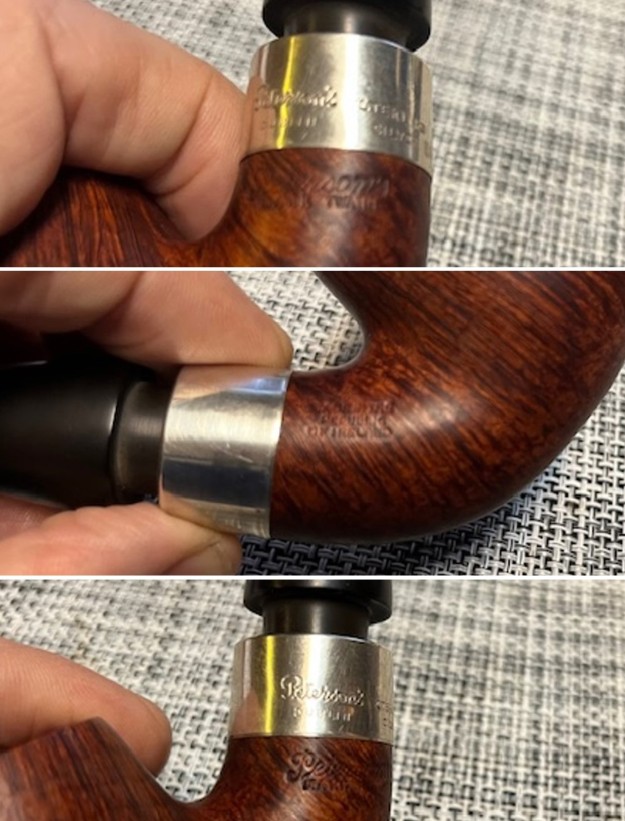
I polished the briar with micromesh sanding pads – dry sanding with 1500-12000 grit pads and wiping the bowl down after each sanding pad. The grain really began to shine through. It is a beautiful pipe. 
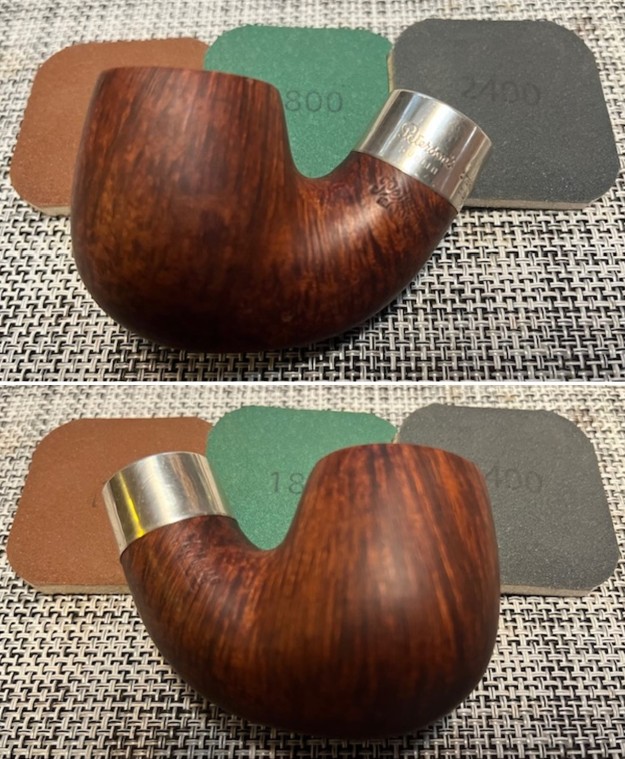
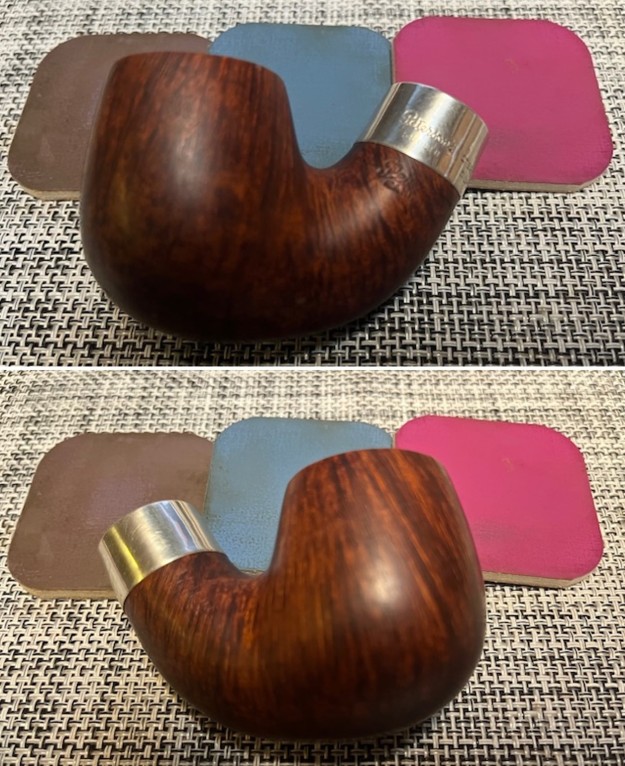
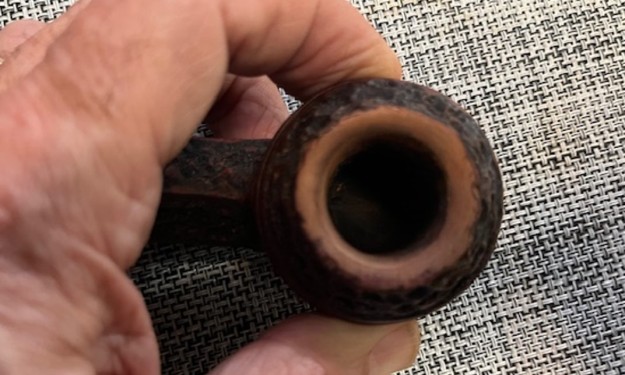
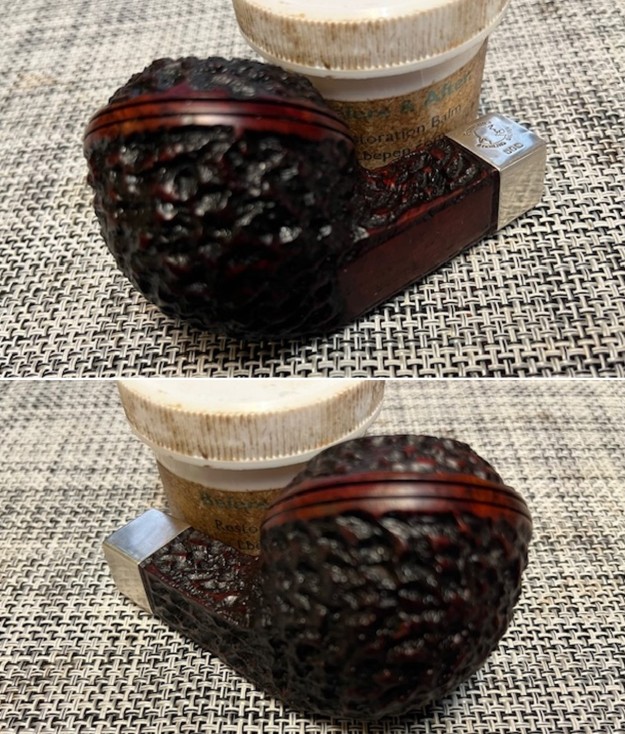
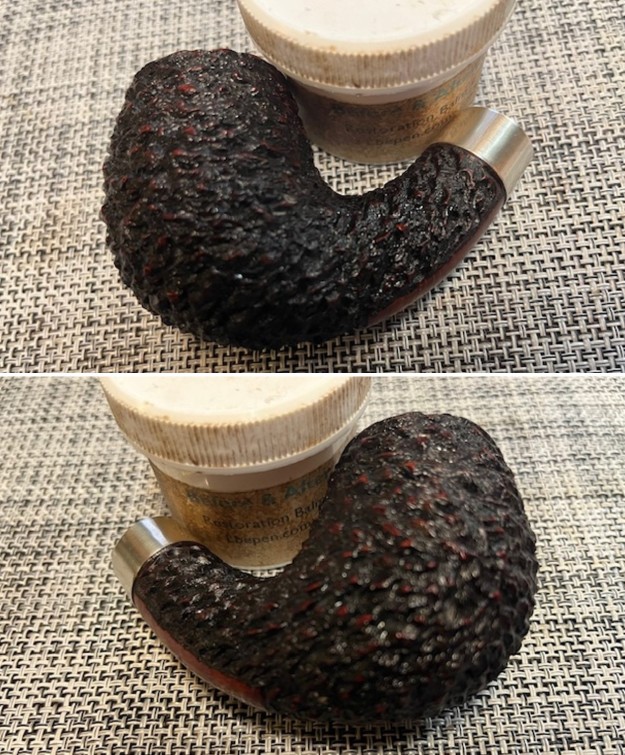
The polishing of the rim top and inner edge brought the rim top colour to match the rest of the bowl. I worked some Before & After Restoration Balm into the surface of the briar with my fingertips to clean, enliven and protect the briar. I let the balm sit for 15 minutes and then buffed with a cotton cloth to raise the shine. The photos show the bowl at this point in the restoration process. 
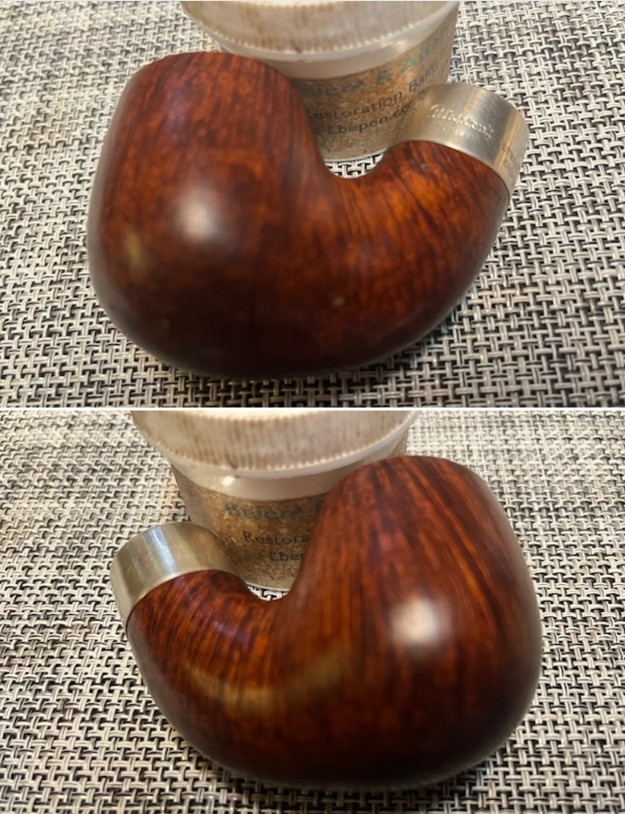
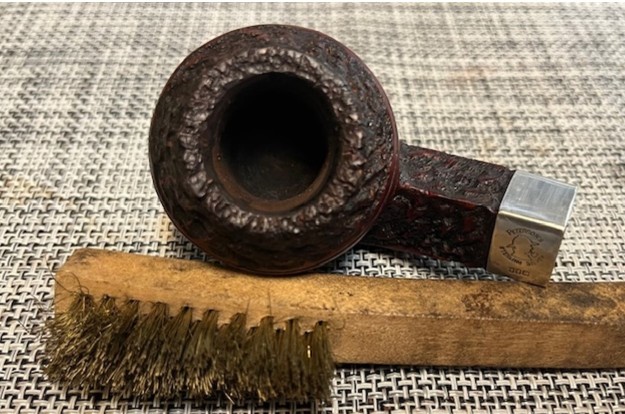
I polished the silver ferrule with a jeweller’s cloth to remove the tarnish and further protect the silver from the intrusion of more tarnish. 
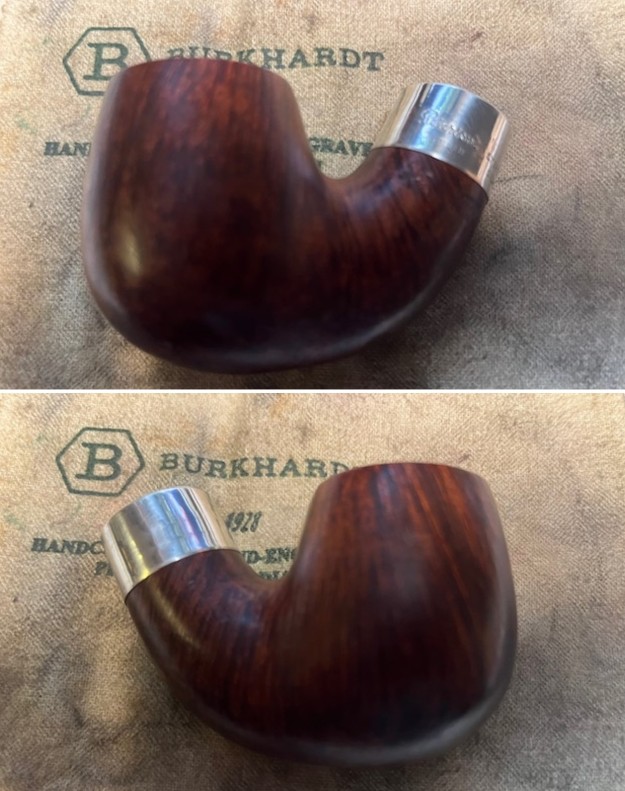
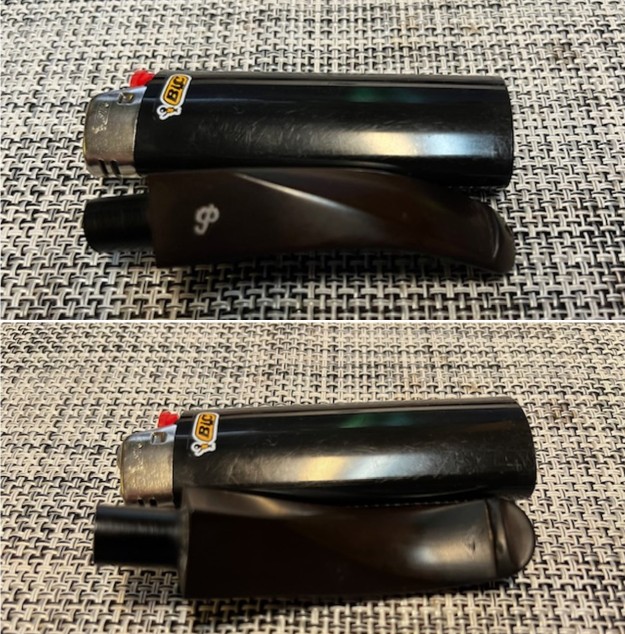
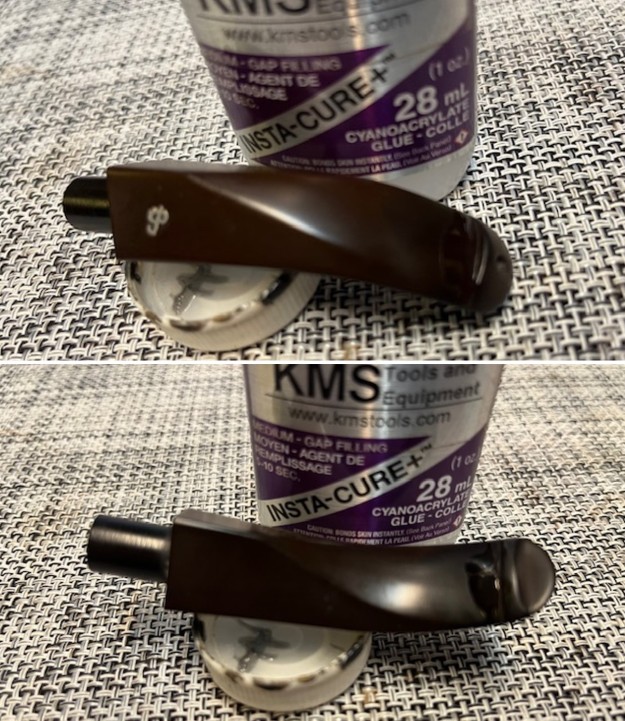
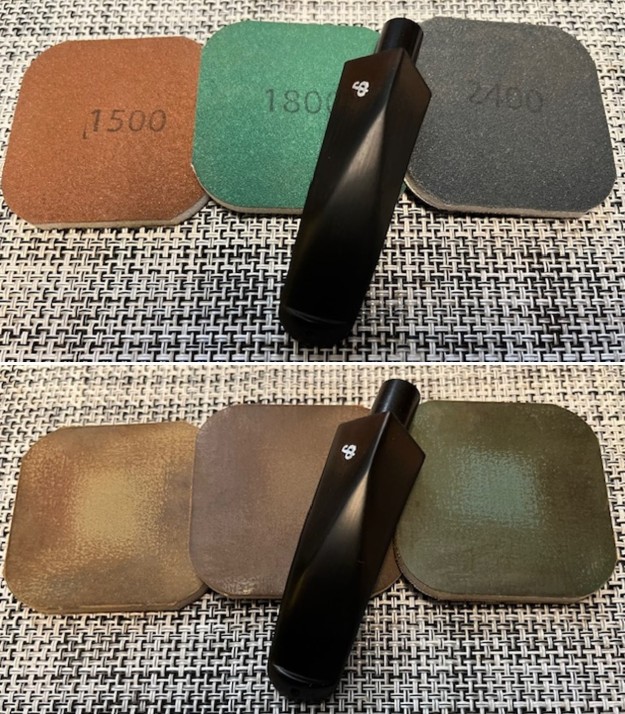
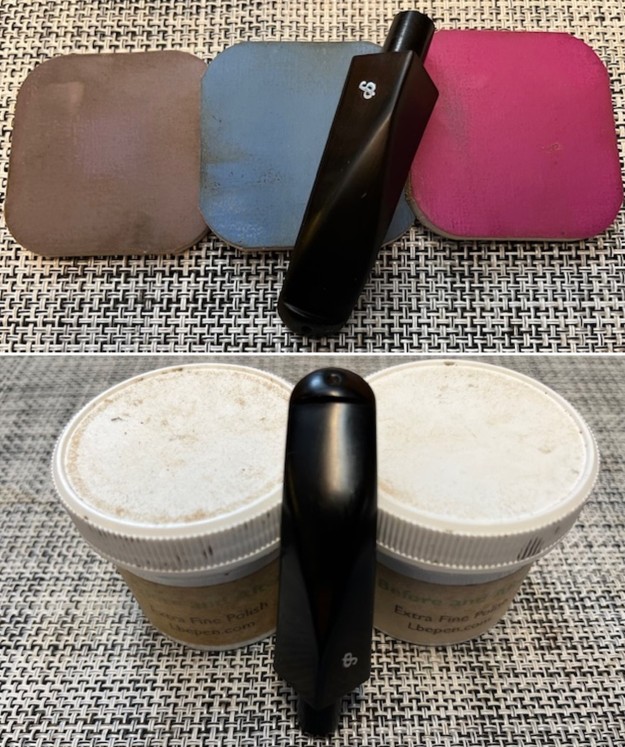
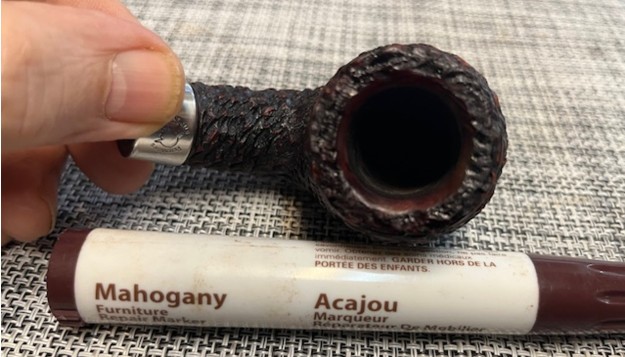
I set the bowl aside and worked on the stem. I touched up the white P stamp on the topside of the stem with some White Acrylic Nail Polish. I pressed it into the stamp with a tooth pick and polished it off once dry with a worn 1500 grit micromesh sanding pad.
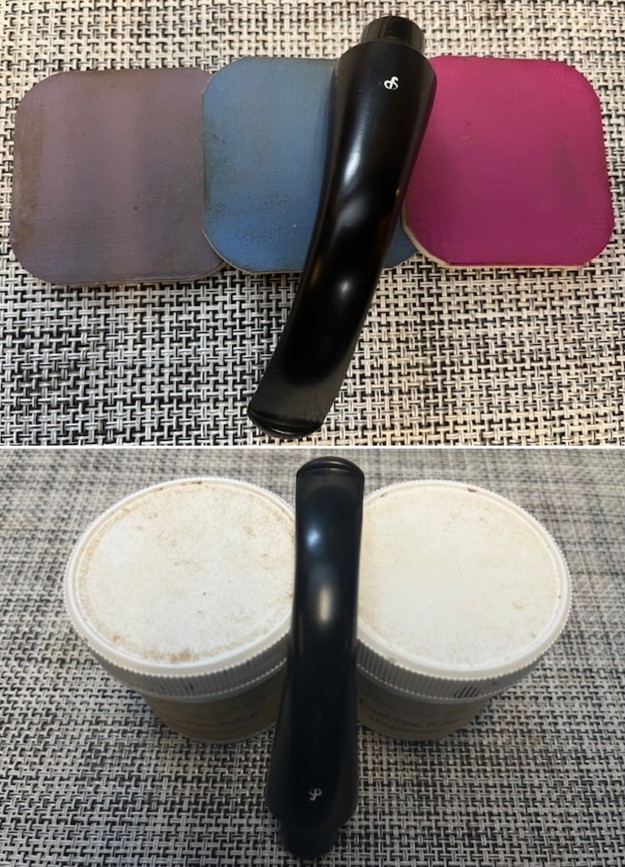
I polished the stem with micromesh sanding pads – dry sanding with 1500-12000 grit sanding pads. I wiped it down after each sanding pad with Obsidian Oil. I polished it with Before & After Pipe Stem Polish – both Fine and Extra Fine. 
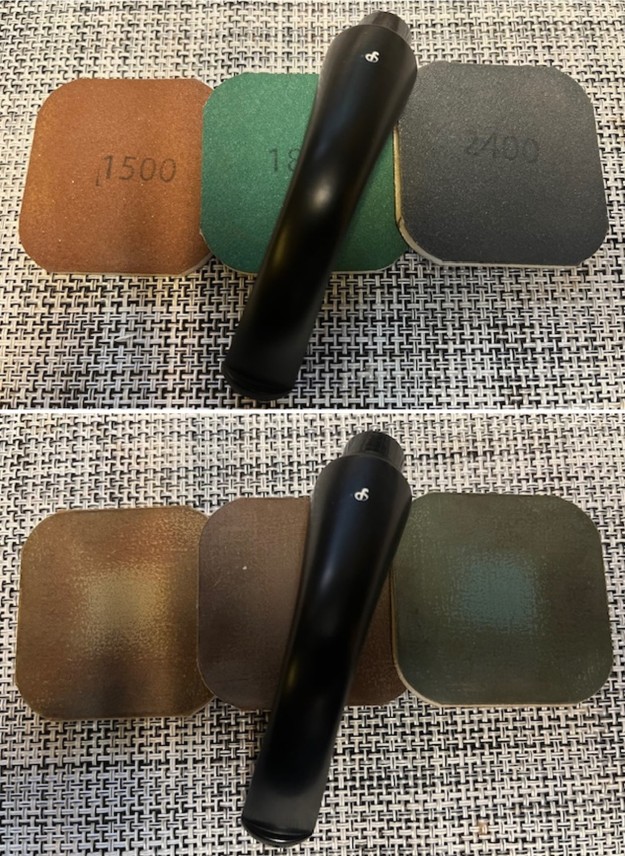
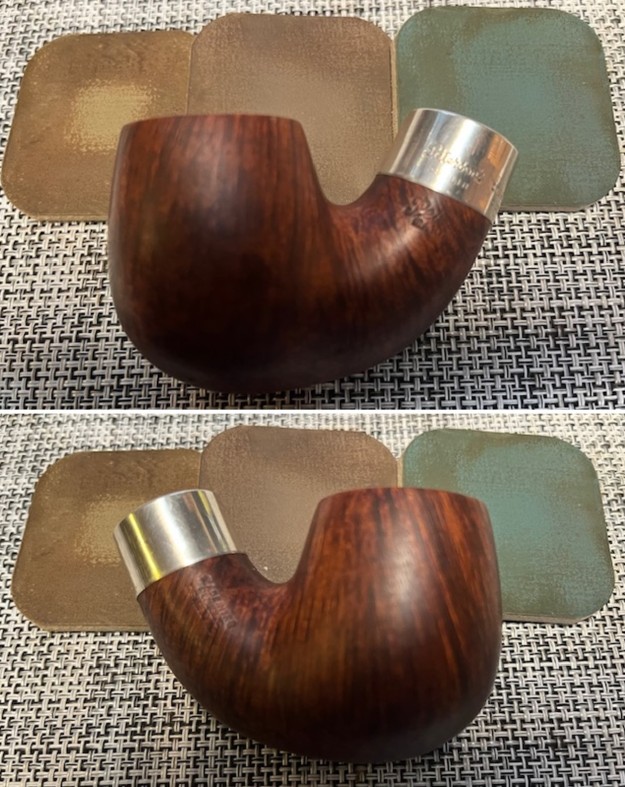
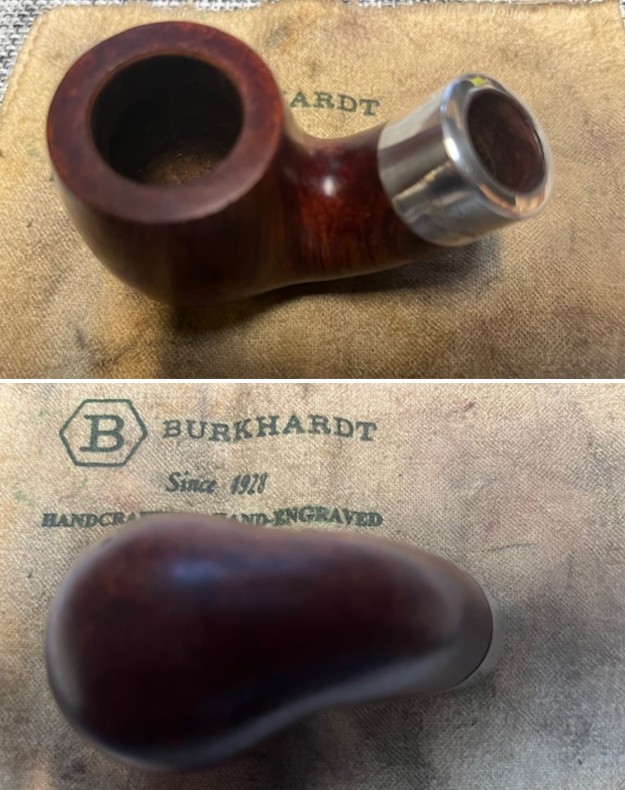
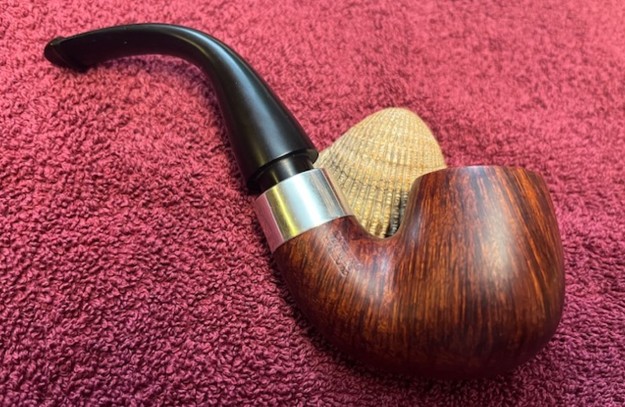
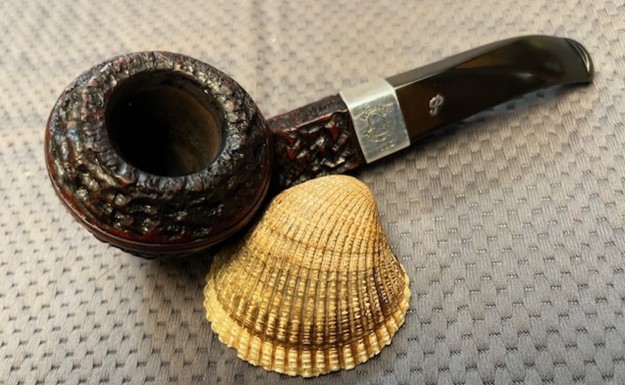
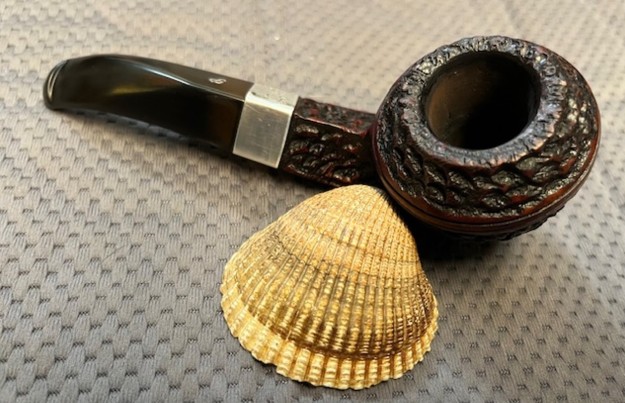
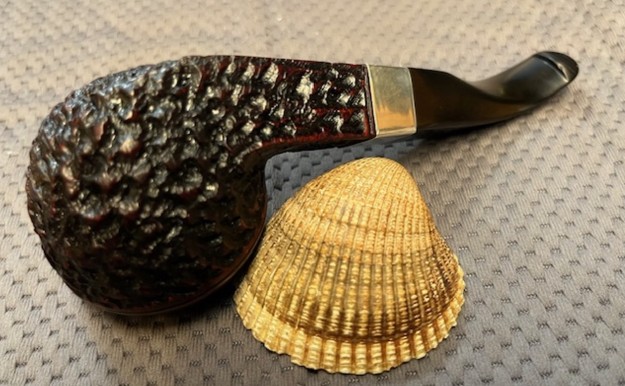
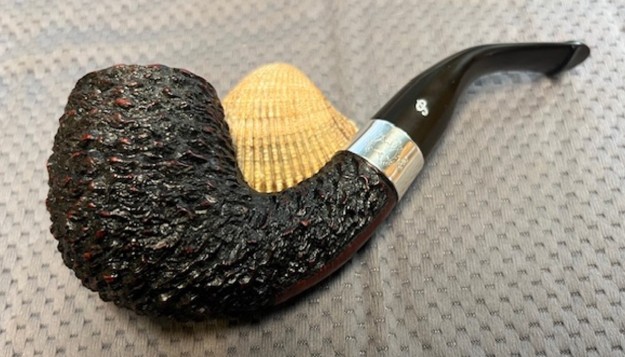
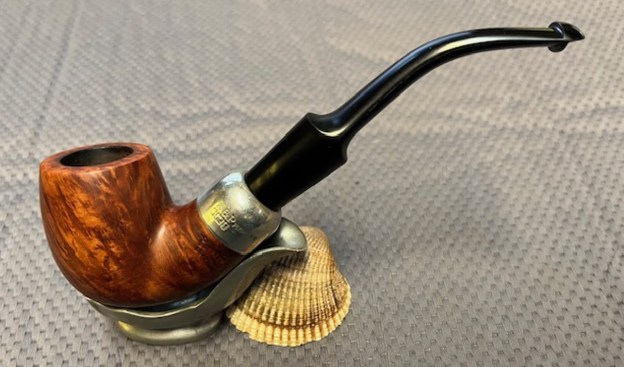
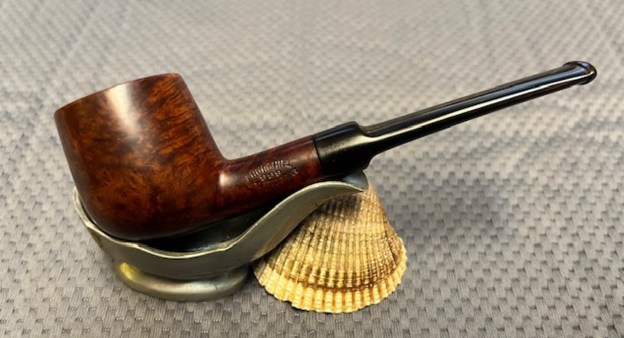
I am excited to put the final touches on this 1984 Made in the Republic of Ireland Peterson’s Mark Twain System Pipe. I put the pipe back together and buffed it with Blue Diamond on the buffing wheel. I gave the bowl and the stem multiple coats of carnauba wax. I hand buffed the pipe with a clean buffing pad to raise the shine. It is fun to see what the polished bowl looks like with beautiful straight and birdseye grain on the bowl sides, top and bottom. Added to that the polished black vulcanite stem combined with the bowl and the Sterling Silver ferrule made a stunning pipe. This smooth Classic Peterson’s Mark Twain System is great looking and the pipe feels great in my hand. It is light and well balanced. Have a look at it with the photos below. The dimensions are Length: 5 ½ inches, Height: 1 ¾ inches, Outside diameter of the bowl: 1 ¼ inches, Chamber diameter: ¾ of an inch. The weight of the pipe is 70 grams/2.47ounces. I will be putting it on the rebornpipes store in the Irish Pipe Makers Section shortly. Let me know if you are interested in adding it to your collection. Thanks for walking through the restoration with me as I worked over this pipe. Thanks to each of you who are reading this blog.
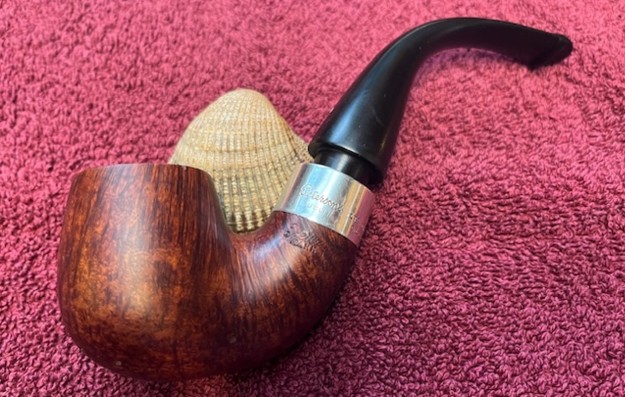
Sherlock Holmes Rusticated Squire Bent bulldog


Blog by Steve Laug

The next pipe that I am working on came from our contact in Copenhagen, Denmark we purchased on 01/08/24. It was very dirty and was a reddish, brown coloured pipe when it started. The rusticated finish around the bowl was dirty and had hand oils ground into the rusticated finish. The bowl had a thick cake and a thick coat of lava onto the bevelled inner edge of the rim top. The rim top had some serious burn damage on the back left and front right that left the bowl out of round. The classic p-lip stem was very dirty, oxidized and had light tooth marks and chatter on both sides ahead of the button. There was a silver inset P logo on the left topside of the diamond stem. The fit of the stem to the shank is perfect. The pipe is stamped on the left underside of the diamond shank and read Peterson’s [over] Sherlock Holmes[over] Squire. That is followed by Made in the Republic of Ireland (in three lines). There is a Sterling Silver band on the shank end that is stamped on the topside with the Sherlock Holmes Series Logo – the outline bust of Sherlock with Peterson ‘s arched above and Sterling Silver arched below. Below that it bears three hallmarks in the silver band – Hibernia seated for Ireland, a crowned harp designating the .925 quality and finally the date mark which in this case is an italic K dating the pipe as made in 1996. It is clean but oxidized. Jeff took photos of the pipe so I could have a sense of what it looked like before he started his work on it. Jeff took photos of the bowl and rim top to show the cake in the bowl with remnants of tobacco stuck on the walls of the bowl. There was a thick lava build up on the rusticated top of the rim and the bevelled edge of the bowl. The rim top had burned areas on the front and rear and the bevel was destroyed. Only clean up would tell the full story. Jeff took photos of the top and underside of the p-lip stem showing the tooth chatter, scratching and oxidation on the stem surface and wear on the edges of the button. Jeff took photos of the sides and heel of the bowl to show the condition of the finish. You can see the grime in the rustication around the sides of the bowl and shank. Even under the dirt and debris of the years it looked very good. Jeff took photos of the stamping on the underside of the shank. The stamping was faint in spots but readable as you can see from the photos. It read as noted above. The Sterling Silver Band is stamped as noted above and is very readable under the oxidation. I wanted to know more about the Peterson’s Sherlock Holmes Line so I turned to the Pipedia article on the line and read it carefully to see where this pipe fit in the line of pipes making up the line. (https://pipedia.org/wiki/Peterson#1950_-_1989_The_Republic_Era). I quote what I found out below.

1987 saw the introduction and Issue of the first Sherlock Holmes ‘Original’ Series of pipes. The Sherlock Holmes series is probably the most successful series of pipes ever introduced by Peterson in terms of numbers. It was first issued to honour Sir Arthur Conan Doyle’s famous fictitious detective character, Sherlock Holmes. Holmes is perhaps the most famous pipe smoking character in fiction…

The Sherlock Holmes Series: Probably the most popular and successful series of pipes ever produced by Peterson. Including the Meerschaum version of the seven day sets. Both briar and Meers can be purchased either as individual pipes or complete seven day sets and stands. Expect to pay around $250 for briars and $300 for individual Meerschaums. The Adventures of Sherlock Holmes runs around $1000 for a 4 pipe boxed set. Complete 7 day sets and stands can be up to $1500 – $2000.

At this point I knew that the original line was introduced in 1987. I did not know the sequence of pipes after the Original first pipe. More work was necessary. So, I followed the links included to another article call the Pete Sherlockiana Group. There was photo there of the full collection of various Sherlock Holmes lines that were issue. I have included the link and the information include with the group photo that shown of the collection below.

Here is the link (https://pipedia.org/wiki/File:Pete_SherlockianaGroup.JPG). The description under the photo read as found below:

Sherlockiana Group, which includes: The ‘Original’ 7 day set w/stand, The ‘Return’ 7day set w/stand, The Meerschaum 7 day set w/stand, The ‘Adventures of’ 4 pipe collection, and Various ‘Silver Specials’I still wanted to know where it fit in the order of release so I did a bit more digging into the pipe. I wanted to know the name of the pipe and what line of the Sherlock Holmes series it was in when it was released. I Googled and came across a link to an advertising brochure on Smokingpipes.com. (https://www.smokingpipes.com/smokingpipesblog/single.cfm/post/closer-look-petersons-sherlock-holmes-pipes-infographic). I have included it below. From that I knew that I was dealing with a Pipe from the Original release of the line from 1987, 1989-1991. It was called the Squire. The pipe is a large bent Bulldog.

I also found a link to a chart on Tobaccopipes.com that was an exploration the Sherlock Series. Here is the link (https://www.tobaccopipes.com/blog/exploring-the-peterson-sherlock-holmes-series/). Each name on the original list on the site can be clicked on for a description of the pipe that is named.I clicked on the Squire name in the chart above and it took me to the following link and information (https://www.tobaccopipes.com/blog/exploring-the-peterson-sherlock-holmes-series/#baker_street). It states that the pipe was in the Original Collection and came out between 1989-1991. The text below the photos reads as follows:

The Squire is named for one of the twelve short stories making up The Memoirs of Sherlock Holmes, “The Adventure of the Reigate Squire.” The name certainly underscores a stateliness that is apt for this slight bent Bulldog. 

The diamond shank elegantly bends into the low base of the squat bowl so that the bowl almost seems to be held from below, offered nonchalantly in the loose cradle of an upturned hand. The Squire’s squat bowl belies its capacious chamber. With a broad, strong base below the bead lines, the Squire evokes the ample Bull-Moose shape.  

In all, the Squire touts a distinguished appeal, but a bit less rigid than the conservative Baker Street. Even with that sharp, diamond shank, there is a relaxed posture.

With that information in hand I knew what I was dealing with in terms of the stamping and the age of this pipe. I knew from the information that the pipe was made during the Republic Era between 1950 and the present. The Squire pipe came out as part of the Original Sherlock Holmes Series and thus should have been made between 1989 and 1991. However, here is the anomaly. The silver hallmarks date the pipe to 1996. Now it was time to work on the pipe.

Jeff cleaned this filthy pipe with his usual clean up process. This one was a real mess and I did not know what to expect when I unwrapped it from his box. He reamed it with a PipNet pipe reamer and cleaned up the reaming with a Savinelli Fitsall Pipe Knife. He scrubbed out the internals with alcohol, pipe cleaners, shank brushes and cotton swabs until the pipe was clean. He scrubbed the exterior of the bowl with Murphy’s Oil Soap and a tooth brush to remove the grime and grit on the briar and the lava on the rim top. The finish looks very good with great looking grain showing through the deep rustication around the bowl and shank. There is some fading on the rim top stain that I will work on but it is a beauty. Jeff soaked the stem in Briarville’s Pipe Stem Deoxidizer to remove the debris on the acrylic surface. When the pipe arrived here in Vancouver for the second stop of its restoration tour I was amazed it looked so good. I took some close up photos of the rim top and also of the stem surface. I wanted to show what an amazing job Jeff did in the cleanup of the rim top. I also wanted to show the damage to the rim top. There is burn damage on the on the left side that the right back side is also damaged and looks thin. The rustication on the rim top is also burned off and only remains on the left side quite clearly. I also took close up photos of the stem to show the condition of the vulcanite. It was quite clean other than the light tooth marks and chatter on both sides of the stem ahead of the button. There is also some deep oxidation still remaining on the stem surface.One of the things I appreciate about Jeff’s cleanup is that he works to protect and preserve the nomenclature on the shank of the pipes that he works on. The stamping on this one was faint in spots to start with so I was worried that it would disappear altogether with the cleanup. He was able to preserve and maintain its condition in the process. I took some photos to show the clarity of the stamping. I have noticed that many restorers are not careful to protect the stamping in their cleaning process and often by the end of the restoration the nomenclature is almost destroyed. I would like to encourage all of us to be careful in our work to preserve this as it is a critical piece of pipe restoration! I took the stem off the shank and took a photo of the pipe. The silver P logo on the left side of the stem is in excellent condition. Now it was time to work on the pipe. I decided to address the issues with the rim top. The first photo below shows the rim top damage before I worked on it. I know that this kind of reworking is a bit controversial and that some would just clean it up and leave it. But for me this pipe begged for a reworking and renewal so I did that. I topped the bowl on a topping board with 220 grit sandpaper. Once finished I took a photo of the rim top. It clearly shows the damage to the top and the edges. I used a wooden ball and some 220 grit sandpaper to give the inner edge a bevel and minimize the damage to the briar. It took some work to make it happen and the next few photos show the progress in the work. I used a Dremel and a series of burrs to rusticate the rim top. I stained it with a Mahogany stain pen after the rustication. I took a photo of it and show it below. I was not happy with the rustication as it just was not as rustic looking as the rest of the bowl and shank. I used a rusticating tool that a reader of the blog gave me to deepen the rustication on the rim surface. It was what was needed. I stained it with a Mahogany stain pen to match the finish on the bowl. I used a brass bristle wire brush to knock off loose briar particles. It looked good! I rubbed the bowl and rim down with Before & After Restoration Balm. I worked it into the rusticated surface of the briar with my fingertips and a horse hair shoe brush to clean, enliven and protect it. I let the balm sit for 10 minutes and then buffed with a cotton cloth to raise the shine. I really like watching the Balm do its magic and bring the briar alive. I polished the Sterling Silver shank band with a jeweller’s cloth to remove the tarnish and also to preserve and protect the silver. It looks much better with the shine. I set the bowl aside and turned my attention to the stem. I “painted” the stem surface with the flame of a lighter to lift the tooth marks. I was able to lift them significantly. They looked better. I filled in what remained with clear CA glue. I used some small files to flatten the repairs and start to blend them into the surface. I sanded it with 220 grit sandpaper. It looked significantly better at this point in the process. I scrubbed the stem surface with Soft Scrub to remove the remaining oxidation on the stem. It took some work but I was able to remove it and the stem looked better.I sanded the stem with 320-3500 grit sanding pads to remove the remaining oxidation and smoothing out the repaired area.I polished the stem with micromesh sanding pads – dry sanding with 1500-12000 grit pads. I wiped the stem down after each sanding pad with Obsidian Oil. I polished it with Before & After Pipe Stem Polish – both Fine and Extra Fine. I gave it a coat of Obsidian Pipe Stem Oil. It works to protect the stem from oxidizing. I set it aside to dry. I am excited to be on the homestretch and look forward to seeing the Republic Era 1996 Sherlock Holmes Squire Bent Bulldog put back together, polished and waxed. I put the bowl and stem back together and lightly polished the bowl and stem with Blue Diamond to polish them. I gave the bowl multiple coats of Conservator’s Wax and the stem multiple coats of carnauba wax. I buffed the pipe on the wheel with a clean buffing pad to raise the shine. I hand buffed it with a microfiber cloth to deepen the shine. The depths of the rustication really pop with the wax and polish. The shiny black acrylic stem is a beautiful contrast to the red and browns of the bowl, thick shank and Sterling Silver Band. This Peterson’s Sherlock Holmes Squire Bulldog was a fun pipe to work on. The pipe is tactile in the hand and should feel great as it is warmed up when smoking. The finished pipe is shown in the photos below. The dimensions of the pipe are Length: 5 ½ inches, Height: 2 inches, Outside diameter of the bowl: 1 ½ inches, Chamber diameter: 7/8 of an inch. The weight of the pipe is 2.19 ounces/ 62 grams. I will soon be putting it on the store in the Irish Pipemakers Section if you are interested in adding it to your collection.

As always, I encourage your questions and comments as you read the blog. Thanks to each of you who are reading this blog. Remember we are not pipe owners; we are pipe men and women who hold our pipes in trust until they pass on into the trust of those who follow us.

Restoring a Peterson’s Sherlock Holmes Rusticated Professor Bent Billiard


Blog by Steve Laug

The next pipe that I am working on came from an estate sale in Oregon City, Oregon, USA we purchased on 03/21/24. It was very dirty and was a reddish, brown coloured pipe when it started. The rusticated finish around the bowl was dirty and had hand oils ground into the rusticated finish. The bowl had a moderate cake and a thick coat of lava onto the bevelled inner edge of the rim top. The classic p-lip stem was very dirty and had light tooth marks and chatter on both sides ahead of the button. There was a silver inset P logo on the left side of the stem. The fit of the stem to the shank is perfect. The pipe is stamped on the left underside of the shank and read Peterson’s [over] Sherlock Holmes. That is followed by Made in the Republic of Ireland (in three lines). There is a Sterling Silver band on the shank end that is stamped on the topside with the Sherlock Holmes Series Logo – the outline bust of Sherlock with Peterson ‘s arched above and Sterling Silver arched below. Below that it bears three hallmarks in the silver band – Hibernia seated for Ireland, a crowned harp designating the .925 quality and finally the date mark which in this case is an italic F dating the pipe as made in 1991. The stamped band has turned partway to the top of the shank rather than the left side. It is clean but oxidized. Jeff took photos of the pipe so I could have a sense of what it looked like before he started his work on it. Jeff took photos of the bowl and rim top to show the cake in the bowl with remnants of tobacco stuck on the walls of the bowl. There was a lava build up on the rusticated top of the rim and the bevelled edge of the bowl. The rim top looked pretty good but it was hard to know for sure if there was damage under the thick lava. Only clean up would tell the full story. Jeff took photos of the top and underside of the p-lip stem showing the tooth chatter, scratching and oxidation on the stem surface and wear on the edges of the button. Jeff took photos of the sides and heel of the bowl to show the condition of the finish. You can see the grime in the rustication around the sides of the bowl and shank. Even under the dirt and debris of the years it looked very good. Jeff took photos of the stamping on the underside of the shank. The stamping was faint in spots but readable as you can see from the photos. It read as noted above. The Sterling Silver Band is stamped as noted above and is very readable under the oxidation. I wanted to know more about the Peterson’s Sherlock Holmes Line so I turned to the Pipedia article on the line and read it carefully to see where this pipe fit in the line of pipes making up the line. (https://pipedia.org/wiki/Peterson#1950_-_1989_The_Republic_Era). I quote what I found out below.

1987 saw the introduction and Issue of the first Sherlock Holmes ‘Original’ Series of pipes. The Sherlock Holmes series is probably the most successful series of pipes ever introduced by Peterson in terms of numbers. It was first issued to honour Sir Arthur Conan Doyle’s famous fictitious detective character, Sherlock Holmes. Holmes is perhaps the most famous pipe smoking character in fiction…

The Sherlock Holmes Series: Probably the most popular and successful series of pipes ever produced by Peterson. Including the Meerschaum version of the seven day sets. Both briar and Meers can be purchased either as individual pipes or complete seven day sets and stands. Expect to pay around $250 for briars and $300 for individual Meerschaums. The Adventures of Sherlock Holmes runs around $1000 for a 4 pipe boxed set. Complete 7 day sets and stands can be up to $1500 – $2000.

At this point I knew that the original line was introduced in 1987. I did not know the sequence of pipes after the Original first pipe. More work was necessary. So, I followed the links included to another article call the Pete Sherlockiana Group. There was photo there of the full collection of various Sherlock Holmes lines that were issue. I have included the link and the information include with the group photo that shown of the collection below.

Here is the link (https://pipedia.org/wiki/File:Pete_SherlockianaGroup.JPG). The description under the photo read as found below:

Sherlockiana Group, which includes: The ‘Original’ 7 day set w/stand, The ‘Return’ 7day set w/stand, The Meerschaum 7 day set w/stand, The ‘Adventures of’ 4 pipe collection, and Various ‘Silver Specials’.I still wanted to know where it fit in the order of release so I did a bit more digging into the pipe. I wanted to know the name of the pipe and what line of the Sherlock Holmes series it was in when it was released. I Googled and came across a link to an advertising brochure on Smokingpipes.com. (https://www.smokingpipes.com/smokingpipesblog/single.cfm/post/closer-look-petersons-sherlock-holmes-pipes-infographic). I have included it below. From that I knew that I was dealing with a Pipe from the Original release of the line from 1987, 1989-1991. It was called the Professor after Professor James Moriarty. The pipe is a large and elegant swan necked bent billiard.

I also found a link to a chart on Tobaccopipes.com that was an exploration the Sherlock Series. Here is the link (https://www.tobaccopipes.com/blog/exploring-the-peterson-sherlock-holmes-series/). Each name on the original list on the site can be clicked on for a description of the pipe that is named.I clicked on the Professor name in the chart above and it took me to the following link and information (https://www.tobaccopipes.com/blog/exploring-the-peterson-sherlock-holmes-series/#baker_street). It states that the pipe was in the Original Collection and came out between 1989-1991.The text below the photos reads as follows:

In 1893, the short story “The Adventure of the Final Problem” was publish in The Strand, introducing Sherlock’s heel, Professor James Moriarty; the shape for which the nemesis is named certainly has quite the heel. 

With the Professor, we are right back to the bold, husky design at the heart of the Peterson House Pipe style. 

The plump heel gives a bulbous visual weight to the base of the bowl. The silhouette offers a bit more splay to accommodate the 1/3 bend. I’m eschewing the swan neck and Nessie comparisons for this stem, I see more of a strong elephant’s trunk in the Professor. It fits just right for the thickset bowl. Though that bowl naturally attracts one’s focus, the stem bears a proportionate strength that keeps the shape in balance. The Professor’s outward reach and large bowl may not make for a comfortable clench, but it practically begs to be cradled in the palm.

With that information in hand I knew what I was dealing with in terms of the stamping and the age of this pipe. I knew from the information that the pipe was made during the Republic Era between 1950 and 1989. The Professor pipe came out as part of the Original Sherlock Holmes Series and was made between 1989 and 1991. Now it was time to work on the pipe.

Jeff cleaned this filthy pipe with his usual clean up process. This one was a real mess and I did not know what to expect when I unwrapped it from his box. He reamed it with a PipNet pipe reamer and cleaned up the reaming with a Savinelli Fitsall Pipe Knife. He scrubbed out the internals with alcohol, pipe cleaners, shank brushes and cotton swabs until the pipe was clean. He scrubbed the exterior of the bowl with Murphy’s Oil Soap and a tooth brush to remove the grime and grit on the briar and the lava on the rim top. The finish looks very good with great looking grain showing through the deep rustication around the bowl and shank. There is some fading on the rim top stain that I will work on but it is a beauty. Jeff soaked the stem in Briarville’s Pipe Stem Deoxidizer to remove the debris on the acrylic surface. When the pipe arrived here in Vancouver for the second stop of its restoration tour I was amazed it looked so good. I took some close up photos of the rim top and also of the stem surface. I wanted to show what an amazing job Jeff did in the cleanup of the rim top. The rim top was and inner edge were in excellent condition. The stain had washed out a bit so I would need to restain those areas but otherwise it is beautiful. I also took close up photos of the stem to show the condition of the acrylic. It was quite clean other than the light tooth marks and chatter on both sides of the stem ahead of the button.One of the things I appreciate about Jeff’s cleanup is that he works to protect and preserve the nomenclature on the shank of the pipes that he works on. The stamping on this one was faint in spots to start with so I was worried that it would disappear altogether with the cleanup. He was able to preserve and maintain its condition in the process. I took some photos to show the clarity of the stamping. I have noticed that many restorers are not careful to protect the stamping in their cleaning process and often by the end of the restoration the nomenclature is almost destroyed. I would like to encourage all of us to be careful in our work to preserve this as it is a critical piece of pipe restoration! I took the stem off the shank and took a photo of the pipe. The silver P logo on the left side of the stem is in excellent condition. I decided to start my work on the pipe by restaining the rustication on the rim top. I touched it up with a Mahogany Stain Pen to blend it into the rest of the rustication around the bowl and shank. The photo shows the look at this point. I rubbed the bowl and rim down with Before & After Restoration Balm. I worked it into the rusticated surface of the briar with my fingertips and a horse hair shoe brush to clean, enliven and protect it. I let the balm sit for 10 minutes and then buffed with a cotton cloth to raise the shine. I really like watching the Balm do its magic and bring the briar alive.  It is looking quite good at this point. I still needed to turn the band on the shank. The Sherlock Holmes Logo on the band was on the top of the shank and should have been on the left side. I heated it with a lighter and then turned it carefully with a towel wrapped around it. I gave the shank end a light coat of white all-purpose glue and then pressed the band onto the shank and aligned the stamp properly on the left. I wiped off the excess glue with a damp cotton pad so as not to leave any of the glue in the rustication around the shank and band. It looked much better.I polished the Sterling Silver shank band with a jeweller’s cloth to remove the tarnish and also to preserve and protect the silver. It looks much better with the shine. I set the bowl aside and turned my attention to the stem. I polished the stem with micromesh sanding pads – dry sanding with 1500-12000 grit pads. I wiped the stem down after each sanding pad with Obsidian Oil. I polished it with Before & After Pipe Stem Polish – both Fine and Extra Fine. I gave it a coat of Obsidian Pipe Stem Oil. It works to protect the stem from oxidizing. I set it aside to dry. I am excited to be on the homestretch and look forward to seeing the Republic Era 1991 Sherlock Holmes Professor Bent Billiard put back together, polished and waxed. I put the bowl and stem back together and lightly polished the bowl and stem with Blue Diamond to polish them. I gave the bowl multiple coats of Conservator’s Wax and the stem multiple coats of carnauba wax. I buffed the pipe on the wheel with a clean buffing pad to raise the shine. I hand buffed it with a microfiber cloth to deepen the shine. The depths of the rustication really pop with the wax and polish. The shiny black acrylic stem is a beautiful contrast to the red and browns of the bowl, thick shank and Sterling Silver Band. This Peterson’s Sherlock Holmes Professor was a fun pipe to work on. The pipe is tactile in the hand and should feel great as it is warmed up when smoking. The finished pipe is shown in the photos below. The dimensions of the pipe are Length: 5 ½ inches, Height: 2 inches, Outside diameter of the bowl: 1 ¼ inches, Chamber diameter: ¾ of an inch. The weight of the pipe is 2.40 ounces/ 69 grams. I will soon be putting it on the store in the Irish Pipemakers Section if you are interested in adding it to your collection.

As always, I encourage your questions and comments as you read the blog. Thanks to each of you who are reading this blog. Remember we are not pipe owners; we are pipe men and women who hold our pipes in trust until they pass on into the trust of those who follow us.

Restoring a Peterson’s Sherlock Holmes Baker Street Rusticated Bulldog with a fishtail stem


Blog by Steve Laug

The next pipe that I am working on came from an estate sale in Oregon City, Oregon, USA we purchased on 03/21/24. It was very dirty and was a reddish, brown coloured pipe when it started. The finish around the bowl was dirty and had hand oils ground into the rustication and the beads and twin rings around the bowl cap. The bowl had a moderate cake and a thick coat of lava onto the rustication on the rim top and edges of the bowl. The fishtail stem was acrylic and was very dirty and had tooth marks on both sides ahead of the button. There was not a silver inset P logo on the stem sides. The fit of the stem to the shank is very well done so I am assuming that it is either an original fishtail from Peterson or a well-made replacement stem. Either way it is a real beauty. The pipe is stamped on the left underside of the diamond shank and read Peterson’s [over] Sherlock Holmes. That is followed by Made in the Republic of Ireland (in three lines). There is a Sterling Silver band on the shank end that is stamped with the Sherlock Holmes Series Logo – the outline bust of Sherlock with Peterson ‘s arched above and Sterling Silver arched below. It is clean but oxidized. Jeff took photos of the pipe so I could have a sense of what it looked like before he started his work on it. Jeff took photos of the bowl and rim top to show the thick, hard cake in the bowl with remnants of tobacco stuck on the walls of the bowl. There was a lava build up on the rusticated top of the rim and the edges of the bowl. The rim top looked pretty good but it was hard to know for sure if there was damage under the thick lava. Only clean up would tell the full story. Jeff took photos of the top and underside of the fishtail stem showing the tooth chatter, scratching and oxidation on the stem surface and wear on the edges of the button. Jeff took photos of the sides and heel of the bowl to show the condition of the finish. You can see the grime in the rustication around the sides of the bowl and shank. The twin cap rings with the bead work in the middle is quite stunning. Even under the dirt and debris of the years it looked very good. Jeff took photos of the stamping on the left underside of the diamond shank. The stamping was faint in spots but readable as you can see from the photos. It read as noted above. The Sterling Silver Band is stamped as noted above and is very readable under the oxidation.  I wanted to know more about the Peterson’s Sherlock Holmes Line so I turned to the Pipedia article on the line and read it carefully to see where this pipe fit in the line of pipes making up the line. (https://pipedia.org/wiki/Peterson#1950_-_1989_The_Republic_Era). I quote what I found out below.

1987 saw the introduction and Issue of the first Sherlock Holmes ‘Original’ Series of pipes. The Sherlock Holmes series is probably the most successful series of pipes ever introduced by Peterson in terms of numbers. It was first issued to honour Sir Arthur Conan Doyle’s famous fictitious detective character, Sherlock Holmes. Holmes is perhaps the most famous pipe smoking character in fiction…

The Sherlock Holmes Series: Probably the most popular and successful series of pipes ever produced by Peterson. Including the Meerschaum version of the seven day sets. Both briar and Meers can be purchased either as individual pipes or complete seven day sets and stands. Expect to pay around $250 for briars and $300 for individual Meerschaums. The Adventures of Sherlock Holmes runs around $1000 for a 4 pipe boxed set. Complete 7 day sets and stands can be up to $1500 – $2000.

At this point I knew that the original line was introduced in 1987. I did not know the sequence of pipes after the Original first pipe. More work was necessary. So, I followed the links included to another article call the Pete Sherlockiana Group. There was photo there of the full collection of various Sherlock Holmes lines that were issue. I have included the link and the information include with the group photo that shown of the collection below.

Here is the link (https://pipedia.org/wiki/File:Pete_SherlockianaGroup.JPG). The description under the photo read as found below:

Sherlockiana Group, which includes: The ‘Original’ 7 day set w/stand, The ‘Return’ 7day set w/stand, The Meerschaum 7 day set w/stand, The ‘Adventures of’ 4 pipe collection, and Various ‘Silver Specials’. I still wanted to know where it fit in the order of release so I did a bit more digging into the pipe. I wanted to know the name of the pipe and what line of the Sherlock Holmes series it was in when it was released. I Googled and came across a link to an advertising brochure on Smokingpipes.com. (https://www.smokingpipes.com/smokingpipesblog/single.cfm/post/closer-look-petersons-sherlock-holmes-pipes-infographic). I have included it below. From that I knew that I was dealing with a Pipe from the Original release of the line from 1987, 1989-1991. It was called a Baker Street after the home address of Sherlock Holmes 221B Baker Street. It was basically a tall, straight Bulldog.

I also found a link to a chart on Tobaccopipes.com that was an exploration the Sherlock Series. Here is the link (https://www.tobaccopipes.com/blog/exploring-the-peterson-sherlock-holmes-series/). Each name on the original list on the site can be clicked on for a description of the pipe that is named.I clicked on the Baker Street name in the chart above and it took me to the following link and information (https://www.tobaccopipes.com/blog/exploring-the-peterson-sherlock-holmes-series/#baker_street). It states that the pipe was in the Original Collection and came out between 1989-1991.The text below the photos reads as follows:

Between 1989 and 1991, six more Peterson Sherlock Holmes Pipes would be added to the range, each named for a significant aspect of the Holmes legacy. Baker Street of cours reference the London address of the detective, 221B Baker Street. In the Baker Street shape we have a stout, flinty Bulldog. The ridges are sharp and muscular. The bold underside brings to mind the vee-bottom hull of a ship, sound and sturdy. The bowl sits up straight from  strong heel, widening up toward the two fine bead lines , where it then tapers in toward the rim. The stem briefly adopts the broadness of the shank before a quick narrowing to the bit. An interesting aspect of this shape is the softer appearance from above with less say from it chiseled lines and more input from the round P-lip.

With that information in hand I knew what I was dealing with in terms of the stamping and the age of this pipe. I knew from the information that the pipe was made during the Republic Era between 1950 and 1989. The Baker Street pipe came out as part of the Original Sherlock Holmes Series and was specifically made between 1989 and 1991. Now it was time to work on the pipe.

Jeff cleaned this filthy pipe with his usual clean up process. This one was a real mess and I did not know what to expect when I unwrapped it from his box. He reamed it with a PipNet pipe reamer and cleaned up the reaming with a Savinelli Fitsall Pipe Knife. He scrubbed out the internals with alcohol, pipe cleaners, shank brushes and cotton swabs until the pipe was clean. He scrubbed the exterior of the bowl with Murphy’s Oil Soap and a tooth brush to remove the grime and grit on the briar and the lava on the rim top. The finish looks very good with great looking grain showing through the deep rustication around the bowl and shank. Jeff soaked the stem in Briarville’s Pipe Stem Deoxidizer to remove the debris on the acrylic surface. When the pipe arrived here in Vancouver for the second stop of its restoration tour I was amazed it looked so good. I took some close up photos of the rim top and also of the stem surface. I wanted to show what an amazing job Jeff did in the cleanup of the rim top. The rim top was and inner edge were in excellent condition. I also took close up photos of the stem to show the condition of the acrylic. It was quite clean other than the light tooth marks and chatter on both sides of the stem ahead of the button.One of the things I appreciate about Jeff’s cleanup is that he works to protect and preserve the nomenclature on the shank of the pipes that he works on. The stamping on this one was faint in spots to start with so I was worried that it would disappear altogether with the cleanup. He was able to preserve and maintain its condition in the process. I took some photos to show the clarity of the stamping. I have noticed that many restorers are not careful to protect the stamping in their cleaning process and often by the end of the restoration the nomenclature is almost destroyed. I would like to encourage all of us to be careful in our work to preserve this as it is a critical piece of pipe restoration! I took the stem off the shank and took a photo of the pipe. I decided to start my work on the pipe by restaining the rustication on the rim top. I touched it up with a Walnut Stain Pen to blend it into the rest of the rustication around the bowl and shank. The photo shows the look at this point.I rubbed the bowl and rim down with Before & After Restoration Balm. I worked it into the rusticated surface of the briar with my fingertips and a horse hair shoe brush to clean, enliven and protect it. I let the balm sit for 10 minutes and then buffed with a cotton cloth to raise the shine. I really like watching the Balm do its magic and bring the briar alive. I wiped down the Sterling Silver shank band with a jeweller’s cloth to remove the tarnish and also to preserve and protect the silver. It looks much better with the shine. I set the bowl aside and turned my attention to the stem. I sanded the surface of the acrylic stem with 320-3500 grit sanding pads to remove the light tooth marks on the top and underside near the button. It looked much better once I finished it.I polished the stem with micromesh sanding pads – wet sanding with 1500-12000 grit pads. I wiped the stem down after each sanding pad with Obsidian Oil. I polished it with Before & After Pipe Stem Polish – both Fine and Extra Fine. I gave it a coat of Obsidian Pipe Stem Oil. It works to protect the stem from oxidizing. I set it aside to dry. I am excited to be on the homestretch and look forward to seeing the Republic Era Sherlock Holmes Baker Street Straight Bulldog put back together, polished and waxed. I put the bowl and stem back together and lightly polished the bowl and stem with Blue Diamond to polish them. I gave the bowl multiple coats of Conservator’s Wax and the stem multiple coats of carnauba wax. I buffed the pipe on the wheel with a clean buffing pad to raise the shine. I hand buffed it with a microfiber cloth to deepen the shine. The depths of the rustication really pop with the wax and polish. The shiny black acrylic stem is a beautiful contrast to the red and browns of the bowl, thick shank and Sterling Silver Band. This Peterson’s Sherlock Holmes Baker Street Bulldog was a fun pipe to work on. The pipe is tactile in the hand and should feel great as it is warmed up when smoking. The finished pipe is shown in the photos below. The dimensions of the pipe are Length: 6 inches, Height: 2 inches, Outside diameter of the bowl: 1 ¼ inches, Chamber diameter: ¾ of an inch. The weight of the pipe is 1.94 ounces/ 55 grams. I am hanging onto the pipe to enjoy looking at it and possibly firing up a bowl. Not sure if I will hang on to so one day it may end up on the store in the Irish Pipemakers Section if I choose to pass it on. I am a Sherlock Holmes reader and this kind of gives me pause.

As always, I encourage your questions and comments as you read the blog. Thanks to each of you who are reading this blog. Remember we are not pipe owners; we are pipe men and women who hold our pipes in trust until they pass on into the trust of those who follow us.

Breathing Fresh Life into a Peterson’s System Standard 307 Rusticated


Blog by Steve Laug

The next pipe on the work table is Rusticated Peterson’s System pipe that we purchased from our contact in Copenhagen, Denmark on 01/08/2024. It was stamped Peterson’s System Standard on the underside side of the shank in a smooth panel. It was stamped Peterson’s [arched over] System [over] Standard. That is followed by Made in the Republic of Ireland (in three lines). After that stamping is the shape number 307. It has a rugged, tactile rustication around the bowl and shank that is filled with a lot of oils, debris and grime. There was a thick cake in the bowl with remnants of tobacco stuck on the walls. There was a lava overflow on the rim top that was heavier toward the back side. The top and edges of the rim were well hidden under the tars and lava. There was a very beautiful pipe underneath all of the buildup of years of use. The nickel ferrule on the shank end was oxidized and is stamped on the left side K&P [over] three faux hallmarks. That is followed by Peterson’s. It is not dented or damaged. The stem was oxidized and calcified toward the end with some tooth chatter and marks ahead of the button on both sides. Jeff took photos of the pipe before he started his cleanup work on it. Jeff took photos of the bowl and rim top to show the thick, hard cake in the bowl with remnants of tobacco stuck on the walls of the bowl. There was a lava build up on the top of the rim and the edges of the bowl. The rim top looked pretty good but it was hard to know for sure if there was damage under the thick lava. Only clean up would tell the full story. Jeff took photos of the top and underside of the stem showing the tooth chatter, scratching and oxidation on the stem surface and wear on the edges of the button. Jeff took photos of the sides and heel of the bowl to show the condition of the finish. You can see the grime in the rustication around the sides of the bowl and shank. Even under the dirt and debris of the years it looked very good. Jeff took photos of the stamping on the underside of the bowl and shank. The stamping was faint but readable as you can see from the photos. It read as noted above. The nickel ferrule on the shank end is stamped on the left side K&P Peterson’s over three Peterson marks used on nickel ferrules.I have included the information on the shape number on this pipe that I picked up on researching the previous pipes with the 307 shape number. I have included a page from a Petersons Catalogue that I have on rebornpipes (https://rebornpipes.com/tag/peterson-hallmark-chart/). I have put a red box around the 307 shown in the catalogue page shown below. That should give a clear picture of the size and shape of the pipe.I am also including the information from Pipedia’s article on Peterson pipes. It is a great read in terms of the history of the brand (https://pipedia.org/wiki/Peterson). I have included a bit of the pertinent history here.

1950 – 1989 The Republic Era  – From 1950 to the present time, the stamp for this era is “Made in the Republic of Ireland” in a block format generally in three lines but two lines have been used with or without Republic being abbreviated.

During the 1950’s and 60’s the Kapp & Peterson company was still in the ownership of the Kapp family. However 1964 saw the retiral of the company Managing Director Frederick Henry(Harry) Kapp.

Pipedia also included a section of information on the System pipes including a diagram of the systems look (https://pipedia.org/wiki/Peterson#Republic_Era_Pipes). I quote a section of the article in part and include a link to another article on Pipedia on the System pipe.

The Peterson System pipes are the standard bearers of the Peterson pipe family, famous for the excellent smoking pleasure they provide. Often imitated but never equaled, the Peterson System smokes dry, cool and sweet, thanks to the scientific effectiveness of the original design. The heart of the System is the unique graduated bore in the mouthpiece. This makes the suction applied by the smoker 15 times weaker by the time it reaches the tobacco chamber. The result is that all the moisture flows into the reservoir and, thus cannot reach the smoker’s mouth. The Peterson Lip further enhances the effectiveness of the graduated bore by directing the flow of smoke upwards and away from the tongue. This achieves a uniquely even distribution of smoke and virtually eliminates any chance of tonguebite or bitterness. Furthermore, the shape is contoured so that the tongue rests comfortably in the depression under the opening. Each “PLip” mouthpiece is made from Vulcanite. For the Peterson System pipes to work properly, the stem/tenon has to have an extension, the tip of which will pass by the draft hole from the bowl and into the sump. Upon the smoker drawing in smoke, this extension then directs the smoke down and around the sump to dispense a lot of the moisture before the smoke enters the extension and stem. On the System Standards and other less expensive systems, this extension with be made of Vulcanite turned integrally with the stem. On the more expensive System pipes this extension will be made of metal which screws into the Vulcanite stem. This extension on the earlier pipes will be of brass and the newer pipes will be of aluminium. Most smokers not knowing this function of the metal extension, assumes that it is a condenser/stinger and will remove it as they do with the metal condensers of Kaywoodie, etc. Should you have a System pipe with this metal extension, do not remove it for it will make the System function properly and give you a dryer smoke (https://pipedia.org/wiki/A_closer_look_at_the_famous_Peterson_Standard_System_Pipe).

With that information in hand I knew what I was dealing with in terms of the stamping and the age of this pipe. I knew from the information that the pipe was made during the Republic Era between 1950 and 1989. My guess is that the pipes is a 1960s era System pipe. Now it was time to work on the pipe.

Jeff cleaned this filthy pipe with his usual clean up process. This one was a real mess and I did not know what to expect when I unwrapped it from his box. He reamed it with a PipNet pipe reamer and cleaned up the reaming with a Savinelli Fitsall Pipe Knife. He scrubbed out the internals with alcohol, pipe cleaners, shank brushes and cotton swabs until the pipe was clean. He scrubbed the exterior of the bowl with Murphy’s Oil Soap and a tooth brush to remove the grime and grit on the briar and the lava on the rim top. The finish looks very good with great looking grain around the bowl and shank. Jeff soaked the stem in Briarville’s Pipe Stem Deoxidizer to remove the oxidation on the vulcanite. When the pipe arrived here in Vancouver for the second stop of its restoration tour I was amazed it looked so good. I took some close up photos of the rim top and also of the stem surface. I wanted to show what an amazing job Jeff did in the cleanup of the rim top. The rim top was and inner edge were in excellent condition. I also took close up photos of the stem to show the condition of the vulcanite. It was quite clean other than some slight oxidation at the edges of the button. There were tooth marks and chatter on both sides of the stem ahead of the button.One of the things I appreciate about Jeff’s cleanup is that he works to protect and preserve the nomenclature on the shank of the pipes that he works on. The stamping on this one was faint to start with so I was worried that it would disappear altogether with the cleanup. He was not only able to preserve and maintain its condition in the process. I took some photos to show the clarity of the stamping. I have noticed that many restorers are not careful to protect the stamping in their cleaning process and often by the end of the restoration the nomenclature is almost destroyed. I would like to encourage all of us to be careful in our work to preserve this as it is a critical piece of pipe restoration! I took the stem off the shank and took a photo of the pipe.I decided to start my work on the pipe by cleaning up the debris left in the rustication on the rim top. I worked it over with a brass bristle wire brush to remove the crud in the finish. The photo shows the progress.I rubbed the bowl and rim down with Before & After Restoration Balm. I worked it into the rusticated surface of the briar with my fingertips and a horse hair shoe brush to clean, enliven and protect it. I let the balm sit for 10 minutes and then buffed with a cotton cloth to raise the shine. I really like watching the Balm do its magic and bring the briar alive. With briar polished with the Restoration Balm I moved onto the metal. I polished the nickel ferrule with a jeweller’s cloth to raise the shine and to protect the ferrule from further oxidation. I set the bowl aside to address the issues with the stem. I painted the surface of the stem with the flame of a lighter to lift them. I was able to lift them quite a bit. I filled in the remaining tooth marks with clear CA glue. Once it had cured I used a file to smooth out the repairs and blend them into the surface. I sanded repairs with 220 grit sandpaper. I sanded the stem with 320-3500 grit sanding pads to remove the oxidation that remained in the vulcanite and also the light tooth marks on the top and underside near the button. It looked much better once I finished it.I polished the stem with micromesh sanding pads – wet sanding with 1500-12000 grit pads. I wiped the stem down after each sanding pad with Obsidian Oil. I polished it with Before & After Pipe Stem Polish – both Fine and Extra Fine. I gave it a coat of Obsidian Pipe Stem Oil. It works to protect the stem from oxidizing. I set it aside to dry. Once again at this point in the restoration process I am excited to be on the homestretch. I look forward to the final look when the Republic Era Rusticated Peterson System 307 is put back together, polished and waxed. I put the bowl and stem back together. I lightly polished the bowl and stem with Blue Diamond to polish out the scratches in the briar and the vulcanite. I gave the bowl multiple coats of Conservator’s Wax and the stem multiple coats of carnauba wax. I buffed the pipe with a clean buffing pad to raise the shine. I hand buffed it with a microfiber cloth to deepen the shine. The pipe polished up pretty nicely. The depths of the rustication really pop with the wax and polish. The shiny black vulcanite stem is a beautiful contrast to the browns of the bowl and thick shank and nickel ferrule. This Peterson’s System Standard 307 Bent Billiard was another fun pipe to work on. It really is a quite stunning piece of briar whose shape follows the flow of the briar. The pipe is tactile in the hand and should feel great as it is warmed up when smoking. The finished pipe is shown in the photos below. The dimensions of the pipe are Length: 6 inches, Height: 2 inches, Outside diameter of the bowl: 1 ¼ inches, Chamber diameter: ¾ of an inch. The weight of the pipe is 2.19 ounces/62 grams. I will be putting it on the rebornpipes store in the Irish Pipemakers Section if you would like to add it to your rack and carry on the previous pipeman’s legacy. This is an interesting estate to bring back to life.

As always, I encourage your questions and comments as you read the blog. Thanks to each of you who are reading this blog. Remember we are not pipe owners; we are pipe men and women who hold our pipes in trust until they pass on into the trust of those who follow us.

Restoring the second Antique Collectible Find – a GT&Co Peterson’s System Standard 1307


Blog by Steve Laug

Last weekend on April 27 Kenneth and I went to an antique and collectible sale at an arena in New Westminster, BC, Canada. I wrote about the adventure and posted it in a previous blog last weekend (https://rebornpipes.com/2024/04/28/you-have-to-join-kenneth-and-me-on-a-great-morning-pipe-hunt/). On the hunt I picked up four pipes that I have listed below:

  1. Jeantet Fait Main Bent Freehand Dublin 4 with a diamond shank
  2. Jeantet Fait Main Bent Apple 9 with a uniquely shaped shank and stem
  3. Republic Era Peterson’s System Pipe 1307 Bowl sans stem
  4. Brigham Made in Canada 625 Squat Straight Bulldog

I have included photos of the foursome below. They are in the order of the list above. I chose to work on the third pipe in the above photos. It is shown in the photos below and is Peterson’s with a forked tail [over] System [over] Standard on the left side of the shank. On the right side of the shank it is stamped Made in the Republic of Ireland (in three lines) [over] 1307 the shape number. There is a very clean nickel ferrule that is stamped on the left side and reads K&P over Makers Marks which makes it pre-circa 1963.The three symbols are a Shamrock, a Wolfhound and a Tower without a door. That is followed by the stamping Peterson’s. The pipe has some great grain around the bowl sides and shank. The rim top is flat and the edges look good. The bowl had a moderate cake on the walls and a light lava coat on the rim top and edges of the bowl. The briar has some grime and grit ground into the briar. There was no stem so I would need to fit a new one on the bowl. The photos below show what I saw when I examined the pipe. I took photos of the stamping on the undersides of the shank. It reads as noted above. It is faint in spots but is still very readable. I took the stem off and took a photo of the parts to give a sense of the size of the bowl.I have included the information on the shape number on this pipe that I picked up on researching the other pipes. It is a Peterson’s System Standard pipe with a 1307 shape number. The 307 is identical in shape, size and marking. I started my hunt for information by turning to a Peterson Catalogue that I have on rebornpipes and looked up the System Standard pipes (https://rebornpipes.com/tag/peterson-hallmark-chart/). I have put a red box around the 307 shown in the catalogue page shown below. That should give a clear picture of the size and shape of the pipe. But there was nothing to give me any information on what number 1 meant in the shape number 1307 that I am working on. Since this is stamped with the same “1” as previous Peterson pipes that I have worked on I turned to the blog and had a look. I am including the information on the unique numbering. Mark pointed me in the direction that I needed. I quote the pertinent part of his email. The underlined portion was the clue I was looking for on this pipe. I have already cleaned up several of Bob’s pipes that were sold through GT&C (Genin, Trudeau and Company, Montreal, Quebec).

The index at the back of the book is pretty good, and points you to all the GT&C goodies, but 155 has a photo from the catalog with your 1307, while 318 and 323 explain the rationale for the “1” prefix. In a nutshell, just drop the “1” and you’ve got the shape. My theory is that GT&C added this to aid them in warranty work, so they’d know the pipe was bought on Canadian soil.

I turned then to a previous blog I had written on a Kapruf 54 that had an odd shape number stamp and referred to the Canadian numbering system used by GT&C. Here it the link to that blog (https://rebornpipes.com/2019/08/09/back-to-bob-kerrs-estate-another-canadian-import-petersons-kapruf-a-54/). In the blog I included a link to a blog I did on the GT&C Catalogue that came to me in some paperwork the family gave me. I have included the cover of the catalogue and the page on the system pipes showing the 1312 shape. I have put a red box around the shape for ease of reference (https://rebornpipes.com/2016/09/13/petersons-pipes-brochure-from-genin-trudeau-co-montreal-quebec/). Be sure to check out the rest of the document on the link.

The GT&C Catalogue combined with the earlier Peterson Pipe Catalogue page make the link definitive. I am also including the information from Pipedia’s article on Peterson pipes. It is a great read in terms of the history of the brand (https://pipedia.org/wiki/Peterson). I have included a bit of the pertinent history here.

1950 – 1989 The Republic Era – From 1950 to the present time, the stamp for this era is “Made in the Republic of Ireland” in a block format generally in three lines but two lines have been used with or without Republic being abbreviated.

During the 1950’s and 60’s the Kapp & Peterson company was still in the ownership of the Kapp family. However 1964 saw the retiral of the company Managing Director Frederick Henry(Harry) Kapp.

Pipedia also included a section of information on the System pipes including a diagram of the sytems look (https://pipedia.org/wiki/Peterson#Republic_Era_Pipes). I quote a section of the article in part and include a link to another article on Pipedia on the System pipe.

The Peterson System pipes are the standard bearers of the Peterson pipe family, famous for the excellent smoking pleasure they provide. Often imitated but never equaled, the Peterson System smokes dry, cool and sweet, thanks to the scientific effectiveness of the original design. The heart of the System is the unique graduated bore in the mouthpiece. This makes the suction applied by the smoker 15 times weaker by the time it reaches the tobacco chamber. The result is that all the moisture flows into the reservoir and, thus cannot reach the smoker’s mouth. The Peterson Lip further enhances the effectiveness of the graduated bore by directing the flow of smoke upwards and away from the tongue. This achieves a uniquely even distribution of smoke and virtually eliminates any chance of tonguebite or bitterness. Furthermore, the shape is contoured so that the tongue rests comfortably in the depression under the opening. Each “PLip” mouthpiece is made from Vulcanite. For the Peterson System pipes to work properly, the stem/tenon has to have an extension, the tip of which will pass by the draft hole from the bowl and into the sump. Upon the smoker drawing in smoke, this extension then directs the smoke down and around the sump to dispense a lot of the moisture before the smoke enters the extension and stem. On the System Standards and other less expensive systems, this extension with be made of Vulcanite turned integrally with the stem. On the more expensive System pipes this extension will be made of metal which screws into the Vulcanite stem. This extension on the earlier pipes will be of brass and the newer pipes will be of aluminium. Most smokers not knowing this function of the metal extension, assumes that it is a condenser/stinger and will remove it as they do with the metal condensers of Kaywoodie, etc. Should you have a System pipe with this metal extension, do not remove it for it will make the System function properly and give you a dryer smoke (https://pipedia.org/wiki/A_closer_look_at_the_famous_Peterson_Standard_System_Pipe).

With that information in hand I knew what I was dealing with in terms of the stamping and the age of this pipe. I knew from the information that the pipe was made during the Republic Era between 1950 and 1989. I also knew that the pipe was brought into Canada by the Canadian Importer, Genin, Trudeau & Co. in Montreal, Quebec. Noting above that the catalogue postal code puts it in the late 60s early 70s which also fits the story. Now it was time to work on the pipe.

I cleaned up the thin cake in the bowl with a Savinelli Fitsall Pipe Knife and sanded the bowl with a piece of 220 grit sandpaper wrapped around a piece of dowel. I used a folded piece of 220 grit sandpaper to clean up the top of the rim and the inner edge to make it look better.I scrubbed the exterior of the bowl and shank with undiluted Murphy’s Oil Soap and a tooth brush to remove the grime. I rinsed it off with warm running water and dried it off with a soft cloth. I cleaned the mortise and the airway in the shank with alcohol, cotton swabs and pipe cleaners. They were dirty but the pipe is clean now.   I sanded the surface of the briar with 320-3500 grit sanding pads. It took on a real shine on the briar. I wiped it down after each sanding pad with a damp cloth to remove the sanding dust and debris left behind. I polished the bowl and rim top with micromesh sanding pads – wet sanding with 1500-12000 grit pads. I wiped the rim down after each sanding pad to remove the dust and debris from the sanding. The rim top was looking very good after the final polishing pad.  I rubbed the bowl and shank down with Before & After Restoration Balm. I worked it into the surface of the briar with my fingertips to clean, enliven and protect it. I let the balm sit for a little while and then buffed with a cotton cloth to raise the shine. I set the bowl aside and turned my attention to fitting a new stem. I chose a new stem for the pipe from my lot of new stem blanks. It is a Peterson’s Made Replacement stem so it should fit well once the work is done.I used a flat rasp to sand out the casting marks on the sides and ends of the stems. I followed that up with a folded piece of 220 sandpaper. I flattened out the casting marks and the sanded them smooth and blended them into the surface. I also sanded out the casting marks on the end of the stem and around the P-lip button. It looked much better at this point. I took a photo of the pipe bowl and the new stem. I still needed to do a lot more work on it to smooth out the scratches and file marks. It is going to look very good.I reshaped the shank end with 220 grit sandpaper to get a snug fit in the ferrule. It took time but as I shaped the angles the stem fit very well deep enough in the shank. I heated it with a lighter to soften the vulcanite and bent it to fit the angles of the bowl. I fit it in the shank and took photos of the pipe put back together. It looks good. I sanded the stem with 320-3500 grit sanding pads. I wiped it down after each sanding pad with a damp cloth to remove the debris left behind. It is beginning to look much better.I polished the stem with micromesh sanding pads – wet sanding it with 1500-12000 grit pads. I wiped the stem down after each sanding pad with a cotton pad to remove the sanding debris. I finished polishing the stem with Before & After Pipe Stem Polish – both fine and extra fine. I finished by wiping it down with Obsidian Oil and buffing it to a shine. It feels good to be finishing the restoration of this Made for Canada GT&Co Republic Era Peterson’s System Standard 1307. I look forward to the final look when it is put back together, polished and waxed. I put the bowl and stem back together. I polished them with Blue Diamond to polish out the scratches in the briar and the vulcanite. I gave the bowl and the stem multiple coats of carnauba wax. I buffed the pipe with a clean buffing pad to raise the shine. I hand buffed it with a microfiber cloth to deepen the shine. The pipe polished up pretty nicely. The grain is quite stunning and really pops with the wax and polish. The newly fit shiny black vulcanite stem is a beautiful contrast to the browns of the bowl and thick shank. This Peterson’s System Standard 1307 Bent Billiard is a beauty. The polished nickel Ferrule works as a contrast between the stem and the briar and binds it all together. It really is a quite stunning piece of briar whose shape follows the flow of the briar. The pipe is comfortable pipe to hold in the hand. The finished pipe is shown in the photos below. The dimensions of the pipe are Length: 6 ½ inches, Height: 2 inches, Outside diameter of the bowl: 1 ¼ inches, Chamber diameter: ¾ of an inch. The weight of the pipe is 68 grams/2.40 ounces. I will be adding the pipe to the rebornpipe store in the Irish Pipe Makers Section. If you are interested in adding it to your collection let me know. Thanks for reading this blog and my reflections on the pipe while I worked on it. This was an interesting estate to bring back to life.

Restoring a Bings Favorite Italy Savinelli Product


Blog by Steve Laug

The next pipe that I am working on came from an estate sale in Oregon City, Oregon, USA we purchased on 03/21/24. It was very dirty and was a reddish, brown coloured pipe when it started. The smooth finish around the bowl was dirty and had hand oils ground into the grooves. The bowl had a moderate cake a spotty coat of lava onto the rim edge and top of the bowl. The stem was vulcanite that was very dirty and had tooth marks on both sides ahead of the button. The stem might be a replacement stem as the fit to the shank is off in terms of stem diameter being larger than the shank. The pipe was stamped on the left side of the shank and read Bings Favorite. On the right side of the shank it is stamped Italy. On the underside of the shank it was stamped Savinelli Product. Jeff took photos of the pipe so I could have a sense of what it looked like before he started his work on it. Jeff took photos of the stem surfaces and the bowl and rim to give a sense of condition of the pipe. You can see the thick cake in bowl and the spots of lava overflow on the edges and rim top of the bowl. The stem surface is very dirty, oxidized, calcified and tooth marks covered by the dirt and debris. The stem did not fit the diameter of the shank properly. It was larger than the shank and would need to be fitted. The stamp on the top of the shank is faint. He also took photos of the sides of the bowl and the heel to show the interesting grain that went around the bowl. The grain is beautiful and you can see the oils and debris in the surface of the briar. He took photos of the stamping on the sides of the shank. It is clear and readable on all the shank sides as noted above. Jeff did not capture the stamping on the right side of the shank. I turned to Pipephil’s site (http://www.pipephil.eu/logos/en/logo-savinelli1.html) to get a sense of the Bing’s Favorite. It is a Savinelli Product and it is listed in the Savinelli pipe section. I did a screen capture of the section and included it below. The stamping on the stem confirms that the stem I have is a replacement.I turned to Pipedia (https://pipedia.org/wiki/Savinelli) and after reading through the history I focused on a section entitled Editions in the “Favorite” line. I have included that section below.

We are compiling a sub-list of known editions in the “Favorite” line of Savanelli pipes, starting with those in Fred Huening’s collection. If you know of others, or have additional information about this line of pipes, please add it here, or send them to sethile.pipes@gmail.com and we can add them for you:

  • Bing’s Favorite
  • Byron’s Favorite
  • Clark’s Favorite
  • Ginger’s Favorite
  • Achille’s Favorite (apparently, I, II, and III)

Now it was my turn to work on the pipe. Jeff had done an amazing cleanup of the pipe. He reamed the cake with a PipNet reamer and cleaned up that with a Savinelli Fitsall Pipe Knife. He scrubbed the internals of the bowl and stem with alcohol, cotton swabs and pipe cleaners. He scrubbed the externals with undiluted Murphy’s Oil Soap and rinsed the bowl off with running water. He soaked the stem in Briarville’s Pipe stem Deoxidizer and once it had soaked, rinsed it off with warm water to remove the residual solution. He dried it off and rubbed it down to remove any oxidation that was still on the stem. The pipe looked very good when I received it. I took a photo of the rim top to show the condition. You can see the clean bowl. The bowl is in excellent condition and is clean. The rim top and the inner edge was in great condition. The stem came out looking clean. There were some light tooth marks and chatter on both sides ahead of the button. I took photos of the stamping on the shank. It is faint but still very readable. There was also a very faint stamp on the stem but I am still not certain it is the correct stem because of the fit and shape of the stem. I removed the stem from the shank and took a photo of the pipe parts to show what I was working with. The pipe had cleaned up so well that I turned to polish the briar with micromesh sanding pads. I dry sanded it with 1500-12000 grit sanding pads and wiped the bowl down after each pad with a damp cloth. By the final pads the briar really had a shine. I rubbed the briar down with Before & After Restoration Balm. I worked it into the briar with my fingertips. The product works to clean, enliven and preserve the briar. I let it sit for 10 minutes then I buffed it with a cotton cloth to deepen the shine. The briar really comes alive with the balm. I set aside the bowl and turned my attention to the stem. I “painted” the stem with the flame of a lighter to soften the vulcanite and give the stem a slight bend like it must have originally had.Next, I worked on the diameter of the stem. I needed to take off the excess so that the flow between the shank and the stem was smooth. I used a flat rasp and small file to quickly remove the excess vulcanite. I sanded it with 220 grit sandpaper to clean up the file marks and smooth out the surface of the stem. I moved on to further smooth out the surface of the vulcanite. I sanded it with 320-3500 grit sanding pads to further clean up the scratches and file marks on the surface of the stem.I polished the vulcanite with micromesh sanding pads – 1500-12000 grit pads. I wiped it down with Obsidian Oil after each sanding pad. I used Before & After Pipe Polish – both Fine and Extra Fine to further polish the stem. It really took on a shine and I knew that once it was buffed it would look amazing. I put the stem back on the Bings Favorite ¼ Bent Vulcanite Stem Long Billiard and took it to the buffer. I worked it over with Blue Diamond to polish out the remaining small scratches. I gave the bowl and the stem several coats of carnauba wax and buffed the pipe with a clean buffing pad to raise the shine. I hand buffed it with a microfiber cloth to deepen the shine. The pipe polished up really well and the rim top looked good. I was happy with the look of the finished pipe. The photos below show what the pipe looks like after the restoration. The Bings Favorite Savinelli Product is a beautiful and unique take on a classic shape. The polished, reshaped vulcanite taper stem looks really good with the browns of the briar. The dimensions of the pipe are Length: 6 ½ inches, Height: 1 ¾ inches, Outside diameter of the bowl: 1 ¼ inches, Chamber diameter: ¾ of an inch. The weight of the pipe is 1.27 ounces/36 grams. This is another pipe that I will be putting it on the rebornpipes store in the Italian Pipe Makers Section shortly, if you are interested in adding it to your collection. The long shank and tall bowl look and feel great in the hand. This one should be a great smoker. Thanks for walking through the restoration with me on this beauty!

Refurbishing An Early Butz Choquin “A Metz” Bent Billiard


Blog by Paresh Deshpande

This pipe too came to me in that lot of 40 pipes purchased from Etsy.fr of which I have restored a few, the ROPP PNEUMATIC being the latest project. This pipe is a large billiard with a swan neck like graceful bend to the shank that extends over to the horn stem. The stummel appears dull and lifeless and yet through this, beautiful cross grains can be faintly made out over the sides of the stummel with bird’s eye grain at the foot. A copper band adorn the shank end with it’s crimped shank end edges covering the shank face. It is stamped over the left shank surface as “BUTZ-CHOQUIN” over “A” over “METZ”. The copper band has minuscule cartouche with some mysterious stampings that are neither visible under bright light nor under magnification.A couple of years ago, I had worked on an early Butz Choquin pipe that was very similarly stamped. I had studied the brand then and also before that when I had refurbished my inherited CHOQUIN PIPE from first era 1858. Given below is the link to the write up on the similarly stamped pipe. For the sake of brevity, I have avoided reproducing the information and implore readers to follow the link for better understanding the brand and establishing the provenance of the pipe (https://rebornpipes.com/2022/04/17/restoring-a-beautiful-older-butz-choquin-a-metz-pipe/).

After reading through the material and correlating the dates, I can, with certainty, claim that this pipe (broadly) is from pre 1951 when Berrod- Regad took over Butz Choquin and moved production from Metz to St. Claude as evidenced from the A METZ stamping.

Further narrowing down the period, I strongly feel that this pipe dates to pre 1920. This conclusion is based on the fact that; firstly, the stem and tenon material used is horn and bone respectively which were the preferred material after Amber during this period for making stems as hard rubber/ vulcanite gained prominence during 1920s. Secondly, the round orifice at the stem end was commonly used until 1920s when vulcanite/ hard rubber with elliptical slot end gained prominence subsequently. Thirdly, use of cork lining inside the mortise to firmly seat the bone tenon in to the mortise.

Any inputs and corrections to my above understanding are solicited and encouraged. Such healthy discussions not only promote interaction between us but also enhance knowledge about pipes and establishing its provenance by sharing information.

Initial Visual Inspection
The elegant swan neck shape of the shank that extends into the stem is the USP of this pipe. The chamber appears to have an even thin layer of cake that appears to have been meticulously maintained by the previous owner. There are a few minor dings to both the inner and outer rim edges. The stummel boasts of beautiful cross grains over the surface with bird’s eye grains at the foot of the stummel. The briar looks dull and lifeless. The mortise has residual old oils and gunk making the draw hard. The horn stem with bone tenon is dull, dry and shows signs of beginnings of cracks over the surface. Both the tenon and orifice slot are clogged with old tars and grime. This one will require a ton of work to spruce it up to its former glory. Following pictures should provide a better understanding of the condition of the pipe before I begin my work. Detailed Visual Inspection
The first impression that I got at a glance of the chamber was an even well maintained layer of cake with practically no darkening of the rim surface or accumulation of carbon overflow. This definitely was either a well cared for pipe or the seller had done so for bargaining a better price. There a few dings on the right and left side of the outer rim edge (encircled in blue). The inner rim edge is intact save for some very minor divots that should be easily addressed with a couple of passes of a piece of 180 grit sandpaper along the edge. The rim top is nicely even and clean, requiring no topping, which I tend to avoid as much as possible. The stummel is dull, lifeless and lacklustre. Under all the dullness and poor appearance, lurks some beautiful cross grains and bird’s eye over the feet of the stummel awaiting exposure. The stummel has developed a deep dark patina from all the years of smoking and handling. There is one fill (encircled in yellow) that would need to be refreshed. Also a couple of minor divots (encircled in red) mark the stummel surface. The mortise is chock-a-block with old oils, tars and gunk and this leads me to the conclusion that it was the seller who had reamed the cake and cleaned the rim surface to ask for a better price. The copper band at the shank end is dull and covered in dust, grime and oxidation. The first issue that I noticed on close examination of the stem surface were a number of cracks all over the upper and lower surfaces. I drew out my magnifying glass and had a hard look at the cracks under bright light. Thankfully, almost all of these cracks were minor and very superficial, save for a few (encircled in red) over the upper surface and would need to be addressed. These cracks are caused because of drying of the horn material due to lack of usage and hot weather conditions. These cracks would need to be stabilized, repaired and hydrated. There are deep tooth indentations in the bite zone, very close to the button edges on either surface of the stem. The long bone tenon has darkened considerably and is covered in grime with the opening showing accumulation of oils, tars and gunk. This condition is similar at the orifice slot. The seating of the stem in to the mortise is very loose. The Restoration Process
The process of this restoration started with stem repairs. I first cleaned the stem airway by running a few hard bristled and regular pipe cleaners dipped in isopropyl alcohol followed by further cleaning with anti oil dish washing soap and thin shank brushes. The pipe cleaners pictured below and the gunk that was removed while cleaning with the shank brushes of which pictures were not clicked, tell a story of how dirty the stem internals were. I continued cleaning of the stem air way till white foam was seen coming out from the air way. I also scrubbed the stem surface with a Scotch Brite pad and soap. The next step was to stabilize the cracks on the top surface of the stem. Using a 1 mm drill bit mounted on a hand held rotary tool, I drilled counter holes at the start and end points of these cracks. These counter holes prevent the further expansion of the cracks in either directions. I filled these holes, cracks and the tooth indentations in the bite zone with CA superglue and set it aside for the glue to harden. I was still sometime away from hitting the sack and with the stem set aside for the repairs to cure; I decided to work the stummel. I began with reaming the chamber with size 1 head followed by size 2 head of the PipNet reamer. The heap of dislodged carbon did surprise me as I had anticipated a far less cake formation along the walls. I further scraped the chamber walls with my fabricated knife to remove the remaining carbon deposits where the reamer head could not reach. Once the cake was reamed back to the bare briar, I used a 220 grit sand paper to remove all the traces of remaining cake and also to smooth out the inner walls of the chamber surface. Finally, to remove the residual carbon dust, I wiped the chamber with a cotton pad wetted with 99.9% pure isopropyl alcohol. The chamber walls are solid without any heat lines or fissures.While I was handling the bowl, the copper band at the shank end came loose and it was then that I saw the cork lining along the walls of the mortise that was in place to ensure a snug fit of the long bone tenon in to the mortise. This cork lining has dried and needs to be revitalized. This lining also means that I would have to be careful while I clean the mortise so as not to erode and break the cork thus disturbing the seating of the stem.As observed above, the mortise is completely clogged with old oils, tars and ash resulting in a very hard and laborious draw. This was the issue that I addressed next. Using dental tools and fabricated poker, I scraped out the entire gunk from the walls of the mortise taking care that the cork lining is not damaged in the process. I used the drill bit from the Kleen Reem to remove and open up the shank airway. It was a tedious and time consuming work, but well worth the caution and efforts. The heap of crud extracted from the shank confirms the reason for the hard and laborious draw. I ran a few hard and regular pipe cleaners dipped in alcohol through the mortise and airway to remove residual gunk. The mortise is now clean with a much better open and easy draw. I shall continue with the cleaning process when I clean the stummel surface.The last agenda for the night was the external cleaning of the bowl and further internal cleaning of the mortise. I cleaned the external surface with a hard-bristled toothbrush and concentrated Murphy’s oil soap. I scrubbed the rim top and stummel surface with the soap and Scotch Brit pad. I rinsed the stummel under warm running water and dried it with paper towels and soft cotton cloth. The grains are now clearly visible and awaiting a nice polish to pop out. This cleaning also brought a few dents and scratches over the stummel surface and outer rim edge to the fore that would need to be addressed and the fill observed near the foot has loosened that would need to be refreshed. I extended my work time for a while and cleaned out the shank internals. I cleaned the shank walls by scrubbing it with shank brushes and anti-oil dish washing soap while being careful around the cork! The bowl is now clean and fresh. I set the bowl aside to dry under a heat lamp.The next evening with the stummel now dry and the stem repairs completely cured, I had the option of either working on the stummel or the stem. There was this small step that was needed to address the fill that required to be refreshed and that is where I began. With sharp dental tool, I removed the old fill and cleaned the area with alcohol. Next, I mixed briar dust with CA superglue to form putty and applied this mix over the area to be filled. I set the stummel aside for an hour or so for the mix to harden, which is almost instantaneous over the surface.I set the stummel aside and worked on the stem repairs next. The repairs had completely hardened and all that needed to be done was to blend in these repairs with the rest of the stem surface. I began by sanding the fills with a flat needle file to achieve a rough match followed by sanding the entire stem with a worn folded piece of 180 grit sandpaper. The button edges were also evened out and sharpened during the process. The fills will be further blended during the polishing cycle using various grit sandpapers and micromesh pads. I applied a generous layer of EVO and massaged it in to the horn stem to hydrate it and set it aside for the oil to be absorbed into the horn.Using the same tools and sandpaper, I blend in the stummel fill with the rest of the briar surface. This blending of the fill will be further fine-tuned when I sand the stummel surface with 220 grit sandpaper to address the issue of dings and scratches over the surface.I addressed the dents and dings to the outer rim edge by creating a bevel with a folded piece of 180 grit sandpaper pinched between fingers and running them evenly over the outer edge surface. I am quite happy with the appearance of the bowl with the bevelled outer rim. Next, I cleaned the copper ferrule at the shank end with “Pitambari”, a powder that is available all across India that is used to clean and shine brass, copper and silver ware. This compound is a very fine powder and is least abrasive with fantastic results. The band is now a nice shining piece and will provide a nice contrast between the shining horn stem and the dark brown stummel. I attached the band at the shank end with all-purpose glue.The next step was to sand the entire stummel surface with sandpaper to remove the scratches and dings that are visible. I used a well worn piece of 180 grit sandpaper to sand the surface. The sanding marks that are now visible will not be so once the bowl is subjected to polishing regime with micromesh pads and compounds. There are a couple of dings and scratches that are still visible, but I shall let them be as part of the pipe’s century old existence! I followed it by wet sanding the entire stummel with 1500 to 12000 grit micromesh pads, wiping frequently with a moist cloth to check the progress. I rubbed a small quantity of “Before and After Restoration Balm” deep in to the briar with my finger tips and let it rest for a few minutes. The balm almost immediately works its magic and the briar now has a nice vibrant appearance with the beautiful grain patterns displayed in their complete splendor. The contrast of the dark browns of the Bird’s eye and cross grains with the natural patina of the rest of the stummel adds an interesting dimension to the appearance of the stummel which cannot be sufficiently described in words and be rather seen in person. I really like the looks of the stummel at this point in restoration. The grains and the clean lines of this piece of briar is really appreciable. With the stummel set aside, I polished the stem by wet sanding, starting with 400 and progressing through 600, 800, 1000, 1500 and 2000 grit sandpapers. I rubbed a good amount of EVO in to the stem surface and set it aside to be absorbed.A few hours later, I wiped the stem surface with paper towels and began the polishing cycle using micromesh pads. I wet sanded the stem surface going through 1500 to 12000 grit pads. I set the stem aside after rubbing it down with EVO again.To complete the restoration, I mount a cotton cloth buffing wheel on to my hand held rotary tool and polished the stummel and stem with Blue Diamond compound. This compound helps to remove the minor scratch marks that remain from the sanding. With another cotton buffing wheel that I have earmarked for carnauba wax, I applied several coats of the wax. I finished the restoration by giving the entire pipe a rigorous hand buffing using a microfiber cloth to raise the shine further. The finished pipe looks amazingly beautiful and is ready to join my collection. I only wish it could share with me its life story of the past years while I enjoy smoking my favorite Virginia blend in it or maybe an English blend or maybe just keep admiring it! Big thank you to all the readers who have joined me on this path by reading this write up as I restored and completed this project.

Cleaning up one of my restorations from many years ago


Blog by Steve Laug

I have always liked the GBD 9438 shaped pipe and this one was one of the first that I picked up many years ago when I first started working on pipes. I found it at an antique shop. It was in the early days when I picked up most every pipe I found. I believe that like others I found in the early days this pipe cost me about $6CDN. Just remembering that reminds me how much things have changed over the years. It became a favourite shape of mine and over the years I have purchased many more 9438 pipes made by GBD for their main and their seconds lines such as Irwin and Dr. Plumb. I have added them to my collection. Here is a link to a blog I did on my collection back in 2013 (https://rebornpipes.com/2013/12/12/my-gbd-9438-saddle-stems-and-tapered-stem-rhodesians/). I have 12 – some were in rough shape and others not so bad. I have been sorting through my pipe collection and thinning out pipes that I am willing to part with. I have sold many already and others are currently on the store. For the most part these pipes have been early restorations and all need a bit of work to bring them up to my current standard. I have set aside three 9438 pipes that I decided to rework. The first of them is stamped on the left side Dr. Plumb [over] London Made. On the right side it is stamped London England [over] 943810. While it was very workable and I had actually smoked it quite a bit over the years I knew that original restoration on it was less rigorous than my current standards. So, before I listed it for sale I wanted to work it over again. I took photos of the pipe to give a sense of the beauty and the work that needed to be done. I took photos of the pipe’s bowl and rim top to show the moderate cake in the bowl and some damage to the inner edge of the bowl. There was also burn damage on the rim top and darkening on the rear and front right top of the bowl. I also took photos to capture the condition of the stem. You can see in the first photo below the dark dot on the top of the saddle. It was originally a Dr. Plumb style logo but over time it had darkened. Fortunately, I am not a biter or stem chewer so there were no deep tooth marks on the top and underside of the stem. There was some oxidation on the vulcanite stem and some chatter around the button.I took photos of the stamping on each side of the shank. It is readable and clear as noted above.I took the stem off the shank and took a photo of the look of the pipe. It really is a beauty.I decided to address the damage to the rim top and inner edge of the bowl. To deal with the burned inner edge of the rim and the rim top damage I lightly topped it on a piece of 220 grit sandpaper. I used a piece of 220 grit sandpaper on a wooden ball to give the rim top a light bevel. It took a bit of work to smooth out the damage and lightly bevel the inner edge of the bowl. I used a Cherry stain pen to restain the rim top and begin the process of blending it in. I reamed the bowl with a Savinelli Fitsall Pipe Knife to take out the cake. I removed ti back to bare briar. I sanded the bowl walls with a piece of 220 grit sandpaper wrapped around a dowel to smooth out the walls. It looked very good. No burn damage or checking on the bowl walls.I scrubbed out the shank and the stem with pipe cleaners, cotton swabs and alcohol to remove the tars and oils. The shank was dirty though the stem airway was not too bad. It cleaned up well. I sanded the bowl and rim top to clean up the damage and repairs to the edge and start the polishing of the bowl. I used 320-3500 grit sanding pads. I wiped the bowl down with a damp cloth after each pad. It really began to take on a shine. I polished the briar with micromesh sanding pads – dry sanding with 1500-12000 grit pads. I wiped it down after each sanding pad with a damp cloth to remove the sanding debris on the surface. I rubbed the bowl down with Before & After Restoration Balm. I worked it into the surface of the briar with my fingertips to clean, enliven and protect it. I let the balm sit for a little while and then buffed with a cotton cloth and shoe brush to raise the shine. I set the bowl aside and turned to address the stem. It was in good condition other than the light tooth chatter so I polished the vulcanite with micromesh sanding pads – 1500-12000 grit pads. I wiped it down with Obsidian Oil after each sanding pad. I used Before & After Pipe Polish – both Fine and Extra Fine to further polish the stem. I gave it a final coat of Obsidian Oil and set it aside to dry. This Dr. Plumb London Made 943810 Bent Rhodesian cleaned up much better this second time around and looks very good. The Before & After Restoration Balm brought the colours and grain out in the smooth finish on the pipe. It works well with the polished vulcanite saddle stem. I put the stem back on the bowl and carefully buffed the pipe with Blue Diamond on the buffing wheel using a light touch on the briar. I gave the bowl and the stem multiple coats of carnauba wax on the buffing wheel. I followed that by buffing the entire pipe with a clean buffing pad. I hand buffed the pipe with a microfiber cloth to deepen the shine. The finished Dr. Plumb London Made Rhodesian 943810 fits nicely in the hand and I think it will feel great as it heats up with a good tobacco. Give the finished pipe a look in the photos below. The dimensions of the pipe are Length: 5 ½ inches, Height: 1 ½ inches, Outside diameter of the bowl: 1 ¼ inches, Chamber diameter: ¾ of an inch. The weight of the pipe is 1.76 ounces/50 grams. I will be adding this one to the British Pipemakers Section of the rebornpipes store shortly. If you want to add it to your collection let me know. Thanks for reading this blog and my reflections on the pipe while I worked on it.

Restoring a Nicely Grained Churchill 999 Imported Briar Pot


Blog by Steve Laug

Last week I received a text from Robert about restoring three pipes his brother had found in Eastern New York. There were two Kaywoodies and a Churchill. The Kaywoodies included a small apple stamped Campus and an octagonal pipe stamped Kaywoodie Standard. The Churchill was a 999 Pot shaped pipe. He sent along two photos of the pipes. You can see the condition of the three pipes. They are dirty and worn. The last pipe in the photo, the Campus has what appears to be a broken shank and a potential repair. It looks to be poorly done. Robert said that he was fairly certain that the stem was glued onto the shank with the repair. On Saturday he brought the pipes by for me to look at. I now had three more pipes to clean up and repair. The Churchill 999 Pot and the Kaywoodie Standard Oxagonal 44 Apple were dirty but were in good repair. I had finished the little KW Campus repair and the pipe looked good (https://rebornpipes.com/2024/04/21/repairing-and-restoring-a-kaywoodie-campus-apple/). I also cleaned up the second Kaywoodie, the Octagonal Apple and it looked good. Here is the link to that blog (https://rebornpipes.com/2024/04/22/restoring-a-kaywoodie-standard-octagonal-44-apple/). There was a moderate cake in the bowl with tobacco debris. There was a coat of lava on the rim top that was quite thick and the inner edge showed some damage. The outer edge looked very good. The finish was dirty but otherwise showed some nice grain underneath. The stamping on the pipe is very simple. On the left side of the shank it is stamped Churchill’s arched over 999 with Imported Briar underneath. The stem was very oxidized and there was light tooth chatter on both sides ahead of the button. The stem was also plugged with tars and debris in the slot and airway was narrowed down.

I have worked on several Churchill pipes over the years and have done research on the brand when I worked on them. Here is a link to one of them that I had worked on. Here is the link to the blog (https://rebornpipes.com/2013/09/08/churchills-bent-pot/). I am including that information below.I am fairly certain that the pipe came from Churchill’s Tobacco Shop in Norwich, England. I found the following information on the Pipes and Logos website http://pipephil.eu/logos/en/logo-c4.html On the site there is a small paragraph which I have copied as follows: “Churchill’s Tobacco shop is situated in St Andrew’s Street at the corner of Bridewell Alley in Norwich, England. The shop was next to a church and at the bottom of two hills, and that’s how it became “Churchill’s”. Former manager: John Elvin (retired on May, 31 2008). Current owner (2008): Keith Garrard.” I have included these pictures from that website as they show the stamping on both the shank and stem that is identical to the pipe that I have just refurbished.According to the Churchill’s website it is the last remaining specialist tobacconist in Norwich, originally standing at 32 St Andrews Street for over 23 years. http://www.churchillsofnorwich.com/index.php?_a=viewDoc&docId=1 The site also notifies the shop’s clients that Keith Garrard, who had a wealth of knowledge and was an avid pipe and cigar smoker himself, passed away on 23rd March 2012. His wife Coral continues to maintain the business in his honour.

I took photos of the pipe when I brought it to the worktable. I wanted to show the general condition of the pipe before I started my work on it. You can see the cake in the bowl and the lava on the rim top. The rim top appears to be good under the lava. The stem is dirty and heavily oxidized as noted and light tooth marks are on the top and underside ahead of the button. I took some close up photos of the rim top and the stem surface. I wanted to show the condition of both more closely. The rim top and the inner and outer edges of the bowl heavily cake in lava and you can see the marks on the inner bowl edge. I also took close up photos of the stem to show the oxidation and the light tooth marks on the stem surface. I took a photo of the stamping on the left side of the shank and it is clear and readable. It is stamped as noted above. I removed the stem for the shank and took a photo of the bowl and stem to give a picture of what it looked like. Now it is time to clean up the pipe. I reamed the bowl with a PipNet pipe reamer and the second cutting head. It cleaned up most of the cake. I used a Savinelli Fitsall Pipe Knife and cleaned up the remaining cake leaving bare briar. I sanded the bowl walls with 220 grip sandpaper wrapped around a piece of dowel. I smoothed out the bowl walls and they looked very good. There was no heat damage or checking on the walls. I scrubbed the exterior of the bowl and shank with a tooth brush and undiluted Murphy’s Oil Soap. It works exceptionally well to remove unwanted oils from the briar and also the grime on the rim and the bowl sides. I rinsed it in warm water while scrubbing with the tooth brush. The pipe looks very good at this point. The rim top is clean enough to know the condition it is in and what I need to do to deal with it. There are scratches and nicks on the rim top and they are very visible now that the lava has been removed. I scrubbed out the shank and the stem with pipe cleaners, cotton swabs and alcohol.
I gently topped the bowl to remove the damage on the rim top and to minimize it on the rear edge where the most damage was. I used a topping board and 220 grit sandpaper.There was some damage and wear on the front outer edge of the bowl. Built it up with CA glue and briar dust to fill in the damage. I smoothed out the damage with 220 grit sandpaper and reshaped it to follow the flow of the bowl. I sanded it further with 320 grit sandpaper to smooth out the repair. It really started to look very good.I touched up the stain on the rim top and on the front of the bowl with a Walnut stain pen. It is a little streaky at this point. It will work better when I finish the sanding and polishing of the rim and bowl.I sanded the bowl and rim top to clean up the damage and repairs to the edge and start the polishing of the bowl. I used 320-3500 grit sanding pads. I wiped the bowl down with a damp cloth after each pad. It really began to take on a shine. I polished the briar with micromesh sanding pads – dry sanding with 1500-12000 grit pads. I wiped it down after each sanding pad with a damp cloth to remove the sanding debris on the surface. I rubbed the bowl down with Before & After Restoration Balm. I worked it into the surface of the briar with my fingertips to clean, enliven and protect it. I let the balm sit for a little while and then buffed with a cotton cloth and shoe brush to raise the shine. I set the bowl aside and turned to address the stem issues. I scrubbed the stem oxidation with Soft Scrub and cotton pads. I was able to remove the majority of the oxidation. Then, I sanded it with a folded piece of 220 grit sandpaper. It looked much better at this point. To remove the remnants of oxidation from the vulcanite I sanded it with 320-3500 grit sanding pads. I wiped it down after each sanding pad with a damp cloth. By the final 3500 grit sanding pad the rim top had a shine.The stem was in good condition so I polished the vulcanite with micromesh sanding pads – 1500-12000 grit pads. I wiped it down with Obsidian Oil after each sanding pad. I used Before & After Pipe Polish – both Fine and Extra Fine to further polish the stem. I gave it a final coat of Obsidian Oil and set it aside to dry. This Churchill 999 Imported Briar Pot cleaned up really well and looks very good. The Before & After Restoration Balm brought the colours and grain out in the smooth finish on the pipe. It works well with the polished vulcanite taper stem. I put the stem back on the bowl and carefully buffed the pipe with Blue Diamond on the buffing wheel using a light touch on the briar. I gave the bowl and the stem multiple coats of carnauba wax on the buffing wheel. I followed that by buffing the entire pipe with a clean buffing pad. I hand buffed the pipe with a microfiber cloth to deepen the shine. The finished Churchill 999 Pot fits nicely in the hand and I think it will feel great as it heats up with a good tobacco. Give the finished pipe a look in the photos below. The dimensions of the pipe are Length: 5 ¼ inches, Height: 1 ½ inches, Outside diameter of the bowl: 1 ¼ inches, Chamber diameter: 7/8 of an inch. The weight of the pipe is 1.13 ounces/32 grams. I know Robert is going to enjoy this last pipe of the three once I return them to him. Thanks for reading this blog and my reflections on the pipe while I worked on it.