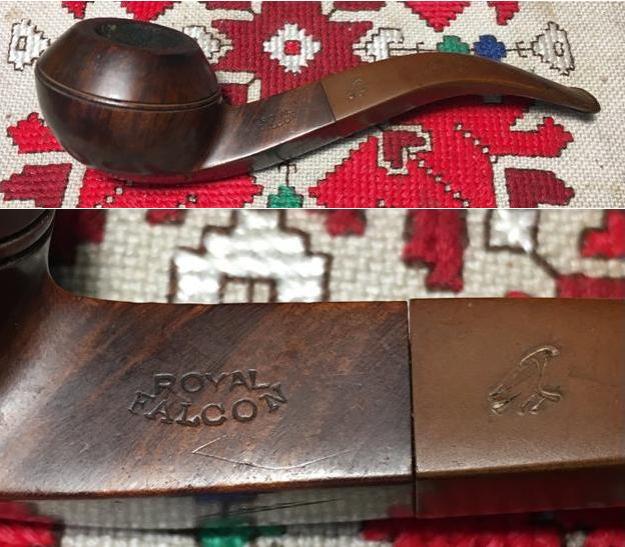
Blog by Dal Stanton
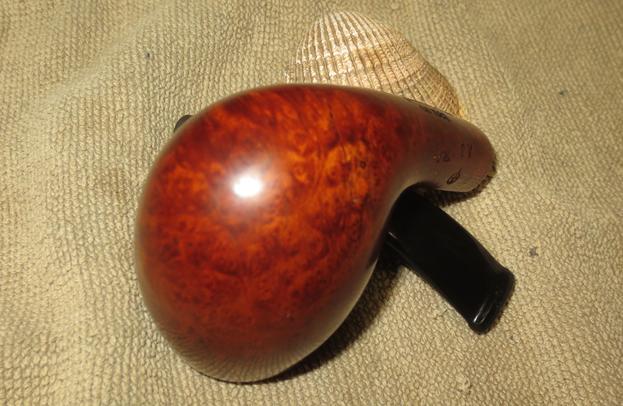
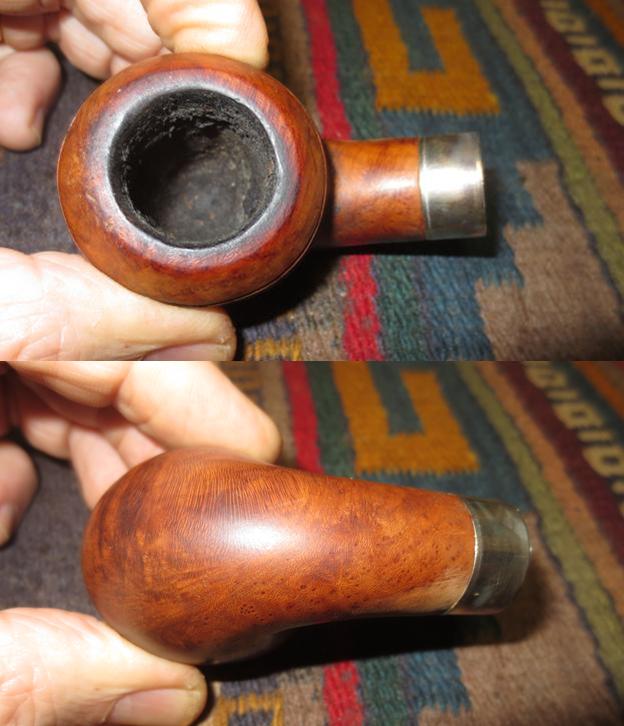
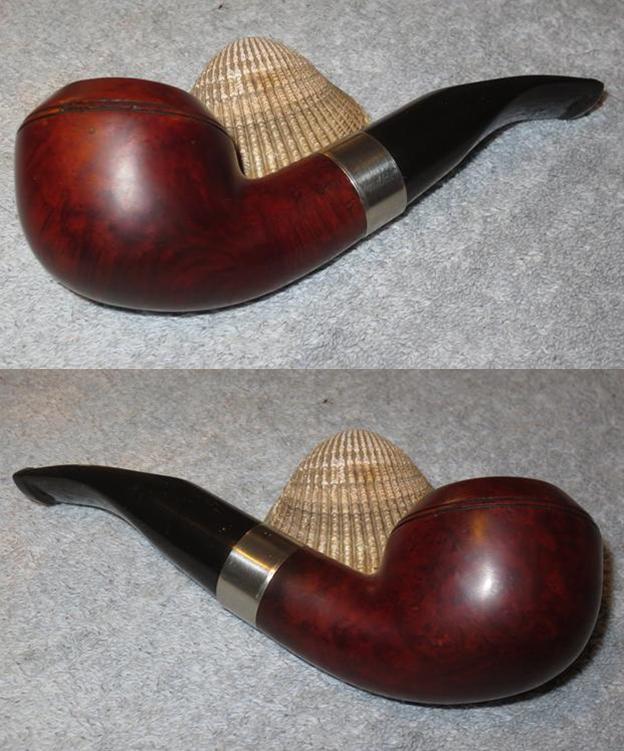
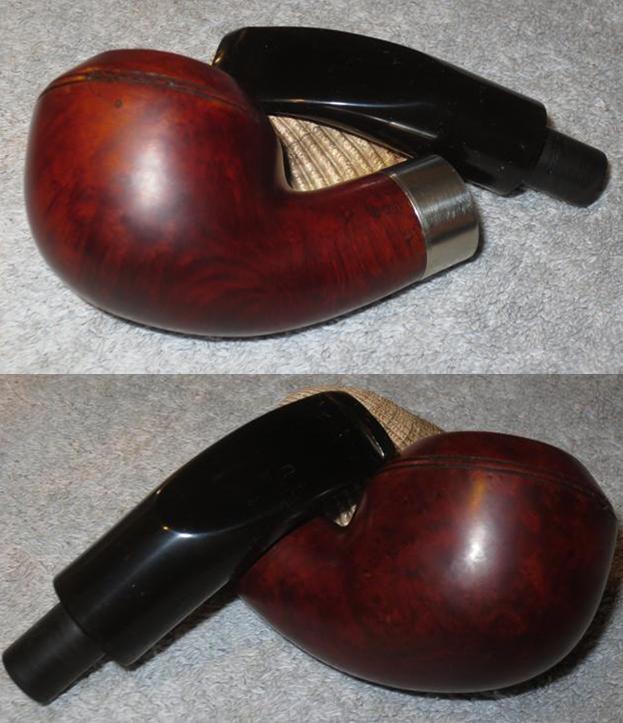
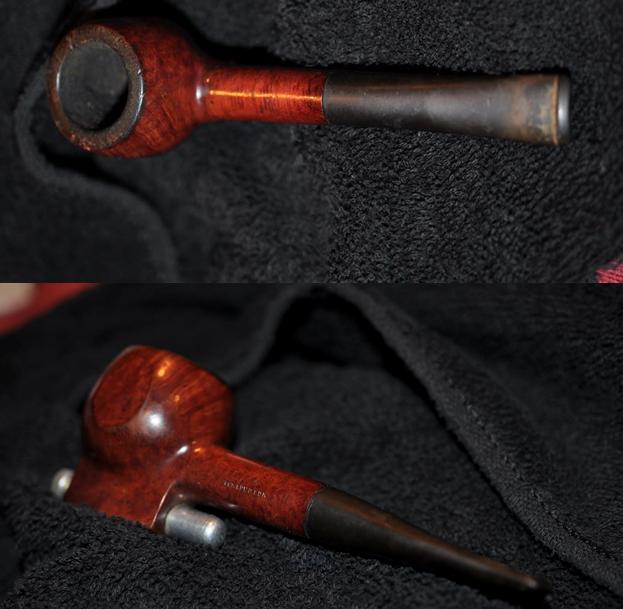
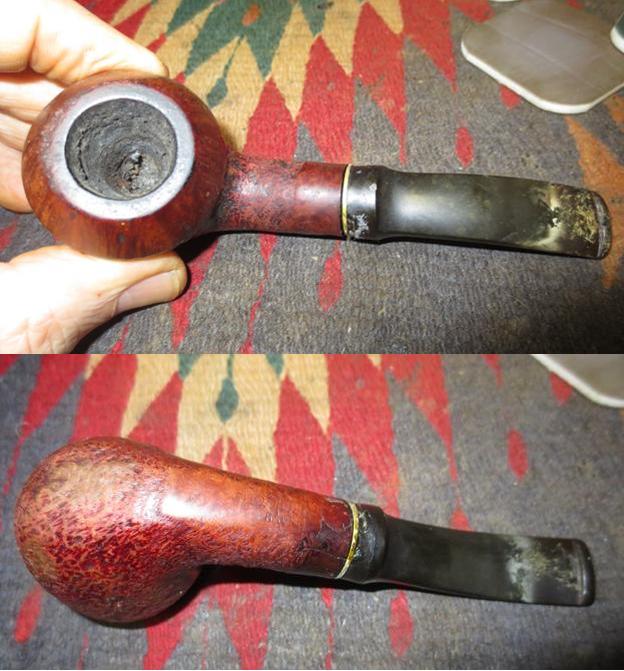
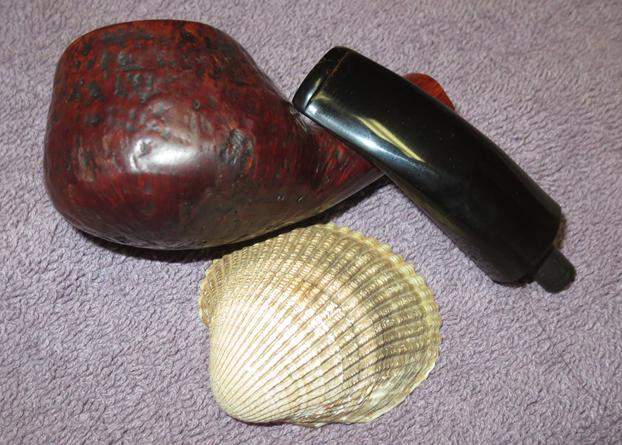
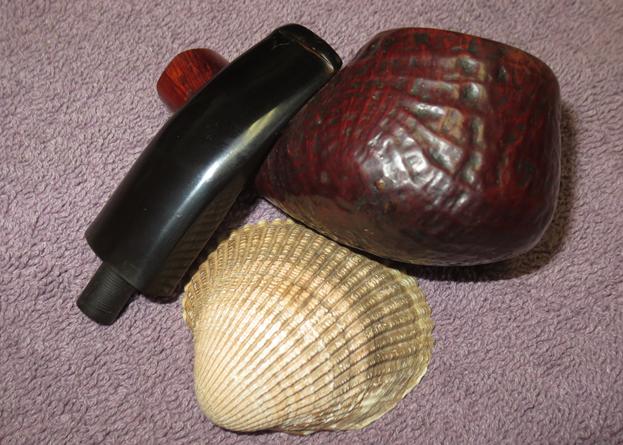
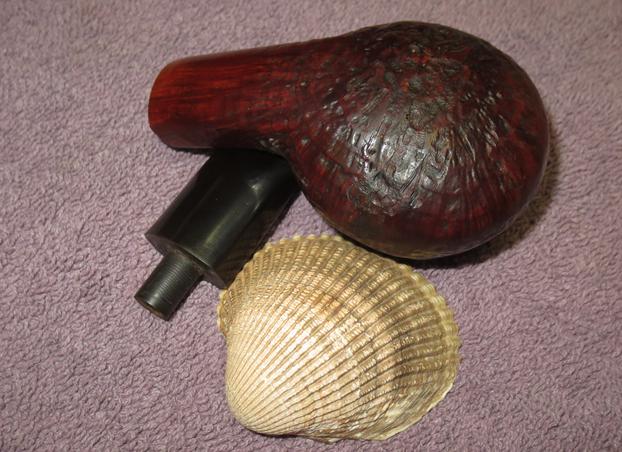
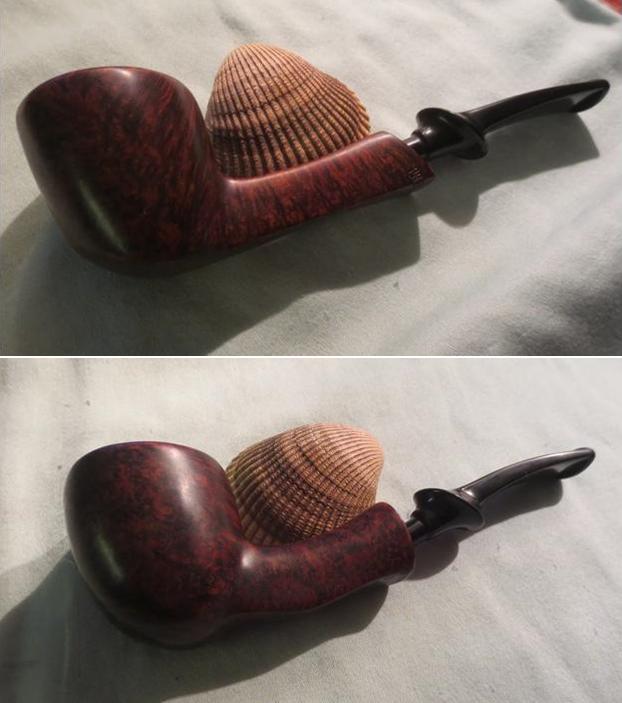
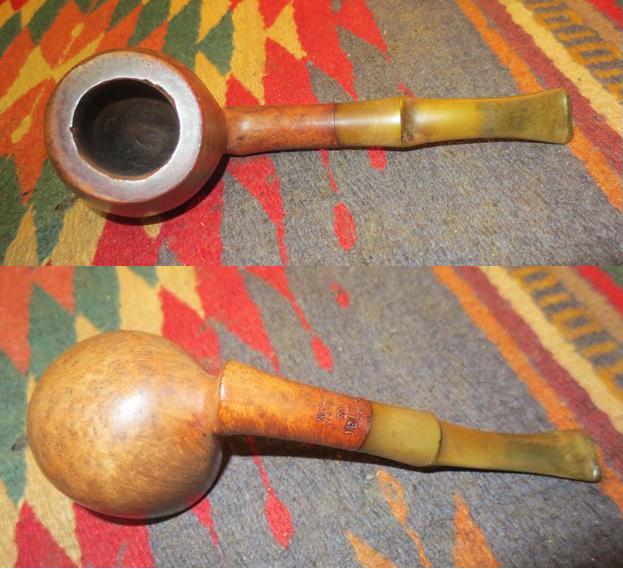
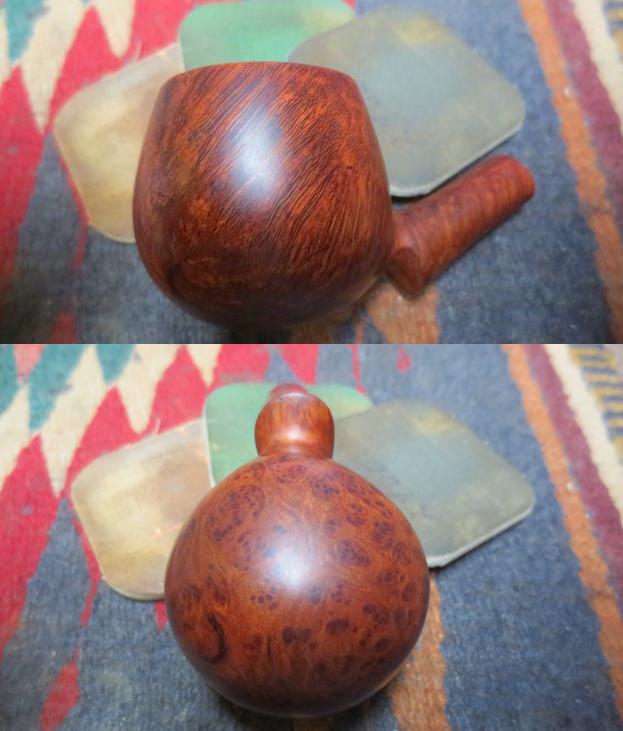
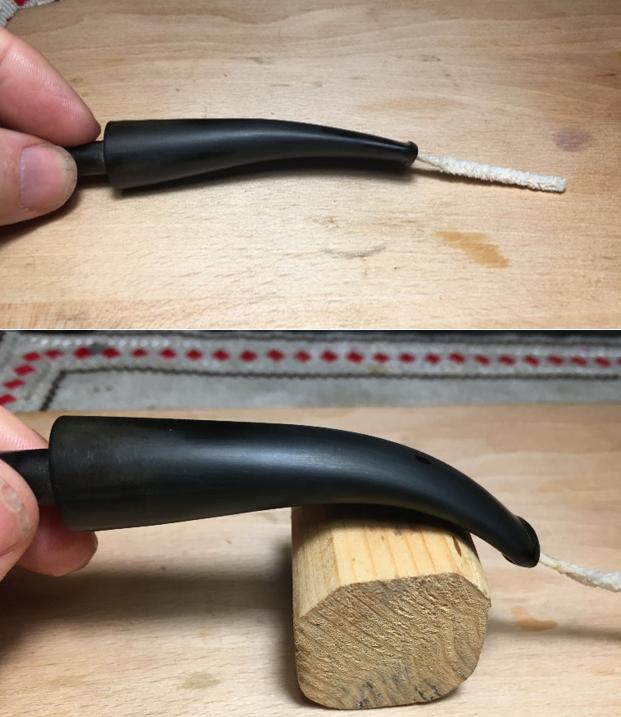
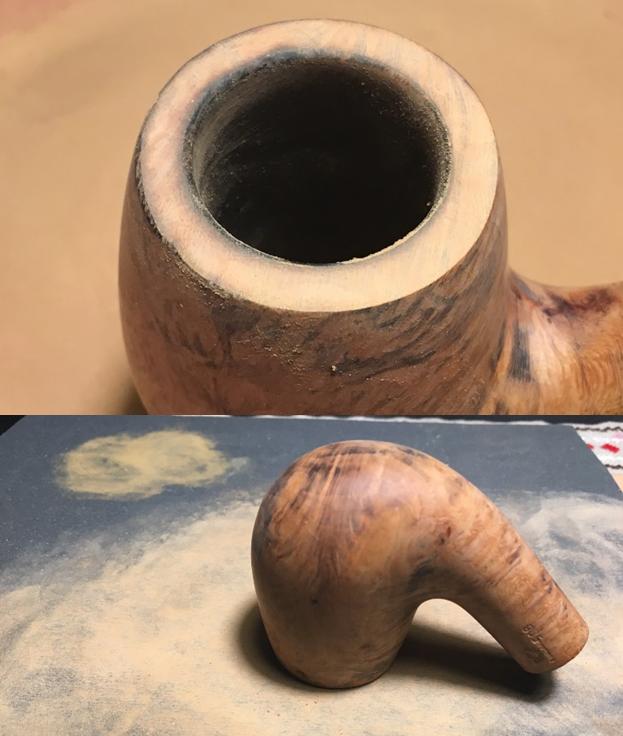
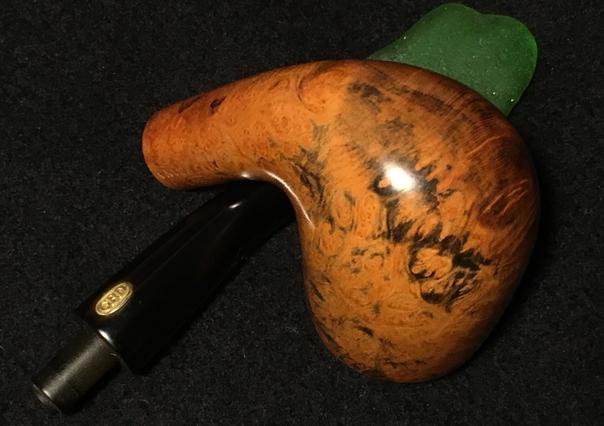
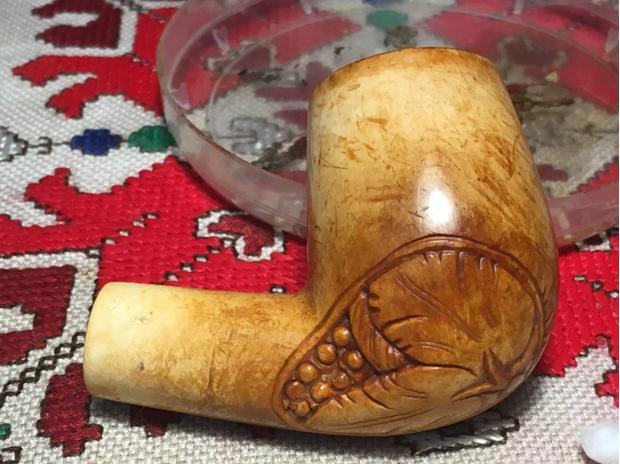
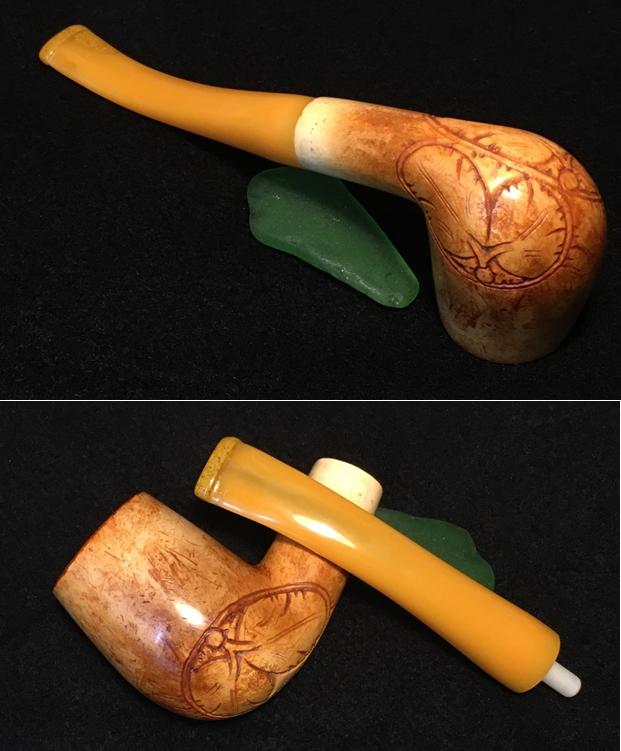
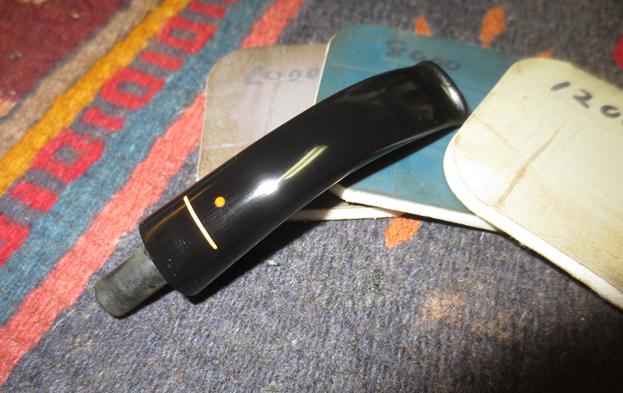
When I first saw the Meer before me on the eBay auction block, I was first attracted by the patina showing on the combination smooth and sculpted surfaces. The base of the billiard bowl showcases two opposing sculpted frescoes, one with the vineyard in expectation of fruit, and the other with the fulfillment – a rack of grapes appearing from behind the grapevine leaves. Hope and fulfillment are always pleasing themes for reflection as one smokes a bowl of his (or her!) favorite blend. The patina of the aging meerschaum is concentrated at the base of the stummel, encompassing the frescoes and then gradually thinning and lightening toward the rim and toward the shank. The other characteristic that drew my attention was the color and taper of the Bakelite stem completing the bent billiard flow. It just looked good to me. I have no idea of a carver as there are no markings on the Meer, and the only information from the seller was that its origins were in Europe – it was a gift to the original owner by his sister who lived in Belgium in the 1970s. Taking it from the ‘Help Me!’ basket, I place it on my work table here in Sofia, Bulgaria, and record the Meer’s condition when it came to me.


 The characteristics and make-up of meerschaum are not widely understood – I know because I was among those who looked at the white coral-like material and wondered what exactly it was! The word ‘meerschaum’ has German origins, literally meaning ‘sea foam’. This brief description from Meerschaum.com is helpful:
Meerschaum is a very rare mineral, a kind of hard white clay. Light and porous structure of the pipe keeps the smoke cool and soft. The pipe itself is a natural filter which absorbs the nicotine. Because of this peculiarity, meerschaum pipes slowly change their colors to different tones of gold and dark brown. This adds an esthetic enjoyment to its great smoking pleasure. The longer a pipe is smoked the more valuable it becomes due to the color change. Today many old and rare meerschaums have found a permanent place in museums and private collections.
Meers are popular because they require no breaking in, no cake, and no resting between smokes. Many consider Meers to be a cooler and dryer smoking experience. The one main issue with Meers is that they don’t like to be dropped on hard floors – that is never a good thing! Most Meerschaum is mined in Turkey and for the curious who want to know what exactly the material is, one last excerpt from Altinok Meerschaum’s facts page:
The geologist knows the light, porous Meerschaum as hydrous magnesium silicate. The pipe smoker knows it as the perfect material for providing a cool, dry, flavorful smoke. The mineral itself is the fossilized shells of tiny sea creatures that fell to the ocean floor over 50 million years ago, there to be covered and compressed over the ages by layer upon layer of silt. Profound movements in the earth’s crust raised the creamy white stone of Meerschaum above sea level. There men eventually discovered it and created an incomparable pipe from it. The first record of Meerschaum as a pipe dates from around 1723.
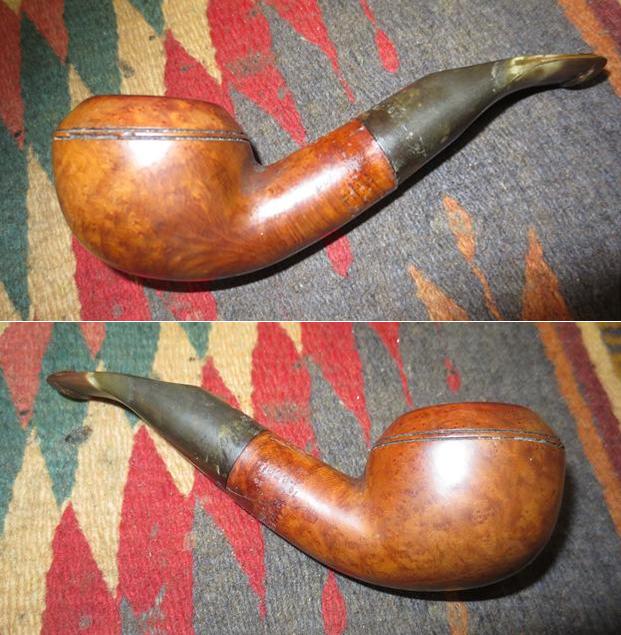
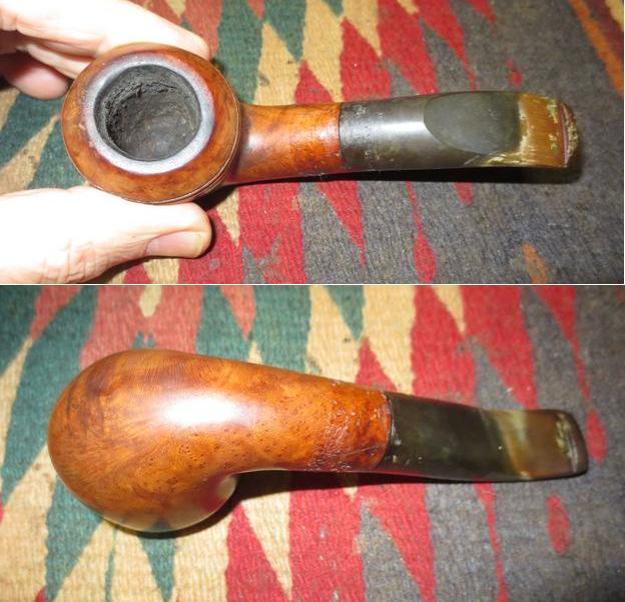
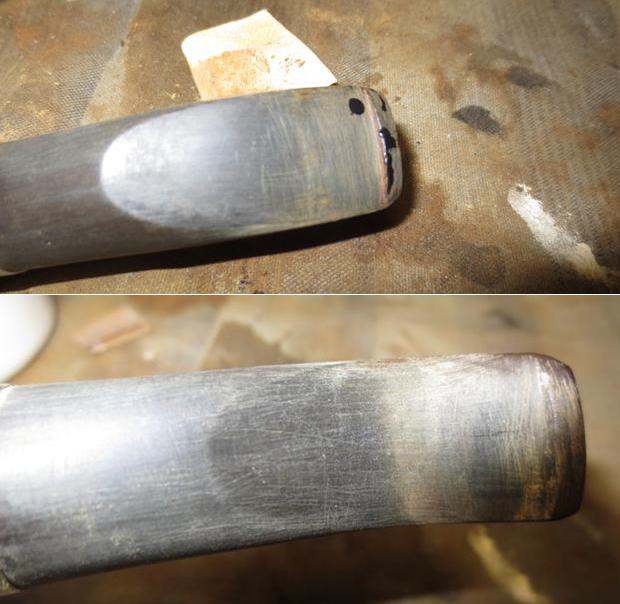
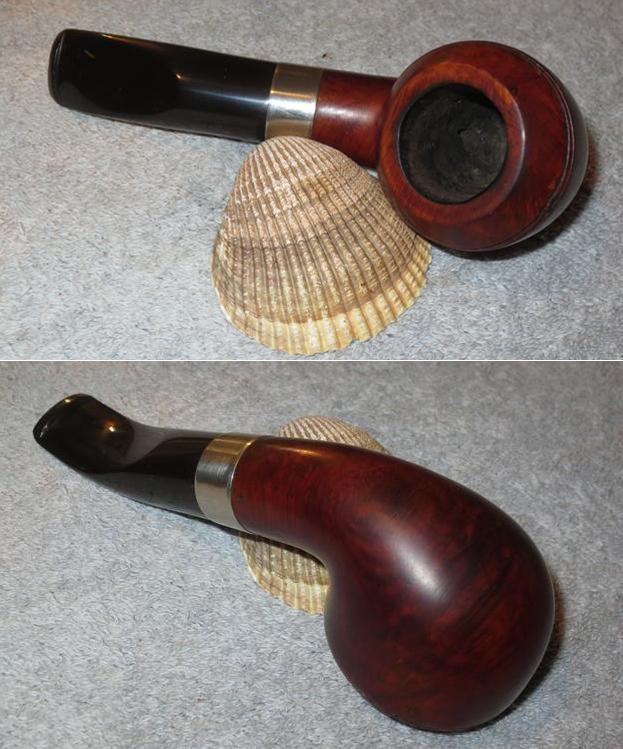
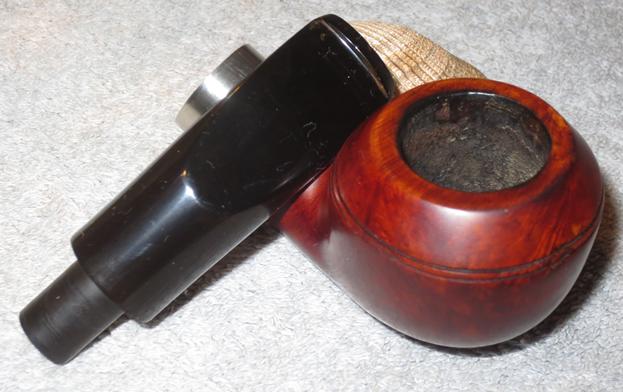
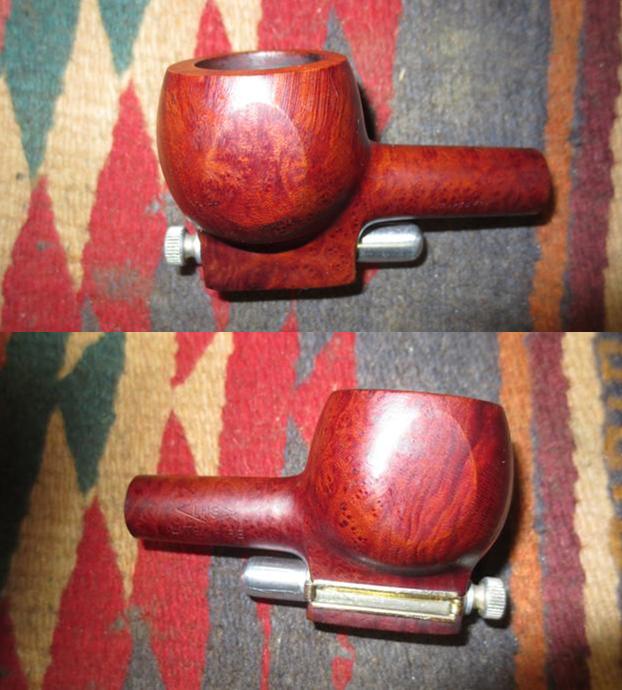
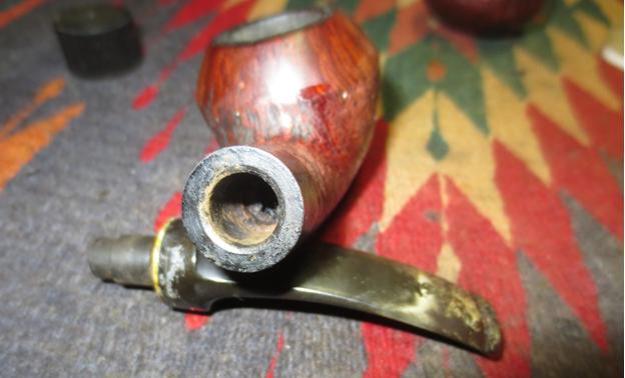
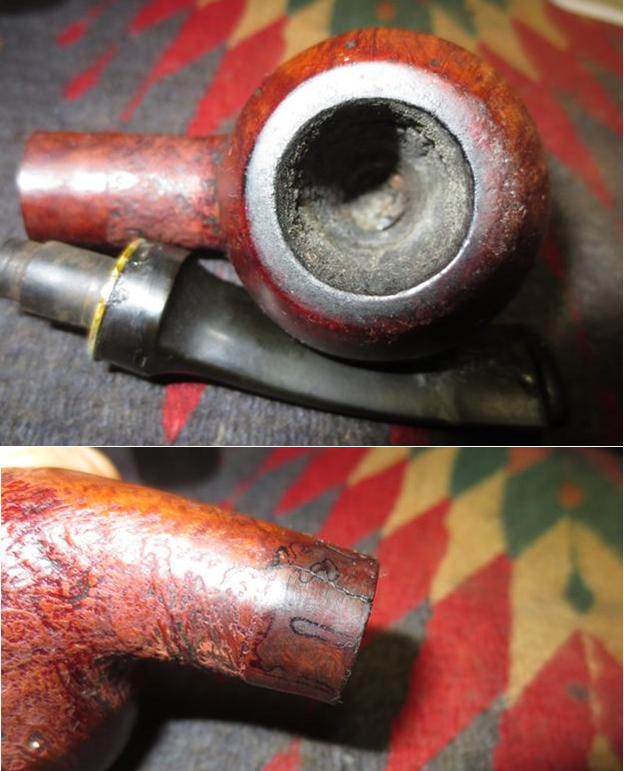
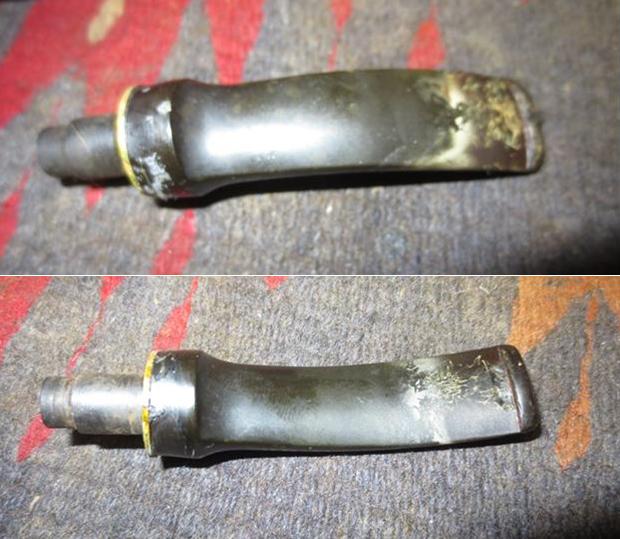
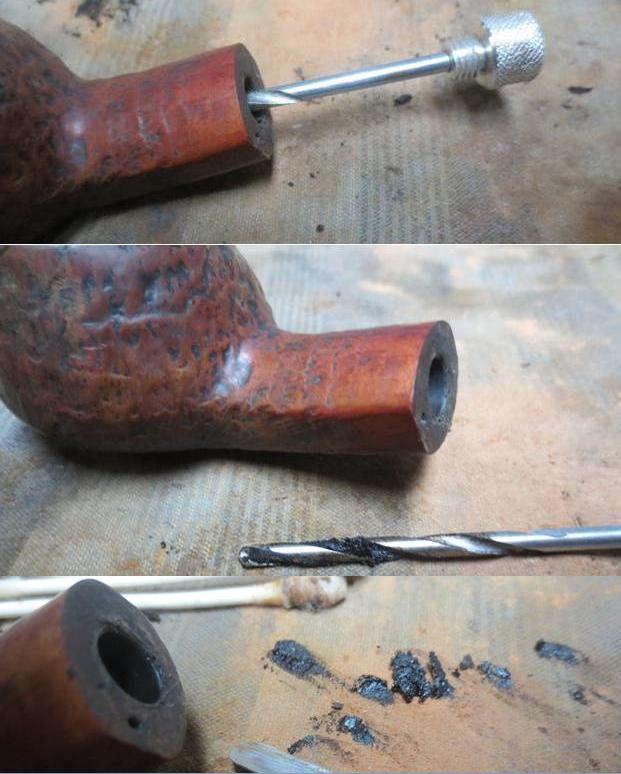
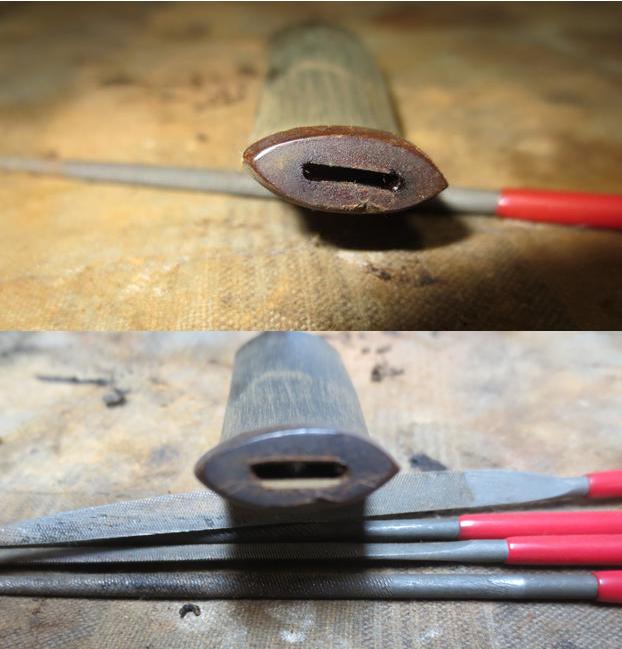
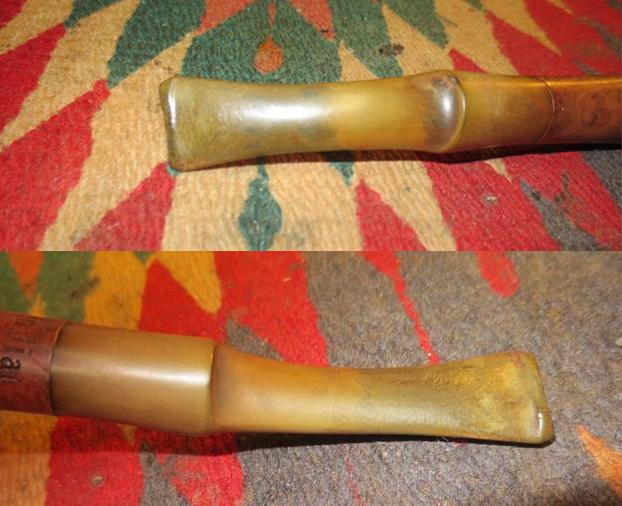
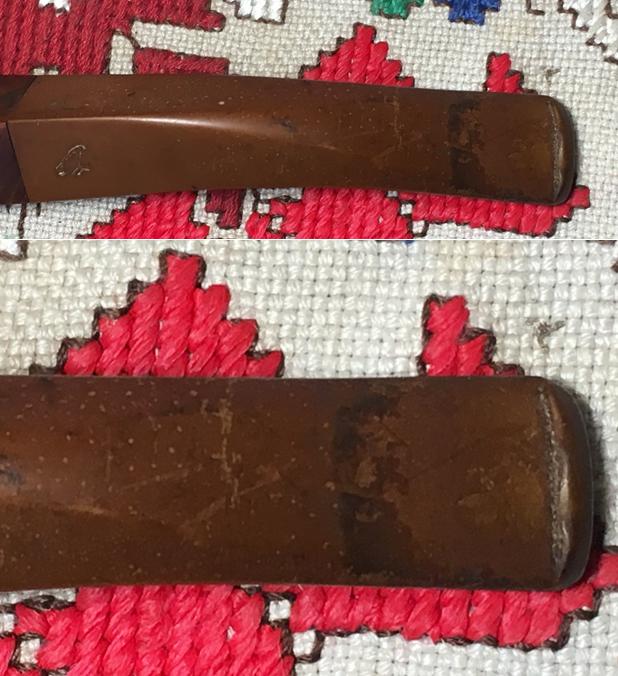
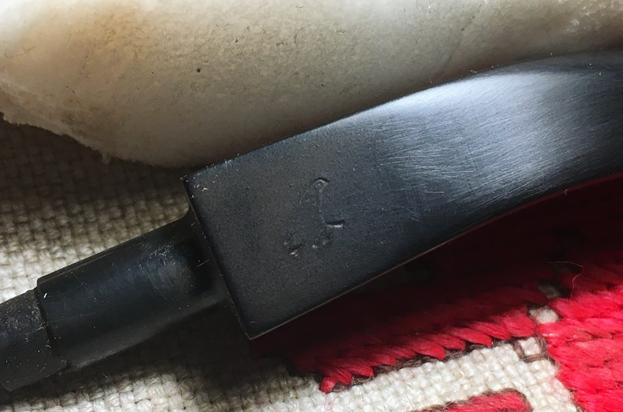
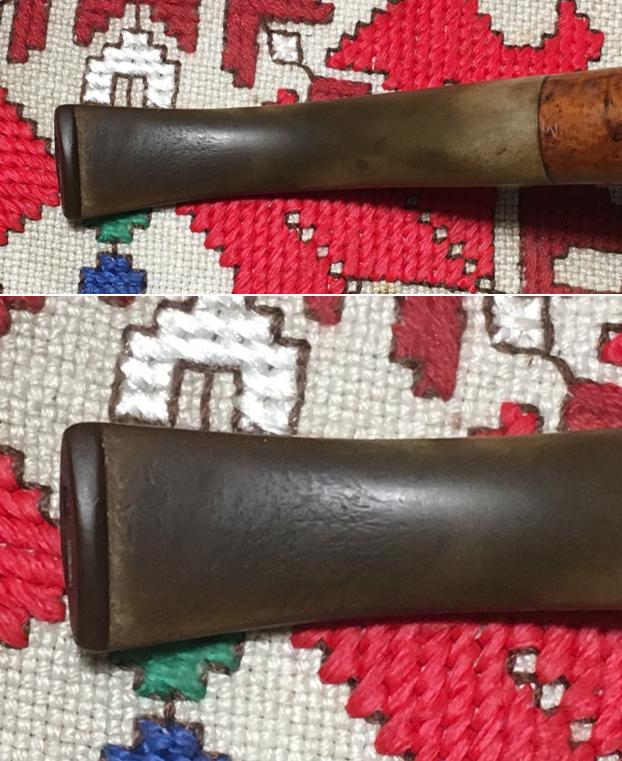
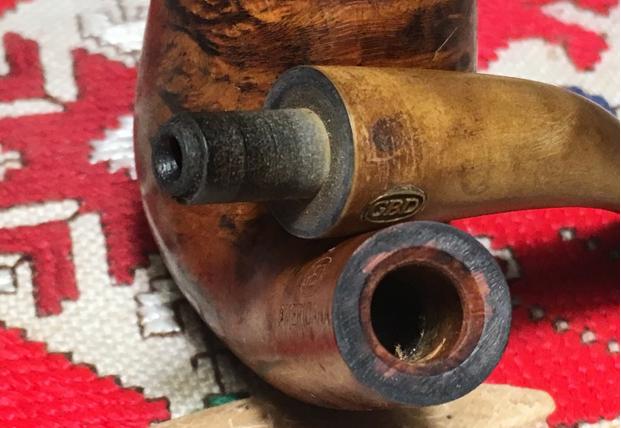
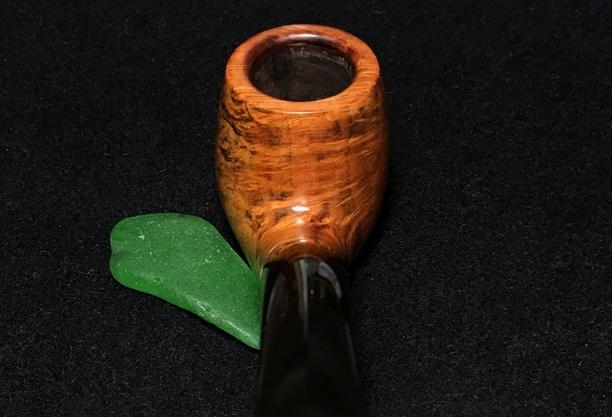
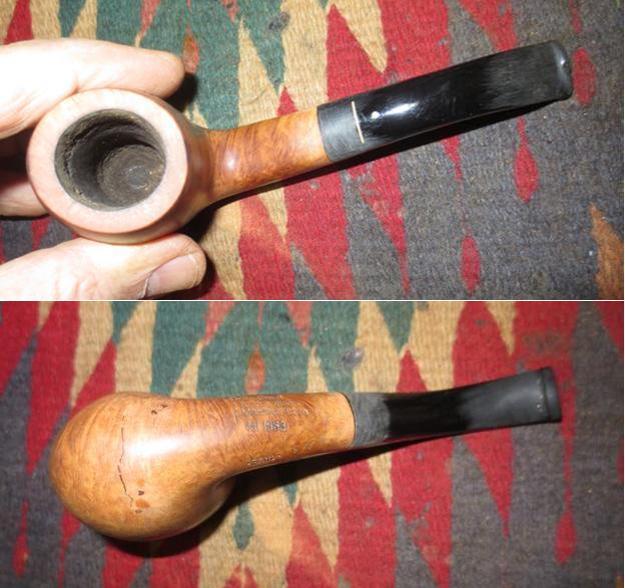
The stummel on the Meer before me has a lot of grime and dirt with nicks showing his age and that he has been well used. The challenge with Meer is always how to clean and restore but not to remove the patina, which for a Meerschaum, is the honorific equivalent of the respect owed to those blessed with gray hair and long life in the Bible. The rim has thick lava and the bowl has moderate cake which will need to be removed with care – cake is not needed on a Meer! The more daunting questions focus on the stem. The obvious challenge is the large chip on the end of the stem which also has removed almost half of the button. I could prepare for this repair by ordering and having someone bring from the US to Bulgaria Behlen’s Medium Yellow Furniture Powders to form a putty patch. I will attempt to repair the stem with the help of others – we’ll see! The other challenge that I was not able to discern from the eBay pictures, was the push tenon. The mortise was threaded for a screw in tenon but the tenon I see connected to the stem has no threads and only engages the mortise as the mortise narrows after the threads. You can see how much of the tenon is engaged by the coloration (last picture above) – only about half. When I test the engaged tenon, there is a bit of a wiggle to the stem and it isn’t solidly seated as one would expect. While the stem, when connected to the shank is usable, it isn’t ideal. I’ll give some thought to this challenge and perhaps seek counsel.
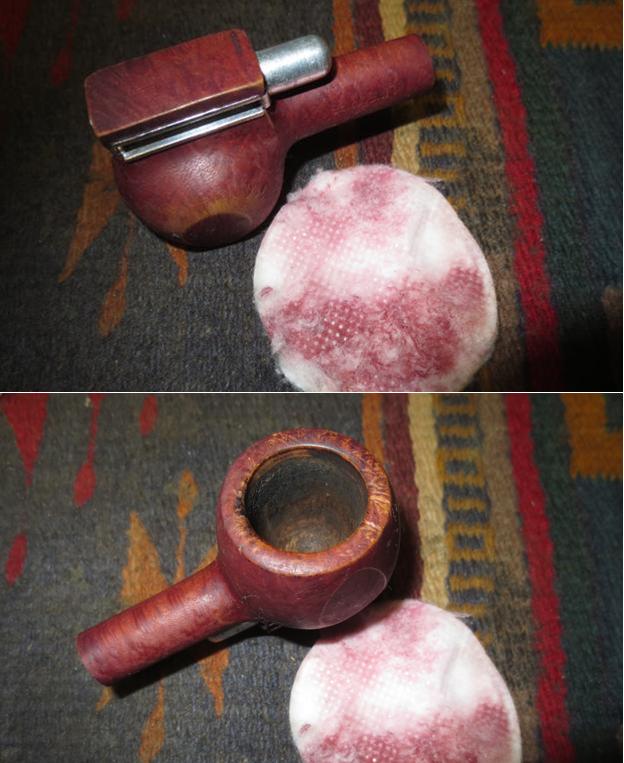
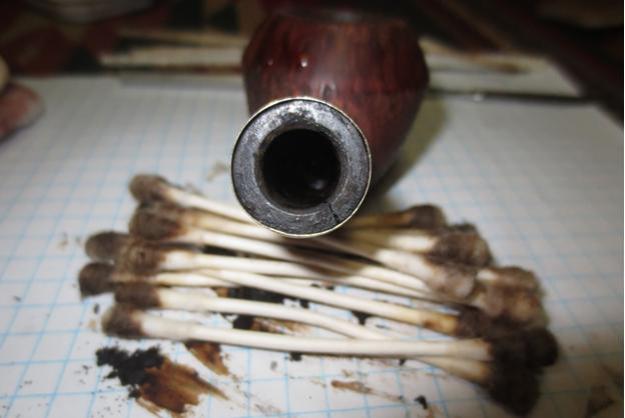
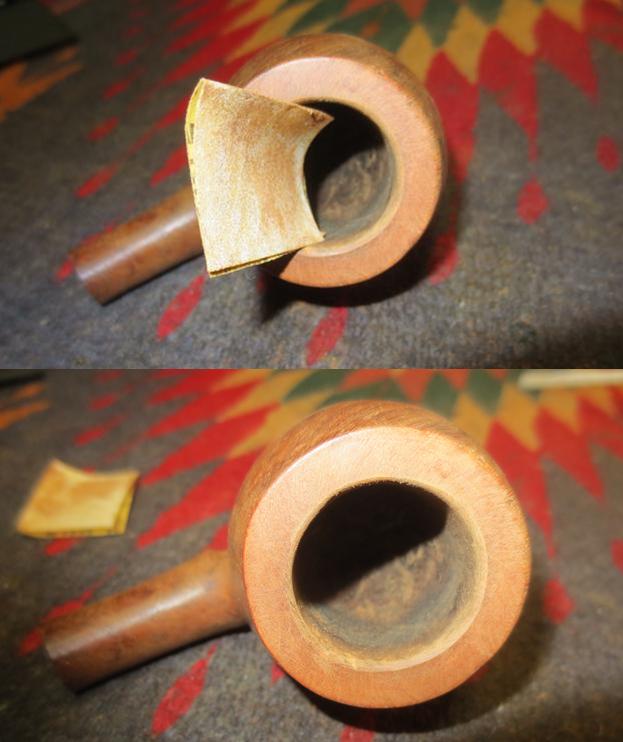
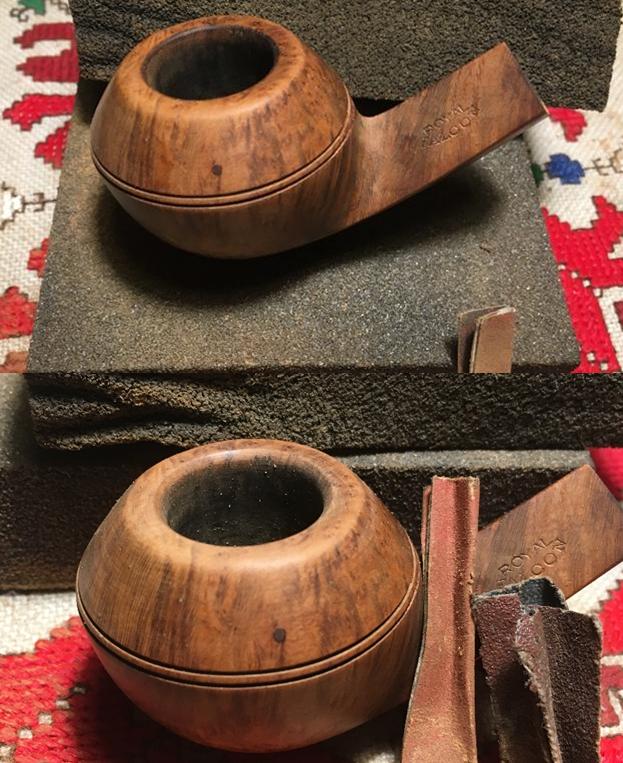
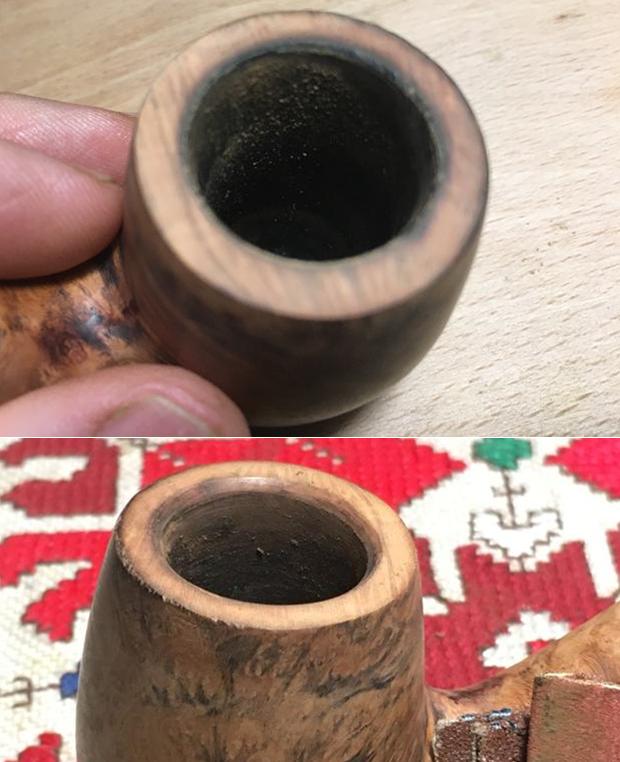
Leaving the question about the approach for the tenon, I decide to start on the clean-up of the stummel. I first clean the rim by using cotton pads wetted with isopropyl 95% – I just want to see how much of the lava and stain will come off. Not much did. I then decide to use a medium grade sanding sponge and lightly top the rim – not aiming to take off the meerschaum but to break through the crusty stuff and remove the burnt areas. That did the trick. Pictures show the progress.
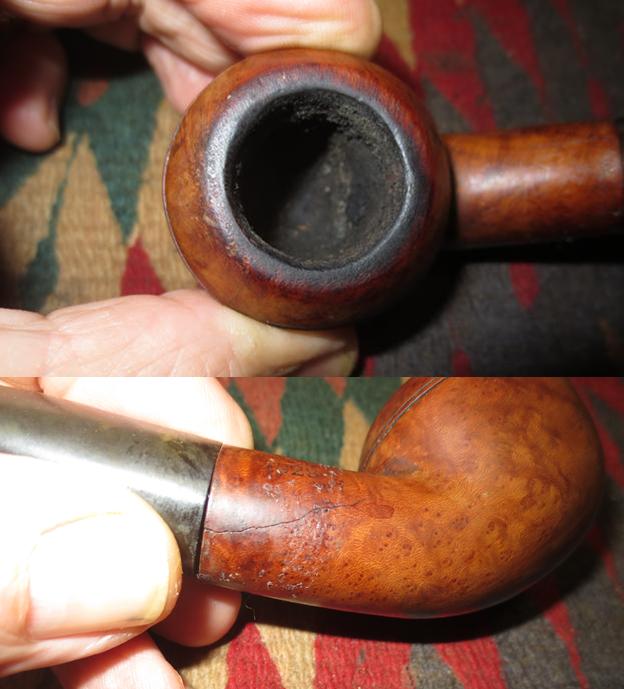
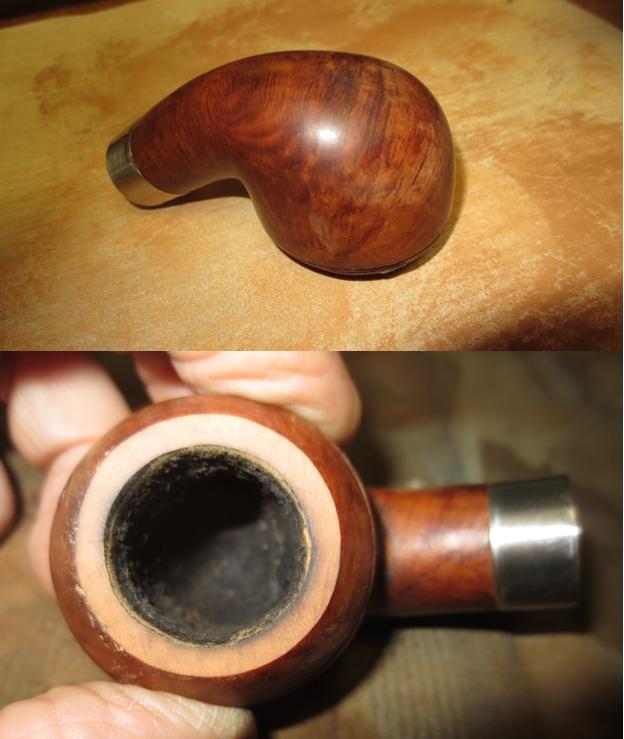
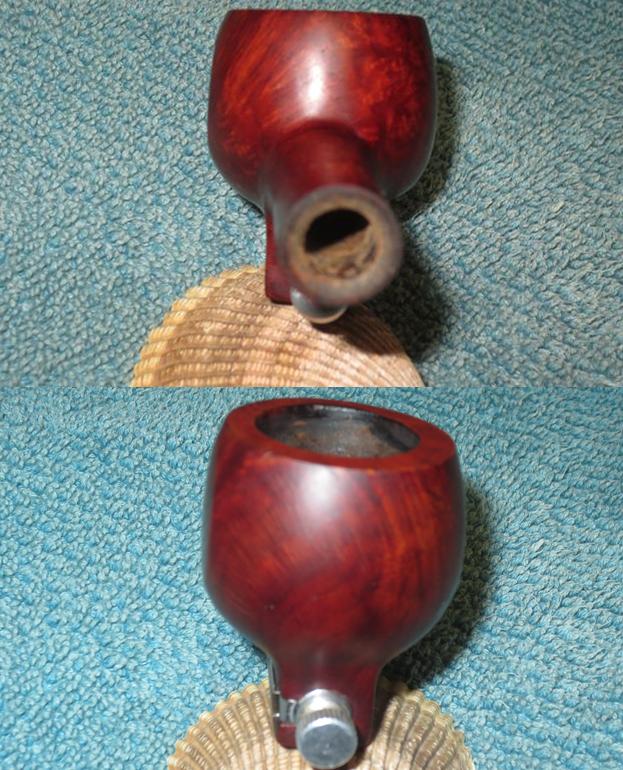
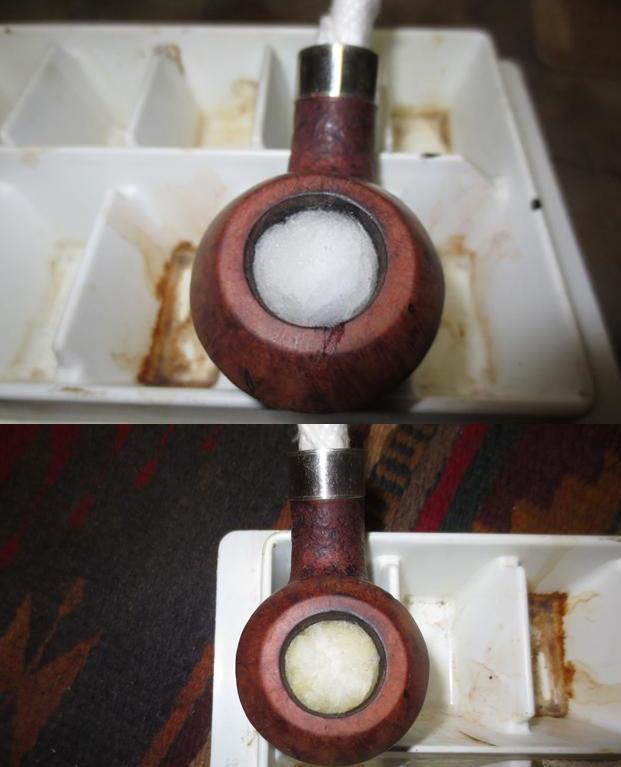
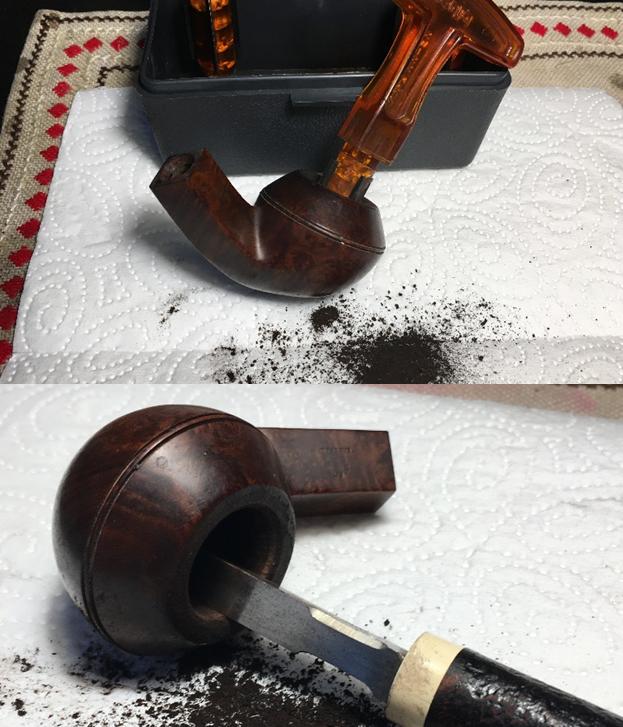
 I can now see the inner edge of the chamber wall and using both a pin knife and the Savinelli Pipe Knife carefully I ream the bowl and remove the cake. I follow this by using 240 grit paper and sand the walls to remove more of the carbon. I wasn’t satisfied with the 240 grit so I rolled up some coarser 120 grit wrapped around a Sharpie Pen and that did the trick. Much nicer. I complete the reaming with cleaning the bowl with a cotton wipe wetted with isopropyl 95%. The fire chamber looks good. To remove the blackening on the inner ring of the rim, I give it a very gentle bevel with 240 grit sanding paper rolled. The pictures show the progress.

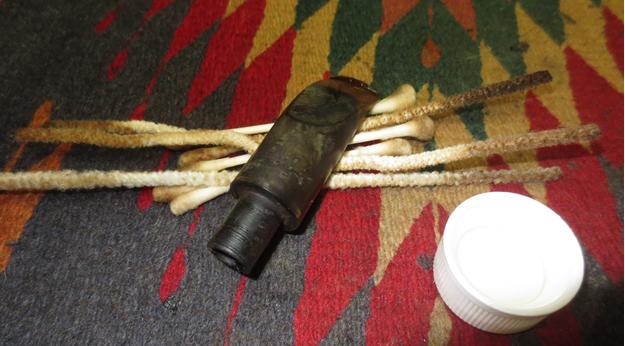
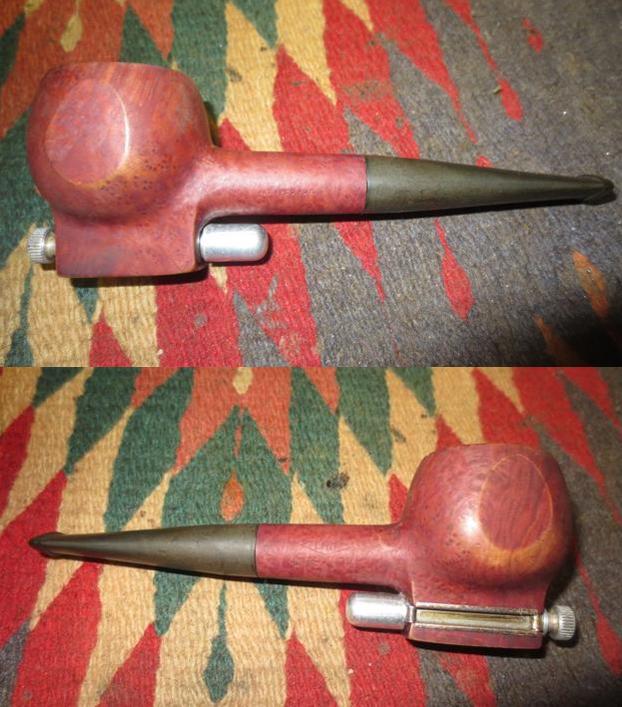
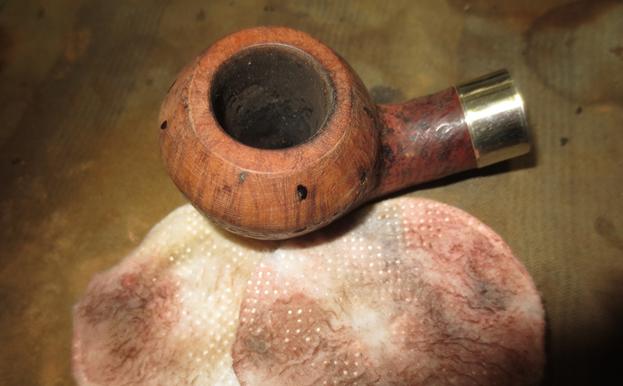
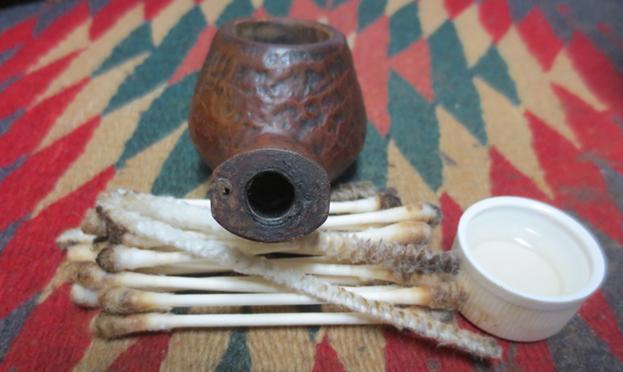
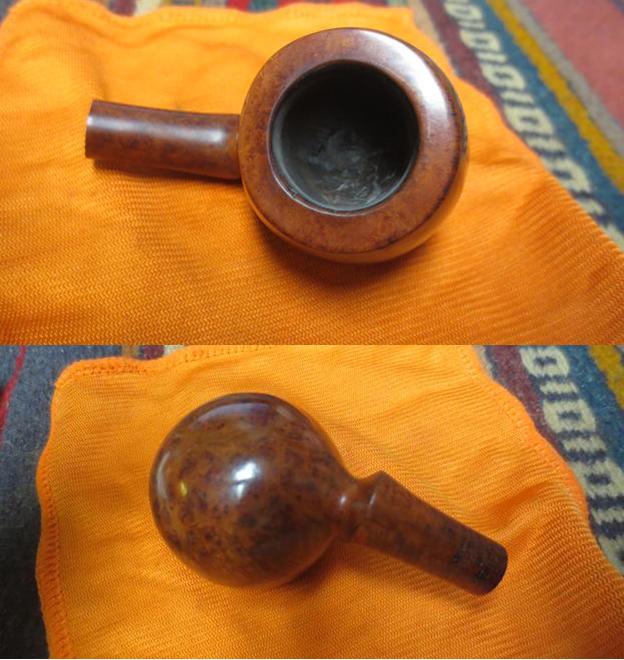
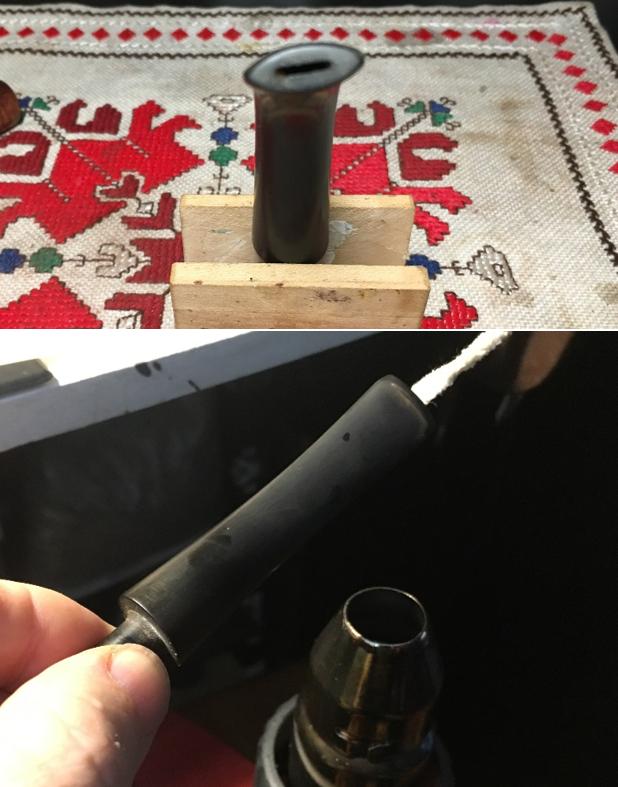
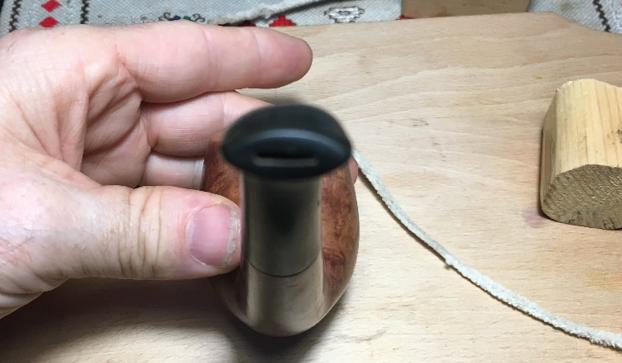
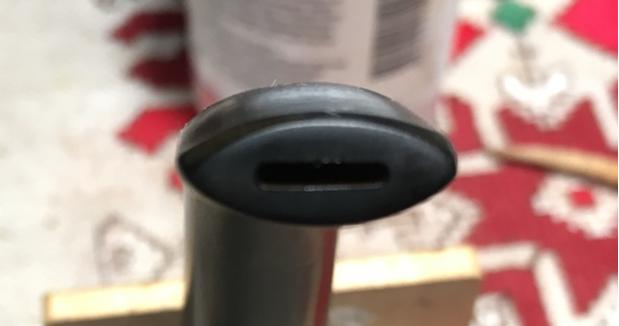
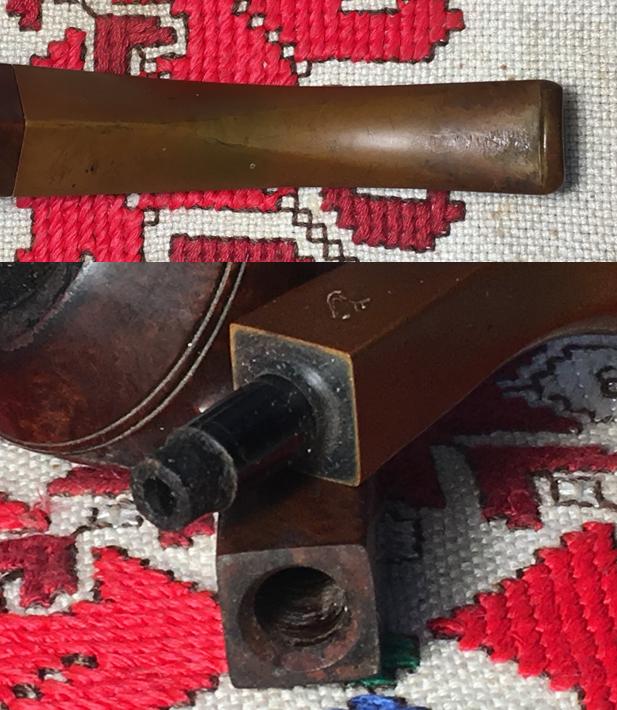
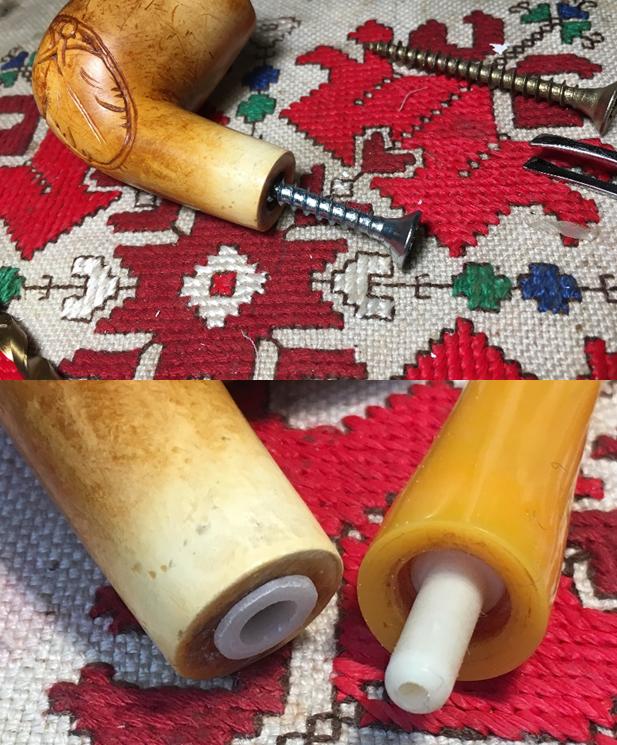
 With the bowl reamed I clean the mortise internals. Using pipe cleaners and Q-tips, dipped in isopropyl 95%, I discover quickly that I’m not able to get a pipe cleaner through the mortise through the draught hole. I twist, turn and angle – it feels like there’s an obstruction. I blow through the mortise and find that air is moving through without pressure build up. Finally, the pipe cleaner moved through. Looking more closely in the mortise with a directed light I see in the throat of the mortise just beyond the end of the threading appears to be a plastic tubing. I manage to take a picture of it. I’m not sure if this is part of the internal system or something broken off and lodged. Yet, this plastic tube is what the tenon is engaging. With great difficulty, I can probe the area what appears to be beyond the tubing and find the airway which seems to be a sharp turn up from the angle of the mortise’s drilling as the pipe cleaner emerges from the plastic tubing. This doesn’t seem right. I’ll research more to see what the tubing is. The mortise is clean, so I move to the cleaning the externals of the bowl.
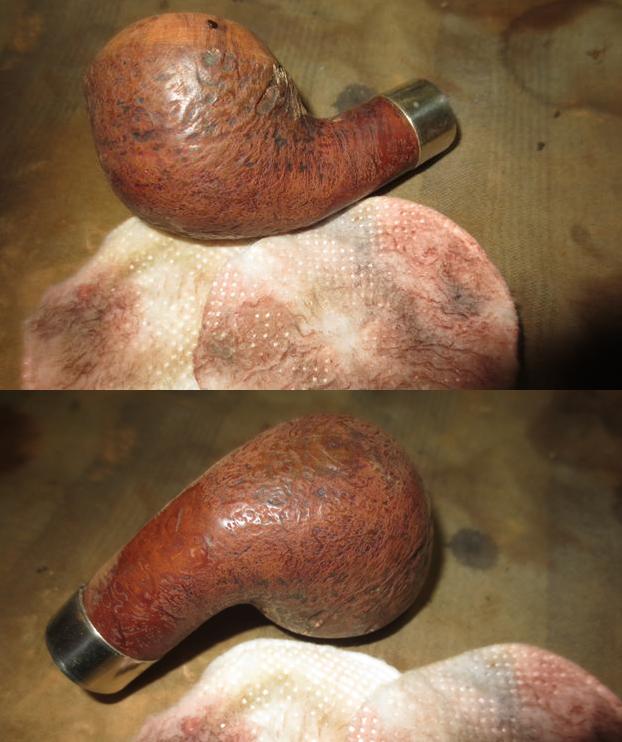
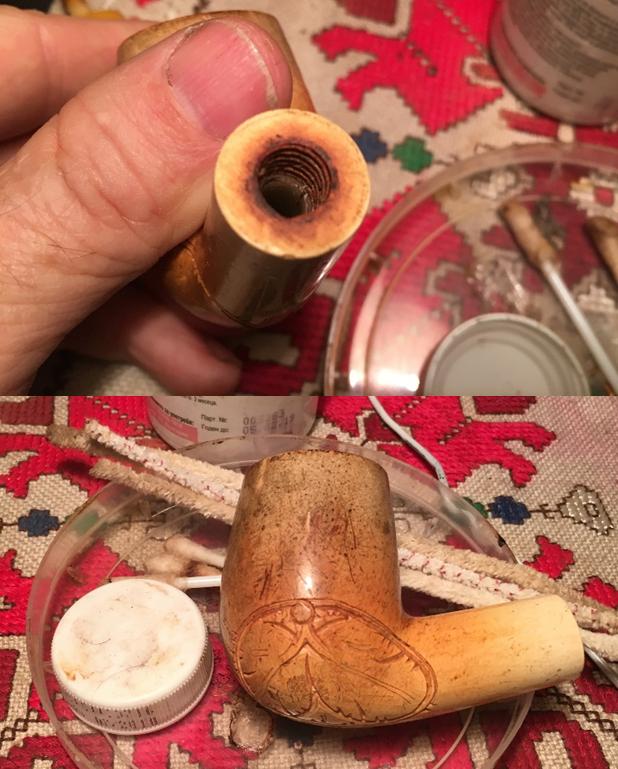 To clean the external surface of the stummel, I use undiluted Murphy’s Oil Soap with a cotton pad as well as scrubbing the sculpted lines of the vineyard frescoes. The amount of grime on the surface becomes apparent as from the before and after pictures. The pictures show the progress.
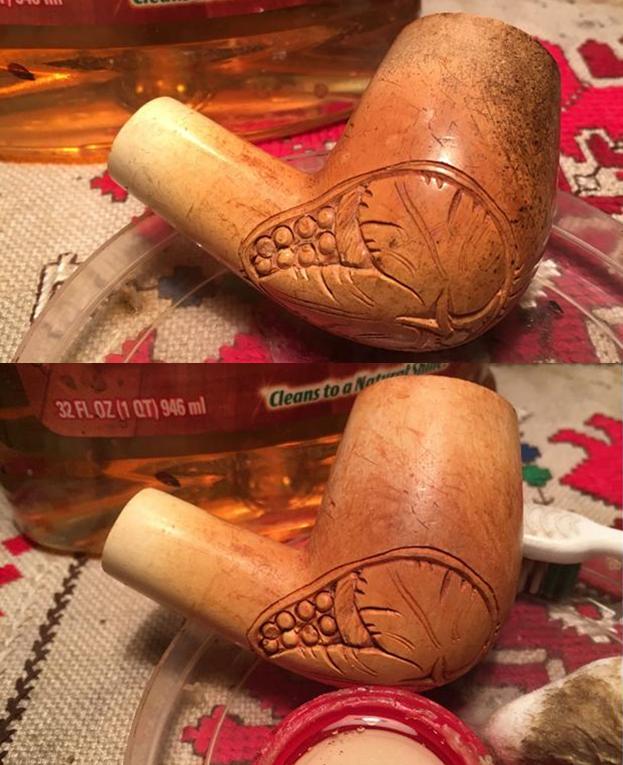
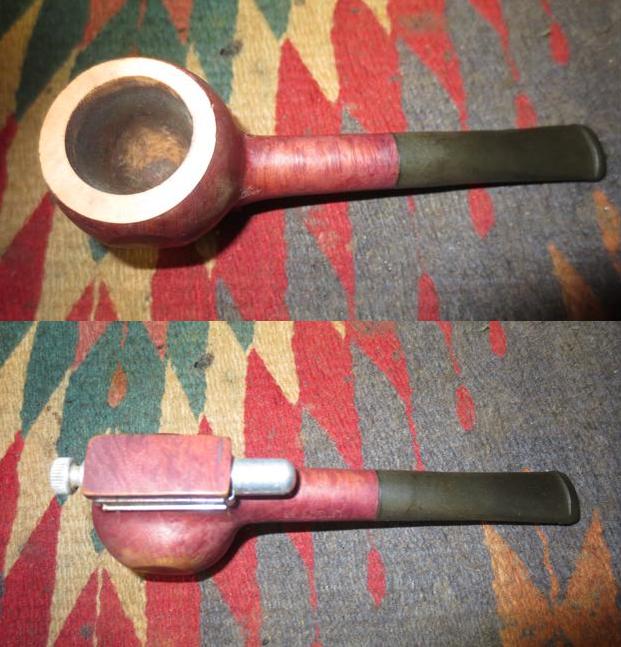
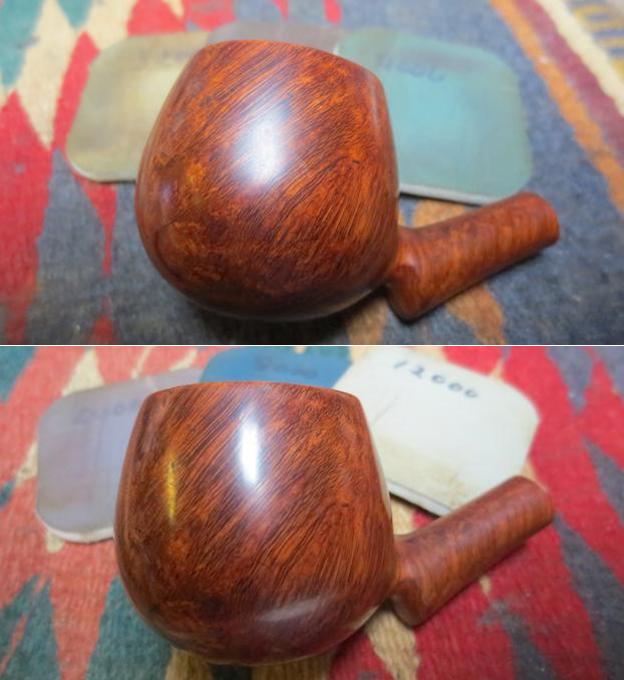
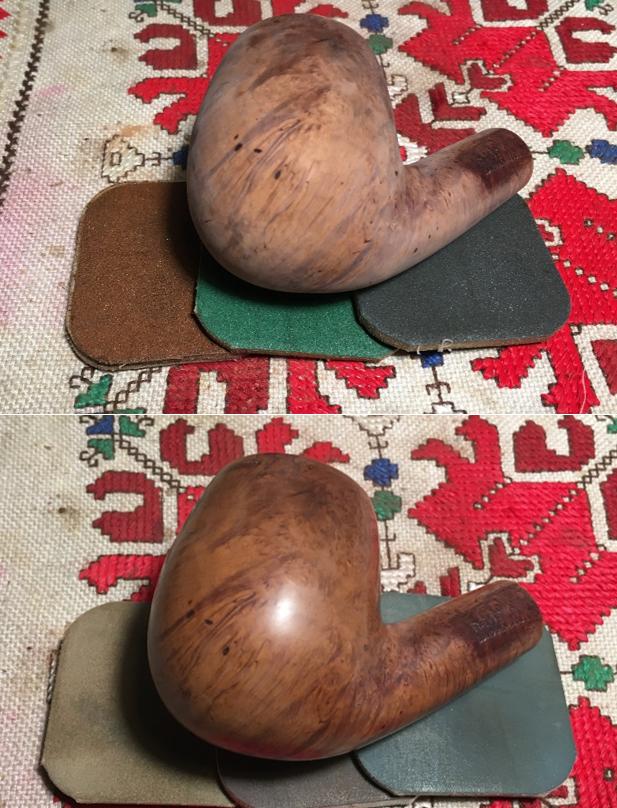
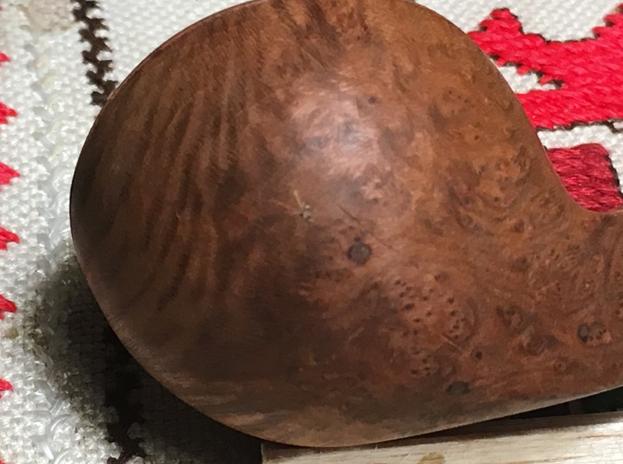
 I then sanded the bowl with micromesh pads not to remove every scratch, which is a sign of character and age, but to restore the shine of a vital meerschaum surface. I wet sanded the surface using pads 1500 to 2400 then dry sanded using micromesh pads 3200 to 4000. I was not aggressive but careful not to damage the patina. I like the result.
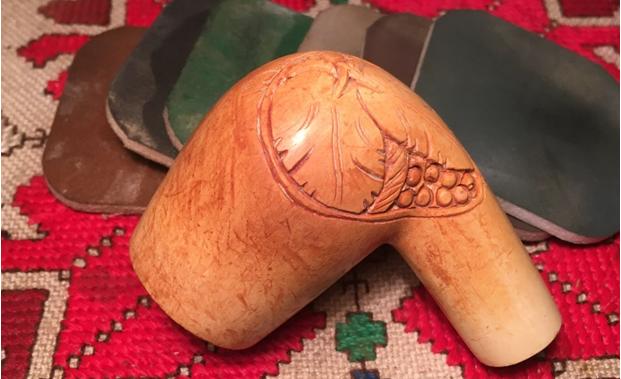 Regarding the stem and tenon questions I referenced above, I sent a note off to Steve and about the push-pull tenon system and what to do with this Meer. In the end, I decide to order a new replacement system. I sent a note and measurements off to Tim at http://www.jhlowe.com/ and am waiting for his recommendations. Since I live in Bulgaria, ordering parts from the States is no small thing as I have it sent to someone coming and they carry it for me. Saves a bit on postage.
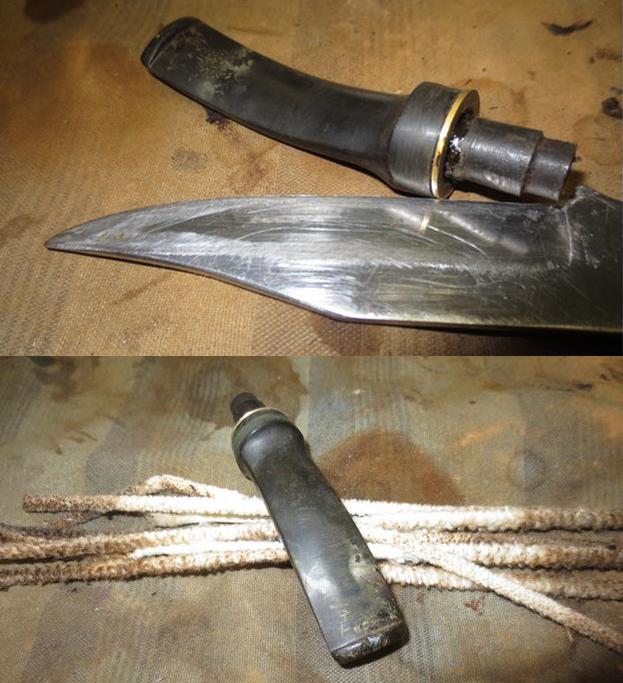
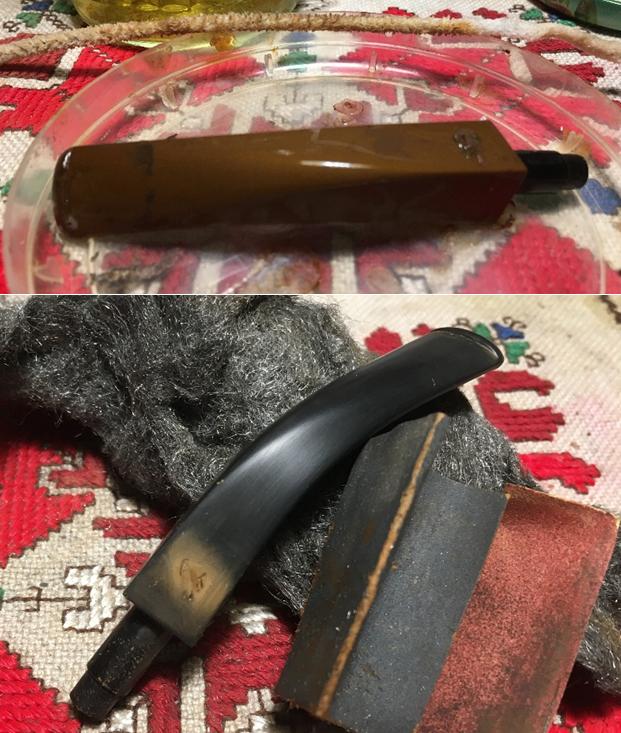
 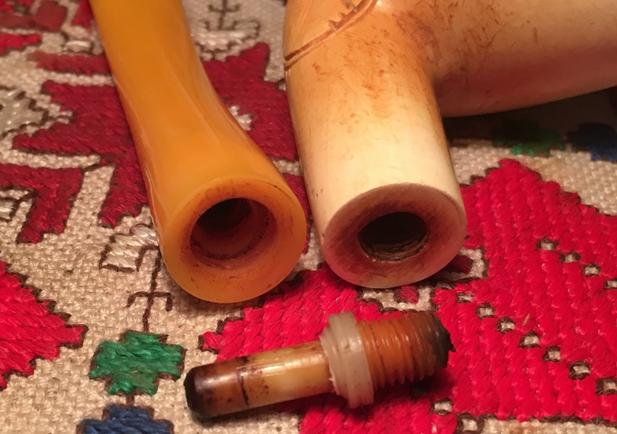 With the tenon situation on hold and on order, I turn to the technical part of this restoration that I’ve been anticipating for some time. Repairing the Bakelite stem or per Steve, possibly a similar material called Amberoid, has been a subject of my research. The stems most often associated with Meerschaums are the attractive, rich honey yellow color. The challenge in a repair is matching the yellow color and glass-like texture of the Bakelite or Amberoid. When I researched this question, I came across Reborn Pipes contributor, Joyal Taylor’s (aka holymolar) 3-part series on patching amber colored stems in 2014. Starting at the first essay, Stem Patch Using Amber Super Glue, Part 1, I benefited from Joyal demonstrating not only what did work well, but what didn’t. Also of benefit were the comments many others contributed at the end of the blogs. So, thanks to Joyal’s trial and error approach, I’m able to jump to a solution in Essay 3 that worked best for him. I hope I can emulate his success! Before beginning on the repair, I want the stem internals to be clean. Taking pipe cleaners dipped in isopropyl, I go to work on the stem. The resistance was a bit more than I expected. The cavity behind the screw-in tenon was gummed up good and I expended several Q-tips and a sharp and spade dental tools helped scrape the cavity walls to break up the gunk. There is some dark staining on the internal airway but the pipe cleaners are now coming out clean.
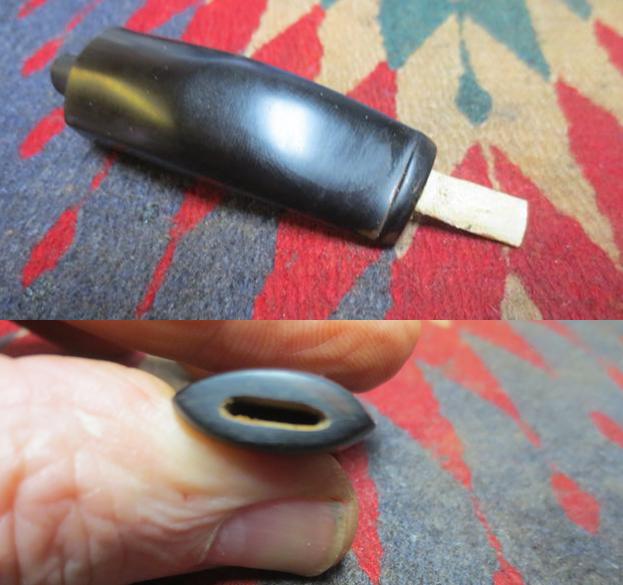
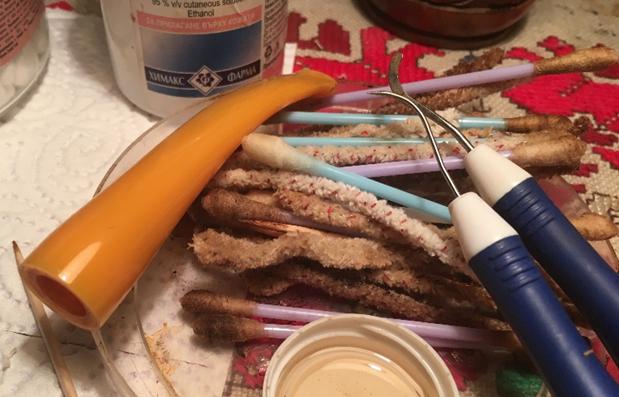 In essay 3, Joyal employed the use of Medium Yellow Behlen Furniture Powder (pictured below) which I found on eBay at this LINK. Previously, he had employed amber colored superglue which came out too clear – lacking the opaque quality needed for a good match. In the second essay, he tried to employ a mixture of Fiebing’s yellow and orange leather dyes and thick superglue. He found that the chemistry of the dyes caused the superglue to setup instantly. Also in essay 2 he mixed StewMac 2-part clear epoxy with Fiebing’s yellow and orange dyes, which mixed well, but the results were less than satisfactory – for both the hue and the texture. The final essay he tried the powder approach using Behlen Medium Yellow with extra thick superglue and the results were the best. Below I picture the match-up between the colors of the powder and the stem. Not bad. Joyal’s final assessment was helpful for the stem I’m looking at now:
This time I tried Behlen’s yellow powder w/ StewMac’s thick clear superglue. This is the best so far. Good color and opaque. Some of the powder didn’t mix in but it all polished smoothly. I had to leave the patch thick at the edge because every time I tried to sand it – smooth it [next] to the acrylic, I would remove more of the original color from the acrylic and have to add more patch material. Oh well, this may be as good as I can do, for now.
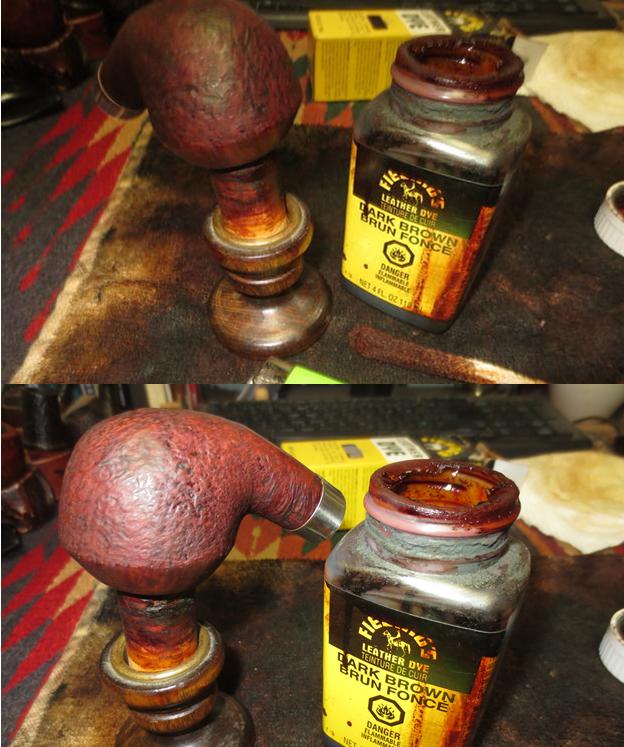
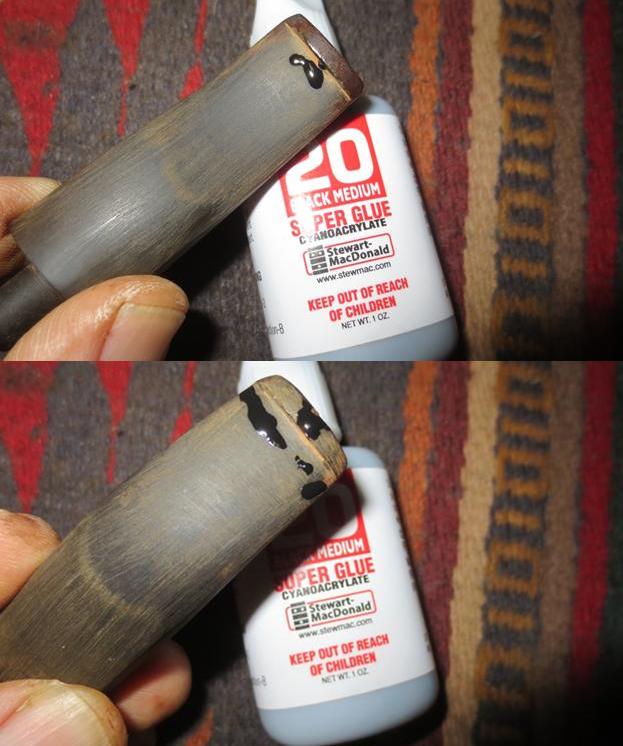
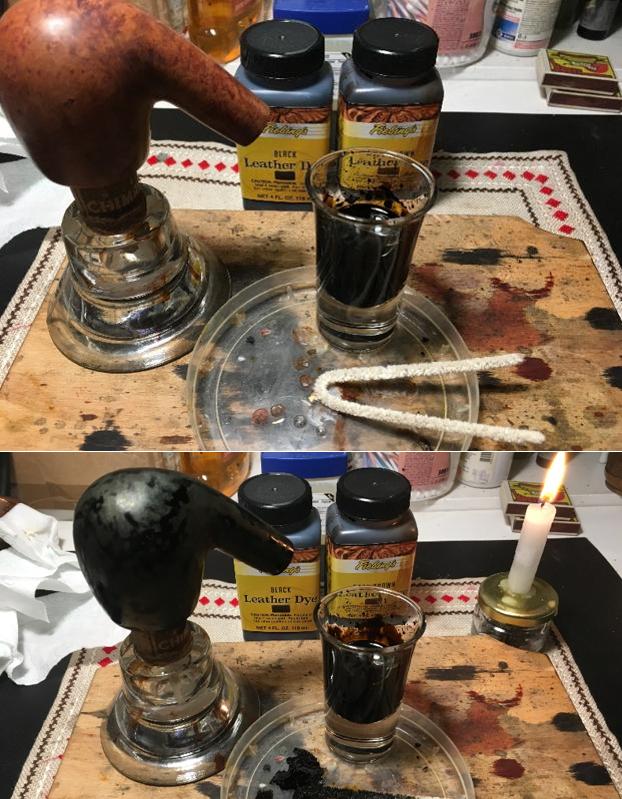
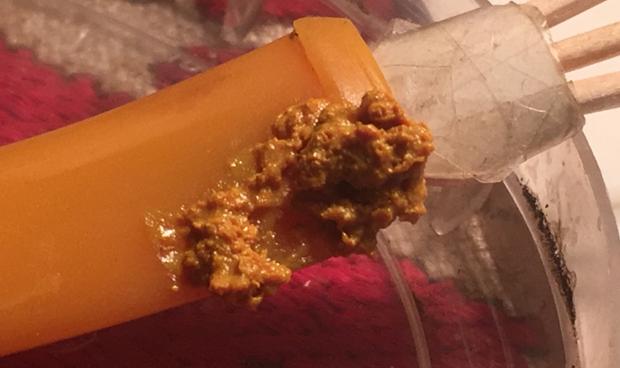
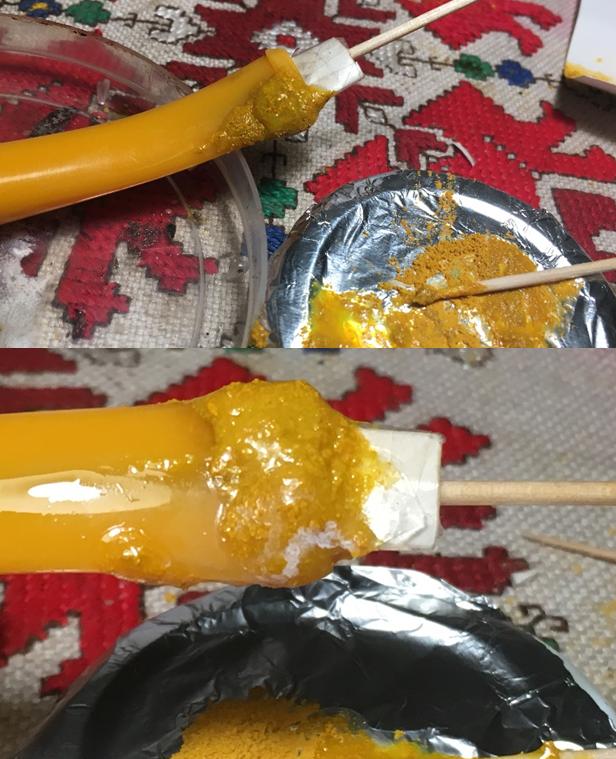
The last observation is helpful because it lets me know that the basic solidity of the patch could be ‘softer’ relatively speaking, than the stem material so that he was removing more collateral stem material than he wanted. So, off we go! I begin the patch on the Meer’s Bakelite stem by taking another close-up focusing on the patch areas. The patch has two parts. First, the side of the stem chipped off parallel with the right-side stem edge until it enters the button area. At this point the break encompasses the entire corner – stem and button. It appears to me the break was caused by dropping the Meer on a hard surface and the impact point was the end of the stem. The second part of the patch is to rebuild the button. To do this, I’ll apply a ‘surplus’ amount of the patch putty not only to the damaged, missing part, but over the entire button. This will allow me to shape a new button with adequate edges. To mix with the Behlen powder I have a newly acquired bottle of BSI Extra Thick Maxi-Cure CA glue. I’ll start the mixture aiming at a 50/50 ratio and eyeball things. I want to mix it well so that the powder is fully dissolved. I’m also not sure how much time I have before the new CA glue starts setting. 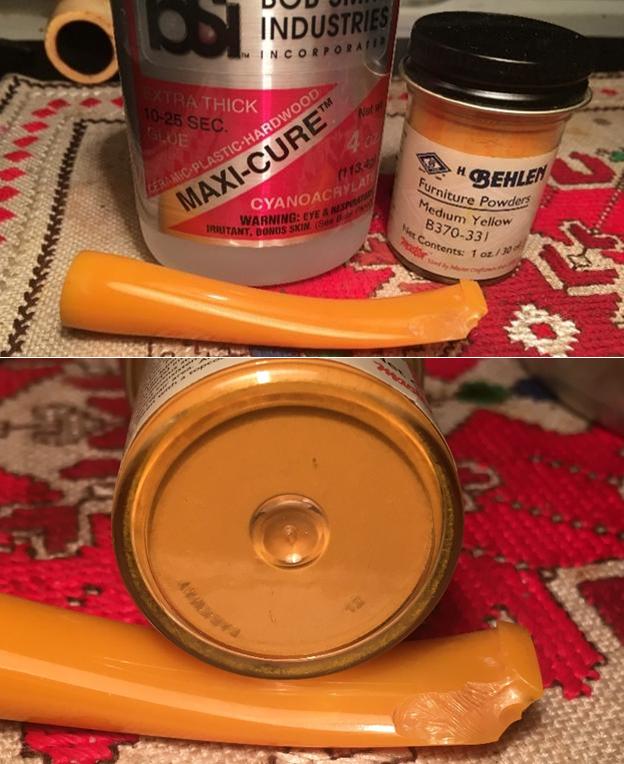

 I first take 240 grit sanding paper and rough up the entire patch area to increase the bonding potential between the Bakelite and patch putty. Now, I construct a ‘slot mold’ for the button. The slot area is shaped like a concave canoe that the button edges encompass. I need to keep putty out of this area and form a mold of sorts for the putty. The results of this mold would remind one of the Wolverine in X-Men. As menacing as it appears, the center toothpick anchors the mold in the airhole and the ‘wing-picks’ are wedging the edges. The folded index card forming the mold I cover with smooth tape so it won’t adhere to the putty. Prep done, I pour some Behlen powder in a plastic egg crate to double as a mixing trough. With tools and toothpicks at hand to serve as putty trowels, I add BSI Extra Thick Maxi-Cure CA to the powder and begin mixing. Well, if this were a science experiment it would remind me of my first chemistry set in 5th grade. Every 10-year-old with a new chemistry set sees the formula included for a ‘skunk bomb’ and tries it as his first experiment. I was no exception. After adding the glue to the powder and mixing, the mixture began to smoke and harden very quickly. After running the smoking egg crate to the bathroom and adding water to the mix, the smoke stopped and I return to the work table and record my science experiment with a picture capturing the toothpick forever encased in the hardened yellow putty. The pictures show the progression.
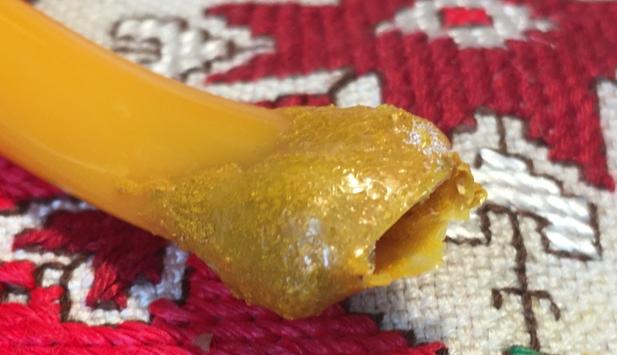
 Now fully in step with Jowal’s methodology of ‘Trial and Error’ progress, I ask the question, what happened? I’m not sure, but my guess is that I started with too much powder and adding the glue to it was not sufficient to keep it in liquid form. My guess is that the rapid hardening created the reactions (chemical energy!), which created the smoke, leading to my emergency procedures. This time I will approach the process like I do with a charcoal and super glue mix – put both powder and glue on an index card together and mix more gradually and see what happens. Well, I’ve proven that the methodology is not the culprit. Again, smoke was produced from the mixture on the index card while I started applying the putty to the stem. At this point, I’m thinking that the new glue I’m using might be the problem. I’ll try again with a glue I’ve used in the past. Thankfully, I could remove the hardened putty that did make it to the stem, by carefully scraping with my thumb nail. The bright side of this is that the color match with the stem looks great! Lesson 2 learned – what not to do. Pictures show the progression of lesson 2.
 While contemplating the next step, an email came in from Tim at J. H. Lowe in Ohio, and as expected, his note is very helpful:
The regular push-pull set is what you need. Are there threads inside the mortise? There are two sizes of these sets but the larger one is only used when the threads are very worn out and the oversize mortise part has to be fitted in the shank to fix this kind of worn out repair sleeve. I sell these by the each for $3 and by the dz. for a discounted price. You’ll need to change out the stem peg and the sleeve in the Meers pipe repair.
I responded by ordering 3 of each size so I’ll have some on hand for future projects. So, in a couple weeks, the new push-pull system order will arrive with a friend coming to visit Bulgaria. By that time, the rest of the Meerschaum Carved Vineyard should be ready and waiting with a quick finish to the restoration.
For the third go – I repeat roughing the patch area with 240 grit sanding paper to remove putty residue from Lesson 2. Then, after replacing Wolverine, I change glues using Hot Stuff Special ‘T’ CA glue and mix the same way that I did in Lesson 2, placing a puddle of glue alongside the Behlen Medium Yellow powder and gradually mix by drawing the powder into the glue until (hopefully) the mixture reaches a molasses like consistency. If it doesn’t ‘smoke’ this time, we’ll know the problem of Lessons 1 & 2.  Unfortunately, the ‘smoking’ is repeated and the putty hardened very quickly. My conclusion to the problem, and the pictures below show the progression of my solution. The problem is that I’m adding too much Behlen powder to the mix or not enough glue. I’m estimating that instead of a 50/50 mixture, I need an 80/20 ratio of glue to powder. I’m not sure of the chemistry involved, but the smoke produced happens when the mixture hardens. I had more time gradually to build up the patch with the greater glue ratio. Of course, the question remains, will the lesser powder content change the color match or texture? We’ll see. The pictures show the several cycles of building the patch around the button area. I had only so much time before the hardening would happen and I would make another small batch. The last picture shows the successfully removed Wolverine mold and the success of guarding the slot area from the putty.
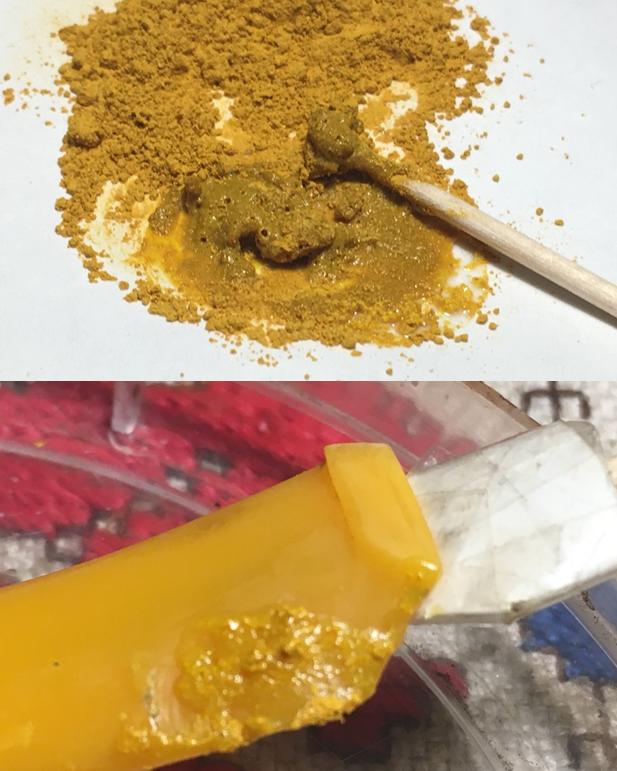
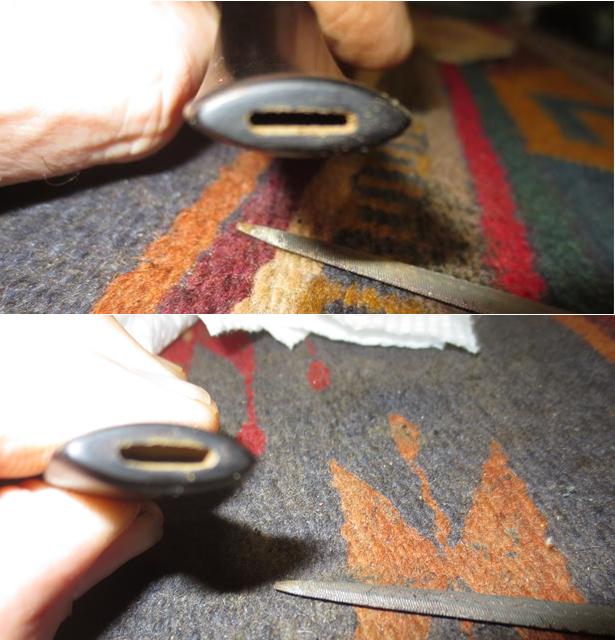
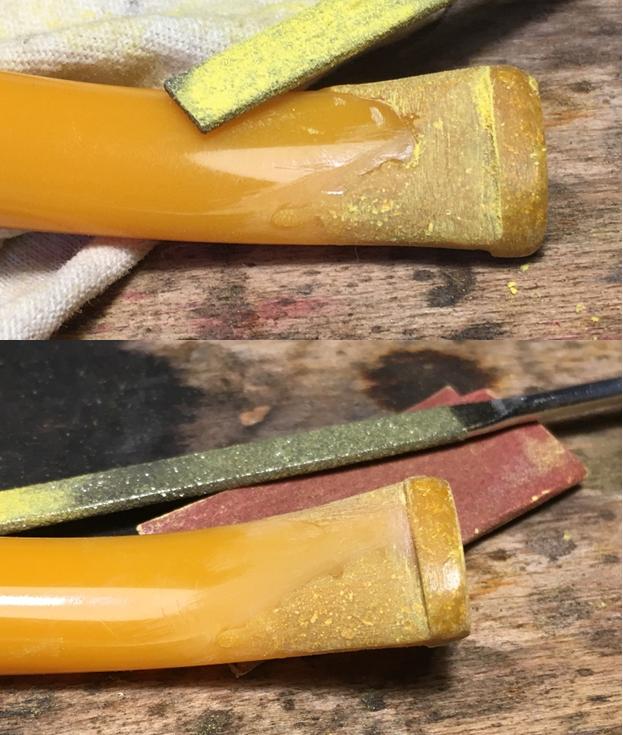
 The proof of this yellow pudding will be in the filing, sanding and shaping of the Behlen powder and superglue putty patch. I use needle files and 240 sanding paper to do the initial shaping. Starting from the slot side – the end of the stem, I like to create a baseline by re-establishing end by removing the excess. After removing excess putty on the end, I find the original button. Since the left side of the button needs to be totally rebuilt, as it was broken off, I use the remaining right side of the button and slot shape to help me form the left side of the slot so it will match.
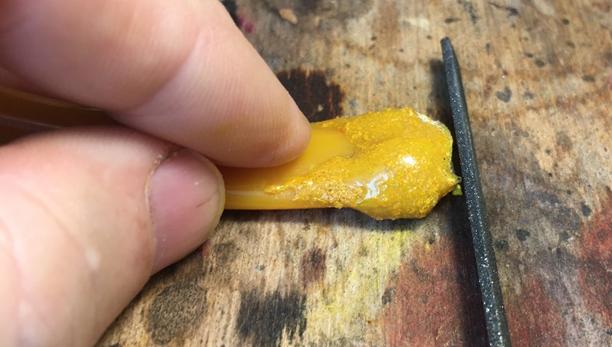
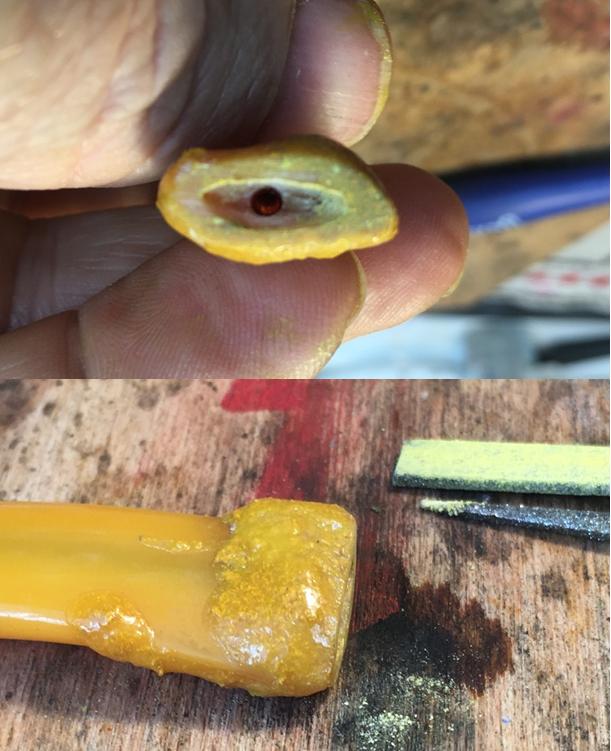 With the baseline established, using the flat edge needle file, I begin to contour the general proportions of the button – lower then upper. The pictures show the gradual progress.
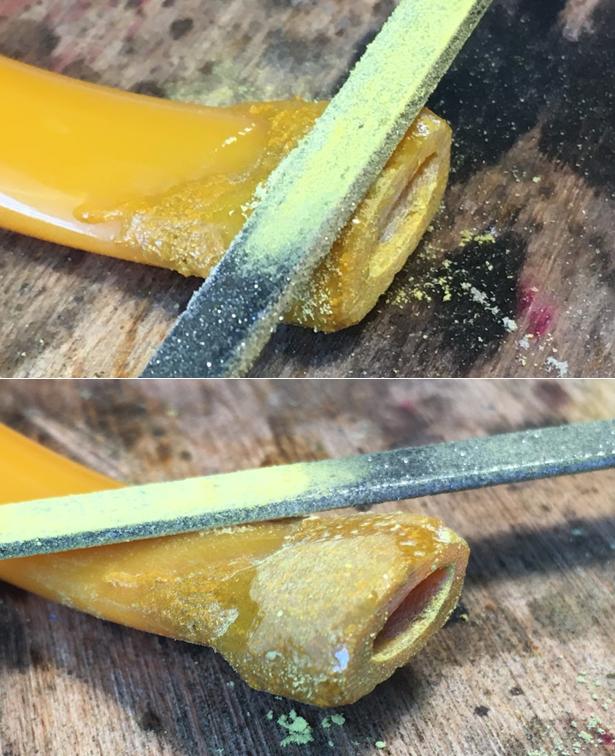
 With the general contours of the button established, I then score a line with the flat needle file to mark the upper button lip edge. With this edge established, I then file down the score line to establish the lip. I turn the file vertically and use the short edge as a saw and set the edge deeper. I like to have that edge established so that I can then begin to remove methodically the excess patch putty more accurately to the left of the lip on the second picture below. After removing as much of the excess putty as possible with the flat needle file, to avoid collateral filing into the Bakelite, I then use 240 grit paper to smooth the surface and remove the putty. The upper bit looks good so far! The pictures show the progress.
 I flip the stem over and repeat same process starting with defining the bit and creating a lip to guide the excess putty removal. While I work, I’m keeping an eye on the right side (lower in the picture below) of the stem where the major stem rebuild was. I recall Joyal’s observations of having to keep the patch high because during the smoothing and blending process sanding on the edge of the patch was taking too much of the stem material in the process. He then described having to refill with more patch the ‘border’ between patch and stem. The pictures show the progress on the lower bit area.
 The next two pictures show the completion of the filing and use of 240 grit sanding paper. I then use 600 grit paper to smooth and blend more and finish with briskly rubbing with 0000 steel wool. At this stage of the stem repair, I look at the patch areas (3rd picture) and the use of Behlen Furniture Powder Medium Yellow and Special ‘T’ CA glue is strong. Building up the chip area and missing button portion wasn’t easy but it looks good. The color is good though it has a speckled quality to it created by small air pockets in the patch which were exposed during the sanding. This I have found is normal. To fill the pockets, I apply a dab of Hot Stuff CA glue on the stem patch and then ‘paint’ it over the patch using a toothpick. I do the same with the button lips – upper and lower. I repeat sanding with 600 grit and then steel wool (I forgot to take pictures of filling the air pockets!). The pictures show the progress.
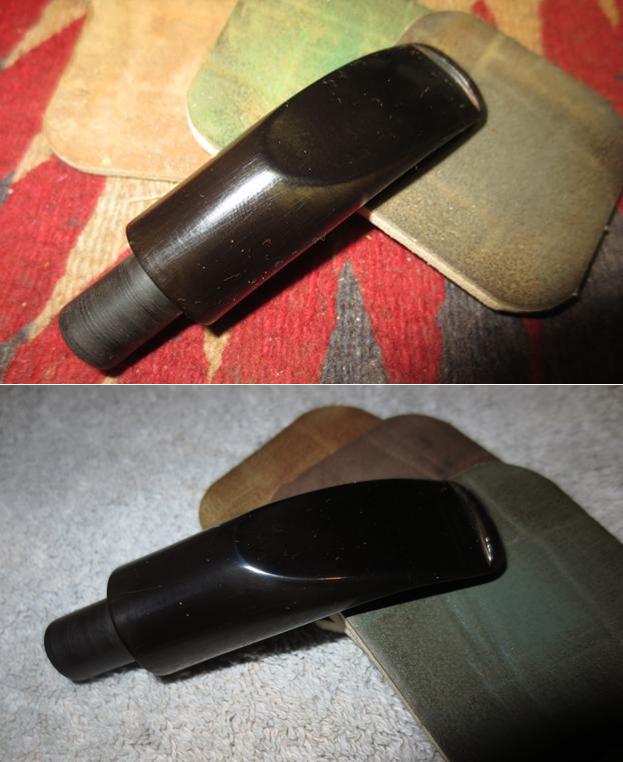
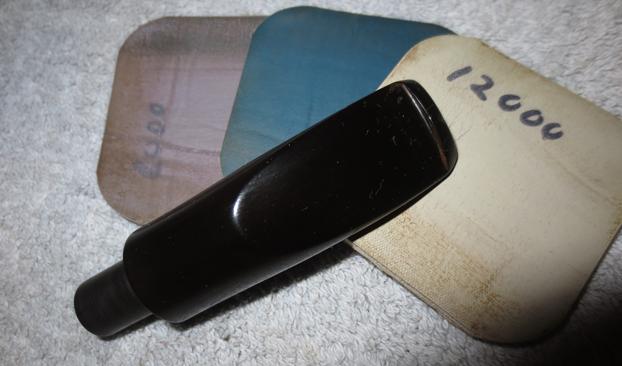
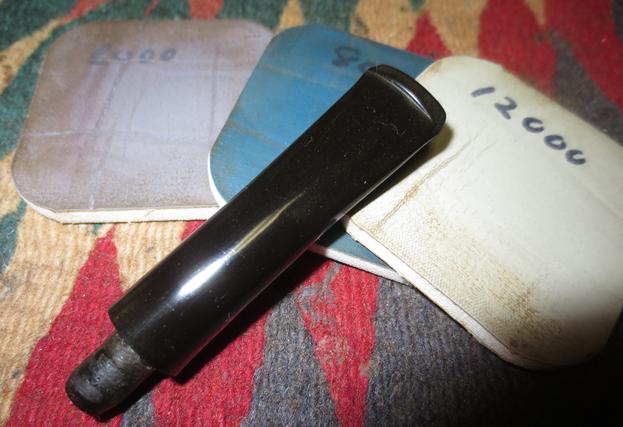
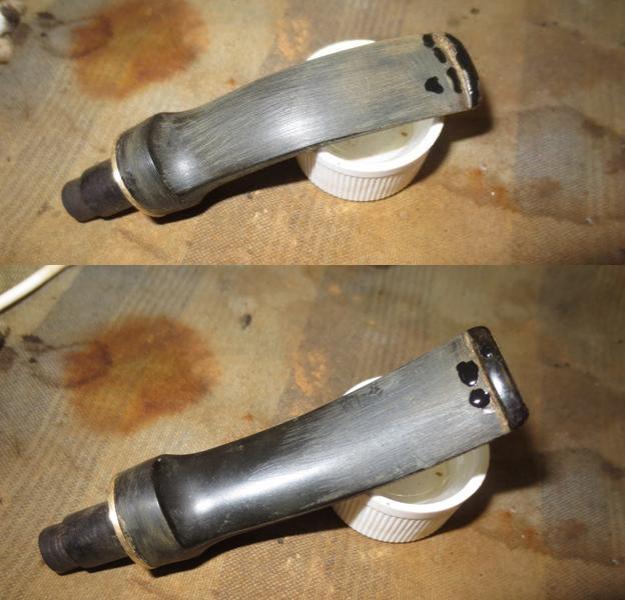
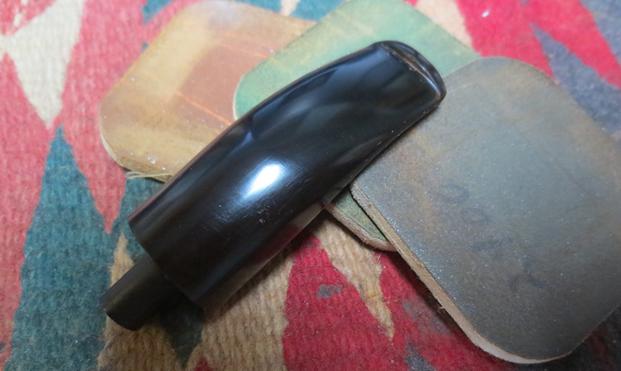
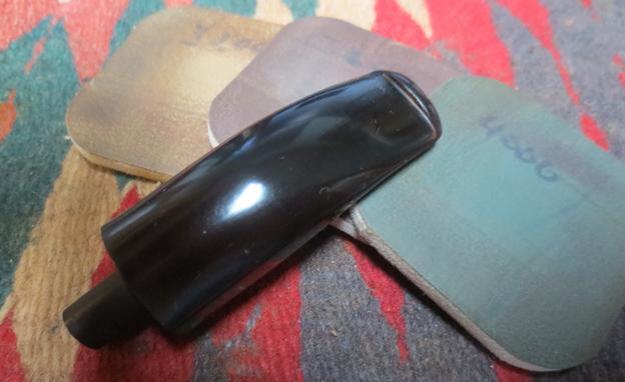
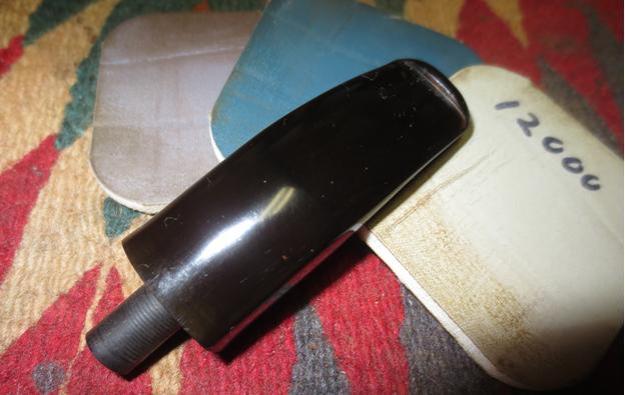
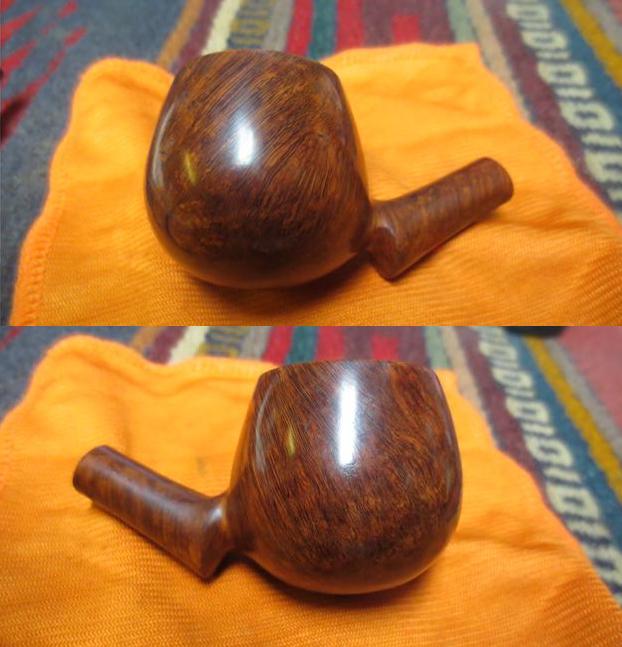
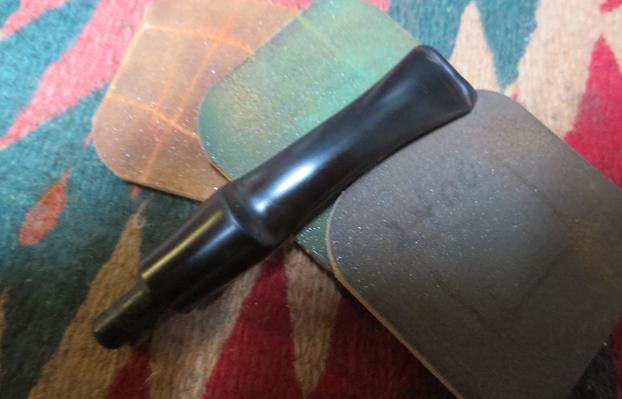
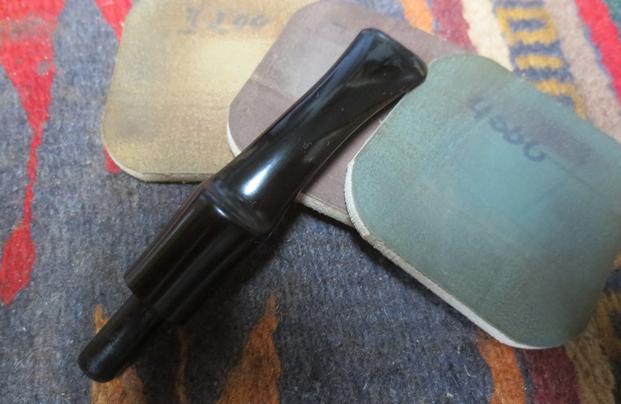
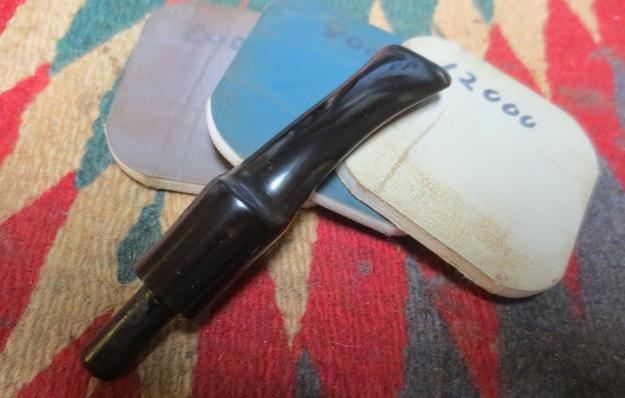
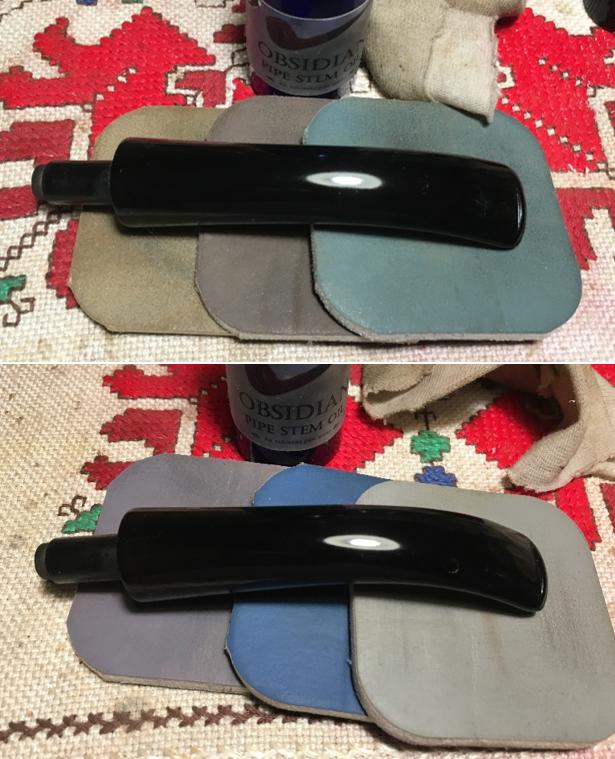
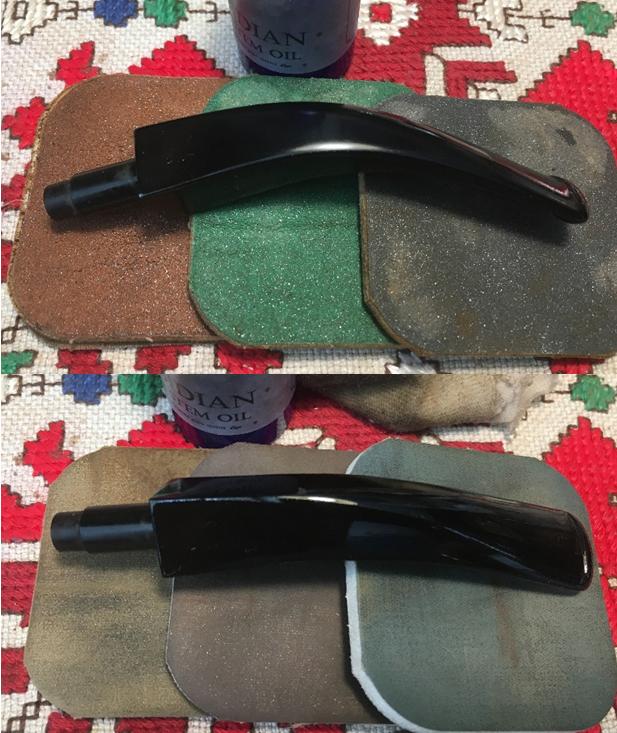
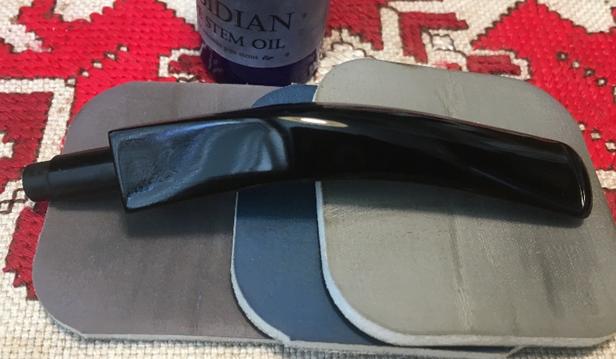
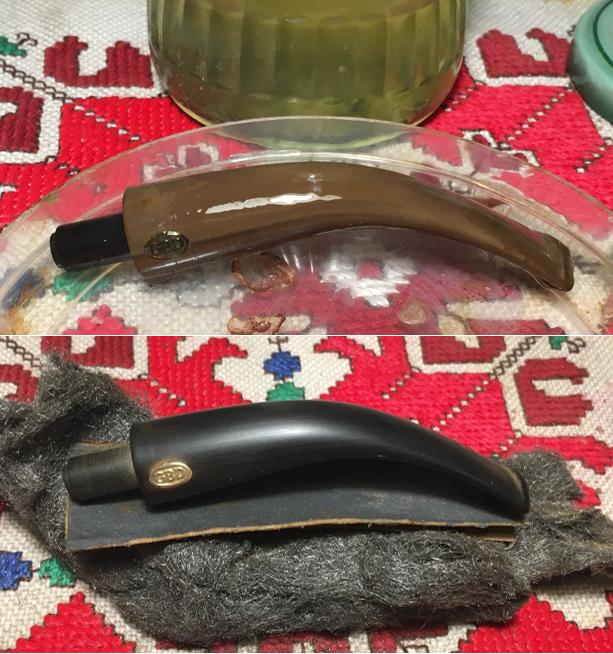
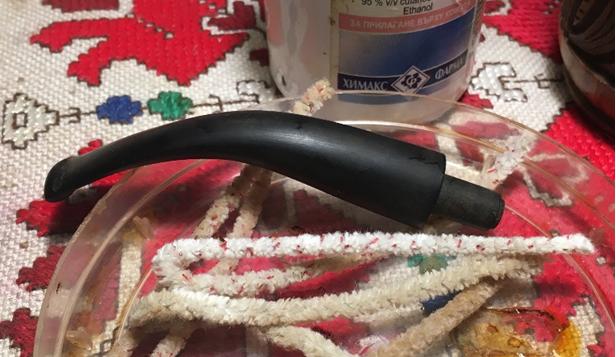
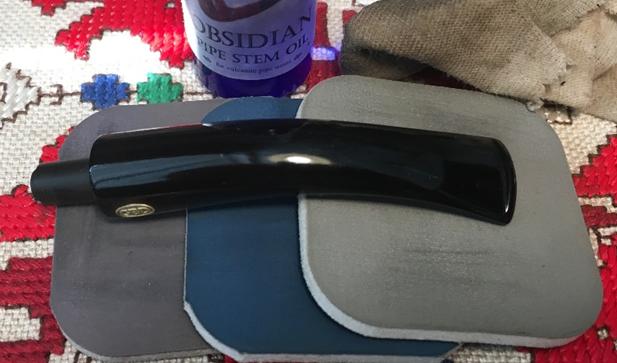
 With the repairs to the stem completed, using micromesh pads 1500 to 2400 I wet sand the stem. Following this, I dry sand the stem using pads 3200 to 4000 and then, 6000 to 12000. The Bakelite (or Amberoid, I’ll have to figure out how to tell the difference) stem gradually shines up nicely with each successive micromesh cycle. The pictures show the progress.
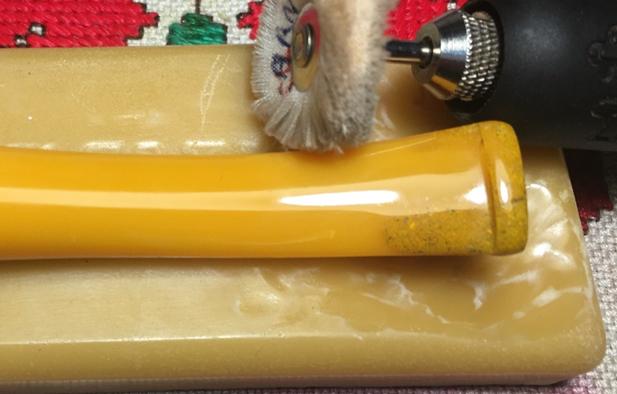
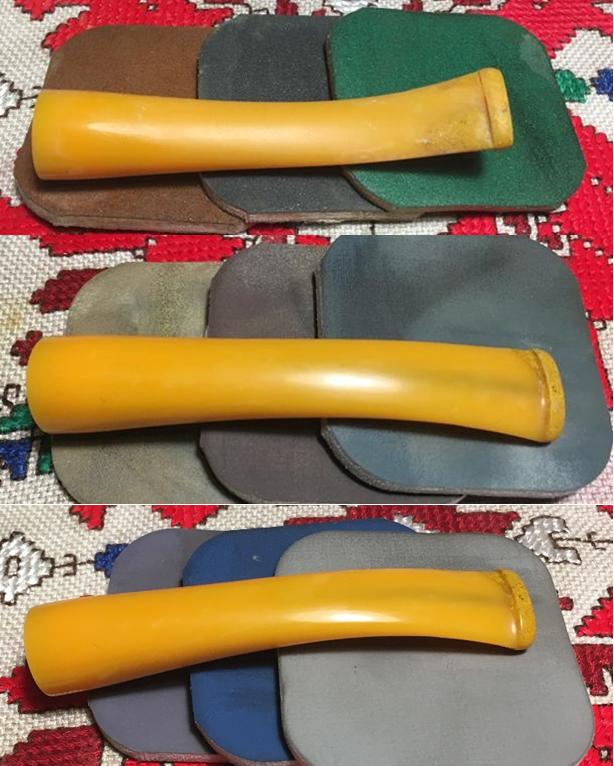 I follow the micromesh cycles with applying Blue Diamond compound to the stem with the cotton cloth Dremel wheel set to the slowest speed. I then mount the carnauba cotton cloth wheel on the Dremel and give the stem 3 coats of carnauba wax. I follow the carnauba with a hand-buff using a microfiber cloth. Wow! I like it. The Bakelite or Amberoid has the appearance of glass – the patch has no textural differences with the original stem. The last two pictures are flipped to show what I’m seeing after the buff. Stem completed for now – the new push-pull tenon system should be in transit.
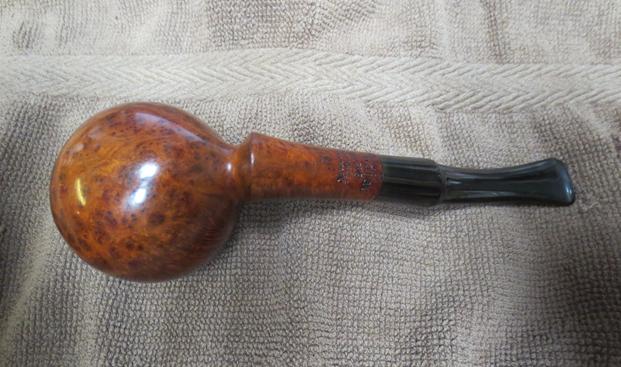
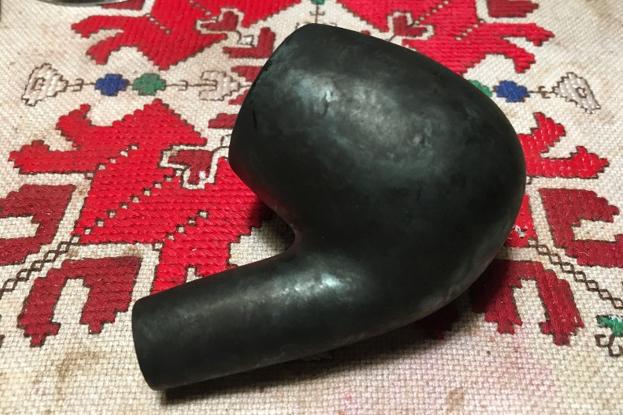
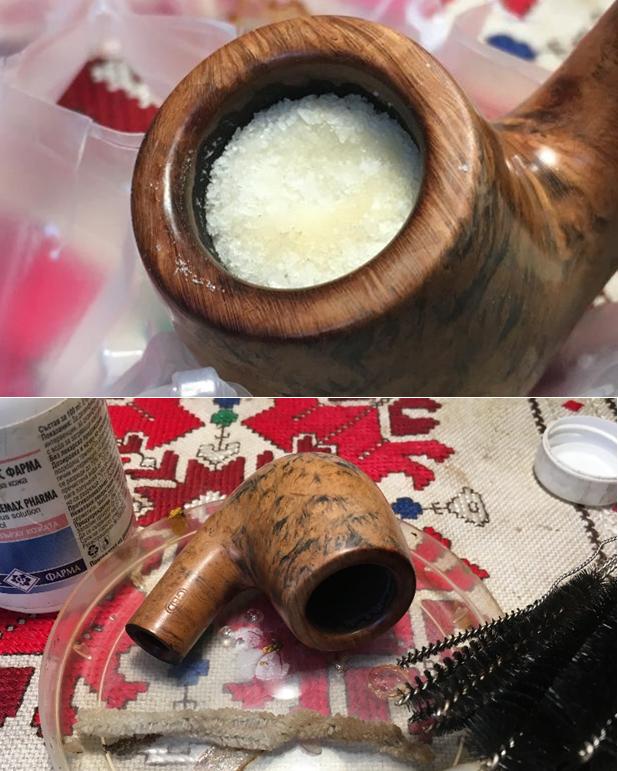
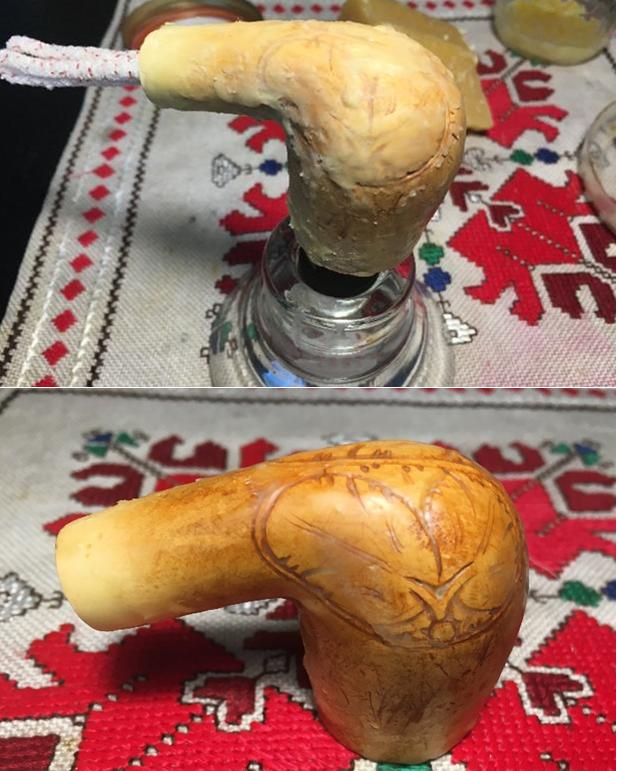
 With the stem completed and on hold for the tenon, I look to complete the stummel of this Meer Carved Vineyard. With of the unique characteristics of Meerschaum pipes, they’re like wine – they get better with age! For Meerschaums, their value increases with use as the oils in the tobacco interact with the unique composition of the Meerschaum the bowl will change color gradually, darkening to the golden, honey brown which is its patina. The Carved Vineyard displays this growing patina and to enhance this natural coloring process, treating the stummel with bees’ wax is the long-used practice of choice. This is my first application of bee’s wax to a Meer and Charles Lemon’s, of Dad’s Pipes, descriptive posts have been helpful as I’ve done my research (See: Quick Clean-up of a Tulip Meerschaum Sitter). One thing very much available in Bulgaria is bees’ wax, which I found in a local outdoor market at the honey kiosk. My price was 3BGN for 100gr (Translation: $1.63 for 1/5 pounds). I don’t know if it’s a deal or a steal.
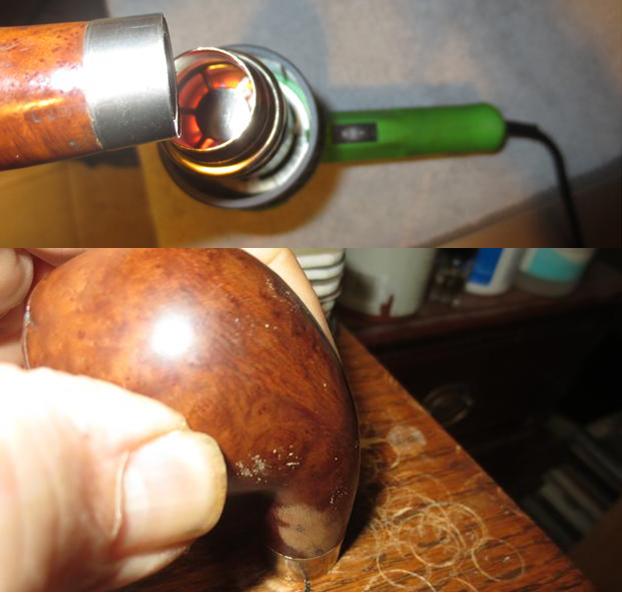
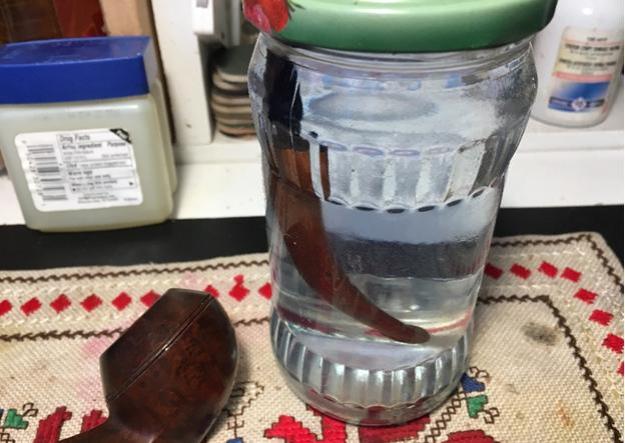
  After I unwrap the package, I break off some chunks of the bee’s wax and put them in a small mason jar, which I’ll be able to keep unused wax for the next Meer treatment. Using my hot air gun, I melt the wax in the mason jar. After melting the wax, I hold the Meer over the hot gun to warm up to better absorb the wax. Blame it on Bulgarian winters, but when I finish warming the Meer, the wax has already cooled down and congealing! So, a more rapid wax melting follows, and a re-warming of the Meer stummel. I used a Q-tip cotton swab to paint the bowl with the melted bee’s wax. I was careful to paint the sculpted vineyard lines – getting the wax in the nooks and crannies. I put the stummel aside to cool. Since this was my first time to apply the bee’s wax treatment to a Meer, I was a little surprised how thick the congealed wax was on the stummel after it cooled. It could be that the Meer wasn’t hot enough and the wax was cooling too quickly. Either way, the Meer received a treatment! After cooled, I try buffing with a towel to remove the thicker waxy residue, and I discover that it’s not too easy. I’m thinking that the wax is too thick and it congealed to fast (3rd picture below). I improvise and I think the improvisation benefited this Meer. Using a Q-tip as a brush, I start passing the thick-layered bees’ wax stummel over the air gun – like passing over a lit candle, it liquefies the wax on the portion impacted by the heat. As the wax liquefies, I paint it into the surface – working it in well and removing the excess with the Q-tip. This time applying wax around the Meerschaum seems to absorb the wax instead of being smothered by it. It didn’t take long and the application of bees’ wax is complete (4th picture below)! Then, before the stummel cooled down, while yet warm, I buff the stummel with a towel and then with a microfiber cloth and WOW. I’m a believer. The shine and deepening of the patina is evident! The pictures tell the story.
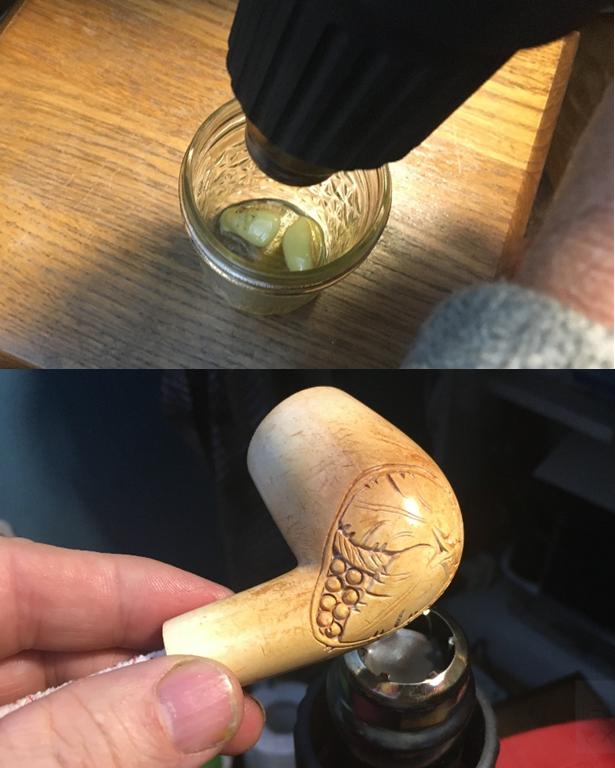
 With the Meerschaum’s stem and stummel complete – almost – I set both aside waiting for the arrival of the push-pull tenon from the US. I’m beginning to wonder whether this Meer Carved Vineyard should go to The Pipe Steward store, or remain in my collection – often I have that problem 🙂 !
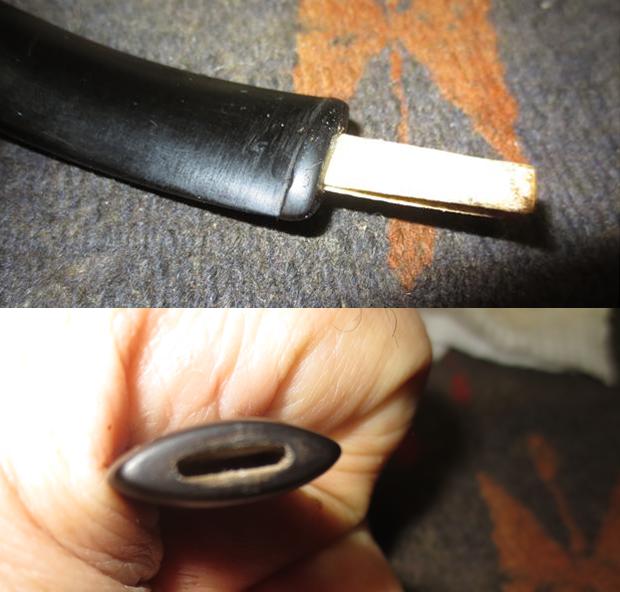
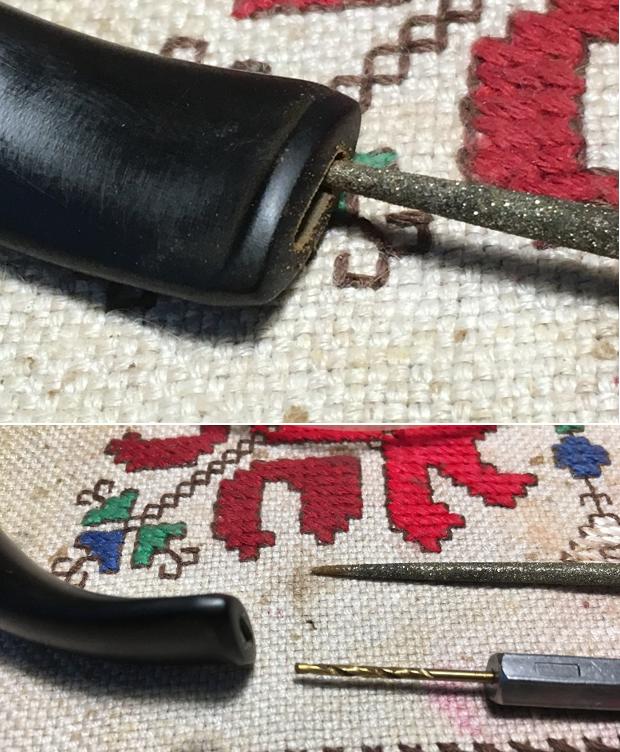
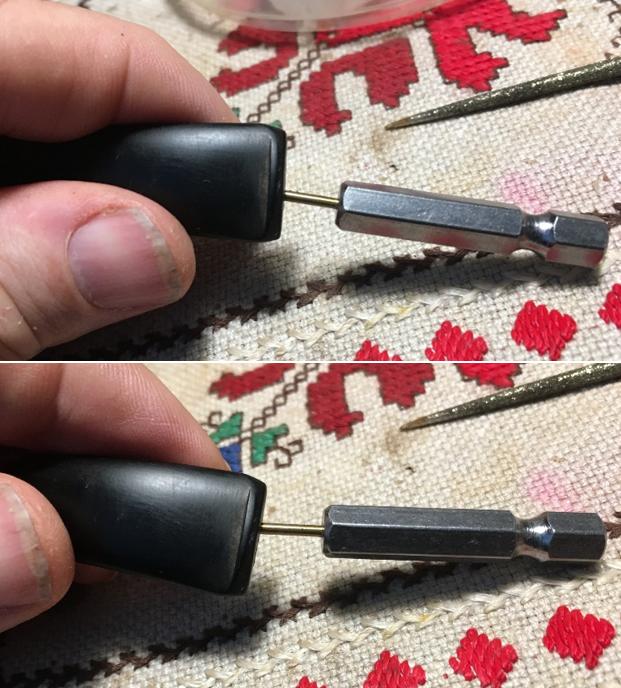
A few weeks later the push-pull tenons arrive via a friend who was willing to carry them to Bulgaria. I open the package sent by Tim West at J.H. Lowe in Columbus, Ohio, and have my first look at what a new push-pull system looks like. I unscrew the old tenon and easily screw the new one in place. The mortise sleeve’s threads worked perfectly as well. The problem though, is that it will not screw all the way in. Previously, I identified a tubing of sorts deeper in the mortise which was the only thing the old tenon was locking into – though poorly. My first inclination was to cut the new mortise tenon sleeve so that being shortened it would fit in the limited space. It was then that I started questioning whether what I was looking at was part of the design or that it was in fact, the left-over remains of the bottom end of the old mortise sleeve which had broken off. After looking closely at the inner tubing, I can see fragments of the old break. Ok! Now I understand that I need to exorcise this vagabond mortise sleeve. I first try wedging a small flat head screw driver in the tubing to ‘unscrew’ it by turning it counter-clockwise. I was hoping that it might be loose, but will not budge. So, using appropriately size drill bits and wood screws, gradually I clear out the obstructing portion by shaving off the material of the old sleeve which I think might be acrylic. I am careful to keep the bits and screws straight so they do not nick the Meer threads. This was not an easy or fast process, but eventually I was satisfied to remove most of the old sleeve – leaving only a very thin ‘skin’ over the threaded area deeper in the mortise, which may indeed help in keeping the mortise cleaner. After this, I screw the new insert into the mortise and trim and sand the protruding ‘head’ of the sleeve to improve the fit and alignment of the mortise and stem. I also sand down the tenon diameter to improve its fit into the sleeve. I’m pleased with the results. The pictures show the replacement of the push-pull tenon system. 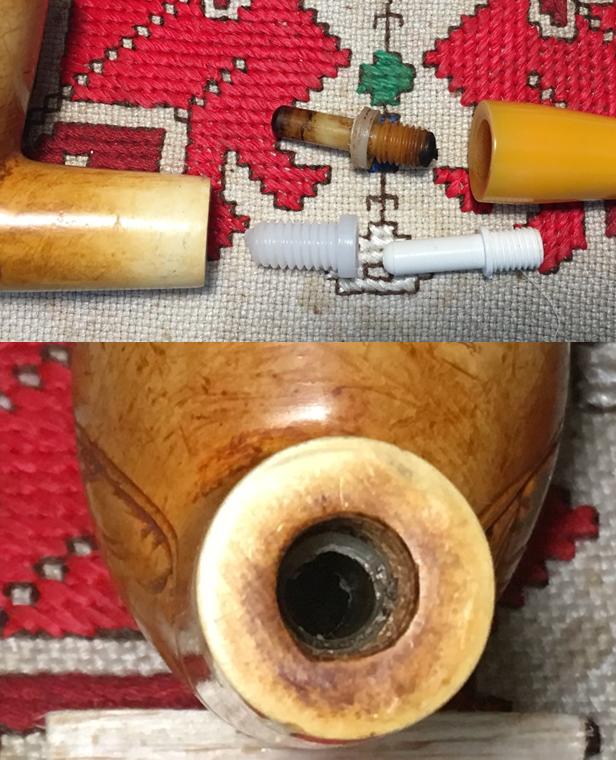
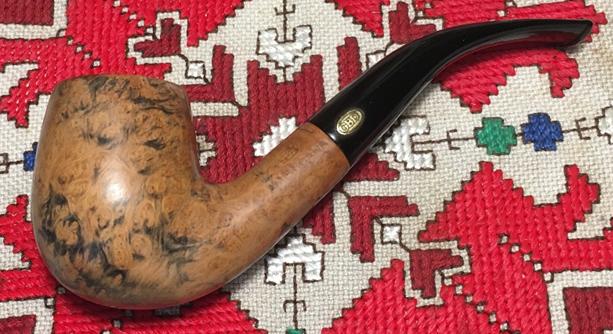
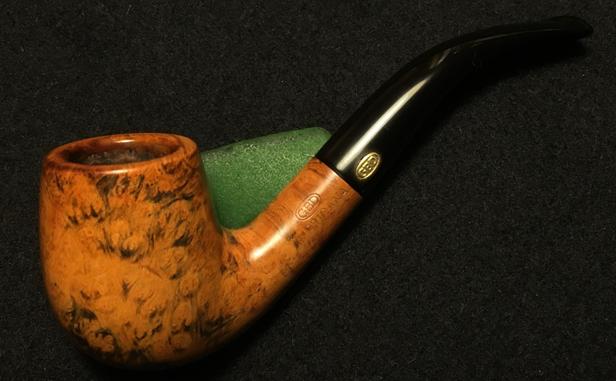
 I’m pleased with the stem rebuild that has blended very well with the Bakelite stem and has put this Meerschaum back in service for a new steward. The patina of the Meerschaum Carved Vineyard has a very healthy start and will only season more with good, aromatic tobaccos. I also like the blending of smooth and carved Meerschaum – a very stylish pipe. If you would like to adopt this Meerschaum Carved Vineyard, look at the Pipe Store in my new blog site at ThePipeSteward.com. The profits of my pipe sales go to help women and children who have been sexually exploited and trafficked through the Daughters of Bulgaria, an organization we work with here in Bulgaria. Thanks for joining me!
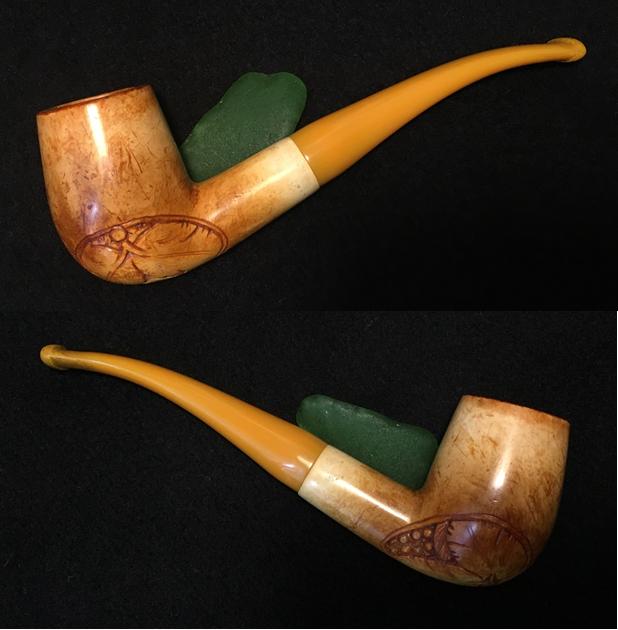


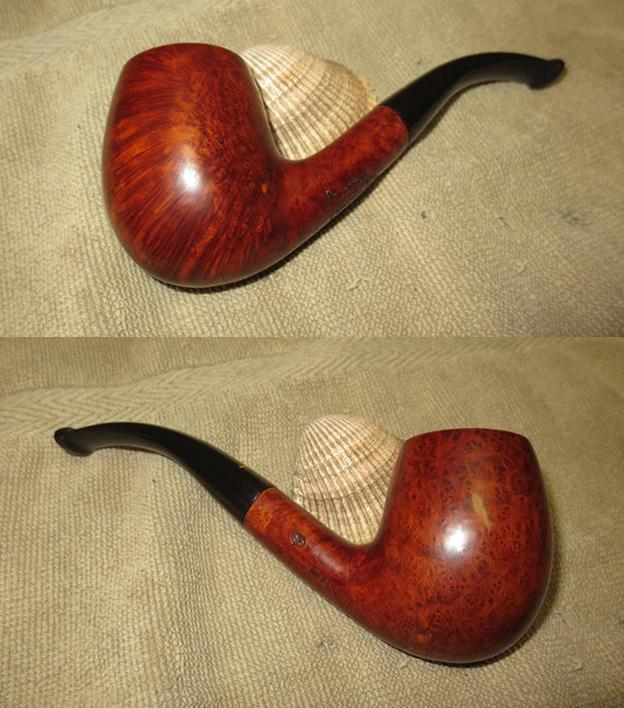
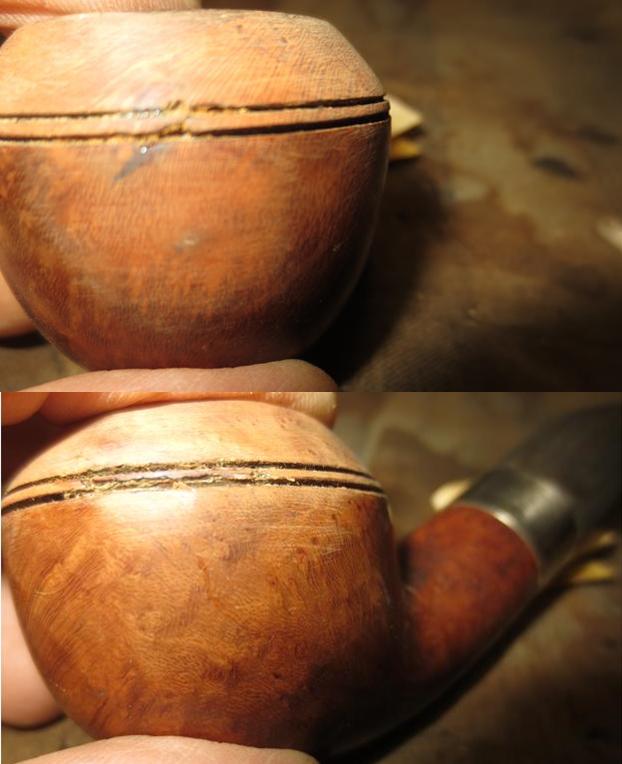
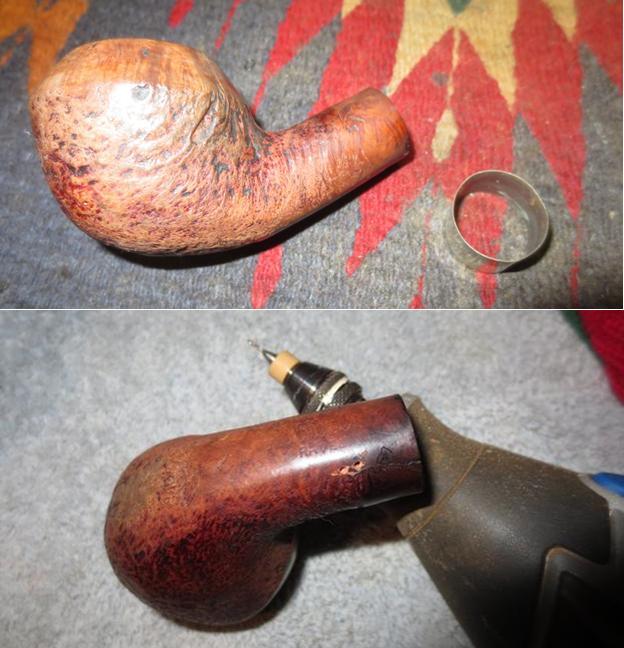
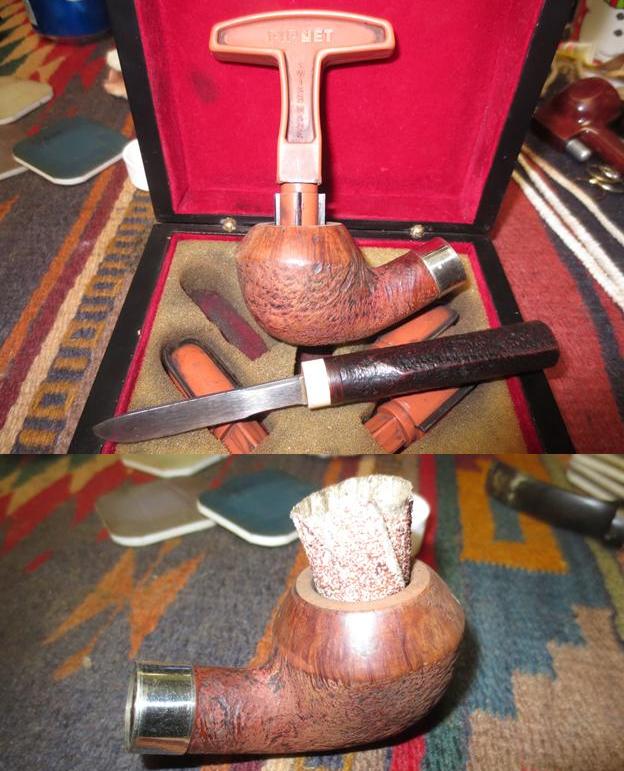
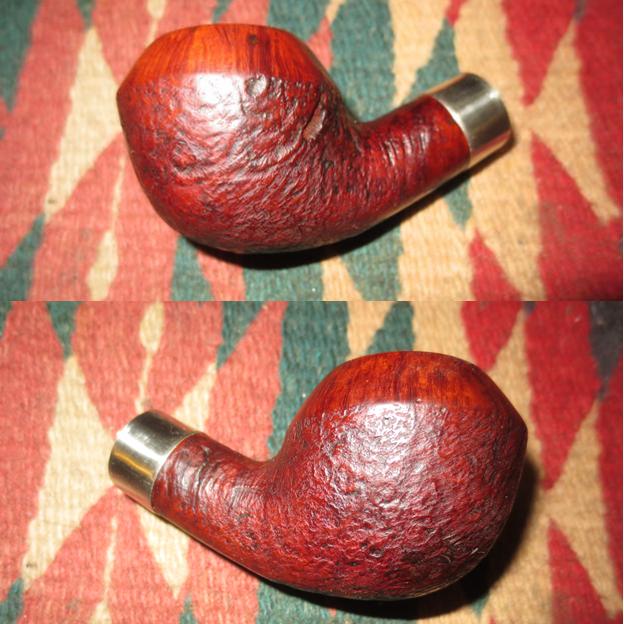
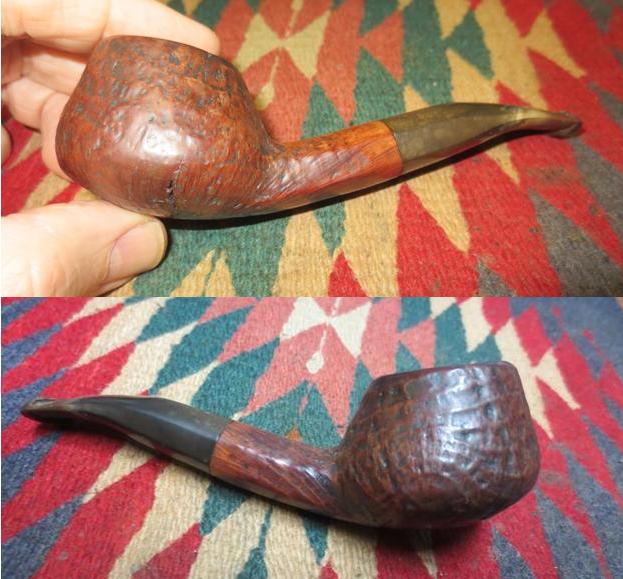
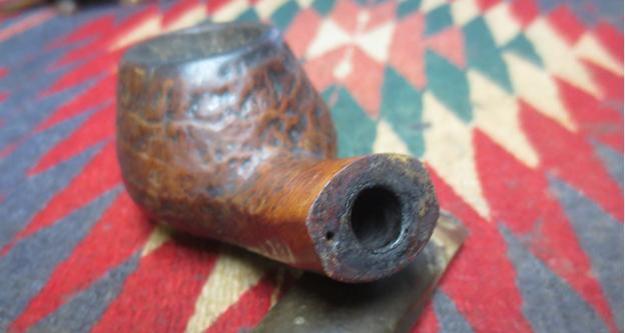
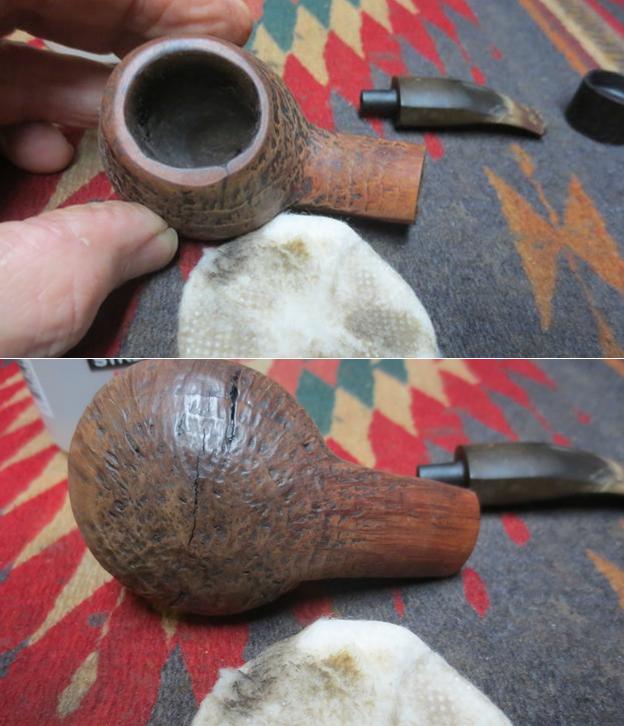
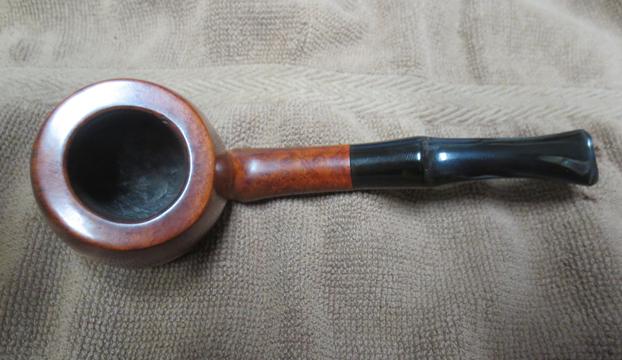
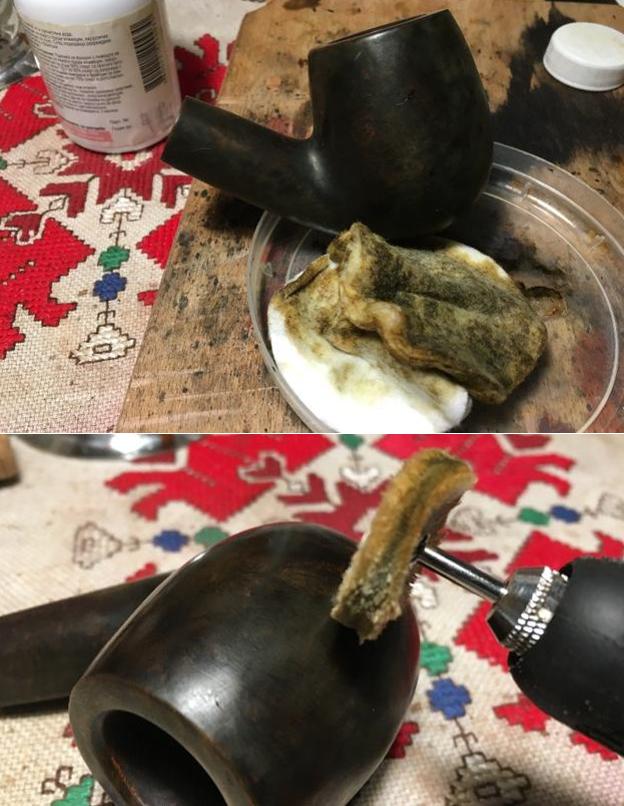
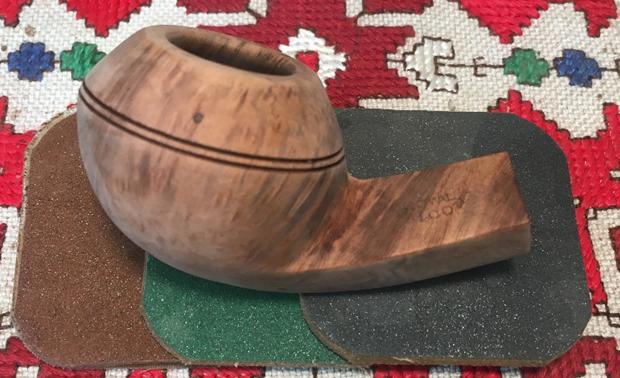
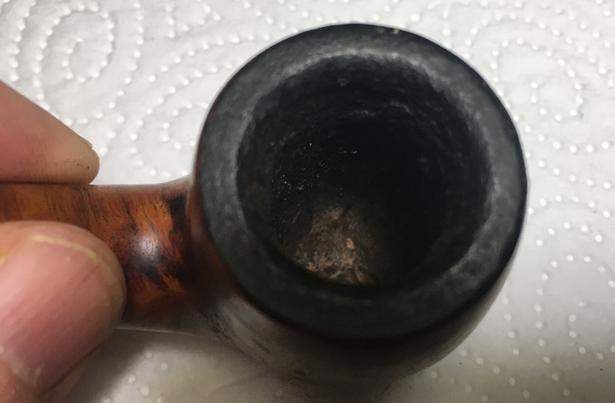
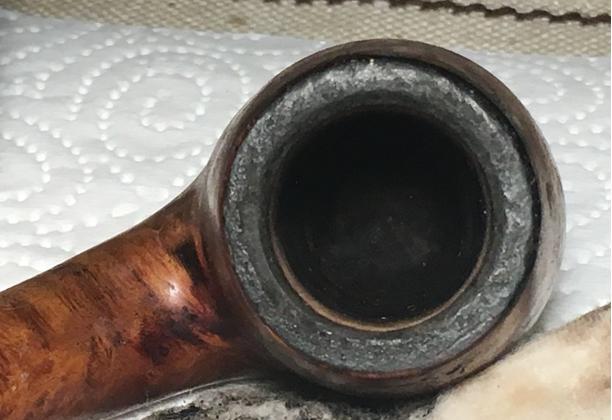
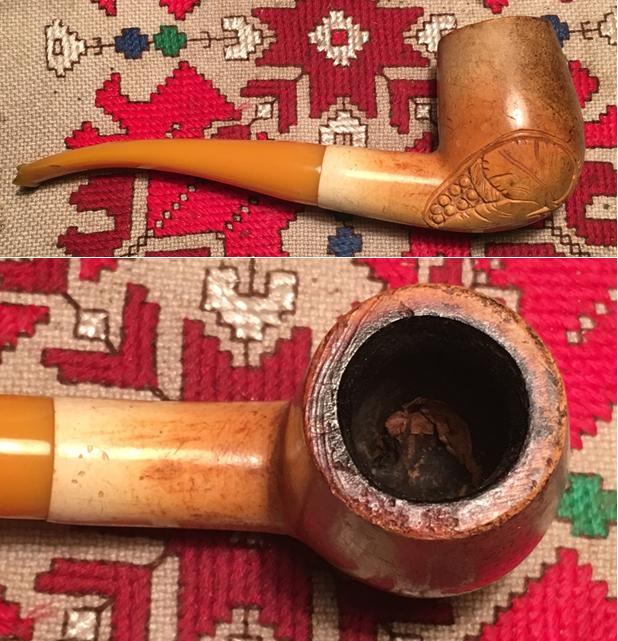
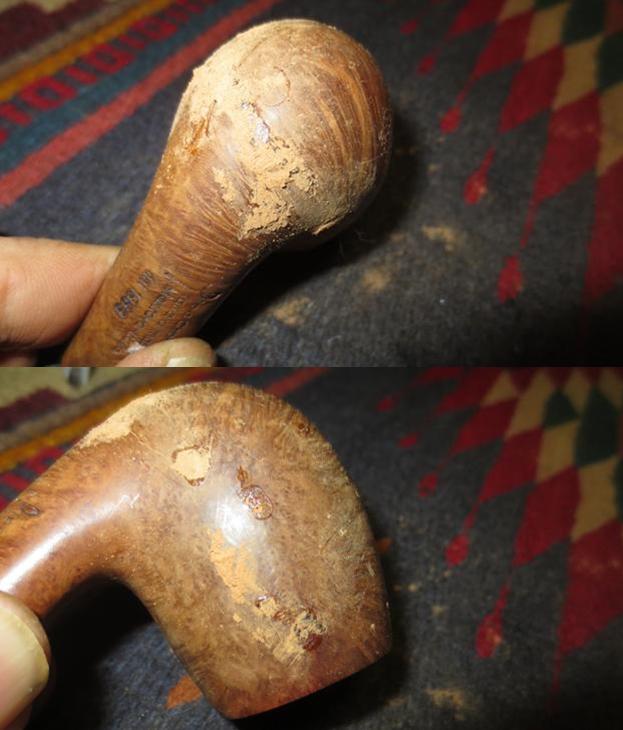
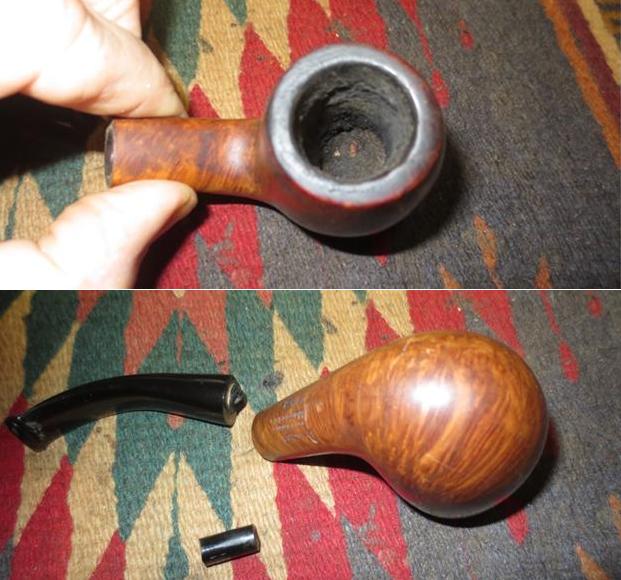 I took a close up photo of the rim and bowl to show the condition. The cake is thick and the rim has a lava overflow from the bowl and some damage on the outer edge near the front.
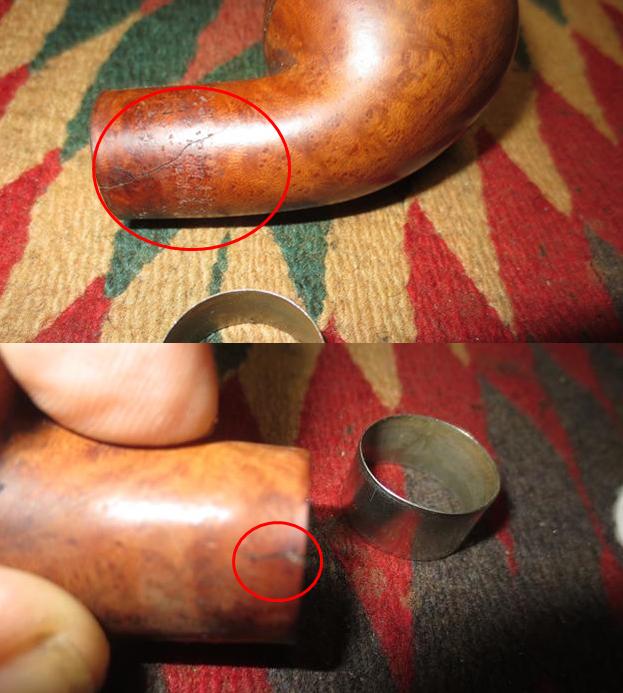
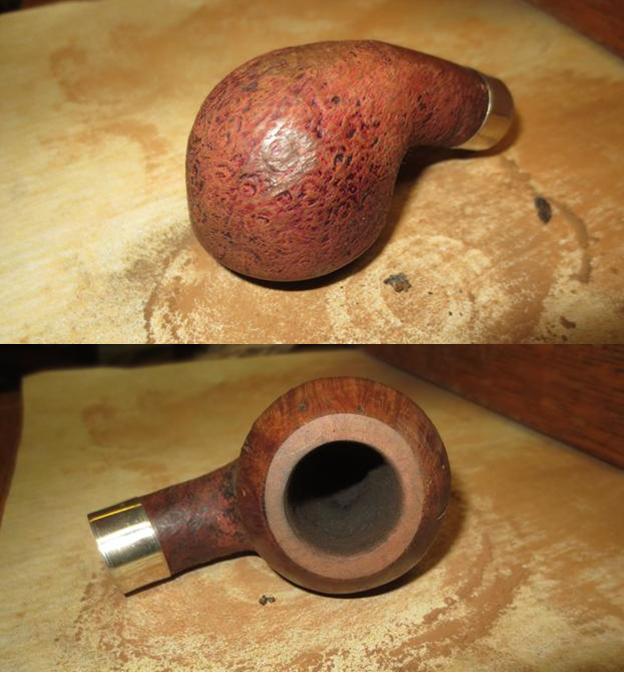
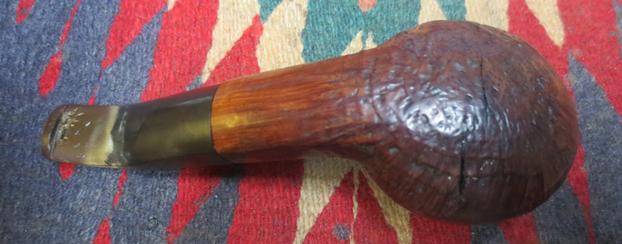
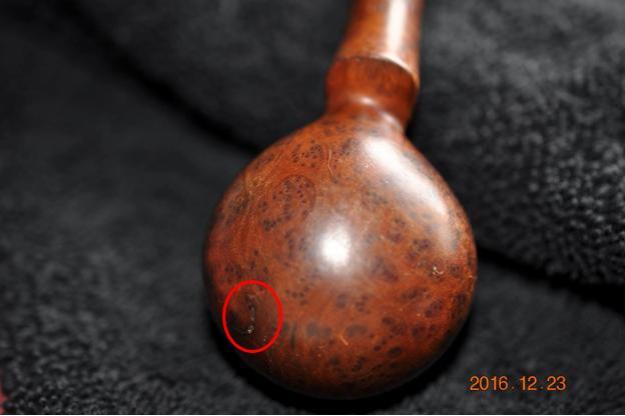
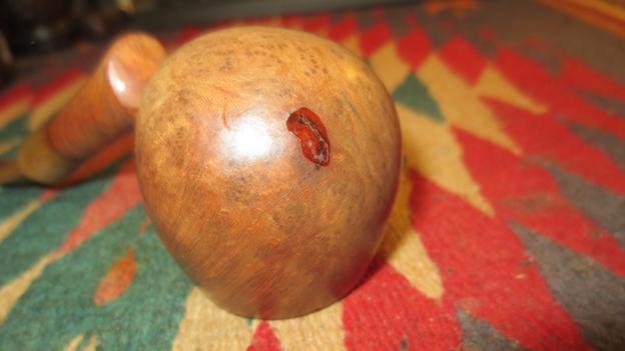
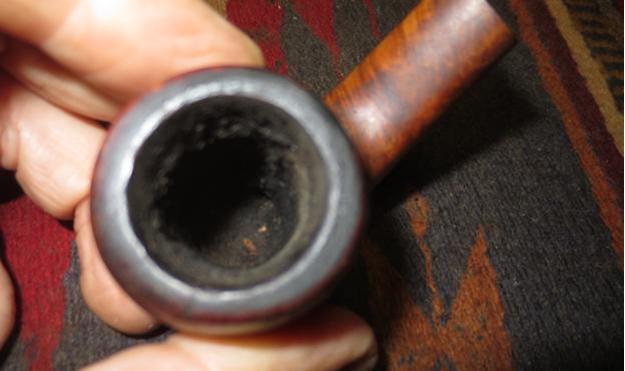 The next two photos, though a little out of focus show the crack in the bowl bottom circled in red. I will continue to show them in the photos as I clean up the bowl.
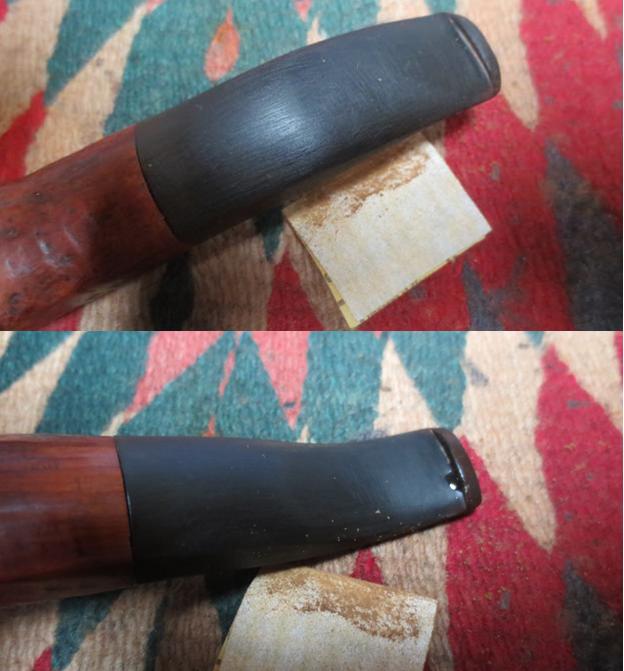
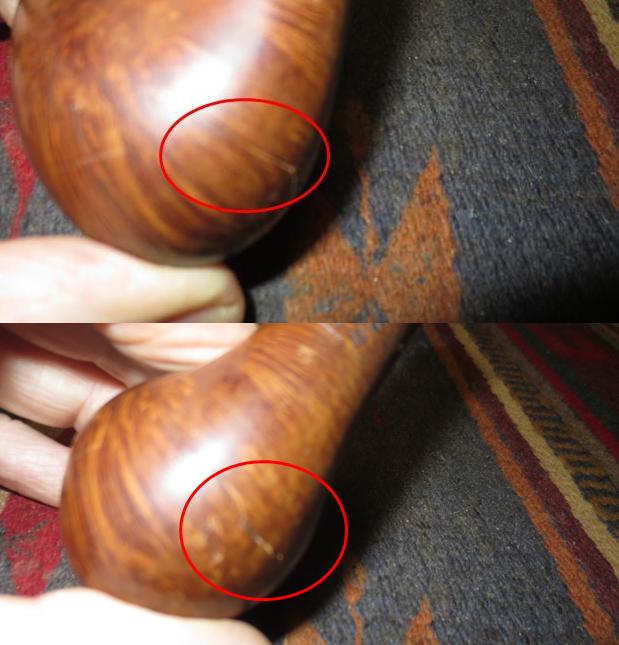 The Lucite/acrylic stem was rough. There were tooth marks on both the top and underside of the stem in front of the button and a deep bit mark on the top of the button. The broken tenon would need to be replaced and there were some nicks in the sides of the stem close to the button end.
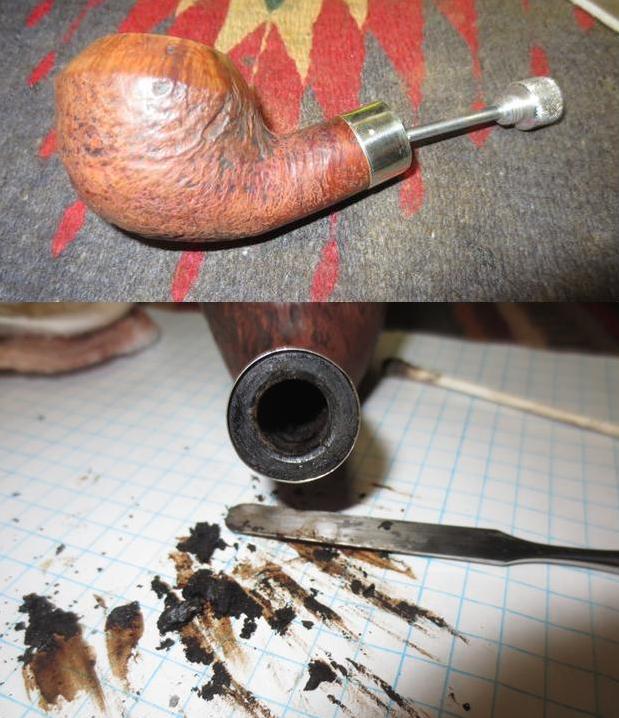
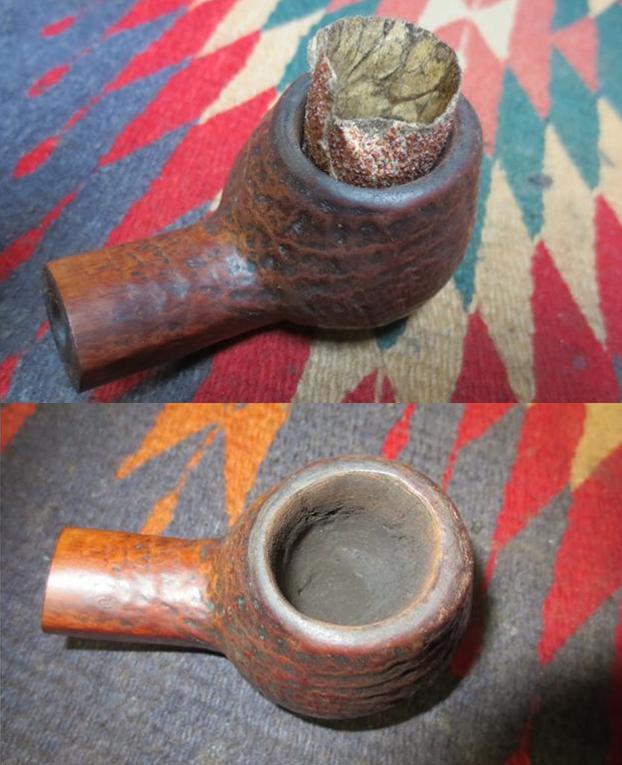
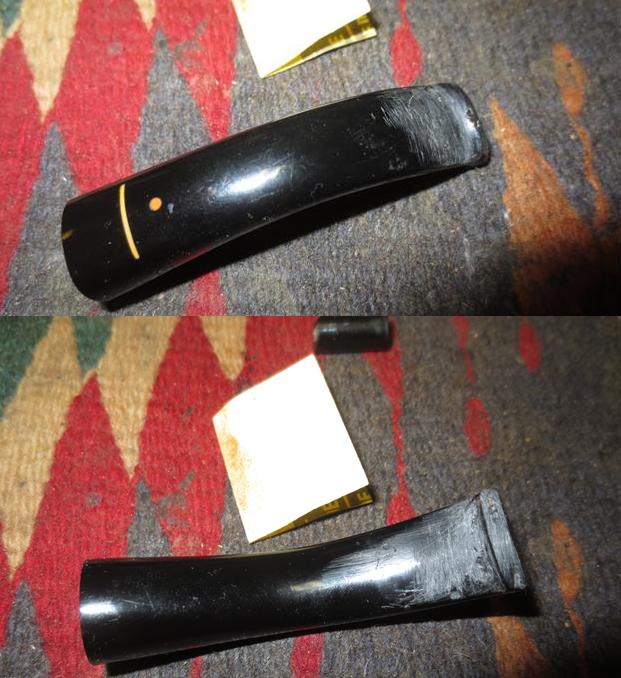 I reamed the bowl with a PipNet pipe reamer and took the cake back to bare briar. I cleaned up the reaming with a Savinelli Fitsall Pipe Knife. There would still need to be more work done to smooth things out but the bowl was clean and I could see that the cracks did not go all the way through to the inside walls.
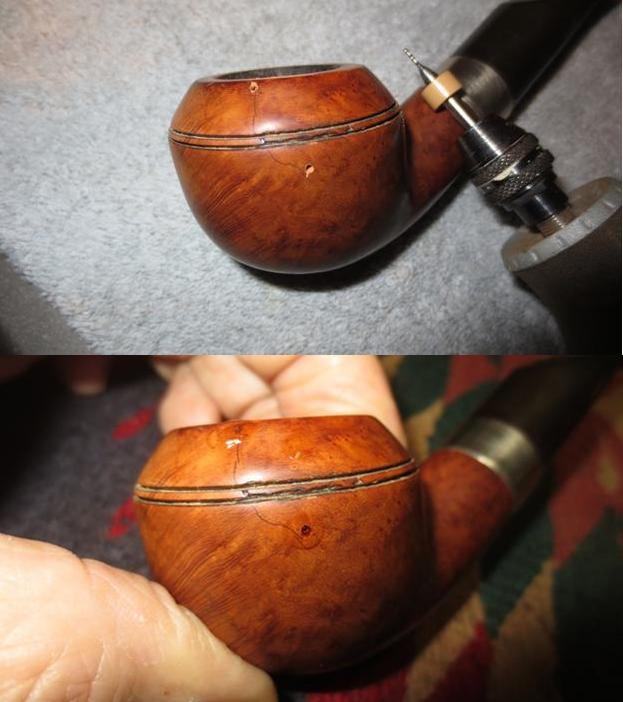
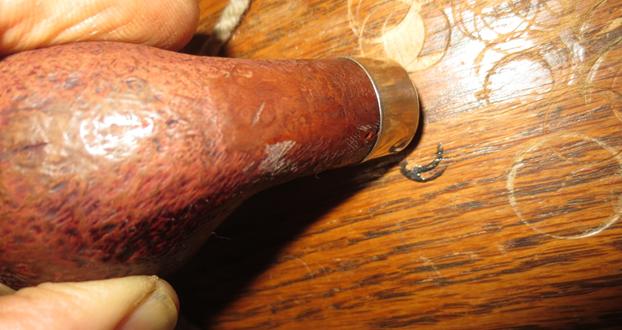
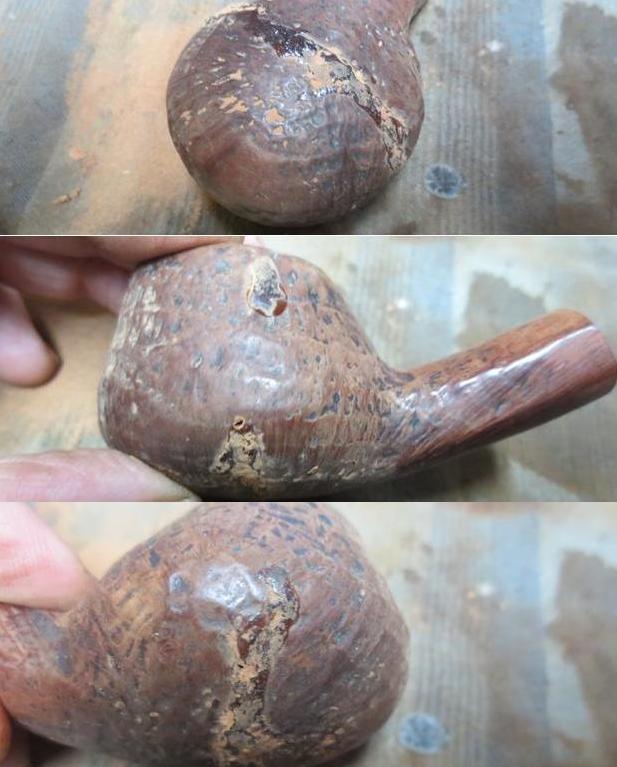
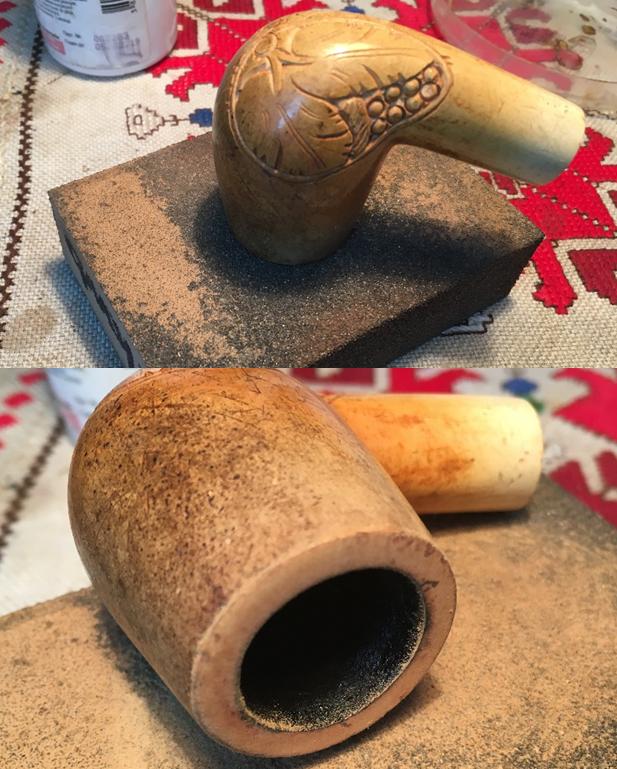
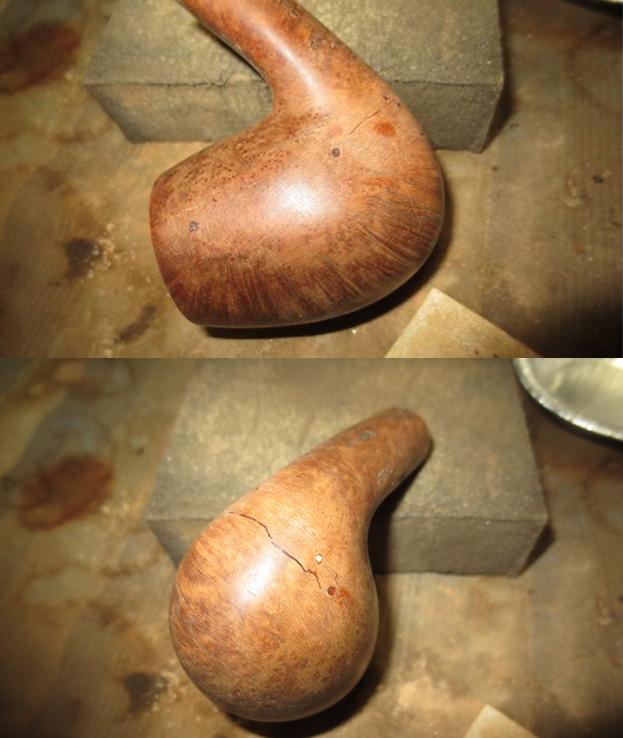
 I topped the bowl to remove the rim damage, particularly that on the outer edge. I also wanted to expose the crack on the rim top and see how bad it was. This pipe really took a beating when it was dropped – fissures all over the place in the briar. I have circled the crack on the bottom to show the largest one. There is a small one next to it that is hard to see in this picture though it will show in later pictures.
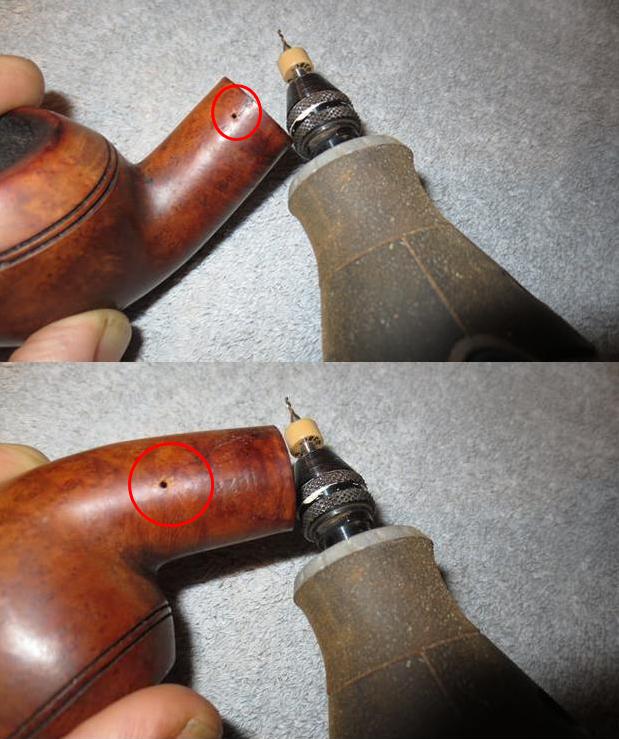
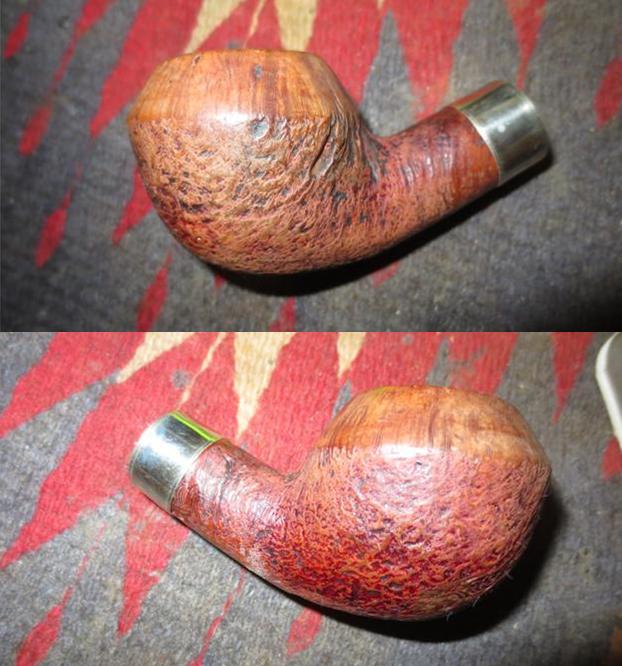
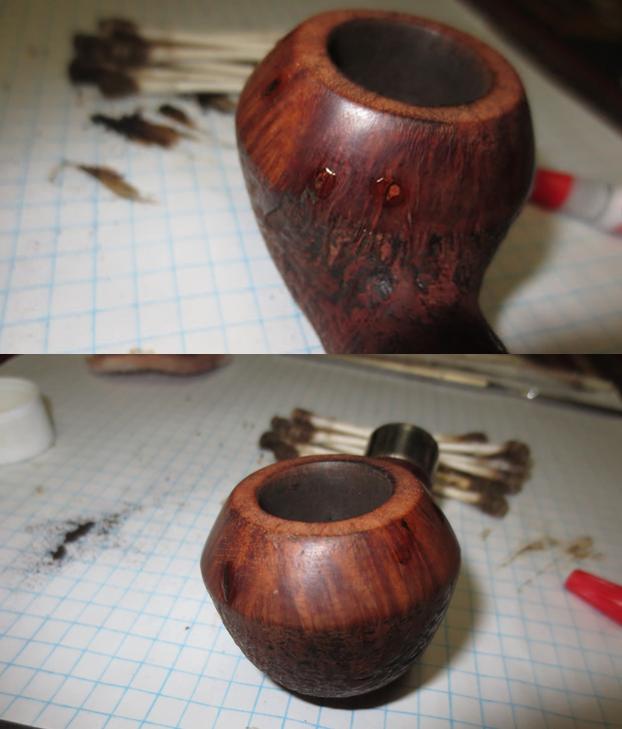
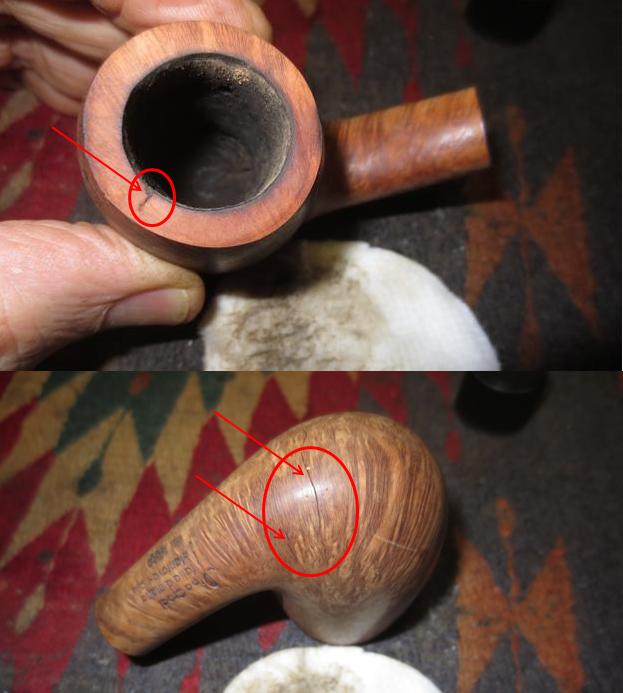
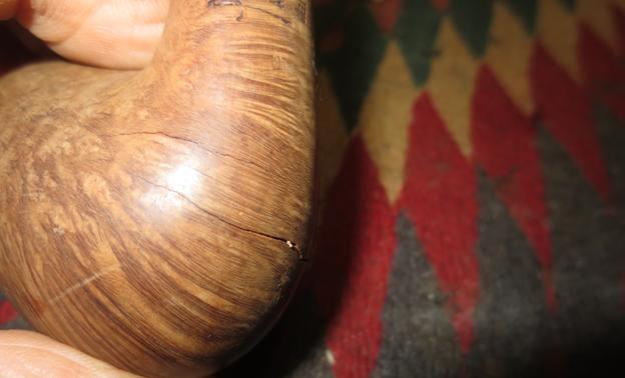
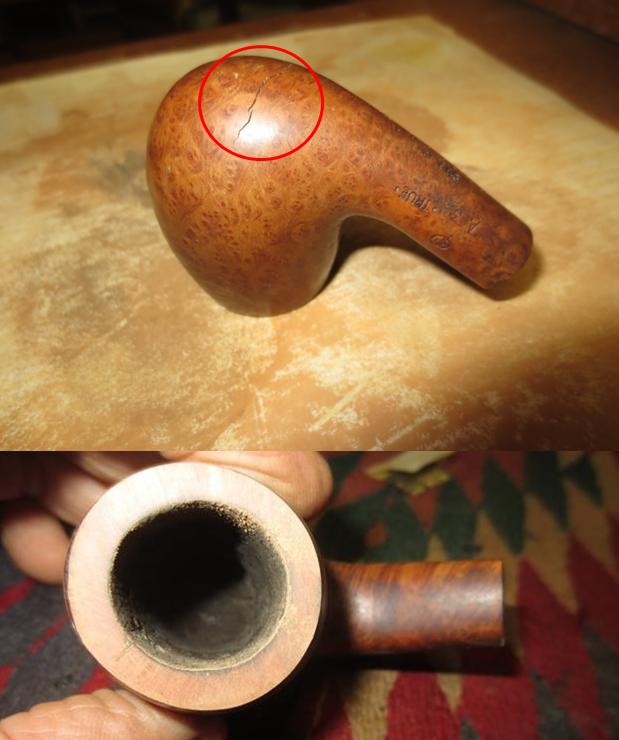 I scrubbed the bowl down with acetone to remove the finish and reveal more clearly the cracks on the bowl. I have circled them in the next set of photos and drawn arrows to the points of origin that will need to be drilled. The number of cracks is amazing to me – all from a drop on concrete. This briar is quite stunning with some birdseye and cross grain.
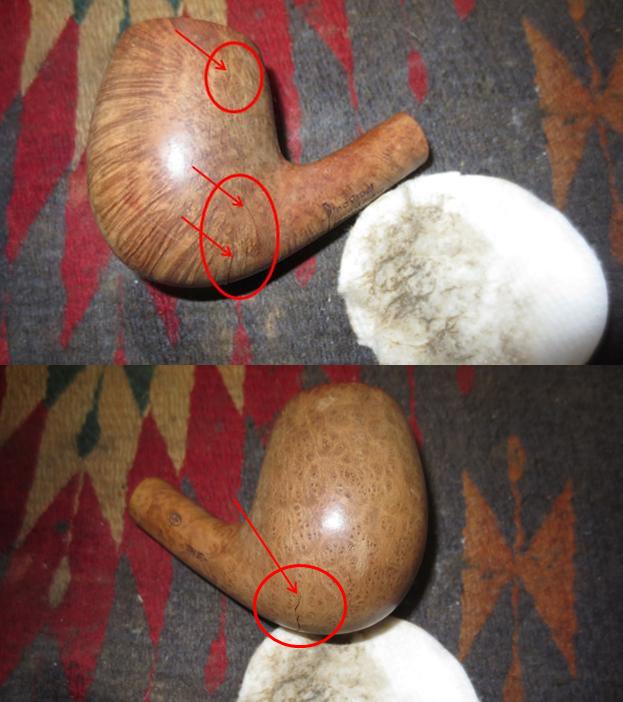
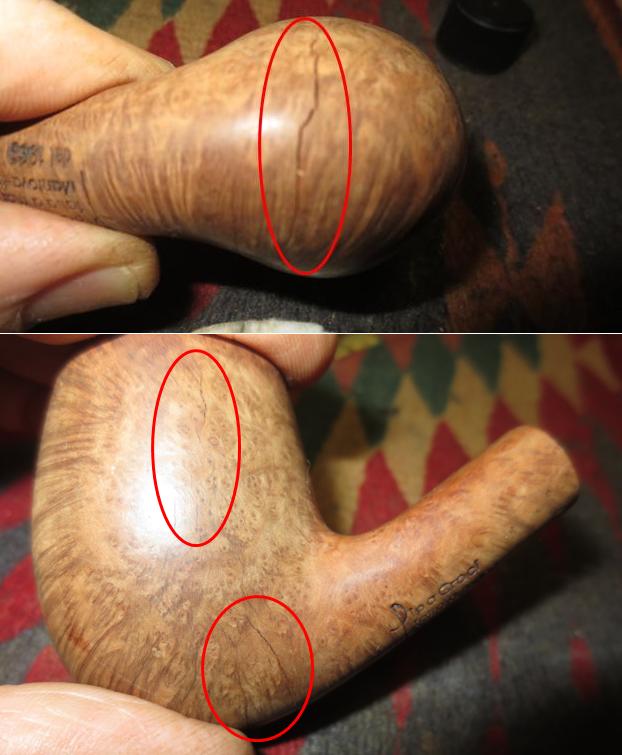
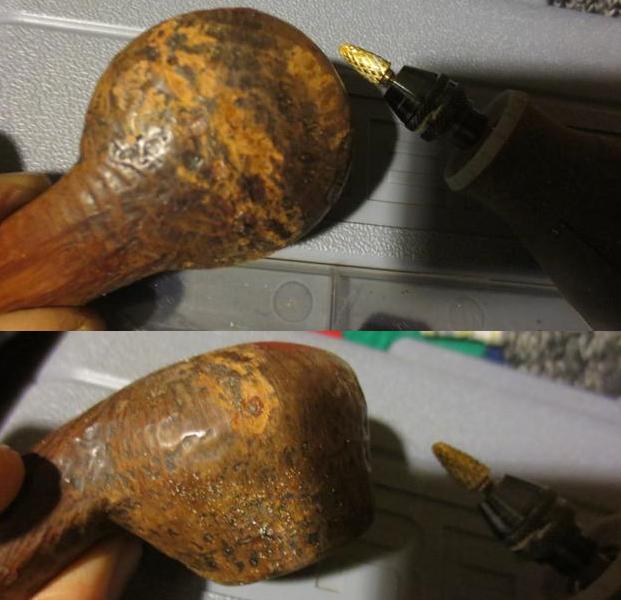
 I drilled with a microdrill bit in the Dremel at each terminus of the cracks. Some of them had spidered a bit so they took multiple holes. I clean out the cracks with a dental pick and wiped the bowl down with alcohol on a cotton pad. I filled in the holes with briar dust and clear super glue. I sanded the repairs with 220 grit sandpaper to blend the repairs into the rest of the bowl. I sanded them with a medium and fine grit sanding sponge to polish the scratches away.
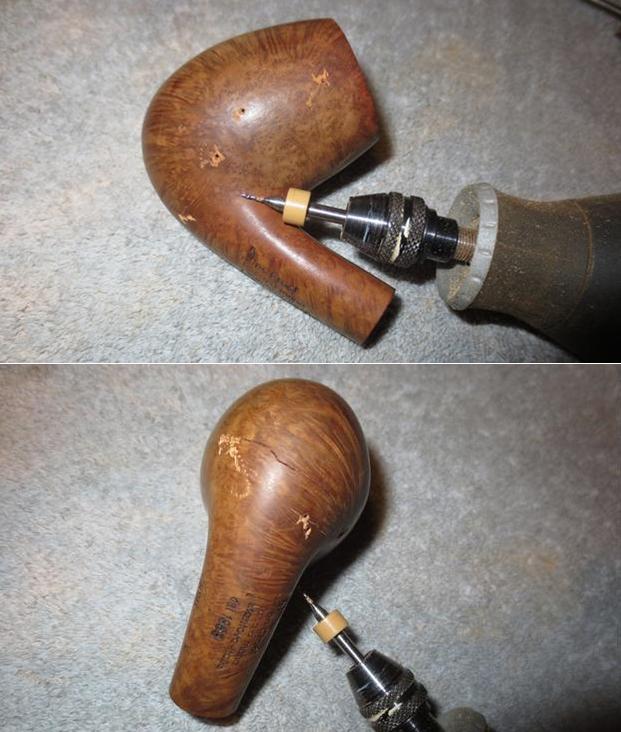
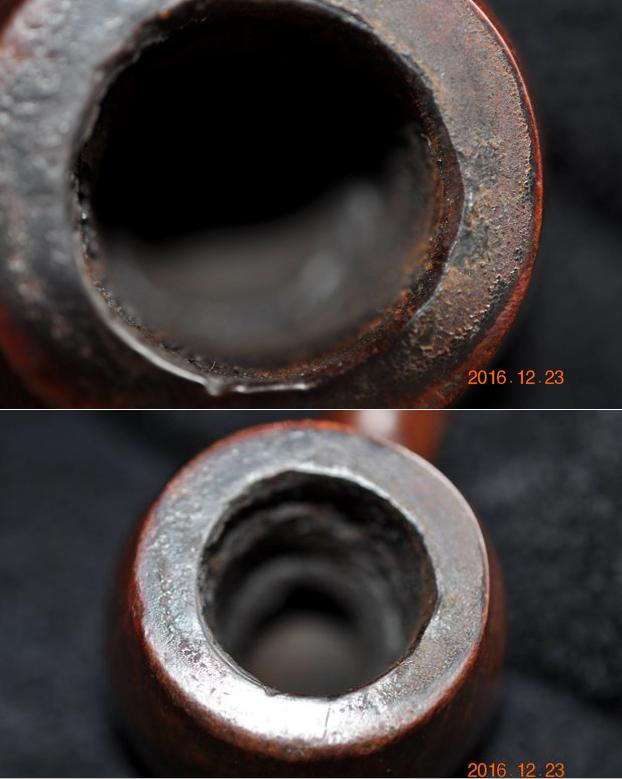
 I set the bowl aside for a while and worked on the stem. I flattened out the broken tenon on the face of the stem with a Dremel and sanding drum. Once it was smooth I used a drill bit about the same size as the airway in the stem to start the process of opening the airway to take the new tenon. I put the drill bit in a stationary drill and turned the stem on to the bit by hand. I increased the size of the bit incrementally so as not to split the stem and to keep things aligned. I put a tape on the bit that marked the depth of the threaded tenon. Once the airway was opened to the diameter of the tenon I used a tap to thread the inside walls of the newly drilled opening. I turned the stem onto the tap carefully to keep it straight and aligned.
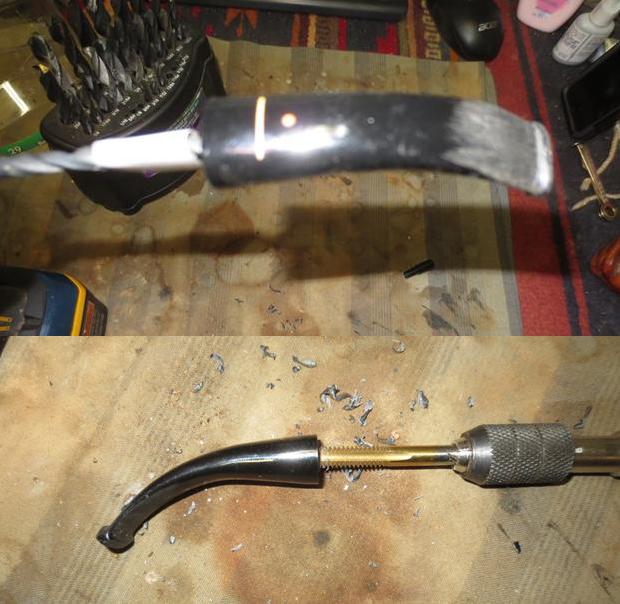 The next two photos show the newly tapped stem and the new tenon that was going to be turned into the stem. The tenon was slightly larger than the mortise so I used the Dremel and sanding drum to take it down to the right size. I dabbed some slow drying glue on the threads of the new tenon and turned it into the stem until it sat tight against the face of the stem. With that done the stem repair was complete. There were some nicks and scratches in the stem around the junction area with the shank that needed to be sanded and cleaned up. I used some 220 grit sandpaper to do that. The stem was ready for the fit and all that remained was to push it into the mortise and check it out once the glue set.
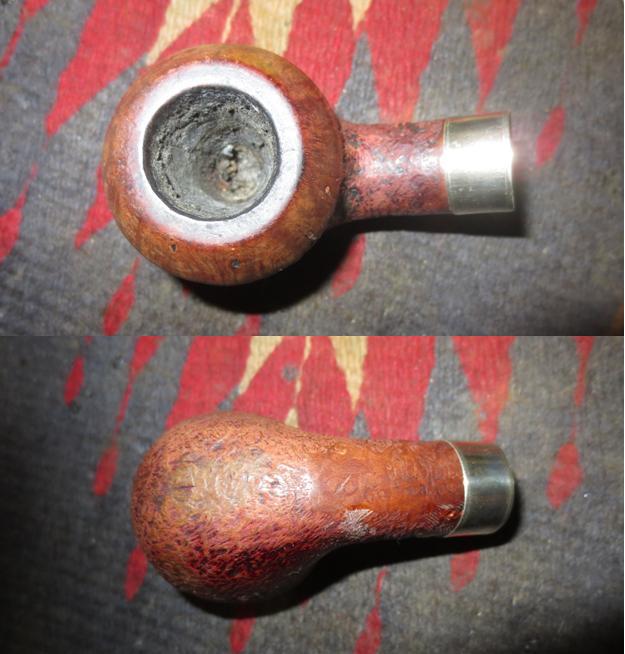
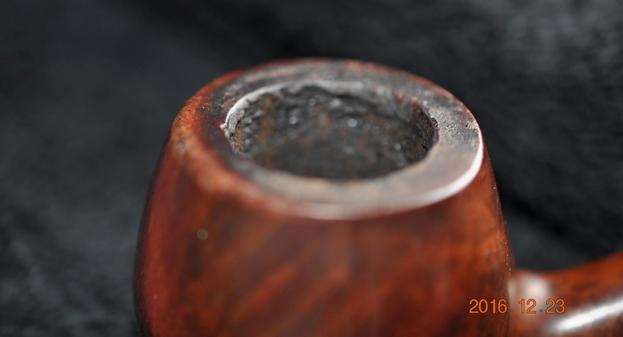
 I put the stem in place in the mortise to check the alignment and was happy with the overall results. As normal there were some slight adjustments that needed to make to the stem and shank but nothing radical so I was happy with the fit. Now all I had to do was finish the fit and repair the stem. I noticed in the photos below that there was some roughness to the inside of the bowl so I would also need to sand that smooth.
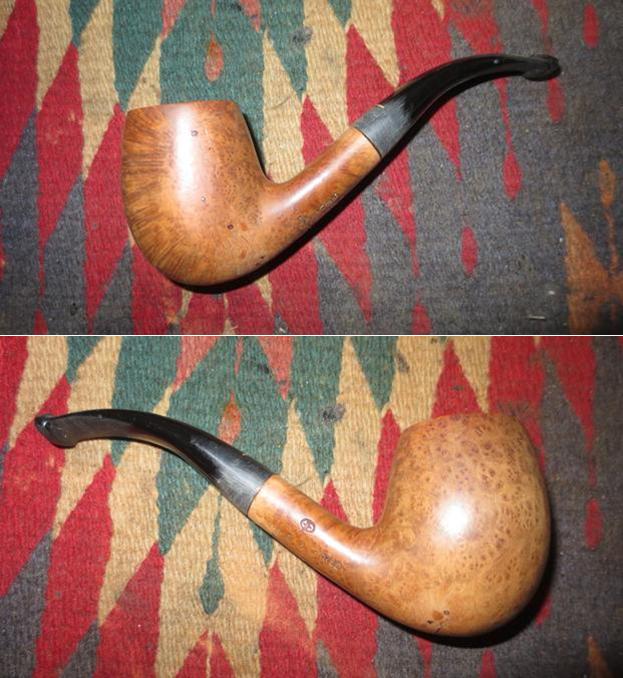
 I wrapped a piece of 220 sandpaper around my finger and sanded the inside walls of the bowl until I had smoothed them out.
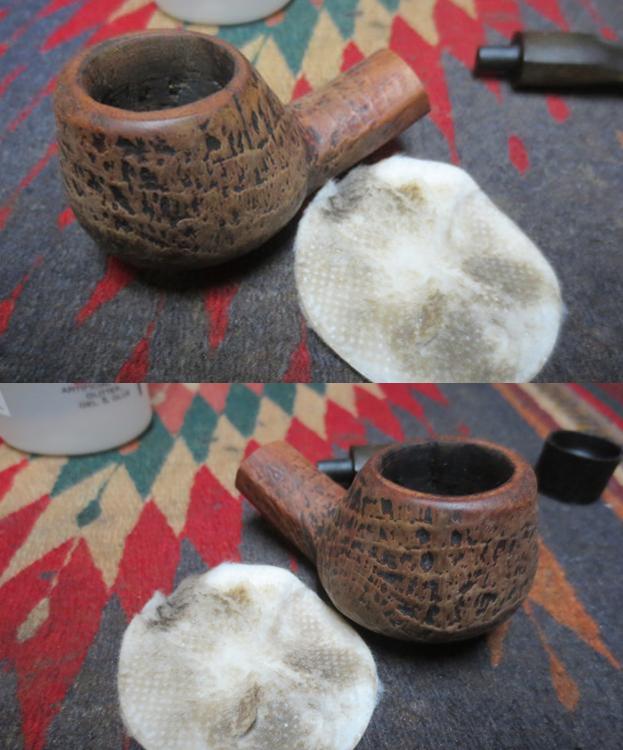
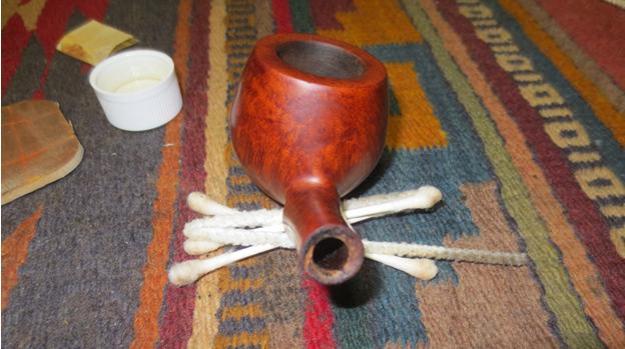
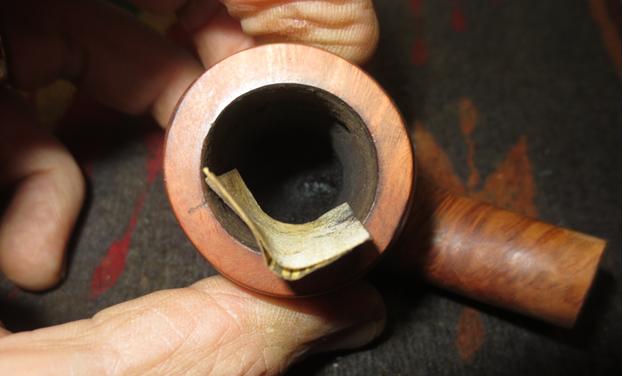 I cleaned out the airway in the stem and the bowl as well as the mortise with pipe cleaners, cotton swabs and alcohol until they were all clean. I also scrubbed the darkened end of the shank to remove the stain that was there.
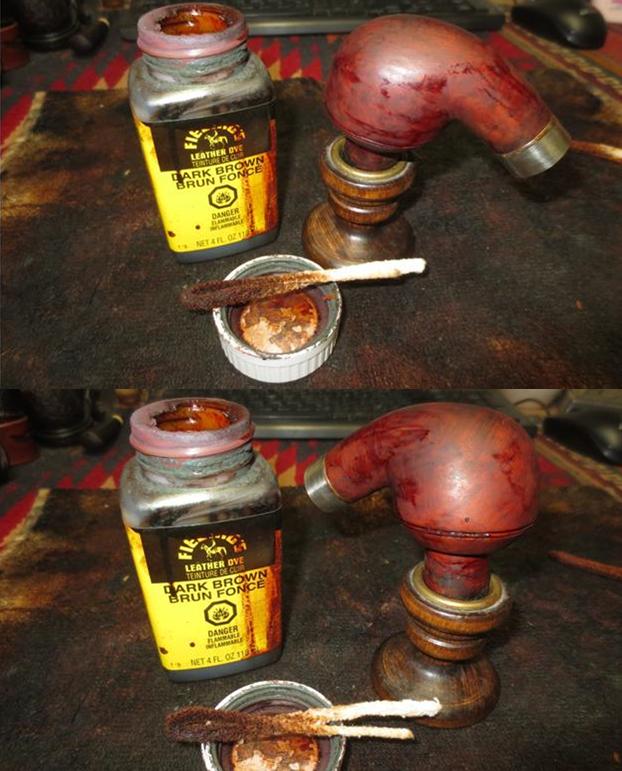
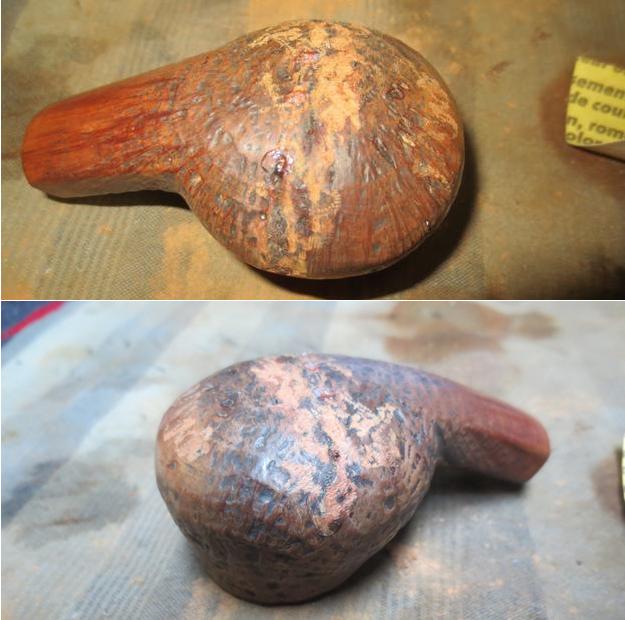
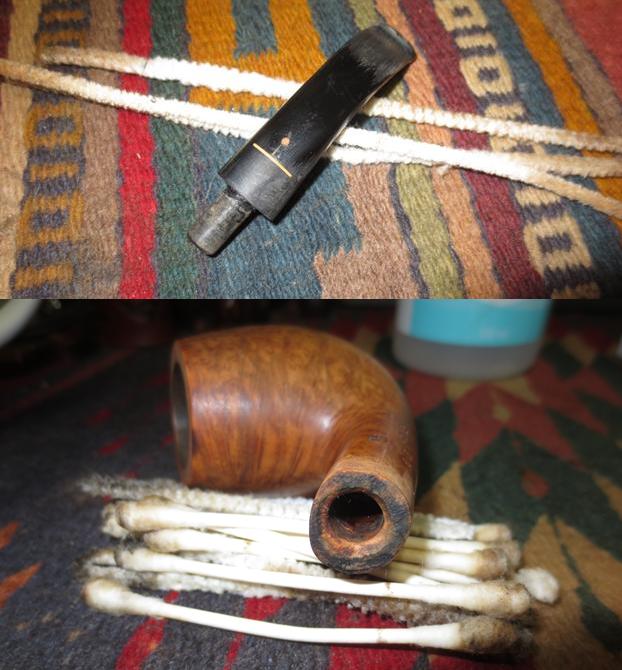 I stained the bowl with a dark brown aniline stain thinned 50/50 with alcohol and flamed it to set it in the grain. I repeated the process until the coverage was even around the bowl. I wanted it to be dark enough to blend the repairs into the sides and bottom of the bowl and hide the drill holes and cracks. I set the bowl aside to let the stain dry overnight and called it a day.
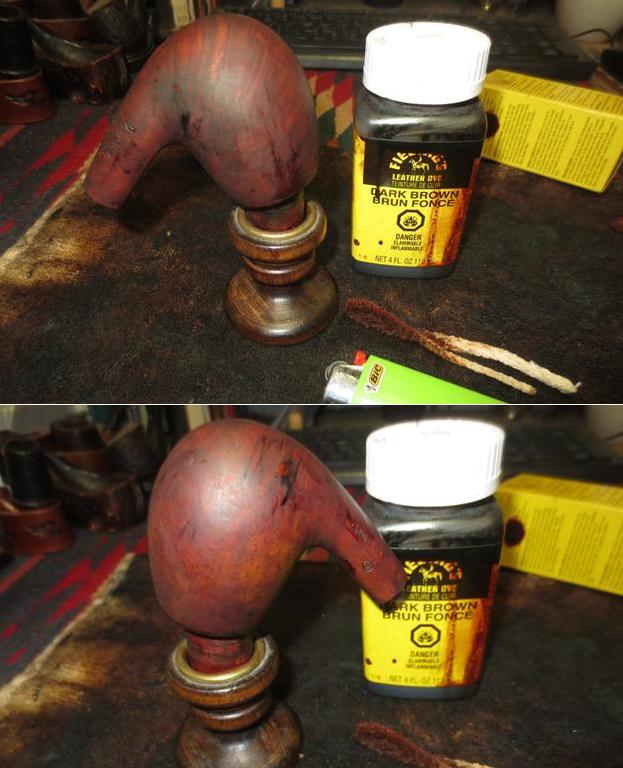 In the morning I started the polishing process on the bowl. I sanded it with 1500-2400 grit micromesh and a small amount of olive oil to help the grit cut into the briar. I wiped it down afterwards and inserted the stem to see what was happening. The alignment of the stem was slightly off to the left in the photos so it appears not to fit. However, the fit is actually quite good. I still need to polish and clean up the stem.
 I continued polishing the bowl with the micromesh pads using 3200-12000 grit pads to really add to the shine of the briar. Each successive grit of micromesh raised the shine more on the briar. The grain really pops on this one…
 I turned back to the stem. I adjusted the fit with 220 grit sandpaper until the transition was smooth. When the fit was correct I polished the stem with micromesh sanding pads – wet sanding with 1500-2400 grit pads and dry sanding with 3200-12000 grit pads. I wiped the stem down after each grit of pad to clean off the sanding debris and gave it a final wiped down after the 12000 grit pad.
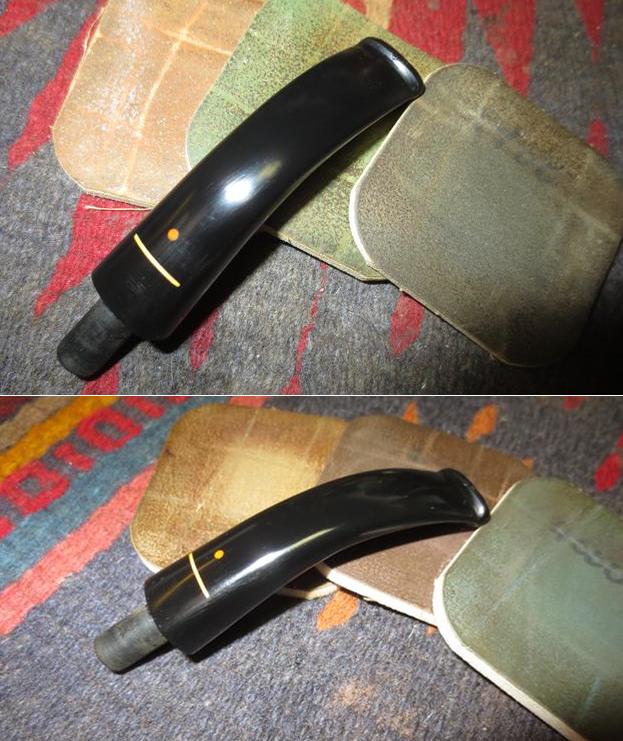
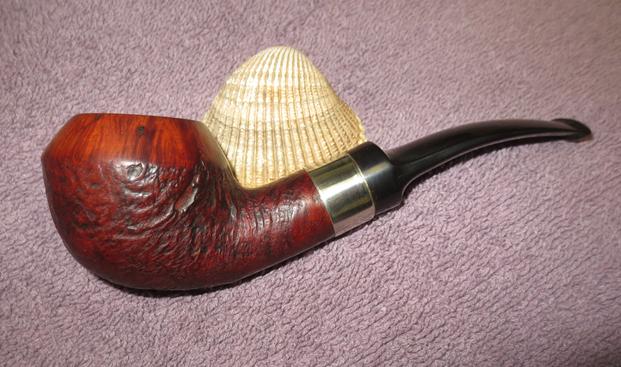
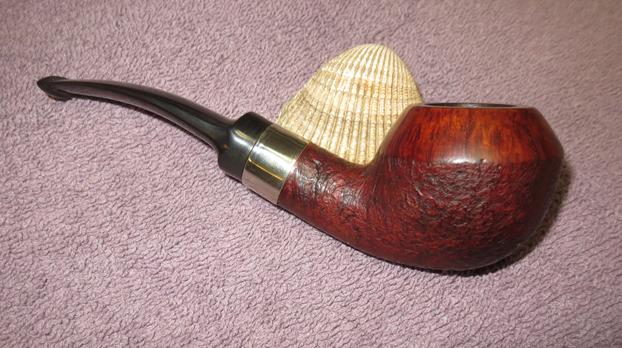
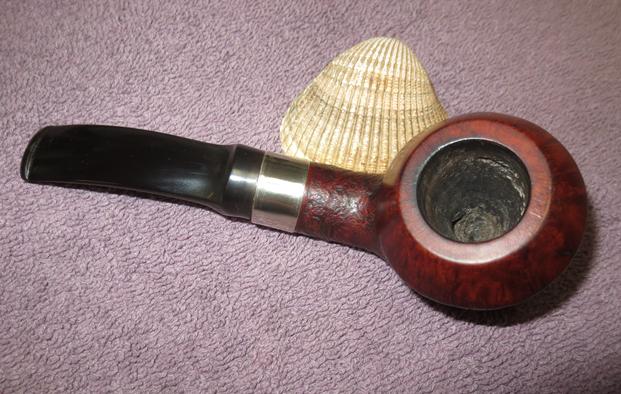
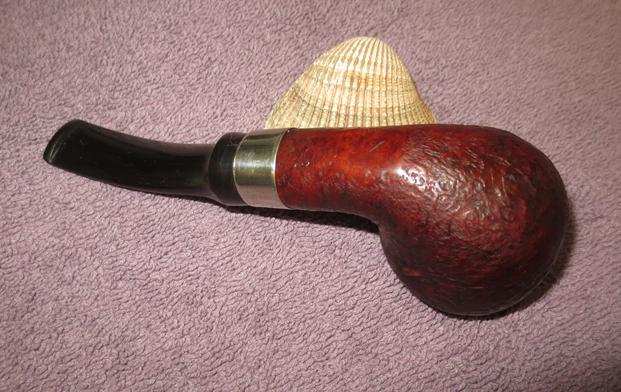
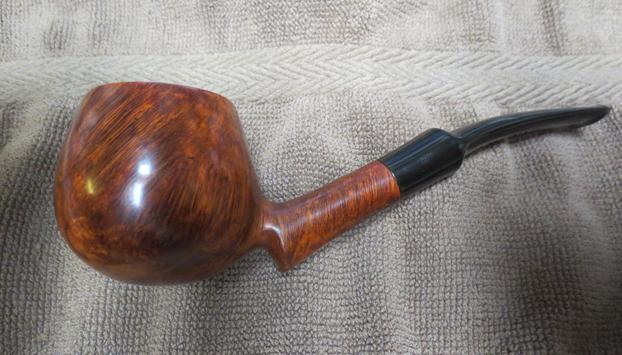
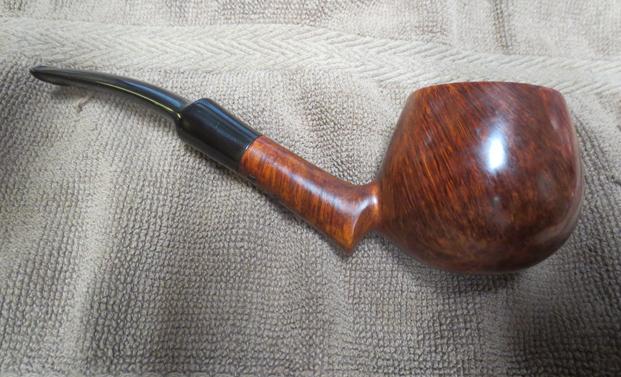
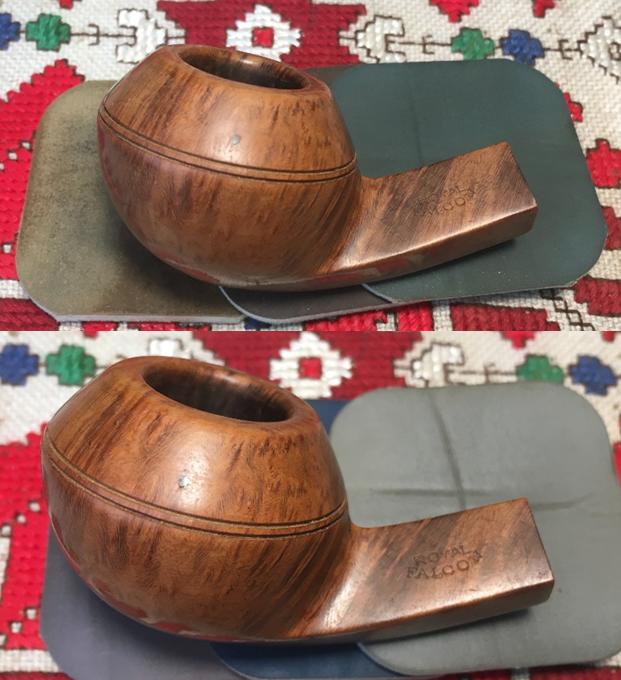
 I buffed the pipe and stem with Blue Diamond on the buffing wheel to remove any remaining scratches or marks and raise a shine. I gave the bowl and stem multiple coats of carnauba wax and buffed the pipe with a clean buffing pad. I hand buffed it with a microfibre cloth to deepen the shine. The finished pipe is shown in the photos below. The cracks are all sealed and since they do not go all the way through into the interior of the bowl I think that they will hold up well. The pipe has a lot of life in it still and I know that the owner will be glad to get it back in far better nick than it was when he left it here. Thanks for journeying with me on this resurrection.