Tag Archives: Bowl – refinishing

Making the Best of Beautiful Pipe with an Unbelievably Rough Patch of Briar – A Giant Gold Crown Bent Billiard


Blog by Dal Stanton

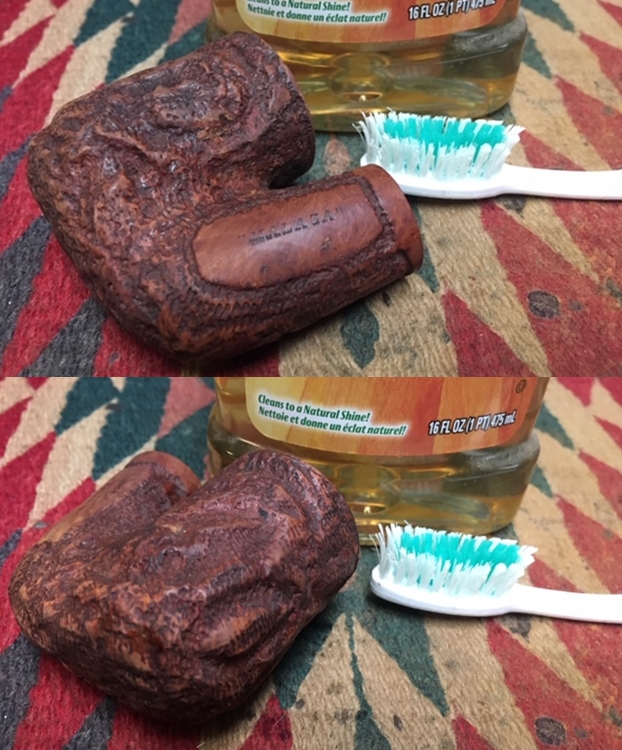
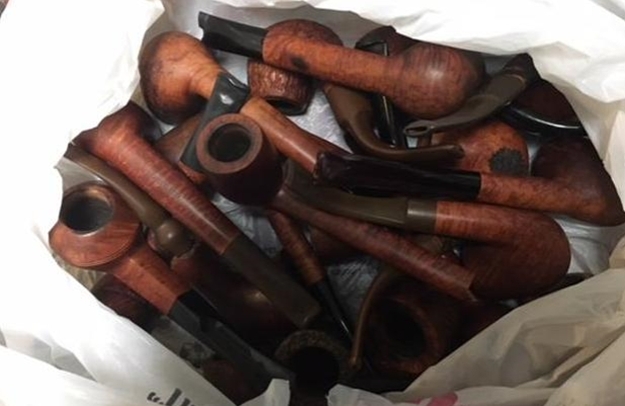
The story begins when I first laid my eyes on this pipe.  It was when the box containing the ‘French Lot of 50’ arrived here in Sofia, Bulgaria, from Paris, and oh my – talk about excitement!  I was alerted to this online Lot by Romanian pipe man friend, Codruț (aka: Piper O’Beard), who had previously become the steward of an L. J. Peretti Oom Paul I had restored. I carefully and slowly unwrapped each pipe, relishing each moment. I had seen the pipes in a pile displayed by the seller on France’s eBay.  Interestingly, when I unwrapped the ‘Gold Crown Giant Bent Billiard’ now on my worktable, I went back and looked at the eBay ‘pile’ picture with the question, how could I have missed this?  I was attracted to this French Lot because of the many horn stems and several very uniquely shaped pipes – the Cutty on the top had my attention!  Yet, the Gold Crown was not visible.After unpacking and cataloging all the pipes from France, each was pictured and put online in the ‘For “Pipe Dreamers” Only!’ collection where hopeful stewards search for a pipe that speaks their name.  After all, as in Harry Potter’s wand lore, the pipe chooses the steward, not the other way around! 
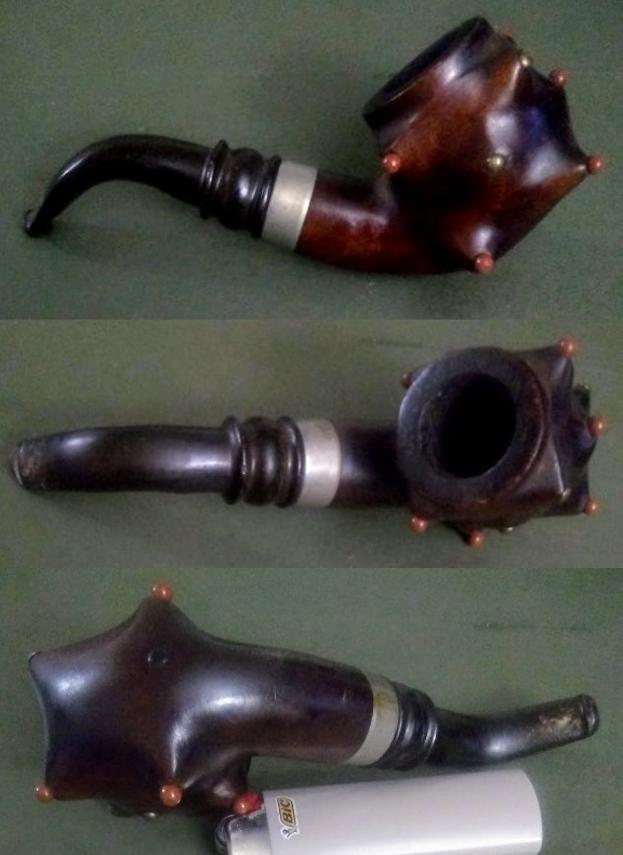
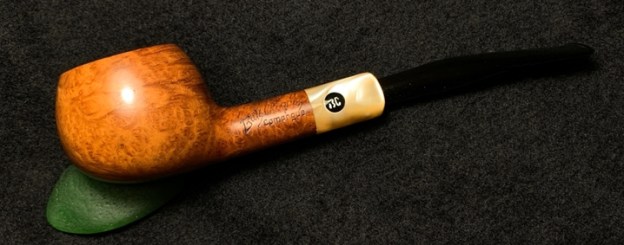
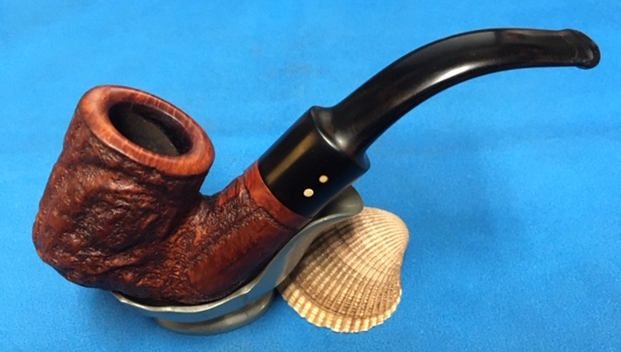
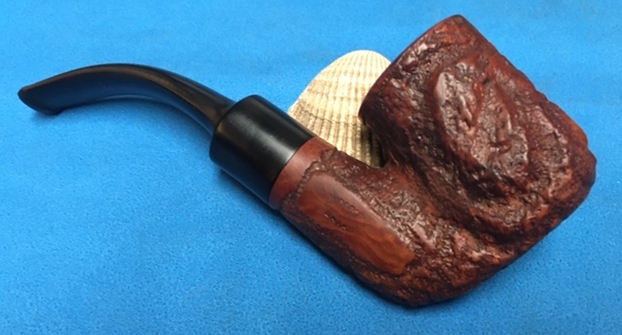
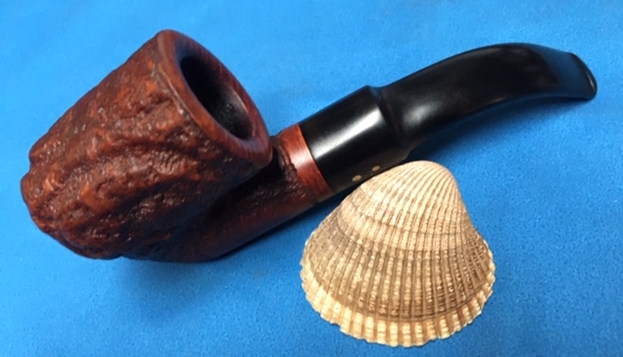
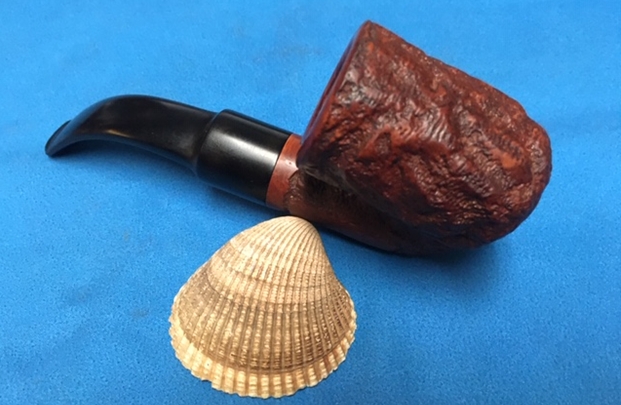
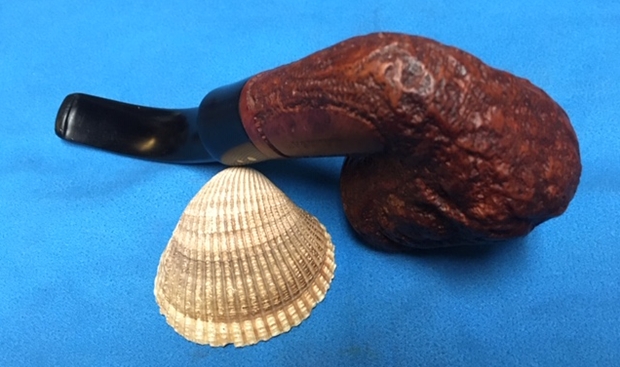
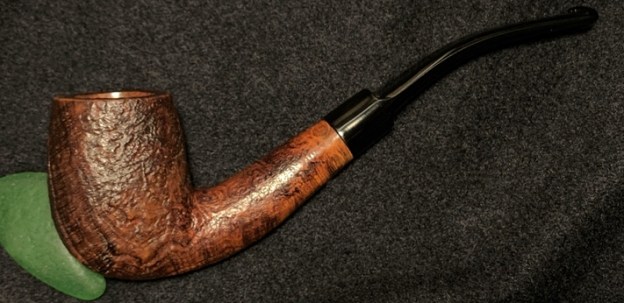
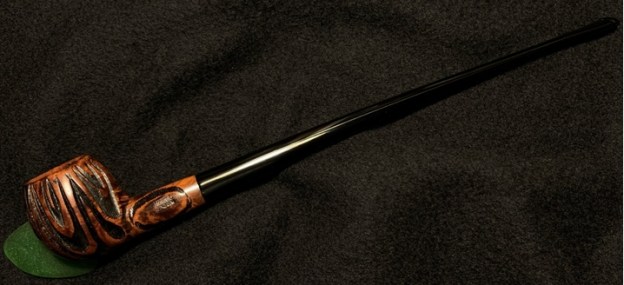
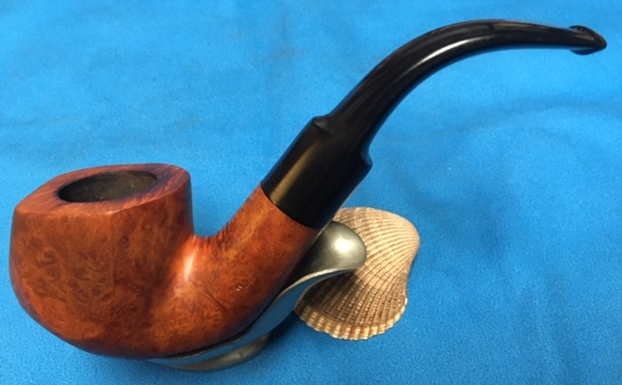
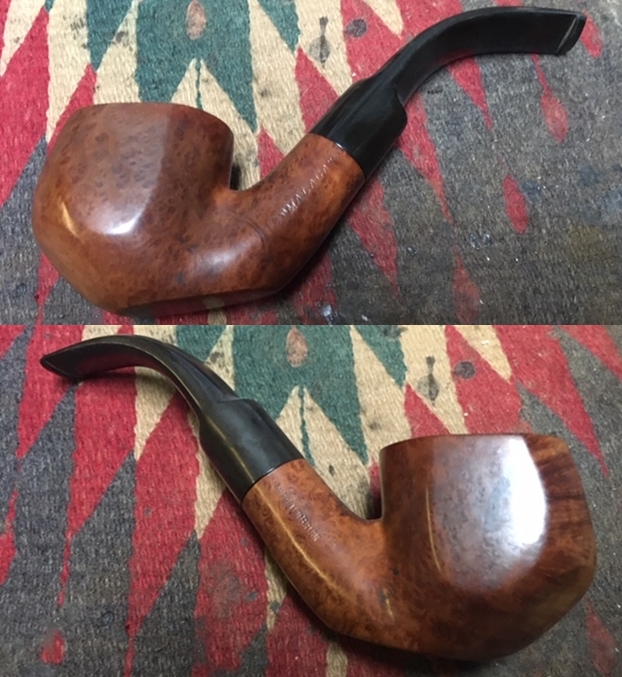
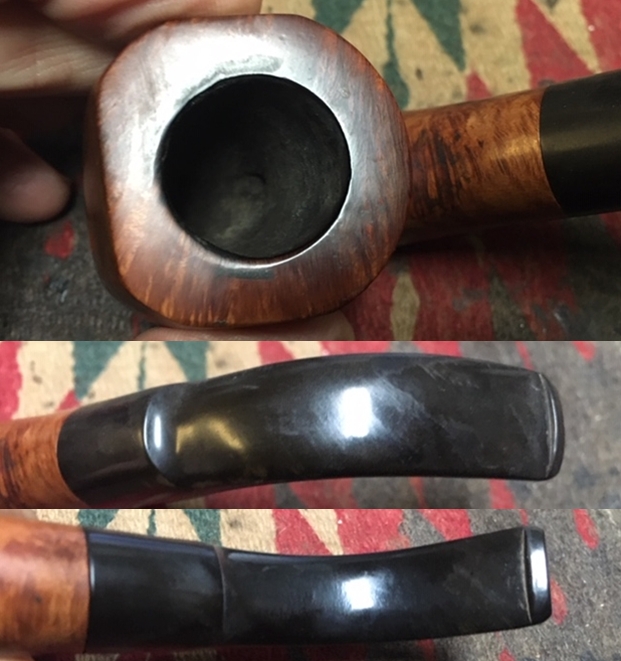
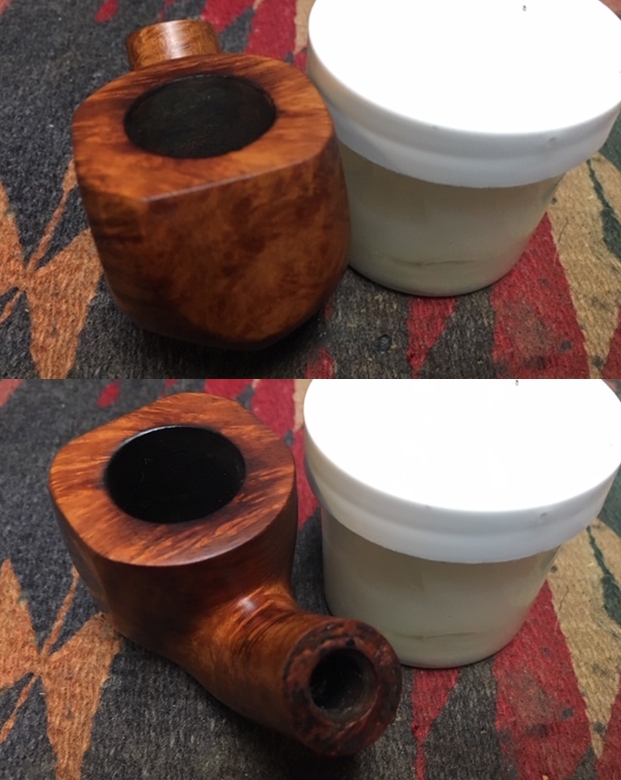
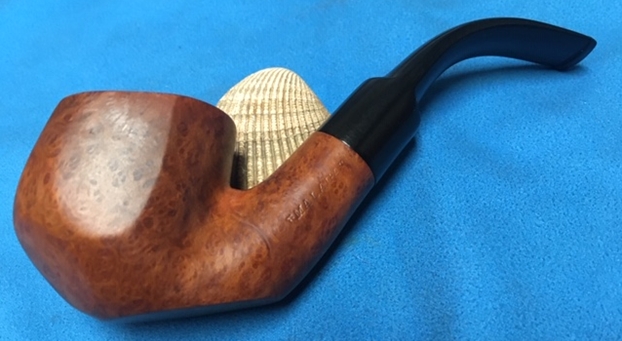
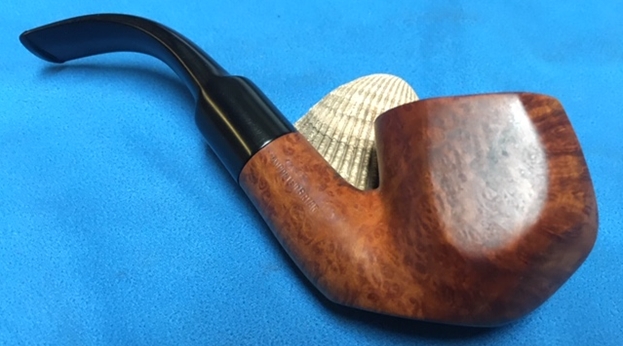
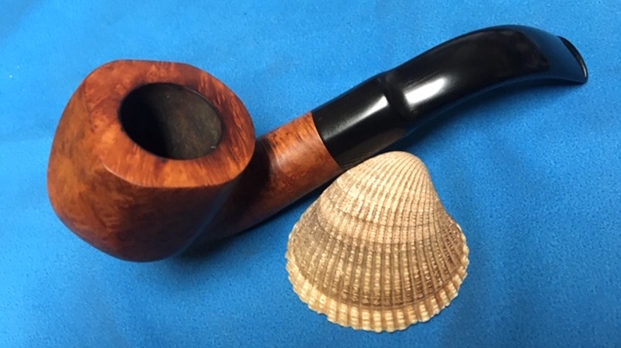
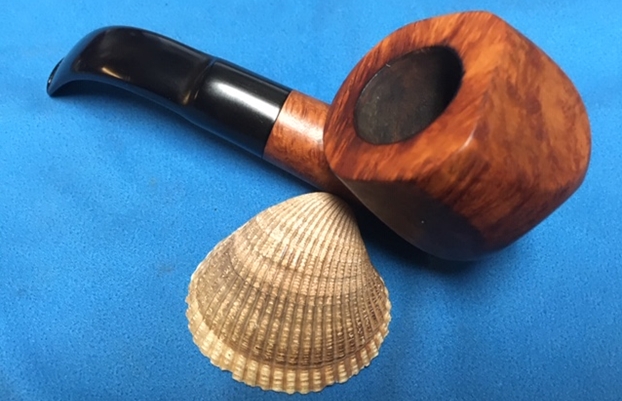
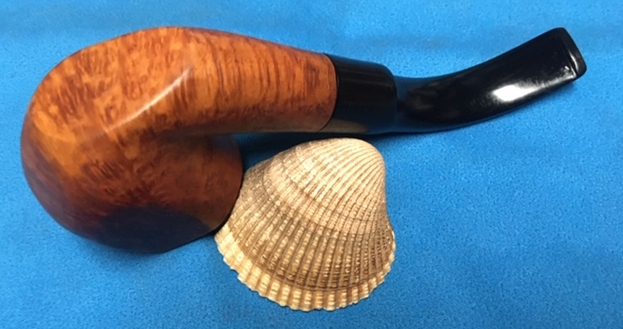
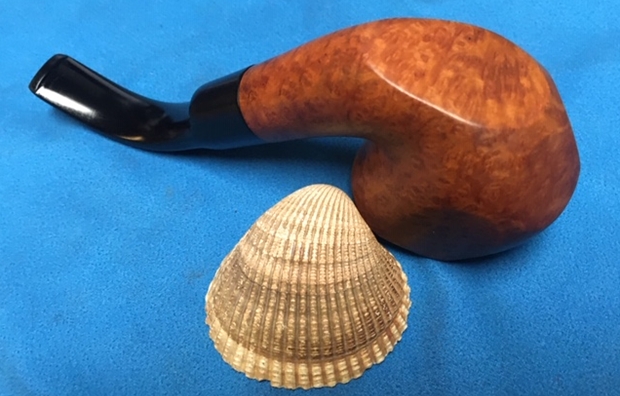
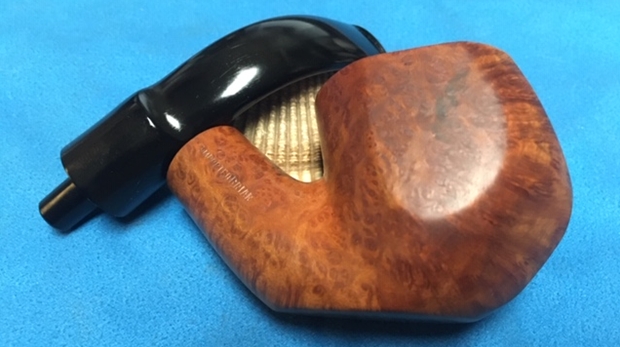
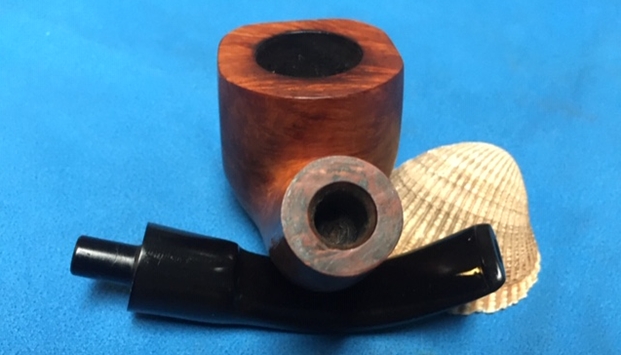
Now, pipe man and friend, Cyrus, enters the story when he saw this pipe online in ‘Pipe Dreamers!’ collection.  He and his wife became good friends when they served here in Bulgaria with US Peace Corp for a few years.  After returning to the US, their family grew, and we stayed in touch.  Cyrus was no stranger to ‘Pipe Dreamers!’ having already commissioned and received a very nice Jarl Dublin (See: Refreshing a Jarl 1545 Made in Denmark Dublin) which benefited our work here in Bulgaria with the Daughters of Bulgaria – women and girls who have been trafficked and sexually exploited. His return to Dreamers found him drawn to the Crown Giant Billiard.  Here are pictures of the Giant Bent Billiard: 
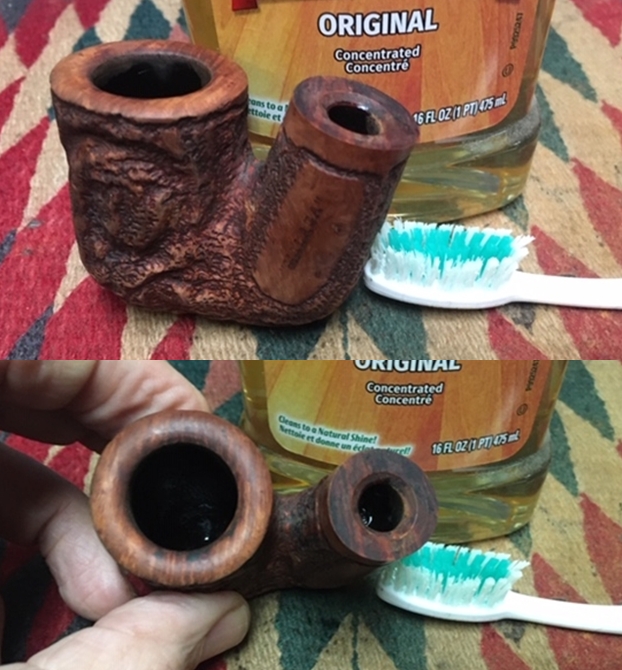
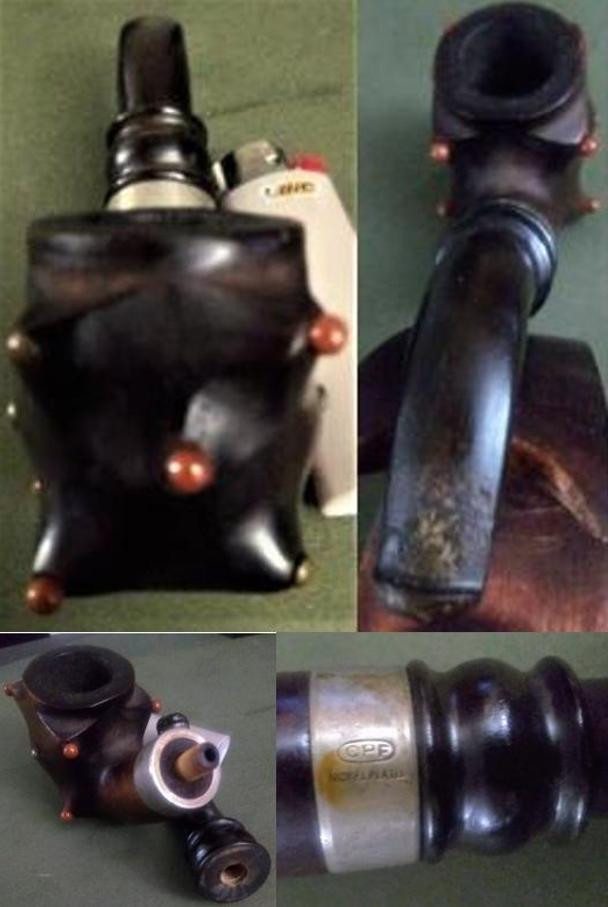
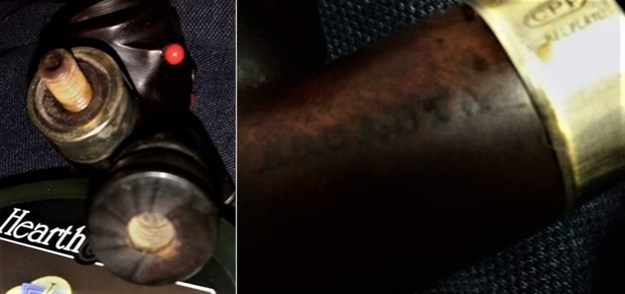
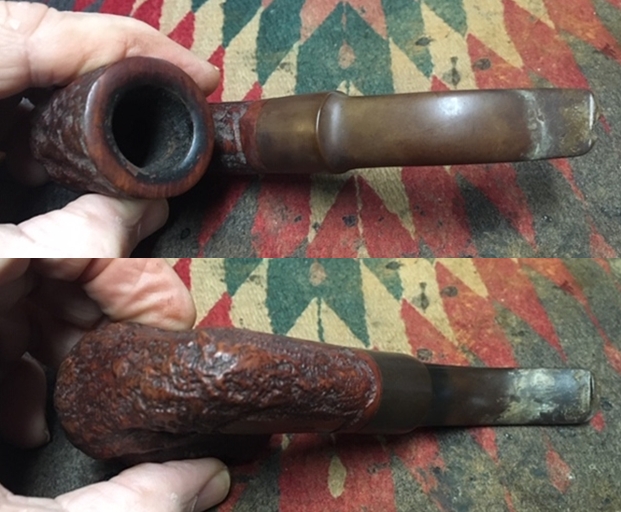
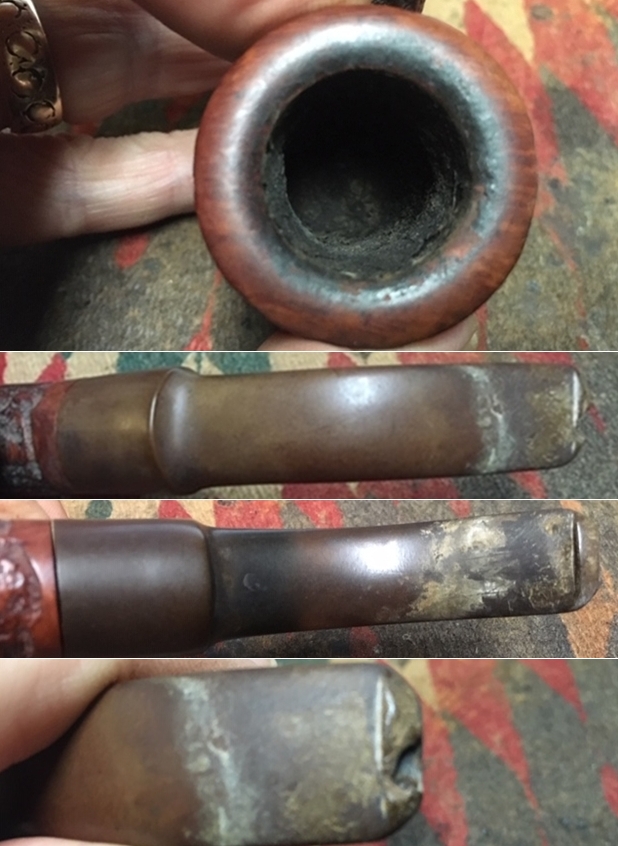
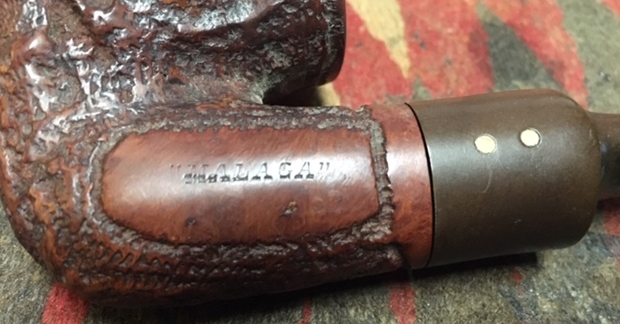
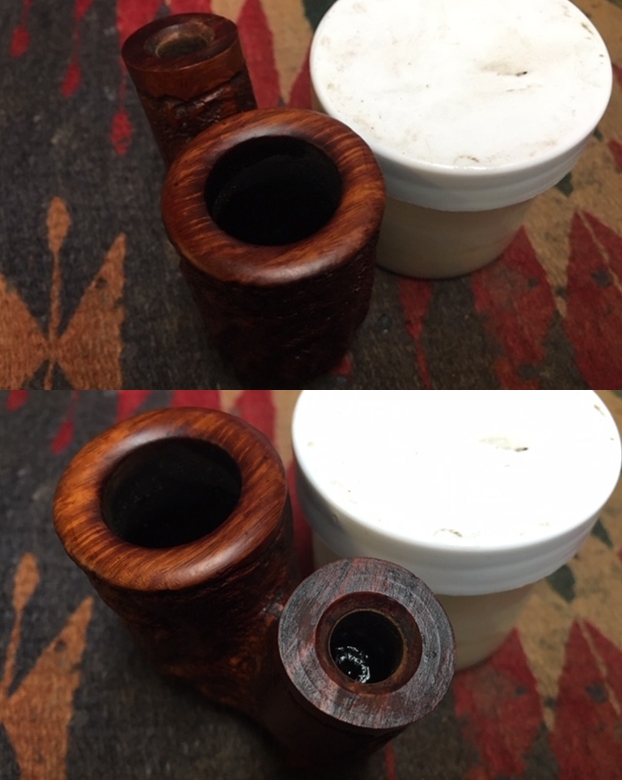
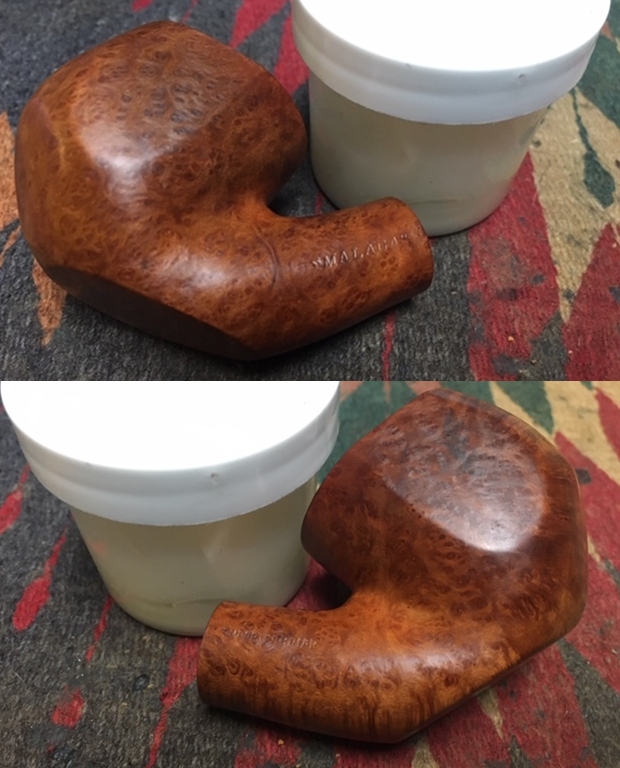
The only markings on this pipe are on the gold band and the ‘tenon ring’.  I have to be honest with full confession – when I first saw this pipe, I was excited about it thinking it might have some historical value.  When it had first come out of the box, I hadn’t taken a good look at it.  When I looked at it again, it was not long after restoring another pipe from this French Lot of 50 which was a treasure.  The writeup was: Discovering the History with the Reclamation of this Petite EPC Majestic Bent Horn Stem Billiard, where my researched uncovered a long-forgotten French pipe manufacturer which resulted in my first submission to Pipedia: A. Pandevant & Roy Co..  The problem, which I have since come to realize more fully, is that one of the trademarks of this French company that disappeared in the late 1930s, based near Paris, was a trademark with the stamp ‘EP’.  The difficulty with this is that it is also now a mark stamped on metals and it simply signifies, ‘Electro Plated’.  When I pulled the acrylic stem out of the mortise and discovered the ‘tenon ring’ with ‘EP’ on it, the novelty of a ‘tenon ring’ and the ‘EP’ stamp with some sort of hallmarks created question – could this be something in line with the Petite EPC?  The gold band was stamped with a crown and a very miniscule stamped letter that I couldn’t make out for certain: GG or GP?  Probably ‘GP’ for gold plated. With questions in my mind about the ‘tenon ring’ and the ‘EP’, I sent my questions off to Steve, Master of Restoration, of rebornpipes.com and not too long after received his replies.

Dal: A strange but interesting huge Bent acrylic stem Billiard with no shank nomenclature and doesn’t appear to ever have been smoked appears to have a gold-plated band.  There are stampings on it – a crown and a very small stamp beneath.  My guess is GG or GP – but it’s so small I can’t be sure.  Then, there is a solo stamp on the opposite side of the band that appears to be the same GG or GP.  Of course, GP could signify Gold Plated.  But perhaps that’s what I want to see!  That’s the band – thoughts?

Steve: I have had gold plated bands on older Weber’s that looked the same. I concur that the GP stamp is gold plated.

 Dal: Then, on the same pipe, I was surprised that when I retracted the ample acrylic stem out of the stummel, there was a band around the tenon!  Have you ever seen anything like this?  The alignment or fit of the stem and shank isn’t great and this band is serving to expand the fit of the tenon in the mortise.  The band also has stampings which I’m assuming are faux of some sort, but the tenon band I’m assuming is an aluminum – it’s light.  I first thought it might be silver, but whoever puts anything of value around a tenon?  Thoughts?

 Steve: I have never seen this before and I can see nothing but problems with this so-called solution. The EP stamp means it is electro plated. Could be silver but looks to like nickel and definitely an aftermarket repair. It is a nice-looking pipe though.  

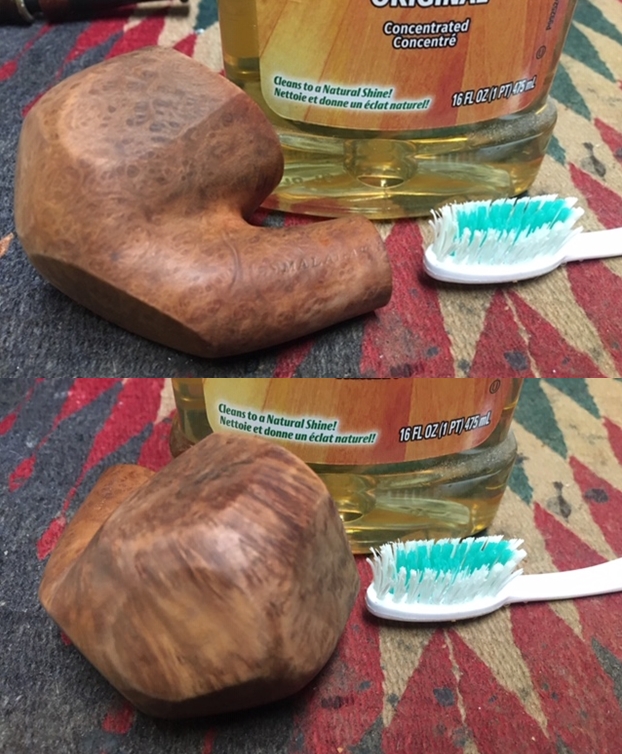
 It’s so much fun unpacking the package of pipes, one at a time, each one wrapped with newspaper…. Christmas over and over!

Dal

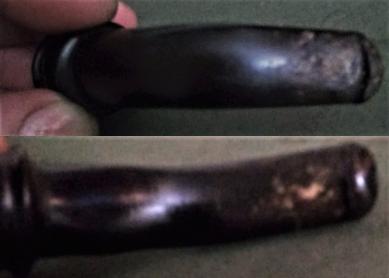
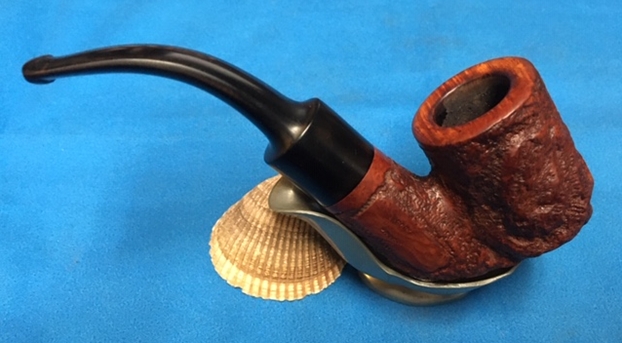
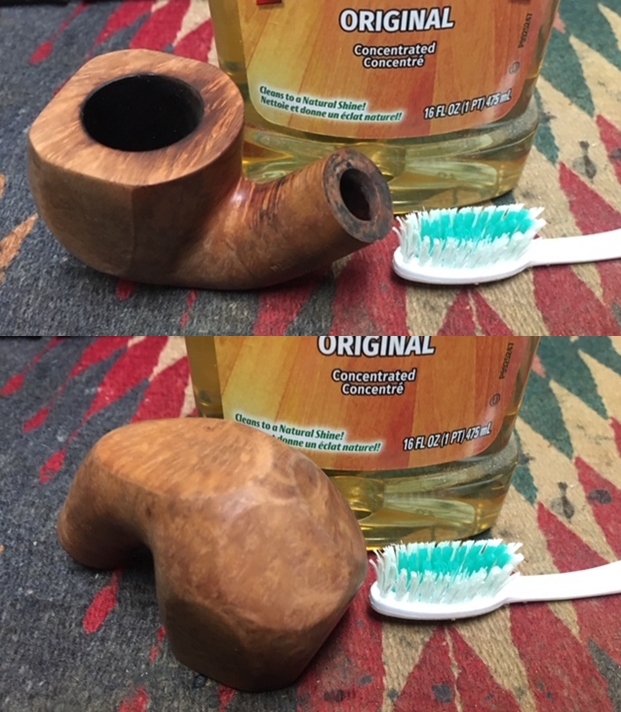
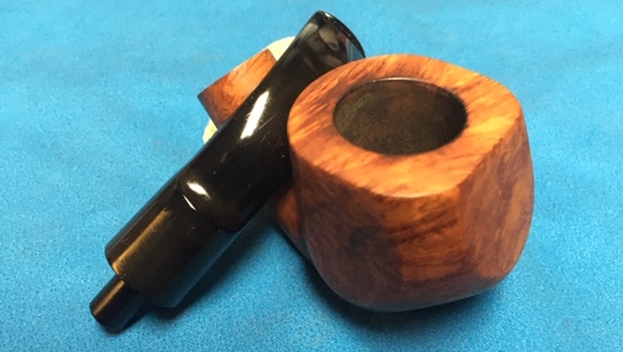
After Cyrus commissioned this pipe and it was getting closer to the worktable, I took a closer look at the pipe trying to figure out its story. The bowl is huge and quite attractive. I weigh the pipe and it comes in at a hefty, 84g. It has never been smoked. The acrylic stem is pristine but needs to be cleaned and receive a fine-tuning regarding sanding and buffing.  The pictures below show ripples where the finishing was not completed or not thorough.
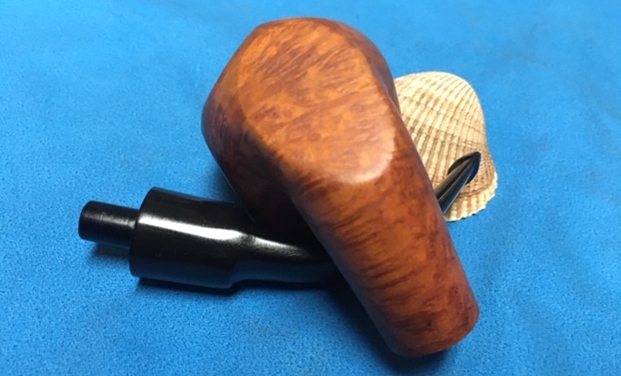
The chamber is virgin briar.  The rim shows some roughness – like it wasn’t finished off as well.
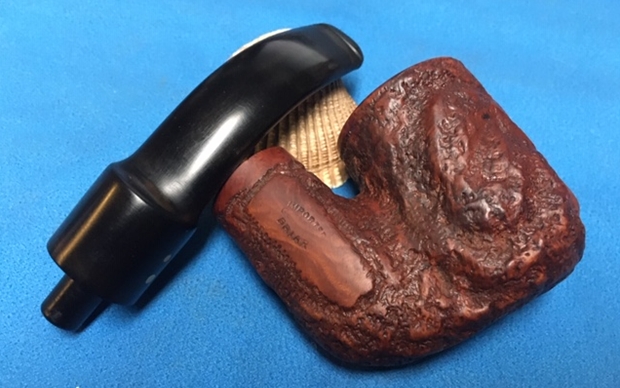
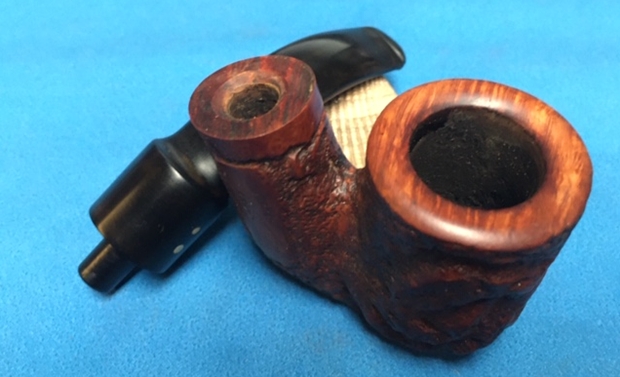
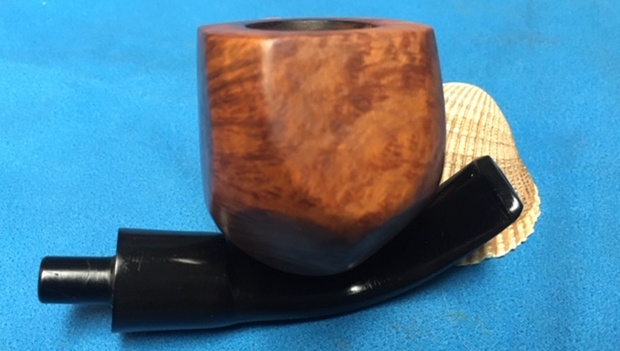
The craftmanship is not superior. Looking down the mortise, the airway drilling isn’t straight.  Is veers off to the left so that the draft hole’s entry point is not centered, but off to the left a bit. 
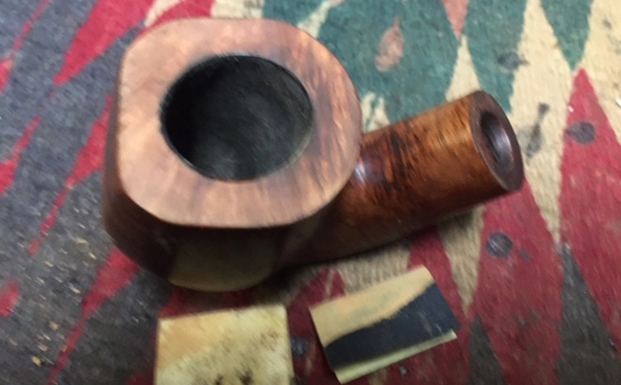
The tenon with the ring, as Steve said, is an attempt to perfect the fit, but after taking the tenon out, I’m not able to put it back in the mortise!  The stem fit from the earlier pictures shows that it’s not good – there is a large gap on the upper side of the shank.  I pry the tenon ring off with a little effort with a pocketknife and try the fit in the mortise without the ring.  The fit is very loose – too loose for use. Carefully I rotate the gold band off the shank with no problem.  It caps the shank with a shank face overhang.  I again insert the stem to see what it looks like. The sizing of the stem is in the ballpark.
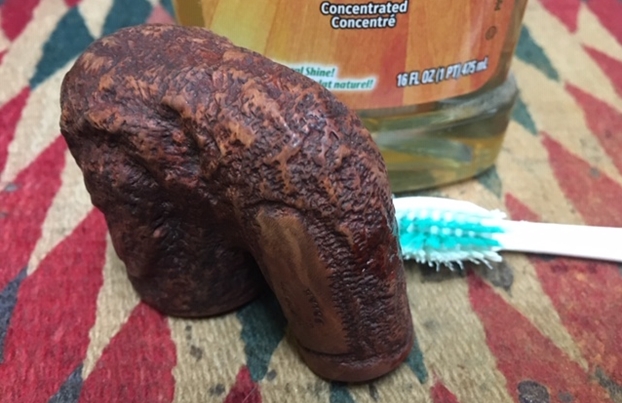
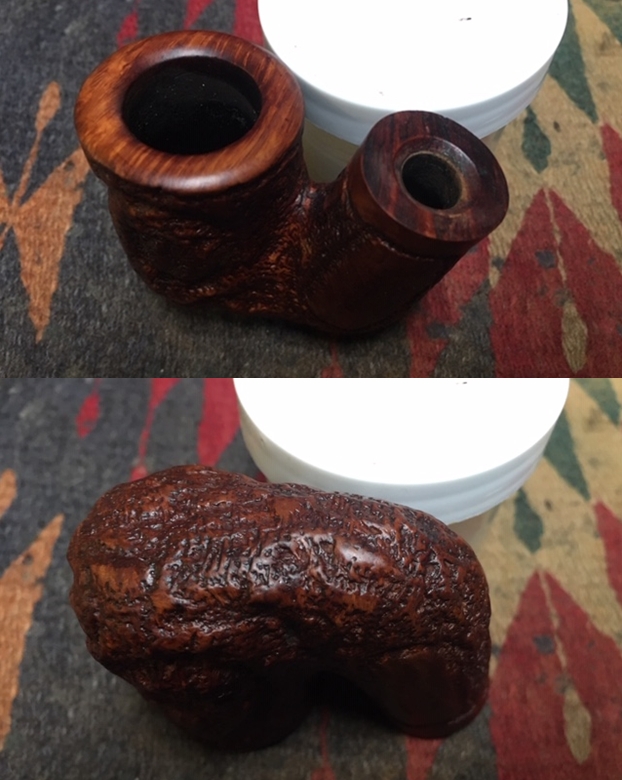
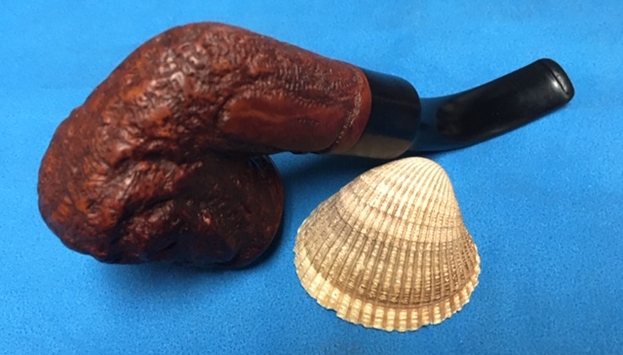
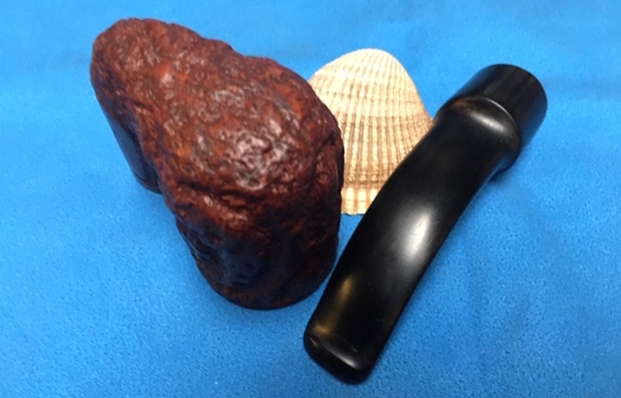
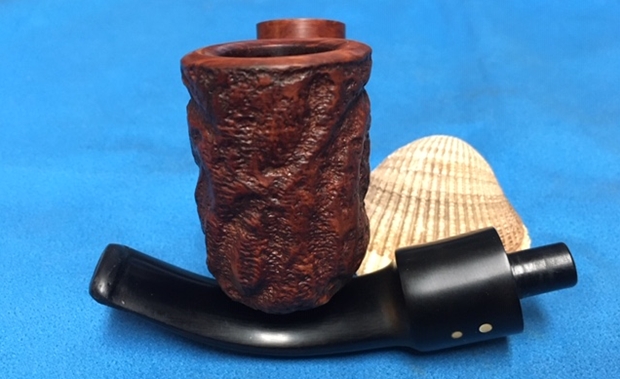
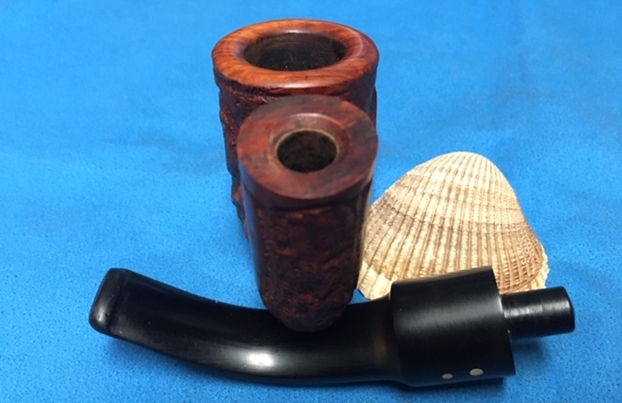
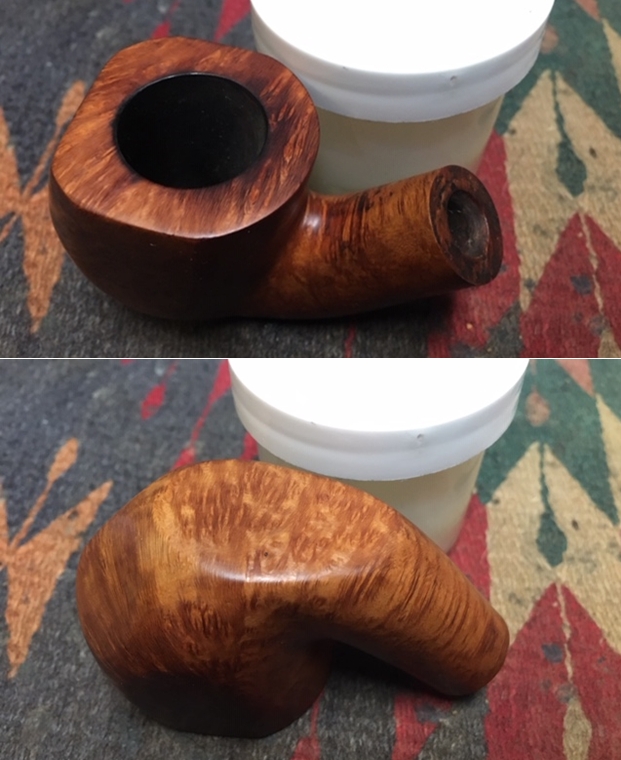
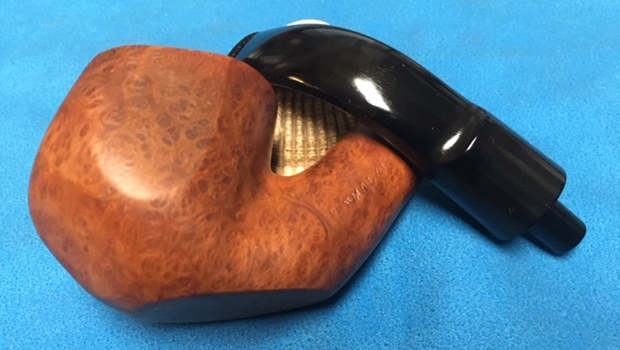
Then, there’s the mysterious crop of pits and ravines on the left side of the Giant’s bowl – what’s the deal with this?  It’s not a crack or trauma but it appears to be very rough briar that emerged during the fashioning of the stummel from a block of briar – a block of briar that obviously showed great potential for the one crafting this Giant Bent Billiard.  The severity of the briar below is in such contrast to the beauty of the briar on the rest of the pipe!  Such beauty and also such despair!  So much like life….  I’m giving some thought to how to approach this. My theory is that someone, probably in France, crafted this pipe.  The block of briar is beautiful, but the shaping of the stummel revealed the imperfections – but too many to fill, but the crafter went with it anyway hoping for a good ending, attaching an attractive acrylic stem and gold band.  Yet, at the end of the day, no one wanted this pipe with the scarring it bears.  It just seems to me that the crafter of this pipe gave up on it and the fine finishing of the pipe was not worth the effort.  I’m not sure the many grain faults that are in this briar patch can be removed or repaired so that there are no lingering scars, but the beauty of the rest of the pipe can offset the imperfections and scarring – off set, probably not erase fully! It reminds me of the Daughters we work with here in Bulgaria – beautiful but also broken and of great worth and worth the effort.

I decide to address the stem fitting first.  As I looked at the fitting, the tenon ring and stem wobbling in the mortise, my first thought is to expand the acrylic tenon like a vulcanite stem.  This method is to heat the tenon by painting it with the open flame of a Bic lighter and then inserting a slightly larger drill bit end into the softened tenon resulting in some expansion. Two questions come to mind – I’m not sure if acrylic will act like vulcanite – a rubber compound.  Will it expand the same way?  I’m not sure.  The second question is, if it does expand, I’m not sure it will expand enough to de-wobble the current situation?  After puzzling more, the solution came to me after reflecting on shank repairs that both Steve has done as well as Charles Lemon of Dad’s Pipes of utilizing inserts in the airways to connect broken shanks.  The solution was staring me in the face.  The nickel band that was acting as a poor ring for the tenon, could very well serve quite nicely as an insert in the mortise.  It is already sized for the tenon correctly.  I wondered if that was the original intent of the ring, but the crafter never got around to finishing? To test my theory, I slide the ring – now an insert – partially into the mortise, and partially insert the tenon.  I believe this will work nicely. To make the insert permanent, I use BSI Maxi-Cure Extra Thick CA glue.  I place some CA on the inside lip of the mortise then spread it around the circumference using a toothpick.  I then insert the nickel ring and press it down firmly on the table top surface pushing the insert into the mortise. The end of the nickel ring is flush with the shank facing.The insert seats as hoped, but what the picture shows is the pressure of the insert creates a small crack on the shank on the upper left side.  The good news is 3-fold.  First, the crack is very small.  Secondly, the insert on the inside will not expand any further and so the crack should not have additional pressure on it.  Lastly, the gold band on the outside will help fully cover the crack cosmetically and provide additional external pressure to support the shank. To address the crack, I first drill a counter hole to keep the crack from expanding. First, using a sharp dental probe, I press a hole at the end of the crack to serve as a guide for the drill. Next, after mounting a 1mm drill bit on the Dremel, I drill a hole at the end of the crack keeping my hand as steady as possible! The counter-creep hole is good.With the drill bit still mounted in the Dremel, I decide also to drill counter creep holes at the ends of the two most distinct ravines in the rough briar grain patch topography.  While these ravines are not cracks in the sense of a trauma related problems, treating these as cracks to guard against the ravines expanding is a good thing to do it seems. I’ve numbered them below.To prepare for drilling the counter-creep holes, I place guide holes as before using the sharp dental probe.Then I drill holes at the end of each ravine.  No problems.The ravines are deep – surprisingly so!  I double check in the chamber to make sure there are no corresponding ravines!  I see none – it looks good. I make sure the crevasses are cleared of loose stuff that may have collected.  I use a dental probe to clean what I can.  I pick at the smaller grain faults as well. I finish the cleaning by wiping the ravine area and the shank crack with a cotton pad wetted with isopropyl 95%.At this point I would usually mix a batch of briar dust putty with dust and thick CA glue.  Instead, I use only regular, thin CA glue on the shank since it will be covered by the band. With the ravines and the grain faults I’ll use regular thin CA glue and sprinkle them with Briar dust building the patches in steps.  Using the thinner CA glue will allow penetration into the deeper parts of the crevasses forming a more sure foundation.  The pictures show the progress. The night is late, I set the stummel aside for the patches to cure through the night.The next morning, what’s on my mind is seeing how the stem will react to the mortise insert.  The glue will be fully cured and with the insert firmly in place, I give the stem a try.  The fit tightens with the tenon inserted about halfway into the mortise. Not wishing to force the issue, I begin sanding the fat part of the tenon down first using 240 grade sanding paper.  When the progress seemed to be stymied, I then resorted to using a flat needle file to help.After several re-tries and additional filing and sanding, the stem seated in the new insert.  It looks good.  There still seems to be a slightly larger gapping on the top, but I will wait until remounting the gold band to make a final assessment on the stem fitting.With flat needle file in hand, filing begins on the bowl patches. Since this entire area is rife with pits and crevasses, I’m not too concerned about using the needle file down to the briar surface.  Usually, I transition to 240 sanding paper when the patch is close to the briar surface using the file, but with all the sanding that will be required for this project, I use the file for sake of speed.After the filing, I finish the first round of sanding with 240 grade paper.  All the light areas in the area indicate that the briar is not smooth and that pitting remains.  The briar dust created by the sanding packs in the holes which helps to show progress, or lack!Beginning the second round of patching, I again use the probe to excavate the compacted briar dust and then I wipe the area with a cotton pad wetted with alcohol to clean.I repeat the patching process with the same, regular thin CA glue and sprinkle the patches with briar dust.In the interest of full disclosure and brevity of describing the same process repeatedly, I repeated the patching process as described above about three more time and made slow progress eradicating the pitting.  I found though, that some of the pits would resist holding the CA glue fill.  After filling with CA glue, curing and sanding, the pit would remain.  I started testing different approaches – I used CA glue, then kneaded the patch with a toothpick to release possible air pockets hindering the glue from filling and holding the crevasses.  I also utilize an accelerator before and after applying CA.The solution that I found that seemed to work the best was not using the regular, thinner CA glue but switching to an extra-thick CA glue in combination with an accelerator.  In the picture below, on this pass of patching (I’ve lost count), I’ve painted a patch of very small grain faults with the thick CA using a toothpick to spread. After using the accelerator and allowing it a few minutes to cure, I go to work on the patch with the file.  I did this method several times to fill in the grain faults as much as I could.At the end of the day, perfection is not achievable.  Yet, the lion’s share of faults have been filled and hugely minimized but some scarring remains.  After finishing the patching and filing, I go over the area with 240 grade paper followed by 600 grade paper. I think that the area is much better, and the finishing process will continue to blend and mask the rough briar patch – I hope!  I move on – finally 😊.Moving now to the top, the rim has some rough spots which are easily dispatched with the topping board.  I first place a sheet of 240 grade paper on the chopping board, my topping board.  I rotate the inverted stummel on it several times, checking as I go.  I then switch to 600 grade paper.  The rim is looking good.  Moving on. 
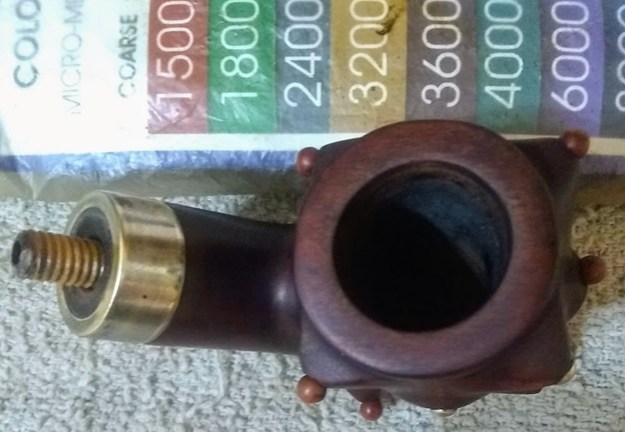
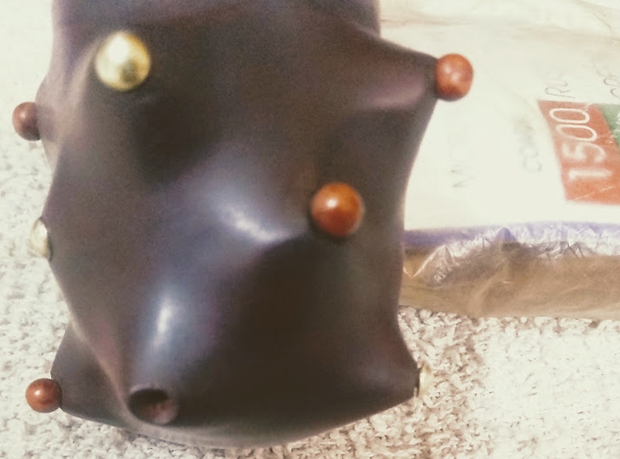
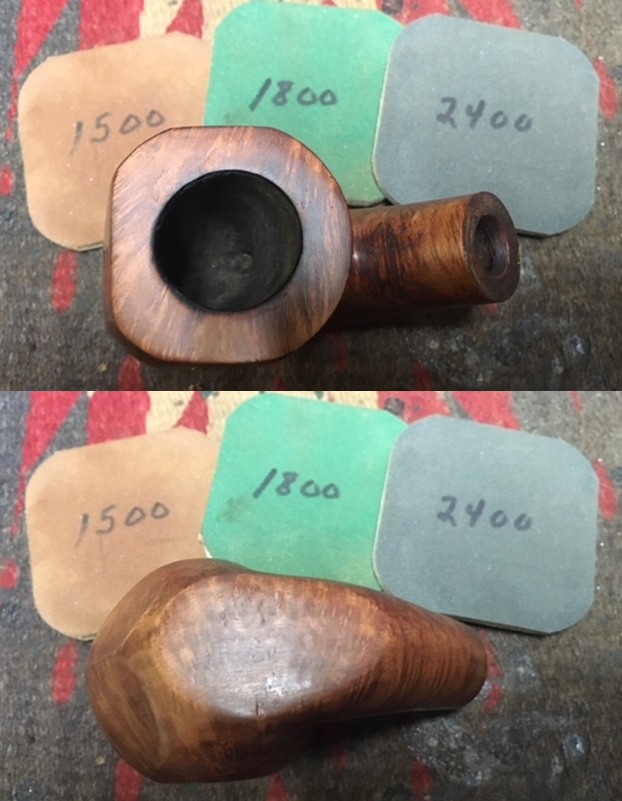
Next, using sanding sponges I continue the sanding of the stummel.  I use a coarse sponge, followed by a medium grade then finish with a light grade.  Wow, comparing the two side in the pictures below, ugh!
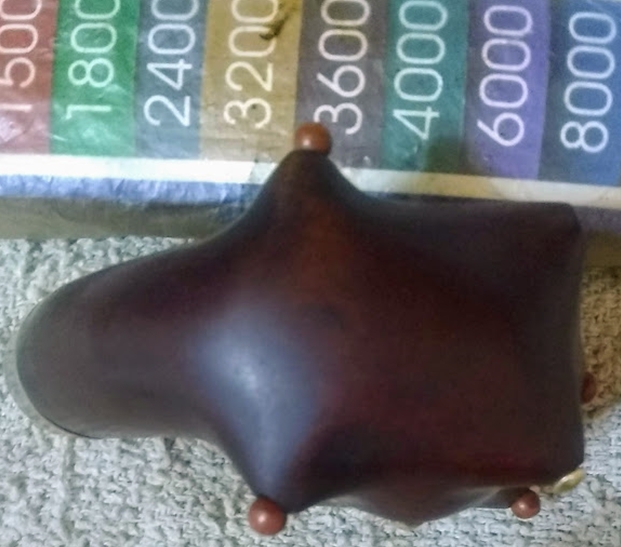
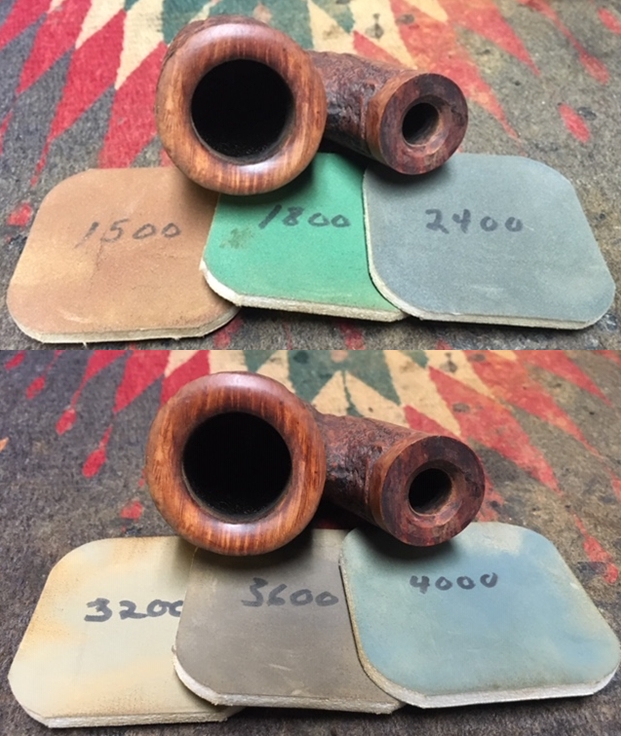
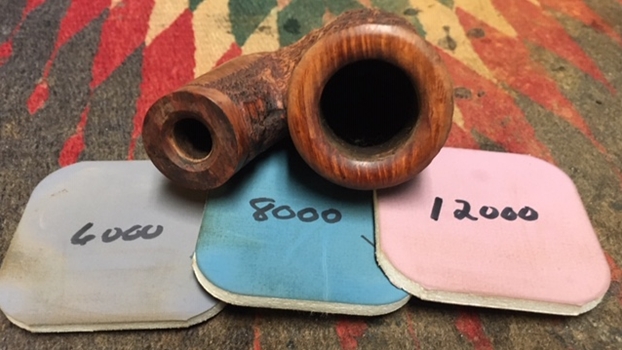
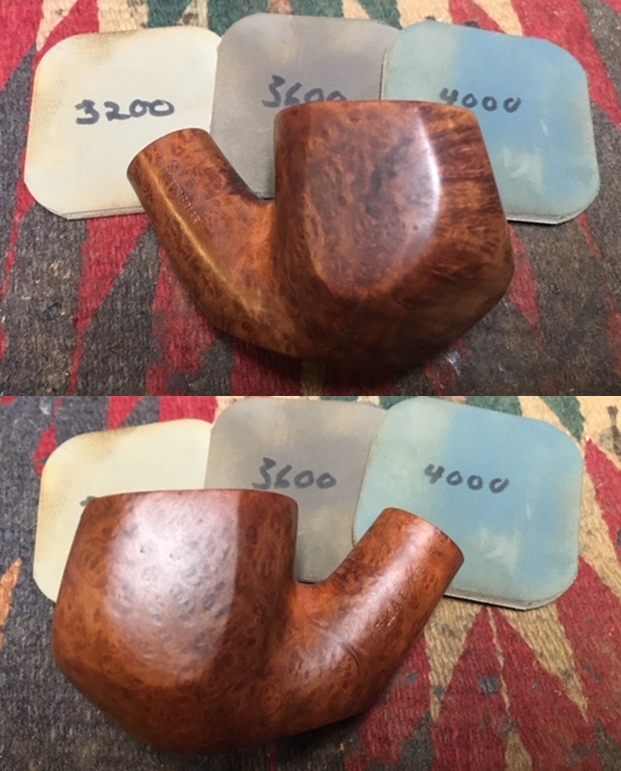
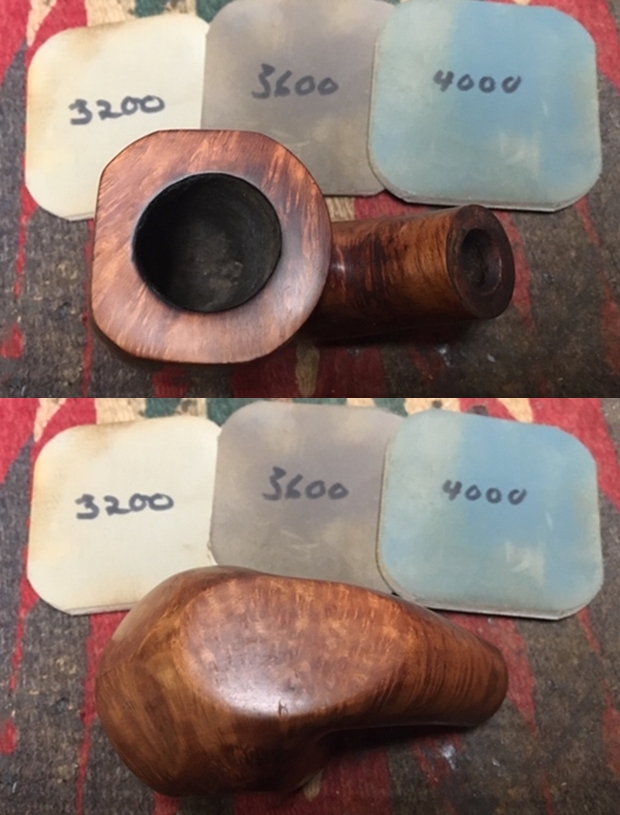
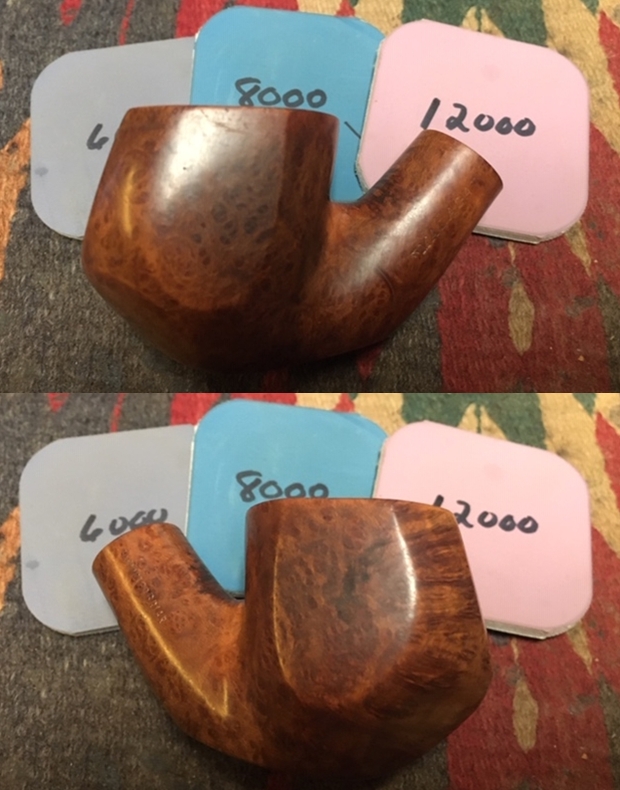
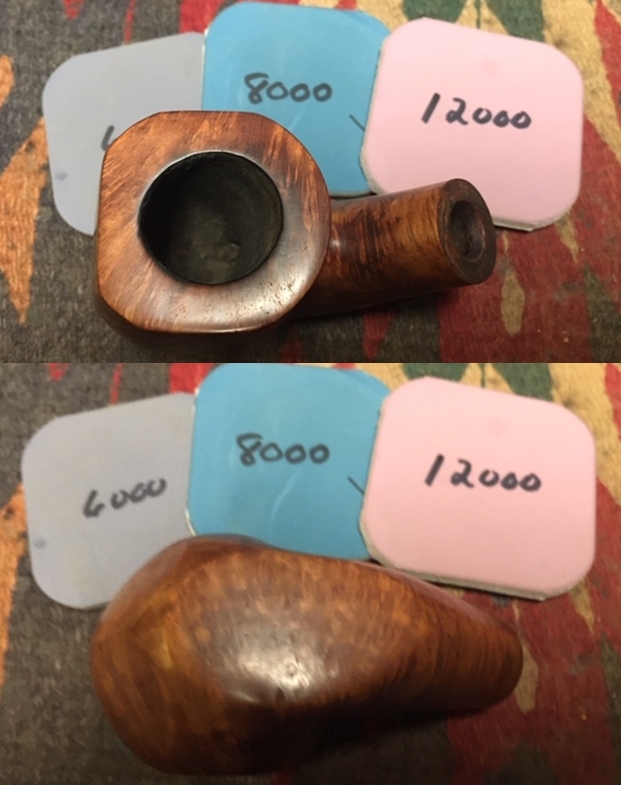
Moving straight away to the micromesh pad regimen, with pads 1500 to 2400 wet sanding is then followed with dry sanding with pads 3200 to 4000 and 6000 to 12000.  Wow!  What a piece of briar!  Other than the area where the grains were pitted, the grain is absolutely striking on this goliath. Without doubt, if not for the rough patch of briar – that has been helped immensely, I would be applying Before & After Restoration Balm now and moving to the finer polishing processes.  But with the rough briar patch, applying a darker dye will assist in masking the many patches.  I decide to mix Fiebing’s Saddle Tan and Dark Brown – about 2 to 1 ratio.  I want a darker brown hue but with the reddish hints that the Saddle Tan will brings.  After ‘unwrapping’ the initial coat, I may decide to do a straight Saddle Tan overcoat. I assemble my desktop dyeing module.  After mixing the dyes to the ratio I described using the large eye dropper, a cotton pad wetted with isopropyl 95% is used to clean the stummel.  The end of a spring-loaded clothes pin inserted into the mortise serves as a handle. The stummel is warmed using a hot air gun to expand the briar grain helping it to be more receptive to the dye. After heated, using a folded over pipe cleaner, the dye is painted onto the stummel in swatches and then, using a lit candle, the wet dye is ‘flamed’.  The aniline dye’s alcohol base combusts and leaves the hue behind in the briar grain.  After methodically covering the entire stummel with dye and firing as I go, I then set the stummel on a cork in the candle holder to let it rest through the night.
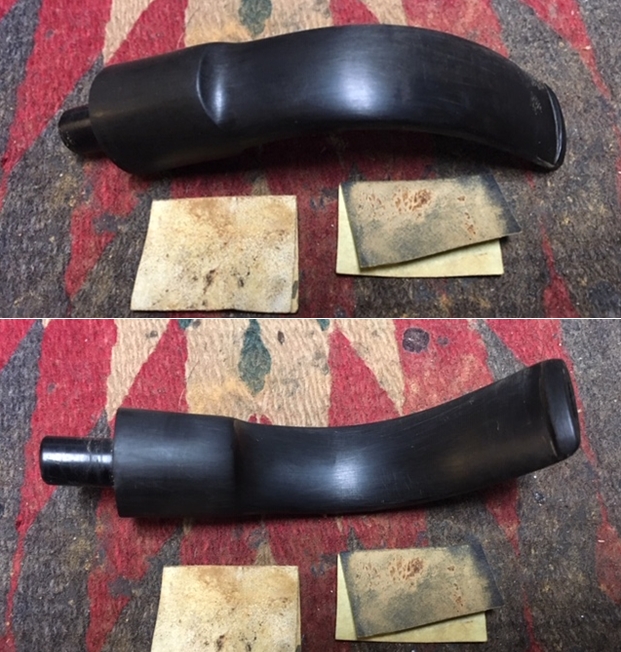
With the dyed stummel now on the sideline, I turn to the attractive acrylic stem.  As I mentioned earlier, the stem is essentially unused, but it doesn’t appear to be in a pristine state.  The finishing left ripples and some rough spots on the stem.  I take a few pictures to illustrate what I’m seeing.
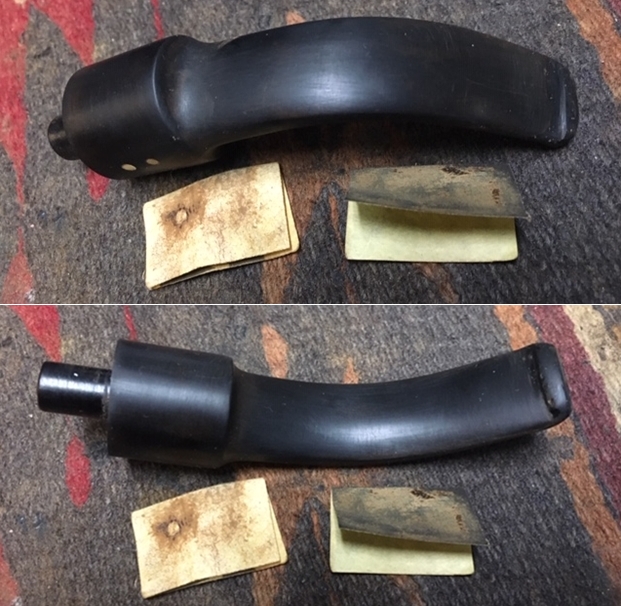
To address these issues, I sand the entire stem using 240 grade paper then follow by wet sanding with 600 grade paper and finish this phase by applying 000 grade steel wool.  I like the results!  The acrylic surface has cleaned up nicely. 
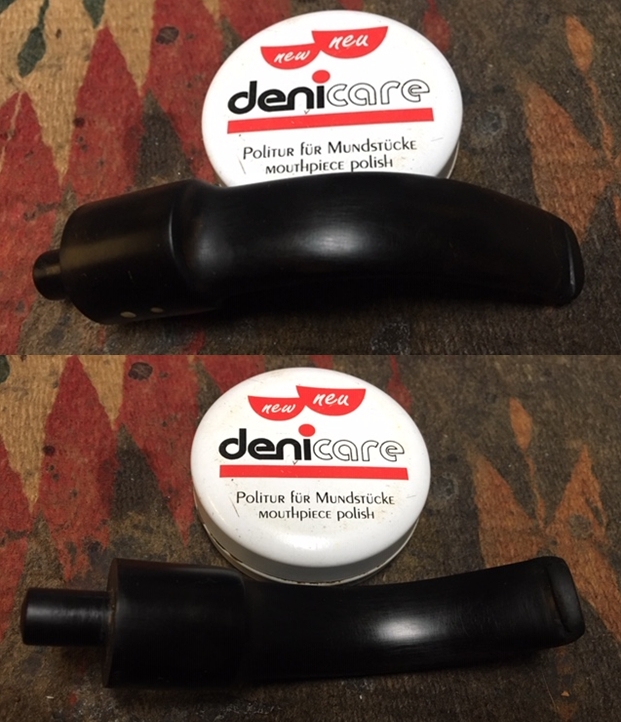
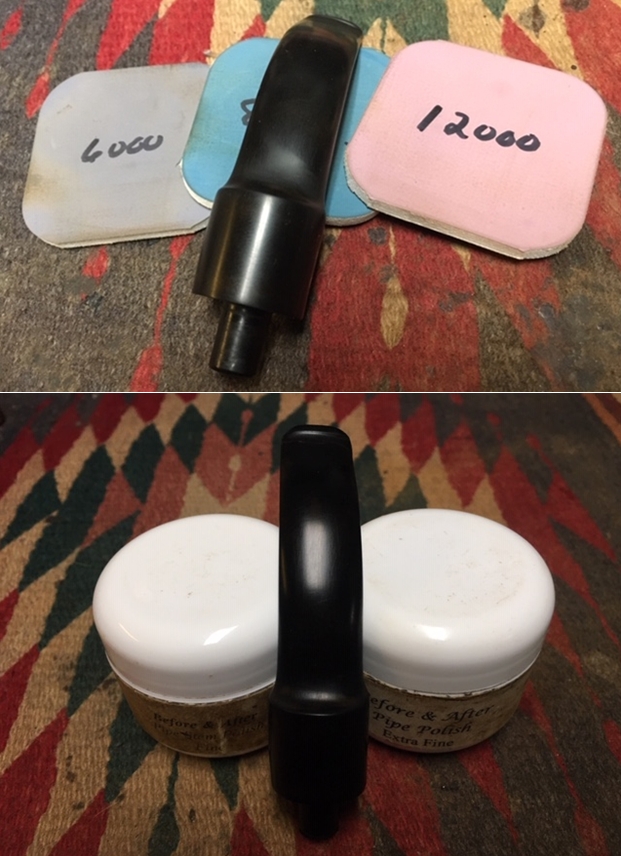
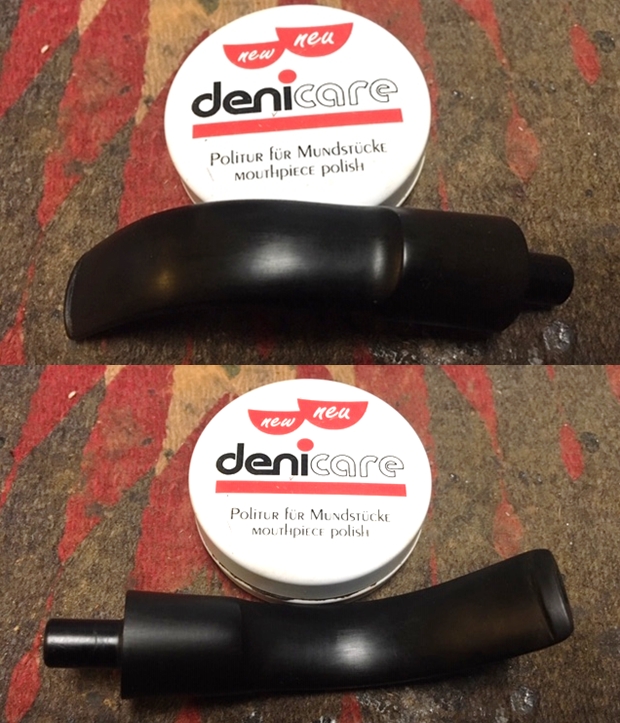
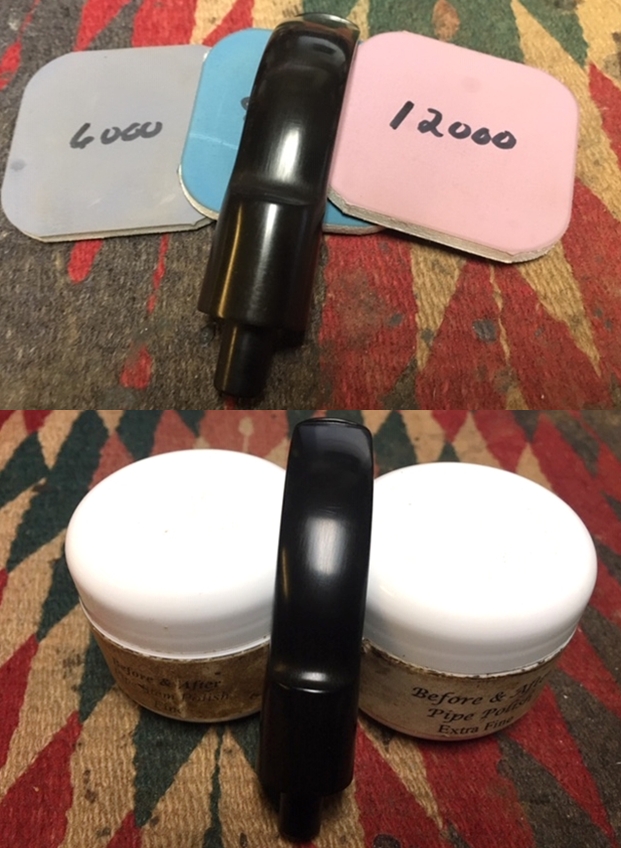
Moving on now to the full regimen of micromesh pads, starting by wet sanding with pads 1500 to 2400 and dry sanding with 3200 to 4000 and 6000 to 12000. I apply Obsidian Oil to the stem after each set of three pads. This stem is spectacular!  The shine and that acrylic translucence is eye catching.  The stem will wait till the morning for the stummel to be ready to go. The next morning has arrived and I’m looking forward to ‘unwrapping’ the dyed stummel to see how the finish came out and how well it has helped mask the rough briar patch.  I mount a felt cloth buffing wheel onto the Dremel, reduce the speed to the lowest possible and apply Tripoli compound to the bowl.  The speed is reduced to decrease the friction and heat generated.I’ve developed this technique that works very well for me.  The following pictures show the process of removing the flamed crust to reveal the grain beneath. It takes patience to move over the surface and spotting the places where dye is still thick.  Usually it looks like a dark spot on the surface.  When I apply additional rotations with the Tripoli on these areas the excess dye is removed revealing the different grain compositions – the softer wood absorbs the dye while the harder wood doesn’t – these are the lighter grains.After unwrapping the stummel, I wipe the surface with a cotton pad wetted with alcohol.  I do this to blend the new dye as well as to lighten the hue.  Lightening the hue a bit softens the finish.Next, after mounting a cotton cloth wheel and adjusting the speed of the Dremel to about 40% full power, I apply Blue Diamond to both the stummel and the rejoined stem.  Yes, I am not replacing the gold band until the end of the process.After completing the compounds, I buff/wipe the pipe with a felt cloth to remove the compound dust in preparation for the wax.  Not pictured is mounting another wheel, maintaining the speed, and applying carnauba wax to the pipe.I have two remaining mini projects before the final hand buffing.  First, to remount the gold-plated band.  I first clean the band using Tarn-X tarnish remover.  It restores a very nice shine to the metal. The band fits over the shank easily about 70% of the way, but to be on the safe side, I use the hard surface cushioned by a few cotton pads to press the band fully on the shank.  The band fit easily the rest of the way with a gentle push.With the band fully seated on the shank, I test fit the stem with disappointing results.  In the picture below the gap at the top is huge. With the band easily moving on the shank, I partially retract the band off the shank and then reengage the stem so that the stem pushes the band over the shank.  With the band pressed with the stem tenon facing, its orientation is now much more favorably aligned with the stem with the gap minimized.  This looks much better as the second picture shows.The next step is to apply some CA glue to the inside of the band and repeat the same process of reseating the band using the stem itself. Using BSI Maxi-Cure Extra Thick CA glue, I place a large drop of glue on the inside of the band and then use a toothpick to spread the glue around the circumference of the inner wall of the band.  Then, after slipping the band carefully over the end of the shank, I press the stem forward over the shank keeping the facing of the stem squarely on the band to avoid the gapping.  When the band starts to gap, I know I’m far enough.  I retract the band slightly with the stem firmly seated and essentially no gap present.  Not wanting to get CA glue on the tenon, I remove the stem and set the stummel in an egg crate to allow the glue to cure.  The results look good!While the CA glue is curing, I move to the final project.  In order to provide the virgin briar in the chamber a good foundation to build a protective cake and for aesthetics, I mix a batch of natural yogurt and activated charcoal.  This mixture is applied to the chamber wall and it hardens to provide a layer over the briar. 
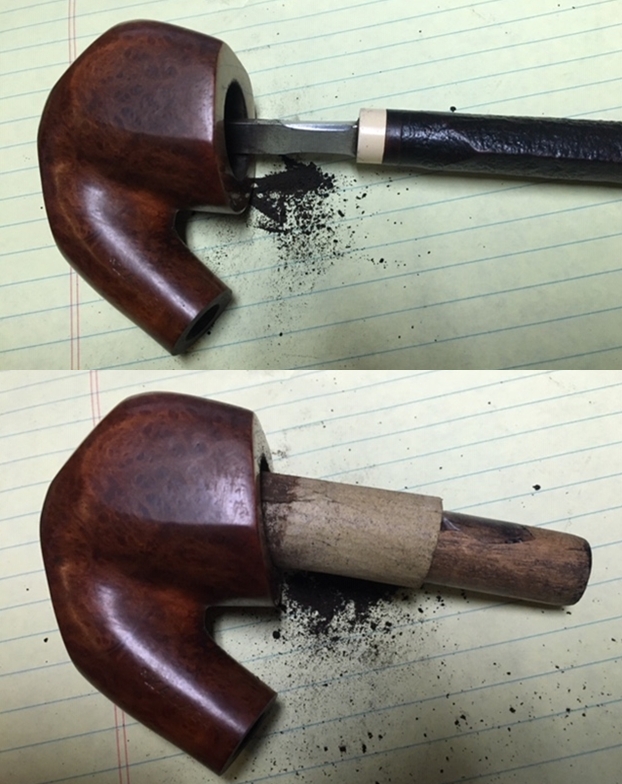
A pipe cleaner is inserted into the airway to guard the draft hole from being blocked.  When I inserted the pipe cleaner, what I remarked about earlier regarding the off-center drilling of the air way was illustrated graphically by the angle of the pipe cleaner!  These pictures show what I’m seeing.I place a small amount of natural yogurt in a small dish and add activated charcoal to it and mix until it thickens enough not to drip off the spoon.  With a pipe nail as a trowel, I scoop the mixture into the chamber and spread it on the chamber wall with the back side of the nail. When the wall is totally covered, I set the stummel aside allowing the mixture to dry and harden.  My day has come to an end and the lights are turned off. 
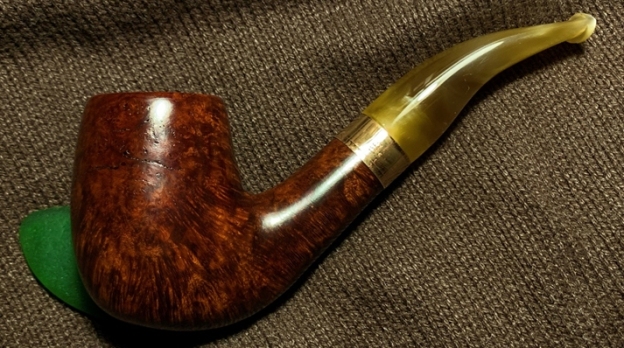
The next morning, the gold band is solidly in place and the yogurt/charcoal coating is dry and hard.  After reattaching the stem, I give the pipe a rigorous hand buffing to raise the shine.

I’m pleased with how far this unmarked, gold band Giant Billiard has come.  The rough briar patch on the side of the bowl was a mess and took a lot of time to provide the healing that I see.  Yet, there remains some pitting from the briar faults.  The dark stain does a great job helping to mask the imperfections.  Yet, as with life, this pipe will carry with it some of the scars of its past.  However, the briar grain on this bowl is beautiful and it is huge!  I’m very pleased with the striking difference the darker brown finish provides – it changes the disposition of the entire pipe presentation.  There is now, I believe, a more striking contrast with the gold band which transition into the stem with all the same tones of color.  I like it.  Reseating the acrylic stem with the insert works well and the Crown Gold Giant Bent Billiard will sit very well in the palm of its new steward.  Cyrus saw the potential of this Giant and commissioned it.  He will have the first opportunity to claim it from The Pipe Steward Store.  Thanks for joining me!


A Project  Close to My Heart;  Restoring a Dunhill from Farida’s Dad’s Collection


Blog by Paresh Deshpande

The next pipe that I have selected as my new project is a very special pipe for the following reasons:-

(a) Firstly, this pipe was in the trust of an adventurer who has been on expeditions to Antarctica, the Arctic and loved Dunhill pipes (and I happen to carry forward that trust with one of his Dunhill pipes).

(b) Secondly, is the reason why and how this pipe came to me. During one of the many Face Time chats with Steve more than a year ago, I remarked that in spite of the huge collection of British, American and Danish pipes that I had inherited, there was not a single Dunhill pipe in it and that how expensive it was to own one. Steve had then only recently acquired an estate lot that contained, amongst other pipes, seven Dunhills. We discussed each of the Dunhill and I zeroed in on one. A few days later, I received a parcel from Steve that contained the Dunhill pipe that I had selected and along with it came another Dunhill in classic Billiard shape. A call to Steve confirmed that the second pipe was not an error, but a surprise for me. He conveyed that should I decide to and thereafter be able to restore it; I could keep it!!

(c) Thirdly and most importantly, I treat this restoration as a tribute to the daughter who loves her father and desired to share that love and those memories with other pipers who wished to carry forward her father’s trust.

Well, with this as a background, the pipe on my work table once belonged to Late Mr. John Barber. His daughter, Farida had requested Steve to restore her Dad’s pipe and pass them on to others for her. Here is the link to the pipe that I had selected for carrying forward the trust of John Barber:-

https://rebornpipes.com/2018/07/07/faridas-dads-pipes-5-restoring-a-dunhill-root-briar-56-bent-billiard/

The above blog makes for a very interesting read to know the personality of Late Mr. John Barber and his adventures as conveyed by his daughter, Farida. The below picture has been picked from the above blog which Steve had done and the pipe that I had selected from Farida’s Dad collection (indicated with a yellow arrow) and the one now on my work table has been marked in blue circle.As with few other pipes from John Barber’s collection, this pipe too has very worn out and faint stampings. Under magnifying glass and bright light one is able to make out the very faint stamping on the left of the shank as “# 197” followed by “DUNHILL” over “BRUYERE”. On the right side the very faint stamping that is visible is “ENGLAND” and a circled “4” followed by the letter “A”. The high quality vulcanite stem bears the trademark Dunhill white dot.To be very honest, I am not very keen to ascertain the vintage of this pipe and lack of stampings don’t help either, since I know that all the pipes that belonged to Farida’s father are from 1950s to 1970s. Having worked on eight Dunhill pipes from my Mumbai Bonanza and researched each one, I roughly know that a Dunhill Billiard with long tapered bit with shape code # 197, similar to what I have on my work table, is from the period 1950 and 1969. This corresponds with other pipes that Steve had worked on from this collection.

I now move ahead with my initial visual inspection as it helps me chalk out a rough path or sequence that I would follow during restoration and also the processes that I would have to employ at each stage of restoration.

INITIAL VISUAL INSPECTION
This is indeed one pipe which I would have not have selected and worked on in the first place, even though it is a Dunhill, but for the provenance of this pipe and for the reasons mentioned above. The stummel is covered in dirt and grime of decades of uncared for use and storage. The stummel is very sticky to the touch and appears to be smothered in some kind of lard, could it be whale fat or fish oils from the Arctic or Antarctic expeditions that it had accompanied the previous owner? I would not know, but it is all prevalent over the stummel surface. Underneath all this lard, dirt and grime, the highest quality of the briar and solid feel in hand for which Dunhill pipes are renowned, can be seen and be felt. Beautiful cross grains along the shank bottom, front and back of the stummel await to be revealed in all their glory. Similarly, lovely bird’s eye grains on both the sides of the stummel should show up nicely when the surface is cleaned. A distinct patch on the left and right side of the stummel is prominently seen which could have been caused due melting of the lard (?) from the warmth and holding of the stummel while smoking. There is a prominent crack on either sides of the stummel extending downwards from the rim outer edge towards the heel for a few millimeters and is marked in red circle. The front and foot of the stummel is peppered with dents and dings. These should be addressed to a great extent when I sand the stummel surface to get rid of all the sticky substance and grime. Coming on to the assessment of the rim top surface and the chamber, it is immediately apparent that this is where the maximum damage lies!!!! There is an even layer of thick cake and appears to have been partially reamed before being stowed away. The rim top surface also appears to have been topped to address the severe charring to the inner edge of the rim at 6 o’clock and 12 o’clock direction (marked in red circle) and at the outer edge towards the front and back end of the stummel (marked in green semi circle). The inner edge is completely out of round and is at its thinnest in the 6 o’clock direction and along the left side of the chamber. A crack (marked with yellow arrow) is clearly visible on the left side atop the rim top surface in 9 o’clock direction which extend in to the chamber as well as to the outside as described in stummel condition above. The topped rim surface is considerably darkened and appears to have absorbed copious amounts of oils and tars. I plan to extract these oils through a salt and alcohol soaking of the chamber. The condition of the inner walls of the chamber will be ascertained only after the cake has been taken down to the bare briar. However, I envisage heat lines and fissures all over the inner walls what with the pipe being subjected to some serious use! And the smell of St. Bruno tobacco, Farida’s Dad’s favorite tobacco, is all pervading and super strong. The shank and mortise is completely clogged with accumulated oils, tars and grime and air flow is laborious to say the least. The edges of the shank end are out of round resulting in shouldering effect once the stem is seated in to the shank. The seating of the stem also appears to be a bit skewed towards the right side by a minuscule margin though not easily noticeable.The vulcanite stem has calcium depositions on either sides about an inch and a half from the button edge towards the tenon end. There are deeper bite marks on the upper and lower stem surface near the buttons in the bite zone. However, the buttons on either surface is undamaged. The tenon and horizontal slot show heavy deposition of dirt, oils and tars, adversely affecting the air flow.THE PROCESS
The restoration process started with sanding the bite zone of the stem with a folded piece of 220 grit sand paper to remove the calcium deposition and followed by internal cleaning of the tenon, stem air way and the slot with pipe cleaners and isopropyl alcohol. This was followed by cleaning the stem surface of all the oxidation by immersing the stem in “Before and After Stem Deoxidizer” bath overnight. This solution developed by Mark, pulls all the oxidation to the surface and makes the subsequent cleaning a breeze.The next morning, Abha my wife, took the stem out and cleaned all the thick sticky solution from the surface under running warm water. She blew out the solution that had clogged the airway and scrubbed out the raised oxidation with cotton pads and a piece of 0000 grade steel wool. She applied a little quantity of Extra Virgin Olive oil in to the stem to hydrate the vulcanite and set it aside. The initial sanding with a folded piece of 220 grit sand paper had evened out the minor tooth chatter and now that the stem is free of the heavy oxidation, I have a clear understanding of the damage that needs to be addressed, which by the way, is very minimal. I am pleased with the stem appearance at this stage.To raise the deeper bite marks from the upper and lower surface of the stem, I flamed the surface with a lighter flame. I went ahead and sand the raised bite mark with a 220 grit sand paper and sharpened the button edges. With a cotton swab and isopropyl alcohol, I wiped the stem surface to clean it of all the dust. I mixed superglue and activated charcoal powder and filled the bite marks and set it aside to cure. While the stem fill was set aside to cure, I worked the stummel and reamed the chamber with size 3 blade head of PipNet pipe reamer. Using my smaller sized fabricated knife, I removed all the cake from the areas which could not be reached by the reamer head. Very carefully, I removed all the charred briar from the outer and inner edges till I reached solid briar wood. With a folded piece of 220 grit sand paper, I sand the chamber walls to remove the last remaining traces of cake and wiped it with a cotton swab dipped in isopropyl alcohol. I am not very enthusiastic about the way the chamber appears at this stage. The inner edge at the rear has been pushed back significantly thinning the rim top surface. Also, the walls are peppered with numerous minor heat fissures/ lines making a web pattern. The crack, it is now clear, extends in to the chamber over the rim surface and on to the outer stummel surface. Another crack is now evident on the right side of the rim surface, but it’s superficial and not deep. Here is how the chamber appears at this stage, though not very encouraging, I say. Continuing with internal cleaning, I cleaned out the mortise, first by scrapping out the entire dried accumulated gunk with a dental tool. I further cleaned the shank internals with hard and regular pipe cleaners dipped in alcohol. Even after removing the cake from the chamber and cleaning the shank internals, the smells in the chamber are still very strong; in fact, my entire room smells of it!!Before I moved to the next stage in the process, I wanted to access the extent of charring over the outer rim edge. I gently scraped the charred briar from the outer rim edge with a sharp knife. Again not a very encouraging sight as the gaping saddle that was formed at the front and back of the stummel was anything that could be addressed by simply creating a bevel over the outer rim edge. Sad!! I have the option of addressing this issue either by topping the rim top surface or by the way of rebuilding the outer rim edge. I shall decide on the best course of action when I reach that stage.Next I decided to address the copious amounts of oils and tars that have been absorbed by the stummel giving it a considerably darkened appearance and a sticky feel in the hand. I stretched a cotton ball into a thick wick, wound it around a folded pipe cleaner and inserted it in to the shank and pushed it till it came out of the draught hole and packed the chamber, just below the rim, with Kosher salt. I topped the bowl with isopropyl alcohol using a syringe. I topped the bowl with alcohol again after 20 minutes when the alcohol level had gone down and set it aside overnight for the salt and alcohol to do its intended job. The next morning, the salt had turned a dirty and smelly brown and so was the wick and pipe cleaner in the shank. The ghost smells, the rim top dark coloration and the stickiness in the surface were still strong and hence I decided to give it a second salt and alcohol bath. This time around I used cotton balls in place of Kosher salt what with Kosher salt being more expensive and not readily available. I repeated the entire process described above and set the bowl aside overnight. By the next afternoon, the alcohol had drawn out maximum of the remaining oils and tars from the stummel surface and trapped it in the cotton balls. I am satisfied with the condition of the bowl internals with this cleaning.With the internals of the pipe cleaned and sorted, it was time to move to the external cleaning of the stummel. Using a hard bristled tooth brush dipped in undiluted Murphy’s oil soap, I very deliberately scrubbed the stummel, cleaning the surface thoroughly. I was very deliberate on the surface areas which were covered in fat-like sticky substance over which dirt and grime had accumulated over the years. I also cleaned the mortise with a shank brush and dish washing soap. I scrubbed the surface with a pad of Scotch-Brite to rid the surface of the slime. I was surprised to observe the stummel turning greasy white. This would need resorting to some heavy duty and abrasive methods to get rid of this grease from the stummel surface. Here is how the stummel appeared at this stage. I am happy that the salt and alcohol treatment had drawn out all the oils from the pores of the briar as can be seen from the cleaned up rim top surface. Next, I decided to stabilize the cracks that were observed prominently on either sides of the stummel extending downwards from the rim outer edge for a few millimeters. Under a magnifying glass, I marked the end point of the cracks and using a 1 mm drill bit, I drilled a counter hole at the base of the crack taking care that I did not drill a through hole. This ensures that the crack is stabilized and does not spread any further. With a heat gun, I warm the stummel and this expands the crack minutely. I fill this crack with clear CA superglue and firmly press the sides together. Once the superglue had sufficiently hardened, I apply a little superglue along the entire crack (rim top and side of the stummel) and press briar dust over it. This further stabilizes, strengthens and masks the fill in the cracks. I had reached that point in restoration where I had to decide on the way ahead for rim repairs. I could either top the bowl till I had a perfectly even round rim top, compromising on the shape and size or I could go for a complete rebuild. I decided on the latter as topping would significantly reduce the bowl size. Using a worn out piece of 150 grit sand paper, I completely remove the charred briar from the outer and inner rim edges in preparation for rebuilding the rim top. Using the layering technique (layer of glue followed by briar dust pressed on to this layer and repeating till the fill is over and above the intact rim surface), I completely rebuild the rim top and set the stummel aside for the fills to harden. While the rim top rebuild was curing, I decided to address the stem repairs. The stem fills had cured nicely and using a flat head needle file, I sand the fill to achieve a rough match with the surrounding stem surface. I further sand the stem surface with a folded piece of 220 and 320 grit sand papers to further blend in the repairs. However, a minor air pocket was revealed on the lower surface of the stem and I spot filled it with clear superglue and set it aside to cure and turned my attention to the stummel repairs again.The rim rebuilt surface had cured nicely. I could now proceed with reshaping the rim top and the inner rim edge to an even round. I mount a coarse 150 grit sanding drum on to my hand held rotary tool and setting a speed at half, I carefully sand off the excess fill from the rim top surface and the rim inner edge till I had achieved a rough match with the intact portion of the rim top and inner edge. I further top the rim on a 220 grit sand paper to achieve a seamless rim top surface. With a folded piece of 220 grit sand paper, I worked the inner rim to a crisp and perfectly rounded edge. I am very pleased with the rim surface rebuild at this stage in restoration. Staying with the stummel, I next decide to address the greasy white coating of whale fat or blubber or whatever fats that covered the stummel surface (remember all the Arctic and Antarctic expeditions on which this pipe must have accompanied Late Mr. John Barber!!). I sand the entire stummel surface with a piece of 180 grit sand paper. I frequently wiped the stummel with a cloth wetted in hot water to get rid of the loosened fat coating. A lot of elbow grease and few grueling hours later, beautiful bird’s eye grains and swirls began to make an appearance over the stummel surface. With renewed vigor, I completely remove the greasy white coat of fat from the stummel. I was careful not to sand the sides of the shank, but only wiping with hot water in an attempt to preserve the worn out stampings on this pipe. Though the surface has been cleaned up nicely, it appears dry and lackluster. I rub a small quantity of Extra Virgin Olive oil in to stummel to hydrate the briar and set it aside for the oil to be absorbed by the briar. The grains in the stummel now pop out and appear resplendent in their beauty. All the hard work up to this stage was well worth the effort and much more. The following pictures speak for themselves! To further smooth out the rim top, I topped the rim surface over piece of 320 grit followed by 420, 600 and 800 grit sand papers. Even though the cracks have now been exposed as a result of this topping, I am not overly worried as I am confident that the cracks have been solidly filled and stabilized.At this point I decided to work on the inner walls of the chamber. There are heat lines seen on the walls of the chamber and add to that the rebuilt inner edge using superglue and briar dust. To protect the walls and prevent the superglue and briar dust from coming in to direct contact with the burning tobacco, I plan to first coat the rebuilt part and the heat lined surface of the chamber walls with J B Weld followed by a second coat of activated charcoal and yogurt to the entire chamber which would assist in faster cake formation. J B Weld is a two-part epoxy Cold Weld that consists of two parts; hardener and steel which are mixed in two equal parts (ratio of 1:1) with hardening time of 5-6 minutes and complete curing time of 6-8 hours. I poured the contents of the two tubes and mixed it well. With a flat bamboo frond, I applied this mix, as evenly as possible, over the intended areas. I worked fast to ensure an even coat over the chamber walls before the weld could harden. I set the stummel aside for the application to harden and cure overnight. By next afternoon when I got back to working on this pipe, the J B Weld coat had completely cured and hardened considerably. With a folded piece of 150 grit sandpaper, I sand the weld coating to a smooth surface and continued till I had as thin a coat as was essential to protect and insulate the walls from the direct heat of the burning tobacco. Here are pictures of the process and the progress at this stage. Wanting a change, I decided to now tackle the stem fill which had been left curing for the last couple of days. Little did I know at this point that I was still some days away from completing the stem repairs!! I followed the golden rule of pipe restoration; “Less is more” and move ahead with sanding the fill with a piece of 220 grit sand paper without first using a flat head needle file. I followed it up with sanding the entire stem surface with 400, 600 and 800 grit sand papers. I finished the sanding regime with a 0000 grade steel wool. It was at this stage that I noticed the same dreaded air pocket and the fill was peeling out. With a dental pick, I completely removed the old fill and refilled it with a fresh mix of activated charcoal and superglue. I set the stem aside to cure overnight, third fill for the same spot!! With time still on my side before I hit the bed for the night, I decided to work on the stummel which had been set aside to absorb the olive oil. I thoroughly wiped the bowl with an absorbent paper towel to remove all the excess oils from the bowl surface. I polished the stummel, including the newly rebuilt rim top surface, wet sanding with 1500 to 12000 grit micromesh pads. I wiped the surface with a moist cloth to remove all the sanding dust left behind by the pads. I was very careful with the stamping as I desired to preserve as much of the worn out stampings as was possible. Though the rebuilt rim surface and outer rim edges stand out as sore thumb at this stage, I intend to mask the same with a dark stain. The stummel surface appears promising and I am absolutely in love the bird’s eye grains on this pipe. Next, I rub a small quantity of “Before and After Restoration Balm” in to the briar with my finger tips and let it rest for a few minutes. The balm almost immediately works its magic and the briar now has a nice vibrant appearance with the beautiful darkened grain patterns on full display. I further buff it with a horse hair shoe brush. While the stummel was set aside for the balm to be absorbed, I worked the stem fill which had cured over 24 hours. I sand the fill with a used and worn piece of 180 grits sandpaper and followed it with wet sanding the entire stem with 1500 to 12000 grade micromesh pads. I wiped the stem with a moist cloth to remove the dust and monitor the progress being made after every three grit pads. The stem polished up nicely and has a rich deep black shine to it. I applied a little Extra Virgin Olive oil to rehydrate the vulcanite and set the stem aside.Though the stummel had cleaned up nicely with a deep color to the briar, it was nowhere near the deep reddish brown coloration associated with the Bruyere line of Dunhill pipes; in fact it was much lighter. While restoring a Dunhill Bruyere from my Mumbai Bonanza (https://rebornpipes.com/2019/03/13/reconstructing-a-broken-stem-on-dunhill-bruyere-51671/), I had stained the stummel in cherry red stain and though the end results were great, it was not the original color associated with a Bruyere. The comments and suggestions received from esteemed readers of the write up pointed me in the direction of achieving this color!!! I decided to first apply a coat of DB followed by a final coat of red stain. However, when I went through my stains, I realized that I did not have Dark brown stain; the Feibing’s stain bottle had mysteriously dried out!!!!! The next best option available was the Cordovan. I consulted Steve and though he was not sure about the color, he encouraged me to go ahead and that is exactly what I did. I heated the stummel surface with my heat gun to open up the pores on the stummel so that the stain is well set while being careful that I do not overheat the fill, a lesson learned while restoring Steve’s Alexander Zavvos pipe. I dipped a folded pipe cleaner in Feibing’s Cordovan leather dye and liberally applied it over the heated surface of the stummel, flaming it with a lighter as I progressed. This helps in the setting of the stain in the grain of the briar. I set the stummel aside overnight for the stain to set. The next afternoon, I mounted a felt cloth buffing wheel on to my hand held rotary tool and proceed, as my dear friend Dal Stanton likes to say “unwrap the coat of stain to reveal the grains” on the stummel surface. Alas, there was no revelation of any sorts!! All that I saw was a dark stummel. You must understand my disappointment at this stage. I realized that the stain coat was too thick. I needed to lighten it up a bit and hence, with a cotton swab wetted in isopropyl alcohol, I wiped the entire stummel surface. Though the stain has lightened a bit, it was not the result that I desired. Here is how the stummel appeared at this stage. To further lighten the stain and “reveal” the stummel grains, I dry sand the entire stummel with 1500 to 12000 grit micromesh pads. The grains are now clearly visible. However, the trademark color of Bruyere line is still an illusion……it was browner than the reddish brown stain that I was looking for. I decided on giving the stummel a stain wash with a Cherry Red stain as suggested by Steve. I diluted the Cherry Red stain powder in 99.9% isopropyl alcohol in approx ratio of 1:4. With a cotton swab, I dabbed the diluted stain over the stummel surface, letting it set for a few moments and thereafter wiping it off with a dry clean cotton swab. I repeated the process till I had achieved the desired coloration. I am pleased with the color of the stummel which is as close as I could achieve, to the original Bruyere color. This time around, even the fills had absorbed the stain and blended in nicely with the rest of the stummel. To complete the restoration, I reattach the stem with the stummel. I mount a cotton cloth buffing wheel on to my hand held rotary tool and applied several coats of carnauba wax. I finished the restoration by giving the entire pipe a rigorous hand buffing using a microfiber cloth to raise the shine further. This dude has definitely come a long way from the condition it was in at the start.Now that the cosmetic aspects of this pipe have dealt with, all that remained was the functional aspect that needs to be taken care of. The minor heat lines and the J B Weld coated surface needs to be protected from the direct heat of the burning tobacco and for this; I coat the complete chamber walls with a mix of activated charcoal and yogurt and set it aside to harden naturally.I shared a few pictures of the pipe with my mentor, Steve, expecting some hearty praises on this restoration!! However, his keen eyes noticed an issue which had missed mine. He very gently pointed that a sterling silver band at the shank end would mask the shouldering that was inadvertently created!! This remark of his left me shocked!! Not at the remark as such, but at the fact that I had shouldered the shank end during the restoration process. Still smarting at being chided by my teacher, I revisited all the pictures and true enough, this issue already existed and I had missed out mentioning it in my initial inspection in the write up and hence missed it out during the entire process. I made necessary amendments to the post and had to keep the pipe aside till I reached back home during my leave where my local silversmith would fabricate one such ring for me.

I revisited the small, dingy and unsophisticated shop with rudimentary tools where the craftsman had built me a Sterling Silver ring for an Alfred Massin Meerschaum cutty that I had restored two months ago (https://rebornpipes.com/2019/10/09/complicating-a-simple-restoration-of-a-cutty-meerschaum/). The craftsman at the shop made me a perfect ring for the Dunhill shank end. This ring not only masks the shouldering, it also adds a touch of class while breaking the monotony of the pipe. I refreshed the bowl coating with activated charcoal yogurt mix and completed this project with a vigorous hand buffing with a microfiber cloth. How I wish I had carried my hand held rotary tool and some carnauba wax for a final polish while on leave!!! Nevertheless, the finished pipe has received a fresh lease on life and is now all set to stay with me for the rest of my time on this earth as part of my Dunhill rotation. The repairs are solid and blended in well with the surrounding surfaces. All that now remains is to load a nice English blend and enjoy a quite peaceful smoke… P.S. This perhaps would be the longest write up that I ever have posted on rebornpipes.com!! Apart from the Alfred Massin Meerschaum pipe that I have mentioned above, this project extended over a period of two months, just for the want of sterling silver band. Nonetheless, it was one project that I enjoyed working on and hope that my Guru and mentor Steve gives me passing marks on this test project (remember that it was a sort of test put forth by Steve for me!).

The most important aspect of this restoration was being able to live up to the belief and faith that Farida had entrusted in Steve and through him, in me, to carry forth the trust of her Father. It is while working on this project that I fully comprehend and understand what and why Dal Stanton calls himself Pipe Steward!! A perfect term coined by this well read gentleman, I say.

Farida, if at all you read this write up, I wish to let you know that it has been a privilege to have been afforded an opportunity to carry forward the trust of your father. As I puffed on this Dunhill, I could conjure up images of your father and his dogs amidst all the snow and loneliness…. A MAN, HIS FAITHFUL PIPE AND HIS BELOVED DOGS!! Thank you Steve and Farida…… and the pipe has a new friend!!

The CPF Arcadia: A Pipe Out of Time


Blog by Robert M. Boughton
Copyright © Reborn Pipes and the Author except as cited
https://www.roadrunnerpipes2k.com/
https://www.facebook.com/roadrunnerpipes/
Member, North American Society of Pipe Collectors

Be careful what you wish for, you may get it.
— Anonymous, quoted in “The Monkey’s Paw,” W.W. Jacobs, from The Lady of the Barge, 1902

INTRODUCTION
Whatever inspiration led Cliff Edwards to write the lyrics to the song that became Disney’s theme, “When You Wish upon a Star” – in which one’s heart need only be in the dream for no request to be too extreme, and fate will be kind – must have been, to be gentle to all of the Mouseketeers out there, in an alternate reality to mine.  I’ve long had two rules: be careful what you ask for, lest you get it, and above all, never ask for what you deserve, because everyone has done things that should have had stiffer consequences.  I’m not being cynical.  From my experience, it’s just the way whatever Higher Power we call by various names helps us humans avoid being selfish and greedy, at least those who ask for guidance now and then if not more.

Of course, I’m not perfect, in fact, far from it.  I found myself during the past two months or so becoming more and more fixated on acquiring not just any new pipe, but one made by the Colossus Pipe Factory.  Then I began my hunt in earnest, with eBay searches and general Googling, but to no avail.  At last I got a hit with a pair of pipes titled, in a somewhat jumbled way, “Vintage Smoking Pipe Tobacco Lot of 2 Arcadia CPF London England Briar.”  From that description alone I thought maybe I was going to see something made by an Arcadia brand and a rare English CPF.  There were enough photos, however, and they were good, to determine without doubt that a big, smooth poker stamped on the right MADE IN/LONDON ENGLAND was one mixed-up part of the seller’s heading, and CPF Arcadia was the other.  The disarray of the title and the low price I paid – about $45 – told me the seller didn’t know what he had and the other bidders were not sure enough that the CPF was real to risk going higher.

Before bidding anything and after studying the pics of the alleged CPF – and I mean I really poured over every detail of them – I was certain it had to be a fake, except for the band on the shank.

From the photos that I snapped when it arrived in the mail with the poker I believe is a Ben Wade reject, the only authentic-looking parts of a CPF are the band, bone tenon and stem.  Otherwise, honestly, I could see where the basic chunk of wood could have been fashioned into a stummel long ago before some Flower Child got ahold of it and turned the bowl into a psychedelic pin cushion, but I could not imagine anyone alive more than a century ago, especially the Old World masters employed by CPF, fashioning such a monstrosity, as I saw the pipe before its comic beauty grew on me.  I even used the “m” word in an email I sent to Steve, with a link to the eBay sale, in which I more or less implored him to tell me it wasn’t real, meaning a genuine CPF.

Needless to say, I was shocked when Steve not only replied that the Arcadia was real and “very old,” an age distinction he had never before made to me, but that he had worked on a meerschaum like it a couple of years ago.  Here are some before and after shots of Steve’s meerschaum, which indeed bear a scary resemblance to my old briar.

A.F. & Co./BBB Spotted Meerschaum photos courtesy Steve Laug.

The severe chicken pox-like similarities are undeniable, and I scrutinized every word and photo of Steve’s blog in hopes of connecting the dots (I’m so sorry, that just popped out) of the definitely funky tobacco pipe specimens.  Struck by a gung-ho fit to research the abbreviation “AF&C0” in Steve’s third photo above, I interrupted my reading to find the answer before continuing and learning Steve already had done so: Adolph Frankau & Co. of England.  Steve’s work restoring the meerschaum that he also dated to 1905, thanks to great detective work tracing the unique hallmarks on the sterling silver band, was phenomenal, in particular the addition of a Bakelite stem that he not only fitted to the shank but made look as old as the original stummel.

Now, in case anyone thinks my choice of details a mere glut of disconnected trivia, I’ll make my point.  Steve took one look at the weird pipe for sale on eBay, flashed on the A.F. & Co./BBB meerschaum he gave new life and instinctively sensed a connection.  I have to say, I had doubts despite the almost genetic resemblance.  After all, there was no indication my CPF Arcadia was a Frankau import.  By the time Steve and I connected on the phone to discuss the two pipes and other matters, I had restored the Arcadia and warmed to its charms.  Although lacking any proof of the pipe’s date of manufacture such as Steve dug up for the meerschaum, certain minute observations and research led me to conclude it was created in the latter part of the 19th century.  Steve concurred.

In particular, I finally figured out that the stem was not Vulcanite but black horn, and the metal band boasted that it was “Nickel Plated.”  What kind of pipe brags about having a nickel plated band?  Nowadays, that’s the bottom of the barrel.  So I looked up nickel plating history online and learned that in 1837 the first crude electrochemical nickel plating of platinum was accomplished.  Really?  Someone thought to cover up the most precious metal with nickel?  You bet he did, and in 1869 a better process that became the industry standard for 70 years was discovered.  The purpose of nickel plating certain other metals, of course, remains nickel’s resistance to tarnishing and corrosion.  The only logical explanation for the proud “NICKEL PLATED” stamp on the band of my CPF, therefore, is that the process was still relatively new.  Given that point and the use of black horn stems being much less common in the late 19th and early 20th centuries, when amber and Bakelite predominated, I am satisfied the pipe was created in the waning years of the Victorian Era.

Returning to Steve and his inspired flash that the “knobby meer,” as he called it, and the CPF Arcadia are related, Steve told me he now questions whether the meerschaum is a real BBB, owing to certain unstated problems with the band.  Steve is the expert, but this time I have to disagree and urge him to stick with his instincts.  The notion of the meerschaum, knobs and all, being a bona fide BBB is no wilder than my briar, with its gaudy plastic bulbs and brass studs, being a genuine CPF, and I do not mean to suggest in a roundabout way that neither is the truth.  Granted the extremity of different materials used to make the pipes, and the necessity of alternate methods for achieving the knobby looks, and still further suspending disbelief because of the admitted implausibility of the idea, I nevertheless can’t help thinking that the connection is the actual crafter of the two pipes.  To be blunt, I think the same person made both of them.  Of course, I will never be able to prove the theory.  Well, isn’t that convenient, as the Church Lady used to say.

With a little more research, I was pleased to settle with much more certainty a question that nagged Steve in his blog of the unusual meerschaum: was there a connection between it and BBB?  As several of the sources below show, the link is clear.  Frankau, who started business in 1847, died in 1856.  At that time, his widow was persuaded to continue operation of A.F. & Co. under the control of Frankau’s very young assistant, Louis Blumfeld, who was then only 18.  Blumfeld started BBB (for Blumfeld’s Best Briar, later Britain’s Best Briar), the famous triangular symbol for which he trademarked in 1905 – again, the year Steve’s meerschaum was made – under the A.F. & Co. banner.  BBB seems to be the first pipe maker with a trademark.  And so the connection, if I haven’t made it obvious, is that A.F. & Co. owned BBB.

Arcadia, part of the modern-day Peloponnese, a peninsular region of southern Greece (capital, Tripoli), is also a reference to Greek mythology.  The mythological Arcadia was named for Arcas, a hunter who became king of the utopic wilderness and is best remembered for teaching the skills of baking bread and weaving.  In Arcadian myth, Pan, the god of shepherds, hunters and the wilds, is said to have roamed the region with dryads, nymphs and other spirits.  The name, therefore, is an odd one for this pipe, unless it’s a reference to the Calydonian Boar killed by the king’s daughter, Atlanta.

CPF had an ephemeral but brilliant run from 1851 to c. 1915, producing with the unparalleled skill of its Old World craftsmen some of the most astounding pipes, meerschaum and briar, ever created.  That’s all I need tell of CPF’s history, as Steve’s account in the sources below is the definitive authority.  Another link to a few of the CPF beauties in Steve’s Wonderland collection shows examples that are far closer to what I had in mind when I was wishing for a pipe of that great brand to find its way to me.

But that’s what can happen to someone who wishes for something.

RESTORATION
A few close-ups show the peculiarities and problems I found.  The first, featuring the front of the bowl, makes the little, round, plastic bulbs – which I did not yet know the means of connection to the bowl – appear red instead of their actual light brown.  Scratches all over the uneven surface that is spotted with the bulbs and brass studs presented awkwardness to remove.  The second shot, of the rim and chamber, has the correct color of the bulbs and at a glance seems the hardest part of the pipe’s repair but in fact was the easiest. The third pic made me happy the band was already spinning on the shank so I could leave it out of an early alcohol soak.  The grime and stains would come off, but I knew I could not fill in the missing patches of nickel.  Then there was the stem, top and bottom, with moderate tooth damage that would typically be no hassle to eliminate if it were Vulcanite.Before I continue, take a close look at the bowl and count the bulbs and brass studs.  There are seven bulbs and four studs, and the arrangement may seem random.  But look again, and you’ll see a very odd order: on the left side, the bulbs start on the top left to right and then down to the bottom right; the studs move diagonally from the lower left to the middle.  On the right side, the opposite is true: the bulbs go from top left down to bottom left and then bottom right, and the studs are diagonal from top right to middle.  On the front, three bulbs form a diagonal, tic-tac-toe line from top right to bottom left, or vice versa if you prefer.  Finally, the back shows all four corners with bulbs.   The person who crafted this pipe had a very playful sense of order.

Thinking the Arcadia stem was Vulcanite but knowing it would do no harm anyway, I tossed it and the one from the Ben Wade reject candidate in an OxiClean bath.  The usual old dirt and tobacco residue came off both.  The first pictures after the bath show the stem not yet fully dried, and the next three dry. This was when I snapped that perhaps the stem material was not Vulcanite and Googled black horn, although if I had ever heard of such a variety of that organic material, it was dredged up from my subconscious.  I emailed Steve somewhat stupidly without photos.  He replied that horn has striations that are visible under a magnifier, so I shot him back the above photos and asked if the last showed the kind of marks he meant.  His brief response was, “Definitely horn.”  In the meantime, I had followed up with 220-grit sanding and wet and dry micro meshing from 1500-12000.While the stem had been taking a bath, I soaked the stummel in Isopropyl alcohol.  I was worried about the possible effects of the alcohol on the bulbs, but somewhat less catastrophic in the potential result than the Trinity Tests of the atom bomb south of Albuquerque nearing the end of World War II, I took a gamble.I started the next longer part by sanding the rim with 400- and 1000-grit papers, then the rest with 1000. Smoothing the chamber with 60- and 320-grit papers, I followed up with a full micro mesh of the rim and rest of the outer stummel.I thought Fiebing’s Dark Brown leather stain would be good for the stain.I performed the retort and decided to add a coat of Fiebing’s Burgundy.  I was satisfied with the color result, but in the process of flaming and micro meshing after the latter stain, a couple of the bulbs went M.I.A. Faced with the not altogether unanticipated contingency of somehow having to replace a bulb or two, as I still considered them, I had already considered using small push pins, the kind for wall maps, and had found a couple of places online that carried close to the same shade of brown in case it became necessary.  Hoping to avoid the time waiting for them to arrive by mail, however, I scoured this wannabe big city that is lacking in so many of the amenities found in the real thing.  The best I could find was the following box of 200 map pins in every color but brown (any shade of it!).  The good news was that they only cost $2.99 minus tax at a hobby store.  I concluded it would be necessary to replace all seven of the bulbs for the sake of consistency and suppose I might have opted for a conservative dark blue or even black, but as Tom Cruise’s high school character in Risky Business put it, “Sometimes you just have to say what the @#$*!”  Besides, Christmas is coming up.  The smaller brown pin below was an original I twisted out.The one prospect I didn’t even consider until I examined the holes left by the missing “bulbs” was that some antique version of map pins might have been used when the pipe was adorned in such an unconventional way by its maker.  But when the time came to remove the bulbs that were still intact, I found out they were indeed nothing more than map pins from more than a century ago.  All I had to do was snip off the longer metal ends of the new ones and Super Glue them into the slots.  I still don’t know how the brass studs are attached because I didn’t want to mess with them.  I’m curious by nature, but I have limits.  My dad always said, if it works, don’t fix it.

And so, without further ado, here is the finished CPF Arcadia. CONCLUSION
I’ve come to love this pipe out of time that should have been made in the Art Deco period, which didn’t really get rolling until 1925 and hit its peak in the 1930s art scenes of Europe and the U.S. – or even the hippie  (or psychedelic, counterculture and what-have-you) movement of the 1960s into the ’70s).  If this restoration taught me anything, it’s that sometimes wishing for something vague can lead to a happy ending.  I’ve come to love this pipe and will happily keep it if it doesn’t sell.  And it is for sale, for the right price on my site, or a good trade.

SOURCES
https://rebornpipes.com/2017/07/30/enlivening-a-mysterious-old-knobby-oval-shank-meerschaum-bowl/
https://rebornpipes.com/2019/02/22/reflecting-on-a-few-of-my-cpf-pipes-colossus-pipe-factory-pipes/
https://rebornpipes.com/2013/04/14/some-reflection-on-the-historical-background-on-cpf-pipes/
https://www.thomasnet.com/articles/metals-metal-products/nickel-plating-history/
https://www.google.com/search?q=when+you+wish+upon+a+star+lyrics&rlz=1C1CHBF_enUS857US857&oq=when+you+wish+upom+&aqs=chrome.2.69i57j0l5.7556j0j4&sourceid=chrome&ie=UTF-8
https://www.gracesguide.co.uk/Adolph_Frankau_and_Co
https://adolphs.weebly.com/blog/adolph-frankau-tobacco-pipes
https://pipedia.org/wiki/BBB
https://trademark.trademarkia.com/bbb-71008248.html

Rejuvenating a Fancy French Butz Choquin Camargue 1683 Prince


Blog by Dal Stanton

The Butz Choquin Camargue came to me via an antique store in St. Louis, Missouri.  Last December, my son Josiah, who was studying there, and now currently works there, came upon this lot for sale in an antique store.  He did the right thing – he called…, rather, he texted his father in Bulgaria with pictures asking the question, ‘What do you think, Dad?’  We didn’t think too long about the purchase and split the cost for the St. Louis Lot of 26.  Why did we split?  The jumbo French Champion Church Warden in the center of the picture below was to be my Christmas gift from Josiah and so he paid that part of this very nice trove of pipes he found!  Many of the pipes of the St. Louis Lot of 26 are still available in ‘For “Pipe Dreamer” Only!’ online collection.  Pipe men and women can peruse the online ‘Help Me!’ baskets and commission an unrestored vintage pipe.  Of course, this benefits our work here with the Daughters of Bulgaria – women and girls who have been trafficked and sexually exploited. One pipe man, Alex, who is from our neighbor to the north, Russia, saw and commissioned the BC as well as a Harvey Rusticated Dublin, which was first in line to be restored (See: Recommissioning a Mysterious Harvey London Paris New York Meerschaum Lined Rusticated Dublin).Next, the Butz Choquin Camargue is on the worktable. I take some additional pictures. Stamped on the left shank flank is the fancy lettering, ‘Butz-Choquin’ [over] ‘Camargue’.  The acrylic shank extension houses an inlaid rondel, with ‘BC’ in silver lettering.  The right side is stamped, ‘St. Claude’(arched) [over] FRANCE [over] 1683, which I assume is the shape number.  I’ve worked on several Butz Choquin pipes which is based in the French pipe center of St. Claude.  Here is a brief overview of the BC history from Pipephil.eu:

The origin of the brand reaches back to 1858 when Jean-Baptiste Choquin in collaboration with his son-in-law Gustave Butz created their first pipe in Metz (France). Since 1951 Butz-Choquin Site officiel Butz Choquin, pipes de Saint-Claude Jura. BC pipe de bruyere luxe is a brand of the Berrod-Regad group (Saint-Claude, France).

Jean Paul Berrod managed the company from 1969 to 2002 when he retired and sold the corporate to Mr Fabien Gichon. Denis Blanc, allready owner of EWA, took over the S.A. Berrod-Regad in 2006.

The BC line, ‘Camargue’ is not an old line as a simple search on the internet turns up several examples of classic pipe shapes with the ‘Camargue’ stamp, but unique to each is the acrylic shank extension and the military mounted stem.  This example is a Dublin shape from Smokingpipes.com:I saw no other examples of what I’m calling a ‘Fancy Prince’ on my worktable – the BC shape number 1683.  The name of the line, ‘Camargue,’ I discovered is a treasured nature reserve on the southern coast of France between Montpellier and Marseille – two beautiful venues which I’ve had the opportunity to visit. A Wiki article was very helpful in describing the area that this BC line is commemorating (Pictures are from the same article):

With an area of over 930 km2 (360 sq mi), the Camargue is western Europe’s largest river delta. It is a vast plain comprising large brine lagoons or étangs, cut off from the sea by sandbars and encircled by reed-covered marshes. These are in turn surrounded by a large cultivated area.

Approximately a third of the Camargue is either lakes or marshland. The central area around the shoreline of the Étang de Vaccarès has been protected as a regional park since 1927, in recognition of its great importance as a haven for wild birds. In 2008, it was incorporated into the larger Parc naturel régional de Camargue.

The Camargue is home to more than 400 species of birds and has been identified as an Important Bird Area (IBA) by BirdLife International.[8] Its brine ponds provide one of the few European habitats for the greater flamingo. The marshes are also a prime habitat for many species of insects, notably (and notoriously) some of the most ferocious mosquitos to be found anywhere in France. Camargue horses (Camarguais) roam the extensive marshlands, along with Camargue cattle (see below).

The native flora of the Camargue have adapted to the saline conditions. Sea lavender and glasswort flourish, along with tamarisks and reeds.

Without doubt, a place my wife would love to visit!With a better understanding of the pipe on my worktable, I take a closer look at the obstacles of restoring this Fancy BC Camargue of St. Claude.  The chamber has some thick carbon cake which needs to be removed for the briar to have a fresh start.  The rim has thick lava flow which also will be addressed.  The Prince stummel surface is dirty from normal wear and the smooth briar surface has small fills that need to be checked out as well as some rough places.  The acrylic shank extension is nice and will shine up very well.  The Fish Tail Military Mount stem shows significant oxidation as well as tooth chatter and bites, especially on the lower bit.

To begin the recommissioning of the BC Camargue, I first clean the stem with a pipe cleaner wetted by isopropyl 95% and then add it to a soak of Before & After Deoxidizer along with other pipes and stems in the queue. After a few hours in the soak, I remove and drain the BC stem of the Deoxidizer fluid and then wipe it down with a cotton pad wetted with isopropyl 95% to remove the raised oxidation, which is a lot!  I also run another pipe cleaner dipped in alcohol through the airway of the stem to clear it of B&A Deoxidizer.To begin the revitalization of the vulcanite stem, I give it a coat of paraffin oil with a cotton pad and put it aside to absorb.Turning now to the stummel, after putting paper towel down to ease the cleanup, I use the Pipnet Reaming Kit to begin the process of removing carbon cake from the chamber to give the briar a fresh start and to inspect the chamber wall for heating damage. I take a picture of the chamber to mark the start. I use three of the four blade heads in the Pipnet Reaming Kit – this chamber is broader than I expected.  Next, I transition to scraping the chamber using the Savinelli Fitsall tool and find that the lava flow on the rim is flaking off with the tool.  I finish by sanding the chamber with 240 grade paper wrapped around a Sharpie Pen to give leverage. After cleaning the chamber with a cotton pad wetted with isopropyl 95%, I inspect the chamber and there are no indications of heating problems. It looks great. I move on.Transitioning now to the external surface, I use undiluted Murphy’s Oil Soap and cotton pads to clean.  After scrubbing with Murphy’s, I transition the stummel to the sink to continue scrubbing the internals using anti-oil dish washing liquid and shank brushes to scrub with warm to hot water.  After scrubbing, the bowl is rinsed thoroughly and returns to the worktable. The internal cleaning continues using cotton buds and pipe cleaners wetted with isopropyl 95%. A small dental spatula is used to scrape tars and oils off the mortise walls.  Excavating the gunk saves a lot of time by bringing out large amounts at a time.  In time, the buds and pipe cleaners start emerging lighter and the cleaning is done for now.  Later, a kosher salt and alcohol soak will continue the internal cleaning and refreshing.With the internals cleaning completed until later, a closer look at the BC Camargue Prince stummel is next.  The grain of the bowl is very expressive – very nice bird’s eye as well, but there are also some issues.The rim cleaned up well and it sports a sharp internal bevel which needs refreshing.  Darker briar on the aft of the rim remains after the cleaning – the section where the former steward lit his favorite blend.The right side of the bowl is pitted with old fills which have lightened and stand out and have shrunk so that the surface is not smooth.One fill, somewhat larger, is on the face of the bowl – situated very nicely between the converging flows of grain which was probably the reason for the pit in the briar bole.  I’m impressed with the grain – it will spruce up very nicely.The right side of the bowl has some rough, skin marks – probably from a hard surface. The night is growing late, and I would like to do two things before turning out the lights: renew the fills in the briar surface and a kosher salt and alcohol soak.  I begin the first project by using a sharp dental probe carefully to remove the old fill from the pits. What is handy about using ‘real’ dental probes is that they are not just sharp on the ends, but they also have very small spurs that allow a simple twist of the instrument to grab and pull material out of the pits.  I clean the large set of pits on the side of the bowl as well as the one on the front. Using briar dust putty to replace the old fills, I first prepare the working pallet.  I use a plastic disk that came off a cosmetics cream container belonging to my wife.  I put scotch tape down on this surface only to quicken the cleanup after making the putty.After cleaning the pitted areas of the bowl with a cotton pad wetted with alcohol to clean the area, a small pile of briar dust is placed on the taped pallet. Then a small amount of BSI Maxi-Cure Extra Thick CA glue is placed next to the mound of briar dust.Using a toothpick as a mixer and a trowel, briar dust is pulled into the CA glue and is mixed.  As the dust is pulled into the mixture, it starts thickening.  The picture below shows the mixture in the early stages – still too thin, giving me time to take the picture.  If it takes too long to apply the putty it will harden in an instant. Or, if too much briar dust is introduced into the CA glue and thickens too quickly, it will harden immediately.  This has happened to me a few times – when it hardens, the chemical reaction sends up smoke! When the putty begins to reach the viscosity of molasses, the putty is troweled onto the pits with the toothpick.  With the pits being so small and close, I cover all of them with two larger globs which when cured will be sanded down. The front pit is also filled with briar dust putty. After a quick clean up, the putty has had enough time to set up (I’ll let the patches cure through the night) and I am able to handle the stummel with no problems.  Next, I transition to the second project before lights out – a kosher salt and alcohol soak to continue the internal cleaning and refreshing.  A ‘mortise wick’ is fashioned by stretching and twisting a cotton ball. The wick helps to draw the oils out of the internal briar cavity.  Then, using a stiff wire (a piece of wire from a clothes hanger) I guide and push the wick through the mortise close to the draft hole. The bowl is then filled with kosher salt. Kosher salt is used because it doesn’t leave an aftertaste and freshens the internals for the new steward.  The stummel is placed in an egg carton for stability and to situate the stummel so that the top of the bowl and the end of the shank are roughly level.  This allows the alcohol fully to saturate the wick. Then, using a large eyedropper, isopropyl 95% is added to the chamber until alcohol fills and surfaces over the salt.  After a few minutes, the liquid is absorbed, and a little more alcohol is added to top it off.  The stummel is set aside to soak through the night.  Both projects completed – lights out!The next morning, the salt and wick show the signs of soiling as tars and oils are absorbed.  After dumping the expended salt in the waste and wiping the bowl with a paper towel to remove salt crystals, I also blow forcefully through the mortise to clear any remaining crystals. To make sure all is clean, a few cotton buds and pipe cleaners dipped in isopropyl 95% are expended to clean up any residual oils.  All looks good.The briar dust patches on the stummel surface have cured and I use a flat needle file to file each down close to the briar surface.  I stay on top of the patches with the file as much as possible to avoid collateral impact on the briar. After filing, 240 sanding paper is employed to bring the patches down to briar level. Following the 240 grade paper, dry sanding with 600 grade paper serves to smooth the patch area out more by removing the scratches of the 240 sanding. Next, the rim.  The rim is darkened from lighting practices but is not damaged.  There are also minuscule nicks on the outer rim edge. I use 240 grade paper to clean up the internal bevel of the rim.Next, the stummel visits the topping board with 240 grade paper on top. The topping will refresh the lines of the rim and help restore a crisp bevel transition.  The topping is for cosmetic purposes but will also help to remove the nicks on the edges.  I invert the stummel and give it a few rotations on the board.  Not much is needed.After the sanding paper is transitioned to 600 grade paper, I give the stummel several more rotations as well as hand sand the bevel.  The results are good.  The lines have been restored and the cross-cut briar grain is coming through nicely.From working on the rim, sanding sponges are used to address the nicks and cuts on the briar surface.  Sponge sanding is not as invasive as regular sanding paper and it will help blend the sanded patch areas.  I start with a coarse sponge, then medium and finish with a light grade sponge.  The sponges are also used on the acrylic shank extension which helps to shine it up quite nicely!After the sanding sponges, to again refresh the lines of the rim, I take the stummel back to the topping board for a few rotations on 600 grade paper.  Nice.After the topping board, a small imperfection on the rim gets my attention.  It is not major but enough for a small detour.To address the problem, I spot drop clear CA glue on the small pit.  It does not take long for the CA glue to set up and I carefully sand the excess patch with 240 grade paper.  Then another trip for the stummel to the topping board with 600 grade paper to finish the repair. On a roll, and anxious to coax the grain out on the BC Prince stummel, the full regimen of micromesh pads is used.  As with the sanding sponges, micromesh pads are used on the acrylic shank extension. Using pads 1500 to 2400, I wet sand followed by dry sanding with pads 3200 to 4000 and 6000 to 12000.  I’m liking what I’m seeing. Wow – I love the pop on this bowl with the acrylic extension contrasted.  To improve on what is already a good situation, to bring out the subtle hues of the grain more, Before & After Restoration Balm is applied to the stummel. Placing a small amount on my finger, the Balm is worked into the briar surface.  It starts off with a crème-like texture but then thickens as it is applied to the briar.  I set the stummel aside while the Balm does its thing.  In about 20 minutes, the excess Balm is wiped off and I also buff up the surface.  The pictures show the 20-minute absorbing period and after buffing. With stummel to the side, I now turn to the waiting stem.  The upper bit has a few minor bite marks but the lower is more significant. I first apply the heating method with the use of a Bic lighter.  With the lighter, I paint the bit with flame thus heating and expanding the rubber compound, vulcanite.  The physics involved encourages the rubber to reclaim it’s original disposition or at least lessen the damage.  After painting with the Bic lighter, the upper bit looks good and can be finished with simple sanding, but the lower bit needs additional help.  Before and after pictures show the results. I use Black Medium-Thick CA glue to repair the tooth compressions on the lower bit.  After cleaning the area with a cotton pad wetted with alcohol, I spot drop the CA on the needed area and utilize an accelerator to quicken the curing process. The cured patch has collapsed which is normal.  I believe the fill is sufficiently covered.First, using the flat needle file, excess patch material is removed and the button is freshened.Following the file, I use 240 grade paper on the lower bit repair and expand the sanding to remove residual oxidation and nicks to the entire upper and lower fishtail stem surface. Following the 240 sanding, using 600 grade paper I wet sand the entire stem and follow this using 000 grade steel wool.A close up of the lower bit repair shows the results of the work.  The patch is barely visible if you know its there, but for the most part, it will be invisible.Moving straight on to the micromesh phase, I wet sand using pads 1500 to 2400 and dry sand with pads 3200 to 4000 and 6000 to 12000.  Between each set of three pads I give the fishtail stem an application of Obsidian Oil to continue the rejuvenation of the vulcanite.  I love the pop of newly sanded vulcanite! On the home stretch – after rejoining stem and stummel and mounting a cotton cloth buffing wheel to the Dremel setting the speed at 40% full power, Blue Diamond compound is applied to the entire pipe. Compound is also applied to the acrylic shank extension and it really pops!After using a felt cloth to wipe off residual compound dust, I change the Dremel’s cotton cloth buffing wheel to one dedicated to applying carnauba wax.  Maintaining the same speed, I apply a few coats of wax to the entire pipe and finish by giving the pipe a rigorous hand buffing to raise the shine.I called this Butz Choquin Camargue a ‘Fancy’ Prince shape and truly he is fancy.  Wow – the grain generally moves in a horizontal fashion around the bowl and tightens as it moves downwardly to the heel.  Large swoops of bird’s eye grain also punctuate the landscape.  Adding to the ‘Fancy’ is the acrylic shank extension with the embedded BC rondel transitioning to the gentle bend of the fishtail stem which splays outwardly.  Alex commissioned this French BC Camargue Fancy Prince of St. Claude and will have the first opportunity to claim him from The Pipe Steward Store benefitting the Daughters of Bulgaria.  Thanks for joining me!

New Life for Alex’s Rusticated “Malaga” Oom Paul


Blog by Steve Laug

I have another of Alex’s purchases on the table this morning. It is an Oom Paul pipe with a rusticated finish. It is another very unique Malaga that has the same kind of rustication as a lot of the Custom-Bilt pipes had as well. The rim top, the ring around the shank end and a panel on each side of the shank are smooth. The pipe was dirty and caked with few spots of lava and some darkening on the inner edge of the bowl. The bowl had a thick rough surfaced cake. The exterior was dirty with grime and oils in the crevices of the finish. The stamping on the left side of the shank read “MALAGA” and the right side the stamping was in an oval and read Imported Briar. There appears to be something else in the oval but it is worn. The first two letters could be CA the rest are worn away. The vulcanite saddle stem had two dots on the left side of the stem. It was oxidized and had tooth marks and chatter on both sides. There was a chip out of the top edge of the button. I took photos of the pipe before I started the cleanup work. I took close up photos of the bowl and rim to capture the condition of the pipe before I started my cleanup work. The rim top had some lava and it was thick enough that I could not see if there was any darkening or damage on the crowned rim top and the inner edge. There was a thick cake in the bowl. Other than being very dirty the pipe was in great condition. The stem was dirty and oxidized. It was covered with a thick scum on the surfaces. There was tooth chatter on the top and underside near the button and some tooth marks on the button surface itself. There was a large chunk out of the top of the button on the stem. I have included a close up photo of the chipped stem surface below.I took a photo to capture the stamping on the shank. The stamping on the left side of the shank read “MALAGA”. I forgot to take a photo of the stamping on the right side the stamping but it was in an oval and read Imported Briar. There appears to be something in the center of the oval but it is worn. The first two letters could be CA the rest is worn away. It would make sense that this was one of the pipes from the “MALAGA” CARVED line so the rest of the letters may well be RVED. There were also two white dots on the left side of the saddle stem.If this is the first of the Malaga restorations that you have read about then you should know the backstory of the brand. I am including the link to a blog that I wrote that gives some of the history of the Malaga brand and the Malaga Pipe Shop in Royal Oak, Michigan in the USA. I have written an earlier blog to give a little history of the Malaga Brand and the pipemaker, George Khoubesser. Here is the link – https://rebornpipes.com/tag/malaga-pipes/.That blog also includes links to a catalogue and the history of the pipemaker George Khoubesser. Follow the link to get a feel for the brand and the pipemaker.

I decided to start with the bowl first. I followed Jeff and my regular regimen for cleaning estates. I reamed the thick cake in the bowl with a PipNet Pipe Reamer using the third size of cutting heads to take the cake back to bare briar. I followed up with a Savinelli Fitsall pipe knife to remove the slight remnants of cake toward the bottom of the bowl. I sanded the bowl with 220 grit sandpaper wrapped around a piece of dowel to smooth out the inside walls of the bowl.The mortise was surprisingly clean but there were some tars and oils on the walls. I scrubbed the mortise and the airway in the shank and the stem with alcohol, cotton swabs and pipe cleaners.I polished the smooth rim top and the ring around the end of the shank with micromesh sanding pads – wet sanding with 1500-12000 grit sanding pads. I wiped down the bowl after each sanding pad with a damp cloth. The polishing took the remainder of the bit of lava that had remained after the cleanup. I scrubbed the briar with Murphy’s Oil Soap with a tooth brush. I scrubbed it off under running water to remove the soap and the grime on the bowl. I dried it off with a soft cloth. I worked some Before & After Restoration Balm into the surface of the briar with my fingertips and a horsehair shoe brush to clean, enliven and protect it. I let the balm sit for a little while and then buffed with a cotton cloth to raise the shine. The photos show the bowl at this point in the restoration process. I set the bowl aside and turned my attention to the stem. I took a photo of the stem before I started my work on it. I cleaned it with alcohol and sanded off the calcification and oxidation on the surface. Once it was cleaned I mixed up a batch of activated charcoal powder and black super glue. I greased a pipe cleaner with Vaseline and inserted it in the button. I used a dental spatula to fill in the missing chunk of vulcanite. Once it had hardened a bit I removed the pipe cleaner and set it aside to cure.I set it on a container to let the repair cure. Once it hardened I would need to reshape the button and the slot on the stem. I had also filled in the damage to the underside of the button. The reshaping would bring it back to the original shape.I shaped the button edges and surface with a needle file to remove the excess material on the repair. I still need to do some more sanding but the stem is shaping up to be quite nice. I still need to remove the oxidation on the surface but it is getting there.I sanded out the tooth chatter with 220 grit sand paper and started to polish it with a folded piece of 400 wet dry sandpaper. Once it was finished it the tooth chatter and oxidation was gone and it began to shine.I reshaped the slot in the button end with needle files to clean up the shape.I polished the stem with Denicare Mouthpiece Polish from a tin of it I have in the drawer here. It is a gritty red paste that I rub on with my finger tips and work into the surface of the stem and button and buff off with a cotton pad. It gives me a bit of a head start on the polishing work plus I have a tin to use up!I polished the stem with micromesh sanding pads – wet sanding with 1500-12000 grit sanding pads. I wiped it down after each sanding pad with Obsidian Oil. I polished it with Before & After Pipe Stem Polish – both Fine and Extra Fine and buffed it off with a final coat of Obsidian Oil. This is another interestingly shaped rusticated pipe in what I would call an Oom Paul shape. It has a black vulcanite saddle stem with two brass dots. The smooth rim top and shank end band look really good against the rustication. Everything about this one says that it was part of the “Malaga” Carved line of pipes. It has a great look and feel. The shape is very tactile and fits well in the hand. I polished stem and the bowl with Blue Diamond polish on the buffing wheel. I gave the bowl multiple coats of Conservator’s Wax and the stem multiple coats of carnauba wax. I buffed the pipe with a clean buffing pad to raise the shine. I hand buffed it with a microfiber cloth to deepen the shine. The pipe polished up pretty nicely. The rich oil cured briar took on life with the buffing. The rich brown colour of the briar works well with the polished vulcanite stem. The finished pipe has a rich look that is quite catching. Have a look at it with the photos below. The shape, finish and flow of the pipe and stem are very well done. The dimensions are Length: 6 inches, Height: 2 inches, Outside diameter of the bowl: 1 ½ inches, Chamber diameter: ¾ of an inch. I will be adding the pipe to the finished Malaga pipes that I have set aside for Alex. This will be a great addition to his collection of Malaga pipes. Thanks for walking through the restoration with me as I worked over another Malaga.

A Long-time Friend Commissions a Blasted French GBD Sablée Standard Bent Billiard


Blog by Dal Stanton

I’ve known Steve for 40 or so years – I’m not counting!  In our earlier years we shared the same pursuit of going to seminary in Jackson, Mississippi, where we shared many things in common.  We studied dusty but fascinating theological books, wrote papers for hopeful professors, studied Greek and Hebrew and we would do the occasional obligatory trips to fish for bass and hunt ducks when they were in season.  We were both relatively new in the business of being husbands and against all odds, we also became fathers during this time of stretching our minds and hearts to be better men before our God and to do what we could to make a difference in this world.  After seminary, Steve and his family and I and my family followed different paths yet, over the years we’ve been able to cross those paths here and there and generally stay in touch – at least every few decades or so.  Steve is a wood worker going way back – the serious kind that gets paid for it.  When he came across my avocation of restoring pipes by seeing my posts on Facebook, he reached out to me a few years back and kept threatening to commission a pipe or two.  Steve isn’t a big pipe smoker, but his last email to me to confirm the two pipes he commissioned, wrote these words his pipe collection:

“I bought a very cheap one in a kit and these will probably be all the ones I get. But knowing that it came from the work of your hands will be special to me and help out the ministry to boot.”

Friendship is a valuable thing, and I appreciate Steve’s desire to help the Daughters of Bulgaria – women and girls who have been trafficked and sexually exploited.  Steve commissioned a very nicely grained, honest to goodness American made iconic pipe, a Carey Magic Inch Straight Apple.  He also commissioned a continental pipe – a beautifully blasted GBD Sablée Standard long shank Bent Billiard.  Here are Steve’s commissioned pipes pictured when I first acquired them:The Carey Magic Inch came to me from another good friend, Dave Shane. I worked with Dave when he was a younger man in Ukraine, a pipe man and restorer himself (see: https://www.thepipery.com).  When I was in the US a few years ago I visited Dave and he gifted me a box of pipes that he hoped would benefit the Daughters of Bulgaria.  The Carey Magic Inch was in this offering.  The first pipe on my worktable is the GBD Sablée Standard which I acquired in what I have affectionately called, the Lot of 66, which I acquired on the eBay auction block a few years back.  This Lot of 66 has yielded many very nice collectable pipes and I’m honestly surprised that this Blasted GBD has remained this long waiting for someone to come along – a very nice pipe for Steve’s small, select collection. Here are more original pictures of the GBD: The nomenclature is found on the lower shank panel with a ‘GBD’ ensconced in the oval.  To the right is ‘Sablée’ [over] STANDARD.  To the right of this is the COM, ‘FRANCE’ perpendicular to the rest of the nomenclature.  The fancy lettering of ‘Sablée’ is classy.  I did a quick search of the French, ‘Sablée’ using Google Translate and discovered the meaning to be, “sandblasted” – a very nice blasted finish to be sure.I like Jerry Hannah’s VERY ‘Brief History of GBD’ from Pipedia: GBD Model Information:

The company was founded in Paris France in the 19th century by Ganeval, Boundier and Donninger who were no longer associated with the company by the turn of the century. By the time they left the GBD name was well established and thus retained. In 1903 an additional factory was built in England and ran by Oppenheimer. The Paris factory moved to Saint-Claude in 1952. Since 1981 the majority of GBD pipes come from the English factory. At about that same time GBD merged with Comoys, since then all production for both GBD and Comoy comes from a single factory. ( I wasn’t kidding when I said it was brief! )

Pipedia’s main article on GBD is extensive in detailing the history and all the corporate iterations of English/French interests going back to the 1800s.

The opportunities that I’ve had to restore GBD pipes, has led me to reach out to the resident expert on GBDs, rebornpipes contributor, Al Jones.  Al has always been very helpful with questions about GBD pipes and some questions emerged as I look at the FRANCE COM of this ‘Sablée’ Standard.  The standard practice in dating GBD pipes is based upon the brass rondel.  Generally, GBDs with brass rondels come from the pre-Cadogan era – that is, when GBD, owned by the Oppenheimer conglomerate, merged with Cadogan, maker of Comoy’s.  This happened in 1980/81.  This gives a dating parameter for GBD made pipes.  With this guideline, then the Sablée STANDARD on my worktable would be dated after 1981.  It’s possible that it’s listed in some GBD catalogue which would give the specific period the line came into production.  The question floating through my mind now has to do with the French origin of this GBD.  There’s much information about the English side of the Channel regarding GBD production, but I could find almost nothing about the French side. Do the openings and closings of French factories referred to above, have any bearing on the dating of this French GBD? Is the absence of the GBD rondel have the same force of marking the date of a French made GBD?  These essentially were the questions I shot off to Al with some pictures of the pipe and nomenclature.

Dal:
I’m not clear on if the pipe has the rondel or not?
You are right, there is almost nothing written about GBD’s made in France.
If it has the rondel, I’d say you can assume it was a pre-Cadogan pipe.
I don’t know what happened to French made COM’s after the merger (perhaps there weren’t any).
So, unfortunately, you can’t be any more definitive.
I don’t think they posted French made GBD’s in the older catalogs, at least not that I’m aware.
Al

After responding to Al’s question about the presence of the rondel in the negative, his last response was definitive:

Yep, another GBD story lost to time, that adds to the charm!
Al

With the mystery of the provenance of this French GBD solidly established with Al’s help, I take a closer look at the pipe’s generally good condition. The medium cake buildup in the chamber needs to be removed to give the underlying briar a fresh start and to check for heating damage.  The rim has normal darkening along with a very nice blasted stummel surface that appears in need only of cleaning of normal grime buildup.  The shank appears to be longer than a normal half bent Billiard and gives more of a sweeping presentation transitioning to the saddle stem – which has some oxidation and tooth chatter damage on the upper and lower bit.  What stands out to me about the stem is its sharp, distinct cut shaping.  The edges are not rounded but have distinctive edge transitions – nice.

I start the restoration by adding the French GBD’s stem to the queue along with other pipes to soak in Before & After Deoxidizer.  First, using pipe cleaners and bristled shank brushes dipped in isopropyl 95%, the stem’s airway is cleaned.Following this, the stem is placed in the B&A Deoxidizer for several hours.After soaking in the Deoxidizer, I fish out the stem allowing it to drain the fluid back into the vat and run another pipe cleaner wetted with isopropyl 95% through the airway to clean it of Deoxidizer.  I then wipe off the raised oxidation with cotton pads wetted with isopropyl 95%.  The Deoxidizer seems to have done a good job.To help in revitalizing the vulcanite rubber, paraffin oil is applied with a cotton pad and worked into the surface.  I set the stem aside to absorb the oil.Turning to the stummel, I take closer look at the condition of the chamber.  I take a close-up of the cake buildup to mark the start.  After putting paper towel down to minimize on the cleanup, I use the Pipnet Reaming Kit to begin cleaning the chamber. I use two smaller of the 4 blade heads available in the Kit.  The cake is soft and is removed very easily.  I follow reaming by fine tuning using the Savinelli Fitsall Tool which does a great job of scraping the walls removing additional carbon cake as well as reaching down to the floor of the chamber and addressing the hard to get to angles and curves.  I finish by sanding the chamber using 240 grade paper wrapped around a Sharpie Pen and then wiping out the residual carbon dust with a cotton pad wetted with alcohol. I forgot to take a picture of the cleaned chamber inspection which looks good.  No heating damages. Moving from the chamber clean up, after taking a few pictures to mark the start, I focus on the external briar using undiluted Murphy’s Oil Soap and a cotton pad to scrub the sandblasted finish.  I also employ a brass wire brush to address the residue on the rim.  A brass brush does not harm the briar as it works. From the worktable I take the GBD stummel to the sink to continue the cleaning by using warm water with anti-oil dish soap and using bristled shank brushes, I scrub the internals of the pipe in the mortise and airway.  I also use the brass wire brush to do some additional scrubbing on the rim.  Finally, after rinsing the stummel thoroughly, I return to the worktable focusing on the internal cleaning using pipe cleaners and cotton buds wetted with isopropyl 95%. The internals are surprisingly clean, but still in need of cleaning.  I also use the small dental spoon to remove some tars and oils that have collected at the ridges created by the mortise drilling.  Without great effort, cotton buds are emerging lighter, and I call it done for now.  Later, I’ll give the stummel a kosher salt and alcohol soak to continue the internal cleaning process.Looking at the stummel and the condition of the blasted surface, the cleaning, as expected lightened the surface.  The briar seemed to call out to me for an application of Before and After Restoration Balm to hydrate and condition the dry stummel. I happily comply!  After applying some of Mark Hoover’s Before & After Restoration Balm (www.iberen.com) to my fingers, I work the balm into the blasted briar surface – thoroughly working it into the rough surface and rim.  I take a picture of the stummel after application, set to the side for 20 minutes or so.After about 20 minutes, using a cloth, I wipe the excess Balm off and then using a microfiber cloth, continue wiping and buffing up the briar surface.  Wow!  I’m loving the results and the hues of this blasted surface.  I take another picture after buffing.  This is a bowl that doesn’t need a lot of help 😊.Turning now to the stem, I observe again the stem’s unique shape.  The stem is not rounded but with flat surfaces on the upper and lower sides.  The edges of the stem connect the flat surfaces with a half diamond right angle.  Very smart – I like it.There is bite and chatter damage on the upper and lower bit. To address this, I first use the heating method to expand the compressions.  Using a Bic lighter, I paint the bit area heating the vulcanite and the physics of expansion take over.  After applying the heat, the indentations are still visible but have lessened so that sanding dispatches the problems easily.  First the before and after of the upper bit followed by the lower bit. I still can detect deep oxidation in the stem.  Therefore, I sand the entire stem with 240 grade paper to address this. Also employing a flat needle file, I file the button to freshen it as well as sand the bit to erase the bite and tooth chatter damage. Following the filing and 240 sanding, using 600 grade sanding paper I wet sand the entire stem followed by applying 000 grade steel wool.  The stem is looking good.Next, I go straight away to applying the full regimen of micromesh pads.  Starting with pads 1500 to 2400, I wet sand.  Following this, I dry sand using pads 3200 to 4000 and 6000 to 12000.  To continue revitalization of the vulcanite, I apply a coat of Obsidian Oil after each set of the micromesh pads. Next, I continue the internal cleaning of the stummel by giving it a soak using kosher salt and alcohol.  I first stretch and twist a cotton ball to act as a ‘wick’ which serves to draw the oils and tars from the internal chamber.  I use a stiff wire to guide the wick down the mortise and airway. After filling the bowl with kosher salt which doesn’t leave an aftertaste as iodized salt does, I settle the stummel in an egg carton for stability. I then fill the bowl with isopropyl 95% with a large eye dropper until it surfaces over the salt.  After a few minutes the alcohol absorbs into the pipe and I top the alcohol off again and set the stummel aside to soak.After several hours, the salt and wick have soiled from absorbing the tars and oils.  I remove the expended salt into the waste basket, wipe the chamber with paper towel and blow through the mortise to dislodge any residual salt crystals.I follow the soak by employing a few more pipe cleaners and cotton buds assuring that all is clean.  I move on!With a freshened bowl for a new steward, and after reuniting the stem and stummel, I mount a cotton cloth buffing wheel to the Dremel, and after setting the speed at about 40% full power, I give a light application of Blue Diamond compound over the blasted surface of the stummel.  I’m light on applying compound so that it will not cake up in the rougher sandblasted surface.  I apply compound normally over the stem.To clean the pipe of compound dust in preparation for the application of wax, a felt cloth is used to wipe down the pipe.After mounting another cotton cloth buffing wheel onto the Dremel, increasing the speed to about 60% full power, I apply carnauba wax to both stem and stummel.  I increase the speed of the Dremel in order to create more friction heat to aid the wax in liquifying as it works into the blasted briar surface.  I decrease the speed of the Dremel to my normal 40% as I apply wax to the stem.  After applying a few coats of wax and working it in well so that there is no caking, using a micromesh cloth, I give the pipe a rigorous hand buffing to disperse excess wax and to raise the shine.Undoubtedly, there’s some mystery surrounding the provenance of this GBD Sablée Standard.  The French origins of this GBD leave us with questions of its dating – pre- or post- 1981, the merger which marks the eras of the GBD name.  Even though this will be lost to us in history, at least for now, there is no disputing the exquisite quality of this pipe’s sandblasted briar surface.  It is a classic Bent Billiard workhorse with an elongated stem that adds to the sweep of this pipe.  The flat, cut stem design also adds to the uniqueness.  Steve, my long-time friend, commissioned this GBD Sablée Standard and will have the first opportunity to acquire it from ThePipeSteward Store.  This pipe benefits the Daughters of Bulgaria – women and girls who have been trafficked and sexually exploited.  Thanks for joining me!

New Life for a Stunning Malaga Bent Billiard from Kathy’s Dad’s Pipes


Blog by Steve Laug

This is another of the Malaga pipes from George Koch’s estate that Alex added to the box of pipes I had set aside for him. There are quite a few of them to work on so I go back to them quite regularly to work on one of them. The next Malaga is a shape I would define as a bent billiard. It has some great cross and birdseye grain and a tapered vulcanite stem. The grain around the bowl and shank combined with the stem make it a stunning pipe. It is one of the many Malaga pipes that came to my brother and me in several shipments of pipes from George’s daughter Kathy. When Jeff got each box the pipes were well wrapped and packed. Jeff unwrapped them and took the following photo to give an idea of the volume of the pipes that we purchased. This Malaga came in mixed in a box of pipes much like the one below.In each of the previous blogs that I have written on the restoration of George’s pipes I have told his story. If you have followed the restorations you will have read the information and the background piece that Kathy did on her father. Here is a link to one of the previous blogs on his Malaga pipes where I included her tribute in full (https://rebornpipes.com/2019/01/26/back-to-kathys-dads-pipes-restoring-a-%c2%bc-bent-malaga-author/). You can also read the bio on her Dad, George Koch. It is an interesting read and one that shows just how far our pipe collecting passion can go when we find a brand of pipes that we enjoy. I am going to only include the portion on the Malagas at this point. If you wish to read the rest follow the link above.

Kathy writes…We lived in Livonia, and that’s where his love for Malaga pipes began. After a few years he returned to Allis Chalmers and we moved back to Springfield. I remember that when we went back to Michigan to visit friends, Dad had to go to the Malaga store and acquire a few new pipes. Many a year I wrote to Malaga and they picked out a pipe for me to purchase that I could give Dad for a Christmas or birthday present. He was always pleased. His favorites were the straight stemmed medium sized bowl pipes, but he liked them all. 

He had some other pipes, but the Malagas were his favorites. I remember him smoking them sitting in his easy chair after work, with feet up on the ledge by the fire burning in the fireplace.  Growing up it was my job to clean them and he liked the inner bowl and stem coated with Watkins vanilla, leaving a little of that liquid in the bowl to soak in when I put them back on the rack…I’m very happy they are being restored by you and your brother and hope they find homes who enjoy them as much as Dad did. Thank-you for your care and interest. — Kathy, the oldest daughter

The next “Malaga” Bent Billiard on the table is another classic bent shape. The carver did a great job of shaping the pipe to follow the grain on the briar. The bowl, round shank and bent tapered vulcanite stem look very good. The bowl had a thick cake that overflowed with lava onto the rim and there was significant burn damage on the top front inner of the bowl. The sides of the bowl and shank are very dirty with grime and oils from prolonged use. The stamping on the left side of the shank read “MALAGA” and on the right side it read Imported Briar. The vulcanite stem had tooth dents and chatter on the top and the underside of the stem. The button was worn almost smooth Jeff took these photos before he started the cleanup work on the pipe. Jeff took a close up photo of the bowl and rim to capture the condition of the pipe before he started his cleanup work. The rim top had some lava overflow and darkening on the back of the bowl and some serious burn damage to the inner edge on the bowl front. The burn marks appeared to be quite deep on the inner edge on the right front side of the grimy pipe.He also took photos of the sides and bottom of the bowl and shank to show the beautiful grain around the bowl. The photos show the general condition of the bowl and wear on the finish. It is very dirty but this is another beautiful pipe.Jeff took a photo to capture the stamping on the shank. The photos show the stamping “MALAGA” on the left side of the shank and Imported Briar on the right side. The stamping is very readable.The next photos show the stem surface. There is oxidation and calcification on the stem. There are tooth marks and chatter on both sides near the button and wear on the button surface and edges. The button surfaces and edges are worn and almost smooth.I am also including the link to a blog that I wrote that gives some of the history of the Malaga brand and the Malaga Pipe Shop in Royal Oak, Michigan in the USA. I have written an earlier blog to give a little history of the Malaga Brand and the pipemaker, George Khoubesser. Here is the link – https://rebornpipes.com/tag/malaga-pipes/.That blog also includes links to a catalogue and the history of the pipemaker George Khoubesser. Follow the link to get a feel for the brand and the pipemaker.

Jeff reamed the bowl with a PipNet pipe reamer and followed up with a Savinelli Fitsall pipe knife to remove the cake. He scrubbed out the mortise and the airway in the shank and the stem with alcohol, cotton swabs and pipe cleaners. He scrubbed the exterior of the bowl, rim, shank and stem with a tooth brush and Murphy’s Oil Soap to remove the oils and tars on the rim and the grime on the finish of the bowl. He rinsed it under running water. He dried it off with a soft cloth. He was able to remove the lava build up on the rim top and the flat surface of the rim looked very good. The inner edge of the rim has some serious burn damage on the front right side. The outer edge looked very good. He soaked the stem in Before & After Deoxidizer and rinsed it with hot water. I took photos of the pipe to show its condition before I started my work on it. I took close up photos of the bowl and rim top as well as the stem. You can see the condition of the rim top and bowl in the first photo. Jeff was able to remove all of the tar and oils but you can now see the damage on the inside rim edge. The edge is out of round. There is a burn mark that extends across the front and the back edge of the rim top at that point. The vulcanite stem had tooth chatter on both sides near and on the button surface there was also a large deep bite mark on the underside of the stem.I took a photo of the stamping on the shank to show how good the condition is. It shows the “MALAGA” stamp on the left side and Imported Briar on the right side. The stamping is very legible.I decided to address the rim top first. I topped the bowl on a topping board with 220 grit sandpaper. I wanted to remove the damage on the top front edge and remove the darkening all the way around the inner edge of the bowl. I took a close up photo the rim top before I started to give a clear picture of the condition of the pipe. I used a folded piece of 220 grit sandpaper to clean up the damage on the right rear inner edge of the bowl. I gave the inner edge a slight bevel to repair the damage. I polished the edge with 400 grit wet dry sandpaper. The rim top and edges really looked better.I polished the rim top and the briar with micromesh sanding pads. I wet sanded the bowl with 1500-12000 grit sanding pads. I wiped the bowl down after each pad with a damp cloth to remove the sanding dust. I restained the rim top and edges with an Oak Stain Pen. I was able to blend it into the rest of the bowl. I scrubbed the briar with Murphy’s Oil Soap and a tooth brush. I rubbed it into the surface of the briar with my finger tips and let it sit for a few minutes then scrubbed it off with a tooth brush and running water. I dried it off with a soft cloth. I worked some Before & After Restoration Balm into the surface of the briar with my fingertips to clean, enliven and protect it. I let the balm sit for a little while and then buffed with a cotton cloth to raise the shine. The following photos show the bowl at this point in the restoration process. I am very happy with the results. I turned to the stem to address the issues on the surface of both sides at the button. I used a needle file to recut the edges of the button. They had been chewed to the point of no edge remaining so I used the file to cut it and sharpen the edges. I smoothed out the top and bottom surfaces of the button on both sides.Once I had the button edge reshaped I decided to address the tooth marks and dents in the button and just ahead of the button. I “painted” the surface of the stem with the flame of a lighter to lift the tooth chatter and marks. The light marks on the top side disappeared quickly and the larger indentation on the underside lifted until the remaining small marks could be dealt with by sanding the stem.I sanded both sides smooth with 220 grit sandpaper to remove the deep oxidation on the surfaces. I finished this initial polishing with 400 grit sandpaper to smooth out the scratches in the stem surface. As I sanded and reshaped the button and stem surface the stem began to look very good. I polished the stem with Denicare Mouthpiece Polish from a tin of it I have in the drawer here. It is a gritty red paste that I rub on with my finger tips and work into the surface of the stem and button and buff off with a cotton pad. It gives me a bit of a head start on the polishing work plus I have a tin to use up!I polished the stem with micromesh sanding pads – wet sanding with 1500-12000 grit sanding pads. I wiped it down after each sanding pad Obsidian Oil. I finished by polishing it with Before & After Pipe Stem Polish both fine and extra Fine and then wiped it down with a final coat of Obsidian Oil. This is another, slightly larger Malaga Bent Billiard with a vulcanite tapered stem. It has a great grain around the bowl and the carver really maximized that with the shape of the pipe. Everything about the pipe – the shape of the bowl, the beveled rim top and the cut of the briar work well to highlight the grain around the bowl sides. I polished stem and the bowl with Blue Diamond polish on the buffing wheel and the grain just popped and came alive. I gave the bowl and the stem multiple coats of carnauba wax. I buffed the pipe with a clean buffing pad to raise the shine. I hand buffed it with a microfiber cloth to deepen the shine. The pipe polished up pretty nicely. The grain took on life with the buffing. The rich oil cured colour works well with the polished vulcanite stem. The finished pipe has a rich look that is quite catching. Have a look at it with the photos below. The shape, finish and flow of the pipe and stem are very well done. The dimensions are Length: 6 inches, Height: 2 inches, Outside diameter of the bowl: 1 ¼ inches, Chamber diameter: ¾ of an inch. I will be adding the pipe to the finished Malaga pipes that I have set aside for Alex. I am glad that he is carrying on the trust for George Koch. Thanks for walking through the restoration with me as I worked over another one of Kathy’s Dad’s Pipes.

Restoring a Stunning Malaga Bent Billiard from Kathy’s Dad’s Pipes


Blog by Steve Laug

Not long ago Alex came by and went through the Malaga pipes from George Koch’s estate. Alex added the newly chosen pipes to the box of pipes I set aside for him. There are quite a few of them to work on so I decided to go back to work on one of them. The next Malaga is a shape I would define as a bent billiard. It has some great cross and birdseye grain and a saddle vulcanite stem. The grain around the bowl and shank combined with the stem make it a stunning pipe. It is one of the many Malaga pipes that came to my brother and me in several shipments of pipes from George’s daughter Kathy. When Jeff got each box the pipes were well wrapped and packed. Jeff unwrapped them and took the following photo to give an idea of the volume of the pipes that we purchased. This Malaga came in mixed in a box of pipes much like the one below.In each of the previous blogs that I have written on the restoration of George’s pipes I have told his story. If you have followed the restorations you will have read the information and the background piece that Kathy did on her father. Here is a link to one of the previous blogs on his Malaga pipes where I included her tribute in full (https://rebornpipes.com/2019/01/26/back-to-kathys-dads-pipes-restoring-a-%c2%bc-bent-malaga-author/). You can also read the bio on her Dad, George Koch. It is an interesting read and one that shows just how far our pipe collecting passion can go when we find a brand of pipes that we enjoy. I am going to only include the portion on the Malagas at this point. If you wish to read the rest follow the link above.

Kathy writes…We lived in Livonia, and that’s where his love for Malaga pipes began. After a few years he returned to Allis Chalmers and we moved back to Springfield. I remember that when we went back to Michigan to visit friends, Dad had to go to the Malaga store and acquire a few new pipes. Many a year I wrote to Malaga and they picked out a pipe for me to purchase that I could give Dad for a Christmas or birthday present. He was always pleased. His favorites were the straight stemmed medium sized bowl pipes, but he liked them all. 

He had some other pipes, but the Malagas were his favorites. I remember him smoking them sitting in his easy chair after work, with feet up on the ledge by the fire burning in the fireplace.  Growing up it was my job to clean them and he liked the inner bowl and stem coated with Watkins vanilla, leaving a little of that liquid in the bowl to soak in when I put them back on the rack…I’m very happy they are being restored by you and your brother and hope they find homes who enjoy them as much as Dad did. Thank-you for your care and interest. — Kathy, the oldest daughter

The “Malaga” Bent Billiard with the classic bent shape is the next on the table. The carver did a great job of shaping the pipe to follow the grain on the briar. The bowl, round shank and bent tapered vulcanite stem look very good. The bowl had a thick cake that overflowed with lava onto the rim so that it was impossible to see if there was damage on the inner edges. The sides of the bowl and shank are very dirty with grime and oils from prolonged use. The stamping on the left side of the shank read “MALAGA” and on the right side it read Imported Briar. The vulcanite stem had tooth dents and chatter on the top and the underside of the stem. Jeff took these photos before he started the cleanup work on the pipe.Jeff took a close up photo of the bowl and rim to capture the condition of the pipe before he started his cleanup work. The rim top had some lava overflow and darkening on the back of the bowl and some damage to the inner edge of the bowl front. There appeared to be deep burn marks on the inner edge on the right front side of the grimy pipe.He also took photos of the sides and bottom of the bowl and shank to show the beautiful grain around the bowl. The photos show the general condition of the bowl and wear on the finish. It is very dirty but this is another beautiful pipe.Jeff took a photo to capture the stamping on the shank. The photos show the stamping “MALAGA” on the left side of the shank and Imported Briar on the right side. The stamping is very readable.The next photos show the stem surface. There are tooth marks and chatter on both sides near the button and wear on the button surface and edges.I am also including the link to a blog that I wrote that gives some of the history of the Malaga brand and the Malaga Pipe Shop in Royal Oak, Michigan in the USA. I have written an earlier blog to give a little history of the Malaga Brand and the pipemaker, George Khoubesser. Here is the link – https://rebornpipes.com/tag/malaga-pipes/.That blog also includes links to a catalogue and the history of the pipemaker George Khoubesser. Follow the link to get a feel for the brand and the pipemaker.

Jeff reamed the bowl with a PipNet pipe reamer and followed up with a Savinelli Fitsall pipe knife to remove the cake. He scrubbed out the mortise and the airway in the shank and the stem with alcohol, cotton swabs and pipe cleaners. He scrubbed the exterior of the bowl, rim, shank and stem with a tooth brush and Murphy’s Oil Soap to remove the oils and tars on the rim and the grime on the finish of the bowl. He rinsed it under running water. He dried it off with a soft cloth. He was able to remove the lava build up on the rim top and the flat surface of the rim looked very good. The inner edge of the rim has some serious burn damage on the front right side. The outer edge looked very good. I took photos of the pipe to show its condition before I started my work on it. I took close up photos of the bowl and rim top as well as the stem. You can see the condition of the rim top and bowl in the first photo. Jeff was able to remove all of the tar and oils but you can now see the damage on the inside rim edge. The edge is out of round. There is a burn mark that extends across the front and the back edge of the rim top at that point. The vulcanite stem had tooth chatter on both sides near and on the button surface there was also a large deep bite mark on the underside of the stem.I took a photo of the stamping on the shank to show how good the condition is. It shows the “MALAGA” stamp on the left side and Imported Briar on the right side. The stamping is very legible.I decided to address the rim top first. I lightly topped the bowl on a topping board with 220 grit sandpaper. I wanted to minimize the damage on the top, remove the darkening and clean up the damage on the front and rear inner edge of the bowl.I used a folded piece of 220 grit sandpaper to clean up the damage on the right rear inner edge of the bowl. I gave the inner edge a slight bevel to repair the damage. I polished the edge with 400 grit wet dry sandpaper. The rim top and edges really looked better.I polished the rim top and the briar with micromesh sanding pads. I wet sanded the bowl with 1500-12000 grit sanding pads. I wiped the bowl down after each pad with a damp cloth to remove the sanding dust. I scrubbed the briar with Murphy’s Oil Soap and a tooth brush. I rubbed it into the surface of the briar with my finger tips and let it sit for about 10 minutes then rinsed it off with running water. I dried it off with a soft cloth. I restained the rim top and edges with an Oak Stain Pen. I was able to blend it into the rest of the bowl.I worked some Before & After Restoration Balm into the surface of the briar with my fingertips to clean, enliven and protect it. I let the balm sit for a little while and then buffed with a cotton cloth to raise the shine. The following photos show the bowl at this point in the restoration process. I am very happy with the results. I turned to the stem to address the issues on the surface of both sides at the button. I started by “painting” the surface of the stem with the flame of a lighter to lift the tooth chatter and marks. The light marks on the top side disappeared quickly and the larger indentation on the underside lifted until the remaining small marks could be dealt with by sanding the stem.I sanded both sides smooth with 220 grit sandpaper to remove the deep oxidation on the surfaces. I finished this initial polishing with 400 grit sandpaper to smooth out the scratches in the stem surface. As I sanded and reshaped the button and stem surface the stem began to look very good.I polished the stem with Denicare Mouthpiece Polish from a tin of it I have in the drawer here. It is a gritty red paste that I rub on with my finger tips and work into the surface of the stem and button and buff off with a cotton pad. It gives me a bit of a head start on the polishing work plus I have a tin to use up!I polished the stem with micromesh sanding pads – wet sanding with 1500-12000 grit sanding pads. I wiped it down after each sanding pad Obsidian Oil. I finished by polishing it with Before & After Pipe Stem Polish both fine and extra Fine and then wiped it down with a final coat of Obsidian Oil. This is a Malaga Bent Billiard with a vulcanite saddle stem. It has a great grain around the bowl and the carver really maximized that with the shape of the pipe. Everything about the pipe – the shape of the bowl, the beveled rim top and the cut of the briar work well to highlight the grain around the bowl sides. I polished stem and the bowl with Blue Diamond polish on the buffing wheel and the grain just popped and came alive. I gave the bowl and the stem multiple coats of carnauba wax. I buffed the pipe with a clean buffing pad to raise the shine. I hand buffed it with a microfiber cloth to deepen the shine. The pipe polished up pretty nicely. The grain took on life with the buffing. The rich oil cured colour works well with the polished vulcanite stem. The finished pipe has a rich look that is quite catching. Have a look at it with the photos below. The shape, finish and flow of the pipe and stem are very well done. The dimensions are Length: 5 ¾ inches, Height: 1 7/8 inches, Outside diameter of the bowl: 1 ¼ inches, Chamber diameter: ¾ of an inch. I will be adding the pipe to the finished Malaga pipes that I have set aside for Alex. I am glad that he is carrying on the trust for George Koch. Thanks for walking through the restoration with me as I worked over another one of Kathy’s Dad’s Pipes.


Fashioning a Churchwarden by Reclaiming an East German Howal Sculpted Apple Bowl


Blog by Dal Stanton

One of the ways I can help benefit women and girls who have been trafficked and sexually exploited – the Daughters of Bulgaria,is by fashioning Churchwardens from discarded repurposed bowls.  I enjoy taking discarded bowls, no longer serving any purpose, and after restoring them, mounting them on the fore of a long, flowing Warden stem.  Suddenly, the metamorphosis is realized – the neglected and discarded again becomes a treasure, sought after with great value.  John, from Utah, saw another CW I created – Fashioning a Churchwarden from a Dimpled Bent Billiard Bowl when I posted it on the Old Codgers Smoking Pipe Facebook group, and he reached out to me to explore commissioning a Churchwarden for himself.  This was the Dimpled Bent Billiard Churchwarden got his attention:After some months, John’s CW project finally worked its way through the queue, patience always appreciated(!) – and as I told him before, when his project was on the worktable, I would contact him with choices for a bowl.  I spread out a selection of bowls next to a Warden stem and ruler.  The selection included bent and straight shanks and smooth and rusticated surfaces – and different shapes.  The unique thing about the Churchwarden shape is that its designation is not determined primarily by the shape of the bowl but by the length of the stem.  After taking a few pictures, and sending them to John, he made his choice.John’s chose a very nice-looking sculpted Apple shape pictured on the right, in the middle.  Through this choice, he expressed that he preferred a straight rather than a slightly bent Warden stem.  When I pulled that bowl aside and took a closer look at the shank, I discovered that on the left side was stamped the name, ‘Howal’ [over] ‘Bruyere’.Howal is not a well-known name in the West, but I became familiar with it after seeing several Howals here in Bulgaria – formerly under the Warsaw Pact, behind the Iron Curtain of the Former USSR.  Having previously restored a Howal – a rusticated Dublin, I enjoyed the research of the Howal name which was a mystery to me.  My research uncovered not only the origins of the pipe in former East Germany, but that the city where Howals were produced was a historical center for pipe manufacturing in Germany that pre-dated WW2.  A fascinating story that I wrote of in this restoration: Checkered History and Heritage of an East German Howal Old Briar Rustified Dublin.

Pipedia’s article that I sited in that write up was both interesting and helpful in understanding the predecessor of and origins of the Howal name:

C.S. Reich was founded by Carl Sebastian Reich in Schweina, Germany in 1887. By its 50th jubilee in 1937 C.S. Reich was the biggest pipe factory in Germany.  In 1952, however, the owners of the company were imprisoned and the company itself was nationalized as Howal, an abbreviation of the German words for “wood products Liebenstein” or “Holzwaren Liebenstein”.  By the 1970’s Howal, after acquiring many other smaller pipe making firms, was the sole maker of smoking pipes in East Germany. In 1990, with the fall of the Berlin Wall and reunification of the Germanys, the company was closed.

As I reread that previous research on the history of the Howal name for this write-up, I decided to restate my observations in full because I don’t restore Howals often and the history and human story draws me to retell the story as I transform this Howal bowl into a Churchwarden.  From the previous restoration (my present comments in brackets):

While helpful for a broad sweep, I discovered much missing from this [Pipedia] summary and it raises more questions.  From another interesting source, Edith Raddatz’s lecture on tobacco pipe production in Schweina [a link which unfortunately is no longer working!] at the Tobacco Pipe Symposium in 2003, it describes a history of pipe production in this central German village that was reminiscent of my research into France’s pipe mecca, St. Claude.  A strong development of the pipe making industry can be traced in the 1800s to the apex of the C.S. Reich Co. being Germany’s largest pipe producer in 1937, but Raddatz’s lecture reveals that other producers of pipes were also based in the German village of Schweina.  Pipedia’s article above describes how the owners of the C.S. Reich Co. were arrested and imprisoned followed by the nationalization of the Reich Co. and becoming ‘Howal’, an acronym for “Wood Products Liebenstein” – Bad Liebenstein was the town that bordered and absorbed the village of Schweina. The question begs to be asked – which, unfortunately introduces the human tragedy wrapped around the name ‘Howal’ – Why were the owners arrested?  In an unlikely source, the website of the ‘Small Tools Museum’ adds the names of those imprisoned: shareholders Robert Hergert and Karl Reich.

Edith Raddatz’s lecture (referenced above) brings more light to the difficult geopolitical realities these people faced (Google translated from German – brackets my clarifications):

By 1945 the company, which had meanwhile [passed to] the next generation – Kurt Reich And Walter Malsch – [had] about 100 employees.   Among them were many women who mainly did the painting work.  At the beginning of the 1950s, an era ended in Schweina. The first [oldest] tobacco pipe factory in Schweina closed their doors. There were several reasons for this. Kurt Reich passed away in 1941, [and] Walter Malsch [in] 1954.  The political situation in the newly founded GDR made the conditions for private entrepreneurship difficult. The heirs of the company “AR Sons” [Reich family] partly moved to West Germany. The operation was nationalized, and later toys were made there.

In post WWII occupied Germany, the Soviet occupied section was declared to be a sovereign state and the German Democratic Republic (GDR) was established in 1949 (See link).  With a rudimentary understanding of Marxism and the economic philosophy undergirding it, it is not difficult to deduce what brought the demise of the C. S. Reich Co. and the formation of Howal.  Solidification of the FDR’s hold on power paralleled the necessity to nationalize private ownership and to institute a State-centered command economy.  These efforts gained momentum and forced companies/workers to work more with no additional pay.  In 1952, the year that the owners of C. S. Reich Co., were arrested, this edict was advanced (See link):

In July 1952 the second party conference of the Socialist Unity Party of Germany (SED) took place in East Berlin. In SED General Secretary Walter Ulbricht‘s words, there was to be the “systematic implementation of Socialism” (planmäßiger Aufbau des Sozialismus); it was decided that the process of  Sovietization should be intensified and the importance of the state expanded. The party was acting on demands made by Soviet premier Joseph Stalin.[2]

As a result, today Germany remembers the Uprising of 1953 which started in East Berlin, as factory workers revolted against the repression of the GDR, and spread to all East Germany.  Many lost their lives as Moscow responded to squelch the unrest with tanks on the streets.  In play also, was the mass exodus of people fleeing to West Germany, which included, per Edith Radditz’s lecture, the Reich family, who would have been heirs of the family’s legacy and company – pipe making.  Also, in 1953, completing the State forced abolition of any Reich claim, the largest pipe making company of Germany was seized, nationalized, and changed from C. S. Reich Co. to Howal.  As ‘Howal’, pipes continued to be produced, undoubtedly with the same hands and sweat of the people of Schweina, along with other wooden products, such as toys.  In the Pipedia article I quoted above, it said:

By the 1970’s Howal, after acquiring many other smaller pipe making firms, was the sole maker of smoking pipes in East Germany. In 1990, with the fall of the Berlin Wall and reunification of the Germanys, the company was closed.

My curiosity piqued, what does it mean when it says that Howal acquired many other smaller pipe making firms?  Should we question whether these words can be understood in the normal free market enterprise way we are accustomed?  Doubtful.

…So, as I had written before regarding the checkered history of the Howal name.  Now, as I look again at the Howal sculpted Apple bowl on my worktable, I take a few more pictures to mark the starting point and to take a closer look. I very much like John’s choice of a bowl to fashion a Churchwarden.  The sculpting of the classic Apple shape will look very nice as a Warden – with a rustic, ‘Olde World’ look to it.  The condition of the Howal bowl is generally good.  The chamber has a heavy cake which will be removed to give the briar a fresh start and to check the chamber wall for heating problems.  The rim has some crusting lava overflow that needs cleaning. The rusticated surface with the intricate ribs carved into the sculpting also needs scrubbing to remove grime lodged in the wood.  Before working on the stem, I start the Howal Churchwarden project by using the Pipnet Reaming Kit.  After taking a picture of the chamber showing the tightening chamber as the cake thickens, I use the two smallest blade heads of the 4 available and ream the chamber.  The cake proves to be stubborn – hard as a brick.  After the Pipnet Kit, transitioning to the Savinelli Fitsall Tool, clearing the cake continues as the tool scrapes the chamber wall. Finishing this phase, I wrap 240 paper around a Sharpie Pen and sand the walls and then wipe the excess carbon dust with a cotton pad wetted with alcohol.

After completing the removal of the cake and cleaning the walls, an inspection reveals no heating problems.  I move on.Next, using undiluted Murphy’s Oil Soap I begin the external cleaning. I also employ a bristled toothbrush to get into the crevasses of the sculpted vertical sweeps, which are more detailed upon closer inspection. Within each crevasse, fine lines have been carved to provide a classier sculpted appearance. I like it. From the picture above, the lava flow caking on the rim is evident. A brass brush helps with removal of the crusting without damaging the briar underneath. The sharp edge of my Winchester pocketknife also helps as I carefully scrape the rim surface. From the worktable, I take the bowl to the sink and there using different sized long shank brushes with some anti-oil dish soap, I scrub the internal mortise under warm water.  After a thorough rinsing of the soap, I bring the bowl back to the worktable. The cleaning did a good job. I can now see the rim more clearly with a cut on the right side and some light damage on the left. The cleaning also reveals the residue of old finish on the smooth briar which shows up dark and shiny in the picture.  I’ll remove these patches with sanding.Starting with the rim, I take another picture showing the damage on the top and the bottom of the picture’s orientation.  The rim is sloped downwardly to form beveled rim peak. This is attractive and accentuates the Apple shape’s peaked rim. Going with this flow, I use 240 grade paper and sand the rim to freshen the lines and to remove the damage.  I show a few pictures to show the freshening progression. I follow the 240 paper by dry sanding with 600 grade paper on the rim.  I’m liking the emergence of a smooth grain contrast underneath.  A few blemishes remain on the rim at this point but I like the more rustic look – some imperfections on the rim accents the overall look.Next, to address the patches of old, dark shiny finish on the bowl’s surface, I dry sand using a 1500 micromesh pad to remove the old finish patches from the smooth briar surfaces of the sculpted motif.  I intentionally leave the rough rusticated briar in the sculpting untouched to preserve the original, darkened patina.  I’m aiming for an attractive contrast between the smooth briar, which will naturally lighten through the restoration process, revealing briar grain, with the rough, darkened sculpted briar. Not forgetting where I am in the cleaning process, I return to working on the internals with cotton buds and pipe cleaners dipped in isopropyl 95% – the strongest rubbing/cleaning alcohol available to me here in Bulgaria.  For a smaller Apple bowl, the internals were rife with old oils and tars.  I also did much excavation of tars and oils using the small dental spoon as well as drill bits.  With the bits, I hand turn a bit that is the same size as the drilling diameter which scrapes the wall.  The gunk seemed to have no end, yet finally, the cotton buds started to lighten, and I call the cleaning provisionally finished.  Later, I’ll continue the cleaning and refreshing of the internals by using a kosher salt and alcohol soak. Now to the stem fabrication.  I cease the stummel work at this point because there will be additional sanding as I size and sand the stem with the shank.  I take a few pictures to mark the starting point.  John prefers a straight stem for his Churchwarden which is not a problem.  The precast Warden stem has a very slight bend as it arrived on my table.  This will remain as it helps with maintaining the up/down orientation of the mounted stem.  The picture below shows the rough tenon oversizing which will be shaped to form a good junction with the Howal shank and tenon seating in the mortise. No shank/stem fitting is the same which means that sanding and finetuning the junction is always required.  The picture below illustrates this – the mortise drilling is slightly higher in the mortise which means that the upper thickness of the shank/mortise briar will be thinner and the lower will be slightly thicker.  Shaping the stem fit must factor this offset.The first step in fashioning the CW stem is to size the tenon.  I use the PIMO Tenon Turning Tool that I purchased from Vermont Freehand.  I keep the instructions tacked on the wall in front of me for a reminder and safe keeping!  A very useful tool to have for fashioning tenons.First, using an electronic caliper to measure the diameter of the mortise marks the target sizing of the tenon of the precast stem.  The mortise measurement is 7.95mm in diameter.  Using Charles Lemon’s (of Dad’s Pipes) methodology, I add about 50mm to this exact measurement to give me my ‘fat’ target.  The ‘fat’ target is what I will aim for when bringing the tenon down to size using the PIMO Tenon Turning Tool.  The ‘fat’ target (7.95mm minus 50mm) is about 8.45mm.  From this ‘fat’ point, I will sand the tenon by hand which gradually and patiently custom sizes the tenon to the mortise.The first thing needed is to pre-drill the tenon airway with the drill bit provided by the PIMO tool.  This enlarges the airway slightly enabling the insertion of the PIMO tool guide pin.  I mount the drill bit to the hand drill and drill out the airway.Next, the PIMO Tenon Turning Tool is mounted on the hand drill and I cut a small test sizing to give me the distance between the test cut and the ‘Fat’ target.  After cutting the test, I measure with the caliper and record 9.23mm and subtract the ‘Fat’ target, 8.45mm, leaving about .78mm to remove using the PIMO tool. Using the Allen wrench provided with the PIMO tool, I close the gap of the cutting arm and cut again.  I only cut a small portion out of the end of the tenon and then measure – this additional test cut guards from taking off too much.  The measurement of this test cut after closing the gap of the carbide cutter arm is 8.45mm.  On the button!  I finish the cut to the stem facing and begin sanding the tenon down. Using 240 grade paper, I uniformly sand the tenon so that the fit is snug, but not too snug.  As I sand the tenon, I often test the progress by inserting the tenon into the mortise.  I NEVER force the tenon to make it fit – a cracking sound of a shank is not a happy thing!I come to a point where the end of the tenon was butting up against the closing ridge from the mortise drilling.  I could detect the bump in the mortise.  Using the sanding paper and a flat needle file, I focus on tapering the end of the tenon so that it can navigate the narrowing mortise.  I don’t want to cut off the end of the tenon as a longer tenon provides a bit more strength for the longer stem’s reach.Finally, a good snug fit it accomplished and the stem is seated well.  The next step in the project is to fashion the shank around the new stem.  The pictures following show the overbite of the shank which needs sanding.To protect the Howal nomenclature and provide a sanding barrier, I wrap masking tape around the shank.  Using 240 sanding paper, I begin the process of sanding to bring the shank and stem into alignment. After making good progress, I discover a dimple at the seam of the precast stem just at the tenon facing. I’ve seen this before. To take the dimple out by sanding also will remove the corresponding briar on the shank side.  This I don’t wish to do more than is necessary.  I could also use the PIMO Tool to shave off more of the facing to remove the dimple.  Yet this would shorten the overall length of the Warden stem – not a good solution either. To remedy the dimple, after cleaning the area with a cotton pad wetted with alcohol, I spot drop regular CA glue on the dimple and immediately give it a spray of an accelerator so that the glue patch stays in place.  I don’t want CA glue running down the tenon facing!Shortly after, I rejoin the stem and Howal stummel and continue sanding the patch area.  The patch did the trick. The pictures show the results and the shank and stem are now in alignment.  I move on. Even though a precast Warden stem is new, it doesn’t arrive on the scene ready for action. Precast stems will usually not have smooth surfaces but tend to be ‘wavy’ – a leftover from the casting process. Therefore, sanding the entire stem is necessary. To do the initial rough sanding of the stem I use a coarse 120 paper to do the heavy lifting. As I sand the stem, the first picture below reveals what I’m describing as sanding reveals the rippled surface. After much sanding and bothersome rubber dust(!), the stem is shaping up well.  I’m liking what I’m seeing.With the rough sanding of the stem-proper done, I shape the button using the 120 grade paper and a flat needle file.  The first two pictures show the starting point and sanding – upper then lower. My day is ending, and the final project is to continue the internal cleaning and refreshing of the stummel.  To do this I use kosher salt and isopropyl 95% to give the internals a soak which helps draw out the tars and oils embedded in the internal briar.  I first stretch and twist a cotton ball to serve as a ‘wick’ that helps draw the oils out of the mortise walls.  Using a stiff wire, I guide the wick down the mortise and airway.  I then fill the bowl with kosher salt – kosher doesn’t leave an aftertaste as iodized salt. After placing the stummel in an egg carton that keeps it stable, with a large eyedropper I fill the bowl with isopropyl 95% until the alcohol surfaces over the salt.  After a few minutes, the alcohol is absorbed, and I refill the bowl with alcohol.  I put the stummel aside to soak through the night. The next morning, the salt and wick are soiled indicating the activity of the soak through the night.  I toss the expended salt in the waste, wipe the chamber with paper towel and blow through the mortise to dislodge any salt crystals left behind.  To make sure all is clean, I again employ a pipe cleaner and cotton buds dipped in isopropyl 95% to finish the cleaning.  Not long after, the buds are emerging clean.  I move on. I return now to a reunited stem and stummel, using 240 sanding paper I now start the fine tuning of the stem after the coarse 120 paper. To show the completed condition of the stem after the 240 grade paper sanding, two close-ups show the improved texture of the sanded surface.Next, for more fine tuning of the stem’s surface, I wet sand with 600 grade paper and follow by applying a buff with 000 grade steel wool.  I love to see the emergence of the buffed-up vulcanite stem!  I keep the stem and stummel united throughout the sanding process to assure that the stem’s tenon facing remains sharp and in alignment with the shank – shouldering the stem is not an option!Turning back to the Howal bowl, I remove the masking tape and take some pictures marking the stage of progress. I like the rustic look this bowl already has.  My approach will be to run the bowl through the full regimen of micromesh pads to bring out the shine and briar of the smooth briar surfaces – going over for the most part, the sculpted surfaces.  At that point I’ll determine if I need to darken the shank end that was lightened because of the stem sanding.  I also will freshen the darker sculpted sections with a stain stick.  I’ll keep the stem and stummel joined through this process which will aid me later when I continue with the micromesh process on the stem. I take pictures of the bowl to mark the starting point. Beginning with micromesh pads 1500 to 2400, I wet sand followed by dry sanding with pads 3200 to 4000 and 6000 to 12000.  The pictures show the progression. The grain came out of the smooth briar nicely.  Now, to freshen the sculpted sections.  With the fine lined carvings in each sculpted section, briar dust has collected from all the sanding.  I first brush the carvings with a bristled brush.  This removes a good deal.  Following this, with an alcohol wetted cotton bud, I wipe out each carved section.  Next, using a very dark brown dye stick which turns out to be a mahogany, which looked the best after blending with the original surface, I trace the carvings darkening the sculpted briar.  After finishing, I give another quick sanding over the smooth briar surface with the last of the micromesh sanding pads, 12000.  I do this to clean off any inadvertent overrun of the dye stick onto the smooth briar and to sharpen the lines. Using Before & After Restoration Balm, I place some on my fingers and work the Balm into the briar surface.  I’m careful to work it into the crevasses of the sculpting.  B&E Restoration Balm is an excellent product from Mark Hoover at www.ibepen.com that raises the natural hues in subtle ways that enhances the presentation of the pipe.  After thoroughly working the Balm into the briar surface, I set the bowl aside for 20 minutes to allow the Balm to do its thing.  The second picture shows this state.  After 20 minutes, I wipe the excess Balm with a cotton cloth and then buff the stummel with a microfiber cloth to thoroughly remove the excess Balm and to raise the shine.The next step is to apply Blue Diamond compound to the entire pipe.  After reuniting stem and stummel, I mount a cotton cloth buffing wheel to the Dremel, set the speed at about 40% full power and apply a light application of the compound focusing primarily, but not exclusively, on the smooth briar sections.  I keep it light because I do not want the compound to cake up in the rusticated ridges of the sculpting.  I apply the compound to the smooth and rusticated surfaces and to the stem.Following the compound, I use a felt cloth to wipe the pipe to clean it of compound dust.  I don’t want compound mixing with the waxing phase.After switching to another cotton cloth buffing wheel, maintaining the same speed, carnauba wax is applied to the entire pipe.  As with the compound, I go easy on the rusticated ridges not wanting wax to cake.  After applying wax to the entire pipe, I use a microfiber cloth to give the Howal Churchwarden a rigorous hand buffing to remove excess wax and to raise the shine.The Howal Sculpted Apple bowl looks great mounted on the bow of the Churchwarden stem!  I’m pleased how the smooth briar surfaces cleaned up and how the grain provides a striking contrast with the sculpted design.  The added rusticated ribs in the carvings adds a nice detail.  The overall presentation of the Howal Sculpted Churchwarden gives a very old, rustic feel.  I’m glad John was patient waiting for this Churchwarden to come to life.  He will have the first opportunity to add this pipe to his own collection from The Pipe Steward Store.  This Churchwarden project benefits the Daughters of Bulgaria – women and girls who have been trafficked and sexually exploited.  Thanks for joining me!

Restoring a Pipe for Alex with a shape I don’t know how to identify


Blog by Steve Laug

I have another of Alex’s purchases on the table this morning. It is a smooth finished pipe in a shape that really covers a gamut of shapes – a bent pot, paneled pot, sitter, canted pot sitter. It is a very unique Malaga that I am not sure what to call. When it is set as a sitter the rim top is straight with the stem. The pipe was dirty and caked with few spots of lava and some darkening on the inner edge of the bowl. The bowl had a rough surfaced cake. The exterior was dirty with grime and oils. The stamping on the left side of the shank read “MALAGA” and the right side read Imported Briar. The vulcanite saddle stem had tooth marks and chatter on both sides. I took photos of the pipe before I started the cleanup work. I took close up photos of the bowl and rim to capture the condition of the pipe before I started my cleanup work. The rim top had some lava and darkening on the top and the inner edge. There was a thin uneven cake in the bowl. Other than being very dirty the pipe was in great condition. The stem was dirty and covered with a thick scum on the surfaces. There was tooth chatter on the top and underside near the button and some tooth marks on the button surface itself.I took a photo to capture the stamping on both sides of the shank. The first photo shows the stamping “MALAGA” on the left side of the shank. The second photo shows the stamping on the right side of the shank. It reads Imported Briar. The stamping on both sides is clear and readable.If this is the first of the Malaga restorations that you have read about then you should know the backstory of the brand. I am including the link to a blog that I wrote that gives some of the history of the Malaga brand and the Malaga Pipe Shop in Royal Oak, Michigan in the USA. I have written an earlier blog to give a little history of the Malaga Brand and the pipemaker, George Khoubesser. Here is the link – https://rebornpipes.com/tag/malaga-pipes/.That blog also includes links to a catalogue and the history of the pipemaker George Khoubesser. Follow the link to get a feel for the brand and the pipemaker.

I decided to start with the bowl first. I cleaned up the rim top with a folded piece of 220 and 400 grit sandpaper to remove the lava and the damage. I followed Jeff and my regular regimen for cleaning estates. I reamed the light cake in the bowl with a Savinelli Fitsall pipe knife to remove the cake. I sanded the bowl with 220 grit sandpaper wrapped around a piece of dowel to smooth out the inside walls of the bowl. The mortise was surprisingly clean but there were some tars and oils on the walls. I scrubbed the mortise and the airway in the shank and the stem with alcohol, cotton swabs and pipe cleaners.I polished the exterior of the bowl and the rim with micromesh sanding pads – wet sanding with 1500-12000 grit sanding pads. I wiped down the bowl after each sanding pad with a damp cloth. I scrubbed the briar with Murphy’s Oil Soap with a tooth brush. I scrubbed it off with running water to remove the soap and the grime on the bowl. I dried it off with a soft cloth. I worked some Before & After Restoration Balm into the surface of the briar with my fingertips to clean, enliven and protect it. I let the balm sit for a little while and then buffed with a cotton cloth to raise the shine. The photos show the bowl at this point in the restoration process. I set the bowl aside and turned my attention to the stem. I sanded out the tooth chatter with 220 grit sand paper and started to polish it with a folded piece of 400 wet dry sandpaper. Once it was finished it the tooth chatter and oxidation was gone and it began to shine.I polished the stem with Denicare Mouthpiece Polish from a tin of it I have in the drawer here. It is a gritty red paste that I rub on with my finger tips and work into the surface of the stem and button and buff off with a cotton pad. It gives me a bit of a head start on the polishing work plus I have a tin to use up!I polished the stem with micromesh sanding pads – wet sanding with 1500-12000 grit sanding pads. I wiped it down after each sanding pad with Obsidian Oil. I polished it with Before & After Pipe Stem Polish – both Fine and Extra Fine and buffed it off with a final coat of Obsidian Oil. This is interestingly shaped smooth, bent sitter in what I would call a Bent, Paneled Pot Sitter with a black vulcanite saddle stem. It has a great look and feel. The shape is very tactile and fits well in the hand. The shape makes it a unique looking pipe. I polished stem and the bowl with Blue Diamond polish on the buffing wheel. I gave the bowl and the stem multiple coats of carnauba wax. I buffed the pipe with a clean buffing pad to raise the shine. I hand buffed it with a microfiber cloth to deepen the shine. The pipe polished up pretty nicely. The rich oil cured briar took on life with the buffing. The rich brown colour of the briar work well with the polished vulcanite stem. The finished pipe has a rich look that is quite catching. Have a look at it with the photos below. The shape, finish and flow of the pipe and stem are very well done. The dimensions are Length: 6 inches, Height: 1 ¾ inches, Outside diameter of the bowl: 1 ½ inches, Chamber diameter: 7/8 of an inch. I will be adding the pipe to the finished Malaga pipes that I have set aside for Alex. This will be a great addition to his collection of Malaga pipes. Thanks for walking through the restoration with me as I worked over another Malaga.