Refreshing a New Old Stock (NOS) Mastercraft De Luxe Chubby Billiard


Blog by Steve Laug

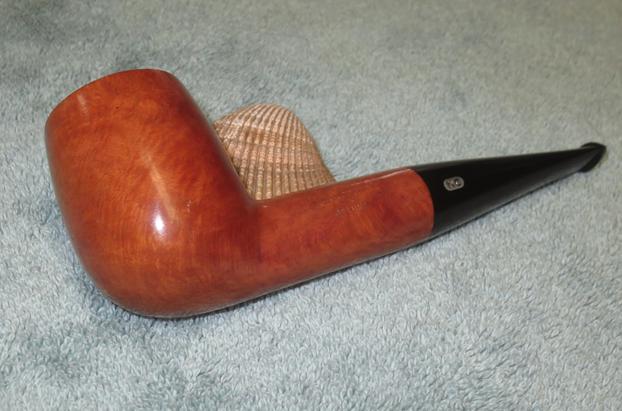
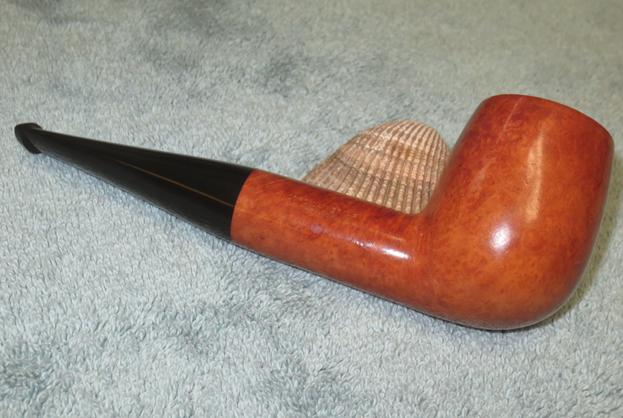
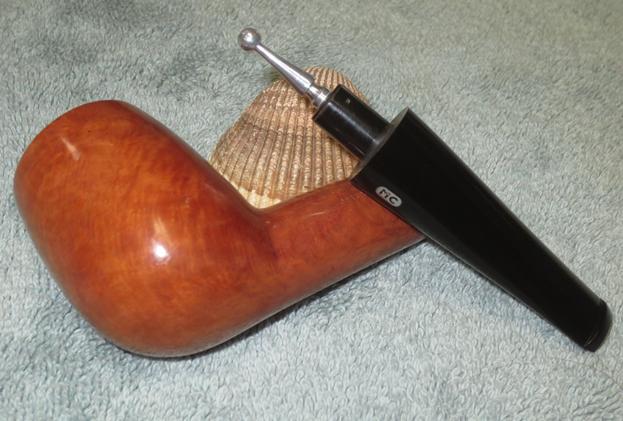
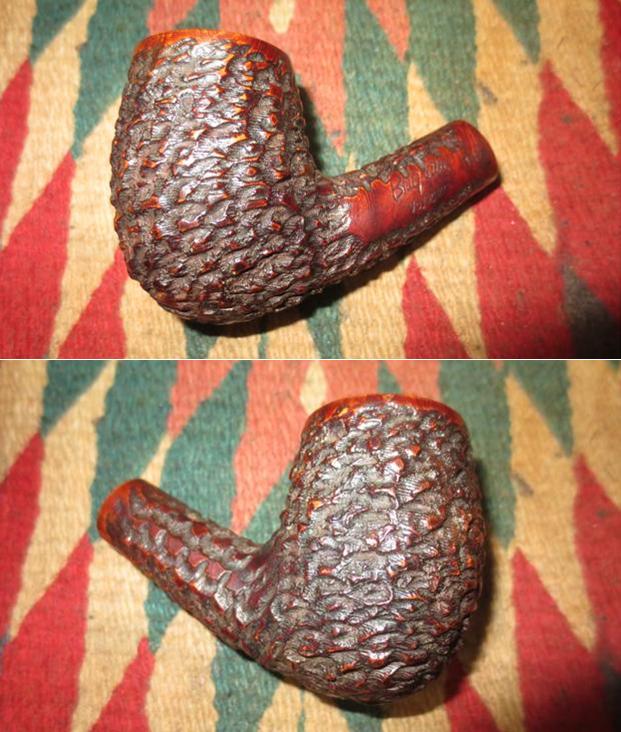
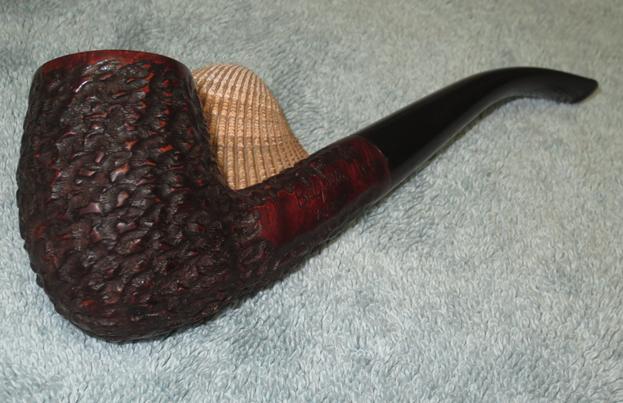
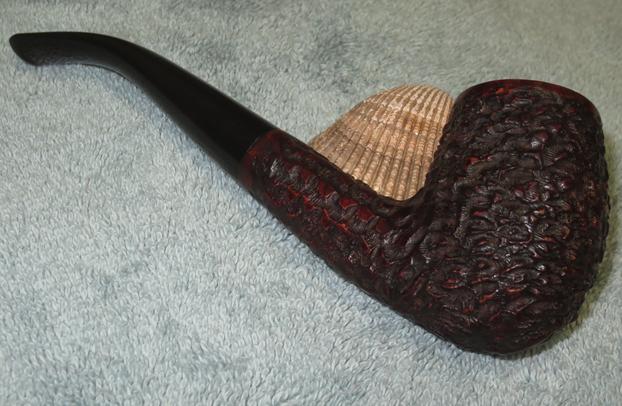
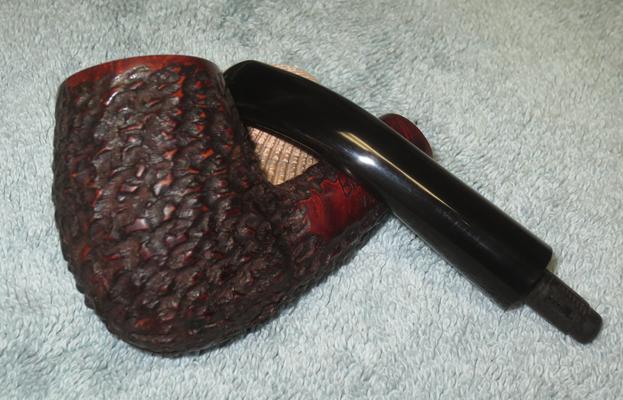
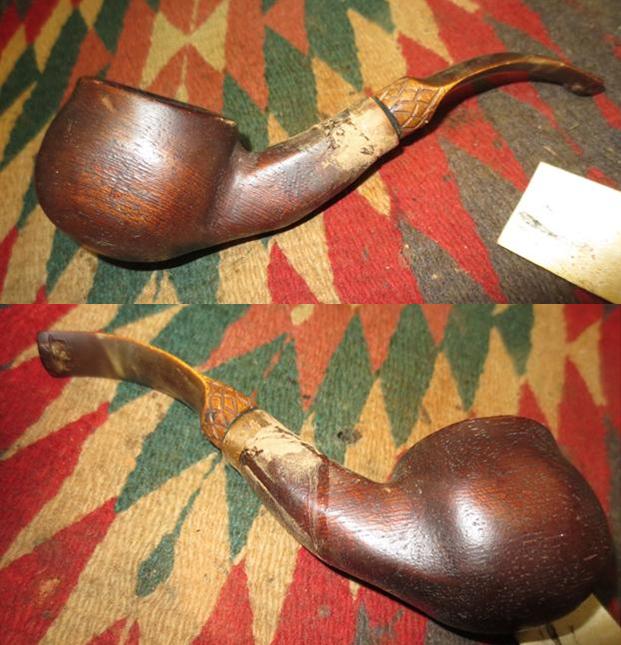
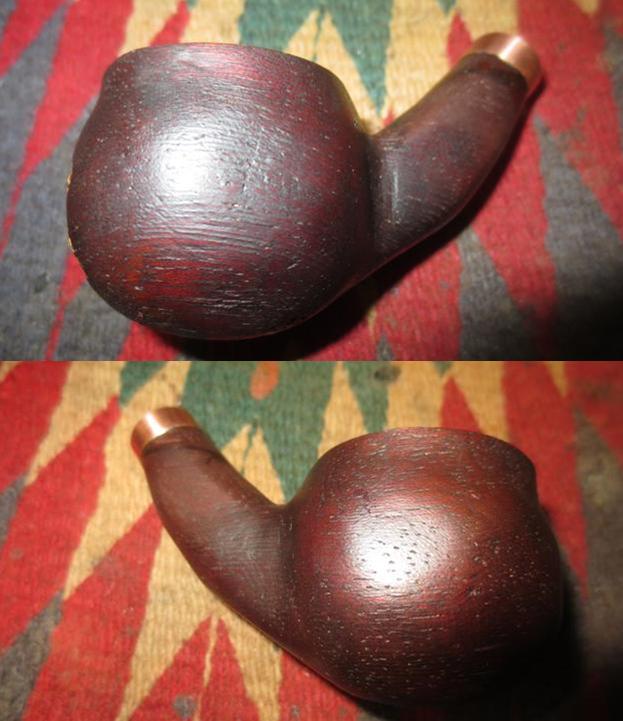
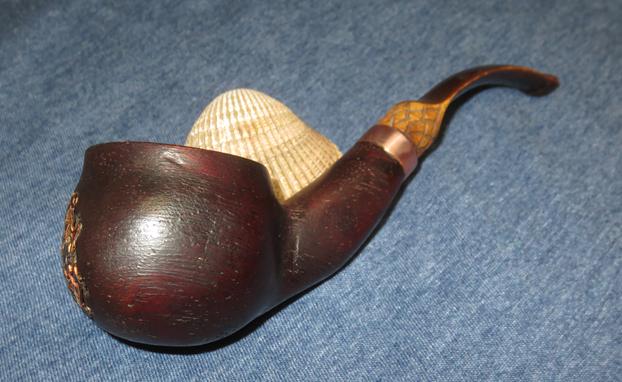
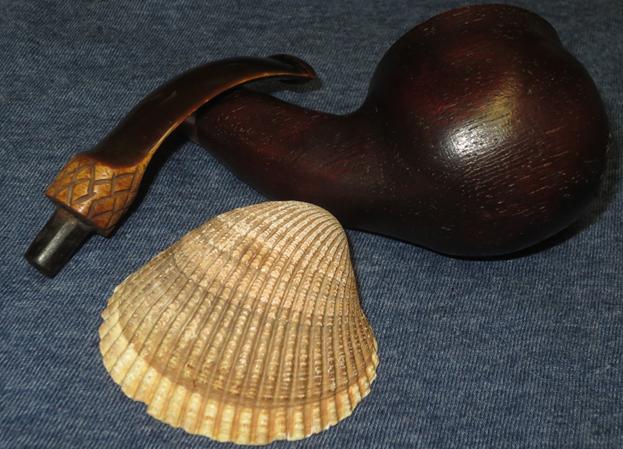
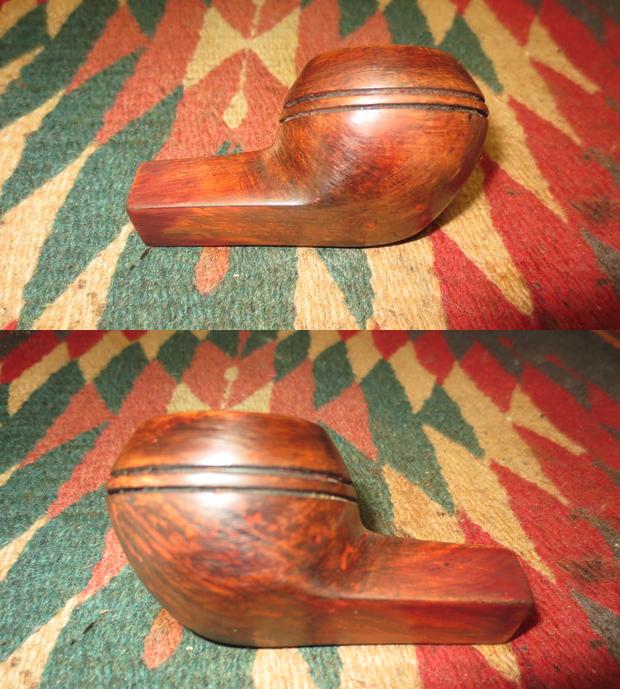
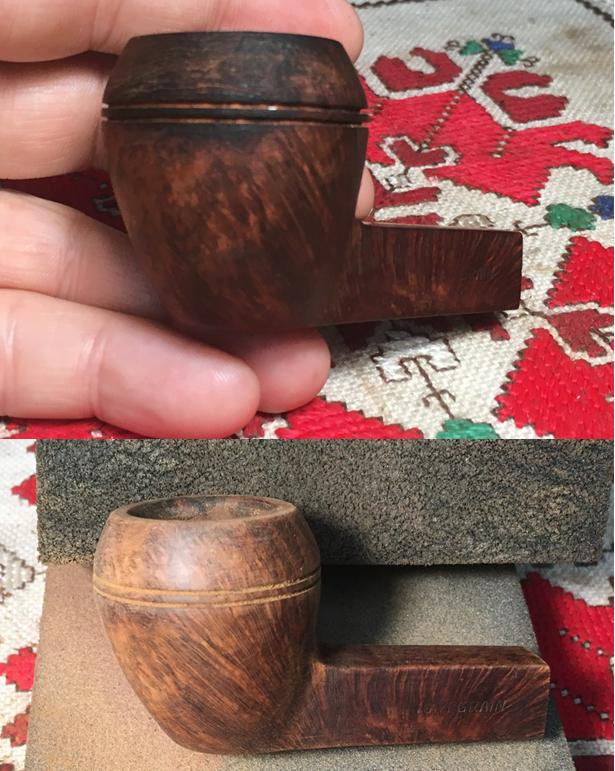
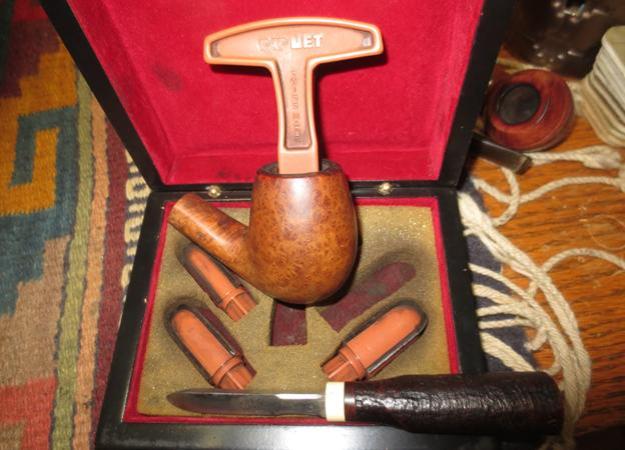
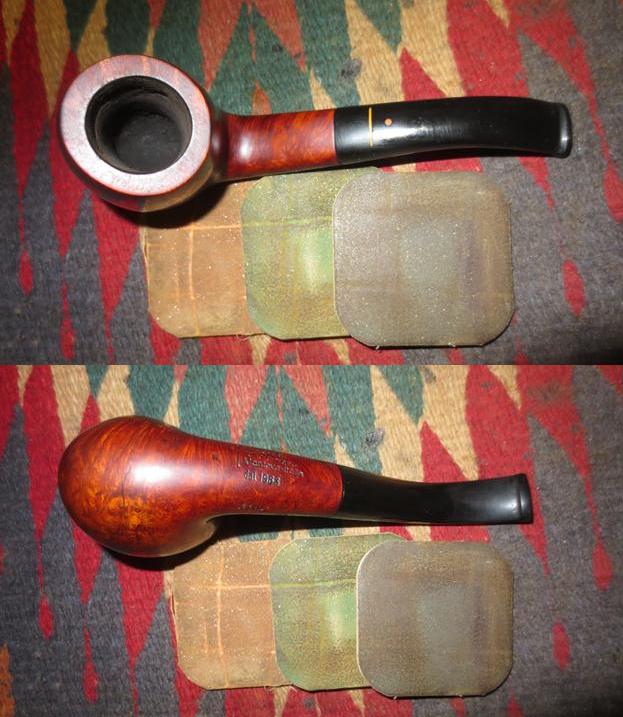
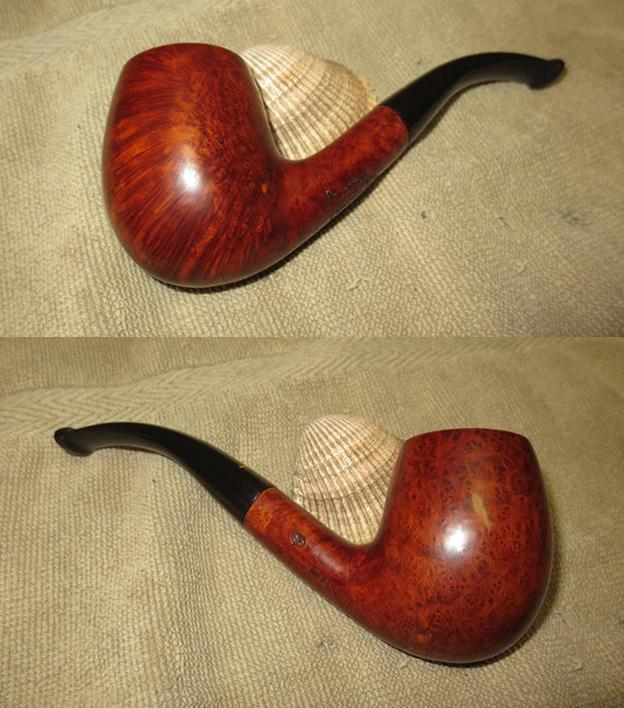
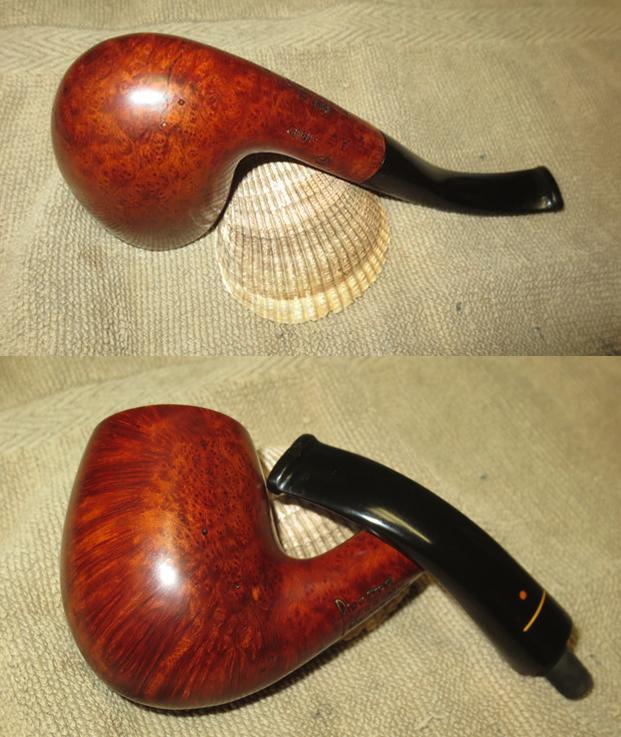
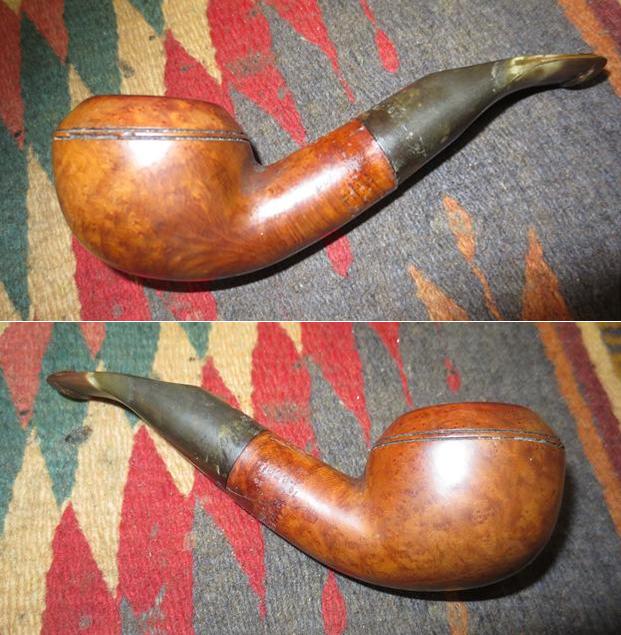
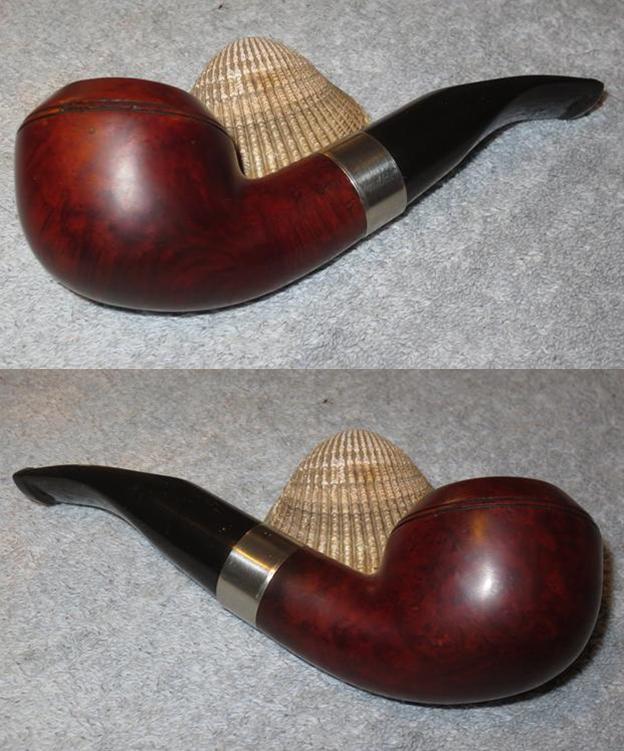
My brother found this pipe on one of his pipe hunts not long ago. It is a beautiful unsmoked, new old stock (NOS) chubby billiard. The briar is in great shape. The rim, the pristine bowl and the finish on the pipe all spoke of new pipe. I did a bit of reading on the brand to see if I could possibly date this pipe. I copied a section from Pipedia. It gives a flow of the history of the brand. Here is the link: https://pipedia.org/wiki/Mastercraft in it the text comes from a posting made by “Ted” on the Grabow Collectors Forum. He was the former Exec VP of Grabow/Mastercraft.

It doesn’t appear that Mastercraft was ever a manufacturer and bought pipes from multiple factories — mostly French and English. It survived briefly the post war recovery and then was acquired by Grabow. Ted writes:

“First a confession. From 1974 till 1984 I had several positions with Mastercraft including Executive Vice President. I also worked for Grabow from 66 till 74 and from 84 till I retired in 91. In 91, with retirement, I was President and COO for the corporation that was called “Sparta Industries”. I have seen both sides of the “fence”, and even though I never left the “employ” of Grabow, My loyalties for 10 years were with M/C.”

“United States Tobacco(UST)(Skoal and Copenhagen) bought Grabow in 69′ from the Lavietes family. In 74′ they bought M/C from Bernard Hochstein and moved it into the EXACT facility Grabow occupied. I was named “operations manager” and we were in the basement of a 4 story building in Sparta, NC.”

“M/C was STRICTLY an importer of pipes and pipe related merchandise. In 74′ when M/C moved from NYC to NC the inventory of finished goods was stored in a facility in Winston Salem, NC. Lentz Moving and Storage. Stacked 10 feet high the inventory covered 180,000 square feet….FINISHED. In my time at Grabow I had never seen that much finished stock, and the shapes, manufacturers,finishes. Heaven for a pipe smoker…..Damn right. You would have had to slap me really hard to get the grin off my face.”

“I’ll just list a few Manufacturers/names of the inventory. England:Parker/Hardcastle(Dunhill), Orlik…France: Jeantet…Jima…Cherrywoods. Italy: GIGI pipe…Radica….Rossi…Federico Rovera….Emilio Rovera….Santambrogio. Brebbia. Meerschaums from Austria: Strambach. Lighters from Japan….Pouches and accessories from Hong Kong…and the Israeli pipes from Mr. Hochstein’s sons. Trust me…This is only a small sample of the things M/C had, and bought into inventory.”

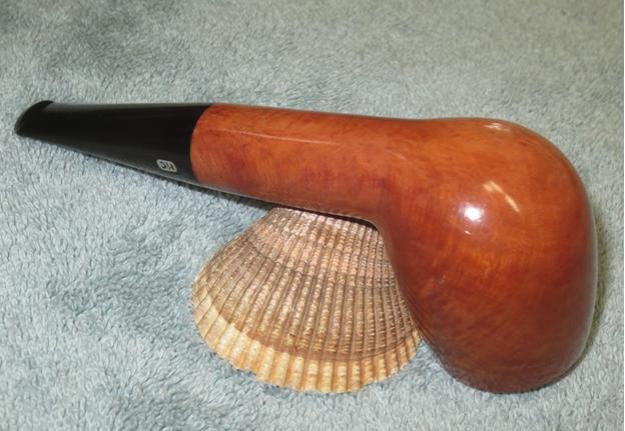
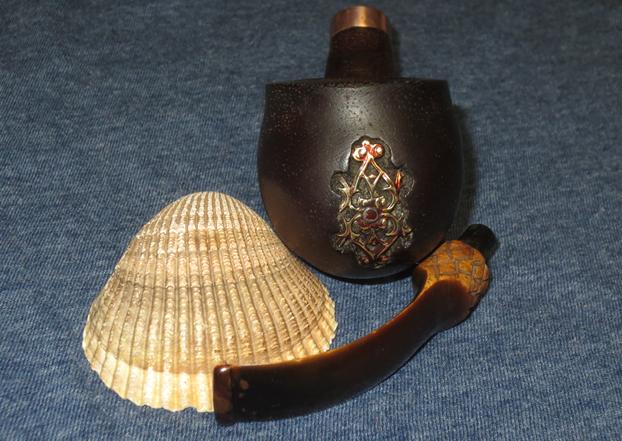
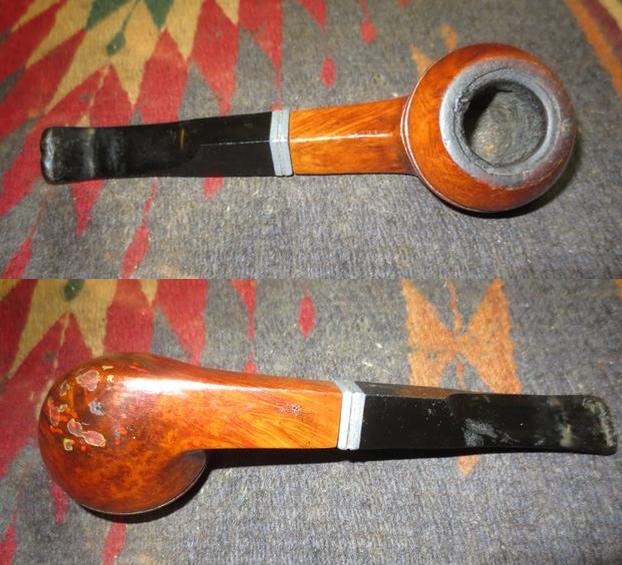
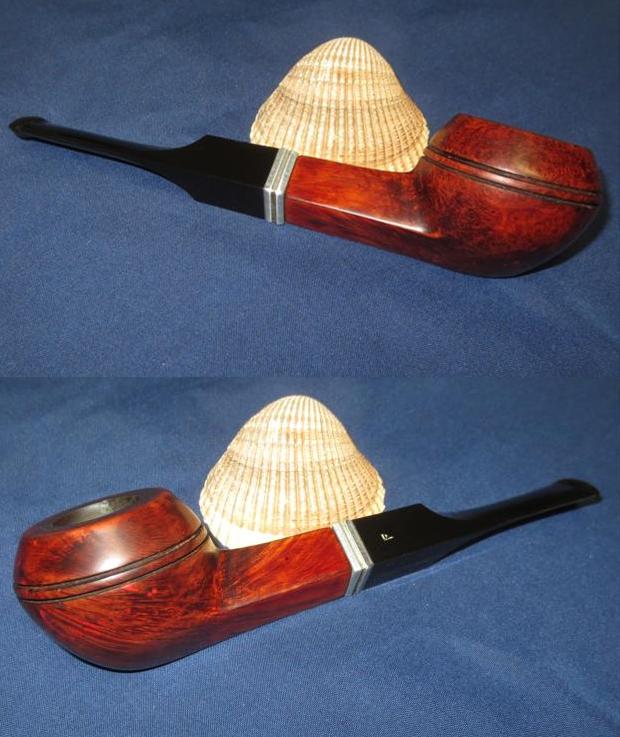
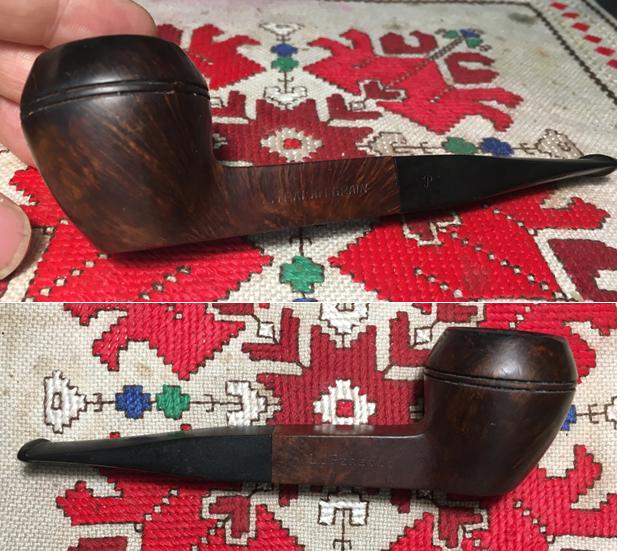
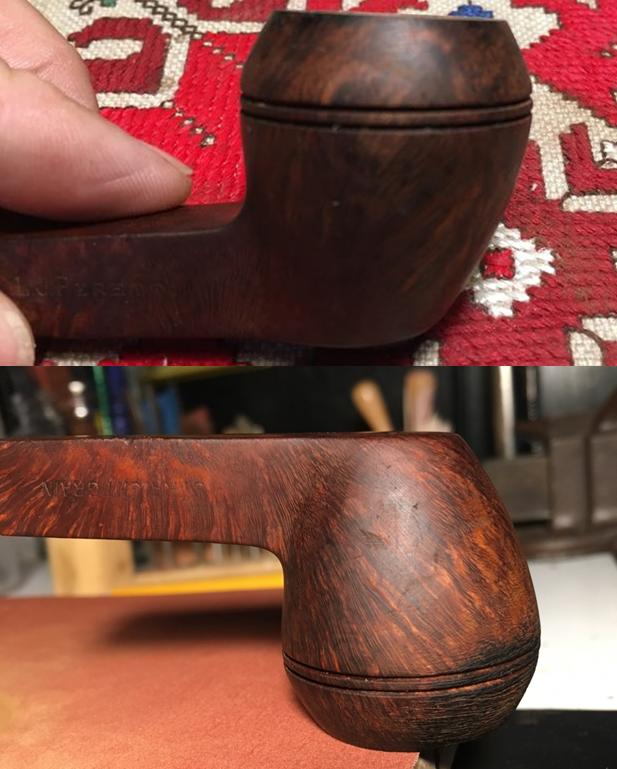
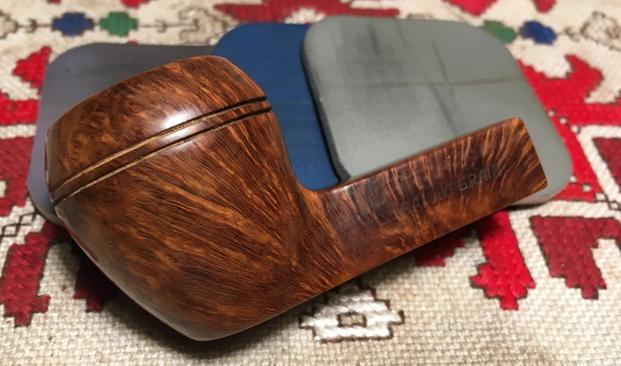
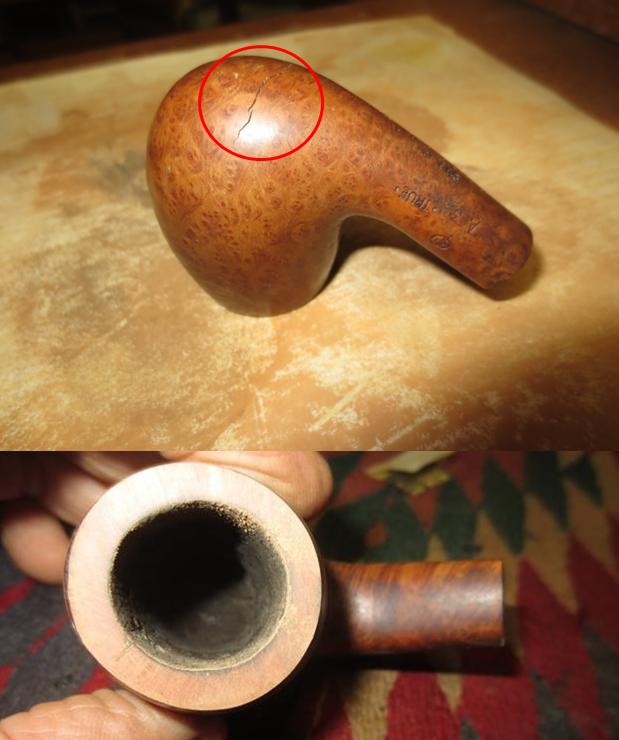
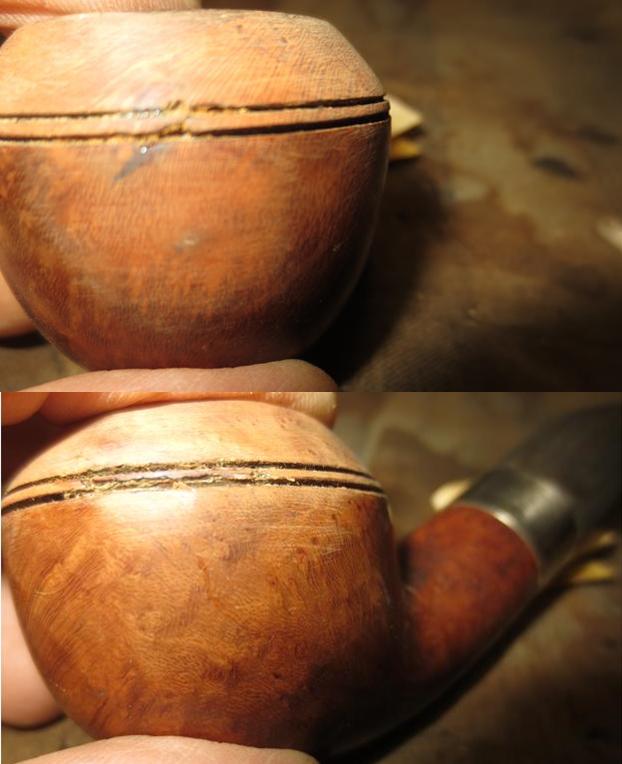
With that bit of history I know that the pipe was made prior to the buyout by Grabow in 1974. That makes the pipe at least 43 years old at this time. This one is French made probably by Jeantet. The stamping reads on the left: Mastercraft in the normal shield over De Luxe. The shield hangs from a branch like a sign. On the right side of the shank it is stamped Corsican Briar over France. 
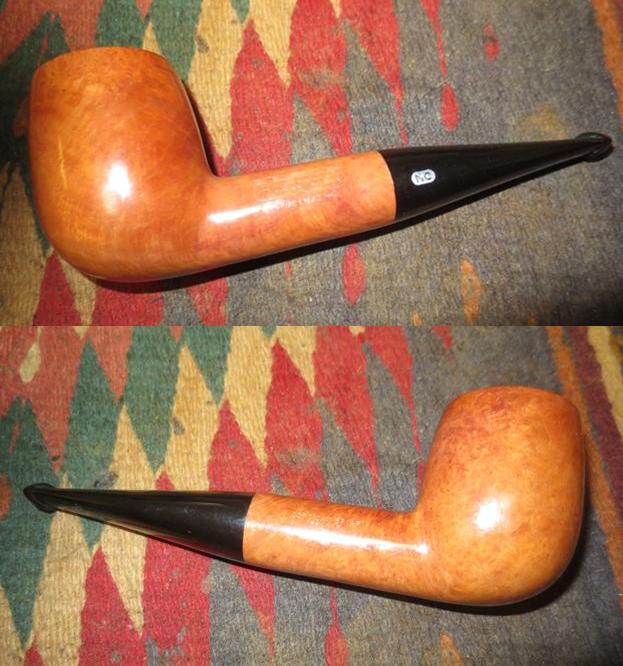
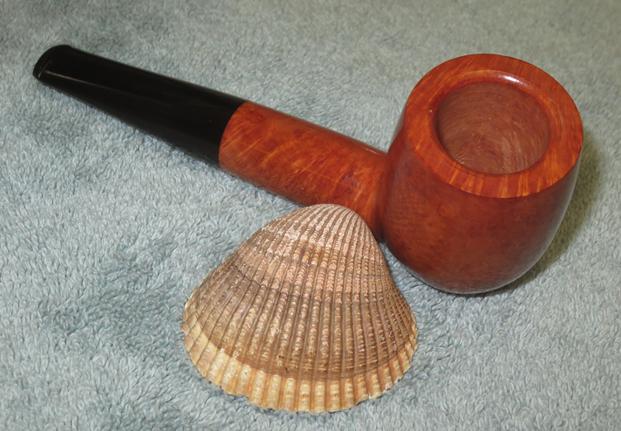
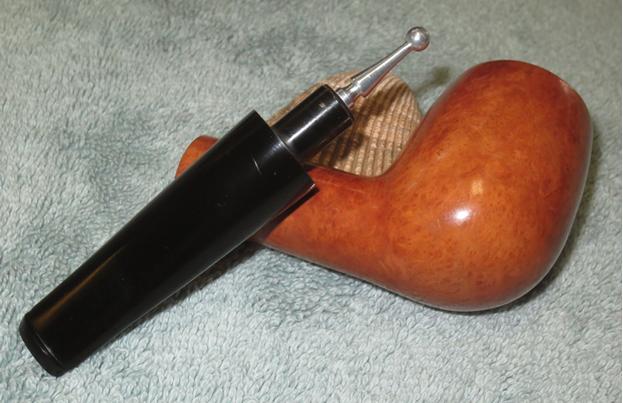
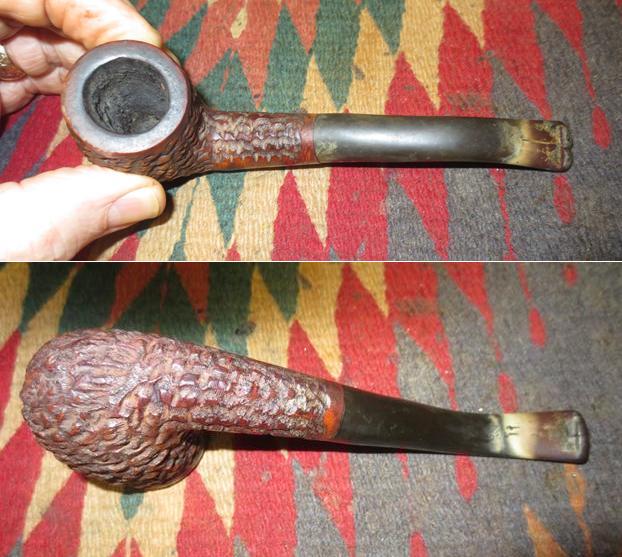
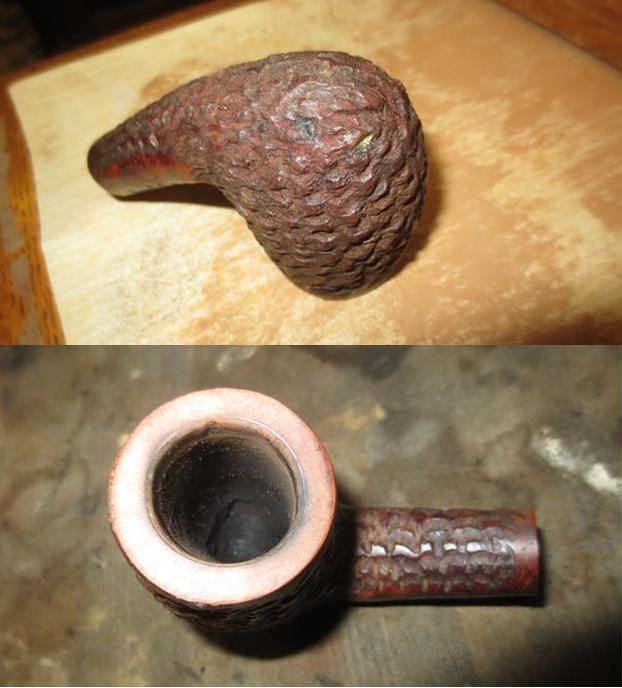
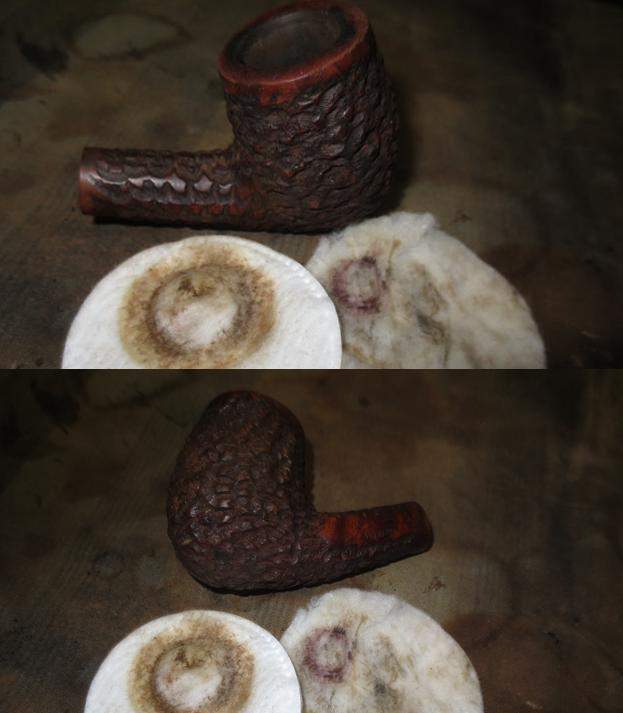
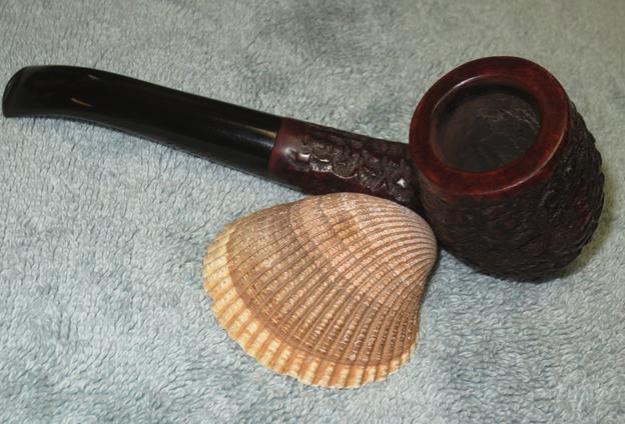
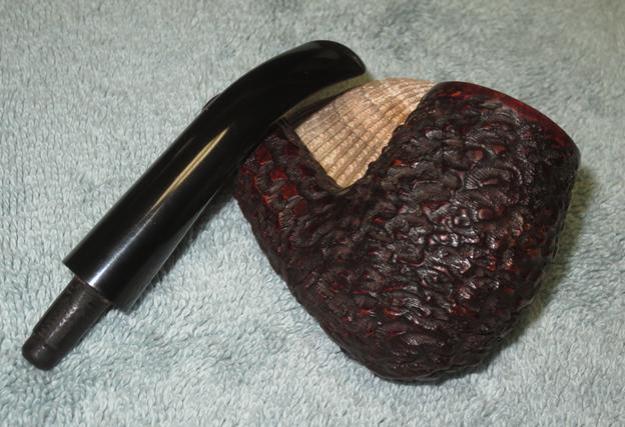
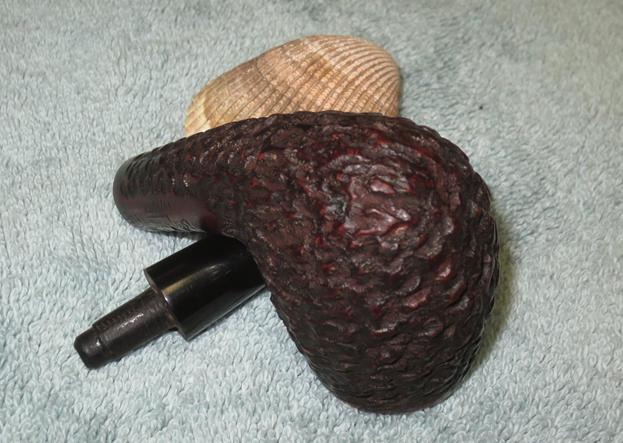
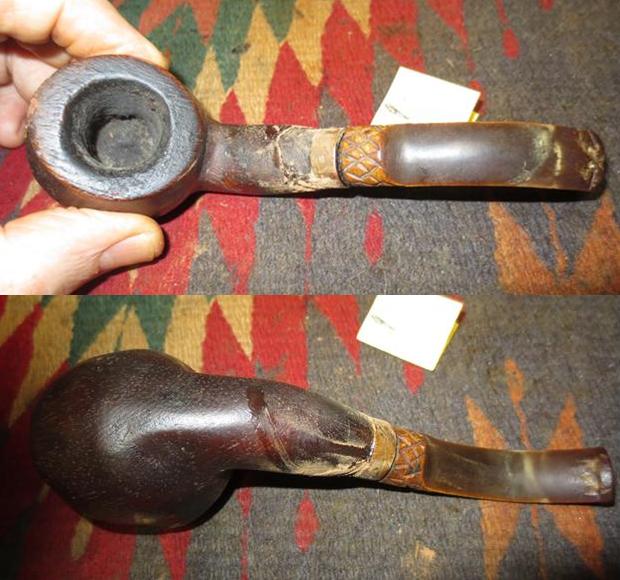
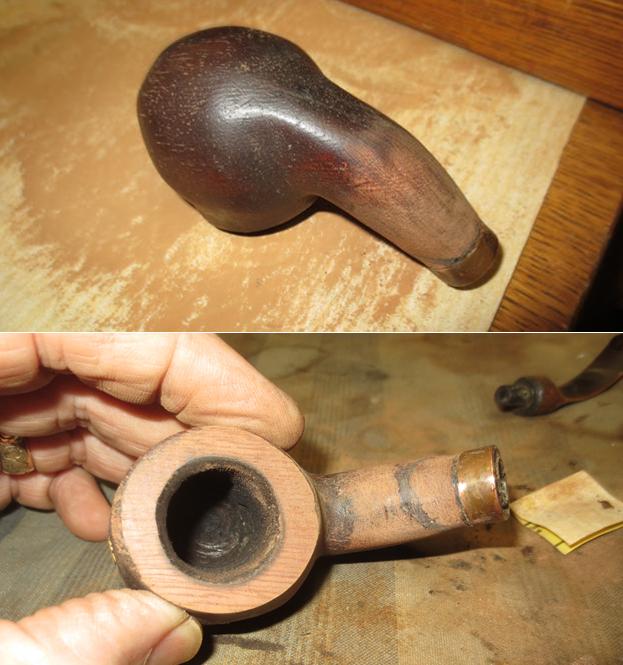
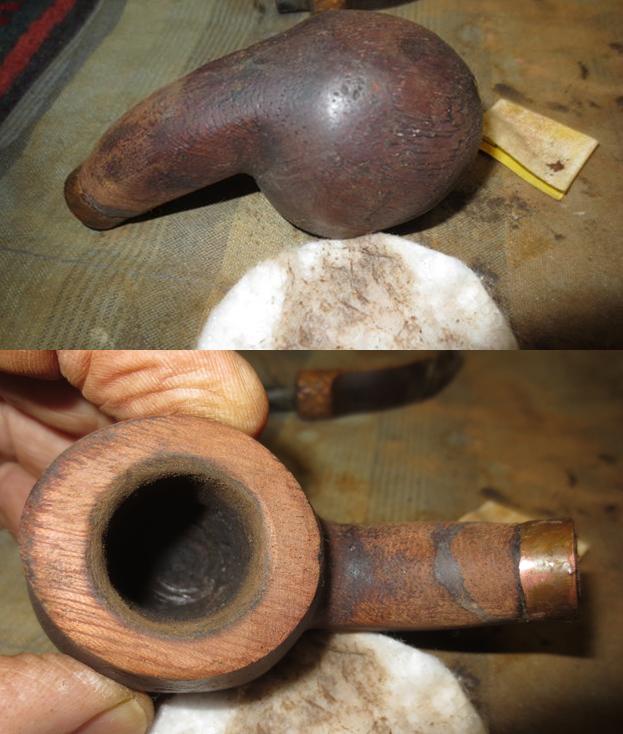
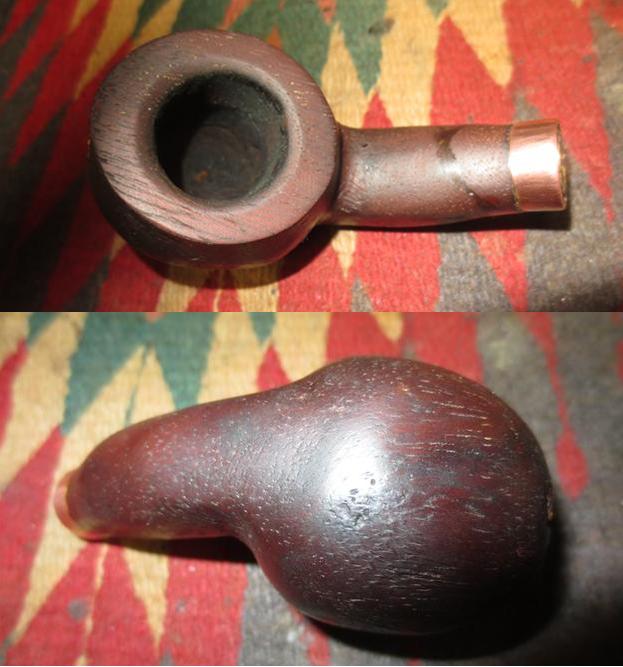
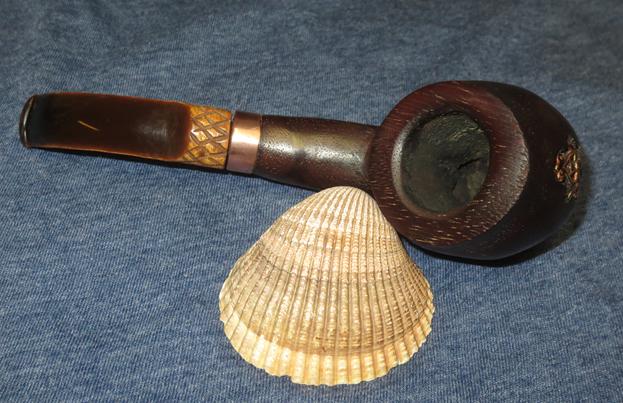
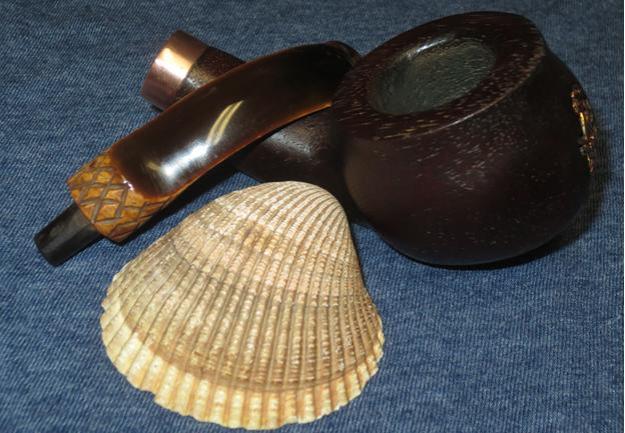
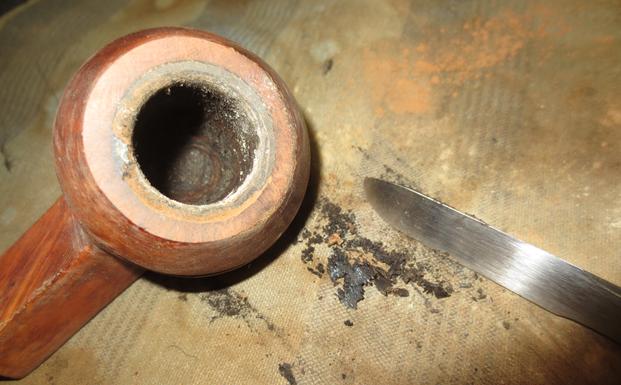
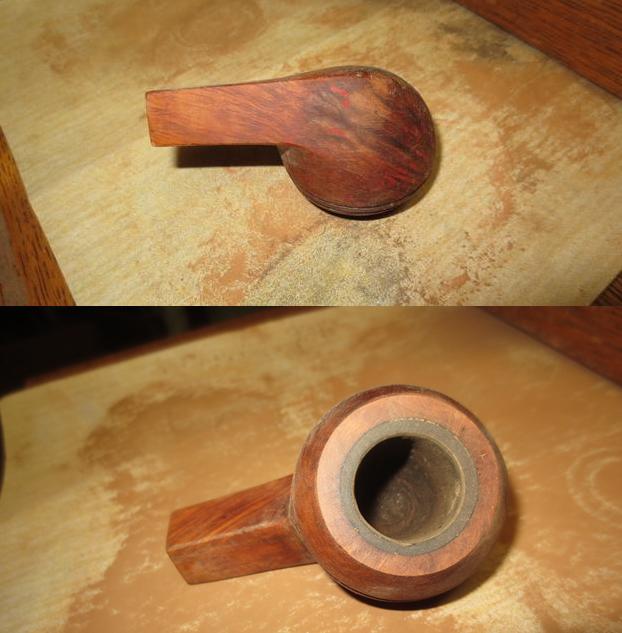
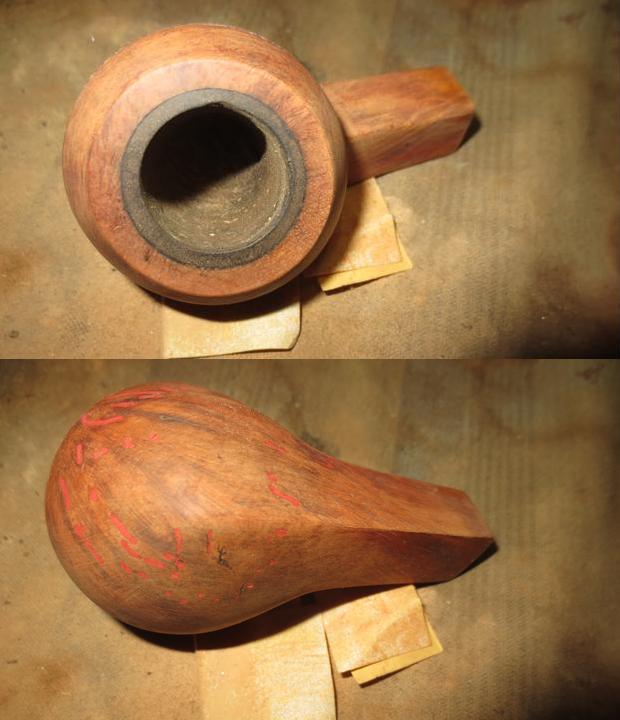
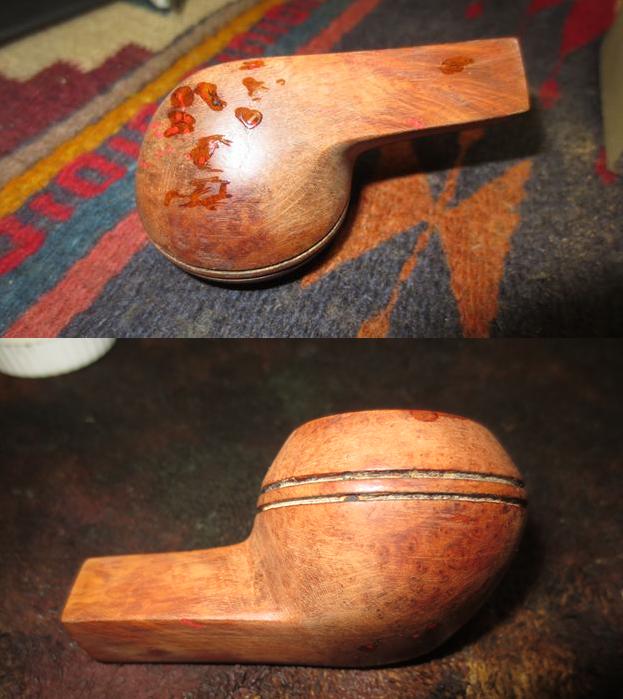
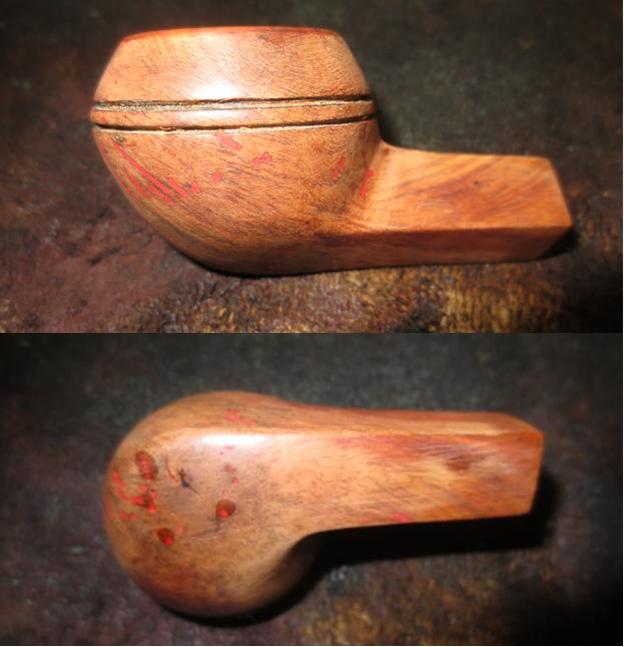
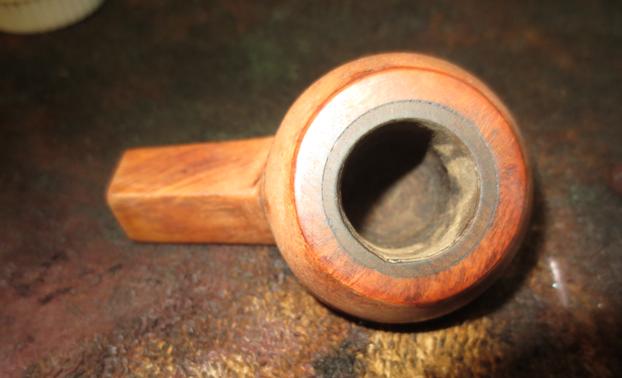
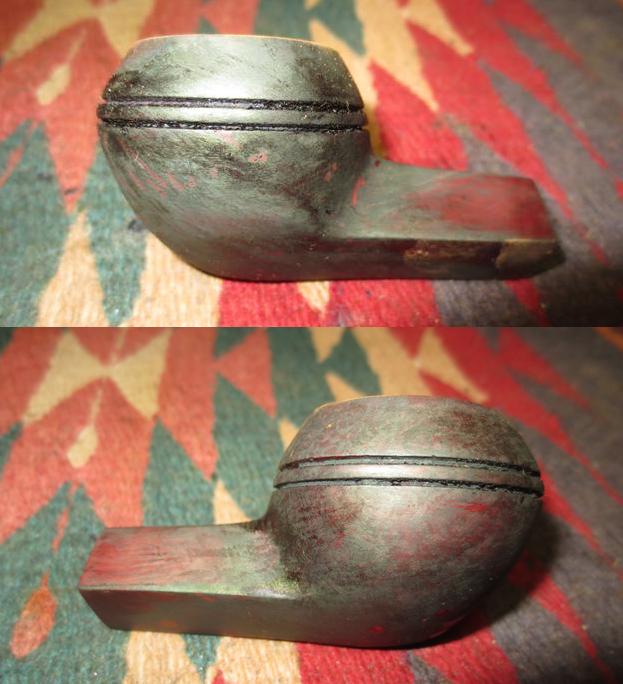
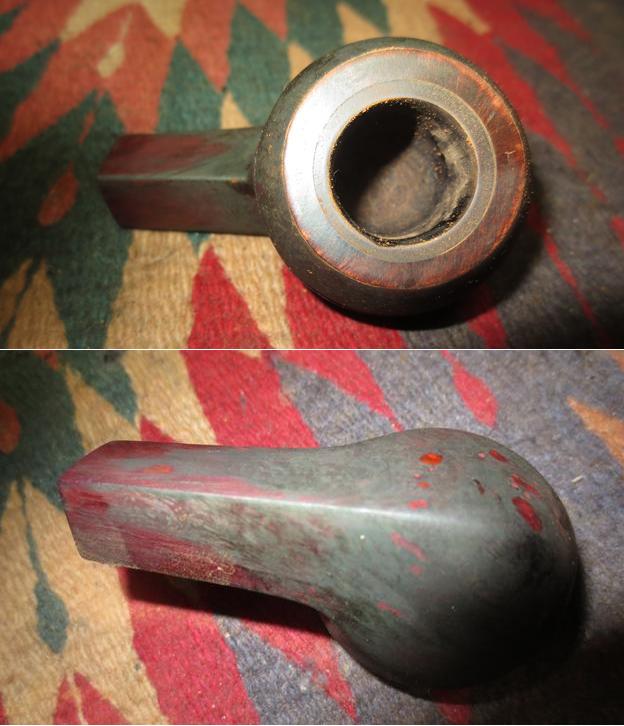
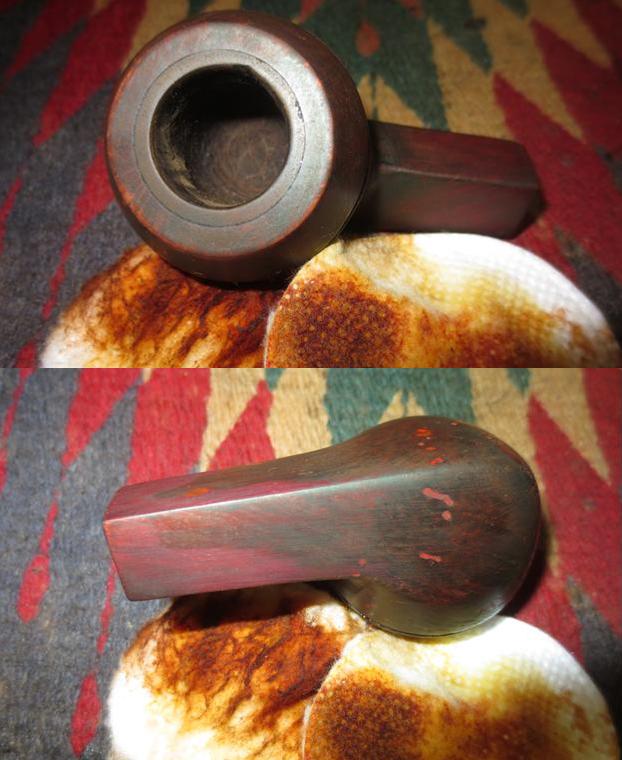
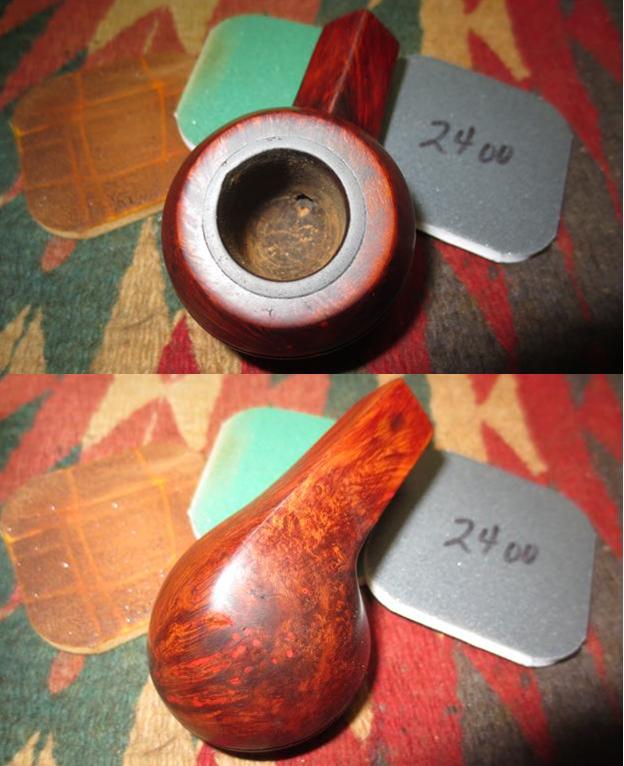
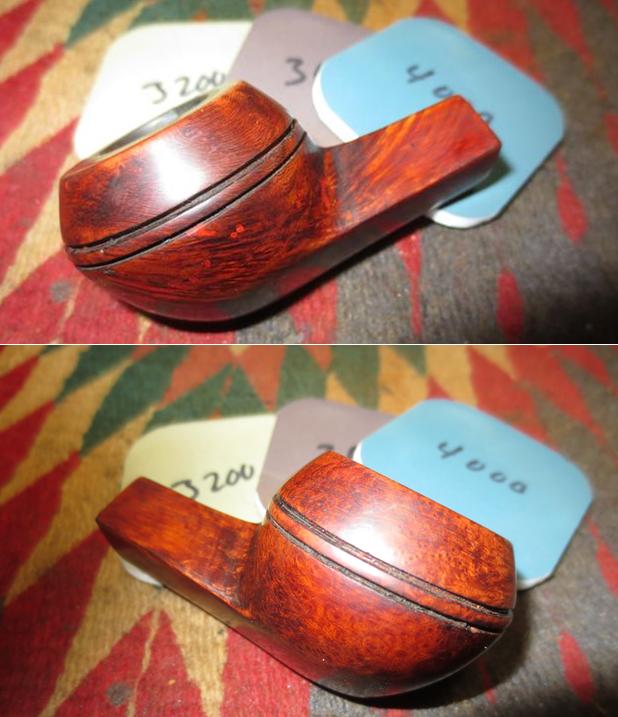
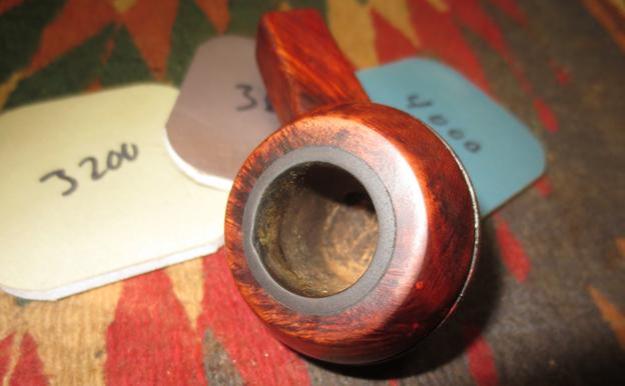
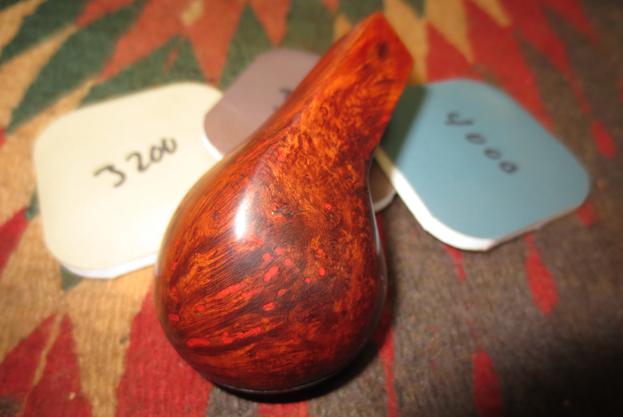
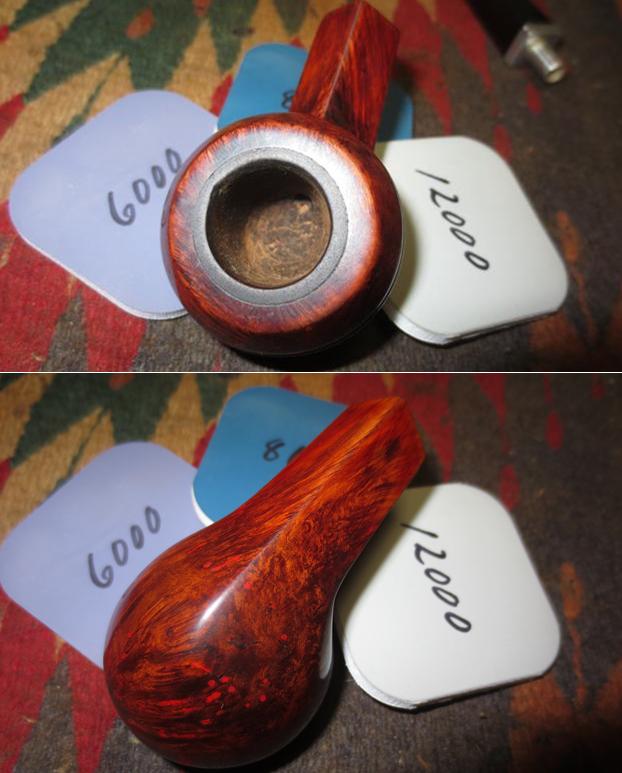
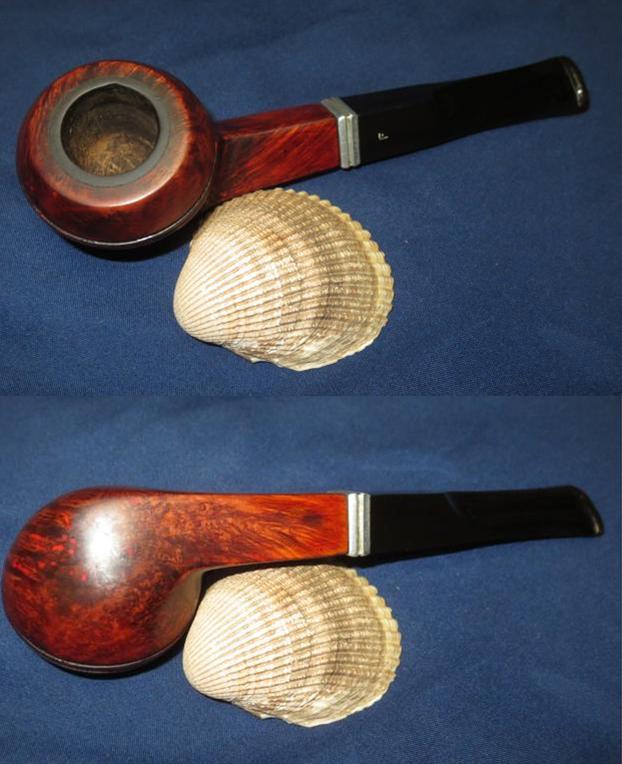
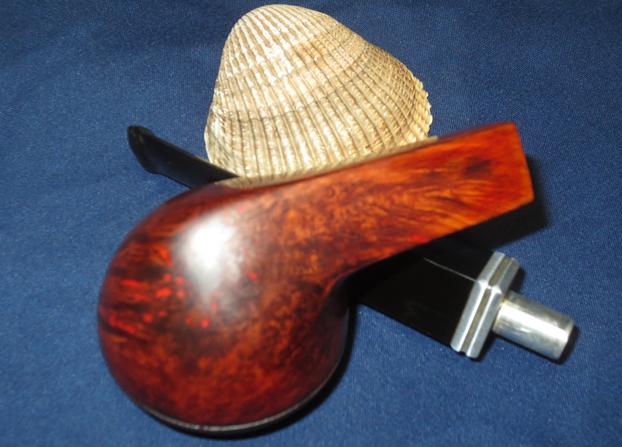
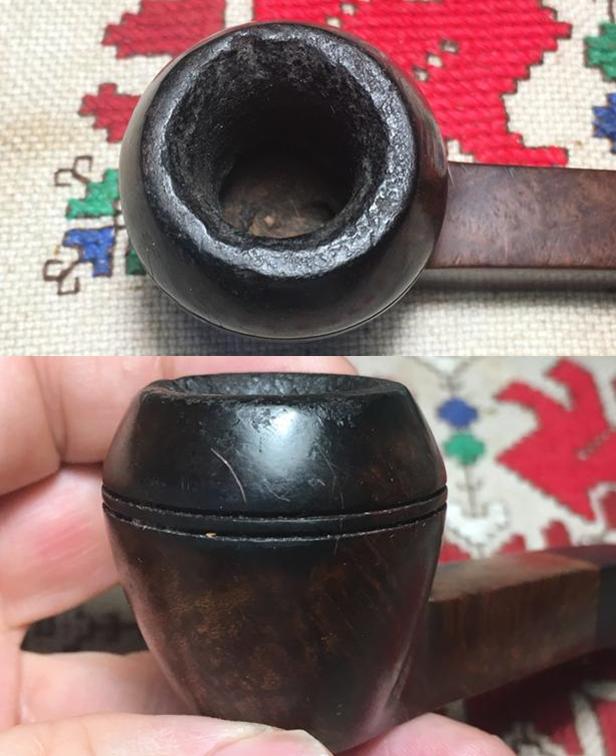
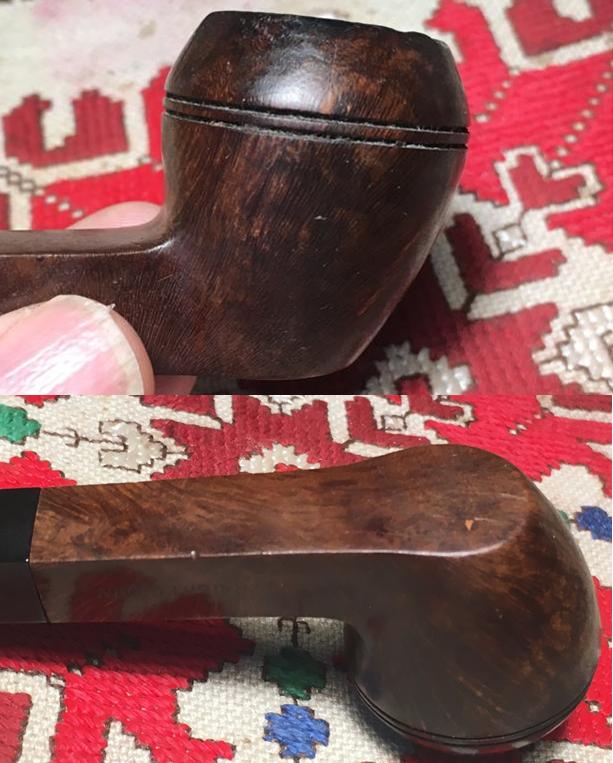
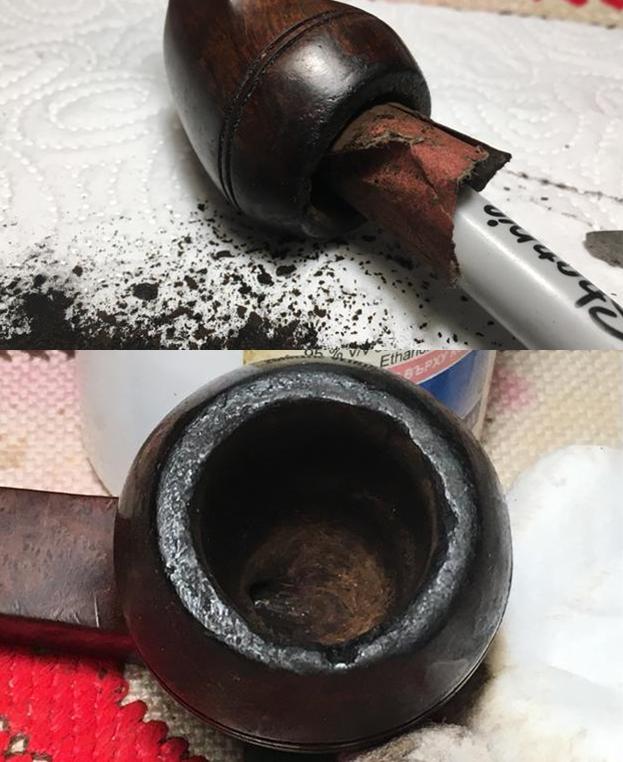
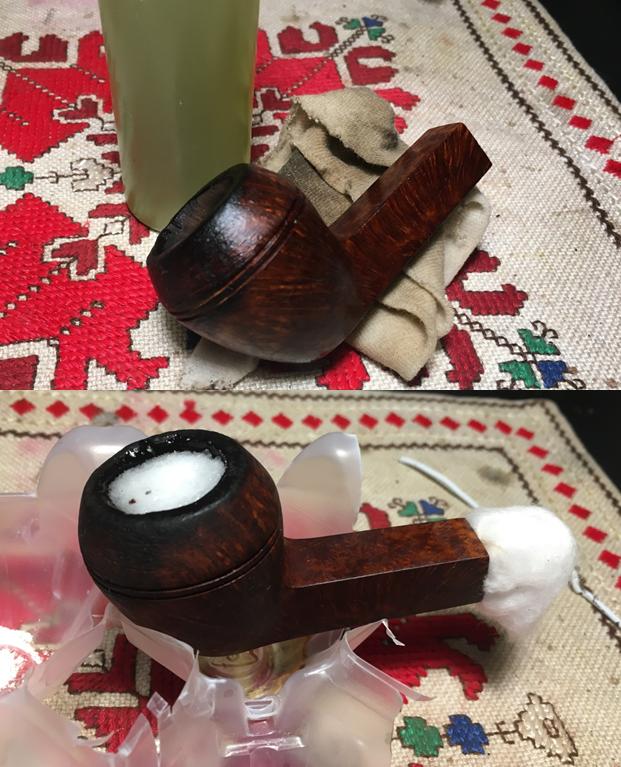
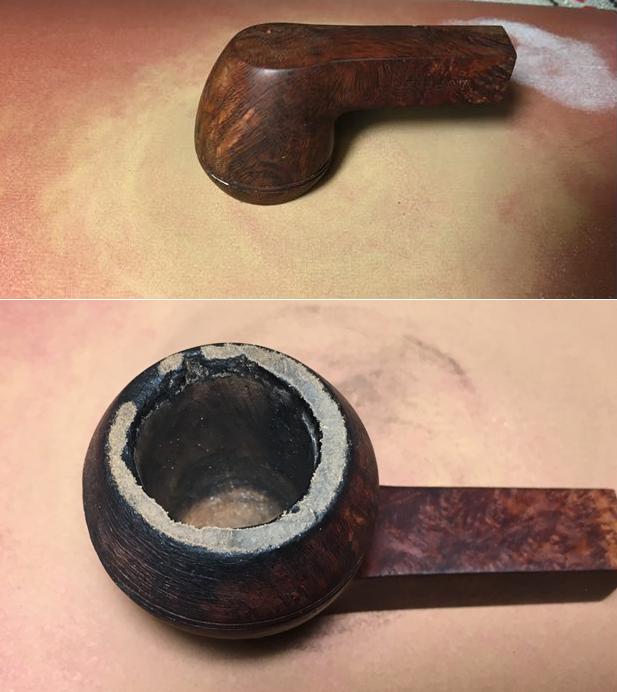
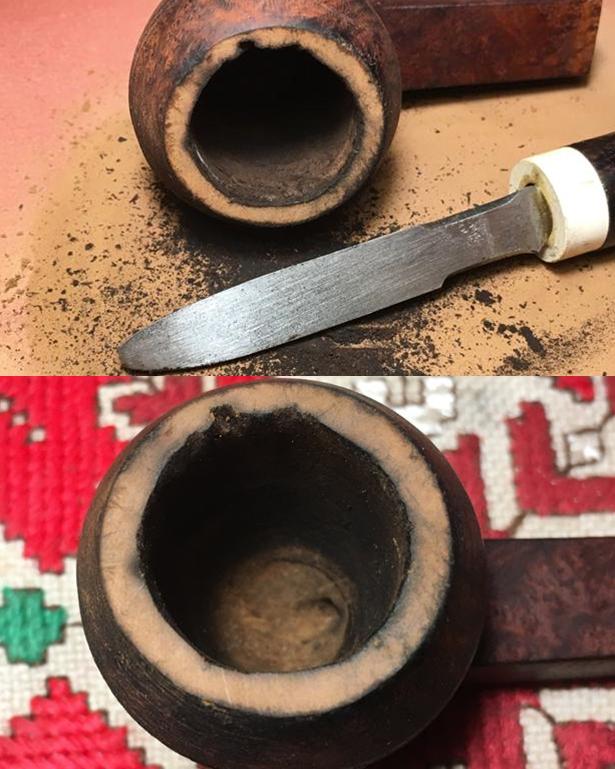
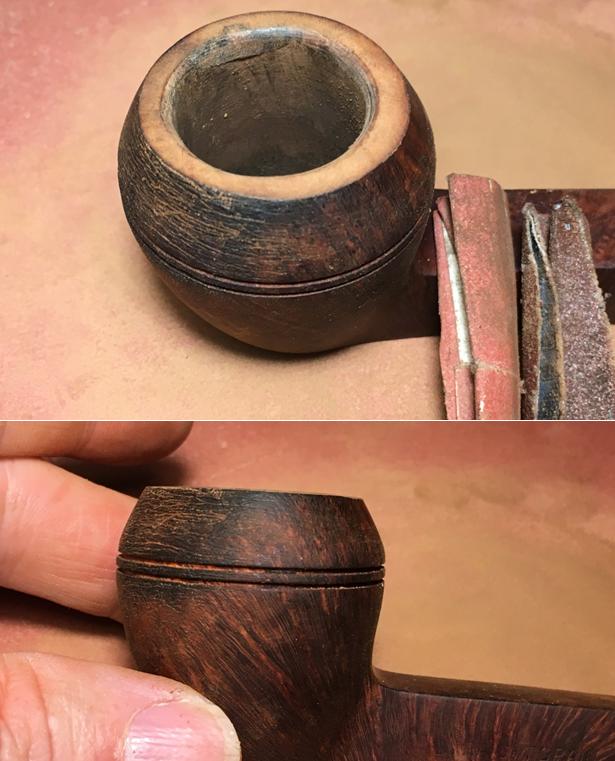
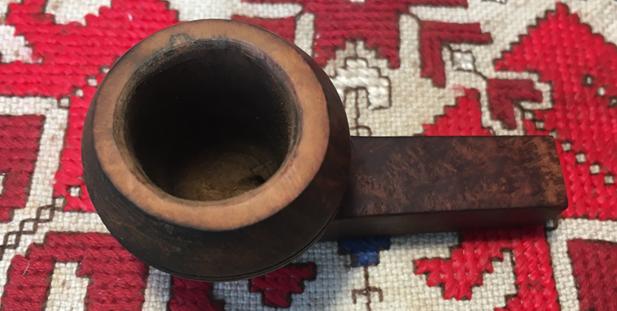
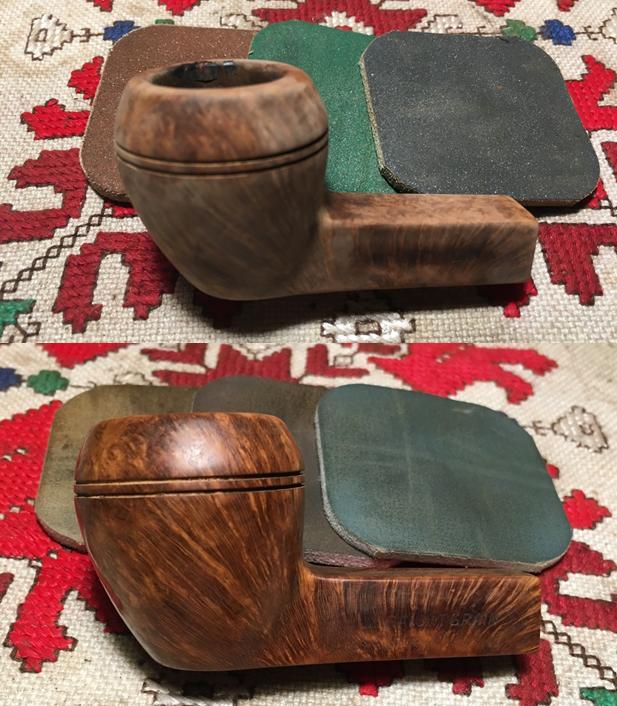
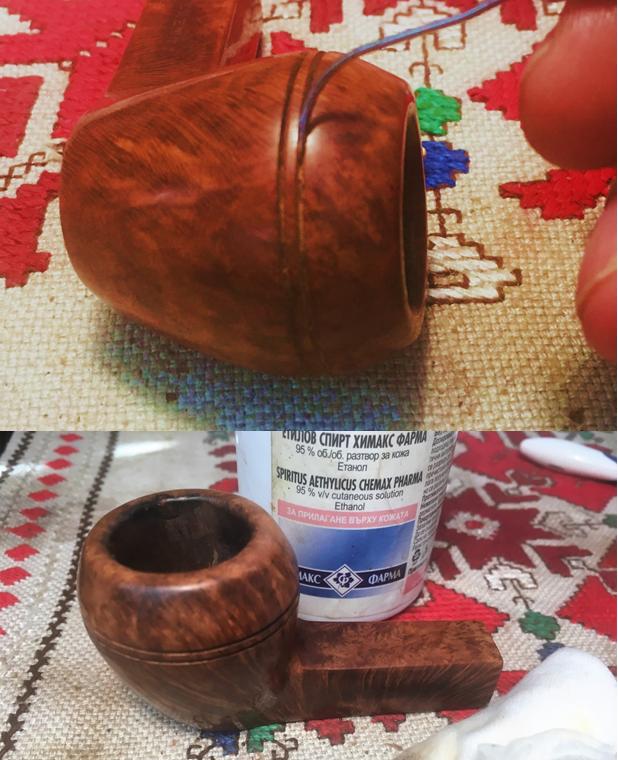
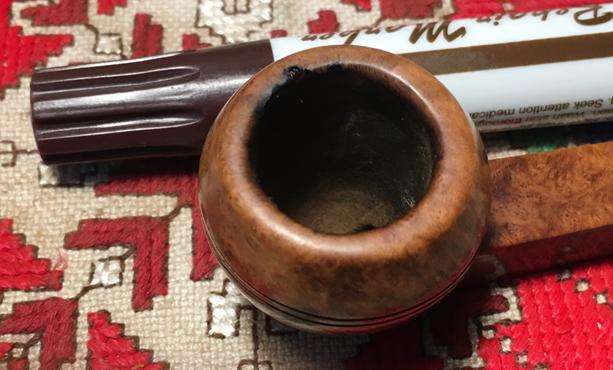
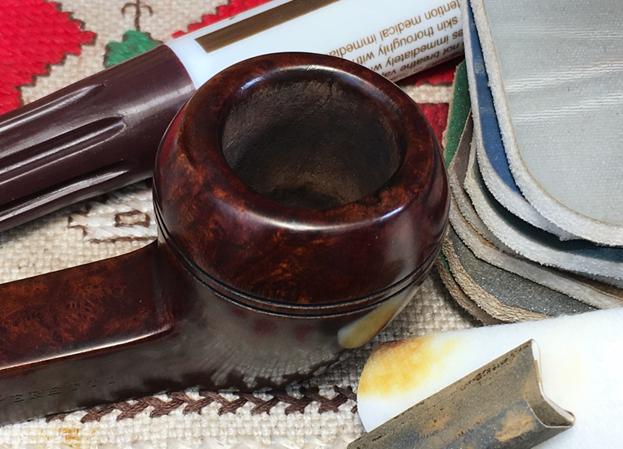
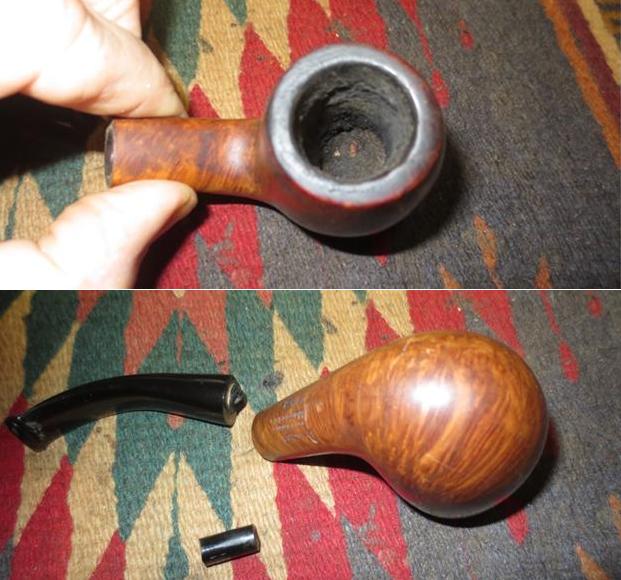
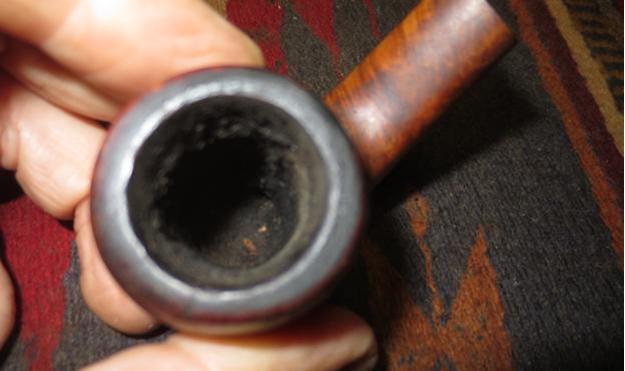
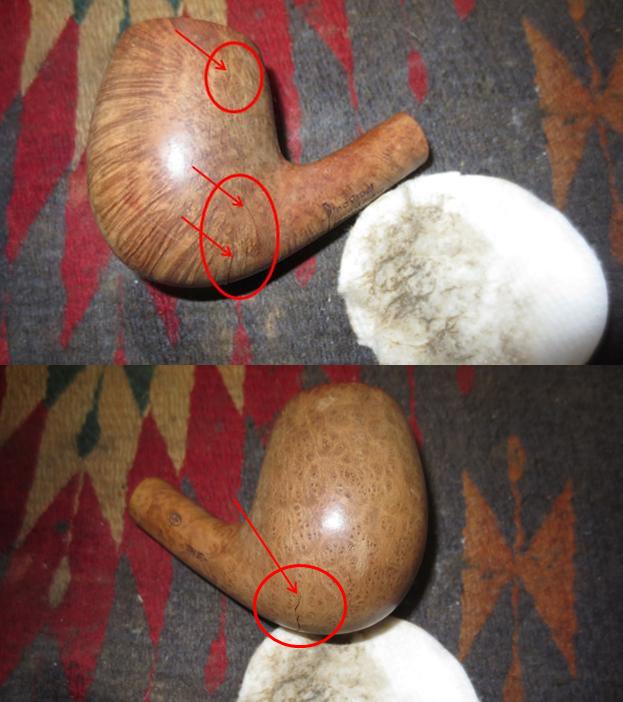
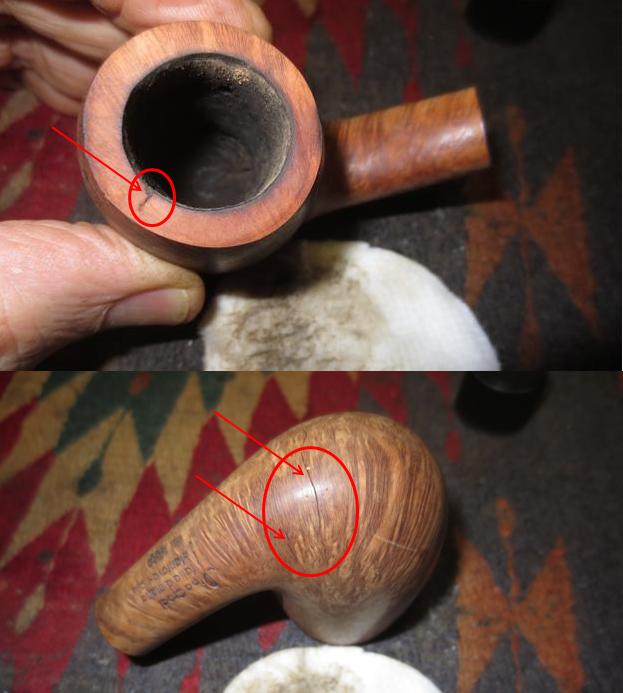
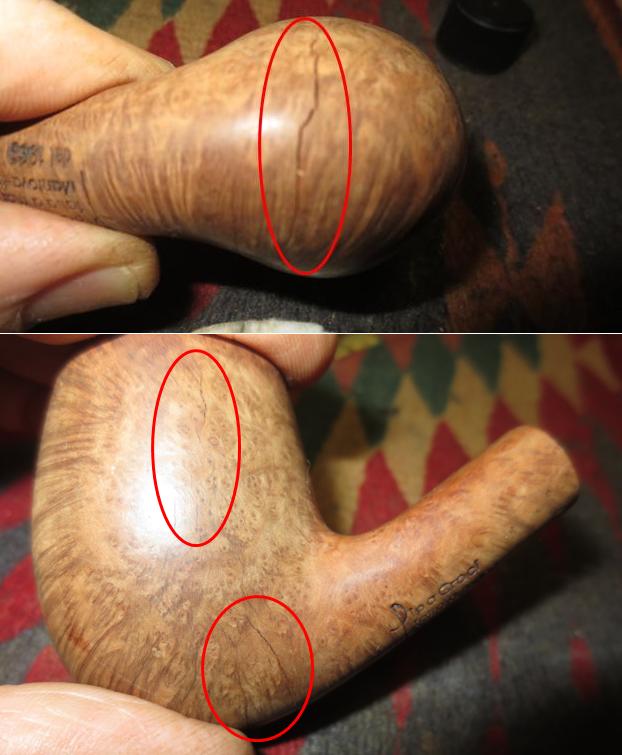
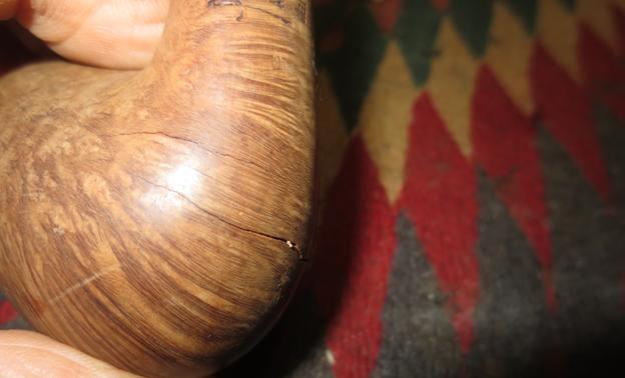
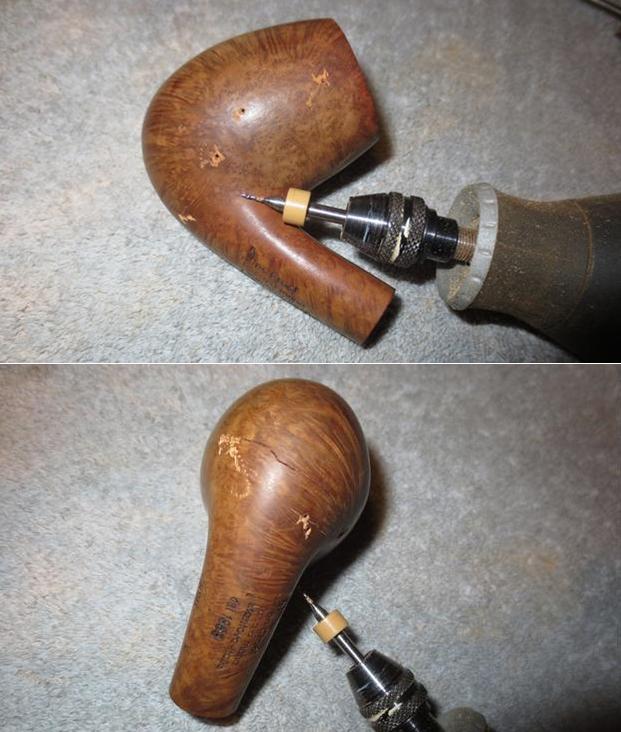
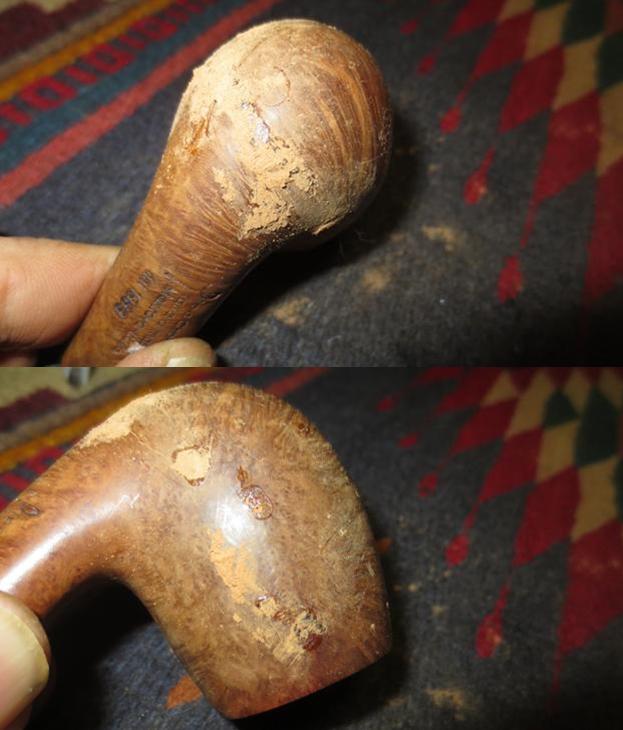
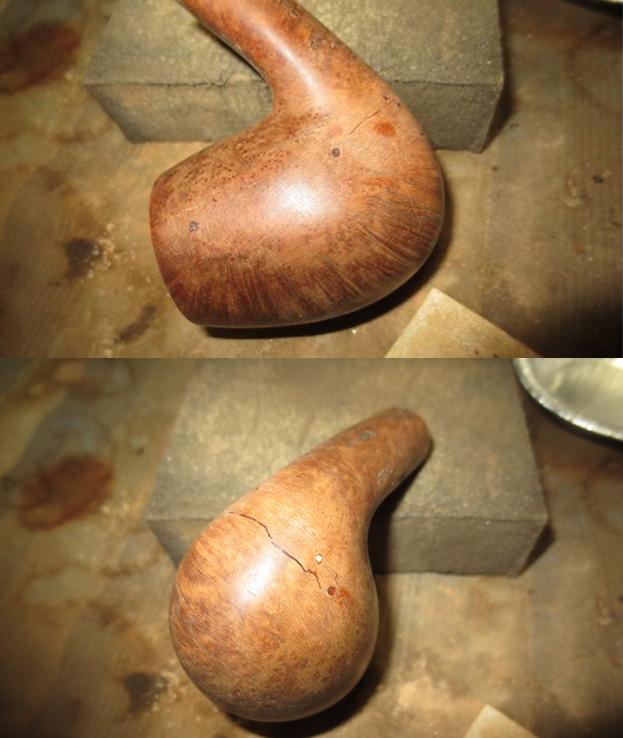
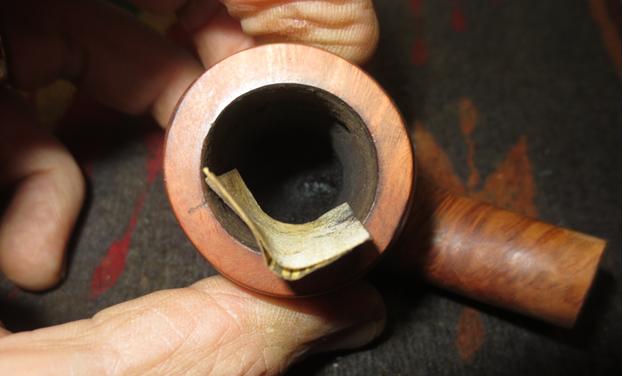
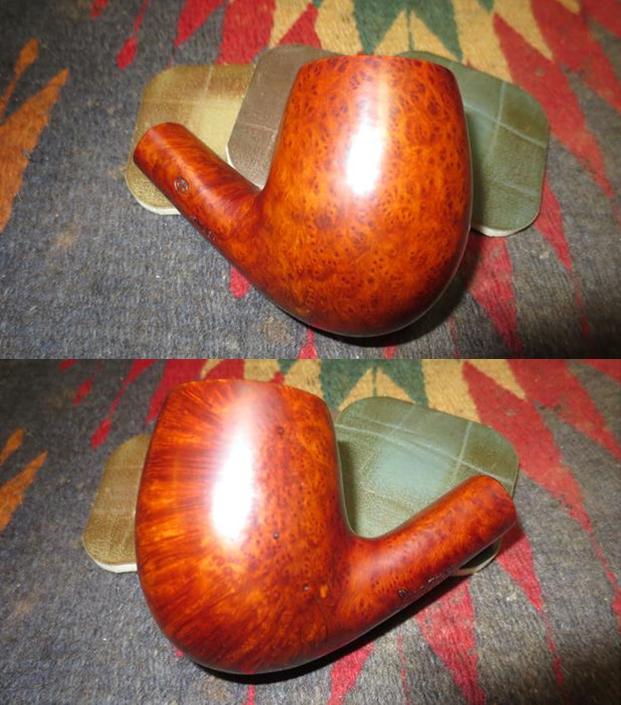
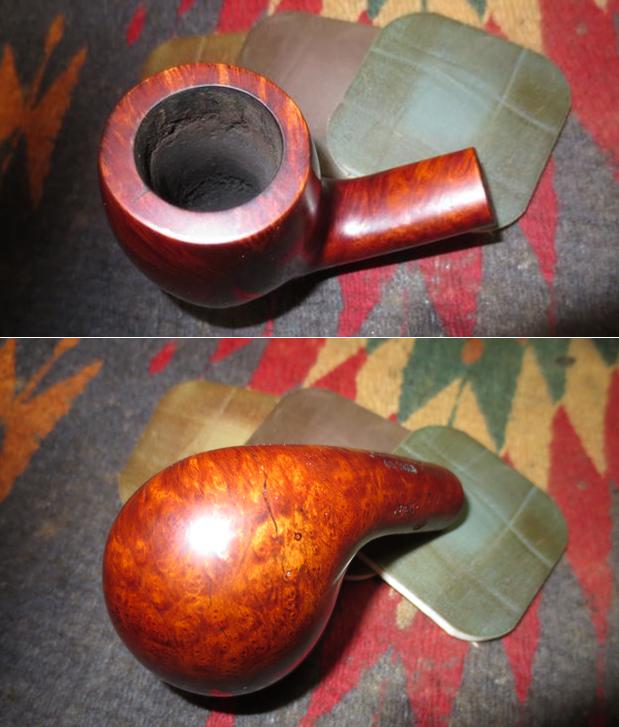
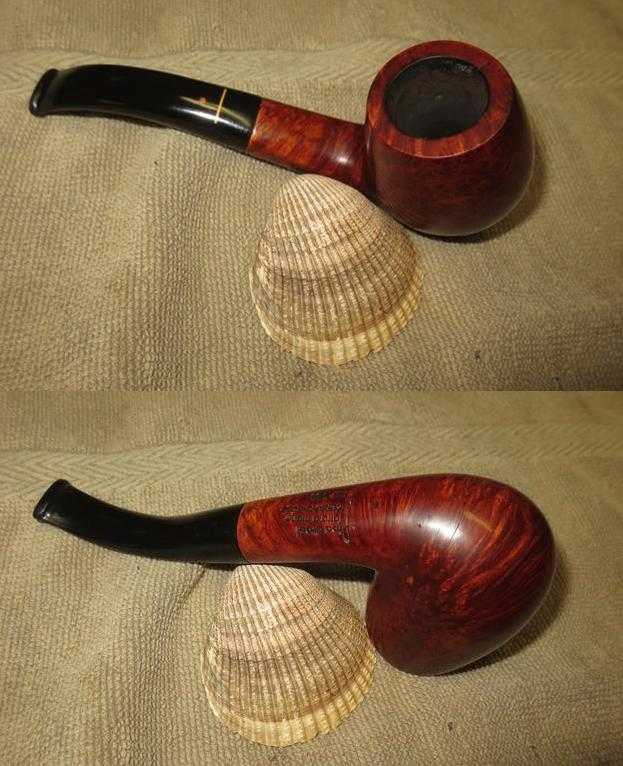
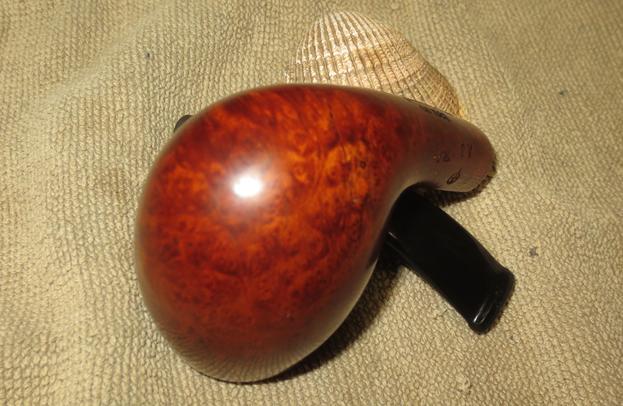
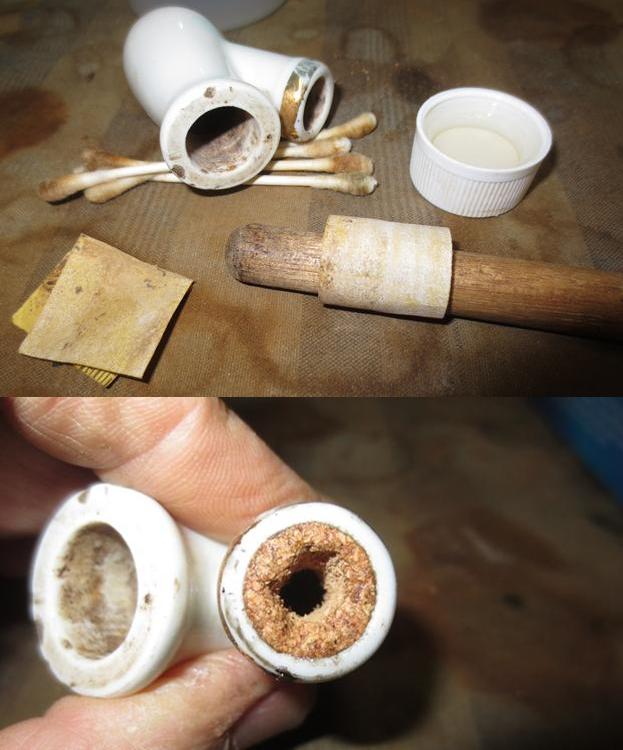
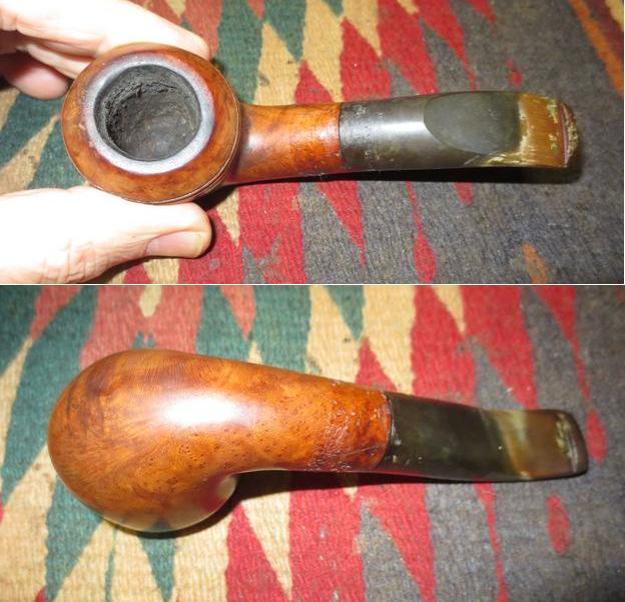
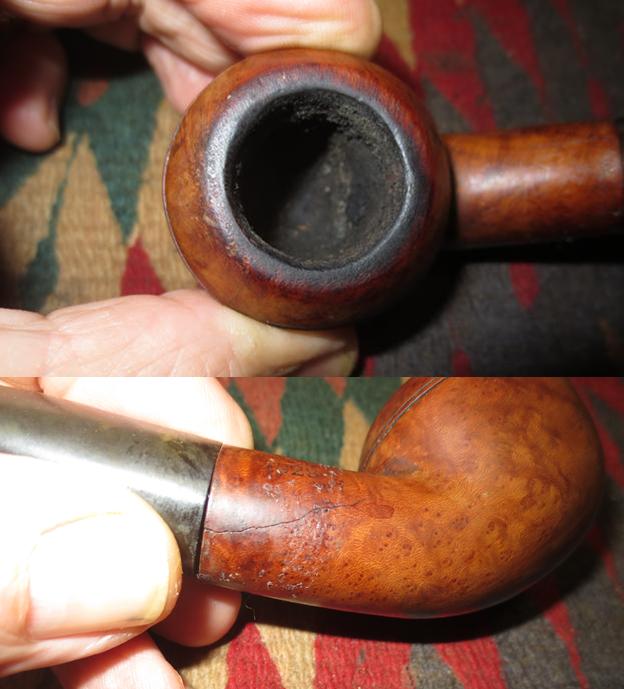
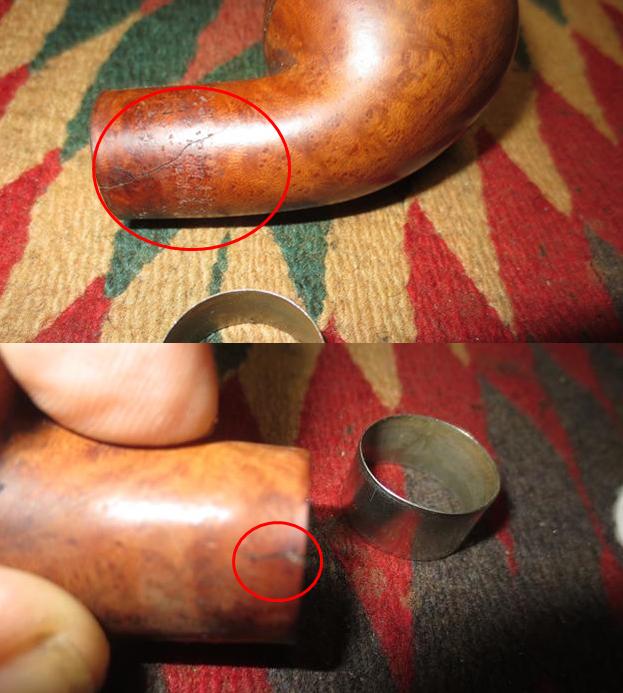
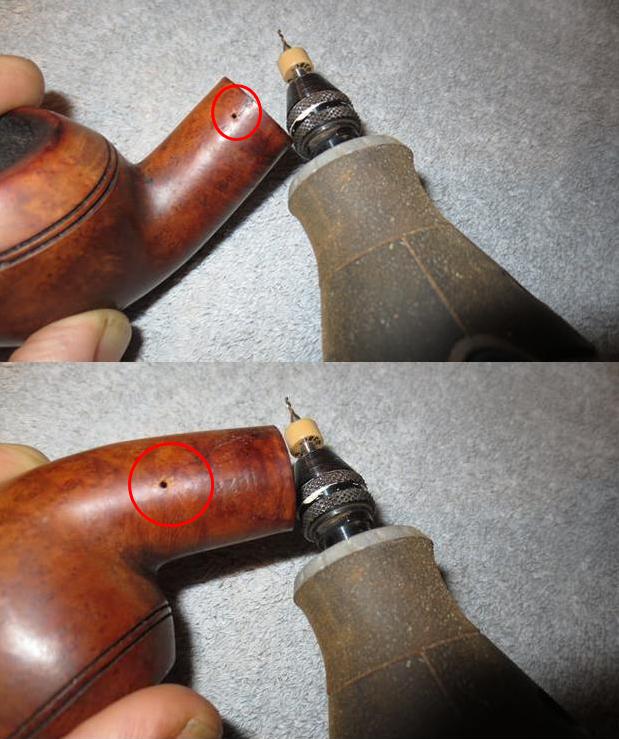
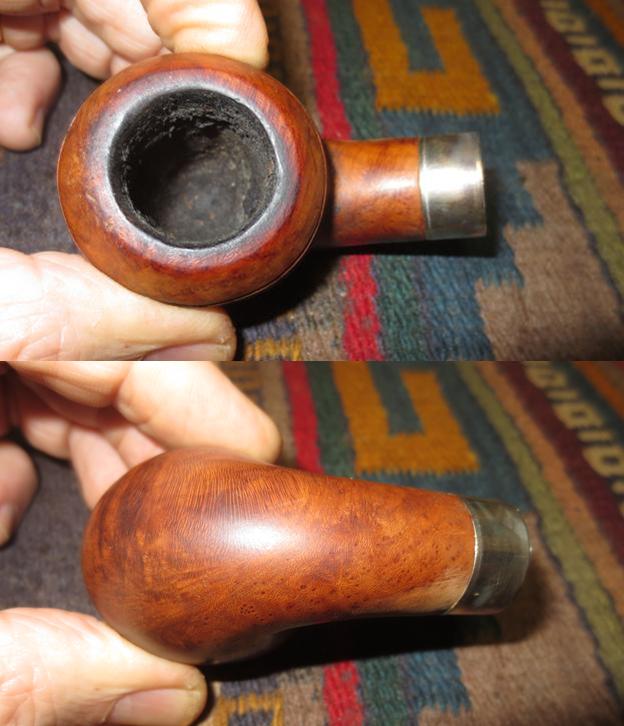
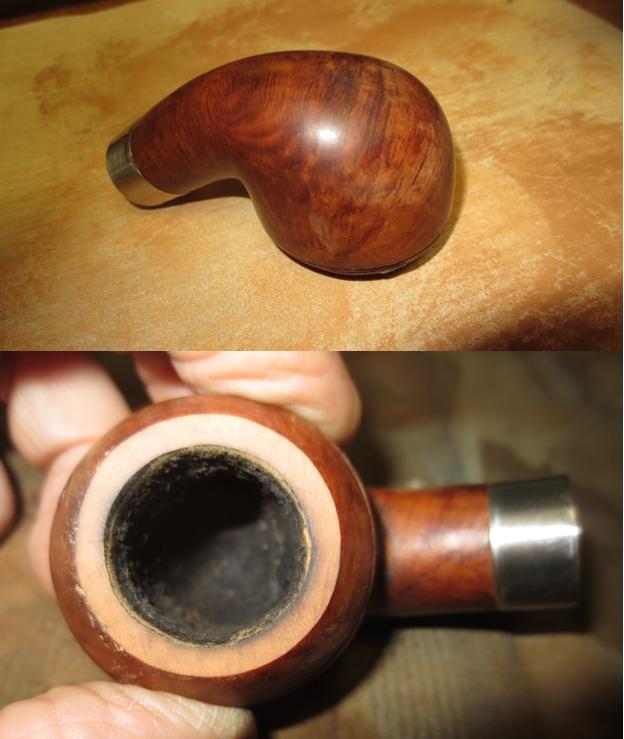
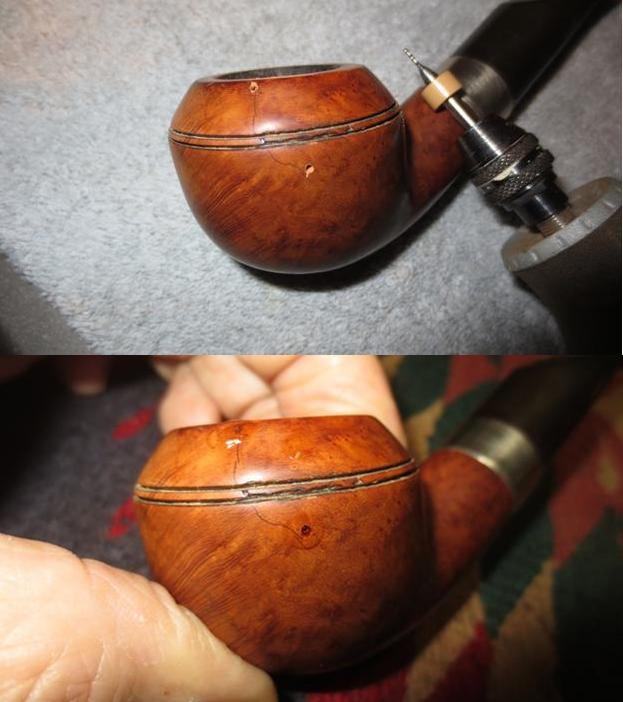
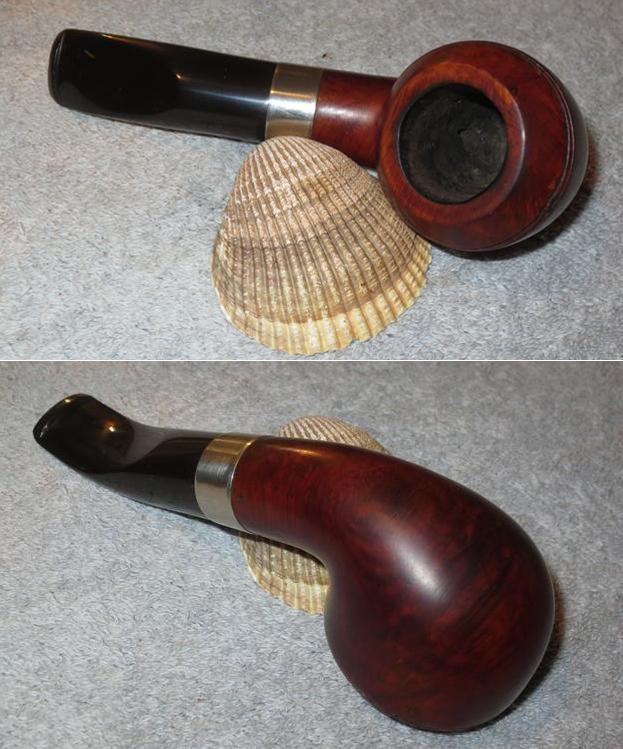
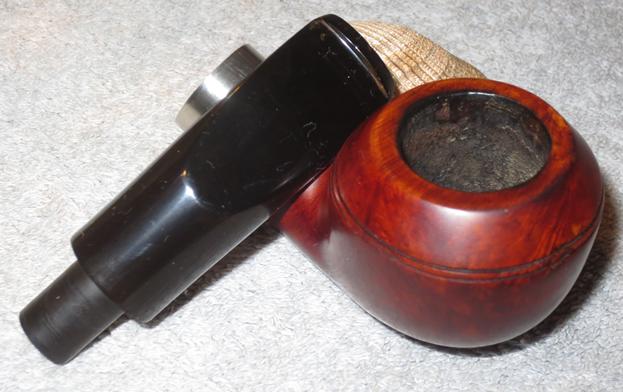
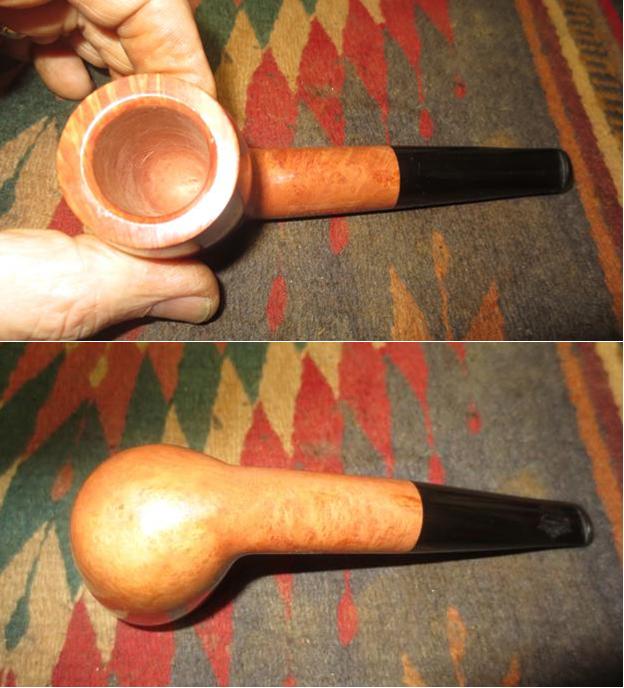
I took a close up photo of the bowl and rim to show the unsmoked condition of it when I received it. The briar is quite beautiful though there are a few fills on the top and right side of the shank that are expertly blended into the finish. I also took a photo of the internals of the mortise and airway to show the raw briar that shines there.
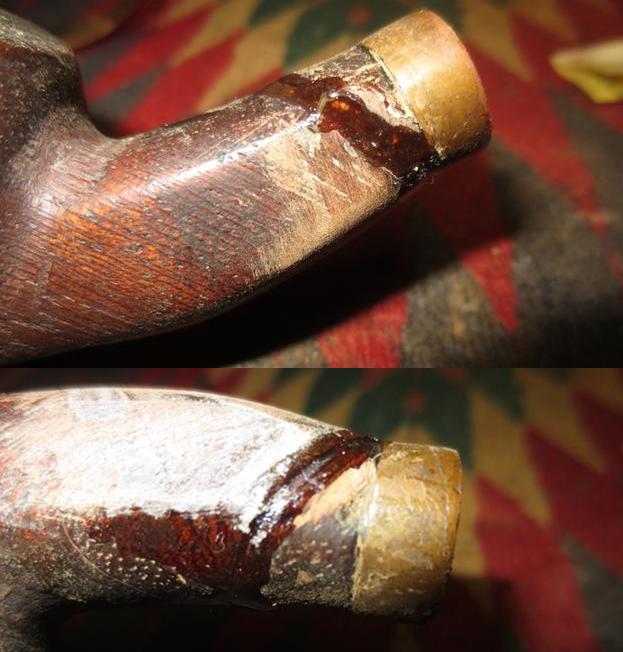
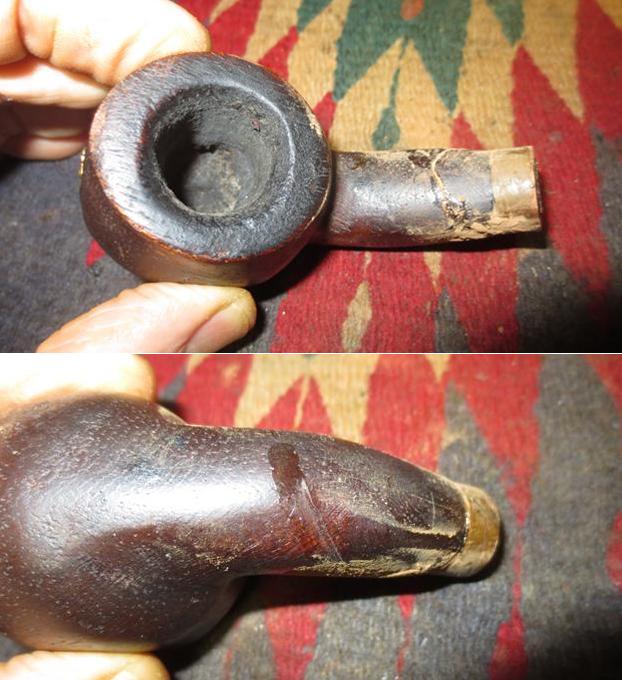
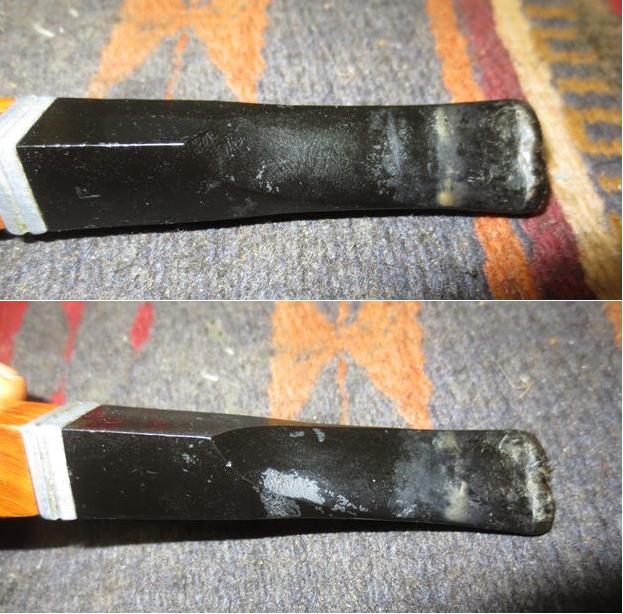
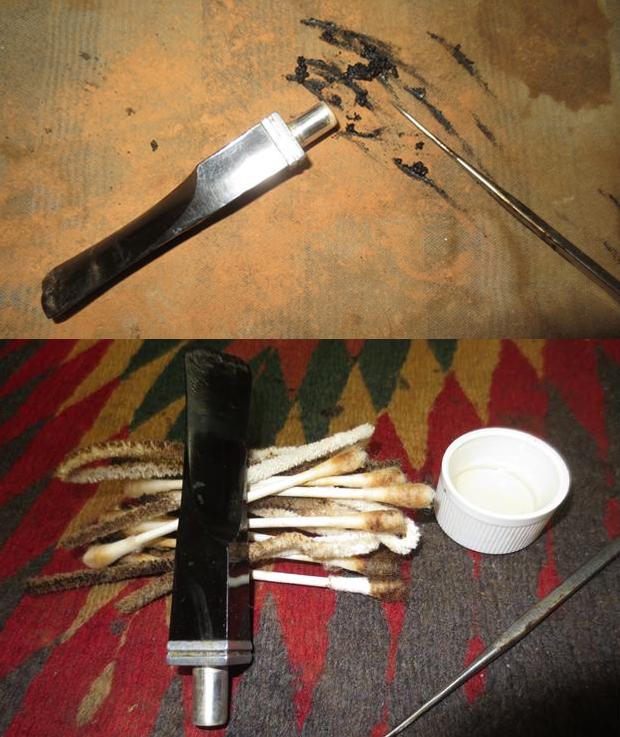
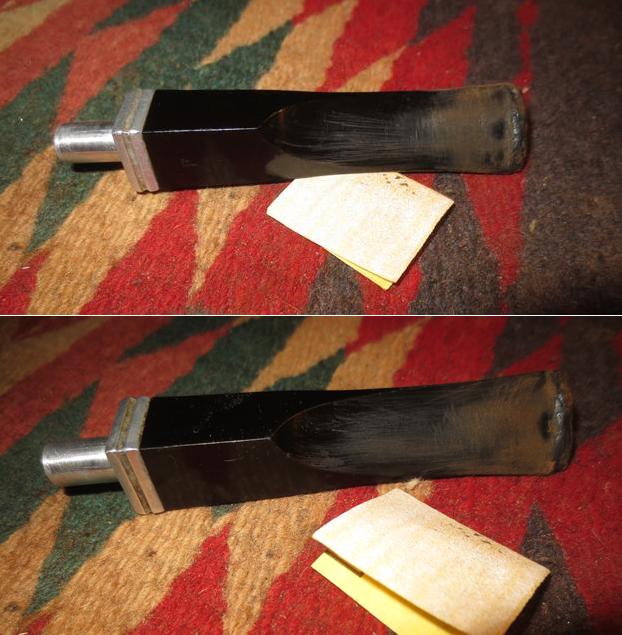
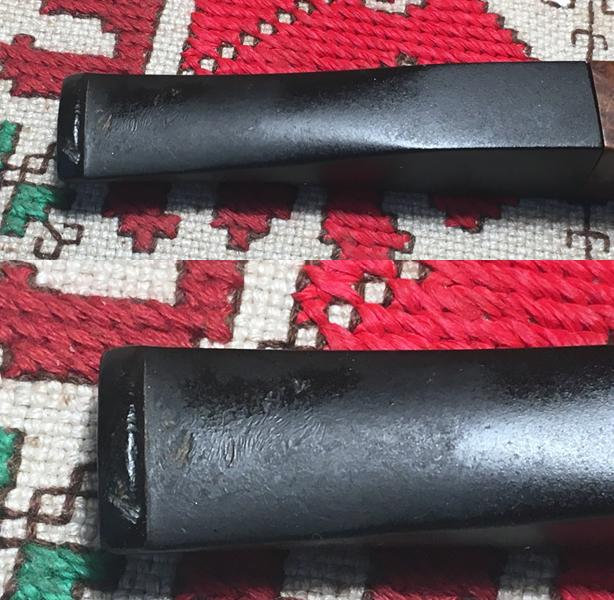
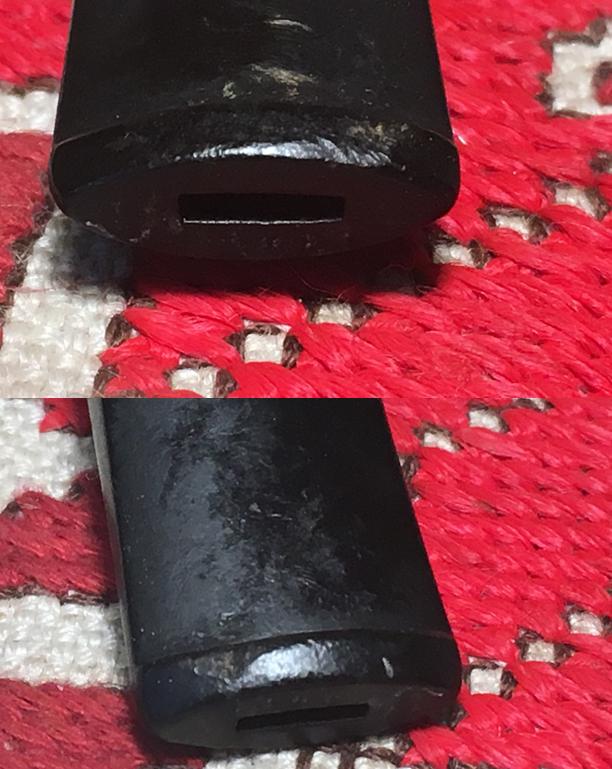
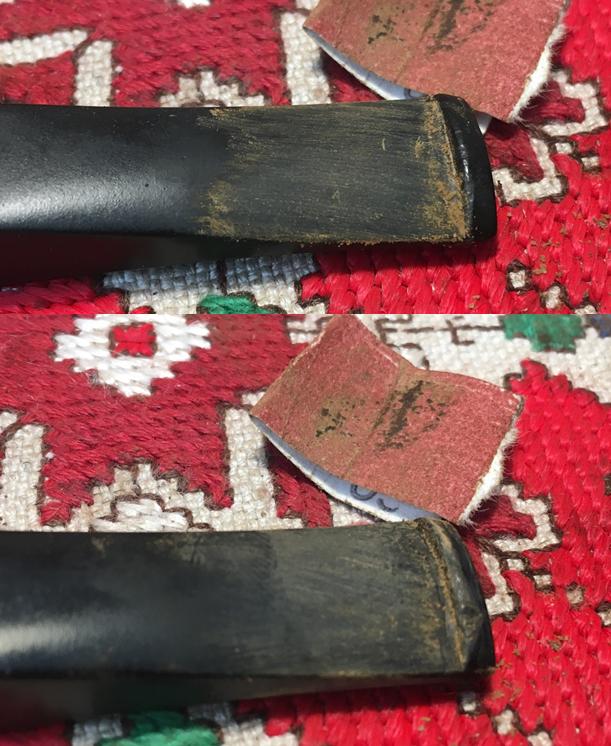
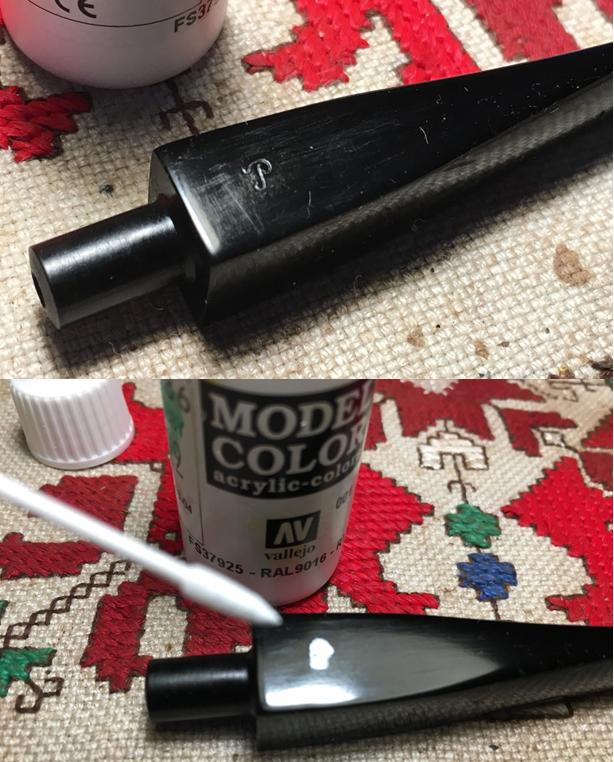
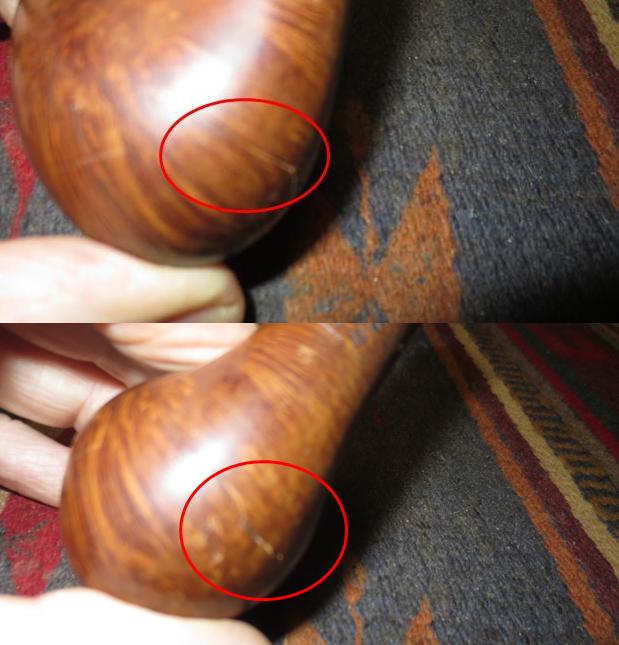
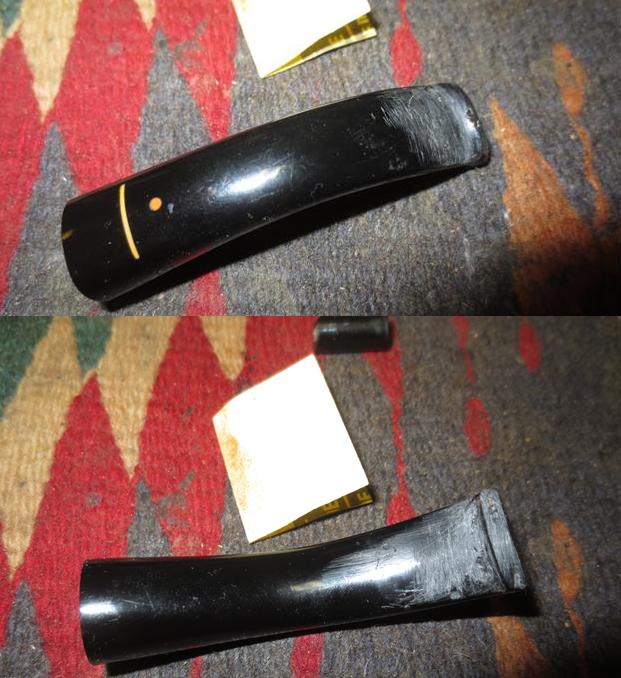
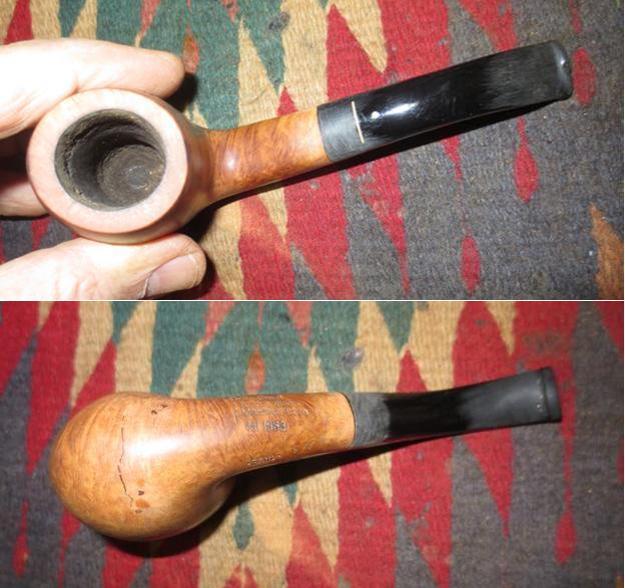
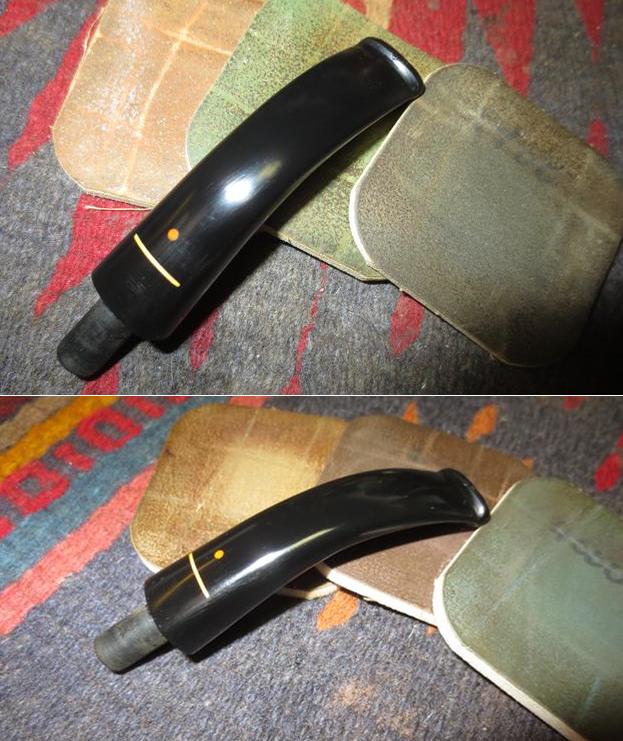
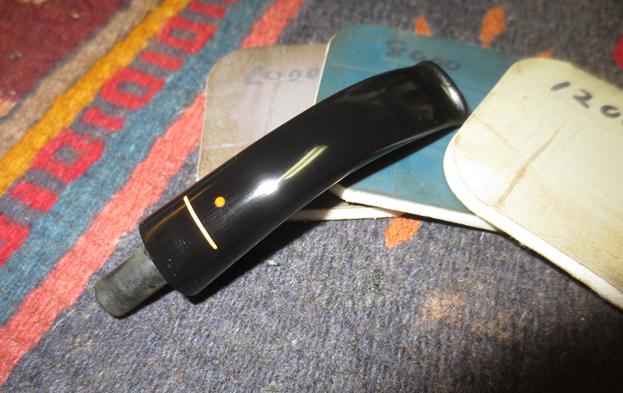
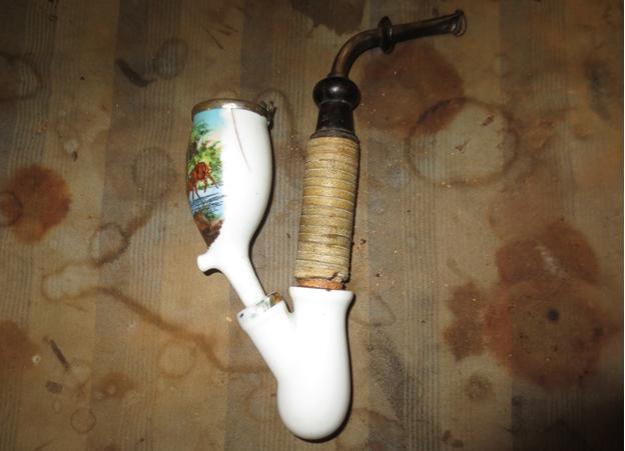
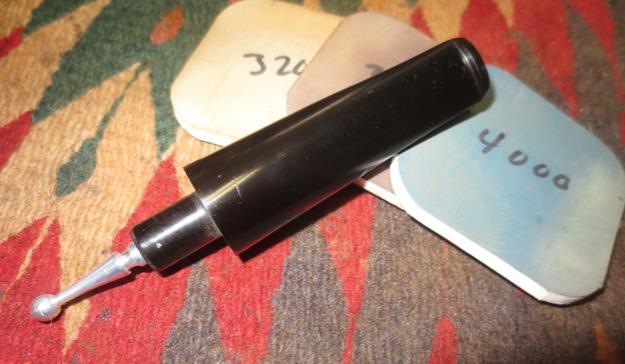
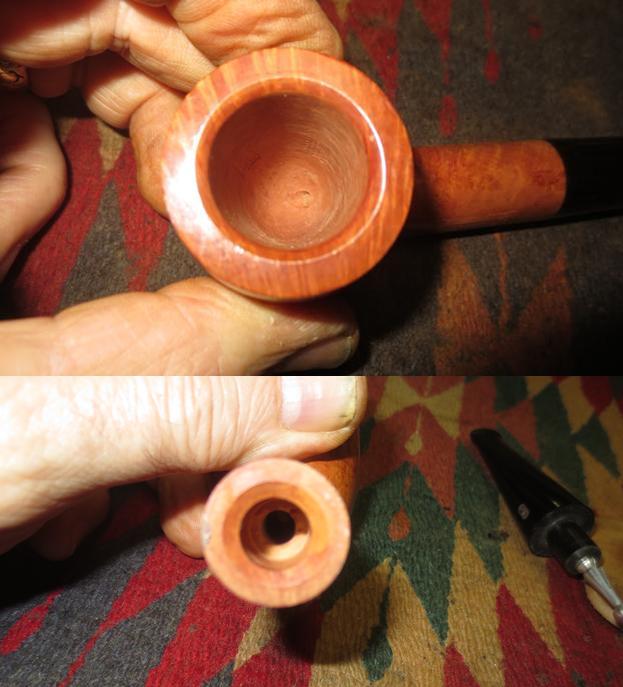
The stem showed signs of wear from sitting for the long years in a display case of cabinet. There were scratches, nicks and marks in the rubber that are shown in the photos below. There was a gummy substance from a label on the underside of the stem.
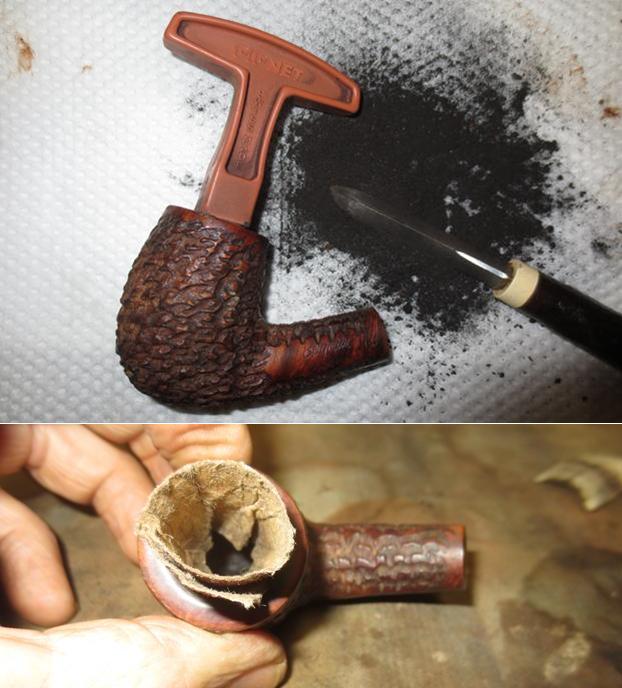
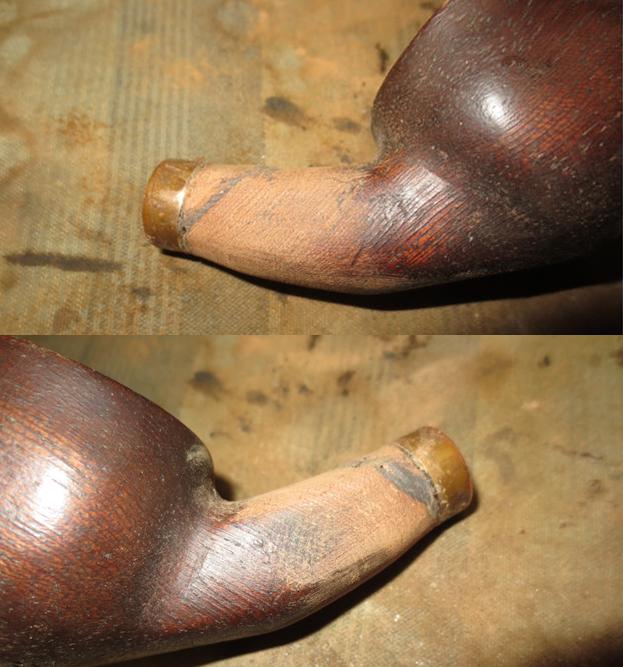
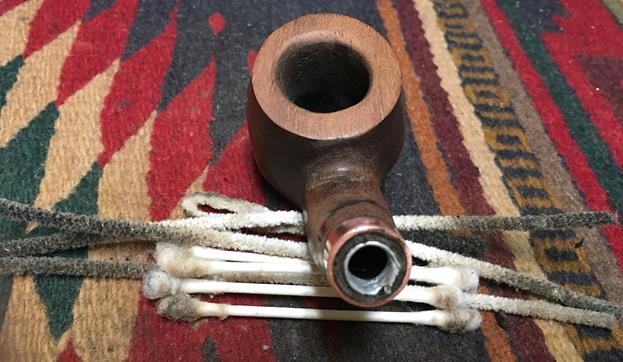
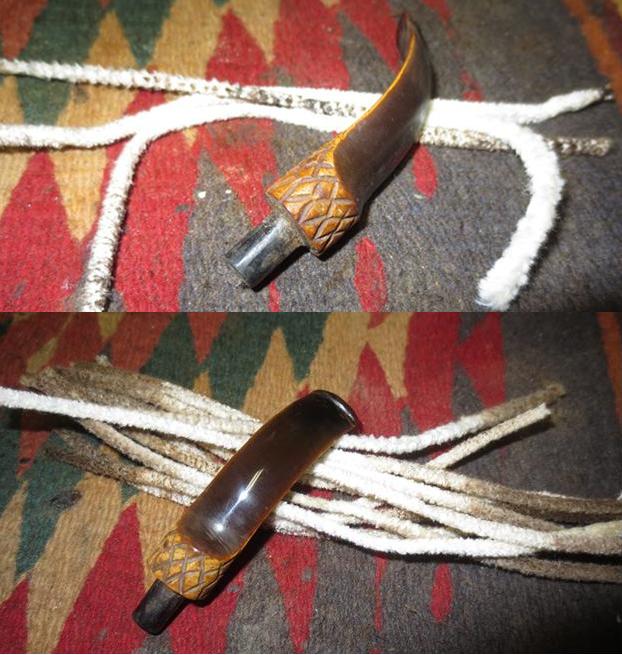
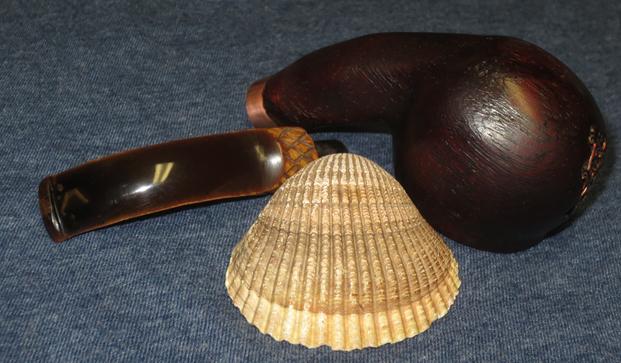
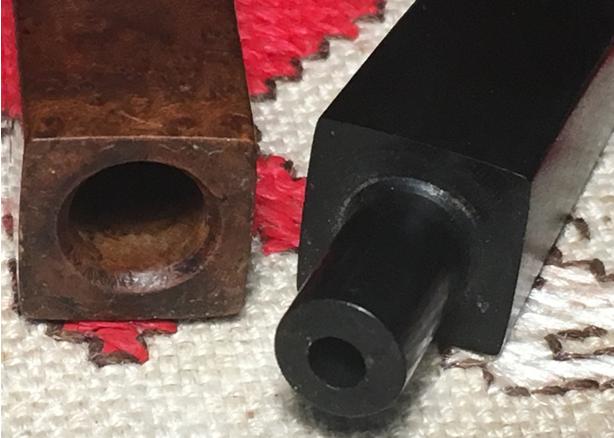
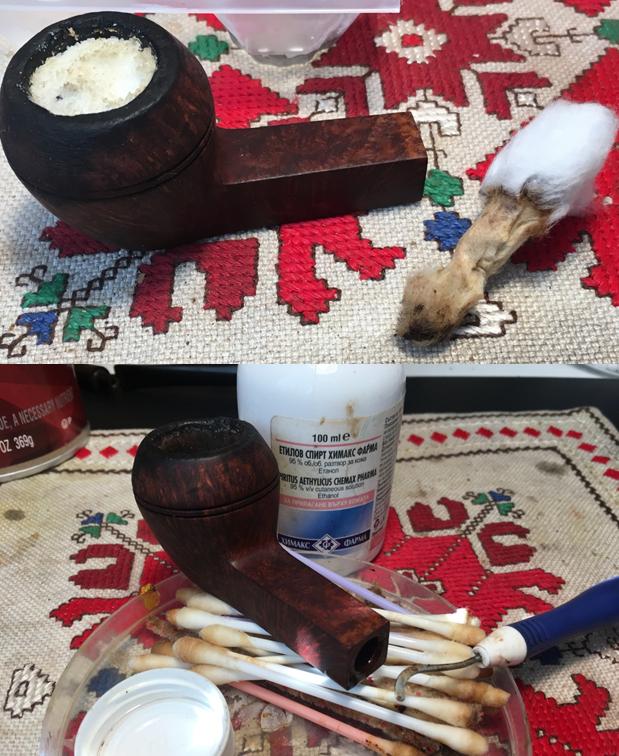
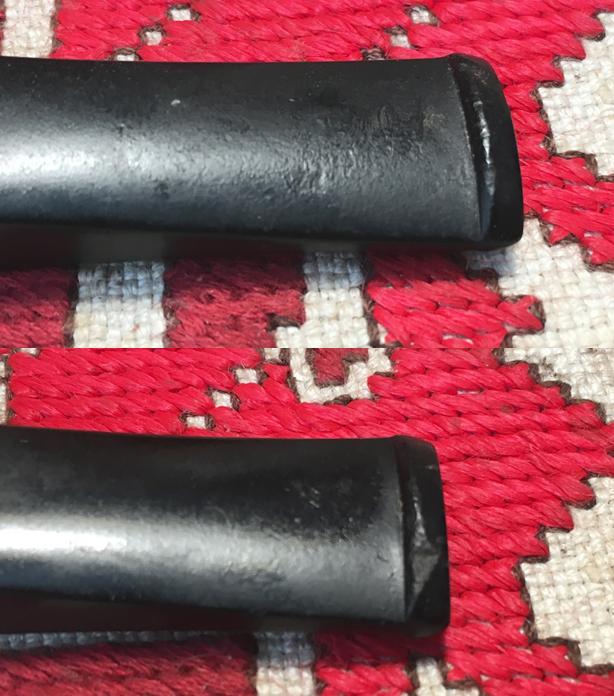
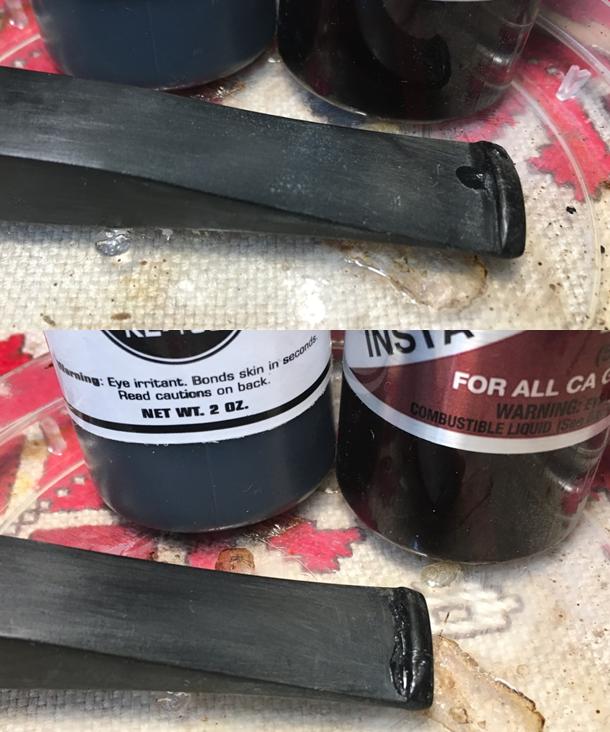
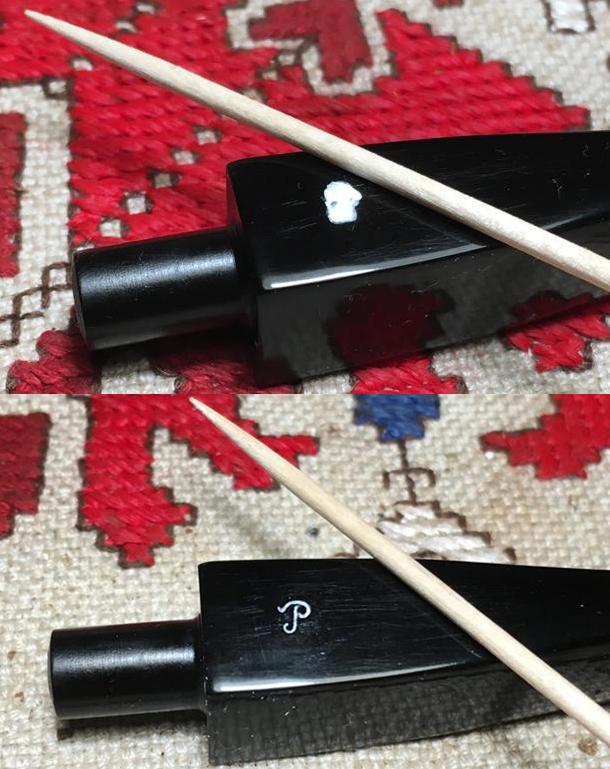
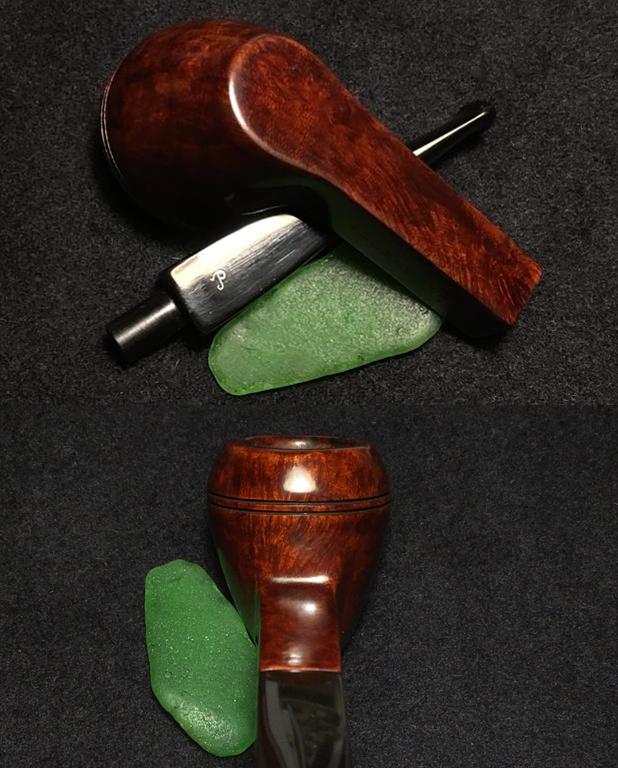
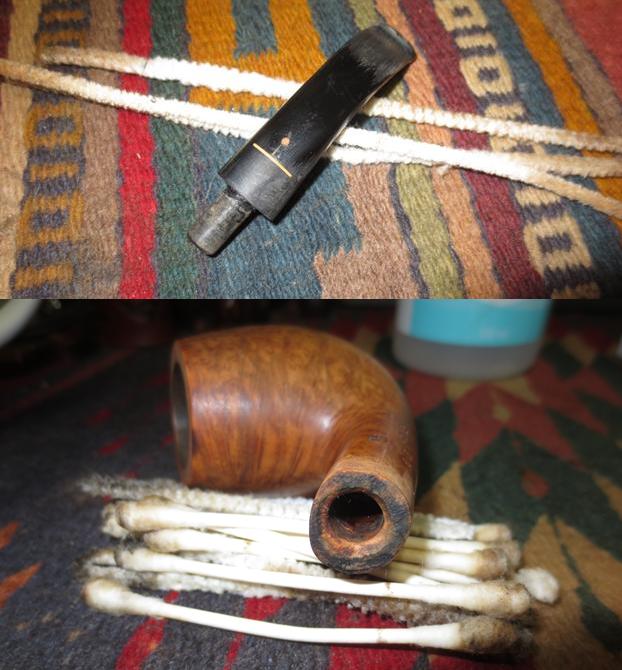
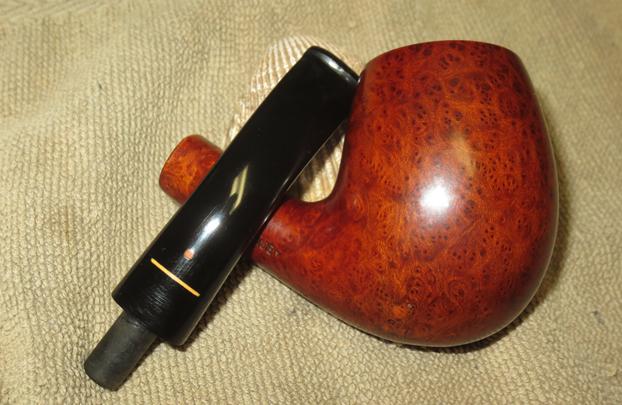
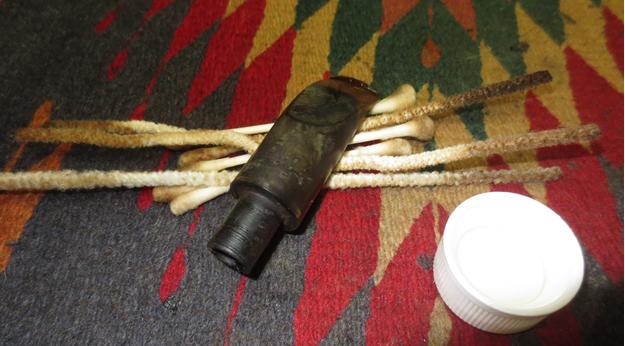
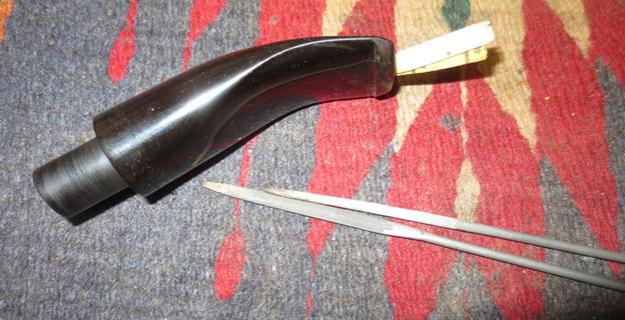
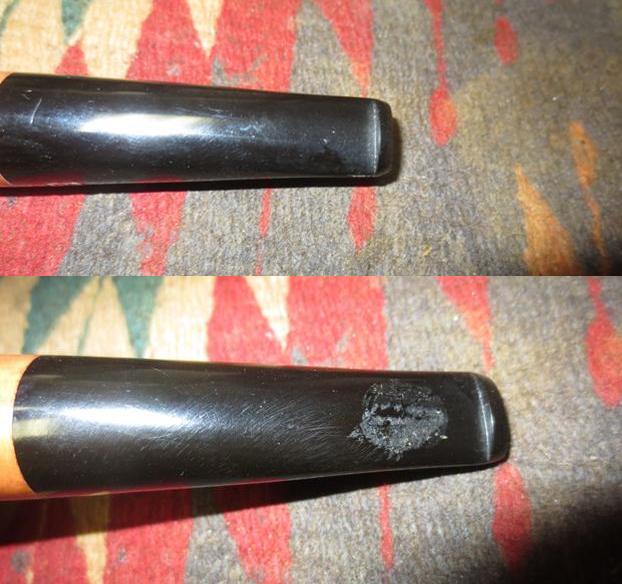
The polished aluminum stinger apparatus in the tenon was unmarked and a shine of a new pipe.
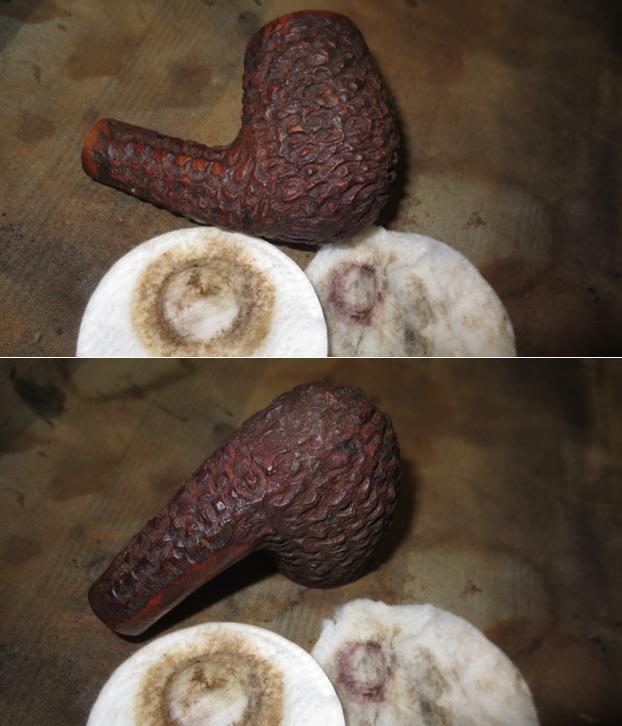
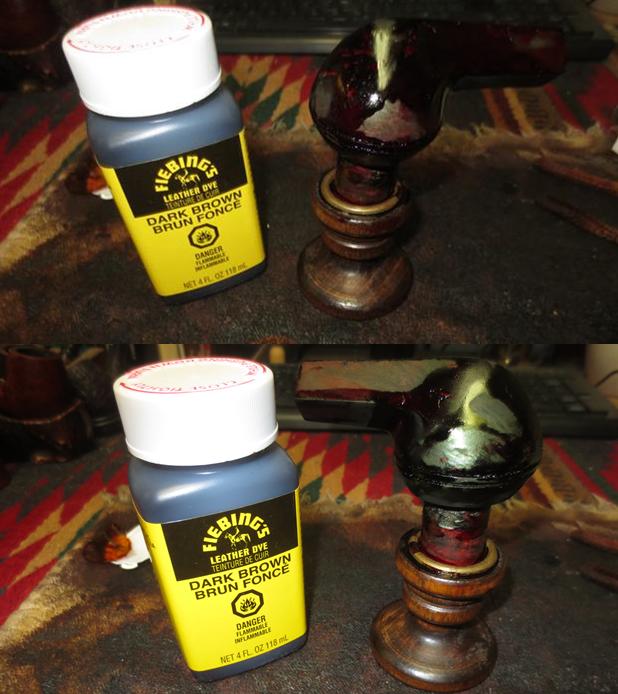
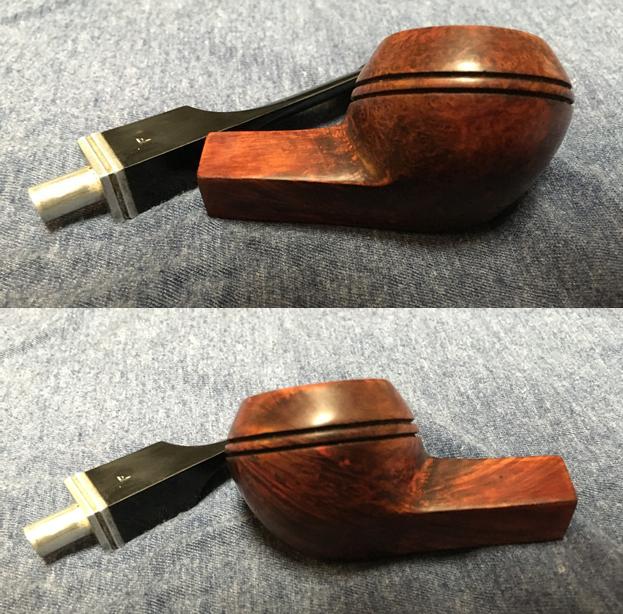
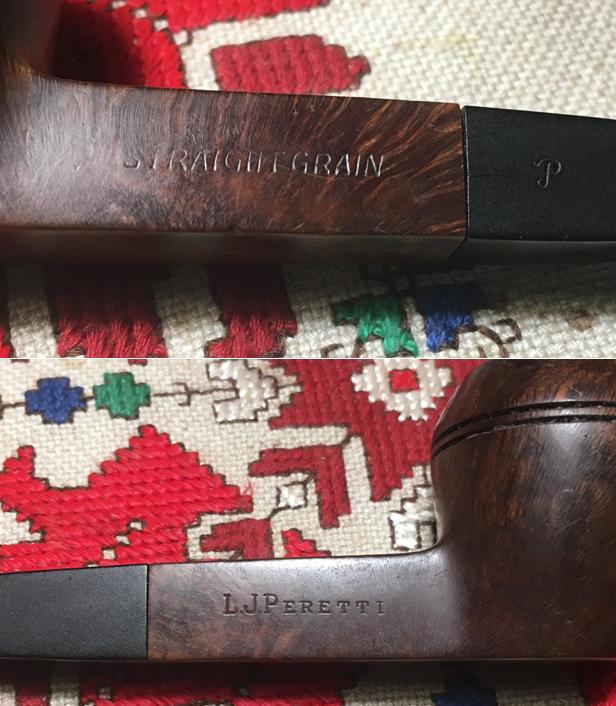
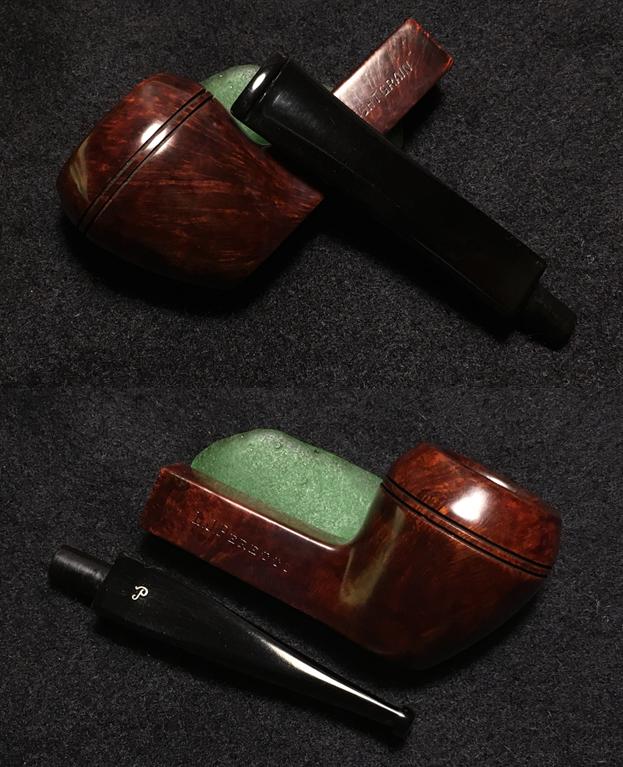
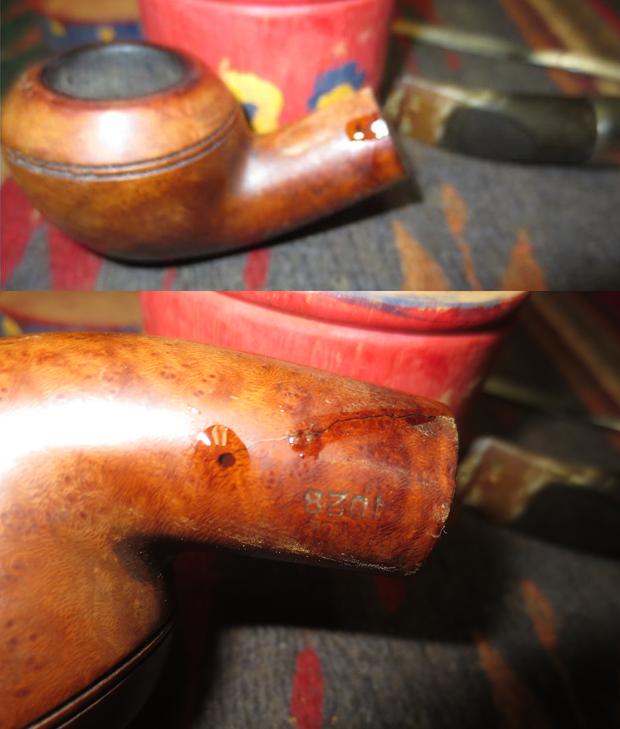
The finish on the pipe has a shiny topcoat of varnish. I took some photos of the stamping on the shank sides. The next two photos show what that looked like.
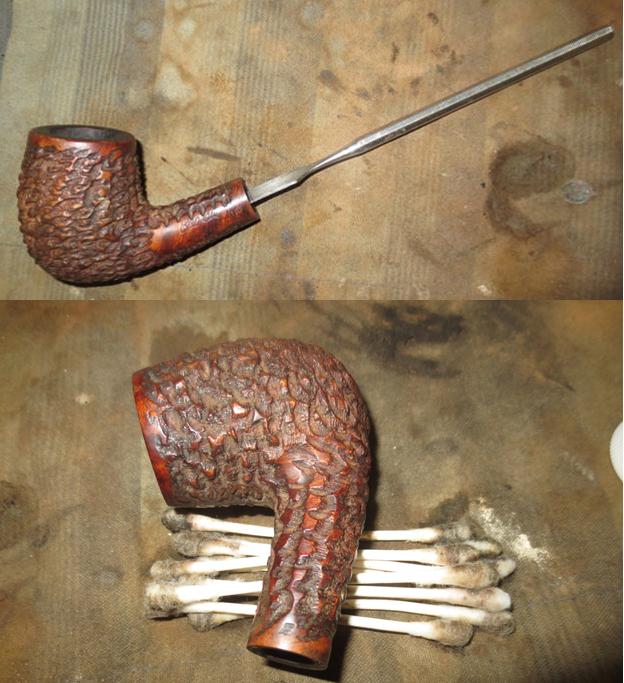
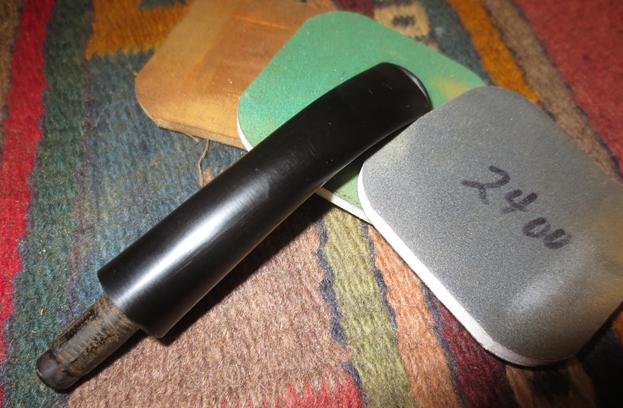
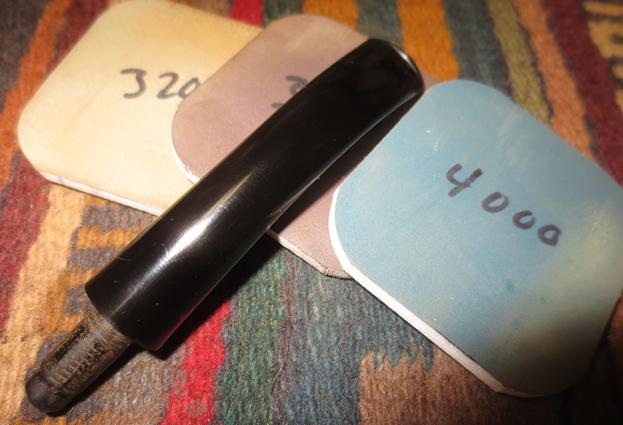
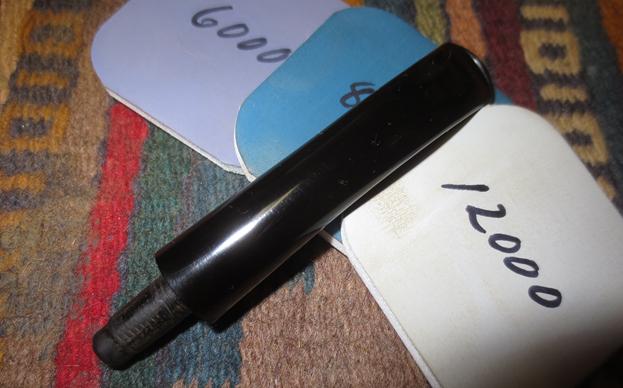
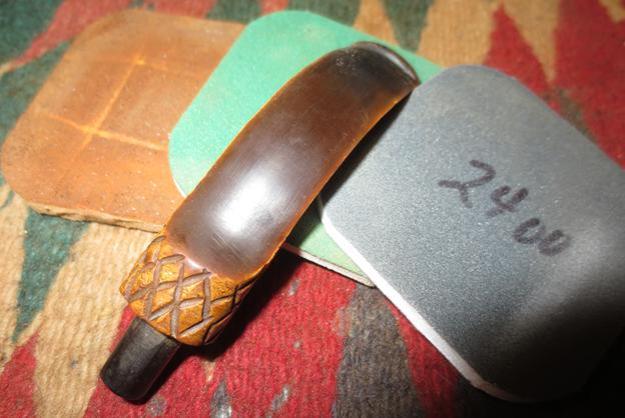
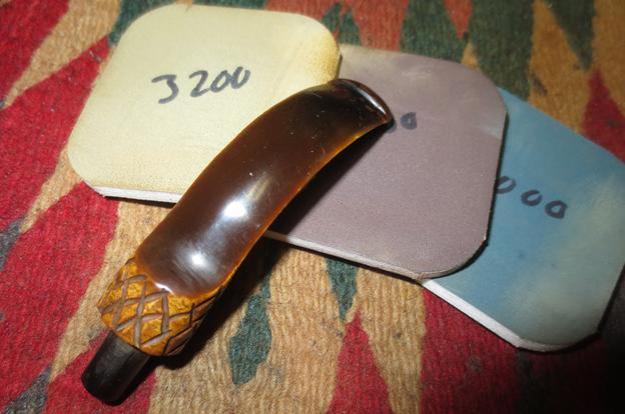
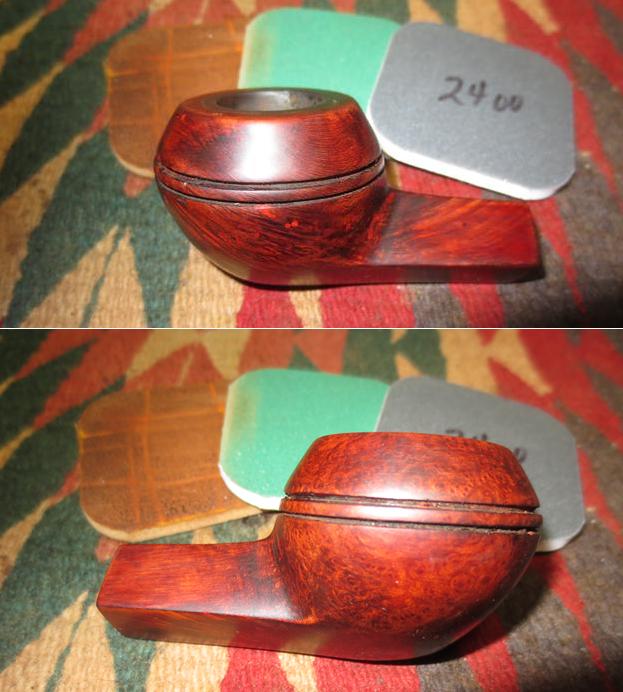
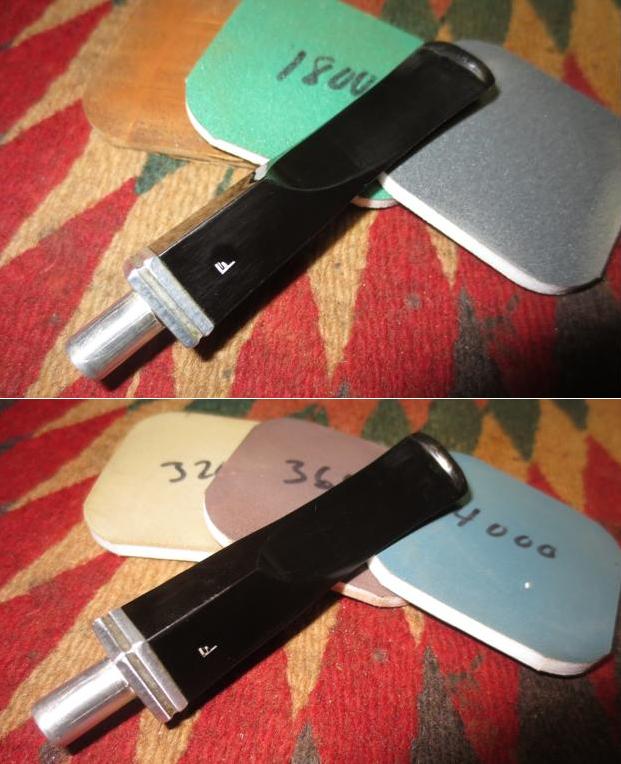
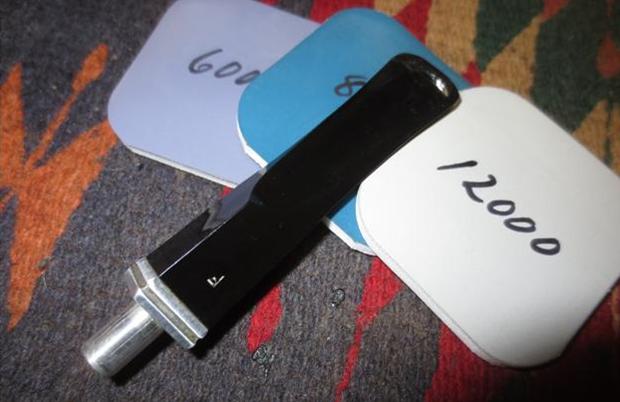
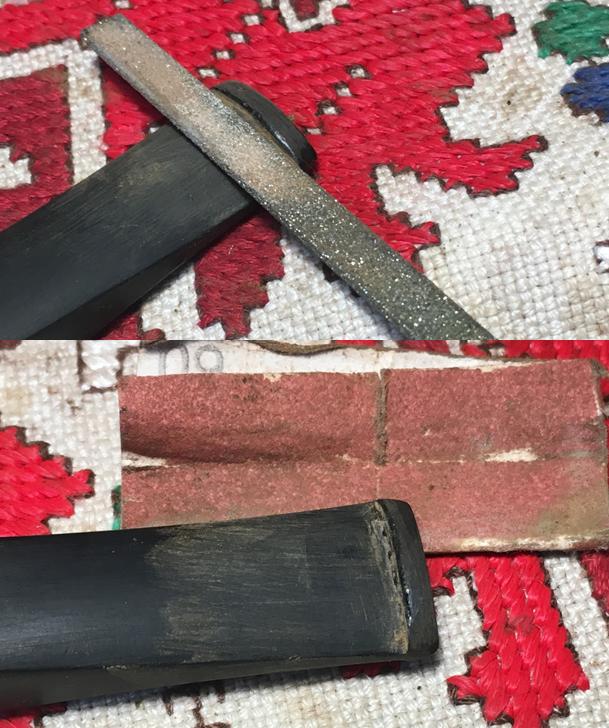
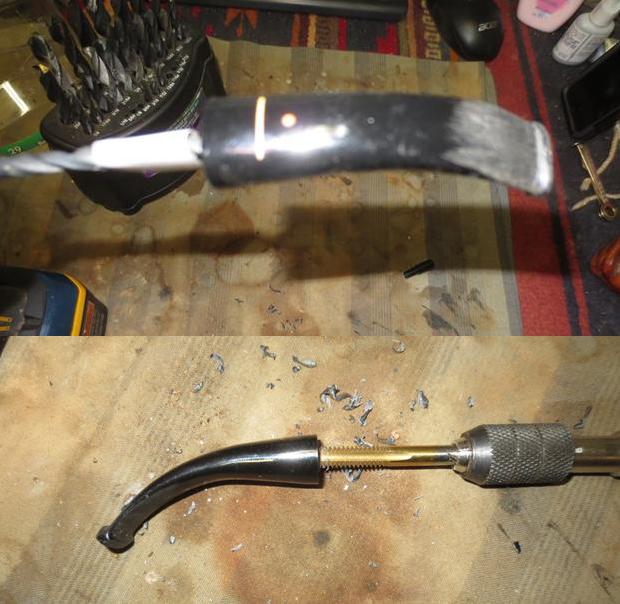
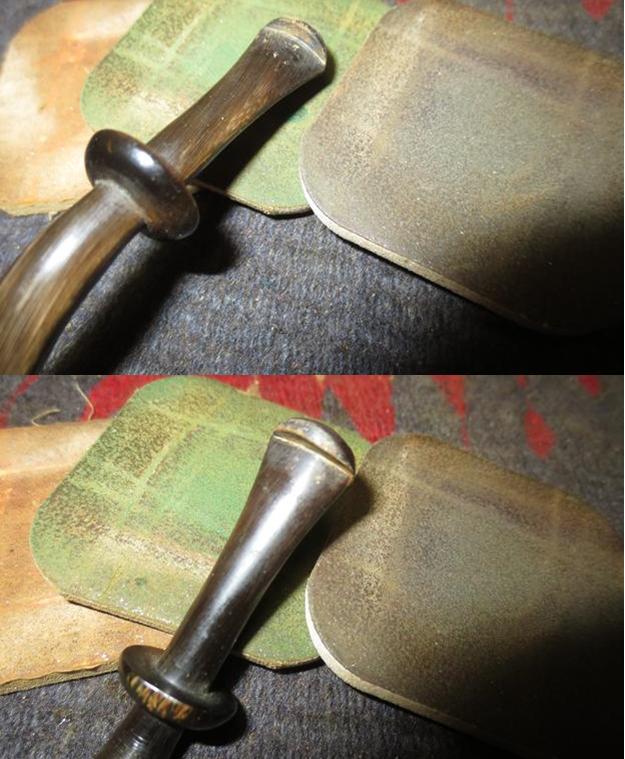
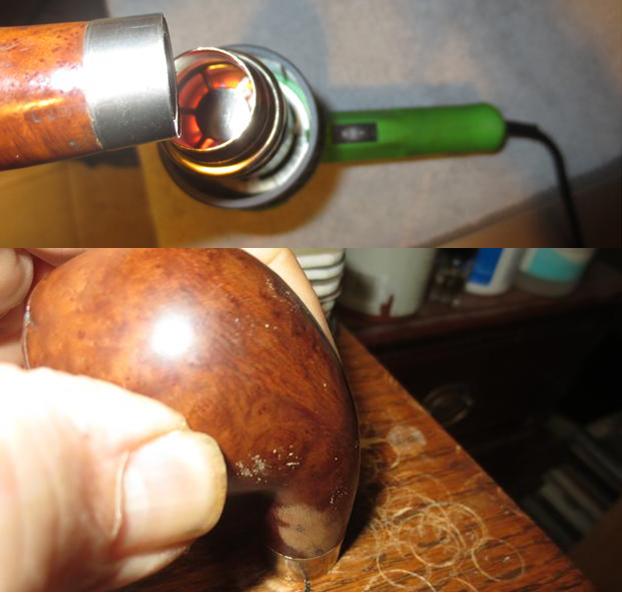
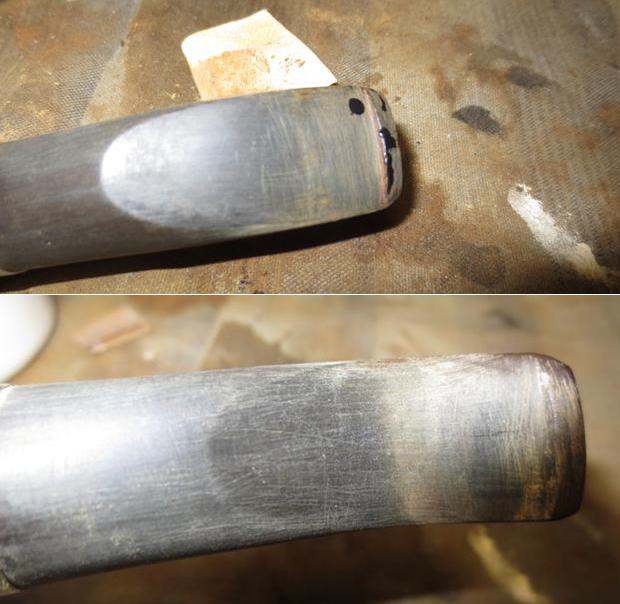
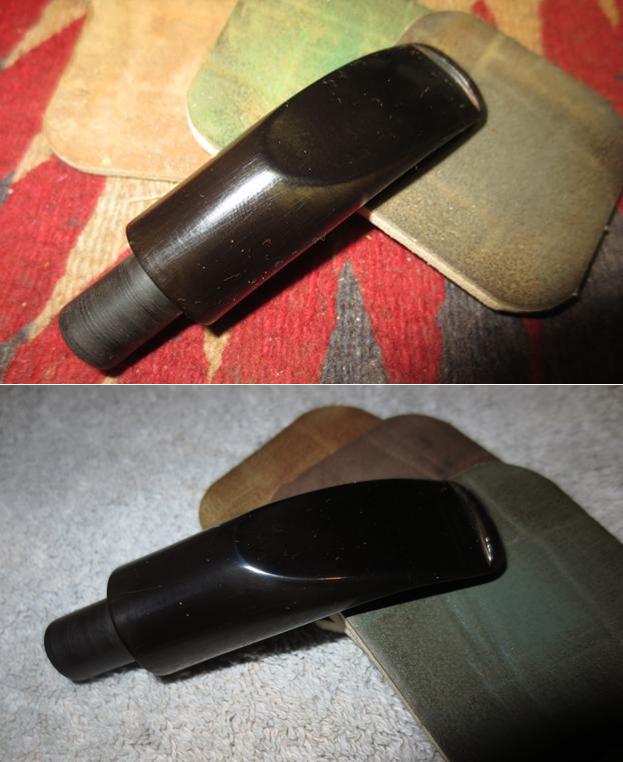
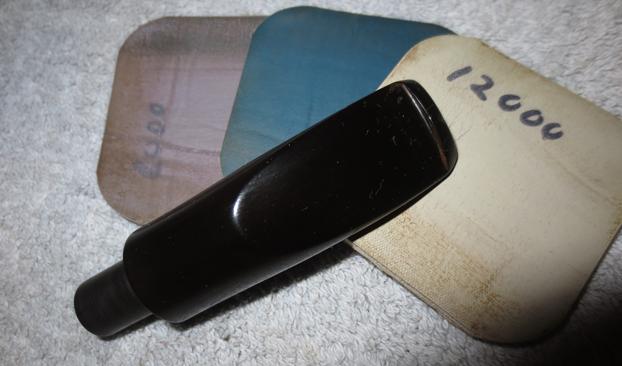
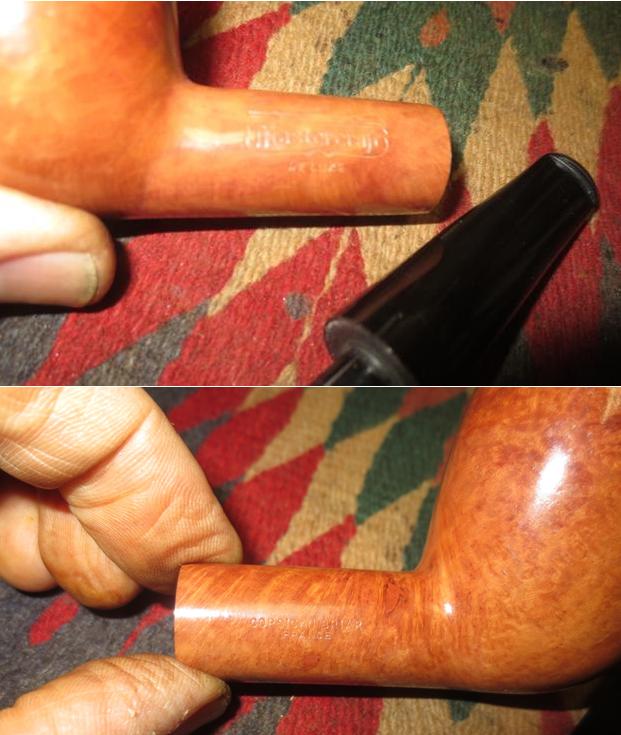
I worked on the stem to polish out the scratches and nicks in the surface. I wet sanded it with 1500-2400 grit micromesh sanding pads and dry sanded it with 3200-12000 grit pads. I was able to polish out all of the nicks and scratches without resorting to more invasive methods. 
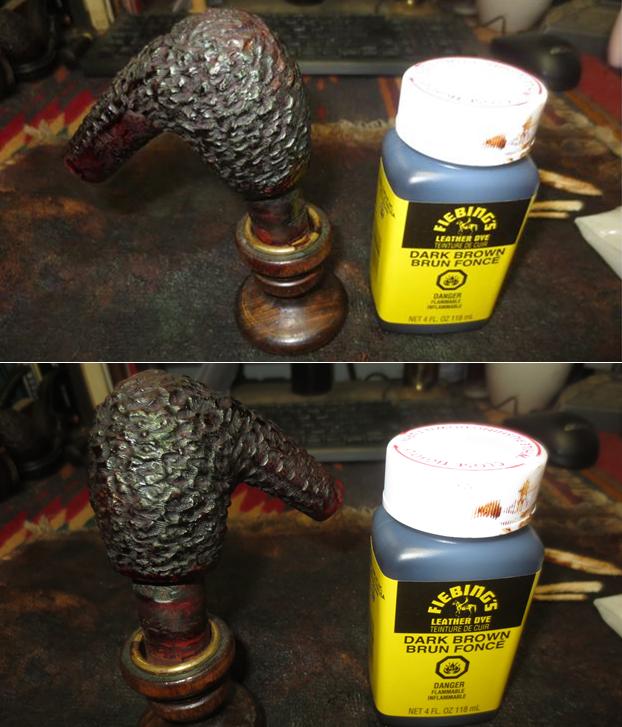
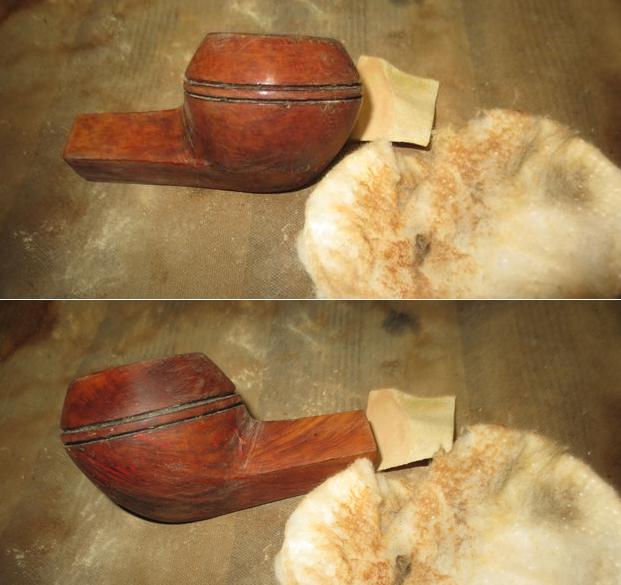
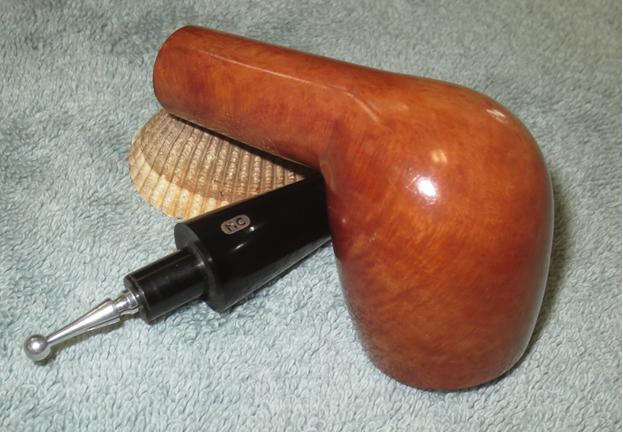
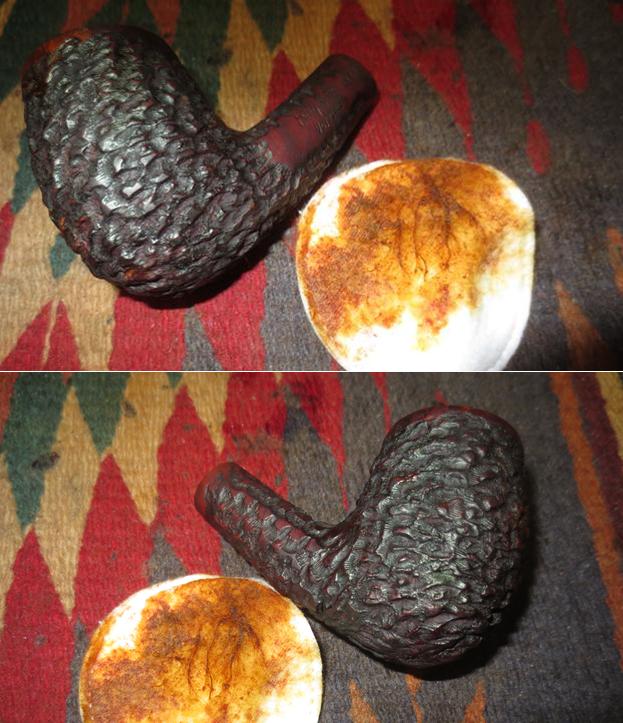
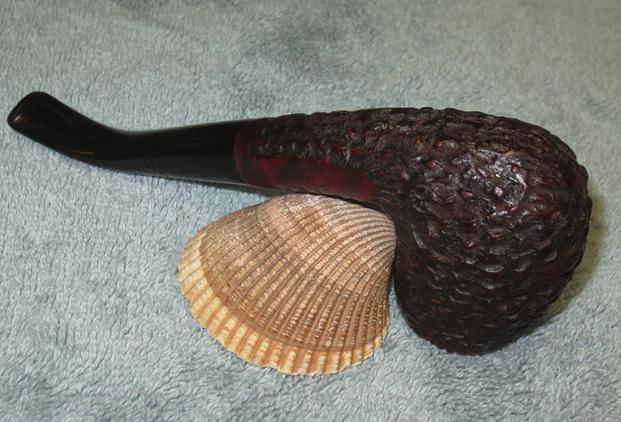
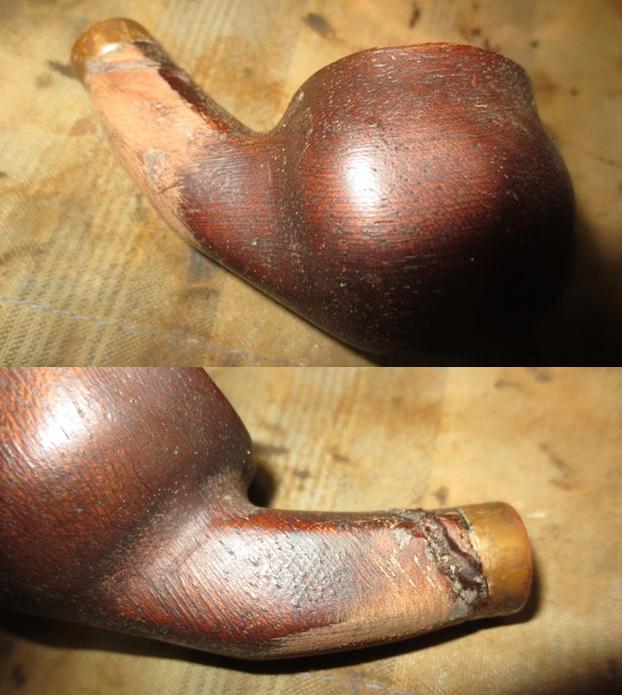
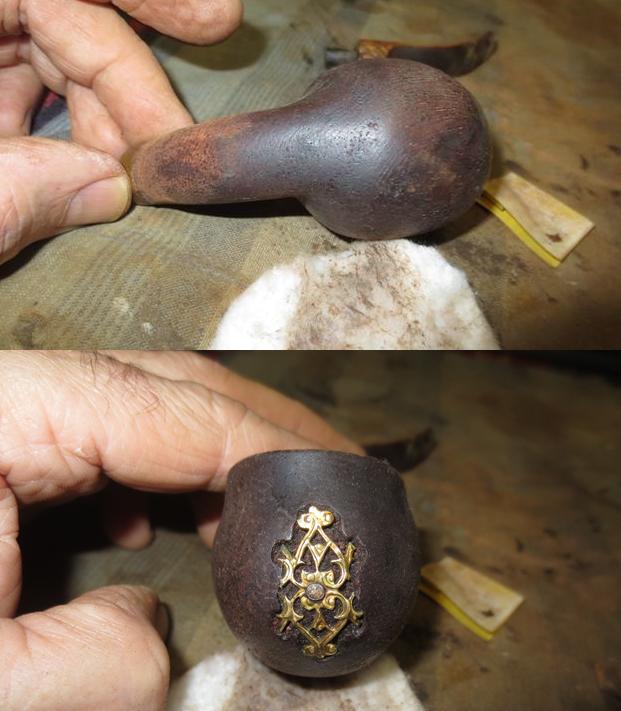
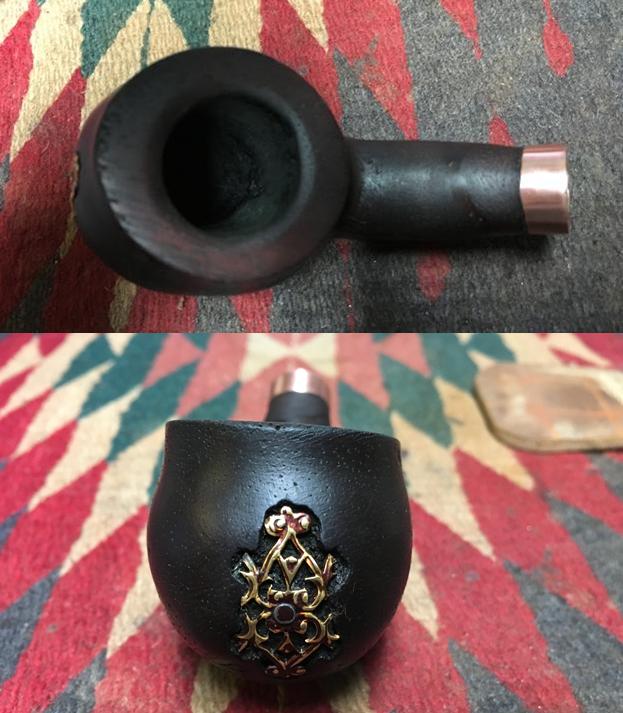
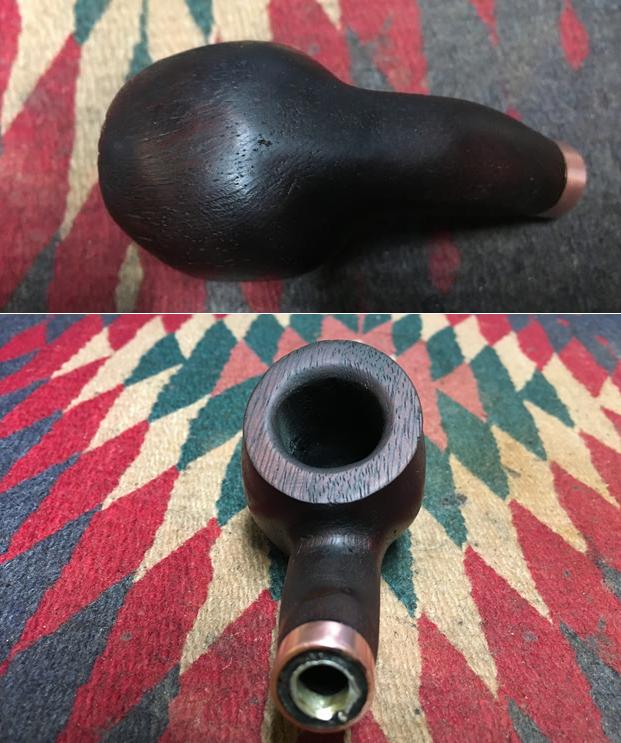
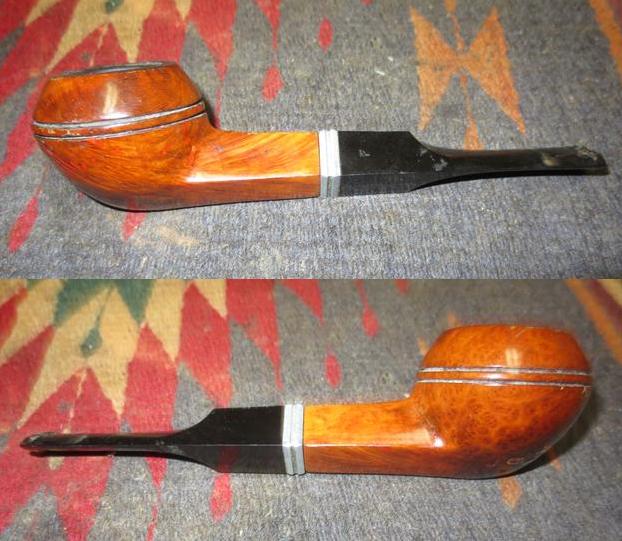
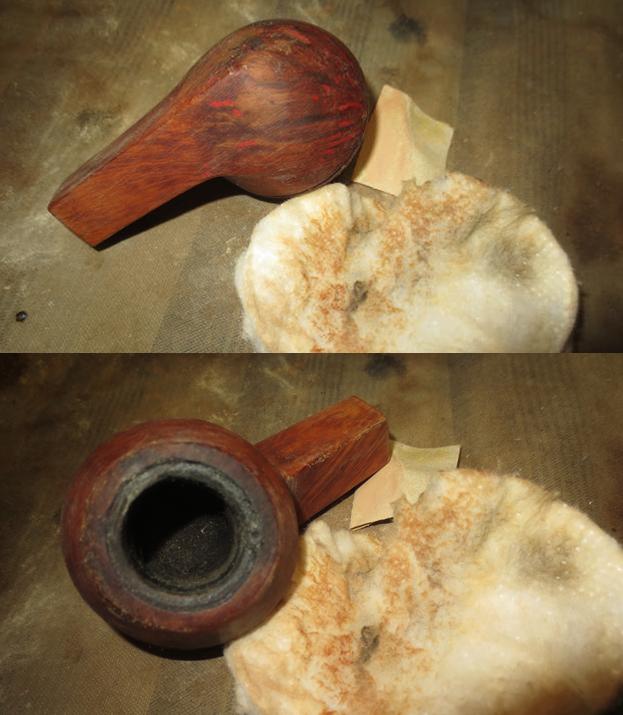
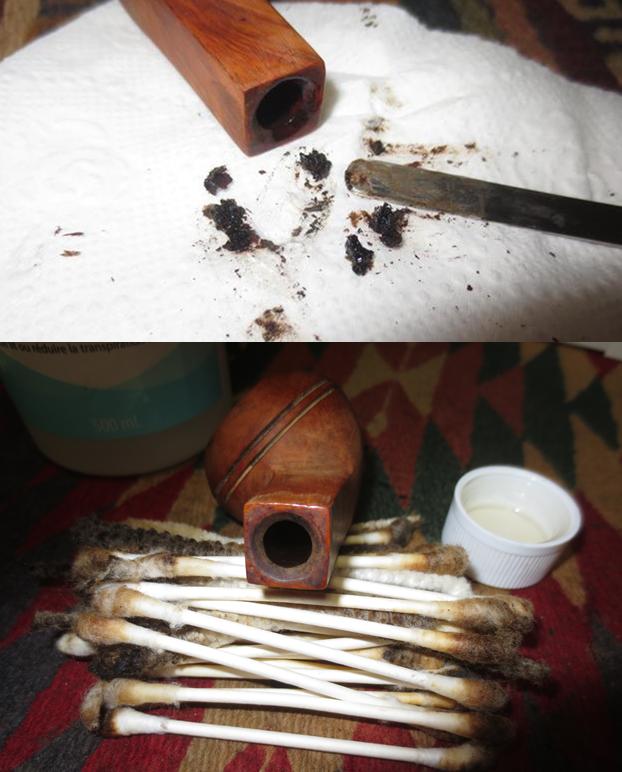
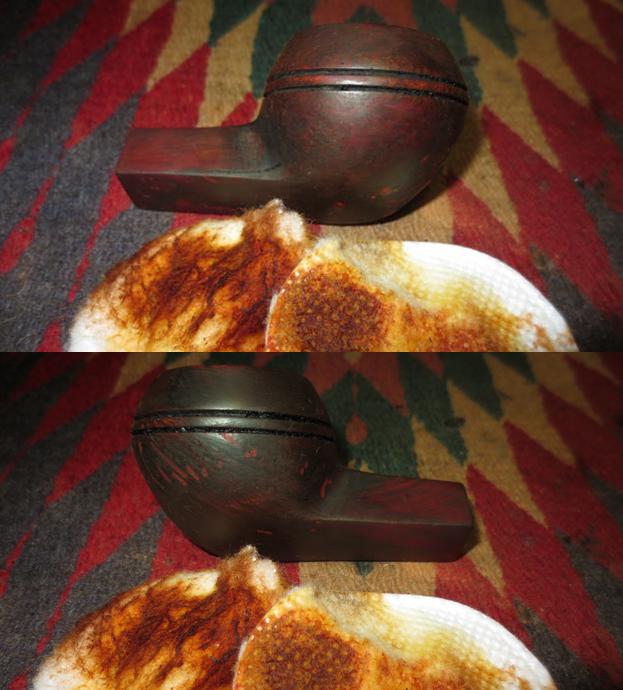
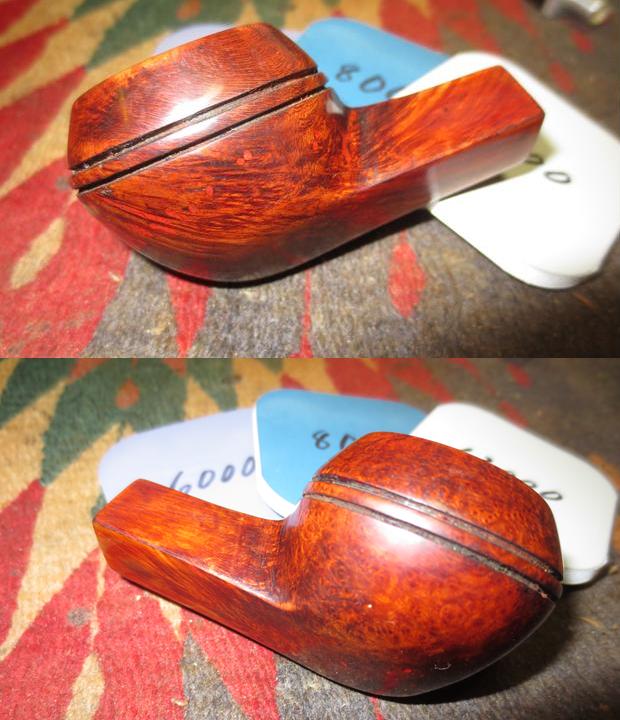
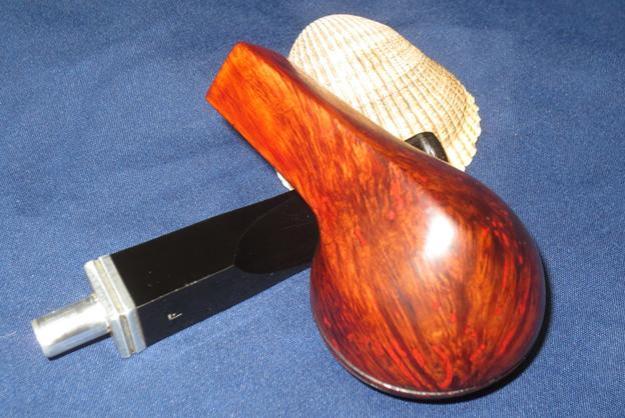
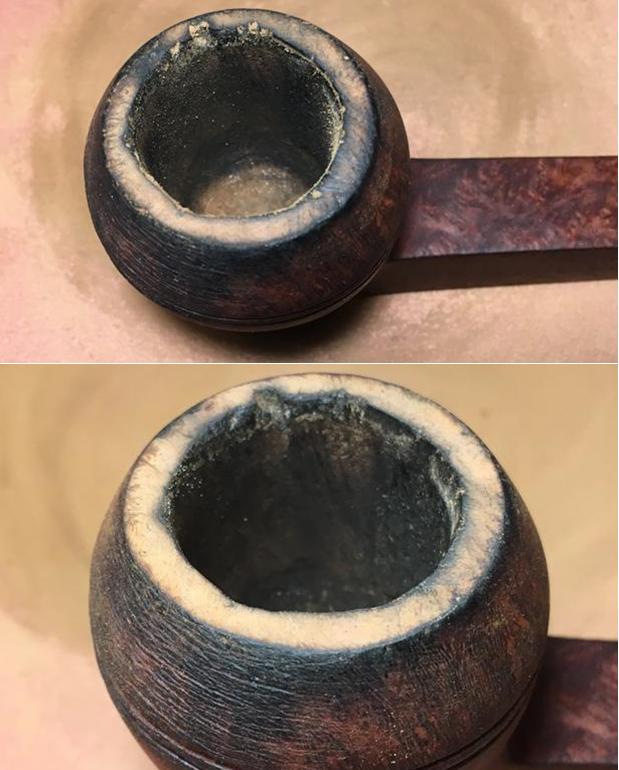
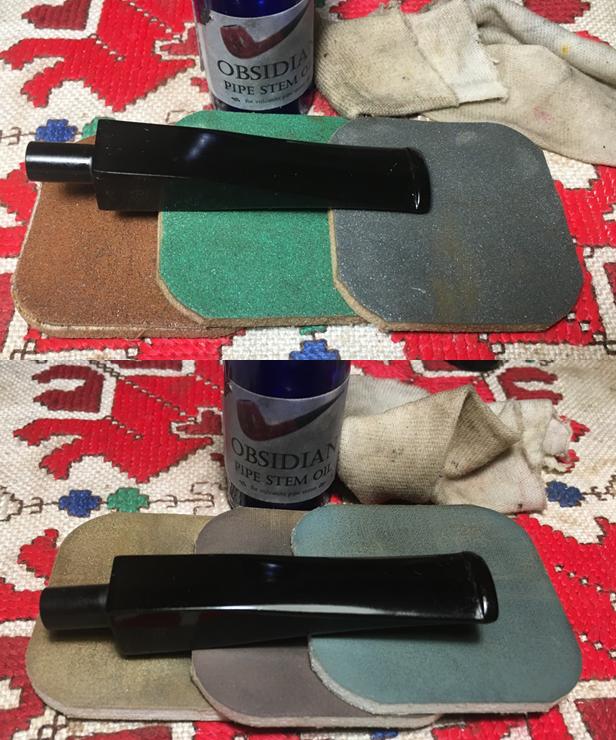
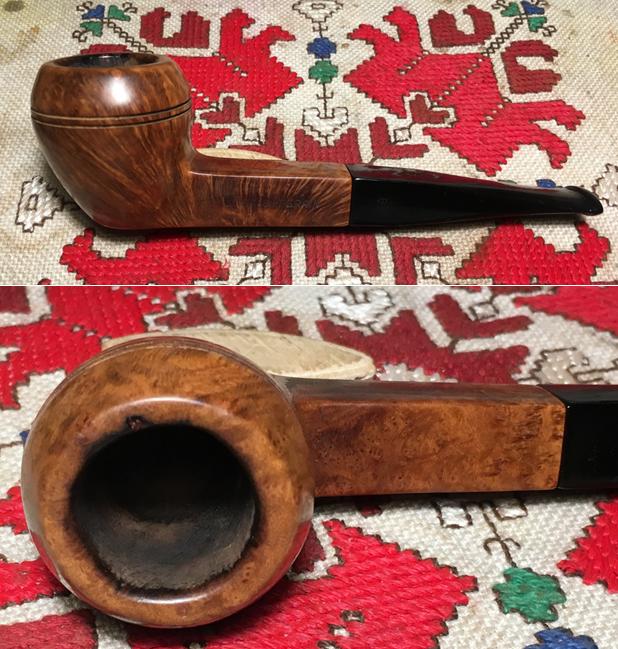
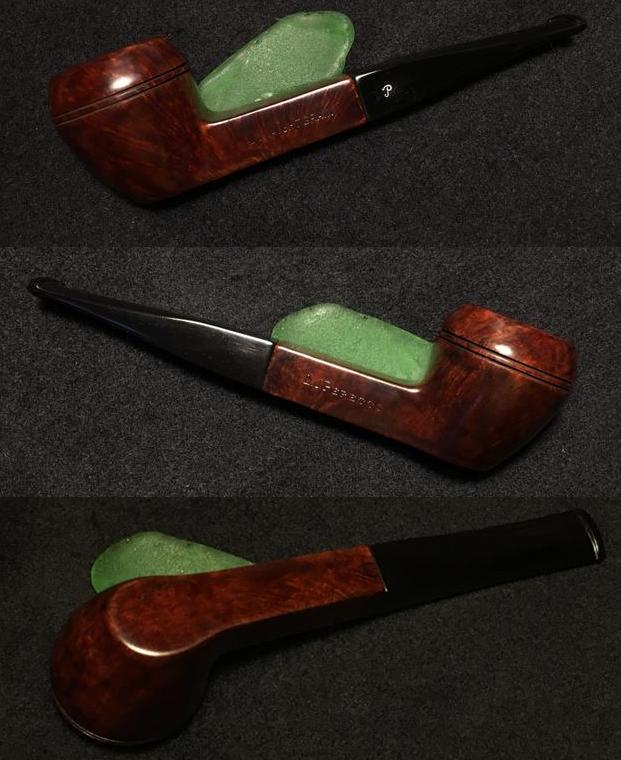
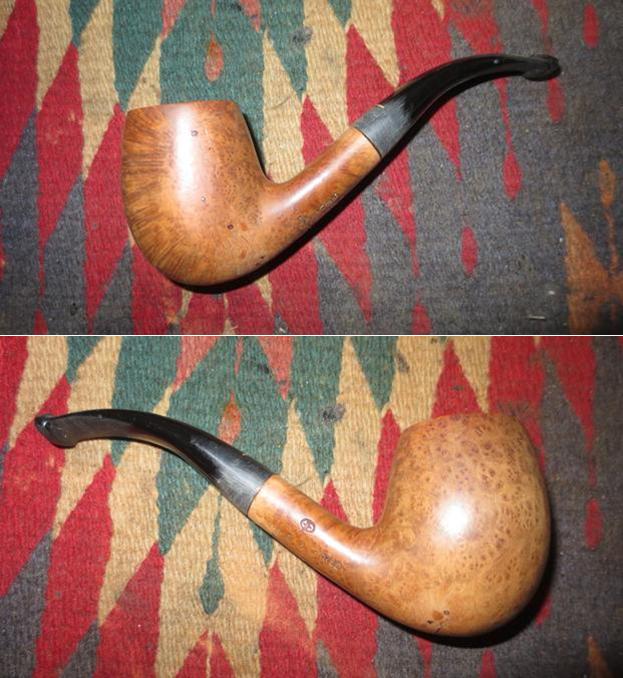
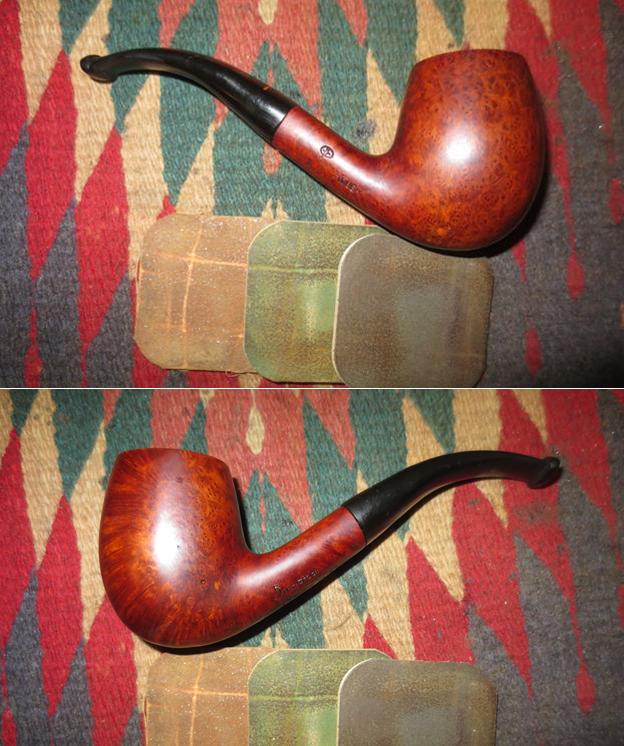
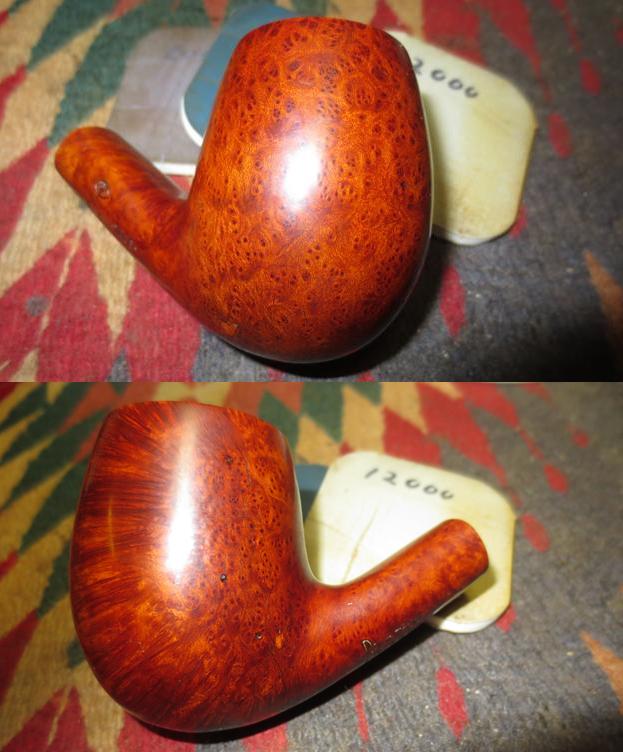
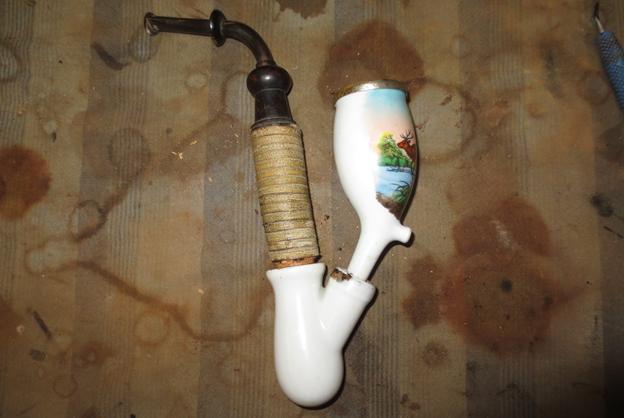
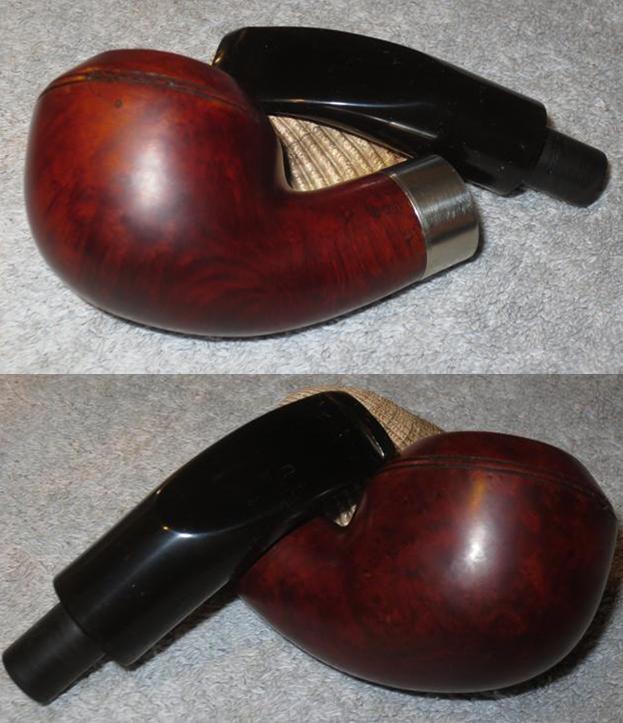
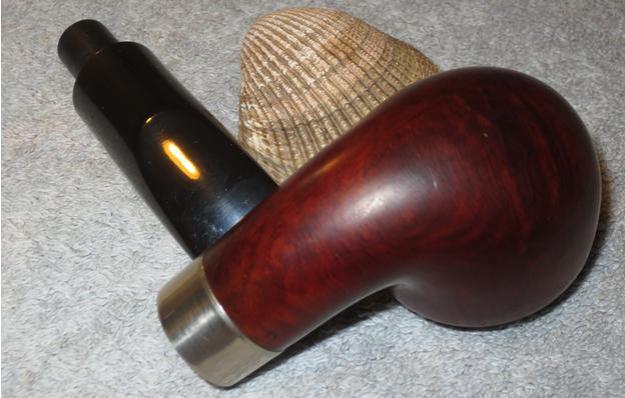
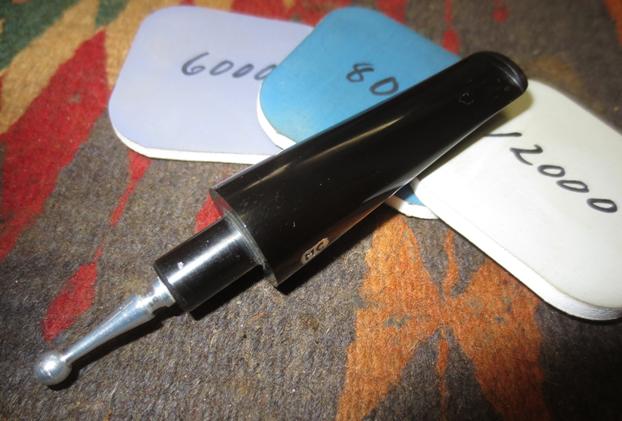
I buffed the stem with Blue Diamond on the buffing wheel to further polish out the scratches. I gave the stem multiple coats of carnauba wax and buffed it with a clean buffing pad to raise the shine back to the surface. I hand buffed it with a microfibre cloth to deepen the shine. The finished pipe is shown in the photos below. It is a great piece of pipe history and one that will be available on the rebornpipes store soon. If you want to beat the traffic and add it to your collection just send me an email and it can be yours. Thanks for looking.

Restemming and Reconditioning a Brigham Voyageur 165


Blog by Steve Laug

The eighth pipe from the lot of pipes that a pipesmoker dropped by for repair is a Brigham Voyageur. It is stamped on the left side of the shank with the Brigham name over Voyageur which is the model. The shape number is 165. It was rusticated in the classic Brigham style with a smooth rim, ring around the rim and the shank end and a smooth spot on the shank for the stamping. The pipe was dirty with dust and grime in the crevices of the finish on the bowl. The rim had a tarry buildup which had flowed from the cake in the bowl. The internals were very dirty with a lot of tar and grime. The overall condition of the bowl was good under the grime. The following photos show the pipe’s condition before I began to clean and restore it. I took a close up photo of the rim top and the bowl to show the condition of the cake and the overflow on to the rim top. I also took a photo of the stamping on the smooth left side of the shank. The pipe was a two dot Brigham. In talking with the owner he was not interested in preserving the Brigham system. He was only interested in having a pipe that he could fire up and enjoy. I would need to decide how I was going to fix this one but it was going to be another challenge for me.The stem was in rough shape. It had a split on the top side that ran from the edge of the button almost an inch up the stem toward the bowl. On the underside it had deep tooth marks and two cracks that ran through the button into the airway in the slot. The slot was compressed from the bit marks. There was a lot of oxidation on the surface and some calcification. The Brigham nylon tenon told me that the pipe is a newer one rather than those with the aluminum tenon. It was designed to hold the Brigham Hard Maple Filter tube that is specially designed for them. This one was clogged with tars. The end of the nylon tube was splitting and flared. It was ruined. The photos below show the damaged areas on the stem.I put the stem aside for a while and started on the bowl. I reamed the cake with a PipNet reamer and the Savinelli Fitsall pipe knife to scrape the cake back to bare briar. I rolled a piece of 220 grit sandpaper and wrapped it around my index finger to sand the walls of the bowl. The cake was so sticky and crumbling that I wanted a hard, clean surface so that the owner could build a new cake to protect the bowl.I scraped out the shank with a dental spatula to scrape away the hardened tars that were on the walls of the mortise and airway to the bowl. I scrubbed the surface with pipe cleaners, cotton swabs and alcohol until the shank and mortise was clean.To remove the hard buildup on the rim top and some of the damage to the front outer edge of the bowl I lightly topped it on the topping board using 220 grit sandpaper. I used a folded piece of 220 grit sandpaper to clean up the burn marks and damage on the inner edge of the rim. I finished by sanding the rim with a medium and a fine grit sanding sponge and 1500-4000 grit micromesh sanding pads to smooth out the rim and remove the scratches.I scrubbed the externals of the bowl with Murphy’s Oil Soap and a soft bristle tooth brush to clean out the crevices and grooves of the rustication. Once it was clean I wiped the bowl down with alcohol on a cotton pad to remove the dust on the finish to prepare it for a new coat of stain. I stained the bowl with a dark brown aniline stain and flamed it with a lighter. I repeated the process until the coverage on the bowl was even.Once the stain dried I wiped it down with a cotton pad and alcohol to make it more transparent. I wanted the grain to show through on the smooth portions and the ridges of the rustication. I lightly buffed the bowl with Blue Diamond on the buffing wheel. I gave it a light coat of Conservator’s Wax and hand buffed it with a shoe brush and a microfiber cloth. The buffed and restored bowl is shown in the photos that follow. The time between this picture and the next cannot be captured in photos as there were two days of work and time that went into trying various methods of repairing the original stem for the pipe. I cleaned out the split in the stem and roughened the surface with a file. I cleaned out the cracks on the button, the split on the top side and the tooth marks on the underside of the stem. It took a bunch of sanding and picking. I filled in the gaps with black super glue and charcoal powder to strengthen the repairs. I filed them smooth and sanded them to restore the finish. All was going well until I tried to slide a pipe cleaner into the airway. I pushed it through the airway and into the button only to have the repaired button fall off. The cracks gave way and the chunk fell free of the stem. No repairs would ever hold on this stem. It was finished. One day I may cut it off and use the shorter version for a different pipe but it is not worth a repair any longer.

That decision having been made for me I went through my stem can in search of a replacement. I knew the owner was fine with a non-Brigham stem so that was the way I was going to proceed. I found a stem that had the same dimensions as the original stem. It was a straight stem that I would need to clean up and bend the stem to match the original but it would look good on this old pipe.I sanded the stem with 220 grit sandpaper to clean off the oxidation and remove the light tooth chatter and tooth marks on the top and underside of the stem. I turned the tenon down with a Dremel and sanding drum and fine-tuned it with a file to reduce the tenon to fit the shank of the pipe. I heated the stem with a heat gun until I was able to bend it to match the original stem. I polished the stem with micromesh sanding pads. I wet sanded it with 1500-2400 grit pads and dry sanded it with 3200-12000 grit pads. I still had to work on the tenon to remove the file marks but the stem was beginning to shine. I polished the tenon with micromesh sanding pads to remove the majority of the file marks on the vulcanite. I buffed the tenon and then the stem and bowl with Blue Diamond polish on the buffing wheel to remove the final scratches on the stem. I gave the stem and the smooth portions of the briar several coats of carnauba wax on the wheel and then buffed it with a clean buffing pad to raise a shine. I hand buffed the bowl and stem with a microfiber cloth to deepen the shine. I think that the owner will really like the looks of his restored and restemmed Brigham. It looks really good to my eye. Thanks for looking.

Repairing and Restoring a Walnut Folk Art Russian Pipe


Blog by Steve Laug

I started cleaning up and repairing this Russian Folk Art Walnut pipe before taking photos of it. It was truly a mess. The shank had been cracked off at an angle behind the copper band and had been repaired by gluing the two pieces together without a lot of care to align the parts. As it was the crack was quite wide open all the way around the shank and had been sealed together with epoxy. I heated it to see if I could take it apart and align the parts and the glue definitely softened. I could rebreak it without further damaging the shank parts so I settled for heating it enough to realign the two parts. I realigned the parts and cooled the shank so the glue hardened. I filled in the deep crevices in the shank with briar dust and clear super glue putty. It hardened and bound the parts together. There was no movement in the shank at all at this point in the process. The photos below show the pipe with the stem in place. The repairs to the shank with the putty mix looked pretty decent in the photos. The rest of the pipe was a mess. The rim was thickly caked with over flow from the thick bowl cake. The finish on the bowl was dirty and sticky. The copper band on the shank was covered with a thick buildup of hardened “gunk” that would not come off with a simple wash. The airway in the shank was dirty and almost closed off. The mortise was also clogged. The tenon on the stem had a rubberized cement buildup around the angles at the stem. The stem itself was horn and had tooth marks on the top and underside near the button. The rounded button had an orific entrance into the stem. It was so plugged that I could not push a pipe cleaner through it. I took some close up photos of the repaired shank to show the flow of the two parts and how the realignment had worked. They also show the super glue/briar dust putty filling the crack that went all the way around the shank. There was some glue from the previous glue job that ran up the shank toward the bowl and actually ran around the copper band edge. The third photo shows the rim and the cake in the bowl. There was damage to the front edge of the bowl from someone knocking it out against a hard surface. I took photos of the stem to show the damage at the button end on both sides. The horn surface was worn and the shine was gone.I sanded the roughness of the repaired area on the shank with 180 grit sandpaper. I wanted to smooth out the surface of the repair so that it matched the shank. I continued to sand it further with 220 grit sandpaper. I smoothed out the repair and the shank began to look like it would have originally. You can see the coating on the copper band. It is like someone painted the surface with a glue coat or with varnish. That coat would need to be removed so that the patina of copper would shine through. The front of the bowl had a brass and copper insert in the wood. It was a mix of thorns and vines that was nailed to the front of the bowl. I reamed the bowl with a PipNet pipe reamer and with a Savinelli Fitsall Pipe Knife until the walls were bare and all of the cake was gone.I topped the bowl on a topping board with 220 grit sandpaper to remove the hard cake and the damage to the front of the bowl. It was a light topping that did not remove much of the rim top but it left it clean, smooth and even.I wiped down the exterior of the bowl with alcohol on cotton pads to remove the finish and the grime that was built up on it. Once it was clean the grain of the walnut shone through the stain on the wood. The next photos show the clean bowl and shank with the repaired area shown clearly in the photos. I used a sharp knife to flare the aluminum insert in the shank. I topped the shank end with the topping board to smooth out the face of the shank. I sanded the bowl, shank and copper band with micromesh sanding pads – wet sanding with 1500-2400 grit pads and dry sanding with 3200-12000 grit pads. The pads removed the material that was built up on the copper band and gave it a shine. I cleaned out the airway in the shank and the mortise with cotton swabs, pipe cleaners and alcohol until the airway was clean.I stained the bowl and shank with a dark brown aniline stain, flamed it and repeated the process until I was happy with the coverage.I took the following photos of the bowl once it had dried. The dark brown was a little dark to my liking so I would have to wipe it down to make it a little more transparent. I wiped the bowl down with alcohol on a cotton pad and then buffed the bowl with Blue Diamond on the buffing wheel. The photos below show the colour of the bowl once I had finished with the buffing. I was really happy with the colour and the coverage of the stain on the repaired area. The stem was fairly clogged with tars and oils. It took a lot of work to clean out the gunk in the stem. Pipe cleaners were really hard to push through the buildup so I picked at it with a piece of wire bent to the angle of the stem. I finally was able to break through so the pipe cleaners and alcohol finally did their job on the stem. I also cleaned off the rubber buildup on the tenon next to the stem with a sharp knife and used the alcohol to scrub that area as well.I polished the horn stem with micromesh sanding pads – wet sanding with 1500-2400 grit pads and dry sanding with 3200-12000 grit pads. I rubbed the stem down with Obsidian Oil after each set of three pads. After the final set of pads I gave it a last coat of the oil and set it aside to dry. I buffed the bowl and stem a final time with Blue Diamond on the buffing wheel and then gave the pipe several coats of carnauba wax. I buffed it with a clean buffing pad to raise a shine and hand buffed it with a microfiber cloth to deepen the shine. The finished pipe is shown in the photos below. It is looking far better than it did when it arrived. I think the owner will be happy about this piece of his own pipe history being brought back to life. It joins the others that are finished of the nine he sent me. Only two more pipes to go and I will be down with this lot. Thanks for looking.


One more hard to clean up – a no name Meerlined Bulldog


Blog by Steve Laug

The fifth pipe from the lot left to me for cleanup by the fellow on holiday was this little no name Bulldog. When he showed it to me, it was later in the evening and in the twilight of my dim living room, I did not notice that it was a meerlined pipe and he neglected to tell me. Once I had the pipe on my worktable and examined it under the light I could see that it was meerlined and that the meerschaum lining extended all the way to the bottom and was thus a cup insert into the briar and not a lining that ended above the airway. Knowing that changed my cleanup routine in that I do not like reaming meerschaum lined bowls because it is too easy to damage the walls and the bottom of the bowl if they are soft or cracked. I use a Savinelli Pipe Knife to carefully scrape the walls clean and wipe it down with a wet paper towel.

The pipe really was a mess in more ways than even the photos show. The finish was a thick varnish/urethane coat that had bubble and cracked on the heel of the bowl. The rim had a thick dark cake of tar that almost hid the proverbial line that separates the meerlining from the briar that holds it. The rings around the bowl were almost filled in with grime and grit. Looking at the bowl in the light I saw more pink/red fills than I have ever seen on a pipe. It seemed like there were fills between every darkened line of grain on the front and left side of the bowl and there were spot fills on the right and backside of the bowl. The inside of the bowl was caked with a thick, sticky tar that made me think that it had never been cleaned. The stem was hard to remove from the shank the goop (technical term here) was so thick and sticky. The metal spacer was attached to the stem not to the shank and it was oxidized and dirty. The surface of the stem was as sticky as the bowl surface and the button end had been chewed to the point that button was almost non-existent and the slot was virtually pinched closed. I have no idea how the owner was able draw smoke from the bowl to his mouth with this pinched and clogged mouthpiece. The pipe was truly a mess and one that would take some time to clean up and restore. Sometimes when I work on a pipe like this one I seriously question whether it is worth restoring. The only thing that keeps me at it is not the worth or condition the pipe is in when I get it, but obviously, it was a favoured pipe and quite possibly a great smoker to the one who wanted it restored. That is what makes it worth it to me – perhaps I can bring it back to some of its former glory and make it smokeable once more.

I took some close up photos of the state of the pipe before I started the restoration process. The first one shows the telltale inner ring on the bowl that signaled a meerlined bowl to me. The build up cake that flowed out of the bowl and over the rim is visible. The only thing you cannot experience is touching the stickiness and smelling the stink of a very dirty pipe. The second photo shows the heel of the pipe with the bubbled finish, missing fills and partial fills that will need attention. The last two photos show the condition of the stem – note the tooth marks and collapsed button visible in both photos. What is amazing is that the stem did not have any bite marks going through into the airway. On the one hand this pipe is a mess, but on the other it provides me with a challenge.The urethane/plastic coat on the bowl was impervious to acetone and alcohol. All it did was remove the dirt and grime but it did not faze the finish – even in the bubbled area on the heel. So much for the easy route of stripping the finish. I would have to resort to a more intrusive approach and sand the bowl. Fortunately, there were no stampings on the shank so I could sand the entire pipe. I sanded the urethane finish off the pipe and used a dental pick and sharp penknife to scrape out the grime in the twin rings around the bowl cap (fortunately the plastic coat did not go into the rings). Once I had broken through the finish I scrubbed the surface of the briar with acetone on cotton pads to remove the stain that was underneath the plastic coat. The red/pink putty fills are evident now that the finish is removed. I scraped the cake out of the bowl with the Savinelli Fitsall Pipe Knife. I took the cake back to the meerschaum lining. The meerschaum was darkened from the tobacco stains and fire but it was solid and undamaged! I am thankful for that little bit of reprieve. I scraped some of the build up from the rim at the same time to see if there was damage underneath.I decided to lightly top the bowl to remove the damage to the briar on the front outer edge of the rim cap and some of the deeper gouges in the rim top. I topped it on the topping board using 220 grit sandpaper. I wanted to have a smooth transition between the briar and the meerschaum insert. The topping achieved that goal.I sanded the exterior of the bowl with 220 grit sandpaper to smooth out the rest of the finish in preparation for repairing the damaged fills on the bottom of the bowl and to assess the other fills to see what needed to be done with them. I wiped the bowl down with alcohol on a cotton pad before I took the following photos. With the externals cleaned up it was time to turn my attention to the internals. I blew air through the end of the shank and found that pipe was clogged with just a trickle of air slipping through the shank. I pushed a metal rod through the airway to the bowl and worked it around to remove the build up that constricted the airway. I used a dental spatula to scrape out the walls of the mortise and the end of the mortise and remove the hardened, sticky mess that had formed along the walls making the stem fit very tight. I scoured out the airway in the shank and the mortise with pipe cleaners, cotton swabs and alcohol until the shank and mortise were clean. At this point the pipe was smelling far better.The stem needed the same treatment. I could not push a pipe cleaner through because of the build up of debris and the pinched button and slot. I used a dental pick to scrape out the metal tenon that had been made for a paper filter. It was so full of thick black tars and oils that it took a while to get that part clean. I worked the pick around in the slot until I was able to open the slot and airway enough to be able to push a pipe cleaner through it. I scrubbed out the tenon and the airway with alcohol, cotton swabs and pipe cleaners until it was clean.I used a file to smooth out the top of the existing button and the area one inch in front of the button on both sides of the stem. Once I had cleaned up with the file I sanded it with 180 grit sandpaper to smooth it further. I wiped it down with an alcohol dampened pad to remove the dust. I filled in the tooth marks in the stem and button with black super glue and set the stem aside to cure.I filled in the damaged fills in the heel of the bowl with clear super glue and set it aside to dry. Once glue had dried on the fills on the heel and cap I sanded the repairs with 220 grit sandpaper and blended them into the surrounding briar surface. I wrapped a piece of 220 grit sandpaper around a dowel and then my finger and sanded out the rough spots on the interior walls of the bowl. I wanted the surface of the bowl to be smooth meerschaum so that I could encourage the owner to not allow the cake to build up in this one but to wipe it down with a paper towel after each smoke.I sanded the bowl with a medium and a fine grit sanding sponge and with 1500-4000 grit micromesh sanding pads. Once it had a shine I stained it with a new bottle of dark brown aniline stain undiluted. I was hoping to get some coverage or blend in on the dark red fills on the bowl. I flamed the stain to set it and repeated the process until the coverage was even.I let the stain dry overnight and once it was dry I took some photos of what Dal calls the crust of the fired stain covering the bowl. You can really see the fills stand out through the stain in these photos. I wiped off the crust coat with alcohol on a cotton pad to get it back to the stain coat so I could examine what I was going to work on. I sanded the bowl with 220 grit sandpaper and remove the dark coat. To me the dark really made the red fill material stand out on the bowl and the fact that there were so many of them it looked like freckles. I sanded it back with the sandpaper which left behind some sanding marks and scratches that would need to be worked on. I polished the sanding marks out by buffing it with red Tripoli and then sanding it with micromesh pads. I wet sanded the bowl with 1500-2400 grit pads (I opened a package of new pads to sand with). I dry sanded with 3200-12000 grit pads. The photos below show the progress. While the fills stand out to me the polishing tends to hide them a bit. The pictures below tell the story. The stem repairs had cured so I sanded the repaired areas with 220 grit sandpaper to smooth them out and blend them with the surface of the stem. I shaped the button with a needle file to make the edges cleaner and sharper. I touched up the repaired areas with a clear super glue and filled in the airholes in the cured super glue. I polished the stem with micromesh sanding pads – wet sanding it with 1500-2400 grit pads and dry sanding it with 3200-12000 grit pads. I rubbed the stem down with Obsidian Oil to enliven the stem surface. I hand buffed it with  a microfibre cloth to raise the shine. I filled in the stamping on the stem with White Acrylic Paint and when it had dried I sanded it off. I buffed the bowl with Blue Diamond polish to raise a shine. I buffed until the scratches were blended in to the surface. I gave the bowl and stem multiple coats of carnauba wax to protect the surface of the briar and stem. I buffed it with a clean buffing pad to raise the shine. I hand buffed it with a microfibre cloth to deepen the shine. I polished the metal decorative band on the stem with a silver polishing cloth.The photos below show the finished pipe. It looks far different from the pipe that I started with. The stain and wax blend the fills into the briar, and though still visible, they look far better than they did before. This is the seventh pipe I have restored and repaired for the gentleman who asked me to refurbish them for him. I look forward to seeing what he thinks when he sees this one.

Another L. J. Peretti of Boston – Square Shanked Rhodesian


Blog by Dal Stanton

When Jon put the L. J. Peretti out on the table I was excited.  I was in Oslo, Norway, where I met up with two colleagues who work in Ukraine – we were there watching a world class biathlon event and we had a great time.  Jon knew that I was restoring pipes for the Daughters of Bulgaria and had a couple pipes that he was no longer smoking.  He picked the Peretti up off eBay some time ago and he passed it on to me to restore for a new steward – a task I was more than willing to take on!  I grew a bit attached to the Boston-based Tobacconist L. J. Peretti Co., when I restored my first Peretti which my son had gifted me for Christmas.  It was a challenge as I salvaged the original Peretti stamp on the surviving squared saddle stem half and added the other half by cannibalizing another stem and accomplishing a stem splice.  For a look at this project look here:  Peretti Square Shanked Billiard.  I brought the ‘new’ L. J. Peretti home to Bulgaria and the first picture below shows the two Perettis – a remarkable resemblance in the sharp squared shanked style.In the interest of full disclosure, when I first saw the ‘new’ Peretti in Oslo, I really wasn’t sure what the shape classification would be.  The first indicator I cued on was the double groove – Bulldog?  Then, the classic Bulldog usually has a diamond shank/stem.  Rhodesian?  The squared shank didn’t fit.  Ok, a Billiard or Apple with a cool grooved ring going with the squared shank, which I think is very attractive.  My questions gave way to an email to Steve for his input and his response came very quickly.  His call is a squared shank Rhodesian.  My response, “Sweet!”  That works for me.  When I did my original research on the Peretti name I discovered the genesis of a significant story of Americana pipe history with the establishment of the L. J. Peretti Company of Boston in 1870, the second oldest tobacco shop in the US, second only to Iwan Ries & Co. of Chicago established in 1857 (See: Link).  It started in 1870, Libero Joseph Peretti arrived in Boston from Lugano, Switzerland, putting in motion the historical axis that exists today in an iconic tobacconist shop that continues to serve patrons by hand-blending tobaccos from around the world to taste.  One can take his empty bowl to the shop in Boston at 2 1/2 Park Square and test different blends under the watchful assistance of L. J. Peretti staff – total ‘old school’ and I like it! With an appreciation for the L. J. Perretti Squared Shank Rhodesian on my work table, I take more pictures to fill in the gaps. The left side of the shank is stamped “STRAIGHT GRAIN” and, interestingly, the right side is “L.J. Peretti”.  As is true of my other Peretti, usually the name is stamped on the left side.  This Peretti’s pedigree is on the right side of the shank.  The squared, tapered stem has the classic “P” stamped and in good shape. The chamber shows significant cake and will need to be cleaned down to the briar.  The rim has some significant damage on the right side and significant lava flow.  I will need to clean bowl and rim to see what might be lurking beneath.  The Rhodesian upper dome has cuts – one noticeably dissects the twin grooves.  There’s a good bit of grime in the grooves and at least one lightened fill on the heel – with the flat heel this Rhodesian is also a sitter – a nice feature for the table!  I also detect some dents on the squared shank corners – this old boy has taken a bit of bruising along the way.  The stem shows no oxidation but the button shows some biting and tooth dents – both upper and lower button lips have clench marks.  ‘Straight Grain’ is stamped on the shank and the grain has some striking features that will be visible once the grime is cleaned and things shined up a bit.

I work on the stummel first.  Taking the Pipnet Reaming Kit I use the two smallest of the four blades available to me and ream the chamber, removing the carbon cake build up to the briar. I then fine tune the ream by using the Savinelli pipe knife which enables me to remove residual cake in more difficult angles.  To clean the chamber further, I take a piece of 240 grit sanding paper and wrap it around a Sharpie Pen and sand the surface of the chamber then clean the left-over carbon dust with cotton pads wetted with isopropyl 95%.  The chamber walls appear to be in good condition.  The pictures show the progress. I now use undiluted Murphy’s Soap with cotton pads, a bristled tooth brush and a brass wired brush to clean the stummel surface, scrub the rim and clean the grime out of the twin grooves.  As I’m cleaning, it becomes evident that the left front of the upper dome is scorched from what appears to be the aftermath of using a lighter flame over the side of the rim to light the tobacco.  I do not use a lighter for this reason – it is difficult to angle the flame without bringing damage to the surface briar.  I use matches and bring the flame directly over the chamber and draw the flame directly to the tobacco.  I’ll need to send Jon a note about this!!!  After scrubbing with all available tools, I rinse the stummel with tap water without introducing water into the internals.  With the rim now clean, the extent of the damage is revealed.  The final picture in the set below, on the lower part of the picture shows this damage. Since my day is ending, I decide to hydrate the stummel surface with a light application of olive oil.  I also decide to use a kosher salt and alcohol soak to work on the internals overnight.  I twist a cotton ball and stuff it down the mortise to act as a wick to draw the oils and tars out.  I then fill the chamber with kosher salt and hold my palm over the top and give it a shake to displace the salt.  Using an eyedropper, I then fill the bowl with isopropyl 95% and leave the stummel in an egg crate for stability and turn off the lights.  The pictures show the progress.The next morning the salt, as expected had discolored somewhat and the cotton served as a wick drawing oils and gunk out of the stummel internals.  I follow with a barrage of pipe cleaners and cotton swabs to finish the cleaning job.  The pictures show the progress.I now face the most daunting part of the restoration of this L. J. Peretti Squared Shank Rhodesian.  I take more pictures for a closer look at the problems.  The burn and scorching damage on the rim and upper dome of the stummel are significant.  The rim at the 11:30 position is cratered severely and it appears that the rim burned and the charred part chipped off after becoming brittle.  From this area, down on the left side to the 7:00 position there is damage but not as severe.  My concern is whether there is healthy briar beneath what I’m seeing or has the wood charred more deeply?  If so, a lot of briar will need to be removed to repair the rim via topping, but this could impact the Rhodesian proportional balance between the upper and lower parts of the bowl – divided by the twin grooves.  This repair reminds me of a rim rebuild I did with a ‘Throw-Away Pipe’ that had little rim left.  With a desire to salvage as much of the rim as possible, I will very lightly top the pipe but only to gain the ‘high ground’ of the rim and then fill the craters and divots in the rim with a briar dust and superglue putty.  I want to ‘build-up’ the rim instead of losing it on the topping board and creating a squat-top, disproportionate Rhodesian.  The pictures show the damage and the challenges. It will be difficult to top the rim evenly with the soft spots created by the charred briar.  With the chopping block covered with 240 grit sanding paper, I very lightly begin to rotate the inverted stummel.  I take pictures to mark the gradual process.  When I arrive at the maximum topping progress, most of the rim has found it’s ‘high ground’ leaving the remainder of the damaged areas more visible.  This allows me to strategically apply patches on the rim.  I notice that there is additional carbon on the inside lip of the chamber so I take out the Peretti Pipe Knife once more and scrape the additional carbon exposed by the topping.  The pictures show the progress of the rim repair. The focus for the briar dust – superglue patch will be the 11:00 area (see above).  The remainder of the damage on the inner rim will be addressed by creating an inner rim bevel.  To prepare the area for the patch I clean it with a cotton swab dipped in isopropyl 95%.  Using Hot Stuff Special ‘T’ CA Instant Glue, I mix it with the briar dust until it reaches a viscosity like molasses.  Using a toothpick as a trowel, I apply the putty excessively over the area with the plan of sanding it down.  I put the stummel aside to allow the patch to cure.  I’ll give it a full 12 hours. The next day, the patch has cured well.  I begin sanding down the excess briar dust patch by using a half-rounded needle file to contour the inner chamber part of the patch.  My goal is to reestablish a round rim by blending the patch with the curvature of the inner rim.  After this I smooth and blend the area further with 240 grit paper.  When satisfied, I turn to the top of the rim using a flat needle file to bring the bump of the patch gently down to the briar rim surface.  The surrounding wood is softer and I avoid collateral filing as much as possible.  I follow to further smooth and blend the whole patch with 240 grit paper.  The pictures show the shaping progress. With the primary patch shaping complete, I want to introduce a bevel to the inner rim lip to remove damage as well as blend the entire rim contour – seeking a round rim.  I believe a bevel always ‘up-classes’ a pipe, too!  I use a coarser 120 grit paper to cut the bevel –  careful to remember the patch area is harder and it is easy to dig in to the surrounding softer briar.  After the 120 grit paper, I smooth and blend further with 240 paper. I complete the rim repair by returning to the topping board with a light topping first with 240 paper followed by 600 grit paper.  This ties things together.  The first picture shows the completed patch shaping to mark the progress of the bevel.  I think things are looking good at this point with the rim repair. Unfortunately, upon closer scrutiny, I discover that my topping inadvertently leaned toward the front of the stummel. This is very evident when comparing the twin grooves to the rim pitch (first picture below).  We do not have a parallel alignment which should be the case.  When I looked back at the pictures above showing the incremental topping process, this is confirmed when the front stummel part of the rim was sanding and the shank side less so.  The result I see is the Rhodesian’s dome lop-sided and that just won’t do.  Even though I’ll give up briar real estate, I take the topping board and hang the stummel over the edge of the 240 paper.  I work only the shank-side of the rim which needs to be lowered and leveled with the front side.  Gradually, I find greater alignment with rim and grooves, though there is still a bit of pitch but not as pronounced. It will work.  I reinstate the bevel and I’m satisfied with the progress.  The pictures show the progress. I put the stummel aside and turn to the stem.  I use 240 grit paper to smooth out the tooth chatter on the upper and lower bit and sand the upper and lower button lips.  By removing the superficial indentations in the vulcanite, I am then able to identify what needs to be filled.  After wiping clean the area, I use Starbond Black Medium KE-150 CA glue to drop fill tooth dents in both the upper and lower button lip as well as the upper bit area.  After application of glue, I spray an accelerator on the cosmetic fills.  I do not use accelerator when the strength of the glue is the issue as the use of an accelerator tends to weaken bonds – from my reading.  I follow with a flat needle file to freshen the button lines and then sanding with 240 grit paper to smooth out the file marks and fills and to blend. I then move to sanding the whole stem.  With some great input from Al Jones in a recent restoration regarding safe-guarding the crisp lines and edges of stems, I mount the stem to the stummel with a plastic disk I fabricated between the two.  This keeps the sanding from creating shoulders over the edge of the vulcanite.  I also wrap the 240, then 600 grit paper around a clothespin half to create a flat sanding surface to guard the sharp edges of the squared shank square and not rounding them.  After completing the sanding, careful to guard the Peretti ‘P’ stem stamp, I buff the stem with 0000 steel wool.  The pictures show the progress.Turning to the internals of the stem, I use pipe cleaners dipped in isopropyl 95% to clean the airway.  I notice that the pipe cleaners have difficulty passing through the slot so I widen it a bit using a rounded needle file against the upper and lower slot opening.  That did the trick.  Pipe cleaners move freely and now, cleanly.  Pictures show the progress.With the stem repairs completed and the internals cleaned, I’m ready to commence the micromesh pad cycle on the LJ Peretti’s squared shank.  Using pads 1500 to 2400 I wet sand the stem.  I follow by dry sanding with pads 3200 to 4000 and then 6000 to 12000.  With each set of 3 pads I apply Obsidian Oil to the stem which revitalizes the vulcanite.  The pictures show the amazing vulcanite ‘pop’ emerging. I put the stem aside to dry.With the stummel showing scorching damage on the upper dome extending downwardly over the grooves, I take another picture for a closer look.  I use a medium grade sanding sponge to address the damaged area.  I need to remove the charcoaled wood and get down to healthy briar beneath the surface.  To aim for uniformity throughout the stummel, I use the sanding sponge on the entire surface, careful to guard the nomenclature on both sides of the shank.  I follow the medium grade sponge with the light grade sanding sponge to finish addressing the charred wood and minor cuts and pits on the stummel surface.  It looks good.  The shank stamping, STRAIGHTGRAIN, is starting to show itself as the grain shows through the once scorched dome area.Taking micromesh pads, I now wet sand the stummel using pads 1500 to 2400.  Following this, I dry sand using pads 3200 to 4000 then 6000 to 12000.  Wow.  I cannot believe the grain making an appearance on this L. J. Peretti Rhodesian.  The pictures show what I watch emerge through each micromesh pad cycle. To get a big picture look at the Peretti, I reunite the stummel and stem.  As with my last Peretti restored, I like the squared shank’s flow from stummel as it tapers out through the stem.  This Rhodesian’s stem tapers whereas my other Peretti Billiard has a squared saddle stem.  Both, very nice variations of the same concept – a classy shank style. Because of the beauty of the grain I’m seeing, I’m tempted to stop at this point, and finish up with carnauba – I like the natural briar that much.  The only issue is that I would like to apply a darker brown shade of dye to better blend the patch and repair of the rim which stands out as is.  The pictures show the story.In preparation for the staining phase, I use a sharp dental probe and run it through the grooves to dislodge any briar dust from the sanding process.  There is a good bit of compressed residue coming loose.  I follow by wiping down the stummel with a cotton pad wetted with isopropyl 95% to clean the surface.  On the stummel heel, I detect one lightened fill.  I darken it with a stain stick to encourage blending.  I also touch up the patch fill on the rim to help blending and masking the patch after dye is applied.  Pictures show the preparation steps. To stain, I use Fiebing’s Dark Brown Leather Dye mixed with isopropyl 95% at 50/50.  I use a large dropper to do the mixing in a shot glass.  With the mixture ready, I heat the stummel using the air gun expanding the briar making a better receptor for the dye.  When heated, I use a doubled-over pipe cleaner to apply the dye to the stummel surface.  I apply the dye liberally seeking to achieve 100% coverage.  When completed, I fire the wet dye which immediately ignites the alcohol in the dye, setting the hue in the grain.  I repeat the above application of dye and flaming after a few minutes.  I put the stummel aside to rest for several hours before removing the fired dye crust.  The pictures show the set-up and the progress.  With the stummel resting, I restore the Peretti’s classic stem ‘P’ with white acrylic paint.  Restoring the stem stamping for me is special, along with guarding the nomenclature – and is why I went through a stem-splice with my first Peretti restore – to save the surviving saddle stem piece with the old, warn ‘P’ stamp.   I apply white acrylic paint to the ‘P’ in a large gob over the area to allow the paint to fully saturate the ‘P’ imprint.  I allow it to dry fully.  Later, when dried (it doesn’t take long), I use the edge of a toothpick and gently scrape the area removing the excess but leaving the paint in the stamp imprint.  Using the side of the toothpick has worked for me as it is a harder surface, yet soft as it’s wood.  The flat area of the toothpick passes over the stamp and does not disturb the paint.  I’m pleased with the results.The next morning, the stummel is waiting to be unwrapped of the flamed crust.  Using the Dremel high speed rotary tool, my tool of choice given the tight quarters of my work table on the 10th floor of a former Communist block apartment building, I mount a felt buffing wheel set at the slowest speed, and use Tripoli compound to apply the gentle abrasion to begin the final buffing stages.  I first purge the wheel of old compound running it against the metal adjustment wrench, then with new compound on the wheel, I apply it to the surface.  I do not use much downward pressure but allow the speed of the wheel’s RPMs and the compound to do the work.  I methodically move over the stummel surface in areas with the sheen of the overhead lamp providing the ‘headlights’ letting me know to spread the compound or apply more to the wheel.  I take a picture to show the felt wheel application of Tripoli compound – I had to stage it because I don’t have enough hands to take a picture and hold stummel and Dremel!  After completing the Tripoli cycle, I lightly wiped the stummel with a cotton pad wetted with isopropyl 95%, not wanting to lighten the hue but to blend certain areas on the heel and shank.  I avoid wiping down the bowl area – it looks good.  Dark enough to mask repairs but on the lighter side to show the striking straight grain definitions.Following the Tripoli compound, I mount a cotton cloth buffing wheel dedicated to Blue Diamond compound.  With the Dremel remaining at its slowest speed I apply the lesser abrasion of Blue Diamond compound to buff the surface preparing it for the carnauba wax application.  I reunite the squared tapered stem to the stummel and apply Blue Diamond compound to both.  I know this borders on eccentricity, but as I was finishing the Blue Diamond cycle, I notice that the rim patch done earlier was showing a ridge around the patch, and not flush with the rim.  A bit late in the game to notice this, but it won’t do.  Very strategically, I roll a piece of 600 sanding paper and address the ridging.  I follow with the full set of 12 micromesh pads folded and strategically addressing the area.  Finally, I apply a dark brown stain stick and lightly wipe a cotton pad wetted with isopropyl 95% to blend the area.  Finally, I run the Blue Diamond wheel over the rim and I’m back to where I started.  The patch is visible, but now without the ridges that draw attention to the repair.  Now, the rim is smooth to the touch.  Much better.  Before and after pictures follow this small detour! With detours behind, I hand buff the stem and stummel with a flannel cloth to remove compound dust from the surface before applying carnauba wax.  I then mount a cotton cloth buffing wheel on the Dremel and increase the speed of the RPMs to 2, a bit faster than the slowest speed, and I apply carnauba wax to both the stummel surface as well as to the mounted stem.  After 3 cycles of applying carnauba wax, I hand buff the pipe with a micromesh cloth to bring out the depth of the grain further.

I appreciate Jon giving me this L. J. Perretti while we were in Oslo.  I’m happy to recommission this very attractive Square Shanked Rhodesian – the grain is exceptional and I like the square shank style of both Peretti’s I’ve restored.  The squared shank, not a common Rhodesian configuration, allows this Rhodesian to function like a ‘table sitter’ as well while one plays their card or board games.  If you are interested in adopting the L. J. Peretti Square Shanked Rhodesian, take a look at my blogsite, The Pipe Steward.  As always, all the profits of the sales from my restorations go to help the Daughters of Bulgaria.  Thanks for joining me!


Resurrection for a Hand Made Pipa Croci Bent that was dropped


Blog by Steve Laug

The next pipe up for repairs and restoration (from nine from the fellow who brought them for repair) is a Hand Made Pipa Croci. It is stamped on the left side and continuing to the underside of the shank with the words Pipa Croci (long-tailed P) over fatta a mano over Mantova, Italia and dal 1983. On the right side is stamped PC in a circle with a tail over A3 (shape number for a bent billiard). Next to that is stamped *True*. Fatta a mano means Hand Made. It would have been a great looking pipe when purchased. I am pretty sure that it is the nicest one that he left for me to work on and the one with the most issues. Somewhere along the way he dropped the pipe on concrete and the tenon snapped. If that had been all then that was a simple fix. It was not all! The bowl cracked two places on the bottom, not deep cracks but cracks nonetheless. There was a crack on the left side mid bowl that ran from close to the bottom up to a ½ inch below the rim and a small one on the top of the rim on the left toward the front of the bowl. I took a close up photo of the rim and bowl to show the condition. The cake is thick and the rim has a lava overflow from the bowl and some damage on the outer edge near the front.The next two photos, though a little out of focus show the crack in the bowl bottom circled in red. I will continue to show them in the photos as I clean up the bowl.The Lucite/acrylic stem was rough. There were tooth marks on both the top and underside of the stem in front of the button and a deep bit mark on the top of the button. The broken tenon would need to be replaced and there were some nicks in the sides of the stem close to the button end.I reamed the bowl with a PipNet pipe reamer and took the cake back to bare briar. I cleaned up the reaming with a Savinelli Fitsall Pipe Knife. There would still need to be more work done to smooth things out but the bowl was clean and I could see that the cracks did not go all the way through to the inside walls.I topped the bowl to remove the rim damage, particularly that on the outer edge. I also wanted to expose the crack on the rim top and see how bad it was. This pipe really took a beating when it was dropped – fissures all over the place in the briar. I have circled the crack on the bottom to show the largest one. There is a small one next to it that is hard to see in this picture though it will show in later pictures.I scrubbed the bowl down with acetone to remove the finish and reveal more clearly the cracks on the bowl. I have circled them in the next set of photos and drawn arrows to the points of origin that will need to be drilled. The number of cracks is amazing to me – all from a drop on concrete. This briar is quite stunning with some birdseye and cross grain. I drilled with a microdrill bit in the Dremel at each terminus of the cracks. Some of them had spidered a bit so they took multiple holes. I clean out the cracks with a dental pick and wiped the bowl down with alcohol on a cotton pad. I filled in the holes with briar dust and clear super glue. I sanded the repairs with 220 grit sandpaper to blend the repairs into the rest of the bowl. I sanded them with a medium and fine grit sanding sponge to polish the scratches away. I set the bowl aside for a while and worked on the stem. I flattened out the broken tenon on the face of the stem with a Dremel and sanding drum. Once it was smooth I used a drill bit about the same size as the airway in the stem to start the process of opening the airway to take the new tenon. I put the drill bit in a stationary drill and turned the stem on to the bit by hand. I increased the size of the bit incrementally so as not to split the stem and to keep things aligned. I put a tape on the bit that marked the depth of the threaded tenon. Once the airway was opened to the diameter of the tenon I used a tap to thread the inside walls of the newly drilled opening. I turned the stem onto the tap carefully to keep it straight and aligned.The next two photos show the newly tapped stem and the new tenon that was going to be turned into the stem. The tenon was slightly larger than the mortise so I used the Dremel and sanding drum to take it down to the right size. I dabbed some slow drying glue on the threads of the new tenon and turned it into the stem until it sat tight against the face of the stem. With that done the stem repair was complete. There were some nicks and scratches in the stem around the junction area with the shank that needed to be sanded and cleaned up. I used some 220 grit sandpaper to do that. The stem was ready for the fit and all that remained was to push it into the mortise and check it out once the glue set.I put the stem in place in the mortise to check the alignment and was happy with the overall results. As normal there were some slight adjustments that needed to make to the stem and shank but nothing radical so I was happy with the fit. Now all I had to do was finish the fit and repair the stem. I noticed in the photos below that there was some roughness to the inside of the bowl so I would also need to sand that smooth. I wrapped a piece of 220 sandpaper around my finger and sanded the inside walls of the bowl until I had smoothed them out.I cleaned out the airway in the stem and the bowl as well as the mortise with pipe cleaners, cotton swabs and alcohol until they were all clean. I also scrubbed the darkened end of the shank to remove the stain that was there.I stained the bowl with a dark brown aniline stain thinned 50/50 with alcohol and flamed it to set it in the grain. I repeated the process until the coverage was even around the bowl.  I wanted it to be dark enough to blend the repairs into the sides and bottom of the bowl and hide the drill holes and cracks. I set the bowl aside to let the stain dry overnight and called it a day.In the morning I started the polishing process on the bowl. I sanded it with 1500-2400 grit micromesh and a small amount of olive oil to help the grit cut into the briar. I wiped it down afterwards and inserted the stem to see what was happening. The alignment of the stem was slightly off to the left in the photos so it appears not to fit. However, the fit is actually quite good. I still need to polish and clean up the stem. I continued polishing the bowl with the micromesh pads using 3200-12000 grit pads to really add to the shine of the briar. Each successive grit of micromesh raised the shine more on the briar. The grain really pops on this one… I turned back to the stem. I adjusted the fit with 220 grit sandpaper until the transition was smooth. When the fit was correct I polished the stem with micromesh sanding pads – wet sanding with 1500-2400 grit pads and dry sanding with 3200-12000 grit pads. I wiped the stem down after each grit of pad to clean off the sanding debris and gave it a final wiped down after the 12000 grit pad. I buffed the pipe and stem with Blue Diamond on the buffing wheel to remove any remaining scratches or marks and raise a shine. I gave the bowl and stem multiple coats of carnauba wax and buffed the pipe with a clean buffing pad. I hand buffed it with a microfibre cloth to deepen the shine. The finished pipe is shown in the photos below. The cracks are all sealed and since they do not go all the way through into the interior of the bowl I think that they will hold up well. The pipe has a lot of life in it still and I know that the owner will be glad to get it back in far better nick than it was when he left it here. Thanks for journeying with me on this resurrection.


Recorking a German Porcelain Tyrolean or Wine Pipe


Blog by Steve Laug

The fourth pipe I chose to work on from the lot the fellow dropped by on his way out of town for his holidays was a family heirloom. He said it was his grandfather’s pipe and then his father’s pipe afterwards. It now was in his keeping. Somewhere along the way the bowl had been cracked but was held together by the brass rim cap. The domed wind cap was also missing. The pictorial scene on the front of the bowl was in perfect shape with no scratches. The bowl was held in place by a wrap of masking tape where there had originally been cork. The remnants of the old cork plug were still stuck to the sides of that portion of the lower cup. The stem was Cherrywood but his father had wrapped it with a leather lace because he liked the way it looked. The end portion of the stem was horn and had tooth marks on the top and bottom next to the chewed on button. The stem was held in the lower cup by a wrapping of thick tape that was wrapped around the end of the Cherrywood in place of the cork. There was a bit of original gold around the bowl portion of the cup. The bottom of the cup portion had some scratches and the porcelain parts of the pipe were dirty and sticky.This traditional German porcelain pipe has been variously called a porcelain wine pipe, Tyrolean pipe, Black Forest pipe, alpine folk pipe, and several other variations on those themes. There are two glazed porcelain sections – a wind-capped bowl (the wind cap was missing on this one) and what I’ve heard call the “chamber-pot” section, or “wine bowl”. I’ve heard and read that sometimes a little wine was put in the chamber pot bottom cup to both flavor and gentle the smoke. The two porcelain sections are fired with a white glaze with a pair of deer at a stream under the glaze.

I took some close up photos of the bowl front, the top and the bottom of the bowl to show the condition. The fired painted deer on the front is in excellent condition. The top of the rim is brass and the hinged wind cap is missing. The bottom of the bowl shows some wear and a rough spot in the porcelain. You can also see the wrap of masking tape around the foot of the bowl to keep it in place in the bottom cup/chamber pot. The end of the stem was wrapped in masking tape as well. This was done in place of the cork that would have originally been present to hold the stem in the bottom chamber pot. You can also see the wrapped leather lace that was glued to the Cherrywood portion of the stem.I unwrapped the tape from the end of the stem in preparation for fitting a new cork on the stem end. I wiped down the cherrywood with alcohol on a cotton pad to remove the glue and tape residue from the wood. The piece of wine cork that is shown in the photo is the one I planned on using to recork the stem and the bowl end.I cut the wine cork in half with a sharp knife. I set up a cordless drill and turned the cork onto the bit by hand. I started by drilling a hole in the centre of the cork with a small bit to get started. I worked my way up to a drill bit that was the same size as the small end of the stem. J cleaned out the hole with a sharp knife to make it more smooth and round. I used a file to smooth out the hole in the centre of the cork and then shaped it with a Dremel and sanding drum. I continued to sand the cork with the Dremel and sanding drum to take it down until it fit in the chamber pot. The next photos tell the story. I drilled a hole in the centre of the other half of the cork and continued until the hole was the same diameter as the nipple at the end of the bowl. I took down the diameter of the second cork to match that of the part of the chamber pot that held the bowl in place. I sanded it with the Dremel and sanding drum until it fit snuggly in the pot. I could see from looking at the inside of the pot that there was originally a cork gasket glued in place at that point. The pictures tell the story. I scraped the walls of the part that held the bowl with a sharp pen knife and removed the remnants of cork I cleaned out the walls where the cork insert would go and where the stem would go using alcohol and cotton swabs. I sanded the inside with 220 grit sandpaper wrapped around a piece of dowel to clean it out. I scrubbed the top of each side with a scrubbing pad and some soft scrub to remove the grime that was built up there. I rubbed the outside of the cork with some Vaseline to soften and lubricate the cork and pressed it into the hole. I put a bead of white glue around the top edge of the cork and set it aside to dry. Once it had dried I used a file to smooth out the hole in the cork. I put Vaseline on the cork on the stem portion and on the end of the bowl and put the pipe back together. The photos below show how things fit together. I could see from the photos that I needed sand off a little more of the cork on the stem to get it seated correctly. The horn stem had tooth marks and chatter on both sides near the button. There were some tooth marks on the edges of the button on both sides. I sanded the marks out with 220 grit sandpaper to remove them. I polished the horn stem with micromesh sanding pads – wet sanding with 1500-2400 grit pads and dry sanding with 3200-12000 grit pads. I rubbed the stem down with Obsidian Oil after each set of three pads. After the final pad I gave it another coat of oil and set it aside to dry. I scrubbed off the porcelain with Soft Scrub to remove the stickiness and grime. I unscrewed the horn stem from the Cherrywood portion and cleaned out the threads and the airway in both the stem and the shank portion. I put some Vaseline on the horn threads and put the stem back in place. I hand buffed the porcelain bowl and chamber pot with a soft microfibre cloth and gave the stem several coats of carnauba wax to protect it. The finished pipe is shown in the photos below. It is ready for the fellow to pick up. Only five more of his pipes to work on before I give him a call to come pick them up. Thanks for looking.

Resurrecting a Butz Choquin Commander 1028 Rhodesian


Blog by Steve Laug

This is the third pipe that I a working on for the pipe smoker who stopped by my house last week and dropped off his pipes for repair. This one is a Butz Choquin Rhodesian. It is stamped Butz Choquin over Commander on the left side of the shank and under that it is stamped Filtre Extra. On the right side, the shape number 1028 is stamped. It was another one that had a replacement stem that is a tight fit in the shank. The owner was pretty sure that the replacement stem is what cracked the shank in two places and that certainly could be true. The stem was oxidized and had tooth marks on both sides just in front of the button. The briar is in rough shape. The rim had a coating of lava that overflow from the bowl and had a lot of nicks and dings from where the pipe had been knocked against a hard surface to remove the dottle. The bowl had a thick crumbly cake that was uneven. There were burn marks around the outer edges of the rim. The double ring had been nicked and some of the band around the top of the bowl was broken. The shank had two cracks on it – one on the right side that extended half way along the shank and one on the top left that was about a ¼ inch long. The finish was gone and the stamping had been over buffed somewhere along the way so it was hard to read. I took a close up photo of the rim and bowl to show the damage and overflow onto the rim. The nicks and roughness are visible in the bowl. It appears that the bowl had been over reamed somewhere along the way and there was a gap between the bottom of the bowl and the entrance of the airway into the bowl. The second photo below shows the crack in the shank on the right side. It was quite long and rough to touch.The next photos show the condition of the replacement stem. You can see the oxidation and tooth marks on both sides and on the button top itself.I took some close up photos of the cracked shank. I circled both cracked areas in red. (I apologize for the blurry second photo. I should have checked the pic before I move on but did not. The crack is still visible.)I drilled a small hole with a microdrill bit at the terminus of both cracks to stop the crack from expanding further. (Again they are circle in red in the photos below.)I pressed briar dust into the cracks and put super glue on top of the dust to fill in the crack and the drilled hole. I sanded the fills until they were blended into the shank.I put the band onto the end of the shank and heated it with a heat gun to expand it. Once it was hot, I pressed it down against a board that I use for this purpose. Make sure to hold the shank straight up and down to keep the band moving up the shank evenly.Once the band was in place on the shank and the end was even with the end of the shank I let is cool. As the band cooled, the cracks were held tightly together and from the end of the shank were visible only if you knew where to look. I took photos of the newly banded shank to show the look of the pipe with the band. I lightly topped the bowl on the topping board with 220 grit sandpaper to remove the rim damage and burn marks.I reamed the bowl with the PipeNet reamer and the Savinelli Fitsall Reamer to take the cake back to the bare walls. I sanded the bowl with sandpaper to smooth it out. I scrubbed the rim and airway in the shank and the stem with pipe cleaners, cotton swabs and alcohol. There was still work to do but it was getting there. I sanded the oxidation and build up on the stem with 220 grit sandpaper to remove it and the tooth marks. Those that could not be sanded out I filled with black super glue.I cleaned out the grooves around the bowl with a thin blade and wiped it down with alcohol. I sanded the rim cap and the ring to smooth out the damage and give me a clear picture of what I needed to do to repair these areas. The two photos below show the damaged areas.I filled in the missing spots on the ring with super glue and briar dust. I used a sharp knife to clean out the rings from the excess glue and fill. I used a piece of sandpaper to sand the edges on the centre ring. I was able to fill in the majority of the damage though there were still some spots on the ring that showed damage.As I cleaned and sanded the rim cap with micromesh sanding  pads I noticed one more small crack on the left side of the bowl from the edge of the rim down the side of the bowl. It was not all the way through the bowl into the inside of the bowl but it was there. I used a microdrill bit on the Dremel to drill small holes at the end of the top edge and also on the hook of the bottom edge of the crack. I filled in the holes and the crack with super glue and briar dust. I sanded the spots once the glue had dried. I smoothed out the repair to blend it into the rest of the briar.I stained the bowl with dark brown aniline stain and flamed it with a lighter to set it in the grain. I repeated the process until I was happy with the coverage on the briar. The stain blended the repairs on the shank and the bowl with the rest of the briar. They are still visible if you know where to look but really look like small black spots in the briar.I hand buffed the bowl with a microfibre cloth and took the following photos to show the state of things at this point in the process. I am pretty happy with the finish at this point. I opened the slot in the button with needle files – both a flat oval and thicker oval to make it easier to pass a pipe cleaner through to the bowl. Once it was clearly opened I used a folded piece of 220 grit sandpaper to smooth out the file marks in the slot.I turned my attention to the surface of the stem. The oxidation was deep and it took some work to get it out. I worked on the stem with 220 grit sandpaper to remove the surface oxidation. It removed much of the oxidation but there was still work to be done. I polished the stem with micromesh sanding pads – wet sanding with 1500-2400 grit pads. The photo below shows that there was still some oxidation to work on. I buffed it with red Tripoli to further remove the oxidation. I was happy with it once it was buffed. I dry sanded it with 3200-4000 grit pads. The second photo shows the stem after that buffing. The oxidation was finally conquered. I rubbed it down with Obsidian Oil. I polished it with the last three grits of micromesh – 6000-12000 grit pads and rubbed it down with Obsidian Oil. I set it aside to let the oil dry.I buffed the bowl and stem with Blue Diamond on the buffing wheel to polish out the last of the scratches. I gave the bowl and stem multiple coats of carnauba wax with the wax wheel. I buffed it with a clean buffing pad to raise the shine and with a microfibre cloth to deepen the shine. The finished pipe is shown in the photos below. The third pipe is finished for the pipe smoker who dropped them by for me to restore. This one had a few challenges but I think they were met and the pipe looks better than when I began. Thanks for looking.

An Old Sealed Package of Eight Brothers Long Cut Tobacco


Blog Steve Laug

I was visiting my brother in Idaho and we went pipe hunting to see what we could find in the various antique shops and malls near by his home. One of the places we went was closing and they had some junk pipes for sale, a boxed set of bowls for a Koolsmoke metal pipe and a few tobacco tins that they were trying to sell out before the shop closed forever. Everything was 50% off so I was hooked to do a bit of looking at things I don’t normally buy. I picked up the Koolsmoke pipe bowls, an old tobacco tin the read Allen & Ginter’s Genuine Louisiana Perique, Made in Richmond, Virginia on the top and sides and a cellophane sealed pouch of Eight Brothers Long Cut Tobacco. I have seen the brand advertised before and I have seen it sold back in my early years or so I thought! I have no idea what it is or what tobacco is in the pouch. I don’t know if it was a Virginia, Burley or even a Latakia. I can’t seem to find any information on the contents of the tobacco. I decided to do a bit of research and see what I could find out about the brand.

I started my search on Google with the name “Eight Brothers Long Cut Tobacco”. I found lots of empty tins for sale and thought that was a dead end. But it was not! I started to notice that the tins had different company names printed on them. Some were marked Swisher International Inc., others were marked Schmitt Brothers Tobacco Works, Penn Tobacco Company, Bloch Brothers Tobacco Company, Helme Tobacco Company, General Cigar & Tobacco Company and also Culbro Co. I had no idea of the historical line of the brand and where it started. I did not know which company came first and which came next, etc. I just new that the package I found read General Cigar & Tobacco Co. a Division of Culbro Corporation. So my work was cut out for me.

Here is what I found. (Throughout this blog I will use pictures I found on the web for this tobacco. The tins show the various iterations of the tobacco through various manufacturers.)

On the US Trademark website (http://www.trademarkia.com/eight-brothers-71539750.html) I found out that the brand was first owned by Swisher International, Inc. (Helme Tobacco Company). Here is what I read on the site: On Friday, October 31, 1947, a U.S. federal trademark registration was filed for EIGHT BROTHERS by Swisher International, Inc., JACKSONVILLE 32206. The USPTO has given the EIGHT BROTHERS trademark serial number of 71539750. The current federal status of this trademark filing is EXPIRED. The correspondent listed for EIGHT BROTHERS is JUDITH D. COHEN of KANE, DALSIMER, SULLIVAN, KURUCZ, LEVY,, EISELE AND RICHARD, 711 THIRD AVENUE, 20TH FLOOR NEW YORK, N. Y. 10017 . The EIGHT BROTHERS trademark is filed in the category of Rubber Products . The description provided to the USPTO for EIGHT BROTHERS is SMOKING AND CHEWING TOBACCO.

It seems that the blend was sold to Schmitt Brothers Tobacco Works. This was an independent tobacco manufacturer, which was later bought by the Penn Tobacco Company of Wilkes-Barre, Pennsylvania. Tins were printed Penn Tobacco Company during that time frame. In the photo below it reads Penn Tobacco Company and underneath it reads Successors to Schmitt Brothers Tobacco Works.I also found one that was printed Bloch Brothers Tobacco. From what I could find out on the web Bloch Brothers purchased the brand from Penn Tobacco Company and moved it to Wheeling, West Virginia. The tin below bears the name of Bloch Brothers and underneath reads Successors to Penn Tobacco Co.In 1969 Bloch Brothers/Penn Tobacco Co was sold to the General Cigar and Tobacco Company, which became a division of Culbro in 1978. The tin below is printed with the name General Cigar & Tobacco Co. I did some reading on the Culbro Company. Here is a link to the their website and specifically to the section on their history. http://www.culbro.com/about-us/our-history.html

Quoting from their site:

The Cullman family has a long history in all parts of the cigar industry. In 1961, Edgar Cullman, Sr., son of a tobacco grower and grandson of a tobacco merchant, entered the business of cigar manufacturing with the purchase of General Cigar, then a large maker of mass market cigars in the US. Under Edgar’s leadership, General Cigar entered the premium cigar industry and over time became the largest manufacturer and marketer of premium cigars in the US. Its leading brands include Macanudo, Partagas, Punch and Hoyo de Monterrey.

The cigar business was the core of General Cigar, but in the 1970s and 1980s, as cigars were experiencing declining consumption, the company diversified its holdings and changed its name to Culbro Corporation. During those years, it acquired, managed and sold a large number of businesses including Ex-Lax, a laxative maker, Bachman Foods, a snack food company, The Eli Witt Company, a wholesale distributor, Centaur Communications, a publishing company, CMS Gilbreth Packaging Systems, a manufacturer of packaging and labeling systems, and Bermas Plastics, a plastic cigar tip manufacturer. Culbro Corporation also formed a real estate development corporation which, when combined with Imperial Nurseries, ultimately became Griffin Land & Nurseries, Inc. and invested in HF, which subsequently became Doral Financial Corporation. Both of these companies were public spin-offs.

In 1997, when interest in cigars had resumed, Culbro once again took General Cigar public and split off the other businesses. A few years later, public markets lost interest in cigars, and General Cigar went private with the assistance of Swedish Match, a multiline tobacco business. Five years later Swedish Match acquired the whole business.

Culbro, LLC was formed in 2005 to bring the financial and operating experience of acquiring and managing businesses to bear in the private equity industry.

The label on my package is printed with the General Cigar & Tobacco Co. of Wheeling, West Virgina label. I know then that tobacco was manufactured between the dates noted above 1961-1969. 1969 was the date when Bloch Brothers Tobacco Co./Penn Tobacco Co. sold the brand to General Cigar & Tobacco. The other article note is that in 1961 Edgar Cullman, Sr. of Culbro Co. purchased General Cigar and tobacco. I believe that the package I have was made sometime during the 1960s (1961-1969).

A cellophane sealed Yellow Eight Brothers Tobacco package. Black print reads “Eight/Brothers/Mild Smoke/8 Brothers” over a circle that reads “ Mild Smoke on the top of the circle and “Pleasant Chew” on the underside. I the centre is an 8 over the word BROTHERS. Underneath the circle it reads “Long Cut Tobacco”. Both front and back are the same. On one side it reads “General Cigar & Tobacco Co.” with the following address: Wheeling, West Virginia. Underneath it has a CULBRO logo and reads “A Division of Culbro Corporation. On the other side it reads  “Union Made” and has a bar code.Now I have a decision in front of me – do I open the pouch and fire up a bowl or do I leave it as a historical pouch from 50+ years ago. What do you think?

A friend on the Gentlemen’s Pipe Smoking Group on FaceBook posted the following link for more information. https://www.wvencyclopedia.org/articles/549 What follows is an interesting addition to the above information.

“Jesse Bloch was president of the company from 1937 to 1947. During his tenure, the company expanded by acquiring the Pollack Crown stogie and the Penn Tobacco Company. Jesse’s son, Thomas, continued as head of the company, adding the firm of Christian Peper Tobacco Company and its line of pipe tobacco products to the mixtures being made in Wheeling. Bloch Brothers was sold in 1969 to the General Cigar and Tobacco Company, which became a division of Culbro in 1978. The company was acquired by the Helme Tobacco Company in 1983 and now uses the name Swisher International. Mail Pouch, described by tobacco chewers as drier and not as sweet as some other chewing tobaccos, remains a popular product.”