Category Archives: Examples of Refurbished Pipes

In this section of the blog you will find before and after pictures of pipes that I have reworked. In each of them I give a summary of the work done to them. There are tips on working with different materials in these posts as well. For instance I have posted two horn stem pipes that I did work on the horn stems to removed tooth damage.

New Life for a Yello Bole Canadian


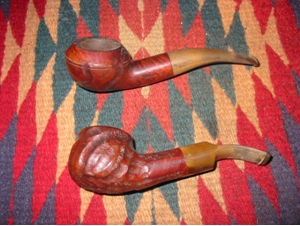
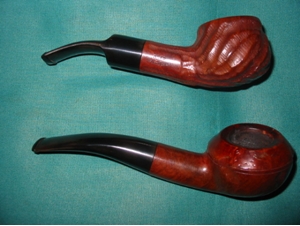
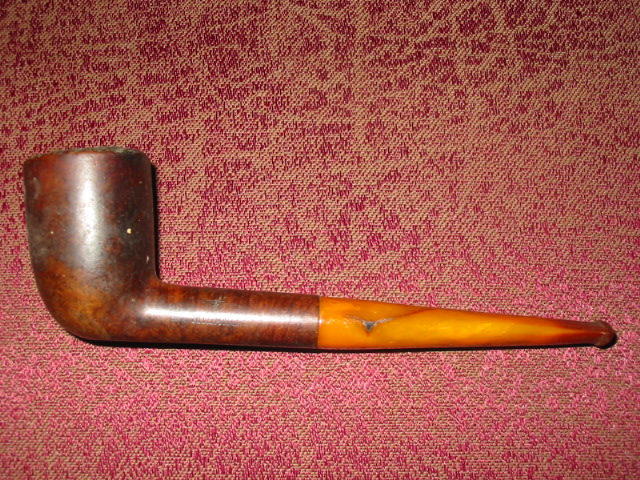
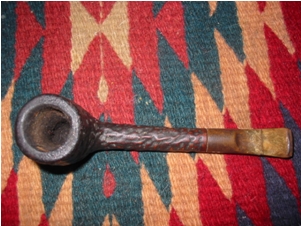
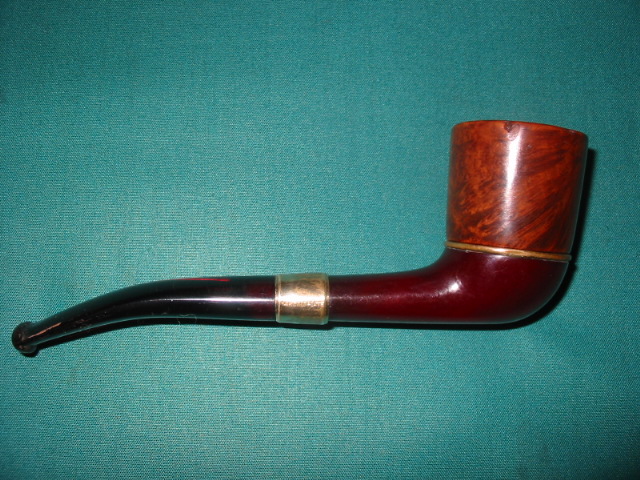
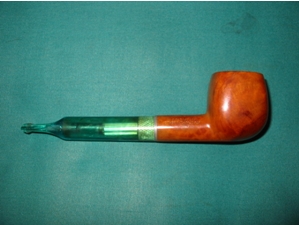
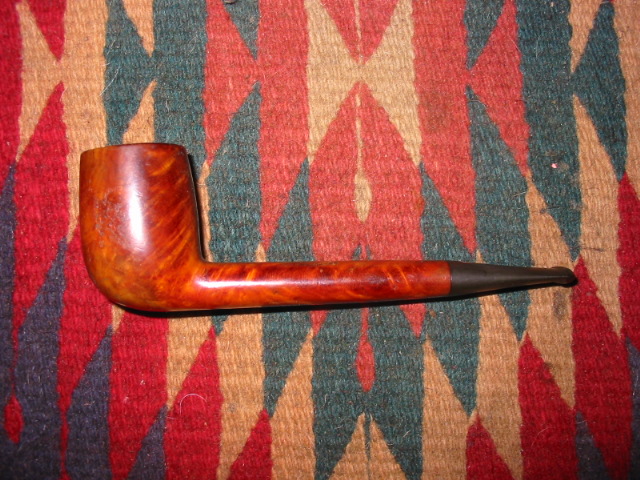
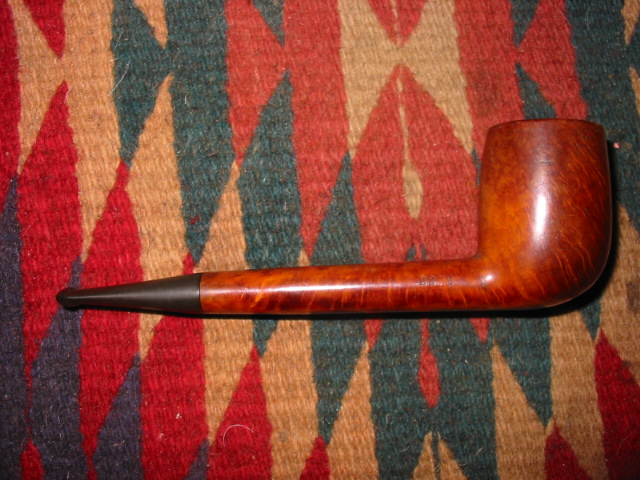
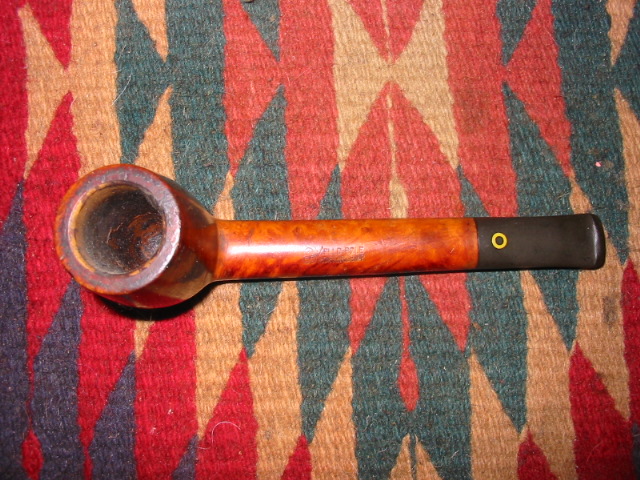
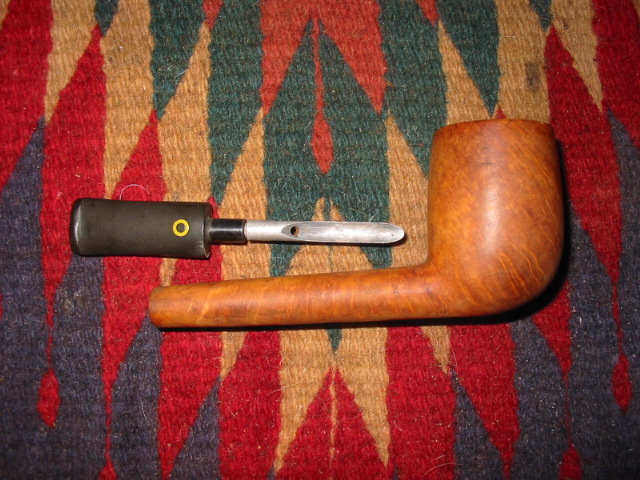
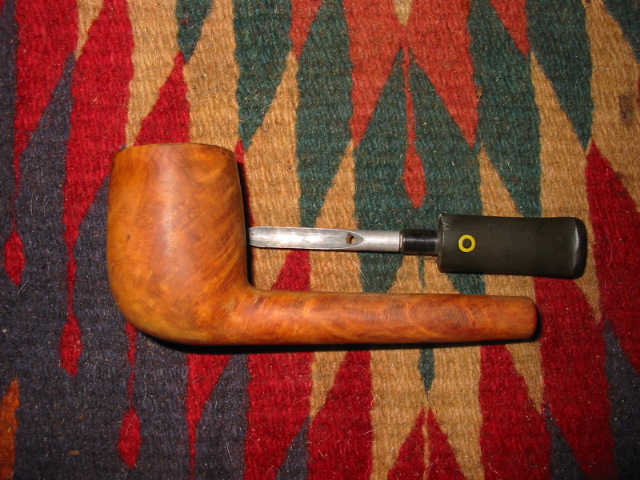
On a recent trip to the US to visit my parents I also visited several antique malls in their city. I have three that I usually have on my list when I go there. The one I want to focus on in this post is in an old grain elevator and has three floors of many “antiques” which always surprise me because many are the same age as I am!  Anyway, on the second floor I found a booth with two pipe racks containing over a dozen older pipes. Most were junk in that they had cracked bowls and broken shanks etc. But also in the midst of it was this old Yello Bole Canadian. It had some beautiful briar in it. Yello Bole is the grade down the line for KayWoodie, or so I am told. Pipes that don’t make the grade for KW will often be stamped with the Yello Bole brand. This one was stamped KBB in a cloverleaf on the top of the shank and next to it Yello Bole over honey cured, over imported briar. The stem has the yellow circle inlaid in the vulcanite. If memory serves me correctly this is one of the older pipes in the line.

ImageImage

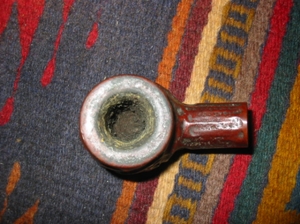
The bowl was in pretty clean shape. The yellow coating was still visible in the bowl and the bottom half of the bowl was very clean with just a bit of darkening to the yellow coating. The rim was dirty and dented. There were tars on the rim and some deep scratches to go along with the dents. The bowl however, was still round, it had not been ruined by a reamer going a muck. The stem was oxidized and was slightly brown. There was light tooth chatter but no dents on the surface of the stem. The overall finish of the pipe had light spots and dark spots where the finish seems to have been exposed to light or was wiped down and finish removed. There was no over coat of varnish or of lacquer just solid clean briar with a spotty stain.

ImageImage

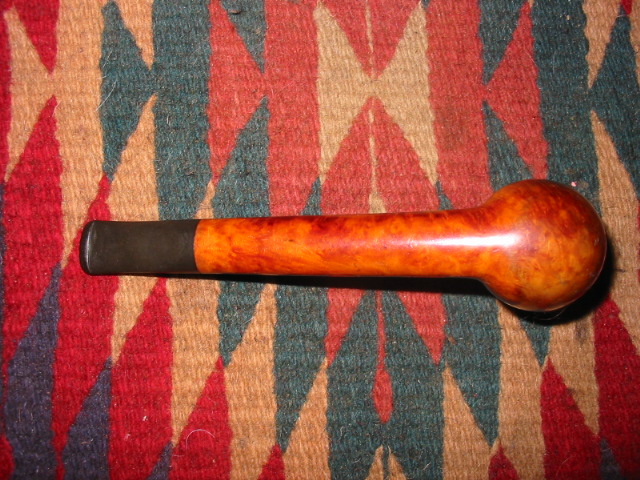
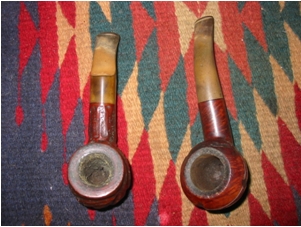
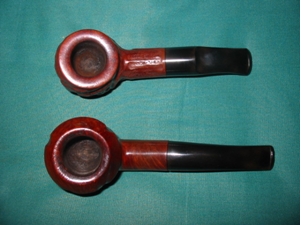
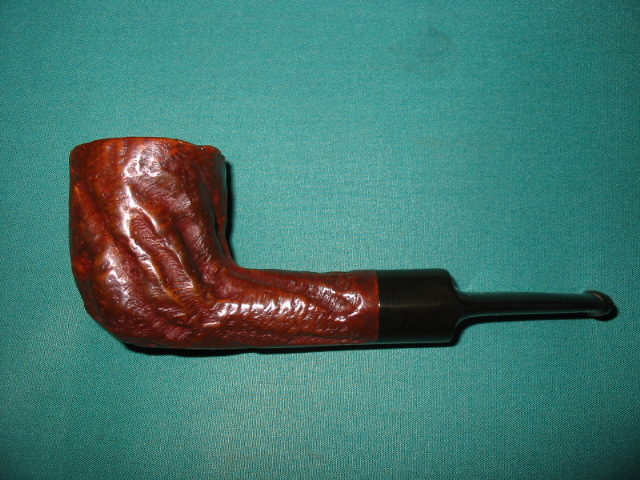
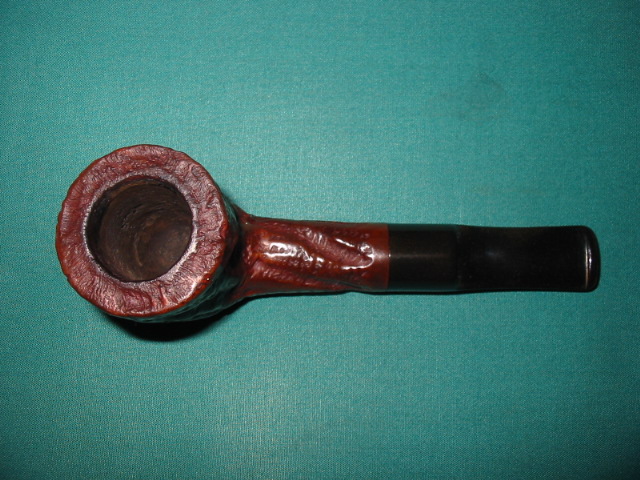
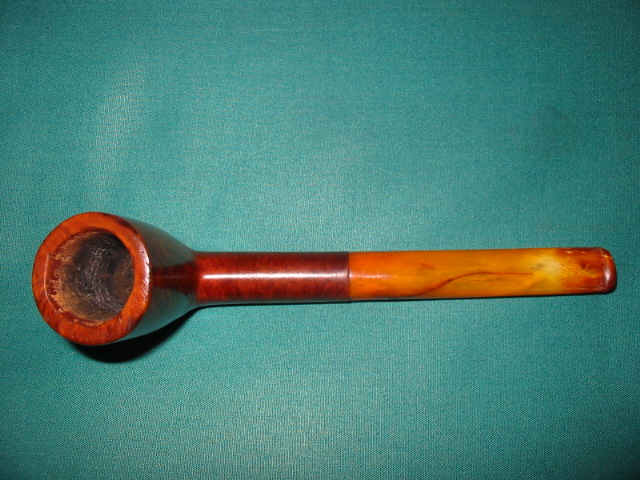
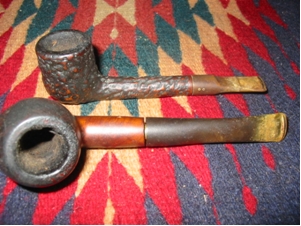
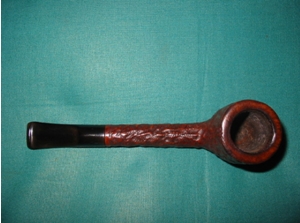
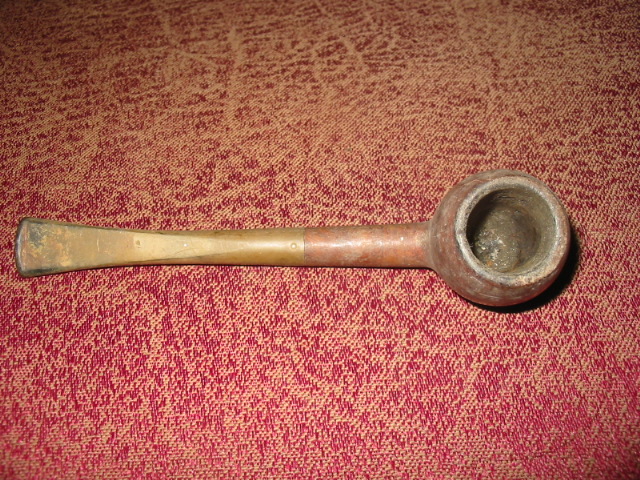
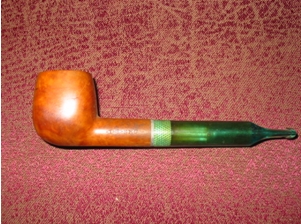
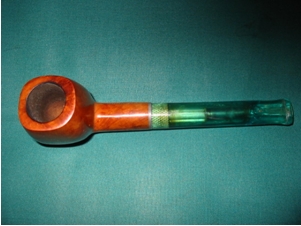
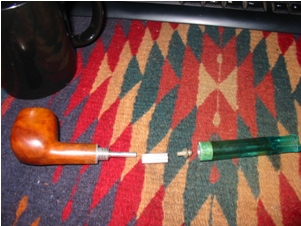
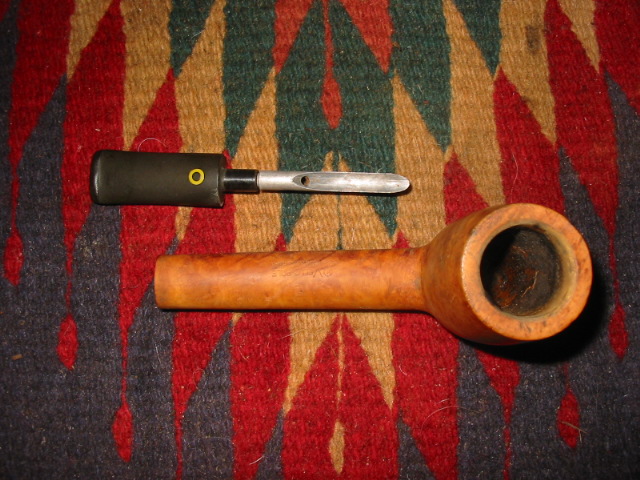
I broke the pipe down as seen in the pictures below. The stinger apparatus can be seen in the pictures. It is an aluminum shovel like contraption with the hole near the tenon and a long shovel like extension that extends through most of the shank. I cleaned out the bowl with an alcohol scrub on cotton swabs and cleaned out the shank with a shank brush, bristle pipe cleaners and fluffy pipe cleaners and alcohol. When they came out clean I worked on the outside of the bowl. I used cotton balls and acetone to wipe down the outside of the bowl and shank. I wanted to remove the rest of the finish so that I could prepare it for restaining. I applied the acetone until the bowl was free of the stain and finish. The pictures below show the cleaned surface of the bowl. I also used the acetone and some 400 and 600 wet dry sandpaper to clean the top of the bowl and rim. A folded piece of sand paper was used on the inner edge of the rim to clean the beveled edge. Before I stained the pipe I decided to clean and polish the stem. I used the Bic lighter method mentioned in an earlier blog post to get rid of the oxidation. In the pictures below the stem has the majority of the oxidation removed using that method. I then used 400 and 600 grit wet dry sandpaper with water and my usual list of micromesh pads from 1500-6000 grit to polish the stem.

ImageImageImage

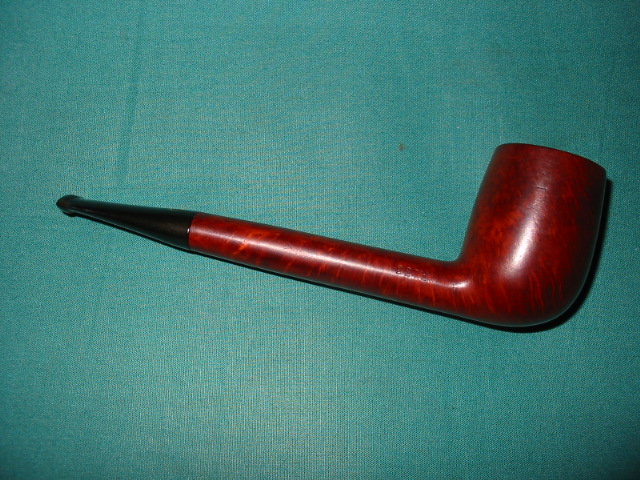
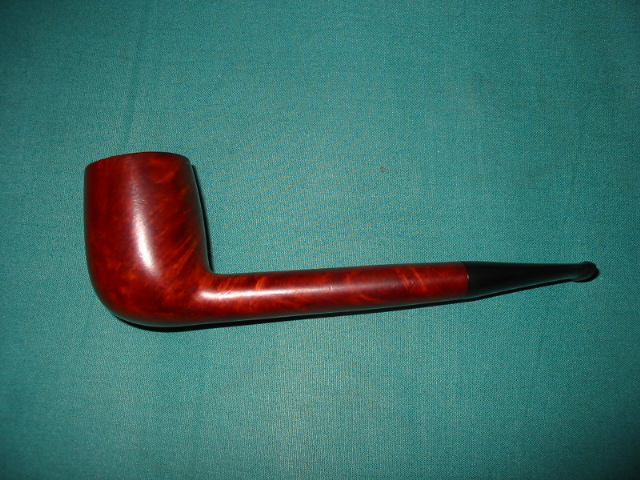
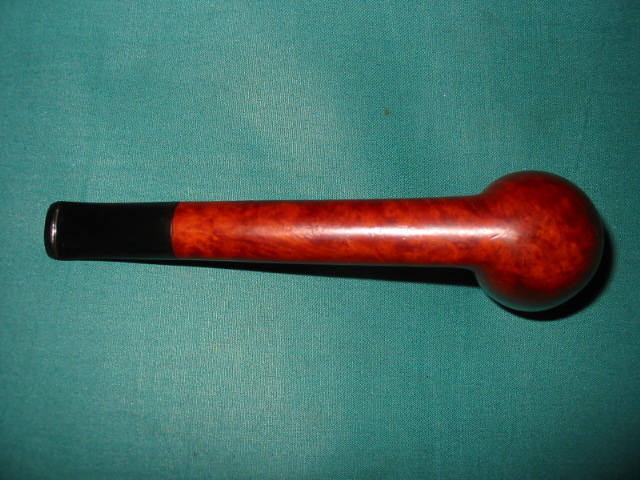
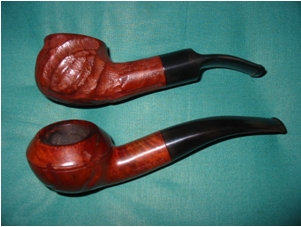
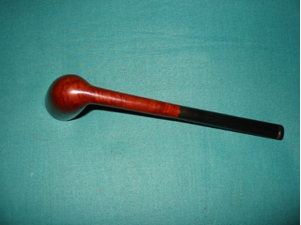
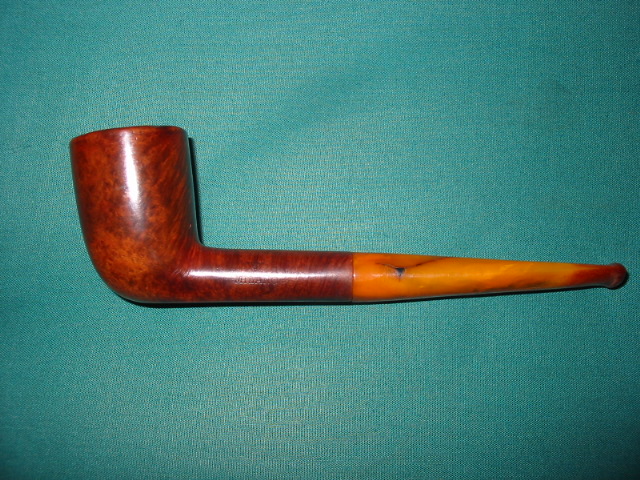
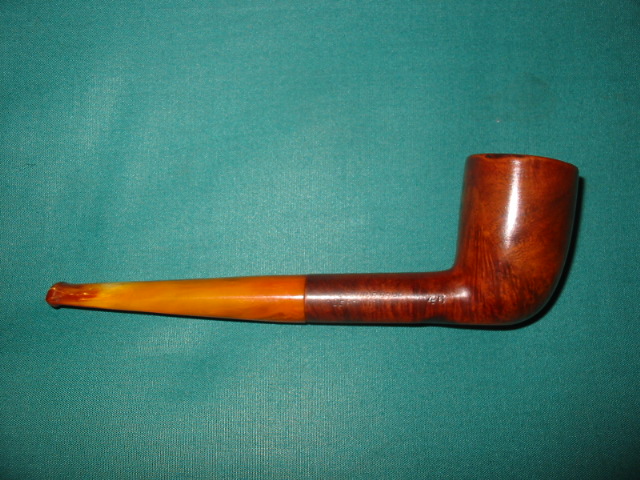
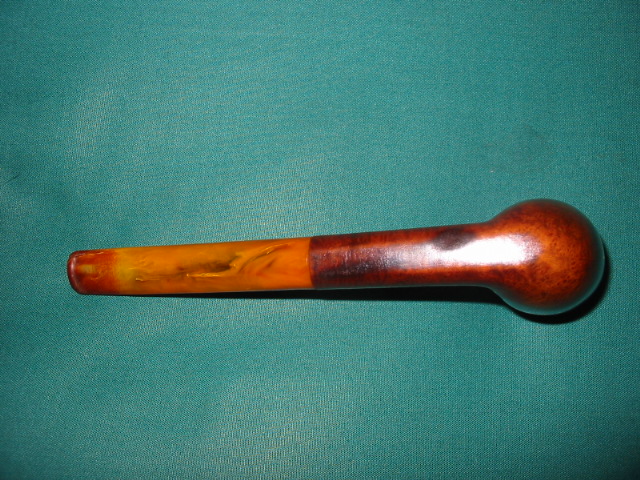
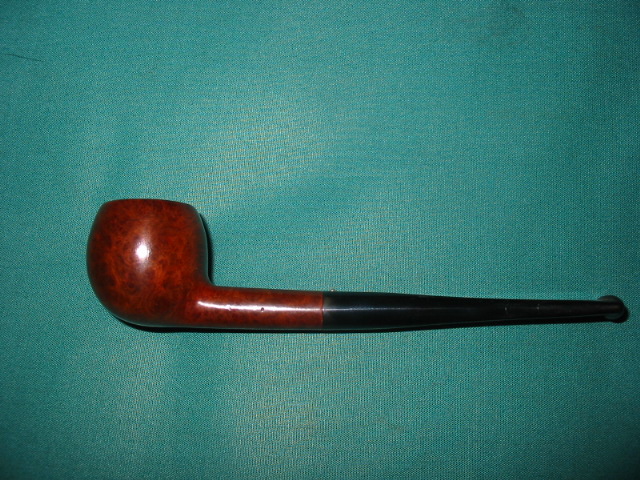
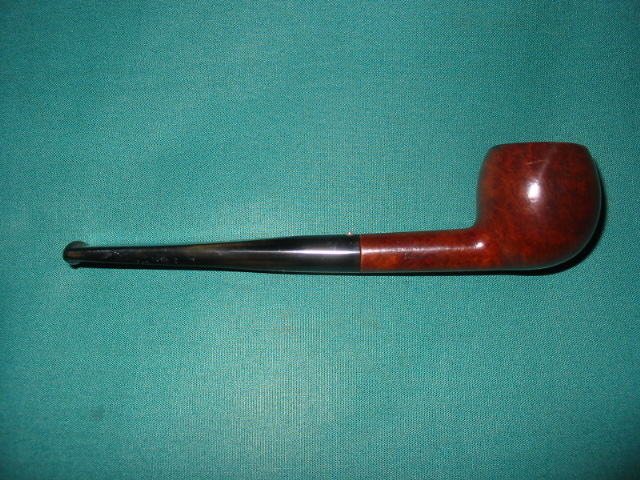
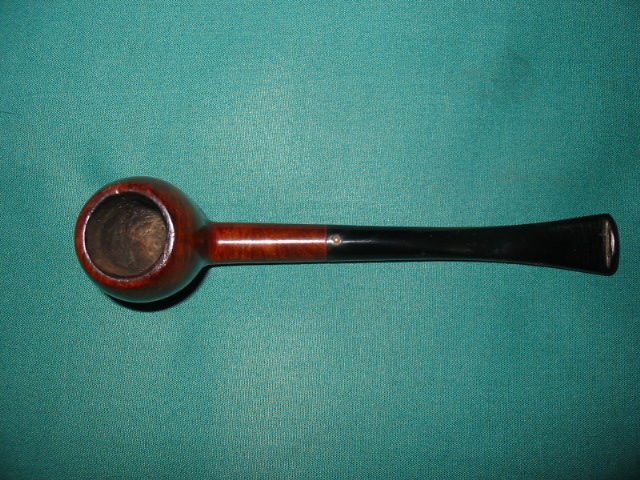
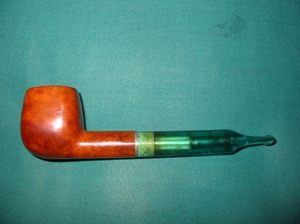
Once the stem was cleaned and polished by hand I inserted it into the bowl and used it to hold the pipe while I restained it. I used a medium brown aniline stain on this pipe to approximate the original stain and to highlight the grain. I applied it with the dauber that came with the stain and then flamed it to set the stain. I then took it to the buffer and buffed it with Tripoli to remove some of the opacity of the medium brown stain and bring the grain to life. Once that was done it was buffed with White Diamond. Both the stem and the bowl were buffed. Care should be exercised in the buffing process to not obliterate the stamping. I use a light touch when buffing around the stamping. The four pictures below show the finished pipe – ready to load with a favourite tobacco and enjoy!

ImageImageImageImage


Refurb – A Pair of Custombilt Look A Likes


I just finished up on these two Custom Bilt look a likes. The Rhodesian shaped pipe has no stamping other than Imported Briar. The bent pot is stamped Aged Imported Briar on one side and Ben Rogers on the other side. I am not familiar with the brand. So if anyone has information on it please post it here. I would appreciate learning about the twosome.

ImageImageImage

Both pipes needed quite a bit of work to make them smokeable once more. The bowls had a thick cake and each one of them still stuffed with half a bowl of tobacco. The stems were rough and pitted from the oxidation and had a white lime like coat on them. They were very dirty inside and out. I cleaned them with a shank brush, bristle pipe cleaners and finished with fluffy ones all dipped in isopropyl alcohol until they came out clean. I buffed the stems with Tripoli after cleaning them to try and break down the coat of oxidation. It did not do much so I put them both in a bath of Oxyclean to soak. I find that though it does not remove the oxidation it does soften it considerably and makes sanding and buffing it off much easier.

Once they were soaking I turned to the bowls. First I reamed them both to remove the crumbling and uneven cake. I generally take them back to bare wood when they are in this state or at the most leave a thin bit of cake on the walls. I cleaned the rims with alcohol and a soft cloth and sanded it with 600 wet dry sandpaper to remove the tar deposits and carbon on them. Once that was done I dropped them in the alcohol bath to wet them and scrubbed them with a soft bristle toothbrush. I find that on the smooth and semi-rusticated finish of these pipes the tooth brush works very well to remove deep seated grime and loosen oils and dirt.  I then left them to soak while I went back to the stems.

After the soak the stems came clean pretty easily with 240 grit sandpaper, 400 and 600 wet dry sand paper and a finishing buff with Tripoli. I worked on them for a while with the sandpapers and Tripoli and then used White Diamond for the final polishing buff. I was careful to not buff the last bit around the stem edge that would meet the shank. I would finish it once the bowls were stained and ready. Then I would buff them together with carnauba wax.

By the time I was done with the stems the bowls were ready. I took them out of the bath and wiped them down. Once they were dry I restained them both with a medium brown aniline stain, flamed the stain and then buffed them with White Diamond to remove excess stain and give a contrast between the smooth portions and the rustication. I hand waxed them both with Halcyon wax and buffed with a soft cotton cloth.

ImageImageImage

Custom-Bilt Saddle Billiard Comes Back to Life


Blog by Steve Laug

It was a pleasure to refurbish this original Custom-Bilt (note the hyphenated title). I have always loved the rugged individualism of Tracy Mincer’s pipes. They are like none of their imitators in terms of character and sheer smoke-ability. They feel great in the hand; have and open draw and generally a comfortable stem. They are nothing pretty to look at yet there is something endearing about their “ugliness”. This old pipe was in very rough shape when I started to work on it. I apologize up front in that I forgot to grab the camera to take pictures of the pipe when I began the work. My words will have to suffice as I tell you about it. There was still a dry and almost petrified dottle of tobacco left in the bottom of the bowl. The cake that was on the walls was filled with cracks and major chunks of it were missing. The only way to remedy that was to ream it. The exterior of the bowl had a very tarred and sticky rim and the finish was gone and flecks of white paint were all over the crevices of the rustication. The stem was dull brownish green with a white crust around the button and up the stem a good half inch. This stuff was like concrete.

I always start my refurbishing process by addressing the issues of the bowl. That way as it soaks I can work on the stem. I scraped out the petrified dottle and reamed the broken cake back to bare wood. I cleaned the inside of the shank with a shank brush and bristle and fluffy pipe cleaners and isopropyl alcohol until they came out clean. I wiped down the exterior of both the shank and bowl with a rub of alcohol. When finished it was dropped in the alcohol bath for most of the morning while I worked on the stem.

I went to work on the stem. I decided to buff it with black Tripoli (coarse polishing compound) to address the hard crust on the front of the stem and the general oxidation on the blade of the stem before the saddle. I did not want to work on the saddle with it off the shank as it is too easy to round the edges and spoil the fit. After buffing it was sanded with 240 grit sandpaper to finish breaking through the white crust. Once it was gone the rest of the stem was cleaned up with my normal list of 400, 600 grit wet dry (with water), and then micromesh pads – 1500, 1800, 2400, 3200, and 4000 grit. I also used the wet dry sandpaper and the pads to careful work on the saddle portion of the stem. Upon completion the entirety was given a coat of Obsidian Oil and then waxed with carnauba.

I set the stem aside and retrieved the bowl from the alcohol bath. As I took it from the bath I scrubbed it with a brass bristle tire brush to get into the crevices on the pipe and the rustication. It was a mess with some paint in the rustication. The alcohol had removed the grime and the wire brush removed the paint flecks. Just a reminder – I use a soft bristled brass white wall tire brush in these instances as the bristles do not damage the surface of the briar. When the bowl was clean I wiped it down with isopropyl on a cotton boll. It was ready to restained with a medium brown aniline stain. I applied the stain with the dauber that comes with the Fiebings Shoe Dye (aniline stain), flamed it and set it aside to dry thoroughly. Once it was dry I buffed it with White Diamond on my buffer and then applied a coat of Halcyon Wax and buffed it by hand with a cotton cloth.

ImageImageImage

The Everyman Pipe from the 1920’s Era


Blog by Steve Laug

This featherweight cutty shaped pipe came from the 1920’s or earlier. I bought it in a lot of that era pipes on EBay and it arrived as pictured below. It is stamped The Everyman Pipe on the left side of the shank and Made in England in a Circle and shape number 195 on the right. When this arrived in the package of the other old timers it was pretty grimy. The bowl needed serious cleaning and the rim was dented and had rough spots. It needed to be topped as steaming it would not raise the broken spots that came from tapping it out. When the surface of the wood is actually broken and not just dented steaming will not raise the grain significantly and the only repair I know is to sand it off and make it smooth and crisp again. The challenge then is to match the stain so the bowl and rim blend.

I reamed and cleaned the bowl and the airway in the shank. The pipe cleaners came out very dark and tarry at the beginning. I decided to use a drill bit the same size as the airway to clean out the gunk before going back to the pipe cleaners. I use a T handle to turn the bit into the shank by hand to remove the tars and open the airway again. I finished cleaning the shank with fluffy pipe cleaners and isopropyl alcohol until they came out clean. I wiped down the bowl with acetone to remove the old wax and the grime from the bowl and then used my topping method – a hard, flat board and an anchored piece of 240 grit sandpaper – and topped the rim. (I have since learned from someone that a good way of doing it is to anchor the sandpaper on a Masonite clipboard and sand the rim that way. It works great.)

Image

The stem needed the most work as it was a round tube of vulcanite. I wonder if it was not made to be like a clay tavern pipe. The previous owner had notched the top of the stem to make it easier to hold with his teeth and keep it from rolling. The notch was a fairly deep V cut that was only on the top of the stem. I used needle files to cut a new button on it and then my Dremel with a sanding drum to taper the stem back to the button. The original had a slight bend in the stem so I left that. The button I shaped for the stem is rounded and crowned to fit the orific airhole like those found on pipes of a similar age. After cutting the button and shaping it, the stem needed a lot of sanding to remove the scratches and oxidation. I used 240 grit sandpaper on the entirety to clean up the deeper scratches and remove the oxidation. I then progressed through the wet dry sandpapers and the micromesh pads until I had a good smooth finish on the stem and a good clean button.

Image

I set the stem aside and restained the rim and bowl to match what appeared to be the original colour of the pipe. I used an oxblood undercoat and a dark brown top coat to get the richness of the original finish. I coated the stem with Obsidian Oil and then inserted it in the shank. Once it was dry I took the pipe to the buffer and used the White Diamond to give it a final buff before giving it several coats of carnauba wax.

The pictures below show the finished pipe with its newly shaped and polished stem:

ImageImageImageImage

Rebirth of a WDC Milano Dublin


This old WDC Milano was a challenge that I wanted to take on and see how it would turn out. In the pictures below you can see the state of the pipe when I received it. The stem was deeply darkened in the button area as well as scratched and marked with tooth chatter on the first inch of the stem. The bowl was badly caked – much of the cake had broken away in chunks and what remained was soft and crumbling. It also appeared to have been reamed with a pocket knife and had nicks and cuts around the inner edge of the rim and the resulting effect left the bowl way out of round. The finish was damaged and parts of the stain had rubbed away and what was left was underneath layers of black grime. The sides of the bowl and the bottom side of the shank both showed signs of having been laid in an ashtray and burned with a cigarette. The burn on the bowl side was not deep and would be easily addressed but the one on the shank was pretty deep. I would have to take out as much as possible without changing the integrity of the shape. That gives you a pretty clear assessment of the damages facing me as I decided to work on this old pipe.

ImageImage

I reamed and cleaned the bowl back to the bare wood in order to remove the crumbling and cracked soft cake in the bowl. My thinking was that a good clean surface would encourage the build-up of a proper cake. With a sharp knife I worked on the inner rim. I worked to get it evened out with the knife and then turned to a folded 1 inch piece of 240 grit sandpaper to smooth out the roughness of the inner rim and to bring it back as close as possible to being round. The roughness of the rim required topping to even it out as well. I used my normal procedure of sandpaper anchored on a solid flat hard surface and turning the bowl clockwise or counter clockwise into the sandpaper – exercising caution to keep the bowl flat on the surface and vertical in order to keep the rim flat and not slanted. To remove the burn mark on the bowl and on the shank took a little time. On the bowl side it was not deep so it only needed to be sanded to remove the damage. But on the shank I scraped until I got to hard wood and then sanded. Once I had solid briar under the burn I put the bowl in an alcohol bath to remove the grime and the remaining finish. I left it overnight to soak and turned my attention to the stem.

The stem has a steel tenon and insert that is the system in these old Milano pipes. It seems to be some sort of condensing chamber to collect the moisture generated in a smoke. In any case this one was filled with tars inside and coated with them on the outside. I cleaned it out with a shank brush, bristle pipe cleaners and then fluffy ones until they came out clean. The outside of the condenser I scrubbed with 0000 steel wool to polish and remove the grime and tars. The aluminum polished up nicely and the tenon looks like new. The Bakelite stem took a bit more work and creativity. I cleaned the inside of the stem scrubbing it with soft scrub and bristle cleaners. I was able to remove much of the interior stains. I sanded the exterior of the stem to remove the tooth chatter and external discolouration. I sanded it with 400 and 600 grit wet dry sandpaper and then the usual course of micromesh pads from 1500-6000 grit. I finished by buffing the stem with Tripoli, White Diamond and carnauba wax.

I put the stem aside and removed the bowl from the alcohol bath and dried it off. I sanded the bowl with 1500 and 1800 grit micromesh to remove any remaining finish. I also sanded it with 3200 and 4000 grit micromesh to polish the bowl. I restained it with an oxblood stain. I flamed the stain and then took the pipe to the buffer and buffed the pipe and stem with White Diamond and carnauba wax. Below are the pictures of the finished pipe.

ImageImageImageImage

Refurb on a Brigham 2 Dot Lovat


Blog by Steve Laug

I just finished refurbishing this Brigham 2 Dot Lovat that I picked up in the estate pipe rack at a local tobacconist. This one was a challenge, but I loved working on it. It has the standard Brigham style rustication. It was in rough shape. The bowl was incredibly grimy and needed a lot of work. The grime had filled in most of the rustication to the point that it looked worn out and smooth. I soaked and scrubbed it for about an hour using a brass white wall tire brush to scrub out the grime caked on the outside of the bowl. The inside of the bowl was so badly caked that I reamed it back to the wood. Once I had it reamed and the scrubbing of the outside finished I dropped it in the alcohol bath overnight and went to work on the stem.

ImageImageImage

The stem was another story. It was given a soak in OxyClean to soften the oxidation. I find that OxyClean does not remove the oxidation at all, but it does soften it and make working on it much simpler. After the Oxy soak I went to work on the inside of the stem. Where normally there was to be a Brigham filter in the long metal tenon this time it was gone and the tars had built up to the point that the stem was totally closed off. I tried to blow through it but could not get any air through. I used an awl or ice pick to open up the stem and the tenon. Then I worked on it with bristle pipe cleaners and a shank brush. It took a lot of pipe cleaners and alcohol to get it clean. Then the outside was sanded with 400 and 600 grit wet dry sandpaper followed by the run of micromesh sanding pads. Once it was clean and shiny I set it aside and turned my attention to the bowl.

I took the pipe bowl out of the alcohol bath and went to work on it. I used the brass brush one last time to clean off the remaining grime and then dried off the pipe. There was no finish left on the pipe so I restained it with a cherry stain. I reinserted the stem in the shank and took it to my buffer and polished the entirety with Tripoli and White Diamond, finishing with a coat of wax.

ImageImageImage

Every restoration has a beginning…. – Chuck, aka Desertpipe on SF


Chuck posted this on Smokers Forums and I thought it merited posting here as well. I asked him for permission to post and use his photos. I copied the exchange from his side in writing about his cleaning process. I include it here as it is helpful to see another refurbisher at work.

It is one thing to restore pipes for yourself, and then later on start giving them to friends. It is quite another to restore as an adjunct to working as a Tobacconist, in a Brick and Mortar Shop. I am slipping into that position, as my pipes have been well received in our Estate Pipe (sorry Ben) display case. I find myself challenged, and we will see, together, the outcome. Here is a trio of pipes that were they to show up in a group from eBay, would go directly to my “Someday Box”. They are caked heavily and there is damage beginning to the structure of the bowls. The briar is tar soaked to the point that grain is no longer visible, and the bits cannot go further into the shanks, nor be withdrawn in one pipe.

Stay tuned over this weekend, as I see what can be made of these three.

ImageImage

Mike….I have practiced on a number of pipes that were badly caked, actually a few were my Dad’s handed down, and I even purchased a few off eBay in that condition. I use my “Someday Pipes” to increase my skill level. I have acquired seven specialized tools that I use to vanquish this demon cake. And I examine closely for any existing damage, pointing it out to the customer and explaining a worst case ending to the attempted restoration.

And I sure hope in these three cases they end up resembling a pipe….

After carefully removing the bits from the shanks, I went to work on the cake. As Mike pointed out, one has to be very careful, as a pipe caked to this extent is almost assuredly suffering from some damage to the briar.

Special note – New Mexico Environmental has informed me that they plan to insist that I get the certification required for coal strip mining, if I plan to continue to bring back pipes in this condition…..

Stage one of the “Cleanup”….Bits soaked overnight in my magic solution and then steel wooled while still wet. Total bristle clean-out of the airway and the tenon area. Two solution scrubs of the briar and clean-out of the mortise…..now on to sanding and briar repair.

Image

I would have had these done Sunday evening, but with the temperature hovering around 100 degrees, we had a wide spread power outage on our side of the Mountain…..six hours later, we could check the update for fires, cool off and relax. The pipes had to wait….until now.

I did not restore the surface bite marks on the bits, as they were going back to the same owner. Leaving them as intact as they came to me, with no heavy sanding, allows him to retain much of the original thickness. Buffing them out and then resurfacing the finish has them looking good.

ImageImage

The customer had a funny response when he picked up his pipes today. He quietly picked them up, one at a time, and examined them for several minutes. He then looked up at me with a big smile on his face and said “Alright! What did you do with MY pipes?” Quiet for another minute, and then “They haven’t looked like this in 20 years.”

And then he paid his bill and added a tip to cover my lunch.

Refurb on a London Made Dainty Prince


This was a refurb I did last August while I was laid up with a couple of cracked ribs. I wanted to post it here because it gives a good idea of the process of refurbishing and taking grimy old pipes and bringing them back to life.

I am a bit laid up after a fall so I am sitting quietly in my shop instead of doing painting and trim on the house (original plan for the holidays). The great part of this is no guilt about not working on the house or yard. Because of that I am getting a bunch of old pipes I have in boxes cleaned up and finished.

The first one today (Aug. 1) is a nice little London Made Prince with a patented Flat Grip Stem. (I cannot remember who made these but I have had a few over the years). The stem is stamped Flat Grip and has a nice raised silver spot on the stem. The bowl is stamped London Made. It is a small pipe – 5 1/4 inches long but about a group one sized bowl.

From the pictures below you can see the state it was in after the reaming. I got into a groove and forgot to take pictures before I reamed it. But it was really dirty and caked – to the point that a pencil could not stand in the bowl. It always amazes me that in these small pipes, which hold very little tobacco any way, people let them get to the point where they hold even less tobacco. Just a few minutes of work and they would have had a clean bowl.

I reamed and cleaned the bowl and shank and put it in my alcohol bath for the morning. I have a pint jar filled with Isopropyl alcohol that serves as the bath for filthy bowls. In this case it sat in the bath for 3 hours before I got to work on it. It is a nice sized jar in that I can drop 4 or 5 bowls in it at the same time and work on the stems while they soak. Once it came out and dried I sanded the bowl all around and cleaned it once again to get any residual grime out. The airway was clogged so a paper clip took care of that and then a good scrub with a bristle pipe shank brush and repeated pipe cleaners. Once clean I stained it with a cherry stain that works with these old timers and brings out the colours of the briar. It was then buffed with Tripoli and White Diamond and waxed it with carnauba.

The stem was rough so I buffed and sanded and buffed and sanded and got the oxidation off and then sanded a bit more to get the teeth chatter off of the surface of the stem near the button. I always start with a 220 or 240 grit sandpaper in removing the oxidation and tooth chatter and then progress through 400 and 600 grit wet dry sandpaper before finishing the progress with micromesh sanding pads – 1500, 1800, 2400, 3200, 4000 and 6000 grit. Once the sanding is finished I took the pipe to the buffer for a final buff with White Diamond before polishing the whole pipe with carnauba wax.

Before shots: (I reamed out the cake prior to this photo set)

ImageImage

Photos of the finished pipe:

ImageImageImage

Refurb on an old WDC “Falcon” style pipe


Blog by Steve Laug

I refurbished this old WDC pipe a while ago now and thought I would post it for its historical value. I have called it a Falcon style pipe in that the bowl is removable and thus interchangeable with other WDC bowls. The stem and bowl bottom are Bakelite and the bowl itself is threaded briar bowl with an airway on the bottom. This one needed a bit of work as can be seen from the first two pictures below. The bowl was badly caked so I reamed it, sanded it and cleaned it. Then I had to top it as the rim seemed to have been used as a “hammer” and was seriously dented and chewed along the out edges of the bowl. Once the bowl was topped I decided to strip the finish from the bowl and restain and polish the bowl as a whole. I wanted to keep with the older style reddish brown stains that I had seen on other WDC pipes that I have so I used an oxblood understain and the overstained it with Medium Brown aniline. I buffed the finished bowl with Tripoli and White Diamond while holding it with a finger inserted in the bowl and holding on to the bowl with the other hand. I did not want the buffer to snatch it out of my hand while I was buffing it. I finished by giving the bowl a polish with carnauba wax and a soft cotton flannel buff.

The bowl seats in the Bakelite bottom on top of a brass ring that seems to act as both decoration and gasket to the bowl connection. It needed some cleaning and polishing as it too had dents and scratches in the surface.

The Bakelite receptacle bottom that the briar bowl screwed into was very dirty and I cleaned it out with cotton swabs and alcohol and then polished the inside with a soft cloth. The stem was rough with deep scratches and gouges in it. I sanded it with 400 and 600 wet dry sandpaper and a bit of water to give the grit a bite. Then I finished with micromesh pads in 1500, 1800, 2400, 3200, 4000 and 6000 grits. Upon completion of the sanding I buffed the stem with Tripoli and White Diamond.

Here are pictures of the pipe after I reamed it with a Pipnet Reamer (T-handle with interchangeable heads).

ImageImage

Here are pictures of the pipe after it has been finished:

ImageImageImage

I also thought some of you might be interested in seeing a picture of the pipe taken apart. I have included a picture of the cleaned version for you to get an idea of what the pipe looks like when taken apart.

Image

Refurb LHS SEC system pipe – strange one


Blog by Steve Laug

In my ongoing quest to collect pipes that are unique and give a picture of the history of interesting inventions and modifications to the simple smoking pipe I wanted to post this refurb that I finished. It is a LH Stern (LHS) SEC pipe. It is a system pipe as can be seen from the blown out pictures and the diagrams from the patent office. It is an interesting piece of history. The apparatus inside is quite elaborate. The stem is green perspex that serves as a collection chamber for sediments before the smoke goes to your mouth. I cleaned and reamed the bowl and polished it with carnauba wax. The stem had some tooth marks and cuts. I lifted the majority of them with my heat gun and finished by sanding them  and buffing them smooth.

Here are pictures of the pipe when it arrived:

ImageImage

Here are pictures of the pipe after I cleaned it and polished it:

ImageImageImage

Here is the pipe taken apart – it has an amazing assortment of parts. I have also included a copy of the patent information for those interested in the background of this pipe.

ImageImageImage