Blog by Steve Laug
The next pipe on the table is another that the Vancouver pipe man dropped off for me to work on for him. It was stamped Radford Ravel and had a mixed finish of smooth top and sandblasted shank and bottom part of the bowl. It is a Rhodesian and the cap is smooth and the rest is a light sandblast. It was finished in a brown stain. It needed restoration on the bowl which was heavily caked and the shank was almost clogged. It also needed some work on the fit of the stem to shank. It was a pipe that I had previously repaired for him back in 2017. At that point it needed banding and repair on a cracked shank. It had a thick cake at that point as well and was well used. Here is the link to that restoration (https://rebornpipes.com/2017/03/19/banding-and-restoring-a-radford-ravel-rhodesian/).The stem had a brass washer on the tenon and glued against the shank. When I received the pipe back from him the stem did not fit tightly. There were tooth marks, tooth chatter and a lot of oxidation on the stem. Here are some photos of the pipe when he picked it up in 2017 to give a bit for context for my work.
 When I took the pipe out of the bag to work on it last evening this is what I saw. The finish on the briar looked very good. It was dirty but the colour had stayed true. It had a bit of patina on the bowl but it was beautiful. The shank band was damaged along the edge where it had been bent and dented. The stem was very loose in the shank and the brass spacer on the stem was very loose. The bowl had a very thick cake and the airway in the shank was almost clogged with tars and oils. I would need to be cleaned up before I worked on tightening the fit in the shank. The stem was oxidized, calcified and had tooth marks and chatter on both sides ahead of the button.
 I took photos of the rim top and the thick cake in the bowl to show how it looked. There was also tobacco debris on the walls. The rim top had some darkening and there were nicks around the inner edge of the bowl. It will clean up pretty well. The photos of the stem show the condition of the stem. You can see the tooth marks and chatter under the calcification on the stem surface.
 I took a photo of the band and how much of the stamping it covered on the shank. You can also see the damage to the band between the shank and the stem. You can see the poor fit of the stem to the shank. I took the stem off the shank and photographed the look of the pipe as a whole. It is a nice looking Rhodesian that has a definite Chacom look to it.
  I went back and reread the previous restoration blog that I written on the restoration the previous time I had worked on the pipe. I also was very interested to read the back story and history on the brand. I quote from the blog below.
 There was something about the brand on the pipe that rang a bell for me. I have a tin of their Sunday’s Fantasy Tobacco in my cellar and I wondered if they might have made pipes as well.
I did a bit of digging and found the picture on the left that showed some of the tobaccos made by the company and also a great figurine with the name Thomas Radford mild premium pipe tobacco on the base. On Pipedia I found that Radford’s Private Label Pipes were crafted by Chacom for the Pöschl Tabak GmbH & Co. in Germany. This information was from “Pipes, Artisans and Trademarks”, by José Manuel Lopes. The pipes were mass produced with ebonite and acrylic stems and were introduced by Butz-Choquin, Chacom, and Nording. On the stem there is generally an embossed logo that was a stylized R. The pipes were made to use 9mm filters and are moderately priced and very attractive. The following three links were the sources I used for this information.
https://pipedia.org/wiki/Radford%27s
http://www.poeschl-tobacco.com/en/products/
http://www.pipephil.eu/logos/en/logo-r1.html
I also looked on another website (http://cigar.supersmokers.biz/radfords/) and got a little more information on the brand.
The Radford’s pipe appears in 6 models in 3 variations 1x time a year in autumn. The so called Radford’s Depot contains a minimum of 1 dozen pipes of the actual running collection. Connected to the Depot is a listing of the Depot holder in Radford’s News.
This particular brand RADFORD’S SERIE RAVEL was a series of 6 elegant models within Radford’s Collection. They are made from good briar wood, sandblast, black/brown with a polished head’s border in dark-red shade. Very nice rich-in-contrast ring at the shaft’s finish. Mouthpiece from Acrylic for 9 mm filter.
Now I knew the background on the pipe. I knew that the stem was a replacement and that the original 9MM filter stem had long since disappeared. It was time to work on the pipe!
I decided to examine the fit of the stem to the shank first. I removed the stem and could see that it was loose. The brass spacer was also loose and seem to take space on the tenon that could otherwise be used in the shank. Once the brass spacer was gone I could also see that the tenon was no longer straight from the end to the saddle portion. There were dips in the surface of the vulcanite just ahead of where the band had been sitting. The photos below show the condition of the tenon at this point. I tried the stem with the spacer removed and it fit snug in the shank. The thickness of the tenon at the saddle portion was perfect so I would need to build up the rest of it to match that portion. The band was bent at the shank end in various places around the diameter. I used a tool I have here with a sharp end and a rounded end. I worked it around the inner edge of the band to smooth it out as much as possible. I used my topping board with 220 grit sandpaper to top off the damage on the shank end edge. It looked considerably better once I had finished and the stem fit more snug against the shank end.
 I turned my attention to the internals at this point. I reamed the bowl back to bare briar with a Pipenet Pipe Reamer using the second cutting head. I cleaned up the reaming with a Savinelli Fitsall Pipe Knife. I finished the bowl clean up with 220 grit sandpaper wrapped around a piece of dowel. The walls were smooth and there was no sign of burning or checking. It looked very good.
 I cleaned out the internals with 99% isopropyl alcohol, pipe cleaners and cotton swabs. I worked over the shank and the airway in the stem. It took some work but once finished it was clean and smelled fresh.
 I polished the rim top with micromesh sanding pads – dry sanding with 1500-12000 grit pads. I wiped the briar down with a damp cloth after each sanding pad. It took on a real shine by the time I finished with the last sanding pad.
 I worked some Before & After Restoration Balm into the smooth rim and the sandblast finish on the bowl and shank. I worked it into the surface of the briar with my fingertips to clean, enliven and protect the wood. I used a horse hair shoe brush to work it into the crevices and keep from building up in the valleys and crevices of the finish. Once the bowl was covered with the balm I let it sit for about 15 minutes and buffed it off with a soft cotton cloth and the shoe brush. I polished it with a microfiber cloth. I took photos of the pipe at this point in the process to show what the bowl looked like at this point.

 Now it was time to address the part of the restoration I leave until last. I set the bowl aside and turned my attention to the stem. I filled in the deep grooves in the tenon to build it up and make it even. Once the repair cured I sanded it smooth to make it round and even once more. Once finished it looked better and the fit in the shank was very good. I also sanded the stem surface to smooth out the tooth marks and chatter. I also sanded it to remove the oxidation and calcification off the surface of the stem.
 I build up the damage to the button edge on the top and the marks in the underside of the stem with black CA rubberized glue. Once it had cured I recut the button edge and flattened the repairs. I smoothed out the repairs with 220 grit sandpaper and started polishing the stem with 600 grit wet dry sand paper.

 I use micromesh sanding pads and water to wet sand the stem with 1500-12000 grit sanding pads. I wiped it down after each sanding pad with Obsidian Oil on a cotton rag after each sanding pad as I find it does two things – first it protects the vulcanite and second it give the sanding pads bite in the polishing process.
 After finishing with the micromesh pads I rub the stem down with Before & After Fine and Extra Fine stem polish as it seems to really remove the fine scratches in the vulcanite. I rub the Fine Polish on the stem and wipe it off with a paper towel and then repeat the process with the Extra Fine Polish. I finished the polishing of the stem down with a final coat of Obsidian Oil and set the stem aside to let the oil absorb. This process gives the stem a shine and also a bit of protection from oxidizing quickly.
  The final steps in my process involve using the buffer. I first buff the stem and the briar with Blue Diamond on the buffing wheel. Blue Diamond is a plastic polish but I find that it works very well to polish out the light scratches in the vulcanite and the briar. I work the pipe over on the wheel with my finger or thumb in the bowl to keep it from becoming airborne. It works well and I am able to carefully move forward with the buffing. The briar and stem just shone!
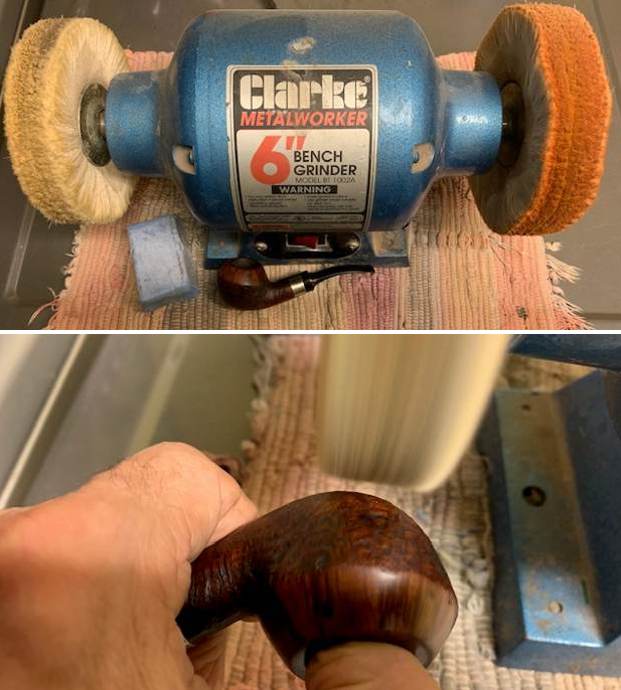
 I finished with the Blue Diamond and moved on to buffing with carnauba wax. Once I have a good shine in the briar and vulcanite I always give the bowl and the stem multiple coats of carnauba wax. I have found that I can get a deeper shine if I following up the wax buff with a clean buffing pad. It works to raise the shine and then I follow that up with a hand buff with a microfiber cloth to deepen the shine. It is always fun for me to see what the polished bowl looks like with the polished vulcanite and acrylic combination stem. It really is a beautiful pipe. The smooth finish around the bowl sides and shank show the grain shining through the rich brown stains of this Radford Ravel Rhodesian. The finished pipe feels great in my hand. It is light and well balanced. Have a look at it with the photos below. The dimensions are Length: 5 ½ inches, Height: 1 ½ inches, Outside diameter of the bowl: 1 ¼ inches, Chamber diameter: ¾ of an inch. The weight of the pipe is 1.90 ounces/53 grams. It is a beautiful pipe and the second of the five pipes for restemming I have ahead of me. Once I am finished with the lot he will get them back to enjoy once more. As always I encourage your questions and comments as you read the blog. Thanks to each of you who are reading this blog. Remember we are not pipe owners; we are pipemen and women who hold our pipes in trust until they pass on into the trust of those who follow us.