Blog by Steve Laug
 I am continuing with the same tack I have taken on the last five pipes I have worked on and take you through my process of working on each pipe that we purchase. Jeff has set up a spread sheet to track where the pipe came from, the date of purchase and what we paid for it so that we know what we have invested in the pipe before we even work on it. This takes a lot of the guess work out of the process. This particular pipe was purchased on 01/23/2023 in a group of pipes from a lady in Cincinnati, Ohio, USA. I also want you to understand why we take the photos we do. It is not accidental or chance as the photos have been taken to help me make an assessment of the pipe Jeff sees before he starts his clean up work. We do this to record the condition that the pipe was in when received it and to assess what kind of work will need to be done on. When I look at these photos this is what I see.
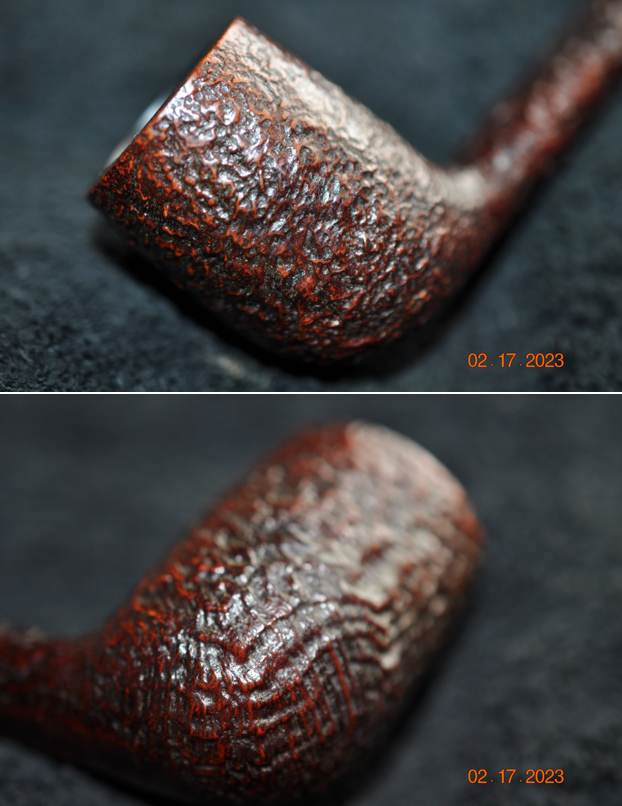
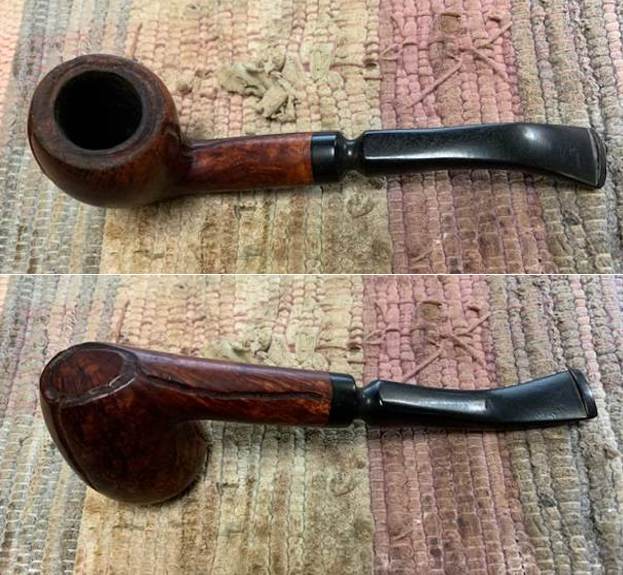
- The finish is dirty with oils darkening the bowl sides and shank. The worm trails carved around the bowl are dirty with dust and oils. This kind of darkening happens as the oils from our hands are absorbed by the briar and over time it grows dark.
- The rim top is dirty and there is a lava overflow from the cake in the bowl and some darkening on the rim top. The rim top also shows damage from being knocked against some hard.
- The bowl has a thick cake in it but the inner bevel and outer edge of the bowl actually look to be undamaged other thank the scratches and darkening. There does not appear to be any burning or reaming damage to the edges of the bowl.
- The fancy turned stem is vulcanite and there is no logo in the surface.
- The vulcanite stem has some light oxidation but was dirty. There were tooth marks and chatter ahead of the button that are visible in the photos below. Nothing to deep but nonetheless present.
Overall my impressions of this unique hand made artisan pipe was that it was in solid shape with a lot of damage on the rim top and edges – nothing horrible but knocked hard against a hard surface throughout its trust with the last person who smoked it. The cake does not seem to hide any burns or checking but I will know more once it is cleaned and reamed. The exterior of the bowl does not show any hot spots but with the darkening by hand oils it is very hard to know with certainty. It is a good looking pipe in spite of the poor care it has had. The photos below confirm the assessment above.  Hopefully as you have learned from the last few blogs we always include close up photos of key areas on the pipe we buy. We do this so that I can have a clearer picture of the condition of the bowl and rim edges and top since Jeff does the clean up and we live quite far apart. The rim top photos confirm my assessment above. The cake in the bowl is quite thick and the rim top has some lava and debris in the grooves that will need to come off. You can also see the condition of the inner and outer edges of the rim. While it is beat up and nicked you can also see that there does not appear to be any over reaming or burn damage to the edges. This is what I look for when assessing a pipe. Even with all of the abuse the bowl is still round.
  His photos of the stem surface confirmed and heightened my assessment of the condition. You can see the light oxidation on the stem surface. You can see the appearance of the tooth marks on the stem surface ahead of the button on both sides.
 Remember that we include photos of the sides and heel of the bowl for me to do a more thorough assessment of the condition of the briar and the finish before I have it in hand. The darkening on the finish is definitely oils as the grain shows through clearly and cleaning should remove that. There were no cracks or splits following the grain or coming down from the rim edges. There were no cracks in the shank. I also look for flaws in what I call the worm trail carvings as they can be used to hide flaws in the briar. In this case the bowl exterior is sound and should clean up very well.
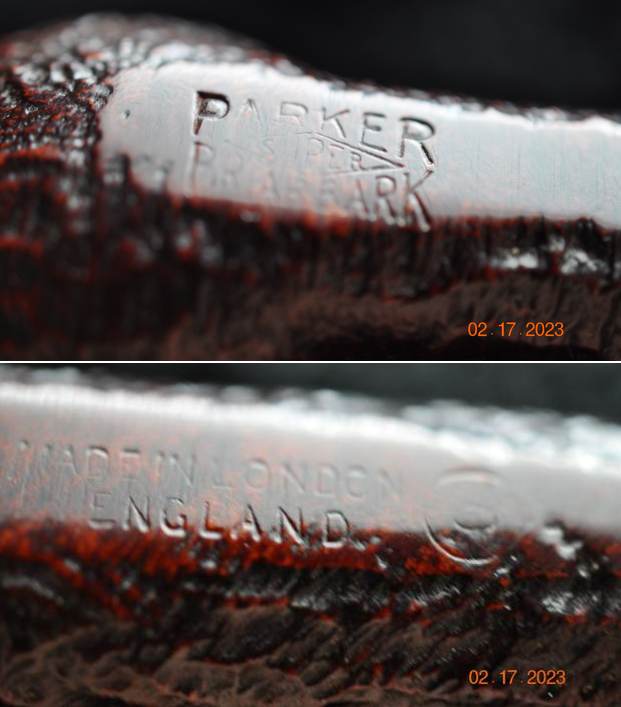
 We take photos of the stamping so I can see if it is faint in any spots or double stamped or unclear. It often takes several photos to capture what I am looking for. The stamping on the left side of the shank is clear and readable in the pictures below. This stamp often fools folks and they cannot identify the maker. It is simply an “S” incorporating a stylized pipe curving toward the shank end and it is crossed by an “R” utilizing the shank and stem of the “S” pipe to form the back leg of the “R”. Hopefully that helps you to identify the stamp clearly.
  For me researching the brand and the maker are an important part of the restoration process. It gives me the background on the philosophy of the pipemakers as well as an understanding of their perspective in making a pipe. That is why I generally include it in my restoration write ups. It is important for me and it is important in educating us on those who have left behind a rich heritage. Here is what I have found on this brand and how I carry on the hunt for data. I turned to Pipedia and read the article that was included there (https://pipedia.org/wiki/S%26R_Pipes). I quote in full below:
Stephen and Roswitha Anderson of S&R Pipes, also known as S&R Woodcrafters, have become pipe makers renowned throughout the world as talented carvers of high-grade briar pipes. They have been featured in several trade publications and magazines such as Pipes and Tobaccos and PipeSmoker, and have several pieces on display in museums in Europe and the United States.
They are the first American pipe carvers honored with induction into the Conferee of Pipe Makers of St. Claude, France; the very place where the carving of briar pipes became a world-wide industry. Sadly, Steve passed away in March of 2009. Roswitha is still carving S&R pipes and carrying on with the shop with help from her “guys” David, Marty, and Tony.
Steve and Roswitha began carving pipes in the 1960’s. They travelled to pipe shows and arts and crafts shows throughout the country and Europe selling their pipes and built up quite an extensive loyal customer base. Eventually, it became time to offer their pipes to the retail fraternity of pipe smokers.
Pipes & Pleasures had its grand opening in a distinct red brick house on Main Street in Columbus, Ohio in 1977. The front section of the house was converted into a traditional tobacco shop selling pipe tobacco, cigars, and pipes manufactured by well known companies such as Dunhill, Charatan, and Savinelli as well as the high-grade S&R pipes that Steve and Roswitha carved. A workshop was set up in the back section of the house.
When the cigar boom hit in the ’90’s, the shop was expanded by building a large computer controlled walk-in humidor. It’s no secret throughout the country that Pipes & Pleasures has the best maintained cigars in the Columbus area as well as the best selection of premium cigars available in the area including the much sought-after Davidoff line.
Soon after the boom began, Steve and Roswitha moved their pipe making workshop to their farm and converted that space into a large smoking lounge for their many customers. The lounge features comfortable easy chairs, a television set, a stereo, a library of books and magazines about every aspect of tobacciana, a chess table, and a couple of card tables. The lounge is populated daily with long-time loyal customers and newcomers to the enjoyment and relaxation of cigar and pipe smoking. It’s also the room where several cigar tastings and samplings are held every year by representatives from cigar companies such as Davidoff and La Flor Dominicana.
I captured a photo of the shop from the Pipedia article to include below. It is a great looking shop.

The Pipes & Pleasures shop, home of S&R Woodcrafters.
From there I turned to the website for Pipes & Pleasures and copied the “About Us” section. Here is the link to the site (https://www.pipesandpleasures.biz/maintenance). I quote in part.
Pipes & Pleasures proprietors Stephen and Roswitha Anderson have become pipe makers renowned throughout the world as talented carvers of high-grade briar pipes. They have been featured in several trade publications and magazines such as Pipes and Tobaccos and PipeSmoker, and have several pieces on display in museums in Europe and the United States. They are the first American pipe carvers honored with induction into the Conferee of Pipe Makers of St. Claude, France; the very place where the carving of briar pipes became a world-wide industry.
Steve and Roswitha began carving pipes in the 1960’s. They travelled to pipe shows and arts and crafts shows throughout the country and Europe selling their pipes and built up quite an extensive loyal customer base. Eventually, it became time to offer their pipes to the retail fraternity of pipe smokers…
…Sadly, Steve passed away in March of 2009. Roswitha is still carving S&R pipes and carrying on with the shop with help from her “guys” David, Marty, and Tony, who welcome you to this website.
While I am sure that some of you will skip the next section of this blog I encourage you to read the process that we use to clean our pipes. It is an important part of the our work of restoration. Jeff wrote a detailed blog about his cleaning process. I am including a link to that now so you can see what I mean about his process. Do not skip it! Give it a read (https://rebornpipes.com/2020/01/20/got-a-filthy-estate-pipe-that-you-need-to-clean/). Here is the introduction to that blog and it is very true even to this day.
Several have asked about Jeff’s cleaning regimen as I generally summarize it in the blogs that I post rather than give a detailed procedure. I have had the question asked enough that I asked Jeff to put together this blog so that you can get a clear picture of the process he uses. Like everything else in our hobby, people have different methods they swear by. Some may question the method and that is fine. But it works very well for us and has for many years. Some of his steps may surprise you but I know that when I get the pipes from him for my part of the restoration they are impeccably clean and sanitized. I have come to appreciate the thoroughness of the process he has developed because I really like working on clean pipe!
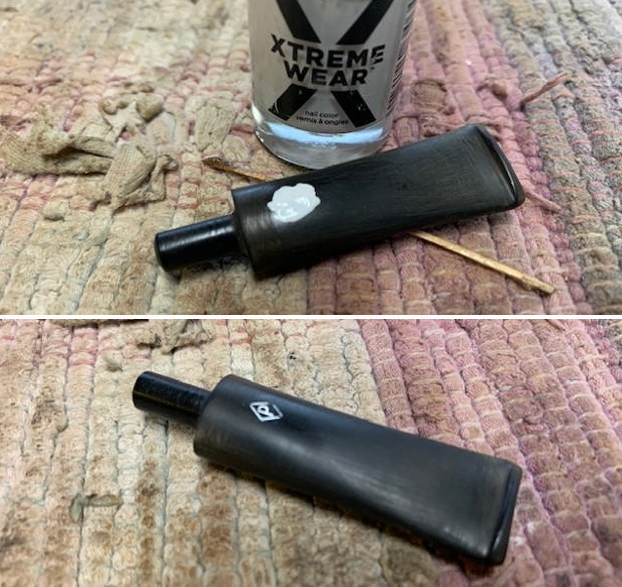
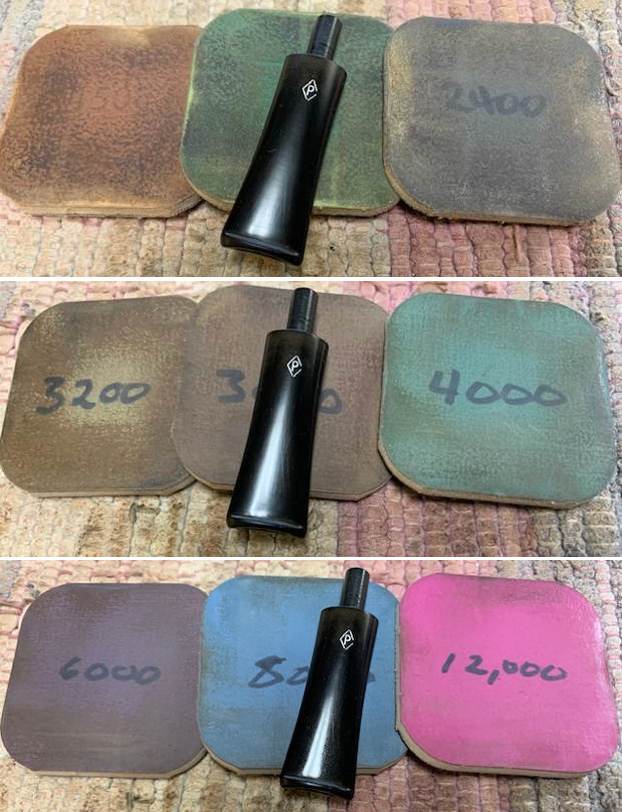
For the benefit of some of you who may be unfamiliar with some of the products he uses I have included photos of three of the items that Jeff mentions in his list. This will make it easier for recognition. These three are definitely North American Products so you will need to find suitable replacements or order these directly on Amazon. The makeup pads are fairly universal as we were able to pick some up in India when we were with Paresh and his family.
In the blog itself he breaks his process down into two parts – cleaning the stem and cleaning the bowl. Each one has a large number of steps that he methodically does every time. I know because I have watched him do the work and I have seen the pipes after his work on them. He followed this process step by step and when the pipe got to me it was spotlessly clean and ready for my work. The inside of the stem, shank and bowl were clean and to me that is an amazing gift as it means that my work on this end is with a clean pipe! I cannot tell you how much difference that makes for my work.
When the pipe arrives here in Vancouver I have a clean pipe and I go over it keeping in mind my assessment shared in the opening paragraph above. I am looking for any significant structural changes in the bowl and finish as I go over it.
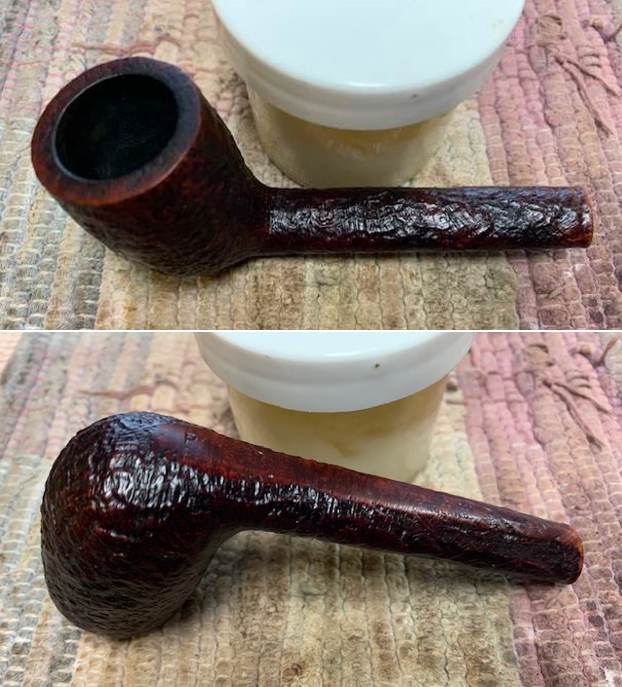
- The finish cleaned up really well and the oils and grime ground into the briar have been removed. The grooves in the finish (worm trails) are also clean revealing the carving marks in the. The was very clean and looked much better. With all the grime removed there was some excellent grain coming through.
- The carved rim top cleaned up well, though was still some darkening on the briar and some damage on the right front inner edge showed up in the clean up. Some of the nicks in the briar lifted during the clean up as well and it looks better.
- The bowl was very clean and the top and inner edge of the bowl show some damage is noted in number 2 above. The bowl walls are also very clean and smooth with no checking or burn marks on the inside or out of the bowl. The walls were undamaged.
- The fancy turned vulcanite saddle stem looks good’
- The vulcanite stem clearly shows the tooth marks and chatter ahead of the button that that will need to be addressed.
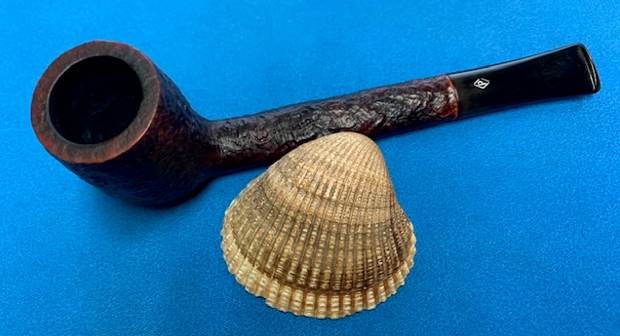
Hopefully the steps above show you both what I look for when I go over the pipe when I bring it to the work table and also what I see when I look at the pipe in my hands. They also clearly spell out a restoration plan in short form. My work is clear and addressing it will be the next steps. I took photos of the whole pipe to give you a picture of what I see when I have it on the table. This is important to me in that it also shows that there was no damage done during the clean up work or the transit of the pipe from Idaho to here in Vancouver. Also things stand out that I did not see in the photos. For instance I did not note the flat bottom on the bowl. It appears to have been made into a sitter however with the stem in place it did not sit. Minus the stem it sat upright on its own.
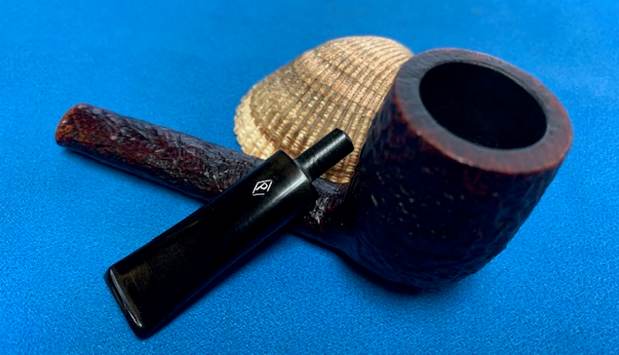
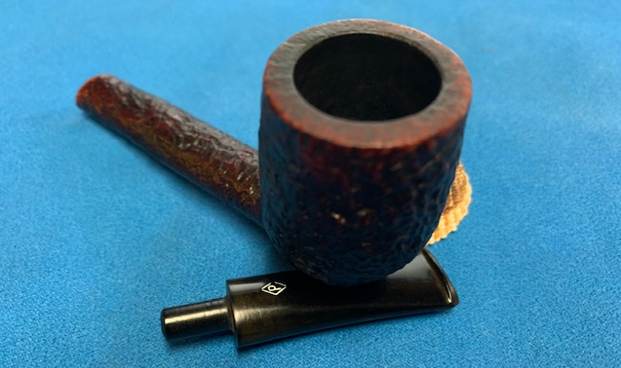
I then spent some time going over the bowl and rim top to get a sense of what is happening there. The bowl looked very good and the walls were smooth. There was no damage internally. The rim top was clean and I could clearly see the worm trail carving around the rim top. It was clean and clear. There as some damage on the rim top and inner and outer edge particularly at the front of the bowl that would need to be dealt. There were also nick on the top of the shank. I also went over the stem carefully. There were dents in the stem that are visible in the photos. But the good news is that the tooth marks were not deep and did not seem to puncture the airway. They would clean up well. I examined the button edge and was happy to see that the marks there were not too bad and should be able to be sanded out. I took photos of the rim top and stem sides to show as best as I can what I see when I look at them. As usual I checked the stamping to make sure that the clean up work did not damage the stamping on the shank in any way. I know Jeff is cognizant of this but I do it anyway and take a photo to show what I see when I examine it. In this case it has not changed at all from the pictures I included above. It is clear and distinct. I removed the stem from the shank and checked the tenon and lay the parts of the pipe out to get a sense of the proportion that was in the mind of the pipe maker when he crafted the pipe. It is a beauty in flow and shape.
 Remember the question of where to begin the restoration work is a matter of personal preference. If you read rebornpipes much you will see that each of the restorers who post here all start at different points. Kenneth always starts with the stems, others as well do that. I personally like to start with the bowl because it gives me hope that this pipe is really a beauty. I think that is why I always leave the stem until last even though I know that it needs to be done. So if you are restoring your pipes choose where you want to start and go from there. Just know that it all will need to be done by the end but for me the encouragement of seeing a rejuvenated bowl is the impetus I need to attack the stem work.
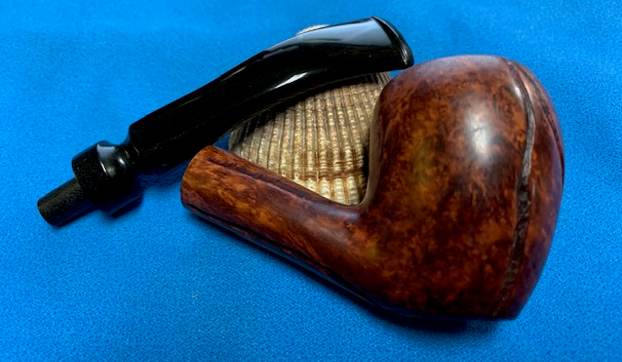
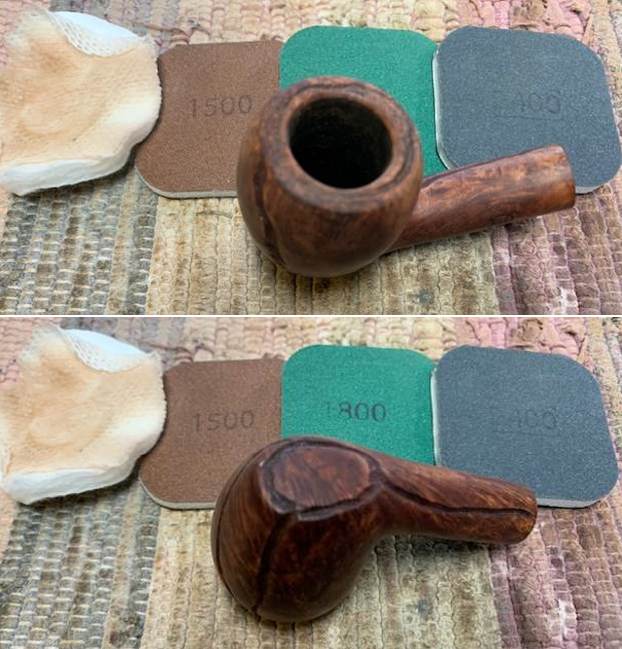
Knowing that about me you can guess that I started working on this pipe by turning to the bowl. The bowl was in great condition over all but the rim top needed attention. I decided to clean up the rim top. I worked on the damage edges and top with a folded piece of 220 grit sandpaper. I used the sandpaper to bring the bowl back into round. I finished the rim top and edge clean up and wiped the bowl down with acetone on a cotton pad to remove more of the oils in the finish that still darkened the briar. I then polished the briar with micromesh sanding pads. I chose to dry sand the briar rather than wet sand it. Again it is a matter of personal preference. I prefer to use the pads dry and find they work very well on the briar. I sand with each pad (9 in total) and group them by threes for ease of reference. I wipe the bowl down with a damp cloth after each pad to remove the sanding debris and check the briar. I love seeing the developing shine on the briar as I move through the pads. I include the many photos of various angles of the bowl so you can see the change. Pay attention to the changes in the briar in these photos as you work through them.


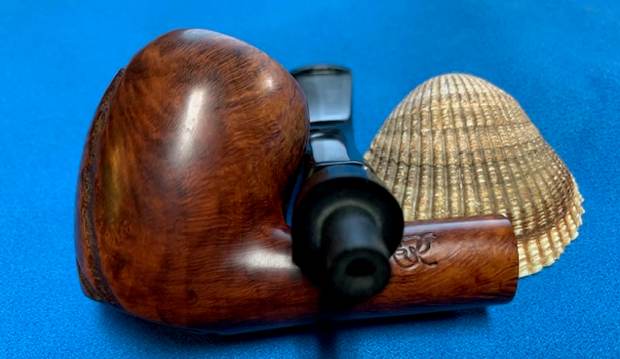
 As usual for me when I get the bowl to this point in the process I use Before & After Restoration Balm. It is a paste/balm that is rubbed into the surface of the briar. The product works to deep clean the finish, enliven and protect the briar. I worked it into the briar with my finger tips to make sure that it covers every square inch of the pipe. I set it aside for 10 minutes to let it do its work. Once the time has passed I wiped it off with a soft cloth then buffed it with a cotton cloth. The briar really began to have a deep shine. The photos I took of the bowl at this point mark the progress in the restoration. You see the shine that the briar has taken on, the removal of the deep oils on the sides of the bowl and the way the grain just pops. It is a gorgeous pipe.

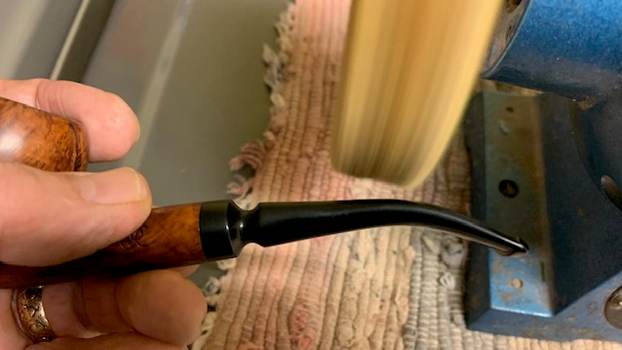
 Now it was time to address the part of the restoration I leave until last. I set the bowl aside and turned my attention to the stem. I wanted to repair the tooth damage on the stem surface and on the surface of the button. Before doing any repairs to a stem surface I always try to lift the marks as much as possible. To do that I use a Bic lighter to heat the tooth marks and dents in the stem surface. I describe that as “painting” the surface. What I mean by that is that I hold the stem stationary and quickly move the flame of the lighter across the dents repeatedly. Typically I am able to lift the dents significantly and sometimes in totality with the heat. It utilizes the “memory” vulcanite and the heat raises the marks.
 In this case I lifted all quite a bit but the heat did not raise them all the way. To take care of that I filled in the tooth marks that remained with clear CA glue and let it cure. Once it was hardened I flattened the repairs with a small file to blend them into the stem surface.
 I finished smoothing out the repairs on the stem with 220 grit sandpaper and started polishing it with 600 grit wet dry sandpaper to remove the scratches. This process makes the repairs almost invisible when polished and also takes care of scratching in the surface of the vulcanite.
 It was the time now to polish the stem and bring back a shine. Over the years I have developed my own process for this. It is all preparation for the buffing that will come last. I use micromesh sanding pads and water to wet sand the stem with 1500-12000 grit sanding pads. I wiped it down after each sanding pad with Obsidian Oil on a cotton rag after each sanding pad as I find it does two things – first it protects the vulcanite and second it give the sanding pads some bite in the polishing process.
 After finishing with the micromesh pads I always rub the stem down with Before & After Fine and Extra Fine stem polish as it seems to really remove the fine scratches in the vulcanite. I rub the Fine Polish on the stem and wipe it off with a paper towel and then repeat the process with the Extra Fine polish. I finish the polishing of the stem by wiping it down with a final coat of Obsidian Oil and set the stem aside to let the oil absorb. This process gives the stem a shine and also a bit of protection from oxidizing quickly.
 The final steps in my process involve using the buffer. I first buff the stem and the briar with Blue Diamond on the buffing wheel. Blue Diamond is a plastic polish but I find that it works very well to polish out the light scratches in the vulcanite and the briar. I work the pipe over on the wheel with my finger or thumb in the bowl to keep it from becoming airborne. It works well and I am able to carefully move forward with the buffing. I lightly buff the plateau on the rim top and shank end at the same time making sure to keep the product from building up in the grooves of the finish.
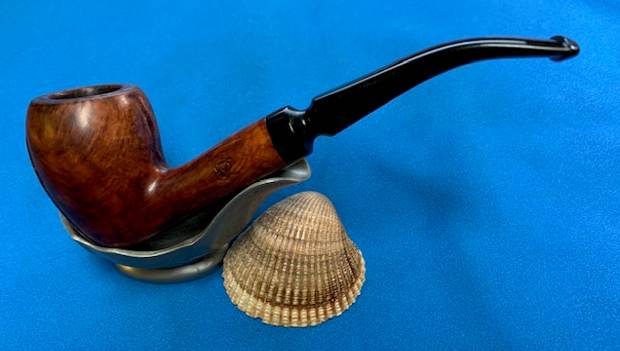
 I finished with the Blue Diamond and moved on to buffing with carnauba wax. Once I have a good shine in the briar and vulcanite I always give the bowl and the stem multiple coats of carnauba wax. I have found that I can get a deeper shine if I following up the wax buff with a clean buffing pad. It works to raise the shine and then I follow that up with a hand buff with a microfiber cloth to deepen the shine. It is always fun for me to see what the polished bowl looks like with the polished vulcanite stem. It really is a beautiful pipe. The smooth finish around the bowl sides and shank show the grain shining through the rich brown stains of this S&R Freehand Acorn and the polished vulcanite stem. There are still some remaining marks from the long story of the pipe that to me add a sense of time that is an interesting part of the story. The finished pipe feels great in my hand. It is light and well balanced. Have a look at it with the photos below. The dimensions are Length: 6 inches, Height: 1 ¾ inches, Outside diameter of the bowl: 1 ¼ inches, Chamber diameter: ¾ of an inch. The weight of the pipe is 1.52 ounces/44 grams. It is a beautiful pipe and one that I will be putting on the rebornpipes store in the American (US) Pipe Maker section.
Hopefully this tack of writing this blog is helpful to you in some way. In it I show both what I am looking for and how I move forward in addressing what I see when work on a pipe has been helpful to you. It is probably the most straightforward detailed description of my work process. As always I encourage your questions and comments as you read the blog. Thanks to each of you who are reading this blog. Remember we are not pipe owners; we are pipemen and women who hold our pipes in trust until they pass on into the trust of those who follow us.