Monthly Archives: October 2019

A Nightmare Resurrecting from ‘Pipe Dreamers ONLY!’ – Comoy’s The Lumberman Special Canadian


Blog by Dal Stanton

There is no other way to describe this Canadian – a Nightmare.  I created the ‘For “Pipe Dreamers” ONLY!’ section on ThePipeSteward site to encourage people to see the hidden potential of a sad, neglected pipe BEFORE the restoration process.  So much of life and relationships we have are shaped by our ability to see what people can become and treat them in this manner.  Jim saw The Lumberman and commissioned him along with a very attractive Butz Choquin Supermate Panel.  In corresponding with Jim, I learned that he’s from Pennsylvania and an engineer by trade working at Pennsylvania State University as a research staff assistant writing software for all kinds of research efforts.  What interested me also was that he, like me, enjoys working with his hands – models, woodworking and Jim has his own shop where he works.  He also builds dioramas – models representing a scene with three-dimensional figures, usually in miniature or as a large-scale museum exhibit (had to look this up!).  In his initial email, Jim assessed The Lumberman that he said he wanted me to restore:

I realize that restoring the Canadian is going to be quite a tall order — it’s former owner seeming to have smoked it hard and hung it up wet — but I can’t help but look at the hints of cross-grain on the shank and think that there is still a solid pipe left underneath all of that dirty exterior.

My response to Jim was a bit more realistic and, let me be honest, skeptical(!):

Oh my.  The Lumberman is in bad shape.  I showed my wife the pipe and that someone had requested to restore it and her response was, ‘Why?’  Your description is an understatement.  He needs a lot of TLC.  The shank chip will probably need to be planed off to reseat the stem/tenon – losing about 1/16 inch of the shank length – doable.  The rim is an ICU inhabitant.  There’s no pretty way to deal with this.  I would clean the chamber to make sure all the briar is exposed.  I would then build up the rim as much as possible with briar dust putty and then sand/top it down until it looked acceptable.  Honestly, Jim, I can’t say how much top I’ll need to remove from the bowl – as little as possible, but he’s not in good shape.  I understand what you see in the grain underneath the years of dirt and grime.  Without a doubt, you are awarded the Pipe Dreamer of the Year award!  It’s difficult for me to put an estimate on it at this point because it will definitely qualify as a resurrection and not a restoration.  I’m game if you are game.  I love the challenge and with this guy, I’m not sure how I’ll value him, but the same applies.  If you’re not satisfied, you’re not obligated to purchase.  As I said before, the sale of these pipes benefit the Daughters of Bulgaria and I appreciate your desire to support that.

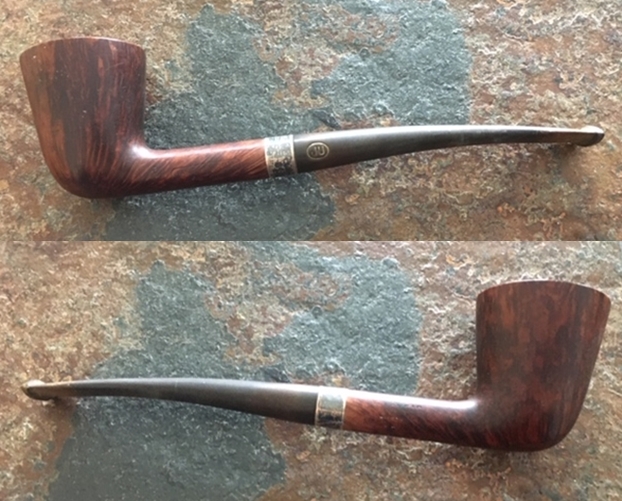
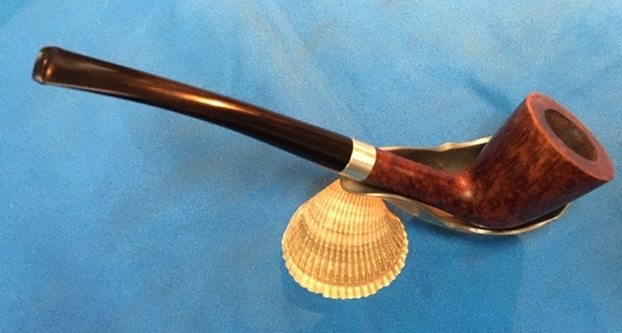
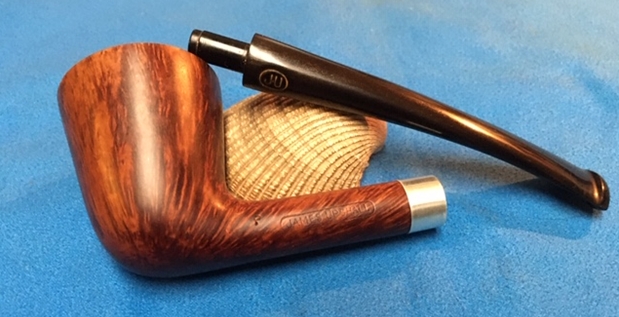
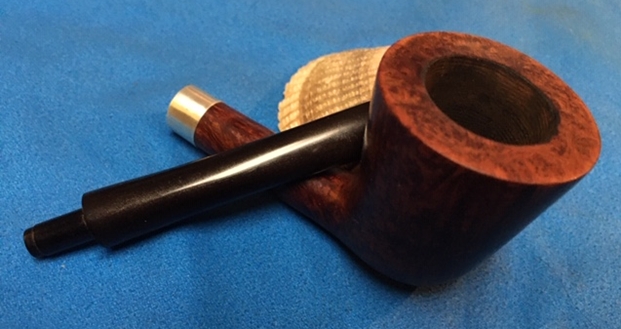
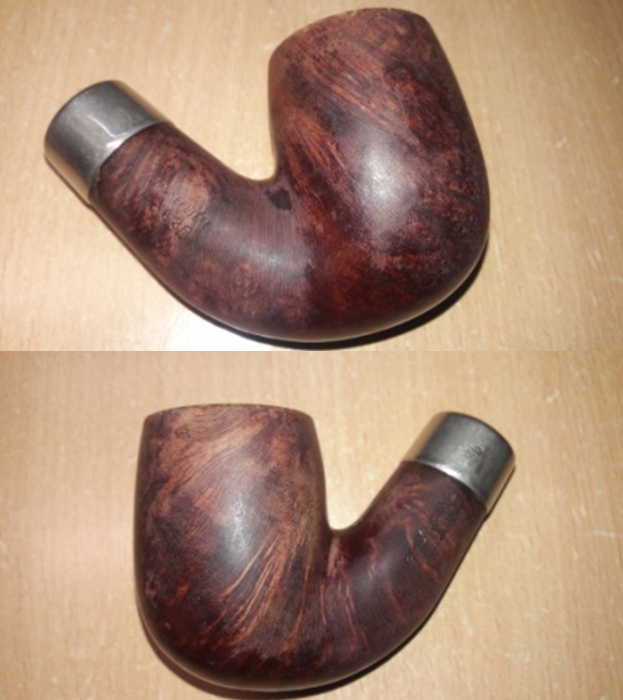
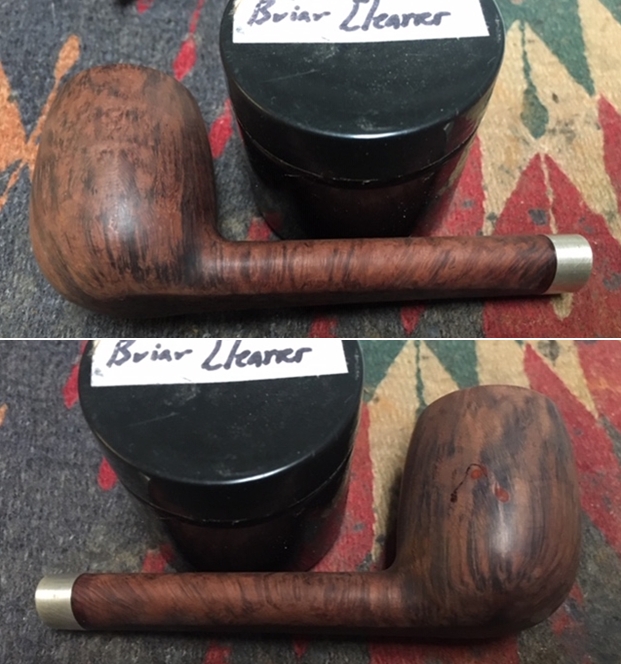
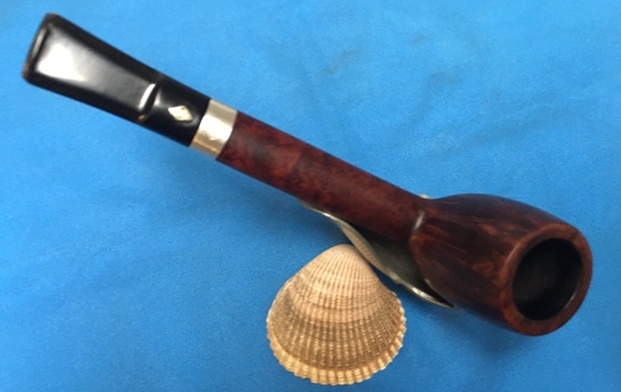
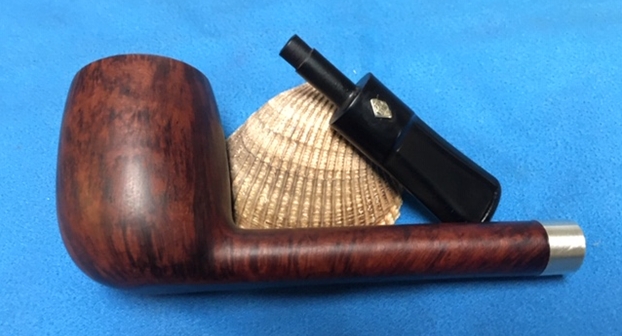
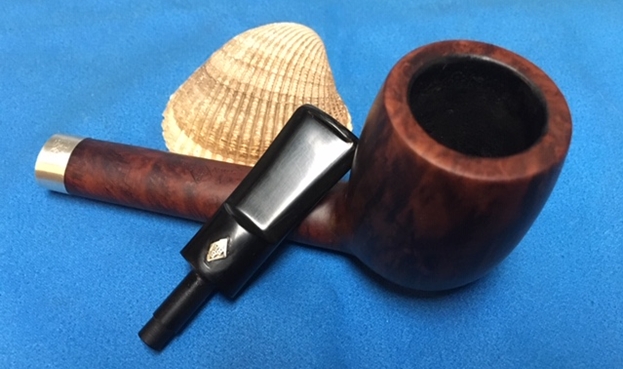
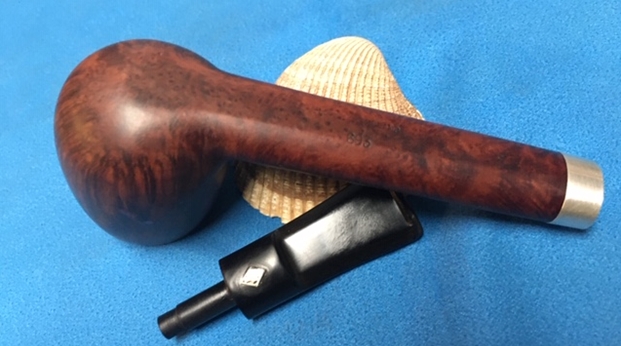
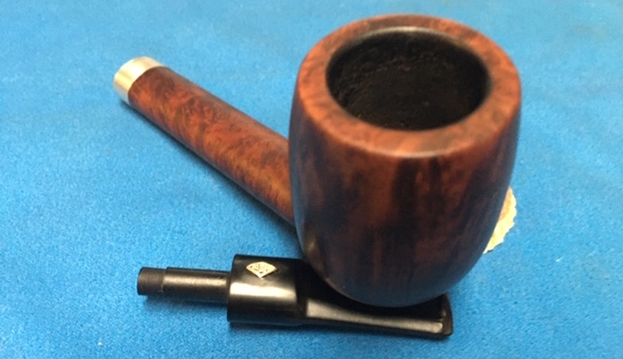
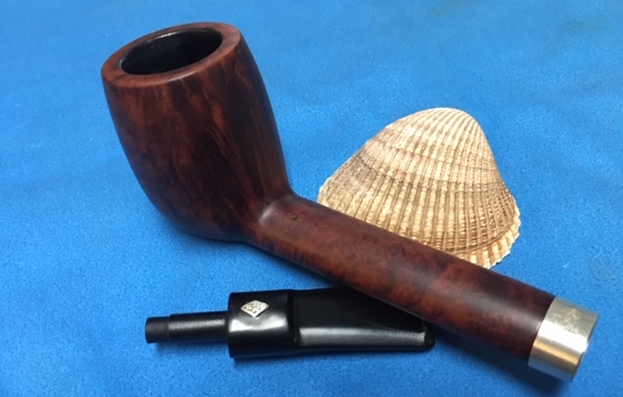
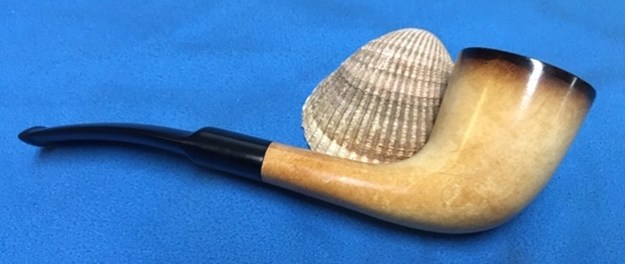
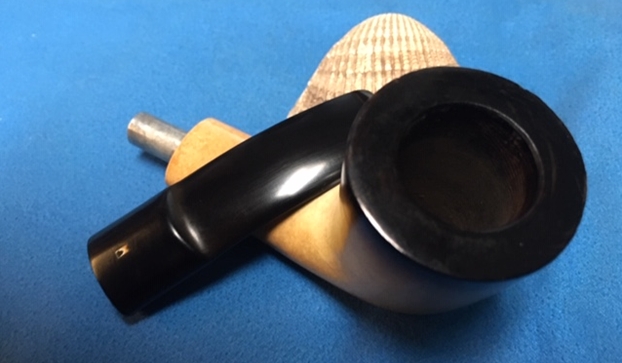
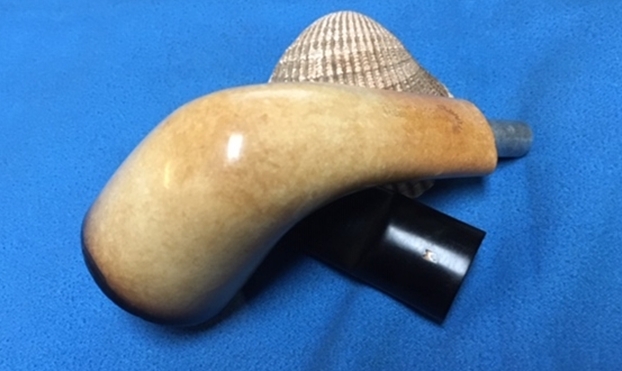
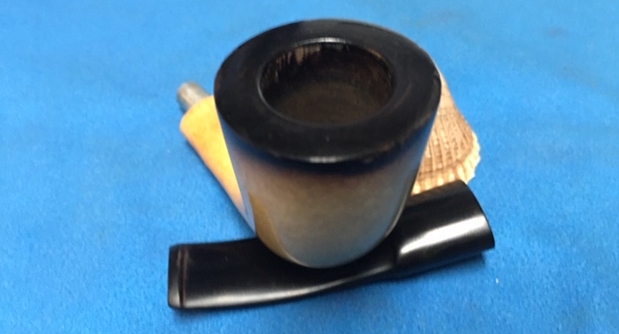
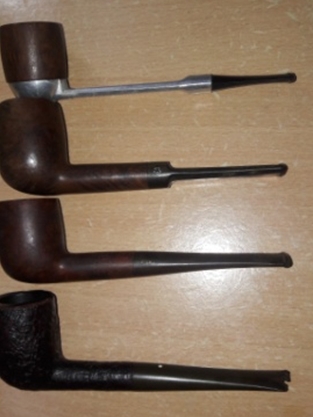
The ’Nightmare’ Canadian that Jim commissioned will be a challenge!  Here are pictures of The Lumberman before he reached my worktable as I took pictures to post in the ‘For “Pipe Dreamers” ONLY!’ online collection: 
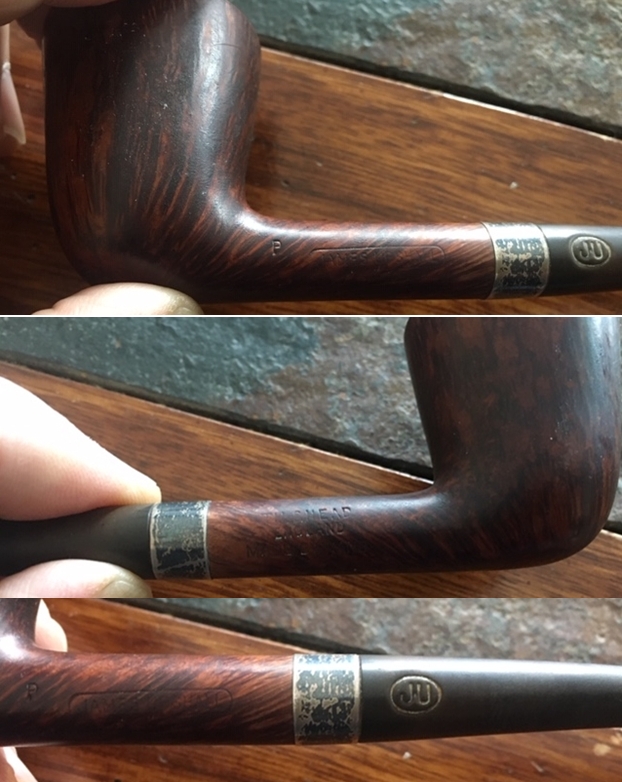
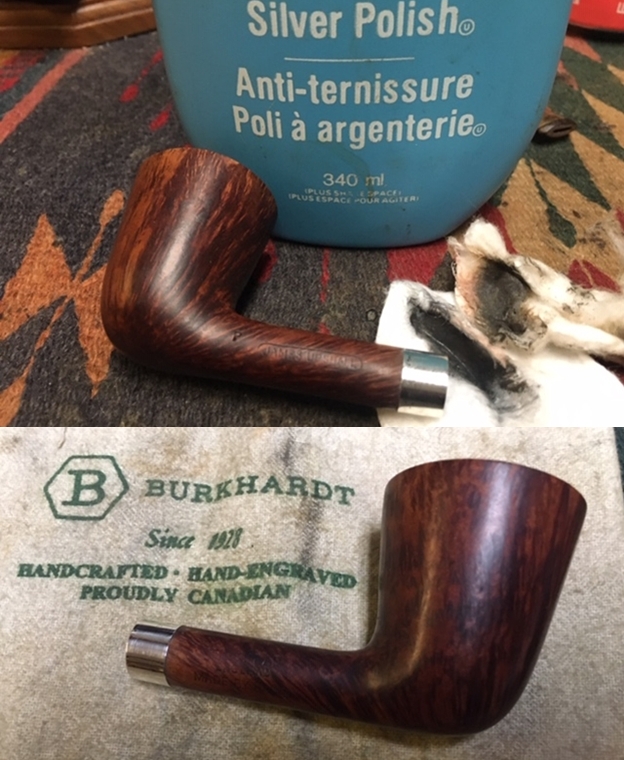
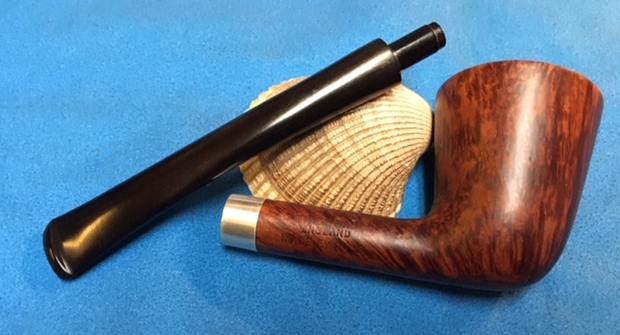
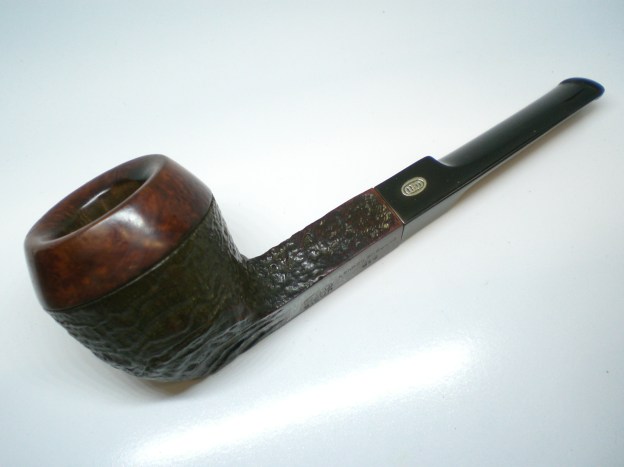
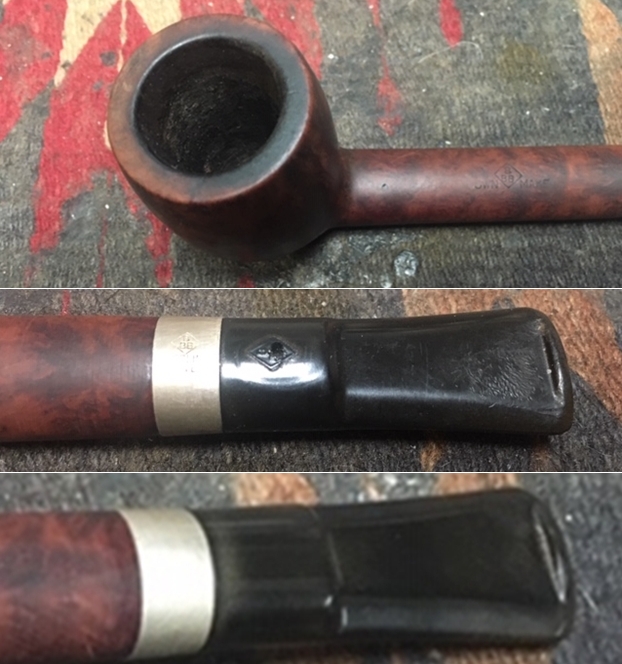
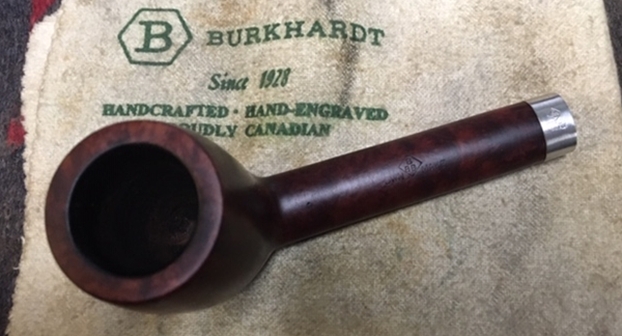
The nomenclature found on the left flank of the long Canadian shank is THE [over an arched] LUMBERMAN.  Not until later, after starting the research, did I discover that on the shank’s right side is stamped, SPECIAL.
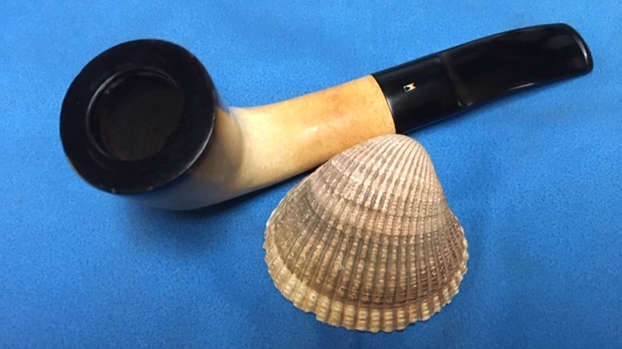
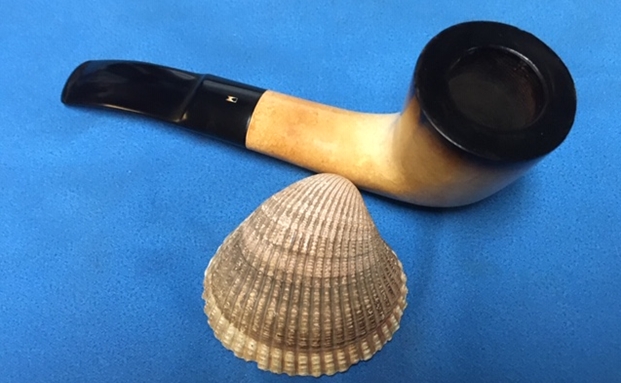
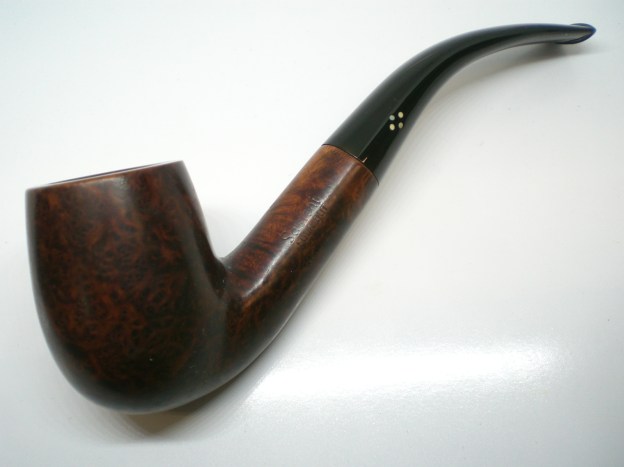
I acquired The Lumberman in what I have called, ‘The Lot of 66’ which has produced many pipes for new stewards benefiting the Daughters of Bulgaria.  Honestly, in every ‘lot’ purchase, there are always pipes that are considered ‘throw aways’ and this pipe was included in that category!  Doing a quick search in Pipephil.eu, I find The Lumberman Special listed as a Comoy’s second.  Here is the panel:The ‘The Lumberman’ lettering is identical to the Canadian on my worktable.  What is distinctly different is that the SPECIAL stamping is not joined as in the example above.  The pipe on my table has the stamping separated on the right shank side.  Another difference is the COM – the example is stamped ‘Made in London England’.  I find no COM on our pipe, nor do I find the same three bar stem logo shown, which is also on other Comoy’s second brands.  A quick look at Pipedia’s Comoy’s article confirms that The Lumberman Special is a Comoy’s second.  Also included is a picture (Second examples, details, and nomenclature, courtesy Doug Valitchka) of a pristine example – a very attractive pipe.  This example of The Lumberman also seems to be without the three bar stem logo.
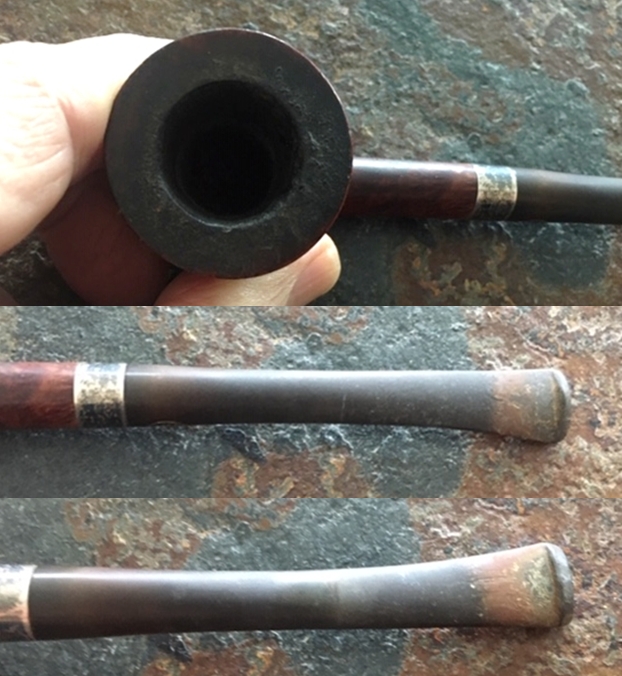
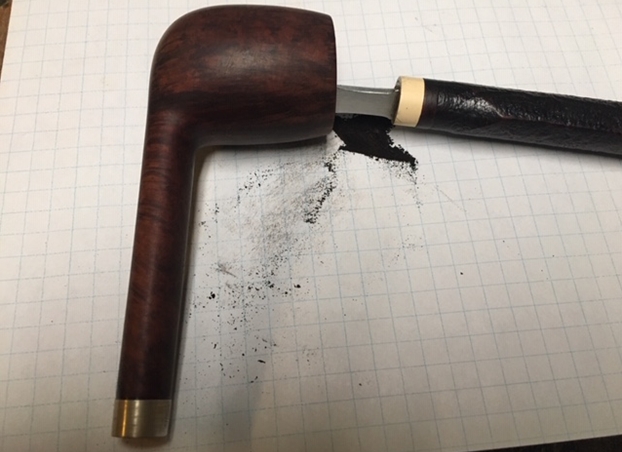
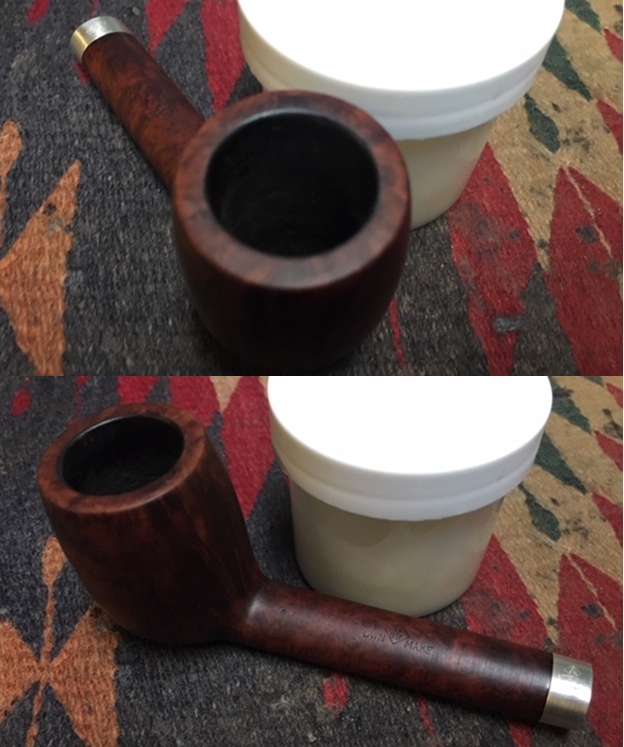
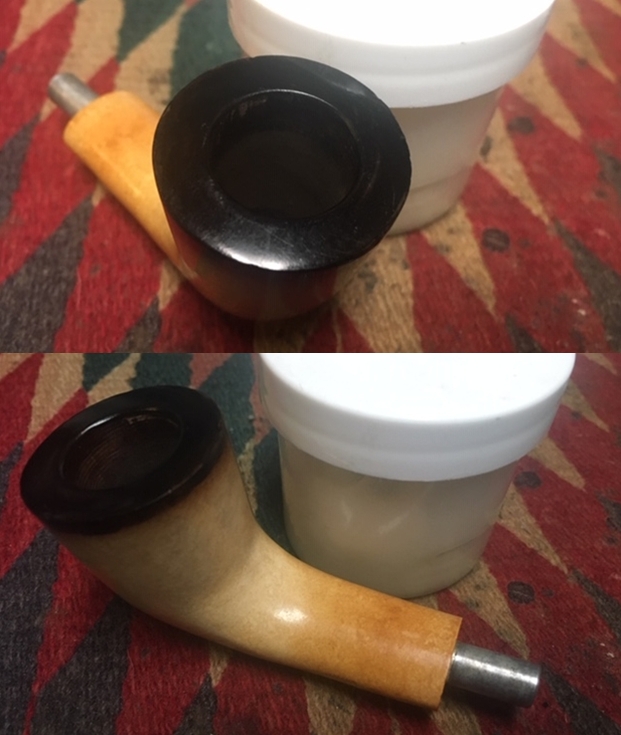
Looking at the example of this pipe in pristine condition above and then gazing at the ‘Nightmare’ version on my table now, lets me know that this will be a grand challenge!  Yet, there’s absolutely nothing to lose.  This pipe was done.  He was no longer the object of anyone’s love or attention.  Now, with the challenge to see what it can become with some TLC (OK, LOTS of TLC) makes me thankful for the challenge Jim has made possible.  My approach generally will be to clean, patch and sand.  The chamber and the rim are the most daunting challenges.  I’ll be surprised if I don’t find heating issues in the chamber after clearing away the thick cake.  The rim is a total mess – charring has deteriorated most of the rim.  The chamber wall has eroded, and the rim plane is wobbled and uneven.  The outer edge of the rim is chipped and gouged.  The bowl is full of scratches and a few fills here and there with pitting as well.  A huge chip has taken almost a quarter of the shank facing.  The good news is that the Canadian short stem has heavy oxidation and nominal tooth and clamping compressions on the upper and lower bit.  I add a few more pictures now from my worktable complimenting the pictures above. 
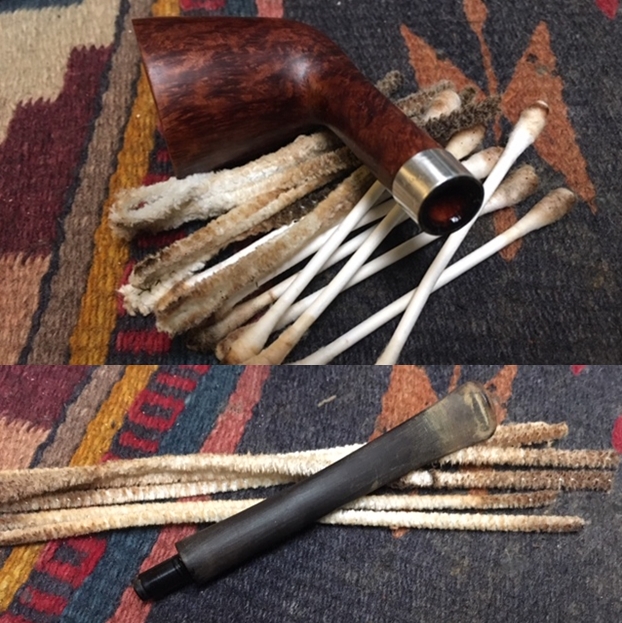
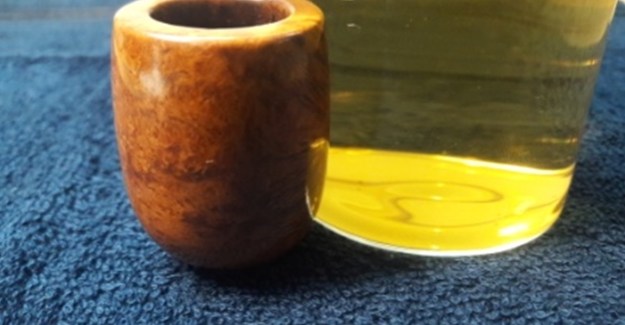
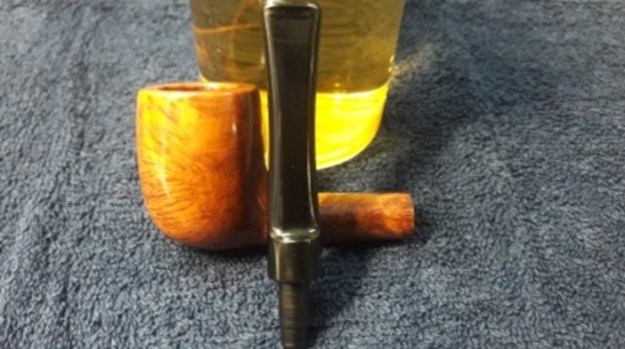
To begin the restoration (or, resurrection?) of this Comoy’s The Lumberman Special, after cleaning the airway with a pipe cleaner wetted with isopropyl 95%, the stem joins other stems in the queue for a soak in Mark Hoover’s product (ibepen.com) Before & After Deoxidizer to address the thick, scaly oxidation. I just communicated with Mark to order more Deoxidizer and Restoration Balm which I’ll pick up on a trip to the US I will be leaving for soon.  I leave the stem in the soak for a few hours.  I include pictures from above to mark the starting point. 
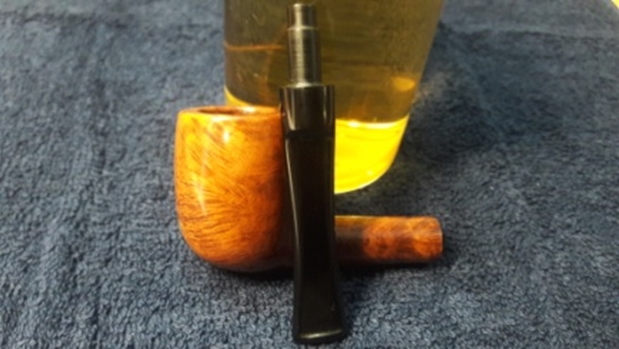
After soaking for a few hours, I fish the stem out and run a pipe cleaner through the airway to remove the liquid.  I then wipe the oxidation off the stem using a cotton pad wetted with isopropyl 95%.  The B&A Deoxidizer has done a good job removing oxidation. Paraffin oil is then applied to the stem to revitalize and hydrate the vulcanite.  I put the stem on the side to absorb the oil.
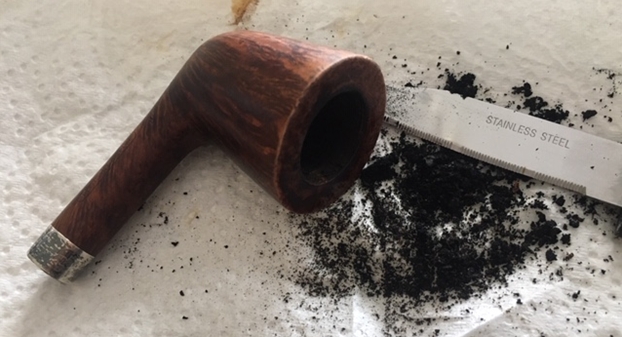
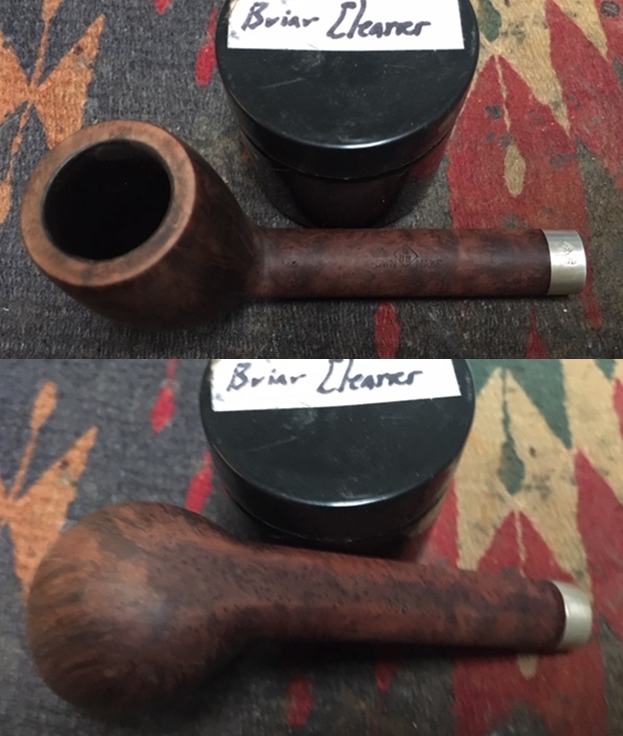
The starting point for working on the hurting stummel is simple cleaning to unmask as much as possible the plethora of issues underneath the cake in the chamber and the grime on the stummel surface.  To clear the chamber of cake, the Pipnet Reaming kit is used.  I take a picture of the chamber to mark the starting point. Not a happy view!After putting paper towel down to save on clean up, using the smallest of the Pipnet blade heads I go to work.  I use 2 of the 4 blade heads available to me and then transition to using the Savinelli Fitsall Tool to scrape the chamber walls further.  Finally, I finish by sanding the chamber with 240 grade paper wrapped around a Sharpie Pen and then wipe the chamber with a cotton pad wetted with alcohol to clear the carbon dust. 
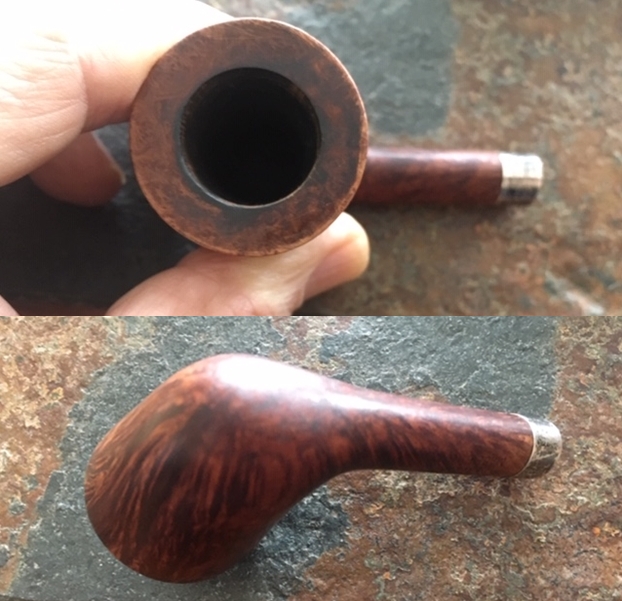
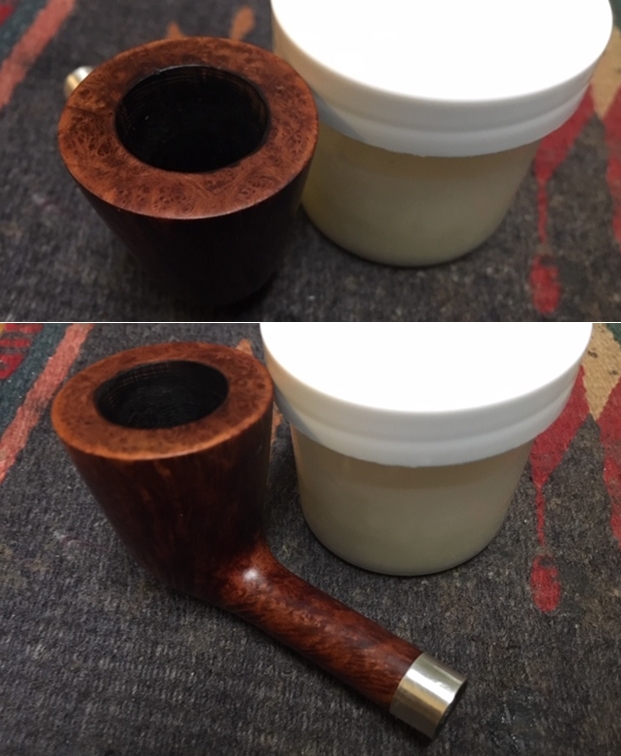
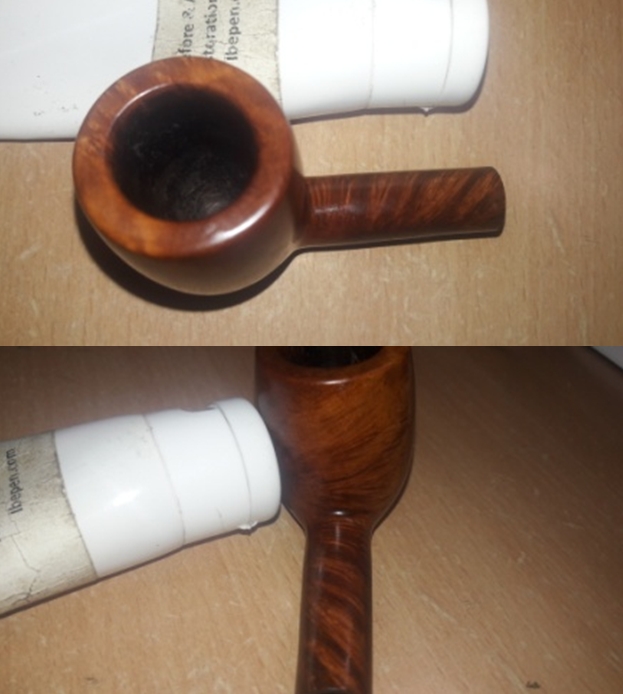
The inspection of the now cleaned chamber shows the chamber wall proper to be in great condition!  This indeed was good news.  The briar is healthy and now it has a fresh start.Next, using undiluted Murphy’s Oil Soap the rim and external briar surface is cleaned using a cotton pad. A brass wire brush also proves useful in cleaning the charred rim.  After cleaning the surface, the stummel is transferred to the kitchen sink where it is rinsed in warm water and using wired shank brushes and anti-oil dish soap, I clean the internal mortise and airway. After rinsing thoroughly, I bring the stummel back to the worktable and clean the internals further using pipe cleaners and cotton buds dipped in isopropyl 95%.  I use a dental spoon to scrape the sides of the mortise as well as using shank brushes to work on the long Canadian shank. After a good bit of effort, progress has been made and since the hour is late, I will continue the cleaning using kosher salt and isopropyl 95% to soak through the night.  This methodology not only continues the internal cleaning but freshens the pipe for a new steward.  First, a cotton ball is pulled and twisted to form a wick that is used to push down the mortise and airway to serve as a ‘wick’ to draw out the residual tars and oils.  Using a stiff wire, the cotton wick is guided down the airway and after the stummel is placed in an egg carton to provide stability.  I then fill the bowl with kosher salt, which leaves no aftertaste unlike iodized salt.  Using a large eyedropper, I fill the bowl with isopropyl 95% until it surfaces over the salt.  With the longer Canadian shank, it takes longer for the alcohol to seep into the longer airway.  After topping it off with alcohol one last time, I turn out the lights and call it a day. The next morning, the salt is mildly soiled showing that it did its job through the night.  When I tug on the cotton wick, unfortunately, it doesn’t come out whole.  I must employ the use of a dental probe and tweezers to pull the remainder out.  Finally, I was able to push the rest through to the bowl with the help of the pointed needle file. 
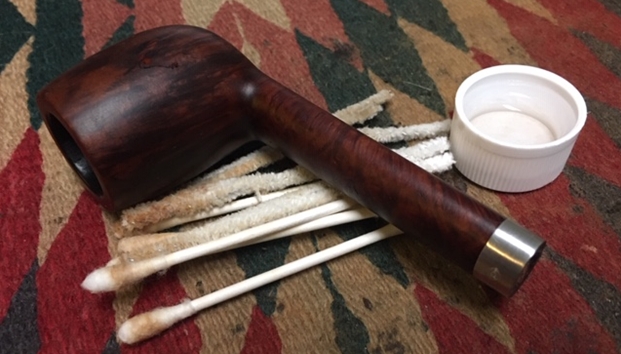
To be sure the internals are finally cleaned, I deploy a few more pipe cleaners and cotton buds wetted with isopropyl 95% to clean up any residue.  After a short time, it is apparent that things look good and I move on.
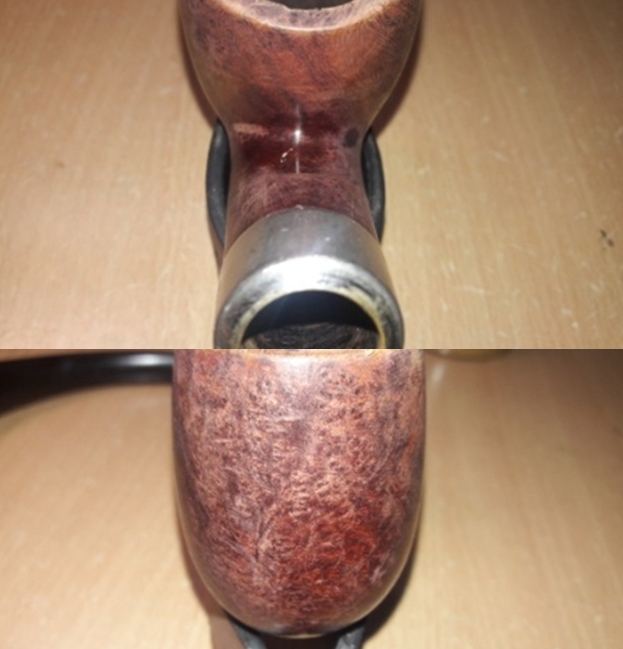
With the internal cleaning completed, my attention shifts now to the primary issue – the rim re-build.  From the picture below looking down on the rim, the remnants of the rim top are at 4 to 5 o’clock and at 9 to 1 o’clock.  These surfaces give me an idea of where the rim was and provide a target for a re-built rim – at least in an ideal world.  The inner rim edge is out of round from charring and…, who knows.  One thing for sure, this Canadian was loved and used, but rode into the ground! Looking now from the side, from both directions, the uneven plane is evident.  The challenge is how to save as much briar as possible off the top of the bowl to have a flat plane?  To top it until this happens will turn the Canadian into a long shank Pot! My path forward, after considering the options, is to start with a very minimal topping to even out the remaining rim plane to see more clearly the areas that will be targeted for patching.  The default option is to lose briar through topping, but I will seek to build the rim up with the patch material – briar dust putty, and top, shape and sand the rebuilt rim until it has a semblance of normality!  At least, this is the hope.  I take out the chopping board which becomes my topping board after placing a sheet of 240 grade paper on it.  The goal is to lightly top to establish the boundaries.Instead of rotating the first round, I drag the stummel across the board.  I do this because I want to stay on top of the remnant rim surface and not dip down into the damaged areas which will be softer.  Keeping the pressure on the high wood was easier this way.  The result shows the emerging boundaries.Next, this time, after rotating the stummel a few more times on the board, I come to the place of diminishing returns for topping.  I’ll apply briar dust putty to the damaged areas – on the rim and along the internal and external edges to fill in the gaps.  It will require a lot of patching, but the patch areas will provide the excess for sanding and shaping.The next area to prep for briar dust patch material is the large chip of the shank facing.  I insert a drill bit into the mortise which forms the boundary for the patch.  I’ll apply a bit of petroleum jelly to the bit to assure the briar putty patch will not stick to the bit.  Earlier, when communicating with Jim, my thinking was that I would simply plane the facing to remove the damage.  With this always being an option, my thinking now is to start with a patch, sand and shape – go from this point with the value on keeping as much briar as possible.The final prep area is a few small pits on the stummel surface that have old fill material in them.  I dig the old material out with a dental probe which will be refilled with briar putty.I clean all the patch areas with a cotton pad and alcohol in preparation for applying the briar putty.Using BSI Maxi Cure Extra Thick CA glue, I mix it with briar dust to form the putty.  I use a plastic disc as a mixing palette and place Scotch Tape on that simply to aid in cleaning.  I’m not sure if I can apply patch to the 3 areas in one batch, but I’ll start with the rim – the largest project.  I place a pile of briar dust on the palette and then a larger dollop of Extra Thick CA glue next to it.Using a toothpick, I gradually mix the briar dust into the glue until it thickens.  When it reaches the viscosity of molasses, I use the toothpick to apply the putty to the rim allowing for excess to be sanded and shaped later. What the following pictures show is that I was only able to address the rim patching with the first batch of briar dust putty.  As I applied the briar dust putty to the rim, I went in stages using an accelerator to quicken the curing and to hold the putty in place. I mix another batch of briar dust putty on the palette and again apply the putty to the shank facing and the pits.  As before, the use of an accelerator quickens the curing and holds the patch material in place. With a little nudge and twist the bit comes out easily with the help of some petroleum jelly.  The mortise circumference looks good though the patch needs to be sanded and shaped.The obvious next step is a lot of filing and sanding.  I start with filing.  I use both a flat and half circle pointed needle files to work on the excess putty.  I start with the rim by first filing down on the rim top to flatten the plane.  The pictures chronicle the progress. With the top rough filing completed, I move to the outer edge of the rim.The repairs are starting to show some promise!  Now to the inner rim edge.  This is critical in seeking to establish an even circumference.  I start with the slow approach of filing to get it right.  I finish up by loading a sanding drum onto the Dremel and fine-tune the edge and to smooth the transitions in the chamber from the patch material to the chamber wall.  I don’t want to leave ridges. Wow!  I showed this finished rough of the rim to my wife and she said with lessening skepticism that this pipe might just come back to life!Next, I quickly dispatch the two small fills under one glob of putty patch with the flat needle file.Finally, the filing is almost finished.  The flat needle file also goes to work on the shank facing and on the outer edge.  I’m very careful with filing the shank facing because too much removed can offset the proper seating of the tenon and create gaps between shank and stem. I also use the half-rounded needle file to create the sharp bevel on the edge of the mortise which accommodates the tenon’s base. After filing, I join the stem with the stummel to see how well the stem seats.  With some gaps, I do a bit more filing and finally I have the fit as good as I can get it.  It looks good!Now, back to the rim.  To even the rim, I take the stummel back to the topping board with 240 grade paper and give the stummel a few more rotations.  This helps blend the filing.The speckling of the putty patches is expected.  I’ll address this later when applying stain to the stummel which should take care of the contrast.  I want to smooth the inner and outer edges of the rim by applying a bevel. For the internal bevel, a hard bevel is the aim so a hard surface is used behind the 240 grade paper to provide a uniform edge.The internal bevel looks great.In addition to the internal bevel, I do a light sanding of the external rim edge simply to soften the edge and to remove any nicks and cuts.Next, I take the stummel back to the topping board covered now with 600 grade paper and rotate the stummel several times.Using both 240 and 600 grade papers, I sand both patches – the two fills and the shank facing.Now, to address the cuts, nicks and small pits of the very worn stummel surface, I’m hopeful that sanding sponges will be adequate to clean and smooth the briar surface so that I won’t need to employ more coarse sanding papers. I take the first 2 pictures to mark the start for comparison. 
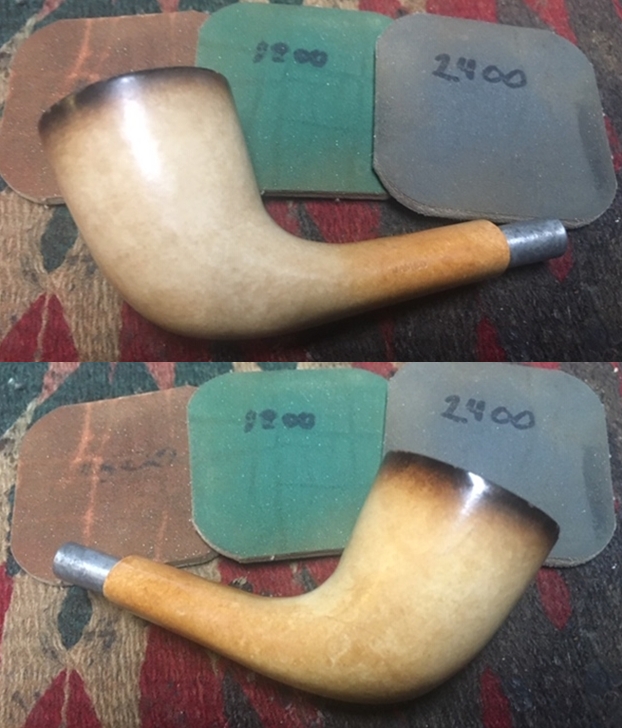
I use first the coarse grade sponge followed by medium and light grades.  I’m careful throughout to guard the nomenclature on both sides of the shank.  Wow!  The grain underneath the old dark finish starts to make an appearance! 
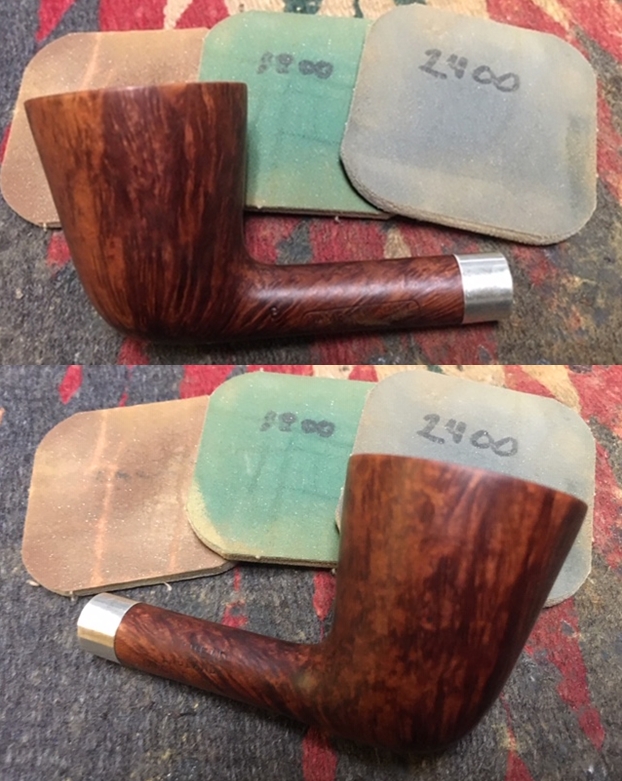
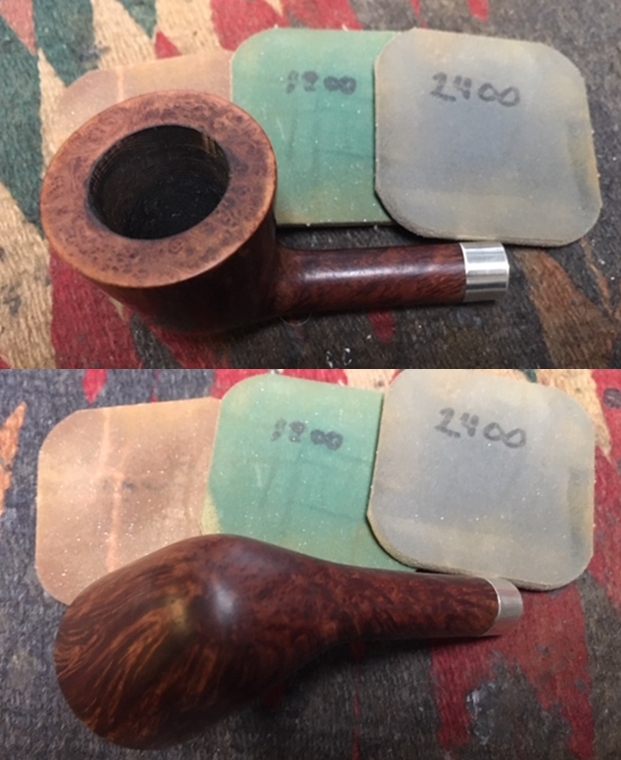
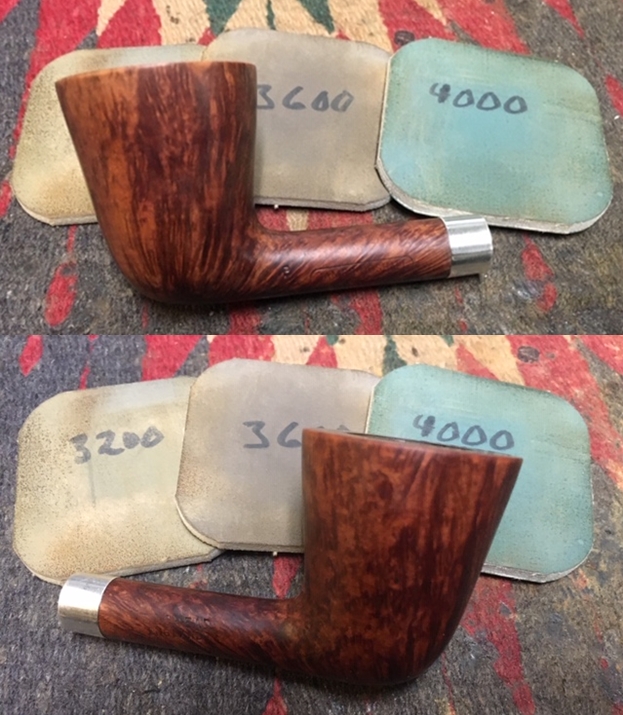
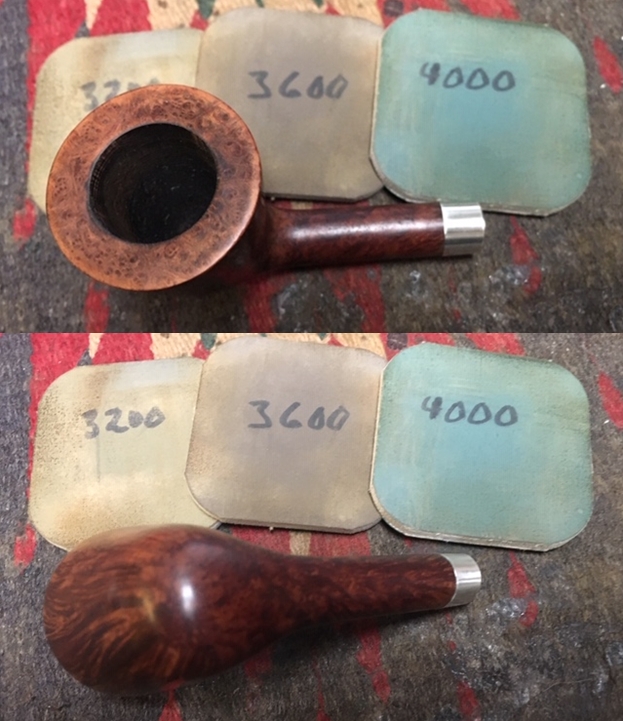
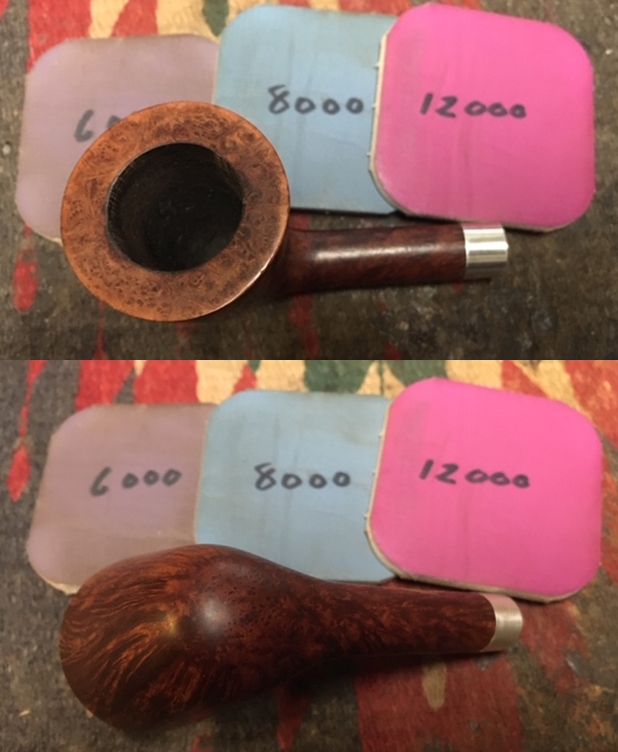
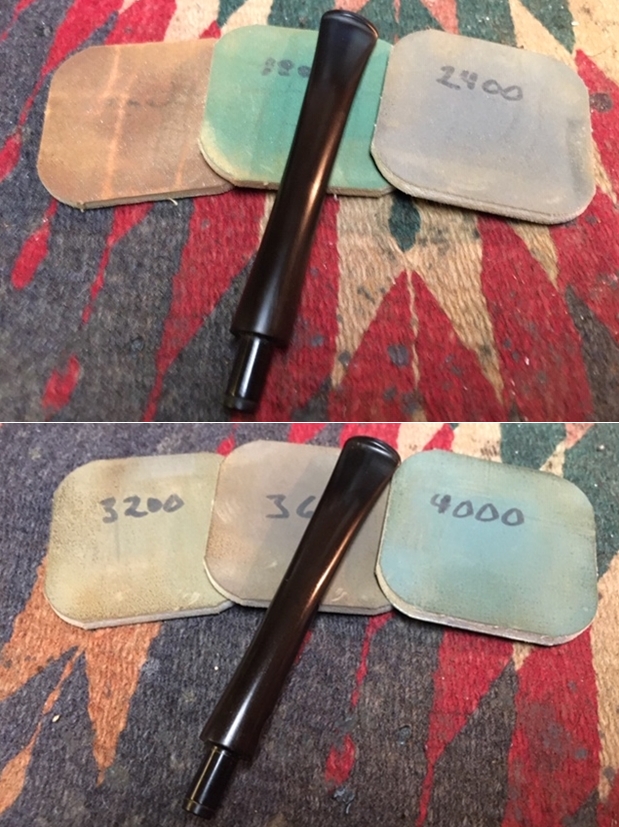
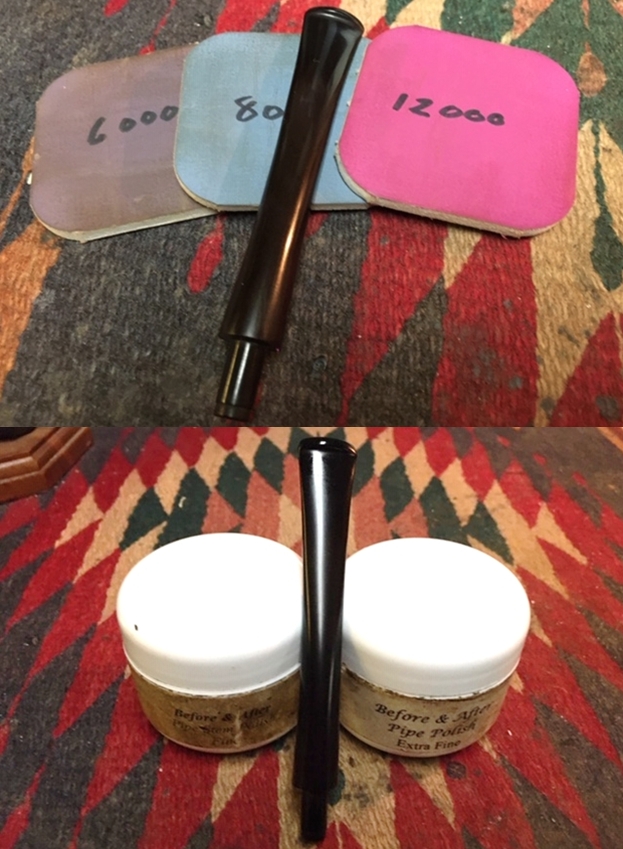
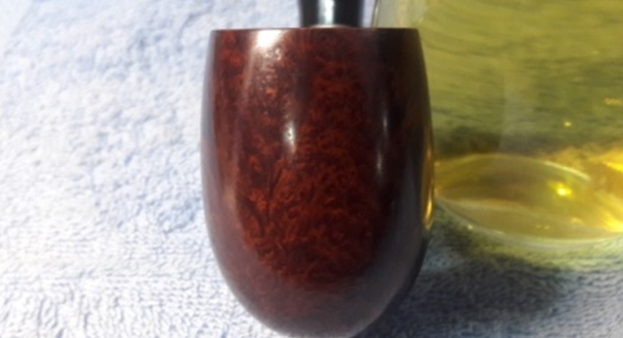
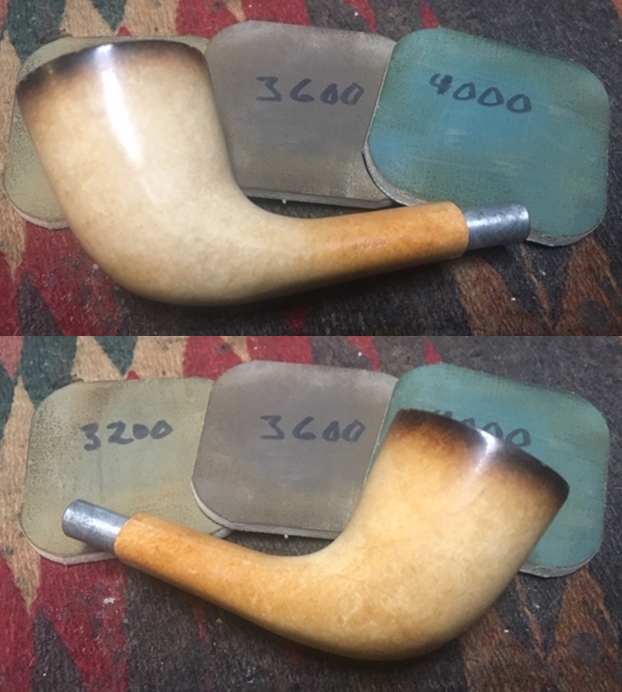
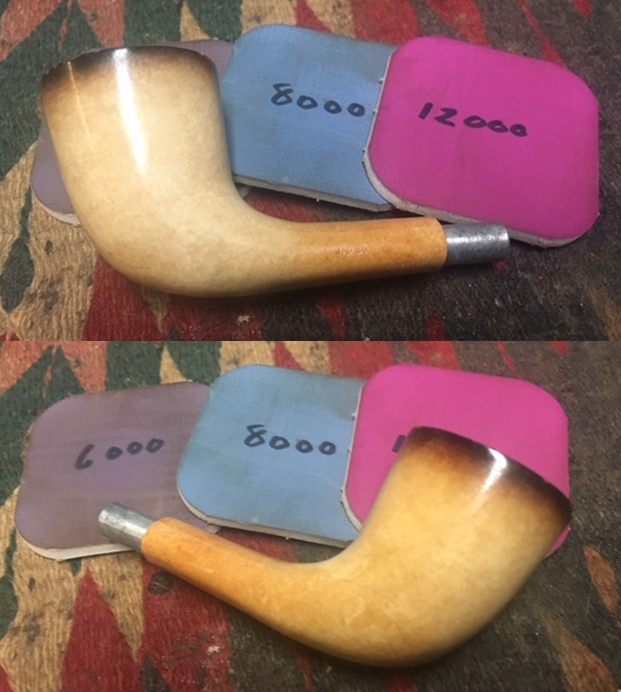
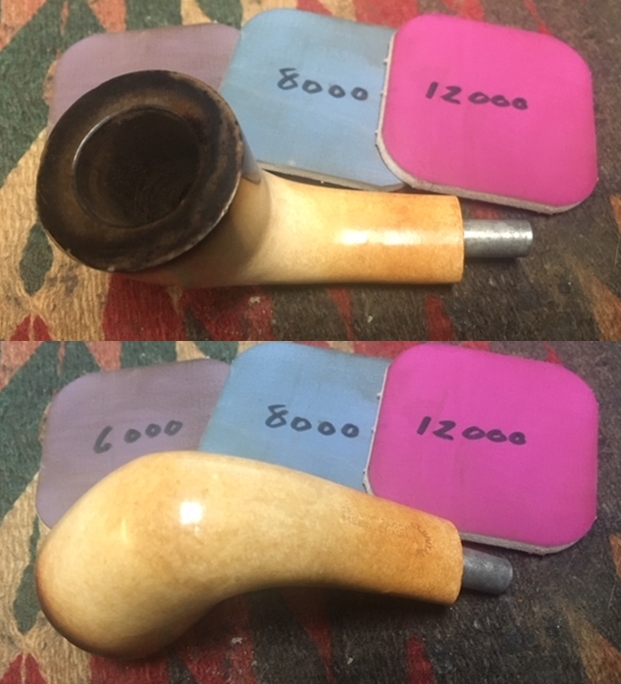
On a roll, I continue the stummel sanding with the full regimen of 9 micromesh pads.  To begin, using pads 1500 to 2400, wet sanding is employed.  Following this, I dry sand using pads 3200 to 4000 and 6000 to 12000.  I’m amazed at the emergence of very nice grain – a horizontal grain on the fore of the bowl with large swirls of bird’s eye grain occupying the flanks.  Nice! There is no question regarding the next step.  Applying Fiebing’s Dark Brown Leather Dye to the stummel should do a good job of masking the rather large patches on the rim and shank facing.  Another benefit of using dye is to utilize the technique I’ve developed with the use of the Dremel using felt cloth buffing wheels to bring out the grain in striking ways.  I assemble the desktop staining station.After wiping the stummel down with a cotton pad wetted with alcohol to clean the surface, I heat the stummel with the use of a hot air gun.  This step is important as it expands the briar grain as the bowl heats, and this helps the wood to be more receptive to the dye.After the stummel is warmed, I use a folded over pipe cleaner to apply the dye which I’ve poured into a shot glass.  As I paint sections of the stummel with the dye-saturated pipe cleaner, I immediately ‘flame’ the dye with the lit candle.  This immediately combusts the alcohol in the aniline dye leaving behind the hue.  I work over the entire stummel thoroughly by applying dye and firing until the surface is fully covered.  I then put the stummel aside to ‘rest’ for several hours – till tomorrow in this case.  This ‘resting’ helps the dye to set more securely in the briar with less chance of the dye coming off on the hands of the new steward who fires the pipe up for the inauguration.
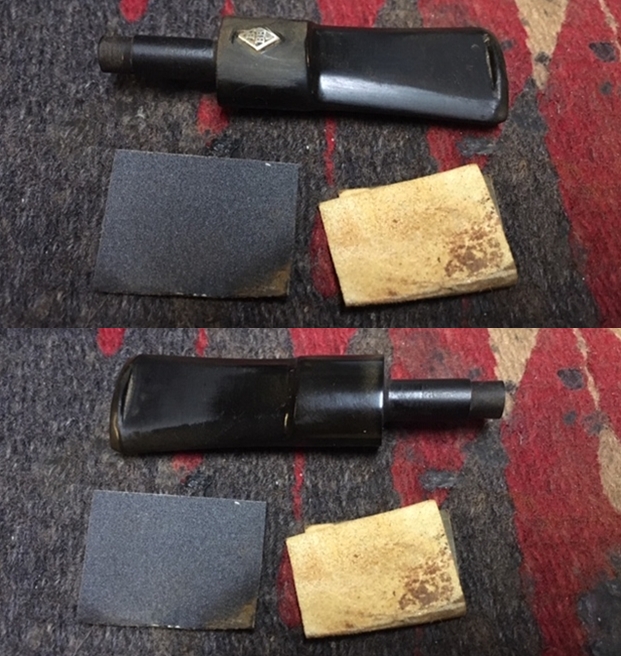
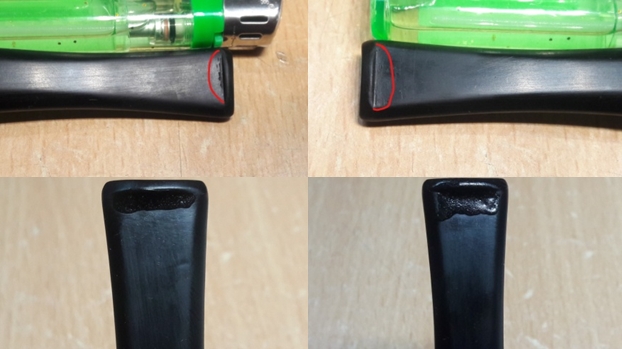
With the newly stained bowl ‘resting’ I turn to the stem.  I take a closer look at the upper and lower bit.  There are bite compressions on both sides that need to be addressed.
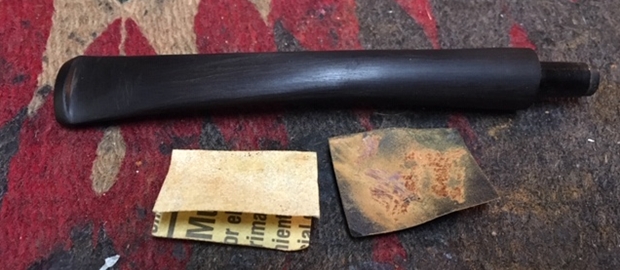
I first use the heating method.  Using a Bic lighter, I paint the upper and lower bit with flame to heat the vulcanite.  As the vulcanite heats it expands and hopefully the compressions will expand to the original condition – or closer to it.  The flame method did help but the compressions are still visible but lessened.Next, I utilize a flat needle file to freshen the button and with 240 paper sand out the compressions.Following the 240 sanding, with the help of a plastic disk to prevent shouldering, I wet sand the entire stem with 600 grade paper and follow with 000 grade steel wool.
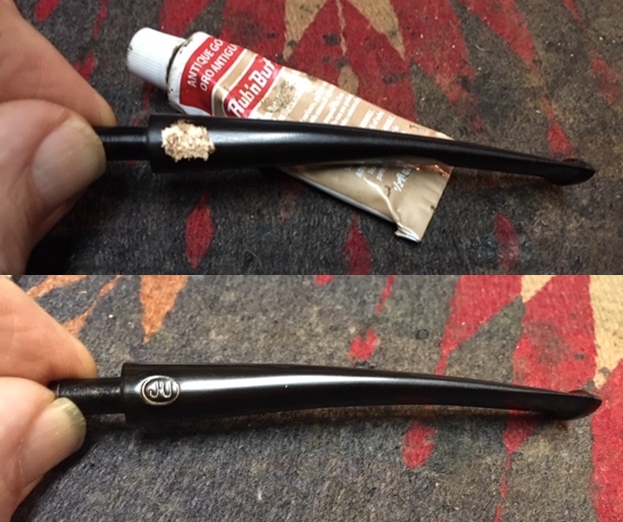
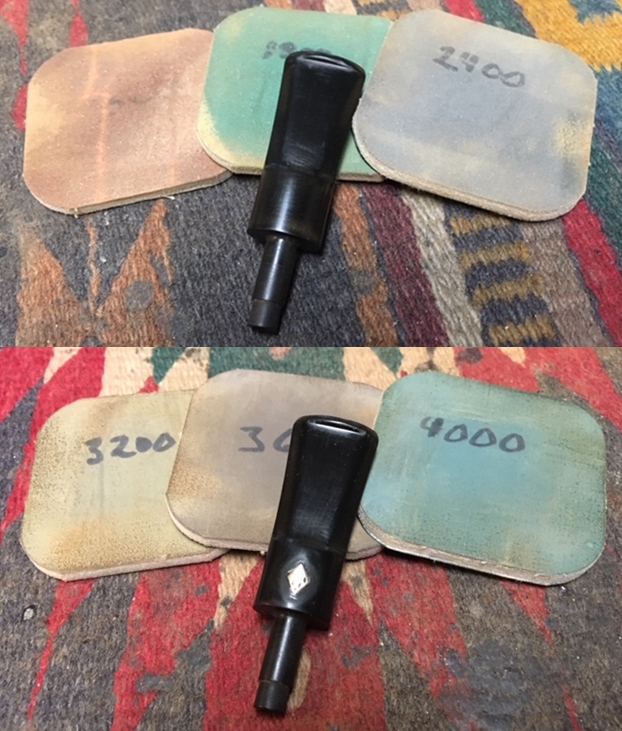
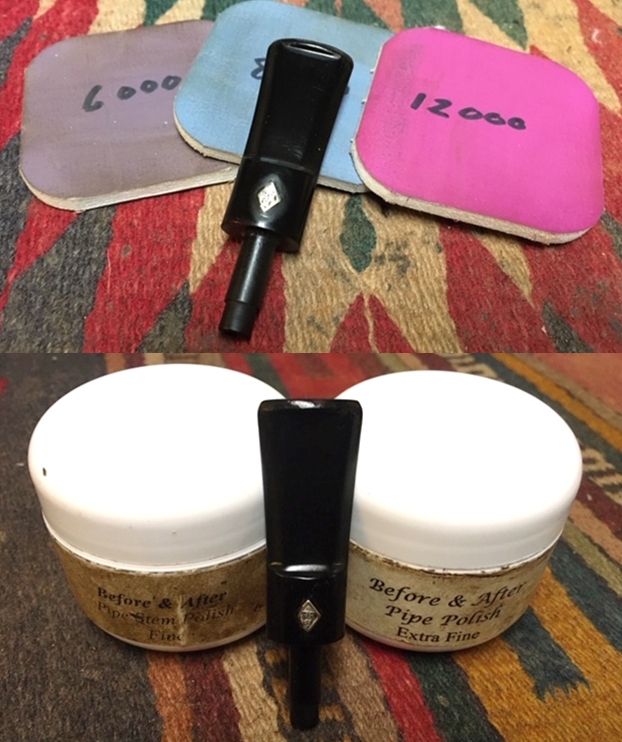
Next, the full set of nine micromesh pads are used.  With pads 1500 to 2400, wet sanding is applied.  Then dry sanding with pads 3200 to 4000 and 6000 to 12000.  Between each set of 3 pads, Obsidian Oil is applied to rejuvenate the vulcanite.  I like the pop of newly micromeshed stems! The morning has come, and the dye has set in the grain of the Comoy’s The Lumberman.  Time to ‘unwrap’ the crusted shell that now encases the pipe.  To do this, a felt cloth buffing wheel is mounted on the Dremel with the speed reduced to the lowest.  The decreases the heating factor of the rougher felt material. To unwrap I use Tripoli compound applying it with the felt wheel methodically over the stummel surface. The felt buffing wheel needs purging often to remove the ‘crust’ buildup.  I take a picture to show the unwrapping process which reveals a beautiful grain underneath! – and yes, during the staining and unwrapping process I wear surgical gloves! After completing the stummel proper with the felt wheel, I briefly change to a cotton cloth wheel to reach into the crook of the bowl and shank junction with Tripoli which the felt wheel was not able to reach.After the unwrapping process is completed, a very light wipe with a cotton pad wetted with alcohol helps to blend the newly stained surface.  With the aniline dye, if I wanted to lighten the finish, I could have applied more wiping.  This I do not do because I’m liking the dark brown finish very much and how well it is masking the repairs!With the Tripoli completed, another cotton cloth buffing wheel is mounted onto the Dremel, the speed is increased to about 40% full power, and after reuniting the Canadian stem and stummel, Blue Diamond compound is applied to the entire pipe.To clean the surface of leftover compound dust, which tends to cake up, I give the pipe a buffing with a felt cloth preparing the surface for the application of wax.
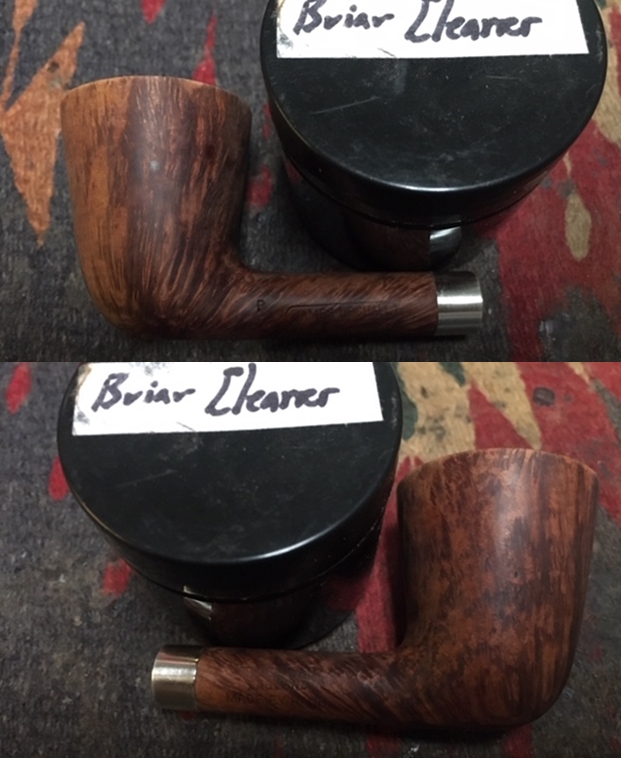
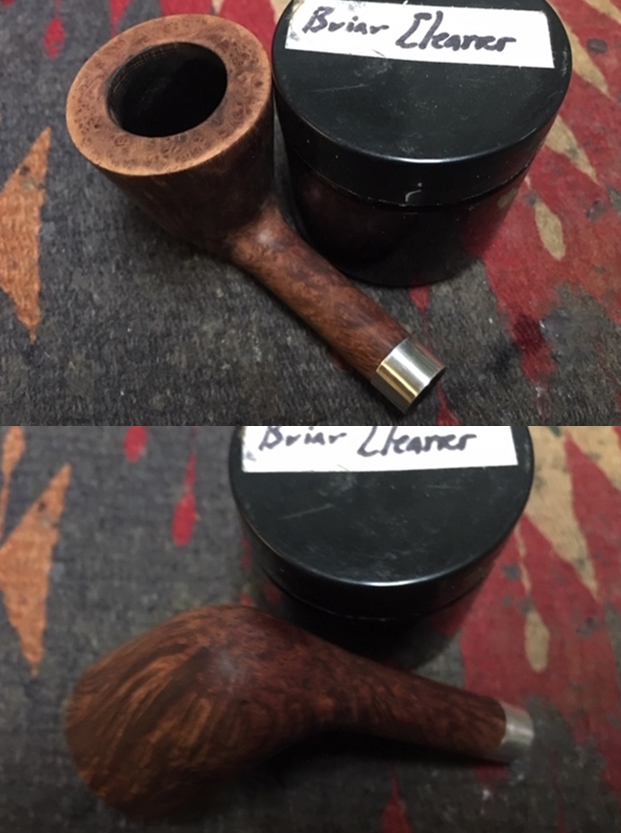
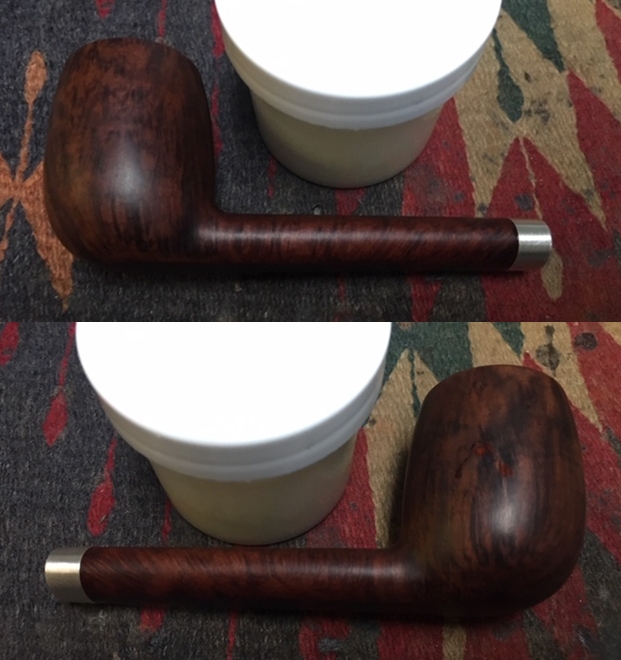
After replacing the cotton buffing wheel used for applying Blue Diamond, another is mounted dedicated to the application of carnauba wax.  With the speed remaining the same at about 40% full power, carnauba wax is applied to both stem and stummel.  After completed, using a microfiber cloth, the shine is raised through a rigorous buffing.
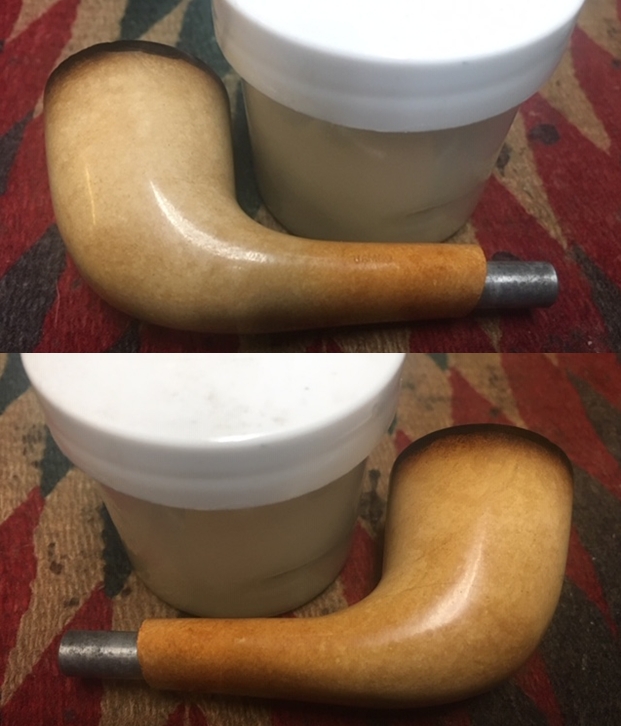
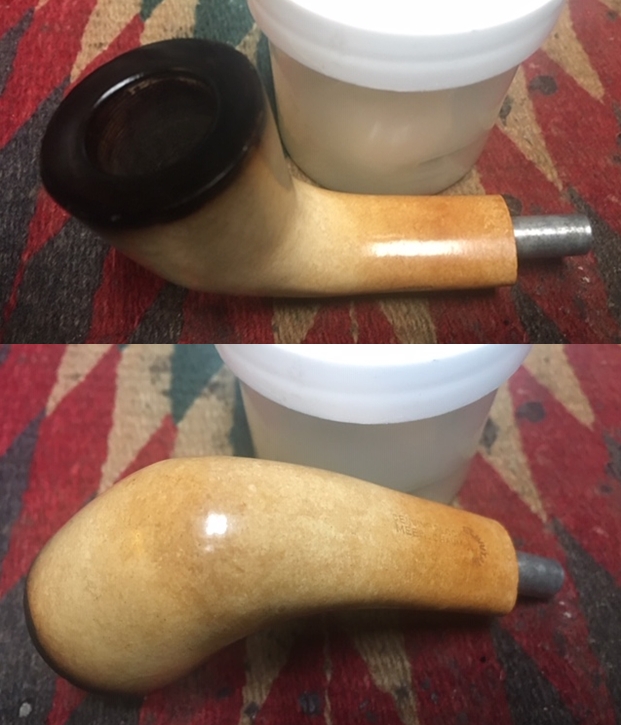
One more step and this Comoy’s The Lumberman Special will be completed.  To provide a ‘cake-starter’ for the new chamber and to provide a buffer for the patch repair work, which is on the upper rim level, a layer of a mixture of natural, non-flavored Bulgarian yogurt and charcoal dust does the job.  This mixture hardens like a rock providing a surface to start a new protective layer of carbon cake.  The thickness of this cake should be no more than the thickness of a US dime to provide optimal performance.  After placing a dollop of yogurt in a small Chinese rice cup, some charcoal dust is added until it thickens somewhat – not running off the pipe nail.  After pushing a pipe cleaner through the draft hole to protect it from being blocked, using the pipe nail as a trowel, I very carefully apply the mixture evenly over the chamber walls – avoiding drippage on the freshly waxed external surface!  It looks good! 
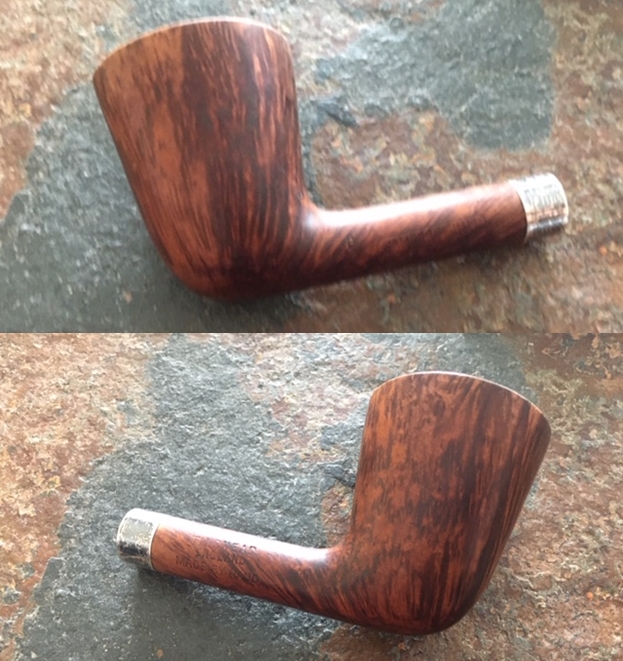
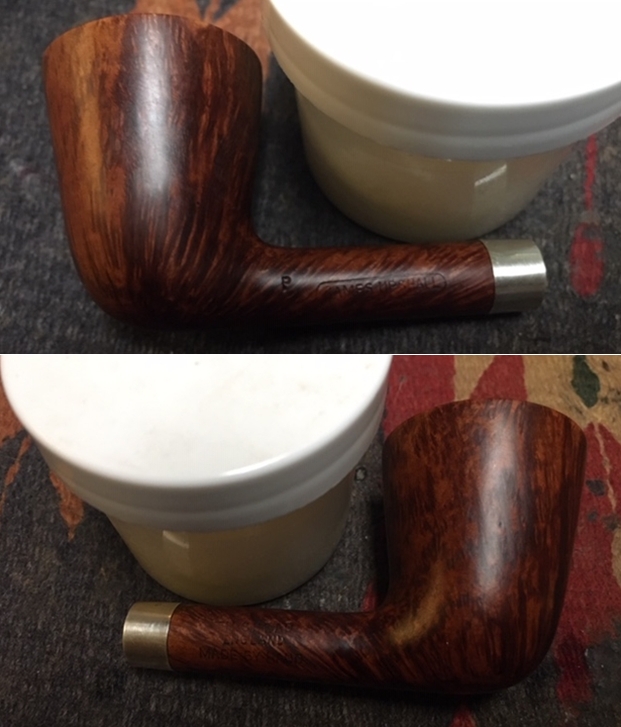
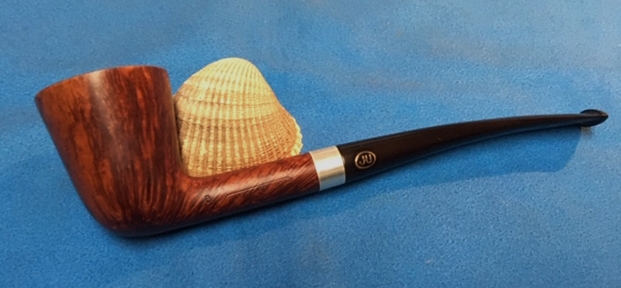
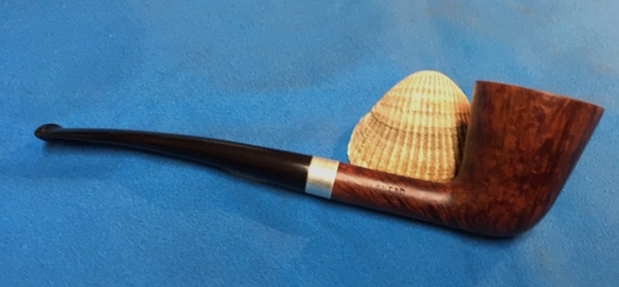
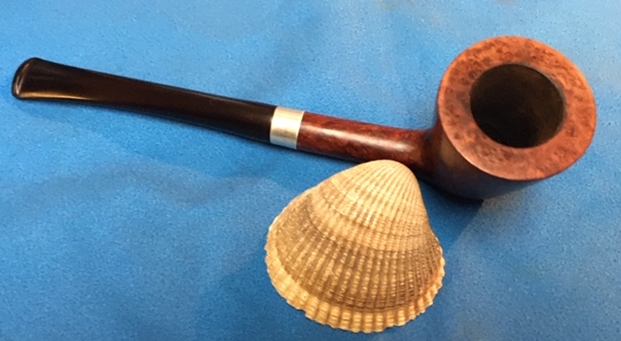
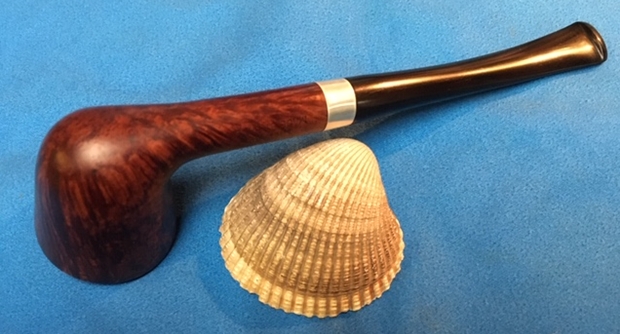
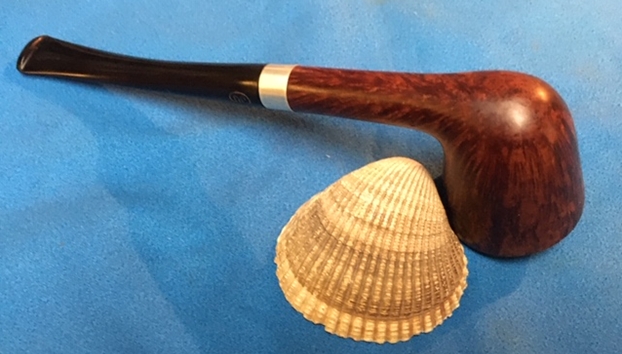
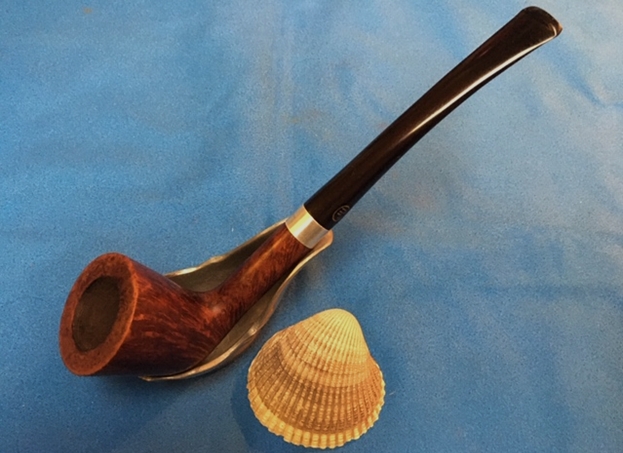
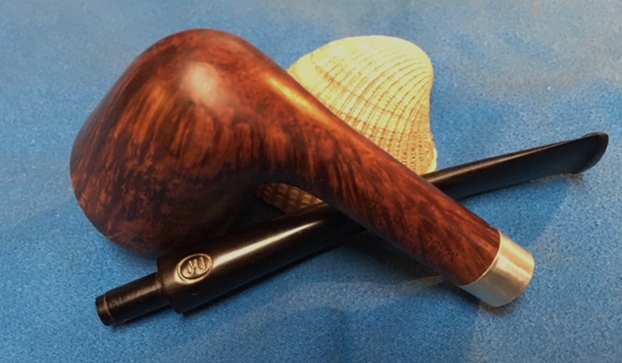
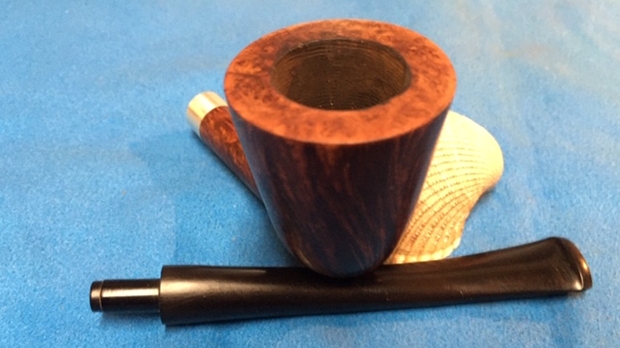
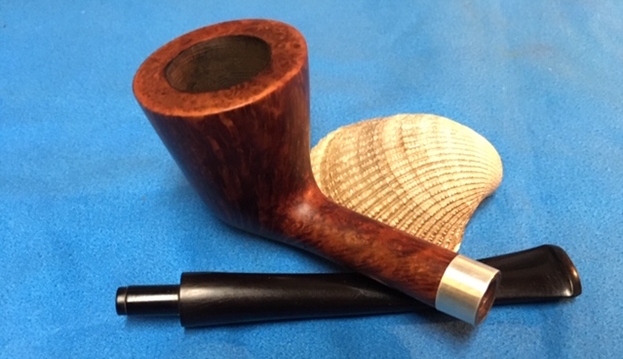
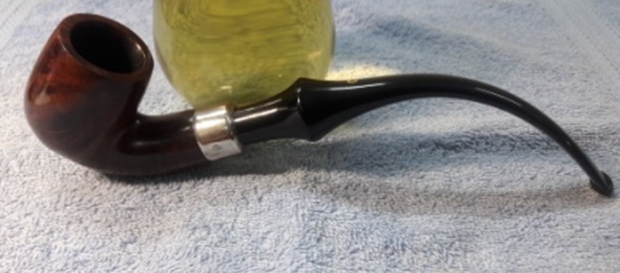
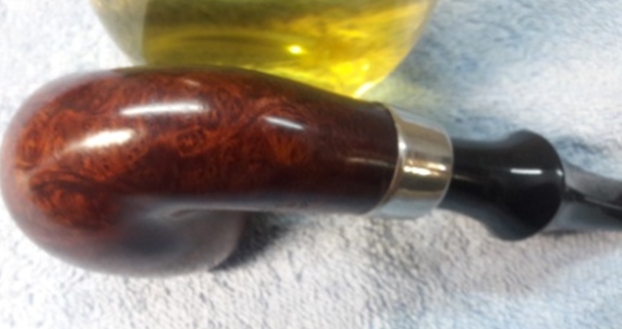
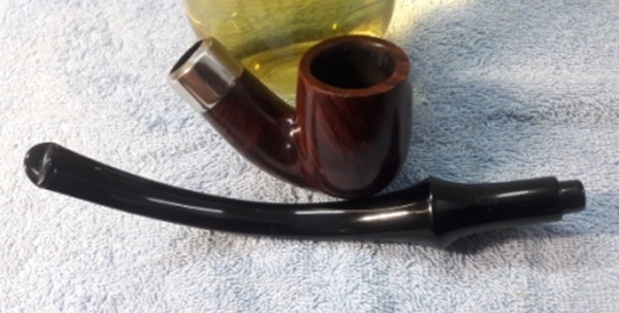
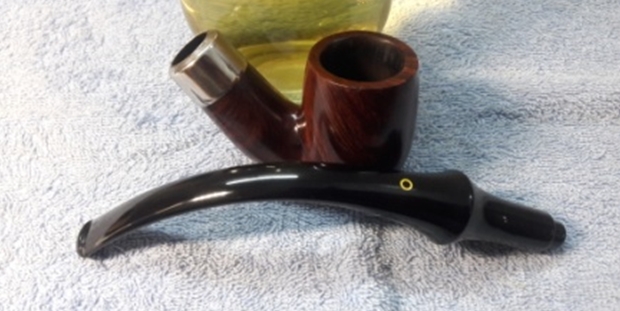
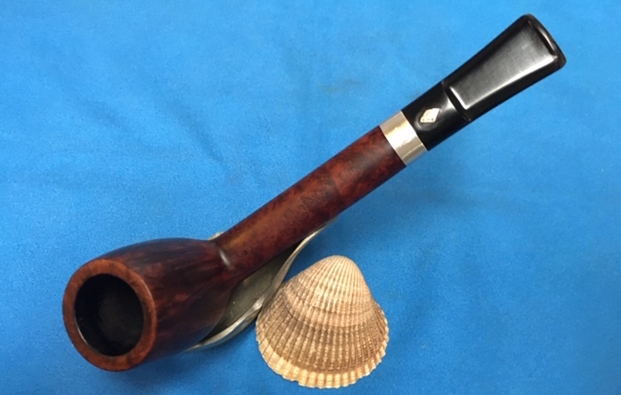
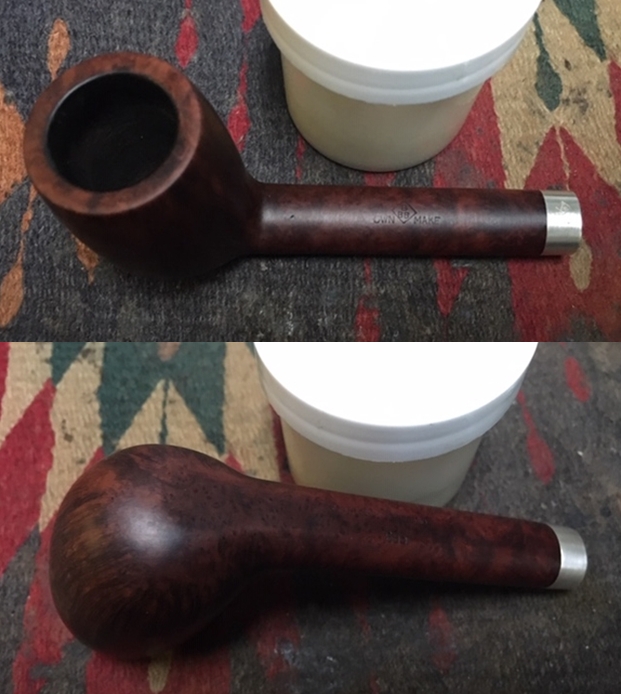
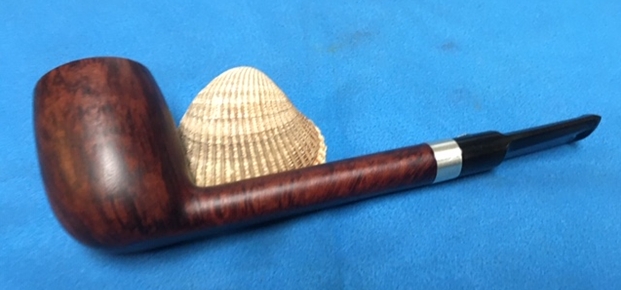
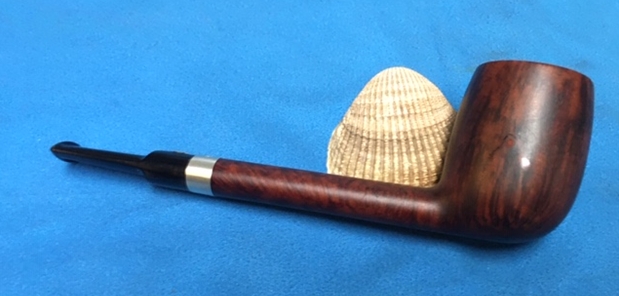
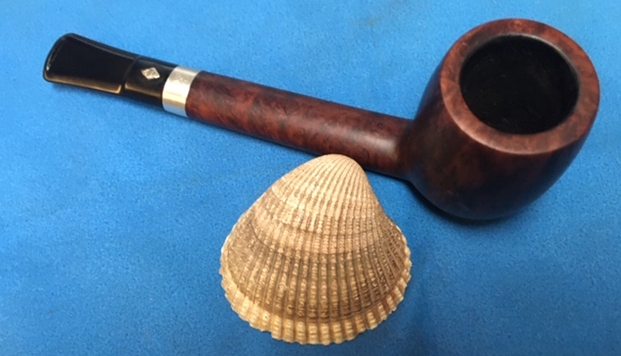
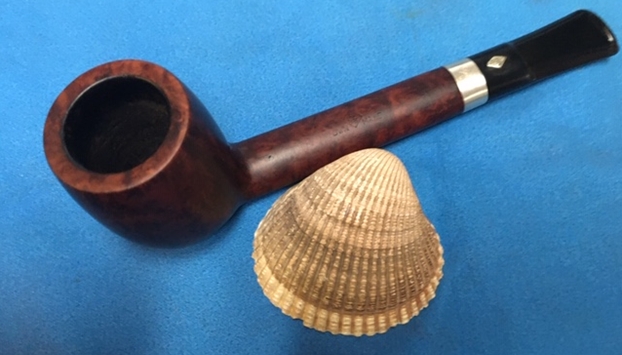
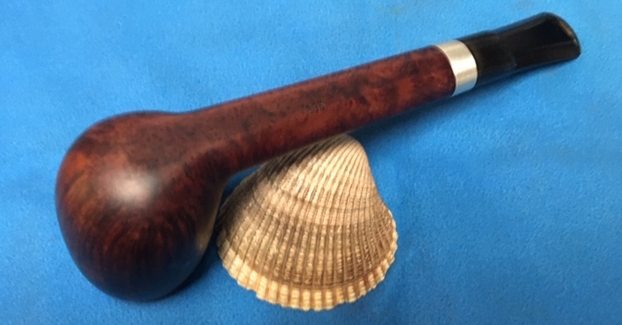
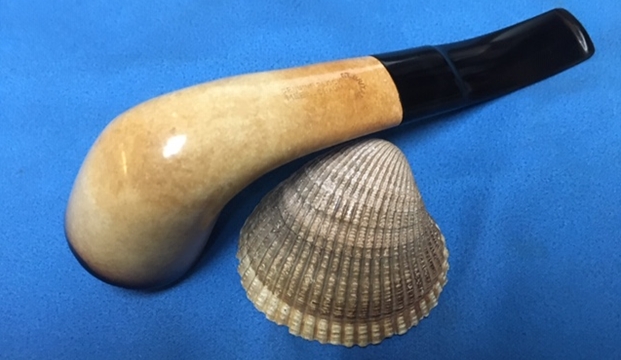
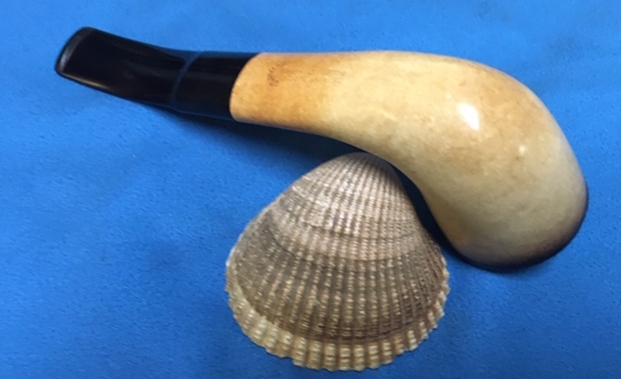
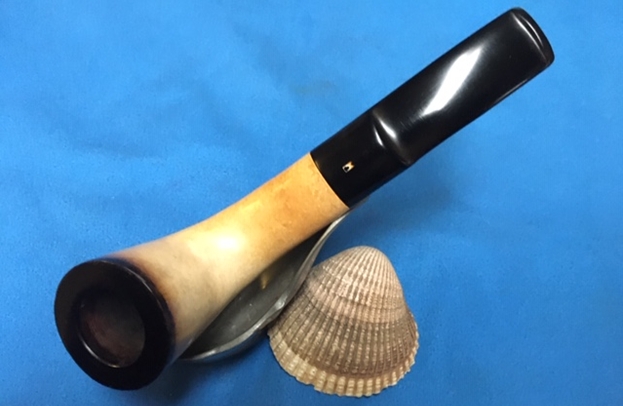
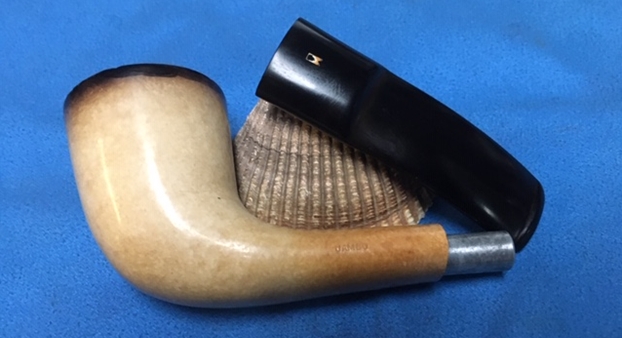
I am amazed.  I initially described this sorry pipe as a Nightmare without any expectations that it could again be described as hedging on pristine.  Yet, that is exactly what I am seeing – a very attractive Comoy’s The Lumberman Special Canadian.  What are also amazing to witness, even if I’m watching the work of my own hands, are the step by step logical, mechanical and artistic processes woven together toward certain micro outcomes resulting in a restored pipe.  Yet, this pipe wasn’t restored, but resurrected to be sure.  The rim repair, both with the fills and the reconstruction of a round presentation, is satisfying to behold. The grain now revealed from underneath the grime and years of use is striking.  Jim commissioned the ‘Nightmare’ from the ‘For “Pipe Dreamers” ONLY! collection and that itself was pretty amazing that he could see the potential.  As the commissioner, Jim will have the first opportunity to claim the Comoy’s The Lumberman Special from The Pipe Steward Store benefiting the Daughters of Bulgaria – women and girls who have been trafficked and sexually exploited.  Lest we forget, I start with a few ‘before’ pictures. Thanks for joining me!


Redeeming a James Upshall P Grade Silver Banded Dublin


Blog by Steve Laug

Over the past two weeks I was traveling in Alberta with my brother Jeff and his wife, Sherry. In between work appointments and presentations we took some time to visit local antique shops and malls. We found quite a few pipes. In a small Antique Shop in Lethbridge we found a few interesting pipes. The third of the pipes that I have chosen to work on from that find is a beautifully straight grained Dublin. The taper stem has a JU in an oval stamped logo on the left side. The pipe was dirty and caked when we picked it up. The rim top had a little lava and some small scratches in the edges of the bowl. The bowl had a thick cake in it that was hard and dense. The exterior of the bowl and shank are very dirty with grime and oils from prolonged use. It was also dull and lifeless. The stamping on the left side of the shank was readable and read James Upshall in an oval. To the left of that stamping there was an upper case “P” grade stamp. On the right side of the shank it is stamped Tilshead over England over Made by Hand. The vulcanite stem was had tooth chatter and tooth marks on the top and the underside near the button. I took photos of the pipe before I started the cleanup. I took close up photos of the bowl and rim to capture the condition of the pipe before I started my cleanup work. The rim top had some lava build up on the edge and there were some small nicks on the inner edge. There was a thick cake in the bowl. Other than being so dirty it appeared to be in great condition. The silver band on the shank is tarnished. The stem was dirty and there was tooth chatter on the top and underside near the button and on the button surface itself. The stem was lightly oxidized.I took a photo to capture the stamping on the left side of the shank. The photo shows the stamping “P” followed by James Upshall in an oval. The stamping on the right side says Tilshead over England over Made by Hand.  The third photo below shows the JU Oval stamp on the left side of the stem.I wanted to educate myself about the Upshall brand so I turned first to one of my go to sites – Pipephil (http://www.pipephil.eu/logos/en/logo-j1.html). I have included a screen capture of the section on the site about Upshall pipes. The pipe I am working on it stamped exactly like the first one in the photo that follows.I turned then to Pipedia to garner some more details about the brand and Barry Jones I have included the link and various sections from that article (https://pipedia.org/wiki/James_Upshall). I quote:

…All our pipes are individually created by a team of highly skilled artisans, headed by Mr. Barry Jones, who is widely regarded as one of the best pipe carvers in the world, with more than 50 years experience in pipe making.

Mr. Jones learned his skill from the age of 15 in London and was personally guided by Mr. Charatan of Charatan Pipe Co., pipe makers to royalty since 1863. For years he was responsible for creating the majority of the famous Charatan shapes and the high standard of quality…

I quote from further down in the article:

…James Upshall gives a unique guarantee on each pipe leaving the workshop. No pipe bearing the name of James Upshall is marred by fillings and putty. Scarcity of good quality plateau briar and the time consumed turning by hand, limit our production, but we will always strive to fulfill the growing demand for James Upshall, quality and tradition at its best…

…As always the James Upshall pipe has been sold in the most prestigious outlets around the world and has been greatly appreciated by royalty, lords and celebrities alike. King Hussein of Jordan, Anwar Sadat, Bing Crosby, Yul Brynner and more recently Arnold Schwarzenegger, Robert Wagner and Tom Selleck to name but a few of the famous names who have helped to cement James Upshalls’ reputation as the Rolls Royce of Pipes.

Further down in the article there is a section on Grading and Sizing of James Upshall Pipes. I have quoted that entire section below. It helps to place the “P” grade stamp on the pipe that I am working. The information comes directly from the James Upshall website.

Grading & Sizing Information

James Upshall pipes are graded by various finishes, i.e. bark, sandblast, black dress and smooth etc. Then by cross grain, flame grain, straight grain and, last but not least, the perfect high grade, which consists of dense straight grain to the bowl and shank. The latter being extremely rare. In addition, the price varies according to group size, i.e. from 3-4-5-6 cm high approximately Extra Large. We also have the Empire Series which are basically the giant size, individually hand crafted pipes which come in all finishes and categories of grain. All our pipes are individually hand carved from the highest quality, naturally dried Greek briar. In order to simplify our grading system, let me divide our pipes into 4 basic categories.

  • It begins with the Tilshead pipe, which smokes every bit as good as the James Upshall but has a slight imperfection in the briar. In the same category price wise you will find the James Upshall Bark and Sandblast finish pipes, which fill and smoke as well as the high grades.
  • In this category we have the best “root quality” which means that the grain is either cross, flame or straight, which is very much apparent through the transparent differing color finishes. This group will qualify as the “S”- Mahogany Red, “A” – Chestnut Tan and “P” – Walnut. The latter having the straighter grain.
  • Here you have only straight grain, high grade pipes, which run from the “B”, “G”, “E”, “X” and “XX”. The latter will be the supreme high grade. Considering the straightness of the grain the latter category is also the rarest. Usually no more than 1% of the production will qualify.
  • Lastly, we have the Empire Series. These are basically Limited Edition gigantic individually hand crafted pieces, which again are extremely rare due to the scarcity of large, superior briar blocks.

We also offer a selection of finely engineered silver and gold banding for pipes. Bands are available in silver, 9ct and 18ct gold, the width can be 6mm or 10mm and they can be fitted flush or on the surface. Bands are finished in plain, engine turned with barley or line patterns and also in gold with large hallmarks.

I am also including a copy of an article from the Pipedia site about the brand and the maker provided by Doug Valitchka (https://pipedia.org/wiki/File:James_Upshall.jpg).

Barry Jones in the photo, and an interesting article, courtesy Doug Valitchka

While we were traveling I decided to do a bit of work on some of the pipes that we had found. This was the third one that I worked on. I scraped the inside of the bowl with a sharp knife. I scraped the tars and lava off the top of the rim with the same knife. I scrubbed the exterior of the bowl with warm water and Dawn Dish Soap to remove the buildup of tars and grime around the bowl and on the rim top. I rinsed it well and wiped the bowl down with a clean paper towel to polish the finish on the bowl. The pictures that follow show the condition of the pipe after it had been scrubbed. When I got it home I would scrub the exterior and the interior some more. When I returned from my trip I cleaned the tarnished silver with silver polish and a jeweler’s cloth. I wanted to get it cleaned off to see if there were any stampings on the silver. It was stamped STERLING on top of the band which correlates to the not in the article from Pipedia where Upshall used Sterling Silver bands on some of their pipes.I followed up on my initial cleaning of the bowl and shank. I reamed the bowl with a Savinelli Fitsall pipe knife to remove the remnants of the cake in the bowl. I sanded the bowl with 220 grit sandpaper wrapped around a piece of dowel to smooth out the inside walls of the bowl.I scrubbed out the mortise and the airway in the shank, the metal mortise and the stem with alcohol, cotton swabs and pipe cleaners.I polished the briar with micromesh sanding pads – wet sanding the bowl walls and rim top with 1500-12000 grit pads. I wiped the bowl down after each sanding pad with a damp cloth to wipe of the dust. I scrubbed the bowl down with Mark Hoover’s Before & After Briar Cleaner. I rubbed it into the surface of the briar, and as Mark wrote me it lifted the grime and dirt out of the briar. I rinsed the cleaner off the bowl with warm running water and dried it with a soft cloth. The photos below show the cleaned briar… Look at the grain on that pipe! I worked some Before & After Restoration Balm into the surface of the briar with my fingertips to clean, enliven and protect it. I let the balm sit for a little while and then buffed with a cotton cloth to raise the shine. The photos show the bowl at this point in the restoration process. I set the bowl aside and turned my attention to the stem. I sanded out the tooth chatter with 220 grit sand paper and started to polish it with a folded piece of 400 wet dry sandpaper. Once it was finished it began to shine. I used some Antique Gold Rub’n Buff to restore the stamping on the left side of the stem. I pressed it into the indentations on the stamp with a tooth pick. I set it aside to dry and let it sit for a few minutes. Once it had cured I rubbed it off with a cotton pad and polished it with micromesh sanding pads.I polished the stem with micromesh sanding pads – wet sanding with 1500-12000 grit sanding pads. I wiped it down after each sanding pad with a damp cloth. I polished it with Before & After Pipe Stem Polish – both Fine and Extra Fine and buffed it off with a cotton cloth. This is a beautifully grained Upshall Dublin with a black tapered vulcanite stem. It has a great look and feel. The shape is very tactile and is a beauty. I polished stem and the bowl with Blue Diamond polish on the buffing wheel. I gave the bowl and the stem multiple coats of carnauba wax. I buffed the pipe with a clean buffing pad to raise the shine. I hand buffed it with a microfiber cloth to deepen the shine. The pipe polished up pretty nicely. The grain on the bowl came alive with the buffing. The rich contrasting browns works well with the polished vulcanite stem. The finished pipe has a rich look that is quite catching. Have a look at it with the photos below. The shape, finish and flow of the pipe and stem are very well done. The dimensions are Length: 6 ½ inches, Height: 1 ¾ inches, Outside diameter of the bowl: 1 ½ inches, Chamber diameter: ¾ of an inch. Thanks for walking through the restoration with me as I worked over the next of the finds of Jeff and my Alberta pipe hunt. It is a beautiful straight grain Hand Made Dublin with a Sterling Silver band and vulcanite stem.

An Unexpected Button Rebuild Recommissioning a French Butz Choquin Festival of St Claude 1305


Blog by Dal Stanton

I remember well where I found this very nice looking Butz Choquin Festival.  Living in Bulgaria, I have had the opportunity to visit our neighbor to the south several time – Greece.  We were with a group of interns who were participating in our summer training program in Sofia which included a field trip to visit the ancient city of Athens.  It is an amazing city with the Parthenon towering over the city set atop the acropolis right next to Mars Hill where the Apostle Paul made his historic stand arguing with the Greek philosophers.  Since I had seen these sites several times before, while the group of interns went hiking in that direction, I went in another toward the Ministirski area to do some pipe picking – one of my favorite pastimes!

This area has many secondhand stores and antique shops with hidden treasures that lurk in the most unexpected places – I couldn’t pass up this opportunity!  There happened to be a Flea Market in session near the ancient meat market area and it was there that I found the BC Festival now on my worktable.  I spied a cluster of pipes amidst coins, bracelets and knock-off sunglasses.  The lady vendor had some very nice pipes but the asking prices started too close to the stratosphere and my pocketbook was a bit closer to earth!  I decided to focus my attention on the French BC Festival.  The shape number is 1305 which pointed to the very shapely Bent Billiard I was focused on.  What attracted me was the very full bowl/shank transition continuing to a full stem bending toward the zenith.  It also had a very solid feel in the palm – one of those pipe whisperer moments – “Take me home!” After some serious negotiating, I think I got a good deal and the BC Festival came home with me and has been waiting for a new steward in my online collection, ‘For “Pipe Dreamers” Only!’. This is where a few months later, Michael from Kansas, wrote asking about the BC Festival.  After we communicated a bit, he commissioned the BC and he wrote this:

Sounds good! I saw this post on Facebook in the Gentlemen’s Pipe Club and was interested. I was taken by your work and wanted to know more.  I’m from the states (Kansas to be exact). Smack dab in the middle. Currently it’s 17 degrees out and a nice pipe sounds pretty tasty.  I’m looking forward to seeing this beauty restored.

I appreciated Michael’s words and I also appreciate his patience!  The Butz Choquin Festival he commissioned benefits our work here in Bulgaria with the Daughters of Bulgaria – working with women and girls who have been trafficked and sexually exploited.  The attractive BC is now on my worktable and I take more pictures for a closer look at this Athens find: The nomenclature is stamped on the left flank of the shank and reads in fancy cursive, ‘Butz Choquin’ [over] ‘Festival’.  The right shank side is stamped with a curved ST. CLAUDE [over] FRANCE [over] 1305.  A very thin, ghosted ‘BC’ is stamped on the left side of the stem.I’ve had the opportunity to restore several pipes from the center of French pipe making, St. Claude.  As a refresher, Pipedia provides this information about the origins of Butz Choquin:

Jean-Baptiste Choquin of Metz started out as a tobacconist. This enterprise was prosperous; he had several employees. Among those, there was a certain Gustave Butz who was its first workman and who became his son-in-law by marrying Choquin’s daughter Marie in 1858.  In 1858 Jean-Baptiste Choquin created, in collaboration with Gustave Butz, the Choquin pipe. This bent pipe with a flat-bottomed bowl was finished with an albatross-bone mouthpiece, fixed with silver rings.  In 1858, still in Metz, Gustave Butz built an establishment for the manufacture of the Choquin pipe which took the name of [Butz-Chochin]. In 1951, the Berrod-Regad company bought the trademark, continuing manufacture until 2002. Departing from Metz, the workshop was relocated to Saint-Claude, then also called ‘the world capital of the briar pipe,’ under the Berrod-Regad group. The Berrod-Regad group would go on to completely rebuild the network of representatives until finally entering the export market in 1960 and has since won several prizes, as well as the Gold Cup of French good taste.

In a few years, the brand’s collection increased from ten to seventy series. 135 years after it was founded, the pipe is still well-known not only in France but throughout the world. In 2002, the Berrod family, wishing to preserve manufacture of pipes in Saint-Claude, handed over the company to Fabien Guichon, a native of the area, who will continue to develop the brand during the 21st century.

The condition of the Festival on my worktable is generally good.  The chamber is clean, and I will soon find out whether the cleaning of the chamber is true also of the internals.  The external briar surface appears only to need a sprucing up, but with a closer look, I find several pockets and dents over the surface.  This will require some work to fill the pockets and to try raising the dents. I take a few pictures to show these challenges. The grain is very nice and expressive – this guy will clean up nicely.  The stem shows some oxidation and the bit has distinct biting compressions on the upper and lower bit.  This will be addressed. To begin the recommissioning this commissioned Butz-Choquin Festival, I address the oxidation issues of the stem using Before & After Deoxidizer.  I clean several stems of other pipes in the queue at the same time.  To preserve the Deoxidizer solution, I first run pipe cleaners wetted with isopropyl 95% through the stem’s airway to clean it.  Unfortunately, when I inserted a pipe cleaner into the BC’s airway, I discover it is blocked.  By measuring the pipe cleaners’ progress, the blockage is toward the button.  I try blowing through the airway and it is rock-solid blocked.  Since, I’m in the conveyer line of cleaning, I move forward with the deoxidation process first.After soaking in the B&A Deoxidizer for several hours, I fish out the BC’s stem and wipe it down to remove raised oxidation with cotton pads wetted with isopropyl 95%. I apply paraffin oil to begin rejuvenating the vulcanite stem and I set it aside to absorb.Before moving on, I need to figure out how to clear the airway of the blockage.  From the button, the blockage begins about 1/2 inch from the end of the stem.  When reaching with a pipe cleaner from the tenon side and measuring, the blockage appears to be about a 1/4 inch of blockage. I use the straightest dental probes I have and reach into the stem airway to extract the blockage.  The dental probes both have spurs on the topside of the metal points which prove useful in hooking and pulling out debris. What I start pulling out with the probes appears to be paper, of course shredded at this point.  I have no idea how paper would be lodged in the stem.  This method has some success, but soon the probes’ effectiveness is nullified by the bend in the stem. After some time of using the probe and realizing diminishing returns, I decide to straighten the stem to reduce the pressure in the bend.  I heated the stem with the hot air gun to do this.  As the vulcanite heats, I’m able to unbend the stem.  What I forgot to picture was the use of a drill bit that fit into the airway from the mortise side.  As I heat the vulcanite and as it unbent, I wedged the drill bit further into the airway.  I did this to keep the airway straight and it works well.  The downside was that the drill bit was not long enough to do the full job.With the stem straightened, I’m able to continue with some success the use of the dental probes. I use a long stiff wire to push from the tenon side, and then dig more with the dental probes from the button side.  The progress is slow.Progress was slow but unfortunately, overzealousness reaching with the dental probe cracked the button.  Ugh!  What I failed to do is to take into consideration the gradually expanding shaft of the probe that pushed outwardly on the slot and the rest is history.  Doing repairs on a pipe one is restoring is one thing.  Creating more problems for a restoration is not what we aim for!  I take a few closeups of the cracks – not a pretty picture!  I decide to continue carefully digging out the blockage.  Eventually, the paper, or whatever, is extricated and I’m able to run a pipe cleaner through.  This took a lot of time and unfortunately, friendly fire damage to the button to open the airway must now be addressed.I proceed with the stem repairs.  Before addressing the button damage – cracks and bite compressions, I re-bend the stem to restore it to the original profile.  Again, after placing a pipe cleaner through the stem to protect the airway integrity, I heat the vulcanite stem with the hot air gun, but I first focus on heating and bending the thicker section of the stem.  If I heat the whole stem at once to make one bend, the thinner part of the stem, toward the button, will accept the bend much easier and this will create a more severe end bend appearance rather than a gentle curve throughout. When the thicker portion of the stem becomes supple and willing to be shaped, I place it over a miniature cue ball #15 and gently shape the fat part of the stem.   I hold it in position over the ball for a few minutes allowing the vulcanite to cool and firm its position.  Then, holding the bend in place I take it to the sink to cool the rubber further under cool tap water.   I forgot to picture the current state of the stem’s orientation, but in the picture below you can see that the end of the stem is still shooting out straight without any bend.With the fat part of the stem’s bend solidified, I then take the stem back to the hot air gun heating the thinner section which softens much more rapidly.  When supple, I again take it to #15 and finish the bend.  My aim is to have the end of the stem’s trajectory parallel with the plane of the rim.  The finished bend looks good.  I move on.Now, I take another close look at the cracks and button biting problems.  Normally, at this point I would attempt to raise and expand the compressed vulcanite using the flame method – painting the vulcanite with the flame of a Bic lighter.  With the cracks, and a desire to salvage the stem as it is without the whole button cracking off, I also want to apply CA glue to weld the cracks together.  The question in my mind is concerning the composition of the CA glue.  If I apply CA glue now, before applying the heating method, will the composition of the CA glue be a problem if I then heat it?  If I use the flame first and then glue it, will the ‘new’ contour of the bit hinder gluing cleanly…  Or, should I forgo using the flame method?  Questions….Using regular clear CA glue, I apply a line of glue over the cracks.  I stress flex the cracked button a small amount allowing the thinner glue to seep into the cracks more efficiently.  My hope is that this will form a solid weld.After the clear CA glue cures, I go to work on the upper button repair.  I use a flat needle file to redefine the button lip and follow by sanding with 240 grade paper.  The crack is still visible at this point, but the repair appears to be solid.Flipping over to the lower bit, it has serious bite compressions and the button lip has been chewed.  I take a starting picture before using the flame technique to raise the compressed vulcanite.  I use a Bic lighter to paint the area with flame and as the vulcanite heats it expands and reclaims the original position of the stem – or at least in theory.After painting with the flame, there isn’t a substantive change in the compressions.  Using a medium thick black CA glue, I apply glue to the bit filling the compressed areas.  I also apply the glue to the button lip edge and put the stem aside for the glue to cure.With so much attention drawn to the challenges of the stem – obstruction, cracked button to repair and compressions, it’s been awhile since the stummel was in view.  Returning now to the regular rhythm of the restoration, with the stem put to the side, I now turn to cleaning the stummel.  There is no cake build up in the chamber and to clean the briar I use a piece of 240 grade sanding paper wrapped around a Sharpie Pen and sand the chamber.Next, using undiluted Murphy’s Oil Soap, I scrub the stummel using cotton pads.  The gunk on the rim comes off easily.  Then, taking the stummel to the sink, I rinse it with warm tap water.  Continuing the cleaning in the mortise and airway, I use shank brushes with a bit of anti-oil dish soap and scrub the internals.  After a thorough rinsing, I bring the stummel back to the worktable.I continue the internal cleaning using pipe cleaners, cotton buds dipped in isopropyl 95%.  A dental spoon assists in scraping oils and tar build-up off the sides of the mortise.  After some effort, the pipe cleaners and buds start to lighten, and I call it clean for now.  I’ll continue later with a kosher salt and alcohol soak to clean further.Looking at the external briar surface, I identified earlier a couple pits that need filling.  I use a dental probe to clean out the pits before filling. After wiping the surface with alcohol to clean, I go to work mixing briar dust and BSI Extra Thick CA Glue.  I do the mixing on an index card after covering a patch with scotch tape.  I use the tape to keep the moisture of the glue from being absorbed into the card stock. After putting a small mound of briar dust on the tape, I add a small puddle of CA glue next to it.  Using the toothpick as my stirrer and trowel, I pull small amounts of the briar dust into the puddle and stir with the toothpick as I go.  After the putty begins to thicken – about the consistency of molasses, I trowel the putty with the toothpick to fill the pits. The end of the toothpick is used to knead the putty before it begins to harden which hopefully minimizes air bubbles from being trapped.   I put the stummel aside for some hours for the putty patches to cure. The black CA glue filling the lower bit tooth compressions has cured.Using a flat needle file, I file carefully and gently remove the excess patch material and to form the button lip.After the file brings the patch material down to the stem surface, I sand using 240 grade paper to remove more patch material and to smooth.  I like the results.There are ripple marks in the vulcanite on the lower side at the bend.  These ripples developed when I re-bent the stem after clearing the airway obstruction.  I expand the sanding to smooth this area as well as the upper side of the stem. First, 240 grade paper is employed then following with 470 grade over the entire stem. Finally, I wet sand the stem using 600 grade paper.  Throughout the sanding process, I’ve avoided sanding the ‘BC’ stamping on the stem, which is already ghosting.  I follow the 600 grade paper with 0000 steel wool over the entire stem.  The repairs on the upper and lower bit are looking good.  I’m hopeful!The slot is rough.  A pointed, rounded needle file does a good job smoothing the slot edges.  Following the file, 240 grade paper finishes the edges well.The briar putty filling the pits on the stummel have cured.  Before sanding these, earlier, along with the pits, one dent was detected on the fore of the stummel.  I take another look at it before powering my wife’s iron.  Wood is porous and has sponge-like characteristics when exposed to heat and moisture.  To draw out the dent, I use the heat of the iron while pressing it on a wetted cloth against the dent – I use a cotton handkerchief, to ‘steam’ the dent.  I have been amazed how this has helped with previous restorations.  I take a close-up to show the dent with the help of the arrows.  I’ll use this picture to compare with the ‘after’ steaming picture. The procedure worked. The dent is gone as hoped!  Moving on.Next, using a flat needle file and following with 240 grade sanding paper, I go to work removing the excess briar putty on the 3 patches.  For each, I first apply the file over the patches by filing them down very close to the briar surface without slipping off the patches and causing collateral damage to the surrounding briar.  I then use 240 paper to bring the patch flush with the briar surface.  The pictures show the progress with each patch. The rim cleaned up nicely before but a residual ring of darkened briar on the internal edge of the rim from mild charring.Using 240 sanding paper, I gently sand the rim and I go with the slight internal beveling to remove the darkened briar.  I follow the 240 sanding with a quick 600 grit sanding.  The results look good.  The sanding does not impact the patina.To clean the briar surface further of minor nicks and scratching, I employ 3 sanding sponges – coarse, medium and light grade sponges.  I like using sanding sponges as they are gentler and are not as invasive as regular sanding papers.  After using each in succession, the briar surface looks good and the grain is emerging with nice bird’s eye patterns.From the sanding sponges, the full regimen of 9 micromesh pads is used by first wet sanding with pads 1500 to 2400 and then dry sanding with pads 3200 to 4000 and 6000 to 12000.  The pictures show the progression. Before proceeding further with the external briar surface conditioning, the internal cleaning is continued using the kosher salt and alcohol soak.  This not only cleans the internal briar more but freshens the pipe for the new steward.  Using a cotton ball, I pull and twist the cotton to form a wick to insert into the mortise and airway.  This ‘wick’ serves to draw the oils and tars out of the internal walls.I use a stiff piece of hanger wire to help guide the wick down through the airway. After the wick is in place, I fill the bowl with kosher salt which has no after taste and place the stummel in an egg carton for stability.  Next, using a large eye dropper, the bowl is filled with isopropyl 95% until it surfaces over the salt.  After a few minutes when the alcohol has been absorbed, the bowl is topped off once more.  I put the stummel aside for several hours allowing the soak to do its thing.With the stummel on the sidelines, attention is turned to the stem to apply the full regimen of micromesh pads.  Before starting, to guard against over-zealousness in sanding, a small piece of masking tape is cut and covers the ghosted ‘BC’ stem stamping.  The Butz Choquin stamp is on its last legs and I do not wish to add to its deteriorated condition!  Next, using pads 1500 to 2400, I wet sand the stem.  Following this, using pads 3200 to 4000 and 6000 to 12000, I dry sand.  Between each set of three pads Obsidian Oil is applied to the stem which aids in rejuvenating the vulcanite. After several hours, the kosher salt and alcohol soak resulted in soiled salt and wick.  I toss the expended salt in the waste and wipe the chamber with a paper towel as well as blow through the mortise to remove salt crystals.  To make sure the internals are clean, I run a few more cotton buds and pipe cleaners wetted with isopropyl 95% through the mortise and airway and all looks good.  Moving on.Next, with the cleaning complete, Before & After Restoration Balm is applied to the stummel by putting some on my fingers and rubbing it in to the briar surface.  I like the Balm because it brings out the subtle hues of the natural briar.  The Balm begins with a cream-like consistency and gradually thickens as it is massaged into the briar.  After applying the Balm, the stummel is set aside for about 15 or 20 minutes while the Balm is absorbed.  I take a picture during this state.  Following this, using a cloth I wipe the excess Balm away and buff the stummel with a microfiber cloth.  With the B&A Restoration process completed, I reunite Butz Choquin Festival stem and stummel and after mounting a cotton cloth buffing wheel on the Dremel, setting speed at 40% of full power, I apply Blue Diamond compound to the pipe.  When I finish, using a felt cloth I buff the pipe to remove the compound dust before applying the wax.  After applying the Blue Diamond, I take a closer look at the stem repair on the button and I’m not satisfied with what I’m seeing.  The button lip where the crack was repaired is not smooth.  I use a dental probe to test the seam of the repair and the piece of the button I tried to salvage pops off.  Well, the button repair was not successful and I’m glad that I discover this before shipping it off to a new steward!  I take a picture to show the break and new challenge.My second approach to repairing this button will be to mix activated charcoal and Extra Thick CA glue to form a patch material.  I first clean the area with alcohol then form an insert made from index card stock.  I form a cone with a pipe cleaner inserted through it.  The end of the cone is covered with scotch tape and I coat it with a small amount of petroleum jelly to prevent sticking with the CA glue.  The cone inserts into the open slot with the pipe cleaner in the airway.Next, I mix activated charcoal and Extra Thick CA glue.  I first cover a piece of index card with scotch tape so that the glue is not absorbed into the card stock.  After putting a small mound of charcoal on the card, I then put a small puddle of CA glue next to the charcoal.  Using a toothpick, I pull charcoal dust into the glue and mix as I go.  To thicken the patch material, I draw more charcoal into the mixture.  When it is about the thickness of molasses, I trowel the patch material with the toothpick and apply it to the bit. I fill the slot cavity and cover the entire button lip.  I do this to provide the foundation for filing and shaping a new button.  After applying the patch material, I set the stem aside, turn out the light and leave it to cure through the night.The next morning, with a little jiggling, the card stock wedge comes out of the slot.The view toward the ‘raw’ end of the stem.Using a flat needle file, the excess is first removed from the end of the stem and then the file is used to shape the rebuilt button.  The change in the work surface reveals that I’m enjoying a sunny day on our 10th floor balcony which I call my ‘Man Cave’.  First a picture of me enjoying a bowl while I work!  After filing to shape the button and slot, I use 240 grade paper to smooth further and remove excess patch material.After the 240 paper, I use in succession, 470, 600 and 000 steel wool to work on the surface. As I sand and smooth the area, the pits emerge which is irritating! I continue to try to figure out how to minimize the air pockets that always emerge after using the CA glue and activated charcoal patch pictured below. To remedy this, I use a regular, thin CA glue to fill the pits by painting the area with a thin film of glue using a toothpick.  After applying the CA glue, I put the stem aside to cure. To remove the excess CA glue, in succession I apply 470, 600 grade papers and 000 steel wool.Next, as before, I apply to the bit area the full 9 micromesh pads from 1500 to 12000 by first wet sanding with 1500 to 2400 and dry sanding from 3200 to 12000.  I apply Obsidian Oil between each set of three.I again apply Blue Diamond compound to the button and bit.  I shine up the stinger that came with the pipe with steel wool and replace it in the tenon.  After reuniting stem and stummel and changing the buffing wheel again to another cotton cloth buffing wheel, maintaining the same speed, I apply a few coats of carnauba wax to stem and stummel.  To complete the restoration, I give the pipe a rigorous hand buffing with a microfiber cloth to raise the shine.

This BC Festival Bent Billiard is a beautiful pipe.  The full Bent Billiard shape has a nice balance and settles well in the hand.  The grain is appealing with a serious patch of bird’s eye covering much of the bowl.  The challenges with the stem obstruction, leading to a friendly fire cracked button was not in the plan!  Yet, the repair is completed, and this French Butz Choquin Festival is ready for a new steward.  Michael will have the first opportunity to secure the BC Festival from The Pipe Steward Store benefiting our work here in Bulgaria working with women and girls who have been trafficked and sexually exploited – the Daughters of Bulgaria.  Thanks for joining me!

Restoring my Inherited Huge KBB Yello-bole “Imperial” # 68c


Blog by Paresh Deshpande

The next pipe on my work table had all the traits/ signs of it being used by my grand old man; it was huge, it was solid with a nice hand fill, it was heavily caked with severe signs of being knocked around the rim edges, blocked shank and stem airways and the likes!! From the number of pipes that I have inherited from him, it appears that regular pipe cleaning and maintenance was an alien concept to him and whence a pipe fouled up, he just chucked it and got a new one- a very simple concept, to say the least!

The pipe that I decided to work on is a large full bent billiards with a P-lip stem. It is stamped on the left side of the shank as “YELLO-BOLE” over “REG. U.S. PAT. OFF” (Registered U.S. Patent Office) in block capital letters over “Imperial” in cursive script over “CURED WITH REAL HONEY”. To the left of these stampings towards the bowl, KBB is stamped in the clover leaf. The right of the shank bears the stamp of “ALGERIAN BRUYERE” over shape code “68C”. The shank end is adorned with a ferrule that bears the stamping of K B & B in a clover leaf over “NICKLE PLATED”. The stem bears the Yello-Bole logo in bright yellow circle. All the stampings are crisp and clear and is definitely surprising that it has survived over all these years!! Researching a pipe is always an enriching learning and I look forward to the same on every pipe that I work. Having worked on a few Kaywoodies and also on Yello-Bole, I knew about the connection between the two. However, what intrigued me during the research is that both the brands also have shared the shape codes along the way, albeit at different points in time. Given below are extracts of the most relevant details from pipedia.com, specifically pertaining to this pipe on my work table, wherein I have highlighted information which merits attention:-

Tips for Dating Yello-Bole Pipes (https://pipedia.org/wiki/Yello-Bole#Tips_for_Dating_Yello-Bole_Pipes)

  • KBB stamped in the clover leaf indicates it was made in 1955 or earlier as they stopped this stamping after being acquired by M. Frank.
  • Pipes from 1933-1936 they were stamped “Honey Cured Briar”
  • Post 1936 pipes were stamped “Cured with Real Honey”
  • Pipe stems stamped with the propeller logo were made in the 1930’s or 1940’s – no propellers were used after the 1940’s.
  • Yello-Bole used a 4 digit code stamped on the pipe in the 1930’s.
  • Pipes with the Yello-Bole circle stamped on the shank it were made in the 1930’s, this stopped after 1939.
  • Pipes stamped BRUYERE rather than BRIAR it was made in the 1930’s.

Thus, from the above tips it is evident that I am dealing with a pipe from the 1930s. However, when I visited the pipedia.com page on Collector’s Guide on Kaywoodie (https://pipedia.org/wiki/Collector%27s_Guide_to_Kaywoodie_Pipes#HINTS_ON_COLLECTING.2C_DATING_AND_PRICING_KAYWOODIES), under the heading 1947 Kaywoodie Shape Numbers and Descriptions”, I found the shape # 68C with the description as Extra Large Billiard, Full Bent which perfectly matched with the size and shape of the pipe on my work table.

Also on the same page, there is a picture of an advertisement flyer for CHESTERFIELD KAYWOODIE from 1947. The similarities between this Kaywoodie (read P-lip stem, large sump, massive size and shape) and the Yello-Bole that I am working on is striking.

Thus, the pipe that I am working on is from 1930s, specifically after 1936 as per the stampings seen on the pipe, however, the shape number and description matches with the Kaywoodie catalogue from 1947. Thus it is an interesting conflict as Yello- Bole was designed as an outlet for lower grade briars not used in Kaywoodie production, but the shape code and Chesterfield similarities were incorporated in Yello-Bole earlier than its introduction in Kaywoodie pipes!! I would be happy if anyone reader can clarify this conflict.

INITIAL VISUAL INSPECTION
The chamber is heavily caked with lava overflow on the rim top surface. The inner edge of the rim is severely damaged. Nicks and dings are also seen along the outer rim edge and chamber appears out of round. Chamber has strong odors of sweet smelling tobaccos. The condition of the inner walls of the chamber can be commented upon once the cake has been reamed down to the bare briar, but going by the solid feel of the external surface, I do not foresee any serious issues/ surprises with the chamber walls. The stummel surface is covered in dust, dirt and grime of years of use and uncared for storage for the last 45 years when my grandfather quit smoking in the late 1970s. Oils and tars have overflowed over the stummel and have attracted dust giving a dull and lackluster appearance to the stummel. A number of minor dents and scratches are seen over the stummel, notably towards the front, foot and the bottom of the shank. Through all the dirt, some really stunning straight and bird’s eye grains are waiting to be exposed. The mortise is, well mildly put, clogged to hell and back!! That the sump is overflowing and overfilled with accumulated gunk is a fact that could be seen with the naked eyes. Believe you me readers, the pipe smells are too strong. The large bent vulcanite stem exudes high quality and is heavily oxidized. The tenon is covered in a very thick coat of dried gunk and blobs of accumulated dried tars are seen inside the wide tenon opening. This also indicates the extreme clogging that can be expected in the expanded portion of the stem and in the stem air way. The lower button edge has a deep tooth indentation and tooth chatter in the bite zone. The button edge on the upper surface has worn down and would need to be sharpened. The lower end of the stem at the tenon end which enters the mortise shows severe scratch marks and chipped surface, the result of rubbing against the sharp edges of the ferrule at the shank end. INITIAL CLEANING BY ABHA…
The initial cleaning on this pipe was done by Abha, my wife (she has cleaned up around 40-50 pipes and these have now reached me for further restoration). She reamed out the complete cake and further smoothed out the chamber walls with a folded piece of 220 grit sand paper. She further cleaned out the internals of the shank with pipe cleaners and alcohol and cotton buds. She followed the internal cleaning of the shank with external cleaning of the stummel using Murphy’s Oil soap and hard bristled tooth brush and dried it with paper napkins and cotton cloth.

Unfortunately, this time around, she could not clean the stem as it was too large to fit in to the container of the stem deoxidizer solution.

ONCE THE PIPE IS ON MY WORK TABLE…
The chamber is massive, that is what I noticed first when I got the cleaned up pipe on my work table. The wall of the chamber shows insignificant beginnings of heat fissure on the left and back of the chamber walls. Though insignificant now, if not addressed at this stage, these heat fissures may further lead to burn outs. I need to address this issue. The rim top surface is uneven and pock marked with dents and dings. The inner edge is severely damaged with dents and dings, some of them quite large. The chamber is significantly out of round, most notably on the left side in 10 o’clock direction. The rim repairs required are extensive.The nicely cleaned stummel looks exciting with beautiful transverse flowing straight grains on the sides of the stummel and shank and bird’s eye on the front of the stummel and extending to the bottom of the shank. Patches of old lacquer coat can still be seen in the fold between the bowl and shank and also along the bottom of the stummel. The dents and scratches to the front and at the foot of the stummel are now clearly visible. I intend to let them be as they are part of the pipe’s past and also since I wish to preserve the patina. Abha has painstakingly cleaned out the mortise and the sump. However, I could still see remnants of the gunk in the sump and the still strong odor is a pointer to the requirement of further sanitizing the internals of the stummel. The ferrule at the end of the shank end came loose as I was inspecting the stummel. This gave me an opportunity to closely inspect the shank end for cracks or any damage. Lucky me, there are no such hidden gremlins here!! I did notice a fill at the base where the ferrule sat on the shank end (circled in yellow) that would need to be refreshed. The edges of the ferrule at the shank end have become very sharp (I did manage a nick during inspection) that had caused the damage observed on the tenon end of the stem. I need to address this issue. The unclean stem that came to me shows heavy scratches to the tenon end which seats in to the mortise and caused due to the sharp edges of the ferrule. I will address this issue by sanding the surface followed by a fill, if required. The upper surface and button edge of the P-lip shows damage and will have to sharpen the button while sanding and filling the surface. Similarly, the lower button edge has a deep tooth indentation and will need a fill to repair. The heavy oxidation will be a bear to get rid off given the size of the stem. The tenon is covered in a thick coat of dried gunk, not to mention the clogged the stem air way. THE PROCESS
As is my norm, I started the process with stem cleaning and repairs. I cleaned the accumulated dried gunk from the insides of the tenon by scrapping it out with my dental tools followed by q-tips, pipe cleaners and isopropyl alcohol. I soon realized that no matter how many pipe cleaners and q-tips I used, the insides of the wide tenon will still keep throwing out dirty pipe cleaners. I would need to use a more invasive method. Using a shank brush and dish washing soap, I thoroughly cleaned out the gunk. I rinsed it under running warm water. Once satisfied with the internal cleaning, with my fabricated knife I scrapped off the dried oils and tars from the tenon surface. I wiped the tenon end with cotton swab and alcohol till clean. I also cleaned the stem air way and the slot end with pipe cleaners and alcohol.While I was working on the stem, a colleague had come visiting and was amazed at the patience and care being exhibited, traits which I am usually not associated with. He did crack a joke on this and clicked a couple of pictures which I have included here for posterity.I cleaned the stem surface with isopropyl alcohol on a cotton swab and followed it with a scrub using Murphy’s Oil soap and cotton swab. I also smooth the sharp edges of the ferrule with a folded piece of 150 grit sand paper. I mix clear superglue and activated charcoal and paint the damaged tenon end surface and also applied it over the both button edges, upper P-lip surface and lower surface of the P-lip. I set the stem aside for the fills to cure. I cleaned the stummel surface with acetone on a cotton swab to remove the patches of old lacquer. This cleaning further highlighted the beautiful grains on this pipe. This is sure going to be beautiful pipe in my collection. Next I decided to address the issue of strong odor in the chamber. To eliminate the ghost smells from the pipe, I decided to treat it with salt and alcohol. I do not use Kosher salt as it is not readily available here and if available, it’s very expensive. I use cotton balls which is an at par substitute as I have realized over a period of time. I pack the sump with cotton and draw out a wick from the cotton and along with a folded regular pipe cleaner; insert it in to the mortise and through the draught hole in the chamber. I pack cotton balls in to the remaining portion of the mortise. Thereafter, I pack the chamber with cotton balls to about quarter of an inch below the rim inner edge. I soak the cotton balls with isopropyl alcohol up to the brim. About half an hour later, the level of alcohol has gone down, having being absorbed by the cotton. I top it up once again and set it aside overnight. By next afternoon, the cotton and alcohol has drawn out all the remaining oils and tars from the chamber, sump and mortise and the cotton and alcohol had fulfilled its intended task. I removed the cotton balls and the dirt can be gauged by the appearance and coloration of the cotton balls. With my fabricated knife and dental tools, I spent the next hour scrapping out the entire loosened gunk. I ran pipe cleaners through the mortise to clean out all the loosened tars and gunk that had lodged when I cleaned the sump and mortise. The chamber now smells clean, fresh and looks it too. I set the stummel to dry out naturally. By this time the stem fills had cured and with a flat head needle file, I sand these fills to achieve a rough match. I further fine tuned the match by sanding the filled area with a folded piece of 220 grit sand paper pinched between my thumb and forefinger. I followed it up by sanding the entire stem surface using 400, 600, 800 grit sand papers and finally with a piece of 0000 grade steel wool. This serves to remove the deep seated oxidation and also reduces the sanding marks of the more abrasive sand papers. I also sharpened the button edges while sanding. I wiped the stem with a cotton swab and alcohol to remove all the oxidation and sanding dust from the surface. I applied a little Extra Virgin Olive oil over the stem and set it aside to be absorbed by the vulcanite.The next stummel issue to be addressed was that of the rim top surface damage. I topped the rim on a piece of 220 grit sand paper, checking frequently till I was satisfied that the charred surface was addressed to a great extent and the rim top surface is nice, smooth and even. The inner edge is still uneven, though much better than before topping, and shall be addressed next. With a folded piece of a 220 grit sand paper pinched between my thumb and forefinger, I created a slight bevel on the inner edge of the rim top surface. This helped to mask the out of round chamber and address the sever dents that had remained on the inner rim edge. It can never be perfect, it’s a repair after all, but the repairs sure looks great. I know I have scrapped the shank end while topping the rim, I should have been careful, but I noticed it early and will be under the ferrule, so no sweat!! The one fill which was seen and readied for a fresh fill was patched up with a mix of briar dust and superglue and set aside to cure. Once the fill had hardened, and it was very quick indeed, I matched the fill with the rest of the stummel surface by sanding the fill with a flat head needle file followed by sanding the fill with a folded piece of 220 grit sand paper.To preserve the patina and bring a deeper shine, I polished the stummel with micromesh pads, dry sanding with 1500 to 12000 pads. I wiped the surface with a soft cloth at the end of the micromesh cycle. The stummel looks amazing with a deep shine and beautiful grains popping over the stummel surface. The massive size of the stummel helps accentuate these grains further. The result of all the topping and subsequent micromesh polishing was that the rim top surface had a lighter hue as compared to the rest of the stummel surface. I matched the rim top surface with the rest of the stummel by staining the surface with a dark brown stain pen. I set it aside for the stain to cure.Turning my attention back to the stem, I decided to polish and shine up the stem surface. I wet sand the stem with 1500 to 12000 girt micromesh pads. Next I rub a small quantity of extra fine stem polish that I had got from Mark and set it aside to let the balm work its magic. After about 10 minutes, I hand buffed the stem with a microfiber cloth to a nice shine. I rub a small quantity of olive oil in to the stem surface to hydrate it and set it aside. After the rim top surface stain had cured for about 6 hours, I rub a small quantity of “Before and After Restoration Balm” in to the briar with my finger tips and let it rest for a few minutes. I applied the balm over the rim top surface also. The balm almost immediately works its magic and the briar now has a nice vibrant appearance with the beautiful darkened grain patterns on full display. I further buff it with a horse hair shoe brush. I wiped it with a microfiber cloth. The rim top is now perfectly matched with the rest of the stummel dark coloration. I am very pleased with the blend. I mount a cotton cloth buffing wheel on to my hand held rotary tool and apply a coat of Blue Diamond to the stummel and the stem to polish out the minor scratches. It was at this point in the process of restoration that I realized that I am yet to attach the ferrule at the shank end. I rub a small quantity of ‘Colgate’ toothpowder over the ferrule surface. Those who have not tried out this trick, you must try it out at least once, it works like magic and imparts a nice shine to the nickel plated (it works even better on Sterling Silver) ferrule. I apply superglue over the shank end, align the ferrule stamp with that on the shank and attach the ferrule over it. I press it down firmly for a couple of minutes to let the glue set. After the glue had completely cured, I tried the seating of the stem in to the mortise and realized that the stem surface still brushed against the sharp ferrule edge. With a needle file I sand the edges, frequently feeling for the sharpness with my fingers and checking the seating of the stem in to the mortise. Once the edges and seating were smooth, I applied a little petroleum jelly on the walls of the mortise as this reduces friction and moisturizes the briar and moved on to the home stretch.With a cotton buffing wheel that I use for carnauba wax, I apply a coat of carnauba wax and continue to work on it till the complete coat of wax had been polished out. I mount a clean cotton cloth buffing wheel and give the entire pipe a once over buff. I finished the restoration by giving the entire pipe a rigorous hand buffing using a microfiber cloth to raise the shine further. The finished pipe looks beautiful. Having addressed the cosmetic aspect of this pipe, I move on to address the functionality aspect by addressing the ridges and re-entrant formed at the draught hole as well as the minor/ insignificant heat fissures. I insert a petroleum jelly coated pipe cleaner in to the draught hole. I mix a small quantity of the contents from the two tubes of J B Weld in equal proportions and apply it evenly only over the damaged area near the draught hole with my fingers. I had to work deftly and fast as the compound starts to harden within 4 minutes. I set the stummel aside for the JB Weld coat to completely harden.The next day, the compound had completely hardened. With a folded piece of 220 grit sand paper, I sanded the fill to as thin a layer as I thought would be just sufficient to protect the heel and ensure a smooth even surface for the pipe mud coating.Next I mixed activated charcoal and yogurt to a thick consistency and evenly applied it over the chamber walls and set it aside to dry out naturally. Once the coating had dried I buffed the pipe again with a microfiber cloth to a nice deep shine. P.S. This was a fun project and I absolutely loved and enjoyed working on it. It has some stunning grains and beats me that even though Yello-Bole was designed as an outlet for lower grade briars not used in Kaywoodie production, this beauty is anything but lower grade!! This would be joining my collection and I shall get to admire the beauty whenever I so desire.

Thank you all for sparing your valuable time in reading thus far and I would be happy to hear comments on the conflict that I find between Yello-Bole and Kaywoodie.

GBD “Sieur” Finish (Bulldog) Restoration


By Al Jones

I’ve restored over 200 pipes in the past few years, many of which were GBD’s, a marque that continues to be a favorite.  I thought that I had seen every finish they’ve made, so I was surprised to find this “Sieur” finish listed on Ebay.  I had to check out the Pipedia site to make sure this was a pre-Cadogan era finish.  GBD and Comoy’s both added a number of new lines after the merger, bu the Sieur was definitely a pre-Cadogan era pipe, with the brass rondell and “London,England” COM.  The 519 shape, a straight bulldog was also new to me.

Pipepedia didn’t have much on the Sieur finish and the 519 shape was not listed on the old Jerry Hannah site.  Over the years, I’ve shared a few emails with Jerry and he even sent me a 1970’s era GBD catalog.  Jerry’s old GBD website information was moved with permission to Pipedia a few years ago.  I’ve tried emailing him, but the address is no longer valid.  I always wonder what happened to him.   Jerry did have the Sieur finish listed on his site and it is described below.  From this pipe, we do now know it was also made in England in addition to the French production.


  • Sieur — France, unknown if also made in England: dark brown blast w/wide ring groove -BJ

The pipe arrived with a typically oxidized stem, with few dents and some build-up on the polished and beveled bowl top.

I put a dab of grease on the rondel and soaked the stem in a mild Oxy-clean solution.  I reamed the mild cake from the bowl and soaked it with alcohol and Kosher sea salt.  A worn piece of scotchbrite was used to remove the build-up on the bowl top.  There were a few dents on the bowl top, but most steamed out nicely with an electric iron and a wet cloth.  The bowl top was then buffed with White Diamond and several coats of carnuba wax.  I hand waxed the sandblasted briar section with Halycon wax.

The stem was mounted on the bowl and to remove the oxidation.  I used a flame to raise the bents on the bottom of the stem, leaving only one tiny tooth mark.  I used 800, 1,500 and 2,000 grade wet paper to remove the oxidation, followed by 8,000 and 12,000 grade micromesh sheets.  The stem was then buffed with White Diamond and Meguiars Plastic polish.

Below is the finished pipe.


Redemption of a BBB Own Make 693 Canadian with a Saddle Stem


Blog by Steve Laug

I recently rebuilt a stem for a friend, Stephen who has a similar love for BBB pipes as I do. It was a beautiful little Liverpool pipe and the stem had a large chunk out of the underside of the button. I am still working on my experiment of rebuilding chipped stems with black super glue and charcoal powder. I say experiment because I have found that though I can get the match to work well and the shape also easy to achieve, I am not sure of the durability of the repair. The flexibility of the repair vs. that of the reset of the vulcanite is very different so the jury is still out on the long term viability of the repair. Because of that we made a deal and Stephen joined the experimental pool with me. Here is the blog post on the restoration and repair of his BBB pipe (https://rebornpipes.com/2019/09/09/restoring-repairing-a-chipped-stem-on-a-bbb-own-make-607-liverpool/). He received the repaired pipe and was thrilled with it. He wanted to gift me a BBB Own Make pipe that he had that was just too big for his style of pipe smoking. It was missing the BBB brass diamond logo on the stem top but I was looking forward to restoring it and seeing if I could find a replacement for the brass emblem.

When I returned from my recent trip to Alberta the pipe was waiting for me. It had some beautiful grain around the bowl and shank. There were two fills on the right side of the bowl that were solid. The rim top had a bit of lava on the flat surface but the edges were in great condition. The bowl had a thin cake on the walls and the pipe was very dirty. The finish was dirty and dull. There was a thin silver band on the shank end that bore the BBB logo on the top with the words Sterling Silver engraved on the band so it was original and not a repair band. The stem was a vulcanite saddle stem with an inset area on the top side which had originally held brass logo that had been lost. The stem had some tooth marks and chatter on both sides just ahead of the button. The edges of the button were worn. I took a close up photo of the rim top and the stem to give a better picture of the issues that I needed to deal with in the restoration. You can see the darkening on the rear of the rim top and some damage on the inner edges of the back of the bowl. The cake on the sides of the bowl was not thick but it was hard and uneven. The stem was another story. The topside had a lot of scratches and marks around where the BBB brass diamond had been. The button was very thin on the top side both in terms of width and height. Both of the sides showed tooth marks and chatter quite prominently and would need work.I took photos of the stamping on the shank. I took a photo of the topside and you can see the BBB Diamond with Own Make flanking it on each side. The stamping on the underside read London, England over the shape number 693. You can see the nice grain on the bowl and shank sides. It is going to be a beautiful pipe once it is cleaned and restored.I reamed the thin cake in the bowl with a Savinelli Fitsall Pipe Knife to remove the buildup on the bowl walls. I sanded the inside of the bowl with a piece of 220 grit sandpaper wrapped around a piece of dowel.  Once the inside of the bowl was clean I was ready to clean out the airway in the stem, shank and mortise. I cleaned out the mortise and the airway in the shank and stem with alcohol, pipe cleaners, and cotton swabs. It did not take too long to clean out the debris in the airways and mortise.I decided to start my clean up on the bowl. I scrubbed the bowl down with Mark Hoover’s Before & After Briar Cleaner. I rubbed it into the surface of the briar, and as Mark wrote me it lifted the grime and dirt out of the briar. I rinsed the cleaner off the bowl with warm running water and dried it with a soft cloth. The photos below show the cleaned briar… Look at the grain on that pipe! I rubbed the bowl down with Before & After Restoration Balm. I worked it into the surface of the briar with my fingertips to clean, enliven and protect it. I let the balm sit for a little while and then buffed with a cotton cloth to raise the shine. I continue to use Mark Hoover’s Balm on every pipe I have been working on. The grain on the Own Make is quite stunning and it just pops now with the cleanup! It is a beauty. I polished the silver band with a jeweler’s cloth to remove the tarnish that had built up on the surface. It  polished up really well. The polished and cleaned pipe are beginning to look really good.With the cleaning and restoration of the bowl finished for now I set it aside and turned my attention to the stem. The photos below show the replacement of the Brass BBB Diamond on the top of the saddle stem. I had a broken BBB Canadian stem that had a Brass Diamond that would work well to replace the missing one on this stem. I used a dental pick to lift the brass piece off of the old stem.I used the dental pick to place some black super glue on the inset of the stem. I wiped it off the pick and then used it to place and align the brass diamond. I pressed it into the inset area with the flat edge of the pick. I set the stem aside to let the glue cure.I used a folded piece of sandpaper to smooth out the high spots of vulcanite that were there from the original pressing of the hot brass into the top of the saddle stem. I sanded out the tooth marks and chatter at the same time. I reshaped the button edges. I started the polishing of the stem with 400 grit wet dry sandpaper.I polished the stem with micromesh sanding pads – wet sanding with 1500-12000 grit pads. I wiped the stem down after each sanding pad with Obsidian Oil. I polished it with Before & After Pipe Stem Polish – both Fine and Extra Fine. Once I had finished the polishing I gave it final coat of oil and set it aside to dry.  Thanks to Stephen I have a beautiful BBB Own Make Canadian in my collection of BBB pipes today. I was able to replace the missing brass logo on the stem surface. I smoothed out the surface of the vulcanite around the insert logo and polished the stem. I put the bowl and stem back together. I polished the bowl and stem with Blue Diamond to polish out the minute scratches in the briar and the vulcanite. I gave the bowl and the stem multiple coats of carnauba wax. I buffed the pipe with a clean buffing pad to raise the shine. I hand buffed it with a microfiber cloth to deepen the shine. The pipe polished up pretty nicely. The grain on and around the bowl looked really good with the polished black vulcanite. This BBB Own Make 693 Canadian was another fun pipe to work on. It really has a look that I have come to expect from BBB pipes. It is really eye catching. The combination of various brown stains really makes the pipe look attractive. It is a comfortable pipe to hold in the hand. The finished pipe is shown in the photos below. The dimensions of the pipe are Length: 6 inches, Height: 2 inches, Outside diameter of the bowl: 1 ¼ inches, Chamber diameter: ¾ of an inch. I look forward to loading up a bowl in this one and enjoying it. I am also looking forward to what Stephen thinks of the finished pipe. Thanks for reading this blog and my reflections on the pipe while I worked on it. This is an interesting estate to bring back to life.

Pipe Hunting with my brother in Alberta


Blog by Steve Laug

Over a period of 11 days this month I was traveling for work in Alberta. My brother Jeff and his wife Sherry joined me in Southern Alberta so they could go with me on the trip visiting donors – both individuals and corporates that support the Foundation that I work for. Between our various appointments we visited local antique malls and shops from Lethbridge to Edmonton and in many small communities in between. We were on a personal mission to hunt down estate pipes in as many of the antique malls and shops as we could visit. We had a great time on the trip visiting people and in our off time hunting and finding some great pipes.

The first stop on our way south to Lethbridge was in a small community called Nanton. There are 5 or 6 antique shops and malls in the small town that advertises itself as an Antique stroll. Walking through the shops we found some interesting additions as shown in the photo below. The piece on the left is a porcelain/china Carlton Ware – Vert Royale combination rest and ash tray. The pipes from top to bottom are a Savinelli 320KS pipe stamped Knudson’s Pipe Dream, a C.P.F. Junior Twin Stem, a WDC Redmanol stem bent triangle shank billiard and a large Peterson style or WDC Wellington style pipe that is missing the ferrule and the stem. These first pipe finds set the stage for the rest of the trip.We continued the trip south. The next stop was an Antique shop in Lethbridge. I have stopped by that shop a lot of times over the years and other than one or two pipes now and then I had not found much worth picking up. This time it was a real surprise – there were a lot of estate pipes that were in racks on shelves on the walls and on shelves around the centre of the store. The left column from top to bottom includes an Amphora Sandblast Bulldog, a James Upshall P Grade Dublin with a Sterling Silver Band and a long straight stem, an Isle of Man Rusticated Bent billiard with a Peterson style system pipe, a Kiko Meerschaum Prince made of African Meer. The right hand column from top to bottom includes a Great Britain Block Meerschaum Author with a flumed top and an oval stem, a second Great Britain Block Meerschaum Zulu with a flumed top and an oval stem and an interesting looking Morel author in much the same style as the first block meerschaum mentioned above. Once again these were some great finds.After being house bound an extra day due to record snows for the area we headed north. I had appointments in communities between Calgary and Edmonton. The first stop on the northern trip was in Airdrie. There is a large antique mall there that had always provided me with some good estate pipes. We found five pipes during our walk through the shop – four briar ones and one meerschaum. Starting in the left column from the top down is a Leonard Payne Classic billiard that is a bit like Keyser Hygienic pipes out of South Africa, a Ben Wade Spiral sandblast with a twist in the shank and the stem, a sandblast Parker Zulu, a Butz Choqin stamped Optimal (des J Colombo) and a Redmanol stemmed Meerschaum billiard with a flumed bowl top.We also made a stop at an antique shop in Innisfail and found a very interesting old pipe that was in a case. It was not like any other old cased pipes that I have worked on. It combined a lace briar carved bowl with a meerschaum insert inside. There was a broken amber stem and a filigreed brass coloured cone shaped band. There was no tenon on the stem piece or in the shank. The oval stem chunk was fitted in the band was held in place against the shank with the band. The pipe was a beauty sporting carving in the briar that was a mix of vines around the bowl sides and bottom with a carved goat’s head on the front of the bowl.We spent the night in Red Deer and met with contacts that I had in the area. We also visited a pipe shop while were there. We picked up a patent applied for Kool Smoke Metal pipe that is shown in the group photos below.  The next stop on our way north was Lacombe. We had a lunch meeting with one of my contacts and his wife. While we were waiting we visited a local antique mall. We found the first two pipes shown in the left column of the photo below. The top one is stamped Made in Greece and is barely smoked. The second pipe is a unique system pipe from the 30-40s stamped Ken’s Patent Pending. The rest of the pipes came from two different Antique Malls in Edmonton. The third pipe in the first column is a nice little Canadian with a short stem. It has no stamping on the shank but the stem has an orific slot. The fourth pipe is a Charatan’s Make Special. The second column from top to bottom includes a GBD Pierrot 110 or 440, Lords London Made on the left side and Mike’s Edmonton 4811 on the right side, and an MRC military bit billiard. The third column (one on the right from top to bottom) includes an English Made Kaywoodie Airway pipe with a push stem with a stinger without holes and an integrated wind cap, an Eric Nording Meerschaum Pot with a Military bit and a Svendborg Sand blast Brandy with a vulcanite shank extension and a Military Bit stem. The pipe at the bottom between the two columns is a Canadian made Brigham 4 dot Rhodesian. We continued our meetings and pipe hunting through several other Antique Malls in Edmonton and an Antique Show at a local hotel. The pipes found are shown in the photo below. These include from the left column top to bottom a diamond shank bent billiard stamped Bruyere Garantie, a smooth finished Big Ben Crosley apple, a Nording Denmark Freehand with a turned fancy stem, a Canadian Made Freehand by the Paradis Brothers stamped SC, and a second Big Ben Crosley – a sandblast apple. The second column from top to bottom includes a Jeantet Bent Panel Rhodesian, a Bromma Swedish Gutta Percha pipe with a tall wood bowl, a Stanwell Hand Made Bark Billiard with the wrong stem, a Capri Italian Made Sandblast Billiard and Big Ben Sand Grain Billiard. The last item in the photo on the right side of the photo is a metal pipe rest that is quite interesting.At the end of the ten days, Jeff and Sherry were packed and ready to drive back to Idaho. I had a couple more days to go before I left. While they packed we divided the spoils and Jeff took 26 of the pipes home to work on with his cleanup process. I took 14 of the pipes that I had already cleaned up or were in relatively good condition. The first photo shows the pipes that Jeff brought home. Included in the lot was a metal KoolSmoke with a Patent applied for number on the base (it is the third pipe down in the middle column of the first photo below) that we found during our hunt in the Antique Malls in Red Deer. The second and third photos show the pipes that I brought home. Included in the second photo is a pipe stamped Moonshine Spanish Brandy with an oval shank that Jeff had picked up in Great Falls, Montana on his way north to Alberta (it is pictured in the second photo, the second pipe down in the far right column). It is lightly smoked and in excellent condition. From the collection of pipes shown in the above photos you can see that it was a great pipe hunt. We could have hunted for a few more days but ran out of time. We agreed that we would need to do it again and pick up where we had left off. Keep an eye out as the pipes are restored and begin to show up on the rebornpipes online store. Thanks for giving the blog a read. Good hunting to all who read this blog.

Redeeming an English Made Flumed Block Meerschaum Zulu


Blog by Steve Laug

Over the past two weeks I was traveling in Alberta with my brother Jeff and his wife, Sherry. In between work appointments and presentations we took some time to visit local antique shops and malls. We found quite a few pipes. In a small Antique Shop in Lethbridge we found a few interesting pipes. The second of the ones that I am working from that find is an oval shank meerschaum Zulu. It has a flumed top and some colouring happening around the bowl and the shank. The saddle stem has a ribbon shaped/bookmark stamped logo on the top of the saddle. The pipe was dirty and caked when we picked it up. The rim top had a little lava and some small scratches in the edges of the bowl. The bowl had a thin cake in it that was hard and dense. The exterior of the bowl and shank are very dirty with grime and oils from prolonged use. The stamping on the underside of the shank below the shank/stem junction was faint but readable and read Genuine Block Meerschaum with an arched Gt. Britain at the stem shank joint. On the right side of the shank it is stamped JAMBO. The vulcanite stem was had tooth chatter on the top and the underside of the stem. There were tooth marks on both sides and on the button. I took photos of the pipe before I started the cleanup. I took close up photos of the bowl and rim to capture the condition of the pipe before I started my cleanup work. The rim top had some lava build up on the edge and there were some small nicks on the inner edge. Other than being so dirty it appeared to be in great condition. The stem was dirty and there was tooth chatter on the top and underside near the button and on the button surface itself. The stem was lightly oxidized.I took a photo to capture the stamping on the underside of the shank near the stem/shank joint. The photo shows the stamping Genuine Block over Meerschaum. Next to that there was an arched stamp that read GT BRITAIN. There was a small nick in the underside of the meerschaum next to the vulcanite stem. I also noted that there was a stamping on the left side of the shank – it read Jambo.While we were traveling I decided to do a bit of work on some of the pipes that we had found. This was the second one that I worked on. I scraped the inside of the bowl with a sharp knife. I scraped the tars and lava off the top of the rim with the same knife. I took the stem off and you can see the metal tenon set in the shank of the pipe. It is anchored firmly and the stem pressure fit over the top of the tenon.I scrubbed the exterior of the bowl with warm water and some Dawn Dish Soap to remove the buildup of grime around the bowl and on the rim top. I rinsed it well and wiped the bowl down with a clean paper towel to polish the finish on the bowl. I decided to follow up on my initial cleaning of the bowl and shank. I reamed the bowl with a Savinelli Fitsall pipe knife to remove the remnants of the cake in the bowl. I sanded the bowl with 220 grit sandpaper wrapped around a piece of dowel to smooth out the inside walls of the bowl.I scrubbed out the mortise and the airway in the shank, the metal mortise and the stem with alcohol, cotton swabs and pipe cleaners.I polished the meerschaum with micromesh sanding pads – wet sanding the bowl walls and rim top with 1500-12000 grit pads. I wiped the bowl down after each sanding pad with a damp cloth to wipe of the dust. I touched up the top of the rim and the edges of the bowl with a black stain pen to restored the colour to the edges and the top. I worked some Before & After Restoration Balm into the surface of the meerschaum with my fingertips to clean, enliven and protect it. I know that it was designed for briar but I used it for meerschaum and it works well. I let the balm sit for a little while and then buffed with a cotton cloth to raise the shine. The photos show the bowl at this point in the restoration process. I set the bowl aside and turned my attention to the stem. I sanded out the tooth chatter with 220 grit sand paper and started to polish it with a folded piece of 400 wet dry sandpaper. Once it was finished it began to shine.     I polished the stem with micromesh sanding pads – wet sanding with 1500-12000 grit sanding pads. I wiped it down after each sanding pad with a damp cloth. I polished it with Before & After Pipe Stem Polish – both Fine and Extra Fine and buffed it off with a cotton cloth. This is a beautiful Flumed top Block Meerschaum Oval Shank Zulu with a black saddle vulcanite stem. It has a great look and feel. The shape is very tactile and is a beauty. I polished stem and the bowl with Blue Diamond polish on the buffing wheel. I gave the bowl and the stem multiple coats of carnauba wax. I buffed the pipe with a clean buffing pad to raise the shine. I hand buffed it with a microfiber cloth to deepen the shine. The pipe polished up pretty nicely. The meerschaum had already begun to take on a patina and it came alive with the buffing. The rich mottled browns of the meerschaum colour works well with the polished vulcanite stem. The finished pipe has a rich look that is quite catching. Have a look at it with the photos below. The shape, finish and flow of the pipe and stem are very well done. The dimensions are Length: 5 ¼ inches, Height: 1 ¾ inches, Outside diameter of the bowl: 1 ¼ inches, Chamber diameter: ¾ of an inch. I will be adding the pipe to the rebornpipes store shortly. If you are interested in adding this Block Meerschaum, English made Zulu to your collection let me know. Thanks for walking through the restoration with me as I worked over the first of the finds of Jeff and my Alberta pipe hunt.

Restoring 16th Pipe from the Mumbai Bonanza Lot; an Amphora X-tra # 726


Blog by Paresh Deshpande

The next pipe that I had selected to work on was dictated by my desire to work on something that would be a simple and an easy project. I went through the lot that Abha, my wife, had sent me duly cleaned and selected one that came to us in a lot which I prefer to call as my Mumbai Bonanza!!

I was fortunate enough to have heeded the advice of my dear friend and mentor, Steve, and struck a deal with a junk collector from Mumbai. He did not know what he was selling and I did not know what I was buying as we reside in different cities!! The argument that Mr. Steve presented was that if not anything, I shall at least have some spares and this was logical. I struck a deal and here are pictures of the pipes that I received in this lot. This lot contains some very nice collectible pipes, a few well known brands and some mediocre brands. Overall, with seven Dunhill pipes, a Preben Holm #1 FH, a couple of “Made in England” Pete System pipes, a couple of  Charatan’s Belvedere, Custom-Bilt, Stanwell and other assorted pipes, I would say that I had struck a decent haul!! This is indeed my “Mumbai Bonanza”.

This 16th pipe that I decided to work on from this find is a medium sized straight billiards and is indicated in yellow color arrow. It has a very solid feel in the hand with top quality briar. The pipe in fact oozes of very high quality of craftsmanship with perfect proportions and classic design!! It is stamped on the left of the shank as “AMPHORA” in block capital letters over “X-tra – 726” in sentence form. The right side of the shank is stamped as “GENUINE BRIAR” over COM stamp “AMPHORA – Holland”. All the stampings are crisp and easily readable. The logo seen on this stem is letter ‘A’ embossed in a circle.Since this is the first Amphora pipe that I am working on, I was keen to know more about this brand and if possible, dating this pipe. I first turned to pipedia.org for information and the little information that I gained is reproduced below:-

Amphora pipes are made in Holland by the Jos. Gubbels organization, the same company which makes the very well known and loved Amphora Pipe Tobaccos. The pipes are produced in relatively small numbers to a high standard and not commonly found. They were used primarily in promotions and incentives for Amphora tobacco.

The Royal Dutch Pipe Factory Elbert Gubbels & Sons B.V. is the only manufacturer of briarroot tobacco pipes in the Benelux countries where pipes of high quality are made under the brands Big Ben, Hilson, Royal Dutch and Amphora. They also supply numerous smokers’ accessories of high quality.

I came across this shape chart posted on this site courtesy Doug Valitchka, which shows the shape # 726 as being a medium billiard and similar to the one on my table.Next I turned to pipephil.eu and the only additional information I learned was that its mother company, The Royal Dutch Pipe Factory went bankrupt in 2012.

Still not satisfied with the information gained so far, I turned to rebornpipes.com and sure enough, I came across this addendum by Robert M. Boughton which points to a connection of Amphora pipes to Dr. Grabow!! This does make for a very interesting read and is highly recommended. Here is the link to the write up:-

https://rebornpipes.com/2016/08/24/about-the-winner-of-an-amphora-bent-billiard-and-more-information-on-the-brand/

INITIAL VISUAL INSPECTION
The pipe came to us in a very well smoked state and a thick layer of cake build up is observed in the chamber. The rim top surface is covered in the thick overflow of lava and several dents and dings to the inner and outer rim edges can be seen, probably caused due to tapping it must have received at the hands of the previous owner to remove the dottle. This will need to be addressed.The smooth stummel surface has beautiful grain patterns with a mix of Bird’s eye, cross grains and nice swirls. The stummel surface has dulled a bit and appears lifeless due to accumulation of dust and dirt. The mortise and the draught hole are clogged with accumulation of oils and tars making the draw laborious.The straight vulcanite saddle stem has a slight flair out towards the slot end and is deeply oxidized with bite marks and tooth chatter on either surface in the bite zone, more so on the upper surface of the stem. The insides of the slot and tenon have heavy accumulation of oils and tars. The stem has calcification deposits towards the button end. The button edges also have bite marks; in fact, they are worn out at places. The embossed logo of ‘A’ has faded a bit.INITIAL CLEANING BY ABHA…
The initial cleaning on this pipe was done by Abha, my wife (she has cleaned up around 40-50 pipes and these have now reached me for further restoration). She reamed out the complete cake and further smoothed out the chamber walls with a folded piece of 220 grit sand paper. She further cleaned out the internals of the shank with pipe cleaners and alcohol and cotton buds. She followed the internal cleaning of the shank with external cleaning of the stummel using Murphy’s Oil soap and hard bristled tooth brush and dried it with paper napkins and cotton cloth.

Next she cleaned out the internals of the stem air way and immersed it in “Before and After Deoxidizer” solution along with the stem of other pipes in line for restoration. Once the stem had soaked overnight, she cleaned the stem under running warm water and scrubbed the raised oxidation from the stem surface using Scotch Brite pad. She further removed the oxidation by scrubbing the stem with 0000 grade steel wool and applied a little olive oil to rehydrate the stem.

ONCE THE PIPE IS ON MY WORK TABLE…
The cleaned up pipes presents a very clear picture of what needs to be done to restore this pipe to a pristine and smokable condition. I really cannot thank Abha, my wife, enough for all the help and support that she extends me in my pursuance of this hobby. I proceed to carry out my appreciation of the work that needs to be done on this pipe to restore it.

The chamber is odorless and the walls are solid without any signs of damage. The smooth rim top surface with nicks and uneven surface is where all the action is on this pipe with an equally damaged inner and outer rim edge. This should be addressed to some extent when I top the rim surface.The stummel surface is without any fills or dents and dings. The only issue that I can figure is the dull and dry appearance of the stummel. This stummel will turn out beautiful and the grains will stand out once I have sanded and polished the surface. The mortise and shank internals are nice and clean.The oxidation on the vulcanite stem has been greatly reduced, thanks to all the efforts put in by Abha, clearly defining the deeper bite marks and the damage to the button edges on both surfaces of the stem. These tooth marks would be required to be filled with a mix of activated charcoal and superglue. A bit of sanding to match the fill and remove the deeper oxidation followed by micromesh polishing cycle should add a nice shine to the stem. The stem logo, unfortunately, appears to have worn out during the initial cleaning. I shall try and highlight it to the extent possible.THE PROCESS
The first issue I addressed was that of the stem repairs as this would take the maximum of my time to clean, repair and subsequently spruce up the stem. I flamed the damaged button edge and the tooth indentations with the flame of a lighter. This helps the vulcanite to rise to the surface as it has an inherent property to regain its original shape when heated. Once the vulcanite had risen to the surface, a few linear pits were observed right at the bottom of the button edge on both sides of the stem surface (marked in red semi circle). It appears as if the stem surface would break and cave in along these linear pits. To address this issue and also to sharpen the button edges, I mixed superglue and activated charcoal powder and diligently applied it over the pits in the bite zone on both upper and lower stem surface and over both the button edges and set it aside to cure.With the stem fill set aside to cure, I started with cleaning of the stummel surface. With a folded piece of 220 grit sand paper, I sand the entire stummel surface. This not only removes the stubborn dirt and grime that remained on the stummel but also evens out the minor dents and dings from the surface. I followed it up with sanding using a piece of 0000 grade steel wool. This helps reduce the sanding marks left behind by the coarser grit sand paper. These sanding marks will be completely eliminated once I am through with micromesh and Blue Diamond polish.Now that I had a fair idea of the extent of topping required to the rim surface, I top the rim on a piece of 220 grit sand paper to even out the rim surface dents and dings. I addressed the uneven inner edge by creating a light bevel to inner edge with a folded piece of 220 grit sand paper pinched between my thumb and index finger. To further smooth out the scratches left behind by the abrasive 220 girt sand paper, I top the rim surface on a piece of 400 grit sand paper. I had hoped that further sanding with a 400 grit paper will address the minor dings that remained on the outer edge, but that was not to be. Thus, with a folded piece of 220 grit sand paper pinched between my thumb and index finger, I created a light bevel over the outer edge. I am very happy at the way the chamber and rim top surface appears at this point in restoration.I subjected the stummel to a complete cycle of micromesh polish, wet sanding with 1500 to 12000 grit pads. I paid greater attention to polish the rim top surface and the bevels created on the inner and outer rim edges. I wiped the stummel with a moist cloth after every grit pad to remove the sanding dust left behind by the pads. This also helps in monitoring the progress being made and provides an opportunity to take early corrective action, if required. I am happy with the progress being made till now. Next, I rub a small quantity of “Before and After Restoration Balm” in to the briar with my finger tips and worked it deep in to the surface and let it rest for a few minutes. The balm almost immediately works its magic and the briar now has a nice vibrant appearance with the beautiful swirl grain patterns on full display. The contrast of the dark browns of the grain with the light hues of the rest of the stummel adds an interesting dimension to the appearance of the stummel. I further buffed it with a horse hair brush to further deepen the shine. Turning my attention to the stem repairs in my home stretch, using a flat head needle file, I reshaped the button and roughly matched the fills with the rest of the stem surface. I sand the fills with a piece of folded 220 grit sand paper and followed it up by further sanding the stem with 320, 600, 800 grit sand papers and finally with a piece of 0000 grade steel wool to achieve a perfect blending of the fills with the stem surface and a build a crisp button edge on either surface of the stem. The repairs look good and the stem should polish up nicely.I completed the polishing cycle of the stem by wet sanding the surface with 1500 to 12000 girt pads. The stem looks great with the fills nicely matched with the rest of the surface. I gave a final rub with “Before and After Extra Fine” stem polish compound from Mark to remove fine scratches from the stem surface. I rub a little quantity of Extra Virgin Olive oil in to the stem surface and set it aside to be absorbed by the vulcanite. The stem polished up nicely and appears as good as when new. To complete the restoration, I mount a cotton cloth buffing wheel on to my hand held rotary tool and applied a coat of Blue Diamond to the stummel and the stem to polish out the minor scratches. With a cotton buffing wheel that I use for carnauba wax, I apply a coat of carnauba wax and continue to work on it till the complete coat of wax had been polished out. I finished the restoration by giving the entire pipe a rigorous hand buffing using a microfiber cloth to raise the shine further. The finished pipe with a natural finish to the briar looks amazingly beautiful and is now ready for a change of guard with a new piper. The pipe feels really light in the hand and has such a perfect balance in the mouth if you like to smoke your pipe clenched. I really appreciate your valuable time spent in walking the distance with me on this restoration.

Sasieni Four Dot Regent Patent Era Restoration


By Al Jones

I was genuinely thrilled to open the package on this Sasieni. The Sasieni “Regent” is one of my favorite shapes from that maker, and it will compliment the “Ruff Root” Regent already in my collection.  The “Regent” is a smaller Sasieni shape, and at 45 grams, is perfect for my taste.

The Ebay seller only included a few poor photographs, but it was priced right and the pipe showed promise.  When I opened the package and saw the Patent number stamping, that put a big smile on my face.

The pipe had some build-up on the bowl top and the stem looked to be in great shape, with no tooth dents and a decent fit.  The Four Dots stem logo had faded with time, but were of the smaller style, so I knew that the stem was original.

Because the pipe has these details, it could have been made as early as 1935 but before 1946.

Four Dot & Town Name – town names started in 1935

Patent Number – used before WWII

Football style COM with no finish name (finishe names, Walnut, etc started after 1946)

Smaller Dot style pattern

The pipe as received:

A piece of worn scotch brite was used to remove the build-up on the bowl top, which revealed an almost perfectly preserved top.  There was a slight cake and once removed, I found that the interior was also in excellent shape.  The briar was lightly buffed with White Diamond and several coats of carnuba wax.  I was careful around the already faded nomenclature.

The stem fitment was slightly loose, but once the tenon was warmed with a heat gun, it expanded back to it’s original size, for a perfect fit.  I removed the oxidation with 800, 1,500 and 2,000 grade wet paper, followed by 8,000 and 12,000 grade micromesh.    The stem was then buffed with White Diamond and Meguiars Plastic Polish.  The stem really gleamed and it has a very nice feel.  I’m looking forward to smoking this one.

My photography skills and equipment don’t capture the depth of the grain finish on this one.  Below is the finished pipe.