Blog by Paresh Deshpande
This is the third Custombilt pipe that I had brought to my place of work from my grandfather’s collection which I had inherited. I had professed my appreciation and liking for old Custom-Bilt pipes for their large size, shape, hand feel and the rustic looks. However, this one seems to be a Custombilt from a later era which is a surprise for me, more of it when I further research about it.
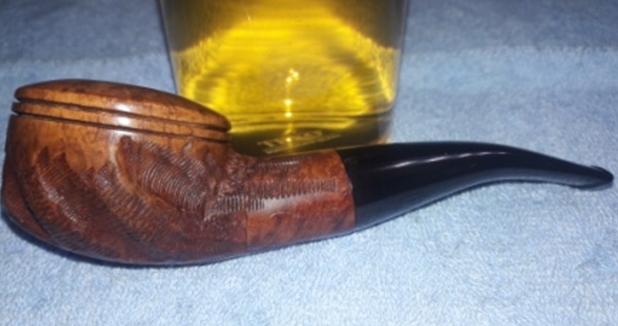
The Custombilt pipe that is now on my work table is a large Bull moose shaped pipe with a ¾ bent stem, having well defined large vertical rustications with very fine, thin horizontal linear rustications in between. This is a beautifully carved pipe with a classic shape and a thick shank. The stummel is distinctly divided in to two halves by two evenly spaced rings. The cap half is smooth while the lower stummel surface proudly displays the worm rustications. The large smooth rim top surface boasts of some beautiful bird’s eye grains. The worm rustications on this beauty are unlike the large scraggy ones seen on the Custom-Bilt Pot shaped and large Billiard pipes that I had restored in the last few days. The ones on this pipe are more evenly carved and evenly spaced. There is strip of smooth surface at the bottom extending from the shank to the foot of the stummel. The worm rustications extend from the side of this smooth surface on either sides and to the front of the stummel. It is indeed a beautiful looking pipe with a fantastic feel in the hand, beauty of which cannot be justified in words. 
 It is stamped on the left side of the shank as “Custombilt” without a hyphen between the two words, in cursive hand over “IMPORTED BRIAR”, a commonly observed stamp on these pipes. There is no other stamping visible either on the stummel or the stem.
 To date having worked on 5 or 6 Custombilt pipes and researched each of them, I have a fair idea about dating these pipes based on the stampings seen on them. However, as is always said and emphasized in our pipe community, the mysteries about pipes never end!! The stampings on this pipe has proved this and how! In the cursive Custombilt stamping seen on this pipe, the lower part of C meets, no, originates from the top of the U while the upper portion extends to the left side of the cross of t, the horizontal cross itself barely reaching the next letter o!!
On pipedia.org, there is a brief description of the various stampings as researched by William E. Unger, Jr., PhD, which deals with the study of Custom-Bilt pipes, here is the link to the review of this book (https://pipedia.org/wiki/Custom-Bilt#Other_Comments).
There are three stamps which are shown and serve as a teaser for dating these Custombilt pipes (for more researched examples of stampings, you might consider purchase of a copy of your own!!). Well as of now, I don’t have one and if any one of the reader does, it is requested that the necessary information may please be shared with readers of rebornpipes.com, so that we all could learn and grow together.
With this unresolved mystery as regards dating this pipe (I think it is from later era of Custombilt pipes, even later than the Wally Frank era, but not sure!), I move ahead with my initial inspection.
INITIAL VISUAL INSPECTION
The chamber has a thick and even layer of cake. The condition of the inner walls of the chamber can be determined only after the cake has been completely reamed out down to the bare briar. The draught hole is dead center and at the bottom of the chamber. This should be a fantastic smoker. The slightly outward sloping smooth rim top surface has several minor dents and dings and has darkened surface on the right side. The inner edge of the rim has one bigger and many minor chips all around. This issue should be easily addressed by sanding down with a sand paper. The cap rings are in decent condition with just a couple of small chips towards the left and back of the stummel. As these chips are visible only on very close inspection and affects neither the aesthetics nor the smoking character of this pipe, I might as well let them be.
 The smooth bottomed stummel feels solid to the touch and makes for a nice fit in the hands of the smoker. The vertical worm rustication with its horizontal thin line rustications within makes for a visual treat. The stummel surface is relatively clean and without any dents, dings or chipped surfaces. The shank end has smooth surfaces on the sides and on top and bottom of the shank. These should polish up nicely and lend a distinct character to the pipe. The upper smooth half of the stummel including the rim top surface has some beautiful straight and bird’s eye grain respectively. This should turn out to be a beautiful and attractive looking pipe, I am sure.

 The mortise and the shank are clogged with accumulated dried oils, tars and grime and dirt. The draught hole too is constricted due to this accumulation (marked in yellow arrow). The draw is slightly hard and laborious and should ease out once the shank internals are cleaned out.
 The ¼ bent vulcanite stem is nice and thick at the tenon end and tapers slightly towards the button end. The stem is heavily oxidized in the bite zone due to use of a rubber bit, with heavy tooth chatter on either surfaces of the stem. The button edges including button surfaces are also damaged due to bite marks. The slot and tenon are also covered in dried oils and tars. The stem internals are clogged and would need a thorough cleaning up.

 THE PROCESS
I started the restoration of this beautiful pipe by first reaming the chamber with size 3 followed by size 4 head of the PipNet pipe reamer. The amount of cake dislodged from the chamber points to the fact that this would have been a favorite of my Grandfather!! With my fabricated knife, I removed the cake from areas where the reamer head could not reach. I followed this reaming with sanding the chamber walls with a folded piece of 220 grit sand paper to completely remove any residual cake. This also helps to smooth the walls of the chamber. I wiped the chamber with a cotton swab and alcohol to get rid of all the carbon dust and expose the bare briar of the chamber. The walls are solid and in good condition. However, the area around the draught hole is slightly charred and a few minor heat lines are visible around it.

 The heat lines seen around the draught hole are superficial and I address them by further sanding with a folded piece of 220 grit sand paper. I also removed the charred briar around the draught hole by scrapping it with my fabricated knife and the drilling attachment of a Kleen Ream tool. The chamber is now clean and all the issues are addressed to my satisfaction.
 I followed up the cleaning of the chamber with that of the shank internals. With a dental spatula, I first scrapped out all the accumulated dried crud and cleaned the mortise. The dried gunk so hard and tightly packed that I also had to use a round needle file to dislodge the gunk from within the air way. Using hard and regular pipe cleaners and alcohol, I cleaned the shank internals and the airway. A number of pipe cleaners later, the shank internals are clean and the draw is nice, smooth and even.
 The internal cleaning was followed by external cleaning of the stummel surface using Murphy’s Oil soap and a hard bristled tooth brush. I also used a brass wired brush to diligently clean out all the dirt and grime from within the worm rustications. With a shank brush and dish washing soap, I thoroughly cleaned the shank internals and the mortise. I dried the bowl with paper napkins and soft cotton cloth.

 With the stummel set aside to dry out naturally, it was time to move ahead with the stem restoration. I cleaned the stem internals with pipe cleaners and alcohol. With the sharp flat end of a dental tool, I scrubbed the dried out oils and tars from the slot area and also from the tenon end of the stem that seats in the mortise. I cleaned the stem surface with a cotton swab and alcohol.
 I flamed the bite zone with the flame of a lighter. The heating of the vulcanite raised the tooth chatter to the surface and I followed it with a light sanding with a piece of 220 grit sand paper to even out the surface around the bite zone. Using a flat head needle file, I reshaped and sharpened the button and button edges. This was followed by sanding the entire stem surface with 400 followed by 600, 800 and 1000 grit sand papers to remove the oxidation. I finished the sanding with a 0000 grade steel wool. Using progressively higher grit sand papers helps in a smooth surface while minimizing the sanding marks left behind by the more abrasive sanding papers. I wiped the stem with a small amount of Extra Virgin Olive oil and set it aside to be absorbed by the stem surface.

 With the stem being set aside to hydrate, I move back to the stummel and sand the smooth rim top surface with a piece of folded 220 grit sand paper. This step took care of the dents and dings on the surface. I also worked the inner edge of the rim with the same piece of sand paper and evened out the numerous dings from the inner rim edge. I wiped the rim top with a moistened cotton swab to remove the resulting sanding dust. Most of the dents and dings on the rim top and edge were addressed thus. Subsequent micromesh polishing will further reduce what little dents and dings that remained. A few minor and insignificant dings that may remain, I intend to let them be as they are a part of this dude’s journey to date.
 The next evening, I decided to move ahead with polishing and completing the stem. I followed up the sanding regime with micromesh polishing to bring a shine on the stem surface. I wet sand the stem with 1500 to 2400 girt micromesh pads. Continuing with my experimentations that I had spelled out in my previous posts, I mount a cotton buffing wheel on my hand held rotary tool and polish the stem with Red Rouge polish. Further, I mount a fresh buffing wheel on the rotary tool and polish the stem with White Diamond polish. I finish the stem polish by wet sanding with 6000 to 12000 grit pads of the micromesh. I rub a small quantity of olive oil in to the stem surface to hydrate it and set it aside again. I am really happy with this process of stem polishing as the results are excellent while saving me huge amounts of time and effort.


 With the stem polishing now completed, I moved ahead with micromesh polishing of the smooth surfaces on the stummel (the rim top surface, the smooth portions at the shank end and the bottom of the stummel). I polished the stummel by wet sanding with 1500 to 12000 micromesh pads. The briar stummel is looking really good at this stage of restoration!!

 Next, I wiped the stummel surface with a moist cloth to remove all the sanding dust left behind by the micromesh pads, paying diligent attention to the areas between the worm rustications. I rubbed a small quantity of “Before and After Restoration Balm” in to the briar with my finger tips and let it rest for a few minutes. The balm almost immediately works its magic and the briar now has a nice vibrant appearance with the beautiful worm rustication patterns on full display. I have been using this balm ever since I embarked on this journey and it is this part of restoration that I always look forward to. I further buff it with a horse hair shoe brush.

 I mount a cotton cloth buffing wheel on to my hand held rotary tool and apply a coat of Blue Diamond to the smooth surfaces of the stummel and the stem to polish out the minor scratches.
 The final step in completing this project is to give the entire pipe a nice wax polish. I apply a coat of carnauba wax and continue to work on it till the complete coat of wax had been polished out. I mount a clean cotton cloth buffing wheel and give the entire pipe a once over buff. This step not only removes any excess wax from the surface but also finger prints that inadvertently are left behind. I complete the restoration by giving the entire pipe a rigorous hand buff using a microfiber cloth to raise the shine further. The finished pipe looks amazingly beautiful and is now ready for its long second innings with me… Cheers!!


